
Preventative Maintenance Procedure
Last update 04/27/2018

Pre-Visit Service
History Check
Common Process (Before)
Maintenance Process
Common Process (After)
Purpose
Increase the following items. FCFR (First Call Fix Rate)
Uptime
MCBC (Mean Copies Between Calls)
Customer Satisfaction
How to use
This document was developed by Canon USA Engineering Services and Solutions to perform consistent, effective and efficient maintenance on all Canon products.

Ser
vice
His
tory
Ch
eck
- [P
re V
isit
] iR ADV C5500 series Advance Maintenance Guide
Procedure Detail Note Time
Action Prior to Customer Visit:
Whenever possible, Check Snapshot for :
6 min
Check
1. Log into Snapshot : • Enter the machine Serial Number to check the following:
1. Firmware Version – Prepare Firmware if necessary 2. Communications 3. Counters – Machine Usage 4. Event History – Check History for Errors, Alarms
and Jams 5. Consumable Part Counters - Prepare Consumable and Durable Parts
• Firmware Version • Event History • Part Counters • Service Mode Settings
1. Understand the machine's current condition (jams and error, needed consumable parts) before visiting EM call or PM-Call. 2. Prepare all consumable parts that exceeded Target and replace them on a PM-call, replace any parts that exceeded life you have now at the EM call. 3. Take the necessary actions for the jamming and errors.

Com
mon P
rocess (
Befo
re)
Procedure Detail Note Time
Verify Customers’ Concern
Ask the customer about the condition of the machine and validate any issues they have. Ask Questions to find out if there are any following issues on the machine? 1.Copy Quality 2.Jamming 3.ERROR 4.Other issues (Copier Only) 5.No Problem
Point: - To perform efficient maintenance, we need to
ask the customer about the machine condition.
Check the Serial Number
Ensure the serial number on the machine matches the serial number that you are dispatched to.
Point: - If the serial number is incorrect and there is
more than one machine at the account that is down please notify dispatch.
Perform COM-TEST
COPIER > Function > INSTALL>COM-TEST If COM-TEST is NG, fix this issue at first. If you can’t fix this issue please insure the issue is resolved prior to leaving the account.
C1
1 min
Check
1 min
Scan
1 min
Check
1 min
COM TEST
COM TEST
C2
C3
iR ADV C5500 series Advance Maintenance Guide

Procedure Detail Note Time
Check Service Log
1. Check Service Log Point: 1. Check the log to see if there is any reoccurring
issues. If you see the same issues listed on the log, then the root cause hasn’t been fixed.
2. Check what parts were replaced recently. These parts should not be replaced again for the same issue.
3. If the problem seems to be related to the previous call, check what the previous tech did.
1. Check System Software Version
General Population: Update the system software to latest version. FXO: Verify the current Fedex Firmware is installed.
Point: The latest firmware version should be installed on
the machine. Please visit e-Support for the latest version.
Check Service history
1. Check ERR/JAM history Address all Error and Jams.
Check
COPIER>DISPLAY>ERR COPIER>DISPLAY>JAM
1 min
Visual Check
1 min
Visual Check
Check System Software Version
Check Update
COPIER>DISPLAY>VERSION
Visual Check
20 min
Update
Com
mon P
rocess (
Befo
re)
C6
C5
C4
iR ADV C5500 series Advance Maintenance Guide
If Snapshot was used successfully, skip steps C5 through C8

Procedure Detail Note Time
1. Check the Drum counter. Point: Replace the drums refer to the value below to eliminate drum over life related issue. COPIER>COUNTER>LF Y/M/C-DRM-LF = 128 % or above K-DRM-LF = 200 % or above
Reset the counters if parts are replaced. *Check that physical condition of the part matches the counter
Check the roller counters. DRBL-1>M-PU-RL Point: Replace the rollers over 100% to eliminate parts over life related JAM. COPIER>COUNTER Cassette 1,2,3,4, Bypass Rollers: DRBL-1>C1-FD-RL DRBL-1>C1-SP-RL DRBL-1>C2-FD-RL DRBL-1>C2-SP-RL DRBL-1>M-PU-RL DRBL-1>M-SP-RL ADF Rollers:
Reset the counters if parts are replaced. *Check that physical condition of the part matches the counter
1. See the Parts counter. COPIER>COUNTER>DRBL-1/DRBL-2
Point: Replace the following parts over 100%. COPIER>COUNTER
Check Replace
COPIER>COUNTER>DRBL-1 COPIER>COUNTER>DRBL-2
COPIER>COUNTER>LF
Check Replace
Transfer DRBL-1>TR-BLT DRBL-1>T-CLN-BD DRBL-1>2TR-ROLL DRBL-1>TR-ROLK/TR-ROLC
Fixing DRBL-1>FX-UP-FR DRBL-1>FX-LW-RL
Check Replace
Clear Counter
Clear Counter
1 min
Visual Check
10 min
Replace
Visual Check
Replace
Visual Check
Up to 60
min
Replace
10 min
DRBL-2>C3-FD-RL DRBL-2>C3-SP-RL DRBL-2>C4-FD-RL DRBL-2>C4-SP-RL
(ADV5551, 5545) DRBL-2>DF-PU-RL DRBL-2>DF-FD-RL DRBL-2>DF-SP-RL
(ADV5535, 5530) DRBL-2>DF-PU-RL DRBL-2>DF-SP-RL DRBL-2>LNT-TAP1
Developer DRBL-1>DV-UNT-BK DRBL-1>DV-UNT-M DRBL-1>DV-UNT-C DRBL-1>DV-UNT-Y
Filter DRBL1>TN-FIL1
Check the Drum counter
Check the P/U roller counters
Check the other durable counters C
om
mon P
rocess (
Befo
re)
C7
C8
C9
iR ADV C5500 series Advance Maintenance Guide
If Snapshot was used successfully, skip steps C5 through C8
If Snapshot was used successfully, skip steps C5 through C8

Procedure Detail Note Time
Make Samples (Before Sample)
Take following Copy/Print samples from Copy from ADF and Copy Glass. 1. PG10 2.CA7
Any issues, resolve them as needed.
Inspect paper Feed
Take copies from All Cassette at least 5 each from ADF.
Take copies from following cassette. Point: Make following jobs. 1.Double sided 2.Staple 3.Hole punch If you see the JAM, find the cause and fix that issue.
Check
1. Cassette 1 2. Cassette 2 3. Cassette 3 4. Cassette 4 5. Bypass tray 6. Side Paper Deck
Perform C10 and C11 at the same time to save time 5 min
Check
Com
mon P
rocess (
Befo
re)
C10
C11
iR ADV C5500 series Advance Maintenance Guide
Check Check 4. PG10

Procedure Detail & Action Note Time
Clean DADF Rollers / Sensors Do not use alcohol to clean the rollers. Use water, roller cleaner or soap and water.
Clean the rollers ( Pick up, Feed, Sep)
Point: Clean the Rollers using a lint free cloth with soap and water. Sensors should be cleaned using a blower brush.
Clean the Glass/Platen roller
1. Copy Glass 2. ADF Reading Glass 3. Platen 4. 2nd Side Glass
Point: 1. If the 2nd side Glass in ADF is dirty or there are
a lot of Alarm codes for this Glass (Alarm code: 020021), take out the 2nd side glass and clean both side of it.
2. Remove and clean the under side of the Copy Glass and clean the Optics
3. Clean the ADF Reading Glass and Copy Glass with Oil cleaner (FY9-6020-000) [TP12 181]
4. Clean the Platen Roller with Alcohol.
Mai
nte
nan
ce P
roce
ss
Clean
5 min
4 min
Clean
*Visually Inspect the Rollers and only clean if necessary. If the Rollers were recently replaced or cleaned they may be fine
M1
M2
iR ADV C5500 series Advance Maintenance Guide
2
1
3
Clean
4

Procedure Detail & Action Note Time
Clean Rollers on Cassettes * Do not use alcohol to clean the rollers. Use water, roller cleaner or soap and water.
1. Clean the rollers if you didn’t replace them in C8. Clean the rollers with lint free paper with soap and water.
3 min
Clean
5 min
Clean
*Visually Inspect the Rollers and only clean if necessary. If the Rollers were recently replaced or cleaned they may be fine
Clean Inside of the machine
Check
Clean
• Point:
1 min
Check
Mai
nte
nan
ce P
roce
ss
M3
M4 1. Pull out P-Kit and vacuum excess toner near on Yellow Developer. ( Check All)
2. Remove the P-Kit and ITB A’ssy. 3. Clean the top cover of the Laser
A’ssy with vacuum. 4. Vaccuum the roof of this cavity.
Clean
iR ADV C5500 series Advance Maintenance Guide
Clean
Procedure Detail Note Time
Clean Check
Replace
Perform M5 to M6 at the same time to save time
3 min
Clean
1 min
Visual Check
5 min
Replace
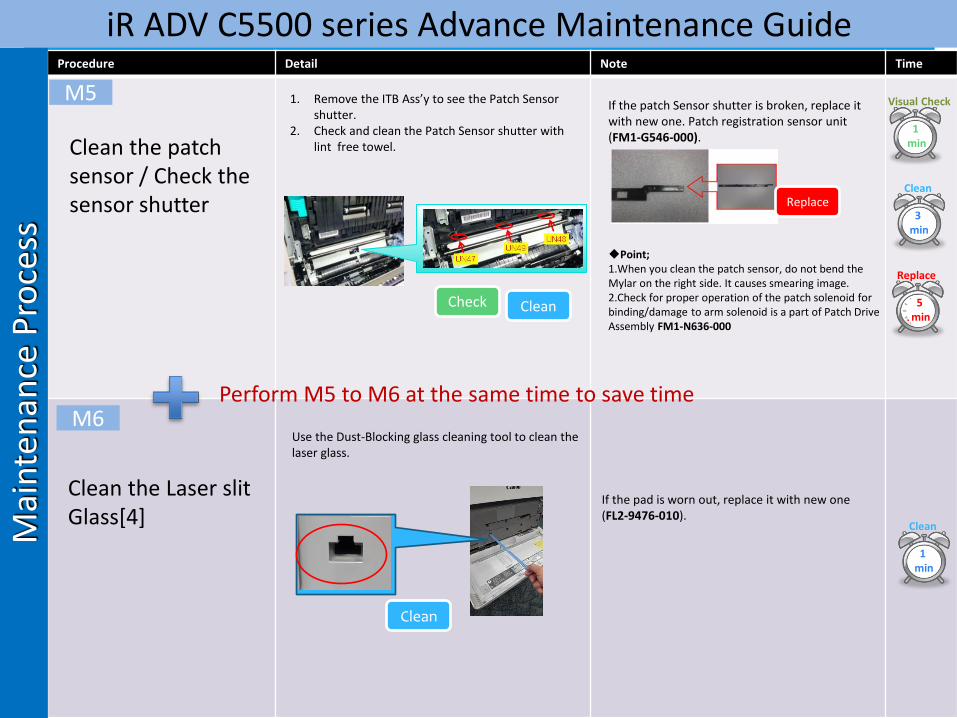
Clean the patch sensor / Check the sensor shutter
1. Remove the ITB Ass’y to see the Patch Sensor shutter.
2. Check and clean the Patch Sensor shutter with lint free towel.
If the patch Sensor shutter is broken, replace it with new one. Patch registration sensor unit (FM1-G546-000).
Point; 1.When you clean the patch sensor, do not bend the Mylar on the right side. It causes smearing image. 2.Check for proper operation of the patch solenoid for binding/damage to arm solenoid is a part of Patch Drive Assembly FM1-N636-000
Clean the Laser slit Glass[4]
Use the Dust-Blocking glass cleaning tool to clean the laser glass.
If the pad is worn out, replace it with new one (FL2-9476-010).
1 min
Clean Mai
nte
nan
ce P
roce
ss
M5
M6
iR ADV C5500 series Advance Maintenance Guide
Clean
Procedure Detail Note Time
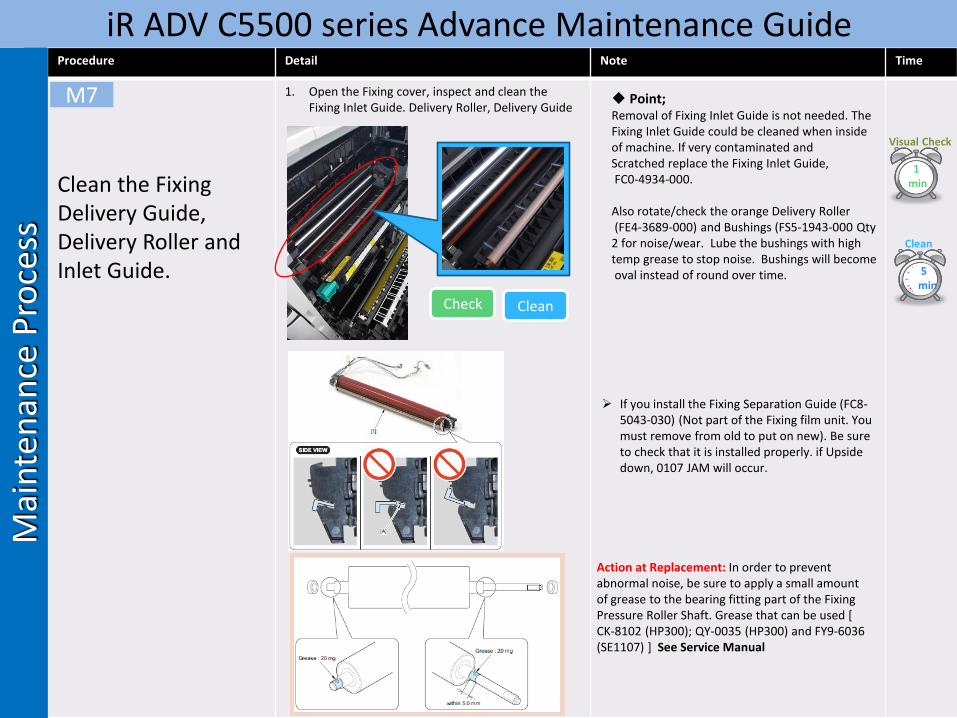
Clean the Fixing Delivery Guide, Delivery Roller and Inlet Guide.
1. Open the Fixing cover, inspect and clean the Fixing Inlet Guide. Delivery Roller, Delivery Guide
1 min
Visual Check
5 min
Clean
Clean
Point; Removal of Fixing Inlet Guide is not needed. The Fixing Inlet Guide could be cleaned when inside of machine. If very contaminated and Scratched replace the Fixing Inlet Guide, FC0-4934-000. Also rotate/check the orange Delivery Roller (FE4-3689-000) and Bushings (FS5-1943-000 Qty 2 for noise/wear. Lube the bushings with high temp grease to stop noise. Bushings will become oval instead of round over time.
Mai
nte
nan
ce P
roce
ss
M7
iR ADV C5500 series Advance Maintenance Guide
Check
Action at Replacement: In order to prevent abnormal noise, be sure to apply a small amount of grease to the bearing fitting part of the Fixing Pressure Roller Shaft. Grease that can be used [ CK-8102 (HP300); QY-0035 (HP300) and FY9-6036 (SE1107) ] See Service Manual
If you install the Fixing Separation Guide (FC8-5043-030) (Not part of the Fixing film unit. You must remove from old to put on new). Be sure to check that it is installed properly. if Upside down, 0107 JAM will occur.

Procedure Detail Note Time
Clean the Reg Roller ( inner & outer side), Pre-Reg Guide ( inner & outer),Reg sensor & prism, Clean the Duplex Feed rollers also.
Point Clean all areas with lint free paper moistened with alcohol.
Clean Secondary Transfer Roller Area
1. Remove the Outer Secondary Transfer Roller 2. Clean toner from the cavity. 3. Clean Feed contact guide
Point; Make sure springs under Secondary Transfer Roller Assembly are in correct position. Clean the secondary transfer guide with lint free paper moistened with alcohol. Clean the feed contact guide with lint free paper moistened with alcohol.
Empty the Waste toner bottle
1. Check the customer’s inventory of waste toner bottles.
With the introduction of the iRAC5500 Series machines the waste toner container has been designed to have a higher capacity / yield.
Check
1 min
Visual Check
5 min
Clean
1 min
Visual Check
Mai
nte
nan
ce P
roce
ss
M8
M9
M10
Clean
2 min
Clean
iR ADV C5500 series Advance Maintenance Guide

Procedure Detail Note Time
Continued Emptying the Waste toner bottle Follow step by step process on how to empty the waste toner container.
Check the customer’s inventory of waste toner bottles.
Step 1 Open the waste toner door Step 2 Remove the waste toner container form the machine. (DO NOT TILT Waste Toner Container to prevent false recognition of waste toner sensor) Step 3 Place the waste container on a flat surface Step 4 Place the waste container vertically to expose the waste toner container window Step 5 In order to remove the plastic window pull up slightly on the upper latch while pushing down slightly on the lower clear plastic latch. Step 6 Remove plastic waste container window. Pull slightly to the front and unhook the rear protrusion of the plastic window . Clean off the waste toner container window of all accumulated toner. Step 7 Empty the waste toner from the container into a plastic waste toner bag. Clean off the waste toner container of all accumulated toner. Reverse the process in step 6 to reinstall the plastic waste container window. Reinstall in machine and clear waste toner counters in service mode. MAKE SURE TO CLEAR THE WASTE TONER COUNTER UNDER COPIER>COUNTER>DRBL-1>WST-TNR
Mai
nte
nan
ce P
roce
ss
M10
5 min
Empty
iR ADV C5500 series Advance Maintenance Guide
Check
Step 1 & 2
Step 3
Step 4 & 5
Step 6
Step 7

Procedure Detail & Action Note Time
Check the ITB POS Check iTB-POS & iTB-POS2 value; If not in range, execute iTB Alignment Adj. ( See Service Manual )
1. Execute COPIER>FUNCTION>MISC-P>ITB-INIT. 2. See the COPIER>DISPLAY>MISC>ITB-POS. 3. Repeat 1 and 2 for 3 times.
Point: 1. If the value of service mode is out of range,
perform the ITB Alignment Adjustment. Note: Since this product is not affected by the tilt of the floor, adjustment of the adjuster height is not valid. Therefore, if it is out of range, perform “ITB adjustment”. ( See Service Manual)
Adjust
Adjust
5 min
Check
15
min
Adjust
5 min
Adjust
Perform Auto Correct Color Mismatch/Auto Adjust Gradation / Auto Correct Color Tone Setting
1. Auto Correct Color Mismatch Settings/Registration > Adjustment/Maintenance > Adjust Image
Quality•> > Auto Correct Color Mismatch 2. Auto Adjust Gradation ( Pick Paper Type & use Full Adjust) Settings/Registration>Adjustment/Maintenance >Adjust Image Quality•> Auto Adjust Gradation 3. Auto Correct Color Tone Settings Settings/Registration>Adjustment/Maintenance >Adjust Image Quality•> Auto Correct Tone Settings
•Point: 1. If error message shows up when performing
Auto Correct Color Mismatch, patch registration shutter could be broken. Check patch registration shutter .
2. If the customer use the heavy paper, perform Auto Adjust Gradation with plain and heavy paper.
3. If the machine has imagePASS P1, perform calibration for imagePASS after performing Auto Correct Color Mismatch/Auto Adjust Gradation.
Check Finishing devices
1. If E540-8002, E542-8002, 110F, or 1104 is shown in the error or jam list ensure there are no boxes or waste bin inhibiting the travel of the trays up and down movement.
2. Ensure all paper clips and staples are cleaned out of the finishing device.
Point:
5 min
Check
C13
C14
Com
mon P
rocess (
After)
C12
iR ADV C5500 series Advance Maintenance Guide
Check
Check

Procedure Detail Note Time
Make Samples (After Sample)
Take following Copy/Print samples from Copy from ADF and Copy Glass. 1. PG5 2.CA7
If you still find following PCQ, check the ADV Topics.
Test paper Feed
Take copies from All Cassette at least 5 each from ADF.
Take copies from following cassette. Point: Make following jobs. 1.Double sided 2.Staple 3.Hole punch If you see the JAM, find the cause and fix that issue.
Complete Documentation
1. Service Log 2. FSR 3. P-PRINT Point: 1. Let the customer print the test prints from
their PC while completing the documentation. 2. Write down detail action and all parts name
and parts # in service log for next visits. 3. If you change the service mode value or update
the system software, take the P-Print and keep with the Service Log and User data list.
Check Check
1. Cassette 1 2. Cassette 2 3. Cassette 3 4. Cassette 4 5. Bypass tray 6. Side Paper Deck
Perform C15 and C16 at the same time to save time
P-PRINT
3 min
2 min
Fill Out
P-Print
5 min
Check
Com
mon P
rocess (
Aft
er)
C15
C16
C17
iR ADV C5500 series Advance Maintenance Guide
Check
Fill out

Procedure Detail & Action Note Time
Perform COM-TEST
1. Check the ADS and make sure the Monitor symbol is indicated.
2. If the Monitor symbol is indicated, execute COM-TEST. If not, do not execute COM-TEST.
COPIER > Function > INSTALL>COM-TEST
If COM-TEST is NG, fix this issue at first. If you can’t fix this issue, call NTSC and get their assistance.
Communicate to the customer that you are leaving
Ask the customer if everything was addressed. Do they have the necessary supplies and ask if they are satisfied with your service.
Address all customer issues with your service manager. Ensure they are resolved or addressed, whether they are administrative, service related or sales oriented.
1 min
Scan
1 min
1 min
Check
COM TEST
Check COM TEST
Com
mon P
rocess (
Aft
er)
C18
C19
iR ADV C5500 series Advance Maintenance Guide


