

QUICK START INSTALL GUIDE D-Ring Hinge Version
Refer to Model Speci�c Guide forSpecial Notes Regarding Your Model
PAGE 1For C
usto
mer
Ser
vice
or W
arra
nty
Issu
es, C
onta
ct U
nder
Cove
r Dire
ctly
(
866)
900
-880
0 w
ww
.und
erco
verin
fo.c
om1
2
Install Parts Check List
Rear Mounting Bracket
A: 2 Hydraulic StrutsB: 8 Aluminum Clamps, Stainless Steel Bolts, Washers, & Lock Washers C: 2 Front Mounting BracketsD: 2 Rear Mounting BracketsE: 2 J-Hooks and Wall Mounting ScrewsTools Needed - 3/8” and 1/2” Wrench or Socket
Mylar Tabs Included
NOTE: UnderCover Tonneaus are designed from trucks that do not have a bedliner (spray-in bedliners pose no problem). Trucks that have plastic drop in bedliners will require some minor trimming of the bedliner to ensure proper placement of the mounting brackets. Any modi�cations must be made to the bedliner and NOT the UnderCover mounting hardware. Modi�cations to the mounting hardware could result in improper installation and will void your warranty.
A
B
C
E
D
NOTE: Brackets may di�er from photo
Install the rear bracket to the truck bed rail near the tailgate. Refer to the Model Speci�c Guide for measurements and special notes.
Use 2 clamps per bracket, install one clamp in hole 1 and one clamp in the hole nearest the tailgate that is unob-structed by the truck bed.
Do not over tighten and distort the brackets.
TOP VIEW PASSENGER SIDE
TRUCK BED RAIL
TRUCK BED RAIL
TAILGATE
CLAMP
BOLT
LOCK WASHERFLAT WASHER
CLAMP INSTALLEDCORRECTLY
CLAMP INSTALLEDINCORRECTLY
BALL STUD
12
3
REAR BRACKET
REAR BRACKET
LOCK STRIKE
REAR BRACKET
REFER TO MODEL SPECIFICGUIDE FOR MEASUREMENT
FRONT BULKHEADTAILGATE

QUICK START INSTALL GUIDE Hidden Hinge Version
Refer to Model Speci�c Guide forSpecial Notes Regarding Your Model
PAGE 2For C
usto
mer
Ser
vice
or W
arra
nty
Issu
es, C
onta
ct U
nder
Cove
r Dire
ctly
(
866)
900
-880
0 w
ww
.und
erco
verin
fo.c
om3 Front Mounting BracketInstall the front bracket to the truck bed rail near the bulkhead. Refer to the Model Speci�c Guide for measure-ments and special notes.
Use 2 clamps per bracket, install one clamp in hole 1 or 2 and one clamp in hole 4. If hole 4 is obstructed by the truck bed, use hole 3.
Do not over tighten and distort the brackets.
TOP VIEW PASSENGER SIDE
PASSENGER SIDE
GAP REFER TO MODEL SPECIFIC GUIDE FOR MEASUREMENT
1 2 3 4
FRONT BRACKET
FRONT BRACKET
FRONT BULKHEAD
SPIRAL RING TAB
FRONT BULKHEAD
4 Install Cover
With some assistance set the bed cover on the truck bed. Position the female hinge over the spiral ring tabs. Install the spiral rings into the holes in the spiral ring tabs.
NOTE: The rings are simply a safety measure to prevent the cover from slipping o� of the tabs in the open posi-tion. Once the hydraulic struts are attached and the cover is closed and locked, it is not possible to lift the front of the cover o� of the spiral ring tabs.
Place the Mylar tabs on the back of the cab, in
front of the spiral rings.
SPIRAL RING
SPIRAL RING TAB
FEMALE HINGE
UNDERCOVER TONNEAU
TOP VIEW

QUICK START INSTALL GUIDE Hidden Hinge Version
PAGE 3For C
usto
mer
Ser
vice
or W
arra
nty
Issu
es, C
onta
ct U
nder
Cove
r Dire
ctly
(
866)
900
-880
0 w
ww
.und
erco
verin
fo.c
om
5
4.1 Install Cover (continued)
Final Adjustment
Adjust the lock strikes up or down accord-ingly. With the tailgate down adjust the lock strike to have approximately 1/8” gap between the lock and the lock strike.
With the tailgate up you should be able to turn the lock with out any resistance. Further adjustment may be needed to achieve this.
Be sure the front �ap hangs over the bulkhead of the truck.
Install the hydraulic struts, attach the large end to the cover and the rod end to the rear mounting bracket (these will snap into place, no tools needed).
UNDERCOVER TONNEAU
CORRECTPLACEMENT OF
FRONT FLAPHANGS OVER BULKHEAD
INCORRECTPLACEMENT OF FRONT FLAP
TRUCK BULKHEAD
LOCK
LOCK STRIKEREAR BRACKET
TRUCK BED RAIL
LOCK CAM
With your cover closed, take a quick inspection to make sure that it is not touching the bed on either side or the tailgate. The desirable gap is no less than 1/8” and no more than 1/4”.
To adjust the cover front to back evenly, move both of the front brackets forward or rearward accordingly. To adjust to one side or the other, move the front brackets forward or rearward independently.
HYDRAULIC STRUT(LARGE END)ATTACHES TO COVER
REAR BRACKET
PASSENGER SIDE
(ROD END)
PAGE 4
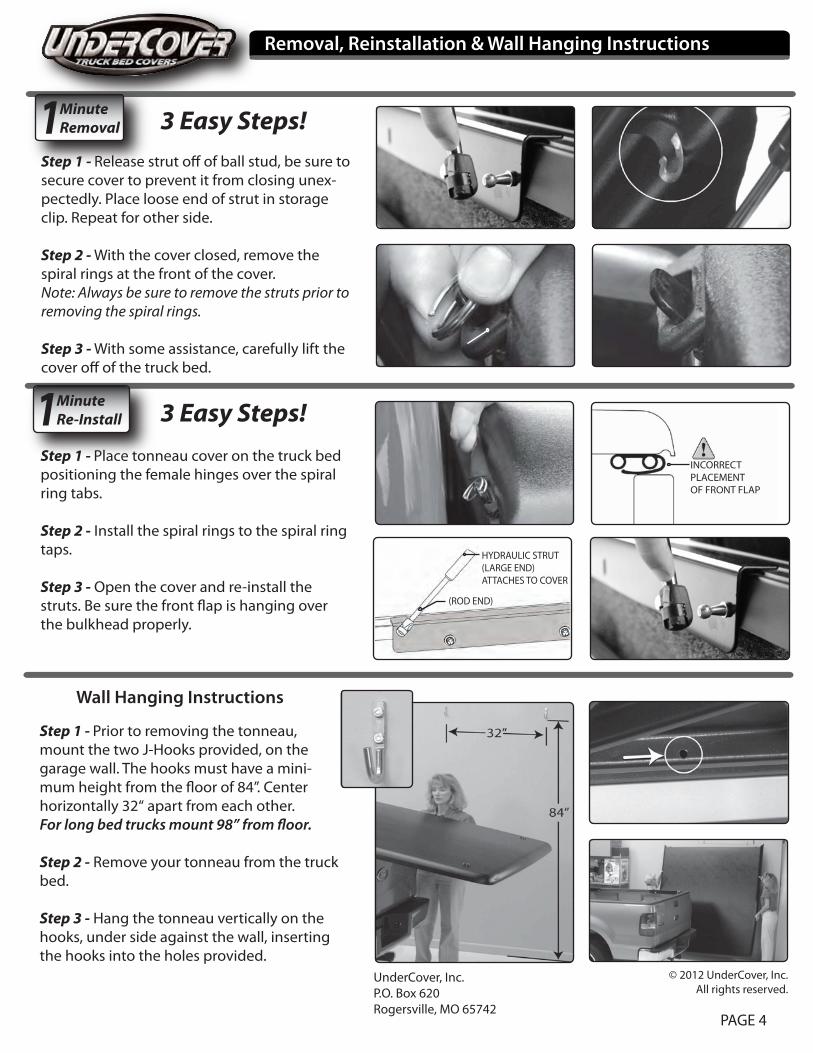
Removal, Reinstallation & Wall Hanging Instructions
1MinuteRemoval
1MinuteRe-Install
3 Easy Steps!
3 Easy Steps!
Wall Hanging Instructions
Step 1 - Release strut o� of ball stud, be sure to secure cover to prevent it from closing unex-pectedly. Place loose end of strut in storage clip. Repeat for other side.
Step 2 - With the cover closed, remove the spiral rings at the front of the cover.Note: Always be sure to remove the struts prior to removing the spiral rings.
Step 3 - With some assistance, carefully lift the cover o� of the truck bed.
Step 1 - Place tonneau cover on the truck bed positioning the female hinges over the spiral ring tabs.
Step 2 - Install the spiral rings to the spiral ring taps.
Step 3 - Open the cover and re-install the struts. Be sure the front �ap is hanging over the bulkhead properly.
Step 1 - Prior to removing the tonneau, mount the two J-Hooks provided, on the garage wall. The hooks must have a mini-mum height from the �oor of 84”. Center horizontally 32“ apart from each other.For long bed trucks mount 98” from �oor.
Step 2 - Remove your tonneau from the truck bed.
Step 3 - Hang the tonneau vertically on the hooks, under side against the wall, inserting the hooks into the holes provided.
HYDRAULIC STRUT(LARGE END)ATTACHES TO COVER
(ROD END)
INCORRECTPLACEMENT OF FRONT FLAP
© 2012 UnderCover, Inc. All rights reserved.
UnderCover, Inc.P.O. Box 620Rogersville, MO 65742


