
Version 1.3
Copyright by
Reebok 2007
ENG 1
www.rbkfitness.com www.rbkfitness.de
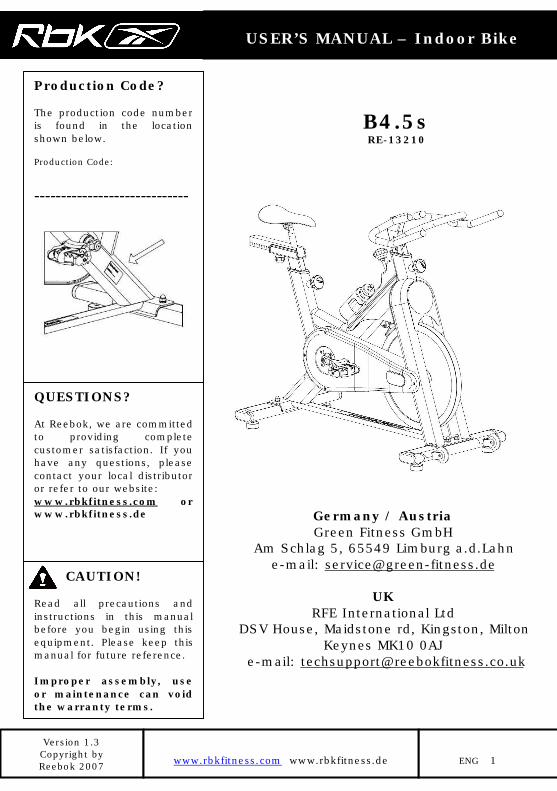
B4.5s
RE-13210
Production Code?
The production code number
is found in the location
shown below.
Production Code:
-----------------------------
En
glish
QUESTIONS?
At Reebok, we are committed
to providing complete
customer satisfaction. If you
have any questions, please
contact your local distributor
or refer to our website:
www.rbkfitness.com or
www.rbkfitness.de
USER’S MANUAL – Indoor Bike
CAUTION!
Read all precautions and
instructions in this manual
before you begin using this
equipment. Please keep this
manual for future reference.
Improper assembly, use
or maintenance can void
the warranty terms.
Germany / Austria
Green Fitness GmbH
Am Schlag 5, 65549 Limburg a.d.Lahn
e-mail: [email protected]
UK
RFE International Ltd
DSV House, Maidstone rd, Kingston, Milton
Keynes MK10 0AJ
e-mail: [email protected]
Version 1.3
Copyright by
Reebok 2007
ENG 2
www.rbkfitness.com www.rbkfitness.de
< Important Précautions page 3
< Before You Begin page 4
< How to Assemble the Indoor Cycle page 5-7
< How to Adjust the Indoor Cycle page 8-9
< Resistance Adjustment page 10
< How to Move the Indoor Cycle page 10
< Preventive Maintenance page 11
< Belt Drive System page 12
< Maintenance Activity Plan & Checklists page 13
< Explosion Drawings of Structural Components page 13-16
< Spare Part Reference List page 17-18
< Computer consol page 19
< Limited Warranty page 20
Technical specifications:
The Reebok Indoor Bike is according to EN 957 a Class H product and is built to
highest standards for home fitness use.
Foot print: 55 x 115 cm / 22 x 46 inch
Weight of Bike: 50 KG / 110 Lbs
Max saddle height: 110 cm / 43,5 inch
Max handlebar height: 110 cm / 43,5 inch
Max user weight: 100 KG / 220 Lbs
Designed to accommodate most users from 150cm to 201cm (4’11’’ to 6’ 6’’)
body height.
This Product is not designed or guaranteed for
commercial or semi/light commercial use.
TABLE OF CONTENTS
USER’S MANUAL – Indoor Bike

Version 1.3
Copyright by
Reebok 2007
ENG 3
www.rbkfitness.com www.rbkfitness.de
WICHTIGE SICHERHEITSHINWEISE
1. It is the sole responsibility of the owner
to ensure that all users of the indoor
cycle are informed of all warnings and
precautions.
2. Operate and maintain the indoor cycle
only as described in this manual and
after proper assembly and functionality
check as descript in this manual.
3. Keep the indoor cycle indoors, away from
moisture and dust. Do not place the
indoor cycle in a garage or covered patio
or near water.
5. Place the indoor cycle on a level surface.
To protect the floor or carpet from
damage, place a mat beneath the indoor
cycle. Make sure that there is adequate
room around the indoor cycle to mount,
dismount, and operate it.
6. Regularly inspect and properly tighten all
parts of the indoor cycle as
recommended in this manual. Please
replace defective parts immediately and
do not use the Bike until repair is
performed. Only use original parts from
the manufacturer
7. Children under the age of 16 should only
be allowed use of the indoor cycle with
parental approval and supervision.
8. The indoor cycle should not be used by
persons weighing more than 220
lbs/100 kg.
9. Always wear appropriate athletic
clothes and shoes while operating the
indoor cycle. Do not wear loose clothes
that could become caught on the
indoor cycle or shoes with loose laces.
10. Before using the indoor cycle, make
sure that you are familiar with the set
-up/operation of the indoor cycle.
11. The indoor cycle does not have a
independently moving flywheel
(wheel); the pedals will continue to
move together with the flywheel until
the flywheel stops.
12. Always regulate the flywheel
resistance so that your pedalling
motion is controlled.
13. Keep your back straight while using
the indoor cycle; do not arch your
back.
14. If you feel pain or dizziness while
exercising, stop immediately, rest and
cool down and consult a physician.
15. If replacement parts are needed, use
only manufacturer supplied parts.
WARNING !
To reduce the risk of serious injury, read the following important precautions and
information before operating the indoor cycle.
WARNING:
Before beginning any exercise program, consult your physician. This is especially important for
persons over the age of 35 or persons with pre-existing health problems. Read all instructions
before using. Be aware that incorrect or extensive training may result in serious health injuries.
The manufacturer assumes no responsibility for personal injury or property damage sustained by
or through the use of this product.
USER’S MANUAL – Indoor Bike
IMPORTANT PRECAUTIONS

Version 1.3
Copyright by
Reebok 2007
ENG 4
www.rbkfitness.com www.rbkfitness.de
Dear customer,
Congratulations for selecting the Reebok Indoor Cycle. The Reebok Indoor Cycle offers an
impressive array of features designed to enhance your cardiovascular fitness, tone muscles,
and develop endurance. Whether you’re a beginner or an experienced athlete, the Indoor
Cycle offers workouts that will help you to reach your individual fitness goals.
IMPORTANT: Read this manual carefully before assembling or
using the indoor cycle. If you have questions after reading this manual, please
contact your local distributor or refer to the website www.rbkfitness.com or
www.rbkfitness.de. Before reading further, please familiarize yourself with the parts that are
labeled in the drawing below.
BEFORE YOU BEGIN
Transport Wheel
Emergency Brake & Resistance Knob
Saddle
Adjustment Knob
Maintenance Cover
Brake Pad
Levelling Feet
Flywheel
Handlebar
Belt Guard
Pedal
USER’S MANUAL – Indoor Bike
Adjustment Knob
Tools needed for assembly: open end spanner: 17/19mm, 13/15mm,
Allen key: 3mm, 6mm

Version 1.3
Copyright by
Reebok 2007
ENG 5
www.rbkfitness.com www.rbkfitness.de
Due to the weight of the indoor cycle, it is recommended that two persons
perform the assembly. Set the studio cycle in a cleared area and remove all
packing materials; do not dispose of the packing materials until assembly is
completed.
1. Identify the Rear Stabilizer. While a
second person lifts the rear of the
frame, attach the Rear Stabilizer to
the Frame with two M10 x 60mm
Bolts, four M10 Washers, a Stabilizer
Gasket, two Plastic Washers, and two
M10 Cap Nuts as shown.
2. Support the Front Stabilizer while
a second person lifts the front of the
Frame. Attach the Front Stabilizer to
the Frame with two M10 x 60mm
Bolts, four M10 Washers, a Stabilizer
Gasket, two Plastic Washers and two
M10 Cap Nuts.
HOW TO ASSEMBLE THE INDOOR CYCLE
2
1
USER’S MANUAL – Indoor Bike

Version 1.3
Copyright by
Reebok 2007
ENG 6
www.rbkfitness.com www.rbkfitness.de
3. Turn the rear Adjustment Knob
counter clockwise and pull the
adjustment knob to insert the
Saddle Post into the Frame. Next,
bring the Saddle Post to the
desired height, release the
adjustment knob so the pin
engages into the holes of the
saddle post. Then turn the
Adjustment Knob clockwise to
retighten until it is snug.
Mount saddle to the horizontal
saddle post as shown in picture 4.
Finally, firmly retighten the saddle
mounting clamp and make sure
that the saddle is mounted in its
most horizontal position at the
middle of the rail.
To adjust the horizontal saddle
position, turn the small
adjustment knob counter
clockwise to adjust desired
horizontal saddle position and
retighten until it is snug.
Please don’t adjust the height of
the vertical saddle support
beyond the stop mark to avoid
instability.
3
4
USER’S MANUAL – Indoor Bike
Stop
mark
Do not over tighten the Adjustment
Knob. Make sure the pin of the
adjustment knob is fully engaged and
Saddle Post does not slide while
riding.

Version 1.3
Copyright by
Reebok 2007
ENG 7
www.rbkfitness.com www.rbkfitness.de
5. Collect the parts needed to
assemble the Handlebar. Slide
upper part of the handlebar into
the handlebar stem and connect
the 2 pieces with the 7 Allen bolts
provided.
Make sure that the connecting
Allen Bolts are appropriately
tightened and Handlebar does
not wobble because of a loose
connection.
6. Turn the front Adjustment Knob
counter clockwise, and pull the
adjustment knob to insert the
Handlebar Post into the Frame.
Next, bring the Handlebar Post to
the desired height, release the
adjustment Knob so pin engages
with the holes of the vertical stem
and turn the Adjustment Knob
clockwise to retighten until it is
secure.
Please don’t adjust the height of the
vertical saddle support beyond the
stop mark to avoid instability
5
6
7
USER’S MANUAL – Indoor Bike
Do not over tighten the connecting bolts.
Make sure the pop pin adjustment knob is
fully engaged and the Handlebar Post does
not slide while riding.
Stop mark
7. Identify the Right Pedal. Using a
15mm pedal wrench, firmly tighten
the Right Pedal clockwise into the
Right Crank Arm. Repeat the same
procedure for the Left Pedal but in a
counter Clockwise motion.
8. Make sure that all parts are properly tightened and that the brake pad is
thoroughly soaked with lubricant before the indoor cycle is used. This
precaution will avoid extensive wear on the brake pad. To protect the floor or
carpet, place a mat under the Indoor Cycle.

Version 1.3
Copyright by
Reebok 2007
ENG 8
www.rbkfitness.com www.rbkfitness.de
The Indoor Cycle can be adjusted for maximum comfort and exercise effectiveness.
The instructions below describe one approach to adjusting the Indoor Cycle to ensure
optimal user comfort and ideal body positioning; you may choose to adjust the
Indoor Cycle differently.
PEDAL STRAP ADJUSTMENT
Sit on the saddle and position your feet on the pedals, with the balls of your feet
directly above the spindles of the pedals (see the drawing below). Adjust the pedal
straps so the toe clips (cages) are snug but not too tight.
SADDLE HEIGHT ADJUSTMENT
Sit on the saddle and slowly pedal until the right pedal is in the lowest position. Your
knees should be slightly bent without a dropping of the hips. To avoid hyper
extending your knees, make sure that your legs are not completely straight.
HOW TO ADJUST THE INDOOR CYCLE
USER’S MANUAL – Indoor Bike
Please do not adjust
handlebar height beyond
the stop mark on the
stem
Please do not adjust
saddle height beyond
the stop mark on the
stem
Version 1.3
Copyright by
Reebok 2007
ENG 9
www.rbkfitness.com www.rbkfitness.de
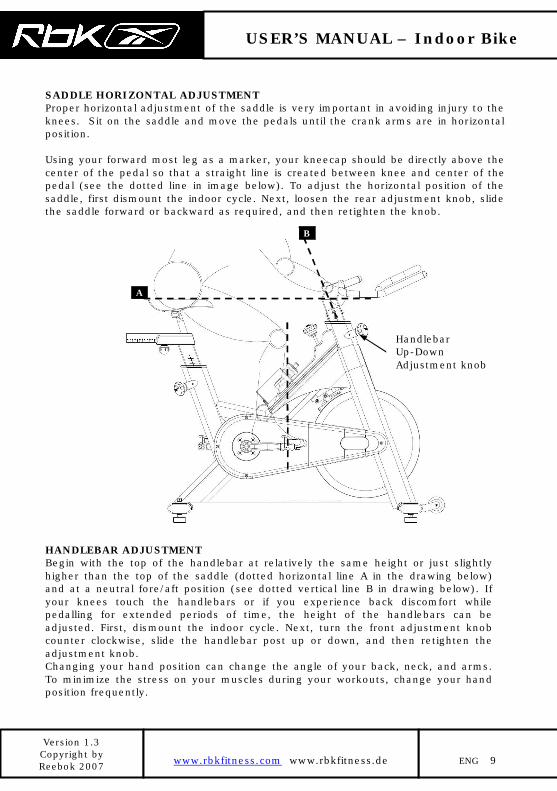
SADDLE HORIZONTAL ADJUSTMENT
Proper horizontal adjustment of the saddle is very important in avoiding injury to the
knees. Sit on the saddle and move the pedals until the crank arms are in horizontal
position.
Using your forward most leg as a marker, your kneecap should be directly above the
center of the pedal so that a straight line is created between knee and center of the
pedal (see the dotted line in image below). To adjust the horizontal position of the
saddle, first dismount the indoor cycle. Next, loosen the rear adjustment knob, slide
the saddle forward or backward as required, and then retighten the knob.
USER’S MANUAL – Indoor Bike
A
B
Handlebar
Up-Down
Adjustment knob
HANDLEBAR ADJUSTMENT
Begin with the top of the handlebar at relatively the same height or just slightly
higher than the top of the saddle (dotted horizontal line A in the drawing below)
and at a neutral fore/aft position (see dotted vertical line B in drawing below). If
your knees touch the handlebars or if you experience back discomfort while
pedalling for extended periods of time, the height of the handlebars can be
adjusted. First, dismount the indoor cycle. Next, turn the front adjustment knob
counter clockwise, slide the handlebar post up or down, and then retighten the
adjustment knob.
Changing your hand position can change the angle of your back, neck, and arms.
To minimize the stress on your muscles during your workouts, change your hand
position frequently.

Version 1.3
Copyright by
Reebok 2007
ENG 10
www.rbkfitness.com www.rbkfitness.de
RESISTANCE ADJUSTMENT
The preferred level of difficulty in pedalling (resistance) can be regulated in fine
increments by use of the resistance knob. To increase the resistance, turn the
resistance knob clockwise. To decrease the resistance, turn the knob counter
clockwise.
IMPORTANT: To stop the flywheel (wheel) while pedalling, push down on the red
brake knob. The flywheel should quickly come to a complete stop. Please make sure
your shoes are fixed into the toe clip or in case cycling shoes are used your shoe
cleat is connected to the pedal binding while ridding.
WARNHINWEIS: Das Indoor Cycle verfügt über keinen Freilauf. Die
Schwungscheibe ist fest mit den Pedalen verbunden und stoppt nicht selbstständig wenn der
Benutzer die Tretbewegung unterbricht. Bitte kontrollieren Sie immer Ihre Bewegungen und
verlangsamen Sie diese kontrolliert um anzuhalten. Notrbremse = Bremsgriff nach unten drücken
HOW TO MOVE THE INDOOR CYCLE
Due to the weight of the Indoor Cycle, it is recommended that two persons move it.
While one person lifts the back of the indoor cycle, the second person firmly holds the handlebar
and tips the indoor cycle forward until it rolls on the wheels. Carefully move the Indoor Cycle to
the desired location and then lower it. CAUTION: To reduce the risk of injury, use extreme
caution while moving the indoor studio cycle. Do not attempt to move it over uneven
surfaces and make sure there’s a safety space of 20 inch (minimum) to the nearest
equipment is (recommended).
If the Indoor Cycle rocks on the
floor after being set down, turn
the levelling feet underneath the
front or rear stabilizer until the
rocking motion is eliminated.
Important: Please do not unscrew
the levelling feet more then ½ inch !
Red Resistance Knob
Emergency Brake
HOW TO OPERATE THE INDOOR CYCLE
Leveling Feet
USER’S MANUAL – Indoor Bike
WARNING: The Indoor Cycle does not have a free moving flywheel (wheel); the
pedals will continue to move together with the flywheel until the flywheel stops. Reducing
speed in a controlled manner is required. To stop the flywheel immediately, push down the
red emergency break knob. Always pedal in a controlled manner and adjust your desired
cadence according to your own abilities. Push the red knob down = emergency stop

Version 1.3
Copyright by
Reebok 2007
ENG 11
www.rbkfitness.com www.rbkfitness.de
Regular maintenance must be performed on the Indoor Cycle for optimal
performance and longevity. Please read and follow all instructions below. If the
Indoor Cycle is not maintained as described, components may wear excessively and
the Indoor Cycle may become damaged. Improper maintenance will void the warranty
terms. If you have questions about maintenance, contact your local distributor.
Note: Many maintenance procedures require lubricant spray. Manufacturer
recommends WD40, Brunox or a similar solvent free lubricant.
DAILY MAINTENANCE
1. Make sure that the Indoor Cycle is level. If the indoor cycle rocks on your floor,
turn the levelling feet underneath the front or rear stabilizer until the rocking motion
is eliminated.
2. After exercising, the Indoor Cycle should be disinfected and cleaned to maintain a
hygienic environment. First, apply a disinfectant spray to the handlebars and the
saddle. Using a lint-free cloth, dry the handlebars and the saddle. Next, apply a small
amount of disinfectant to a lint-free cloth and clean the adjustment knobs and the
adjustment handles. Avoid using strong detergents on the Indoor Cycle frame.
WEEKLY MAINTENANCE
1. Apply a small amount of the lubrication spray to a lint-free cloth, and thoroughly
clean the frame, the handlebar slider and seat sliders the flywheel and the plastic
parts of the Indoor Cycle.
2. (Picture A) For optimal performance of the resistance
system, and to minimize wear on the brake pad, the
solvent free lubricant spray should be applied to the
brake pad using the lubrication holes on the plastic part
of the brake pad. If fuzz or lint appears on the brake pad,
the brake pad has become too dry—lubricant spray should
be applied more frequently. Make sure the brake pad is
thoroughly soaked from end to end with lubricant spray.
Then, wipe the excess off.
BI-WEEKLY MAINTENANCE
1. (Picture B) The Indoor Cycle should not be used if the
Emergency Brake System is not working properly. While
sitting on the saddle and pedalling, test the brake by
pushing down the brake knob. The flywheel should
come to a quick and complete stop.
PREVENTIVE MAINTENANCE
A
USER’S MANUAL – Indoor Bike
B

Version 1.3
Copyright by
Reebok 2007
ENG 12
www.rbkfitness.com www.rbkfitness.de
3. Belt driven Bike
Important: A loose belt as well as an over-tightened belt will
cause damage to the belt and drive system.
Checking Belt Tension:
To check for a loose belt, sit on the saddle, place your feet
on the pedals, move the pedals until the crank arms are
horizontal. Next, push down the emergency brake handle and
hold it. Then, stand on the pedals and rock forward and
backward. There should be no more than 1/8th inch (2–3 mm)
of play in the belt. If there is too much play in the belt, this
indicates that the belt is too loose.
Correcting Belt Tension:
To correct a loose belt: To adjust the belt, pull off the right
and the left maintenance covers (A).
Loosen the axle nut (B) on both ends of the flywheel axle two
full turns.
Loosen the Outer Adjustment Nut (C) facing the head of the
Allen bolt on each side of the flywheel. Then, turn both (right
and left sides) of the Inner Adjustment Nuts (D) on the inside
of the flywheel bracket 1/4 of a turn at a time (upward on the
R side and downward on L side) until the belt is properly
adjusted. Make sure to turn both adjustment screws
exactly the same amount to avoid misalignment of the
flywheel. Re-check the amount of play in the belt as described
at the beginning of this step. If necessary, readjust the belt.
Finally, retighten the two Outer Adjustment Nuts (C) and the
two axle nuts (B), and reattach the maintenance covers.
To avoid damage to the flywheel bearings, do not over
tighten the axle nuts (B). Unusual noises or vibrations are
indications that the belt has been over tightened or that the
flywheel is at a wrong angle.
3
A
B
C
D
Right Side
USER’S MANUAL – Indoor Bike
Below graphics shows the right
side of the Bike (ridding position)
Version 1.3
Copyright by
Reebok 2007
ENG 13
www.rbkfitness.com www.rbkfitness.de
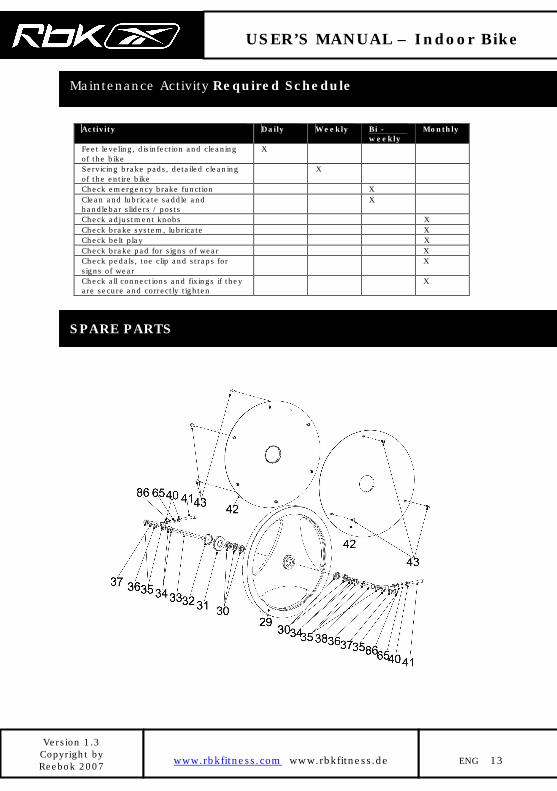
Activity Daily Weekly Bi -
weekly
Monthly
Feet leveling, disinfection and cleaning
of the bike
X
Servicing brake pads, detailed cleaning
of the entire bike
X
Check emergency brake function X
Clean and lubricate saddle and
handlebar sliders / posts
X
Check adjustment knobs X
Check brake system, lubricate X
Check belt play X
Check brake pad for signs of wear X
Check pedals, toe clip and straps for
signs of wear
X
Check all connections and fixings if they
are secure and correctly tighten
X
SPARE PARTS
Maintenance Activity Required Schedule
USER’S MANUAL – Indoor Bike

Version 1.3
Copyright by
Reebok 2007
ENG 14
www.rbkfitness.com www.rbkfitness.de
USER’S MANUAL – Indoor Bike

Version 1.3
Copyright by
Reebok 2007
ENG 15
www.rbkfitness.com www.rbkfitness.de
USER’S MANUAL – Indoor Bike

Version 1.3
Copyright by
Reebok 2007
ENG 16
www.rbkfitness.com www.rbkfitness.de
USER’S MANUAL – Indoor Bike

Version 1.3
Copyright by
Reebok 2007
ENG 17
www.rbkfitness.com www.rbkfitness.de
NO PART NAME SIZE Q'TY NO PART NAME SIZE Q'TY
1 MAIN FRAME 1 48 COMPUTER CONSOL J006 1
2 REAR STABILIAER
40*97*2.0*498 1
49 ADJUSTMENT KNOB 2
3 END COVER
40*97 ABS 4
50
VERTICAL SADDLE
SUPPORT STEM
30*60*1.8
1
4 RUBBER FOOT
M8 4
51
OUTER CHAIN
GUARD
709*261
1
5 BOLT
M10*60 4
52
INNER CHAIN
GUARD
715*269 1
6 NYLON WAHSER
10*26*2 4
53 LEFT COVER 248*138 ABS 1
7 WASHER
10*26*2 8
54
PLASTIC COVER FOR
CHAIN GUARD
53.5*118/TPR 2
8 HEXAGONAL NUT M10
4
55 BOLT
5*16 14
9
FRONT
STABILIZER
40*97*2.0*498
1 56 WASHER 5*9 14
10
TRANSPORT
WHEEL
Φ57*22 2 57 NYLON WASHER 6*12 7
11 BOLT 8*30*M6 2 58 SWEATGUARD
367*187*164
ABS
1
12 BOLT M6*12 2 59 NUT
M8
4
13 AXLE PULLEY 25*134 1 60 ADJUSTMENT KNOB
M10*30
1
14 IRON PULLEY Φ210 1 61 WASHER 10*19*1.5 1
15 BELT 550EL 1 62
NYLON SLIDING
BLOCK
59*3*158 1
16 SPRING WASHER Φ10 4 63
SEAT SLIDING
BLOCK
1
17 BOLT 10*15 4 64 BOLT
M8*15
7
18 BEARING 6004ZZ NBK 2 65 WASHER 8*19*1.5
9
19 HANDLE PULSE PE18 2 66 BRAKE ROD 10*133 1
20 SENSOR WIRE SPRING 1 67 BRAKE NUT 1 16.8*16.8*31
1
21 NYLOCK NUT M20*P1.0 1 68 BOLT M5*5 DIN 2
22
NYLOCK NUT
COVER
1 69 NUT M10*P1.5 2
23 CRANK ( L )
170 SPINBIKE
1 70 NUT
M8
1
USER’S MANUAL – Indoor Bike

Version 1.3
Copyright by
Reebok 2007
ENG 18
www.rbkfitness.com www.rbkfitness.de
NO PART NAME SIZE Q'TY NO PART NAME SIZE Q'TY
24 FLANGE NUT 2 71 ROUND PLATE 16.8*3
2
25 CRANK COVER 2 72 SPRING
2*16*30 1
26 PEDAL ( L ) VP386 1 73 BRAKE AXLE BOLT 10*101.5
1
27 CRANK ( R )
170
SPINBIKE
1 74 SPRING 2 1.5*15*25
1
28 PEDAL ( R ) VP386 1 75 BRAKE NUT 2 16.8*16.8*25
1
29 FLYWHEEL
13KG
Φ450*28
1
76 FLANGE NUT M8*P1.25
2
30 BEARING 6001ZZ NBK 4 77
BRAKE ADJUSTMENT
DRUM
20*30
1
31 FRONT PULLEY 1 78 NYLOCK NUT M6
1
32 LOCK RING
Φ42.5*4
SPHC
1 79 BOLT M6*20
2
33
ALXE OF
FLYWHEEL
14*185
SCM415
2
80
BELL CRANK FOR
BRAKE PAD
30*3*66.5 1
34 WASHER 12.2*16.6*1 4 81 SPACER Φ6.2*Φ10*6.2 2
35 NUT M12*P1.5
6
82 BRAKE PAD 25*112
1
36 BRACKET
19*4
2 83 PAD 25*7*115 1
37 FLANGE WASHER 13*20*2 2 84 PVC GASKET
176*59*1.5
PVC
2
38
SLEEVE FOR
FLYWHEEL AXLE
12.25*16*11 1 85
RUBBER STOP
INSERT FOR
HANDLEBAR TUBE
12*92 1
39
INSERT SLEEVE
FOR HANDLEBAR
1 86 WASHER
Φ8*Φ18*1.0
2
40
NUT M8*P1.25 4
87 NUT M10 1
41 BOLT M8*50*P1.25 2 88 SADDLE DD6801 1
42 FLYWHEEL PLATE 390*2 PP 2 89 NUT M6 1
43 BOLT M4*12 6 90 WASHER
Φ11*Φ21*1.5
1
44
RUBBER STOP
INSERT
8*92
1 91 MOVE SLOT 1
45 HANDLEBAR 1 92 PUSLE WIRE 600mm 1
46
INSERT SLEEVE
FOR SADDLE
36*93*259 2 93 MIDDLE WIRE 1
47
HANDELBAR
SUPPORT STEM
30*60*1 1 94
USER’S MANUAL – Indoor Bike

Version 1.3
Copyright by
Reebok 2007
ENG 19
www.rbkfitness.com www.rbkfitness.de
Computer consol
SPECIFICATIONS:
TIME…………….. 00:00-99:59 Heart rate …………40-240BPM
CNT/MIN…………0-9999 CALORIES (CAL)………0.0-9999KCAL
COUNT (CNT)…...0-9999
KEY FUNCTION:
SELECT: This key lets you to select and lock on to a particular function you want.
RESET: Reset the value to zero by pressing the key.
OERATION PROCEDURES:
1. AUTO NO / OFF
The system turns on when any key is pressed or when it receives an input from the speed
sensor. The processor turns off automatically when the speed sensor has no signal input or
no key is pressed for approximately 4 minutes.
2. RESET:
The unit can be reset by changing the batteries or pressing the RESET key for 3seconds.
3. FUNCTIONS:
TIME: The time of exercise will be displayed by pressing SELECT key until corresponding
triangle appear.
CNT/MIN: Current speed will be shown by pressing SELECT key until corresponding
triangle appear.
COUNT: The distance of each workout will be displayed by pressing SELECT key until
corresponding triangle appear.
PULSE: Users’ current heart rate is displayed in beats per minute (BPM) by pressing
SELECT key until corresponding triangle appear. Place the palms of your hands on both of
the contact beds and wait for 30 seconds for the most accurate reading.
CALORIES: The calories burned will be displayed by pressing SELECT key until
corresponding triangle appear.
SCAN: Automatic display of the following functions in the order shown:
TIME-CNT/MIN-COUNT-PULSE -CALORIES
CAUTION:
1. Don’t expose to direct sunlight too long.
2. Protect from water and strong shock.
3. While installing the batteries, the computer’s LCD is out of order. Please reinstall the
batteries again.
USER’S MANUAL – Indoor Bike

Version 1.3
Copyright by
Reebok 2007
ENG 20
www.rbkfitness.com www.rbkfitness.de
1. The expressed warranty is provided according to the guidelines listed below and applies on the Indoor Bike
only while:
a) proper assembly and maintenance as required in the Care and Maintenance Manual has been followed.
(Important note: Improper assembly of the Product or improper maintenance will void the warranty
terms)
b) it remains in the possession of the original purchaser and proof of purchase is demonstrated,
c) it has not been subject to accident, misuse, abuse, improper service or modification, and
d) claims are made within the warranty period
2. If a legitimate warranty claim is determined the local Product distributor will deliver or ship to you any new or
rebuilt replacement part or component, or, at the option of the manufacturer, replace the Product. Any shipment
cost incurred by the commercial client for the purpose of inspection of part by the local Product distributor will
only be reimbursed after legitimacy of the claim is established by the manufacturer. Method of shipment must be
approved in writing by local Product distributor prior mailing. In the case of non-legitimate claims the purchaser
carries the cost of the replacement parts and the shipping.
3. This warranty does not cover damage or equipment failure caused by failure to provide required maintenance
as outlined in this manual. Any failures or damage caused by unauthorized service, misuse, accident, negligence
or improper assembly or installation; debris resulting from any construction or repair activities in the Product’s
environment; rust or corrosion as a result of the Product’s location; alterations or modifications made without
written authorization; or failure on your part to use, operate, and maintain the Product as set forth in this manual
will void this warranty. All terms of this warranty are void if the Product is moved beyond the country to
which it was originally sold and are then subject to the terms provided by that country’s local authorized
Reebok representative.
4. Reebok. Limited Warranty service can be obtained by contacting your local Product distributor. You can also
reach us directly for support at www.rbkfitness.com.
5. Product limited warranty is void when Product is installed in a country other than where sold.
Your Responsibility
The purchaser is obligated to examine the goods immediately on delivery, for defects, otherwise the goods are
considered approved and accepted. Retain proof of purchase; install, use, operate, and maintain the Product as
specified in this manual; notify Customer Service of any defect within 10 days after discovery of the defect; and, if
instructed, return any defective part for replacement, or, if instructed, return the entire Product for repair.
Placing a Warranty Claim
Simply contact your local Product distributor, provide them your name, address, and the serial number of your
Product. A representative will assess the situation and take appropriate measures. If applicable you will be told
how to get a replacement part.
Exclusive Warranty
Reebok nor its distributors are responsible or liable for indirect, special, or consequential damages arising out of,
or in connection with, the use or performance of the Product or damages with respect to any economic loss, loss
of property, loss of revenues or profits, loss of enjoyment or use, costs of removal or installation, or other
consequential damages of whatsoever nature. Unauthorized Changes to Warranty
The terms of this Limited Warranty cannot be changed, modified, or extended by anyone including local Product
distributors without the signed acceptance by Reebok.
Country Laws
This warranty gives you specific legal rights according to European regulations and you may have other rights
which vary from country to country. Some countries may not allow the exclusion or limitation of incidental or
consequential damages. Accordingly, the above limitation may not apply to you. The warranty extended
hereunder is in lieu of any and all other warranties and any implied warranties of merchantability or fitness for a
particular purpose is limited in its scope and duration to the terms set forth herein.
LIMITED WARRANTY Indoor Bike
TERMS AND CONDITIONS OF WARRANTY


