

i
2013
Developed By:
Brittany Rhodes
Kyle Schmidt
Ned Shelton
Mike Strickland
Worcester Polytechnic Institute
SCIENCE ACTIVITY PORTFOLIO

ii
Table of Contents Table of Contents ..................................................................................................................................... i
Portfolio User Notes ................................................................................................................................ 1
Biology ................................................................................................................................................... 2
Biology Sample Program ...................................................................................................................... 3
Biology Career Connections ................................................................................................................. 4
Biology Session 1 Pre-Survey ............................................................................................................... 6
Biology Session 1 Post-Survey .............................................................................................................. 7
Biology Session 2 Post-Survey .............................................................................................................. 8
Biology Session 3 Post-Survey .............................................................................................................. 9
Biology Session 4 Post-Survey ............................................................................................................ 10
After Image (5 Minutes) ................................................................................................................. 11
Body Systems Bingo (15-30 Minutes) ............................................................................................. 13
Cheshire Cat (10 Minutes).............................................................................................................. 46
DNA Extraction (45 Minutes) ......................................................................................................... 48
Emphysema Simulation (10 Minutes) ............................................................................................. 51
Heart Valve (40-60 Minutes) .......................................................................................................... 52
Need a Hand (45 Minutes) ............................................................................................................. 56
Sweat Spot (20 Minutes) ................................................................................................................ 60
What Makes Our Bones Strong (80 Minutes) ................................................................................. 62
Chemistry .............................................................................................................................................. 64
Chemistry Sample Program................................................................................................................ 65
Chemistry Career Connections ........................................................................................................... 66
Chemistry Session 1 Pre-Survey ......................................................................................................... 68
Chemistry Session 1 Post-Survey........................................................................................................ 69
Chemistry Session 2 Post-Survey........................................................................................................ 70
Chemistry Session 3 Post-Survey........................................................................................................ 71
Chemistry Session 4 Post-Survey........................................................................................................ 72
Bouncy Balls (40 Minutes) .............................................................................................................. 73
Bubble-ology (20 Minutes) ............................................................................................................. 76
Cabbage Chemistry (40 Minutes) ................................................................................................... 78
Disappearing Ink (25 Minutes) ....................................................................................................... 80

iii
Exploding Plastic Bag (5-10 Minutes).............................................................................................. 85
Ice Cream Making (60 Minutes) ..................................................................................................... 87
Lava Lamp (20 Minutes) ................................................................................................................. 89
Mentos and Coke (15 Minutes) ...................................................................................................... 91
Snow Globe (40 Minutes)............................................................................................................... 93
Physics .................................................................................................................................................. 95
Physics Sample Program .................................................................................................................... 96
Physics Career Connections ............................................................................................................... 97
Physics Session 1 Post-Survey .......................................................................................................... 102
Physics Session 2 Post-Survey .......................................................................................................... 103
Physics Session 3 Post-Survey .......................................................................................................... 104
Physics Session 4 Post-Survey .......................................................................................................... 105
Physics (Electricity and Magnetism) ................................................................................................ 106
Balloon Levitation (10-15 Minutes) .............................................................................................. 107
Electric Piano (45 Minutes) .......................................................................................................... 110
Particle Separation (15 Minutes) .................................................................................................. 113
Pepper Printer (30 Minutes) ........................................................................................................ 116
Rainbows in Water (15-30 Minutes) ............................................................................................. 119
Visualizing Magnetic Fields (20-30 Minutes)................................................................................. 124
Physics (Mechanics) ........................................................................................................................ 126
Angry Birds Fort Destruction (30-40 Minutes) .............................................................................. 127
Bridge Building (45 Minutes) ........................................................................................................ 128
Catapult Building (45 Minutes) ..................................................................................................... 130
Egg Drop (45-60 Minutes) ............................................................................................................ 132
Phone Book Rope Pull (15 Minutes) ............................................................................................. 133
Soda Bottle Rocket Launcher (50 Minutes) ................................................................................... 135
External References ............................................................................................................................. 139

1
Portfolio User Notes
This portfolio was compiled to give Banksia Gardens Community Services a resource of science
activities to execute their Science Education Outreach Program in local schools. The science
topics are broken up into 3 subjects: Biology, Chemistry, and Physics. Within each section, a
sample program is provided with pre and post-surveys, and information for a career connections
presentation at the end of all sessions. After the sample program, there are running sheets that
detail out all activities as well as provide facilitator information. To adapt to the schools that
wish to have this program presented, the facilitators may substitute activities with each other
based on the time estimates included in the running sheets. The sample program is based on a 4
session program for 90 minutes each. The 4 sessions are intended to be held once a term. To
continue to keep this document up to date, if a facilitator finds one of the citation links to be
broken, to please update with the new existing link for future use.

2
Biology

3
Biology Sample Program
First day: Time (min) Cost
Program Introduction 10 0
Sweat Spots 20 25.5
Heart Valve 45 60 Total
Post evaluation 1 /clean up 10 0 85
Second day:
Daily Introduction 5 0
Cheshire Cat 10 41
DNA extraction 45 56.5
Strong Bones Part 1 20 45 Total
Post eval 2/clean up 10 0 90
Third day:
Daily Introduction 5
Need a Hand? 45 42
Body Systems Bingo 30 6 Total
Post eval 3 /clean up 10 0 90
Fourth day:
Daily Introduction 5 0
Breathing Thorugh Straws 10 8
Strong Bones Part 2 20 0
After image 10 31.5
Career connections 20 0 Total
Post eval 4 /clean up 25 0 90
TOTAL COST 316 Total
COST /STUDENT 12.6 355
Time Breakdown
Wow factor 30
Activity 225
Presentation 45
Evaluation 55 355
*NOTE: The activity “What Makes our Bones Strong” is intended to have 4 days in between
initial and final observations. This activity may need to be adjusted based on the schedule of the
school.

4
Biology Career Connections
Tissue Engineering – Bone repair, cartilage repair, wound healing, and growing new organs
http://en.wikipedia.org/wiki/File:Tissue_engineering_english.jpg
Biomechanics – Prosthetics and Orthotics, Medical Devices (pace makers, band-aids,
wheelchairs), and robotics
Reference this video: http://www.youtube.com/watch?v=chPanW0QWhA
Doctor – Surgeon, Pediatric Doctor, Cardiologist, Neurologist, Oncologist, and Radiologist
Veterinarian – Help sick or hurt animals. This can include farm animals, household pets, zoo
animals, and other wild animals
Reference this video: http://www.youtube.com/watch?v=Es25DjTEzdA
Marine Biology – Work in a lab, aquarium, or in water; study how sea life works and how we
affect it; isolate medicines from marine life; and oceans make up about 71%
of earth
Reference this video: http://www.youtube.com/watch?v=GRSbC6HAgNE

5
Genetics – Human Genome Project, Bacterial Geneticist, and Botanist
http://en.wikipedia.org/wiki/Double_helix

6
Biology Session 1 Pre-Survey
First Letter of Surname How many siblings do you have? Number of month you were born
Age: ___________________
Year: __________________
Gender: Male Female
Circle your favorite subject:
Maths Science Humanities English Physical Education
Technologies Languages Art
What career would you like to pursue? ____________________________________________
Do you want to participate in this program? Yes No
Do you like science? Yes No
Have you participated in an outreach science program before? Yes No
In the boxes below, please place an “X” in the box which describes how you feel about each statement
Statement Strongly
Agree
Agree Disagree Strongly
Disagree
I enjoy learning about science
I enjoy doing science experiments
I do not like science
I would like to work in a science field in the future
Science is important
I look forward to science class
I would like to learn more about science
List 2 things you like about science.
1. ______________________________________________________________________________
2. ______________________________________________________________________________
List 2 things you dislike about science.
1. ______________________________________________________________________________
2. ______________________________________________________________________________
7
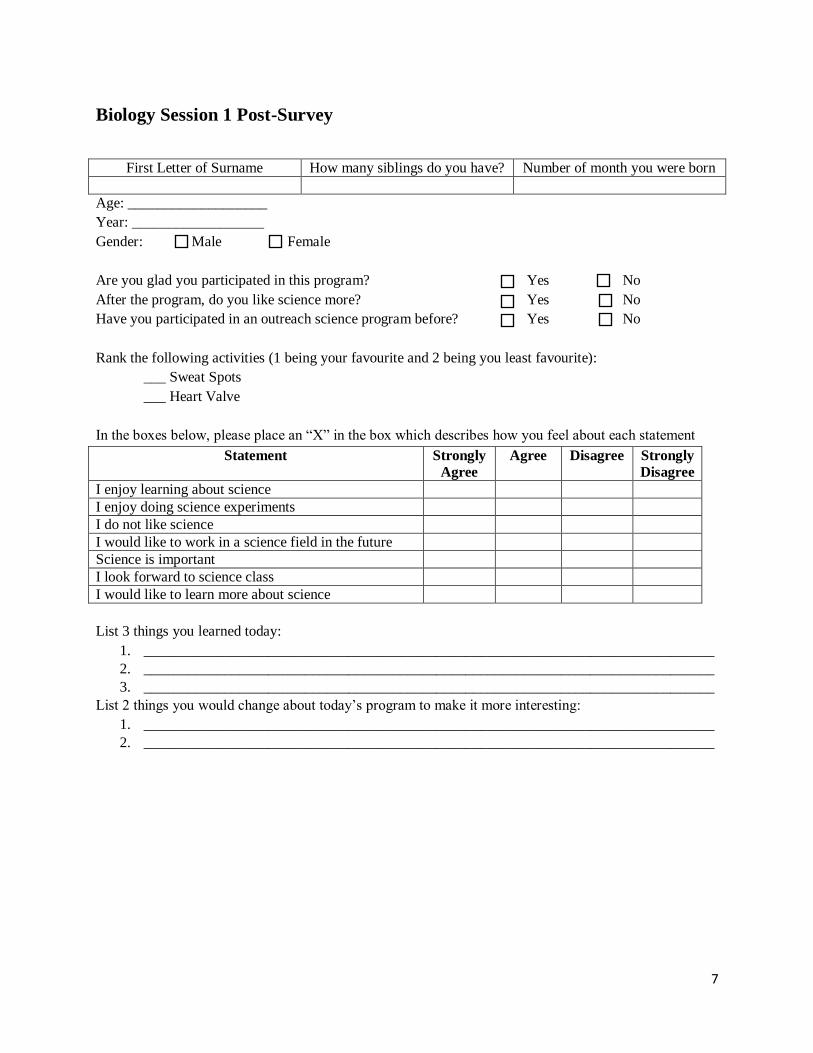
Biology Session 1 Post-Survey
First Letter of Surname How many siblings do you have? Number of month you were born
Age: ___________________
Year: __________________
Gender: Male Female
Are you glad you participated in this program? Yes No
After the program, do you like science more? Yes No
Have you participated in an outreach science program before? Yes No
Rank the following activities (1 being your favourite and 2 being you least favourite):
___ Sweat Spots
___ Heart Valve
In the boxes below, please place an “X” in the box which describes how you feel about each statement
Statement Strongly
Agree
Agree Disagree Strongly
Disagree
I enjoy learning about science
I enjoy doing science experiments
I do not like science
I would like to work in a science field in the future
Science is important
I look forward to science class
I would like to learn more about science
List 3 things you learned today:
1. ______________________________________________________________________________
2. ______________________________________________________________________________
3. ______________________________________________________________________________
List 2 things you would change about today’s program to make it more interesting:
1. ______________________________________________________________________________
2. ______________________________________________________________________________

8
Biology Session 2 Post-Survey
First Letter of Surname How many siblings do you have? Number of month you were born
Age: ___________________
Year: __________________
Gender: Male Female
Are you glad you participated in this program? Yes No
After the program, do you like science more? Yes No
Have you participated in an outreach science program before? Yes No
Rank the following activities (1 being your favourite and 3 being you least favourite):
___ Cheshire Cat
___ DNA Extraction
___ Strong Bones Part 1
In the boxes below, please place an “X” in the box which describes how you feel about each statement
Statement Strongly
Agree
Agree Disagree Strongly
Disagree
I enjoy learning about science
I enjoy doing science experiments
I do not like science
I would like to work in a science field in the future
Science is important
I look forward to science class
I would like to learn more about science
List 3 things you learned today:
1. ______________________________________________________________________________
2. ______________________________________________________________________________
3. ______________________________________________________________________________
List 2 things you would change about today’s program to make it more interesting:
1. ______________________________________________________________________________
2. ______________________________________________________________________________

9
Biology Session 3 Post-Survey
First Letter of Surname How many siblings do you have? Number of month you were born
Age: ___________________
Year: __________________
Gender: Male Female
Are you glad you participated in this program? Yes No
After the program, do you like science more? Yes No
Have you participated in an outreach science program before? Yes No
Rank the following activities (1 being your favourite and 2 being you least favourite):
___ Need a Hand?
___ Body Systems Bingo
In the boxes below, please place an “X” in the box which describes how you feel about each statement
Statement Strongly
Agree
Agree Disagree Strongly
Disagree
I enjoy learning about science
I enjoy doing science experiments
I do not like science
I would like to work in a science field in the future
Science is important
I look forward to science class
I would like to learn more about science
List 3 things you learned today:
1. ______________________________________________________________________________
2. ______________________________________________________________________________
3. ______________________________________________________________________________
List 2 things you would change about today’s program to make it more interesting:
1. ______________________________________________________________________________
2. ______________________________________________________________________________

10
Biology Session 4 Post-Survey
First Letter of Surname How many siblings do you have? Number of month you were born
Age: ___________________
Year: __________________
Gender: Male Female
What career would you like to pursue? ____________________________________________
Are you glad you participated in this program? Yes No
After the program, do you like science more? Yes No
Have you participated in an outreach science program before? Yes No
Rank the following activities (1 being your favourite and 3 being you least favourite):
___ Breathing Through Straws
___ Strong Bones Part 2
___ After Image
In the boxes below, please place an “X” in the box which describes how you feel about each statement
Statement Strongly
Agree
Agree Disagree Strongly
Disagree
I enjoy learning about science
I enjoy doing science experiments
I do not like science
I would like to work in a science field in the future
Science is important
I look forward to science class
I would like to learn more about science
List 3 things you learned today:
1. ______________________________________________________________________________
2. ______________________________________________________________________________
3. ______________________________________________________________________________
List 2 things you would change about today’s program to make it more interesting:
1. ______________________________________________________________________________
2. ______________________________________________________________________________
11
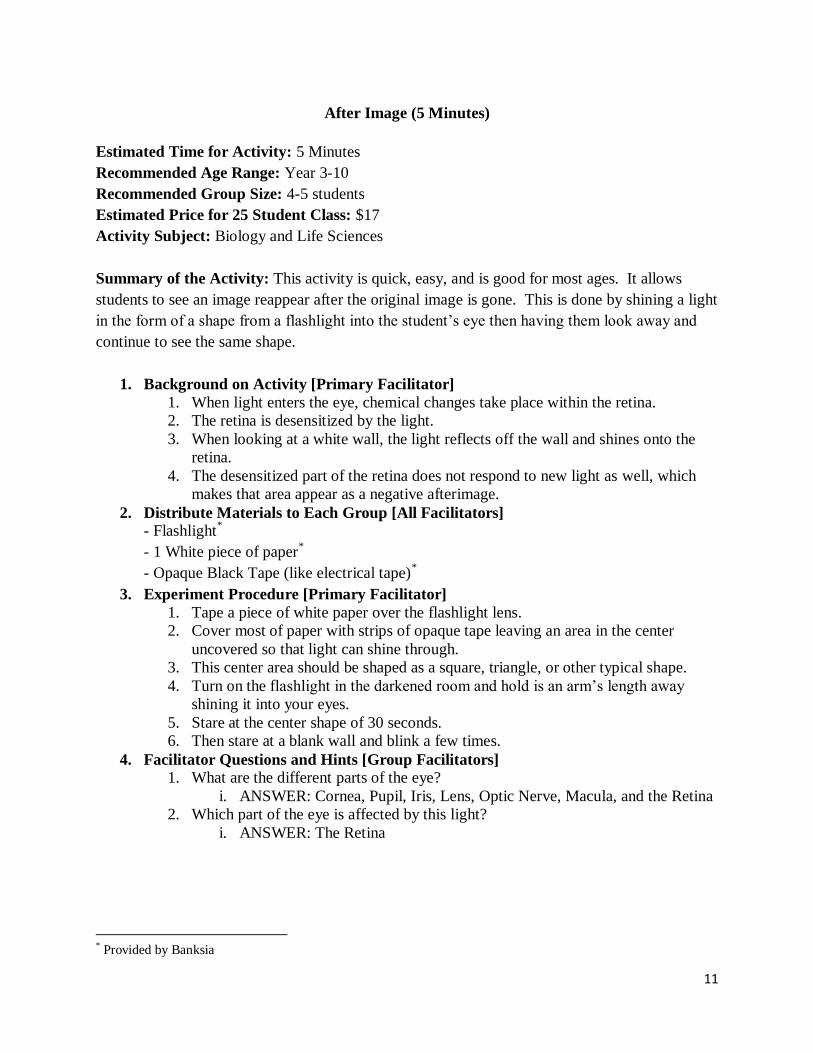
After Image (5 Minutes)
Estimated Time for Activity: 5 Minutes
Recommended Age Range: Year 3-10
Recommended Group Size: 4-5 students
Estimated Price for 25 Student Class: $17
Activity Subject: Biology and Life Sciences
Summary of the Activity: This activity is quick, easy, and is good for most ages. It allows
students to see an image reappear after the original image is gone. This is done by shining a light
in the form of a shape from a flashlight into the student’s eye then having them look away and
continue to see the same shape.
1. Background on Activity [Primary Facilitator]
1. When light enters the eye, chemical changes take place within the retina.
2. The retina is desensitized by the light.
3. When looking at a white wall, the light reflects off the wall and shines onto the
retina.
4. The desensitized part of the retina does not respond to new light as well, which
makes that area appear as a negative afterimage.
2. Distribute Materials to Each Group [All Facilitators]
- Flashlight*
- 1 White piece of paper*
- Opaque Black Tape (like electrical tape)*
3. Experiment Procedure [Primary Facilitator]
1. Tape a piece of white paper over the flashlight lens.
2. Cover most of paper with strips of opaque tape leaving an area in the center
uncovered so that light can shine through.
3. This center area should be shaped as a square, triangle, or other typical shape.
4. Turn on the flashlight in the darkened room and hold is an arm’s length away
shining it into your eyes.
5. Stare at the center shape of 30 seconds.
6. Then stare at a blank wall and blink a few times.
4. Facilitator Questions and Hints [Group Facilitators]
1. What are the different parts of the eye?
i. ANSWER: Cornea, Pupil, Iris, Lens, Optic Nerve, Macula, and the Retina
2. Which part of the eye is affected by this light?
i. ANSWER: The Retina
* Provided by Banksia
12
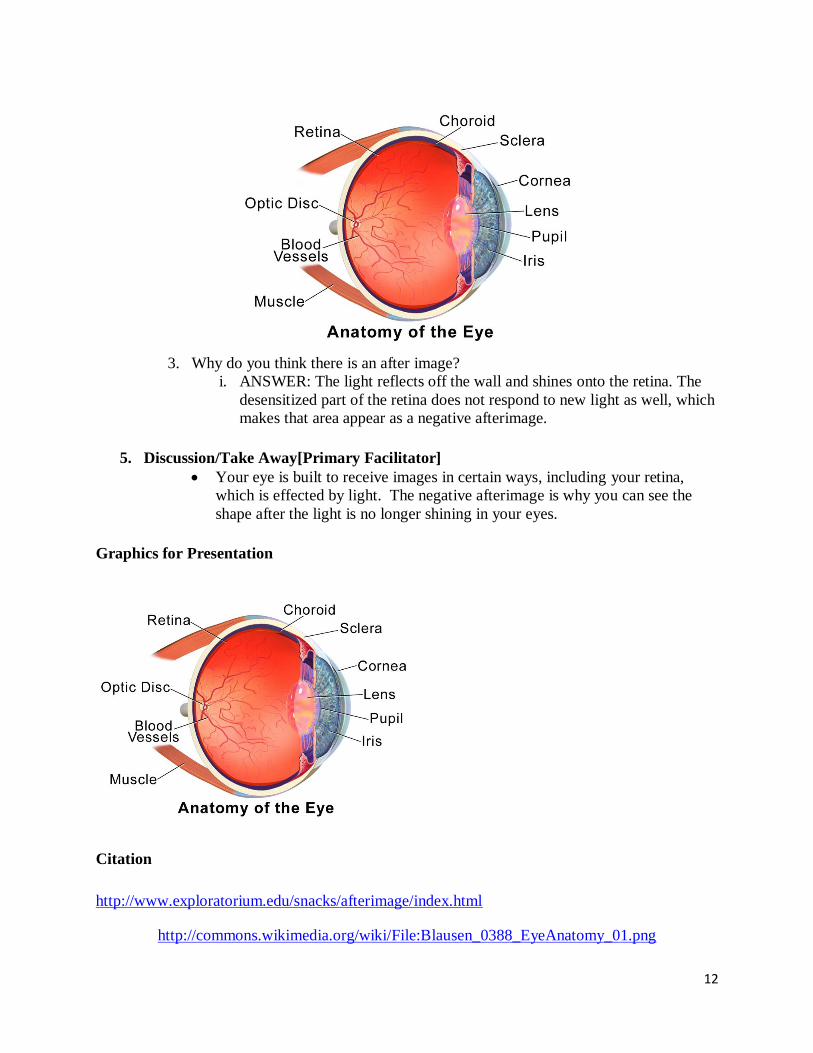
3. Why do you think there is an after image?
i. ANSWER: The light reflects off the wall and shines onto the retina. The
desensitized part of the retina does not respond to new light as well, which
makes that area appear as a negative afterimage.
5. Discussion/Take Away[Primary Facilitator]
Your eye is built to receive images in certain ways, including your retina,
which is effected by light. The negative afterimage is why you can see the
shape after the light is no longer shining in your eyes.
Graphics for Presentation
Citation
http://www.exploratorium.edu/snacks/afterimage/index.html
http://commons.wikimedia.org/wiki/File:Blausen_0388_EyeAnatomy_01.png

13
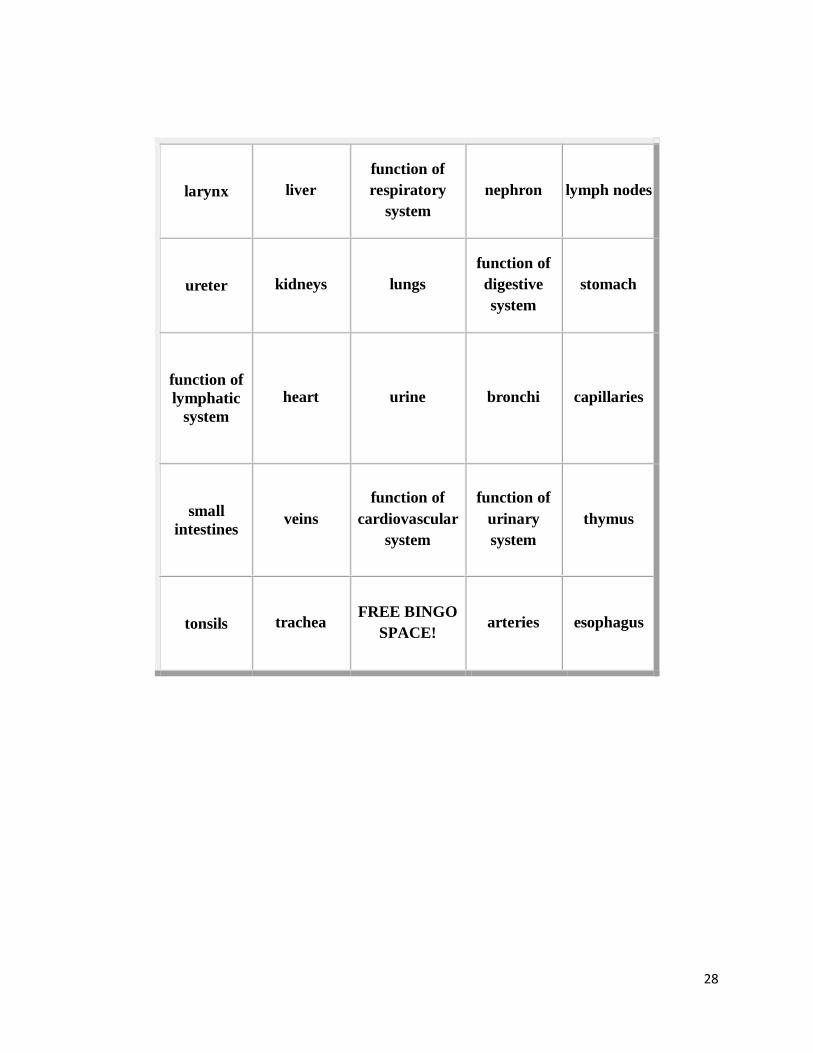
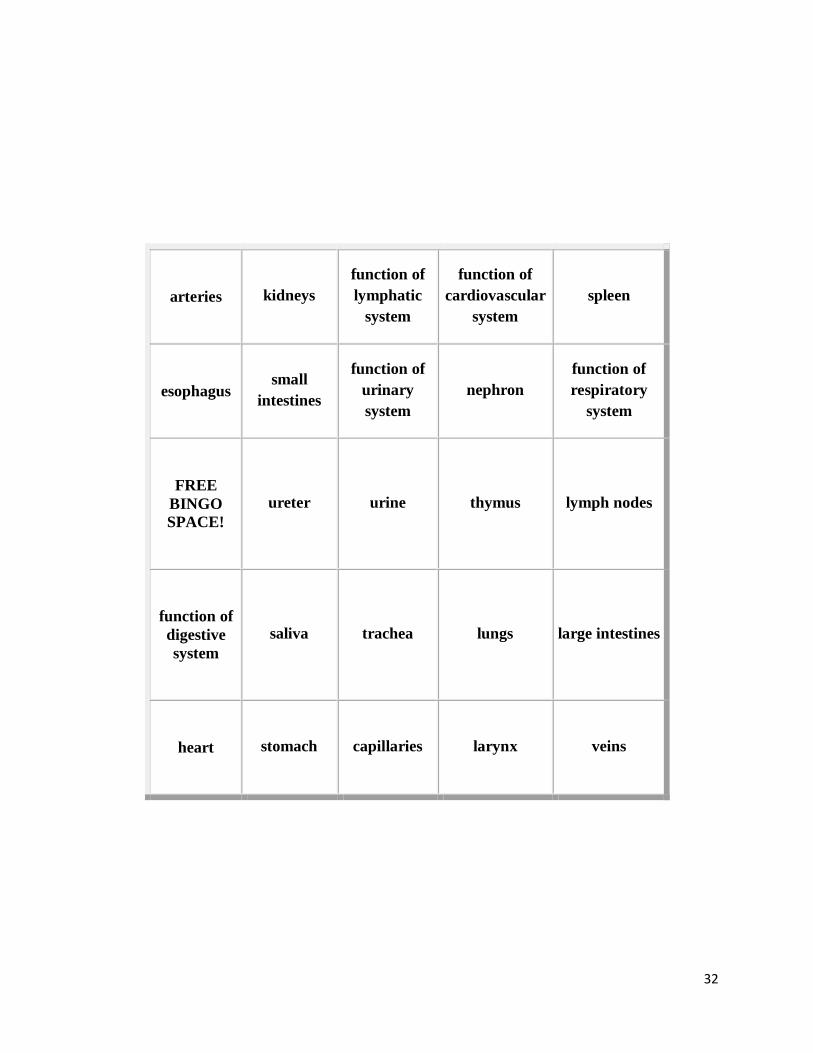
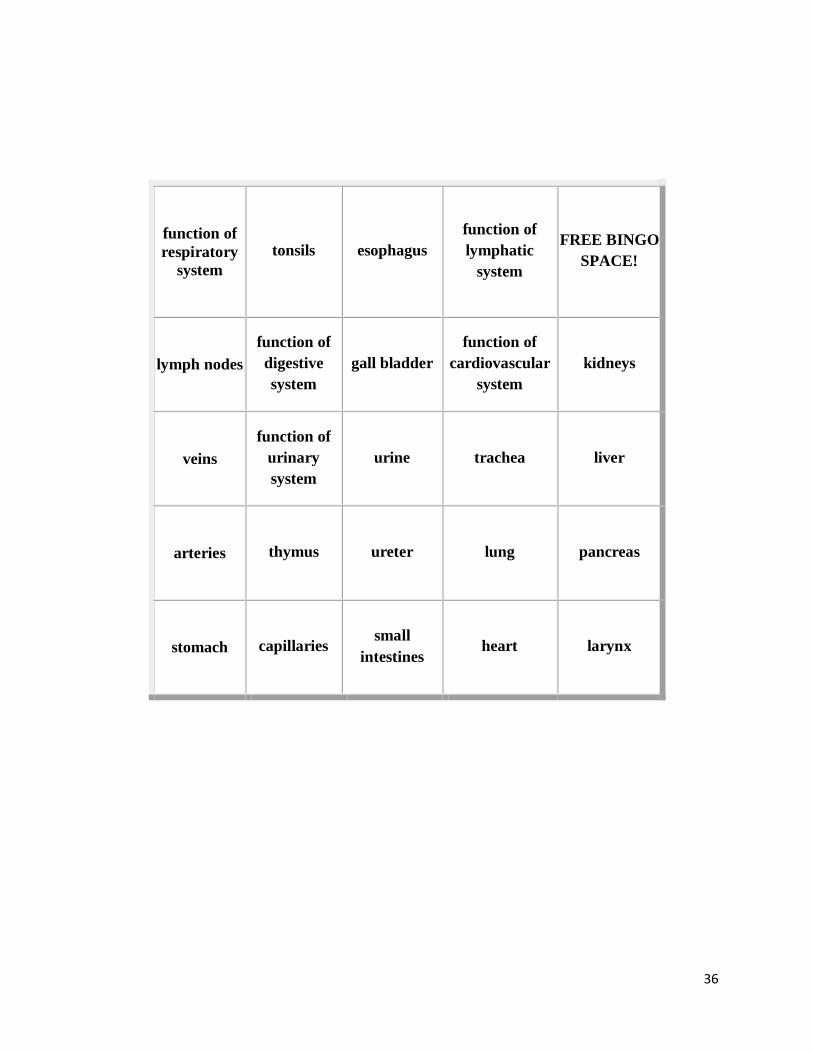
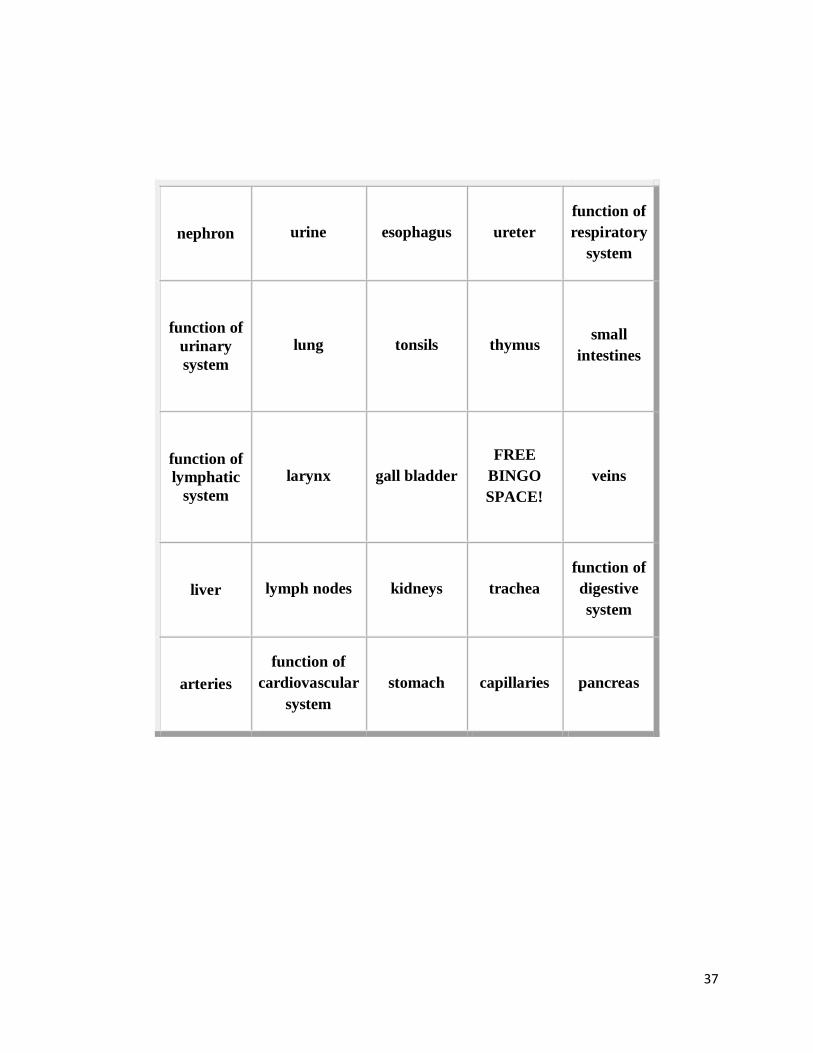
Body Systems Bingo (15-30 Minutes)
Estimated Time for Activity: 15-30 Minutes
Recommended Age Range: Year 8-12
Recommended Group Size: 25 students
Estimated Price for 25 Student Class: $6
Activity Subject: Biology and Life Sciences
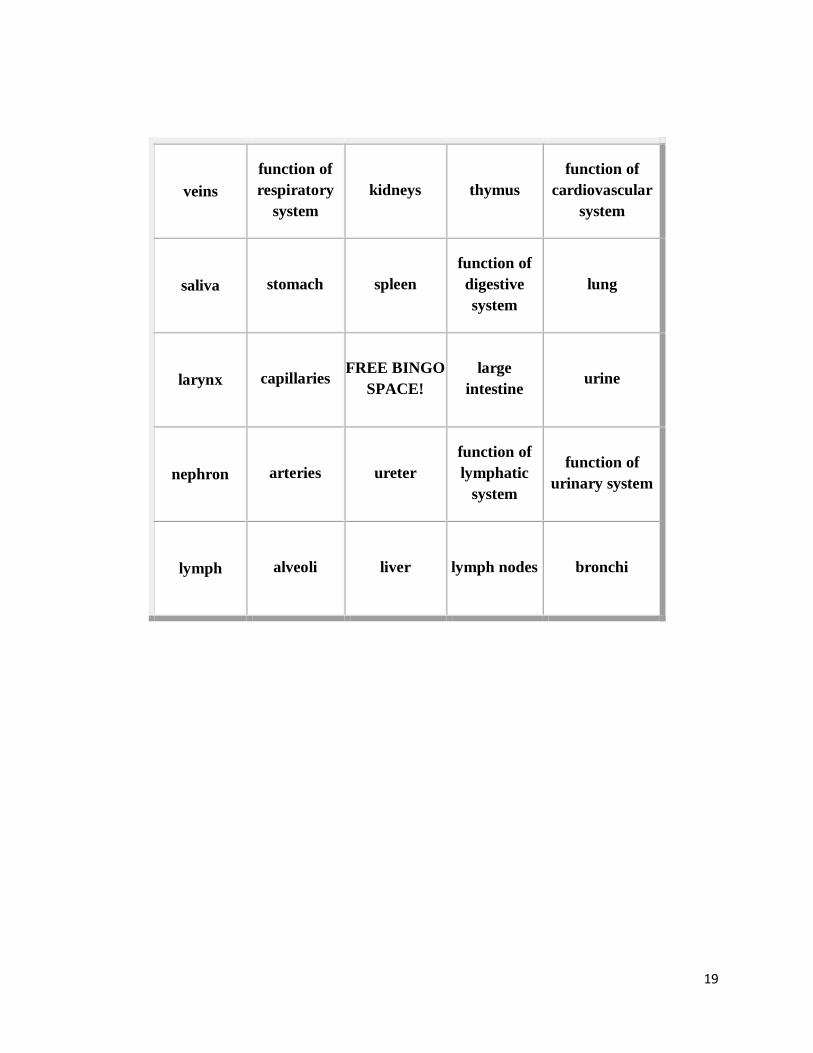
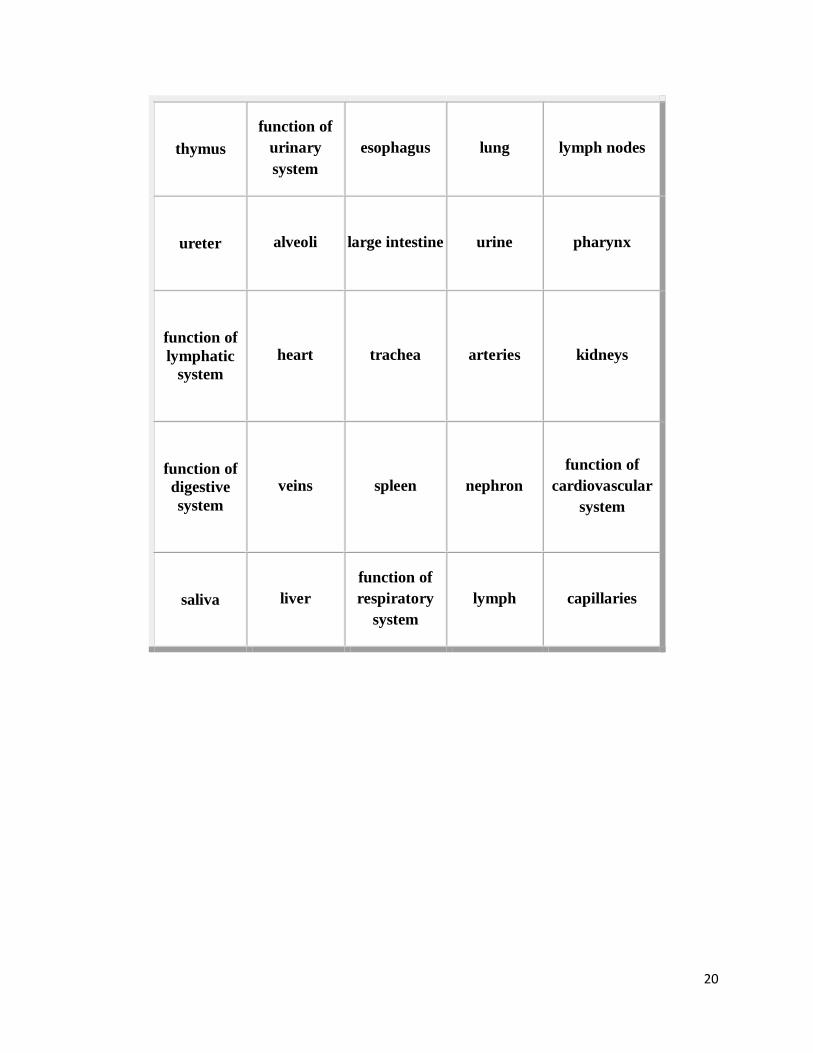
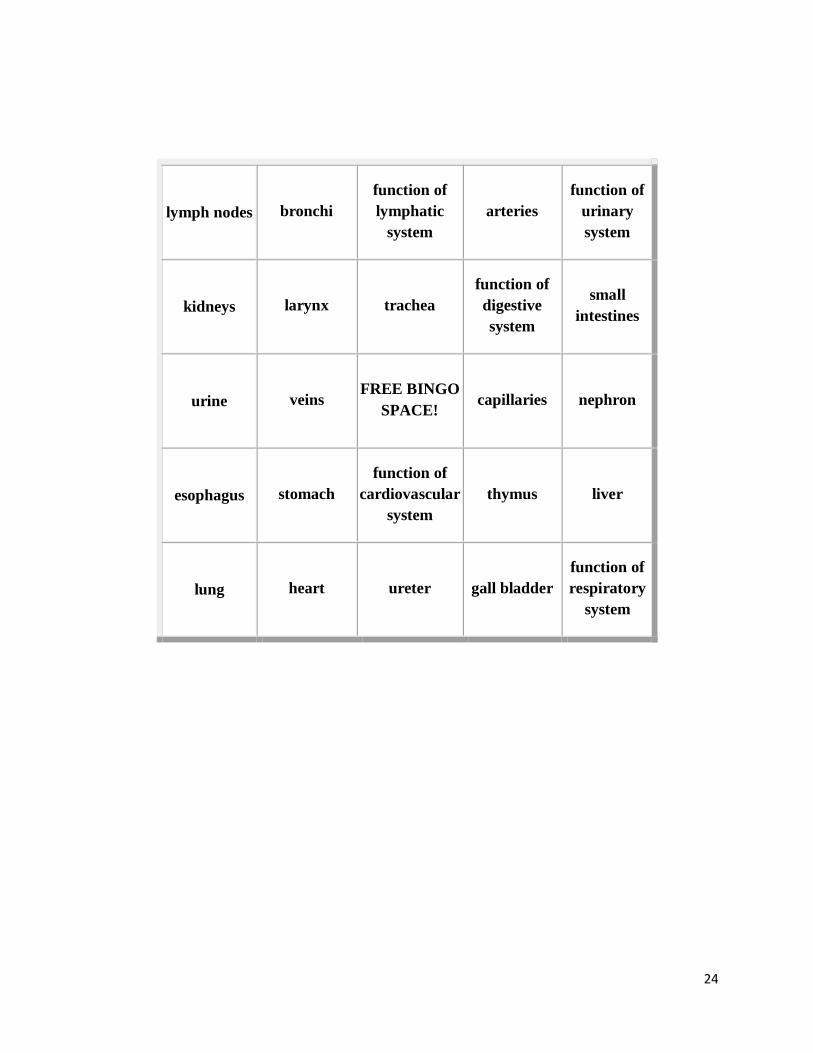
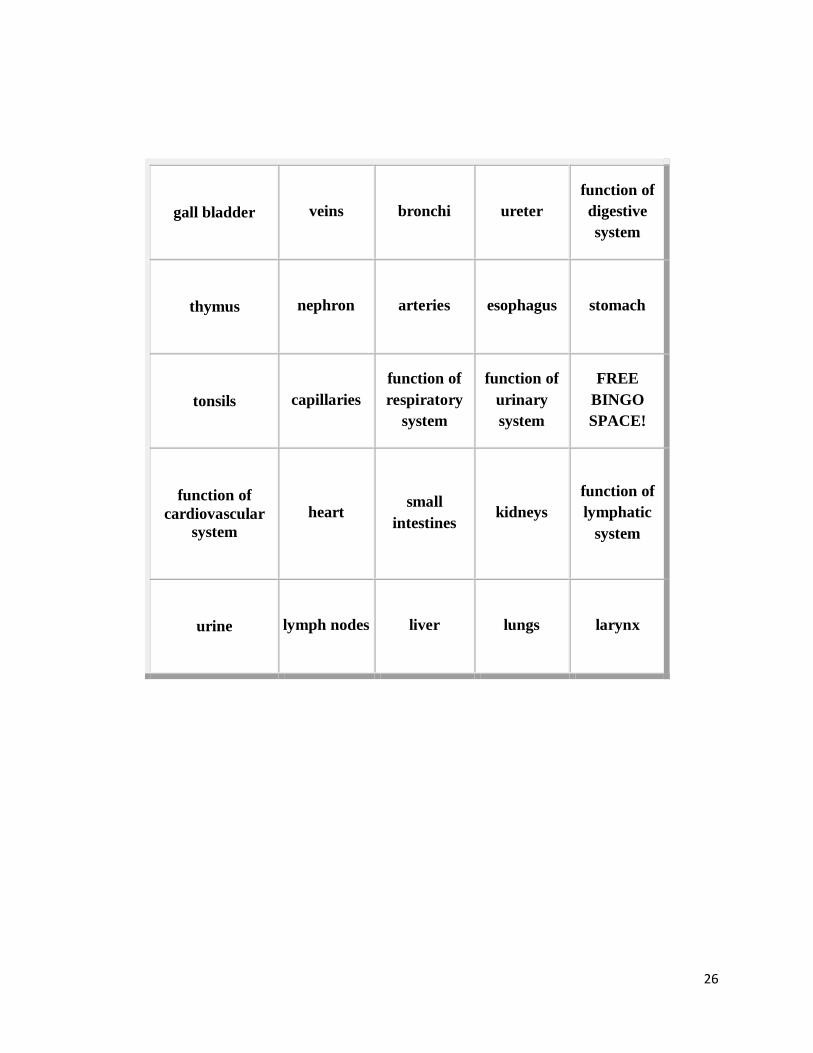
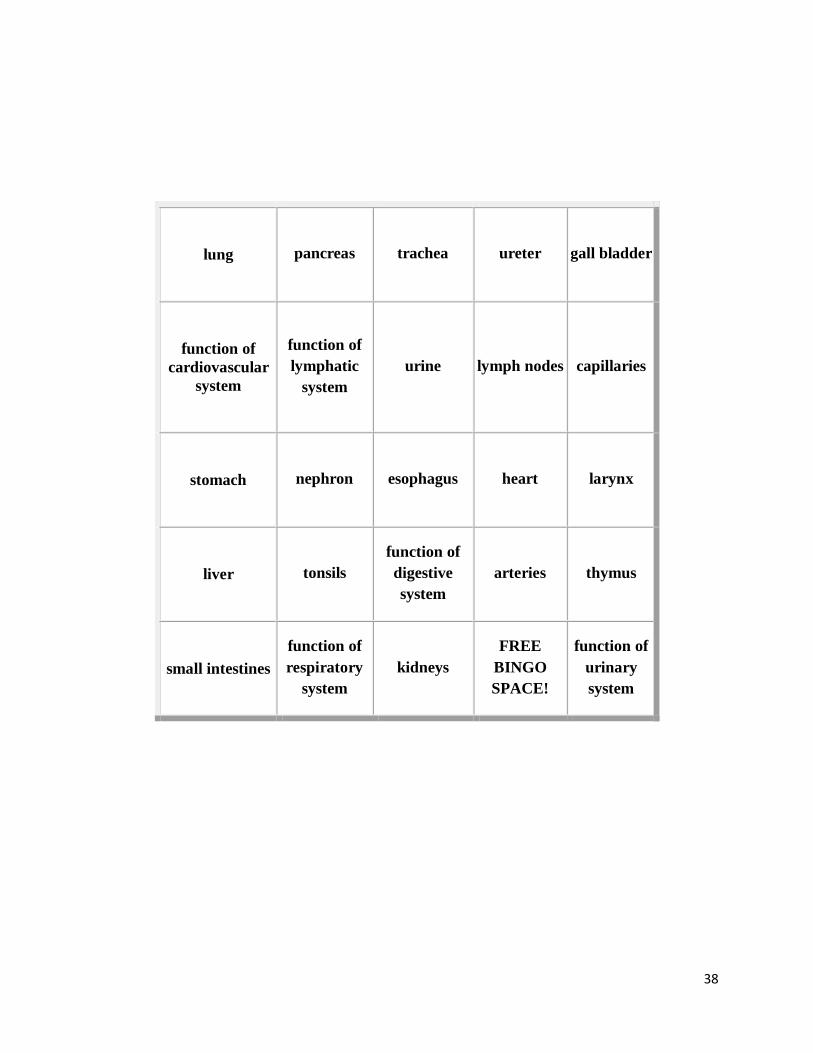
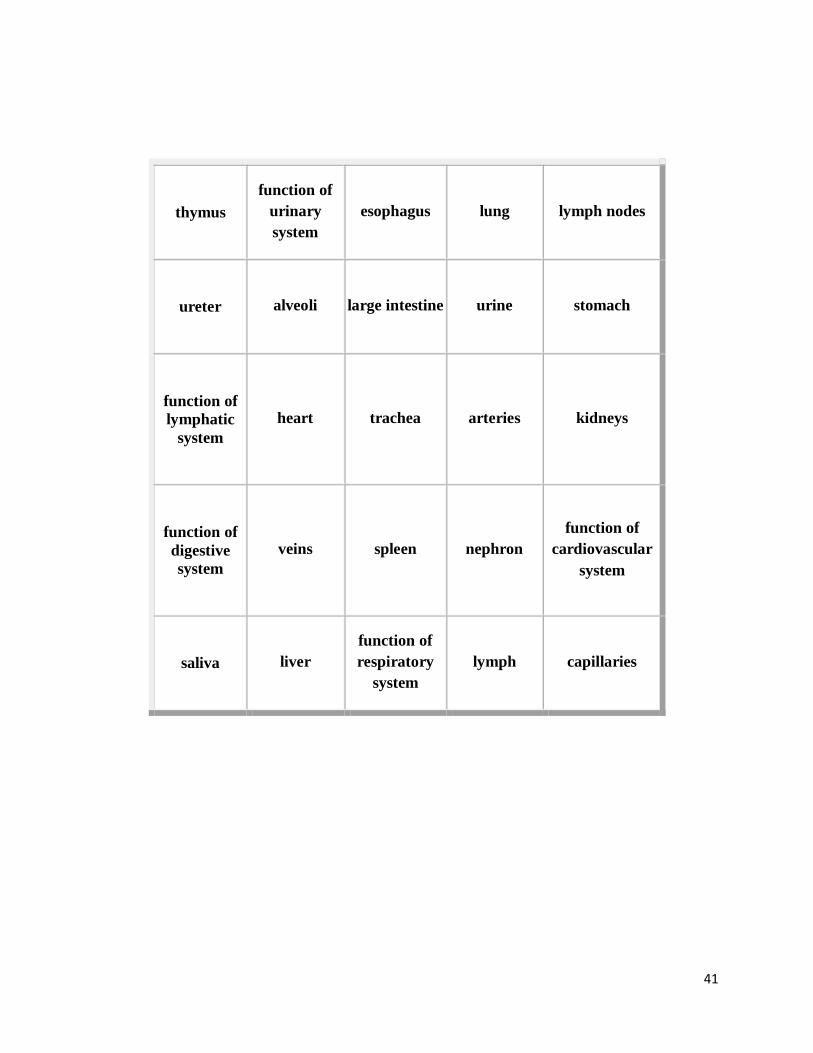
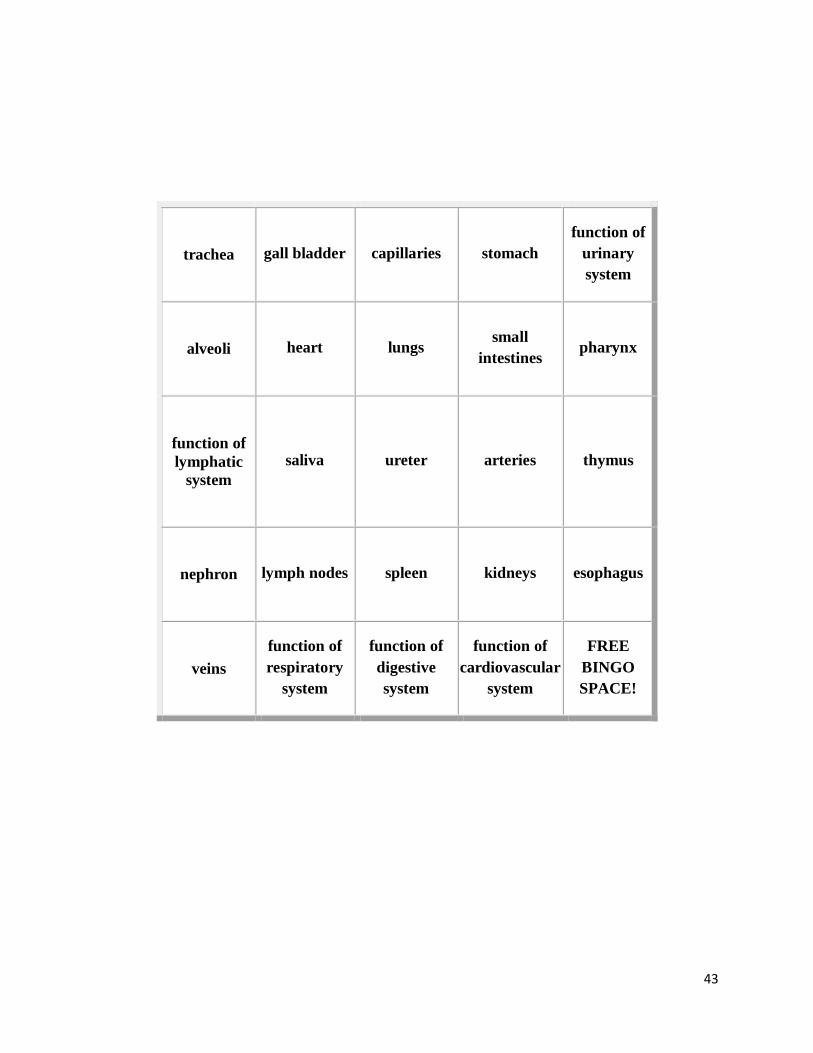
Summary of the Activity: This activity is fun and can offer prizes and competition for the
students. It is good to get an idea of the student’s current knowledge or review at the end of a
program. It is simple because everyone knows the rules of bingo, but the twist is that they need
to know the biology subject to be able to answer the questions to put a marker on a board. This
particular game reinforces the functions of the organ system. The facilitator reads the definition
of a term and the answer is somewhere on the bingo card.
1. Distribute Materials to Each Group [All Facilitators]
- 1 Bingo Board per student*
- 20 Coins or other markers per student*
- Prizes*
2. Experiment Procedure [Primary Facilitator]
1. The Primary Facilitator randomly chooses a definition and reads it off to the
students.
2. The students figure out the term that matches with the definition based on current
knowledge. If the term exists on their bingo card, the student places a marker
over the term.
3. Once a student gets 5 terms in a row (vertically, horizontally, or diagonally) they
yell bingo and receive a prize.
3. Facilitator Questions and Hints [Group Facilitators]
1. If the student does not know the term for a definition that was read, give hints so
that they are led to the correct answer.
* Provided by Banksia
14
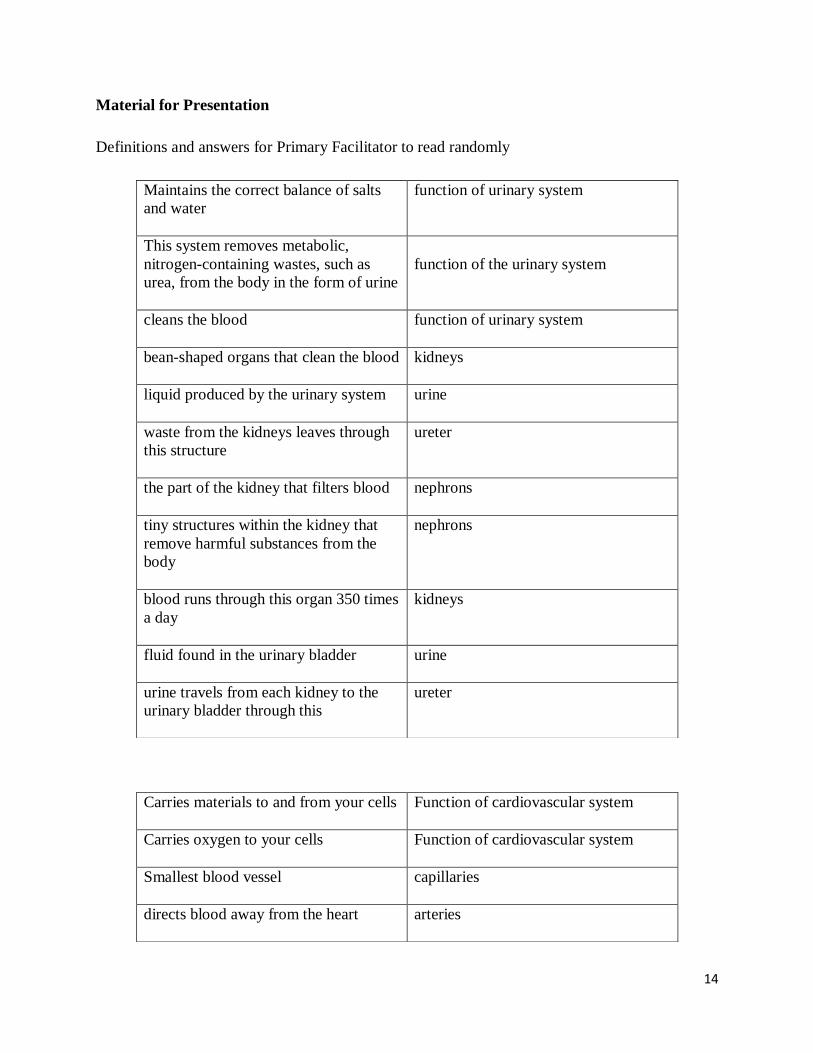
Material for Presentation
Definitions and answers for Primary Facilitator to read randomly
Maintains the correct balance of salts
and water
function of urinary system
This system removes metabolic,
nitrogen-containing wastes, such as
urea, from the body in the form of urine
function of the urinary system
cleans the blood
function of urinary system
bean-shaped organs that clean the blood
kidneys
liquid produced by the urinary system
urine
waste from the kidneys leaves through
this structure
ureter
the part of the kidney that filters blood
nephrons
tiny structures within the kidney that
remove harmful substances from the
body
nephrons
blood runs through this organ 350 times
a day
kidneys
fluid found in the urinary bladder
urine
urine travels from each kidney to the
urinary bladder through this
ureter
Carries materials to and from your cells
Function of cardiovascular system
Carries oxygen to your cells Function of cardiovascular system
Smallest blood vessel capillaries
directs blood away from the heart arteries

15
directs blood to the heart veins
this is a muscular organ about the size
of your fist
heart
cleaned and filtered blood from the
kidney leave through this
vein
blood enters the kidney through this
artery
Contains oxygen-rich blood arteries
valves prevent blood from flowing
backwards in these structures
veins
Contains oxygen-poor blood veins
blood cells must pass through this
structure single file
capillaries
Located in the center of your chest
cavity and is very muscular
heart
Pumps blood
heart
This structure is designed to allow
nutrients and oxygen to easily diffuse
through the walls
capillaries
surrounds aveoli capillaries
These vessels are thick walled to handle
the pressure of blood as it is pumped
out by the heart
arteries
collection of organs and vessels that return
fluid that leaks out of the bloodstream
function of lymphatic system
fluid that leaks out of your blood vessels this
fluid also bathes the cells
lymph
releases white blood cells
thymus or spleen

16
filters blood AND releases white blood cells
spleen
bean-shaped organs found throughout your
body
lymph nodes
lymphatic tissue found in your nasal cavity,
inside your throat and at the back of your
tongue
tonsils
this system helps fight pathogens
function of lymphatic system
a function of this system is to prevent
diseases such as elephantiasis
function of lymphatic system
largest lymph organ
spleen
allows you to breathe function of respiratory system
takes in oxygen and releases carbon dioxide function of respiratory system
Enriches (adds) oxygen to blood function of respiratory system
the pharynx branches into two tubes that lead
to either of these organs
stomach or lungs
tiny sacs located in the lung alveoli
air passes from the nose into this structure pharynx
Contains the vocal cords larynx
also called the windpipe trachea
this structure splits at the trachea to connect
to the lungs
bronchi
air moves into this organ when the
diaphragm contracts or moves down
lungs
the airway that connects the larynx to the
lungs
trachea
vibration of the vocal cords by air in this
structure produces sound
larynx

17
the pharynx branches off into two tubes esophagus or larynx
pneumonia occurs when pathogens grow
inside this structure
bronchioles and alveoli
emphysema and lung cancer affect the
function of this system
cardiovascular or respiratory
this system digests food function of digestive system
breaks down food for the body to use as
nutrients
function of digestive system
located between the stomach and small
intestine and can neutralize the acid in
chime
pancreas
makes juices that contain digestive
enzymes and contains bicarbonate that
neurtralizes the acid in chyme
pancreas
makes green bile which is used in fat
digestion
liver
makes green bile and makes cholesterol
for cell membranes
liver
stores nutrients and breaks down toxic
substances in the blood
liver
a small bag-like organ that stores bile gall bladder
no digestion occurs in this part of the
digestive system
large intestine
acts like a trash compactor for the
digestive system
large intestine
chyme is released into this organ where
chemical digestion takes place
small intestine
if this organ was stretched out it would
be larger than a tennis court
small intestine
this organ contains villi which are
nutrient absorbing cells
small intestine
this is a bag-like muscular structure that
is responsible for breaking down food
stomach
this organ is connected to the
esophagus and is responsible for
breaking down food
stomach
a muscular bag-like structure that
produces a large amount of acid for
food digestion
stomach

18
this structure connects the pharynx to
the stomach
esophagus
contains enzymes that starts chemical
digestion in your mouth
saliva
rhythmic contraction called peristalsis
occurs in this structure to force food
into the stomach
esophagus
this liquid mixes with food in your
mouth to start digesting food
saliva
19
veins
function of
respiratory
system
kidneys thymus
function of
cardiovascular
system
saliva
stomach spleen
function of
digestive
system
lung
larynx
capillaries FREE BINGO
SPACE!
large
intestine urine
nephron
arteries ureter
function of
lymphatic
system
function of
urinary system
lymph
alveoli liver lymph nodes bronchi
20
thymus
function of
urinary
system
esophagus lung lymph nodes
ureter
alveoli large intestine urine pharynx
function of
lymphatic
system
heart trachea arteries kidneys
function of
digestive
system
veins spleen nephron
function of
cardiovascular
system
saliva
liver
function of
respiratory
system
lymph capillaries

21
thymus
function of
urinary
system
esophagus lung lymph nodes
ureter
alveoli large intestine urine pharynx
function of
lymphatic
system
heart trachea arteries kidneys
function of
digestive
system
veins spleen nephron
function of
cardiovascular
system
saliva
liver
function of
respiratory
system
lymph capillaries

22
thymus
function of
urinary
system
esophagus lung lymph nodes
ureter
alveoli large intestine urine stomach
function of
lymphatic
system
heart trachea arteries kidneys
function of
digestive
system
veins spleen nephron
function of
cardiovascular
system
saliva
liver
function of
respiratory
system
lymph capillaries

23
thymus
function of
urinary
system
esophagus lung lymph nodes
ureter
alveoli large intestine urine pharynx
function of
lymphatic
system
heart trachea arteries kidneys
function of
digestive
system
veins spleen nephron
function of
cardiovascular
system
saliva
liver
function of
respiratory
system
lymph capillaries
24
lymph nodes
bronchi
function of
lymphatic
system
arteries
function of
urinary
system
kidneys
larynx trachea
function of
digestive
system
small
intestines
urine
veins FREE BINGO
SPACE! capillaries nephron
esophagus
stomach
function of
cardiovascular
system
thymus liver
lung
heart ureter gall bladder
function of
respiratory
system

25
urine
trachea veins lymph nephron
thymus
liver lymph nodes small
intestines stomach
FREE
BINGO
SPACE!
arteries bronchi kidneys
function of
cardiovascular
system
capillaries
function of
urinary
system
lung ureter heart
gall bladder
function of
lymphatic
system
esophagus
function of
respiratory
system
function of
digestive system
26
gall bladder
veins bronchi ureter
function of
digestive
system
thymus
nephron arteries esophagus stomach
tonsils
capillaries
function of
respiratory
system
function of
urinary
system
FREE
BINGO
SPACE!
function of
cardiovascular
system
heart small
intestines kidneys
function of
lymphatic
system
urine
lymph nodes liver lungs larynx

27
tonsils
esophagus bronchi larynx
function of
lymphatic
system
gall bladder
lymph nodes capillaries thymus heart
small
intestines
ureter
function of
respiratory
system
urine kidneys
liver
function of
urinary
system
veins
function of
cardiovascular
system
lungs
nephron
trachea
function of
digestive
system
stomach
FREE
BINGO
SPACE!
28
larynx
liver
function of
respiratory
system
nephron lymph nodes
ureter
kidneys lungs
function of
digestive
system
stomach
function of
lymphatic
system
heart urine bronchi capillaries
small
intestines
veins
function of
cardiovascular
system
function of
urinary
system
thymus
tonsils
trachea FREE BINGO
SPACE! arteries esophagus

29
arteries
urine lymph gall bladder ureter
small
intestines
trachea lymph nodes
function of
lymphatic
system
function of
respiratory
system
stomach
capillaries veins
FREE
BINGO
SPACE!
function of
cardiovascular
system
thymus
larynx
function of
urinary
system
kidneys esophagus
nephron
liver bronchi
function of
digestive
system
lung

30
veins
nephron lung esophagus kidneys
lymph
function of
urinary
system
function of
lymphatic
system
function of
digestive
system
heart
thymus
larynx small
intestines stomach lymph nodes
arteries
function of
respiratory
system
capillaries trachea liver
urine
FREE
BINGO
SPACE!
ureter
function of
cardiovascular
system
bronchi

31
stomach
nephron liver lymph thymus
gall bladder
ureter FREE BINGO
SPACE! arteries
function of
digestive system
larynx
large
intestine
small
intestines veins capillaries
kidneys
heart
function of
urinary
system
function of
respiratory
system
urine
lymph nodes
trachea
function of
lymphatic
system
lung
function of
cardiovascular
system
32
arteries
kidneys
function of
lymphatic
system
function of
cardiovascular
system
spleen
esophagus
small
intestines
function of
urinary
system
nephron
function of
respiratory
system
FREE
BINGO
SPACE!
ureter urine thymus lymph nodes
function of
digestive
system
saliva trachea lungs large intestines
heart
stomach capillaries larynx veins

33
function of
cardiovascular
system
heart stomach arteries function of
lymphatic system
function of
respiratory
system
esophagus urine spleen lymph nodes
ureter
FREE
BINGO
SPACE!
saliva trachea larynx
nephron
kidneys thymus large
intestines lungs
bronchi
function of
urinary
system
function of
digestive
system
capillaries small intestines

34
tonsils
esophagus bronchi larynx
function of
lymphatic
system
gall bladder
lymph nodes capillaries thymus heart
small
intestines
ureter
function of
respiratory
system
urine kidneys
liver
function of
urinary
system
veins
function of
cardiovascular
system
lungs
nephron
trachea
function of
digestive
system
stomach FREE BINGO
SPACE!

35
arteries
nephron large intestine veins ureter
trachea
larynx gall bladder kidneys heart
stomach
FREE
BINGO
SPACE!
function of
digestive system pharynx
function of
urinary system
liver
urine
function of
cardiovascular
system
lung capillaries
lymph nodes
thymus
function of
lymphatic
system
function of
respiratory
system
small
intestines
36
function of
respiratory
system
tonsils esophagus
function of
lymphatic
system
FREE BINGO
SPACE!
lymph nodes
function of
digestive
system
gall bladder
function of
cardiovascular
system
kidneys
veins
function of
urinary
system
urine trachea liver
arteries
thymus ureter lung pancreas
stomach
capillaries small
intestines heart larynx
37
nephron
urine esophagus ureter
function of
respiratory
system
function of
urinary
system
lung tonsils thymus small
intestines
function of
lymphatic
system
larynx gall bladder
FREE
BINGO
SPACE!
veins
liver
lymph nodes kidneys trachea
function of
digestive
system
arteries
function of
cardiovascular
system
stomach capillaries pancreas
38
lung
pancreas trachea ureter gall bladder
function of
cardiovascular
system
function of
lymphatic
system
urine lymph nodes capillaries
stomach
nephron esophagus heart larynx
liver
tonsils
function of
digestive
system
arteries thymus
small intestines
function of
respiratory
system
kidneys
FREE
BINGO
SPACE!
function of
urinary
system

39
function of
urinary system
ureter
function of
respiratory
system
saliva
FREE
BINGO
SPACE!
gall bladder
esophagus small
intestines stomach
function of
digestive
system
function of
cardiovascular
system
lung veins capillaries trachea
nephron
function of
lymphatic
system
arteries thymus lymph nodes
tonsils
urine alveoli kidneys heart

40
function of
urinary system
ureter
function of
respiratory
system
saliva
FREE
BINGO
SPACE!
gall bladder
esophagus small
intestines stomach
function of
digestive
system
function of
cardiovascular
system
lung veins capillaries trachea
nephron
lymph arteries thymus lymph
nodes
tonsils
urine alveoli kidneys heart
41
thymus
function of
urinary
system
esophagus lung lymph nodes
ureter
alveoli large intestine urine stomach
function of
lymphatic
system
heart trachea arteries kidneys
function of
digestive
system
veins spleen nephron
function of
cardiovascular
system
saliva
liver
function of
respiratory
system
lymph capillaries

42
function of
respiratory
system
thymus larynx esophagus small
intestines
lung
capillaries kidneys gall bladder
function of
lymphatic
system
urine
arteries heart
function of
cardiovascular
system
nephron
pharynx
lymph nodes
function of
digestive
system
veins pancreas
tonsils
FREE
BINGO
SPACE!
function of
urinary
system
ureter stomach
43
trachea
gall bladder capillaries stomach
function of
urinary
system
alveoli
heart lungs small
intestines pharynx
function of
lymphatic
system
saliva ureter arteries thymus
nephron
lymph nodes spleen kidneys esophagus
veins
function of
respiratory
system
function of
digestive
system
function of
cardiovascular
system
FREE
BINGO
SPACE!

44
trachea
gall bladder capillaries stomach
function of
urinary
system
alveoli
heart lungs small
intestines pharynx
function of
lymphatic
system
saliva ureter arteries thymus
nephron
lymph nodes
function of
cardiovascular
system
kidneys esophagus
veins
function of
respiratory
system
function of
digestive system spleen
FREE
BINGO
SPACE!

45
trachea
veins larynx spleen heart
urine
alveoli lung kidneys esophagus
function of
respiratory
system
nephron large intestine
function of
cardiovascular
system
function of
urinary system
small
intestine
function of
digestive
system
capillaries FREE BINGO
SPACE!
function of
lymphatic
system
arteries
ureter lymph thymus stomach
Citation
http://peer.tamu.edu/curriculum_modules/OrganSystems/bingo_activity.htm

46
Cheshire Cat (10 Minutes)
Estimated Time for Activity: 10 Minutes
Recommended Age Range: Year 3-10
Recommended Group Size: 5
Estimated Price for 25 Student Class: $25
Activity Subject: Biology and Life Sciences
Summary of the Activity: This activity is quick and applicable to most ages. It uses minimal
materials so it is easy to do at any time. Students sit across from each other with a mirror
covering one eye and then confuse their brains and eyes to make the person they are looking at
disappear.
1. Background on Activity [Primary Facilitator]
1. Your eyes see different pictures in your surroundings
2. The brain takes the two images that the eyes see and analyzes them to create one
three-dimensional image.
3. In this activity, your brain tries to piece together different parts of images but with
motion and the eyes looking at completely separate images, it confuses the brain
and the eyes.
4. If this does not work for each student, it could be because of the individual’s
ability to see and their eyesight.
2. Distribute Materials to Each Group [All Facilitators]
- A handheld mirror – 10 to 15 cm wide*
- A white wall or white surface (poster board can work) *
- A partner
3. Experiment Procedure [Primary Facilitator]
1. Have two people sit facing each other about a meter apart next to a white wall.
2. The partner with the white surface on their right side (Partner A) holds the edge of
a handheld mirror to the tip of their nose using their left hand. Angle the mirror
towards the wall so that one eye can see the reflection of the white wall and the
other eye can see the partner sitting across from them.
3. Partner A then moves their right hand in front of the white wall so that they can
see the movement in the reflection of the mirror. Meanwhile, the partner sitting
across from them (Partner B) stays as still as possible.
NOTE: if Partner B does not disappear, try flipping sides so that the wall is on the
left side and the mirror is covering the left eye.
* Provided by Banksia

47
4. Facilitator Questions and Hints [Group Facilitators]
1. Why do you think your partner disappeared?
i. ANSWER: Your eyes are seeing two different images and your
brain is sensitive to changes with motion. Since the partner is
sitting still, the eyes focus on the movement of Partner A’s hand.
5. Discussion/Take Away[Primary Facilitator]
The brain works with your eyes to create three-dimensional images based on what
each eye sees.
Graphics for Presentation
Citation
http://www.exploratorium.edu/snacks/cheshire_cat/index.html

48
DNA Extraction (45 Minutes)
Estimated Time for Activity: 45 Minutes
Recommended Age Range: Year 7-12
Recommended Group Size: 5
Estimated Price for 25 Student Class:
Activity Subject: Biology and the Life Sciences
Summary of the Activity: In this activity students will extract DNA from a kiwi. They will be
able to see and feel the actual DNA. Students will also get a better understanding of the general
structure of cells.
**NOTE: The night before the activity, put 10 ml of 95% ethanol in the freezer
1. Background on Activity [Primary Facilitator]
1. Deoxyribonucleic Acid (DNA) is the genetic instruction that makes ups all living
organisms.
2. DNA is not visible to the human eye but when extracted, it can be clumped
together enough to see it.
3. Scientists must first extract DNA from their test subjects to continue the tests they
need.
4. The main parts of a cell are the cell wall, chloroplasts, vacuole, mitochondrion,
peroxisome, cytoplasm, golgi vesicles, golgi apparatus, rough endoplasmic
reticulum, nucleus, ribosomes, smooth endoplasmic reticulum, cytoskeleton, and
the plasma membrane.
5. The cell wall provides structure the cell
6. DNA is stored in the nucleus of the cell
2. Distribute Materials to Each Group [All Facilitators]
- 10 ml of clear shampoo (Suave daily clarifying shampoo)*
- 1.5 g of table salt*
- 1-liter Zipper bag*
- Skinned and freshly cut kiwi fruit cut into 12 pieces
*
- Cheese cloth cut to fit over the small beaker*
- Tape*
- Large cooler with ice water bath*
- 1 small test tube
- 1 wood applicator
- Transfer Pipettes
- 2 ml ice cold 95% ethanol
- Hot water plate with beaker or saucepan of water set at 60ºC
* Provided by Banksia
49
- 500 ml beaker
- Distilled water
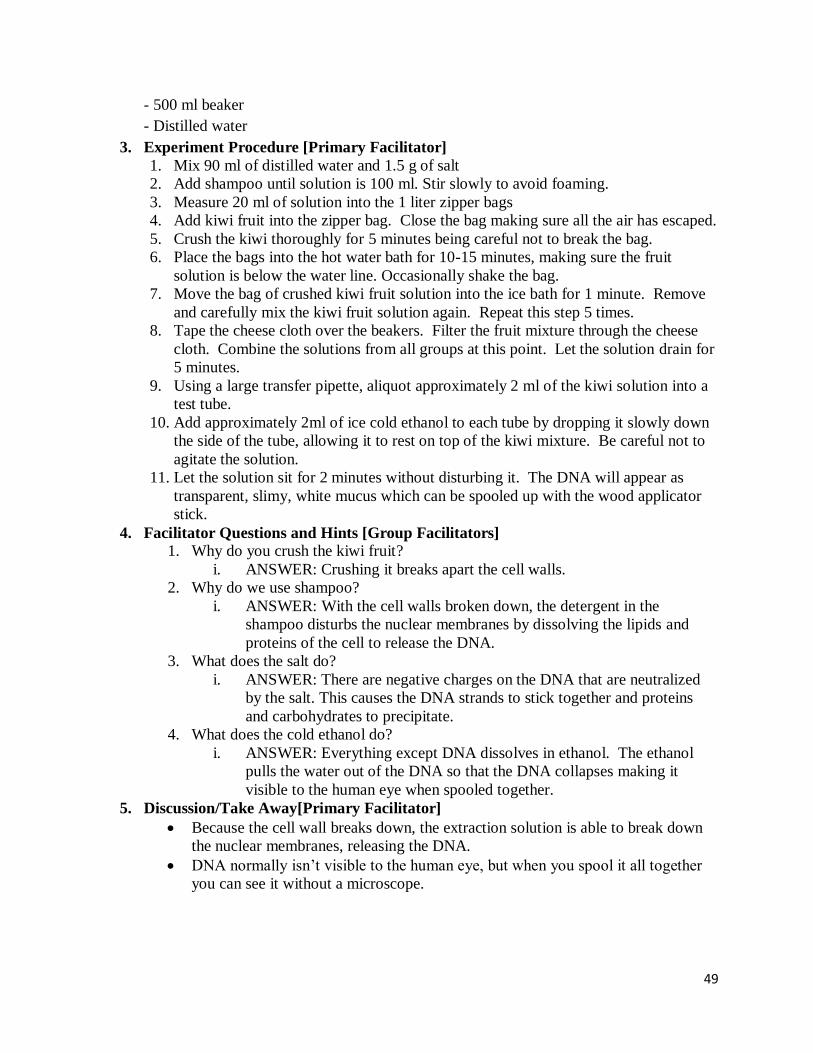
3. Experiment Procedure [Primary Facilitator]
1. Mix 90 ml of distilled water and 1.5 g of salt
2. Add shampoo until solution is 100 ml. Stir slowly to avoid foaming.
3. Measure 20 ml of solution into the 1 liter zipper bags
4. Add kiwi fruit into the zipper bag. Close the bag making sure all the air has escaped.
5. Crush the kiwi thoroughly for 5 minutes being careful not to break the bag.
6. Place the bags into the hot water bath for 10-15 minutes, making sure the fruit
solution is below the water line. Occasionally shake the bag.
7. Move the bag of crushed kiwi fruit solution into the ice bath for 1 minute. Remove
and carefully mix the kiwi fruit solution again. Repeat this step 5 times.
8. Tape the cheese cloth over the beakers. Filter the fruit mixture through the cheese
cloth. Combine the solutions from all groups at this point. Let the solution drain for
5 minutes.
9. Using a large transfer pipette, aliquot approximately 2 ml of the kiwi solution into a
test tube.
10. Add approximately 2ml of ice cold ethanol to each tube by dropping it slowly down
the side of the tube, allowing it to rest on top of the kiwi mixture. Be careful not to
agitate the solution.
11. Let the solution sit for 2 minutes without disturbing it. The DNA will appear as
transparent, slimy, white mucus which can be spooled up with the wood applicator
stick.
4. Facilitator Questions and Hints [Group Facilitators]
1. Why do you crush the kiwi fruit?
i. ANSWER: Crushing it breaks apart the cell walls.
2. Why do we use shampoo?
i. ANSWER: With the cell walls broken down, the detergent in the
shampoo disturbs the nuclear membranes by dissolving the lipids and
proteins of the cell to release the DNA.
3. What does the salt do?
i. ANSWER: There are negative charges on the DNA that are neutralized
by the salt. This causes the DNA strands to stick together and proteins
and carbohydrates to precipitate.
4. What does the cold ethanol do?
i. ANSWER: Everything except DNA dissolves in ethanol. The ethanol
pulls the water out of the DNA so that the DNA collapses making it
visible to the human eye when spooled together.
5. Discussion/Take Away[Primary Facilitator]
Because the cell wall breaks down, the extraction solution is able to break down
the nuclear membranes, releasing the DNA.
DNA normally isn’t visible to the human eye, but when you spool it all together
you can see it without a microscope.

50
Recommendations for Implementation
To prepare for the activity, follow the steps below:
1. Start water heating to 60°C.
2. Prepare ice-water bath.
3. Prepare fruit pieces.
Graphics for Presentation
Citation
http://en.wikipedia.org/wiki/File:Plant_cell_structure_svg.svg
51
Emphysema Simulation (10 Minutes)
Estimated Time for Activity: 10 Minutes
Recommended Age Range: Year 6-11
Recommended Group Size: 1
Estimated Price for 25 Student Class: $4
Activity Subject: Biology and Life Sciences
Summary of the Activity: This activity is very quick and eye opening. The students breath
through a straw for a prescribed amount of time so that they can see what it is like to have
emphysema or other lung diseases.
1. Background on Activity [Primary Facilitator]
1. Emphysema can be linked to smoking
2. The passage way to your lungs narrows with this type of disease
2. Distribute Materials to Each Group [All Facilitators]
- Drinking Straw *
3. Experiment Procedure [Primary Facilitator]
1. Have each student place the straw in their mouth and walk around the classroom
for 1 minute. Have them block their nose so that they can only breathe out of the
small opening of the straw.
4. Discussion/Take Away[Primary Facilitator]
How did this activity make you feel when breathing through the straw?
Could you image walking around or doing all your daily activities with this little
of oxygen?
Recommendations for Implementation
Remind students that they can stop the activity at any time if they are having too much
trouble breathing
Safety
Make sure that students do not try to test themselves and stop the activity if they are having too
much trouble breathing.
Citation
http://healthteacherlessons.blogspot.com.au/2012/02/emphysema-simulation.html
* Provided by Banksia

52
Heart Valve (40-60 Minutes)
Estimated Time for Activity: 40-60 Minutes
Recommended Age Range: Years 8-12
Recommended Group Size: 4
Estimated Price for 25 Student Class: $55
Activity Subject: Biology and Life Science / Engineering
Summary of the Activity: This engineering based competition activity encourages teamwork
and innovative ideas to construct an artificial heart valve that only allows the blood to flow one
way through the device.
1. Background on Activity [Primary Facilitator]
1. A valve is device that controls the movement of a fluid
2. A one-way valve is constructed to only allow fluid to flow in only one direction,
like a heart valve
3. Prosthetic valves have many different designs that have different advantages and
disadvantages
1. A design with a ball that can be pushed up to let the blood through but when fluid
comes from the other direction, the ball is pushed onto the tubing to stop flow of the
fluid.
53
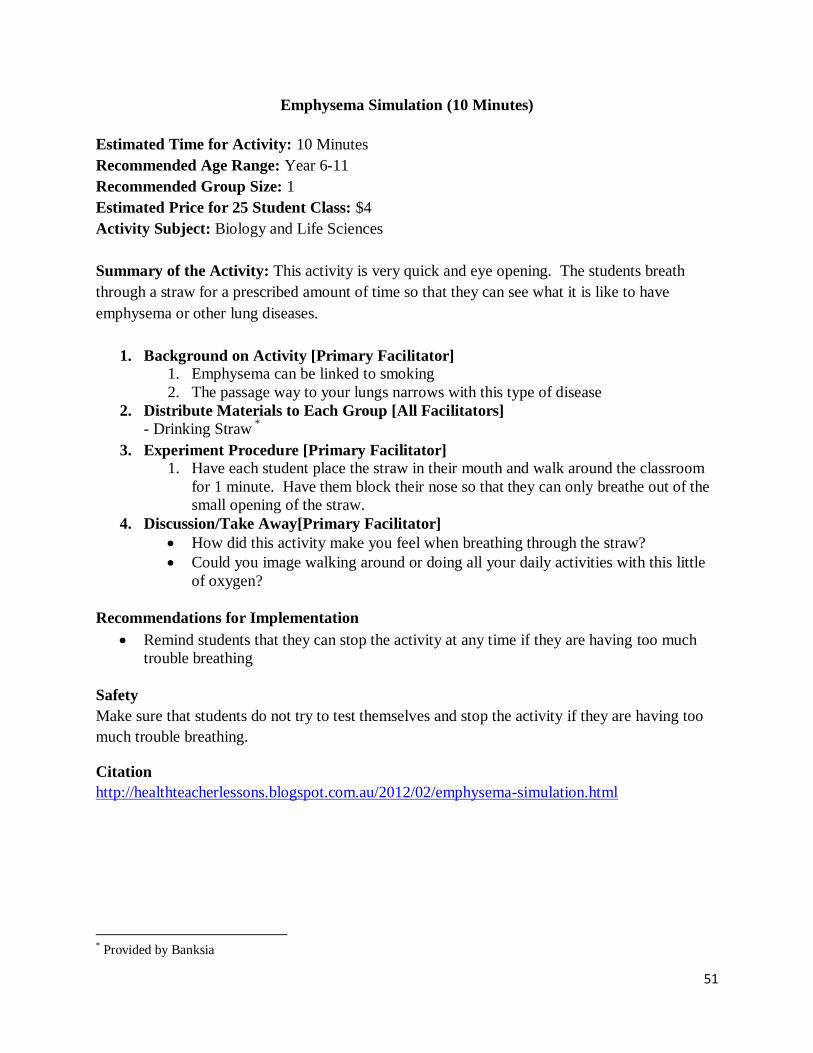
2. A design where there are two flaps angled to allow fluid one way but are pushed
closed when the blood comes from the other direction.
2. Distribute Materials to Each Group [All Facilitators]
*Note: Not all of these materials are necessary
- Cardboard (miscellaneous pieces)*
- Vinyl tubing (slightly smaller than the diameter of the syringe. You want the tube to fit
snuggly around the syringe)*
- Cardboard rolls (from paper towel or toilet paper rolls) *
- Dental Floss*
- Duct Tape*
- Syringe*
- Glue sticks (or glue guns) *
- Masking tape*
- Paper clips*
- Rubber Bands*
- Table Tennis Balls*
- Balloons*
- Scissors
- Rulers
- Water
- and any other miscellaneous household supplies
3. Experiment Procedure [Primary Facilitator]
1. Within your group, brainstorm ideas for a heart valve with given supplies
2. Build your design of the heart valve
3. Bring your design to the primary facilitator at the sink. The primary facilitator
will take a syringe of water and place it in the tube then push water in. After that,
the model will be submerged in water with an empty syringe. Using the syringe,
the primary facilitator will attempt to pull water back through the model in the
opposite direction.
4. Make revisions to your model if time allows and the testing failed.
5. Present all models to the class to see which design performs best.
* Provided by Banksia * Provided by Banksia

54
4. Facilitator Questions and Hints [Group Facilitators]
1. What kind of things have you seen that only let things move one way?
i. ANSWER: Turnstile/gate, trapdoor, winch, etc.
2. What kind of valves can you make?
i. ANSWER: Tethered ball/caged ball, trap door, etc.
5. Discussion/Take Away[Primary Facilitator]
Sometimes biological replacements are made
o Leads into career in tissue engineering
Potential problems with heart valves
o Caged ball requires more effort from heart
o Running into ball kills blood cells which causes blood clots
Recommendations for Implementation
An example of a way to build a model:
1. Rest a Table Tennis Ball on top of the vinyl tubing.
2. Place two crossing rubber bands around the ball and tubing. Use tape on the sides
of the tube to secure the rubber bands.
Side View Top View
55
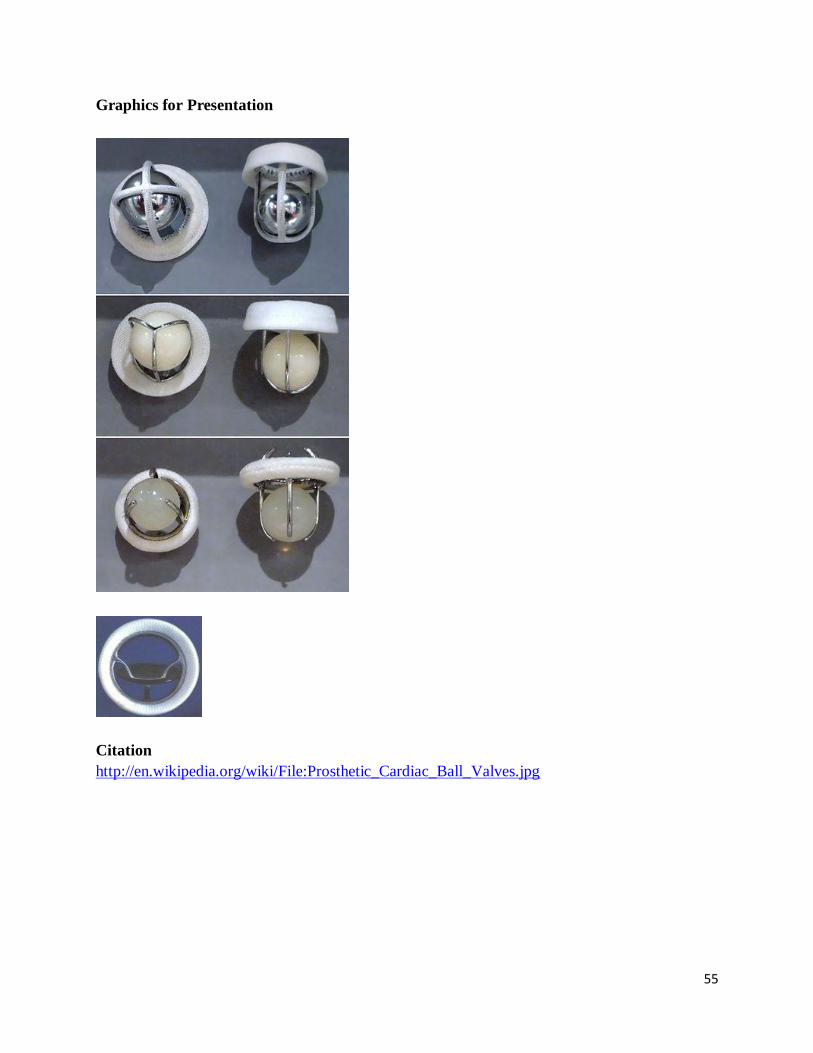
Graphics for Presentation
Citation
http://en.wikipedia.org/wiki/File:Prosthetic_Cardiac_Ball_Valves.jpg
56
Need a Hand (45 Minutes)
Estimated Time for Activity: 45 Minutes
Recommended Age Range: Year 8-12
Recommended Group Size: 4
Estimated Price for 25 Student Class: $15
Activity Subject: Biology and Life Sciences / Engineering
Summary of the Activity: This activity allows students to get creative and try to engineer a
prosthetic hand out of household items. The students will work on a team to achieve the goal of
having the fingers close.
1. Background on Activity [Primary Facilitator]
1. Prosthetic hands have been used in different forms for years
2. Designs are constantly changing to create a product that is exactly like a normal
human hand.
3. Examples of different designs are a hook, a wooden hand, a myoelectric1 hand,
stationary designs made for looks, etc.
4. Hands can perform different functions like bending the finger with a stationary
thumb, moving the thumb with stationary fingers, ability to pick up heavy or
delicate items, moving fingers individually, etc.
5. Real human hands have tendons running up each finger that are connected to
muscles in your arm. When the muscle in your arm contracts, the tendons tighten
and curl your fingers.
2. Distribute Materials to Each Group [All Facilitators]
- Index card (5cm x 20cm)*
- 5 30-cm pieces of string*
- Sticky tape*
- Heavy cardboard*
- Straws*
- Pipe Cleaners*
- Pencil
- Ruler
- Scissors
3. Experiment Procedure [Primary Facilitator]
1. Instruct each group to use the materials given to make a hand that the fingers bend
to close. They are only required to accomplish this goal but can add in other
features if possible
2. Give the groups 25 minutes to build their model
1 Electrical impulses connected from the muscle to the brain to control the movement of the hand * Provided by Banksia

57
3. Each group then presents their design to the class and explains how they came to
that idea for a model
4. Facilitator Questions and Hints [Group Facilitators]
1. What brainstorming techniques did you use?
2. What problems did you encounter in your design?
3. How did you overcome these problems?
4. How do you think you could make your design better?
5. Discussion/Take Away[Primary Facilitator]
There are many different ways to build prosthetics that have different advantages
and disadvantages
Teamwork is imperative to engineering projects for a compilation of ideas
Recommendations for Implementation
Example for how to build a generic hand out of these supplies:
1. Tie one piece of 30 cm sting to the middle of a 2 cm long pipe cleaner. Repeat this 3
more times.
2. Cut a 4 straws to be 7 cm long
3. With each 7 cm long straw, cut two triangles out of one side of the straw. These are the
hinges that the straw, or finger, will bend. The triangles will be 3cm and 5cm respectively
from the left side of the straw.
4. Wire the string through the straw so that the pipe cleaner holds the string inside the straw
from the right side. Repeat this for the 3 other straws and strings.
58
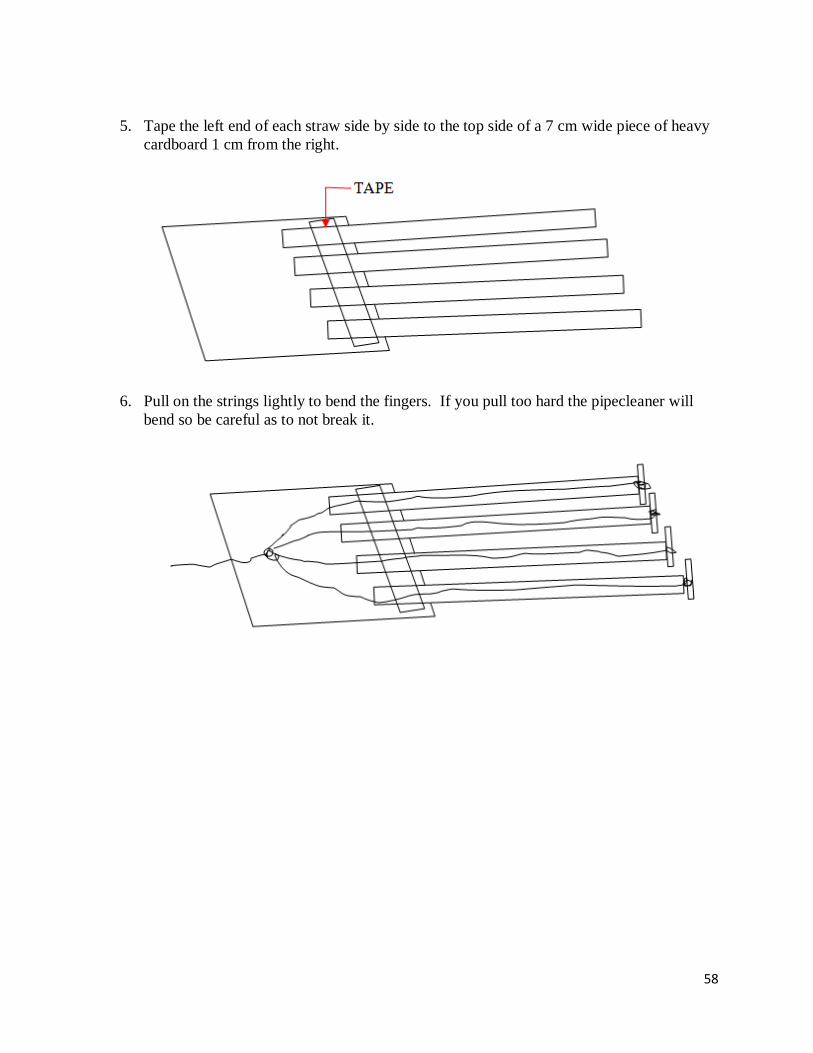
5. Tape the left end of each straw side by side to the top side of a 7 cm wide piece of heavy
cardboard 1 cm from the right.
6. Pull on the strings lightly to bend the fingers. If you pull too hard the pipecleaner will
bend so be careful as to not break it.

59
Graphics for Presentation
Citation
http://commons.wikimedia.org/wiki/File:Pipe_cleaner_white.jpg
http://en.wikipedia.org/wiki/File:Wrist_extensor_compartments_(numbered).PNG

60
Sweat Spot (20 Minutes)
Estimated Time for Activity: 20 Minutes
Recommended Age Range: Years 7-12
Recommended Group Size: 1
Estimated Price for 25 Student Class: $20
Activity Subject: Biology and Life Sciences
Summary of the Activity: The students will get to see where their sweat glands are, how many
there are, and big they are.
1. Background on Activity [Primary Facilitator]
1. The integumentary system is made up of the skin, hair, nails, scales, feathers,
hooves
2. Sweat is mainly for thermoregulation
3. Sweat is 99% water
4. Apocrine is armpit sweat, has bacteria which is why it smells bad
5. Eccrine is the rest of the sweat
2. Distribute Materials to Each Group [All Facilitators]
- Iodine tincture *
- Corn flour*
- Deodorant*
- Cotton swab*
- Magnifying glass or microscope
3. Experiment Procedure [Primary Facilitator]
1. Apply and antipersperent deodorant to 2 finger tips, leaving the rest untreated.
2. Once the deodorant is dry, apply a thin layer of iodine to each fingertip, including
the untreated ones, using a cotton swab. Let the iodine completely.
3. Gently press your fingertips into a pile of cornstarch so that they are lightly
coated. Gently rub off any excess starch.
4. Observe what happens on each fingertip using a magnifying glass or microscope.
If hands are cold, try moving around to create sweat.
4. Facilitator Questions and Hints [Group Facilitators]
1. How many sweat glands do you count/predict are on your finger?
i. ANSWER: Approximately 750-1000
2. How many per sq. cm?
i. ANSWER: Approximately 100-150 per sq. cm
3. Given this how many do you think are on your whole body?
i. ANSWER: 2-4 million sweat glands on the body
4. Given how many you have how big do you think a sweat gland is?
i. ANSWER: 20-60 micrometers; about the size of a human hair
* Provided by Banksia
61
5. Discussion/Take Away[Primary Facilitator]
The reaction between the iodine and starch makes a blue colour which allows you to
visualize the sweat formation.
The antiperspirant deodorant is meant to block perspiration from the body, so the
fingers with the deodorant hypothetically, should get less moisture to appear.
With this information, you can test to see the effectiveness of different types of
deodorants.
Recommendations for Implementation
Make sure that the classroom is not cold. It is best to do this on a hot humid day so that sweat is
created easily.
Safety
Iodine does not hurt the skin and can be washed off easily. Make sure that it does not get in the
eyes, though. If that happens, wash eyes out in WARM water for 15 minutes.
Citation
http://www.exo.net/~jyu/activities/sweat%20spot.pdf
62
What Makes Our Bones Strong (80 Minutes)
Estimated Time for Activity: 80 Minutes (4 days in between set up and completion)
Recommended Age Range: Year 8-12
Recommended Group Size: 5
Estimated Price for 25 Student Class: $45
Activity Subject: Biology and Life Sciences
Summary of the Activity: Students will see the importance of calcium in our bones by
extracting it from current bones to see the loss of strength. They will work on determining what
material keeps our bones strong.
1. Background on Activity [Primary Facilitator]
1. As humans age, calcium is depleted from your bones faster than it can be restored.
2. The more calcium in your bones, the stronger your bones are. If your bones are
not strong, they cannot support as much weight so they can break easily.
3. Strength and torque2 tests are done often on bones to see how engineers can create
a substitute for depleted bones.
2. Distribute Materials to Each Group [All Facilitators]
- Cooked / un-cooked chicken bones *
- Vinegar*
- Wax Pencil*
- Rubber Bands*
- Beaker
3. Experiment Procedure [Primary Facilitator]
1. Label beaker with your group members names using wax pencil.
2. Label the date and time on the beaker of when you started the experiment.
3. Observe the chicken bone (length, width, shape, mass, color, rigidity, etc.).
4. Make a chart with the written observations about what your group thinks makes
our bones strong
5. Place the chicken bone in the beaker.
6. Cover the bone with vinegar.
7. Cover the beaker with the plastic cover and secure it with a rubber band.
8. Allow bones to sit four days in the liquid solution.
9. Write all observations on a chart.
10. Conclusion should include the comparison and the contrast of the observations
before and after the experiment.
4. Facilitator Questions and Hints [Group Facilitators]
1. What do you think will happen to the bones after sitting in the vinegar for 4 days?
2. What is happening between the vinegar and the bones?
2 How much a bone can flex, or how rigid or elastic the bone is * Provided by Banksia
63
3. How does calcium affect the strength of our bones?
i. ANSWER: Without calcium, bones have cavities that make the bones
weaker.
5. Discussion/Take Away[Primary Facilitator]
Biomedical and Mechanical Engineers study the mechanical and structural
properties of bones.
Biomedical and Mechanical Engineers are working to create materials that
perform the same way as bones so that there is a solution to this problem.
Recommendations for Implementation
This activity can only be run if there are 2 sessions around 4 days apart in order to have the
bones soak long enough in the vinegar.
Safety
After touching the bones, ensure that all students wash their hands well with soap. The bones are
boiled as to remove any bacteria, but washing your hands after reinforces that no bacteria was
transferred.
Citation
http://www.teachengineering.org/view_activity.php?url=collection/van_/activities/van_skeletal_
system_activity2/van_skeletal_system_activity2.xml
64
Chemistry

65
Chemistry Sample Program
First day: Time (min) Cost
Program Introduction 10 0
Exploding Plastic Bag 10 20
Disappearing Ink 20 0
Cabbage Chemistry 40 60 TotalPost evaluation 1 /clean up 10 0 90
Second day:
Daily Introduction 5 0
Coke & Mentos 15 7
Lava Lamp 20 25
Snow Globe Lab 40 40 Total
Post eval 2/clean up 10 0 90
Third day:
Daily Introduction 5 0
Ice Cream Making 55 50
Bubble-ology 20 30 Total
Post eval 3 /clean up 10 0 90
Fourth day:
Daily Introduction 5 0
Bouncy Balls 40 50
Career connections 20 0 Total
Post eval 4 /clean up 25 0 90
TOTAL COST 282 Total
COST /STUDENT 11.28 360
Time Breakdown
Wow factor 25
Activity 195
Presentation 45
Evaluation 55 320
66
Chemistry Career Connections
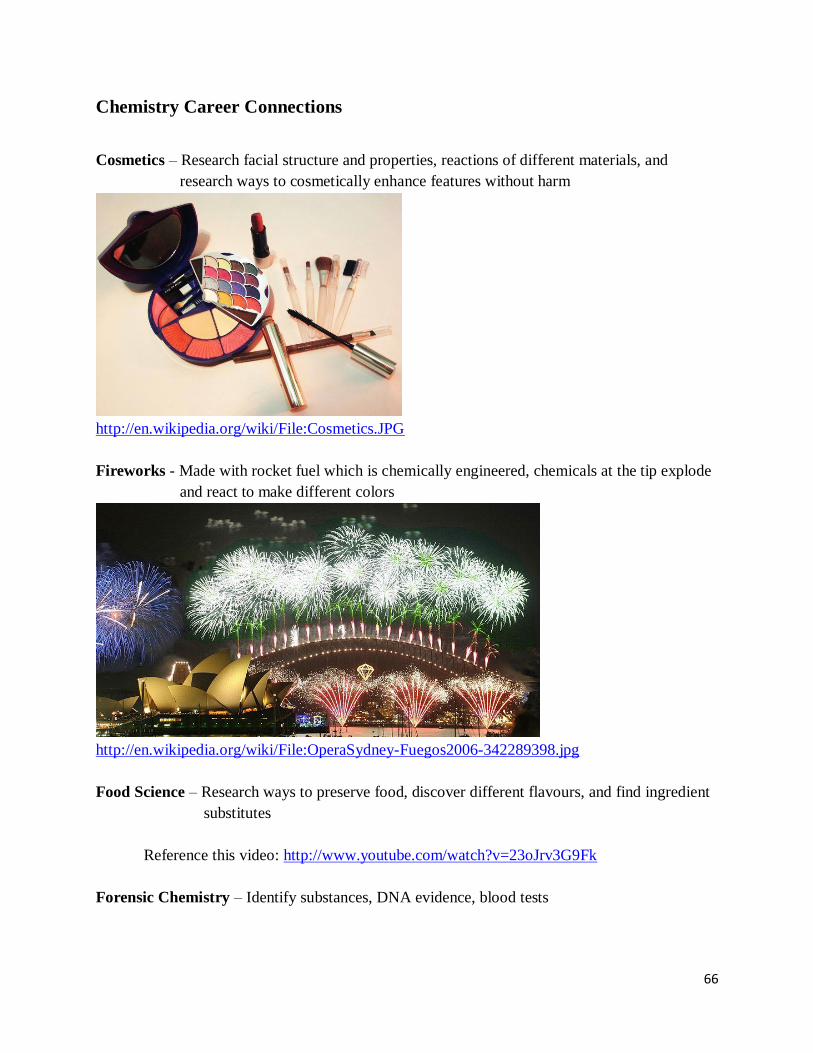
Cosmetics – Research facial structure and properties, reactions of different materials, and
research ways to cosmetically enhance features without harm
http://en.wikipedia.org/wiki/File:Cosmetics.JPG
Fireworks - Made with rocket fuel which is chemically engineered, chemicals at the tip explode
and react to make different colors
http://en.wikipedia.org/wiki/File:OperaSydney-Fuegos2006-342289398.jpg
Food Science – Research ways to preserve food, discover different flavours, and find ingredient
substitutes
Reference this video: http://www.youtube.com/watch?v=23oJrv3G9Fk
Forensic Chemistry – Identify substances, DNA evidence, blood tests

67
Material Science – Make different materials with different properties, make materials for certain
functions
Medicine – Develop new medicine treatments, research the cause and effect of diseases and
treatments

68
Chemistry Session 1 Pre-Survey
First Letter of Surname How many siblings do you have? Number of month you were born
Age: ___________________
Year: __________________
Gender: Male Female
Circle your favorite subject:
Maths Science Humanities English Physical Education
Technologies Languages Art
What career would you like to pursue? ____________________________________________
Do you want to participate in this program? Yes No
Do you like science? Yes No
Have you participated in an outreach science program before? Yes No
In the boxes below, please place an “X” in the box which describes how you feel about each statement
Statement Strongly
Agree
Agree Disagree Strongly
Disagree
I enjoy learning about science
I enjoy doing science experiments
I do not like science
I would like to work in a science field in the future
Science is important
I look forward to science class
I would like to learn more about science
List 2 things you like about science.
3. ______________________________________________________________________________
4. ______________________________________________________________________________
List 2 things you dislike about science.
3. ______________________________________________________________________________
4. ______________________________________________________________________________

69
Chemistry Session 1 Post-Survey
First Letter of Surname How many siblings do you have? Number of month you were born
Age: ___________________
Year: __________________
Gender: Male Female
Are you glad you participated in this program? Yes No
After the program, do you like science more? Yes No
Have you participated in an outreach science program before? Yes No
Rank the following activities (1 being your favourite and 3 being you least favourite):
___ Exploding Plastic Bag
___ Disappearing Ink
___ Cabbage Chemistry
In the boxes below, please place an “X” in the box which describes how you feel about each statement
Statement Strongly
Agree
Agree Disagree Strongly
Disagree
I enjoy learning about science
I enjoy doing science experiments
I do not like science
I would like to work in a science field in the future
Science is important
I look forward to science class
I would like to learn more about science
List 3 things you learned today:
1. ______________________________________________________________________________
2. ______________________________________________________________________________
3. ______________________________________________________________________________
List 2 things you would change about today’s program to make it more interesting:
1. ______________________________________________________________________________
2. ______________________________________________________________________________

70
Chemistry Session 2 Post-Survey
First Letter of Surname How many siblings do you have? Number of month you were born
Age: ___________________
Year: __________________
Gender: Male Female
Are you glad you participated in this program? Yes No
After the program, do you like science more? Yes No
Have you participated in an outreach science program before? Yes No
Rank the following activities (1 being your favourite and 3 being you least favourite):
___ Coke and Mentos
___ Lava Lamp
___ Snow Globe
In the boxes below, please place an “X” in the box which describes how you feel about each statement
Statement Strongly
Agree
Agree Disagree Strongly
Disagree
I enjoy learning about science
I enjoy doing science experiments
I do not like science
I would like to work in a science field in the future
Science is important
I look forward to science class
I would like to learn more about science
List 3 things you learned today:
1. ______________________________________________________________________________
2. ______________________________________________________________________________
3. ______________________________________________________________________________
List 2 things you would change about today’s program to make it more interesting:
1. ______________________________________________________________________________
2. ______________________________________________________________________________

71
Chemistry Session 3 Post-Survey
First Letter of Surname How many siblings do you have? Number of month you were born
Age: ___________________
Year: __________________
Gender: Male Female
Are you glad you participated in this program? Yes No
After the program, do you like science more? Yes No
Have you participated in an outreach science program before? Yes No
Rank the following activities (1 being your favourite and 2 being you least favourite):
___ Ice Cream Making
___ Bubble-ology
In the boxes below, please place an “X” in the box which describes how you feel about each statement
Statement Strongly
Agree
Agree Disagree Strongly
Disagree
I enjoy learning about science
I enjoy doing science experiments
I do not like science
I would like to work in a science field in the future
Science is important
I look forward to science class
I would like to learn more about science
List 3 things you learned today:
1. ______________________________________________________________________________
2. ______________________________________________________________________________
3. ______________________________________________________________________________
List 2 things you would change about today’s program to make it more interesting:
1. ______________________________________________________________________________
2. ______________________________________________________________________________
72
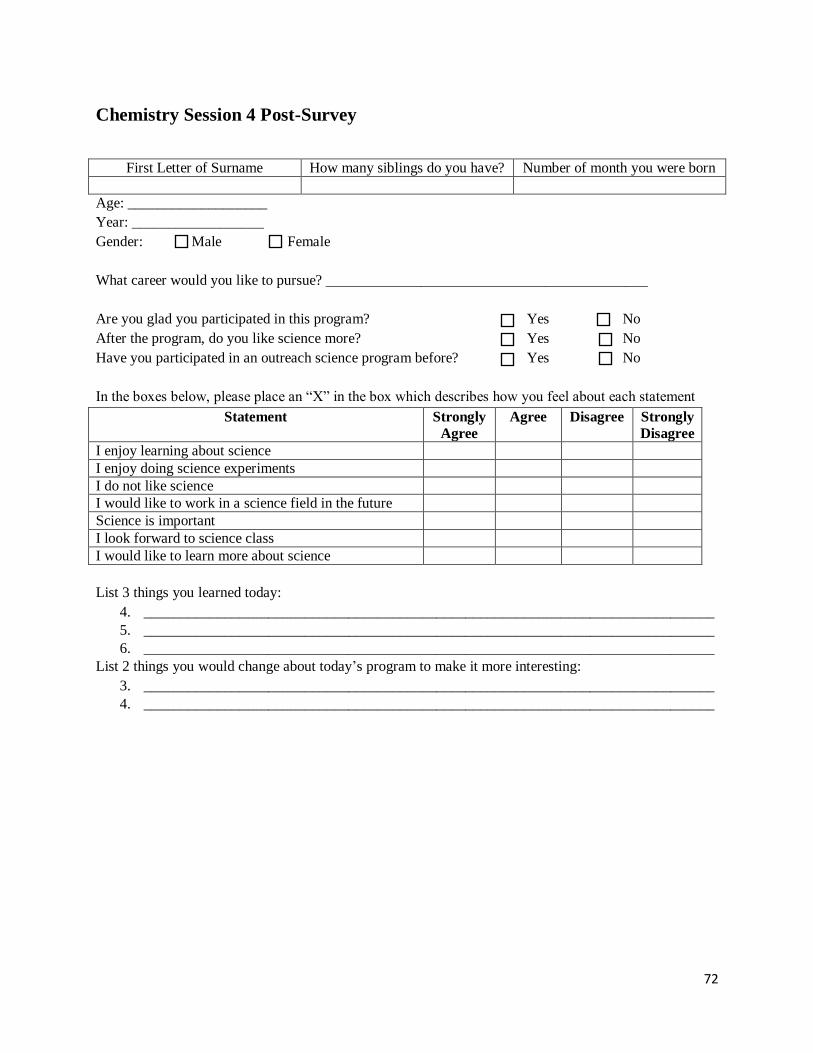
Chemistry Session 4 Post-Survey
First Letter of Surname How many siblings do you have? Number of month you were born
Age: ___________________
Year: __________________
Gender: Male Female
What career would you like to pursue? ____________________________________________
Are you glad you participated in this program? Yes No
After the program, do you like science more? Yes No
Have you participated in an outreach science program before? Yes No
In the boxes below, please place an “X” in the box which describes how you feel about each statement
Statement Strongly
Agree
Agree Disagree Strongly
Disagree
I enjoy learning about science
I enjoy doing science experiments
I do not like science
I would like to work in a science field in the future
Science is important
I look forward to science class
I would like to learn more about science
List 3 things you learned today:
4. ______________________________________________________________________________
5. ______________________________________________________________________________
6. ______________________________________________________________________________
List 2 things you would change about today’s program to make it more interesting:
3. ______________________________________________________________________________
4. ______________________________________________________________________________

73
Bouncy Balls (40 Minutes)
Estimated Time for Activity: 40 minutes
Recommended Year Range: Primary – Secondary School
Recommended Group Size: Individual Activity (each student make own set)
Estimated Price for 25 Student Class: $50
Activity Subject: Chemistry
Summary of the Activity: This activity is great for all ages. The concepts of chemistry can be
emphasized differently depending on the age group. The materials are combined physically to
create a bouncy ball. The materials should be combined in the order specified in the procedure
to ensure the correct end product. The material should be stored in a plastic bag because it will
become less firm and ball like when left sitting out.
1. Background on Activity [Primary Facilitator]
1. A mixture is when 2 or more substances are mixed physically, and not combined
chemically.
o Heterogeneous mixture: 2 or more substances combined physically where
the separate particles can be seen and separated easily
Examples: salad and dressing, milk and cereal
o Homogenous mixture: 2 or more substances combined physically that
have a uniform appearance
Examples: cake batter, salt water
2. Distribute Materials to Each Group [All Facilitators]
- Borax*
- Corn starch (or corn flour) *
- White or transparent glue*
- Food colouring*
- Warm water
- Measuring spoons
- Plastic spoons (to stir mixture) *
- Small plastic cups*
- Markers
- Plastic zip bags*
- Plastic containers*
3. Experiment Procedure [Primary Facilitator]
Preparation:
1. Put Borax, corn starch, and warm water into smaller plastic containers which will
be situated at two different table stations
a. One station will be dedicated to the Borax, warm water, and food coloring
b. One station will be dedicated to the corn starch/flour and glue
* Provided by Banksia

74
2. Each participant station should be set up with the following:
a. 2 plastic cups (one labeled “Borax Solution” and the other labeled “Ball
Mixture”)
b. 1 spoon
c. 1 plastic bag
3. Remaining materials will be shared by everyone
4. Provide copies of procedure for each group
Procedure:
1. Pour 2 tablespoons warm water and 1/2 teaspoon borax powder into the cup
labeled 'Borax Solution'. Stir the mixture to dissolve the borax. Add 2-3 drops of
food colouring.
2. Pour 1 tablespoon of glue and 1 tablespoon of corn flour into the cup labeled 'Ball
Mixture'. Mix thoroughly so there are no clumps.
3. Pour ‘Borax Solution’ into ‘Ball Mixture’ cup. Mix the clump of ‘Ball Mixture’ in
the solution while it is still in the cup.
4. Afterwards, remove the ball mixture from the cup and start rolling the ball in your
hands to form a sphere. The ball will start out sticky and messy, but will solidify
as you knead it.
5. Once the ball is less sticky, go ahead and bounce it!
6. You can store your ball in a sealed plastic bag when you are finished playing with
it.
7. Don't eat the materials used to make the ball or the ball itself. Wash your work
area, utensils, and hands when you have completed this activity.
4. Facilitator Questions and Hints [Group Facilitators]
1. What are the two ways that substances are mixed?
i. ANSWER: Physically and chemically
2. What are the two types of physical mixtures?
i. ANSWER: Heterogeneous and Homogeneous
3. What is a Heterogeneous mixture?
i. ANSWER: 2 or more substances combined physically where the
separate particles can be seen and separated easily
4. What are some examples?
i. ANSWER: salad and dressing, milk and cereal
5. What is a Homogeneous mixture?
i. ANSWER: 2 or more substances combined physically that have a
uniform appearance
6. What are some examples?
i. ANSWER: cake batter, salt water
5. Discussion/Take Away [Primary Facilitator]
Experiment process:
o Different amounts and different ingredients can lead to different properties
o The Borax solution acted as the binder, the glue gave the ball its bounce, and
the corn starch acted as the thickener.
Safety
Be sure not to eat any of the materials.

75
Citation
http://www.wpi.edu/Pubs/E-project/Available/E-project-050112-100535/

76
Bubble-ology (20 Minutes)
Estimated Time for Activity: 20 minutes
Recommended Age Range: Years 6-10
Recommended Group Size: 4-5 Students
Estimated Price for 25 Student Class: $30
Activity Subject: Chemistry
Summary of the Activity: This activity is a fun way to incorporate chemistry into a fun activity
with bubbles. It also allows the students to use the scientific method to determine which bubble
solution created the best bubbles.
1. Background on Activity [Primary Facilitator]
Water molecule: a polar molecule which has two hydrogen molecules connected to a
hydrogen molecule using covalent bonds
Polar molecule: an electronegative molecule with a positive and negative end
Surface tension: the tendency of a liquid to resist an external force
Physical properties: properties that are measurable in a physical state, they are
categorized into intensive and extensive properties intensive properties do not depend
on size of the system, while extensive properties depends on the size.
Elastic properties: the tendency to become elastically deformed
Detergent
2. Distribute Materials to Each Group [All Facilitators]
Glass mason jars with lids (recycled jars work great) 3
Graduated Cylinder
Distilled Water
Liquid dishwashing soap1
Small bottle of Glycerin (found at pharmacy) 1
Light corn syrup1
Pipe cleaners1
Permanent marker1
Stopwatch
3 Provided by Banksia

77
3. Experiment Procedure [Primary Facilitator]
1. Make all the bubble solutions with the proportions of ingredients below and label
each jar. Note that the total volume is kept consistent.
2.
Ingredient Solution #1
(detergent only)
Solution #2 (detergent &
glycerin)
Solution #3 (detergent
& corn syrup)
Water 255 mL 240 mL 240 mL
Detergent 30 mL 30 mL --
Glycerin -- 15 mL --
Corn Syrup -- -- 15 mL
3. Use a pipe cleaner to create a bubble wand for each solution. Fold the pipe cleaner
in half and bend one half back to the middle and connect. Repeat for each solution
until there are three wands of equal diameter.
4. Test the bubble solutions. Blow a bubble with the wand and catch it. Start the
stopwatch and time how long the bubble lasts. This make take some practice to get
the procedure down.
5. Record how long each bubble lasts for each solution in a table.
6. Find the average time of the bubbles for each solution to determine which solution
makes the best bubbles!
4. Discussion/Take Away [Primary Facilitator]
1. Bubbles are created due to the surface tension that holds the water molecules
together. Water is a polar molecule and the plus and minus ends are attracted to
each other. When the molecules align they stick together and create surface
tension.
2. Good bubbles have a stretch property to relax the surface tension, which is created
by the use of the detergent.
Recommendations for Implementation
Be sure to practice making the bubbles a few times before starting the timing.
Citation
http://www.sciencebuddies.org/science-fair-
projects/project_ideas/Chem_p025.shtml#background

78
Cabbage Chemistry (40 Minutes)
Estimated Time for Activity: 40 minutes
Recommended Age Range: Years 8-10
Recommended Group Size: 4-5 Students
Estimated Price for 25 Student Class: $20
Activity Subject: Chemistry
Summary of the Activity: This activity teaches students about acids and bases while allowing
them to experiment on their own with a material an simple as cabbage. The cabbage reacts with
different liquids to change colors and indicate the pH of the liquid.
1. Background on Activity [Primary Facilitator]
Solution: a mixture of a soluble chemical dissolved in water
Acid: has a pH below 7
Base: has a pH above 7
Indicator: changes color based on whether the solution is an acid or a base
Pigment: the color that is seen in cabbage indicators
pH: the scale (1-14) that indicates how acidic or basic a solution is. A pH is neutral at
7, acidic below 7, and basic above 7.
2. Distribute Materials to Each Group [All Facilitators]
Cabbage1
Boiling pot of water1
Strainer1
Small white cups1
Medicine dropper
A series of household items to test the pH of:
o Fruit juice: lemon, lime, orange, apple1
o Soda pop (dark sodas might be tricky to see) 1
o Vinegar1
o Baking soda solution1
o Cleaning products. 1 Note: Always use caution when handling cleaning
products.
3. Experiment Procedure [Primary Facilitator]
1. Grate a small red cabbage and place in a bowl
2. Cover the cabbage in boiling water.
3. Leave the cabbage mixture to cool until it reaches room temperature. The liquid
should be red.
4. Strain the mixture to remove the cabbage pieces.
5. The strained liquid should now be clear with a blue or purple tint. The color will
change depending on the pH. Use the table below to determine the pH.
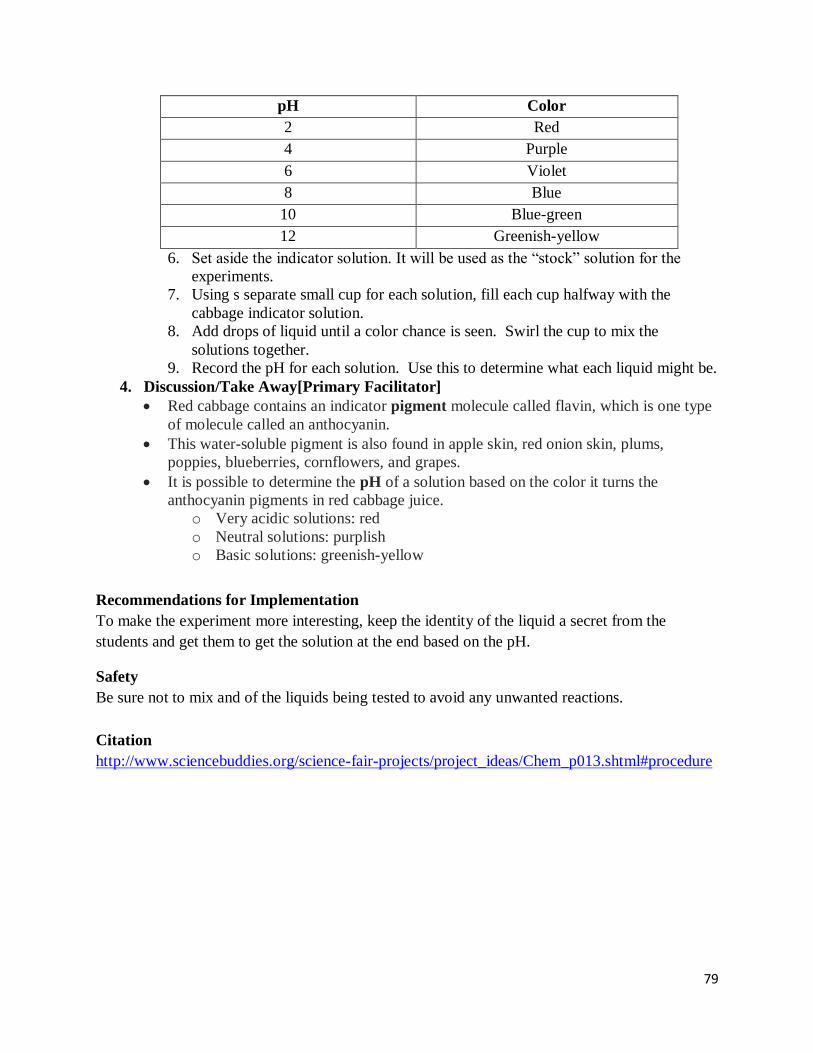
79
pH Color
2 Red
4 Purple
6 Violet
8 Blue
10 Blue-green
12 Greenish-yellow
6. Set aside the indicator solution. It will be used as the “stock” solution for the
experiments.
7. Using s separate small cup for each solution, fill each cup halfway with the
cabbage indicator solution.
8. Add drops of liquid until a color chance is seen. Swirl the cup to mix the
solutions together.
9. Record the pH for each solution. Use this to determine what each liquid might be.
4. Discussion/Take Away[Primary Facilitator]
Red cabbage contains an indicator pigment molecule called flavin, which is one type
of molecule called an anthocyanin.
This water-soluble pigment is also found in apple skin, red onion skin, plums,
poppies, blueberries, cornflowers, and grapes.
It is possible to determine the pH of a solution based on the color it turns the
anthocyanin pigments in red cabbage juice.
o Very acidic solutions: red
o Neutral solutions: purplish
o Basic solutions: greenish-yellow
Recommendations for Implementation
To make the experiment more interesting, keep the identity of the liquid a secret from the
students and get them to get the solution at the end based on the pH.
Safety
Be sure not to mix and of the liquids being tested to avoid any unwanted reactions.
Citation
http://www.sciencebuddies.org/science-fair-projects/project_ideas/Chem_p013.shtml#procedure
80
Disappearing Ink (25 Minutes)
Estimated Time for Activity: 25 minutes
Recommended Age Range: Years 8-10
Recommended Group Size: 4-5 Students
Estimated Price for 25 Student Class: $0 (All provided by school)
Activity Subject: Chemistry
Summary of the Activity: This is a cool acid and base chemistry related activity that can also be
presented a bit more like a magic trick. Indicators, acids and bases are combined to create ink
that disappears when it reacts with the carbon dioxide in the air. The ink can reappear when
ammonia is added.
1. Background on Activity [Primary Facilitator]
Acids:
Release hydrogen cations (H+) during a reaction
Dissolve in water to form excess hydrogen ions
Are highly reactive and will corrode most metals
Conduct electricity
Have a sour taste
Produce a stinging sensation
Bases:
Able to accept hydrogen ions in a reaction
Dissolve in water to absorb excess hydrogen ions
Neutralise the effect of acid
Denature proteins
Have a bitter taste
Feel soapy
Alkali are soluble bases that contain hydroxide ions (OH-)
Classifying Acids and Bases:
Strong substances are either acids that readily lose hydrogen cations or bases that
readily gain hydrogen ions
Weak substances less readily lose or gain hydrogen ions
Concentrated acids and bases are either pure or come dissolved in very little
water, while dilute substances are dissolved in a lot of water
To test the strength of acids and bases, we use two main tools: the pH scale and
indicators
pH Scale: At 25°C, considered the standard temperature, the pH value of a neutral
solution is 7. Solutions with a pH value below 7 are considered acidic, whereas
solutions with a pH above 7 are basic (alkaline).
Indicators: An indicator is a substance that changes colour depending on its pH
level.
Common acids: lemon juice, tomatoes, vinegar, oranges

81
Common bases: ammonia, soapy solutions, baking soda, sea water
Acid-Base Reactions:
Since acids and bases are more or less opposite substances, they cancel each other
in “neutralisation” resulting in a salt and water:
o Acid + Base Salt + Water
o Example: HCl + NaOH NaCl + H2O
Adding an acid to a base does not necessarily mean that the product is
automatically neutralised. The strength of each of the reactants must ne matched
so that all the ions released by the acid find a place with the base.
Acids react aggressively in the presence of metals, corroding the metal uch faster
than moisture and air
o Acid + Metal Metallic Salt + Hydrogen
Hydrogen ions are easily lost and replace by the metallic ions, forming a metallic
salt. The hydrogen then forms molecule with itself, resulting in hydrogen gas.
o Example: H2SO4 + Mg MgSO4 + H2
2. Distribute Materials to Each Group [All Facilitators]
- 0.10 g thymolphthalein for blue ink or phenolphthalein for red ink (1/3 of 1/8 tsp)
- 10 ml (2 tsp) ethyl alcohol (ethanol) [can substitute 14 ml or 3 tsp of ethyl rubbing
alcohol]
- 90 ml water
- 20 drops of 3M sodium hydroxide solution or 10 drops 6M sodium hydroxide
solution [make a 3 M sodium hydroxide solution by dissolving 12 g of sodium
hydroxide NaOH (1 level tablespoon of lye) in 100 ml (1/2 cup) of water.]
- White cotton t-shirt or table cloth, and white paper*
- Paint brushes*
3. Experiment Procedure [Primary Facilitator]
1. Dissolve the thymolphthalein (or phenolphthalein) in the ethyl alcohol.
2. Stir in 90 ml of water (will produce a milky solution).
3. Add sodium hydroxide solution drop-wise until the solution turns a dark blue or
red.
4. Test the ink by applying it to fabric (cotton tee-shirt material or a table cloth
works well). Paper allows less interaction with air, so the color change reaction
takes more time.
5. In a few seconds, the 'stain' will disappear. The pH of the ink solution is 10-11,
but after exposure to air will drop to 5-6. The damp spot will eventually dry. A
white residue may be visible on dark fabrics. The residue will rinse out in the
wash.
6. If you brush over the spot with a cotton ball that has been dampened in ammonia
the color will return. Similarly, the color will vanish more quickly if you apply a
cotton ball dampened with vinegar or if you blow on the spot to improve air
circulation.
* Provided by Banksia

82
7. Leftover ink may be stored in a sealed container. All of the materials may be
safely poured down the drain.
4. Facilitator Questions and Hints [Group Facilitators]
1. What was the pH of the ink at the beginning?
i. ANSWER: BASIC
ii. CLUE: Indicator chart
2. What was in the solution that made it basic?
i. ANSWER: SODIUM HYDROXIDE
ii. CLUE: Ingredient list
3. What was the pH when it disappeared?
i. ANSWER: 5-6 (CLOSE TO NEUTRAL)
ii. CLUE: Indicator Chart
4. What reaction could have made that happen?
i. ANSWER: ACID + BASE = SALT + WATER
ii. CLUE: Acid + Base = ?
5. What is the solution in contact with?
i. ANSWER: AIR AND CLOTH
6. What elements are in the air?
i. ANSWER: NITROGEN, OXYGEN, ARGON, CARBON DIOXIDE
ii. CLUE: Composition of the air
7. Which of these elements can combine with water to make an acid?
i. ANSWER: CARBON DIOXIDE
ii. CLUE: Composition of air + bottle of water = Soda
8. Can you write 2 reactions and describe what happened?
i. ANSWER: CO2 + H2O → H2CO3
2 Na (OH) + H2CO3 → Na2CO3 + 2 H2O

83
INK INGREDIENTS
0.10 g thymolphthalein for blue ink or phenolphthalein for red ink (1/3 of 1/8 tsp).
10 ml (2 tsp) ethyl alcohol (ethanol) [can substitute 14 ml or 3 tsp of ethyl rubbing alcohol].
90 ml water.
20 drops of 3M sodium hydroxide solution or 10 drops 6M sodium hydroxide solution.
[make a 3 M sodium hydroxide solution by dissolving 12 g of sodium hydroxide NaOH (1
level tablespoon of lye) in 100 ml (1/2 cup) of water.]
Clue for question 4
ACID + BASE ?
Figure 1: Clue for question 7
Series1, Oxygen, 20.95%, 21%
Series1, Argon, 0.93%, 1%
Series1, Carbon Dioxide, 0.04%, 0%
Series1, Nitrogen, 78.08%, 78%
Figure 1: Atmospheric Composition
84
5. Discussion/Take Away[Primary Facilitator]
When the ink is sprayed onto a porous material the water in the ink reacts with carbon
dioxide in the air to form carbonic acid. The carbonic acid then reacts with the
sodium hydroxide in a neutralization reaction to form sodium carbonate.
Neutralizaton of the base causes a color change of the indicator and the stain
disappears
Carbon dioxide in the a+ir reacts with water to form carbonic acid:
CO2 + H2O → H2CO3
The neutralization reaction is sodium hydroxide + carbonic acid -> sodium carbonate
+ water:
2 Na (OH) + H2CO3 → Na2CO3 + 2 H2O
Recommendations for Implementation
Be sure to follow correct proportions given by the instructions to ensure that the ink works
correctly.
Safety
Never spray disappearing ink into a person's face. Particularly avoid getting the solution in the
eyes.
Preparing/handling the sodium hydroxide (lye) solution requires adult supervision, as the base
is caustic. In case of skin contact, immediately rinse well with water.
Citation
http://chemistry.about.com/od/demonstrationsexperiments/ss/disappearink_4.htm

85
Exploding Plastic Bag (5-10 Minutes)
Estimated Time for Activity: 5-10 minutes
Recommended Age Range: Years 7-10
Recommended Group Size: Whole Class (Demonstration)
Estimated Price for 25 Student Class: $20
Activity Subject: Chemistry
Summary of the Activity: This activity can be used as a WOW factor to quickly engage
students. The use of the reaction between backing soda and vinegar inside the plastic bag causes
it to explode, creating an exciting environment for the students. This allows them to learn about
how the gases build up inside the bag from the reaction while enticing their attention with a
small explosion.
1. Background on Activity [Primary Facilitator]
AcidBaseCarbon Dioxide
1. A compound usually having a sour taste and capable of neutralizing alkalis and
reddening blue litmus paper, containing hydrogen that can be replaced by metal or
an electropositive group to form a salt.
2. A chemical compound that combines with an acid to form a salt and water.
3. A solution of a base and in water turns litmus paper blue, produces hydroxyl ions,
and has a pH greater than 7.
4. A colourless, odorless, incombustible gas, CO2, present in the atmosphere and
formed during respiration, usually obtained from coal, coke, or natural gas by
combustion
2. Distribute Materials to Each Group [All Facilitators]
- Plastic Ziploc freezer bag*
- Baking soda*
- Warm water
- Vinegar*
- Measuring cup - 1 tissue
*
3. Experiment Procedure [Primary Facilitator]
Preparation:
1. Measure out 1⁄4 cup of warm water
2. Measure out 1⁄2 cup of vinegar
3. Measure out 3 teaspoons of baking soda
Procedure:
1. Put the warm water into the plastic bag
2. Add the vinegar to the water in the bag
3. Pour the baking soda into the middle of the tissue and wrap the tissue up
* Provided by Banksia
86
4. Zip up the bag just far enough so you can fit the tissue in it
5. Put the tissue with the baking soda in the bag and quickly zip the bag up
completely sealing the bag shut
6. Put the bag down and step back
4. Discussion/Take Away [Primary Facilitator]
What happened? Why?
Examples of different types of acids?
o Lactic acid (milk)
o citric acid (orange juice)
o hydrochloric acid (stomach fluid)
o acetic acid (vinegar)
o sulphuric acid (batteries)
Examples of different types of bases?
o Sodium bicarbonate (baking soda)
o ammonia
o sodium hydroxide (drain cleaner)
Recommendations for Implementation
Include Career Connection to show the students how this experiment relates to jobs they could
have in the future.
Chemist - One trained in chemistry
Chemical Engineer - dealing with the industrial application of chemistry
Safety
Be sure students do not stand too close to the exploding plastic bag.
Citation
http://www.wpi.edu/Pubs/E-project/Available/E-project-050112-100535/
Experiment adapted from:
http://www.sciencebob.com/experiments/bagbomb.php
Definitions adapted from:
http://dictionary.reference.com/ http://www.merriam-webster.com/
87
Ice Cream Making (60 Minutes)
Estimated Time for Activity: 60 minutes
Recommended Age Range: Any Age Group
Recommended Group Size: Individual Activity
Estimated Price for 25 Student Class: $40-$60 (depending on class size)
Activity Subject: Chemistry (Elements, Compounds, and Reactions)
Summary of the Activity: This activity allows the students to create a delicious treat while a lot
learning about the effects of salt on the freezing temperature of water. The salt lowers the
freezing temperature of the water, allowing the ice to stay frozen longer and turn the ingredients
to ice cream quickly.
1. Background on Activity [Primary Facilitator]
When salt is added to the salt it lowers the freezing temperature of water, which keeps
the ice from melting as fast, allowing the cream and other ingredients to turn into ice
cream. The cold temperature of the ice is transferred to the ingredients, allowing it to
get cooler faster.
2. Distribute Materials to Each Group [All Facilitators]
- Thick Cream*
- castor sugar*
- vanilla essence*
- Ice*
- Rock salt*
- 1 medium sized Zipper bag*
- 1 large sized Zipper bag*
- tea towel or oven mitts*
3. Experiment Procedure [Primary Facilitator]
Preparation:
1. Measure 300 ml of cream
2. Measure 2 tbsp. of castor sugar
3. Measure 1 tbsp. of vanilla essence
4. Measure 6 tbsps. of rock salt
Procedures:
1. Supply each student with one medium Ziploc bag and one large Ziploc bag.
2. Place the cream, sugar and vanilla in the medium bag and mix the ingredients.
3. Place the ice and salt in the large Ziploc bag.
4. Place the medium bag containing the ingredients in the large Ziploc bag on top of the
ice and close it properly.
5. Shake and massage the bag for five to ten minutes or until the mixture becomes the
consistency of ice cream. Give towels to the students when the bag gets really cold.
* Provided by Banksia
88
6. Enjoy the homemade ice cream!
4. Discussion/Take Away [Primary Facilitator]
Why do you think that we can make ice cream so fast?
o ANSWER: By adding salt to ice, you lower the freezing temperature of water.
The ice is not going to melt as fast as it would without the salt, therefore the
cream, sugar and vanilla will turn into ice cream. The cold temperature of the
ice is being transferred to the ice cream, so it gets colder very fast.
Recommendations for Implementation
Include Career Connections for the students to understand how this activity is relevant to life
outside of just eating the delicious ice cream.
Food Scientist - A scientist who studies the properties of food and ingredients as well as
evaluates the nutritional value, colour, flavour and texture of food.
Chemical Engineer - A scientist who uses science to process raw materials and chemicals
into useful forms. Work by chemical engineers can lead to the discovery of important
new materials and processes
Citation
http://www.wpi.edu/Pubs/E-project/Available/E-project-022813-034020/
Definitions adapted from:
http://www.sciencekids.co.nz/sciencefacts/engineering/typesofengineeringjobs.html
http://www.newton.dep.anl.gov/askasci/gen01/gen01667.htm
89
Lava Lamp (20 Minutes)
Estimated Time for Activity: 20 minutes
Recommended Age Range: Any Age
Recommended Group Size: 4-5 students
Estimated Price for 25 Student Class: $25
Activity Subject: Chemistry
Summary of the Activity: This activity is good for any age and displays the differences in the
density of water and oil. It also shows how Alka-Seltzer reacts with water to create bubbles.
These bubbles flow though the oil to create an exciting lava lamp equivalent!
1. Background on Activity [Primary Facilitator]
Some key terms to discuss before the activity are:
1. Density - Because all objects are made out of molecules, it is possible to
determine how tightly packed those molecules are. This is known as density. The
more tightly packed the molecules of an object, liquid or gas are, the denser we
say they are.
2. Distribute Materials to Each Group [All Facilitators]
- Water
- 1 clear plastic bottle for each child*
- Vegetable oil (enough to fill about ¾ of each bottle)*
- Food colouring (12 drops per bottle)*
- Alka-Seltzer (or other tablets that fizz) (1 tablet per bottle) *
3. Experiment Procedure [Primary Facilitator]
Preparation:
1. Measure out amounts for each material and distribute
Procedures:
1. Pour water into the plastic bottle until it is around one quarter full (you might want to
use a funnel when filling the bottle so you don't spill anything).
2. Pour in vegetable oil until the bottle is nearly full.
3. Wait until the oil and water have separated.
4. Add around a dozen drops of food colouring to the bottle (choose any colour you like).
5. Watch as the food colouring falls through the oil and mixes with the water.
6. Cut an Alka-Seltzer tablet into smaller pieces (around 5 or 6) and drop one of them
into the bottle, things should start getting a little crazy, just like a real lava lamp!
7. When the bubbling stops, add another piece of Alka-Seltzer and enjoy the show!
* Provided by Banksia

90
4. Discussion/Take Away[Primary Facilitator]
2. Explain that oil and water don't mix with each other. Since oil is less dense than
water, it will float above the water. When the Alka-Seltzer is introduced, it reacts
with water to release carbon dioxide gas. This gas is even denser than the oil so it
tries to rise to the top of the oil from the bottom in the water. In this process, it
takes some water along with it. When the gas bubbles reach the oil surface, they
pop and the water falls back through the oil.
Recommendations for Implementation
Include Career Connections presentation about applications of this activity.
3. Chemist - A scientist who studies the composition and properties of chemicals
and the way chemicals interact with each other. Chemists search for new
information about matter and ways this information can be applied. Chemists also
design and develop instruments to study matter.
Citation
http://www.wpi.edu/Pubs/E-project/Available/E-project-022813-034020/
91
Mentos and Coke (15 Minutes)
Estimated Time for Activity: 15 minutes
Recommended Age Range: Any Age
Recommended Group Size: Whole Class (Demonstration)
Estimated Price for 25 Student Class: $7
Activity Subject: Chemistry (Elements, Compounds, and Reactions)
Summary of the Activity: This activity is a demonstration that can be used to quickly engage
the students of any age. When the Mentos are dropped into the diet coke after being shaken, the
pressure increases so much that the bottle explodes.
1. Background on Activity [Primary Facilitator]
Some key terms to go over with the students are:
1. Pressure - how much force you apply to an object
2. Pores in Mentos - Mentos contain a lot of little holes also known as nucleation
sites. When the gas fills these holes, it creates bubbles. Because of the many pores
in Mentos, it creates a lot of bubbles and they go out of the bottle due to pressure.
2. Distribute Materials to Each Group [All Facilitators]
- 2-liter bottle of diet soda*
- 3 Mentos mints*
3. Experiment Procedure [Primary Facilitator]
Preparation:
1. Attach 3 Mentos to clear tape and tape them to the cap of the bottle. Make sure that
the piece of tape is short enough so it doesn’t touch the liquid when you put the cap
back on
2. Find a safe open space to explode the diet soda
Procedures:
1. After putting the cap with the Mentos back in the diet soda, shake it until the pressure
in the bottle is so high, that the gas is dripping from the cap
2. Throw the diet soda to the ground (far away from you) and watch it launch to the air
4. Discussion/Take Away[Primary Facilitator]
Why do you think that the diet soda launched to the air?
o ANSWER: When you add the Mentos to the diet soda and recap it, the gas
in the soda is creating a lot of bubbles around the Mentos. Therefore, there
is a lot of pressure building inside the bottle. The pressure is so high that
the moment the bottle touches the ground, the cap is pushed off and the
pressurized soda forming inside the bottle makes it fly to the air.
Why does diet soda work better than regular soda?
o ANSWER: The diet soda has more carbon dioxide; therefore more
bubbles are formed around the Mentos.
* Provided by Banksia
92
Recommendations for Implementation
Include Career Connection to show students how this demonstration is relevant to future jobs.
Rocket Scientist - A scientist who designs rockets.
Chemical Engineer - A scientist who uses science to process raw materials and
chemicals into useful forms. Work by chemical engineers can lead to the
discovery of important new materials and processes
Safety
Be sure students do not walk near the bottle while it is exploding.
Citation http://www.wpi.edu/Pubs/E-project/Available/E-project-022813-034020/
Experiment adapted from
http://www.instructables.com/id/Mentos-and-Diet-Coke-Rocket/
Definitions adapted from
http://www.sciencekids.co.nz/sciencefacts/engineering/typesofengineeringjobs.html
http://www.newton.dep.anl.gov/askasci/gen01/gen01667.htm
93
Snow Globe (40 Minutes)
Estimated Time for Activity: 40 minutes
Recommended Age Range: Years 8-10
Recommended Group Size: Individual Activity
Estimated Price for 25 Student Class: $40
Activity Subject: Chemistry
Summary of the Activity: This activity not only allows the students to learn about polarity, and
solubility, but also allows them to create a snow globe that they can take home. The students are
provided with a variety of solvents and solutes to challenge them to create the best looking snow
globe possible. Some combinations work better than others so this process forces the students to
think outside the box about the materials they have been given and the properties of each
material.
1. Background on Activity [Primary Facilitator]
1. Solute - the material, typically a solid, that is dissolved in a solvent
2. Solvent - the liquid in which a solute is dissolved
3. “Like dissolves like”
4. Polar covalent compounds dissolve other polar covalent compounds.
5. Non-Polar covalent compounds don’t dissolve either.
6. Typically the goal is to dissolve the solute in the solvent, but for this lab, the purpose
is to make sure that the solute does not dissolve in the solvent.
2. Distribute Materials to Each Group [All Facilitators]
- One small baby food jar for each student. (Students can bring these in for themselves
if you can ask ahead of time)
- One small oil and waterproof item for each snow globe. (Can also be brought from
home if asked ahead of time)
- Hot glue gun*
- Package of 24 glue sticks*
- 32 oz. of vegetable oil*
- 10-16 oz. bottles of mineral oil*
- 32 small vials with lids*
- 2 lb box of kosher salt*
- 2 lb box of table salt*
- 2 lb carton of Epsom salts (magnesium sulfate heptahydrate)
- 5 lb bag of table sugar (sucrose) *
- 1 lb bottle of talcum powder*
- 1 lb of sand*
- 1 lb box of sodium bicarbonate*
- 1 bottle of concentrated ammonia (for cleaning up)
3. Experiment Procedure [Primary Facilitator]
1. First clean the jar with rubbing alcohol to ensure that the hot glue will stick to the
jar.
* Provided by Banksia
94
2. Affix the small personal item to the inside of the top to the baby food jar with hot
glue. Be sure not to get the hot glue on the skin. Set this aside.
3. Give the students the materials and allow them to experiment with which
combination of solute and solvent will work best to create a snow globe. The
ideal snow globe will have solute floating inside the solvent.
4. Once they have created a suitable solvent and solute combination, put the solution
inside the baby food jar.
5. Once the solution is inside, clean the top of the jar with rubbing alcohol. Once the
alcohol has evaporated, put a small line of glue around the inside of the lid.
Screw on the lid while the glue is still hot to keep the jar from opening.
6. Turn the jar over and shake it to see the snow fall!
4. Discussion/Take Away [Primary Facilitator]
Discuss which combinations of solvent and solute created the best snow fall in the
snow globes.
o Some example combinations that worked well for others are
mineral oil/magnesium sulfate,
mineral oil/kosher salt, and
vegetable oil/magnesium sulfate.
o Using sand creates a “sandstorm” and is less idea.
o Both talcum powder and sodium bicarbonate make a cloudy liquid that’s hard
to see.
o Water dissolves most of the solutes, which means it doesn’t work well as a
solvent
Safety
Students should wear goggles to avoid getting any of the ingredients in their eyes. The hot glue
gun should be used very carefully or only used by the facilitators. It is also important to not that
mineral oil is very slippery when spilled on the floor so it is necessary to clean up any spills
quickly to avoid accidents.
Citation
http://misterguch.brinkster.net/snowglobelab.pdf

95
Physics
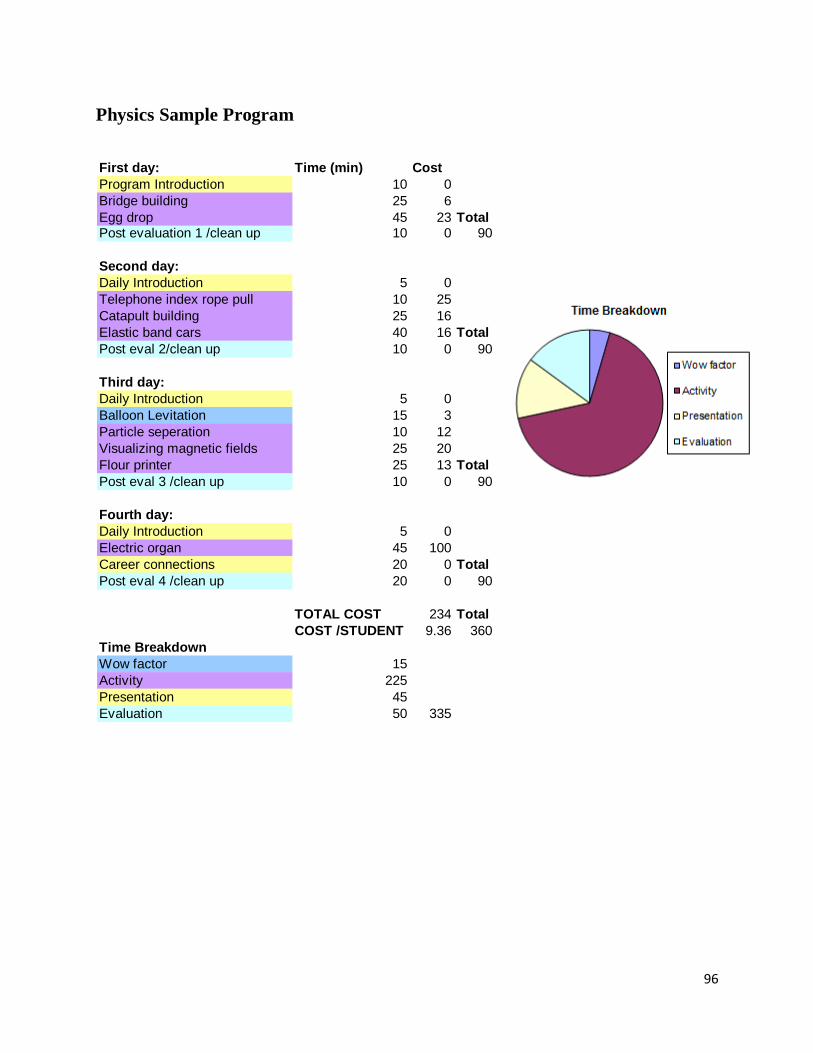
96
Physics Sample Program
First day: Time (min) Cost
Program Introduction 10 0
Bridge building 25 6
Egg drop 45 23 TotalPost evaluation 1 /clean up 10 0 90
Second day:
Daily Introduction 5 0
Telephone index rope pull 10 25
Catapult building 25 16
Elastic band cars 40 16 Total
Post eval 2/clean up 10 0 90
Third day:
Daily Introduction 5 0
Balloon Levitation 15 3
Particle seperation 10 12
Visualizing magnetic fields 25 20
Flour printer 25 13 Total
Post eval 3 /clean up 10 0 90
Fourth day:
Daily Introduction 5 0
Electric organ 45 100
Career connections 20 0 Total
Post eval 4 /clean up 20 0 90
TOTAL COST 234 Total
COST /STUDENT 9.36 360
Time Breakdown
Wow factor 15
Activity 225
Presentation 45
Evaluation 50 335
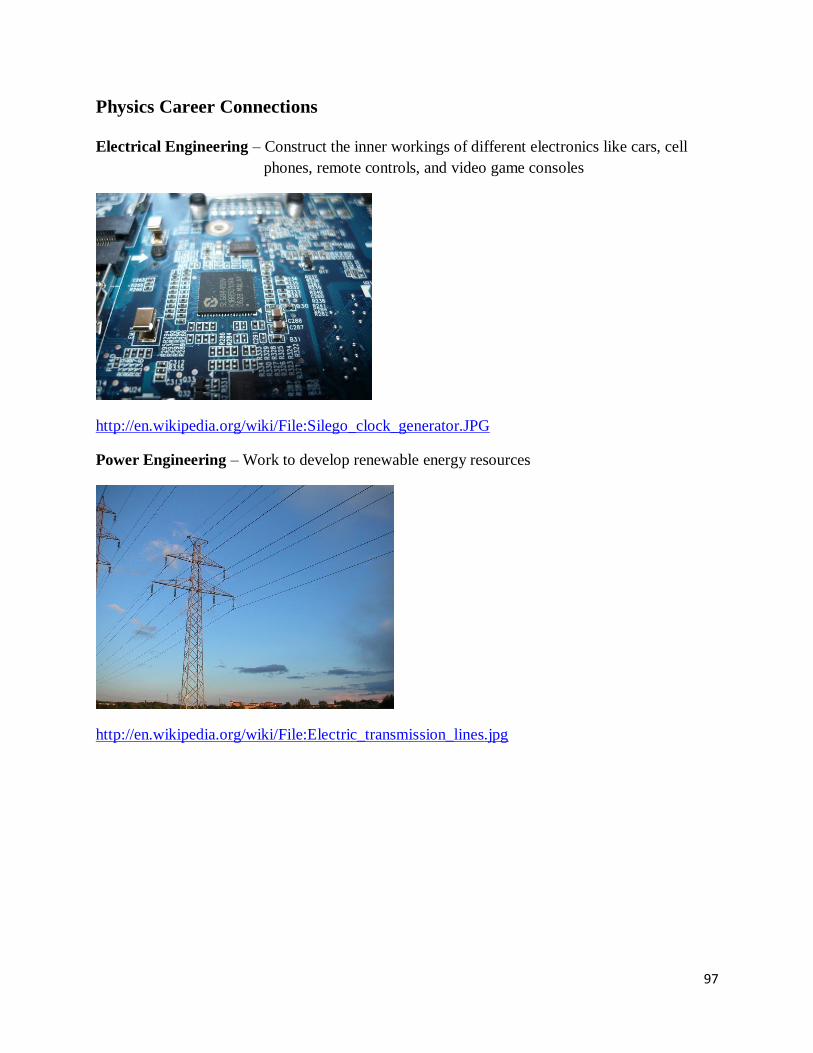
97
Physics Career Connections
Electrical Engineering – Construct the inner workings of different electronics like cars, cell
phones, remote controls, and video game consoles
http://en.wikipedia.org/wiki/File:Silego_clock_generator.JPG
Power Engineering – Work to develop renewable energy resources
http://en.wikipedia.org/wiki/File:Electric_transmission_lines.jpg
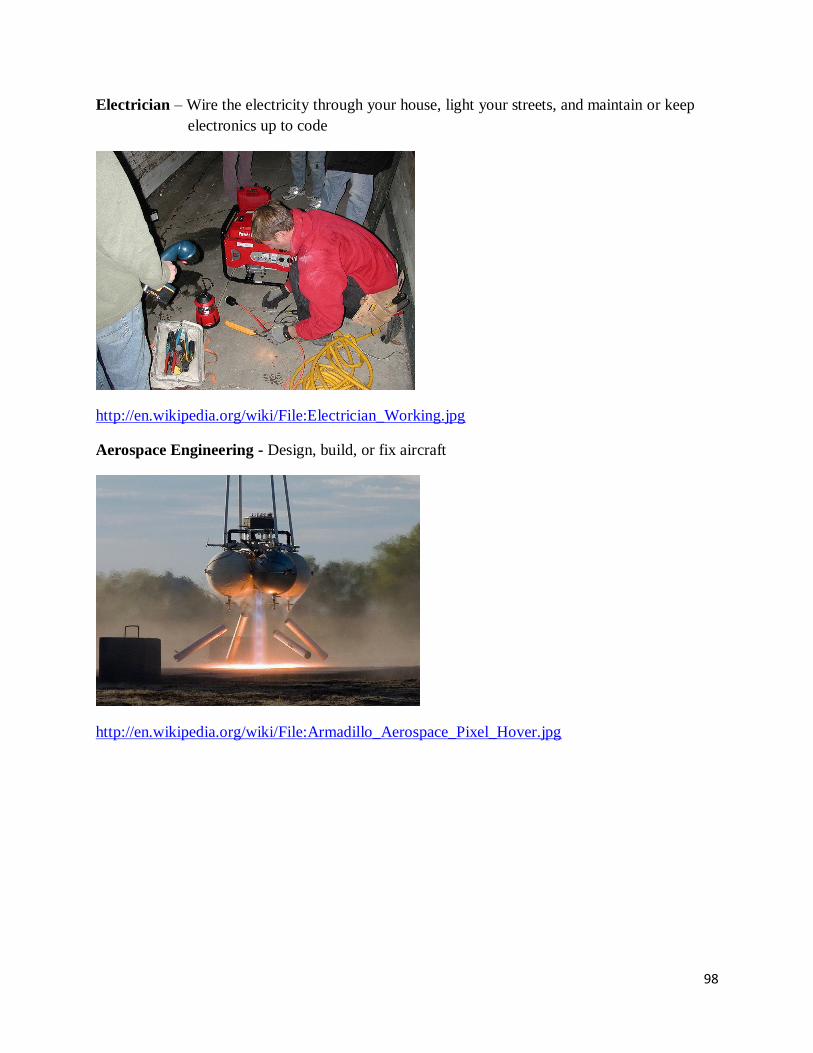
98
Electrician – Wire the electricity through your house, light your streets, and maintain or keep
electronics up to code
http://en.wikipedia.org/wiki/File:Electrician_Working.jpg
Aerospace Engineering - Design, build, or fix aircraft
http://en.wikipedia.org/wiki/File:Armadillo_Aerospace_Pixel_Hover.jpg

99
Renewable Energy-wind, solar, geothermal, tidal, working to develop those
http://en.wikipedia.org/wiki/File:Dampfturbine_Montage01.jpg
Robotics- Manufacturing robotics, cars, consumer toys and robots
http://en.wikipedia.org/wiki/File:KUKA_Industrial_Robots_IR.jpg
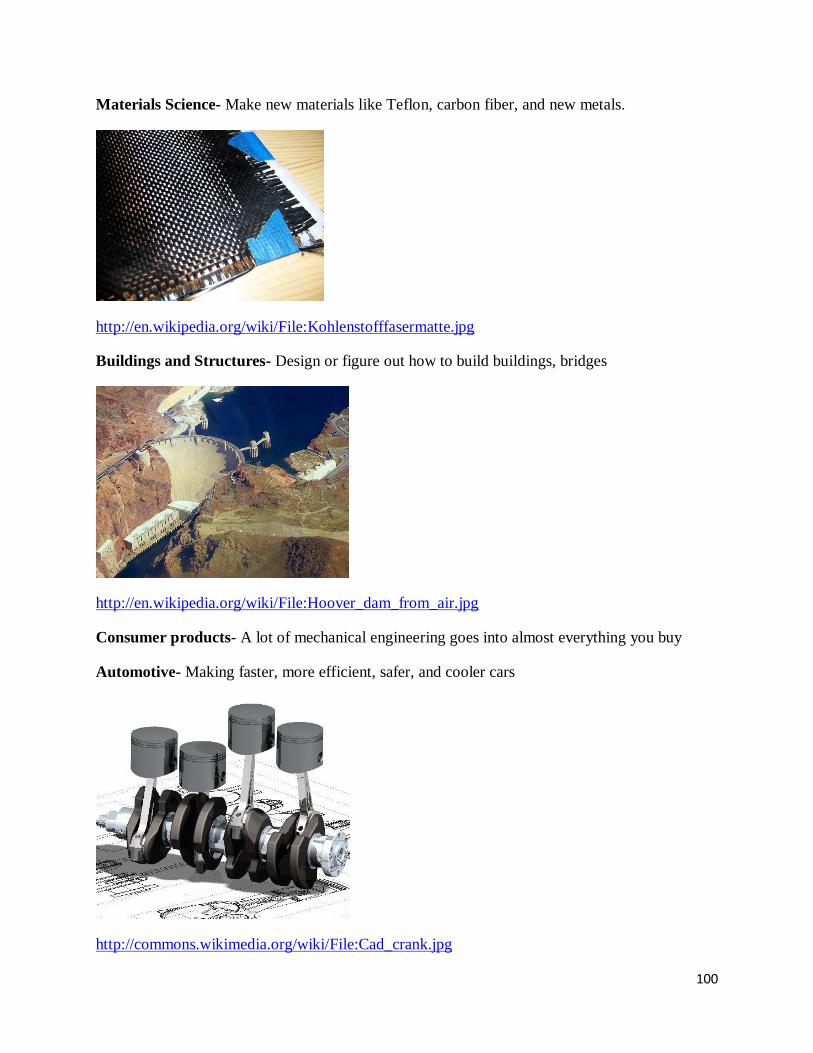
100
Materials Science- Make new materials like Teflon, carbon fiber, and new metals.
http://en.wikipedia.org/wiki/File:Kohlenstofffasermatte.jpg
Buildings and Structures- Design or figure out how to build buildings, bridges
http://en.wikipedia.org/wiki/File:Hoover_dam_from_air.jpg
Consumer products- A lot of mechanical engineering goes into almost everything you buy
Automotive- Making faster, more efficient, safer, and cooler cars
http://commons.wikimedia.org/wiki/File:Cad_crank.jpg
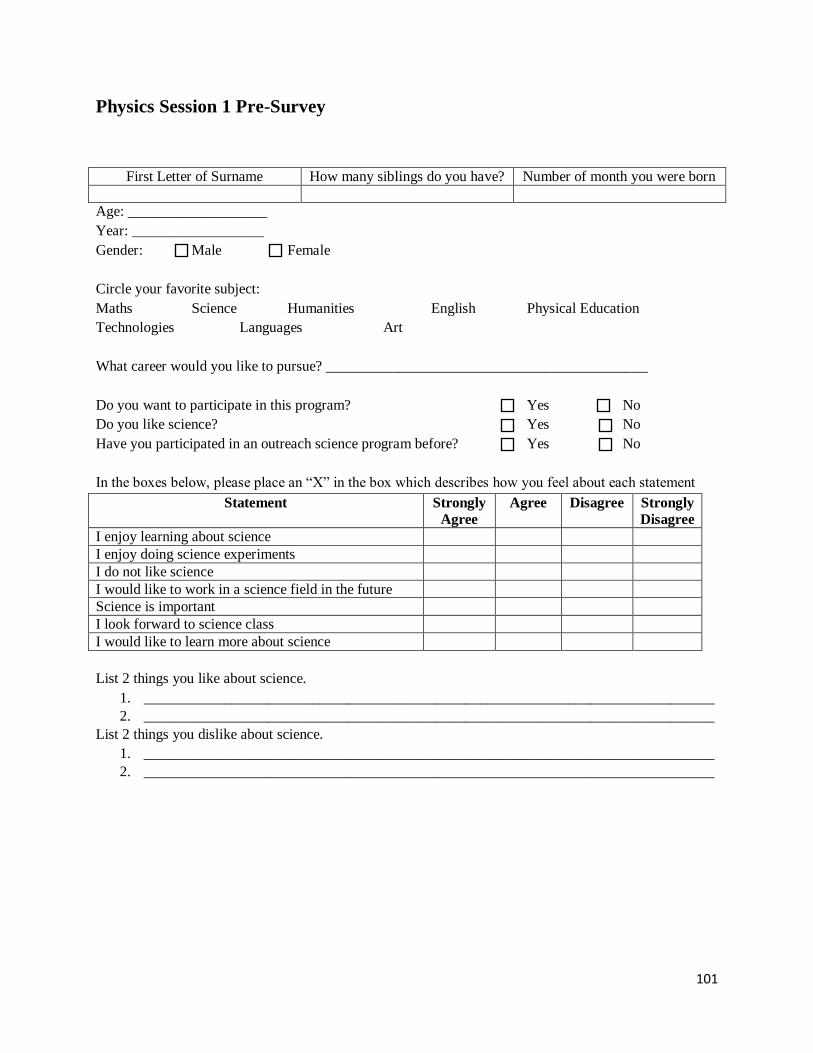
101
Physics Session 1 Pre-Survey
First Letter of Surname How many siblings do you have? Number of month you were born
Age: ___________________
Year: __________________
Gender: Male Female
Circle your favorite subject:
Maths Science Humanities English Physical Education
Technologies Languages Art
What career would you like to pursue? ____________________________________________
Do you want to participate in this program? Yes No
Do you like science? Yes No
Have you participated in an outreach science program before? Yes No
In the boxes below, please place an “X” in the box which describes how you feel about each statement
Statement Strongly
Agree
Agree Disagree Strongly
Disagree
I enjoy learning about science
I enjoy doing science experiments
I do not like science
I would like to work in a science field in the future
Science is important
I look forward to science class
I would like to learn more about science
List 2 things you like about science.
1. ______________________________________________________________________________
2. ______________________________________________________________________________
List 2 things you dislike about science.
1. ______________________________________________________________________________
2. ______________________________________________________________________________

102
Physics Session 1 Post-Survey
First Letter of Surname How many siblings do you have? Number of month you were born
Age: ___________________
Year: __________________
Gender: Male Female
Are you glad you participated in this program? Yes No
After the program, do you like science more? Yes No
Have you participated in an outreach science program before? Yes No
Rank the following activities (1 being your favourite and 2 being you least favourite):
___ Bridge Building
___ Egg Drop
In the boxes below, please place an “X” in the box which describes how you feel about each statement
Statement Strongly
Agree
Agree Disagree Strongly
Disagree
I enjoy learning about science
I enjoy doing science experiments
I do not like science
I would like to work in a science field in the future
Science is important
I look forward to science class
I would like to learn more about science
List 3 things you learned today:
1. ______________________________________________________________________________
2. ______________________________________________________________________________
3. ______________________________________________________________________________
List 2 things you would change about today’s program to make it more interesting:
1. ______________________________________________________________________________
2. ______________________________________________________________________________

103
Physics Session 2 Post-Survey
First Letter of Surname How many siblings do you have? Number of month you were born
Age: ___________________
Year: __________________
Gender: Male Female
Are you glad you participated in this program? Yes No
After the program, do you like science more? Yes No
Have you participated in an outreach science program before? Yes No
Rank the following activities (1 being your favourite and 3 being you least favourite):
___ Telephone Index Rope Pull
___ Catapult Building
___ Elastic Band Cars
In the boxes below, please place an “X” in the box which describes how you feel about each statement
Statement Strongly
Agree
Agree Disagree Strongly
Disagree
I enjoy learning about science
I enjoy doing science experiments
I do not like science
I would like to work in a science field in the future
Science is important
I look forward to science class
I would like to learn more about science
List 3 things you learned today:
1. ______________________________________________________________________________
2. ______________________________________________________________________________
3. ______________________________________________________________________________
List 2 things you would change about today’s program to make it more interesting:
1. ______________________________________________________________________________
2. ______________________________________________________________________________
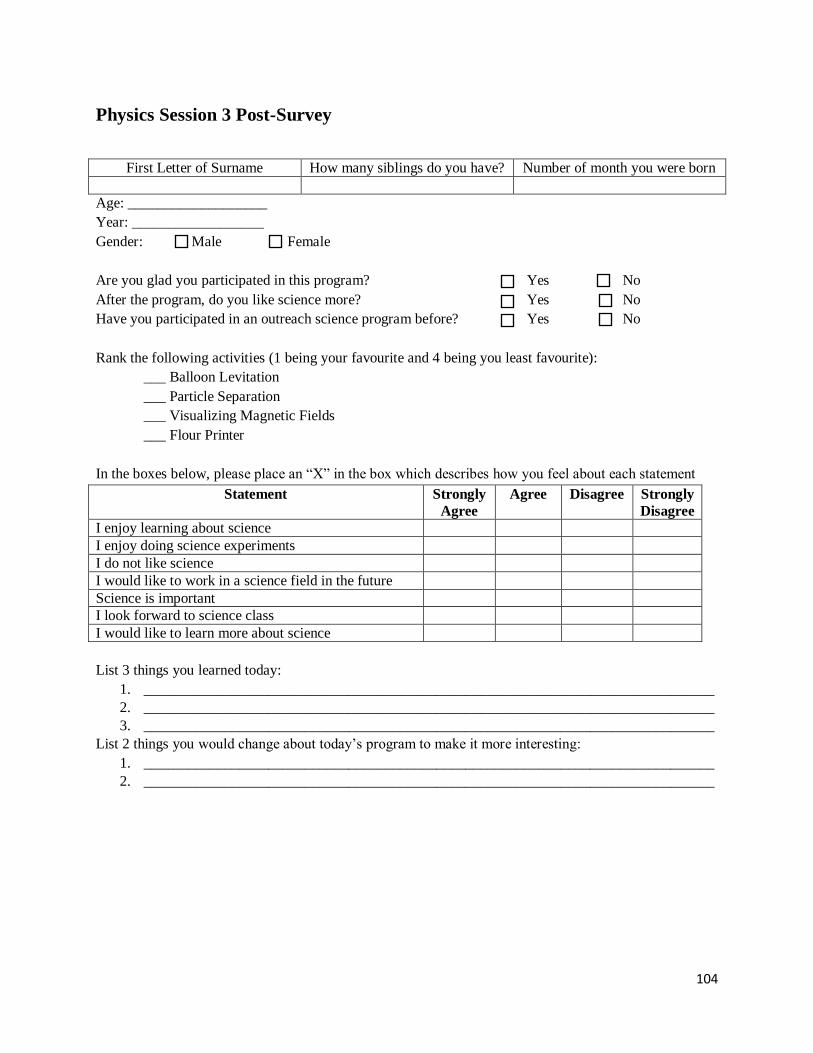
104
Physics Session 3 Post-Survey
First Letter of Surname How many siblings do you have? Number of month you were born
Age: ___________________
Year: __________________
Gender: Male Female
Are you glad you participated in this program? Yes No
After the program, do you like science more? Yes No
Have you participated in an outreach science program before? Yes No
Rank the following activities (1 being your favourite and 4 being you least favourite):
___ Balloon Levitation
___ Particle Separation
___ Visualizing Magnetic Fields
___ Flour Printer
In the boxes below, please place an “X” in the box which describes how you feel about each statement
Statement Strongly
Agree
Agree Disagree Strongly
Disagree
I enjoy learning about science
I enjoy doing science experiments
I do not like science
I would like to work in a science field in the future
Science is important
I look forward to science class
I would like to learn more about science
List 3 things you learned today:
1. ______________________________________________________________________________
2. ______________________________________________________________________________
3. ______________________________________________________________________________
List 2 things you would change about today’s program to make it more interesting:
1. ______________________________________________________________________________
2. ______________________________________________________________________________

105
Physics Session 4 Post-Survey
First Letter of Surname How many siblings do you have? Number of month you were born
Age: ___________________
Year: __________________
Gender: Male Female
What career would you like to pursue? ____________________________________________
Are you glad you participated in this program? Yes No
After the program, do you like science more? Yes No
Have you participated in an outreach science program before? Yes No
In the boxes below, please place an “X” in the box which describes how you feel about each statement
Statement Strongly
Agree
Agree Disagree Strongly
Disagree
I enjoy learning about science
I enjoy doing science experiments
I do not like science
I would like to work in a science field in the future
Science is important
I look forward to science class
I would like to learn more about science
List 3 things you learned today:
1. ______________________________________________________________________________
2. ______________________________________________________________________________
3. ______________________________________________________________________________
List 2 things you would change about today’s program to make it more interesting:
1. ______________________________________________________________________________
2. ______________________________________________________________________________
106
Physics
(Electricity and
Magnetism)

107
Balloon Levitation (10-15 Minutes)
Estimated Time for Activity: 10-15 minutes
Recommended Age Range: Year 5 – 12
Recommended Group Size: 2
Estimated Price for 25 Student Class: $3
Activity Subject: Static Electricity, physics
Summary: You can negatively charge balloons and strips of plastic bag by rubbing them on
your hair. If both a balloon and plastic bag are negatively charged, they repel each other. Using
that phenomenon, you can rub a balloon and plastic bag on your hair, then levitate the bag above
the balloon!
1. Background on Activity [Primary Facilitator]
Note: as this is a ‘wow factor’ activity, no material should be presented before the
demo.
2. Prepare Materials to Each Group [Primary Facilitator and Assistant]
- Balloon*
- Strip of plastic bag, cut into palm-sized squares, or loops*
3. Experiment Procedure [Primary Facilitator]
1. Build up charge on an inflated balloon and bag loop be rubbing each on your hair.
It helps to have a partner to charge his own object.
2. One person spread out bag loop and release it about 30cm over balloon.
3. Person with balloon ‘balances’ ring above balloon.
4. Students try the levitation themselves. (possibly in the form of a race between a
group of students)
5. Group Facilitators work with group to figure out why this happens.
6. Primary Facilitator goes over calculation for force and charge on ring.
7. Group Facilitators work with group to figure out how much charge it would take
to lift a student 10cm.
8. Primary Facilitator leads discussion on findings as a class.
How much charge would you need to lift the same student 20cm? 10m?
(inverse square law)
4. Facilitator Questions and Hints [Group Facilitators]
1. Coulomb’s law:
F = (k*Q1*Q2)/d2
2. What Charge is present on the balloon and the bag
i. Negative Charge
3. Why doesn’t the plastic bag fly away?
* Provided by Banksia

108
i. A. The electric force gets weaker much faster than the gravity of earth. The
height it goes to is the height at which the forces of gravity and electric
repulsion are equal.
5. Discussion/Take Away[Primary Facilitator]
1. The plastic of the bag and balloon both have a negative TriboElectric values. So
they both become negatively charged when rubbed on hair
2. Like charges repel
3. Coulomb’s Law: F = (k*Q1*Q2)/d2
4. Inverse Square law
5. Math for ring height:
F=m*g = 9.81[m/s2]*.05[kg]=4.905[N]
4.905[N]=9x10⁹[Nm
2/C
2]* Q1*Q2/.1
2[m
2]
Q1*Q2=4.905[N]*.12 [m
2]/9x10
9[Nm
2/C
2]
Q1*Q2=5.45x10⁻¹² [C]
Q1= Q2 =2.33x10⁻⁶
[C]
Minimum total charge needed: 4.66x10⁻⁶
[C]
6. Math for Student (10cm):
F=m*g = 9.81[m/s2]*60[kg]=588.6[N]
588.6[N]=9x10⁹[Nm
2/C
2]*Q1* Q2/.1
2[m
2]
Q1*Q2=588.6 [N]*.12 [m
2]/(9x10
9[Nm
2/C
2])
Q2=Q1=2.55734x10⁻⁵[C]
Minimum total charge needed: 5.11x10⁻⁵
[C]
7. Math for Student(10m):
Minimum total charge needed: 5.11x10⁻¹
[C]
6.24x10^19 [e-] per [C]
Recommendations for Implementation
Wool can also be used to charge the plastic and balloons, but we had the best luck with
dry hair.
This experiment works better on dry days.
Different shapes of bags, like squares, rings, tassels, have an effect on how well they
levitate.

109
Graphics for Presentation
Citation:
http://www.thenakedscientists.com/HTML/content/kitchenscience/exp/levitating-plastic-bags/
http://www.stevespanglerscience.com/lab/experiments/static-flyer-flying-bag
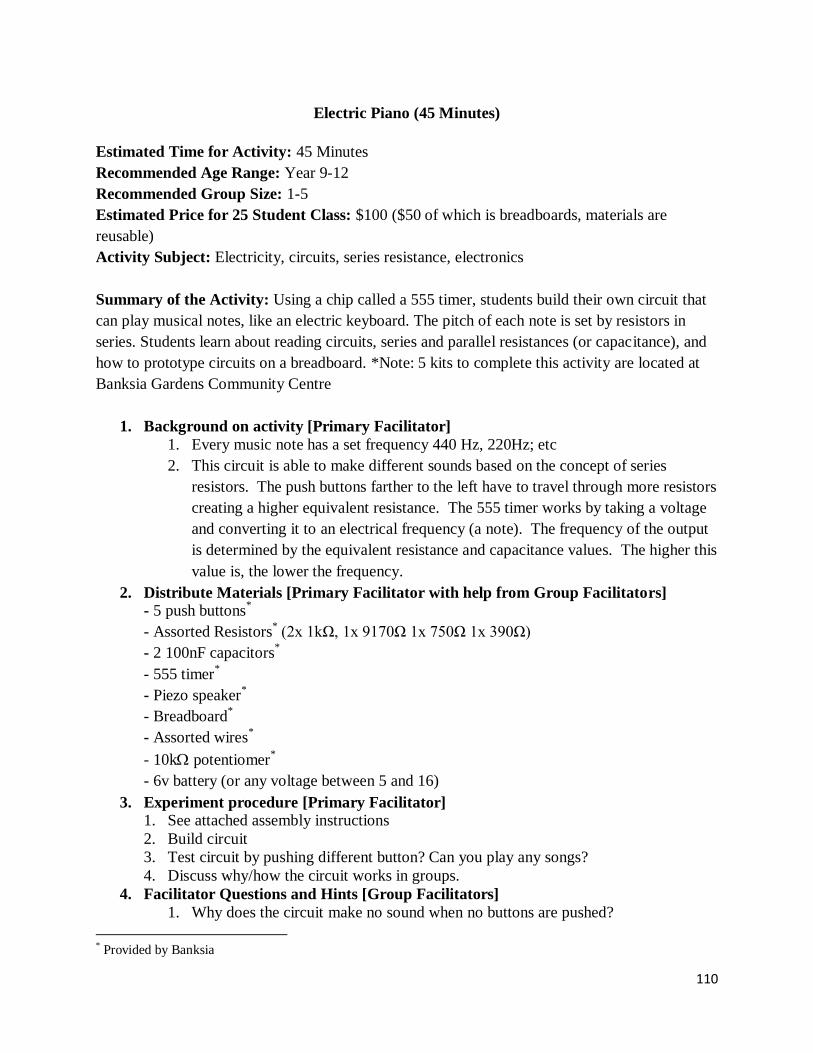
110
Electric Piano (45 Minutes)
Estimated Time for Activity: 45 Minutes
Recommended Age Range: Year 9-12
Recommended Group Size: 1-5
Estimated Price for 25 Student Class: $100 ($50 of which is breadboards, materials are
reusable)
Activity Subject: Electricity, circuits, series resistance, electronics
Summary of the Activity: Using a chip called a 555 timer, students build their own circuit that
can play musical notes, like an electric keyboard. The pitch of each note is set by resistors in
series. Students learn about reading circuits, series and parallel resistances (or capacitance), and
how to prototype circuits on a breadboard. *Note: 5 kits to complete this activity are located at
Banksia Gardens Community Centre
1. Background on activity [Primary Facilitator]
1. Every music note has a set frequency 440 Hz, 220Hz; etc
2. This circuit is able to make different sounds based on the concept of series
resistors. The push buttons farther to the left have to travel through more resistors
creating a higher equivalent resistance. The 555 timer works by taking a voltage
and converting it to an electrical frequency (a note). The frequency of the output
is determined by the equivalent resistance and capacitance values. The higher this
value is, the lower the frequency.
2. Distribute Materials [Primary Facilitator with help from Group Facilitators]
- 5 push buttons*
- Assorted Resistors* (2x 1kΩ, 1x 9170Ω 1x 750Ω 1x 390Ω)
- 2 100nF capacitors*
- 555 timer*
- Piezo speaker*
- Breadboard*
- Assorted wires*
- 10k potentiomer*
- 6v battery (or any voltage between 5 and 16)
3. Experiment procedure [Primary Facilitator]
1. See attached assembly instructions
2. Build circuit
3. Test circuit by pushing different button? Can you play any songs?
4. Discuss why/how the circuit works in groups.
4. Facilitator Questions and Hints [Group Facilitators]
1. Why does the circuit make no sound when no buttons are pushed?
* Provided by Banksia
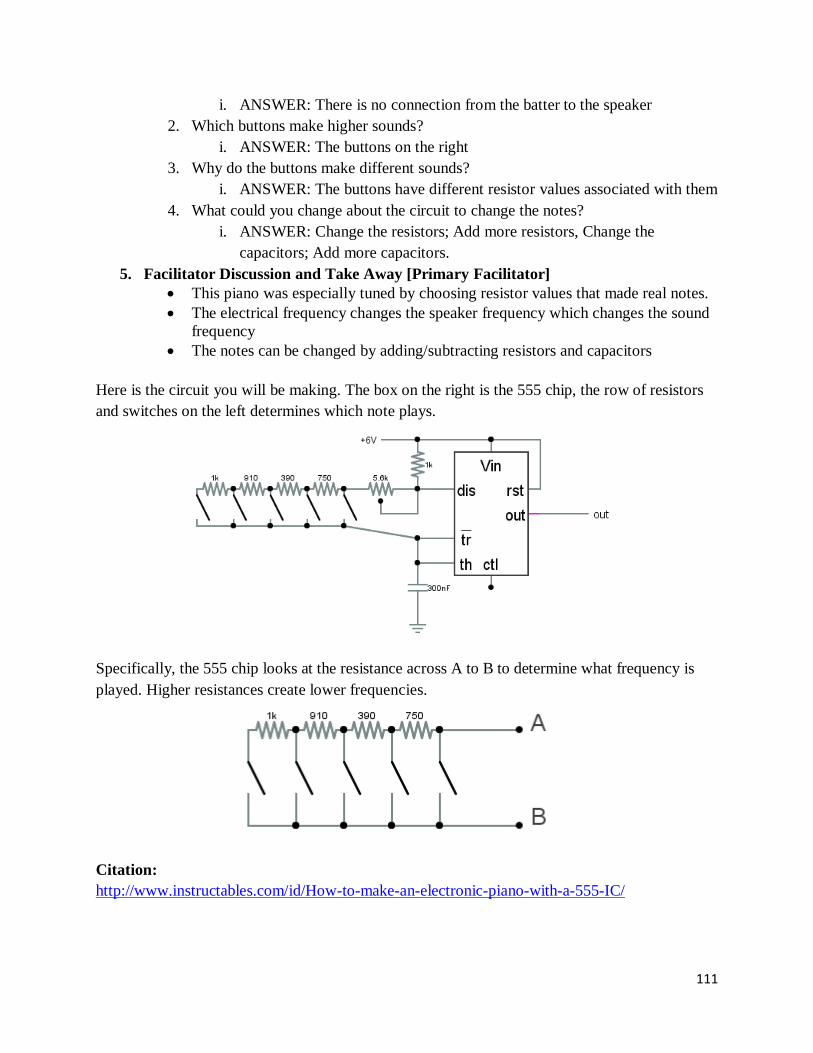
111
i. ANSWER: There is no connection from the batter to the speaker
2. Which buttons make higher sounds?
i. ANSWER: The buttons on the right
3. Why do the buttons make different sounds?
i. ANSWER: The buttons have different resistor values associated with them
4. What could you change about the circuit to change the notes?
i. ANSWER: Change the resistors; Add more resistors, Change the
capacitors; Add more capacitors.
5. Facilitator Discussion and Take Away [Primary Facilitator]
This piano was especially tuned by choosing resistor values that made real notes.
The electrical frequency changes the speaker frequency which changes the sound
frequency
The notes can be changed by adding/subtracting resistors and capacitors
Here is the circuit you will be making. The box on the right is the 555 chip, the row of resistors
and switches on the left determines which note plays.
Specifically, the 555 chip looks at the resistance across A to B to determine what frequency is
played. Higher resistances create lower frequencies.
Citation:
http://www.instructables.com/id/How-to-make-an-electronic-piano-with-a-555-IC/

112
Assembly Procedure
Step 1:
Note the buttons may not stay in, if this happens just put Key:
Them lightly in the holes
Step 2:
Note: The dot (circled in red) MUST be in the bottom
left-hand corner.
Also the 2 capacitors go into the same columns
Step 3:
Note: the Potentiometer in the picture is a different size
than the one you have. The up-down position does not
matter, so long as the pins are in columns 17,18, and
19. The 5 holes in each a column are connected.

113
Step 4:
Note: The colours on the resistors matter! (From left to right 1kΩ, 910Ω, 3970Ω, 750Ω)
Step 5: Ask for battery after everything else is complete.
This is the circuit diagram of the
circuit on the board. The resistors and
buttons are on the left. The box on
the right is the 555 timer
The frequency (or note) that the 555
chip makes depends on the resistance
between points A and B. Higher
resistance makes a lower note.

114
Particle Separation (15 Minutes)
Estimated Time for Activity: 15 Minutes
Recommended Age Range: Years 7-10
Recommended Group Size: 3-5 students
Estimated Price for 25 Student Class: $12
Activity Subject: Static Electricity Forces
Summary of the Activity: Students are challenged to separate the pepper out of a pile of salt
and pepper, as fast as they can. The most effective way is to use static electricity to pick up the
pepper, but not the salt. They learn about static charge, force, and how laser printers and
photocopiers use static electricity.
1. Background on Activity [Primary Facilitator]
1. Charged objects can attract neutral objects [ask class why?]
2. A charged object brought near neutral objects polarizes them
3. The like charges are farther away than the un-like charges so attraction occurs
2. Prepare Materials to Each Group [Primary Facilitator and Assistant]
- Balloon or plastic spoons*
- Salt*
- Pepper
*
3. Experiment Procedure [Primary Facilitator]
1. Find a way to separate the salt from the pepper.
2. The fastest/easiest way is the best!
3. Brainstorm real world applications for this.
4. Facilitator Questions and Hints [Group Facilitators]
1. What are the differences between salt and pepper that you could use to separate
them
i. ANSWER: (colour, texture, size, weight*) weight is the correct answer
For applications:
2. When would you need to separate to things without touching them?
i. ANSWER: When the things are very small (smoke stack, air filter)
ii. ANSWER: When separation would be difficult or time consuming
(recycling)
iii. ANSWER: When touching the things could be dangerous (to you or them)
3. When would you want to remove small particles from a mixture?
i. ANSWER: Cleaning air (AC, smoke stack)
ii. ANSWER: Cleaning water (water treatment and/or purification)
* Provided by Banksia

115
5. Discussion/Take Away[Primary Facilitator]
The best way (with given materials) is using static electricity
Applications of this:
o Smoke stack air filters
o General purpose air filters such as in AC units
Why would something like a mesh filter not work as well?
o What happens when it gets clogged?
Recycling (usually magnets are used for this but the idea is on the right track)
Citation:
http://www.chem.ufl.edu/~saacs/outreach/Separate%20Salt%20and%20Pepper%20with%20Stati
c%20Electricity.pdf
116
Pepper Printer (30 Minutes)
Estimated Time for Activity: 30 minutes
Recommended Age Range: Years 8 - 12
Recommended Group Size: 3-5
Estimated Price for 25 Student Class: $13
Activity Subject: Static Electricity, Laser printers and photocopiers
Summary of the Activity: Students apply a static charge to a sheet of plastic, but through a
paper stencil. The paper does not let charge pass through it, so the plastic sheet only has charge
in the cut out areas of the paper. When flour or pepper is then dusted across the plastic, it will
only stick to the charged areas, revealing an image of the stencil, even after the stencil is gone!
This is how laser printers and photocopiers work.
1. Background on activity [Primary Facilitator]
1. On non-conductive materials, like plastic, static charges don’t usually spread all
around the surface. This experiment demonstrates that a charge will stay where it
is applied on a plastic surface, and relate this behaviour to photocopiers. When
you rub a plastic sheet with wool, it accumulates a negative charge. Putting a
paper stencil between the wool and plastic prevents the entire sheet from
becoming charged. When the paper stencil is removed, only the exposed areas of
the plastic have a charge. This is then visualized by holding the plastic over a
plate of pepper, which will only stick to the charged areas, creating an image of
the stencil on the plastic sheet, even though the stencil is gone!
2. Distribute Materials [Primary Facilitator with help from Group Facilitators]
-Plastic Sheets – margarine lids, laminated paper, or plastic envelopes will work*
-Wool or a dry head of hair*
-Sheets of paper*
-Scissors
-Ground pepper or flour- pepper if the sheet is a light colour, flour if dark*
-Plates or paper towels to contain the pepper*
3. Experiment procedure [Primary Facilitator]
1. Cut the paper down so that it will fit on the plastic sheet, then cut a shape from the
middle of the paper to create a stencil. The shapes should be simple and large, like a
bolt letter.
2. Tape the stencil to the plastic sheet.
3. Rub the wool on the plastic that shows through the stencil.
4. Carefully peel off the stencil, making sure not to touch the exposed section with your
hands or the stencil itself.
* Provided by Banksia
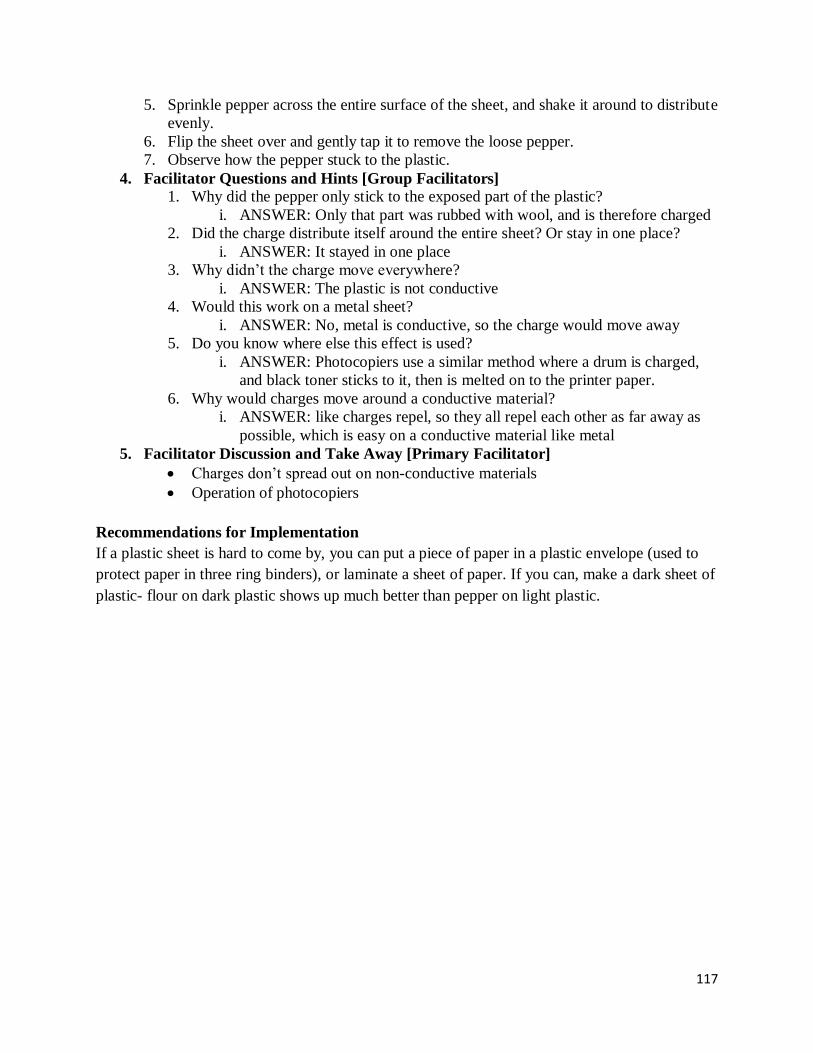
117
5. Sprinkle pepper across the entire surface of the sheet, and shake it around to distribute
evenly.
6. Flip the sheet over and gently tap it to remove the loose pepper.
7. Observe how the pepper stuck to the plastic.
4. Facilitator Questions and Hints [Group Facilitators]
1. Why did the pepper only stick to the exposed part of the plastic?
i. ANSWER: Only that part was rubbed with wool, and is therefore charged
2. Did the charge distribute itself around the entire sheet? Or stay in one place?
i. ANSWER: It stayed in one place
3. Why didn’t the charge move everywhere?
i. ANSWER: The plastic is not conductive
4. Would this work on a metal sheet?
i. ANSWER: No, metal is conductive, so the charge would move away
5. Do you know where else this effect is used?
i. ANSWER: Photocopiers use a similar method where a drum is charged,
and black toner sticks to it, then is melted on to the printer paper.
6. Why would charges move around a conductive material?
i. ANSWER: like charges repel, so they all repel each other as far away as
possible, which is easy on a conductive material like metal
5. Facilitator Discussion and Take Away [Primary Facilitator]
Charges don’t spread out on non-conductive materials
Operation of photocopiers
Recommendations for Implementation
If a plastic sheet is hard to come by, you can put a piece of paper in a plastic envelope (used to
protect paper in three ring binders), or laminate a sheet of paper. If you can, make a dark sheet of
plastic- flour on dark plastic shows up much better than pepper on light plastic.

118
Graphics for Presentation
Citation:
http://www.charlesedisonfund.org/experiments/Edison-pdf/edison_ch9.pdf page 12
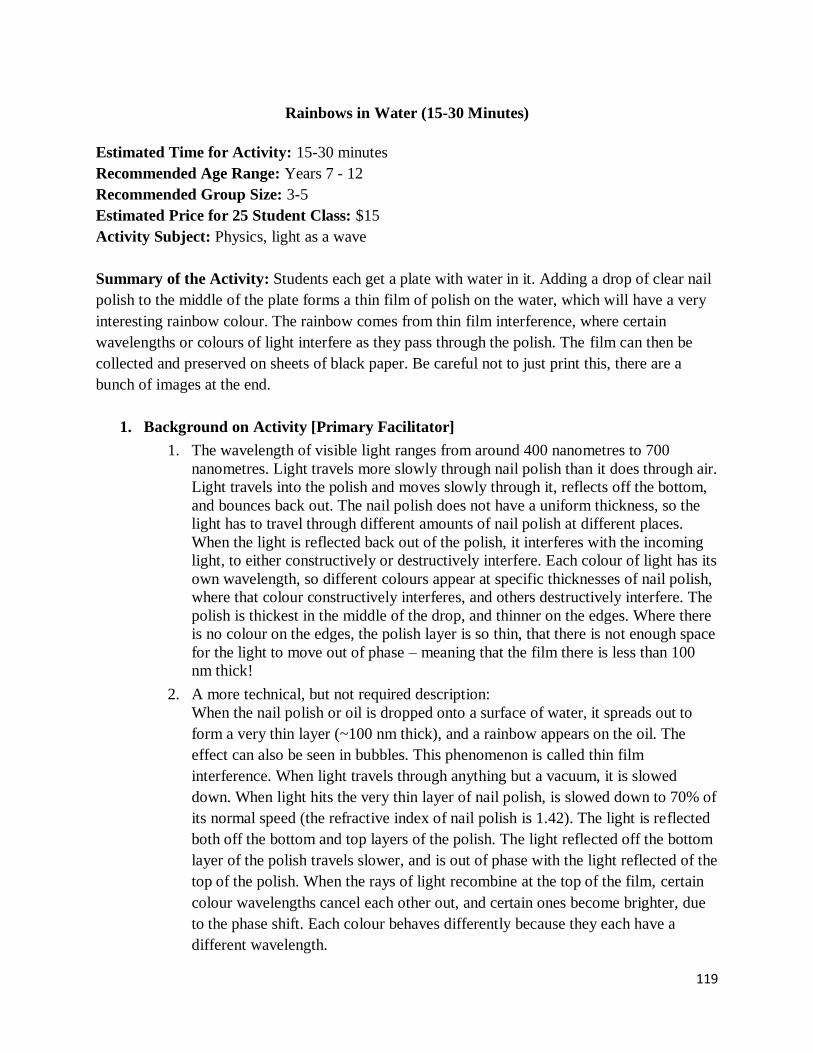
119
Rainbows in Water (15-30 Minutes)
Estimated Time for Activity: 15-30 minutes
Recommended Age Range: Years 7 - 12
Recommended Group Size: 3-5
Estimated Price for 25 Student Class: $15
Activity Subject: Physics, light as a wave
Summary of the Activity: Students each get a plate with water in it. Adding a drop of clear nail
polish to the middle of the plate forms a thin film of polish on the water, which will have a very
interesting rainbow colour. The rainbow comes from thin film interference, where certain
wavelengths or colours of light interfere as they pass through the polish. The film can then be
collected and preserved on sheets of black paper. Be careful not to just print this, there are a
bunch of images at the end.
1. Background on Activity [Primary Facilitator]
1. The wavelength of visible light ranges from around 400 nanometres to 700
nanometres. Light travels more slowly through nail polish than it does through air.
Light travels into the polish and moves slowly through it, reflects off the bottom,
and bounces back out. The nail polish does not have a uniform thickness, so the
light has to travel through different amounts of nail polish at different places.
When the light is reflected back out of the polish, it interferes with the incoming
light, to either constructively or destructively interfere. Each colour of light has its
own wavelength, so different colours appear at specific thicknesses of nail polish,
where that colour constructively interferes, and others destructively interfere. The
polish is thickest in the middle of the drop, and thinner on the edges. Where there
is no colour on the edges, the polish layer is so thin, that there is not enough space
for the light to move out of phase – meaning that the film there is less than 100
nm thick!
2. A more technical, but not required description:
When the nail polish or oil is dropped onto a surface of water, it spreads out to
form a very thin layer (~100 nm thick), and a rainbow appears on the oil. The
effect can also be seen in bubbles. This phenomenon is called thin film
interference. When light travels through anything but a vacuum, it is slowed
down. When light hits the very thin layer of nail polish, is slowed down to 70% of
its normal speed (the refractive index of nail polish is 1.42). The light is reflected
both off the bottom and top layers of the polish. The light reflected off the bottom
layer of the polish travels slower, and is out of phase with the light reflected of the
top of the polish. When the rays of light recombine at the top of the film, certain
colour wavelengths cancel each other out, and certain ones become brighter, due
to the phase shift. Each colour behaves differently because they each have a
different wavelength.

120
2. Distribute Materials [Primary Facilitator with help from Group Facilitators]
- Plastic plates or pie tins*
-Black construction paper, cut to fit in the bottom of the plates*
-A drop of nail polish per team*
- Paper towels
3. Experiment procedure [Primary Facilitator]
1. Place the black paper in the bottom of the plate
2. Carefully fill the plate halfway full with water. The water should at least
completely cover the paper.
3. Hold the paper down to the bottom of the plate by its edges. It’s important that it
does not come up in the next step.
4. Let one drop of nail polish to fall in the centre of the plate, and wait 10 seconds
for it to spread out.
5. Allow the polish to dry for 5 minutes. The edges will crinkle a little bit as the film
dries.
6. Reach around the film to grab the black paper by one corner. Pull it out slowly,
allowing the paper to touch the film. The entire film should stick to the paper as it
is removed.
7. Let the paper dry on paper towels.
4. Facilitator Questions and Hints [Group Facilitators]
1. Where else do we see this pattern?
i. ANSWER: bubbles, oil in a car park, bugs, CDs, rainbow coloured bugs
2. What do these things have in common?
i. ANSWER: thin films
3. What colours make up white light?
i. ANSWER: all the visible colours
4. Visible light has a wavelength of around 400nm for violet, 600 for red.
5. Where is the film thickest?
i. ANSWER: In the middle, you can tell by the colour rings
6. Why are the edges not coloured?
i. ANSWER: The film is too thin to effect the light
7. Where do the multiple colours come from?
i. ANSWER: each colour has a different wavelength, so can only
constructively interfere at one thickness of oil
5. Facilitator Discussion and Take Away [Primary Facilitator]
Light can interfere with itself, both constructively and destructively.
Light travels slower in different mediums.
On a thin film, the light reflected from the top and bottom of the film interfere.
The films are very thin, around 100 nm (1/4 – 1/6 the wavelength of light)
The rainbow of colours appears because the film has a varying thickness. Each
colour (wavelength) of light fits a certain thickness exactly, causing either
constructive or destructive interference.
* Provided by Banksia
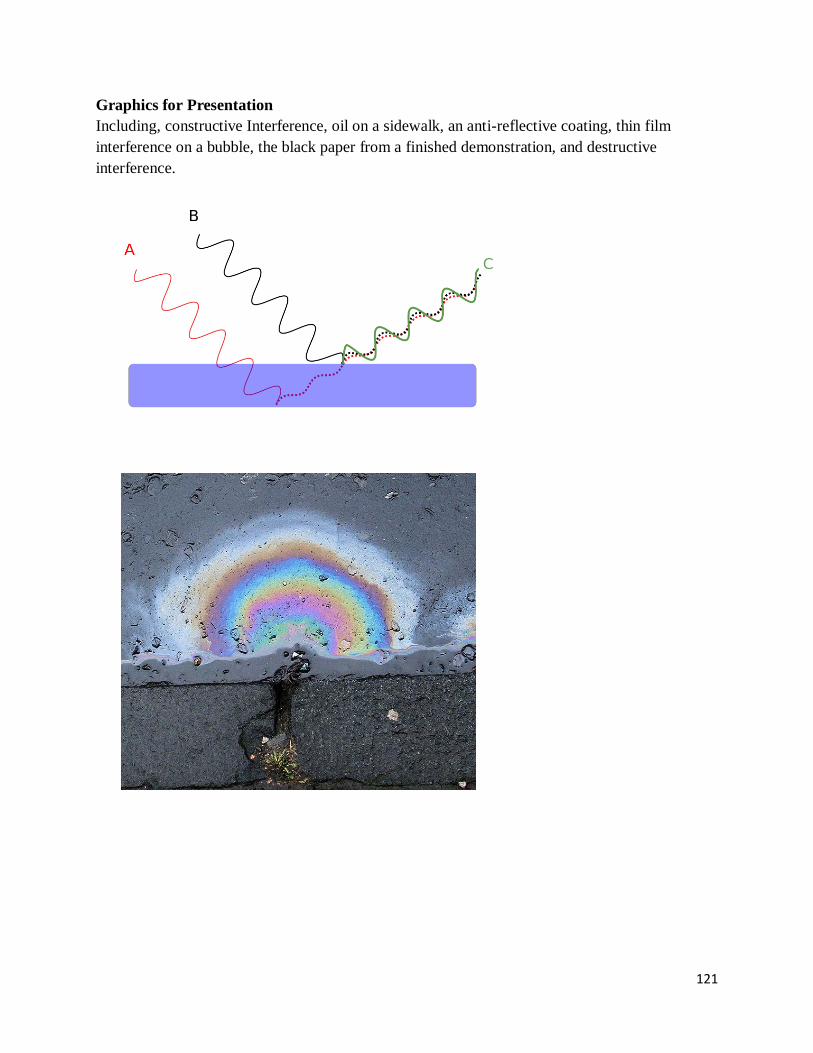
121
Graphics for Presentation
Including, constructive Interference, oil on a sidewalk, an anti-reflective coating, thin film
interference on a bubble, the black paper from a finished demonstration, and destructive
interference.
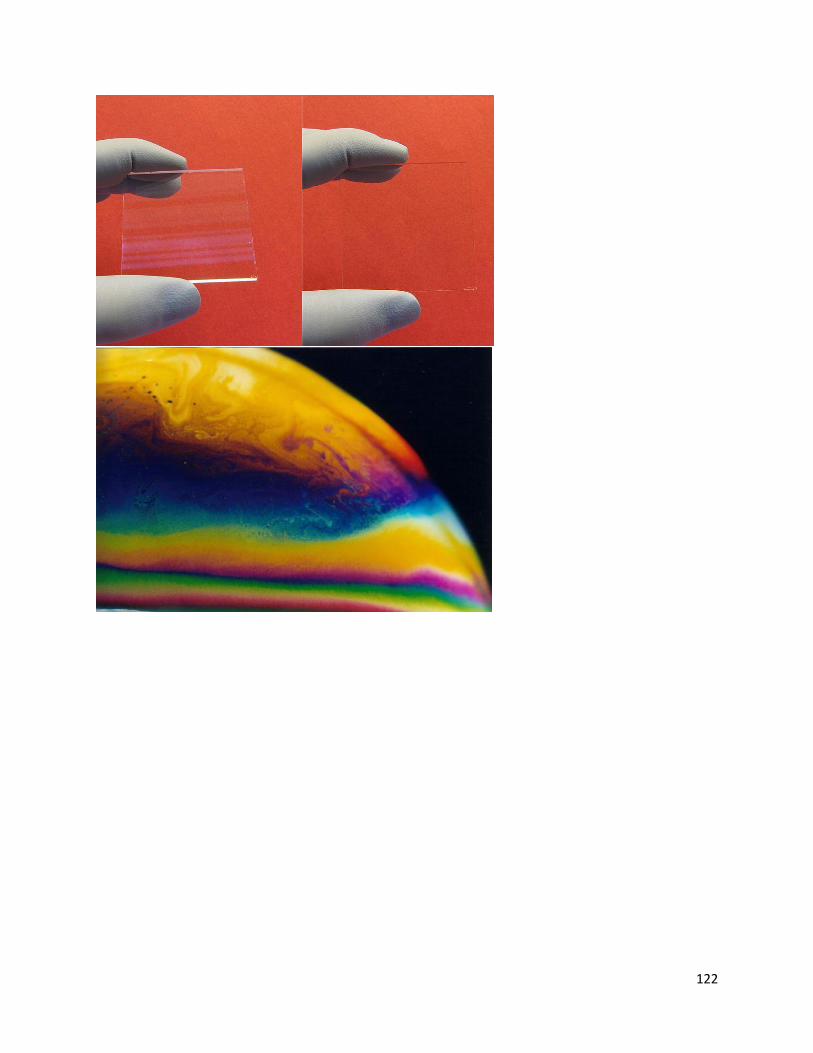
122
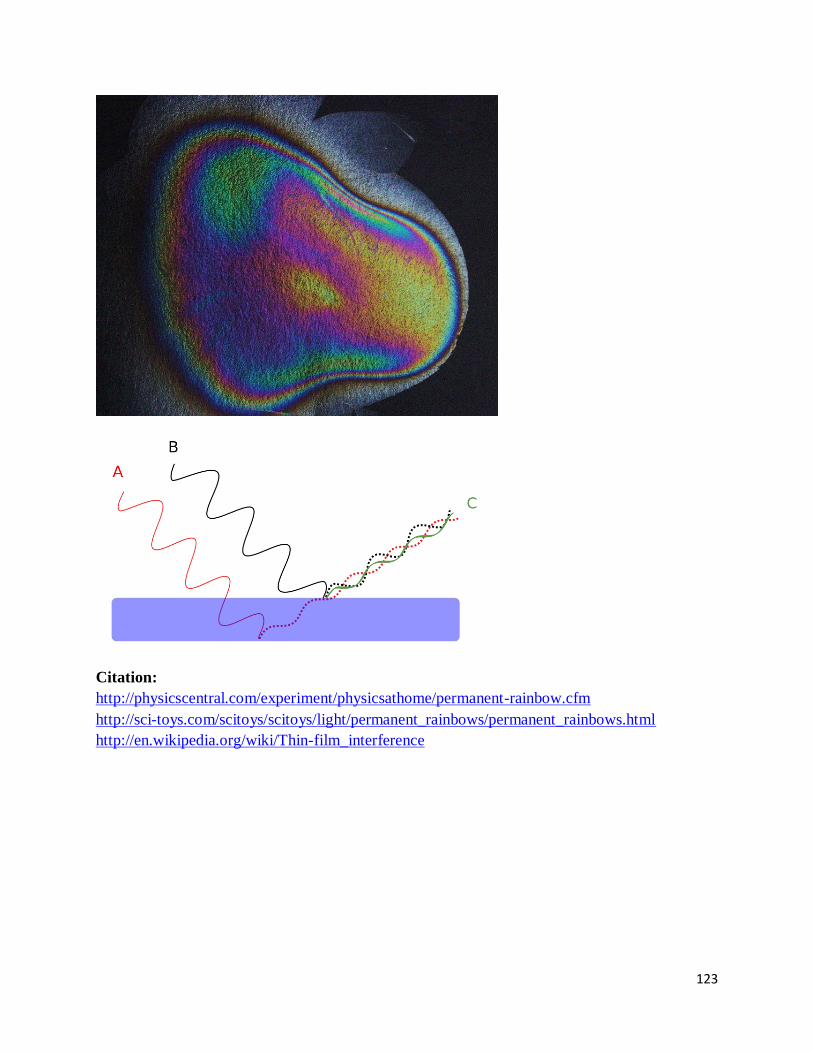
123
Citation:
http://physicscentral.com/experiment/physicsathome/permanent-rainbow.cfm
http://sci-toys.com/scitoys/scitoys/light/permanent_rainbows/permanent_rainbows.html
http://en.wikipedia.org/wiki/Thin-film_interference

124
Visualizing Magnetic Fields (20-30 Minutes)
Estimated Time for Activity: 20-30 minutes
Recommended Age Range: Years 8-12
Recommended Group Size: 1-3
Estimated Price for 25 Student Class: $20
Activity Subject: Magnetism
Summary of the Activity: Using iron filings, students can visualize magnetic field lines.
The field lines show up when a magnet is held underneath a paper covered in iron filings, and in
three dimensions when a magnet is held near a bottle of cooking oil with iron filings mixed in.
1. Background on Activity [Primary Facilitator]
1. Magnetic fields are strongest near a magnet, and become weaker father away.
2. In the presence of a magnetic field, iron filings will align themselves along the
magnetic field lines, which are all closed loops that go from north poles to south
poles.
3. When an unmagnetized piece of iron (in this case, each iron filing) is in a
magnetic field, it becomes a magnet. The magnetic field induces a smaller
magnetic field in each piece of iron.
4. When all the particles of iron act like magnets, they line up along the magnetic
field lines, which go between north and south.
5. Because the field cannot have 2 magnitudes at one spot, the lines can’t intersect.
2. Distribute Materials to Each Group [All Facilitators]
- Magnets- at least coin-sized, one for each student or group*
- Disposable plates, or sheets of paper*
- Iron filings- ½ tablespoon for each group*
- OPTIONAL- A compass for each group
- Tape*
Note: If iron filings are not available, steel wool can be cut into small pieces with scissors
3. Experiment Procedure [Primary Facilitator]
1. Have each group tape their magnet to the bottom of a plate or sheet of paper.
2. If the students have compasses, they can move the compass around the paper or
plate, and at each point, draw an arrow in the direction that the compass is
pointing. Be careful not to touch the compass to the magnet, because that could
break the compass by magnetizing it the wrong way.
3. Sprinkle a teaspoon of iron or steel wool filings on the plate, and gently shake
them around. Observe the pattern they create. Is it similar to the arrows?
4. If more magnets are available, try positioning 2 or more magnets under the plate,
to see how the magnetic fields interact with each other.
* Provided by Banksia

125
5. Shake the bottle of oil to mix up the fragments of steel wool. Bring a magnet near
the edge of the container, and watch the steel wool inside. The shape it creates is a
3 dimensional reorientation of the magnetic field lines.
4. Facilitator Questions and Hints [Group Facilitators]
1. What does the map the compass arrows remind you of?
i. ANSWER: pictures of magnetic field lines
2. What does the shape of the iron filings look like, compared to the arrows?
i. ANSWER: they follow the same pattern
3. What is different about the iron in the oil and on the paper?
i. ANSWER: one forms a 2D field, and one forms a 3D field
4. Where does it look like the magnetic field is strongest?
i. ANSWER: around the poles, where the iron is most closely grouped
5. Discussion/Take Away[Primary Facilitator]
Magnetic field lines run from north to south
Recommendations for Implementation
Sheets of paper or paper plates work well to hold iron filings. After finishing the
experiment, the plate or paper can be folded, to pour the iron back into a single
container for the class. For more of a wow-factor, you could try to find some
ferrofluid, which is very impressive and fun to play with.
Graphics for Presentation
Citations:
http://www.teachengineering.org/view_activity.php?url=collection/van_/activities/van_mri_act_l
ess_1/van_mri_act_less_1.xml
http://lasp.colorado.edu/home/wp-content/uploads/2011/08/P1-2_3D_field.pdf
126
Physics
(Mechanics)

127
Angry Birds Fort Destruction (30-40 Minutes)
Estimated Time for Activity: 30-40 Minutes
Recommended Age Range: Years 4-10
Recommended Group Size: 3-5 students
Estimated Price for 25 Student Class: $11
Activity Subject: Design of structures, Projectile motion
Summary of the Activity: Students use marshmallows and spaghetti to build a structure and
once complete try to destroy it with projectiles fired from a catapult (see catapult building
activity). Not unlike the popular Smart phone game, Angry BirdsTM
.
1. Background on Activity [Primary Facilitator]
1. The key concept of this activity is strong structures. Triangles are one of the
strongest shapes. Spaghetti has very low shear stress (bending and buckling) and
somewhat higher tensile strength (pulling). Multiple small length of spaghetti
will make for a strong structure.
2. Distribute Materials to Each Group [All Facilitators]
- Spaghetti*
- Mashmallows*
3. Experiment Procedure [Primary Facilitator]
1. Build a fort with the spaghetti and marshmallows
2. Try to demolish the fort by launching marshmallows at it with the catapult
4. Facilitator Questions and Hints [Group Facilitators]
1. What shapes make a strong structure?
i. ANSWER: Triangles
2. How easy or hard is it to break a long piece of spaghetti?
i. ANSWER: Easy
3. How about a short piece?
i. ANSWER: Hard(er)
5. Discussion/Take Away[Primary Facilitator]
Strong structures will be composed of triangles and short lengths of spaghetti.
Longer lengths of spaghetti are easier to break.
Recommendations for Implementation
You can combine this activity with the catapult building activity.
You can relate this activity to certain careers:
o Civil engineers - A scientists who designs the construction of buildings, roads,
bridges and dams. Further specialist areas such as transportation, water
resources, surveying and construction.
Citation
http://www.sciencekids.co.nz/sciencefacts/engineering/typesofengineeringjobs.html http://www.wpi.edu/Pubs/E-project/Available/E-project-022813-034020/
* Provided by Banksia
128
Bridge Building (45 Minutes)
Estimated Time for Activity: 45 min
Recommended Age Range: years 6-10
Recommended Group Size: 3-5 students
Estimated Price for 25 Student Class: $6
Activity Subject: Design of structures
Summary of the Activity: Students design and build a bridge out of gum (spice) drops and
toothpicks to span 20cm and hold 2kg of weight.
1. Background on Activity [Primary Facilitator]
The strongest shapes are triangles. Students will have to find a way to make a bridge
support the weight and not break.
Key Terms and Definitions
o Truss - A truss usually takes the form of a triangle or combination of triangles,
since this design the greatest rigidity. Trusses are used for large spans and
heavy loads, especially in bridges and roofs.
2. Distribute Materials to Each Group [All Facilitators]
-100 toothpicks* (per team)
-50 gum drops or spice drops* (
per team)
-bottles full of water to test bridges
3. Experiment Procedure [Primary Facilitator]
1. Students will build their toothpick and gumdrop bridges in teams. Bridges must
span at 20 centimeters and be at least 25 centimeters long.
2. Up to 2 kilograms of weight will be placed on top of the bridges; the bridge that
can hold the most weight wins! (bottles of water can be used for weights)
3. Students should be asked to think about what makes some teams’ bridges so much
stronger than others
4. Facilitator Questions and Hints [Group Facilitators]
1. What do you think makes bridges strong?
i. ANSWER: Triangles; thicker beams
2. What kinds of bridges have you seen and which do you think is the best choice for
this?
i. ANSWER: An arch bridge (cannot be made with these materials), a
suspension/cable bridge (cannot be made with these materials), and a span
Bridge (can be made with these materials)
5. Discussion/Take Away[Primary Facilitator]
Which bridge designs worked best and why?
You can relate this activity to certain careers:
o Civil engineer - A scientists who designs the construction of buildings, roads,
bridges and dams. Further specialist areas such as transportation, water
resources, surveying and construction.
* Provided by Banksia

129
Citation:
http://www.wpi.edu/Pubs/E-project/Available/E-project-022813-034020/
Experiment adapted from
http://9-dots.org/toothpick-gumdrop-bridges/
Definitions extracted from
http://encyclopedia2.thefreedictionary.com/Truss

130
Catapult Building (45 Minutes)
Estimated Time for Activity: 45 min
Recommended Age Range: years 8-12
Recommended Group Size: 3-5 Students
Estimated Price for 25 Student Class: $20
Activity Subject: Design of Structures, Projectile Motion
Summary of Activity: Students build catapults and use them to launch ‘rocks’ made of
cardboard to see whose can go the farthest.
1. Background on Activity [Primary Facilitator]
Energy can be stored by deforming elastic materials, this is called elastic potential
energy. The energy can then be turned into kinetic energy and motion of the
projectile.
Key Terms and Definitions:
o Projectile - any object that is cast, fired, flung, heaved, hurled, pitched, tossed,
or thrown
o Trajectory - the path a projectile follows
2. Distribute Materials to Each Group [All Facilitators]
- cardboard
- kebab skewers
- tape
- straws
- string
- elastic bands
- rulers
To make the projectile cut 2 circles of equal size out cardboard and cut a slit half-way
through each, then fit the 2 piece together as shown
131
3. Experiment Procedure [Primary Facilitator]
1. Ask the students to brain storm ideas for a catapult
2. Distribute materials to each group
3. Students build their designs
4. Test designs
4. Facilitator Questions and Hints [Group Facilitators]
1. What materials can be used to store energy?
i. Plastic rulers
ii. Rubber bands
iii. Straws (to a degree)
2. What angle seems to launch the projectile the farthest?
i. ANSWER: About 45 degrees
5. Discussion/Take Away[Primary Facilitator]
Catapults were first invented to hurl projectiles farther than any human could. The
spoon applies a force to the object that sends it into flight. The object follows a
parabolic path, which is an arch shape.
Recommendations for Implementation
You can relate this activity to certain careers:
o Aerospace engineer - A scientists who involves the design and construction of
planes and space shuttles. Aeronautical engineering covers craft that stay
inside the Earth’s atmosphere (such as commercial planes) while astronautical
engineering covers craft that leave the Earth’s atmosphere (such as space
shuttles).
o Physicist - A scientist who observes natural phenomena and use mathematics
to develop theories which help explain why they occur.
Ways to Expand the Activity:
o Combine with Angry Birds Fort Destruction
Citation:
http://www.wpi.edu/Pubs/E-project/Available/E-project-022813-034020/ Experiment adapted from
http://spaghettiboxkids.com/blog/easy-to-make-catapult-egg-carton-design/
Definitions extracted from
http://physics.info/projectiles/
http://www.sciencekids.co.nz/sciencefacts/engineering/typesofengineeringjobs.html

132
Egg Drop (45-60 Minutes)
Estimated Time for Activity: 45-60min
Recommended Age Range: years 4-12
Recommended Group Size: 3-5 students
Estimated Price for 25 Student Class: $23
Activity Subject: Physics; engineering
Summary of the Activity: Students work in teams to design and build a container for an egg
such that it will not break when dropped. The egg carriers are then dropped from a large height
to see whose will survive.
1. Background on Activity [Primary Facilitator]
1. The idea behind this activity is that of softening a force, known in physics as the
impulse. Impulse is the force divided by the time it is applied over. So to reduce the
impulse you can either decrease the force or increase the time, or both.
2. Distribute Materials to Each Group [All Facilitators]
- 1 Egg*
- 10 pieces of paper towels*
- 5 tissues*
- 10 cotton balls*
- 2 disposable cups*
- 50 cm String*
- 50 cm of tape*
- Scissors
3. Experiment Procedure [Primary Facilitator]
1. Teams have 20 minutes to create their design (don’t tell them they will have more
time later to redesign)
2. Drop the teams designs from the roof
3. Teams have 20 more minutes to re-design their vehicle
4. Test everyone’s a second time
5. Discuss what worked and didn’t work
4. Facilitator Questions and Hints [Group Facilitators]
1. What ways can you think to protect the egg?
2. What could you do to slow down the egg’s fall?
3. What could you do to cushion the egg?
5. Discussion/Take Away[Primary Facilitator]
The principals of reducing impulse is what is used in the safety features of an
automobile. The ‘crumple zone’ of a car does crumple as it’s name suggests and
increase the time that the crash takes. The airbag is designed to the same thing.
Another part of this activity is the engineering method, the process of testing an
idea and discussing what worked and didn’t work, and making changes.
Citation:
http://www.wpi.edu/Pubs/E-project/Available/E-project-022813-034020/
* Provided by Banksia
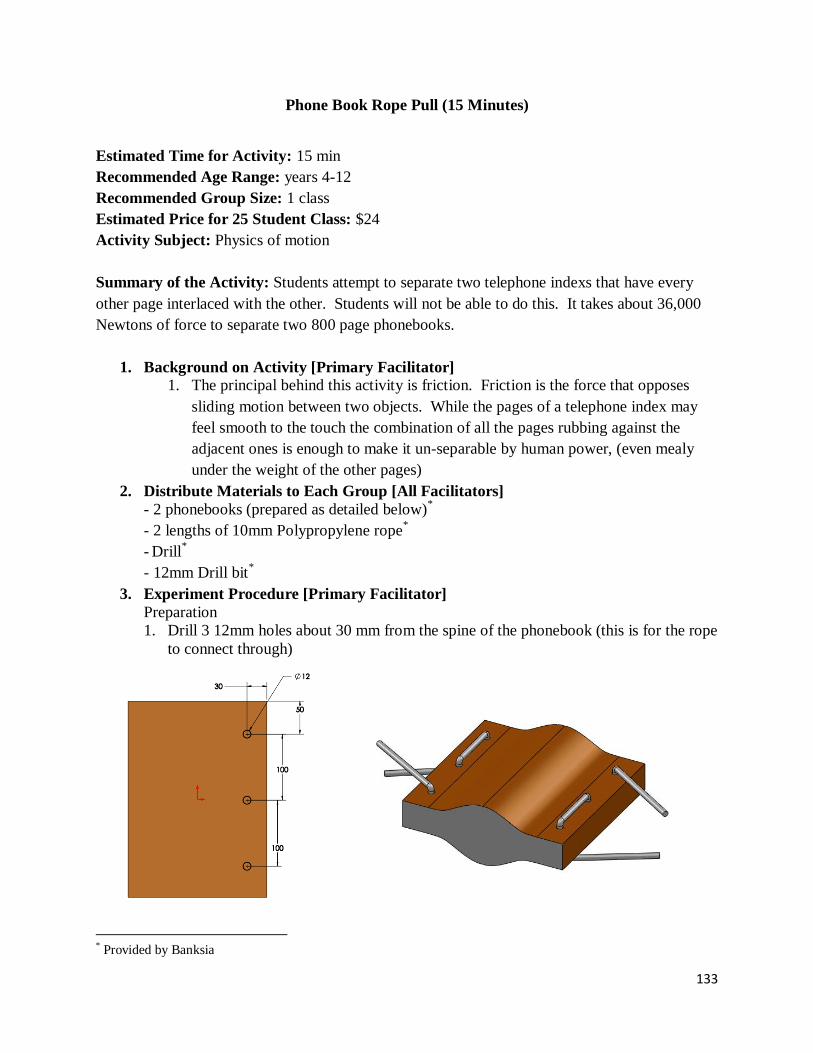
133
Phone Book Rope Pull (15 Minutes)
Estimated Time for Activity: 15 min
Recommended Age Range: years 4-12
Recommended Group Size: 1 class
Estimated Price for 25 Student Class: $24
Activity Subject: Physics of motion
Summary of the Activity: Students attempt to separate two telephone indexs that have every
other page interlaced with the other. Students will not be able to do this. It takes about 36,000
Newtons of force to separate two 800 page phonebooks.
1. Background on Activity [Primary Facilitator]
1. The principal behind this activity is friction. Friction is the force that opposes
sliding motion between two objects. While the pages of a telephone index may
feel smooth to the touch the combination of all the pages rubbing against the
adjacent ones is enough to make it un-separable by human power, (even mealy
under the weight of the other pages)
2. Distribute Materials to Each Group [All Facilitators]
- 2 phonebooks (prepared as detailed below)*
- 2 lengths of 10mm Polypropylene rope*
- Drill
*
- 12mm Drill bit*
3. Experiment Procedure [Primary Facilitator]
Preparation
1. Drill 3 12mm holes about 30 mm from the spine of the phonebook (this is for the rope
to connect through)
* Provided by Banksia
134
2. Interlace the pages of the telephone index by flipping one down at a time page 1
to page 1 page 2 to page 2 etc.
3. Weave the rope through the holes and tie it off.
Experiment procedure:
4. Explain how the two phonebooks are put together (remind them there is no
adhesive involved) and the ropes are strictly through the binding and have
nothing to do with holding the phonebooks together.
5. Ask for two volunteers and have them hold a rope on each end and pull at the
same time in opposite directions.
6. Ask for some more volunteers to help pull the rope on each end, but make sure
there are an equal number of volunteers on each rope. Eventually have everyone
pull on one of the two ropes.
4. Facilitator Questions and Hints [Group Facilitators]
1. Do you think the class can separate the telephone indices?
i. ANSWER: no
2. How much force do you think it will take?
i. ANSWER: It depends on the size of the telephone indices, 2 5cm thick
books will take about 35,000 N of force to separate.
ii. For a demonstration of this refer to the American Television show,
Mythbusters where they did this with tanks. (this is no longer available on
their website but can be found here on youtube:
http://www.youtube.com/watch?v=HB3cBB7Z4rI)
5. Discussion/Take Away[Primary Facilitator]
Ask the audience why they think that happened? Why didn’t the phonebook pull apart
despite the number of increasing people pulling on it?
Ask “what is friction?” and “what are the different types?” Whether someone is able
to answer or not, still explain the proper definitions and how it applies to the
phonebook.
Explain other real-life situations and encounters which involve friction.
Safety
It is best to do this activity outdoors in a grassy area or on some other soft surface. While the
telephone indices will not separate there is a chance the rope will tear through the spine of the
book which may cause student to fall an injure themselves.
Citation
http://www.wpi.edu/Pubs/E-project/Available/E-project-022813-034020/

135
Soda Bottle Rocket Launcher (50 Minutes)
Estimated Time for Activity: 50 min
Recommended Age Range: Year 8-12
Recommended Group Size: 3-5 students
Estimated Price for 25 Student Class: $90 (mostly for the launcher)
Activity Subject: Physics: projectile motion
Summary of the Activity: Students work in groups to design and build a rocket out of a 2-liter
soda bottle. The rocket is then filled with water set on the launcher, and air is pumped in from a
tyre pump. The rocket is released and flies away. Competitions can be for longest distance,
longest time in the air, highest flight (requires tools such as an astrolabe), or safest landing (test
with egg or similar object) Warning: the set-up for this activity is costly and time consuming, in
terms of the construction of the launch base. However a well-build base can be used for many
years assuming there is storage space for it.
1. Background on Activity [Primary Facilitator]
1. There are many factors that contribute to the flight of an aircraft of spacecraft.
These are all categorized under Aerodynamics- the study of how air moves
around (or inside of) an object. The principals of aerodynamics are very involved
but students are expected to recognize the roll that center of mass and fins play in
the stability of their rocket. The rocket launch mechanism functions by forcing
pressurized air into the volume above the water in the rocket. The bottle is able to
withstand these forces because of the pressures associated with holding a
carbonated beverage. When the bottle is released, the air forces the water out the
mouth of the bottle (which is conveniently shaped like a nozzle) and through the
principal of newton’s 3rd
law, the rocket flies skyward.
2. Distribute Materials to Each Group [All Facilitators]
- electrical tape*
- Soda Bottle*
- Bicycle pump*
- foam sheet*
- cardboard*
* Provided by Banksia

136
3. Experiment Procedure [Primary Facilitator]
Preparation: Materials
- 2m of .12mm PVC*
- 1 12mm Tee*
- 2 12mm 90 deg elbows
*
- 2 12mm end caps
*
- 2 12mm male thread adapters
*
- 1 valve stem
*
- Bathtub Seale*
- PVC pipe glue*
- electrical tape*
* Provided by Banksia

137
Assembly Instructions
1. cut the pipes into 4 pieces approximately 1 meter, 30cm, 30cm, 10cm
2. Drill holes in the center of one of the end caps so that the valve stem fits through. Using
the bathtub sealer, glue the valve stem to the PVC
3. glue the 2 30cm pipes into the tee using the PVC glue
4. Glue and end cap to the other open end
5. 6. Glue a male thread adapter to the end of the 1m piece to the opening in the tee and then
glue and elbow and the 10cm piece to the other end
7. glue the other male thread adapter into the end of the short piece
8. after the glue has dried wrap a few lengths of electrical tape around the exposed threads
to provide friction
To Use
1. Make sure the long pipe is securely attached to the on with the tee
2. Connect the bicycle pump to the valve stem
3. Crew rocket into exposed threads
4. Pump the bicycle pump until rocket flies off

138
Procedure:
1. Have the student construct their rockets
2. Use the launcher to launch the rockets
4. Facilitator Questions and Hints [Group Facilitators]
1. Where should we stand to avoid looking into the sun?
2. How do we estimate how high the rockets go? How could we do this more precisely?
3. time the rockets to see which is in the air longest, precise: use an astrolabe to measure
the angle of the rocket at its highest point
4. Does the launcher work with no water in the bottle?
i. ANSWER: No, it need to shoot out water
5. Does it work if completely full?
i. ANSWER: No, it needs to have air to compress
6. What made for a steady flight in the rocket?
7. What made for a safe landing?
5. Discussion/Take Away [Primary Facilitator]
Key Terms and Definitions:
o Rocket - Any of various simple or complex tube-like devices containing
combustibles that on being ignited liberate gases
whose action propels the tube through the air
o Combustion - the act or process of burning
o Outer space - space beyond the atmosphere of the earth
You can relate this activity to certain careers:
o Aerospace Engineer - The branch of engineering that deals with the
design, development, testing, and production of aircraft and related
systems and of spacecraft, missiles, rocket-propulsion systems, and other
equipment operating beyond the earth’s atmosphere
o Astronaut - a person engaged in or trained for spaceflight
Safety:
This is an OUTDOOR activity do not attempt to launch inside. Make sure that students are
several meters back from the launcher when rocket is armed
Citation:
http://www.wpi.edu/Pubs/E-project/Available/E-project-022813-034020/
Experiment adapted from:
http://users.soe.ucsc.edu/~karplus/abe/soda-bottle-rocket.pdf
Definitions extracted from:
http://dictionary.reference.com/

139
External References *To be used if any links are broken throughout the portfolio*
http://nsdl.org/
http://www.teachengineering.org/
http://www.ianstructables.com/index


