
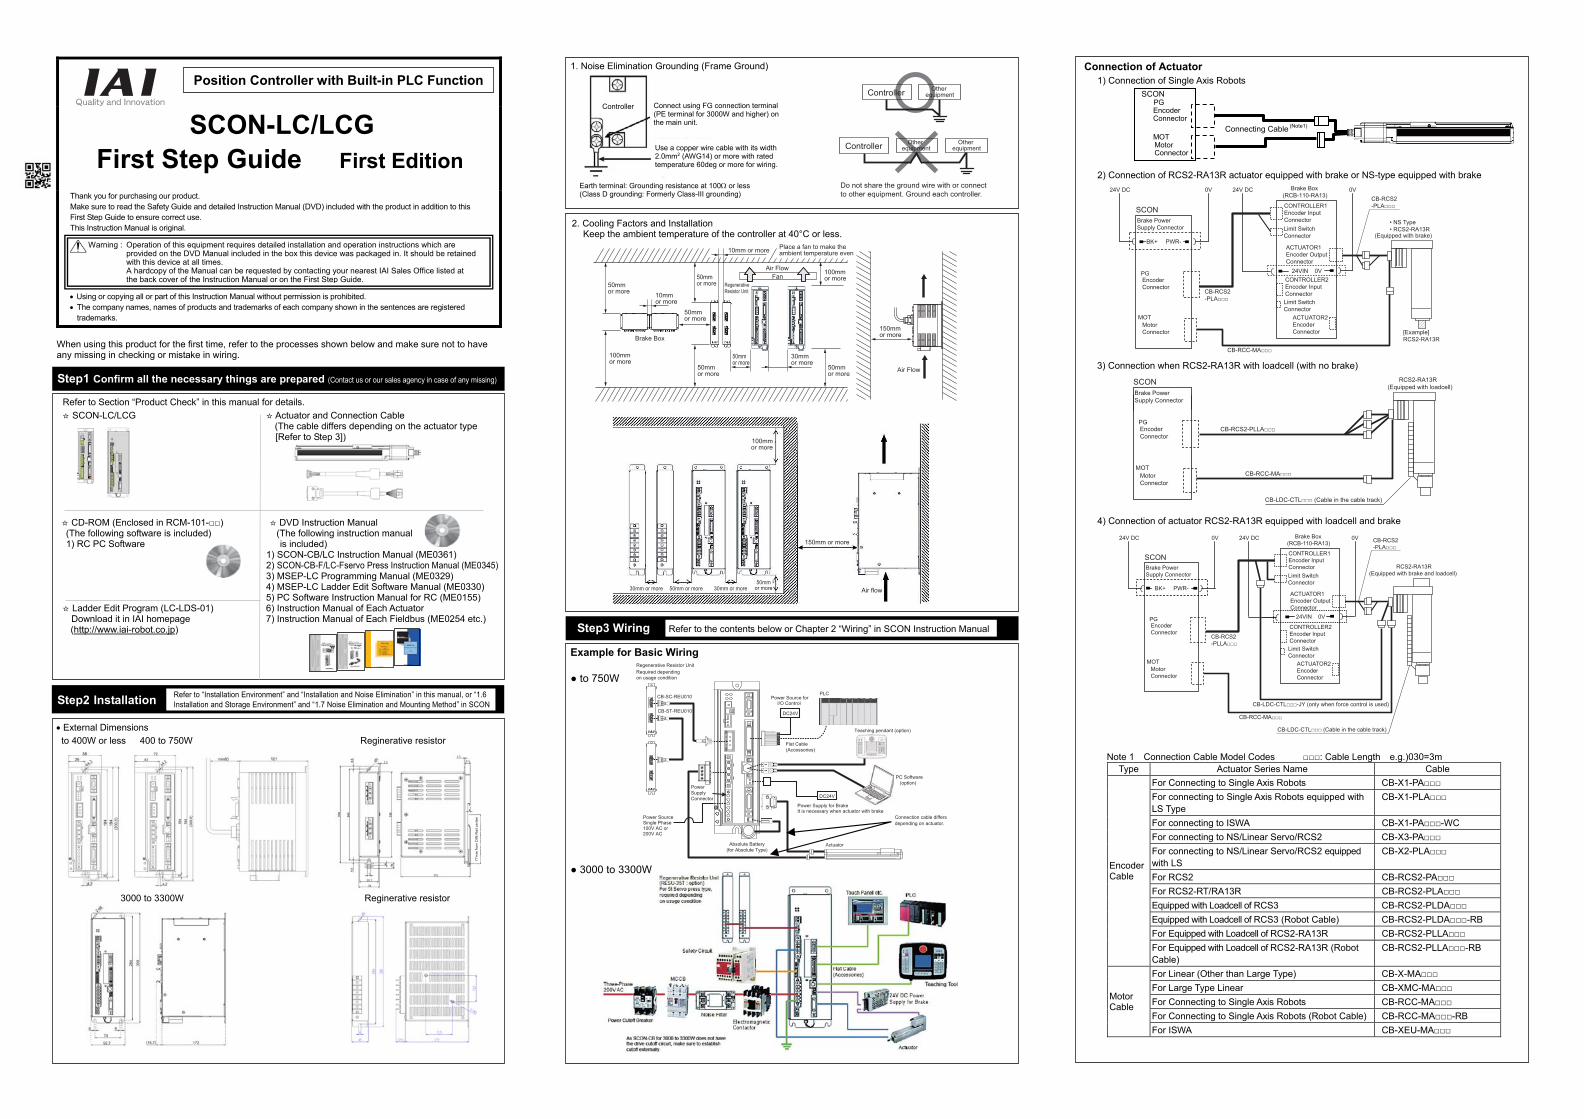
CB-SC-REU010
Regenerative Resistor UnitRequired dependingon usage condition
CB-ST-REU010
Power Source Single Phase 100V AC or 200V AC
Power SupplyConnector
Absolute Battery(for Absolute Type)
PLCPower Source for
I/O Control
Flat Cable(Accessories)
PC Software (option)
Power Supply for BrakeIt is necessary when actuator with brake
Actuator
Teaching pendant (option)
Connection cable differs depending on actuator.
SCON-LC/LCG First Step Guide First Edition
Thank you for purchasing our product. Make sure to read the Safety Guide and detailed Instruction Manual (DVD) included with the product in addition to this First Step Guide to ensure correct use. This Instruction Manual is original. Using or copying all or part of this Instruction Manual without permission is prohibited. The company names, names of products and trademarks of each company shown in the sentences are registered
trademarks. When using this product for the first time, refer to the processes shown below and make sure not to have any missing in checking or mistake in wiring. Step1 Confirm all the necessary things are prepared (Contact us or our sales agency in case of any missing)
Refer to Section “Product Check” in this manual for details. ☆ SCON-LC/LCG ☆ Actuator and Connection Cable
(The cable differs depending on the actuator type [Refer to Step 3])
☆ CD-ROM (Enclosed in RCM-101-□□) ☆ DVD Instruction Manual (The following software is included) (The following instruction manual
1) RC PC Software is included) 1) SCON-CB/LC Instruction Manual (ME0361)
2) SCON-CB-F/LC-Fservo Press Instruction Manual (ME0345) 3) MSEP-LC Programming Manual (ME0329) 4) MSEP-LC Ladder Edit Software Manual (ME0330) 5) PC Software Instruction Manual for RC (ME0155) ☆ Ladder Edit Program (LC-LDS-01) 6) Instruction Manual of Each Actuator
Download it in IAI homepage 7) Instruction Manual of Each Fieldbus (ME0254 etc.) (http://www.iai-robot.co.jp)
Step2 Installation External Dimensions to 400W or less 400 to 750W Reginerative resistor
3000 to 3300W Reginerative resistor
1. Noise Elimination Grounding (Frame Ground)
2. Cooling Factors and Installation
Keep the ambient temperature of the controller at 40°C or less.
Step3 Wiring Refer to the contents below or Chapter 2 “Wiring” in SCON Instruction Manual Example for Basic Wiring ● to 750W ● 3000 to 3300W
Connection of Actuator
1) Connection of Single Axis Robots
2) Connection of RCS2-RA13R actuator equipped with brake or NS-type equipped with brake 3) Connection when RCS2-RA13R with loadcell (with no brake) 4) Connection of actuator RCS2-RA13R equipped with loadcell and brake
Note 1 Connection Cable Model Codes □□□: Cable Length e.g.)030=3m Type Actuator Series Name Cable
Encoder Cable
For Connecting to Single Axis Robots CB-X1-PA□□□ For connecting to Single Axis Robots equipped with LS Type
CB-X1-PLA□□□
For connecting to ISWA CB-X1-PA□□□-WC For connecting to NS/Linear Servo/RCS2 CB-X3-PA□□□ For connecting to NS/Linear Servo/RCS2 equipped with LS
CB-X2-PLA□□□
For RCS2 CB-RCS2-PA□□□ For RCS2-RT/RA13R CB-RCS2-PLA□□□ Equipped with Loadcell of RCS3 CB-RCS2-PLDA□□□ Equipped with Loadcell of RCS3 (Robot Cable) CB-RCS2-PLDA□□□-RB For Equipped with Loadcell of RCS2-RA13R CB-RCS2-PLLA□□□ For Equipped with Loadcell of RCS2-RA13R (Robot Cable)
CB-RCS2-PLLA□□□-RB
Motor Cable
For Linear (Other than Large Type) CB-X-MA□□□ For Large Type Linear CB-XMC-MA□□□ For Connecting to Single Axis Robots CB-RCC-MA□□□ For Connecting to Single Axis Robots (Robot Cable) CB-RCC-MA□□□-RB For ISWA CB-XEU-MA□□□
Position Controller with Built-in PLC Function
Refer to “Installation Environment” and “Installation and Noise Elimination” in this manual, or “1.6 Installation and Storage Environment” and “1.7 Noise Elimination and Mounting Method” in SCON
SCON PG
Encoder Connector
MOT Motor Connector
Connecting Cable (Note1)
Warning : Operation of this equipment requires detailed installation and operation instructions which are provided on the DVD Manual included in the box this device was packaged in. It should be retained with this device at all times.
A hardcopy of the Manual can be requested by contacting your nearest IAI Sales Office listed at the back cover of the Instruction Manual or on the First Step Guide.
Do not share the ground wire with or connect to other equipment. Ground each controller.
Controller Other equipment
Controller Other equipment
Other equipment
Earth terminal: Grounding resistance at 100 or less(Class D grounding: Formerly Class-III grounding)
10mm or more
50mmor more50mm
or more
50mmor more
50mmor more
50mmor more
50mmor more
100mmor more
30mmor more
10mmor more
100mmor more
150mm or more
Air Flow
Air FlowFan
Brake Box
Regenerative Resistor Unit
Place a fan to make the ambient temperature even
Air flow
150mm or more
100mm or more
50mmor more30mm or more 50mm or more 30mm or more
SCON
PG
MOT
Brake Box(RCB-110-RA13)
24VIN 0V
CB-RCS2-PLA□□□CONTROLLER1
Encoder Input ConnectorLimit SwitchConnector
Limit SwitchConnector
ACTUATOR1Encoder Output Connector
24V DC 0V
• NS Type• RCS2-RA13R
[Example]RCS2-RA13R
BK+
24V DC 0V
CB-RCC-MA□□□
CB-RCS2-PLA□□□
PWR-
Brake Power Supply Connector
CONTROLLER2Encoder Input Connector
ACTUATOR2EncoderConnector
Encoder Connector
MotorConnector
(Equipped with brake)
SCON RCS2-RA13R(Equipped with loadcell)
MOTMotorConnector
Brake Power Supply Connector
PGEncoder Connector
CB-RCS2-PLLA□□□
CB-RCC-MA□□□
CB-LDC-CTL□□□ (Cable in the cable track)
SCON
Brake Box(RCB-110-RA13)
24VIN 0V
CONTROLLER1Encoder Input ConnectorLimit SwitchConnector
Limit SwitchConnector
ACTUATOR1Encoder Output Connector
24V DC 0V
RCS2-RA13R(Equipped with brake and loadcell)
BK+
24V DC 0V CB-RCS2-PLA□□□
PWR-
CONTROLLER2Encoder Input Connector
ACTUATOR2EncoderConnector
MOTMotorConnector
Brake Power Supply Connector
PGEncoderConnector
CB-RCC-MA□□□
CB-RCS2-PLLA□□□
CB-LDC-CTL□□□-JY (only when force control is used)
CB-LDC-CTL□□□ (Cable in the cable track)
Use a copper wire cable with its width 2.0mm2 (AWG14) or more with rated temperature 60deg or more for wiring.
Controller Connect using FG connection terminal (PE terminal for 3000W and higher) on the main unit.
77m
m fr
om D
IN R
ail c
ente
r

SCON-LC/LCG
Input and output signal(PIO connector)
Input (X)Output (Y)memory Internal relay (M)
PIO signalConnect with the ladder
Internal process along IO pattern
SCON-LC/LCG
Input and output signal(PIO connector)
Input (X)Output (Y)memory Internal relay (M)
Connect with the ladder
Internal process along IO pattern
Fieldbussignal
Example for Power Source Emergency Stop Circuit ● to 750W
Note 1 The power rating of the motor power-OFF relay turning ON/OFF with contact CR1 is 24V DC and 10mA or less.
Note 2 Connect such as a connector to L1/L2 terminals when cutting OFF the motor power source externally. Note 3 S1 and S2 make short-circuit inside the controller if a teaching pendant is not connected. Note 4 Select the CR1 coil current and 0.1A or less.
● 3000 to 3300W
Note 1 The power rating of the motor power-off relay turning ON/OFF with contact CR1 is 24V DC
and 10mA or less. Note 2 Connect such as a connector to L1/L2/L3 terminals when cutting off the motor power source externally.
(This controler not equipped with the drive cutoff relay mounted inside the controller.) Note 3 It is the contact output to control the drive source breaker connected externally. The rating is 30V DC and
20mA or less. Note 4 Connect a temperature sensor when an external regenerative resistor unit is connected.
Step4 Establish SCON-LC Initial Setting Software Necessary for Initial Setting
1) RC PC Software
Connect the PC to SCON-LC with the dedicated cable enclosed in the PC software.
1. Setting of Target Position (Note) It excludes the case that operation is made with the direct
numerical commands on the fieldbus. ⇒ go to Step5
(1) Start up RC PC Software.
→For the number of connectable actuators→
Initial screen
(2) After the position table is opened, the incremental type conducts the home-return operation.
(3) The destination can be defined by using the following two methods: 1) Read out the coordinate values from such a tool as CAD. 2) Drive the slider or rod with the JOG operation to the destination, and reading the position data.
(4) Type the destination in the column of Position in Position Table. Once the position is filled, the initial
value for Speed and Acceleration/Deceleration are automatically input.
☆ When writing a number directly; ☆ When setting direct position with JOG operation;
Move the actuator to the desired position with the JOG button and press the position reading button.
JOG (Backward) JOG (Forward) (5) Transfer the information such as position that is written in position table to the controller.
Press the OK
Step5 Creating of Ladder Program
Software and instruction manuals necessary for creating (Installed in DVD Instruction Manuals) Ladder Edit Program (LC-LDS-01) LC Ladder Edit Soft Manual (ME0330) LC Ladder Programming Manual (ME0329) SCON-LC/CB Instruction Manual (ME0340) SCON-LC-F/CB-F Servo Press Function Instruction Manual (ME0345) Each fieldbus instruction manual (such as ME0254 [Refer to Section 1.1.3 in the instruction manual of
SCON-LC/CB or SCON-LC-F/CB-F])
Referring to the points of the PLC built-in type described below and LC ladder edit software manuals, edit the ladder program. (Note: Not applicable for pulse train control)
Outline LC Type is equipped with a built-in PLC function, and is capable to control SCON with ladder programs instead of the host PLC if the programs are in small scale.
External Interface (1) PIO Type Each signal of PIO is general input and output. Use it with connecting to internal relay, which each IO pattern is assigned to, with the ladder program if necessary. (2) Fieldbus Type Each bit in fieldbus communication is general input and output. Use it with connecting to internal relay, which each IO pattern is assigned to, with the ladder program if necessary. For fieldbus communication, the data volume transferred in one time of communication is restricted. CC-Link:1station 1time, Other than CC-Link:Input 8byte, Output 8byte
Operation Pattern (Assignment), and Setting The operation pattern is to be set in Parameter No. 84 “Fieldbus Operation Mode”.
Parameter No.84 Setting Operation Pattern Parameter No.84
Setting Operation Pattern
0 Remote I/O mode 5 Posiiton/Simple Direct Mode 2
1 Posiiton/Simple Direct Mode, Full Functional Mode (dedicated for servo press)
6 Half Direct Mode 2
2 Half Direct Mode 7 Remote I/O mode 3 3 Full Direct Mode 8 Half Direct Mode 3 4 Remote I/O mode 2
The set operation patterns are assigned to the internal relay (input signals to M2048 to 2303, output signals to M2304 to M2559). * For the servo press type, it is applicable only in the remote I/O mode and full functional mode.
Wiring of I/O (When using input and output of PIO) Refer to “Wiring of I/O” in this manual or Chapter 2 “Wiring” in SCON Instruction Manual.
Wiring of Fieldbus (When using fieldbus) Refer to the section for wiring of each field network or Chapter 2 “Wiring” in each fieldbus Instruction Manual.
SIO Connector
1) Press the Servo 2) Turn on the Servo lamp 3) Press the Home (for Incremental Type) 4) Turn on the Home lamp
(The lamp is always kept on once the absolute reset is complete for the absolute type)
Motor Power Cutoff Relay
Motor power supply
Control power supply
(Note 3)
(Note 1)
(Note 1)
(Note 2)
(Note 4)
System I/O connector SIO connector
EMG A EMG BEmergency stop reset switch
Emergency stop switch
Emergency stop switch for the teaching pendant
Emergency stop circuit exclusive use 24V
AC power supply input connector
Position → Select Edit/Teaching
Write the destination to the position box of the position number to be registered. For data except for the
position, initial values are input automatically.
Emergency stop reset switch
Emergency stop switch
System I/O connector SIO connector
(Note 1)
(Note 1)
(Note 2)
(Note 3)
(Note 4)
Motor power supply
Control power supply
Temperature sensor contactof external regenerative resistor
AC power supply input connector
Emergency stop circuit exclusive use 24V
Stop Circuit
Contact output for theexternal drive cutoff
5
Turn to black after transfer complete
Written in red before transferred
Press “Transfer to Controller”

Figure below shows an example for Remote I/O Mode (occupied 2 bytes). ☆ Internal relay ⇒ Example of SCON input side Assignment
Bit No. 15 14 13 12 11 10 9 8 7 6 5 4 3 2 1 0
Port No. M
2319
M23
18
M23
17
M23
16
M23
15
M23
14
M23
13
M23
12
M23
11
M23
10
M23
09
M23
08
M23
07
M23
06
M23
05
M23
04
Port
15
Port
14
Port
13
Port
12
Port
11
Port
10
Port
9
Port
8
Port
7
Port
6
Port
5
Port
4
Port
3
Port
2
Port
1
Port
0
Signal Name (For PIO
Pattern 0) SON
RES
CST
R
*STP
HO
ME
RM
OD
BKR
L
-
-
-
PC32
PC16
PC8
PC4
PC2
PC1
☆ SCON output ⇒ Example of internal relay Assignment
Bit No. 15 14 13 12 11 10 9 8 7 6 5 4 3 2 1 0
Port No.
M20
63
M20
62
M20
61
M20
60
M20
59
M20
58
M20
57
M20
56
M20
55
M20
54
M20
53
M20
52
M20
51
M20
50
M20
49
M20
48
Port
15
Port
14
Port
13
Port
12
Port
11
Port
10
Port
9
Port
8
Port
7
Port
6
Port
5
Port
4
Port
3
Port
2
Port
1
Port
0
Signal Name (For PIO
Pattern 0) *BAL
M
*ALM
*EM
GS
SV
PEN
D
HEN
D
RM
DS
PZO
NE
ZON
E1
MO
VE
PM32
PM16
PM8
PM4
PM2
PM1
Step6 Test Run
1) Have an operation check on the emergency stop circuit.
2) Without any work piece mounted, check in low speed for any debugging in the ladder, operation of the actuator, and also the cooperation with peripheral devices.
3) Check the operation in the desired speed with a work piece loaded. Check the condition of the actuator attachment and adjust the servo if there is any abnormal noise.
4) Put the operation mode setting switch on SCON-LC to AUTO, and have an operation. to 750W type 3000 to 3300W type Operation mode
switch
Emergency stop!
Stop!

Product Check This product is comprised of the following parts if it is of standard configuration. If you find any fault in the contained model or any missing parts, contact us or our distributor. 1. Parts
No. Part Name Model Remarks
1 Controller Main Body Refer to “How to read the model plate”, “How to read the model”
Accessories 2 I/O Flat Cable CB-PAC-PIO*** ***shows the cable length
3 Service Connector for Pulse Train Control (Connector for Multi-function)
Plug : 10114-3000PE Shell :10314-52F0 (Supplier:3M)
4 System I/O Plug
~750W Motor FMC1.5/4-ST-3.5 (Supplier:PHOENIX CONTACT) Recommended cable size 0.5mm2 (AWG20) 3000W~Motor FMC1.5/6-ST-3.5 (Supplier:PHOENIX CONTACT)
5 Breake Power Supply Plug MC1.5/2-ST-3.5 (Supplier:PHOENIX CONTACT)
6 ACPower Supply Plug
~750W Motor MSTB2.5/6-STF-5.08 (Supplier:PHOENIX CONTACT) Recommended cable size 2.0mm2 (AWG14)
3000W~ Motor PC5/6-STF-7.62 (Supplier:PHOENIX CONTACT) Recommended cable size 3.3mm2 (AWG12)
7 Absolute Battery AB-5 Enclosed for Absolute Type (dedicated for battery-less absolute)
8 Dummy Plug DP-5 Enclosed for SCON-LCG
9 External Regenerative Unit Connecting Plug GIC2,5/2-STF-7.62 (Supplier:PHOENIX CONTACT) Recommended cable size
0.75mm2 (AWG18)
10 First Step Guide 11 Instruction Manual (DVD) 12 Safety Guide
AC Power Supply Plug Breake Power Supply Plug System I/O Plug Dummy Plug Absolute Battery ~750W Motor 3000W~Motor ~750W Motor
3000W~ Motor
2. Teaching Tool (Sold separately: Download the ladder edit software from IAI homepage)
A teaching tool such as PC software is necessary when performing the setup for position setting, parameter setting, etc. that can only be done on the teaching tool. Please prepare either of the following teaching tools. No. Part Name Model 1 PC Software (Includes RS232C Exchange Adapter + Peripheral Communication Cable) RCM-101-MW 2 PC Software (Includes USB Exchange Adapter + USB Cable + Peripheral Communication Cable) RCM-101-USB 3 Touch Panel Teaching TB-02 TB-02 4 Touch Panel Teaching TB-01 TB-01 5 LC Ladder Edit Soft LC-LDS-01
3. Instruction manuals related to this product, which are contained in the instruction manual (DVD). No. Name Manual No. 1 SCON Controller Instruction Manual ME0340 2 SCON Controller Servo Press Function Instruction Manual ME0345 3 PC Software RCM-101-MW/RCM-101-USB Instruction Manual ME0155 4 Touch Panel Teaching TB-02 ME0355 5 Touch Panel Teaching TB-01 ME0324 6 LC Programming Manual ME0329 7 LC Ladder Edit Soft Manual ME0330
4. How to read the model plate 5. How to read controller model code
S C O N - L C - 2 0 I H A - N P - 3 - 1 - * *
Basic Specifications Specifications
Item SCON-LC/LCG/LC-F/LCG-F 400W or less 400 to 750W 3000 to 3300W
Applicable Motor Capacity 12W to 399W 400W to 750W 3000 to 3300W Power Supply Voltage (Power-supply Fluctuation±10% or less)
Single-phase AC100 to 115VSingle-phase AC200 to 230V
Single-phase AC200 to 230V
Three-phase AC200 to 230V
Rush Current *1
Power Supply Voltage AC100V 20A (Control Side),
70A (Drive Side)
Power Supply Voltage AC200V
30A (Control Side), 80A (Drive Side)
40A (Control Side), 40A (Drive Side)
Leak Current *2 3.0mA (Primary side when noise filter is connected to power supply line) 3.5mA
Load Capacity, Heat Generation Refer to Power Capacity and Heat Generation. Power Supply Frequency 50/60Hz PIO Power Supply *3 DC24V±10% Electromagnetic Brake Power Supply (for actuator equipped with brake)
DC24V±10% 1A(Max.)
DC24V±10% 0.1A (Max.) (Note) Necessary to supply 1.5A (max.) to actuator separately
Transient Power Cutoff Durability 20ms (50Hz), 16ms (60Hz)
Motor Control System Sinusoidal Wave PWM Vector Current Control Applicable Encoder Incremental Serial, Absolute Serial, ABZ (UVW) Pararell, Battery-less Absolute
Encoder Resolution Battery-less Absolute (ISB): 131072 pulse/rev
Battery-less Absolute (RCS2/3): 16384 pulse/rev
* In any models other than above, refer to instruction manual of each actuator. Actuator Cable Length Max. 20m Serial Communication Interface
For Connect the teaching tool or connect the link RS485 : 1CH … based on Modbus Protocol RTU/ASCII Speed: 9.6 to 230.4Kbps
External Interface
PIO Type Signal I/O dedicated for 24V DC (selected from NPN/PNP) … Input 16 ports max., output 16 ports max.
Fieldbus Type DeviceNet, CC-Link, PROFIBUS, CompoNet, MECHATROLINK-Ⅰ/Ⅱ, EtherCAT, EtherNET/IP, PROFINET IO
External Interface (Multi- function connector)
Serial Communication Interface 2
RS485 : 1CH … based on Modbus Protocol RTU/ASCII Speed : 9.6 to 230.4Kbps Control available with serial communication in the modes other than the pulse train
Feedback Pulse Differential System (Line Driver System) MAX. 2.5Mpps Open Collector System MAX. 500Kpps (under condition JM-08 is used)
Analog Output 1system (load data) 4 to 20mA Current Output (±1%) Load resistance 10 to 600
Cable Length
PIO Max. 10m RS485 Total Cable Length 100m o less Fieldbus Refer to each Fieldbus specification
Data Setting and Input PC Software, Touch Panel Teaching
Data Retention Memory Position Data, Saves position data and parameters to non-volatile memory (There is no limitation in number of writing)
Operation Mode Positioner Mode (Servo Press Type is dedicated for press program operation mode)
Number of Positioning Points (Except for Servo Press Type)
512ponts (PIO Type), 768pints (dedicated for fieldbus type) (Note) Number of positions differs depending on the selection in operation pattern (fieldbus operation mode).
LED Display (Mounted on Front Panel)
PWR (Green) : Controller in normal condition, SV (Green) : Servo ON, ALM (Orange) : Alarm generated, EMG (Red) : Emergency Stop,
Forcibly Releasing of Electromagnetic Brake (Mounted on Front Panel)
Switchover of NOM (normal) / BK RLS (compulsory release)
Insulation Resistance DC500V 10M or more Insulation Strength AC1500V For 1minite (Note) Withstand voltage of force control loadcell is 50V DC
E
nviro
nmen
t
Surrounding air temperature 0 to 40C Surrounding humidity 85%RH or less (non-condensing) Surrounding environment [Refer to Installation and Storage Environment.] Surrounding storage temperature -20 to 70C (non-condensing) Surrounding storage humidity 85% or less (non-condensing)
Vibration Durability XYZ Each direction 10 to 57Hz Pulsating amplitude 0.035mm (continuous) 0.075mm (intermittent) 57 to 150Hz 4.9m/s2(continuous) 9.8m/s2 (intermittent)
Weight Approx. 900g Approx. 1200g Approx. 2800g Cooling Method Natural air-cooling Forced air-cooling Forced air-cooling External Dimensions 58W194H121D 72W194H121D 92.7W300H187.7D
● Power Capacity and Heat Generation Rated Power Capacity Motor Power Capacity Control Power Capacity Peek Max. Power Capacity Peek Max. Motor Power Capacity Control Power Capacity
Actuator Motor Wattage
Motor Power Capacity [VA]
Peek Max. Motor Power Capacity
[VA]
Control Power Capacity
[VA]
Rated Power Capacity
[VA]
Peek Max. Power Capacity
[VA]
Heat Generation
[W] 12 41 123
48
89 171 3020 26 78 74 126 30
30D (RS excluded) 46 138 94 186 3130R (For RS) 138 414 186 462 33
60 138 414 186 462 3360 (RCS3-CTZ5) 197 591 245 639 32
100 234 702 282 750 35100S (LSA) 283 851 331 899 36
150 328 984 376 1032 37200 421 1263 469 1311 38
200(DD) 503 1509 551 1557 7.5200S
(LSA excluding LSA-N15H) 486 1458 534 1506 38
200S (LSA-N15H) 773 2319 821 2367 56300S (LSA) 662 1986 710 2034 40
400 920 2760 968 2808 45400 (RCS3-CT8) 1230 3690 1278 3738 47
600 1164 2328 1212 2376 56600 (DD) 1462 4386 1510 4434 20.8
750 1521
30421569
309058
750S 4563 46113000 5657 16970 5705 17018 180 3300 6014 18041 6062 18099 182
RS: Rotary Axis LSA: Linear Actuator DD: Direct Drive Motor
Selection of Circuit Breaker 3 times of the rated current may flow to the controller during the acceleration/deceleration. Select an interrupter that does not
trip with this value of current. If a trip occurs, select an interrupter that possesses the rated current of one grade higher. (Refer to the operation characteristics curves in the product catalog.)
Select an interrupter that does not trip with the in-rush current. (Refer to the operation characteristics curves in the product catalog.)
Consider the current that enables to cutoff the current even when a short circuit current is flown for the rated cutoff current. Rated Interrupting Current Short Circuit Current Primary Power Capacity / Power Voltage
● For ~750W Motor Rated Current for Circuit Interrupter (Rated Motor Power Capacity [VA] Control Power Capacity [VA]) / AC Input Voltage Safety Margin (reference 1.2 to 1.4 times)
● For 3000~3300W Motor Rated Current for Circuit Interrupter (Rated Motor Power Capacity [VA] Control Power Capacity [VA]) / AC Input Voltage Safety Margin (reference 1.2 to 1.4 times) / √3
Regenerative Resistor Unit (Option) This is a unit that converts the regenerative current to heat when the motor decelerates. Screw fixed:RESU-1, RESU-2, DIN rail fixed:RESUD-1, RESUD-2 (For SCON to 750W) [Specification]
Item Specification Body Size W35.6mmH158mmD115mm
Body Weight 0.7kg Internal Regenerative Resistor 235 80W
Accessories 2nd unit or later RESU-1, RESUD-1 Controller Connection Cable (Model Code CB-ST-REU010) 1m
First Unit RESU-2, RESUD-2 Controller Connection Cable (Model Code CB-SC-REU010) 1m
[Reference Connectable Quantity] Motor Wattage Connectable Number of
Regenerative Resistor Units Horizontal Mount/Vertical Mount to 100W (Note3) Not necessary 101 to 400W 1 401 to 750W 2
(Note 1) This is a reference for the case when the actuator is ran forward and backward on 1,000mm stroke with the operation duty 50% under the rated acceleration/deceleration speed and rated load.
(Note 2) It is necessary to have the regenerative resistor listed above when the operation duty is above 50%. The maximum quantity of the external regenerative resistor units that can be connected is as stated below: 2 units for less than 400W 4 units for 400W or more
(Note 3) It is necessary to have one unit for LSA/LSAS-N10S Type.
RESU-35T (For SCON 3000 to 3300W) [Specification]
Item Specification Body Size W45mmH300mmD197mm
Body Weight 1.8kg Internal Regenerative Resistor 30 450W
Built-in Temp. Sensor
Operation Temp. 130C±5C Contact Format b contact
Contact Open-Close Capacity DC30V, 200mA (MAX)
[Reference Connectable Quantity] They are not necessary for RCS3-RA15R. RCS3-RA20R requires two units at maximum depending on the cycle time. [Refer to servo press function instruction manual for details.]
Loadcell This is the pressing force measurement unit that is used for the force control. This is used by connecting to the actuator corresponding to the force control or servo press. [Specification] *1 R.C: Rated Capacity [Refer to servo press function instruction manual for each actuators.]
Item Specification Loadcell System Strain Gauge
Rated Capacity [N] 200 600 2000 6000 20000 50000 Allowable Overload [%R.C*1] 200 200 200 200 200 Loadcell Accuracy [%R.C*1] ±1 ±1 ±1
Temperature Drift [%R.C*1/10C]
Zero ±0.2 ±0.35 ±0.2 Output ±0.1 ±0.2 ±0.1
Applicable Temperature Range [C] 0 to 40
Installation Environment This product is capable for use in the environment of pollution degree 2*1 or equivalent. *1 Pollution Degree 2 : Environment that may cause non-conductive pollution or transient conductive pollution by frost
(IEC60664-1) 1. Installation Environment
Do not use this product in the following environment. Location where the surrounding air temperature exceeds the range of 0 to 40C Location where condensation occurs due to abrupt temperature changes Location where relative humidity exceeds 85%RH Location exposed to corrosive gases or combustible gases Location exposed to significant amount of dust, salt or iron powder Location subject to direct vibration or impact Location exposed to direct sunlight Location where the product may come in contact with water, oil or chemical droplets Environment that blocks the air vent [Refer to Installation and Noise Elimination]
When using the product in any of the locations specified below, provide a sufficient shield. Location subject to electrostatic noise Location where high electrical or magnetic field is present Location with the mains or power lines passing nearby
2. Storage Environment Storage environment follows the installation environment. Especially in a long-term storage, consider to avoid
condensation of surrounding air. Unless specially specified, moisture absorbency protection is not included in the package when the machine is delivered. In the case that the machine is to be stored in an environment where dew condensation is anticipated, take the condensation preventive measures from outside of the entire package, or directly after opening the package.
<Series> <Type> LC : High Performance Type LCG : Safety Categories Complied Type CB : High Performance Type CGB : Safety Categories Complied Type
<Actuator Characteristics> [Motor Type] 12 : 12W 200S : 200W (LSA) 20 : 20W 300S : 300W (LSA) 30D : 30W (excluded) 400 : 400W 30R : 30W (For RS) 600 : 600W 60 : 60W 750 : 750W 100 : 100W 750S : Equipped with Loadcell 100S : 100W (LSA) RCS2-RA13R 150 : 150W 3000 : 3000W 200 : 200W 3300 : 3300W
<Encoder Type> A : Absolute G : Spurious Absolute
WAI : Battery-less Absolute <Option> No Indication : Standard Type HA : High Acceleration/deceleration Type I : Index Absolute (DD) M : Multi-Rotation Absolute (DD) F : Servo Press Type (dedicated for servo press actuators)
<Identification for IAI use only> * There is no identification in
some cases
<Power-supply Voltage> 1 : Single-phase AC100V 2 : Single-phase AC200V 3 : Three-phase AC200V
<I/O Cable Length>
0 : No cable 2 : 2m 3 : 3m(Standard) 5 : 5m
<I/O Type> NP : NPN Specification (Sink Type) (Standard) ML : MECHATROLINK-Ⅰ/Ⅱ Connection Type PN : PNP Specification (Source Type) CN : CompoNet Connection Type DV : DeviceNet Connection Type EC : EtherCAT Connection Type CC : CC-Link Connection Type EP : EtherNet/IP Connection Type PR : PROFIBUS Connection Type PRT : PROFINET-IO Connection Type
Regenerative Unit Connecting Plug 3000W~Motor Connector for Multi-function
I/O Flat Cable
Serial Number
Model SCON-CA-60A-NP-2-1MODELSERIAL No. 800056144 L11 MADE IN JAPAN
LC

Model : CB-MSEP-PIO□□□ (□□□ indicates the cable length L. Example. 020 = 2m)
Half Pitch MIL Socket HIF6-40D-1.27R (Hirose Electric)
Pin No.
Load
Black-4 (20B) • • No treatment • conducted •
Brown-3 (1B) Black-2 (20A) • • No treatment • conducted •
Brown-1 (1A) Flat Cable (20-core)×2
Noise Elimination and Installation 1. Precautions regarding wiring method
1) Wire is to be twisted for the 24V DC power supply. 2) Separate the signal and encoder lines from the power supply and power lines.
2. Noise Sources and Elimination Carry out noise elimination measures for electrical devices on the same power path and in the same equipment. The following are examples of measures to eliminate noise sources. 1) AC solenoid valves, magnet switches and relays 2) DC solenoid valves, magnet switches and relays
3. Heat Radiation and Installation Design and Build the system considering the size of the controller box, location of the controller and cooling factors to keep the ambient temperature around the controller below 40C.
● PIO Interface Type Input section Output section
Specification
Input voltage DC24V±10% Load current DC24V±10%
Input current 5mA 1circuit Maximum load current 50mA 1circuit
ON/OFF voltage ON voltage MIN. 18V DC OFF voltage MAX. 6V DC Leakage current MAX. 2mA/1point
External circuit insulation with photocoupler
NPN
Inte
rnal
Po
wer
Sou
rce
6805.6K
P24
MSEP
Input Terminal
External Power Source24V DC
15
P24
N
MSEP
Inte
rnal
P
ower
Sou
rce
External Power Source24V DC
Output Terminal Load
Wiring of I/O Use the attached cable for the connection.
Wiring of DeviceNet Check the instruction manuals for each field network master unit and mounted PLC for the details.
Connector Name DeviceNet Connector Cable Side MSTB2.5/5-STF-5.08 AU Enclosed in standard package
Manufactured by PHOENIX CONTACT Controller Side MSTBA2.5/5-GF-5.08 AU
Pin No. Signal Name Contents Applicable Cable
1 V- (BK) Power Supply Cable Negative Side
DeviceNet Dedicated Cable
2 CAN L (BL) Communication Data Low Side
3 Shield (None) Shield
4 CAN H (WT) Communication Data High Side
5 V+ (RD) Power Supply Cable Positive Side
Wiring of CC-Link Check the instruction manuals for each field network master unit and mounted PLC for the details.
Connector Name CC-Link Connector Cable Side SMSTB2.5/5-STF-5.08 AU Enclosed in standard package
Manufactured by PHOENIX CONTACT
Controller Side MSTBA2.5/5-GF-5.08AU
Pin No. Signal Name Contents Applicable Cable 1 DA (BL) Communications Line A
CC-Link Dedicated Cable
2 DB (WT) Communications Line B 3 DG (YW) Digital GND
4 SLD Connect the shield of the shielded cable
(Connect the FG of the 5 pins and controller FG internally)
5 FG Frame Ground
(Connect the SLD of the 4 pins and controller FG internally)
Wiring of PROFIBUS-DP Check the instruction manuals for each Field Network master unit and mounted PLC for the details.
Connector Name PROFIBUS-DP Connector Cable Side D-sub 9-pin Connector (Male) Please prepare separately Controller Side D-sub 9-pin Connector (Female)
Pin No. Signal Name Contents Applicable Cable
1 NC Unconnected
PROFIBUS-DP Dedicated Cable (Type A : EN5017)
2 NC Unconnected
3 B-Line Communications Line B (RS485)
4 RTS Request for Sending
5 GND Signal GND (Insulated)
6 +5V +5V Output (Insulated)
7 NC Unconnected
8 A-Line Communications Line A (RS485)
9 NC Unconnected
Wiring of CompoNet Check the instruction manuals for each field network master unit and mounted PLC for the details.
Connector Name CompoNet Connector Cable Side Connector that complies with CompoNet standards Controller Side XW7D-PB4-R Manufactured by OMRON
Pin No. Signal Name Contents Applicable Cable
1 BS+ (RD) Communication Power Supply + (Note 1)
CompoNet Dedicated Cable
2 BDH (WT) Signal Cable H Side
3 BDL (BL) Signal Cable L Side
4 BS- (BK) Communication Power Supply - (Note 1) Note 1 It is unnecessary to supply the communication power. (Internal power source is used.)
If conducting multi power supply to other slave devices via communication cables, there is no problem with connecting the power supply to BS+ and BS- terminals.
Wiring of EtherNet/IP, PROFINET-IO, EtherCAT Refer to the instruction manuals for field network master unit and mounted Host Device for the details.
MECHATROLINK-Ⅰ/Ⅱ Check the instruction manuals for each field network master unit and mounted PLC for the details.
MECHATROLINK Cable (JEPMC-W6002 etc.)
Connector Name MECHATROLINK-Ⅰ/ⅡConnector Cable Side MECHATROLINK-Ⅰ/Ⅱthat complies with CompoNet standards
Pin No. Signal Name (Colors) Contents Applicable Cable
1 NC Disconnected MECHATROLINK Dedicated Cable
2 /DATA Signal - Side 3 DATA Signal + Side 4 SH Disconnected
Operation Pattern There are nine patterns of control systems. Set the operation pattern most suitable for the purpose in Parameter No. 84.
No.84Setting Mode Name
Occupied Data Volume
(Number of Iinternal Relay)
Contents
0 Remote I/O Mode 32 PIO patterns selected in Parameter No. 25 are assigned to the internal relay.
1 Posiiton
/Simple Direct Mode
128 Indicate the target position with direct numerical command, or operation can be made in the value in the position data. For other values necessary for operation, the operation modes set in the position data are assigned to the internal relay.
2 Half Direct Mode 256
The operation modes to make operation by indicating the velocity, acceleration /deceleration and pressing current as well as the target position with the direct numbers are assigned to the internal relay.
3 Full Direct Mode 512 The operation modes to make operation by indicating all the values related to the
position control with the direct numbers are assigned to the internal relay.
4 Remote I/O Mode 2 192
The operation modes that the current position and the current velocity reading function was added to the remote I/O mode functions are assigned to the internal relay.
5 Posiiton
/Simple Direct Mode 2
128 The operation modes that conduct the force control (loadcell pressing) instead of teaching and zone function in the position / simple direct mode are assigned to the internal relay.
6 Half Direct Mode 2 256 The operation modes that read the current load of the loadcell instead of
command current reading in the half direct mode are assigned to the internal relay.
7 Remote I/O Mode 3 192 The operation modes that the force control (loadcell pressing) function was added
to the remote I/O mode are assigned to the internal relay.
8 Half Direct Mode 3 256 The operation modes that conduct the anti-vibration control instead of JOG
function in the half direct mode are assigned to the internal relay.
Connector Name EtherNet/IP Connector (EtherNet/IP), EtherCAT Connector (EtherCAT), PROFINET-IO Connector (PROFINET-IO)
Cable Side 8P8C Modular Plug Controller Side 8P8C Modular Jack
Pin No. Signal Name Description Applicable cable diameter
1 TD+ Data sending +
For EtherNet cable, use a straight STP cable that possesses the performance of Category 5e or more.
2 TD- Data sending - 3 RD+ Data receiving + 4 - Disconnected 5 - Disconnected 6 RD- Data receiving - 7 - Disconnected 8 - Disconnected
Manual No.: ME0363-1A
1 2 3 4
Head Office: 577-1 Obane Shimizu-KU Shizuoka City Shizuoka 424-0103, JapanTEL +81-54-364-5105 FAX +81-54-364-2589
website: www.iai-robot.co.jp/
Ober der Röth 4, D-65824 Schwalbach am Taunus, GermanyTEL 06196-88950 FAX 06196-889524
SHANGHAI JIAHUA BUSINESS CENTER A8-303, 808, Hongqiao Rd. Shanghai 200030, ChinaTEL 021-6448-4753 FAX 021-6448-3992
website: www.iai-robot.com
Technical Support available in USA, Europe and China
Head Office: 2690 W. 237th Street, Torrance, CA 90505TEL (310) 891-6015 FAX (310) 891-0815
Chicago Office: 110 East State Parkway, Schaumburg, IL 60173TEL(847) 908-1400 FAX (847) 908-1399
TEL (678) 354-9470 FAX (678) 354-9471website: www.intelligentactuator.com
Atlanta Office: 1220 Kennestone Circle, Suite 108, Marietta, GA 30066
825 PhairojKijja Tower 12th Floor, Bangna-Trad RD., Bangna, Bangna, Bangkok 10260, ThailandTEL +66-2-361-4458 FAX +66-2-361-4456
WT (DB)
BL (DA)
Shield (SLD)
YW (DG)
1
2
3
4
5
Front view of connector on controller side
Shield
BL (CAN L)
RD (V+)
WT (CAN H)
BK (V-)
4
5
1
2
3
Front view of connector on controller side
16
9 5
コントローラ側コネクタ正面図
Front view of connector on controller side
5
1
9
6
Cable
Shield
Red B Line (Positive side)
Green A Line (Negative side)
BK (BS-) BL (BDL)
RD (BS+) WT (BDH)
Front view of connector on controller side
1 2 3 4
1
8
EtherNet/IP, front view of connector on controller side
8 1 EtherCAT front
view of connector on controller side
8 1


