

UNIVERSITY OF MALTA
FACULTY OF MEDICINE & SURGERY
PHARMACY DEPARTMENT Ref. No. SOP/PD/315_01
STANDARD OPERATING PROCEDURE
AA®
SERIES AA-160
PRECISION BALANCE
Valid for:
2 years from
approval
Page 1 of 14
Table of Contents
Page
1. Scope 2
2. Objective 2
3. Definitions 2
4. Responsibility 3
5. Procedure 3
6. Precautions 12
7. References 12
8. Appendices 12
9. Revision History 12
Original
Authorised Copy
for:
Reading Copy
Written by: Signature/Date:
Reviewed by: Signature/Date:
Approved by: Signature/Date:

UNIVERSITY OF MALTA
FACULTY OF MEDICINE & SURGERY
PHARMACY DEPARTMENT Ref. No. SOP/PD/315_01
STANDARD OPERATING PROCEDURE
AA®
SERIES AA-160
PRECISION BALANCE
Valid for:
2 years from
approval
Page 2 of 14
1. Scope
This Standard Operating Procedure (SOP) applies to the staff and students
using the AA® Series AA-160 Precision Balance in the laboratories of the
Pharmacy Department, University of Malta.
2. Objective
To describe the procedure for the installation, configuration, operation,
calibration, maintenance and troubleshooting of the AA® Series AA-160
Precision Balance.
3. Definitions
3.1. Adjustable Feet: Circular screws situated at the bottom of the balance
that are manipulated to level the balance out.
3.2. Auto CAL Key: To initiate automatic calibration using internal
weights.
3.3. Calibration: A procedure to check a measuring instrument against an
accurate standard to determine any deviations and correct for errors.
3.4. Calibration Variance: The corrections made to the calibration values
to compensate for differences between the actual weight being used
and the desired value.
3.5. Configuration Parameters Set-Up Menu: Allows the user to adapt
the balance to different weighing situations (see SOP/PD/315_01/A1).
3.6. Message Display: Part of the dual LCD display that uses text to
provide additional information.
3.7. Number Display: Part of the dual LCD display that continuously
shows the weighing results.
3.8. On/Off Key: To turn the display ON or OFF or to enter the desired
option in the Set-Up menu.
3.9. Print Key: To transmit sample weight to printer or computer. Is also
used to scroll through the different options in the Set-Up Print menu.

UNIVERSITY OF MALTA
FACULTY OF MEDICINE & SURGERY
PHARMACY DEPARTMENT Ref. No. SOP/PD/315_01
STANDARD OPERATING PROCEDURE
AA®
SERIES AA-160
PRECISION BALANCE
Valid for:
2 years from
approval
Page 3 of 14
3.10. Select Key: To scroll through the configuration parameters of a
particular option in the Configuration Parameters Set-Up menu.
3.11. Set-Up Key: To access the Configuration Parameters Set-Up menu and
then to cycle through its options. Is also used to access the Set-Up Print
menu.
3.12. Tare: Allows the balance to display the weight of the sample only and
not the combined weight of the sample and its container.
3.13. Tare Key: To set the Numeric Display to zero. Is also used to exit Set-
Up menu and return the balance to normal weighing mode.
3.14. U symbol: An unstable indicator that is automatically displayed
whenever the balance is not stable and then disappears when the
balance becomes stable.
3.15. Weighing Pan: The area on top of which the material to be weighed is
placed.
4. Responsibility
4.1. The members of the Department of Pharmacy (staff and students) are
responsible for following this SOP.
4.2. The designated Laboratory Officer or Laboratory Assistant is
responsible for ensuring that this SOP is followed.
5. Procedure
5.1. Installation
5.1.1. Place the balance on a stable surface, away from any vibrations.
5.1.2. Turn the adjustable feet at the bottom of the balance clockwise
or anticlockwise until the air bubble in the spirit level is in the
centre of the marked circle.
5.1.3. Insert power supply connector in the plug on the rear of the
balance and plug the power supply into the mains supply.
5.1.4. Press the On/Off key to switch on the balance.
5.1.5. Wait until the start-up message and then 0.0000 are displayed
before starting to operate the balance.

UNIVERSITY OF MALTA
FACULTY OF MEDICINE & SURGERY
PHARMACY DEPARTMENT Ref. No. SOP/PD/315_01
STANDARD OPERATING PROCEDURE
AA®
SERIES AA-160
PRECISION BALANCE
Valid for:
2 years from
approval
Page 4 of 14
5.2. Configuration
5.2.1. Press the Set-Up key briefly but repeatedly until the desired
option is displayed (see SOP/PD/315_01/A1 – Configuration
Parameters Set-Up Table).
5.2.2. Press the On/Off key to enter into the desired option.
5.2.3. Press the SELECT key briefly but repeatedly until the desired
configuration parameter is displayed.
5.2.4. Press the TARE key to save changes and return the balance to
normal weighing mode.
5.3. Operation
5.3.1. Place the material that needs to be weighed on the weighing
pan.
5.3.2. Close the draft shield.
5.3.3. Wait until the [U] symbol disappears.
5.3.4. Read off the value from the display.
If using the tare function:
5.3.5. Place an empty weighing container on the weighing pan.
5.3.6. Close the draft shield.
5.3.7. Wait until the [U] symbol disappears.
5.3.8. Press the Tare key.
5.3.9. Open draft shield and place the material to be weighed in the
weighing container.
5.3.10. Close draft shield.
5.3.11. Wait until the [U] symbol disappears.
5.3.12. Read off the value from the display.
5.4. Calibration
5.4.1. Auto Calibration
5.4.1.1. Press the On/Off Key to switch on the balance.
5.4.1.2. Wait until the [U] symbol disappears from the
message display.
5.4.1.3. Press the TARE key.
5.4.1.4. Press the AUTO CAL key.

UNIVERSITY OF MALTA
FACULTY OF MEDICINE & SURGERY
PHARMACY DEPARTMENT Ref. No. SOP/PD/315_01
STANDARD OPERATING PROCEDURE
AA®
SERIES AA-160
PRECISION BALANCE
Valid for:
2 years from
approval
Page 5 of 14
5.4.1.5. Wait until the message display changes from [CAL]
to [CAL-100-*] to [TARING] and finally to
[GRAMS] to indicate that the auto-calibration
process is complete.
5.4.2. External Calibration
5.4.2.1. Press the On/Off Key to switch on the balance.
5.4.2.2. Wait until the [U] symbol disappears from the
message display.
5.4.2.3. Press the TARE key.
5.4.2.4. Place the standard calibration weight on the
weighing pan.
5.4.2.5. Wait for the [U] symbol to disappear and the
calibration weight value together with [GRAM] to be
displayed.
5.4.2.6. Press the AUTO CAL key.
5.4.2.7. Wait until [XXX.0000] and [CAL-XXX-] are
displayed.
5.4.2.8. Remove the standard weight.
5.4.2.9. Perform the calibration procedure once again if it is
to be repeated with a different standard weight.
5.4.2.10. See SOP/PD/315_01/A2 – Calibration Variance
Table if calibration variance needs to be modified.
5.5. Maintenance
5.5.1. Disconnect the balance from its power supply before
attempting to clean and leave it in its normal operating position.
5.5.2. Use a clean fine brush to remove any surrounding powder.
5.5.3. Use a moistened cloth with a mild cleaning agent to clean and
remove any spilt material.
5.5.4. Ensure that the air bubble in the spirit level on the front end of
the scale is in the centre of the marked circle.
UNIVERSITY OF MALTA
FACULTY OF MEDICINE & SURGERY
PHARMACY DEPARTMENT Ref. No. SOP/PD/315_01
STANDARD OPERATING PROCEDURE
AA®
SERIES AA-160
PRECISION BALANCE
Valid for:
2 years from
approval
Page 6 of 14
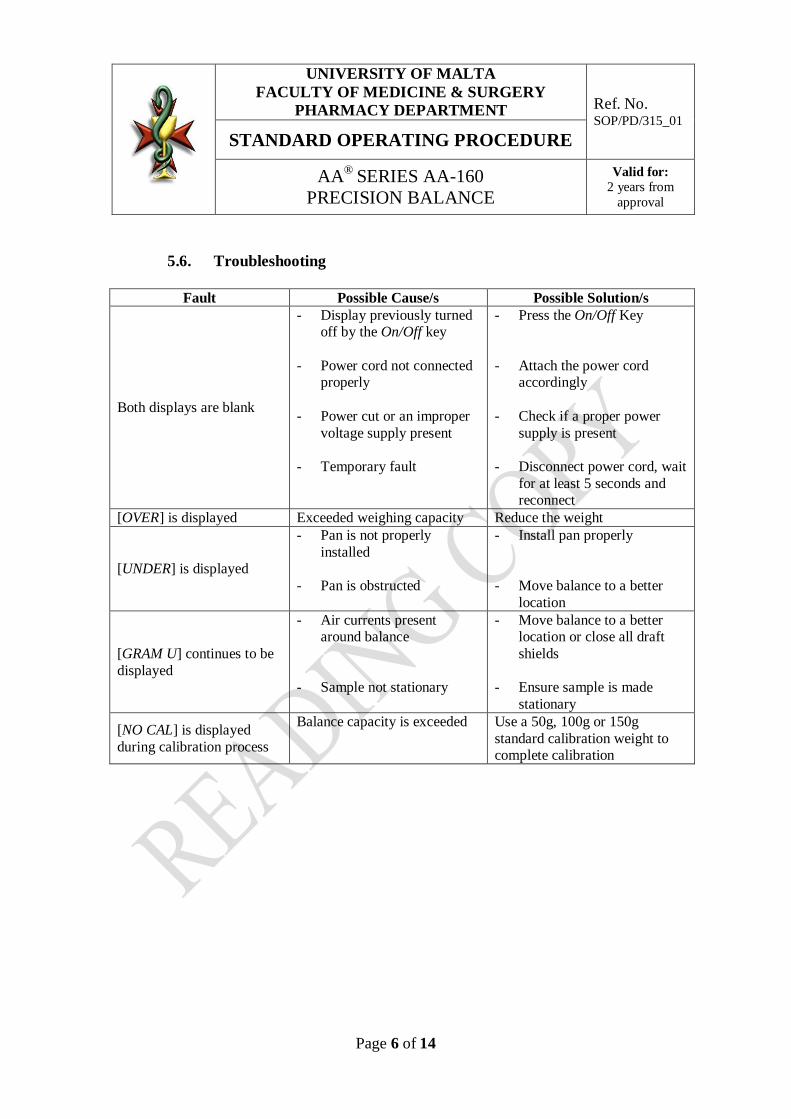
5.6. Troubleshooting
Fault Possible Cause/s Possible Solution/s
Both displays are blank
- Display previously turned off by the On/Off key
- Power cord not connected properly
- Power cut or an improper
voltage supply present
- Temporary fault
- Press the On/Off Key
- Attach the power cord accordingly
- Check if a proper power
supply is present
- Disconnect power cord, wait
for at least 5 seconds and reconnect
[OVER] is displayed Exceeded weighing capacity Reduce the weight
[UNDER] is displayed
- Pan is not properly
installed
- Pan is obstructed
- Install pan properly
- Move balance to a better
location
[GRAM U] continues to be
displayed
- Air currents present around balance
- Sample not stationary
- Move balance to a better location or close all draft
shields
- Ensure sample is made
stationary
[NO CAL] is displayed
during calibration process
Balance capacity is exceeded Use a 50g, 100g or 150g
standard calibration weight to complete calibration
UNIVERSITY OF MALTA
FACULTY OF MEDICINE & SURGERY
PHARMACY DEPARTMENT Ref. No. SOP/PD/315_01
STANDARD OPERATING PROCEDURE
AA®
SERIES AA-160
PRECISION BALANCE
Valid for:
2 years from
approval
Page 7 of 14
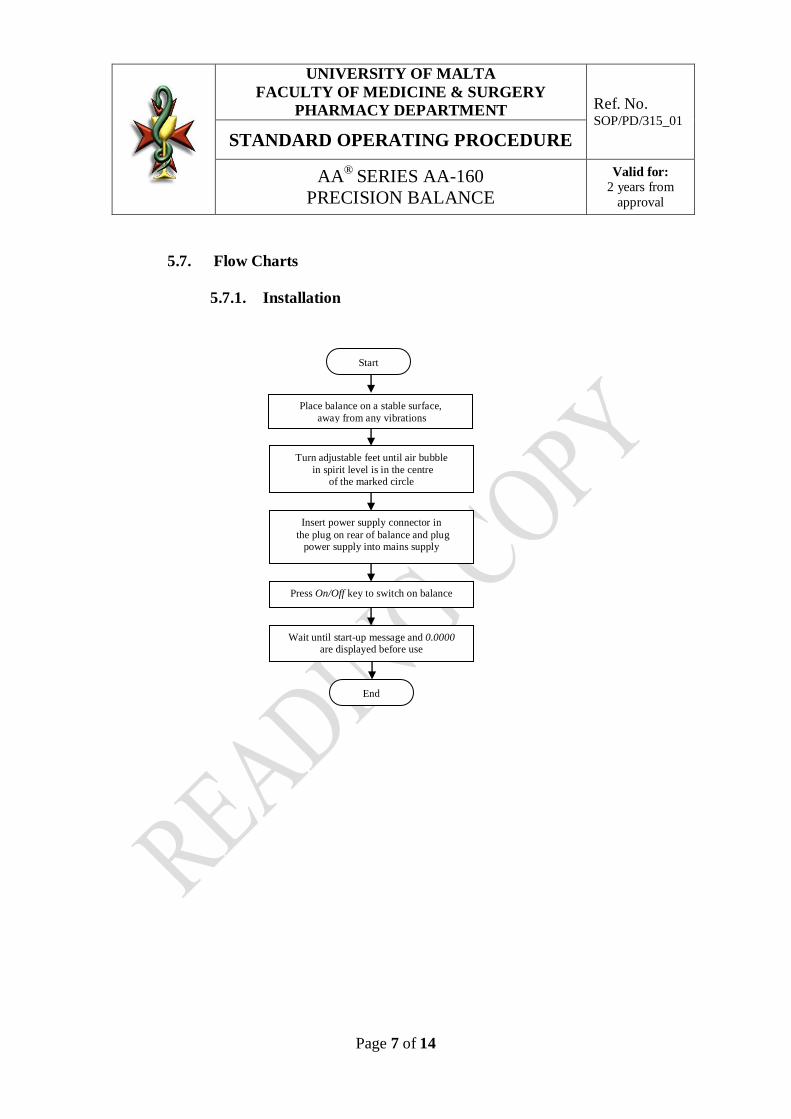
5.7. Flow Charts
5.7.1. Installation
Start
Place balance on a stable surface,
away from any vibrations
Turn adjustable feet until air bubble
in spirit level is in the centre of the marked circle
Insert power supply connector in
the plug on rear of balance and plug power supply into mains supply
Press On/Off key to switch on balance
Wait until start-up message and 0.0000 are displayed before use
End
UNIVERSITY OF MALTA
FACULTY OF MEDICINE & SURGERY
PHARMACY DEPARTMENT Ref. No. SOP/PD/315_01
STANDARD OPERATING PROCEDURE
AA®
SERIES AA-160
PRECISION BALANCE
Valid for:
2 years from
approval
Page 8 of 14
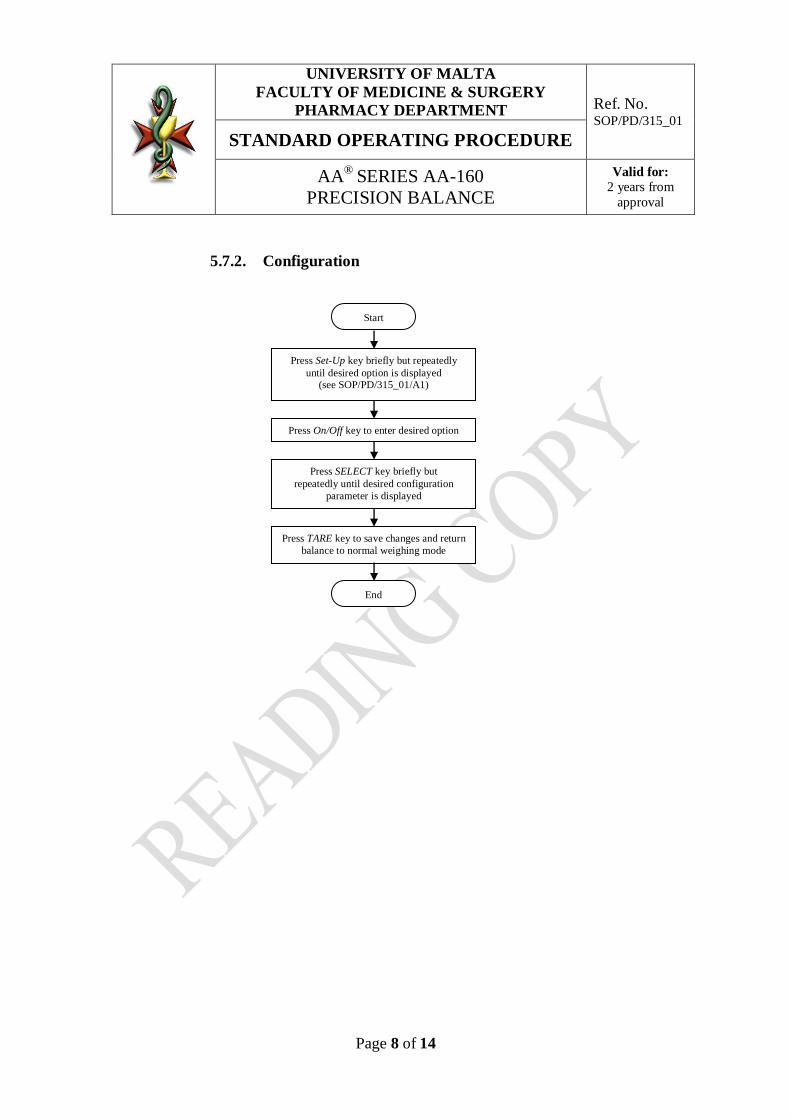
5.7.2. Configuration
Start
Press Set-Up key briefly but repeatedly
until desired option is displayed (see SOP/PD/315_01/A1)
Press On/Off key to enter desired option
Press SELECT key briefly but
repeatedly until desired configuration
parameter is displayed
Press TARE key to save changes and return
balance to normal weighing mode
End
UNIVERSITY OF MALTA
FACULTY OF MEDICINE & SURGERY
PHARMACY DEPARTMENT Ref. No. SOP/PD/315_01
STANDARD OPERATING PROCEDURE
AA®
SERIES AA-160
PRECISION BALANCE
Valid for:
2 years from
approval
Page 9 of 14
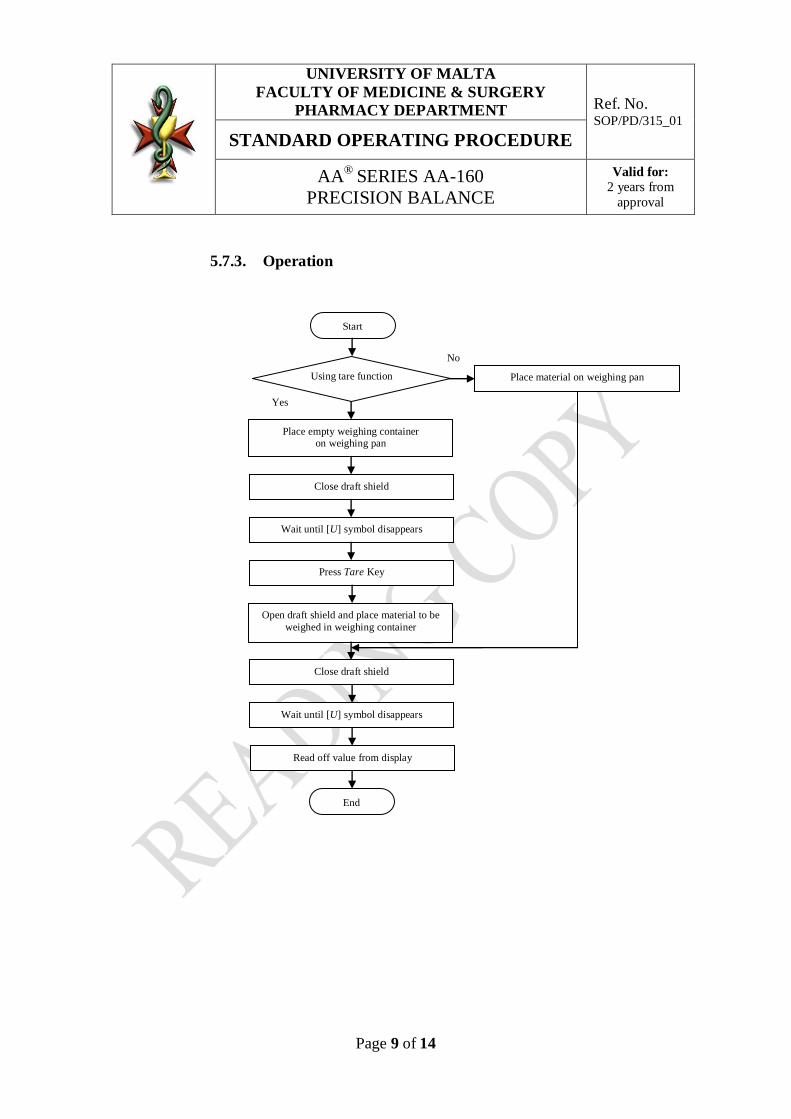
5.7.3. Operation
Start
Place empty weighing container on weighing pan
Using tare function
Close draft shield
Wait until [U] symbol disappears
Open draft shield and place material to be
weighed in weighing container
Close draft shield
Wait until [U] symbol disappears
Read off value from display
End
Place material on weighing pan
Yes
No
Press Tare Key
UNIVERSITY OF MALTA
FACULTY OF MEDICINE & SURGERY
PHARMACY DEPARTMENT Ref. No. SOP/PD/315_01
STANDARD OPERATING PROCEDURE
AA®
SERIES AA-160
PRECISION BALANCE
Valid for:
2 years from
approval
Page 10 of 14
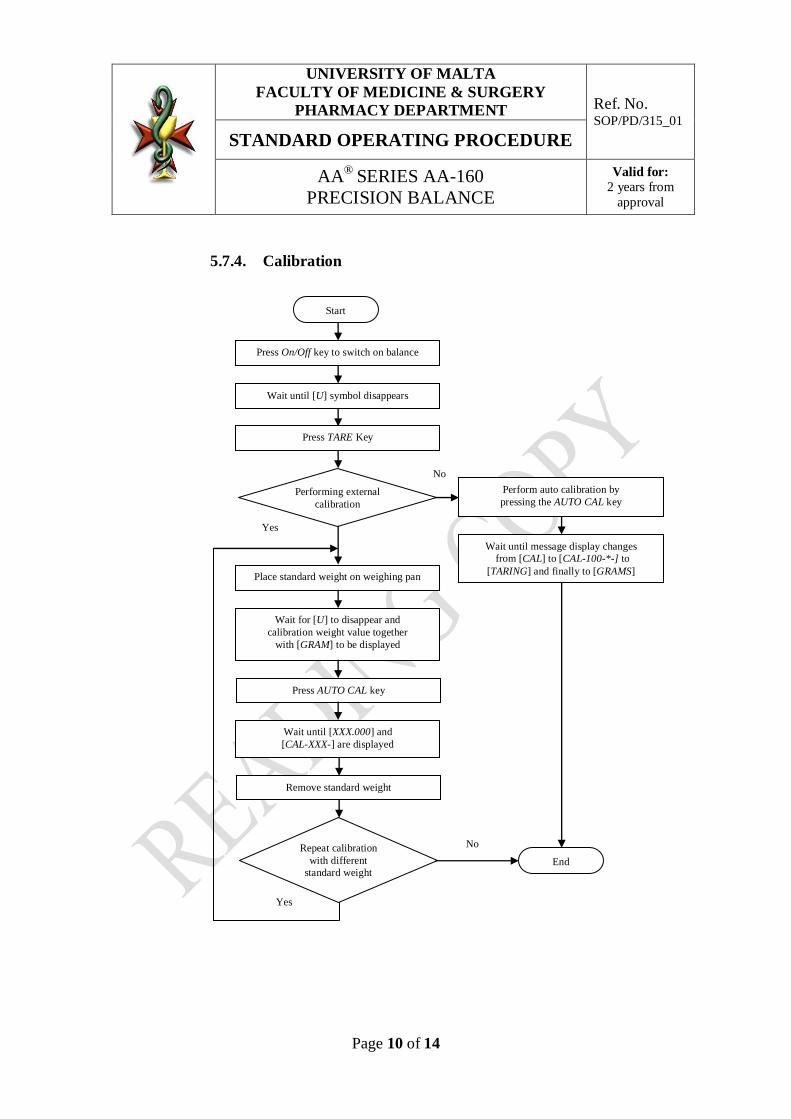
5.7.4. Calibration
Start
Press On/Off key to switch on balance
Wait until [U] symbol disappears
Press TARE Key
Performing external
calibration
Place standard weight on weighing pan
Wait for [U] to disappear and
calibration weight value together
with [GRAM] to be displayed
Press AUTO CAL key
Wait until [XXX.000] and
[CAL-XXX-] are displayed
Remove standard weight
Repeat calibration
with different
standard weight End
Perform auto calibration by
pressing the AUTO CAL key
Wait until message display changes
from [CAL] to [CAL-100-*-] to
[TARING] and finally to [GRAMS]
No
No
Yes
Yes
UNIVERSITY OF MALTA
FACULTY OF MEDICINE & SURGERY
PHARMACY DEPARTMENT Ref. No. SOP/PD/315_01
STANDARD OPERATING PROCEDURE
AA®
SERIES AA-160
PRECISION BALANCE
Valid for:
2 years from
approval
Page 11 of 14
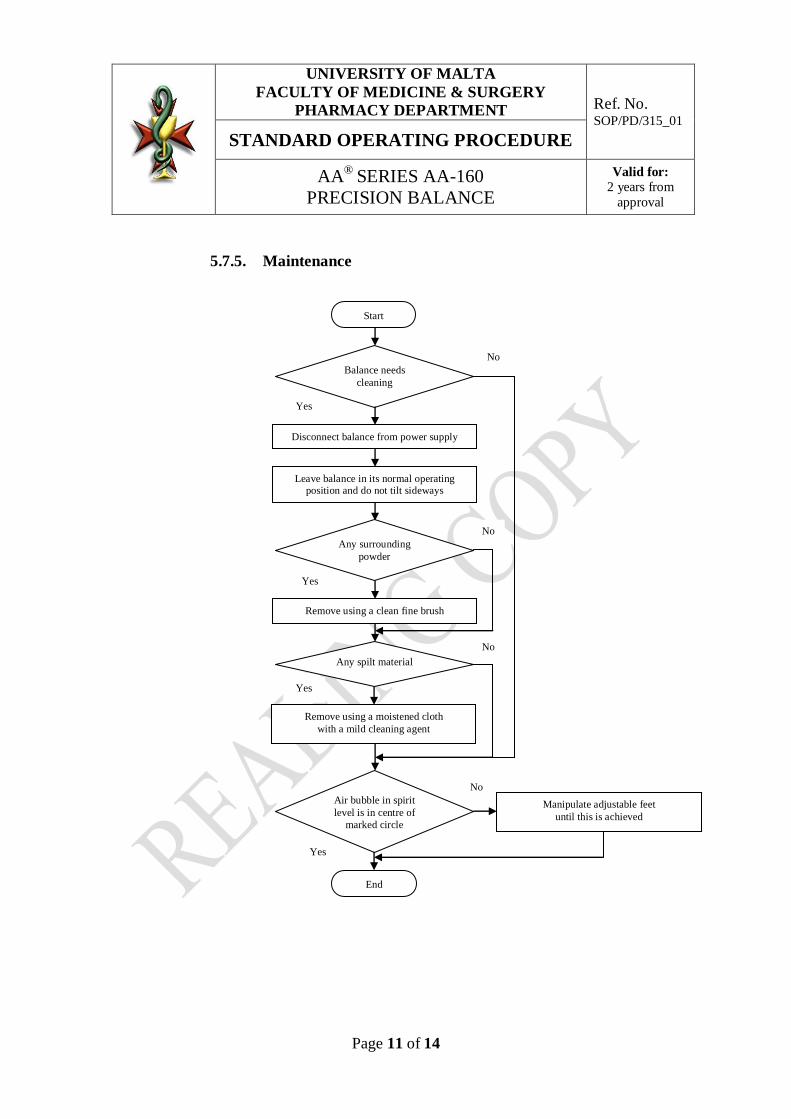
5.7.5. Maintenance
Start
Balance needs
cleaning
Disconnect balance from power supply
Leave balance in its normal operating position and do not tilt sideways
Remove using a clean fine brush
Any surrounding
powder
Any spilt material
Remove using a moistened cloth
with a mild cleaning agent
Air bubble in spirit
level is in centre of
marked circle
End
Manipulate adjustable feet
until this is achieved
No
No
No
No
Yes
Yes
Yes
Yes

UNIVERSITY OF MALTA
FACULTY OF MEDICINE & SURGERY
PHARMACY DEPARTMENT Ref. No. SOP/PD/315_01
STANDARD OPERATING PROCEDURE
AA®
SERIES AA-160
PRECISION BALANCE
Valid for:
2 years from
approval
Page 12 of 14
6. Precautions
6.1. Do not install balance near extremes of heat and cold.
6.2. Protect balance from dust and air draughts.
6.3. Keep weighing pan clean and dry to prevent inaccuracies.
6.4. Do not move balance during weighing.
6.5. Ensure that the maximum tolerated weight of 160g is not exceeded
during weighing procedures and also when using the tare function.
6.6. Do not leave any items on the balance when this is not in use.
6.7. Only use the balance if the spirit level is correct.
6.8. Adjust the air bubble in the spirit level each time the balance is moved
to a different location.
6.9. Avoid static charge buildup of the material to be weighed and of the
weighing container.
6.10. When transferring balance to a significantly warmer environment,
allow it to acclimatise for approximately 2 hours at room temperature
after it has been disconnected from the mains.
6.11. Do not unplug balance as this is designed to be continuously plugged
in.
6.12. Ensure that an audible beep is heard whenever one of the keys is
pressed if the beeper option is activated. If this beep is not heard, press
the key again until the beep is heard.
7. References
Denver Instrument Company. AA® Series Electronic Analytical Balances
Operating Instructions.
8. Appendices
SOP/PD/315_01/A1 – Configuration Parameters Set-Up Table
SOP/PD/315_01/A2 – Calibration Variance Table
9. Revision History
Version Number Amendments/ Reasons for change
01 Initial Release

UNIVERSITY OF MALTA
FACULTY OF MEDICINE & SURGERY
PHARMACY DEPARTMENT Ref. No. SOP/PD/315_01
STANDARD OPERATING PROCEDURE
AA®
SERIES AA-160
PRECISION BALANCE
Valid for:
2 years from
approval
Page 13 of 14
SOP/PD/315_01/A1 – Configuration Parameters Set-Up Table
Option Function
CURRENT To display the current selected configuration parameters
DEFAULT To reset the balance to the default factory configuration
parameters
FILTER
To choose the desired filter settings from [FT FAST] in
ideal conditions, [FT NORMAL] in standard laboratory
conditions and [FT SLOW] in areas with drafts and
vibrations
AUTO ZERO To choose to automatically compensate for zero drift [A-Z ON] or to turn off this correction feature [A-Z OFF]
BEEPER
To choose between short beeps [BP SHORT], long beeps
[BP LONG] or else to turn off the beeper function [BP
OFF]
UNIVERSITY OF MALTA
FACULTY OF MEDICINE & SURGERY
PHARMACY DEPARTMENT Ref. No. SOP/PD/315_01
STANDARD OPERATING PROCEDURE
AA®
SERIES AA-160
PRECISION BALANCE
Valid for:
2 years from
approval
Page 14 of 14
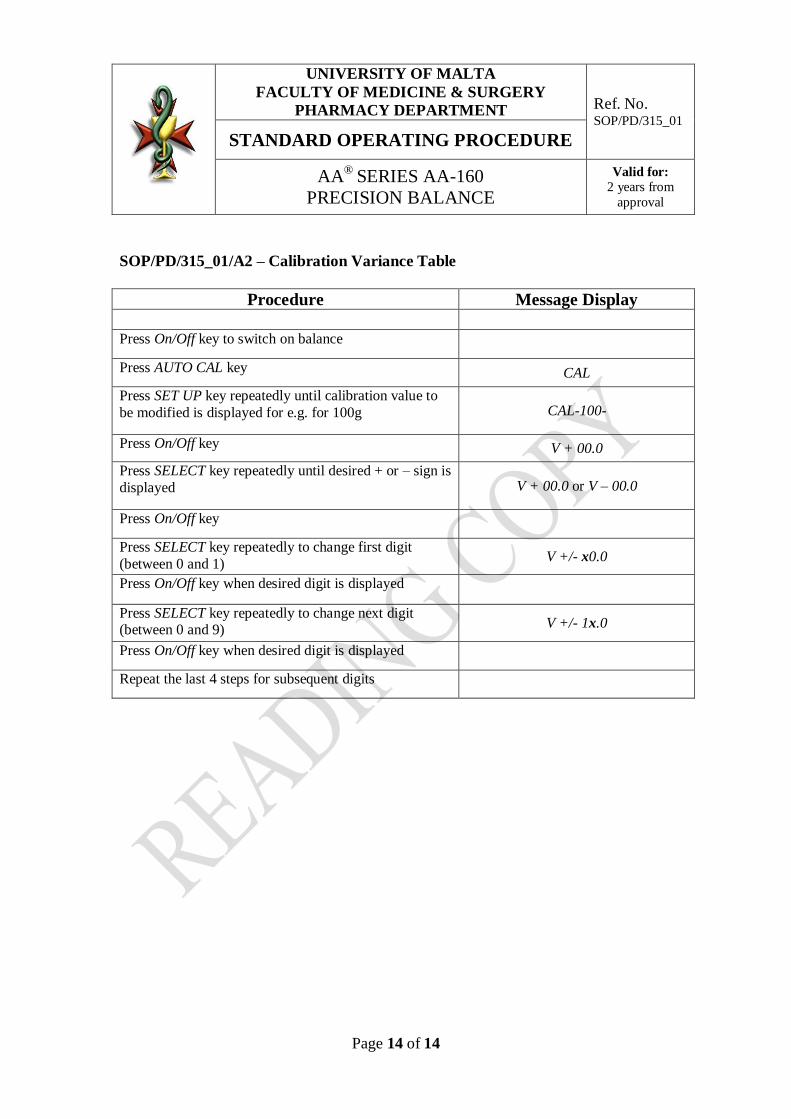
SOP/PD/315_01/A2 – Calibration Variance Table
Procedure Message Display
Press On/Off key to switch on balance
Press AUTO CAL key CAL
Press SET UP key repeatedly until calibration value to
be modified is displayed for e.g. for 100g CAL-100-
Press On/Off key V + 00.0
Press SELECT key repeatedly until desired + or – sign is
displayed V + 00.0 or V – 00.0
Press On/Off key
Press SELECT key repeatedly to change first digit
(between 0 and 1) V +/- x0.0
Press On/Off key when desired digit is displayed
Press SELECT key repeatedly to change next digit (between 0 and 9)
V +/- 1x.0
Press On/Off key when desired digit is displayed
Repeat the last 4 steps for subsequent digits


![SOP/PD/317 02 STANDARD OPERATING PROCEDURE€¦ · 3.1. Batch Operation: ... release adapter [8] to draw liquid into the rotating ... SOP/PD/317_02 STANDARD OPERATING PROCEDURE](https://static.documents.pub/doc/80x56/5b7746287f8b9ad3338ccea2/soppd317-02-standard-operating-procedure-31-batch-operation-release.jpg)


