

8/14/2019 SP101 Manual .pdf
http://slidepdf.com/reader/full/sp101-manual-pdf 1/40
INSTRUCTIONMANUAL
FOR
RUGER
®
SP101
®
DOUBLE-ACTION REVOLVER
For Product Service on This Model Please Call:(603) 865-2442 (See p. 25)
THIS INSTRUCTION MANUAL SHOULD ALWAYS ACCOMPANY THIS FIREARM AND BE
TRANSFERRED WITH IT UPON CHANGE OF OWNERSHIP, OR WHEN THE FIREARM IS LOANED OR
PRESENTED TO ANOTHER PERSON.
KW/3-09 CR17
READ THE INSTRUCTIONS ANDWARNINGS IN THIS MANUAL CAREFULLYBEFORE USING THIS FIREARM
STAINLESSSTEEL
CALIBERS.357, .38 SPECIAL9mm, .22, .32 &
.327 Federal Magnum
S

8/14/2019 SP101 Manual .pdf
http://slidepdf.com/reader/full/sp101-manual-pdf 2/40
8/14/2019 SP101 Manual .pdf
http://slidepdf.com/reader/full/sp101-manual-pdf 3/40
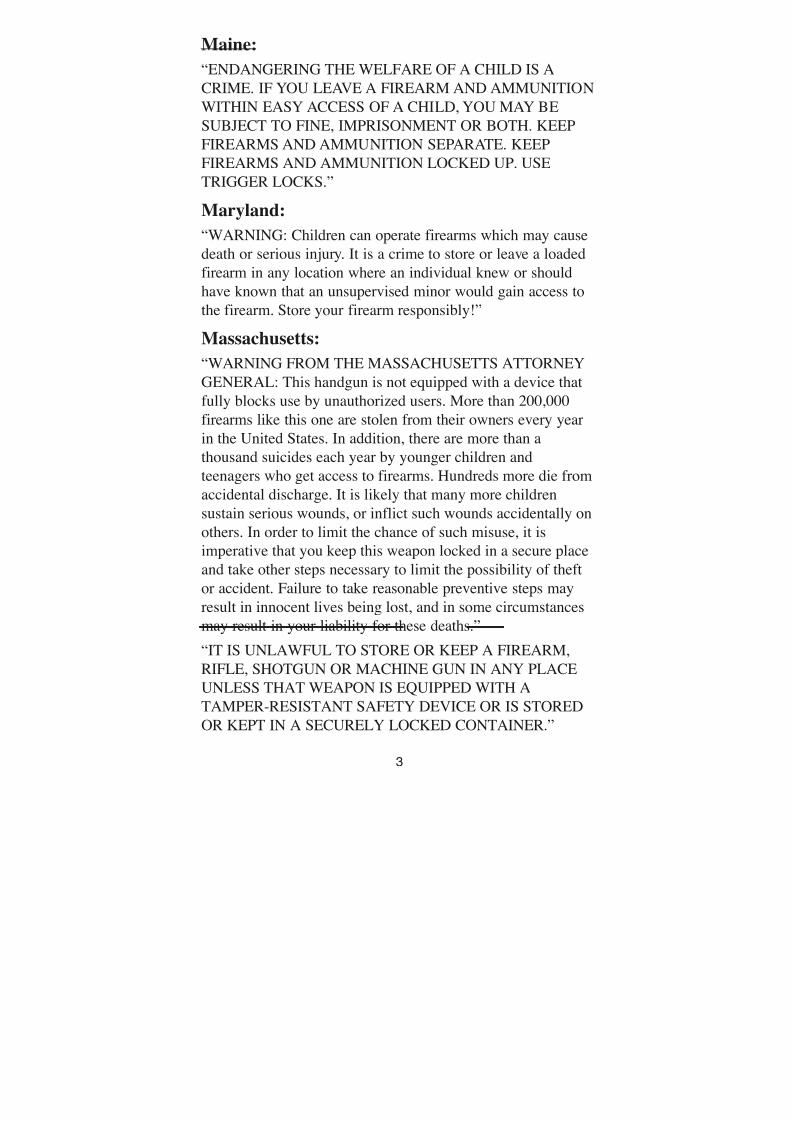
Maine:
“ENDANGERING THE WELFARE OF A CHILD IS A
CRIME. IF YOU LEAVE A FIREARM AND AMMUNITION
WITHIN EASY ACCESS OF A CHILD, YOU MAY BE
SUBJECT TO FINE, IMPRISONMENT OR BOTH. KEEPFIREARMS AND AMMUNITION SEPARATE. KEEP
FIREARMS AND AMMUNITION LOCKED UP. USE
TRIGGER LOCKS.”
Maryland:
“WARNING: Children can operate firearms which may cause
death or serious injury. It is a crime to store or leave a loaded
firearm in any location where an individual knew or should
have known that an unsupervised minor would gain access to
the firearm. Store your firearm responsibly!”
Massachusetts:
“WARNING FROM THE MASSACHUSETTS ATTORNEYGENERAL: This handgun is not equipped with a device that
fully blocks use by unauthorized users. More than 200,000
firearms like this one are stolen from their owners every year
in the United States. In addition, there are more than a
thousand suicides each year by younger children and
teenagers who get access to firearms. Hundreds more die from
accidental discharge. It is likely that many more childrensustain serious wounds, or inflict such wounds accidentally on
others. In order to limit the chance of such misuse, it is
imperative that you keep this weapon locked in a secure place
and take other steps necessary to limit the possibility of theft
or accident. Failure to take reasonable preventive steps may
result in innocent lives being lost, and in some circumstancesmay result in your liability for these deaths.”
“IT IS UNLAWFUL TO STORE OR KEEP A FIREARM,
RIFLE, SHOTGUN OR MACHINE GUN IN ANY PLACE
UNLESS THAT WEAPON IS EQUIPPED WITH A
TAMPER-RESISTANT SAFETY DEVICE OR IS STORED
OR KEPT IN A SECURELY LOCKED CONTAINER.”
3

8/14/2019 SP101 Manual .pdf
http://slidepdf.com/reader/full/sp101-manual-pdf 4/40
New Jersey:
“IT IS A CRIMINAL OFFENSE TO LEAVE A LOADED
FIREARM WITHIN EASY ACCESS OF A MINOR.”
New York City:“THE USE OF A LOCKING DEVICE OR SAFETY LOCK IS
ONLY ONE ASPECT OF RESPONSIBLE FIREARM
STORAGE. FOR INCREASED SAFETY, FIREARMS
SHOULD BE STORED UNLOADED AND LOCKED IN A
LOCATION THAT IS BOTH SEPARATE FROM THEIR
AMMUNITION AND INACCESSIBLE TO CHILDREN ANDOTHER UNAUTHORIZED PERSONS.”
North Carolina:
“IT IS UNLAWFUL TO STORE OR LEAVE A FIREARM
THAT CAN BE DISCHARGED IN A MANNER THAT A
REASONABLE PERSON SHOULD KNOW IS ACCESSIBLE
TO A MINOR.”
Texas:
“IT IS UNLAWFUL TO STORE, TRANSPORT, OR
ABANDON AN UNSECURED FIREARM IN A PLACE
WHERE CHILDREN ARE LIKELY TO BE AND CAN
OBTAIN ACCESS TO THE FIREARM.”
Wisconsin:
“IF YOU LEAVE A LOADED FIREARM WITHIN THE
REACH OR EASY ACCESS OF A CHILD YOU MAY BE
FINED OR IMPRISONED OR BOTH IF THE CHILD
IMPROPERLY DISCHARGES, POSSESSES, OR EXHIBITS
THE FIREARM.”
* * * * * * * * * * * * * * * * * * * * * *
Please check with your licensed retailer or state police for
additional warnings which may be required by local law or
regulation. Such regulations change constantly, and local
authorities are in the best position to advise you on such legal
matters.
4
8/14/2019 SP101 Manual .pdf
http://slidepdf.com/reader/full/sp101-manual-pdf 5/40
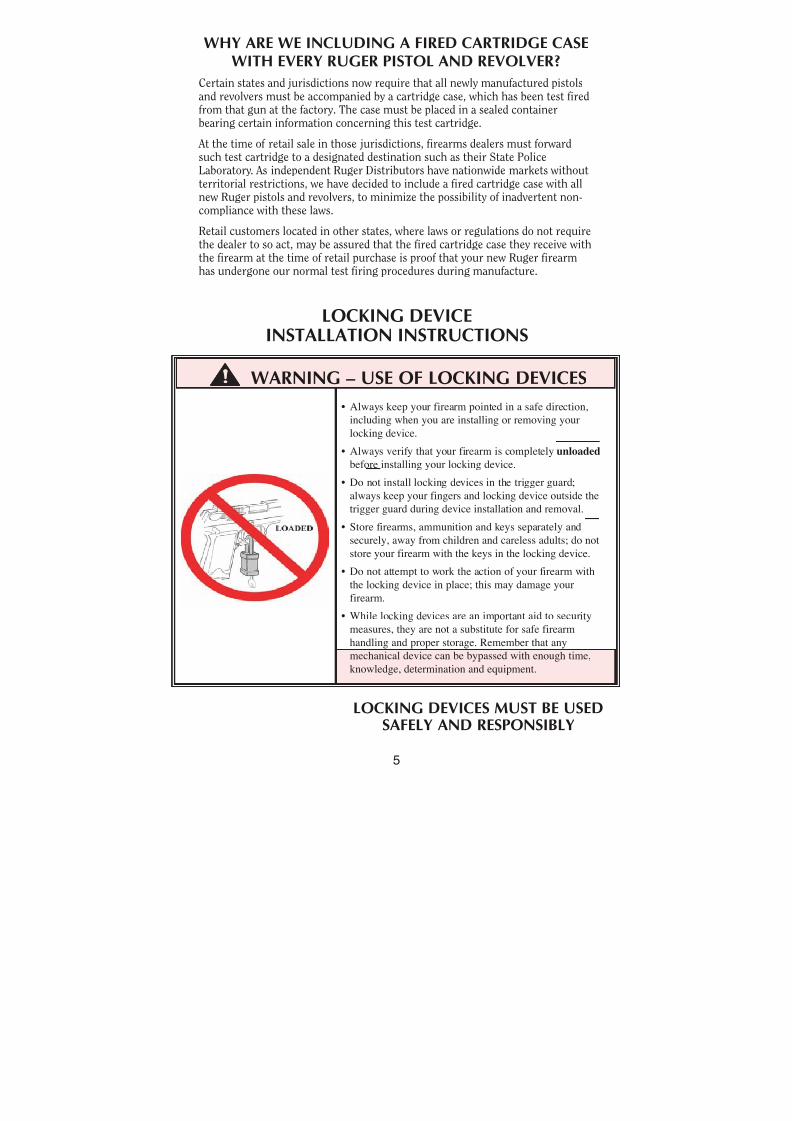
WHY ARE WE INCLUDING A FIRED CARTRIDGE CASEWITH EVERY RUGER PISTOL AND REVOLVER?
Certain states and jurisdictions now require that all newly manufactured pistolsand revolvers must be accompanied by a cartridge case, which has been test firedfrom that gun at the factory. The case must be placed in a sealed container
bearing certain information concerning this test cartridge.
At the time of retail sale in those jurisdictions, firearms dealers must forwardsuch test cartridge to a designated destination such as their State PoliceLaboratory. As independent Ruger Distributors have nationwide markets withoutterritorial restrictions, we have decided to include a fired cartridge case with allnew Ruger pistols and revolvers, to minimize the possibility of inadvertent non-compliance with these laws.
Retail customers located in other states, where laws or regulations do not require
the dealer to so act, may be assured that the fired cartridge case they receive withthe firearm at the time of retail purchase is proof that your new Ruger firearmhas undergone our normal test firing procedures during manufacture.
5
LOCKING DEVICEINSTALLATION INSTRUCTIONS
WARNING – USE OF LOCKING DEVICES
• Always keep your firearm pointed in a safe direction,
including when you are installing or removing your
locking device.
• Always verify that your firearm is completely unloaded
before installing your locking device.
• Do not install locking devices in the trigger guard;
always keep your fingers and locking device outside the
trigger guard during device installation and removal.
• Store firearms, ammunition and keys separately and
securely, away from children and careless adults; do not
store your firearm with the keys in the locking device.
• Do not attempt to work the action of your firearm with
the locking device in place; this may damage your
firearm.
• While locking devices are an important aid to securitymeasures, they are not a substitute for safe firearm
handling and proper storage. Remember that any
mechanical device can be bypassed with enough time,
knowledge, determination and equipment.
LOCKING DEVICES MUST BE USEDSAFELY AND RESPONSIBLY

8/14/2019 SP101 Manual .pdf
http://slidepdf.com/reader/full/sp101-manual-pdf 6/40
6
Correct Installation of Lock For
Ruger ® .22 cal. SP101 Revolvers Only
Correct Installation of Lock For
Ruger ® .32, .327, .38 & .357 cal.
SP101 Revolvers Only
Use the Correct Lock: While the basic locking device is substantially similar for
all Ruger® firearms, due to the different shapes of the many Ruger® firearms, some
firearms utilize different locking devices. The lock with a 1 1/2” shackle with the
clamp is for use with the RUGER® SP101® .22 caliber revolvers only. The
lock with the 2 1/2” shackle (without the vinyl coating) is for use with the .32 and
.327 caliber revolvers. The lock with the 2 1/2” shackle (with the vinyl coating) isfor use with .38 and .357 caliber revolvers. It is very important to use the correct
locking device!
To Install the Factory-Supplied Locking Device:
1. Keep the muzzle pointed in a safe direction and your fingers outside the trigger
guard at all times!
2. Be sure the firearm is completely unloaded and contains no cartridges or
cartridge cases!3. Completely swing out the cylinder.
4. If a clamp (black metal bracket that receives the lock) was supplied with your
firearm, apply the clamp and then apply the lock by placing the shackle of the
lock into the clamp as shown in Figure 1. If no clamp was supplied, then apply
the lock to the cylinder as shown in Figure 2.
5. Close the lock by pressing the shackle into the body of the lock (the part that
receives the key) as tightly together as possible. The lock has bumpers and theshackle is coated with a non-marring material that will not harm the metal finish
of your firearm; be careful not to dent the frame or grips of the revolver.
6. Once the lock is securely closed, remove the key and pull firmly on the lock to
test the connection and be sure it is locked. Do not leave or store your firearm
with the key in the lock! Store your locked unloaded firearm and the key in
secure, separate locations, away from ammunition, children, or unauthorized
adults.
Figure 2Figure 1
(Bearcat Revolver Shown)
8/14/2019 SP101 Manual .pdf
http://slidepdf.com/reader/full/sp101-manual-pdf 7/40
FIREARMS SAFETY-YOUR RESPONSIBILITY
SAFETY MUST BE THE FIRST AND CONSTANTCONSIDERATION OF EVERY PERSON WHO HANDLES
FIREARMS AND AMMUNITION.
This Instruction Manual is designed to assist you in learning how to use and carefor your RUGER® SP101® revolver properly. Please contact us if you have
any questions about it.
Only when you are certain you fully understand the Manual and can properly
carry out its instructions should you practice loading, unloading, etc. with live
ammunition. If you have any doubts about your ability to handle or use a
particular type of gun safely, then you should seek supervised instruction. Such
personalized instruction is often available from gun dealers, gun clubs or policedepartments. If none of these sources can help you, write to the National Rifle
Association, 11250 Waples Mill Road, Fairfax, VA 22030-7400. They will put youin touch with a source of personalized instruction.
The person possessing a gun has a full-time job. You cannot guess; you cannot
forget. You must know how to use your firearm safely. Do not use any firearm
without having a complete understanding of its particular characteristics and
safe use. Remember: There is no such thing as a foolproof gun.
TABLE OF CONTENTSPage
State-By-State Warnings . . . . . . . . . . . . . . . . . . . . . . . . . . . . . . . . . . . . . . . . . . . . .2
Locking Device Installation Instructions . . . . . . . . . . . . . . . . . . . . . . . . . . . . . . . .5General Information and Mechanical Characteristics . . . . . . . . . . . . . . . . . . . . . . 8
Ammunition . . . . . . . . . . . . . . . . . . . . . . . . . . . . . . . . . . . . . . . . . . . . . . . . . . . . . 10
Operation of “Double-Action Only” Revolvers . . . . . . . . . . . . . . . . . . . . . . . . . . . 12
Handling . . . . . . . . . . . . . . . . . . . . . . . . . . . . . . . . . . . . . . . . . . . . . . . . . . . . . . . . 13
To Load and Fire . . . . . . . . . . . . . . . . . . . . . . . . . . . . . . . . . . . . . . . . . . . . . . . . . . 14
To Uncock (Decock) The Revolver . . . . . . . . . . . . . . . . . . . . . . . . . . . . . . . . . . . . 16To Unload or Eject Cartridge Cases . . . . . . . . . . . . . . . . . . . . . . . . . . . . . . . . . . . 17Special Instructions for 9 mm Clips . . . . . . . . . . . . . . . . . . . . . . . . . . . . . . . . . . 18
Disassembly . . . . . . . . . . . . . . . . . . . . . . . . . . . . . . . . . . . . . . . . . . . . . . . . . . . . . . 19
Reassembly . . . . . . . . . . . . . . . . . . . . . . . . . . . . . . . . . . . . . . . . . . . . . . . . . . . . . . 21
Care and Cleaning . . . . . . . . . . . . . . . . . . . . . . . . . . . . . . . . . . . . . . . . . . . . . . . . . 22
Storage . . . . . . . . . . . . . . . . . . . . . . . . . . . . . . . . . . . . . . . . . . . . . . . . . . . . . . . . . .23
Care of Stainless Steel Revolvers . . . . . . . . . . . . . . . . . . . . . . . . . . . . . . . . . . . . . 24
Sights . . . . . . . . . . . . . . . . . . . . . . . . . . . . . . . . . . . . . . . . . . . . . . . . . . . . . . . . . . . 24
Sight Adjustments . . . . . . . . . . . . . . . . . . . . . . . . . . . . . . . . . . . . . . . . . . . . . . . . . 25Service and Parts Policy . . . . . . . . . . . . . . . . . . . . . . . . . . . . . . . . . . . . . . . . . . . . 25
Shipping Firearms for Repair . . . . . . . . . . . . . . . . . . . . . . . . . . . . . . . . . . . . . . . .25
Ordering Parts . . . . . . . . . . . . . . . . . . . . . . . . . . . . . . . . . . . . . . . . . . . . . . . . . . . .26
Parts List . . . . . . . . . . . . . . . . . . . . . . . . . . . . . . . . . . . . . . . . . . . . . . . . . . . . . . . . .28
Parts Drawing . . . . . . . . . . . . . . . . . . . . . . . . . . . . . . . . . . . . . . . . . . . . . . . . . . . . 33
The Basic Rules of Safe Firearms Handling . . . . . . . . . . . . . . . . . . . . . . . . . . . . 35 Warranty Information . . . . . . . . . . . . . . . . . . . . . . . . . . . . . . . . . . . . . . . . . . . . . . 40
“Ruger,” “SP101,” and the Sturm, Ruger logo are registered U.S. trademarks.
7
8/14/2019 SP101 Manual .pdf
http://slidepdf.com/reader/full/sp101-manual-pdf 8/40
8
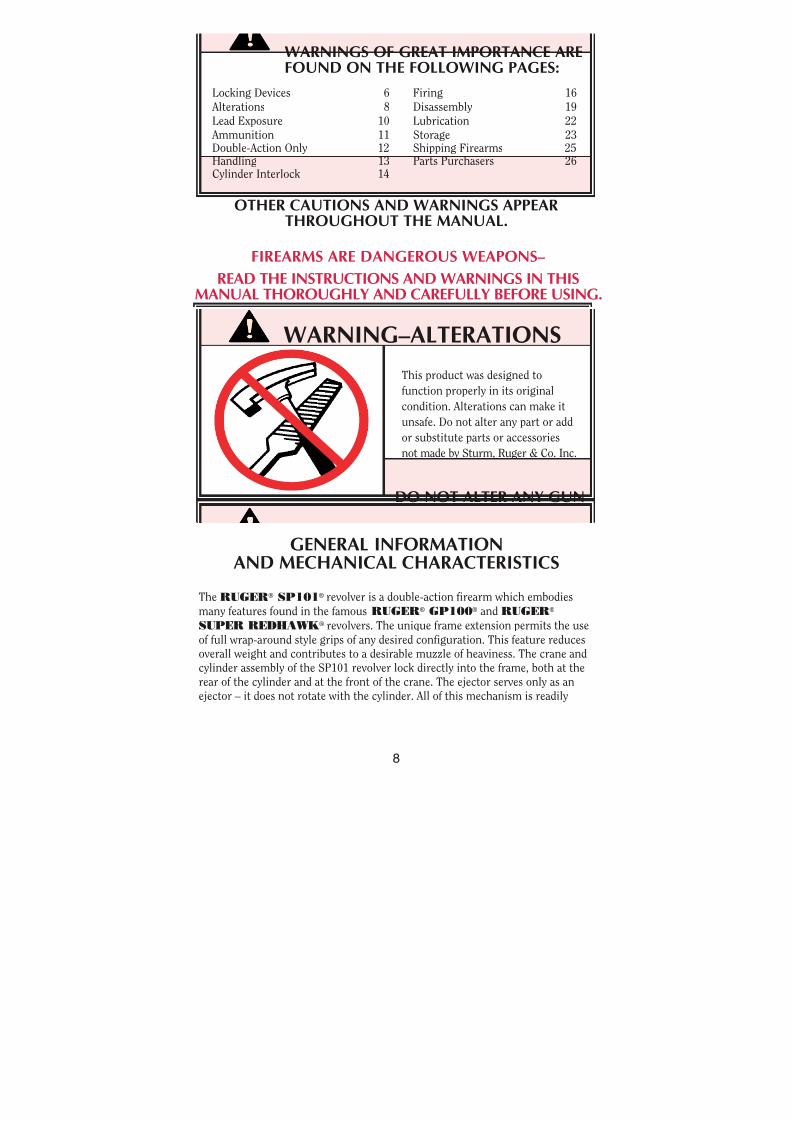
FIREARMS ARE DANGEROUS WEAPONS–
READ THE INSTRUCTIONS AND WARNINGS IN THISMANUAL THOROUGHLY AND CAREFULLY BEFORE USING.
GENERAL INFORMATIONAND MECHANICAL CHARACTERISTICS
The RUGER® SP101® revolver is a double-action firearm which embodies
many features found in the famous RUGER®
GP100®
and RUGER®
SUPER REDHAWK® revolvers. The unique frame extension permits the use
of full wrap-around style grips of any desired configuration. This feature reducesoverall weight and contributes to a desirable muzzle of heaviness. The crane and
cylinder assembly of the SP101 revolver lock directly into the frame, both at the
rear of the cylinder and at the front of the crane. The ejector serves only as an
ejector – it does not rotate with the cylinder. All of this mechanism is readily
WARNING–ALTERATIONS
This product was designed to
function properly in its original
condition. Alterations can make it
unsafe. Do not alter any part or add
or substitute parts or accessories
not made by Sturm, Ruger & Co. Inc.
DO NOT ALTER ANY GUN
WARNINGS OF GREAT IMPORTANCE AREFOUND ON THE FOLLOWING PAGES:
Locking Devices 6 Firing 16
Alterations 8 Disassembly 19
Lead Exposure 10 Lubrication 22 Ammunition 11 Storage 23Double-Action Only 12 Shipping Firearms 25Handling 13 Parts Purchasers 26Cylinder Interlock 14
OTHER CAUTIONS AND WARNINGS APPEARTHROUGHOUT THE MANUAL.
8/14/2019 SP101 Manual .pdf
http://slidepdf.com/reader/full/sp101-manual-pdf 9/40
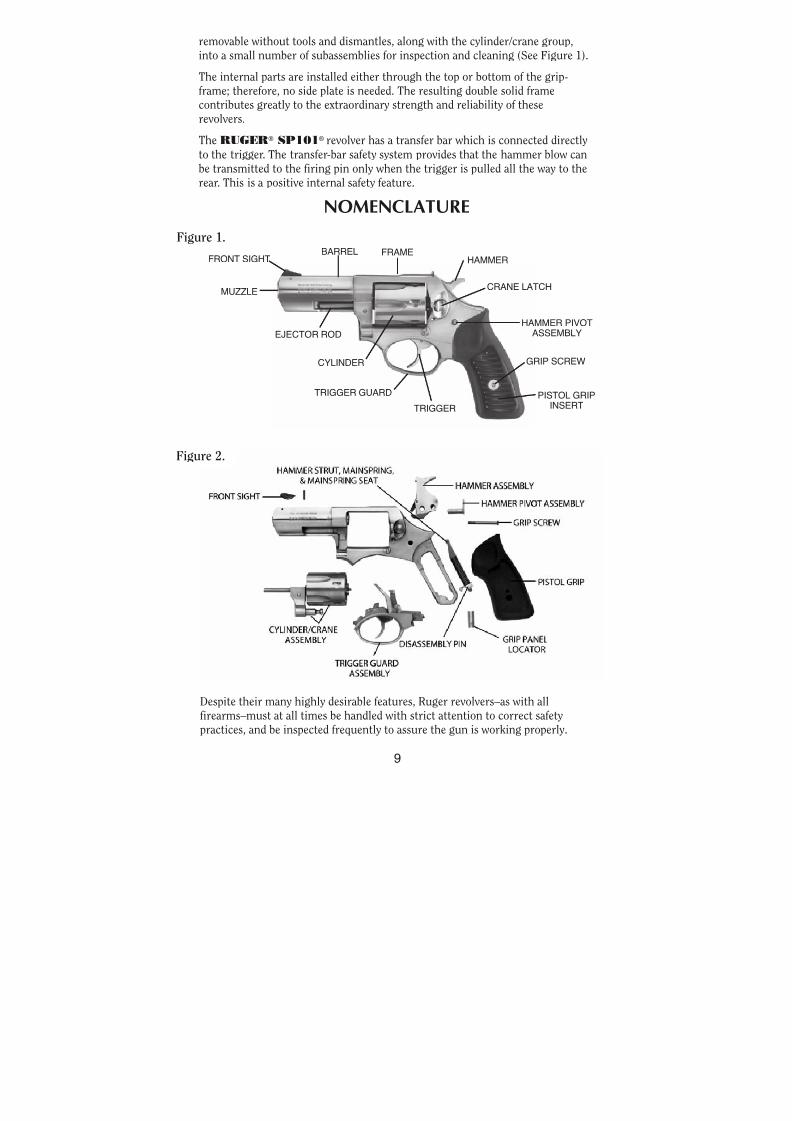
removable without tools and dismantles, along with the cylinder/crane group,
into a small number of subassemblies for inspection and cleaning (See Figure 1).
The internal parts are installed either through the top or bottom of the grip-
frame; therefore, no side plate is needed. The resulting double solid framecontributes greatly to the extraordinary strength and reliability of these
revolvers.The RUGER® SP101® revolver has a transfer bar which is connected directly
to the trigger. The transfer-bar safety system provides that the hammer blow can
be transmitted to the firing pin only when the trigger is pulled all the way to the
rear. This is a positive internal safety feature.
NOMENCLATURE
9
FRONT SIGHT
MUZZLE
EJECTOR ROD
CYLINDER
TRIGGER GUARD PISTOL GRIP
INSERT
GRIP SCREW
CRANE LATCH
HAMMER PIVOT
ASSEMBLY
HAMMERBARREL
TRIGGER
FRAME
Figure 1.
Figure 2.
Despite their many highly desirable features, Ruger revolvers–as with all
firearms–must at all times be handled with strict attention to correct safety
practices, and be inspected frequently to assure the gun is working properly.
8/14/2019 SP101 Manual .pdf
http://slidepdf.com/reader/full/sp101-manual-pdf 10/40
10
Discharging firearms in poorly ventilatedareas, cleaning firearms, or handlingammunition may result in exposure tolead and other substances known to thestate of California to cause birth defects,reproductive harm, and other seriousphysical injury. Have adequate ventilationat all times. Wash hands thoroughly afterexposure.
SHOOTING OR CLEANING GUNSMAY EXPOSE YOU TO LEAD
WARNING – LEAD EXPOSURE
AMMUNITION
RUGER® SP101® revolvers are designed for use with cartridges of the
correct caliber which are manufactured in accordance with the U.S. Industry
Standards. Be certain to use proper cartridges of the correct caliber. See page 21
(“Care and Cleaning”) for important information on chamber cleaning.
Please refer to the Notes below regarding proper ammunition for the available
SP101 calibers.
Notes on Caliber .38 Special: .38 Special caliber revolvers are designed
specifically for modern higher-powered factory loaded cartridges, including .38Special and .38 Special + P ammunition.
Notes on .357 Magnum caliber: This revolver is designed to fire factory loaded.357 Magnum, .38 Special and .38 Special + P ammunition.
Special Ammunition Notice for .357 Revolvers marked “125 GR. BULLET”only: Some revolvers have slightly shorter cylinders and frames and aretherefore limited to the use of .357 Magnum ammunition with a maximum
bullet weight of 125 grains and an overall loaded cartridge length of not
more than 1.57 inches. These revolvers are roll-marked with “125
GR.BULLET” on the right side of the barrel.
Ammunition containing heavier bullets or of a longer length may not permit
the cylinder to close or rotate! You may not even be able to fire the revolver if you try to use longer or heavier bullets. Be sure the ammunition you wish to
use in the revolver will chamber freely, and will permit the cylinder to open,
close and rotate readily. Do not assume any ammunition will work without
checking it first.
All other .357 SP101 revolvers can use all standard factory .357 loads.
8/14/2019 SP101 Manual .pdf
http://slidepdf.com/reader/full/sp101-manual-pdf 11/40
11
Notes on 9mm Parabellum Revolvers: This model is chambered for the 9mmParabellum (Luger) cartridge. A package of 9mm clips are supplied with the
revolver and are required to allow proper ejection of the 9mm rimless cases. See
SPECIAL INSTRUCTIONS FOR 9mm CLIPS, p. 14. Do not use any other 9mmcartridges (9mm Short, 9mm Bergmann, etc.).
Because 9mm cartridges are manufactured worldwide for use in pistols, revolvers,and submachine guns, it is possible to encounter cartridges which, when fired,
develop pierced primers. If this occurs, discontinue the use of the particular brand
or type of ammunition. The possibility of a pierced primer is another complete
reason why a shooter should always wear protective glasses to shield his eyes. Use
only metal jacketed bullets in 9mm revolvers. When a lead bullet is fired, its baseexpands and a ring of lead is shaved off and deposited in the shoulder area of the
chamber. A build-up of lead rings can prevent proper chambering of cartridges
because 9mm cartridge mouths seat on the chamber shoulders.
Notes on .22 Caliber Long Rifle: The .22 cal. model is a six-shot double actionrevolver chambered for the .22 Long Rifle cartridge. The .22 Short, .22 Long and
.22 shot cartridges can also be fired from this model. It should be noted that
extensive use of the .22 Short cartridge can cause a “ring” to be cut in eachcylinder chamber which may interfere with the extraction of Long and Long Rifle
Cartridges.
Notes on Caliber .32 H & R Magnum: This six-shot SP101 chambered for theCaliber .32 H & R Magnum cartridge will also chamber the .32 S & W cartridge and
the .32 S & W Long cartridge. The use of other than .32 H & R Magnum cartridges,
may, in some loadings, result in unsatisfactory accuracy.
Notes on Caliber .327 Federal Magnum: This six-shot SP101 chambered for theCaliber .327 Federal Magnum cartridge will also chamber the .32 H & R, .32 S & W
and the .32 S & W Long cartridge. The use of other than .327 Federal Magnum
cartridges, may, in some loadings, result in unsatisfactory accuracy.
For reasons noted above, revolver chambers should be cleaned regularly and
chamber cleaning should be the first corrective action when cartridges of thecorrect caliber and type do not chamber properly.
WARNING –AMMUNITION
Death, serious injury, and damage
can result from the use of wrongammunition, bore obstructions,powder overloads, or incorrectcartridge components. Always wearshooting glasses and hearingprotectors.
IMPROPER AMMUNITIONDESTROYS GUNS

8/14/2019 SP101 Manual .pdf
http://slidepdf.com/reader/full/sp101-manual-pdf 12/40
12
AMMUNITION (CARTRIDGES) NOTICE WE SPECIFICALLY DISCLAIM RESPONSIBILITY FOR
ANY DAMAGE OR INJURY WHATSOEVER OCCURRING INCONNECTION WITH, OR AS THE RESULT OF, THE USE IN
THE SP101 REVOLVER OF FAULTY, OR NON-STANDARD, OR“RE-MANUFACTURED”, OR HAND LOADED (RELOADED) AMMUNITION, OR OF CARTRIDGES OTHER THAN THOSEFOR WHICH THE FIREARM WAS ORIGINALLY CHAMBERED.
OPERATION OF
“DOUBLE-ACTION ONLY “ REVOLVERS(This section applied only to “Double-Action Only” revolvers, identified by their
lack of a hammer spur)
The model you have selected is equipped with a special trigger mechanism that
permits only “double-action” firing. The hammer cannot be manually cocked,
since there is no full cock notch or hammer spur. The revolver can only be fired
by a relatively long (“double-action”) pull of the trigger which draws the hammer
rearward and then releases it to fire every shot.
It is important to note that the mechanism of the gun will not permit another
shot to be fired unless the trigger is first fully released and then pulled again.
The revolver has an internal transfer bar that will not allow the hammer tocontact the firing pin and fire the gun until the operator completely pulls the
trigger.
WARNING–DOUBLE-ACTION ONLY
Do not attempt to manually cockthe hammer! Since there is no full-cock notch, the hammer will fallforward when released, and if fingerpressure is applied to the trigger,the revolver can fire. The automatic
safeties that prevent firing if thehammer falls are deactivated if thetrigger is pulled. Do not touch thetrigger unless you intend to shootthe revolver!
DO NOT COCKHAMMER

8/14/2019 SP101 Manual .pdf
http://slidepdf.com/reader/full/sp101-manual-pdf 13/40
13
CAUTION: When firing the double-action only revolver,be sure that the trigger is released completely to its fully
forward position before attempting to pull the trigger for asubsequent shot. If the trigger finger is allowed to interfere with thefull recovery of the trigger (preventing it from moving through aboutthe last one-eighth inch of its forward movement), pulling the trigger
will not fire the revolver. The trigger must be fully released after eachshot is fired. This characteristic is found on all modern double-actionrevolvers and “double-action only” pistols.
HANDLING
CARRYING: The SP101 revolver can be carried with all chambers loaded. Whenthe hammer and trigger are fully forward, the transfer-bar is lowered out of itsfiring position and the hammer rests directly on the frame.
WARNING–HANDLING
DRY-FIRING
“Dry Firing” is practicing the trigger pull of the empty revolver for practice and
familiarity. The SP101 revolver can be dry-fired without damage to the firing pin
or internal components.
Be sure that the revolver is unloaded before handling. Be sure of your bullet
stop, even when dry-firing for practice. Do not dry-fire the revolver with the
plastic ‘safety disc’ on the cylinder.
If the trigger is held to the rear, the gun
can fire if the hammer strikes thetransfer bar. Note that it need not be adeliberate effort to pull the trigger. Anysituation where the trigger attains itsrearward position and permits thetransfer bar to be interposed between thehammer and the firing pin can cause thecartridge under the firing pin todischarge.
NEVER DROP OR STRIKE THEREVOLVER – COCKED OR UNCOCKED
CARRY AND HANDLE THE REVOLVERIN SUCH A MANNER THAT THEHAMMER AND TRIGGER WILL NOT BESTRUCK.
NEVER CARRY ANYREVOLVER WITH THE
HAMMER COCKED OR THETRIGGER HELD TO THE REAR

8/14/2019 SP101 Manual .pdf
http://slidepdf.com/reader/full/sp101-manual-pdf 14/40
WARNING –CYLINDER INTERLOCK
14
2. Insert cartridges and gently close cylinder, making sure it is securely latched.
Do not “flip” the cylinder open or shut.
3. The revolver is now ready to fire, either “double-action” by pulling the triggerthrough its complete arc for each shot, or “single-action” by cocking the
hammer and then pulling the trigger for each shot. The trigger pull is
somewhat shorter and lighter when the revolver is fired single action, and
this is the preferred mode for precise shots or target shooting.
FIGURE 3LOADING THE REVOLVER.
When correctly operated, the cylindercannot be opened when the hammer iscocked, and the hammer/triggermechanism is not able to be operated
until the cylinder is locked shut.However, this safety interlock can beintentionally defeated if the crane latch isdepressed and the hammer is thencocked while the cylinder is opened. If the cylinder is then shut when thehammer is cocked, the hammer may falland the gun may fire.
NEVER CLOSE OR OPEN
THE CYLINDER WHILETHE HAMMER IS COCKED
TO LOAD AND FIRE
Be sure the revolver is pointed in a safe direction and is
never cocked while loading.
1. Press the crane latch and guide cylinder out of frame to the left to its loadingposition (See Figure 3, below).

8/14/2019 SP101 Manual .pdf
http://slidepdf.com/reader/full/sp101-manual-pdf 15/40
4. DO NOT TOUCH THE TRIGGER UNTIL YOU ARE READY TO FIRE.
5. DO NOT HOLD THE REVOLVER BY THE BARREL OR CYLINDER WHEN
FIRING.
CAUTION–DOUBLE ACTION FIRING
15
When firing in the double action
mode, be sure that the trigger isreleased completely to its fully
forward position before pulling the
trigger for a subsequent shot. If
the trigger finger is allowed tointerfere with the full recovery of
the trigger (preventing it from
moving thru about the last one-eighth inch of its forward
movement), the trigger cannot be
pulled again for another discharge.
The trigger must be fully released
after each shot is fired. This
characteristic is found in allmodern double-action revolversand “double-action only” pistols.
FULLY RELEASETRIGGER
BETWEEN SHOTS

8/14/2019 SP101 Manual .pdf
http://slidepdf.com/reader/full/sp101-manual-pdf 16/40
When firing the SP101 revolver, be sureall persons are a safe distance to the rearof the shooter. When fired, all revolversdischarge hot gas and particles of lead,powder grains, or lubricant through theclearance gap between the cylinder andthe rear of the barrel at high speed. Thiscan injure a person who is standing tooclose to the revolver.
When firing the SP101 revolver (or anyrevolver), always be certain that nothing– including your hands – is in the path of the hot gas and particles which aredischarged from the front and sides of the
cylinder.
When shooting, adequate eye protectionis essential. Shooters and bystandersmust wear shooting glasses. Hearingprotection must also be worn. Exposureto shooting noise can damage hearing.
HOT GASES EXITBARREL/CYLINDER GAP
TO UNCOCK (DECOCK) THE REVOLVERIf your revolver is cocked, and you wish to let the hammer down to its forward
position (against the frame), proceed as follows: USE EXTREME CARE WHEN
ATTEMPTING TO DECOCK THE REVOLVER, AS THE THUMB SLIPPING
DURING THIS PROCESS CAN RESULT IN AN ACCIDENTAL DISCHARGE IFTHE TRIGGER IS HELD TO THE REAR.
1. Make certain that the revolver is pointed in a safe direction (see Rule 2, Page
35).
2. Make certain both hands are dry and not impeded in any way – gloves,
bandages, cold, etc.
3. Grasp the revolver (if right handed) so that the thumb and forefinger of your
left hand are firmly holding the frame, forward of the trigger guard. Thus,
your left hand is in full control of the revolver (see Figure 4A, Page 17).
4. Place your right thumb firmly on the hammer spur and, with your thumbsecurely in control of the hammer, squeeze the trigger only enough to permit
the hammer to ‘break free’ of the trigger. At that instant, IMMEDIATELY
RELEASE THE TRIGGER and then slowly permit the hammer, STILL
SECURE UNDER YOUR THUMB, to move fully forward to its resting position
against the frame. NOTE: It is imperative that finger pressure be removed
from the trigger just as soon as it is free of the hammer. Then, properly, thetrigger and hammer will move towards their fully forward rest positions
together (see Figure 4B, Page 17).
16
WARNING–FIRING

8/14/2019 SP101 Manual .pdf
http://slidepdf.com/reader/full/sp101-manual-pdf 17/40
Practice this important gun handling skill with an unloaded revolver until you
have developed the proper control and ‘touch’ to decock your revolver safely. The
key to safe decocking is having the weight of the revolver controlled with one
hand, while the thumb and forefinger of the ‘shooting hand’ control thehammer and trigger. Improperly restraining the trigger during this procedure
may result in the hammer not resting fully against the frame. If this should
occur, carefully repeat the procedure for decocking, steps 1–4 again.
UNCOCKING THE REVOLVER
FIGURE 4
A. With the thumb controlling the hammeras shown (1), squeeze trigger to permit
hammer to ‘break free’ (2).
TO UNLOAD OR EJECT CARTRIDGE CASES
KEEP THE REVOLVER POINTED IN A SAFE DIRECTION!
DO NOT ATTEMPT TO UNLOAD WHEN THE HAMMER IS COCKED.
1. Uncock the revolver. (See pp. 16 - 17.)
2. Press crane latch. Guide cylinder out left of frame as for loading. The revolvernow cannot be fired.
3. Push head of ejector rod smartly toward rear of cylinder until it stops. This
action will extract cartridges or fired cases. Do not eject live cartridges onto
any surface where a primer might strike a solid object and discharge the
cartridge.
4. Check to be sure all chambers are empty.
1
2
4
3
17
B. When hammer is free, IMMEDIATELY
release trigger (3). Then lower hammerslowly to its resting position completely
down against frame (4).

8/14/2019 SP101 Manual .pdf
http://slidepdf.com/reader/full/sp101-manual-pdf 18/40
NOTE: When ejecting fired cartridge cases, position the revolver at ahigh angle so the cases will come fully out of the chambers and not slipunder the ejector. This high angle positioning is not necessary whenejecting unfired cartridges.
18
SPECIAL INSTRUCTIONS FOR 9MM CLIPS
9mm revolvers require special clips to extract cartridges using the ejector rod
because this cartridge has no rim for the ejector to act against. Individual
cartridges may be fired without the clip, but will then require that each cartridge
or fired case be individually removed to unload the revolver.
TO LOAD CLIP:
Hold clip on outside diameter in one hand. With thumb and forefinger of
opposite hand, press cartridge’s extractor groove into clip until it snaps into
place. Continue until clip is fully loaded. Load cartridges, along with the clip,
into the cylinder.
3
2
4
1
CORRECT UNLOADING SEQUENCE

8/14/2019 SP101 Manual .pdf
http://slidepdf.com/reader/full/sp101-manual-pdf 19/40
DISASSEMBLYRead instructions before disassembling a gun.1. BE CERTAIN THE REVOLVER IS UNLOADED BEFORE DISASSEMBLY.
2. Using a properly fitting screwdriver, remove
grip screw. Remove pistol grip inserts from
grips. Grip panel locator may then be removed.
Pull grip downward off frame. Take care not to
lose the disassembly pin, which may fall free
when the grip is removed.
3. Cock the hammer. Insert disassembly pin
about one half its length into the hole at the
rear of the mainspring strut. Lacking a
disassembly pin, any similar instrument will
serve (see Figure 5).
4. With thumb on hammer spur, squeeze trigger allowing hammer to go fully
forward. Lift out mainspring assembly. CAUTION: Do not remove the
disassembly pin until the mainspringassembly is reinstalled in the revolver at the
time of reassembly. Doing so will permit the
mainspring to fly off its strut with great force
and may cause injury.
5. Pull trigger and remove hammer pivot while
holding trigger in a rearward position. Lifthammer out of the top of the frame while
trigger is held in a rearward position (seeFigure 6).
TO UNLOAD CLIP:
Eject clip and cases from cylinder. While holding clip on outside diameter, press
empty cases of clip for removal. Clip is now ready to be reloaded. Inspect clips
after each use. If broken, bent or cracked, discard and replace. Additional clips
can be purchased from out Newport, New Hampshire Service Department.
19
WARNING –DISASSEMBLY
Always unload a firearm before
cleaning, lubrication, disassembly
or assembly.
Never remove or install a loadedcylinder – it can fire if dropped or
struck.
UNLOAD BEFORE CLEANING
3
2
4
1
Figure 5
Figure 6
8/14/2019 SP101 Manual .pdf
http://slidepdf.com/reader/full/sp101-manual-pdf 20/40
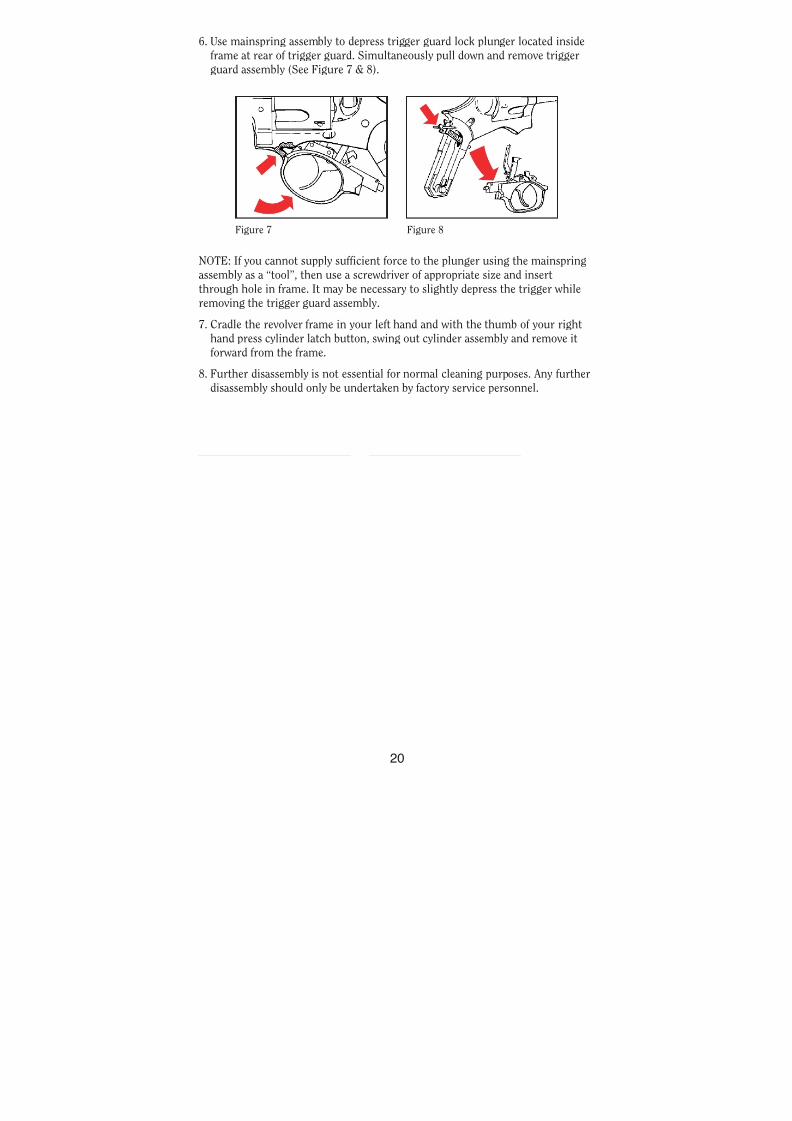
NOTE: If you cannot supply sufficient force to the plunger using the mainspring
assembly as a “tool”, then use a screwdriver of appropriate size and insert
through hole in frame. It may be necessary to slightly depress the trigger while
removing the trigger guard assembly.
7. Cradle the revolver frame in your left hand and with the thumb of your right
hand press cylinder latch button, swing out cylinder assembly and remove it
forward from the frame.
8. Further disassembly is not essential for normal cleaning purposes. Any further
disassembly should only be undertaken by factory service personnel.
6. Use mainspring assembly to depress trigger guard lock plunger located inside
frame at rear of trigger guard. Simultaneously pull down and remove trigger
guard assembly (See Figure 7 & 8).
20
Figure 7 Figure 8
8/14/2019 SP101 Manual .pdf
http://slidepdf.com/reader/full/sp101-manual-pdf 21/40
REASSEMBLY
AGAIN, BE CERTAIN REVOLVER IS UNLOADED!
Before starting reassembly, be certain that all components and the inside of the
frame are thoroughly clean. In particular the tongue on the front of the trigger
guard and its mating recess in the frame must be completely clean.
1. Replace cylinder and crane assembly in frame
and close cylinder.
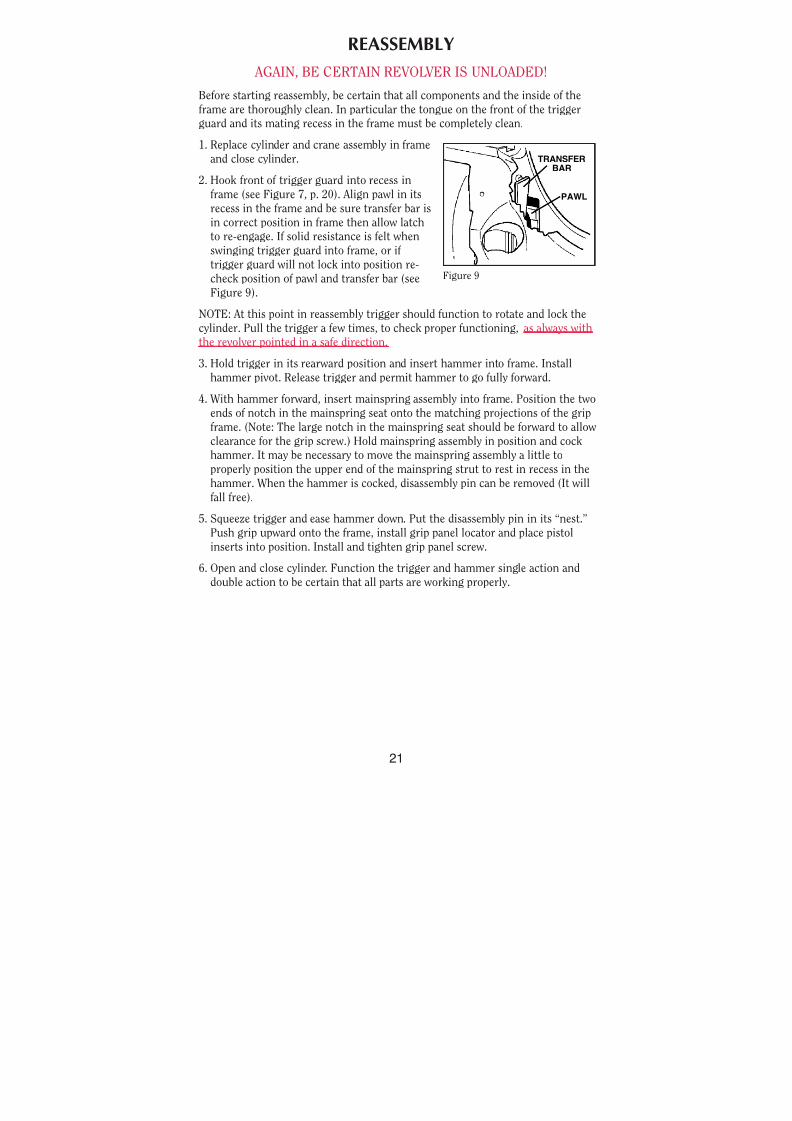
2. Hook front of trigger guard into recess in
frame (see Figure 7, p. 20). Align pawl in its
recess in the frame and be sure transfer bar is
in correct position in frame then allow latchto re-engage. If solid resistance is felt when
swinging trigger guard into frame, or if trigger guard will not lock into position re-
check position of pawl and transfer bar (see
Figure 9).
NOTE: At this point in reassembly trigger should function to rotate and lock the
cylinder. Pull the trigger a few times, to check proper functioning, as always withthe revolver pointed in a safe direction.
3. Hold trigger in its rearward position and insert hammer into frame. Installhammer pivot. Release trigger and permit hammer to go fully forward.
4. With hammer forward, insert mainspring assembly into frame. Position the two
ends of notch in the mainspring seat onto the matching projections of the grip
frame. (Note: The large notch in the mainspring seat should be forward to allow
clearance for the grip screw.) Hold mainspring assembly in position and cockhammer. It may be necessary to move the mainspring assembly a little to
properly position the upper end of the mainspring strut to rest in recess in the
hammer. When the hammer is cocked, disassembly pin can be removed (It will
fall free).
5. Squeeze trigger and ease hammer down. Put the disassembly pin in its “nest.”
Push grip upward onto the frame, install grip panel locator and place pistol
inserts into position. Install and tighten grip panel screw.
6. Open and close cylinder. Function the trigger and hammer single action and
double action to be certain that all parts are working properly.
21
TRANSFER
BAR
PAWL
Figure 9

8/14/2019 SP101 Manual .pdf
http://slidepdf.com/reader/full/sp101-manual-pdf 22/40
22
WARNING –LUBRICATIONFiring a revolver with oil, grease, or anyother material even partially obstructing thebore may result in damage to the revolverand injury to the shooter and those nearby.
Do not spray or apply lubricants directly onammunition. If the powder charge of acartridge is affected by the lubricant, it maynot be ignited, but the energy from the
primer may be sufficient to push the bulletinto the bore where it may become lodged.Firing a subsequent bullet onto theobstructed bore may damage the revolverand cause injury to the shooter and thosenearby. Use lubricants properly. You areresponsible for the proper care andmaintenance of your firearms.
IMPROPER LUBRICATIONDESTROYS GUNS
CARE AND CLEANING
ALWAYS BE CERTAIN THE REVOLVER IS UNLOADED BEFORE CLEANING.
The internal mechanism of the SP101 revolver can be lubricated without
disassembly. A few drops of light oil recommended as suitable for firearms,
applied periodically about the various frame openings, will work its way into themechanism parts. The exterior of the revolver and the bore and chambers should
be thoroughly cleaned and then wiped with an oily cloth if the gun is to bestored. Do not apply excess lubrication.
To clean the revolver after firing, swing the cylinder out and clean the barrel
from the muzzle by running a cleaning rod with a solvent coated patch through
the bore several times. A bronze wire brush (of correct size for gun caliber)
attached to the cleaning rod should then be pushed the full length of the bore
several times. Again swab the bore with a solvent coated patch. Then wipe therod clean and, using a dry patch, swab the bore until it is clean. Examine thebore to be sure that no fouling remains. Repeat the above procedure for each of
the five chambers.
Chambers must be thoroughly scrubbed to remove build-up of bullet metal and
firing residue. A dirty chamber can prevent full seating of a cartridge, which in
turn causes the cylinder to bind. DO NOT APPLY EXCESSIVE OIL TO
UNDERSIDE OF EJECTOR – AREA SHOULD BE WIPED DRY WITH OILY
CLOTH. Also, the underside of the ejector (‘star’) and the area of the cylinder where the ejector seats, must be clean. Dirt can prevent the ejector from fully
seating. That condition can cause hard closing of the cylinder and interfere with
proper cylinder rotation.
If lead bullet loads are fired extensively, lead build-up may cause cylinder
binding. Lubricate the cylinder crane gap with Break-Free® CLP or some other
lubrication which meets mil. spec. Mil-163460 to prevent this condition.

8/14/2019 SP101 Manual .pdf
http://slidepdf.com/reader/full/sp101-manual-pdf 23/40
Never place or store any firearm in
such a manner that it may be
dislodged. Firearms should always be
stored securely and unloaded, away
from children and careless adults. Use
the locking device originally supplied
with this firearm for storage.
The use of a locking device or safety
lock is only one aspect of responsiblefirearms storage. For increased safety,
firearms should be stored unloaded and
locked in a location that is both
separate from their ammunition and
inaccessible to children and any other
unauthorized person.
STORE SECURELY & UNLOADED
23
WARNING –STORAGE
STORAGEGUNS SHOULD NOT BE STORED LOADED!
Do not keep your revolver in a leather, fabric or canvas holster when it is stored.These materials attract moisture, even though the holster may appear to be
perfectly dry.
Sturm, Ruger also offers gun safes for sale as a means to secure more than onefirearm. Please call the Heritage Safe Company at 1-800-515-7233 for details and
ordering information.
USE THE LOCKING DEVICE SUPPLIED
WITH THE REVOLVER TO RENDER ITINOPERATIVE FOR SAFE STORAGE.
(SEE P AGE 6)

8/14/2019 SP101 Manual .pdf
http://slidepdf.com/reader/full/sp101-manual-pdf 24/40
SIGHTS.38 SPL, .357 Mag. & 9mm
The SP101 .38 SPL, .357 Mag. & 9mm revolvers are provided with fixed sights. To
change the front sight, drive out the pin in the barrel rib with a small punch and lift
out sight blade.
24
Rear sight Suggested sight picture
Top of front sight even with top of
rear sight. Front sight centered in
notch of rear sight. Target bullseye
centered on top of front sight.
CARE OF STAINLESS STEEL REVOLVERS
Revolvers made of stainless steel are more resistant to corrosion than blued steel
revolvers. However, in the interest of proper operation and long life of your revolver,
inspect it frequently and clean, lubricate and apply an appropriate rust preventative.
Sometimes surface discoloration may be noted, particularly in the grip area of stainless steel revolvers, resulting from perspiration. Contact with some types of
holsters can also cause stains or rusting. Rusting may also occur as a result of therevolver being exposed to moisture, humidity, salt air or chemicals.
Minor discoloration can usually be removed by rubbing the stained area with an
abrasive ink eraser, crocus cloth, or a “metal polishing” compound. When using any
of these abrasives, proceed with care and use light pressure to achieve a blending of
‘color’ with those areas that are not discolored.
External surfaces of the barrel, frame and cylinder should be cleaned and wiped dryafter use or after exposure to adverse conditions. If the revolver is to be stored, coatit with a light film of oil or preservative. Where the revolver is in continuing use,
and the presence of oil or grease would be objectionable, then the external surface
can be coated (after cleaning and drying) with a paste wax formulated for use on
metals. Apply the wax sparingly, allow time for it to dry hard, then buff lightly with a
soft cloth. When applying the wax, take care that it does not get into the mechanism
or on the functioning parts such as the hammer, trigger, crane latch, etc. A properly
applied hard wax coating will not interfere with gun handling and it will provide ameasure of protection.
8/14/2019 SP101 Manual .pdf
http://slidepdf.com/reader/full/sp101-manual-pdf 25/40
25
SIGHT ADJUSTMENTS.22 LR, .32 H & R Mag. & .327 Fed. Mag.
The SP101 .22 LR, .32 H & R Mag., & .327 Fed. Mag. revolvers are equipped with
sights adjustable for windage. Each click of the rear sight adjustment screw will
move the point of bullet impact approximately 1/2” on the target at 25 yardsusing a 4” barrel length.
To move the point of impact to the right: Turn the click screw counterclockwise.
To move the point of impact to the left: Turn the click screw clockwise.
SERVICE AND PARTS POLICY
If you have any questions with regard to the performance of your RUGER®
SP101® revolver please write or call (603-865-2442) our Product Service
Department in Newport, New Hampshire 03773, fully describing all
circumstances and conditions involved. If you should return your revolver to the
factory for repair, or order parts for it, please comply with the following
suggestions for prompt service:
SHIPPING FIREARMS FOR REPAIR
RUGER® SP101® revolvers returned to the factory for repair should be sent
to: Sturm, Ruger & Company, Inc., Product Service Department, 411 SunapeeSt., Newport, New Hampshire 03773. Telephone (603) 865-2442.
Guns should be sent prepaid. We will not accept collect shipments.
The Federal Gun Control Act, as well as the laws of most States and localities, do
not prohibit an individual (who is not otherwise barred from purchasing or
possessing a firearm) from shipping a firearm directly to the manufacturer for
repair. However, before you ship your revolver to us, be certain that your State or
locality does not have a law or regulation which will prohibit you from receiving
the revolver from us after it has been repaired. If such receiving is prohibited,then please have a Federally Licensed firearms dealer ship the gun to us. If your
revolver is sent to us by a dealer, it will be returned to that dealer after being
repaired. If a handgun (pistol or revolver) is shipped by an individual who does
not hold a Federal Firearms License, it must be shipped for overnight delivery via
U.P.S., Federal Express or other, similar private overnight service. NOTE:
Firearms may not be shipped via U.S. Mail. Persons who do not hold a Federal
Firearms License are prohibited by Federal law from shipping a handgun by Mail.Handguns mailed in violation of the law are impounded by the Post Office.
WARNING–BEFORE SHIPPING ANYFIREARM, BE ABSOLUTELY CERTAIN THAT ITAND ITS CYLINDER ARE UNLOADED. DONOT SHIP CARTRIDGES WITH A FIREARM.

8/14/2019 SP101 Manual .pdf
http://slidepdf.com/reader/full/sp101-manual-pdf 26/40
DO NOT SEND GUN BOXES OR LITERATURE THAT YOU CONSIDER TO BE
COLLECTOR’S ITEMS – THESE ARE INVARIABLY DAMAGED OR
DESTROYED IN SHIPMENT. Please do not include holster, grip panels, or other
accessories with a firearm being shipped to the factory for service. Always insure your shipment.
Enclose a letter which includes your name, address, telephone number, serialnumber and model of the firearm. Describe in detail the trouble you have
experienced with your firearm, or the work you wish to have done. Merely stating
that the firearm “needs repair” is inadequate information.
All work performed is subject to a minimum labor charge and charges for
shipping and handling. Most models can be reblued, but custom gunsmithing
service or nonstandard alterations are NOT AVAILABLE from Ruger Product
Service Departments. Please contact the Product Service Department for pricing
information.
26
ORDERING PARTSPlease contact the New Hampshire Product Service Department for partsavailability and current prices. All parts orders for the RUGER® SP101
®
revolvers should be sent to: Sturm, Ruger & Co., Inc., Product Service
Department, 411 Sunapee Street, Newport, New Hampshire 03773, 603-865-
2442. We cannot comply with open account or C.O.D. orders. Payment in full via
credit card (Visa or MasterCard only), money order or certified bank check (no
personal checks, please) is required before any service will be performed. Pleaseprovide your name as it appears on the credit card along with the expiration date
of the card. All parts orders are subject to a minimum charge and charges for
shipping and handling. Order parts by Part Name and Part Number and include
the entire serial number of the firearm for which the parts are being ordered.
There is a minimum labor charge plus a shipping and handling charge if the
parts are factory fitted. All factory fitted parts are fit on an exchange basis only.
We will not return the replaced parts. Please contact the Product Service
Department for pricing information.
WARNING–PARTS PURCHASERS
It is the purchaser’s responsibility to beabsolutely certain that any parts ordered from thefactory are correctly fitted and installed. Firearmsare complicated mechanisms and IMPROPER
FITTING OF PARTS MAY RESULT IN A DANGEROUS MALFUNCTION, DAMAGE TOTHE FIREARM, AND SERIOUS INJURY TO THESHOOTER AND OTHER PERSONS. Thepurchaser and installer of parts must accept fullresponsibility for the correct adjustment andfunctioning of the revolver after such installation.
PARTS MUST FIT CORRECTLY

8/14/2019 SP101 Manual .pdf
http://slidepdf.com/reader/full/sp101-manual-pdf 27/40
27
Barrels, cylinders, cylinder/crane assemblies and a number of other component
parts must be fitted at the factory. Company policy is to proof-test and/or
function fire all barrels after fitting to the frames in which they are to be used.
This procedure ensures maximum protection to our customers. The specialproof-test ammunition used in this testing is sold only to bonafide firearms
manufacturers and is not available to gun shops, gunsmiths, or individuals.
Because the frame of the RUGER® SP101® revolver is a serial numbered
component, it is defined as a “firearm” by Federal law and is not sold as a
separate component.
*Parts designated by an asterisk must be factory fitted. These parts are fitted onan exchange basis only. We will not return the replaced parts. We will not return
any part that is broken, malfunctioning, badly worn or has been modified. See
“Warning – Parts Purchasers,” p. 26.
CAUTION: A gun containing modified, broken,malfunctioning, or badly worn parts should not be fired.

8/14/2019 SP101 Manual .pdf
http://slidepdf.com/reader/full/sp101-manual-pdf 28/40
2 8
RUGER® SP101® REVOL
PARTS LISTDesign, prices and specifications subject to change
SPECIFY MODEL AND CALIBER WHEN OR
(See Exploded View on Page 33)
Part Name Part No. Mode* Barrel, 2 1/4” KW00625 SP10* Barrel, 3 1/16” KW00626 SP10* Barrel, 2 1/4” KW00601 SP10* Barrel, 2 1/4”, Extended Frame KW00640 SP10* Barrel, 3 1/16” KW00602 SP10
* Barrel, 2 1/4” KW00617 SP10* Barrel, 3 1/16” KW00616 SP10* Barrel, 2 1/4” KW00607 SP10* Barrel, 4”, Half Shroud KW00620 SP10* Barrel, 4”, Full Shroud KW00606 SP10* Barrel, 3 1/16” KW00612 SP10* Barrel, 4”, Full Shroud KW00611 SP10* Barrel, 3 1/16” KW00614 SP10
Cable Lock, 10”, Not Illustrated PM120A All SCase Only, Small RGC-S All S
Center Pin Lock KW05300 All SCenter Pin Rod KW05400 SP10Center Pin Rod KW05410 SP10Center Pin Spring KW03400 SP10Center Pin Spring KW03410 SP10Clip, Full Moon, 10 per package W06400-10 SP10
* Crane & Crane Pivot Assembly KW00800A SP10

8/14/2019 SP101 Manual .pdf
http://slidepdf.com/reader/full/sp101-manual-pdf 29/40
2 9
Part Name Part No. Mode* Crane & Crane Pivot Assembly KW00812A SP10* Crane Latch KW00900 All SP* Crane Latch Pivot KW02700 All SP
Crane Latch Spring KE-57 All SP
Crane Latch Spring Plunger KH05100 All SP* Crane Pivot Lock Plunger KH06700 All SP* Crane Pivot Lock Spring KH07600 All SP* Cylinder KW00100 SP10* Cylinder KW00116 SP10* Cylinder KW00104 SP10* Cylinder, 6-shot KW00102 SP10* Cylinder, 6-shot KW00103 SP10* Cylinder, 6-shot KW00124 SP10
Cylinder Latch KW04501 All SPCylinder Latch Pivot KH01400 All SPCylinder Latch Plunger KE-51 All SPCylinder Latch Spring KH05000 All SPDisassembly Pin E-63 All SP
* Ejector KW01817 SP10* Ejector KW01800 SP10* Ejector KW01805 SP10* Ejector KW01802 SP10* Ejector KW01803 SP10
Ejector Alignment Pin, (2 Req’d.) KE-35 All SP* Ejector Retainer KW02400 All SP
Ejector Rod KW02300 All SPEjector Spring KW02500 SP10Ejector Spring KW02510 SP10

8/14/2019 SP101 Manual .pdf
http://slidepdf.com/reader/full/sp101-manual-pdf 30/40
3 0
Part Name Part No. ModeFerrule (Right Side), Not Illustrated W01014 All SPFerrule (Left Side) W01015 All SP
* Firing Pin KH02100 SP10* Firing Pin KXR02100 SP10
Firing Pin Rebound Spring KE-48 All SPFront Latch KW03100 All SPFront Latch Pivot Lock KH07500 All SPFront Latch Pivot Lock Spring KH07700 All SPFront Latch Pivot Pin KW05600 All SPFront Latch Spring KE-57 All SPFront Latch Spring Plunger KW06800 All SPFront Sight W03602 SP10Front Sight W03603 SP10Front Sight W03604 SP10
Front Sight Cross Pin KW02600 All SPGrip, 1 Piece Rubber, No Inserts W01000 All SPGrip with Plastic Inserts W21000 All SP
(Disassembly Pin & Screw Included)Grip Inserts, Black Plastic (Sold in Pairs Only) W21018 All SPGrip Inserts, Wood (Sold in Pairs Only) WI All SPGrip Panel Locator W03300 All SPGrip Panel Screw KW01300 All SP
* Hammer Assembly KW24000 All SP
* Hammer Assembly, Spurless, Not Illustrated KW24004 All SP* Hammer Dog KW01900 All SP
Hammer Dog Pivot Pin KE-22 All SP

8/14/2019 SP101 Manual .pdf
http://slidepdf.com/reader/full/sp101-manual-pdf 31/40
3 1
Part Name Part No. ModeHammer Dog Spring KE-57 All SPHammer Dog Spring Plunger KH05100 All SPHammer Pivot Assembly KE-16 All SPHammer Strut KT01500 All SP
Hammer Strut Mainspring KW00401 All SPHammer Strut Mainspring Seat KT00500 All SPPawl KW00700 SP10Pawl KW00701 SP10Pawl Plunger KH05100 All SPPawl Plunger Spring KH05000 All SPRear Sight Adjustment Screw W05900 SP10Rear Sight Blade W05902 SP10Rear Sight Spring MR05907 SP10
* Recoil Plate KMR02000 SP10
* Recoil Plate KXR02000 SP10Recoil Plate Cross Pin KE-49 SP10Recoil Plate Cross Pin KH04900 SP10Safety Insert W10000 SP10Safety Insert W10002 SP10Transfer Bar KW01700 SP10Transfer Bar KW01701 SP10
* Trigger Assembly KW23900 All SP* Trigger Guard KW00300 All SP
Trigger Guard Latch KW04600 All SPTrigger Guard Latch Pin KE-22 All SPTrigger Guard Latch Spring KW03800 All SPTrigger Link KW07100 All SP

8/14/2019 SP101 Manual .pdf
http://slidepdf.com/reader/full/sp101-manual-pdf 32/40
3 2
Part Name Part No. ModeTrigger Link Pin KH06400 All SPTrigger Link Plunger KW03700 All SPTrigger Pivot Pin KE02800 All SPTrigger Plunger KH03200 All SP
* PARTS SO MARKED MUST BE FACTORY FITTED

8/14/2019 SP101 Manual .pdf
http://slidepdf.com/reader/full/sp101-manual-pdf 33/40
3 3
8/14/2019 SP101 Manual .pdf
http://slidepdf.com/reader/full/sp101-manual-pdf 34/40
3 4

8/14/2019 SP101 Manual .pdf
http://slidepdf.com/reader/full/sp101-manual-pdf 35/40
THE BASIC RULES OF SAFE FIREARMS HANDLING We believe that Americans have a right to purchase and use firearms for lawful
purposes. The private ownership of firearms in America is traditional, but that
ownership imposes the responsibility on the gun owner to use his firearms in
a way which will ensure his own safety and that of others. When firearms are
used in a safe and responsible manner, they are a great source of pleasure andsatisfaction, and represent a fundamental part of our personal liberty.
Firearms do not cause accidents! Firearms accidents are almost always found
to have been the result of carelessness, or ignorance on the part of the shooter
of the basic rules of safe gun handling.
The following rules must be observed by gun users at all times. Safe gun
handling is not just desirable, it is absolutely essential to your safety, the safety
of others, and the continuation of gun ownership and sport shooting as weknow it today.
1. LEARN THE MECHANICAL AND HANDLINGCHARACTERISTICS OF THE FIREARM YOU ARE USING.
Not all firearms are the same. The
method of carrying and handling
firearms varies in accordance with the
mechanical provisions for avoiding
accidental discharge and the variousproper procedures for loading and
unloading. No person should handle
any firearm without first having
thoroughly familiarized himself with
the particular type of firearm he is
using, and with safe gun handling in
general.
2. ALWAYS KEEP THEMUZZLE POINTED IN ASAFE DIRECTION.Be sure of the bullet stop behind your
target, even when dry-firing. Never let
the muzzle of a firearm point at any
part of your body or at another
person. This is particularly important when loading or unloading a firearm.
In the event of an accidental
discharge, no injury can occur as long
as the muzzle is pointing in a safe
direction. A safe direction means a
direction which will not permit a
discharged bullet to strike a person, or to strike an object from which the
bullet may ricochet.
35
R U G E
R ®
I N S T R U C T
I O N MA N UA
L
R EA D T H E I
N S T R U C T I O N
S
A N D WA R N I N
G S I N T H I S
MA N UA L C
A R E F U L L Y B E
F O R E
U S I N G T H I
S F I R EA RM.

8/14/2019 SP101 Manual .pdf
http://slidepdf.com/reader/full/sp101-manual-pdf 36/40
A safe direction must take into account the fact that a bullet may penetrate a wall, ceiling, floor, window, etc., and strike a person or damage property. Makeit a habit to know exactly where the muzzle of your gun is pointing whenever you handle it, and be sure that you are always in control of the direction in which the muzzle is pointing, even if you fall or stumble. Keep your finger off
the trigger until you are ready to shoot.
3. FIREARMS SHOULD BE UNLOADED WHEN NOT INUSE.
Firearms should be loaded only when you are in the field or on the targetrange or shooting area, ready to shoot.Firearms and ammunition should be
securely locked in safes, racks orcabinets, or by using the lockingdevice supplied with the firearm whennot in use. Ammunition should safelybe stored separate from firearms.Store your firearms out of sight of visitors and children. It is the gunowner’s responsibility to be certain
that children and persons unfamiliar with firearms cannot gain access tofirearms, ammunition, orcomponents.
4. BE SURE THE BARREL ISCLEAR OF OBSTRUCTIONS
BEFORE SHOOTING.Even a bit of mud, snow or excesslubricating oil or grease in the bore
may cause the barrel to bulge, oreven burst on firing, and can causeserious injury to the shooter andbystanders. Be sure that you areusing ammunition of the propercaliber and loading for the gun youare using. If the report or recoil onfiring seems weak, or doesn’t seemquite right, CEASE FIRINGIMMEDIATELY, unload your firearm, and check to be sure that no obstructionhas become lodged in the barrel.
36
3
2
4
1

8/14/2019 SP101 Manual .pdf
http://slidepdf.com/reader/full/sp101-manual-pdf 37/40
5. BE SURE OF YOURTARGET BEFORE YOUSHOOT.Don’t shoot unless you know
exactly where your bullet is goingto strike. Be sure of the bulletstop behind your target, even
when dry-firing with an unloadedgun. If you are in the fieldhunting, do not fire at a
movement or noise. Take the timeto be absolutely certain of your
target before you pull the trigger.
6. WEAR SHOOTINGGLASSES AND HEARINGPROTECTORS WHENYOU SHOOT.
All shooters should wear
protective shooting glasses andadequate hearing protectors whenshooting. Exposure to shooting
noise can damage hearing, andadequate eye protection whenshooting is essential.
7. NEVER CLIMB A TREEOR FENCE WITH ALOADED FIREARM.Put the firearm down carefullybefore climbing a fence, andunload it before climbing ordescending a tree or jumping
over a ditch or other obstruction.Never pull or push a loadedfirearm toward yourself oranother person. When in doubt,or whenever you are about to doanything awkward, unload your
gun!
37
8/14/2019 SP101 Manual .pdf
http://slidepdf.com/reader/full/sp101-manual-pdf 38/40
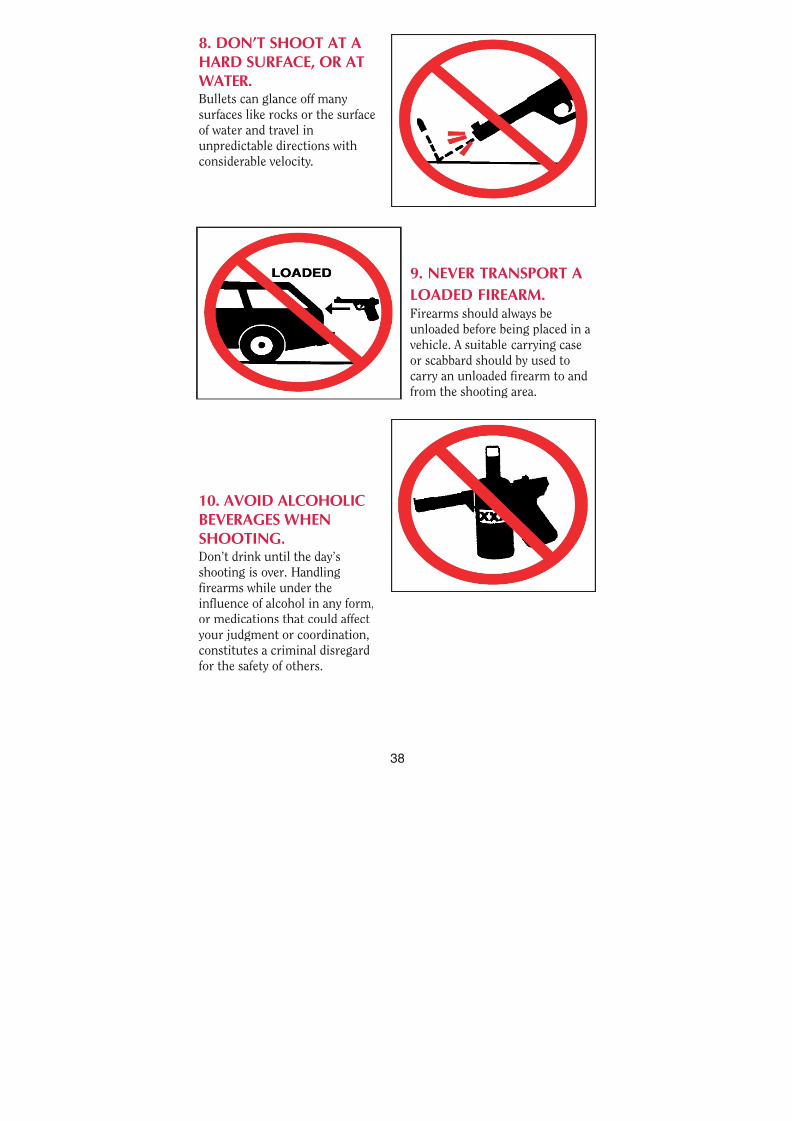
8. DON’T SHOOT AT AHARD SURFACE, OR ATWATER.Bullets can glance off many
surfaces like rocks or the surfaceof water and travel inunpredictable directions withconsiderable velocity.
9. NEVER TRANSPORT A
LOADED FIREARM.Firearms should always beunloaded before being placed in a
vehicle. A suitable carrying caseor scabbard should by used tocarry an unloaded firearm to andfrom the shooting area.
10. AVOID ALCOHOLICBEVERAGES WHENSHOOTING.Don’t drink until the day’sshooting is over. Handlingfirearms while under theinfluence of alcohol in any form,
or medications that could affect your judgment or coordination,constitutes a criminal disregardfor the safety of others.
38

8/14/2019 SP101 Manual .pdf
http://slidepdf.com/reader/full/sp101-manual-pdf 39/40
A BRIEF ACCOUNT OF AN EXTRAORDINARY
ACHIEVEMENT: RUGER FIREARMS
Sturm, Ruger & Company, Inc., had its beginning in a small machine shopoccupying a rented frame building in Southport, Connecticut. In January,1949, with an initial investment of only $50,000 and an idea, William B.Ruger and Alexander M. Sturm started production of a .22 caliberautoloading pistol–a design which was so successful that it became thecornerstone upon which one of the most comprehensive lines of sporting
firearms ever made in America was established. After Alex Sturm’s death in1951, William B. Ruger continued to direct the Company until his death in2002. William B. Ruger, Jr. continued to provide guidance, which helpedmake this Company a sound and successful enterprise, until his retirementin 2006. The Company has continued to prosper, under new management
and guidance from our Board, with new products and fresh perspectives.
Ruger, in this relatively short time, has established itself as a leading smallarms design organization, developing a unique and broad line of finequality sporting, military and police firearms to become one of the world’smost famous producers of revolvers, pistols, rifles and shotguns. Since1949 Ruger craftsmen have built many millions of firearms.
During its five decades of growth and progress under the leadership of William B. Ruger, the Company developed a business philosophy andimplemented policies which represent a constructive influence in the lifeof modern America. From the beginning, Ruger played a positive role inconservation efforts and has supported the interests of shooters through
such groups as the National Rifle Association, National Shooting SportsFoundation, and many regional sportsmen’s organizations.
The Company has always endeavored to market its firearms forconstructive and recreational purposes, to emphasize the traditional andresponsible aspects of shooting, to render meaningful public services, andto encourage shooters in constructive, responsible, and safe participation
in the shooting sports. Its motto, “Arms Makers For Responsible Citizens,”exemplifies this Company philosophy.
Today, Ruger is particularly mindful of those elements which have
contributed to the creation of its success, and extends heartfelt thanks toits many loyal employees and customers.
A current catalog of Ruger firearms is available free upon request toRuger, Southport, CT 06890
The firearms catalog, and instruction manuals for all Ruger firearms,can also be downloaded from our website at:
www.ruger.com39

8/14/2019 SP101 Manual .pdf
http://slidepdf.com/reader/full/sp101-manual-pdf 40/40
WHY NO WARRANTY CARD HAS BEENPACKED WITH THIS NEW RUGER FIREARM
The Magnuson-Moss Act (Public Law 93-637) does not require anyseller or manufacturer of a consumer product to give a written
warranty. It does provide that if a written warranty is given, it must bedesignated as “limited” or as “full” and sets minimum standards for a“full” warranty. Sturm, Ruger & Company, Inc. has elected not toprovide any written warranty, either “limited” or “full”, rather than toattempt to comply with the provisions of the Magnuson-Moss Act andthe regulations issued thereunder. There are certain implied
warranties under state law with respect to sales of consumer goods. Asthe extent and interpretation of these implied warranties varies fromstate to state, you should refer to your state statutes. Sturm, Ruger &Company wishes to assure its customers of its continued interest inproviding service to owners of Ruger firearms.
STURM, RUGER & Company, Inc.411 Sunapee Street
Newport, New Hampshire 03773 U.S.A.
www.ruger.comArms Makers For Responsible Citizens®
A COPY OF THE INSTRUCTION MANUAL FOR ANY RUGERFIREARM IS AVAILABLE FROM THE FACTORY FREE ON REQUEST, OR IT MAY
BE DOWNLOADED FROM OUR WEBSITE AT WWW.RUGER.COM.THESE INSTRUCTION MANUALS CONTAIN IMPORTANT
WARNINGS WHICH MUST BE UNDERSTOOD
BEFORE USING THESE FIREARMS.
“22/45,” “22 Charger,” “LCP,” “LCR,” “Model 96,” “P90,” “P91,” “P93,” “P94,” “P95,” “P97,” “P345D,”
“Mark III,” and “P345PR” are RUGER TRADEMARKS. “RUGER,” THE STURM, RUGER LOGO, “AC-
556,” “Arms Makers For Responsible Citizens,” “10/22,” “All-Weather,” “Bearcat,” “Blackhawk,” “Gold
Label,” “GP100,” “Hawkeye,” “M77,” “Mini Thirty,” “Mini-14,” “Old Army,” “P345,” “P85,” “Redhawk,”
“Ruger Titanium,” “Ruger 77/17,” “Ruger 77/22,” “Ruger 77/44,” “Ruger 77/50,” “Ruger SP101,” “Ruger


