

8/8/2019 SSIS Blogs
http://slidepdf.com/reader/full/ssis-blogs 1/82
Using Our Blogging System
8/8/2019 SSIS Blogs
http://slidepdf.com/reader/full/ssis-blogs 2/82
1 First Steps
1.1 Blog Overview 4
1.2 Logging In To A Blog 6
1.3 Creating A Blog Post 8
1.4 Change Your Blogging Name 10
1.5 Wordpress Categories 13
1.6 Adding a Graphic From Computer 17
1.7 Adding a Graphic From URL 21
1.8 Adding a Graphic From Media Library 24
2 Second Steps
2.1 Adding Powerpoint To Our Eportfolio 27
2.2 Embedding Any Content 32
2.3 Embedding Content - Youtube (custom sizes) 35
2.4 Embedding Content - oEmbed 38
2.5 Using the Embed.ly Plugin WP3.1 41
2.6 Using Wylio to add Graphics To Your Blog 44
2.7 Creating Podcasts 50
2.8 Adding a Video to a Widget 55
3 Integrating GApps and Our Blogging System
3.1 Adding a Chart To your Blog 57
3.2 Adding a Gadget To Your Blog 62
3.3 Adding a Table To your Blog 67
4 Other Steps
4.1 Scratch-Converting an MP3 to a Wav file 74
4.2 Creating Aggregating Blogs 79

8/8/2019 SSIS Blogs
http://slidepdf.com/reader/full/ssis-blogs 3/82
First Steps
Using Our Blogging System - 3 Blogs at SSIS
8/8/2019 SSIS Blogs
http://slidepdf.com/reader/full/ssis-blogs 4/82
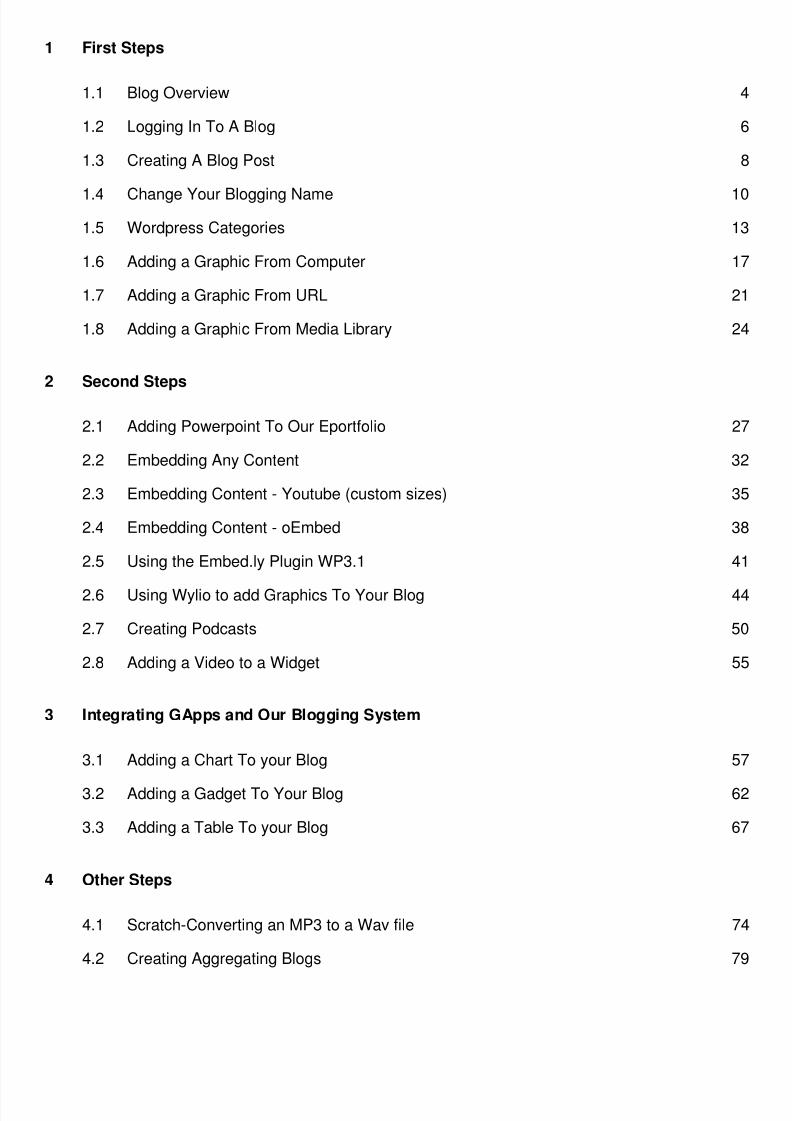
Blog Overview
A look at the parts of a Wordpress blog.
We have a number of different themes available in our blogging system. Most
themes have some common elements.
Using Our Blogging System - 4 Blogs at SSIS
8/8/2019 SSIS Blogs
http://slidepdf.com/reader/full/ssis-blogs 5/82
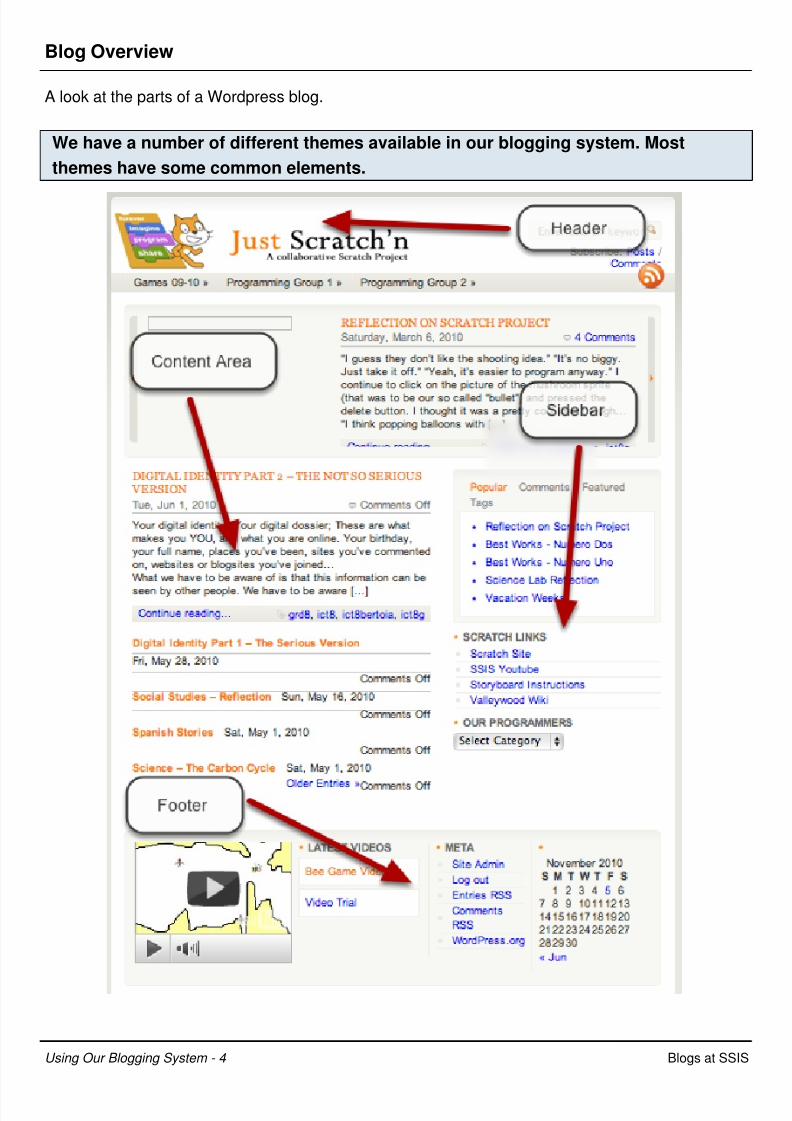
Blog Layout
There are a number of different blog themes you can pick for your blog as well. Some themes have
one column others have two, three or even four columns. In our blog FAQ there is more information
about these themes.
Using Our Blogging System - 5 Blogs at SSIS

8/8/2019 SSIS Blogs
http://slidepdf.com/reader/full/ssis-blogs 6/82
Logging In To A Blog
The following lesson deals with logging into a blog on the SSIS blogging system.
Locate the Meta Area of your Blog
The meta area is a blog widget and is usually on one of the blog sidebars. Each theme can have a
different location for where you will find the this widget. On the Scratch blog (blog.ssis.edu.vn/scratch
) the meta area is located on the bottom footer area. In this widget the area you will use the most is
the Log In link and when you click on this link you will be taken to the login screen.
If The Meta Widget is Not Visible
Although most themes display the Meta widget there are some that do not. Widgets can be addedand taken away from a blog and we will look at how this works in a future lesson. If your theme does
not contain a Meta widget then you can get to the login page by going to the following url
Using Our Blogging System - 6 Blogs at SSIS

8/8/2019 SSIS Blogs
http://slidepdf.com/reader/full/ssis-blogs 7/82
http://blog.ssis.edu.vn/name_of_your_blog/wp-admin. So for our Scratch blog we would go to
http://blog.ssis.edu.vn/scratch/wp-admin. This will take you to a login screen where you can add
your username and password.
Using Our Blogging System - 7 Blogs at SSIS

8/8/2019 SSIS Blogs
http://slidepdf.com/reader/full/ssis-blogs 8/82
Creating A Blog Post
How to create a blog post.
Creating a New Post
Our blogging system uses pages and posts. After you have logged in to your blog you will see the
blog dashboard. On the left hand side you will see Posts menu. Click on Add New to get to the blog
post page. When completed you will see the screen below.
Blog Menu
Similar to what you are used to in Moodle there are many familiar icons on the wordpress menu.
Don't forget to use the spell check tool after you have finished your post.
Using Our Blogging System - 8 Blogs at SSIS

8/8/2019 SSIS Blogs
http://slidepdf.com/reader/full/ssis-blogs 9/82
Tag and Category
Add appropriate tags. These are basically keywords for each post/page you create and makes it
easier for others to find your blog. Then pick the appropriate category. Categories are used to
organize your blog into appropriate topics. When all is done click on publish.
Using Our Blogging System - 9 Blogs at SSIS
8/8/2019 SSIS Blogs
http://slidepdf.com/reader/full/ssis-blogs 10/82
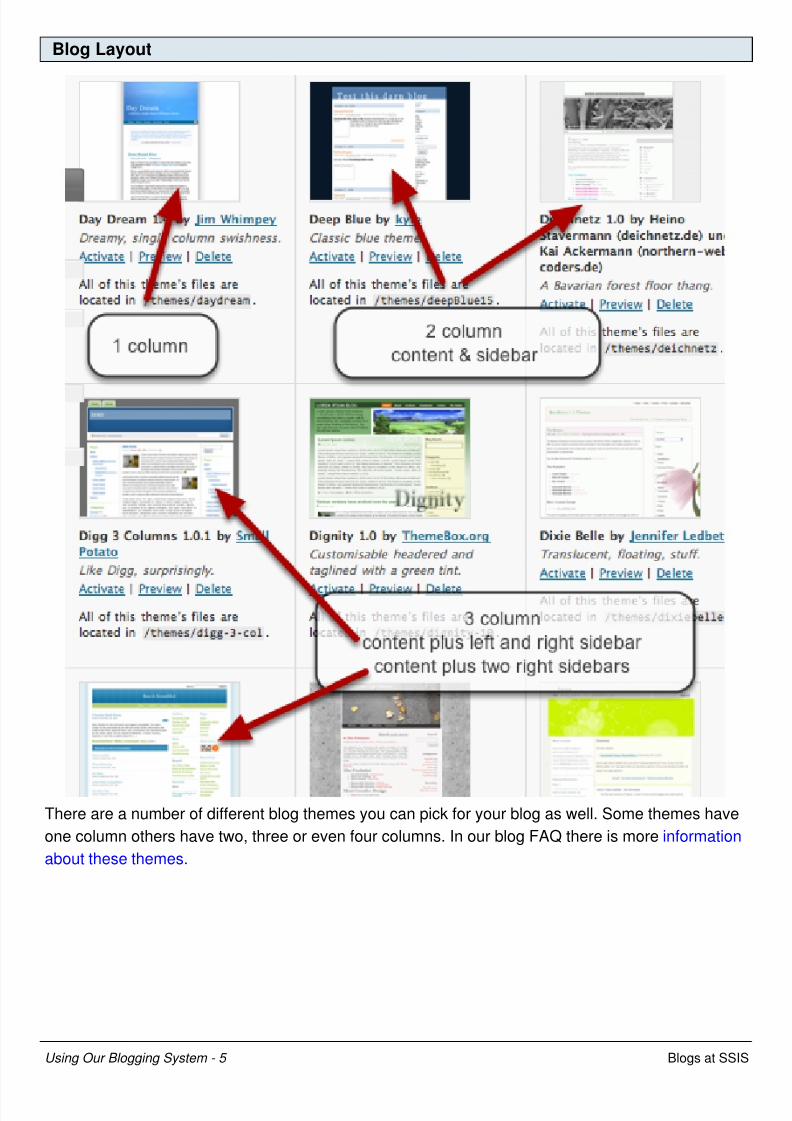
Change Your Blogging Name
How to change the name that blog posts are attributed to.
Users
Our SSIS Wordpress system uses your regular network username as the default name. If you want
a more friendly sounding name than jlee14 Then you can change this by going to Users and clicking
on Users.
Using Our Blogging System - 10 Blogs at SSIS

8/8/2019 SSIS Blogs
http://slidepdf.com/reader/full/ssis-blogs 11/82
Edit Username
Drag your mouse over the username and you will see edit
Add A Nickname
In the nickname area add a nickname then from the bottom of the page select Update Profile. I am
going to add Mr Bertoia
Using Our Blogging System - 11 Blogs at SSIS

8/8/2019 SSIS Blogs
http://slidepdf.com/reader/full/ssis-blogs 12/82
Select your nickname
In the Display name publicly as drop down menu select the name you just added then go to the
bottom of the page and Update Profile.
Using Our Blogging System - 12 Blogs at SSIS
8/8/2019 SSIS Blogs
http://slidepdf.com/reader/full/ssis-blogs 13/82
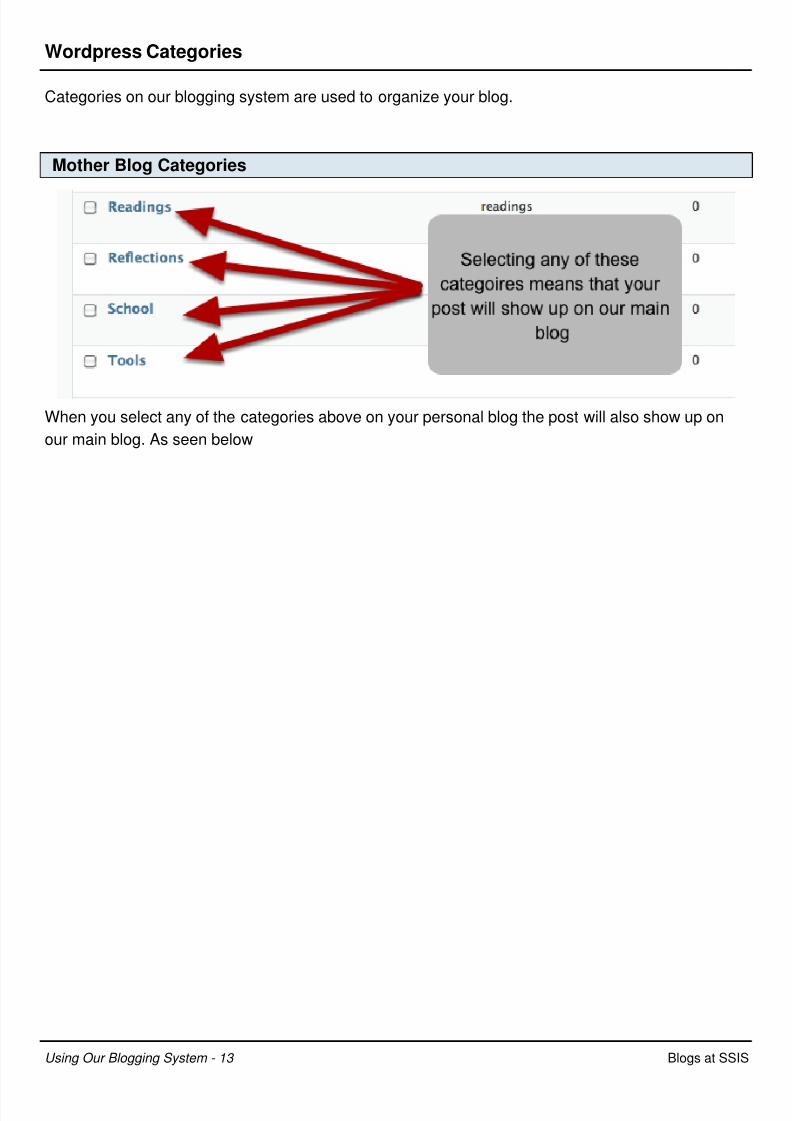
Wordpress Categories
Categories on our blogging system are used to organize your blog.
Mother Blog Categories
When you select any of the categories above on your personal blog the post will also show up on
our main blog. As seen below
Using Our Blogging System - 13 Blogs at SSIS

8/8/2019 SSIS Blogs
http://slidepdf.com/reader/full/ssis-blogs 14/82
Main Blog Layout
Using Our Blogging System - 14 Blogs at SSIS

8/8/2019 SSIS Blogs
http://slidepdf.com/reader/full/ssis-blogs 15/82
Eportfolio Categories
So that your posts are added to our Eportfolio Blogs. You need to create specific categories. This
year our categories are created by using the subject and the grade level so for our grade Eight
classes we have the following categories Portfolio 8, Science 8, Social studies 8, Language Arts 8,
Electives 8, Math 8, My Pick 8, World Language 8, ADV8 followed by the name of your advisory
teacher ( ADV8 Graziano or ADV8 Richert) and finally your first name. In grade 7 it is exactly the
same except you would add 7. The easiest way to create these categories would be to copy fromthis list and follow the next few steps.
Using Our Blogging System - 15 Blogs at SSIS

8/8/2019 SSIS Blogs
http://slidepdf.com/reader/full/ssis-blogs 16/82
Go to the Category Page
Log in to your blog and click on post then click on category.
Create Category
Under Category Name add the category you would like to add to your blog, for example Math 8.
Under category Parent add Portfolio 8. When you are done click on Add Category.
Using Our Blogging System - 16 Blogs at SSIS

8/8/2019 SSIS Blogs
http://slidepdf.com/reader/full/ssis-blogs 17/82
Adding a Graphic From Computer
Taking a photo with your digital camera or phone is a good way to add graphic content to your blog
Before You Upload
Remember that images taken using a digital camera can be quite large for a blog. You should resize
the image prior to adding it to your blog. At SSIS this can be done using Iranview on the PC's and
Iphoto in the Mac Lab. There are separate tutorials that show you how to resize images using these
tools. Image size of 400 pixels if you want the graphic to be displayed by itself or 200-250 pixels if
you want the graphic to have text wrapped around it.
You can upload the following image types to a post or page on your SSIS blog by using the Add an
Image icon found within your visual editor:
.jpg/.jpeg
.gif
.png
To only upload an image to your blog’s Media Library (and not attach it to a specific post/page), use
Media -> Add New in your dashboard.
Using Our Blogging System - 17 Blogs at SSIS
8/8/2019 SSIS Blogs
http://slidepdf.com/reader/full/ssis-blogs 18/82
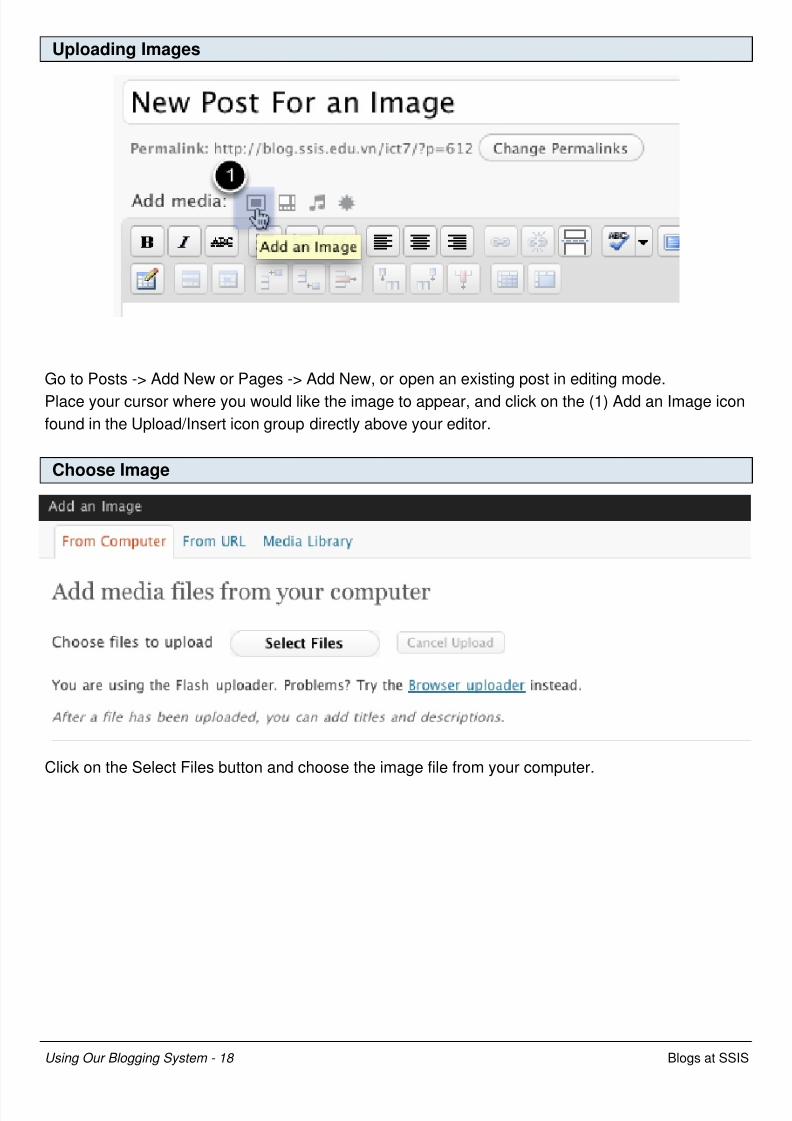
Uploading Images
Go to Posts -> Add New or Pages -> Add New, or open an existing post in editing mode.
Place your cursor where you would like the image to appear, and click on the (1) Add an Image icon
found in the Upload/Insert icon group directly above your editor.
Choose Image
Click on the Select Files button and choose the image file from your computer.
Using Our Blogging System - 18 Blogs at SSIS

8/8/2019 SSIS Blogs
http://slidepdf.com/reader/full/ssis-blogs 19/82
Add the Image
Once the uploading/crunching process has completed, you will be given the option to edit some
settings before inserting the image into the post/page.
Title - Text displayed as a tooltip (when a mouse is hovered over the image)
Caption - Image caption displayed directly underneath the image (will also serve as the alternate
text.)
Description - Text displayed with the image in your dashboard and attachment pages on your blog.
Using Our Blogging System - 19 Blogs at SSIS

8/8/2019 SSIS Blogs
http://slidepdf.com/reader/full/ssis-blogs 20/82
Link URL / Link Image to: – The URL/web address to which the image will be linked. Click the File
URL button to link the image to its original, full-size version. Click the Post URL button to have the
image linked to its attachment page.
Alignment – The position of the image within your post or page.
Size – The size of the image.
Once done select insert into post.
Text taken from Wordpress.com
Using Our Blogging System - 20 Blogs at SSIS
8/8/2019 SSIS Blogs
http://slidepdf.com/reader/full/ssis-blogs 21/82
Adding a Graphic From URL
Taking a photo with your digital camera or phone is a good way to add graphic content to your blog
Before You Add the Image
he following process describes inserting an image which already exists on another web site or
domain. This method will not upload the document/file to your blog’s Media Library. Because it is
hosted elsewhere, if the file is removed from its location, the image will no longer work on your blog.
Uploading Images
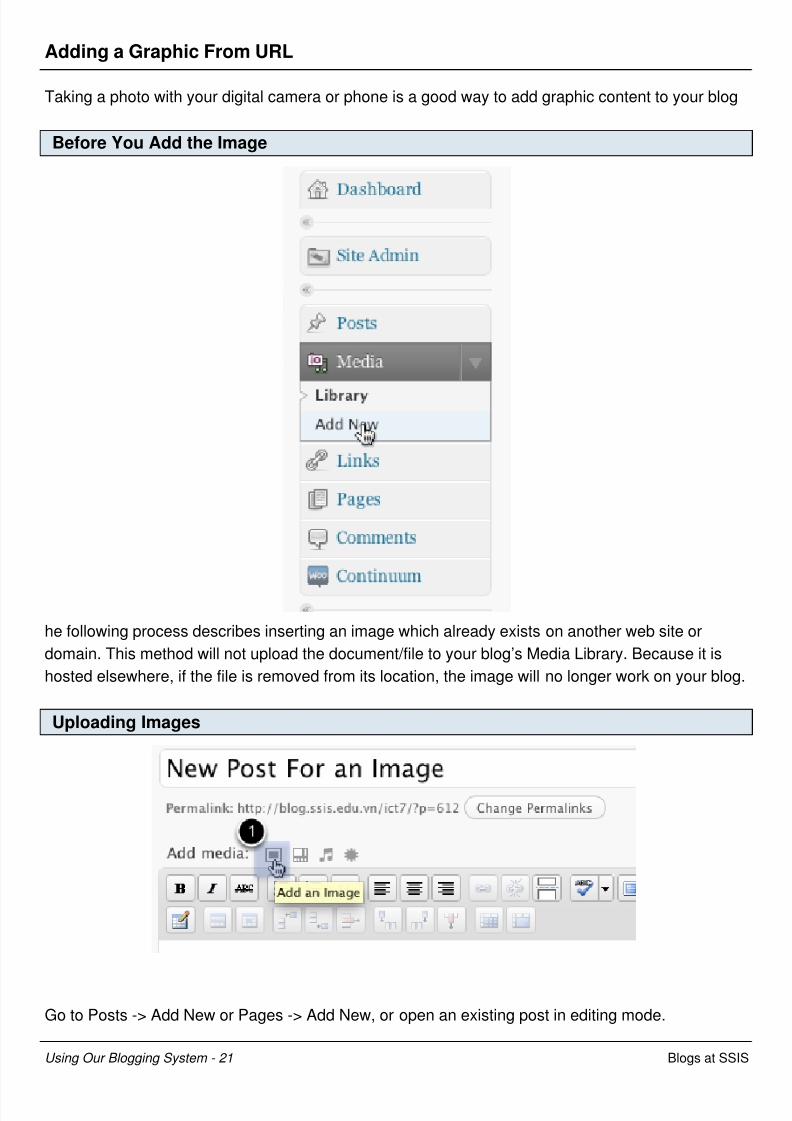
Go to Posts -> Add New or Pages -> Add New, or open an existing post in editing mode.
Using Our Blogging System - 21 Blogs at SSIS

8/8/2019 SSIS Blogs
http://slidepdf.com/reader/full/ssis-blogs 22/82
Place your cursor where you would like the image to appear, and click on the (1) Add an Image icon
found in the Upload/Insert icon group directly above your editor.
Choose Image
Click on the From URL tab
Add the Image
Image URL - The url to the image. You can get this in in chrome by right clicking on the image and
select Copy Image URL. In Firefox right click on image and use Copy Image Location. In Safari right
click and select Copy Image Address.
Image Caption - Image caption displayed directly underneath the image.
Alignment – The position of the image within your post or page.
Using Our Blogging System - 22 Blogs at SSIS

8/8/2019 SSIS Blogs
http://slidepdf.com/reader/full/ssis-blogs 23/82
Once done select insert into post.
Text taken from Wordpress.com
Using Our Blogging System - 23 Blogs at SSIS

8/8/2019 SSIS Blogs
http://slidepdf.com/reader/full/ssis-blogs 24/82
Adding a Graphic From Media Library
Adding a photo you have already uploaded to your blog
Ge the Image
Go to Posts -> Add New or Pages -> Add New, or open an existing post in editing mode.
Place your cursor where you would like the image to appear, and click on the (1) Add an Image icon
found in the Upload/Insert icon group directly above your editor.
Choose Image
Click on the Media Library tab.
Select the image
Locate the image you wish to insert and click its Show link.
Using Our Blogging System - 24 Blogs at SSIS

8/8/2019 SSIS Blogs
http://slidepdf.com/reader/full/ssis-blogs 25/82
Edit Image information
You will be able to edit some of the image’s settings before inserting it into the post/page. Note that
the fields will already be populated if you previously added the information when you uploaded your
image to the media library. When done click on Insert into Post.
Text taken from Wordpress.com
Using Our Blogging System - 25 Blogs at SSIS

8/8/2019 SSIS Blogs
http://slidepdf.com/reader/full/ssis-blogs 26/82
Second Steps
Using Our Blogging System - 26 Blogs at SSIS

8/8/2019 SSIS Blogs
http://slidepdf.com/reader/full/ssis-blogs 27/82
Adding Powerpoint To Our Eportfolio
How to embed a powerpoint presentation into your blog.
PowerPoint
There are a number of ways you can embed your Powerpoint presentations into your blog post.
This way uses tools that are part of the Eportal system. After you have mastered this why not try it a
different way.
Get a slideshare account and upload your presentation to slideshare then embed the slideshare into
your blog.
Get a sliderocket account and upload your presentation to sliderocket then embed the presentation
into your blog.
School Google Apps
Upload your Powerpoint presentation to your school Google Apps account.
This will then be converted into a Google Presentation.From the Share menu get the embed code for the presentation.
In your blog page make sure you are in HTML mode.
Paste the code into your blog post.
Publish the post.
Upload Your Presentation
Open your Google Docs and click on upload
Using Our Blogging System - 27 Blogs at SSIS
8/8/2019 SSIS Blogs
http://slidepdf.com/reader/full/ssis-blogs 28/82
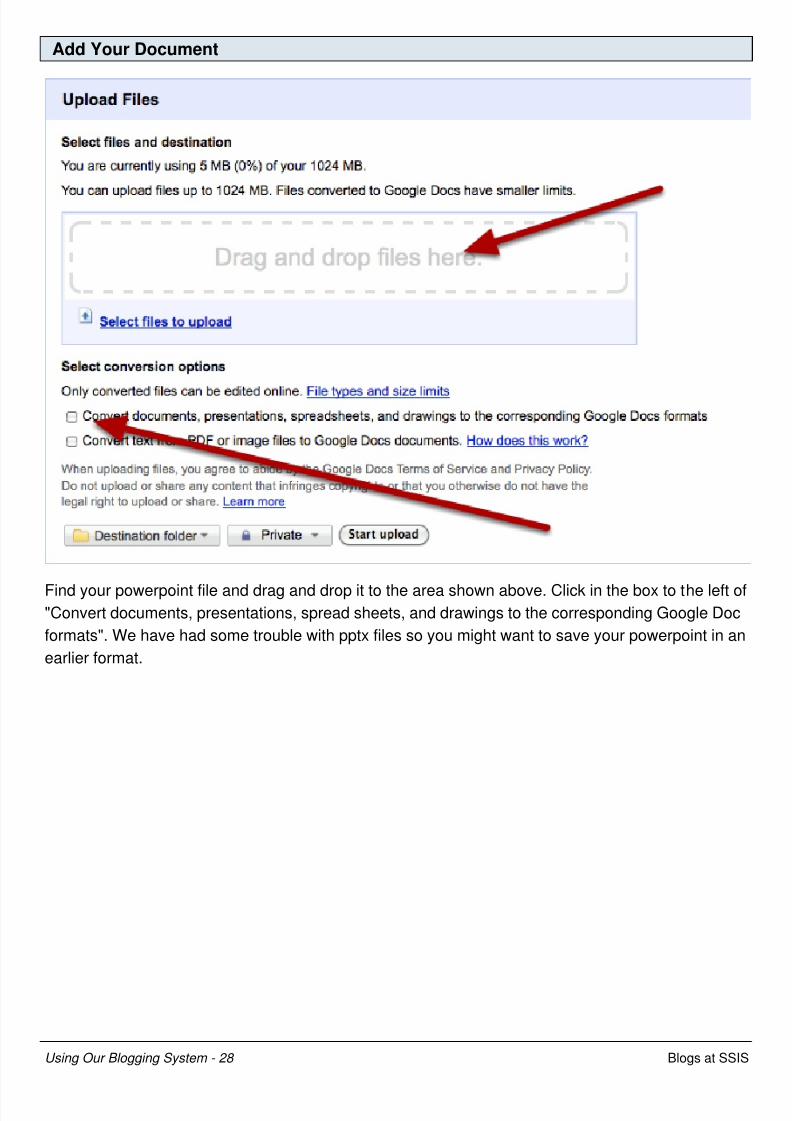
Add Your Document
Find your powerpoint file and drag and drop it to the area shown above. Click in the box to the left of"Convert documents, presentations, spread sheets, and drawings to the corresponding Google Doc
formats". We have had some trouble with pptx files so you might want to save your powerpoint in an
earlier format.
Using Our Blogging System - 28 Blogs at SSIS

8/8/2019 SSIS Blogs
http://slidepdf.com/reader/full/ssis-blogs 29/82
Privacy
Remember this will be embedded in your blog. As your blog is public to the world you should change
your privacy settings. So I have chosen Public on the web.
Publish
From the share menu click on publish/embed then publish the document.
Using Our Blogging System - 29 Blogs at SSIS

8/8/2019 SSIS Blogs
http://slidepdf.com/reader/full/ssis-blogs 30/82
Get The Embed Code
Select the size of the presentation you wish to embed in your blog. I have found the large size to big
for most themes. You may need to experiment with your theme to find the best size. Copy the code
in the box and go to the dashboard of your blog and create a new post.
Add the Presentation to Your Blog
Go to your blog and create a new post add a title and a brief description of what the presentation is
about. Click on the html tab and paste your content into the blog post. Add the appropriate tags and
categories then publish your blog. If you do not see the Google Presentation embedded in your blog
you may need to add the plugin unfilteredmu.
Using Our Blogging System - 30 Blogs at SSIS

8/8/2019 SSIS Blogs
http://slidepdf.com/reader/full/ssis-blogs 31/82
Using Our Blogging System - 31 Blogs at SSIS

8/8/2019 SSIS Blogs
http://slidepdf.com/reader/full/ssis-blogs 32/82
Embedding Any Content
How do you embed any content into a blog?
Find the embed code
In this example I will embed a dipity timeline. So we need to locate the embed code.
Using Our Blogging System - 32 Blogs at SSIS
8/8/2019 SSIS Blogs
http://slidepdf.com/reader/full/ssis-blogs 33/82
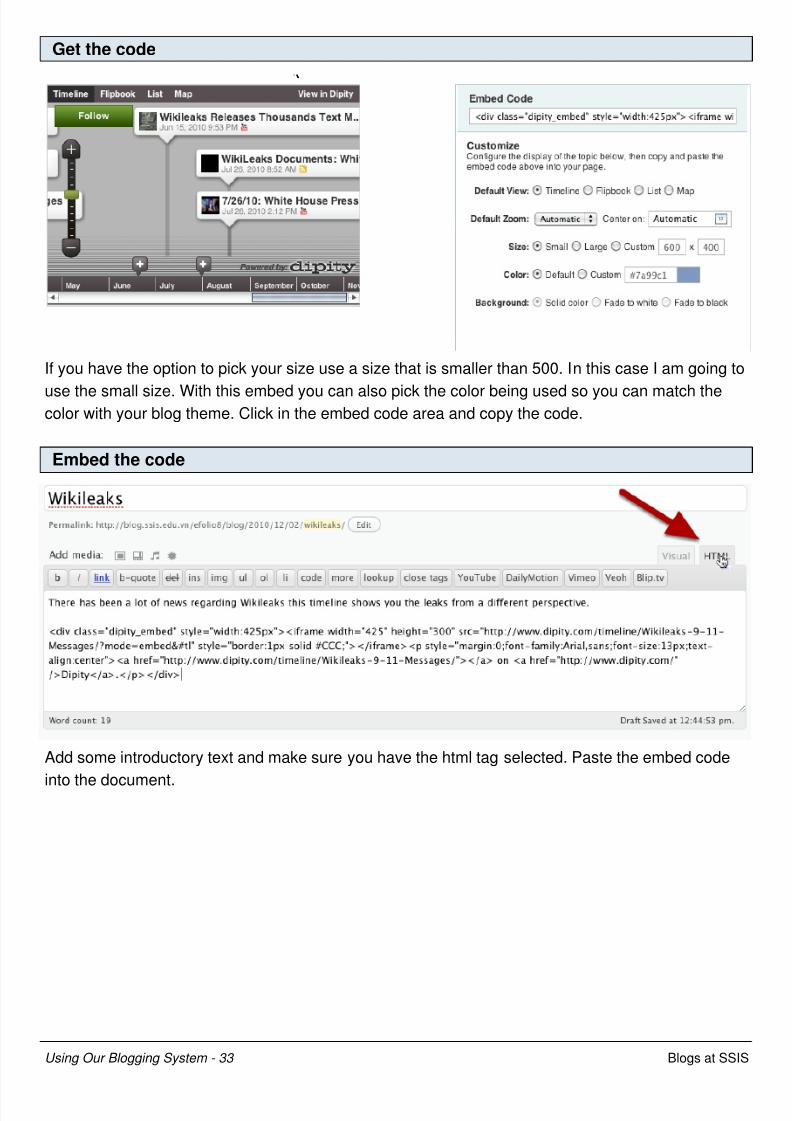
Get the code
If you have the option to pick your size use a size that is smaller than 500. In this case I am going to
use the small size. With this embed you can also pick the color being used so you can match thecolor with your blog theme. Click in the embed code area and copy the code.
Embed the code
Add some introductory text and make sure you have the html tag selected. Paste the embed code
into the document.
Using Our Blogging System - 33 Blogs at SSIS

8/8/2019 SSIS Blogs
http://slidepdf.com/reader/full/ssis-blogs 34/82
Check your post
If you do not see the post you may need to activate unfilteredmu.
Using Our Blogging System - 34 Blogs at SSIS
8/8/2019 SSIS Blogs
http://slidepdf.com/reader/full/ssis-blogs 35/82
Embedding Content - Youtube (custom sizes)
Embedding video into your blog with custom sizes.
An Overview
When you use oEmbed to add a youtube to your blog you do not have control over the size of the
video. As some themes have narrower main sections sometimes the video does not fit in the blog.
You may need to create a custom sized video.
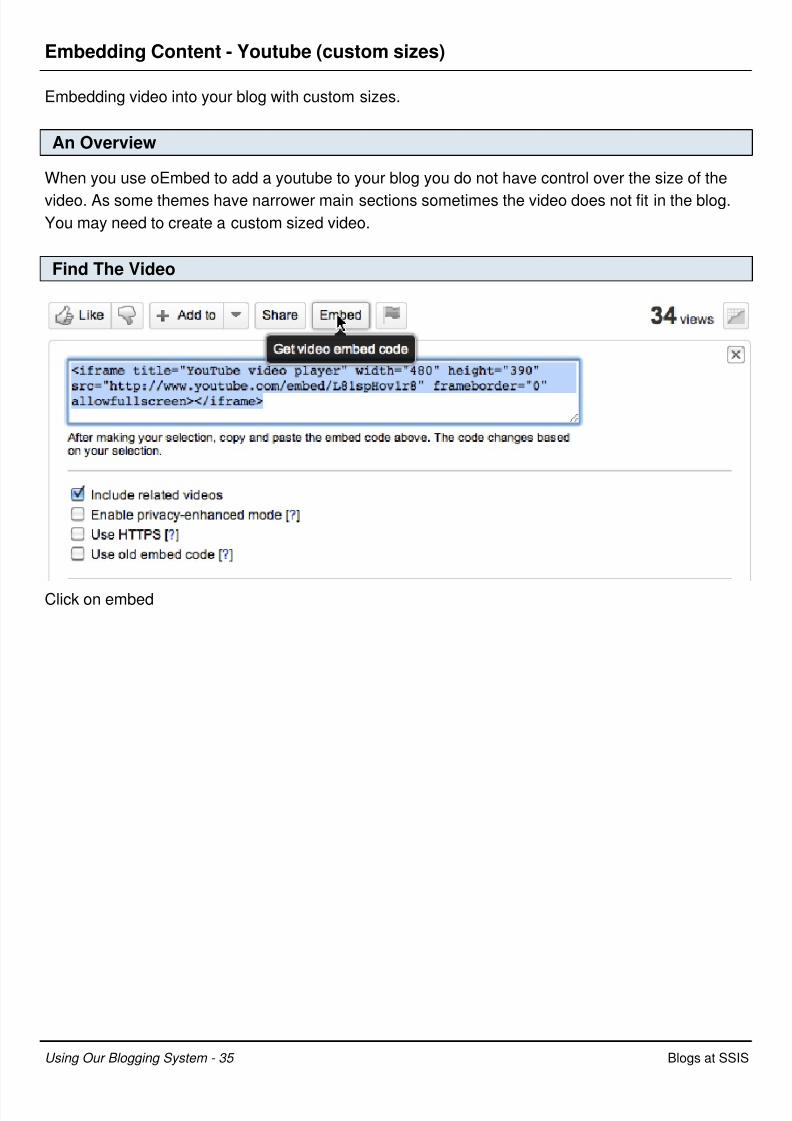
Find The Video
Click on embed
Using Our Blogging System - 35 Blogs at SSIS

8/8/2019 SSIS Blogs
http://slidepdf.com/reader/full/ssis-blogs 36/82
Select an appropriate size
Select the appropriate size for your blog. Usually the youtube at 425 and 480 will work with most of
our blog themes. If it is still too big you may need to come back to this page and try custom sizes
until you find a size that fits.
Create a blog post
Add the text you need for the blog post then, while in HTML mode, paste the embed code into your
blog post.
Using Our Blogging System - 36 Blogs at SSIS

8/8/2019 SSIS Blogs
http://slidepdf.com/reader/full/ssis-blogs 37/82
Publish post
When you are finished remember to view your post to see if everything is OK.
Using Our Blogging System - 37 Blogs at SSIS

8/8/2019 SSIS Blogs
http://slidepdf.com/reader/full/ssis-blogs 38/82
Embedding Content - oEmbed
Embedding content into your blog the easy way.
An Overview
All you need to do to embed something into a post or page is to post the URL to it into your content
area. Make sure that the URL is on its own line and not hyperlinked (clickable when viewing the
post).
The easy embedding feature is mostly powered by oEmbed. This only works with select services:
YouTube
Vimeo
DailyMotion
blip.tv
Flickr (both videos and images)
Viddler
Hulu
Qik
Revision3
Scribd
Photobucket
PollDaddy
Google Video
WordPress.tv (only VideoPress-type videos for the time being)SmugMug (WordPress 3.0+)
FunnyOrDie.com (WordPress 3.0+)
(h<a>ttp://codex.wordpress.org/Embeds)
Using Our Blogging System - 38 Blogs at SSIS

8/8/2019 SSIS Blogs
http://slidepdf.com/reader/full/ssis-blogs 39/82
Get the content address
From the media you would like to use get the url for the content in this case it is a Youtube video.
(http://www.youtube.com/watch?v=_eq3Sj1GGs8)
Create a blog post
Go to the dashboard of your blog and create a new post. Add some introductory text then add the
url.
Using Our Blogging System - 39 Blogs at SSIS

8/8/2019 SSIS Blogs
http://slidepdf.com/reader/full/ssis-blogs 40/82
Publish post
When you are finished remember to view your post to see if everything is OK.
Using Our Blogging System - 40 Blogs at SSIS

8/8/2019 SSIS Blogs
http://slidepdf.com/reader/full/ssis-blogs 41/82
Using the Embed.ly Plugin WP3.1
This plugin will allow you to embed a variety of sites using the url only.
Check what is available
From the sidebar select the Embedly link. The image above shows a few of the many different
embed possibilities. I am going to try a Qwiki embed
Using Our Blogging System - 41 Blogs at SSIS
8/8/2019 SSIS Blogs
http://slidepdf.com/reader/full/ssis-blogs 42/82
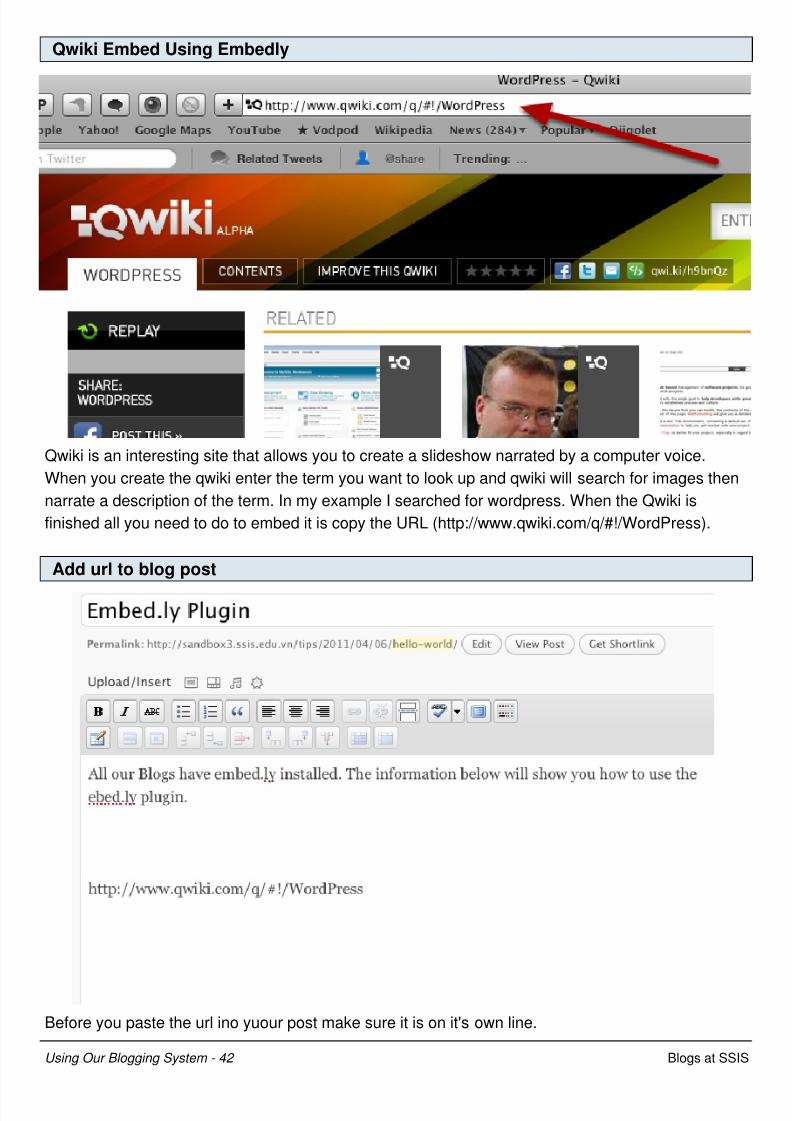
Qwiki Embed Using Embedly
Qwiki is an interesting site that allows you to create a slideshow narrated by a computer voice.
When you create the qwiki enter the term you want to look up and qwiki will search for images then
narrate a description of the term. In my example I searched for wordpress. When the Qwiki is
finished all you need to do to embed it is copy the URL (http://www.qwiki.com/q/#!/WordPress).
Add url to blog post
Before you paste the url ino yuour post make sure it is on it's own line.
Using Our Blogging System - 42 Blogs at SSIS
8/8/2019 SSIS Blogs
http://slidepdf.com/reader/full/ssis-blogs 43/82
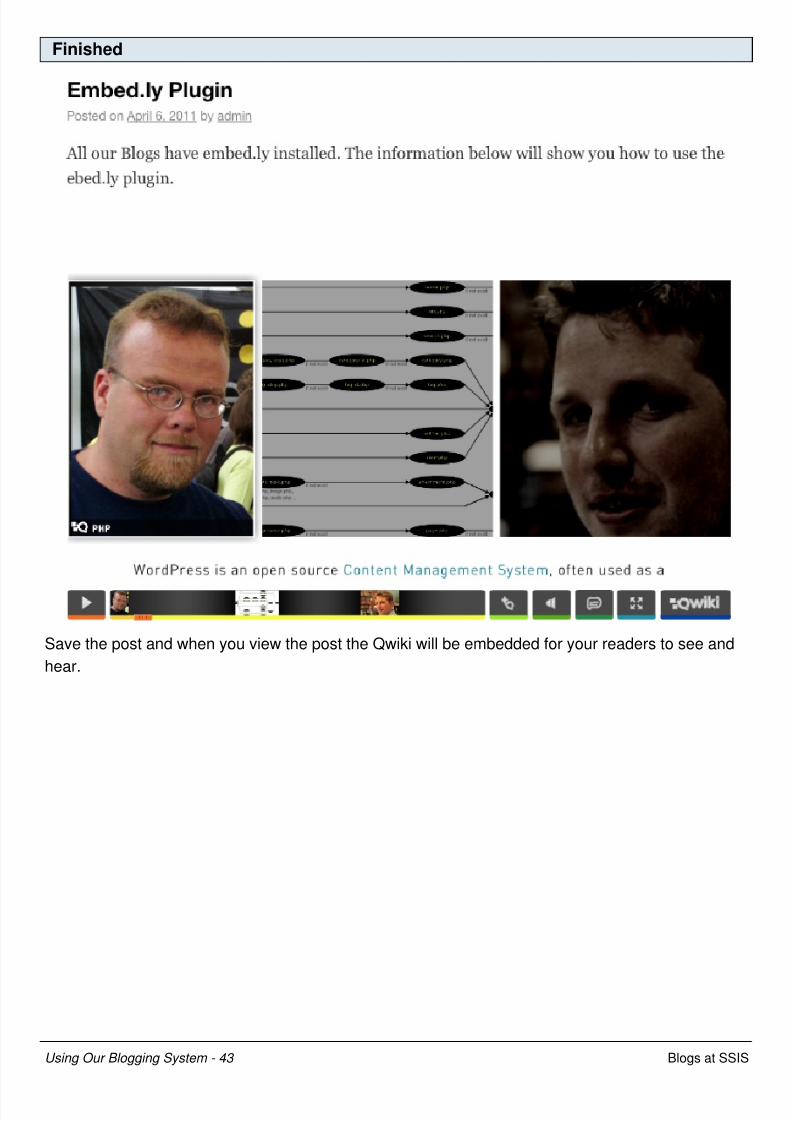
Finished
Save the post and when you view the post the Qwiki will be embedded for your readers to see and
hear.
Using Our Blogging System - 43 Blogs at SSIS

8/8/2019 SSIS Blogs
http://slidepdf.com/reader/full/ssis-blogs 44/82
Using Wylio to add Graphics To Your Blog
Wylio is a great tool that you can use to add graphics to your blog. The images are taken from Flickr
and attribution is given to the person who took the photo.
Using Wylio
Go to Wylio and search for a photo since my blog post is about the steps you need to know when
using Wordpress. I am going to search for steps.
Go to Wylio
You need to go to Wylio.com and add your search word. Since this post is about steps and thesteps you need to be able to do I am searching for steps.
Using Our Blogging System - 44 Blogs at SSIS

8/8/2019 SSIS Blogs
http://slidepdf.com/reader/full/ssis-blogs 45/82
Select your Photo
Click on the photo you would like to use.
Using Our Blogging System - 45 Blogs at SSIS

8/8/2019 SSIS Blogs
http://slidepdf.com/reader/full/ssis-blogs 46/82
Decide on Format
Decide on how you would like the image to be aligned. Remember what we talked about in class
and if the image has eyes have the image aligned so the eyes bring the viewer into the text. Adjust
the size so it is appropriate for you blog then click on get the code. (What language is Lorem ipsum
dolor? )
Using Our Blogging System - 46 Blogs at SSIS

8/8/2019 SSIS Blogs
http://slidepdf.com/reader/full/ssis-blogs 47/82
Get Code
Highlight all of the text in the text box and copy the code.
Using Our Blogging System - 47 Blogs at SSIS

8/8/2019 SSIS Blogs
http://slidepdf.com/reader/full/ssis-blogs 48/82
Switch Modes
You need to add the code in HTML mode so you will need to click on the HTML button.
Paste
Past eh code you copied from Wylio into the blog text area.
Using Our Blogging System - 48 Blogs at SSIS

8/8/2019 SSIS Blogs
http://slidepdf.com/reader/full/ssis-blogs 49/82
Have a Look
Switch back to visual mode and see if the image looks OK. You may need to delete the code if the
image is too big. To do this just start from <span id and highlight to the last </Span> and delete the
text then adjust the size of your image, copy the code and paste it into your blog once again.
Using Our Blogging System - 49 Blogs at SSIS

8/8/2019 SSIS Blogs
http://slidepdf.com/reader/full/ssis-blogs 50/82
Creating Podcasts
A simple tool, Audioboo, that can be used to embed podcasts into your blog.
Login to the account
Login to our audioboo account then click on my profile.
Using Our Blogging System - 50 Blogs at SSIS

8/8/2019 SSIS Blogs
http://slidepdf.com/reader/full/ssis-blogs 51/82
Get Ready to Record
Start by clicking on the New Recording/File Upload. This will open the Create a Boo window. Click
on Got your mic ready.
Add Your Audio
Click on start recording
Using Our Blogging System - 51 Blogs at SSIS

8/8/2019 SSIS Blogs
http://slidepdf.com/reader/full/ssis-blogs 52/82
Pause
Click on the Blue pause recording area.
Save Recording
Click on Happy Add Title
Using Our Blogging System - 52 Blogs at SSIS
8/8/2019 SSIS Blogs
http://slidepdf.com/reader/full/ssis-blogs 53/82
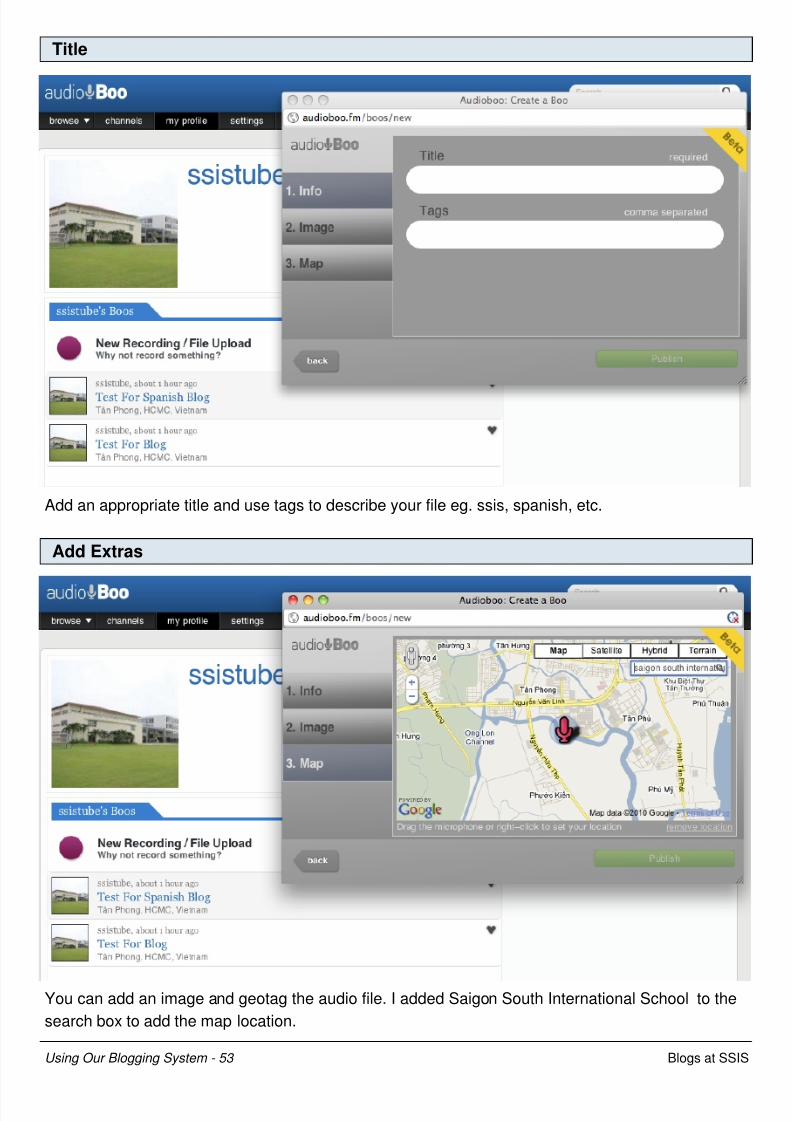
Title
Add an appropriate title and use tags to describe your file eg. ssis, spanish, etc.
Add Extras
You can add an image and geotag the audio file. I added Saigon South International School to the
search box to add the map location.
Using Our Blogging System - 53 Blogs at SSIS

8/8/2019 SSIS Blogs
http://slidepdf.com/reader/full/ssis-blogs 54/82
Get the Code
Click on the embed icon and copy the embed code then off to your blog.
Add Embed Code
Create a new blog post and switch to HTML by clicking on the HTML tab. Past the code into the
blog post area. Add the appropriate blog categories and tags then publish your post.
Using Our Blogging System - 54 Blogs at SSIS

8/8/2019 SSIS Blogs
http://slidepdf.com/reader/full/ssis-blogs 55/82
Adding a Video to a Widget
How to add a video or two to a wordpress widget.
Adding Video
You will need to log in to your dashboard then go to the appropriate widget area. Once there you
can add a text widget then add the video code to the text widget area as shown in the video below. I
don't show this in the video but if you only want to change the videos then delete the old video code
and add the new video code.
[youtube]http://www.youtube.com/watch?v=9dJvvZcyl40[/youtube]
Using Our Blogging System - 55 Blogs at SSIS

8/8/2019 SSIS Blogs
http://slidepdf.com/reader/full/ssis-blogs 56/82
Integrating GApps and OurBlogging System
Using Our Blogging System - 56 Blogs at SSIS
8/8/2019 SSIS Blogs
http://slidepdf.com/reader/full/ssis-blogs 57/82
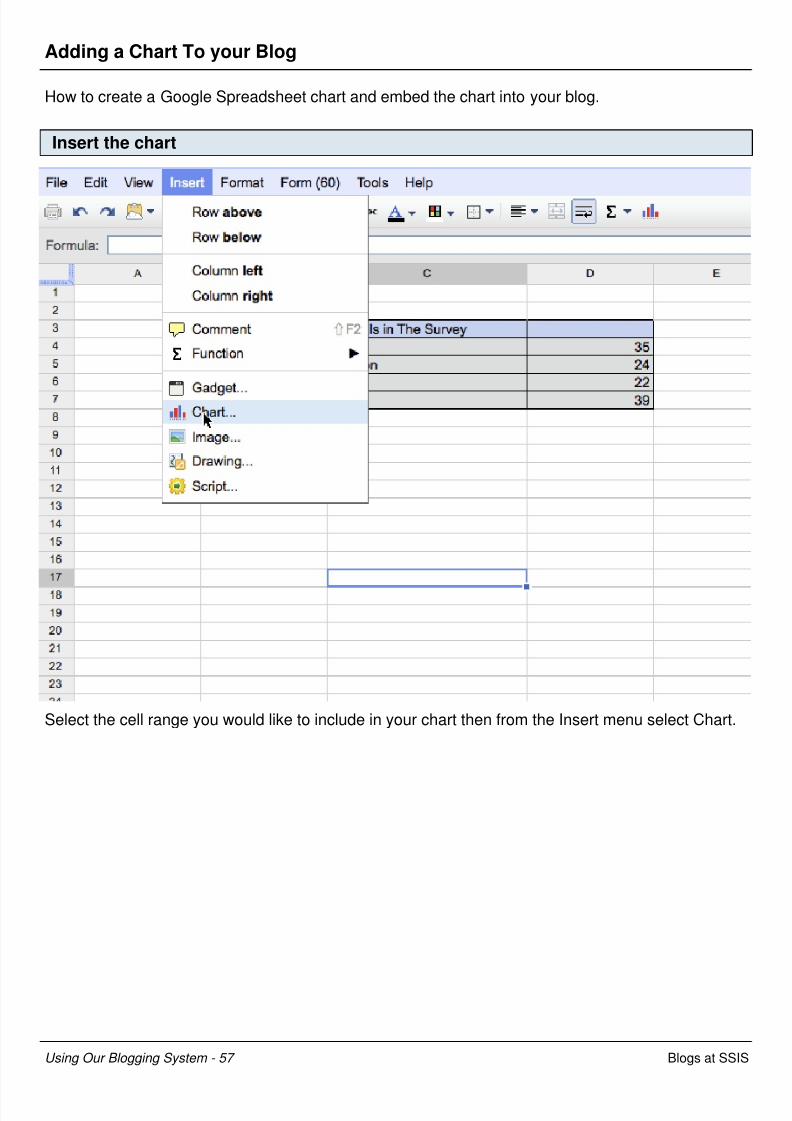
Adding a Chart To your Blog
How to create a Google Spreadsheet chart and embed the chart into your blog.
Insert the chart
Select the cell range you would like to include in your chart then from the Insert menu select Chart.
Using Our Blogging System - 57 Blogs at SSIS
8/8/2019 SSIS Blogs
http://slidepdf.com/reader/full/ssis-blogs 58/82
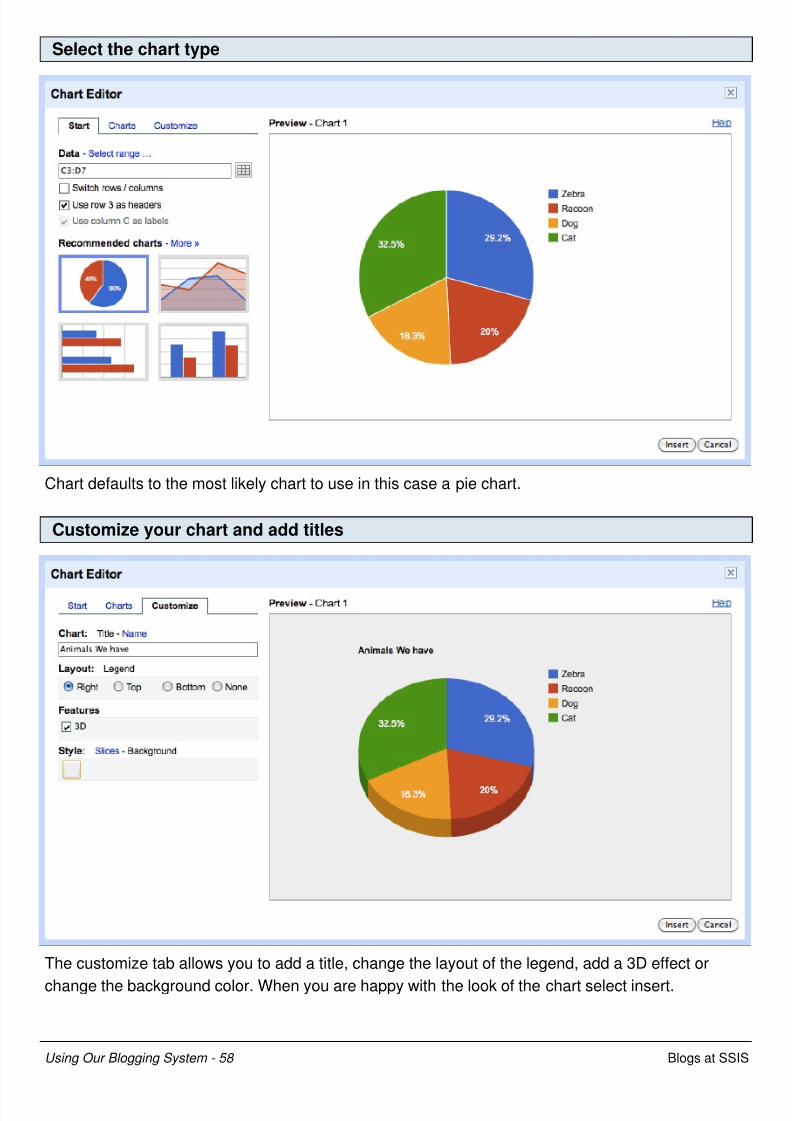
Select the chart type
Chart defaults to the most likely chart to use in this case a pie chart.
Customize your chart and add titles
The customize tab allows you to add a title, change the layout of the legend, add a 3D effect or
change the background color. When you are happy with the look of the chart select insert.
Using Our Blogging System - 58 Blogs at SSIS

8/8/2019 SSIS Blogs
http://slidepdf.com/reader/full/ssis-blogs 59/82
insert the chart
Completed chart.
Publish an interactive chart or an image
To add the chart to your blog you will need to select publish.
Using Our Blogging System - 59 Blogs at SSIS

8/8/2019 SSIS Blogs
http://slidepdf.com/reader/full/ssis-blogs 60/82
Copy the embed code
You can publish the chart as an image or as an interactive chart selecting either using the drop
down menu.
Paste the code into your blog while in HTML mode
When published as an image using the default settings you need to log in to your Gapp account. if
you delete the school Gapp portion highlighted in blue you will be able to view the chart without
being logged in. This did not seem to work for me when I tried an interactive chart.
Using Our Blogging System - 60 Blogs at SSIS

8/8/2019 SSIS Blogs
http://slidepdf.com/reader/full/ssis-blogs 61/82
View the blog post. Note the difference between using the default URL versus
modified URL
As you can see above the graph with the default url
https://spreadsheets.google.com/a/student.ssis.edu.vn/oimg?key= does not show while the graph
using the modified url https://spreadsheets.google.com/oimg?key= does display.
Using Our Blogging System - 61 Blogs at SSIS

8/8/2019 SSIS Blogs
http://slidepdf.com/reader/full/ssis-blogs 62/82
Adding a Gadget To Your Blog
How to create a Google Spreadsheet gadget and embed the gadget into your blog.
Insert the gadget
Select the cell range you would like to include in your gadget then from the Insert menu select
Gadget.
Using Our Blogging System - 62 Blogs at SSIS
8/8/2019 SSIS Blogs
http://slidepdf.com/reader/full/ssis-blogs 63/82
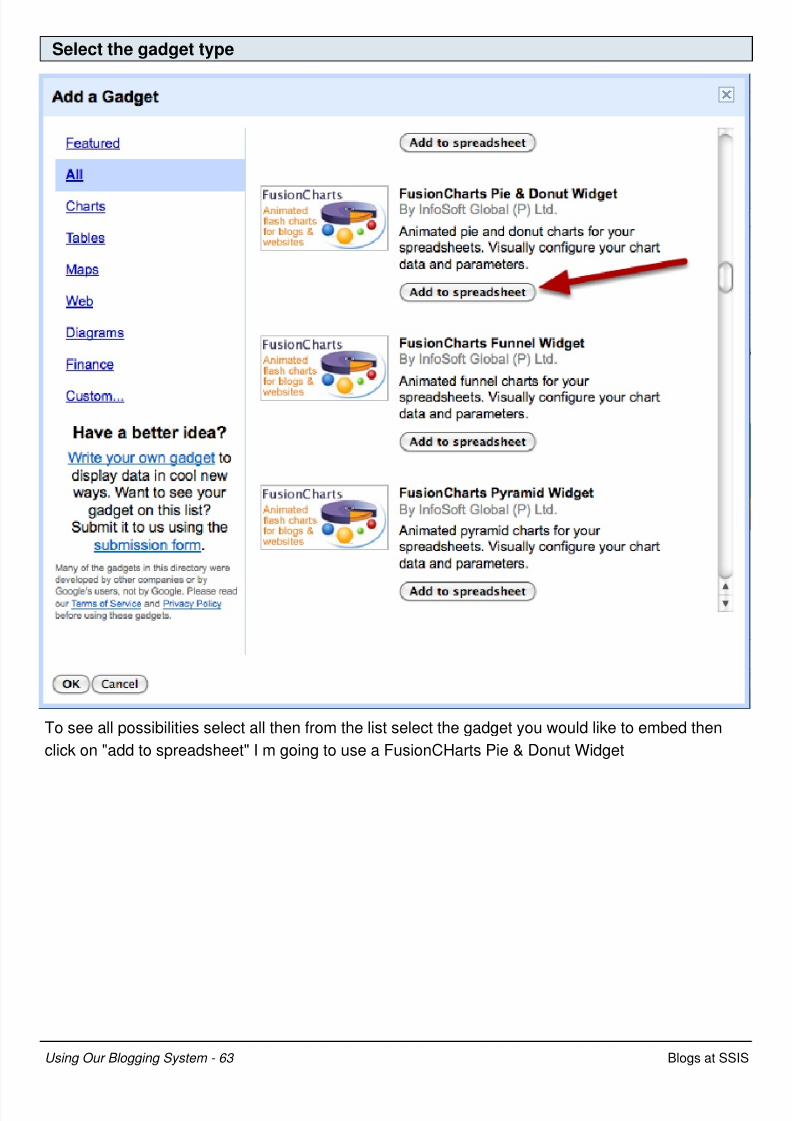
Select the gadget type
To see all possibilities select all then from the list select the gadget you would like to embed then
click on "add to spreadsheet" I m going to use a FusionCHarts Pie & Donut Widget
Using Our Blogging System - 63 Blogs at SSIS

8/8/2019 SSIS Blogs
http://slidepdf.com/reader/full/ssis-blogs 64/82
Customize your gadget
Select the options you want to customize your chart. When you are happy with the look of the chart
select inser then click Apply & close.
Using Our Blogging System - 64 Blogs at SSIS
8/8/2019 SSIS Blogs
http://slidepdf.com/reader/full/ssis-blogs 65/82
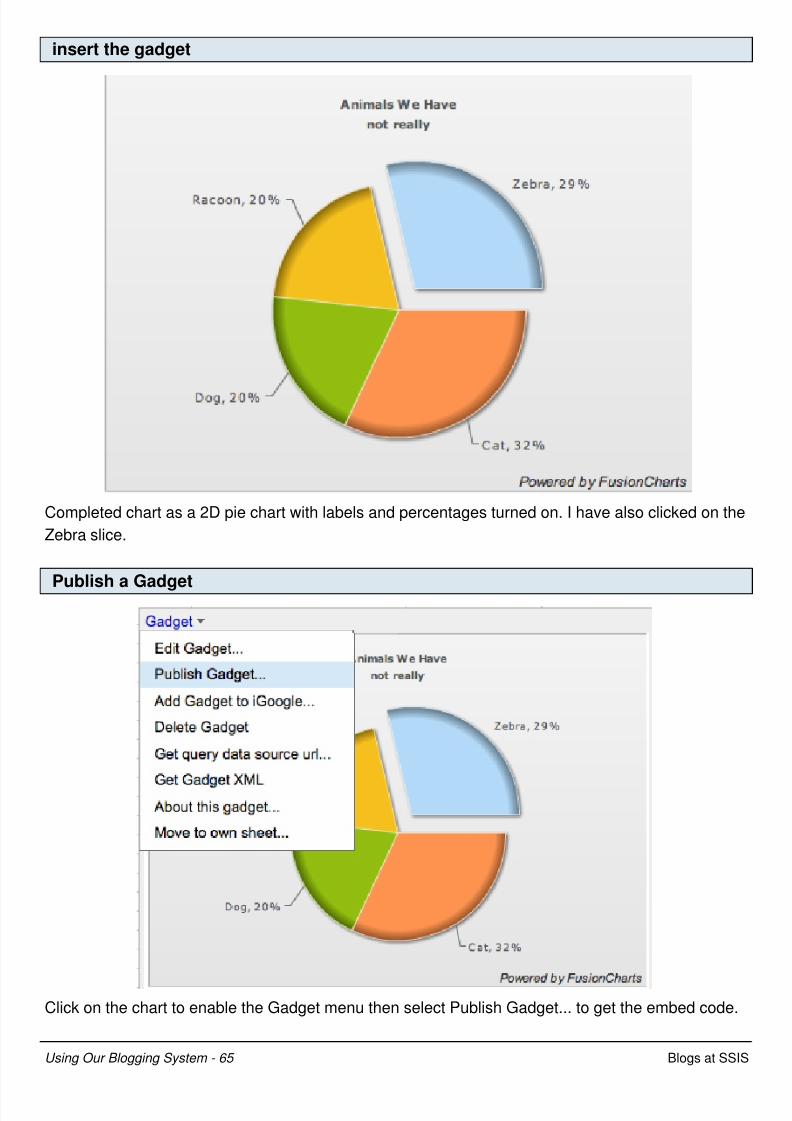
insert the gadget
Completed chart as a 2D pie chart with labels and percentages turned on. I have also clicked on the
Zebra slice.
Publish a Gadget
Click on the chart to enable the Gadget menu then select Publish Gadget... to get the embed code.
Using Our Blogging System - 65 Blogs at SSIS

8/8/2019 SSIS Blogs
http://slidepdf.com/reader/full/ssis-blogs 66/82
Paste the code into your blog while in HTML mode
Making sure you have the HTML tab active then paste the code into your blog post.
View the blog post.
Gadget displayed in your blog.
Using Our Blogging System - 66 Blogs at SSIS

8/8/2019 SSIS Blogs
http://slidepdf.com/reader/full/ssis-blogs 67/82
8/8/2019 SSIS Blogs
http://slidepdf.com/reader/full/ssis-blogs 68/82
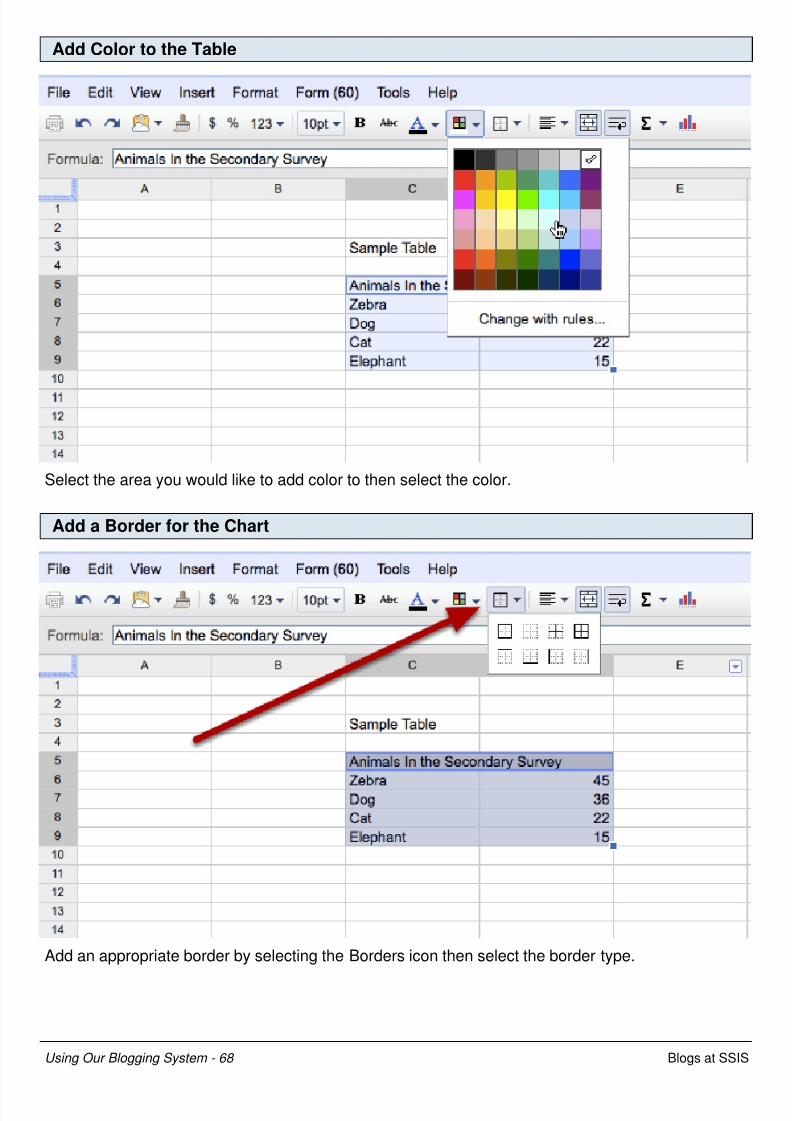
Add Color to the Table
Select the area you would like to add color to then select the color.
Add a Border for the Chart
Add an appropriate border by selecting the Borders icon then select the border type.
Using Our Blogging System - 68 Blogs at SSIS

8/8/2019 SSIS Blogs
http://slidepdf.com/reader/full/ssis-blogs 69/82
Publish the Table - 1
Click on the triangle to the right of share then select "Publish as a web page". Since my table is in
Sheet3 I need to publish sheet 3. When you select the correct worksheet click on publish now.
Using Our Blogging System - 69 Blogs at SSIS

8/8/2019 SSIS Blogs
http://slidepdf.com/reader/full/ssis-blogs 70/82
Publish the Table - 2
Select HTML to embed in a page so that you can embed the table to your blog.
Using Our Blogging System - 70 Blogs at SSIS

8/8/2019 SSIS Blogs
http://slidepdf.com/reader/full/ssis-blogs 71/82
Publish The Table - 3
In the all cells area select the range of cells you want in the table in this case from cell c5 to cell d9
or c5:d9. Then click in the box and copy the code
Using Our Blogging System - 71 Blogs at SSIS

8/8/2019 SSIS Blogs
http://slidepdf.com/reader/full/ssis-blogs 72/82
Paste the code into your blog while in HTML mode
I made a change to the (1) width and height of the Iframe to 300 and 210 . When published using
the default settings you need to log in to your Gapp account. if you delete the school Gapp portionhighlighted in (2) blue you will be able to view the table without being logged in (3). Also if you make
widget=true widget =false then you will only see the table
View the blog post. Note the difference between using the default URL versus
modified URL
As you can see above the graph with the default url
https://spreadsheets.google.com/a/student.ssis.edu.vn/pub?key= does not show while the graphusing the modified url https://spreadsheets.google.com/pub?key= does display.
Using Our Blogging System - 72 Blogs at SSIS

8/8/2019 SSIS Blogs
http://slidepdf.com/reader/full/ssis-blogs 73/82
Other Steps
Using Our Blogging System - 73 Blogs at SSIS
8/8/2019 SSIS Blogs
http://slidepdf.com/reader/full/ssis-blogs 74/82
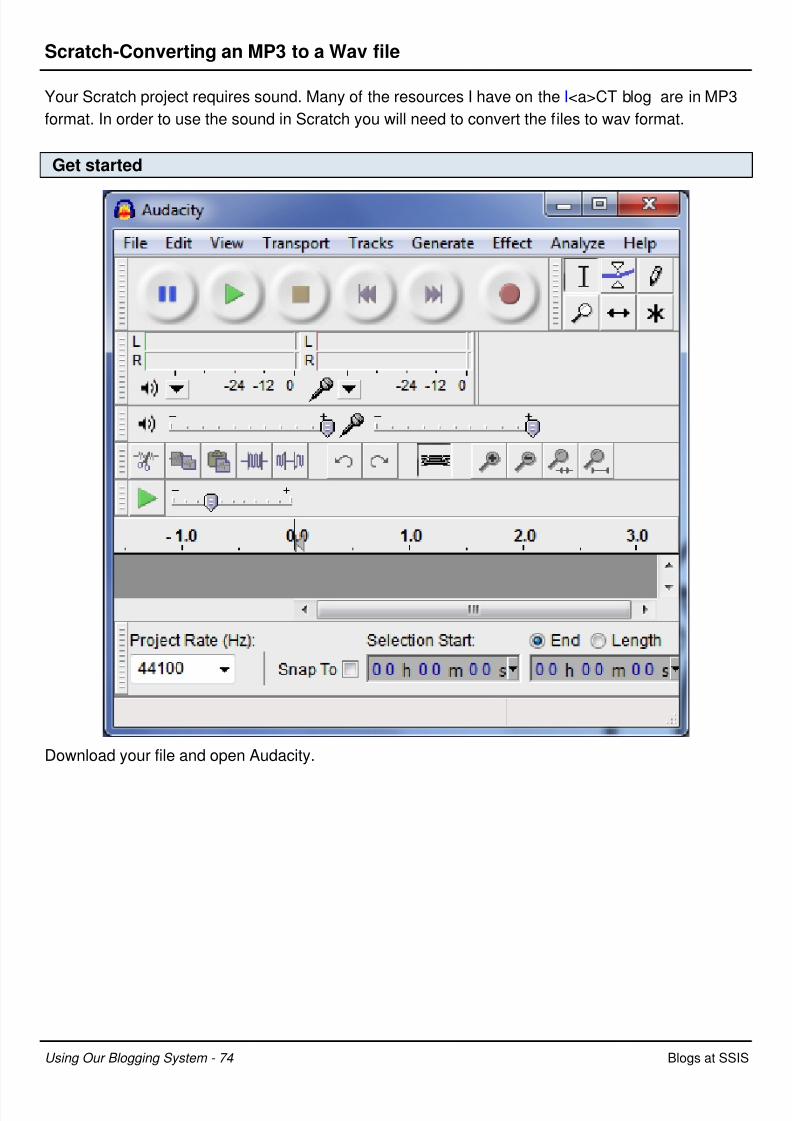
Scratch-Converting an MP3 to a Wav file
Your Scratch project requires sound. Many of the resources I have on the I<a>CT blog are in MP3
format. In order to use the sound in Scratch you will need to convert the files to wav format.
Get started
Download your file and open Audacity.
Using Our Blogging System - 74 Blogs at SSIS

8/8/2019 SSIS Blogs
http://slidepdf.com/reader/full/ssis-blogs 75/82
Get File
From the file open menu select the MP3 file you have downloaded.
Using Our Blogging System - 75 Blogs at SSIS

8/8/2019 SSIS Blogs
http://slidepdf.com/reader/full/ssis-blogs 76/82
Export
From the file menu select export.
Using Our Blogging System - 76 Blogs at SSIS

8/8/2019 SSIS Blogs
http://slidepdf.com/reader/full/ssis-blogs 77/82
Select Filetype
Select WAV (Microsoft) signed 16 bit PMC
Using Our Blogging System - 77 Blogs at SSIS

8/8/2019 SSIS Blogs
http://slidepdf.com/reader/full/ssis-blogs 78/82
Done
Once the file has been exported you will be able to import the WAV file into Scratch. Remember to
cite your music source.
Using Our Blogging System - 78 Blogs at SSIS

8/8/2019 SSIS Blogs
http://slidepdf.com/reader/full/ssis-blogs 79/82
Creating Aggregating Blogs
Adding content from multiple blogs to one blog.
Tutorial
The past few periods in block H have been spent customizing a few teacher blogs and creating a
system that allows student syndicated content to become part of a teacher blog. There are more
teachers beginning to use our internal wordpressmu install and many are interested in adding
student content to their blog. Both of the blogs I mention below begin with the student creating
content on their own personal blog. Once the post is created RSS feeds and Feedwordpress are
used to add the content to the teachers' blog. I thought I would start outlining the steps needed to
create a blog that aggregates other content in it.
I am creating this post with ScreenStep. This software makes it easy to organize a tutorial and to
add graphics to the tutorial. You can also add video to the tutorials. I had some trouble adding a
video embed from Vimeo that I created using Screenflow. Since I use the Viper Video Quicktags
plugin I can add the Quick tag code as text and the video I want is added to this post/lesson.
B<a>log One: This blog will be used to collect students math reflections. The students have all been
added to the blogs and soon the explorations that have been created will result in reflective blog
posts. This teacher is doing some really interesting things with Mathematica. So if you are interested
download Mathematica player and check out what the is doing
B<a>log Two:This teacher is creating a Spanish Magazine. Each student is required to create aspanish blogpost on their won blog. Then the content is syndicated to the teacher blog and using
category matching the content is used to create a Spanish Emagazine. We are still at the initial
phase with the blog but I think it will end up being an interesting site.
Have added the first few lessons and will continue adding lessons to this tutorial until it is completed.
The resulting pages are being fed via RSS feeds into my personal professional portfolio via as well.
Using Our Blogging System - 79 Blogs at SSIS

8/8/2019 SSIS Blogs
http://slidepdf.com/reader/full/ssis-blogs 80/82
Setup Feedwordpress
Once the feedwordpress plugin has been enabled you will see the syndication area available on
your sidebar.
Syndication
[vimeo]http://www.vimeo.com/16810466[/vimeo]
Feeds and Updates
The settings I have.
Using Our Blogging System - 80 Blogs at SSIS
8/8/2019 SSIS Blogs
http://slidepdf.com/reader/full/ssis-blogs 81/82
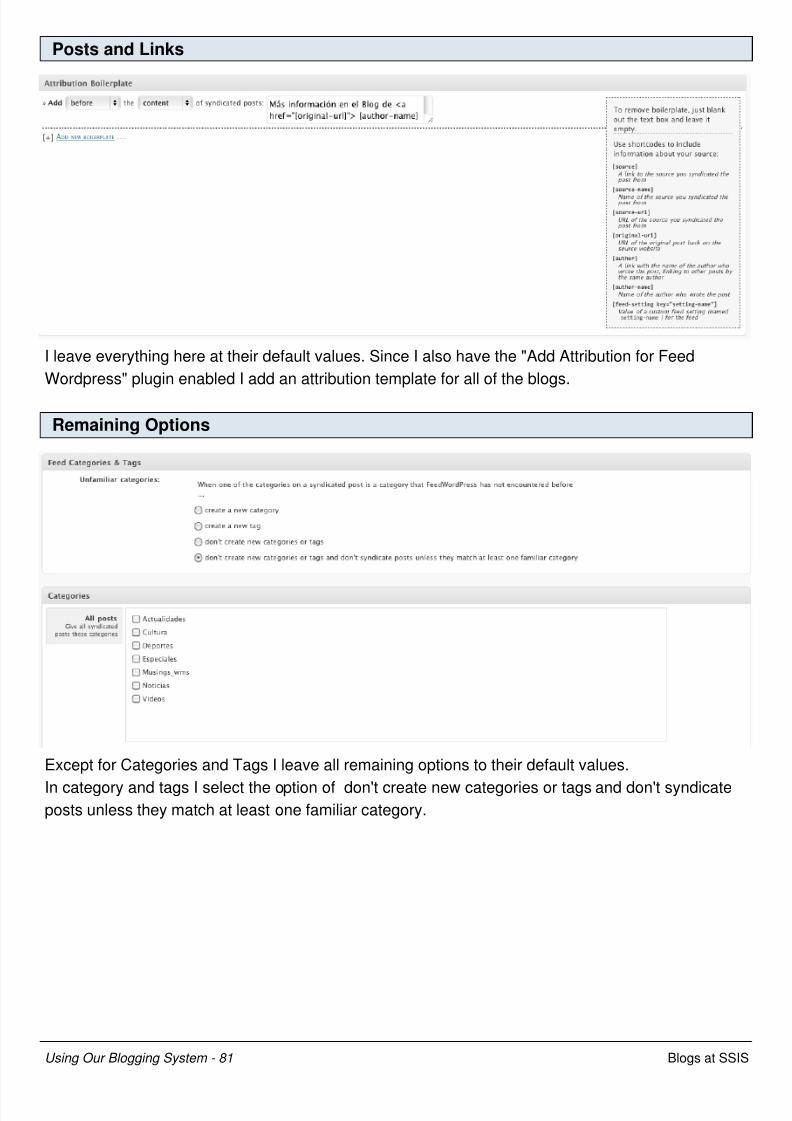
Posts and Links
I leave everything here at their default values. Since I also have the "Add Attribution for Feed
Wordpress" plugin enabled I add an attribution template for all of the blogs.
Remaining Options
Except for Categories and Tags I leave all remaining options to their default values.
In category and tags I select the option of don't create new categories or tags and don't syndicateposts unless they match at least one familiar category.
Using Our Blogging System - 81 Blogs at SSIS
8/8/2019 SSIS Blogs
http://slidepdf.com/reader/full/ssis-blogs 82/82
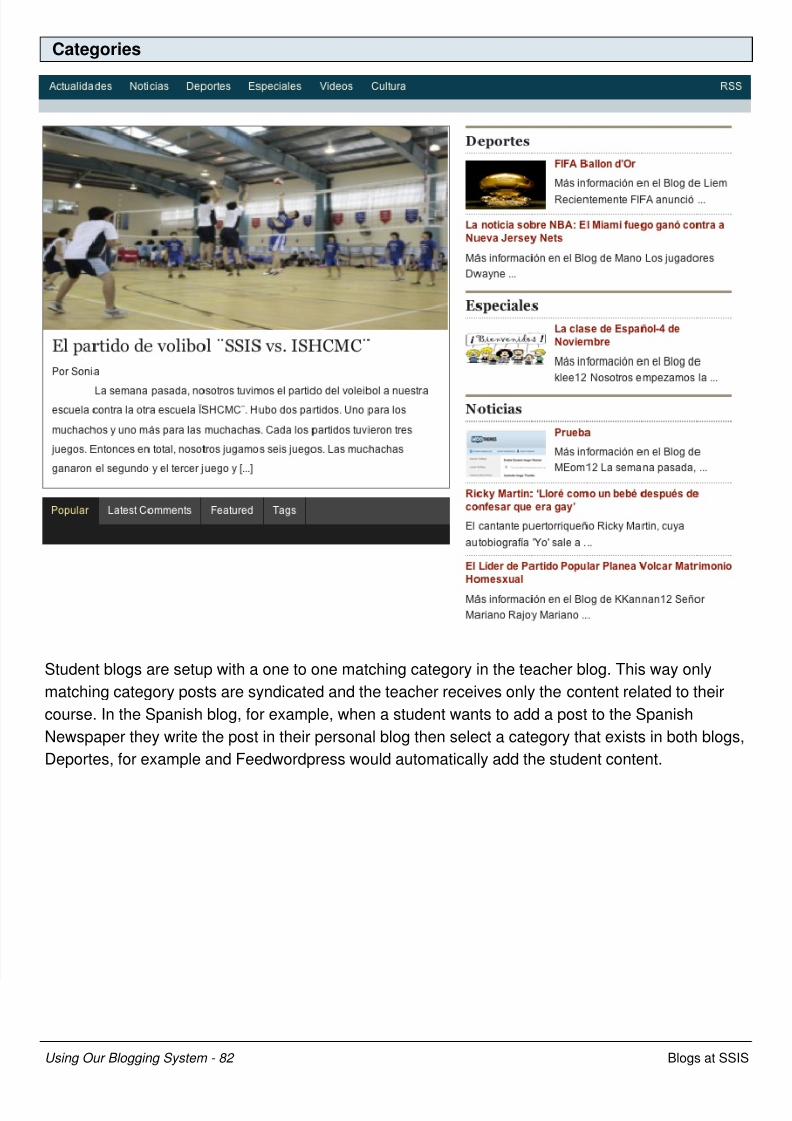
Categories
Student blogs are setup with a one to one matching category in the teacher blog. This way only
matching category posts are syndicated and the teacher receives only the content related to their
course. In the Spanish blog, for example, when a student wants to add a post to the Spanish
Newspaper they write the post in their personal blog then select a category that exists in both blogs,
Deportes, for example and Feedwordpress would automatically add the student content.


