

Step #1: Setting up RASPBERRY PI (4B)
1) OS and SD card flashing as per https://www.pyimagesearch.com/2019/09/16/install-opencv-4-on-raspberry-pi-
4-and-raspbian-buster/ :
a. Download the OS image from the Rpi site (https://www.raspberrypi.org/software/operating-systems/)
b. Download RaspberryPi imager from: https://www.raspberrypi.org/software/)
c. Write the image to the microSD
d. Disk will have a “boot” partition type FAT32 (readable in Windows too), a partition with the SO (non-
readable in windows) and space not allocated
2) How to get RASPEBERRY PI connecting to the laptop in WiFI via SSH: https://maker.pro/raspberry-
pi/projects/how-to-connect-a-raspberry-pi-to-a-laptop-display
3) File to add to the SD card for automatic wifi setup (Place and additional file empty and without the extension
called “ssh” into the “boot” partition of the micro SD) :
https://www.raspberrypi.org/documentation/configuration/wireless/headless.md
a. Copy 2 files into the “boot” partition, on the root (empty file “ssh” without extension, and “wpa_supplicant.conf” text file with below text:
ctrl_interface=DIR=/var/run/wpa_supplicant GROUP=netdev
update_config=1
country=NL
network={
ssid="XXXXXXXXXX" (WiFi SSID name)
psk="YYYYYYYYY" (Wifi Password)
}
4) Search the Raspberry pi IP (via router or via https://www.advanced-ip-scanner.com/it/)
a. Check the raspberry Pi IP address via Advanced IP Scanner , or via the modem program.
5) Use putty to connect to the raspberry pi IP via SSH

a. Run Putty, with the IP address of the Raspberry Pi on the Host Name, remain settings as per Putty
default
b. On putty terminal enter user “pi’ and password “raspberry”
c. Type “sudo raspi-config” to enter the raspberry setup
d. Expand the filesystem to use the full micro SD volume
e. Enable VNC connection set screen resolution (back to https://maker.pro/raspberry-pi/projects/how-to-
connect-a-raspberry-pi-to-a-laptop-display)
f. reboot
6) Connect via VNC viewer (https://www.realvnc.com/en/connect/download/viewer/); First time there is a
warning to confirm

7) Setup location and language
8) Apply for a new password
9) Follow instructions for updates
10) Additional settings on Rpi Config.txt (sudo nano /boot/config.txt):
a. hdmi_group=2 (to activate selection group 2 wherein the right laptop screens are)
b. hdmi_mode=82 (to activate the resolution closer to the one of Asus laptop @ home)
c. gpu_mem=256 (to increase memory for the GPU)
d. enable_uart=1 (to activate serial ports, to monitor when Rpi can be switched off)
e. dtoverlay=uart2 (to activate TDX2 →pin26, wherein the led’s cathode is connected)
f. dtoverlay=gpio-shutdown (to switch ON the Rpi via switch to GND on GPIO 3 →pin5)
g. dtoverlay=gpio-shutdown,gpio_pin=11 (to switch OFF the Rpi via switch to GND on GPIO 11 →pin23)
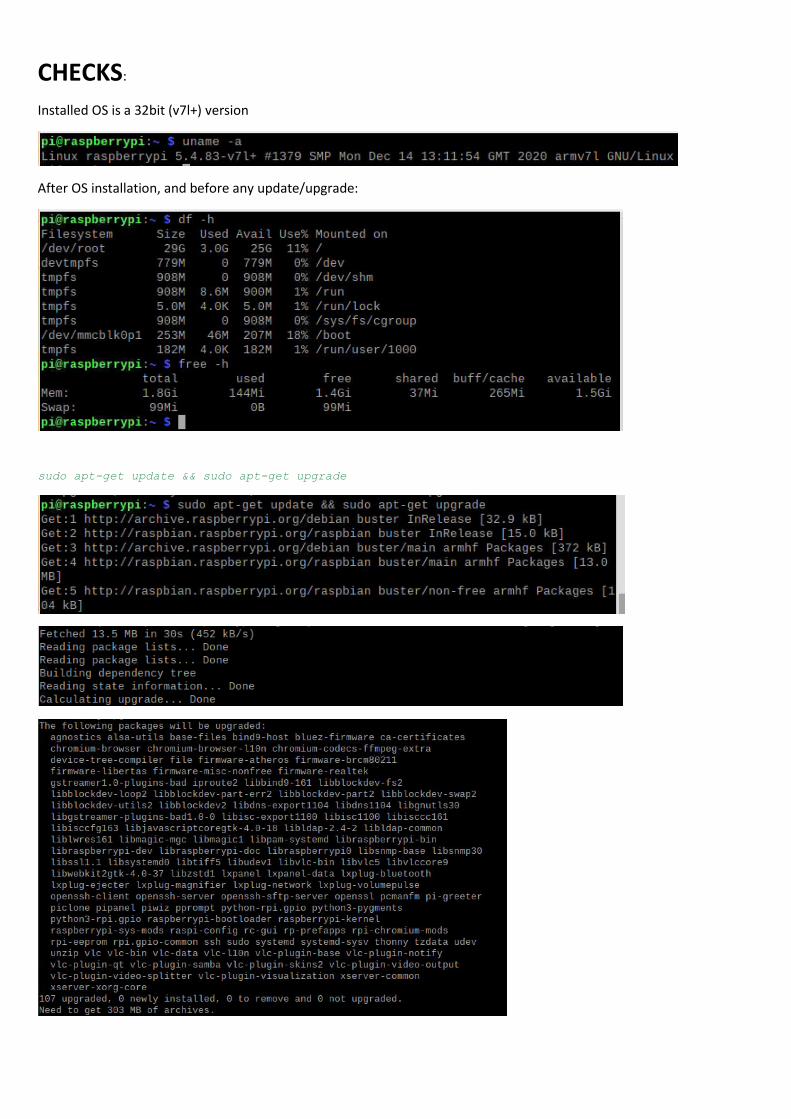
CHECKS:
Installed OS is a 32bit (v7l+) version
After OS installation, and before any update/upgrade:
sudo apt-get update && sudo apt-get upgrade
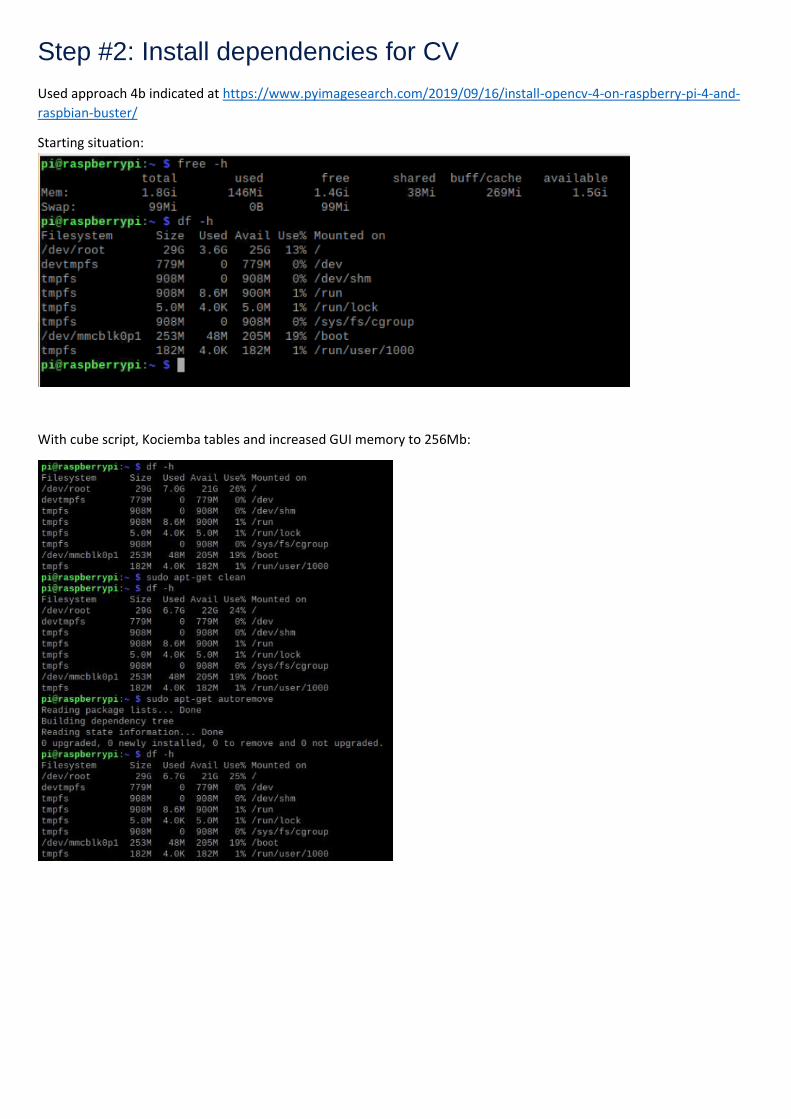
Step #2: Install dependencies for CV
Used approach 4b indicated at https://www.pyimagesearch.com/2019/09/16/install-opencv-4-on-raspberry-pi-4-and-
raspbian-buster/
Starting situation:
With cube script, Kociemba tables and increased GUI memory to 256Mb:
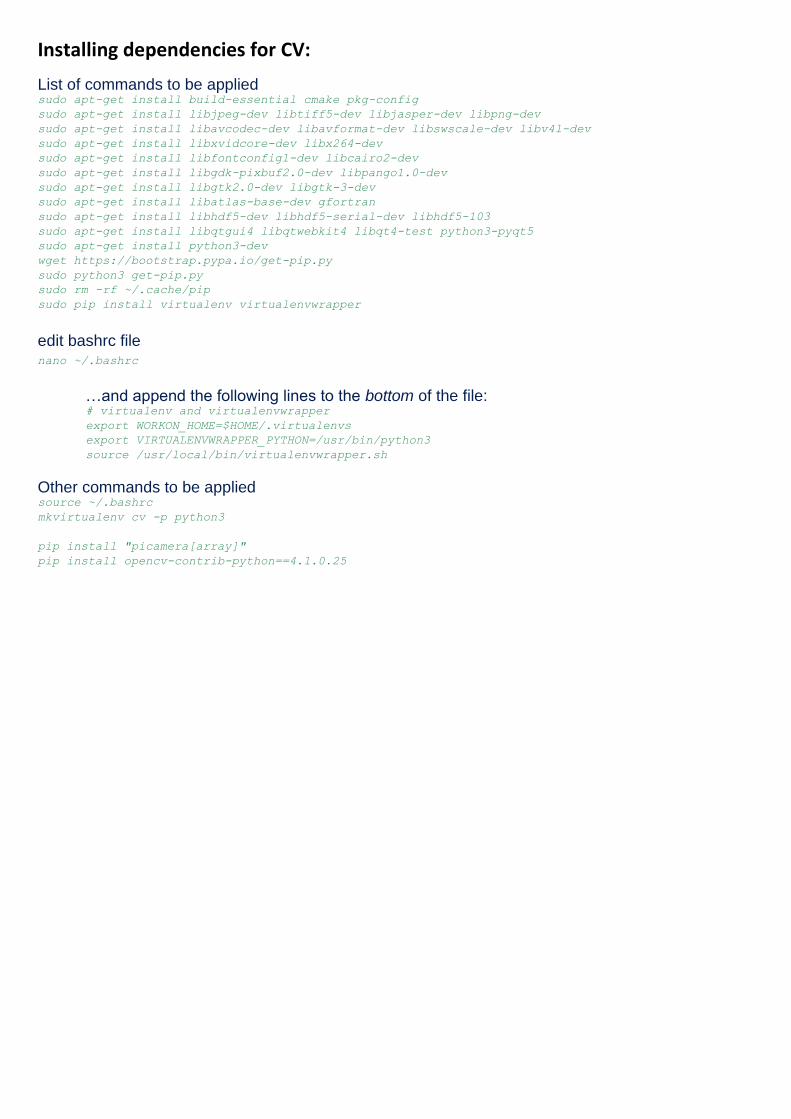
Installing dependencies for CV:
List of commands to be applied sudo apt-get install build-essential cmake pkg-config
sudo apt-get install libjpeg-dev libtiff5-dev libjasper-dev libpng-dev
sudo apt-get install libavcodec-dev libavformat-dev libswscale-dev libv4l-dev
sudo apt-get install libxvidcore-dev libx264-dev
sudo apt-get install libfontconfig1-dev libcairo2-dev
sudo apt-get install libgdk-pixbuf2.0-dev libpango1.0-dev
sudo apt-get install libgtk2.0-dev libgtk-3-dev
sudo apt-get install libatlas-base-dev gfortran
sudo apt-get install libhdf5-dev libhdf5-serial-dev libhdf5-103
sudo apt-get install libqtgui4 libqtwebkit4 libqt4-test python3-pyqt5
sudo apt-get install python3-dev
wget https://bootstrap.pypa.io/get-pip.py
sudo python3 get-pip.py
sudo rm -rf ~/.cache/pip
sudo pip install virtualenv virtualenvwrapper
edit bashrc file nano ~/.bashrc
…and append the following lines to the bottom of the file: # virtualenv and virtualenvwrapper
export WORKON_HOME=$HOME/.virtualenvs
export VIRTUALENVWRAPPER_PYTHON=/usr/bin/python3
source /usr/local/bin/virtualenvwrapper.sh
Other commands to be applied source ~/.bashrc
mkvirtualenv cv -p python3
pip install "picamera[array]"
pip install opencv-contrib-python==4.1.0.25
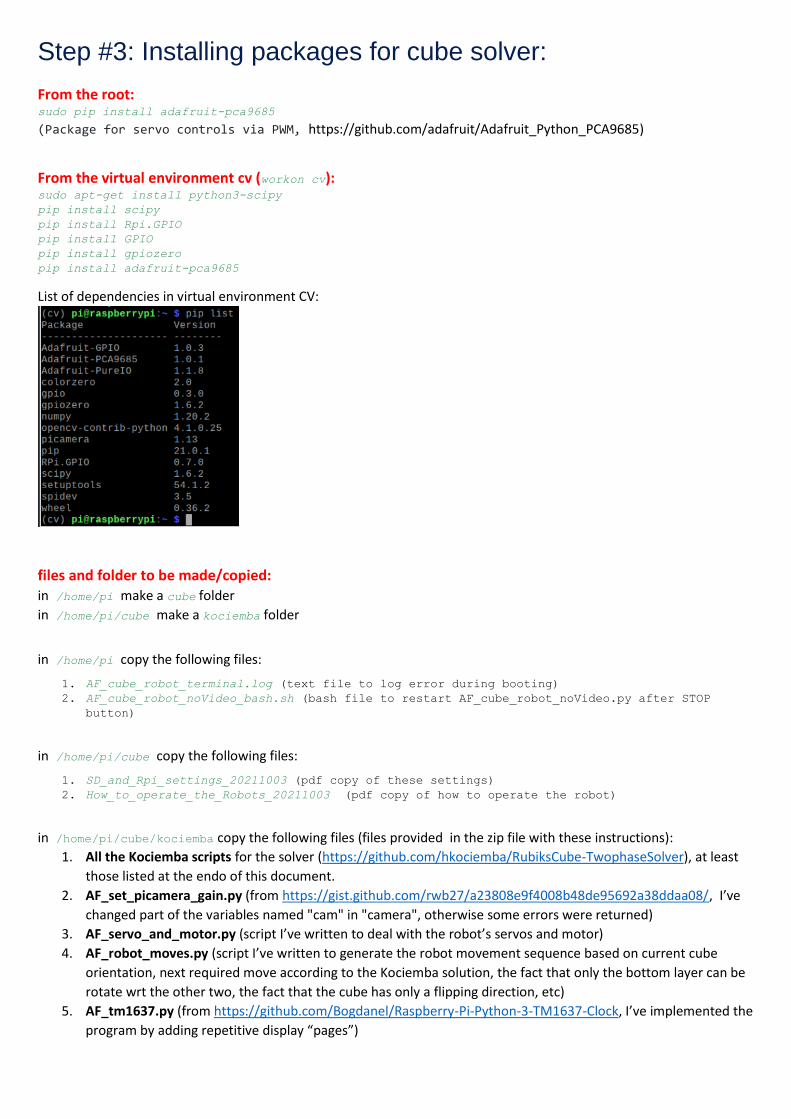
Step #3: Installing packages for cube solver:
From the root: sudo pip install adafruit-pca9685
(Package for servo controls via PWM, https://github.com/adafruit/Adafruit_Python_PCA9685)
From the virtual environment cv (workon cv): sudo apt-get install python3-scipy
pip install scipy
pip install Rpi.GPIO
pip install GPIO
pip install gpiozero
pip install adafruit-pca9685
List of dependencies in virtual environment CV:
files and folder to be made/copied: in /home/pi make a cube folder
in /home/pi/cube make a kociemba folder
in /home/pi copy the following files:
1. AF_cube_robot_terminal.log (text file to log error during booting)
2. AF_cube_robot_noVideo_bash.sh (bash file to restart AF_cube_robot_noVideo.py after STOP
button)
in /home/pi/cube copy the following files:
1. SD_and_Rpi_settings_20211003 (pdf copy of these settings)
2. How_to_operate_the_Robots_20211003 (pdf copy of how to operate the robot)
in /home/pi/cube/kociemba copy the following files (files provided in the zip file with these instructions):
1. All the Kociemba scripts for the solver (https://github.com/hkociemba/RubiksCube-TwophaseSolver), at least
those listed at the endo of this document.
2. AF_set_picamera_gain.py (from https://gist.github.com/rwb27/a23808e9f4008b48de95692a38ddaa08/, I’ve
changed part of the variables named "cam" in "camera", otherwise some errors were returned)
3. AF_servo_and_motor.py (script I’ve written to deal with the robot’s servos and motor)
4. AF_robot_moves.py (script I’ve written to generate the robot movement sequence based on current cube
orientation, next required move according to the Kociemba solution, the fact that only the bottom layer can be
rotate wrt the other two, the fact that the cube has only a flipping direction, etc)
5. AF_tm1637.py (from https://github.com/Bogdanel/Raspberry-Pi-Python-3-TM1637-Clock, I’ve implemented the
program by adding repetitive display “pages”)
Step #4: Get the robot starting, after raspberry pi boots:
https://www.pyimagesearch.com/2016/05/16/running-a-python-opencv-script-on-reboot/#comment-428806
I’ve spent many hours before getting this working, mainly due to user “pi” to be set on the script….
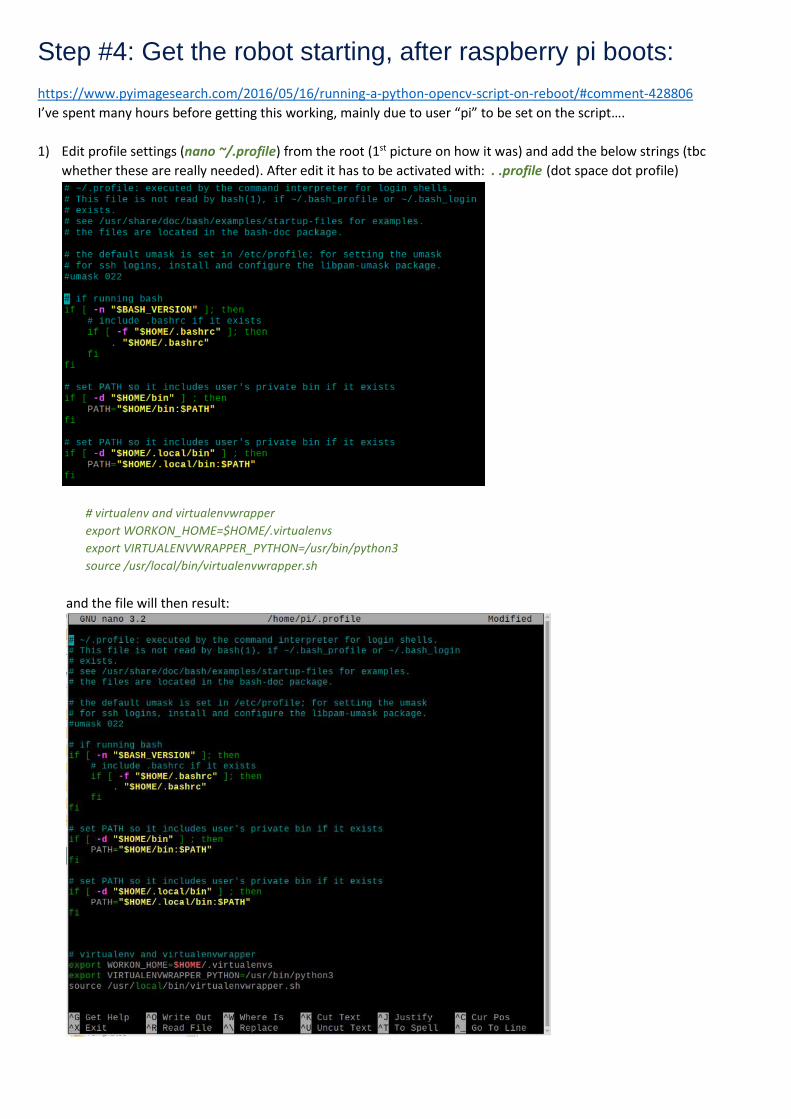
1) Edit profile settings (nano ~/.profile) from the root (1st picture on how it was) and add the below strings (tbc
whether these are really needed). After edit it has to be activated with: . .profile (dot space dot profile)
# virtualenv and virtualenvwrapper
export WORKON_HOME=$HOME/.virtualenvs
export VIRTUALENVWRAPPER_PYTHON=/usr/bin/python3
source /usr/local/bin/virtualenvwrapper.sh
and the file will then result:

2) Edit crontab by typing: sudo crontab -e and and the end type below commands:
MAILTO=""
@reboot /bin/sleep 5; bash -l /home/pi/cube/AF_cube_robot_noVideo_bash.sh >
/home/pi/cube/AF_cube_robot_terminal.log 2>&1
Notes:
First row’s command prevents errors if the email isn’t set
Second one imposes 5seconds delay from boot, set user “pi” and sources the bash script
The AF_cube_robot_noVideo_bash.sh bash file can be tested, from the folder where it’s located by typing:
. AF_cube_robot_noVideo_bash.sh (dot space AF_cube_robot_noVideo_bash.sh)
File crontab -e will result:

Files in /home/pi/cube/kociemba
Robot related files:
• AF_cube_robot.py
• AF_cube_robot_noVideo.py
• AF_robot_moves.py
• AF_servo_and_motor.py
• AF_set_picamera_gain.py
• AF_tm1637.py
• AF_scrambler.py
Kociemba solver files:
• co_classidx
• co_rep
• co_sym
• conj_twist
• conj_ud_edges
• coord.py
• cubie.py
• defs.py
• enums.py
• example.py
• face.py
• fs_classidx
• fs_rep
• fs_sym
• LICENSE
• misc.py
• move_corners
• move_d_edges
• move_flip
• move_slice_sorted
• move_twist
• move_u_edges
• move_ud_edges
• moves.py
• phase1_prun
• phase2_cornsliceprun
• phase2_edgemerge
• phase2_prun
• pruning.py
• README.md
• solver.py
• symmetries.py
Files in /home/pi
Robot related files:
• AF_cube_robot_noVideo_bash.sh
• AF_cube_robot_terminal.log
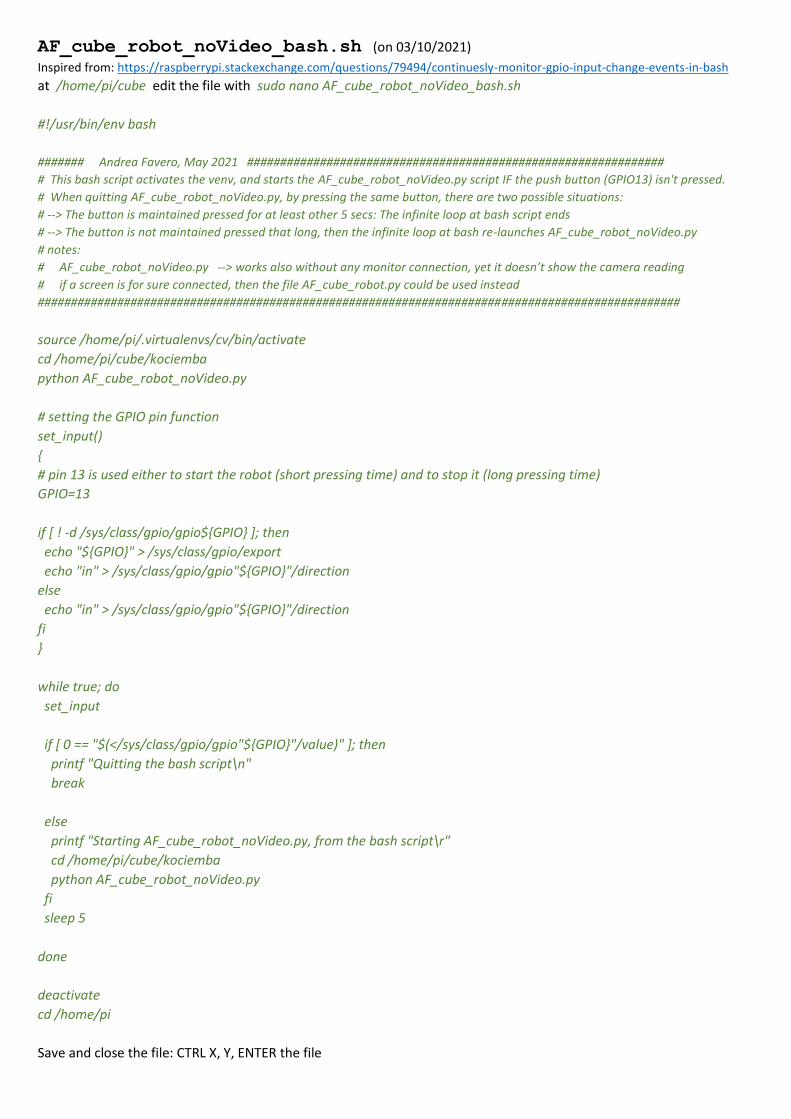
AF_cube_robot_noVideo_bash.sh (on 03/10/2021)
Inspired from: https://raspberrypi.stackexchange.com/questions/79494/continuesly-monitor-gpio-input-change-events-in-bash
at /home/pi/cube edit the file with sudo nano AF_cube_robot_noVideo_bash.sh
#!/usr/bin/env bash
####### Andrea Favero, May 2021 ###############################################################
# This bash script activates the venv, and starts the AF_cube_robot_noVideo.py script IF the push button (GPIO13) isn't pressed.
# When quitting AF_cube_robot_noVideo.py, by pressing the same button, there are two possible situations:
# --> The button is maintained pressed for at least other 5 secs: The infinite loop at bash script ends
# --> The button is not maintained pressed that long, then the infinite loop at bash re-launches AF_cube_robot_noVideo.py
# notes:
# AF_cube_robot_noVideo.py --> works also without any monitor connection, yet it doesn’t show the camera reading
# if a screen is for sure connected, then the file AF_cube_robot.py could be used instead
#################################################################################################
source /home/pi/.virtualenvs/cv/bin/activate
cd /home/pi/cube/kociemba
python AF_cube_robot_noVideo.py
# setting the GPIO pin function
set_input()
{
# pin 13 is used either to start the robot (short pressing time) and to stop it (long pressing time)
GPIO=13
if [ ! -d /sys/class/gpio/gpio${GPIO} ]; then
echo "${GPIO}" > /sys/class/gpio/export
echo "in" > /sys/class/gpio/gpio"${GPIO}"/direction
else
echo "in" > /sys/class/gpio/gpio"${GPIO}"/direction
fi
}
while true; do
set_input
if [ 0 == "$(</sys/class/gpio/gpio"${GPIO}"/value)" ]; then
printf "Quitting the bash script\n"
break
else
printf "Starting AF_cube_robot_noVideo.py, from the bash script\r"
cd /home/pi/cube/kociemba
python AF_cube_robot_noVideo.py
fi
sleep 5
done
deactivate
cd /home/pi
Save and close the file: CTRL X, Y, ENTER the file

Other settings made in due course, for a better WiFi connection
1. Assigned a fix IP on wlan0:
(https://raspberrypi.stackexchange.com/questions/37920/how-do-i-set-up-networking-wifi-static-ip-address-on-
raspbian-raspberry-pi-os) If you want your Pi to be assigned a predictable IP Address you can either reserve one in your router OR request the DHCP server to
assign one.
If you request an IP Address within the range managed by the DHCP server which is available this should be honoured, otherwise the
DHCP server will allocate an address as normal.
Interface wlan0
request=XXX. XXX. X. XX/24 (IP address)
2. WiFi power management
Attempt to improve WiFi as per bullet point 2 on https://internet-access-guide.com/raspberry-pi-slow-wifi/
Via iwconfig the WiFi power management was set on
With sudo iwconfig wlan0 power off the WiFi power management has been set off:
Without rebooting the SSH became much more responsive
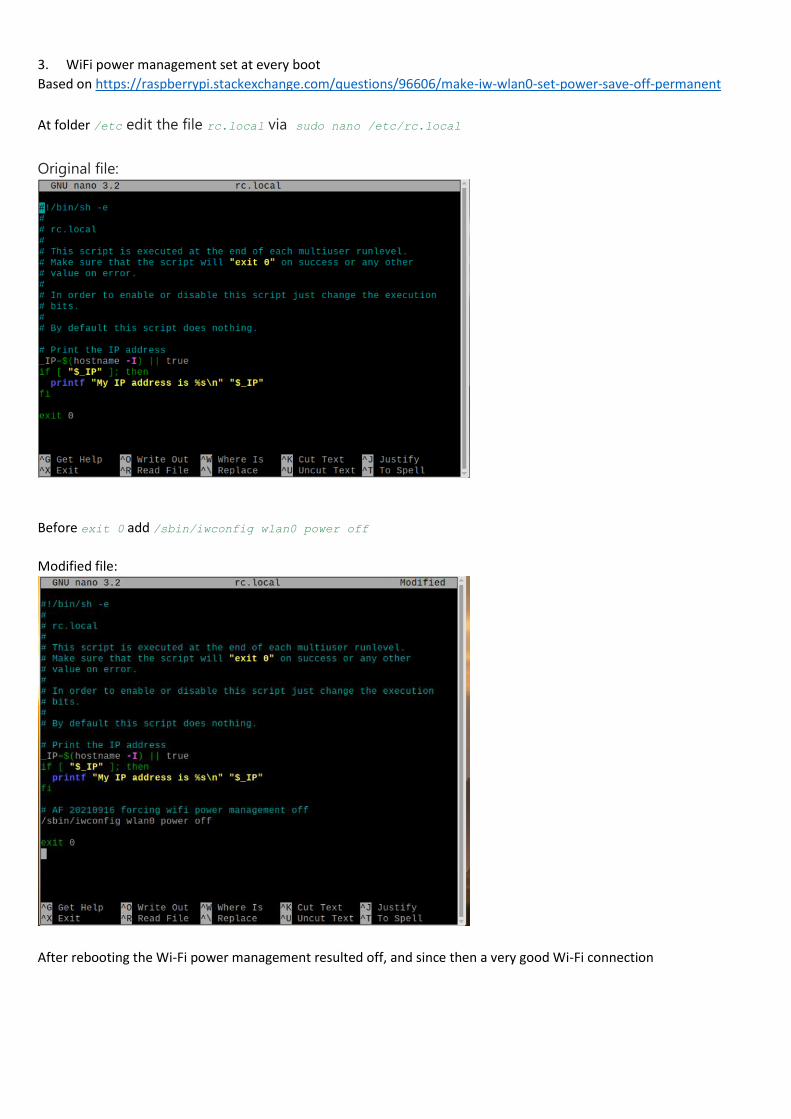
3. WiFi power management set at every boot
Based on https://raspberrypi.stackexchange.com/questions/96606/make-iw-wlan0-set-power-save-off-permanent
At folder /etc edit the file rc.local via sudo nano /etc/rc.local
Original file:
Before exit 0 add /sbin/iwconfig wlan0 power off
Modified file:
After rebooting the Wi-Fi power management resulted off, and since then a very good Wi-Fi connection

Step #5: Make an image backup of the microSD:
I learned the hard way … when the 1st microSD card crashed:
The project was still relatively at the beginning, yet I had quite some hours of coding not saved elsewhere.
Obviously, I did try to recover data, via multiple tutorials, but not success.
Since that moment I decided to periodically make an image of the card; I’ve also bought a second microSD, so I’ve two
cards with the same OS and settings, and almost the same updates for the scripts part.
After the 1st card broke, and I had to learned to better stay in control, no more issue with the cards
Anyhow this is supposed to be the last, yet relevant step: Make an image of the microSD card, so you can easily recover
in case the card will suddenly stop working.
For this step just follow one of plenty tutorials: https://raspberrytips.com/create-image-sd-card/


