

Table of contents1 Important 31.1 Safety 31.2 Care of the screen 31.3 Recycling 3
2 Your TV 42.1 Television overview 42.2 Product highlights 5
3 Getting started 53.1 Position the TV 53.2 Wall mounting - VESA 53.3 Remote control batteries 73.4 Antenna cable 73.5 Connect the mains 73.6 First time installation 7
4 Use your TV 84.1 Switch on or off - Standby 84.2 Watch TV 94.3 Watch channels from a digital receiver 94.4 Watch connected devices 94.5 Watch a DVD 104.6 Select a Teletext page 104.7 Change Ambilight mode 11
5 Use more of your TV 125.1 Remote Control overview 125.2 TV menu overview 145.3 Picture and sound settings 165.4 Ambilight 195.5 Teletext 205.6 Create favourite channel lists 225.7 Electronic Programme Guide 235.8 Timers and locks 245.9 Subtitles 255.10 View and play photos, MP3... 265.11 Listen to digital radio channels 285.12 Software update 28
6 Channel installation 316.1 Automatic channel installation 316.2 Manual channel installation 326.3 Rearrange stored channels 326.4 Automatic channel management 336.5 Digital reception test 336.6 Factory settings 33
7 Connections (DVD, receiver, ...) 347.1 Connections overview 347.2 About connecting 357.3 Connect your devices 377.4 Connections setup 417.5 Preparing for digital services 42
8 Technical data 43
9 Troubleshooting 44
10 Index 46
Register your product and get support atwww.philips.com/welcome.
Table of contents 1
ENG
LISH
2695.1 en (+ softw) 13-09-2007 13:30 Pagina 1

2007 © Koninklijke Philips Electronics
N.V. All rights reserved. Specifications
are subject to change without notice.
Trademarks are the property of
Koninklijke Philips Electronics N.V. or
their respective owners.
Philips reserves the right to change
products at any time without being
obliged to adjust earlier supplies
accordingly.
The material in this manual is believed
adequate for the intended use of the
system. If the product, or its individual
modules or procedures, are used for
purposes other than those specified
herein, confirmation of their validity and
suitability must be obtained. Philips
warrants that the material itself does
not infringe any United States patents.
No further warranty is expressed or
implied.
Warranty
No components are user-serviceable.
Do not open or remove covers to the
inside of the product. Repairs may only
be done by Philips Service Centres and
official repairshops. Failure to do so shall
void any warranty, stated or implied.
Any operation expressly prohibited in
this manual, any adjustments, or
assembly procedures not recommended
or authorised in this manual shall void
the warranty.
Pixel characteristics
This LCD product has a high number of
colour pixels. Although it has effective
pixels of 99,999% or more, black dots or
bright points of light (red, green or blue)
may appear constantly on the screen.This
is a structural property of the display
(within common industry standards) and
is not a malfunction.
Open source software
This television contains open source
software. Philips hereby offers to deliver
or make available, upon request, for a
charge no more than the cost of
physically performing source distribution,
a complete machine-readable copy of
the corresponding source code on a
medium customarily used for software
interchange.
This offer is valid for a period of 3 years
after the date of purchase of this
product.To obtain the source code,
write to
Philips Innovative Applications N.V.
Ass. to the Development Manager
Pathoekeweg 11
B-8000 Brugge
Belgium
Compliance with EMF
Koninklijke Philips Electronics N.V.
manufactures and sells many products
targeted at consumers, which, like any
electronic apparatus, in general have the
ability to emit and receive
electromagnetic signals.
One of Philips’ leading Business Principles
is to take all necessary health and safety
measures for our products, to comply
with all applicable legal requirements and
to stay well within the EMF standards
applicable at the time of producing the
products.
Philips is committed to develop, produce
and market products that cause no
adverse health effects.
Philips confirms that if its products are
handled properly for their intended use,
they are safe to use according to scientific
evidence available today.
Philips plays an active role in the
development of international EMF and
safety standards, enabling Philips to
anticipate further developments in
standardisation for early integration in its
products.
Mains fuse (UK only)
This TV is fitted with an approved
moulded plug. Should it become
necessary to replace the mains fuse, this
must be replaced with a fuse of the
same value as indicated on the plug
(example 10A).
1. Remove fuse cover and fuse.
2. The replacement fuse must comply
with BS 1362 and have the ASTA
approval mark. If the fuse is lost,
contact your dealer in order to verify
the correct type.
3. Refit the fuse cover.
In order to maintain conformity to the
EMC directive, the mains plug on this
product must not be detached from the
mains cord.
Copyrights
VESA, FDMI and the VESA
Mounting Compliant logo are
trademarks of the Video Electronics
Standards Association.
Manufactured under license
from Dolby Laboratories.
‘Dolby’, ‘Pro Logic’ and the double D
symbol G, are trademarks of Dolby
Laboratories.
Manufactured under license
from BBE Sound, Inc.
Licensed by BBE, Inc under one or more
of the following US patents: 5510752,
5736897. BBE and BBE symbol are
registered trademarks of BBE Sound Inc.
Windows Media is either a registered
trademark or trademark of Microsoft
Corporation in the United States and/or
other countries
® Kensington and MicroSaver are
registered US trademarks of ACCO
World Corporation with issued
registrations and pending applications in
other countries throughout the world.
All other registered and unregistered
trademarks are the property of their
respective owners.
2
2695.1 en (+ softw) 13-09-2007 13:30 Pagina 2

ENG
LISH
Important 3
1 ImportantRead this user manual before you start to use thisproduct.
Pay attention to this section and closely follow theinstructions.The warranty does not apply todamage caused by not taking into account theinstructions.
1.1 Safety
• To avoid short circuit, do not expose the productto rain or water.
• To avoid a risk of fire or electric shock do notplace naked flame sources (e.g. lighted candles)close to the TV.
• Leave a space of at least 10cm (4 inches) allaround the TV for ventilation.
• Keep away from radiators or other heat sources.• Do not install the TV in a confined space such as
a book case. Make sure that curtains, cupboardsand so on cannot obstruct the air flow throughthe ventilation slots.
• Make sure the TV can not fall down. Place the TVon a solid and flat surface and only use the standprovided with the TV.
• To prevent damaging the mains cord which maycause a fire or electric shock, do not place the TVon the cord or anything else that can pinch tecord.
• When mounted on a swivel stand or VESA wallbracket avoid force coming on the mains plugs.Partly loosened mains plugs can cause arcing orfire.
1.2 Care of the screen
• Unplug the TV before cleaning.• Clean the surface with a soft damp cloth. Do not
apply any other substance (chemical orhousehold cleaning agent).This may damage thescreen.
• Do not touch, push or rub or strike the screenwith anything hard as this may scratch, mar ordamage the screen permanently.
• To avoid deformations and colour fading, wipe offwater drops as soon as possible.
• Stationary imagesAvoid stationary images as much as possible. Ifyou can not, reduce screen contrast andbrightness to prevent damage to the screen.Stationary images are images that remain on thescreen for a long time. Examples of stationaryimages are: on screen menus, teletext pages, blackbars, stock market information,TV channel logos,time displays, and so on.
1.3 Recycling
• Take the packaging to your local recycling centre.• Dispose old batteries safely according local
regulations.• This product is designed and manufactured for
material recycling and re-use.• This product should not be disposed with other
household waste. Inform yourself or ask yourdealer about local environmentally safe recyclingand local regulations. Uncontrolled waste disposalharms the environment and human health.(EEC 2002/96/EC)
2695.1 en (+ softw) 13-09-2007 13:30 Pagina 3

2 Your TVThis section gives you an overview of the controlsand functions of this TV.
2.1 Television overview
Side controls
1 Volume up and down2 Menu3 Program or Channel up and down4 Power switch5 Led indicator (Blue: On; Red: Standby)6 Remote control sensor
Side connectors
To connect a camera, game console, headphone ora USB memory device.
Back connectors
To connect the antenna, DVD,VCR or other device.
Remote control
1 Standby or On2 DVD, STB, ... device selection3 Colour keys4 Navigation key (up, down, left, right) OK5 Teletext key6 Menu key7 Programme up or down8 Volume up or down9 Ambilight on or off
Find more on your remote control in section 5.1Remote control overview.
4 Your TV
MENU b
¬ PV
321
654
987
0i
B
BROWSE
DEMO
OPTION
GUIDE
a
OKLIST
vINPUT
TV DVD STB HTS
PHILIPS DEVICE CONTROL
MHEG CANCEL
MODEAmbilight
1
2
3
4
6
8
5
7
9
-
PRO
GRA
M
+
-
VO
LUM
E
+M
ENU
B P
OW
ER
5-6
1
2
3
4
2695.1 en (+ softw) 13-09-2007 13:30 Pagina 4

ENG
LISH
2.2 Product highlights
Your new TV is equipped with some of the mostmodern audio or video innovations.Your TV offers the following advantages ...
Full High Definition LCD displayA full HD resolution of 1920x1080p, the highestresolution HD broadcast can transmit. It offers abrilliant flicker-free progressive scan picture withoptimum brightness and superb colours.
Ambilight For a more relaxed viewing experience andimproved perceived picture quality.
Perfect Pixel HD Offers perfect picture quality from any source.
100Hz Clear LCD 100Hz Clear LCD results in superior sharpness ofmotion reproduction, better black level,highcontrast with a flicker-free, quiet image and a largerviewing angle.
DVB-T integrated tunerNext to normal analogue TV broadcast your TVreceives digital terrestrial TV and radio broadcasts.
Electronic Programme Guide - EPGThe EPG shows the scheduled digital TVprogrammes on screen.The guide can remind youwhen programmes start, switch the TV on, etc.
HDMI connectors3 HDMI connectors for highest quality highdefinition connectivity.
Memory card and USB connectionMultimedia connections for instantly view or playyour photos or music.
3 Getting startedThis section helps you with the positioning and thefirst time installation of the TV.
3.1 Position the TV
) WarningCarefully read the safety precautions in section 1.1Safety before you position the TV.
Large screen TVs are heavy. Carry and handle theTV with at least two persons.
Connect your devices first before you position yourTV or mount it on the wall.
The ideal viewing distance for watching TV is threetimes its screensize.
For ideal viewing conditions, position the TV wherelight does not fall directly on the screen.
Best Ambilight effect is watched in a room withdimmed lighting conditions.
For the best Ambilight effect, position the TV 10 to20 cm away from the wall. Position the TV wheresunlight does not fall directly on the TV.
Kensington Security SlotYour TV is equipped with a Kensington Security Slotat the back of the TV for an anti-theft lock.An anti-theft Kensington lock has to be purchasedseparately.
Your TV 5
2695.1 en (+ softw) 13-09-2007 13:30 Pagina 5

3.2 Wall mounting - VESA
Your TV is prepared for VESA compliant wallmounting.This bracket is not included.Use a VESA compliant bracket with code VESA MIS-F, 600, 400 M8.
ç WarningConsider the TV’s weight if you wall mount it.Improper mounting could result in severe injury ordamage. Koninklijke Philips Electronics N.V. bearsno responsibility for improper mounting thatresults in accident or injury.
‡ Locate the 4 small discs at the back of the TV.
® Unscrew the discs and use the free holes (M8)for fixing the VESA wall bracket.
Ò To remove the TV stand locate the 4 screws ofthe TV stand.
† Unscrew the 4 screws.
º Lift the TV off the stand.
◊Make all connections at the back of the TVbefore you wall mount the TV. See section 7Connections.
Now go on with the instructions supplied with theVESA wall bracket.
6 Your TV
4x
2
2695.1 en (+ softw) 13-09-2007 13:30 Pagina 6

ENG
LISH
3.3 Remote control batteries
‡ Open the battery cover on the back of theremote control.
® Insert the 2 batteries supplied (Type AA-R6-1,5V). Make sure the + and - ends of thebatteries line up correctly (inside of case ismarked.)
Ò Close the cover.
rNoteRemove the batteries if you don’t use the remotecontrol for a long time.
3.4 Antenna cable
‡ Locate the antenna connection at the back ofthe TV.
® Insert the antenna cable tightly into the antennasocket x Antenna.
3.5 Connect the mains cord
‡ Verify that your mains voltage corresponds withthe voltage printed on the sticker at the back ofthe TV. Do not insert the mains cord if thevoltage is different.
® Insert the mains cord tightly.
The TV is never powered off completely unless themains cord is physically unplugged.Therefore themains plug must be accessible at all time.
3.6 First time installation
The first time, and only the first time, the mainscord is inserted, the installation procedures startsup automatically. Follow the instructions on screen.
à Tips• If you notice you have selected a wrong language,
press the red key on the remote control toreturn to the language selection menu.
• To rearrange the stored channels, see section 6.3Rearrange stored channels.
Your TV 7
ANTENNA
UK - EIRE
Menu language
Español
Hrvatski
ItalianoMagyar...
Please select yourlanguage...
using cursor up anddown
English
Next
2695.1 en (+ softw) 13-09-2007 13:30 Pagina 7

4 Use your TV Learn how to operate your TV for daily use.
4.1 Switch on or off - Standby
To switch on the TV:• Press B Power at the right side of the TV if the
standby led is off.• Press B on the remote control if the standby
led in on.To switch to standby:• Press B on the remote control.
To switch on from standby without remote control:• Press B Power at the side of the TV to switch
off first and press B Power again to switch on.
To switch off:• Press B Power at the side of the TV.
rNoteEnergy consumption contributes to air and waterpollution. As long as the mains cord is plugged in,the TV consumes energy.This TV has a very lowstandby power consumption.
8 Use your TV
- P
ROB
PO
WER
BB
DEMO
OPTION
GUIDE
a
vINPUT
TV DVD STB HTS
PHILIPS DEVICE CONTROL
2695.1 en (+ softw) 13-09-2007 13:30 Pagina 8

ENG
LISH
4.2 Watch TV
4.2.1 Switch channels‡ To switch TV channels:
• Press a number (1 to 999) or press P+ or P-on your remote control.
• Press Program/Channel - or + on the sidecontrols of the TV.
® Press R to return to the previously viewed TVchannel .
4.2.2 Adjust volume‡ To adjust the volume:
• Press V + or - on the remote control• Press Volume + or - on the side controls
of your TV.® To mute the sound:
• Press ¬ on the remote control• Press ¬ again to restore the sound.
4.3 Watch channels from adigital receiver
‡ Switch on the digital receiver.The picture from your receiver might appearautomatically on your screen.
® Use the remote control of your digital receiverto select TV channels.
If the picture does not appear :‡ Press v on the remote control.
® Press v repeatedly to select the device. Waita few seconds until the picture appears.
Ò Press OK.† Use the remote control of the digital receiver
to select TV channels.
4.4 Watch connected devices
‡ Switch on the device.The picture from your device might appearautomatically.
If the picture does not appear :® Press v on the remote control.Ò Press v repeatedly to select the device. Wait
a few seconds until the picture appears.† Press OK.º Use the remote control of your device to select
TV channels.
Use your TV 9
B
DEMO
OPTION
GUIDE
a
vINPUT
TV DVD STB HTS
PHILIPS DEVICE CONTROLv¬ PV
321
654
987
0i
BROWSE
MODEAmbilight
P
90 -
¬ PV
321
654
987
0i
BROWSE
V
¬
2695.1 en (+ softw) 13-09-2007 13:30 Pagina 9

10 Use your TV
4.5 Watch a DVD
‡ Insert a DVD disc in your player.® Press Play π.
The picture from your player appearsautomatically on your screen.
If the picture does not appear :‡ Press v on the remote control.
® Press v repeatedly to select the DVD player.Wait a few seconds until the picture appears.
Ò Press OK.† Press Play π.
4.6 Select a Teletext page
Most TV channels broadcast information viaTeletext.To watch Teletext:‡ Press b.
The main index page appears.
® To select a page of your choice:• Enter the page number with the number keys.• Press P- or P+ or navigation key up or down
to view the next or the previous page.•Press a colour key to select one of the colour
coded items at the bottom of the screen.
à TipPress R to return to the previously viewed page.
Ò Press b again to switch Teletext off.
rNoteOnly for UK: some digital TV channels offerdedicated digital text services (for example BBC1).
For more information on teletext, see section 5.5Teletext.
B
DEMO
OPTION
GUIDE
a
vINPUT
TV DVD STB HTS
PHILIPS DEVICE CONTROLv MENU b
¬ PV
BROWSE
OKLIST
b
2695.1 en (+ softw) 13-09-2007 13:30 Pagina 10

ENG
LISH
Use your TV 11
4.7 Change Ambilight mode
You can choose among four Ambilight modes:• Colour
Sets Ambilight to a constant colour.• Relaxed
Sets Ambilight to change soft and smoothly withthe images on screen.
• ModerateSets Ambilight between Relaxed and Dynamic.
• DynamicSets Ambilight to change quick and responsive.
To change the Ambilight mode:‡ Press Ambilight to switch on or off.
® Press Mode repeatedly to toggle through theAmbilight modes.
Ò Press OK.
For more information on Ambilight, see section 5.4Ambilight.
à TipTo fully enjoy Ambilight, switch off or dim the roomlights.
MODEAmbilight
MHEG CANCEL
MODEAmbilight
2695.1 en (+ softw) 13-09-2007 13:30 Pagina 11

Use more of your TV
5.1 Remote control
5.1.1 Remote control overview1 Standby B
To switch the TV on or back to standby.2 Input v
To select a connected device or to return toTV.
3 TV DVD STB HTSTo control connected Philips devices.
4 Colour keys• Easy selection of teletext pages.• Easy selection of tasks.
5 Guide aTo switch on or off the Electronic ProgrammeGuide.
6 OK/List• To display the channel list.• To activate a setting.
7 Navigation keys (up, down, left, right) To navigate the menu.
8 Teletext b To switch teletext on or off.
9 +P- Channel up or downTo switch to the next or previous channel inthe channel list.
10 Mute ¬ To mute the sound or restore it.
11 Number keysTo select a TV channel.
12 Previous channel R To return to the previously viewed channel.
13 ModeTo toggle through the Ambilight modes
14 Audio and video keys Ò‡π†®To use with connected Philips devices.
15 Widescreen Picture format q To select a picture format.
16 Dual screen b To show teletext on the right and the pictureon the left of the screen.
12
5 Use more of your TVThis section deals with the more advanced use ofyour TV:• how to use the menus • to adjust the picture, sound and Ambilight
settings • more about Teletext • how to create favourite channel lists
• the advantages of Electronic Programme Guide • how to set locks and timers • to set subtitles and select a subtitle language • how you can view your photos or play your
favourite music from a memory card or USBmemory device.
MENU b
¬ PV
321
654
987
0i
B
BROWSE
DEMO
OPTION
GUIDE
a
OKLIST
vINPUT
TV DVD STB HTS
PHILIPS DEVICE CONTROL
MODEAmbilight
MHEG CANCEL
22
21
20
19
17
23
24
5
1
2
4
3
7
6
8
9
11
10
12
13
14
15
18
16
2695.1 en (+ softw) 13-09-2007 13:30 Pagina 12

ENG
LISH
Use more of your TV
17 Subtitles j To activate or deactivate the subtitle mode.
18 ‡ MHEG cancel (only for UK)To cancel only Digital text or Interactiveservices.
19 AmbilightTo switch Ambilight on or off.
20 On screen information i To show channel or programme information ifavailable.
21 Volume up or down V To adjust the volume.
22 MenuTo switch the menu on or off.
23 OptionTo switch the Quick access menu on or off.
24 DemoTo switch the Demo menu on and to get ademonstration of the features of the TV.
See section 10 Index to find the section in themanual about a specific remote control key.
5.1.2 Operate Philips Audio/Video devicesThis TV remote control can operate most of thePhilips Audio/Video devices.You can select a DVD, a Digital or Satellite receiver(STB) or Home Theatre System (HTS) to operate.To set to operate a particular DVD or STB devicesee sections 5.1.3 or 5.1.4.‡ Press one of the Philips device control keys to
switch the remote control to operate thedevice you need.
® Use the relevant keys on the TV remote controlto operate the device.
Ò Press the TV key to return to normal TV mode.When no key is pressed for 30 seconds theremote control will switch back to normal TV.
5.1.3 Set to operate a particular DVD deviceThe factory setting for the DVD key is the DVDplayer.You can also set the DVD key to operate aparticular DVD type like a DVD recorder, DVD-Rwith Hard Disk Drive or Blu-ray Disc player.‡ Press the DVD key and the appropriate number
key at the same time to set the remote controlto operate a particular device.
• DVD key and number key 1 for a DVD player(factory setting)
• DVD and 2 for a DVD recorder• DVD and 3 for a DVD-R Hard Disk Drive• DVD and 4 for a Blu-ray Disc player
All Philips device control keys will blink for 1second to confirm the setting.
From now on the DVD key will switch the remotecontrol to the correct DVD device.
13
B
DEMO
OPTION
GUIDE
a
vINPUT
TV DVD STB HTS
PHILIPS DEVICE CONTROL
DVD STB HTS
2695.1 en (+ softw) 13-09-2007 13:30 Pagina 13

5.1.4 Set to operate a particular STBYou may need to switch the factory setting for STBon the remote control to fit your particular Digitalor Satellite receiver.‡ Press the STB key and the appropriate number
key at the same time.• STB and number key 1 (factory setting)• STB and 2
All Philips device control keys will blink for 1second to confirm the setting.
5.1.5 Device functions overviewWhen the remote control is set for a particulardevice all keys have the same function except thekeys mentioned here.• DVD player
Option key = DVD System menuMenu key = DVD Disc menuP+/- = DVD Next/Previous track
• DVD RecorderOption key = DVD-R System menuMenu key = DVD-R Disc menuÒ key = DVD-R previous track† key = DVD-R next track
• DVD Recorder with Hard Disc DriveOption key = DVD-R HDD Disc menuMenu key = DVD-R HDD, HDD browserÒ key = DVD-R HDD previous track† key = DVD-R HDD next track
• Blu-ray Disc playerOption key = BD Home screena key = BD Content menuMenu key = BD Disc menu
• Digital or Satellite receiverNo change of functions.
• Home Theatre SystemOption key = HTS Set upMenu key = HTS Disc menuV key = HTS volumeP+/- = HTS Next/Previous
5.2 TV menu overview
With the on screen menus you install your TV,adjust picture, sound and Ambilight settings andaccess features.This section gives an overview ofthe menus and describes how to navigate.
5.2.1 The menu‡ Press Menu on the remote control to show the
main menu.® Press Menu to quit the menu.
The main menu offers the following items:• TV menu
Select this menu for installation, picture andsound settings, Ambilight and other featuresettings.
• Channel listSelect this item to show the Channel list.Create your Favourite channel lists here.
• Programme guideAvailable when digital channels are installed, thisitem shows information about the digitalprogrammes.According to the type of Electronic ProgrammeGuide, you can also access the table of scheduledDigital TV programmes and easily select and tuneto a desired programme. See section 5.7Electronic Programme Guide.
• MultimediaSelect this item to view photos or play musicstored on a memory card or USB device. Seesection 5.10 View and play photos, MP3, ...
14 Use more of your TV
MENU b
¬ PV
BROWSE
OKLIST
MENU
BROWSE
Television
Multimedia
TV menu
Channel listProgramme guide
2695.1 en (+ softw) 13-09-2007 13:30 Pagina 14
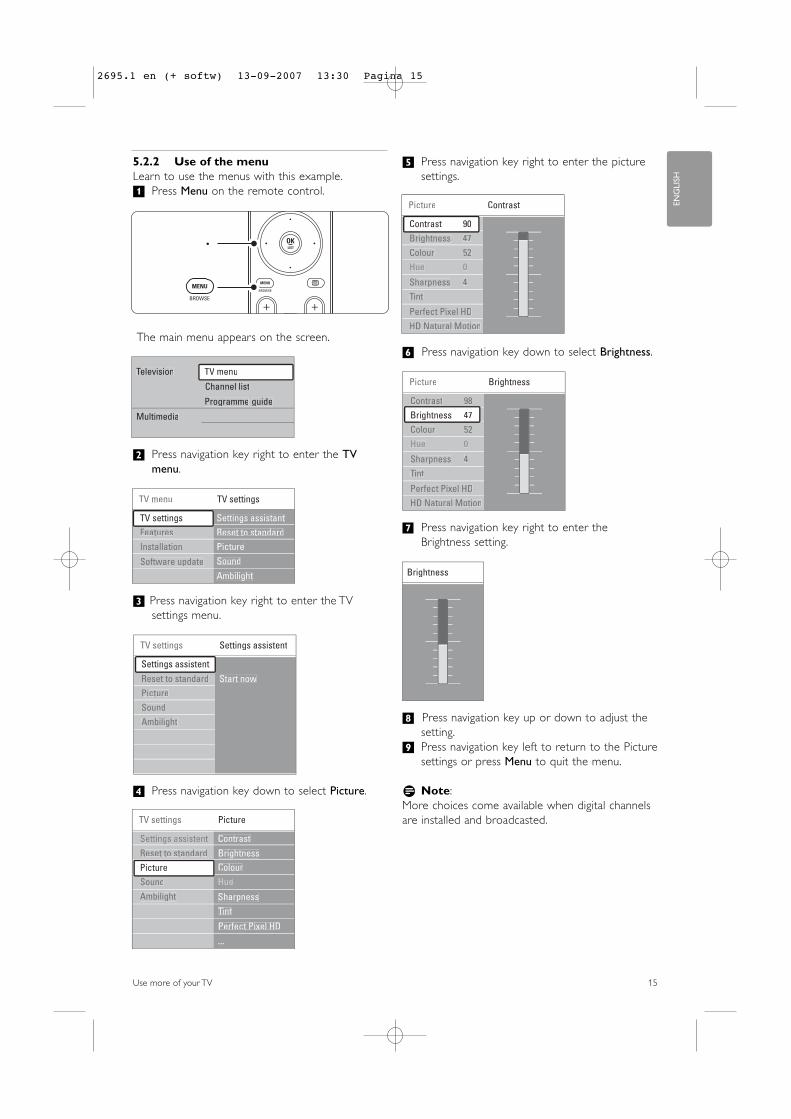
5.2.2 Use of the menuLearn to use the menus with this example.‡ Press Menu on the remote control.
The main menu appears on the screen.
® Press navigation key right to enter the TVmenu.
ÒPress navigation key right to enter the TVsettings menu.
† Press navigation key down to select Picture.
º Press navigation key right to enter the picturesettings.
◊Press navigation key down to select Brightness.
‹Press navigation key right to enter theBrightness setting.
≈Press navigation key up or down to adjust thesetting.
ÚPress navigation key left to return to the Picturesettings or press Menu to quit the menu.
rNote:More choices come available when digital channelsare installed and broadcasted.
Use more of your TV 15
ENG
LISH
MENU b
¬ PV
BROWSE
a
OKLIST
MENU
BROWSE
Television
Multimedia
TV menu
Channel list
Programme guide
TV settings Picture
ContrastBrightness
Perfect Pixel HD
ColourHueSound
Ambilight
...
SharpnessTint
Reset to standardPicture
Picture Contrast
ColourHue
Perfect Pixel HDHD Natural Motion
SharpnessTint
Brightness90
520
4
47Contrast
Picture Brightness
Contrast
ColourHue
Perfect Pixel HDHD Natural Motion
SharpnessTint
Brightness98
520
4
47
Brightness
TV menu TV settings
Settings assistantReset to standardPictureSoundAmbilight
Features
Software update
Installation
settings
TV settings Settings assistent
Start now
SoundAmbilight
Reset to standardPicture
2695.1 en (+ softw) 13-09-2007 13:30 Pagina 15

5.2.3 Quick access menuThe Quick access menu gives direct access to someoften needed menu items.When digital channels are installed and broadcastedthe relevant digital options are shown in the menu.
‡ Press Option on the remote control.® Press navigation key up or down to select an
option.Ò Press OK to show the selected option menu.† Press navigation key up, down, left, right to
adjust the settings in the menu.º Press Option to quit the menu.
• Audio languageSee section 5.3.5 Adjust sound settings.
• Subtitle languageSee section 5.9.3 Select a digital subtitle language.
• SubtitlesSee section 5.9 Subtitles.
• Picture formatSee section 5.3.4 Widescreen picture format.
• EqualizerSee section 5.3.5 Adjust sound settings.
• Clock
Display the clock ‡ Press OK to display the clock permanently.® Press Option and press navigation key up or
down to select Clock again.Ò Press OK to hide the clock.
5.3 Picture and Sound settings
This section describes how to adjust picture andsound in the menus.
5.3.1 Settings assistantUse the Settings assistant to guide you throughbasic picture, sound and Ambilight settings in aneasy way.‡ Press Menu on the remote control and select
TV menu > TV settings > Settings assistant andpress navigation key right to enter.
® Press OK.Ò Press the green key on the remote control to
start the assistant.† Press navigation key left or right to select the
left or right side to make your choice.º Press the green key to go to the next setting.
You will go through several settings. Whenfinished the TV will ask you to store thesesettings.
◊Press the green key to store all your settings.‹Press Menu to quit the menu.
5.3.2 Reset to standardsSets the TV to one of the predefined settings. Eachsetting combines picture, sound and Ambilight.‡ Press Menu on the remote control and select
TV menu > TV settings > Reset to standardand press navigation key right to enter the list.
® Press navigation key up or down to select asetting.
Ò Press the green key to store your selection.† Press Menu to quit the menu.
Standard settings: Current, Natural,Vivid, Movie
16 Use more of your TV
DEMO
OPTION
GUIDE
a
OKLIST
v
TV DVD STB HTS
PHILIPS DEVICE CONTROL
OPTION
Quick access
Subtitle
Audio languageSubtitle language
EqualizerPicture format
Clock
2695.1 en (+ softw) 13-09-2007 13:30 Pagina 16

5.3.3 Picture settingsThis section describes how to adjust all picturesettings.‡ Press Menu on the remote control and select
TV menu > TV settings > Picture and pressnavigation key right to enter the list.
® Press navigation key up or down to select asetting.
• ContrastChanges the level of bright parts in the picturebut keeps the dark parts unchanged.
• BrightnessChanges the level of light of the total picture.
• ColourChanges the level of saturation.
• HueIf NTSC is broadcasted, this level compensatesthe colour variations.
• SharpnessChanges the level of sharpness of fine details.
• Tint Sets the colours to Normal, Warm (reddish) orCool (bluish). Select Custom to make a setting ofyour own in the Custom tint menu.
• Custom tintIf Custom is selected in the Tint menu you canmake a setting of your own here.Press the green key to select each bar to changethe value of:- R-WP red whitepoint- G-WP green whitepoint- B-WP blue whitepoint- R-BL red blacklevel- G-BL green blacklevel
• Perfect Pixel HDEnables or disables Perfect Pixel HD, the mostideal picture setting.
• HD Natural MotionReduces the field and line flicker and reproducessmooth movement especially in movies.Set the level to Minimum, Maximum or Off.
• 100 Hz Clear LCDSwitches 100 Hz Clear LCD on or off.
• Dynamic contrastEnhances the contrast in the picture as the imageon the screen changes.Set the level to Minimum, Medium, Maximum orOff.The level medium is recommended.
• Noise reductionFilters out and reduces the noise in the picture.Set the level to Minimum, Medium, Maximum orOff.
• MPEG artefact reductionSmoothens the transitions on digital pictures.Switches MPEG artefact reduction on or off.
• Colour enhancementMakes the colours more vivid and improves theresolution of details in bright colours.Set the level to Minimum, Medium, Maximum orOff.
• Active controlCorrects all incoming signals in order to providethe best picture possible.Switches Active control on or off.
• Light sensorAdjusts the picture and Ambilight settings on thelighting conditions in the room.Switches Light sensor on or off.
• Picture formatSee section 5.3.4 Widescreen picture format.
Use more of your TV 17
ENG
LISH
TV settings Picture
ContrastBrightnessColourHueSound
Ambilight
Perfect Pixel HDHD Natural Motion
SharpnessTint
Dynamic contrast100 Hz Clear LCD
Noise reductionMPEG artefact red.Colour enhanc …
Picture format
Active controlLight sensor
Settings assistentReset to standard
Picture
2695.1 en (+ softw) 13-09-2007 13:30 Pagina 17

5.3.4 Widescreen picture formatAvoid black bars on the sides or on top andbottom of the picture. Change the picture formatto a format that fills the screen.‡ Press q to switch on the Picture format
menu.
® Press navigation key up or down to select anavailable picture format.
Ò Press navigation key up to shift the pictureupwards to make partly covered subtitlesvisible.
à TipThe Auto format setting is recommended forminimal distortion .
Auto format (Not for PC.)Enlarges the pictureautomatically to fill thescreen. Subtitles remainvisible.
Super zoom (Not for HD.)Removes the black bars onthe side of 4:3 broadcasts.There is a minimaldistortion.
4:3 (Not for HD.)Shows the classical 4:3format.
Movie expand 14:9(Not for HD.)Scales classical 4:3 format to14:9.
Movie expand 16:9(Not for HD.)Scales classical 4:3 format to16:9.
Wide screenStretches 4:3 format to 16:9.
Unscaled(Only for HD and PC.)Maximum sharpness.Distortion may appear onborders. Black bars mayappear with pictures from your PC.
rNoteDo not forget to name the connection in theConnection menu. See section 7.4.3 Naming yourdevices.
5.3.5 Sound settingsThis section describes how to adjust all soundsettings.‡ Press Menu on the remote control and select
TV menu > TV settings > Sound and pressnavigation key right to enter the list.
® Press navigation key up or down to select asetting.
• Equalizer Changes the bass and treble of the sound. Selecteach bar to change the setting. See also section5.2.3 Quick access menu.
• VolumeChanges the volume.When adjusting the volume with V a volumebar appears. If you don’t want it to appear go toTV menu > Installation > Preferences and pressnavigation key right to enter the list and selectVolume bar off.
‡ Press navigation key up or down to selectVolume bar.
® Press navigation key right to enter.Ò Select On to activate the temporarily display of
the volume bar when adjusting the volume.• Balance
Sets the balance of the left and rightloudspeakers to fit best your listening position.
18 Use more of your TV
MODEAmbilight
MHEG CANCEL
q
TV settings Sound
EqualizerVolumeBalanceAudio language
Ambilight
Surround modeHeadphone volume
Dual I/IIMono/Stereo
Auto volume level...Delta volumeAuto surround
Sound
Settings assistentReset to standardPicture
e
2695.1 en (+ softw) 13-09-2007 13:30 Pagina 18

• Audio languageA list of audio languages for the currentprogramme may be available when digitalchannels are installed and broadcasted.See also section 5.2.3 Quick access menu.To permanently change the audio language, seesection 6 Channel installation.
• Dual I/IIIf broadcasted, you can choose between twodifferent languages.
• Mono/stereoIf stereo broadcasting is available, you can selectMono or Stereo per TV channel.
• Surround modeTo select a more spatial sound if broadcasted orif available from a connected device.
• Headphone volumeChanges the volume of the headphone.You can mute the TV speakers with ¬ on theremote control.
• Automatic volume levellerReduces sudden volume differences like at thebeginning of commercials or when switching fromone channel to another.Select on or off.
• Delta volumeLevels out volume differences between channelsor connected devices.
‡ Switch to the channel or device you want tolevel out the volume difference.
® Select Delta volume in the Sound menu andchange the volume level.
• Auto surroundSwitches the TV automatically to the bestsurround sound mode broadcasted.Select on or off.
5.4 Ambilight
This section describes how to adjust Ambilightsettings.‡ Press Menu on the remote control and select
TV menu > TV settings > Ambilight and pressnavigation key right to enter the list.
® Press navigation key up or down to select asetting.
• AmbilightSwitches Ambilight on or off.
• BrightnessChanges the light output of Ambilight.
• ModeYou can choose among four Ambilight modes:Colour, Relaxed, Moderate, Dynamic. See section4.7 Change Ambilight mode.
• ColourIf Colour is selected in the Mode menu you canselect a constant colour from the list or make acustom colour of your own.- Warm white- Cool white- Blue- CustomWhen Custom is selected in the Colour menuyou can customise your colour.
‡ Select Saturation first and set the value high.® Select Palette and slide from 0 to 100 to go
from red over yellow, green to blue.• Separation
Sets the level of difference in colour between theleft, right and top side of the TV if Relaxed,Moderate or Dynamic is selected in the Modemenu. Separation off shows a dynamic but monocolour Ambilight.
• Colour boostAmplifies the colours for a more dynamic effect ifRelaxed, Moderate or Dynamic is selected in theMode menu.
• BalanceLike stereo sound balance, sets the level ofAmbilight for the left and right side of the TV.
Use more of your TV 19
ENG
LISH
TV settings Ambilight
Ambilight
Colour
BrightnessMode
Sound
SeparationColour boostBalance
Ambilight
Settings assistantReset to standardPicture
2695.1 en (+ softw) 13-09-2007 13:30 Pagina 19

ç CautionTo avoid bad infrared remote control reception,place your devices out of sight of Ambilight.
TV standby with AmbilightWhen the TV is standby, you can switch Ambilighton. In this case Ambilight is only available asconstant colour.‡ Press Ambilight on the remote control when
the TV is in standby.® Press Mode repeatedly to select an available
colour.
5.5 Teletext
Your TV has a 1200 pages memory that storesbroadcasted teletext pages and subpages to reducewaiting time.
To select a teletext page see section 4.6 Select aTeletext page.
5.5.1 Select pagenumber subpagesA teletext page number can hold several subpages.The pages are shown on a bar next to the mainpagenumber.‡ Press b.® Select a teletext page.Ò Press navigation key left or right to select a
subpage.
5.5.2 Select T.O.P. teletext broadcastsT.O.P. teletext (Table of Pages) is not broadcast byall TV channels. You can easily jump from onesubject to another without using pagenumbers.‡ Press b.® Press i.
The T.O.P. overview appears.Ò Use navigation key left, right or up, down to
select a subject.† Press OK to view the page.
5.5.3 Dual screen teletext(Not available for channels with Digital textservices.)View the TV channel and teletext next to eachother.‡ Press b for Dual screen teletext.® Press b again to show normal teletext .Ò Press b to switch off teletext.
20 Use more of your TV
MODEAmbilight
MHEG CANCEL
MODEAmbilight
MODEAmbilight
987
0i
MHEG CANCEL
i
2695.1 en (+ softw) 13-09-2007 13:30 Pagina 20

5.5.4 Search teletextQuickly jump to a subject linked to a series ofpagenumbers or search for specific words inteletext pages.‡ Press b.® Press OK to highlight the first word or number.Ò Press navigation key left, right or up, down to
jump to the next word or number on the page.† Press OK the search a page which holds the
highlighted word or number.º Press navigation key up until no word or
number is highlighted to quit Search.
5.5.5 Enlarge teletext pagesFor a more comfortable reading, you can enlargethe teletext page.‡ Press b and select a teletext page.® Press Option on the remote control to enlarge
the top part of the page.Ò Press Option again to view the enlarged lower
part of the page.† Press navigation key up or down to scroll
through the enlarged page.º Press Option again to return to the normal
page size.
5.5.6 Teletext menuWith the options in the teletext menu you canreveal hidden info, let cycle subpages automaticallyand change the character setting.• Reveal
Hide or unhide hidden information on a page,such as solutions to riddles or puzzles.
• Cycle subpages If subpages are available for the selected page,you can make subpages cycle automatically.
• LanguageSome languages use a different set of characters.Switch to the other group to show the textcorrectly.
‡ Press b.® Press Menu.
Ò Press navigation key up or down to select anoption.
† Press OK to change a setting.º Press Menu to quit the teletext menu.◊Press b to switch off teletext.
5.5.7 Digital text services (UK only)
Some digital TV broadcasters offer dedicated digitaltext or interactive services (for example BBC1) ontheir digital TV channels .These services work asnormal Teletext with the number, colour andnavigation keys to select and navigate.‡ Press b.® Press navigation key left, right or up, down to
select or highlight items.Ò Press one of the colour keys to select an
option.† Press OK to confirm or activate.º Press MHEG Cancel to cancel Digital text or
interactive services.
ç CautionDigital text services are blocked when subtitles arebroadcasted and Subtitle On is set in the Featuresmenu. See section 5.9 Subtitles.
5.5.8 Teletext 2.5 If broadcasted by the TV channel this teletext offersmore colours and better graphics.Teletext 2.5 is switched on as a factory setting.‡ Press Menu on the remote control and select
TV menu > Installation > Preferences >Teletext 2.5 and press navigation key right toenter the list.
® Select on or off.
Use more of your TV 21
ENG
LISH
Teletext menuReveal
Language Gr. IIOffCycle subpages
Off
DEMO
OPTION
GUIDE
a
OKLIST
v
TV DVD STB HTS
PHILIPS DEVICE CONTROL
OPTION
2695.1 en (+ softw) 13-09-2007 13:30 Pagina 21

5.6 Create favourite channellists
View the All channels list or set up a Favourite listof your own with your preferred TV channels andradio stations. For example, each member of yourfamily can create his or her own favourite list.
5.6.1 Select a favourite listLearn how to select one of the favourite channellists.‡ Press OK.
The first time after you have finished theinstallation, the All channels list is shown. Inother situations, it brings up the last selectedfavourite list.
® Press the red key to show all favourite lists.Ò Press navigation key up or down to select a list.† Press OK.
The selected favourite list appears.º Press OK again to quit.
5.6.2 To set up a favourite listCreate or modify your own favourite list.‡ Press OK.
The last selected list appears.® Press the red key to show all favourite lists.Ò Press navigation key up or down to select a list.† Press OK.º Press the green key to enter the Edit mode.
The selected list brings up a full channel list.◊Press navigation key up or down to highlight a
channel.‹Press OK to mark (or unmark) the highlighted
channel.The channel is added to (or removedfrom) the selected list.
≈Press the green key again to leave the Editmode.The modified channel list appears again.
5.6.3 Select a channel from a favourite list‡ Press OK.
The last selected channel list appears.® Use navigation key up or down to highlight a
channel.Ò Press OK.
The TV tunes to that channel.
à Tip• Use -P+ to go through the TV channels of the
selected favourite list.• With the number keys you can still select
channels which are not marked as favourite.
22 Use more of your TV
All channels
....EXT 3
3 Digital channel 24 Radio channel 1
2 Digital channel 11 Analogue channel 1
....
Select list
A
b
¬ PV
321
654
987
0i
BROWSE
MODEAmbilight
P
90 -
2695.1 en (+ softw) 13-09-2007 13:30 Pagina 22

5.7 Electronic ProgrammeGuide - EPG -
The Electronic Programme guide is an on screenguide to scheduled digital TV programmes.You can navigate, select and view programmes bytime, title or genre.There are two types of EPG,‘Now and Next’ and ‘7 or 8 day’ EPG.
When digital channels are installed andbroadcasted, EPG is available. ‘Now and Next’ isalways available but the ‘7 or 8 day’ EPG is onlyavailable in some countries.
With the EPG menu you can ...• see a list of current broadcasted programmes• see the next programme• group programmes by genre• set reminders when programmes will start• set up preferred EPG channels• etc.
5.7.1 Switch on EPG‡ Press a.
The following type of EPG appears:
‘Now and Next’ EPG Detailed information about the current programmeis shown.
Or ‘7 or 8 day’ EPGIt may take some time to receive the EPG data.The list of TV programmes will show
® Use the colour keys to activate the availableactions at the bottom of the screen.
• Next: to show information about the nextprogramme.
• Remind: to mark or unmark a programme as areminder.
• Watch: to watch or listen to a currentprogramme.
• Jump to...: to jump to the next or previous day.• Info: to display information on a selected
programme (if available).Ò Press a to quit the EPG.
5.7.2 More on ‘7 or 8 day’ EPGSearch by genre, scheduled reminders, etc. aremanaged in the Programme guide menu.‡ Press a on the remote control.® Press Menu.
The Programme guide menu appears.
Ò Press navigation key up or down to select amenu option.
† Press navigation key right to enter.º Press navigation key up or down to make a
selection.◊Press OK to activate or press the green key to
watch‹Press a to quit the EPG.
rNoteOnly channels marked as Preferred EPG channelsappear in the Programme guide menu.
Use more of your TV 23
ENG
LISH
26 BBC1 Tue., 12 Sep 09:17
Title : Commonwealth Games
Info: 7:50 - 12:30 : 280 min..........
ExitPress -P+ to change channel.
Next
DEMO
OPTION
GUIDE
a
OKLIST
v
TV DVD STB HTS
PHILIPS DEVICE CONTROL
GUIDE
a
Programme guide Tue., 12 Sep
09:55
BBC ONE
BBC TWO
five
BBC THREE
BBC FOUR
abc1
09:50 Tweenies
09:00 The Wright Stuff
05:32 This is BBC THREE
05:32 This is BBC FOUR
09:20 Moonlighting
12:30 Commonwealth
10:15 Something Special
10:30 Trisha Goddard
12:00 This is BBC THREE
12:00 This is BBC FOUR
10:15 Daddio
Around Next
07:50 Commonwealth
13:50 Anastasia 0010 - EENRemind Watch InfoJump to ...
Programme guide What's on
12:30 South Today
13:00 In aller Freund
11:50 Working Lunch
Preferred EPG ch...Acquire EPG data
What's onSearch by genre
2695.1 en (+ softw) 13-09-2007 13:30 Pagina 23
5.8 Timers and locks
This section describes how to switch the TV on oroff at a specified time and to lock or unlock the TV.
5.8.1 Automatically switch to standbySleeptimer switches the TV to standby after a time.‡ Press Menu on the remote control and select
TV menu > Features > Sleeptimer and pressnavigation key right to enter the sleeptimer bar.
® Press navigation key up or down to set the timeup to 180 minutes in steps of 5 minutes. If setto 0 minutes, the Sleeptimer is switched off.
You can always switch off your TV earlier or resetthe time during countdown.
5.8.2 Automatically switch the TV onOn timer switches the TV on automatically to aspecified channel at a specified time, from standby.‡ Press Menu on the remote control and select
TV menu > Features > On timer and pressnavigation key right to enter the On timermenu.
® Use navigation key left, right or up, down toselect and enter the menu items one by one toset a channel, a day of the week or daily, and astarting time.
Ò Press OK to confirm.† Press Menu to quit the menu.
à TipTo switch off the On timer, select Off in the Ontimer menu.
5.8.3 Lock TV channels and programmesLock TV channels and/or programmes fromconnected devices to prevent children fromwatching them. Lock and unlock with a four numbercode.
Set or change your code‡ Press Menu on the remote control and select
TV menu > Features > Set or Change codeand press navigation key right to enter yourcode.
® Enter your code with the number keys.The Features menu reappears with a messageconfirming that your code has been created orchanged.
Did you forget your code ?‡ Select Change code.® Press navigation key right.Ò Enter the overriding code 8-8-8-8.† Enter a new personal code.º Confirm your new entered code.
The previous code is erased and the new codeis stored.
5.8.4 Activate or deactivate Child lockIf your code is set, you can lock all channels anddevices, lock a specific channel or device, set a timeafter which all channels and devices are locked orset the age of your child for parental rating whendigital channels are installed and broadcasted.‡ Press Menu on the remote control and select
TV menu > Features > Child lock and pressnavigation key right to enter your code.
® Enter your code with the number keys.Ò Select one of the options.† Press navigation key right.
Lock or unlock all channels and connected devices‡ Select Lock or Unlock.® Press OK.
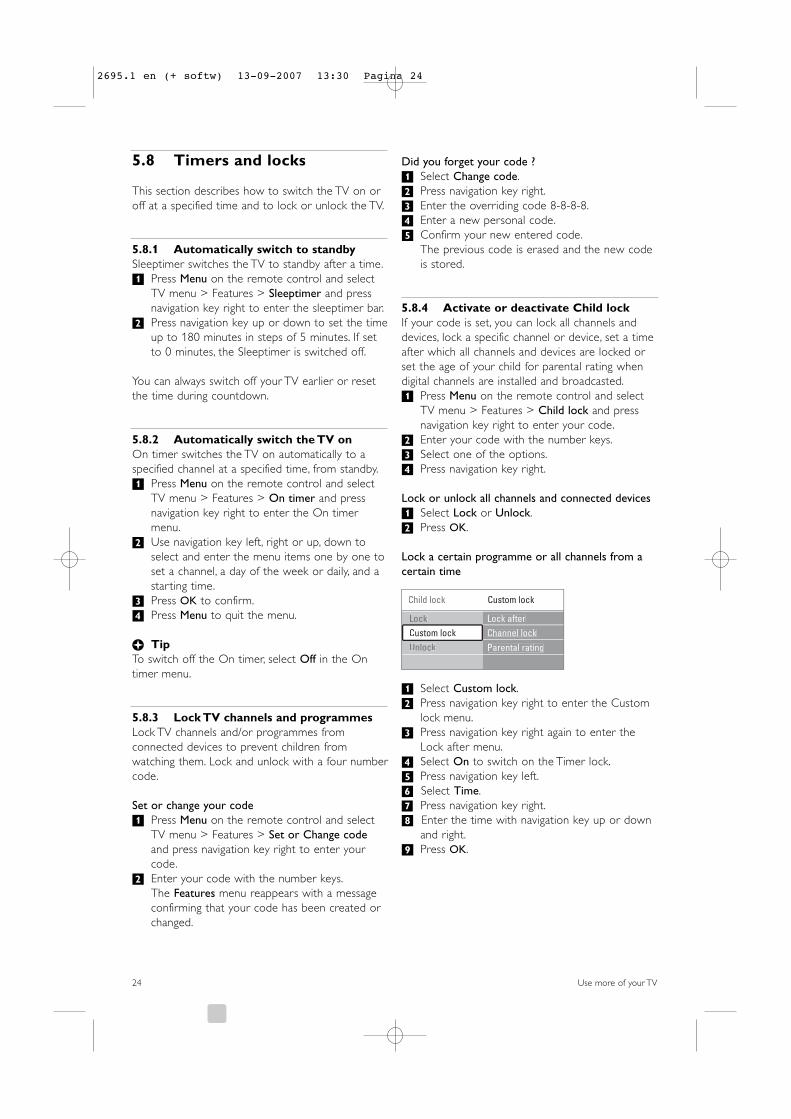
Lock a certain programme or all channels from acertain time
‡ Select Custom lock.® Press navigation key right to enter the Custom
lock menu.Ò Press navigation key right again to enter the
Lock after menu.† Select On to switch on the Timer lock.º Press navigation key left.◊Select Time.‹Press navigation key right.≈Enter the time with navigation key up or down
and right.ÚPress OK.
24 Use more of your TV
Child lock Custom lock
Lock afterChannel lockParental rating
LockCustom lockUnlock
2695.1 en (+ softw) 13-09-2007 13:30 Pagina 24

Lock one or more channels and connected devices‡ Select Custom lock.® Press navigation key right to enter.Ò Press navigation key up or down to select
Channel lock.† Press navigation key right.º Press navigation key up or down to select the
channel(s) you want to lock or unlock.◊Each time press OK to lock or unlock the
channel.
Set an age rating to a digital programmeSome digital broadcasters have their programmesrated (depending on your country). When therating is higher than your child’s age, theprogramme will be locked.‡ Select Custom lock.® Press navigation key right to enter.Ò Press navigation key up or down to select
Parental rating.† Press navigation key right.º Press navigation key up or down to select an
age rating.◊Press Menu to quit the Child lock menu.
5.9 Subtitles
For each TV channel, subtitles can be set, comingfrom Teletext or DVB-T (digital) broadcasts.If digital channels are installed and broadcasted, youcan select your preferred subtitle language.
5.9.1 Subtitling from analogue TV channels‡ Select an analogue TV channel.® Press b to switch on Teletext.Ò Enter the three number pagenumber of the
subtitle page.† Press b to switch off Teletext.
rNoteThe Teletext subtitle page of analogue channelsmust be stored for each TV channel separately.
5.9.2 Activate or deactivate subtitling‡ Press Menu on the remote control and select
TV menu > Features > Subtitle and pressnavigation key right to enter the list.
® Press navigation key up or down to select Onto show the subtitles always or On during muteto show the subtitles only when the sound ismuted with the ¬ key on the remote control.
Ò Press navigation key left to return to theFeatures menu.
à TipSelect the Subtitle menu directly with Option onthe remote control. See section 5.2.3 Quick accessmenu.
5.9.3 Select a digital subtitle languageIf subtitle broadcasting is available with digitalchannels, you can select a preferred subtitlelanguage out of a list of broadcasted languages.Thepreferred subtitle language set in the Installationmenu is overruled temporarily.‡ Press Menu on the remote control and select
TV menu > Features > Subtitle language andpress navigation key right to enter the list ofavailable languages.
® Press navigation key up or down to select asubtitle language.
Ò Press OK.
à TipSelect the Subtitle language menu directly withOption on the remote control. See section 5.2.3Quick access menu.
Use more of your TV 25
ENG
LISH
TV menu Features
SubtitleSubtitle languageSleeptimerChild lockSet/Change codeOn timerCommon interfaceDemo
FeaturesInstallationSoftware update
TV settings
2695.1 en (+ softw) 13-09-2007 13:30 Pagina 25

5.10 View and play: photos,MP3, ...
Watch pictures or listen to music stored on amemory card or USB device (not supplied with theTV). Watch your pictures as a slideshow or listen toa self made music playlist.
rNotePhilips can not be held responsible if your memorycard or USB device is not supported nor shallPhilips accept any liability for damage or loss ofstored data.
5.10.1 Insert a memory card or USB device ç CautionCard data protection• Do not touch the terminals on the back of the
card.• Always insert a card in the correct direction.
Failure to do so may result in damage to the cardand the unit.
• Do not subject the card to excessive pressure orstrong impacts.
• Malfunctions of the unit or card may result indata loss or damage to the card.
Insert a device at the side of the TV while the TV isswitched on.The main menu appears automaticallyand the name of the USB device or memory card ishighlighted next to Multimedia.
5.10.2 Remove the USB device or memorycard
ç CautionTo avoid damaging the USB device or memory cardalways quit the menu on screen and wait fiveseconds before you remove the USB device ormemory card.‡ Press Menu to quit the menu.® Remove the USB device or memory card.
5.10.3 View your picturesThe Multimedia menu shows the files you havestored on your USB device or memory card.‡ Press navigation key right to enter the
Multimedia menu. Picture is highlighted.
® Press navigation key right to enter the Picturefolder.
Ò Press navigation key up or down to select apicture or a picture album on the USB deviceor memory card.
26 Use more of your TV
USB Picture
Afrika_2001Paris_2006My_car.jpgJean.jpgMary.jpg
MusicPicture
Television
Multimedia
TV menu
Channel listProgramme guide
Jean.jpgMary.jpg
Picture Afrika_2001
Kenya.jpgCongo.jpgVictoria.jpg
Cairo.jpg
Paris_2005My_car.jpg
Afrika_2001
BSU
1 Compact Flash2 Microdrive3 Memory stick
4 SD card5 Multimedia Card6 Smart Media
2695.1 en (+ softw) 13-09-2007 13:30 Pagina 26

† Press OK to view the picture or to start aslideshow of the pictures in the album.
º Press OK to pause the slideshow. Press again torestart.
◊Press one of the colour keys on the remotecontrol to perform the corresponding functionshown at the bottom of the screen. Press theblue key to stop the show and to see morefunctions.If the function bar at the bottom disappeared,press any colour key to let it reappear.
‹Press navigation key left and select anotherpicture or another album.
Slideshow settings• Details / More details
Shows the picture name, date, size and nextpicture in the slideshow.
• TransitionsShows the list of available transition styles of thepictures.Press navigation key up or down to select andpress OK to activate.
• Slide timeSets the time lag for the picture transitions:Short, Medium or Long.
• RotateTo rotate a picture.
• ZoomShow a list of available zoom magnifications toselect.
• Start/ShowTo stop and restart the slideshow.
5.10.4 ThumbnailsView the pictures of a selected album in anoverview.‡ Select a picture album.® Press navigation key right to enter the picture
list.Ò Press the green key.† Press navigation key up or down, left or right to
highlight a picture.º Press OK to view the picture.◊Press navigation key left to return to the
thumbnail overview.‹Press the green key again to go back to the
picture list.
5.10.5 Listen to musicFind your songs in the Music album of theMultimedia menu.‡ Highlight Music in the Multimedia menu.® Press navigation key right to enter the Music
folder.Ò Press navigation key up or down to select a
song or a music album.† Press OK to play the selected song or to play a
song followed by the next song in the samealbum.
Music settings• Details
Shows the file name.• Repeat one/all
Repeat all songs in the album until you stop asong or only repeat the one song selected untilyou stop the song.
• ShufflePlay songs in a random sequence.
5.10.6 Slideshow with background musicWatch a slideshow of your stored picturesaccompanied with your stored background music.‡ Select an album of songs first and press OK.® Highlight the Picture folder and select an album
of pictures and press OK.
Use more of your TV 27
ENG
LISH
Afrika_2001 Afrika_2001
Kenya.jpgCongo.jpgVictoria.jpgDakar.jpgCairo.jpg
Kenya.jpg
USB Afrika_2001— Kenya.jpg—
Kenya.jpg
2695.1 en (+ softw) 13-09-2007 13:30 Pagina 27

5.11 Listen to radio channels
If digital broadcasting is available, digital radiochannels will be installed during installation.To listen to a digital radio channel:‡ Press OK on the remote control.
The All channels menu is displayed.® Use the number keys to select a radio channel
available from channel number 400 onwards.To reorder see section 6.3.3 Reorder thechannels.
Ò Press OK.
5.12 Software update
Philips continuously tries to improve its products. Itmay be recommended for you to update the TV’ssoftware.To update your TV software you need aUSB Memory device (not supplied).
rNoteThe device must have at least 48Mb free space.Make sure the write protection is turned off.Some USB devices do not work with our TV.Contact your dealer.
5.12.1 Update assistantThe Update assistant helps you to update the TV’ssoftware.
TV identificationThe TV will identify itself to your USB memorydevice.‡ Press Menu.® Press navigation key right.Ò Press navigation key up or down to select
Software update.† Press navigation key right.
º Press navigation key up or down to selectUpdate assistant.
◊Press navigation key right.‹Press OK to activate.≈Insert a USB memory device to the USB
connector at the side of the TV.The main menu appears.
Ú Press the green key to proceed.A message appears the TV has successfullywritten the identification file to the USBmemory device.
œ Press the green key again to finish.πRemove the USB memory device from the TV.
28 Use more of your TV
TV menu Software update
Current software...Update assistantLocal updatesAnnouncement
FeaturesInstallationSoftware update
TV settings
2695.1 en (+ softw) 13-09-2007 13:30 Pagina 28

5.12.2 Software download from the PC tothe USB device
‡ Insert the USB memory device into a PC linkedto the internet.
® Locate and open the file “update.htm” on yourUSB device.
Ò Read the instructions on screen and click onthe Send ID button.The software update is downloaded on theUSB memory device.
† Remove the USB memory device from yourPC.
5.12.3 Transfer of the downloaded softwareupdate to the TV
The downloaded software on the USB memorydevice must now be uploaded to your TV.
ç Caution• Do not remove the USB memory device during
the software update.• If a power drop occurs during the update, do not
remove the USB memory device from the TV.The TV will continue the update as soon as thepower comes back.
‡ Insert the USB memory device to the USBconnector at the side of the TV.
® The TV switches off.The screen stays black forabout 10 seconds. Wait and do not use thepower switch B on the TV.
Ò The update process starts automatically. Pleasewait.
The update is finished when the message‘Operation successful’ appears on the screen.
† Remove the USB memory device from the TV.
º Press B on the remote control.
rNoteDo not press more than once and do not use thePower B switch on the TV.
Use more of your TV 29
ENG
LISH
Operation Successful! Rem
Programming
BB
DEMOGUIDE
vINPUT
TV DVD STB HTS
PHILIPS DEVICE CONTROL
2695.1 en (+ softw) 13-09-2007 13:30 Pagina 29

◊The TV switches off.The screen stays black forabout 10 seconds. Please, wait.
‹The TV switches back on again.The update isdone.
5.12.4 Verify the current software versionUpdating software is only possible if the version ofthe new available software is different from thecurrent one.You can verify your current softwareversion.
‡ Select Software update in the TV menu.® Press navigation key right.Ò Press navigation key up or down to select
Current software info.The version and the description of the currentsoftware appears.
5.12.5 Software update by digital broadcast(DVB-T)
Your TV might receive new software from thedigital broadcast system automatically.If you receive an update message on screen it isstrongly advised to update the softwareimmediately - select Now.Select Later, if you want to be reminded later on.Select Cancel to quit the update (notrecommended). If you cancelled the update you canstill update yourself from the TV menu > Softwareupdate > Local update.
30 Use more of your TV
2695.1 en (+ softw) 13-09-2007 13:30 Pagina 30

6 Channel installationThe first time you switched on your TV you’veselected the language of the TV menus and all theavailable channels have been installed.This chapter will help you if you find it necessary tore-do the initial installation or if you want to tune ina new analogue TV channel.
rNotes:- You do not have to follow every step described if
it is not necessary.- Re-installation will modify the All channels list and
new added channels will not be added to anyfavourite list.
6.1 Automatic installation
This section describes how to search for and storeall available channels automatically.
Step 1 Menu language Sets the language of the TV menus.Go to a next step if your language settings arecorrect.‡ Press Menu on the remote control and select
TV menu > Installation > Languages and pressnavigation key right to enter Menu language.
® Press navigation key up or down to select yourlanguage.
Ò Press OK to confirm.† Press navigation key left to return to the
Installation menu.
The Languages menu also offers the followinglanguage settings when digital channels are installedand broadcasted.• Preferred audio
Select one of the available audio languages aspreferred language.
• Preferred subtitlesSelect one of the available subtitle languages aspreferred language. See section 5.9 Subtitles.
• Hearing impairedSelect On to display the hearing impaired subtitleversion of your preferred audio or subtitlelanguage when available.
Step 2 Select your country Select the country where you are located.The TVwill install and arrange the TV channels according toyour country.‡ Press navigation key down to select Country.® Press navigation key right to enter the list.Ò Press navigation key up or down to select your
country.† Press navigation key left to return to the
Installation menu.
Step 3 Time zone selectionOnly available for countries with different timezones.‡ Press navigation key down to select Time zone.® Press navigation key right to enter the list.Ò Press navigation key up or down to select your
time zone.† Press navigation key left to return to the
Installation menu.
Step 4 Install TV and radio channelsYour TV will search for and store all available digitaland non-digital TV channels and all available digitalradio channels.‡ Press navigation key down to select Channel
installation.® Press navigation key right to enter the Channel
installation menu.Automatic installation is highlighted.
Ò Press navigation key right to select Start now.† Press OK.º Press the green key to start.
The installation may take a few minutes.◊When the channel search is completed, press
the red key to return to the Installation menu.‹Press Menu to quit the TV menu.
à TipWhen digital TV channels are found, the list ofinstalled channels may show some empty channelnumbers.If you want to rename, reorder or uninstall storedchannels, see section 6.3 Rearrange channels.
Use more of your TV 31
ENG
LISH
Installation Languages
Menu languagePreferred audioPreferred subtitlesHearing impaired
LanguagesCountryTime zoneChannel install...PreferencesConnections…
2695.1 en (+ softw) 13-09-2007 13:30 Pagina 31

6.2 Analogue: Manual installation
You can tune-in analogue TV channels channel bychannel manually with Manual installation.
6.2.1 Select the system‡ Press Menu on the remote control and select
TV menu > Installation > Channel installation >Analogue: Manual installation.
® Press navigation key right to enter the Manualinstallation menu.System is highlighted.
Ò Press navigation key right to enter the Systemlist.
† Press navigation key up or down to select yourcountry or part of the world where you arenow located.
º Press navigation key left to return to theManual installation menu.
6.2.2 Search for and store a new channel‡ Press Menu on the remote control and select
TV menu > Installation > Channel installation >Analogue: manual installation > Search.
® Press navigation key right to enter the Searchmenu.
Ò Press the red key to enter the frequencyyourself or press the green key to search for anext channel.
à TipIf you know the frequency, enter the three numbersof the frequency with the number keys of theremote control.
† Press navigation key left when the new channelhas been found.
º Select Store as new channel to store the newchannel under a new channel number.
◊Press navigation key right to enter.‹Press OK.
Done appears.≈Press Menu to quit the channel installation
menu.
6.2.3 Fine tune a channelFine tune a found channel when the reception ispoor.‡ Press Menu on the remote control and select
TV menu > Installation > Channel installation >Analogue: manual installation > Fine tune.
® Press navigation key right to enter the Fine tunemenu.
Ò Press navigation key up or down to adjust thefrequency
† Press navigation key left when you finished finetuning.
º Select Store current channel to store the finetuned channel under the current channelnumber.
◊Press navigation key right to enter.‹Press OK.
Done appears.≈Press Menu to quit the Channel installation
menu.
6.3 Rearrange stored channels
To rename, reorder, uninstall or reinstall storedchannels.
6.3.1 Rename a channelAssign or change a channel name to a channel forwhich a name has not yet been entered.‡ Press Menu on the remote control and select
TV menu > Installation > Channel installation >Rearrange.
® Press navigation key right to enter the channellist.
Ò Press navigation key up or down in the channellist to select the channel you want to rename.
† Press the red key.º Press navigation key left or right to select a
character or up or down to change thecharacters. Space, numbers and other specialcharacters are located between z and A.
◊Press the green key or OK to finish.
à TipWith the yellow key all characters can be deleted.With the blue key you can delete the characterwhich is highlighted.
32 Use more of your TV
Channel install... Analogue: Manual...
SystemSearchFine tune
Store as new ch...
Automatic install...Installation updateDigital: Test recept...
Rearrange
2695.1 en (+ softw) 13-09-2007 13:30 Pagina 32

6.3.2 Uninstall or reinstall a channelTo uninstall a stored channel so that it is no longerpossible to tune to.Reinstall an earlier uninstalled channel.‡ Press Menu on the remote control and select
TV menu > Installation > Channel installation >Rearrange.
® Press navigation key right to enter the channellist.
Ò Press navigation key up or down in the channellist to select the channel you want to uninstallor reinstall.
† Press the green key to uninstall or reinstall thechannel.
º Press Menu to quit the menu.
6.3.3 Reorder the channelsChange the order of the stored channels.‡ Press Menu on the remote control and select
TV menu > Installation > Channel installation >Rearrange.
® Press navigation key right to enter the channellist.
Ò Press navigation key up or down in the channellist to select the channel you want to reorder.
† Press the yellow key to move up the highlightedchannel in your channel list.
º Press the blue key to move down thehighlighted channel in your channel list.
◊Press Menu to quit the menu.
6.4 Automatic channel management
Once a day, at 3 AM, all available TV channels areupdated automatically.The update is done if yourTV is in standby.Earlier stored channels not found by the update willbe removed from the channel list.You can do this update yourself anytime.
‡ Press Menu on the remote control and selectTV menu > Installation > Channel installation >Installation update.
® Press navigation key right to enter theInstallation update menu.
Ò Press OK.† Press the green key to start.
The update starts and may take a few minutes.º When the update is completed, press the red
key to return to the Channel installation menu.◊Press Menu to quit the menu.
6.5 Digital reception test
If you receive Digital TV broadcasting you can checkthe quality and signal strength of a specific channel.‡ Select a channel.® Press Menu on the remote control and select
TV menu > Installation > Channel installation >Digital:Test reception.
Ò Press navigation key right to enter† Press OK.
The channel frequency, the network name, thesignal quality and strength appear.
º Press the green key to start or directly enterthe frequency of the channel you want to test.If the signal quality and strength are poor,reposition the antenna.
◊Press the yellow key to store the frequency ifthe signal quality and strength are good.
‹Press the red key to return to the Channelinstallation menu.
≈Press Menu to quit the menu.
à TipTo achieve the best results, contact a specialisedantenna installer.
6.6 Factory settings
If you are lost in the picture, sound and Ambilightsettings, you can reset the TV to the factory settingsof picture, sound and Ambilight
‡ Press Menu on the remote control and selectTV menu > Installation > Factory settings.
® Press navigation key right to enter the Factorysettings menu.
Ò Press OK.† Press Menu to quit the menu.
rNoteThe channel installation settings are not changed.
Use more of your TV 33
ENG
LISH
2695.1 en (+ softw) 13-09-2007 13:30 Pagina 33

Back connectors1 EXT1
Scart connector for DVD,VCR, digital receiver,game console, etc.
2 EXT2Second scart connector.
3 EXT3Component Video Y Pb Pr and Audio L/Rconnectors for DVD, digital receiver or gameconsole, etc.
4 Common InterfaceSlot for Conditional Access Modules (CAM)
5 Audio Out L/RSound output cinch connectors for a HomeTheatre System, etc.
6 Digital Audio In (if present)Sound input cinch connector for use with anyof the HDMI connectors with a HDMI to DVIadaptor.
7 Digital Audio OutSound output cinch connector for a HomeTheatre System, etc.
8 HDMI 1 InHDMI in connector for Blu-ray Disc player, HDdigital receiver or HD game console, etc.
9 HDMI 2 InSecond HDMI in connector.
10 HDMI 3 InThird HDMI in connector.
11 Antenna input
Side connectors12 S-Video
S-Video input connector to be used togetherwith Audio L/R connectors for camcorder, gameconsole, etc.
13 VideoVideo input cinch connector to be used togetherwith Audio L/R connectors for camcorder, gameconsole, etc.
14 Audio L/R inAudio L/R for camcorder, game console, etc.
15 HeadphonesStereo Mini Jack.
16 USBUSB connector.
17 Card reader
34 ConnectionsConnections
7 Connections
7.1 Connection overview
EXT 3
Y
Pb
Pr
AUDIOL/R
S-VIDEO
VIDEO
AUDIO
L
R
EXT 1EXT 2
AUDIO OUT DIGITALAUDIO
L
R
ANTENNACOMMON INTERFACE
IN
OUT
SERVICEUART
DISPLAY SYNCHRONIZED DISPLAY SYNCHRONIZED.
HDMI 1 HDMI 2 HDMI 3
123
12
13
14
4 8 9 10 115 76
15
BSU16
17
2695.1 en (+ softw) 13-09-2007 13:30 Pagina 34

7.2 About connecting
Learn here how to make the best connection foryour device.Six connections are ready to use at the back of theTV - EXT1, EXT2, EXT3, HDMI1, HDMI2 andHDMI3. Connect your device with the highestpossible quality connection. Look for the highestquality connection on your device. Use thatconnection to your TV.
Connection set upWhen connecting is done the TV needs to knowwhat connections you made, which device isconnected to which connector. Use the TV menu todo this. See section 7.4 Connection set up.
7.2.1 HDMI - Highest quality ★★★★★
A HDMI connection has the best picture and soundquality. One cable combines video and audio signals.Use HDMI for HD (High Definition) TV signals.HDMI can offer easy operation of your devices bythe touch of one button when these devices haveHDMI with CEC.A device connected with HDMI tothe TV can only send out audio and video signals toyour TV.The device cannot receive or record audioand video from your TV.
HDMI cable (max. 5m)
à TipUse a HDMI / DVI adaptor in case your device hasonly a DVI connection. An extra audio cable isneeded to complete this connection.
rNoteHDMI supports HDCP (High-bandwidth DigitalContents Protection). HDCP is a copy protectionsignal that comes with HD content (DVD disc orBlu-ray Disc).
7.2.2 HDMI with CEC (if present)HDMI with Consumer Electronics Control (CEC)adds to the normal HDMI advantages. It offers easyoperation of the TV and connected devices.Thesedevices also have to be equipped with HDMI withCEC.‡ Press Menu on the remote control and select
TV menu > Installation > Preferences and pressnavigation key right to enter the list.
® Press navigation key up or down to selectHDMI-control.
ÒPress navigation key right to enter.† Select On to activate HDMI with CEC.
rNoteHDMI with CEC might not work with other brands.
One touch playInsert a DVD disc to watch and your TV will switchon from standby and show the DVD programmeautomatically when you start playing the disc.‡ Press Play π on the device.
The TV is switched on from standby.
System standbySwitches off all devices with the TV remote control.‡ Press B on the TV remote control for a few
seconds.All devices will switch to standby.
7.2.3 YPbPr - Higher quality ★★★★
Use the Component Video YPbPr connectionstogether with the Audio L/R mini jack. Match thecable colours when you connect.YPbPr can handle HD TV signals.
Component Video Audio L/R to StereoYPbPr cable mini jack cable- Red, Green, Blue
Connections 35
ENG
LISH
2695.1 en (+ softw) 13-09-2007 13:30 Pagina 35

7.2.4 Scart - Good quality ★★★
One cable combines video and audio signals.Scart connectors can handle RGB video but no HDTV signals.
Scart cable
7.2.5 S-Video - Good quality ★★
Use a S-Video cable together with an Audio L/R(cinch) cable. Match the cable colours when youconnect.
An S-Video cable Audio L/R cable- Red, White
7.2.6 Video - Basic quality ★
Use a Video (cinch) cable together with an AudioL/R (cinch) cable. Match the cable colours whenyou connect
Combined Video - yellow and Audio L/R cable - red and white
7.2.7 Display synchronised audio outFor the best match of image and sound in speechon screen, connect a Home Theatre System toAudio Out L/R or Digital Audio outputs.See diagrams 7.3.4 and 7.3.8.Do not connect the audio signal of a DVD player,digital receiver or other audio/video device directlyto the Home Theatre System.
36 Connections
2695.1 en (+ softw) 13-09-2007 13:30 Pagina 36

7.3 Connect your devices
The connections shown in this section arerecommendations for the most used cases.Other solutions may be possible.
7.3.1 DVD playerUse a scart cable to connect the device to theEXT1 input at the back of the TV.
7.3.2 DVD Recorder or Digital ReceiverUse a scart cable and 2 antenna cables.
7.3.3 DVD Recorder and Digital ReceiverUse 3 scart cables and 3 antenna cables.
Connections 37
ENG
LISH
EXT 3
Y
Pb
Pr
AUDIOL/R
HDMI 3HDMI 1 HDMI 2
EXT 1EXT 2
AUDIO OUT
L
R
OUT
IN
ANTENNADIGITALAUDIO
Receiver / Cable boxDVD Recorder
INOUTINOUT
EXT 3
Y
Pb
Pr
AUDIOL/R
HDMI 3HDMI 1 HDMI 2
EXT 1EXT 2
DVD PlayerAUDIO OUT
L
R
OUT
IN
ANTENNADIGITALAUDIO
EXT 3
Y
Pb
Pr
AUDIOL/R
HDMI 3HDMI 1 HDMI 2
EXT 1EXT 2
DVD Recorder / Digital receiverAUDIO OUT
L
R
OUT
IN
ANTENNADIGITALAUDIO
INOUT
2695.1 en (+ softw) 13-09-2007 13:30 Pagina 37

7.3.4 DVD Recorder and Home TheatreSystem
Use a scart cable, 2 antenna cables and 1 digitalaudio (cinch) cable.
7.3.5 DVD Recorder and DVD HomeTheatre System
Use 2 scart cables, 2 antenna cables and 1 digitalaudio (cinch) cable.
7.3.6 Satellite receiverUse a scart cable and 2 antenna cables.
38 Connections
EXT 3
Y
Pb
Pr
AUDIOL/R
HDMI 3HDMI 1 HDMI 2
EXT 1EXT 2
Satellite receiverAUDIO OUT
L
R
OUT
IN
ANTENNADIGITALAUDIO
EXT 3
Y
Pb
Pr
AUDIOL/R
HDMI 3HDMI 1 HDMI 2
EXT 1EXT 2
AUDIO OUT
L
R
OUT
IN
ANTENNA
DIGITALAUDIOOUT
Home Theatre SystemDVD Recorder
DIGITALAUDIOIN
INOUTDIGITALAUDIO
EXT 3
Y
Pb
Pr
AUDIOL/R
HDMI 3HDMI 1 HDMI 2
EXT 1EXT 2
AUDIO OUT
L
R
OUT
IN
ANTENNA
DVD Home Theatre SystemDVD Recorder
INOUTDIGITALAUDIO
2695.1 en (+ softw) 13-09-2007 13:30 Pagina 38

7.3.7 HD Digital receiver / HD satellitereceiver
Use a HDMI cable and 2 antenna cables.
7.3.8 DVD-R, Home Theatre System andDigital receiver
Use 3 scart cables, 3 antenna cables and 1 audio(cinch) cable.
7.3.9 Blu-ray Disc playerUse a HDMI cable.
Connections 39
ENG
LISH
EXT 3
Y
Pb
Pr
AUDIOL/R
HDMI 3HDMI 1 HDMI 2
EXT 1EXT 2
Blu-ray Disc playerAUDIO OUT
L
R
OUT
IN
ANTENNADIGITALAUDIO
OUTHDMI
EXT 3
Y
Pb
Pr
AUDIOL/R
HDMI 3HDMI 1 HDMI 2
EXT 1EXT 2
HD Digital receiver / HD Satellite receiverAUDIO OUT
L
R
OUT
IN
ANTENNADIGITALAUDIO
INOUTOUTHDMI
EXT 3
Y
Pb
Pr
AUDIOL/R
HDMI 3HDMI 1 HDMI 2
EXT 1EXT 2
AUDIO OUT
L
R
OUT
IN
ANTENNA
DIGITALAUDIOOUT
Home Theatre SystemDigital ReceiverDVD Recorder
DIGITALAUDIOIN
INOUTINOUT
DIGITALAUDIO
2695.1 en (+ softw) 13-09-2007 13:30 Pagina 39

7.3.10 Game consoleThe most practical connection for a game consoleis at the side of the TV. More qualitativeconnections are at the back of the TV.
Connected at the side of the TVUse the Video and Audio L/R (cinch) connectors.
Connected at the back of the TVUse a HDMI or the YPbPr (EXT3) input for HDquality.
7.3.11 CamcorderThe most practical connection for a camcorder is atthe side of the TV. More qualitative connections areat the back of the TV.
Connected at the side of the TVUse the Video and Audio L/R (cinch) connectors oruse the S-Video and Audio L/R connectors.
Connected at the back of the TVUse a HDMI or the YPbPr (EXT3) input for HDquality.
7.3.12 Personal ComputerThe best connection for a PC is at the back of theTV. A more practical connection, but only forviewing photos and films from your PC, is theconnection at the side of the TV.
ç CautionBefore connecting the PC, set the PC monitorrefresh rate to 60Hz.
Connected at the back of the TVUse the DVI connection of your PC to connect toa HDMI connection of the TV. Use a HDMI to DVIcable or a HDMI-to-DVI-adaptor.Add an audio cable with a Stereo mini jack forsound. Connect the Stereo mini jack to EXT3 onthe TV.
In the Connections menu, link this EXT3 audio tothe HDMI connector you are using.See section 7.4 Connections setup.
Connected at the side of the TVIf your PC has no DVI connection, use the S-Videoand Audio L/R (cinch) connectors at the side of theTV.This connection is only suited for applicationslike Windows Media Center or similar.
à TipChange the TV picture format to Unscaled in thePicture format menu for maximal picture sharpness.See section 5.3.4.Widescreen picture format.
For supported PC monitor resolutions, see section8 Technical data.
40 Connections
S-VIDEO
VIDEO
AUDIO
L
R
DVIAUDIO OUT
DVIAUDIOOUT
HDMI
HDMI
EXT 3 - AUDIO L/R
S-VIDEO
VIDEO
AUDIO
L
R
S-VIDEO
VIDEO
AUDIO
L
R
2695.1 en (+ softw) 13-09-2007 13:30 Pagina 40

7.4 Connections setup
When all devices have been connected the TVneeds to know what connections you have made,which device is connected to which connector.
7.4.1 Digital Audio In (if present)If you use the Digital Audio In connection,assign this connection, in the menu, to the devicefrom where the sound comes from.‡ Press Menu on the remote control and select
TV menu > Installation > Connections > DigitalAudio In.
® Press navigation key right to enter the list.Ò Press navigation key up or down to select the
connector used by the device.
7.4.2 Audio In L/RIf you use the Audio In L/R connection, assign thisconnection, in the menu, to the device from wherethe sound comes from.‡ Press Menu on the remote control and select
TV menu > Installation > Connections > AudioIn L/R.
® Press navigation key right to enter the list.Ò Press navigation key up or down to select the
connector used by the device.
7.4.3 Naming your devicesName the connected devices for easy selection andbest signal handling.Assign the type of device (DVD,VCR, Game ...) tothe connector you use for that device.‡ Press Menu on the remote control and select
TV menu > Installation > Connections > EXT1.® Press navigation key right to enter the list.Ò Press navigation key up or down to select the
type of device.† Press Menu to quit the menu.
7.4.4 Decoder channelsDecoders that decode an antenna channel areconnected to EXT1 or EXT2 (scart).You have to assign the TV channel as a channel tobe decoded.Then assign the connection where thedecoder is connected.‡ Press Menu on the remote control and select
TV menu > Installation > Decoder > Channel.® Press navigation key right to enter the list.Ò Press navigation key up or down to select the
channel to decode.† Press navigation key left and go back to select
Status.º Press navigation key up or down to select the
connector used by the decoder.◊Press Menu to quit the menu.
Connections 41
ENG
LISH
Connections DIGITAL AUDIO IN
NoneEXT 1EXT 2EXT 3
HDMI 1HDMI 2HDMI 3Side
...EXT 3HDMI 1HDMI 2HDMI 3Side
AUDIO IN L/RDIGITAL AUDIO IN
Connections AUDIO IN L/R
NoneEXT 3HDMI 1HDMI 2
HDMI 3
EXT 2EXT 3HDMI 1HDMI 2HDMI 3Side
DIGITAL AUDIO INAUDIO IN L/R
Connections EXT 1
NoneDVDBlu-rayHDD/DVDR
HD rec.GameVCR...
EXT 1EXT 2EXT 3HDMI 1HDMI 2HDMI 3Side
...
2695.1 en (+ softw) 13-09-2007 13:30 Pagina 41

7.5 Preparing for digitalservices
Scrambled digital TV channels can be decoded witha Conditional Access Module (CAM) and a Smartcard provided by a digital TV service operator.TheCAM may enable several services depending on theoperator you choose (e.g. Pay TV).Contact your digital TV service operator for moreinformation and terms.
7.5.1 Insert a Conditional Access Module -CAM
) WarningSwitch off your TV before inserting a CAM.Look on the CAM for the correct insertingdirection. Inserting the module incorrectly maydamage the CAM and your TV.
‡ Gently insert the CAM into the CommonInterface slot at the back of your TV as far as itwill go.
® Leave the CAM in the Common Interface slotpermanently.
It may take a few minutes before a CAM isactivated. Removing the CAM will deactivate thedigital TV service.
7.5.2 Common interface menuFrom this menu you access the CAM service youhave installed.The applications and their function,the content and the messages on screen comefrom the CAM service provider.‡ Press Menu on the remote control and select
TV menu > Features > Common interface.This menu option is available when a CAM isinserted and has made contact with the provider.
42 Connections
COMMON INTERFACE COMMON INTERFACE
2695.1 en (+ softw) 13-09-2007 13:30 Pagina 42

8 Technical data
Picture / Display• Display type: LCD Full HD W-UXGA• Panel resolution: 1920x1080p• Perfect Pixel HD picture enhancement• 1080p 24/25/30/50/60Hz processing• 100 Hz Clear LCD
Supported display resolutions• Computer formats (via HDMI/DVI input)
Resolution Refresh rate640 x 480 60Hz800 x 600 60Hz1024 x 768 60Hz1280 x 768 60Hz1360 x 768 60Hz1920 x 1080i 60Hz1920 x1080p 60Hz
• Video formatsResolution Refresh rate480i 60Hz480p 60Hz576i 50Hz576p 50Hz720p 50Hz, 60Hz1080i 50Hz, 60Hz1080p 24Hz, 25Hz, 30Hz1080p 50Hz, 60Hz
Tuner / Reception / Transmission• Antenna input: 75ohm coaxial (IEC75)• TV system: DVD COFDM 2K/8K• Video playback: NTSC, SECAM, PAL• DVD: DVB Terrestrial
(see selected countries on the TV typeplate)
Dimensions and weights (approx.)
TV model 37-42-47PFL9732D/1037” 42” 47”
- width 950 1060 1170 mm- height 612 675 736 mm- depth 125 125 125 mm- weight 25,5 29 35 kgTV + stand- width 950 1060 1170 mm- height 677 740 801 mm- depth 184 256 297 mm- weight 29 32 40 kg
Sound• Sound system:
- Vir tual Dolby Digital- BBE
Multimedia• Connections: USB; card reader• Playback formats: MP3, LPCM, Slideshow (.alb)
JPEG, Compact flash I & II, Memory stick,Memory stick PRO, SD Card/Mini SD card, Smart media, Micro Drive,Multi Media Card.
Remote control• Type: RC4422• Batteries: 2 Size AA- R6 type
Connectivity• EXT1 (scart): Audio L/R, CVBS in/out, RGB• EXT2 (scart): Audio L/R, CVBS in/out, RGB,
S-video in/out• EXT3:Y Pb Pr, Audio L/R in (mini jack)• HDMI 1 In• HDMI 2 In• HDMI 3 In• HDMI-control 1.3a• Analog Audio L/R out - display synchronised• Digital Audio in (coaxial-cinch-S/PDIF) (if present)• Digital Audio out (coaxial-cinch-S/PDIF) -
display synchronised• Side: Audio L/R in,Video (CVBS) in, S-Video
Headphone out (stereo mini jack),USB, Card reader
Power• Mains power : AC 220-240V (±10%)• Power and standby power consumption:
See technical specification on www.philips.com• Ambient temperature: 5°C - 35°C
Specifications are subject to change without notice.For more specification details of this product seewww.philips.com/support.
Technical data 43
ENG
LISH
2695.1 en (+ softw) 13-09-2007 13:30 Pagina 43

9 Troubleshooting
Television and remote control
The TV does not switch on• Verify the mains cord connection.• Verify if the batteries of the remote control are
flat or weak.Verify their + / - orientation.You can use the keys on the TV to switch the TVon.
• Unplug the mains cord, wait for one minute andplug in the mains again.
The TV does not react on the remote control• Verify if the batteries of the remote control are
not empty or weak.Verify their + / - orientation.• Clean the remote control and TV sensor lens.• Use the side control keys to change some of the
basic settings of picture and sound.‡ Press Volume - and + to adjust the volume.® Press Program/Channel - and + to go through
the channels marked as favourites.Ò Press Menu to show the main menu.
Press Program/Channel - and + to select andadjust picture and sound menu items.
The red light on the TV blinks• Unplug the mains cord for half a minute and
insert it again.Verify if there is enough space forventilation. Wait until the TV has cooled down.When the TV does not restart to standby andthe blinking occurs again, call our CustomerSupport Centre.
You forgot your code to unlock Child lock• See section 5.8.3 Set code / Change code.
Wrong language in the TV menu ?Follow these steps to change the language.‡ Press Menu on the remote control.® Press navigation key right.Ò Use navigation down to highlight the third line.† Press navigation key right three times.º Press navigation key up or down to select your
language.◊Press OK.‹Press Menu to quit the menus.
TV channels
Some TV channels are gone• Verify if the correct channel list is chosen.• A channel could be uninstalled in the Rearrange
menu.No digital channels found during installation• Verify if the TV supports DVB-T in your country.
See the list of countries on the TV typeplate.
Picture
The blue light is on, but there is no picture• Verify if the antenna is connected properly.• Verify if the correct device is selected.
The sound is on, but there is no picture• Verify the contrast or brightness setting in the
menu.
The TV picture is poor• Verify if the antenna is connected properly.• Loudspeakers, non-earthed audio devices, neon
lights, high buildings or mountains can influencethe picture quality.Try to improve the picture bychanging the antenna direction or place devicesaway from the TV.
• Verify if the correct TV system is chosen in theManual installation menu.
• If only a certain channel is poor, try to fine tunethis channel in the Fine tune menu. See section6.2.3.
The picture has poor colour• Verify the colour settings in the Picture menu.
Select any of the Reset to standard settings inthe Reset to standard menu. See section 5.3.2.
• Verify the connections and cables of theconnected devices.
The TV did not remember my settings when Iswitch back on• Verify if the TV is set to Home in the TV menu >
Installation > Preferences > Location menu.
The picture does not fit the screen, it is too big ortoo small• Select a more fitting picture format in the Picture
format menu.See section 5.3.4 Widescreen picture format.
• Name your connected device in the Connectionsmenu to obtain the best signal handling.See section 7.4.3 Naming your devices.
44 Technical data
2695.1 en (+ softw) 13-09-2007 13:30 Pagina 44

The picture position on screen is not correct• Some picture signals from some devices do not
fit the screen correctly.You can shift the picturewith the navigation key on the remote control.Check the signal output of the device.
Sound
There is a picture but no sound• Verify the volume is not set to 0.• Verify the sound has not been muted with the
¬ key.• Verify if all cables are connected properly.• If no sound signal is detected, the TV
automatically switches off the sound.This is proper operation and does not indicatemalfunction.
The sound is poor• Verify if the sound is set to Stereo.• Verify the Equalizer settings.• Select any of the Reset to standards settings in
the Reset to standard menu. See section 5.3.2.
The sound comes from one speaker only• Verify if the Balance is not set to extreme left or
right.
HDMI connections
Trouble with devices connected with HDMI• The HDMI - HDCP procedure might take a few
seconds before the TV shows the picture from adevice.
• If the TV does not recognise the device and thescreen shows no picture, try switching from onedevice to another and back again to restart theHDCP procedure.
• If sound interruptions occur persistently, see theuser manual of the device to verify the outputsettings. If that does not help, connect anadditional audio cable.
• If an HDMI-to-DVI adaptor is used, verify if anadditional audio connection is in place tocomplete the DVI connection.
USB connection
The TV does not show the USB device content• Set your device (camera) to ‘Mass Storage Class’
compliant.• The USB device may need specific driver
software. Unfortunately this software can not bedownloaded to your TV.
I can not see my files in the Multimedia menu.• Not all audio and picture files are supported. See
section 8 Technical data.
Audio and picture files do not playback smoothly• The transfer performance of the USB device
limits the transfer rate.
Personal computer
The PC display on my TV is not stable or is notsynchronised• Verify if the correct resolution mode is selected
on your PC. See section 8 Technical data.
If your problem is not solvedSwitch your TV off and on again. If the problem isnot solved, call the Customer Support Centre orconsult our website www.philips.com/support.
See the Customer Support Centre telephonenumbers on the last page of this user manual.
Please, have the TV Model and Product Numberready before you call.You can find these numbers on the packaging labelor on the typelabel on the back and bottom of theTV.
) WarningNever try to repair the TV yourself.
Technical data 45
ENG
LISH
2695.1 en (+ softw) 13-09-2007 13:30 Pagina 45

10 Index
100 Hz Clear LCD 17
Active Control 17Ambilight
colour 19menu / settings 19modes 19with TV standby 20
Analoguemanual installation 32TV channels 31
Antennacable 7connect 7with devices 34
Auto format 18Automatic installation 31Auto surround 19Automatic Volume Leveler 19
BalanceAmbilight 19sound 18
Batteries 3,7Blacklevel 17Blu-ray 34,35,39Brightness 17
ambilight 19
CA module 34,42Cable
HDMI 35Scart 35YPbPr 35S-Video 36Video 36
Camcorder 40Camera (photo) 40Care of the screen 3Change code 24Channel
all channels list 22favourite list 22installation 31lock 24management 33previous 12rearrange 32
Channelstore / install 32
Child lock 24Clock 16Code 24Colour enhancement 17Colour
boost 19menu 17keys 4,12
Common interface (CAM)menu 42slot 34,42
Connectionbest 35overview 34set up 35,40
Contrast 17Country
selection 31Custom colour 19Custom lock 24Custom tint 17
Decoderchannel 41
Delta volume 19Device
connecting 35naming 41watch 9
Digitalaudio out 34subtitle language 25receiver 35text services 21test reception 33
Dual I/II 19Dual screen 12DVB-T 5DVD
connect 37playback 9player 37recorder 37
Dynamic contrast 17
Electronic Programme Guide 23Equalizer 18External 1,2,3 (EXT) 34
Factory settings 33Favourite channel lists 22Fine tune 32
Game console 40
HDCP 35HDMI
connection 34control 35
HD digital receiver 39HD natural motion 17Headphone
connect 4,34 volume 19
Hearing impaired 31Home
location 44Home theatre system 38Hue 17
Installationautomatic 31manual 32menu 31update 33
Kensington Security Slot 5Key(s)
colour 12on TV 4on remote control 4,12
Languagemenu 31audio 19subtitle 25
Light sensor 17Locks 24
L
K
I
H
G
F
E
D
C
B
A
46 Index
2695.1 en (+ softw) 13-09-2007 13:30 Pagina 46

Mains cord 8Menu key 14Mono 19Movie expand 18MPEG artefact reduction 17Music 27Mute key 12
Naming devices 41Noise reduction 17
OK key 12On timer 24
Perfect Pixel HD 17Personal Computer
connect 40display resolutions 43
Photo viewer 26Picture
format 17menu 17
Position the TV 5Power 8Programme up/down 12
Quick access menu 16
Radio channel 28Rearrange channels 32Recorder 37Recycling 3Remote control
batteries 7overview 12
Rename 32Reorder 32Reset to standards 16
Safety 3Satellite receiver 38Scart connection 35Screen cleaning 3Search
channels 32teletext pages 21
Set code 24Settings assistant 16Sharpness 17Sleeptimer 24Software update 28Sound
menu 18surround mode 19
Standby 12,24Super zoom 18Stationary images 3Stereo 19Subtitle 25
shift 18Switch on 8
Table of Pages T.O.P 20Technical data 43Teletext 20
teletext 2.5 21digital 21dual screen 20menu 21page 20
Time zone 31Timers 24Tint 17Troubleshooting 44TV settings menu 16
USBconnector 34device 26photo viewer 26
VCRconnect 37
Video cable 36Video formats 43Volume
key 12menu 18
Whitepoint 17Widescreen picture format 18
YPbPr 35
Y
W
V
U
T
S
R
Q
P
O
N
M
Index 47
ENG
LISH
2695.1 en (+ softw) 13-09-2007 13:30 Pagina 47

48
2695.1 en (+ softw) 13-09-2007 13:30 Pagina 48


