
The contents of this document may be reproduced in any form and by any means either in part or as a complete
document with changes if required.
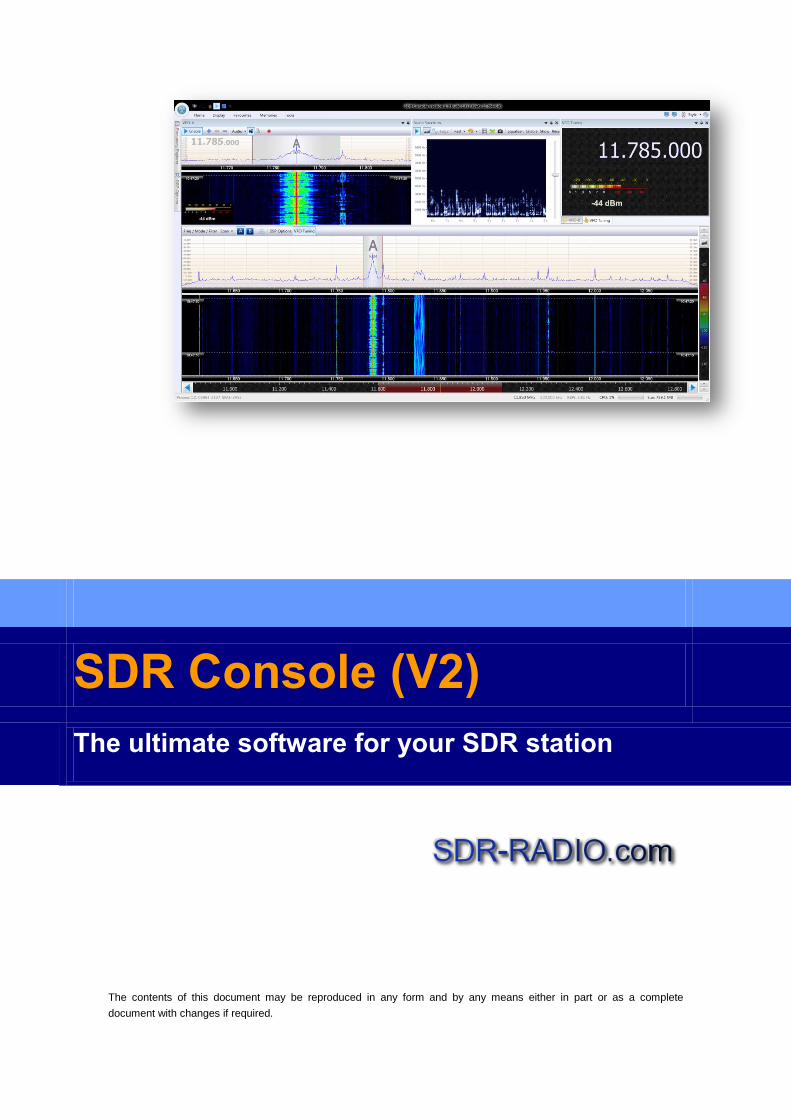
SDR Console (V2) User Guide
The ultimate software for your SDR station

June 2, 2013 Copyright 2013 Simon Brown Page 2 of 62
Table of Contents
Contents
1 INTRODUCTION ....................................................................................................................... 6
1.1 SYSTEM REQUIREMENTS ...................................................................................................... 6
1.2 LICENCE .............................................................................................................................. 6
1.3 INSTALLING .......................................................................................................................... 6
1.3.1 2010 C++ Redistributable ......................................................................................................... 6
2 STARTING ................................................................................................................................ 8
2.1 LOCAL ................................................................................................................................. 8
2.1.1 Definitions .................................................................................................................................. 9
2.1.2 Converters ................................................................................................................................ 10
2.2 REMOTE ............................................................................................................................11
3 MAIN DISPLAY .......................................................................................................................12
3.1 VFO SELECTION ................................................................................................................12
3.2 DISPLAY QUALITY ..............................................................................................................12
3.2.1 Palette ...................................................................................................................................... 12
3.2.2 Speed ........................................................................................................................................ 13
3.2.3 Resolution ................................................................................................................................ 13
3.2.4 Spectrum Scale ......................................................................................................................... 13
3.2.5 Timestamps .............................................................................................................................. 13
3.2.6 Contrast ................................................................................................................................... 13
4 TUNING ...................................................................................................................................14
4.1 MAIN TUNING BAR .............................................................................................................14
4.2 FREQUENCY EXPLORER .....................................................................................................14
4.3 BAND DEFINITIONS .............................................................................................................15
4.4 DIRECT ENTRY ..................................................................................................................16
5 RADIO OPTIONS ....................................................................................................................17
5.1 RADIO CONFIGURATION .....................................................................................................17

June 2, 2013 Copyright 2013 Simon Brown Page 3 of 62
6 VFOS .......................................................................................................................................18
6.1 SELECTION ........................................................................................................................18
6.1.1 Enabling ................................................................................................................................... 18
6.2 OPTIONS ...........................................................................................................................19
6.2.1 VFOs | Basic ............................................................................................................................ 19
6.2.2 VFOs | Scroll ............................................................................................................................ 20
6.3 TUNING .............................................................................................................................20
6.4 MODE & FILTER .................................................................................................................21
6.4.1 Mode ........................................................................................................................................ 21
6.4.2 Filter ........................................................................................................................................ 22
6.5 AUDIO ...............................................................................................................................23
6.5.1 ASIO Support ........................................................................................................................... 24
6.5.2 Pseudo Stereo ........................................................................................................................... 24
6.6 DSP OPTIONS ...................................................................................................................24
6.6.1 AGC ......................................................................................................................................... 25
6.6.2 CW Peak................................................................................................................................... 26
6.6.3 Noise Blanker ........................................................................................................................... 26
6.6.4 Noise Reduction ....................................................................................................................... 26
6.6.5 Notch ........................................................................................................................................ 27
6.6.6 Squelch ..................................................................................................................................... 27
6.7 RECORDING .......................................................................................................................27
7 AUDIO SPECTRUM ................................................................................................................28
7.1 GRAPHICAL EQUALISER ......................................................................................................28
7.2 DISPLAY ............................................................................................................................28
8 DATA RECORDER .................................................................................................................30
8.1 RECORDING .......................................................................................................................30
8.2 PLAYBACK .........................................................................................................................31
9 FAVOURITES .........................................................................................................................32
9.1 ADD ..................................................................................................................................32

June 2, 2013 Copyright 2013 Simon Brown Page 4 of 62
9.2 ORGANISER .......................................................................................................................32
10 MEMORIES .........................................................................................................................34
10.1 SAVE .................................................................................................................................34
10.2 CLEAR ...............................................................................................................................34
10.3 APPLY ...............................................................................................................................34
11 LAYOUT ..............................................................................................................................35
12 EXTRAS ..............................................................................................................................36
12.1 CLOCK ..............................................................................................................................36
12.2 FM STEREO ......................................................................................................................36
13 TOOLS ................................................................................................................................38
13.1 SUPPORT ..........................................................................................................................38
13.2 PROGRAMS .......................................................................................................................38
13.3 DSP .................................................................................................................................39
13.3.1 Stress Test ............................................................................................................................ 39
14 LICENCE .............................................................................................................................41
14.1 SAMPLE .............................................................................................................................41
15 PROGRAM OPTIONS .........................................................................................................42
15.1 PERFORMANCE ..................................................................................................................42
15.1.1 CPU ..................................................................................................................................... 42
15.1.2 Queues ................................................................................................................................. 43
15.1.3 Threads ................................................................................................................................ 43
15.2 RECORDING .......................................................................................................................44
15.2.1 Audio .................................................................................................................................... 44
15.2.2 Data ..................................................................................................................................... 45
15.3 VFOS ...............................................................................................................................46
15.3.1 Basic .................................................................................................................................... 46
15.3.2 Scroll .................................................................................................................................... 47
15.4 EXTERNAL CONTROLLERS ..................................................................................................47
15.5 MODES ..............................................................................................................................49

June 2, 2013 Copyright 2013 Simon Brown Page 5 of 62
15.6 FIREWALL ..........................................................................................................................50
15.6.1 Console ................................................................................................................................ 50
15.6.2 Server ................................................................................................................................... 50
15.6.3 Radios .................................................................................................................................. 50
15.7 IP SERVER ........................................................................................................................51
15.8 NETWORK .........................................................................................................................52
15.9 PSEUDO STEREO ...............................................................................................................52
15.10 REGION .........................................................................................................................54
15.11 SPECTRUM & WATERFALL ..............................................................................................54
15.12 UDP BROADCAST ..........................................................................................................55
16 TROUBLESHOOTING ........................................................................................................57
16.1 FIREWALLS ........................................................................................................................57
16.2 VFO - NO AUDIO OR DATA .................................................................................................58
INDEX .............................................................................................................................................59

June 2, 2013 Copyright 2013 Simon Brown Page 6 of 62
1 Introduction
Welcome to the second generation SDR console from SDR-Radio.com. This new console
takes the technology developed in version 1 and adds many improvements to bring you the
most advanced SDR solution available today.
The main focus is traditional receivers for HF, UHF and higher.
1.1 System Requirements
This software is design for Windows only. Although the software runs on Core 2 Duo
systems with 32-bit Windows XP, the recommended minimum system configuration for a
new hardware acquisition is:
Windows 7 64-bit,
Intel I3,
8GB RAM.
To ensure support for SDR solutions coming to market over the next few years a third-
generation CPU such as i5-3570 or i7-3770 should be used as these new SDR receivers will
offer bandwidths of 20MHz or more which in turn require significant processing power.
Newer computers generally use less power; have better processing and often a lower
footprint.
1.2 Licence
This program requires a licence key. When downloaded the built-in licence is automatically
activated. For more information about licencing see page 41.
1.3 Installing
Download the latest kit, start the installation, accept all defaults. The default installation folder
is:
C:\Program Files (x86)\SDR-RADIO-PRO.com on 32-bit systems and
C:\Program Files\SDR-RADIO-PRO.com on 64-bit systems.
1.3.1 2010 C++ Redistributable

June 2, 2013 Copyright 2013 Simon Brown Page 7 of 62
If an essential C++ or Microsoft foundation class (MFC)
dll is not found on your computer you are prompted to
install this kit; without these dlls the software will not run!
If you need to install this kit at a later date you will find it
in the Windows Start menu.
“The Microsoft Visual C++ 2010 Redistributable Package
installs runtime components of Visual C++ Libraries
required to run applications developed with Visual C++
on a computer that does not have Visual C++ 2010
installed.
This package installs runtime components of C Runtime
(CRT), Standard C++, ATL, MFC, OpenMP and MSDIA
libraries.”

June 2, 2013 Copyright 2013 Simon Brown Page 8 of 62
2 Starting
When you start the console the layout and appearance is restored from the previous session
(if any).
2.1 Local
To start a radio you select Radio from the ribbon bar. The Select
Radio window is displayed. If you do not have any radio definitions
you are prompted to open the Radio Definitions window,
alternatively just press the Definitions button to modify your
definitions.
In the above example a definition exists for n RFSpace NetSDR radio.
1. Select the radio definition to start,
2. Select a frequency span
3. I (the frequency bandwidth returned by the radio),
4. Press Start.
June 2, 2013 Copyright 2013 Simon Brown Page 9 of 62
Note: a higher frequency span will require more data processing, so if using an older or
under-powered computer select only the required span.
If the display appears to be inverted then select the Invert spectrum (Swap IQ) check box.
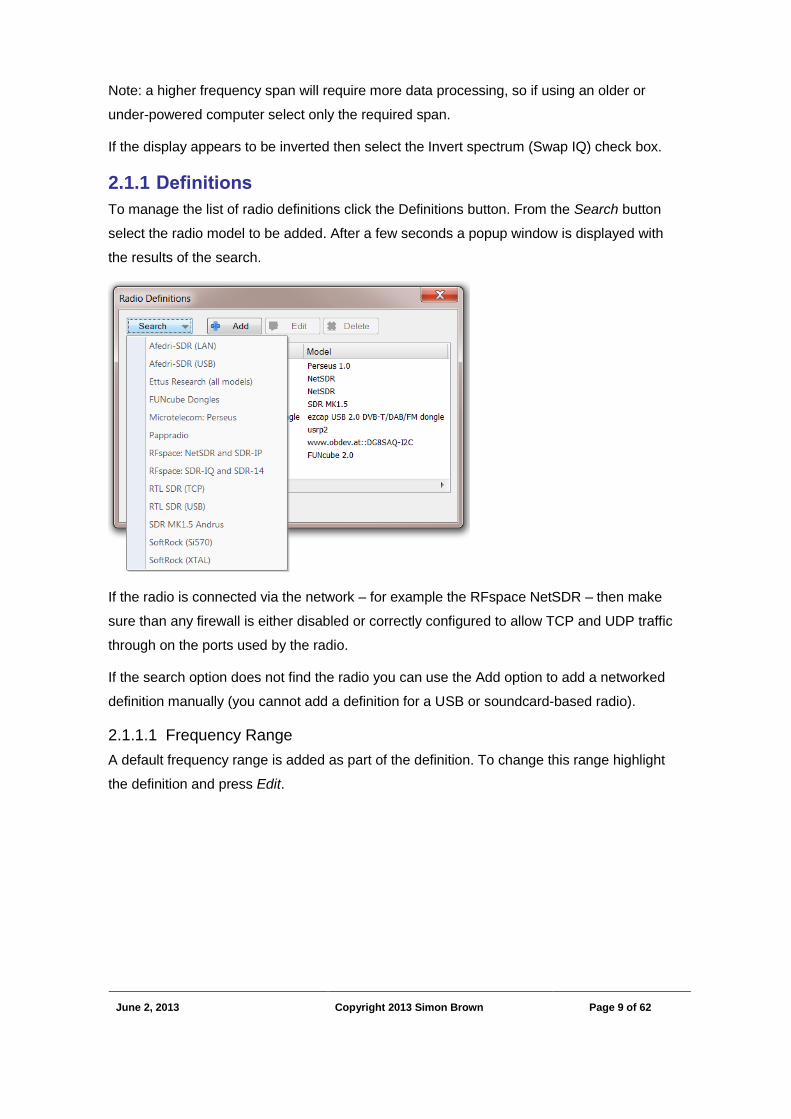
2.1.1 Definitions
To manage the list of radio definitions click the Definitions button. From the Search button
select the radio model to be added. After a few seconds a popup window is displayed with
the results of the search.
If the radio is connected via the network – for example the RFspace NetSDR – then make
sure than any firewall is either disabled or correctly configured to allow TCP and UDP traffic
through on the ports used by the radio.
If the search option does not find the radio you can use the Add option to add a networked
definition manually (you cannot add a definition for a USB or soundcard-based radio).
2.1.1.1 Frequency Range
A default frequency range is added as part of the definition. To change this range highlight
the definition and press Edit.

June 2, 2013 Copyright 2013 Simon Brown Page 10 of 62
With the Edit option you can change any field in the radio definition.
2.1.2 Converters
If you are using a down-converter, for example converting 144-146MHz to 28-30MHz select
this from the Converter dropdown.
2.1.2.1 Definitions
Select Manager from the dropdown to display the Converter Definitions window.
Use this window to define down-converter and up-converter offsets. Simply enter the
frequency difference and select down-converter or up-converter.
Down-Converter
An example of a down-converter receives signals in the range 88 to 108 MHz and outputs
the same signals in the range 8 to 28 MHz, that is 80 MHz lower.
June 2, 2013 Copyright 2013 Simon Brown Page 11 of 62
Up-Converter
An example of an up-converter receives signals in the range 1 to 30 MHz and outputs these
same signals in the range 151 to 180 MHz, which is 150 MHz higher.
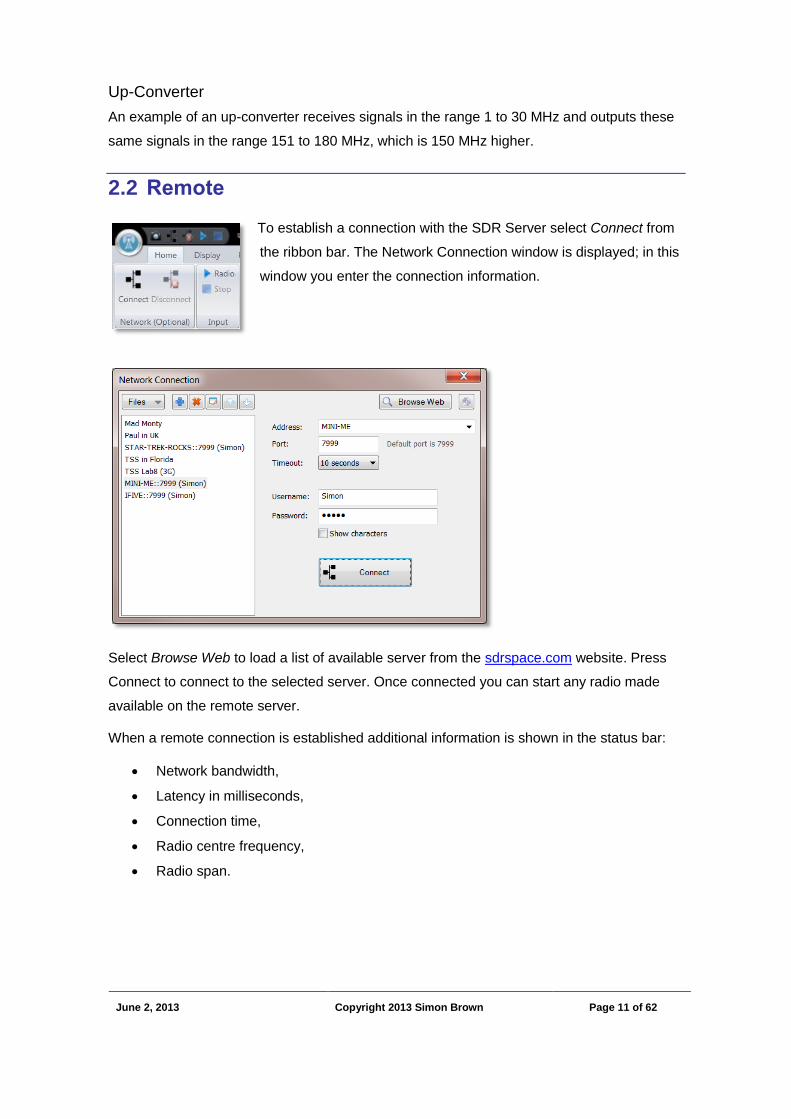
2.2 Remote
To establish a connection with the SDR Server select Connect from
the ribbon bar. The Network Connection window is displayed; in this
window you enter the connection information.
Select Browse Web to load a list of available server from the sdrspace.com website. Press
Connect to connect to the selected server. Once connected you can start any radio made
available on the remote server.
When a remote connection is established additional information is shown in the status bar:
Network bandwidth,
Latency in milliseconds,
Connection time,
Radio centre frequency,
Radio span.

June 2, 2013 Copyright 2013 Simon Brown Page 12 of 62
3 Main Display
The main display window gives you a full overview of the signals in radio’s span. To change
the display span select an option from the Span button in the toolbar.
3.1 VFO Selection
Select the active VFO with the blue A, B… buttons in the toolbar. The active VFO is
highlighted; this is the VFO whose frequency is adjusted by clicking and dragging the VFO
bar with the left mouse button.
3.2 Display Quality
The waterfall display options are selected from the Display pane in the ribbon bar.
3.2.1 Palette
The palette is the colour scheme; just select whichever you find the most pleasing.

June 2, 2013 Copyright 2013 Simon Brown Page 13 of 62
3.2.2 Speed
The number of lines per second, the default is 20. Due to the mathematics of FFT
computation a faster display results in a lower quality display (see also Resolution).
3.2.3 Resolution
By using FFT Overlaps the resolution of the display is increased as the expense of more
CPU usage. An additional side-effect of increased resolution is increased blurring in the time
domain (vertical axis), however you will normally be more interested in higher frequency
resolution.
3.2.4 Spectrum Scale
Adjust the spectrum scale to enhance the signals in the visible portion of the spectrum
scope.
3.2.5 Timestamps
Adds timestamps to the waterfall display.
3.2.6 Contrast
There are two options which are selected from the Contrast panel in the ribbon bar’s Display
pane, Default and Manual.
Default
Default uses an advanced algorithm to enhance as much data as possible.
Manual
Manual gives full control to the user using the selection window to the right of the display.
Use the mouse to adjust the contrast range.

June 2, 2013 Copyright 2013 Simon Brown Page 14 of 62
4 Tuning
There are several ways you can adjust the radio’s frequency.
Main tuning bar,
Frequency explorer,
Band definitions,
Direct entry.
4.1 Main Tuning Bar
This is displayed at the bottom of the main window.
The current display span is shown in red; the yellow vertical line indicates the centre
frequency. Drag the span at either the left or right edge of the red bar. Change the centre
frequency by dragging the bar.
4.2 Frequency Explorer
The explorer gives you a quick indication of the current span relative to the radio’s frequency
range.
The current display span in the main window is shown in red, as
you move your mouse over the grid the corresponding span is
shown in green; select this span by clicking with the mouse’s left-
button.
June 2, 2013 Copyright 2013 Simon Brown Page 15 of 62
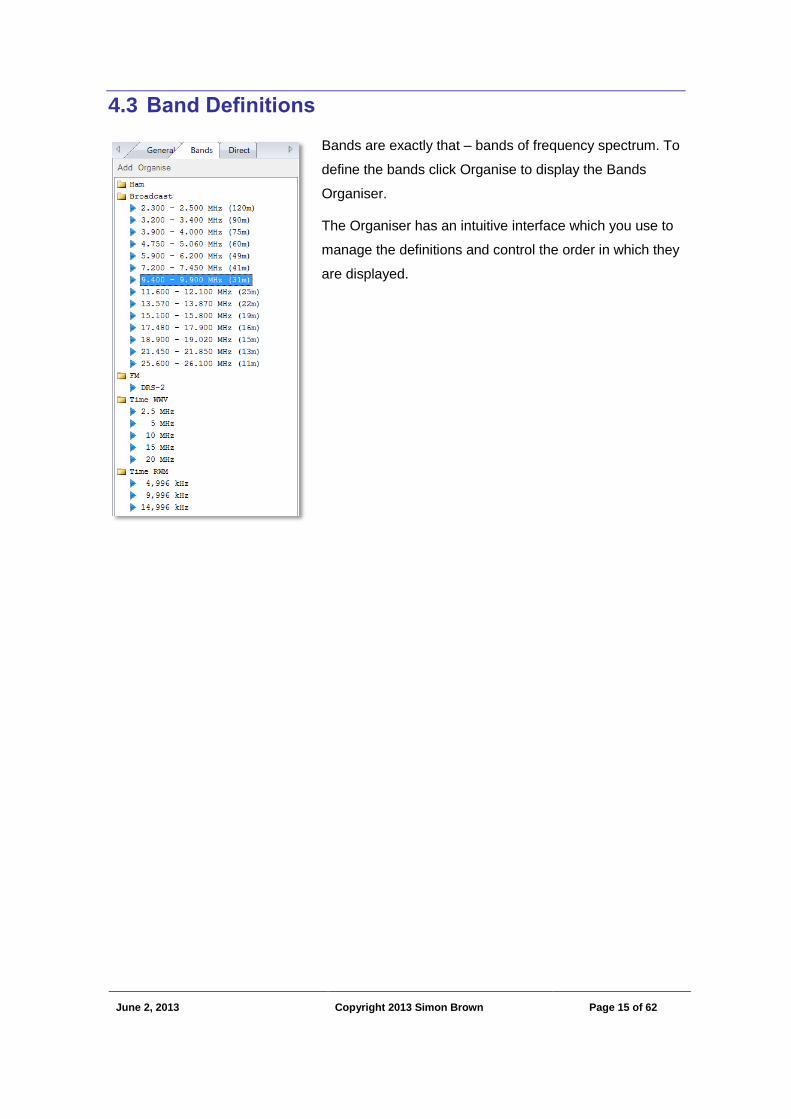
4.3 Band Definitions
Bands are exactly that – bands of frequency spectrum. To
define the bands click Organise to display the Bands
Organiser.
The Organiser has an intuitive interface which you use to
manage the definitions and control the order in which they
are displayed.

June 2, 2013 Copyright 2013 Simon Brown Page 16 of 62
4.4 Direct Entry
Use this option to change the centre frequency and span.
Use the chevron (<<) buttons to select the current
frequency or span.

June 2, 2013 Copyright 2013 Simon Brown Page 17 of 62
5 Radio Options
Radio options are selected from the Options panel in the ribbon bar Home pane.
The available options depend on the currently started radio.
IF gain
RF gain
Antenna selection
Radio Configuration
5.1 Radio Configuration
The configuration options depends on the currently started radio, this example is for the
Perseus.

June 2, 2013 Copyright 2013 Simon Brown Page 18 of 62
6 VFOs
The term VFO stands for variable frequency oscillator, in SDR software a window where you
select a frequency for further processing such as demodulation, decoding etc.
The console supports up to six VFOs which can be enabled independent of each other.
6.1 Selection
In the ribbon bar select the Home pane to display the VFO options. By default only two VFOs
(A and B) are enabled; to enable more VFOs select Options, the VFOs | Basic page controls
the available VFOs.
6.1.1 Enabling
A VFO must be enabled (started) before you can tune, to enable a VFO click the Enable
button in the VFO’s toolbar. The VFO’s frequency must be within the range currently returned
by the radio, otherwise nothing is displayed and nothing is heard (no audio).

June 2, 2013 Copyright 2013 Simon Brown Page 19 of 62
6.2 Options
6.2.1 VFOs | Basic
Here you select:
Number of visible VFOs,
Position of the signal strength meter,
Style and size of the signal strength meter,
Whether the VFO should be centered on the demodulation frequency after the user
has finished dragging the filter bar.

June 2, 2013 Copyright 2013 Simon Brown Page 20 of 62
6.2.2 VFOs | Scroll
Here you select the step size when scrolling with the mouse wheel. Values are saved for
each mode.
Press CTRL for finer tuning (step size / 10).
Press SHIFT for coarser tuning (step size * 10).
6.3 Tuning
Select Tuning to display the large tuning window where:
You enter the frequency, and
A larger signal strength meter is displayed.
To adjust the frequency, position the cursor over a digit, then:
Click with the left mouse button to increment,

June 2, 2013 Copyright 2013 Simon Brown Page 21 of 62
Click with the right mouse button to decrement,
Scroll the mouse wheel to adjust up/down.
6.4 Mode & Filter
All common audio modes are supported; for each mode a preset list of filters widths is
available. To display this window just select the Freq / Mode / Filter button on the centre
toolbar.
This windows shows both VFO-A and VFO-B are available, the current VFO being VFO-A.
The current mode is LSB (lower sideband), the filter width is 2,800Hz (from 200 to 3000 Hz).
The ‘L’ and ‘U‘entries in the menu select the Lower or Upper sideband variant of the current
mode.
6.4.1 Mode
To change the mode select an option from the AM, CW … menu.
6.4.1.1 AM
There are several AM demodulators:
Basic AM
Synchronous AM (SAM)
Exalted-carrier selectable-sideband (ECSS)
The most commonly used is SAM.
6.4.1.2 CW
Two versions of CW are available:
1. Lower sideband, and
2. Upper sideband.

June 2, 2013 Copyright 2013 Simon Brown Page 22 of 62
Normally you use upper sideband, the CW pitch (see Modes on page 49) is shown in the
VFO window to aid tuning. Demodulation for CW is the same as SSB.
6.4.1.3 FM
Various variants of FM are available: narrow, wide and broadcast.
6.4.1.3.1 Narrow FM
Bandwidth maximum 16 kHz, high-pass filter 150Hz (to remove CTCSS and similar access
tones), 60us de-emphasis.
6.4.1.3.2 Wide FM
Bandwidth maximum 48 kHz, no high-pass filter, no de-emphasis.
6.4.1.3.3 Broadcast FM
Bandwidth maximum 192 kHz, 15kHz low-pass filter, either 50us or 75us de-emphasis
(depending on Region, see page 54).
6.4.1.3.4 Stereo FM
The same as broadcast FM except a stereo demodulator is used. See also FM Stereo on
page 36.
6.4.1.4 SSB
All common SSB variants are supported:
lower sideband,
upper sideband,
double sideband.
6.4.2 Filter
When you change the mode your preset list of filter widths is updated for the new mode
selection. Click More… to display the Filter Definitions window.

June 2, 2013 Copyright 2013 Simon Brown Page 23 of 62
You can also change the filter by simply dragging the edges of the filter bar in the VFO
window’s scope.
6.5 Audio
The audio menu in the VFO window is used to select:
Enable audio for the current VFO only (if not checked than audio is enabled for all
VFOs which are not muted).
Mute all VFOs.
Channels – left, right or left and right.
Soundcard and driver type.

June 2, 2013 Copyright 2013 Simon Brown Page 24 of 62
6.5.1 ASIO Support
The standard Windows Driver Mode (WDM) drivers have higher latency than ideally required
for a low-latency application such as a SDR console. To overcome the latency issues with
WDM the ASIO model was introduced.
6.5.1.1 What is ASIO?
Audio Stream Input/Output (ASIO) is a computer sound card driver protocol for digital audio
specified by Steinberg, providing a low-latency and high fidelity interface between a software
application and a computer's sound card.
6.5.1.2 ASIO4ALL
For minimum latency use ASIO drivers if available; if not are available for your hardware
there is always ASIO4ALL, the Universal ASIO Driver for WDM Audio. See
http://www.asio4all.com/ for downloads, it takes just a minute or two to download and install
this driver.
Note: the ASIO4ALL driver requires exclusive access to the soundcard, so before starting the
console make sure the soundcard is not in use by other programs.
For more information about ASIO drivers see the Wikipedia entry:
http://en.wikipedia.org/wiki/Audio_Stream_Input/Output .
6.5.2 Pseudo Stereo
Enable and configure the Pseudo Stereo effect from the Home pane of the ribbon bar.
Pseudo Stereo processing generates two channels
(stereo) from one channel (mono). The result can help in
decoding some signals such as Morse code (CW) and
'digging' weak speech out of the background noise.
For more information see Pseudo Stereo on page 52.
6.6 DSP Options
All the common digital signal processing (DSP) options are available:
Automatic gain control (AGC),
CW peak filter,
Noise blanker,
Noise reduction,
Notch,

June 2, 2013 Copyright 2013 Simon Brown Page 25 of 62
Squelch
6.6.1 AGC
Automatic gain control (AGC) is an adaptive system found in many electronic devices. The
average output signal level is fed back to adjust the gain to an appropriate level for a range
of input signal levels. For example, without AGC the sound emitted from an AM radio
receiver would vary to an extreme extent from a weak to a strong signal; the AGC effectively
reduces the volume if the signal is strong and raises it when it is weaker. (From Wikipedia,
the free encyclopedia.)
The AGC system in this software has three presets which are fully adjustable:
Knee – the minimum signal level at which the AGC is applied. Below this value there
is no AGC.
Slope – the increase in out as the input signal varies between the lower threshold
(knee) and 0dB.
Hang – the AGC is inactive for the hang time after a signal peak caused AGC gain
reduction.
Decay – the time taken for the AGC gain to drop down to zero.

June 2, 2013 Copyright 2013 Simon Brown Page 26 of 62
6.6.2 CW Peak
The CW peak filter is a very simple infinite impulse response (IIR) peak (resonator) filter. The
level slider adjusts the filter gain.
6.6.3 Noise Blanker
The noise blanker is designed to remove impulse noise, for example the ‘clicks’ generated by
an electric fence. The algorithm maintains a moving average of the input signal and removes
pulses above a user-definable threshold.
6.6.4 Noise Reduction
There are three noise reduction algorithms in this software:
1. LMS uses the Least Mean Square adaptive filtering algorithm. If the input signal
exceeds the threshold then the signal is processed.
2. RTA uses algorithms developed by Intel for the Microsoft Real-Time audio codec.
3. EMNS is the Ephraim-Malah Noise Suppressor originally described in Y. Ephraim
and D. Malah. Speech Enhancement Using a Minimum Mean-Square Error Short-
Time Spectral Amplitude Estimator. IEEE Trans. ASSP, Vol. 32, No. 6, Dec. 1984,
pp. 1109-1121.

June 2, 2013 Copyright 2013 Simon Brown Page 27 of 62
6.6.5 Notch
The notch filter is an Automatic filter with level adjustment. It is based on the Least Mean
Square adaptive filtering algorithm used in the noise reduction, for the notch filter the
parameters are set so that the constant signal components such as heterodynes are
removed.
6.6.6 Squelch
Two different algorithms are available:
Frequency Modulation (FM) and
Other
signals.
6.7 Recording
The audio recording options are contained in the Program Options, see page 44 for
configuration options.
The audio recorder supports two formats, Windows Media Audio (WMA) and standard WAV.
Wma requires less storage and has the advantage that tags can be embedded in the
recording.
This software does not have an audio player – these are included in Windows and are freely
available on the internet.

June 2, 2013 Copyright 2013 Simon Brown Page 28 of 62
7 Audio Spectrum
The audio spectrum window serves two purposes:
1. Control the optional graphical equaliser, and
2. Display the audio spectrum.
7.1 Graphical Equaliser
When you select the Show option the equaliser sliders are displayed, the slider range is
20dB. Graphical equalisers are implemented via a series of Biquad IIR filters, one filter per
slider.
In the above example you see the current spectrum in blue and the theoretical frequency
response as a dashed black line.
7.2 Display
There are two display formats:
1. Waterfall and
2. Spectrum.
An example of each format is shown below. The Spectrum display has either a linear or
logarithmic frequency axis.

June 2, 2013 Copyright 2013 Simon Brown Page 29 of 62

June 2, 2013 Copyright 2013 Simon Brown Page 30 of 62
8 Data Recorder
The data recorder saves raw data received from the input source as a series of either
complex 32-bit floating point values or
complex 16-bit integer values
in a WAV file (the VITA-49 format will be supported at a later date). These files can be played
back and/or analysed as required.
8.1 Recording
The recording options are selected in the program options, see page 45. Select the
Recording option from the Display / Data (IQ) Recordings option in the ribbon bar.
When you make a recording a series of WAV files are created in the selected folder. The
filenames contain the data and time of the start of the recording.
The data size can be computed from this formula:
Radio bandwidth * 2 (I + Q) * sample size (16-bit or 32-bit).
So if you have a radio bandwidth of 500kHz and a sample size of 32-bits then disk space
required per hour is:
3600 (seconds per hour) * 500,000 (radio bandwidth) * 2 (I + Q) * 4 (sample size)
14,400 megabytes or 14.4 gigabytes.

June 2, 2013 Copyright 2013 Simon Brown Page 31 of 62
8.2 Playback
Note: you can only play these files with this software, not standard media players.
Select the Playback option from the Display / Data (IQ) Recordings option in the ribbon bar.
When you play back a recording all the demodulation and display options are available.
You can navigate to a specific time in the playback by selecting the Navigate tab.

June 2, 2013 Copyright 2013 Simon Brown Page 32 of 62
9 Favourites
Favourites are displayed in the Favourites pane of the ribbon bar.
9.1 Add
Select the Add option to add a new definition which is based on the current settings. The
Favourite Definition window selects the properties which are saved in the definition.
Organise your definitions by use of the Group dropdown – either select an existing definition
or just type a new name in this field.
9.2 Organiser
A powerful, yet easy to use window where you organise the Favourites layout display.
To rename a group in the Available Groups list simply double-click on an entry in the list and
the format changes to enable editing.

June 2, 2013 Copyright 2013 Simon Brown Page 33 of 62

June 2, 2013 Copyright 2013 Simon Brown Page 34 of 62
10 Memories
Memories are displayed in the Memories pane of the ribbon bar. There are 9 banks with 10
memories per bank.
10.1 Save
To save the current frequency and mode either:
Click on a Save icon (the small floppy disk), or
Select Save from the dropdown menu displayed when you click the dropdown arrow.
The memory title is created automatically and cannot be changed.
10.2 Clear
To clear (erase) a memory definition select Clear from the dropdown menu displayed when
you click the dropdown arrow.
10.3 Apply
To apply a memory either click the Memory icon (a yellow folder with a star) or select Apply
from the dropdown menu displayed when you click the dropdown arrow.

June 2, 2013 Copyright 2013 Simon Brown Page 35 of 62
11 Layout
Click the round ribbon bar button located in the top-left of the display to select Layout
options.
The available options are:
Default - restores the default display layout.
Custom Save - saves the current layout.
Custom Restore - restores the custom layout.

June 2, 2013 Copyright 2013 Simon Brown Page 36 of 62
12 Extras
A brief description of features of this software which don’t belong anywhere else.
12.1 Clock
Current time, date and zone. Selected from the Display pane of the ribbon bar.
12.2 FM Stereo
When demodulating broadcast FM you can use the FM Stereo window to display the
demodulated spectrum along with RDS information. For a good description of the FM Stereo
signal see http://en.wikipedia.org/wiki/FM_broadcasting .

June 2, 2013 Copyright 2013 Simon Brown Page 37 of 62

June 2, 2013 Copyright 2013 Simon Brown Page 38 of 62
13 Tools
The Tools pane of the ribbon bar contains support options and additional SDR programs.
13.1 Support
The support options are:
Registry – displays the registry editor opened at the folder where this program’s
settings are stored.
Program Installation – browse the files in the installation folder with Windows
Explorer.
User Files – browse the settings files created by this program which are stored in you
private folders.
Program Options – see page 42.
13.2 Programs
The programs which can be started are:
Licence Manager – starts the licence manager which you use to diagnose licence
problems and load new licences.
Server Manager – for configuring the optional remote server.
Data File Analyser – for analyzing data file recordings.
DX Cluster – for radio amateurs only, this is a website showing the most interesting
stations which are currently active.

June 2, 2013 Copyright 2013 Simon Brown Page 39 of 62
13.3 DSP
13.3.1 Stress Test
This option is used to create an IQ test file which in turn is used to stress-test the DSP engineer-
ing in this program. The IQ test file contains a strong signal which is swept across part or all of
the file's data bandwidth. This signal is usually combined with a much weaker beacon signal;
when the strong sweep signal is outside the filter range (the frequency range passed to the de-
modulation code from the decimator) there should not be any interference with the beacon.
The file is centered on 10Mhz.
13.3.1.1 Creating A File
Sweep Signal
The bandwidth is selected to control the actual half-band and fractional decimation filters used
to generate the signal which is passed to the DSP demodulation. A higher bandwidth requires
more half-band filtering. If the half-band filters are not correctly designed then unwanted signals
will be created.
The sweep width is the bandwidth over which the signal is swept.
The sweep speed is the rate of change in signal frequency.
The sweep count is the number of complete sweeps in the file.
The signal power is the maximum signal strength of the swept signal.
Beacon
The beacon is a weak signal (typically at least 120 dB lower in strength than the sweep signal)
which is monitored while the file is being played.
Noise

June 2, 2013 Copyright 2013 Simon Brown Page 40 of 62
Optionally add Gaussian noise to the signal to simulate real-world signals with noise.
13.3.1.2 Playing a File
When you play a file the aim is to be able to hear the beacon signal while the much stronger
sweep signal is outside the frequency range passed to the demodulation code from the decima-
tor.
Select CW-U and open the filter to the maximum 4 kHz width to allow all demodulated
signal through to the speakers.
Display the Audio Spectrum window to see the beacon signal.
Center the VFO on 10MHz.

June 2, 2013 Copyright 2013 Simon Brown Page 41 of 62
14 Licence
The licence information is shown in the logfile. To display the logfile select Logfile from the
Display pane of the ribbon bar.
14.1 Sample
13:40:03> Licence
13:40:03> Activation key ....: EHHX0-D0Y00-91EGD-P8A8R-4N2DZ-
MN477J
13:40:03> Computer key ......:
13:40:03> Computer name .....: STAR-TREK-ROCKS
13:40:03> Current date ......: 04/22/13 13:40:03
13:40:03> Status ............: Valid
13:40:03> Valid .............: Yes
13:40:03> Expiration ........: 09/30/13 00:00:00
13:40:03> Duration (days) ...: 0
13:40:03> Days left ........: 162
13:40:03> Needs activation ..: No
13:40:03> Version ...........: 2.0 (2.0)
13:40:03> -
13:40:03> Activation key ....: E4KS0-D0Z00-51FJD-C8N8N-442I5-
RGCU3C
13:40:03> Computer key ......:
13:40:03> Computer name .....: STAR-TREK-ROCKS
13:40:03> Current date ......: 04/22/13 13:40:03
13:40:03> Status ............: Valid
13:40:03> Valid .............: Yes
13:40:03> Expiration ........: 05/31/13 00:00:00
13:40:03> Duration (days) ...: 0
13:40:03> Days left ........: 40
13:40:03> Needs activation ..: No
13:40:03> Version ...........: 2.0 (2.0)

June 2, 2013 Copyright 2013 Simon Brown Page 42 of 62
15 Program Options
15.1 Performance
15.1.1 CPU
This software is designed to run on anything from a 1.6GHz ATOM processor to the latest i7.
When a lower-powered system is used it is necessary to reduce the processing. Normally
you let the software decide whether it is running on a low or high-power system; here you
can override this setting.
The logic used to select high-power is:
Two or more cores
SIMD extensions 4.1 or 4.2
Clock frequency of 2GHz or higher

June 2, 2013 Copyright 2013 Simon Brown Page 43 of 62
15.1.2 Queues
This diagnostic page shows the background thread unprocessed queue sizes (length). If the
background threads are not running properly the queue sizes will increase.
15.1.3 Threads
This diagnostic page shows the per-background thread usage and audio latency.

June 2, 2013 Copyright 2013 Simon Brown Page 44 of 62
15.2 Recording
15.2.1 Audio
The page contains audio recording configuration. The software supports two formats:
1. Windows Media Audio (WMA) is an audio data compression technology developed
by Microsoft. This is used in the normal lossy format.
2. Waveform Audio File Format (WAVE, or more commonly known as WAV due to its
filename extension), (also, but rarely, named, Audio for Windows) is a Microsoft and
IBM audio file format standard for storing an audio bitstream on PCs. This is a
lossless format.
WMA uses less storage (disk space) than WAV and supports tags which are displayed when
the file is played in Windows Media Player. When using WMA select the output rate; a higher
rate has better quality at the cost of more storage.
WAV: The maximum audio frequency is half the sample rate, the file size is proportional to
the sample rate. Stereo recordings ignore the sample rate and use 48kHz instead.
Cache: a pre-record cache is added to the start of the actual recording. Normally only 5 or 10
seconds is required.

June 2, 2013 Copyright 2013 Simon Brown Page 45 of 62
15.2.2 Data
Data recordings contain the raw IQ data read from the SDR radio, this can be played back
for later signal analysis.
Two sample rates are supported; 32-bit samples contain higher precision data but require
twice as much storage.
The data is stored in a series of files, select the individual file size.
The pre-record cache is added to the start of the recorded data. Normally only 5 or 10
seconds is required.
Data is stored using the Waveform Audio File Format (WAVE, or more commonly known as
WAV), later VITA-49 will be used.

June 2, 2013 Copyright 2013 Simon Brown Page 46 of 62
15.3 VFOs
15.3.1 Basic
The page contains basic VFO configuration:
The maximum number of VFO windows which are available,
The position, type and size of the signal strength meter,
Whether the VFO should be centered on the demodulation frequency after the user
has dragged the frequency.

June 2, 2013 Copyright 2013 Simon Brown Page 47 of 62
15.3.2 Scroll
For each mode select the step size when scrolling with the mouse wheel. The same value is
used when rounding the VFO frequency while dragging the frequency bar.
15.4 External Controllers
An SDR radio is a radio ‘with no knobs’, but that doesn’t stop you adding a MIDI device such
as a Hercules DJ console or Steinberg MIDI controller.

June 2, 2013 Copyright 2013 Simon Brown Page 48 of 62
To edit a definition double-click on the entry, the editor window is displayed.
Select the MIDI device from the dropdown at the top, press or adjust the correspoding button
/ slider / wheel and press OK to use the currently displayed values.

June 2, 2013 Copyright 2013 Simon Brown Page 49 of 62
15.5 Modes
This page contains mode-specific settings.
The CW pitch is the frequency used when setting the VFO frequency – for example setting a
VFO frequency of 7.050.000 with a CW pitch of 500 Hz results in a CW signal at 7.050.000
being heard at 500 Hz.

June 2, 2013 Copyright 2013 Simon Brown Page 50 of 62
15.6 Firewall
This software uses two TCP connections for communicating between the console and
server, also some radios such as the Net-SDR use TCP and UDP, so you must open up the
correct ports in your firewalls.
15.6.1 Console
The console connects to the server using TCP, the default port is 7999 (the port is shown in
the Network Connection window on the server).
TCP outgoing on port 7999
15.6.2 Server
The server accepts TCP connections on port 7999 (as selected in the Network Connection
window on the server).
TCP incoming on port 7999
15.6.3 Radios
Ethernet-based radios use TCP and/or UDP so you must know which ports are being used.
15.6.3.1 RFspace
The RFspace Net-SDR and SDR-IP use the same port for incoming TCP connection and
outgoing UDP packets, the default is 50,000. This port assignment is user-configurable.
TCP outgoing on port 50,000

June 2, 2013 Copyright 2013 Simon Brown Page 51 of 62
UDP incoming on port 50,000
15.6.3.2 Ettus Research
The Ettus radios use a default port of 49152 for UDP control and receiving UDP packets.
This port assignment is user-configurable.
UDP outgoing and incoming on port 49152.
15.7 IP Server
The IP Server provides support for add-on programs by sending an IQ data stream by
sending data and control commands using TCP. The add-on programs connect to the
console using the port and one of the accounts specified here.

June 2, 2013 Copyright 2013 Simon Brown Page 52 of 62
15.8 Network
Displays network throughput when connected to a remote server.
The bandwidth settings are defined on the remote server.
15.9 Pseudo Stereo

June 2, 2013 Copyright 2013 Simon Brown Page 53 of 62
Pseudo Stereo processing generates two channels (stereo) from one channel (mono). The
result can help in decoding some signals such as Morse code (CW) and 'digging' weak
speech out of the background noise.
The first step is to add a small delay (known as the Haas Effect); this delay is anything
between 1 and 50 milliseconds.
Next split the signal into high and low frequencies by using simple (order = 1) IIR filters; the
response curve of these filters is deliberately not very steep but is enough to add further
spatial awareness.
Finally there is the 'Outside of the Speaker' trick, this is simply inverting the phase of either
the left or right channel, the sound mow appears to come from somewhere outside of the
speakers. This is not suitable for use with headphones.
Of course there are more advanced algorithms, but these are either patented or more
applicable to re-mastering of old mono records, not communications talk or Morse code.
Suggested settings are:
Delay: 10 ms
Crossover: L/R, 600 Hz
Phase invert: Right (if using headphones select None).
Note: Pseudo Stereo is only available when the VFO is using both left and right channels -
see the Audio menu in the VFO window, make sure Channels is set to L + R.

June 2, 2013 Copyright 2013 Simon Brown Page 54 of 62
15.10 Region
This page defines settings for the FM broadcast demodulation. Just select the correct region
(USA, rest of world).
15.11 Spectrum & Waterfall
The spectrum scope can run one of two modes:

June 2, 2013 Copyright 2013 Simon Brown Page 55 of 62
1. Low quality (default),
2. High quality (uses more CPU).
The waterfall displays FFT data, when the FFT is generated a windowing function is applied
to the data to enhance the display, select the windowing function that produces the best
results for your system.
15.12 UDP Broadcast
Programs such as MATLAB (from MathWorks) and GNU Radio can receive data via UDP
from third-party software such as this program. Why not let SDR Console deliver this data -
this saves you time interfacing to many different radios and makes life so much simpler.
In this window you define up the three addresses to which the UDP data read from your SDR
radio is sent - in UDP terminology this data is broadcast. For each definition you also select
the packet size; bigger is more efficient but you must take Maximum Transmission Unit
(MTU) size in any routers into account. Each packet contains multiple IQ samples; each
sample is 16 bits, so the size of each IQ sample is 2 * 2 = 4 bytes.
If UDP Broadcast is currently enabled you can update the current settings by pressing Apply
now.
The frequency span is the same as the frequency span returned from the radio; this is shown
in the status bar. The network bandwidth will be 4 x this span as the samples are 16-bit
signed integer, in addition there will be UDP packet overhead which will depend on whether
you are using IPv4 or IPv6.

June 2, 2013 Copyright 2013 Simon Brown Page 56 of 62
This only works with local radio connections, not in network mode.

June 2, 2013 Copyright 2013 Simon Brown Page 57 of 62
16 Troubleshooting
Here are suggested solutions to common problems you may encounter.
16.1 Firewalls
Firewall
This software uses two TCP connections for communicating between the console and server,
also some radios such as the Net-SDR use TCP and UDP, so you must open up the correct ports
in your firewalls.
Console
The console connects to the server using TCP, the default port is 7999 (the port is shown in the
Network Connection window on the server).
TCP outgoing on port 7999
Server
The server accepts TCP connections on port 7999 (as selected in the Network page).
TCP incoming on port 7999
Radios
Ethernet-based radios use TCP and/or UDP so you must know which ports are being used.
RFspace
The RFspace Net-SDR and SDR-IP use the same port for incoming TCP connection and outgoing
UDP packets, the default is 50,000. This port assignment is user-configurable.
TCP outgoing on port 50,000
UDP incoming on port 50,000
Ettus Research
The Ettus radios use a default port of 49152 for UDP control and receiving UDP packets. This
port assignment is user-configurable.
UDP outgoing and incoming on port 49152.

June 2, 2013 Copyright 2013 Simon Brown Page 58 of 62
16.2 VFO - No Audio or Data
If a VFO does not display data and does not generate audio, make sure:
The VFO is enabled,
The VFO frequency is within the current frequency range of the radio,
The correct soundcard is selected,
The audio is not muted,
The audio level is not turned down.

June 2, 2013 Copyright 2013 Simon Brown Page 59 of 62
Index
2010 C++ Redistributable ................................... 6
64-bit .................................................................. 6
AGC .................................................................. 25
AM .................................................................... 21
ECSS ............................................................. 21
SAM.............................................................. 21
Antenna selection ............................................ 17
ASIO ................................................................. 24
ASIO4ALL ...................................................... 24
ASIO4ALL
Exclusive access ........................................... 24
Audio ................................................................ 23
Audio Spectrum ............................................... 28
Band Definitions ............................................... 15
Clock ................................................................. 36
Converter
Down ............................................................ 10
Up ................................................................ 11
Converters ........................................................ 10
CW .................................................................... 21
CW Peak ........................................................... 26
Data File Analyser ............................................ 38
Data Recorder .................................................. 30
Playback ....................................................... 31
Recording ..................................................... 30
Definitions
Converters ................................................... 10
Radio .............................................................. 9
Direct Entry ...................................................... 16
Display
Spectrum Scale ............................................ 13
Display
Palette .......................................................... 12
Quality ......................................................... 12
Span ............................................................. 12
Speed ........................................................... 13
Display
Timestamps.................................................. 13
Display
Contrast ....................................................... 13
DSP Options ..................................................... 24
DX Cluster......................................................... 38
Enabling............................................................ 18
External Controllers ......................................... 47
Favourites ........................................................ 32
Add ............................................................... 32
Organiser ..................................................... 32
Filter ................................................................. 22
Firewall ......................................................... 9, 50
Firewalls ........................................................... 57

June 2, 2013 Copyright 2013 Simon Brown Page 60 of 62
FM .................................................................... 22
Broadcast ..................................................... 22
Narrow ......................................................... 22
Stereo .................................................... 22, 36
Wide............................................................. 22
Frequency Explorer .......................................... 14
Frequency range
Default ........................................................... 9
Frequency Range ............................................... 9
Frequency span .................................................. 8
GNU Radio ........................................................ 55
Graphical Equaliser .......................................... 28
Spectrum...................................................... 28
Waterfall ...................................................... 28
IF gain ............................................................... 17
Installation folder ............................................... 6
Installing ............................................................. 6
Invert spectrum.................................................. 9
Layout .............................................................. 35
Custom ......................................................... 35
Licence ......................................................... 6, 41
Licence Manager .............................................. 38
Local ................................................................... 8
Main Display .................................................... 12
Main Tuning Bar ............................................... 14
MATLAB ........................................................... 55
Memories ......................................................... 34
Mode ................................................................ 21
Modes .............................................................. 49
NetSDR ............................................................... 8
Network ........................................................... 52
Noise Blanker ................................................... 26
Noise Reduction ............................................... 26
Notch................................................................ 27
Program Options .............................................. 42
External Controllers ..................................... 47
Firewall ........................................................ 50
FM Broadcast ............................................... 54
IP Server ....................................................... 51
Modes .......................................................... 49
Network ....................................................... 52
Performance ................................................ 42
Recording
Audio ....................................................... 44
Data ......................................................... 45
Region .......................................................... 54
Spectrum & Waterfall .................................. 54
UDP Broadcast ............................................. 55
VFOs ............................................................. 46
Pseudo Stereo ............................................ 24, 52
Radio Configuration ......................................... 17
Radio Options ................................................... 17
Recording ......................................................... 27
Registry ............................................................ 38
Remote ............................................................. 11
Resolution ........................................................ 13

June 2, 2013 Copyright 2013 Simon Brown Page 61 of 62
RF gain .............................................................. 17
Server Manager................................................ 38
Spectrum & Waterfall ...................................... 54
Squelch ............................................................. 27
SSB ................................................................... 22
DSB ............................................................... 22
LSB ............................................................... 22
USB............................................................... 22
Starting ............................................................... 8
Status bar ......................................................... 11
Stereo ............................................................... 52
Swap IQ .............................................................. 9
System Requirements ........................................ 6
Tools ................................................................. 38
DSP ............................................................... 39
Troubleshooting ............................................... 57
Tuning .............................................................. 14
UDP Broadcast ................................................. 55
VFO
Selection ...................................................... 12
VFOs ................................................................. 18
Enabling ....................................................... 18
Filter ............................................................. 21
Mode ............................................................ 21
Options ........................................................ 19
Scroll ............................................................ 20
Selection ...................................................... 18
Step Size ....................................................... 20
Tuning .......................................................... 20

The contents of this document may be reproduced in any form and by any means either in part or as a complete
document with changes if required.


