

**T22*R - MMC (07/00)
Toyota Genuine Audio
INSTALLATION INSTRUCTIONS
FOR
TOYOTA MOTOR CORPORATION3A3RT22/W-1.pdf
Avensis (RHD)

Avensis (T22) TOYOTA GENUINE AUDIO
Avensis (RHD) - 3 10-00
TABLE OF CONTENTS
1. Audio Application Chart ...................................................................................................................................... 4
2. Required Parts ...................................................................................................................................................... 8
3. Combo Installation ............................................................................................................................................. 9
4. 6 Disc CD Changer Installation in glove box ............................................................................................... 11
5. CD Changer Installation ...................................................................................................................................... 18
6. MD Changer Installation ..................................................................................................................................... 28
7. Tweeter Installation ............................................................................................................................................... 32
- Tweeters in mirror cover
CD
-Cha
nger
TM
0461
(086
01-0
0879
)M
D-C
hang
er T
M06
60 (0
8601
-009
00)
In-D
ash
CD
-Cha
nger
TM
0561
(086
01-0
0892
)N
avig
atio
n Sy
stem
TN
S500
(085
45-0
0803
) (C
an n
ot b
e ap
plie
d fo
r Ave
nsis
T22
- M
MC
)
CD
-Dec
k TF
0411
(086
01-0
0893
)N
avig
atio
n Sy
stem
TN
S200
(085
45-0
0802
)
Cas
sette
-Dec
k TM
0300
(086
90-0
0824
)C
asse
tte-S
tora
ge P
Z437
-903
42-0
0 or
CD
-Sto
rage
PZ4
37-9
0341
-00
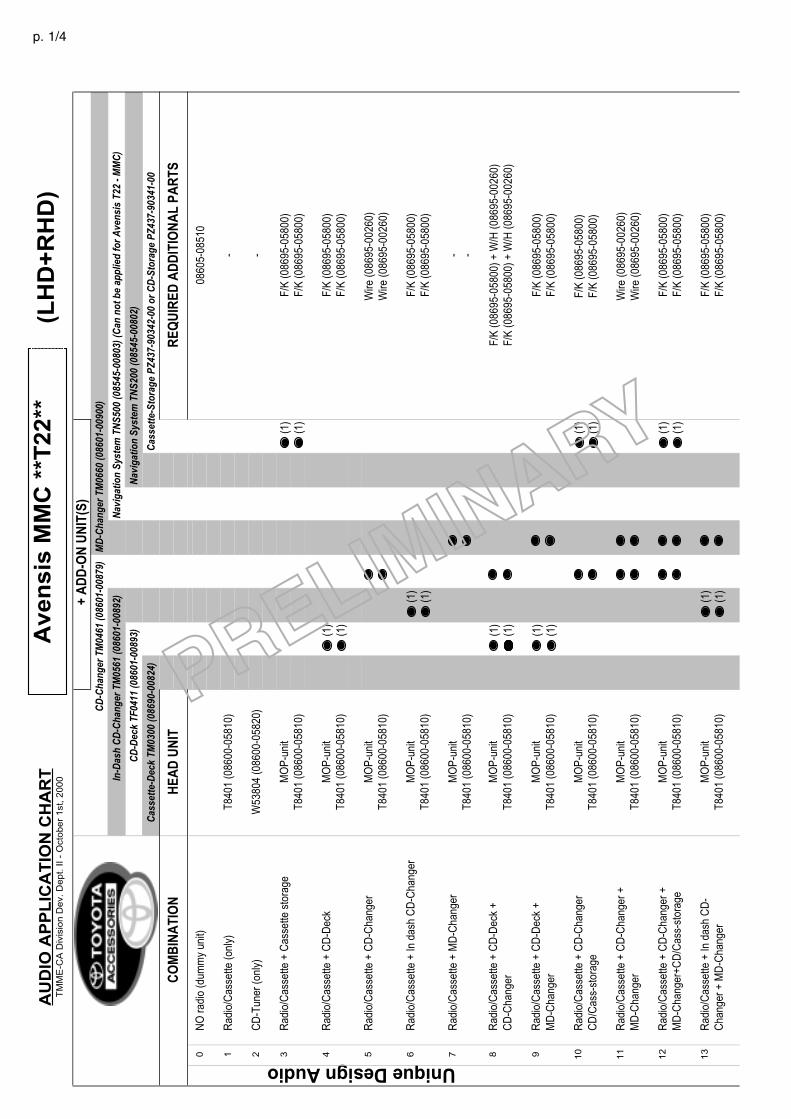
0N
O ra
dio
(dum
my
unit)
0860
5-08
510
1R
adio
/Cas
sette
(onl
y)T8
401
(086
00-0
5810
)-
2C
D-T
uner
(onl
y)W
5380
4 (0
8600
-058
20)
-
3R
adio
/Cas
sette
+ C
asse
tte s
tora
geM
OP
-uni
t(1
)F/
K (0
8695
-058
00)
T840
1 (0
8600
-058
10)
(1)
F/K
(086
95-0
5800
)
4R
adio
/Cas
sette
+ C
D-D
eck
MO
P-u
nit
(1)
F/K
(086
95-0
5800
)T8
401
(086
00-0
5810
)(1
)F/
K (0
8695
-058
00)
5R
adio
/Cas
sette
+ C
D-C
hang
erM
OP
-uni
tW
ire (0
8695
-002
60)
T840
1 (0
8600
-058
10)
Wire
(086
95-0
0260
)
6R
adio
/Cas
sette
+ In
das
h C
D-C
hang
erM
OP
-uni
t(1
)F/
K (0
8695
-058
00)
T840
1 (0
8600
-058
10)
(1)
F/K
(086
95-0
5800
)
7R
adio
/Cas
sette
+ M
D-C
hang
erM
OP
-uni
t-
T840
1 (0
8600
-058
10)
-
8R
adio
/Cas
sette
+ C
D-D
eck
+M
OP
-uni
t(1
)F/
K (0
8695
-058
00) +
W/H
(086
95-0
0260
)C
D-C
hang
erT8
401
(086
00-0
5810
)(1
)F/
K (0
8695
-058
00) +
W/H
(086
95-0
0260
)
9R
adio
/Cas
sette
+ C
D-D
eck
+M
OP
-uni
t(1
)F/
K (0
8695
-058
00)
MD
-Cha
nger
T840
1 (0
8600
-058
10)
(1)
F/K
(086
95-0
5800
)
10
Rad
io/C
asse
tte +
CD
-Cha
nger
MO
P-u
nit
(1)
F/K
(086
95-0
5800
) C
D/C
ass-
stor
age
T840
1 (0
8600
-058
10)
(1)
F/K
(086
95-0
5800
)
11
Rad
io/C
asse
tte +
CD
-Cha
nger
+
MO
P-u
nit
Wire
(086
95-0
0260
) M
D-C
hang
erT8
401
(086
00-0
5810
)W
ire (0
8695
-002
60)
12
Rad
io/C
asse
tte +
CD
-Cha
nger
+M
OP
-uni
t(1
)F/
K (0
8695
-058
00)
MD
-Cha
nger
+CD
/Cas
s-st
orag
eT8
401
(086
00-0
5810
)(1
)F/
K (0
8695
-058
00)
13
Rad
io/C
asse
tte +
In d
ash
CD
-M
OP
-uni
t(1
)F/
K (0
8695
-058
00)
Cha
nger
+ M
D-C
hang
erT8
401
(086
00-0
5810
)(1
)F/
K (0
8695
-058
00)
Unique Design Audio
+ A
DD
-ON
UN
IT(S
)
HE
AD
UN
ITC
OM
BIN
ATI
ON
RE
QU
IRE
D A
DD
ITIO
NA
L P
AR
TS
AU
DIO
AP
PL
ICA
TIO
N C
HA
RT
TM
ME
-CA
Div
isio
n D
ev.
De
pt.
II
- O
cto
be
r 1
st,
20
00
Av
en
sis
MM
C *
*T2
2**
(LH
D+
RH
D)
p. 1/4
CD
-Cha
nger
TM
0461
(086
01-0
0879
)M
D-C
hang
er T
M06
60 (0
8601
-009
00)
In-D
ash
CD
-Cha
nger
TM
0561
(086
01-0
0892
)N
avig
atio
n Sy
stem
TN
S500
(085
45-0
0803
) (C
an n
ot b
e ap
plie
d fo
r Ave
nsis
T22
- M
MC
)
CD
-Dec
k TF
0411
(086
01-0
0893
)N
avig
atio
n Sy
stem
TN
S200
(085
45-0
0802
)
Cas
sette
-Dec
k TM
0300
(086
90-0
0824
)C
asse
tte-S
tora
ge P
Z437
-903
42-0
0 or
CD
-Sto
rage
PZ4
37-9
0341
-00
+ A
DD
-ON
UN
IT(S
)
HE
AD
UN
ITC
OM
BIN
ATI
ON
RE
QU
IRE
D A
DD
ITIO
NA
L P
AR
TS
AU
DIO
AP
PL
ICA
TIO
N C
HA
RT
TM
ME
-CA
Div
isio
n D
ev.
De
pt.
II
- O
cto
be
r 1
st,
20
00
Av
en
sis
MM
C *
*T2
2**
(LH
D+
RH
D)
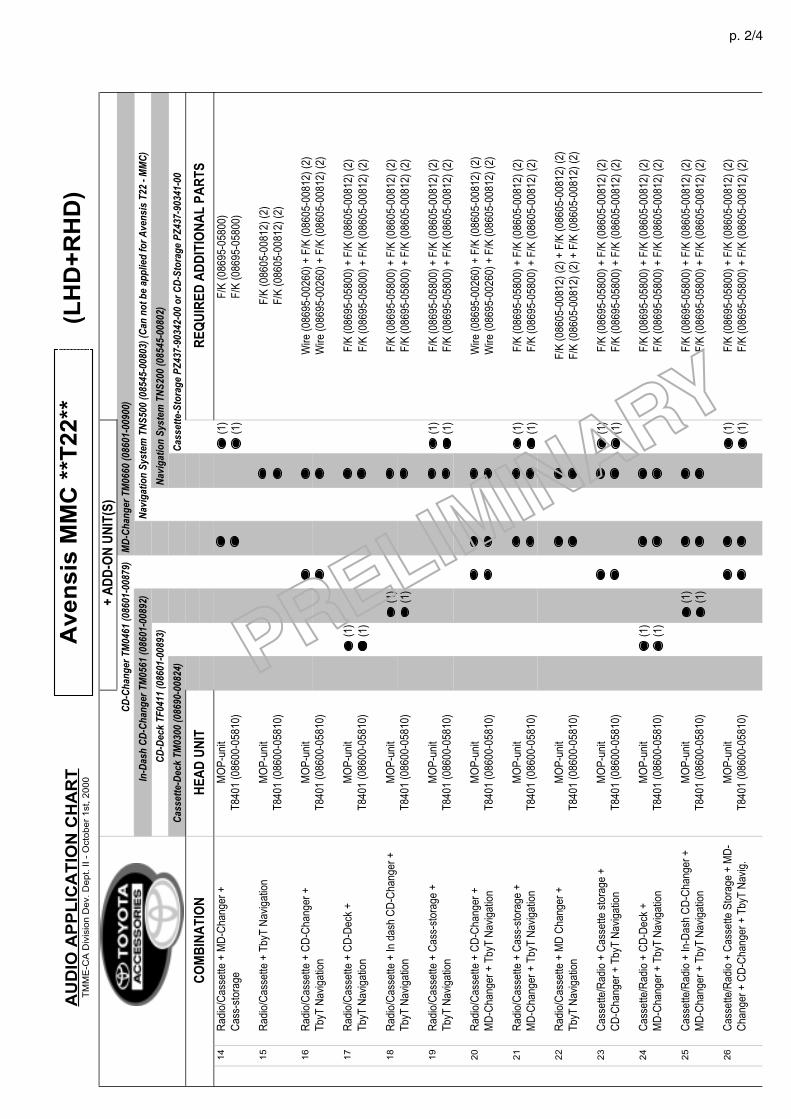
14
Rad
io/C
asse
tte +
MD
-Cha
nger
+M
OP
-uni
t(1
)F/
K (0
8695
-058
00)
Cas
s-st
orag
eT8
401
(086
00-0
5810
)(1
)F/
K (0
8695
-058
00)
15
Rad
io/C
asse
tte +
Tby
T N
avig
atio
n M
OP
-uni
tF/
K (0
8605
-008
12) (
2)T8
401
(086
00-0
5810
)F/
K (0
8605
-008
12) (
2)
16
Rad
io/C
asse
tte +
CD
-Cha
nger
+M
OP
-uni
tW
ire (0
8695
-002
60) +
F/K
(086
05-0
0812
) (2)
TbyT
Nav
igat
ion
T840
1 (0
8600
-058
10)
Wire
(086
95-0
0260
) + F
/K (0
8605
-008
12) (
2)
17
Rad
io/C
asse
tte +
CD
-Dec
k +
MO
P-u
nit
(1)
F/K
(086
95-0
5800
) + F
/K (0
8605
-008
12) (
2)Tb
yT N
avig
atio
nT8
401
(086
00-0
5810
)(1
)F/
K (0
8695
-058
00) +
F/K
(086
05-0
0812
) (2)
18
Rad
io/C
asse
tte +
In d
ash
CD
-Cha
nger
+M
OP
-uni
t(1
)F/
K (0
8695
-058
00) +
F/K
(086
05-0
0812
) (2)
TbyT
Nav
igat
ion
T840
1 (0
8600
-058
10)
(1)
F/K
(086
95-0
5800
) + F
/K (0
8605
-008
12) (
2)
19
Rad
io/C
asse
tte +
Cas
s-st
orag
e +
MO
P-u
nit
(1)
F/K
(086
95-0
5800
) + F
/K (0
8605
-008
12) (
2)Tb
yT N
avig
atio
nT8
401
(086
00-0
5810
)(1
)F/
K (0
8695
-058
00) +
F/K
(086
05-0
0812
) (2)
20
Rad
io/C
asse
tte +
CD
-Cha
nger
+M
OP
-uni
tW
ire (0
8695
-002
60) +
F/K
(086
05-0
0812
) (2)
MD
-Cha
nger
+ T
byT
Nav
igat
ion
T840
1 (0
8600
-058
10)
Wire
(086
95-0
0260
) + F
/K (0
8605
-008
12) (
2)
21
Rad
io/C
asse
tte +
Cas
s-st
orag
e +
MO
P-u
nit
(1)
F/K
(086
95-0
5800
) + F
/K (0
8605
-008
12) (
2)M
D-C
hang
er +
Tby
T N
avig
atio
nT8
401
(086
00-0
5810
)(1
)F/
K (0
8695
-058
00) +
F/K
(086
05-0
0812
) (2)
22
Rad
io/C
asse
tte +
MD
Cha
nger
+M
OP
-uni
tF/
K (0
8605
-008
12) (
2) +
F/K
(086
05-0
0812
) (2)
TbyT
Nav
igat
ion
T840
1 (0
8600
-058
10)
F/K
(086
05-0
0812
) (2)
+ F
/K (0
8605
-008
12) (
2)
23
Cas
sette
/Rad
io +
Cas
sette
sto
rage
+M
OP
-uni
t(1
)F/
K (0
8695
-058
00) +
F/K
(086
05-0
0812
) (2)
CD
-Cha
nger
+ T
byT
Nav
igat
ion
T840
1 (0
8600
-058
10)
(1)
F/K
(086
95-0
5800
) + F
/K (0
8605
-008
12) (
2)
24
Cas
sette
/Rad
io +
CD
-Dec
k +
MO
P-u
nit
(1)
F/K
(086
95-0
5800
) + F
/K (0
8605
-008
12) (
2)M
D-C
hang
er +
Tby
T N
avig
atio
nT8
401
(086
00-0
5810
)(1
)F/
K (0
8695
-058
00) +
F/K
(086
05-0
0812
) (2)
25
Cas
sette
/Rad
io +
In-D
ash
CD
-Cha
nger
+M
OP
-uni
t(1
)F/
K (0
8695
-058
00) +
F/K
(086
05-0
0812
) (2)
MD
-Cha
nger
+ T
byT
Nav
igat
ion
T840
1 (0
8600
-058
10)
(1)
F/K
(086
95-0
5800
) + F
/K (0
8605
-008
12) (
2)
26
Cas
sette
/Rad
io +
Cas
sette
Sto
rage
+ M
D-
MO
P-u
nit
(1)
F/K
(086
95-0
5800
) + F
/K (0
8605
-008
12) (
2)C
hang
er +
CD
-Cha
nger
+ T
byT
Nav
ig.
T840
1 (0
8600
-058
10)
(1)
F/K
(086
95-0
5800
) + F
/K (0
8605
-008
12) (
2)
p. 2/4

CD
-Cha
nger
TM
0461
(086
01-0
0879
)M
D-C
hang
er T
M06
60 (0
8601
-009
00)
In-D
ash
CD
-Cha
nger
TM
0561
(086
01-0
0892
)N
avig
atio
n Sy
stem
TN
S500
(085
45-0
0803
) (C
an n
ot b
e ap
plie
d fo
r Ave
nsis
T22
- M
MC
)
CD
-Dec
k TF
0411
(086
01-0
0893
)N
avig
atio
n Sy
stem
TN
S200
(085
45-0
0802
)
Cas
sette
-Dec
k TM
0300
(086
90-0
0824
)C
asse
tte-S
tora
ge P
Z437
-903
42-0
0 or
CD
-Sto
rage
PZ4
37-9
0341
-00
+ A
DD
-ON
UN
IT(S
)
HE
AD
UN
ITC
OM
BIN
ATI
ON
RE
QU
IRE
D A
DD
ITIO
NA
L P
AR
TS
AU
DIO
AP
PL
ICA
TIO
N C
HA
RT
TM
ME
-CA
Div
isio
n D
ev.
De
pt.
II
- O
cto
be
r 1
st,
20
00
Av
en
sis
MM
C *
*T2
2**
(LH
D+
RH
D)
27
CD
-Tun
er +
CD
-sto
rage
MO
P-u
nit
(1)
F/K
(086
95-0
5800
)W
5380
4 (0
8600
-058
20)
(1)
F/K
(086
95-0
5800
)
28
CD
-Tun
er +
Cas
sette
-Dec
kM
OP
-uni
t(1
)F/
K (0
8695
-058
00)
W53
804
(086
00-0
5820
)(1
)F/
K (0
8695
-058
00)
29
CD
-Tun
er +
CD
-Cha
nger
MO
P-u
nit
Wire
(086
95-0
0260
) W
5380
4 (0
8600
-058
20)
Wire
(086
95-0
0260
)
30
CD
-Tun
er +
In d
ash
CD
-Cha
nger
MO
P-u
nit
(1)
F/K
(086
95-0
5800
)W
5380
4 (0
8600
-058
20)
(1)
F/K
(086
95-0
5800
)
31
CD
-Tun
er +
MD
-Cha
nger
MO
P-u
nit
-W
5380
4 (0
8600
-058
20)
-
32
CD
-Tun
er +
Cas
sette
-Dec
k +
MO
P-u
nit
(1)
F/K
(086
95-0
5800
) + W
/H (0
8695
-002
60)
CD
-Cha
nger
W53
804
(086
00-0
5820
)(1
)F/
K (0
8695
-058
00) +
W/H
(086
95-0
0260
)
33
CD
-Tun
er +
Cas
sette
-Dec
k +
MO
P-u
nit
(1)
F/K
(086
95-0
5800
)M
D-C
hang
erW
5380
4 (0
8600
-058
20)
(1)
F/K
(086
95-0
5800
)
34
CD
-Tun
er +
CD
-Cha
nger
+
MO
P-u
nit
(1)
F/K
(086
95-0
5800
)C
D-s
tora
geW
5380
4 (0
8600
-058
20)
(1)
F/K
(086
95-0
5800
)
35
CD
-Tun
er +
CD
-Cha
nger
+M
OP
-uni
tW
ire (0
8695
-002
60)
MD
-Cha
nger
W53
804
(086
00-0
5820
)W
ire (0
8695
-002
60)
36
CD
-Tun
er +
CD
-Cha
nger
+
MO
P-u
nit
(1)
F/K
(086
95-0
5800
)M
D-C
hang
er +
CD
-Sto
rage
W53
804
(086
00-0
5820
)(1
)F/
K (0
8695
-058
00)
37
CD
-Tun
er +
In-D
ash
CD
-Cha
nger
+M
OP
-uni
t(1
)F/
K (0
8695
-058
00)
MD
-Cha
nger
W53
804
(086
00-0
5820
)(1
)F/
K (0
8695
-058
00)
38
CD
-Tun
er +
MD
-Cha
nger
+M
OP
-uni
t(1
)F/
K (0
8695
-058
00)
CD
-sto
rage
W53
804
(086
00-0
5820
)(1
)F/
K (0
8695
-058
00)
39
CD
-Tun
er +
Tby
T N
avig
atio
n M
OP
-uni
tF/
K (0
8605
-008
12) (
2)W
5380
4 (0
8600
-058
20)
F/K
(086
05-0
0812
) (2)
p. 3/4

CD
-Cha
nger
TM
0461
(086
01-0
0879
)M
D-C
hang
er T
M06
60 (0
8601
-009
00)
In-D
ash
CD
-Cha
nger
TM
0561
(086
01-0
0892
)N
avig
atio
n Sy
stem
TN
S500
(085
45-0
0803
) (C
an n
ot b
e ap
plie
d fo
r Ave
nsis
T22
- M
MC
)
CD
-Dec
k TF
0411
(086
01-0
0893
)N
avig
atio
n Sy
stem
TN
S200
(085
45-0
0802
)
Cas
sette
-Dec
k TM
0300
(086
90-0
0824
)C
asse
tte-S
tora
ge P
Z437
-903
42-0
0 or
CD
-Sto
rage
PZ4
37-9
0341
-00
+ A
DD
-ON
UN
IT(S
)
HE
AD
UN
ITC
OM
BIN
ATI
ON
RE
QU
IRE
D A
DD
ITIO
NA
L P
AR
TS
AU
DIO
AP
PL
ICA
TIO
N C
HA
RT
TM
ME
-CA
Div
isio
n D
ev.
De
pt.
II
- O
cto
be
r 1
st,
20
00
Av
en
sis
MM
C *
*T2
2**
(LH
D+
RH
D)
40
CD
-Tun
er +
Cas
sette
-Dec
k +
MO
P-u
nit
(1)
F/K
(086
95-0
5800
) + F
/K (0
8605
-008
12) (
2)Tb
yT N
avig
atio
nW
5380
4 (0
8600
-058
20)
(1)
F/K
(086
95-0
5800
) + F
/K (0
8605
-008
12) (
2)
41
CD
-Tun
er +
CD
-Sto
rage
+M
OP
-uni
t(1
)F/
K (0
8695
-058
00) +
F/K
(086
05-0
0812
) (2)
TbyT
Nav
igat
ion
W53
804
(086
00-0
5820
)(1
)F/
K (0
8695
-058
00) +
F/K
(086
05-0
0812
) (2)
42
CD
-Tun
er +
In d
ash
CD
-Cha
nger
+M
OP
-uni
t(1
)F/
K (0
8695
-058
00) +
F/K
(086
05-0
0812
) (2)
TbyT
Nav
igat
ion
W53
804
(086
00-0
5820
)(1
)F/
K (0
8695
-058
00) +
F/K
(086
05-0
0812
) (2)
43
CD
-Tun
er +
CD
-Cha
nger
+M
OP
-uni
tW
ire (0
8695
-002
60) +
F/K
(086
05-0
0812
) (2)
TbyT
Nav
igat
ion
W53
804
(086
00-0
5820
)W
ire (0
8695
-002
60) +
F/K
(086
05-0
0812
) (2)
44
CD
-Tun
er +
MD
-Cha
nger
+M
OP
-uni
tW
ire (0
8695
-002
60) +
F/K
(086
05-0
0812
) (2)
TbyT
Nav
igat
ion
W53
804
(086
00-0
5820
)W
ire (0
8695
-002
60) +
F/K
(086
05-0
0812
) (2)
45
CD
-Tun
er +
CD
-Cha
nger
+M
OP
-uni
t W
ire (0
8695
-002
60) +
F/K
(086
05-0
0812
) (2)
MD
-Cha
nger
+ T
byT
Nav
igat
ion
W53
804
(086
00-0
5820
) W
ire (0
8695
-002
60) +
F/K
(086
05-0
0812
) (2)
46
CD
-Tun
er +
In d
ash
CD
-Cha
nger
+M
OP
-uni
t(1
)F/
K (0
8695
-058
00) +
F/K
(086
05-0
0812
) (2)
MD
-Cha
nger
+ T
byT
Nav
igat
ion
W53
804
(086
00-0
5820
)(1
)F/
K (0
8695
-058
00) +
F/K
(086
05-0
0812
) (2)
47
CD
-Tun
er +
Cas
sette
-Dec
k +
MO
P-u
nit
(1)
F/K
(086
95-0
5800
) + W
/H (0
8695
-002
60) +
F/K
(086
05-0
0812
) (2)
CD
-Cha
nger
+ T
byT
Nav
igat
ion
W53
804
(086
00-0
5820
)(1
)F/
K (0
8695
-058
00) +
W/H
(086
95-0
0260
) + F
/K (0
8605
-008
12) (
2)
48
CD
-Tun
er +
Cas
sette
-Dec
k +
MO
P-u
nit
(1)
F/K
(086
95-0
5800
) + F
/K (0
8605
-008
12) (
2)M
D-C
hang
er +
Tby
T N
avig
atio
nW
5380
4 (0
8600
-058
20)
(1)
F/K
(086
95-0
5800
) + F
/K (0
8605
-008
12) (
2)
49
CD
-Tun
er +
CD
-Sto
rage
+M
OP
-uni
t(1
)F/
K (0
8695
-058
00) +
F/K
(086
05-0
0812
) (2)
CD
-Cha
nger
+ T
byT
Nav
igat
ion
W53
804
(086
00-0
5820
)(1
)F/
K (0
8695
-058
00) +
F/K
(086
05-0
0812
) (2)
50
CD
-Tun
er +
CD
-Sto
rage
+M
OP
-uni
t(1
)F/
K (0
8695
-058
00) +
F/K
(086
05-0
0812
) (2)
MD
-Cha
nger
+ T
byT
Nav
igat
ion
W53
804
(086
00-0
5820
)(1
)F/
K (0
8695
-058
00) +
F/K
(086
05-0
0812
) (2)
51
CD
-Tun
er +
Cas
sette
-Dec
k +
MO
P-u
nit
(1)
F/K
(086
95-0
5800
) + W
/H (0
8695
-002
60) +
F/K
(086
05-0
0812
) (2)
CD
-Cha
nger
+ M
D-C
hang
er +
W53
804
(086
00-0
5820
)(1
)F/
K (0
8695
-058
00) +
W/H
(086
95-0
0260
) + F
/K (0
8605
-008
12) (
2)Tb
yT N
avig
atio
n
52
CD
-Tun
er +
CD
-Sto
rage
+M
OP
-uni
t(1
)F/
K (0
8695
-058
00) +
F/K
(086
05-0
0812
) (2)
CD
-Cha
nger
+ M
D-C
hang
er +
W53
804
(086
00-0
5820
)(1
)F/
K (0
8695
-058
00) +
F/K
(086
05-0
0812
) (2)
TbyT
Nav
igat
ion
p. 4/4
0869
5-05
800
= A
dd-o
n M
ount
ing
Kit
(Glo
ve B
ox)
//
086
95-0
0260
= J
unct
ion
Cor
d(1
): G
love
Box
app
licat
ion
(2):
TN
S 2
00 M
ount
ing
Kit
for
Sed
an o
nly

Avensis (T22) TOYOTA GENUINE AUDIO
Avensis (RHD) - 810-00
2. REQUIRED PARTS
GLOVE BOX MOUNTING KIT 08695-05800
No. Part name Quantity
MOUNTING BRACKET 2
FOAM 1
PANEL 1
TAPPING SCREW 4
SQUARE ADHESIVE FELT 1
JUNCTION CORD 165
64
63
62
61
60
This is only required for applications that are mounted in the glove box. See audio application chart formore information.
This wire harness splitter is required for certain applications. See AudioApplication Chart to find out if this part is needed.
60 61 62 63
64
JUNCTION CORD 08695-00260
65

Avensis (T22) TOYOTA GENUINE AUDIO
Avensis (RHD) - 9 10-00
3. COMBO INSTALLATION
1. Remove the centre cluster panel .2
2. Remove the audio assembly and thecover plate .
: Screw (4x)10215
14
Fig. 1
Fig. 2
2
14 15and
3. Remove the brackets from the coverplates .
: Screw (2x)10215
12
Fig. 3
(R)(R)(D)
(L)(L)(G)
15
12
12
102
102
102
Avensis (T22) TOYOTA GENUINE AUDIO
Avensis (RHD) - 1010-00
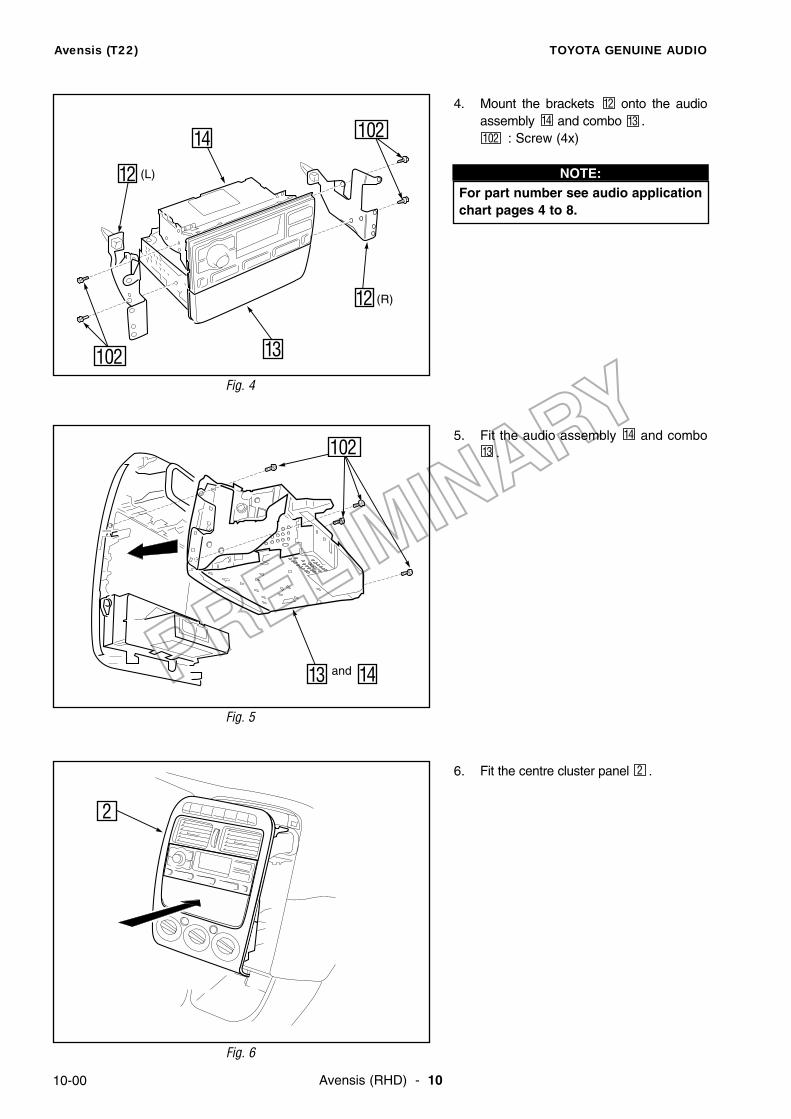
4. Mount the brackets onto the audioassembly and combo .
: Screw (4x)1021314
12
Fig. 4
5. Fit the audio assembly and combo.13
14
Fig. 5
(R)
(L)
13
14
12
12
For part number see audio applicationchart pages 4 to 8.
NOTE:
102
102
13 14and
102
6. Fit the centre cluster panel .2
Fig. 6
2

Avensis (T22) TOYOTA GENUINE AUDIO
Avensis (RHD) - 11 10-00
2. Remove the centre cluster panel .: Clip (6x)
: Hook (2x)106
2
4. 6 DISC CD CHANGER INSTALLATION IN GLOVE BOX
Fig. 7
Fig. 8
First pull the cluster forward torelease the 6 clips then lift the clus-ter to release the 2 hooks .1062
2
NOTE:
1. Remove the under cover .: Clip (3x)
1
1
106
2
n Lift
106
Avensis (T22) TOYOTA GENUINE AUDIO
Avensis (RHD) - 1210-00
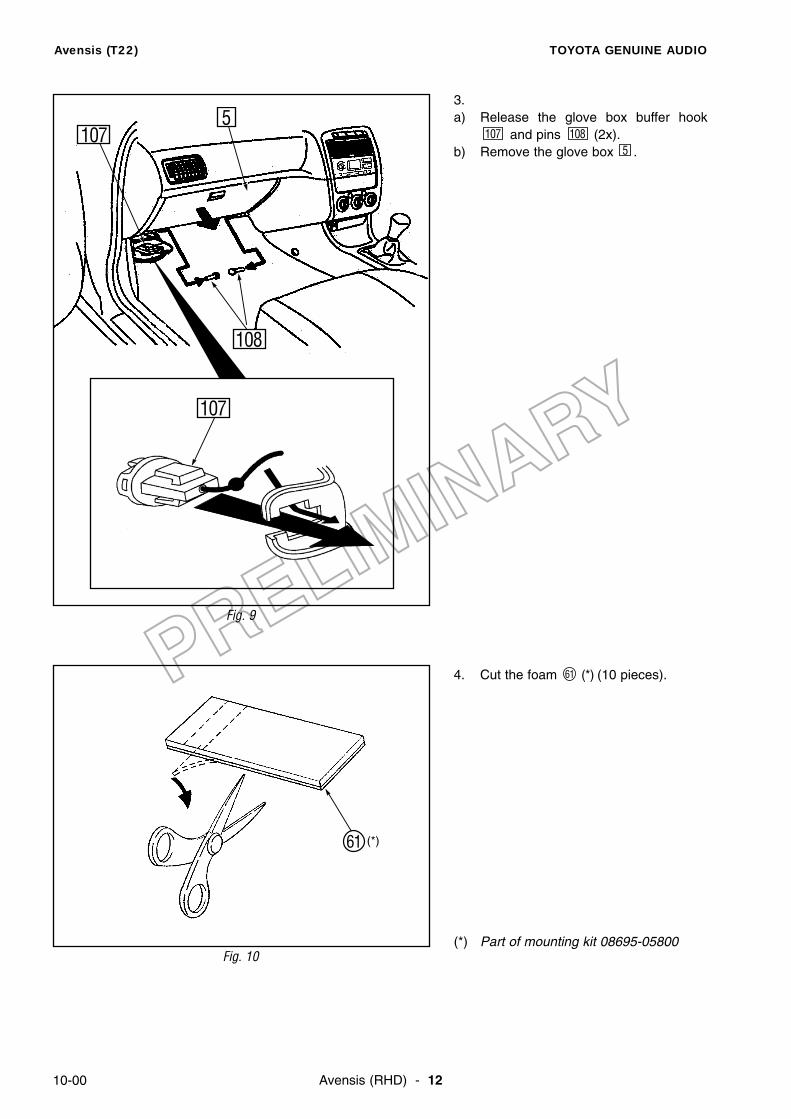
3.a) Release the glove box buffer hook
and pins (2x).b) Remove the glove box .5
108107
Fig. 9
4. Cut the foam (*) (10 pieces).
(*) Part of mounting kit 08695-05800
61
Fig. 10
5
61
107
108
107
(*)
Avensis (T22) TOYOTA GENUINE AUDIO
Avensis (RHD) - 13 10-00
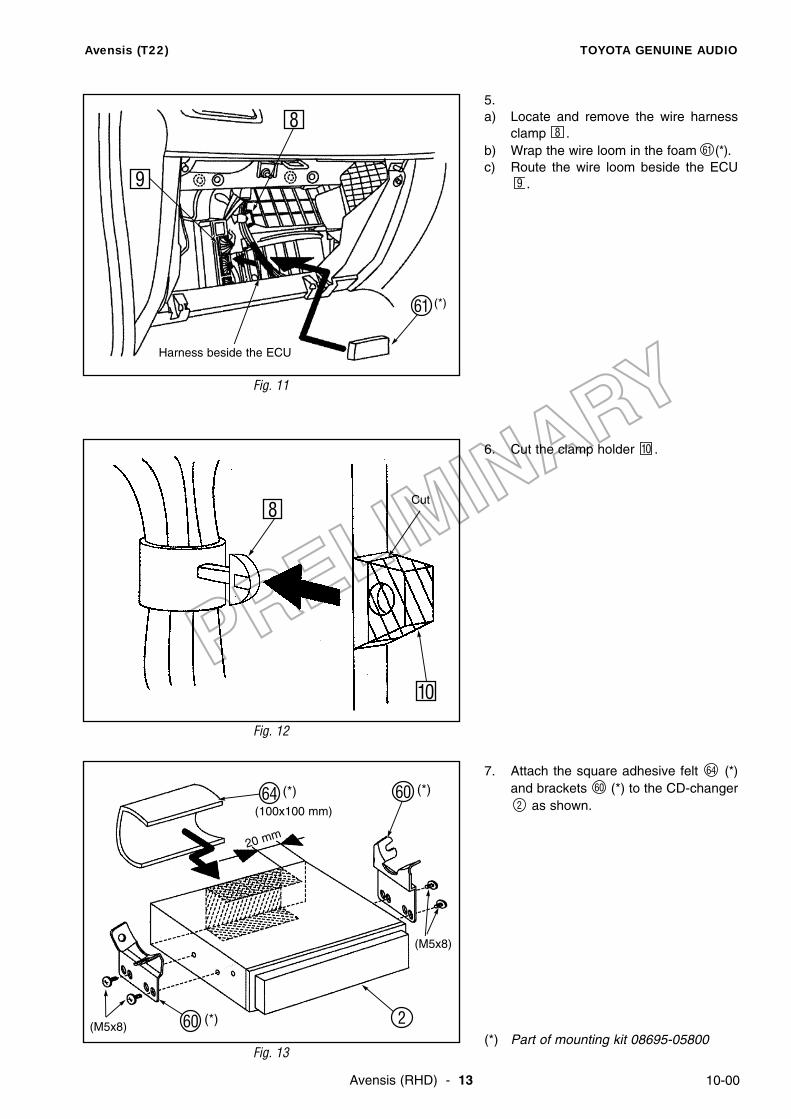
7. Attach the square adhesive felt (*)and brackets (*) to the CD-changer
as shown.
(*) Part of mounting kit 08695-05800
2
60
64
Fig. 13
5. a) Locate and remove the wire harness
clamp .b) Wrap the wire loom in the foam (*).c) Route the wire loom beside the ECU
.9
61
8
Fig. 11
6. Cut the clamp holder .10
Fig. 12
8
9
61
Harness beside the ECU
10
8Cut
60 (*)
(*)60
20 mm
(100x100 mm)
(M5x8)
(M5x8)
2
(*)64
(*)

10-00 Avensis (RHD) - 14
Avensis (T22) TOYOTA GENUINE AUDIO
8.a) Locate the 4 holes in the instrument
panel reinforcement.b) Screw a tapping screw (*) in the
front right hole .
c) Tap the other 3 holes using the tappingscrews (*) and remove thescrews afterwards.
(*) Part of mounting kit 08695-05800
B63
A63
11
Fig. 14
Leave a clearance of about 7 mm.NOTE:
11
AB
B
B
n Use a box wrenchL = 70 mm
Box wrench
7 mm
63 (*)
9. Fit the CD-changer to the rein-forcement.First position the CD-changer RH-sidebracket to the screw (*) and fitthe CD-changer to the reinforce-ment using the tapping screws (*).
(*) Part of mounting kit 08695-05800
63
2
A63
2
Fig. 15
A
2
63 (*)
(*)

10-00
Avensis (T22) TOYOTA GENUINE AUDIO
Avensis (RHD) - 15
10.a) Connect the CD-changer wire to the
junction cord (*) and wrap theconnectors in the foam (*) .
b) Route the junction cord (*) as shown.
(*) Part of mounting kit 08695-05800
65
61
65
3
Fig. 16
Connector
3
2 (*)
61 (*)
(*)61
11. Remove the glove box buffer .: Hook: Screw (2x)109
10721
Fig. 17
5
21107109
65
Avensis (T22) TOYOTA GENUINE AUDIO
Avensis (RHD) - 1610-00
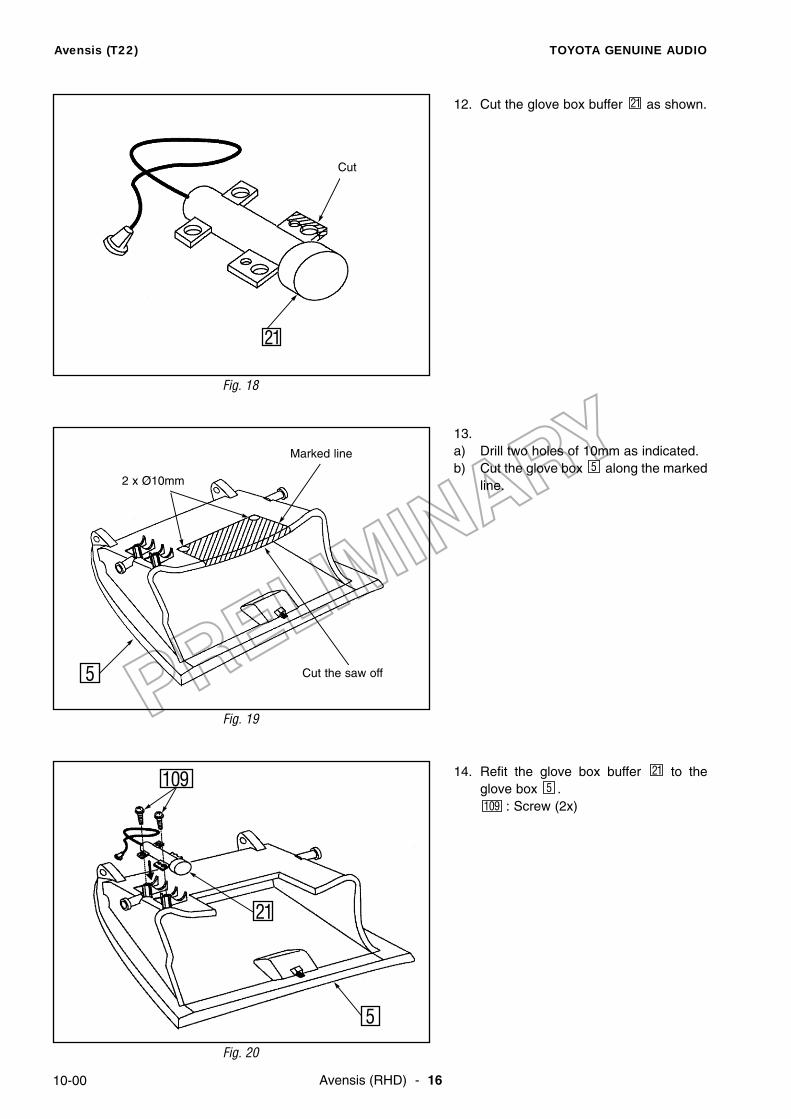
12. Cut the glove box buffer as shown.21
Fig. 18
13.a) Drill two holes of 10mm as indicated.b) Cut the glove box along the marked
line.5
Fig. 19
21
Cut
5
Marked line
2 x Ø10mm
Cut the saw off
14. Refit the glove box buffer to theglove box .
: Screw (2x)1095
21
Fig. 20
5
21
109

Avensis (T22) TOYOTA GENUINE AUDIO
Avensis (RHD) - 17 10-00
16. Fit the panel (*) to the CD-changer .
(*) Part of mounting kit 08695-05800
262
Fig. 22
2
5
(*)
15. Refit the glove box .: Pin (2x)108
5
Fig. 21
2
5
Refit the trim and removed parts.
108
Make sur the glove compartment opensand closes smoothely.
NOTE:
62

Avensis (T22) TOYOTA GENUINE AUDIO
Avensis (RHD) - 1810-00
5. CD CHANGER INSTALLATION
Fig. 23
Fig. 24
Fig. 25
1. Remove the centre cluster panel and combo .
: Clip (6x): Hook106
1322
13
2. Remove the front scuff plate andcowl side trim .
: Nut10317
16
1617
106
3. Remove the rear scuff plate .18
18
103
Avensis (T22) TOYOTA GENUINE AUDIO
Avensis (RHD) - 19 10-00
Fig. 26
Fig. 27
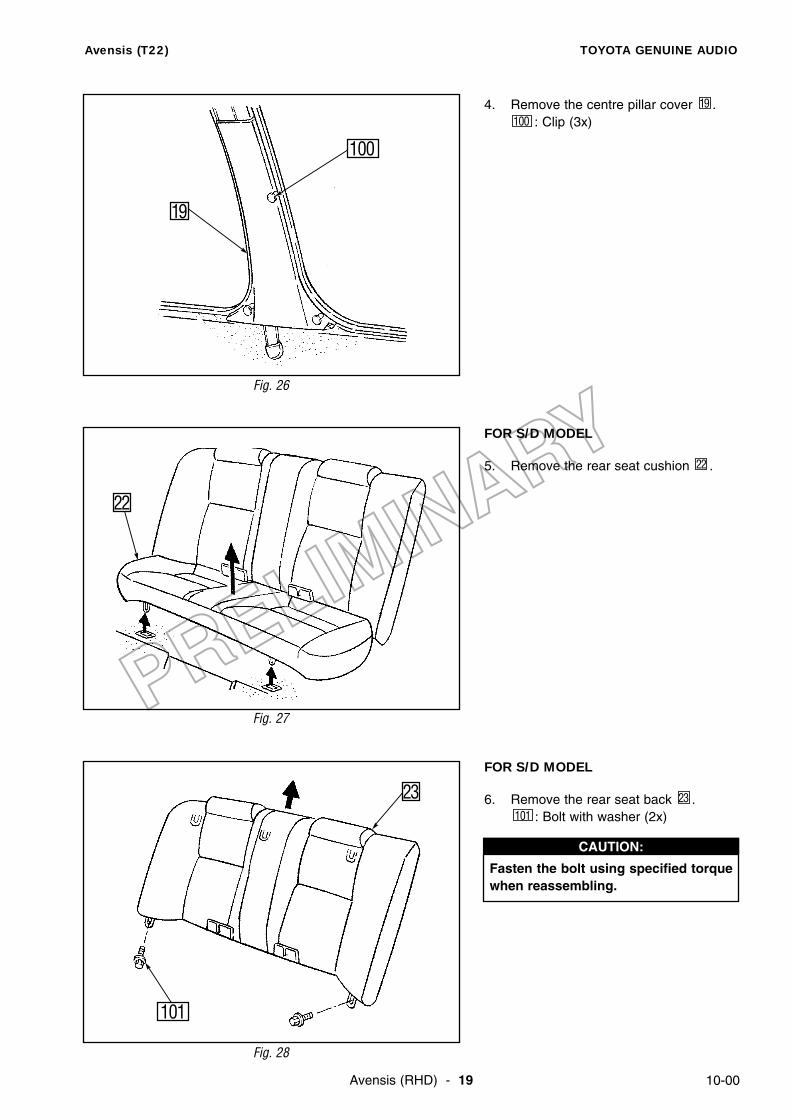
4. Remove the centre pillar cover .: Clip (3x)100
19
19
FOR S/D MODEL
5. Remove the rear seat cushion .22
22
100
FOR S/D MODEL
6. Remove the rear seat back .: Bolt with washer (2x)101
23
Fig. 28
23
101
Fasten the bolt using specified torquewhen reassembling.
CAUTION:
Avensis (T22) TOYOTA GENUINE AUDIO
Avensis (RHD) - 2010-00
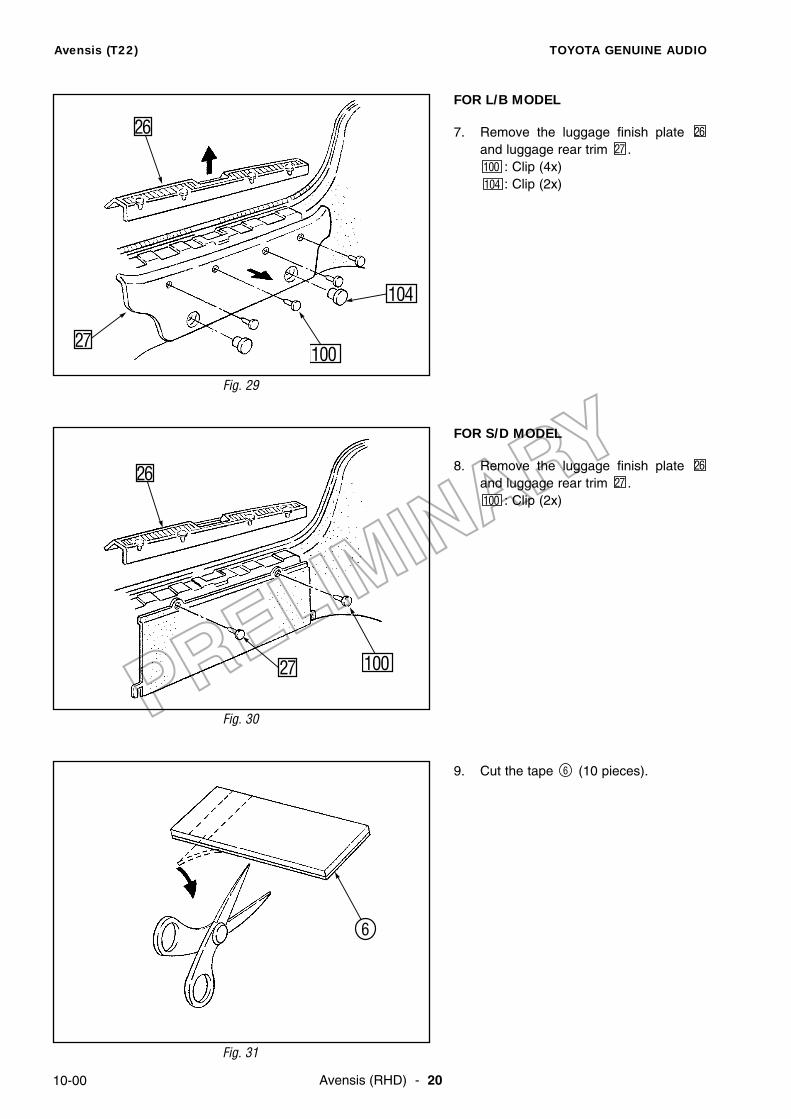
FOR L/B MODEL
7. Remove the luggage finish plate and luggage rear trim .
: Clip (4x): Clip (2x)104
10027
26
Fig. 29
27
26
100
104
FOR S/D MODEL
8. Remove the luggage finish plate and luggage rear trim .
: Clip (2x)10027
26
Fig. 30
9. Cut the tape (10 pieces).6
Fig. 31
26
10027
6
Avensis (T22) TOYOTA GENUINE AUDIO
Avensis (RHD) - 21 10-00
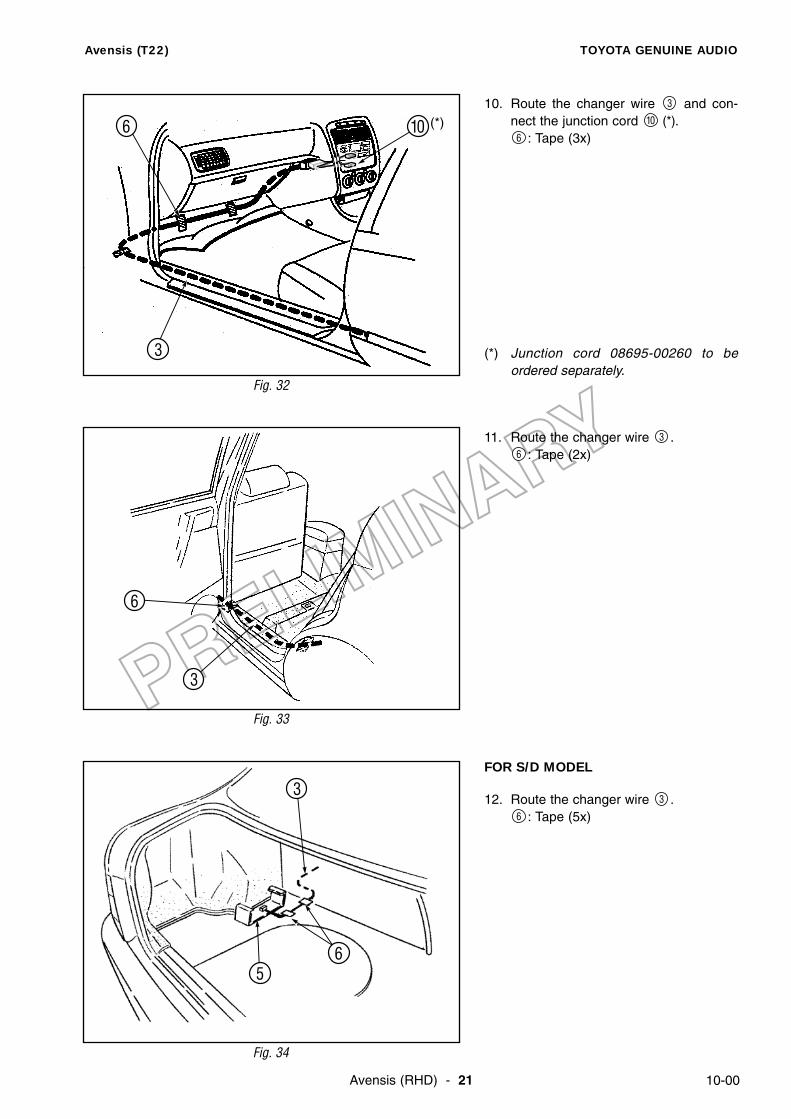
10. Route the changer wire and con-nect the junction cord (*).
: Tape (3x)
(*) Junction cord 08695-00260 to beordered separately.
6
10
3
Fig. 32
6
3
10 (*)
11. Route the changer wire .: Tape (2x)6
3
Fig. 33
FOR S/D MODEL
12. Route the changer wire .: Tape (5x)6
3
Fig. 34
6
65
3
3
Avensis (T22) TOYOTA GENUINE AUDIO
Avensis (RHD) - 2210-00
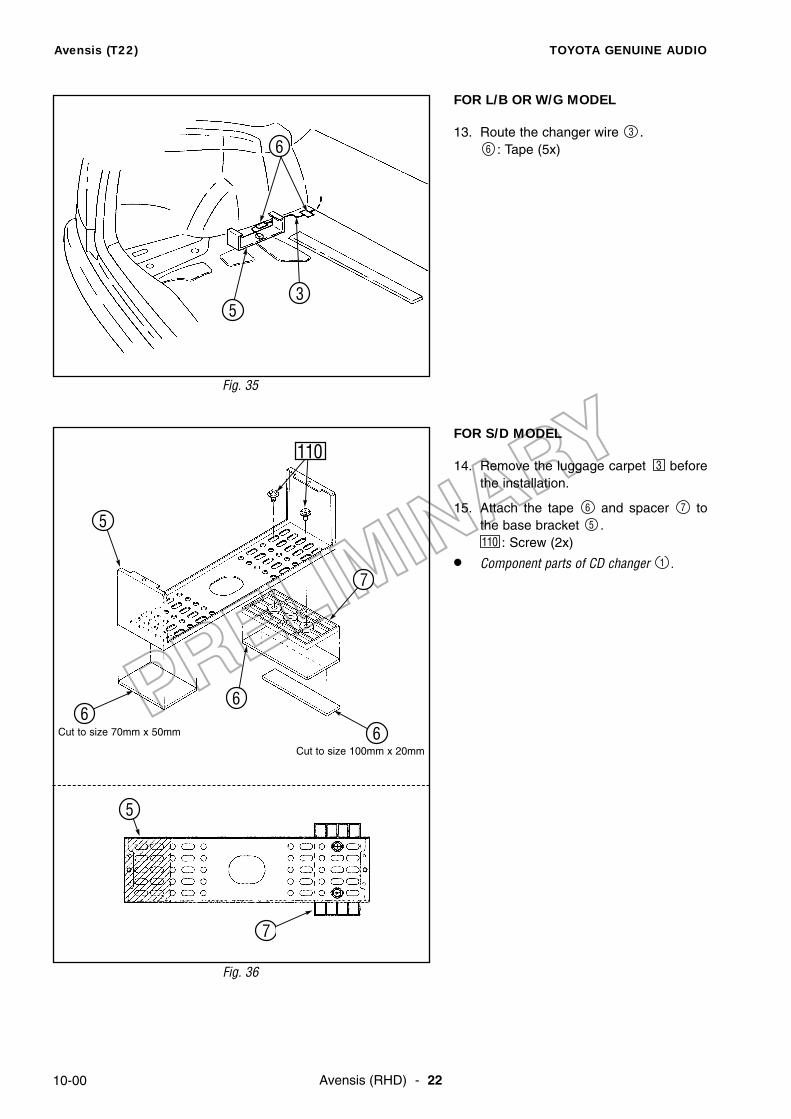
FOR L/B OR W/G MODEL
13. Route the changer wire .: Tape (5x)6
3
Fig. 35
6
53
FOR S/D MODEL
14. Remove the luggage carpet beforethe installation.
15. Attach the tape and spacer tothe base bracket .
: Screw (2x)
• Component parts of CD changer .1
1105
76
3
Fig. 36
110
6
5
5
6
7
7
6Cut to size 70mm x 50mm
Cut to size 100mm x 20mm

Avensis (T22) TOYOTA GENUINE AUDIO
Avensis (RHD) - 23 10-00
16. Locate the base bracket on thefloor.
: Hook106
5
Fig. 37
55mm
106
Luggage inner trim
Location of 5
Location of 7
17. Attach the base bracket on thefloor.
5
Fig. 38
18. Fit the side brackets (2x) to thechanger unit .
: Screw (4x)1121
12
Fig. 39
5
12
12
112
112
Avensis (T22) TOYOTA GENUINE AUDIO
Avensis (RHD) - 2410-00
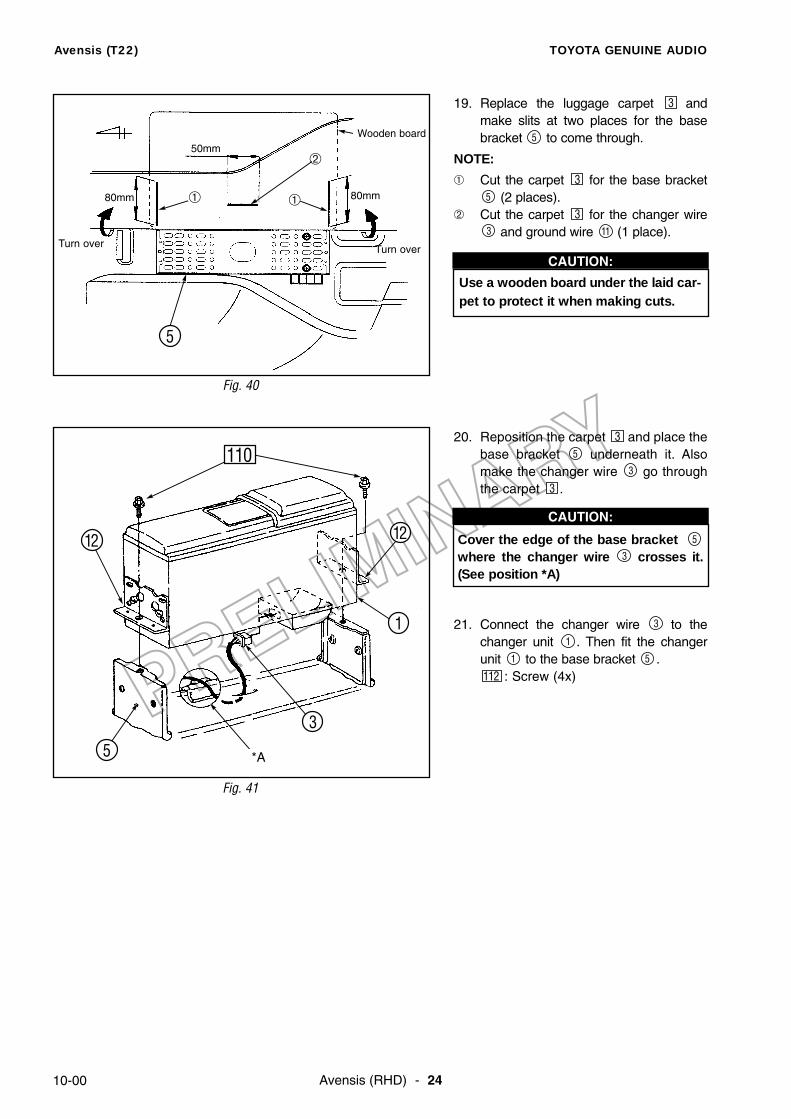
19. Replace the luggage carpet andmake slits at two places for the basebracket to come through.
NOTE:
¿ Cut the carpet for the base bracket(2 places).
¡ Cut the carpet for the changer wireand ground wire (1 place).113
35
3
5
3
Fig. 40
Use a wooden board under the laid car-pet to protect it when making cuts.
CAUTION:
¿
50mm
80mm 80mm
Turn over
Wooden board
5
Turn over
20. Reposition the carpet and place thebase bracket underneath it. Alsomake the changer wire go throughthe carpet .
21. Connect the changer wire to thechanger unit . Then fit the changerunit to the base bracket .
: Screw (4x)11251
1
3
33
5
3
Fig. 41
Cover the edge of the base bracket where the changer wire crosses it.(See position *A)
3
5
CAUTION:
12
5
3
1
12
110
*A
¡
¿

Avensis (T22) TOYOTA GENUINE AUDIO
Avensis (RHD) - 25 10-00
FOR L/B AND W/G MODEL
14. Remove the luggage carpet beforeinstallation.
15. Attach the tape and spacer tothe base bracket .
: Screw (4x)
• Component parts of CD changer .1
1135
76
3
Fig. 42
16. Locate the base bracket on thefloor.
: Hook106
5
Fig. 43
60mm
113
113
5
5
6
7
7
7
106
Luggage inner trim
Location of 5
Location of 7

Avensis (T22) TOYOTA GENUINE AUDIO
Avensis (RHD) - 2610-00
17. Attach the base bracket on thefloor.
5
Fig. 44
18. Fit the side brackets (2x) to thechanger unit .
: Screw (4x)1121
12
Fig. 45
5
12
12
112
112
19. Replace the luggage carpet andmake slits at two places for the basebracket to come through.
NOTE:
¿ Cut the carpet for the base bracket(2 places).
¡ Cut the carpet for the changer wireand ground wire (1 place).113
35
3
5
3
Fig. 46
Use a wooden board under the laid car-pet to protect it when making cuts.
CAUTION:
¿¿
¡50mm
80mm 80mm
Turn over
Turn over
Wooden board
5

Avensis (T22) TOYOTA GENUINE AUDIO
Avensis (RHD) - 27 10-00
20. Reposition the carpet and place thebase bracket underneath it. Alsomake the changer wire go throughthe carpet .
21. Connect the changer wire to thechanger unit . Then fit the changerunit to the base bracket .51
1
3
33
5
3
Fig. 47
Cover the edge of the base bracket where the changer wire crosses it.(See position *A)
3
5
CAUTION:
12
5
3
12
110
*A
Avensis (T22) TOYOTA GENUINE AUDIO
Avensis (RHD) - 2810-00
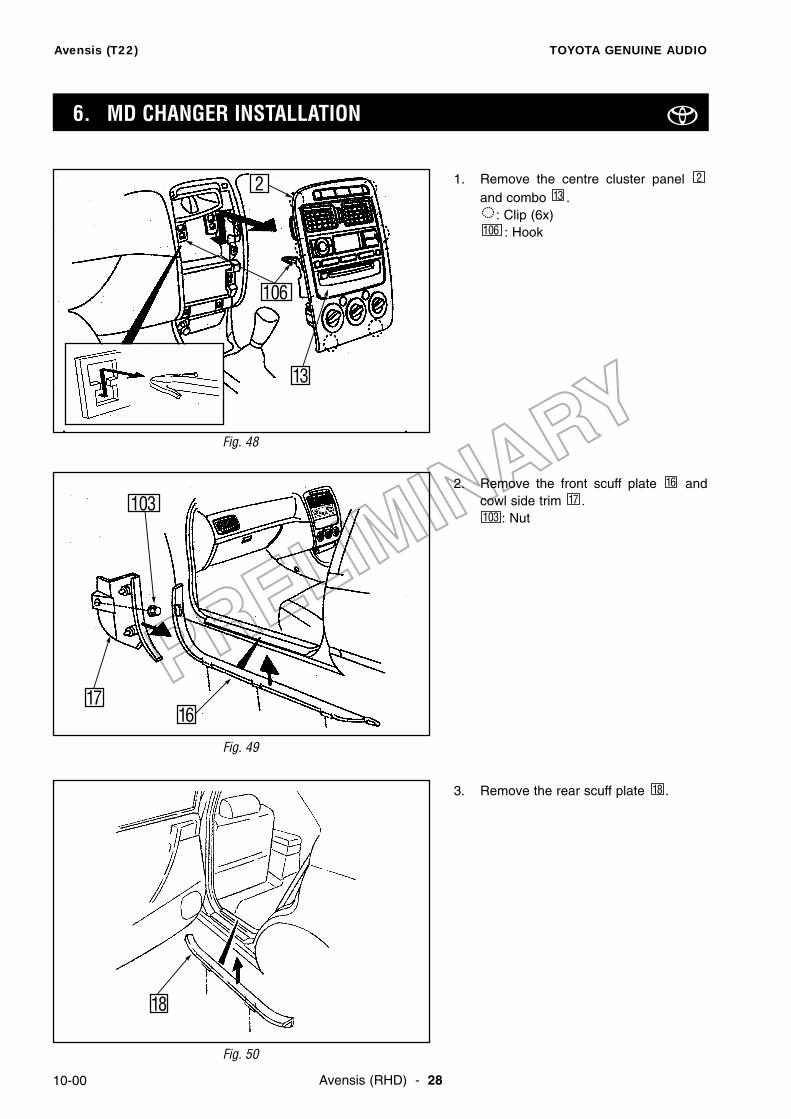
6. MD CHANGER INSTALLATION
1. Remove the centre cluster panel and combo .
: Clip (6x): Hook106
132
2. Remove the front scuff plate andcowl side trim .
: Nut10317
16
Fig. 48
Fig. 49
3. Remove the rear scuff plate .18
Fig. 50
18
2
13
106
1617
103

Avensis (T22) TOYOTA GENUINE AUDIO
Avensis (RHD) - 29 10-00
4. Remove the centre pillar cover .: Clip (3x)100
19
Fig. 51
FOR S/D MODEL
5. Remove the rear seat cushion .22
Fig. 52
19
22
100
FOR S/D MODEL
6. Remove the rear seat back .: Bolt with washer (2x)101
23
Fig. 53
23
101
Fasten the bolt using specified torquewhen reassembling.
CAUTION:

Avensis (T22) TOYOTA GENUINE AUDIO
Avensis (RHD) - 3010-00
FOR L/B MODEL
7. Remove the luggage finish plate and luggage rear trim .
: Clip (4x): Clip (2x)104
10027
26
Fig. 54
27
26
100
104
FOR S/D MODEL
8. Remove the luggage finish plate and luggage rear trim .
: Clip (2x)10027
26
Fig. 55
9. Cut the tape (10 pieces).6
Fig. 56
26
10027
6
Avensis (T22) TOYOTA GENUINE AUDIO
Avensis (RHD) - 31 10-00
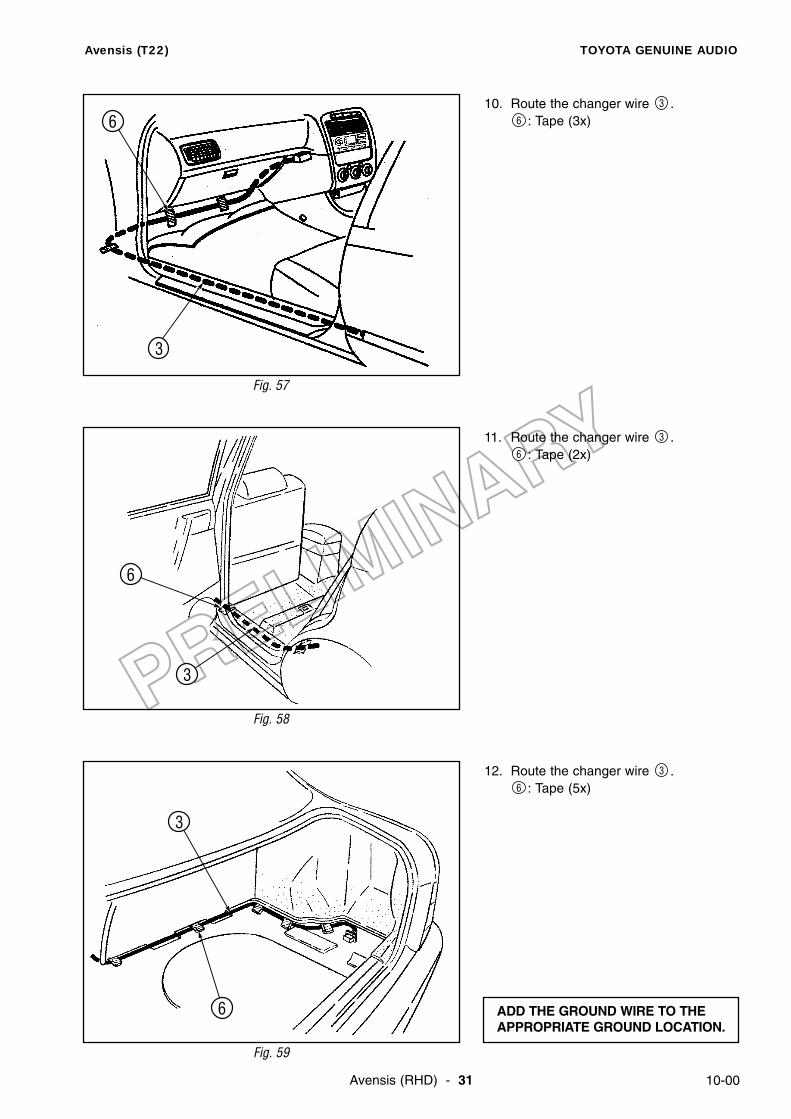
10. Route the changer wire .: Tape (3x)6
3
Fig. 57
3
6
11. Route the changer wire .: Tape (2x)6
3
Fig. 58
12. Route the changer wire .: Tape (5x)6
3
Fig. 59
6
6
3
3
ADD THE GROUND WIRE TO THEAPPROPRIATE GROUND LOCATION.

Avensis (T22) TOYOTA GENUINE AUDIO
Avensis (RHD) - 3210-00
7. TWEETERS INSTALLATION
FOR ALL VEHICLES
1.a) Remove the inside handle bezel .b) Using a screwdriver, raise up the plug.c) Remove the screw.d) Using a screwdriver, pry out the bezel.
29
2.a) Remove the screw.b) Remove the power window switch
board .c) Disconnect the 14P connector under-
neath.
30
Fig. 60
Fig. 61
29
Tweeters in mirror cover
30
102
3. Remove the mirror cover .: Clip (1x)
32
Fig. 62
32

Avensis (T22) TOYOTA GENUINE AUDIO
Avensis (RHD) - 33 10-00
4. a) Remove the door trim .b) Remove the 2 clips and 6 screws.
: Clip (2x): Screw (6x)
c) Pull the door trim upward to remove it.d) Pull out from bottom, then lift the whole
panel to remove it the lining.
102
33
Fig. 63
33
102
102
5.a) Cut out both templates and put it on
the mirror covers.b) Measure and mark the hole centres.c) Drill 2 holes of 7 mm.d) Drill a hole of 32 mm.
Fig. 64
LH RH
43,8 Ø 7
Ø 7
Ø 32
43,8Ø 7
Ø 7
Ø 32
6. Cut away the reinforcement rib.
Fig. 65
Reinforcement rib

Avensis (T22) TOYOTA GENUINE AUDIO
Avensis (RHD) - 3410-00
8.a) Cut out the “Avensis” template and put
it on the A-pillar cover .b) Drill 2 holes of 7 mm.c) Drill a hole of 32 mm.
35
Fig. 67
7. Remove the kick panel on bothsides.
: Nut (1x)103
34
Fig. 66
10334
35
9. Fit the tweeter on the A-pillar cover. Mount the A-pillar cover on the
vehicle.: Bolt (2x)105
353536
Fig. 68
36
105
Tweeter cover

Avensis (T22) TOYOTA GENUINE AUDIO
Avensis (RHD) - 35 10-00
LEFT HAND SIDE
11. Locate and disconnect the 8P connec-tor (white).
Fig. 70
10. Guide the tweeter wire to the cowlside area.
37
Fig. 69
37
8P connector (white)
12.a) Turn the connector so that the wires
face you.b) Connect the red/black wire of the
tweeter to the violet wire of the firstposition from the right side of the low-est row.
Fig. 71
violet
Splice connector
violetred/black
WIRE SIDE VIEW

Avensis (T22) TOYOTA GENUINE AUDIO
Avensis (RHD) - 3610-00
13. Connect the red wire of the tweeter tothe pink wire of the wire harness.
Fig. 72
pink
Splice connector
rot / red / rouge
WIRE SIDE VIEW
15.a) Turn the 13P connector so that the
wires face you and the tab is on top.b) Connect the red/black wire of the
tweeter to the light green wire of thewire harness.
Fig. 74
RIGHT HAND SIDE
14. Locate and disconnect the 13P whiteconnector at the cowl side area.
Fig. 73
13P connector (white)
Splice connector
light greenred
light green
WIRE SIDE VIEW

Avensis (T22) TOYOTA GENUINE AUDIO
Avensis (RHD) - 37 10-00
16. Connect the red wire of the tweeter tothe blue wire of the wire harness.
Fig. 75
blue
Splice connector
blue
red
WIRE SIDE VIEW
......................................................................................................................................................................................................................................................................................................
......................................................................................................................................................................................................................................................................................................
......................................................................................................................................................................................................................................................................................................
......................................................................................................................................................................................................................................................................................................
......................................................................................................................................................................................................................................................................................................
......................................................................................................................................................................................................................................................................................................
......................................................................................................................................................................................................................................................................................................
......................................................................................................................................................................................................................................................................................................
......................................................................................................................................................................................................................................................................................................
......................................................................................................................................................................................................................................................................................................
......................................................................................................................................................................................................................................................................................................
......................................................................................................................................................................................................................................................................................................
......................................................................................................................................................................................................................................................................................................
......................................................................................................................................................................................................................................................................................................
......................................................................................................................................................................................................................................................................................................
......................................................................................................................................................................................................................................................................................................
......................................................................................................................................................................................................................................................................................................
......................................................................................................................................................................................................................................................................................................
......................................................................................................................................................................................................................................................................................................
......................................................................................................................................................................................................................................................................................................
......................................................................................................................................................................................................................................................................................................
......................................................................................................................................................................................................................................................................................................
......................................................................................................................................................................................................................................................................................................
......................................................................................................................................................................................................................................................................................................
......................................................................................................................................................................................................................................................................................................
Avensis (T22) TOYOTA GENUINE AUDIO
Avensis (RHD) - 3810-00
NOTES

GENUINE PARTS


