ICTS Information Communication amp Technology Services
ECM Enterprise Content Management
WRP Web Renewal Project
UCT University of Cape Town
PA Platform Administrator
CA Content Architect
DA Domain Administrator
SCM Senior Content Manager
CM Content Manager
PM Page Manager
UCT Web CMS
Document version 2
Date 20150304
Created by ICTS Training
Contact us at icts-traininguctacza
Terms and Abbreviations
UCT Web Content Management System Domain Administrator guide 2
Icon guides Icon Description
Log on to Web Content Management System (CMS) Authentication is required
Platform Administrator (PA) has access to all the domains and functions on all the
websites and functionality within the UCT Drupal web environment
Domain Administrator (DA) has full access to all functionality via the CMS on a specific website in the UCT web environment
Senior Content Manager (SCM) can create edit publish unpublish and review (moderate) content on a particular website as well as assign roles to content managers
Content Manager (CM) can create edit publish and unpublish content on a particular website
Page Manager (PM) can create and edit pages on a particular website
Important information that you need to take note of
Useful information
Warning indicates that you need to perform a task before starting a process
Tips
UCT Web Content Management System Domain Administrator guide 3
Note
Digging deeper indicates that additional information is available
Exercises
Online help
Lesson duration
Link indicates what content types are related
Resources used
UCT Web Content Management System Domain Administrator guide 4
Document Control ndash Web CMS Domain Admin guide
Document location
Location
Central location to be confirmed Currently located on G drive
Author(s)
Position Name
Charmaine van der Merwe (CvdM)
Contact no
x5392 Training co-ordinator
Senior Helpdesk Consultant
Jamiela Dawood (JD) x4500
Helpdesk Consultant Gavin Joe (GJ) x4500
Senior Helpdesk Consultant
Elizabeth van Deventer (EvD) x4500
Revision history
Version Issue date Authoreditor DescriptionSummary of changes
Modules updated bull Modules 24 - 26
o Screenshots updatedo General updates to notes
Module addedreplaced
Sign on to UCT Web CMS dashboard
2 4 March CvdM GJ
Reviewed by
Version
2
Issue date
4 March
Name
Cindy Mathys
Position
Communications Co-Ordinator
Review date
2 March 2015
Approvals
Version
2
Issue date
4 March
Name
Pierre Neethling
Position
Team Leader CBS TSS - ICTS
Approval date
Related documents
Document
Drupal ndash Adding and Editing content
CMD web guide
Web CMS manual
CMD Drupal site approval guide
UCT Web Content Management System Domain Administrator guide 5
Table of Contents
24 Custom Regions
25 Web forms
26 Theme Dashboard
Appendix A How to request access to the UCT Web Content Management System
Appendix B How to assign roles
Note Modules 1 ndash 23 and 27 ndash 31 can be viewed in the UCT Web CMS manual
Important Notes
Report any other issues you may encounter to ICTS Helpdesk
Take note of the scheduled maintenance slots listed on the ICTS website
UCT Web Content Management System Domain Administrator guide 7
Sign on to the UCT Web CMS dashboard There are two ways that you can access websites on the UCT Drupal platform
1 Log on to the UCT Drupal dashboard
2 Log on directly to the website that you have been given access to
Method 1 Log on to the dashboard
1 Open a web browser and in the address bar enter httpwebcmsuctacza
2 You are redirected to the UCT Single Sign On page- Log on using your studentstaff number and network password
3 The Web CMS Dashboard page opens
- You are logged on to the UCT Web CMS with your appropriate roles and permissions
Method 2 Log on directly to a website
1 Open a web browser and in the address bar enter your site URL followed by user (eghumanitiesuctaczauser)
2 You are redirected to the UCT Single Sign On page- Log on using your studentstaff number and network password
3 The homepage will reload displaying a black fly-out arrow on the right of the screen- Click the arrow and select Workbench
4 You are directed to your sitersquos Workbench
Log on to the Web CMS
Dashboard using your UCT credentials
Username staffstudent number
Password your network password
8
Module 24 Custom Regions
Lesson time 30 minutes
Lesson objectives
In this lesson you will learn how to use and edit the Custom Regions feature on the Web CMS Workbench
At the end of this lesson you will be able to view and edit custom regions
Introduction
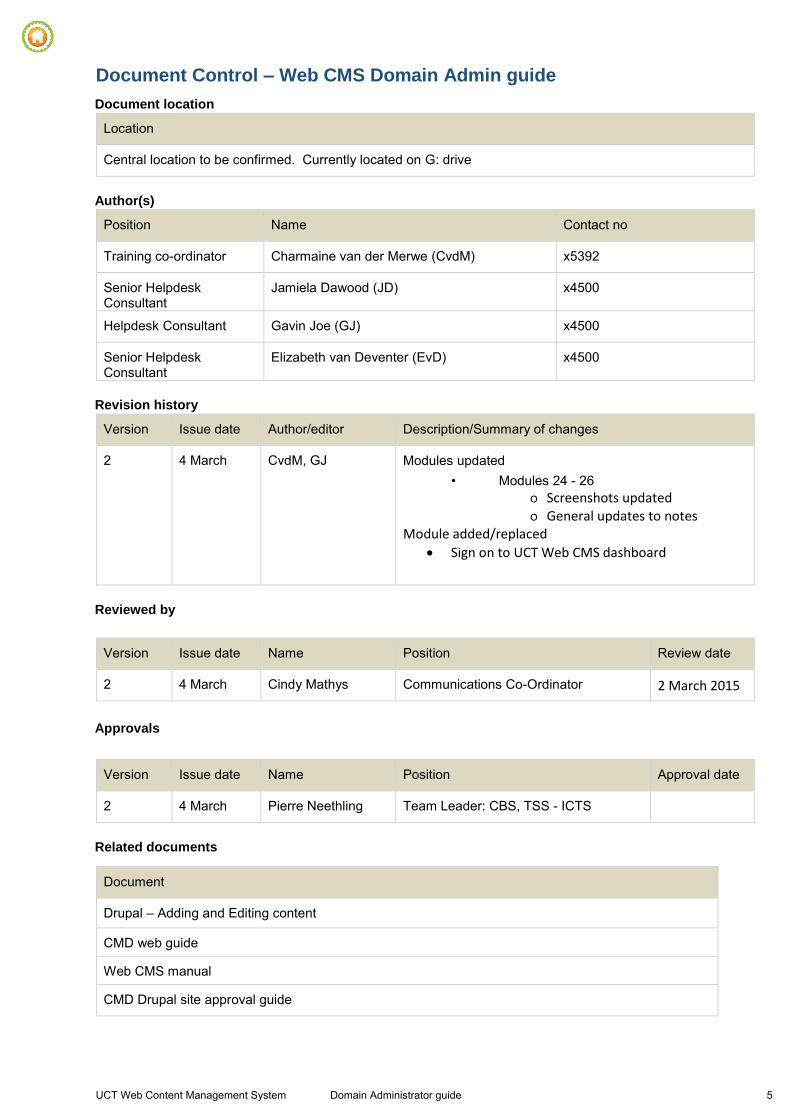
Regions are pre-defined areas on a page where content can be placed Basic regions include the Header Footer
Content Left bar and Right bar (Drupal) Custom regions are additional areas on your homepage where Domain
Administrators (DA) can add content
Custom regions that are available in the Web CMS include
You can copy and paste text into the WYSIWYG editor to add headings to the left bar
To change the colour select one of the example items in the WYSIWYG view click the top right corner and either choose a colour or add a hex value
12
Edit or add content to footer blocks
1 Log on to the Web CMS Dashboard
2 Click Workbench to view your toolbox
- On the Workbench drop-down menu click Custom Regions
3 The Custom Regions page opens
- Click edit to make changes to your websitersquos Custom Regions
4 Your sitersquos Regions page opens
- Enter text in the Footer Block (1 2 or 3) field Use the WYSIWYG editor to format text insert
images andor apply styles
5 Click Save Your changes are reflected in the footer block
By clicking Source on the
WYSIWYG editor HTML code can be
added to make changes to
Footer Block 1
Footer Block 2
Footer Block 3
Front Right Top
Front Left Top
All footer blocks should have Heading 2 titles to fit in with the Quick Links header
UCT Web Content Management System Domain Administrator guide 13
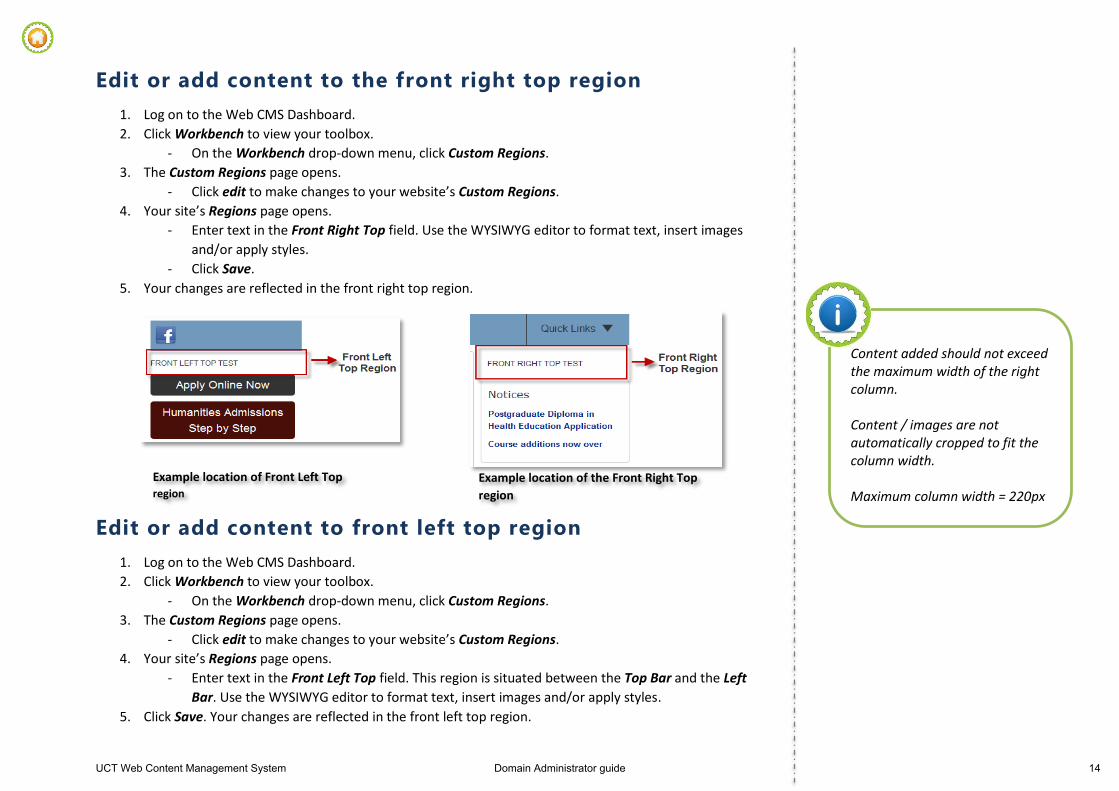
Edit or add content to the front right top region
1 Log on to the Web CMS Dashboard
2 Click Workbench to view your toolbox
- On the Workbench drop-down menu click Custom Regions
3 The Custom Regions page opens
- Click edit to make changes to your websitersquos Custom Regions
4 Your sitersquos Regions page opens
- Enter text in the Front Right Top field Use the WYSIWYG editor to format text insert images
andor apply styles
- Click Save
5 Your changes are reflected in the front right top region
Edit or add content to front left top region
1 Log on to the Web CMS Dashboard
2 Click Workbench to view your toolbox
- On the Workbench drop-down menu click Custom Regions
3 The Custom Regions page opens
- Click edit to make changes to your websitersquos Custom Regions
4 Your sitersquos Regions page opens
- Enter text in the Front Left Top field This region is situated between the Top Bar and the Left
Bar Use the WYSIWYG editor to format text insert images andor apply styles
5 Click Save Your changes are reflected in the front left top region
Example location of Front Left Top region
Example location of the Front Right Top
region
Content added should not exceed the maximum width of the right column
Content images are not automatically cropped to fit the column width
Maximum column width = 220px
UCT Web Content Management System Domain Administrator guide 14
Edit or add a banner
1 Log on to the Web CMS Dashboard
2 Click Workbench to view your toolbox
- On the Workbench drop-down menu click Custom Regions
3 The Custom Regions page opens
- Click edit to make changes to your websitersquos Custom Regions
4 Your sitersquos Regions page opens
- Scroll to the Banner section and click Browse to upload and insert an image
- Select the image you would like to use as a banner
- Click Upload
5 Click Save Your site will display the banner beneath the top bar
Always ensure that you use either a dynamic feature or a banner
It is not recommended that you use both at the same time as this makes a homepage look cluttered
The required banner width is 934 pixels
The co-brand logo will only appear if you requested that ICTS apply the co-brand template
UCT Web Content Management System Domain Administrator guide 15
Remove banner
1 Log on to the Web CMS Dashboard
2 Click Workbench to view your toolbox
- On the Workbench drop-down menu click Custom Regions
3 The Custom Regions page opens
- Click edit to make changes to your websitersquos Custom Regions
4 Your sitersquos Regions page opens
- Scroll to the Banner section and click Remove
5 Click Save to confirm your changes
Edit or add a co-brand logo
1 Log on to the Web CMS Dashboard
2 Click Workbench to view your toolbox
- On the Workbench drop-down menu click Custom Regions
3 The Custom Regions page opens
- Click edit to make changes to your websitersquos Custom Regions
4 Your sitersquos Regions page opens
- Scroll to the Co Brand Logo section and click Browse to select the image that will be used as the
co-brand logo
- Click Upload
- In the Co Brand URL section
Enter the name of co-brand site in the Title field
Enter the sitersquos domain name in the URL field
- Click Save
5 The co-brand logo will appear next to the UCT logo The website title will appear as a tooltip when
hovering over the co-brand logo
Co-branded site pointers
If you have a co-brand
template remember to
add your sitersquos domain
name (address) to the co-
brand logorsquos URL field in
Custom Regions This will
make your logo click
through to your main page
A co-brand site has the
option of three UCT logos
the logos have white black
or blue text
Select the logo with the
text that is most legible on
your chosen header
background colour
The link Title is limited to a
maximum of 128 characters
UCT Web Content Management System Domain Administrator guide 16
Module 25 Web forms
Lesson time 45 minutes
Lesson objectives
In this lesson you will learn how to use the Web forms feature on the Web CMS Workbench
At the end of this lesson you will be able to create publish and edit a web form
Introduction A web form or a HTML form allows a user to enter data that is sent to a server for processing andor emailed to a
specific person Forms may resemble paper or database versions and contain check boxes radio buttons andor
text fields
Consider adding a contact form to web pages that will give visitors the opportunity to contact you Submission
results and statistics are recorded and accessible to Domain Administrators (DA)
ROLES AND PERMISSIONS
Create
Edit
Delete View published
View Published View published
The Domain Administrator (DA)
is the only role that can create edit
and remove Web forms
UCT Web Content Management System Domain Administrator guide 17
Create a web form
1 Log on to the Web CMS Dashboard
2 Click Workbench to view your toolbox
- From the Workbench drop-down menu click Create Content 3 The Add Content page opens
- Click Web form 4 The Submit Web form page opens
- In the Content Fields section
Enter the formrsquos Title
Enter a summary for the form in the Body field
- Click URL path settings to change the URL alias This function allows you to create a customised
link to any item on your website
Clear the Generate automatic URL alias check box
Enter the URL alias where this content can be accessed
- Click Save
5 A default web form will be saved to your domain
The next section explains how to add content to the newly created web form
Edit a web form
1 Click Workbench | Web Forms to access the forms that have been created
2 The Web Forms page opens
- Search for the form that you created and click Components
3 The Web form Components page opens
Log on to the CMS Dashboard
using your UCT credentials
Username staffstudent number
Password your network password
Use a relative path for the URL
alias Donrsquot add a preceding or a
trailing slash or else the URL wonrsquot
work
UCT Web Content Management System Domain Administrator guide 18
- The Name Surname Email and QueryComment fields are created as default components - To edit a default component click Edit in the Actions column - To clone a default component click Clone in the Actions column - To delete a default components click Delete in the Actions column - To add a new component
- Enter a New component name - From the drop-down menu select a field type
- Select the Mandatory check box to make the component mandatory - Click Add - Click Save to add the Web form components
Click Save after reorganising
the current components and before
adding a new component This will
ensure that all your changes are
saved
UCT Web Content Management System Domain Administrator guide 19
Add an email address that the web form must be sent to
1 Click Workbench to view your toolbox
2 Click Web forms to access the forms that have been created
3 The All Forms page opens
- Select a form and under the Actions column click Emails
4 The Web Form Emails page opens
- In the Address field enter the email address that all submitted web forms should be sent to
- Click Add
5 The Edit Email Settings page opens
- Under the Email subject section in the Custom field add a subject
- Under the Email from address section in the Custom field enter the email address the email
message will be sent from
- Under the Email from name section in the Custom field enter the name of the sender
- Select an Email template from the drop-down menu
Select the Send e-mail as HTML box check box if you want to send the email in HTML
format
- Click Save email settings
- Click Back to Web Forms list
How to PublishUnpublish a web form
1 Click Workbench | Web Forms to access the forms that have been created
2 The All Forms page opens
- Select the form you would like to publish and under the Actions column click PublishUnpublish
3 The web form is now available on your website
UCT Web Content Management System Domain Administrator guide 20
Use the web form as an Include on a page
Items saved as a web form can be added to content types via the Includes button on the WYSIWYG toolbar
1 From the Workbench drop-down menu click Create Content
2 The Add Content page opens
- Click Page
3 The Submit Page opens
- Scroll down to the WYSIWYG editor
- Click Includes on the WYSIWIG editor to insert a web form
4 The Includes dialogue box appears
- From the Type drop-down menu select Web form
- Click Search
- From the list of displayed web forms select the relevant include item
- Click OK to confirm your selection
- The include is displayed via a reference number
The Web Form must be set to
Published before it can be used as an
Include on a page
Be careful not to delete or alter
the Include reference code as this will
result in the Include being removed
from the content
5 Select the Moderation state
- Current Draft indicates that this include will be saved as a draft in the All Drafts folder
- Needs Review indicates that this include will be sent for review to the applicable content
manager
6 Click Save Your web form will either be saved as a draft if you selected Current Draft or the moderation
process will be initiated if you chose Needs Review
UCT Web Content Management System Domain Administrator guide 21
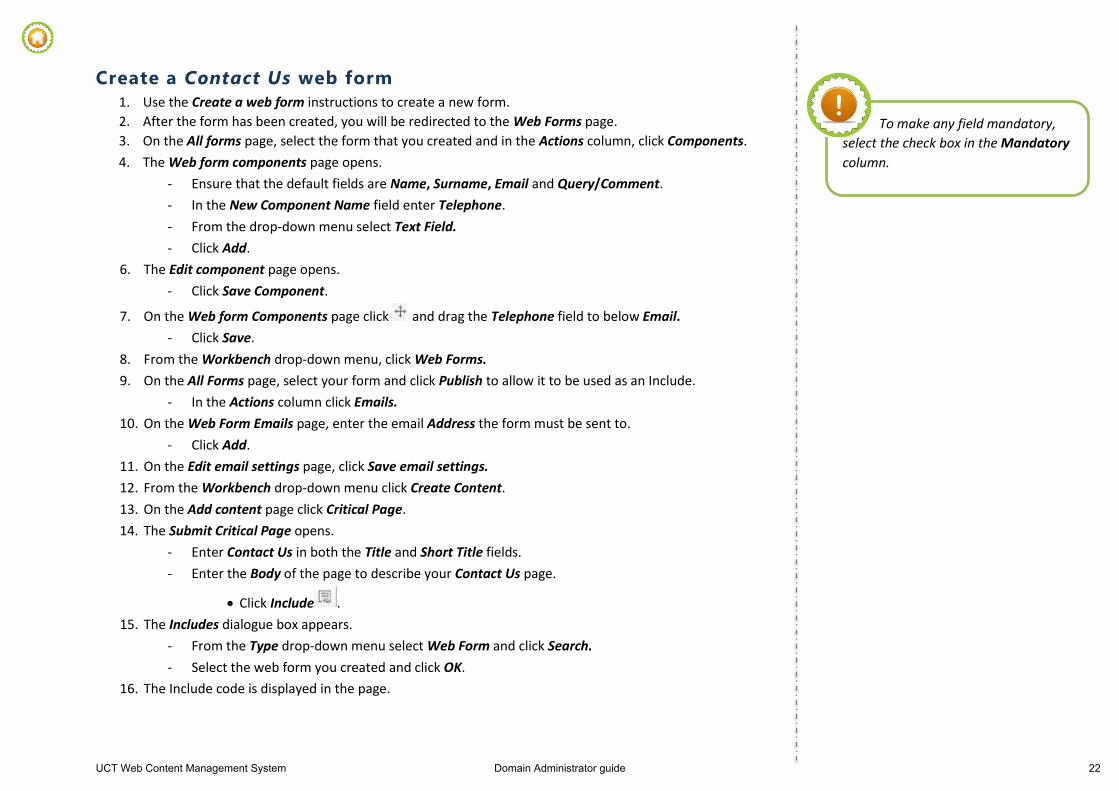
Create a Contact Us web form
1 Use the Create a web form instructions to create a new form
2 After the form has been created you will be redirected to the Web Forms page
3 On the All forms page select the form that you created and in the Actions column click Components
4 The Web form components page opens
- Ensure that the default fields are Name Surname Email and QueryComment
- In the New Component Name field enter Telephone
- From the drop-down menu select Text Field
- Click Add
6 The Edit component page opens
- Click Save Component
7 On the Web form Components page click and drag the Telephone field to below Email
- Click Save
8 From the Workbench drop-down menu click Web Forms
9 On the All Forms page select your form and click Publish to allow it to be used as an Include
- In the Actions column click Emails
10 On the Web Form Emails page enter the email Address the form must be sent to
- Click Add
11 On the Edit email settings page click Save email settings
12 From the Workbench drop-down menu click Create Content
13 On the Add content page click Critical Page
14 The Submit Critical Page opens
- Enter Contact Us in both the Title and Short Title fields
- Enter the Body of the page to describe your Contact Us page
To make any field mandatory
select the check box in the Mandatory
column
Click Include
15 The Includes dialogue box appears
- From the Type drop-down menu select Web Form and click Search
- Select the web form you created and click OK
16 The Include code is displayed in the page
UCT Web Content Management System Domain Administrator guide 22
17 From the Page Type drop-down menu select Contact Us
18 In the Menu section select where the page should appear
19 From the Moderation state drop-down menu select Published
20 Click Save
21 From the Workbench drop-down menu click Published
22 You can check your page by navigating to your website and completing the web form
23 When you click Submit you will get a notification confirming the form has been submitted
UCT Web Content Management System Domain Administrator guide 23
Module 26 Theme Dashboard
Lesson time 45 minutes
Lesson objectives
In this lesson you will learn how to use the Theme Dashboard to change the base theme styles for each website
you create
Each websitersquos base theme has a default layout which includes the header menu sidebars content and footer
You can customise the default theme using styles layout changes palette selectors images and some custom
JavaScript or Customised Cascading Style Sheets (CSS)
At the end of this lesson you will be able to
Customise styles
Add CSS and JavaScript to customise your website theme
Change background images
Use or create custom palettes
Change the page layout
Change font colour
ROLES AND PERMISSIONS
Read Write
Publish
UCT Web Content Management System Domain Administrator guide 24
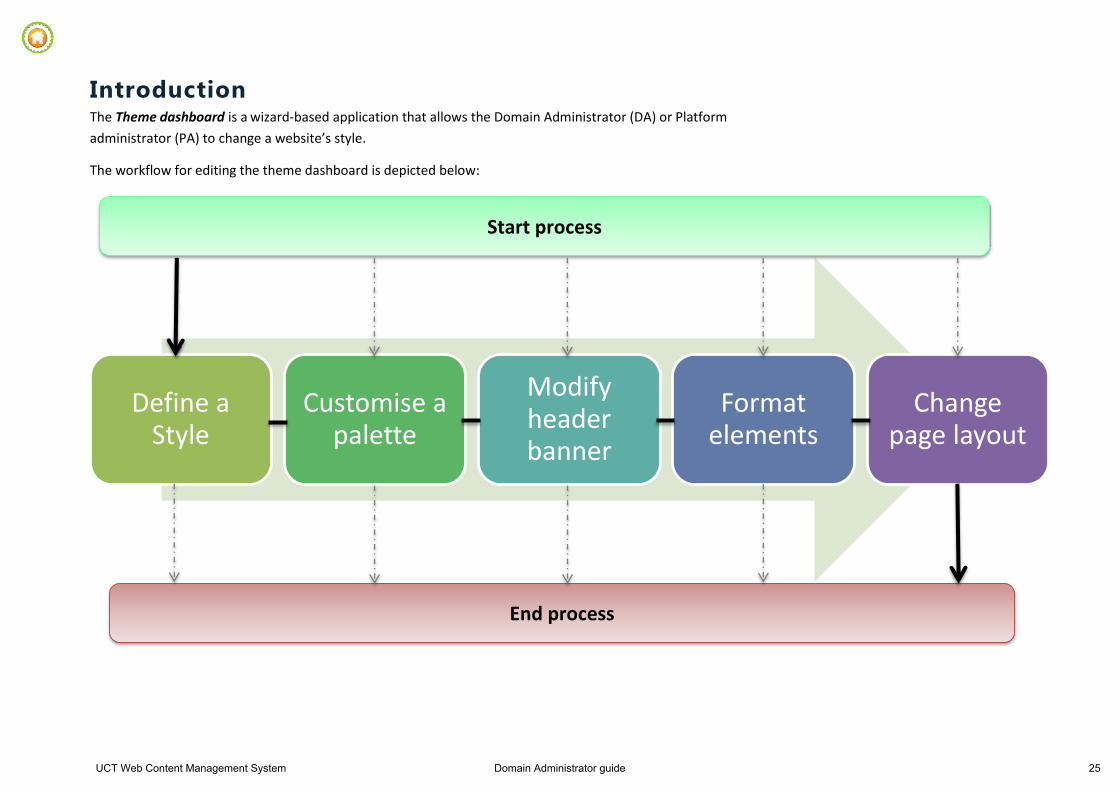
Introduction The Theme dashboard is a wizard-based application that allows the Domain Administrator (DA) or Platform
administrator (PA) to change a websitersquos style
The workflow for editing the theme dashboard is depicted below
Define a Style
Customise a palette
Modify header banner
Format elements
Change page layout
Start process
End process
UCT Web Content Management System Domain Administrator guide 25
Start process by accessing the Theme Dashboard
1 Log on to the Web CMS Dashboard
2 Click the hyperlinked URL to access your websitersquos homepage
3 The websitersquos homepage opens
- The Theme Dashboard appears as a collapsible menu at the bottom of your screen
- Click one of the tabs to expand the feature or tool or the collapsible arrow to minimise the
Theme Dashboard
If the Theme Dashboard is not
visible while logged in you can view it by
adding user to the site URL
When the site loads the Theme
Dashboard appears as a collapsible
menu at the bottom of the screen
Do you manage multiple sites
Click Clear Session on the theme
dashboard if you are loading another
site while logged on to the web CMS
This will ensure that you do not
overwrite Site Brsquos theme with Site Arsquos
UCT Web Content Management System Domain Administrator guide 26
Define a style
1 Ensure that you are logged onto the Web CMS Dashboard
2 Click the hyperlinked URL to access your websitersquos homepage
3 The homepage opens
- Click Save at the bottom of your screen
4 The Save style dialog box appears
- From the Existing Style drop-down menu select New Style
- Enter a Style name in the provided field
- Click Save and continue Your custom style has been saved and can be edited at any time
5 The Theme Dashboard menu collapses and your newly created style name will appear as the Active Style
Save and continue allows you to
save changes and continue editing
These changes will not be visible to
site visitors
Save and publish allows you to save
your changes and make it visible to
site visitors
It is advisable to always have a
titled default style
Choose a name that is
descriptive of the style you are
creating for example World Aids Day
Arbour Week etc
UCT Web Content Management System Domain Administrator guide 27
Customise a palette
1 Ensure that you are logged onto the Web CMS Dashboard
2 Click the hyperlinked URL to access your websitersquos homepage
3 The homepage opens
- Click Palettes Selector to access the palette controls
- Click Add new Palette
4 The Submit Palettes page on the Web CMS Dashboard opens
- Enter the custom palettersquos Title
- Set the desired colour for one or more of the following items
Corporate applies to the Header and Footer background colour
Primary font applies to Headings Titles and Paragraph text
Secondary applies to the Utility Bar Quick links and the left column navigation on
secondary pages
Navigation Background applies to the main navigation section
Footer Background applies to the Footer section
Navigation Links applies to main navigation links
Log on to the CMS Dashboard
using your UCT credentials
Username staffstudent number
Password your network password
Specify custom colours for a
new palette via the Web CMS
Dashboard
Apply the new palette using the
Theme Dashboard
Reload the site to apply the edited
palette
UCT Web Content Management System Domain Administrator guide 28
Footer Links applies to footer links
Links applies to ParagraphContent links
Links Hover applies to ParagraphContent links when you hover over them and as
ldquovisitedrdquo link colour
- Click Save
5 The Palettes page opens A notification appears at the top of the page informing you that your custom palette
has been created
- Click edit to make additional changes to your custom palette
- Should no additional changes be required click the site link URL to return to the Theme
Dashboard
Apply a palette
6 On the homepage click the Palettes Selector tab
- Select your custom palette and it is immediately applied to your website
- A confirmation message is displayed ldquoPalette has been successfully appliedrdquo
7 Click Save to apply the new palette style
8 The Save style dialog box appears
- Select New style from the drop-down menu
- Enter a title for your custom style
9 Click Save and Publish to apply the new style
Reload the page if changes were
made in another tab in the same
section
Only create a New style if you
want an independent style
Alternatively make the required
changes and click Save to update the
existing style
UCT Web Content Management System Domain Administrator guide 29
Example of a colour palette Palette item name and description Example of applied colour palette
Corporate Colour 002479 Header and footer background
Primary Font Colour 333333 Headingstitle paragraph text
Secondary Colour 85A7CB Utility bar amp quick links box
Navigation background Colour 212121 Main menu navigation section
Footer background Colour 002479 Headingstitle paragraph text
UCT Web Content Management System Domain Administrator guide 30
Navigation links Colour 333333 Headingstitle paragraph text
Footer links Colour FFFFFF Headingstitle paragraph text
Links Colour 006699 Headingstitle paragraph text
Links hover Colour 729ABD Headingstitle paragraph text
UCT Web Content Management System Domain Administrator guide 31
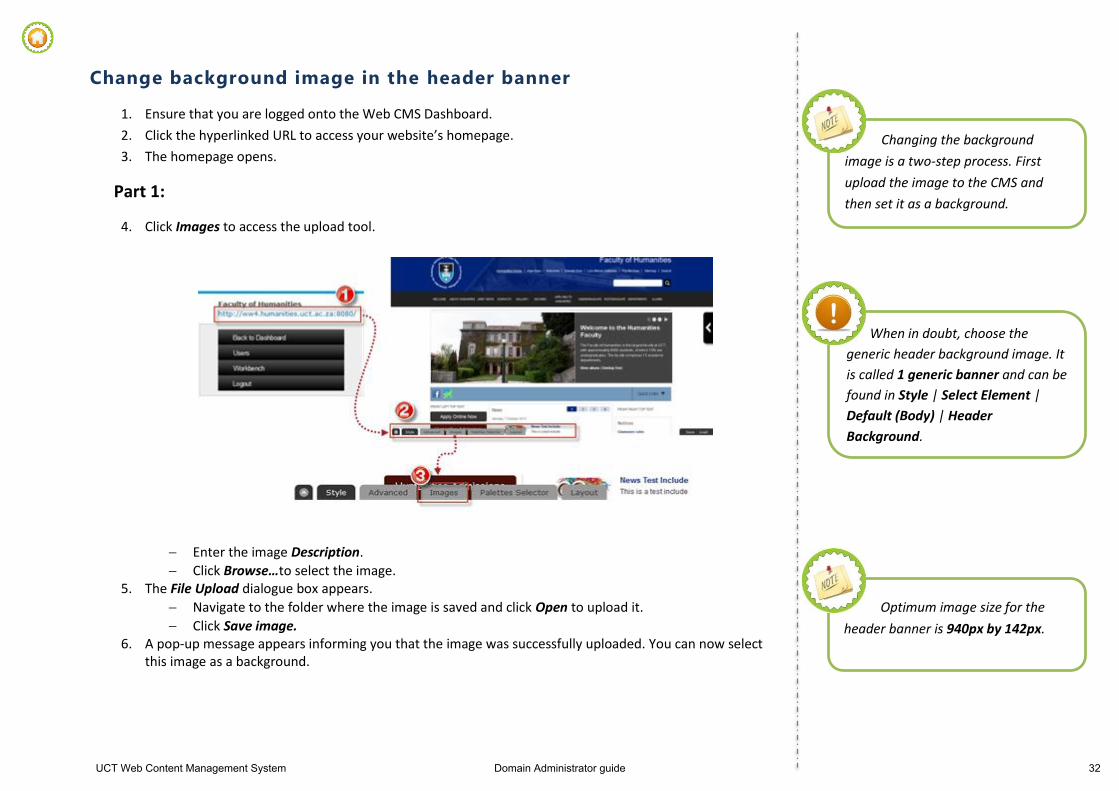
Change background image in the header banner
1 Ensure that you are logged onto the Web CMS Dashboard
2 Click the hyperlinked URL to access your websitersquos homepage
3 The homepage opens
Part 1
4 Click Images to access the upload tool
Enter the image Description
Click Browsehellipto select the image 5 The File Upload dialogue box appears
Navigate to the folder where the image is saved and click Open to upload it
Click Save image 6 A pop-up message appears informing you that the image was successfully uploaded You can now select
this image as a background
Changing the background
image is a two-step process First
upload the image to the CMS and
then set it as a background
Optimum image size for the
header banner is 940px by 142px
When in doubt choose the
generic header background image It
is called 1 generic banner and can be
found in Style | Select Element |
Default (Body) | Header
Background
UCT Web Content Management System Domain Administrator guide 32
Part 2
7 On the theme dashboard click Style
From the Select Element drop-down menu select Default (Body)
Click Header Background
In the Header Column 1 section from the Theme default drop-down menu select a background The background image immediately displays
In the Header Column 2 section click Header Repeat None
In the Header Attachment section click Scroll
Click Save to apply the new header background 8 The Save style dialog box appears
Click Save and Publish to apply the new header banner
UCT Web Content Management System Domain Administrator guide 33
Format elements ndash Main menu navigation item spacing
1 Ensure that you are logged onto the Web CMS Dashboard
2 Click the hyperlinked URL to access your websitersquos homepage
3 The homepage opens
- Click Style
From the Select Element drop-down menu select the appropriate Top Level item eg
Main Menu ndash Top Level Item 1 The selected item is outlined in red on the websitersquos
homepage
Click Borders amp Spacing
Click Width to specify how wide the navigation item should be and add a value that will
best display the main menu item
- Click Save to apply the new font style
4 The Save style dialog box appears
- Click Save and Publish
5 Your new style has been applied
Check the main navigation in
Internet Explorer as it handles widths
differently
When you change the position of
an item or add a new item on the
main navigation you will need to
update the item spacing
Repeat this process to customise
the width for the rest of the Main
Navigation Menu items
UCT Web Content Management System Domain Administrator guide 34
Change page layout
1 Ensure that you are logged onto the Web CMS Dashboard
2 Click the hyperlinked URL to access your websitersquos homepage
3 Navigate to the page you want to change the layout of
- On the Theme Dashboard click Layout
Select your preferred column page layout option and click This Page
4 The style is automatically applied to the page
Log on to the CMS Dashboard
using your UCT credentials
Username staffstudent number
Password your network password
When applying layout changes
always select This Page instead of All
Pages There is no undo button to
reverse this change and you would
need manually change each pagersquos
layout
Do not remove the left column of
your site unless it is required for items
such as calendars The left column is
the main navigation column
UCT Web Content Management System Domain Administrator guide 35
End process ndash Save versus Publish
When you click Save on the Theme Dashboard you have the option to Save and continue or Save and publish
Save and continue
This option allows you to save your changes and continue working on the website or you can continue editing at a
later stage Your changes will not yet be visible to site visitors
1 On the theme dashboard click Save2 The Save style dialog box appears
- From the Existing style drop-down menu either create a New style or leave it as is to overwrite the Existing style
3 Click Save and continue to save your current changes and continue working
Save and publish
This option saves your changes and immediately publishes them to the website so that they are visible to site
visitors
1 On the theme dashboard click Save2 The Save style dialog box appears
- From the Existing style drop-down menu either create a New style or leave it as is to overwrite the Existing style
- Click Save and publish 3 Your changes are saved and published
If a page is refreshed without
click Save then any changes made will
be lost
Custom CSS and JavaScript code
cannot be recovered when
overwritten
Recommendation
Save your custom CSS and JavaScript
in a separate file
UCT Web Content Management System Domain Administrator guide 36
Publish
A page is published for site visitors to view
1 On the theme dashboard click Publish
2 The Publish style dialog box appears
- Click Publish style
3 Your current style and changes are made visible to site visitors Any unsaved changes will be saved when
publishing
End process ndash Logging out
1 Hover over the Domain Dashboard flyout menu on the right hand side of your screen
- Click Logout
2 You will be logged out of the system
UCT Web Content Management System Domain Administrator guide 37
How to change font colour
1 Log on to the Web CMS
2 The Dashboard page opens
- Click the hyperlinked URL to access your websitersquos homepage
3 The homepage opens
- The Theme Dashboard appears as a collapsible menu at the bottom of your screen
- Click Style
- From the Select Element drop-down menu select the element you want to change
4 The Style tab loads the full path of the selected element and all style related options
- Select Font
- The font attributes are displayed
- Click to display the font colour options
- Select the colour you want to apply to the selected font
- Click Save
5 The Save style dialog box appears
- Click Save and Publish to apply your changes
UCT Web Content Management System Domain Administrator guide 38
How to request access to the Web CMS On completion of the UCT Web Content Management System Domain Administrator workshop you will need to
log a call with the IT Helpdesk to request Domain Administrator (DA) access After your request has been
submitted and you have been granted DA access you will be able to manage your websitersquos content
Log a call via the UCT Service Management Suite
1 Open a web browser and in the address bar enter httpuctservice-nowcomess
2 You are redirected to the UCT Single Sign On page- Enter your studentstaff number and network password - Click Sign In
3 The UCT Service Management Suite page opens
- On the ServiceNow Customer View home screen click Web and Collaboration 2 The Service Catalog |Web and Collaboration page opens
- Click AddChange Domain Administrator 3 The AddChange Domain Administrator page opens The first part of the page provides an overview of a
DArsquos role- In the form below complete the following fields
- Requested by Enter the name of the person who requires Domain Administrator access - Head of departmentfacultyunit approving this request Enter the name of the person
who will approve the request - Please provide the name of the domain Enter the website URL
(eghumanitiesuctacza) - In the New domain administrator details section select the appropriate option from the
drop-down menu - If applicable enter the Previous domain administratorrsquos details - Enter any Additional information regarding the request to addremove a Domain
Administrator - Click Submit to process your request
4 You will receive an email with a reference number confirming your request
UCT Web Content Management System Domain Administrator guide 39
How to assign roles 1 Open a web browser and in the address bar enter your site URL followed by user (eg
humanitiesuctaczauser) - Click Log In
2 You are redirected to the UCT Single Sign On page - Log on using your studentstaff number and network password - Click Sign In
3 The homepage will reload displaying a black fly-out arrow on the right-hand side of the screen - Click the arrow and select Domain Dashboard
4 You are directed to your sitersquos Domain Administrator Dashboard - Click Users | List
5 The User List page opens - In the Username field enter a staffstudent number of the user and click Apply - The user details are listed Click roles
6 The User Domain Roles window is displayed - Assign the appropriate role by selecting a tick box - Click Save to confirm your changes
7 The user you added can now access the Web CMS system and create edit view and publish according to their role
Once you have completed the UCT Web Content Management System training you will get access to your site
Un-publishing content 4 Quality-checking (QA) 4 EDITING CONTENT MIGRATED FROM THE CMD CMS 5
Titles 5 Contextual title 5 Text formatting 5 Page structure 5 URL aliases 5 Content links 6 ldquoBack to toprdquo links 6 Quality-checking (QA) 6
Glossary of terms 6
The sections below detail what should be done for both new and migrated websites
Home pages
The home page will already have been set up when the site shell is handed over to the Domain Administrator
All home pages are and must be Critical Pages
There must be a link to the Home page in the Header or Main Menu See Navigation below
Page elements
Before you create a page please see Link content types below
Contextual title
Add a contextual title in cases where such a title will make it clearer what section the page is in
Communication and Marketing
Communication amp Marketing Department Welgelegen Chapel Rd Ext Rosebank 7701 Cape Town 2
ldquoOUR MISSION is to be an outstanding teaching and research university educating for life and addressing the challenges facing our societyrdquo
o See httpwwwhumanitiesuctaczahumundergraduatestudentswelcome for an example The Welcome page is specifically for Current Students
Keywords
Add specific keywords that describe the pagersquos content
Keywords are separated by semi-colons ()
Capital letters may only be used for the first letters in proper names
Donrsquot duplicate the Subject in this field
Donrsquot use the site name as a keyword
Subject
More general keywords such as Research Publications or Staff are found in this list
Pick one or more subjects that describe the page or the section it is in
If you donrsquot find the subject in the list you can request that it be added via an email to ICTS-Helpdesk
Page structure
Only change this if the content on the particular page (eg a big table) does not fit into the central column
The 1-column option may only be chosen in exceptional cases (such as full-page calendars) since it means that the left navigation column will not be visible
Domain administrators can change the column layout on a page via the Theme Dashboard
ldquoURL path settingsrdquo
Use custom URL aliases for all pages o Note that custom URL aliases must have no initial or trailing forwardslashes eg
humdepartmentslibrary_studies is correct humdepartmentslibrary_studies is incorrect and will not work
o Reflect the site hierarchynavigational structure in the custom URL aliases eg departmentssacmfirstyear_courses and not just firstyear_courses The former positions the course content in its proper place in the content hierarchystructure
Use a prefix (such as your org code) in front of all URL aliases eg ebeaboutstructure o This will ensure that your URLs are unique (Each URL alias can only be used once in
the Drupal environment) o The system will alert you if a URL alias already exists
The following need not have custom URL aliases (in other words the automatic URLs assigned by the system need not be changed)
o Audio files (when uploaded via the Audio content type) o Events (although a more user-friendlyshorter URL may be useful) o Images (when uploaded via the Image content type) o Includes o Link content types o News articles (although a more user-friendlyshorter URL may be useful) o Notices (although a more user-friendlyshorter URL may be useful) o Vacancies (although a more user-friendlyshorter URL may be useful) o Videos
Typos
Check your site content for typos by using the spellchecker built into the editor o Common typos include words like ldquoaccomodationrdquo ldquoVice Chancellorrdquo ldquotheirrdquo for
Communication amp Marketing Department Welgelegen Chapel Rd Ext Rosebank 7701 Cape Town 3
ldquoOUR MISSION is to be an outstanding teaching and research university educating for life and addressing the challenges facing our societyrdquo
Content
Text formatting
The first heading inside the Body of a page should be a Heading 3 o Since Heading 3 is bold already you should not add bold to the formatting
Subsequent headings in the body content should be bold
Relative URLs
Links to other pages in your own website or documents hosted on your own website must have relative URLs and not full URLs
o Example of a relative URL humundergraduatestudentswelcome o Example of a full URL
httpwwwhumanitiesuctaczahumundergraduatestudentswelcome o This ensures that should your domain name change you need not change every
internal link on your website o Edit all internal links in your content to ensure that they are relative URLs
Includes
Naming convention
An includersquos title should indicate if it contains content destined for the middle or right columns of a page Use the following naming convention
o Research ethics human subjects ndash BODY o Research ethics human subjects - SIDEBAR
Navigation
Do not duplicate navigation items in both the Header and the Main Menu
ldquoHomerdquo
Home must always be in your navigation either the Main Menu or the Header Menu o In most cases it will have been set up already when you receive the site shell from
ICTS or CMD o It can be in Header Menu if there is limited space in the main navigation o Note that this link must be a Link Content Type o Important use ltfrontgt as the URL in the URL field
ldquoSitemaprdquo amp ldquoSearchrdquo
These items will be added to the Header Menu when the site goes live Remember to leave sufficient space in the Header Menu otherwise they will not be displayed ndash items occurring after a certain number of pixels are hidden from view
Do not add these items to the Header Menu yourself
Link content types
Link content types have two purposes 1 Adding an external link to your site navigation (ie a link to another website) 2 Creating a parent link
o Every navigation item that is a parent ndash ie has ldquochildrenrdquo (sub-pages) ndash should be a link content type and not a page
o Both parent (link content type) and its first child must have the same URL alias Eg (from httpwwwhumanitiesuctacza)
Current students [humundergraduatestudentswelcome] (parent - link content type)
Communication and Marketing
Communication amp Marketing Department Welgelegen Chapel Rd Ext Rosebank 7701 Cape Town 4
ldquoOUR MISSION is to be an outstanding teaching and research university educating for life and addressing the challenges facing our societyrdquo
o The reason for doing this is illustrated by the following extract from a navigational tree Departments [httpwwwhumanitiesuctaczahumdepartmentsagi] African Gender Institute [httpwwwhumanitiesuctaczahumdepartmentsagi] Archaeology [httpwwwhumanitiesuctaczahumdepartmentsarchaeology] Etc If Departments were not a link content type but a page containing African Gender Institute content the words African Gender Institute would never appear in the navigation Clicking on Departments would load the page with AGI content (httpwwwhumanitiesuctaczahumdepartmentsagi) and the next navigation item in the left column (after Departments) would be Archaeology
Numbering (positioning)
Number your navigation items correctly
Start at 1 ndash you will be able to add a number ldquo0rdquo should an additional item need to be added before 1 at a later stage
You can leave ldquogapsrdquo between numbers to enable you to accommodate additional navigation items later without having to renumber all items after the additional ones
o Eg use the numbering sequence 1 3 5 or 2 4 6 etc
Alphabetical order
Menu items that can or should be ordered alphabetically must all be given the same number or weight
o Use 0 o A list of links to departments is an example of a list of navigation items that should be
in alphabetical order
Should an Overview or other introductory page be necessary it is best to choose -50 as its number ensuring that it will always be the first navigation item
External links
Avoid linking to other websites in your site navigation visitors tend to become confused when a link in the navigation of website opens another website altogether
o Where this is unavoidable have the link open in a new window (Web browsers will open the link in another tab)
o Use link content types to add external links to your site navigation
Un-publishing content
Before you un-publish any node add ldquo-unpublishedrdquo to the custom or automatic URL - eg humdepartmentslibrary_studies-unpublished First save the node and then un-publish it
o This frees up the URL for use by either your own or someone elsersquos site
Quality-checking (QA)
Remember to check your work by viewing your editsupdates in the browser (once published) as you go along
Always check the mobile view as well ndash click and drag the browser window smaller until the mobile view shows
It is a good idea to check the current and new migrated website side by side after yoursquore done to make sure that no content was left behind
o Check for content in image format delivered via scripts or in right columns Such content is easily overlooked
Communication and Marketing
Communication amp Marketing Department Welgelegen Chapel Rd Ext Rosebank 7701 Cape Town 5
ldquoOUR MISSION is to be an outstanding teaching and research university educating for life and addressing the challenges facing our societyrdquo
The sections below detail how to edit content migrated off the CMD CMS
EDITING CONTENT MIGRATED FROM THE CMD CMS
First check ALL parentfirst child URL aliases They must be identical If they are not it means that a parent navigation item was not tagged as link content type in the CMD CMS and that duplicate pages would have been created for it and its first child Unpublish the parent page (after changing its URL as described above) add a link content type and make sure that it and its first child have the same URL alias
Titles
Check that page titles are not duplicated o There is a Title option for each page it automatically displays above the content The
page title should therefore not be added at the top of the content text field as well
Contextual title
Add a contextual title in cases where such a title will make it clearer what section the page is in
o See httpwwwhumanitiesuctaczahumundergraduatestudentswelcome for an example The Welcome page is specifically for Current Students
Text formatting
The first heading inside the Body of a page should be a Heading 3 o Since Heading 3 is bold already you must not add bold to the formatting
Remove unnecessary spaces between paragraphs from the content
The following changes are required to content imported from the CMD CMS o Right column content must no longer be right-aligned o There is no specific style for bold text you can remove the class=rdquoheadrdquo and
class=rdquosubheadrdquo code from the content (in the [HTML] Source view in the Editor) o Table headings must be made bold since the original table style will have been lost o Percentages must be used for table and column widths not pixels
Page structure
Check each page to make sure that the migrated content fits into the middle column content such as tables may be too wide
Should the content not fit use the Theme Dashboard to apply a 2-column layout to that particular page
o Do not apply this layout if there is a right column with content In that case the middle columnrsquos content should be altered to fit into that column
The 1-column option may only be chosen in exceptional cases (such as full-page calendars) since it means that the left navigation column will not be visible
URL aliases
If an auto-migrated page had a URL that is already in use the system will add a number to the end of it eg humundergraduatestudentswelcome-0
o This can also be a sign that a navigation item was not tagged as link content type in the CMD CMS Check that all parent navigation has the exact same URL alias as its first child
Change such a URL to one that does not exist yet o The system will inform you if you attempt to change it to one that already exists
Communication and Marketing
Communication amp Marketing Department Welgelegen Chapel Rd Ext Rosebank 7701 Cape Town 6
ldquoOUR MISSION is to be an outstanding teaching and research university educating for life and addressing the challenges facing our societyrdquo
Content links
Links to other pages in your own website or documents hosted on your own website must have relative URLs and not full URLs
o Example of a relative URL humundergraduatestudentswelcome o Example of a full URL
httpwwwhumanitiesuctaczahumundergraduatestudentswelcome o This ensures that should your domain name change you need not change every
internal link to your website o Edit all internal links in your content to ensure that they are relative URLs
Check all internal page links (links to other pages on your site) your site URLs will most likely all change which means that internal links will no longer work
Avoid linking to other websites in your site navigation visitors tend to become confused when a link in website navigation opens another website
o Where this is unavoidable have the link open in a new window (Web browsers will open the link in another tab)
o Use link content types to add external links to your site navigation
ldquoBack to toprdquo links
ldquoBack to toprdquo links are no longer necessary since they are built into the site template
Remove all ldquoback to toprdquo links from the bottom of migrated pages
Quality-checking (QA)
Remember to check your work by viewing your editsupdates in the browser (once published) as you go along
It is a good idea to check the current and new migrated website side by side after yoursquore done to make sure that no content was left behind
Glossary of terms
URLs
URL ndash address of a web page or other web content on a particular website
Custom URL alias ndash a custom address created by a content manager for a web page or other web content over-writing the URL generated by the system
Links
Internal link ndash a link to content on the current website
External link ndash a link to content on another website Text field ndash a text box into which content is entered and in which content can be edited Node ndash an item of content on a website such as a page an event a notice etc Parentchild navigation items
Parent navigation item ndash a navigation item which has secondary navigation items associated with it a content category
Child navigation item ndash a navigation item which has a parent a piece of content belonging to a larger category
Unpublish ndash the action of removing content from a website by hiding it from view rather than deleting it
1
Drupal Website Approval Guide Once you want your website to go live the Communication and Marketing Department will be requested
to approve it Your site will be evaluated according to the points listed below You may be required to
affect changes before the site is approved to go live
Drupal Website Approval Guide 1
Theming 1
Colours 2
Layout 2
Maximum widths 2
Navigation 2
Quick Links 3
Content 3
Copying and pasting content 4
Images 4
Image width amp height 4
Theming If you have a co-brand template remember to add your sitersquos site domain name (address) to the
co-brand logorsquos URL field in the Custom Regions This will make your logo click through to your
main page
A co-brand site has the option of three UCT logos the logos have white black or blue text
Choose the logo whose text is most legible on your chosen header background colour
Do not add an unsuitable header background image to your header (See Images below) You
should not choose a very busy image since the image must not obscure compete with or cause
the site title Header navigation andor the site logo to become hard to distinguish from the
background
o You could upload a header image that only displays an image or pattern between the
logo on the left and the site title Header navigation and search box on the right
o When in doubt choose the generic header background image It is called 1 Generic
Background and can be found in the header background image dropdown list in the
Theme Dashboard
If you use custom code to rearrange or otherwise customise items on the header do not obscure
or remove the UCT logo or the search box
If you add items to the Utility Bar ensure that they are not too high If an image that is too high
is added to the bar you will note that vertical line next to the Quick Links does not reach all the
way to the top
2
o A safe maximum height for an item in the Utility Bar is 35 pixels
o View the Source of the Utility Bar field to check that whatever you upload into it is in a
ldquodivrdquo called social-links If your icons or text is not too high it will ensure that they are
spaced correctly Below is the ltdivgt code
ltdiv class=social-linksgt icontextltagtltdivgt
The site must display correctly on mobile devices (phones specifically) ndash the UCT and site logo (if
any) as well as the relevant navigation must be visible and properly styled
Colours
Do not use a dark font on a dark background
Ensure that link colours are easily distinguishable from the rest of the content
Ensure that the colours of links in the left column are sufficiently darker than a light background
or lighter than a dark background in order to be easily readable
Layout
It is advisable to use a two-column layout for all secondary pages unless they require a third
column
You may not hide the left column of secondary pages (identified as column A in the Theme
Dashboard) This will hide the left column navigation
o You may make an exception for very wide content that will not fit properly into two
columns (such as the Calendar)
A site Calendar must be displayed in a single column layout to be as user-friendly as possible
Maximum widths
The following are the maximum width items in site columns can have
Middle column ndash 458 pixels
Right column ndash 198 pixels
Two-column (spanning the middle and right columns) - 685 pixels
Single column (spanning all three) ndash 918 pixels
o Single columns may mainly be used on the home page as well as the Calendar
Navigation Site navigation is a hierarchical content structure
Please use URL aliases instead of the URLs the system provides
Use a prefix in front of all URL aliases to ensure that your site URLs are unique
o In the following example the prefix is fhs - fhsaboutteam (instead of just
aboutteam)
All pages and features (Calendar News etc) you add to the site must be in the site navigation
o This means that a user must be able to find all pages on the site by following the site
navigation Pages on your site must not be hidden or orphaned by only being available
via a link inside the content somewhere
3
Your site will have been created with a Home navigation item in the Header navigation You may
move this to the Main navigation if you wish but do not unpublish it
o Your Home navigation item must be a Link Content Type with ltfrontgt as the URL
Do not add a page or other item to both the Header and the Main navigation If you do this it
will cause two sets of breadcrumbs to be displayed
o Note though that a page or other item can be added to either the Main or Header
navigation as well as the Quick Links navigation
Once you are satisfied with your Main navigation items you should space them far enough apart
to be easily distinguishable from one another Often adding five or ten pixels to each is enough
o Ensure that you do not have too many items in your Main navigation andor that you
do not space them too far apart Items on the far right that go beyond the available
width will be hidden Note that the way that Internet Explorer handles spacing may
cause items to be hidden even though Chrome Firefox Safari etc may display all of
them
Ensure that all navigation items load what they are supposed to
Quick Links
The purpose of Quick Links is to make popular or important pages on your site more easily
findable
Do not add your sitersquos Main navigation items to the Quick Links as well ndash Main navigation is
visible at all times already
Choose pages from second level navigation down for inclusion in the Quick Links
You can also add external sites (such as Vula or staff and student email access) to Quick Links
o To add an external link first create a Link Content Type with the external URL then
choose to add that Link to Quick Links
If you donrsquot need Quick Links you can hide them by adding the following code to the Theme
o It becomes very apparent when the Dynamic Feature andor News articles on the home
page contain very old content
If pages have no content yet they must be unpublished until you have added content to them
Do not publish empty pages that have no content other than a sentence saying ldquoContent coming
soonrdquo or something to that effect
Links to other sites must load in a new window Choose ldquo_blankrdquo from Target (on the Link pop-
up) when creating the link
4
If your site has a News feature that is pulled into the home page there must be at least one
article in it Otherwise there will be an empty column on your main page
o Note that ICTS Helpdesk needs to be contacted should you want to add News to your
home page or remove it from that location A site can have a News module without
displaying news articles on the home page if that is what you require
Regularly clean up your home page by unchecking the box which instructs the system to display
news articles on it All articles are archived news articles not displayed on the home page
remain available in the News Archive unless you unpublish them
If you have a Calendar make sure that it has at least one upcoming event in it If you have a
three-column home page as well as a Calendar the latest events will show in the home pagersquos
right column If there are no upcoming events the third column will be blank
Do not use unnecessarily large font in your content or on the home page
If you have a large table with much content on a page rather change the page layout to two
columns (AB) in the Theme Dashboard
Copying and pasting content
If you copy and paste content from MS Word into the Editor the original formatting will be
retained ndash highlight all content then use the Clear Formatting button to get rid of the
formatting
Since the above does not always work perfectly it may be a better solution to copy and paste
into Notepad first then from there into the Editor Then apply the necessary formatting via the
Editor
Keep an eye out for multiple fonts on a page It is most likely the result of copying and pasting
from Word which overwrites the site style
Images Ensure that images are displayed with their correct width and height Forcing images into a
space too small for them will distort the images (by forcing the wrong aspect ratio on them)
If the image you want to add to the content of a page is wider than the middle column either
edit the image to fit or change the page layout to two columns (AB)
Do not upload very wide and high high-resolution images to be displayed in content
Editoptimise them appropriately
Image width amp height
The header background image must be 940x142 pixels
The Dynamic Feature image must be 558x274 pixels Do not use any image that does not
actually have that width and height
Main page news article thumbnail images must be 142x98 pixels
The co-brand logo image can have a maximum width of 392 and a maximum height of 142 pixels
Communication and Marketing Department
September 2014
TOC
Abbreviation
CMS
Description
Content Management System
CMD Communications and Marketing Department
ICTS Information Communication amp Technology Services
ECM Enterprise Content Management
WRP Web Renewal Project
UCT University of Cape Town
PA Platform Administrator
CA Content Architect
DA Domain Administrator
SCM Senior Content Manager
CM Content Manager
PM Page Manager
UCT Web CMS
Document version 2
Date 20150304
Created by ICTS Training
Contact us at icts-traininguctacza
Terms and Abbreviations
UCT Web Content Management System Domain Administrator guide 2
Icon guides Icon Description
Log on to Web Content Management System (CMS) Authentication is required
Platform Administrator (PA) has access to all the domains and functions on all the
websites and functionality within the UCT Drupal web environment
Domain Administrator (DA) has full access to all functionality via the CMS on a specific website in the UCT web environment
Senior Content Manager (SCM) can create edit publish unpublish and review (moderate) content on a particular website as well as assign roles to content managers
Content Manager (CM) can create edit publish and unpublish content on a particular website
Page Manager (PM) can create and edit pages on a particular website
Important information that you need to take note of
Useful information
Warning indicates that you need to perform a task before starting a process
Tips
UCT Web Content Management System Domain Administrator guide 3
Note
Digging deeper indicates that additional information is available
Exercises
Online help
Lesson duration
Link indicates what content types are related
Resources used
UCT Web Content Management System Domain Administrator guide 4
Document Control ndash Web CMS Domain Admin guide
Document location
Location
Central location to be confirmed Currently located on G drive
Author(s)
Position Name
Charmaine van der Merwe (CvdM)
Contact no
x5392 Training co-ordinator
Senior Helpdesk Consultant
Jamiela Dawood (JD) x4500
Helpdesk Consultant Gavin Joe (GJ) x4500
Senior Helpdesk Consultant
Elizabeth van Deventer (EvD) x4500
Revision history
Version Issue date Authoreditor DescriptionSummary of changes
Modules updated bull Modules 24 - 26
o Screenshots updatedo General updates to notes
Module addedreplaced
Sign on to UCT Web CMS dashboard
2 4 March CvdM GJ
Reviewed by
Version
2
Issue date
4 March
Name
Cindy Mathys
Position
Communications Co-Ordinator
Review date
2 March 2015
Approvals
Version
2
Issue date
4 March
Name
Pierre Neethling
Position
Team Leader CBS TSS - ICTS
Approval date
Related documents
Document
Drupal ndash Adding and Editing content
CMD web guide
Web CMS manual
CMD Drupal site approval guide
UCT Web Content Management System Domain Administrator guide 5
Table of Contents
24 Custom Regions
25 Web forms
26 Theme Dashboard
Appendix A How to request access to the UCT Web Content Management System
Appendix B How to assign roles
Note Modules 1 ndash 23 and 27 ndash 31 can be viewed in the UCT Web CMS manual
Important Notes
Report any other issues you may encounter to ICTS Helpdesk
Take note of the scheduled maintenance slots listed on the ICTS website
UCT Web Content Management System Domain Administrator guide 7
Sign on to the UCT Web CMS dashboard There are two ways that you can access websites on the UCT Drupal platform
1 Log on to the UCT Drupal dashboard
2 Log on directly to the website that you have been given access to
Method 1 Log on to the dashboard
1 Open a web browser and in the address bar enter httpwebcmsuctacza
2 You are redirected to the UCT Single Sign On page- Log on using your studentstaff number and network password
3 The Web CMS Dashboard page opens
- You are logged on to the UCT Web CMS with your appropriate roles and permissions
Method 2 Log on directly to a website
1 Open a web browser and in the address bar enter your site URL followed by user (eghumanitiesuctaczauser)
2 You are redirected to the UCT Single Sign On page- Log on using your studentstaff number and network password
3 The homepage will reload displaying a black fly-out arrow on the right of the screen- Click the arrow and select Workbench
4 You are directed to your sitersquos Workbench
Log on to the Web CMS
Dashboard using your UCT credentials
Username staffstudent number
Password your network password
8
Module 24 Custom Regions
Lesson time 30 minutes
Lesson objectives
In this lesson you will learn how to use and edit the Custom Regions feature on the Web CMS Workbench
At the end of this lesson you will be able to view and edit custom regions
Introduction
Regions are pre-defined areas on a page where content can be placed Basic regions include the Header Footer
Content Left bar and Right bar (Drupal) Custom regions are additional areas on your homepage where Domain
Administrators (DA) can add content
Custom regions that are available in the Web CMS include
You can copy and paste text into the WYSIWYG editor to add headings to the left bar
To change the colour select one of the example items in the WYSIWYG view click the top right corner and either choose a colour or add a hex value
12
Edit or add content to footer blocks
1 Log on to the Web CMS Dashboard
2 Click Workbench to view your toolbox
- On the Workbench drop-down menu click Custom Regions
3 The Custom Regions page opens
- Click edit to make changes to your websitersquos Custom Regions
4 Your sitersquos Regions page opens
- Enter text in the Footer Block (1 2 or 3) field Use the WYSIWYG editor to format text insert
images andor apply styles
5 Click Save Your changes are reflected in the footer block
By clicking Source on the
WYSIWYG editor HTML code can be
added to make changes to
Footer Block 1
Footer Block 2
Footer Block 3
Front Right Top
Front Left Top
All footer blocks should have Heading 2 titles to fit in with the Quick Links header
UCT Web Content Management System Domain Administrator guide 13
Edit or add content to the front right top region
1 Log on to the Web CMS Dashboard
2 Click Workbench to view your toolbox
- On the Workbench drop-down menu click Custom Regions
3 The Custom Regions page opens
- Click edit to make changes to your websitersquos Custom Regions
4 Your sitersquos Regions page opens
- Enter text in the Front Right Top field Use the WYSIWYG editor to format text insert images
andor apply styles
- Click Save
5 Your changes are reflected in the front right top region
Edit or add content to front left top region
1 Log on to the Web CMS Dashboard
2 Click Workbench to view your toolbox
- On the Workbench drop-down menu click Custom Regions
3 The Custom Regions page opens
- Click edit to make changes to your websitersquos Custom Regions
4 Your sitersquos Regions page opens
- Enter text in the Front Left Top field This region is situated between the Top Bar and the Left
Bar Use the WYSIWYG editor to format text insert images andor apply styles
5 Click Save Your changes are reflected in the front left top region
Example location of Front Left Top region
Example location of the Front Right Top
region
Content added should not exceed the maximum width of the right column
Content images are not automatically cropped to fit the column width
Maximum column width = 220px
UCT Web Content Management System Domain Administrator guide 14
Edit or add a banner
1 Log on to the Web CMS Dashboard
2 Click Workbench to view your toolbox
- On the Workbench drop-down menu click Custom Regions
3 The Custom Regions page opens
- Click edit to make changes to your websitersquos Custom Regions
4 Your sitersquos Regions page opens
- Scroll to the Banner section and click Browse to upload and insert an image
- Select the image you would like to use as a banner
- Click Upload
5 Click Save Your site will display the banner beneath the top bar
Always ensure that you use either a dynamic feature or a banner
It is not recommended that you use both at the same time as this makes a homepage look cluttered
The required banner width is 934 pixels
The co-brand logo will only appear if you requested that ICTS apply the co-brand template
UCT Web Content Management System Domain Administrator guide 15
Remove banner
1 Log on to the Web CMS Dashboard
2 Click Workbench to view your toolbox
- On the Workbench drop-down menu click Custom Regions
3 The Custom Regions page opens
- Click edit to make changes to your websitersquos Custom Regions
4 Your sitersquos Regions page opens
- Scroll to the Banner section and click Remove
5 Click Save to confirm your changes
Edit or add a co-brand logo
1 Log on to the Web CMS Dashboard
2 Click Workbench to view your toolbox
- On the Workbench drop-down menu click Custom Regions
3 The Custom Regions page opens
- Click edit to make changes to your websitersquos Custom Regions
4 Your sitersquos Regions page opens
- Scroll to the Co Brand Logo section and click Browse to select the image that will be used as the
co-brand logo
- Click Upload
- In the Co Brand URL section
Enter the name of co-brand site in the Title field
Enter the sitersquos domain name in the URL field
- Click Save
5 The co-brand logo will appear next to the UCT logo The website title will appear as a tooltip when
hovering over the co-brand logo
Co-branded site pointers
If you have a co-brand
template remember to
add your sitersquos domain
name (address) to the co-
brand logorsquos URL field in
Custom Regions This will
make your logo click
through to your main page
A co-brand site has the
option of three UCT logos
the logos have white black
or blue text
Select the logo with the
text that is most legible on
your chosen header
background colour
The link Title is limited to a
maximum of 128 characters
UCT Web Content Management System Domain Administrator guide 16
Module 25 Web forms
Lesson time 45 minutes
Lesson objectives
In this lesson you will learn how to use the Web forms feature on the Web CMS Workbench
At the end of this lesson you will be able to create publish and edit a web form
Introduction A web form or a HTML form allows a user to enter data that is sent to a server for processing andor emailed to a
specific person Forms may resemble paper or database versions and contain check boxes radio buttons andor
text fields
Consider adding a contact form to web pages that will give visitors the opportunity to contact you Submission
results and statistics are recorded and accessible to Domain Administrators (DA)
ROLES AND PERMISSIONS
Create
Edit
Delete View published
View Published View published
The Domain Administrator (DA)
is the only role that can create edit
and remove Web forms
UCT Web Content Management System Domain Administrator guide 17
Create a web form
1 Log on to the Web CMS Dashboard
2 Click Workbench to view your toolbox
- From the Workbench drop-down menu click Create Content 3 The Add Content page opens
- Click Web form 4 The Submit Web form page opens
- In the Content Fields section
Enter the formrsquos Title
Enter a summary for the form in the Body field
- Click URL path settings to change the URL alias This function allows you to create a customised
link to any item on your website
Clear the Generate automatic URL alias check box
Enter the URL alias where this content can be accessed
- Click Save
5 A default web form will be saved to your domain
The next section explains how to add content to the newly created web form
Edit a web form
1 Click Workbench | Web Forms to access the forms that have been created
2 The Web Forms page opens
- Search for the form that you created and click Components
3 The Web form Components page opens
Log on to the CMS Dashboard
using your UCT credentials
Username staffstudent number
Password your network password
Use a relative path for the URL
alias Donrsquot add a preceding or a
trailing slash or else the URL wonrsquot
work
UCT Web Content Management System Domain Administrator guide 18
- The Name Surname Email and QueryComment fields are created as default components - To edit a default component click Edit in the Actions column - To clone a default component click Clone in the Actions column - To delete a default components click Delete in the Actions column - To add a new component
- Enter a New component name - From the drop-down menu select a field type
- Select the Mandatory check box to make the component mandatory - Click Add - Click Save to add the Web form components
Click Save after reorganising
the current components and before
adding a new component This will
ensure that all your changes are
saved
UCT Web Content Management System Domain Administrator guide 19
Add an email address that the web form must be sent to
1 Click Workbench to view your toolbox
2 Click Web forms to access the forms that have been created
3 The All Forms page opens
- Select a form and under the Actions column click Emails
4 The Web Form Emails page opens
- In the Address field enter the email address that all submitted web forms should be sent to
- Click Add
5 The Edit Email Settings page opens
- Under the Email subject section in the Custom field add a subject
- Under the Email from address section in the Custom field enter the email address the email
message will be sent from
- Under the Email from name section in the Custom field enter the name of the sender
- Select an Email template from the drop-down menu
Select the Send e-mail as HTML box check box if you want to send the email in HTML
format
- Click Save email settings
- Click Back to Web Forms list
How to PublishUnpublish a web form
1 Click Workbench | Web Forms to access the forms that have been created
2 The All Forms page opens
- Select the form you would like to publish and under the Actions column click PublishUnpublish
3 The web form is now available on your website
UCT Web Content Management System Domain Administrator guide 20
Use the web form as an Include on a page
Items saved as a web form can be added to content types via the Includes button on the WYSIWYG toolbar
1 From the Workbench drop-down menu click Create Content
2 The Add Content page opens
- Click Page
3 The Submit Page opens
- Scroll down to the WYSIWYG editor
- Click Includes on the WYSIWIG editor to insert a web form
4 The Includes dialogue box appears
- From the Type drop-down menu select Web form
- Click Search
- From the list of displayed web forms select the relevant include item
- Click OK to confirm your selection
- The include is displayed via a reference number
The Web Form must be set to
Published before it can be used as an
Include on a page
Be careful not to delete or alter
the Include reference code as this will
result in the Include being removed
from the content
5 Select the Moderation state
- Current Draft indicates that this include will be saved as a draft in the All Drafts folder
- Needs Review indicates that this include will be sent for review to the applicable content
manager
6 Click Save Your web form will either be saved as a draft if you selected Current Draft or the moderation
process will be initiated if you chose Needs Review
UCT Web Content Management System Domain Administrator guide 21
Create a Contact Us web form
1 Use the Create a web form instructions to create a new form
2 After the form has been created you will be redirected to the Web Forms page
3 On the All forms page select the form that you created and in the Actions column click Components
4 The Web form components page opens
- Ensure that the default fields are Name Surname Email and QueryComment
- In the New Component Name field enter Telephone
- From the drop-down menu select Text Field
- Click Add
6 The Edit component page opens
- Click Save Component
7 On the Web form Components page click and drag the Telephone field to below Email
- Click Save
8 From the Workbench drop-down menu click Web Forms
9 On the All Forms page select your form and click Publish to allow it to be used as an Include
- In the Actions column click Emails
10 On the Web Form Emails page enter the email Address the form must be sent to
- Click Add
11 On the Edit email settings page click Save email settings
12 From the Workbench drop-down menu click Create Content
13 On the Add content page click Critical Page
14 The Submit Critical Page opens
- Enter Contact Us in both the Title and Short Title fields
- Enter the Body of the page to describe your Contact Us page
To make any field mandatory
select the check box in the Mandatory
column
Click Include
15 The Includes dialogue box appears
- From the Type drop-down menu select Web Form and click Search
- Select the web form you created and click OK
16 The Include code is displayed in the page
UCT Web Content Management System Domain Administrator guide 22
17 From the Page Type drop-down menu select Contact Us
18 In the Menu section select where the page should appear
19 From the Moderation state drop-down menu select Published
20 Click Save
21 From the Workbench drop-down menu click Published
22 You can check your page by navigating to your website and completing the web form
23 When you click Submit you will get a notification confirming the form has been submitted
UCT Web Content Management System Domain Administrator guide 23
Module 26 Theme Dashboard
Lesson time 45 minutes
Lesson objectives
In this lesson you will learn how to use the Theme Dashboard to change the base theme styles for each website
you create
Each websitersquos base theme has a default layout which includes the header menu sidebars content and footer
You can customise the default theme using styles layout changes palette selectors images and some custom
JavaScript or Customised Cascading Style Sheets (CSS)
At the end of this lesson you will be able to
Customise styles
Add CSS and JavaScript to customise your website theme
Change background images
Use or create custom palettes
Change the page layout
Change font colour
ROLES AND PERMISSIONS
Read Write
Publish
UCT Web Content Management System Domain Administrator guide 24
Introduction The Theme dashboard is a wizard-based application that allows the Domain Administrator (DA) or Platform
administrator (PA) to change a websitersquos style
The workflow for editing the theme dashboard is depicted below
Define a Style
Customise a palette
Modify header banner
Format elements
Change page layout
Start process
End process
UCT Web Content Management System Domain Administrator guide 25
Start process by accessing the Theme Dashboard
1 Log on to the Web CMS Dashboard
2 Click the hyperlinked URL to access your websitersquos homepage
3 The websitersquos homepage opens
- The Theme Dashboard appears as a collapsible menu at the bottom of your screen
- Click one of the tabs to expand the feature or tool or the collapsible arrow to minimise the
Theme Dashboard
If the Theme Dashboard is not
visible while logged in you can view it by
adding user to the site URL
When the site loads the Theme
Dashboard appears as a collapsible
menu at the bottom of the screen
Do you manage multiple sites
Click Clear Session on the theme
dashboard if you are loading another
site while logged on to the web CMS
This will ensure that you do not
overwrite Site Brsquos theme with Site Arsquos
UCT Web Content Management System Domain Administrator guide 26
Define a style
1 Ensure that you are logged onto the Web CMS Dashboard
2 Click the hyperlinked URL to access your websitersquos homepage
3 The homepage opens
- Click Save at the bottom of your screen
4 The Save style dialog box appears
- From the Existing Style drop-down menu select New Style
- Enter a Style name in the provided field
- Click Save and continue Your custom style has been saved and can be edited at any time
5 The Theme Dashboard menu collapses and your newly created style name will appear as the Active Style
Save and continue allows you to
save changes and continue editing
These changes will not be visible to
site visitors
Save and publish allows you to save
your changes and make it visible to
site visitors
It is advisable to always have a
titled default style
Choose a name that is
descriptive of the style you are
creating for example World Aids Day
Arbour Week etc
UCT Web Content Management System Domain Administrator guide 27
Customise a palette
1 Ensure that you are logged onto the Web CMS Dashboard
2 Click the hyperlinked URL to access your websitersquos homepage
3 The homepage opens
- Click Palettes Selector to access the palette controls
- Click Add new Palette
4 The Submit Palettes page on the Web CMS Dashboard opens
- Enter the custom palettersquos Title
- Set the desired colour for one or more of the following items
Corporate applies to the Header and Footer background colour
Primary font applies to Headings Titles and Paragraph text
Secondary applies to the Utility Bar Quick links and the left column navigation on
secondary pages
Navigation Background applies to the main navigation section
Footer Background applies to the Footer section
Navigation Links applies to main navigation links
Log on to the CMS Dashboard
using your UCT credentials
Username staffstudent number
Password your network password
Specify custom colours for a
new palette via the Web CMS
Dashboard
Apply the new palette using the
Theme Dashboard
Reload the site to apply the edited
palette
UCT Web Content Management System Domain Administrator guide 28
Footer Links applies to footer links
Links applies to ParagraphContent links
Links Hover applies to ParagraphContent links when you hover over them and as
ldquovisitedrdquo link colour
- Click Save
5 The Palettes page opens A notification appears at the top of the page informing you that your custom palette
has been created
- Click edit to make additional changes to your custom palette
- Should no additional changes be required click the site link URL to return to the Theme
Dashboard
Apply a palette
6 On the homepage click the Palettes Selector tab
- Select your custom palette and it is immediately applied to your website
- A confirmation message is displayed ldquoPalette has been successfully appliedrdquo
7 Click Save to apply the new palette style
8 The Save style dialog box appears
- Select New style from the drop-down menu
- Enter a title for your custom style
9 Click Save and Publish to apply the new style
Reload the page if changes were
made in another tab in the same
section
Only create a New style if you
want an independent style
Alternatively make the required
changes and click Save to update the
existing style
UCT Web Content Management System Domain Administrator guide 29
Example of a colour palette Palette item name and description Example of applied colour palette
Corporate Colour 002479 Header and footer background
Primary Font Colour 333333 Headingstitle paragraph text
Secondary Colour 85A7CB Utility bar amp quick links box
Navigation background Colour 212121 Main menu navigation section
Footer background Colour 002479 Headingstitle paragraph text
UCT Web Content Management System Domain Administrator guide 30
Navigation links Colour 333333 Headingstitle paragraph text
Footer links Colour FFFFFF Headingstitle paragraph text
Links Colour 006699 Headingstitle paragraph text
Links hover Colour 729ABD Headingstitle paragraph text
UCT Web Content Management System Domain Administrator guide 31
Change background image in the header banner
1 Ensure that you are logged onto the Web CMS Dashboard
2 Click the hyperlinked URL to access your websitersquos homepage
3 The homepage opens
Part 1
4 Click Images to access the upload tool
Enter the image Description
Click Browsehellipto select the image 5 The File Upload dialogue box appears
Navigate to the folder where the image is saved and click Open to upload it
Click Save image 6 A pop-up message appears informing you that the image was successfully uploaded You can now select
this image as a background
Changing the background
image is a two-step process First
upload the image to the CMS and
then set it as a background
Optimum image size for the
header banner is 940px by 142px
When in doubt choose the
generic header background image It
is called 1 generic banner and can be
found in Style | Select Element |
Default (Body) | Header
Background
UCT Web Content Management System Domain Administrator guide 32
Part 2
7 On the theme dashboard click Style
From the Select Element drop-down menu select Default (Body)
Click Header Background
In the Header Column 1 section from the Theme default drop-down menu select a background The background image immediately displays
In the Header Column 2 section click Header Repeat None
In the Header Attachment section click Scroll
Click Save to apply the new header background 8 The Save style dialog box appears
Click Save and Publish to apply the new header banner
UCT Web Content Management System Domain Administrator guide 33
Format elements ndash Main menu navigation item spacing
1 Ensure that you are logged onto the Web CMS Dashboard
2 Click the hyperlinked URL to access your websitersquos homepage
3 The homepage opens
- Click Style
From the Select Element drop-down menu select the appropriate Top Level item eg
Main Menu ndash Top Level Item 1 The selected item is outlined in red on the websitersquos
homepage
Click Borders amp Spacing
Click Width to specify how wide the navigation item should be and add a value that will
best display the main menu item
- Click Save to apply the new font style
4 The Save style dialog box appears
- Click Save and Publish
5 Your new style has been applied
Check the main navigation in
Internet Explorer as it handles widths
differently
When you change the position of
an item or add a new item on the
main navigation you will need to
update the item spacing
Repeat this process to customise
the width for the rest of the Main
Navigation Menu items
UCT Web Content Management System Domain Administrator guide 34
Change page layout
1 Ensure that you are logged onto the Web CMS Dashboard
2 Click the hyperlinked URL to access your websitersquos homepage
3 Navigate to the page you want to change the layout of
- On the Theme Dashboard click Layout
Select your preferred column page layout option and click This Page
4 The style is automatically applied to the page
Log on to the CMS Dashboard
using your UCT credentials
Username staffstudent number
Password your network password
When applying layout changes
always select This Page instead of All
Pages There is no undo button to
reverse this change and you would
need manually change each pagersquos
layout
Do not remove the left column of
your site unless it is required for items
such as calendars The left column is
the main navigation column
UCT Web Content Management System Domain Administrator guide 35
End process ndash Save versus Publish
When you click Save on the Theme Dashboard you have the option to Save and continue or Save and publish
Save and continue
This option allows you to save your changes and continue working on the website or you can continue editing at a
later stage Your changes will not yet be visible to site visitors
1 On the theme dashboard click Save2 The Save style dialog box appears
- From the Existing style drop-down menu either create a New style or leave it as is to overwrite the Existing style
3 Click Save and continue to save your current changes and continue working
Save and publish
This option saves your changes and immediately publishes them to the website so that they are visible to site
visitors
1 On the theme dashboard click Save2 The Save style dialog box appears
- From the Existing style drop-down menu either create a New style or leave it as is to overwrite the Existing style
- Click Save and publish 3 Your changes are saved and published
If a page is refreshed without
click Save then any changes made will
be lost
Custom CSS and JavaScript code
cannot be recovered when
overwritten
Recommendation
Save your custom CSS and JavaScript
in a separate file
UCT Web Content Management System Domain Administrator guide 36
Publish
A page is published for site visitors to view
1 On the theme dashboard click Publish
2 The Publish style dialog box appears
- Click Publish style
3 Your current style and changes are made visible to site visitors Any unsaved changes will be saved when
publishing
End process ndash Logging out
1 Hover over the Domain Dashboard flyout menu on the right hand side of your screen
- Click Logout
2 You will be logged out of the system
UCT Web Content Management System Domain Administrator guide 37
How to change font colour
1 Log on to the Web CMS
2 The Dashboard page opens
- Click the hyperlinked URL to access your websitersquos homepage
3 The homepage opens
- The Theme Dashboard appears as a collapsible menu at the bottom of your screen
- Click Style
- From the Select Element drop-down menu select the element you want to change
4 The Style tab loads the full path of the selected element and all style related options
- Select Font
- The font attributes are displayed
- Click to display the font colour options
- Select the colour you want to apply to the selected font
- Click Save
5 The Save style dialog box appears
- Click Save and Publish to apply your changes
UCT Web Content Management System Domain Administrator guide 38
How to request access to the Web CMS On completion of the UCT Web Content Management System Domain Administrator workshop you will need to
log a call with the IT Helpdesk to request Domain Administrator (DA) access After your request has been
submitted and you have been granted DA access you will be able to manage your websitersquos content
Log a call via the UCT Service Management Suite
1 Open a web browser and in the address bar enter httpuctservice-nowcomess
2 You are redirected to the UCT Single Sign On page- Enter your studentstaff number and network password - Click Sign In
3 The UCT Service Management Suite page opens
- On the ServiceNow Customer View home screen click Web and Collaboration 2 The Service Catalog |Web and Collaboration page opens
- Click AddChange Domain Administrator 3 The AddChange Domain Administrator page opens The first part of the page provides an overview of a
DArsquos role- In the form below complete the following fields
- Requested by Enter the name of the person who requires Domain Administrator access - Head of departmentfacultyunit approving this request Enter the name of the person
who will approve the request - Please provide the name of the domain Enter the website URL
(eghumanitiesuctacza) - In the New domain administrator details section select the appropriate option from the
drop-down menu - If applicable enter the Previous domain administratorrsquos details - Enter any Additional information regarding the request to addremove a Domain
Administrator - Click Submit to process your request
4 You will receive an email with a reference number confirming your request
UCT Web Content Management System Domain Administrator guide 39
How to assign roles 1 Open a web browser and in the address bar enter your site URL followed by user (eg
humanitiesuctaczauser) - Click Log In
2 You are redirected to the UCT Single Sign On page - Log on using your studentstaff number and network password - Click Sign In
3 The homepage will reload displaying a black fly-out arrow on the right-hand side of the screen - Click the arrow and select Domain Dashboard
4 You are directed to your sitersquos Domain Administrator Dashboard - Click Users | List
5 The User List page opens - In the Username field enter a staffstudent number of the user and click Apply - The user details are listed Click roles
6 The User Domain Roles window is displayed - Assign the appropriate role by selecting a tick box - Click Save to confirm your changes
7 The user you added can now access the Web CMS system and create edit view and publish according to their role
Once you have completed the UCT Web Content Management System training you will get access to your site
Un-publishing content 4 Quality-checking (QA) 4 EDITING CONTENT MIGRATED FROM THE CMD CMS 5
Titles 5 Contextual title 5 Text formatting 5 Page structure 5 URL aliases 5 Content links 6 ldquoBack to toprdquo links 6 Quality-checking (QA) 6
Glossary of terms 6
The sections below detail what should be done for both new and migrated websites
Home pages
The home page will already have been set up when the site shell is handed over to the Domain Administrator
All home pages are and must be Critical Pages
There must be a link to the Home page in the Header or Main Menu See Navigation below
Page elements
Before you create a page please see Link content types below
Contextual title
Add a contextual title in cases where such a title will make it clearer what section the page is in
Communication and Marketing
Communication amp Marketing Department Welgelegen Chapel Rd Ext Rosebank 7701 Cape Town 2
ldquoOUR MISSION is to be an outstanding teaching and research university educating for life and addressing the challenges facing our societyrdquo
o See httpwwwhumanitiesuctaczahumundergraduatestudentswelcome for an example The Welcome page is specifically for Current Students
Keywords
Add specific keywords that describe the pagersquos content
Keywords are separated by semi-colons ()
Capital letters may only be used for the first letters in proper names
Donrsquot duplicate the Subject in this field
Donrsquot use the site name as a keyword
Subject
More general keywords such as Research Publications or Staff are found in this list
Pick one or more subjects that describe the page or the section it is in
If you donrsquot find the subject in the list you can request that it be added via an email to ICTS-Helpdesk
Page structure
Only change this if the content on the particular page (eg a big table) does not fit into the central column
The 1-column option may only be chosen in exceptional cases (such as full-page calendars) since it means that the left navigation column will not be visible
Domain administrators can change the column layout on a page via the Theme Dashboard
ldquoURL path settingsrdquo
Use custom URL aliases for all pages o Note that custom URL aliases must have no initial or trailing forwardslashes eg
humdepartmentslibrary_studies is correct humdepartmentslibrary_studies is incorrect and will not work
o Reflect the site hierarchynavigational structure in the custom URL aliases eg departmentssacmfirstyear_courses and not just firstyear_courses The former positions the course content in its proper place in the content hierarchystructure
Use a prefix (such as your org code) in front of all URL aliases eg ebeaboutstructure o This will ensure that your URLs are unique (Each URL alias can only be used once in
the Drupal environment) o The system will alert you if a URL alias already exists
The following need not have custom URL aliases (in other words the automatic URLs assigned by the system need not be changed)
o Audio files (when uploaded via the Audio content type) o Events (although a more user-friendlyshorter URL may be useful) o Images (when uploaded via the Image content type) o Includes o Link content types o News articles (although a more user-friendlyshorter URL may be useful) o Notices (although a more user-friendlyshorter URL may be useful) o Vacancies (although a more user-friendlyshorter URL may be useful) o Videos
Typos
Check your site content for typos by using the spellchecker built into the editor o Common typos include words like ldquoaccomodationrdquo ldquoVice Chancellorrdquo ldquotheirrdquo for
Communication amp Marketing Department Welgelegen Chapel Rd Ext Rosebank 7701 Cape Town 3
ldquoOUR MISSION is to be an outstanding teaching and research university educating for life and addressing the challenges facing our societyrdquo
Content
Text formatting
The first heading inside the Body of a page should be a Heading 3 o Since Heading 3 is bold already you should not add bold to the formatting
Subsequent headings in the body content should be bold
Relative URLs
Links to other pages in your own website or documents hosted on your own website must have relative URLs and not full URLs
o Example of a relative URL humundergraduatestudentswelcome o Example of a full URL
httpwwwhumanitiesuctaczahumundergraduatestudentswelcome o This ensures that should your domain name change you need not change every
internal link on your website o Edit all internal links in your content to ensure that they are relative URLs
Includes
Naming convention
An includersquos title should indicate if it contains content destined for the middle or right columns of a page Use the following naming convention
o Research ethics human subjects ndash BODY o Research ethics human subjects - SIDEBAR
Navigation
Do not duplicate navigation items in both the Header and the Main Menu
ldquoHomerdquo
Home must always be in your navigation either the Main Menu or the Header Menu o In most cases it will have been set up already when you receive the site shell from
ICTS or CMD o It can be in Header Menu if there is limited space in the main navigation o Note that this link must be a Link Content Type o Important use ltfrontgt as the URL in the URL field
ldquoSitemaprdquo amp ldquoSearchrdquo
These items will be added to the Header Menu when the site goes live Remember to leave sufficient space in the Header Menu otherwise they will not be displayed ndash items occurring after a certain number of pixels are hidden from view
Do not add these items to the Header Menu yourself
Link content types
Link content types have two purposes 1 Adding an external link to your site navigation (ie a link to another website) 2 Creating a parent link
o Every navigation item that is a parent ndash ie has ldquochildrenrdquo (sub-pages) ndash should be a link content type and not a page
o Both parent (link content type) and its first child must have the same URL alias Eg (from httpwwwhumanitiesuctacza)
Current students [humundergraduatestudentswelcome] (parent - link content type)
Communication and Marketing
Communication amp Marketing Department Welgelegen Chapel Rd Ext Rosebank 7701 Cape Town 4
ldquoOUR MISSION is to be an outstanding teaching and research university educating for life and addressing the challenges facing our societyrdquo
o The reason for doing this is illustrated by the following extract from a navigational tree Departments [httpwwwhumanitiesuctaczahumdepartmentsagi] African Gender Institute [httpwwwhumanitiesuctaczahumdepartmentsagi] Archaeology [httpwwwhumanitiesuctaczahumdepartmentsarchaeology] Etc If Departments were not a link content type but a page containing African Gender Institute content the words African Gender Institute would never appear in the navigation Clicking on Departments would load the page with AGI content (httpwwwhumanitiesuctaczahumdepartmentsagi) and the next navigation item in the left column (after Departments) would be Archaeology
Numbering (positioning)
Number your navigation items correctly
Start at 1 ndash you will be able to add a number ldquo0rdquo should an additional item need to be added before 1 at a later stage
You can leave ldquogapsrdquo between numbers to enable you to accommodate additional navigation items later without having to renumber all items after the additional ones
o Eg use the numbering sequence 1 3 5 or 2 4 6 etc
Alphabetical order
Menu items that can or should be ordered alphabetically must all be given the same number or weight
o Use 0 o A list of links to departments is an example of a list of navigation items that should be
in alphabetical order
Should an Overview or other introductory page be necessary it is best to choose -50 as its number ensuring that it will always be the first navigation item
External links
Avoid linking to other websites in your site navigation visitors tend to become confused when a link in the navigation of website opens another website altogether
o Where this is unavoidable have the link open in a new window (Web browsers will open the link in another tab)
o Use link content types to add external links to your site navigation
Un-publishing content
Before you un-publish any node add ldquo-unpublishedrdquo to the custom or automatic URL - eg humdepartmentslibrary_studies-unpublished First save the node and then un-publish it
o This frees up the URL for use by either your own or someone elsersquos site
Quality-checking (QA)
Remember to check your work by viewing your editsupdates in the browser (once published) as you go along
Always check the mobile view as well ndash click and drag the browser window smaller until the mobile view shows
It is a good idea to check the current and new migrated website side by side after yoursquore done to make sure that no content was left behind
o Check for content in image format delivered via scripts or in right columns Such content is easily overlooked
Communication and Marketing
Communication amp Marketing Department Welgelegen Chapel Rd Ext Rosebank 7701 Cape Town 5
ldquoOUR MISSION is to be an outstanding teaching and research university educating for life and addressing the challenges facing our societyrdquo
The sections below detail how to edit content migrated off the CMD CMS
EDITING CONTENT MIGRATED FROM THE CMD CMS
First check ALL parentfirst child URL aliases They must be identical If they are not it means that a parent navigation item was not tagged as link content type in the CMD CMS and that duplicate pages would have been created for it and its first child Unpublish the parent page (after changing its URL as described above) add a link content type and make sure that it and its first child have the same URL alias
Titles
Check that page titles are not duplicated o There is a Title option for each page it automatically displays above the content The
page title should therefore not be added at the top of the content text field as well
Contextual title
Add a contextual title in cases where such a title will make it clearer what section the page is in
o See httpwwwhumanitiesuctaczahumundergraduatestudentswelcome for an example The Welcome page is specifically for Current Students
Text formatting
The first heading inside the Body of a page should be a Heading 3 o Since Heading 3 is bold already you must not add bold to the formatting
Remove unnecessary spaces between paragraphs from the content
The following changes are required to content imported from the CMD CMS o Right column content must no longer be right-aligned o There is no specific style for bold text you can remove the class=rdquoheadrdquo and
class=rdquosubheadrdquo code from the content (in the [HTML] Source view in the Editor) o Table headings must be made bold since the original table style will have been lost o Percentages must be used for table and column widths not pixels
Page structure
Check each page to make sure that the migrated content fits into the middle column content such as tables may be too wide
Should the content not fit use the Theme Dashboard to apply a 2-column layout to that particular page
o Do not apply this layout if there is a right column with content In that case the middle columnrsquos content should be altered to fit into that column
The 1-column option may only be chosen in exceptional cases (such as full-page calendars) since it means that the left navigation column will not be visible
URL aliases
If an auto-migrated page had a URL that is already in use the system will add a number to the end of it eg humundergraduatestudentswelcome-0
o This can also be a sign that a navigation item was not tagged as link content type in the CMD CMS Check that all parent navigation has the exact same URL alias as its first child
Change such a URL to one that does not exist yet o The system will inform you if you attempt to change it to one that already exists
Communication and Marketing
Communication amp Marketing Department Welgelegen Chapel Rd Ext Rosebank 7701 Cape Town 6
ldquoOUR MISSION is to be an outstanding teaching and research university educating for life and addressing the challenges facing our societyrdquo
Content links
Links to other pages in your own website or documents hosted on your own website must have relative URLs and not full URLs
o Example of a relative URL humundergraduatestudentswelcome o Example of a full URL
httpwwwhumanitiesuctaczahumundergraduatestudentswelcome o This ensures that should your domain name change you need not change every
internal link to your website o Edit all internal links in your content to ensure that they are relative URLs
Check all internal page links (links to other pages on your site) your site URLs will most likely all change which means that internal links will no longer work
Avoid linking to other websites in your site navigation visitors tend to become confused when a link in website navigation opens another website
o Where this is unavoidable have the link open in a new window (Web browsers will open the link in another tab)
o Use link content types to add external links to your site navigation
ldquoBack to toprdquo links
ldquoBack to toprdquo links are no longer necessary since they are built into the site template
Remove all ldquoback to toprdquo links from the bottom of migrated pages
Quality-checking (QA)
Remember to check your work by viewing your editsupdates in the browser (once published) as you go along
It is a good idea to check the current and new migrated website side by side after yoursquore done to make sure that no content was left behind
Glossary of terms
URLs
URL ndash address of a web page or other web content on a particular website
Custom URL alias ndash a custom address created by a content manager for a web page or other web content over-writing the URL generated by the system
Links
Internal link ndash a link to content on the current website
External link ndash a link to content on another website Text field ndash a text box into which content is entered and in which content can be edited Node ndash an item of content on a website such as a page an event a notice etc Parentchild navigation items
Parent navigation item ndash a navigation item which has secondary navigation items associated with it a content category
Child navigation item ndash a navigation item which has a parent a piece of content belonging to a larger category
Unpublish ndash the action of removing content from a website by hiding it from view rather than deleting it
1
Drupal Website Approval Guide Once you want your website to go live the Communication and Marketing Department will be requested
to approve it Your site will be evaluated according to the points listed below You may be required to
affect changes before the site is approved to go live
Drupal Website Approval Guide 1
Theming 1
Colours 2
Layout 2
Maximum widths 2
Navigation 2
Quick Links 3
Content 3
Copying and pasting content 4
Images 4
Image width amp height 4
Theming If you have a co-brand template remember to add your sitersquos site domain name (address) to the
co-brand logorsquos URL field in the Custom Regions This will make your logo click through to your
main page
A co-brand site has the option of three UCT logos the logos have white black or blue text
Choose the logo whose text is most legible on your chosen header background colour
Do not add an unsuitable header background image to your header (See Images below) You
should not choose a very busy image since the image must not obscure compete with or cause
the site title Header navigation andor the site logo to become hard to distinguish from the
background
o You could upload a header image that only displays an image or pattern between the
logo on the left and the site title Header navigation and search box on the right
o When in doubt choose the generic header background image It is called 1 Generic
Background and can be found in the header background image dropdown list in the
Theme Dashboard
If you use custom code to rearrange or otherwise customise items on the header do not obscure
or remove the UCT logo or the search box
If you add items to the Utility Bar ensure that they are not too high If an image that is too high
is added to the bar you will note that vertical line next to the Quick Links does not reach all the
way to the top
2
o A safe maximum height for an item in the Utility Bar is 35 pixels
o View the Source of the Utility Bar field to check that whatever you upload into it is in a
ldquodivrdquo called social-links If your icons or text is not too high it will ensure that they are
spaced correctly Below is the ltdivgt code
ltdiv class=social-linksgt icontextltagtltdivgt
The site must display correctly on mobile devices (phones specifically) ndash the UCT and site logo (if
any) as well as the relevant navigation must be visible and properly styled
Colours
Do not use a dark font on a dark background
Ensure that link colours are easily distinguishable from the rest of the content
Ensure that the colours of links in the left column are sufficiently darker than a light background
or lighter than a dark background in order to be easily readable
Layout
It is advisable to use a two-column layout for all secondary pages unless they require a third
column
You may not hide the left column of secondary pages (identified as column A in the Theme
Dashboard) This will hide the left column navigation
o You may make an exception for very wide content that will not fit properly into two
columns (such as the Calendar)
A site Calendar must be displayed in a single column layout to be as user-friendly as possible
Maximum widths
The following are the maximum width items in site columns can have
Middle column ndash 458 pixels
Right column ndash 198 pixels
Two-column (spanning the middle and right columns) - 685 pixels
Single column (spanning all three) ndash 918 pixels
o Single columns may mainly be used on the home page as well as the Calendar
Navigation Site navigation is a hierarchical content structure
Please use URL aliases instead of the URLs the system provides
Use a prefix in front of all URL aliases to ensure that your site URLs are unique
o In the following example the prefix is fhs - fhsaboutteam (instead of just
aboutteam)
All pages and features (Calendar News etc) you add to the site must be in the site navigation
o This means that a user must be able to find all pages on the site by following the site
navigation Pages on your site must not be hidden or orphaned by only being available
via a link inside the content somewhere
3
Your site will have been created with a Home navigation item in the Header navigation You may
move this to the Main navigation if you wish but do not unpublish it
o Your Home navigation item must be a Link Content Type with ltfrontgt as the URL
Do not add a page or other item to both the Header and the Main navigation If you do this it
will cause two sets of breadcrumbs to be displayed
o Note though that a page or other item can be added to either the Main or Header
navigation as well as the Quick Links navigation
Once you are satisfied with your Main navigation items you should space them far enough apart
to be easily distinguishable from one another Often adding five or ten pixels to each is enough
o Ensure that you do not have too many items in your Main navigation andor that you
do not space them too far apart Items on the far right that go beyond the available
width will be hidden Note that the way that Internet Explorer handles spacing may
cause items to be hidden even though Chrome Firefox Safari etc may display all of
them
Ensure that all navigation items load what they are supposed to
Quick Links
The purpose of Quick Links is to make popular or important pages on your site more easily
findable
Do not add your sitersquos Main navigation items to the Quick Links as well ndash Main navigation is
visible at all times already
Choose pages from second level navigation down for inclusion in the Quick Links
You can also add external sites (such as Vula or staff and student email access) to Quick Links
o To add an external link first create a Link Content Type with the external URL then
choose to add that Link to Quick Links
If you donrsquot need Quick Links you can hide them by adding the following code to the Theme
o It becomes very apparent when the Dynamic Feature andor News articles on the home
page contain very old content
If pages have no content yet they must be unpublished until you have added content to them
Do not publish empty pages that have no content other than a sentence saying ldquoContent coming
soonrdquo or something to that effect
Links to other sites must load in a new window Choose ldquo_blankrdquo from Target (on the Link pop-
up) when creating the link
4
If your site has a News feature that is pulled into the home page there must be at least one
article in it Otherwise there will be an empty column on your main page
o Note that ICTS Helpdesk needs to be contacted should you want to add News to your
home page or remove it from that location A site can have a News module without
displaying news articles on the home page if that is what you require
Regularly clean up your home page by unchecking the box which instructs the system to display
news articles on it All articles are archived news articles not displayed on the home page
remain available in the News Archive unless you unpublish them
If you have a Calendar make sure that it has at least one upcoming event in it If you have a
three-column home page as well as a Calendar the latest events will show in the home pagersquos
right column If there are no upcoming events the third column will be blank
Do not use unnecessarily large font in your content or on the home page
If you have a large table with much content on a page rather change the page layout to two
columns (AB) in the Theme Dashboard
Copying and pasting content
If you copy and paste content from MS Word into the Editor the original formatting will be
retained ndash highlight all content then use the Clear Formatting button to get rid of the
formatting
Since the above does not always work perfectly it may be a better solution to copy and paste
into Notepad first then from there into the Editor Then apply the necessary formatting via the
Editor
Keep an eye out for multiple fonts on a page It is most likely the result of copying and pasting
from Word which overwrites the site style
Images Ensure that images are displayed with their correct width and height Forcing images into a
space too small for them will distort the images (by forcing the wrong aspect ratio on them)
If the image you want to add to the content of a page is wider than the middle column either
edit the image to fit or change the page layout to two columns (AB)
Do not upload very wide and high high-resolution images to be displayed in content
Editoptimise them appropriately
Image width amp height
The header background image must be 940x142 pixels
The Dynamic Feature image must be 558x274 pixels Do not use any image that does not
actually have that width and height
Main page news article thumbnail images must be 142x98 pixels
The co-brand logo image can have a maximum width of 392 and a maximum height of 142 pixels
Communication and Marketing Department
September 2014
TOC
Icon guides Icon Description
Log on to Web Content Management System (CMS) Authentication is required
Platform Administrator (PA) has access to all the domains and functions on all the
websites and functionality within the UCT Drupal web environment
Domain Administrator (DA) has full access to all functionality via the CMS on a specific website in the UCT web environment
Senior Content Manager (SCM) can create edit publish unpublish and review (moderate) content on a particular website as well as assign roles to content managers
Content Manager (CM) can create edit publish and unpublish content on a particular website
Page Manager (PM) can create and edit pages on a particular website
Important information that you need to take note of
Useful information
Warning indicates that you need to perform a task before starting a process
Tips
UCT Web Content Management System Domain Administrator guide 3
Note
Digging deeper indicates that additional information is available
Exercises
Online help
Lesson duration
Link indicates what content types are related
Resources used
UCT Web Content Management System Domain Administrator guide 4
Document Control ndash Web CMS Domain Admin guide
Document location
Location
Central location to be confirmed Currently located on G drive
Author(s)
Position Name
Charmaine van der Merwe (CvdM)
Contact no
x5392 Training co-ordinator
Senior Helpdesk Consultant
Jamiela Dawood (JD) x4500
Helpdesk Consultant Gavin Joe (GJ) x4500
Senior Helpdesk Consultant
Elizabeth van Deventer (EvD) x4500
Revision history
Version Issue date Authoreditor DescriptionSummary of changes
Modules updated bull Modules 24 - 26
o Screenshots updatedo General updates to notes
Module addedreplaced
Sign on to UCT Web CMS dashboard
2 4 March CvdM GJ
Reviewed by
Version
2
Issue date
4 March
Name
Cindy Mathys
Position
Communications Co-Ordinator
Review date
2 March 2015
Approvals
Version
2
Issue date
4 March
Name
Pierre Neethling
Position
Team Leader CBS TSS - ICTS
Approval date
Related documents
Document
Drupal ndash Adding and Editing content
CMD web guide
Web CMS manual
CMD Drupal site approval guide
UCT Web Content Management System Domain Administrator guide 5
Table of Contents
24 Custom Regions
25 Web forms
26 Theme Dashboard
Appendix A How to request access to the UCT Web Content Management System
Appendix B How to assign roles
Note Modules 1 ndash 23 and 27 ndash 31 can be viewed in the UCT Web CMS manual
Important Notes
Report any other issues you may encounter to ICTS Helpdesk
Take note of the scheduled maintenance slots listed on the ICTS website
UCT Web Content Management System Domain Administrator guide 7
Sign on to the UCT Web CMS dashboard There are two ways that you can access websites on the UCT Drupal platform
1 Log on to the UCT Drupal dashboard
2 Log on directly to the website that you have been given access to
Method 1 Log on to the dashboard
1 Open a web browser and in the address bar enter httpwebcmsuctacza
2 You are redirected to the UCT Single Sign On page- Log on using your studentstaff number and network password
3 The Web CMS Dashboard page opens
- You are logged on to the UCT Web CMS with your appropriate roles and permissions
Method 2 Log on directly to a website
1 Open a web browser and in the address bar enter your site URL followed by user (eghumanitiesuctaczauser)
2 You are redirected to the UCT Single Sign On page- Log on using your studentstaff number and network password
3 The homepage will reload displaying a black fly-out arrow on the right of the screen- Click the arrow and select Workbench
4 You are directed to your sitersquos Workbench
Log on to the Web CMS
Dashboard using your UCT credentials
Username staffstudent number
Password your network password
8
Module 24 Custom Regions
Lesson time 30 minutes
Lesson objectives
In this lesson you will learn how to use and edit the Custom Regions feature on the Web CMS Workbench
At the end of this lesson you will be able to view and edit custom regions
Introduction
Regions are pre-defined areas on a page where content can be placed Basic regions include the Header Footer
Content Left bar and Right bar (Drupal) Custom regions are additional areas on your homepage where Domain
Administrators (DA) can add content
Custom regions that are available in the Web CMS include
You can copy and paste text into the WYSIWYG editor to add headings to the left bar
To change the colour select one of the example items in the WYSIWYG view click the top right corner and either choose a colour or add a hex value
12
Edit or add content to footer blocks
1 Log on to the Web CMS Dashboard
2 Click Workbench to view your toolbox
- On the Workbench drop-down menu click Custom Regions
3 The Custom Regions page opens
- Click edit to make changes to your websitersquos Custom Regions
4 Your sitersquos Regions page opens
- Enter text in the Footer Block (1 2 or 3) field Use the WYSIWYG editor to format text insert
images andor apply styles
5 Click Save Your changes are reflected in the footer block
By clicking Source on the
WYSIWYG editor HTML code can be
added to make changes to
Footer Block 1
Footer Block 2
Footer Block 3
Front Right Top
Front Left Top
All footer blocks should have Heading 2 titles to fit in with the Quick Links header
UCT Web Content Management System Domain Administrator guide 13
Edit or add content to the front right top region
1 Log on to the Web CMS Dashboard
2 Click Workbench to view your toolbox
- On the Workbench drop-down menu click Custom Regions
3 The Custom Regions page opens
- Click edit to make changes to your websitersquos Custom Regions
4 Your sitersquos Regions page opens
- Enter text in the Front Right Top field Use the WYSIWYG editor to format text insert images
andor apply styles
- Click Save
5 Your changes are reflected in the front right top region
Edit or add content to front left top region
1 Log on to the Web CMS Dashboard
2 Click Workbench to view your toolbox
- On the Workbench drop-down menu click Custom Regions
3 The Custom Regions page opens
- Click edit to make changes to your websitersquos Custom Regions
4 Your sitersquos Regions page opens
- Enter text in the Front Left Top field This region is situated between the Top Bar and the Left
Bar Use the WYSIWYG editor to format text insert images andor apply styles
5 Click Save Your changes are reflected in the front left top region
Example location of Front Left Top region
Example location of the Front Right Top
region
Content added should not exceed the maximum width of the right column
Content images are not automatically cropped to fit the column width
Maximum column width = 220px
UCT Web Content Management System Domain Administrator guide 14
Edit or add a banner
1 Log on to the Web CMS Dashboard
2 Click Workbench to view your toolbox
- On the Workbench drop-down menu click Custom Regions
3 The Custom Regions page opens
- Click edit to make changes to your websitersquos Custom Regions
4 Your sitersquos Regions page opens
- Scroll to the Banner section and click Browse to upload and insert an image
- Select the image you would like to use as a banner
- Click Upload
5 Click Save Your site will display the banner beneath the top bar
Always ensure that you use either a dynamic feature or a banner
It is not recommended that you use both at the same time as this makes a homepage look cluttered
The required banner width is 934 pixels
The co-brand logo will only appear if you requested that ICTS apply the co-brand template
UCT Web Content Management System Domain Administrator guide 15
Remove banner
1 Log on to the Web CMS Dashboard
2 Click Workbench to view your toolbox
- On the Workbench drop-down menu click Custom Regions
3 The Custom Regions page opens
- Click edit to make changes to your websitersquos Custom Regions
4 Your sitersquos Regions page opens
- Scroll to the Banner section and click Remove
5 Click Save to confirm your changes
Edit or add a co-brand logo
1 Log on to the Web CMS Dashboard
2 Click Workbench to view your toolbox
- On the Workbench drop-down menu click Custom Regions
3 The Custom Regions page opens
- Click edit to make changes to your websitersquos Custom Regions
4 Your sitersquos Regions page opens
- Scroll to the Co Brand Logo section and click Browse to select the image that will be used as the
co-brand logo
- Click Upload
- In the Co Brand URL section
Enter the name of co-brand site in the Title field
Enter the sitersquos domain name in the URL field
- Click Save
5 The co-brand logo will appear next to the UCT logo The website title will appear as a tooltip when
hovering over the co-brand logo
Co-branded site pointers
If you have a co-brand
template remember to
add your sitersquos domain
name (address) to the co-
brand logorsquos URL field in
Custom Regions This will
make your logo click
through to your main page
A co-brand site has the
option of three UCT logos
the logos have white black
or blue text
Select the logo with the
text that is most legible on
your chosen header
background colour
The link Title is limited to a
maximum of 128 characters
UCT Web Content Management System Domain Administrator guide 16
Module 25 Web forms
Lesson time 45 minutes
Lesson objectives
In this lesson you will learn how to use the Web forms feature on the Web CMS Workbench
At the end of this lesson you will be able to create publish and edit a web form
Introduction A web form or a HTML form allows a user to enter data that is sent to a server for processing andor emailed to a
specific person Forms may resemble paper or database versions and contain check boxes radio buttons andor
text fields
Consider adding a contact form to web pages that will give visitors the opportunity to contact you Submission
results and statistics are recorded and accessible to Domain Administrators (DA)
ROLES AND PERMISSIONS
Create
Edit
Delete View published
View Published View published
The Domain Administrator (DA)
is the only role that can create edit
and remove Web forms
UCT Web Content Management System Domain Administrator guide 17
Create a web form
1 Log on to the Web CMS Dashboard
2 Click Workbench to view your toolbox
- From the Workbench drop-down menu click Create Content 3 The Add Content page opens
- Click Web form 4 The Submit Web form page opens
- In the Content Fields section
Enter the formrsquos Title
Enter a summary for the form in the Body field
- Click URL path settings to change the URL alias This function allows you to create a customised
link to any item on your website
Clear the Generate automatic URL alias check box
Enter the URL alias where this content can be accessed
- Click Save
5 A default web form will be saved to your domain
The next section explains how to add content to the newly created web form
Edit a web form
1 Click Workbench | Web Forms to access the forms that have been created
2 The Web Forms page opens
- Search for the form that you created and click Components
3 The Web form Components page opens
Log on to the CMS Dashboard
using your UCT credentials
Username staffstudent number
Password your network password
Use a relative path for the URL
alias Donrsquot add a preceding or a
trailing slash or else the URL wonrsquot
work
UCT Web Content Management System Domain Administrator guide 18
- The Name Surname Email and QueryComment fields are created as default components - To edit a default component click Edit in the Actions column - To clone a default component click Clone in the Actions column - To delete a default components click Delete in the Actions column - To add a new component
- Enter a New component name - From the drop-down menu select a field type
- Select the Mandatory check box to make the component mandatory - Click Add - Click Save to add the Web form components
Click Save after reorganising
the current components and before
adding a new component This will
ensure that all your changes are
saved
UCT Web Content Management System Domain Administrator guide 19
Add an email address that the web form must be sent to
1 Click Workbench to view your toolbox
2 Click Web forms to access the forms that have been created
3 The All Forms page opens
- Select a form and under the Actions column click Emails
4 The Web Form Emails page opens
- In the Address field enter the email address that all submitted web forms should be sent to
- Click Add
5 The Edit Email Settings page opens
- Under the Email subject section in the Custom field add a subject
- Under the Email from address section in the Custom field enter the email address the email
message will be sent from
- Under the Email from name section in the Custom field enter the name of the sender
- Select an Email template from the drop-down menu
Select the Send e-mail as HTML box check box if you want to send the email in HTML
format
- Click Save email settings
- Click Back to Web Forms list
How to PublishUnpublish a web form
1 Click Workbench | Web Forms to access the forms that have been created
2 The All Forms page opens
- Select the form you would like to publish and under the Actions column click PublishUnpublish
3 The web form is now available on your website
UCT Web Content Management System Domain Administrator guide 20
Use the web form as an Include on a page
Items saved as a web form can be added to content types via the Includes button on the WYSIWYG toolbar
1 From the Workbench drop-down menu click Create Content
2 The Add Content page opens
- Click Page
3 The Submit Page opens
- Scroll down to the WYSIWYG editor
- Click Includes on the WYSIWIG editor to insert a web form
4 The Includes dialogue box appears
- From the Type drop-down menu select Web form
- Click Search
- From the list of displayed web forms select the relevant include item
- Click OK to confirm your selection
- The include is displayed via a reference number
The Web Form must be set to
Published before it can be used as an
Include on a page
Be careful not to delete or alter
the Include reference code as this will
result in the Include being removed
from the content
5 Select the Moderation state
- Current Draft indicates that this include will be saved as a draft in the All Drafts folder
- Needs Review indicates that this include will be sent for review to the applicable content
manager
6 Click Save Your web form will either be saved as a draft if you selected Current Draft or the moderation
process will be initiated if you chose Needs Review
UCT Web Content Management System Domain Administrator guide 21
Create a Contact Us web form
1 Use the Create a web form instructions to create a new form
2 After the form has been created you will be redirected to the Web Forms page
3 On the All forms page select the form that you created and in the Actions column click Components
4 The Web form components page opens
- Ensure that the default fields are Name Surname Email and QueryComment
- In the New Component Name field enter Telephone
- From the drop-down menu select Text Field
- Click Add
6 The Edit component page opens
- Click Save Component
7 On the Web form Components page click and drag the Telephone field to below Email
- Click Save
8 From the Workbench drop-down menu click Web Forms
9 On the All Forms page select your form and click Publish to allow it to be used as an Include
- In the Actions column click Emails
10 On the Web Form Emails page enter the email Address the form must be sent to
- Click Add
11 On the Edit email settings page click Save email settings
12 From the Workbench drop-down menu click Create Content
13 On the Add content page click Critical Page
14 The Submit Critical Page opens
- Enter Contact Us in both the Title and Short Title fields
- Enter the Body of the page to describe your Contact Us page
To make any field mandatory
select the check box in the Mandatory
column
Click Include
15 The Includes dialogue box appears
- From the Type drop-down menu select Web Form and click Search
- Select the web form you created and click OK
16 The Include code is displayed in the page
UCT Web Content Management System Domain Administrator guide 22
17 From the Page Type drop-down menu select Contact Us
18 In the Menu section select where the page should appear
19 From the Moderation state drop-down menu select Published
20 Click Save
21 From the Workbench drop-down menu click Published
22 You can check your page by navigating to your website and completing the web form
23 When you click Submit you will get a notification confirming the form has been submitted
UCT Web Content Management System Domain Administrator guide 23
Module 26 Theme Dashboard
Lesson time 45 minutes
Lesson objectives
In this lesson you will learn how to use the Theme Dashboard to change the base theme styles for each website
you create
Each websitersquos base theme has a default layout which includes the header menu sidebars content and footer
You can customise the default theme using styles layout changes palette selectors images and some custom
JavaScript or Customised Cascading Style Sheets (CSS)
At the end of this lesson you will be able to
Customise styles
Add CSS and JavaScript to customise your website theme
Change background images
Use or create custom palettes
Change the page layout
Change font colour
ROLES AND PERMISSIONS
Read Write
Publish
UCT Web Content Management System Domain Administrator guide 24
Introduction The Theme dashboard is a wizard-based application that allows the Domain Administrator (DA) or Platform
administrator (PA) to change a websitersquos style
The workflow for editing the theme dashboard is depicted below
Define a Style
Customise a palette
Modify header banner
Format elements
Change page layout
Start process
End process
UCT Web Content Management System Domain Administrator guide 25
Start process by accessing the Theme Dashboard
1 Log on to the Web CMS Dashboard
2 Click the hyperlinked URL to access your websitersquos homepage
3 The websitersquos homepage opens
- The Theme Dashboard appears as a collapsible menu at the bottom of your screen
- Click one of the tabs to expand the feature or tool or the collapsible arrow to minimise the
Theme Dashboard
If the Theme Dashboard is not
visible while logged in you can view it by
adding user to the site URL
When the site loads the Theme
Dashboard appears as a collapsible
menu at the bottom of the screen
Do you manage multiple sites
Click Clear Session on the theme
dashboard if you are loading another
site while logged on to the web CMS
This will ensure that you do not
overwrite Site Brsquos theme with Site Arsquos
UCT Web Content Management System Domain Administrator guide 26
Define a style
1 Ensure that you are logged onto the Web CMS Dashboard
2 Click the hyperlinked URL to access your websitersquos homepage
3 The homepage opens
- Click Save at the bottom of your screen
4 The Save style dialog box appears
- From the Existing Style drop-down menu select New Style
- Enter a Style name in the provided field
- Click Save and continue Your custom style has been saved and can be edited at any time
5 The Theme Dashboard menu collapses and your newly created style name will appear as the Active Style
Save and continue allows you to
save changes and continue editing
These changes will not be visible to
site visitors
Save and publish allows you to save
your changes and make it visible to
site visitors
It is advisable to always have a
titled default style
Choose a name that is
descriptive of the style you are
creating for example World Aids Day
Arbour Week etc
UCT Web Content Management System Domain Administrator guide 27
Customise a palette
1 Ensure that you are logged onto the Web CMS Dashboard
2 Click the hyperlinked URL to access your websitersquos homepage
3 The homepage opens
- Click Palettes Selector to access the palette controls
- Click Add new Palette
4 The Submit Palettes page on the Web CMS Dashboard opens
- Enter the custom palettersquos Title
- Set the desired colour for one or more of the following items
Corporate applies to the Header and Footer background colour
Primary font applies to Headings Titles and Paragraph text
Secondary applies to the Utility Bar Quick links and the left column navigation on
secondary pages
Navigation Background applies to the main navigation section
Footer Background applies to the Footer section
Navigation Links applies to main navigation links
Log on to the CMS Dashboard
using your UCT credentials
Username staffstudent number
Password your network password
Specify custom colours for a
new palette via the Web CMS
Dashboard
Apply the new palette using the
Theme Dashboard
Reload the site to apply the edited
palette
UCT Web Content Management System Domain Administrator guide 28
Footer Links applies to footer links
Links applies to ParagraphContent links
Links Hover applies to ParagraphContent links when you hover over them and as
ldquovisitedrdquo link colour
- Click Save
5 The Palettes page opens A notification appears at the top of the page informing you that your custom palette
has been created
- Click edit to make additional changes to your custom palette
- Should no additional changes be required click the site link URL to return to the Theme
Dashboard
Apply a palette
6 On the homepage click the Palettes Selector tab
- Select your custom palette and it is immediately applied to your website
- A confirmation message is displayed ldquoPalette has been successfully appliedrdquo
7 Click Save to apply the new palette style
8 The Save style dialog box appears
- Select New style from the drop-down menu
- Enter a title for your custom style
9 Click Save and Publish to apply the new style
Reload the page if changes were
made in another tab in the same
section
Only create a New style if you
want an independent style
Alternatively make the required
changes and click Save to update the
existing style
UCT Web Content Management System Domain Administrator guide 29
Example of a colour palette Palette item name and description Example of applied colour palette
Corporate Colour 002479 Header and footer background
Primary Font Colour 333333 Headingstitle paragraph text
Secondary Colour 85A7CB Utility bar amp quick links box
Navigation background Colour 212121 Main menu navigation section
Footer background Colour 002479 Headingstitle paragraph text
UCT Web Content Management System Domain Administrator guide 30
Navigation links Colour 333333 Headingstitle paragraph text
Footer links Colour FFFFFF Headingstitle paragraph text
Links Colour 006699 Headingstitle paragraph text
Links hover Colour 729ABD Headingstitle paragraph text
UCT Web Content Management System Domain Administrator guide 31
Change background image in the header banner
1 Ensure that you are logged onto the Web CMS Dashboard
2 Click the hyperlinked URL to access your websitersquos homepage
3 The homepage opens
Part 1
4 Click Images to access the upload tool
Enter the image Description
Click Browsehellipto select the image 5 The File Upload dialogue box appears
Navigate to the folder where the image is saved and click Open to upload it
Click Save image 6 A pop-up message appears informing you that the image was successfully uploaded You can now select
this image as a background
Changing the background
image is a two-step process First
upload the image to the CMS and
then set it as a background
Optimum image size for the
header banner is 940px by 142px
When in doubt choose the
generic header background image It
is called 1 generic banner and can be
found in Style | Select Element |
Default (Body) | Header
Background
UCT Web Content Management System Domain Administrator guide 32
Part 2
7 On the theme dashboard click Style
From the Select Element drop-down menu select Default (Body)
Click Header Background
In the Header Column 1 section from the Theme default drop-down menu select a background The background image immediately displays
In the Header Column 2 section click Header Repeat None
In the Header Attachment section click Scroll
Click Save to apply the new header background 8 The Save style dialog box appears
Click Save and Publish to apply the new header banner
UCT Web Content Management System Domain Administrator guide 33
Format elements ndash Main menu navigation item spacing
1 Ensure that you are logged onto the Web CMS Dashboard
2 Click the hyperlinked URL to access your websitersquos homepage
3 The homepage opens
- Click Style
From the Select Element drop-down menu select the appropriate Top Level item eg
Main Menu ndash Top Level Item 1 The selected item is outlined in red on the websitersquos
homepage
Click Borders amp Spacing
Click Width to specify how wide the navigation item should be and add a value that will
best display the main menu item
- Click Save to apply the new font style
4 The Save style dialog box appears
- Click Save and Publish
5 Your new style has been applied
Check the main navigation in
Internet Explorer as it handles widths
differently
When you change the position of
an item or add a new item on the
main navigation you will need to
update the item spacing
Repeat this process to customise
the width for the rest of the Main
Navigation Menu items
UCT Web Content Management System Domain Administrator guide 34
Change page layout
1 Ensure that you are logged onto the Web CMS Dashboard
2 Click the hyperlinked URL to access your websitersquos homepage
3 Navigate to the page you want to change the layout of
- On the Theme Dashboard click Layout
Select your preferred column page layout option and click This Page
4 The style is automatically applied to the page
Log on to the CMS Dashboard
using your UCT credentials
Username staffstudent number
Password your network password
When applying layout changes
always select This Page instead of All
Pages There is no undo button to
reverse this change and you would
need manually change each pagersquos
layout
Do not remove the left column of
your site unless it is required for items
such as calendars The left column is
the main navigation column
UCT Web Content Management System Domain Administrator guide 35
End process ndash Save versus Publish
When you click Save on the Theme Dashboard you have the option to Save and continue or Save and publish
Save and continue
This option allows you to save your changes and continue working on the website or you can continue editing at a
later stage Your changes will not yet be visible to site visitors
1 On the theme dashboard click Save2 The Save style dialog box appears
- From the Existing style drop-down menu either create a New style or leave it as is to overwrite the Existing style
3 Click Save and continue to save your current changes and continue working
Save and publish
This option saves your changes and immediately publishes them to the website so that they are visible to site
visitors
1 On the theme dashboard click Save2 The Save style dialog box appears
- From the Existing style drop-down menu either create a New style or leave it as is to overwrite the Existing style
- Click Save and publish 3 Your changes are saved and published
If a page is refreshed without
click Save then any changes made will
be lost
Custom CSS and JavaScript code
cannot be recovered when
overwritten
Recommendation
Save your custom CSS and JavaScript
in a separate file
UCT Web Content Management System Domain Administrator guide 36
Publish
A page is published for site visitors to view
1 On the theme dashboard click Publish
2 The Publish style dialog box appears
- Click Publish style
3 Your current style and changes are made visible to site visitors Any unsaved changes will be saved when
publishing
End process ndash Logging out
1 Hover over the Domain Dashboard flyout menu on the right hand side of your screen
- Click Logout
2 You will be logged out of the system
UCT Web Content Management System Domain Administrator guide 37
How to change font colour
1 Log on to the Web CMS
2 The Dashboard page opens
- Click the hyperlinked URL to access your websitersquos homepage
3 The homepage opens
- The Theme Dashboard appears as a collapsible menu at the bottom of your screen
- Click Style
- From the Select Element drop-down menu select the element you want to change
4 The Style tab loads the full path of the selected element and all style related options
- Select Font
- The font attributes are displayed
- Click to display the font colour options
- Select the colour you want to apply to the selected font
- Click Save
5 The Save style dialog box appears
- Click Save and Publish to apply your changes
UCT Web Content Management System Domain Administrator guide 38
How to request access to the Web CMS On completion of the UCT Web Content Management System Domain Administrator workshop you will need to
log a call with the IT Helpdesk to request Domain Administrator (DA) access After your request has been
submitted and you have been granted DA access you will be able to manage your websitersquos content
Log a call via the UCT Service Management Suite
1 Open a web browser and in the address bar enter httpuctservice-nowcomess
2 You are redirected to the UCT Single Sign On page- Enter your studentstaff number and network password - Click Sign In
3 The UCT Service Management Suite page opens
- On the ServiceNow Customer View home screen click Web and Collaboration 2 The Service Catalog |Web and Collaboration page opens
- Click AddChange Domain Administrator 3 The AddChange Domain Administrator page opens The first part of the page provides an overview of a
DArsquos role- In the form below complete the following fields
- Requested by Enter the name of the person who requires Domain Administrator access - Head of departmentfacultyunit approving this request Enter the name of the person
who will approve the request - Please provide the name of the domain Enter the website URL
(eghumanitiesuctacza) - In the New domain administrator details section select the appropriate option from the
drop-down menu - If applicable enter the Previous domain administratorrsquos details - Enter any Additional information regarding the request to addremove a Domain
Administrator - Click Submit to process your request
4 You will receive an email with a reference number confirming your request
UCT Web Content Management System Domain Administrator guide 39
How to assign roles 1 Open a web browser and in the address bar enter your site URL followed by user (eg
humanitiesuctaczauser) - Click Log In
2 You are redirected to the UCT Single Sign On page - Log on using your studentstaff number and network password - Click Sign In
3 The homepage will reload displaying a black fly-out arrow on the right-hand side of the screen - Click the arrow and select Domain Dashboard
4 You are directed to your sitersquos Domain Administrator Dashboard - Click Users | List
5 The User List page opens - In the Username field enter a staffstudent number of the user and click Apply - The user details are listed Click roles
6 The User Domain Roles window is displayed - Assign the appropriate role by selecting a tick box - Click Save to confirm your changes
7 The user you added can now access the Web CMS system and create edit view and publish according to their role
Once you have completed the UCT Web Content Management System training you will get access to your site
Un-publishing content 4 Quality-checking (QA) 4 EDITING CONTENT MIGRATED FROM THE CMD CMS 5
Titles 5 Contextual title 5 Text formatting 5 Page structure 5 URL aliases 5 Content links 6 ldquoBack to toprdquo links 6 Quality-checking (QA) 6
Glossary of terms 6
The sections below detail what should be done for both new and migrated websites
Home pages
The home page will already have been set up when the site shell is handed over to the Domain Administrator
All home pages are and must be Critical Pages
There must be a link to the Home page in the Header or Main Menu See Navigation below
Page elements
Before you create a page please see Link content types below
Contextual title
Add a contextual title in cases where such a title will make it clearer what section the page is in
Communication and Marketing
Communication amp Marketing Department Welgelegen Chapel Rd Ext Rosebank 7701 Cape Town 2
ldquoOUR MISSION is to be an outstanding teaching and research university educating for life and addressing the challenges facing our societyrdquo
o See httpwwwhumanitiesuctaczahumundergraduatestudentswelcome for an example The Welcome page is specifically for Current Students
Keywords
Add specific keywords that describe the pagersquos content
Keywords are separated by semi-colons ()
Capital letters may only be used for the first letters in proper names
Donrsquot duplicate the Subject in this field
Donrsquot use the site name as a keyword
Subject
More general keywords such as Research Publications or Staff are found in this list
Pick one or more subjects that describe the page or the section it is in
If you donrsquot find the subject in the list you can request that it be added via an email to ICTS-Helpdesk
Page structure
Only change this if the content on the particular page (eg a big table) does not fit into the central column
The 1-column option may only be chosen in exceptional cases (such as full-page calendars) since it means that the left navigation column will not be visible
Domain administrators can change the column layout on a page via the Theme Dashboard
ldquoURL path settingsrdquo
Use custom URL aliases for all pages o Note that custom URL aliases must have no initial or trailing forwardslashes eg
humdepartmentslibrary_studies is correct humdepartmentslibrary_studies is incorrect and will not work
o Reflect the site hierarchynavigational structure in the custom URL aliases eg departmentssacmfirstyear_courses and not just firstyear_courses The former positions the course content in its proper place in the content hierarchystructure
Use a prefix (such as your org code) in front of all URL aliases eg ebeaboutstructure o This will ensure that your URLs are unique (Each URL alias can only be used once in
the Drupal environment) o The system will alert you if a URL alias already exists
The following need not have custom URL aliases (in other words the automatic URLs assigned by the system need not be changed)
o Audio files (when uploaded via the Audio content type) o Events (although a more user-friendlyshorter URL may be useful) o Images (when uploaded via the Image content type) o Includes o Link content types o News articles (although a more user-friendlyshorter URL may be useful) o Notices (although a more user-friendlyshorter URL may be useful) o Vacancies (although a more user-friendlyshorter URL may be useful) o Videos
Typos
Check your site content for typos by using the spellchecker built into the editor o Common typos include words like ldquoaccomodationrdquo ldquoVice Chancellorrdquo ldquotheirrdquo for
Communication amp Marketing Department Welgelegen Chapel Rd Ext Rosebank 7701 Cape Town 3
ldquoOUR MISSION is to be an outstanding teaching and research university educating for life and addressing the challenges facing our societyrdquo
Content
Text formatting
The first heading inside the Body of a page should be a Heading 3 o Since Heading 3 is bold already you should not add bold to the formatting
Subsequent headings in the body content should be bold
Relative URLs
Links to other pages in your own website or documents hosted on your own website must have relative URLs and not full URLs
o Example of a relative URL humundergraduatestudentswelcome o Example of a full URL
httpwwwhumanitiesuctaczahumundergraduatestudentswelcome o This ensures that should your domain name change you need not change every
internal link on your website o Edit all internal links in your content to ensure that they are relative URLs
Includes
Naming convention
An includersquos title should indicate if it contains content destined for the middle or right columns of a page Use the following naming convention
o Research ethics human subjects ndash BODY o Research ethics human subjects - SIDEBAR
Navigation
Do not duplicate navigation items in both the Header and the Main Menu
ldquoHomerdquo
Home must always be in your navigation either the Main Menu or the Header Menu o In most cases it will have been set up already when you receive the site shell from
ICTS or CMD o It can be in Header Menu if there is limited space in the main navigation o Note that this link must be a Link Content Type o Important use ltfrontgt as the URL in the URL field
ldquoSitemaprdquo amp ldquoSearchrdquo
These items will be added to the Header Menu when the site goes live Remember to leave sufficient space in the Header Menu otherwise they will not be displayed ndash items occurring after a certain number of pixels are hidden from view
Do not add these items to the Header Menu yourself
Link content types
Link content types have two purposes 1 Adding an external link to your site navigation (ie a link to another website) 2 Creating a parent link
o Every navigation item that is a parent ndash ie has ldquochildrenrdquo (sub-pages) ndash should be a link content type and not a page
o Both parent (link content type) and its first child must have the same URL alias Eg (from httpwwwhumanitiesuctacza)
Current students [humundergraduatestudentswelcome] (parent - link content type)
Communication and Marketing
Communication amp Marketing Department Welgelegen Chapel Rd Ext Rosebank 7701 Cape Town 4
ldquoOUR MISSION is to be an outstanding teaching and research university educating for life and addressing the challenges facing our societyrdquo
o The reason for doing this is illustrated by the following extract from a navigational tree Departments [httpwwwhumanitiesuctaczahumdepartmentsagi] African Gender Institute [httpwwwhumanitiesuctaczahumdepartmentsagi] Archaeology [httpwwwhumanitiesuctaczahumdepartmentsarchaeology] Etc If Departments were not a link content type but a page containing African Gender Institute content the words African Gender Institute would never appear in the navigation Clicking on Departments would load the page with AGI content (httpwwwhumanitiesuctaczahumdepartmentsagi) and the next navigation item in the left column (after Departments) would be Archaeology
Numbering (positioning)
Number your navigation items correctly
Start at 1 ndash you will be able to add a number ldquo0rdquo should an additional item need to be added before 1 at a later stage
You can leave ldquogapsrdquo between numbers to enable you to accommodate additional navigation items later without having to renumber all items after the additional ones
o Eg use the numbering sequence 1 3 5 or 2 4 6 etc
Alphabetical order
Menu items that can or should be ordered alphabetically must all be given the same number or weight
o Use 0 o A list of links to departments is an example of a list of navigation items that should be
in alphabetical order
Should an Overview or other introductory page be necessary it is best to choose -50 as its number ensuring that it will always be the first navigation item
External links
Avoid linking to other websites in your site navigation visitors tend to become confused when a link in the navigation of website opens another website altogether
o Where this is unavoidable have the link open in a new window (Web browsers will open the link in another tab)
o Use link content types to add external links to your site navigation
Un-publishing content
Before you un-publish any node add ldquo-unpublishedrdquo to the custom or automatic URL - eg humdepartmentslibrary_studies-unpublished First save the node and then un-publish it
o This frees up the URL for use by either your own or someone elsersquos site
Quality-checking (QA)
Remember to check your work by viewing your editsupdates in the browser (once published) as you go along
Always check the mobile view as well ndash click and drag the browser window smaller until the mobile view shows
It is a good idea to check the current and new migrated website side by side after yoursquore done to make sure that no content was left behind
o Check for content in image format delivered via scripts or in right columns Such content is easily overlooked
Communication and Marketing
Communication amp Marketing Department Welgelegen Chapel Rd Ext Rosebank 7701 Cape Town 5
ldquoOUR MISSION is to be an outstanding teaching and research university educating for life and addressing the challenges facing our societyrdquo
The sections below detail how to edit content migrated off the CMD CMS
EDITING CONTENT MIGRATED FROM THE CMD CMS
First check ALL parentfirst child URL aliases They must be identical If they are not it means that a parent navigation item was not tagged as link content type in the CMD CMS and that duplicate pages would have been created for it and its first child Unpublish the parent page (after changing its URL as described above) add a link content type and make sure that it and its first child have the same URL alias
Titles
Check that page titles are not duplicated o There is a Title option for each page it automatically displays above the content The
page title should therefore not be added at the top of the content text field as well
Contextual title
Add a contextual title in cases where such a title will make it clearer what section the page is in
o See httpwwwhumanitiesuctaczahumundergraduatestudentswelcome for an example The Welcome page is specifically for Current Students
Text formatting
The first heading inside the Body of a page should be a Heading 3 o Since Heading 3 is bold already you must not add bold to the formatting
Remove unnecessary spaces between paragraphs from the content
The following changes are required to content imported from the CMD CMS o Right column content must no longer be right-aligned o There is no specific style for bold text you can remove the class=rdquoheadrdquo and
class=rdquosubheadrdquo code from the content (in the [HTML] Source view in the Editor) o Table headings must be made bold since the original table style will have been lost o Percentages must be used for table and column widths not pixels
Page structure
Check each page to make sure that the migrated content fits into the middle column content such as tables may be too wide
Should the content not fit use the Theme Dashboard to apply a 2-column layout to that particular page
o Do not apply this layout if there is a right column with content In that case the middle columnrsquos content should be altered to fit into that column
The 1-column option may only be chosen in exceptional cases (such as full-page calendars) since it means that the left navigation column will not be visible
URL aliases
If an auto-migrated page had a URL that is already in use the system will add a number to the end of it eg humundergraduatestudentswelcome-0
o This can also be a sign that a navigation item was not tagged as link content type in the CMD CMS Check that all parent navigation has the exact same URL alias as its first child
Change such a URL to one that does not exist yet o The system will inform you if you attempt to change it to one that already exists
Communication and Marketing
Communication amp Marketing Department Welgelegen Chapel Rd Ext Rosebank 7701 Cape Town 6
ldquoOUR MISSION is to be an outstanding teaching and research university educating for life and addressing the challenges facing our societyrdquo
Content links
Links to other pages in your own website or documents hosted on your own website must have relative URLs and not full URLs
o Example of a relative URL humundergraduatestudentswelcome o Example of a full URL
httpwwwhumanitiesuctaczahumundergraduatestudentswelcome o This ensures that should your domain name change you need not change every
internal link to your website o Edit all internal links in your content to ensure that they are relative URLs
Check all internal page links (links to other pages on your site) your site URLs will most likely all change which means that internal links will no longer work
Avoid linking to other websites in your site navigation visitors tend to become confused when a link in website navigation opens another website
o Where this is unavoidable have the link open in a new window (Web browsers will open the link in another tab)
o Use link content types to add external links to your site navigation
ldquoBack to toprdquo links
ldquoBack to toprdquo links are no longer necessary since they are built into the site template
Remove all ldquoback to toprdquo links from the bottom of migrated pages
Quality-checking (QA)
Remember to check your work by viewing your editsupdates in the browser (once published) as you go along
It is a good idea to check the current and new migrated website side by side after yoursquore done to make sure that no content was left behind
Glossary of terms
URLs
URL ndash address of a web page or other web content on a particular website
Custom URL alias ndash a custom address created by a content manager for a web page or other web content over-writing the URL generated by the system
Links
Internal link ndash a link to content on the current website
External link ndash a link to content on another website Text field ndash a text box into which content is entered and in which content can be edited Node ndash an item of content on a website such as a page an event a notice etc Parentchild navigation items
Parent navigation item ndash a navigation item which has secondary navigation items associated with it a content category
Child navigation item ndash a navigation item which has a parent a piece of content belonging to a larger category
Unpublish ndash the action of removing content from a website by hiding it from view rather than deleting it
1
Drupal Website Approval Guide Once you want your website to go live the Communication and Marketing Department will be requested
to approve it Your site will be evaluated according to the points listed below You may be required to
affect changes before the site is approved to go live
Drupal Website Approval Guide 1
Theming 1
Colours 2
Layout 2
Maximum widths 2
Navigation 2
Quick Links 3
Content 3
Copying and pasting content 4
Images 4
Image width amp height 4
Theming If you have a co-brand template remember to add your sitersquos site domain name (address) to the
co-brand logorsquos URL field in the Custom Regions This will make your logo click through to your
main page
A co-brand site has the option of three UCT logos the logos have white black or blue text
Choose the logo whose text is most legible on your chosen header background colour
Do not add an unsuitable header background image to your header (See Images below) You
should not choose a very busy image since the image must not obscure compete with or cause
the site title Header navigation andor the site logo to become hard to distinguish from the
background
o You could upload a header image that only displays an image or pattern between the
logo on the left and the site title Header navigation and search box on the right
o When in doubt choose the generic header background image It is called 1 Generic
Background and can be found in the header background image dropdown list in the
Theme Dashboard
If you use custom code to rearrange or otherwise customise items on the header do not obscure
or remove the UCT logo or the search box
If you add items to the Utility Bar ensure that they are not too high If an image that is too high
is added to the bar you will note that vertical line next to the Quick Links does not reach all the
way to the top
2
o A safe maximum height for an item in the Utility Bar is 35 pixels
o View the Source of the Utility Bar field to check that whatever you upload into it is in a
ldquodivrdquo called social-links If your icons or text is not too high it will ensure that they are
spaced correctly Below is the ltdivgt code
ltdiv class=social-linksgt icontextltagtltdivgt
The site must display correctly on mobile devices (phones specifically) ndash the UCT and site logo (if
any) as well as the relevant navigation must be visible and properly styled
Colours
Do not use a dark font on a dark background
Ensure that link colours are easily distinguishable from the rest of the content
Ensure that the colours of links in the left column are sufficiently darker than a light background
or lighter than a dark background in order to be easily readable
Layout
It is advisable to use a two-column layout for all secondary pages unless they require a third
column
You may not hide the left column of secondary pages (identified as column A in the Theme
Dashboard) This will hide the left column navigation
o You may make an exception for very wide content that will not fit properly into two
columns (such as the Calendar)
A site Calendar must be displayed in a single column layout to be as user-friendly as possible
Maximum widths
The following are the maximum width items in site columns can have
Middle column ndash 458 pixels
Right column ndash 198 pixels
Two-column (spanning the middle and right columns) - 685 pixels
Single column (spanning all three) ndash 918 pixels
o Single columns may mainly be used on the home page as well as the Calendar
Navigation Site navigation is a hierarchical content structure
Please use URL aliases instead of the URLs the system provides
Use a prefix in front of all URL aliases to ensure that your site URLs are unique
o In the following example the prefix is fhs - fhsaboutteam (instead of just
aboutteam)
All pages and features (Calendar News etc) you add to the site must be in the site navigation
o This means that a user must be able to find all pages on the site by following the site
navigation Pages on your site must not be hidden or orphaned by only being available
via a link inside the content somewhere
3
Your site will have been created with a Home navigation item in the Header navigation You may
move this to the Main navigation if you wish but do not unpublish it
o Your Home navigation item must be a Link Content Type with ltfrontgt as the URL
Do not add a page or other item to both the Header and the Main navigation If you do this it
will cause two sets of breadcrumbs to be displayed
o Note though that a page or other item can be added to either the Main or Header
navigation as well as the Quick Links navigation
Once you are satisfied with your Main navigation items you should space them far enough apart
to be easily distinguishable from one another Often adding five or ten pixels to each is enough
o Ensure that you do not have too many items in your Main navigation andor that you
do not space them too far apart Items on the far right that go beyond the available
width will be hidden Note that the way that Internet Explorer handles spacing may
cause items to be hidden even though Chrome Firefox Safari etc may display all of
them
Ensure that all navigation items load what they are supposed to
Quick Links
The purpose of Quick Links is to make popular or important pages on your site more easily
findable
Do not add your sitersquos Main navigation items to the Quick Links as well ndash Main navigation is
visible at all times already
Choose pages from second level navigation down for inclusion in the Quick Links
You can also add external sites (such as Vula or staff and student email access) to Quick Links
o To add an external link first create a Link Content Type with the external URL then
choose to add that Link to Quick Links
If you donrsquot need Quick Links you can hide them by adding the following code to the Theme
o It becomes very apparent when the Dynamic Feature andor News articles on the home
page contain very old content
If pages have no content yet they must be unpublished until you have added content to them
Do not publish empty pages that have no content other than a sentence saying ldquoContent coming
soonrdquo or something to that effect
Links to other sites must load in a new window Choose ldquo_blankrdquo from Target (on the Link pop-
up) when creating the link
4
If your site has a News feature that is pulled into the home page there must be at least one
article in it Otherwise there will be an empty column on your main page
o Note that ICTS Helpdesk needs to be contacted should you want to add News to your
home page or remove it from that location A site can have a News module without
displaying news articles on the home page if that is what you require
Regularly clean up your home page by unchecking the box which instructs the system to display
news articles on it All articles are archived news articles not displayed on the home page
remain available in the News Archive unless you unpublish them
If you have a Calendar make sure that it has at least one upcoming event in it If you have a
three-column home page as well as a Calendar the latest events will show in the home pagersquos
right column If there are no upcoming events the third column will be blank
Do not use unnecessarily large font in your content or on the home page
If you have a large table with much content on a page rather change the page layout to two
columns (AB) in the Theme Dashboard
Copying and pasting content
If you copy and paste content from MS Word into the Editor the original formatting will be
retained ndash highlight all content then use the Clear Formatting button to get rid of the
formatting
Since the above does not always work perfectly it may be a better solution to copy and paste
into Notepad first then from there into the Editor Then apply the necessary formatting via the
Editor
Keep an eye out for multiple fonts on a page It is most likely the result of copying and pasting
from Word which overwrites the site style
Images Ensure that images are displayed with their correct width and height Forcing images into a
space too small for them will distort the images (by forcing the wrong aspect ratio on them)
If the image you want to add to the content of a page is wider than the middle column either
edit the image to fit or change the page layout to two columns (AB)
Do not upload very wide and high high-resolution images to be displayed in content
Editoptimise them appropriately
Image width amp height
The header background image must be 940x142 pixels
The Dynamic Feature image must be 558x274 pixels Do not use any image that does not
actually have that width and height
Main page news article thumbnail images must be 142x98 pixels
The co-brand logo image can have a maximum width of 392 and a maximum height of 142 pixels
Communication and Marketing Department
September 2014
TOC
How to request access to the Web CMS On completion of the UCT Web Content Management System Domain Administrator workshop you will need to
log a call with the IT Helpdesk to request Domain Administrator (DA) access After your request has been
submitted and you have been granted DA access you will be able to manage your websitersquos content
Log a call via the UCT Service Management Suite
1 Open a web browser and in the address bar enter httpuctservice-nowcomess
2 You are redirected to the UCT Single Sign On page- Enter your studentstaff number and network password - Click Sign In
3 The UCT Service Management Suite page opens
- On the ServiceNow Customer View home screen click Web and Collaboration 2 The Service Catalog |Web and Collaboration page opens
- Click AddChange Domain Administrator 3 The AddChange Domain Administrator page opens The first part of the page provides an overview of a
DArsquos role- In the form below complete the following fields
- Requested by Enter the name of the person who requires Domain Administrator access - Head of departmentfacultyunit approving this request Enter the name of the person
who will approve the request - Please provide the name of the domain Enter the website URL
(eghumanitiesuctacza) - In the New domain administrator details section select the appropriate option from the
drop-down menu - If applicable enter the Previous domain administratorrsquos details - Enter any Additional information regarding the request to addremove a Domain
Administrator - Click Submit to process your request
4 You will receive an email with a reference number confirming your request
UCT Web Content Management System Domain Administrator guide 39
How to assign roles 1 Open a web browser and in the address bar enter your site URL followed by user (eg
humanitiesuctaczauser) - Click Log In
2 You are redirected to the UCT Single Sign On page - Log on using your studentstaff number and network password - Click Sign In
3 The homepage will reload displaying a black fly-out arrow on the right-hand side of the screen - Click the arrow and select Domain Dashboard
4 You are directed to your sitersquos Domain Administrator Dashboard - Click Users | List
5 The User List page opens - In the Username field enter a staffstudent number of the user and click Apply - The user details are listed Click roles
6 The User Domain Roles window is displayed - Assign the appropriate role by selecting a tick box - Click Save to confirm your changes
7 The user you added can now access the Web CMS system and create edit view and publish according to their role
Once you have completed the UCT Web Content Management System training you will get access to your site
Un-publishing content 4 Quality-checking (QA) 4 EDITING CONTENT MIGRATED FROM THE CMD CMS 5
Titles 5 Contextual title 5 Text formatting 5 Page structure 5 URL aliases 5 Content links 6 ldquoBack to toprdquo links 6 Quality-checking (QA) 6
Glossary of terms 6
The sections below detail what should be done for both new and migrated websites
Home pages
The home page will already have been set up when the site shell is handed over to the Domain Administrator
All home pages are and must be Critical Pages
There must be a link to the Home page in the Header or Main Menu See Navigation below
Page elements
Before you create a page please see Link content types below
Contextual title
Add a contextual title in cases where such a title will make it clearer what section the page is in
Communication and Marketing
Communication amp Marketing Department Welgelegen Chapel Rd Ext Rosebank 7701 Cape Town 2
ldquoOUR MISSION is to be an outstanding teaching and research university educating for life and addressing the challenges facing our societyrdquo
o See httpwwwhumanitiesuctaczahumundergraduatestudentswelcome for an example The Welcome page is specifically for Current Students
Keywords
Add specific keywords that describe the pagersquos content
Keywords are separated by semi-colons ()
Capital letters may only be used for the first letters in proper names
Donrsquot duplicate the Subject in this field
Donrsquot use the site name as a keyword
Subject
More general keywords such as Research Publications or Staff are found in this list
Pick one or more subjects that describe the page or the section it is in
If you donrsquot find the subject in the list you can request that it be added via an email to ICTS-Helpdesk
Page structure
Only change this if the content on the particular page (eg a big table) does not fit into the central column
The 1-column option may only be chosen in exceptional cases (such as full-page calendars) since it means that the left navigation column will not be visible
Domain administrators can change the column layout on a page via the Theme Dashboard
ldquoURL path settingsrdquo
Use custom URL aliases for all pages o Note that custom URL aliases must have no initial or trailing forwardslashes eg
humdepartmentslibrary_studies is correct humdepartmentslibrary_studies is incorrect and will not work
o Reflect the site hierarchynavigational structure in the custom URL aliases eg departmentssacmfirstyear_courses and not just firstyear_courses The former positions the course content in its proper place in the content hierarchystructure
Use a prefix (such as your org code) in front of all URL aliases eg ebeaboutstructure o This will ensure that your URLs are unique (Each URL alias can only be used once in
the Drupal environment) o The system will alert you if a URL alias already exists
The following need not have custom URL aliases (in other words the automatic URLs assigned by the system need not be changed)
o Audio files (when uploaded via the Audio content type) o Events (although a more user-friendlyshorter URL may be useful) o Images (when uploaded via the Image content type) o Includes o Link content types o News articles (although a more user-friendlyshorter URL may be useful) o Notices (although a more user-friendlyshorter URL may be useful) o Vacancies (although a more user-friendlyshorter URL may be useful) o Videos
Typos
Check your site content for typos by using the spellchecker built into the editor o Common typos include words like ldquoaccomodationrdquo ldquoVice Chancellorrdquo ldquotheirrdquo for
Communication amp Marketing Department Welgelegen Chapel Rd Ext Rosebank 7701 Cape Town 3
ldquoOUR MISSION is to be an outstanding teaching and research university educating for life and addressing the challenges facing our societyrdquo
Content
Text formatting
The first heading inside the Body of a page should be a Heading 3 o Since Heading 3 is bold already you should not add bold to the formatting
Subsequent headings in the body content should be bold
Relative URLs
Links to other pages in your own website or documents hosted on your own website must have relative URLs and not full URLs
o Example of a relative URL humundergraduatestudentswelcome o Example of a full URL
httpwwwhumanitiesuctaczahumundergraduatestudentswelcome o This ensures that should your domain name change you need not change every
internal link on your website o Edit all internal links in your content to ensure that they are relative URLs
Includes
Naming convention
An includersquos title should indicate if it contains content destined for the middle or right columns of a page Use the following naming convention
o Research ethics human subjects ndash BODY o Research ethics human subjects - SIDEBAR
Navigation
Do not duplicate navigation items in both the Header and the Main Menu
ldquoHomerdquo
Home must always be in your navigation either the Main Menu or the Header Menu o In most cases it will have been set up already when you receive the site shell from
ICTS or CMD o It can be in Header Menu if there is limited space in the main navigation o Note that this link must be a Link Content Type o Important use ltfrontgt as the URL in the URL field
ldquoSitemaprdquo amp ldquoSearchrdquo
These items will be added to the Header Menu when the site goes live Remember to leave sufficient space in the Header Menu otherwise they will not be displayed ndash items occurring after a certain number of pixels are hidden from view
Do not add these items to the Header Menu yourself
Link content types
Link content types have two purposes 1 Adding an external link to your site navigation (ie a link to another website) 2 Creating a parent link
o Every navigation item that is a parent ndash ie has ldquochildrenrdquo (sub-pages) ndash should be a link content type and not a page
o Both parent (link content type) and its first child must have the same URL alias Eg (from httpwwwhumanitiesuctacza)
Current students [humundergraduatestudentswelcome] (parent - link content type)
Communication and Marketing
Communication amp Marketing Department Welgelegen Chapel Rd Ext Rosebank 7701 Cape Town 4
ldquoOUR MISSION is to be an outstanding teaching and research university educating for life and addressing the challenges facing our societyrdquo
o The reason for doing this is illustrated by the following extract from a navigational tree Departments [httpwwwhumanitiesuctaczahumdepartmentsagi] African Gender Institute [httpwwwhumanitiesuctaczahumdepartmentsagi] Archaeology [httpwwwhumanitiesuctaczahumdepartmentsarchaeology] Etc If Departments were not a link content type but a page containing African Gender Institute content the words African Gender Institute would never appear in the navigation Clicking on Departments would load the page with AGI content (httpwwwhumanitiesuctaczahumdepartmentsagi) and the next navigation item in the left column (after Departments) would be Archaeology
Numbering (positioning)
Number your navigation items correctly
Start at 1 ndash you will be able to add a number ldquo0rdquo should an additional item need to be added before 1 at a later stage
You can leave ldquogapsrdquo between numbers to enable you to accommodate additional navigation items later without having to renumber all items after the additional ones
o Eg use the numbering sequence 1 3 5 or 2 4 6 etc
Alphabetical order
Menu items that can or should be ordered alphabetically must all be given the same number or weight
o Use 0 o A list of links to departments is an example of a list of navigation items that should be
in alphabetical order
Should an Overview or other introductory page be necessary it is best to choose -50 as its number ensuring that it will always be the first navigation item
External links
Avoid linking to other websites in your site navigation visitors tend to become confused when a link in the navigation of website opens another website altogether
o Where this is unavoidable have the link open in a new window (Web browsers will open the link in another tab)
o Use link content types to add external links to your site navigation
Un-publishing content
Before you un-publish any node add ldquo-unpublishedrdquo to the custom or automatic URL - eg humdepartmentslibrary_studies-unpublished First save the node and then un-publish it
o This frees up the URL for use by either your own or someone elsersquos site
Quality-checking (QA)
Remember to check your work by viewing your editsupdates in the browser (once published) as you go along
Always check the mobile view as well ndash click and drag the browser window smaller until the mobile view shows
It is a good idea to check the current and new migrated website side by side after yoursquore done to make sure that no content was left behind
o Check for content in image format delivered via scripts or in right columns Such content is easily overlooked
Communication and Marketing
Communication amp Marketing Department Welgelegen Chapel Rd Ext Rosebank 7701 Cape Town 5
ldquoOUR MISSION is to be an outstanding teaching and research university educating for life and addressing the challenges facing our societyrdquo
The sections below detail how to edit content migrated off the CMD CMS
EDITING CONTENT MIGRATED FROM THE CMD CMS
First check ALL parentfirst child URL aliases They must be identical If they are not it means that a parent navigation item was not tagged as link content type in the CMD CMS and that duplicate pages would have been created for it and its first child Unpublish the parent page (after changing its URL as described above) add a link content type and make sure that it and its first child have the same URL alias
Titles
Check that page titles are not duplicated o There is a Title option for each page it automatically displays above the content The
page title should therefore not be added at the top of the content text field as well
Contextual title
Add a contextual title in cases where such a title will make it clearer what section the page is in
o See httpwwwhumanitiesuctaczahumundergraduatestudentswelcome for an example The Welcome page is specifically for Current Students
Text formatting
The first heading inside the Body of a page should be a Heading 3 o Since Heading 3 is bold already you must not add bold to the formatting
Remove unnecessary spaces between paragraphs from the content
The following changes are required to content imported from the CMD CMS o Right column content must no longer be right-aligned o There is no specific style for bold text you can remove the class=rdquoheadrdquo and
class=rdquosubheadrdquo code from the content (in the [HTML] Source view in the Editor) o Table headings must be made bold since the original table style will have been lost o Percentages must be used for table and column widths not pixels
Page structure
Check each page to make sure that the migrated content fits into the middle column content such as tables may be too wide
Should the content not fit use the Theme Dashboard to apply a 2-column layout to that particular page
o Do not apply this layout if there is a right column with content In that case the middle columnrsquos content should be altered to fit into that column
The 1-column option may only be chosen in exceptional cases (such as full-page calendars) since it means that the left navigation column will not be visible
URL aliases
If an auto-migrated page had a URL that is already in use the system will add a number to the end of it eg humundergraduatestudentswelcome-0
o This can also be a sign that a navigation item was not tagged as link content type in the CMD CMS Check that all parent navigation has the exact same URL alias as its first child
Change such a URL to one that does not exist yet o The system will inform you if you attempt to change it to one that already exists
Communication and Marketing
Communication amp Marketing Department Welgelegen Chapel Rd Ext Rosebank 7701 Cape Town 6
ldquoOUR MISSION is to be an outstanding teaching and research university educating for life and addressing the challenges facing our societyrdquo
Content links
Links to other pages in your own website or documents hosted on your own website must have relative URLs and not full URLs
o Example of a relative URL humundergraduatestudentswelcome o Example of a full URL
httpwwwhumanitiesuctaczahumundergraduatestudentswelcome o This ensures that should your domain name change you need not change every
internal link to your website o Edit all internal links in your content to ensure that they are relative URLs
Check all internal page links (links to other pages on your site) your site URLs will most likely all change which means that internal links will no longer work
Avoid linking to other websites in your site navigation visitors tend to become confused when a link in website navigation opens another website
o Where this is unavoidable have the link open in a new window (Web browsers will open the link in another tab)
o Use link content types to add external links to your site navigation
ldquoBack to toprdquo links
ldquoBack to toprdquo links are no longer necessary since they are built into the site template
Remove all ldquoback to toprdquo links from the bottom of migrated pages
Quality-checking (QA)
Remember to check your work by viewing your editsupdates in the browser (once published) as you go along
It is a good idea to check the current and new migrated website side by side after yoursquore done to make sure that no content was left behind
Glossary of terms
URLs
URL ndash address of a web page or other web content on a particular website
Custom URL alias ndash a custom address created by a content manager for a web page or other web content over-writing the URL generated by the system
Links
Internal link ndash a link to content on the current website
External link ndash a link to content on another website Text field ndash a text box into which content is entered and in which content can be edited Node ndash an item of content on a website such as a page an event a notice etc Parentchild navigation items
Parent navigation item ndash a navigation item which has secondary navigation items associated with it a content category
Child navigation item ndash a navigation item which has a parent a piece of content belonging to a larger category
Unpublish ndash the action of removing content from a website by hiding it from view rather than deleting it
1
Drupal Website Approval Guide Once you want your website to go live the Communication and Marketing Department will be requested
to approve it Your site will be evaluated according to the points listed below You may be required to
affect changes before the site is approved to go live
Drupal Website Approval Guide 1
Theming 1
Colours 2
Layout 2
Maximum widths 2
Navigation 2
Quick Links 3
Content 3
Copying and pasting content 4
Images 4
Image width amp height 4
Theming If you have a co-brand template remember to add your sitersquos site domain name (address) to the
co-brand logorsquos URL field in the Custom Regions This will make your logo click through to your
main page
A co-brand site has the option of three UCT logos the logos have white black or blue text
Choose the logo whose text is most legible on your chosen header background colour
Do not add an unsuitable header background image to your header (See Images below) You
should not choose a very busy image since the image must not obscure compete with or cause
the site title Header navigation andor the site logo to become hard to distinguish from the
background
o You could upload a header image that only displays an image or pattern between the
logo on the left and the site title Header navigation and search box on the right
o When in doubt choose the generic header background image It is called 1 Generic
Background and can be found in the header background image dropdown list in the
Theme Dashboard
If you use custom code to rearrange or otherwise customise items on the header do not obscure
or remove the UCT logo or the search box
If you add items to the Utility Bar ensure that they are not too high If an image that is too high
is added to the bar you will note that vertical line next to the Quick Links does not reach all the
way to the top
2
o A safe maximum height for an item in the Utility Bar is 35 pixels
o View the Source of the Utility Bar field to check that whatever you upload into it is in a
ldquodivrdquo called social-links If your icons or text is not too high it will ensure that they are
spaced correctly Below is the ltdivgt code
ltdiv class=social-linksgt icontextltagtltdivgt
The site must display correctly on mobile devices (phones specifically) ndash the UCT and site logo (if
any) as well as the relevant navigation must be visible and properly styled
Colours
Do not use a dark font on a dark background
Ensure that link colours are easily distinguishable from the rest of the content
Ensure that the colours of links in the left column are sufficiently darker than a light background
or lighter than a dark background in order to be easily readable
Layout
It is advisable to use a two-column layout for all secondary pages unless they require a third
column
You may not hide the left column of secondary pages (identified as column A in the Theme
Dashboard) This will hide the left column navigation
o You may make an exception for very wide content that will not fit properly into two
columns (such as the Calendar)
A site Calendar must be displayed in a single column layout to be as user-friendly as possible
Maximum widths
The following are the maximum width items in site columns can have
Middle column ndash 458 pixels
Right column ndash 198 pixels
Two-column (spanning the middle and right columns) - 685 pixels
Single column (spanning all three) ndash 918 pixels
o Single columns may mainly be used on the home page as well as the Calendar
Navigation Site navigation is a hierarchical content structure
Please use URL aliases instead of the URLs the system provides
Use a prefix in front of all URL aliases to ensure that your site URLs are unique
o In the following example the prefix is fhs - fhsaboutteam (instead of just
aboutteam)
All pages and features (Calendar News etc) you add to the site must be in the site navigation
o This means that a user must be able to find all pages on the site by following the site
navigation Pages on your site must not be hidden or orphaned by only being available
via a link inside the content somewhere
3
Your site will have been created with a Home navigation item in the Header navigation You may
move this to the Main navigation if you wish but do not unpublish it
o Your Home navigation item must be a Link Content Type with ltfrontgt as the URL
Do not add a page or other item to both the Header and the Main navigation If you do this it
will cause two sets of breadcrumbs to be displayed
o Note though that a page or other item can be added to either the Main or Header
navigation as well as the Quick Links navigation
Once you are satisfied with your Main navigation items you should space them far enough apart
to be easily distinguishable from one another Often adding five or ten pixels to each is enough
o Ensure that you do not have too many items in your Main navigation andor that you
do not space them too far apart Items on the far right that go beyond the available
width will be hidden Note that the way that Internet Explorer handles spacing may
cause items to be hidden even though Chrome Firefox Safari etc may display all of
them
Ensure that all navigation items load what they are supposed to
Quick Links
The purpose of Quick Links is to make popular or important pages on your site more easily
findable
Do not add your sitersquos Main navigation items to the Quick Links as well ndash Main navigation is
visible at all times already
Choose pages from second level navigation down for inclusion in the Quick Links
You can also add external sites (such as Vula or staff and student email access) to Quick Links
o To add an external link first create a Link Content Type with the external URL then
choose to add that Link to Quick Links
If you donrsquot need Quick Links you can hide them by adding the following code to the Theme
o It becomes very apparent when the Dynamic Feature andor News articles on the home
page contain very old content
If pages have no content yet they must be unpublished until you have added content to them
Do not publish empty pages that have no content other than a sentence saying ldquoContent coming
soonrdquo or something to that effect
Links to other sites must load in a new window Choose ldquo_blankrdquo from Target (on the Link pop-
up) when creating the link
4
If your site has a News feature that is pulled into the home page there must be at least one
article in it Otherwise there will be an empty column on your main page
o Note that ICTS Helpdesk needs to be contacted should you want to add News to your
home page or remove it from that location A site can have a News module without
displaying news articles on the home page if that is what you require
Regularly clean up your home page by unchecking the box which instructs the system to display
news articles on it All articles are archived news articles not displayed on the home page
remain available in the News Archive unless you unpublish them
If you have a Calendar make sure that it has at least one upcoming event in it If you have a
three-column home page as well as a Calendar the latest events will show in the home pagersquos
right column If there are no upcoming events the third column will be blank
Do not use unnecessarily large font in your content or on the home page
If you have a large table with much content on a page rather change the page layout to two
columns (AB) in the Theme Dashboard
Copying and pasting content
If you copy and paste content from MS Word into the Editor the original formatting will be
retained ndash highlight all content then use the Clear Formatting button to get rid of the
formatting
Since the above does not always work perfectly it may be a better solution to copy and paste
into Notepad first then from there into the Editor Then apply the necessary formatting via the
Editor
Keep an eye out for multiple fonts on a page It is most likely the result of copying and pasting
from Word which overwrites the site style
Images Ensure that images are displayed with their correct width and height Forcing images into a
space too small for them will distort the images (by forcing the wrong aspect ratio on them)
If the image you want to add to the content of a page is wider than the middle column either
edit the image to fit or change the page layout to two columns (AB)
Do not upload very wide and high high-resolution images to be displayed in content
Editoptimise them appropriately
Image width amp height
The header background image must be 940x142 pixels
The Dynamic Feature image must be 558x274 pixels Do not use any image that does not
actually have that width and height
Main page news article thumbnail images must be 142x98 pixels
The co-brand logo image can have a maximum width of 392 and a maximum height of 142 pixels
Communication and Marketing Department
September 2014
TOC
Communication and Marketing
Communication amp Marketing Department Welgelegen Chapel Rd Ext Rosebank 7701 Cape Town 3
ldquoOUR MISSION is to be an outstanding teaching and research university educating for life and addressing the challenges facing our societyrdquo
Content
Text formatting
The first heading inside the Body of a page should be a Heading 3 o Since Heading 3 is bold already you should not add bold to the formatting
Subsequent headings in the body content should be bold
Relative URLs
Links to other pages in your own website or documents hosted on your own website must have relative URLs and not full URLs
o Example of a relative URL humundergraduatestudentswelcome o Example of a full URL
httpwwwhumanitiesuctaczahumundergraduatestudentswelcome o This ensures that should your domain name change you need not change every
internal link on your website o Edit all internal links in your content to ensure that they are relative URLs
Includes
Naming convention
An includersquos title should indicate if it contains content destined for the middle or right columns of a page Use the following naming convention
o Research ethics human subjects ndash BODY o Research ethics human subjects - SIDEBAR
Navigation
Do not duplicate navigation items in both the Header and the Main Menu
ldquoHomerdquo
Home must always be in your navigation either the Main Menu or the Header Menu o In most cases it will have been set up already when you receive the site shell from
ICTS or CMD o It can be in Header Menu if there is limited space in the main navigation o Note that this link must be a Link Content Type o Important use ltfrontgt as the URL in the URL field
ldquoSitemaprdquo amp ldquoSearchrdquo
These items will be added to the Header Menu when the site goes live Remember to leave sufficient space in the Header Menu otherwise they will not be displayed ndash items occurring after a certain number of pixels are hidden from view
Do not add these items to the Header Menu yourself
Link content types
Link content types have two purposes 1 Adding an external link to your site navigation (ie a link to another website) 2 Creating a parent link
o Every navigation item that is a parent ndash ie has ldquochildrenrdquo (sub-pages) ndash should be a link content type and not a page
o Both parent (link content type) and its first child must have the same URL alias Eg (from httpwwwhumanitiesuctacza)
Current students [humundergraduatestudentswelcome] (parent - link content type)
Communication and Marketing
Communication amp Marketing Department Welgelegen Chapel Rd Ext Rosebank 7701 Cape Town 4
ldquoOUR MISSION is to be an outstanding teaching and research university educating for life and addressing the challenges facing our societyrdquo
o The reason for doing this is illustrated by the following extract from a navigational tree Departments [httpwwwhumanitiesuctaczahumdepartmentsagi] African Gender Institute [httpwwwhumanitiesuctaczahumdepartmentsagi] Archaeology [httpwwwhumanitiesuctaczahumdepartmentsarchaeology] Etc If Departments were not a link content type but a page containing African Gender Institute content the words African Gender Institute would never appear in the navigation Clicking on Departments would load the page with AGI content (httpwwwhumanitiesuctaczahumdepartmentsagi) and the next navigation item in the left column (after Departments) would be Archaeology
Numbering (positioning)
Number your navigation items correctly
Start at 1 ndash you will be able to add a number ldquo0rdquo should an additional item need to be added before 1 at a later stage
You can leave ldquogapsrdquo between numbers to enable you to accommodate additional navigation items later without having to renumber all items after the additional ones
o Eg use the numbering sequence 1 3 5 or 2 4 6 etc
Alphabetical order
Menu items that can or should be ordered alphabetically must all be given the same number or weight
o Use 0 o A list of links to departments is an example of a list of navigation items that should be
in alphabetical order
Should an Overview or other introductory page be necessary it is best to choose -50 as its number ensuring that it will always be the first navigation item
External links
Avoid linking to other websites in your site navigation visitors tend to become confused when a link in the navigation of website opens another website altogether
o Where this is unavoidable have the link open in a new window (Web browsers will open the link in another tab)
o Use link content types to add external links to your site navigation
Un-publishing content
Before you un-publish any node add ldquo-unpublishedrdquo to the custom or automatic URL - eg humdepartmentslibrary_studies-unpublished First save the node and then un-publish it
o This frees up the URL for use by either your own or someone elsersquos site
Quality-checking (QA)
Remember to check your work by viewing your editsupdates in the browser (once published) as you go along
Always check the mobile view as well ndash click and drag the browser window smaller until the mobile view shows
It is a good idea to check the current and new migrated website side by side after yoursquore done to make sure that no content was left behind
o Check for content in image format delivered via scripts or in right columns Such content is easily overlooked
Communication and Marketing
Communication amp Marketing Department Welgelegen Chapel Rd Ext Rosebank 7701 Cape Town 5
ldquoOUR MISSION is to be an outstanding teaching and research university educating for life and addressing the challenges facing our societyrdquo
The sections below detail how to edit content migrated off the CMD CMS
EDITING CONTENT MIGRATED FROM THE CMD CMS
First check ALL parentfirst child URL aliases They must be identical If they are not it means that a parent navigation item was not tagged as link content type in the CMD CMS and that duplicate pages would have been created for it and its first child Unpublish the parent page (after changing its URL as described above) add a link content type and make sure that it and its first child have the same URL alias
Titles
Check that page titles are not duplicated o There is a Title option for each page it automatically displays above the content The
page title should therefore not be added at the top of the content text field as well
Contextual title
Add a contextual title in cases where such a title will make it clearer what section the page is in
o See httpwwwhumanitiesuctaczahumundergraduatestudentswelcome for an example The Welcome page is specifically for Current Students
Text formatting
The first heading inside the Body of a page should be a Heading 3 o Since Heading 3 is bold already you must not add bold to the formatting
Remove unnecessary spaces between paragraphs from the content
The following changes are required to content imported from the CMD CMS o Right column content must no longer be right-aligned o There is no specific style for bold text you can remove the class=rdquoheadrdquo and
class=rdquosubheadrdquo code from the content (in the [HTML] Source view in the Editor) o Table headings must be made bold since the original table style will have been lost o Percentages must be used for table and column widths not pixels
Page structure
Check each page to make sure that the migrated content fits into the middle column content such as tables may be too wide
Should the content not fit use the Theme Dashboard to apply a 2-column layout to that particular page
o Do not apply this layout if there is a right column with content In that case the middle columnrsquos content should be altered to fit into that column
The 1-column option may only be chosen in exceptional cases (such as full-page calendars) since it means that the left navigation column will not be visible
URL aliases
If an auto-migrated page had a URL that is already in use the system will add a number to the end of it eg humundergraduatestudentswelcome-0
o This can also be a sign that a navigation item was not tagged as link content type in the CMD CMS Check that all parent navigation has the exact same URL alias as its first child
Change such a URL to one that does not exist yet o The system will inform you if you attempt to change it to one that already exists
Communication and Marketing
Communication amp Marketing Department Welgelegen Chapel Rd Ext Rosebank 7701 Cape Town 6
ldquoOUR MISSION is to be an outstanding teaching and research university educating for life and addressing the challenges facing our societyrdquo
Content links
Links to other pages in your own website or documents hosted on your own website must have relative URLs and not full URLs
o Example of a relative URL humundergraduatestudentswelcome o Example of a full URL
httpwwwhumanitiesuctaczahumundergraduatestudentswelcome o This ensures that should your domain name change you need not change every
internal link to your website o Edit all internal links in your content to ensure that they are relative URLs
Check all internal page links (links to other pages on your site) your site URLs will most likely all change which means that internal links will no longer work
Avoid linking to other websites in your site navigation visitors tend to become confused when a link in website navigation opens another website
o Where this is unavoidable have the link open in a new window (Web browsers will open the link in another tab)
o Use link content types to add external links to your site navigation
ldquoBack to toprdquo links
ldquoBack to toprdquo links are no longer necessary since they are built into the site template
Remove all ldquoback to toprdquo links from the bottom of migrated pages
Quality-checking (QA)
Remember to check your work by viewing your editsupdates in the browser (once published) as you go along
It is a good idea to check the current and new migrated website side by side after yoursquore done to make sure that no content was left behind
Glossary of terms
URLs
URL ndash address of a web page or other web content on a particular website
Custom URL alias ndash a custom address created by a content manager for a web page or other web content over-writing the URL generated by the system
Links
Internal link ndash a link to content on the current website
External link ndash a link to content on another website Text field ndash a text box into which content is entered and in which content can be edited Node ndash an item of content on a website such as a page an event a notice etc Parentchild navigation items
Parent navigation item ndash a navigation item which has secondary navigation items associated with it a content category
Child navigation item ndash a navigation item which has a parent a piece of content belonging to a larger category
Unpublish ndash the action of removing content from a website by hiding it from view rather than deleting it
1
Drupal Website Approval Guide Once you want your website to go live the Communication and Marketing Department will be requested
to approve it Your site will be evaluated according to the points listed below You may be required to
affect changes before the site is approved to go live
Drupal Website Approval Guide 1
Theming 1
Colours 2
Layout 2
Maximum widths 2
Navigation 2
Quick Links 3
Content 3
Copying and pasting content 4
Images 4
Image width amp height 4
Theming If you have a co-brand template remember to add your sitersquos site domain name (address) to the
co-brand logorsquos URL field in the Custom Regions This will make your logo click through to your
main page
A co-brand site has the option of three UCT logos the logos have white black or blue text
Choose the logo whose text is most legible on your chosen header background colour
Do not add an unsuitable header background image to your header (See Images below) You
should not choose a very busy image since the image must not obscure compete with or cause
the site title Header navigation andor the site logo to become hard to distinguish from the
background
o You could upload a header image that only displays an image or pattern between the
logo on the left and the site title Header navigation and search box on the right
o When in doubt choose the generic header background image It is called 1 Generic
Background and can be found in the header background image dropdown list in the
Theme Dashboard
If you use custom code to rearrange or otherwise customise items on the header do not obscure
or remove the UCT logo or the search box
If you add items to the Utility Bar ensure that they are not too high If an image that is too high
is added to the bar you will note that vertical line next to the Quick Links does not reach all the
way to the top
2
o A safe maximum height for an item in the Utility Bar is 35 pixels
o View the Source of the Utility Bar field to check that whatever you upload into it is in a
ldquodivrdquo called social-links If your icons or text is not too high it will ensure that they are
spaced correctly Below is the ltdivgt code
ltdiv class=social-linksgt icontextltagtltdivgt
The site must display correctly on mobile devices (phones specifically) ndash the UCT and site logo (if
any) as well as the relevant navigation must be visible and properly styled
Colours
Do not use a dark font on a dark background
Ensure that link colours are easily distinguishable from the rest of the content
Ensure that the colours of links in the left column are sufficiently darker than a light background
or lighter than a dark background in order to be easily readable
Layout
It is advisable to use a two-column layout for all secondary pages unless they require a third
column
You may not hide the left column of secondary pages (identified as column A in the Theme
Dashboard) This will hide the left column navigation
o You may make an exception for very wide content that will not fit properly into two
columns (such as the Calendar)
A site Calendar must be displayed in a single column layout to be as user-friendly as possible
Maximum widths
The following are the maximum width items in site columns can have
Middle column ndash 458 pixels
Right column ndash 198 pixels
Two-column (spanning the middle and right columns) - 685 pixels
Single column (spanning all three) ndash 918 pixels
o Single columns may mainly be used on the home page as well as the Calendar
Navigation Site navigation is a hierarchical content structure
Please use URL aliases instead of the URLs the system provides
Use a prefix in front of all URL aliases to ensure that your site URLs are unique
o In the following example the prefix is fhs - fhsaboutteam (instead of just
aboutteam)
All pages and features (Calendar News etc) you add to the site must be in the site navigation
o This means that a user must be able to find all pages on the site by following the site
navigation Pages on your site must not be hidden or orphaned by only being available
via a link inside the content somewhere
3
Your site will have been created with a Home navigation item in the Header navigation You may
move this to the Main navigation if you wish but do not unpublish it
o Your Home navigation item must be a Link Content Type with ltfrontgt as the URL
Do not add a page or other item to both the Header and the Main navigation If you do this it
will cause two sets of breadcrumbs to be displayed
o Note though that a page or other item can be added to either the Main or Header
navigation as well as the Quick Links navigation
Once you are satisfied with your Main navigation items you should space them far enough apart
to be easily distinguishable from one another Often adding five or ten pixels to each is enough
o Ensure that you do not have too many items in your Main navigation andor that you
do not space them too far apart Items on the far right that go beyond the available
width will be hidden Note that the way that Internet Explorer handles spacing may
cause items to be hidden even though Chrome Firefox Safari etc may display all of
them
Ensure that all navigation items load what they are supposed to
Quick Links
The purpose of Quick Links is to make popular or important pages on your site more easily
findable
Do not add your sitersquos Main navigation items to the Quick Links as well ndash Main navigation is
visible at all times already
Choose pages from second level navigation down for inclusion in the Quick Links
You can also add external sites (such as Vula or staff and student email access) to Quick Links
o To add an external link first create a Link Content Type with the external URL then
choose to add that Link to Quick Links
If you donrsquot need Quick Links you can hide them by adding the following code to the Theme
o It becomes very apparent when the Dynamic Feature andor News articles on the home
page contain very old content
If pages have no content yet they must be unpublished until you have added content to them
Do not publish empty pages that have no content other than a sentence saying ldquoContent coming
soonrdquo or something to that effect
Links to other sites must load in a new window Choose ldquo_blankrdquo from Target (on the Link pop-
up) when creating the link
4
If your site has a News feature that is pulled into the home page there must be at least one
article in it Otherwise there will be an empty column on your main page
o Note that ICTS Helpdesk needs to be contacted should you want to add News to your
home page or remove it from that location A site can have a News module without
displaying news articles on the home page if that is what you require
Regularly clean up your home page by unchecking the box which instructs the system to display
news articles on it All articles are archived news articles not displayed on the home page
remain available in the News Archive unless you unpublish them
If you have a Calendar make sure that it has at least one upcoming event in it If you have a
three-column home page as well as a Calendar the latest events will show in the home pagersquos
right column If there are no upcoming events the third column will be blank
Do not use unnecessarily large font in your content or on the home page
If you have a large table with much content on a page rather change the page layout to two
columns (AB) in the Theme Dashboard
Copying and pasting content
If you copy and paste content from MS Word into the Editor the original formatting will be
retained ndash highlight all content then use the Clear Formatting button to get rid of the
formatting
Since the above does not always work perfectly it may be a better solution to copy and paste
into Notepad first then from there into the Editor Then apply the necessary formatting via the
Editor
Keep an eye out for multiple fonts on a page It is most likely the result of copying and pasting
from Word which overwrites the site style
Images Ensure that images are displayed with their correct width and height Forcing images into a
space too small for them will distort the images (by forcing the wrong aspect ratio on them)
If the image you want to add to the content of a page is wider than the middle column either
edit the image to fit or change the page layout to two columns (AB)
Do not upload very wide and high high-resolution images to be displayed in content
Editoptimise them appropriately
Image width amp height
The header background image must be 940x142 pixels
The Dynamic Feature image must be 558x274 pixels Do not use any image that does not
actually have that width and height
Main page news article thumbnail images must be 142x98 pixels
The co-brand logo image can have a maximum width of 392 and a maximum height of 142 pixels
Communication and Marketing Department
September 2014
TOC
Communication and Marketing
Communication amp Marketing Department Welgelegen Chapel Rd Ext Rosebank 7701 Cape Town 6
ldquoOUR MISSION is to be an outstanding teaching and research university educating for life and addressing the challenges facing our societyrdquo
Content links
Links to other pages in your own website or documents hosted on your own website must have relative URLs and not full URLs
o Example of a relative URL humundergraduatestudentswelcome o Example of a full URL
httpwwwhumanitiesuctaczahumundergraduatestudentswelcome o This ensures that should your domain name change you need not change every
internal link to your website o Edit all internal links in your content to ensure that they are relative URLs
Check all internal page links (links to other pages on your site) your site URLs will most likely all change which means that internal links will no longer work
Avoid linking to other websites in your site navigation visitors tend to become confused when a link in website navigation opens another website
o Where this is unavoidable have the link open in a new window (Web browsers will open the link in another tab)
o Use link content types to add external links to your site navigation
ldquoBack to toprdquo links
ldquoBack to toprdquo links are no longer necessary since they are built into the site template
Remove all ldquoback to toprdquo links from the bottom of migrated pages
Quality-checking (QA)
Remember to check your work by viewing your editsupdates in the browser (once published) as you go along
It is a good idea to check the current and new migrated website side by side after yoursquore done to make sure that no content was left behind
Glossary of terms
URLs
URL ndash address of a web page or other web content on a particular website
Custom URL alias ndash a custom address created by a content manager for a web page or other web content over-writing the URL generated by the system
Links
Internal link ndash a link to content on the current website
External link ndash a link to content on another website Text field ndash a text box into which content is entered and in which content can be edited Node ndash an item of content on a website such as a page an event a notice etc Parentchild navigation items
Parent navigation item ndash a navigation item which has secondary navigation items associated with it a content category
Child navigation item ndash a navigation item which has a parent a piece of content belonging to a larger category
Unpublish ndash the action of removing content from a website by hiding it from view rather than deleting it
1
Drupal Website Approval Guide Once you want your website to go live the Communication and Marketing Department will be requested
to approve it Your site will be evaluated according to the points listed below You may be required to
affect changes before the site is approved to go live
Drupal Website Approval Guide 1
Theming 1
Colours 2
Layout 2
Maximum widths 2
Navigation 2
Quick Links 3
Content 3
Copying and pasting content 4
Images 4
Image width amp height 4
Theming If you have a co-brand template remember to add your sitersquos site domain name (address) to the
co-brand logorsquos URL field in the Custom Regions This will make your logo click through to your
main page
A co-brand site has the option of three UCT logos the logos have white black or blue text
Choose the logo whose text is most legible on your chosen header background colour
Do not add an unsuitable header background image to your header (See Images below) You
should not choose a very busy image since the image must not obscure compete with or cause
the site title Header navigation andor the site logo to become hard to distinguish from the
background
o You could upload a header image that only displays an image or pattern between the
logo on the left and the site title Header navigation and search box on the right
o When in doubt choose the generic header background image It is called 1 Generic
Background and can be found in the header background image dropdown list in the
Theme Dashboard
If you use custom code to rearrange or otherwise customise items on the header do not obscure
or remove the UCT logo or the search box
If you add items to the Utility Bar ensure that they are not too high If an image that is too high
is added to the bar you will note that vertical line next to the Quick Links does not reach all the
way to the top
2
o A safe maximum height for an item in the Utility Bar is 35 pixels
o View the Source of the Utility Bar field to check that whatever you upload into it is in a
ldquodivrdquo called social-links If your icons or text is not too high it will ensure that they are
spaced correctly Below is the ltdivgt code
ltdiv class=social-linksgt icontextltagtltdivgt
The site must display correctly on mobile devices (phones specifically) ndash the UCT and site logo (if
any) as well as the relevant navigation must be visible and properly styled
Colours
Do not use a dark font on a dark background
Ensure that link colours are easily distinguishable from the rest of the content
Ensure that the colours of links in the left column are sufficiently darker than a light background
or lighter than a dark background in order to be easily readable
Layout
It is advisable to use a two-column layout for all secondary pages unless they require a third
column
You may not hide the left column of secondary pages (identified as column A in the Theme
Dashboard) This will hide the left column navigation
o You may make an exception for very wide content that will not fit properly into two
columns (such as the Calendar)
A site Calendar must be displayed in a single column layout to be as user-friendly as possible
Maximum widths
The following are the maximum width items in site columns can have
Middle column ndash 458 pixels
Right column ndash 198 pixels
Two-column (spanning the middle and right columns) - 685 pixels
Single column (spanning all three) ndash 918 pixels
o Single columns may mainly be used on the home page as well as the Calendar
Navigation Site navigation is a hierarchical content structure
Please use URL aliases instead of the URLs the system provides
Use a prefix in front of all URL aliases to ensure that your site URLs are unique
o In the following example the prefix is fhs - fhsaboutteam (instead of just
aboutteam)
All pages and features (Calendar News etc) you add to the site must be in the site navigation
o This means that a user must be able to find all pages on the site by following the site
navigation Pages on your site must not be hidden or orphaned by only being available
via a link inside the content somewhere
3
Your site will have been created with a Home navigation item in the Header navigation You may
move this to the Main navigation if you wish but do not unpublish it
o Your Home navigation item must be a Link Content Type with ltfrontgt as the URL
Do not add a page or other item to both the Header and the Main navigation If you do this it
will cause two sets of breadcrumbs to be displayed
o Note though that a page or other item can be added to either the Main or Header
navigation as well as the Quick Links navigation
Once you are satisfied with your Main navigation items you should space them far enough apart
to be easily distinguishable from one another Often adding five or ten pixels to each is enough
o Ensure that you do not have too many items in your Main navigation andor that you
do not space them too far apart Items on the far right that go beyond the available
width will be hidden Note that the way that Internet Explorer handles spacing may
cause items to be hidden even though Chrome Firefox Safari etc may display all of
them
Ensure that all navigation items load what they are supposed to
Quick Links
The purpose of Quick Links is to make popular or important pages on your site more easily
findable
Do not add your sitersquos Main navigation items to the Quick Links as well ndash Main navigation is
visible at all times already
Choose pages from second level navigation down for inclusion in the Quick Links
You can also add external sites (such as Vula or staff and student email access) to Quick Links
o To add an external link first create a Link Content Type with the external URL then
choose to add that Link to Quick Links
If you donrsquot need Quick Links you can hide them by adding the following code to the Theme