
DRAFT DRAFT DRAFT
WebSphere Portal Server: Step By Step www.WebSphereMentor.com
UNDER REVIEW USE AT YOUR OWN RISK
Author: Rama Turaga Page 1 Courtesy to: Owen Cline
Chapter 3
WebSphere Portal Server V6: Configuration Data
Transfer to DB2
Introduction
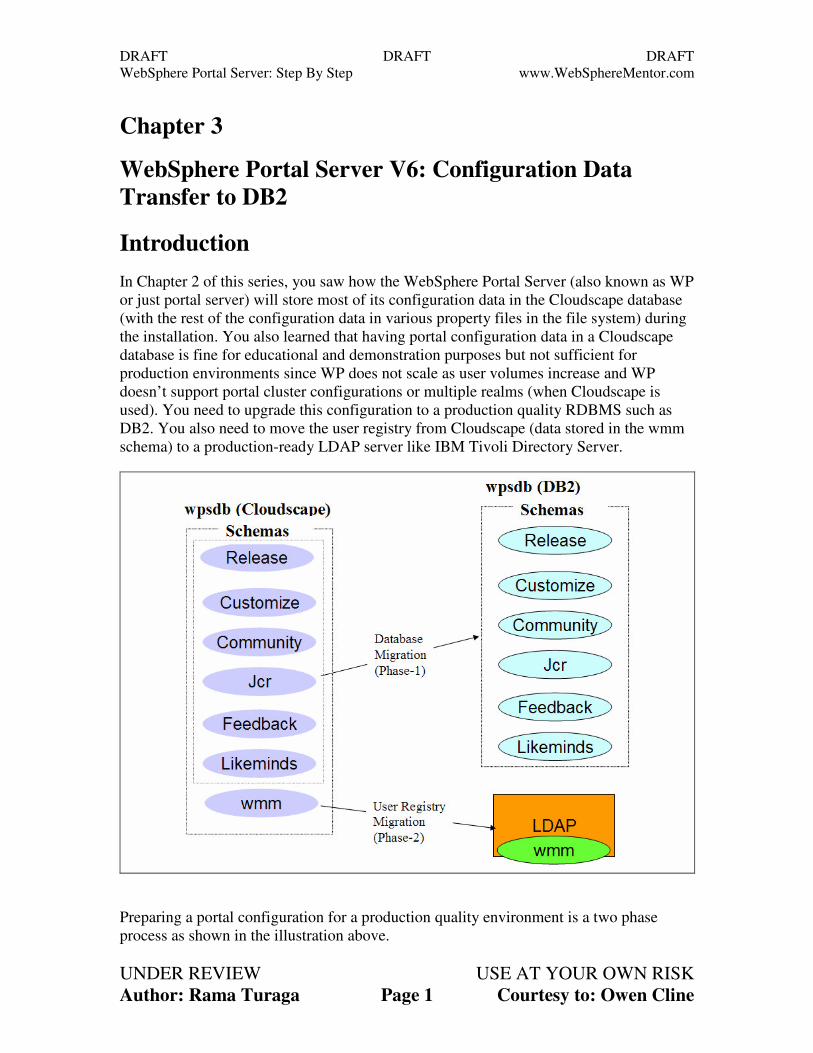
In Chapter 2 of this series, you saw how the WebSphere Portal Server (also known as WP
or just portal server) will store most of its configuration data in the Cloudscape database
(with the rest of the configuration data in various property files in the file system) during
the installation. You also learned that having portal configuration data in a Cloudscape
database is fine for educational and demonstration purposes but not sufficient for
production environments since WP does not scale as user volumes increase and WP
doesn’t support portal cluster configurations or multiple realms (when Cloudscape is
used). You need to upgrade this configuration to a production quality RDBMS such as
DB2. You also need to move the user registry from Cloudscape (data stored in the wmm
schema) to a production-ready LDAP server like IBM Tivoli Directory Server.
Preparing a portal configuration for a production quality environment is a two phase
process as shown in the illustration above.
DRAFT DRAFT DRAFT
WebSphere Portal Server: Step By Step www.WebSphereMentor.com
UNDER REVIEW USE AT YOUR OWN RISK
Author: Rama Turaga Page 2 Courtesy to: Owen Cline
• Database Migration (Phase-1): The first phase involves transfering portal
configuration data (stored in the release, customize, community, jcr, feedback and
likeminds schemas in the wpsdb database) from the Cloudscape database to a
production quality database. We used DB2 as our production quality database in our
sample configuration.
� After a successful migration during Phase-1, you will still have user registry
information in the Cloudscape database.
• User Registry Migration (Phase-2): The second phase of migration involves
transfering the user registry data (stored in the wmm schema in the wpsdb database)
from Cloudcsape to the LDAP server. We used IBM Tivoli Directory Server as our
production quality LDAP server in our sample configuration.
One important point to note here is that, even though we are using only one database
(wpsdb) with all the schemas in our sample configuration, you can use a dedicated
database for each schema or a set of related schemas (domains) in your production
environment for performance, scalability, availability and other architectural reasons. For
example, you can configure a separate database (releasedb for example) for release,
likeminds and feedback schemas whose data is not modified during the portal runtime.
And, another database (customizedb for example) for customize schema that stores the
user specific data. And yet another database (communitydb for example) for community
and jcr schemas whose data is modified during the portal runtime. And finally wmmdb
database for the wmm schema to store user registry information. Refer to Understand
the PortalServer Configuration section in Chapter 2 to get a good idea on different
portal domains.
Cloudscape to DB2 Migration (Phase-1)
The illustration below shows the portal configuration after a successful migration during
Phase-1 (moving data from Cloudscape to DB2). It also illustrates that the user registry
(stored in the wmm schema) is still stored in Cloudscape after a Phase-1 migration.
Please note that the end user does not see any difference even after a portal configuration
is migrated. They still use the same ports to connect to the portal page. But they need to
start the database (DB2 in this case) before starting the portal server as the portal server
needs to access the configuration data in the DB2 database during the startup.

DRAFT DRAFT DRAFT
WebSphere Portal Server: Step By Step www.WebSphereMentor.com
UNDER REVIEW USE AT YOUR OWN RISK
Author: Rama Turaga Page 3 Courtesy to: Owen Cline
In our sample scenario, we are assuming that you have installed or are prepared to install
DB2 UDB V8.2 (fixpack 6 or above) locally on the same machine as the portal server.
The configuration steps for a remote database are different and we will cover them in a
later chapter when we discuss portal clusters. We are using DB2 UDB V 8.2 with fixpack
13 in our sample configuration. This DB2 server is installed on the same machine as the
portal server. Refer to
http://publib.boulder.ibm.com/infocenter/wpdoc/v6r0/index.jsp?topic=/com.ibm.wp.ent.d
oc/wpf/inst_req.html for more information on supported versions and fixpack levels of
DB2.
Prepare your system
Step 1: Make sure that you followed the instructions provided under the same
section in Chapter-1 of this series, before you start with the migration task.
Prepare and verify DB2 Server
Step 2: If you have not already done so, use the instructions given in Chapter 11
of the printed version of the book, to install DB2 UDB V8.2 server.
• Apply the fixpack (6 or above) supported by WP V6. From the command
line, issue the db2level command to see that it meets the minimum
requirements. We applied fixpack 13 on our sample DB2 server.

DRAFT DRAFT DRAFT
WebSphere Portal Server: Step By Step www.WebSphereMentor.com
UNDER REVIEW USE AT YOUR OWN RISK
Author: Rama Turaga Page 4 Courtesy to: Owen Cline
Step 3: Before migrating the portal configuration, you need to edit the db2cli.ini
file (under the <DB2-ROOT> directory), by adding two lines followed by an empty line
depending on the fixpack level as mentioned below. If you do not make this change, your
portal database transfer will hang during the action-process-constraints task.
• If the DB2 fixpack level of your system is 12 or above as in our sample
configuration then add [COMMON], followed by ReturnAliases=0 on the
next line, followed by an empty line. These lines should be at the end of the
file as shown in the screenshot below.
• If the DB2 fixpack level of your system is less than 12 then add
[COMMON], followed by DYNAMIC=1 on the next line, followed by an
empty line. These lines should be at the end of the file.

DRAFT DRAFT DRAFT
WebSphere Portal Server: Step By Step www.WebSphereMentor.com
UNDER REVIEW USE AT YOUR OWN RISK
Author: Rama Turaga Page 5 Courtesy to: Owen Cline
Work with the property files
Step 4: As explained in Chapter 2, all of the database information related to a
portal configuration is defined in the wpconfig_dbdomain and wpconfig_dbtype property
files in the <WPV6-ROOT>\config directory. If you have not already done so, take a
backup copy of these files.
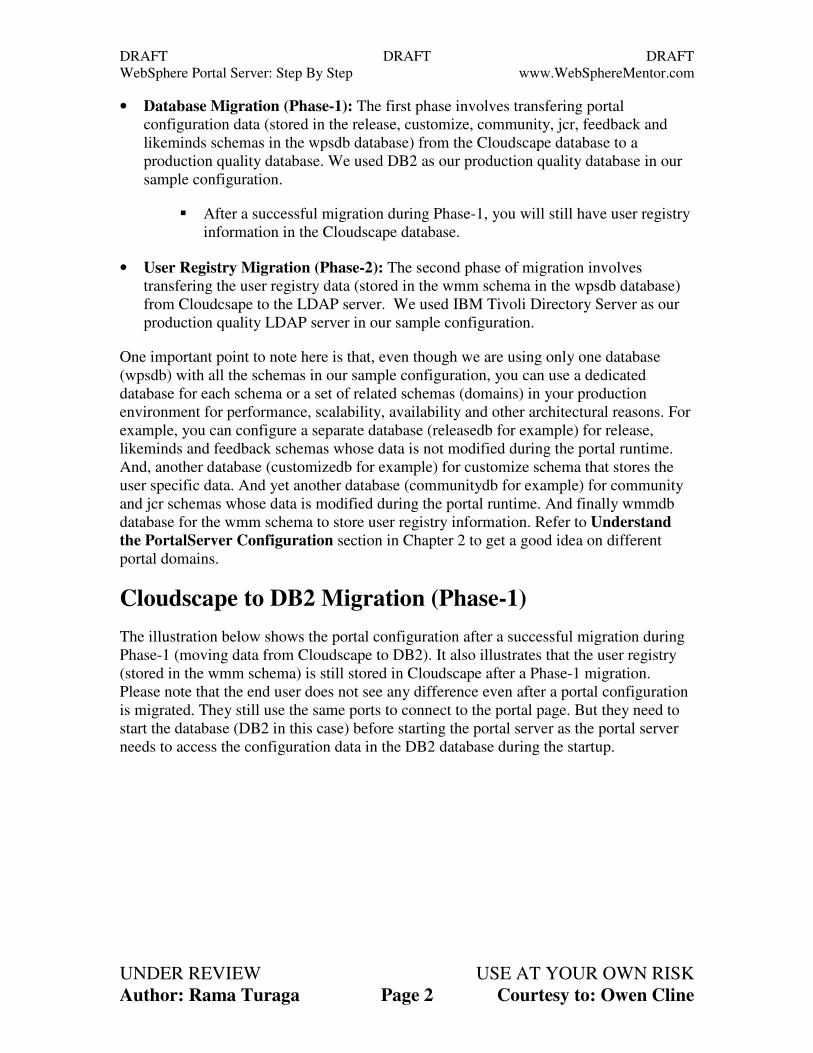
Step 5: Open the wpconfig_dbdomain.properties file, navigate to Release
datababase properties section and change the following:
• release.DbType - Change from Cloudscape to DB2 (if you are using another
supported database, Oracle for example, then you would change it to that
database and the remaining values have to be changed specifically to match
that database type).
• release.DbName - This still stays the same as we named the database on
DB2 also wpsdb. If you want to use a different database name then you
would change this property to that database name.
• release.DbUrl – Change it from jdbc:db2j:wpsdb;create=true to
jdbc:db2:wpsdb to point to the DB2 database.
• release.DbUser and DbPassword – Change it to db2admin/db2admin. If you
used a different DB2 database administrator user name and password, you
should enter that user name and password here.
DRAFT DRAFT DRAFT
WebSphere Portal Server: Step By Step www.WebSphereMentor.com
UNDER REVIEW USE AT YOUR OWN RISK
Author: Rama Turaga Page 6 Courtesy to: Owen Cline
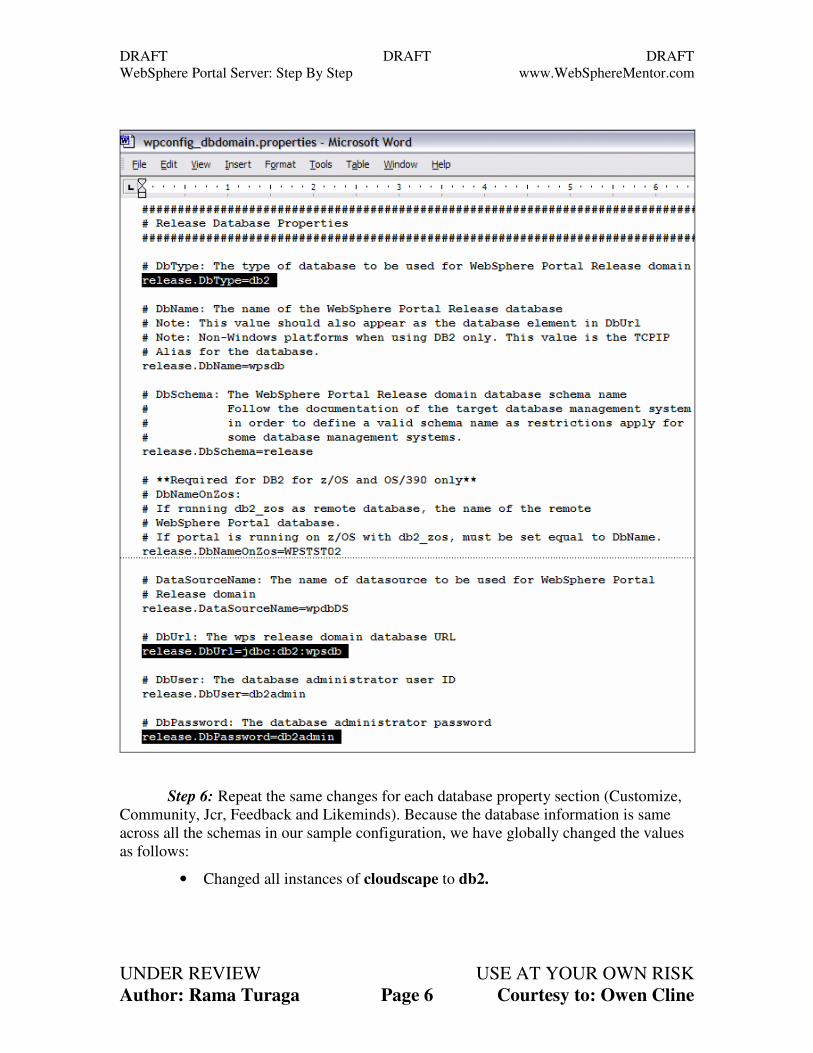
Step 6: Repeat the same changes for each database property section (Customize,
Community, Jcr, Feedback and Likeminds). Because the database information is same
across all the schemas in our sample configuration, we have globally changed the values
as follows:
• Changed all instances of cloudscape to db2.
DRAFT DRAFT DRAFT
WebSphere Portal Server: Step By Step www.WebSphereMentor.com
UNDER REVIEW USE AT YOUR OWN RISK
Author: Rama Turaga Page 7 Courtesy to: Owen Cline
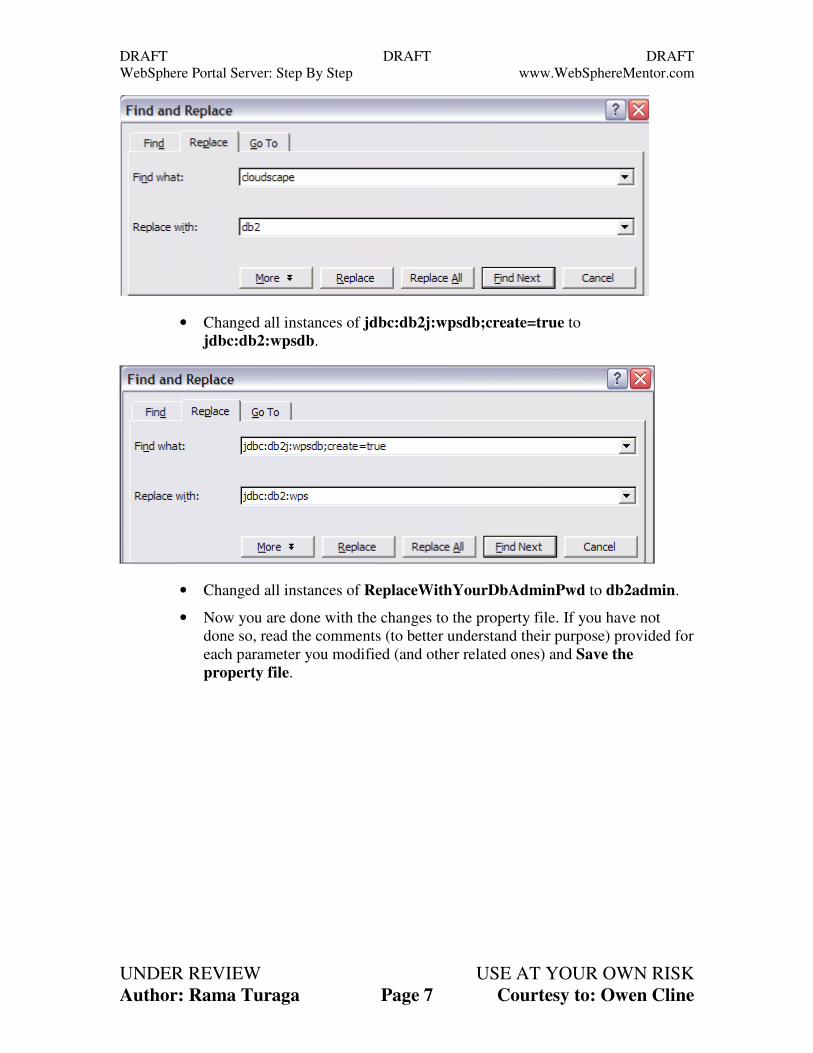
• Changed all instances of jdbc:db2j:wpsdb;create=true to
jdbc:db2:wpsdb.
• Changed all instances of ReplaceWithYourDbAdminPwd to db2admin.
• Now you are done with the changes to the property file. If you have not
done so, read the comments (to better understand their purpose) provided for
each parameter you modified (and other related ones) and Save the
property file.

DRAFT DRAFT DRAFT
WebSphere Portal Server: Step By Step www.WebSphereMentor.com
UNDER REVIEW USE AT YOUR OWN RISK
Author: Rama Turaga Page 8 Courtesy to: Owen Cline
NOTE: If you want to assign different databases based on the domain (or schema) then
you can specify different databases for each domain (or schema). Because we are
assuming that you are performing these steps for educational purposes, we used only one
database (wpsdb) for all the schemas.
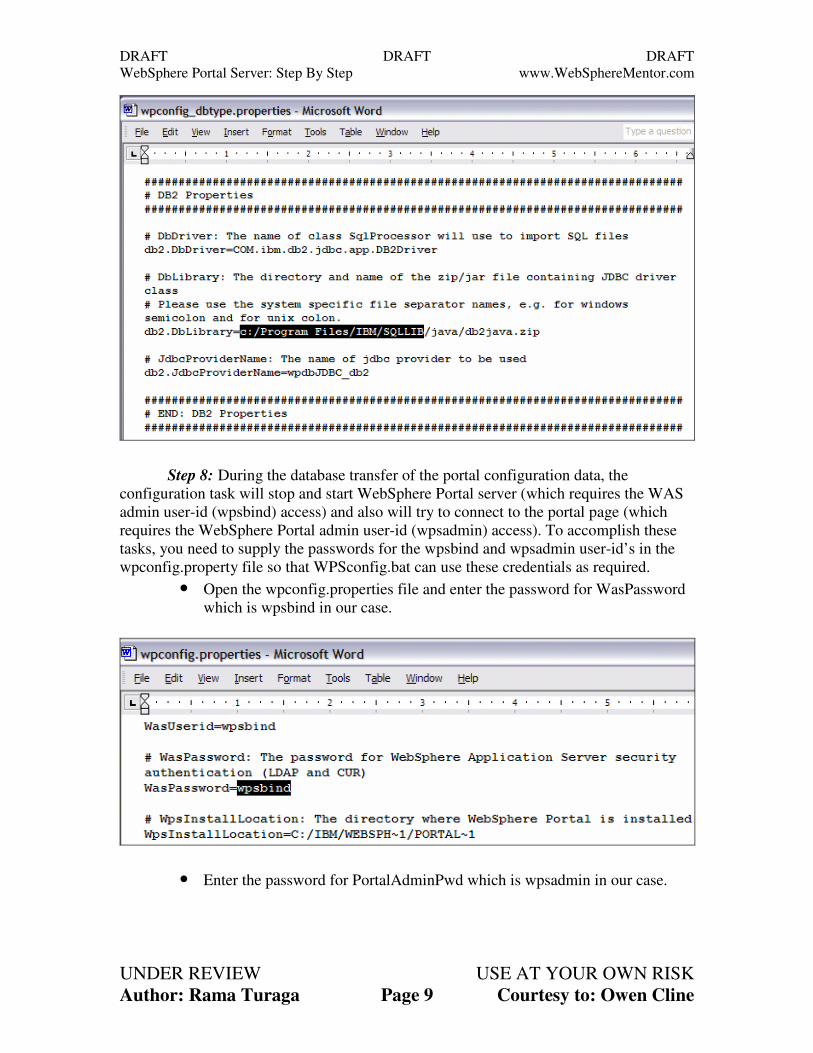
Step 7: Since you changed the DbType parameter value to DB2 in the dbdomain
configuration file in the earlier steps, the configuration task will look for parameters
related to the DB2 driver in the wpconfig_dbtype property file. Open the
wpconfig_dbtype.properties file and change the db2.DbLibrary parameter value to the
path where the db2java.zip is available.
• Change <SQLLIB> to the directory where you installed DB2 software
(<DB2-ROOT>). We installed DB2 in the default directory for a Windows
environment which is c:\program files\IBM\SQLLIB. But, remember that
you should always use the “/” (forward slash) instead of the “\” (backward
slash) even on a Windows operating system when editing these property
files.
• Save the file. Now you are ready to run the configuration task that creates
the database and schemas using the information provided in the property
files you modified.
DRAFT DRAFT DRAFT
WebSphere Portal Server: Step By Step www.WebSphereMentor.com
UNDER REVIEW USE AT YOUR OWN RISK
Author: Rama Turaga Page 9 Courtesy to: Owen Cline
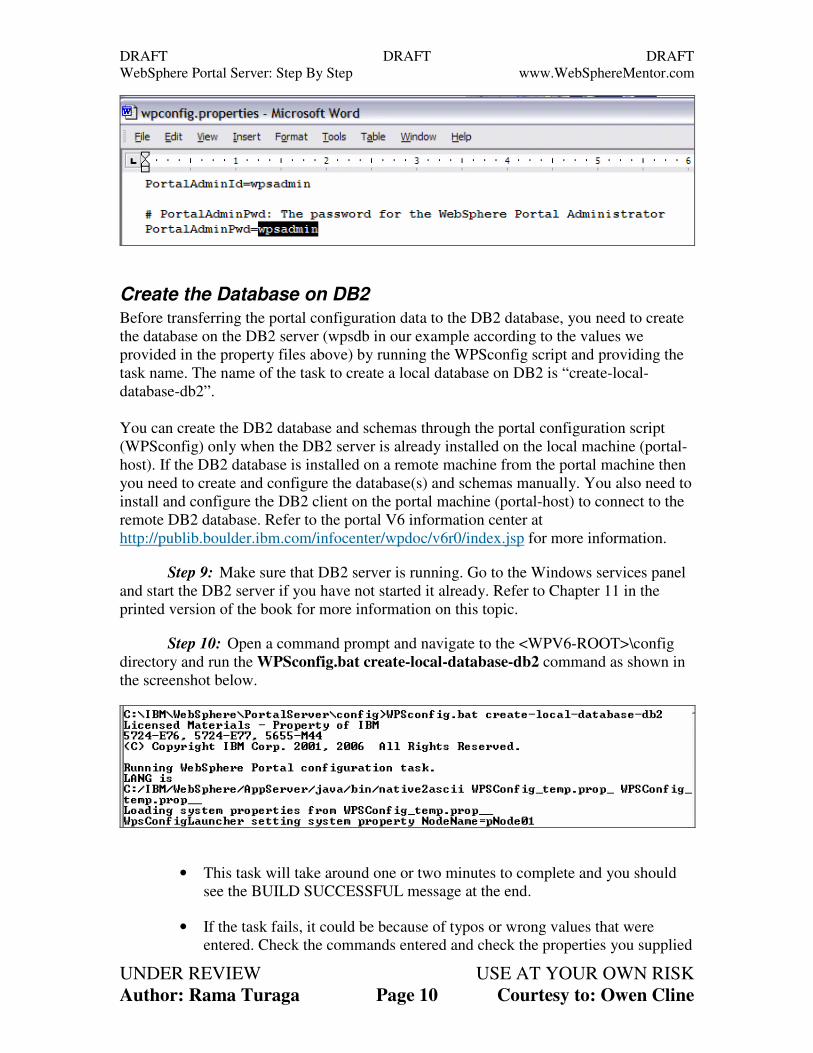
Step 8: During the database transfer of the portal configuration data, the
configuration task will stop and start WebSphere Portal server (which requires the WAS
admin user-id (wpsbind) access) and also will try to connect to the portal page (which
requires the WebSphere Portal admin user-id (wpsadmin) access). To accomplish these
tasks, you need to supply the passwords for the wpsbind and wpsadmin user-id’s in the
wpconfig.property file so that WPSconfig.bat can use these credentials as required.
• Open the wpconfig.properties file and enter the password for WasPassword
which is wpsbind in our case.
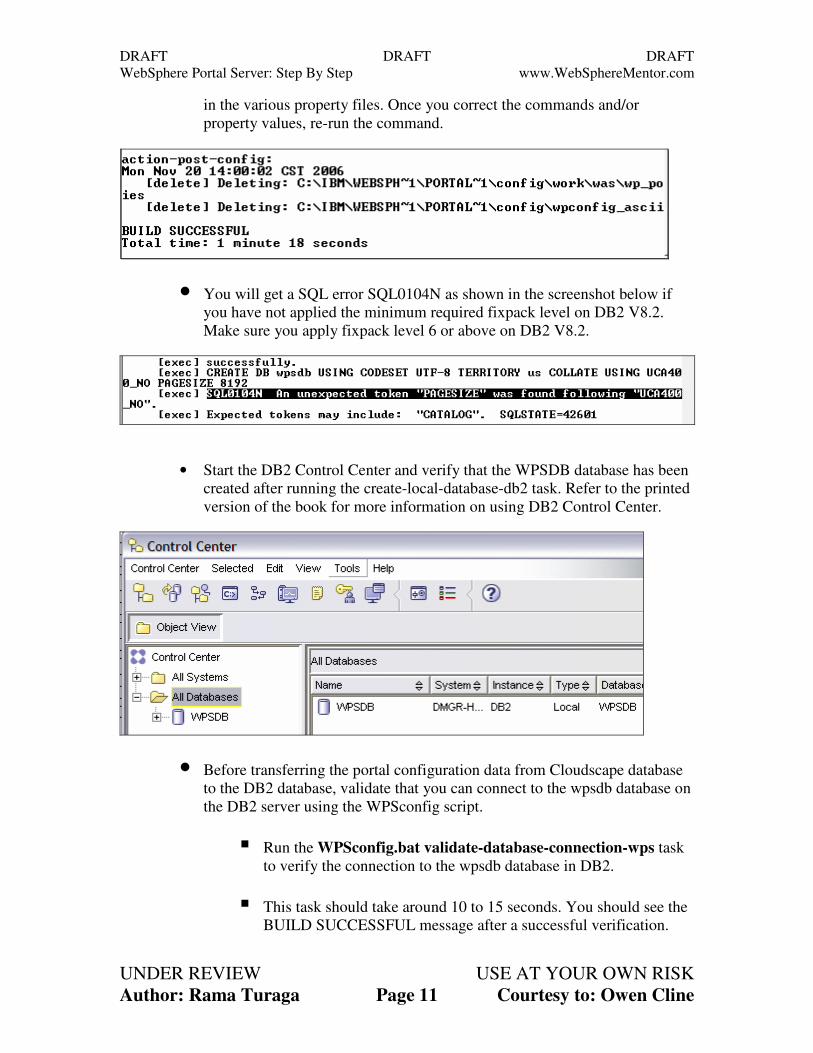
• Enter the password for PortalAdminPwd which is wpsadmin in our case.
DRAFT DRAFT DRAFT
WebSphere Portal Server: Step By Step www.WebSphereMentor.com
UNDER REVIEW USE AT YOUR OWN RISK
Author: Rama Turaga Page 10 Courtesy to: Owen Cline
Create the Database on DB2
Before transferring the portal configuration data to the DB2 database, you need to create
the database on the DB2 server (wpsdb in our example according to the values we
provided in the property files above) by running the WPSconfig script and providing the
task name. The name of the task to create a local database on DB2 is “create-local-
database-db2”.
You can create the DB2 database and schemas through the portal configuration script
(WPSconfig) only when the DB2 server is already installed on the local machine (portal-
host). If the DB2 database is installed on a remote machine from the portal machine then
you need to create and configure the database(s) and schemas manually. You also need to
install and configure the DB2 client on the portal machine (portal-host) to connect to the
remote DB2 database. Refer to the portal V6 information center at
http://publib.boulder.ibm.com/infocenter/wpdoc/v6r0/index.jsp for more information.
Step 9: Make sure that DB2 server is running. Go to the Windows services panel
and start the DB2 server if you have not started it already. Refer to Chapter 11 in the
printed version of the book for more information on this topic.
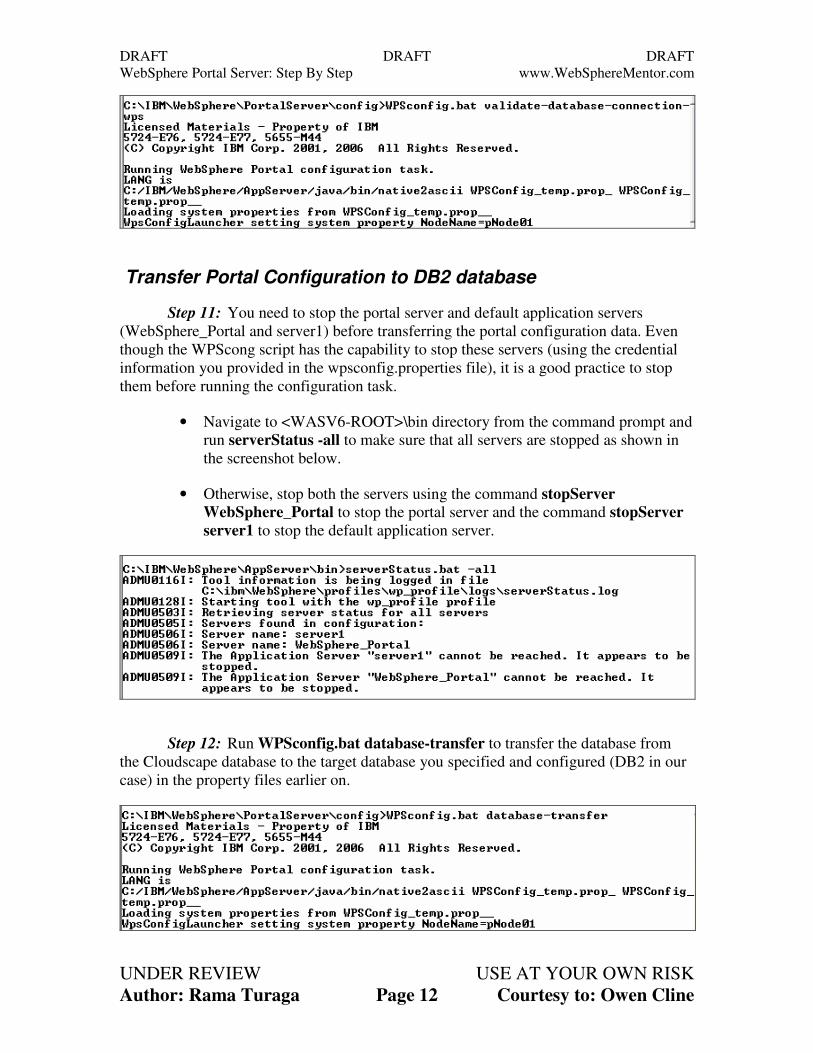
Step 10: Open a command prompt and navigate to the <WPV6-ROOT>\config
directory and run the WPSconfig.bat create-local-database-db2 command as shown in
the screenshot below.
• This task will take around one or two minutes to complete and you should
see the BUILD SUCCESSFUL message at the end.
• If the task fails, it could be because of typos or wrong values that were
entered. Check the commands entered and check the properties you supplied
DRAFT DRAFT DRAFT
WebSphere Portal Server: Step By Step www.WebSphereMentor.com
UNDER REVIEW USE AT YOUR OWN RISK
Author: Rama Turaga Page 11 Courtesy to: Owen Cline
in the various property files. Once you correct the commands and/or
property values, re-run the command.
• You will get a SQL error SQL0104N as shown in the screenshot below if
you have not applied the minimum required fixpack level on DB2 V8.2.
Make sure you apply fixpack level 6 or above on DB2 V8.2.
• Start the DB2 Control Center and verify that the WPSDB database has been
created after running the create-local-database-db2 task. Refer to the printed
version of the book for more information on using DB2 Control Center.
• Before transferring the portal configuration data from Cloudscape database
to the DB2 database, validate that you can connect to the wpsdb database on
the DB2 server using the WPSconfig script.
� Run the WPSconfig.bat validate-database-connection-wps task
to verify the connection to the wpsdb database in DB2.
� This task should take around 10 to 15 seconds. You should see the
BUILD SUCCESSFUL message after a successful verification.
DRAFT DRAFT DRAFT
WebSphere Portal Server: Step By Step www.WebSphereMentor.com
UNDER REVIEW USE AT YOUR OWN RISK
Author: Rama Turaga Page 12 Courtesy to: Owen Cline
Transfer Portal Configuration to DB2 database
Step 11: You need to stop the portal server and default application servers
(WebSphere_Portal and server1) before transferring the portal configuration data. Even
though the WPScong script has the capability to stop these servers (using the credential
information you provided in the wpsconfig.properties file), it is a good practice to stop
them before running the configuration task.
• Navigate to <WASV6-ROOT>\bin directory from the command prompt and
run serverStatus -all to make sure that all servers are stopped as shown in
the screenshot below.
• Otherwise, stop both the servers using the command stopServer
WebSphere_Portal to stop the portal server and the command stopServer
server1 to stop the default application server.
Step 12: Run WPSconfig.bat database-transfer to transfer the database from
the Cloudscape database to the target database you specified and configured (DB2 in our
case) in the property files earlier on.

DRAFT DRAFT DRAFT
WebSphere Portal Server: Step By Step www.WebSphereMentor.com
UNDER REVIEW USE AT YOUR OWN RISK
Author: Rama Turaga Page 13 Courtesy to: Owen Cline
• This task will take awhile to finish, so be patient as alot of data has to be
transferred and recreated on target database (in our case DB2). It took around 75
minutes on our sample configuration as shown in the screenshot below.
• If the task fails, it could be because of typos or wrong property values provided.
You should re-verify all of the changes made and provide correct values in the
property files and then re-run the task.
• If the database transfer hangs at action-process-constraints task, then you may not
have made all of the required changes to the db2cli.ini file as in explained earlier
part of this chapter. Recheck your changes
• Invoke the DB2 Control Center again and verify that the various schemas
(Release, Customization etc.) have been created in the WPSDB database. If
they are, you have successfully transferred the portal configuration to DB2.

DRAFT DRAFT DRAFT
WebSphere Portal Server: Step By Step www.WebSphereMentor.com
UNDER REVIEW USE AT YOUR OWN RISK
Author: Rama Turaga Page 14 Courtesy to: Owen Cline
Step 13: Your portal server should be started after a successful database transfer
task. If you stopped it for any reason, restart the server by entering the startServer
WebSphere_Portal command from the <WASV6-ROOT>\bin directory on the
command line. You do not have to start server1 to work with the portal server.
Step 14: Open a browser and use the URL http://portal-host:10038/wps/portal to
login into the portal page to verify that portal configuration has been successfully
migrated.
How Does WPSconfig Perform each Task?
Have you wondered how WPSconfig reads database information from the modified
property files or what is really happening behind the scenes while running the tasks
create-local-database-db2 or database-transfer? If so, the following is a brief explanation.
The following illustration explains how the WPSconfig.bat script completes a task. When
you run the command WPSconfig.bat create-local-database-db2 for example:
WPSconfig.bat reads the file wpconfig.xml (you can see this in the bat script) which in
turn contains references to the other property files it needs to read and ANT scripts it
needs to run for each task. Make sure that you take backups of files before viewing them.

DRAFT DRAFT DRAFT
WebSphere Portal Server: Step By Step www.WebSphereMentor.com
UNDER REVIEW USE AT YOUR OWN RISK
Author: Rama Turaga Page 15 Courtesy to: Owen Cline
Step 1: Navigate to the <WPV6-ROOT>\config directory. Open the
WPSconfig.bat file to verify that it is accessing wpconfig.xml during its runtime as
highlighted in the screenshot below.
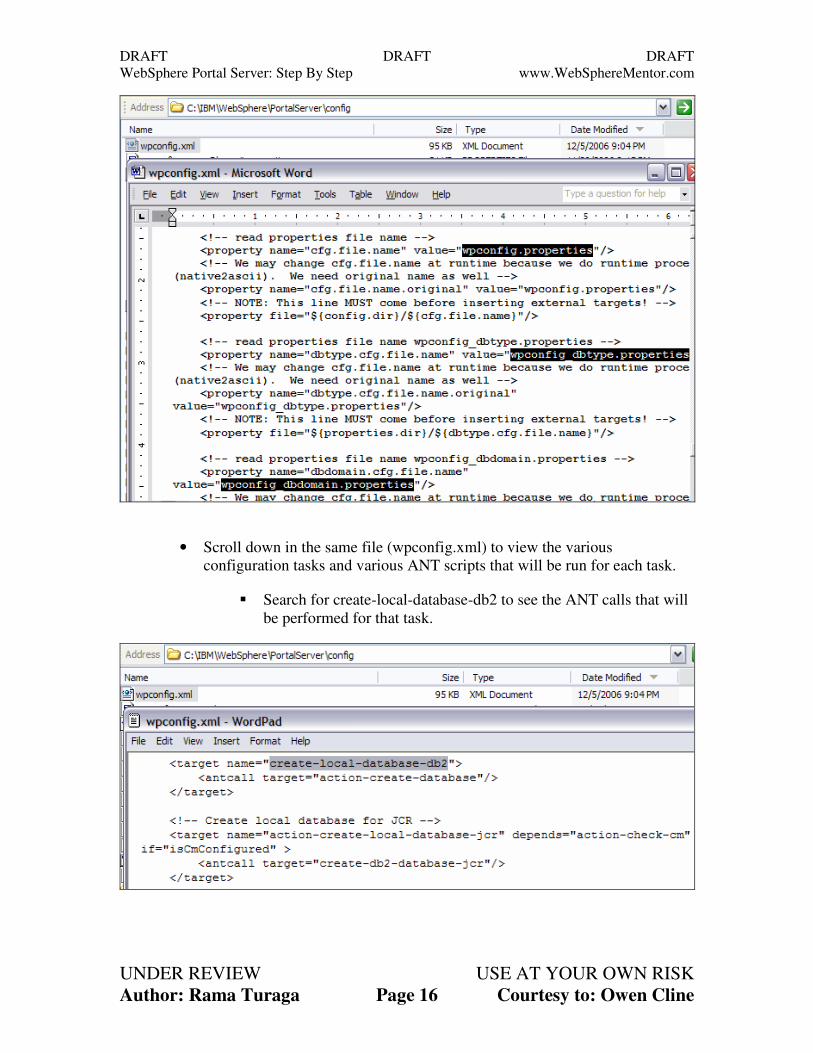
Step 2: Now open the wpconfig.xml file to verify that it is accessing these
property files: wpconfig.properties, wpconfig.properties _dbdomain.properties,
wpconfig.properties and dbtype.properties.
DRAFT DRAFT DRAFT
WebSphere Portal Server: Step By Step www.WebSphereMentor.com
UNDER REVIEW USE AT YOUR OWN RISK
Author: Rama Turaga Page 16 Courtesy to: Owen Cline
• Scroll down in the same file (wpconfig.xml) to view the various
configuration tasks and various ANT scripts that will be run for each task.
� Search for create-local-database-db2 to see the ANT calls that will
be performed for that task.

DRAFT DRAFT DRAFT
WebSphere Portal Server: Step By Step www.WebSphereMentor.com
UNDER REVIEW USE AT YOUR OWN RISK
Author: Rama Turaga Page 17 Courtesy to: Owen Cline
Hopefully, you now should have a complete understanding of how the configuration
tasks are getting executed from the WPSconfig.bat file.
Configuration Wizard Overview
So far, you have seen how to modify the property files manually and run the tasks from
the command line. There is another GUI based tool that is easier to use, but it only
performs a few typical tasks. Even though this tool is easy to use, it does not support all
the tasks (currently it only supports four tasks).
To work with the GUI based configuration wizard, navigate to the <WPV6-
ROOT>\config\wizard directory and double click on configwizard.bat as shown in the
screenshot below. You could have used this tool to transfer data to the DB2 server, by
selecting the Transfer data to another database option and entering the correct values
prompted for on the screens that follow (you need to click Next to navigate through the
screens) instead of directly editing the values in property files. The values you provide on
each screen will be updated in the property files we discussed above before running the
task.
This tool has limitations if you want to enable security using the LDAP server. You can
only enable LDAP security without realm support by selecting the Enable LDAP
security option currently. If you want to enable LDAP security with realm support then
you need to manually change the property files and run the enable-security-wmmur-ldap
task from the command line as you will see in the next chapter.
DRAFT DRAFT DRAFT
WebSphere Portal Server: Step By Step www.WebSphereMentor.com
UNDER REVIEW USE AT YOUR OWN RISK
Author: Rama Turaga Page 18 Courtesy to: Owen Cline


