

WH171B(系列)WH172B(系列)WH171AWH172A
WH171B(SERIES)WH172B(SERIES)WH171AWH172A
5634032018.4
Middle East Branch LOB19-1701-1702, Jebel Ali Free Zone, P.O. box 261804, Dubai U.A.E.
Manila Representative Office. Unit 1010, 10th Floor Rufino Building, Ayala Avenue cor.V.A.
/
77 Moo 5 HSIL Industrial Zone T.Nong -Plamor A.Nong-Khae Saraburi 18140 Thailand

2
温馨提示:
Note:Users may fix the problems on their own if the corrective action is to be taken by the user according to the chart below. Non-professionals are prohibited from disassembling and repairing the product. Please contact the relevant professionals for futher troubleshooting to avoid aggravating the problem.
Common faults
Water does not flow into the tank
Water is constantly running into the bowl.
Possible causes Corrective actions
1 Household water supply has not been turned on or has been cut off.
2. Angle valve has not been turned on.
3. Residuums in the inlet valve causing the float device to not operate properly.
4. None of the above.
1. Flush valve seal is not completely closed due to residuums around the outlet of the cistern and flush valve (sand or debris lodged in during installation).
2. The exposed part of the panel's adjust screw is too long, which resulting the rubber of flush valve can not fixed in a certain position and can not sealed.
3. The part of panel's adjusting screw in the cistern is too long, which may get stuck in the soft pipe or cistern body and unable to return sometimes.
1. Turn on the household water supply or contact the relevant personnel (To be done by the user).
2. Turn on the angle valve (To be done by professionals only).
3. Check the fill valve and remove the residuum (To be done by professionals only).
4. Change the inlet valve (To be done by professionals only).
1. Remove the residuums in the cistern (To be done by professionals only).
2. Adjust the position of the panel's screw (To be done by professionals only).
3. To cut back the adjust screw (To be done by professionals only).
Self diagnosis and troubleshooting
1
重要提示:
提示:
Important:
Caution: Neglecting this sign may result in misunderstanding of the installation instructions, which can lead to injuries or damage to property.
Use water or dilute mild detergent (such as dishwashing detergent) to scrub and clean the surface, Never use strong corrosive detergent (such as cleanser, paint thinner, benzene and so on) or wire ball to scrub, and to avoid corroding the surface of the product.
Please dispose of this product in accordance to the local waste disposal laws and regulations.
1. Functions of the manual concealed cistern: storage water, inlet and outlet calve vessel, frame of wall-hung toilet, The function reflected in the manual actuator panel instructions.
2. This instruction manual only supports the installation of the manual concealed cistern.3. For Australia, the installation has to be in accordance with AS/NZS 3500 series of Standards and/or local standards.
Cautions
Cleaning and waste disposal

3
重要提示: Important:1. Please read through this Instructions carefully prior to
installation,and our company shall not be responsible for any loss caused by not installating according with this Instructions. Lubricants are provided for the installation.
2. Please confirm the FFL according to the overall indoor fitment method. Line out the FFL on the wall and always regard FFL as datum line of 0 height.
3. Please confirm the wall is the main wall, the thickness exceed 80mm and it can bear more than 300kgf strength when the strength act on the front of toilet bowl.
1. Please install the frame before paving the tiles.
The dimensional unit is millimeter.
2. As the parts images are for illustrative purposes only, please refer to the actual product if it varies from the parts images.
注: Note:
FFL =完成面地坪. 0 FFL of finish face, all dimension ismillimeter FFL =0
FFL 0
B
A
300kgf
INSTALLATION INSTRUCTION FOR MANUAL CONCEALED CISTERN
Accessories List:
安装墙Main wall
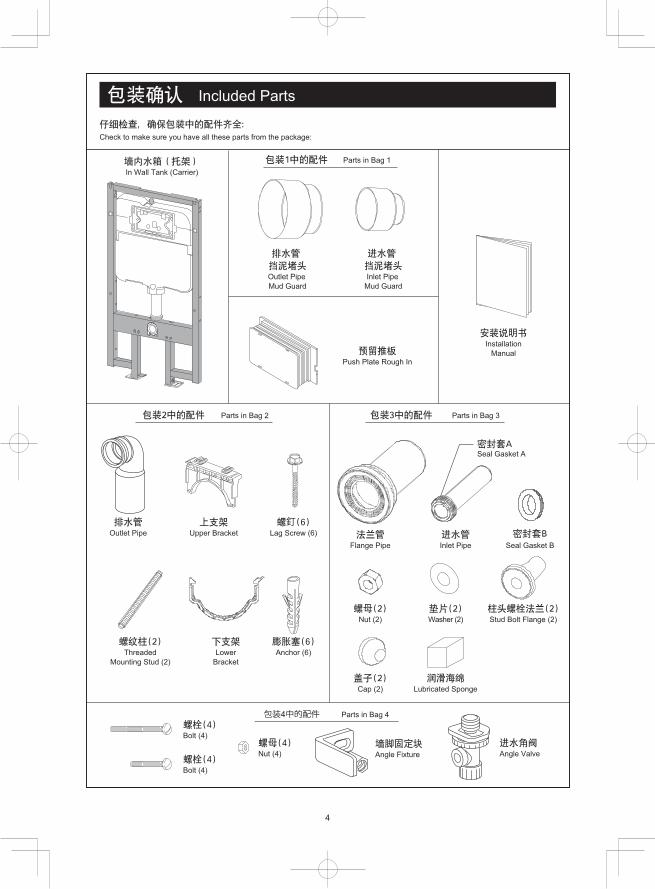
某些型号产品冲刷直管密封套提供两种规格A.B,安装时根据便器型号选配。Straight flush pipe of some products are offered with two kinds of seal gaskets A.B which can be selected according to toilet bowl type during installation.
4
Check to make sure you have all these parts from the package:
Parts in Bag 2
Parts in Bag 4包装4中的配件
Parts in Bag 3
In Wall Tank (Carrier)
ThreadedMounting Stud (2)
ThreadedMounting Stud (2)
LowerBracket
Anchor (6)
釘Lag Screw (6)
Bolt (4)
Angle Fixture Angle Valve
Bolt (4)
Nut (4)
Nut (2)
Cap (2)
Washer (2) Stud Bolt Flange (2)
Flange Pipe Inlet Pipe
Lubricated Sponge
Seal Gasket B
Seal Gasket A
Push Plate Rough InPush Plate Rough In
InstallationManual
Parts in Bag 1
Outlet Pipe Mud Guard
Inlet Pipe Mud Guard
Outlet Pipe Upper Bracket
Included Parts
3
重要提示: Important:1. Please read through this Instructions carefully prior to
installation,and our company shall not be responsible for any loss caused by not installating according with this Instructions. Lubricants are provided for the installation.
2. Please confirm the FFL according to the overall indoor fitment method. Line out the FFL on the wall and always regard FFL as datum line of 0 height.
3. Please confirm the wall is the main wall, the thickness exceed 80mm and it can bear more than 300kgf strength when the strength act on the front of toilet bowl.
1. Please install the frame before paving the tiles.
The dimensional unit is millimeter.
2. As the parts images are for illustrative purposes only, please refer to the actual product if it varies from the parts images.
注: Note:
FFL =完成面地坪. 0 FFL of finish face, all dimension ismillimeter FFL =0
FFL 0
B
A
300kgf
INSTALLATION INSTRUCTION FOR MANUAL CONCEALED CISTERN
Accessories List:
安装墙Main wall
某些型号产品冲刷直管密封套提供两种规格A.B,安装时根据便器型号选配。Straight flush pipe of some products are offered with two kinds of seal gaskets A.B which can be selected according to toilet bowl type during installation.
4
Check to make sure you have all these parts from the package:
Parts in Bag 2
Parts in Bag 4包装4中的配件
Parts in Bag 3
In Wall Tank (Carrier)
ThreadedMounting Stud (2)
ThreadedMounting Stud (2)
LowerBracket
Anchor (6)
釘Lag Screw (6)
Bolt (4)
Angle Fixture Angle Valve
Bolt (4)
Nut (4)
Nut (2)
Cap (2)
Washer (2) Stud Bolt Flange (2)
Flange Pipe Inlet Pipe
Lubricated Sponge
Seal Gasket B
Seal Gasket A
Push Plate Rough InPush Plate Rough In
InstallationManual
Parts in Bag 1
Outlet Pipe Mud Guard
Inlet Pipe Mud Guard
Outlet Pipe Upper Bracket
Included Parts

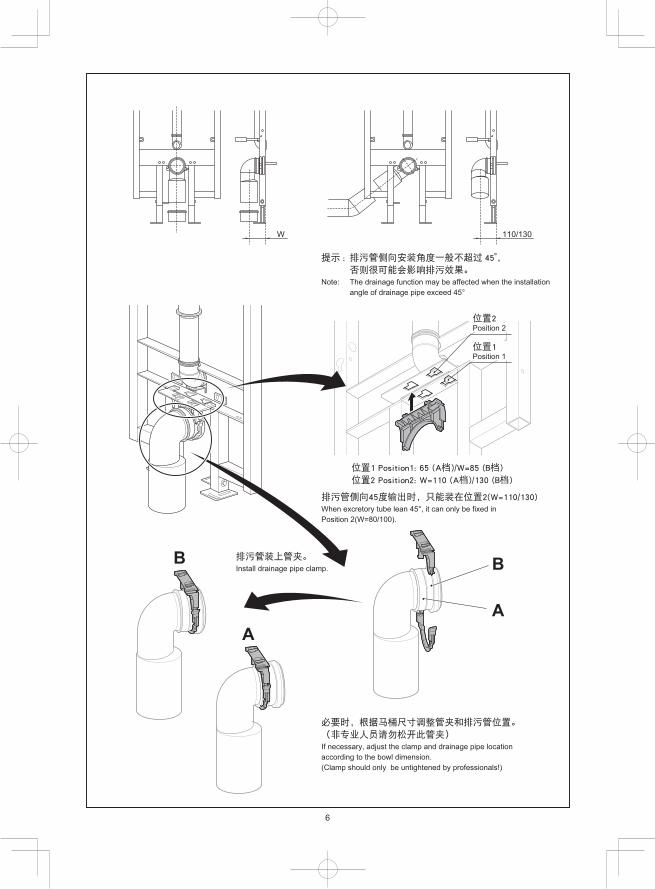
110/130
位置1 Position1: 65 (A档)/W=85 (B档)
位置2 Position2: W=110 (A档)/130 (B档)
45°,
The drainage function may be affected when the installation
排污管侧向45度输出时,只能装在位置2(W=110/130)When excretory tube lean 45°, it can only be fixed in
必要时,根据马桶尺寸调整管夹和排污管位置。
If necessary, adjust the clamp and drainage pipe location
(Clamp should only be untightened by professionals!)
位置2Position 2
位置1Position 1
B
A
152 134
6
W 110/130
位置1 Position1: 65 (A档)/W=85 (B档)位置2 Position2: W=110 (A档)/130 (B档)
提示 : 排污管侧向安装角度一般不超过 45°,否则很可能会影响排污效果。
Note: The drainage function may be affected when the installation angle of drainage pipe exceed 45°
排污管侧向45度输出时,只能装在位置2(W=110/130)When excretory tube lean 45°, it can only be fixed in Position 2(W=80/100).
必要时,根据马桶尺寸调整管夹和排污管位置。(非专业人员请勿松开此管夹)If necessary, adjust the clamp and drainage pipe location according to the bowl dimension. (Clamp should only be untightened by professionals!)
排污管装上管夹。Install drainage pipe clamp.
位置2Position 2
位置1Position 1
BB
AA
5
580
1000
650
40G1/2
1110
1180
180230
320
100
35
FFL 0
35(1
5~13
5)
147 1290110
安装墙Main wall
安装墙Main wall 135~220
20~60
400-100
110
W(70~130)
要求排水管中心到安装墙面的距离(W)在70~130之间.Please make sure W is between 70 to 130.
基本尺寸及供水管道铺设:Dimensions and Supply Pipe-laying
排污管安装:Drainage Pipe Installation
8
11
2
1
19
2
3
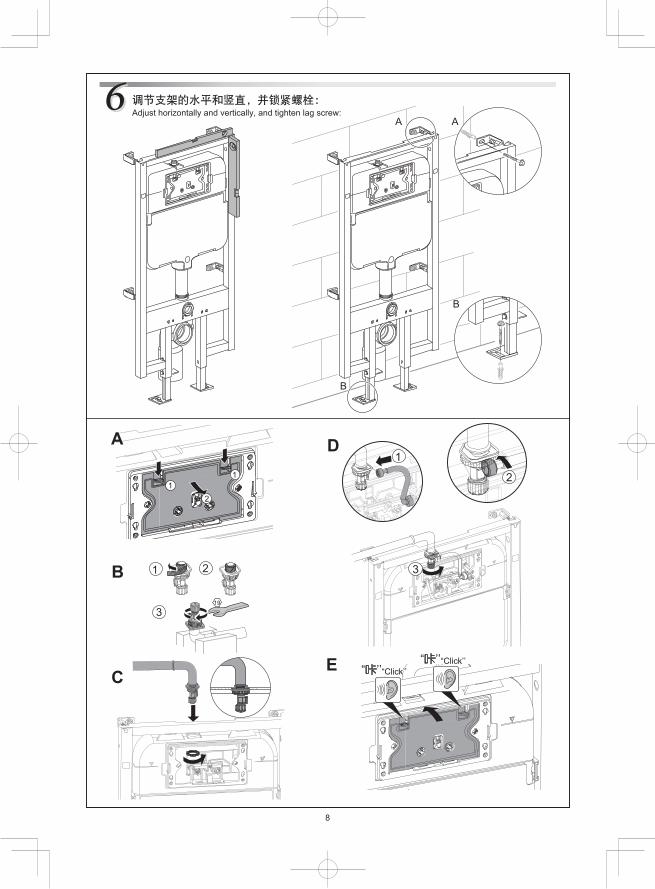
“Click”“Click”
1
2
3
B
B
A A
“Click’’“Click’’“Click’’“Click’’
调节支架的水平和竖直,并锁紧螺栓:Adjust horizontally and vertically, and tighten lag screw:
B
C
D
E
A
7
2.1.10mm
10X50mm1
3
2
4
56
1165
0FFL
490
286
650
C
B
A
C
A
B
A
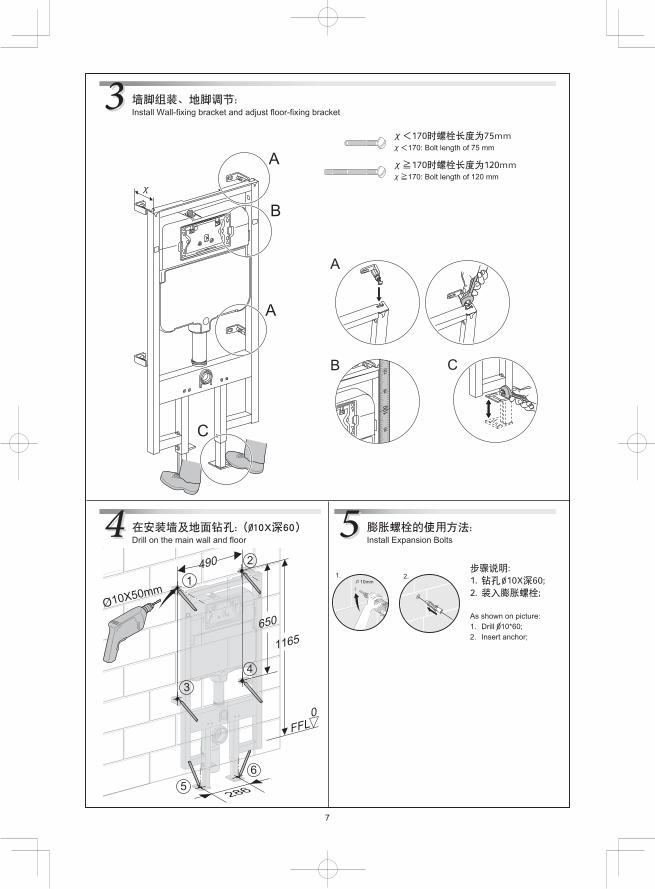
As shown on picture:1. Drill 10*60;2. Insert anchor;
在安装墙及地面钻孔:( 10X深60)Drill on the main wall and floor
墙脚组装、地脚调节:Install Wall-fixing bracket and adjust floor-fixing bracket
膨胀螺栓的使用方法:Install Expansion Bolts
0
0
170: Bolt length of 75 mm
170: Bolt length of 120 mm
0
8
11
2
1
19
2
3
“Click”“Click”
1
2
3
B
B
A A
“Click’’“Click’’“Click’’“Click’’
调节支架的水平和竖直,并锁紧螺栓:Adjust horizontally and vertically, and tighten lag screw:
B
C
D
E
A
7
2.1.10mm
10X50mm1
3
2
4
56
1165
0FFL
490
286
650
C
B
A
C
A
B
A
As shown on picture:1. Drill 10*60;2. Insert anchor;
在安装墙及地面钻孔:( 10X深60)Drill on the main wall and floor
墙脚组装、地脚调节:Install Wall-fixing bracket and adjust floor-fixing bracket
膨胀螺栓的使用方法:Install Expansion Bolts
0
0
170: Bolt length of 75 mm
170: Bolt length of 120 mm
0
10
装修墙厚度范围20~60mm (从固定支架外面算起,到贴砖后完成面)The thickness of fixed wall is 20~60mm (measured from the front of frame to the finished tile surface)
It is forbidden to use unsustainable, ductile or light-weight material to fix the covering. Such as foam board etc.
20-60mm
max. 3mm
max.3mm
610m
m10
0mm
0
FFL
180mm
35mm
推板 226m
m
Push Plate 226mm
140mm
排水管孔
直径 114m
m
Outlet Drain Hole
Diameter 114mm
进水管孔
直径 64mm
Inlet Drain Hole
Diameter 64mm
马桶安装孔
直径 19mm
Toilet Mounting
Holes
Diameter 19mm
进水管挡泥堵头Inlet Drainmud guard
排水管挡泥堵头Outlet DrainMud Guard
预留推板Push PlateRough-In
螺纹安装柱Threaded Mounting Stud
20~60mm
9
180230
“Click’’“Click’’
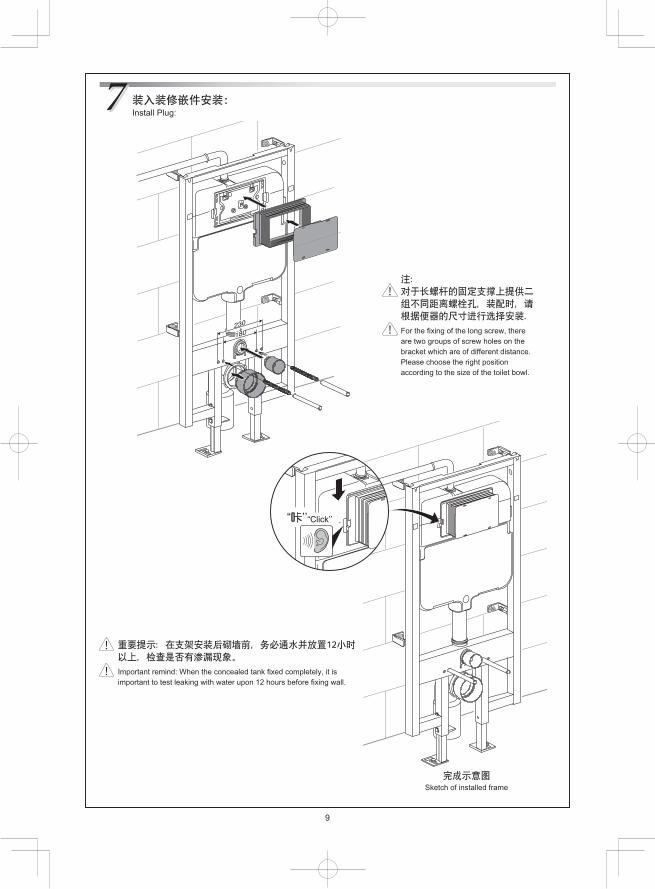
装入装修嵌件安装:Install Plug:
For the fixing of the long screw, there are two groups of screw holes on the bracket which are of different distance. Please choose the right position according to the size of the toilet bowl.
Important remind: When the concealed tank fixed completely, it is important to test leaking with water upon 12 hours before fixing wall.
Sketch of installed frame

10
装修墙厚度范围20~60mm (从固定支架外面算起,到贴砖后完成面)The thickness of fixed wall is 20~60mm (measured from the front of frame to the finished tile surface)
It is forbidden to use unsustainable, ductile or light-weight material to fix the covering. Such as foam board etc.
20-60mm
max. 3mm
max.3mm
610m
m10
0mm
0
FFL
180mm
35mm
推板 226m
m
Push Plate 226mm
140mm
排水管孔
直径 114m
m
Outlet Drain Hole
Diameter 114mm
进水管孔
直径 64mm
Inlet Drain Hole
Diameter 64mm
马桶安装孔
直径 19mm
Toilet Mounting
Holes
Diameter 19mm
进水管挡泥堵头Inlet Drainmud guard
排水管挡泥堵头Outlet DrainMud Guard
预留推板Push PlateRough-In
螺纹安装柱Threaded Mounting Stud
20~60mm
9
180230
“Click’’“Click’’
装入装修嵌件安装:Install Plug:
For the fixing of the long screw, there are two groups of screw holes on the bracket which are of different distance. Please choose the right position according to the size of the toilet bowl.
Important remind: When the concealed tank fixed completely, it is important to test leaking with water upon 12 hours before fixing wall.
Sketch of installed frame

12
d
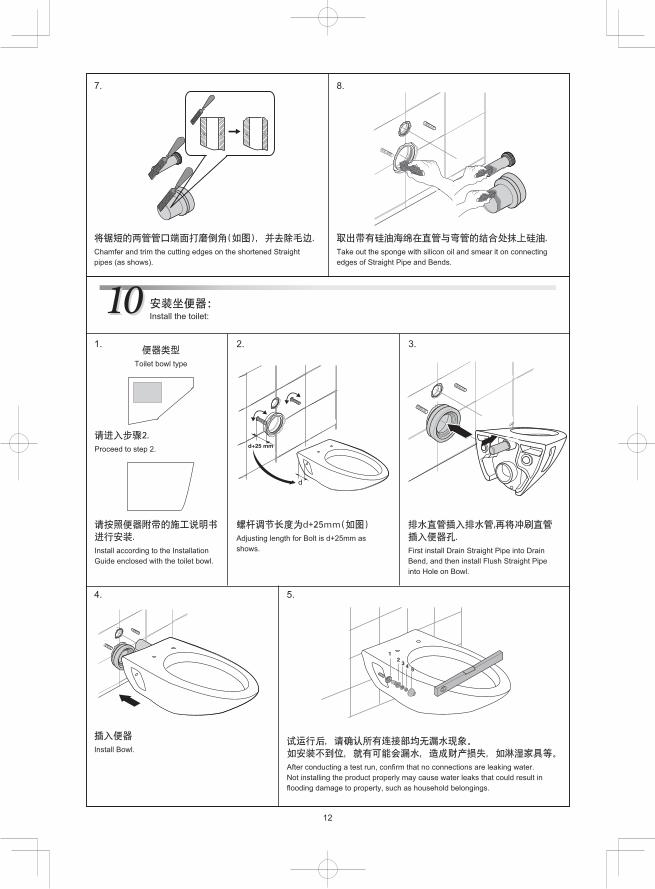
2. 3.
Adjusting length for Bolt is d+25mm as shows. First install Drain Straight Pipe into Drain
Bend, and then install Flush Straight Pipe into Hole on Bowl.
4. 5.
Install Bowl.
After conducting a test run, confirm that no connections are leaking water.Not installing the product properly may cause water leaks that could result in flooding damage to property, such as household belongings.
1.
Toilet bowl type
Proceed to step 2.
Install according to the Installation Guide enclosed with the toilet bowl.
安装坐便器:Install the toilet:
7. 8.
Take out the sponge with silicon oil and smear it on connecting edges of Straight Pipe and Bends.
Chamfer and trim the cutting edges on the shortened Straight pipes (as shows).
11
L2L1
L1+3mm
L2+3mm
21
安装坐便器:Install the toilet
1. 2. 3.
5. 6.
Set Straight Pipes into Flush Bend and Drain Bend properly, and marks lines.
4. 5. 6.
L1 is the distance of two marks on Flush Straight Pipe, and L2 is that of two marks on Drainpipe Straight Pipe.Mark lines as shows.
Cut Straight Pipe just as shows.
Add lubricant onto the Rubber Gaskets of two Straight Pipes and set them into Bowl. (Flush Pipe seal Gasket assembly see 3.1, 3.2 and 3.3).
3.1 3.2 3.3
Seal Gasket A insert into Bowl with Flush Pipe together. Seal Gasket B install:
➀ install the Gasket into Bowl first;➁ then insert the Flush Pipe into the Seal Gasket.
Seal Gasket A installFlush Pipe Seal Gasket.
Seal Gasket B install.
Seal Gasket A
Seal Gasket B
12
d
2. 3.
Adjusting length for Bolt is d+25mm as shows. First install Drain Straight Pipe into Drain
Bend, and then install Flush Straight Pipe into Hole on Bowl.
4. 5.
Install Bowl.
After conducting a test run, confirm that no connections are leaking water.Not installing the product properly may cause water leaks that could result in flooding damage to property, such as household belongings.
1.
Toilet bowl type
Proceed to step 2.
Install according to the Installation Guide enclosed with the toilet bowl.
安装坐便器:Install the toilet:
7. 8.
Take out the sponge with silicon oil and smear it on connecting edges of Straight Pipe and Bends.
Chamfer and trim the cutting edges on the shortened Straight pipes (as shows).
11
L2L1
L1+3mm
L2+3mm
21
安装坐便器:Install the toilet
1. 2. 3.
5. 6.
Set Straight Pipes into Flush Bend and Drain Bend properly, and marks lines.
4. 5. 6.
L1 is the distance of two marks on Flush Straight Pipe, and L2 is that of two marks on Drainpipe Straight Pipe.Mark lines as shows.
Cut Straight Pipe just as shows.
Add lubricant onto the Rubber Gaskets of two Straight Pipes and set them into Bowl. (Flush Pipe seal Gasket assembly see 3.1, 3.2 and 3.3).
3.1 3.2 3.3
Seal Gasket A insert into Bowl with Flush Pipe together. Seal Gasket B install:
➀ install the Gasket into Bowl first;➁ then insert the Flush Pipe into the Seal Gasket.
Seal Gasket A installFlush Pipe Seal Gasket.
Seal Gasket B install.
Seal Gasket A
Seal Gasket B
14
清洁进水阀滤嘴Cleaning the Filter of the Fill Valve
1. Close the water shutoff valve, and then remove the fill valve as described above.
2. As shown in the figure, disassemble the fill valve, and then either clean the filter with water or use a brush to clean any dirt from it.
3. To install, follow the procedure in reverse to return the fill valve to its original position.
13
❷
❶
❸
❷
❶
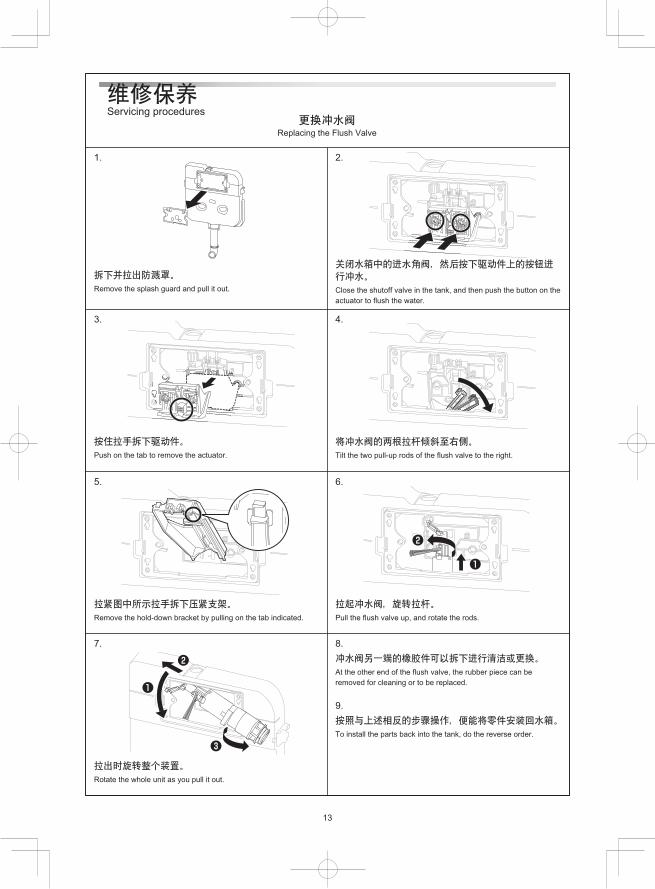
维修保养Servicing procedures
更换冲水阀Replacing the Flush Valve
1.
Remove the splash guard and pull it out.
2.
5.
Remove the hold-down bracket by pulling on the tab indicated.
3.
Close the shutoff valve in the tank, and then push the button on the actuator to flush the water.
4.
6.
Pull the flush valve up, and rotate the rods.
Push on the tab to remove the actuator.
7.
Rotate the whole unit as you pull it out.
Tilt the two pull-up rods of the flush valve to the right.
8.
At the other end of the flush valve, the rubber piece can be removed for cleaning or to be replaced.
9.
To install the parts back into the tank, do the reverse order.

14
清洁进水阀滤嘴Cleaning the Filter of the Fill Valve
1. Close the water shutoff valve, and then remove the fill valve as described above.
2. As shown in the figure, disassemble the fill valve, and then either clean the filter with water or use a brush to clean any dirt from it.
3. To install, follow the procedure in reverse to return the fill valve to its original position.
13
❷
❶
❸
❷
❶
维修保养Servicing procedures
更换冲水阀Replacing the Flush Valve
1.
Remove the splash guard and pull it out.
2.
5.
Remove the hold-down bracket by pulling on the tab indicated.
3.
Close the shutoff valve in the tank, and then push the button on the actuator to flush the water.
4.
6.
Pull the flush valve up, and rotate the rods.
Push on the tab to remove the actuator.
7.
Rotate the whole unit as you pull it out.
Tilt the two pull-up rods of the flush valve to the right.
8.
At the other end of the flush valve, the rubber piece can be removed for cleaning or to be replaced.
9.
To install the parts back into the tank, do the reverse order.


![[系列活動] Data exploration with modern R](https://static.documents.pub/doc/80x56/58f9a903760da3da068b69fc/-data-exploration-with-modern-r-58f9e91a6d2df.jpg)


