

Microsoft Word is a software program
designed for word processing. It
provides tools for the creation of a
variety of documents including re-
sumes, research papers, letters, fly-
ers, and more. In addition, Word has
formatting options to create stylized
documents. This les-
son will provide an
introduction to using
Word including get-
ting familiar with the
layout and options. It will also pro-
vide the basics of formatting text.
Learning to use Microsoft Word 2016
Word Basics
What is Word?
Start Screen
When you first open Word, the Start
Screen will appear. Here you can
choose to start with a blank docu-
ment or begin with a template. Tem-
plate options range from resumes to
invitations. These can save time when
you need to create a specific docu-
ment. The area in blue along the left-
hand side of the screen shows a list
of documents that were created or
worked on recently. When you are
working with documents, this gives
easy access to re-opening them.
Getting started

2
Once you choose a document or tem-
plate, Word will open to the Docu-
ment view. The document view lets
you type and create content. Format-
ting and other options are available in
the menu that runs along the top of
the document. This menu is called the
Ribbon. The Ribbon is broken up into
different tabs. Each tab contains an
extensive set of options.
Home tab — The most commonly
used options including text and para-
graph formatting tools.
Insert tab — Tools for adding
shapes, SmartArt, or images.
Design tab — Options for changing
the theme of your document and cre-
ating stylized text.
Layout tab — Includes tools for
changing indents and spacing.
References tab — Tools mainly for
creating reports or academic articles
including citations, footnotes, and
contents.
Mailings tab — Formatting tools for
envelopes and labels, as well as, cre-
ation of mailing lists. Mainly used by
businesses or organizations.
Review tab — Provides grammar
and spelling checks, as well as, edit-
ing markup options.
View tab — Options for controlling
your view of the document from side-
by-side pages to zoom and ruler op-
tions.
Quick Access Toolbar — Above the
Ribbon is a toolbar with frequently
used actions such as Save and Undo.
This toolbar may be customized by
selecting the down arrow.
Document View
The Ribbon
Quick Access Toolbar
www.poudrelibraries.org
Document View

3
Clicking on File opens the Back-
stage View. In the Backstage View,
you can view information about
your document. It also provides
access to options like Save, Save
As, Print, and Export.
The Print option provides a print
preview of your document. The
Print screen offers options for
printing including single or double-
sided printing and number of cop-
ies.
The Export option allows you to
create specific file types. It is most
commonly used to create PDF files.
A PDF (Portable Document Format)
Backstage View
Backstage View
file is useful for file sharing. It is
locked for editing, which means that
other people viewing the file will not
be able to make changes to it. PDFs
are often smaller than .docx files, and
thus are easier to email. Additionally,
PDFs can be opened in most browsers
and do not require proprietary soft-
ware to view.
New allows you to create an additional
Word file. Open gives easy access to
other Word documents you saved pre-
viously. The Share and Account fea-
tures are available for Microsoft ac-
count holders for cloud sharing and
saving.
www.poudrelibraries.org

4
Saving Documents
The Save As option is used for your
first save. This option allows you to
name your document and choose a
location for the file.
If you choose to save to the comput-
er, the computer’s folders will display
allowing you to choose the file’s loca-
tion. In the File Name line, you can
type the document name. This line
will default to the first line of text in
the document. Simply, click in the
line to begin typing and replace the
text.
www.poudrelibraries.org
Recent File Locations
Microsoft Cloud Storage
Computer Storage
Additional Cloud Storage
Choose File Location
The Save icon is in the shape of
a floppy disk, an early digital
file storage technology.
File type options are included in a
dropdown below the file name to allow
for saving to different file types. The
file type will default to the one stand-
ard for that program. Files saved in
Word will save as a .docx
file.
Once you have made your
selections, click the Save
button to apply them and
save the document. After
initially saving the docu-
ment, clicking the Save icon
will save new changes to
the document without re-
opening the Save As dialog
box.
Save As Dialog Box
5
Working with Text
After entering text into your docu-
ment, there are tools available for
quickly editing text. First, you
must select the text.
To select text, move your cursor to
the left or right of the line of text
you want to edit. Click with your
left mouse button and drag your
cursor across the text. A gray
highlight will appear over selected
text. An easy option for selecting
all the text in your document is
choosing the Select option on the
Ribbon and clicking on “Select all
text.” Once text is selected you
can copy it, cut it, or change its
formatting.
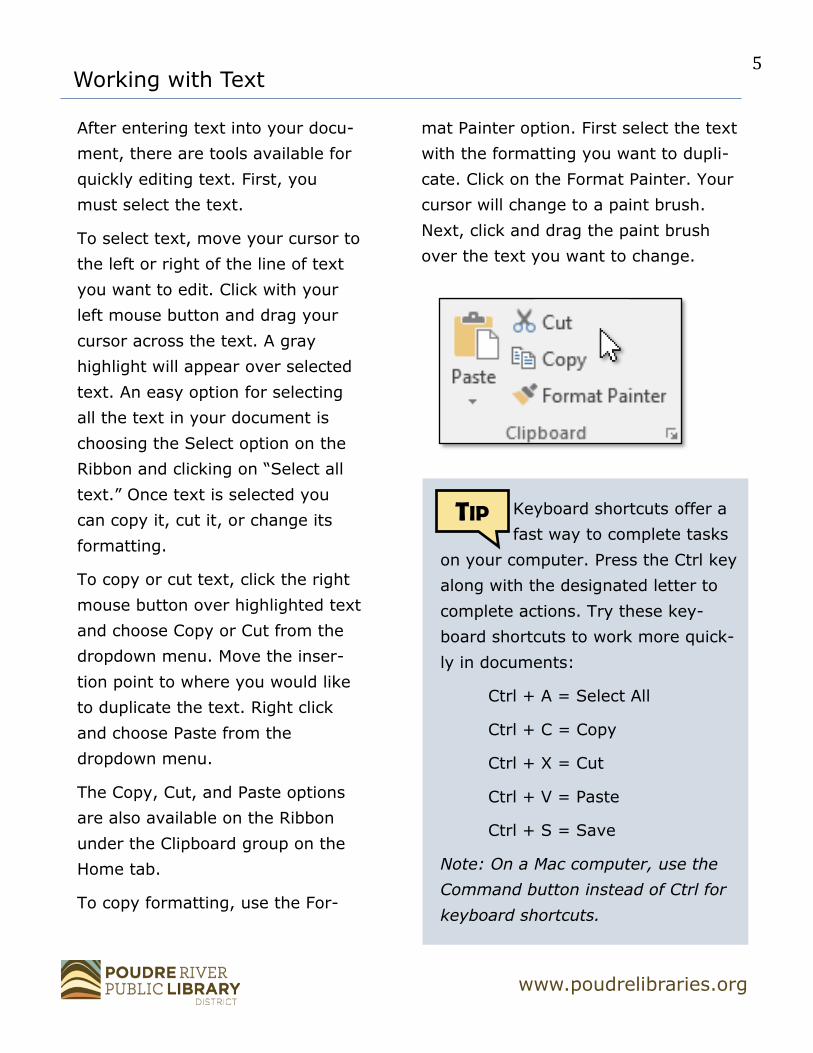
To copy or cut text, click the right
mouse button over highlighted text
and choose Copy or Cut from the
dropdown menu. Move the inser-
tion point to where you would like
to duplicate the text. Right click
and choose Paste from the
dropdown menu.
The Copy, Cut, and Paste options
are also available on the Ribbon
under the Clipboard group on the
Home tab.
To copy formatting, use the For-
mat Painter option. First select the text
with the formatting you want to dupli-
cate. Click on the Format Painter. Your
cursor will change to a paint brush.
Next, click and drag the paint brush
over the text you want to change.
www.poudrelibraries.org
Keyboard shortcuts offer a
fast way to complete tasks
on your computer. Press the Ctrl key
along with the designated letter to
complete actions. Try these key-
board shortcuts to work more quick-
ly in documents:
Ctrl + A = Select All
Ctrl + C = Copy
Ctrl + X = Cut
Ctrl + V = Paste
Ctrl + S = Save
Note: On a Mac computer, use the
Command button instead of Ctrl for
keyboard shortcuts.
TIP

6
Formatting Text
The Ribbon has formatting options
in two groups: Font and Para-
graph. Both of these groups are
located on the Home tab.
To make changes to how the text
appears, select the text you want
to change and select options from
the Font group. Word offers doz-
ens of options for Font appearance
that can be found in the dropdown
menu. Each font has a name such
as Calibri, Arial, and Verdana. Font
sizes can be changed in the
dropdown menu to the right of the
Font dropdown. To increase and
decrease font sizes incrementally,
use the A with the up arrow or the
www.poudrelibraries.org
To make changes to how paragraphs
appear in your document, select the
paragraph you want to change and
make selections from the Paragraph
group of options. You can adjust the
text alignment to the left, right, or
center. This menu also gives the op-
tion to create bulleted or numbered
TIP
Ctrl + B = Bold
Ctrl + I = Italics
Ctrl + U = Underline
Ctrl + Shift + > = Increase text size
Ctrl + Shift + < = Decrease text size
Here are more keyboard
shortcuts for working
with text.
A with the down arrow next to the font
size dropdown. Additional options in-
clude Bold, Italics, or Underlined text.
Font colors and highlighting can also be
added on this menu. Finally, the Change
Case option allows you to change the
upper and lowercase letters in a group
of words at one time. For a full menu of
advanced Font options, click on the
small arrow in the corner of the Font
group to open a pop-up window.
Formatting Paragraphs
lists. You can also adjust the line spac-
ing. To see the full suite of options,
choose the small arrow in the corner of
the Paragraph group.

7
Review Tools
Word also offers tools to help with
grammar and spelling. To check your
document for suggestions or correc-
tions, go to the Review tab and se-
lect Spelling & Grammar. Word will
scan your document and give you
suggestions or corrections.
www.poudrelibraries.org
You can select corrections and
choose Change to update your
document. Or, you can choose Ig-
nore if you do not want to make
the change to your document. This
feature can also show you defini-
tions for words.
If you would like to view synonyms
for a word in your document, select it
and choose the Thesaurus option
from the Proofing group on the Re-
view tab. The thesaurus feature
makes it easy to prevent repetition in
your writing.
To view the word count for your doc-
ument, select Word Count on the Re-
view tab. This feature will tell you the
total number of words, letters, lines,
characters, and paragraphs in your
document. This feature is often used
for academic or research writing.
While working in
Word, you will notice
an autocorrect feature
that will fix typos as you work. A
lightning bolt symbol will appear
under words that have been
automatically corrected. If you
do not like this feature or it is
interfering with your work, you
can turn it off by going to File,
Options, and choosing Proofing.
TIP

8
Resources for Further Learning
Continue developing computer skills
with the following resources:
Poudre River Public Library — We
are committed to supporting you as
you Connect to Curiosity in technolo-
gy tools. Take advantage of our free
assistance at a class or by stopping
by a help desk.
Recommends: Word Beyond Basics
and Google Docs. Visit our resources
at https://read.poudrelibraries.org/
research/z264.html
GCF Learn Free — Quality collection
of technology tutorials free of adver-
tisements and free to use.
Recommends: Word, Word Tips, and
Office for Macs. Check out all they
have to offer at https://
edu.gcfglobal.org/en/subjects/tech/
NorthStar Digital — Tutorials and
assessments for a variety of computer
skills. Earn badges and certificates.
Recommends: Microsoft Word tutorial
and assessment. Access on our com-
puter resources page: https://
read.poudrelibraries.org/research/
z264.html
Learning Express — The library
provides a subscription to this data-
base to all library card holders. Use
your library card to access courses
on software and computer skills.
Recommends: Microsoft Word Basic,
Intermediate, and Advanced cours-
es. Find it on the library’s Research
page: https://
read.poudrelibraries.org/research/
eresources.cfm?flter=alll
LinkedIn Learning — Access to
this database of computer and busi-
ness classes is offered with a library
card.
Recommends: Learning Word and
Word Tips and Tricks. Find it on the
Library’s Research page: https://
read.poudrelibraries.org/research/
eresources.cfm?flter=alll


