36
1 Timers and Event Counters Timers and Event Counters These lecture notes created by Dr. Alex Dean, NCSU
| Date post: | 29-Dec-2015 |
| Category: |
Documents |
| Upload: | jeffery-norman |
| View: | 217 times |
| Download: | 0 times |
1
Timers and Event CountersTimers and Event Counters
These lecture notes created by Dr. Alex Dean, NCSU
2
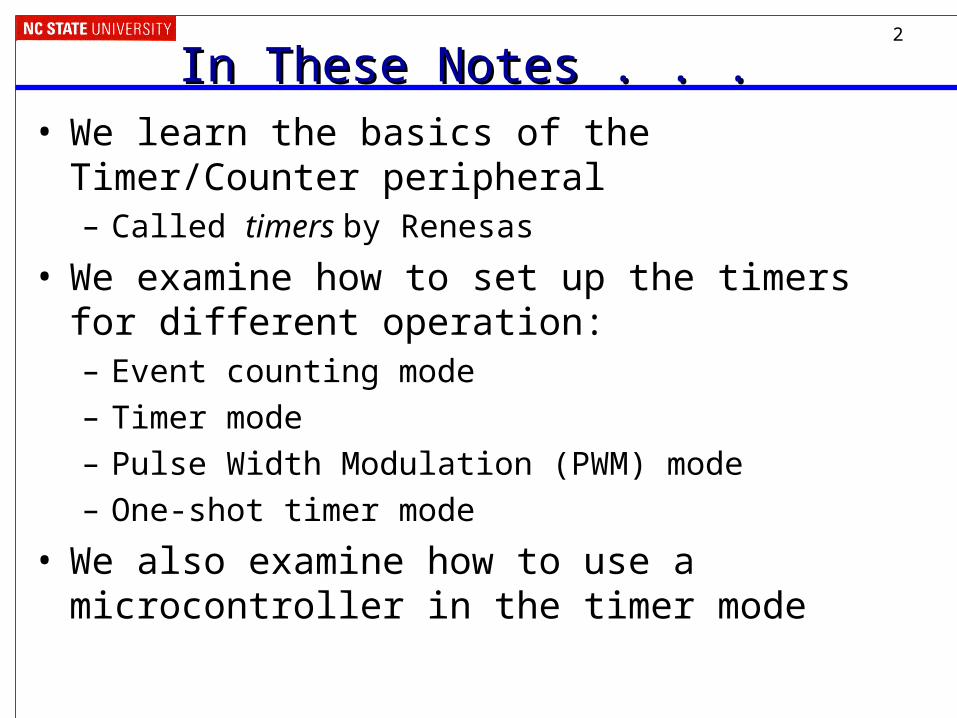
In These Notes . . . In These Notes . . . • We learn the basics of the Timer/Counter peripheral
– Called timers by Renesas
• We examine how to set up the timers for different operation:– Event counting mode
– Timer mode
– Pulse Width Modulation (PWM) mode
– One-shot timer mode
• We also examine how to use a microcontroller in the timer mode

3
Timer/Counter IntroductionTimer/Counter Introduction
• Common peripheral for microcontrollers• Based on presettable binary counter, enhanced with configurability
– Count value can be read and written by MCU– Count direction can often be set to up or down– Counter’s clock source can be selected
• Counter mode: count pulses which indicate events (e.g. odometer pulses)• Timer mode: clock source is periodic, so counter value is proportional to
elapsed time (e.g. stopwatch)– Counter’s overflow/underflow action can be selected
• Generate interrupt• Reload counter with special value and continue counting• Toggle hardware output signal• Stop!
Events
Clock
Current Count
Reload Value
Presettable Binary Counter ÷2 or RS PWM
Interrupt
Reload
or

4
Timer A Block DiagramTimer A Block Diagram
• Each timer has one input, which is selectable from several different sources.

5
High-Level Timer A Block DiagramHigh-Level Timer A Block Diagram• Timer A
devices will be the most frequently used
• Flexible – can be cascaded to create larger timers (i.e. 32 bits long)

6
Timer A Mode RegisterTimer A Mode Register• To use the timer, you must set up how you wish to use it
(i.e. via TA0MR). After that, the mode register has different settings depending on bits 1 and 0.
7
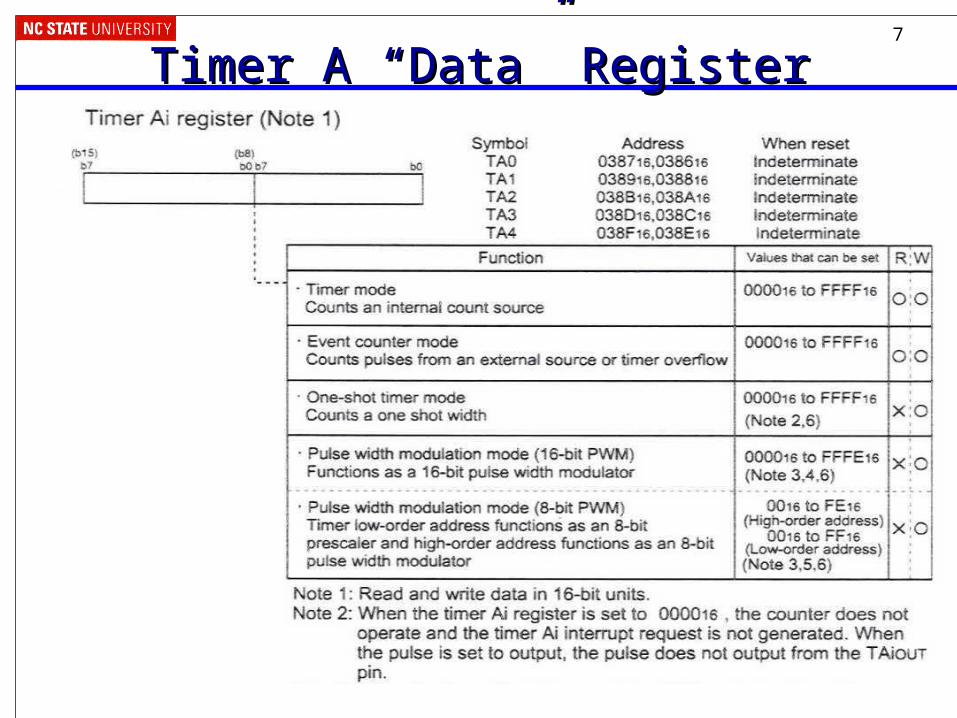
Timer A “Data” RegisterTimer A “Data” Register

8
Count Start RegisterCount Start Register• Once the timer has been loaded with a value, start it
counting.

9
Timer ModesTimer Modes• We examine how to set up the timers for different
operation:– Event counting mode
– Timer mode
– Pulse Width Modulation (PWM) mode
– One-shot timer mode

10
Counter ModeCounter Mode• Count pulses representing events
• Odometer example– Measure total distance your car has
traveled
– Events are wheel rotations, measured with magnetic sensors (dirt-proof!)
– Distance travelled = counter value * 100.53”
• Assume 16” tire radius. Tire circumference = 2r = 100.53”
– Will limited range of 16 bit counter be a problem?• 100.53” * (216-1) = 1247.78 miles
– Yes. So need to extend range in software. • Enable overflow interrupt for the timer
• Create an ISR to count overflows
11
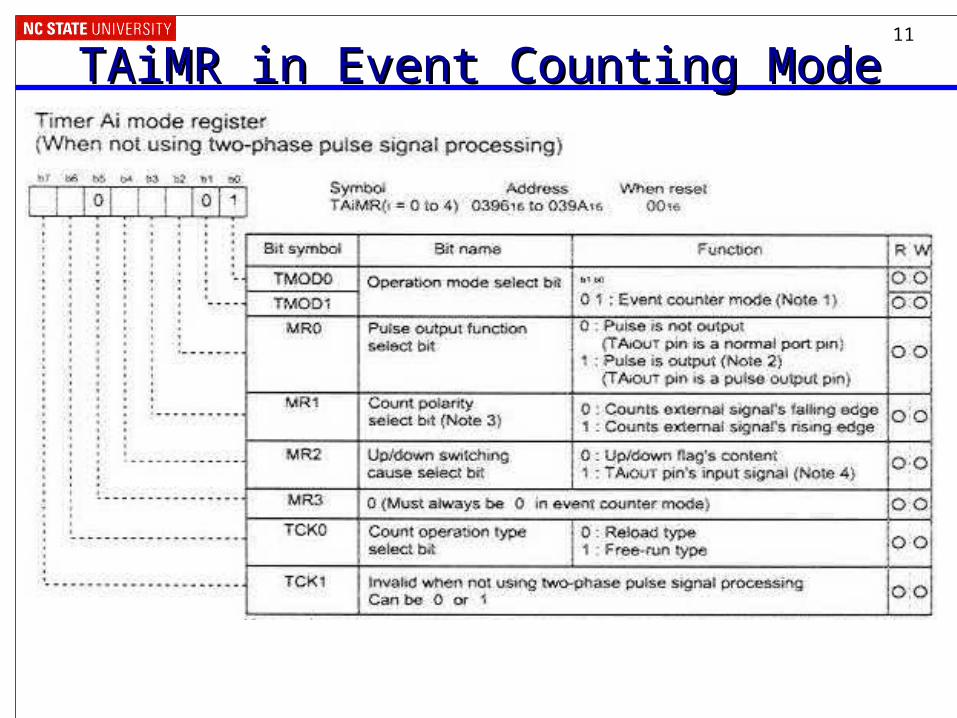
TAiMR in Event Counting ModeTAiMR in Event Counting Mode

12
Up/Down FlagUp/Down Flag• The default is that the timer will count down.

13
Trigger Select RegisterTrigger Select Register• You can set the trigger pulse of Timers A1 to A4

14
Example – Setting-up Event ModeExample – Setting-up Event Mode#define TIME_CONFIG 0x01 /* 00000001 val to load into timer mode reg ||||||||_ TMOD0,TMOD1: EVENT COUNTR MODE ||||||____ MR0: NO PULSE OUTPUT |||||_____ MR1: COUNT FALLING EDGES ||||_______MR2: USE UP/DOWN FLAG |||_______ MR3: = 0 IN EVENT COUNTER MODE ||________ TCK0: RELOAD TYPE |__________TCK1: BIT NOT USED */ #define CNTR_IPL 0x03 // TA2 priority interrupt level
void mcu_init() {… // Existing mcu_init() code
ta2 = 100; //e.g for an automated packaging line, 100 items per case // the following procedure for writing an Interrupt Priority Level follows // that as described in the M16C data sheets under 'Interrupts' _asm (" fclr i") ; // turn off interrupts before modifying IPL ta2ic |= CNTR_IPL; // use read-modify-write instruction to write IPL ta2mr = TIME_CONFIG; _asm (" fset i");
ta2s = 1; //start counting }

15
Example – Using Event ModeExample – Using Event Mode#pragma INTERRUPT /B TimerA2Int void TimerA2Int(void) { int delaycntr; delaycntr = 0; count++; // e.g for an automated packaging line, cnts # of cases RED_LED = 1; while( delaycntr <0xffff) //software delay for flashing LED
delaycntr++; RED_LED = 0; }
// initializes variables and LED port. Then does nothing but // wait for TA2 interrupts. void main (void){
int temp; count = 0;
mcu_init(); while (1);}

16
Timer ModesTimer Modes• We examine how to set up the timers for different
operation:– Event counting mode
– Timer mode
– Pulse Width Modulation (PWM) mode
– One-shot timer mode

17
• Use a fixed-frequency signal fbase as a time-base• To measure elapsed time – automatically instead of measuring twiddle (debug)
bits on an oscilloscope– Clear the timer (or read its value and subtract it out later)– Let time go by…– Read timer value (possibly subtract out start time)
• Examplevoid Compute_Cosine(float angle){
unsigned t_start, t_stop, t_cosine;t_start = timer_current_count;compute,
calculate,approximate,
interpolate,complete.t_stop = timer_current_count;t_cosine = t_stop – t_start;
}• Gate function
– Can use external signal (applied to TAiIN) to enable/disable counting
– Can select counting during either high or low portion– Use MR1 and MR2 to configure– Convenient way to measure duty cycle
Timer Mode – Measure Elapsed TimeTimer Mode – Measure Elapsed Time
WARNING:THIS CODE WILL
NOT COMPILE

18
TAiMR in Timer ModeTAiMR in Timer Mode

19
Timer Mode DemonstrationTimer Mode Demonstration• Use Timer A0 to generate an interrupt every 5 ms based
on the 24 MHz system clock• In the TA0 ISR
– Update a millisecond counter
– Every 1000 ms• Update a second counter
• Toggle the green LED
• In the main code thread– Display current milliseconds, seconds values on LCD

20
Example – Setting Up Timer ModeExample – Setting Up Timer Mode#define TIME_CONFIG 0x40 /* 01000000 value to load into timer mode register ||||||||_ TMOD0,TMOD1: TIMER MODE SELECTED
||||||____ MR0: NO PULSE OUTPUT
|||||_____ MR1,MR2: GATE FUNCTION NOT SELECTED |||_______ MR3: SET TO 0 IN TIMER MODE ||________ TCK0,TCK1: F DIVIDED BY 8 SELECTED */
#define CNTR_IPL 0x03 // TA0 priority interrupt level
void mcu_init() {… // existing code from mcu_init() ta0 = 15000; // 24meg system clock, /8, *15000 counts-> 5msec interrupts.
// the following procedure for writing an Interrupt Priority Level follows // that as described in the M16C data sheets under 'Interrupts' // Note: ta0ic is the interrupt control register, memory location x0055 _asm (" fclr i") ; //turn off interrupts before modifying IPL ta0ic |= CNTR_IPL; // use read-modify-write instruction to write IPL ta0mr = TIME_CONFIG; _asm (" fset i");
ta0s = 1; //start counting}

21
Example – Using Timer ModeExample – Using Timer Mode#include "qsk_bsp.h" // include QSK board support package#include "stdio.h" // include support for sprintf volatile unsigned int msec_ctr; // Global millisecond countervolatile unsigned int sec_ctr; // Global second counter
#pragma INTERRUPT /B TimerA0Int void TimerA0Int(void) {
msec_ctr += 5; // timer interrupts every 5 ms if (msec_ctr > 1000) { // reached 1 second? GRN_LED ^= 1; // toggle LED sec_ctr++; // another second has gone by msec_ctr = 0; // reset ms counter }}void main(void){
char buf[9];mcu_init(); // Initialize MCU
InitDisplay();DisplayString(LCD_LINE1, "Timers");msec_ctr = 0;
sec_ctr = 0; while (1) { //LED flashing is interrupt driven
sprintf(buf, "%5d ms", msec_ctr);DisplayString(LCD_LINE1, buf);sprintf(buf, "%5d s", sec_ctr);DisplayString(LCD_LINE2, buf);
}}
22
• Note: An n-bit counter will overflow every 2n/fbase seconds– 16-bit timer and 1 MHz clock ► 65.535 ms range
• Need a variable to count overflows– Using unsigned int, can count 216-1 overflows ► 232-1 ticks– Time range: 232-1 ticks at 1 MHz ► 4,294,967.295 ms ≈ 1.193 h
unsigned int overflow_count=0;• Need an ISR which runs on overflow
#pragma INTERRUPT timer_isrvoid timer_isr(void) { overflow_count++;}
• Configure timer to continue counting upon overflow, don’t need reload with a special value
• Need a function to merge overflow and timer information
unsigned long get_ticks(void) return (
(unsigned long) overflow_count << 16) + (unsigned long) ta3;}
• Warning: this code will intermittently return an incorrect tick count! Shared Data Problem
Extending Time Range in SoftwareExtending Time Range in Software
WARNING:BUGS LURKING IN CODE NEXT
20 MILES

23
Example – Timer & Event ModeExample – Timer & Event Mode• The maximum amount of time one can count using two
timers is:– Cascade Timer A0 to Timer A1
– Use the 1/32 clock (bits 7 and 6 of TA0MR set to ’10’)
– Set both timer values to xFFFF
– Timer A1 output generates an interrupt
• This would create a timer event which would interrupt the CPU every 6871 seconds (almost 2 hours!)

24
What Registers Need to be Set?What Registers Need to be Set?/*Timer A0 mode register settings
b7 b6 b5 b4 b3 b2 b1 b0| | | | | | | |____ TA0D0 => 0 - 00 => timer mode| | | | | | |_______ TA0D1 => 0; | | | | | |__________ MR0 => 0 - TA0out is not used| | | | |_____________ MR1 => 0 - TA0in is not used| | | |________________ MR2 => 0; | | |___________________ MR3 => 0 - must be 0 in timer mode| |______________________ TCK0 => 0; |_________________________ TCK1 => 1 - TCK[10] => 00 is f1 or f2
=> 01 is f8 => 10 is f32 => 11 is fc32 */
TA0MR = x80; // Timer A0 in timer mode with f32 clock/************************************************************************** - Timer A1 mode register settings
b7 b6 b5 b4 b3 b2 b1 b0| | | | | | | |____ TA1D0 => 1 - 01 => event counter mode| | | | | | |_______ TA1D1 => 0; | | | | | |__________ MR0 => 0 - TA1out is not used| | | | |_____________ MR1 => 0 - TA1in pin not used| | | |________________ MR2 => 0; - Up/Down flag used| | |___________________ MR3 => 0 - must be 0 in event counter mode| |______________________ TCK0 => 0; - reload type counter|_________________________ TCK1 => 0; - Invalid for regular counting*/
TA1MR = x01; // Timer A1 in event counter mode with reload enable

25
What Registers Need to be Set?What Registers Need to be Set?/*Value to initialize TA0 and TA1 to each time at initialization and
each time overflow occurs
TAi/(XTAL * fx) = Z ms - where TAi is initialization value, XTAL is the clock frequency (20MHz) fx is the clock multiplier
(1,1/8,1/32) Z is the miliseconds between
overflows
xFFFF = 6553665536/(20,000,000 * 1/32) = 104.8576 milliseconds
TA0 overflows every 104.8576 ms, TA1 counts the overflows up to
65536, then overflows every 6871.9 seconds (almost 2 hours) */
TA0 = xFFFF // value loaded into TA0 data registerTA1 = xFFFF // value loaded into TA1 data register
/****************************************************************** Count Start Flag -> b0 = 1 - start TA0 counting b1 = 1 - start TA1 counting b2-b7 - not applicable*/
TABSR = x03 // start Timers A0 and A1 counting

26
What Registers Need to be Set?What Registers Need to be Set?Timer Up/Down Function Register -> b0 = 0 - TA0 counting down b1 = 0 - TA1 counting down
b2-b7 - not applicable*/
UDF = x00; // UDF[10] => 00 makes Timers A0 and A1 count down
/******************************************************************* - Timer Trigger Select Register
b7 b6 b5 b4 b3 b2 b1 b0 | |____ TA1TGL => 0 - TA0 overflow select |_______ TA1TGH => 1; */
TGRSR = x02; // TA0 overflow is selected as trigger
/********************************************************************* Set TA1 priority level interrupt; */
TA1IC = x03; // set TA1 priority level interrupt

27
Timer ModesTimer Modes• We examine how to set up the timers for different
operation:– Event counting mode
– Timer mode
– Pulse Width Modulation (PWM) mode
– One-shot timer mode

28
Pulse-Width ModulationPulse-Width Modulation• Often need to generate an analog value: motor speed, servo motor
position, incandescent light dimmer, adj. switch-mode power supply
• Analog circuits have some disadvantage– Generating the voltage accurately – circuits drift with temperature and time– Analog power amplifiers are inefficient (P = E*I)– Analog signals are much more sensitive to noise than digital signals
• PWM provides a digital encoding of an analog value– Now circuits are digital: more efficient,
less sensitive to noise, temperature, aging effects
• PWM signal characteristics– Modulation frequency – how many
pulses occur per second (fixed)– Period – 1/(modulation frequency)– On-time – amount of time that each
pulse is on (asserted)– Duty-cycle – on-time/period– Adjust on-time (hence duty cycle) to create encoded analog value

29
Pulse-Width ModulationPulse-Width Modulation• We rely on low-pass filtering to “decode” (convert) this high-
frequency PWM signal to an analog DC value– Variable speed motor control: Motor has inertia (will coast if power is turned
off)– Incandescent Lamp Dimmer: Human eye has persistence of vision (retina
averages signals above 30 Hz), and filament takes time to cool down and stop emitting visible light
– Adjustable switch-mode power supply: Rely on inductor and capacitor to maintain current and voltage when not drawing current from battery
• Many Timer/Counter peripherals can also generate PWM signal– For example
• Count up• Set PWM output when counter value reaches 0• Reset PWM output when counter value reaches n • When counter reaches 11.111, overflow and continue counting
• Read Michael Barr’s Embedded Systems Programming article “Pulse Width Modulation” for more PWM information

30
Timer A PWM DescriptionTimer A PWM Description
31
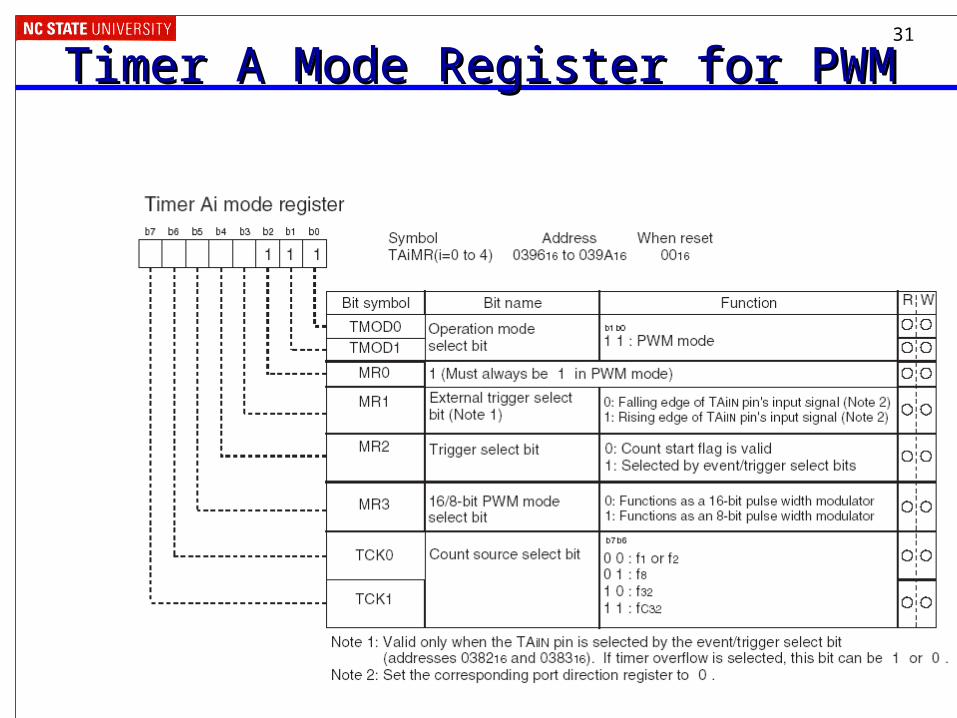
Timer A Mode Register for PWMTimer A Mode Register for PWM

32
Timer ModesTimer Modes• We examine how to set up the timers for different
operation:– Event counting mode
– Timer mode
– Pulse Width Modulation (PWM) mode
– One-shot timer mode

33
One-Shot Timer ModeOne-Shot Timer Mode• Set up timer to generate a time delay
– Preload timer with a 16-bit value– Timer counts down to zero, clocked by f1, f2, f8, f32 or fC32
• Starting the timer– Set TAiS (start) bit for timer i– Select hardware or software trigger with MR2 bit in TAi Mode register
• Software trigger: start by setting bit TAiOS (one-shot start)• Hardware trigger: start with trigger pulse selected by TRGSR
– External input pulse on TAiIN (Select polarity with MR1 bit in TAi Mode register)– Output from one of three other timers
• When timer reaches 0– Counter reloads self with value from reload register and then stops– Counter can generate interrupt (if enabled)
• Pulse output– Can enable on TAiOUT
• 1 when counting, 0 when stopped• Use cases
– “Interrupt me after 30 ms”– “Generate a 100 us pulse for every rising edge on TA3IN”– “Interrupt me 50 ms after TA3IN falls”

34
Specification (from Manual)Specification (from Manual)

35
One-Shot FlagOne-Shot Flag

36
Example CodeExample Codevoid timer_init(void) {
// one shot timer mode// Turn off ints before // modifying IPL
_asm (" fclr i") ; ta0ic |= CNTR_IPL; // one-shot timer mode
tmod0_ta0mr = 0;tmod1_ta0mr = 1;
// no output pulse mr0_ta0mr = 0;// trigger is software -- TA0OS bit mr2_ta0mr = 0;// must be 0
mr3_ta0mr = 0;// select f32
tck0_ta0mr = 0;tck1_ta0mr = 1;
// enable interrupts_asm (" fset i");
}
void Set_TA0_Delay(unsigned long ticks) {if (ticks > 0xffff)
ticks = 0xffff;ta0 = ticks;
ta0s = 1; //enable counting // start one-shot counting now
ta0os = 1; }
// also need an ISR for TA0!
void main(void){
// Initialize MCUmcu_init();timer_init();
Set_TA0_Delay(100);while (1) {
/* interrupt will happen after
100 ticks */};
}


