296
www.it-ebooks.info
Oracle APEX Best Practices
Accentuate Oracle APEX development with proven best practices
Learco Brizzi
Iloon Ellen-Wolff
Alex Nuijten
P U B L I S H I N G
professional expert ise dist i l led
BIRMINGHAM - MUMBAI
www.it-ebooks.info
Oracle APEX Best Practices
Copyright © 2012 Packt Publishing
All rights reserved. No part of this book may be reproduced, stored in a retrieval system, or transmitted in any form or by any means, without the prior written permission of the publisher, except in the case of brief quotations embedded in critical articles or reviews.
Every effort has been made in the preparation of this book to ensure the accuracy of the information presented. However, the information contained in this book is sold without warranty, either express or implied. Neither the authors, nor Packt Publishing, and its dealers and distributors will be held liable for any damages caused or alleged to be caused directly or indirectly by this book.
Packt Publishing has endeavored to provide trademark information about all of the companies and products mentioned in this book by the appropriate use of capitals. However, Packt Publishing cannot guarantee the accuracy of this information.
First published: October 2012
Production Reference: 1181012
Published by Packt Publishing Ltd.
Livery Place 35 Livery Street Birmingham B3 2PB, UK.
ISBN 978-1-84968-400-2
www.packtpub.com
Cover Image by Sandeep Babu ([email protected])
www.it-ebooks.info

Credits
AuthorsLearco Brizzi
Iloon Ellen-Wolff
Alex Nuijten
ReviewersDimitri Gielis
Surachart Opun
Michel van Zoest
Acquisition EditorsDilip Venkatesh
Dhwani Devatar
Lead Technical EditorSusmita Panda
Technical EditorsPrasad Dalvi
Lubna Shaikh
Project CoordinatorsYashodhan Dere
Jovita Pinto
ProofreaderAaron Nash
IndexersTejal Soni
Hemangini Bari
GraphicsValentina Dsilva
Aditi Gajjar
Production Coordinator Nilesh R. Mohite
Cover WorkNilesh R. Mohite
www.it-ebooks.info
About the Authors
Learco Brizzi received his MSc in Informatics in 1993 and then he started working with the early versions of Oracle Forms (3.0), Reports (1.1), and Designer (1.2.1). When WebDB was launched, he created his first steps towards building Internet applications. When APEX (HTMLDB) hit the market, he saw the potential of this tool and built a complete music download store with it in 2004, including integration with e-mail, reports, and payment service providers. This was one of the very first serious applications ever built with APEX. Nowadays, Learco is dedicated to the APEX and PL/SQL development. He is a very enthusiastic technician, trainer of advanced APEX courses, presenter at conferences, organizer of seminars, committee member of the OGh (Oracle user group in Holland) and member of the editorial-committee for the Oracle magazine OGh Visie. Together with a companion Learco started his own company, Itium, in 1999, which specializes in Oracle technology. In May 2010, Learco was awarded the Oracle ACE membership. You can contact Learco at [email protected].
I would like to thank my wife Judith, and my children Emma (my nine-year-old daughter) and Dante (my six-year-old son) for their patience and support they gave me while writing this book. Most of the work had to be done in the evenings and weekends (our family time together). For me this was the first time I wrote a book and didn't know what to expect. I didn't expect that it would take so much time, but it was fun to do and I learned a lot of new things about Oracle and APEX as well. I would also like to thank my fellow writers Alex and Iloon. Together we were a great team and kept each other sharp. Last but not least I would like to thank the editors of the book who had good comments and suggestions on our material.
www.it-ebooks.info
Iloon Ellen-Wolff started working with Oracle 21 years ago, employed by several software houses in the Netherlands. Her experience goes back to Oracle Forms version 2 and Report Writer.
Almost 14 years ago, she started working for Oracle Support Services for the developer competency (Oracle Forms, Oracle Reports, SQL Developer, and Application Express), assisting customers by solving their software-related problems.
During those years, she applied the knowledge she had gained in many ways such as coaching new engineers, team leading, teaching the Application Express courses, and seminars for Oracle University.
Aside from being a very senior team member with excellent troubleshooting and customer skills, in Oracle Support, she acts as Advanced Resolution Engineer.
One of her responsibilities in Oracle Support is Global Technical Lead Application Express. She works closely with Sustaining Engineering, Product Development, and Product Management of the Application Express team.
Starting last year, she is now involved in the Oracle Cloud project. She is member of the platform as a service readiness team. Involved in testing Application Express in the Cloud and being a trainer in this area, she enjoys the challenge to prepare her engineers for the Cloud and ultimately to support Oracle customers in the very near future!
Besides that, she is a frequent speaker for different Oracle User Groups about Application Express, SQL Developer, and Oracle Public Cloud.
I would like to take the opportunity to thank the Application Express development team and particularly Joel Kallman as Development Director for the continuing effort to make Application Express an excellent product. I'd also like to thank my husband, Albert Ellen, for assisting me in getting the layout right and supporting me in writing this book. Of course, it took a big amount of time to achieve this goal. I would also like to thank co-authors on this book, Alex and Learco.
www.it-ebooks.info

Alex Nuijten works as a database developer and Expertise Lead (database development) for AMIS Services BV in Nieuwegein, The Netherlands. Besides his consultancy work, he conducts training classes, mainly in SQL and PL/SQL. Alex has been a speaker at numerous international conferences, such as ODTUG, Oracle Open World, UKOUG, IOUG, OGh, and OBUG. He is also a frequent contributor at the Oracle Technology Network forum for SQL and PL/SQL. He has written many articles in Oracle-related magazines, and at regular intervals he writes about Oracle database development on the AMIS Technology Blog (technology.amis.nl), as well as on his own blog, Notes on Oracle (nuijten.blogspot.com). In August 2010, Alex was awarded the Oracle ACE Director membership.
I think this may be the hardest section to write. There are so many people that inspired me and from whom I have learned so much along the way. And each one of them helped me in writing my chapters. It would be impossible to try to name you all and therefore do injustice to the ones I let slip. My colleagues, fellow members of the OTN forums and in the ACE program, the bloggers, the Oracle user groups all over the globe, basically everyone I ever dealt with—a big thank you to you all. There are still some people I have to name in this section explicitly. Let me start by thanking my co-authors, Iloon and Learco. Writing this book was quite a journey. Thank you for allowing me to join you with this adventure, it was a great experience. Without the technical reviewers, this book would have looked totally different. Thank you, Dimitri Gielis, Surachart Opun, and Michel van Zoest, for your feedback and suggestions on improving the quality of the book. Any outstanding errors in my chapters are, of course, my own. Without the continuing support of my wife Rian, son Tim, and daughter Lara, I could never have worked on this. Preparing presentations, writing articles and chapters take an enormous amount of time and my family understands this, and they are alright with it. I could never do all that without you, I love you so much. Finally I would like to thank the Packt editorial and production teams who have worked on this book, especially Yashodhan Dere, Susmita Panda, Dilip Venkatesh, Dhwani Devatar, and Jovita Pinto.
www.it-ebooks.info

About the Reviewers
Dimitri Gielis was born in 1978. Together with his family he lives in Leuven, Belgium.
At an early age, Dimitri started experimenting with computers (Apple II and IBM XT), and he quickly got to know that he would like to work with computers and especially with databases all his life.
In 2000, Dimitri began his career working as a consultant for Oracle Belgium where he came across almost every Oracle product. His main expertise was in the database area, but at that time he was also exposed to HTMLDB, which was renamed as Oracle Application Express later on. From the very start he liked the Oracle database and APEX so much that he never stopped working with it. Dimitri then switched to another company to create an Oracle team and do pre-sales, to later create and manage an Oracle Business Unit.
In 2007, Dimitri co-founded APEX Evangelists (http://www.apex-evangelists.com), together with John Scott. APEX Evangelists is a company that specializes in providing training, development, and consulting specifically for the Oracle Application Express product.
On his blog (http://dgielis.blogspot.com), he shares his thoughts and experience about Oracle, and especially, Oracle Application Express.
Dimitri is a frequent presenter at OBUG Connect, IOUG Collaborate, ODTUG Kaleidoscope, UKOUG conference, and Oracle Open World. He likes to share his experience and meet other people. He's also President of the OBUG (Oracle Benelux User Group) APEX SIG.
In 2008, Dimitri became an Oracle ACE Director. Oracle ACE Directors are known for their strong credentials as Oracle community enthusiasts and advocates.
In 2009, Dimitri received the APEX Developer of the year award by Oracle Magazine.
In 2012, Dimitri was part of the LA OTN Tour where he presented different APEX topics.
You can contact Dimitri at [email protected].
www.it-ebooks.info

Surachart Opun has been working on Oracle products for over seven years. He has worked with Internet Service Provider Business for over eight years. He is Oracle ACE, OCE RAC 10g, and OCP 10g and 11g. He has experience in implementation, migration, and management of Oracle Database in telecommunication business and so on. He has spent time in helping people who are interested in the Oracle products as contributor. He is working on APEX since version 3 and has worked on APEX implementation and migration.
His blog is at http://surachartopun.com.
Michel van Zoest was born in 1976. He currently lives in Bergambacht, The Netherlands with his wife, two daughters, and son.
In 2000, he started working as an Oracle Consultant. He now has more than 12 years of experience in building (web) applications by using the Oracle technologies such as Oracle (web) Forms, Oracle Designer, MOD_PLSQL, ADF, SOA Suite, and of course, APEX.
Michel was one of the first Oracle Application Express Developer Certified Experts in the world.
He currently works at Whitehorses in The Netherlands and runs his own blog at http://www.aboutapex.com. As well as that, he blogs at the company website at http://blog.whitehorses.nl and he regularly writes Whitebook articles (in Dutch) for Whitehorses.
Michel is also one of the authors of the Oracle APEX 4.0 Cookbook published by Packt in December 2010.
You can contact Michel via his website or by emailing him at [email protected].
www.it-ebooks.info
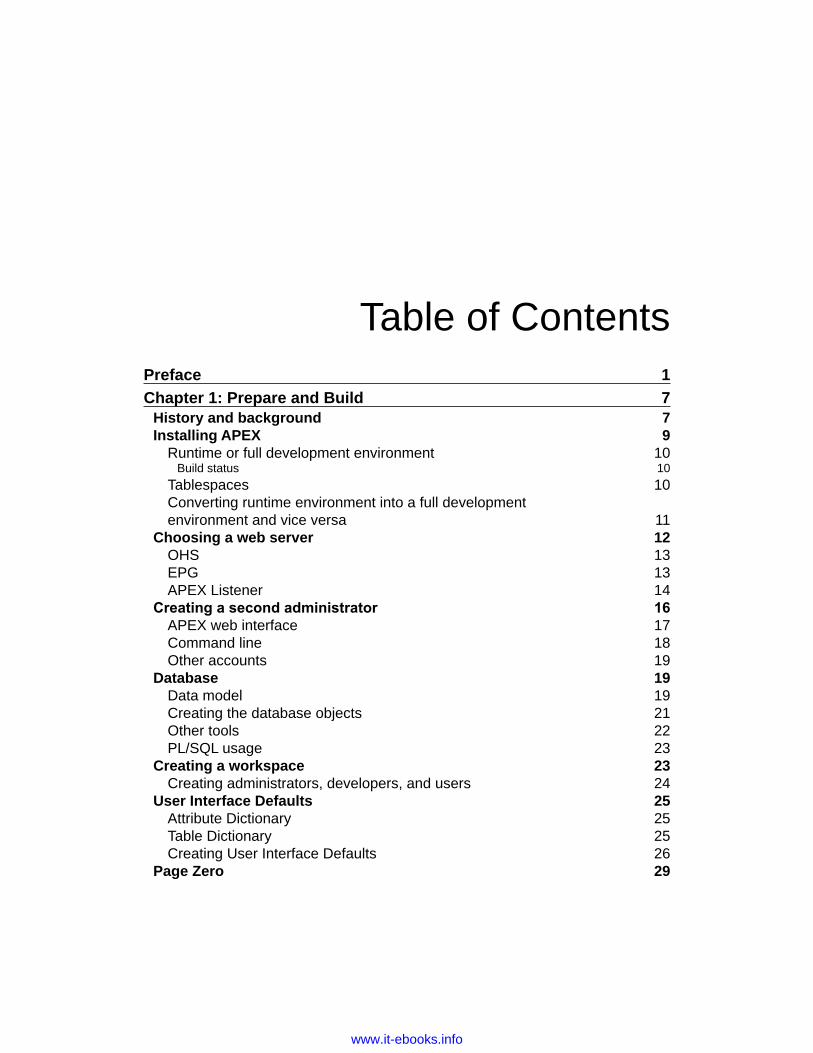
Table of ContentsPreface 1Chapter 1: Prepare and Build 7
History and background 7Installing APEX 9
Runtime or full development environment 10Build status 10
Tablespaces 10Converting runtime environment into a full development environment and vice versa 11
Choosing a web server 12OHS 13EPG 13APEX Listener 14
Creating a second administrator 16APEX web interface 17Command line 18Other accounts 19
Database 19Data model 19Creating the database objects 21Other tools 22PL/SQL usage 23
Creating a workspace 23Creating administrators, developers, and users 24
User Interface Defaults 25Attribute Dictionary 25Table Dictionary 25Creating User Interface Defaults 26
Page Zero 29
www.it-ebooks.info
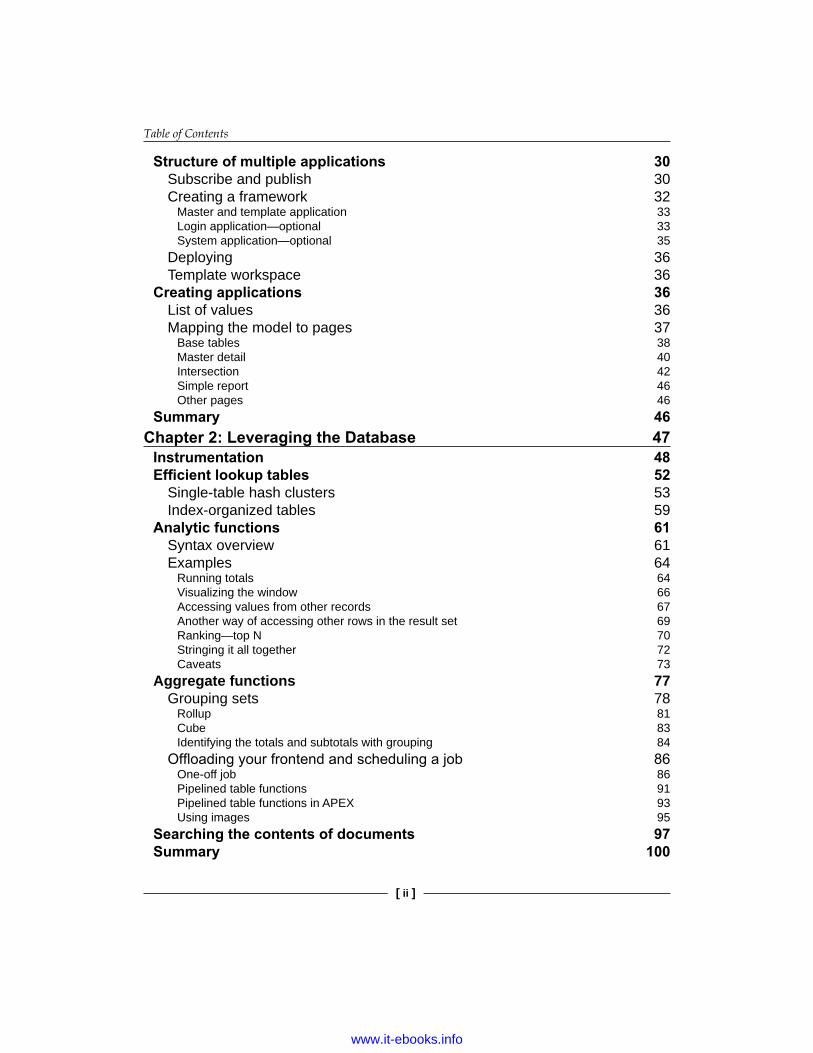
Table of Contents
[ ii ]
Structure of multiple applications 30Subscribe and publish 30Creating a framework 32
Master and template application 33Login application—optional 33System application—optional 35
Deploying 36Template workspace 36
Creating applications 36List of values 36Mapping the model to pages 37
Base tables 38Master detail 40Intersection 42Simple report 46Other pages 46
Summary 46Chapter 2: Leveraging the Database 47
Instrumentation 48Efficient lookup tables 52
Single-table hash clusters 53Index-organized tables 59
Analytic functions 61Syntax overview 61Examples 64
Running totals 64Visualizing the window 66Accessing values from other records 67Another way of accessing other rows in the result set 69Ranking—top N 70Stringing it all together 72Caveats 73
Aggregate functions 77Grouping sets 78
Rollup 81Cube 83Identifying the totals and subtotals with grouping 84
Offloading your frontend and scheduling a job 86One-off job 86Pipelined table functions 91Pipelined table functions in APEX 93Using images 95
Searching the contents of documents 97Summary 100
www.it-ebooks.info
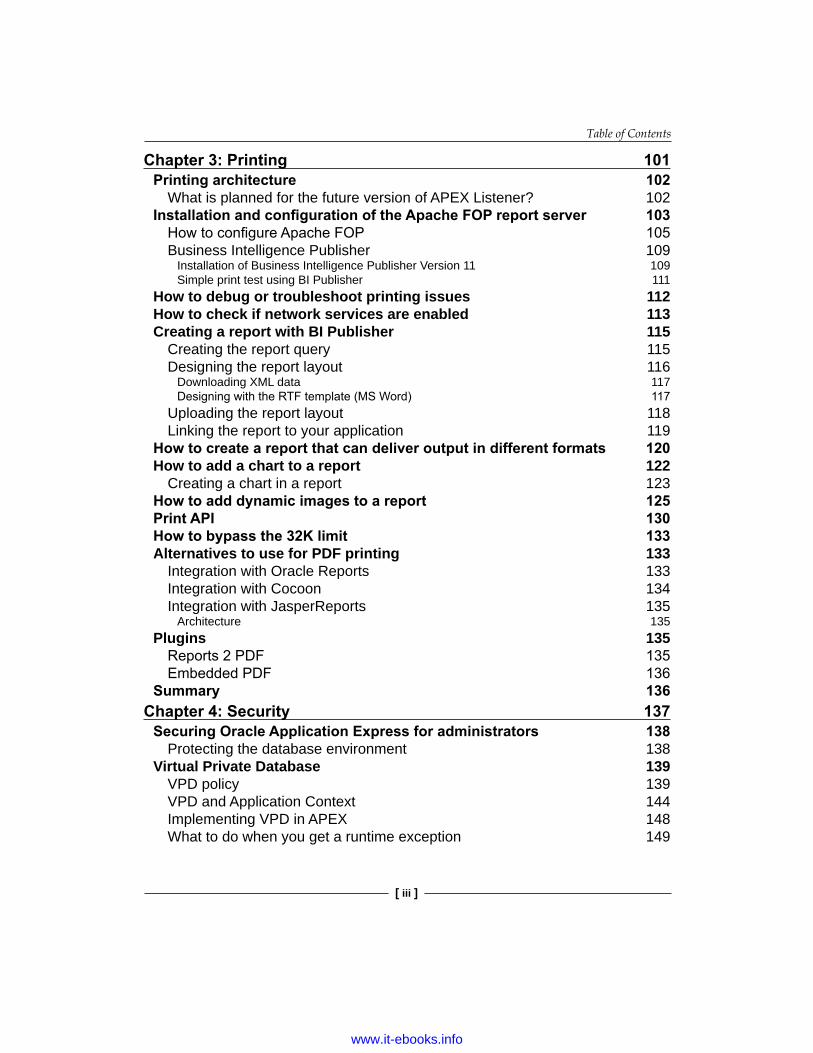
Table of Contents
[ iii ]
Chapter 3: Printing 101Printing architecture 102
What is planned for the future version of APEX Listener? 102Installation and configuration of the Apache FOP report server 103
How to configure Apache FOP 105Business Intelligence Publisher 109
Installation of Business Intelligence Publisher Version 11 109Simple print test using BI Publisher 111
How to debug or troubleshoot printing issues 112How to check if network services are enabled 113Creating a report with BI Publisher 115
Creating the report query 115Designing the report layout 116
Downloading XML data 117Designing with the RTF template (MS Word) 117
Uploading the report layout 118Linking the report to your application 119
How to create a report that can deliver output in different formats 120How to add a chart to a report 122
Creating a chart in a report 123How to add dynamic images to a report 125Print API 130How to bypass the 32K limit 133Alternatives to use for PDF printing 133
Integration with Oracle Reports 133Integration with Cocoon 134Integration with JasperReports 135
Architecture 135Plugins 135
Reports 2 PDF 135Embedded PDF 136
Summary 136Chapter 4: Security 137
Securing Oracle Application Express for administrators 138Protecting the database environment 138
Virtual Private Database 139VPD policy 139VPD and Application Context 144Implementing VPD in APEX 148What to do when you get a runtime exception 149
www.it-ebooks.info

Table of Contents
[ iv ]
Securing the web listener 151HTTP server 151
Embedded PL/SQL gateway 153Oracle Application Express Listener 154
Enabling SSL for the web server 155Security considerations when installing Oracle Application Express 156
Runtime installation 156Access Control Lists (ACLs) 157Enabling builders in Oracle Application Express 158Session timeout 159
Instance level 159Application level 160
Password complexity rules 161Patching strategy 162
Security considerations for the developer 162Browser attacks 163
Cross-site scripting (XSS) 163Protecting HTML regions and other static areas 165Protecting dynamic output 165Protecting reports regions 165Protecting form items 165
SQL injection 166Insecure use of variables 167Correct use of Bind variables 169SYS.DBMS_ASSERT 169
Security attributes 170Authentication 170Authorization 174Database schema 179
URL tampering 179Session state protection against URL tampering 179
Browser security attributes 183Cache 183Embed in Frames 183Database session 184
Authorization and authentication plugin 184Secure items in an application 185
Item encryption 186Hidden items protection 186Items of type password 187File upload items 188Managing instance security 188Application data 189Fake input 189Saving state before branching 191
www.it-ebooks.info
Table of Contents
[ v ]
Utilities 191Application dashboard 191
How to check the security of your application 192Oracle Application Express Advisor 192Third-party tools to check on security 193
Summary 194Chapter 5: Debugging and Troubleshooting 195
Debugging an APEX page 195Instrumentation of the APEX code 201
APEX_APPLICATION.G_DEBUG 202The debug Advanced Programming Interface (API) 202The APEX debug message 202APEX_DEBUG_MESSAGE.LOG_MESSAGE 204WWV_FLOW_API.SET_ENABLE_APP_DEBUGGING 205
APEX and Oracle SQL Developer 205Remote debugging 209
Steps to be performed in APEX 210JavaScript console wrapper 211
Installation of the console wrapper 211Web development tools 213
Firebug 214APEX and Firebug 215
Debugging dynamic actions 215Yslow 216Error handling 217Logging and tracing 217Enabling/disabling logging 219Reports in Application Express that facilitate troubleshooting 220Application Express Advisor 221
Summary 223Chapter 6: Deploy and Maintain 225
Package your application, or not? 226Version control 231
Subversion 232Deploying the database packages 235Deploying the APEX application 239
Using the APEX environment 239Using the command-line interface 245Housekeeping the APEX repository 248
www.it-ebooks.info
Table of Contents
[ vi ]
Being active and proactive 249Feedback 249
Activate feedback 250Processing entered feedback 252
Weighted page performance 255Summary 258
Appendix A: Database Cloud Service and APEX 4.2 259Oracle Public Cloud 259
Packaged applications 260Plan for the future 260
RESTful web services 261The RESTful Web Services wizard 262
Data load feature (SQL Workshop/utilities/data load) 267Summary 267
Index 269
www.it-ebooks.info

PrefaceHave you ever wanted to create real-world database applications? In this book, you will not only get APEX best practices, but will also take into account the total environment of an APEX application and benefit from it. Many examples are given based on a simple but appealing case.
This book will guide you through the development of real-world applications. It will give you a broader view of APEX. The various aspects include setting up an APEX environment, testing and debugging, security, and getting the best out of SQL and PL/SQL.
In six distinct chapters, you will learn about different features of Oracle APEX as well as SQL and PL/SQL.
Do you maximize the capabilities of Oracle APEX? Do you use all the power that SQL and PL/SQL have to offer? Do you want to learn how to build a secure, fully functional application? Then this is the book you'll need.
Oracle APEX Best Practices is where practical development begins!
What this book coversChapter 1, Prepare and Build, discusses different aspects of setting up an Application Express (APEX) environment. Among others, we'll take a look at installing APEX, performing preparational tasks before actually building applications, and transforming the data model into initial screens. We will also discuss some guidelines and best practices for these phases.
Chapter 2, Leveraging the Database, explains various subjects related to an APEX environment. These subjects include instrumentation, efficient lookup tables, analytic and aggregate functions, offloading long running programs, and so on.
www.it-ebooks.info

Preface
[ 2 ]
Chapter 3, Printing, deals with different aspects of printing in Oracle Application Express. In this chapter, we will discuss the two most used architectures in Application Express printing, using Apache FOP and Business Intelligence Publisher. Then, we will see how to install and configure both Apache FOP and Business Intelligence Publisher.
Chapter 4, Security, describes how to provide security for Oracle Application Express. In this chapter, we will discuss the responsibilities of an administrator. We will also discuss security aspects for developers.
Chapter 5, Debugging and Troubleshooting, discusses various subjects such as debugging in APEX, remote debugging using Oracle SQL Developer, reports available in Application Express for troubleshooting, and so on.
Chapter 6, Deploy and Maintain, discusses the deployment and maintenance of an APEX environment. In this chapter, we will discuss various topics such as considerations regarding packaging the application, version control, and so on.
Appendix, Database Cloud Service and APEX 4.2, discusses Oracle Public Cloud and the Application Express features in the Database Cloud Service and APEX 4.2.
What you need for this bookYou will require following software:
• SQL Developer version 3.2 or higher• Application Express 4.1.1 or higher• APEX Listener with GlassFish, OC4J, or WebLogic• BI Publisher (version 10 or version 11) and/or FOP
Who this book is forThis book is filled with best practices on how to make the most of Oracle APEX. Developers beginning with application development as well as those who are experienced will benefit from this book. You will need to have basic knowledge of SQL and PL/SQL to follow the examples in this book.
www.it-ebooks.info

Preface
[ 3 ]
ConventionsIn this book, you will find a number of styles of text that distinguish between different kinds of information. Here are some examples of these styles, and an explanation of their meaning.
Code words in text are shown as follows: "These settings can also be set manually with the APEX_INSTANCE_ADMIN API."
A block of code is set as follows:
BEGIN wwv_flow_api.set_security_group_id (p_security_group_id=>10); wwv_flow_fnd_user_api.create_fnd_user( p_user_name => 'second_admin', p_email_address => '[email protected]', p_web_password => 'second_admin_password') ; END;/COMMIT/
Any command-line input or output is written as follows:
@apexins tablespace_apex tablespace_files tablespace_temp images
New terms and important words are shown in bold. Words that you see on the screen, in menus or dialog boxes for example, appear in the text like this: "Select the appropriate settings for Disable Administrator Login and Disable Workspace Login."
Warnings or important notes appear in a box like this.
Tips and tricks appear like this.
www.it-ebooks.info
Preface
[ 4 ]
Reader feedbackFeedback from our readers is always welcome. Let us know what you think about this book—what you liked or may have disliked. Reader feedback is important for us to develop titles that you really get the most out of.
To send us general feedback, simply send an e-mail to [email protected], and mention the book title via the subject of your message.
If there is a book that you need and would like to see us publish, please send us a note in the SUGGEST A TITLE form on www.packtpub.com or e-mail [email protected].
If there is a topic that you have expertise in and you are interested in either writing or contributing to a book, see our author guide on www.packtpub.com/authors.
Customer supportNow that you are the proud owner of a Packt book, we have a number of things to help you to get the most from your purchase.
Downloading the example codeYou can download the example code files for all Packt books you have purchased from your account at http://www.PacktPub.com. If you purchased this book elsewhere, you can visit http://www.PacktPub.com/support and register to have the files e-mailed directly to you.
ErrataAlthough we have taken every care to ensure the accuracy of our content, mistakes do happen. If you find a mistake in one of our books—maybe a mistake in the text or the code—we would be grateful if you would report this to us. By doing so, you can save other readers from frustration and help us improve subsequent versions of this book. If you find any errata, please report them by visiting http://www.packtpub.com/support, selecting your book, clicking on the errata submission form link, and entering the details of your errata. Once your errata are verified, your submission will be accepted and the errata will be uploaded on our website, or added to any list of existing errata, under the Errata section of that title. Any existing errata can be viewed by selecting your title from http://www.packtpub.com/support.
www.it-ebooks.info

Preface
[ 5 ]
PiracyPiracy of copyright material on the Internet is an ongoing problem across all media. At Packt, we take the protection of our copyright and licenses very seriously. If you come across any illegal copies of our works, in any form, on the Internet, please provide us with the location address or website name immediately so that we can pursue a remedy.
Please contact us at [email protected] with a link to the suspected pirated material.
We appreciate your help in protecting our authors, and our ability to bring you valuable content.
QuestionsYou can contact us at [email protected] if you are having a problem with any aspect of the book, and we will do our best to address it.
www.it-ebooks.info
Prepare and BuildIn this chapter, we will discuss different aspects of setting up an Application Express (APEX) environment. Among others, we'll take a look at installing APEX, performing preparational tasks before actually building applications, and transforming the data model into initial screens. We will also discuss some guidelines and best practices for these phases. You'll get a lot of new ideas for structuring and building your applications.
Before doing that we will take a brief look at the history and background of APEX.
History and backgroundAPEX is a very powerful development tool, which is used to create web-based database-centric applications. The tool itself consists of a schema in the database with a lot of tables, views, and PL/SQL code. It's available for every edition of the database. The techniques that are used with this tool are PL/SQL, HTML, CSS, and JavaScript.
Before APEX there was WebDB, which was based on the same techniques. WebDB became part of Oracle Portal and disappeared in silence. The difference between APEX and WebDB is that WebDB generates packages that generate the HTML pages, while APEX generates the HTML pages at runtime from the repository. Despite this approach APEX is amazingly fast.
Because the database is doing all the hard work, the architecture is fairly simple. We only have to add a web server. We can choose one of the following web servers:
• Oracle HTTP Server (OHS)• Embedded PL/SQL Gateway (EPG)• APEX Listener
www.it-ebooks.info
Prepare and Build
[ 8 ]
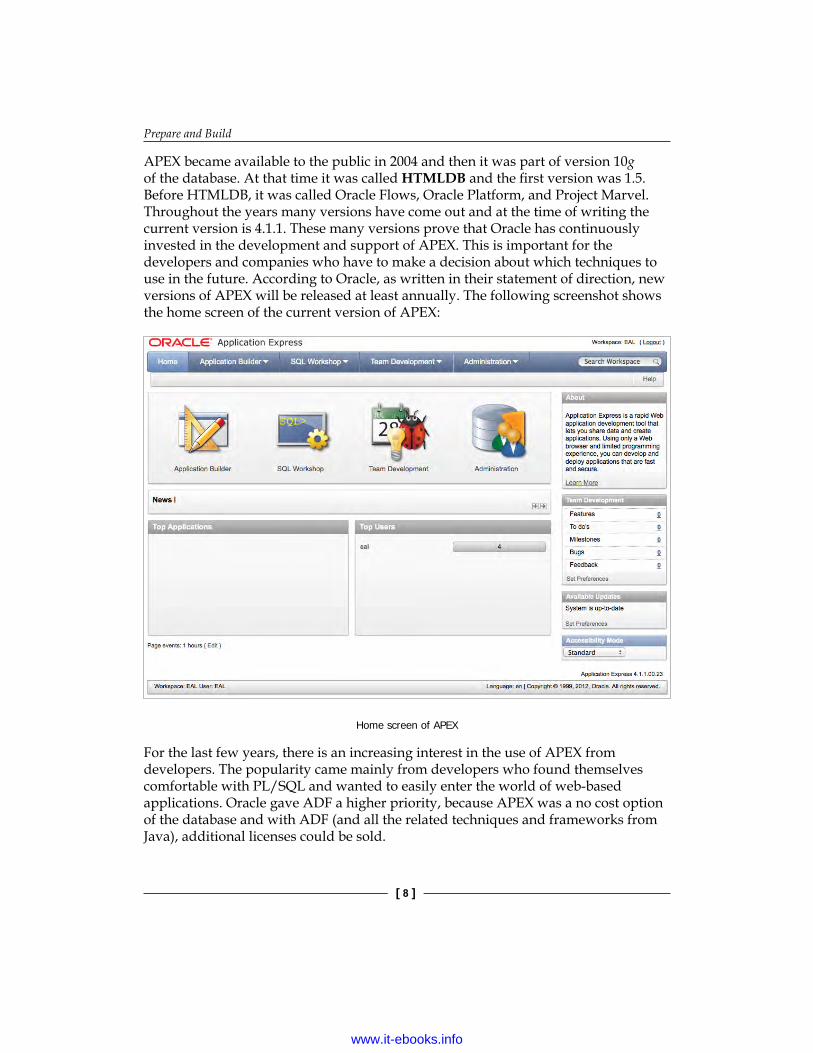
APEX became available to the public in 2004 and then it was part of version 10g of the database. At that time it was called HTMLDB and the first version was 1.5. Before HTMLDB, it was called Oracle Flows, Oracle Platform, and Project Marvel. Throughout the years many versions have come out and at the time of writing the current version is 4.1.1. These many versions prove that Oracle has continuously invested in the development and support of APEX. This is important for the developers and companies who have to make a decision about which techniques to use in the future. According to Oracle, as written in their statement of direction, new versions of APEX will be released at least annually. The following screenshot shows the home screen of the current version of APEX:
Home screen of APEX
For the last few years, there is an increasing interest in the use of APEX from developers. The popularity came mainly from developers who found themselves comfortable with PL/SQL and wanted to easily enter the world of web-based applications. Oracle gave ADF a higher priority, because APEX was a no cost option of the database and with ADF (and all the related techniques and frameworks from Java), additional licenses could be sold.
www.it-ebooks.info

Chapter 1
[ 9 ]
Especially now Oracle has pointed out APEX as one of the important tools for building applications in their Oracle Database Cloud Service, this interest will only grow. APEX shared a lot of the characteristics of cloud computing, even before cloud computing became popular. These characteristics include:
• Elasticity• Roles and authorization• Browser-based development and runtime• RESTful web services (REST stands for Representational State Transfer)• Multi-tenant• Simple and fast to join
APEX has outstanding community support, witnessed by the number of posts and threads on the Oracle forum. This forum is the most popular after the database and PL/SQL.
Oracle itself has some websites, based on APEX. Among others there are the following:
• http://asktom.oracle.com
• http://shop.oracle.com
• http://cloud.oracle.com
Oracle uses quite a few internal APEX applications.
Oracle also provides a hosted version of APEX at http://apex.oracle.com. Users can sign up for free for a workspace to evaluate and experiment with the latest version of APEX. This environment is for evaluations and demonstrations only, there are no guarantees! Apex.oracle.com is a very popular service—more than 16,000 workspaces are active. To give an idea of the performance of APEX, the server used for this service used to be a Dell Poweredge 1950 with two Dual Core Xeon processors with 16 GB.
To get a jumpstart with developing real-life APEX applications, we have written this book and provided you with some best practices. These practices don't have to be appropriate in all situations, see them as guidelines. This book is not intended as a point and click starters guide and assumes a basic understanding of APEX, PL/SQL, HTML, and CSS.
Installing APEXIn this section, we will discuss some additional considerations to take care of while installing APEX. The best source for the installation process is the Installation Guide of APEX.
www.it-ebooks.info
Prepare and Build
[ 10 ]
Runtime or full development environmentOn a production database, the runtime environment of APEX should be installed. This installation lacks the Application Builder and the SQL Workshop. Users can run applications, but the applications cannot be modified. The runtime environment of APEX can be administered using SQL*Plus and SQL Developer. The (web interface) options for importing an application, which are only available in a full development environment, can be used manually with the APEX_INSTANCE_ADMIN API. See the reference guide for details. Using a runtime environment for production is recommended for security purposes, so that we can be certain that installed applications cannot be modified by anyone.
On a development environment the full development environment can be installed with all the features available to the developers.
Build statusBesides the environment of APEX itself, the applications can also be installed in a similar way. When importing or exporting an application the Run Application Only or Run and Build Application options can be selected.
Changing an application to Run Application Only can be done in the Application Builder by choosing Edit Application Properties. Changing the Build Status to Run and Build Application can only be done as the admin user of the workspace internal. In the APEX Administration Services, choose Manage Workspaces and then select Manage Applications | Build Status. Also refer to Chapter 6, Deploy and Maintain.
Another setting related to the Runtime Only option could be used in the APEX Administration Services at instance level. Select Manage Instance and then select Security. Setting the property Disable Workspace Login to yes, acts as setting a Runtime Only environment, while still allowing instance administrators to log in to the APEX Administration Services.
TablespacesFollowing the install guide for the full development environment, at a certain moment, we have to run the following command, when logged in as SYS with the SYSDBA role, on the command line:
@apexins tablespace_apex tablespace_files tablespace_temp images
www.it-ebooks.info

Chapter 1
[ 11 ]
The command is explained as follows:
• tablespace_apex is the name of the tablespace that contains all the objects for the APEX application user.
• tablespace_files is the name of the tablespace that contains all the objects for the APEX files user.
• tablespace_temp is the name of the temporary tablespace of the database.• images will be the virtual directory for APEX images. Oracle recommends
using /i/ to support the future APEX upgrades.
For the runtime environment, the command is as follows:
@apxrtins tablespace_apex tablespace_files tablespace_temp images
In the documentation, SYSAUX is given as an example for both tablespace_apex and tablespace_files. There are several reasons for not using SYSAUX for these tablespaces, but to use our own instead:
• SYSAUX is an important tablespace of the database itself• We have more control over sizing and growth• It is easier for a DBA to manage tablespace placement• Contention in the SYSAUX tablespace is less occurring• It's easier to clean-up older versions of APEX• And last but not least, it's only an example
Converting runtime environment into a full development environment and vice versaIt's always possible to switch from a runtime to a production environment and vice versa. If you want to convert a runtime to a full development environment log in as SYS with the SYSDBA role and on the command line type @apxdvins.sql. For converting a full development to a runtime environment, type @apxdevrm—but export websheet applications first. For more details see the installation guide.
Another way to restrict user access can be accomplished by logging in to the APEX Administration Services, where we can (among others) manage the APEX instance settings and all the workspaces. We can do that in two ways:
• http://server:port/apex/apex_admin: Log in with the administrator credentials
• http://server:port/apex/: Log in to the workspace internal, with the administrator credentials
www.it-ebooks.info

Prepare and Build
[ 12 ]
After logging in, perform the following steps:
1. Go to Manage Instance.2. Select Security.3. Select the appropriate settings for Disable Administrator Login and
Disable Workspace Login. These settings can also be set manually with the APEX_INSTANCE_ADMIN API. See the reference guide for details.
Choosing a web serverWhen using a web-based development and runtime environment, we have to use a web server.
Architecture of APEX
The choice of a web server and the underlying architecture of the system has a direct impact on performance and scalability. Oracle provides us with three choices:
• Oracle HTTP Server (OHS)• Embedded PL/SQL Gateway (EPG)• APEX Listener
Simply put, the web server maps the URL in a web browser to a procedure in the database. Everything the procedure prints with sys.htp package, is sent to the browser of the user. This is the concept used by tools such as WebDB and APEX.
www.it-ebooks.info
Chapter 1
[ 13 ]
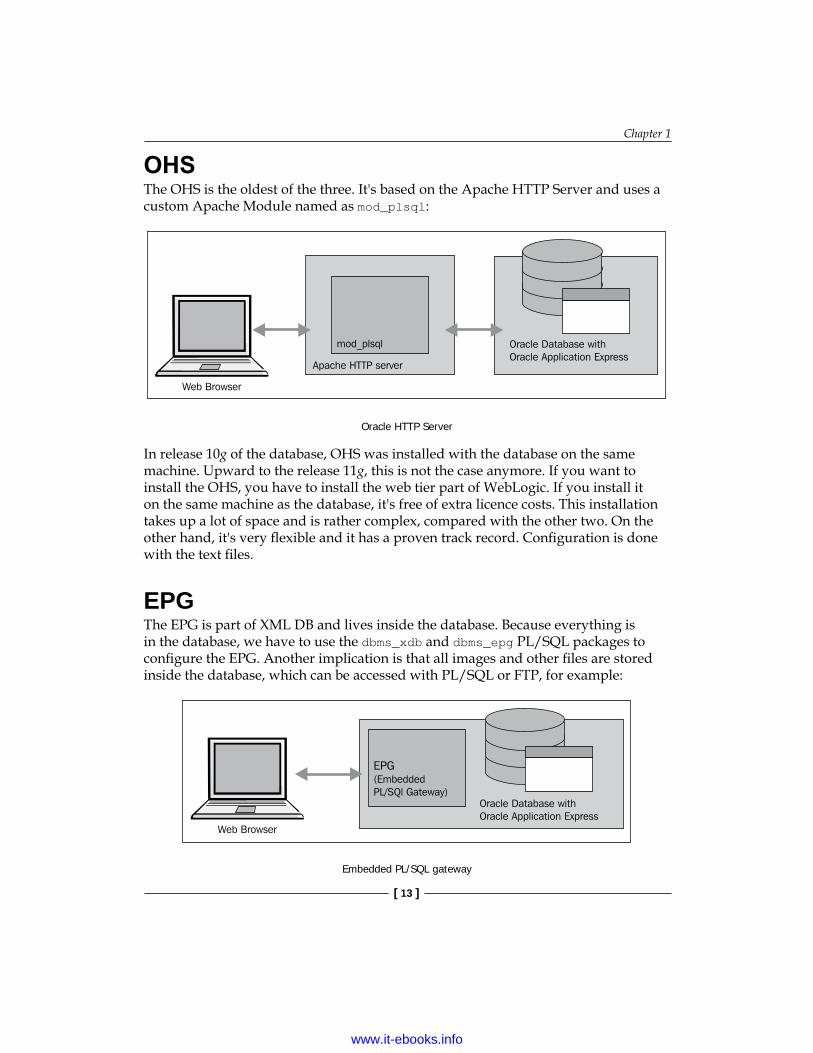
OHSThe OHS is the oldest of the three. It's based on the Apache HTTP Server and uses a custom Apache Module named as mod_plsql:
Oracle HTTP Server
In release 10g of the database, OHS was installed with the database on the same machine. Upward to the release 11g, this is not the case anymore. If you want to install the OHS, you have to install the web tier part of WebLogic. If you install it on the same machine as the database, it's free of extra licence costs. This installation takes up a lot of space and is rather complex, compared with the other two. On the other hand, it's very flexible and it has a proven track record. Configuration is done with the text files.
EPGThe EPG is part of XML DB and lives inside the database. Because everything is in the database, we have to use the dbms_xdb and dbms_epg PL/SQL packages to configure the EPG. Another implication is that all images and other files are stored inside the database, which can be accessed with PL/SQL or FTP, for example:
Embedded PL/SQL gateway
www.it-ebooks.info

Prepare and Build
[ 14 ]
The architecture is very simple. It's not possible to install the EPG on a different machine than the database. From a security point of view, this is not the recommended architecture for real-life Internet applications and in most cases the EPG is used in development, test, or other internal environments with few users.
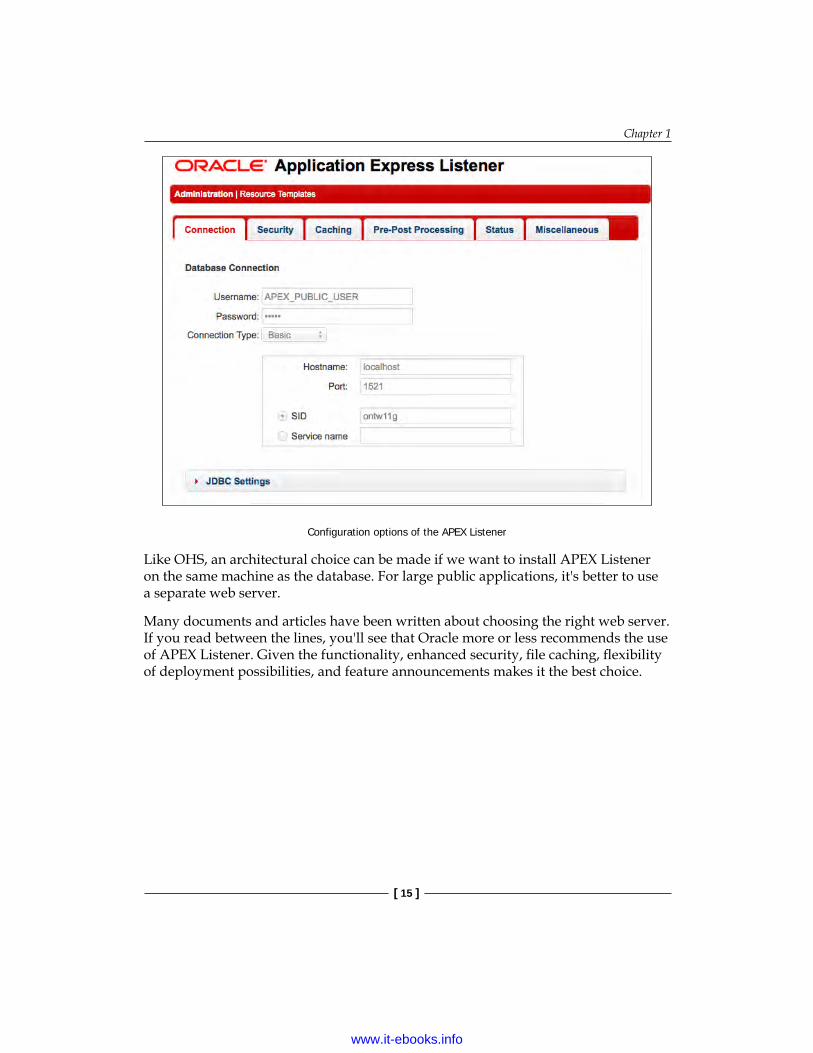
APEX ListenerAPEX Listener is the newest of the three, it's still in development and with every new release more features are added to it. In the latest version, RESTful APIs can be created by configuring resource templates. APEX Listener is a Java application with a very small footprint. APEX Listener can be installed in a standalone mode, which is ideal for development and testing purposes. For production environments, the APEX Listener can be deployed by using a J2EE compliant Application Server such as Glassfish, WebLogic, or Oracle Containers for J2EE:
APEX Listener
Configuration of the APEX Listener is done in a browser. With some extra configuration, uploading of Excel into APEX collections can be achieved. In future release, other functionalities, such as OAuth 2.0 and ICAP virus scanner integration, have been announced.
www.it-ebooks.info
Chapter 1
[ 15 ]
Configuration options of the APEX Listener
Like OHS, an architectural choice can be made if we want to install APEX Listener on the same machine as the database. For large public applications, it's better to use a separate web server.
Many documents and articles have been written about choosing the right web server. If you read between the lines, you'll see that Oracle more or less recommends the use of APEX Listener. Given the functionality, enhanced security, file caching, flexibility of deployment possibilities, and feature announcements makes it the best choice.
www.it-ebooks.info

Prepare and Build
[ 16 ]
Creating a second administratorWhen installing APEX, by default the workspace Internal with the administrator user Admin is created. Some users know more than the average end user. Also, developers have more knowledge than the average user. Imagine that such users try to log in to either the APEX Administration Services or the normal login page with the workspace Internal and administrator Admin, and consequently use the wrong password. As a consequence, the Admin account would be locked after a number of login attempts. This is a very annoying situation, especially when it happens often. Big companies and APEX Hosting companies with many workspaces and a lot of anonymous users or developers may suffer from this. Fortunately there is an easy solution, creating a second administrator account.
Login attempt in workspace Internal as Admin
If the account is already locked, we have to unlock it first. This can be easily done by running the apxchpwd.sql script, which can be found in the main Apex directory of the unzipped installation file of APEX:
1. Start SQL*Plus and connect as sys with the sysdba role.2. Run the script by entering @apxchpwd.sql.3. Follow the instructions and enter a new password.
Now we are ready to create a second administrator account. This can be done in two ways, using the web interface or the command line.
www.it-ebooks.info
Chapter 1
[ 17 ]
APEX web interfaceFollow these steps to create a new administrator, using the browser.
First, we need to log in to the APEX Administrator Services at http://server:port/apex/. Log in to the workspace Internal, with the administrator credentials.
After logging in, perform the following steps:
1. Go to Manage Workspaces.2. Select Existing Workspaces.3. You can also select the edit icon of the workspace Internal to inspect
the settings. You cannot change them. Select Cancel to return to the previous screen.
4. Select the workspace Internal by clicking on the name.5. Select Manage Users. Here you can see the user Admin.6. You can also select the user Admin to change the password. Other settings
cannot be changed. Select Cancel or Apply Changes to return to the previous screen.
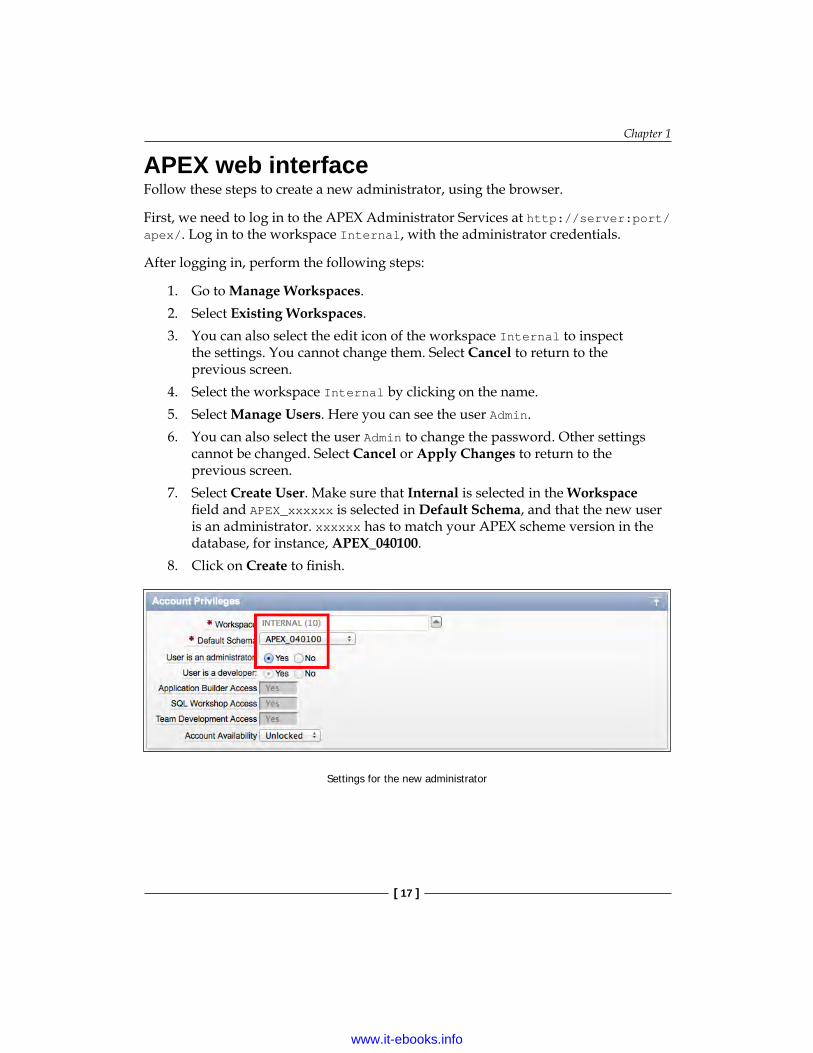
7. Select Create User. Make sure that Internal is selected in the Workspace field and APEX_xxxxxx is selected in Default Schema, and that the new user is an administrator. xxxxxx has to match your APEX scheme version in the database, for instance, APEX_040100.
8. Click on Create to finish.
Settings for the new administrator
www.it-ebooks.info
Prepare and Build
[ 18 ]
Command lineWhen we still have access, we can use the web interface of APEX. If not we can use the command line:
1. Start SQL*Plus and connect as SYS with the SYSDBA role.2. Unlock the APEX_xxxxxx account by issuing the following command:
alter user APEX_xxxxxx account unlock;
3. Connect to the APEX_xxxxxx account. If you don't remember your password, you can just reset it, without impacting the APEX instance.
4. Execute the following (use your own username, e-mail, and password):BEGIN wwv_flow_api.set_security_group_id (p_security_group_id=>10); wwv_flow_fnd_user_api.create_fnd_user( p_user_name => 'second_admin', p_email_address => '[email protected]', p_web_password => 'second_admin_password') ; END;/COMMIT/
5. The new administrator is created. Connect again as SYS with the SYSDBA role and lock the account again with the following command:alter user APEX_xxxxxx account lock;
6. Now you can log in to the Internal workspace with your newly created account and you'll be asked to change your password.
www.it-ebooks.info
Chapter 1
[ 19 ]
Other accountsWhen an administrator of a developer workspace loses his/her password or has a locked account, you can bring that account back to life by following these steps:
1. Log in to the APEX Administrator Services.2. Go to Manage Workspace.3. Select Existing Workspaces.4. Select the workspace.5. Select Manage Users.6. Select the user, change the password, and unlock the user.
A developer or an APEX end user account can be managed by the administrator of the workspace from the workspace itself. Follow these steps to do so:
1. Log in to the workspace.2. Go to Administration.3. Select the user, change the password, and unlock the user.
DatabaseWe have set up the APEX environment, now let's focus on the database. For means of consistency and maintainability, it's a good practice to use standards and guidelines. In this section, we will describe some standards and guidelines for data modeling, database objects, and PL/SQL usage.
Data modelWhen the requirements are clear, we can create a data model. A data model provides the structure, definition, and format of the data.
www.it-ebooks.info
Prepare and Build
[ 20 ]
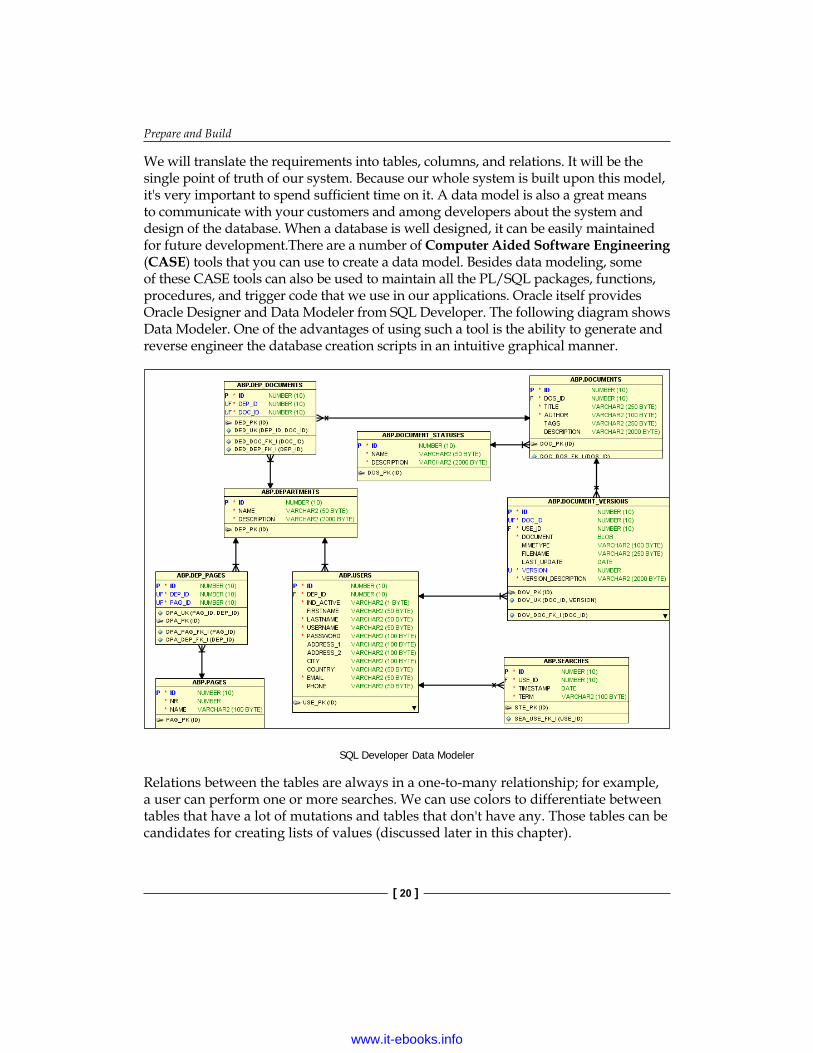
We will translate the requirements into tables, columns, and relations. It will be the single point of truth of our system. Because our whole system is built upon this model, it's very important to spend sufficient time on it. A data model is also a great means to communicate with your customers and among developers about the system and design of the database. When a database is well designed, it can be easily maintained for future development.There are a number of Computer Aided Software Engineering (CASE) tools that you can use to create a data model. Besides data modeling, some of these CASE tools can also be used to maintain all the PL/SQL packages, functions, procedures, and trigger code that we use in our applications. Oracle itself provides Oracle Designer and Data Modeler from SQL Developer. The following diagram shows Data Modeler. One of the advantages of using such a tool is the ability to generate and reverse engineer the database creation scripts in an intuitive graphical manner.
SQL Developer Data Modeler
Relations between the tables are always in a one-to-many relationship; for example, a user can perform one or more searches. We can use colors to differentiate between tables that have a lot of mutations and tables that don't have any. Those tables can be candidates for creating lists of values (discussed later in this chapter).
www.it-ebooks.info
Chapter 1
[ 21 ]
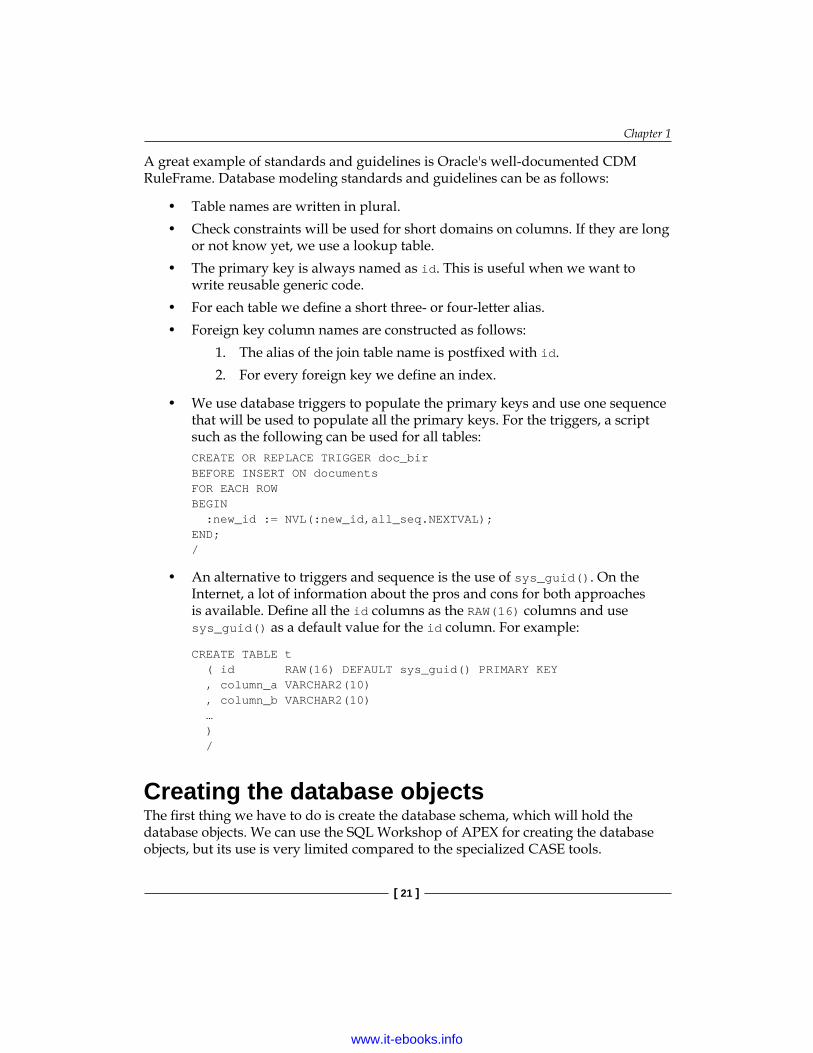
A great example of standards and guidelines is Oracle's well-documented CDM RuleFrame. Database modeling standards and guidelines can be as follows:
• Table names are written in plural.• Check constraints will be used for short domains on columns. If they are long
or not know yet, we use a lookup table.• The primary key is always named as id. This is useful when we want to
write reusable generic code.• For each table we define a short three- or four-letter alias.• Foreign key column names are constructed as follows:
1. The alias of the join table name is postfixed with id.2. For every foreign key we define an index.
• We use database triggers to populate the primary keys and use one sequence that will be used to populate all the primary keys. For the triggers, a script such as the following can be used for all tables:CREATE OR REPLACE TRIGGER doc_bir BEFORE INSERT ON documents FOR EACH ROWBEGIN :new_id := NVL(:new_id,all_seq.NEXTVAL);END;/
• An alternative to triggers and sequence is the use of sys_guid(). On the Internet, a lot of information about the pros and cons for both approaches is available. Define all the id columns as the RAW(16) columns and use sys_guid() as a default value for the id column. For example:
CREATE TABLE t ( id RAW(16) DEFAULT sys_guid() PRIMARY KEY , column_a VARCHAR2(10) , column_b VARCHAR2(10) … ) /
Creating the database objectsThe first thing we have to do is create the database schema, which will hold the database objects. We can use the SQL Workshop of APEX for creating the database objects, but its use is very limited compared to the specialized CASE tools.
www.it-ebooks.info
Prepare and Build
[ 22 ]
The following objects can be created in the application schema:
• Tables• Primary keys• Unique constraints• Foreign keys• Indexes on the foreign keys• Other indexes• Sequences• Scripts for insert and update triggers on the tables to generate an ID• Other objects (packages, materialized views, and so on)
Other toolsBeside the tools for creating a model, we need some tools during the further development process, tools for accessing the database easily, and tools for web development. Without going into detail, we will just name a few tools that you can use.
Examples of database tools are:
• Toad• SQL Developer• PL/SQL Developer
Tools for web development, HTML, CSS, and JavaScript are as follows:
• Aptana• Firebug• Web Developer• Internet Explorer Developer Tools• Built-in tools in the browser
Miscellaneous tools:
• Versioning tools• Performance measurement tools• GUI design tools
Refer to Chapter 5, Debugging and Troubleshooting for the details on other tools.
www.it-ebooks.info
Chapter 1
[ 23 ]
PL/SQL usageWe use the following guidelines regarding PL/SQL:
• Keep PL/SQL in APEX to an absolute minimum• Try to store all your PL/SQL in packages in the database• Replace PL/SQL blocks in APEX with simple calls to the functions and
procedures in those packages.
This approach has the following advantages:• Easier to debug• Higher maintainability, due to more structure• Better reusability possible• Don't deploy an application each time there is a change in PL/SQL• Easier to tune
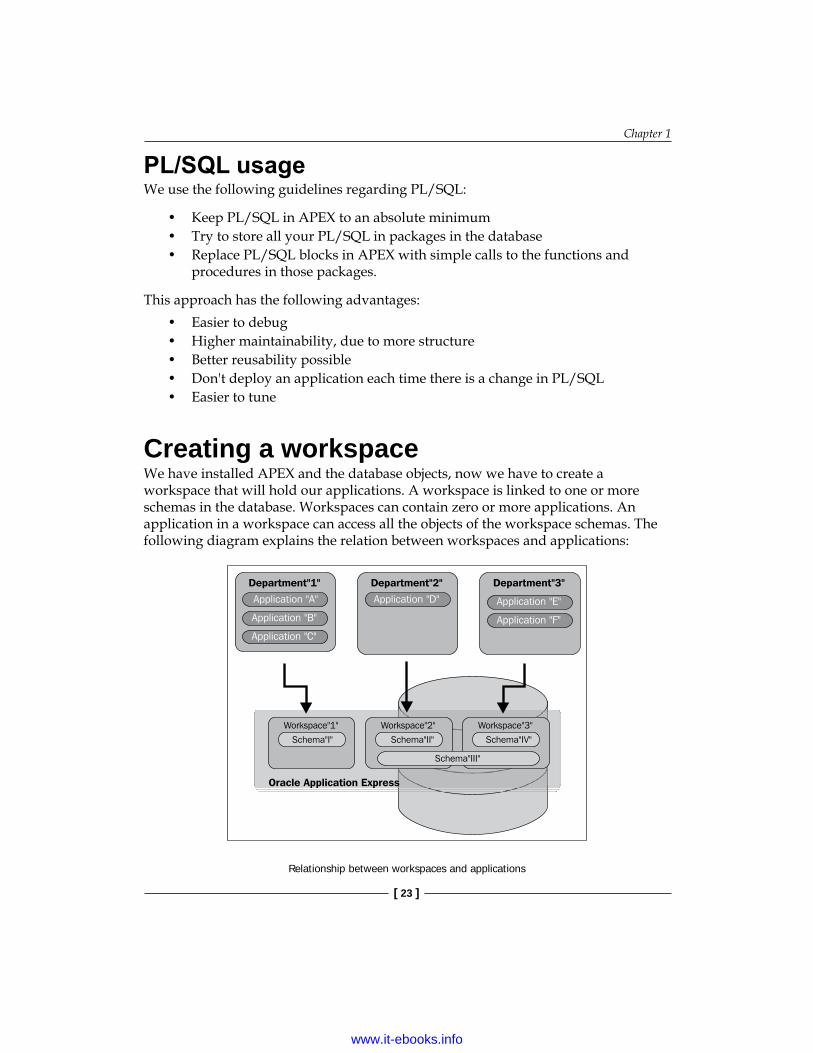
Creating a workspaceWe have installed APEX and the database objects, now we have to create a workspace that will hold our applications. A workspace is linked to one or more schemas in the database. Workspaces can contain zero or more applications. An application in a workspace can access all the objects of the workspace schemas. The following diagram explains the relation between workspaces and applications:
Relationship between workspaces and applications
www.it-ebooks.info

Prepare and Build
[ 24 ]
If security issues are expected, it is possible to create a dedicated empty schema for the workspace and grant access to only the database objects that are needed for that schema. Applications in that workspace can only access the objects that have been granted to the schema.
When we want to create a workspace we have to log in to the APEX Administration Services. In APEX there are two special workspaces. Internal as mentioned before is, as the name implies, the internal workspace used by APEX itself. There is also another workspace called com.oracle.apex.repository, which is used for themes.
Once logged in to the Internal workspace, we see the screen shown in the following screenshot:
Creating a workspace
We have two possible ways to create a workspace: directly by using the button or indirectly through the Manage Workspaces option, where we have to click on Create Workspace. After filling in the details in the wizard, the workspace will be created.
Creating administrators, developers, and usersWhen creating a workspace, we also need to create an administrator for the workspace. If the workspace is in place, we could log in to the workspace as the administrator and add other administrators, developers, and end users.
www.it-ebooks.info

Chapter 1
[ 25 ]
User Interface DefaultsAfter creating the workspace and users, it's the moment to use the User Interface Defaults possibilities in APEX—do not start building applications immediately. This option isn't used very much in practice, but it's a very useful utility. With User Interface Defaults, we populate initial values and control the appearance and behavior of items when using them in reports and items (in forms). User Interface Defaults can accelerate your development and result in less repetition of tasks in APEX. You can compare its possibilities with table and column properties in Oracle Designer.
User Interface Defaults don't work retroactively; they only apply to newly built objects. User Interface Defaults can provide consistency across multiple pages for all the applications in our workspace. It's also possible to export and import the User Interface Defaults, to use them in another workspace.
APEX provides two types of dictionaries for this purpose:
• Attribute Dictionary• Table Dictionary
Attribute DictionaryThe Attribute Dictionary consists of a simple set of attributes. The definitions are matched only by column name, and a particular definition can be shared amongst several columns by creating synonyms.
Table DictionaryIn the Table Dictionary, the defaults are defined by table and column combinations. The Table Dictionary is more specific than the Attribute Dictionary, because more properties can be defined in this one. When processed during the use of a creation wizard for a region or item, an entry in the Table Dictionary takes priority over an entry in the Attribute Dictionary. On table level, we can define some region defaults. It's also possible to migrate the Table Dictionary to the more generic Attribute Dictionary. When migrating, you lose some default properties that don't exist in the Attribute Dictionary (for instance the list of values information).
Another functionality of the Table Dictionary is the use of Column Groups. Related columns within a table can be grouped together. In forms, these groups appear as separate regions and in the single row view of interactive reports.
www.it-ebooks.info
Prepare and Build
[ 26 ]
Creating User Interface DefaultsUser Interface Defaults can be defined at the workspace level. Follow these steps to get there:
1. From the Home screen, select SQL Workshop.2. Select Utilities.3. Then, select User Interface Defaults.
User Interface Defaults Dashboard
On this screen, you'll see the Dashboard tab of the User Interface Defaults. You can also see the tabs for Table Dictionary and Attribute Dictionary.
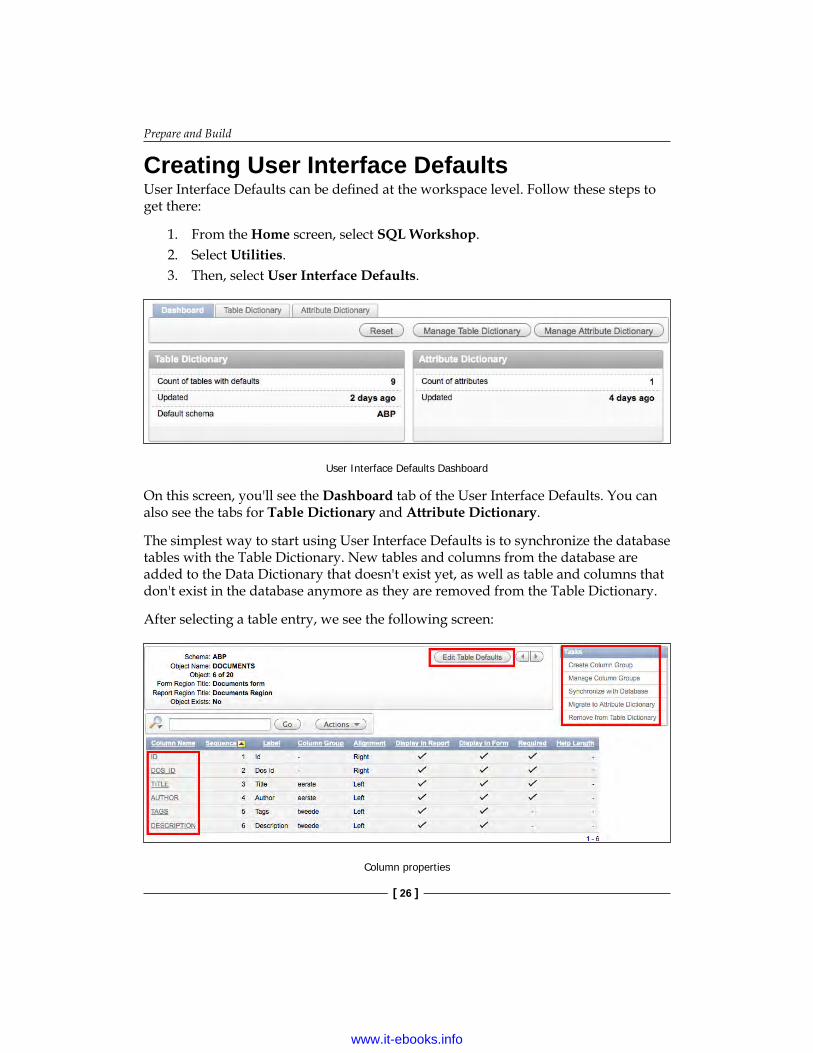
The simplest way to start using User Interface Defaults is to synchronize the database tables with the Table Dictionary. New tables and columns from the database are added to the Data Dictionary that doesn't exist yet, as well as table and columns that don't exist in the database anymore as they are removed from the Table Dictionary.
After selecting a table entry, we see the following screen:
Column properties
www.it-ebooks.info

Chapter 1
[ 27 ]
On this screen, you can select a column to define the default properties or select Edit Table Defaults to define the region titles for this table. You will also see a list of tasks that you can perform. After selecting a column, we see the following screen. This is where the actual work will be done. You can see, for instance, the different sections for Form Defaults and Report and Tabular Form Defaults.
Defaults for the Table Dictionary
www.it-ebooks.info
Prepare and Build
[ 28 ]
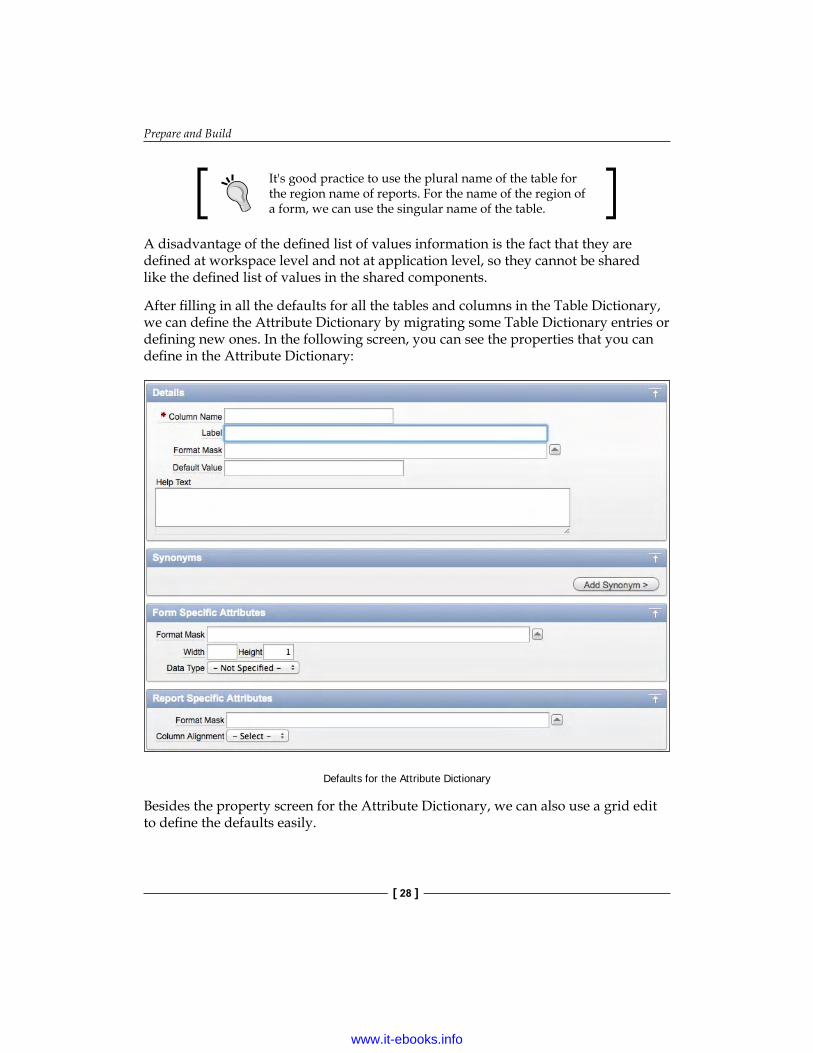
It's good practice to use the plural name of the table for the region name of reports. For the name of the region of a form, we can use the singular name of the table.
A disadvantage of the defined list of values information is the fact that they are defined at workspace level and not at application level, so they cannot be shared like the defined list of values in the shared components.
After filling in all the defaults for all the tables and columns in the Table Dictionary, we can define the Attribute Dictionary by migrating some Table Dictionary entries or defining new ones. In the following screen, you can see the properties that you can define in the Attribute Dictionary:
Defaults for the Attribute Dictionary
Besides the property screen for the Attribute Dictionary, we can also use a grid edit to define the defaults easily.
www.it-ebooks.info

Chapter 1
[ 29 ]
Page ZeroPage Zero acts as a template page for the application. All components of Page Zero will be rendered on all the pages in the application. Compared to a normal page, it consists of only the page rendering part. The following components can be used on Page Zero:
• Computations• Branches• Regions, for example, forms, reports, lists, and HTML• Items• Dynamic actions
In combination with the use of conditions for the components that determine on which specific pages the components will be rendered, is a flexible place for reusable components. Think, for example, of a menu made up of a list region, centralized help functionality, personal information, task list, and so on.
Page Zero has no processing part. The pages themselves—where the components of Page Zero will be rendered when running the application—will take care of this.
Page Zero
www.it-ebooks.info
Prepare and Build
[ 30 ]
Structure of multiple applicationsWhen creating applications, the less repeating work is done, the better. Within an application you can use shared components for this purpose. If our application (or better said, system) consists of more application modules than one big application, we need another approach. Between multiple applications in the same workspace, we can use the less known subscribe feature of APEX.
By using the subscribe and publish mechanism of APEX, we can create a structure of multiple applications that can serve as a good starting point. Some benefits:
• Better maintainable look and feel across multiple applications• The use of shared components across applications• Modular structure• Reusable centralized functionality, such as authorization, authentication,
auditing, and logging
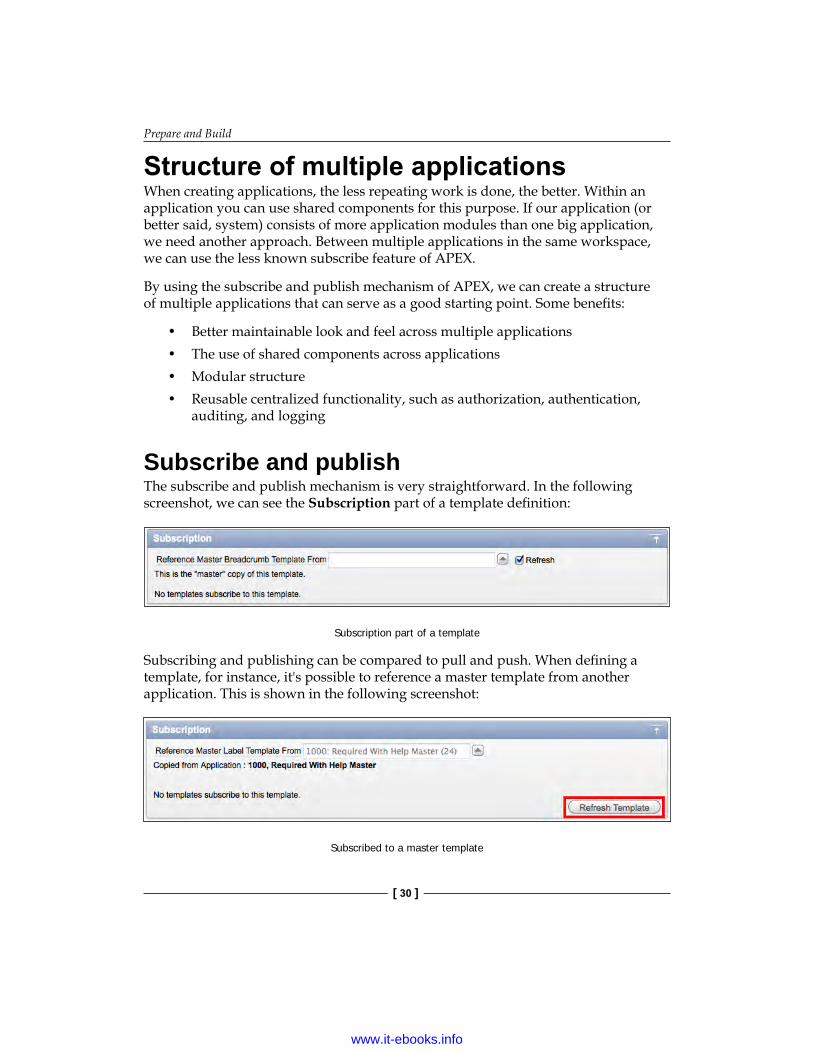
Subscribe and publishThe subscribe and publish mechanism is very straightforward. In the following screenshot, we can see the Subscription part of a template definition:
Subscription part of a template
Subscribing and publishing can be compared to pull and push. When defining a template, for instance, it's possible to reference a master template from another application. This is shown in the following screenshot:
Subscribed to a master template
www.it-ebooks.info
Chapter 1
[ 31 ]
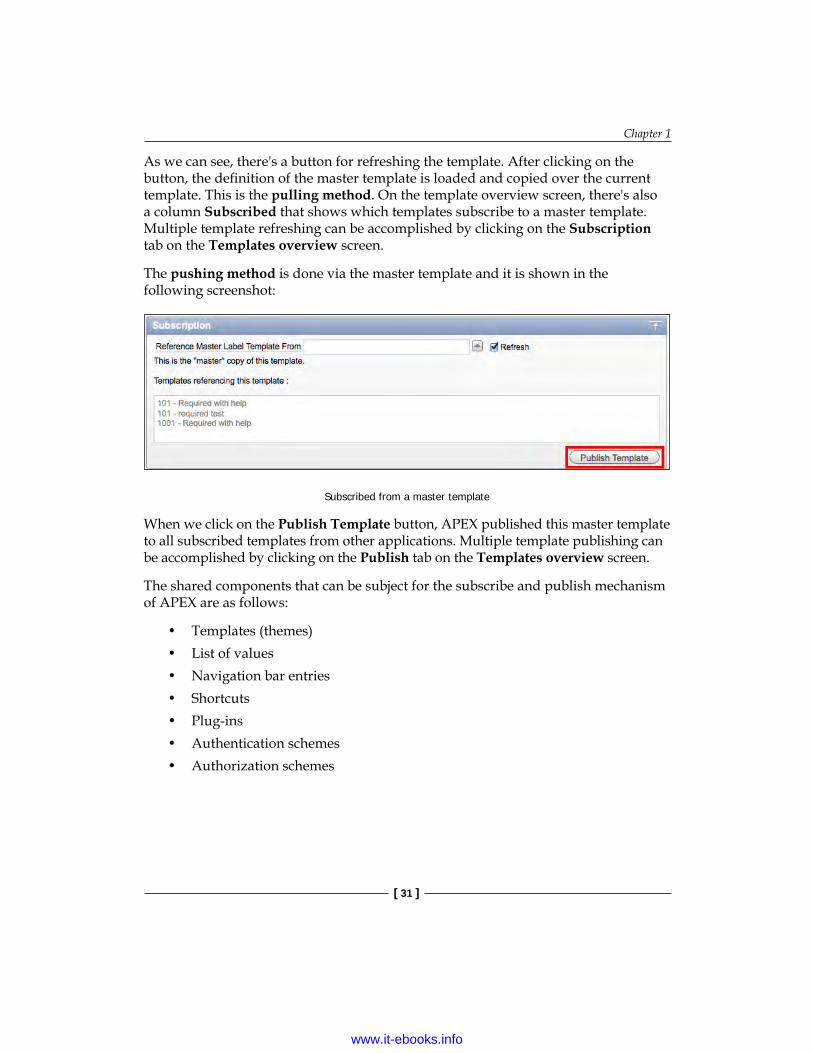
As we can see, there's a button for refreshing the template. After clicking on the button, the definition of the master template is loaded and copied over the current template. This is the pulling method. On the template overview screen, there's also a column Subscribed that shows which templates subscribe to a master template. Multiple template refreshing can be accomplished by clicking on the Subscription tab on the Templates overview screen.
The pushing method is done via the master template and it is shown in the following screenshot:
Subscribed from a master template
When we click on the Publish Template button, APEX published this master template to all subscribed templates from other applications. Multiple template publishing can be accomplished by clicking on the Publish tab on the Templates overview screen.
The shared components that can be subject for the subscribe and publish mechanism of APEX are as follows:
• Templates (themes)• List of values• Navigation bar entries• Shortcuts• Plug-ins• Authentication schemes• Authorization schemes
www.it-ebooks.info
Prepare and Build
[ 32 ]
Notes:
• Subscribed objects are updatable, but refreshing them will overwrite these changes.
• Subscribing and publishing only works within a single workspace. It's not possible to reference, for instance, a template from an application in another workspace.
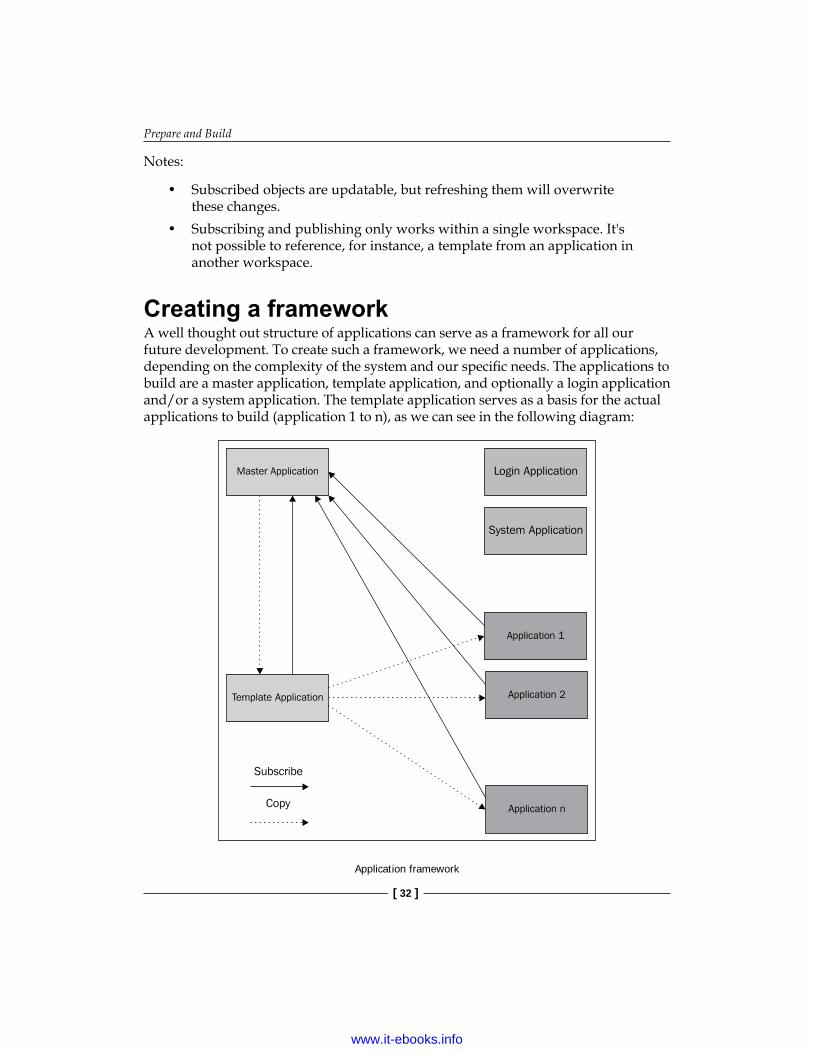
Creating a frameworkA well thought out structure of applications can serve as a framework for all our future development. To create such a framework, we need a number of applications, depending on the complexity of the system and our specific needs. The applications to build are a master application, template application, and optionally a login application and/or a system application. The template application serves as a basis for the actual applications to build (application 1 to n), as we can see in the following diagram:
Application framework
www.it-ebooks.info
Chapter 1
[ 33 ]
Master and template applicationCreate a master application that contains publishable shared components such as authentication schemes, authorization schemes, lists of values, and templates. Changes can be pushed from the master application to all subscribing applications. Other applications will reference the standard templates by subscribing to the master application.
To make newly created applications subscribe to the master application, we need to create a template application. Create the template application as a copy of the master application and change the subscription of all the shared components to reference the master application. To change the subscription of multiple templates, you can replace templates in this application with templates from another application. This can only be done for currently used templates. Another option is to delete templates and recreate them as a copy (and subscribe) from the master application. The remaining templates and shared components can be modified manually.
The template application is also the place where Page Zero is added.
In more complex situations, the master can have more than one theme or more variants of shared components. We can then create more than one template—which serve as a starting point for the applications.
To create a new application, we simply need to make a copy of the template application. Because the new application is a copy, all the subscriptions to the master application are also copied. For the shared components, it's always possible to unsubscribe. To unsubscribe from multiple templates, the Unsubscribe Templates option from the Task menu can be selected.
Login application—optionalWhen more than one application in the workspace share the same authentication, we can extend the framework with an application dedicated to the authentication process. This application will handle the login and can serve as a starting menu for the other applications.
We can create this login application as a copy of the template application. The authentication of this application is different than the other applications. Here we create the actual authentication schema, which we want to use in all our applications.
When switching between applications without having to log in again, we need to share the session state between the applications. To do so we have to give the session cookie the same name. We do that in the authentication schema of the master application.
www.it-ebooks.info
Prepare and Build
[ 34 ]
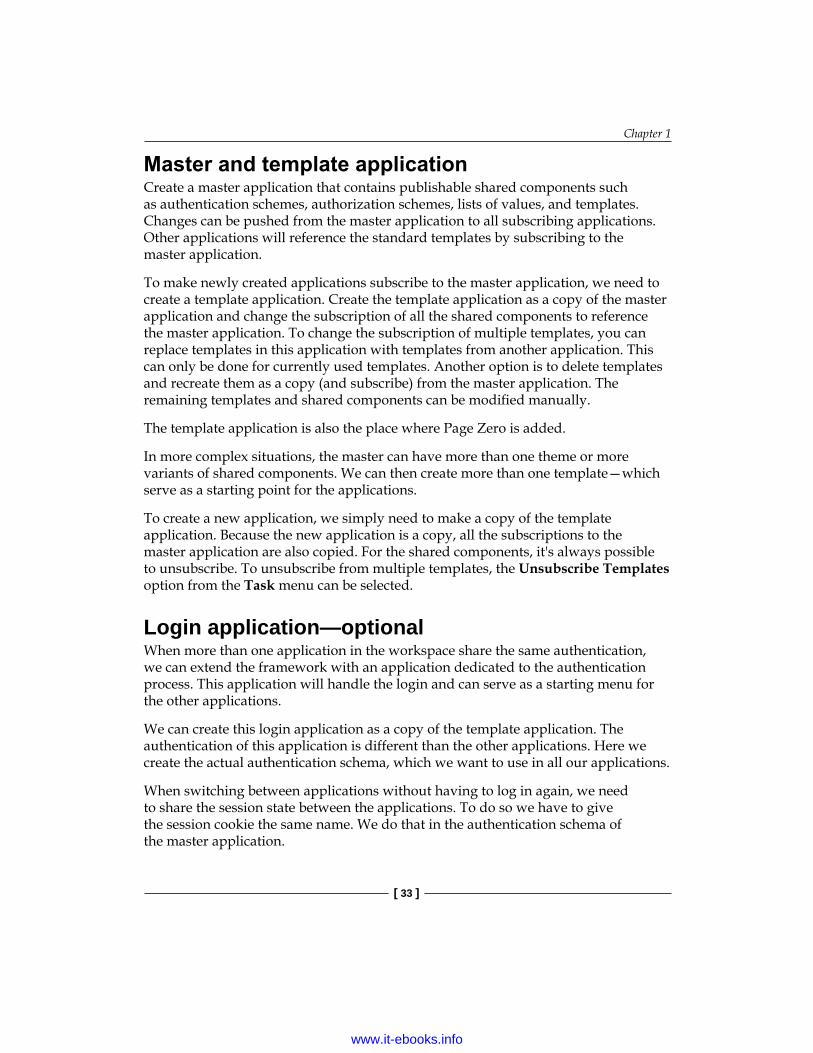
We also need to get redirected to this application when a user tries to log in directly to one of the applications. We can accomplish this by redirecting to this application by setting the Session Not Valid property of the authentication schema in the master application to redirect to the login application. In APEX 4.1.1, you are automatically redirected to the calling application after successful login.
Optionally, we can also set the logout URL to point to a specific page in the login application.
In the following screenshot, we can see the relevant authentication scheme settings for the master application:
Authentication scheme settings
www.it-ebooks.info

Chapter 1
[ 35 ]
Other examples of pages that can be included in this application are as follows:
• User registration page for self-service applications: It can also have the functionality to send a confirmation e-mail with a link in it, which leads to an activation page.
• Application start page.• Personal account settings page.• Password forgotten page to reset an old password: An email with the new
password is sent to the user. The e-mail can also contain a link to a landing page to change it immediately.
• Change the password page to let passwords expire after a given period of time.
• Help pages for the application(s).
System application—optionalBesides a login application, we can also create a system application for the more technically oriented system administrator or DBA. This application will offer control and maintenance functionality for all other applications and/or the whole system.
Possible functionality includes:
• Controlling e-mail queues.• Performance reports of the pages and applications: This is also possible in
APEX itself, but it could be useful to be able to access it in a convenient way within the application.
• Reading the APEX Feedback.• Dealing with user approval of a self-service application.• Inspecting (error) logs.• Setting system parameters such as mail host address, mail host port, colors,
and so on.• Inspecting jobs.• A structure for maintaining user and access roles: On this structure we can
build some functionality that can be incorporated into the authorization scheme of the master application.
• Maintaining system parameters.
Depending on the situation, a part of this functionality can be part of the normal application administrator tasks of the system as well.
www.it-ebooks.info
Prepare and Build
[ 36 ]
DeployingTo deploy these applications, we just need to export them and then do an import in the target environment, just as a single application. If it applies to the situation, also deploy the login and system application. It's not necessary to deploy the master or template application.
Template workspaceIf you develop many projects for different companies with different needs, we need to create a framework for every new customer/system. What we need is in fact a template workspace as the starting point for creating the actual workspace, with a master template and login/system applications in it with the minimal used common functionality.
When we start a new project, we need to create a new workspace and place all the applications in it with export and import. If we want to use the same application IDs, we have to set up such a template workspace in a separate database.
Creating applicationsNow all the definitions are in place and preparation work is done, we can finally start building our applications. Go to the Application Builder in your workspace and create an application, either by making a copy of the template application or by clicking on the Create button.
List of valuesOne of the first things that we need to tackle is the creation of list of values. There are two kinds of list of values—static and dynamic. A static list of values consists of a limited number of possible values. A dynamic list of values is defined by a query that returns the possible values. For dynamic list of values, it's also possible to make them even more dynamic, by just typing in a function that returns (dynamically) a query.
Most of the list of values will be dynamic, but we can easily think of a few static list of values that will be used in almost every system and thus are a good candidate for the template application. Two examples of them are the Yes/No and the Male/Female list of values.
www.it-ebooks.info

Chapter 1
[ 37 ]
If for some reason we create a list of values definition for an item by typing in a query, instead of referencing a pre-created shared component list of values, we can easily create a real reusable list of values for it, by clicking on the Convert LOV task. This wizard will create a reusable component list of values and replace the hand-made query with a reference to the new list of values.
There are two sources to identify our first set of application-specific list of values. The first one is for short domains, used in check constraints of a column in a table. These values can be used in static list of values. The second source is to identify base tables and create dynamic list of values of them. To identify them, see the Base Tables section discussed later in this chapter.
When creating list of values, always use the aliases d and r or display_value and return_value for the two columns in the query, just to be clear which values are displayed and returned.
After creating our first set of list of values, we need to add more list of values as we build our system. For more performance-related information on list of values, refer to Chapter 2, Leveraging the Database.
Mapping the model to pagesThe next step is to map our data model to APEX pages. With mapping we mean that for every table in the data model we must define pages (with respect to the desired functionality) to manipulate or query the data. There could be exceptions, such as parameter or logging tables, although pages for those tables could also be very useful, though not necessary for a properly functioning application.
We have some guidelines regarding pages:
• If we are just selecting and if we want the user to enhance and adjust the resulting (report) page, we should use interactive reports, otherwise we should use normal reports.
• Don't confuse the user with too many objects on a page. On the other hand, we don't want to create too many pages for simple tasks.
• Basic tables should be maintained on a single page.• Forms can always be put on a separate screen and if necessary, can be called
from a link in a report.• Be sure to use User Interface Defaults for consistency.• Use region columns where appropriate.• Use nested region where appropriate.
www.it-ebooks.info
Prepare and Build
[ 38 ]
Some other points to take into account are as follows:
• At the moment, it's not possible to put more than one tabular form or more than one interactive report on a single page.
• Drawback of having everything on a single page is the number of buttons with the same name, and so on. Rename some of them, but be consistent with that renaming throughout the application. Also, some kind of current record indicator is needed. This can be accomplished by manipulating the report template.
Basically we use the following regions for building or composing a page:
• SQL report• Interactive report• Form on a table or view• Tabular form• Form on table with report• Master detail form
When we build a page, we look at the data model and along with the requirements we try to combine one or more of these regions. Also we link those regions to each other where appropriate. While building the pages we also create the processes, validations, computations, extra items, dynamic actions, and so on, which we need to achieve the desired functionality.
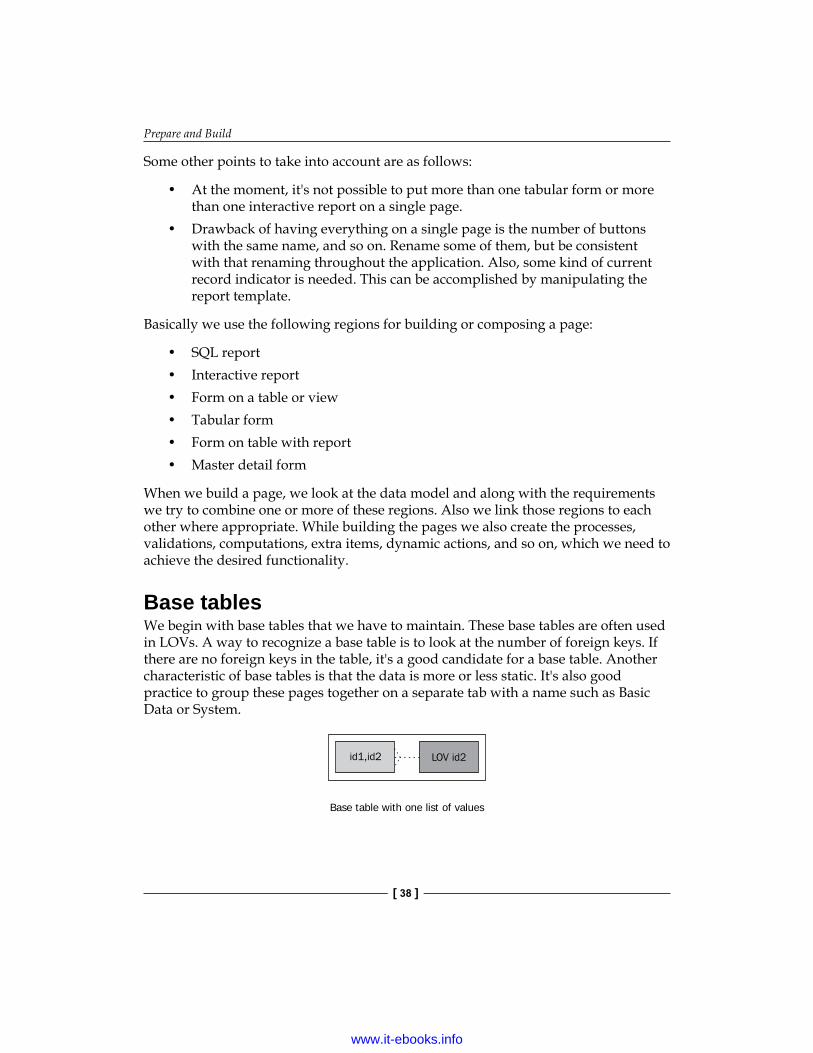
Base tablesWe begin with base tables that we have to maintain. These base tables are often used in LOVs. A way to recognize a base table is to look at the number of foreign keys. If there are no foreign keys in the table, it's a good candidate for a base table. Another characteristic of base tables is that the data is more or less static. It's also good practice to group these pages together on a separate tab with a name such as Basic Data or System.
Base table with one list of values
www.it-ebooks.info
Chapter 1
[ 39 ]
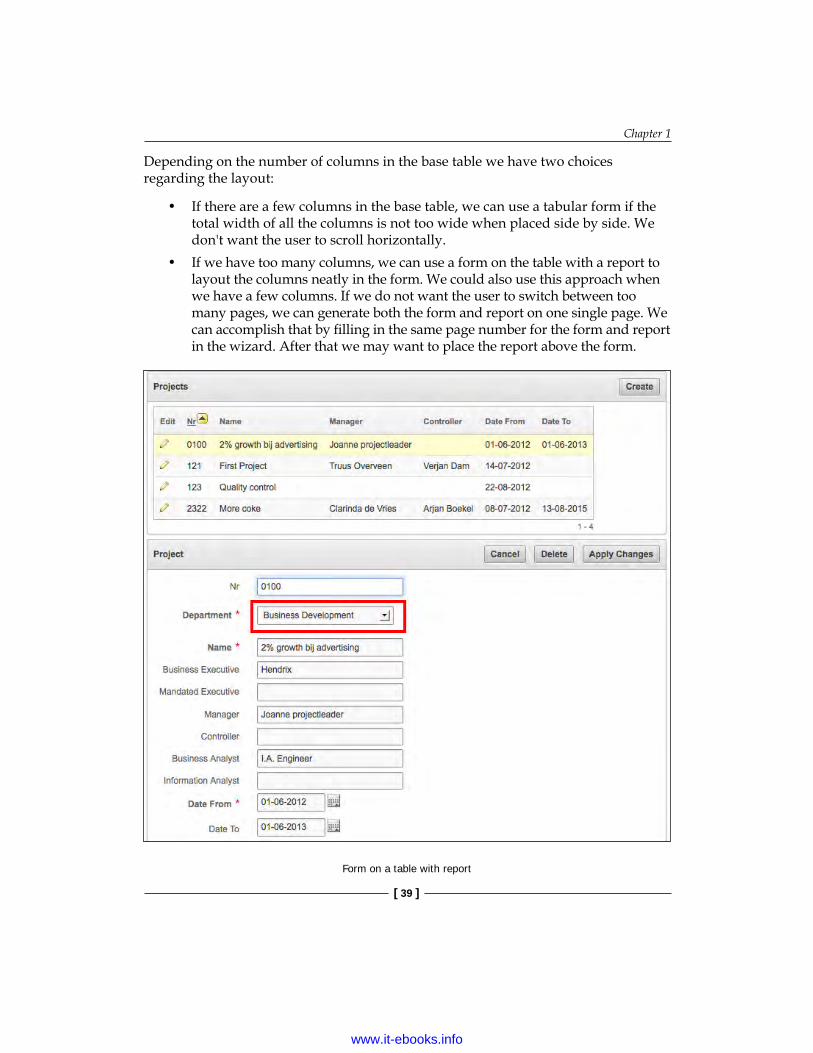
Depending on the number of columns in the base table we have two choices regarding the layout:
• If there are a few columns in the base table, we can use a tabular form if the total width of all the columns is not too wide when placed side by side. We don't want the user to scroll horizontally.
• If we have too many columns, we can use a form on the table with a report to layout the columns neatly in the form. We could also use this approach when we have a few columns. If we do not want the user to switch between too many pages, we can generate both the form and report on one single page. We can accomplish that by filling in the same page number for the form and report in the wizard. After that we may want to place the report above the form.
Form on a table with report
www.it-ebooks.info
Prepare and Build
[ 40 ]
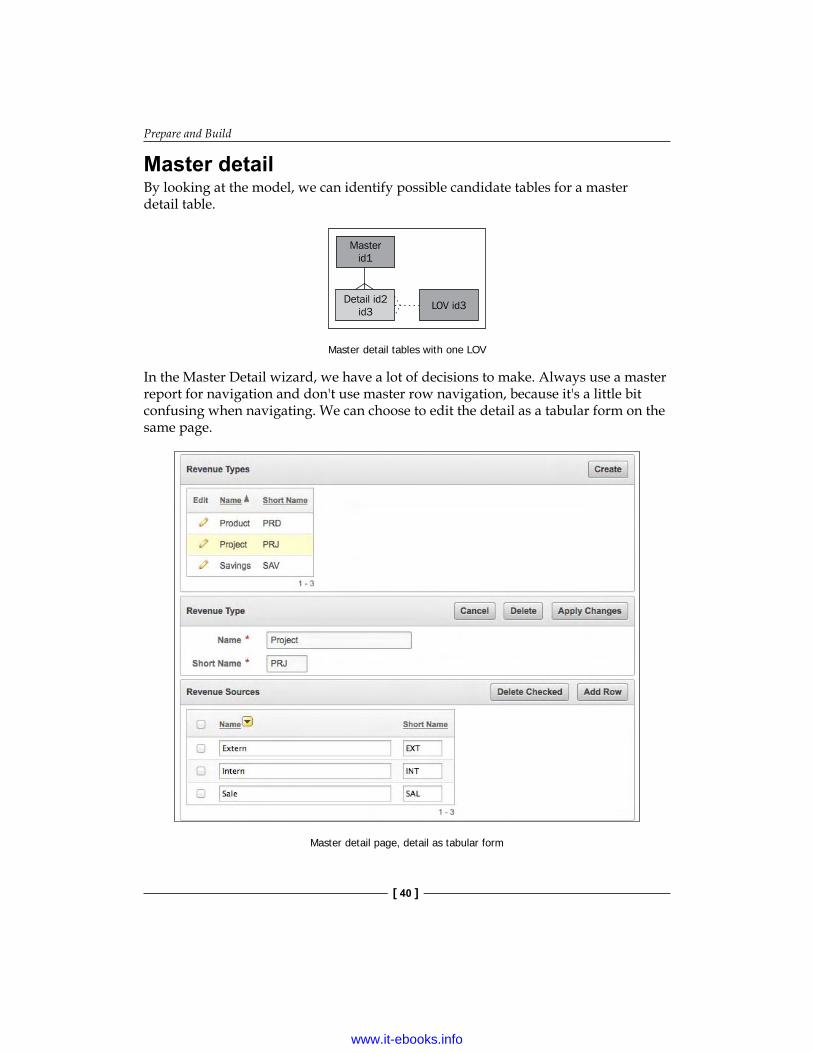
Master detailBy looking at the model, we can identify possible candidate tables for a master detail table.
Master detail tables with one LOV
In the Master Detail wizard, we have a lot of decisions to make. Always use a master report for navigation and don't use master row navigation, because it's a little bit confusing when navigating. We can choose to edit the detail as a tabular form on the same page.
Master detail page, detail as tabular form
www.it-ebooks.info

Chapter 1
[ 41 ]
Another option is to generate a report as a detail region with a form on a separate page or the same page. As with base table pages, it depends on the number of columns in the detail table.
Master detail page, detail on separate page as a form
If we do not want the user to switch between too many pages, we fill in the same page number for the components that we want to appear on the same page. After that we need to place the report above the form. Beware of using breadcrumbs when we put all the regions on one page. In that case, we will get the ORA-00001: unique constraint (APEX_040000.WWV_FLOW_UNIQUE_MENU_OPT) violated error.
Depending on whether the master is already a base table with its own page we can maintain that table here. If we don't want to maintain it here, we can hide that generated region, so the form will never be shown. We don't have to delete it, so that we can always use it later, if necessary. After the wizard, we have to rearrange some regions to get the right page.
Another variant is master detail detail. In that case, we have to link the regions together manually.
www.it-ebooks.info
Prepare and Build
[ 42 ]
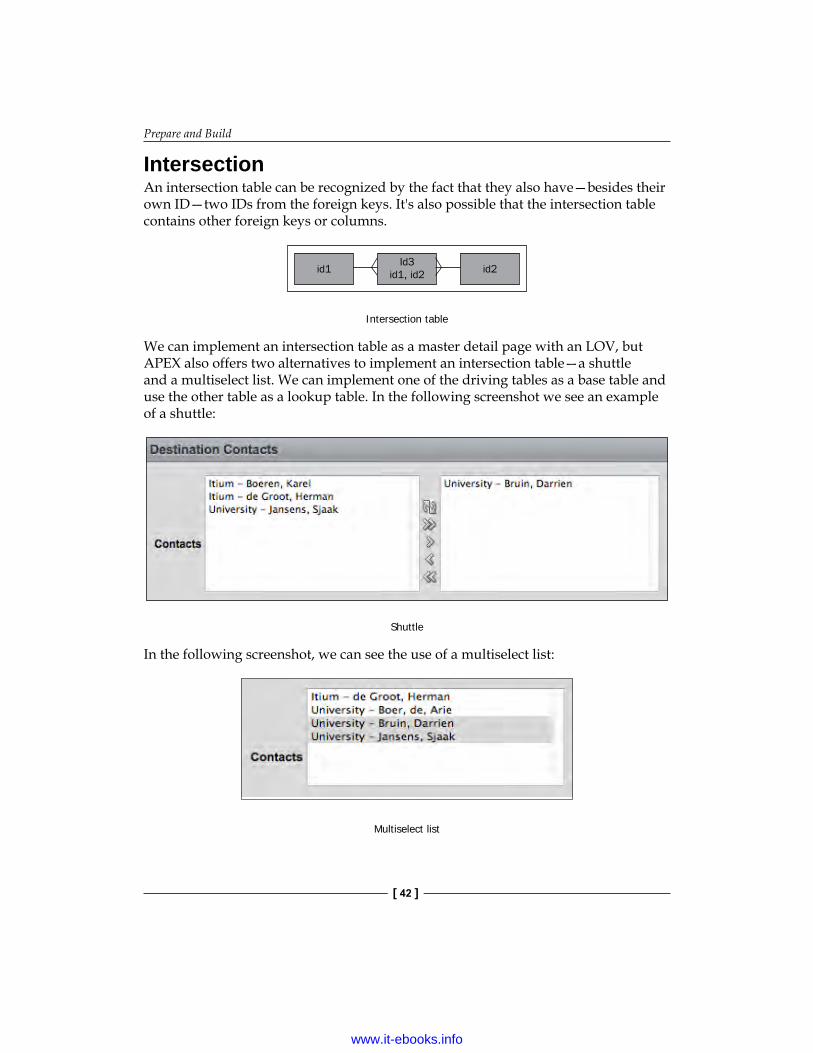
IntersectionAn intersection table can be recognized by the fact that they also have—besides their own ID—two IDs from the foreign keys. It's also possible that the intersection table contains other foreign keys or columns.
Intersection table
We can implement an intersection table as a master detail page with an LOV, but APEX also offers two alternatives to implement an intersection table—a shuttle and a multiselect list. We can implement one of the driving tables as a base table and use the other table as a lookup table. In the following screenshot we see an example of a shuttle:
Shuttle
In the following screenshot, we can see the use of a multiselect list:
Multiselect list
www.it-ebooks.info
Chapter 1
[ 43 ]
Unfortunately, APEX doesn't offer standard processes for populating and maintaining shuttles or multiselect lists. The following function and procedure can be used as a generic solution for these processes. You should put them in a package and write exception handlers to log and deal with the errors that can occur (see next chapters in this book). The function get_selectlist can be used to populate the item. We call this function in the On Load - After Header process and after the Fetch Row process, which is generated by the wizard (if present):
FUNCTION GET_SELECTLIST (P_INTERSECTION_TABLE IN VARCHAR2 ,P_LOOKUP_FK_NAME IN VARCHAR2 ,P_MASTER_FK_NAME IN VARCHAR2 ,P_MASTER_FK_VALUE IN VARCHAR2 ) RETURN VARCHAR2 IS-- Get the selectlist value as a list e.g. 1:2:4 . -- Create the process to fire After Header and after -- the wizard generated Fetch Row process.
l_selected APEX_APPLICATION_GLOBAL.VC_ARR2; l_sql_statement VARCHAR2(1000); l_dummy_number NUMBER;
BEGIN
-- Check if master foreign key value is a number l_dummy_number := TO_NUMBER(p_master_fk_value);
IF p_lookup_fk_name IS NOT NULL AND p_intersection_table IS NOT NULL AND p_master_fk_name IS NOT NULL AND p_master_fk_value IS NOT NULL THEN l_sql_statement := 'SELECT ' || p_lookup_fk_name || ' ' || 'FROM ' || p_intersection_table || ' ' || 'WHERE ' || p_master_fk_name || '=' || p_master_fk_value ; EXECUTE IMMEDIATE l_sql_statement BULK COLLECT INTO l_selected; END IF; -- Assign the colon separated list to l_selected RETURN APEX_UTIL.TABLE_TO_STRING(l_selected);
www.it-ebooks.info

Prepare and Build
[ 44 ]
EXCEPTION WHEN OTHERS THEN NULL; -- logging can be done here! END;
If the intersection item P250_shuttle is called and the driving table ID is stored in P250_id, the call to this function could look as follows:
: P250_shuttle := get_selectlist ( p_intersection_table => 'dep_pages' , p_lookup_fk_name => 'pag_id' , p_master_fk_name => 'dep_id' , P_master_fk_value => :P250_id);
Beware of SQL injection and keep P250_id hidden and protected.
The procedure set_selectlist can be used to store the changes made in the shuttle or multiselect list. We call the function On Submit - After Validations and Computations and after that we call the DML processes generated by the wizard. Be aware of a reset process. If such a process is present, we have to call our procedure before the reset process. Otherwise, we lose all our changes and nothing is saved.
PROCEDURE SET_SELECTLIST (P_LIST IN VARCHAR2 ,P_INTERSECTION_TABLE IN VARCHAR2 ,P_LOOKUP_FK_NAME IN VARCHAR2 ,P_MASTER_FK_NAME IN VARCHAR2 ,P_MASTER_FK_VALUE IN VARCHAR2 ) IS-- Insert the selectlist value (as a list e.g. 1:2:4) into -- the intersection table. This process fires After Submit -- and after the wizard generated process that handles -- inserts, updates and deletes on the master table. l_selected APEX_APPLICATION_GLOBAL.VC_ARR2; l_sql_statement VARCHAR2(1000); l_id NUMBER; l_dummy_number NUMBER; BEGIN -- Check if master foreign key value is a number l_dummy_number := TO_NUMBER(p_master_fk_value);
IF p_lookup_fk_name IS NOT NULL AND p_intersection_table IS NOT NULL AND p_master_fk_name IS NOT NULL AND p_master_fk_value IS NOT NULL THEN
www.it-ebooks.info

Chapter 1
[ 45 ]
-- Convert the colon separated string of values -- into a PL/SQL array l_selected := HTMLDB_UTIL.STRING_TO_TABLE(p_list); -- Clean up the intersection table first -- Delete necessary records only l_sql_statement := 'DELETE FROM ' || p_intersection_table || ' ' || 'WHERE ' || p_master_fk_name || '=' || p_master_fk_value || ' ' || 'AND instr('':'|| p_list ||':'','':''||TO_CHAR('|| p_lookup_fk_name||')||'':'' )=0' EXECUTE IMMEDIATE l_sql_statement;
-- Loop over the array to insert lookup_ids and -- master_id into the intersection table FOR i IN 1..l_selected.count LOOP -- Check if the record already exists l_sql_statement := 'SELECT ' || l_selected(i) ||' ' || 'FROM ' || p_intersection_table || ' ' || 'WHERE ' || p_master_fk_name || '=' || p_master_fk_value || ' ' || 'AND ' || p_lookup_fk_name ||'='|| l_selected(i); BEGIN -- when the record exists do nothing EXECUTE IMMEDIATE l_sql_statement INTO l_id; EXCEPTION WHEN OTHERS THEN -- In case there is no record, insert it l_sql_statement := 'INSERT INTO ' || p_intersection_table || ' ' || '(' || p_master_fk_name || ',' || p_lookup_fk_name || ') ' || 'VALUES (' || p_master_fk_value || ',' || l_selected(i) || ')'; -- no parent key exception BEGIN EXECUTE IMMEDIATE l_sql_statement; EXCEPTION WHEN OTHERS THEN NULL; -- logging can be done here! END; END; END LOOP; END IF;
www.it-ebooks.info
Prepare and Build
[ 46 ]
EXCEPTION WHEN OTHERS THEN NULL; -- logging can be done here!
END;
If the intersection item P250_shuttle is called and the driving table ID is stored in P250_id, the call to this procedure could look as follows:
set_selectlist ( p_list => :P250_shuttle , p_intersection_table => 'dep_pages' , p_lookup_fk_name => 'pag_id' , p_master_fk_name => 'dep_id' , p_master_fk_value => :P250_ID );
Simple reportIf we have only one simple read-only table or query for a page, we can use a SQL report or an interactive report. With the latter, the user has a lot of possibilities, including the presentation and filtering of the data.
Other pagesThere are always certain pages that don't fall in the aforementioned categories, with special functionality—for example, parameter sections or charts with management information. These pages must be built up with separate regions and after that those must be attached together. Another example is a wizard for the end user that can be used to accomplish rather complex input tasks with validations between the sub-screens.
SummaryWith every new version of APEX, new features and capabilities are being added to the tool and it's constantly evolving. It's almost impossible to describe all the possibilities of APEX in this chapter, but with the information in this chapter you will be able to kick start and structure your development.
In this chapter, we got an overview of the installation and preparation tasks before actually building the application. We discussed User Interface Defaults and the application structure. We saw techniques to transform the data model into initial screen designs. We also discussed a lot of best practices and guidelines during the building phase.
In the next chapter, we will be using some advanced database features to enhance our application.
www.it-ebooks.info

Leveraging the DatabaseEven with basic SQL and PL/SQL skills, it is possible to create applications with APEX that are both fast and secure. You probably know that the APEX engine is built by using SQL and PL/SQL. This means that all the features available in SQL and PL/SQL are available to you when you create an application with APEX. When you leverage the functionality that the database has to offer, you will get functionality developed and supported by Oracle. By utilizing the built-in functionality, you will not only save time, but also money to be spent on development. The key thing is to leverage what is available to you instead of trying to reinvent the wheel.
In this chapter we will cover the following subjects:
• Instrumentation• Efficient lookup tables• Analytic and aggregate functions• Offloading long running programs• Pipelined table functions• Resizing images• Oracle text
www.it-ebooks.info

Leveraging the Database
[ 48 ]
InstrumentationHave you ever found yourself in a situation where a user contacts you and reports a problem, which you can't reproduce on your own environment? What would really be helpful is knowing how your code was being used, with which values your stored procedures were called, and which code path the user took to get to the situation they found themselves in before they contacted you.
There is a way to know all this information, and the way to get it is by properly instrumenting your code. Instrumenting your developed code means putting in debug statements throughout. In these debug statements, there should be the information you need to track the execution of the developed code. Also, it should be complete with timestamps and other meaningful information.
Tyler Muth has written an excellent utility to help you with instrumenting your code. This package is called Logger and can be used to instrument your code—not only your APEX code, but also your database stored procedures. One of the functions that you can use specifically for APEX is to capture all items and values from session state.
The Logger package, which was written by Tyler Muth and is presently available with release 1.4, can be downloaded for free from http://sn.im/logger1.4.Please note that this is a temporary location; at the time of writing the package was moved to different locations.When all other approaches fail, you can always search on the Internet for "Muth and Logger"; undoubtedly you will find the current site where this package can be downloaded from.
Inside each of the package bodies that contains the database code, we declare a global constant as follows:
g_package constant varchar2(31) := $$plsql_unit||'.';
www.it-ebooks.info
Chapter 2
[ 49 ]
Because we declare it inside the package body, it is available for all procedures and functions inside the package body. $$plsql_unit is a predefined inquiry directive that indicates the current program unit. Unfortunately, it only returns the top-level program unit, in this case the name of the package—not the individual procedure inside the package.
Because of this limitation, we use a local constant to identify the procedure name, using the global constant that we have declared previously:
l_proc constant varchar2(61) := g_package||'test';
In this example, the name of the procedure is concatenated to the global g_package and called as test. This declaration of the variable should be placed in each procedure and function in the package. The reason we use the global constant concatenated with the name of the procedure is to support the case when the procedure needs to be transferred to a different package. When the procedure moves to a different package, the procedure name remains the same and g_package should be available in the other package as well. This way we can easily instrument our code with a template such as the following:
begin logger.log (p_text => 'start' ,p_scope => l_proc ); logger.log_information (p_text => 'p_parameter: '||p_parameter ,p_scope => l_proc ); ... logger.log (p_text => 'end' ,p_scope => l_proc );end;
www.it-ebooks.info
Leveraging the Database
[ 50 ]
The first statement in the code is to signal the beginning of the stored procedure—note the use of the local constant as being passed in the p_scope parameter, followed by recording the names, and values of the parameters with which this procedure was being called. The actual code is to be filled in on the three dots. The last line of code should be a line signaling the end of the procedure. If you are using a function instead of a procedure, the returned value should be logged prior to the final return statement. The last part of the template will look as follows, in the case of a function:
logger.log_information (p_text => 'Return Value: '||l_retval ,p_scope => l_proc ); logger.log (p_text => 'End' ,p_scope => l_proc ); return l_retval;end;
Using the Logger facility from your APEX application, the usage is slightly different. It is not advisable to use elaborate PL/SQL code in the APEX application itself use calls to stored database code instead. This centralizes the source code, which facilitates re-use.
begin logger.log (' ** Call the Stored Procedure'); package.procedure (p_parameter => 'Hello');end;
If needed, you can also store the items and values in the Logger tables:
logger.log_apex_items('Debug the called Stored Procedure');
A very handy view to query the Logger tables, is logger_logs_5_min. This view shows you all the logging statements that happened in the last five minutes. When you run into something you can't explain yet, this view will help in identifying which code path was taken and where it went wrong. There is also a similar view that shows the last 60 minutes worth of logger data. To query the APEX items and values, you need to query logger_logs_apex_items.
www.it-ebooks.info

Chapter 2
[ 51 ]
There is a lot more functionality in the Logger package, and it is certainly worth trying out by yourself. Adding timing information is just one example. Maybe it feels like overkill when you begin with instrumenting your code, but when you instrument your code for the first time you will need it to track down a bug. The information you will get from instrumenting your code is invaluable.
Comprehensive example of using the logger package
www.it-ebooks.info
Leveraging the Database
[ 52 ]
In the preceding screenshot, you can see a small example of how you can use the Logger package to instrument your code.
The steps that are performed are as follows:
1. A procedure is created with the name test. This procedure takes two arguments and the only thing that the procedure does is make calls to the Logger package.
2. The procedure is being executed in an anonymous block where the arguments are being passed by using the named notation.
3. Lastly the logger_logs_5_min view is queried to see what is being recorded. There are many more columns available, including the complete callstack.
There are different opinions regarding logging in a production environment. Should you have logging turned on all the time? I believe it should be turned on always. The moment you need logging most is when something goes wrong. This moment is impossible to predict, so keeping logging on is the only option. When you feel really strongly about turning off logging in a production environment, the Logger package also accommodates this. It is possible to install the logger_no_op (no operation) version of the package. This is simply a shell that does not log anything in tables; it does not even create the tables.
Efficient lookup tablesProperly designing the data model plays a crucial part in the success of your application. An application can have a really good-looking interface, but when the performance is very poor the users still won't be happy with the application. To ensure your user has an overall positive experience, the application needs to be visually attractive and responsive to the actions that the user carries out.
Designing the application begins with designing a logical and physical data model. There are many types of database objects, that can be used in an Oracle database, such as heap tables, index organized tables, clusters, b-tree indexes, or bitmap indexes. Each of these objects has its own usage. Before implementing the physical data model, you should know each of these object types and when to use them properly. You will not be able to know which object type to choose, if you don't know how the application is going to be used. Knowing how the application is going to be used, in combination with the available data objects, is key to the success of the application. Your DBA should be able to help you in implementing the proper database objects for your application.
www.it-ebooks.info

Chapter 2
[ 53 ]
In this section, we will take a closer look at one of the most common types of structure in almost every data model—the lookup table.
Lookup tables are tables where the data change is slow, meaning that the data hardly (if ever after the initial load) changes. The data is inserted once, but is queried very frequently. These tables are often used as List of Values (LOV) in your application. Because these tables are queried so frequently, it is important to make the actual query as efficient as possible. Tables like these are excellent candidates to be implemented as single-table hash clusters, provided that the size of the table is primarily static and the lookup is done with an equality query. Another option is to use an index-organized table; think of it as a combination of an index and table in one structure. This will be discussed later in this chapter.
Single-table hash clustersDetailed explanation about single-table hash clusters can be found in the Oracle documentation—Oracle database concepts, 11g Release 2 (11.2)—at http://docs.oracle.com/cd/E11882_01/server.112/e25789/tablecls.htm#CNCPT88831.
"A single-table hash cluster is an optimized version of a hash cluster that supports only one table at a time. A one-to-one mapping exists between hash keys and rows. A single-table hash cluster can be beneficial when users require rapid access to a table by primary key. For example, users often look up an employee record in the employees table by employee_id."
A lookup table fits this description like a glove.
Normally a database block stores data for exactly one table. A cluster allows you to store data from more than one table on a block. However this is not the case with a single-table hash cluster. As you might have guessed from the name, only the data of a single table is stored in the cluster. The first thing we need before we can create a single-table hash cluster, is the cluster itself:
SQL> create cluster lookup_c 2 (id number) 3 single table 4 hashkeys 50000 5 size 50 6 /
Cluster created.
www.it-ebooks.info
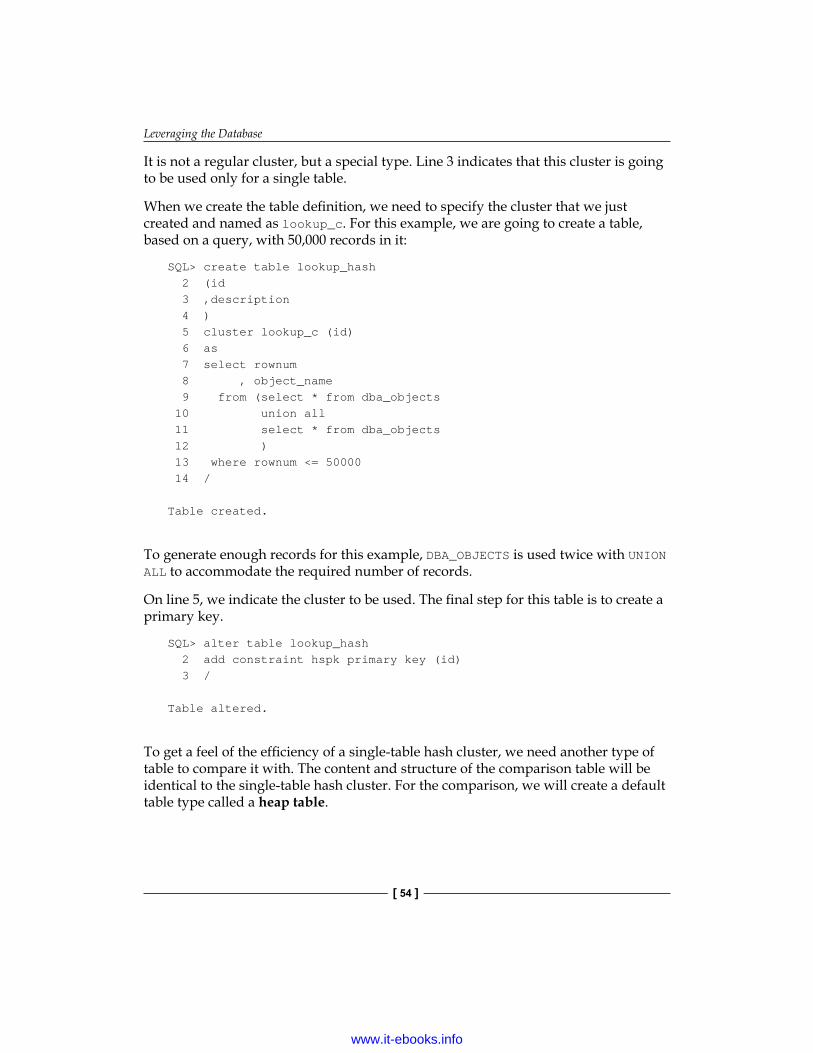
Leveraging the Database
[ 54 ]
It is not a regular cluster, but a special type. Line 3 indicates that this cluster is going to be used only for a single table.
When we create the table definition, we need to specify the cluster that we just created and named as lookup_c. For this example, we are going to create a table, based on a query, with 50,000 records in it:
SQL> create table lookup_hash 2 (id 3 ,description 4 ) 5 cluster lookup_c (id) 6 as 7 select rownum 8 , object_name 9 from (select * from dba_objects 10 union all 11 select * from dba_objects 12 ) 13 where rownum <= 50000 14 /
Table created.
To generate enough records for this example, DBA_OBJECTS is used twice with UNION ALL to accommodate the required number of records.
On line 5, we indicate the cluster to be used. The final step for this table is to create a primary key.
SQL> alter table lookup_hash 2 add constraint hspk primary key (id) 3 /
Table altered.
To get a feel of the efficiency of a single-table hash cluster, we need another type of table to compare it with. The content and structure of the comparison table will be identical to the single-table hash cluster. For the comparison, we will create a default table type called a heap table.
www.it-ebooks.info

Chapter 2
[ 55 ]
The following statements will create the heap table with a primary key constraint for the comparison:
SQL> create table lookup_heap_t 2 as 3 select rownum id 4 , object_name description 5 from (select * from dba_objects 6 union all 7 select * from dba_objects 8 ) 9 where rownum <= 50000 10 /
Table created.
SQL> alter table lookup_heap_t 2 add constraint hpk primary key (id) 3 /
Table altered.
Now that both tables are in place, statistics are gathered on both tables. Consider the following query:
SQL> begin 2 dbms_stats.gather_table_stats (user 3 ,'LOOKUP_HASH' 4 ,cascade => true 5 ); 6 dbms_stats.gather_table_stats (user 7 ,'LOOKUP_HEAP_T' 8 ,cascade => true 9 ); 10 end; 11 /
PL/SQL procedure successfully completed.
www.it-ebooks.info

Leveraging the Database
[ 56 ]
The following is just a quick test to verify whether there is data in the table or not, and to get the same amount of caching for a single row lookup:
SQL> select * 2 from lookup_hash 3 where id = 4325 4 /
ID DESCRIPTION---------- ------------------------------ 4325 DBMS_STAT_FUNCS_AUX_LIB
SQL> select * 2 from lookup_heap_t 3 where id = 4325 4 /
ID DESCRIPTION---------- ------------------------------ 4325 DBMS_STAT_FUNCS_AUX_LIB
Both queries return the same data from the table; let's have a look at the explain plan for both statements.
Before you can examine the explain plan and use the autotrace facility as described in the examples, you need to set up PLAN_TABLE and create the PLUSTRACE role. This role should be granted to the user that is running the examples. PLAN_TABLE can be created by using the utlxplan.sql file. The PLUSTRACE role can be created by using the plustrce.sql file.The location of these files depends on your operating system. You might need to get your DBA involved, as the PLUSTRACE role needs to be set up by SYS.
www.it-ebooks.info
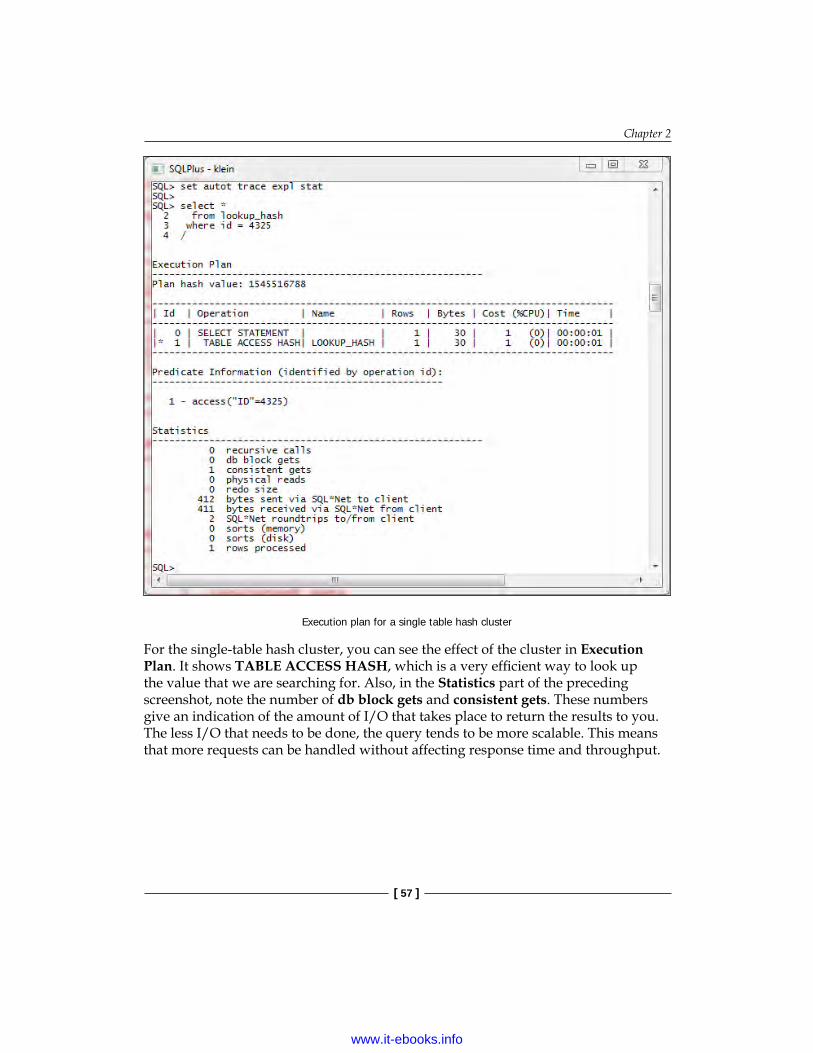
Chapter 2
[ 57 ]
Execution plan for a single table hash cluster
For the single-table hash cluster, you can see the effect of the cluster in Execution Plan. It shows TABLE ACCESS HASH, which is a very efficient way to look up the value that we are searching for. Also, in the Statistics part of the preceding screenshot, note the number of db block gets and consistent gets. These numbers give an indication of the amount of I/O that takes place to return the results to you. The less I/O that needs to be done, the query tends to be more scalable. This means that more requests can be handled without affecting response time and throughput.
www.it-ebooks.info
Leveraging the Database
[ 58 ]
From the preceding screenshot, note that the value with consistent gets is only 1.
Let's do the same exercise with the heap table.
Execution plan for a heap table
The heap table query uses INDEX UNIQUE SCAN, the index of the primary key, to look up the values that we are looking for. It is also a very efficient way to look up the values. As you can see in the Statistics part, the number of consistent gets is slightly higher (3) than the number of consistent gets of the single-table hash cluster query. This is the first indication that the single-table hash cluster query is slightly more efficient compared to using a regular heap table to do a lookup.
www.it-ebooks.info
Chapter 2
[ 59 ]
Index-organized tablesThe characteristic feature of an index-organized table is the way in which it stores the data. Instead of storing the data where it fits, like with a heap table, the data is stored in a structure similar to a b-tree index. This means that not only the key is stored in the index structure, but also the other data resides there as well. Because you traverse the index structure and immediately find the data that you are looking for, this type of table is very efficient for lookup purposes.
Because the data needs to be stored alongside the key, it can only be stored at a certain location. Hence, performing the INSERT or UPDATE operations on data in index-organized tables is not as efficient as storing data in a heap table. In the case of lookup tables, which are being discussed here, data changes slowly and is created once but queried over and over again, making the DML operations less prone to an issue. Unlike the single-table hash cluster, where you need to know the size of the table in advance and allocate this space as well, this is not necessary with an index-organized table.
To compare an index-organized table to a regular heap table, an index-organized table that resembles the previously created heap table is created.
SQL> create table lookup_io_t 2 (id primary key, description) 3 organization index 4 as 5 select rownum id 6 , object_name description 7 from (select * from dba_objects 8 union all 9 select * from dba_objects 10 ) 11 where rownum <= 50000 12 /
Table created.
An index-organized table needs to have a primary key. The primary key is defined on line 2 of the preceding code sample. To indicate that an index-organized table is needed, include organization index on line 3.
Just like the single-table hash cluster and the heap table were populated with 50,000 records, the index-organized table is also populated with 50,000 records with the same structure.
www.it-ebooks.info
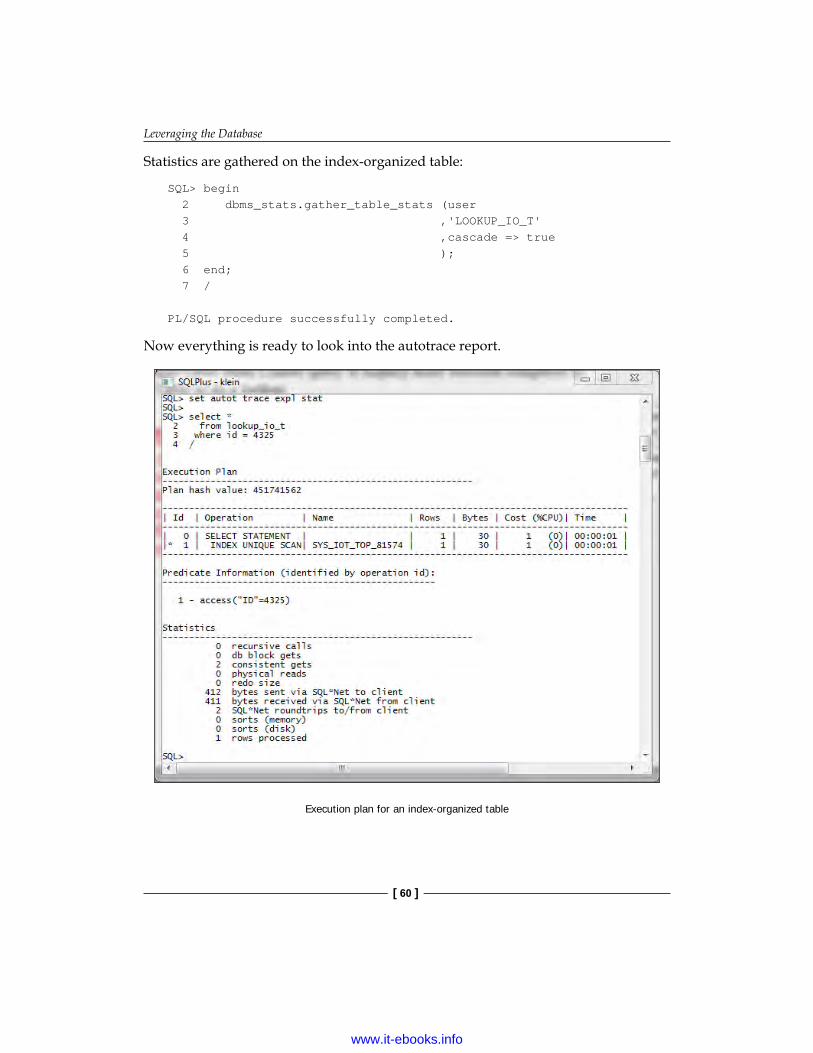
Leveraging the Database
[ 60 ]
Statistics are gathered on the index-organized table:
SQL> begin 2 dbms_stats.gather_table_stats (user 3 ,'LOOKUP_IO_T' 4 ,cascade => true 5 ); 6 end; 7 /
PL/SQL procedure successfully completed.
Now everything is ready to look into the autotrace report.
Execution plan for an index-organized table
www.it-ebooks.info
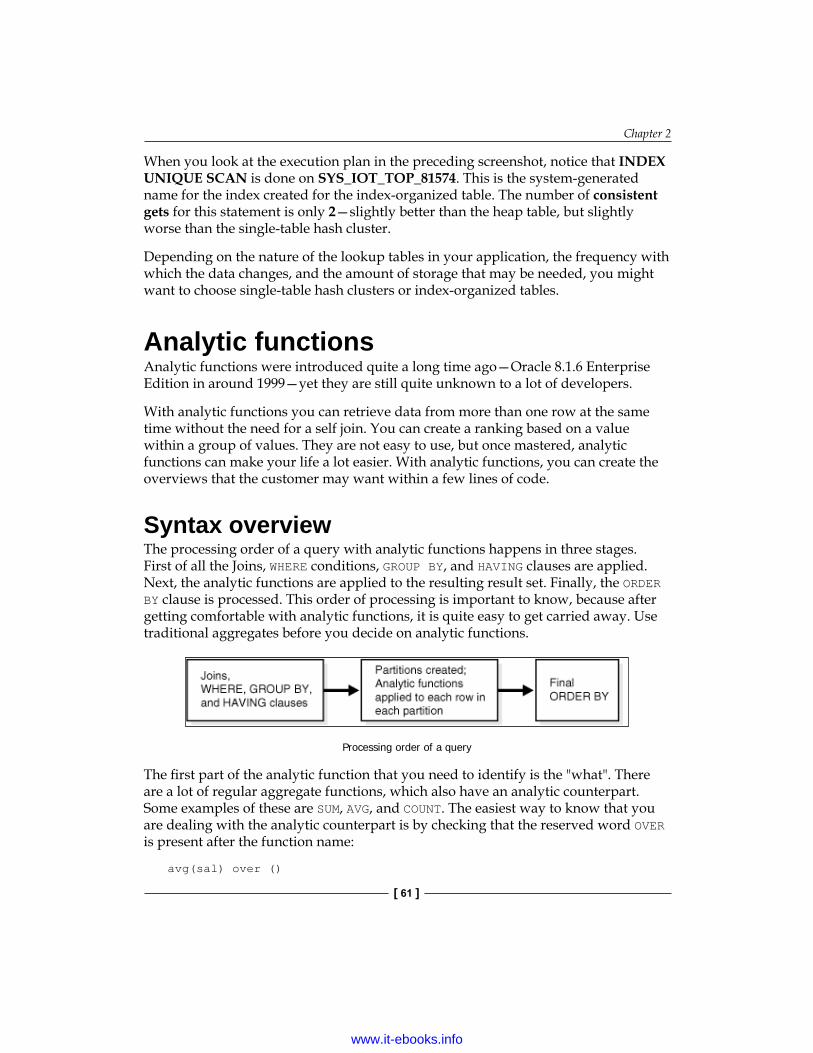
Chapter 2
[ 61 ]
When you look at the execution plan in the preceding screenshot, notice that INDEX UNIQUE SCAN is done on SYS_IOT_TOP_81574. This is the system-generated name for the index created for the index-organized table. The number of consistent gets for this statement is only 2—slightly better than the heap table, but slightly worse than the single-table hash cluster.
Depending on the nature of the lookup tables in your application, the frequency with which the data changes, and the amount of storage that may be needed, you might want to choose single-table hash clusters or index-organized tables.
Analytic functionsAnalytic functions were introduced quite a long time ago—Oracle 8.1.6 Enterprise Edition in around 1999—yet they are still quite unknown to a lot of developers.
With analytic functions you can retrieve data from more than one row at the same time without the need for a self join. You can create a ranking based on a value within a group of values. They are not easy to use, but once mastered, analytic functions can make your life a lot easier. With analytic functions, you can create the overviews that the customer may want within a few lines of code.
Syntax overviewThe processing order of a query with analytic functions happens in three stages. First of all the Joins, WHERE conditions, GROUP BY, and HAVING clauses are applied. Next, the analytic functions are applied to the resulting result set. Finally, the ORDER BY clause is processed. This order of processing is important to know, because after getting comfortable with analytic functions, it is quite easy to get carried away. Use traditional aggregates before you decide on analytic functions.
Processing order of a query
The first part of the analytic function that you need to identify is the "what". There are a lot of regular aggregate functions, which also have an analytic counterpart. Some examples of these are SUM, AVG, and COUNT. The easiest way to know that you are dealing with the analytic counterpart is by checking that the reserved word OVER is present after the function name:
avg(sal) over ()
www.it-ebooks.info
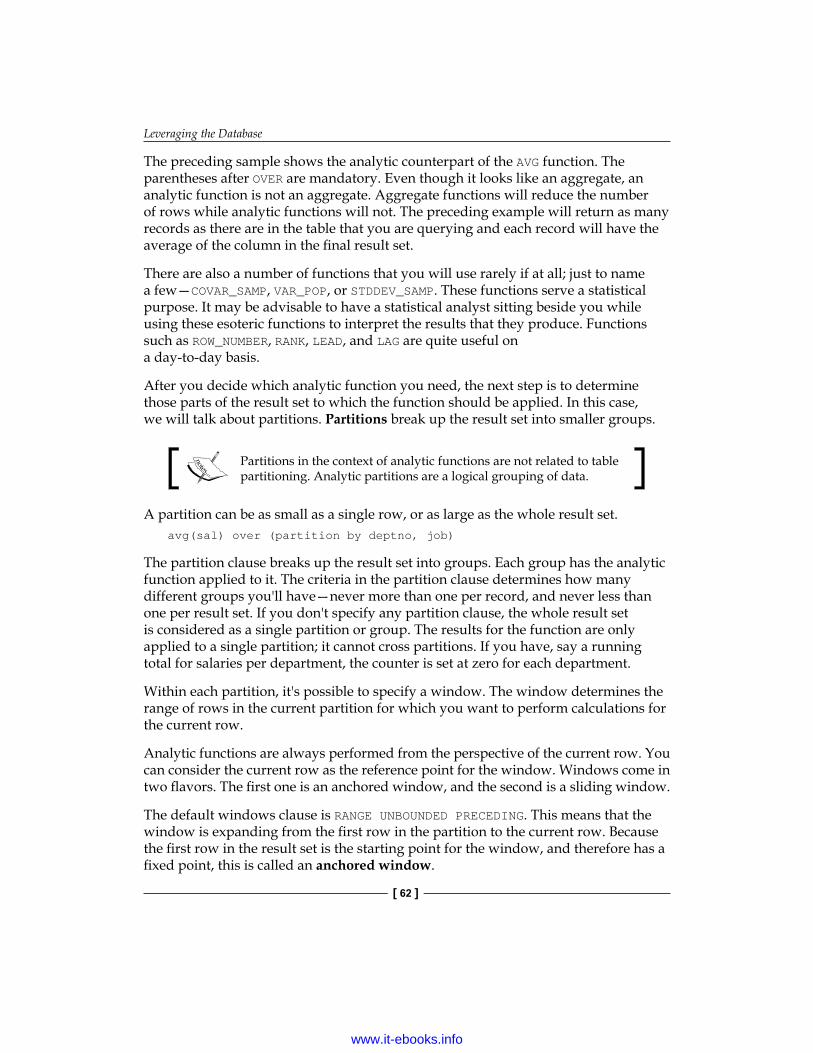
Leveraging the Database
[ 62 ]
The preceding sample shows the analytic counterpart of the AVG function. The parentheses after OVER are mandatory. Even though it looks like an aggregate, an analytic function is not an aggregate. Aggregate functions will reduce the number of rows while analytic functions will not. The preceding example will return as many records as there are in the table that you are querying and each record will have the average of the column in the final result set.
There are also a number of functions that you will use rarely if at all; just to name a few—COVAR_SAMP, VAR_POP, or STDDEV_SAMP. These functions serve a statistical purpose. It may be advisable to have a statistical analyst sitting beside you while using these esoteric functions to interpret the results that they produce. Functions such as ROW_NUMBER, RANK, LEAD, and LAG are quite useful on a day-to-day basis.
After you decide which analytic function you need, the next step is to determine those parts of the result set to which the function should be applied. In this case, we will talk about partitions. Partitions break up the result set into smaller groups.
Partitions in the context of analytic functions are not related to table partitioning. Analytic partitions are a logical grouping of data.
A partition can be as small as a single row, or as large as the whole result set.avg(sal) over (partition by deptno, job)
The partition clause breaks up the result set into groups. Each group has the analytic function applied to it. The criteria in the partition clause determines how many different groups you'll have—never more than one per record, and never less than one per result set. If you don't specify any partition clause, the whole result set is considered as a single partition or group. The results for the function are only applied to a single partition; it cannot cross partitions. If you have, say a running total for salaries per department, the counter is set at zero for each department.
Within each partition, it's possible to specify a window. The window determines the range of rows in the current partition for which you want to perform calculations for the current row.
Analytic functions are always performed from the perspective of the current row. You can consider the current row as the reference point for the window. Windows come in two flavors. The first one is an anchored window, and the second is a sliding window.
The default windows clause is RANGE UNBOUNDED PRECEDING. This means that the window is expanding from the first row in the partition to the current row. Because the first row in the result set is the starting point for the window, and therefore has a fixed point, this is called an anchored window.
www.it-ebooks.info
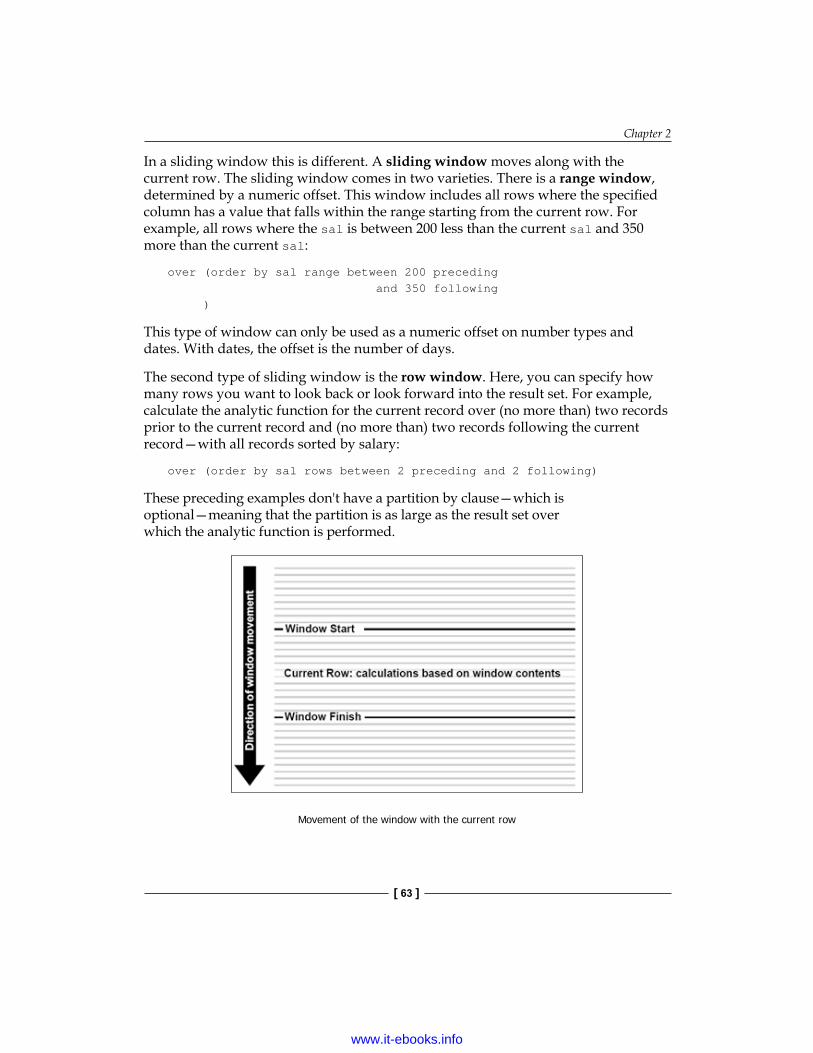
Chapter 2
[ 63 ]
In a sliding window this is different. A sliding window moves along with the current row. The sliding window comes in two varieties. There is a range window, determined by a numeric offset. This window includes all rows where the specified column has a value that falls within the range starting from the current row. For example, all rows where the sal is between 200 less than the current sal and 350 more than the current sal:
over (order by sal range between 200 preceding and 350 following )
This type of window can only be used as a numeric offset on number types and dates. With dates, the offset is the number of days.
The second type of sliding window is the row window. Here, you can specify how many rows you want to look back or look forward into the result set. For example, calculate the analytic function for the current record over (no more than) two records prior to the current record and (no more than) two records following the current record—with all records sorted by salary:
over (order by sal rows between 2 preceding and 2 following)
These preceding examples don't have a partition by clause—which is optional—meaning that the partition is as large as the result set over which the analytic function is performed.
Movement of the window with the current row
www.it-ebooks.info

Leveraging the Database
[ 64 ]
ExamplesLet's look at some of the most common usages of analytic functions. Of course, there are many more possibilities. These merely serve as examples to get you going. It is possible to reproduce these result sets with plain old SQL, but the analytic way is so much more attractive and elegant, and often better in terms of performance. A lot of questions on the SQL and PL/SQL forum on Oracle Technology Network can be answered by using analytic functions. The most common questions are used as examples in this section.
Running totalsRunning totals are easy to create, using analytic functions. To accomplish something similar the traditional way can be quite challenging. Let's see an example of a running totals query:
SQL> select empno 2 , ename 3 , sal 4 , sum (sal) over (order by empno) overall_total 5 from emp 6 order by empno 7 /
EMPNO ENAME SAL OVERALL_TOTAL---------- ---------- ---------- ---------------- 7369 SMITH 800 800 7499 ALLEN 1600 2400 7521 WARD 1250 3650 7566 JONES 2975 6625 7654 MARTIN 1250 7875 7698 BLAKE 2850 10725 7782 CLARK 2450 13175 7788 SCOTT 3000 16175 7839 KING 5000 21175 7844 TURNER 1500 22675 7876 ADAMS 1100 23775 7900 JAMES 950 24725 7902 FORD 3000 27725 7934 MILLER 1300 29025
www.it-ebooks.info

Chapter 2
[ 65 ]
In this example, you can see that the partition keyword is omitted; therefore there's only one single group. There is, however, a window that is expanding with each row. The window is determined by the order by clause in line 4. The (implicit) window clause in this example is RANGE UNBOUNDED PRECEDING, which is the default for the Window clause. This means that all preceding salaries are added to the current row's salary, thereby creating a running total.
If we look at EMPNO 7521 (WARD), we can see that the OVERALL_TOTAL column shows 3650. This is a summary of all preceding salaries, including Ward's (800 + 1600 + 1250). To make this a running total per department, simply add a partition clause as done in the following example:
SQL> select empno 2 , ename 3 , sal 4 , deptno 5 , sum (sal) over (partition by deptno 6 order by empno 7 ) department_total 8 from emp 9 order by deptno, empno 10 /
EMPNO ENAME SAL DEPTNO DEPARTMENT_TOTAL---------- ---------- ---------- ---------- ---------------- 7782 CLARK 2450 10 2450 7839 KING 5000 10 7450 7934 MILLER 1300 10 8750 7369 SMITH 800 20 800 7566 JONES 2975 20 3775 7788 SCOTT 3000 20 6775 7876 ADAMS 1100 20 7875 7902 FORD 3000 20 10875 7499 ALLEN 1600 30 1600 7521 WARD 1250 30 2850 7654 MARTIN 1250 30 4100 7698 BLAKE 2850 30 6950 7844 TURNER 1500 30 8450 7900 JAMES 950 30 9400
www.it-ebooks.info

Leveraging the Database
[ 66 ]
When we look at EMPNO 7521 (WARD) again, we see that the DEPARTMENT_TOTAL column shows 2850. This is a summary of all preceding salaries within his department (1600 + 1250). Just to show the effect of a running total more clearly, I adjusted the final order by predicate to match the window's sort condition. It should be noted that there's no need to do this. When the final order by is different from the sort order in the partition, the final result can be rather confusing. The final order by has no impact on the values determined by the analytic functions.
Visualizing the windowTo help you visualize where a window starts and where it ends, you can use the analytic functions FIRST_VALUE and LAST_VALUE, which return the specified column value for the first or last record in the window:
SQL> select ename 2 , sum (sal) over (partition by deptno 3 order by empno 4 ) dept_total 5 , first_value (ename) over (partition by deptno 6 order by empno 7 ) fv 8 , last_value (ename) over (partition by deptno 9 order by empno 10 ) lv 11 from emp 12 where deptno = 20 13 order by deptno 14 , empno 15 /
ENAME DEPT_TOTAL FV LV---------- ---------- ---------- ----------SMITH 800 SMITH SMITHJONES 3775 SMITH JONESSCOTT 6775 SMITH SCOTTADAMS 7875 SMITH ADAMSFORD 10875 SMITH FORD
Here you can see that the window is expanding per row. When we look at SCOTT, the window starts with the employee named SMITH and ends with the current row (SCOTT).
www.it-ebooks.info
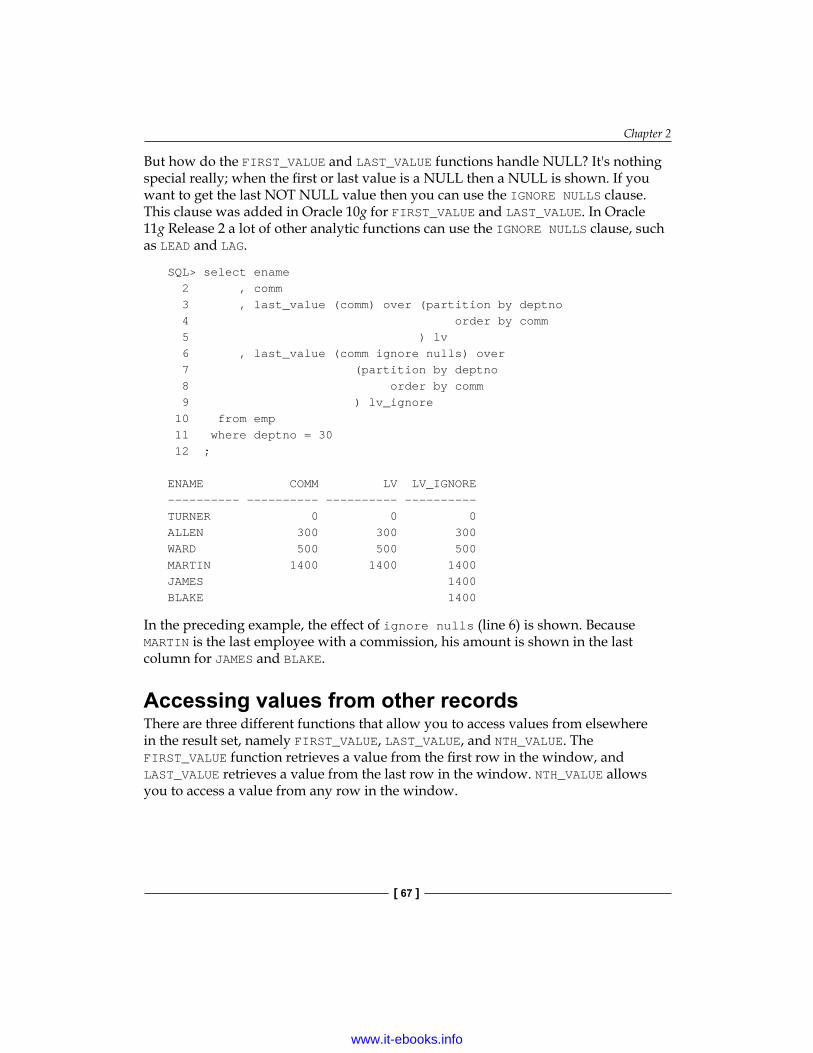
Chapter 2
[ 67 ]
But how do the FIRST_VALUE and LAST_VALUE functions handle NULL? It's nothing special really; when the first or last value is a NULL then a NULL is shown. If you want to get the last NOT NULL value then you can use the IGNORE NULLS clause. This clause was added in Oracle 10g for FIRST_VALUE and LAST_VALUE. In Oracle 11g Release 2 a lot of other analytic functions can use the IGNORE NULLS clause, such as LEAD and LAG.
SQL> select ename 2 , comm 3 , last_value (comm) over (partition by deptno 4 order by comm 5 ) lv 6 , last_value (comm ignore nulls) over 7 (partition by deptno 8 order by comm 9 ) lv_ignore 10 from emp 11 where deptno = 30 12 ;
ENAME COMM LV LV_IGNORE---------- ---------- ---------- ----------TURNER 0 0 0ALLEN 300 300 300WARD 500 500 500MARTIN 1400 1400 1400JAMES 1400BLAKE 1400
In the preceding example, the effect of ignore nulls (line 6) is shown. Because MARTIN is the last employee with a commission, his amount is shown in the last column for JAMES and BLAKE.
Accessing values from other recordsThere are three different functions that allow you to access values from elsewhere in the result set, namely FIRST_VALUE, LAST_VALUE, and NTH_VALUE. The FIRST_VALUE function retrieves a value from the first row in the window, and LAST_VALUE retrieves a value from the last row in the window. NTH_VALUE allows you to access a value from any row in the window.
www.it-ebooks.info

Leveraging the Database
[ 68 ]
With these functions, you can do a comparison between different rows in your result set. For example, determining the difference between the highest earning employee and the second highest earning employee:
SQL> select deptno 2 , ename 3 , first_value(sal) over (partition by deptno 4 order by sal desc 5 ) 6 - nth_value(sal,2) from first 7 over (partition by deptno 8 order by sal desc 9 ) 10 top2_difference 11 from emp 12 /
DEPTNO ENAME TOP2_DIFFERENCE---------- ---------- --------------- 10 KING 10 CLARK 2550 10 MILLER 2550 20 SCOTT 0 20 FORD 0 20 JONES 0 20 ADAMS 0 20 SMITH 0 30 BLAKE 30 ALLEN 1250 30 TURNER 1250 30 MARTIN 1250 30 WARD 1250 30 JAMES 1250
The second argument with NTH_VALUE (line 6) identifies the nth value in the window. As you may notice on line 6 in the preceding code, there is a from first clause. This clause determines where to start counting from in the result set. There is also a from last clause. FIRST_VALUE can also be retrieved with the following statement:
nth_value (sal, 1) from first over ()
LAST_VALUE can be retrieved as follows:
nth_value (sal, 1) from last over ()
www.it-ebooks.info

Chapter 2
[ 69 ]
Another way of accessing other rows in the result setOccasionally, it's necessary to access values from different rows in the result set. The LAG and LEAD functions do just that. LAG looks at values from previous rows, and LEAD looks to the following records in the result set. The current row is always the starting point for the number of rows you want to look forward or back into the result set. The need for a self-join has vanished in many cases.
Let's take a look at another example. For each employee, we want to show the next employee to be hired in the same job:
SQL> select ename, job 2 , hiredate 3 , lead (ename) over (partition by job 4 order by hiredate 5 ) next_hiree_in_job 6 from emp 7 order by job 8 , hiredate;
ENAME JOB HIREDATE NEXT_HIREE---------- --------- --------- ----------FORD ANALYST 03-DEC-81 SCOTTSCOTT ANALYST 19-APR-87SMITH CLERK 17-DEC-80 JAMESJAMES CLERK 03-DEC-81 MILLERMILLER CLERK 23-JAN-82 ADAMSADAMS CLERK 23-MAY-87JONES MANAGER 02-APR-81 BLAKEBLAKE MANAGER 01-MAY-81 CLARKCLARK MANAGER 09-JUN-81KING PRESIDENT 17-NOV-81ALLEN SALESMAN 20-FEB-81 WARDWARD SALESMAN 22-FEB-81 TURNERTURNER SALESMAN 08-SEP-81 MARTINMARTIN SALESMAN 28-SEP-81
In this example, we used the LEAD function to look to the next records. We divided the results in partitions based on the job and sorted them by hiredate. When we look at the managers, you can see that the next hiree from Blake's perspective is Clark. From Clark's perspective there were no new managers hired; that's why this row's value for the NEXT_HIREE column is null.
www.it-ebooks.info
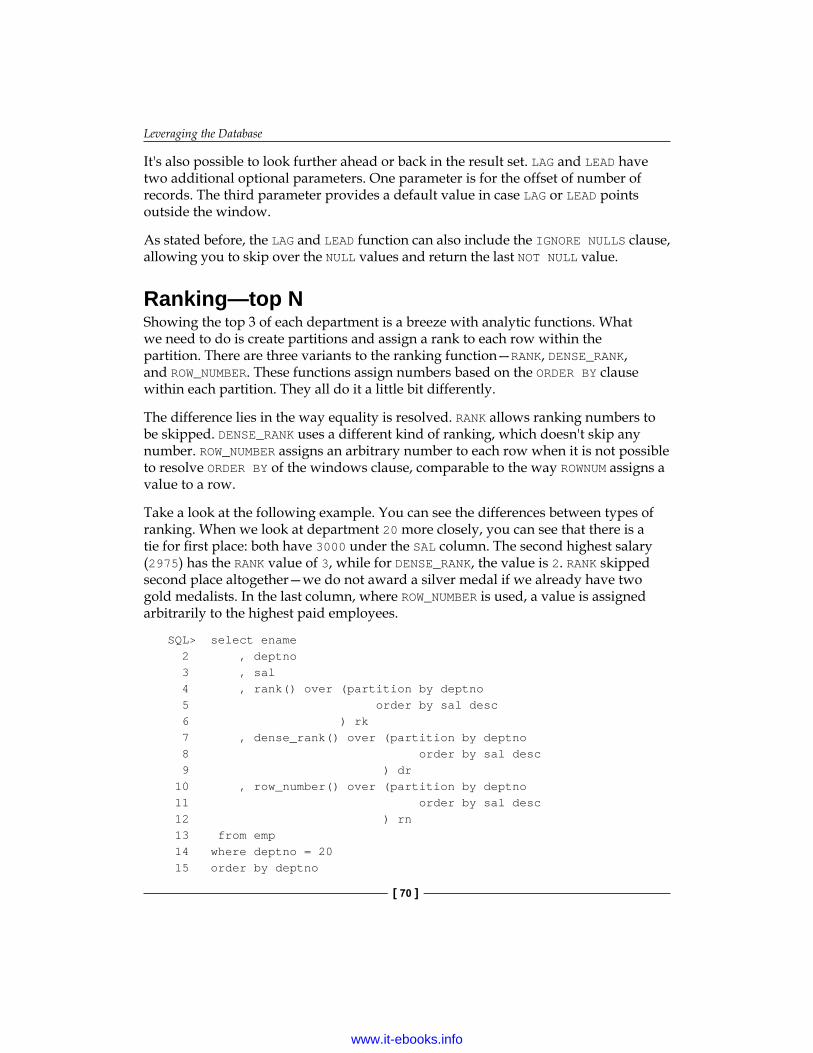
Leveraging the Database
[ 70 ]
It's also possible to look further ahead or back in the result set. LAG and LEAD have two additional optional parameters. One parameter is for the offset of number of records. The third parameter provides a default value in case LAG or LEAD points outside the window.
As stated before, the LAG and LEAD function can also include the IGNORE NULLS clause, allowing you to skip over the NULL values and return the last NOT NULL value.
Ranking—top NShowing the top 3 of each department is a breeze with analytic functions. What we need to do is create partitions and assign a rank to each row within the partition. There are three variants to the ranking function—RANK, DENSE_RANK, and ROW_NUMBER. These functions assign numbers based on the ORDER BY clause within each partition. They all do it a little bit differently.
The difference lies in the way equality is resolved. RANK allows ranking numbers to be skipped. DENSE_RANK uses a different kind of ranking, which doesn't skip any number. ROW_NUMBER assigns an arbitrary number to each row when it is not possible to resolve ORDER BY of the windows clause, comparable to the way ROWNUM assigns a value to a row.
Take a look at the following example. You can see the differences between types of ranking. When we look at department 20 more closely, you can see that there is a tie for first place: both have 3000 under the SAL column. The second highest salary (2975) has the RANK value of 3, while for DENSE_RANK, the value is 2. RANK skipped second place altogether—we do not award a silver medal if we already have two gold medalists. In the last column, where ROW_NUMBER is used, a value is assigned arbitrarily to the highest paid employees.
SQL> select ename 2 , deptno 3 , sal 4 , rank() over (partition by deptno 5 order by sal desc 6 ) rk 7 , dense_rank() over (partition by deptno 8 order by sal desc 9 ) dr 10 , row_number() over (partition by deptno 11 order by sal desc 12 ) rn 13 from emp 14 where deptno = 20 15 order by deptno
www.it-ebooks.info
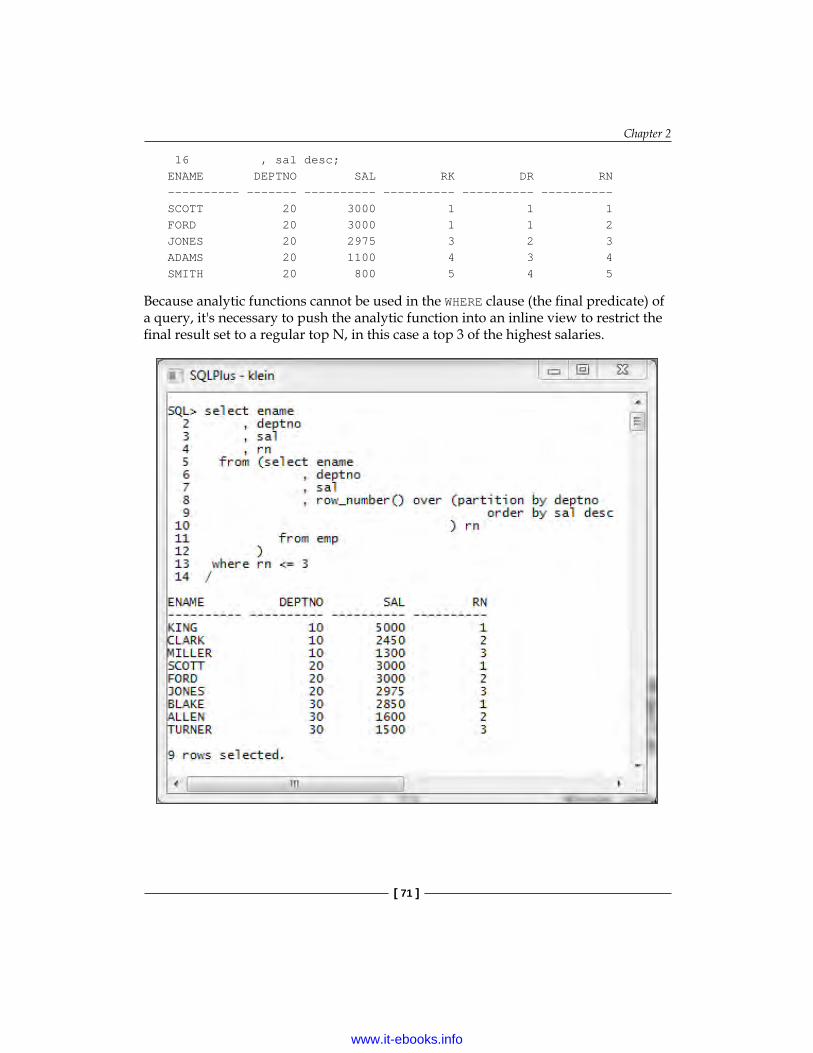
Chapter 2
[ 71 ]
16 , sal desc;ENAME DEPTNO SAL RK DR RN---------- ------- ---------- ---------- ---------- ----------SCOTT 20 3000 1 1 1FORD 20 3000 1 1 2JONES 20 2975 3 2 3ADAMS 20 1100 4 3 4SMITH 20 800 5 4 5
Because analytic functions cannot be used in the WHERE clause (the final predicate) of a query, it's necessary to push the analytic function into an inline view to restrict the final result set to a regular top N, in this case a top 3 of the highest salaries.
www.it-ebooks.info
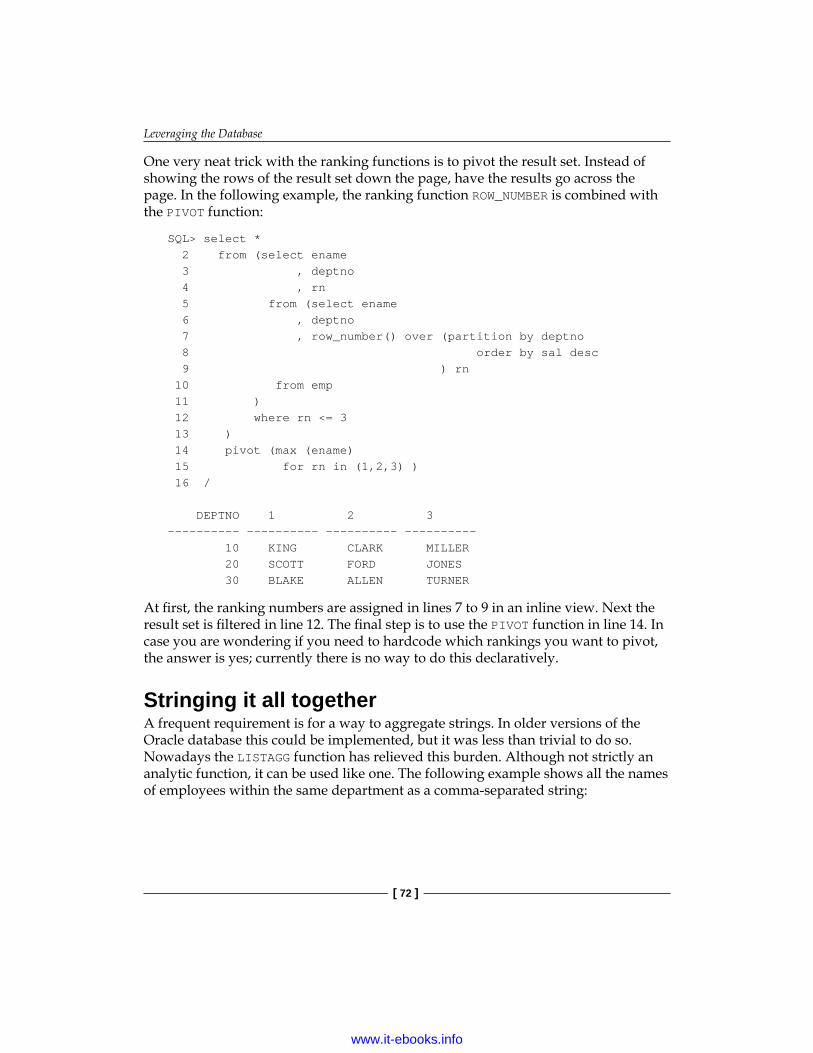
Leveraging the Database
[ 72 ]
One very neat trick with the ranking functions is to pivot the result set. Instead of showing the rows of the result set down the page, have the results go across the page. In the following example, the ranking function ROW_NUMBER is combined with the PIVOT function:
SQL> select * 2 from (select ename 3 , deptno 4 , rn 5 from (select ename 6 , deptno 7 , row_number() over (partition by deptno 8 order by sal desc 9 ) rn 10 from emp 11 ) 12 where rn <= 3 13 ) 14 pivot (max (ename) 15 for rn in (1,2,3) ) 16 /
DEPTNO 1 2 3---------- ---------- ---------- ---------- 10 KING CLARK MILLER 20 SCOTT FORD JONES 30 BLAKE ALLEN TURNER
At first, the ranking numbers are assigned in lines 7 to 9 in an inline view. Next the result set is filtered in line 12. The final step is to use the PIVOT function in line 14. In case you are wondering if you need to hardcode which rankings you want to pivot, the answer is yes; currently there is no way to do this declaratively.
Stringing it all togetherA frequent requirement is for a way to aggregate strings. In older versions of the Oracle database this could be implemented, but it was less than trivial to do so. Nowadays the LISTAGG function has relieved this burden. Although not strictly an analytic function, it can be used like one. The following example shows all the names of employees within the same department as a comma-separated string:
www.it-ebooks.info

Chapter 2
[ 73 ]
CaveatsAs with all features, it's not always gold. Once you master the syntax of these analytic functions, then the sky is the limit, but there are some things to be wary of.
Analytic functions cannot be used in the WHERE clause or the final ORDER BY clause. To circumvent this limitation, you can push the analytic function into an inline view. Another way of circumventing the limitation with ORDER BY is to use a column alias in the ORDER BY clause.
You also need to look out for the ordering of the NULL values and how this will affect the ORDER BY clause of the analytic window. Yet another thing to look out for is the performance impact. Analytic functions may look like the best thing that ever happened, especially regarding performance. Using different windows and sort orders may use a considerable amount of sorting and shifting. This might influence the overall performance of the query. As with all features that you use, you should test with a representative set of data before you move to production.
www.it-ebooks.info

Leveraging the Database
[ 74 ]
Finally , a warning—once you get more comfortable with using analytic functions, you will want to use them all the time. It's easy to get carried away and you might produce some code that is hard, if not impossible to maintain.
Just to illustrate, here is a quick demonstration of how you might get carried away. Using an analytic function with the DISTINCT keyword in the same statement is a telltale sign that you are getting carried away. Say we have a table that contains the contents of the EMP table multiple times and we want to identify the duplicate names.
The table used for this example contains around 900,000 records:
SQL> select count(*) 2 from big_emp 3 /
COUNT(*)---------- 917504
One method might be to create partitions based on the name in the table—assign a ranking number to each of them and filter out the names which rank higher than one.
www.it-ebooks.info
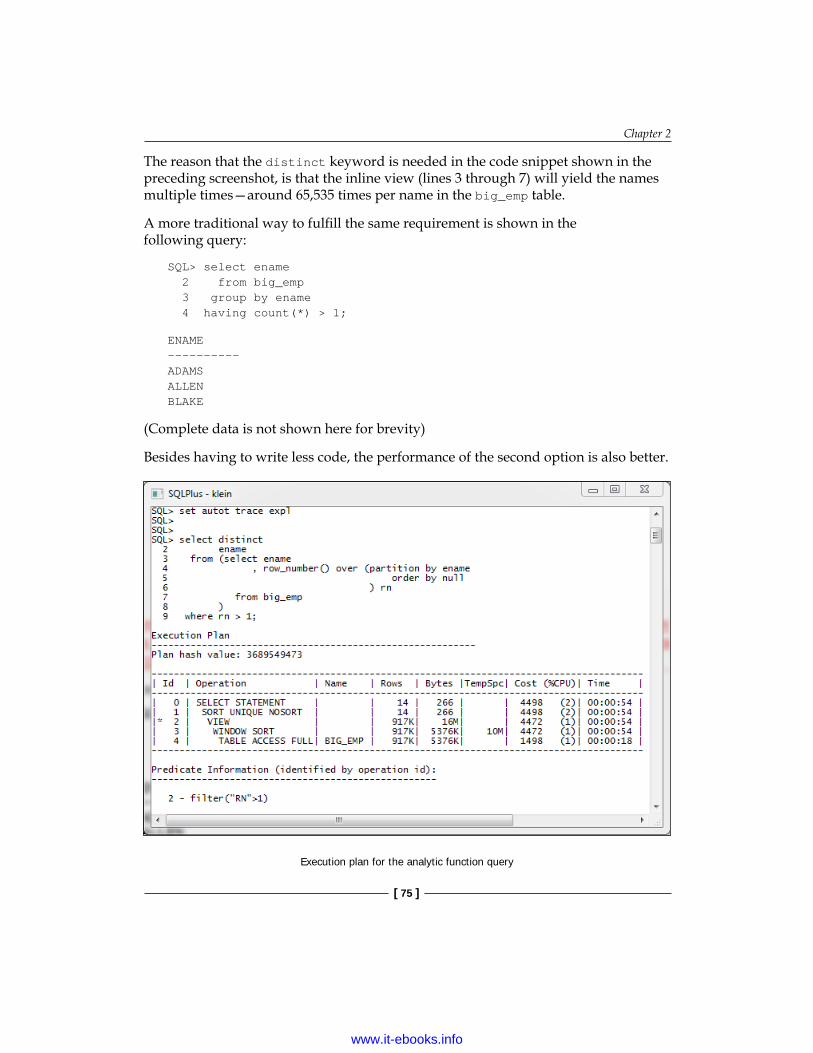
Chapter 2
[ 75 ]
The reason that the distinct keyword is needed in the code snippet shown in the preceding screenshot, is that the inline view (lines 3 through 7) will yield the names multiple times—around 65,535 times per name in the big_emp table.
A more traditional way to fulfill the same requirement is shown in the following query:
SQL> select ename 2 from big_emp 3 group by ename 4 having count(*) > 1;
ENAME----------ADAMSALLENBLAKE
(Complete data is not shown here for brevity)
Besides having to write less code, the performance of the second option is also better.
Execution plan for the analytic function query
www.it-ebooks.info

Leveraging the Database
[ 76 ]
The execution plan in the preceding screenshot, with the analytic function and the DISTINCT keyword, clearly shows the steps that are performed to answer the query. The late filtering, reducing the number of rows from 917K to 14, is done after the table has been accessed and the window sort is done.
Let's compare the execution plan for the more traditional way to answer the question.
Execution plan for the traditional query
In the execution plan shown in the preceding screenshot, you can see that the number of rows has decreased rapidly. After executing the HASH GROUP BY step, the number of rows has reduced to 1. Also note the last column of the execution plan—the Time column. For the last statement the value in the Time column is significantly lower than the timing for the execution plan for the analytic function query.
www.it-ebooks.info

Chapter 2
[ 77 ]
Aggregate functionsCreating multilevel totals with aggregate functions might not be the first thing you think about. This has been a capability of the aggregate functionality for quite some time.
The purpose of the GROUP BY clause is to group rows together, based on the columns specified. But with aggregates, you don't always need to specify columns. When you want a grand total, you can omit the GROUP BY clause altogether:
SQL> select sum (sal) 2 from emp 3 /
SUM(SAL)---------- 29025
Omitting the GROUP BY clause leads to a grand total, but you can also use an empty set in the GROUP BY clause:
SQL> select sum (sal) 2 from emp 3 group by () 4 /
SUM(SAL)---------- 29025
On line 3 the empty set is used, denoted by the opening and closing braces ().
There is a lot more about aggregates, such as GROUPING SETS, ROLLUP, and CUBE.
www.it-ebooks.info

Leveraging the Database
[ 78 ]
Grouping setsIn the preceding example, we created a grand total by using an empty set in the GROUP BY clause. The GROUPING SETS clause lets you create multiple sets, to use them in the GROUP BY clause. Let's take a look at an example:
The query shown in the preceding screenshot is a combination of two separate queries to create empno with the value in the SALARY column for each employee as well as a grand total of values in the SALARY column. The emp table has only 14 employees, but because of the grand total the total number of records in the SALARY column is 15.
www.it-ebooks.info

Chapter 2
[ 79 ]
In this query, the first part—lines 1 through 4—the GROUP BY set consists of empno. The second part of the query—lines 6 through 8—consists of groups on an empty set.
To get the same results, you can combine these two separate statements by using a single GROUP BY clause with the GROUPING SETS keyword.
www.it-ebooks.info
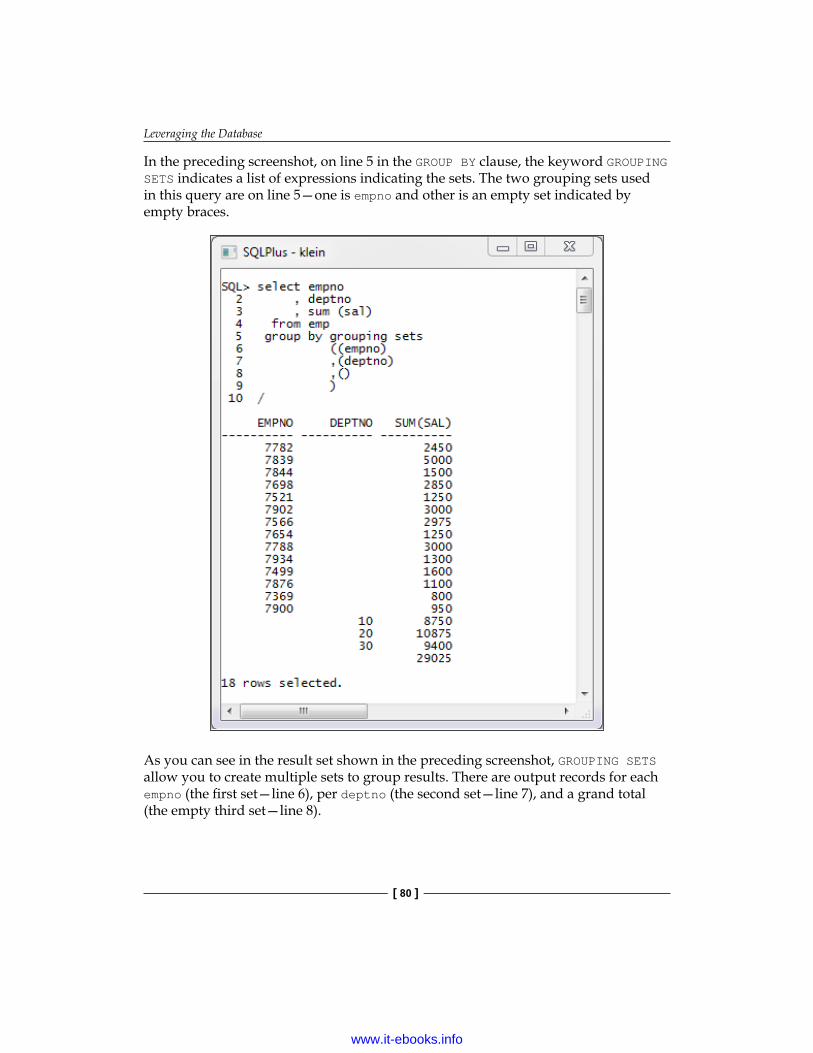
Leveraging the Database
[ 80 ]
In the preceding screenshot, on line 5 in the GROUP BY clause, the keyword GROUPING SETS indicates a list of expressions indicating the sets. The two grouping sets used in this query are on line 5—one is empno and other is an empty set indicated by empty braces.
As you can see in the result set shown in the preceding screenshot, GROUPING SETS allow you to create multiple sets to group results. There are output records for each empno (the first set—line 6), per deptno (the second set—line 7), and a grand total (the empty third set—line 8).
www.it-ebooks.info
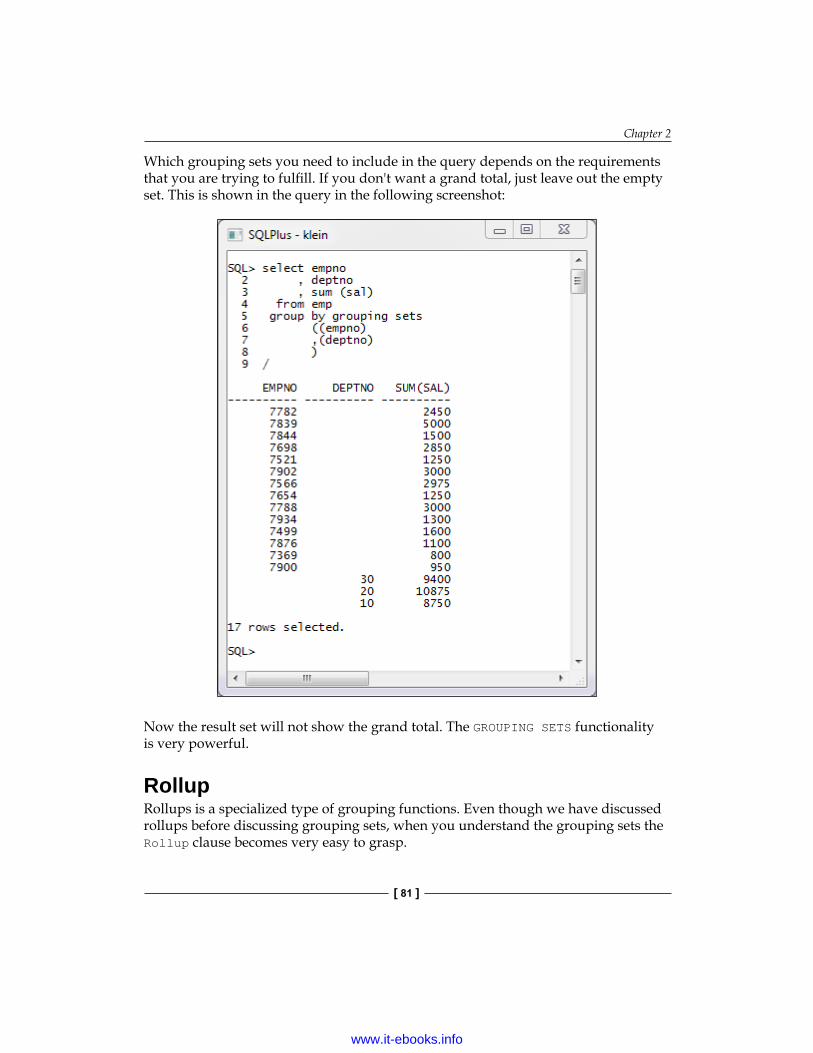
Chapter 2
[ 81 ]
Which grouping sets you need to include in the query depends on the requirements that you are trying to fulfill. If you don't want a grand total, just leave out the empty set. This is shown in the query in the following screenshot:
Now the result set will not show the grand total. The GROUPING SETS functionality is very powerful.
RollupRollups is a specialized type of grouping functions. Even though we have discussed rollups before discussing grouping sets, when you understand the grouping sets the Rollup clause becomes very easy to grasp.
www.it-ebooks.info
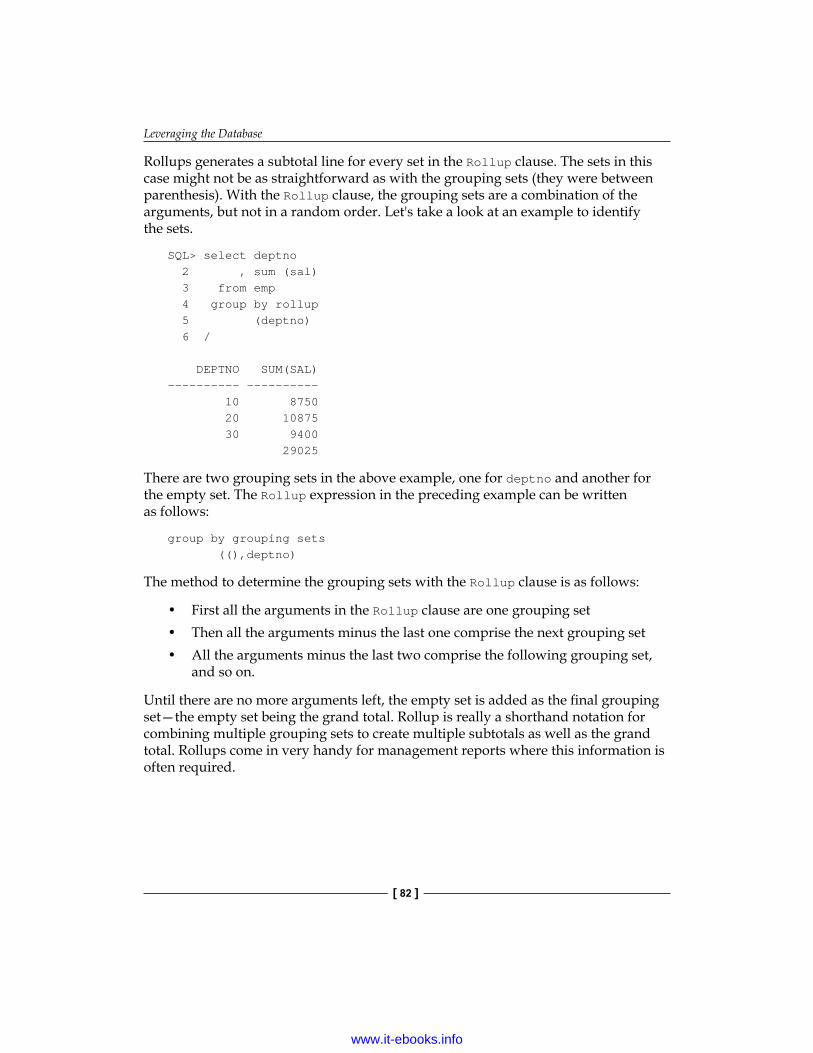
Leveraging the Database
[ 82 ]
Rollups generates a subtotal line for every set in the Rollup clause. The sets in this case might not be as straightforward as with the grouping sets (they were between parenthesis). With the Rollup clause, the grouping sets are a combination of the arguments, but not in a random order. Let's take a look at an example to identify the sets.
SQL> select deptno 2 , sum (sal) 3 from emp 4 group by rollup 5 (deptno) 6 /
DEPTNO SUM(SAL)---------- ---------- 10 8750 20 10875 30 9400 29025
There are two grouping sets in the above example, one for deptno and another for the empty set. The Rollup expression in the preceding example can be written as follows:
group by grouping sets ((),deptno)
The method to determine the grouping sets with the Rollup clause is as follows:
• First all the arguments in the Rollup clause are one grouping set• Then all the arguments minus the last one comprise the next grouping set• All the arguments minus the last two comprise the following grouping set,
and so on.
Until there are no more arguments left, the empty set is added as the final grouping set—the empty set being the grand total. Rollup is really a shorthand notation for combining multiple grouping sets to create multiple subtotals as well as the grand total. Rollups come in very handy for management reports where this information is often required.
www.it-ebooks.info
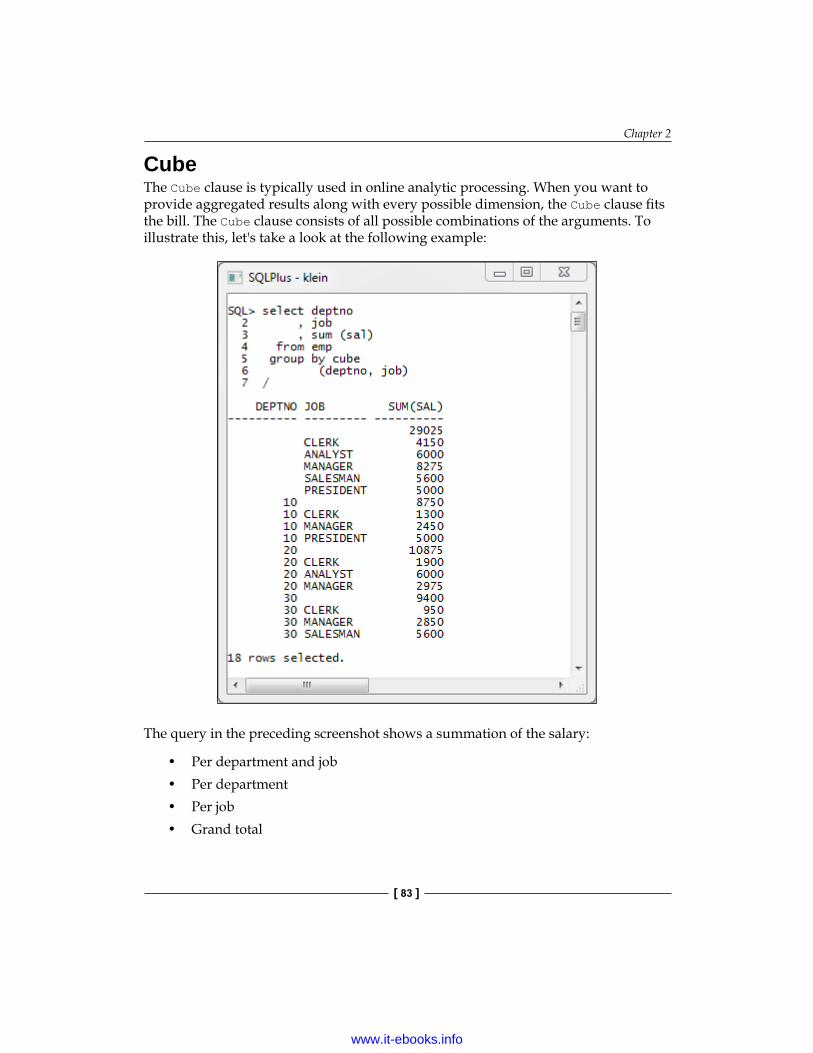
Chapter 2
[ 83 ]
CubeThe Cube clause is typically used in online analytic processing. When you want to provide aggregated results along with every possible dimension, the Cube clause fits the bill. The Cube clause consists of all possible combinations of the arguments. To illustrate this, let's take a look at the following example:
The query in the preceding screenshot shows a summation of the salary:
• Per department and job• Per department• Per job• Grand total
www.it-ebooks.info
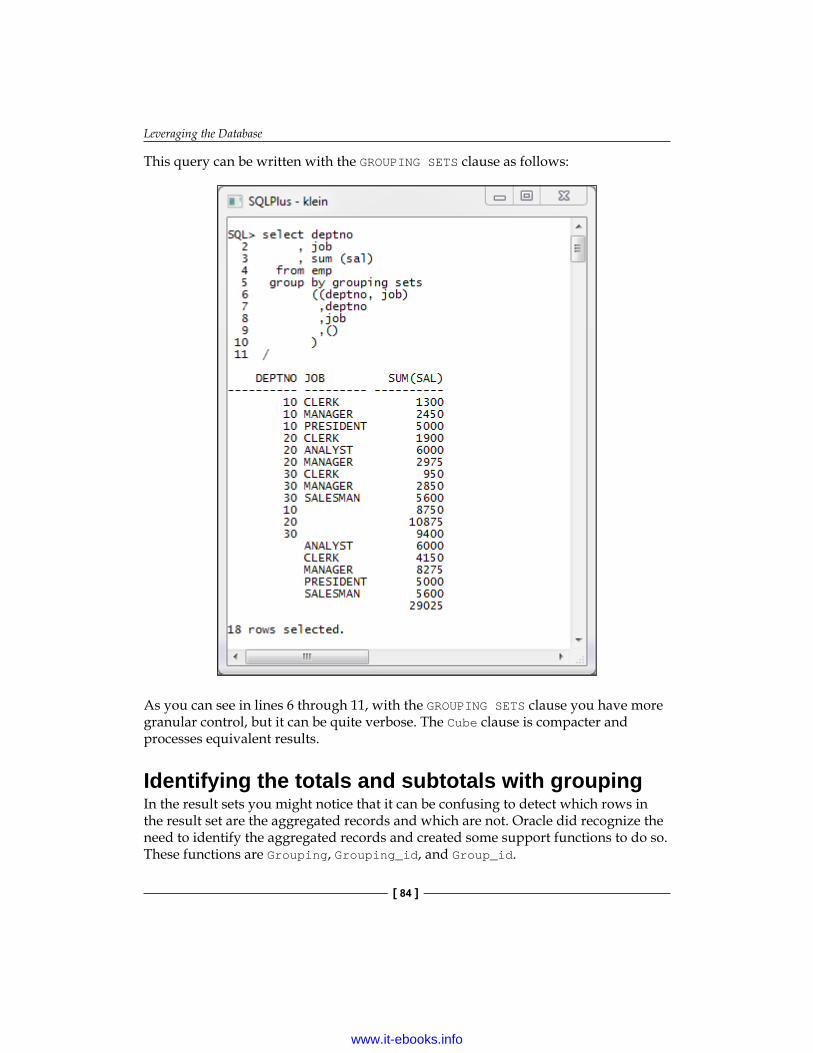
Leveraging the Database
[ 84 ]
This query can be written with the GROUPING SETS clause as follows:
As you can see in lines 6 through 11, with the GROUPING SETS clause you have more granular control, but it can be quite verbose. The Cube clause is compacter and processes equivalent results.
Identifying the totals and subtotals with groupingIn the result sets you might notice that it can be confusing to detect which rows in the result set are the aggregated records and which are not. Oracle did recognize the need to identify the aggregated records and created some support functions to do so. These functions are Grouping, Grouping_id, and Group_id.
www.it-ebooks.info
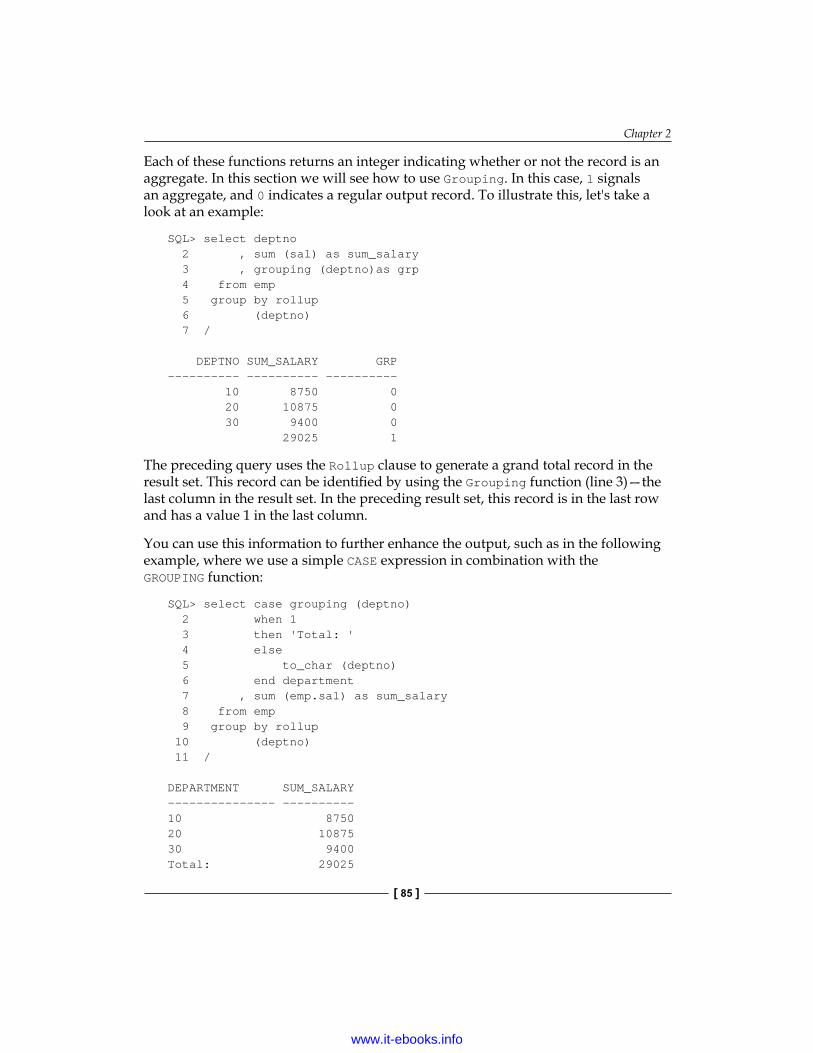
Chapter 2
[ 85 ]
Each of these functions returns an integer indicating whether or not the record is an aggregate. In this section we will see how to use Grouping. In this case, 1 signals an aggregate, and 0 indicates a regular output record. To illustrate this, let's take a look at an example:
SQL> select deptno 2 , sum (sal) as sum_salary 3 , grouping (deptno)as grp 4 from emp 5 group by rollup 6 (deptno) 7 /
DEPTNO SUM_SALARY GRP---------- ---------- ---------- 10 8750 0 20 10875 0 30 9400 0 29025 1
The preceding query uses the Rollup clause to generate a grand total record in the result set. This record can be identified by using the Grouping function (line 3)—the last column in the result set. In the preceding result set, this record is in the last row and has a value 1 in the last column.
You can use this information to further enhance the output, such as in the following example, where we use a simple CASE expression in combination with the GROUPING function:
SQL> select case grouping (deptno) 2 when 1 3 then 'Total: ' 4 else 5 to_char (deptno) 6 end department 7 , sum (emp.sal) as sum_salary 8 from emp 9 group by rollup 10 (deptno) 11 /
DEPARTMENT SUM_SALARY--------------- ----------10 875020 1087530 9400Total: 29025
www.it-ebooks.info

Leveraging the Database
[ 86 ]
On lines 1 through 6, the simple CASE expression determines whether to show the text Total or deptno. You may notice that TO_CHAR has to be executed on deptno in order to have the datatypes match up.
Offloading your frontend and scheduling a jobThe built-in package DBMS_JOB has been around for a very long time. With this package you could schedule jobs in the database but the possibilities of scheduling the job were pretty limited. Oracle 10g introduced DBMS_SCHEDULER, the new and improved way of scheduling jobs in the database. This built-in package adds more functionality to scheduling the jobs—like a more sophisticated way to determine the set times when a job is supposed to run.
But there are more things—such as offloading a process from your application to a background process—that you can do with jobs. Instead of having your end user wait for the process to complete, let the process take place in the background. This way your user can carry on with the tasks at hand, while the process is being done elsewhere. The user experience will be enhanced drastically. The application will react more responsively to user actions.
One-off jobA one-off job is a job that only runs once, at most. In order to offload the process to the background, the job only needs to run once. After the job is completed it is no longer needed and can therefore be removed. Because the requirements are simple, we can use DBMS_JOB for this task.
A job is run as a background process; this means that the actions are initiated by your user but are carried out in the background. Your user's session will continue with whatever he/she pleases.
Say you have a long running program that you want to be initiated by the user of your application when he/she presses a button. To simulate a long running program, we will use the following procedure:
SQL> create or replace 2 procedure long_running 3 is 4 begin 5 sys.dbms_lock.sleep (seconds => 3); 6 end long_running; 7 /
Procedure created.
www.it-ebooks.info

Chapter 2
[ 87 ]
This procedure waits for three seconds before giving control back to the caller of the procedure. When you call this procedure from SQL*Plus, you will have to wait for three seconds.
When the following program is called from your application, your user would have to wait for three seconds, which may seem like forever to a user. This is simply not acceptable.
SQL> set timing onSQL> begin 2 long_running; 3 end; 4 /
PL/SQL procedure successfully completed.
Elapsed: 00:00:03.00
The trick is to schedule a job, which would call the long running program for you. Then you won't have to wait for three seconds for the program to complete. What you need to do is create a process that will submit the job, instead of calling the long_running program. Now, we will see how it is done in SQL*Plus:
SQL> declare 2 j pls_integer; 3 begin 4 dbms_job.submit (job => j 5 ,what => 'long_running;' 6 ); 7 dbms_output.put_line ('The job has number: ' 8 || to_char (j) 9 ); 10 end; 11 /The job has number: 68
PL/SQL procedure successfully completed.
Elapsed: 00:00:00.00
As you can see in the preceding code, it takes hardly any time to submit the job (none in my environment). Results may vary, but it will never be as long as your long running process.
www.it-ebooks.info
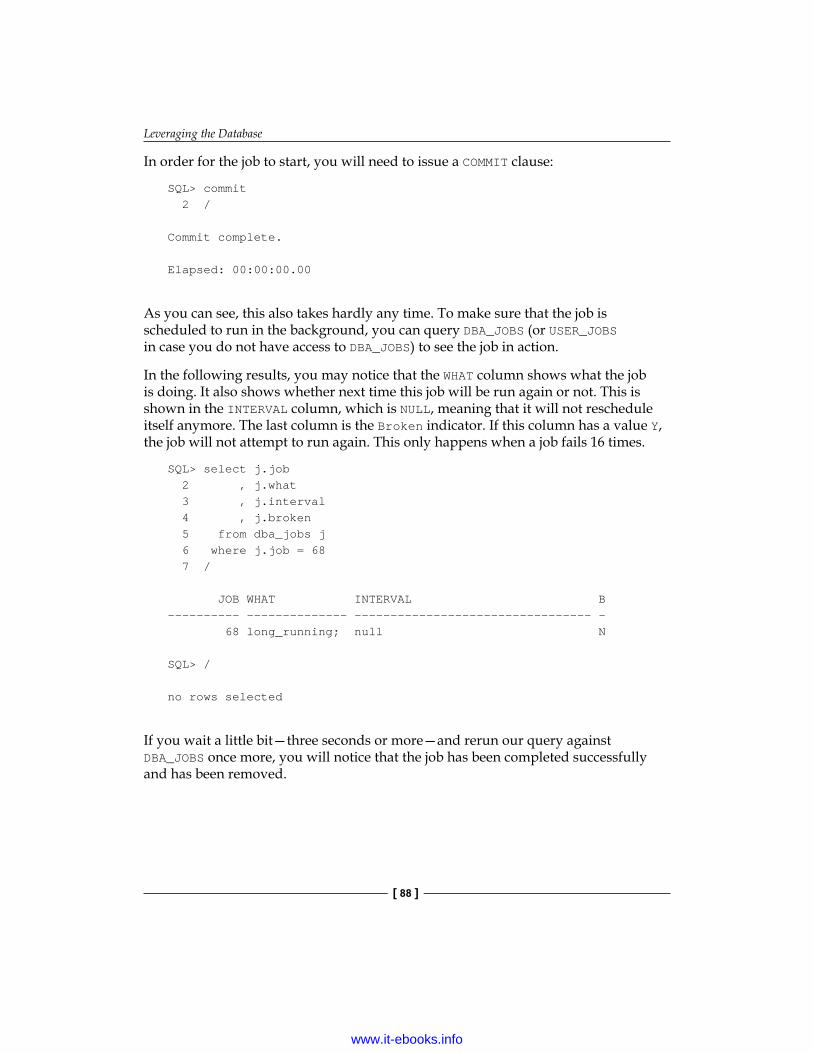
Leveraging the Database
[ 88 ]
In order for the job to start, you will need to issue a COMMIT clause:
SQL> commit 2 /
Commit complete.
Elapsed: 00:00:00.00
As you can see, this also takes hardly any time. To make sure that the job is scheduled to run in the background, you can query DBA_JOBS (or USER_JOBS in case you do not have access to DBA_JOBS) to see the job in action.
In the following results, you may notice that the WHAT column shows what the job is doing. It also shows whether next time this job will be run again or not. This is shown in the INTERVAL column, which is NULL, meaning that it will not reschedule itself anymore. The last column is the Broken indicator. If this column has a value Y, the job will not attempt to run again. This only happens when a job fails 16 times.
SQL> select j.job 2 , j.what 3 , j.interval 4 , j.broken 5 from dba_jobs j 6 where j.job = 68 7 /
JOB WHAT INTERVAL B---------- -------------- --------------------------------- - 68 long_running; null N
SQL> /
no rows selected
If you wait a little bit—three seconds or more—and rerun our query against DBA_JOBS once more, you will notice that the job has been completed successfully and has been removed.
www.it-ebooks.info

Chapter 2
[ 89 ]
If, for whatever reason, the job cannot be completed in one go, the job reschedules itself to run after some time. If the job still can't be completed successfully, the job reschedules itself again but with an increasing interval. This mechanism will try to run the job up to 16 times. If the job still can't complete, the job is marked as Broken. This means that the job will not be tried again.
In the following example, there is a long running program, which can only be called by pressing the button in the APEX application:
Calling the long_running process directly
In the preceding screenshot, a page process is created. This process calls the long running program directly in an anonymous PL/SQL block. Because we want to call this program when a button is pressed, the condition When Button Pressed for the page process is set to the button (called LONG_RUNNING), as shown in the following screenshot:
www.it-ebooks.info
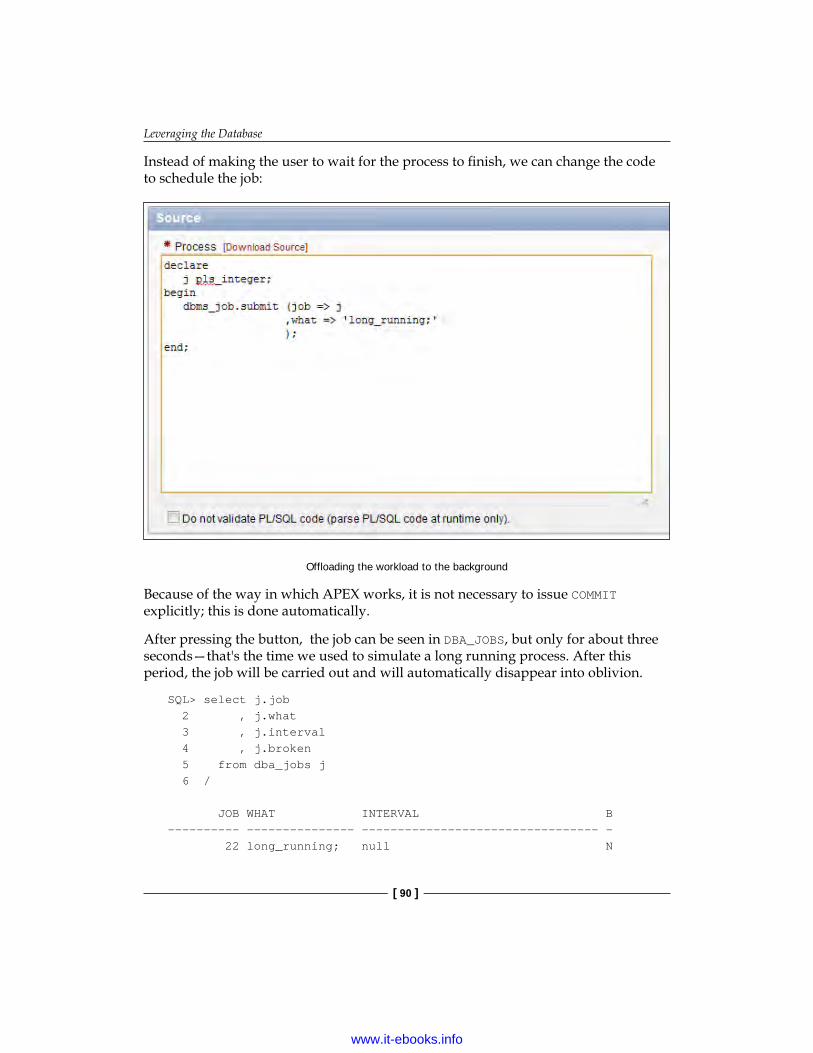
Leveraging the Database
[ 90 ]
Instead of making the user to wait for the process to finish, we can change the code to schedule the job:
Offloading the workload to the background
Because of the way in which APEX works, it is not necessary to issue COMMIT explicitly; this is done automatically.
After pressing the button, the job can be seen in DBA_JOBS, but only for about three seconds—that's the time we used to simulate a long running process. After this period, the job will be carried out and will automatically disappear into oblivion.
SQL> select j.job 2 , j.what 3 , j.interval 4 , j.broken 5 from dba_jobs j 6 /
JOB WHAT INTERVAL B---------- --------------- --------------------------------- - 22 long_running; null N
www.it-ebooks.info

Chapter 2
[ 91 ]
The process is not going any faster; it is still taking three seconds to complete, but the user experience is better. The page will respond immediately after clicking on the button. The only action that needs to be completed on the APEX page, before giving control back to the user, is submitting the job. When the page process is done with submitting the job, the user gets control back and can continue working with the application.
Pipelined table functionsOne of the key features of functions is that they return a value. This value can be either a scalar value of a composite value such as a record or an object, or even a set of values such as an associative array, a nested table, or a varray. A regular function returns its value after the function is completely finished and the RETURN statement is encountered. The program that calls a function will have to wait until the function is finished with its task, before the caller can continue with processing.
A pipelined table function is slightly different. This type of function can return values before the final RETURN statement is encountered. This means that it can return values for multiple times. This feature allows you to use a pipelined table function in the FROM clause of a query.
First we will take a look at a small example, then we will look at how you can apply this function in your APEX application.
A pipelined table function needs to return a collection type, such as a nested table of varrays. This can be a collection of objects—if this is what you need. For this example, we will keep things simple and create a collection of Varchar2:
SQL> create or replace type time_list is 2 table of varchar2(10) 3 /
Type created.
Now, we need to create the function that returns the previously created collection pipelined:
SQL> create or replace 2 function show_time 3 return time_list pipelined 4 is 5 begin 6 for i in 1..5 7 loop
www.it-ebooks.info

Leveraging the Database
[ 92 ]
8 dbms_lock.sleep (1); 9 pipe row (to_char (sysdate, 'hh24:mi:ss')); 10 end loop; 11 return; 12 end show_time; 13 /
Function created.
This function is returning a list of five time information outputs, each with a second inbetween. Line 8 takes care of the one-second pause, using DBMS_LOCK.SLEEP. In the Return clause of the function signature, is the PIPELINED keyword (line 3). On line 9, the values are returned from the function. PIPE ROW is the key to return the values, in our case the time component of SYSDATE.
Finally, RETURN on line 11 signals the end of the function and returns control to the calling function.
Now we can see the power of the pipelined table function in action, used in the from clause of the following query:
SQL> select to_char (sysdate, 'hh24:mi:ss') 2 , column_value 3 from table (show_time) 4 /
TO_CHAR( COLUMN_VAL-------- ----------21:49:13 21:49:1421:49:13 21:49:1521:49:13 21:49:1621:49:13 21:49:1721:49:13 21:49:18
In this query, we have shown the current time, as well as the results from the pipelined table function that we created earlier. On line 3, the pipelined table function is called, inside the table operator, in the from clause. As you can see from the output, the value for the current time is determined at the start of the query (read consistency in action) and is fixed at 21:49:13. The pipelined table function returns its values with one second pause in between. So, the rows are returned—not all at the same time, but one after the other—until the function is completely finished.
www.it-ebooks.info
Chapter 2
[ 93 ]
When you run this example on your own database—such as SQL*Plus, you need to change your arraysize setting to observe this. The default setting for the arraysize in SQL*Plus is 15. As there are fewer than 15 records returned from the query, the one record at a time clause is not observed. One little oddity—even if you set the arraysize to 1, first you will see one record, then the following records are returned in pairs (two at a time).
SQL> set arraysize 1
Pipelined table functions in APEXAfter this brief introduction to pipelined table functions, we will take a look at how to use pipelined table functions in APEX.
The goal that we want to achieve is to create a comma-delimited list of employee names for a given department number. This is a very contrived example as Oracle 11g R2 already has a built-in function that can do this for you—LISTAGG.
What we first need is a collection type. For this example, we will use a nested table of the varchar2 objects:
SQL> create type string_tt is table of varchar2(250) 2 /
Type created.
And of course we will need a pipelined table function as well—one that takes in a department number and returns the list of employee names in comma-delimited form:
SQL> create function enames (p_deptno in number) 2 return string_tt pipelined 3 is 4 l_str varchar2(32767); 5 begin 6 for rec in (select ename 7 from emp 8 where deptno = p_deptno 9 ) 10 loop 11 l_str := l_str ||rec.ename||','; 12 end loop; 13 pipe row ( 14 case 15 when length (l_str) > 250 16 then substr (l_str, 1, 247)||'...' 17 else rtrim (l_str, ',')
www.it-ebooks.info

Leveraging the Database
[ 94 ]
18 end 19 ); 20 return; 21 end enames; 22 /
Function created.
This function takes up the department number and looks for the employees who work for that department (lines 6 to 8). The results are concatenated together, separated by a comma (line 11). The resulting string is returned by the function, after dealing with strings which are too long (lines 13 to 19).
When all these things are in place, we can turn our focus to creating a report in APEX. For this report, we will use the query shown in the following screenshot:
Query where pipelined table function is used
www.it-ebooks.info
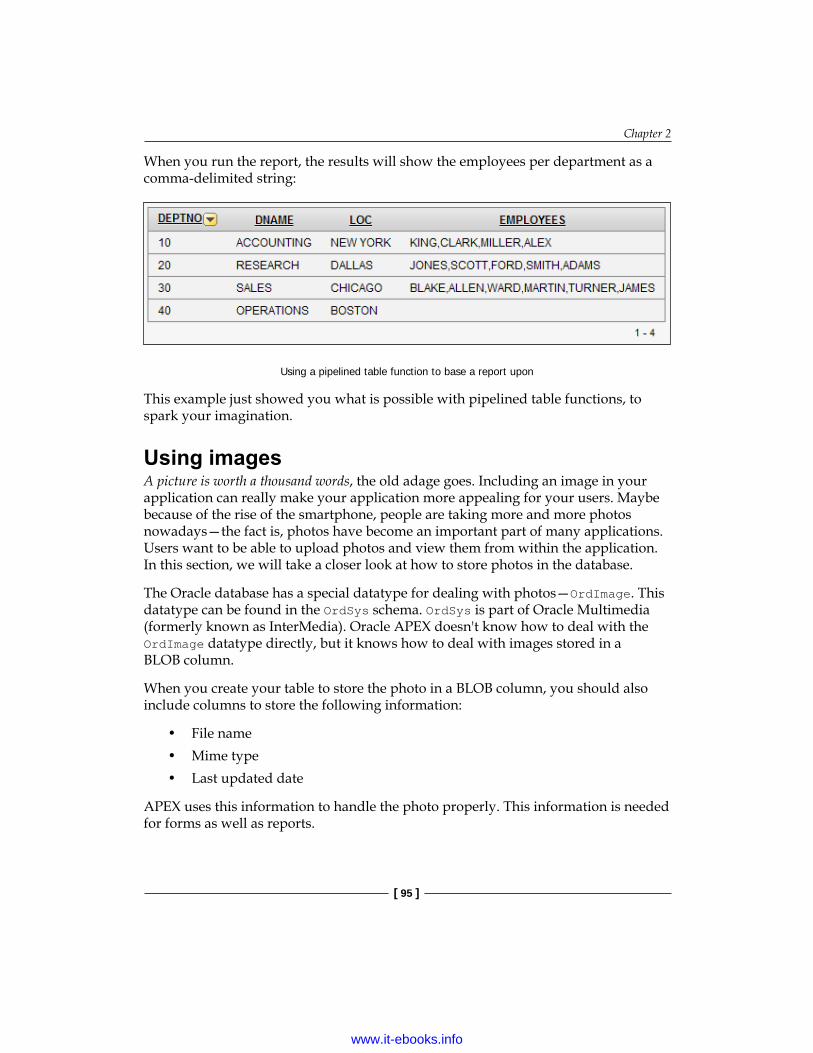
Chapter 2
[ 95 ]
When you run the report, the results will show the employees per department as a comma-delimited string:
Using a pipelined table function to base a report upon
This example just showed you what is possible with pipelined table functions, to spark your imagination.
Using imagesA picture is worth a thousand words, the old adage goes. Including an image in your application can really make your application more appealing for your users. Maybe because of the rise of the smartphone, people are taking more and more photos nowadays—the fact is, photos have become an important part of many applications. Users want to be able to upload photos and view them from within the application. In this section, we will take a closer look at how to store photos in the database.
The Oracle database has a special datatype for dealing with photos—OrdImage. This datatype can be found in the OrdSys schema. OrdSys is part of Oracle Multimedia (formerly known as InterMedia). Oracle APEX doesn't know how to deal with the OrdImage datatype directly, but it knows how to deal with images stored in a BLOB column.
When you create your table to store the photo in a BLOB column, you should also include columns to store the following information:
• File name• Mime type• Last updated date
APEX uses this information to handle the photo properly. This information is needed for forms as well as reports.
www.it-ebooks.info

Leveraging the Database
[ 96 ]
In one of the sample applications that come with APEX, images are used to display products. The current version of this sample application only uses very small images throughout. If you only store small images, and you want to show a larger size on some pages, you would need to resize the image in order to get the enlarged version. By doing this, the quality will deteriorate dramatically. When you store the large version of the image, the quality will be much better. The downside is that if you use these large images as thumbnails by resizing them to a small image, they are still actually large—just sized to appear smaller. The loading time of your pages will increase because of the size of the image (say multiple MB instead of a few KB).
The solution to this problem is quite easy. Store a large and a small version of the image. Resizing an image can easily be done by using the OrdImage functionality, and this also works on BLOBs. It should be noted that the reduction in size only happens when the user has already uploaded the photo to the database.
SQL> create or replace 2 procedure thumbnail (p_id in number) 3 is 4 l_photo blob; 5 l_thumb blob; 6 begin 7 select p.photo 8 , p.photo 9 into l_photo 10 , l_thumb 11 from products p 12 where p.id = p_id 13 for update 14 ; 15 -- Scale the images down 16 ordsys.OrdImage.process (l_thumb, 'maxScale=75 75'); 17 ordsys.OrdImage.process (l_photo, 'maxScale=2000 2000'); 18 -- Store the resized images back into the table 19 update products p 20 set p.thumbnail = l_thumb 21 , p.photo = l_photo 22 where p.id = p_id 23 ; 24 end thumbnail; 25 /
www.it-ebooks.info

Chapter 2
[ 97 ]
This procedure takes the primary key and resizes the original photo to a more manageable size and also creates a real thumbnail. The first thing we need to do is declare two BLOB variables (lines 4 and 5). These BLOB variables will be filled with the original photo from the table. Note that you need to use FOR UPDATE to lock the record (line 13). Now you can resize both images, using the ordsys.OrdImage.process procedure (lines 16 and 17). The second argument determines the size of the final image. Lastly, write the resized images back to the table (lines 19 through 22).
This procedure can be called right after you upload a photo in the APEX application, but the ordsys.OrdImage.process procedure takes quite a long time to complete. The time it takes increases when the size of the uploaded photo increases. A procedure such as this one is an excellent candidate to be called asynchronously, using the technique described earlier in the section called Offload your frontend, schedule a job. This way the application becomes more responsive to the end user.
Because the job will run in the background, it takes some time for the thumbnail to show up in the application. As long as you can explain this to your end user, this shouldn't be a problem.
Depending on what we need in the page, we either use the larger photo or the smaller thumbnail.
Searching the contents of documentsBecause we are creating a document management system, there are going to be documents stored inside the database, obviously. Searching through these documents is a must-have feature. Oracle supports this kind of functionality in the form of Oracle Text functionality.
In order to work with the Oracle Text feature, we need a special type of index—a context index—on our documents tables, more specifically on the column that stores the document:
SQL> create index doc_index on documents (document) 2 indextype is ctxsys.context 3 parameters ('SYNC (ON COMMIT) TRANSACTIONAL') 4 /
Index created.
www.it-ebooks.info
Leveraging the Database
[ 98 ]
The index type that is needed for Oracle Text is CTXSYS.CONTEXT (line 2). On line 3, we specify that we want this index to be refreshed when a commit is issued.
There are many more options that can be used with Oracle Text, such as searching for alternative spelling, searching for words in a certain context, or searching independent diacritic characters. More suggestions on using Oracle Text are listed in Chapter 1, Prepare and Build. All these features are outside the scope of this chapter.
When you create the index, you will notice that a number of tables are created to support the index. These tables have the prefix DR$DOC, which Oracle uses to support Oracle Text searches. This index will allow you to search through large amounts of text such as Word, PDF, XML, HTML, or plain text documents.
For the following example, I have uploaded the document containing this chapter into our Documents table, so we might find some text that the reviewer told me to remove. Because the Oracle Text index is in place, we can use the functions available to us to search for certain keywords.
SQL> col mimetype format a22SQL> col snippet format a38 word wrappedSQL> select doc.mimetype 2 , ctx_doc.snippet ('doc_index' 3 ,id 4 ,'express' 5 ) snippet 6 from documents doc 7 where contains(doc.document, 'express') > 0 8 /
MIMETYPE SNIPPET---------------------- --------------------------------------application/msword Application <b>Express</b>. And that i s true up to a certain point. You prob ably know that the Oracle Application <b>Express</b> engine is
1 row selected.
In the preceding query, we have used the contains query operator to search for express (line 7). The contains operator returns a relevant score for every selected row. Because when we want all rows where the word "express" is in the text of the documents column, we use the greater than zero comparison. You may notice that we have put express in lowercase and we still get results back even though we didn't use "express" in lowercase in this chapter (until this part of it at least). contains can search through texts in a case-insensitive manner.
www.it-ebooks.info
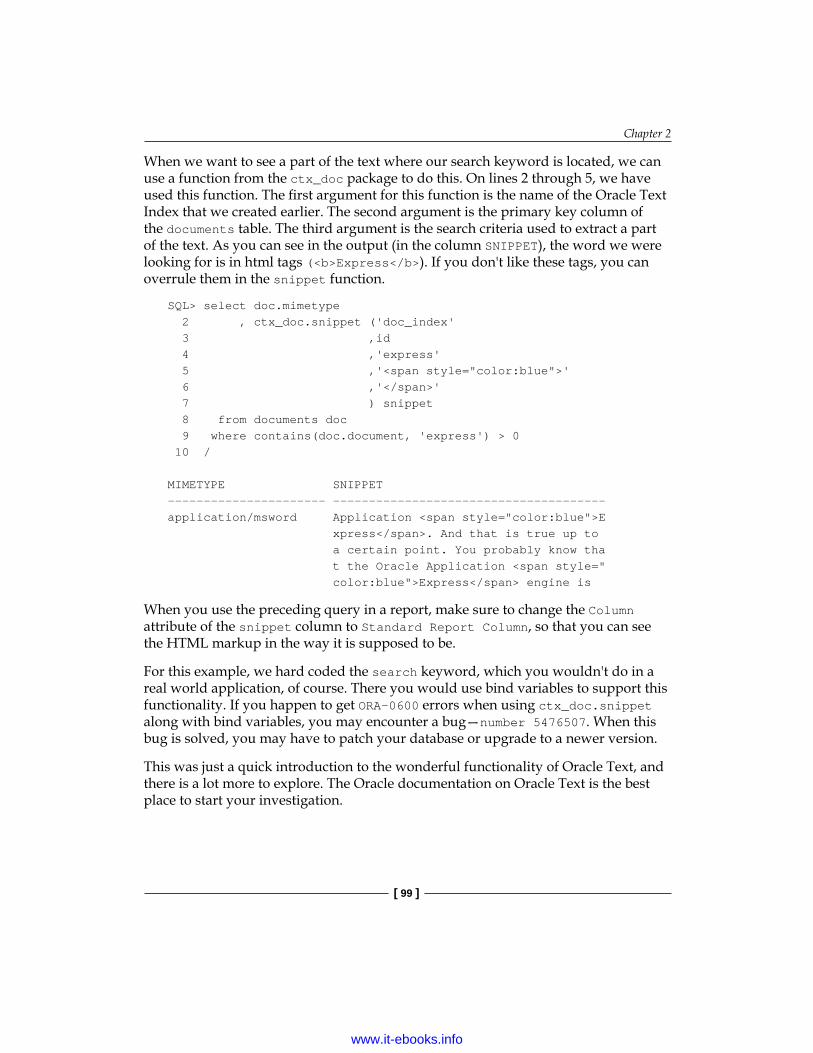
Chapter 2
[ 99 ]
When we want to see a part of the text where our search keyword is located, we can use a function from the ctx_doc package to do this. On lines 2 through 5, we have used this function. The first argument for this function is the name of the Oracle Text Index that we created earlier. The second argument is the primary key column of the documents table. The third argument is the search criteria used to extract a part of the text. As you can see in the output (in the column SNIPPET), the word we were looking for is in html tags (<b>Express</b>). If you don't like these tags, you can overrule them in the snippet function.
SQL> select doc.mimetype 2 , ctx_doc.snippet ('doc_index' 3 ,id 4 ,'express' 5 ,'<span style="color:blue">' 6 ,'</span>' 7 ) snippet 8 from documents doc 9 where contains(doc.document, 'express') > 0 10 /
MIMETYPE SNIPPET---------------------- --------------------------------------application/msword Application <span style="color:blue">E xpress</span>. And that is true up to a certain point. You probably know tha t the Oracle Application <span style=" color:blue">Express</span> engine is
When you use the preceding query in a report, make sure to change the Column attribute of the snippet column to Standard Report Column, so that you can see the HTML markup in the way it is supposed to be.
For this example, we hard coded the search keyword, which you wouldn't do in a real world application, of course. There you would use bind variables to support this functionality. If you happen to get ORA-0600 errors when using ctx_doc.snippet along with bind variables, you may encounter a bug—number 5476507. When this bug is solved, you may have to patch your database or upgrade to a newer version.
This was just a quick introduction to the wonderful functionality of Oracle Text, and there is a lot more to explore. The Oracle documentation on Oracle Text is the best place to start your investigation.
www.it-ebooks.info
Leveraging the Database
[ 100 ]
SummaryIn this chapter, we looked at some of the lesser-known features of SQL and PL/SQL, but there are many, many more. Thorough knowledge of SQL and PL/SQL is essential to an APEX developer.
We started by examining a method to instrument your database code. This enables you to keep track of the code path and the arguments that are passed down.
Next different options were investigated to have efficient lookup tables for your application. Creating a proper physical data model by using the right types of database object where appropriate will also contribute to a successful application and a better user experience.
Analytic and aggregate functions leverage the functionality that SQL has to offer out of the box. Using these functions, you can create statements that are both elegant and perform well.
When you have programs that take a long time, and you don't want to have the user wait for the response, you can offload these programs to the background. We saw an example on using DBMS_JOB to do just that.
With pipelined table functions, you are not depended on standard SQL functionality alone—you can leverage all your PL/SQL skills to accommodate your needs. Using a user-defined PL/SQL function as the source to query from is an extremely powerful process—pipelined table functions enable you to do just that.
Using images in your application can make the application more attractive. When you have to deal with images that are being uploaded to the database, make sure that you keep a close eye on the size of the images.
Lastly we saw a small example that showed how you can use Oracle Text to search through documents with more features than just the standard LIKE syntax.
The more you know, the more you can release the power of the Oracle database, and the better your application will be.
The next chapter will explore different methods of creating printed reports.
www.it-ebooks.info
PrintingThis chapter deals with different aspects of printing in Oracle Application Express. We will start with the two most used architectures in Application Express printing, Apache FOP and Business Intelligence Publisher. Then, we will see how to install and configure both Apache FOP and Business Intelligence Publisher. After the installation we will discuss how to investigate printing problems.
The main part of this chapter deals with layout of your report and describes how to include things such as charts and images.
Finally, we will look at some alternatives that can be used for PDF printing, plug-ins.
In this chapter, we will cover the following topics:
• Different printing architectures such as Apache FOP and Business Intelligence Publisher
• Installation and configuration of the Apache FOP report server and Business Intelligence Publisher
• Debugging printing problems• Creating a simple report against the Business Intelligence Publisher• Creating a report that can output in different formats• Adding charts to reports• Adding dynamic images to reports• Description of the Print API• Alternatives for printing reports
www.it-ebooks.info

Printing
[ 102 ]
Printing architecturePDF printing in Oracle Application Express requires an externally defined print or report server. An external report server can be the Apache FOP reports server from Apache, the reports server from Business Intelligence Publisher, or server from a third-party such as Jasper reports. Different flavors of an external report server are possible. When the user clicks on a print link in Application Express, the Application Express engine generates the corresponding report data in XML format and a report template in XSL-FO or RTF format.
All of this architectural complexity is transparent to the end users and developers. Here, transparent means that the end user only sees the print link and the end result, and not the architecture behind. So end users just click on the print links, and developers just declaratively set regions to support PDF printing.
Your report server can be Oracle BI Publisher, Oracle Application Server Containers for J2EE (OC4J) with Apache FOP, or another processing engine.
If you choose BI Publisher as your report server, you will enjoy a higher level of functionality. Oracle Application Express provides two levels of functionality—External (Apache FOP) and BI Publisher (Advanced). With Apache FOP, you are limited to XSL-FO report templates only.
What is planned for the future version of APEX Listener?The idea is that instead of having to configure a separate print rendering engine, this engine would be enabled automatically when using the APEX Listener. And rather than sending XML and XSL out from the database and retrieving the PDF back into the database, we would just send the XML and XSL to the APEX Listener, which would process the PDF and send that straightaway to the client.
Of course, this might be considered forward looking and there is a need to point here as well to the Safe Harbor Statement of Oracle Corporation. Hopefully this feature will make it, but who knows.
www.it-ebooks.info

Chapter 3
[ 103 ]
The following diagram shows the printing architecture using Business Intelligence Publisher:
Installation and configuration of the Apache FOP report serverApache FOP enables you to print report regions and report queries by using either the built-in templates (provided with a standard XSL-FO processing engine) or other formats created by you. The output formats include PDF and XML. This setting does not support Rich Text Format (RTF).
Application Express calls apex_fop.jsp through the UTL_HTTP RDBMS package.
www.it-ebooks.info
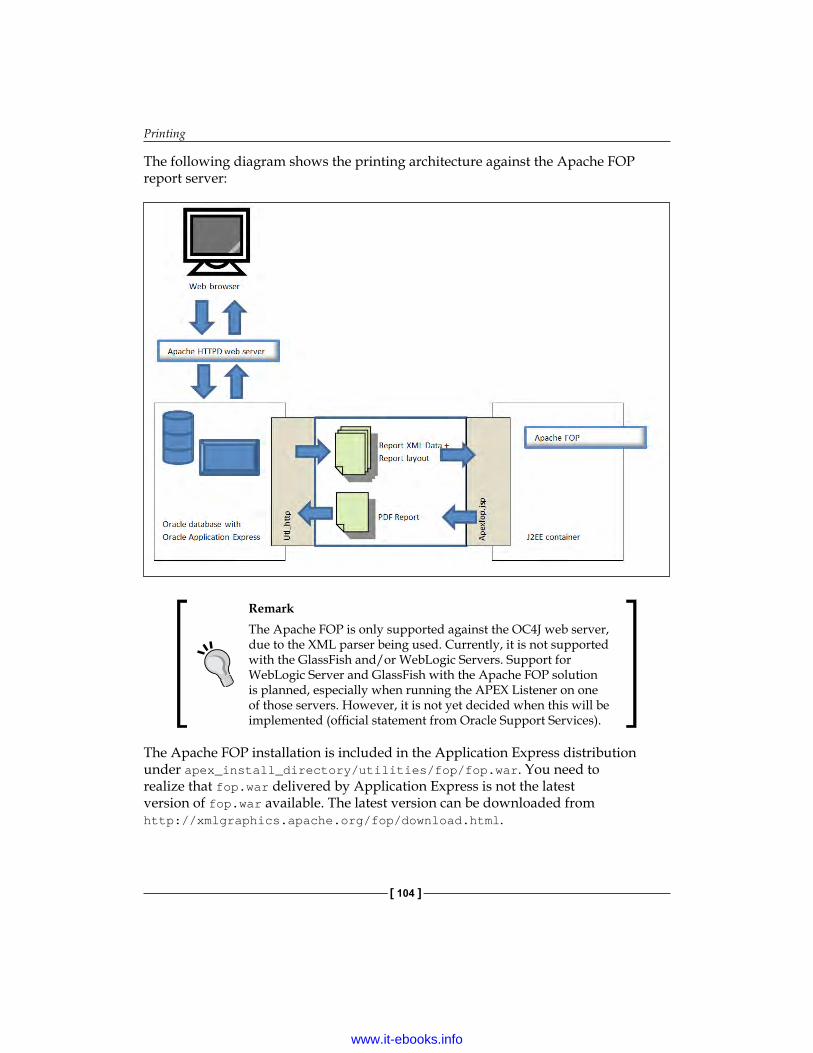
Printing
[ 104 ]
The following diagram shows the printing architecture against the Apache FOP report server:
RemarkThe Apache FOP is only supported against the OC4J web server, due to the XML parser being used. Currently, it is not supported with the GlassFish and/or WebLogic Servers. Support for WebLogic Server and GlassFish with the Apache FOP solution is planned, especially when running the APEX Listener on one of those servers. However, it is not yet decided when this will be implemented (official statement from Oracle Support Services).
The Apache FOP installation is included in the Application Express distribution under apex_install_directory/utilities/fop/fop.war. You need to realize that fop.war delivered by Application Express is not the latest version of fop.war available. The latest version can be downloaded from http://xmlgraphics.apache.org/fop/download.html.
www.it-ebooks.info

Chapter 3
[ 105 ]
How to configure Apache FOPOracle Containers for J2EE (10.1.3.2 or above) needs to be configured for using Application Express. Oracle Containers for Java will be abbreviated to OC4J in the rest of this chapter. OC4J is delivered in a ZIP file and can be downloaded at Oracle Technology Network:
http://www.oracle.com/technetwork/middleware/ias/downloads/utilsoft-090603.html
Creating a batch file or shell script is the most handy way to start OC4J. For example:
set ORACLE_HOME=d:\oc4j (Location from OC4j Installation)
set JAVA_HOME=D:\Program Files\Java\jdk1.6.0_version_of_JDK (Location of JDK)
oc4j -start
OC4J is dependent on the Java Runtime Environment (JRE)—this is officially supported against JRE version 1.5 and higher, but it is strongly recommended to run against JRE version 1.6.0_33 or higher, or version 1.7. To verify which version of JRE is installed run the following command:
java –version
The output of this command will look as follows:
java version "1.6.0_33" Java(TM) SE Runtime Environment (build 1.6.0_33-rev-b07) Java HotSpot(TM) Client VM (build 16.3-b05, mixed mode, sharing)
When starting OC4J for the first time, you will be prompted for the password—oc4jadmin. The entered password is used as password for the oc4jadmin website. The next step is the deployment of the fop.war (web archive) file. Deployment can be performed in the Enterprise Manager from OC4J.
Steps for the deployment from the fop.war file are as follows:
1. Click on the Applications tab in the Enterprise Manager.2. Click on the Deploy button.3. Choose Archive is present on local host. Upload the archive to the server
where application server control is running.. Browse to the fop.war file (in the utilities/fop directory) and click on Next.
4. Make application name equal to FOP, clear the content in Context Root, and click on the Next button.
5. Click on the Deploy button.
www.it-ebooks.info

Printing
[ 106 ]
After a successful deployment, you will see an application named FOP in the OC4J Enterprise Manager website (http://hostname:port/em/applications/deploy/fop).
The following screenshot shows the deployment of fop.war in the Enterprise Manager:
To use the Apache FOP as your report server, you need to configure the Report Printing parameters. A login to the administration site of application express is required (http://hostname:port/apex(DAD)/apex_admin).
Navigate to instance settings and enter the required data.
The following screenshot shows the administration website of Application Express and the Instance Settings option:
www.it-ebooks.info
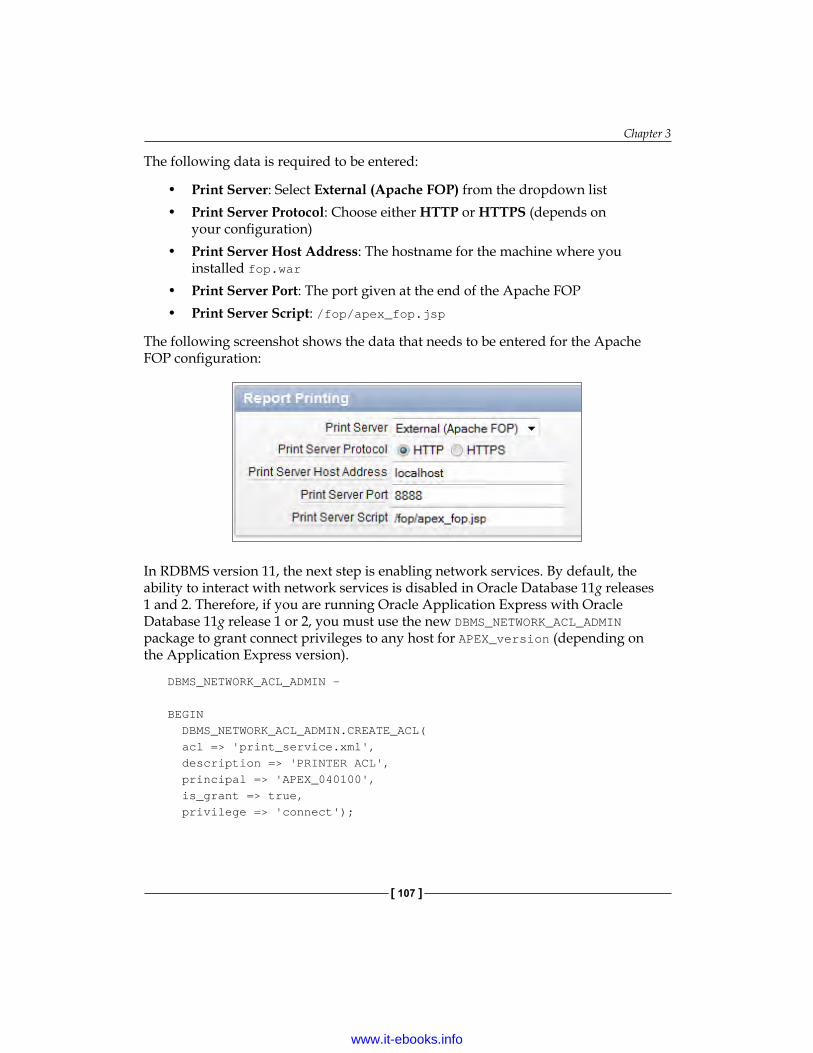
Chapter 3
[ 107 ]
The following data is required to be entered:
• Print Server: Select External (Apache FOP) from the dropdown list• Print Server Protocol: Choose either HTTP or HTTPS (depends on
your configuration)• Print Server Host Address: The hostname for the machine where you
installed fop.war• Print Server Port: The port given at the end of the Apache FOP• Print Server Script: /fop/apex_fop.jsp
The following screenshot shows the data that needs to be entered for the Apache FOP configuration:
In RDBMS version 11, the next step is enabling network services. By default, the ability to interact with network services is disabled in Oracle Database 11g releases 1 and 2. Therefore, if you are running Oracle Application Express with Oracle Database 11g release 1 or 2, you must use the new DBMS_NETWORK_ACL_ADMIN package to grant connect privileges to any host for APEX_version (depending on the Application Express version).
DBMS_NETWORK_ACL_ADMIN –
BEGIN DBMS_NETWORK_ACL_ADMIN.CREATE_ACL( acl => 'print_service.xml', description => 'PRINTER ACL', principal => 'APEX_040100', is_grant => true, privilege => 'connect');
www.it-ebooks.info
Printing
[ 108 ]
DBMS_NETWORK_ACL_ADMIN.ADD_PRIVILEGE( acl => 'print_service.xml', principal => 'APEX_040100', is_grant => true, privilege => 'resolve');
DBMS_NETWORK_ACL_ADMIN.ASSIGN_ACL( acl => 'print_service.xml', host => 'localhost', lower_port => 8888, upper_port => 8888); COMMIT;END;/
(The preceding script is using APEX version 4.1.1.)
You can read more at http://docs.oracle.com/cd/B28359_01/appdev.111/b28419/d_networkacl_adm.htm.
Failing to grant these privileges will result in issues with PDF/report printing. Specifically, you will get the following error message:
ORA-20001: The printing engine could not be reached because either the URL specified is incorrect or a proxy URL needs to be specified
To test a simple report against the Apache FOP report server, perform the following steps:
1. Create a simple report and enable report printing.2. For the Report region under the Print tab, select Yes for Print enabled and
create a link label name.3. Run the report and test the printing.
www.it-ebooks.info
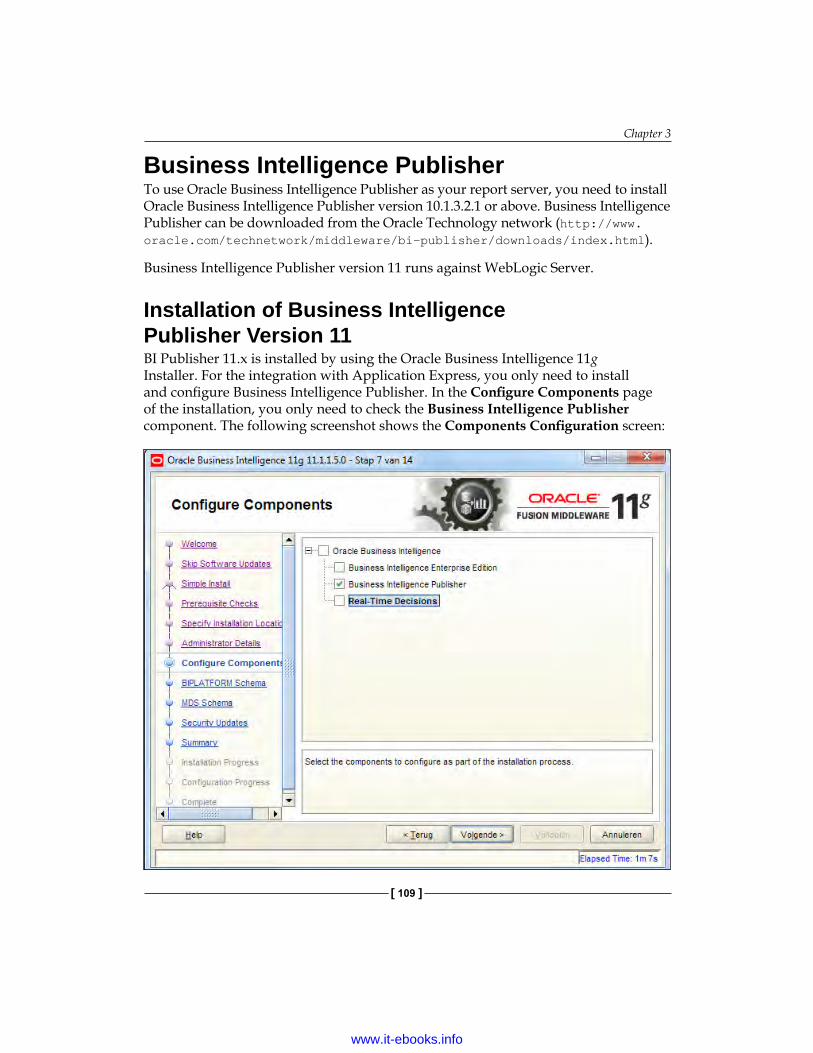
Chapter 3
[ 109 ]
Business Intelligence PublisherTo use Oracle Business Intelligence Publisher as your report server, you need to install Oracle Business Intelligence Publisher version 10.1.3.2.1 or above. Business Intelligence Publisher can be downloaded from the Oracle Technology network (http://www.oracle.com/technetwork/middleware/bi-publisher/downloads/index.html).
Business Intelligence Publisher version 11 runs against WebLogic Server.
Installation of Business Intelligence Publisher Version 11BI Publisher 11.x is installed by using the Oracle Business Intelligence 11g Installer. For the integration with Application Express, you only need to install and configure Business Intelligence Publisher. In the Configure Components page of the installation, you only need to check the Business Intelligence Publisher component. The following screenshot shows the Components Configuration screen:
www.it-ebooks.info

Printing
[ 110 ]
Only BI Publisher needs to be checked in the Configure Components screen.
Before installing Business Intelligence Publisher, you must run the Repository Creation Utility (RCU). RCU creates the BIPLATFORM schema to support Oracle Business Intelligence Enterprise Edition Plus (OBIEE Plus). In RCU, specify the prefix for this schema; the default value is DEV for development, but you can change it. This is a pre-requisite from Business Intelligence Publisher version 11. At the end of a successful installation, the BI Publisher Server should be up and running.
The following screenshot shows the main screen from BI Publisher; this screen is used to create your report layout:
To use BI Publisher as your report server, you need to configure the Report Printing parameters.
Logging in to the administration site of Application Express is required (http://hostname:port/apex(DAD)/apex_admin). Navigate to instance settings and enter the required data.
Select Manage Instance or Instance Settings and click on the Report Printing tab.
www.it-ebooks.info

Chapter 3
[ 111 ]
The following attributes need to be specified:
• Print Server: Select Oracle BI Publisher from the dropdown list• Print Server Protocol: Choose either HTTP or HTTPS (depends on
your configuration)• Print Server Host Address: The hostname for the machine where you
installed Business Intelligence Publisher• Print Server Port: The port given at the end of the BI Publisher installation
(port from the managed server)• Print Server Script: /xmlpserver/convert
The following screenshot shows the configuration from BI Publisher in the administration website from Application Express:
Simple print test using BI PublisherPrinting can be tested by using the sample application from Application Express. The name of the sample application is product portal, database application. Enable Report Printing needs to be configured in the Printing attributes page. In the same page, give the link a name. The following screenshot shows the Print tab for the Report region:
www.it-ebooks.info

Printing
[ 112 ]
When running the print page, you will see Print link somewhere near the report and clicking on that link will give you a report in the format selected in the Printing attributes page.
How to debug or troubleshoot printing issuesMy statement is, "Keep it as simple as possible." So when you face issues with testing the report server, start by taking Application Express out of scope.
One way to make sure that your print server is up, running, and configured properly is to set up a static HTML form that simulates what Application Express is doing internally, that is, posting some XML data along with an XSL-FO stylesheet to a print server via HTTP and receiving back a PDF document as the response. If this works properly, you can at least be sure that your print server is working.
ExampleThe example file, How To Debug APEX and PDF Printing Integration Issues: BI Publisher / Apache FOP (Doc ID 454701.1), can be downloaded from My Oracle Support:
• Download the attached ZIP file (testpdf.html).• Open the testpdf.html file in a browser and enter one of
the following URLs for your print server installation:http://servername.domain.com:9704/xmlpserver/convert (BI Publisher)
http://servername.domain.com:8888/fop/ apex_fop.jsp
• Click on the Submit button.
If this is successful and the report server can be contacted, you should see a PDF file document. If not, there is something wrong in contacting the report server. Check the URL entered for the test to make sure you have not entered the instance details incorrectly.
Another way to check if the report server can be reached without taking Application Express in the picture, is to check the outcome of the following PL/SQL block. Of course, you need to replace the hostname with your own hostname and the port with your printer server port.
DECLARE req utl_http.req; resp utl_http.resp; value VARCHAR2(1024);
www.it-ebooks.info
Chapter 3
[ 113 ]
BEGIN req := utl_http.begin_request('http://hostname:printer server port/xmlpserver'); utl_http.set_header(req, 'User-Agent', 'Mozilla/4.0'); resp := utl_http.get_response(req); LOOP utl_http.read_line(resp, value, TRUE); dbms_output.put_line(value); END LOOP; utl_http.end_response(resp); EXCEPTION WHEN utl_http.end_of_body THEN utl_http.end_response(resp); END;
How to check if network services are enabledNetwork services need to be enabled for Oracle RDBMS version 11 and higher. When an error occurs in the printing, the network services need to be checked.
select acl, principal, privilege, is_grant from dba_network_acl_privileges;
The outcome is as follows:
ACL Principal Privilege Is_Grant
/sys/acls/power_users.xml APEX_040100 Connect True
The preceding query will check the necessary privileges that are needed for the printing feature in Application Express. These rows need to be present for enabling printing. If the necessary privileges are not granted when you are printing, the following error will be generated:
ORA-20001: The printing engine could not be reached because either the URL specified is incorrect or a proxy URL needs to be specified
When there are no rows, ACL needs to be added. The code needed to fix this problem is available in the Installation Guide from Application Express, under the header 3.3.7 Enable Network Services in Oracle Database 11g (http://docs.oracle.com/cd/E23903_01/doc/doc.41/e21673/pre_require.htm#i1009513).
www.it-ebooks.info
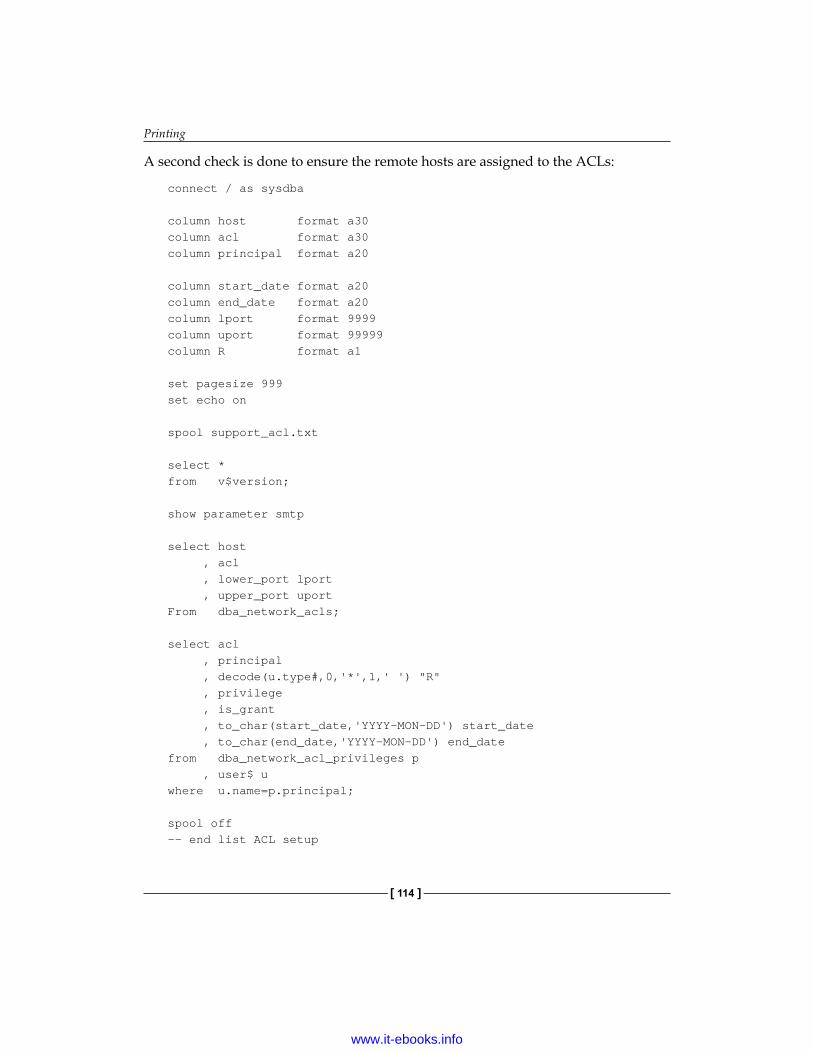
Printing
[ 114 ]
A second check is done to ensure the remote hosts are assigned to the ACLs:
connect / as sysdba
column host format a30column acl format a30column principal format a20
column start_date format a20column end_date format a20column lport format 9999column uport format 99999column R format a1
set pagesize 999set echo on
spool support_acl.txt
select * from v$version;
show parameter smtp
select host , acl , lower_port lport , upper_port uportFrom dba_network_acls;
select acl , principal , decode(u.type#,0,'*',1,' ') "R" , privilege , is_grant , to_char(start_date,'YYYY-MON-DD') start_date , to_char(end_date,'YYYY-MON-DD') end_datefrom dba_network_acl_privileges p , user$ uwhere u.name=p.principal;
spool off-- end list ACL setup
www.it-ebooks.info
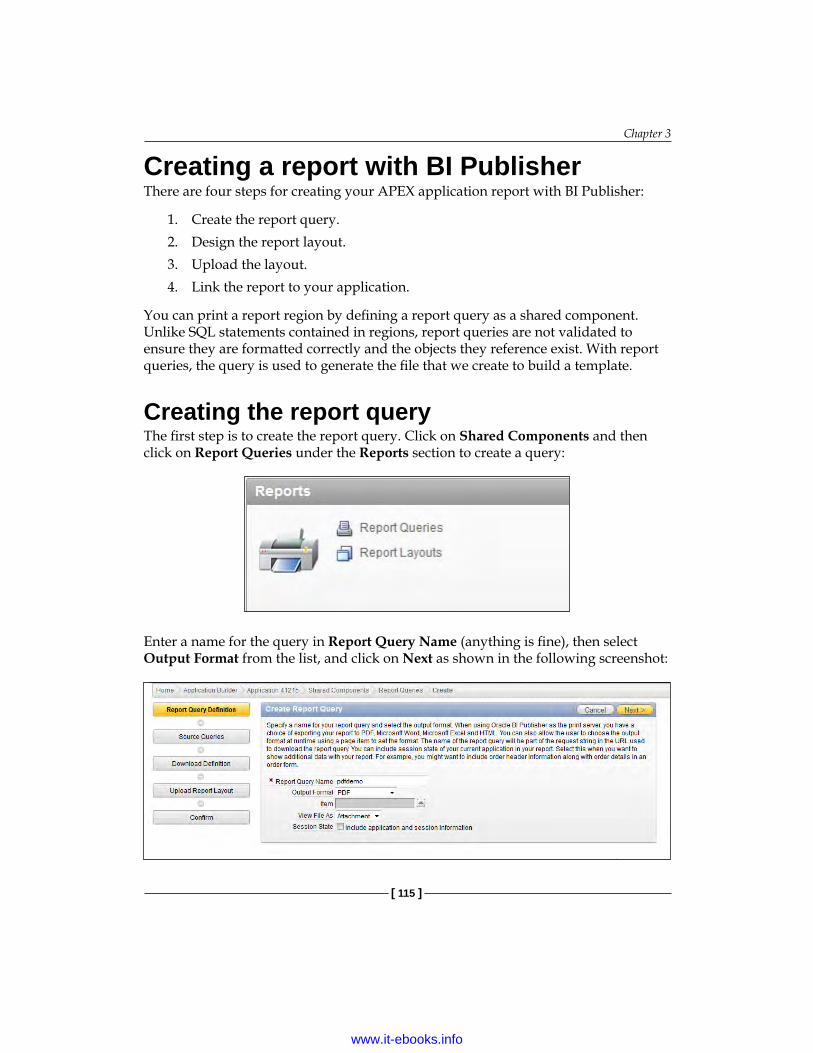
Chapter 3
[ 115 ]
Creating a report with BI PublisherThere are four steps for creating your APEX application report with BI Publisher:
1. Create the report query.2. Design the report layout.3. Upload the layout.4. Link the report to your application.
You can print a report region by defining a report query as a shared component. Unlike SQL statements contained in regions, report queries are not validated to ensure they are formatted correctly and the objects they reference exist. With report queries, the query is used to generate the file that we create to build a template.
Creating the report queryThe first step is to create the report query. Click on Shared Components and then click on Report Queries under the Reports section to create a query:
Enter a name for the query in Report Query Name (anything is fine), then select Output Format from the list, and click on Next as shown in the following screenshot:
www.it-ebooks.info

Printing
[ 116 ]
Enter the query and click on the Next button. See the following screenshot:
To end the report query, click on the Finish button. See the following screenshot:
Designing the report layoutThe second step is to design the report layout. Now that you have created a report query, you can design the report output with MS Word, but before doing so you need to download the XML data onto your local machine. BI Publisher provides you an MS Word add-in called Template Builder, which helps you to design the reports and preview the result easily and quickly (http://www.oracle.com/technetwork/middleware/bi-publisher/downloads/index.html).
You can associate a report query with a report layout and download it as a formatted document. If no report layout is selected, a generic layout is used. The generic layout is intended to be used to test and verify a report query. When using the generic layout option and multiple source queries are defined, only the first result set is included in the document.
www.it-ebooks.info
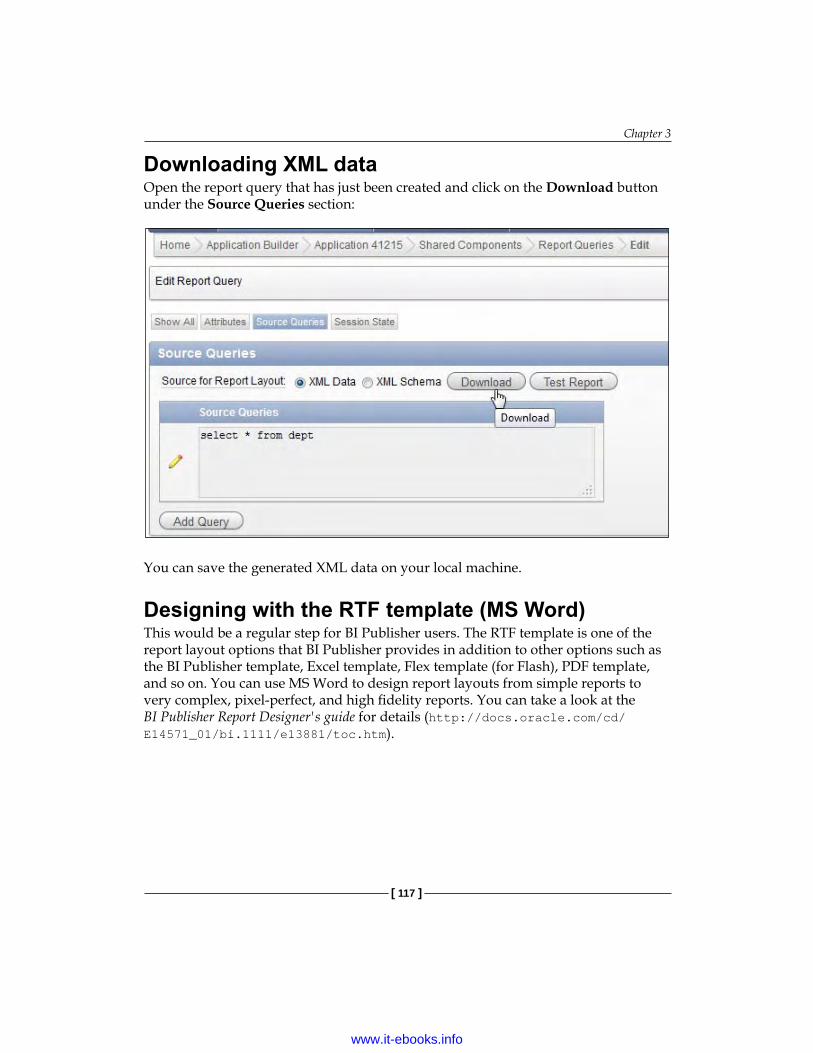
Chapter 3
[ 117 ]
Downloading XML dataOpen the report query that has just been created and click on the Download button under the Source Queries section:
You can save the generated XML data on your local machine.
Designing with the RTF template (MS Word)This would be a regular step for BI Publisher users. The RTF template is one of the report layout options that BI Publisher provides in addition to other options such as the BI Publisher template, Excel template, Flex template (for Flash), PDF template, and so on. You can use MS Word to design report layouts from simple reports to very complex, pixel-perfect, and high fidelity reports. You can take a look at the BI Publisher Report Designer's guide for details (http://docs.oracle.com/cd/E14571_01/bi.1111/e13881/toc.htm).
www.it-ebooks.info

Printing
[ 118 ]
Uploading the report layoutThe third step is to upload the layout. Once you finish designing the report layout with the RTF template, you can upload it to Oracle APEX and associate it to the report query. Log in to Oracle APEX and go to your application. Go to Shared Component and click on Report Layout. See the following screenshot:
Then click on the Create button. Select Named Column (RTF) and click on Next:
Type the layout name in the Layout Name field and select the RTF template. Then click on Create Layout to finish:
www.it-ebooks.info
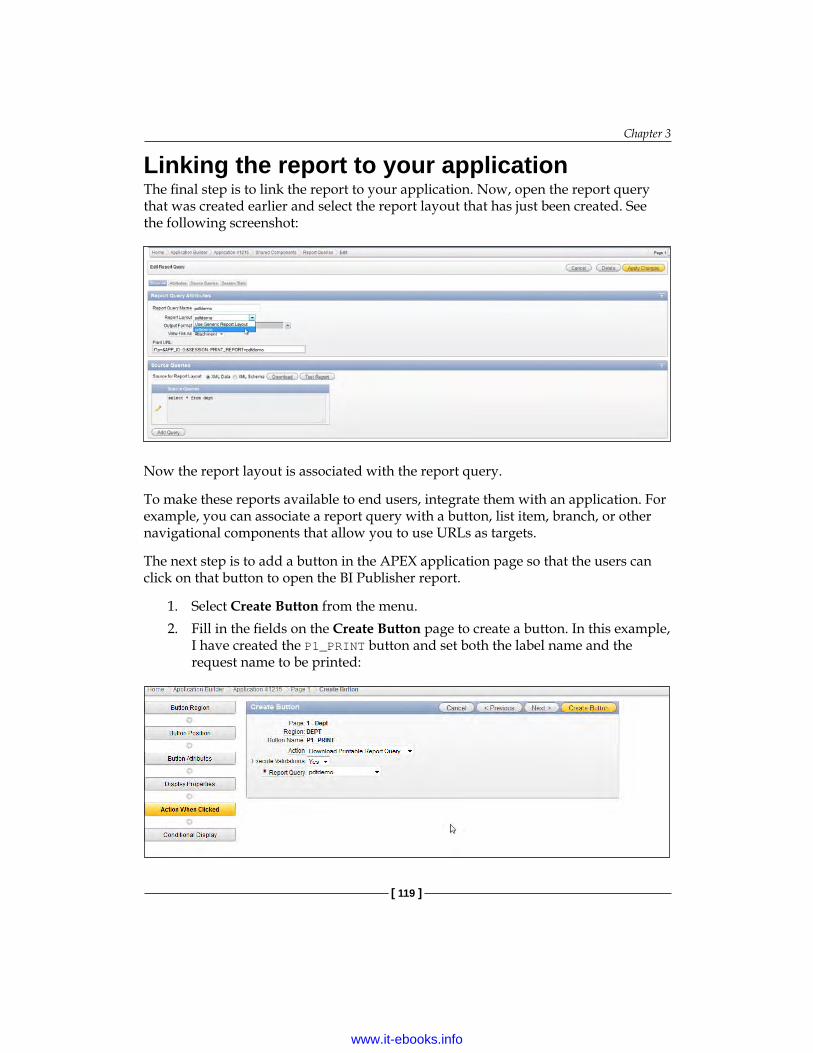
Chapter 3
[ 119 ]
Linking the report to your applicationThe final step is to link the report to your application. Now, open the report query that was created earlier and select the report layout that has just been created. See the following screenshot:
Now the report layout is associated with the report query.
To make these reports available to end users, integrate them with an application. For example, you can associate a report query with a button, list item, branch, or other navigational components that allow you to use URLs as targets.
The next step is to add a button in the APEX application page so that the users can click on that button to open the BI Publisher report.
1. Select Create Button from the menu.2. Fill in the fields on the Create Button page to create a button. In this example,
I have created the P1_PRINT button and set both the label name and the request name to be printed:
www.it-ebooks.info
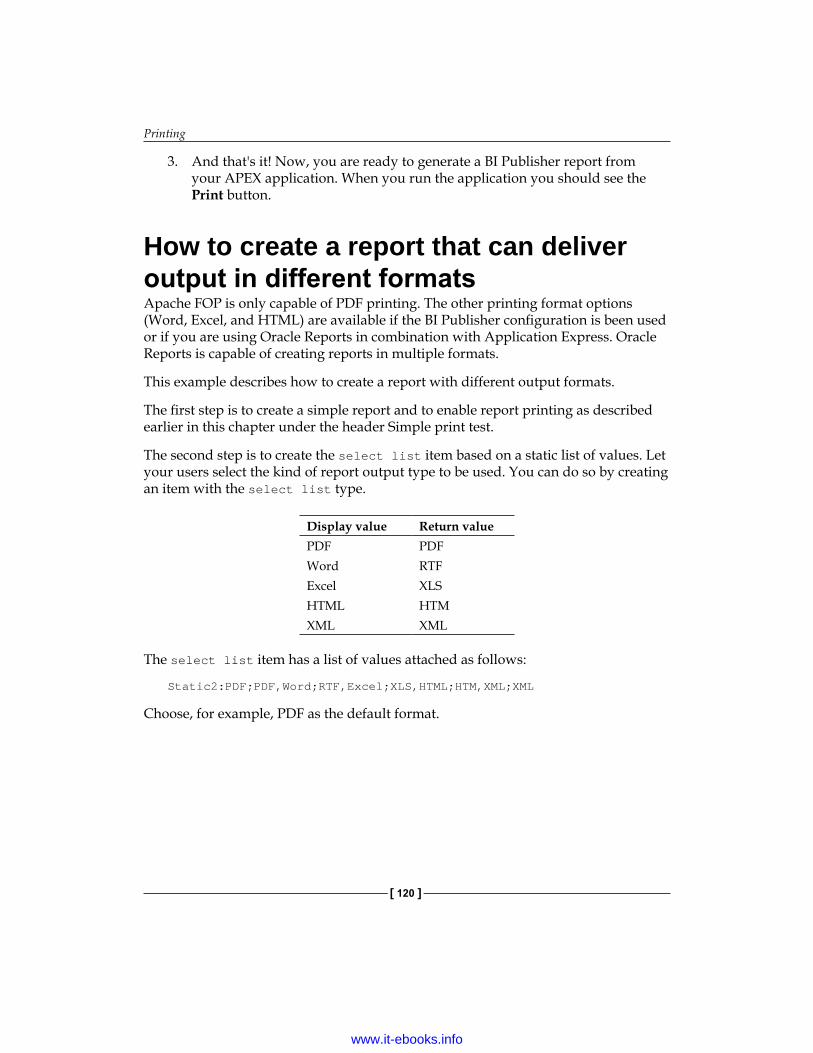
Printing
[ 120 ]
3. And that's it! Now, you are ready to generate a BI Publisher report from your APEX application. When you run the application you should see the Print button.
How to create a report that can deliver output in different formatsApache FOP is only capable of PDF printing. The other printing format options (Word, Excel, and HTML) are available if the BI Publisher configuration is been used or if you are using Oracle Reports in combination with Application Express. Oracle Reports is capable of creating reports in multiple formats.
This example describes how to create a report with different output formats.
The first step is to create a simple report and to enable report printing as described earlier in this chapter under the header Simple print test.
The second step is to create the select list item based on a static list of values. Let your users select the kind of report output type to be used. You can do so by creating an item with the select list type.
Display value Return valuePDF PDFWord RTFExcel XLS HTML HTMXML XML
The select list item has a list of values attached as follows:
Static2:PDF;PDF,Word;RTF,Excel;XLS,HTML;HTM,XML;XML
Choose, for example, PDF as the default format.
www.it-ebooks.info
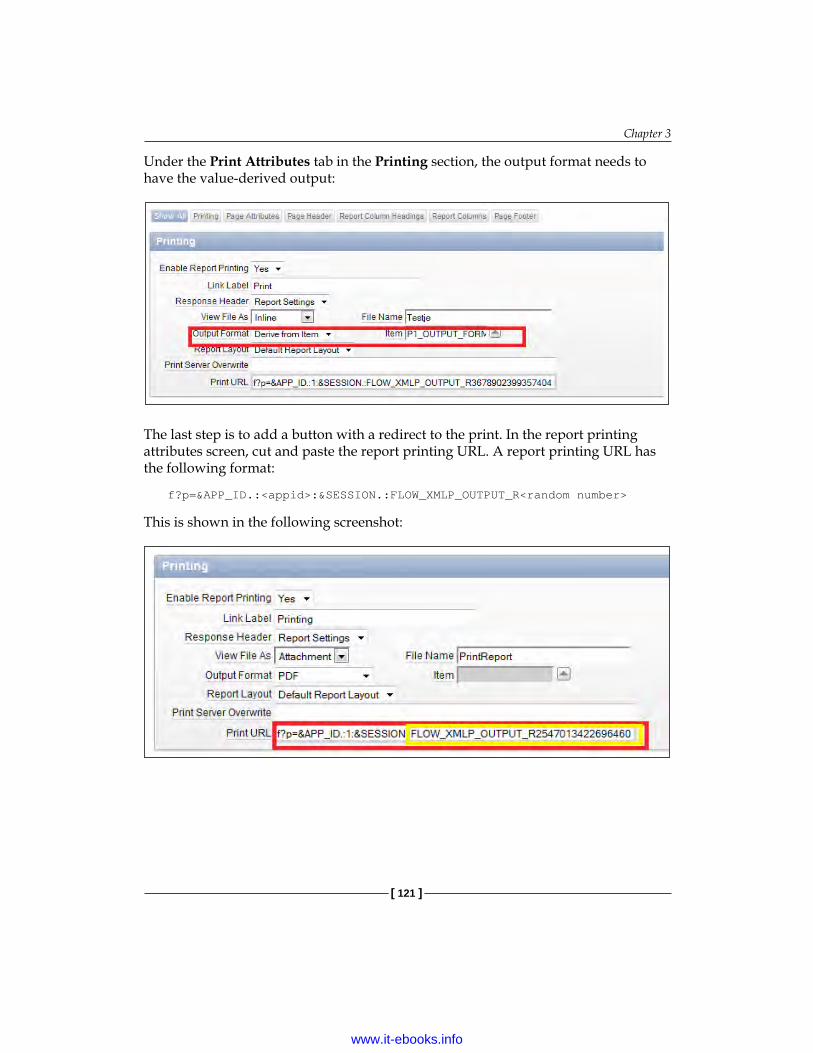
Chapter 3
[ 121 ]
Under the Print Attributes tab in the Printing section, the output format needs to have the value-derived output:
The last step is to add a button with a redirect to the print. In the report printing attributes screen, cut and paste the report printing URL. A report printing URL has the following format:
f?p=&APP_ID.:<appid>:&SESSION.:FLOW_XMLP_OUTPUT_R<random number>
This is shown in the following screenshot:
www.it-ebooks.info

Printing
[ 122 ]
Cut and paste the FLOW_XMLP_OUTPUT_R### section from the Print URL field. Since you are going to invoke the print from the button, you can remove the Printing from the Link Label field and a branch needs to be created, as shown in the following screenshot:
How to add a chart to a reportIt's actually quite easy to use the BI Publisher Template Builder plugin for Microsoft Word and BI Publisher as the PDF rendering engine for Application Express.
The Template Builder plugin can be downloaded from http://www.oracle.com/technetwork/middleware/bi-publisher/downloads/index.html.
Report layouts can be developed by using the BI Publisher Word Template Builder. Using the Template Builder, you can create a chart and report definition, and save this as an RTF file, which can be uploaded back into Application Express.
It's important to understand however, that this is not a printer-friendly version of your web page. So if you have, for example, a Flash chart region and a report region on your page, you can't simply print this as a PDF.
The PDF printing feature in Application Express generates XML data of your report's result set, using an XSL-FO report layout (or RTF template). This XML data is then transformed into PDF (or other supported output format). The transformation is sent back to the browser for download.
www.it-ebooks.info
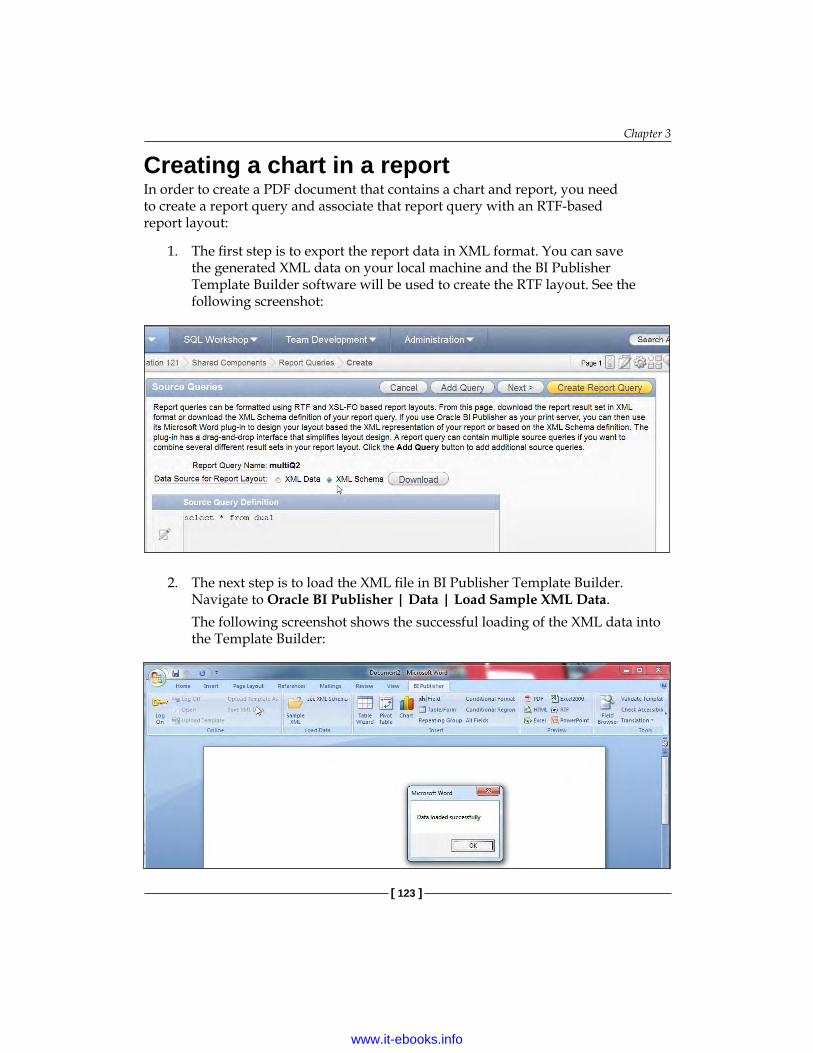
Chapter 3
[ 123 ]
Creating a chart in a reportIn order to create a PDF document that contains a chart and report, you need to create a report query and associate that report query with an RTF-based report layout:
1. The first step is to export the report data in XML format. You can save the generated XML data on your local machine and the BI Publisher Template Builder software will be used to create the RTF layout. See the following screenshot:
2. The next step is to load the XML file in BI Publisher Template Builder. Navigate to Oracle BI Publisher | Data | Load Sample XML Data.The following screenshot shows the successful loading of the XML data into the Template Builder:
www.it-ebooks.info
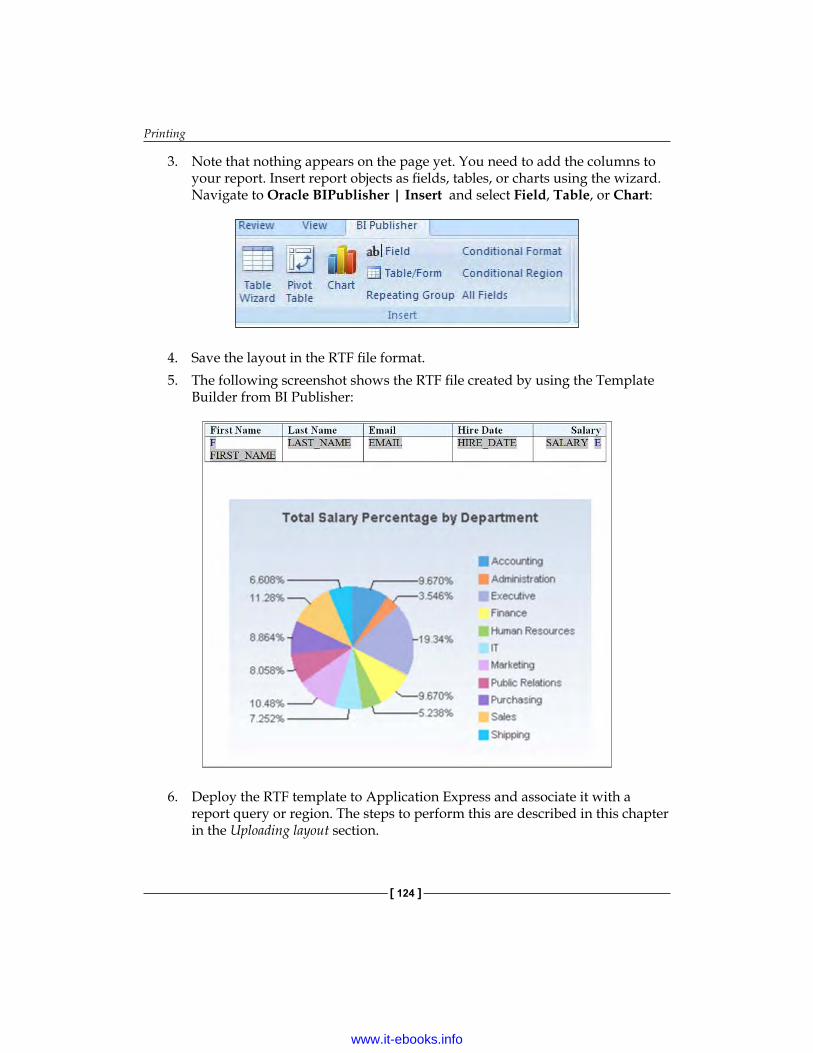
Printing
[ 124 ]
3. Note that nothing appears on the page yet. You need to add the columns to your report. Insert report objects as fields, tables, or charts using the wizard. Navigate to Oracle BIPublisher | Insert and select Field, Table, or Chart:
4. Save the layout in the RTF file format.5. The following screenshot shows the RTF file created by using the Template
Builder from BI Publisher:
6. Deploy the RTF template to Application Express and associate it with a report query or region. The steps to perform this are described in this chapter in the Uploading layout section.
www.it-ebooks.info

Chapter 3
[ 125 ]
7. The last step of the process is to create a button to print the report. The next screenshot shows you how to do this:
8. Test the report by running the page. In this example, when I press the PRINT_REPORT button, I'm getting a PDF document with the chart included in it.
How to add dynamic images to a reportFor static images it's pretty straightforward. Just place the static images into your RTF layout, using MS Word and BI Publisher Desktop. For dynamic images, well that's a little more complicated.
When talking about dynamic images, what I mean is the images that are stored in BLOB columns in database tables. To include the image in the PDF, you need to take care of the following:
• The image needs to be included in the generated XML representation of the report data and the RTF report layout needs to include instructions on what to do with the image information stored in the XML data.
• Before BLOB columns can be included in the XML export, they need to be converted to CLOB by using base64 encoding and the report template needs to reference the image data column by using an XSL-FO expression. So the reports template needs to reference the image data column, using XSL-FO expression.
Keep in mind the 32K limit on report columns.
www.it-ebooks.info
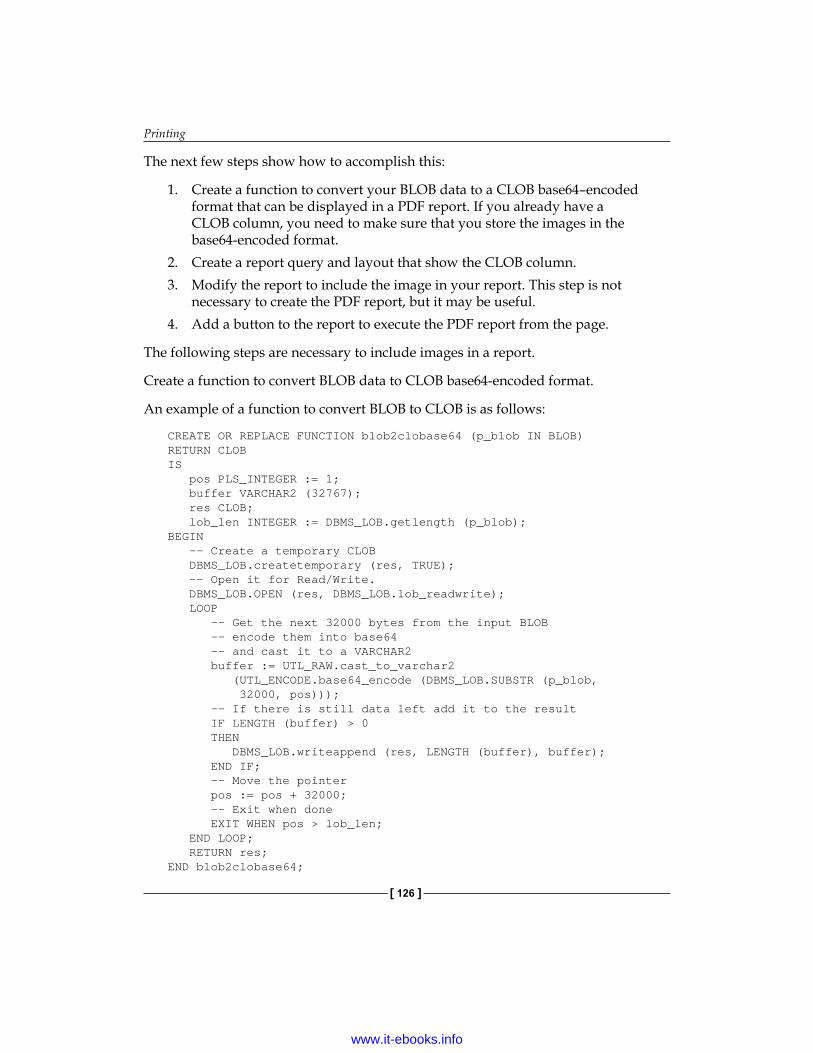
Printing
[ 126 ]
The next few steps show how to accomplish this:
1. Create a function to convert your BLOB data to a CLOB base64–encoded format that can be displayed in a PDF report. If you already have a CLOB column, you need to make sure that you store the images in the base64-encoded format.
2. Create a report query and layout that show the CLOB column.3. Modify the report to include the image in your report. This step is not
necessary to create the PDF report, but it may be useful.4. Add a button to the report to execute the PDF report from the page.
The following steps are necessary to include images in a report.
Create a function to convert BLOB data to CLOB base64-encoded format.
An example of a function to convert BLOB to CLOB is as follows:
CREATE OR REPLACE FUNCTION blob2clobase64 (p_blob IN BLOB)RETURN CLOBIS pos PLS_INTEGER := 1; buffer VARCHAR2 (32767); res CLOB; lob_len INTEGER := DBMS_LOB.getlength (p_blob);BEGIN -- Create a temporary CLOB DBMS_LOB.createtemporary (res, TRUE); -- Open it for Read/Write. DBMS_LOB.OPEN (res, DBMS_LOB.lob_readwrite); LOOP -- Get the next 32000 bytes from the input BLOB -- encode them into base64 -- and cast it to a VARCHAR2 buffer := UTL_RAW.cast_to_varchar2 (UTL_ENCODE.base64_encode (DBMS_LOB.SUBSTR (p_blob, 32000, pos))); -- If there is still data left add it to the result IF LENGTH (buffer) > 0 THEN DBMS_LOB.writeappend (res, LENGTH (buffer), buffer); END IF; -- Move the pointer pos := pos + 32000; -- Exit when done EXIT WHEN pos > lob_len; END LOOP; RETURN res;END blob2clobase64;
www.it-ebooks.info

Chapter 3
[ 127 ]
The UTL_RAW.CAST_TO_VARCHAR2 function converts a raw value into a value of datatype VARCHAR2 with the same number of data bytes. The result is treated as if it was composed of single "8-bit" bytes, not characters. Multibyte character boundaries are ignored. The data is not modified in any way—it is only changed to datatype VARCHAR2.
The UTL_ENCODE.BASE64_ENCODE function encodes the binary representation of the RAW value into base 64 elements and returns it in the form of a RAW string.
The DBMS_LOB.SUBSTR function selects the requested number of characters of a BLOB column from a given starting position.
Create a report query and layout to show the CLOB column:
select employee_id, first_name, last_name, blob2clobase64(photo)from employeeswhere photo is not null
In the report query, invoke the blob2clobase64 function for the photo image.
In addition, because you have many rows in the table that may or may not have photos, you need to add the WHERE clause to select only those records that have a photo.
The Image element is the name of image_item.
For example, the image item is photo. In the template, you now need to reference the image data. We can use an XSL-FO expression to reference the image:
<fo:instream-foreign-object content-type="image/gif"> <xsl:value-of select="PHOTO"/></fo:instream-foreign-object>
www.it-ebooks.info

Printing
[ 128 ]
Notice that the template needs to know the mime type of the image—in this case it is image/gif. IMAGE_ELEMENT (PHOTO) contains the base64-encoded image data. The following screenshot shows that the image (picture) has been converted:
You may also want to include the photo on the report on a page in your application. You can add the PHOTO column to the Report region, which then needs to be configured in Report Attributes.
www.it-ebooks.info

Chapter 3
[ 129 ]
The key to manipulate the download link of a BLOB column is the column's format mask. You specify a format mask for a date or number, in the same way you can format a download link. However, the DOWNLOAD format mask requires you to specify at least three parameters, as shown in the following line:
DOWNLOAD:EMPLOYEES:PHOTO:EMPLOYEE_ID
This is the default format that gets created by the wizard. Additional format options can be added to make the download capability more user friendly (also see the document at http://docs.oracle.com/cd/E23903_01/doc/doc.41/e21674/advnc_blob.htm#BCGBCHBD).
Modify the format of the BLOB_CONTENT column as follows:
DOWNLOAD:TABLE_NAME:BLOB_CONTENT:ID::MIME_TYPE:FILENAME: LAST_UPDATED:CHARACTER_SET
Clicking on the link BLOB Download Format Mask, displays a pop up to assist you in entering all the parameters that are necessary for the DOWNLOAD format, as you can see in the following screenshot:
www.it-ebooks.info
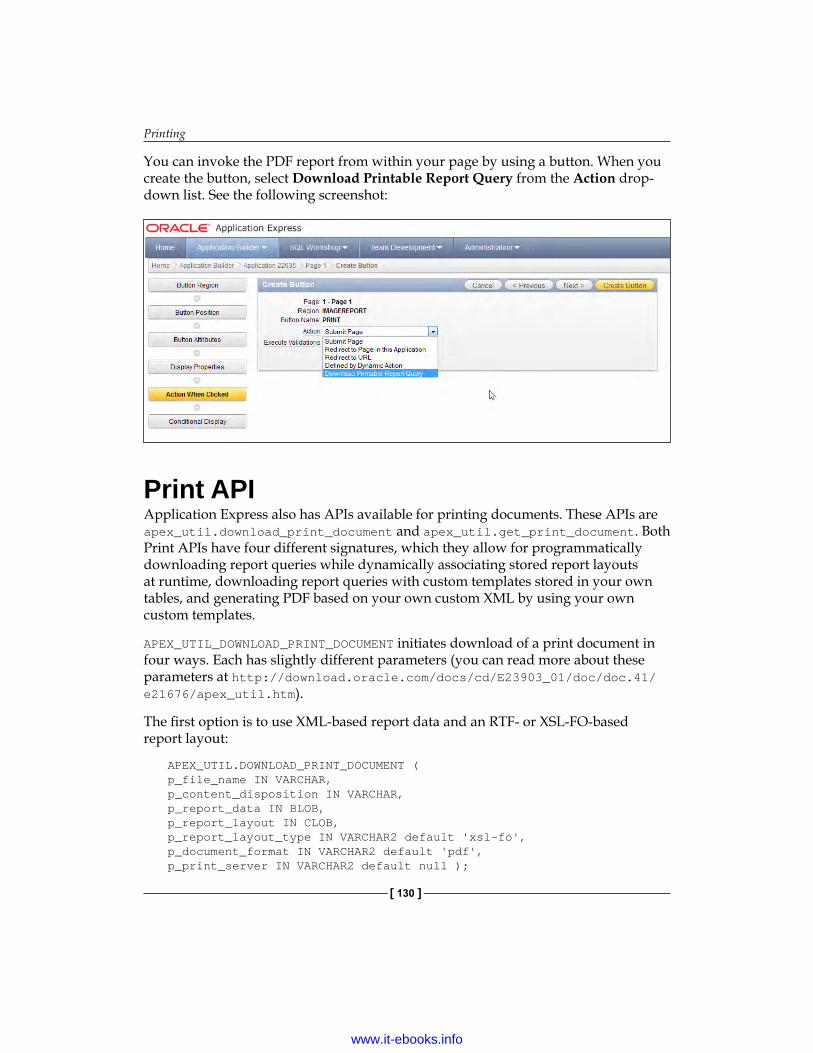
Printing
[ 130 ]
You can invoke the PDF report from within your page by using a button. When you create the button, select Download Printable Report Query from the Action drop-down list. See the following screenshot:
Print APIApplication Express also has APIs available for printing documents. These APIs are apex_util.download_print_document and apex_util.get_print_document. Both Print APIs have four different signatures, which they allow for programmatically downloading report queries while dynamically associating stored report layouts at runtime, downloading report queries with custom templates stored in your own tables, and generating PDF based on your own custom XML by using your own custom templates.
APEX_UTIL_DOWNLOAD_PRINT_DOCUMENT initiates download of a print document in four ways. Each has slightly different parameters (you can read more about these parameters at http://download.oracle.com/docs/cd/E23903_01/doc/doc.41/e21676/apex_util.htm).
The first option is to use XML-based report data and an RTF- or XSL-FO-based report layout:
APEX_UTIL.DOWNLOAD_PRINT_DOCUMENT ( p_file_name IN VARCHAR, p_content_disposition IN VARCHAR, p_report_data IN BLOB, p_report_layout IN CLOB, p_report_layout_type IN VARCHAR2 default 'xsl-fo', p_document_format IN VARCHAR2 default 'pdf', p_print_server IN VARCHAR2 default null );
www.it-ebooks.info
Chapter 3
[ 131 ]
The second option is to use a predefined report query and an RTF- or XSL-FO–based report layout:
APEX_UTIL.DOWNLOAD_PRINT_DOCUMENT ( p_file_name IN VARCHAR, p_content_disposition IN VARCHAR, p_application_id IN NUMBER, p_report_query_name IN VARCHAR2, p_report_layout IN CLOB, p_report_layout_type IN VARCHAR2 default 'xsl-fo', p_document_format IN VARCHAR2 default 'pdf', p_print_server IN VARCHAR2 default null );
The third option is to use a predefined report query and a predefined report layout:
APEX_UTIL.DOWNLOAD_PRINT_DOCUMENT ( p_file_name IN VARCHAR, p_content_disposition IN VARCHAR, p_application_id IN NUMBER, p_report_query_name IN VARCHAR2, p_report_layout_name IN VARCHAR2, p_report_layout_type IN VARCHAR2 default 'xsl-fo', p_document_format IN VARCHAR2 default 'pdf', p_print_server IN VARCHAR2 default null );
The fourth and last option is to use an XML-based report data (as a CLOB) and an RTF- or XSL-FO–based report layout:
APEX_UTIL.DOWNLOAD_PRINT_DOCUMENT ( p_file_name IN VARCHAR, p_content_disposition IN VARCHAR, p_report_data IN CLOB, p_report_layout IN CLOB, p_report_query_name IN VARCHAR2, p_report_layout_type IN VARCHAR2 default 'xsl-fo', p_document_format IN VARCHAR2 default 'pdf', p_print_server IN VARCHAR2 default null );
Reports can be captured and stored in database tables, using the Application Express Print API. apex_util.get_print_document retrieves the report in BLOB format. So the apex_util.get_print_document function always returns a document as BLOB.
www.it-ebooks.info
Printing
[ 132 ]
The first option is to use XML-based report data and a RTF- or XSL-FO-based report layout:
APEX_UTIL.GET_PRINT_DOCUMENT ( p_report_data IN BLOB, p_report_layout IN CLOB, p_report_layout_type IN VARCHAR2 default 'xsl-fo', p_document_format IN VARCHAR2 default 'pdf', p_print_server IN VARCHAR2 default NULL ) RETURN BLOB;
The second option is to use a predefined report query and a predefined report layout:
APEX_UTIL.GET_PRINT_DOCUMENT ( p_application_id IN NUMBER, p_report_layout_name IN VARCHAR2, p_report_query_name IN VARCHAR2, p_report_layout_name IN VARCHAR2 default null, p_report_layout_type IN VARCHAR2 default 'xsl-fo', p_document_format IN VARCHAR2 default 'pdf', p_print_server IN VARCHAR2 default null ) RETURN BLOB;
The third option is to use a predefined report query and an RTF- or XSL-FO–based report layout:
APEX_UTIL.GET_PRINT_DOCUMENT ( p_application_id IN NUMBER, p_report_query_name IN VARCHAR2, p_report_layout IN CLOB, p_report_layout_type IN VARCHAR2 default 'xsl-fo', p_document_format IN VARCHAR2 default 'pdf', p_print_server IN VARCHAR2 default null ) RETURN BLOB;
The fourth and last option is to use an XML-based report data and an RTF- or XSL-FO–based report layout:
APEX_UTIL.GET_PRINT_DOCUMENT ( p_report_data IN CLOB, p_report_layout IN CLOB, p_report_layout_type IN VARCHAR2 default 'xsl-fo', p_document_format IN VARCHAR2 default 'pdf', p_print_server IN VARCHAR2 default NULL ) RETURN BLOB;
www.it-ebooks.info

Chapter 3
[ 133 ]
How to bypass the 32K limitOne issue, which will be addressed in the next version of Application Express, is the 32K limit on report columns. This means that only fairly small images are currently supported when using the technique with report queries or report regions. If the XML data is generated some other way, and the PDF rendering is done using the Print API, the use of larger images would be possible as well.
The 32K limit on report columns can be bypassed by using the Print APIs—apex_util.download_print_document and apex_util.get_print_document. With these APIs, you can generate PDF and other documents through a simple PL/SQL API call. These APIs take care of all the communication with BI Publisher or Apache FOP.
The apex_util.get_print_document API can be called to generate and retrieve the print document as a BLOB in the database for further processing, such as storing the document in tables, and so on.
The apex_util.download_print_document API can be called in an Oracle Application Express page process to generate and download the print document straight to your client.
An example of this mechanism can be downloaded from http://marcsewtz.blogspot.com/2012/02/dynamic-images-in-pdf-what-32k-limit.html.
Alternatives to use for PDF printingBeside the use of Apache FOP or BI Publisher, PDF documents can be created in Oracle Application Express by making use of alternative methods such as calling Oracle Reports, using plugins, and so on.
Integration with Oracle ReportsOracle Reports, a component of Oracle Fusion Middleware, is a high-fidelity enterprise reporting tool. It enables businesses to provide instant access to information to all levels within and outside of the organization in a scalable and secure environment.
More information about Oracle Reports can be found on the Oracle Technology Network website (http://www.oracle.com/technetwork/middleware/reports/overview/index.html).
www.it-ebooks.info

Printing
[ 134 ]
Oracle Reports Developer includes Oracle Reports Builder and Oracle Reports Services. Oracle Reports Builder is used to develop the report and Oracle Reports Services executes, distributes, and publishes your reports for enterprise-wide reporting.
This paragraph has been added just to show you the possibility of integrating Oracle Reports with Oracle Application Express.
The Oracle report is called as follows:
http://hostname:port/reports/rwservlet?module=example.rdf&userid=hr/hr@tnsalias&destype=cache&desformat=pdf&p_empid=10
In Application Express, the only thing needed is to define a substitution variable to integrate Oracle Reports with Application Express.
Substitution strings use the &variable notation. They can be used anywhere in your APEX application such as in an HTML region or even in a template.
The navigation path for creating a substitution string is Application Builder Tab/Edit Application properties/Substitution section.
Enter REPORTS_URL under the Substitution String field.
Enter http://hostname:port/reports/rwservlet?userid=hr/hr@tnsalias&P_EMPID under the Substitution Value field.
The Oracle report can be called by pressing a button. A button is created with the URL target as follows:
&REPORTS_URL.&module=example.rdf&destype=cache&desformat= &P1_DESFORMAT.&p_empid=&P1_EMPID
Integration with CocoonYou may prefer another XSL-FO processing engines, which are Apache Cocoon and Apache Tomcat. Cocoon is a web framework other than APEX, of course. For full explanation and a step-by-step approach, follow this link:
http://carlback.blogspot.com/2007/03/apex-cocoon-pdf-and-more.html
www.it-ebooks.info
Chapter 3
[ 135 ]
Integration with JasperReportsJasperReports is a powerful alternative to Oracle Reports. The important design patterns can be translated, using JasperReports.
ArchitectureThe architecture for JasperReports is as follows:
1. User clicks on link in APEX application.2. PL/SQL API calls a Jasper report and passes parameter (by using utl_http).3. Jasper Reports creates a JDBC connection to Oracle, executes the report, and
returns the report output (for example, PDF) directly.
More on step-by-step integration into the sample application can be found at the following links:
• http://www.opal-consulting.de/downloads/free_tools/JasperReportsIntegration/Opal-Consulting-JasperReportsIntegration.pdf
• http://www.opal-consulting.de/downloads/presentations/2012-06-28-ODTUG-KScope12/2012-06-28-ODTUG-KScope12-jasper-reports.pdf
PluginsPlugins allow the Application Express framework to be extended with custom item types, region types, processes, and dynamic actions. Once defined, plugin-based components are created and maintained very much like standard Application Express components. Plugins enable developers to create highly customized components to enhance the functionality, appearance, and user friendliness of their application. Third-party plugins can be found at http://www.apex-plugin.com/.
There are two alternatives available for printing PDF files.
Reports 2 PDFThis plugin is a process type plugin. It uses the source queries of all report regions on a page—either a classic or interactive—and puts the results of these queries in a PDF file, ready for download. No print engine, such as Apache FOP or BI Publisher, is needed.
www.it-ebooks.info
Printing
[ 136 ]
Embedded PDFThis is a plugin that can be used to get the output of a query as a PDF, which is embedded in your application. Also no print-server, such as Apache FOP, BI Publisher, or Cocoon is required.
These plugins are third-party plugins, which means that they are officially not supported by the Oracle Company.
SummaryThis chapter gave you an overview of the possibilities for printing in Application Express.
There are different choices for implementing reports printing/PDF printing:
• Apache FOP by using OC4J• BI Publisher• Or alternatives such as Oracle Reports, Jasper Reports, and Plugins
We started with the two most commonly used architectures in Application Express printing—Apache FOP and BI Publisher. Then we saw how to install and configure both Apache FOP and BI Publisher. After the installation, we discussed how to investigate printing problems.
We also dealt with layout of your report and discussed how to include charts and images.
Finally, we discussed some alternatives that can be used for PDF printing, and also plugins.
www.it-ebooks.info
SecurityThe main question is: How secure is "Secure Enough"?
The answer to this question depends on what you're protecting, who you are protecting it from, and the likelihood of someone wanting to steal what you are protecting. You also need to understand the repercussions you would face if someone was able to successfully steal the things you are protecting. To summarize, you need to think about the questions: Who/what/how can data be accessed?
The definition of security is subjective. My idea of security may be different from yours as a reader of this book. In my view, the secured data can only be seen and edited by people who are qualified and authorized, and that data is protected from people who are not.
Security must be designed into applications from the outset, starting with database design, continuing through application design, development, and testing, and finally with implementation and training. So, plan security and the architecture, and make sure people know the security basics. Have people in your organization who are responsible for security, patching, and so on.
This chapter describes how to provide security for Oracle Application Express. Oracle Application Express is secure, but developers can make it insecure. There is a difference between administrators and developers. Administrators are responsible for the installation from Application Express, and developers are responsible for developing a secure application. Both views and responsibilities are discussed.
www.it-ebooks.info
Security
[ 138 ]
The first part of the chapter will discuss the responsibilities of an administrator:
• Installation from Application Express • Installation from patches • Security in the database• Security in the web server• Session time out• Password rule(s)
The second part of the chapter will discuss the security aspects for the Oracle Application Express developer. For application developers, security can be a very difficult subject. The application must be tested from the perspective of a hacker or someone who deliberately wants to do harm. Security aspects for developers are as follows:
• Cross-site scripting• SQL injection• Authentication• Authorization• Session state protection• Browser security
Securing Oracle Application Express for administratorsOracle Application Express is secure, but developers can make it insecure.
Protecting the database environmentOracle Application Express runs in the database, so the database environment needs to be protected.
Follow the principle of least privilege, so a user only has access to the resources required. Lock or remove unused users. Use sensible passwords, and do not use the same password for SYS and SYSTEM.
www.it-ebooks.info

Chapter 4
[ 139 ]
This document provides a checklist for security in the Oracle databaseDocument # 131752.1: Security Checklist at the My Oracle Support website.
The best way to secure data in your APEX application, or any application, is to secure your data in the database. You can do this by using Oracle's Virtual Private Database.
Virtual Private DatabaseA very powerful feature of the Oracle database is Virtual Private Database (VPD). This feature is only available with the Enterprise edition. Virtual Private Database, also known as Row Level Security or Fine Grained Access Control, is a very popular choice of security when the standard object privileges and database roles are not sufficient. With VPD, you can specify which part (rows and/or columns) are accessible to the user. The policies that you specify can be as simple or complex as required.
VPD policies are defined against the database tables and are enforced whenever the table is accessed, regardless of the user interface that is being used. When the data is accessed through APEX or SQL*Plus, the same VPD policies are enforced and only the data is accessible, which is allowed by the policy.
When you define a VPD policy on a database table, a predicate is added whenever the table is accessed. With the VPD policy, you can define when the predicate is applied to the database table; for example, with SELECT or UPDATE. The user will not see the predicate being added to the issued statement.
VPD policyThe VPD policy is the key to using VPD. In the VPD policy function, you enforce the security rules that need to be implemented. Depending on your requirements, the VPD policy can be very simple or immensely complex.
Using VPD is a two-step process. The first step is to define a VPD policy and the second step is to apply the policy to the relevant table.
The VPD policy function is a regular database function, which can be in a package. It is highly recommended to place the VPD policy function in a package, as you would place all functions in packages.
www.it-ebooks.info

Security
[ 140 ]
The main purpose of the VPD policy is to return a predicate. The VPD policy function needs to adhere to a certain signature. The signature is as follows:
function get_predicate (p_schema_name in varchar2 ,p_table_name in varchar2 ) return varchar2
The name of the VPD policy function as well as the names of the parameters can be whatever you want. There must be two input arguments of data type VARCHAR2. The first argument will contain the schema name, and the second argument will contain the object name. The purpose of the arguments is not quite clear. The documentation on VPD states the following:
Define input parameters to hold this information, but do not specify the schema and object name themselves within the function.
The function will return the predicate as a VARCHAR2. This predicate will be used when you apply the policy to the database table.
Be that as it may, the VPD policy function still needs the two arguments defined. In order to show a complete example of what VPD is capable of, two database users are created and some sample data is set up.
The ADMIN user will own a table named EMP, similar to the EMP table in the SCOTT schema.
www.it-ebooks.info
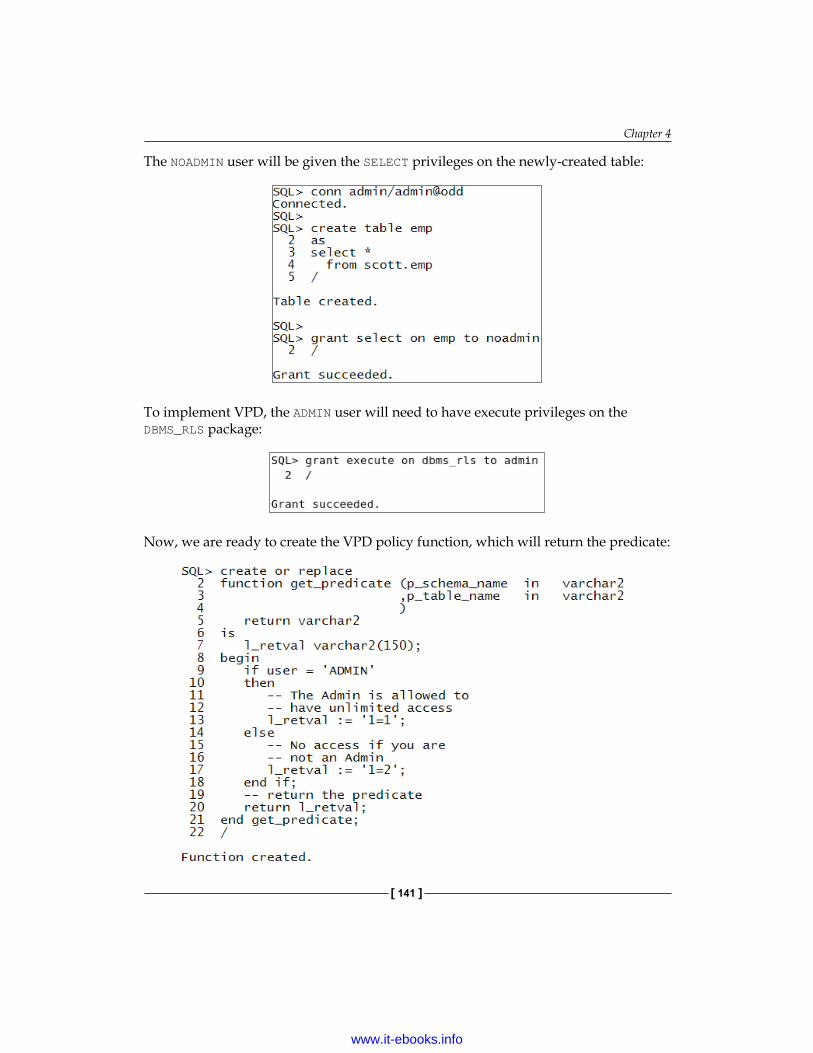
Chapter 4
[ 141 ]
The NOADMIN user will be given the SELECT privileges on the newly-created table:
To implement VPD, the ADMIN user will need to have execute privileges on the DBMS_RLS package:
Now, we are ready to create the VPD policy function, which will return the predicate:
www.it-ebooks.info

Security
[ 142 ]
In the preceding example, a predicate is returned depending on USER. When the user is ADMIN, predicate 1=1 is returned (line 13 and line 20), which doesn't restrict anything. When the user is not ADMIN, predicate 1=2 is returned (line 17 and line 20). Because one is never equal to two, this predicate applied to any table will return nothing.
Note that only the predicate is returned; do not include a WHERE clause with the returned predicate. This would lead to invalidations at runtime.
One of the other names of Virtual Private Database is Row Level Security, hence the name of the built-in package DBMS_RLS.The term Row Level Security does not cover the complete functionality of Virtual Private Database. Since Oracle Database 10g, you can also provide a Column Level Security.
The second step in using VPD is to "connect" the VPD policy function to the table. You handle this by using the DBMS_RLS built-in package . The appropriate privileges are already granted, so the VPD policy can be added.
On lines 3 and 4, you should specify the object to which the VPD policy needs to be applied to; in this case, on the EMP object of ADMIN. Line 5 specifies the name of the policy; make sure it is a useful name, so you can identify the policy for future reference. On lines 6 and 7, you should specify the location of the VPD policy function, the schema in which it is being called, and what function is called.
www.it-ebooks.info
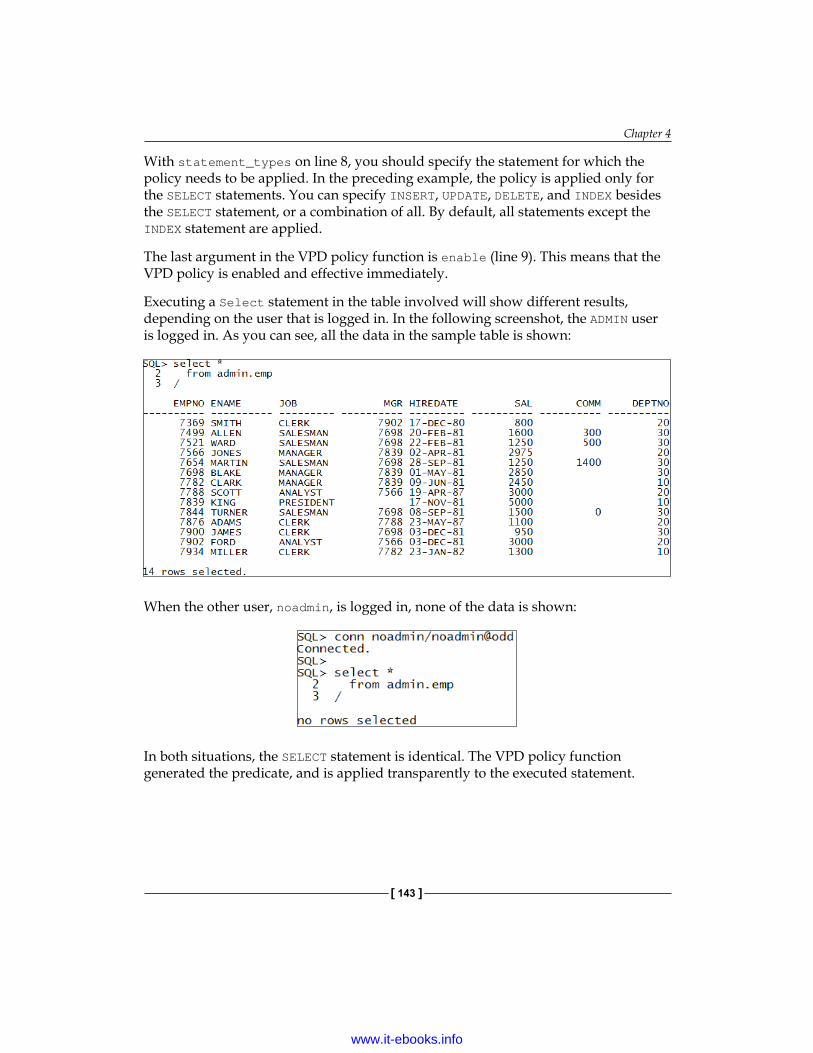
Chapter 4
[ 143 ]
With statement_types on line 8, you should specify the statement for which the policy needs to be applied. In the preceding example, the policy is applied only for the SELECT statements. You can specify INSERT, UPDATE, DELETE, and INDEX besides the SELECT statement, or a combination of all. By default, all statements except the INDEX statement are applied.
The last argument in the VPD policy function is enable (line 9). This means that the VPD policy is enabled and effective immediately.
Executing a Select statement in the table involved will show different results, depending on the user that is logged in. In the following screenshot, the ADMIN user is logged in. As you can see, all the data in the sample table is shown:
When the other user, noadmin, is logged in, none of the data is shown:
In both situations, the SELECT statement is identical. The VPD policy function generated the predicate, and is applied transparently to the executed statement.
www.it-ebooks.info
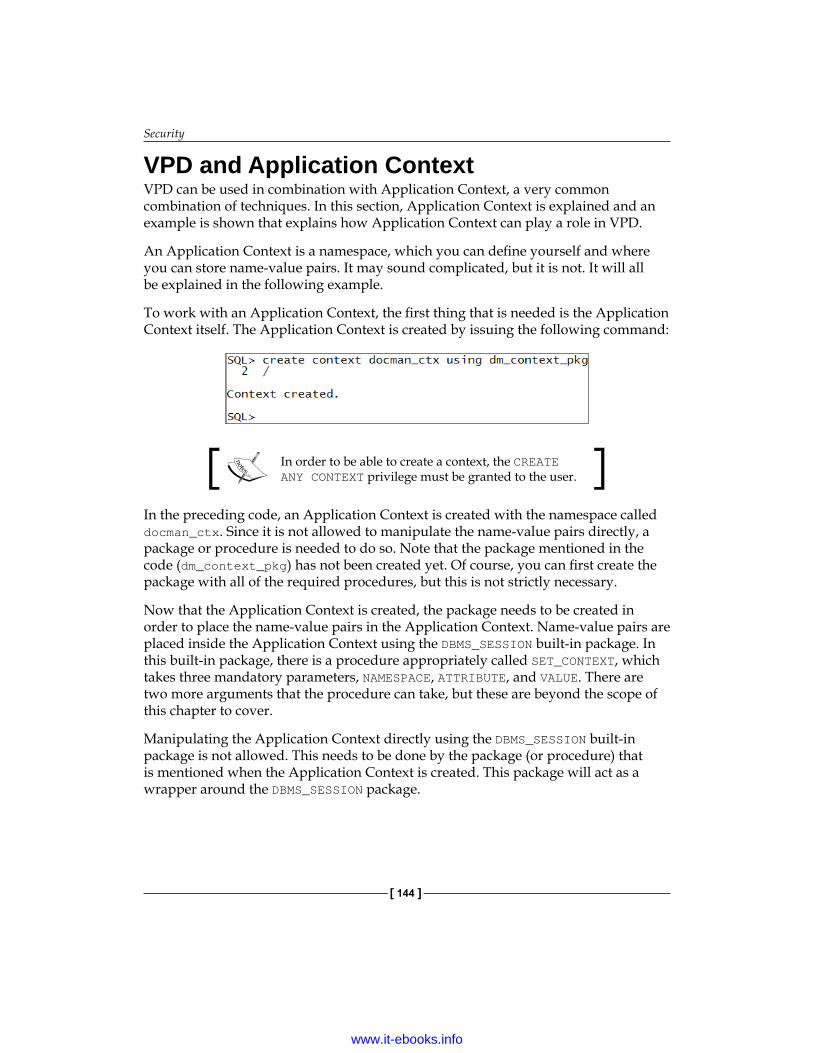
Security
[ 144 ]
VPD and Application ContextVPD can be used in combination with Application Context, a very common combination of techniques. In this section, Application Context is explained and an example is shown that explains how Application Context can play a role in VPD.
An Application Context is a namespace, which you can define yourself and where you can store name-value pairs. It may sound complicated, but it is not. It will all be explained in the following example.
To work with an Application Context, the first thing that is needed is the Application Context itself. The Application Context is created by issuing the following command:
In order to be able to create a context, the CREATE ANY CONTEXT privilege must be granted to the user.
In the preceding code, an Application Context is created with the namespace called docman_ctx. Since it is not allowed to manipulate the name-value pairs directly, a package or procedure is needed to do so. Note that the package mentioned in the code (dm_context_pkg) has not been created yet. Of course, you can first create the package with all of the required procedures, but this is not strictly necessary.
Now that the Application Context is created, the package needs to be created in order to place the name-value pairs in the Application Context. Name-value pairs are placed inside the Application Context using the DBMS_SESSION built-in package. In this built-in package, there is a procedure appropriately called SET_CONTEXT, which takes three mandatory parameters, NAMESPACE, ATTRIBUTE, and VALUE. There are two more arguments that the procedure can take, but these are beyond the scope of this chapter to cover.
Manipulating the Application Context directly using the DBMS_SESSION built-in package is not allowed. This needs to be done by the package (or procedure) that is mentioned when the Application Context is created. This package will act as a wrapper around the DBMS_SESSION package.
www.it-ebooks.info
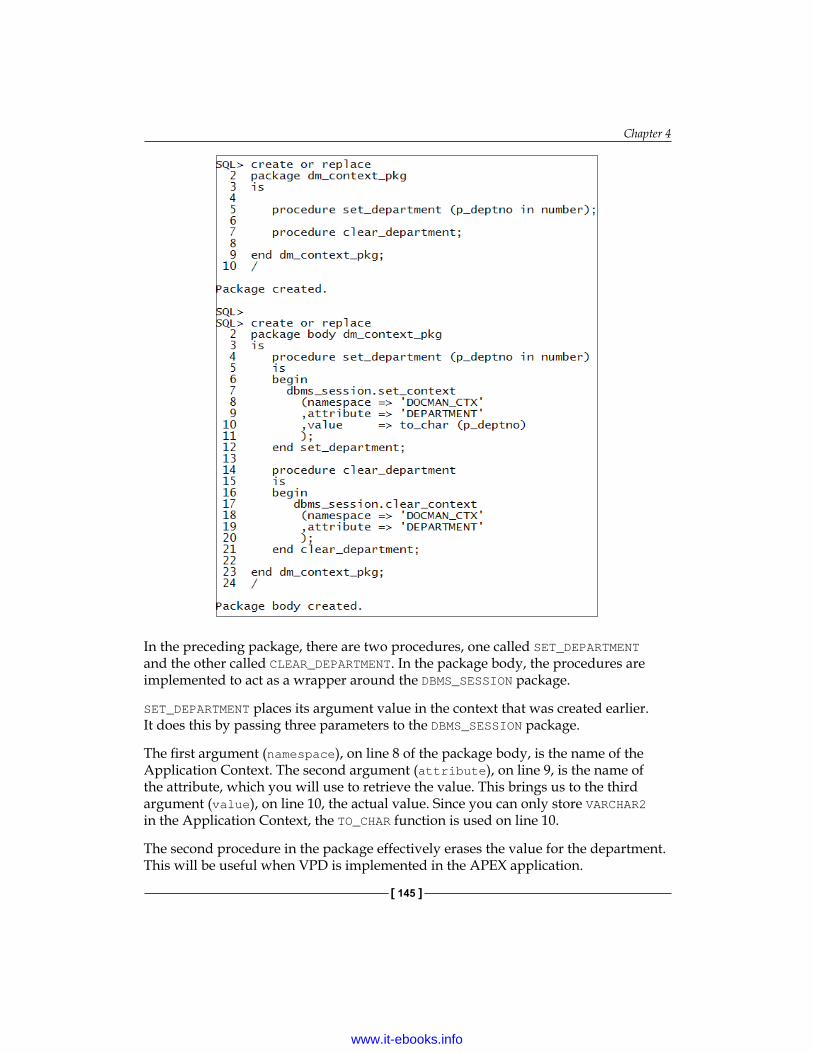
Chapter 4
[ 145 ]
In the preceding package, there are two procedures, one called SET_DEPARTMENT and the other called CLEAR_DEPARTMENT. In the package body, the procedures are implemented to act as a wrapper around the DBMS_SESSION package.
SET_DEPARTMENT places its argument value in the context that was created earlier. It does this by passing three parameters to the DBMS_SESSION package.
The first argument (namespace), on line 8 of the package body, is the name of the Application Context. The second argument (attribute), on line 9, is the name of the attribute, which you will use to retrieve the value. This brings us to the third argument (value), on line 10, the actual value. Since you can only store VARCHAR2 in the Application Context, the TO_CHAR function is used on line 10.
The second procedure in the package effectively erases the value for the department. This will be useful when VPD is implemented in the APEX application.
www.it-ebooks.info
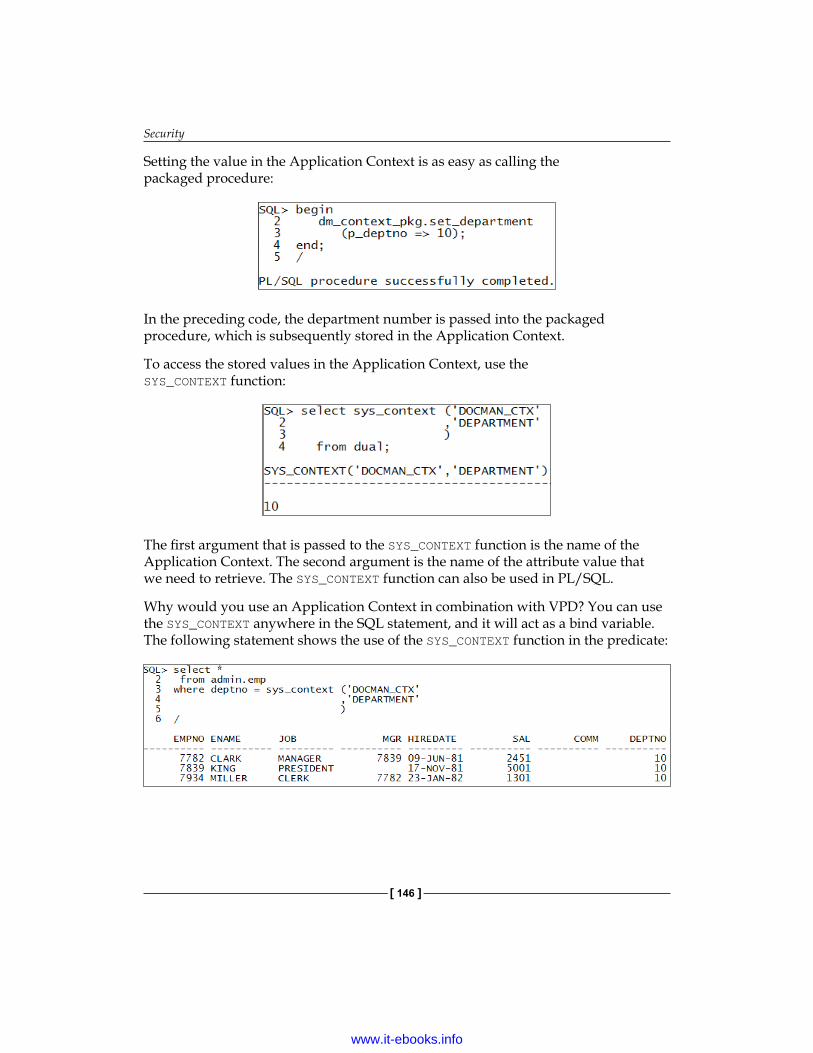
Security
[ 146 ]
Setting the value in the Application Context is as easy as calling the packaged procedure:
In the preceding code, the department number is passed into the packaged procedure, which is subsequently stored in the Application Context.
To access the stored values in the Application Context, use the SYS_CONTEXT function:
The first argument that is passed to the SYS_CONTEXT function is the name of the Application Context. The second argument is the name of the attribute value that we need to retrieve. The SYS_CONTEXT function can also be used in PL/SQL.
Why would you use an Application Context in combination with VPD? You can use the SYS_CONTEXT anywhere in the SQL statement, and it will act as a bind variable. The following statement shows the use of the SYS_CONTEXT function in the predicate:
www.it-ebooks.info
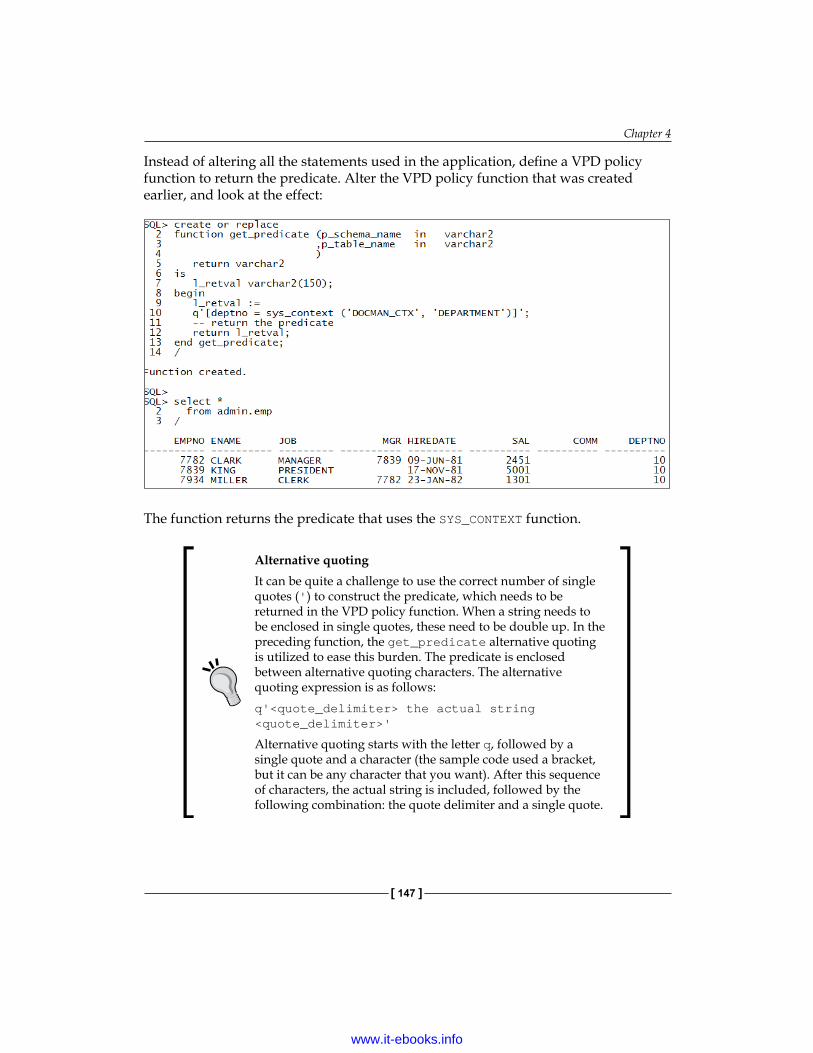
Chapter 4
[ 147 ]
Instead of altering all the statements used in the application, define a VPD policy function to return the predicate. Alter the VPD policy function that was created earlier, and look at the effect:
The function returns the predicate that uses the SYS_CONTEXT function.
Alternative quotingIt can be quite a challenge to use the correct number of single quotes (') to construct the predicate, which needs to be returned in the VPD policy function. When a string needs to be enclosed in single quotes, these need to be double up. In the preceding function, the get_predicate alternative quoting is utilized to ease this burden. The predicate is enclosed between alternative quoting characters. The alternative quoting expression is as follows:q'<quote_delimiter> the actual string <quote_delimiter>'
Alternative quoting starts with the letter q, followed by a single quote and a character (the sample code used a bracket, but it can be any character that you want). After this sequence of characters, the actual string is included, followed by the following combination: the quote delimiter and a single quote.
www.it-ebooks.info
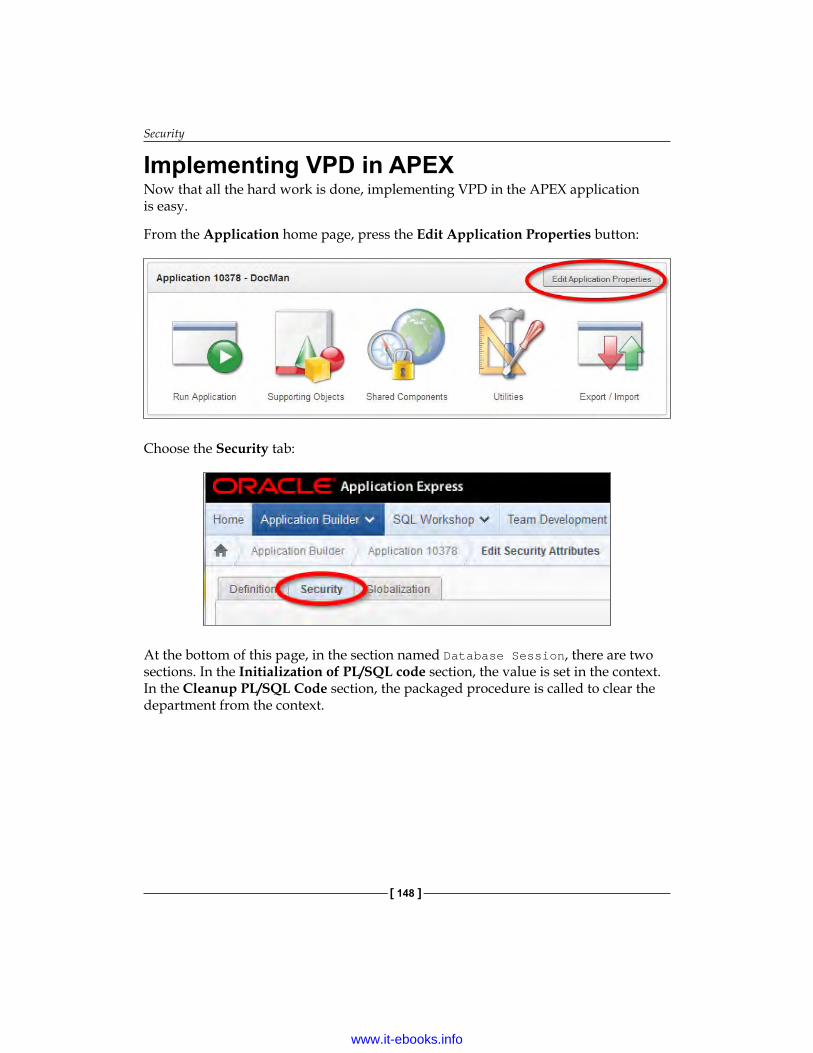
Security
[ 148 ]
Implementing VPD in APEXNow that all the hard work is done, implementing VPD in the APEX application is easy.
From the Application home page, press the Edit Application Properties button:
Choose the Security tab:
At the bottom of this page, in the section named Database Session, there are two sections. In the Initialization of PL/SQL code section, the value is set in the context. In the Cleanup PL/SQL Code section, the packaged procedure is called to clear the department from the context.
www.it-ebooks.info
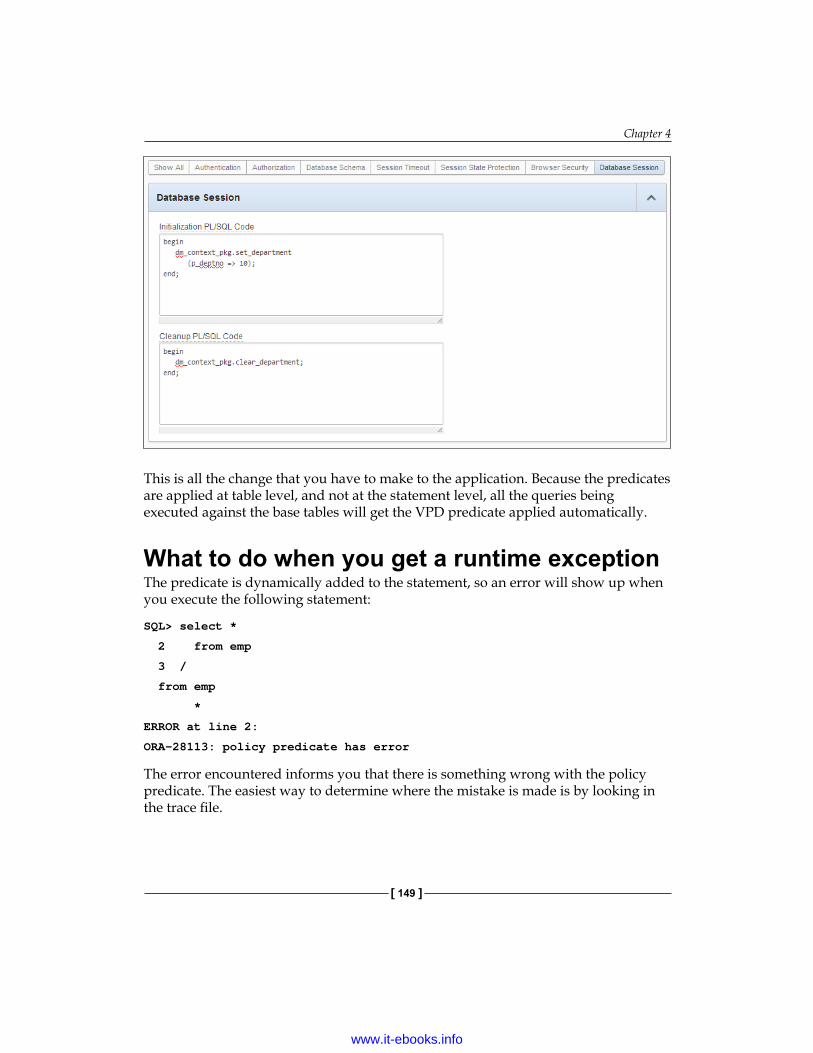
Chapter 4
[ 149 ]
This is all the change that you have to make to the application. Because the predicates are applied at table level, and not at the statement level, all the queries being executed against the base tables will get the VPD predicate applied automatically.
What to do when you get a runtime exceptionThe predicate is dynamically added to the statement, so an error will show up when you execute the following statement:
SQL> select *
2 from emp
3 /
from emp
*
ERROR at line 2:
ORA-28113: policy predicate has error
The error encountered informs you that there is something wrong with the policy predicate. The easiest way to determine where the mistake is made is by looking in the trace file.
www.it-ebooks.info

Security
[ 150 ]
To determine where the trace files are generated, you must issue the following statement, for which you might need help from your DBA, if you do not have access to the V$PARAMETER view:
SQL> select value
2 from v$parameter
3 where name = 'user_dump_dest'
4 /
VALUE
----------------------------------------------------------
/home/oracle/app/oracle/diag/rdbms/orcl/orcl/trace
In the preceding location, you will find all the trace files that are generated from the database; tracking down the correct file can be quite a challenge. When you search the folder for the exception number, ORA-28113, the number of files can be greatly reduced.
When you open up the correct trace file, you can see the culprit. The statement that you issued as well as the added predicate done by the VPD Policy function results in two WHERE clauses for the SQL statement:
Error information for ORA-28113:
Logon user : ADMIN
Table/View : ADMIN.EMP
Policy name : ALL_OR_NOTHING
Policy function: ADMIN.GET_PREDICATE
RLS view :
SELECT "EMPNO","ENAME","JOB","MGR","HIREDATE","SAL","COMM","DEPTNO" FROM "ADMIN"."EMP" "EMP" WHERE (where 1=1)
ORA-00936: missing expression
-------------------------------------------------------------
The trace file indicates the error that was encountered, the user, the table, the name of the VPD policy, and the VPD policy function that was used. Under the section labeled RLS view, you can see the issued statement.
Examining this statement will point you directly to the—now obvious—mistake. As you can see, there are two WHERE keywords in the statement
www.it-ebooks.info
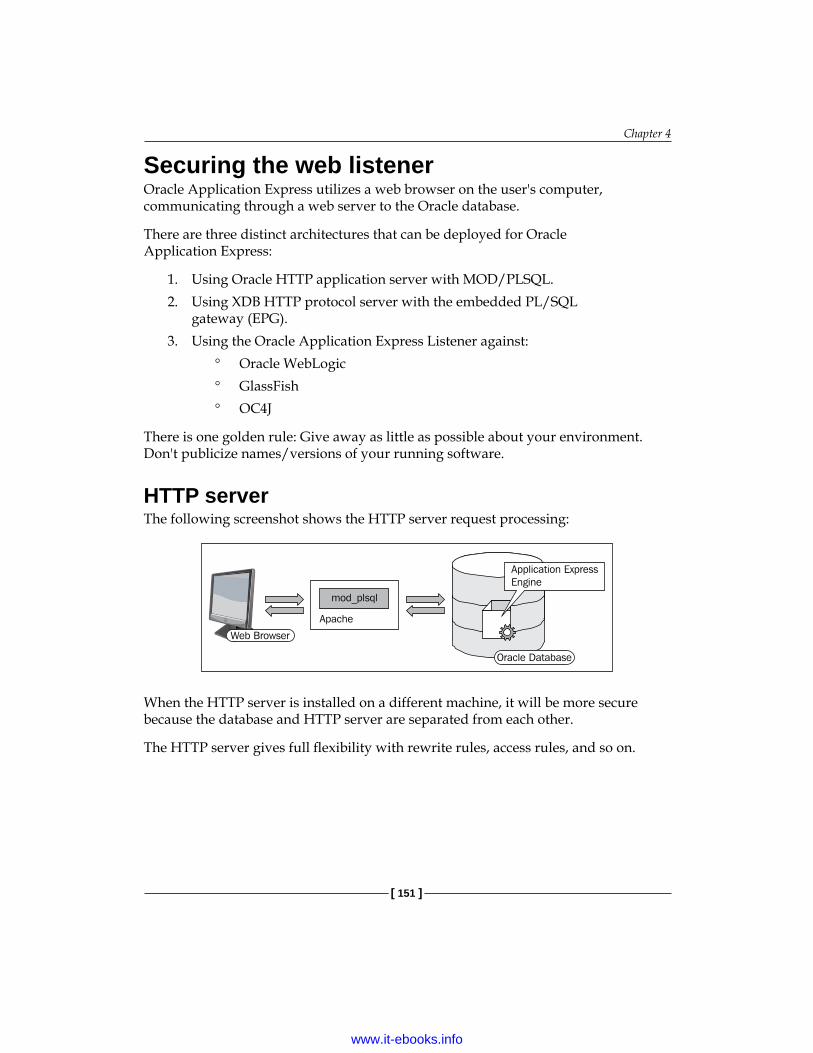
Chapter 4
[ 151 ]
Securing the web listenerOracle Application Express utilizes a web browser on the user's computer, communicating through a web server to the Oracle database.
There are three distinct architectures that can be deployed for Oracle Application Express:
1. Using Oracle HTTP application server with MOD/PLSQL.2. Using XDB HTTP protocol server with the embedded PL/SQL
gateway (EPG).3. Using the Oracle Application Express Listener against:
° Oracle WebLogic ° GlassFish ° OC4J
There is one golden rule: Give away as little as possible about your environment. Don't publicize names/versions of your running software.
HTTP serverThe following screenshot shows the HTTP server request processing:
When the HTTP server is installed on a different machine, it will be more secure because the database and HTTP server are separated from each other.
The HTTP server gives full flexibility with rewrite rules, access rules, and so on.
www.it-ebooks.info

Security
[ 152 ]
RewriteRewrite relies on the mod_rewrite module from APACHE to rewrite an incoming URL and modify the URL dynamically. You enable mod_rewrite by adding RewriteEngine in the httpd.conf configuration file.
For example:
#LoadModule rewrite_module modules/mod_rewrite.so RewriteEngine onRewriteRule ^/application$ http://hostname:port/pls/apex/f?p=102:
This rewrite rule causes the application in the URL to be rewritten to hostname:port/pls/apex/f?p=102.
So, application number 102 will show that http://hostname:port/application is rewritten to hostname:port/pls/apex/f?p=102.
You need to restart the Web Server before the rewrite rule is taken into account. The syntax is as follows:
RewriteRule url-pattern new_url [flag optional]
Additional information about rewrite rules can be found in the Apache documentation at http://httpd.apache.org/docs/2.0/misc/rewriteguide.html.
Security considerations in the HTTP serverYou would like to give as little information as possible about yourself. So, you also need to think about the security aspects when configuring the web server, HTTP server.
Some important security considerations related to the HTTP server are as follows:
ServerSignatureOff (Removes server info from error pages)ServerTokensProd (Removes server version from HTTP header)
Obfuscate the password in the dads.conf configuration file. The parameter PlsqlDatabasePassword specifies the password for logging in to the database. You can use the dadTool.pl utility to obfuscate passwords in the dads.conf file. You can find the dadTool.pl utility in the following directory:
ORACLE_HTTPSERVER_HOME/ohs/modplsql/conf
www.it-ebooks.info
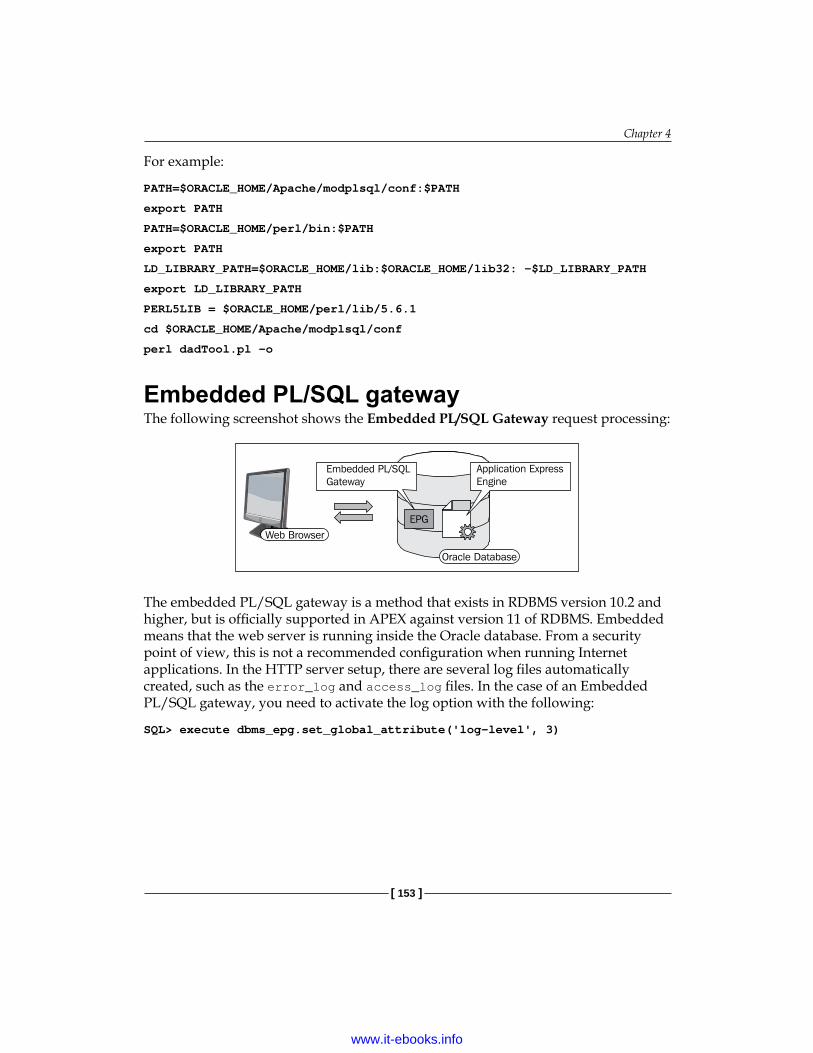
Chapter 4
[ 153 ]
For example:
PATH=$ORACLE_HOME/Apache/modplsql/conf:$PATH
export PATH
PATH=$ORACLE_HOME/perl/bin:$PATH
export PATH
LD_LIBRARY_PATH=$ORACLE_HOME/lib:$ORACLE_HOME/lib32: -$LD_LIBRARY_PATH
export LD_LIBRARY_PATH
PERL5LIB = $ORACLE_HOME/perl/lib/5.6.1
cd $ORACLE_HOME/Apache/modplsql/conf
perl dadTool.pl -o
Embedded PL/SQL gatewayThe following screenshot shows the Embedded PL/SQL Gateway request processing:
The embedded PL/SQL gateway is a method that exists in RDBMS version 10.2 and higher, but is officially supported in APEX against version 11 of RDBMS. Embedded means that the web server is running inside the Oracle database. From a security point of view, this is not a recommended configuration when running Internet applications. In the HTTP server setup, there are several log files automatically created, such as the error_log and access_log files. In the case of an Embedded PL/SQL gateway, you need to activate the log option with the following:
SQL> execute dbms_epg.set_global_attribute('log-level', 3)
www.it-ebooks.info

Security
[ 154 ]
So, you need to make use of an API to turn on logging, and it's therefore much harder to get the necessary log information. wwv_flow_epg_include_local.sql, included with Oracle Application Express, contains a request-validation function named wwv_flow_epg_include_modules.authorize. This function specifies access restrictions appropriate for the standard DAD configured for Oracle Application Express. During installation, scripts also name this function in the request-validation function directive in the XDB configuration file.
At the installation time, the installer also creates a PL/SQL function in the Oracle Application Express product schema (FLOWS_XXXXXX or / APEX_XXXXXX). You can change and recompile this function in order to restrict URL access procedures within the DAD. The source code for this function is not wrapped and can be found in the database administrator's product core directory in the file named wwv_flow_epg_include_local.sql.
Additional information can be found at the following URLs:
• http://docs.oracle.com/cd/B25329_01/doc/appdev.102/b25309/ adm_wrkspc.htm#BEJDIJAH
• http://docs.oracle.com/cd/E14373_01/appdev.32/e11838/sec.htm
Oracle Application Express ListenerThe following screenshot shows the Oracle Application Express Listener request processing:
The Oracle Application Express Listener is configurable from a web page, and includes a rich set of configuration options including security options, database connectivity options, and caching options. The Oracle Application Express listener is the recommended architecture from Oracle because of integrated security in front of the database. Apart from this, the Oracle Application Express listener has a graphical user interface, which makes configuration easy.
www.it-ebooks.info
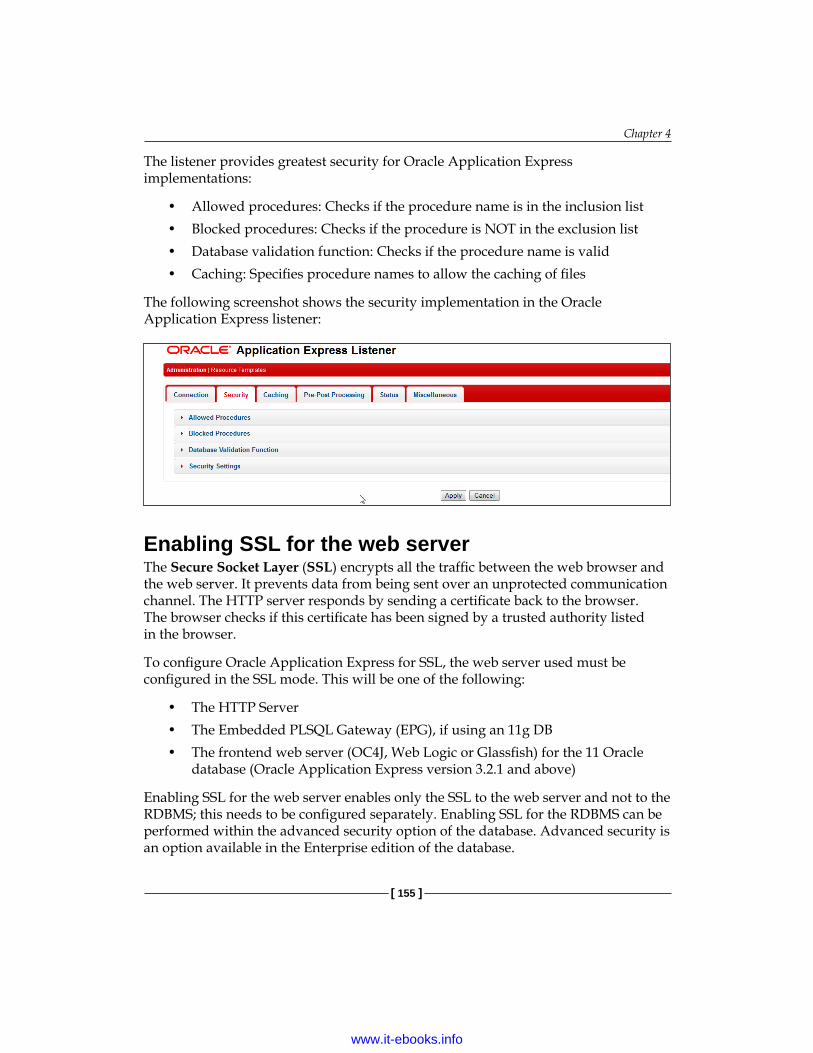
Chapter 4
[ 155 ]
The listener provides greatest security for Oracle Application Express implementations:
• Allowed procedures: Checks if the procedure name is in the inclusion list• Blocked procedures: Checks if the procedure is NOT in the exclusion list• Database validation function: Checks if the procedure name is valid• Caching: Specifies procedure names to allow the caching of files
The following screenshot shows the security implementation in the Oracle Application Express listener:
Enabling SSL for the web serverThe Secure Socket Layer (SSL) encrypts all the traffic between the web browser and the web server. It prevents data from being sent over an unprotected communication channel. The HTTP server responds by sending a certificate back to the browser. The browser checks if this certificate has been signed by a trusted authority listed in the browser.
To configure Oracle Application Express for SSL, the web server used must be configured in the SSL mode. This will be one of the following:
• The HTTP Server• The Embedded PLSQL Gateway (EPG), if using an 11g DB • The frontend web server (OC4J, Web Logic or Glassfish) for the 11 Oracle
database (Oracle Application Express version 3.2.1 and above)
Enabling SSL for the web server enables only the SSL to the web server and not to the RDBMS; this needs to be configured separately. Enabling SSL for the RDBMS can be performed within the advanced security option of the database. Advanced security is an option available in the Enterprise edition of the database.
www.it-ebooks.info

Security
[ 156 ]
The following screenshot shows SSL at instance level (navigation path: APEX_ADMIN/Manage Instance/Security):
When you enable SSL at the administration website of APEX, you need to ensure that the HTTPS protocol is enabled on your web server. Additional information about security considerations in web servers can be found at http://docs.oracle.com/cd/E14571_01/security.htm.
Security considerations when installing Oracle Application ExpressEven before installing Application Express, you need to think about security measures to be taken during each step of the installation process.
Runtime installationAn Oracle Application Express runtime environment enables you to run production applications, but it does not provide a Web interface for administration or direct development of these applications. So, this makes it more an indurate environment. The runtime environment is a more secure environment, because only the necessary objects and privileges are installed and configured.
You administer the Oracle Application Express runtime environment using SQL*Plus or SQL Developer and the APEX_INSTANCE_ADMIN API. The ADMIN account is not used in a runtime environment, but is created anyway. It will be used if the runtime environment is converted to a full development environment.
To determine if only the runtime environment is installed, connect as SYS and run the following query (Oracle Application Express version 4.x):
Select count(*) from APPLICATION_EXPRESS_040200.WWV_FLOWS where id = 4000;
The query checks if the runtime is installed. The ID is always equal to 4000, so do not enter your application ID. If the count is 0, it is a runtime; if the count is 1, it is a full development environment.
www.it-ebooks.info

Chapter 4
[ 157 ]
There are scripts provided to completely remove/re-install the application builder. The scripts to install or remove the application builder are apxdevrm.sql and apxdvins.sql. The scripts are installed in the APEX main directory.
Access Control Lists (ACLs)Network services needs to be enabled when attempting actions related to the following:
• Sending outbound mail in Oracle Application Express. • Using Web services in Oracle Application Express. • PDF/report printing. • Searching for content in online Help (that is, using the find link). The
following screenshot shows the find link:
In Oracle RDBMS 11gR1, a new feature called fine grained access control to external networks was introduced. This feature gives the administrator a control over which database users are permitted to access external network services, and on which ports access is permitted. If an application relied upon the PL/SQL packages UTL_TCP, UTL_SMTP, UTL_MAIL, UTL_HTTP, or UTL_INADDR, they would now need to be given permission to access the external network service via a Network ACL.
If you are running Oracle Application Express against Oracle RDBMS 11g and later releases, you need to use the new DBMS_NETWORK_ACL_ADMIN package to grant connect privileges to any host for the FLOWS_XXXXXX/APEX_XXXXXX (version) database user and any other user who may need to interact with network services, such as UTL_HTTP, UTL_SMTP, UTL_TCP.
The instructions for accomplishing this are included in the Oracle Application Express Installation Guide, which is available at the Oracle Technology network under the documentation library (Oracle Database Oracle Application Express Installation Guide). Information about ACL can be found in the section entitled Enable Network Services in Oracle Database 11g. This document can be found at http://www.oracle.com/technetwork/developer-tools/apex/documentation/index.html
www.it-ebooks.info
Security
[ 158 ]
If you are running a different version of Oracle Application Express, then you will need to change the reference to the appropriate Oracle Application Express schema. This script should normally be run as SYSTEM.
If you are encountering the error, ORA-29273: HTTP request failed ORA-06512: at "SYS.UTL_HTTP", line 1577 ORA-24247: network access denied by access control list (ACL), when running a custom application, then the script must be run for the Database account associated with the workspace containing the application. In other words, it needs to be run for the application's parsing schema.
There have been two changes in this feature in Database 11gR2, which may have an impact on Oracle Application Express users:
• In Database 11gR2 11.2.0.1, the precedence order in the evaluation of the network ACL entries has been changed to most specific to least specific. More information on this topic is discussed in the sections to follow.
• In Database 11gR2 11.2.0.2, the network ACL now applies to any use of DBMS_LDAP.
For additional information, refer to the following URL:
http://joelkallman.blogspot.co.uk/2010/10/application-express-network-acls-and.html
Enabling builders in Oracle Application ExpressInstance administrators can control which components are available within an Oracle Application Express instance. Configurable components include Web sheets, SQL workshop, application builder, and team development.
Navigation path: Home/Administration/Manage Service/Workspace preferences
www.it-ebooks.info
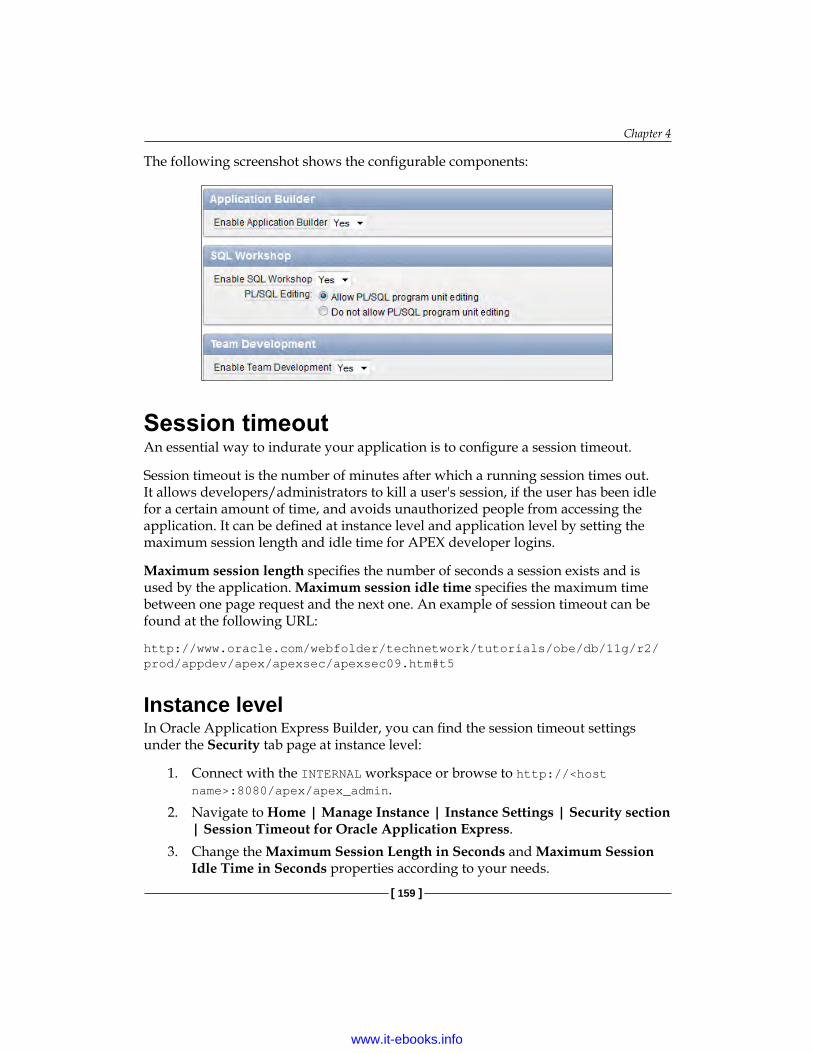
Chapter 4
[ 159 ]
The following screenshot shows the configurable components:
Session timeoutAn essential way to indurate your application is to configure a session timeout.
Session timeout is the number of minutes after which a running session times out. It allows developers/administrators to kill a user's session, if the user has been idle for a certain amount of time, and avoids unauthorized people from accessing the application. It can be defined at instance level and application level by setting the maximum session length and idle time for APEX developer logins.
Maximum session length specifies the number of seconds a session exists and is used by the application. Maximum session idle time specifies the maximum time between one page request and the next one. An example of session timeout can be found at the following URL:
http://www.oracle.com/webfolder/technetwork/tutorials/obe/db/11g/r2/prod/appdev/apex/apexsec/apexsec09.htm#t5
Instance levelIn Oracle Application Express Builder, you can find the session timeout settings under the Security tab page at instance level:
1. Connect with the INTERNAL workspace or browse to http://<host name>:8080/apex/apex_admin.
2. Navigate to Home | Manage Instance | Instance Settings | Security section | Session Timeout for Oracle Application Express.
3. Change the Maximum Session Length in Seconds and Maximum Session Idle Time in Seconds properties according to your needs.
www.it-ebooks.info
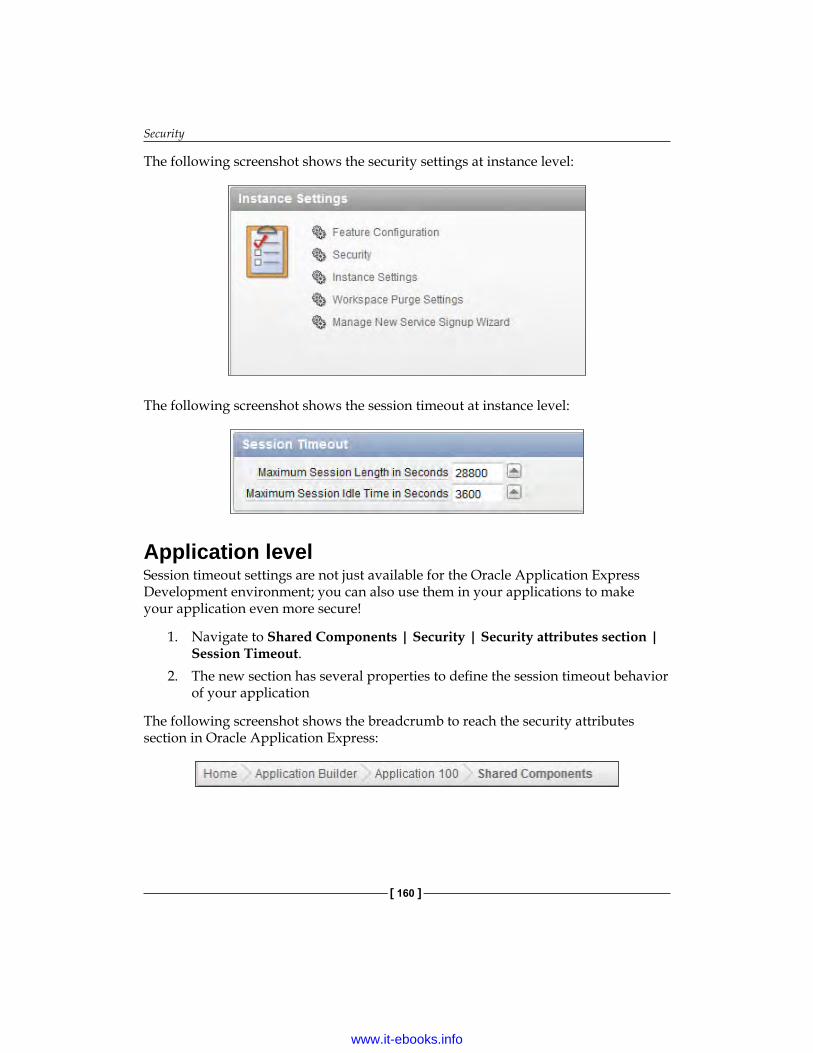
Security
[ 160 ]
The following screenshot shows the security settings at instance level:
The following screenshot shows the session timeout at instance level:
Application levelSession timeout settings are not just available for the Oracle Application Express Development environment; you can also use them in your applications to make your application even more secure!
1. Navigate to Shared Components | Security | Security attributes section | Session Timeout.
2. The new section has several properties to define the session timeout behavior of your application
The following screenshot shows the breadcrumb to reach the security attributes section in Oracle Application Express:
www.it-ebooks.info

Chapter 4
[ 161 ]
The following screenshot shows the Security Attributes section:
Time out\settings can also be set programmatically during runtime. This can be performed with the APEX_Util.set_session_lifetime_seconds and APEX_Util.set_session_max_idle_seconds API procedures.
Password complexity rulesThe Oracle Application Express administrator can create password complexity rules or a policy, for the passwords from the available accounts in an instance. These rules apply to all the accounts in the installation, across all the workspaces. You can set multiple complexity rules and re-use rules across an instance.
The following are examples of password complexity policies of passwords:
• It should contain at least one uppercase character• It should contain at least one numeric digit• It must be at least six characters long
You can set all the available parameter values within the APEX_INSTANCE_ADMIN package. You should be able to set the password preferences, such as PASSWORD_NOT_LIKE_USERNAME, PASSWORD_NEW_DIFFERS_BY, and PASSWORD_ONE_ALPHA, using the APEX_INSTANCE_ADMIN API.
Additional documentation about the APEX_INSTANCE_ADMIN package can be found at: http://docs.oracle.com/cd/E23903_01/doc/doc.41/e21676/Oracle Application Express_instance.htm#CHDFGJEI.
www.it-ebooks.info
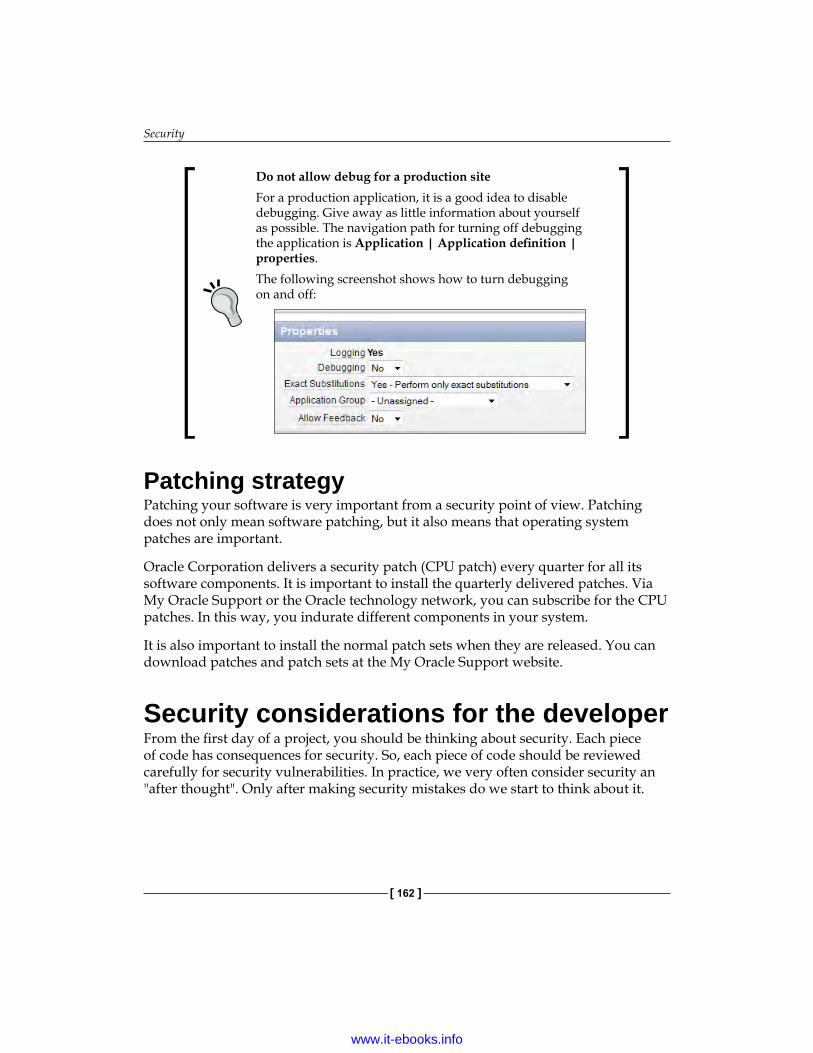
Security
[ 162 ]
Do not allow debug for a production siteFor a production application, it is a good idea to disable debugging. Give away as little information about yourself as possible. The navigation path for turning off debugging the application is Application | Application definition | properties.The following screenshot shows how to turn debugging on and off:
Patching strategyPatching your software is very important from a security point of view. Patching does not only mean software patching, but it also means that operating system patches are important.
Oracle Corporation delivers a security patch (CPU patch) every quarter for all its software components. It is important to install the quarterly delivered patches. Via My Oracle Support or the Oracle technology network, you can subscribe for the CPU patches. In this way, you indurate different components in your system.
It is also important to install the normal patch sets when they are released. You can download patches and patch sets at the My Oracle Support website.
Security considerations for the developerFrom the first day of a project, you should be thinking about security. Each piece of code has consequences for security. So, each piece of code should be reviewed carefully for security vulnerabilities. In practice, we very often consider security an "after thought". Only after making security mistakes do we start to think about it.
www.it-ebooks.info
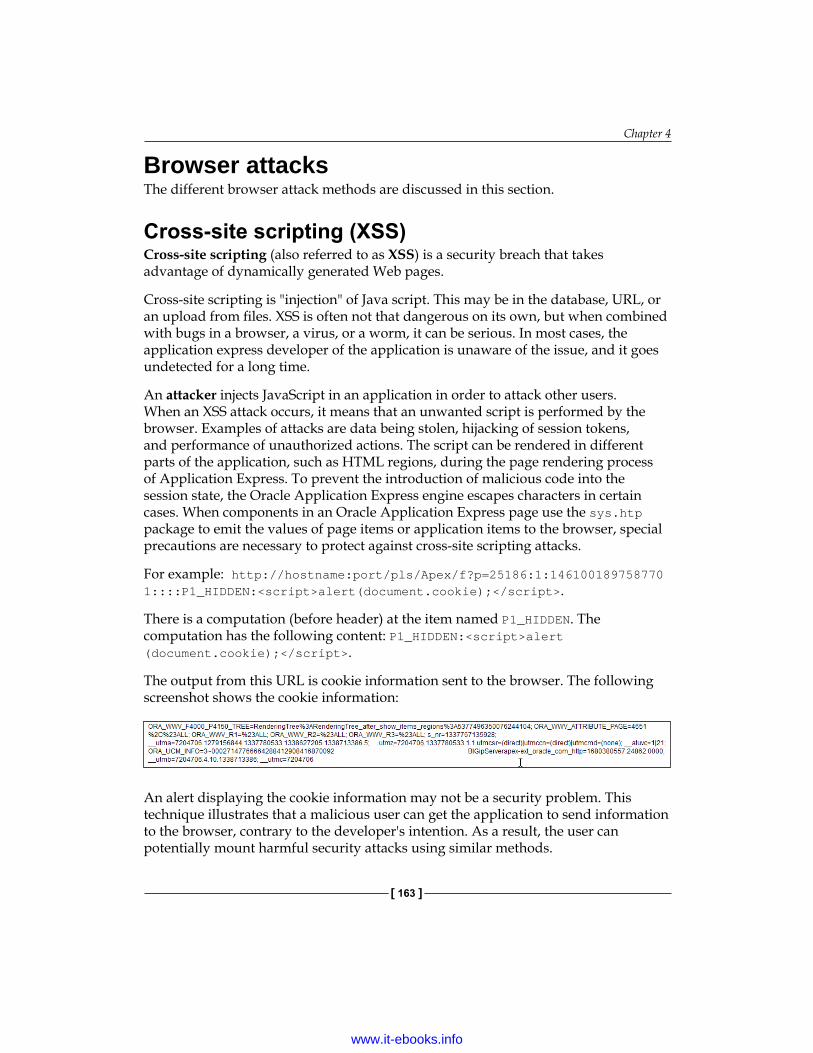
Chapter 4
[ 163 ]
Browser attacksThe different browser attack methods are discussed in this section.
Cross-site scripting (XSS)Cross-site scripting (also referred to as XSS) is a security breach that takes advantage of dynamically generated Web pages.
Cross-site scripting is "injection" of Java script. This may be in the database, URL, or an upload from files. XSS is often not that dangerous on its own, but when combined with bugs in a browser, a virus, or a worm, it can be serious. In most cases, the application express developer of the application is unaware of the issue, and it goes undetected for a long time.
An attacker injects JavaScript in an application in order to attack other users. When an XSS attack occurs, it means that an unwanted script is performed by the browser. Examples of attacks are data being stolen, hijacking of session tokens, and performance of unauthorized actions. The script can be rendered in different parts of the application, such as HTML regions, during the page rendering process of Application Express. To prevent the introduction of malicious code into the session state, the Oracle Application Express engine escapes characters in certain cases. When components in an Oracle Application Express page use the sys.htp package to emit the values of page items or application items to the browser, special precautions are necessary to protect against cross-site scripting attacks.
For example: http://hostname:port/pls/Apex/f?p=25186:1:1461001897587701::::P1_HIDDEN:<script>alert(document.cookie);</script>.
There is a computation (before header) at the item named P1_HIDDEN. The computation has the following content: P1_HIDDEN:<script>alert(document.cookie);</script>.
The output from this URL is cookie information sent to the browser. The following screenshot shows the cookie information:
An alert displaying the cookie information may not be a security problem. This technique illustrates that a malicious user can get the application to send information to the browser, contrary to the developer's intention. As a result, the user can potentially mount harmful security attacks using similar methods.
www.it-ebooks.info

Security
[ 164 ]
To prevent XSS vulnerability, change the code used in your Oracle Application Express region to escape the text sent to the browser.
An example of this code is: sys.htp.p(sys.htf.escape_sc(:P1_SOMETHING));.
The following screenshot shows the PL/SQL code to prevent XSS. The code is prefixed with sys.
Why prefix the code with sys? If the PL/SQL code is not prefixed with sys, hackers get the opportunity to make a local package to define the same name. When making use of the htp or htf package, you need to prefix with sys. When the text is escaped, the information in the URL is displayed in the browser window. However, there can be a case that the value in the session state is not escaped. As a result, malicious information can still be manipulated in the session state (WWV_FLOW_DATA).
When the session state is referenced, the value posted to the page will not have special characters (<, >, &, and ") escaped. If the referenced item is one of the following safe item display types, the value will be escaped.
The following item display types can be used safely:
• Display as Text (does not save state)• Display as Text (escape special characters, does not save state)• Display as Text (based on LOV, does not save state)• Display as Text (based on PL/SQL, does not save state)• Text Field (Disabled, does not save state): This field is a read-only item;
the end user cannot type into the field and the value is not saved into a session state.
An example of a "safe" item type is an item type with the following property: Display as text. In this way, the text is escaped in the browser and in the session state.
www.it-ebooks.info

Chapter 4
[ 165 ]
The following screenshot shows a safe item type. The text is escaped in the browser and in the session state.
Protecting HTML regions and other static areasSession states can be referenced by the &ITEM notation.
Protecting dynamic outputItems fetched and rendered should explicitly escape special characters.
Protecting reports regionsIn Application Express 4.1 and higher, report attributes have the default value of Display as Text (escape special characters, does not save state). Any extra embedded HTML code will be ignored during page rendering.
The following screenshot shows an item of the type Display as Text (escape special characters):
Protecting form itemsWhen form items, including hidden items, obtain their values during the generation of the form page to be sent to the browser, the resulting text is escaped before rendering.
The rules for cross-site scripting that must be taken into account are as follows:
• Escape Special Characters (<> &) and / or escape output. • Use of sys.htf.escape_sc.
www.it-ebooks.info
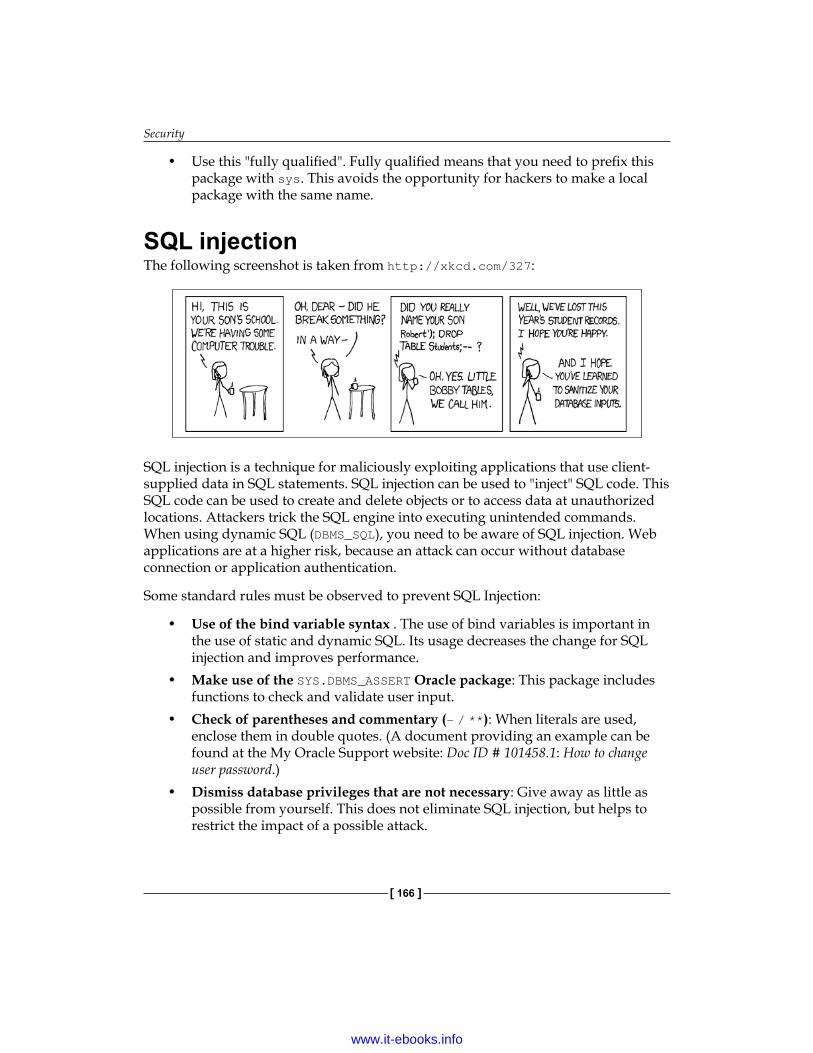
Security
[ 166 ]
• Use this "fully qualified". Fully qualified means that you need to prefix this package with sys. This avoids the opportunity for hackers to make a local package with the same name.
SQL injectionThe following screenshot is taken from http://xkcd.com/327:
SQL injection is a technique for maliciously exploiting applications that use client-supplied data in SQL statements. SQL injection can be used to "inject" SQL code. This SQL code can be used to create and delete objects or to access data at unauthorized locations. Attackers trick the SQL engine into executing unintended commands. When using dynamic SQL (DBMS_SQL), you need to be aware of SQL injection. Web applications are at a higher risk, because an attack can occur without database connection or application authentication.
Some standard rules must be observed to prevent SQL Injection:
• Use of the bind variable syntax . The use of bind variables is important in the use of static and dynamic SQL. Its usage decreases the change for SQL injection and improves performance.
• Make use of the SYS.DBMS_ASSERT Oracle package: This package includes functions to check and validate user input.
• Check of parentheses and commentary (- / **): When literals are used, enclose them in double quotes. (A document providing an example can be found at the My Oracle Support website: Doc ID # 101458.1: How to change user password.)
• Dismiss database privileges that are not necessary: Give away as little as possible from yourself. This does not eliminate SQL injection, but helps to restrict the impact of a possible attack.
www.it-ebooks.info
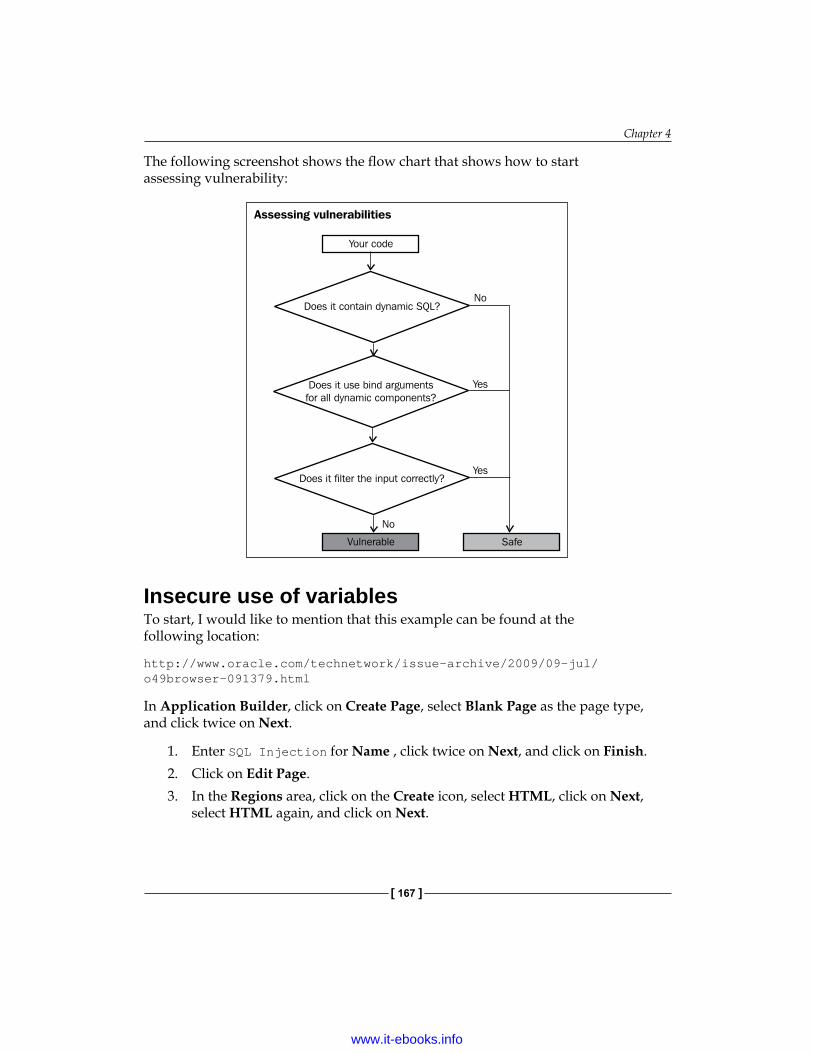
Chapter 4
[ 167 ]
The following screenshot shows the flow chart that shows how to start assessing vulnerability:
Insecure use of variablesTo start, I would like to mention that this example can be found at the following location:
http://www.oracle.com/technetwork/issue-archive/2009/09-jul/o49browser-091379.html
In Application Builder, click on Create Page, select Blank Page as the page type, and click twice on Next.
1. Enter SQL Injection for Name , click twice on Next, and click on Finish.2. Click on Edit Page.3. In the Regions area, click on the Create icon, select HTML, click on Next,
select HTML again, and click on Next.
www.it-ebooks.info
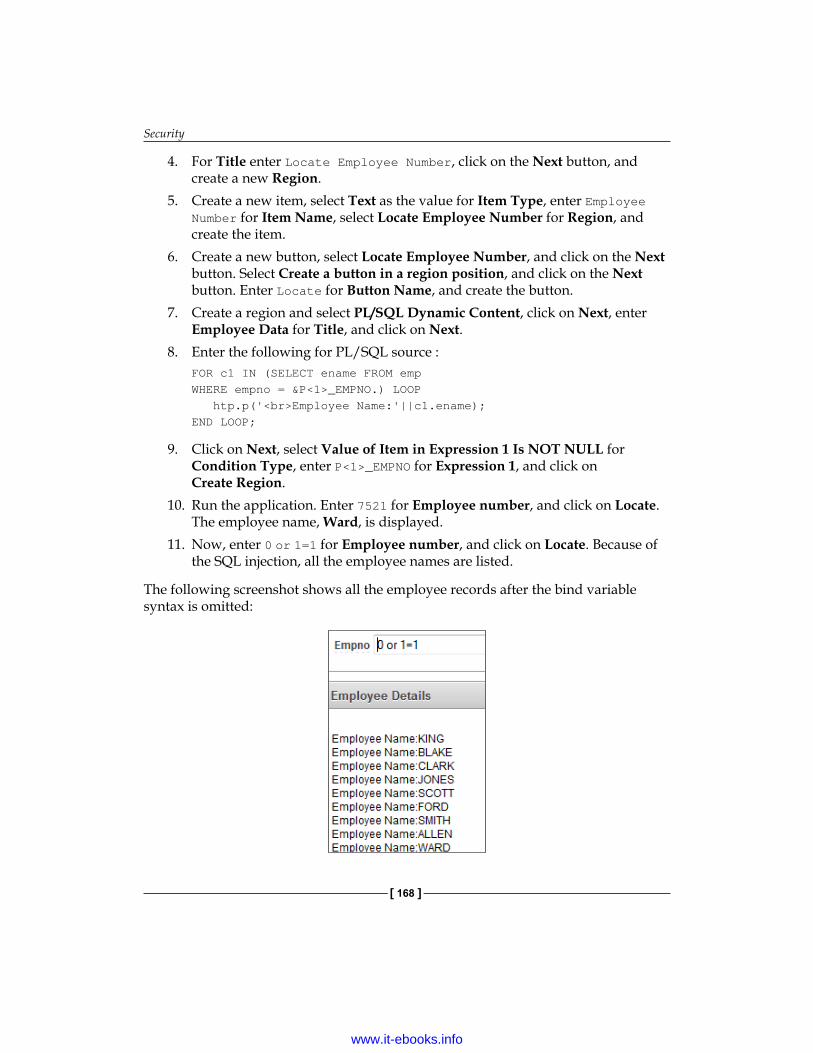
Security
[ 168 ]
4. For Title enter Locate Employee Number, click on the Next button, and create a new Region.
5. Create a new item, select Text as the value for Item Type, enter Employee Number for Item Name, select Locate Employee Number for Region, and create the item.
6. Create a new button, select Locate Employee Number, and click on the Next button. Select Create a button in a region position, and click on the Next button. Enter Locate for Button Name, and create the button.
7. Create a region and select PL/SQL Dynamic Content, click on Next, enter Employee Data for Title, and click on Next.
8. Enter the following for PL/SQL source :FOR c1 IN (SELECT ename FROM emp WHERE empno = &P<1>_EMPNO.) LOOP htp.p('<br>Employee Name:'||c1.ename);END LOOP;
9. Click on Next, select Value of Item in Expression 1 Is NOT NULL for Condition Type, enter P<1>_EMPNO for Expression 1, and click on Create Region.
10. Run the application. Enter 7521 for Employee number, and click on Locate. The employee name, Ward, is displayed.
11. Now, enter 0 or 1=1 for Employee number, and click on Locate. Because of the SQL injection, all the employee names are listed.
The following screenshot shows all the employee records after the bind variable syntax is omitted:
www.it-ebooks.info
Chapter 4
[ 169 ]
Correct use of Bind variablesThis example shows the appropriate way of using bind variable syntax and to avoid possible SQL Injection:
1. Navigate to Application Builder for page <1>, and in the Regions area, click on Employee Details.
2. For Region Source, change WHERE empno = &<1>_EMPNO to WHERE empno = :P<1>_EMPNO.
3. Make sure the Do not validate PL/SQL code (parse PL/SQL code at runtime only) box is checked. Click on Apply Changes.
4. Run the SQL Injection page. 5. Enter 7521 for Empno, and click on Search. The employee name, Ward,
is displayed.6. Enter 0 or 1=1 for Empno, and click on Search. This time you should see an
error message, because the PL/SQL uses a bind variable.
SYS.DBMS_ASSERTSometimes, you cannot prevent SQL injection by using bind variables (select * from P1_TABLE is not valid in SQL). You have to rely on filtering and/or validation. The SYS.DBMS_ASSERT package contains a number of functions that can be used to filter and sanitize input strings, particularly the ones that are meant to be used as Oracle identifiers. In Oracle Application Express, a validation is created from the type: function returning a Boolean value.
This example of the SYS.DBMS_ASSERT function checks the name of the table, an item level validation from the function returning a Boolean type:
beginif dbms_assert.simple_sql_name(:P<N>_TABLE) = :P<N>_TABLE then Return true;end if;exception when others then Return false;end;
SYS.DBMS_ASSERT contains many functions against SQL injection. Additional information about SYS.DBMS_ASSERT can be found at the following URL:
http://www.oracle-base.com/articles/10g/dbms_assert_10gR2.php
www.it-ebooks.info
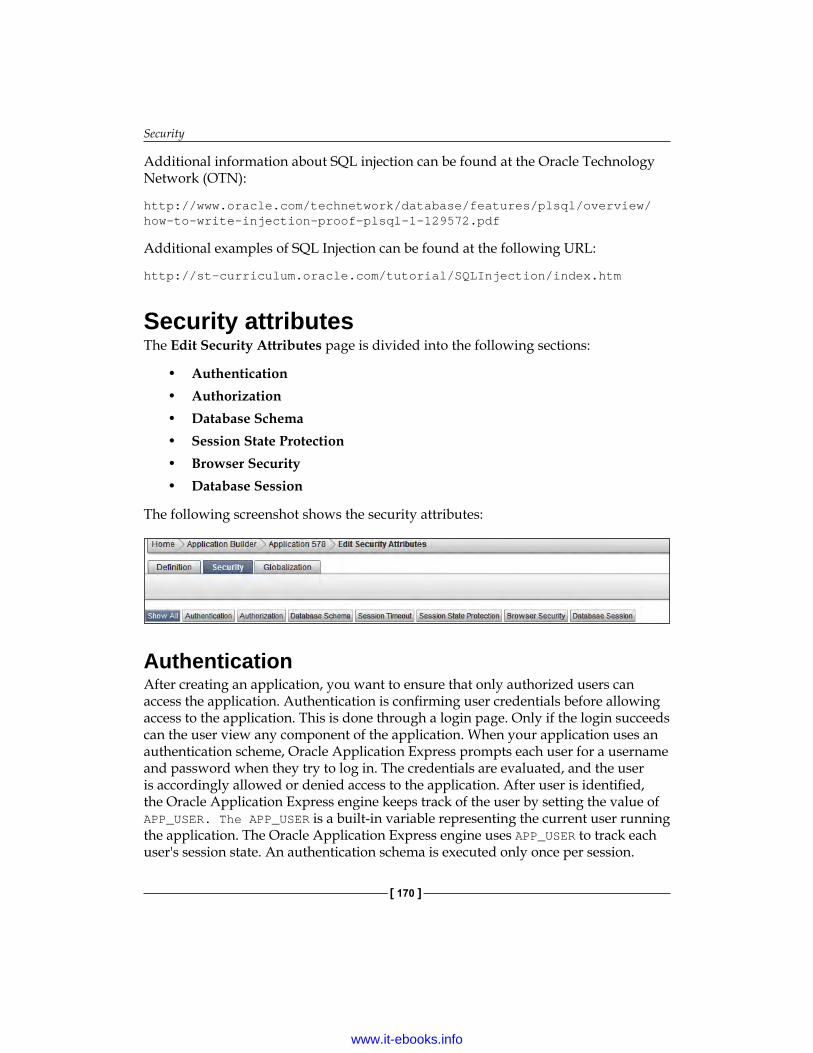
Security
[ 170 ]
Additional information about SQL injection can be found at the Oracle Technology Network (OTN):
http://www.oracle.com/technetwork/database/features/plsql/overview/how-to-write-injection-proof-plsql-1-129572.pdf
Additional examples of SQL Injection can be found at the following URL:
http://st-curriculum.oracle.com/tutorial/SQLInjection/index.htm
Security attributesThe Edit Security Attributes page is divided into the following sections:
• Authentication• Authorization • Database Schema • Session State Protection• Browser Security • Database Session
The following screenshot shows the security attributes:
AuthenticationAfter creating an application, you want to ensure that only authorized users can access the application. Authentication is confirming user credentials before allowing access to the application. This is done through a login page. Only if the login succeeds can the user view any component of the application. When your application uses an authentication scheme, Oracle Application Express prompts each user for a username and password when they try to log in. The credentials are evaluated, and the user is accordingly allowed or denied access to the application. After user is identified, the Oracle Application Express engine keeps track of the user by setting the value of APP_USER. The APP_USER is a built-in variable representing the current user running the application. The Oracle Application Express engine uses APP_USER to track each user's session state. An authentication schema is executed only once per session.
www.it-ebooks.info
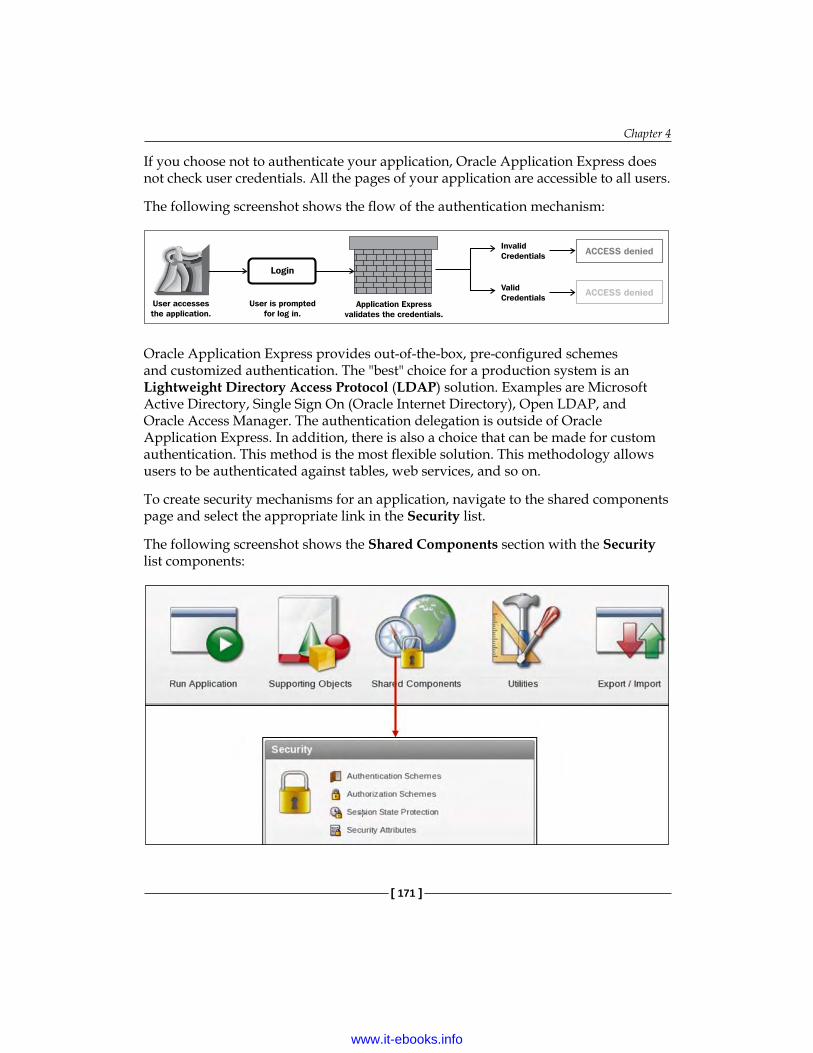
Chapter 4
[ 171 ]
If you choose not to authenticate your application, Oracle Application Express does not check user credentials. All the pages of your application are accessible to all users.
The following screenshot shows the flow of the authentication mechanism:
Oracle Application Express provides out-of-the-box, pre-configured schemes and customized authentication. The "best" choice for a production system is an Lightweight Directory Access Protocol (LDAP) solution. Examples are Microsoft Active Directory, Single Sign On (Oracle Internet Directory), Open LDAP, and Oracle Access Manager. The authentication delegation is outside of Oracle Application Express. In addition, there is also a choice that can be made for custom authentication. This method is the most flexible solution. This methodology allows users to be authenticated against tables, web services, and so on.
To create security mechanisms for an application, navigate to the shared components page and select the appropriate link in the Security list.
The following screenshot shows the Shared Components section with the Security list components:
www.it-ebooks.info
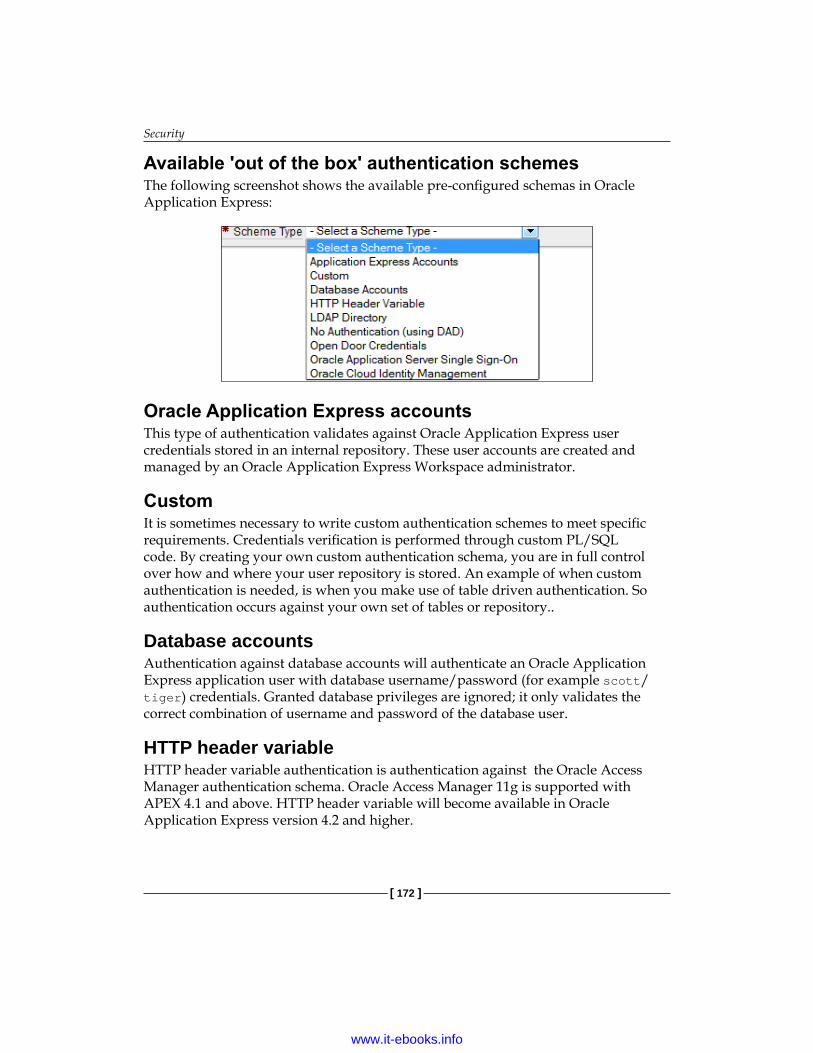
Security
[ 172 ]
Available 'out of the box' authentication schemesThe following screenshot shows the available pre-configured schemas in Oracle Application Express:
Oracle Application Express accountsThis type of authentication validates against Oracle Application Express user credentials stored in an internal repository. These user accounts are created and managed by an Oracle Application Express Workspace administrator.
CustomIt is sometimes necessary to write custom authentication schemes to meet specific requirements. Credentials verification is performed through custom PL/SQL code. By creating your own custom authentication schema, you are in full control over how and where your user repository is stored. An example of when custom authentication is needed, is when you make use of table driven authentication. So authentication occurs against your own set of tables or repository..
Database accountsAuthentication against database accounts will authenticate an Oracle Application Express application user with database username/password (for example scott/tiger) credentials. Granted database privileges are ignored; it only validates the correct combination of username and password of the database user.
HTTP header variableHTTP header variable authentication is authentication against the Oracle Access Manager authentication schema. Oracle Access Manager 11g is supported with APEX 4.1 and above. HTTP header variable will become available in Oracle Application Express version 4.2 and higher.
www.it-ebooks.info

Chapter 4
[ 173 ]
Additional details about Oracle Application Express and Oracle Access Manager can be found at the following URL:
http://www.oracle.com/technetwork/developer-tools/apex/learnmore/apex-oam-integration-1375333.pdf
LDAP directoryThe username and password are entered in a login page by using an LDAP. LDAP is an Internet protocol used to look up directory information. To use this scheme, you must have access to an LDAP directory. Additional information can be found here:
http://www.oracle.com/technetwork/developer-tools/apex/how-to-ldap-authenticate-099256.html
NoteThe apex_ldap.authenticate function in 4.1.1 and older versions calls the following piece of code:
dbms_ldap.simple_bind_s (g_session, 'cn=' ||p_username||case when p_search_base is not null then ','||p_search_base end,p_password )
Tests with ldapsearch on the command line against the LDAP server shows that searches should be against the uid attribute:
DECLARE vSession DBMS_LDAP.session; vResult PLS_INTEGER;BEGIN DBMS_LDAP.use_exception := TRUE; vSession := DBMS_LDAP.init ( hostname => 'ldap_server', portnum => 389 ); vResult := DBMS_LDAP.simple_bind_s ( ld => vSession , dn => 'uid=xx,cn=Users,dc=xx,dc=org' , passwd => 'password1'); DBMS_Output.put_line('User authenticated!'); vResult := DBMS_LDAP.unbind_s(vSession);END;
LDAP auth in 4.2 has a new attribute, Username Escaping, that escapes special characters in the username, to prevent LDAP injection.
www.it-ebooks.info
Security
[ 174 ]
No authenticationThere can be a requirement that NO authentication is necessary for the Oracle Application Express application. This is named a public application; no login page is shown, and all the pages of an application are accessible to all users.
Open door credentialsA built-in login page is displayed and you are prompted for a username. You can enter any string, which then serves as the user identifier for the session.
Single sign onIn the Single Sign On (SSO) scheme, you must register the Oracle Application Express site as a partner application with the Oracle Application Server - SSO server. This method will be replaced in future releases with Oracle Access manager, because SSO will be phased out in near future.
Oracle Cloud identity managementIn Oracle Cloud identity management authentication you need to authenticate against the Oracle Cloud identity management. This option will become available in Oracle Application Express version 4.2 and higher.
AuthorizationAn authorization scheme specifies which data can be seen or not seen by users or groups of users. Authorization may take place several times during the use of the application. It determines the power of seeing or not seeing a particular data set, and restricts access to specific pages, components (for example forms, reports, or items), or to a particular column in a report. Authorization is a process of determining whether an authenticated or identified person is permitted to access a resource or do an operation. Authorizations are implemented by using authorization schemes. If the component-level authorization succeeds, the user can view the component. If the application-level or page-level authorization fails, Oracle Application Express displays a predefined message. There are various types, such as Exists, SQL Query, and PL/SQL functions.
An authorization scheme can be applied to any of the following:
• Application• Page• Component on a page (form or chart)• Item, such as a button or a text field• Column in a report
www.it-ebooks.info
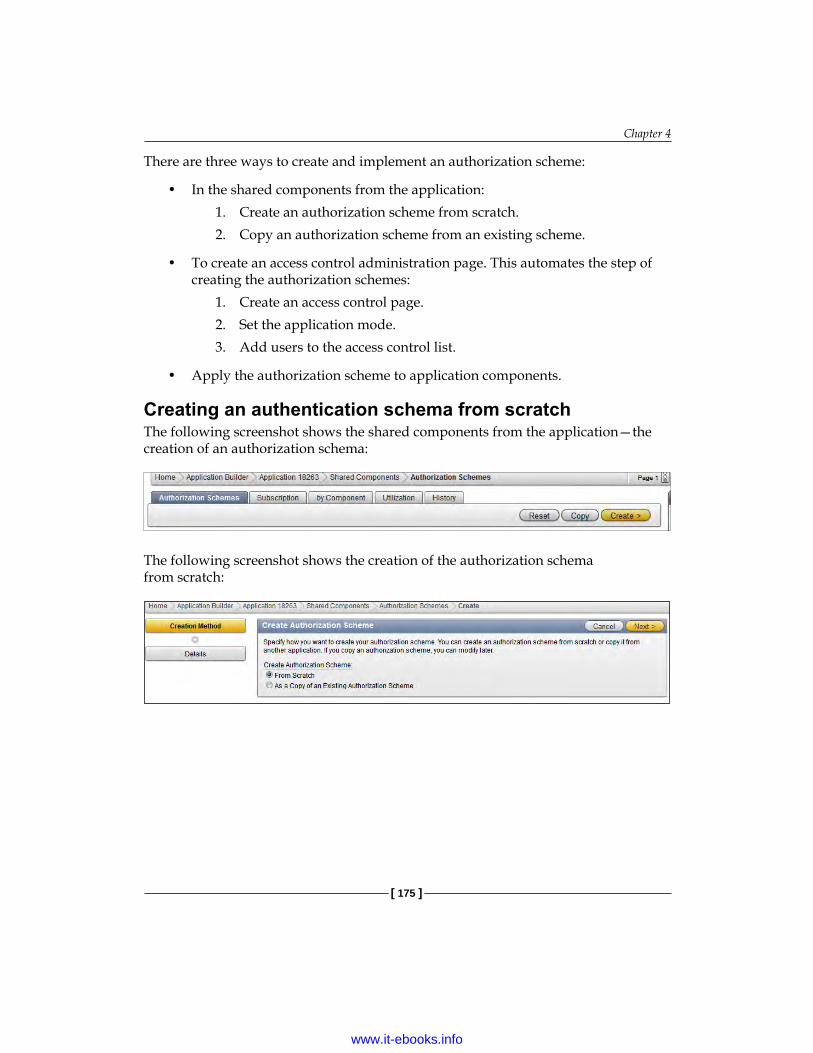
Chapter 4
[ 175 ]
There are three ways to create and implement an authorization scheme:
• In the shared components from the application:1. Create an authorization scheme from scratch.2. Copy an authorization scheme from an existing scheme.
• To create an access control administration page. This automates the step of creating the authorization schemes:
1. Create an access control page.2. Set the application mode.3. Add users to the access control list.
• Apply the authorization scheme to application components.
Creating an authentication schema from scratchThe following screenshot shows the shared components from the application—the creation of an authorization schema:
The following screenshot shows the creation of the authorization schema from scratch:
www.it-ebooks.info
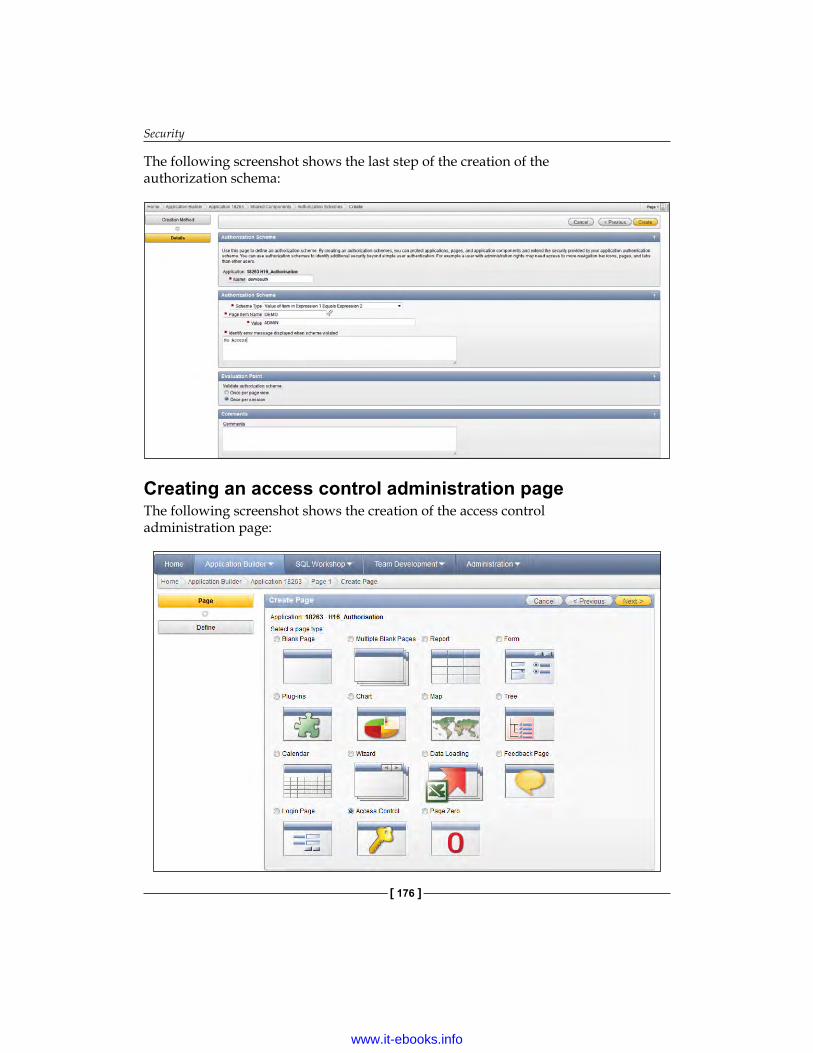
Security
[ 176 ]
The following screenshot shows the last step of the creation of the authorization schema:
Creating an access control administration pageThe following screenshot shows the creation of the access control administration page:
www.it-ebooks.info
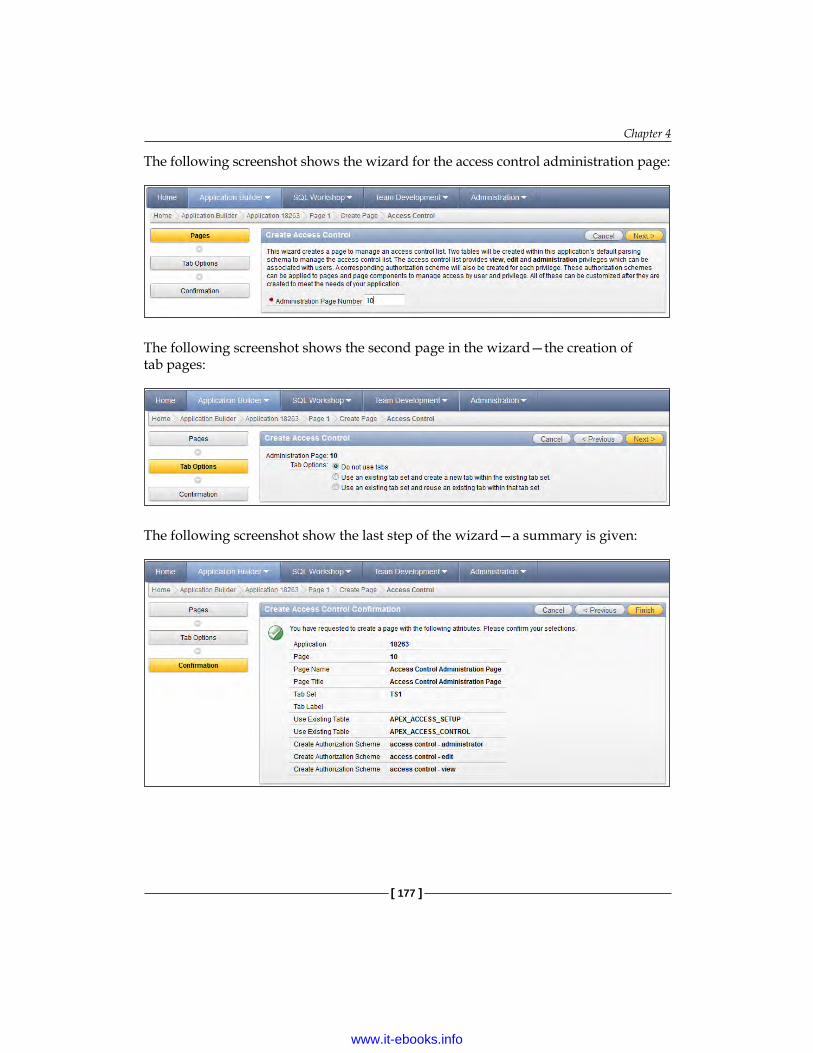
Chapter 4
[ 177 ]
The following screenshot shows the wizard for the access control administration page:
The following screenshot shows the second page in the wizard—the creation of tab pages:
The following screenshot show the last step of the wizard—a summary is given:
www.it-ebooks.info

Security
[ 178 ]
The following screenshot shows the configuration of the access control administration page:
Applying authorization schemasThe following screenshot shows the option to edit application properties for applying the authorization schema:
The following screenshot shows the edit application property/security part:
www.it-ebooks.info
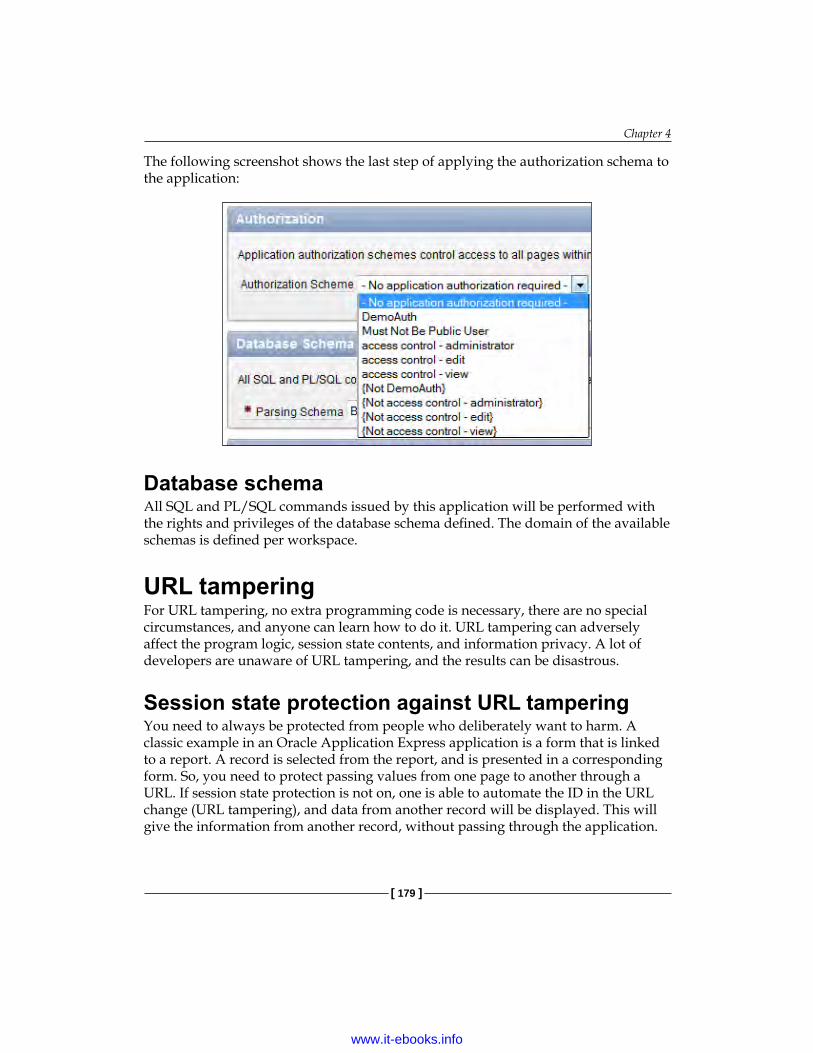
Chapter 4
[ 179 ]
The following screenshot shows the last step of applying the authorization schema to the application:
Database schemaAll SQL and PL/SQL commands issued by this application will be performed with the rights and privileges of the database schema defined. The domain of the available schemas is defined per workspace.
URL tamperingFor URL tampering, no extra programming code is necessary, there are no special circumstances, and anyone can learn how to do it. URL tampering can adversely affect the program logic, session state contents, and information privacy. A lot of developers are unaware of URL tampering, and the results can be disastrous.
Session state protection against URL tamperingYou need to always be protected from people who deliberately want to harm. A classic example in an Oracle Application Express application is a form that is linked to a report. A record is selected from the report, and is presented in a corresponding form. So, you need to protect passing values from one page to another through a URL. If session state protection is not on, one is able to automate the ID in the URL change (URL tampering), and data from another record will be displayed. This will give the information from another record, without passing through the application.
www.it-ebooks.info
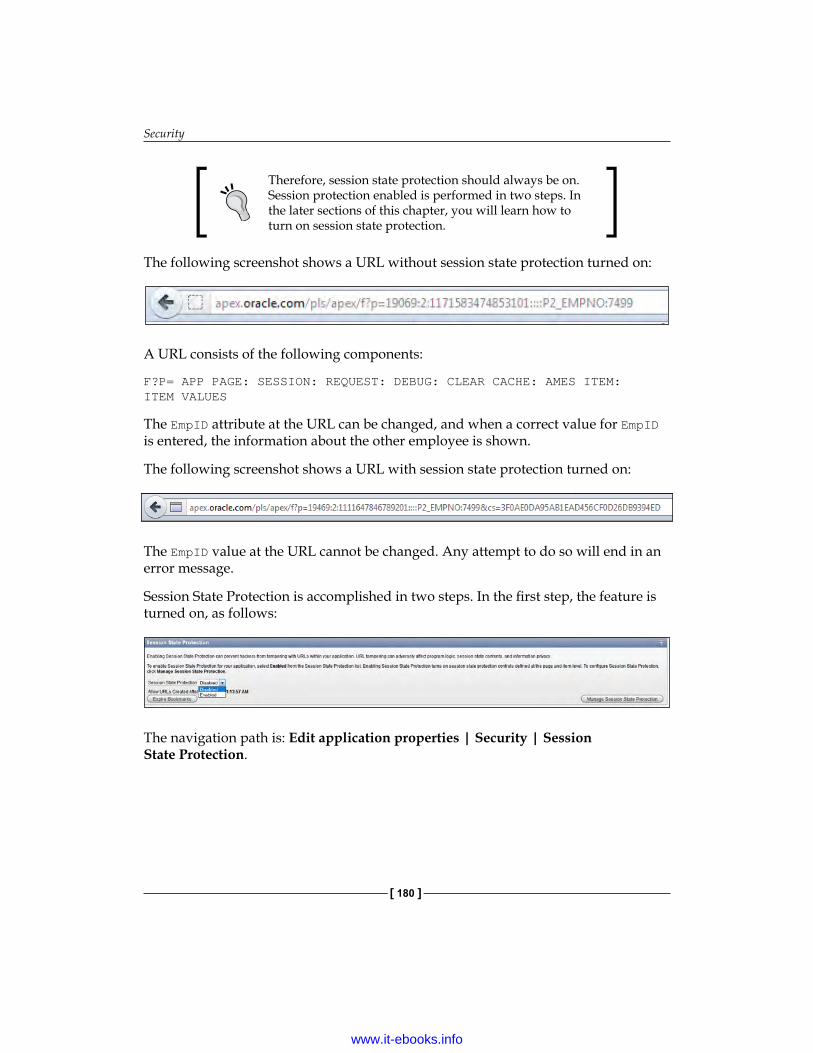
Security
[ 180 ]
Therefore, session state protection should always be on. Session protection enabled is performed in two steps. In the later sections of this chapter, you will learn how to turn on session state protection.
The following screenshot shows a URL without session state protection turned on:
A URL consists of the following components:
F?P= APP PAGE: SESSION: REQUEST: DEBUG: CLEAR CACHE: AMES ITEM: ITEM VALUES
The EmpID attribute at the URL can be changed, and when a correct value for EmpID is entered, the information about the other employee is shown.
The following screenshot shows a URL with session state protection turned on:
The EmpID value at the URL cannot be changed. Any attempt to do so will end in an error message.
Session State Protection is accomplished in two steps. In the first step, the feature is turned on, as follows:
The navigation path is: Edit application properties | Security | Session State Protection.
www.it-ebooks.info

Chapter 4
[ 181 ]
In the second follow-up step, the page and item security attributes are defined:
Then starts the configuration of session state protection by making use of the wizard:
The following screenshot shows the summary page of the configuration of the session state protection:
www.it-ebooks.info
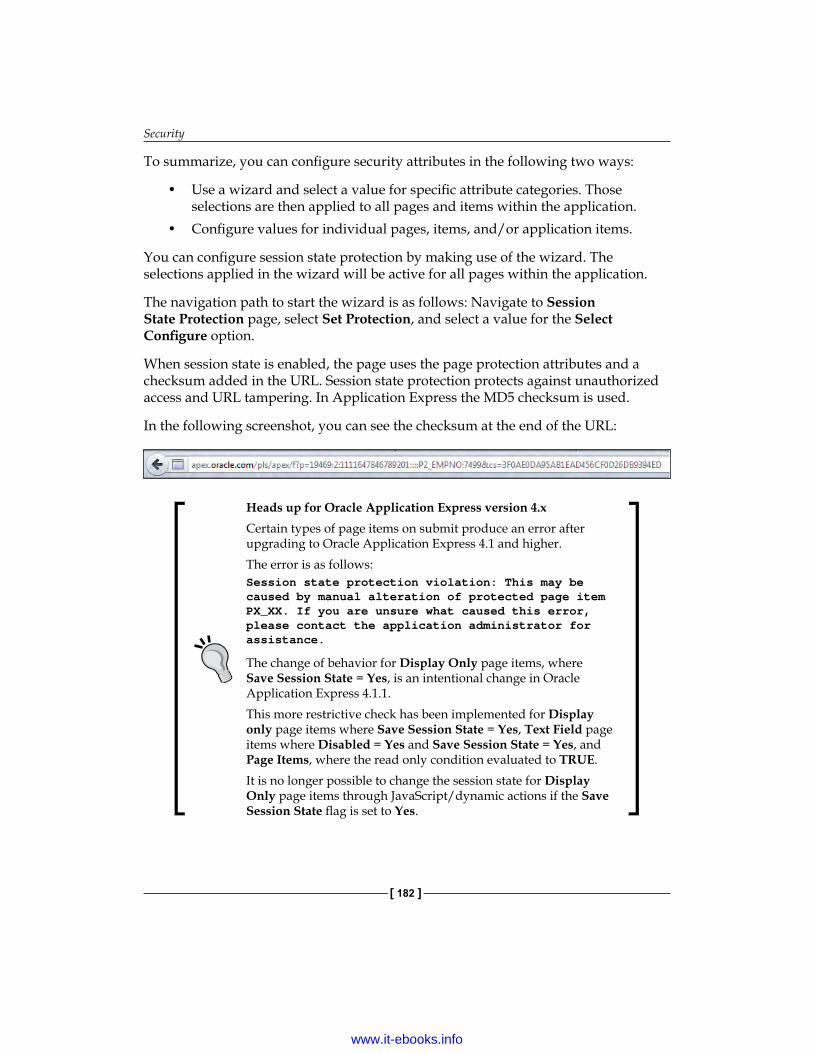
Security
[ 182 ]
To summarize, you can configure security attributes in the following two ways:
• Use a wizard and select a value for specific attribute categories. Those selections are then applied to all pages and items within the application.
• Configure values for individual pages, items, and/or application items.
You can configure session state protection by making use of the wizard. The selections applied in the wizard will be active for all pages within the application.
The navigation path to start the wizard is as follows: Navigate to Session State Protection page, select Set Protection, and select a value for the Select Configure option.
When session state is enabled, the page uses the page protection attributes and a checksum added in the URL. Session state protection protects against unauthorized access and URL tampering. In Application Express the MD5 checksum is used.
In the following screenshot, you can see the checksum at the end of the URL:
Heads up for Oracle Application Express version 4.x Certain types of page items on submit produce an error after upgrading to Oracle Application Express 4.1 and higher.The error is as follows:Session state protection violation: This may be caused by manual alteration of protected page item PX_XX. If you are unsure what caused this error, please contact the application administrator for assistance.
The change of behavior for Display Only page items, where Save Session State = Yes, is an intentional change in Oracle Application Express 4.1.1.This more restrictive check has been implemented for Display only page items where Save Session State = Yes, Text Field page items where Disabled = Yes and Save Session State = Yes, and Page Items, where the read only condition evaluated to TRUE.It is no longer possible to change the session state for Display Only page items through JavaScript/dynamic actions if the Save Session State flag is set to Yes.
www.it-ebooks.info
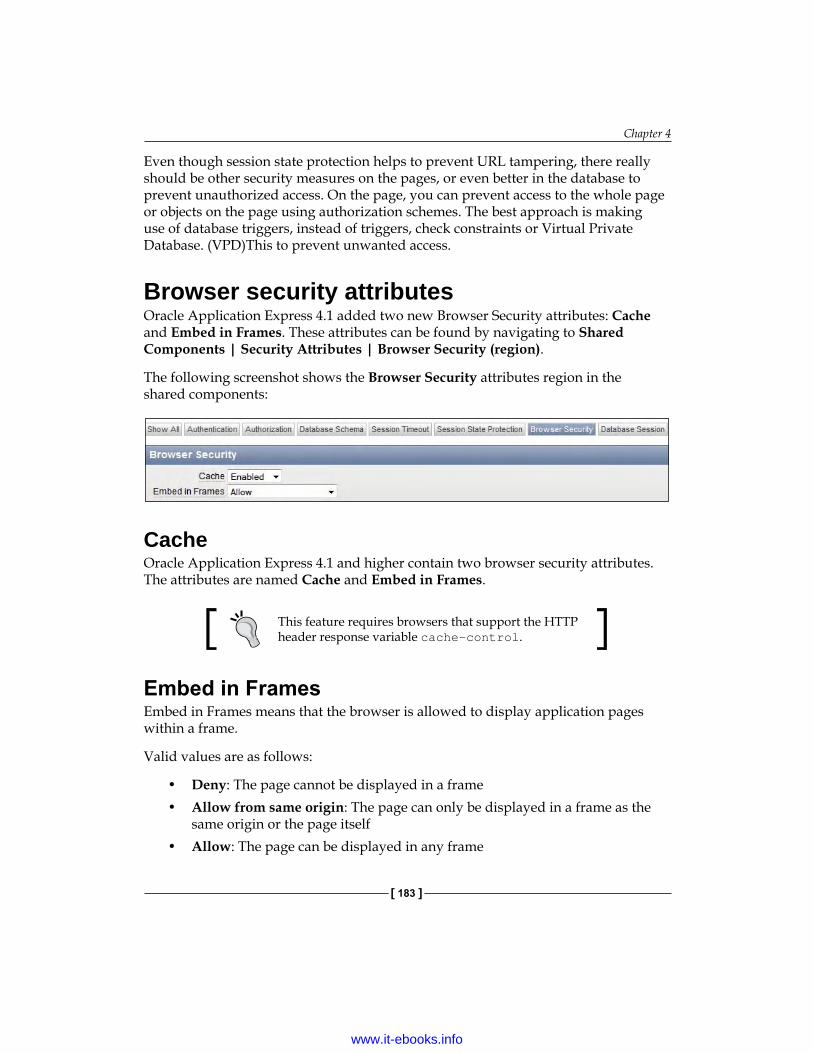
Chapter 4
[ 183 ]
Even though session state protection helps to prevent URL tampering, there really should be other security measures on the pages, or even better in the database to prevent unauthorized access. On the page, you can prevent access to the whole page or objects on the page using authorization schemes. The best approach is making use of database triggers, instead of triggers, check constraints or Virtual Private Database. (VPD)This to prevent unwanted access.
Browser security attributesOracle Application Express 4.1 added two new Browser Security attributes: Cache and Embed in Frames. These attributes can be found by navigating to Shared Components | Security Attributes | Browser Security (region).
The following screenshot shows the Browser Security attributes region in the shared components:
CacheOracle Application Express 4.1 and higher contain two browser security attributes. The attributes are named Cache and Embed in Frames.
This feature requires browsers that support the HTTP header response variable cache-control.
Embed in Frames Embed in Frames means that the browser is allowed to display application pages within a frame.
Valid values are as follows:
• Deny: The page cannot be displayed in a frame• Allow from same origin: The page can only be displayed in a frame as the
same origin or the page itself• Allow: The page can be displayed in any frame
www.it-ebooks.info
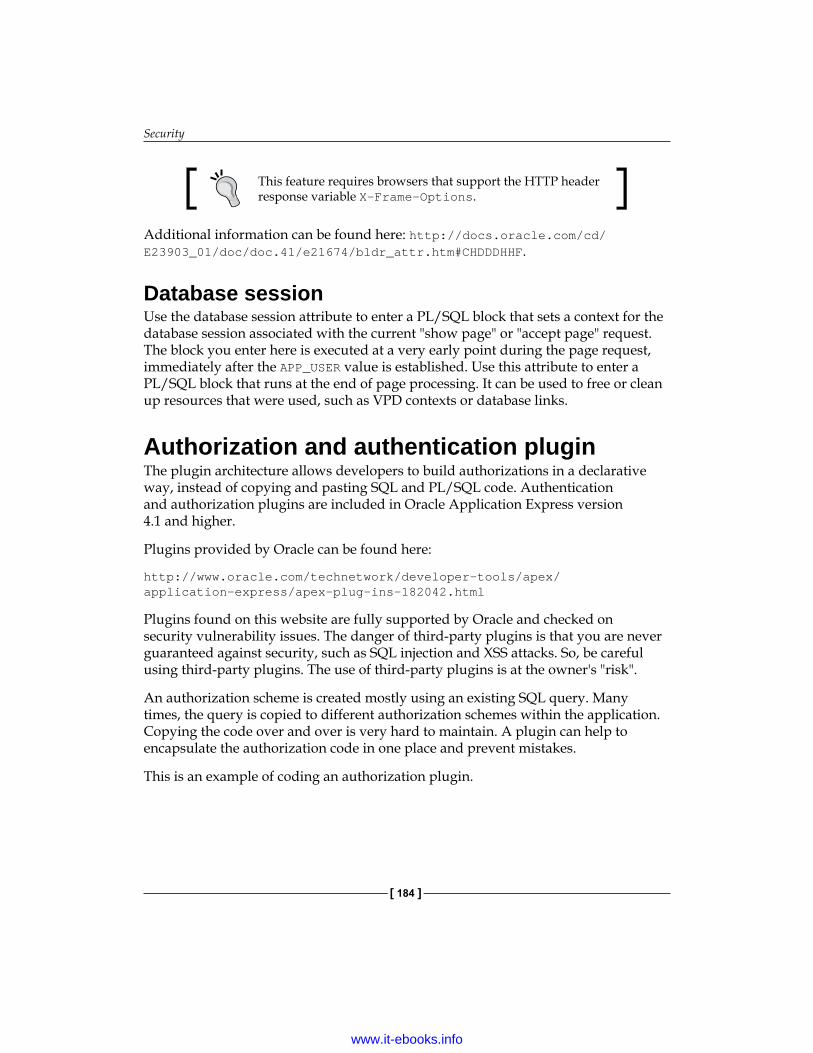
Security
[ 184 ]
This feature requires browsers that support the HTTP header response variable X-Frame-Options.
Additional information can be found here: http://docs.oracle.com/cd/E23903_01/doc/doc.41/e21674/bldr_attr.htm#CHDDDHHF.
Database sessionUse the database session attribute to enter a PL/SQL block that sets a context for the database session associated with the current "show page" or "accept page" request. The block you enter here is executed at a very early point during the page request, immediately after the APP_USER value is established. Use this attribute to enter a PL/SQL block that runs at the end of page processing. It can be used to free or clean up resources that were used, such as VPD contexts or database links.
Authorization and authentication pluginThe plugin architecture allows developers to build authorizations in a declarative way, instead of copying and pasting SQL and PL/SQL code. Authentication and authorization plugins are included in Oracle Application Express version 4.1 and higher.
Plugins provided by Oracle can be found here:
http://www.oracle.com/technetwork/developer-tools/apex/ application-express/apex-plug-ins-182042.html
Plugins found on this website are fully supported by Oracle and checked on security vulnerability issues. The danger of third-party plugins is that you are never guaranteed against security, such as SQL injection and XSS attacks. So, be careful using third-party plugins. The use of third-party plugins is at the owner's "risk".
An authorization scheme is created mostly using an existing SQL query. Many times, the query is copied to different authorization schemes within the application. Copying the code over and over is very hard to maintain. A plugin can help to encapsulate the authorization code in one place and prevent mistakes.
This is an example of coding an authorization plugin.
www.it-ebooks.info

Chapter 4
[ 185 ]
The code checks if the user is authorized to see a certain part of the application. An example of the PL/SQL code that can be used in an authentication plugin is as follows:
function is_authorized ( p_authorization in apex_plugin.t_authorization, p_plugin in apex_plugin.t_plugin ) return apex_plugin.t_authorization_exec_result
is v_group varchar2(4000) := p_authorization.attribute_01; v_count number; v_result apex_plugin.t_authorization_exec_result;begin select count(*) into v_count from apex_workspace_group_users where user_name = p_authorization.username and group_name = v_group; v_result.is_authorized := l_count > 0; return v_result;end is_authorized;
Applying the authentication schema can be performed with the following steps:
1. Go to Shared Components | Authorization Schemes.2. Click on Create. 3. Click on Next.4. Enter Is SalesManager for Name. 5. Enter APEX Group Authorization [Plug-in] for Scheme Type. 6. Enter SalesManager for Group Name.7. Enter This part of the application is ONLY for sales managers for
Error Message.8. Click on Create.
Secure items in an applicationThe various security aspects in items will now be discussed.
www.it-ebooks.info

Security
[ 186 ]
Item encryptionIn version 3.2.1 from Oracle Application Express and higher, it is possible to store data encrypted in session state. Item security is a property of an item.
The following screenshot shows the item security property named Store value encrypted in session state:
Hidden items protectionOracle Application Express has two types of hidden items:
• Hidden: A form element that is not visible within the HTML page• Hidden and protected: A form element, but the value is checked by the
server to ensure the value has not been modified
The following screenshot shows a hidden and protected item:
It is safer to use a value that is Hidden and Protected, by default, for maximum security. The reason is that a hidden item will very probably not change and this will protect against unwanted change of the value by a client-side script.
The Oracle Application Express User's Guide states:"For maximum security, use Hidden and Protected instead of Hidden unless your page has client-side behavior; for example, JavaScript that alters the item value after the page is rendered by Oracle Application Express."
www.it-ebooks.info
Chapter 4
[ 187 ]
Let's look at an example.
An application may contain a page to display user information, and allow the user to update their details. If this page has a hidden username field that is used by the application to know which user to update, then a user could update another user's details by modifying the hidden field.
If the item was hidden and protected, the application would raise an error when the modified value was submitted.
RecommendationChange all Hidden items to be Hidden and Protected, unless they are modified by client-side code.
For Oracle Application Express version 4.0 onward, set the Value Protected item in Settings on the item. Additional documentation covering hidden and protected items can be found at the following URL:
http://download.oracle.com/docs/cd/E10513_01/doc/appdev.310/e10499/bldapp.htm#BCEGHEAJ
Items of type passwordPassword items enable users to enter passwords without saving them to the session state. This prevents the password from being saved in the database in the session state tables.
There are reports provided to identify at-risk password items:
1. Navigate to the Workspace home page.2. Click on the Application Builder icon.3. The Application Builder home page appears.4. On the Tasks list, click on Cross Application Reports.5. Under Security, click on Password Items.
www.it-ebooks.info
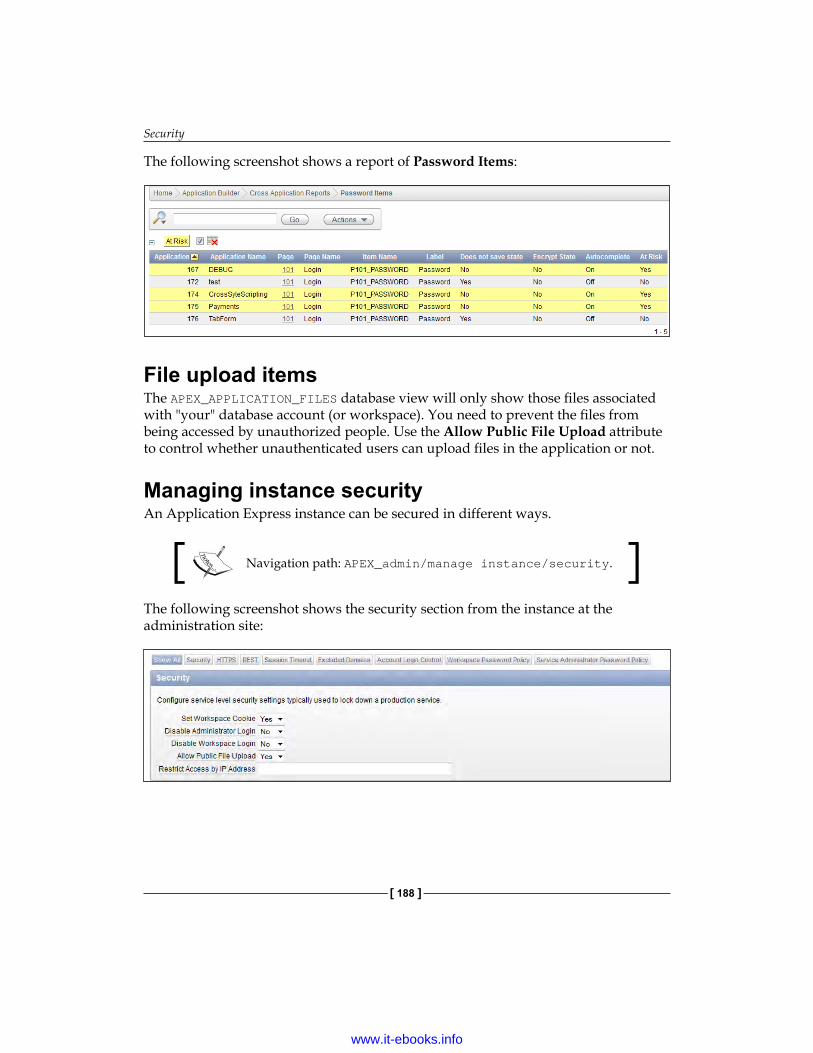
Security
[ 188 ]
The following screenshot shows a report of Password Items:
File upload itemsThe APEX_APPLICATION_FILES database view will only show those files associated with "your" database account (or workspace). You need to prevent the files from being accessed by unauthorized people. Use the Allow Public File Upload attribute to control whether unauthenticated users can upload files in the application or not.
Managing instance securityAn Application Express instance can be secured in different ways.
Navigation path: APEX_admin/manage instance/security.
The following screenshot shows the security section from the instance at the administration site:
www.it-ebooks.info

Chapter 4
[ 189 ]
Application dataIn Oracle Application Express, it is possible to download a report to different formats. In a classic report, it is possible to define a column restriction such as: "Not allowed to include in Export". Unfortunately, column restriction is not available in Interactive reports and therefore you need to write your own customized code to create this kind of column restriction. An alternative can be to write your own customized PL/SQL code to download reports to XML. This technique is very well explained at the following blog:
http://spendolini.blogspot.co.uk/2006/04/custom-export-to-csv.html
An own export routine prevents downloading all data by any authenticated user. In this way, you can restrict downloading of data to certain groups of users.
The following screenshot shows the column restriction attribute in a classic report:
Fake inputWhen you use HTML controls, such as select lists, checkboxes, or radio buttons, you might think that you don't need to validate the input from these since the values are constrained. However, you cannot count on this. A select list can easily be converted to a normal text input field. In Firebug or a web developer, there is an option available in the menu to convert all select lists on the current page to text fields. So take care and validate all input. Use a database trigger, a foreign key constraint, or a check constraint to restrict the values entered by the user.
A classic example from fake input via the Firebug add-on is changing a value that is selected in a list of values to another value. Fake input via Firebug can be avoided by creating extra validations within the database.
www.it-ebooks.info
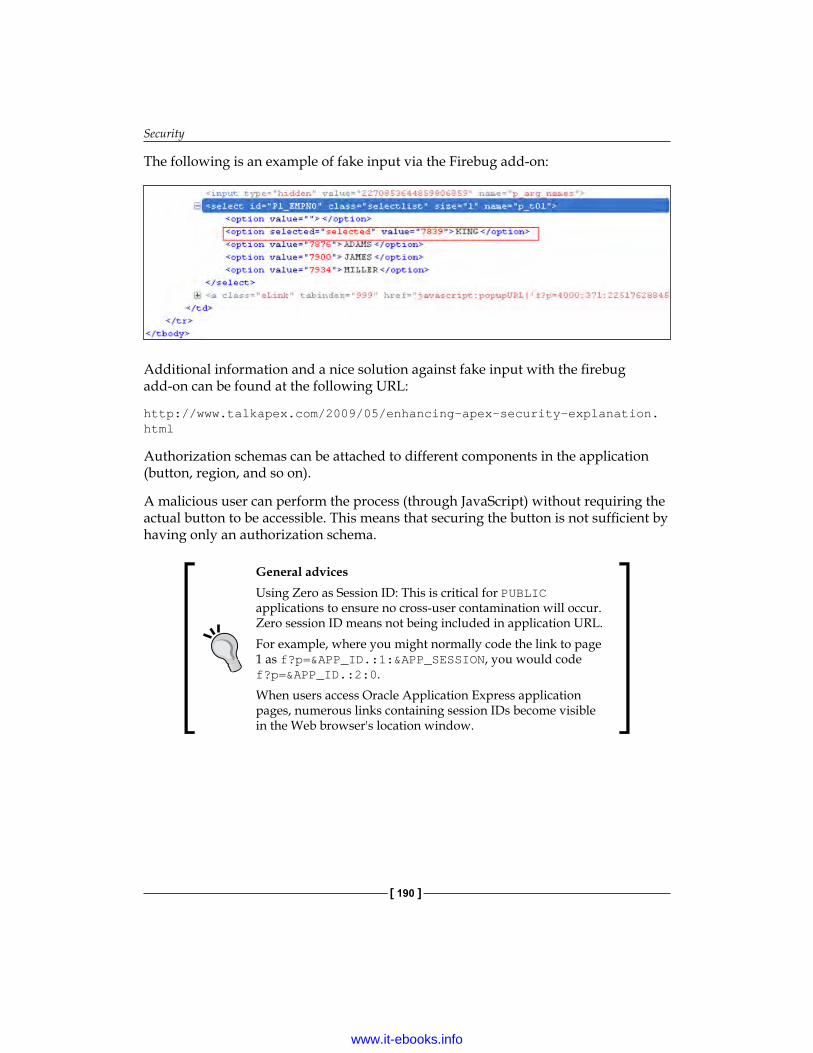
Security
[ 190 ]
The following is an example of fake input via the Firebug add-on:
Additional information and a nice solution against fake input with the firebug add-on can be found at the following URL:
http://www.talkapex.com/2009/05/enhancing-apex-security-explanation.html
Authorization schemas can be attached to different components in the application (button, region, and so on).
A malicious user can perform the process (through JavaScript) without requiring the actual button to be accessible. This means that securing the button is not sufficient by having only an authorization schema.
General advicesUsing Zero as Session ID: This is critical for PUBLIC applications to ensure no cross-user contamination will occur. Zero session ID means not being included in application URL.For example, where you might normally code the link to page 1 as f?p=&APP_ID.:1:&APP_SESSION, you would code f?p=&APP_ID.:2:0.When users access Oracle Application Express application pages, numerous links containing session IDs become visible in the Web browser's location window.
www.it-ebooks.info
Chapter 4
[ 191 ]
Saving state before branchingThe "Save state before branch" feature for branches was deprecated, because the existing implementation had some serious restrictions that confused numerous developers in many different situations.
• If clear page was specified, it was performed when the page was rendered. So the value which was set during "accept" processing was cleared out when the page was actually rendered.
• If a page item was set, which was based on a database column and it wasn't the primary key column, the value didn't show up when the page was rendered. When someone used Save state before branch = No, it would work as expected.
Workaround:
• Use a computation or a process to set the session state before branches are fired
• In the branch, simply specify the page and do not include page items
The preceding workaround is doing the same as Save state before branch = Yes, and will work fine for primary key page items or page items that are not based on a database column.
Utilities There are different utilities in Application Express that can be handy to ensure security.
Application dashboardTo access the Utilities page, click on the Utilities icon on the application home page. From the Utilities page, you can access application utilities as well as page-specific utilities.
Security lists the current authentication scheme, the number of public and non-public pages, and the number of authorization schemes.
www.it-ebooks.info
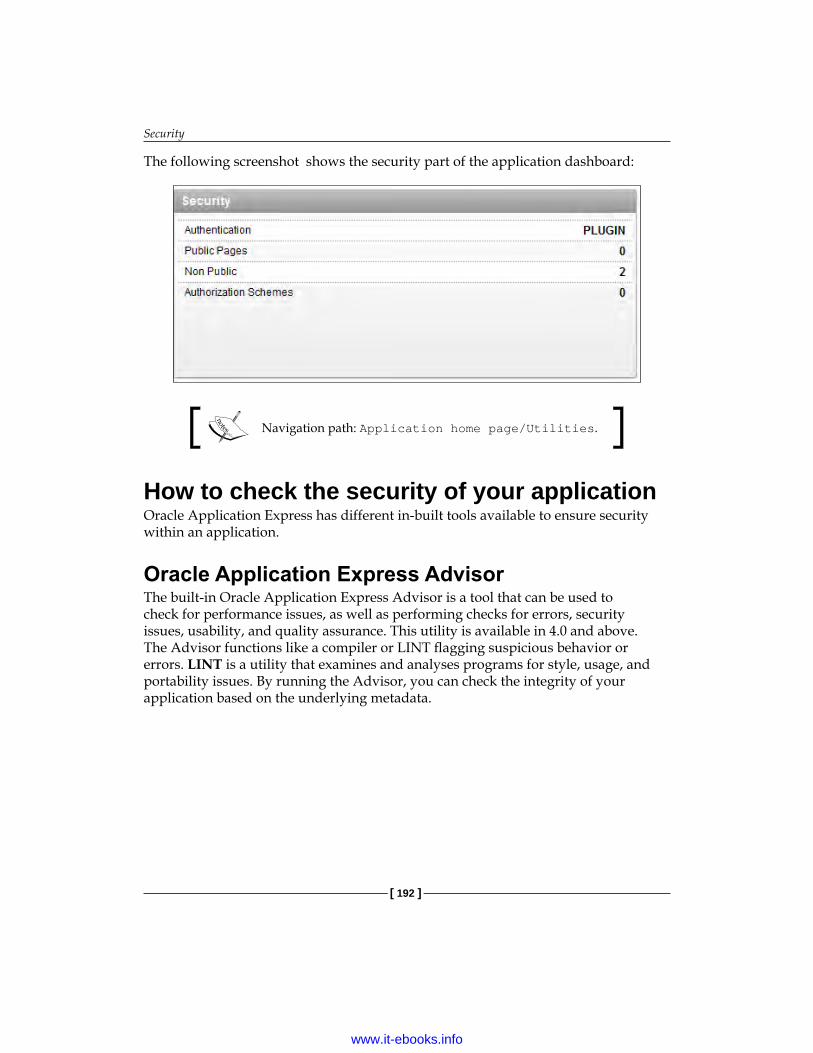
Security
[ 192 ]
The following screenshot shows the security part of the application dashboard:
Navigation path: Application home page/Utilities.
How to check the security of your applicationOracle Application Express has different in-built tools available to ensure security within an application.
Oracle Application Express AdvisorThe built-in Oracle Application Express Advisor is a tool that can be used to check for performance issues, as well as performing checks for errors, security issues, usability, and quality assurance. This utility is available in 4.0 and above. The Advisor functions like a compiler or LINT flagging suspicious behavior or errors. LINT is a utility that examines and analyses programs for style, usage, and portability issues. By running the Advisor, you can check the integrity of your application based on the underlying metadata.
www.it-ebooks.info

Chapter 4
[ 193 ]
NoteWhen running the Advisor with all the checks checked, the following error is thrown:ORA-01460: Unimplemented or unreasonable conversion requested.
Work-around is easy, hit the apply button.
The following screenshot shows the Advisor utility in Oracle Application Express:
Third-party tools to check on securityThere are third-party tools available to check the security from your application. The ApexSec Security Console is designed to import and analyze your Oracle Application Express application for issues with security implications. Demonstration of the tool can be found at the following website:
https://secure.recx.co.uk/apexsec/help.jsp
Sumneva also provides a security scan tool for Oracle Application Express applications, at the following URL:
http://www.sumneva.com/apex/f?p=15000:1070:0
www.it-ebooks.info
Security
[ 194 ]
SummarySecurity is not an easy subject, and should be considered all the time and with each piece of code that you write. All layers involved with Oracle Application Express should involve insecurity; this means the web server, database, and the application itself. There is a fine balance between security and productivity. Too much security means a hard time doing your job, and too little means exposing the system to a security breach. Basic security hardening is just a matter of knowing where the weaknesses are. Organizations need to have their patches and CPU patches strategy in place. Patching is very important when hardening security. Think about security before it is too late, as it could have negative consequences for you and your organization!
A general advice is making use of Application Express built-in security capabilities and the Application Express Advisor.
Besides this, perform an Application Express analysis by making use of third-party analysis tools.
www.it-ebooks.info
Debugging and Troubleshooting
Debugging Oracle Application Express can be a conundrum. Oracle APEX is a blend of technologies – PL/SQL and SQL that generates HTML pages using CSS, templates, and JavaScript. Tracking and resolving problems in this multi-layer environment necessitates a blend of tactics to examine what is happening in each component of the application.
This chapter will cover the following topics:
• Debugging in APEX• Remote debugging using Oracle SQL Developer• Web development tools• Reports available in Application Express for troubleshooting• Advisor
Debugging an APEX pageBefore you can start by debugging a page, there are some prerequisites. First of all, the debugging property needs to be set to Yes, and second the developer toolbar needs to be visible. Although this last requirement is not strictly necessary, it is very convenient when the development toolbar is visible.
www.it-ebooks.info
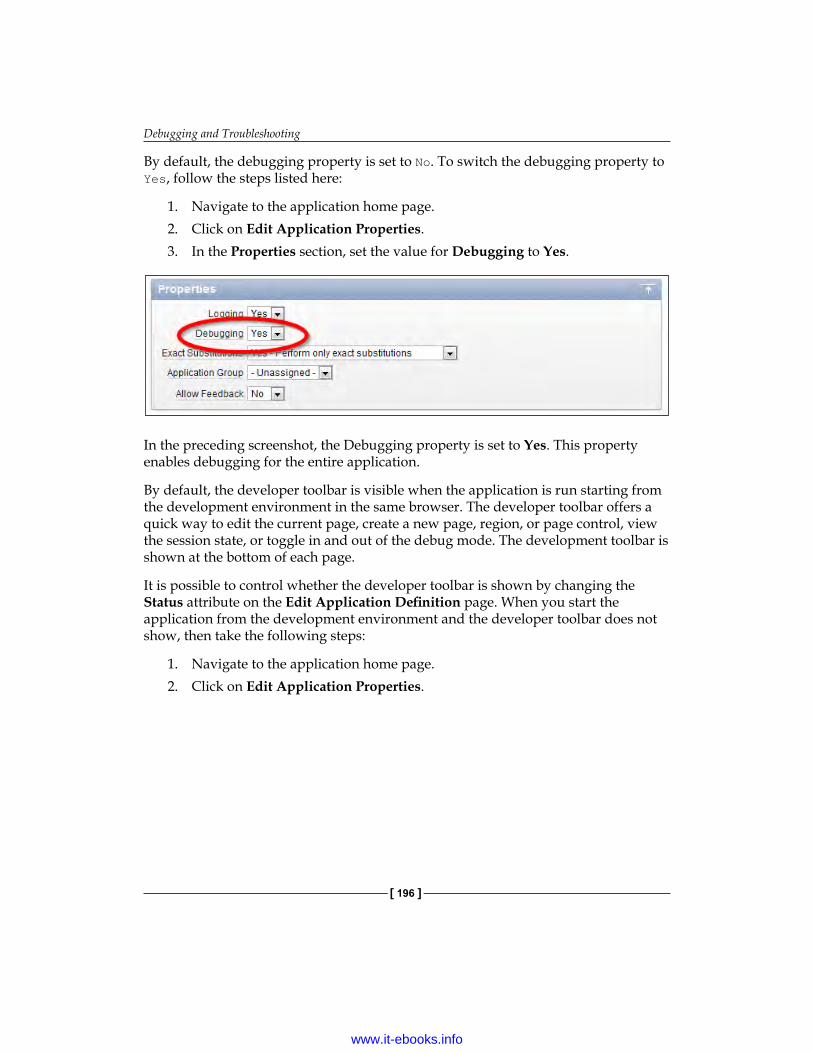
Debugging and Troubleshooting
[ 196 ]
By default, the debugging property is set to No. To switch the debugging property to Yes, follow the steps listed here:
1. Navigate to the application home page.2. Click on Edit Application Properties. 3. In the Properties section, set the value for Debugging to Yes.
In the preceding screenshot, the Debugging property is set to Yes. This property enables debugging for the entire application.
By default, the developer toolbar is visible when the application is run starting from the development environment in the same browser. The developer toolbar offers a quick way to edit the current page, create a new page, region, or page control, view the session state, or toggle in and out of the debug mode. The development toolbar is shown at the bottom of each page.
It is possible to control whether the developer toolbar is shown by changing the Status attribute on the Edit Application Definition page. When you start the application from the development environment and the developer toolbar does not show, then take the following steps:
1. Navigate to the application home page.2. Click on Edit Application Properties.
www.it-ebooks.info
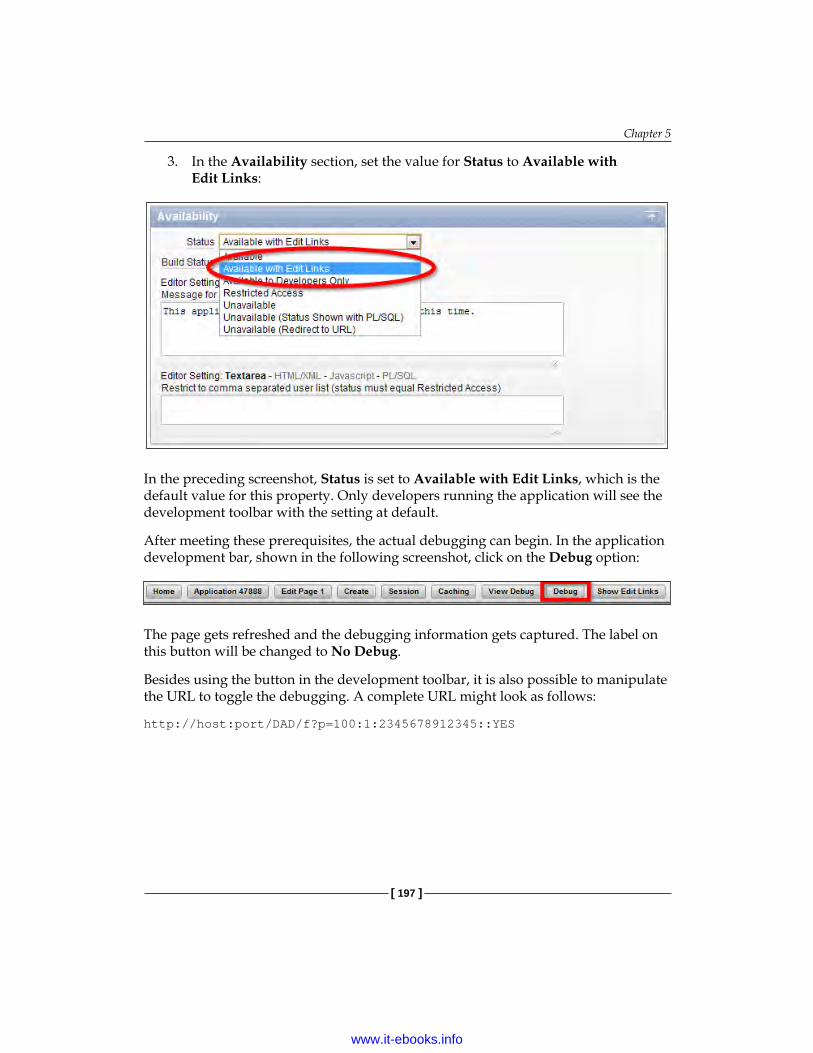
Chapter 5
[ 197 ]
3. In the Availability section, set the value for Status to Available with Edit Links:
In the preceding screenshot, Status is set to Available with Edit Links, which is the default value for this property. Only developers running the application will see the development toolbar with the setting at default.
After meeting these prerequisites, the actual debugging can begin. In the application development bar, shown in the following screenshot, click on the Debug option:
The page gets refreshed and the debugging information gets captured. The label on this button will be changed to No Debug.
Besides using the button in the development toolbar, it is also possible to manipulate the URL to toggle the debugging. A complete URL might look as follows:
http://host:port/DAD/f?p=100:1:2345678912345::YES
www.it-ebooks.info
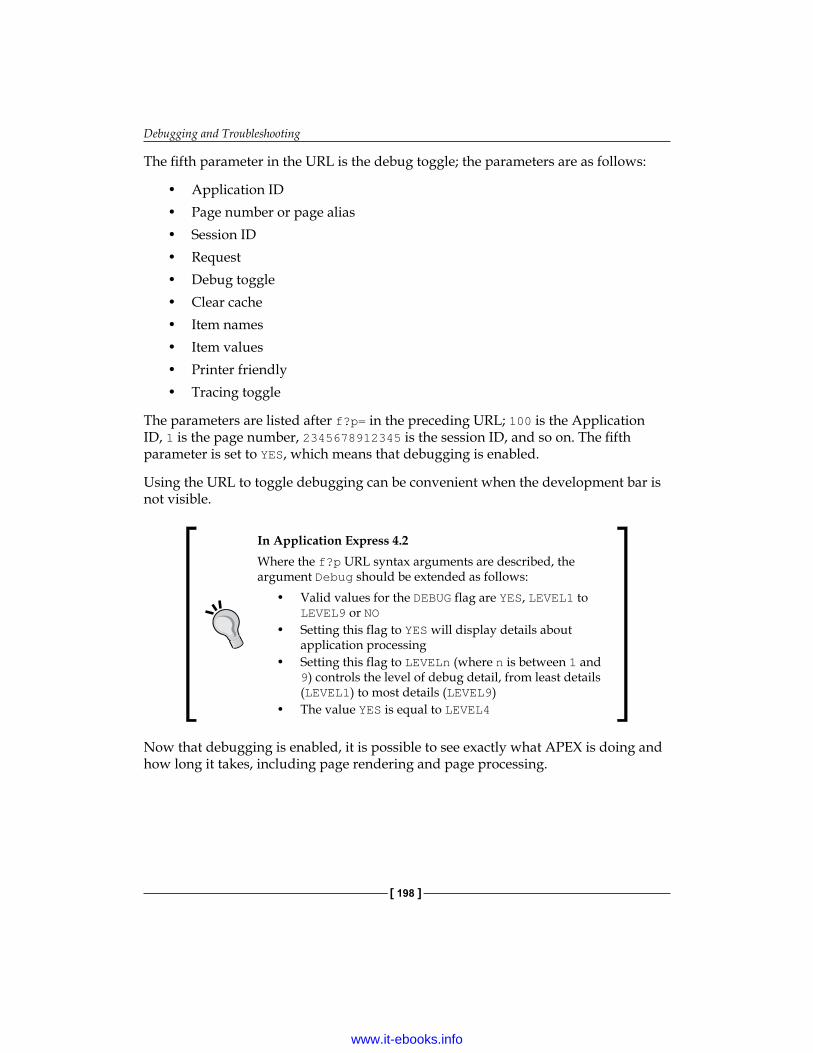
Debugging and Troubleshooting
[ 198 ]
The fifth parameter in the URL is the debug toggle; the parameters are as follows:
• Application ID• Page number or page alias• Session ID• Request• Debug toggle• Clear cache• Item names• Item values• Printer friendly• Tracing toggle
The parameters are listed after f?p= in the preceding URL; 100 is the Application ID, 1 is the page number, 2345678912345 is the session ID, and so on. The fifth parameter is set to YES, which means that debugging is enabled.
Using the URL to toggle debugging can be convenient when the development bar is not visible.
In Application Express 4.2Where the f?p URL syntax arguments are described, the argument Debug should be extended as follows:
• Valid values for the DEBUG flag are YES, LEVEL1 to LEVEL9 or NO
• Setting this flag to YES will display details about application processing
• Setting this flag to LEVELn (where n is between 1 and 9) controls the level of debug detail, from least details (LEVEL1) to most details (LEVEL9)
• The value YES is equal to LEVEL4
Now that debugging is enabled, it is possible to see exactly what APEX is doing and how long it takes, including page rendering and page processing.
www.it-ebooks.info
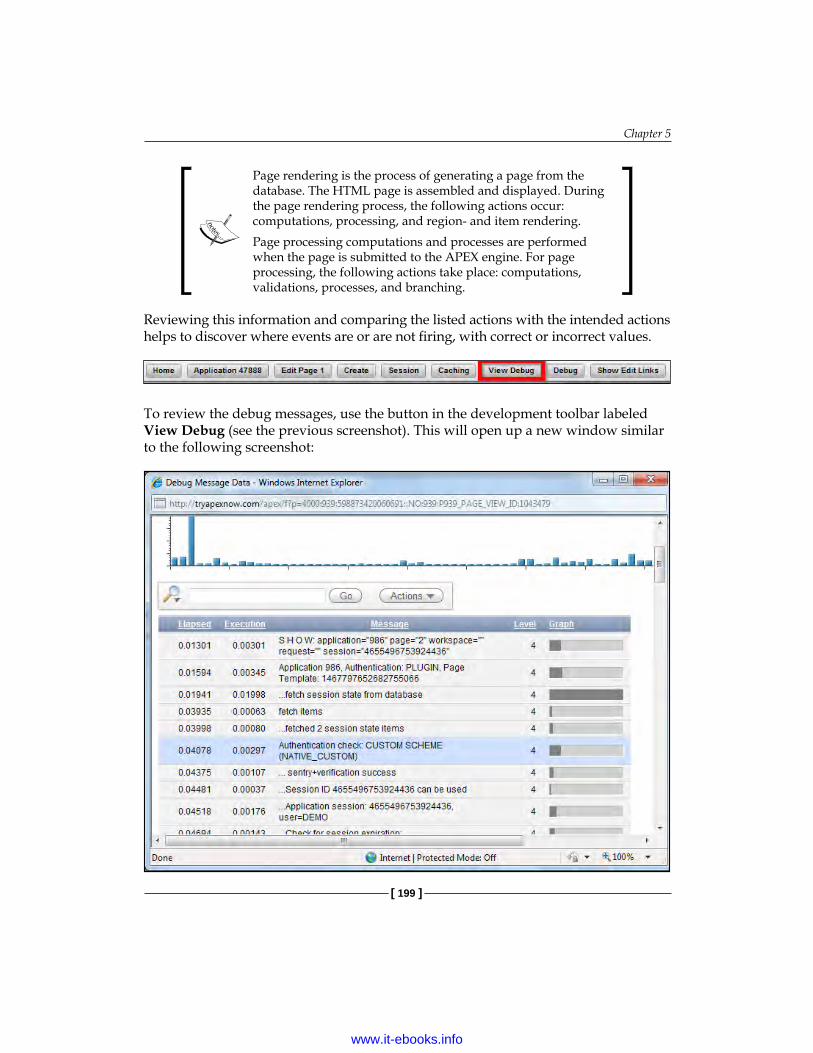
Chapter 5
[ 199 ]
Page rendering is the process of generating a page from the database. The HTML page is assembled and displayed. During the page rendering process, the following actions occur: computations, processing, and region- and item rendering.Page processing computations and processes are performed when the page is submitted to the APEX engine. For page processing, the following actions take place: computations, validations, processes, and branching.
Reviewing this information and comparing the listed actions with the intended actions helps to discover where events are or are not firing, with correct or incorrect values.
To review the debug messages, use the button in the development toolbar labeled View Debug (see the previous screenshot). This will open up a new window similar to the following screenshot:
www.it-ebooks.info

Debugging and Troubleshooting
[ 200 ]
At the top of the Debug Message Data window (see the previous screenshot), there is a graphical representation of the execution times. This makes it easy to narrow down where most of the time is spent on the page. Clicking on the graph on the top will navigate to the appropriate line in the report. A similar graph is shown per line in the report; the wider the bar, the more time this line takes.
The previous screenshot shows the information that can be found in the debug information: authentication information, validation checks, assignments and session state information, values assigned in queries, and much more.
Debug information can also be queried through the APEX_DEBUG_MESSAGES view. The actual debug information is stored in two data dictionary tables: WWV_FLOW_DEBUG_MESSAGES and WWV_FLOW_DEBUG_MESSAGES2.
In Application Express 4.2The APEX_DEBUG_MESSAGE has been renamed to APEX_DEBUG. In the top-level description, it should be specified that the module can still be accessed by its previous name, APEX_DEBUG_MESSAGE, for compatibility reasons, but the new name is preferred.
The following table lists the columns in the APEX_DEBUG_MESSAGES view:
Column name Data type RemarkID NUMBER
PAGE_VIEW_ID NUMBER Page view identifier, which is a unique sequence generated for each page view recorded with debugging
MESSAGE_TIMESTAMP TIMESTAMP(6) with time zone
Timestamp: In GMT that message was saved
ELAPSED_TIME NUMBER Elapsed time in seconds from the beginning of page submission or page view
EXECUTION_TIME NUMBER Time elapsed between the current and the next debug message
MESSAGE VARCHAR2(4000) MessageAPPLICATION_ID NUMBER Application identifierPAGE_ID NUMBER Page identifier within the applicationSESSION_ID NUMBER APEX session identifier
www.it-ebooks.info

Chapter 5
[ 201 ]
Column name Data type RemarkAPEX_USER VARCHAR2(255) Username of the user authenticated to
the applicationMESSAGE_LEVEL NUMBER Can be level 1:7 (importance)WORKSPACE_ID NUMBER Application Express workspace
identifier
Instrumentation of the APEX codeCode instrumentation makes it much easier to track down bugs and isolate unexpected behavior more quickly. Code instrumentation is used to diagnose errors and to write trace information. Besides instrumenting the database code (see Chapter 2, Leveraging the Database), instrumenting APEX code can also be very beneficial.
You can reference the DEBUG flag using the following syntax:
Substitution string &DEBUG.
PL/SQL V('DEBUG')
Bind variable :DEBUG
When a page is run in the DEBUG mode, the debug item is automatically set to YES; otherwise, it is set to NO. This can be useful to show region content depending on the debug mode variable.
The following example shows a region depending on the value of the DEBUG variable:
Create a condition of the type PL/SQL expression.
The value expression 1 has the following value:
v('DEBUG') = 'YES'
That means when the DEBUG variable is equal to 'YES', the region is shown; when the DEBUG variable is 'NO', the region is not shown. This way you can limit your debug code to only execute when running in the debug mode. So you only call the code when you need the code. When running the application in production, the debug mode is turned off and the debug code is ignored by the APEX engine.
www.it-ebooks.info

Debugging and Troubleshooting
[ 202 ]
APEX_APPLICATION.G_DEBUGThe APEX_APPLICATION package enables users to take advantage of global variables. The apex_application.g_debug variable refers to whether debugging is currently switched on or off. Valid values for this variable are TRUE or FALSE.
Turning debug ON shows details about application processing.
For example:
IF apex_application.g_debug THEN apex_debug_message.log_message('Custom Validation'); END IF;
Including the preceding code in the APEX page, anywhere where PL/SQL is allowed, will add information visible in APEX_DEBUG_MESSAGES, and therefore in the View Debug page. This information will only be added when apex_application.g_debug evaluates to TRUE.
The debug Advanced Programming Interface (API)The APEX_DEBUG_MESSAGE package provides utility functions for managing the debug message log. Specifically, this package provides the necessary APIs to instrument and debug PL/SQL code contained within the APEX application as well as the PL/SQL code in database stored procedures and functions. Sometimes, you need to know where the problem resides. A problem can exist in the rendering part or in the processing part of the page. Using the API, debug messages can be included at page rendering and page processing level. Page rendering: before header, page processing: after submit.
The APEX debug messageThere are several procedures in the APEX_DEBUG_MESSAGE package. These procedures are listed in the following table:
Procedure UsageDISABLE_DEBUG_MESSAGES Programmatically disable debuggingENABLE_DEBUG_MESSAGES Programmatically enable debuggingLOG_MESSAGE Log a message of up to 4000 bytes at a given levelLOG_LONG_MESSAGE Log a LONG message (split into 4000 byte chunks) at a
given level
www.it-ebooks.info

Chapter 5
[ 203 ]
Procedure UsageLOG_PAGE_SESSION_STATE Emit session state information into the DEBUG tableREMOVE_DEBUG_BY_AGE Remove debug messages for a given application older
than N days REMOVE_DEBUG_BY_APP Remove debug messages for a given applicationREMOVE_DEBUG_BY_VIEW Remove debug messages for a given application and
page view IDREMOVE_SESSION_MESSAGES Remove debug messages for a given session
The following is an example of enabling debug messages for a specific user in the page rendering process—Onload/Before header header.
IF :APP_USER = 'XX' THEN apex_debug_message.enable_debug_messages;END IF;
The REMOVE_DEBUG_BY_AGE procedure takes two arguments:
(p_application_id in number default null, P_older_than_days in number default null);
This example shows how the REMOVE_DEBUG_BY_AGE procedure is used.
Before we can use the procedure to remove the debug information, we first need to create some debug information. Debug information is created when the View Debug button in the developer toolbar is pressed.
The following steps will guide you through this process:
1. Edit the page, and in the Processes section, click on the Create icon, to add a new process to this page. This will launch the Create Page Process wizard.
2. Select category PL/SQL, and click on the Next button.3. Type Clear Debug Info, ensure that Point is set to On Load -Before
Header, and click on Next.4. Under the Source heading, enter the following code:
apex_debug_message.remove_debug_by_age (p_application_id => :APP_ID ,p_older_than_days => 1 );
www.it-ebooks.info
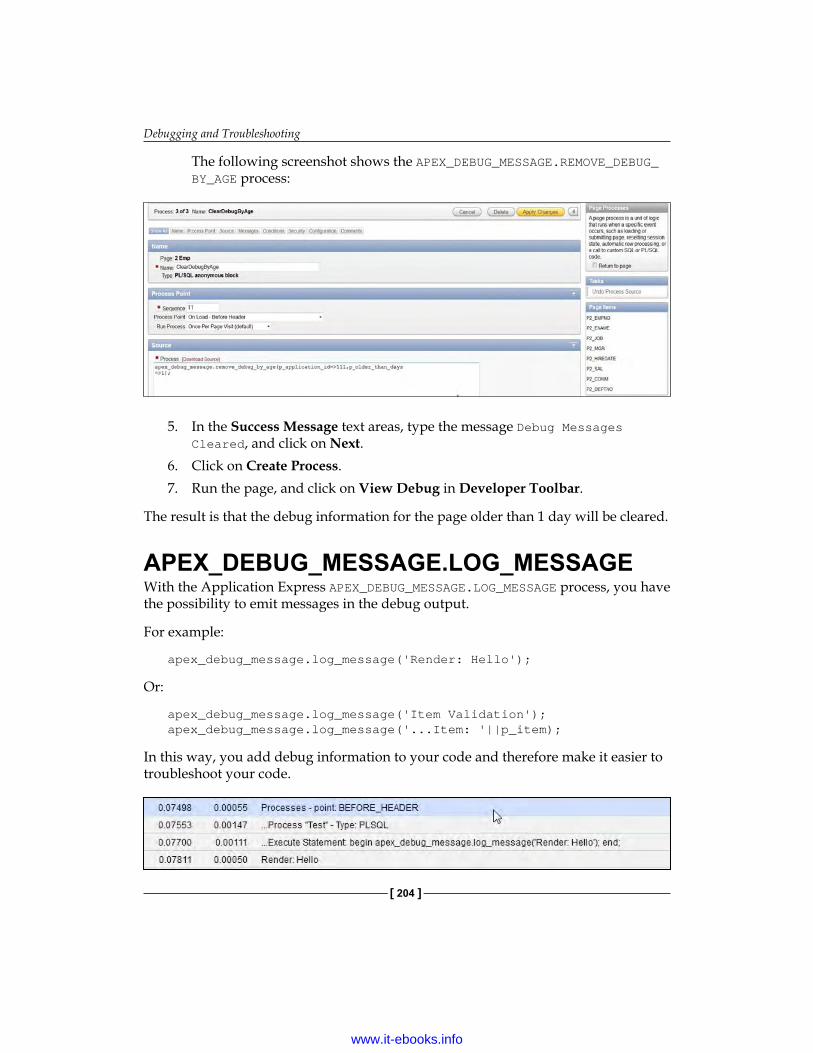
Debugging and Troubleshooting
[ 204 ]
The following screenshot shows the APEX_DEBUG_MESSAGE.REMOVE_DEBUG_BY_AGE process:
5. In the Success Message text areas, type the message Debug Messages Cleared, and click on Next.
6. Click on Create Process.7. Run the page, and click on View Debug in Developer Toolbar.
The result is that the debug information for the page older than 1 day will be cleared.
APEX_DEBUG_MESSAGE.LOG_MESSAGEWith the Application Express APEX_DEBUG_MESSAGE.LOG_MESSAGE process, you have the possibility to emit messages in the debug output.
For example:
apex_debug_message.log_message('Render: Hello');
Or:
apex_debug_message.log_message('Item Validation');apex_debug_message.log_message('...Item: '||p_item);
In this way, you add debug information to your code and therefore make it easier to troubleshoot your code.
www.it-ebooks.info
Chapter 5
[ 205 ]
This image shows the extra debug information 'Hello', which is emitted by the apex_debug_message.log_message API.
WWV_FLOW_API.SET_ENABLE_APP_DEBUGGINGThis API is not documented in the APEX documentations, and is therefore officially not supported. It allows you to turn debugging ON or OFF at the application level.
For example:
On:wwv_flow_api.set_enable_app_debugging (:APP_ID, 1);
Off:wwv_flow_api.set_enable_app_debugging (:APP_ID, 0);
APEX and Oracle SQL DeveloperAPEX and Oracle SQL Developer can work perfectly together. For troubleshooting PL/SQL code within APEX, remote debugging can be very handy.
Oracle SQL Developer is a graphical user interface that allows you to browse database objects, run SQL statements and scripts, and debug PL/SQL statements. Before concentrating on the integration of Oracle SQL Developer and APEX, we are going to look at how debugging is done in Oracle SQL Developer. Oracle provides two packages for debugging PL/SQL code. The first, DBMS_DEBUG, was introduced in Oracle version 8i and not used anymore in Oracle SQL Developer. The second, DBMS_DEBUG_JDWP, was introduced in Oracle version 9i and is used by Oracle SQL Developer.
More information and downloads of Oracle SQL Developer can be found at:http://www.oracle.com/technetwork/developer-tools/sql-developer/overview/index.html
To demonstrate debugging with Oracle SQL Developer, create the following procedure:
The procedure is for demonstrations purposes only; it does not reflect best practices or efficient coding techniques.
www.it-ebooks.info
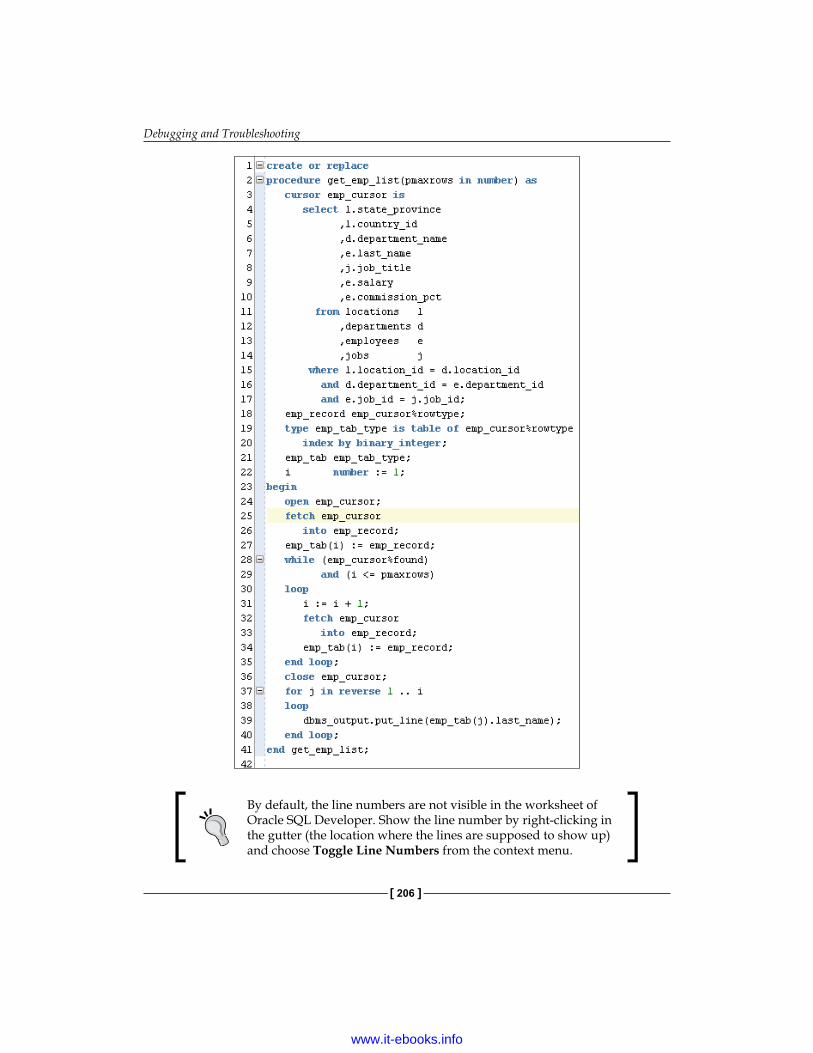
Debugging and Troubleshooting
[ 206 ]
By default, the line numbers are not visible in the worksheet of Oracle SQL Developer. Show the line number by right-clicking in the gutter (the location where the lines are supposed to show up) and choose Toggle Line Numbers from the context menu.
www.it-ebooks.info

Chapter 5
[ 207 ]
To run the procedure, locate the procedure in the connections navigator. Right-click on the procedure and choose run. The results are displayed in the Running Log window.
To debug a procedure, it needs to be compiled for debug first. This step adds in the compiler directives required for debugging. Once you have completed the debug, you should compile the procedure again and remove the extra directives.
When the directives are not removed, performance will be decreased because of the directives available in the code.
Set a breakpoint in the EMP_LIST procedure by clicking on the margin at the line where you would like the execution to stop. The line number is replaced with a red dot. This is a breakpoint symbol.
A breakpoint is a location in the code that you identify as a stopping point. When the code is run in debug mode, execution will stop at the breakpoint.
This image shows the compile for debug option in Oracle SQL Developer
www.it-ebooks.info
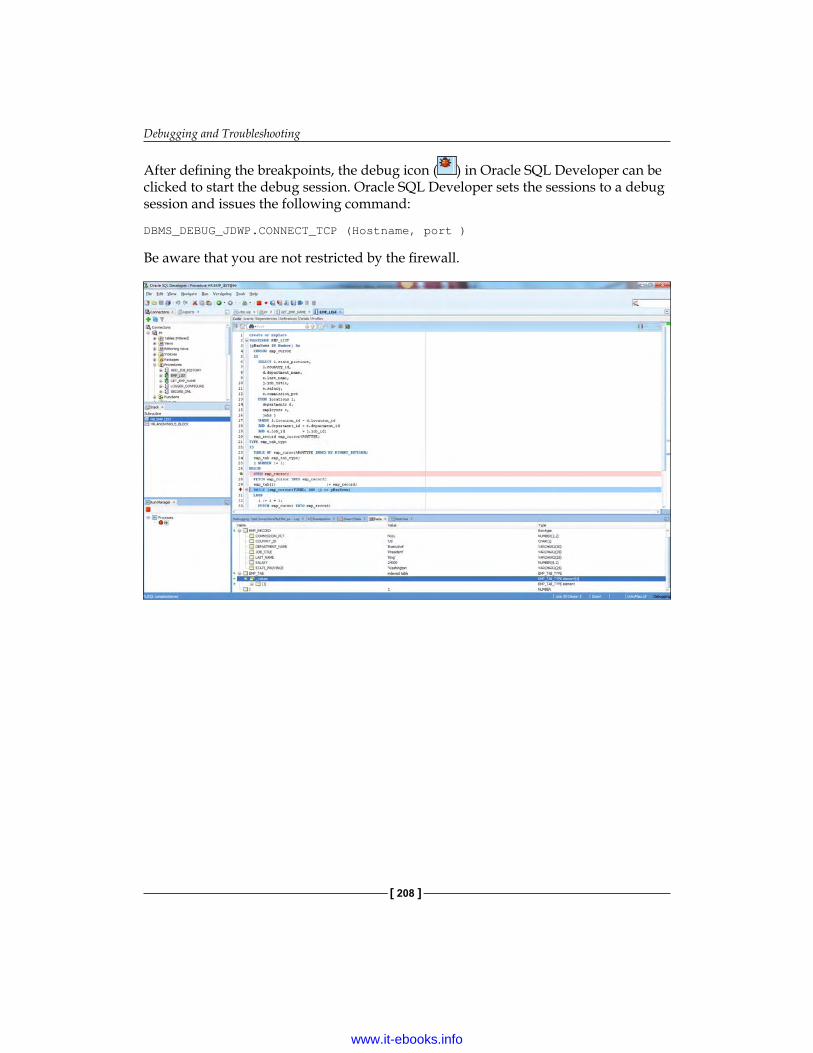
Debugging and Troubleshooting
[ 208 ]
After defining the breakpoints, the debug icon ( ) in Oracle SQL Developer can be clicked to start the debug session. Oracle SQL Developer sets the sessions to a debug session and issues the following command:
DBMS_DEBUG_JDWP.CONNECT_TCP (Hostname, port )
Be aware that you are not restricted by the firewall.
www.it-ebooks.info

Chapter 5
[ 209 ]
This image shows defining the breakpoint in the EMP_LIST procedure:
Item RemarkThe Data tab Collect all values of the variables as you step through the codeThe smart data Keeps track of the same detail as the Data tab, but only the
values immediately related to the area worked inRun to cursor Start debugging and quickly move to another part of the codeWatch Allows you to watch an expression or codeInspect Allows you to watch values
Remote debuggingThe easiest way to illustrate remote debugging is to use Oracle SQL Developer with an application in APEX. The subprogram resides in APEX, and Oracle SQL Developer is used to debug it. This capability is especially useful when an application isn't failing but also isn't producing the results you expect. The following grants are necessary before performing remote debugging:
grant DEBUG CONNECT SESSION to <schema>; grant DEBUG on <object> to PUBLIC;grant DEBUG ANY PROCEDURE to APEX_PUBLIC_USER;
Or ANONYMOUS when using the embedded gateway.
1. Connect Oracle SQL Developer and import the APEX application.2. Set a breakpoint in the code that needs to be debugged.3. Compile the procedure for debug.
Note that running a package in debug mode severely hampers performance. Once testing is complete, compile the package without debug information.
4. At this point, prepare Oracle SQL Developer for remote debugging. Do this by selecting the connection that will be used for debugging the code, and select Remote Debug in the menu.
5. Next, a pop-up window is shown where the port and IP address need to be entered. The port number will be shared by Oracle SQL Developer and the APEX application.
www.it-ebooks.info
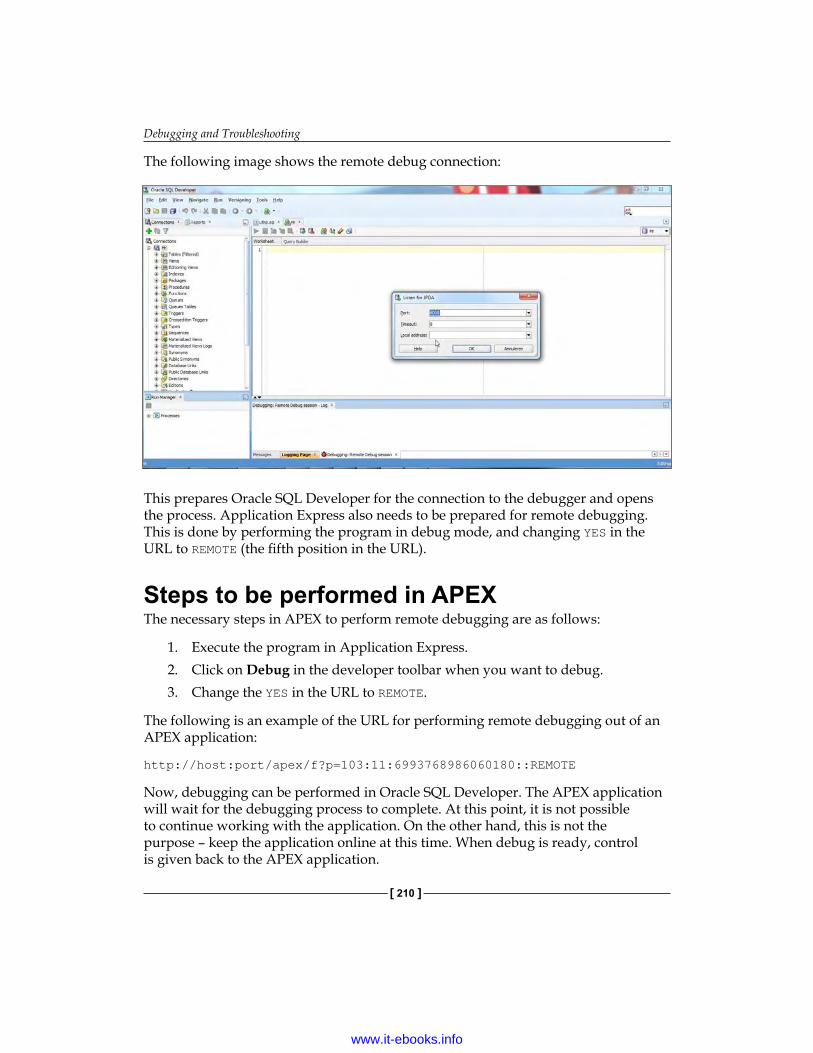
Debugging and Troubleshooting
[ 210 ]
The following image shows the remote debug connection:
This prepares Oracle SQL Developer for the connection to the debugger and opens the process. Application Express also needs to be prepared for remote debugging. This is done by performing the program in debug mode, and changing YES in the URL to REMOTE (the fifth position in the URL).
Steps to be performed in APEX The necessary steps in APEX to perform remote debugging are as follows:
1. Execute the program in Application Express.2. Click on Debug in the developer toolbar when you want to debug.3. Change the YES in the URL to REMOTE.
The following is an example of the URL for performing remote debugging out of an APEX application:
http://host:port/apex/f?p=103:11:6993768986060180::REMOTE
Now, debugging can be performed in Oracle SQL Developer. The APEX application will wait for the debugging process to complete. At this point, it is not possible to continue working with the application. On the other hand, this is not the purpose – keep the application online at this time. When debug is ready, control is given back to the APEX application.
www.it-ebooks.info

Chapter 5
[ 211 ]
JavaScript console wrapperMartin Giffy D'Souza has written the Console Wrapper utility. For additional information, see http://www.talkapex.com/2011/01/console-wrapper-previously-js-logger.html.
Console wrapper allows to view the debug information in a nice console window within browsers. Most of the browsers are console-enabled (exception is the Internet Explorer browser). The utility is designed to easily debug JavaScript within applications. It allows developers to use the JavaScript console without breaking anything.
The most common use of the console is the console.log command:
console.log('hello world');
Removing instrumentation code before going into production can be annoying, especially if you need to debug it later on. To resolve this issue, Martin D'Souza has created a console wrapper. This allows you to leave your debugging calls in production code. Here are some features:
When running APEX in debug mode, the log level is automatically set.
Installation of the console wrapperInstallation steps of the JavaScript Console Wrapper are as follows:
1. To download $console_wrapper.js, navigate to http://code.google.com/p/js-console-wrapper/.
2. Add the console_wrapper.js in the page template.
The different levels can be defined as follows:
• Info• Exception• Error• Log/debug• Off• Warn
Using the console wrapper, it is possible to set the debugging level, by issuing the following command:
$.console.setLevel('log');
www.it-ebooks.info
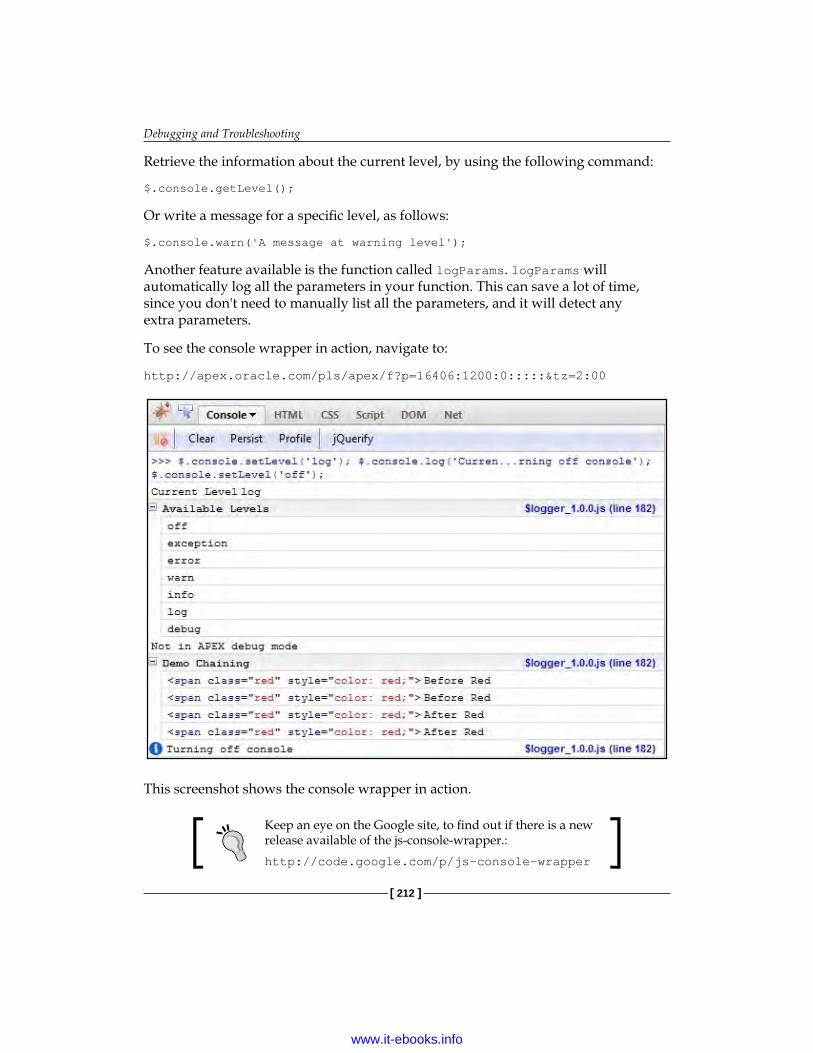
Debugging and Troubleshooting
[ 212 ]
Retrieve the information about the current level, by using the following command:
$.console.getLevel();
Or write a message for a specific level, as follows:
$.console.warn('A message at warning level');
Another feature available is the function called logParams. logParams will automatically log all the parameters in your function. This can save a lot of time, since you don't need to manually list all the parameters, and it will detect any extra parameters.
To see the console wrapper in action, navigate to:
http://apex.oracle.com/pls/apex/f?p=16406:1200:0:::::&tz=2:00
This screenshot shows the console wrapper in action.
Keep an eye on the Google site, to find out if there is a new release available of the js-console-wrapper.:http://code.google.com/p/js-console-wrapper
www.it-ebooks.info

Chapter 5
[ 213 ]
Web development toolsWhen you make use of the Advanced Programming Interface, custom user interface, templates, or specialized JavaScript, a web development tool can be essential. The Web Developer plugin authored by Chris Pederick is a must have addition to Firefox and Chrome for CSS, JavaScript, and HTML development. The Web Developer add-on can be downloaded from here:
http://chrispederick.com/work/web-developer/
Installation is as simple as clicking on the Install Now button on the Download page from a browser window. The Web Developer extension adds a menu and a toolbar to the browser with various web developer tools. The extension is available for Firefox and Chrome.
This screenshot shows the Web Developer toolbar as it appears in Firefox.
The Web Developer toolbar is a set of tools meant to assist with web development. It provides a large number of useful tools when developing with APEX. Most options in Web Developer interact directly with the page. Changes made in Web Developer are not saved. So, changes are lost when leaving or reloading the page.
www.it-ebooks.info
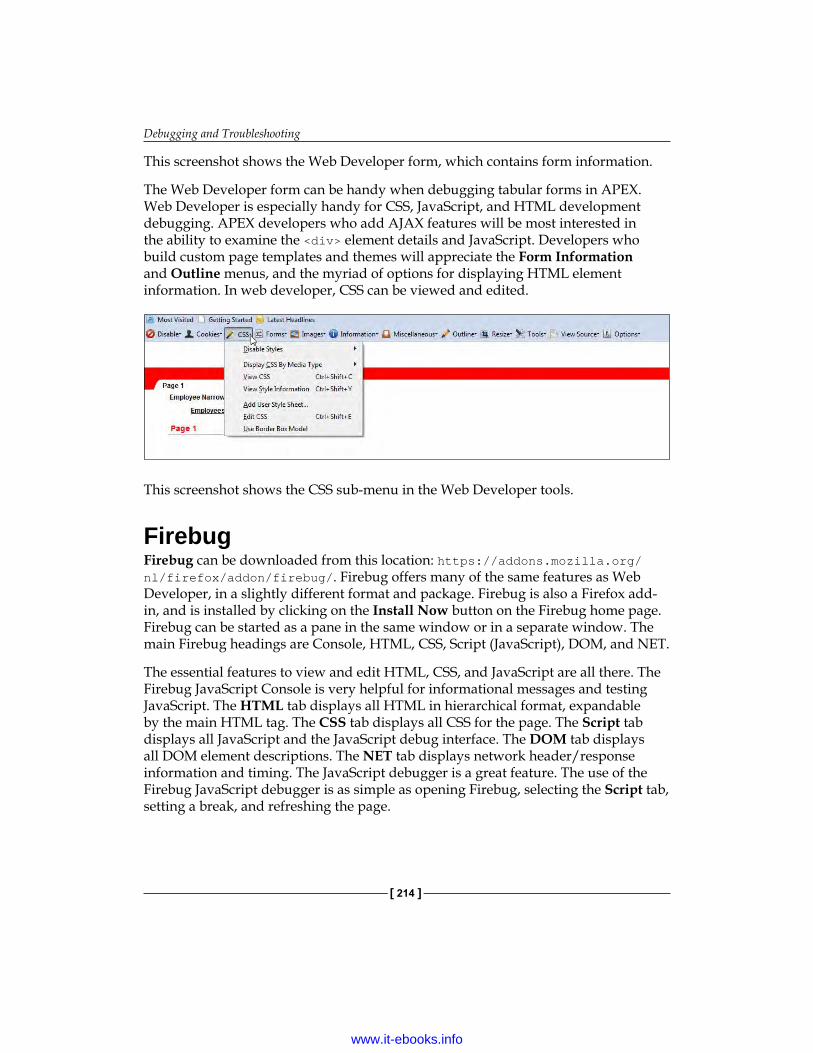
Debugging and Troubleshooting
[ 214 ]
This screenshot shows the Web Developer form, which contains form information.
The Web Developer form can be handy when debugging tabular forms in APEX. Web Developer is especially handy for CSS, JavaScript, and HTML development debugging. APEX developers who add AJAX features will be most interested in the ability to examine the <div> element details and JavaScript. Developers who build custom page templates and themes will appreciate the Form Information and Outline menus, and the myriad of options for displaying HTML element information. In web developer, CSS can be viewed and edited.
This screenshot shows the CSS sub-menu in the Web Developer tools.
FirebugFirebug can be downloaded from this location: https://addons.mozilla.org/nl/firefox/addon/firebug/. Firebug offers many of the same features as Web Developer, in a slightly different format and package. Firebug is also a Firefox add-in, and is installed by clicking on the Install Now button on the Firebug home page. Firebug can be started as a pane in the same window or in a separate window. The main Firebug headings are Console, HTML, CSS, Script (JavaScript), DOM, and NET.
The essential features to view and edit HTML, CSS, and JavaScript are all there. The Firebug JavaScript Console is very helpful for informational messages and testing JavaScript. The HTML tab displays all HTML in hierarchical format, expandable by the main HTML tag. The CSS tab displays all CSS for the page. The Script tab displays all JavaScript and the JavaScript debug interface. The DOM tab displays all DOM element descriptions. The NET tab displays network header/response information and timing. The JavaScript debugger is a great feature. The use of the Firebug JavaScript debugger is as simple as opening Firebug, selecting the Script tab, setting a break, and refreshing the page.
www.it-ebooks.info

Chapter 5
[ 215 ]
APEX and FirebugFirebug can be useful for checking images and their location, to check the version of CSS, and JavaScript's currently loaded or used by an APEX application. Firebug allows us to investigate our page, run and debug JavaScript, changing page styles on the fly, and see which files are missing.
The preceding screenshot shows images and stylesheets used in APEX in the Firebug console.
The preceding screenshot shows the CSS sub-menu in the Firebug add-on.
Debugging dynamic actionsDebugging dynamic actions in Application Express is slightly different than other debugging, because much of the processing done with the dynamic action framework is done on the client, not on the server. In order to debug dynamic actions, output the debug information to the browser's JavaScript console.
The Firebug add-on integrates with Firefox. You can edit, debug, and monitor CSS, HTML, and JavaScript live in any web page. Firebug will show the debug information in its Console pane.
The debug information will tell you when a dynamic action fires, the name of the dynamic action, and also specifically which action has fired.
www.it-ebooks.info
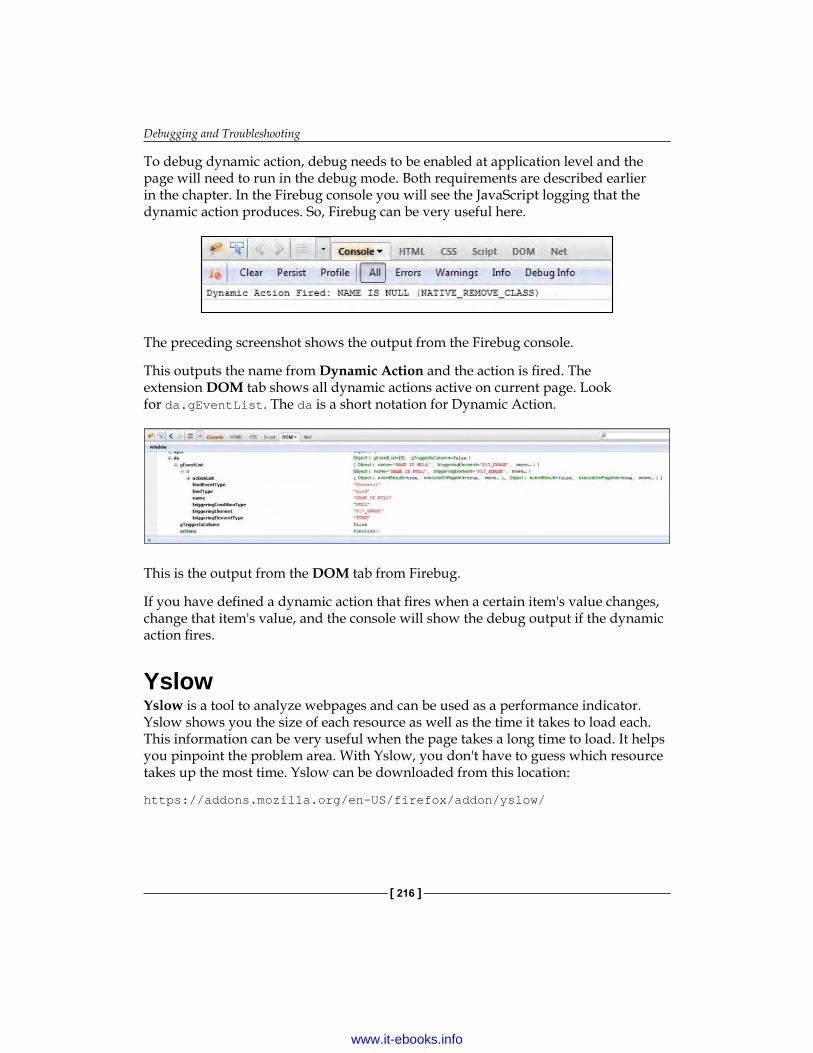
Debugging and Troubleshooting
[ 216 ]
To debug dynamic action, debug needs to be enabled at application level and the page will need to run in the debug mode. Both requirements are described earlier in the chapter. In the Firebug console you will see the JavaScript logging that the dynamic action produces. So, Firebug can be very useful here.
The preceding screenshot shows the output from the Firebug console.
This outputs the name from Dynamic Action and the action is fired. The extension DOM tab shows all dynamic actions active on current page. Look for da.gEventList. The da is a short notation for Dynamic Action.
This is the output from the DOM tab from Firebug.
If you have defined a dynamic action that fires when a certain item's value changes, change that item's value, and the console will show the debug output if the dynamic action fires.
YslowYslow is a tool to analyze webpages and can be used as a performance indicator. Yslow shows you the size of each resource as well as the time it takes to load each. This information can be very useful when the page takes a long time to load. It helps you pinpoint the problem area. With Yslow, you don't have to guess which resource takes up the most time. Yslow can be downloaded from this location:
https://addons.mozilla.org/en-US/firefox/addon/yslow/
www.it-ebooks.info
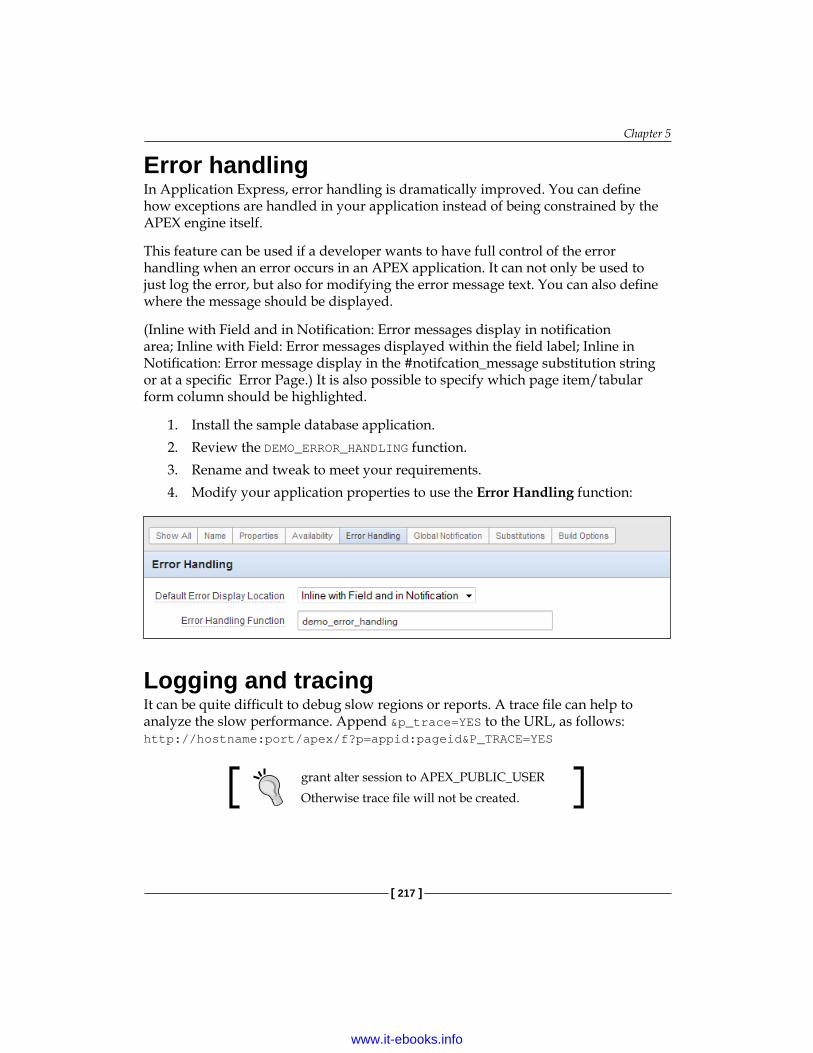
Chapter 5
[ 217 ]
Error handlingIn Application Express, error handling is dramatically improved. You can define how exceptions are handled in your application instead of being constrained by the APEX engine itself.
This feature can be used if a developer wants to have full control of the error handling when an error occurs in an APEX application. It can not only be used to just log the error, but also for modifying the error message text. You can also define where the message should be displayed.
(Inline with Field and in Notification: Error messages display in notification area; Inline with Field: Error messages displayed within the field label; Inline in Notification: Error message display in the #notifcation_message substitution string or at a specific Error Page.) It is also possible to specify which page item/tabular form column should be highlighted.
1. Install the sample database application.2. Review the DEMO_ERROR_HANDLING function.3. Rename and tweak to meet your requirements.4. Modify your application properties to use the Error Handling function:
Logging and tracingIt can be quite difficult to debug slow regions or reports. A trace file can help to analyze the slow performance. Append &p_trace=YES to the URL, as follows: http://hostname:port/apex/f?p=appid:pageid&P_TRACE=YES
grant alter session to APEX_PUBLIC_USEROtherwise trace file will not be created.
www.it-ebooks.info
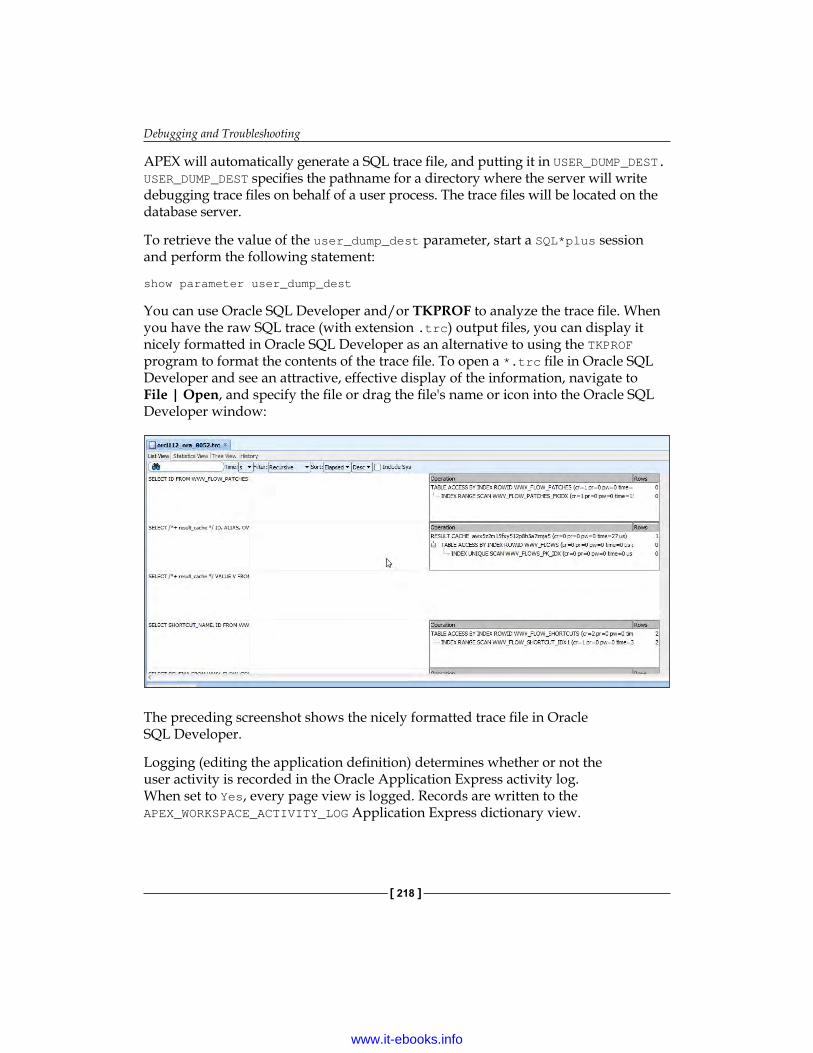
Debugging and Troubleshooting
[ 218 ]
APEX will automatically generate a SQL trace file, and putting it in USER_DUMP_DEST. USER_DUMP_DEST specifies the pathname for a directory where the server will write debugging trace files on behalf of a user process. The trace files will be located on the database server.
To retrieve the value of the user_dump_dest parameter, start a SQL*plus session and perform the following statement:
show parameter user_dump_dest
You can use Oracle SQL Developer and/or TKPROF to analyze the trace file. When you have the raw SQL trace (with extension .trc) output files, you can display it nicely formatted in Oracle SQL Developer as an alternative to using the TKPROF program to format the contents of the trace file. To open a *.trc file in Oracle SQL Developer and see an attractive, effective display of the information, navigate to File | Open, and specify the file or drag the file's name or icon into the Oracle SQL Developer window:
The preceding screenshot shows the nicely formatted trace file in Oracle SQL Developer.
Logging (editing the application definition) determines whether or not the user activity is recorded in the Oracle Application Express activity log. When set to Yes, every page view is logged. Records are written to the APEX_WORKSPACE_ACTIVITY_LOG Application Express dictionary view.
www.it-ebooks.info
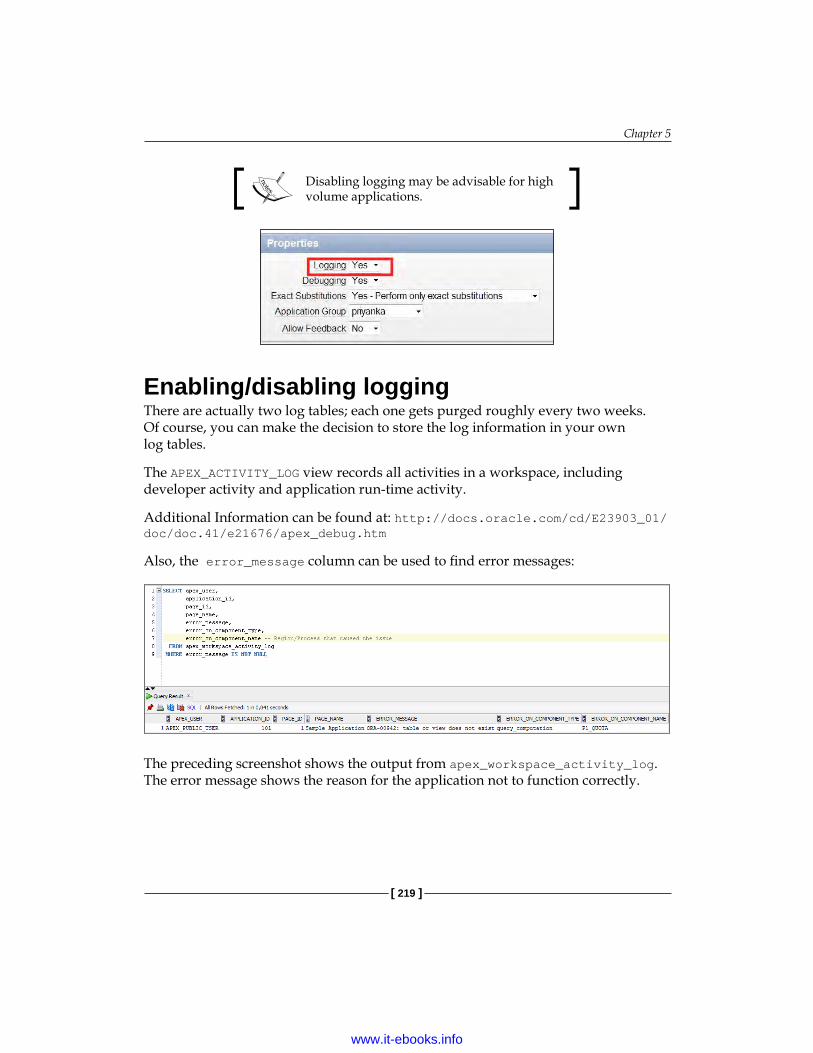
Chapter 5
[ 219 ]
Disabling logging may be advisable for high volume applications.
Enabling/disabling loggingThere are actually two log tables; each one gets purged roughly every two weeks. Of course, you can make the decision to store the log information in your own log tables.
The APEX_ACTIVITY_LOG view records all activities in a workspace, including developer activity and application run-time activity.
Additional Information can be found at: http://docs.oracle.com/cd/E23903_01/doc/doc.41/e21676/apex_debug.htm
Also, the error_message column can be used to find error messages:
The preceding screenshot shows the output from apex_workspace_activity_log. The error message shows the reason for the application not to function correctly.
www.it-ebooks.info

Debugging and Troubleshooting
[ 220 ]
The activity log identifies both region- and page-level errors. APEX_WORKSPACE_ACTIVITY_LOG.ERROR_ON_COMPONENT_NAME identifies the region or process that the error occurred in.
Watch outWhen multiple region level errors occur, only the first error is logged in the activity log.
Reports in Application Express that facilitate troubleshootingAPEX comes with a set of utility reports that can aid you in troubleshooting. These utilities are accessible by navigating to Application Utilities. The different items on this page will be discussed in this section, some in more detail than others.
Utilities Page RemarksApplication Dashboard Breaks down the metrics of a specific application by overview,
security, templates, page by type, application components, and page components.
Change History Displays who changed what in the application builder. Does NOT provide a before and after image of changes, but only that something is changed. Be careful in using this as it may not correctly identify.
Recently Updated Pages A list from the most recently updated pages.Debug Messages All debug trace information collected from the application
can be accessed here for a specific application. Can drill down to specific debug information and debug information can be purged.
www.it-ebooks.info
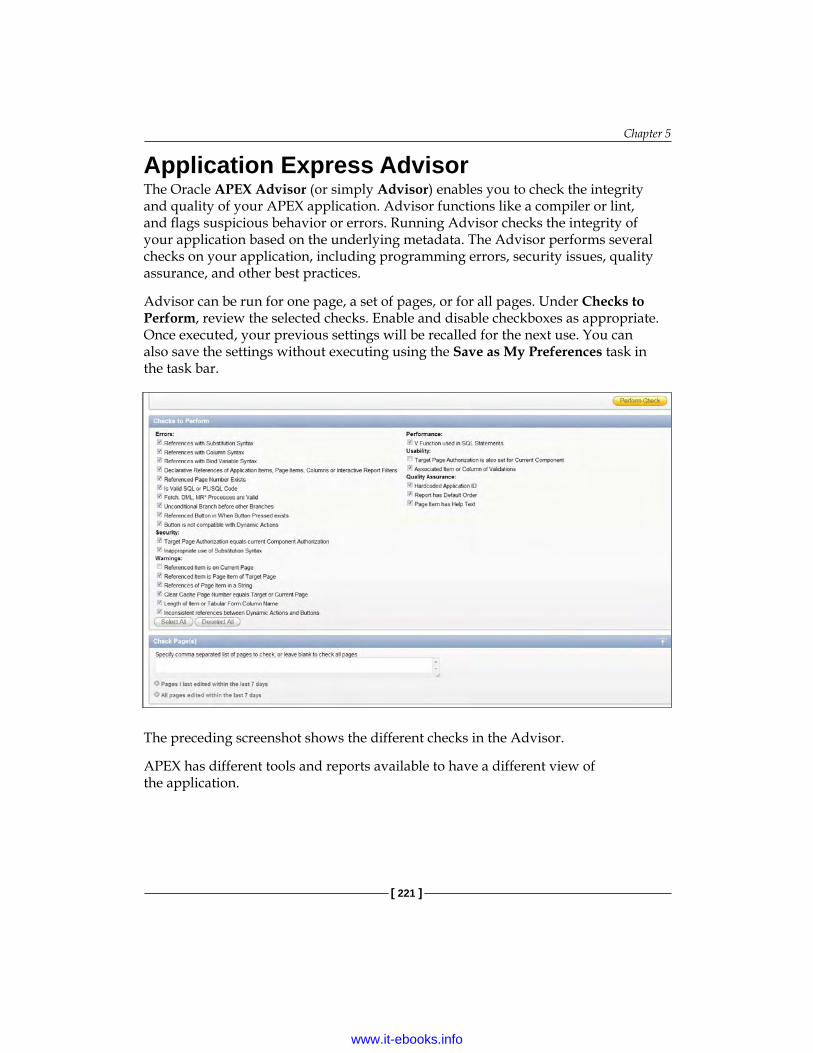
Chapter 5
[ 221 ]
Application Express AdvisorThe Oracle APEX Advisor (or simply Advisor) enables you to check the integrity and quality of your APEX application. Advisor functions like a compiler or lint, and flags suspicious behavior or errors. Running Advisor checks the integrity of your application based on the underlying metadata. The Advisor performs several checks on your application, including programming errors, security issues, quality assurance, and other best practices.
Advisor can be run for one page, a set of pages, or for all pages. Under Checks to Perform, review the selected checks. Enable and disable checkboxes as appropriate. Once executed, your previous settings will be recalled for the next use. You can also save the settings without executing using the Save as My Preferences task in the task bar.
The preceding screenshot shows the different checks in the Advisor.
APEX has different tools and reports available to have a different view of the application.
www.it-ebooks.info
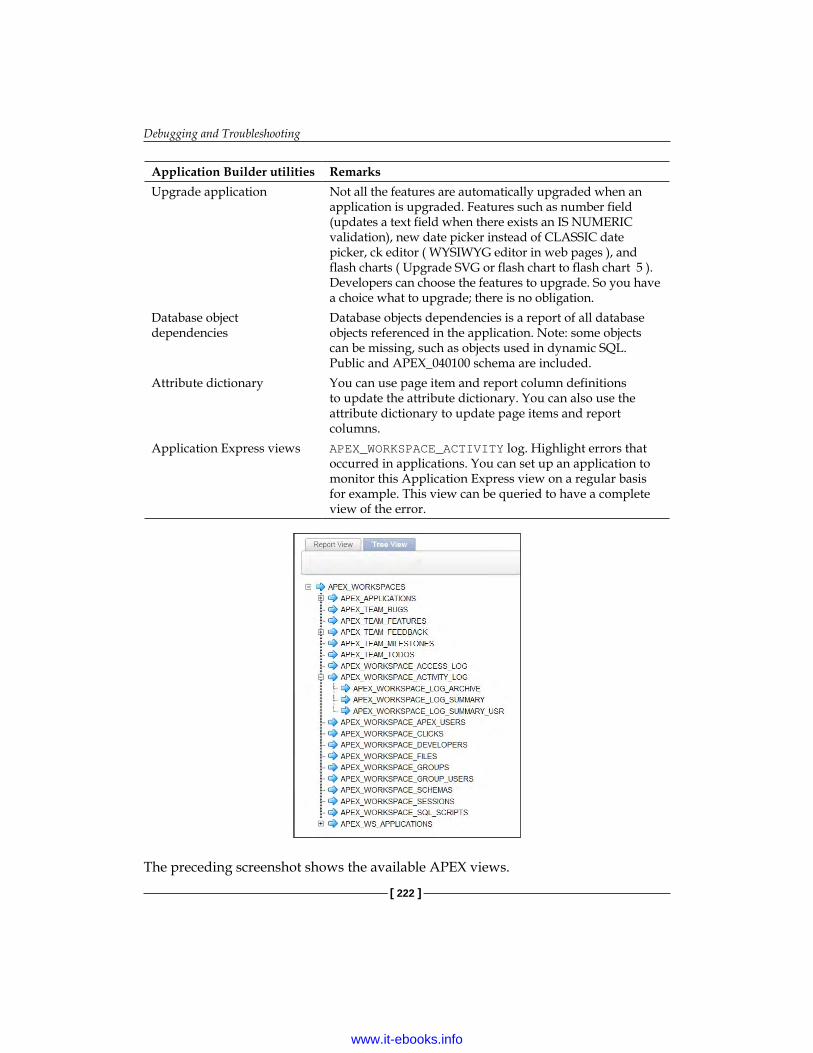
Debugging and Troubleshooting
[ 222 ]
Application Builder utilities RemarksUpgrade application Not all the features are automatically upgraded when an
application is upgraded. Features such as number field (updates a text field when there exists an IS NUMERIC validation), new date picker instead of CLASSIC date picker, ck editor ( WYSIWYG editor in web pages ), and flash charts ( Upgrade SVG or flash chart to flash chart 5 ). Developers can choose the features to upgrade. So you have a choice what to upgrade; there is no obligation.
Database object dependencies
Database objects dependencies is a report of all database objects referenced in the application. Note: some objects can be missing, such as objects used in dynamic SQL. Public and APEX_040100 schema are included.
Attribute dictionary You can use page item and report column definitions to update the attribute dictionary. You can also use the attribute dictionary to update page items and report columns.
Application Express views APEX_WORKSPACE_ACTIVITY log. Highlight errors that occurred in applications. You can set up an application to monitor this Application Express view on a regular basis for example. This view can be queried to have a complete view of the error.
The preceding screenshot shows the available APEX views.
www.it-ebooks.info

Chapter 5
[ 223 ]
SummaryDebugging and troubleshooting in Application Express can be challenging because of different technologies used in Application Express. Each technology has its own set of tools for effective troubleshooting and debugging.
Fortunately, there is a variety of readily available options for debugging APEX applications. The key is to know how APEX generates pages, to know the tenets of the application, and to employ a variety of tactics to meet the challenge at hand.
Running the pages of the application in debug mode shows exactly which steps are taken. Use Oracle SQL Developer to not only debug your PL/SQL database code, but also to remotely debug the PL/SQL called from the APEX application.
There are numerous utility reports available that can assist you in the troubleshooting process. The Advisor can advise you before the trouble begins.
Specific web development tools, such as Web Developer, Firebug, and console wrapper, can assist with checking the HTML, CSS, and JavaScript code.
www.it-ebooks.info

Deploy and MaintainWhen you are done with the building phase of your application, you need to deploy it. Deployment can be done in several ways. One way is to create a packaged application. The deployment of a packaged application is very straightforward—simply follow the import wizard and you're done. However, the preparation to create a packaged application can be quite cumbersome.
Another way to deploy your application would be to separate all different components, such as database objects and JavaScript files, into a "deployment per type". This makes the deployment more complicated, but it is easier to patch or upgrade a small part of the application. In this way, the maintenance phase of your application will be easier. Both of these different approaches have their pros and cons.
Deploying your application to the users is only part of the job. After this step is done, your job is not over. At this moment, your users really start working with the application, and encounter issues they never thought of during the testing phase.
In this chapter, the following topics are covered:
• Considerations regarding packaging the application• Version control• Deployment • Maintain the application: Active and proactive
www.it-ebooks.info

Deploy and Maintain
[ 226 ]
Package your application, or not?Oracle APEX allows you to create a self-contained application. This means that all necessary components are all bundled together in a single deployment script. All the database tables, stored procedures, images, JavaScript files, CSS files, and of course the APEX application itself, are bundled together. If all the components you need to install the application are in a single file, then deployment is very easy.
One of the new features that will be included in Oracle APEX 4.2 is an exchange of packaged applications. Packaged applications are not only created by Oracle itself, but also by independent developers. The Oracle packaged applications were previously known as packaged applications, and mainly served as example applications. Nowadays, they are fully functional and can be used as productivity boosters. Instead of having to develop your own bug tracking application, use the packaged application provided by Oracle. Oracle will support their own packaged applications and will be available when you use the Oracle Database Cloud service. The packaged application provided by Oracle will be locked when you install it into your own environment. It is not possible to edit and modify the locked application. When this is required, the application will need to be unlocked. Doing so will make the application ineligible for future upgrades and will no longer be supported by Oracle.
To create your own packaged application, you would need to navigate to the Supporting Objects page from within the context of your application.
Figure 1: Main application builder menu
On the Supporting Objects page, you can create a packaged application. You can get to this page by clicking on the Supporting Objects icon on the application builder page (see Figure 1).
www.it-ebooks.info

Chapter 6
[ 227 ]
All of the different components required to create a packaged application are right here on this page.
Figure 2: Summary of Supporting Objects
In the summary section, displayed in the preceding screenshot, there is an overview of the different settings and number of scripts you or your fellow developer have so far for the packaged application.
Figure 3: Installation Section
In the following region, labeled Installation, you can define all necessary scripts to make deploying your applications easy and straightforward.
Figure 4: Deinstallation section
www.it-ebooks.info
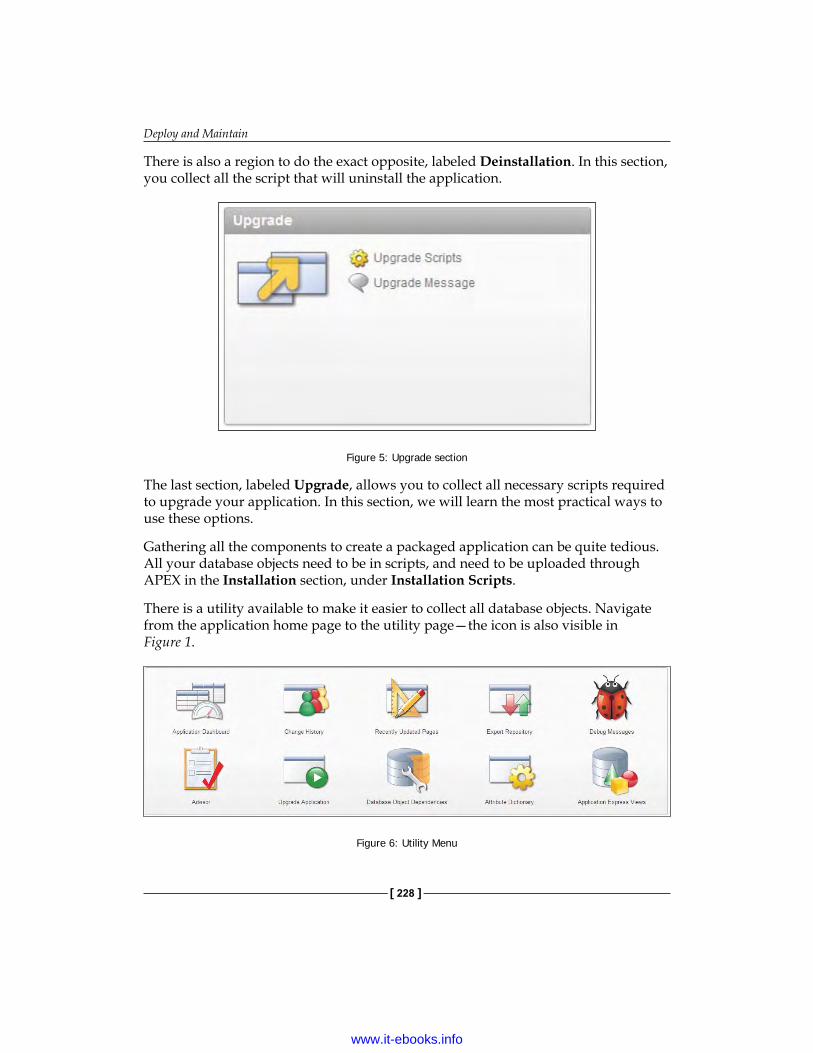
Deploy and Maintain
[ 228 ]
There is also a region to do the exact opposite, labeled Deinstallation. In this section, you collect all the script that will uninstall the application.
Figure 5: Upgrade section
The last section, labeled Upgrade, allows you to collect all necessary scripts required to upgrade your application. In this section, we will learn the most practical ways to use these options.
Gathering all the components to create a packaged application can be quite tedious. All your database objects need to be in scripts, and need to be uploaded through APEX in the Installation section, under Installation Scripts.
There is a utility available to make it easier to collect all database objects. Navigate from the application home page to the utility page—the icon is also visible in Figure 1.
Figure 6: Utility Menu
www.it-ebooks.info
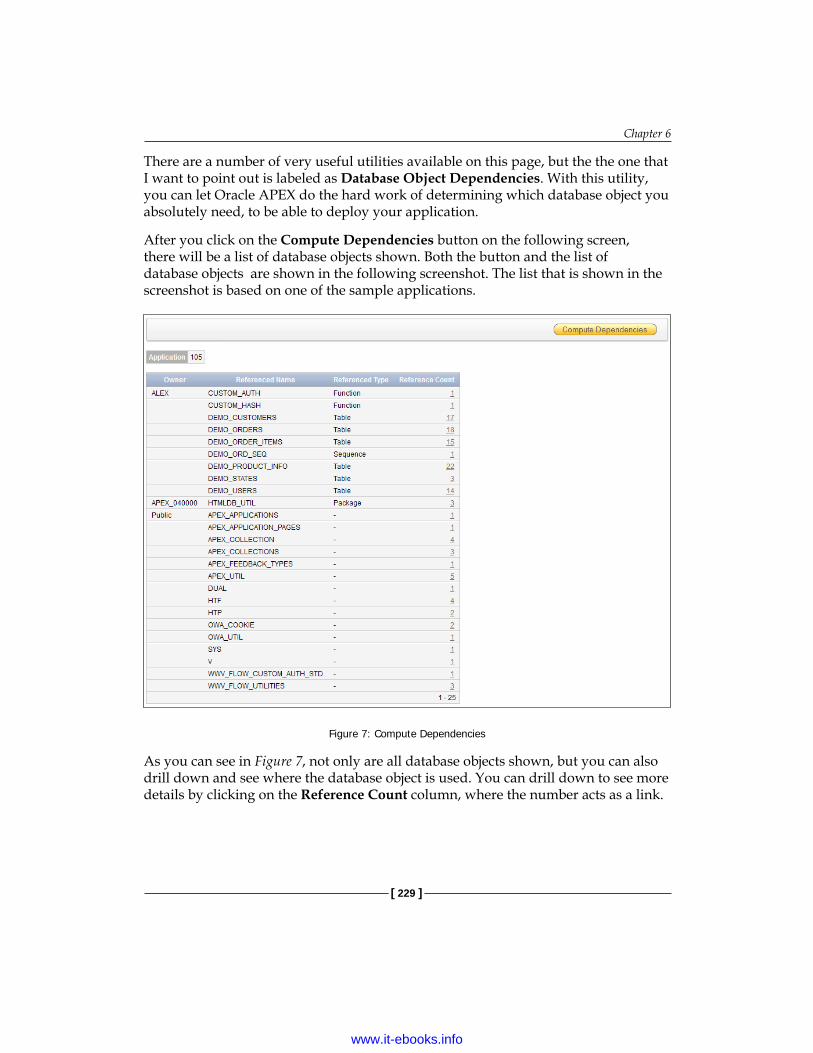
Chapter 6
[ 229 ]
There are a number of very useful utilities available on this page, but the the one that I want to point out is labeled as Database Object Dependencies. With this utility, you can let Oracle APEX do the hard work of determining which database object you absolutely need, to be able to deploy your application.
After you click on the Compute Dependencies button on the following screen, there will be a list of database objects shown. Both the button and the list of database objects are shown in the following screenshot. The list that is shown in the screenshot is based on one of the sample applications.
Figure 7: Compute Dependencies
As you can see in Figure 7, not only are all database objects shown, but you can also drill down and see where the database object is used. You can drill down to see more details by clicking on the Reference Count column, where the number acts as a link.
www.it-ebooks.info
Deploy and Maintain
[ 230 ]
There are two problems with this utility. The first is that only the directly referenced objects will appear in the overview, and the second one is that it doesn't help you with extracting the database objects into scripts. At least now you know which objects you need to include in the packaged application.
There is a utility which can be used to extract all the DDL from an Oracle schema and spool the results to the file system. This utility is written and maintained by Dietmar Aust and can be retrieved from his website. You can download the utility from the following URL:https://www.opal-consulting.de/apex/f?p=20090928:12:0::NO:::
You can also export database objects with Oracle SQL Developer. When you do, make sure to check the Dependents option on the export; this will make sure that all database objects referenced in the source code are also included in the export file.
As you can see from the previous description, it takes a lot of work to create a packaged application. Most applications will have more than just database objects; there will also be JavaScript, images, and CSS files, and they will need to be included in the supporting objects to create the packaged application.
There is also another way of deploying your application. Instead of creating a single script, which will contain the application, the database objects, the required images, JavaScript, and CSS, deploy each component separately.
This means that there will be multiple scripts to deploy. As you can imagine, this takes more work when you are deploying your application. The big advantage that you have with this method is that you can get all the static files, such as the images, JavaScript, and CSS, on the application server. The biggest downside is that it is very easy to forget a certain file. Therefore, it is advisable to create a shell script to assist you with this.
www.it-ebooks.info
Chapter 6
[ 231 ]
Why is it beneficial to place static files on the application server? These static files are needed very frequently in the browser. Instead of having these files in the database, and having to read them out of the database with each page load, the application server can serve these static files more efficiently than the database. The application server can also cache these files more efficiently.
So, should you create a package application or not? As with many things, it depends. I believe that it mainly depends on what you are going to do with the application.
If you are going to distribute the application, it might be a good idea to create a packaged application. If the application is going to be inhouse type (the application is for internal use), then it would be preferable that you deploy in separate files. This will give you a fine-grained control over which part of the application needs to be upgraded. For instance, if you have found a bug in your database code, then you can only redeploy the fixed database code, and only that database code and nothing else.
Each of the described methods of deploying the application has its pros and cons. The first described way makes it easy to deploy the application, and the second makes it easier after the application has been deployed. The choice is yours; the user just wants a bug-free application that works.
Version controlAPEX doesn't have any built-in version control, at least not in versions up to 4.1. This means you will have to come up with your own plan of doing version control. The way we organize our application is outlined in the following section of this chapter.
We like to keep our database code, all the PL/SQL code such as packages, procedures, and functions, in files. Working in files has the advantage that they can be easily kept in under version control, like Subversion. The same is true for all other files necessary for the application, such as JavaScript, CSS, and images.
www.it-ebooks.info
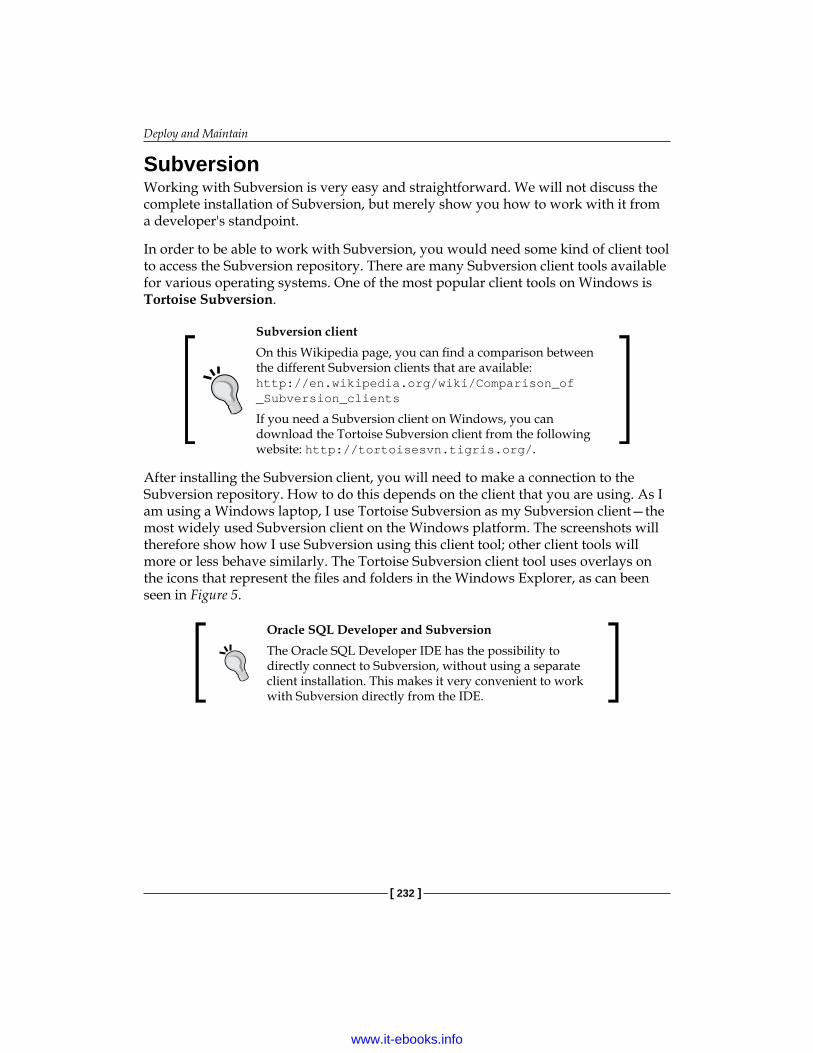
Deploy and Maintain
[ 232 ]
SubversionWorking with Subversion is very easy and straightforward. We will not discuss the complete installation of Subversion, but merely show you how to work with it from a developer's standpoint.
In order to be able to work with Subversion, you would need some kind of client tool to access the Subversion repository. There are many Subversion client tools available for various operating systems. One of the most popular client tools on Windows is Tortoise Subversion.
Subversion clientOn this Wikipedia page, you can find a comparison between the different Subversion clients that are available: http://en.wikipedia.org/wiki/Comparison_of _Subversion_clients
If you need a Subversion client on Windows, you can download the Tortoise Subversion client from the following website: http://tortoisesvn.tigris.org/.
After installing the Subversion client, you will need to make a connection to the Subversion repository. How to do this depends on the client that you are using. As I am using a Windows laptop, I use Tortoise Subversion as my Subversion client—the most widely used Subversion client on the Windows platform. The screenshots will therefore show how I use Subversion using this client tool; other client tools will more or less behave similarly. The Tortoise Subversion client tool uses overlays on the icons that represent the files and folders in the Windows Explorer, as can been seen in Figure 5.
Oracle SQL Developer and SubversionThe Oracle SQL Developer IDE has the possibility to directly connect to Subversion, without using a separate client installation. This makes it very convenient to work with Subversion directly from the IDE.
www.it-ebooks.info

Chapter 6
[ 233 ]
Figure 8. Directory Structure for Database Objects
In the preceding screenshot, you can see the directory structure that we use to keep our files under version control. Besides the structure you may also notice the overlay icons that Tortoise imposes. There are white checkmarks in green discs, and there are white exclamation marks in red discs.
The green icons in the preceding screenshot (Figure 8) indicate that the files within the folder are up to date, and not changed by you. When you start to change files, the icon overlay will change to the red icon. This will indicate that files are changed, and that you need to commit these files to the Subversion repository.
Subversion does not lock the files when you are working on them, although you can if you want to. When you change the file and want to write the changed file back to the Subversion repository (commit, see Figure 9), it will verify if someone else changed the file in the meantime. When this is not the case, your version will be the current version and all is well. When this is the case, and someone changed the file you were working on, Subversion will try to merge the files.
www.it-ebooks.info

Deploy and Maintain
[ 234 ]
Of course, Subversion can only merge the files, the file from the repository and your changed file, when different sections are modified. When Subversion is not able to automatically merge the files, you will need to do this yourself. Tortoise provides tools to assist you with this. Right-clicking on the file or folder will show you all tools that Tortoise makes available to you. It is beyond the scope of this book to go into detail of all of Subversion's functionality.
Figure 9. Tortoise Subversion Context Menu
www.it-ebooks.info

Chapter 6
[ 235 ]
To get your local folders up to date with the version that is available in the Subversion repository, you will need to perform an update. Right-click on the folder you want to synchronize, and choose the SVN Update option (see Figure 9).
Removing a file from your local folders will not remove the file from the Subversion repository. The next time you update your folder, the file will be "missing" in the eyes of Subversion, and will be placed back into your local folder. When you want to remove a file (or folder) from your local system as well as from the Subversion repository, you will need to do a "Subversion delete". Right-click on the file (or folder) and select TortoiseSVN | Delete from the context menu. This will mark the file as "deleted", and the next time you commit your changes to the repository, the file will be deleted from the Subversion repository. This option is visible in Figure 9.
A Sourceforge project is started to combine the power of APEX with XMLDB, which allows you to use the Oracle database as your version control system. You can find more information about this project at http://xace.sourceforge.net/.
Deploying the database packagesWhen you keep all your files in folders, it is very convenient to generate a script with all the filenames in a single SQL file to be installed. That way, you will always know which files to call to install the database objects.
To generate the file to install the package specifications, we use a BAT file, which looks similar to the following. We have similar files for the other database objects.
@ECHO OFFREM ===================================REM == Prepare the Command Processor ==REM ===================================SETLOCAL ENABLEEXTENSIONSSETLOCAL ENABLEDELAYEDEXPANSIONSETLOCAL
SET outputfile=%0SET outputfile=%outputfile:~0,-4%.sqlset workdir=%~dp0set currdir=%cd%
cd %workdir%
www.it-ebooks.info
Deploy and Maintain
[ 236 ]
ECHO ------------------------------------------- > %outputfile%ECHO -- Automatically created on: %date% -- >> %outputfile%ECHO ------------------------------------------- >> %outputfile%ECHO set define off >> %outputfile%ECHO. >> %outputfile%
ECHO prompt ================================ >> %outputfile%ECHO prompt ==== Package Specificaties ===== >> %outputfile%ECHO prompt ================================ >> %outputfile%ECHO. >> %outputfile%
REM ================================REM == list the .pks packages ==REM ================================FOR /F %%a IN ('dir /b *.pks') DO ( ECHO prompt Running %%a >> %outputfile% ECHO @@%%a >> %outputfile%)ECHO. >> %outputfile%
ECHO prompt ========================= >> %outputfile%ECHO prompt ==== Package Bodies ===== >> %outputfile%ECHO prompt ========================= >> %outputfile%ECHO. >> %outputfile%
REM ==================================REM == list the .pkb packages ==REM ==================================FOR /F %%a IN ('dir /b *.pkb') DO ( ECHO prompt Running %%a >> %outputfile% ECHO @@%%a >> %outputfile%)ECHO. >> %outputfile%
ECHO set define '^&' >> %outputfile%ECHO. >> %outputfile%
cd %currdir%
ECHO file "%outputfile%" created.ENDLOCAL
This BAT file will gather all files within the folder with the .pks and .pkb extensions. This works as we keep our package specifications and package bodies in separate files, with the pks extensions for package specifications and pkb for package bodies.
www.it-ebooks.info
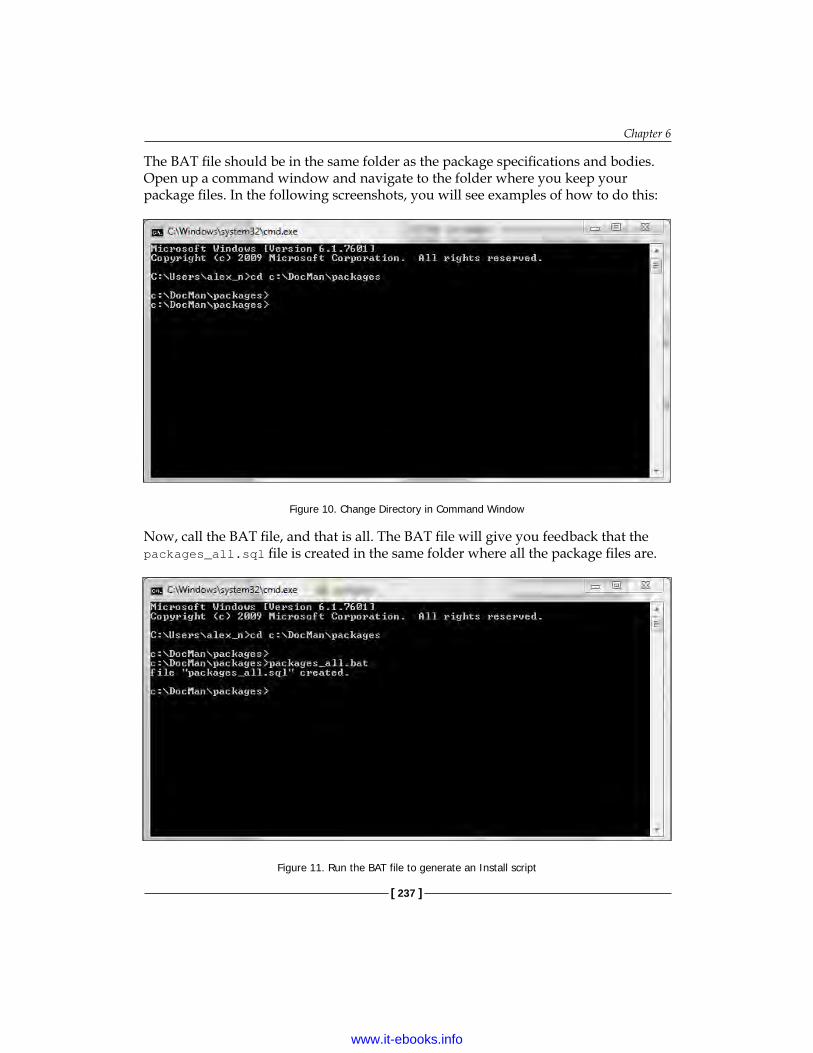
Chapter 6
[ 237 ]
The BAT file should be in the same folder as the package specifications and bodies. Open up a command window and navigate to the folder where you keep your package files. In the following screenshots, you will see examples of how to do this:
Figure 10. Change Directory in Command Window
Now, call the BAT file, and that is all. The BAT file will give you feedback that the packages_all.sql file is created in the same folder where all the package files are.
Figure 11. Run the BAT file to generate an Install script
www.it-ebooks.info
Deploy and Maintain
[ 238 ]
The following listing shows what that the generated file will look like. The list of package specifications and bodies are shortened for display purposes.
---------------------------------------------- -- Automatically created on: Sat 12-05-2012 -- ---------------------------------------------- set define off
prompt ================================ prompt ==== Package Specificaties ===== prompt ================================
prompt Running docman_autorisatie_apex.pks @@ docman_autorisatie_apex.pks prompt Running docman_autorisatie_pkg.pks @@ docman_autorisatie_pkg.pks prompt Running docman_context_pkg.pks @@ docman_context_pkg.pks
prompt ========================= prompt ==== Package Bodies ===== prompt =========================
prompt Running docman_autorisatie_apex.pkb@@ docman_autorisatie_apex.pkb prompt Running docman_autorisatie_pkg.pkb@@ docman_autorisatie_pkg.pkbprompt Running docman_context_pkg.pkb@@ docman_context_pkg.pkb
set define '&'
We deliberately included SET DEFINE OFF at the beginning of the generated script, to avoid being prompted for substitution variables when we run the script. Of course, we also included SET DEFINE '&' at the end of the script to reset SQL*Plus.
Sometimes you will encounter SET SCAN OFF in SQL*Plus scripts. This will have the same effect as SET DEFINE OFF. The former is the older version to achieve the same, hence we prefer to use SET DEFINE.
Between each of the calls to run either the package specification, or the package body, we include a prompt command. This will help us when we run the packages_all.sql file to install the package specifications and bodies. When a package specification or body does not compile properly, we get the information that specifies the file that was executed.
www.it-ebooks.info
Chapter 6
[ 239 ]
Deploying the APEX applicationEven though the database deployment is essential for the application, most users don't like to use an interface, such as SQL*Plus, to interact with the data. That is why they ask for the APEX application in the first place.
When the database side of the application is done, the APEX application itself also needs to be deployed. This can be done in different ways, through the APEX builder interface or through the command line. Both will be shown in this section.
My personal preference of deploying the APEX application is to do this through the command-line interface. This way I can deploy the database side, tables, packages, and so on, from the command line as well as the APEX application. There is no need to start up the browser and log in to the APEX environment. This whole process can also be scripted, so that installation becomes very easy.
Using the APEX environmentIn order to deploy the APEX application using the APEX environment, you need to log in to the APEX Builder.
At the top of the page in the APEX Builder, there are options to create a new application, export an application, and import an application, as can be seen in Figure 12.
Figure 12. Import or Export through the APEX Builder
The Reset option in this menu relates to Interactive Report, which shows all the applications within the workspace. When you have filtered the results, the Reset button will remove all the customization you made to Interactive Report.
www.it-ebooks.info
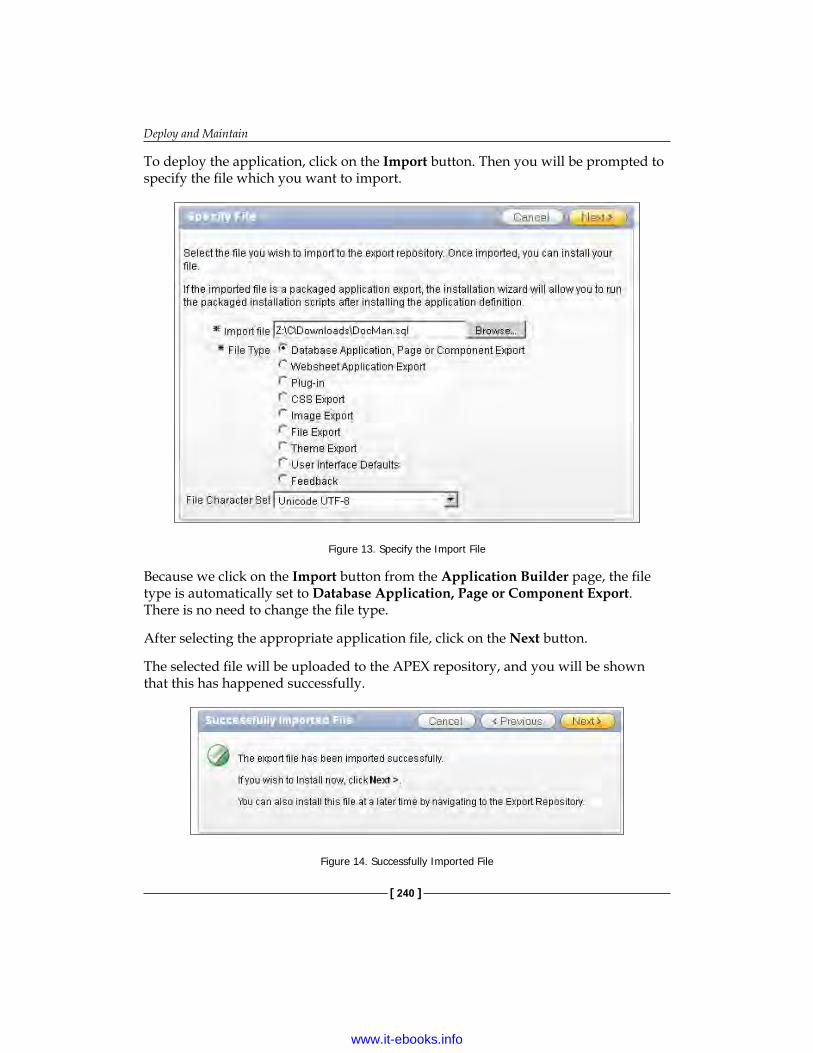
Deploy and Maintain
[ 240 ]
To deploy the application, click on the Import button. Then you will be prompted to specify the file which you want to import.
Figure 13. Specify the Import File
Because we click on the Import button from the Application Builder page, the file type is automatically set to Database Application, Page or Component Export. There is no need to change the file type.
After selecting the appropriate application file, click on the Next button.
The selected file will be uploaded to the APEX repository, and you will be shown that this has happened successfully.
Figure 14. Successfully Imported File
www.it-ebooks.info
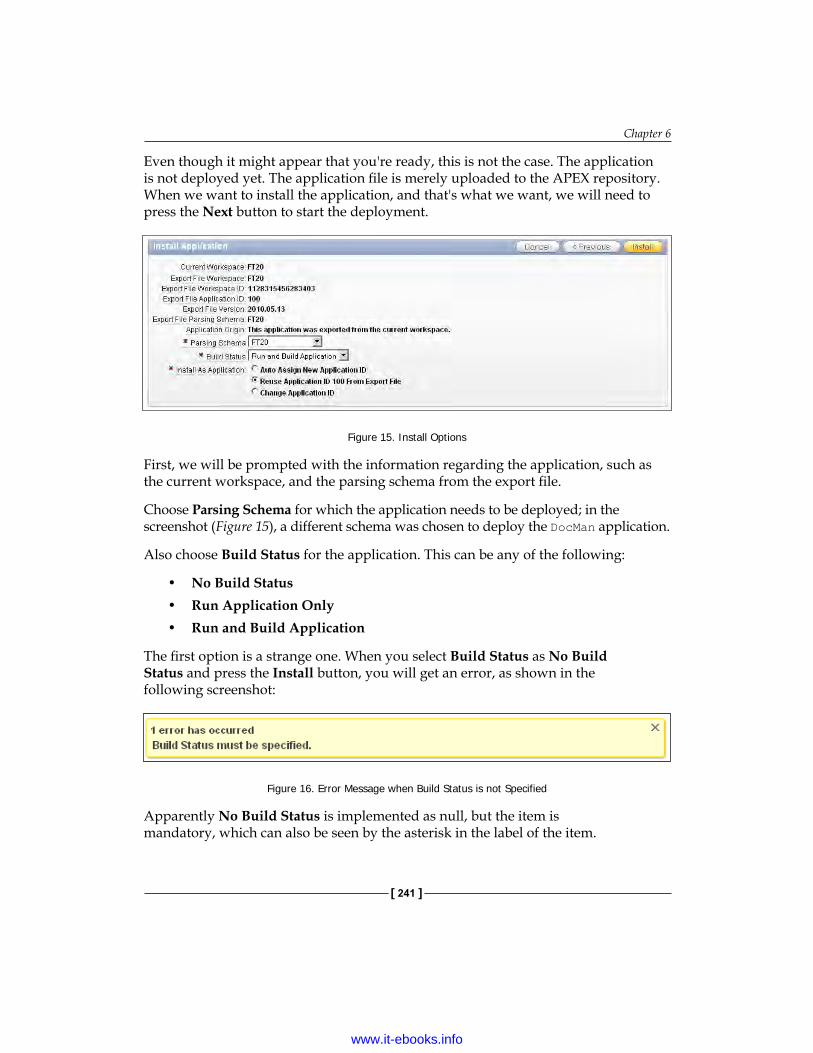
Chapter 6
[ 241 ]
Even though it might appear that you're ready, this is not the case. The application is not deployed yet. The application file is merely uploaded to the APEX repository. When we want to install the application, and that's what we want, we will need to press the Next button to start the deployment.
Figure 15. Install Options
First, we will be prompted with the information regarding the application, such as the current workspace, and the parsing schema from the export file.
Choose Parsing Schema for which the application needs to be deployed; in the screenshot (Figure 15), a different schema was chosen to deploy the DocMan application.
Also choose Build Status for the application. This can be any of the following:
• No Build Status• Run Application Only• Run and Build Application
The first option is a strange one. When you select Build Status as No Build Status and press the Install button, you will get an error, as shown in the following screenshot:
Figure 16. Error Message when Build Status is not Specified
Apparently No Build Status is implemented as null, but the item is mandatory, which can also be seen by the asterisk in the label of the item.
www.it-ebooks.info

Deploy and Maintain
[ 242 ]
Run Application Only should be the option to choose when you deploy the application. This option deploys a run-only version of your application, just as the name indicates. Because the application is run-only, you are not allowed to make changes to the application after deployment. After all, you want to make changes to the development version of the application, and not to the deployed application.
Even though the application is run-only, you can still switch it to the Run and Build Application mode at a later time. This needs to be done by the workspace administrator.Log in to the workspace as the administrator. Navigate to the Administration section, and select the Manage Service option. On the right-hand side of this page is a section labeled Manage Meta Data. In this list is an entry named Application Build Status. Clicking on this link will bring you to the Application Build page. On the Application Build Status page, you have the option to change the Build Status value of the application to Run and Build Application or to Run Application Only.
Run and Build Application will deploy the application in a similar manner as it was in the development environment. It allows you, as the name indicates, to run the application as well as to make changes to it. When deploying the application to production, this option should not be used. You don't want to have changes made to the production environment directly. Changes should always be made starting from the development environment to the test environment and eventually to production.
On the same page in the import wizard, the last option you have to choose is the application ID. There are three options:
• Auto Assign New Application ID• Reuse Application ID from Export File• Change Application ID
When you choose the first option, Auto Assign New Application ID, the first available application ID will be chosen for the application that you are importing.
www.it-ebooks.info

Chapter 6
[ 243 ]
The second option, Reuse Application ID from Export File, will use the application ID that is specified in the export file. This will be the same ID as the original application. When you use this option, the previously deployed application, if there is one, will be overridden. You will be prompted if you want to replace the existing application (Figure 17):
Figure 17: Confirmation Question to Replace an Existing Application
This should be the option you want to use. This way, you will only have one version of the production application in the production environment. There will never be any confusion as to which application is the "real" one.
If you auto assign a new application ID, the import process will also alter your application alias. Using an application alias is very convenient, because it allows you provide the users with a single URL, such as http://xp-vm:8080/apex/f?p=DOCMAN.
This URL doesn't need to change after you deploy the new version of the application.
The last option with regard to the application ID is to change it. When you choose this option, you will see a new text item where you can input your new application ID. There is a restriction, however. Not all application IDs are allowed. Oracle reserves the range between 3000 and 9000.
After you complete this form, the actual installation of the application will start:
Figure 18. Processing Animation when Installing
www.it-ebooks.info
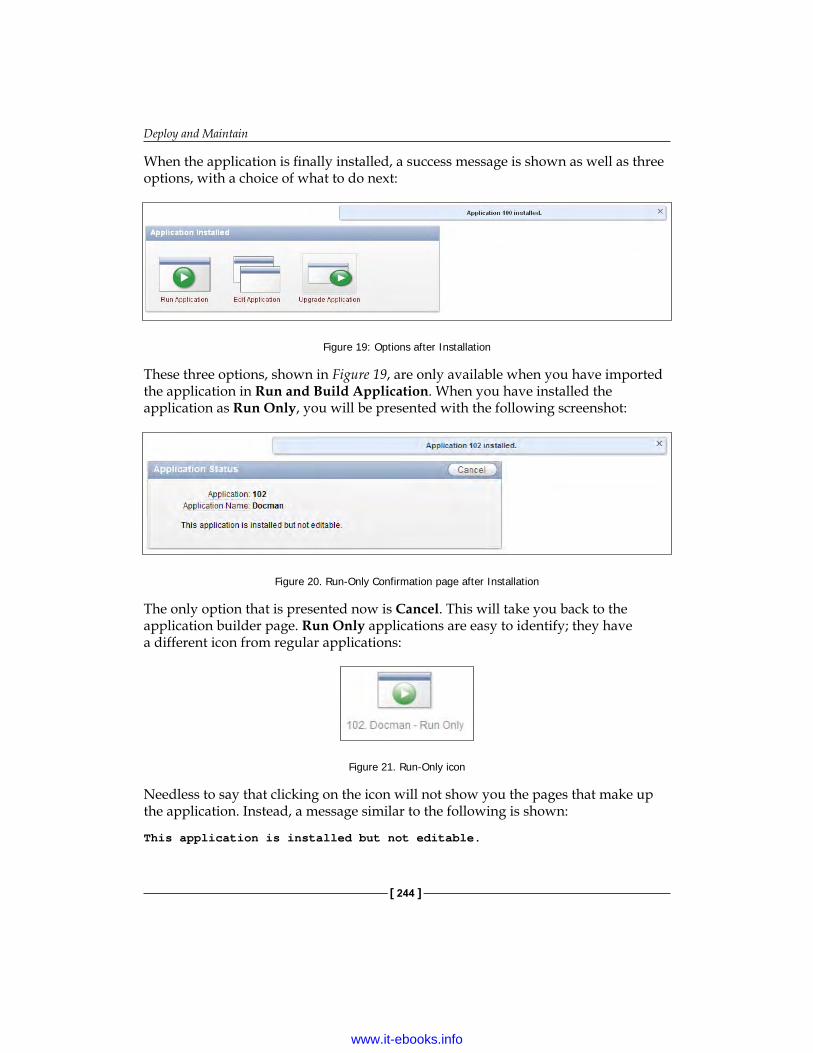
Deploy and Maintain
[ 244 ]
When the application is finally installed, a success message is shown as well as three options, with a choice of what to do next:
Figure 19: Options after Installation
These three options, shown in Figure 19, are only available when you have imported the application in Run and Build Application. When you have installed the application as Run Only, you will be presented with the following screenshot:
Figure 20. Run-Only Confirmation page after Installation
The only option that is presented now is Cancel. This will take you back to the application builder page. Run Only applications are easy to identify; they have a different icon from regular applications:
Figure 21. Run-Only icon
Needless to say that clicking on the icon will not show you the pages that make up the application. Instead, a message similar to the following is shown:
This application is installed but not editable.
www.it-ebooks.info
Chapter 6
[ 245 ]
The first and the second options are self-explanatory. The third option, Upgrade Application, was introduced with APEX 4. Since APEX 4 was a fairly extended overhaul, the APEX team provided you with the option to upgrade your application. Some of the functionality, which you had to implement yourself in earlier versions of APEX, have been standard pieces of functionality since APEX 4. For example, the datepicker; in earlier versions of APEX, the datepicker would open a separate browser window. Nowadays, it is a jQuery datepicker, which displays as if it were integrated in your application. The Upgrade Application option identifies the old-style datepicker and can convert these for you automatically, if you want of course—the choice is yours. There are many other features that can be enabled by a click of a button.
Using the command-line interfaceWhen you know all the options that you want or need, it can be quite tedious to go through the APEX environment to deploy the application.
There is also the option to use the SQL command-line interface to deploy the application. The big advantage of this method is that the SQL commands can be combined into a complete deployment script, including the database objects (tables, packages, and so on) as well as the APEX application itself.
When you export an application, you are actually exporting the metadata that comprises the application. When you open the exported application, which is just a .sql file, you will see that the script consists of a number of PL/SQL anonymous blocks.
Some might be tempted to open up a SQL window and simply run the application export script. If you have ever done so, you will recognize the follow statement:
APPLICATION 100 - DocMan
Set Credentials...
Check Compatibility...
API Last Extended:20100513
Your Current Version:20100513
This import is compatible with version: 20100513
COMPATIBLE (You should be able to run this import without issues.)
Set Application ID...
begin
*
ERROR at line 1:
www.it-ebooks.info

Deploy and Maintain
[ 246 ]
ORA-20001: Package variable g_security_group_id must be set.
ORA-06512: at "APEX_040000.WWV_FLOW_API", line 51
ORA-06512: at "APEX_040000.WWV_FLOW_API", line 304
ORA-06512: at line 4
Disconnected from Oracle Database 11g Express Edition Release 11.2.0.2.0 – Production
Even though it is a regular .sql file, you can not run it without undertaking some actions first. The following script generates the offset that is needed to install the application.
This script has to be run as SYS.
declare l_workspace_id number;begin select workspace_id into l_workspace_id from apex_workspaces where workspace = upper('&ws_name');
APEX_APPLICATION_INSTALL.SET_WORKSPACE_ID(l_workspace_id); APEX_APPLICATION_INSTALL.GENERATE_OFFSET; APEX_APPLICATION_INSTALL.SET_SCHEMA(upper('&schema')); APEX_APPLICATION_INSTALL.SET_APPLICATION_ALIAS('&app_alias');end;/
There are a number of substitution variables in the script, which can be set when you run the script from SQL*Plus. The substitution variables are easy to recognize, as they have an ampersand (&) at the beginning of the name. You need to provide the actual names for the workspace name, the parsing schema, and the application alias. After running this script, you can run the exported application script from SQL*Plus.
Depending on your needs, it is also possible to create a workspace using the command-line interface, as follows:
begin begin APEX_INSTANCE_ADMIN.REMOVE_WORKSPACE( p_workspace => upper('&ws_name') ,p_drop_users => 'N'
www.it-ebooks.info

Chapter 6
[ 247 ]
,p_drop_tablespaces => 'N' ); exception when others then -- removing the workspace doesn't succeed -- most likely it is not there (yet) -- ignore the exception null; end; APEX_INSTANCE_ADMIN.ADD_WORKSPACE( p_workspace => upper('&ws_name') ,p_primary_schema => upper('&schema') ,p_additional_schemas => null );end;/
The preceding script will attempt to remove the workspace if it exists, and then create a workspace with the given name. This script will also need to be run logged in as SYS.
When you create the workspace using the preceding method, you might get a message informing you that the workspace is inactive when you try to log in to the workspace. This bug only happens with APEX version 4.1.1, and should be resolved in later releases.
The exact message will be:
Error Workspace <workspace name> is inactive. Contact your administrator
To make the workspace available again, you need to run the following script:
-- Workspace can be disabled when the workspace-- is created using the command line.-- This can only happen with APEX 4.1.1begin for l_workspace in ( select short_name from wwv_flow_companies where account_status='AVAILABLE' ) loop apex_instance_admin.enable_workspace (l_workspace.short_name); end loop; commit;end;
www.it-ebooks.info

Deploy and Maintain
[ 248 ]
The preceding script should be run when connected as SYS, SYSTEM, APEX_040100, or any user who has APEX_ADMINISTRATOR_ROLE. In future releases of APEX, this inactivation of the workspace should not occur. This behavior was filed as a bug, number 13769526.
Housekeeping the APEX repositoryImporting applications into your workspace basically means that the files are uploaded to the APEX repository. When a lot of applications are uploaded, or at least a lot of files are uploaded, this will result in quite a large repository.
It is good practice to remove the older imported files from the repository, as they might be inadvertently installed. Since APEX version 4, the repository is automatically purged, but the time between each purge might still create an opportunity to mistakenly install the wrong application.
From the main menu, click on the little arrow next to Application Builder. A context menu will be shown. Select the second-last option on the list, labeled Repository:
Figure 22. Navigate to Repository
www.it-ebooks.info

Chapter 6
[ 249 ]
This will take you to Export Repository, as shown in the following screenshot:
Figure 23. Export Repository
A list of imported files is shown. Not only imported applications, but all imported file types, such as plugins, Websheet applications, and themes will display.
Now, select the files you want to remove by selecting the checkbox on the left-hand side of the report, and click on the Delete Checked button. After the confirmation question, the selected files are removed from the repository.
Being active and proactiveThe users expect the application to work flawlessly and the way they imagined that it would work. You do your best to create a flawless application, and implement all the wishes that the user wanted. You have taken care to test, test, and test some more. Your database code has gone through the harshest of scrutiny and has been deemed application quality code. Yet when the application is deployed, within the first millisecond, the user encounters a problem or just does not like the way the application works.
It seems like it does not matter how much effort you put into creating the ultimate application; there is always something that goes wrong, takes too long, or should have been implemented a different way.
FeedbackAPEX 4 makes it really easy to enable feedback for your application. Before the APEX team releases their next version, they often ask the community to try it out, kick the tires so to speak. When they do, they always enable the feedback option, because the feedback the APEX team gets about bugs, requests for improvement, or general comment will improve the product before it is actually released.
You can do something similar in your own application, and it just takes a few minutes to be up and running.
www.it-ebooks.info

Deploy and Maintain
[ 250 ]
Feedback is part of the Team Development, which is incorporated in APEX. In this section, we offer you a glimpse of what you can do with it. We strongly encourage you to discover all the ins and outs of Team Development.
Activate feedbackActivating the feedback for your application is as simple as following a wizard. Start the wizard to create a new page. Choose the page type as Feedback Page (see Figure 24):
Figure 24. Create Page Wizard
www.it-ebooks.info
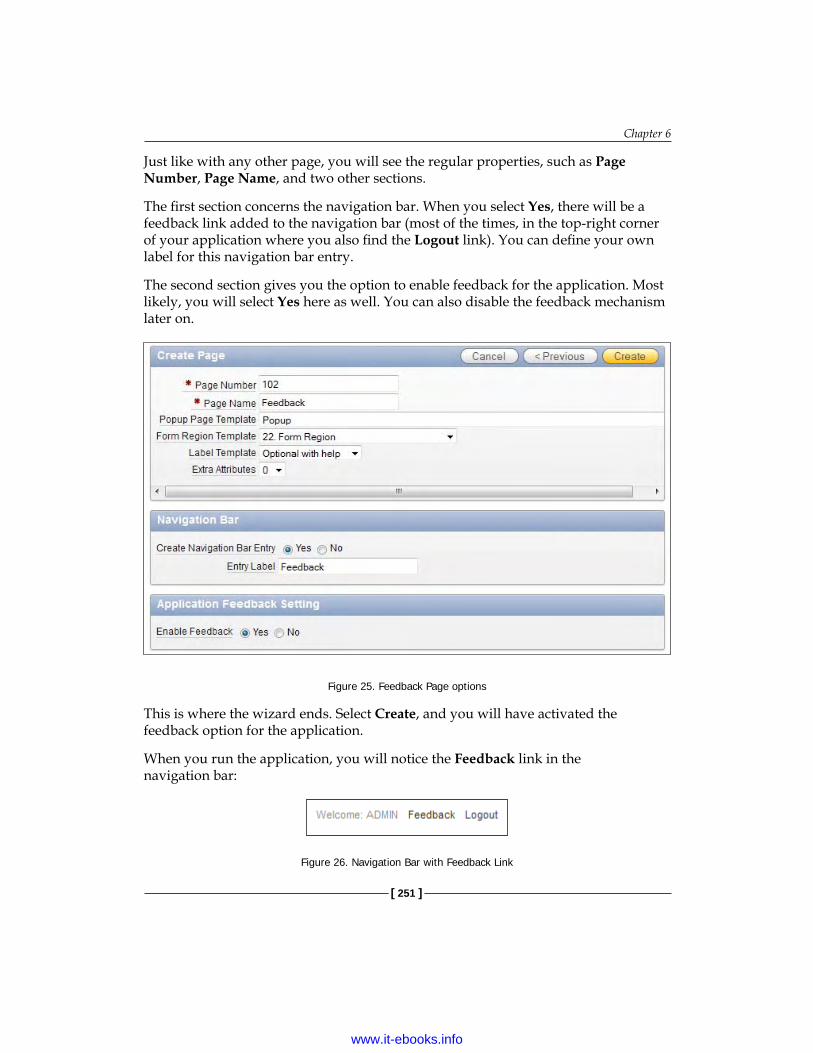
Chapter 6
[ 251 ]
Just like with any other page, you will see the regular properties, such as Page Number, Page Name, and two other sections.
The first section concerns the navigation bar. When you select Yes, there will be a feedback link added to the navigation bar (most of the times, in the top-right corner of your application where you also find the Logout link). You can define your own label for this navigation bar entry.
The second section gives you the option to enable feedback for the application. Most likely, you will select Yes here as well. You can also disable the feedback mechanism later on.
Figure 25. Feedback Page options
This is where the wizard ends. Select Create, and you will have activated the feedback option for the application.
When you run the application, you will notice the Feedback link in the navigation bar:
Figure 26. Navigation Bar with Feedback Link
www.it-ebooks.info
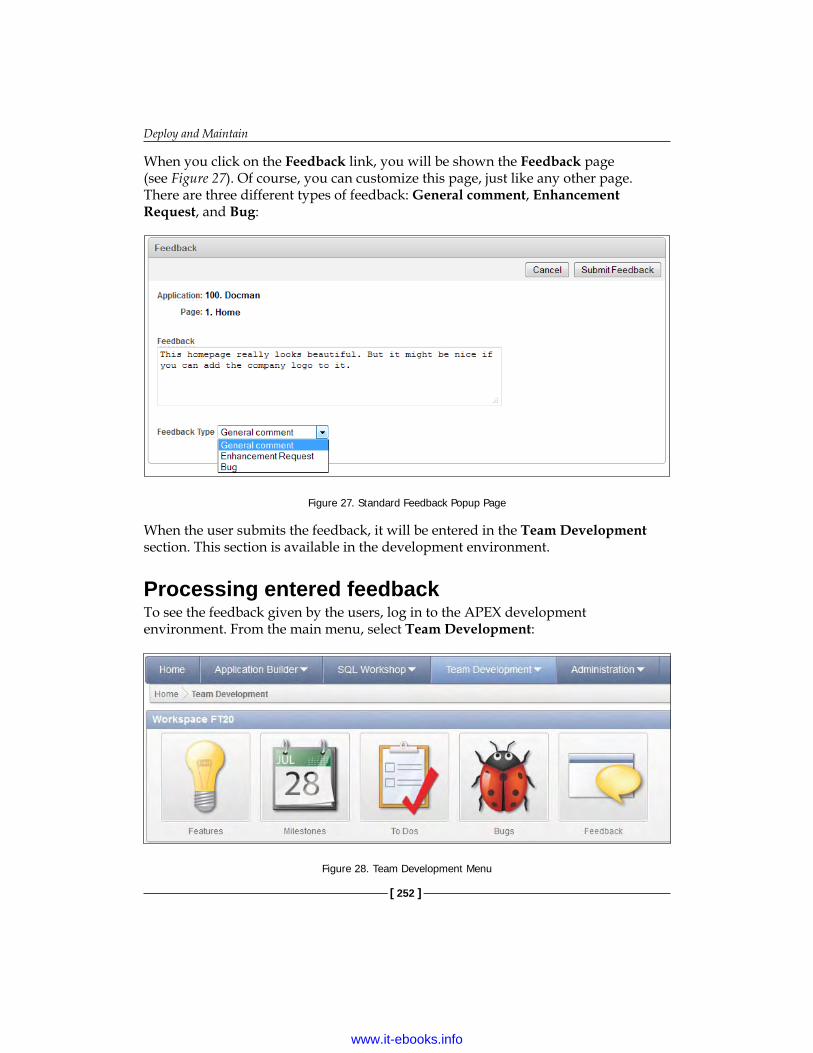
Deploy and Maintain
[ 252 ]
When you click on the Feedback link, you will be shown the Feedback page (see Figure 27). Of course, you can customize this page, just like any other page. There are three different types of feedback: General comment, Enhancement Request, and Bug:
Figure 27. Standard Feedback Popup Page
When the user submits the feedback, it will be entered in the Team Development section. This section is available in the development environment.
Processing entered feedbackTo see the feedback given by the users, log in to the APEX development environment. From the main menu, select Team Development:
Figure 28. Team Development Menu
www.it-ebooks.info
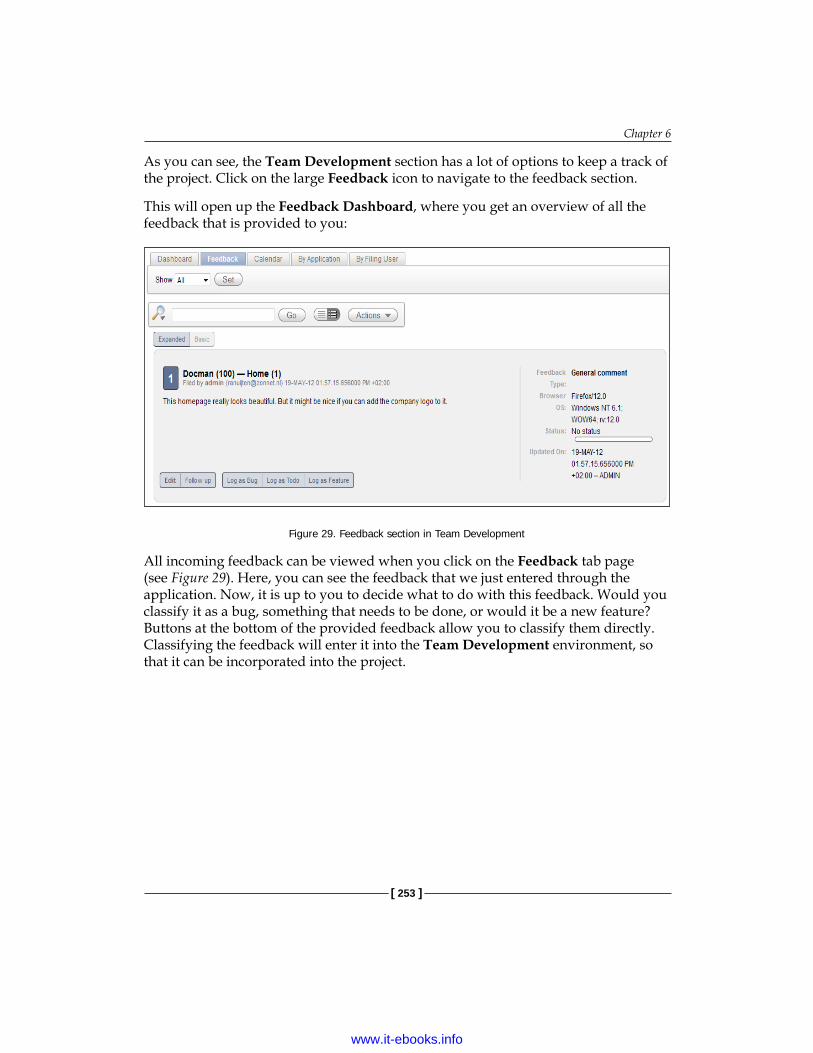
Chapter 6
[ 253 ]
As you can see, the Team Development section has a lot of options to keep a track of the project. Click on the large Feedback icon to navigate to the feedback section.
This will open up the Feedback Dashboard, where you get an overview of all the feedback that is provided to you:
Figure 29. Feedback section in Team Development
All incoming feedback can be viewed when you click on the Feedback tab page (see Figure 29). Here, you can see the feedback that we just entered through the application. Now, it is up to you to decide what to do with this feedback. Would you classify it as a bug, something that needs to be done, or would it be a new feature? Buttons at the bottom of the provided feedback allow you to classify them directly. Classifying the feedback will enter it into the Team Development environment, so that it can be incorporated into the project.
www.it-ebooks.info
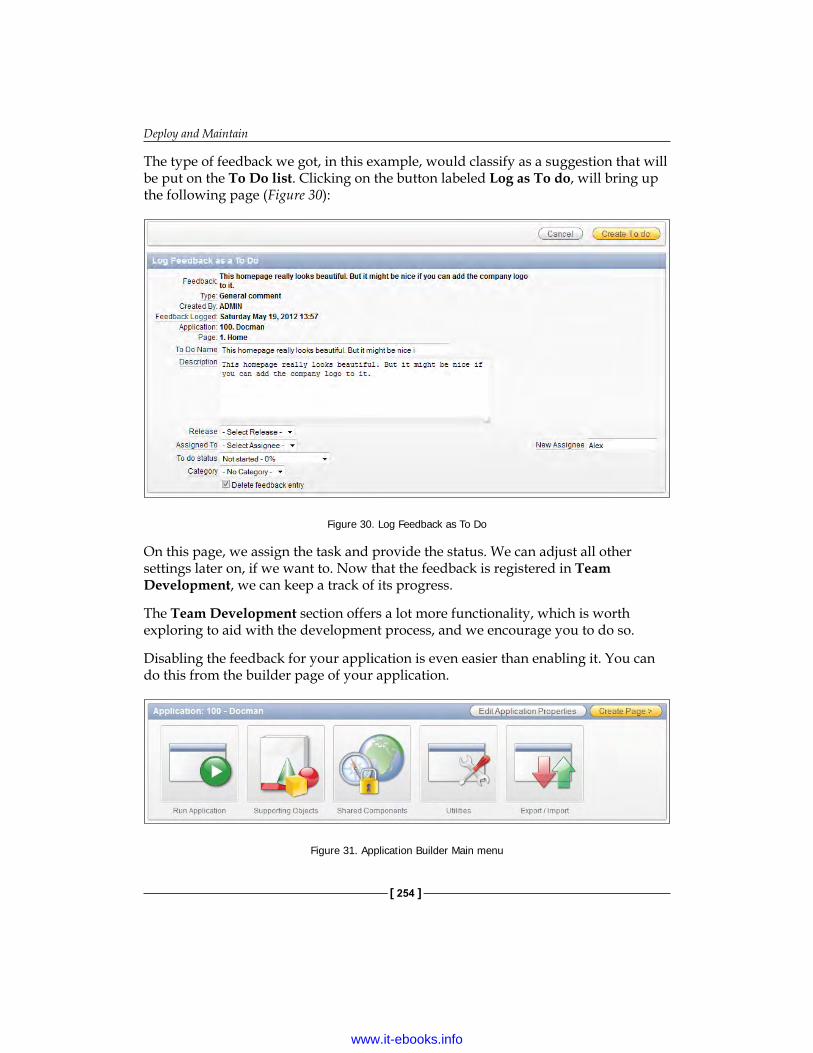
Deploy and Maintain
[ 254 ]
The type of feedback we got, in this example, would classify as a suggestion that will be put on the To Do list. Clicking on the button labeled Log as To do, will bring up the following page (Figure 30):
Figure 30. Log Feedback as To Do
On this page, we assign the task and provide the status. We can adjust all other settings later on, if we want to. Now that the feedback is registered in Team Development, we can keep a track of its progress.
The Team Development section offers a lot more functionality, which is worth exploring to aid with the development process, and we encourage you to do so.
Disabling the feedback for your application is even easier than enabling it. You can do this from the builder page of your application.
Figure 31. Application Builder Main menu
www.it-ebooks.info
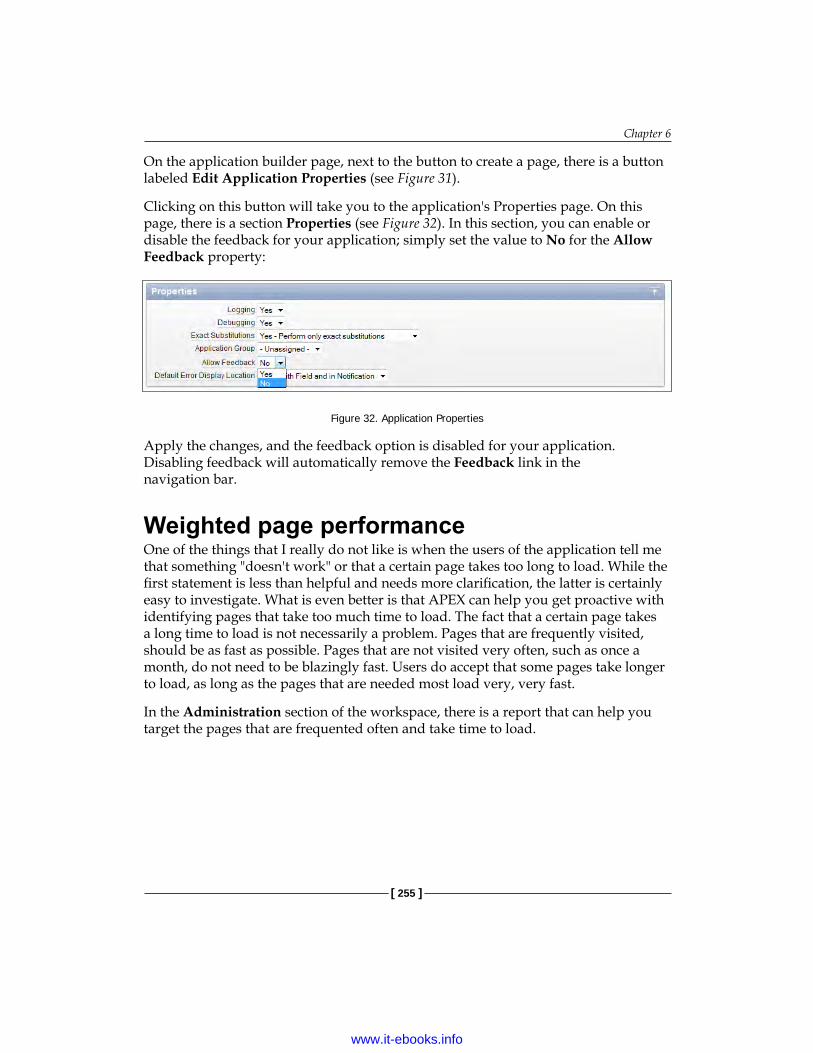
Chapter 6
[ 255 ]
On the application builder page, next to the button to create a page, there is a button labeled Edit Application Properties (see Figure 31).
Clicking on this button will take you to the application's Properties page. On this page, there is a section Properties (see Figure 32). In this section, you can enable or disable the feedback for your application; simply set the value to No for the Allow Feedback property:
Figure 32. Application Properties
Apply the changes, and the feedback option is disabled for your application. Disabling feedback will automatically remove the Feedback link in the navigation bar.
Weighted page performanceOne of the things that I really do not like is when the users of the application tell me that something "doesn't work" or that a certain page takes too long to load. While the first statement is less than helpful and needs more clarification, the latter is certainly easy to investigate. What is even better is that APEX can help you get proactive with identifying pages that take too much time to load. The fact that a certain page takes a long time to load is not necessarily a problem. Pages that are frequently visited, should be as fast as possible. Pages that are not visited very often, such as once a month, do not need to be blazingly fast. Users do accept that some pages take longer to load, as long as the pages that are needed most load very, very fast.
In the Administration section of the workspace, there is a report that can help you target the pages that are frequented often and take time to load.
www.it-ebooks.info

Deploy and Maintain
[ 256 ]
Navigate from within your workspace to the Administration section, and click on the Monitor Activity icon:
Figure 33. Monitor Activity
There is also another way of getting to the Monitor Activity page. Next to the Administration menu item is a small triangle. When you click on that, you will see a drop-down menu, which also shows the Monitor Activity entry:
Figure 34. Monitor Activity Menu Option
Either way leads you to the page where you can find the report we were talking about.
www.it-ebooks.info
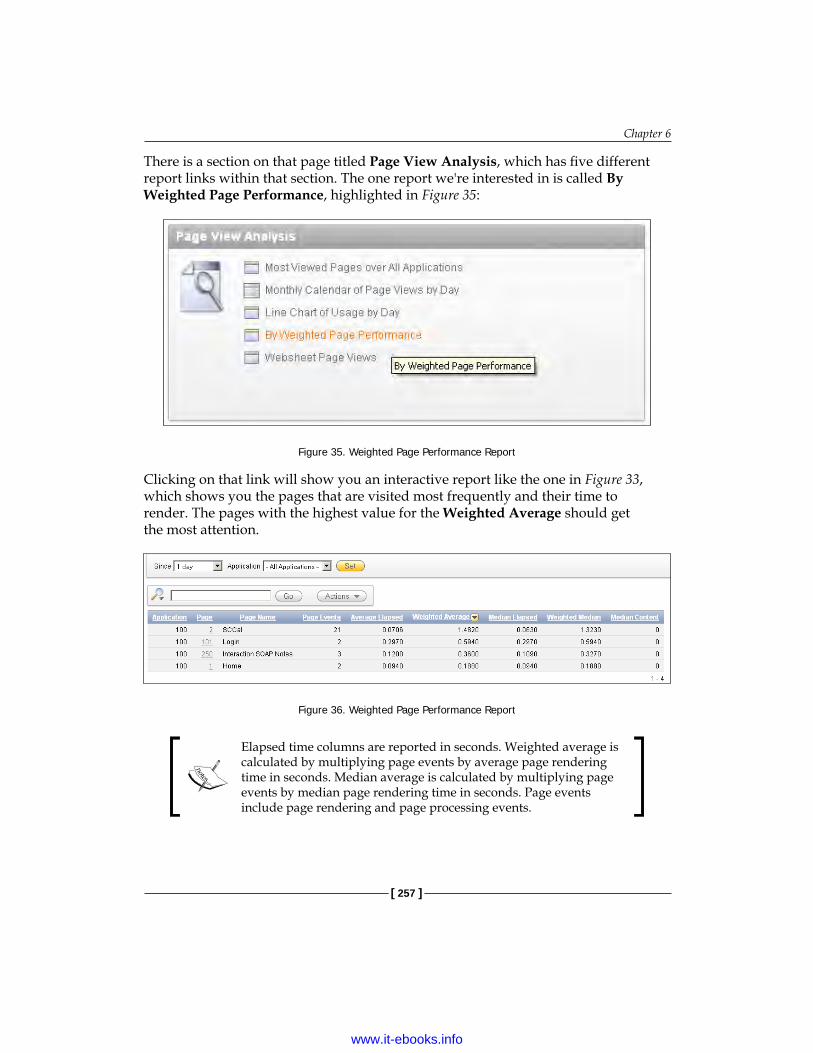
Chapter 6
[ 257 ]
There is a section on that page titled Page View Analysis, which has five different report links within that section. The one report we're interested in is called By Weighted Page Performance, highlighted in Figure 35:
Figure 35. Weighted Page Performance Report
Clicking on that link will show you an interactive report like the one in Figure 33, which shows you the pages that are visited most frequently and their time to render. The pages with the highest value for the Weighted Average should get the most attention.
Figure 36. Weighted Page Performance Report
Elapsed time columns are reported in seconds. Weighted average is calculated by multiplying page events by average page rendering time in seconds. Median average is calculated by multiplying page events by median page rendering time in seconds. Page events include page rendering and page processing events.
www.it-ebooks.info
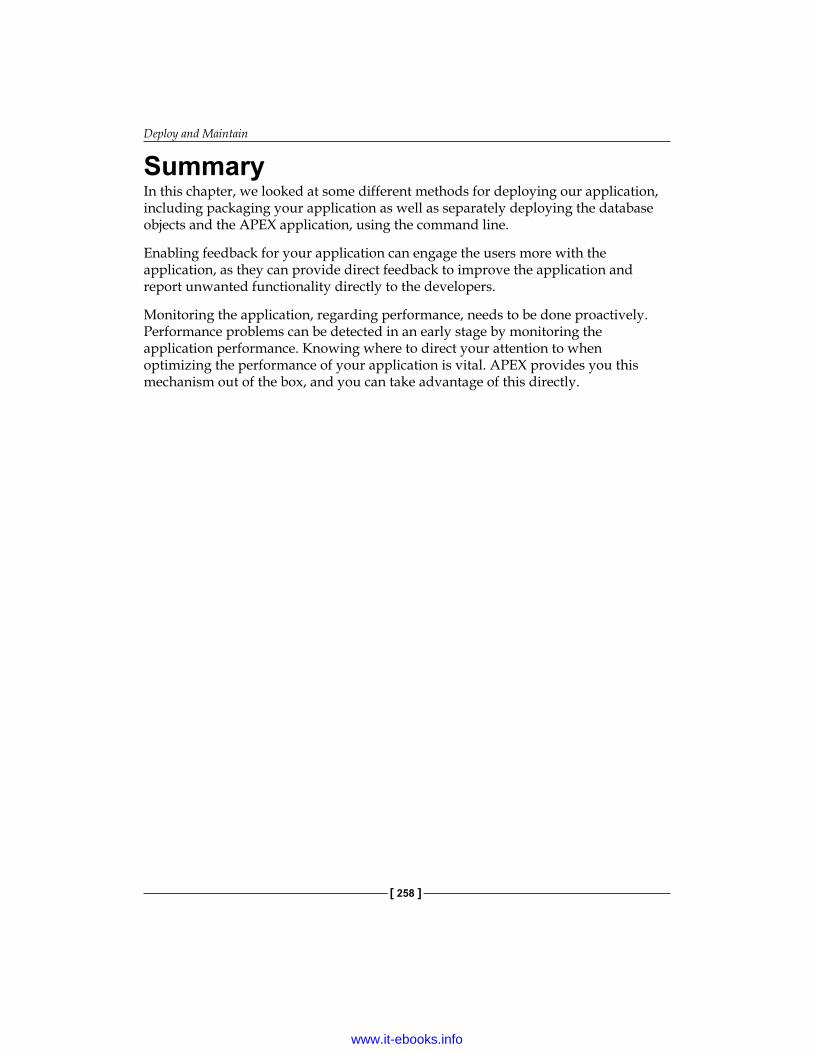
Deploy and Maintain
[ 258 ]
SummaryIn this chapter, we looked at some different methods for deploying our application, including packaging your application as well as separately deploying the database objects and the APEX application, using the command line.
Enabling feedback for your application can engage the users more with the application, as they can provide direct feedback to improve the application and report unwanted functionality directly to the developers.
Monitoring the application, regarding performance, needs to be done proactively. Performance problems can be detected in an early stage by monitoring the application performance. Knowing where to direct your attention to when optimizing the performance of your application is vital. APEX provides you this mechanism out of the box, and you can take advantage of this directly.
www.it-ebooks.info
Database Cloud Service and APEX 4.2
Cloud is the new pride of Oracle, announced during Oracle Open World in 2011. This addendum will give a short overview of the Database Cloud Service and the role of Application Express.
This addendum will discuss the following subjects:
• What is Oracle Public Cloud?• Application Express features in the Database Cloud Service and APEX 4.2.
Oracle Public CloudThe Oracle Public Cloud is a suite of Oracle applications, middleware, and database offerings delivered in a self-service, subscription-based, elastically scalable, reliable, highly available, and secure manner.
The Oracle Public Cloud includes the following services:
• Application Services• Oracle Fusion CRM Cloud Service• Oracle Fusion HCM Cloud Service• Oracle Social Network Cloud Service
Platform Services:
• Oracle Database Cloud Service• Oracle Java Cloud Service
www.it-ebooks.info
Database Cloud Service and APEX 4.2
[ 260 ]
For additional information, see https://cloud.oracle.com.
The Database Cloud Service, although based on the Oracle database, is a platform as a service product rather than a database as a service product. The Database Cloud Service combines the following products:
• Application Express• RESTFul web services access• SQL Developer• Packages applications
Cloud computing is a little bit misleading. For Database Cloud Service, you interact with the Oracle database.
Packaged applicationsThe Oracle Database Cloud Service and Application Express 4.2 include a set of business productivity applications and sample code. All of these applications are easy to use, support mobile devices, and are installable in a few clicks. Productivity applications can be unlocked for customization and learning purposes. Of course, Oracle can only provide support for locked applications. Productivity applications are not the same as sample applications, because sample applications are unlocked by default.
Examples of productivity applications are the project tracker and checklist manager. Examples of sample applications are error handling, interactive reports, and the mobile sample application.
Plan for the futureIn addition to these packaged business applications and sample code, the Oracle Database Cloud Service supports third-party applications. All third-party applications will go through a validation process to ensure the safety of the application and the protection of user data in the Oracle Database Cloud Service environment (Oracle Certification).
www.it-ebooks.info
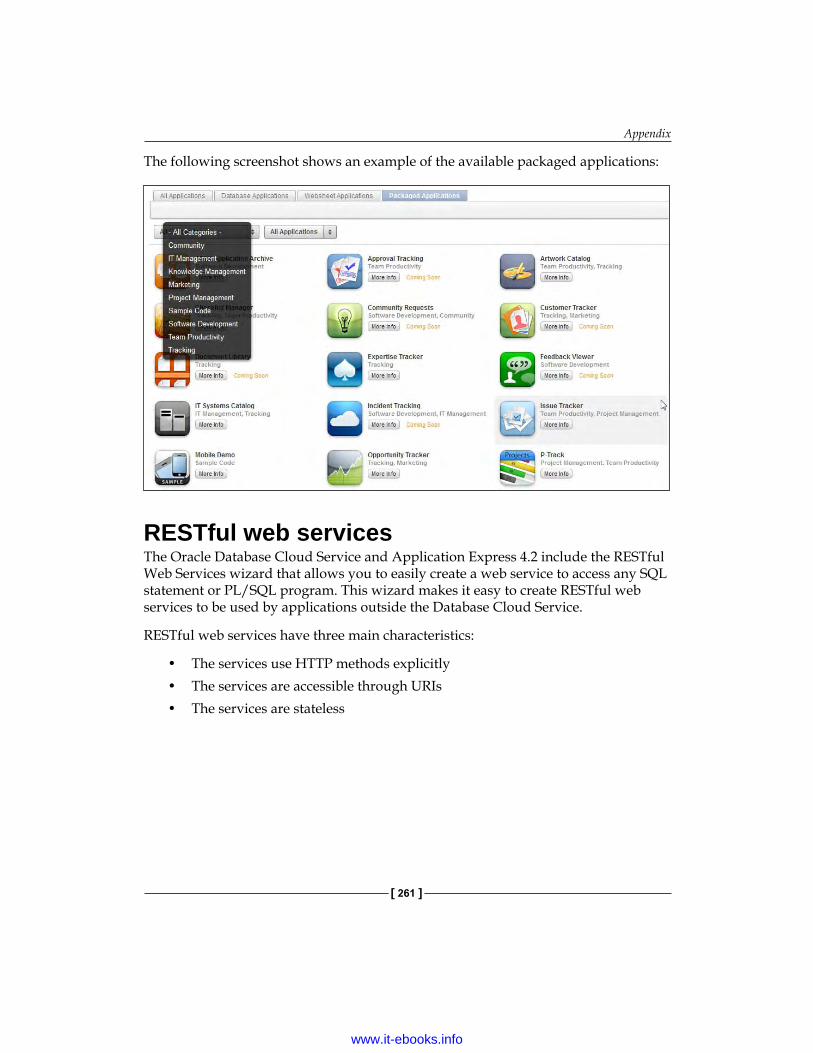
Appendix
[ 261 ]
The following screenshot shows an example of the available packaged applications:
RESTful web servicesThe Oracle Database Cloud Service and Application Express 4.2 include the RESTful Web Services wizard that allows you to easily create a web service to access any SQL statement or PL/SQL program. This wizard makes it easy to create RESTful web services to be used by applications outside the Database Cloud Service.
RESTful web services have three main characteristics:
• The services use HTTP methods explicitly• The services are accessible through URIs• The services are stateless
www.it-ebooks.info
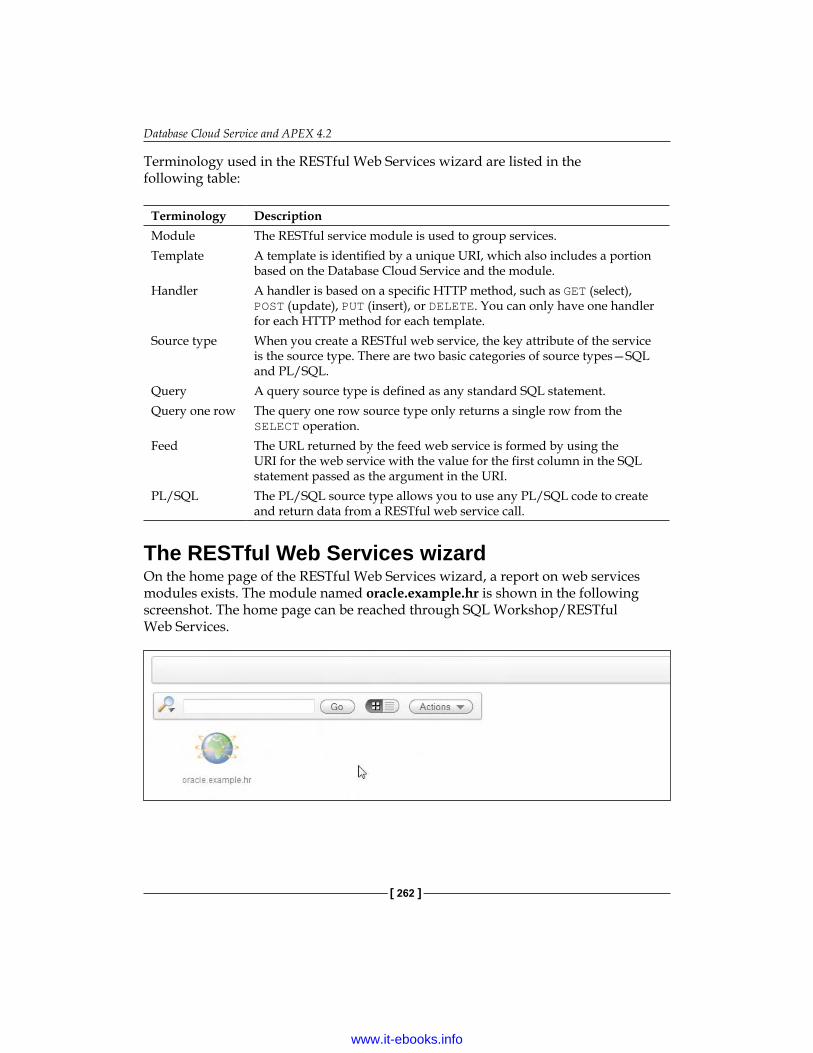
Database Cloud Service and APEX 4.2
[ 262 ]
Terminology used in the RESTful Web Services wizard are listed in the following table:
Terminology DescriptionModule The RESTful service module is used to group services.Template A template is identified by a unique URI, which also includes a portion
based on the Database Cloud Service and the module.Handler A handler is based on a specific HTTP method, such as GET (select),
POST (update), PUT (insert), or DELETE. You can only have one handler for each HTTP method for each template.
Source type When you create a RESTful web service, the key attribute of the service is the source type. There are two basic categories of source types—SQL and PL/SQL.
Query A query source type is defined as any standard SQL statement.Query one row The query one row source type only returns a single row from the
SELECT operation.Feed The URL returned by the feed web service is formed by using the
URI for the web service with the value for the first column in the SQL statement passed as the argument in the URI.
PL/SQL The PL/SQL source type allows you to use any PL/SQL code to create and return data from a RESTful web service call.
The RESTful Web Services wizardOn the home page of the RESTful Web Services wizard, a report on web services modules exists. The module named oracle.example.hr is shown in the following screenshot. The home page can be reached through SQL Workshop/RESTful Web Services.
www.it-ebooks.info

Appendix
[ 263 ]
Click on the module and you will see two logical parts of the page. On the left-hand side, you will see a list of various templates within the module. On the right-hand side, you will see the attributes of this module.
The next example steps through the RESTful Web Services creation wizard are as follows:
1. Start the wizard by clicking on Create Template, as shown in the following screenshot:
www.it-ebooks.info

Database Cloud Service and APEX 4.2
[ 264 ]
2. Give the template a name, for example empall/.
Remember that the forward slash at the end of the URI is required.
3. The next step is to create the handler.You can do that by clicking on Create Handler just below the RESTful service (empall/):
www.it-ebooks.info

Appendix
[ 265 ]
4. Now select the HTTP method for your RESTful service.The HTTP methods available here are GET (equal to select), DELETE (equal to delete), PUT (equal to insert), and POST (equal to update):
5. From the available source types, select Query. As the output format you can choose between JSON and CSV. Select JSON.
www.it-ebooks.info

Database Cloud Service and APEX 4.2
[ 266 ]
6. The Source field contains the source code, which will be executed when the web service is called. Enter the following query in this field:Select * From EMPOrder by deptno, ename
7. Click on the Create button to save the template.
We can test the web service by clicking on the Test button and check the outcome of the web service. An example of a possible outcome, depending on your data, is shown in the following screenshot:
www.it-ebooks.info
Appendix
[ 267 ]
RemarkTo have this nice layout, I installed the Firefox browser JSON viewer plug-in from https://addons.mozilla.org/en-us/firefox/addon/jsonview/.A report region can be created to show the output from the RESTful web services as shown in the preceding example.
Data load feature (SQL Workshop/utilities/data load)The data load feature enables us to load or unload data from our Oracle Database Cloud Service. The utility enables you to upload data from a text file, an XML document, or a spreadsheet. This utility is accessed from the Application Express SQL Workshop.
SummaryOracle Application Express is going to be an important tool in the Database Cloud Service. RESTful Web Services allows you to easily create a web service to access any SQL statement, PL/SQL program. The data load feature helps to upload or unload data from the Oracle Public Cloud.
www.it-ebooks.info

IndexSymbols32K limit
bypassing, on reports 133
Aaccess control administration page
creating 176-178Access Control Lists (ACLs) 157, 158accounts, APEX 19ADF 8administrator
APEX, securing for 138creating 16, 17creating, in workspace 24
aggregate functionsabout 77frontend process, offloading 86GROUPING SETS 78
alternative quoting 147analytic functions
about 61examples 64syntax overview 61-63
Apache FOPabout 102, 103, 120configuring 105, 106installing 104printing architecture 104using 106, 107
APEXabout 7, 195, 205, 226accounts 19administrator, creating 16, 17administrator, creating for workspace 24
and Firebug 215application, deploying 239background 7builders, enabling in 158characteristics 9command line 18database 19database environment, protecting 138database packages, deploying 235-238database tools 22developers, creating in workspace 24dynamic actions, debugging 215, 216error handling 217hidden items, protecting 186, 187history 8installing 9miscellaneous tools 22multiple applications, structure 30packaged application, creating 226-231Page Zero template 29password complexity rules 161remote debugging, performing 210repository, housekeeping 248, 249secure items 185securing, for administrator 138subscribe and publish mechanism 30, 31Subversion 232-235tools, for web development 22URL, for hosted version 9user interface defaults 25users, creating in workspace 24utility reports, used for troubleshooting 220version control 231versus WebDB 7VPD, implementing in 148, 149web interface 17
www.it-ebooks.info

[ 270 ]
web server, selecting 12workspace, creating 23, 24
APEX 4feedback, activating for application 250-252feedback option, enabling 249
APEX 4.2features 226
APEX_ACTIVITY_LOG view 219APEX advisor 192, 193, 221APEX application
deploying 239deploying, command-line interface
used 245-248weighted page performance 255-257
apex_application.g_debug variable 202APEX_APPLICATION package 202APEX application report
creating, with Business Intelligence Publisher 115
APEX Builder 239APEX_DEBUG_MESSAGE.LOG_
MESSAGE process 204APEX_DEBUG_MESSAGE
package 202, 203APEX_DEBUG_MESSAGE procedure 202APEX_DEBUG_MESSAGES view 200APEX, dictionaries
about 25attribute 25table 25
APEX environmententered feedback, processing 252-255using 239-244
apex_fop.jsp 103APEX, installing
full development environment, converting to runtime environment 11, 12
on development environment 10on runtime environment 10runtime environment, converting to full
development environment 11, 12APEX Listener
about 14, 15plans, for future versions 102
APEX pagesdata model, mapping to 37, 38debugging 195-200
APEX repositoryhousekeeping 248, 249
ApexSec Security Console 193apex_util.download_print_document 133APEX_UTIL_DOWNLOAD_PRINT_
DOCUMENT function 130apex_util.get_print_document 133APEX web interface 17Application Builder utilities
Application Express views 222attribute dictionary 222database object dependencies 222upgrade application 222
Application Contextabout 144manipulating 144working with 144-146
application dashboard 191application data 189Application Express. See APEXapplications
creating 36deploying 36, 225feedback, activating for 250-252report, linking to 119, 120
application services 259Application Utilities 220architectures
used, for deploying APEX 151attacker 163Attribute Dictionary 25authentication 170, 171authentication mechanisms
custom 172database accounts 172HTTP header variable 172LDAP directory 173no authentication 174open door credentials 174Oracle Application Express accounts 172Oracle Cloud identity management 174out of the box 172Single Sign On (SSO) 174
authentication plugin 184, 185authentication schema
creating, from scratch 175
www.it-ebooks.info
[ 271 ]
authorizationabout 174access control administration page,
creating 176-178authorization plugin 184, 185authorization schema
applying 178, 179authorization scheme
about 174creating 175implementing 175
Bbase tables
about 38characteristics 38, 39
BAT file 235, 236bind variable
using 169breakpoint
about 207defining, in procedure 209
browser attack methodsabout 163cross-site scripting (XSS) 163, 164
browser security attributesabout 183Cache 183database session attribute 184Embed in Frames 183
buildersenabling, in APEX 158
Build Status option 10Business Intelligence Publisher
about 109APEX application report, creating with 115main screen 110print test, performing 111, 112using 110, 111
Business Intelligence Publisher version 11installing 109
Ccharacteristics, RESTful web services 261chart
adding, to report 122-125
Cloud 259cloud computing 9, 260Cocoon 134code instrumentation 201Column Level Security 142command line, APEX 18command-line interface
used, for deploying APEX application 245-248
Computer Aided Software Engineering (CASE) 20
configuringApache FOP 105, 106
contentsearching, in documents 97-99
credentials verification 172cross-site scripting (XSS)
about 163, 164rules 165
CSS 7Cube clause 83custom authentication schemes 172
Ddatabase 138Database 11gR2 11.2.0.1 158Database 11gR2 11.2.0.2 158database accounts 172database, APEX
database objects, creating 21, 22data model 19-21tools 22
Database Cloud Service 260database environment
protecting, for APEX 138database modeling
guidelines 21Database Object Dependencies utility
about 229problems 230
database objectscreating 21, 22
database packagesdeploying 235-238
database schema 179
www.it-ebooks.info
[ 272 ]
database session attributeusing 184
database tools 22data load feature 267data model
about 19-21mapping, to APEX pages 37, 38
Data Modeler 20data model, mapping to APEX pages
base model 38, 39intersection table 42-44master detail 40, 41other pages 46simple report 46
datepicker 245DBMS_DEBUG_JDWP 205DBMS_DEBUG package 205DBMS_LOB.SUBSTR function 127DBMS_SESSION package 144debug Advanced Programming
Interface (API) 202debug option, Oracle SQL Developer 207deployment 225developers
creating, in workspace 24development environment
APEX, installing on 10docman_ctx namespace 144documents
printing, Print API used 130-132dynamic actions
debugging, in APEX 215, 216dynamic images
adding, to report 125-130dynamic output
protecting 165
EEmbedded PDF plugin 13, 136embedded PL/SQL gateway
about 153URL, for info 154
ENABLE_DEBUG_MESSAGES procedure 202
entered feedbackprocessing, in APEX environment 252-255
error handling, APEX 217examples, analytic functions
caveats 73-76rank, assigning 70-72rows, accessing in result set 69running totals 64, 65stringing 72values, accessing from other records 67, 68window, visualizing 66, 67
Ffake input 189feed 262feedback
activating, for application 250-252feedback option
enabling, in APEX 4 249Fetch Row process 43file upload items 188Fine Grained Access Control 139Firebug
about 214and APEX 215URL, for downloading 214
fop.war filedeployment steps 105
form itemsprotecting 165
frameworkcreating 32
full development environmentruntime environment, converting
into 11, 12functionalities, login application 35
Gget_selectlist function 43Glassfish 14g_package 49GROUPING SETS
about 78-81Cube clause 83, 84Rollups 81, 82totals and subtotals, identifying 84-86
www.it-ebooks.info
[ 273 ]
Hhandler 262heap table 54hidden items
protecting 186, 187hidden items, APEX
hidden 186hidden and protected 186
HTML 7HTMLDB 8HTML regions
protecting 165HTTP header variable authentication 172HTTP methods, RESTful service 265HTTP server
about 151rewrite rule 152security considerations 152
Iimport wizard 225index-organized tables 59-61installation process, APEX
security measures 156installing
APEX 9Business Intelligence Publisher
version 11 109JavaScript console wrapper 211, 212Subversion client 232
instance securitymanaging 188
instrumentation, APEX code 201intersection table 42-44item encryption 186
JJasperReports
about 102, 135architecture 135
Java Runtime Environment (JRE) 105JavaScript 7
JavaScript Console Wrapperabout 211installing, steps 211, 212
jQuery datepicker 245
LLDAP directory 173Lightweight Directory Access
Protocol (LDAP) 171, 173LINT 192List of Values (LOV)
about 53creating 36, 37
logger_logs_5_min 50logger_logs_apex_items 50Logger package 48logging
about 218disabling 220enabling 219
login applicationabout 33creating 33, 34examples, of pages 35functionalities 35
LOG_LONG_MESSAGE procedure 202LOG_MESSAGE procedure 202LOG_PAGE_SESSION_STATE
procedure 203lookup tables
about 52, 53index-organized tables 59-61single-table hash clusters 53-58
Mmaster application
about 33creating 33
master detail 40, 41maximum session idle time 159maximum session length 159mod_rewrite module 152module 262
www.it-ebooks.info
[ 274 ]
multiple applicationsframework, creating 32structure 30
Nnetwork services
testing 113NO authentication 174
OOC4J 102, 105offloading process
about 86images, using 95-97one-off job 86-90pipelined table functions 91, 92pipelined table functions, in APEX 93-95
OHS 13one-off job 86-90On Load - After Header process 43open door credentials 174Open LDAP 171Oracle
websites, based on APEX 9Oracle Access Manager 171Oracle Application Express
plugins 135printing architecture 102
Oracle Application Express accounts 172Oracle Application Express Listener
about 154security implementation 155SSL, enabling for web server 155, 156
Oracle Application Express, pluginsabout 135Embedded PDF 136Reports 2 PDF 135
Oracle Application Server Containers for J2EE. See OC4J
Oracle Business Intelligence Enterprise Edition Plus (OBIEE Plus) 110
Oracle Cloud identity management 174Oracle Database Cloud Service 9, 226Oracle Designer 20Oracle Flows 8
Oracle Fusion CRM Cloud Service 259Oracle Fusion HCM Cloud Service 259Oracle Fusion Middleware 133Oracle HTTP Server. See OHSOracle Java Cloud Service 259Oracle Platform 8Oracle Public Cloud
about 259packaged applications 260patform services 259services 259
Oracle Reportsabout 133integration 134URL, for info 133used, for creating reports in multiple
formats 120-122Oracle SQL Developer
about 205debug option 207URL, for downloading 205
Oracle SQL Developer IDE 232Oracle Technology network
URL 109out of the box authentication schemes 172
Ppackaged applications
about 225, 226creating 226-231
packaged applications, Oracle Public Cloud 260
page processing 199, 202page rendering 199, 202Page Zero 29password complexity rules 161password items 187patching strategy 162PDF printing
about 102, 120alternatives used 133
pipelined table functionabout 91, 92in APEX 93, 94
pks extensions 236
www.it-ebooks.info
[ 275 ]
platform services, Oracle Public CloudOracle Database Cloud Service 259Oracle Java Cloud Service 259
PL/SQLabout 7, 195, 262guidelines 23
Print APIused, for printing documents 130-132
printing architecture 102printing architecture, Apache FOP 104printing issues
debugging 112print test
performing, in Business Intelligence Publisher 111, 112
procedurebreakpoint, defining in 209debugging 207running 207
procedures, APEX_DEBUG_MESSAGE package
DISABLE_DEBUG_MESSAGES 202ENABLE_DEBUG_MESSAGES 202LOG_LONG_MESSAGE 202LOG_MESSAGE 202LOG_PAGE_SESSION_STATE 203REMOVE_DEBUG_BY_AGE 203REMOVE_DEBUG_BY_APP 203REMOVE_DEBUG_BY_VIEW 203REMOVE_SESSION_MESSAGES 203
Project Marvel 8prompt command 238p_scope parameter 50pulling method 31pushing method 31
Qquery 262query one row 262
Rrelations 20remote debugging
about 209, 210performing, in APEX 210
REMOVE_DEBUG_BY_AGE procedure 203REMOVE_DEBUG_BY_APP procedure 203REMOVE_DEBUG_BY_VIEW
procedure 203REMOVE_SESSION_MESSAGES
procedure 203report
32K limit, bypassing on 133chart, adding to 122-125creating, in multiple formats 120-122creating, with Business Intelligence
Publisher 115dynamic images, adding to 125-130linking, to application 119, 120testing, against Apache FOP 108
report, creating with Business Intelligence Publisher
about 115report layout, designing 116report layout, uploading 118report query, creating 115, 116
report layoutdesigning 116uploading 118
report layout, designingabout 116with RTF template (MS Word) 117XML data, downloading 117
report querycreating 115, 116
Reports 2 PDF plugin 135reports regions
protecting 165Repository Creation Utility (RCU) 110Representational State Transfer (REST) 9RESTful web services
about 261, 262characteristics 261
RESTful Web Services creation wizardsteps 263-266
Rich Text Format (RTF) 103Rollups 81, 82Row Level Security 139, 142RTF template (MS Word)
report layout, designing 117
www.it-ebooks.info

[ 276 ]
runtime environmentAPEX, installing on 10converting, into full development
environment 11, 12runtime exception
determining 149, 150runtime installation, APEX 156, 157
Ssave state before branch feature 191schema 7secure items, APEX
about 185application data 189fake input 189file upload items 188hidden items protection 186, 187instance security, managing 188item encryption 186items, of type password 187save state before branch feature 191
Secure Socket Layer. See SSLsecurity 137security attributes 170security considerations, for developer
about 162authorization and authentication
plugin 184, 185browser attacks 163browser security attributes 183security attributes 170SQL injection 166URL tampering 179utilities 191
security considerations, HTTP server 152security implementation
in Oracle Application Express Listener 155security measures, for APEX
installation processabout 156Access Control Lists (ACLs) 157, 158builders, enabling 158password complexity rules 161patching strategy 162runtime installation, determining 156, 157session timeout 159
security patch 162SELECT operation 262services, Oracle Public Cloud
application services 259Oracle Fusion CRM Cloud Service 259Oracle Fusion HCM Cloud Service 259Oracle Social Network Cloud Service 259
session state protectionused, for protecting against URL
tampering 179-183session timeout 159session timeout settings
at application level 160at instance level 159, 160
Single Sign On (SSO) 174single-table hash clusters
about 53-58URL 53
Sourceforge project 235source type 262SQL 195SQL injection
about 166avoiding 169insecure use, of variables 167, 168rules, for prevention 166
SQL*Plus 139, 239SSL
enabling, for web server 155, 156static areas
protecting 165subscribe and publish mechanism, APEX
about 30, 31benefits 30
Subversionabout 232working with 233-235
Subversion clientabout 232installing 232
Sumneva 193SVN Update option 235syntax overview, analytic functions 61-63SYS_CONTEXT function
about 146, 147used, for accessing stored values in
Application Context 146
www.it-ebooks.info
[ 277 ]
SYS.DBMS_ASSERT package 169system application 35
TTable Dictionary 25tablespaces
about 10images directory 11tablespace_apex 11tablespace_files 11tablespace_temp 11
team development 250template 262template application
about 33creating 33
Template Builderabout 116URL, for downloading 122
template workspace 36terminologies, RESTful web services
handler 262module 262PL/SQL 262query 262query one row 262source type 262template 262
TKPROF 218Tortoise Subversion 232trace file 217tracing 217
UURL tampering 179User Interface Defaults
about 25, 26creating 26using 26-28
userscreating, in workspace 24
utilities, APEXabout 191application dashboard 191
utility reportsused, for troubleshooting in APEX 220
UTL_ENCODE.BASE64_ENCODE function 127
UTL_HTTP RDBMS package 103UTL_RAW.CAST_TO_VARCHAR2
function 127
Vversion control, APEX 231Virtual Private Database. See VPDVPD
about 139, 144implementing, in APEX 148, 149runtime exception, determining 149, 150using 139
VPD policyabout 139purpose 140
VPD policy function 139-143vulnerabilities assessment
flowchart 167
WWebDB
about 7versus APEX 7
Web Developer form 214Web Developer plugin 213Web Developer toolbar 213web listener
securing 151WebLogic 14web server
APEX Listener 7, 14, 15EPG 7, 13OHS 7, 13selecting 12SSL, enabling for 155, 156
weighted page performance 255-257WHERE clause 142workspace
administrators, creating 24creating 23, 24developers, creating 24users, creating 24
WWV_FLOW_API.SET_ENABLE_ APP_DEBUGGING 205
www.it-ebooks.info

[ 278 ]
XXML data
downloading 117
YYslow
about 216URL, for downloading 216
www.it-ebooks.info

Thank you for buying Oracle APEX Best Practices
About Packt PublishingPackt, pronounced 'packed', published its first book "Mastering phpMyAdmin for Effective MySQL Management" in April 2004 and subsequently continued to specialize in publishing highly focused books on specific technologies and solutions.
Our books and publications share the experiences of your fellow IT professionals in adapting and customizing today's systems, applications, and frameworks. Our solution based books give you the knowledge and power to customize the software and technologies you're using to get the job done. Packt books are more specific and less general than the IT books you have seen in the past. Our unique business model allows us to bring you more focused information, giving you more of what you need to know, and less of what you don't.
Packt is a modern, yet unique publishing company, which focuses on producing quality, cutting-edge books for communities of developers, administrators, and newbies alike. For more information, please visit our website: www.packtpub.com.
About Packt EnterpriseIn 2010, Packt launched two new brands, Packt Enterprise and Packt Open Source, in order to continue its focus on specialization. This book is part of the Packt Enterprise brand, home to books published on enterprise software – software created by major vendors, including (but not limited to) IBM, Microsoft and Oracle, often for use in other corporations. Its titles will offer information relevant to a range of users of this software, including administrators, developers, architects, and end users.
Writing for PacktWe welcome all inquiries from people who are interested in authoring. Book proposals should be sent to [email protected]. If your book idea is still at an early stage and you would like to discuss it first before writing a formal book proposal, contact us; one of our commissioning editors will get in touch with you.
We're not just looking for published authors; if you have strong technical skills but no writing experience, our experienced editors can help you develop a writing career, or simply get some additional reward for your expertise.
www.it-ebooks.info

Oracle Application Express 4.0 with Ext JSISBN: 978-1-849681-06-3 Paperback: 392 pages
Deliver rich, desktop-styled Oracle APEX applications using the powerful Ext JS JavaScript library
1. Build robust, feature-rich web applications using Oracle APEX and Ext JS
2. Add more sophisticated components and functionality to an Oracle APEX application using Ext JS
3. Build your own themes based on Ext JS into APEX - developing templates for regions, labels, and lists
4. Create plug-ins in your application workspace to enhance the existing built-in functionality of your APEX applications
Oracle APEX 4.0 CookbookISBN: 978-1-849681-34-6 Paperback: 328 pages
Over 80 great recipes to develop and deploy fast, secure, and modern web applications with Oracle Application Express 4.0
1. Create feature-rich web applications in APEX 4.0
2. Integrate third-party applications like Google Maps into APEX by using web services
3. Enhance APEX applications by using stylesheets, Plug-ins, Dynamic Actions, AJAX, JavaScript, BI Publisher, and jQuery
4. Hands-on examples to make the most out of the possibilities that APEX has to offer
Please check www.PacktPub.com for information on our titles
www.it-ebooks.info
Oracle Application Express 3.2 - The Essentials and MoreISBN: 978-1-847194-52-7 Paperback: 644 pages
Develop Native Oracle database-centric web applications quickly and easily with Oracle APEX
1. Grasp the principles behind APEX to develop efficient and optimized data-centric native web applications, for the Oracle environment
2. Gain a better understanding of the major principles and building blocks of APEX, like the IDE and its modules
3. Review APEX-related technologies like HTML and the DOM, CSS, and JavaScript, which will help you to develop better, richer, and more efficient APEX applications
Oracle Application Express Forms ConverterISBN: 978-1-847197-76-4 Paperback: 172 pages
Convert your Oracle Forms applications to Oracle APEX successfully
1. Convert your Oracle Forms Applications to Oracle APEX
2. Master the different stages of a successful Oracle Forms to APEX conversion project
3. Packed with screenshots and clear explanations to facilitate learning
4. A step-by-step tutorial providing a proper understanding of Oracle conversion concepts
Please check www.PacktPub.com for information on our titles
www.it-ebooks.info