2021-2022 Student Registration Community Unit School District 200 06/01/2021 For new students enrolling in District 200, most of the registration process is completed at the student’s school where required forms have been submitted and your student has been assigned a student ID number. The steps outlined below are the last steps of the registration process for new enrollments and the only two steps for registering returning students. Important and required student information is reviewed and updated and registration fees are processed. To complete registering your student(s), following the 2-step process outlined for each student: Log into ParentVUE to Review/Update Student Information Log into ParentVUE to Review/Update Student Information If you have not already created your ParentVUE account, please contact your student’s school and request an Activation Letter and ParentVUE Instructions to create and use your ParentVUE account. Student information can be updated through ParentVUE with the exception of address. To update address information, please contact the school your student attends. Proof of Residency documents verifying the updated address will be required. Once your ParentVUE account has been created, log into your ParentVUE account and follow the steps below: Step 1 On the Home Screen, use the drop- down in the upper left-hand corner to select each student. Step 2 Log into MySchoolBucks and Pay Registration Fees Step 1
Transcript
2021-2022 Student Registration Community Unit School District 200 06/01/2021
For new students enrolling in District 200, most of the registration process is completed at the student’s school where required forms have been submitted and your student has been assigned a student ID number.
The steps outlined below are the last steps of the registration process for new enrollments and the only two steps for registering returning students. Important and required student information is reviewed and updated and registration fees are processed.
To complete registering your student(s), following the 2-step process outlined for each student:
Log into ParentVUE to Review/Update Student Information
Log into ParentVUE to Review/Update Student Information
If you have not already created your ParentVUE account, please contact your student’s school and request an Activation Letter and ParentVUE Instructions to create and use your ParentVUE account. Student information can be updated through ParentVUE with the exception of address. To update address information, please contact the school your student attends. Proof of Residency documents verifying the updated address will be required. Once your ParentVUE account has been created, log into your ParentVUE account and follow the steps below:
Step 1
On the Home Screen, use the drop-down in the upper left-hand corner to select each student.
Step 2 Log into MySchoolBucks and Pay Registration Fees
Select Student Info Click the Edit Information button in the upper left had corner.
Enter any necessary information. Scrolling down, update Student info, Physician and Dentist information as well as Student Phone Numbers and Emergency Contacts as necessary by entering data under the Changed Value column.
Scroll down and fill confirm that you agree to the district’s Acceptable Access and Use of Technology Agreement. Response is required in order to complete to complete registration.
Scroll down to the next section and set Student Permissions.
If you have not yet responded to the Acceptable Access and Use of Technology question referenced later in this document you will see the error shown below.
Scroll down to the next sections and indicate any interpreter requirements and also update Race and Ethnicity information as necessary.
The next section pertains only to parents of preschool students. Parents are requested to click the links and enter important information regarding their students.
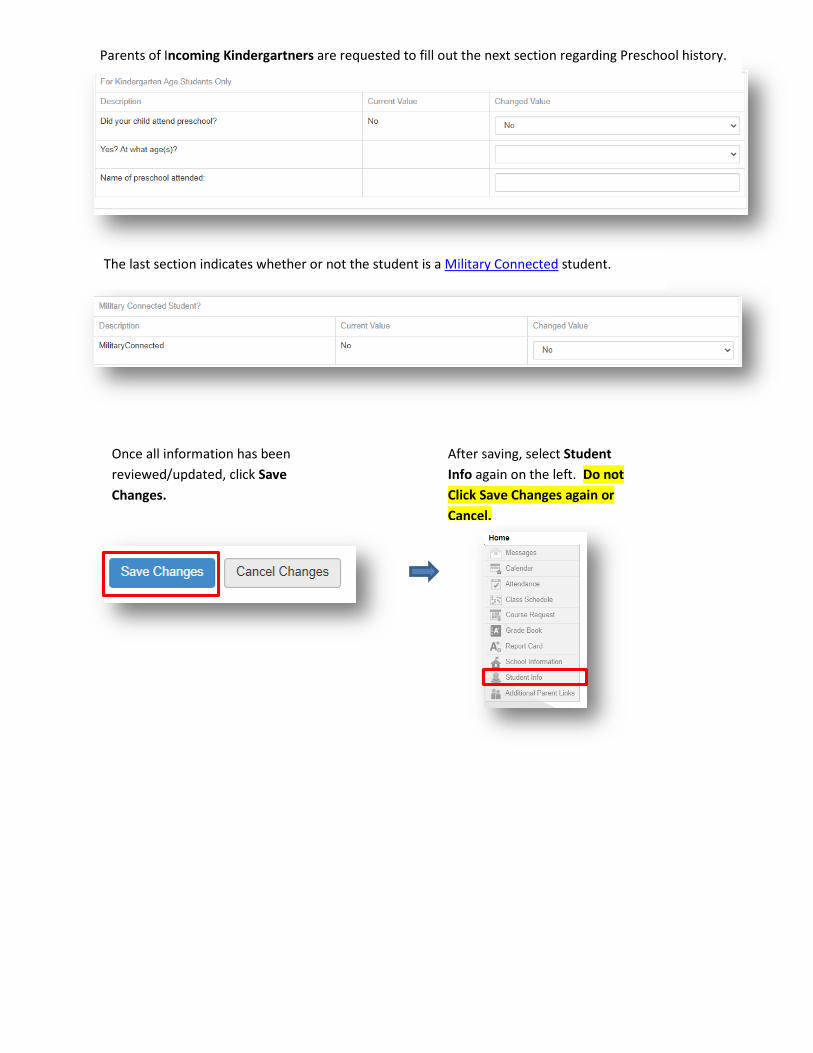
Parents of Incoming Kindergartners are requested to fill out the next section regarding Preschool history.
The last section indicates whether or not the student is a Military Connected student.
Once all information has been reviewed/updated, click Save Changes.
After saving, select Student Info again on the left. Do not Click Save Changes again or Cancel.
Registration fees paid before July 1st are applicable for the Early Bird Rate. Registration fees paid after June 30th will be at the regular rate. High School Course Fees will not be posted until at least 20 days after the start
of the semesters in order to allow for any initial schedule changes. Click here for complete fee information.
If you do not already have a MySchoolBucks Account, you will need to create an account to pay your students fees online.
MySchoolBucks accounts can be set up on a computer, laptop, mobile device or IPad. Once your account is set up you can access from any device with your login. There is no fee for a MySchoolBucks account. The set-up is the same on whichever device you choose to set up your account.
Step 2
This is the App if you choose to download on a mobile device or IPad. Select Sign-Up
On a computer/laptop the website is www.MySchoolBucks.com. Select Sign-Up.
Once your MySchoolBucks account has been created, login at www.MySchoolBucks.com
Enter your Username and password
Setting Up Your Account There are 3 steps to setting up your account. On a mobile device or IPad the 3 steps are one step per screen. On a computer or laptop all 3 steps are on the same screen.
Step 1 of 3 is the parent information. The district you will choose is “Wheaton Warrenville Community Unit School District 200”. Follow the prompts on each screen.
Step 2 of 3 are your security questions used if you ever need to reset your password or have trouble with your login to gain access.
Step 3 of 3 is to agree to the policy for MySchoolBucks.
Click the Avitar in the upper right hand corner and select My Students from the menu.
Students already associated with your account will be listed. Click Add Student to add any of your students not listed to your account.
All fields on the Add Student screen are required. Student name must be the student’s legal name used in the school enrollment process. You must enter the student ID number. Required student information can be found in your ParentVUE account on the Student Info tab or you may contact their school.
Click Find Student and add the student to your account.
Adding Students to Your Account
Each student must be associated with your account if you have not already added them.
On the Website
Click the Hamburger button in the upper right hand corner and select Add Student.
If you know your student’s ID number, you can click continue or you can access your student’s ID number through your ParentVUE account. This will be the quickest way to complete adding your student to your account. This is only available through a mobile device - You can click Request Student ID and this will send an email to the school. This will take longer as it will only be accessible on school days. You will not have the option to Request Student ID from a computer or laptop.
Once you have successfully logged in to your account and your students are correctly associated with your account, you will first see the School Invoices screen where fees can be processed. Current and prior outstanding balances will be available for payment.
Click Add All Invoices to Basket to pay all invoices or click Add To Basket to pay individual invoices.
Select View Cart/Checkout to process payments.
On the App
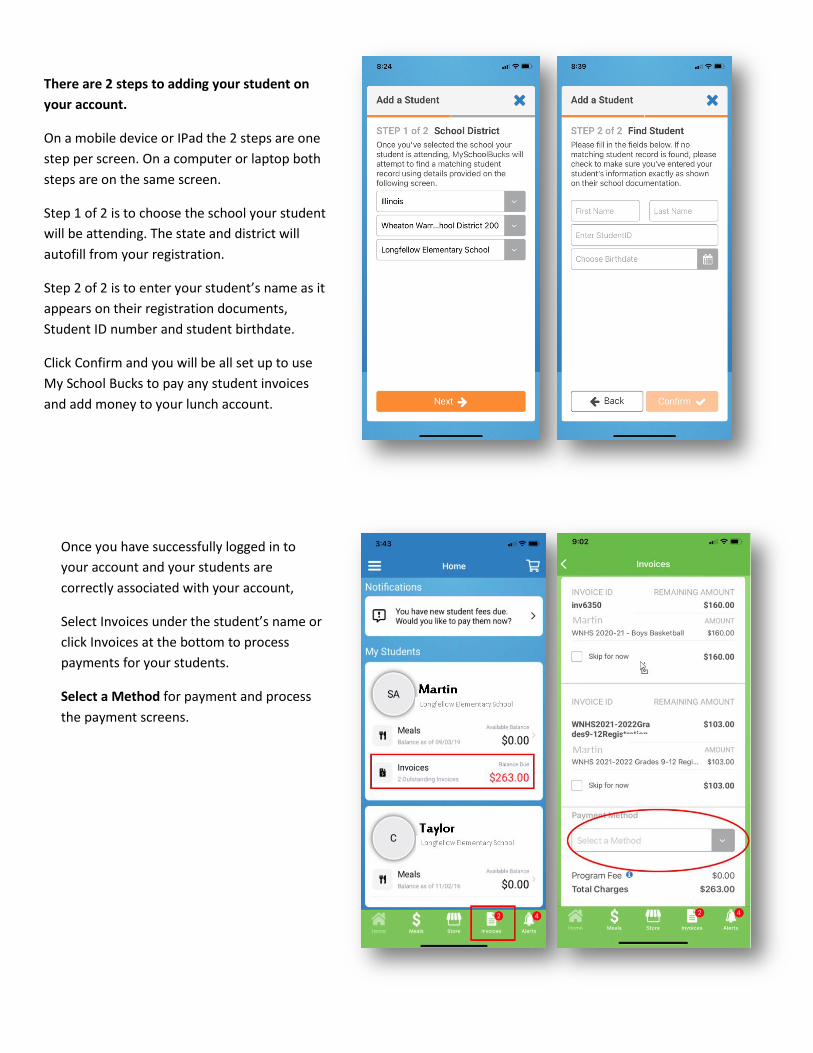
There are 2 steps to adding your student on your account.
On a mobile device or IPad the 2 steps are one step per screen. On a computer or laptop both steps are on the same screen.
Step 1 of 2 is to choose the school your student will be attending. The state and district will autofill from your registration.
Step 2 of 2 is to enter your student’s name as it appears on their registration documents, Student ID number and student birthdate.
Click Confirm and you will be all set up to use My School Bucks to pay any student invoices and add money to your lunch account.
Once you have successfully logged in to your account and your students are correctly associated with your account,
Select Invoices under the student’s name or click Invoices at the bottom to process payments for your students.
Select a Method for payment and process the payment screens.
Contact Information
Assistance with ParentVUE
If you experience any difficulties using ParentVUE please contact your child's school first.
If your child's school is unable to resolve the problem, they will get you the assistance you need or you can email [email protected] or call the ParentVUE Support Line at 630-784-7396.
Please include your name, phone number, student ID number(s) as well as a brief description of the problem you are experiencing.
Assistance with MySchoolBucks
Please contact child’s school first for information regarding the balance of your account, refunds, balance transfers, or if your child appears to be enrolled in the wrong school. During the summer months, if your child’s school is closed, please call the District Office at 630-682-2000.
For MySchoolBucks technical issue, please call Parent Support at 855-832-5226 or email [email protected]