READ THE INSTRUCTIONS THOROUGHLY AND COMPLETELY BEFORE BEGINNING THE INSTALLATION. Please double check the parts list before beginning installation, to ensure all parts are present. If there is something missing, please contact Maxtrac Suspension immediately (714) 630-0363 PRIOR TO INSTALLATION: 1. Factory service manual is recommended to have on hand. 2. Secure and properly block vehicle prior to beginning installation 3. Always wear safety glasses when using power tools or working under the vehicle 4. Modifications to any part will void the warranty associated with that product. AFTER REMOVING PARTS FROM VEHICLE, SAVE HARDWARE FOR REINSTALLATION. NOTE *WILL NOT WORK ON VEHICLES EQUIPPED WITH MAGNETIC RIDE CONTROL OR AUTO RIDE STRUTS/SHOCKS 2007-18 GM 1500 2WD/4WD LOWERING STRUTS 2007-18 GM SUV 2WD/4WD LOWERING STRUTS 221303 PARTS LIST: (1) Adjustable strut (1) lower coil seat (1) retainer clip
Transcript
READ THE INSTRUCTIONS THOROUGHLY AND COMPLETELY BEFORE BEGINNING THE INSTALLATION.
Please double check the parts list before beginning installation, to ensure all parts are present. If there is something missing, please contact Maxtrac Suspension immediately (714) 630-0363
PRIOR TO INSTALLATION:1. Factory service manual is recommended to have on hand.2. Secure and properly block vehicle prior to beginning installation3. Always wear safety glasses when using power tools or working under the vehicle4. Modifications to any part will void the warranty associated with that product.
AFTER REMOVING PARTS FROM VEHICLE, SAVE HARDWARE FOR REINSTALLATION.
NOTE
*WILL NOT WORK ON VEHICLES EQUIPPED WITH MAGNETIC RIDE CONTROL OR AUTO RIDE STRUTS/SHOCKS
READ THE INSTRUCTIONS THOROUGHLY AND COMPLETELY BEFORE BEGINNING THE INSTALLATION.
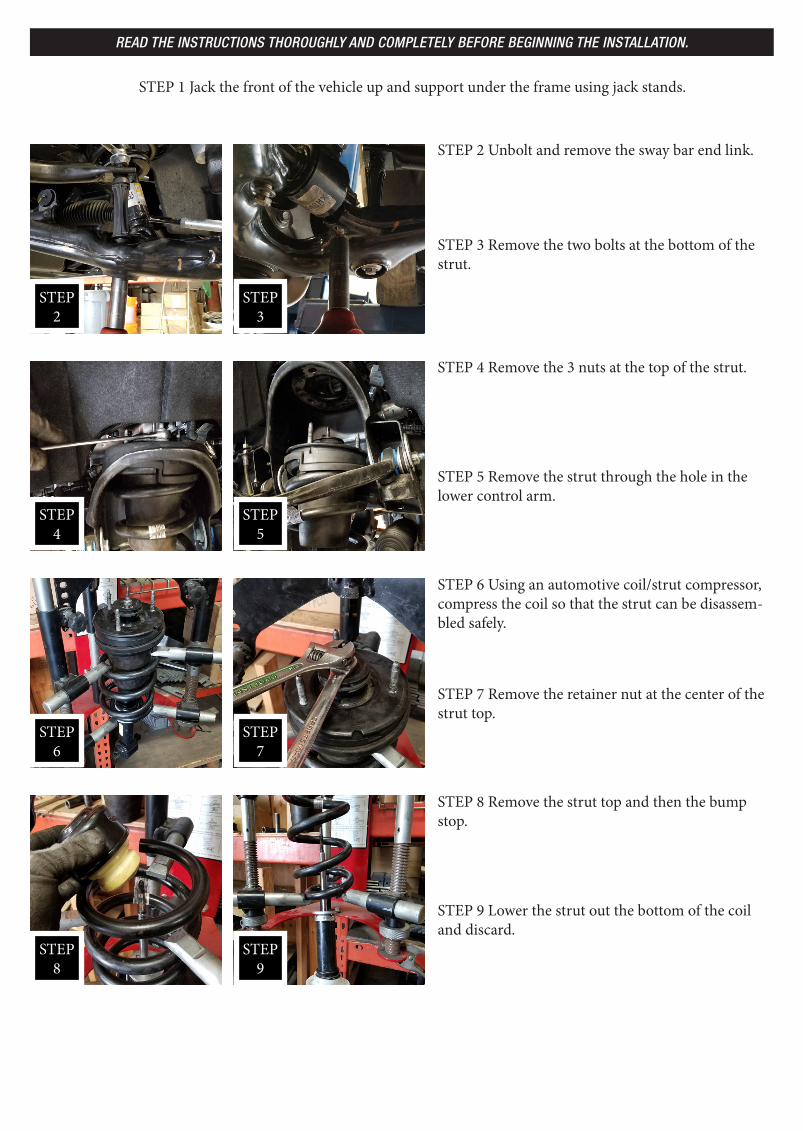
STEP 3 Remove the two bolts at the bottom of the strut.
STEP 4 Remove the 3 nuts at the top of the strut.
STEP 2 Unbolt and remove the sway bar end link.
STEP 5 Remove the strut through the hole in the lower control arm.
STEP 1 Jack the front of the vehicle up and support under the frame using jack stands.
STEP 6 Using an automotive coil/strut compressor, compress the coil so that the strut can be disassem-bled safely.
STEP 7 Remove the retainer nut at the center of the strut top.
STEP 8 Remove the strut top and then the bump stop.
STEP 9 Lower the strut out the bottom of the coil and discard.
STEP 2
STEP 9
STEP 8
STEP 7
STEP 6
STEP 5
STEP 4
STEP 3
READ THE INSTRUCTIONS THOROUGHLY AND COMPLETELY BEFORE BEGINNING THE INSTALLATION.
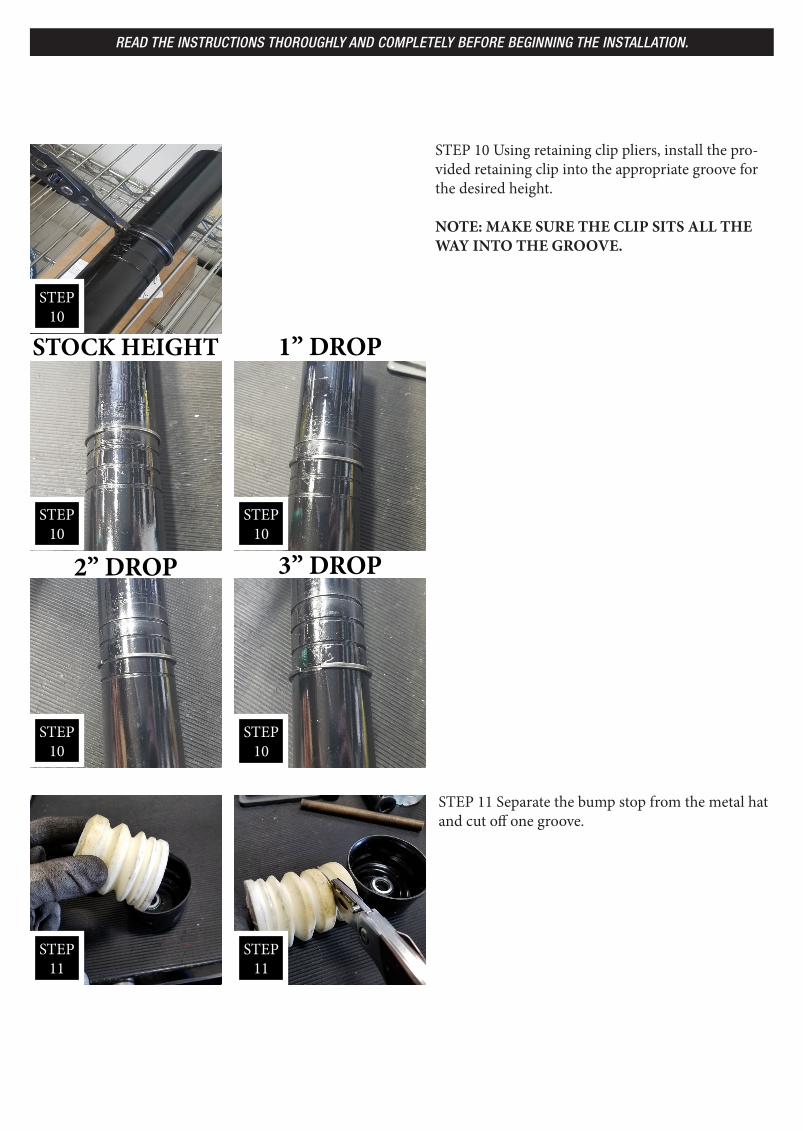
STEP 10 Using retaining clip pliers, install the pro-vided retaining clip into the appropriate groove for the desired height.
NOTE: MAKE SURE THE CLIP SITS ALL THE WAY INTO THE GROOVE.
STEP 11 Separate the bump stop from the metal hat and cut off one groove.
STEP 10
STEP 10
STEP 10
STEP 10
STEP 11
STEP 10
STEP 11
STOCK HEIGHT 1” DROP
3” DROP2” DROP
READ THE INSTRUCTIONS THOROUGHLY AND COMPLETELY BEFORE BEGINNING THE INSTALLATION.
STEP 13 Install the bump stop onto the shaft of the shock without the metal hat.
STEP 14 Re-install all of the strut top components.
STEP 15 Tighten down the top retaining nut.
STEP 16 Reverse the removal steps to install the new strut back into the truck.
NOTE: THE FACTORY LOWER BOLT CLIPS WILL NEED TO BE REMOVED FROM THE FACTORY STRUT AND RE-INSTALLED ONTO THE NEW STRUT.
STEP 12 Slide the provided lower coil seat onto the strut and then install the strut into the coil. (
STEP 13
STEP 14
STEP 12
STEP 11
STEP 166
STEP 15
NOTE: THE 3 MOUNTING STUDS ON THE STRUT TOP ARE NOT SYMMETRICAL. BE-FORE RELEASING THE COIL FROM THE COMPRESSOR, MAKE SURE THE TOP AND BOTTOM MOUNTS ARE CLOCKED IN THE CORRECT POSITION.