22
By Fernando Andrea & Julio Cabos Making a diorama step-by-step ‘The Andrea way’

ByFernandoAndrea
&Julio Cabos
Making a diorama step-by-step‘The Andrea way’

2
NO SWIMMING
INDEX1. INTRODUCTION . . . . . . . . . . . . . . . . . . . . . . . . . . . . . . . 03
2. BUILDING THE GROUND . . . . . . . . . . . . . . . . . . . . . . . . 04
3. GROUND PAINTING . . . . . . . . . . . . . . . . . . . . . . . . . . . 08
4. PAINTING OF THE FIGURE . . . . . . . . . . . . . . . . . . . . . . . 14
5. THE WATER . . . . . . . . . . . . . . . . . . . . . . . . . . . . . . . . . . 17
6. THE FINISHED DIORAMA . . . . . . . . . . . . . . . . . . . . . . . . 18
3
NO SWIMMING
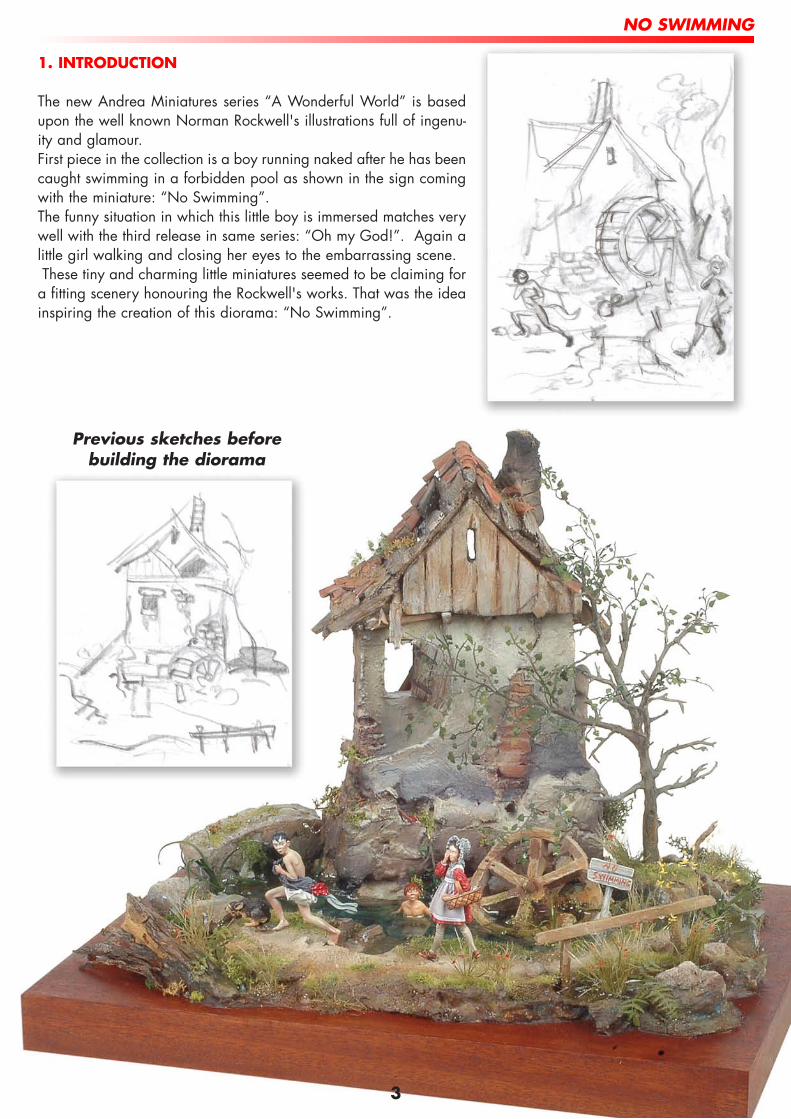
1. INTRODUCTION
The new Andrea Miniatures series “A Wonderful World” is basedupon the well known Norman Rockwell's illustrations full of ingenu-ity and glamour.First piece in the collection is a boy running naked after he has beencaught swimming in a forbidden pool as shown in the sign comingwith the miniature: “No Swimming”.The funny situation in which this little boy is immersed matches verywell with the third release in same series: “Oh my God!”. Again alittle girl walking and closing her eyes to the embarrassing scene.These tiny and charming little miniatures seemed to be claiming fora fitting scenery honouring the Rockwell's works. That was the ideainspiring the creation of this diorama: “No Swimming”.
Previous sketches beforebuilding the diorama

NO SWIMMING
2. BUILDING THE GROUNDBy Fernando Andrea
One of the most important things in building asmall diorama like this is the initial plan. It is thus advis-able to draw some sketches in advance till the defini-tive layout is settled considering all the different partscoming into the composition as the façade, woodbeams, tiles, vegetation and artificial water. In thisway the whole work will go much easier and the resultmuch more rewarding.
01
1: A rough attempt to the dioramausing 5mm foam board for the roofbase and the façade and 10mmsheet for the ground. Foam boardsheets can be easily cut off with ahobby craft blade and slightlybended too.
2: The foam board sheet is coveredwith a mix of plaster, white glueand water.
3: Once the mixture is dry, we willsandpaper and carve some detailskind of chippings by using a punchor blade. This technique was usedin making the façade, the chimneyand the bridge.
4
02 03

NO SWIMMING
5
4: A chipboard plank is used for thepool's bed. A paper template is pre-pared in advance as a guide for thecarving.
5: A small drill is used in getting thesocket even.
6: Once the rough work is finished, itis the time to line the chipboardwith fine wooden sheets.
7: Finishing with some sandpapering.
8: Finally, we cover the surface withmore wooden sheet and cut awaythe pool bed according with thepattern previously used.
9: The figure of the boy placedinto the water must be treat-ed as a part of the ground asit should be assembled beforepouring the resin representingthe water. It is a conversion ofthe Andrea's “Little Boy”coded S4-A02 in which detailshas been removed beforeinserting some wires torebuild arms and legs.
10: Re building the figure withputty.
04
05
06 07 08
09 10

6
NO SWIMMING
11: We will work the other elements on theground as we did with the boy in thewater. We won't glue those elementsonto the ground yet to make thesubsequent painting easier. In the picturewe can clearly notice the elements madefrom balsa wood (very light and easy towork with) as for example the shutters,the wood beams, the roof, the attic, themill wheel, the path handrail and themetal tree (Andrea SG-26) with twistedbranches in a natural way, or the naturalelements also used as little roots,branches or stones. The work on stones,bricks and cracks on the plaster façadeand the bridge is enhanced with a softpencil.
11
12
12: To apply some texture to the poolbed and banks we will use somefine sand and small rocks spared ona coat of fresh white glue.
13: The tiles are made one by one withputty bending them while the puttyis still curing. In the picture we cansee the pattern used to obtain aneven thickness in all tiles.
14: Details of the roof where we can seethe work made with balsa wood inthe beams. The tiles are made withAndrea Sculp. Some vegetable ele-ments are included too.
13
14

NO SWIMMING
15
15: Detail of the mill wheelwith its arms misplaced.
16: Rear view. Note thecarving on the plastercoating.
17: We add some small stonesto the bridge to get a morerealistic finish.
18: Once the diorama isplanned, we work with theartificial vegetableelements, as the tree orplants, which will be madewith metal and photoetched parts. First of all wewill make some drills onthe tree to assemble thebranches.
19: Then, we place the allbranches, natural or not,filling the gaps with putty.
16 17
7
18
19
Andrea SculpCode: ASCULP
8
NO SWIMMING
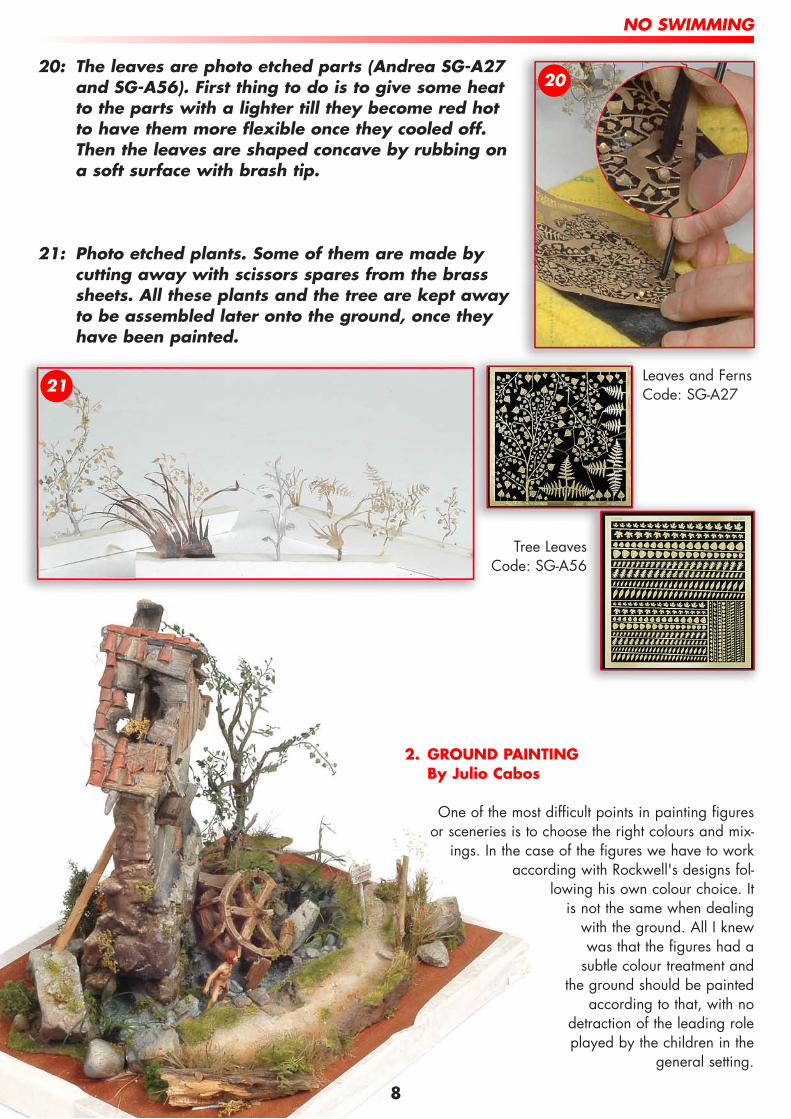
20: The leaves are photo etched parts (Andrea SG-A27and SG-A56). First thing to do is to give some heatto the parts with a lighter till they become red hotto have them more flexible once they cooled off.Then the leaves are shaped concave by rubbing ona soft surface with brash tip.
21: Photo etched plants. Some of them are made bycutting away with scissors spares from the brasssheets. All these plants and the tree are kept awayto be assembled later onto the ground, once theyhave been painted.
Leaves and FernsCode: SG-A27
Tree LeavesCode: SG-A56
20
21
2. GROUND PAINTINGBy Julio Cabos
One of the most difficult points in painting figuresor sceneries is to choose the right colours and mix-
ings. In the case of the figures we have to workaccording with Rockwell's designs fol-
lowing his own colour choice. Itis not the same when dealingwith the ground. All I knewwas that the figures had asubtle colour treatment and
the ground should be paintedaccording to that, with no
detraction of the leading roleplayed by the children in the
general setting.

23
9
NO SWIMMING
2222: There should be no
doubt in that the air-brush is the most con-venient tool in paintinga ground. In this casewe will prepare a basemixed colour like that:XNAC-41 ochre +XNAC-51 wood +XNAC-52 burnt Siena.
23: A light coat is givennow to the wholeground with ochreXNAC-41.
24: The river bed will beshaded with a greyblue tone to make itlook different form thepath. We use the toneN 3 from the BlackPaint Set (ACS-02) soenhancing both riverbanks.
25: The next step is a sub-tle dry brushing on thewhole ground, includ-ing the stones on themiddle of the river. Wewill use here pearlgrey XNAC-22, whichmight look too lightwhen compared withthe base colour, but thecontrast will be consid-erably reduced afterapplying some glazeswith inks.
24
25
60 acrylic colours

10
NO SWIMMING
26: Next step will be the differentglazes carefully applied on theground to enhance details addingchromatic richness. To this pur-pose we mix different ink tones(blue + brown, green + brown,etc.) according to the part of theground we are working in. Thesemixtures must be diluted withwater, kind of watercolour, toavoid the apparition of little ringswhen drying.
27
27: The glazes on the river bed are very importantbecause the water will be quite transparent andwill reflect the colour of the bottom. Same as wedid with other parts of the scenery we can intro-duce different shades here. Kind of example, weused a mixture with green + blue + a little bit ofdiluted brown and then let it dry. Glazes intensi-ty varies when drying according with theamount of water. By adding more or less waterwe will produce lighter or darker shades respec-tively.
28: We go on working with the ground assemblingsome vegetation elements as the tree in thiscase. It is possible that once the shading processis finished using the ink paint set some extradry-brushing may be required her and there.
28
26

NO SWIMMING
29 30 31 32
32: In this picture we can see in detailthe woods on the roof and the tileswhich were painted with a mixtureof XNAC-47 reddish brown + XNAC-36 dark orange, for the base colour.The woods of the roof were treatedwith glazes of brown ink + blue forthe older ones and a less wateredbrown ink for the newer.
33: Before adding vegetation we shouldblur any ring left over by the inks.Then we add some pigment(Pigmentset-01) on the main pathand some other spots on the groundso adding some extra enhancingshades to the whole scene.
29: Now is the turn for the ruined millwheel taking advantage of the prim-ing light grey colour (putty) that wewill save just as another light tone.The airbrush is used once againpainting the base colour with the fol-lowing mixture: XNAC-41 wood +ACS- 03: N2 White Paint Set.
30: Now we apply a shadow tone withXNAC-51 wood + ACS-02 Black PaintSet N 5.
31: Same as with the ground, we willuse inks to reinforce some shadowsand apply some other tones to thedifferent materials of the mill. Kind ofexample the bricks were paintedwith red ink + yellow + brown whilethe woods of the roof took a muchmore diluted brown ink. Shadingwas painted adding blue ink +brown.
11
33
Naturalpigments
Code:PIGMENTSET-01

12
NO SWIMMING
34: Now the base to the millwheel ispainted with XNAC-51 wood + XNAC-46 medium brown.
35: Shading the wheel with airbrush andBlack Paint Set N3.
36: We pint lights same way with XNAC-37 golden brown + XNAC-41 ochre +XNAC-46 medium brown.
37: We insist in the lights enhancing thewood texture at the same time bymean of a smooth dry brushing andthe same colour mixture.
38: Shading the wheel with washingswith different ink tones. A darkertone is used for weathering with arather dark tone (brown ink + greenink + black or blue ink). Sound woodwill be painted with brown ink + yel-low ink.
39: Base colour of the ferns (photo etch-ing): XNAC-13 light olive green +XNAC-05 English khaki.
40: Base colour of the tree leaves: XNAC-14 emerald green + XNAC-13 lightolive green + XNAC-37 golden brown+ XNAC-11 navy blue.
41: Leaf lights are painted airbrushingaccording with overhead lighting withXNAC-13 light olive green + XNAC-37golden brown.
34 35 36 37
38
40 41
39
NO SWIMMING
42 43
44
45 46
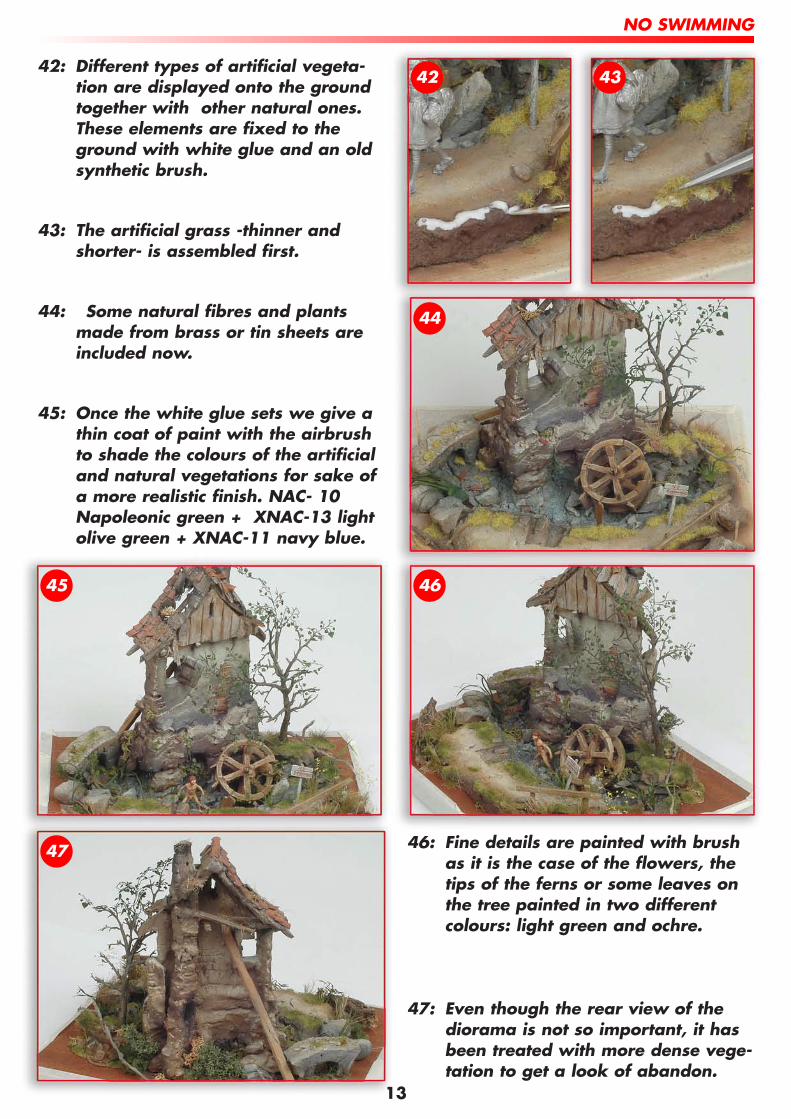
47 46: Fine details are painted with brushas it is the case of the flowers, thetips of the ferns or some leaves onthe tree painted in two differentcolours: light green and ochre.
47: Even though the rear view of thediorama is not so important, it hasbeen treated with more dense vege-tation to get a look of abandon.
42: Different types of artificial vegeta-tion are displayed onto the groundtogether with other natural ones.These elements are fixed to theground with white glue and an oldsynthetic brush.
43: The artificial grass -thinner andshorter- is assembled first.
44: Some natural fibres and plantsmade from brass or tin sheets areincluded now.
45: Once the white glue sets we give athin coat of paint with the airbrushto shade the colours of the artificialand natural vegetations for sake ofa more realistic finish. NAC- 10Napoleonic green + XNAC-13 lightolive green + XNAC-11 navy blue.
13
NO SWIMMING
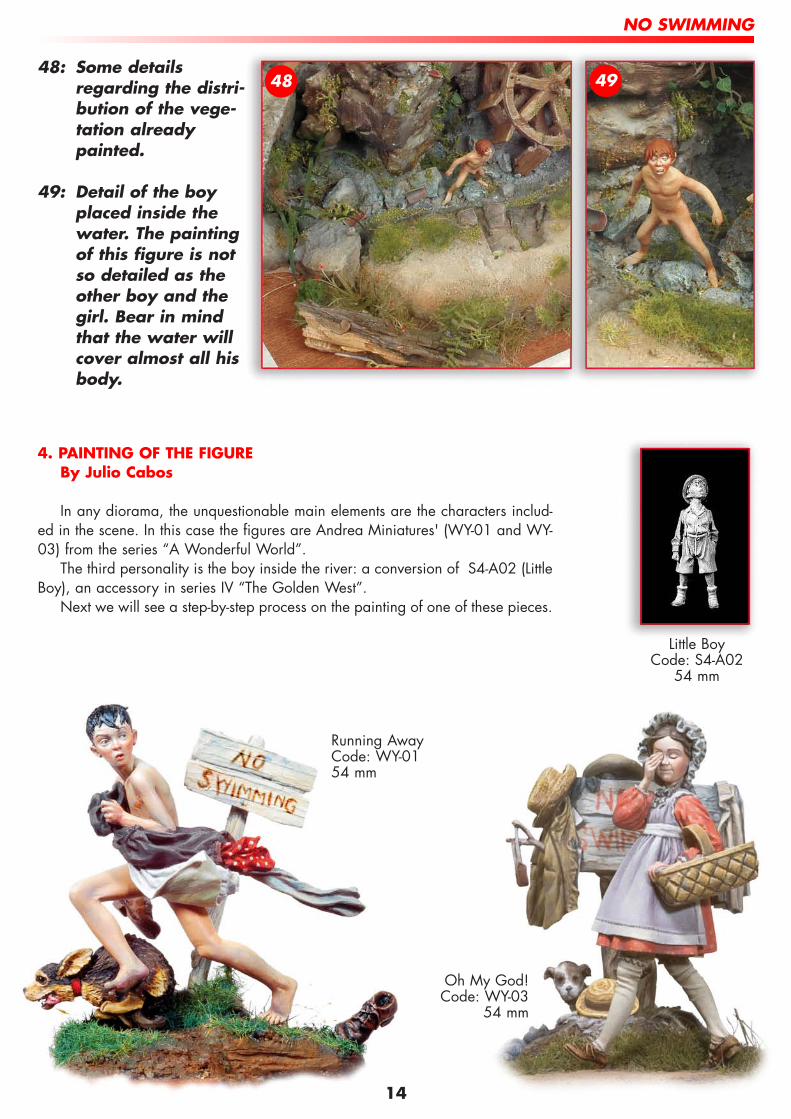
48: Some detailsregarding the distri-bution of the vege-tation alreadypainted.
49: Detail of the boyplaced inside thewater. The paintingof this figure is notso detailed as theother boy and thegirl. Bear in mindthat the water willcover almost all hisbody.
48 49
14
Running AwayCode: WY-0154 mm
Oh My God!Code: WY-03
54 mm
4. PAINTING OF THE FIGUREBy Julio Cabos
In any diorama, the unquestionable main elements are the characters includ-ed in the scene. In this case the figures are Andrea Miniatures' (WY-01 and WY-03) from the series “A Wonderful World”.
The third personality is the boy inside the river: a conversion of S4-A02 (LittleBoy), an accessory in series IV “The Golden West”.
Next we will see a step-by-step process on the painting of one of these pieces.
Little BoyCode: S4-A02
54 mm
15
NO SWIMMING
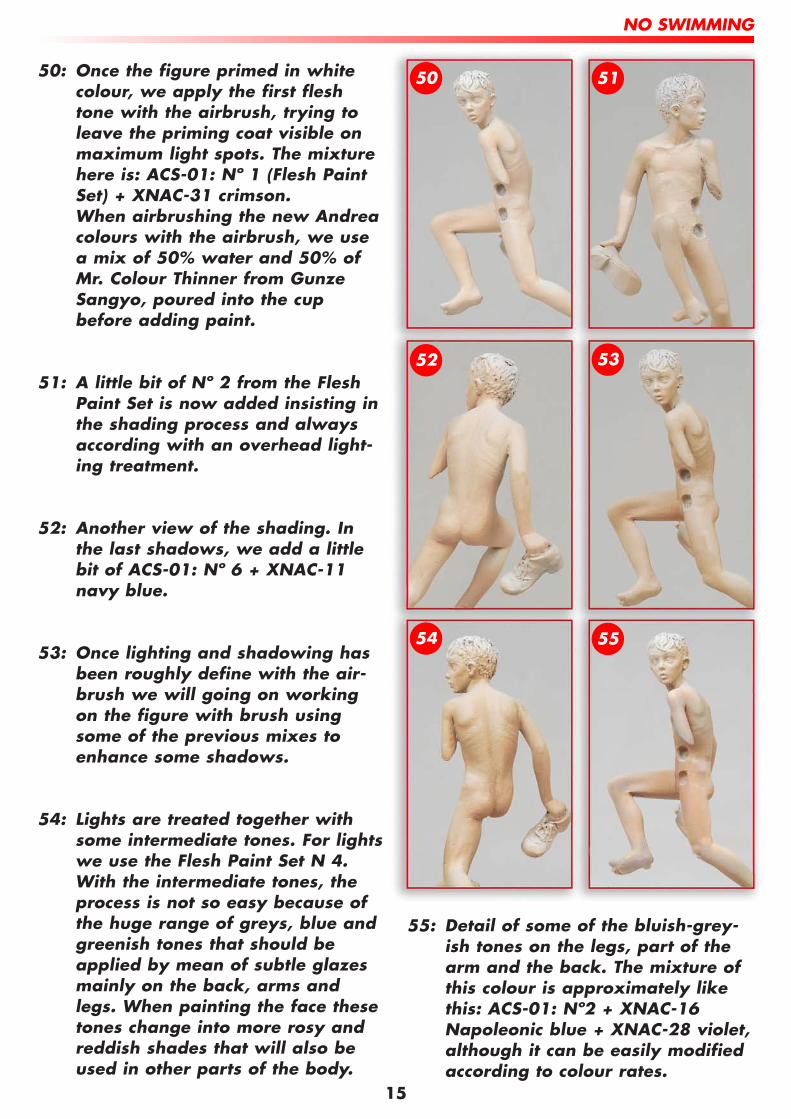
50: Once the figure primed in whitecolour, we apply the first fleshtone with the airbrush, trying toleave the priming coat visible onmaximum light spots. The mixturehere is: ACS-01: Nº 1 (Flesh PaintSet) + XNAC-31 crimson.When airbrushing the new Andreacolours with the airbrush, we usea mix of 50% water and 50% ofMr. Colour Thinner from GunzeSangyo, poured into the cupbefore adding paint.
51: A little bit of Nº 2 from the FleshPaint Set is now added insisting inthe shading process and alwaysaccording with an overhead light-ing treatment.
52: Another view of the shading. Inthe last shadows, we add a littlebit of ACS-01: Nº 6 + XNAC-11navy blue.
53: Once lighting and shadowing hasbeen roughly define with the air-brush we will going on workingon the figure with brush usingsome of the previous mixes toenhance some shadows.
54: Lights are treated together withsome intermediate tones. For lightswe use the Flesh Paint Set N 4.With the intermediate tones, theprocess is not so easy because ofthe huge range of greys, blue andgreenish tones that should beapplied by mean of subtle glazesmainly on the back, arms andlegs. When painting the face thesetones change into more rosy andreddish shades that will also beused in other parts of the body.
50
55: Detail of some of the bluish-grey-ish tones on the legs, part of thearm and the back. The mixture ofthis colour is approximately likethis: ACS-01: Nº2 + XNAC-16Napoleonic blue + XNAC-28 violet,although it can be easily modifiedaccording to colour rates.
52
54
51
53
55
16
NO SWIMMING
56 57
58 59
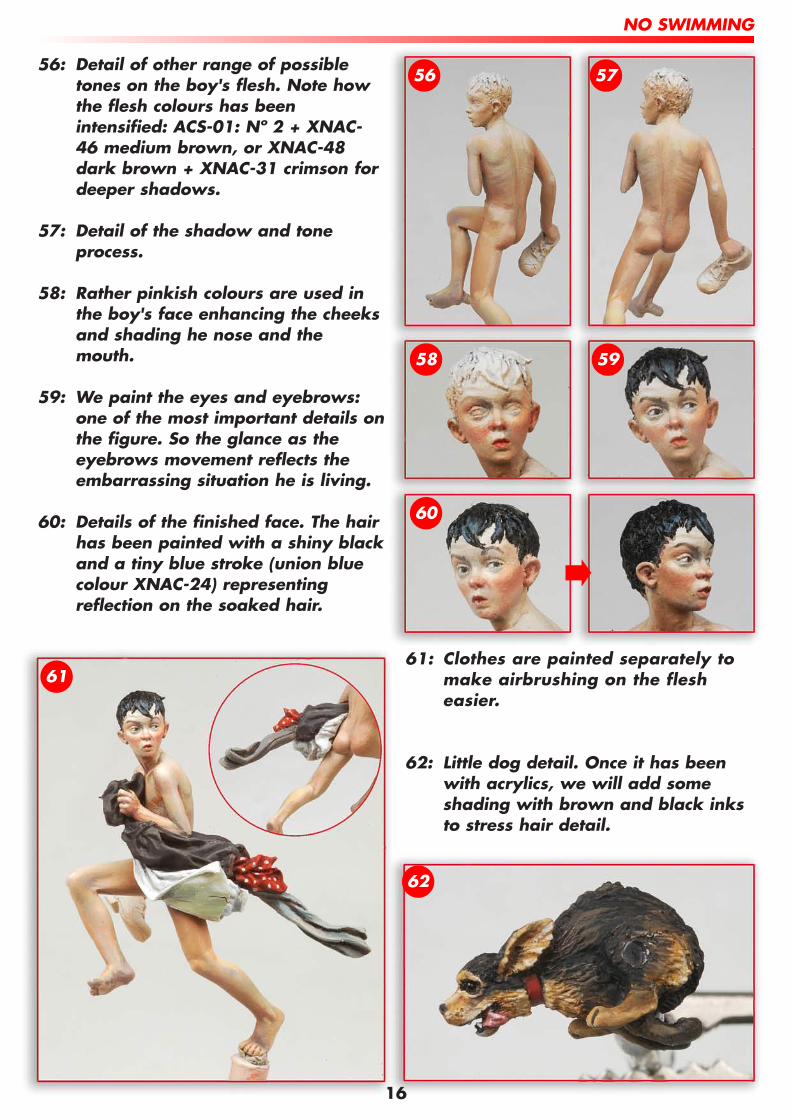
56: Detail of other range of possibletones on the boy's flesh. Note howthe flesh colours has beenintensified: ACS-01: Nº 2 + XNAC-46 medium brown, or XNAC-48dark brown + XNAC-31 crimson fordeeper shadows.
57: Detail of the shadow and toneprocess.
58: Rather pinkish colours are used inthe boy's face enhancing the cheeksand shading he nose and themouth.
59: We paint the eyes and eyebrows:one of the most important details onthe figure. So the glance as theeyebrows movement reflects theembarrassing situation he is living.
60: Details of the finished face. The hairhas been painted with a shiny blackand a tiny blue stroke (union bluecolour XNAC-24) representingreflection on the soaked hair.
60
61: Clothes are painted separately tomake airbrushing on the flesheasier.
62: Little dog detail. Once it has beenwith acrylics, we will add someshading with brown and black inksto stress hair detail.
61
62

17
NO SWIMMING
63
64
Artificial WaterCode: AAW
65
67. The mixture iscarefully pouredonto river bedand let dry.
68. Details of thewater alreadycured.
66 67
5. THE WATERBy Fernando Andrea
A good rendering of water in a diorama isnot a simple process even if we use theAndrea's artificial water, which detailed instruc-tions, should be attentively followed.
63. To make easier the product han-dling, we will pour the resinand the catalyst contents intoseparated containers.Extractions will be performedusing the syringes supplied withthe kit.
64. The working product rate is tworesin and one catalyser parts.
65. Both components are mixed inanother container.
66. The mix can be dyed with a lit-tle bit of oils if you wish.
68
www.andrea-miniatures.comwww.youtube.com/user/ANDREAMINIATURES

NO SWIMMING
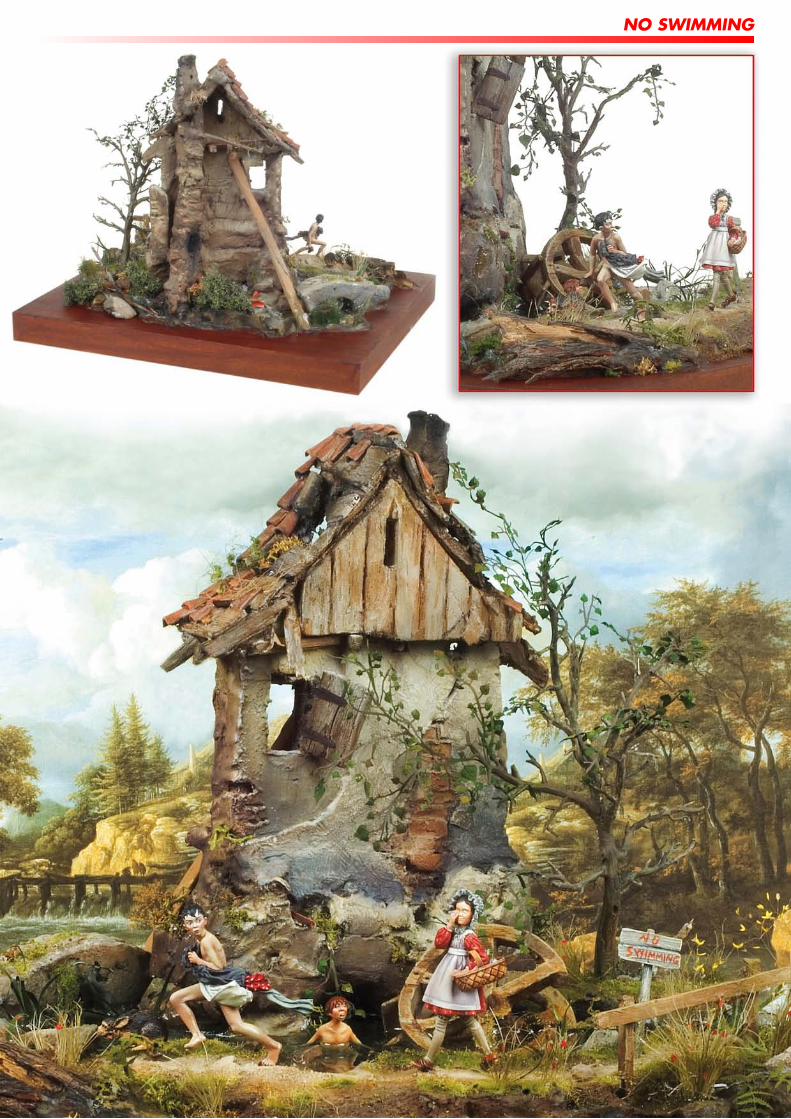
THE FINISHED DIORAMA
Once all prior steps have been completed, theplans we dreamed of at the beginning become a real-ity. Now we can see a series of views and details ofthe vignette.
We earnestly hope all the advices and tips in thisarticle could be useful for this and many other upcom-ing dioramas.
Fernando Andrea & Julio Cabos.
18
NO SWIMMING


