47
NETWORKED DIGITAL AUDIO RECORDER-PLAYER WITH EDITING Model DR-600 OWNER'S MANUAL

NETWORKED DIGITAL AUDIO RECORDER-PLAYER
WITH EDITING
Model DR-600
OWNER'S MANUAL

2
Warning Symbols
THE FOLLOWING WARNING SYMBOLS ARE USED ON THE PRODUCT IN THIS
MANUAL:
ENGLISH ATTENTION: REFER TO OWNER’S MANUAL FOR IMPORTANT INFORMATION.
FRANÇAIS ATTENTION: VEUILLEZ VOUS RÉFÉRER AU MODE D’EMPLOI POUR UNE INFORMATION IMPORTANTE.
ITALIANO ATTENZIONE: FATE RIFERIMENTO AL MANUALE PER INFORMAZIONI IMPORTANTI.
ESPAÑOL ATENTCION: FAVOR DE REFERIR AL MANUAL DE OPERACION POR INFORMACION IMPORTANTE.
ENGLISH WARNING: ELECTRICAL SHOCK HAZARD.
FRANÇAIS AVERTISSEMENT: DANGER DE CHOC ÉLECTRIQUE.
ITALIANO AVVERTIMENTO: PERICOLO DI SHOCK ELETTRICO.
ESPAÑOL ADVERTENSIA: PELIGRO DE CHOQUE ELECTRICO.
Safety Compliance Instant Replay II Plus complies with the following safety standards:
• UL 1950, Standard for Safety of Information Technology Equipment, Including Electrical Business Equipment.
• EN 60950, Standard for Safety of Information Technology Equipment, Including Electrical Business Equipment.
EU Declaration of Conformity Type of Equipment:
Professional Use Audio Equipment.
Conforms to the Following Standards:
EN55103-1 (Emission) (1997) Electromagnetic compatibility – Product family standard for audio, video, audio-visual and entertainment lighting control apparatus for professional use.
EN55103-2 (Immunity) (1997) Electromagnetic compatibility – Product family standard for audio, video, audio-visual and entertainment lighting control apparatus for professional use.
IEC950 2nd Edition, Amendment 1 (1992), Amendment 2 (1993) and Amendment 3 (1995); Safety of Information Technology and Business Equipment.

3
FCC Compliance This equipment complies with part 15 of the FCC rules. These limits are designed to provide reasonable protection against harmful interference when the equipment is operated in a commercial environment. This equipment generates, uses and can radiate radio frequency energy and if not installed and used in accordance with the owners manual, may cause interference to radio communications. Operation of this equipment in a residential area is likely to cause interference in which case the user will be required to correct the interference at his own expense.
This device will accept any interference received, including interference that may cause undesired operation. The user is cautioned that changes made to the equipment without the approval of the manufacturer could void the user's authority to operate this equipment. It is suggested that only shielded and grounded cables be used to ensure compliance with FCC rules.
Notice This Class A digital apparatus meets all requirement of the Canadian Interference-Causing Equipment Regulations.
Français:
Cet appariel numérique de la classe A respecte toute les exigences du Reglement sur le matériel brouilleur du Canada.
Company Address & Shipping Information Freight and mail may be sent to 360 Systems at the following address. Please call for a Returned Material
Authorization (RMA) number before returning equipment or parts.
360 Systems Customer Service 31355 Agoura Rd
Westlake Village, California 91361-4613 USA
Telephone (818) 991-0360, 8:00 AM to 5:00 PM, Pacific Time. Fax: (818) 991-1360 Email: [email protected] Visit our web site at www.360systems.com
CAUTION!
Instant Replay contains a hard disk drive. While today’s hard disks are very reliable, they are vulnerable to shock. Handle with care. Please exercise care not to drop or
bump Instant Replay – damage to the internal hard disk may result. Be sure power is off before moving the unit.

4
Product Improvements And Upgrades 360 Systems reserves the right to make changes and/or improvements to its products, without incurring any obligation to incorporate such changes or improvements in units previously sold or shipped.
360 Systems may issue Technical Support Bulletins from time to time, advising owners of record of product enhancements that become available. Technical Support Bulletins may also be requested through 360 Systems Customer Service department by telephone at (818) 991-0360 or Facsimile at (818) 991-1360. However, we cannot contact you if you do not return your Warranty Card. Please take a moment now to fill out your Warranty Card and either mail or fax it to 360 Systems. You may also register your warranty with us by telephone.
Trademarks And Patents 360 Systems, 360 Systems Instant Replay, and DigiCart are trademarks of 360 Systems
Software contained in this product is copyrighted by 360 Systems, Microware Systems Corp.
Designs incorporated in this product are the subject of current or pending U.S. and foreign patents.
Limited Warranty Instant Replay is warranted against defects in material and workmanship for a period of one year from date of original purchase. This warranty includes parts and labor.
This warranty excludes units that have been modified, repaired by unauthorized personnel, or damaged by abuse, improper operation, dirt, or static electricity.
360 Systems assumes no liability whatsoever for real or consequential damages, loss of profits, inconvenience or any other losses due to non-operation of the Instant Replay.
360 Systems' sole liability under this limited warranty shall be the repair or replacement of defective product or components. Products being returned under warranty shall be sent to 360 Systems or one of its foreign service centers, freight prepaid in the original or equivalent packaging.
Printing history: Software 2.1 February 2000 Software 2.3, October 2000
Software 3.47 April 2007
Copyright 1995-2007 360 Systems Printed in the United States of America. All rights reserved.

5
TABLE OF CONTENTS INTRODUCTION .............................................................................................. 7 CHAPTER 1 – OVERVIEW................................................................................ 8 FRONT PANEL CONTROLS ..................................................................................... 8
Hot-Keys ................................................................................................ 9 Transport Control Buttons..................................................................... 9
STOP.................................................................................................. 9 PLAY ................................................................................................. 9 RECORD ........................................................................................... 9 LOOP ................................................................................................. 9
PAUSE ................................................................................................... 9 Metering and Level Controls ............................................................... 10 Function Buttons.................................................................................. 10 BANK SELECT .................................................................................... 10 ASSIGN HOT-KEYS ............................................................................ 10 PREVIEW ............................................................................................ 10 Setup and Configuration Buttons......................................................... 10 MENU.................................................................................................. 10 CANCEL .............................................................................................. 11 Scroll Up/Down Arrows....................................................................... 11 FIND.................................................................................................... 11 ENTER ................................................................................................. 11
CHAPTER 2 – BASIC OPERATION ................................................................ 12 Powering on Instant Replay................................................................. 12 Connecting Instant Replay to External Audio Equipment ................... 13 Recording a Cut ................................................................................... 14 Limiting the Record Time of a Cut....................................................... 15 Playing a Cut ....................................................................................... 16 Pausing a Cut ...................................................................................... 16 Erasing a Cut ....................................................................................... 17 Assigning a Cut to a Hot-Key .............................................................. 17 Using Hot-Key Banks........................................................................... 18 Replacing Cuts with Existing Hot-Key Assignments............................ 18 Locating a Cut using FIND ................................................................. 18 Viewing the Sample Rate and Word Length of a Cut........................... 18 Previewing a Cut ................................................................................. 18 Looping a Cut ...................................................................................... 19
Adjusting Output Gain on a Cut....................................................... 19 Using the Record Sample Rate Converter ........................................... 19 Converting 24 bit material to 16 bits ( Dither ) ................................... 20 Using the Sample Rate Converter and Dither at the same time........... 20 Using the Playback Sample Rate Converter ........................................ 21
CHAPTER 3 – EDITING CUTS ......................................................................... 22 Using Head and Tail Trim ................................................................... 22 Setting the Head Trim .......................................................................... 22 Setting the Tail Trim ............................................................................ 23
Setting the Pre-Roll before Setting the Tail Trim............................. 23 Now Set the Tail Trim...................................................................... 23 Fade In ............................................................................................. 24 Fade Out........................................................................................... 24
CHAPTER 4 – USING PLAYLISTS ................................................................. 26 Creating a New Playlist ....................................................................... 26 Editing a Playlist ................................................................................. 27 Changing the Playlist Playback Order “On-the-Fly” ......................... 27 Playing a Playlist................................................................................. 28

6
CHAPTER 5 – USING THE NETWORK.......................................................... 29 Introduction ......................................................................................... 29 About WAV files ................................................................................... 29 File Naming Conventions .................................................................... 30 Supported FTP Clients......................................................................... 31 Initial FTP Setup.................................................................................. 32 Connecting to Instant Replay using FTP ............................................. 33 Connecting to Instant Replay using a DOS Client............................... 34 Downloading a file from Instant Replay to your host:......................... 34 Uploading a file from your host computer to Instant Replay.............. 35 Deleting a file from Instant Replay...................................................... 35 Renaming a file on Instant Replay....................................................... 36 Transferring Files with Flash FXP...................................................... 37 Connect to Instant Replay.................................................................... 37 Upload/Download files ........................................................................ 38 Renaming or Deleting a File using Flash FXP.................................... 39
CHAPTER 6 – MACHINE SETUP MENU’S.................................................... 40 EDIT Menu .......................................................................................... 40 RECORD SETUP................................................................................. 40 NETWORKING Menu .......................................................................... 40 OPERATIONS Menu............................................................................ 40 HOT-KEYS Menu................................................................................. 41
CHAPTER 7 – THE REAR PANEL .................................................................. 42 ELECTRICAL POWER ........................................................................................... 42
Power Switch ....................................................................................... 42 Fuses .................................................................................................... 42
AUDIO CONNECTIONS ......................................................................................... 43 Audio Inputs......................................................................................... 43 Audio Outputs ...................................................................................... 43 Headphone Output............................................................................... 43
DIGITAL AUDIO CONNECTIONS ........................................................................... 43 AES/EBU Input .................................................................................... 43 IEC 958 Type II Input .......................................................................... 43 Digital Audio Interfacing..................................................................... 44 Digital Audio Output ........................................................................... 44 AES/EBU Output ................................................................................. 44 IEC 958 Type II Output ....................................................................... 45
NETWORK CONNECTIONS ................................................................................ 45 Network Port........................................................................................ 45
CHAPTER 8 – MAINTENANCE AND DISK OPERATIONS ...................................... 46 FORMATTING THE INTERNAL HARD DISK......................................................... 46
To Format the Internal Hard Disk....................................................... 46 INDEX ............................................................................................................... 47

7
INTRODUCTION Thank you for purchasing Instant Replay. The system provides a unique combination of mass storage, direct access to stored audio, network access and ease of operation, all in a professional quality package. Key features include:
Storage of up to 1000 Audio Cuts
At least 100 Hours of Storage
Assignment of Cuts to 50 front panel Hot Keys
Playlists that play a sequence of cuts manually or automatically
16 and 24 bit WAV support
Head and Tail editing
Variable fade in and fade out
FIND function for locating cuts
Familiar tape transport style controls to provide fast and sure operation
Network Connectivity for uploading, downloading renaming and deleting Cuts.
8
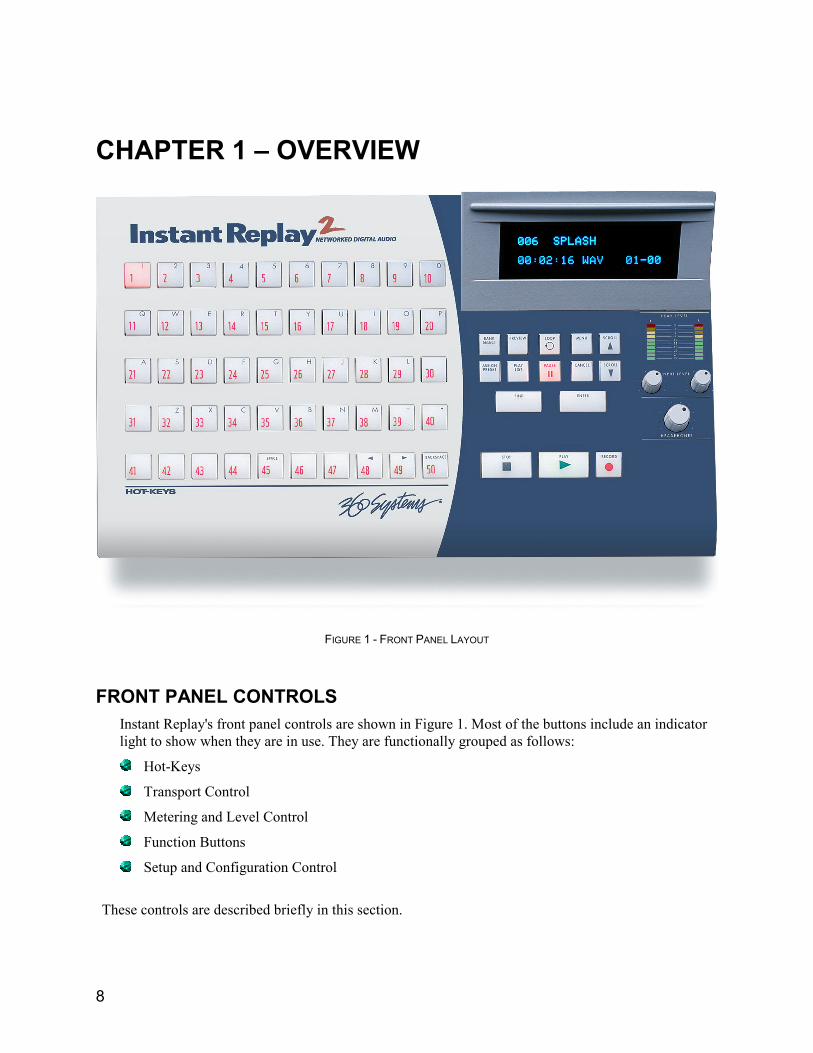
CHAPTER 1 – OVERVIEW
FIGURE 1 - FRONT PANEL LAYOUT
FRONT PANEL CONTROLS
Instant Replay's front panel controls are shown in Figure 1. Most of the buttons include an indicator light to show when they are in use. They are functionally grouped as follows:
Hot-Keys
Transport Control
Metering and Level Control
Function Buttons
Setup and Configuration Control
These controls are described briefly in this section.

9
Hot-Keys There are three primary uses for Hot-Keys:
1. Triggering playback of assigned Cuts 2. As an alphanumeric keyboard 3. Bank selection, using the top row of keys The main array of 50 buttons are Hot-Keys numbered 1 through 50. A Hot-Key's primary function is to trigger playback of a Cut assigned to it. Hot-Keys light up whenever their assigned Cut is playing.
In the Bank Select mode, the numbers 1 through 10 on the top row select the corresponding Banks numbered 1 through 10. The banks are like pages of Hot Keys. They extend the number of cuts that can be assigned to Hot Keys to 500 ( 50 Hot Keys times 10 Banks ) and also provide a method for organizing cuts.
Transport Control Buttons The Transport Controls include STOP, PLAY, PAUSE and RECORD. They perform in the traditional manner of tape recorders.
STOP STOP Immediately ends recording or playback. STOP will halt some sequential operations, such as Network Transfers.
PLAY PLAY Starts playback of the currently selected Cut. Note that pressing PLAY initiates playback from the beginning of the selected Cut, even if it is already playing. The exception is when PLAY is used to disengage PAUSE.
RECORD RECORD Places Instant Replay in Record Ready mode. ( Instant Replay will enter record when the PLAY button is pressed.)
LOOP LOOP causes a Cut to repeat endlessly until either STOP or LOOP is pressed. STOP ends playback immediately. Pressing LOOP exits from the Loop mode, and allows the current Cut to continue playing to its end. Pressing LOOP while running a Playlist will cause the entire Playlist to loop.
PAUSE PAUSE interrupts playback of a Cut. When pressed again, playback will resume.

10
Metering and Level Controls
Level Meters
The LEVEL METERS show the current record or playback level.
Input Level Controls
The Left and Right INPUT LEVEL Controls set the levels for recording. Set the levels so that the loudest part of your recording causes the first red segment of the meter to light. When turned all the way down, the input will be muted. The level controls do not apply to digital recording from the AES/EBU inputs.
Headphone Level Control
Sets the level of the HEADPHONE OUTPUT.
Function Buttons
BANK SELECT The 50 Hot-Keys are further organized into 10 Banks. This allows 500 Cuts to be programmed into Hot-Keys. When you press the BANK SELECT button, it lights and the top row of Hot-Keys flash. The display changes to show the Number and Name of the current Bank; the number of Hot-Key Assignments it contains; and an indication of the presence of a Playlist in the Bank. Pressing Hot-Keys 1-10 will directly select the corresponding Bank.
ASSIGN HOT-KEYS The ASSIGN HOT-KEYS button lights when pressed and the display prompts for selection of a HOT-KEY. Pressing a HOT-KEY immediately assigns the Cut shown in the top line of the display to that HOT-KEY, overwriting any previous assignment.
PREVIEW When PREVIEW is pressed in Stop mode the main audio outputs are muted, so Cuts played subsequently can be auditioned from the headphone output only. Both the analog and digital audio outputs are muted.
Setup and Configuration Buttons
MENU Pressing the MENU button will bring up all configurable items. As with most menus in equipment of this type, these are organized as nested menus. Once a menu option is selected, pressing ENTER will allow you to select a value for that option. Pressing MENU a second time will exit to normal operation. See Chapter 6, “Machine Setup Menus” for a listing of menu options.
Note: In this manual, MENU navigation is shown using arrows to indicate a new menu
level. For example, MENU->CONFIGURATION->PLAYBACK SAMPLE RATE
Is telling the user to press MENU, scroll to the CONFIGURATION option, Press
ENTER, then scroll to the PLAYBACK SAMPLE RATE menu item.

11
CANCEL This button is used to end operations, exit menus, or to answer "no" to display prompts. In Playlist mode, CANCEL deletes the currently selected Step of the Playlist.
Scroll Up/Down Arrows Used to select Cuts, Banks, Menus, Playlist Steps and adjust parameter values. Cuts can be selected during playback of other Cuts.
FIND FIND searches for a Cut by Index Number or Name. When you press the FIND button, any previously found Cut name or ID number is displayed. To use that name for the current FIND simply press ENTER. To use a different Name or Index Number, simply type it and press ENTER.
ENTER Used to enter Menus, initiate operations, confirm choices, and to answer "yes" to display prompts. In Playlist mode, pressing ENTER causes the selected Step to be set as the next Step to play. If the currently selected cut is displayed but not being played, pressing ENTER will momentarily display the sample rate and word length of the cut.

12
CHAPTER 2 – BASIC OPERATION Instant Replay is an extensively featured, high quality professional audio workstation. However, it is also very simple and intuitive to use. The following sections cover Instant Replay’s basic operation.
Powering on Instant Replay
CAUTION!
CONNECT THIS PRODUCT ONLY TO AN AC POWER SOURCE WITHIN THE VOLTAGE AND FREQUENCY RANGE
INDICATED ON THE REAR PANEL. THE PRODUCT IS SUPPLIED WITH A DETACHABLE IEC TYPE AC LINE CORD
APPROPRIATE TO THE COUNTRY TO WHICH THE UNIT WAS ORIGINALLY DELIVERED. CHECK TO SEE THAT IT
MATCHES THE ELECTRICAL OUTLET YOU WILL BE USING.
• Connect the supplied power connector to the rear panel and plug it into an AC power outlet. • Turn on the power switch located at the far right of the rear panel. • Instant Replay will run through a power up sequence that includes lighting each front panel
indicator in sequence. • When it is ready to use, the Display Module will display the current selected Cut per Figure 2
below. o The Index number is a unique number associated with the file o The Cut Name is the user-supplied Cut Name. o The File Type indicates if the file is a WAV or DC2 file type. o The Duration indicates the length of the cut in minutes and seconds. o The Hot Key Bank/Number indicates the Hot Key Bank and number the cut is assigned
to. 01-00 Indicates it has NOT been assigned to a hot key.
FIGURE 2 – THE DISPLAY MODULE
Instant Replay ships with a large number of sample cuts you can use to try it out. If there are no cuts available the Display Module will display:
NO CUTS AVAILABLE

13
Connecting Instant Replay to External Audio Equipment The rear panel of the Instant Replay is shown in Figure 3.
Connecting Input Sources
Connect Balanced stereo analog sources to the BALANCED INPUT stereo pair. Connect Un-balanced stereo analog sources to the UNBALANCED IN stereo pair.
Note: These inputs are mixed together internally and are both active whenever the AUDIO Input is set to ANALOG.
Connect a digital AES/EBU source to the AES/EBU DIGITAL IN connection. Connect a digital IEC-958 RCA source to the IEC-958 II RCA jack.
The input source used for recording is selected via the AUDIO INPUT menu under the RECORD SETUP. See Page 14.
Connecting Monitoring Equipment
Connect Balanced stereo analog monitors to the BALANCED OUTPUT stereo pair. Connect Un-balanced stereo analog monitors to the UNBALANCED OUT stereo pair. Connect a digital AES/EBU monitor to the AES/EBU DIGITAL OUT connection. Connect standard stereo headphones to the ¼” headphones jack ( far left ).
Cuts will be played on all outputs at all times with one exception. When the PREVIEW key is lighted, Cuts will be played only to the headphone output. Refer to Page 43 for technical details about audio connections.
FIGURE 3 - INSTANT REPLAY REAR PANEL

14
Recording a Cut The Model DR-600 stores at least 130 hours of stereo audio. Total storage capacity varies according to the type of cuts you create. Individual Cuts can be from about 4 hours to about 7 hours long depending on the Recording Format you select.
Table 1 indicates the types of Cuts you can create and their associated durations in hours, minutes and seconds ( HHH:MM:SS ).
Sample Rate Word Length Format Max Record Time Per Cut Total Record Time
44.1K 16 WAV 06:45:41 216:44:53
44.1K 24 WAV 04:30:27 142:14:23
48K 16 WAV 06:12:44 195:12:05
48K 24 WAV 04:08:29 130:35:50
44.1K 16 DC2 06:45:41 216:44:53
48K 16 DC2 06:12:44 195:12:05
Table 1
Note: The quality of 16 bit WAV and DC2 are identical. The only reason to use DC2 format is for compatibility with the DigiCart E product.
WARNING
Note that while you can have Cuts recorded in any of the formats stored in the unit, it is best not to mix formats on a particular project. Switching from a 48K Linear to 44.1 will cause the output sample rate to change, causing possible disturbance of equipment monitoring the digital outputs. In most cases, the Playback sample rate converter may be used to maintain a constant output rate regardless of the sample rate of the original Cut. ( See Page 21 ).
NOTE
The Balanced and Unbalanced analog inputs are mixed together. It is not recommended that both be connected at the same time, unless one or the other is muted.

15
To Record A Cut: Disable the RECORD ERASE LOCKOUT if necessary
Press MENU->RECORD SETUP->RECORD/ERASE LOCKOUT then ENTER The parameter should be set to OFF.
Select an Input Source
Press MENU->RECORD SETUP->AUDIO INPUT then ENTER Select ANALOG to use the BALANCED inputs or UNBALANCED I/O inputs. Select AES/EBU XLR-3 To use the digital AES/EBU inputs.
Select IEC-958 TYPE II to use the IEC-958 II Input with Consumer format digital audio sources.
Select AES/SMPTE-75 OHM RCA to use the IEC-958 II Input with Professional format digital audio sources.
Adjust Levels in Record Standby Mode
Press RECORD to enter Record Standby. You can monitor levels and set input level controls (Analog inputs only ) before beginning to record.
Begin Recording
Press PLAY to begin recording.
Press STOP to stop recording.
A default cut name, such as NEW001 will be provided. Press ENTER to accept the name or type in a new name using the alphanumeric and scroll keys, then press
ENTER.
Limiting the Record Time of a Cut You can limit the maximum record time of a cut to 5 minutes, 30 minutes or 1 hour. This is useful if you want to make a longer recording and don’t want to wait for it to finish before stopping the recording. Once the Record Time Limit is set, it will apply to all recordings until it is specifically disabled. All of the record time limits allow a little extra than the time advertised. For example, a time limit of 5 minutes will actually allow you to record for nearly six minutes. To set a Record Time Limit:
Press MENU->RECORD SETUP->RECORD TIME LIMIT then ENTER
Select NONE, 5,30 or 60 minutes. Press ENTER.

16
Playing a Cut There are a number of ways to play a cut. Play a Cut Using a Hot Key If the cut has been assigned to a Hot Key, simply press the hot key to play the cut. Refer to Assigning A Cut To a Hot Key on Page 10 for instructions on assigning a cut to a Hot Key. Play a Cut by selecting the cut in the Display Module window
A cut that is currently displayed on the Display Module can be played simply by Pressing PLAY. To display a cut in the Display Module, use the SCROLL KEYS. To locate a cut by name or index number, use the FIND key. Refer to Locating A Cut Using FIND on Page 18. Play a Cut Using the rear-panel GPI Instant Replay includes a General Purpose Interface (GPI) that duplicates the PLAY button. It is on a 1/8” mini phone jack on the back panel. Connect a momentary switch (console button, footswitch, etc.) to the back panel jack marked GPI/PLAY. This must be enabled before it can be used.
To enable GPI, press MENU->CONFIGURATION->GPI INPUT then ENTER
Select ENABLE using the SCROLL KEYS. Press ENTER
When you activate the remote momentary switch, Instant Replay will behave as if you had pressed PLAY. You can also initiate recording remotely by putting Instant Replay in Record Ready and activating the remote switch.
Note that activating the remote switch will also CANCEL PAUSE if it is active. While Instant Replay is Paused, pressing a Hot-Key displays the Assigned Cut’s title and statistics but does not play it. This lets you check the Hot-Key assignment silently, and is most useful in a live broadcast or performance application. For example, an engineer can find and cue up a Hot-Key Cut to be played, and on-air talent can start playback with the remote switch.
Pausing a Cut Press PAUSE TO interrupt playback of a Cut. Press PAUSE again to resume playback.
TTTIIIPPP:::
Note that while Instant Replay is paused, pressing a Hot-Key displays the Assigned Cut’s title and statistics, but the Cut will not play until PAUSE or PLAY is pressed. Several Hot-Keys can be pressed in series to see what Cuts are assigned to them, allowing the Hot-Key Assignments to be reviewed silently. Only the last one pressed will play when Pause is released.

17
Erasing a Cut Erasing a cut will permanently delete the cut from the disk. There are two ways to erase a cut.
1. From the Display Module Menu Front Panel 2. Using FTP with the network connection.
The Display Module method works fine for most cases. If you need to erase a lot of cuts, it may be easier to use the network connection. See the example of this on Page 35. To ERASE a Cut using the Display Module Front Panel:
Disable the RECORD ERASE LOCKOUT if necessary
Press MENU->RECORD SETUP->RECORD/ERASE LOCKOUT then ENTER The parameter should be set to OFF.
Select the cut Select the cut in the Display Module window using the SCROLL KEYS.
Erase the Cut
Press MENU->OPERATIONS->ERASE then press ENTER. Instant Replay will Prompt
ARE YOU SURE?
PRESS ENTER/CANCEL
Press ENTER to erase the cut. Press CANCEL to cancel the operation.
If you pressed ENTER, Instant Replay will scroll to the next cut. By pressing ENTER twice you can erase this cut as well, then the next cut and so on. This is a good way to get rid of lots of cuts at once.
Assigning a Cut to a Hot-Key The ASSIGN HOT-KEY button lights when pressed and the display prompts for selection of a HOT-KEY. Pressing a HOT-KEY immediately assigns the Cut shown in the top line of the display to that HOT-KEY, overwriting any previous assignment.
You do not need to clear a Hot-Key before assigning a new Cut, assignments can be simply overwritten.
The same audio Cut may be assigned to keys in different banks. If a Cut is assigned to keys in several different banks, reassigning a new Cut to one key will not disturb assignments in other banks. For example, if a station ID is assigned to Hot-Key #1 in each of four different banks (1, 2, 3, and 4), and you reassign Hot-Key #1 in bank 4 to a different Cut, then the station ID remains assigned in banks 1, 2, and 3.
You can select other Cuts to be assigned using the SCROLL ARROW keys or FIND. With the new Cut selected, press the HOT-KEY you wish to assign it to.
To exit, press ASSIGN HOT-KEY again, or CANCEL.

18
Using Hot-Key Banks There are ten Banks numbered 1 to 10. Each Bank is like a separate “page”; changing Banks is equivalent to flipping a page, and presents a different set of Hot-Key Assignments. Note that the ten Banks all have access to all the Cuts recorded in Instant Replay. Banks are a convenient way to organize Instant Replay’s audio collection. A total of 500 Cuts can be assigned to Hot-Keys if all 50 keys in each of the 10 banks are assigned to a different Cut.
Replacing Cuts with Existing Hot-Key Assignments When audio that is assigned to Hot-Keys is replaced by any means (FTP Upload or Record Overwrite) the Hot-Key assignments will still exist, and will be assigned to the new audio. This allows material to be updated without the need for manually reassigning Hot-Keys. For instance, hourly promos can be named for their time slot and day of the week. Each week the new promos can be loaded in over the network and will appear at the same places in all Banks and Playlists.
Locating a Cut using FIND FIND searches for a Cut by Index Number or Name. When you press the FIND button, any previously found Cut name or ID number is displayed. To use that name for the current FIND simply press ENTER. To use a different Name or Index Number, simply type it and press ENTER.
Cuts can be located by entering part of the name followed by the Asterisk key (“*”, Hot-Key number 40). In the event many Cuts exist with almost the same name, they will be found in alphabetical order with each subsequent use of the Find command. The Scroll Arrows may be used to examine all similar entries when the Sort By Name option is active in the configuration menu.
Viewing the Sample Rate and Word Length of a Cut With the Cut selected on the display module but NOT playing, hit the ENTER key briefly. The Sample Rate ( 44.1KHz or 48KHz ) and word length ( 16 bit or 24 bit ) will be displayed for 2 seconds in place of the cut name.
Previewing a Cut When PREVIEW is pressed in Stop mode the main audio outputs are muted, so Cuts played subsequently can be auditioned from the headphone output only. Both the analog and digital audio outputs are muted.
If PREVIEW is turned on during playback, the display changes from showing the current Cut and playing time, to showing the ID Number, Name, Length and Hot-Key Assignment of the playing Cut. The Cut will continue playing from both the main and headphone outputs. Other Cuts can be selected using the Scroll Arrows, Find, or the Hot-Keys to view their information.
TTTIIIPPP::: Using Preview to Find Unassigned Hot-Keys
PREVIEW is useful when assigning Hot-Keys to find an unassigned or unneeded key without losing track of the Cut you are about to assign. Before pressing ASSIGN HOT-KEY, press PREVIEW and then push HOT-KEYS until you find one that can be re-used or that is unassigned. Press STOP if a Cut is still playing, then press PREVIEW again. The Cut to be assigned reappears. Use the normal Assign Hot-Key procedure to assign the Hot-Key you found.
19
Looping a Cut LOOP causes a Cut to repeat endlessly until either STOP or LOOP is pressed. STOP ends playback immediately. Pressing LOOP exits from the Loop mode, and allows the current Cut to continue playing to its end.
While a Cut is looping, another Cut can be selected for playback. A different Hot-Key can also be played. The new Cut will immediately start from the beginning, and will also loop until Loop mode is exited.
Looping works in all modes. You can loop a single Cut, or an individual Cut in a Manual-Step Playlist. Turning Loop on during playback of a Follow-On Playlist causes the entire list to loop.
Adjusting Output Gain on a Cut Cuts also contain an Output Gain value, which allows you to adjust and store the playback level after the recording has been made. You can adjust output gain in 1 dB increments from +6 dB (twice as loud) to -90 dB, which is close to the softest sound that can be recorded.
Go to MENU->EDIT->ADJUST OUTPUT GAIN. Then press ENTER
ADJUST OUTPUT GAIN
0 dB
The cursor will blink over the value to be changed. Use the SCROLL keys to make an adjustment to the numeric value. Press ENTER to accept the displayed value.
Press MENU or CANCEL to return to previous menu level.
Using the Record Sample Rate Converter What the Record Sample Rate Converter does. If you are recording material using the digital ( AES/EBU or IEC958 II ) inputs, you can ensure that it will be recorded at the sample rate you have selected, even if the incoming material is at a different sample rate. The sample rate converter can do the following. 1. Convert 44.1K digital content to 48K 2. Convert 48K digital content to 44.1K For example, assume your RECORDING FORMAT is set to 44.1K 16 Bit WAV and your input source is the AES/EBU inputs. The digital source is clocking at a 48K sample rate. If the Sample Rate Converter is enabled, the incoming 48K signal will be converted to your selected 44.1K format. Likewise, if the RECORDING FORMAT is set to 48K, an incoming signal clocking at 44.1K will be converted to 48K if the Sample Rate Converter is enabled.
Note: The Sample Rate Converter has no effect if you are using the balanced or unbalanced analog inputs for recording.

20
To Enable the Sample Rate Converter:
Press MENU->RECORD SETUP->DIG INPUT PROCESS ->SAMPLE RATE
CONVERT
Then Press ENTER.
Converting 24 bit material to 16 bits ( Dither ) If you are recording material using the digital ( AES/EBU or IEC958 II ) inputs, you can convert 24 bit material to 16 bit material using the dither option. Dither is a professional audio technique for data reduction that results in an extremely high quality content at a reduced data rate. To Enable dither: Press MENU->RECORD SETUP->DIG INPUT PROCESS->DITHER 24BIT -> 16BIT
Then Press ENTER.
Note: The Dither setting has no effect if you are using the balanced or unbalanced analog inputs for recording.
Note: Enabling dither if you are using a 16 bit digital source is unnecessary and will slightly increase noise level.
Using the Sample Rate Converter and Dither at the same time The Dither option and the Sample Rate Converter can be used at the same time. This would be appropriate under the following conditions. 1. You are using the digital ( AES/EBU or IEC958 II ) inputs. 2. You are recording from a 24 bit source and want to convert it to 16 bits. 3. You want to convert the sample rate of the input source. To Enable dither and the sample rate converter at the same time: Press MENU->RECORD SETUP->DIG INPUT PROCESS->DITHER->16BIT + SRC
Press ENTER.
21
Using the Playback Sample Rate Converter There are three ways to set the sample rate of a Cut being played.
1. At the same sample rate it was recorded 2. At a specified sample rate ( 44.1K or 48K ) 3. At a rate determined by the AES/EBU or IEC958 II input clock
To play a cut at a user-specified sample rate.
Press MENU->CONFIGURATION->PLAYBACK SAMPLE RATE Then Press ENTER
• Select OUTPUT AT 48K to play the cut at 48Kb/S
• Select OUTPUT AT 44.1K to play the cut at 44.1Kb/S
• Select SYNC TO DIGITAL IN to play the cut at the rate of the AES/EBU or IEC958 II input clock
• Select AS RECORDED to play the cut at the rate it was recorded ( this is the default )
Press ENTER to complete the selection
22
CHAPTER 3 – EDITING CUTS Instant Replay features the following cut editing operations.
1. Adjustable Head Trim
2. Adjustable Tail Trim
3. Variable length Fade In
4. Variable length fade out
Using Head and Tail Trim You can perform precise Head and Tail Trims on an existing file or immediately after recording a new cut. Head trim is a means of chopping off some content at the start of the cut. Usually, this is used to remove unwanted sound at the start of the cut to provide a smooth sounding cut.
Tail Trim performs the identical function, but at the end of the cut.
Head and Tail trim can be performed in one of two ways.
1. By manually entering a trim time.
2. By playing the cut and marking the trim points as it plays.
Head and Tail trims can be as short as a tenth of a second. Head and Tail Trims can be as long as the cut, as long as the two trim points do not overlap.
Setting the Head Trim Head trim can be performed in one of two ways.
1. If “Prompt for Head/Tail” is ENABLED in the RECORD SETUP, you will be automatically prompted to enter head trim after a new recording is created.
2. Select an existing cut in the display module then press :
MENU->EDIT->SET HEAD TRIM.
The only difference between the two methods is that after a new recording you will be prompted to enter both a head and tail trim.
The Head Trim editor display looks like this. The display is in Hours, Minutes, seconds and hundredths of a second.
00:00:00.00 HEAD
ENTER/ADJUST OR PLAY
Hit ENTER to leave head trim unchanged. The Head Trim is set 00:00:00.00, which is no trim.
Or…Type in the amount of time you want to trim off the head of the cut using the alphanumeric keypad. The value is in hours, minutes, seconds and hundredths of a second. Use the < and > keys to move forward and backwards if necessary. Hit ENTER once you have entered the Head trim delay you want.
23
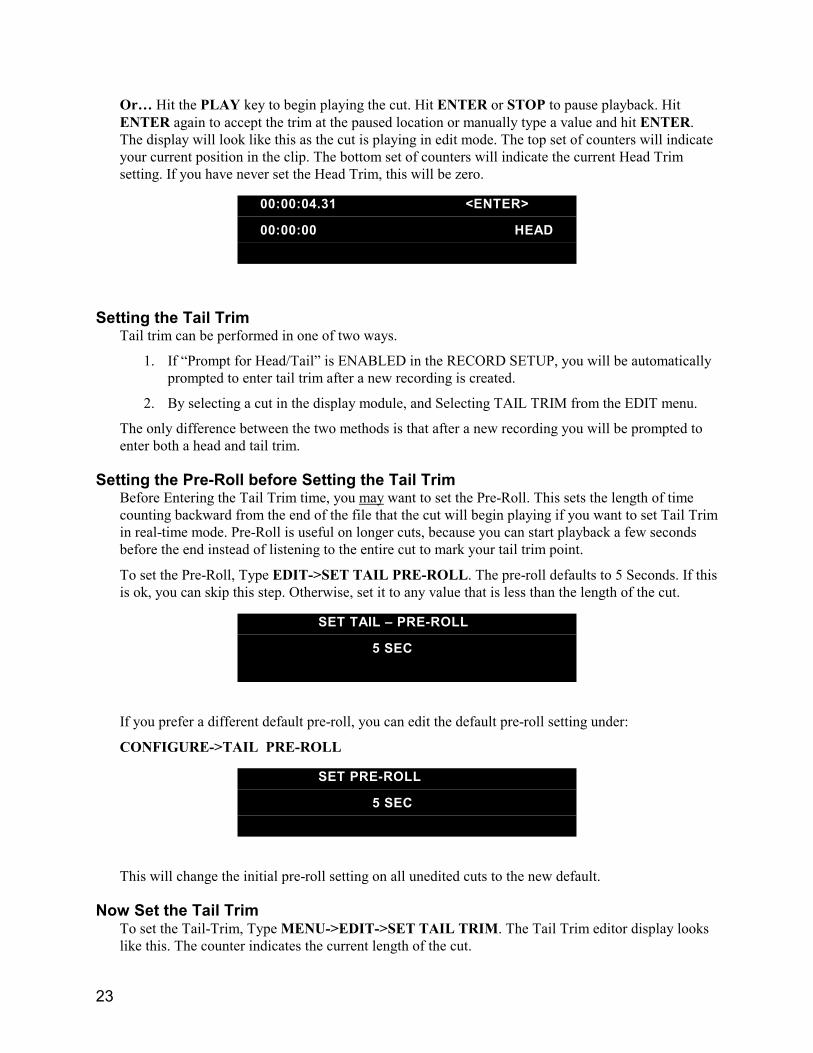
Or… Hit the PLAY key to begin playing the cut. Hit ENTER or STOP to pause playback. Hit ENTER again to accept the trim at the paused location or manually type a value and hit ENTER. The display will look like this as the cut is playing in edit mode. The top set of counters will indicate your current position in the clip. The bottom set of counters will indicate the current Head Trim setting. If you have never set the Head Trim, this will be zero.
00:00:04.31 <ENTER>
00:00:00 HEAD
Setting the Tail Trim Tail trim can be performed in one of two ways.
1. If “Prompt for Head/Tail” is ENABLED in the RECORD SETUP, you will be automatically prompted to enter tail trim after a new recording is created.
2. By selecting a cut in the display module, and Selecting TAIL TRIM from the EDIT menu.
The only difference between the two methods is that after a new recording you will be prompted to enter both a head and tail trim.
Setting the Pre-Roll before Setting the Tail Trim Before Entering the Tail Trim time, you may want to set the Pre-Roll. This sets the length of time counting backward from the end of the file that the cut will begin playing if you want to set Tail Trim in real-time mode. Pre-Roll is useful on longer cuts, because you can start playback a few seconds before the end instead of listening to the entire cut to mark your tail trim point.
To set the Pre-Roll, Type EDIT->SET TAIL PRE-ROLL. The pre-roll defaults to 5 Seconds. If this is ok, you can skip this step. Otherwise, set it to any value that is less than the length of the cut.
SET TAIL – PRE-ROLL
5 SEC
If you prefer a different default pre-roll, you can edit the default pre-roll setting under:
CONFIGURE->TAIL PRE-ROLL
SET PRE-ROLL
5 SEC
This will change the initial pre-roll setting on all unedited cuts to the new default.
Now Set the Tail Trim To set the Tail-Trim, Type MENU->EDIT->SET TAIL TRIM. The Tail Trim editor display looks like this. The counter indicates the current length of the cut.
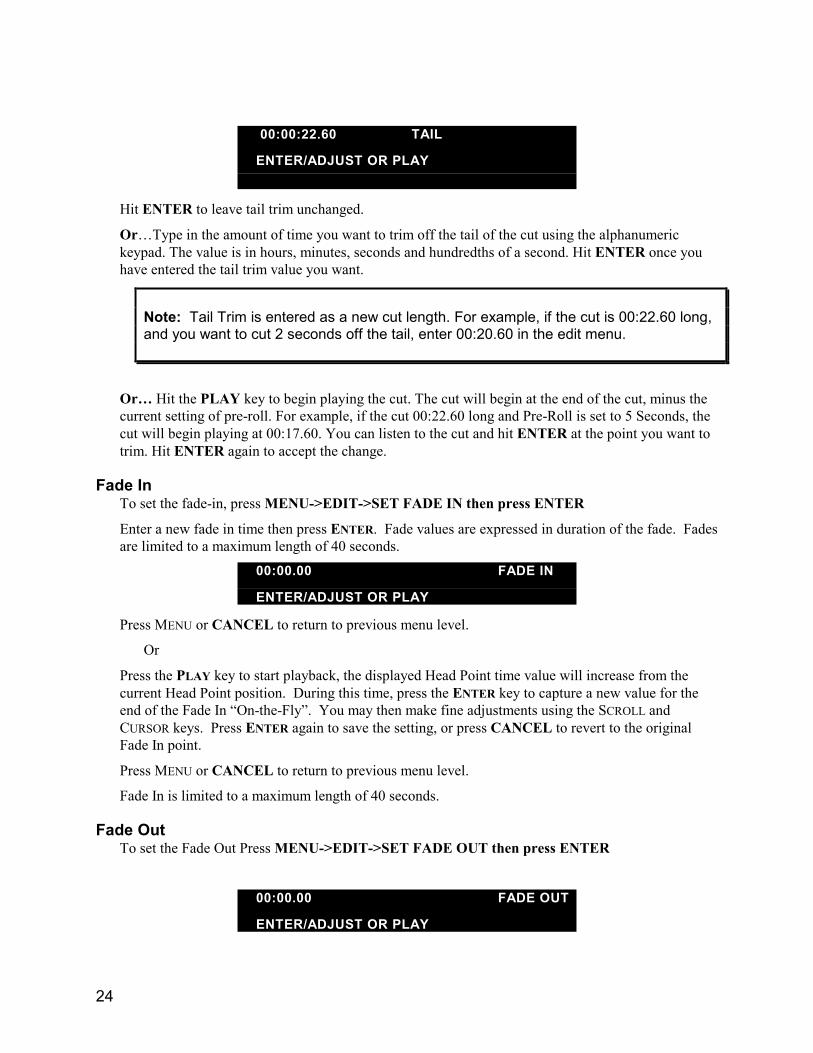
24
00:00:22.60 TAIL
ENTER/ADJUST OR PLAY
Hit ENTER to leave tail trim unchanged.
Or…Type in the amount of time you want to trim off the tail of the cut using the alphanumeric keypad. The value is in hours, minutes, seconds and hundredths of a second. Hit ENTER once you have entered the tail trim value you want.
Note: Tail Trim is entered as a new cut length. For example, if the cut is 00:22.60 long, and you want to cut 2 seconds off the tail, enter 00:20.60 in the edit menu.
Or… Hit the PLAY key to begin playing the cut. The cut will begin at the end of the cut, minus the current setting of pre-roll. For example, if the cut 00:22.60 long and Pre-Roll is set to 5 Seconds, the cut will begin playing at 00:17.60. You can listen to the cut and hit ENTER at the point you want to trim. Hit ENTER again to accept the change.
Fade In To set the fade-in, press MENU->EDIT->SET FADE IN then press ENTER
Enter a new fade in time then press ENTER. Fade values are expressed in duration of the fade. Fades are limited to a maximum length of 40 seconds.
00:00.00 FADE IN
ENTER/ADJUST OR PLAY
Press MENU or CANCEL to return to previous menu level.
Or
Press the PLAY key to start playback, the displayed Head Point time value will increase from the current Head Point position. During this time, press the ENTER key to capture a new value for the end of the Fade In “On-the-Fly”. You may then make fine adjustments using the SCROLL and CURSOR keys. Press ENTER again to save the setting, or press CANCEL to revert to the original Fade In point.
Press MENU or CANCEL to return to previous menu level.
Fade In is limited to a maximum length of 40 seconds.
Fade Out To set the Fade Out Press MENU->EDIT->SET FADE OUT then press ENTER
00:00.00 FADE OUT
ENTER/ADJUST OR PLAY

25
Press the ENTER key to make an adjustment. Fade values are expressed in duration of the fade. Fades are limited to a maximum of 40 seconds.
Press the ENTER key, then use the CURSOR keys to move the cursor to the digit to be adjusted. Then use the NUMERIC keys (top row of Hot-Keys), or the SCROLL keys to make an adjustment to the numeric value.
Press MENU or CANCEL to return to previous menu level.
Or
Press PLAY to start playback, the displayed Fade Out time value will increase from the Pre-roll position to the End-of-File. During this time, press the ENTER key to capture a new value for the beginning of the Fade Out “On-the-Fly”. You may then make fine adjustments using the SCROLL and CURSOR keys. Press ENTER again to save the setting, or press CANCEL to revert to the original Fade Out point.
Press MENU or CANCEL to return to previous menu level.

26
CHAPTER 4 – USING PLAYLISTS
Playlists allow you to create and playback a sequence of Cuts that are assigned to Hot-Keys. You can set Playlists for Follow-On or Manual-Step playback. Refer to the section Creating a New Playlist, immediately below.
In Manual-Step mode, the playlist will pause after each cut until you press PLAY. In follow-on mode, the playlist will play all cuts to the end of the playlist.
You can create one Playlist for each Bank.
Creating a New Playlist
Set the Bank Instant Replay has 10 Hot-Key banks. Each bank of Hot-Keys can have it’s own Playlist. You can tell what bank you are currently on by pressing the BANK SELECT key. The keys 1 through 10 will blink with the exception of the key denoting the current bank, which will be solid. If you want to make a playlist for a different bank than the current bank, simply hit the numbered key for the bank you want to make a playlist for. Clear the Playlist If a Playlist is already assigned to the selected BANK, pressing PLAYLIST will indicate the first Cut in the Playlist and the Hot-Key the cut it is assigned to will blink. To create a new playlist in its place, you need to clear the playlist. . If PLAYLIST PROTECTION is ON, the Playlist cannot be cleared.
Press MENU->PLAYLIST then ENTER.
The Display Indicates:
Clear Playlist? Press ENTER
The Display Indicates:
Are you Sure? Press ENTER
The Display Indicates:
Playlist Cleared
27
Assign Cuts to the Playlist
Press PLAYLIST The Display Indicates:
LIST IS EMPTY
SELECT HOT KEY
Press the HOT-KEYs you want to assign to the playlist in sequence.
Press PLAYLIST to complete the operation.
Set the Playlist to MANUAL STEP or FOLLOW-ON The Playlist will be MANUAL STEP by default. This means it will pause after each Cut until you press PLAY. Changing the Playlist to FOLLOW ON mode will allow it to play all cuts on the list in sequence without operator intervention.
To change the Playlist to FOLLOW-ON, Press PLAYLIST. Scroll with the down arrow to the beginning of the playlist.
The Display Indicates:
START OF PLAYLIST
MANUAL STEP
Press ENTER.
Scroll to FOLLOW ON.
Press ENTER.
Editing a Playlist
Remove a Step from a Playlist
To remove a Step from the Playlist, use the SCROLL ARROWS to select the Step, then press CANCEL to remove it from the list. Press ENTER to confirm, or CANCEL.
Append a Step to a playlist
To append a Step to the end of the Playlist, SCROLL to the end of the list and press additional HOT-KEYS to add additional Steps.
Changing the Playlist Playback Order “On-the-Fly” The SCROLL ARROWS and ENTER key can be used in real time to change the sequence in which the Cuts are played. At any time you can SCROLL through the list. If you then press ENTER, the step you selected will be played next, and the Playlist will continue from that point onward. You can SCROLL
UP the list, effectively skipping steps in the Playlist, or you can SCROLL DOWN to repeat steps. This can be done while stopped or during playback. When a Cut is playing (and Playlist is not enabled), pressing the PLAYLIST key enables the Playlist mode and “cues up” the first Cut of the Playlist. The current Cut will play to completion and the button corresponding to the first Cut in the Playlist will flash. However, the Playlist will not execute until you press PLAY, even if it is a Follow-On Playlist.

28
Playing a Playlist Select the BANK if necessary. Press PLAYLIST, then press PLAY. To Halt the Playlist, Press PLAYLIST again. The current cut will play to completion, then play will stop.
Looping a Playlist
Press LOOP at any time to cause a playlist to loop. The playlist will continue to loop until you press LOOP again to deactivate looping.
Protecting a Playlist
Turning playlist protection on will lock the current Playlists. They cannot be edited or deleted until protection is turned back off. To enable playlist protection:
Press MENU->PLAYLIST->PLAYLIST PROTECTION
Select ON. Press ENTER
29
CHAPTER 5 – USING THE NETWORK
Introduction Instant Replay offers 10/100 ethernet connectivity using an RFC-1359 compliant FTP server. This allows you to connect to Instant Replay from a host computer using most commercially available FTP clients. Using FTP, you can do the following.
Rapidly Download Cuts, including WAV cuts, from Instant Replay to your computer. List Cuts Rename Cuts Delete Cuts
Important: Instant Replay can only perform FTP transfers while in FTP Mode. Record and
Playback cannot be performed while in FTP Mode. Pressing STOP at any time will abort FTP Mode, allowing Record and Playback operations to resume. If an FTP transfer is in progress when STOP is pressed it will be aborted. Pressing STOP while an FTP transfer is in progress will also DISABLE FTP Mode. Refer to Page 30 for instructions on entering FTP Mode.
Note: Instant Replay has a “flat” file system. All cuts must reside in the “root” directory. Instant Replay will not allow you to create sub-directories using FTP.
About WAV files Exporting WAV Cuts
Instant Replay can record 16 and 24 bit WAV files at sample rates of 44.1 or 48Khz. Using FTP, these cuts can be exported and played on a Personal Computer or any device capable of playing WAV files. Refer to Downloading a File From Instant Replay on Page 31.
Note: Many Personal Computers do NOT support 24 Bit WAV files. If 24 bit WAV files created on Instant Replay will not play on your personal computer, check to see if your sound card supports 24 bit WAV files.
Importing WAV Cuts
Instant Replay can also import WAV files from a personal computer and play them. Refer to Uploading a File From Your Host To Instant Replay on Page 32.

30
Note: Many “stock” WAV files on Personal Computers are recorded at a sample rates other than 44.1K or 48KHz. These cannot be uploaded or played. The following message will be displayed if you upload a WAV file that is not 44.1 or 48KHz.
SAMPLE RATE UNAVAIL
File Naming Conventions Instant Replay filenames must be 15 characters or less, not counting the file suffix ( e.g. WAV,DC2 ). Alphanumeric characters, hyphens, spaces and underscores are allowed. Each file on Instant Replay is referenced by a user-supplied file name and a unique index number. Files of the same name are not allowed for the same file type ( WAV or DC2 ). The one exception is noted below.
Note: Files originated on other equipment that have filenames longer than 15 characters will be truncated to 15 characters when they are uploaded to Instant Replay. A ‘~’ character will indicate the file was originally longer than 15 characters. For Example: 1234567890abcdefghijklmn.wav Will be truncated to: 1234567890abcd~.wav

31
Note: Uploading groups of files with long but similar file names may result in many cuts having the same name. This is the only case in which identical file names are allowed. For Example: Upload the following three files. 123456789abcdef_01.wav 123456789abcdef_02.wav 123456789abcdef_03.wav They will all be named 123456789abcde~.wav. However, they will all have a unique index number and, often, a unique duration, so they can be identified on the local Display Module. You may then rename them if you so desire, using the local Display Module or using the FTP client. On the Local Display Module the ‘~’ character looks like a little superscript square.
Supported FTP Clients Instant Replay includes an RFC-1359 compliant FTP server. The user connects to the FTP server using a commercially available FTP client. Most FTP clients should work with Instant Replay, but it has been tested with the following products. Table 2 indicates approved FTP clients. FTP Client Version Platform
Flash FXP 3.2.0 WINDOWS XP, WIN2K DOS FTP XP Version 5.1.2600 WINDOWS XP, WIN2K WS FTP 5.08 WINDOWS XP, WIN2K
Table 2 – Approved FTP Clients

32
Initial FTP Setup Connect the ethernet cable Connect a Standard RJ45 Ethernet cable between to the rear panel connector marked NETWORK. Connect the other end to your network. If the cable is connected correctly, the green LINK LED directly above the cable port will turn ON. If the green LED is not ON, check the cable polarity, cable continuity or network connection.
Set the FTP User ID
Optionally enter a new login User ID. The default User ID is 360USER.
Press MENU. Use the SCROLL and ENTER keys to navigate the menus as shown.
Networking->FTP USERNAME
Press ENTER then type in a user ID. Use up to 11 numbers and letters in any combination.
Press ENTER Set the FTP password
Optionally enter a new login password. The default password is PASSWORD.
Press MENU. Use the SCROLL and ENTER keys to navigate the menus as shown.
Networking->FTP PASSWORD
Press ENTER then type in a password. Use up to 11 numbers and letters in any combination.
Press ENTER Set the IP Address
Optionally enter a new FTP IP Address. The default IP Address is 192.168.1.100.
Networking->FTP IP Address
Press ENTER then type in a new IP address. Any IP address is allowed.
Press ENTER. OR….Automatically acquire an IP address using DHCP Optionally, Instant Replay can acquire it’s IP address from a DHCP server.
Networking->DHCP Enable
Select ON. Press ENTER
NOTE: If DHCP is enabled, Instant Replay will acquire it’s IP address when FTP Mode is turned on. The address will be momentarily displayed when FTP Mode is enabled.
WARNING: If you are connecting over a network that has more than one network device attached to it, use caution when setting the IP address. If the IP address you select conflicts with another device having the same address, unstable operation of either device may result.

33
Set the Subnet Mask
Optionally enter a new FTP Subnet mask. The default subnet mask is 255.255.255.0.
Networking->FTP Subnet Mask
Hit <ENTER> then type in a new subnet mask.
TTTIIIPPP::: DDDooonnn’’’ttt ssseeettt ttthhheee sssuuubbbnnneeettt mmmaaassskkk uuunnnllleeessssss yyyooouuu nnneeeeeeddd tttooo...
Note: If you don’t know what a subnet mask is, don’t change it. Chances are, the default will work on your network.
Enable FTP MODE The FTP Server is only turned on when it is in use.
Press MENU. Use the SCROLL and ENTER keys to navigate the menus as shown.
Networking->FTP Mode
Press ENTER. Use the scroll keys to set it to ON.
Press ENTER.
Press MENU.
The Display will indicate FTP MODE ON!
Hit STOP at any time to exit FTP Mode. Hitting STOP while a transfer is in progress will
CANCEL the transfer.
Connecting to Instant Replay using FTP
Note: These instructions will vary according to the FTP client you select. The example uses a Windows XP/ Win 2K DOS FTP Client
Note: Make sure your Instant Replay is at the Top Level menu. Press CANCEL a few times if you are not sure.

34
Connecting to Instant Replay using a DOS Client. 1. From a Windows XP or Windows 2K environment, open a DOS Shell as follows.
START->All Programs->Accessories->Command Prompt From the command prompt, type
ftp <IP ADDRESS>
…where the IP ADDRESS is the address you set your Instant Replay to in the Initial Setup step. For example 192.168.1.120 would be a valid entry. The display will do the “dots” for you.
2. Type in USER ID when Prompted. 3. Type in the PASSWORD when prompted.
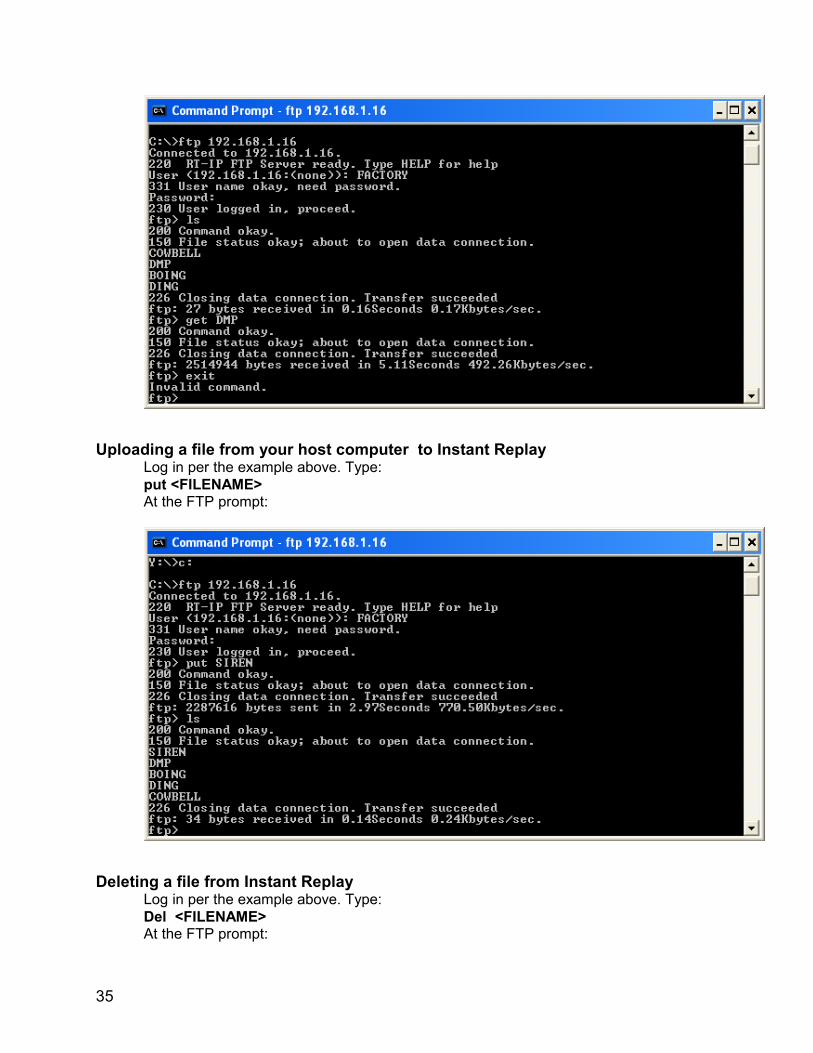
Downloading a file from Instant Replay to your host: Log in per the example above. Type:
Get <FILENAME> At the FTP prompt:
35
Uploading a file from your host computer to Instant Replay Log in per the example above. Type:
put <FILENAME> At the FTP prompt:
Deleting a file from Instant Replay Log in per the example above. Type:
Del <FILENAME> At the FTP prompt:

36
Renaming a file on Instant Replay Log in per the example above. Type:
rename <CURRENT FILENAME> < NEW FILENAME > At the FTP prompt:
37
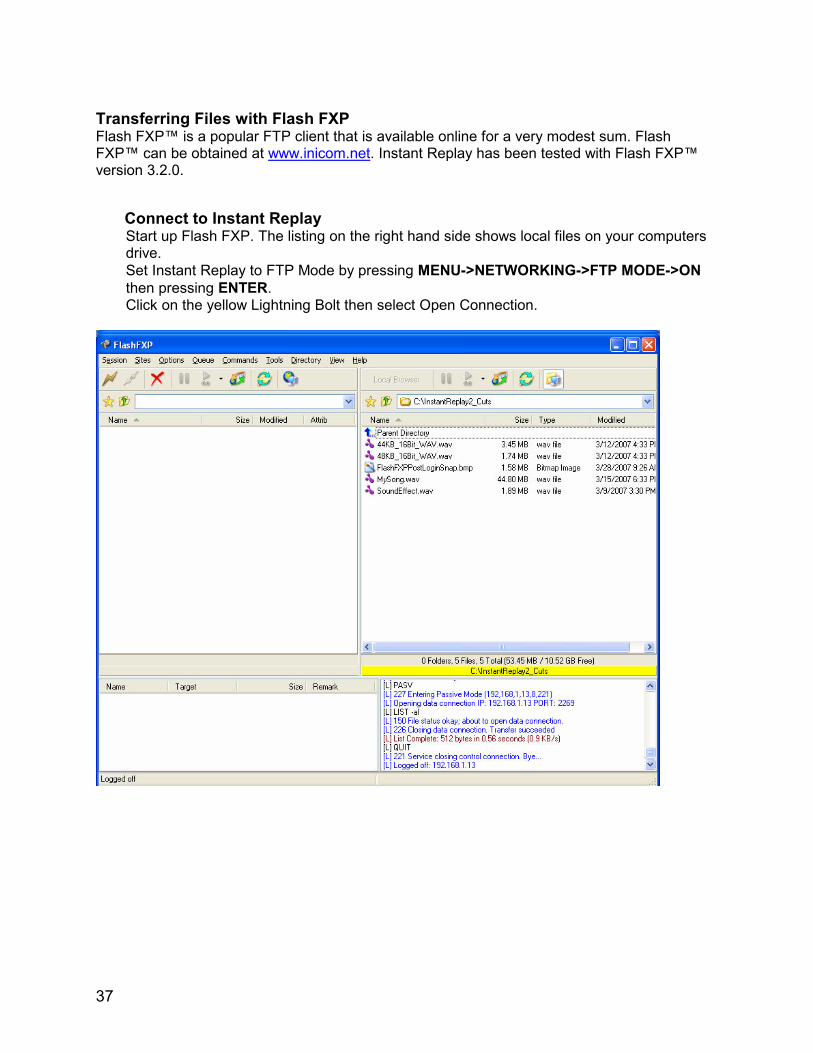
Transferring Files with Flash FXP Flash FXP™ is a popular FTP client that is available online for a very modest sum. Flash FXP™ can be obtained at www.inicom.net. Instant Replay has been tested with Flash FXP™ version 3.2.0.
Connect to Instant Replay Start up Flash FXP. The listing on the right hand side shows local files on your computers drive.
Set Instant Replay to FTP Mode by pressing MENU->NETWORKING->FTP MODE->ON
then pressing ENTER. Click on the yellow Lightning Bolt then select Open Connection.

38
The login dialog box appears. Set the IP address, User ID and Password fields to the values you configured your Instant Replay to under the Networking menu.
Upload/Download files You can move files from Instant Replay to your computer simply by dragging them across to the listing on the right side of the screen. Likewise you can move files from your computer to Instant Replay by dragging them from left to right.

39
Renaming or Deleting a File using Flash FXP Right click on the file. Select RENAME or DELETE from the pull-down menu. Rename or delete the file.

40
CHAPTER 6 – MACHINE SETUP MENU’S Default values are UNDERLINED. All settings are saved on disk and restored on power up.
EDIT Menu Menu Item Values
Adjust Head Point 0.00
Adjust Tail Point end of file
Set Fade In Length Range is 0.00 to 40.00
Set Fade Out Length Range is 0.00 to 40.00
Set Tail Pre-roll Variable from 1 to 9 seconds. Default is 5 sec.
Adjust Output Gain Range is +6 to – 90 dB. Default is 0dB
Refer to the section, “Editing Cuts” on page 22 for more information about these settings.
RECORD SETUP Menu Item Values
Audio Input ANALOG, AES/EBU XLR-3, AES/SMPTE-75 OHM RCA,
IEC-958 TYPE II RCA
Threshold (in dB) OFF, -6, -12, -18, -24, -30, -36, -42, -48, -54, -60
Record Overwrite OFF, ON
Record Time Limit NONE, 60 MIN, 30 MIN, 5 MIN
Record/Erase Lockout OFF, ON
Recording Format 44.1K WAV 16 Bit, 48K WAV 24 Bit, 44.1K WAV 16
Bit, 48K WAV 16 Bit, 44.1K DC2, 48K DC2
Dig Input Processing OFF, Dither 24-> 16 Bit, Sample Rate Convert, Dither
24-> 16 Bit + SRC
Prompt for Head/Tail Enabled, Disabled
Refer to the section, “Recording A Cut” on Page 13 for more information about these settings.
NETWORKING Menu Menu Item Values
FTP Enable ENABLE, DISABLE
FTP User 360USER
FTP Password PASSWORD
Subnet Mask 255.255.255.0
IP Address 192.168.1.100
DHCP Enable ON, OFF
OPERATIONS Menu Menu Item Function
Change Cut Name Changes name of currently selected Cut
Erase Erases currently selected Cut
Move Cut Move currently selected Cut to any unused Index
number
Change Bank Name Changes name of currently selected Bank

41
HOT-KEYS Menu Menu Item Values
Assign HOT-KEYS -
HOT-KEY Protect OFF,ON
Assign Bank -
Clear HOT-KEY -
PLAYLIST Menu Menu Item Values
Clear Playlist -
Playlist Protection OFF,ON
CONFIGURATION Menu Menu Item Values
Time Display TIME REMAINING, ELAPSED TIME
Sort Directory By INDEX, NAME
Select Language ENGLISH, SPANISH
Digital Output OFF, PROFESSIONAL FORMAT,
CONSUMER FORMAT,
COPY PROT. CONSUMER -
Playback sample Rate AS RECORDED, SYNC TO DIGITAL IN,
OUTPUT AT 48K, OUTPUT AT 44.1K
GPI PLAY ENABLE ENABLED, DISABLED
Tail Trimmed Audio KEEP ONLY 1ST 30 SEC, KEEP ALL

42
CHAPTER 7 – THE REAR PANEL
INSTANT REPLAY REAR PANEL
ELECTRICAL POWER
CAUTION! CONNECT THIS PRODUCT ONLY TO AN AC POWER SOURCE WITHIN THE VOLTAGE AND
FREQUENCY RANGE INDICATED ON THE REAR PANEL. THE PRODUCT IS SUPPLIED WITH A
DETACHABLE IEC TYPE AC LINE CORD APPROPRIATE TO THE COUNTRY TO WHICH THE UNIT
WAS ORIGINALLY DELIVERED. CHECK TO SEE THAT IT MATCHES THE ELECTRICAL OUTLET
YOU WILL BE USING.
WARNING:
REPLACE POWER CORD ONLY WITH UNDERWRITERS LABORATORIES (UL) LISTED CORD OF
EQUIVALENT TYPE AND RATING!
Power Switch The POWER SWITCH is located next to the AC POWER INPUT on the rear of the product.
Fuses The fuses in this product are not user replaceable. Failure of a fuse is an indication of other component failure, and will require service by a qualified repair technician. Contact 360 Systems, or your 360 Systems distributor.

43
AUDIO CONNECTIONS
Audio Inputs The ANALOG INPUTS are a pair of female XLR-3 connectors marked LEFT and RIGHT. The inputs are electronically balanced, with an impedance of 40k ohms. With the INPUT LEVEL controls up full, a 6.75dBu tone will produce a full scale output, approximately 15dBu with the OUTPUT ATTENUATOR in the –10 position and 25 dBu in the 0 position. Refer to Table 3 for input and output connections.
Input cables should be wired as follows:
XLR Connector Pin Balanced Connection Unbalanced Connection
PIN 1 COMMON GROUND
PIN 2 + INPUT SIGNAL
PIN 3 - INPUT No Connect
TABLE 3 - INPUT AND OUTPUT CONNECTIONS
Audio Outputs The main ANALOG OUTPUTS are a pair of male XLR-3 connectors. The output is electronically balanced, and is capable of driving loads of 600 ohms or greater. Output cables should be wired the same as shown above for the inputs.
Headphone Output The HEADPHONE OUTPUT always carries the same signal as the Main outputs, but its level is controlled by the HEADPHONES LEVEL control on the front panel.
When the PREVIEW button is activated in Stop mode, the HEADPHONE OUTPUT is active and the Main Outputs are turned off during subsequent playback. It may be helpful to use the HEADPHONE OUTPUT
for control room monitoring, while the Main Outputs provide the main feed to a mixer or transmitter.
DIGITAL AUDIO CONNECTIONS
AES/EBU Input An XLR-3 female connector is provided for digital input in the AES/EBU format. There is a selectable Sample Rate Converter built in to Instant Replay. When SAMPLE RATE CONVERTER is ENABLED, the input will accept any sample rate from 24k samples/second to 50k samples/second. Use only special AES cable having an impedance of 110 ohms. Limit the cable run to 100 feet. Do not use microphone cables for runs of over 6 feet.
IEC 958 Type II Input An RCA "phono" connector provides a digital input from consumer or semi-pro equipment. Most equipment with connectors marked "S/P DIF" can be connected to this input.
As described in the previous section, when SAMPLE RATE CONVERTER is ENABLED the input will accept any sample rate from 24k samples/second to 50k samples/second. Use only low-

44
capacitance 75Ω coaxial cable, such as those made for video connection between VCRs and television video inputs. Do not use audio cables with RCA connectors.
Digital Audio Interfacing Should Instant Replay detect a mismatch at its digital audio ports when preparing to record, the PLAY
button is disabled and an error message, INTERFACE MISMATCH, appears in the display. Possible mismatches can include professional/consumer data format conflicts, non-audio data and data flagged as invalid. Copyright Protected data (“SCMS”) will cause a similar error message. Correct the mismatch as necessary.
If the SAMPLE RATE CONVERTER is DISABLED, another mismatch condition can arise between the selected RECORDING FORMAT and the sample rate of the incoming digital audio. The 48K Linear format requires the digital audio to be input from a 48K source. The 44.1K Linear format requires digital audio to be input from a 44.1K source.
Some digital audio equipment does not correctly output audio data or flags. Also, the data might be flagged as invalid when not in play mode. This is most common in consumer CD players with digital outputs. The following techniques may help:
Put the device in Play and Pause before pressing Play on Instant Replay to start recording. Put the device in play and “cue” or “scan” backwards until the previous audio selection is heard,
or in the case of CDs the “preroll” seconds are displayed (usually shown as P :02 or -:02). Let go of the button on the device and press Play on Instant Replay to begin recording immediately.
Start Instant Replay recording on the fly between two selections and use Head Trim to remove any unwanted audio from the start of the recording. This can be useful with DAT machines that are unstable until they have played for a few seconds.
In cases where Instant Replay records for only a few milliseconds or seconds and then stops, check for proper connections and cabling. Try another cable, or different device equipped with a digital output.
If all else fails, use the analog inputs. The conversion to digital is of high quality and will result in minimal loss of fidelity.
Digital Audio Output When using Instant Replay as a digital audio source, RECEIVER ECHO should be DISABLED in the FILE TRANSFER MENU. Also, it is not a good idea to use cuts with different sample rates
on the same project, as this may cause equipment connected to the digital outputs to click, pop, mute or stop recording when the sample rate changes. Use the Playback Sample Rate Converter ( Page 21 ) to make all of your cuts conform to a single sample rate at the output. The analog outputs are not affected by sample rate changes.
AES/EBU Output An XLR-3 male connector provides a digital audio output in the AES/EBU format. Use only special AES cable having an impedance of 110 ohms. Limit the cable run to 100 feet. Do not use microphone cable for runs over 6 feet.
Always set the DIGITAL AUDIO OUTPUT parameter in the CONFIGURATION Menu to PROFESSIONAL when using the AES/EBU output. Although the output is still active with the CONSUMER output formats selected, the signal is not AES/EBU compliant.

45
IEC 958 Type II Output An RCA "phono" connector provides a digital audio output to consumer or semi-pro equipment. Most equipment with input connectors marked "S/P DIF" can also be connected to this output.
Always set the DIGITAL AUDIO OUTPUT parameter in the CONFIGURATION Menu to CONSUMER or COPY PROT. CONS. when using the IEC 958 Type II output with IEC 958 or S/P DIF equipment. Recordings made from Instant Replay in COPY PROT. CONS. mode can not be copied by other digital audio input devices equipped with the Serial Copy Management System (SCMS).
When DIGITAL AUDIO OUTPUT is set to PROFESSIONAL, this output produces a signal that is compatible with the AES/SMPTE digital audio standard. This signal is normally supplied on a BNC connector. It is designed to allow digital audio to be routed and cabled using the same methods as 75Ω video signals
NETWORK CONNECTIONS
Network Port Instant Replay has a 10/100 ethernet port and features an FTP server. This allows you to connect Instant Replay using most commercially available FTP clients. Using the FTP client, you can do the following. • Upload cuts from your computer to Instant Replay • Download cuts from Instant Replay to your computer • Display cuts • Rename cuts • Delete cuts
46
CHAPTER 8 – MAINTENANCE AND DISK OPERATIONS
FORMATTING THE INTERNAL HARD DISK
The Format Disk option for the internal drive is only available through a special "power-on" sequence. This option will erase the entire contents of Instant Replay's internal hard disk It is essential to back up the contents of your hard drive using the FTP Network Port. Refer to Chapter 4 to read how to do this. During FORMAT DISK, if you wait too long to select an option, Instant Replay will "time out", aborting the Format Disk operation.
CAUTION!
FORMAT DISK WILL PERMANENTLY ERASE THE CONTENTS OF THE HARD DISK .
IF AT ANY TIME THE FORMATTING PROCESS IS ABORTED, YOU MUST RECYCLE POWER
(TURN THE MACHINE OFF, THEN BACK ON AGAIN) TO ENSURE PROPER OPERATION. REPEAT
THE FORMAT PROCESS AFTER CYCLING POWER.
To Format the Internal Hard Disk • Turn Instant Replay's power switch OFF.
• While holding down the STOP button, turn power ON. Continue to hold stop until the unit initializes. The display will prompt:
FORMAT & ERASE DISK?
PRESS ENTER/CANCEL
• Press ENTER to proceed, or CANCEL to abort. If you press ENTER, the display will prompt:
PLAY
CANCEL
• Press PLAY to continue. The display will prompt:
FORMATTING
WAIT
After the formatting operation is complete, the display will show the initializing message, then will indicate “NO CUTS AVAILABLE”. At this point, you may:
• Press RECORD and begin recording new material.

47
INDEX 24->16 Bit Conversion, 20 Audio Connections
analog, 43–45 digital, 43–45
Banks, 10 Cancel, 11 Compliance
emissions and immunity, 2, 3 safety, 2
Configuration Menu, 41 Controls, 8
front panel, 8 Declaration of Conformity, 2 Digital Output format selection, 41 Editing Operations, 22
fade in, 24 fade out, 24
Editing Setup Menu, 40 Electrical Power, 42 Enter, 11 Erase, 17 Find, 11, 18 Format
internal drive, 46 Front Panel Controls, 8 FTP
Connecting to, 33, 34, 39 Downloading, 34 Initial Setup, 32 Renaming, 36 Supported Clients, 31 Uploading, 35
Headphone Level Control, 10 Hot-Keys, 9
assigning, 10, 17, 18
overwritng, 10 reassigning audio, 18
Hot-Keys, 17, 18 Input Level Controls, 10 Level Meters, 10 Loop, 9, 19 Menu
configuration, 41 editing, 40 File Transfer, 40 operations, 40, 41 record, 40 setup options, 40
Menu Key, 10 Operations Menu, 40, 41 Output gain adjust, 19 Pause, 9 Play, 9 Playing, 16 Power-On, 12, 13 Preview, 10, 18 Rear Panel, 13, 42 Record, 9 Record Setup Menu, 40 Recording, 14, 15 Sample Rate Converter, 19, 21 Scroll Keys, 11 Sort Directory By, 41 Stop, 9 Symbols
warning and information, 2 Transport Control Buttons, 9 Transport Controls, 9 Warranty Information, 4
RMA number, 3


