498
A+ Training & Test Preparation Guide Volume II – 6 th Edition SPECIALIZED SOLUTIONS, INC.

A+ Training & Test Preparation Guide
Volume II – 6th Edition
SPECIALIZED SOLUTIONS, INC.

Copyright 2003 by Specialized Solutions, Inc.
All rights reserved. Printed in the United States of America. No part of this book may be used or reproduced in any form or by any means, or stored in a database or retrieval system, without prior written permission of the publisher, except in the case of brief quotations embodied in critical articles and reviews. Making copies of any part of this book for any purpose is a violation of United States copyright laws. For further information, please write to: Publisher, c/o Specialized Solutions, Inc., 338 E. Lemon Street, Tarpon Springs, FL 34689.
ISBN 1–893596–60–5
This book is sold as is, without warranty of any kind, either expressed or implied, respecting the contents of this book, including but not limited to implied warranties for the books quality, performance, merchantability or fitness for any particular purpose. Neither Specialized Solutions, Inc., nor its authorized distributors, shall be liable to the purchaser or any other person or entity with respect to any liability, loss or damage caused, or alleged to be caused, directly or indirectly by this book. Furthermore, any mention or reference to any products does not constitute an endorsement by Specialized Solutions, Inc.
03 1
Publisher: Specialized Solutions, Inc.
Authors: Garrett Smiley, Richard Harrison
Editor: David Harvey
Trademark Acknowledgments
Brands and product names cited in this manual are trademarks or registered trademarks held by their respective companies. Any use of a term in this book should not be regarded as affecting the validity of any trademark or service mark.
Suggestions/Comments
Please forward all comments or suggestions to:
Specialized Solutions, Inc. 338 E. Lemon Street Tarpon Springs, FL 34689

Table of Contents
Specialized Solutions, Inc. i
Table of Contents
ABOUT SPECIALIZED SOLUTIONS, INC. ................................1
INTRODUCTION...............................................................................................................1
CHAPTER 1 – INTRODUCTION TO OPERATING SYSTEMS ................................3
SOFTWARE .........................................................................................................................3 OPERATING SYSTEM BASICS..............................................................................................4
Firmware.......................................................................................................................5 OS Software ..................................................................................................................5 Operating System Interfaces .........................................................................................6
OPERATING SYSTEMS ........................................................................................................7 DOS...............................................................................................................................7 Microsoft Windows 3.x..................................................................................................9
OPERATING MODES .........................................................................................................10 Real Mode ...................................................................................................................10 Protected Mode...........................................................................................................10 386 Enhanced Mode ...................................................................................................11
OVERVIEW OF OTHER MICROSOFT OPERATING SYSTEMS................................................11 Windows for Workgroups 3.11 ...................................................................................11 Windows 95.................................................................................................................12 Windows 98.................................................................................................................12 Windows Millennium Edition......................................................................................12 Windows NT................................................................................................................12 Windows 2000.............................................................................................................13 Windows XP................................................................................................................13
OTHER OPERATING SYSTEMS...........................................................................................13 OS/2.............................................................................................................................14 UNIX ...........................................................................................................................14 Linux ...........................................................................................................................14 MacOS.........................................................................................................................14
SUMMARY........................................................................................................................15 KEYWORDS EXERCISE .................................................................................................16 REVIEW QUESTIONS – CHAPTER 1 ...................................................................................18
CHAPTER 2 – WORKING IN A COMMAND LINE PROMPT ENVIRONMENT 21
THE COMMAND LINE PROMPT .........................................................................................21 DOS.................................................................................................................................22
DOS Terms and Commands........................................................................................22 DOS COMMANDS ............................................................................................................25 THE BOOT PROCESS .........................................................................................................27
Optimizing DOS..........................................................................................................28 Configuring DOS ........................................................................................................28
CONFIG.SYS SETTINGS .................................................................................................29 AUTOEXEC.BAT COMMANDS......................................................................................31 MEMORY MANAGEMENT .................................................................................................32 DOS FILES TYPES............................................................................................................33

A+ Training & Test Preparation Guide
Specialized Solutions, Inc. ii
Backing up in a DOS Environment ............................................................................ 35 Troubleshooting in a DOS Environment .................................................................... 35 The following are known DOS issues: ....................................................................... 37
WINDOWS 3.X ................................................................................................................. 37 Windows 3.x Features ................................................................................................ 37 Minimum Requirements for Running Windows 3.x .................................................... 39 Installing and Configuring Windows 3.x.................................................................... 39 Windows Setup ........................................................................................................... 40 Windows 3.x Operating System Files ......................................................................... 40 Windows 3.x Configuration........................................................................................ 41 Control Panel ............................................................................................................. 41 Windows Setup ........................................................................................................... 42 Windows Initialization Files....................................................................................... 42 Configuring the SYSTEM.INI File.............................................................................. 45 Configuring the WIN.INI File .................................................................................... 46 Configuring the CONTROL.INI File.......................................................................... 48 Configuring the PROGMAN.INI File......................................................................... 49 Using Sysedit .............................................................................................................. 49 Configuring Virtual Memory...................................................................................... 50 Virtual Memory Manager........................................................................................... 50 Temporary Swap File ................................................................................................. 50 Permanent Swap File ................................................................................................. 50 Virtual Memory Sizing................................................................................................ 50 Swap File Settings ...................................................................................................... 51
IMPROVING HARD DRIVE SPEED ..................................................................................... 51 SMARTDRV.EXE ....................................................................................................... 52 Vcache ........................................................................................................................ 52 Temp Files .................................................................................................................. 52 Running DOS Applications from Windows ................................................................ 53 Settings for PIF Files ................................................................................................. 54
SUMMARY ....................................................................................................................... 55 KEYWORDS EXERCISE................................................................................................. 56 REVIEW QUESTIONS ........................................................................................................ 60
CHAPTER 3– WORKING IN A GUI ENVIRONMENT............................................ 61
A NEW GENERATION OF OPERATING SYSTEM................................................................. 61 WINDOWS 9X AND FILES ................................................................................................. 63
32–Bit VFAT............................................................................................................... 63 Long Filenames .......................................................................................................... 63 The New CONFIG.SYS and *.INI .............................................................................. 64 Windows 9x Enhancements ........................................................................................ 64 Advantages of Windows 9x......................................................................................... 66
INSTALLING AND CONFIGURING WINDOWS 95 ................................................................ 67 Windows 95 Hardware Requirements ........................................................................ 67 Minimum Requirements.............................................................................................. 67 What You Really Need................................................................................................ 68 Additional Hardware.................................................................................................. 68 How Much RAM Is Enough?...................................................................................... 68

Table of Contents
Specialized Solutions, Inc. iii
Upgrading from Windows 3.x (Windows 95 Version A).............................................69 Windows 95 Installation Process................................................................................70
PERFORMING A CLEAN INSTALLATION.............................................................................73 Installing Windows 95 on a New Computer or Hard Drive .......................................74 Optional Install ...........................................................................................................76 Installing a Dual–Boot System....................................................................................76 Windows 3.1 and Windows 95 ....................................................................................76 Dual Booting with Windows NT .................................................................................77
THE BOOT PROCESS FROM POWER UP TO STARTUP .........................................................78 THE STARTUP MENU – MODES OF STARTING ..................................................................79
Normal ........................................................................................................................79 Logged (BOOTLOG.TXT)...........................................................................................79 Safe Mode....................................................................................................................80 Safe Mode without Compression ................................................................................80 Safe Mode with Network Support ...............................................................................80 Step-by-Step Confirmation..........................................................................................80 Command Prompt Only ..............................................................................................81 Safe Mode Command Prompt Only ............................................................................82 Previous Version of MS-DOS .....................................................................................82
INSTALLING AND CONFIGURING WINDOWS 98.................................................................82 Windows 98 Hardware Requirements ........................................................................82 Minimum Requirements ..............................................................................................82 What You Really Need ................................................................................................83
PREPARING TO INSTALL WINDOWS 98 .............................................................................83 Installing Windows 98.................................................................................................84 The five steps for installation of Windows 98 are as follows: ....................................84
ALTERNATE METHODS OF INSTALLATION .......................................................................86 Windows 98 boot Process ...........................................................................................86 BIOS Bootstrap ...........................................................................................................86 Master Boot Record (MBR) ........................................................................................86 Real Mode Boot...........................................................................................................87 Real Mode Configuration ...........................................................................................87 Protected Mode Load..................................................................................................87 Safe Mode and Windows 98........................................................................................88 Dual Booting Windows 9x ..........................................................................................88 Dual Booting Windows 95 and 98 ..............................................................................88 Dual Booting Windows 9x and DOS...........................................................................88 Dual Booting Windows 9x and Windows NT..............................................................88 Dual Booting Windows 9x and Windows 2000...........................................................89
A NEW DESKTOP ENVIRONMENT.....................................................................................89 Web Style Desktop.......................................................................................................90
INSIDE WINDOWS 9X........................................................................................................90 File Architecture in Windows 9x.................................................................................90 Important System Files ...............................................................................................91 EMM386.EXE .............................................................................................................92 MSDOS.SYS ................................................................................................................92 CONFIG.SYS and AUTOEXEC.BAT..........................................................................95 COMMAND.COM ......................................................................................................96

A+ Training & Test Preparation Guide
Specialized Solutions, Inc. iv
System Commands...................................................................................................... 97 BOOTLOG.TXT.......................................................................................................... 98 Initialization Files ...................................................................................................... 99
WINDOWS 9X REGISTRY.................................................................................................. 99 Why the Change in Windows 9x? ............................................................................... 99 Accessing the Registry.............................................................................................. 100 HKEY_CLASSES_ROOT.......................................................................................... 101 HKEY_CURRENT_USER ........................................................................................ 101 HKEY_LOCAL_MACHINE...................................................................................... 101 HKEY_USERS.......................................................................................................... 101 HKEY_CURRENT_CONFIG ................................................................................... 102 HKEY_DYN_DATA.................................................................................................. 102 Editing the Registry .................................................................................................. 102 Regedit’s Dual Purpose............................................................................................ 104 Using Regedit to Modify the Registry....................................................................... 105
BACKING UP THE REGISTRY.......................................................................................... 105 Microsoft Configuration Backup (CFGBACK.EXE)................................................ 106 CFGBACK.EXE Limitations:................................................................................... 106 Emergency Recovery Utility..................................................................................... 107 ERU.EXE Limitations: ............................................................................................. 107 Using .REG Files...................................................................................................... 107 Additional Restore Techniques................................................................................. 107 Registry Restored—Still Having Windows Problems............................................... 108 Last Resort before Reloading Windows ................................................................... 109
DRIVERS AND WINDOWS 9X .......................................................................................... 109 Virtual Device Drivers (VxD) vs. Real–Mode Drivers............................................. 110 Plug and Play ........................................................................................................... 110 Device Manager ....................................................................................................... 111
ADDING NEW HARDWARE............................................................................................. 114 Windows 9x Configuration....................................................................................... 115 Bootable Disk ........................................................................................................... 115 Supporting DOS Applications in the Windows 9x Environment .............................. 115 Tuning Hard Drive Cache........................................................................................ 116 Configuring a Swap File .......................................................................................... 118
WINDOWS 9X SHORTCUTS............................................................................................. 118 Keystroke Commands ............................................................................................... 118 Navigating Text ........................................................................................................ 120
CONTROL PANEL ........................................................................................................... 120 Accessibility Options ................................................................................................ 122
ADD NEW HARDWARE .................................................................................................. 125 ADD/REMOVE PROGRAMS ............................................................................................. 125
Date/Time ................................................................................................................. 125 Display...................................................................................................................... 125 Internet Options........................................................................................................ 126 Keyboard .................................................................................................................. 126 Mail .......................................................................................................................... 126 Modems .................................................................................................................... 126 Mouse ....................................................................................................................... 126

Table of Contents
Specialized Solutions, Inc. v
Multimedia ................................................................................................................126 Network.....................................................................................................................126 ODBC........................................................................................................................126 Passwords .................................................................................................................127 Printers .....................................................................................................................127 Regional Settings ......................................................................................................127 Sounds .......................................................................................................................127 System .......................................................................................................................127 Users .........................................................................................................................127
SUMMARY......................................................................................................................128 KEYWORDS EXERCISE ...............................................................................................129 REVIEW QUESTIONS – CHAPTER 3 .................................................................................132
CHAPTER 4 – MANAGING FILES AND DISKS IN WINDOWS 9X.....................135
MANAGING FILES ..........................................................................................................135 Hierarchical Storage ................................................................................................135
MANAGING FILES IN WINDOWS .....................................................................................137 MICROSOFT EXPLORER ..................................................................................................139 MY COMPUTER ..............................................................................................................140 MANAGING FILES WITH EXPLORER ................................................................................141
Displaying File Extensions .......................................................................................142 Sorting Files and Folders .........................................................................................143 Moving Objects Within Explorer ..............................................................................144 Properties..................................................................................................................145 Searching for Files....................................................................................................146 The Windows Taskbar...............................................................................................148 The Recycle Bin.........................................................................................................148 Folder Options ..........................................................................................................149 Active Desktop ..........................................................................................................149
MANAGING DISKS..........................................................................................................150 Disk Maintenance .....................................................................................................150 Formatting a Floppy Disk.........................................................................................151 Copying a Floppy......................................................................................................151 Viewing Disk Properties ...........................................................................................152 Partitioning a Disk in Windows 9x ...........................................................................153
SUMMARY......................................................................................................................154 KEYWORDS EXERCISE ...............................................................................................155 REVIEW QUESTIONS CHAPTER 4 ....................................................................................156
CHAPTER 5 – TROUBLESHOOTING WINDOWS 9X ...........................................159
LIMITATIONS OF WINDOWS 9X ......................................................................................159 The System Monitor ..................................................................................................159
RESOURCE METER .........................................................................................................161 DOS APPLICATION INCOMPATIBILITIES.........................................................................162
Wrong DOS Version .................................................................................................162 Other DOS Workarounds..........................................................................................163
WINDOWS 98 SYSTEM TOOLS ........................................................................................164 Backup.......................................................................................................................164

A+ Training & Test Preparation Guide
Specialized Solutions, Inc. vi
Character Map ......................................................................................................... 165 Clipboard Viewer ..................................................................................................... 165 Compression Agent................................................................................................... 166 Disk Cleanup ............................................................................................................ 167 Disk Defragmenter ................................................................................................... 168 Drive Converter........................................................................................................ 169 Drive Space .............................................................................................................. 169 Maintenance Wizard................................................................................................. 170 Net Watcher.............................................................................................................. 171 Resource Meter......................................................................................................... 171 ScanDisk................................................................................................................... 172 Scheduled Tasks ....................................................................................................... 173 System Information................................................................................................... 174 System Monitor......................................................................................................... 176 Welcome to Windows................................................................................................ 176
PRINTING PROBLEMS ..................................................................................................... 176 Viruses ...................................................................................................................... 178
SUMMARY ..................................................................................................................... 180 KEYWORDS EXERCISE............................................................................................... 181 REVIEW QUESTIONS CHAPTER 5.................................................................................... 182
CHAPTER 6 – WINDOWS ME ................................................................................... 183
A NEW MILLENNIUM .................................................................................................... 183 WHAT’S NEW ABOUT ME?............................................................................................. 184
Driver Compatibility ................................................................................................ 185 USB/FireWire Support ............................................................................................. 185 Smart Menus............................................................................................................. 185 DOS says goodbye.................................................................................................... 185 Explorer in Windows Me.......................................................................................... 185 Smarter Run box....................................................................................................... 185
THE HEALTH OF THE COMPUTER ................................................................................... 186 Help and Support...................................................................................................... 186 System File Protection.............................................................................................. 186 System Restore.......................................................................................................... 186 ASD (Automatic Skip Driver) Agent......................................................................... 187
MEDIA AND ENTERTAINMENT ....................................................................................... 187 Windows Movie Maker............................................................................................. 187 Digital Cameras and VCRs ...................................................................................... 188 Windows Media Player ............................................................................................ 188 Windows DVD Player .............................................................................................. 188 Games....................................................................................................................... 189 DirectX 7 .................................................................................................................. 189
ENHANCED USER INTERACTION .................................................................................... 189 The Accessibility Wizard .......................................................................................... 189
ENHANCED INTERNET USE ............................................................................................ 190 Internet Explorer 5.5 ................................................................................................ 190 Dial-up Networking.................................................................................................. 190 NetMeeting 3.1 ......................................................................................................... 191

Table of Contents
Specialized Solutions, Inc. vii
USER-FRIENDLY HOME NETWORKING ............................................................................192 Home Networking Wizard.........................................................................................192 Internet Connection Sharing (ICS) ...........................................................................192 Internet Connection Wizard......................................................................................192 Various Network Support..........................................................................................193 Sharing over a network.............................................................................................193 UPnP Support (Universal Plug and Play)................................................................193 TCP/IP suite stability................................................................................................193
SYSTEM REQUIREMENTS ................................................................................................194 CONTROL PANEL REVISITED ..........................................................................................195
Accessibility Options.................................................................................................195 Date/Time..................................................................................................................198 Internet Options ........................................................................................................199 Dial-Up Networking..................................................................................................201 Display ......................................................................................................................202 Printers .....................................................................................................................205 Add/Remove Programs .............................................................................................205 Updates for Windows Me..........................................................................................207 Driver Signing...........................................................................................................207 Power Management ..................................................................................................207 Installing Software....................................................................................................207
PERFORMANCE PROBLEMS IN WINDOWS ME .................................................................207 Hard Disk Issues .......................................................................................................207 New Hardware and Drivers Issues ...........................................................................208 Display Issues ...........................................................................................................208 Performing a “Clean Boot”......................................................................................209
TROUBLESHOOTING WINDOWS ME................................................................................210 UNINSTALLING WINDOWS ME .......................................................................................219
Uninstalling Me from GUI: ......................................................................................219 Uninstalling Me from a command prompt: ..............................................................219
SUPPORT FOR WINDOWS ME..........................................................................................220 SUMMARY......................................................................................................................221 KEYWORDS EXERCISE ...............................................................................................222 REVIEW QUESTIONS CHAPTER 6 ....................................................................................223
CHAPTER 7 – WINDOWS NT.....................................................................................225
NETWORK OPERATING SYSTEMS ...................................................................................225 Server/Client Software..............................................................................................226
WINDOWS NT – THE BEGINNING ..................................................................................227 Windows for Workgroups (Windows 3.11) ...............................................................227 Warp Connect ...........................................................................................................227 Windows NT..............................................................................................................228 Windows 2000...........................................................................................................228
MICROSOFT WINDOWS NT NETWORK OPERATING SYSTEM..........................................228 WINDOWS NT FILE SERVICES........................................................................................229
Windows NT Security................................................................................................230 Local Security Authority (LSA).................................................................................231 Security Account Manager (SAM) ............................................................................231

A+ Training & Test Preparation Guide
Specialized Solutions, Inc. viii
Security Reference Monitor...................................................................................... 231 WORKGROUP OR DOMAIN ............................................................................................. 231
Workgroup Model..................................................................................................... 231 Domain Model .......................................................................................................... 231
WINDOWS NT PRINT SERVERS...................................................................................... 232 NTFS......................................................................................................................... 232 HPFS ........................................................................................................................ 233 Windows NT Services ............................................................................................... 233 Interoperability......................................................................................................... 233 Installation................................................................................................................ 234 Hardware Compatibility........................................................................................... 234 Windows NT Minimum Requirements ...................................................................... 235
INSTALLATION OPTIONS ................................................................................................ 235 Installation Types ..................................................................................................... 235
WINDOWS NT INSTALLATION PROCESS ........................................................................ 236 UPGRADING TO WINDOWS NT ...................................................................................... 236
Windows 3x............................................................................................................... 237 Windows 9x............................................................................................................... 237 OS/2 .......................................................................................................................... 237 Installing Service Packs ........................................................................................... 237
UNINSTALLING WINDOWS NT....................................................................................... 237 Windows NT Boot Process ....................................................................................... 239 Boot Files ................................................................................................................. 239 Boot Process............................................................................................................. 239 NT Startup Disk ........................................................................................................ 240 Common Boot Errors ............................................................................................... 240 File Management in Windows NT............................................................................ 240 Disk Management in Windows NT ........................................................................... 241 Configuring Windows NT......................................................................................... 242
REGISTRY ...................................................................................................................... 243 System Policy Editor (Server Only).......................................................................... 244
TROUBLESHOOTING WINDOWS NT ............................................................................... 245 System Properties ..................................................................................................... 246 Administrative Tools................................................................................................. 249 Backup ...................................................................................................................... 250 Disk Administrator ................................................................................................... 250 Event Viewer............................................................................................................. 251 License Manager (Server only) ................................................................................ 252 Migration Tool for Netware (Server only) ............................................................... 252 Network Client Administrator (Server only) ............................................................ 252 Performance Monitor ............................................................................................... 253 Remote Access Admin............................................................................................... 253 Server Manager (Server only) .................................................................................. 254 User Manager (Workstation only) ........................................................................... 254 System Policy Editor (Server only) .......................................................................... 255 User Manager for Domains (Server only) ............................................................... 255 Windows NT Diagnostics ......................................................................................... 256 Dr. Watson................................................................................................................ 260

Table of Contents
Specialized Solutions, Inc. ix
SUMMARY......................................................................................................................261 KEYWORDS EXERCISE ...............................................................................................262 REVIEW QUESTIONS CHAPTER 7 ....................................................................................264
CHAPTER 8 – WINDOWS 2000 ..................................................................................265
WINDOWS 2000 – THE BEGINNING................................................................................265 Windows 2000 Professional......................................................................................265 Windows 2000 Server ...............................................................................................265 Windows 2000 Advanced Server...............................................................................265 Windows 2000 Datacenter........................................................................................266 The History of Windows 2000...................................................................................266 Features and Benefits of Windows 2000 Professional .............................................267
WINDOWS 2000 OPERATING SYSTEM ............................................................................269 File Systems ..............................................................................................................269 Recovery Console......................................................................................................272 Security .....................................................................................................................273 Print Servers .............................................................................................................274 Interoperability .........................................................................................................275 Applications and Windows 2000...............................................................................276 Windows 2000 Minimum Requirements....................................................................277 Preparing to Install – Hardware ..............................................................................278 Preparing to Install – Make a Plan ..........................................................................278 Upgrading from Windows 9x or NT .........................................................................280 Installing from a CD-ROM .......................................................................................281
INSTALLING FROM A COMMAND-LINE ENVIRONMENT ...................................................283 INSTALLING FROM A NETWORK .....................................................................................284 WINDOWS 2000 BOOT PROCESS ....................................................................................284
2000 Boot Disk..........................................................................................................285 Common Boot Errors................................................................................................286 Windows 2000 Administrative Tools ........................................................................289 Microsoft Management Console ...............................................................................290 Component Services..................................................................................................291 Computer Management.............................................................................................292 Data Sources (ODBC) ..............................................................................................294 Event Viewer .............................................................................................................294 Power Options ..........................................................................................................295 System Tools..............................................................................................................295 Backup.......................................................................................................................298 Character Map..........................................................................................................300 Disk Cleanup.............................................................................................................301 Disk Defragmenter....................................................................................................302 Getting Started ..........................................................................................................302 Scheduled Tasks ........................................................................................................303 System Information ...................................................................................................304 Event Viewer .............................................................................................................305 Performance..............................................................................................................305 Services .....................................................................................................................306 Telnet Server Administration ....................................................................................306

A+ Training & Test Preparation Guide
Specialized Solutions, Inc. x
Disk Management in Windows 2000 ........................................................................ 307 Configuring Windows 2000...................................................................................... 308 Troubleshooting Windows 2000............................................................................... 309 Stop Messages .......................................................................................................... 309 Device Management ................................................................................................. 310 Event Viewer............................................................................................................. 310 Dr. Watson................................................................................................................ 311
SUMMARY ..................................................................................................................... 312 KEYWORDS EXERCISE............................................................................................... 313 REVIEW QUESTIONS CHAPTER 8.................................................................................... 315
CHAPTER 9 – WINDOWS XP .................................................................................... 317
THE WINDOWS XP FAMILY........................................................................................... 317 Windows XP Professional ........................................................................................ 317 Windows XP Home Edition ...................................................................................... 317 Windows XP Tablet PC Edition ............................................................................... 317 Windows XP Media Center Edition.......................................................................... 317 Windows XP 64-Bit Edition...................................................................................... 317
WHAT’S NEW ABOUT XP?............................................................................................. 318 A Graphical Overhaul .............................................................................................. 318 Take the Tour............................................................................................................ 319 User Icons................................................................................................................. 320 Processor Support .................................................................................................... 321 Memory Support ....................................................................................................... 321 Hard Drive Support.................................................................................................. 321 Protocol Support ...................................................................................................... 321 Application Support.................................................................................................. 321 Partition Support...................................................................................................... 321 Volume Support ........................................................................................................ 321 Mount Support.......................................................................................................... 322 Zip It!........................................................................................................................ 322 Burn, Baby, Burn! .................................................................................................... 322 No More HPFS......................................................................................................... 322
ACCESSIBILITY OPTIONS ............................................................................................... 323 Magnifier .................................................................................................................. 323 Narrator.................................................................................................................... 323 On-Screen Keyboard ................................................................................................ 324 Utility Manager ........................................................................................................ 325
HELP AND SUPPORT CENTER ......................................................................................... 326 MEDIA SUPPORT............................................................................................................ 327
Windows Media Player ............................................................................................ 327 Windows Movie Maker............................................................................................. 328
AN OUNCE OF PREVENTION…....................................................................................... 329 System Restore.......................................................................................................... 329 ASR (Automatic System Recovery) ........................................................................... 329 Recovery Console ..................................................................................................... 330 Device Driver Rollback ............................................................................................ 330 Backing Up ............................................................................................................... 331

Table of Contents
Specialized Solutions, Inc. xi
REMOTE POSSIBILITIES ..................................................................................................331 Remote Desktop ........................................................................................................332 Remote Assistance.....................................................................................................333
SECURITY MEASURES IN WINDOWS XP.........................................................................333 Auditing.....................................................................................................................333 EFS (Encrypted File System)....................................................................................333 ICF (Internet Connection Firewall)..........................................................................334 Configuring Internet Connection Firewall ...............................................................334
INSTALLING WINDOWS XP ............................................................................................335 Minimum System Requirements ................................................................................336 Product Activation ....................................................................................................337
CONTROL PANEL............................................................................................................337 DEVICE MANAGER .........................................................................................................338
Hardware Profiles ....................................................................................................339 MMC (MICROSOFT MANAGEMENT CONSOLE)..............................................................340 NETWORKING WITH WINDOWS XP ................................................................................341
Network Bridge .........................................................................................................341 Support for IPv6........................................................................................................342
TROUBLESHOOTING WITH WINDOWS XP .......................................................................342 NEW COMMANDS USED WITH WINDOWS XP .................................................................348 SUMMARY......................................................................................................................350 KEYWORDS EXERCISE ...............................................................................................351 REVIEW QUESTIONS CHAPTER 9 ....................................................................................352
CHAPTER 10 – NETWORKS ......................................................................................353
NETWORK OPERATING SYSTEMS ...................................................................................353 Peer-to-Peer NOS .....................................................................................................353
CLIENT/SERVER NOS ....................................................................................................354 Client Software..........................................................................................................354 Server Software.........................................................................................................355 Sharing Files and Resources in Windows 9x............................................................356 Network Neighborhood.............................................................................................357 Sharing Folders ........................................................................................................360
NETWORK COMMUNICATION STANDARDS .....................................................................362 OSI Model .................................................................................................................363 IEEE 802 Standards..................................................................................................363 Networking Protocols ...............................................................................................364 Protocol Binding.......................................................................................................365 Naming Systems ........................................................................................................366 Dial-up Networking ..................................................................................................368 Network Utilities .......................................................................................................369 Internetworking.........................................................................................................370 World Wide Web (WWW)..........................................................................................370 Web Browsers ...........................................................................................................370 Internet Service Providers ........................................................................................372 Email .........................................................................................................................373
SUMMARY......................................................................................................................375 KEYWORDS EXERCISE ...............................................................................................377

A+ Training & Test Preparation Guide
Specialized Solutions, Inc. xii
REVIEW QUESTIONS CHAPTER 10.................................................................................. 379
CHAPTER 11 – STAYING ON TOP OF YOUR PROFESSION ............................. 381
A+ TECHNICIAN ............................................................................................................ 381 Staying on Top.......................................................................................................... 381 Getting Technical Support........................................................................................ 383 Being Prepared......................................................................................................... 384 Troubleshooting Techniques .................................................................................... 386 Define the Problem................................................................................................... 386 Isolate the Problem .................................................................................................. 387 Customer Service...................................................................................................... 388 Get Your Act Together.............................................................................................. 388 Providing Tech Support............................................................................................ 389 The Art of Technical Support ................................................................................... 391
SUMMARY ..................................................................................................................... 398 KEYWORDS EXERCISE............................................................................................... 399 REVIEW QUESTIONS CHAPTER 11.................................................................................. 400
CONCLUSION............................................................................................................... 401
APPENDIX A – HOW TO REGISTER FOR THE A+ EXAM ................................ 403
TO REGISTER FOR THE A+ EXAM .................................................................................. 403
APPENDIX B – TABLES.............................................................................................. 405
APPENDIX C – GLOSSARY ....................................................................................... 419
APPENDIX D – REVIEW QUESTIONS AND ANSWERS...................................... 443
REVIEW QUESTIONS – CHAPTER 1................................................................................. 443 REVIEW QUESTIONS – CHAPTER 2................................................................................. 445 REVIEW QUESTIONS – CHAPTER 3................................................................................. 447 REVIEW QUESTIONS – CHAPTER 4................................................................................. 451 REVIEW QUESTIONS – CHAPTER 5................................................................................. 453 REVIEW QUESTIONS – CHAPTER 6................................................................................. 455 REVIEW QUESTIONS – CHAPTER 7................................................................................. 456 REVIEW QUESTIONS – CHAPTER 8................................................................................. 458 REVIEW QUESTIONS – CHAPTER 9................................................................................. 461 REVIEW QUESTIONS – CHAPTER 10............................................................................... 463 REVIEW QUESTIONS – CHAPTER 11............................................................................... 465
INDEX ............................................................................................................................. 467

About SPECIALIZED SOLUTIONS, INC.
Specialized Solutions, Inc. 1
About SPECIALIZED SOLUTIONS, INC. Welcome to the Specialized Solutions, Inc. A+ training and certification course. We thank you for choosing our company as your resource for Information Technology Self–Study Training.
SPECIALIZED SOLUTIONS, INC. is dedicated to providing the computer professional the highest level of self–study training and certification materials the industry has to offer. We are committed to always be on the leading edge of new computer environment training products.
We will always provide a quality product to customers at a price that is within reach of most computer professionals. We strive to provide training programs that far exceed the expectations of our customers. One hundred percent customer satisfaction and unmatched customer service is always our commitment to the computer professional.
Our highly skilled staff of computer and educational professionals is dedicated to delivering high quality, cost-effective programs that are customized to suit your needs.
To see other Specialized Solutions, Inc. course offerings, please visit us at:
http://www.specializedsolutions.com/

A+ Training & Test Preparation Guide
Specialized Solutions, Inc. 2

Introduction
Specialized Solutions, Inc. 1
Introduction
This Training Guide is designed to meet all of the A+ exam objectives. It can be used in conjunction with the SPECIALIZED SOLUTIONS, INC. A+ video training series, as a stand–alone textbook, or as a textbook in a classroom environment. We have carefully prepared this multi–media training material to provide you with necessary information in a logical, easy to follow format.
Our staff consists of Microsoft Certified Professionals, Technical Writers, Technical Editors, Computer Graphics Experts, and Digital Video Studio Professionals. We hope you enjoy your A+ training program. Remember, at SPECIALIZED SOLUTIONS, INC., our success is directly tied to the success our students have with our training programs. We are here to help with all of your training and certification needs!

A+ Training & Test Preparation Guide
Specialized Solutions, Inc. 2

Chapter 1 – Introduction to Operating Systems
Specialized Solutions, Inc. 3
Chapter 1 – Introduction to Operating Systems
This chapter begins the study of computer operating systems and your preparation for the A+ OS Technologies Exam. We will start with a discussion of operating systems. What they are and their functions. Here you will learn to identify the most common operating systems including those used today and in the past. In the following chapters, we will focus on the Microsoft suite of operating systems. You will learn the details of each, including how to navigate, install, and configure them.
Software
Software refers to any program (set of instructions) that directs a computer to carry out a task or function. Software falls into two categories—operating systems and applications.
Operating system software is used to manage hardware, data, and application software. No computer can run without an operating system. DOS, DOS/Windows 3.x, Windows 95/98, Windows 2000, Windows NT, OS/2, UNIX, and Linux are examples of operating systems.
Application software programs (Microsoft Word, Access, Excel, WordPerfect, Lotus 123, and so forth) use the operating system software, enabling users to create, manipulate, and present data. Applications are the tools users use.
We have included an introduction to earlier operating system software, such as DOS and Windows 3.x. Although DOS and DOS/Windows 3.x are somewhat outdated, they remain the foundation on which Windows 95/98, NT, and 2000 evolved. Many of the fundamental concepts and conventions used with today’s operating systems stem from these beginnings. In addition, as an A+ Technician, you will no doubt encounter computers that still use these operating systems.

A+ Training & Test Preparation Guide
Specialized Solutions, Inc. 4
Popular examples of:
Operating Systems Applications
DOS Microsoft Works
DOS/Windows 3.x Microsoft Word
Windows 95/98 Microsoft Excel
Windows NT Microsoft Access
Windows Millennium Edition (ME) Microsoft Outlook
Windows 2000 WordPerfect
UNIX Lotus 1-2-3
Linux Adobe Photoshop
Operating System Basics
An operating system is a special software program that is loaded in a computer at power up, and is responsible for running the computer. The operating system manages all the hardware and provides an interface between the computer’s hardware and the user. Before the operating system can take command of the computer, certain basic hardware functions must be verified and enabled. Essentially, three components make up a complete operating system.
• Firmware
• Operating System Software
• Interface

Chapter 1 – Introduction to Operating Systems
Specialized Solutions, Inc. 5
Firmware
Firmware is software, but it is stored on a microchip rather than a floppy, CD, or hard drive. The most common form of firmware is the BIOS.
BIOS is an acronym for Basic Input/Output System. This built–in software determines the computer’s capabilities without accessing programs from a disk. The BIOS contains all the code needed to control various functions such as the keyboard, display screen, disk drives, and serial communications. It is usually placed on a ROM chip that comes with the computer (called ROM BIOS) to make sure that it is always accessible and not in danger of being damaged by disk failure.
Hint: any antivirus features in your BIOS have to be disabled before updating system files or performing an operating systems install.
The BIOS also makes it possible for the computer to boot itself. However, because RAM is faster than ROM, many computer manufacturers have designed systems that copy BIOS from ROM to RAM every time the computer is booted. This is called shadowing.
Computers may also use flash BIOS. Flash BIOS uses a different type of chip than standard ROM. These chips are called EEPROM (Electronically Erasable Programmable Read Only Memory). This means that by using a special program, you can change the contents of the chip. Therefore, on a new motherboard, the BIOS is recorded on a flash memory chip that can be updated when necessary. It is not uncommon these days to resolve basic hardware problems by “flashing the BIOS.”
Some workstations that run via a network (also called a dumb terminal) must boot to the network software each time the system is started by installing a ROM or BIOS chip on the network card. On this chip is written all the information required to boot to the network and allow the user to logon.
Many hardwired computers such as clocks, video tape recorders, etc., use EEPROM to boot the system and run the process.
Note: the IRQs that the BIOS assigns are assign first, before plug–and–play devices or regular hardware. This is done to reserve IRQs for legacy devices.
OS Software
Operating system software is perhaps the one with which we are most familiar. Windows 9x, Windows NT, Windows ME, and Windows 2000 are popular examples of operating system software from Microsoft. Other manufacturers produce operating systems as well.
When a computer is booted up, it first completes all of its internal checks, such as running the POST, and then searches for an operating system. It will search the contents of each drive (in the order specified by the BIOS) and look for a formatted disk. When it finds a disk, it will look for any system files, specifically the boot sector. These system

A+ Training & Test Preparation Guide
Specialized Solutions, Inc. 6
files begin the process of loading the data and initializing the operating system. If it finds a disk, but does not find any system files, you will get a “non–system disk” error. Finally, the operating system is loaded, either to line-command or GUI.
Early operating systems, such as DOS 1.0 came complete on a single floppy disk. With time, this grew to several disks (Windows 95 contained 24 to 30 disks). Eventually, operating systems required CD–ROMs to hold all the data. This presented problems because at the time, CDs were not bootable. As a result, you would have to create a bootable floppy disk that would boot the CD–ROM in order to install the operating system. Today, this is not a problem because the newer BIOS will allow you to boot from a CD–ROM, and operating systems can be installed directly from the CD.
Operating System Interfaces
Operating systems can be classified as one of two types depending on how the user (person) communicates with the software (ones and zeros). The first type is the command line interface, and the second is the GUI (Graphical User Interface).
Command Line Interfaces
A command line interface is any operating system (or software) that requires the user to type commands. Alternatively, the commands can be “read” from a software text file and executed one at a time. These are called text-based operating systems. Earlier systems such as DOS and UNIX are command line interfaces. While these systems may be considered “old”, they are still used today and are invaluable to the computer professional. As an A+ certified technician, you should be familiar with using these types of interfaces.
Note: Carefully observe the startup of your Windows computer. What are the first screens that you see? Notice that they are text. During this part of the boot process, the system is using command lines from the software configuration to initialize the boot sequence.
GUI (Graphical User Interface)
A GUI, or Graphical User Interface, is the most common type of computer interface used today. These operating systems are based on objects such as icons, menus, and windows. This type of interface, today’s standard, is considered easier to use or user-friendly.
Don’t be fooled, many GUI operating system (including Windows) still use command line interfaces. As a technician, you may sometimes experience trouble with the GUI portion of the operating system, and may need to use command lines as backup. A wise technician will know how to use both command lines and the GUI.

Chapter 1 – Introduction to Operating Systems
Specialized Solutions, Inc. 7
Operating Systems
In this section, we will look at several popular operating systems. In the following chapters, we will study each of the operating systems presented on the A+ OS Technologies Exam in more detail.
DOS
DOS stands for Disk Operating System. The modern computer professional must be familiar with DOS because DOS remains at the heart of Windows. Although more of Windows configuration can carried out from within the Windows interface, there comes a time when every computer professional is faced with a screen of DOS commands.
Windows 2000 is more independent of DOS than any prior version of Windows. However, for backwards compatibility with the earlier versions of Windows (9x, NT), it still looks for DOS-based configuration files (Autoexec.bat, Config.sys, and various initialization files). These files will allow you to run old DOS applications in the new Windows environment. Since there are still a lot of these old or legacy machines, the computer professional will still need to be familiar with DOS.
Three suppliers have produced versions of DOS. These versions are so similar they are considered one operating system. The three brands of DOS are:
• MS–DOS, produced by Microsoft—the most popular
• PC–DOS, produced by IBM
• DR DOS, produced by Novell
Note: Proprietary DOS –– Some computer manufacturers produced their own versions of DOS (OEM – Original Equipment Manufacturer). These are actually tweaked versions of DOS that contain additional commands or utilities specific to their hardware. You may encounter them with brand name computers such as Compaq. Care should be taken when using any computer with one of these operating systems—some incompatibilities with software written for MS–DOS may exist. You should be careful not to substitute the generic MS–DOS if you’re reformatting or reinstalling DOS, because the proprietary version may be necessary to support some of the hardware.
DOS was originally designed to load an operating system from a floppy disk to a computer with no hard drive (before hard drives were common). Today, any reference to DOS is synonymous with MS–DOS. The following table provides a version history of MS–DOS:

A+ Training & Test Preparation Guide
Specialized Solutions, Inc. 8
History of DOS
Version Introduced Features
1.0 8/81 Distributed on one floppy (required 8 KB of RAM)
1.1 5/82 Supported 320 KB double–sided disks
2.0 3/83 Supported hard disks, directories, background printing, ability to add device drivers
3.0 8/84 Supported hard disks larger than 10 MB and 1.2 MB floppy disks
3.1 3/85 Added networks and file sharing
3.2 1/86 Supported 3.5–inch floppy disks
3.3 4/87 Added new commands and international support
4.0 2/88 Supported hard disks greater than 32 MB, the MEM command, and the DOS shell
5.0 5/91 Added memory management tools, help, undelete, unformat, task swapping (last with printed manual)
6.0 3/93 MEMMAKER, multiple boot configurations, Windows UNFORMAT and undelete, virus protection, and backup
6.2 10/93 SCANDISK, MSD utilities, enhanced diagnostics
7.0 12/95 Bundled with Windows 95
The final version as an independent operating system was 6.22. The version of DOS found in Windows 9x is considered version 7.0.
DOS System Files
DOS includes three programs that constitute the core operating system:
• IO.SYS: The interface between the hardware and the operating system code.
• MSDOS.SYS: The main operating system code.
• COMMAND.COM: The interface between the user and the operating system code.

Chapter 1 – Introduction to Operating Systems
Specialized Solutions, Inc. 9
Any disk (hard disk or floppy disk) designated for use as a system disk must have these three files to boot a computer.
Note: IO.SYS and MSDOS.SYS are hidden files that may not be visible when you are examining a disk directory. These files are used in relation to Windows 9x. Stand–alone versions of DOS generally only have COMMAND.COM, CONFIG.SYS, and AUTOEXEC.BAT. Hidden files can be viewed in Windows explorer if you go to Tools, Folder Options, View Tab, and click the radio button to “reveal” them.
In addition to the three core files, DOS uses two other startup files. These files are not required to start the machine, but they add any additional startup configuration required by the user or applications. These files are:
• CONFIG.SYS: Loads extra hardware and device drivers not built into IO.SYS.
• AUTOEXEC.BAT: Loads Terminate and Stay Resident (TSR) programs selected by the user and sets up the environmental variables such as TEMP and PATH.
Note: with Windows 9x, the IO.SYS is executed, then MSDOS.SYS. After that, if a CONFIG.SYS exists, it will load device drivers, then COMMAND.COM, and if there is an AUTOEXEC.BAT file, it will run as well.
Microsoft Windows 3.x
The Windows 3.x operating system has been dropped from the requirements for A+ certification. However, the authors have elected to leave this section in the book for you as a reference. Please don’t ignore this section, as many of the principles created for this operating system are the roots of the Windows 9x operating systems.
Microsoft Windows 3.x is not in itself an operating system. Windows 3.x is an operating environment that uses DOS as its foundation. Unlike Windows 3.x, Windows 9x is an operating system that incorporates DOS. The purpose of Windows 3.x was to make the computer more user-friendly by providing a GUI (Graphical User Interface). The GUI uses icons or pictures to display command information rather than requiring the user to type a command. It was intended that users would interact the with the operating system using a mouse or other pointing device (it can be operated entirely with a keyboard—but that's not recommended).
Windows did not get off to a fast start. In fact, it was not generally accepted until the release of version 3.0. The first version (version 1.0) was released in 1985 followed by version 2.0 in 1987. Both of these versions provided a graphical interface and were used predominately by the engineering community. It wasn’t until the release of version 3.0 in the early 1990s that this operating environment became popular. This jump in popularity can be attributed to its ability to overcome the 640K memory limits imposed by the pre–286 computers. The best–known and most used version, 3.11, was released in the spring of 1992.

A+ Training & Test Preparation Guide
Specialized Solutions, Inc. 10
All applications written for Windows standards provide a common user interface:
• The menu system will offer the same basic commands.
• Selecting text or objects will be done in a similar manner.
• Clicking and dragging mouse functions are the same.
This commonality reduces the user’s learning cycle for unfamiliar applications. On a programming level, application developers have access to a toolbox of Windows routines, so they do not have to reinvent the wheel every time they want to invoke a menu or dialog box.
Windows uses a sophisticated memory management system that makes better use of memory and allows the user to run multiple applications concurrently. In reality, Windows provides the appearance of running more than one application at a time by using a task–switching technique.
One of the restrictions of DOS is that it was designed to run on an 8086 machine. Windows overcomes this restriction by implementing new modes of memory use.
Operating Modes
With the release of the 80286 processors, the CPU was able to address more than 1 megabyte of RAM, thus breaking the DOS barrier. This was good, but the market was still dominated by DOS–based programs that worked within this limit. The release of Windows solved this problem by allowing the OS to operate in several “modes” thus accommodating both the old and new worlds.
Real Mode
Real Mode is a term that is generally used to define the early versions of DOS. Hardware-dependent mode operates within the original 1-megabyte memory limits of DOS. It is hardware dependent, as it must directly address all the hardware in the computer. Support of real mode applications and hardware is part of backwards compatibility. Even in the Windows 95 environment, you will encounter terms such as “real mode driver,” which refers to operating at this level.
Protected Mode
Protected Mode is a term that is used interchangeably with standard mode and 286 protected mode. It was developed to exploit the “new” 286 machines that could address up to 16 MB of RAM. It works by allocating chunks of memory to a program. In real mode, you could run only one program at time, but with protected mode, two programs could run independently. This mode would then allocate a block of memory to each application and protect the memory from each of them. So, the OS manages the memory.
Along with Windows protected mode, came the now–famous “GPF” (General Protection Fault). Encountering this error message generally means that some portion of the

Chapter 1 – Introduction to Operating Systems
Specialized Solutions, Inc. 11
Windows protected mode has been violated (such as by a program trying to write data outside of the portion of memory allocated to it).
Another concept that came with protected mode was resources. Various components of the computer such as the drives, memory, and printer were designated resources and controlled by the operating system. The operating system, such as Windows, would manage all the resources of the computer and allocate them to any program that needed to use the resource. This way, programs were not given direct access to the hardware of the machine.
One of the problems with this mode was that you could not switch between real mode and protected mode without rebooting the computer.
Note: Windows Runtime Version ––Certain applications (like PageMaker) could be purchased with a “runtime” version of Windows. This allowed a program that required a Windows environment to run on computers that did not have the full version of Windows installed.
386 Enhanced Mode
With the introduction of the 386 machines and the 32–bit address bus, came a new mode called 386 enhanced mode. This is an advanced version of the protected mode designed to operate on 386 machines and take advantage of the now 4-gigabyte memory limit. It was also designed to enhance the performance of the Windows environment.
One of the key developments of the 386 enhanced mode is its ability to use what is known as virtual mode. This mode allows the processor to create virtual DOS machines. These are 1–megabyte blocks of memory configured to look and run like an 8086 DOS machine. By using virtual mode, you could run several DOS computers at the same time without having to reboot the computer to switch between modes.
Overview of Other Microsoft Operating Systems
The following chapters will cover in detail the more important Microsoft operating systems. The following section includes an overview (in chronological order) of the Microsoft operating systems:
Windows for Workgroups 3.11
Windows for Workgroups was an upgrade to Windows 3.1. Like Windows 3.1, it was a 16–bit operating system that required DOS, but had a few enhancements such as better networking capabilities for sharing files and printers. It also included two utility programs: Schedule+ and Mail service. The primary purpose of this upgrade was to add networking functionality to the Windows operating system.
Just as Windows 3.x laid the foundation for the Windows 95 and Windows 98, Windows 3.11 laid the foundation for Windows NT.

A+ Training & Test Preparation Guide
Specialized Solutions, Inc. 12
Windows 95
Windows 95 adds the functionality of a 32–bit system to enhance the user interface. Windows 95's backward-compatibility with Windows 3.X operating environments was one of its key features. Windows 95 is a stand–alone operating system. This means that it did not require you to load and run DOS first. Windows 95 uses an improved interface that closes the gap between it and its number one competitor – the Macintosh.
However, it did have its limitations. Unlike Windows 98, the OEM Windows 95 CD does not boot by itself and requires a boot disk or other means to get the setup process started. This, coupled with other limitations such as FAT partitions (only Windows 95 OSR2 could use FAT32), no USB support (unless specified), and a maximum number of 300 shared folders make Windows 98 a better choice.
Note: if you need to repair a Windows 95 installation, existing items will be preserved.
Windows 98
Windows 98 is a 32–bit operating system that is fully compatible with 16–bit programs, which can be used as an alternate for Windows NT (see next section). It is the last major version of Windows based on the old kernel running on top of DOS. One of its big features is the integration of Internet Explorer 4.
Note: A kernel is the essential part (or core) of a computer operating system. The core provides basic services for all other parts of the operating system. A kernel can be contrasted with a shell, which is the outermost part of an operating system and is the part of the operating system that interacts with user commands.
Windows Millennium Edition
The Windows Millennium Edition is the successor to Windows 98. It is marketed as Windows Me. It has few advantages over Windows 98, but does include better audio software, graphics handling and system tools. It is not getting very good reviews and most people prefer Windows 98 or Windows 2000 Professional.
Windows NT
Windows NT is a true 32–bit operating system with a completely different architecture from that of its predecessors. Windows NT is designed for users who need stability, security, and the ability to use various types of processors such as Alpha, MIPS, and Pentium. Windows NT supports serial, PS/2 and SCSI connections, but, since it does not support plug and play, USB and IEEE1394 devices are incompatible. Windows NT does not provide complete backwards compatibility with 16–bit programs.
Note: Be careful when upgrading to Windows NT. Not all applications and hardware are compatible with NT. Be sure to consider all the advantages and disadvantages before making the decision to upgrade.

Chapter 1 – Introduction to Operating Systems
Specialized Solutions, Inc. 13
Windows NT has various versions; including, Windows NT Server and Windows NT Workstation. Windows NT is predominantly used as a Network Operating System. Windows NT Server is a server operating system and Windows NT Workstation is a client operating system.
Windows 2000
The Windows 2000 platform consists of four operating systems.
Windows 2000 Professional
Windows 2000 Professional is the desktop operating system for businesses of all sizes. It replaces Windows 95, Windows 98, and Windows NT Workstation in the business environment.
Windows 2000 Server
Windows 2000 Server provides services that simplify network management. It provides improved network access to branch offices, and is ideal for file and print servers, Web servers, and workgroups.
Windows 2000 Advanced Server
Windows 2000 Advanced Server provides increased scalability and system availability. It is designed for servers used in a large enterprise networks and for database–intensive work.
Windows 2000 Datacenter Server
Windows 2000 Datacenter Server supports more memory and more CPUs per computer. It is the most powerful and functional server operating system that Microsoft offers. It is designed for large data warehouses, Online Transaction Processing (OLTP), large–scale simulations, and server consolidation projects.
Windows XP
Windows XP has many versions, but all of these versions are more graphically enhanced than Windows 2000. Windows XP is designed to use the newest in both hardware and software technology.
Other Operating Systems
The following operating systems are not included on the test, but we are including a brief overview of each as you may encounter them in the field. These operating systems are considered command–prompt environments, and use essentially the same DOS commands as Microsoft’s products.

A+ Training & Test Preparation Guide
Specialized Solutions, Inc. 14
OS/2
OS/2 began as a joint venture between IBM and Microsoft but was ultimately finished and marketed by IBM. There are very few business applications still running on this operating system. It uses the HPFS (High Performance File System) and is similar in capability to Windows 3.11 and Widows 95. The latest version of OS/2 is called OS/2 Warp.
UNIX
UNIX stands for UNiplexed Information and Computing System, and is a command –prompt operating system that has been around since the late 60s. Ken Thompson and Dennis Ritchie are considered the inventors of UNIX. UNIX was the first open standard operating system. Open means that it can be improved or enhanced by anyone with the knowledge to do so.
UNIX, a bulky operating system that is primarily used on minicomputers, is written in the C language and is a multi–tasking, multi–user, general–purpose operating system. Although it was not designed as a NOS, it can be, and is, used as such.
Linux
Linux is a freeware UNIX–based operating system that is distributed for the Intel architecture. It has all the utilities to provide printer services, FTP services, network file services, Web page services, mail services, and Internet services. A popular implementation of Linux is Red Hat Linux. There is also a freely distributed version of Linux available for the Macintosh computer.
MacOS
MacOS is the operating system used on most Macintosh computers. The latest version is OS X. One of the main reasons that the PC became more popular than the Mac is that Macintosh took a business approach of using a closed (proprietary) architecture. They focused on quality and not compatibility with other systems.

Chapter 1 – Introduction to Operating Systems
Specialized Solutions, Inc. 15
Summary
This chapter has provided an overview of a few of the most common operating systems. While most of the material presented will not be on the A+ OS Technologies exam, we feel that the knowledge is important to the PC Technician who may encounter some of these operating systems in the field.
The following summarized the key points of this chapter:
• Software falls into two categories: Operating Systems and Applications
• An operating system is a software program that is responsible for handling computer functions.
• There are two types of operating system interfaces: Command Line Prompt and GUI.
• Firmware is software stored on a ROM chip. The most common form of firmware is the BIOS.
• DOS was the first operating system, from which modern Microsoft operating systems has developed.
• Windows 3.x is not an operating system; it is an operating environment that operates on top of DOS. It was the first Microsoft GUI interface.
• You should be familiar with the Real, Protected, and 386 Enhanced modes.
• Windows 95 was the first GUI interface that was also an operating system.
• You should be familiar with the other popular operating systems mentioned in this chapter.

A+ Training & Test Preparation Guide
Specialized Solutions, Inc. 16
KEYWORDS Exercise
Define each of the following keywords. Hint: There’s a glossary in the back of this book.
Keyword Definition
386 enhanced mode.
AUTOEXEC.BAT
BIOS
Command line interface
COMMAND.COM
CONFIG.SYS:
DOS
Dumb terminal
Firmware
Flash BIOS
GPF
GUI
IO.SYS
Linux
MacOS
MSDOS.SYS
OS/2
Protected Mode
Real Mode
Software
UNIX
Virtual DOS machine

Chapter 1 – Introduction to Operating Systems
Specialized Solutions, Inc. 17
Keyword Definition
Windows 2000 Advanced Server
Windows 2000 Datacenter Server
Windows 2000 Professional
Windows 2000 Server
Windows 3.11
Windows 95
Windows 98
Windows Me
Windows NT

A+ Training & Test Preparation Guide
Specialized Solutions, Inc. 18
Review Questions – Chapter 1
1. What are the two categories of software?
2. Name the two types of operating system interfaces.
3. What is the most common form of firmware?
4. What does DOS stand for?
5. Name the three brands of DOS.
6. What are the three core files in DOS?
7. Name two DOS startup files:
8. What does TSR stand for?
9. What was the first GUI–based operating environment?
10. Name the three operating modes that were used to overcome the DOS memory limits.
11. Name the first GUI–based operating system.
12. Name as many of the Microsoft operating systems that you can remember.

Chapter 1 – Introduction to Operating Systems
Specialized Solutions, Inc. 19
13. Which operating system uses the HPFS (High Performance File System) as its file system?
14. Which operating system is free?
15. Macintosh makes an excellent computer and its users are extremely loyal. Given this, why are PCs more popular than Macs?

A+ Training & Test Preparation Guide
Specialized Solutions, Inc. 20
Chapter 2 – Working in a Command Line Prompt Environment
Specialized Solutions, Inc. 21
Chapter 2 – Working in a Command Line Prompt Environment
This chapter introduces working in a command line prompt interface environment. We will focus on using the Microsoft DOS operating system. Most technicians will eventually be required to use command line interfaces at some time in their career. Understanding the basics of typing commands will be valuable, even when using the more popular GUI interfaces. We will also be looking at the Windows 3.x interface. If you recall, this is a GUI interface operating on top of DOS and we often had to use the principles of command lines to configure the operating system and the applications that run within it. The fact that Windows 3.x is no longer an objective of the A+ exam is no reason to ignore it. Being familiar with the configuration files will help you gain an understanding of the evolution of the registry that is used by the later Windows operating systems.
As an A+ technician, you will need to be familiar with some of the basic DOS commands and the principles of syntax.
The Command Line Prompt
Seeing the command line prompt is the main way users know they are in a DOS or Virtual DOS environment. The computer screen is blank except for a few lines, one of which begins with a capital letter, followed by a colon, a backslash and ending with a greater than symbol (>). The information provided in the command line prompt must follow the proper syntax.
Hint: to access a command–line environment in a Windows operating system, go to the Run option in the Start menu, and type and run either COMMAND for Windows 9x or CMD for Windows NT/2000/XP.
Syntax is the arrangement and inter-relationship of words in phrases and sentences. In computer jargon, it is the correct format in which to type a command. In DOS every letter, number, and space has value (Bad news, spelling counts).
For example:
C:\EXAMPLE\DOS\CLP\SAMPLE
The C: indicates the file space (disk storage) on the hard drive given the designation C:. C is typically the internal hard disk of the PC. It can represent either a physical or logical drive.

A+ Training & Test Preparation Guide
Specialized Solutions, Inc. 22
The backslash (\) represents a level in the hierarchy of the file structure. There is always at least one because it represents the root directory, which is the very first level of the hard disk. Windows 9x is limited to a maximum of 512 entries in the root directory.
In the example above, the file SAMPLE is on the internal hard disk, four levels deep. The list of directories (\EXAMPLE\DOS\CLP\) is the pathname. Following the path of directories will get you to the file. The name of the file itself (SAMPLE) is the filename.
The most common problem when typing DOS commands is to add or leave out a letter or character. Typos are the most common cause for “Bad command or filename” errors.
Note: When you use networking or the Internet, you will be introduced to the forward slash (/). Don’t confuse this with the backslash. They have entirely different functions.
DOS
This section covers configuration of the DOS operating system. This is not intended to be a complete course in DOS; however, some important techniques useful to the computer professional will be pointed out. Gaining an understanding of DOS and having a DOS manual as a reference is a requirement for the computer professional. If you don’t have one, you had better start looking now. They are no longer in print and often difficult to find. Learning DOS requires perseverance and experience.
DOS Terms and Commands
A distinguishing feature of the DOS operating system is that it is a command line or text–based system. This means that the user must memorize and type commands in order to interface with the operating system. This is not what we call a user–friendly operating system.
Key DOS Terms
As with any operating system it is important to understand the language or terms used. As mentioned, this is not a complete course in DOS and there is no substitute for a DOS manual. Here is a list of some of the important terms you may encounter in DOS.
.BAT An extension that indicates a batch file that can be run from a command–line.
.COM An extension used to identify a file as an executable program file. Similar to the .EXE extension and it can be run from a command–line.

Chapter 2 – Working in a Command Line Prompt Environment
Specialized Solutions, Inc. 23
.EXE An extension used to identify a file as an executable program file. It can be run from a command–line
Backslash (\) This symbol is used to separate each directory level, for instance c:\windows\utilities. For this reason, it is a reserved character and cannot be used as part of a file name.
Case Sensitivity Case sensitivity is the ability of the operating system to distinguish between uppercase and lowercase letters. DOS commands are not case-sensitive. Traditionally DOS commands have been represented in documentation as uppercase. DOS commands may be typed in either upper or lowercase.
Cursor Any time you are entering data, whether in an application, or in a DOS command, the cursor (usually a small flashing line) indicates the place where the characters will be inserted. It is a good idea to always know where your cursor is.
Default Drive Each drive in a computer has its own drive letter designation. The default drive is the active drive. Any commands, unless otherwise specified, will act upon the default drive. The DOS prompt indicates the current default drive. For example, if you want to see a directory (the command is DIR) of files on the A: drive and the default drive is C: you will need to type dir a: otherwise you will see a directory of the C: drive.
Directory Directories are locations for storing files. Many users now know these as “folders.” Every disk contains a main directory known as the root directory. Below the root directory is a hierarchical structure of other (sub) directories.
DOS Prompt The DOS prompt displays the active drive letter (for instance “C:”) and directory. This indicates that the operating system is ready to accept the next command.
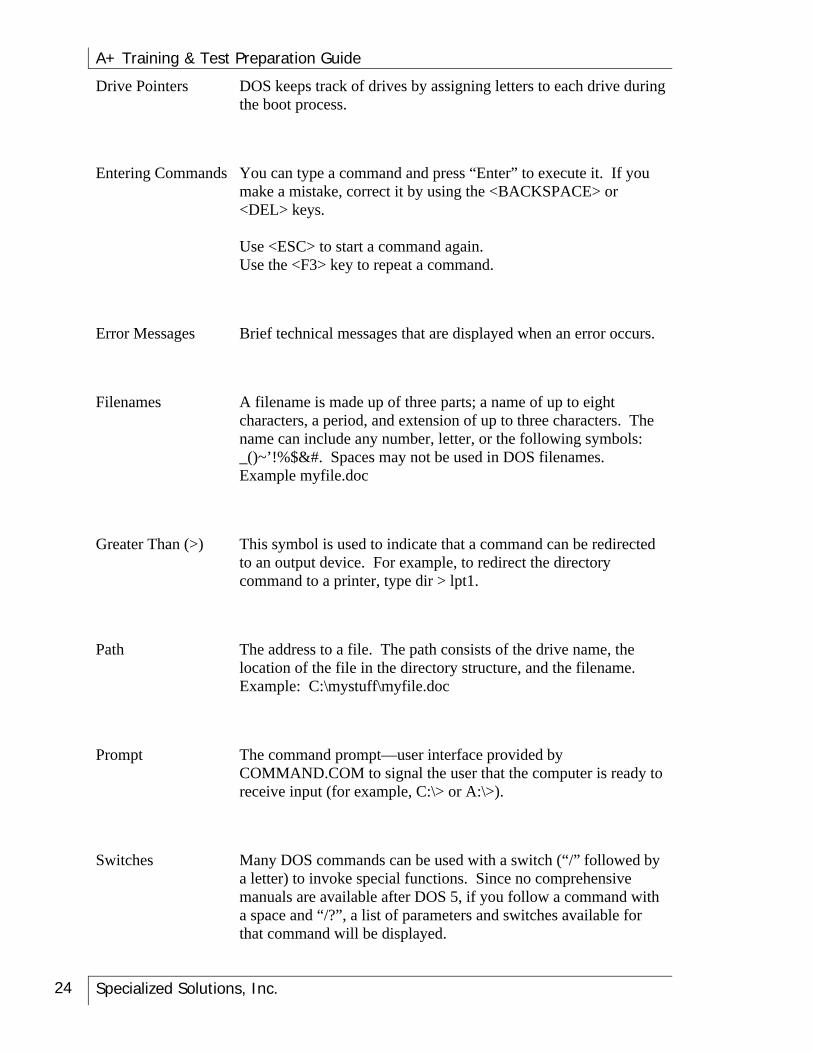
A+ Training & Test Preparation Guide
Specialized Solutions, Inc. 24
Drive Pointers DOS keeps track of drives by assigning letters to each drive during the boot process.
Entering Commands You can type a command and press “Enter” to execute it. If you make a mistake, correct it by using the <BACKSPACE> or <DEL> keys. Use <ESC> to start a command again. Use the <F3> key to repeat a command.
Error Messages Brief technical messages that are displayed when an error occurs.
Filenames A filename is made up of three parts; a name of up to eight characters, a period, and extension of up to three characters. The name can include any number, letter, or the following symbols: _()~’!%$&#. Spaces may not be used in DOS filenames. Example myfile.doc
Greater Than (>) This symbol is used to indicate that a command can be redirected to an output device. For example, to redirect the directory command to a printer, type dir > lpt1.
Path The address to a file. The path consists of the drive name, the location of the file in the directory structure, and the filename. Example: C:\mystuff\myfile.doc
Prompt The command prompt—user interface provided by COMMAND.COM to signal the user that the computer is ready to receive input (for example, C:\> or A:\>).
Switches Many DOS commands can be used with a switch (“/” followed by a letter) to invoke special functions. Since no comprehensive manuals are available after DOS 5, if you follow a command with a space and “/?”, a list of parameters and switches available for that command will be displayed.

Chapter 2 – Working in a Command Line Prompt Environment
Specialized Solutions, Inc. 25
Syntax Syntax is the arrangement and inter-relationship of words in phrases and sentences. In computer jargon, it is the correct format in which to type a command. In DOS every letter, number, and space has a value. The most common problem when typing DOS commands is to add or leave out a letter or character. Typos are the most common cause for “Bad command or filename” errors.
Wildcards The question mark (?) matches any character in a specified position and the asterisk (*) matches any number of characters up to the end of the filename or extension. For example, to search for files beginning with the letter “A,” the command would be DIR A*.* or A?????.* (The second command would find files that start with the letter A and any other five characters.)
DOS Commands
DOS commands are found in two varieties and locations. The internal DOS commands are stored within the COMMAND.COM file and always available. The external DOS commands are larger utilities stored as .COM or .EXE files in the DOS directory. External DOS commands must be on the current drive or some other drive whose location is stored in the PATH variable (they can be in any directory as long the directory name and location is included in the path statement in the AUTOEXEC.BAT file).
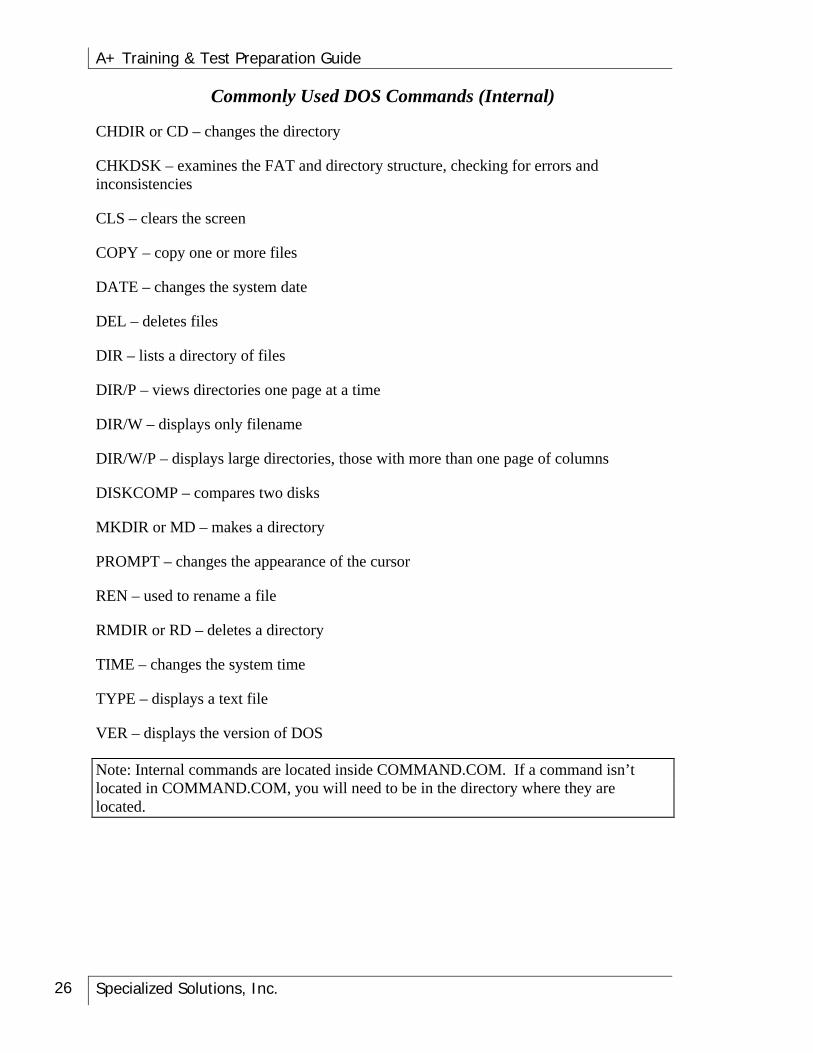
A+ Training & Test Preparation Guide
Specialized Solutions, Inc. 26
Commonly Used DOS Commands (Internal)
CHDIR or CD – changes the directory
CHKDSK – examines the FAT and directory structure, checking for errors and inconsistencies
CLS – clears the screen
COPY – copy one or more files
DATE – changes the system date
DEL – deletes files
DIR – lists a directory of files
DIR/P – views directories one page at a time
DIR/W – displays only filename
DIR/W/P – displays large directories, those with more than one page of columns
DISKCOMP – compares two disks
MKDIR or MD – makes a directory
PROMPT – changes the appearance of the cursor
REN – used to rename a file
RMDIR or RD – deletes a directory
TIME – changes the system time
TYPE – displays a text file
VER – displays the version of DOS
Note: Internal commands are located inside COMMAND.COM. If a command isn’t located in COMMAND.COM, you will need to be in the directory where they are located.

Chapter 2 – Working in a Command Line Prompt Environment
Specialized Solutions, Inc. 27
Commonly Used DOS Commands (External)
ATTRIB – displays or changes a file’s attributes
DEFRAG – reorganizes the files on a disk to make them contiguous
DISKCOPY – makes a copy of a complete disk
EDIT – invokes the text editor program
FORMAT – prepares a disk for receiving files
FORMAT/S – formats a disk as a system disk
MEM – displays information about a computer’s memory, how memory is allocated, what memory areas are free, what programs currently loaded, etc.
SCANDISK – disk analysis and repair utility that checks and fixes common disk and file errors
UNDELETE – will recover a deleted file
XCOPY – copies the contents of one disk to another disk
Note: Getting Help in DOS – The latter versions of DOS (4.0 and newer) provide some on–line help. There are two ways to access this information. You can type the word “help” followed by a space and the command or type the command with the /? Switch. In either case, you will get information regarding the proper syntax and available options for the command.
The Boot Process
In computer terms, boot means to start or get going. In Volume I, we discussed POST (power on self test). Once POST is complete (the basic hardware is OK), the computer loads software that tells it how to run. This software is the operating system (OS). The boot sequence for operating systems will vary. There are several steps involved in the startup process of a DOS system. They are as follows:
• The ROM BIOS looks for an operating system. It checks for the presence of IO.SYS and MSDOS.SYS, first searching the A: (floppy) drive and then the C: drive.
• The operating system processes the CONFIG.SYS file (if present). The CONFIG.SYS contains information to configure the system environment such as memory management and hardware drivers.
• The COMMAND.COM program is loaded.

A+ Training & Test Preparation Guide
Specialized Solutions, Inc. 28
• The operating system processes the AUTOEXEC.BAT file (if present). The AUTOEXEC.BAT loads programs and user-defined settings.
• If no programs (such as Windows) have been invoked, COMMAND.COM presents the active drive prompt and waits for a command.
The process of starting from a no–power condition is called a cold boot. Occasionally a system may require a reset, which occurs when the computer locks up or runs out of memory. Resetting may be accomplished without turning off the computer by holding down the Ctrl, Alt, and Del keys at the same time. This is called a warm boot.
Optimizing DOS
Understanding how to configure and optimize a DOS computer may seem like a waste of time in view of the new operating systems available like Windows 9x, Windows NT, and Windows 2000, however, one must remember that DOS is the basic building block for computers. All computers today have evolved from a similar standard. The limitations imposed by DOS and backwards compatibility has a lot to do with how today's computers operate. Future generations of computers will not be dependent on the DOS kernel as it is too limited for today’s applications. To run DOS on these computers requires creating a virtual DOS environment. This means that a portion of memory is allocated to create DOS in a window. Inside that window is a complete DOS machine that will have to be configured to the needs of the program. If you ever have to do this, you might just need that old DOS manual.
Configuring DOS
The job of configuring DOS to run on a specific computer is done by the two startup files: CONFIG.SYS and AUTOEXEC.BAT. The CONFIG.SYS file is run first. It sets up and configures the computer’s hardware components. The AUTOEXEC.BAT file executes commands and loads TSR (terminate and stay resident) programs. Since DOS is incapable of running two programs at the same time, it stops running one program, and maintains it in a ready state. When it is time to use the program again, it does not have to reload the software, just reactivate it.
If problems are encountered during startup, the CONFIG.SYS and AUTOEXEC.BAT files can be bypassed by pressing F5 as soon as the message “Starting MS–DOS” appears on the screen. Alternatively, F8 will allow files to be processed one command at a time (with the option to bypass specific commands) making troubleshooting possible. If you bypass a command and the computer boots, you have isolated the problem.

Chapter 2 – Working in a Command Line Prompt Environment
Specialized Solutions, Inc. 29
CONFIG.SYS Settings
The CONFIG.SYS is primary used to load device drivers. The following table lists several CONFIG.SYS settings and their functions:
BUFFERS Allocates reserved memory for transferring information to and from the hard disk.
COUNTRY Enables MS–DOS to use country conventions for times, dates, and currency. Example: COUNTRY=044,437,C:\DOS\COUNTRY.SYS
DEVICE Loads a device driver into memory. DEVICE=C:\DOS\EMM386.EXE
DEVICEHIGH Loads a device driver into upper memory.
DOS=HIGH Loads part of MS–DOS into the upper memory area.
FCBS Specifies the number of file control blocks (FCBS) that MS–DOS can have open at the same time.
FILES Specifies the number of files that MS–DOS can hold open concurrently. FILES=60
INSTALL Loads a memory–resident program. INSTALL=C:\DOS\SHARE.EXE/F:500 /L:500
LASTDRIVE Specifies the maximum number of drives the computer can access. LASTDRIVE=Z

A+ Training & Test Preparation Guide
Specialized Solutions, Inc. 30
MOUSE.SYS Loads a Mouse driver.
NUMLOCK Specifies whether the Num Lock key is on or off when DOS starts.
SHELL Specifies the name and location of the command interpreter. The interpreter converts the typed command to an action. The default for MS–DOS is COMMAND.COM.
SWITCHES Specifies special options in MS–DOS. “/N” will disable the use of the F5 and F8 keys to bypass startup commands (used for security).
Here is a sample CONFIG.SYS listing:
DEVICE=C:\WINDOWS\HIMEM.SYS
DEVICE=C:\DOS\EMM386.EXE NOEMS
DOS=HIGH, UMB
BUFFERS=20
FILES=80
FCBS=4,0
LASTDRIVE=Z
DEVICE=C:\CDROM\NEC2.SYS /D:MSCD001 /V
Note: if you get an error concerning a specific line in your config.sys file, check the syntax of that specific line.

Chapter 2 – Working in a Command Line Prompt Environment
Specialized Solutions, Inc. 31
AUTOEXEC.BAT Commands
The following table lists several commands that you might find in the AUTOEXEC.BAT file (keep in mind that any line in a autoexec.bat file can be run from a command prompt):
ECHO Displays commands as they are executed.
@ECHO OFF Suppresses the display of commands as they are executed.
LH (LOAD HIGH) Loads into UMA memory
PAUSE Stops the execution of AUTOEXEC.BAT and displays the message “Strike any key to continue.”
PATH Defines the search path for program commands.
PROMPT Defines how the prompt looks (i.e. – prompt $p$g)
SET Displays, sets, or removes MS–DOS environment variables.
SMARTDRV Provides disk caching.
KEYB Configures a keyboard for a specific language.
SHARE Starts the Share program, which will install the file sharing and locking capabilities.
DOSKEY Loads the DOSKEY program. You can use the Doskey program to view, edit, and carry out MS–DOS commands that you have used previously.
MOUSE.EXE Loads a mouse driver.
PROMPT Sets the display of the command prompt.
Here is a sample AUTOEXEC.BAT listing:
@ECHO OFF
PATH C:\DOS;C:\WINDOWS;C:\
DOSKEY
SMARTDRV
UNDELETE /LOAD
VSAFE
MSAV

A+ Training & Test Preparation Guide
Specialized Solutions, Inc. 32
Tip: Here are some useful tricks when working with CONFIG.SYS and AUTOEXEC.BAT — if you want the computer to ignore a command line, enter REM before that statement. For example: REM MOUSE.EXE would tell the computer to ignore that line and the MOUSE.EXE file would not be loaded. Also, if you want to bypass CONFIG.SYS and AUTOEXEC.BAT, hold down the <SHIFT> button at the Windows start-up screen. The <SHIFT> button is generally used to bypass other things, like the Recycle Bin and the Startup Folder.
Memory Management
Most DOS programs are constrained to the bottom 640K of PC memory. Not only is this memory used to run software applications; it is also needed to run the network drivers, mouse drivers, and terminate–and–stay programs (TSRs) needed to operate the PC. In order to optimize DOS, you must optimize the use of memory. Memory is very limited and is therefore the key to running DOS effectively. You should know the following terms.
Conventional Memory
On DOS systems, conventional memory refers to the portion of memory that is available to standard DOS programs.
High Memory
In DOS based systems, high memory is a term that generically refers to memory above conventional memory which includes:
UMA (upper memory area) – the memory area between the first 640K and 1megabyte
Extended memory – the memory beyond the standard 1MB of main memory that DOS supports. Extended memory is only available in PCs with an Intel 80286 or later microprocessor.
HMA (High Memory Area) – a 64K area of memory located between 1024K and 1088K.
Extended Memory
HIMEM.SYS
An extended memory (XMS) driver included with DOS, Windows 3.1, Windows for Workgroups, and Windows 9x. Windows 9x automatically loads HIMEM.SYS during startup. With older versions of Windows, and with DOS, HIMEM.SYS must be explicitly loaded by placing a command in CONFIG.SYS. If corrupted, you will receive an error message

Chapter 2 – Working in a Command Line Prompt Environment
Specialized Solutions, Inc. 33
EMM386.EXE
The EMM386.EXE device driver is used to simulate expanded memory on a computer with an 80386 or higher processor. EMM386.EXE also is used to provide access to the Upper Memory Area.
High Memory Area
DOS Files Types
The following is a list of the various types of files that can found in most commercial software.
Batch file same as command file– contains operating system commands
Binary file Holds data or instructions in binary format
Command file Holds operating system commands
Data file Holds data
Directory file Holds bookkeeping information about files that are below it.

A+ Training & Test Preparation Guide
Specialized Solutions, Inc. 34
Executable file Holds a program or commands in an executable format
Library file Holds functions in object format
Map file Holds a map of the program
Object file Holds code that had been compiled
Text file Holds textual data (that is, data that can be read by humans), including files created with a text editor and any file in ASCII format
In DOS (and most operating systems), there are only two basic files; binary files and text files (ASCII). Text files can be easily viewed. Binary files are not easily viewed. Most binary files are not meant to be viewed. Instead, they are executed (like a command such as COPY). If the user attempts to view binary files, the screen will fill up with what appears to be nonsense and possibly the computer will beep.
Even though there are only two file types, it can sometimes be difficult to figure out which kind a particular file is, because files can have any extension. Some extensions do have a standard meaning.
Text Files Binary Files
.txt .exe
.bat .com
.dat

Chapter 2 – Working in a Command Line Prompt Environment
Specialized Solutions, Inc. 35
Backing up in a DOS Environment
You can backup using the MSBACKUP command in DOS 6.0 and higher. It will allow you to backup and restore files either manually or automatically. It does not work with floppies. Here is the syntax of the MSBACKUP command:
MSBACKUP [setup_file][/BW|/LCD|/MDA]
Description of each of the switches:
/BW – Starts MSBACKUP in black and white
/LCD – Starts MSBACKUP in a mode suitable for laptops
/MDA – Starts MSBACKUP in monochrome
Troubleshooting in a DOS Environment
The following are some common problems that are associated with DOS. They will usually manifest themselves as errors on the screen.
Abort, Retry, Fail? – Common error message when attempting to read a disk that is not readable or if no disk is in drive
Access denied – Usually means the file has an attribute on it. To delete this file type: deltree FILE
Bad command or file name – Common error when the syntax for the command is typed incorrectly.
Bad or missing command interpreter – Means DOS cannot locate the Command.com. This file holds all of DOS's needed information. It will need to be recopied. There is also a chance of a possible virus.
Divide overflow – This means the program has attempted to divide something by 0.
Drive not ready error –The disk in the drive is not readable, for example, a disk not being in the disk drive.
Duplicate file name or file not found – This may happen when attempting to rename a file and the file does not exist, or there is already a file with that name.
File cannot be copied onto itself – Unable to copy a file because the file already exists on the same source and destination.

A+ Training & Test Preparation Guide
Specialized Solutions, Inc. 36
File creation error – This could mean that the directory is full. It could also mean the file already exists or the file was not copied correctly.
File not found – This means the directory searched does not have that certain file or there are no files in the directory.
General Failure – A problem has occurred that DOS is unable to provide an error message for. If this happens while trying to read the hard drive, it may need to be reformatted.
Insufficient disk space – The disk is full or the file being copied is too big to fit on the disk.
Internal stack overflow – This means DOS's internal storage areas are full. You need to go into config.sys and increase the STACKS=0,0.
Invalid directory –The directory is invalid or does not exist in the directory you are currently in.
Invalid drive specification –This means the drive does not exist on the computer or cannot be found.
Invalid file name or file not found – This means DOS cannot find the file specified in the current directory or the file has an invalid character in it.
Invalid media, track 0 bad or unusable – This could mean the format command cannot format the specified disk. It could also mean the disk capacity is invalid, or the disk is bad.
Invalid number of parameters – Something was left out or added when the command was typed.
Invalid parameter – The command was typed but specified an incorrect parameter such as; format /x.
Invalid Switch –This means the wrong slash was typed such as cd/ when it is supposed to be cd\.
Non–System disk or disk error – This error will usually occur when booting up the computer, and there is a floppy disk in the computer that is not bootable. If there is no disk inside the computer, this could be an indication of an unrecognized hard drive, unformatted hard drive, or hard drive with missing system files.
Not ready, reading drive X – This means the DOS attempted to read a disk that is not readable, or there is no disk in that drive.
Write fault error – This means that DOS tried to reroute text to a device that is not connected, not valid, or not hooked up.
Write protect – An attempt was made to write to a disk that is write protected

Chapter 2 – Working in a Command Line Prompt Environment
Specialized Solutions, Inc. 37
The following are known DOS issues:
• DOS 6.2 will not accept or recognize more than 64 Megs of RAM when typing MEM.
• When using XCOPY to copy the contents of a folder, the source folder's attributes are not applied to the new folder. This is because XCOPY does not have the ability to copy attributes for folders. To address this issue, make sure the folders are not attributed. Using the /s switch with the XCOPY command will allow for the copying of subdirectories as well.
• When labeling a hard drive or disk drive make sure not to use extended characters. Doing so may cause SCANDISK, when run, to say a file is being misreported. SCANDISK’s attempt to fix it may damage or destroy the drive.
• Mem /c command from a DOS window in Windows 95 cannot be run because when Windows 95 loads, it reserves all global upper memory blocks for itself.
• When running from a DOS prompt in Windows 9x, pressing ALT+SPACE and continuing to hold down ALT, while letting go of SPACE, and pressing TAB to switch to another window, will cause the switch application menu to stay up after letting go of all keys.
• When running a DOS window in Windows 9x, if the screen saver is activated, then deactivated, the DOS window will be minimized. This is because Windows 9x is not designed to restore the DOS window to full screen mode.
Windows 3.x
Note: Windows 3.x will not be on the test, however the information presented in this section provides a foundation for Windows 9x and Windows 2000 and is worthy of review.
As mentioned in the first chapter, Windows 3x is an operating environment that resides on top of DOS. It brought with it two distinct advances. First, it was a graphical interface so we no longer had to remember all those commands (we use icons or pictures instead) and second, it gave us the ability to get around some of the limitations of DOS. Although more user–friendly, it brought with it additional configuration requirements.
As with the section on DOS, this lesson is not intended to be a complete course in Windows 3.x, however, some important techniques useful to the computer professional will be presented. Gaining an understanding of Windows 3.x and having a Windows manual as a reference is a requirement for the computer professional.
Windows 3.x Features
Along with Windows came many new features. As stated earlier, it is a resource manager and handles the entire common or shared functions (such as printing). Windows

A+ Training & Test Preparation Guide
Specialized Solutions, Inc. 38
makes it easier for application programmers, hardware manufacturers, and operators to share resources. As long as a device, or application meets the Windows standard, it is available to share its operation, or data, with other compliant applications or hardware.
The following table lists some of the primary features of Windows 3.1 and 3.11.
Customizable Such things as colors, background
User Interface pictures, screen savers, mouse settings, startup programs, and the Program Manager can be changed to look and run to meet the user’s preferences.
Data Sharing Using Dynamic Data Exchange (DDE), information can be shared from one application to another. Object Linking and Embedding (OLE) will allow embedding of information from one application into another application’s file.
Icons Windows uses small pictures called icons to represent programs or objects.
Multi–tasking By allocating processor time to each application, Windows allows multiple applications to run at the same time. Each application is assigned a priority with the one currently in use having the most processor time.
Network Awareness Windows can recognize disk and print resources provided by network systems. It is compatible with Novell, NetWare, Banyan Vines, DEC Pathworks and Unix/Linux.
Virtual Memory In a DOS environment, programs are limited to the amount of physical memory (RAM) available in the computer. With Windows, part of the hard drive can be used as a swap file and be used in place of RAM. Using a swap file is slower than RAM, however, it does expand the capability of the computer.

Chapter 2 – Working in a Command Line Prompt Environment
Specialized Solutions, Inc. 39
Minimum Requirements for Running Windows 3.x
Windows was designed to take advantage of improvements in hardware and to overcome limitations imposed by DOS. Therefore, before installing Windows on a computer, it must meet several minimum specification requirements. Minimum means just that—Windows will run with these parameters, but performance will not be optimal. The following table lists the minimum requirements of Windows 3.1:
Minimum Requirements for Windows 3.1
Minimum Requirement Comment
Processor 80386 Must have enhanced mode
Memory 2 MB Runs, but 4 MB makes it useable, 8 MB more desirable
DOS Version 3.10 The higher the version, the more tools
Free Disk Space 8 MB minimum install, 10.5 MB full install
The less RAM, the more free disk space needed
Floppy Disk Necessary for installing programs
Display Adapter VGA Any VGA or better
Printer Optional, may have to install driver
Mouse Optional Difficult to use without mouse, may require driver
Installing and Configuring Windows 3.x
There may be an occasion when, as an A+ technician, you are required to install or make configuration changes to a Windows 3.x system. Yes, there are still a few of these systems running (although it is rare). At the vary least; you should be able to identify this interface. This section will point out some of the key issues that you may encounter when working with the Windows 3.x operating systems.

A+ Training & Test Preparation Guide
Specialized Solutions, Inc. 40
Windows Setup
Placing the Windows Disk #1 in floppy drive A:, and typing a:\setup does a standard Windows 3.x setup or installation.
Several switches can be used with the setup command that will allow special options to be chosen:
SETUP /A: Places Windows on a network server for installation across the network or for file sharing. Files are designated as read–only.
SETUP /B: Setup for a monochrome display—useful with older laptops.
SETUP /I: Windows will start without performing any automatic hardware detection.
SETUP /N: Sets up a shared copy of Windows on a workstation.
SETUP /P: This can be run from within Windows (winsetup /P for 3.11 version) and will rebuild the default Program Manager groups (Main, Accessories, Games).
Express setup installs the program to c:\windows directory, selects hardware automatically, chooses U.S. English as the default language, allows selection of printer(s), and configures existing applications.
Custom setup installs the program, but allows the user to choose many options such as drive and directory, hardware, country, optional components, and confirm changes to startup files. Windows will automatically set up icons and program groups for any application it finds.
Note: Applications that are made specifically for Windows (such as Microsoft Office and Lotus SmartSuite) should be installed after Windows.
After Windows is installed, type WIN from any directory and Windows will load. To configure Windows to automatically start when the computer boots, add WIN as the last statement in the AUTOEXEC.BAT file.
Windows 3.x Operating System Files
When loading, Windows uses the following files:
• Win386.exe: Handles virtual memory and DOS applications; converts extended to expanded memory if required.
• Krnl386.exe: Controls and allocates system resources, handles I/O and memory management, launching of applications, and controls multitasking.
• User.exe: Controls input and output, including mouse, keyboard, sound, timer, and COM ports. Also provides the Windows user interface.

Chapter 2 – Working in a Command Line Prompt Environment
Specialized Solutions, Inc. 41
• GDI.exe: Manages display graphics and printing.
• Core files: Windows loads dynamic link libraries (DLLs) that provide the core Windows functionality. A DLL is a shareable library of executable code modules.
• System resources: Each DLL has a storage area in memory called a “heap” (64 KB). If these heaps are full, you will receive “out of memory” error messages. Closing applications should relieve the problem.
• Windows Device Drivers: Drivers are small programs that connect Windows to the hardware. This allows applications to be independent of devices. When adding a new piece of hardware to a system, this driver will have to be installed (it is usually provided on a diskette with the device). Information on device drivers is recorded in the SYSTEM.INI file.
• Font Files: Windows provides three types of font files. Each font contains a complete character set for a particular typeface. Vector fonts are designed as a set of lines drawn between two points. Each character represents a mathematical model that can be scaled to virtually any size. Raster fonts are bitmap fonts made up of a set of dots. Each character or set of dots is “painted” on the screen or printer. Because each character requires separate data for each size, only limited scaling is possible. TrueType fonts are made from an “outline” of each character. When printing (on the screen or on a printer), these outlines are filled in. TrueType fonts are supported by all printers and provide WYSIWYG (What–You–See–Is–What–You–Get) results.
Windows 3.x Configuration
Proper configuration of Windows is critical for optimal performance. There are three methods for managing or changing Windows configuration. They are Control Panel; Windows Setup, and .ini files
Control Panel
The primary method for changing the Windows configuration (and the one used by most users) is the Control Panel, a Windows application (found in the Main Program Group) that provides a visual way to make changes.
By selecting icons and using the associated dialog boxes, a user can customize the working environment. The following items can be changed from the Control Panel:
• Screen Colors
• Other Desktop Options (screen savers, wallpaper, etc.)
• Fonts
• Printers

A+ Training & Test Preparation Guide
Specialized Solutions, Inc. 42
• Keyboard
• Mouse
• International Settings
• COM Port Settings
• Network Settings
• Date and Time
• Sounds (used by system)
• Drivers for Hardware
• Multitasking and Virtual Memory Settings
Windows Setup
Windows setup will operate from within Windows (click the Setup icon in the Main group) or, from DOS (type SETUP when in the Windows directory). Only experienced users should use setup. The results of an improper setup can be disastrous –Windows won’t run. If this happens, you can use the DOS version of setup. From a DOS prompt, change directories to the Windows directory and type the command SETUP.
Windows Initialization Files
The third method for modifying Windows configuration is to edit the .ini files. As with the setup method, this method should only be used by experienced users. Initialization files are used by Windows to initialize (configure) everything from device drivers to applications. These files are most commonly found in the Windows directory of the bootable drive. A Windows computer will store at least three .ini files. Any application including Windows can create these files.
As a computer technician, you will need to know how to edit these files. Since they are text files, you can use any word processor or text editor. If you use a word processor, be sure to save them as text only and not in the word processor’s native format. If you need to edit one of these files and do not have a word processor or you are working on a computer that has no software installed, you can use the DOS stand–by program. This program is called EDIT.COM and can be run from the DOS prompt. It is an external command so you must have it on the disk where you need to run it. When you open an .ini file in a text editor, you will find that the data is organized into logical groups. Each group will start with a header with its name in square brackets. These names are identified by Windows and cannot be changed. Under each header will be the data. The syntax for the data is: item=settings. Item is the name of the item to be configured, and setting is the value to be configured.

Chapter 2 – Working in a Command Line Prompt Environment
Specialized Solutions, Inc. 43
This chart is a good reminder of the program files that can be edited:
Program files that can be edited in a Windows environment
AUTOEXEC.BAT CONFIG.SYS WIN.INI SYSTEM.INI MSDOS.SYS
PROGMAN.INI BOOT.INI
*Note: other related files, such as text (.txt) and log files (.log) can also be edited.
For example, see the following PROGMAN.INI file:
[Settings]
Order= 4 21 13 25 3 8 17 29 27 7 15 6 14 16 10 18 32 23 22 20 11 12 9 19 24 26 28 5 2 30 1
SaveSettings=1
AutoArrange=0
Window=28 22 628 433 1
[Groups]
Group1=C:\WINDOWS\MAIN.GRP
Group2=C:\WINDOWS\ACCESSOR.GRP
Group5=C:\WINDOWS\STARTUP.GRP
Group8=C:\WINDOWS\PROSHARE.GRP
Group13=C:\WINDOWS\LOTUSAPP.GRP
Group14=C:\WINDOWS\DIGITAL.GRP
Group15=C:\WINDOWS\MODERNAG.GRP
Group7=C:\WINDOWS\SOUNDIMP.GRP
Group10=C:\WINDOWS\PHONEBOO.GRP
Group18=C:\WINDOWS\DESIGNCA.GRP

A+ Training & Test Preparation Guide
Specialized Solutions, Inc. 44
Group20=C:\WINDOWS\ALDUS.GRP
Group12=C:\WINDOWS\APPLICAT.GRP
Group17=C:\WINDOWS\UTILITIE.GRP
Group4=C:\WINDOWS\MICROSOF.GRP
Group6=C:\WINDOWS\LOGITECH.GRP
Group21=C:\WINDOWS\IOMEGA.GRP
Group22=C:\WINDOWS\PARSONST.GRP
Group23=C:\WINDOWS\PHOTOENH.GRP
Group25=C:\WINDOWS\WINZIP.GRP
Group27=C:\WINDOWS\QUICKBOO.GRP
Group29=C:\WINDOWS\ADOBEACR.GRP
Group16=C:\WINDOWS\FAXWORKS.GRP
Group32=C:\WINDOWS\IMS2.GRP
Group3=C:\WINDOWS\NETSCAP0.GRP
Group11=C:\WINDOWS\FIRSTCLA.GRP
Group9=C:\WINDOWS\FAX.GRP
Group19=C:\WINDOWS\PROGRAMS.GRP
Group24=C:\WINDOWS\DESKTOP.GRP
Group26=C:\WINDOWS\SYSTEMTO.GRP
Group28=C:\WINDOWS\DOCUMENT.GRP
Group30=C:\WINDOWS\MULTIMED.GRP
Windows uses two .ini files for configuration: SYSTEM.INI and WIN.INI. The SYSTEM.INI is the Windows version of the DOS CONFIG.SYS file. It initializes all the hardware resources. The WIN.INI file is like the AUTOEXEC.BAT used by DOS, but does more. Since Windows is a graphical environment, it allows the users to customize the screens. For example, the user can change the color scheme of the windows and the size and fonts for the text used. The information stored in these two files hold the secret to operating, optimizing, and troubleshooting Windows. Even though Windows has

Chapter 2 – Working in a Command Line Prompt Environment
Specialized Solutions, Inc. 45
SYSTEM.INI and WIN.INI, it still uses the CONFIG.SYS and AUTOEXEC.BAT files of DOS for the basic setup of devices and the computer. Windows also needs to use the DOS files to configure the machine so that it (Windows) can run.
Note: Starting with Windows 95, most of the tasks performed by SYSTEM.INI and WIN.INI are performed by the Registry.
Configuring the SYSTEM.INI File
If you can master the SYSTEM.INI file, you can customize Widows 3.x. This file is the primary hardware configuration file for Windows. Of special interest is the [386Enh] group. Changing the statements in this file configures most hardware devices.
The following is an example of the [386Enh] section of a SYSTEM.INI file:
[386Enh]
device=vhhscand.386
device=C:\Netscape\system\vntstimd.exe
device=C:\Netscape\system\vtcprac.386
device=C:\Netscape\system\pdwcomm.386
device=C:\Netscape\system\dial.386
device=SYMEVNT.386
32BITDISKACCESS=on
device=*vpowerd
ebios=*ebios
device=vsndsys.386
mouse=*vmouse, msmouse.vxd
device=*vpd
woafont=dosapp.fon
netheapsize=60
device=cs$cbuf.386
device=vpmtd.386

A+ Training & Test Preparation Guide
Specialized Solutions, Inc. 46
device=*vshare
COMIrqSharing=on
COM3Base=03E8
COM4Base=02E8
COM2FIFO=1
COM1Irq=4
COM1Base=03F8
COM2Irq=3
COM2Base=02F8
COM4Irq=2
MinTimeslice=20
WinTimeslice=100,50
WinExclusive=0
Com1AutoAssign=2
Com2AutoAssign=2
LPT1AutoAssign=60
keyboard=*vkd
device=*enable
Configuring the WIN.INI File
The WIN.INI file is not required and Windows will run without it. However, it can be helpful because it contains information on processes and background applications, like the Registry. Two important commands used in WIN.INI are:
Load=
Run=

Chapter 2 – Working in a Command Line Prompt Environment
Specialized Solutions, Inc. 47
In Windows 3.x, there are two methods for getting a program to automatically start when Windows starts. The most common way is to add the program’s icon to the Start–Up group in the Program Manager. The second is to use the Load and Run statements. The difference between Load and Run is that programs invoked by Run will start minimized. If you need to disable a program that “always” starts, be sure to check both of these locations.
Note: Systems that have been upgraded to Windows 9x from Windows 3.x may still have this file. Although it is not required, and Windows 9x will not create this file, it will use it if it already exists. In this case, any Run and Load statements in this file will be activated by Windows 9x just as previously done by Windows 3.x.
The WIN.INI file contains settings that affect the appearance of the Windows desktop, printer selections, and network connections. To edit this file, use the Control Panel or open it in any text editor (the Windows application, Notepad will do the job). Close and save the file after you’re done editing it.
Note: Windows needs to be rebooted before any changes to WIN.INI will take affect. Be very careful when editing, a single typo will cause an error or unexpected results.
The WIN.INI file contains several sections of related settings. The header, displayed in square brackets [Windows], defines each section. Within each section are entries in the format keyname=value.
• Keyname is the name of the setting.
• Keynames are made up of digits and letters with no spaces.
• Keynames must be immediately followed by an equal sign (=).
• Value can be an integer, a string, or a quoted string.
• Comments are preceded with a semicolon (;), which can prevent a device driver from loading. (Semicolons works like the REM statement in CONFIG.SYS or AUTOEXEC.BAT.)
• Always backup the WIN.INI file before editing.
The [windows] section of the WIN.INI file will make changes to the Windows environment, such as which applications run when Windows is started and how information appears on the screen. Some of its parameters are:
DoubleClickHeight=<pixels>: Specifies the height (in pixels) that the mouse can move between clicks when double–clicked. Default is 4. If movement exceeds this value, the double click will be interpreted as two single clicks.
DoubleClickWidth=<pixels>: Specifies the width (in pixels) that the mouse can move between clicks when double–clicked. Default is 4. If movement exceeds this value, the double click will be interpreted as two single clicks.

A+ Training & Test Preparation Guide
Specialized Solutions, Inc. 48
Load=<filename(s)>: Specifies applications to run (minimized) when Windows is started. Can include one or more filenames or applications—each filename must be separated by a space.
MenuDropAlignment=<0 or 1>: Specifies whether menus open right-aligned or left-aligned with the menu title. 0 means left-aligned and 1 means right-aligned.
Programs=<extensions>: Defines which files Windows considers applications. Defaults are .COM .EXE .BAT and .PIF files.
Run=<filename(s)>: When started, Windows will run any application listed.
The [desktop] section contains optional settings that control the appearance of the screen background, and the positioning of windows and icons on the screen. Most of these setting can be changed via the Control Panel.
The [Fonts] Section of WIN.INI describes the fonts to be loaded when Windows starts.
Note: semicolons are used to
Configuring the CONTROL.INI File
All sections in the CONTROL.INI file can be changed from the Control Panel. This is the recommended method. The following are the sections in the CONTROL.INI file:
• [Current]: The current color scheme.
• [Color schemes]: Descriptions of color schemes.
• [Patterns]: Descriptions of the desktop patterns.
• [Installed]: Installed device drivers.
• [Screen Saver] The current password used by the active screen saver (encrypted).
• [Screen Saver.xxxxx]: Individual screen saver settings.
• [Don’t load]: This setting can be used to exclude items that are displayed in the Control Panel. List the name of the section to be excluded followed by “=1”.

Chapter 2 – Working in a Command Line Prompt Environment
Specialized Solutions, Inc. 49
For example, you may want to edit the CONTROL.INI file directly if the screen saver password has been forgotten. The screensaver password can be removed by changing the following:
[Screen Saver.Screen Save Name]
PWProtected=1 (change to =0 to remove password protection)
[ScreenSaver]
Password=139xhfn9 (encrypted password – delete to remove password)
Configuring the PROGMAN.INI File
This file controls the settings for the Program Manager Group files. Adding a section to PROGMAN.INI called [Restrictions] will add some protection for the group files. If these statements are not present, the value assumed is the default of “0”, which means the opposite of the statement will happen. The commands and syntax are:
NoRun=1: Disables the File Run command.
NoClose=1: Prevents the user from exiting Windows.
NoSaveSetting=1: Prevents the Program Manager layout from being saved on exit.
NoFileMenu=1: Removes the File menu from the Program Manager.
EditLevel=x: From 0, (the default), to 4, establishes higher levels of restrictions.
Note: Setting attributes as “read–only” can protect individual groups. To do this, locate the .GRP file in the File Manager, select File, next select Properties, and then check the Read Only check box.
Using Sysedit
Windows provides a program for editing the system files (AUTOEXEC.BAT, CONFIG.SYS, WIN.INI, SYSTEM.INI). This program resides in the Windows directory and is called Sysedit. Windows does not provide an icon for this program in the standard setup. However, if no icon exists, Sysedit can be run by selecting File, and then Run from the Program Manager, and then typing Sysedit and pressing Enter. If an icon does not exist, selecting New from the File menu in the Program Manager can create it. Notepad is another editing tool used in the Windows environment on these types of files.

A+ Training & Test Preparation Guide
Specialized Solutions, Inc. 50
Configuring Virtual Memory
As mentioned earlier in this chapter, virtual memory allows the processor to use the hard drive to simulate RAM. Applications can access this simulated memory through virtual addresses mapped onto physical addresses, which may either be in RAM or on the hard disk. The paging file or the application’s temporary file size can be increased to temporarily patch a memory problem.
Virtual Memory Manager
The Virtual Memory Manager (VMM) controls all virtual memory. The VMM divides memory into 4–KB pages and then maintains a page table to keep track of where everything goes (in RAM or on the hard drive). When the amount of free RAM reaches a critical level, a portion of RAM is set aside for page swapping. Windows uses a temporary or permanent swap file on the disk for writing the least recently used page frames of physical RAM.
Temporary Swap File
A temporary swap file is recommended when a computer is low on disk space because the file can increase or decrease in size as needed. The temporary file is called \Windows\Win386.swp and it’s deleted when you exit Windows. If corrupted, this file can cause KERNEL32.dll errors. If it runs out of space, it can cause the hard drive to crash.
Permanent Swap File
When disk space is not a problem, a permanent swap file is recommended. Permanent swap files are faster to access than temporary swap files because they use contiguous blocks (clusters) of the hard drive to store data.
Virtual Memory Sizing
The required size of virtual memory varies with every machine and depends upon the memory requirements of the applications that will be run at the same time. When setting up virtual memory, consider the following:
• Total memory requirements of the computer should equal RAM plus the size of the swap file.
• The maximum swap file should not be larger than three times the size of RAM memory.
• Maximum total virtual memory should not be larger than four times the size of RAM.
To determine the actual memory requirements for a machine, add together all the memory requirements for each application to be run concurrently and add an extra 1 MB each for DOS and Windows.

Chapter 2 – Working in a Command Line Prompt Environment
Specialized Solutions, Inc. 51
Swap File Settings
Swap files are modified using the Control Panel’s 386 Enhanced icon. Select the Virtual Memory button on the right side of the dialog box. The following settings are recommended:
• Drive: Use the disk drive with the most available space. Do not select any removable drives such as floppies or zip drives (they are too slow).
• Type: For best performance, use a permanent swap file (be sure to defragment the drive first—this will provide a space for a contiguous file).
• Space Available: Calculate the recommended size. Consult your application manuals to determine the amount of memory required to run each of them; Use a value large enough to support the workload on the computer, but do not exceed the recommended maximum size as suggested by Windows in the Virtual Memory dialog box.
• 32-bit access: Use 32-bit access if available. Requires a Western Digital WD1003, or compatible, drive. 32-bit disk access allows Windows to talk directly to the hard drive, (therefore skipping the requirement to open a DOS session), which then talks to the BIOS and then to the drive. 32-bit file access can be used with Windows 3.11 or Windows for Workgroups. It works the same as the 32-bit disk access and can often speed up drive access. 32-bit file access is not hardware-sensitive and may often work when 32-bit disk access won’t.
Note: If the drive controller is not compatible, this option will not be available.
Note: “Out of memory” messages from Windows usually means out of conventional memory. It can also mean a shortage of virtual memory. Try closing files or increasing virtual memory.
Improving Hard Drive Speed
In addition to improving memory, Windows operation can be improved by speeding up the hard drive by using disk cache and RAMDrive.
RAMDrive is a DOS utility that lets you use memory (RAM) to create a virtual disk. This was a good method for improving performance when applications were run from floppy disk. You could create a virtual drive and copy the application to this drive. Then by running from the virtual drive you would experience a dramatic increase in performance. The problem with this system was that each time you turned the computer off and then back on, you would have to recreate the drive and copy the files. A RAMDrive is the opposite of a swap file. Instead of using hard disk space to act as RAM, RAM thinks it is a drive. As with any drive, RAMDrive has a drive letter and the user can read and delete from it, write to it, and copy to and from it.

A+ Training & Test Preparation Guide
Specialized Solutions, Inc. 52
Installing a disk cache is one of the best methods for improving the performance of Windows. Most applications will use the same files repeatedly. By creating a disk cache, the computer takes a piece of extended memory and uses it to hold the repetitive files. Since access to RAM is faster than disk access, the overall performance of the system improves. The most popular disk cache is SMARTDRV.EXE that comes with DOS.
Note: There is a problem with using disk caching. It is the exact opposite of virtual memory. Disk caching uses memory to improve performance and virtual memory uses disks to improve performance. As a computer technician, you will have to strive to achieve the best compromise between the two, based on the situation.
SMARTDRV.EXE
SMARTDRV.EXE is a disk caching program used to improve the performance of a DOS–based system. It operates by caching disk writes into RAM. Once there, the program can access the information more quickly (RAM access is faster than disk access).
Vcache
Vcache is the protected mode replacement for the real mode SMARTDRV. While created for use with Windows 3.11, Windows 95 uses it exclusively for caching. One of the improvements that came with Windows 95 is vcache, the ability to cache data from CD–ROMs and networks.
Temp Files
As programs became larger and larger, they needed to store larger amounts of temporary data. To do that, they create a temporary file that can be accessed during operation and then, (hopefully) it is deleted when the program is shut down. Randomly creating these files would wreak havoc on a file management system. So in order to resolve this, or at least keep some order, Windows, by default, puts all temporary files into the same directory. The name of that directory is Windows/Temp. To change the location of the temporary files, place this statement in the AUTOEXEC.BAT file (SET TEMP=<PATH>). PATH is the location of the directory. Example, C:\HOLD\TEMP.
It is a good idea to periodically clean out the temp files by deleting them. Be careful when doing this because one or more of them may be in use. In general, as long as you delete any temporary files created before the current computer session, they will not be in use. There are two ways that you could automatically remove temporary files. One would be to create a batch file to delete the contents of the temporary directory and run it from the AUTOEXEC.BAT file. The other would be to create a RAMDrive and store the temporary folder in that drive.

Chapter 2 – Working in a Command Line Prompt Environment
Specialized Solutions, Inc. 53
To make a RAMDrive, and have Windows save all temp files to the RAMDrive, add the following to the CONFIG.SYS and AUTOEXEC.BAT files:
CONFIG.SYS
DEVICE=C:/DOS/RAMDRIVE 1024
AUTOEXEC.BAT
MD D:\TEMP
SET TEMP=D:/TEMP
Note: Drive letter will depend on the system and what drive letter is the next available.
Running DOS Applications from Windows
By running DOS in a virtual 8086 machine, Windows remains in memory and active. Therefore, Windows functions like Cut, Copy, and Paste can be used between DOS applications and the Windows application. Switching between the DOS application and the Windows application is done the same as between any two Windows applications, by pressing the Alt and Tab keys at the same time. DOS applications can be run either full screen or inside a window. To make a DOS application operate properly, Windows uses a PIF file (Program Information File) to hold the necessary data to set up the virtual machine.
Most DOS applications are provided with their own PIF files that include the optimum settings. When these are provided, they should be used. Usually, PIF files are located in the same directory as the program executable file. If no PIF is provided, Windows will use its default PIF file. If there are problems running the program, or no PIF files exist, the current PIF file can be modified or a new one created. To create or modify this file, use the PIF editor utility provided by Windows.

A+ Training & Test Preparation Guide
Specialized Solutions, Inc. 54
Settings for PIF Files
The following settings are available for DOS PIF files:
PIF File Settings
Setting Description
Advanced Options Setting the multitasking priority, more memory options, allow Windows to quit with application open
Close Window on Exit If unchecked, the window will stay open when application terminates
Display Usage Determines whether the application is to be run in a window or full screen
Execution Selects whether the program is to be run in the background or exclusive
Memory Requirements Sets the minimum amount of conventional memory required for application to start
Optional Parameters Includes switches or other command settings
Program File Name Includes drive, path, and filename of DOS program

Chapter 2 – Working in a Command Line Prompt Environment
Specialized Solutions, Inc. 55
Summary
The following information summarizes the key points of this chapter:
• MS–DOS is considered synonymous with the term DOS, even though there were other Disk Operating Systems produced.
• The three programs that constitute the core operating system of DOS are IO.SYS, MSDOS.SYS, and COMMAND.COM.
• CONFIG.SYS loads extra hardware and device drivers that are not built into the IO.SYS file.
• It is important that you are familiar with the steps involved with the boot process.
• Windows 3.x is not an operating system, but provides a common user interface for applications written to its standards.
• It is important that you are familiar with the different modes of windows and how (and where) they function.
• Windows runs on top of DOS. A DOS–based program provides a Graphical User Interface (GUI).
• Windows provides three types of fonts: vector fonts, raster fonts, and TrueType fonts.
• There are three methods for managing or configuring Windows: the Control Panel, Windows Setup, and Windows INI files.
• Sysedit is a program for editing the system files (AUTOEXEC.BAT, CONFIG.SYS, WIN.INI and SYSTEM.INI).
• PROGMAN.INI controls the settings for the Program Manager Group files.
• Virtual Memory allows the processor to use the hard drive to simulate RAM.
• A popular disk cache is SMARTDRV.EXE. It is provided as part of DOS and is activated by entering it into the CONFIG.SYS file.
• Windows uses a PIF (Program Information File) to hold the necessary data to set up the virtual machine.

A+ Training & Test Preparation Guide
Specialized Solutions, Inc. 56
KEYWORDS Exercise
Keyword Definition
ATTRIB
AUTOEXEC.BAT
Backslash (\)
BAT
Batch file
Binary file
Case Sensitivity
CD or CHDIR
CHKDSK
CLS
Cold boot
COM
Command file
Command line prompt
CONFIG.SYS
Conventional Memory
COPY
Cursor
Data file
DATE
Default Drive
DEFRAG

Chapter 2 – Working in a Command Line Prompt Environment
Specialized Solutions, Inc. 57
Keyword Definition
DEL
Device Drivers
DIR
DIR/P
DIR/W
DIR/W/P
Directory
Directory file
Disk cache
DISKCOMP
DISKCOPY
DLL
DOS Prompt
Drive Pointers
EDIT
EDIT
EMM386.EXE
Error Messages
EXE
Executable file
Extended Memory
Filenames
FORMAT
FORMAT/S

A+ Training & Test Preparation Guide
Specialized Solutions, Inc. 58
Keyword Definition
GDI.exe
Greater Than (>)
Heap
High Memory
HIMEM.SYS
HMA (High Memory Area)
Krnl386.exe
Library file
Map file
MEM
MKDIR or MD
Object file
Path
Permanent swap file
Prompt
PROMPT
RAMDrive
REN
RMDIR or RD
SCANDISK
SMARTDRV.EXE
Switches
Syntax
Syntax

Chapter 2 – Working in a Command Line Prompt Environment
Specialized Solutions, Inc. 59
Keyword Definition
Sysedit
SYSTEM.INI
Temp files
Temporary swap file
Text file
TIME
TYPE
Typos
UMA
UNDELETE
User.exe
Vcache
Vector fonts
VER
Virtual memory
VMM
Warm boot
Wildcards
WIN.INI
Win386.exe
XCOPY

A+ Training & Test Preparation Guide
Specialized Solutions, Inc. 60
Review Questions
1. What does DOS stand for?
2. What was DOS created to do?
3. What are the core operating systems within DOS?
4. What are the two DOS startup files?
5. What DOS command is used to determine the amount of free space left on a disk?
6. What is the difference between real mode and protected mode?
7. Windows provides a GUI for the user. What does “GUI” stand for? What is its advantage over the older DOS system?
8. What are the three kinds of fonts used in a Windows environment?
9. Name five settings that can be changed from the Windows Control Panel.
10. What wildcard character can be used to replace a single character in a search string?

Chapter 3- Working in a GUI Environment
Specialized Solutions, Inc. 61
Chapter 3– Working in a GUI Environment
Just as the microprocessor has developed with time, so have software and operating systems. In the previous chapter, we discussed operating systems that use the command line interface (DOS and Windows 3.x). These two software packages (DOS as an operating system and Windows as an operating environment) have become cornerstones of the computer market. If you will recall, DOS comes with restrictions in terms of memory and ease of configuration. Windows overcame many of these problems to a certain extent, however, since it resides on top of DOS, it retained some of the restrictions and operating overhead.
There was only one solution to this problem—a new operating system from the ground up. Microsoft took on this task and developed Windows 95. After three years of success, Microsoft responded to the ever–changing needs of technology and the phenomenal growth of the Internet with an upgrade appropriately called Windows 98.
This chapter focuses on the Windows 95/98 operating system. It is intended to provide the basics of managing the Windows 9x environment. To gain the high level of proficiency required of today’s computer professional, it is recommended that you obtain advanced training and build a library of references as you complete this chapter.
Note: Windows 98 shares many features with Windows 95. We will discuss these two operating systems as if they were one and point out the additional features provided by Windows 98.
A New Generation of Operating System
As you may recall, Windows 3.x is an operating environment created on top of DOS that provides a graphical user interface along with other features that make it easier to run programs and manage files. Windows 9x is a complete operating system that includes an improved GUI as well as other useful features. It has a unique desktop appearance and features multimedia and Internet access.
When you first boot Windows 9x, you will see a splash screen that identifies the operating system. At this point, Windows is starting the DPMI (DOS Protected Mode Interface). This is equivalent to booting from a floppy disk with system files. If the process were to stop at this point, you would see the “DOS prompt” or C:\.
The difference is that this is a protected mode DOS. In a normal boot, the process will continue by loading the more familiar Windows GUI (Graphical User Interface). Let’s look at these two components of Windows 9x (DOS and GUI).
DOS is alive and available in Windows 9x, but comes in two forms. The old familiar DOS external commands can be found in the windows\command directory of the bootable drive. Its name is DOS 7, although if you were to use the VER command at a DOS prompt, you will see “Windows 95” or “Windows 98.”

A+ Training & Test Preparation Guide
Specialized Solutions, Inc. 62
Operating systems are classified by their interface:
Command Line Prompt GUI (Graphical User Interface)
Commands are typed in on a command line.
An icon (or picture) is selected (usually with a mouse) to enter commands.
In the previous chapter on DOS, we described three essential files that make up DOS (at least within Windows), IO.SYS, MSDOS.SYS, and COMMAND.COM. These files are still used (mostly to maintain backwards compatibility), but they also have different functions.
First, the functions of MSDOS.SYS and IO.SYS are combined into IO.SYS. By doing this, the MSDOS.SYS file is not needed, but is retained as a hidden, read–only text file in the root directory of the boot drive, again for backwards compatibility issues. The COMMAND.COM has not changed and still provides us with the C:\ prompt when needed. To get to a DOS command prompt when booting, press the F8 key when you see the “Starting Windows” text on the screen. This will take you to a start–up menu where you can select to start at a DOS prompt.
Note: A DOS prompt from boot is different from a DOS prompt inside a window. The boot DOS is protected mode DOS 7 and DOS in a window is a virtual DOS machine. A virtual DOS machine uses 1 megabyte of memory and acts like an 8086 computer. In this mode, you will have to load real–mode drivers to run devices, such as a CD–ROM.
The Windows 9x operating system operates in a new way. The Windows 9x GUI operates completely different from the Windows 3.x GUI. In Windows 3.x, the emphasis was on the program level. With Windows 9x, the emphasis is on the desktop level. This means that with Windows 3.x, most operations were started from the Program Manager. Windows 9x is more user-friendly because you work from a desktop, not unlike a desktop in an office.
The Windows 9x architecture is based on three core components. These are the User, the Kernel, and the GDI (Graphical Device Interface). The User provides the input and output functions. It manages the sound, communication ports, and any components that directly interact with the user (human). The Kernel is the core operating system. The GDI manages all the graphics for input and output devices as well as printing subsystems. All three of these components are provided by dynamic–link libraries (DLLs). There are two versions of each one. A 16–bit version and a 32–bit version.
USER32.DLL and USER16.DLL
KERNEL32.DLL and KERNEL16.DLL
GDI32.DLL and GDI16.DLL

Chapter 3- Working in a GUI Environment
Specialized Solutions, Inc. 63
Windows 9x and Files
When Windows 95 was first released, there were no changes in the basic file structures. There were no changes in procedures for installing, partitioning and formatting hard drives. However, with the release of Windows 95 OSR2 (sometimes–called version C) and Windows 98, came support for 32–bit FAT (FAT32). This file system improves storage efficiency by reducing cluster sizes on large partitions, which proves to be helpful since a cluster is the smallest unit of storage that a hard drive can manage or access. The following table shows the Windows 9x release versions and their appropriate file systems.
95 Version A Original Windows 95 release – intended for upgrading from Windows 3.1 – FAT16.
95 Version B OEM (original equipment manufacturer) version – intended for installation on new computers only – FAT16.
95 OSR2 (Sometimes referred to as Version C) The final version of Windows 95 – intended for installation on new computers only – uses the FAT32 file system.
98 First Edition The first release of Windows 98 – introduced the active desktop and is more Internet–friendly than Windows 95.
98 Second Edition The upgrade to Windows’ first Edition.
Windows ME The version of Windows 98 that is designed for the home user.
32–Bit VFAT
Disk access is provided through the 32–bit VFAT (virtual file allocation table). Unlike the 16–bit FAT used in previous versions, VFAT is a virtual device driver that operates in protected mode. This provides more reliability and works with a greater variety of hardware. 32–bit VFAT is not to be confused with 32–bit FAT. FAT32 has to do with how data is stored on a partition (cluster size), while VFAT has to do with how files are accessed.
Note: VFAT was formerly known as 32–bit file access in Windows 3.1.
Long Filenames
One new feature that really improved file management and user friendliness was the addition of support for long file names. For a long time, Apple Macintosh users could name a file using any number of letters and numbers. They could even use spaces. This was called using long file names.

A+ Training & Test Preparation Guide
Specialized Solutions, Inc. 64
With Windows 95, users were able to enter file names up to 255 characters including spaces and the file path. We no longer had to create an 8–character code of our own to identify files. Actually, Windows still uses the old 8–character files names to retain backward compatibility. Windows takes the first 6 characters (no spaces), adds a tilde (~), a number, and then the extension. In the event there are two or more files with the same first six characters, the number is incremented by one for each. For example, two files (long file name one.txt and long file name two.txt) would be longfi~1.txt and longfi~2.txt. To keep things straight, Windows maintains a table with the short “official” name and the long name that we see. For A+ Exam purposes, it is important that you know how long file names are truncated for backwards compatibility.
Caution: Long file names (LFN) can cause problems with some of the older disk utility programs and virus software. Since these programs cannot recognize them, they can be interpreted as an error or a virus.
The New CONFIG.SYS and *.INI
The biggest technical difference between Windows 9x and DOS/Windows 3.x is the new Registry. Remember all the SYS.INI, WIN.INI, etc. files that we had to edit to get Windows 3.1 to work? Those are virtually gone and replaced by the Windows 9x Registry. Windows 9x will still look for and use any of the INI files if they exist on a machine. This way, you can still run those “old” DOS programs that require them.
The registry is a binary database that keeps track of hardware and software configuration and set–up information. It is actually made up of two files called SYSTEM.DAT and USER.DAT (the dat meaning data). The SYSTEM.DAT file keeps track of all the system information and the USER.DAT keeps track of all the users. Yes, all the users.
You can actually have several users; each with their own personalized set–up. When a user logs on, they will get their own custom environment in which to work, and if they change anything, it will not affect any of the other user’s set–ups. We will look at the registry in more detail later in this chapter.
Windows 9x Enhancements
Windows 9x is dramatically different than any of the Windows 3.x series, not only in the way it looks, but it also more versatile and user–friendly than ever before. Proficiency in using the Windows 9x environment requires a great deal of study and hands–on experience.
Windows 9x represents an evolutionary step in operating the system.
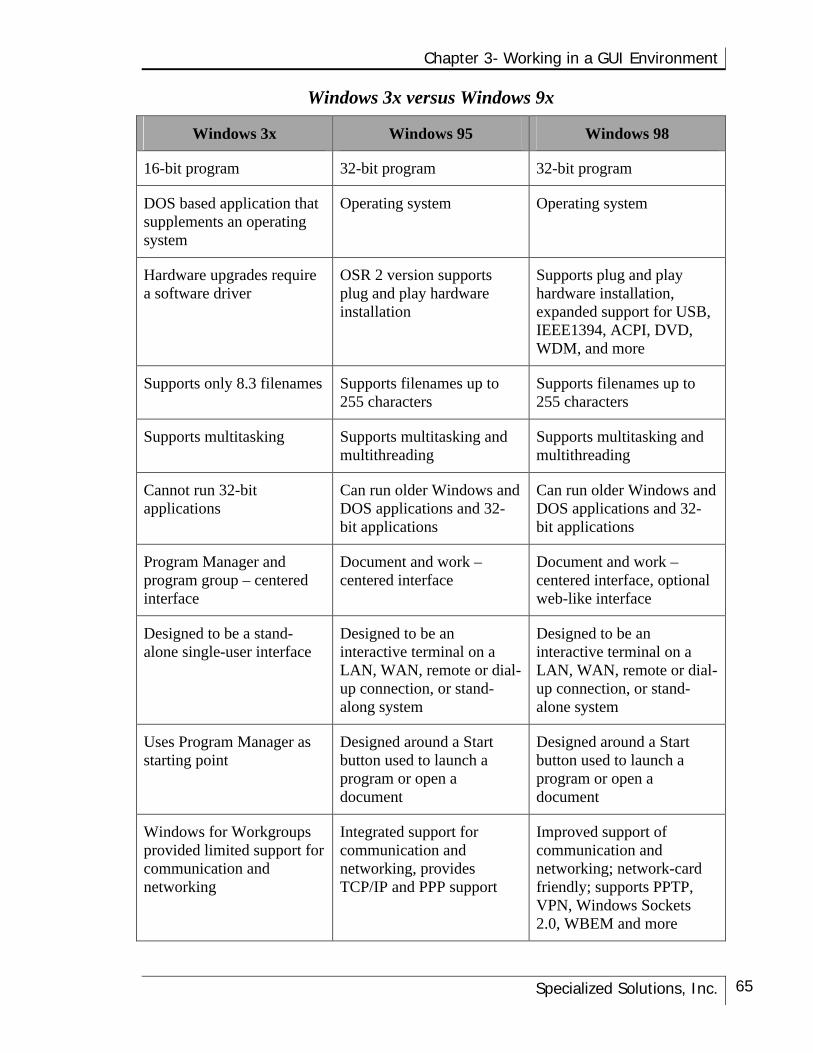
Chapter 3- Working in a GUI Environment
Specialized Solutions, Inc. 65
Windows 3x versus Windows 9x
Windows 3x Windows 95 Windows 98
16-bit program 32-bit program 32-bit program
DOS based application that supplements an operating system
Operating system Operating system
Hardware upgrades require a software driver
OSR 2 version supports plug and play hardware installation
Supports plug and play hardware installation, expanded support for USB, IEEE1394, ACPI, DVD, WDM, and more
Supports only 8.3 filenames Supports filenames up to 255 characters
Supports filenames up to 255 characters
Supports multitasking Supports multitasking and multithreading
Supports multitasking and multithreading
Cannot run 32-bit applications
Can run older Windows and DOS applications and 32-bit applications
Can run older Windows and DOS applications and 32-bit applications
Program Manager and program group – centered interface
Document and work –centered interface
Document and work –centered interface, optional web-like interface
Designed to be a stand-alone single-user interface
Designed to be an interactive terminal on a LAN, WAN, remote or dial-up connection, or stand-along system
Designed to be an interactive terminal on a LAN, WAN, remote or dial-up connection, or stand-alone system
Uses Program Manager as starting point
Designed around a Start button used to launch a program or open a document
Designed around a Start button used to launch a program or open a document
Windows for Workgroups provided limited support for communication and networking
Integrated support for communication and networking, provides TCP/IP and PPP support
Improved support of communication and networking; network-card friendly; supports PPTP, VPN, Windows Sockets 2.0, WBEM and more

A+ Training & Test Preparation Guide
Specialized Solutions, Inc. 66
Windows 98 provides additional features beyond Windows 95.
Hardware and Software
• Improved Fat32 – provides a conversion utility for upgrading FAT 16
• Built in support for USB, IEEE 1394 (FireWire), and DVD
• Supports infrared connectivity
• Improved print spooling
• Windows Internet Explorer is integrated into the Windows 98 shell
• Hardware detection occurs after the file copy phase is complete (settings for legacy hardware are maintained in the registry)
Communications
• Support for the Point–to–Point Tunneling Protocol (PPTP), Remote Access Server (RAS) and PCMCIA
• Client support for NetWare Directory Services (NDS)
• Internet Connection Wizard (ICW)
• An Online Services folder on the desktop – access to ISP
• Advanced Browsing Tools
Troubleshooting and Maintenance
• Windows Tune Up Wizard – schedule maintenance
• Windows Update Wizard – automatic updates via the web
• System Information Utility – maintains configuration information
• Improved backup functions
• Dr. Watson for troubleshooting
Advantages of Windows 9x
There are several changes, not readily visible to the user, that make Windows 9x better than the older versions of Windows.
Windows 9x has a better system of managing computer resources: memory (RAM), video RAM, hard disk drives, and network communications.

Chapter 3- Working in a GUI Environment
Specialized Solutions, Inc. 67
Programs designed to run on Windows 9x carry out tasks effortlessly. Programs written for Win9x tend to be faster, more efficient, and less likely to crash than with earlier Windows versions.
Microsoft’s goal was to build a backward-compatible 32-bit operating system that allowed users to continue using their favorite DOS programs and existing hardware. The following table summarizes some additional advantages of Windows 9x:
User-definable Interface The desktop is completely and easily customized by the user.
Interconnectivity Designed to run as part of any network system.
New Accessories The standard Windows accessory package has been improved and expanded.
Direct Cabling Any two computers with Windows 9x and a free COM or parallel port can be connected for data sharing. One computer will act as a host and share its files with the other.
Installing and Configuring Windows 95
Windows 95 can be installed as an upgrade toWindows 3.x, from DOS, on a new machine, or as a dual–boot system with Windows 3.x, Windows NT, or other operating system. Each method has its own unique requirements and limitations. The basic process is the same for all installations, but you must be sure that you understand the differences, and that the result is the solution that you or your client needs. In many cases, you may have to compromise to achieve the best results.
Windows 95 Hardware Requirements
The minimum recommended requirements (and those you should be familiar with for the Certification test) differ from the “practical” requirements to run Windows 95. Let’s look at both.
Minimum Requirements
The minimum requirements recommended by Microsoft and covered by the test are:
• A 386DX personal computer or better
• At least 4 MB of random access memory (RAM)
• At least 40 MB of free hard disk space – for the operating system only
By selecting the typical Windows setup, Windows 95 uses 30 megabytes of hard disk space and reserves at least 8 to 10 megabytes for swap space on the hard disk. Windows 95 still needs to create a virtual machine (VM) environment, and the more hard disk space available; the better Windows 95 operates.

A+ Training & Test Preparation Guide
Specialized Solutions, Inc. 68
If your computer suddenly gives you a number of different read/write error messages or its performance declines dramatically, it could be that you don’t have enough hard disk space to handle the swapping requirements of Windows 95. Free up some hard disk space and see if your computer’s performance improves.
What You Really Need
In order to run Windows 95 instead of just looking at the opening Windows 95 screen, don’t use anything less than:
• A 486DX 66 MHz
• 8 MB RAM or more
• A 520 MB hard drive
Tip: Windows 95 starts outperforming Windows for Workgroups on a 486 computer once you increase RAM from 8 MB to 16 MB.
Additional Hardware
It is recommended that the following additional hardware be included on a Windows 95 installation:
• Modem and/or network card
• Microsoft Mouse or compatible pointing device
• Sound card and speakers
How Much RAM Is Enough?
The amount of RAM you really need depends on the user and which applications you intend to run. Typical Microsoft Office users can usually work quite well with 8 MB of RAM. Moderate users of the Copy and Paste commands will need to increase RAM to at least 16 MB. If users require their applications to be a click away (all running at the same time), they will need 32 MB of RAM. In the 32–bit Windows world, additional RAM will always boost performance.
Remember:
• You can never have too much RAM.
• RAM is the key to optimizing Windows.
• The simplest and least expensive way to improve the speed and performance of any computer is to add RAM.

Chapter 3- Working in a GUI Environment
Specialized Solutions, Inc. 69
• Moore’s Law: Processing power doubles every 18 months (from Gordon Moore, cofounder of Intel).
• Parkinson’s Law of Data: Data expands to fill the storage space available (from the original Parkinson’s Law: Work expands to fill the time available).
• “In preparing for battle I have always found that plans are useless, but planning is indispensable.” – Dwight D. Eisenhower
Upgrading from Windows 3.x (Windows 95 Version A)
Windows 95 installation is a relatively painless affair (in most cases) and requires minimal intervention. Before starting an installation, consider the following:
• The more complicated the system, the more complicated the installation.
• Incompatible hardware is probably the number one cause of installation problems.
• Conflicting software is probably the number two cause of installation problems.
• Patience and persistence are two requirements for a Windows 95 upgrade.
Before you start the installation, consider the following:
• BACK UP! BACK UP! BACK UP!
• Make copies of all the current system files— .INI, .GRP, AUTOEXEC.BAT, CONFIG.SYS, .DLL, and all critical data files.
• You can use the DOS version of MSD (Microsoft Diagnostics) to record (and print) a complete configuration of the system.
• The best tool for an installation is a pad of paper and a pencil. Write everything down. DOCUMENT! DOCUMENT! DOCUMENT!
• It is probably better to remove any questionable hardware and software before starting the installation. Be sure to back up any data files and check the integrity of the installation disks. Reinstall after Windows 95 is up and running.
• Check the Microsoft Web site for its incompatible hardware list. Search http://www.microsoft.com.
• Be sure to turn off all TSRs and active programs before starting the installation.
• Check the CMOS setup for any virus protection. Windows 95 installation does not like virus protection. While you are there, document your CMOS.

A+ Training & Test Preparation Guide
Specialized Solutions, Inc. 70
Windows 95 Installation Process
The Windows 95 installation process can be divided into five distinct steps:
Step 1—Startup and System Check
Run the SETUP.EXE from either the CD (best choice) or Disk 1. Windows 95 is shipped on CD therefore, if your computer does not have a CD–ROM drive, you can request the disk version from Microsoft.
The process goes like this:
Setup looks through the system for the presence of a previous version of Windows. If you are installing the upgrade version, it must find a previous version of Windows or it will not install.
1. Setup runs ScanDisk—you must correct any disk problems before continuing the install. If problems are encountered, run ScanDisk again.
2. Setup confirms that the system is ready to accept a new OS.
3. Setup checks for an extended memory manager (HIMEM.SYS) and a diskcache (SMARTDrive). If not present, it will load XMSMMGR.EXE and SMARTDrive.
4. Setup checks for any TSR programs and device drivers.
5. If setup was started from DOS and this is an upgrade, it will copy the basic Windows 3.1 files to a temporary directory (Wininsto.400). It will use the old GUI to get started.
6. Setup looks for a directory named Old_DOS.x and asks if you want to remove it.
7. Setup adds the following to the AUTOEXEC.BAT file:
@if exist c:\wininst0.400\suwarn.bat call c:\wininst0.400\suwarn.bat
@if exist c:\wininst0.400\suwarn.bat del c:\wininst0.400\suwarn.bat
You need to rerun Setup and choose the Safe Recover option if for any reason the installation process aborts displaying a warning that Windows 95 was not installed completely.
Chapter 3- Working in a GUI Environment
Specialized Solutions, Inc. 71
Step 2—Information Collection
This step runs the Installation Wizard, which presents a step–by–step series of dialog boxes. The purpose of this process is to collect any custom information required, such as:
• The directory in which to install Windows 95.
• Which components to install.
• Your name and company name.
• Any network configurations.
Setup creates a text file named SETUPLOG.TXT in the root directory. This file stores the aforementioned information.
Step 3—Hardware Detection
Setup attempts to automatically determine all hardware (IRQs, addresses, DMA, and so forth). If the hardware is PNP (Plug and Play) compatible, the detection manager simply queries the BIOS for the information. With legacy (the older non–Plug and Play) devices, it is more complicated (and dangerous). This low–level detection can cause device drivers to go haywire and cause delays to the system, therefore, Windows looks for “hints” of these devices. This is called Safe Detection.
Hardware devices are divided into four classes: sound cards, SCSI controllers, network adapters, and proprietary CD–ROM drives. Windows setup will look in the following places for information about these devices:
• The DEVICE= lines in CONFIG.SYS.
• Device drivers residing in memory.
• Search the hard drive for files that might be associated with a driver (*.DRV, etc.).
• Read–only memory strings.
• Looks for warnings in MSDET.INF that spell out prescribed actions.
Remember, setup is looking for “hints.” If it makes an incorrect assumption, problems may occur when Windows 95 tries to run for the first time. (Consider uninstalling any questionable legacy devices before starting the installation.) The data found during the search is stored in a file called DETLOG.TXT in the root directory of the C drive. It is not deleted at the end of setup and can be examined.
After finding all the devices, setup will create the Registry (database for this information). During this process, go get a cup of coffee and a donut. This may take a while and you will need a break anyway.

A+ Training & Test Preparation Guide
Specialized Solutions, Inc. 72
Step 4—Startup Disk Creation and File Installation
Setup will next ask if you want a startup disk created. (It is highly recommended that you select yes.) This will create a bootable floppy with several useful files. This is also called an emergency boot disk and can be created at any time (on any Windows 95 computer) by selecting the Startup Disk tab of the Add/Remove icon found in the Control Panel.
The following files will be put on the Startup disk:
ATTRIB.EXE
CHKDSK.EXE
COMMAND.COM
DEBUG.EXE
DRVSPACE.BIN
EBD.SYS
EDIT.COM
FDISK.EXE
FORMAT.COM
IO.SYS
MSDOS.SYS
REGEDIT.EXE
SCANDISK.EXE
SCANDISK.INI (stores operating settings)
SYS.COM
UNINSTALL.EXE
After creation of the startup disk, setup will check the SETUPLOG.TXT and begin copying all the necessary files from the CD (or floppy disks) to the hard disk.
Note: If the boot sector is damaged, SYS.COM can restore it. This is necessary when you receive error messages about COMMAND.COM either being corrupted or missing.

Chapter 3- Working in a GUI Environment
Specialized Solutions, Inc. 73
Step 5—Windows Configuration
Now that everything is copied to the hard drive, Windows 95 needs to set itself up to take over the operating system duties. Configuration is a multi–step process as Windows:
• Replaces the Master Boot Record with the Windows 95 version.
• Renames several system files: IO.SYS to IO.DOS; MSDOS.SYS to MSDOS.DOS; COMMAND.COM to COMMAND.DOS.
• Copies the Windows 95 operating system files: replaces IO.SYS and MSDOS.SYS with IO.SYS.
Now the computer will reboot invoking a special routine used only when Windows 95 is run for the first time. This process:
• Combines all virtual device drivers into one file called VMM32.VXD.
• Loads the Run-Once module, which configures the hardware.
• Installs network information (if required).
• Converts any program group files (from Windows 3.x) into Windows 95 shortcuts for the Start menu.
• Runs Wizards for configuration of printers and other peripherals.
• Initializes the Windows 95 Help system.
• Enables MS-DOS program settings.
• Sets the date and time properties.
• Reboots to set final hardware configuration.
Performing a Clean Installation
A clean installation is perhaps the best way to install Window 95. Before undertaking a clean installation, make sure you have:
• A bootable floppy disk with all the necessary files (FORMAT, FDISK, and so forth).
• A disk with all the files necessary to run any hardware such as the CD–ROM or SCSI controller.

A+ Training & Test Preparation Guide
Specialized Solutions, Inc. 74
• A startup disk, which should include an AUTOEXEC.BAT file with a MSCDEX.EXE line that points to the location of the MSCDEX file, and a CONFIG.SYS file that loads the CD driver. See example at the end of this section.
• If upgrading from Windows 3.x (Windows 95 version A), you will need Disk #1 from your Windows 3.x disk set. Setup will ask to see this disk to verify that this is an upgrade. When asked, insert the disk in the floppy drive and tell Windows 95 where to look for the information.
• This type of installation requires that you wipe everything off the hard drive. Therefore, backup copies of all your programs and data are necessary.
If you are going to complete a clean installation on an existing drive, you will need to remove all the files. You can simply erase (delete) them or reformat the drive (reformatting is the best choice as all hidden files will be removed).
Whether or not you erase the drive or install a new drive, you will need to follow the instructions for installation on a new computer or hard drive.
Example of an AUTOEXEC.BAT file on a boot disk:
MSCDEX /D:MSCD001 /V
Example of a CONFIG.SYS file on a boot disk:
DEVICE=A:\CDPRO\VIDE–CDD.SYS /D:MSCD001
Note: This example disk also contains a folder (CDPRO) with the driver for the CD–ROM (VIDE–CDD.SYS).
Installing Windows 95 on a New Computer or Hard Drive
Windows 95 B version is an OEM product designed specifically for installation on new machines or new hard drives. It does not require an existing version of Windows 3.x to be present in order to install. It was replaced with the OSR2 (OEM Service Release 2) version. The primary difference between Version B and OSR2 is that the latter uses a 32–bit FAT (Version A & B use 16 bit–FAT). Since this installation takes place on a new drive with no other installed software, potential software conflicts are avoided. For your convenience, here is the complete process of installing a new hard drive and the Windows 95 operating system from scratch:
Note: Today, new OEM computers will come with Windows 98 or Windows ME preloaded. It is highly unlikely that you will be able to locate a copy of Windows 95 in any local computer stores. Windows 98 can be installed on a new computer or as an upgrade to DOS, Windows 3.1, or Windows 95. If you wish to retain your Windows 95 settings when upgrading, be sure to start the installation from Windows 95.

Chapter 3- Working in a GUI Environment
Specialized Solutions, Inc. 75
You will need the following for the installation:
• A hard drive (preferably new) with manufacturer’s specifications (CHS values and jumper settings)
• Bootable floppy—a Win95 startup disk (can be made from any Windows 95 computer)
• Device drivers for the CD drive: MSCDEX.EXE and the driver that came with the CD drive
• Windows 95 OEM CD–ROM
Follow these steps to install a hard drive and put Windows 95 on it:
1. Set up all the jumpers according to the manufacturer’s specifications. Identify the drive as master or slave.
2. Physically install the drive. (See Volume I if you need a refresher on hard drives.)
3. Connect the cables (power and data).
4. Start the computer and open the CMOS setup.
5. Set the CMOS using either the CHS values established by the manufacturer or use Auto–detect (the preferred method).
6. Reboot the computer using the Win95 startup disk.
7. Run FDISK from the floppy; partition the drive and reboot.
8. Format the C partition by typing: Format C: /S
9. Format any other partitions.
10. Remove the floppy disk and reboot the computer.
11. Install the CD–ROM drivers on the new C: drive.
12. Confirm operation of the CD–ROM.
13. Install Windows 95 from the CD. Follow instructions with the documentation.
Hint: If you get a message that sector 0 is bad, the hard drive is bad and needs to be replaced.

A+ Training & Test Preparation Guide
Specialized Solutions, Inc. 76
Optional Install
This optional install method will speed up the installation process and allow for easy addition of drives and Windows 95 programs not installed during the initial installation. However, it requires an additional 40 megabytes of hard drive space.
The optional install process is:
After installing the CD–ROM driver, make a directory (name it “Win95”) on the C: drive and copy all the files in the Win95 directory on the CD into this folder.
Install Windows 95 from the new folder on the C: drive by typing the following command:
C:\win95\setup
Installing a Dual–Boot System
You can install Windows 95 on a disk that already has Windows 3.1 or Windows NT. Let’s look at both options.
Windows 3.1 and Windows 95
Windows 95 can be installed without removing the Window 3.x system. The main advantages of this approach are that Windows 95 will install clean and the Windows 3.x files will be left intact. In other words, you will still be able to run the old programs that Windows 95 doesn’t like.
There are two considerations when creating a dual–boot computer:
• Windows (3.x) and Windows 95 must be installed in different directories (for instance, install Windows 95 in a Win95 directory).
• It will require lots of hard disk space. Not only must both operating systems be on the hard drive, many programs will have to be installed twice—once for Windows 3.x and once for Windows 95. This is because not all program configurations will migrate across two operating systems.
To run the old system, press F8 when you see the “Starting Windows 95 …” message during boot.

Chapter 3- Working in a GUI Environment
Specialized Solutions, Inc. 77
Microsoft Windows 95 Startup Menu
Select number 7 (8 if running a network) and the old version of DOS will boot. You can then change to the Windows 3.x directory and start the earlier operating system.
Note: Another method for setting up a dual boot computer would be to create two partitions on the hard drive (or have two hard drives) and install one operating system in each. On startup, you can then select which partition to boot. Using this method, you will keep both operating systems completely separate and reduce the chances of contamination.
Dual Booting with Windows NT
Windows 95 and Windows NT share the same machine quite well and dual booting is no problem. However, you must consider the following:
• The hard drive must have a Windows 95 FAT16 partition. NT will run in Windows FAT16, but Windows 95 will not run on NTFS (NT File System).
• Drive compression for Windows 95 and Windows NT are different and incompatible. Therefore, you cannot install Windows NT on a Windows partition that uses drive compression.
To avoid reinstalling all the Windows 95 applications in Windows NT, do the following:
• In the NT Control Panel, open the system icons.
• In the System dialog box, highlight the Path line in the System Environment Variables section.
• Move down to the Value text box and add the following string to the end of the existing value: ;c:\windows;c:\windows\system.

A+ Training & Test Preparation Guide
Specialized Solutions, Inc. 78
The Boot Process from Power Up to Startup
There are twelve steps to a successful startup of Windows 95.
1. Power on: The system microprocessor executes the ROM BIOS code and initiates the POST. A single beep means success.
2. Finds a boot sector: The BIOS checks the A drive for a boot sector; if there is no disk in the floppy drive, it checks the C: drive.
3. Runs the boot program: BIOS runs IO.SYS (same as IO.SYS and MSDOS.SYS), initializes some device drivers, and performs a few real–mode chores.
4. Reads MSDOS.SYS: Remember, this is not the same as used with DOS (it is a text file with setup information). After collecting the information from MSDOS.SYS, you will see the “Starting Windows 95” message.
5. Reads CONFIG.SYS: Processes the commands in CONFIG.SYS file and loads real–mode devices.
6. Reads AUTOEXEC.BAT: Processes the commands in AUTOEXEC.BAT.
7. Reads the Registry: Reads the Registry data and loads drivers and settings. The following table describes some of the drivers and their functions that can be specified by the Registry. They could also be loaded via the CONFIG.SYS file.
BUFFERS=30 Determines the number of file buffers to create—for backward compatibility.
DOS=HIGH Loads DOS into high memory.
DRVSPACE.BIN Disk compression.
or
DBLSPACE.BIN
FCBS=4 Determines the number of file control blocks that can be open at one time—for backward compatibility.
FILES=30 Determines the number of file handles to create—for backward compatibility.
HIMEM.SYS Real–mode extended memory manager.
IFSHLP.SYS Installable file system helper—helps load VFAT and other Windows 95 installable file systems.

Chapter 3- Working in a GUI Environment
Specialized Solutions, Inc. 79
LASTDRIVE=Z Determines the last drive letter that can be assigned to a disk drive—for backward compatibility.
SETVER.EXE The operating system version. If a DOS program needs a special version of DOS, this setting can “lie” to DOS so the program will run.
SHELL=COMMAND.COM /P Determines the name of the command–line interpreter.
STACKS=9,256 Determines the number of stack frames and the size of each frame—for backward compatibility.
Caution: Don’t use values less than these defaults.
8. Switches to Protected Mode: The processor switches to protected mode and loads protected–mode drivers (VMM32.VXD).
9. Configures Plug and Play: Windows now loads new device drivers detected during the initial boot phase, removes devices, hardware conflicts and so on.
10. Loads Windows 95 GUI: The interface is loaded.
11. Configures Network: Prompts for network password if applicable (or user password if user profiles are enabled).
12. Processes Startup Folder: Checks the startup folder and loads any programs found.
The Startup Menu – Modes of Starting
With early versions of Windows, booting from a floppy and editing the appropriate file could resolve startup problems. With Windows 95, it’s not that simple. Therefore, Windows 95 comes with a Startup menu. Pressing the <CTRL> key when the computer beeps (Windows 98) or pressing the F8 key when the “Starting Windows 95” message appears on the screen evokes this menu.
Let’s look at the options presented by the Startup menu.
Normal
This option loads Windows 95 in the usual fashion.
Logged (BOOTLOG.TXT)
This choice loads Windows 95 the same as normal, but creates a boot log file (BOOTLOG.TXT) and places it in the root directory of the boot drive. It can be read

A+ Training & Test Preparation Guide
Specialized Solutions, Inc. 80
with any text editor and will show all steps of the boot process, noting whether they were successful.
Safe Mode
If it encounters difficulty starting up, Windows 95 can (and will) be loaded in the safe mode (you have to press F8). Most of the time, startup problems are caused by driver conflicts or problems. Safe mode starts Windows 95 with a minimum of drivers. This mode is considered the Windows 95 troubleshooting mode.
When safe mode is enabled:
• CONFIG.SYS, AUTOEXEC.BAT, and the Registry are bypassed.
• HIMEM.SYS and IFSHLP.SYS are loaded.
• IO.SYS is loaded
• MSDOS.SYS is checked for the location of the Windows 95 files.
• The command WIN /D:M (enables a safe-mode boot) is executed and COMMAND.COM is bypassed.
• Windows loads only the virtual device drivers for the keyboard, mouse, and a standard VGA display. It also allows for floppy drive and hard drive use.
• The SYSTEM.INI and WIN.INI files are partially loaded (reading the shell and drivers lines in SYSTEM.INI [Boot] sections).
• The desktop is resized for 640x480 resolution.
• A dialog box appears to notify the user that safe mode is in effect.
Safe Mode without Compression
With this option selected, safe mode is loaded, but Windows doesn’t load any drivers to access a compressed drive.
Safe Mode with Network Support
With this option, safe mode is loaded along with any real-mode drivers for network support.
Step-by-Step Confirmation
Systematic confirmation allows Windows 95 to load normally, but each command in the IO.SYS, CONFIG.SYS, and AUTOEXEC.BAT is addressed one step at a time and the operator has the option to bypass or use each item.

Chapter 3- Working in a GUI Environment
Specialized Solutions, Inc. 81
Here is a four-combination matrix that can be used to troubleshoot startup problems using the systematic method. Each of the columns represents combinations you should try.
Step–by–Step
Step–by–Step Prompt A B C D
Load Double Space Driver? Yes Yes Yes Yes
Process the System Registry? Yes Yes Yes No
Create a Startup Log File (BOOTLOG.TXT)? Yes Yes Yes Yes
Process Startup Device Drivers (CONFIG.SYS)? No No Yes Yes
DEVICE=PATH/HIMEM.SYS? Yes Yes Yes Yes
DEVICE=PATH/IFSHLP.SYS? Yes Yes Yes Yes
DEVICE=PATH/SETVER.EXE? Yes Yes Yes Yes
Process your startup command file (AUTOEXEC.BAT)?
No No Yes Yes
Load the Windows Graphical User Interface? Yes Yes Yes Yes
Load all Windows Drivers? No Yes No Yes
Option A – If Windows starts properly when you use this response, you know you have a problem with a device driver or TSR.
Option B – If Windows starts properly when you use this response, you know you have a problem with a real–mode device driver or TSR in CONFIG.SYS or AUTOEXEC.BAT.
Option C – If Windows starts properly when you use this response, you know you have a problem with a protected–mode device.
Option D – If Windows starts properly when you use this response, you know you have a problem with the Registry.
Command Prompt Only
This choice will boot to DOS without loading the Windows 95 GUI and protected mode drivers. It will, however, load CONFIG.SYS and AUTOEXEC.BAT.
Note: The CD-ROM may not work in this mode.

A+ Training & Test Preparation Guide
Specialized Solutions, Inc. 82
Safe Mode Command Prompt Only
This operates the same as command prompt only, but does not process the CONFIG.SYS and AUTOEXEC.BAT.
Previous Version of MS-DOS
This option is used for dual–boot systems.
To save time, you can use shortcut keys to access Startup menu options.
BootKey Startup Menu Equivalent
F4 Previous version of MS–DOS
F5 Safe mode
Shift+F5 Safe mode — command prompt only
Ctrl+F5 Safe mode without compression
F6 Safe mode with network support
Shift+F8 Step-by-step confirmation
Installing and Configuring Windows 98
Installing and configuring Windows 98 is very similar to installing Window 95. One of the biggest differences is that the process is even more automated in Windows 98. Installing Windows 98 on a new computer that is fully plug and play enabled can be as easy as inserting the CD in the drive and starting the computer. While this is possible, this is not always the case. In this section, we will look at installing Windows 98 and how it differs from Windows 95.
Windows 98 Hardware Requirements
The minimum recommended requirements (and those you should be familiar with for the Certification test) differ from the “practical” requirements to run Windows 98. Let’s look at both.
Minimum Requirements
The minimum requirements recommended by Microsoft are:
• A 486DX 66 MHz personal computer or better
• At least 16 MB of random access memory (RAM)
• At least 225 MB of free hard disk space (FAT16) or 172 megabytes (FAT32)
• A CD–ROM

Chapter 3- Working in a GUI Environment
Specialized Solutions, Inc. 83
The amount of free disk space required varies depending on the kind of installation you choose (Typical, Portable, Compact, or Custom). Each of these types will require different amounts of drive space because they do not install all of the operating system’s components, only those Microsoft believes are necessary for each type of operation. If you have limited hard drive space and cannot install the complete operating system, it may be wise to choose the custom install and choose what you want or don’t want to install.
What You Really Need
In order to run Windows 98 instead of just looking at the opening Windows 98 screen, don’t use anything less than:
• A Pentium or equivalent
• 24 megabytes RAM or more
• At least 75 MB more than the minimum requirement for the type installation you choose
• A CD–ROM
It is recommended that the following additional hardware be included on a Windows 98 installation:
• Modem and/or network card
• Microsoft Mouse or compatible pointing device
• Sound card and speakers
Preparing to Install Windows 98
Installing Window 98 on a new computer is generally no problem. However, if you are installing on an older computer or upgrading, you will have to check a few things before getting started. Without checking these first, you will most likely encounter problems due to hardware and software conflicts.
• Disable all running software to prevent conflicts. Look carefully to make sure you get all of them that might be running in the background.
• Disable any Anti-Virus Software. Windows 98 will make changes to the boot sector and any anti-virus software will prevent this; thus, causing a conflict. You must be sure to check you BIOS settings (CMOS). Many of the newer BIOSs have built in protection for the boot sector. These must be disabled for the installation. You can turn them back on after the installation.
• Disable any memory managers. If you have been using DOS or Windows 3x, you will need these. Look in the CONFIG.SYS file (EMM386, QEMM, or 386MAX).

A+ Training & Test Preparation Guide
Specialized Solutions, Inc. 84
Installing Windows 98
It is much easier to install Windows 98 than Windows 95. Another difference is that hardware detection and enumeration will take place after coping files, instead of after the first reboot as in Windows 95, so this critical installation phase will be run from Windows, which is more stable than running it from DOS as before.
You can install Windows 98 from a CD–ROM (preferred method), over a network, or from a removable drive. Microsoft’s preferred method for installing Windows 98 is from Windows 95. This method will require the least amount of input from users and will retain all the configuration settings from before. In addition, you will not have to reinstall all the user’s applications.
• From a CD, Run Setup.exe from the CD.
• Over a network, copy the setup files from the CD to a shared directory on a network server, then run Setup.exe over the network.
• From a hard disk, copy the files from the CD to the hard disk and then run Setup.exe.
The five steps for installation of Windows 98 are as follows:
Step 1 – Prepare to run Windows 98 Setup
During this step, you will see the startup screen with the following information listed on the left.
• The five steps for installation
• Time to complete the install (in Microsoft time)
• A description of the current activity
Windows 98 Setup Screen

Chapter 3- Working in a GUI Environment
Specialized Solutions, Inc. 85
Windows will now look for any anti–virus software. If it detects any it will stop and require you to turn if off before continuing.
At this point, you will have to read and agree to the License Agreement.
Step 2 – Information Collection
This step uses four sub-functions:
Checks the System – Runs ScanDisk in protected mode, checks directory for errors, and prepares the drive for copying files (checks for hard drive space).
Saves existing files – Allows you the option of saving any old Windows and DOS files. If you choose to save them, it will create a winundo.dat and winundo.ini so that you can revert to the old system.
Selecting Internet Channels – Provides information of interest based on the country of location.
Create ERD start up disk – This is also called the Windows Startup Disk. Even though you can do it later, NOW IS A GOOD TIME. Remember, it is better to make one and never use it than not to make one and need it.
Step 3 – Copying Files
During this step, Windows will copy all the files you need to install and run. You don’t need to do anything except watch. If you are considering taking a break, now is a good time.
Step 4 – Restart the Computer
When this step starts, you will be given 15 seconds to restart your computer. If you don’t, it will restart anyway. During this restart, any real mode setups occur.
• Win.ini, System.ini, and Config.sys files are modified
• Autoexec.bat and Config.sys are examined for any real mode device drivers and TSRs. Any incompatible devices or drivers will be “REMed” out.
After installation, it is theoretically possible to edit your AUTOEXEC.BAT and CONFIG.SYS files to get your old DOS files running again. We say theoretically, because some of them may not work.
Step 5 – Final Adjustments and Configuration
This step will require some operator intervention. The final settings are made during this step and you will have to manually enter some data, such as the date, time, and printer information, etc.

A+ Training & Test Preparation Guide
Specialized Solutions, Inc. 86
When Windows has all the information it needs, it will make these final adjustments:
• Configures DOS programs, the Control Panel, and Start Menu
• Initializes Windows Help
• Modifies the registry and other system configuration files
Note: if you need to get at specific files on an installation CD, you can use the EXTRACT command. It will remove specific files from the cabinet (.cab) files, such as executables (.exe).
Alternate Methods of Installation
There may be times when you cannot install Windows 98 directly from a system containing Windows 95, such as upgrading from a machine running Windows 3.1. You will want to install Windows 98 from DOS under the following conditions:
• You have a Windows 3.1 computer
• You want to change the current settings
• Windows 95 setup fails
• You are installing on a new or reformatted hard disk.
When installing Windows 98 onto a system where there was no Windows program installed before, or on a machine running Windows 3.x, you'll need to install from DOS. Start by loading the CD–ROM driver that came with your CD–ROM drive, along with MSCDEX.EXE (read the manual that comes with your CD drive). Then run setup from the MS–DOS mode.
Windows 98 boot Process
Booting a Windows 98 computer is similar to booting a Windows 95 computer. The boot process is divided into five steps.
BIOS Bootstrap
Beginning with the BIOS start, which is the same as it always has been with a few notable exceptions. The new machines (and their BIOS chips) have added features to address larger drives, more drives, and plug and play devices.
Master Boot Record (MBR)
The MBR and the partition table of the bootable drive load. The disk boot program loads IO.sys into RAM.

Chapter 3- Working in a GUI Environment
Specialized Solutions, Inc. 87
Real Mode Boot
IO.sys performs the following functions:
• Loads minimal FAT file system
• Reads MSDOS.sys
• Loads Drvspace.bin and checks for Drvspace.ini. It will unload Drvspace.bin if Drvspace.ini is not present. Drvspace.bin (supports compressed drives) remains only if Drvspace.ini exist.
• Prompts for hardware profile from the menu (only if you have multiple hardware configurations).
• Loads and displays Logo.sys. This is a bitmap logo (default is Windows 98). If you press Esc key it will be disabled.
• Verifies that System.dat is a recognizable registry file.
• Loads System.dat (if not valid, startup menu is displayed).
• Initializes double-buffering for SCSI controller (if required).
• Selects hardware profile from the registry.
• Reads and processes Config.sys.
Real Mode Configuration
Windows automatically loads Himem.sys, Ifshlp.sys, and sets several environment variables. When these are loaded, it will look for and load Config.sys and Autoexec.bat if present. Although these files are not necessary in Window 98, it will look for them and use them if present. These files are still used to provide for backwards compatibility with older software or hardware.
Protected Mode Load
Win.com executes and loads Vmm32.vxd and other virtual drivers. The processor is switched into protected mode and initializes the virtual device drivers. Finally, the Windows Kernel, GDI, user libraries, the Explorer shell, and network support are loaded. With this, Windows is ready to go. All it needs to do is initialize any programs in the Startup Group and those referenced in:
HKEY_LOCAL_MACHINE\Software\Microsoft\Windows\Current Version|
The list of programs in the registry key is then deleted, and the boot process is complete.

A+ Training & Test Preparation Guide
Specialized Solutions, Inc. 88
Safe Mode and Windows 98
The safe mode in Windows 98 provides the same functions as the safe mode in Windows 95. You can still enter the same way by pressing the F8 key during boot. When a computer will boot into safe mode, but not normal mode, the problem is generally found in one of four areas. You can use an isolation technique for troubleshooting these problems. Use the following to determine in which of the four areas the problem exists.
Network Configuration Use Device Manager to disable the protected mode networking drivers.
Protected Mode Disk Driver Use Device Manager to disable the protected mode disk driver.
Video Driver Change the display to a VGA driver.
VxDs Disable any third party VxDs in the System.ini
After disabling one of these, reboot the computer. If it now runs, you have isolated the problem.
Dual Booting Windows 9x
There may be an occasion when you will be required to create a dual boot system. This means that the computer is capable of running more than one operating system (but only one at a time). You will often find dual boot setups in schools and software development companies. When considering a dual boot system, you will have to be very careful, as not all operating systems are compatible.
Dual Booting Windows 95 and 98
You cannot dual boot Windows 95 and 98 because they use the same boot files (IO.sys, Command.com, and Msdos.sys).
Dual Booting Windows 9x and DOS
You can dual boot Windows 95 or 98 with DOS version 5.0 or later. All you need to do is have both operating systems installed and use the F4 boot-to-previous operating system feature.
Restriction: Drive C:\ must be partitioned as FAT16.
Dual Booting Windows 9x and Windows NT
This setup is possible, but not recommended. First, Windows 9x cannot access the Windows NT File System (NTFS) partitions and Windows NT cannot access FAT32 partitions.

Chapter 3- Working in a GUI Environment
Specialized Solutions, Inc. 89
You can dual boot these operating systems if you follow these restrictions:
• All applications will have to be installed in both operating systems.
• Windows NT must be setup and configured to dual boot before you setup Windows 9x.
• Both operating systems must be installed in different directories.
• The C:\ drive must be FAT16 and hold the startup files.
Dual Booting Windows 9x and Windows 2000
Use FAT32 with this dual–booting scenario. It is also preferable to install Windows 98 first in the active partition.
A New Desktop Environment
With Windows 9x, Microsoft has replaced the Windows 3.x Program Manager with a new format. Program groups have been replaced with a Start Menu and shortcuts and desktop items have replaced program icons. A shortcut is a pointer (an icon) to an object such as an executable file or a document. The desktop now truly represents a virtual desktop. Windows 98 further advances the desktop by including an active desktop also called Web Style desktop.
Note: A common problem with a shortcut is that the object it is pointing to is moved. When a user tries to use the shortcut, they will get an error message indicating that the file is missing or corrupt. Right clicking on the application icon and creating a new shortcut solves this problem.
Some of the new features that you will encounter in Windows 9x include:
Folders Folders have replaced DOS directories and subdirectories. A folder is used to hold data and system objects and may reside within another folder, on a disk, or on the desktop.
Windows Explorer Windows Explorer has replaced the Windows 3.x File Manager. Explorer provides a visual representation of the computer and its components, as well as providing enhanced file management tools.
Printers Folder The Printers folder has replaced the Print Manager. This folder allows access to all aspects of printing (from setup of printers to monitoring printing activity). If you wanted to rename a printer, you would do it here. The Printers folder can be accessed via Settings from the Start Menu or My Computer.

A+ Training & Test Preparation Guide
Specialized Solutions, Inc. 90
Properties All items in the Windows 9x environment are treated as objects and have properties. All properties can be configured. An object’s settings and properties are located on the properties sheet. The long ignored, little used, right mouse button now has a major function in a Windows 9x environment (and on the Internet.) The secondary mouse button now accesses shortcut menus and the properties dialog boxes.
Plug and Play Windows 9x supports “Plug and Play” hardware. In some cases, you will have to provide additional driver software (provided by the manufacturer). Look for the Windows 9x symbol on the device to determine if it is Plug and Play.
Web Style Desktop
If you are familiar with the Windows 9x desktop, you will need a period of adjustment (and frustration) before becoming efficient with this new concept. If it doesn’t work for you, just turn if off. Two of the new techniques are hover select and single–click execution.
Hover Select All you need to do is move the cursor over an object and it will change to a “hand” just like on the Internet. Be careful, if you leave the cursor in position too long, the object will auto select.
Single Click You can start a program or open an object by clicking only once.
Inside Windows 9x
The first sections in this chapter provided a brief overview of Windows 9x. We looked at what makes it different from its predecessors and described its distinguishing features. This section takes you inside the operating system and presents the basics of how it works. It is not a complete course, but it is intended to give you a firm background in the operation of Windows 9x.
File Architecture in Windows 9x
As mentioned earlier in this chapter, the introduction of Windows 95 brought with it no changes in file architecture. The methods that we learned to partition and format a DOS drive did not change. It wasn’t until the last version of Windows 95 (version C or OSR-2) and the introduction of Windows 98 that things changed. Actually, how we partition and format are still the same, it’s just that the new 32–bit FAT was introduced. While both of these operating systems will run on 16 or 32-bit FAT, the new file system accommodates larger drives without the need for several partitions.
Note: Using 32-bit FAT provided with Windows 95 OSR2 or Windows 98, reduces the necessity for multiple partitions as cluster size is set at 4 KB by default.

Chapter 3- Working in a GUI Environment
Specialized Solutions, Inc. 91
One new tidbit of information that Windows 9x added is the “last accessed” date value. This is just a small addition to the properties of a file that Windows now maintains. This is in addition to the date created and date modified information.
Important System Files
The difference in the way that Windows 9x starts up compared with earlier versions of Windows is considerable. The startup relies on several files that both complement and work independently of each other. We introduced most of these files in earlier sections of this chapter. Now let’s take a look at what makes them tick.
IO.SYS
This is the real-mode operating system for Windows 9x. Most of the “old” CONFIG.SYS commands have been incorporated into the IO.SYS. If you recall, the IO.SYS does most of the work that was done by the CONFIG.SYS file in DOS. For that reason, we are no longer required to have a CONFIG.SYS with Windows 9x.
The following is a list of files included with IO.SYS:
• COMMAND.COM
• HIMEM.SYS
• IFSHLP.SYS
• SETVER.EXE
The following is a list of commands included with IO.SYS:
• OS=HIGH
• FILES=
• LASTDRIVE=
• BUFFERS=
• STACKS=
• SHELL=
• CBS=
Note: The IO.SYS file cannot be changed or overwritten. The only way to override these commands is by creating a CONFIG.SYS or editing an existing CONFIG.SYS file. Remember that a CONFIG.SYS file is not required with Windows 9x; however, if one exists it will take precedence over any commands or files in the IO.SYS.

A+ Training & Test Preparation Guide
Specialized Solutions, Inc. 92
EMM386.EXE
EMM386.EXE is a memory manager left over from Windows 3.1, and is not loaded by IO.SYS. EMM386.EXE is an MS–DOS driver that uses extended memory to simulate expanded memory. Some older DOS–based programs take advantage of this memory in order to run. If you have an application that needs EMM386.EXE in memory, you must add it to your CONFIG.SYS file.
MSDOS.SYS
As mentioned earlier in the course, in the days before Windows 9x, DOS used two system files to boot—IO.SYS and MSDOS.SYS. The IO.SYS file provided the system initialization code and MSDOS.SYS contains multiboot information and loads basic system drivers. In Windows 9x, MSDOS.SYS functions have been incorporated into the IO.SYS file. Now, MSDOS.SYS is a special information file. It contains two components; paths used to locate other Windows files and options to add information that helps run older DOS programs. MSDOS.SYS is a text file that can be edited with any text editor and should be limited to 1KB. It is hidden and read–only, therefore the attributes must be changed to make the file read/write, non–hidden (the DOS command attrib –r –h filename still works).
To open MSDOS.SYS:
• In Explorer, select Options from the View menu to display the Options dialog box.
• Activate the Show All Files option and click OK (This will make visible all hidden files.)
• In the Folders window, highlight the root folder (C:\).
• Select MSDOS.SYS and right–click it.
• Select Properties.
• Deactivate the Read–only check box and click OK.

Chapter 3- Working in a GUI Environment
Specialized Solutions, Inc. 93
MSDOS.SYS Properties sheet
The following section lists what you’ll find in the [PATH] Group of MSDOS.SYS.
HostWinBootDrv=C The drive letter of the system boot drive.
UninstallDir=C:\ The location of the Windows 9x uninstall file.
WinBootDirC:\WINDOWS The location of the Windows files needed to boot.
WinDir=C:\WINDOWS The location of the GUI files.
The following table lists what you’ll find in the MSDOS.SYS [OPTION] Group. Unless otherwise specified, the values are either 0 or 1.
Default Selections
BootConfig= Enter the number to indicate the configuration to boot. If you have multiple hardware configurations, this allows boot up of a particular hardware configuration.
BootDelay=X X determines the number of seconds that the Starting Windows 9x message appears during startup. Default is 2 seconds.
BootGUI=1 1 – Will boot the Windows 9x GUI. 0 – Boots to the DOS prompt.

A+ Training & Test Preparation Guide
Specialized Solutions, Inc. 94
Bootkeys=1 1 – Allows use of function keys at boot. 0 – Disables the keys.
BootMenu=0 1 – Shows the boot menu. 0 – Does not show the menu.
BootMenuDefault=1 Determines which of the Startup menu options is highlighted automatically when you invoke the menu:
l – Normal 2 – Logged to BOOTLOG.TXT 3 – Safe Mode 4 – Safe Mode with network support (if network installed).
If a network is not installed, this line item will not be available and the following steps will be numbered accordingly.
5 – Step-by-step 6 – Command prompt 7 – Safe Mode command prompt 8 – Previous version of MS-DOS (if BootMulti=l).
BootMulti=0 Determines whether to prompt for previous version of MS-DOS in boot menu—requires BootMenu=1.
Bootsafe=0 1 – Invokes Safe Mode. 0 – Normal boot sequence.
Bootwarn=1 1 – Invokes the “You are in Safe Mode” warning message. 0 – Does not show the message.
BootWin=1 1 – Boots to Win 95. 0 – Boots to the previous version of DOS.
DisableLog=l 1 – Enables the BOOTLOG.TXT file. 0 – Disables the log.
DoubleBuffer=1 1 – Loads VFAT’s double buffer. 0 – Doesn’t load the buffer.
Dblspace=1 1 – Loads Doublespace. 0 – Does not load Doublespace.
Drvspace=1 1 – Loads Drivespace. 0 – Does not load Drivespace.
LoadTop=l 1 – Loads COMMAND.COM at the top of 640 KB. 0 – Loads it normally.
Logo=l 1 – Show the animated Windows logo. 0 – Doesn’t show the logo.
Network=1 1 – Adds the boot in Safe Mode with networking menu to the startup menu.
0 – Doesn’t show it.
SystemReg=1 1 – Load the system Registry. 0 – Prevents the Registry from loading.

Chapter 3- Working in a GUI Environment
Specialized Solutions, Inc. 95
Caution: Older programs, especially virus protection programs, expect the MSDOS.SYS file to be larger than 1024 bytes. To make MSDOS.SYS large enough to prevent these problems, 19 lines of 'x's are included to keep the file size large enough for compatibility.
MSDOS.SYS in Notepad
CONFIG.SYS and AUTOEXEC.BAT
These two familiar files play roles very similar to those in the old DOS world, with one important exception: Windows 9x automatically loads drivers and sets defaults by using the IO.SYS file and the Registry. If you have a software or hardware device that needs a driver not contained in the IO.SYS file or Registry, Windows 9x will use the commands contained within CONFIG.SYS and AUTOEXEC.BAT files.
If you edit AUTOEXEC.BAT and CONFIG.SYS to override some of the information contained in the Registry and IO.SYS file, remember to avoid the following items:
In AUTOEXEC.BAT:
• Don’t include other versions of Windows in the path statements.
• Don’t add SMARTDRV.SYS or other device caches. Windows 9x has built–in disk caching.
• Don’t add any statements for loading mouse drivers. Windows 9x includes mouse support.
• Don’t make your network connections via commands in the AUTOEXEC.BAT file. Do it from inside Windows 9x.

A+ Training & Test Preparation Guide
Specialized Solutions, Inc. 96
In CONFIG.SYS:
• Don’t include the SMARTDRV.SYS command. Windows 9x has built–in disk caching.
• Remove any device=mouse.sys command. Windows 9x includes mouse support.
COMMAND.COM
Windows 9x comes with a few “DOS like” real–mode components. These are necessary to get it going and get into protected mode. COMMAND.COM is one of those components. It provides the DOS prompt (C:\) and a few internal DOS commands. The following table lists the COMMAND.COM internal DOS commands:
BREAK Sets or clears extended Ctrl+C checking.
CD and CHDIR Changes to a different directory or displays the current directory.
CHCP Displays the number of the active character sets.
CLS Clears the screen.
COPY Copies one or more files to the specified location.
CTTY Changes the terminal device used to control the computer.
DATE Displays or sets the current date.
DEL Deletes the specified files.
DIR Displays a list of the files and subfolders that exist in the current folder.
ERASE Deletes the specified files.
EXIT Quits COMMAND.COM and returns to the previous program.
LH and LOADHIGH Loads a program into upper memory.
LOCK Enables direct disk access. (Allows storage and retrieval from disk without involving the CPU.)
MD Creates a folder or subfolder.
MKDIR Same as MD.
PATH Specifies which folders Windows 9x should search for executable files.
PROMPT Changes the appearance of the command prompt.

Chapter 3- Working in a GUI Environment
Specialized Solutions, Inc. 97
RD and RMDIR Deletes a folder.
REN and RENAME Changes the name of a file or files.
SET Displays, sets, or removes environment variables.
TIME Displays or sets the current time.
TYPE Displays the contents of a text file.
UNLOCK Disables direct disk access.
VER Displays the operating system version number.
VERIFY Directs the operating system to verify that files are written correctly to a disk, and displays the status of verifications.
VOL Displays the volume label and serial number for a disk.
Note: a copy of this command is located in the system folder under C:\windows and could prove to be very useful if your COMMAND.COM is missing, corrupted, or if it is a different version than what is needed.
System Commands
Many of the familiar DOS prompt commands or drivers are included in Windows 9x. They are found in the Windows\Command directory. The following is a list of commands not included in the basic Windows 9x command set. Some of these commands can be loaded from the Windows 9x CD and are found in the directory Other\Olddos:
ASSIGN INTERLNK QBASIC
BACKUP INTERSVR RAMDRIVE.SYS
CHKSTATE.SYS JOIN RECOVER
COMP LOADFIX REPLACE
DOSSHELL MEMCARD RESTORE
EDLIN MEMMAKER ROMDRIVE.SYS
EGA.SYS MIRROR SHARE
EXPAND MONOUMB.386 SIZER
FASTHELP MSAV SMARTMON

A+ Training & Test Preparation Guide
Specialized Solutions, Inc. 98
FASTOPEN MSBACKUP TREE
GRAFTABL POWER UNDELETE
GRAPHICS PRINT UNFORMAT
HELP PRINTER.SYS VSAFE
INSTUPP.BAT
BOOTLOG.TXT
As mentioned earlier, this log contains information about the Windows 9x startup process. It is a good troubleshooting tool. The BOOTLOG.TXT file contains the following sections:
• Loading real–mode drivers.
• Loading VxDs system–critical initialization of VxDs. A VxD is a Windows virtual device driver – they replace the real mode drivers from DOS.
• Device initialization of VxDs.
• Successful VxD initialization.
The following is an example of the first 10 lines in a BOOTLOG.TXT file:
[000B346F] Loading Device = ATAPICD.SYS
[000B3482] LoadSuccess = ATAPICD.SYS
[000B3482] Loading Device = C:\WINDOWS\HIMEM.SYS
[000B3484] LoadSuccess = C:\WINDOWS\HIMEM.SYS
[000B3484] Loading Device = C:\WINDOWS\IFSHLP.SYS
[000B3485] LoadSuccess = C:\WINDOWS\IFSHLP.SYS
[000B3485] Loading Device = C:\WINDOWS\SETVER.EXE
[000B3486] LoadSuccess = C:\WINDOWS\SETVER.EXE
[000B348D] C:\PROGRA~1\MCAFEE\VIRUSS~1\SCANPM.EXE[000B348D] starting
[000B34D2] Loading VXD = VMM

Chapter 3- Working in a GUI Environment
Specialized Solutions, Inc. 99
Initialization Files
The INI files were some of the most important files a user had in earlier versions of Windows. In Windows 9x, .INI files are not nearly as important as the Registry. The Registry is a hierarchical database that contains all the information about the computer’s configuration, including hardware, software, and desktop settings.
The Windows 3.1 .INI system included WIN.INI, which contained information about the appearance of the Windows environment including keyboard, mouse, and display options. The SYSTEM.INI file contained information related to hardware and device options including memory options, device drivers, and networking and resource sharing parameters.
WIN.INI and SYSTEM.INI are still used by Windows 9x to run older Windows 3.x programs that are not supported by VxD files. With time, the use of these files will diminish. They are not required by Windows 9x, they simply provide backwards compatibility.
Tip: If Windows 9x is installed in its own directory and not in the root directory of the hard disk, older versions of MS–DOS can still be run by setting the BootMulti= statement in the [Options] section of Windows 9x version of MSDOS.SYS. Load the earlier version of MS-DOS by pressing F4 at the “Starting Windows” screen during system startup.
Windows 9x Registry
So far, we have been making inferences to the Windows Registry. Now it is time to take a good hard look at it. The registry, a hierarchical database, is no place for amateurs. As stated earlier, the registry is composed of two binary files: SYSTEM.DAT and USER.DAT. These files are hidden and read–only files located in the Windows directory. Let’s now look at these files and how they work.
Why the Change in Windows 9x?
Windows 3.1x supported two different kinds of INI files: system initialization files and private initialization files. System initialization files controlled the Windows environment and included SYSTEM.INI and WIN.INI. Private initialization files included CONTROL.INI, PROGMAN.INI, WINFILE.INI, and PROTOCOL.INI, as well as any application INI files. Initialization files created a bridge between the application and the Windows operating environment.
In addition to INI files, Windows 3.1 used a host of other text files to manage operations. The files included AUTOEXEC.BAT and CONFIG.SYS. It was conceivable for a user to have more than 150 files responsible for the operation of the computer and the Windows environment.
During the development of Windows 3.11, it became apparent that a move away from the INI files was needed. A new file type was introduced into the programming
A+ Training & Test Preparation Guide
Specialized Solutions, Inc. 100
environment. The file was called REG.DAT and was the precursor to the Windows 9x’s Registry. REG.DAT included information used for drag–and–drop operations, Object Linking and Embedding (OLE), and establishing associations between data files and their programs.
The binary file REG.DAT was bundled with its editor, REGEDIT.EXE. While this began the process of centralizing computer operations, REG.DAT came with some serious size limits. It could not exceed 64 KB, which is the same limit established for the INI files in Windows 3.11.
Accessing the Registry
Accessing and changing the registry should not be taken lightly. If you make the wrong change, Windows 9x will not work when you reboot. As far as Microsoft is concerned, any changes made directly to the registry are at the owner’s risk. In spite of that, there are several ways to make changes. The recommended way to access the Registry is through the Control Panel. In fact, the only function of the Control Panel is to update the registry.
Tip: Everything necessary to configure the system so that it will work, can be handled from the Windows 9x Control Panel. The three areas where Windows 9x preferences/settings can be viewed and configured are the Control Panel, the System Monitor, and the Registry.
Microsoft tried to make the Registry as inaccessible as possible. The fact that the Registry is the central repository creates its principal weakness—once it’s corrupted it’s hard to recover settings if they haven’t been backed up. The Registry is a binary file and cannot be edited with a text editor as we did with the INI files. To edit the Registry, you must use the REGEDIT command. From the Start menu, select RUN and enter “regedit.” This will start the program.
WARNING: Editing the Registry can be dangerous. Be sure to backup before attempting any changes!
The Registry is stored in three locations:
• SYSTEM.DAT: Stores the majority of data, including most of the hardware and software configurations.
• USER.DAT: Stores data about a particular user.
• The Virtual Registry: – Composed of a host of files that are created by Windows 9x when the system is started up. They are stored in RAM.
The Windows 9x Registry consists of six root keys, each of which reflects a different aspect of the configuration. Each key or branch of the Registry contains information that logically belongs together. All top-level keys are defined and named by Windows 9x. These are called root keys and cannot be changed. Root keys are named HKEY_XXX and can be followed by several subkeys. All other keys in the Registry are subkeys of these six primary keys. Subkeys can be added, deleted, or renamed.

Chapter 3- Working in a GUI Environment
Specialized Solutions, Inc. 101
Registry Root Keys
HKEY_CLASSES_ROOT
The first section of the Registry is very important to the operation of Windows 9x and should never be manually changed. Always let Windows take care of these. This is where all the standard class objects used by Windows 9x are stored. This is a link to the KEY_LOCAL_MACHINE\SOFTWARE\Classes, which simply provides compatibility with Windows 3.1’s registration database. This compatibility is important if you want to run Windows 3.1 16–bit applications in Windows 9x.
HKEY_CURRENT_USER
This key holds the information about the current user. Remember, several users can have their own custom set–up and configuration. Any information for the user that has properly logged on will be located here by linking to the HKEY_USERS key. This key provides Windows 9x compatibility to applications using the Windows NT Registry structure.
HKEY_LOCAL_MACHINE
This Registry key is the big one. It retains all the information about the hardware and software configurations. It is the largest key in the Registry. Most, if any, editing to the registry will take place in this key. Information stored here includes hardware configuration, peripheral devices, installed software, OLE compatibility, software configuration, and Windows 9x configuration. The data stored in HKEY_LOCAL_MACHINE is stored in the SYSTEM.DAT file.
HKEY_USERS
Since many users can define their own individual profiles, there must be a place to store the information. If there is only one user listed, there will be only one subkey named: DEFAULT. If your computer has been configured for multiple users, two profiles are created when you log on: HKEY_USERS\DEFAULT and HKEY_USERS\user name\USER.DAT. If it’s a two–user system, the other user’s settings are held in memory. This makes it impossible to alter users settings without logging on under their name and password.

A+ Training & Test Preparation Guide
Specialized Solutions, Inc. 102
HKEY_CURRENT_CONFIG
This key handles Plug and Play and contains information about the current configuration of a multiple hardware configured computer. This key works in conjunction with HKEY_LOCAL_MACHINE\Config\xxxx where xxxx is the subkey that represents the numeric value of the current hardware configuration.
HKEY_DYN_DATA
This portion of the Registry is dynamic. It’s where virtual device drivers (VDDs) are installed, where Plug and Play hardware information is maintained, and where performance statistics are calculated. Because this information is accessed and changed constantly, this portion of the Registry is never written to the hard disk. It resides in your computer’s RAM.
Editing the Registry
Caution: Editing the Registry directly can cause serious problems if not done correctly. Windows 9x provides the Control Panel and properties sheets for editing the Registry. Microsoft recommends these methods. Microsoft does not support direct editing of the Registry.
If you feel you must edit the Registry, BACK UP FIRST (see the end of this section for details on backing up the Registry). The tool used to edit the Registry is Regedit. This program is not included in any of the menus and will not be found on the desktop. You have to either activate the REGEDIT.EXE via Explorer or start the program from the command line.
Note: If you perform regular daily backups of your registry in Windows 98, and the registry becomes corrupted somehow, the Windows Registry Checker can restore the registry from the most recent backup.

Chapter 3- Working in a GUI Environment
Specialized Solutions, Inc. 103
Editing the Registry
The following table provides an overview of the commands in Regedit:
File Import Registry File: Allows you take a Registry file that you’ve created or modified and import it into the current Registry. Importing a Registry file is often one of the best ways to rescue a corrupted Registry or to replace the current mangled Registry with a known good backup. Export Registry File: Allows you to export the Registry file to a diskette or network location. Exporting a Registry is one of the best ways to back up your Windows 9x system. Connect Network Registry: Allows you to connect to a user on your network, and if you have the proper authority, you can modify that user’s Registry. Because is a very powerful feature, the majority of users should not have access to it.
Disconnect Network Registry: Releases the connection to a network user’s Registry. Print: Allows you to print either the entire Registry or just one of the keys or branches in the Registry.
Edit New: Allows you to create keys and assign values. Delete: This command allows you to delete a key, key value, or value name.

A+ Training & Test Preparation Guide
Specialized Solutions, Inc. 104
Rename: This command lets you rename either a key or value name. Find: Allows you to find a particular string or key value name. Find Next: Finds the next value that was defined in the Find command.
View Status Bar: Either hides or shows the status bar at the bottom of the screen. Split: This command lets you move the split bar (vertical separation) between the Key window (on the left) and the Value window (on the right). Refresh: This command refreshes the Regedit screen.
Note: The Edit command doesn’t include the typical Copy, Cut, and Paste options. If you need to copy and paste in RegEdit, you will need to use the Windows keyboard commands. Press Ctrl+C for Copy and Ctrl+V for Paste. These two commands are required if you do a lot of searching and replacing in the Registry.
Regedit’s Dual Purpose
Regedit is more than a Windows utility program. It can be used from inside real-mode MS-DOS. This is particularly important if you have a seriously corrupted Registry file and Windows won’t start. During installation, Windows 9x puts a copy of Regedit on the startup disk. When running Regedit in real mode, it doesn’t have an interface—it uses a command line format to carry out instructions. The following table lists the most common Regedit switches:
/? Displays the Regedit command-line syntax.
/L:system Provides the location and filename of SYSTEM.DAT.
/R:user Provides the location and filename of USER.DAT.
/E filename <regpath> Creates a Registry (.REG) file.
/C filename Replaces the entire Registry with the contents of your .REG file.
Note: To use Regedit in real mode, you’ll need to tell it where your SYSTEM.DAT and USER.DAT files are located, if they are in a directory other than Windows. It should also be noted that REGEDIT can be found in the Windows directory.
Here is the syntax needed to replace an existing corrupt Registry with the contents of the .REG file you created. Remember, this command is typed in full at the MS-DOS prompt:
REGEDIT [/L:SYSTEM] [/R:USER] /C FILENAME

Chapter 3- Working in a GUI Environment
Specialized Solutions, Inc. 105
Using Regedit to Modify the Registry
Before modifying the Registry, make sure it is backed up sufficiently. When you edit the Registry, consider using the Control Panel and the applications contained inside of it to make Registry edits. The Control Panel is the Wizard for updating the Registry. A corrupted Registry is not something from which you can easily recover.
Edits made to the Registry can be done using either the menu or the right mouse button. Adding keys can be accomplished by simply right clicking the key you want to add to and entering your information. Windows 9x has two restrictions of which you need to be aware when adding keys:
• You cannot add a top-level key. Windows 9x creates those.
• Within a parent key, each subkey name must be unique. You may use the same subkey name in different parent keys.
Modifying the value section of the Value entry can be accomplished with a double-click on the value in the Value window. Once you double-click the value, you will see one of three different dialog boxes. These dialog boxes will vary depending on the type of data to be input (binary, text, etc.).
Windows 9x uses multiple registers for multi-user operations and it can be difficult to know exactly where pieces of information are stored. The System Policy Editor allows administrators to locate where information is stored.
Backing Up the Registry
Backing up the Windows 9x Registry is one of the most important parts of maintaining a personal computer. Because the Registry is mostly undocumented, the only way to recover from Registry errors is by restoring the Registry data. A corrupt Registry can disable a few components of a particular piece of software or it can prevent Windows from booting. Microsoft has provided you with a number of different tools to backup the Registry. None of them alone offers the total solution, but if used in combination they can provide a very effective backup strategy.
Every time you add a piece of software, adjust a system component, or make a new connection, the Registry is changed. The Registry is extremely dynamic and needs to be backed up any time it is changed.
There are three primary Registry backup tools available in Windows 9x:
• Microsoft Configuration Backup (CFGBACK.EXE)
• Emergency Recovery Utility (ERU.EXE)
• .REG files

A+ Training & Test Preparation Guide
Specialized Solutions, Inc. 106
Microsoft Configuration Backup (CFGBACK.EXE)
CFGBACK.EXE (Microsoft Configuration Backup) is a proprietary program that creates backups that can only be restored from inside this program. CFGBACK will allow you to create up to nine iterations, or different backup files, of a Registry. Once the program is installed, start it and choose the option you want to execute: Backup or Restore. One nice feature of CFGBACK is that it allows you to write a description of why the backup was run (for instance: “Before MSOffice installation,” “After MSOffice installation,” and so on).
CFGBACK.EXE
Configuration Backup is available in two places: on the Windows 9x CD in the folder \Other\Misc\Cfgback or on the CD included with the Windows 9x Resource Kit. Either way, you need to load the file from the CD to your Windows 9x system before you can use it.
CFGBACK.EXE Limitations:
• If a Windows 9x system includes multiple user settings, CFGBACK.EXE will not back up the separate user settings.
• CFGBACK.EXE will not help if Windows itself cannot start.
• CFGBACK.EXE runs inside Windows, not in MS–DOS real mode. One of the best ways to bring your system back from a Windows boot failure is to use the .REG files created using REGEDIT.

Chapter 3- Working in a GUI Environment
Specialized Solutions, Inc. 107
Emergency Recovery Utility
The Emergency Recovery Utility (ERU.EXE) is available on the Windows 9x CD in the folder \Other\Misc\Eru. The ERU.EXE program backs up all critical system files, including AUTOEXEC.BAT, COMMAND.COM, CONFIG.SYS, IO.SYS, MSDOS.SYS, PROTOCOL.INI, SYSTEM.DAT, SYSTEM.INI, USER.DAT, and WIN.INI.
ERU.EXE also creates a MS–DOS real mode file called ERD.EXE that you can use to restore from MS-DOS if the Windows system fails to start up.
ERU.EXE Limitations:
• When backing up to a floppy diskette, ERU.EXE will determine the amount of space available to perform the backup. If the diskette doesn’t contain enough space, it will simply not back up one of the components. Unlike the old DOS BACKUP command, which could back up over multiple diskettes, ERU.EXE can only back up to a single floppy diskette.
• On a multi–user system, ERU.EXE fails to create a backup of Registry settings related to the current user.
• If ERU.EXE can’t find a file it’s trying to back up, it will hang without giving you an error message. You are left on your own to try to figure out the problem. If it hangs, however, you can usually assume that you’re missing one of the files that it’s trying to back up.
Using .REG Files
One of the features of Regedit is its ability to export Registry information. By creating a .REG file that backs up your entire system, you can easily restore a Registry. To rescue a Registry, you would simply use either Regedit in Windows or the real-mode Regedit found on your Rescue diskette. You can also double-click a .REG file to merge it into the registry.
Tip: If you don’t know where your Windows 9x Rescue diskette is, you can re-create it by doing the following: Go to the Control Panel and click the Add/Remove programs applet. Inside the applet, click the Startup Disk tab and follow the instructions.
Additional Restore Techniques
Windows 9x comes with at least two other techniques you can use to restore your system. Often these techniques are the quickest ones available and offer the easiest solution.
The first technique is to let Windows try to restore your Registry. Occasionally, Windows will display a dialog box telling you that it could not load the Registry and to let it try to restore it. If you see the message, try it. Windows will use the “last known good” Registry.

A+ Training & Test Preparation Guide
Specialized Solutions, Inc. 108
Note: Remember what the message says, “Restoring the Registry will replace the faulty Registry with a known good backup copy. However, this backup copy may not contain all of the information recently added to your system.”
The second technique is to restore the Registry in DOS mode by replacing the SYSTEM.DAT and USER.DAT files. Follow these steps:
1. Click the Start Button and select Shut Down.
2. In the Shut Down dialog box, select “Restart in MS-DOS Mode.”
3. Once you’re in DOS mode, make sure you’re in the Windows directory. You can change directories (folders) by typing: cd\windows
4. Next, type each of these commands as they appear in this order:
attrib –h –r –s system.dat
attrib –h –r –s system.da0
copy system.da0 system.dat
attrib –h –r –s user.dat
attrib –h –r –s user.da0
copy user.da0 user.dat
Note: This will change the Registry files from hidden read–only to non–hidden read/write and then replace the original Registry files with the backup files.
5. Restart your computer.
It is also possible to use the SCANREG command to fix or restore the registry. This is a registry checker used in the 9x environment. Here are the switches used with the SCANREG command.
SCANREG Switch What It Does
/FIX Used to check and fix errors.
/RESTORE Used to restore the registry.
/COMMENT=”<comment>” Adds a comment to the CAB file during the backup process
Registry Restored—Still Having Windows Problems
Not all Windows problems are attributable to a corrupt or bad Registry. Some problems relate to erroneous entries in either the SYSTEM.INI or WIN.INI files. Not everything critical to your system is stored in the Registry.

Chapter 3- Working in a GUI Environment
Specialized Solutions, Inc. 109
When backing up a Registry, you should also back up SYSTEM.INI and WIN.INI. If you get one of the following two error messages, it’s possible that the problem lies elsewhere besides the Registry and the .INI files:
• Registry File Was Not Found
• Invalid VxD dynamic link call from IFSMGR (03)
It could be that you have a missing or bad MSDOS.SYS file. If you receive one of these error messages, find your Startup diskette and copy the MSDOS.SYS file from the diskette to your Windows directory.
Last Resort before Reloading Windows
When Windows was originally set up on your computer, it created another SYSTEM.DAT file called SYSTEM.1ST during installation. If you want, you can reload SYSTEM.1ST using the following real mode commands:
attrib –r –h –s system.dat
attrib –r –h –s system.1st
copy system.1st system.dat
If none of these solutions work, you will need to reload Windows.
Note: The Windows Registry is very complex and we have only touched on some of the more important aspects of it. If you really want to know more about the Registry and how to edit it, the following text is recommended for your technical library. “Inside the Registry for Microsoft Windows 95” – Gunter Born – Microsoft Press, or other appropriate references.
Drivers and Windows 9x
Although Windows 9x has made many changes, it could not get away with not using drivers. The preferred method (from Microsoft’s perspective) is to use their protected mode *.VxD drivers. These are 32-bit drivers written to take full advantage of the Windows environment. To provide a driver for every possible device would be an impossible task (there are hundreds of thousands of them) so not all devices will install automatically. You will still have to install the manufacturers driver just as before. The only difference is that the installation wizard for hardware will make it easier.
Another problem with drivers is that many devices are still using real-mode drivers. In these cases, you will have to install them and configure them using CONFIG.SYS and AUTOEXEC.BAT as with DOS. Windows 9x will always look for these files and run whatever is in them. Remember, drivers allow a device to have communication with the OS and they may need to be updated if you upgrade your OS.
A+ Training & Test Preparation Guide
Specialized Solutions, Inc. 110
Virtual Device Drivers (VxD) vs. Real–Mode Drivers
When Microsoft developed Windows 9x, one of its main goals was to eliminate the use of real–mode device drivers. There are several reasons for eliminating these drivers:
• Real–mode drivers are 16-bit. For the most part, they are slower than 32-bit drivers (although a well-written 16-bit driver can outperform a poorly written 32-bit driver).
• Windows 9x runs in protected mode. To use a real-mode driver, Windows must switch between real mode and protected mode (this takes time).
• Real-mode drivers must reside in conventional or upper memory, thus using valuable resources (virtual drivers don’t).
• The processor has no built-in protection for real-mode drivers.
Windows 9x includes VxDs (virtual device drivers) to replace the following Windows 3.x real-mode components:
• FAT File System (VFAT.VXD)
• CD-ROM File System (CDFS.VSD)
• SMARTDrive Disk Cache (VCACHE.VXD)
• Mouse Driver (VMOUSE.VXD)
• Network Protocols
• SHARE.EXE DOS File Sharing and Locking Support (VSHARE.VXD)
• Disk Device Drivers Including SCSI Devices
Plug and Play
The ultimate goal of any computer user is to be able to simply plug any device into a computer, turn it on, and it will work. This is how Plug and Play (PNP) devices are suppose to work. A well–designed PNP system would eliminate the need for jumpers, switches, and installation software. Does PNP work? The answer is a resounding yes and no. In order for PNP to work, the system must have three things:
• A Plug and Play BIOS
• A Plug and Play Device (and appropriate drivers)
• A Plug and Play Operating System

Chapter 3- Working in a GUI Environment
Specialized Solutions, Inc. 111
Windows 9x uses the Configuration Manager (CONFIGMG.VXD) to collect BIOS information and manage the assignment of IRQ, DMA, and so forth. During each startup, the Configuration Manager searches the system for all information, checks for conflicts, and reconfigures as necessary to resolve conflicts. Any time a new device (without a driver) is detected; the Configuration Manager will launch the necessary Wizard Dialog box to configure the device. When all is well, it will simply ask for confirmation of the device and how it is to be configured. When PNP doesn’t work or there is a problem, the answer is usually in the Device Manager.
Device Manager
As you know, all Windows 9x information is stored in the Registry. The Device Manager is a graphical view of all the devices on a computer. This is the place to find and resolve hardware problems. Device Manager allows you to make many changes to the hardware configuration of a computer, such as:
• Add/remove/disable/enable a device
• View devices by IRQ, I/O port, and DMA channel
• Print system reports
• View individual device properties
• Adjust a device’s resources
• Change drivers
• Adjust device settings
To display the Device Manager, select Start, Settings, Control Panel, and then open the System icon. You can also right-click My Computer and select Properties from the context menu.

A+ Training & Test Preparation Guide
Specialized Solutions, Inc. 112
Device Manager
To see a specific device, click on the plus sign (+) to the left of the device class. Any time Windows 9x sees a conflict it will denote the device with a red X or a yellow exclamation point. The hardware conflict troubleshooter can help with this as well as checking the properties of the device that isn’t functioning.
Device Manager Expanded
To see a list of all IRQ and DMA channels, right–click My Computer to get properties, click on the panel marked System Manager, and then click on the properties below that to get the IRQ.

Chapter 3- Working in a GUI Environment
Specialized Solutions, Inc. 113
Computer Properties
To document a system, select the Print command button from the Device Manager window, and then select the type of printout you want (system summary, selected class or device, all devices, and system summary).
Print System Summary
To view the details of an individual device, select the device and select the Properties button at the bottom of the window. Many setup options can be changed from this screen.
Note: If the device is not PNP compliant, the changes will also have to be made on the device itself.

A+ Training & Test Preparation Guide
Specialized Solutions, Inc. 114
Device Properties
To remove a device, simply select it from the Device Manager and click the Remove button at the bottom of the Device Manager screen. Don’t forget to turn off your computer and physically remove the device from the system.
Adding New Hardware
Adding new hardware is simple. You will follow one of two processes, depending on whether or not the device is PNP. Both processes use the Hardware Wizard. With PNP, this wizard will be launched automatically when Windows detects the new device during startup. With a non–PNP device, you will have to start the wizard manually by using the Add New Hardware icon in the Control Panel. When installing manually, Windows will ask if you want to specify the device or let Windows find it. In most cases, Windows does a good job of finding it, however, if you know the device and have the manufacturer’s software for installation, it is often better to tell Windows what to do.
Installing printers is similar to installing any other device. However, since several printer drivers can be installed and chosen at will from inside an application, Windows 9x uses a special wizard for printers. Printers also use standard ports (LPT1 or LPT2) therefore setting the IRQ and I/O address is not an issue. A new PNP printer is perhaps as close to true PNP as possible. Simply plug the printer into a parallel port, turn on the printer, and boot the computer. Windows 9x will recognize the printer (by polling the ports during startup) and launch the Install Wizard. In many cases, you merely confirm that Windows has recognized the correct printer and it will do the rest.
For a non-PNP printer, simply select the Add Printer icon from the Printers folder in the Control Panel. You will be asked to select the printer from a list. If the printer is not on the list, you will have to use the Have Disk option and supply the software. Options may vary depending on whether you are connecting to a network or to a local printer.

Chapter 3- Working in a GUI Environment
Specialized Solutions, Inc. 115
Windows 9x Configuration
Windows 9x is less difficult to configure than Window 3.x. The Windows 9x operating system automatically handles disk caching as well as many other configuration settings. Here are a few things to watch for when configuring Windows 9x.
Bootable Disk
It is important to have a bootable floppy disk for every operating system that you intend to work on. This includes DOS, Windows 95, Windows 98, Windows NT, and Windows 2000. The big difference is that a boot disk (also called a startup disk) is easy to make from Windows 9x. All you need to do is open the Add/Remove Programs window in the Control Panel. You will find a tab named “Startup Disk”. Select the tab and follow the instructions. You can also make a bootable disk the old fashioned way. Use the DOS prompt (format a: /s). A third method would be to format from the Explorer program just like in DOS and Windows 3.x.
Tip: if you don’t format the floppy with /s switch, you won’t be able to boot with it and it will tell you that there isn’t an operating system available.
Making a startup disk is a good idea, as the process will also copy many of the utility files used by a computer professional. Remember, if you use one of the old fashioned ways, you may still have to copy some files to the boot disk.
Supporting DOS Applications in the Windows 9x Environment
Microsoft has put a lot of work into getting everything to operate in protected mode. This way, Windows can manage all the resources and especially memory. Until the transition from DOS/Windows 3.x to Windows 9xis complete and DOS, as we used to know it, is truly obsolete, you will still find some occasions that require supporting DOS applications in a Windows 9xenvironment. For example, you may encounter an office or small business that is still using a DOS–based accounting system. To run this on their new Windows 9x computers will require extra effort put into memory management to insure that sufficient RAM is configured and available for this software. This means that you will have to create a PIF file.
The problem is that Windows 9x no longer creates .PIF files by using the PIF editor as in Windows 3.1. The good news is that it is actually easier. All you need to do is open Explorer and find the icon for the DOS program. Then by right clicking on the icon and selecting Properties, you can define the settings.
Keep in mind that you can also run in MS–DOS mode in Windows 95. This is possible via a batch file called DOSSTART.BAT. It is executed whenever you run a program in "MSDOS Mode" or "Shutdown/Restart in MSDOS Mode."

A+ Training & Test Preparation Guide
Specialized Solutions, Inc. 116
Tuning Hard Drive Cache
Tuning the hard drive cache is a simple process. Access the System properties (the same as done for the Device Manager) and select the Performance tab. From this window, select the File Systems button at the bottom.
There are now three choices for File System Performance: Hard Disk, CD–ROM, and Troubleshooting.
Hard Disk tab
This tab selects the role of the machine. Choose the most common role for the computer and select OK.
The Hard Disk Tab
The following choices are available on the Hard Disk tab:
Desktop Computer – Typical for a desktop computer and assumes there is more than the minimum required RAM. Don’t select this if you want improved system performance.
Mobile or Docking System – This configuration assumes a minimum amount of RAM and that the computer is running on batteries.
Network Server – This configuration assumes that there is more than 16 MB RAM and frequent hard disk access. This system is optimized for increased hard disk activities. Select this to improve system performance.

Chapter 3- Working in a GUI Environment
Specialized Solutions, Inc. 117
CD–ROM tab
Use this tab for configuring the operation of the CD–ROM. You can increase performance by setting the drives to a lower speed. This will work unless you need the speed for video and other operations that require these speeds. For most systems, Windows will handle CD–ROM configuration quite well.
CD–ROM tab
Troubleshooting tab
This tab is for advanced users only. It will allow you to disable several functions, therefore helping the troubleshooter to isolate problems.
Troubleshooting tab

A+ Training & Test Preparation Guide
Specialized Solutions, Inc. 118
Configuring a Swap File
You can adjust the size of the swap file although Windows would prefer to manage this itself. The swap file can be set from the Virtual Memory Option of the System Properties window. Set the swap file manually to get better performance.
Using a cache is a typical method of increasing performance. We saw earlier how cache improves the performance of memory and our CPU processing. You can increase the performance of your drives through cache in two ways. The first is to properly setup your Vcache and the second is to tune your drive cache. You can also increase performance by properly setting your swap file size.
The Vcache that comes with Windows 9x is dynamically configured. That means that as Windows needs more cache, it will take it. For most operations, this is not a problem, but if resources are limited this could be a problem. You can set a limit to Vcache, but you will have to resort to the old way of editing the SYSTEM.INI file. Include MaxCacheSize=(X) in the [386] group. The recommended size is 25 percent of the amount of the RAM in the machine.
Windows 9x Shortcuts
When working in the Windows 9x environment you will find many tricks and shortcut keys that apply to the desktop as well as many applications. In this section, we will review some of the more common ones.
Keystroke Commands
Using a combination of keystroke commands and the mouse, users can increase their speed of navigating and using Windows 9x applications. The following table shows a list of keystroke commands that are from Word 97. The beauty of these commands is that they are pretty much universal to any application that is Windows 9x compliant. Not all of them will work in other applications, but most will.
Shortcut Keystrokes:
BOLD CTRL B
CLOSE APPLICATION ALT F4
CLOSE OPEN DOCUMENT CTRL F4
COPY CTRL C
FIND CTRL F
GO TO CTRL G

Chapter 3- Working in a GUI Environment
Specialized Solutions, Inc. 119
ITALIC CTRL I
MOVE (CUT) CTRL X
NEW DOCUMENT CTRL N
OPEN EXISTING DOCUMENT CTRL O
PASTE CTRL V
PRINT CTRL P
REPEAT TYPING CTRL Y
REPLACE CTRL H
SAVE CTRL S
SELECT ALL CTRL A
SPELL CHECK F7
THESAURUS SHIFT F7
UNDERLINE CTRL U
UNDO TYPING CTRL Z
As you can see, most of the commands are logical, such as CTRL B will turn Bold on, CTRL P will bring up the Print screen, CTRL S saves a document, etc. Not all of them are logical however, and thus will require some memorization. They can be useful in speeding up your navigation in most applications. For example, hitting the “ALT” and “F4” keys is much faster than clicking “File” “Close” or even the “X” in the upper right hand corner to close an application.
You can usually use your keyboard instead of a mouse in Windows applications. Using the “ALT” key and the letter that is underlined on the menu item will open that menu item. For example, “ALT” “F” will open the File menu. Once you open the menu, all you need do is type the underlined letter of the menu selection that you want to open. This can be useful if your mouse suddenly fails to work. In addition, when you open a menu, if there is a keystroke command (CTRL+?) for the menu item, it is listed to the right of the item. Underlining the first letter of the command can denote these commands.
Again, remember these are tips that can be used with most Windows 9x compliant applications.

A+ Training & Test Preparation Guide
Specialized Solutions, Inc. 120
Navigating Text
The following tips are helpful for navigating through text as well as for file management tasks:
SHIFT + ARROW KEYS – Will highlight (select) text, you can use the up or down arrows to highlight one row at a time.
SHIFT + PAGE UP or PAGE DOWN – Will highlight (select) one page at a time.
Use HOME to go to the beginning of a line.
Use END to go to the end of a line.
Use CTRL HOME to go to the beginning of a document.
Use CTRL END to go to the end of a document.
Use CTRL + ARROW KEYS (right and left) to move one word at a time.
Use CTRL + ARROW KEYS (up and down) to move one paragraph at a time.
The following can be a real time saver when sorting and deleting files (especially email files):
You can use the mouse and the CTRL key together to select more than one file to open or delete. You can also select all files and then click (while holding down the CTRL key) on the ones you want to de–select. This is great when you are sorting hundreds of emails or dumping your temp files in Windows 9x!
Another source of tips and tricks are the help files of Windows 9x and applications themselves. Don’t forget this extremely useful source of information when a problem has you stumped. Windows 9x even has help files on updating flash ROM. Check them out.
Control Panel
The Windows Control Panel first made its appearance in Windows 1.0. With the development of the graphics interface, we needed a tool (graphical) that allowed us to change the configuration of our computers. Yes, we could still use the DOS editing tools to accomplish the same task, but this new interface made it user–friendlier. The primary function of the Control Panel was to provide a user–friendly method for editing and updating the various system files in DOS.
With the introduction of Windows 9x and the system registry, the Control Panel took on a new role. It was still used to change the configuration and setup of a computer, but it not only changed the system files as it did before, it edited the system registry. In fact, its

Chapter 3- Working in a GUI Environment
Specialized Solutions, Inc. 121
role in editing the registry files was so important that Microsoft recommended (and still does) that it is the only way to edit the registry. They did not want users to access the registry in any other manner. This left editing of registry files to the professionals and the hackers.
Today, the Control Panel is only one of the many tools that we can use to make changes to the configuration of a computer. In fact, there are so many other tools and utilities available that the Control Panel has lost some of its prominence as a standard.
To access the Control Panel, click on Start, Settings, and Control Panel. The control panel window will open. The most common view is the icon view as shown below.
Tip: if you receive an invalid page fault error when opening Control Panel, a .CPL file is damaged. You will need to find and replace the specific file to resolve the problem.
Control Panel
The following is a summary of some of the most popular icons found in the Control Panel. Note that many computers such as portables will have proprietary icons that relate to specific functions of that computer.

A+ Training & Test Preparation Guide
Specialized Solutions, Inc. 122
Accessibility Options
When you open this icon, you will find a dialog box that has five tabs. Each of these tabs provides a dialog box that will enable you to configure several parameters that will aid those who have difficulties using a computer. The tabs are:
Keyboard

Chapter 3- Working in a GUI Environment
Specialized Solutions, Inc. 123
Sound
Display

A+ Training & Test Preparation Guide
Specialized Solutions, Inc. 124
Mouse
General

Chapter 3- Working in a GUI Environment
Specialized Solutions, Inc. 125
Add New Hardware
The Add New Hardware icon activates the hardware installation wizard. This same one is used when Windows detects a new plug-n-play device. When installing a device that does not have plug-n-play you need to run this wizard. This wizard will walk you through the process of identifying and installing the appropriate driver for the new device. In most cases, Windows 9x will have the appropriate driver to do the job. If not, you will have to supply the manufacturers driver files (indicate where they are located) so the installer can properly configure them.
Note: Even if Windows says that it has the latest driver, you will have to have the original Windows Operating System CD (or have the cab files installed on the hard drive) to install the files. The best practice to follow is to always go to the manufacturers Internet site and download the latest driver.
Add/Remove Programs
When you open the Add/Remove Programs icon, you will see a dialog box with three tabs. The first one is the Install/Uninstall tab. It provides a list of software that can be automatically removed by Windows.
The Windows Setup tab will display a list of all the Windows components. Beside each name is a check box. If it is checked, the component will be installed. If the box is checked, but gray, it means that some of the components are installed. By selecting the component and the Details button, you will see a list of all the sub components available. All you have to do is add or remove check marks for the boxes and Windows will install or remove those items. You will need to have the original disk or have the installation files installed on the hard drive to complete any changes.
The Startup Disk tab will allow you to create a startup disk if you did not do so during installation of Windows.
Date/Time
The Date/Time icon provides a dialog box for resetting the computer’s internal calendar and clock.
Display
The Display icon provides a dialog box for changing the settings for your monitor. You can change the background, the screen saver, the appearance, the effects (size, shape and look of the icons), Web (setup for the active desktop – Windows 98/2000only), and settings (resolution, number of colors, and video driver). You can also access this dialog box by right clicking on the desktop and selecting properties from the menu. Use this option if you need to set up multiple monitors.

A+ Training & Test Preparation Guide
Specialized Solutions, Inc. 126
Internet Options
This icon opens the dialog box for configuring your Internet connection, the properties dialog box for Internet Explorer.. It has six tabs (General, Security, Content, Connections, Programs, and Advanced).
Keyboard
This icon opens the dialog box for setting the speed and language for the keyboard.
The Mail icon provides access to a dialog box that lets you configure e–mail accounts for Internet Explorer and Outlook.
Modems
The Modems icon opens a dialog box that allows you to configure the modem(s) in the computer. You can also access a diagnostics wizard to help find problems with the modem.
Mouse
This icon opens a dialog box for configuring the mouse. Its contents and the look of the icons will vary depending on the type and manufacturer of your mouse.
Tip: if your mouse isn’t working properly, use the <TAB> key to get from the desktop to the taskbar. The arrow keys can be used for navigation on the desktop.
Multimedia
The Multimedia icon provides a dialog box for configuring audio, video, MIDI, CD Music, and other multimedia devices.
Network
The Network icon provides dialog boxes for the configuration of the network connection(s) and network devices on the computer. You can configure hardware devices and the protocols that they use. This is also the place to setup logon identification and access control to files on the computer. Before you can share any files, you must enable File and Print Sharing. The button for configuring this is found on the Configuration tab of this dialog box. You can also access the network configuration dialog box by right clicking on the Network Neighborhood icon on the desktop and then clicking on Properties in the menu.
ODBC
This icon allows you to add and configure ODBC drivers (Open DataBase Connectivity).

Chapter 3- Working in a GUI Environment
Specialized Solutions, Inc. 127
Passwords
This icon is used to add or change passwords, remote administration, and user profiles.
Printers
This icon is a short cut that gives you access to the Printers Folder. From this folder, you can find information about your current printers, view, or delete what jobs are queued in the printer and a wizard to help you install new ones. This can be reached either through My Computer, or Settings in the Start Menu. Printers can be shared here using TCP/IP, NetBEUI, and IPX/SPX.
Regional Settings
The Regional Setting icon allows you to configure the international settings for the computer. Changing the Regional Setting affects the way programs display and sort dates, times, currency, and numbers.
Sounds
The Sounds icons and its dialog box allow you to enable, disable, and change the sounds that your computer makes.
Tip: if you can’t hear anything, check to see if the volume icon in the system tray has a red circle with a line through it. It means that the volume is presently muted.
System
The System icon takes you to the System Properties dialog box. Here, you can find general information about the computer such as the processor used, amount of memory installed, and the version of Windows installed. You also have access to the Device Manager, which will show what type of hardware is installed in your computer, like network adapters, Hardware Profiles, and Performance settings. Right clicking on the My Computer Icon can also provide access to this dialog box.
Users
This icon allows you to enable multi–user settings. It starts a wizard that lets you set up a username and password for you, so that your desktop settings will automatically be available when you log on. Whenever you log on, you’ll see your custom desktop icons, background picture, and other settings.

A+ Training & Test Preparation Guide
Specialized Solutions, Inc. 128
Summary
The following information summarizes the key points of this chapter:
• Windows 9x replaces the DOS and Windows 3.x system and is a 32–bit operating system. The new desktop operating environment is a user–friendly operator interface for IBM compatible PCs.
• Unlike Windows 3.x (which is an operating environment), Windows is a full operating system and does not rely on DOS. DOS (often called DOS 7.0) is available for backward compatibility.
• Windows 9x supports long file names, but retains an 8.3 filespec directory for backward compatibility.
• Windows 9x supports multi–reading and multi–tasking.
• Installing Windows 9x is a simple five–step process. It can be installed as an upgrade to a DOS/Windows 3.x system or as a stand–alone operating system. It can also be installed in a dual–boot system with either Windows 3.x or Windows NT.
• Hardware installation is simple with the Plug and Play support.
• Hardware management is made simple by using the Device Manager.
• The Registry is the biggest difference between Windows 9x and Windows 3.x. The Registry replaces the .INI configuration files used by Windows 3.x; however, they can still be used to provide backward compatibility.

Chapter 3- Working in a GUI Environment
Specialized Solutions, Inc. 129
KEYWORDS Exercise
Define each of the following keywords. Hint: There’s a glossary in the back of this book.
Keyword Definition
BIOS Bootstrap
BREAK
CD and CHDIR
CFGBACK.EXE
CHCP
CLS
Control Panel
COPY
CTTY
DATE
DEL
Device Manager
DIR
ERASE
ERU.EXE
EXIT
Folders
GDI
HKEY_CLASSES_ROOT
HKEY_CURRENT_CONFIG
HKEY_CURRENT_USER
HKEY_DYN_DATA

A+ Training & Test Preparation Guide
Specialized Solutions, Inc. 130
Keyword Definition
HKEY_LOCAL_MACHINE
HKEY_USERS
IO.SYS
Kernel
LH and LOADHIGH
LOCK
MD and MKDIR
MSDOS.SYS
PATH
PnP
PROMPT
RD and RMDIR
Registry
REN and RENAME
Safe Mode
SET
SYSTEM.DAT
The Virtual Registry
TIME
TYPE
UNLOCK
User
USER.DAT
VER

Chapter 3- Working in a GUI Environment
Specialized Solutions, Inc. 131
Keyword Definition
VERIFY
VOL
VxD drivers
Windows Explorer

A+ Training & Test Preparation Guide
Specialized Solutions, Inc. 132
Review Questions – Chapter 3
1. Name three ways that Windows 95 differs from Windows 3.x.
2. What is Plug and Play? What is required for a component to be Plug and Play?
3. Does Windows 9x still require DOS?
4. What version of DOS comes with Windows 95?
5. Is CONFIG.SYS required to install GUI drivers?
6. Why would you want to set the swap file size in Windows 95?
7. What is the main difference between Windows 3.x and Windows 95?
8. Why can’t older versions of disk utilities be used with Windows 95?
9. After turning on the power to the computer, what is the first step in the boot process?
10. In what directory do you find the external DOS commands?
11. What is FDISK used for?
12. What is virtual memory?

Chapter 3- Working in a GUI Environment
Specialized Solutions, Inc. 133
13. The Registry is made up of two binary files. Name them.
14. What is the difference between a DOS session and DOS mode?
15. If you are running in DOS mode and the CD-ROM does not run, what do you have to do it get it running?
16. Do you need a PIF file to run a DOS program in Windows 9x?
17. Windows 95 and 98 each have a five-step installation process, but they are slightly different from each other. What are the five steps of a Windows 95 installation? What are the five steps of a Windows 98 installation?
18. What version of Windows 95 uses FAT32?
19. What is Safe Mode and what is it used for?
20. What are the three Registry backup tools available with Windows 9x?
21. Which version of Windows 9x offers the active desktop and what is it?

A+ Training & Test Preparation Guide
Specialized Solutions, Inc. 134

Chapter 4 – Managing Files and Disks in Windows 9x
Specialized Solutions, Inc. 135
Chapter 4 – Managing Files and Disks in Windows 9x
We have begun our study of the Windows 9x operating system. We studied what makes it different from DOS and previous versions of Windows, how it works, and how to install it both as an upgrade and on a new system. One of the most powerful aspects of this operating system is its ability to manage files.
Another powerful improvement, especially useful to computer technicians, is its ability to troubleshoot hardware and software problems. Although the new Plug and Play hardware takes a lot of the work out of installing and troubleshooting, there are still times when hardware and software just won’t work properly and we have to fix them. The various tools in Windows 9x make troubleshooting much easier. In this chapter, we will focus on using Windows 9x to manage files and troubleshoot problems. But, before we get started, let’s look at some file management basics.
Managing Files
A file management system is a part of an operating system or an application that is used to organize and keep track of files on a computer. Most operating systems offer some level of file management as a standard component. You will also find many third party software vendors that offer user-friendly applications for file management.
To store files on a computer, we will consider any BINARY file stored on any storage media, a file. These files may be documents, spreadsheets, applications, or simple small files that the computer needs to perform a task (drivers for example). Normally, you can identify the file type by referring to its file extension (the three letters after the “.” in the file name). For this discussion, we will focus on managing files in a windows environment.
Hierarchical Storage
Data storage in a computer is referred to as hierarchical storage. This type of storage is based on a pyramid. The top level (point of the pyramid) represents the highest level (like the president of a company). Underneath the president (on the second level) are the VPs, followed by the Department Heads, etc. Each row in the hierarchy represents a parent/child relationship.

A+ Training & Test Preparation Guide
Specialized Solutions, Inc. 136
Company Structure
Functionally, hierarchical storage works like a pyramid, but visually we look at this as a tree structure when referring to files in a computer. A tree data structure is one in which each element is attached to one or more elements directly beneath it. The connections between the elements are called the branches. The elements at the very end of each branch that have nothing attached to them are called the leaves. In our computer, we call the tree trunk the root, the branches are called folders or directories, and the leaves are the files.
To simplify the viewing of a data tree on our computer screens, we align the branches in vertical lines from left to right. Each branch represents a lower level as you move to the right. When we explore or look at a branch, we will see any sub-branches and leaves on that branch.
File Structure

Chapter 4 – Managing Files and Disks in Windows 9x
Specialized Solutions, Inc. 137
Managing Files in Windows
Managing files in the Windows environment is best accomplished by using Microsoft Explorer. This program is the new generation File Manager that was found in Windows 3.x and it is not limited to truncated names. As you recall, the major difference between using the command line interface and a windows interface is that with command line, we had to type (and spell correctly) all commands. We used commands such as DIR, COPY, and XCOPY to move and manage files. In the GUI operating systems, we use icons and drag and drop technology to move and copy files.
To manage files (in any operating system) you will need to know how to do all of the following:
• Copy a File
• Move a File
• Delete a File
• Find a File
• Set File Attributes
• Drag and Drop
Remember, in a windows environment, there are at least three ways to do anything. You should practice the fundamentals for accomplishing any task, and use all three methods.
• Use a mouse (or other input device)
• Use application menus
• Use keystrokes and shortcuts
For the discussions in this book, we are going to focus on using the mouse as the primary device for navigation and selection of icons. You should however, practice using the other two methods. As a computer technician, you may be required to troubleshoot a PC that has a defective mouse. That being the case, you had better know how to use a keyboard to navigate. Being able to use a keyboard when a mouse or other input device fails is what makes heroes in the PC world.
Before moving into using these commands, we need to look at the basic file structure in a windows environment. File structure is similar to files in a file cabinet. We first go to the file cabinet, look into the file drawer, and then a hanging folder, etc.
When we manage files in a command line environment, we must follow proper syntax. For example, we would type C:\main\sub1\sub2 to access the file “sub2” that is located on the C:\ drive in the “sub1” sub-directory of the “main” directory. This syntax is known as the path. We also refer to this as a directory tree (the computer or a drive in the

A+ Training & Test Preparation Guide
Specialized Solutions, Inc. 138
computer being the trunk, each folder being a branch and each sub-folder being a sub-branch). The path defines the logical route that we (or the computer) must follow to open the specified file. We begin with the root directory (the logical or physical device – partition) and move down through the layers called folders or sub-directories. In the case of our sample path above, this means that we want to look into the C: drive (the file cabinet – root directory), the main file drawer (sub1 folder), and then the hanging file folder – (sub2). In a windows environment, the path is no different except we will see icons that represent each drive and folder in the structure.
The Microsoft Windows 9x file system is better and faster than the one that powers Windows 3.x. The following table summarizes the significant improvements.
32-bit VFAT Disk access is provided by the 32-bit VFAT (virtual file allocation table). This virtual device works in protected mode, requiring no time-consuming mode changes every time the system needs to write to the disk.
Long Filenames Filenames can now be as long as 255 characters (including the path). Windows 9x long filenames are implemented without creating incompatibilities with 16-bit applications.
Demand Paging This is an advanced algorithm for paging memory to the swap file. It is faster than a permanent swap file in Windows 3.x. It’s also dynamic (it adjusts according to the load on the system).
VCACHE This 32-bit cache driver replaces SMARTDrive (a 16-bit real mode driver).
CD–ROM Support Windows 9x uses a protected mode 32-bit file system to speed up CD performance (CDFS – CD File System).
IDE and SCSI Support Windows 9x has its own EIDE and SCSI drivers so it no longer relies on third-party drivers.
Port Drivers These 32-bit drivers communicate directly with specific disk devices, thus allowing a floppy to format in the background.
Note: Page faults are caused when requested memory isn’t available. You will either have to get more RAM or temporarily increase your page file.

Chapter 4 – Managing Files and Disks in Windows 9x
Specialized Solutions, Inc. 139
Microsoft Explorer
Microsoft Explorer is the preferred method (for PC professionals) to explore files and the file structure of a computer. Microsoft Explorer (not to be confused with Internet Explorer) is a utility in Windows 9x that enables the user to locate and open files and folders. Windows Explorer resembles the File Manager of Windows 3.1. The user can select folders from a list displayed on the left side of the screen and access files in a selected folder from a list displayed on the right side of the screen.
To search for a file or see the structure, all we need to do is double click on an icon and it will open and show any sub folders inside it.
The following graphic is taken from Microsoft Explorer.
MS Explorer
1. The left hand column is the tree or directory structure.
2. The right hand column lists the details of what is inside the selected folder.
3. Notice the plus sign (+) beside a folder. It tells you that there are more folders inside.
4. Notice the current folder selected.

A+ Training & Test Preparation Guide
Specialized Solutions, Inc. 140
5. This represents the path to the folder (the same one we would use if we were using a command line interface).
6. Notice that when a folder is selected (double clicked) it will open. (You could also right click the file and select Open to access the folder or file.)
To see the hierarchy of folders on a disk drive:
1. Click Start, point to Programs, and then click Windows Explorer.
Alternative method: right click on the My Computer icon on your desktop and then click on Explore.
Alternative method: right click on the Start button and then click on Explore.
Alternative method: hold down the “Windows” key (between the Ctrl and Alt keys on a Windows 95 keyboard) and press E key.
2. Click a folder in the left pane of the window to display its contents in the right pane.
3. Click the plus signs (+) to display the folders within a folder.
Note: To change the size of either pane of the window, drag the bar that separates the two panes. You can also display the contents of a folder by clicking it in either the right or left pane.
A complete tutorial of using Microsoft Explorer is beyond the scope of this A+ certification course. If you are not familiar with using Microsoft Explorer, you should spend a few hours exploring all the menus and tools of this very useful utility. Don’t forget to use the Microsoft Windows Help files to get more information.
Hint: To create new documents or folders in explorer, you can go to the File menu, select new, and select the file or folder option you want. You can also right-click anywhere in the right-handed pane where there isn’t an icon and select new, and select the file or folder option you want.
My Computer
My Computer is another way to “explore” the files within your computer. While most PC professionals will use the Microsoft Explorer to manage files, you can accomplish the same task using My Computer. My Computer is intended as a user-friendlier version of Explorer and leaves out all the technical details (although you can find them if you know where to look). For most non-technical users, My Computer will provide all the functionality required.

Chapter 4 – Managing Files and Disks in Windows 9x
Specialized Solutions, Inc. 141
My Computer
My Computer is a standard Microsoft icon found on every desktop. The difference between using My Computer and Explorer is that My Computer displays the information in a virtual format. When using DOS and Explorer, you are working with the hierarchical structure of the disk drive(s). In My Computer, you are able to take a logical look at files and devices connected to the computer. Microsoft has designed its operating systems to resemble a desktop. My Computer uses this desktop as the highest level or virtual root directory.
Note: you can map a network drive in Windows by right-clicking My Computer or Network Neighborhood or My Network Places. You can also view the operating system by right-clicking the My Computer icon and selecting the properties option.
To see what's on your computer using My Computer:
1. Double-click My Computer.
2. Double-click the icon of the drive you want to see.
Windows displays the files and folders on the drive. Folders can contain files, programs, and other folders.
3. To open a file or folder or to start a program, double-click it, (or right-click and choose Open).
Note: You can switch back to the previous folder by clicking on the toolbar or pressing the BACKSPACE key. If the toolbar is not visible, go to the View menu, point to Toolbar, and then click Standard Buttons.
For a quick listing of the files on your desktop, click in a Save As or Open dialog box.
Managing Files with Explorer
With a basic understanding of how to open and navigate either Microsoft Explorer or My Computer, you are ready to begin managing your files. Don’t forget, there are three techniques you can use to manage files (keyboard, mouse, menu).
By default, Windows 9x hides the Explorer toolbar. This toolbar provides the icons and menus to control the display of information within Explorer. To customize your toolbar settings, click on toolbar in the View menu and make your selections.

A+ Training & Test Preparation Guide
Specialized Solutions, Inc. 142
Explorer Toolbar
Displaying File Extensions
By default, Windows 9x does not display “registered” file extensions. A registered file extension is one that Explorer can “understand. “ In other words, an extension that Explorer can associate with an executable program (the source of the file). For instance, you will not see extensions such as .exe, .doc, .jpg, and so forth. Any file extension that Explorer does not recognize is considered text and displayed. With this system, Windows 9x allows users to open any file (with a registered file extension) by simply double-clicking its icon in Explorer. If you try to rename a file and forget to add an extension or delete the existing extension, Windows will warn you of a potential problem.
Tip: Rename a file either by right-clicking the file icon and selecting rename or by the File menu in the open document or in Explorer with the file highlighted.
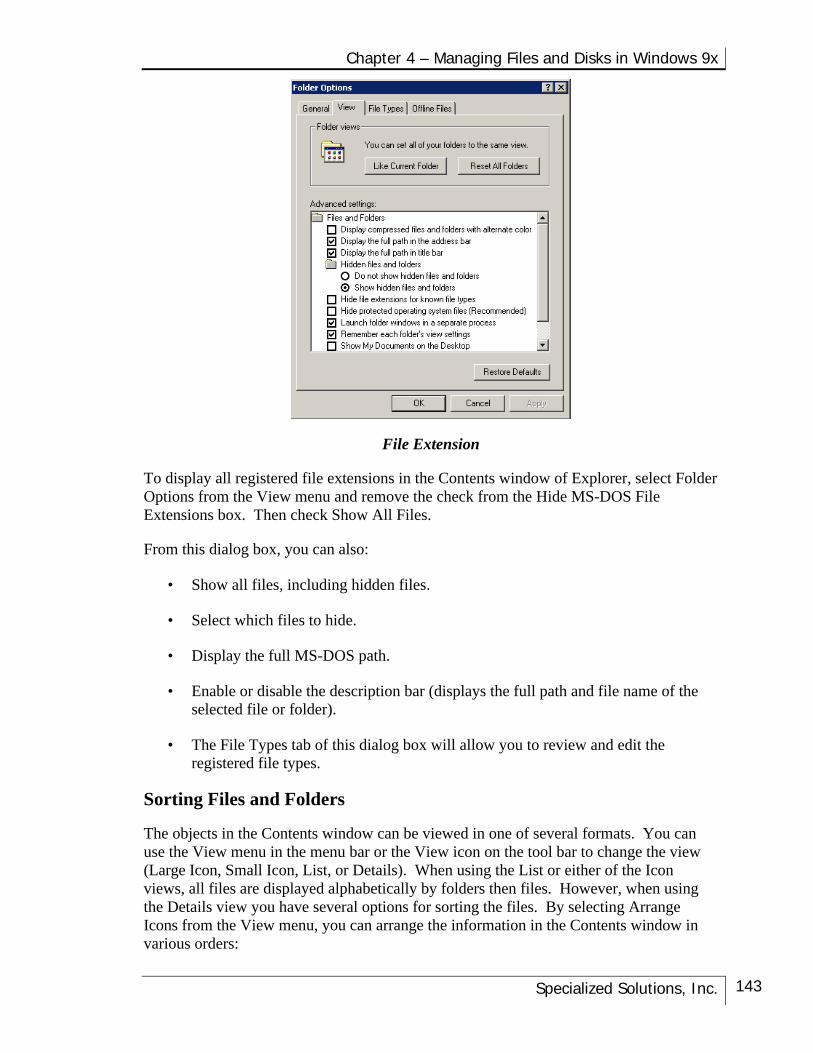
Chapter 4 – Managing Files and Disks in Windows 9x
Specialized Solutions, Inc. 143
File Extension
To display all registered file extensions in the Contents window of Explorer, select Folder Options from the View menu and remove the check from the Hide MS-DOS File Extensions box. Then check Show All Files.
From this dialog box, you can also:
• Show all files, including hidden files.
• Select which files to hide.
• Display the full MS-DOS path.
• Enable or disable the description bar (displays the full path and file name of the selected file or folder).
• The File Types tab of this dialog box will allow you to review and edit the registered file types.
Sorting Files and Folders
The objects in the Contents window can be viewed in one of several formats. You can use the View menu in the menu bar or the View icon on the tool bar to change the view (Large Icon, Small Icon, List, or Details). When using the List or either of the Icon views, all files are displayed alphabetically by folders then files. However, when using the Details view you have several options for sorting the files. By selecting Arrange Icons from the View menu, you can arrange the information in the Contents window in various orders:

A+ Training & Test Preparation Guide
Specialized Solutions, Inc. 144
By Name Alphabetically, the default setting.
By Type Ascending alphabetical order by file type with folders first.
By Size Ascending numerical order by file size with folders first.
By Date Ascending order by the last modified date with folders first.
Auto Arrange When activated, this command sorts the object automatically if moved or if a new one is added. This only works in icon view.
Note: Clicking the Column heading of the Contents window will also arrange the contents according to that column.
Moving Objects Within Explorer
One of Explorer’s most useful functions is the ability to move and copy files from one location to another. Two methods in Explorer are available to do this.
Drag-and-Drop
Drag-and-drop simply means moving an object from one location to another. Most users know how to do this instinctively: select an object by left clicking, holding the mouse button down, moving the object to a new location (the destination folder must be highlighted), and then releasing the mouse. If you hold down the Ctrl key while dragging, the object will be copied instead of moved (you’ll see a small plus sign attached to the mouse pointer icon during copy operations).
Here are a few rules for drag-and-drop:
• When the source and destination folder are on the same disk, drag-and-drop moves an object. To copy the object instead, hold down the Ctrl key.
• When the source and destination folders are on different disks, the object is copied. To move the object, hold down the Shift key.
• When the object is an executable file (.exe), a shortcut will be created in the destination folder. Keep in mind that a shortcut won’t work if you later move the file or delete it.
Cut, Copy, and Paste
Any file or folder (including its contents) can be cut, copied, or pasted from any folder or drive to another.
Note: Any object to be cut, copied, or pasted must be selected first.

Chapter 4 – Managing Files and Disks in Windows 9x
Specialized Solutions, Inc. 145
There are four methods to cut, copy, or paste:
• Use the icons on the toolbar.
• Select the object to be cut or copied by right clicking. Choose Cut from the drop-down menu, and then choose the destination location, right-click, and select Paste from the menu.
• Use the key commands: Ctrl+X (Cut); Ctrl+C (Copy); or Ctrl+V (Paste).
• Or, use Cut, Copy and Paste from the Edit menu.
Note: To select more than one file or folder to copy, hold down the CTRL key, and then click the items you want.
To quickly send files and folders to another destination:
1. In Explorer or My Computer, right-click the file or folder you want to send.
2. Click on Send To and then choose the destination.
Note: You can add other destinations to the Send To menu. In the Send To folder, which is located in the Windows folder, create shortcuts to the destinations you often send files to, such as a printer, fax machine, a zip drive, or a particular folder.
Note: In addition to Explorer, files can also be manipulated using “My Computer.” The methods for moving, copying, etc. are very similar.
Properties
The Properties command is probably the most important command of all. It is found throughout the Windows 9x environment and especially in Explorer. Any time you need to know more about an object, right-click the icon and choose Properties. It is usually found at the bottom of the shortcut menu. It may also be found as a command button at the bottom of a dialog box or at the bottom of the File menu in a window. By selecting this option, you will be directed to a dialog box(es) that provides the details of the object and often will allow you to make changes.
Note: You should always look for “Properties” when working with applications or objects. Often, this is the key to configuring that object properly.

A+ Training & Test Preparation Guide
Specialized Solutions, Inc. 146
To change file or folder attributes:
Every file stored on a disk will contain a list of attributes (also called properties). Each of these attributes defines how the file can be accessed.
Read–only File can be opened and viewed, but cannot be edited.
Archive The user will have full access to the file. It can be opened and edited.
Hidden The file will be hidden from view in Explorer. This is done to protect files from being accidentally moved or deleted.
System Files used by the operating system.
Most files, by default, will be designated as archive. If you need to change an attribute, you will have to find the properties dialog box for the file and check or uncheck the appropriate box to enable or disable the attribute.
1. In My Computer or Windows Explorer, click the file or folder whose properties you want to change.
2. On the File menu, click Properties.
3. Enter any changes in the Properties dialog box.
Note: You can also right-click a folder or file that is on your desktop (or in Windows Explorer), and then click Properties. To select a folder in the left pane of Windows Explorer, click the folder.
Searching for Files
In today’s multi-gigabyte world, finding a file is like looking for that proverbial needle in a haystack. To overcome this problem, Windows 9x has a new and intuitive Find feature. Finding a file has never been easier.
• To search a particular folder, highlight the folder, from the Tools menu select Find, and then select Files or Folders.
• To search the entire desktop (all drives in the computer), click on any part of the Explorer window and press F3. The default is to search the C drive, however, you can select any drive or My Computer to search the entire computer.

Chapter 4 – Managing Files and Disks in Windows 9x
Specialized Solutions, Inc. 147
Find
There are three methods of searching: Name and Location, Date Modified, or Advanced.
Search by Name and Location
This tab will let you search for files or folders by name. It will also let you specify the drive or folder in which to search.
Here are a few helpful hints to limit your search:
• If the filename contains a space (more than one word), enclose the filename in quotation marks.
• When searching for multiple files, separate each name with a space, comma, or semicolon.
• File searches are not case-sensitive.
• All DOS wildcards work with Find.
Search by Date
If you don’t know the name of the file, but know approximately when it was created or last modified, use this tab. There are three methods of searching with this tab:
• Between any two dates.
• During the previous x months.
• During the previous x days.

A+ Training & Test Preparation Guide
Specialized Solutions, Inc. 148
Using Advanced Search
The advanced search tab provides some additional search techniques:
• By type of file (requires a registered file extension).
• By size of file.
• For any file containing a specific word or phrase.
The Windows Taskbar
The Windows 9x taskbar provides a unified place in the interface for important information. By default, it sits at the bottom of the screen, but the user can move it. By clicking and dragging any portion of the Taskbar that is not a button, you can move it to the top, bottom, left, or right of the screen. It is comprised of three sections:
• The notification area (also called the system tray) contains the clock (if you point your mouse to the time, the date will pop up) and any icons representing applications that are running in the background (printer, scanner, anti-virus).
• The Start Button opens programs.
• Any open programs are displayed on the taskbar as a button (between the notification area and the Start Button) that contains the program name and icon.
Note: the more open programs, the smaller each button.
The Recycle Bin
In the early days of the computer, accidental deletion of files was a common occurrence. When a file was deleted, DOS did not delete the contents, but it changed the first letter of the filename to a lowercase Greek sigma and changed all the file’s FAT entries to 0 (the clusters could now be used by another file). Later versions of DOS included an UNDELETE command, which could restore a file (as long as no other file had used the clusters). Unless the file was recovered immediately after deleting, the chances of recovery were slim.
Windows 9x has overcome this problem by creating the Recycle Bin, which is a hidden folder that holds deleted files. The files will stay safe and out of sight in this folder until they are removed from the Recycle Bin. You can restore any file by opening the Recycle Bin, selecting the file, and selecting Restore from the File menu. The Recycle Bin is a great new tool, but it is not perfect. Here are some things to be aware of:
• When the Recycle Bin is emptied, the files are deleted.
• Floppy, network, and removable drive deletions are permanent.
Chapter 4 – Managing Files and Disks in Windows 9x
Specialized Solutions, Inc. 149
• The Recycle Bin can be bypassed by holding down the Shift key while deleting. This will trash a file with no chance to recover it.
• The Properties dialog box (right-click on the icon) allows you to customize Recycle Bin activities. You can configure a Recycle Bin independently for each drive, select to remove files immediately when deleted, or set the maximum size of the Recycle Bin.
To delete a file or folder:
1. In Explorer or My Computer, click the file or folder that you want to delete.
2. On the file menu, click Delete.
Note: You can also drag the file or folder to the Recycle Bin, or right-click on the selected folder and choose delete. You can delete more than one file at a time by highlighting all the ones slated for deletion.
To rename a file or folder:
1. In Explorer or My Computer, select the file or folder that you wish to rename.
2. Click Rename on the file menu.
Note: You can also rename a file by highlighting the file that you wish to rename, right clicking it, and selecting Rename.
Folder Options
With a little practice, you will find the style of file management that best suits your workflow. To change the view of either My Computer or Microsoft Explorer, you will need to access the folder options dialog box. The folder options dialog box can be accessed from the View menu.
From the dialog box, you will see three tabs:
• General Tab – From this tab, you can specify the general look of the windows.
• View Tab – From this tab, you can select what files and attributes you want to display on the screen.
• File Type – From this tab, you can assign file types (based on file extensions) to icons and the applications that open them.
Active Desktop
Windows 98 introduced Active Desktop. Active Desktop makes it possible for you to customize your desktop, launch programs, switch between files, and keep up with the latest world news by integrating the Web with your desktop.

A+ Training & Test Preparation Guide
Specialized Solutions, Inc. 150
With Active Desktop, you can turn Web elements into desktop elements and update them at any time. For example, you can maintain constant updates on your stocks, or make your favorite newspaper your desktop wallpaper.
Of course, to take full advantage of Active Desktop, you need full-time high-speed Internet access as well as a high-powered computer with lots of memory.
To turn on the Active Desktop interface:
1. Open Display Properties. Right-click on your desktop and select Properties from the menu.
2. On the Web tab, make sure the View my Active Desktop as a web page check box is selected.
Note: You can also open Display Properties by clicking Start, pointing to Settings, clicking Control Panel, and then double-clicking Display. You can also open Display Properties by right-clicking your desktop and choosing Properties. If you select Web style for your desktop, the Active Desktop is already turned on. You can also turn Active Desktop on or off by clicking Start, pointing to Settings, pointing to Active Desktop, and then clicking View as Web Page. You must have the new desktop installed in order to use the Active Desktop. If you are running Windows 95 or Windows NT 4.0 and did not originally install the new desktop, you will need to do so in order to use Active Desktop.
Managing Disks
In addition to managing files, a computer technician must be proficient in disk management. Windows 9x provides several tools to make this job easier.
Disk Maintenance
As it is for managing files, Explorer is very helpful for managing disks. By right-clicking a disk’s icon, you can access a full menu of disk management options.
The two most common disk management tools are Format and Copy.

Chapter 4 – Managing Files and Disks in Windows 9x
Specialized Solutions, Inc. 151
Disk Management Option
Formatting a Floppy Disk
Follow these steps to format a floppy disk:
1. Insert a disk into the floppy drive.
2. From Explorer, right-click the drive containing the disk and select Format. Do not highlight the drive first. Windows 9x will not let you format if the drive is highlighted first.
3. Use the Capacity drop-down list to select the correct drive size.
4. In the Format group, choose from: Quick (removes files but does not check for bad sectors), Full (removes files and checks for bad sectors), or Copy System Files Only (makes a bootable disk but does not delete any data).
5. Select any other options: Label (to add a label less than 11 characters), No Label (to delete an existing label) Display Summary When Finished (displays a summary of the results of the formatting process), or Copy System Files (will add system files after formatting is complete).
6. Select Start and the formatting process will begin.
Copying a Floppy
Follow these steps to copy a floppy disk:
1. Insert the disk to copy into the floppy drive (this will be the source disk).
2. Select Copy Disk from the disk management menu.
3. From the Copy menu, highlight the disk to be copied (Source).

A+ Training & Test Preparation Guide
Specialized Solutions, Inc. 152
4. From the Copy menu, highlight the disk to be copied to (Destination).
5. Click Start to begin the process.
6. When all the data is copied from the source disk into memory, you will be prompted to insert the destination disk.
7. If the destination disk is unformatted, Windows 95 will format it first.
8. When the copy process is finished, select Close.
Viewing Disk Properties
By selecting Properties from the disk management menu, you will be able to see statistics about the drive.
Drive Statistics
By selecting the Tools tab, you can perform basic maintenance on the selected drive.
Error-checking status: Tells you when ScanDisk was last run and allows you to run ScanDisk.
Backup status: Tells you when the disk was last backed up and allows you to backup.
Note: backup hardware (tape or disk drive) must be installed.
Defragmentation status: This group tells you when the drive was last “defragged” and allows defragmentation (rearranges disk sectors so files are stored on consecutive sectors in adjacent tracks).

Chapter 4 – Managing Files and Disks in Windows 9x
Specialized Solutions, Inc. 153
Partitioning a Disk in Windows 9x
Partitioning a disk increases its storage efficiency by reducing waste or cluster overhang, the smaller the drive, the more efficient it is. If you will recall from Volume I, the smallest unit of a hard drive is a cluster and its size depends on the size of the partition size. In addition, a cluster can contain only data from one file. Therefore, if you have a file that is 4000 bytes and a cluster size of 8389 bytes, you will have 4389 bytes of wasted space or overhang. By creating several smaller partitions, you will have smaller cluster sizes and therefore less waste. Creating a partition in the Windows 9x environment is the same process as with DOS. Here are a few things to keep in mind when partitioning in Windows 9x:
• Use FDISK to partition a drive.
• FDISK will destroy all data on the drive.
• FDISK must be run from DOS. The computer must be booted from the startup diskette.
Note: One of the advantages of using FAT32 with Windows 98 or Windows 95 OSR2 is that you can create partitions up to 8GB and keep the cluster size 4KB.
If you have issues with the master boot record, such as a virus infecting the master boot record, run the FDISK /mbr command to replace it.

A+ Training & Test Preparation Guide
Specialized Solutions, Inc. 154
Summary
File and disk management is more of an art than a science. Practice is the only way to become proficient. The authors recommend that you spend several hours using the tools introduced in this chapter. Your goal is to make navigation and file management intuitive, so that you can focus on things that are more important when you are troubleshooting. The following information summarizes the key points of this chapter:
• Windows 9x has many improvements that make managing files simple. Some of those features are: 32-bit VFAT, long filenames, VCACHE, built-in CD-ROM support, built-in EIDE and SCSI drivers, and an expanded list of 32-bit drivers.
• Windows 9x includes two programs for managing files. My Computer, with its simple windows format, is a user-friendly utility designed especially for beginners. Explorer is an enhanced version of the Windows 3.x File Manager. For the computer professional, mastering Explorer is key to troubleshooting both hardware and software problems.
• Windows allows extensive use of the drag-and-drop, and Cut, Copy, and Paste functions for managing files. In addition, the right mouse button provides easy access to shortcut menus.
• Practice using these tools. Your goal is to become proficient at disk and file management.

Chapter 4 – Managing Files and Disks in Windows 9x
Specialized Solutions, Inc. 155
KEYWORDS Exercise
Define each of the following keywords. Hint: There’s a glossary in the back of this book.
Keyword Definition
32-bit VFAT
Active Desktop
Archive
CD-ROM Support
Defragmentation
Demand Paging
Drag-and-drop
File management system
Hidden
IDE and SCSI Support
Long Filenames
Microsoft Explorer
My Computer
Port Drivers
Read-only
Recycle Bin
System
Taskbar
UNDELETE
VCACHE

A+ Training & Test Preparation Guide
Specialized Solutions, Inc. 156
Review Questions Chapter 4
1. What two tools are available in Windows 9x for managing files and disks?
2. How many characters may be used (including the path) for a filename in Windows 9x?
3. There are at least three ways to accomplish file management in a Windows environment. Besides using the mouse or pointing device, what are the other two methods?
4. You are looking at the files on your hard drive with Windows Explorer. In the left-hand column, you notice that a folder has a plus sign (+) beside it. What does this mean?
5. There are several ways to open Windows Explorer. Name as many as you can remember.
6. The files in the Contents window of Explorer can be sorted in a number of different orders. Name as many as you remember.
7. What is the keystroke command to paste a file?
8. The Find tool is extremely helpful for finding lost files and folders. What are the three options available with this tool?
9. How do you change file attributes in Windows 9x?
10. What are the three areas of the taskbar called?
11. You have accidentally deleted a necessary file in Windows 98. What do you do?

Chapter 4 – Managing Files and Disks in Windows 9x
Specialized Solutions, Inc. 157
12. Describe the procedure for formatting a floppy disk.
13. What is used to partition a drive?

A+ Training & Test Preparation Guide
Specialized Solutions, Inc. 158

Chapter 5 – Troubleshooting Windows 9x
Specialized Solutions, Inc. 159
Chapter 5 – Troubleshooting Windows 9x
No application or program is perfect. The evolution from DOS to Windows 3.x to Windows 9x was neither short nor simple. Windows 9x is a major improvement in the way computers operate and the way we interface with them. It’s not realistic to expect this operating system to solve all problems and achieve full compatibility with all hardware, there are simply too many different hardware and software manufacturers, each with their own unique approach, for one operating system to manage. As computer technicians, we must understand both the strengths and weaknesses of computer systems (hardware and software) in order to achieve the best possible performance for our clients. Fortunately, Microsoft has incorporated many tools to help us fine-tune our systems and achieve the best performance. This section will focus on some of the methods and tools that we can use to identify problems and manage our systems.
Limitations of Windows 9x
You must understand how efficiently a system is operating before you can troubleshoot and tune that system. Windows 9x provides two tools for that purpose: (System Monitor and the Resource Meter). If they are not installed, use the Control Panel, Add/Remove Programs (Windows tab) to add them to your system. When installed, you can find both by selecting Programs from the Start menu, then Accessories, and finally System Tools.
The System Monitor
The System Monitor provides real-time reports about how various system processes (such as virtual memory, server information and clients) are performing. It displays various functions in a line graph, a bar graph, or a numeric graph. To run System Monitor, go to the Start menu, select Programs, Accessories, System Tools, and System Monitor. By default, the System Monitor shows only the Kernel Process Usage setting (the percentage of time the processor is busy).
Items can be added to or removed from the System Monitor by selecting Add Item from the System Monitor Edit menu or use the add button in the tool bar.

A+ Training & Test Preparation Guide
Specialized Solutions, Inc. 160
System Monitor
Two useful items are the Kernel (which tracks CPU usage) and the Memory Manager (which tracks allocated memory, cache size, and swap file size).
System Monitor – Add item
Both of these tools can help you determine when it’s time to upgrade a computer. For example, start the computer and open all the files and applications that are normally used at the same time. Turn on the System Monitor and run the system for a while. If the processor is constantly running at more than 75 percent, it may be time to upgrade. In addition, if the total allocated memory (RAM, plus the swap file, plus the cache) exceeds the amount of RAM in the system, it may be time to get more RAM.

Chapter 5 – Troubleshooting Windows 9x
Specialized Solutions, Inc. 161
Resource Meter
The Resource Meter is used to monitor (in real-time) the use of system resources. When activated, it will add a small bar graph to the taskbar, (in the notification area) indicating the percent of free resources (based on the computers total resources). As the bar gets smaller, (fewer resources are available) it will change color indicating a potential problem. When the color changes to yellow, the resources have dropped to 30 percent. When the color changes to red, the resources have dropped to 15 percent. If the resources were to drop to 10 percent, Windows will warn you that you are in immanent danger of hanging, so you must start closing applications to avoid loosing data.
Resource Meter
For more details, hold the mouse over the Resource Meter icon for a second or two. This displays a banner that shows the individual resource percentages. You can also double-click the icon to display the resource meter dialog box.
Resource Meter Details
A good example of when you might use these tools is if a customer complains that they are getting out of memory errors or that their disk drive seems to run all the time. By monitoring memory use, you will be able to determine how much memory is required to run all the applications, and which applications are consuming the most memory. From this information, you should be able to determine the best course of action. If a client is trying to decide whether or not to upgrade a processor, you can also monitor the CPU kernel to determine just how busy it is. If it is working more than 80 percent of the time, a new processor might be warranted.

A+ Training & Test Preparation Guide
Specialized Solutions, Inc. 162
DOS Application Incompatibilities
In spite of all attempts to make Windows 9x backwardly compatible, there are still problems running DOS applications. Most MS-DOS applications run faster and more reliably in Windows 9x than in Windows 3.11. However, there were few users who “pushed the envelope” on running DOS applications, rather most people updated them and learned to use the new software. Often, DOS applications will refuse to run under Windows 9x because they cannot find a version of DOS they recognize.
Wrong DOS Version
One of the most common causes for both DOS and Windows application crashes in Windows 9x is that many applications check the version number of DOS before running. If the software reads the wrong version number or a version number that’s in the wrong range, an error occurs and the program crashes. To get around this, Windows 9x will “lie” to applications and give the right version number.
To achieve this, Windows needs a bit of help tricking DOS programs. Include the following line in the CONFIG.SYS file. Remember, lines in the CONFIG.SYS overwrite IO.SYS and SYSTEM.DAT commands.
device=c:\windows\setver.exe
With SETVER.EXE loaded, Windows 9x will report a correct version number to your DOS application.
If working with an old Windows 3.x application, tricking the application is a two-step process.
First, find the module name for the application that is crashing. To find an application’s module name, start Explorer and then right-click the application’s executable (.EXE) file. Using Quick View, find the Module Name. For example, the Module Name for Word 6.0 is winword.
Note: QuickView is not included in the typical Windows 9x installation. To load QuickView, go to the Control Panel and select the Add/Remove Program applet. In the Add/Remove Program dialog box, select the Windows Setup tab, and then select Accessories. Click the Details button, check QuickView on the Components list, and click the OK button.
Next, add a section to your Windows 95 WIN.INI file. Open WIN.INI using a text editor and add the following lines:
[Compatibility]
compiled_module_name = 0x00200000
For example, you would add:
winword = 0x00200000

Chapter 5 – Troubleshooting Windows 9x
Specialized Solutions, Inc. 163
Other DOS Workarounds
Often DOS applications fail to execute because of missing drivers or because of the presence of Windows itself. By using the Properties tab of a program’s .EXE file, you can modify many of the settings that cause your program to fail. To do this:
1. Open Explorer and find the troublesome DOS .EXE file.
2. Right-click with your mouse and select Properties.
3. Click the Program tab.
4. Click the Advanced button.
The Advanced dialog box will give the following options:
Prevent MS-DOS-based Programs from Detecting Windows: This hides Windows in memory so that DOS programs can’t detect it.
Suggest MS-DOS Mode As Necessary: This is an on-the-fly MS-DOS mode diagnostic. If Windows detects an application that’s likely to run better in MS-DOS, it will start a Wizard so that you can customize the application to run in MS-DOS.
MS-DOS Mode: If this option is selected, the application will run in MS-DOS mode. Within this setting are three additional options.
• Warn Before Entering MS-DOS: When entering MS-DOS mode, you will want to close any open Windows applications and files. This will warn you so that you may properly close and save any applications that are running.
• Use Current MS-DOS configuration: This uses all the current system settings that have been passed along, including settings in CONFIG.SYS, AUTOEXEC.BAT, IO.SYS, and the Registry.
• Specify A New MS-DOS Configuration: Lets you modify the CONFIG.SYS and AUTOEXEC.BAT for MS-DOS mode.
This property sheet is the Windows 95 replacement for the PIF files that we used in Windows 3.x. You will find five other tabs for configuring the properties of this DOS application. These tabs are:
• General – provides the statistics of the file.
• Font – specifies the type of fonts you want to use.
• Memory – configures expanded and extended memory requirements.
• Screen – options for running inside a window or full screen.
• Misc – miscellaneous settings.

A+ Training & Test Preparation Guide
Specialized Solutions, Inc. 164
Note: the MKCOMPAT.EXE command might help if you are having compatibility issues with a Windows 3x program in a Windows 9x environment.
Windows 98 System Tools
Think about this scenario. You arrive at the office of a new client. The client is experiencing difficulties running their computers. They all seem to work, but are slow, crashing, and generally doing strange things. As a computer professional, where can you get the best source of tools that are easily accessible (and literally at your fingertips) that you can use to troubleshoot these computers? The answer is operating system tools. Many “professional” computer repair “experts” will show up with CD after CD of software that will “clean and lean” your computer. Is this really the answer to solving all your performance problems? It is certainly one solution, but perhaps not the best.
If you really understand computers and their operating systems, you will find that all the tools you need are literally at your fingertips. It is true that they may not be as glamorous and you may have to actually know something in order to use them, but they work and they are free (included with the operating system).
In this section, we will examine the standard system tools provided with the Windows 98 operating system.
To access them, you will need to go to Start | Programs | Accessories | System Tools.
Note: Not all of these will install automatically when Windows is installed. To install them, you will have to open Add/Remove programs from the Control Panel. Then open the Windows Setup tab. A Windows Operating System CD may be required.
Backup
Backing up files implies that you will copy files from you hard drive to another media. This media can be a floppy drive, a CD-ROM, a network drive, or a tape drive. If all you need to do is copy a few files, you can use the file management tools and complete the task manually. Once files have been placed on the backup media, you can restore them if the originals are damaged. The process of restoring files is essentially the reverse of backing up files.
From the backup screen, you can choose to backup specified files, the entire computer, or the registry. When not running a full backup, you create a backup job that designates what, where, and how you want the system backed up. Once the job is saved, you can run the backup anytime you want. You can even create automatic (scheduled) backups at regular intervals.

Chapter 5 – Troubleshooting Windows 9x
Specialized Solutions, Inc. 165
Backup Dialog Box
Character Map
You can use Character Map to insert special characters into a document.
To open Character Map:
Click Start | Programs | Accessories | System Tools, and then click Character Map. Character Map works only with Windows-based programs.
Character Map
Clipboard Viewer
This is a useful tool if you are experiencing problems related to the Windows clipboard. By opening this window, you can view the current contents of the clipboard.

A+ Training & Test Preparation Guide
Specialized Solutions, Inc. 166
Clipboard Viewer
Compression Agent
Compression Agent is used to increase the storage space on a hard drive by reducing the size of files. You can compress selected files using the settings you specify. While files on your drive are being recompressed, Compression Agent updates information in a table to reflect how your disk space changes as files are moved from one compression method to another.
To open Compression Agent:
Open Compression Agent by clicking Start | Programs | Accessories | System Tools, and then clicking Compression Agent.
Note: You can use Compression Agent to compress files only on drives compressed using DriveSpace 3.
Compressing files on a hard drive is a good way to improve the capacity of a drive. However, you should think twice before implementing this technique or any other compression technique. Be sure that you understand what you are doing and any potential risk. Often the files will be compressed into a single volume. You will be able see and use the individual files, but if that single file is corrupted, all the data is lost.

Chapter 5 – Troubleshooting Windows 9x
Specialized Solutions, Inc. 167
Compression Agent.
Disk Cleanup
Disk Cleanup is a utility that will remove unnecessary files from your drive. Modern computers tend to leave many temporary files lying around (such as in the recycle bin and temporary Internet files). When you run Disk Cleanup, the computer will search for these files and display a window that describes the type of files it found and where they are located. You then have the option (by selecting each group) to delete these files. These types of files can be removed using Internet Options in Control Panel or Internet Explorer.
Disk Cleanup.

A+ Training & Test Preparation Guide
Specialized Solutions, Inc. 168
Disk Defragmenter
Defragmenting a hard disk in Windows 2000 is nearly identical to the method in Windows 9x. In the hardware portion of the A+ certification, we learned about how data is stored in clusters on a hard drive. In an ideal world where you only stored new data to the hard drive, each file would be stored consecutively from the beginning to the end of the disk. However, we don’t live in a perfect world and we frequently read and write to our drives. When you start deleting files, spaces are left that are then filled the next time you write files. After a while, the hard drive is a mess and files (components of them) are scattered all over the drive. When this happens, the performance of the read/write operation of the drive will slow down. It’s the defragmenter’s job to reorganize the hard drive so each file is contiguous (located in one location on the hard drive).
As a normal course of business, you should defragment your drive about once a month. You should do this even if the operating system tells you that it is not needed.
Note: Certain applications, such as anti-virus software like Norton Anti-virus and screen savers, will prevent the defragmenting. It will likely remain at 0% complete until it’s stopped. Also, if the drive is writing data it will not defragment.
To access disk defragmenter in Windows 9x, go to Start Menu button, Programs, Accessories, System Tools, or right-click the drive you want to defrag and go into properties. Select the Tools option and you can defrag from there.
Warning: Newer machines with large hard drives can take several hours to defragment. Do not attempt this unless you have an adequate power backup unit (UPS). If the process is stopped abruptly, (due to loss of power, etc.) you will lose data and possibly may not be able to restart the computer.
Disk Defragmenter.

Chapter 5 – Troubleshooting Windows 9x
Specialized Solutions, Inc. 169
Drive Converter
Drive Converter converts a FAT16 drive to the FAT32 file system. When your drive is in this format, it stores data more efficiently, creating up to several hundred MB of extra disk space on the drive. FAT32 increases performance. Programs run faster and your computer uses fewer system resources. There are some considerations that you have to take into account before converting your drives:
• Once you convert your hard drive to FAT32 format using Drive Converter, you cannot return to using the FAT16 format unless you repartition and reformat the FAT32 drive. If you converted the drive on which Windows 98 is installed, then you must reinstall Windows 98 after repartitioning the drive.
• Most disk compression software is not compatible with FAT32. If your drive is compressed, you may not be able to convert.
• If you convert a removable disk and use the disk with other operating systems that are not FAT32-compatible, you cannot access the disk when running the other operating system.
• If your computer has a hibernate feature, the conversion may turn off this feature.
• Because previous versions of Windows are not compatible with FAT32, you cannot uninstall Windows 98 after converting.
• Although most programs are not affected by the conversion from FAT16 to FAT32, some disk utilities that depend on FAT16 do not work with FAT32 drives.
• If you convert your hard drive to FAT32 using Drive Converter, you can no longer use dual boot to run earlier versions of Windows (Windows 95 [Version 4.00.950], Windows NT 3.x, Windows NT 4.0, and Windows 3.x). However, if you are on a network, earlier versions of Windows can still gain access to your FAT32 hard drive through the network.
Drive Space
Drive Space is used to compress an entire drive into a virtual drive. The contents of a compressed drive are stored in a single file, called a CVF (Compressed Virtual File), which is located on an uncompressed drive. For example, when you compress your hard disk (drive C), DriveSpace 3 assigns a different drive letter to it, such as E. The new drive becomes the host for drive C. DriveSpace 3 then compresses your hard disk into a compressed volume file stored on drive E. The compressed volume file on drive E appears as your original drive C, but drive C has more free space than before.

A+ Training & Test Preparation Guide
Specialized Solutions, Inc. 170
When you view the contents of your computer by using My Computer or Windows Explorer, the host drive is hidden unless it has more than 2 megabytes (MB) of free space. In this case, it is visible, and you can work with it as you would with any other drive.
Maintenance Wizard
The Maintenance Wizard is a scheduling program that allows you to automatically run other maintenance utilities. This is very convenient, for example if you need to defrag a drive and know that it will take 4 hours. You can schedule it for the weekend.
By scheduling these utilities to run on a regular basis, you can make sure that your computer is performing at its best.
The utilities that it can schedule are:
Defragmentation
ScanDisk
Delete Unnecessary Files
To start the Maintenance Wizard:
Start the Maintenance wizard by clicking Start | Programs | Accessories | System Tools, and then clicking Maintenance wizard.
Note: Your computer must be on during scheduled maintenance tasks. Windows 98 will attempt to wake up some computers to run the scheduled Maintenance task. If your computer supports Advanced Power Management (APM) 1.2 or Advanced Configuration and Power Interface (ACPI), your tasks will attempt to run when the computer is in suspend.
Maintenance Wizard.

Chapter 5 – Troubleshooting Windows 9x
Specialized Solutions, Inc. 171
Net Watcher
With Net Watcher, you can monitor the network activity on your computer. You will be able to see who is currently using resources on your computer and disconnect them if you like. While this is not the easiest method of managing your shared folders, you can do that here as well.
Note: along with sharing folders and printers over the network, you can also share an Internet connection through ICS, and CD-ROMs as well.
To start Net Watcher:
You can start Net Watcher by clicking Start | Programs | Accessories | System Tools, and then clicking Net Watcher.
Note: You will be required to install Client for Microsoft Networks and enable print and file sharing before running Net Watcher.
Net Watcher
Resource Meter
The Resource Meter allows you to monitor system resources by placing a small bar graph in the system tray of the task bar. The height and color of the bar indicates the percentage of resources being used. While this tool does not provide specifics of resource consumption, it does let you monitor resources over time. I can be useful to detect when you are have resource problems.

A+ Training & Test Preparation Guide
Specialized Solutions, Inc. 172
To start the Resource Meter:
Start the Resource Meter by clicking Start | Programs | Accessories | System Tools, and then clicking Resource Meter.
Resource Meter
Resource Meter Details
ScanDisk
ScanDisk is used to check a hard drive for logical and physical errors. We have all experienced ScanDisk when Windows 9x is shut down improperly and has to be rebooted. The first thing that Windows does is confirm the integrity of the disk by running ScanDisk.
In addition to checking the hard drive or floppy drive, ScanDisk can then repair the damaged areas, such as cross-linked files. Repairing the damage does not necessarily save the data.
To run ScanDisk:
Run ScanDisk by clicking Start | Programs | Accessories | System Tools, and then clicking ScanDisk.

Chapter 5 – Troubleshooting Windows 9x
Specialized Solutions, Inc. 173
ScanDisk
Tip: If you have bad sectors, go to a line command and type in SCANDISK x:\surface (x equaling the drive letter you want to run the command on). It will help to separate bad sectors, so that data isn’t stored there in the future.
Scheduled Tasks
The Windows operating system will automatically install Task Scheduler so you do not have to worry about installation. You can add tasks by double-clicking Add Scheduled Task, which starts the Scheduled Task wizard. You can add tasks by dragging scripts, programs, or documents from Windows Explorer or the desktop to the Scheduled Tasks window.
You can also use Task Scheduler to modify, delete, pause, or stop the tasks that you have scheduled, to view a log of past scheduled tasks, or to view tasks that are scheduled on a remote computer.
To take advantage of Task Scheduler, make sure that the system date and time for your computer are accurate before you add a task.
To schedule a new task:
1. Start Task Scheduler.
2. Double-click Add Scheduled Task.
3. Follow the instructions in the Add Scheduled Task wizard.
The following describes some of the advanced features of the Task Scheduler:
• If you want to configure advanced settings for the task, select the “Open advanced properties for this task when I click Finish” check box in the final screen of the wizard.

A+ Training & Test Preparation Guide
Specialized Solutions, Inc. 174
• To have a new task run repeatedly each time it runs, select the “Open advanced properties for this task when I click Finish” check box in the final screen of the wizard, then click the Schedule tab and click Advanced.
• If the task program requires parameters, select the “Open advanced properties for this task when I click Finish” check box in the final screen of the wizard, then click the Task tab and type them in Run, after the task path.
• Make sure that the system date and time for your computer are accurate. Task Scheduler relies on this information to know when to run scheduled tasks. To check or change the date and time, double-click the time on the taskbar.
Task Scheduler
System Information
Of all the system tools, this one is perhaps the most useful for the PC technician. System Information collects system configuration information and displays it in a menu format. As a technician, you will require specific information about a computer before being able to configure and troubleshoot. System Information is a good utility that you can use to quickly find the data you need to resolve a system problem, such as program errors or a frozen system.
System Information displays a comprehensive view of your hardware, system components, and software environment. The information is organized into three categories: Resources, Components, and Software Environment.
• The Resources View – displays hardware-specific settings (DMA, IRQs, I/O addresses, and memory addresses).
• The Conflicts/Sharing View – identifies devices that are sharing resources or are in conflict. You can use this to identify device problems.

Chapter 5 – Troubleshooting Windows 9x
Specialized Solutions, Inc. 175
• The Components View – displays configuration information about your Windows system. You can use this view to determine the status of device drivers, networking, and multimedia software.
• The Software Environment View – displays a snapshot of the software loaded in computer memory. This information can be used to see if a process is still running, to check version information, or remove startup programs.
• Depending on the individual topic, you may be presented with a choice of basic, advanced, or historical system data.
System Information.
It is well worth your time to open and explore every menu item in this utility. For example, you will find a useful tool (in the Tool Menu) called System Utility Configuration. This utility allows you to adjust the boot sequence, edit the autoexec.bat, config.sys, win.ini, and sys.ini files, and select which items in the startup that you want to run with the Startup Tab, or disable those that you want off.

A+ Training & Test Preparation Guide
Specialized Solutions, Inc. 176
System Utility Configuration
System Monitor
This same System Monitor is found in Windows 95 and described in the previous section.
Welcome to Windows
This utility provides access to the Windows 98 splash screen. Take the time to watch these tutorials, especially if you are new to the Windows 98 environment.
Note: Windows 98 SE (Second Edition) provides ICS (Internet Connection Sharing), which will allow you to share one Internet connection between many Windows computers. Windows 98 SE also provides large hard drive support.
Printing Problems
It’s incredibly frustrating when a printer won’t print anything, or when it prints garbage characters, or only part of the data. To help in times like these, Windows 95 offers the Print Troubleshooter. You can select Help from the Start menu and then choose the Contents tab to find this tool. Select “Open The Troubleshooter Book” and display the topic, “If You Have Trouble Printing.” Troubleshooter will ask a series of questions that lead you through the problem and—hopefully— provide a solution.
If the Print Troubleshooter doesn’t solve the problem, you can try the Enhanced Print Troubleshooter (EPTS). This program is found on the Windows 9x CD. To use this program, copy the EPTS folder (and files) from the CD to the hard drive. Then start the program EPTS.EXE. This program operates the same way the standard version does, but is much more detailed.

Chapter 5 – Troubleshooting Windows 9x
Specialized Solutions, Inc. 177
Here are some other troubleshooting tips:
If the printer won’t print:
• Make sure the printer is turned on and online.
• Check the cable connections.
• Verify that the printer has paper.
• Clear any paper jams.
• Clear the print buffer by turning the printer off and restarting it.
• Make sure the driver and the printer are in the same mode.
• Send a print job directly to the printer (not from an application).
• Try printing from another application (a simple one like Notepad).
• Reinstall the printer (be sure to delete it first).
• Try printing to a file and then copying the file to the printer port.
• Try capturing the printer port by going into the details of the printer by using the printer applet
If the printer takes a long time to print:
• Make sure spooling is enabled and that Windows 9x is spooling to:
• EMF files (Enhanced Metafile Spooling).
• Make sure the drive on which Windows is installed has enough disk space.
• Defragment the hard disk.
• Check the system resources — are they low?
• Upgrade the printer driver if a newer one is available (check the printer manufacturer’s web site).
• Make sure Windows 9x is sending TrueType fonts as outlines and not bitmaps. (Check the Fonts tab of the printer’s properties sheet.)

A+ Training & Test Preparation Guide
Specialized Solutions, Inc. 178
If the printouts contain garbage:
• Verify that there is enough printer memory. It’s not always easy to tell how much memory you need. The printer will just give you an out-of-memory error. Also, see if you can either eliminate graphics from the document or select a lower print resolution (you can configure the printer from the application’s Printer dialog box). This can both speed up printing, and possibly eliminate errors due to limited printer memory.
• Print directly to the printer. Go to a DOS prompt and send a text file directly to the printer, thus bypassing the application.
• Use RAW spooling instead of EMF.
• Print only one job at a time.
• Make sure the printable region isn’t larger than what is supported by the printer.
If the Print command on the File menu is dimmed, verify that a printer driver is installed.
If you cannot print from a DOS program, from the printer’s properties sheet, deactivate the Spool MS-DOS Print Jobs.
Viruses
Viruses are those nasty little programs that can wreak havoc on a computer and its data. The sole purpose of a virus is to replicate and make life miserable for computer users. Many viruses are simple annoyances, but some of them can cause irreparable harm to files. Hackers write most viruses to try to show off.
Viruses can be caught from various sources including: shareware files downloaded from the Internet, software from unknown origins, and bulletin boards.
There are four basic types of viruses:
File Infectors: These attach themselves to executable files and spread to other files when the program is run.
Boot Sector: These replace the master boot record (or boot sector on a floppy). They will write themselves into memory any time the computer is booted.
Trojan Horses: These appear to be legitimate programs, but when loaded, they will go to work on the system.

Chapter 5 – Troubleshooting Windows 9x
Specialized Solutions, Inc. 179
Macro Virus: The biggest nuisances now are macro viruses (such as those that infect Word documents). These attach themselves as executable code to documents and run when the document is opened. (They can also attach to some kinds of E-mail). It used to be true that you couldn’t get a virus from opening a document, just from running a program. Unfortunately, while macros are very valuable, they mean that when you open a document you are running a program.
Unfortunately, viruses are common . Several measures can be taken to prevent or at least minimize the damage:
• Purchase an antivirus program. There are several good ones on the market. Make sure it is compatible with Windows 95. Old DOS antivirus programs do not like Windows 9x and can do more damage than good.
• If the computer has a BIOS setting that allows you to disable boot-sector writes (prevents applications from writing to the boot section of the hard disk), enable it! This setting must be disabled before installing Windows 9x.
• Many viruses are transmitted by floppy disks. Be careful when reading floppies of unknown origin or using your disks on unfamiliar machines.
• These days, many viruses and macro viruses are transmitted over the Internet. Use extreme caution when you download files, especially if they come from sources other than a manufacturer’s web site. The most secure protection against Internet-distributed viruses is to make sure you have an antivirus program running at all times (or at least when you’re downloading and first running new files).
• Trust no one when it comes to loading programs on your machine.
• Keep your anti-virus program updated. Hundreds of viruses are written each month.
• If a virus is detected, boot from a clean startup disk

A+ Training & Test Preparation Guide
Specialized Solutions, Inc. 180
Summary
This chapter is about tools that are available in modern operating system to help you troubleshoot operating system problems. The following are the key points of this chapter:
• The System Monitor provides real time reports about how various system processes are performing.
• The Resource Meter is used to monitor the use of system resources.
• Setver is used by Windows 9x to “lie” to old DOS applications, by supplying the application with a wrong version of DOS for backwards compatibility.
• Windows 98 comes with a wealth of system tools that can make the life of a PC technician much easier. You should explore these tools thoroughly until you can skillfully use them.
• Windows 9x provides a number of useful tools for maintaining disks. Backup, defragmentation, and ScanDisk utilities are built into the operating system.
• Print Troubleshooter and Enhanced Print Troubleshooter (EPTS) can help solve printing problems.
• Viruses are common in modern computing environments. Learn the different types of viruses and how to protect your computer.

Chapter 5 – Troubleshooting Windows 9x
Specialized Solutions, Inc. 181
KEYWORDS Exercise
Define each of the following keywords. Hint: There’s a glossary in the back of this book.
Keyword Definition
Boot Sector Virus
Character Map
Clipboard Viewer
Compression Agent
Disk Cleanup
Disk Defragmenter
Drive Converter
Drive Space
File Infectors
Macro Virus
Maintenance Wizard
Net Watcher
Resource Meter
Resource Meter
ScanDisk
SETVER.EXE
System Information
System Monitor
Task Scheduler
Trojan Horses
Virus

A+ Training & Test Preparation Guide
Specialized Solutions, Inc. 182
Review Questions Chapter 5
1. For what is the System Monitor used?
2. For what is the Resource Meter used?
3. Loading which file will cause Windows 95 to report a correct version of DOS to older DOS applications?
4. Which Windows 98 system tool would you use to remove unnecessary files from your hard drive?
5. Which system tool is used to reorganize the hard drive so that files are contiguous?
6. It can take several hours to defragment a hard drive. What system tool can you use to make this happen automatically after normal business hours?
7. How can you see who is connected to your computer over the network?
8. You are trying to print to a network printer, but the icon for the printer is grayed out. What could be causing this?
9. Name the four basic types of viruses and how they can be caught.
10. What is the most common method used to protect computers from viruses?

Chapter 6 –Windows Me
Specialized Solutions, Inc. 183
Chapter 6 – Windows Me
In this chapter, the Windows Millennium OS will be reviewed. Windows Me is one of the first Windows operating systems to focus on multimedia for the home user. It has received a graphical update, but it is still based on 9x.
A New Millennium Windows Me (Millennium) edition, the successor to Windows 98, was released at the end of 2000. Because of this, it shares a lot of features with Windows 98, but we will mainly focus on the differences between Me and 98.
Me Version Release Date
Developer Preview 1 July 23, 1999
Beta 1 September 23, 1999
Beta 2 November 23, 1999
Beta 2 Refresh January 20, 2000
Beta 3 April 11, 2000
Release Candidate 0 May 9, 2000
Release Candidate 1 May 17, 2000
RTM June 18, 2000
Final release September 14, 2000
Note: Throughout this chapter and, for that matter, throughout the entire book, the Me operating system’s functionality will be grouped with 9x. It is designed for end users in the corporate environment and home use.

A+ Training & Test Preparation Guide
Specialized Solutions, Inc. 184
What’s new about Me?
Windows Millennium Edition
One of the first things that you will note is the new look of Windows Me. Even though it is based on the kernel of Windows 98, the desktop visually appears more like Windows 2000. Note the icons on your desktop, some of which have changed names. Network Neighborhood is now called My Network Places, just like in Windows 2000.
Me Desktop

Chapter 6 –Windows Me
Specialized Solutions, Inc. 185
Driver Compatibility
Windows Me actually checks the drivers you install for compatibility.
USB/FireWire Support
Windows Me also has support for USB and IEEE 1394 devices, so finding appropriate device drivers for your USB or FireWire device is much easier.
Smart Menus
These menus help you to find everything you use most often. Me presents the user with the applications or programs used most often.
DOS says goodbye
Me can no longer restart Windows in DOS mode. But even though DOS seems gone, it would be more appropriate to say that it is well hidden. Taking this action against DOS has made the system more stable and quicker to boot. Windows Me boots faster than Windows 98 and is more stable.
Explorer in Windows Me
You now have the ability to use “Copy To” and “Move To” in Me Explorer. This added convenience makes managing the locations of your files and folders that much simpler.
Smarter Run box
The Run Box in the Start Menu is now able to suggest paths if the one you attempt to use isn’t correct.

A+ Training & Test Preparation Guide
Specialized Solutions, Inc. 186
The focus of the Me operating system falls under these categories:
• The health of the computer
• Media and Entertainment
• Enhanced User Interaction
• Enhanced use of the Internet
• User-friendly home networking
The Health of the Computer
Windows Me has several features to help maintain the health of your PC.
Help and Support
This web-based tool can help you with problems that you need to solve or give you information on various features of Me.
System File Protection
This keeps a user from inadvertently deleting or corrupting system files.
System Restore
This allows you to reset the computer back to a point where it functioned correctly. All you have to do is restart the computer, and it will function as it did before the malfunction.

Chapter 6 –Windows Me
Specialized Solutions, Inc. 187
System Restore
ASD (Automatic Skip Driver) Agent
The Automatic Skip Driver agent (ASD.EXE) is found in both Windows 98 and Windows Me and it allows you to identify and disables devices that may hang your operating system. It can be started by going to the Start Menu | Programs | Accessories | System Tools, and from the Tools menu, select the Automatic Skip Driver Agent.
The ASD agent lists all the failed operations and devices that haven’t started. You can re-enable these devices, if you wish. A record called ASD.log lists the disabled devices.
Media and Entertainment
Multimedia support seems to be the biggest part of the Windows Me operating system. It is designed to meet your audio, gaming, graphical, and video needs.
Windows Movie Maker
Movie Maker is the first video editing software included with a Microsoft operating system. With Movie Maker, you can transfer your home movies to your computer and edit them to your liking. You can even add sound or background music to your movies as well. It produces .AVI files.

A+ Training & Test Preparation Guide
Specialized Solutions, Inc. 188
Digital Cameras and VCRs
Windows Me allows you to get pictures from your digital camera, edit those pictures and save the ones you like without the need for additional software.
Digital cameras and VCRs are recognized in My Computer and Explorer just like drives.
Windows Media Player
Windows Me can allow you to listen to on-line radio stations, and view streaming and local video (as well as audio). Copying a music CD to your hard disk is also possible. It works with AVI, MP3 files, MPEG, and WMA files. Your player’s appearance can be changed (there are countless number of selections available on the Internet).
Windows Media Player
Windows DVD Player
This is a DVD player that has great video quality, but it seems rather tucked away. You can find the DVD player by using the following path:
C:\WINDOWS\DVDPLAY.EXE

Chapter 6 –Windows Me
Specialized Solutions, Inc. 189
Games
The games packaged with Me include Internet and multiplayer-oriented games.
DirectX 7
DirectX 7 allows you to support 3-D animation, full-color graphics, and surround sound for the ultimate in gaming experiences.
Enhanced User Interaction
Accessibility tools helps users who are disabled or impaired use their operating system better. These tools vary between different versions of Windows but they all play their part facilitating better us of Windows for the disabled user.
The Accessibility Wizard
The Accessibility Wizard will help to set-up Me to better serve the user’s viewing, listening, and/or mobility needs.

A+ Training & Test Preparation Guide
Specialized Solutions, Inc. 190
Accessibility Wizard
Enhanced Internet Use
What would a multimedia machine be without better Internet support? Me comes with an advanced version of IE and video conferencing capacity.
Internet Explorer 5.5
IE 5.5 allows an Internet experience that is both straightforward and easy to use. It has an improved HTML display that displays web pages more quickly.
Dial-up Networking
Me supports dial-up networking in the same way that 9x does. It allows you to interact with other computers with a modem or on the network.

Chapter 6 –Windows Me
Specialized Solutions, Inc. 191
Dial-up Networking
NetMeeting 3.1
NetMeeting supports video conferencing and file sharing over a network.
NetMeeting

A+ Training & Test Preparation Guide
Specialized Solutions, Inc. 192
User-friendly home networking
Because Microsoft wanted to make setting up a home network easier with Windows Me, a home networking wizard was included plus support for wireless networks.
Home Networking Wizard
This greatly simplifies the process of setting up a home network. This makes the process more systematic instead of a troubleshooting process that can only be resolved by a networking professional.
Home Networking Wizard
Internet Connection Sharing (ICS)
Just like Windows 98 and 2000, this allows you to share an Internet connection between computers in your home.
Internet Connection Wizard
This wizard is what appears the first time you double-click the Internet Explorer icon on your desktop. To set up your Internet connection, just select the method of connection, if
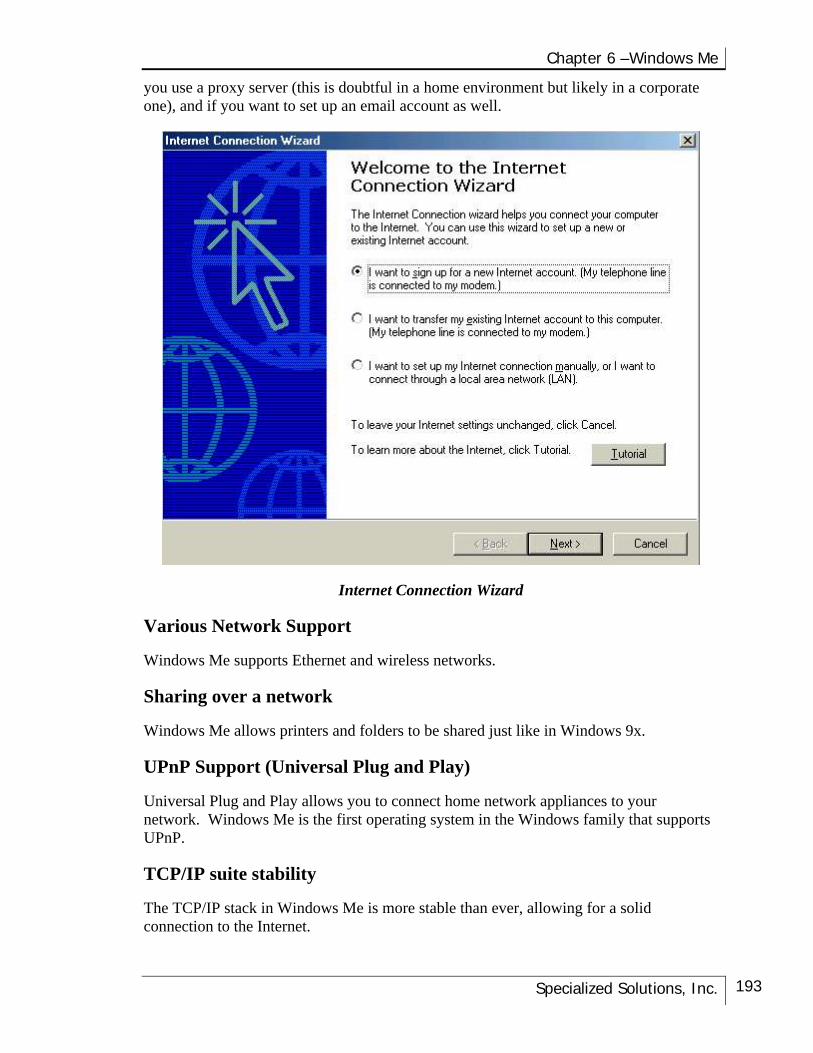
Chapter 6 –Windows Me
Specialized Solutions, Inc. 193
you use a proxy server (this is doubtful in a home environment but likely in a corporate one), and if you want to set up an email account as well.
Internet Connection Wizard
Various Network Support
Windows Me supports Ethernet and wireless networks.
Sharing over a network
Windows Me allows printers and folders to be shared just like in Windows 9x.
UPnP Support (Universal Plug and Play)
Universal Plug and Play allows you to connect home network appliances to your network. Windows Me is the first operating system in the Windows family that supports UPnP.
TCP/IP suite stability
The TCP/IP stack in Windows Me is more stable than ever, allowing for a solid connection to the Internet.

A+ Training & Test Preparation Guide
Specialized Solutions, Inc. 194
System Requirements
Here is a chart with the minimum and recommended system requirements for Me:
Basic Windows Media Player 7
Windows Movie Player
Recommended
Processor Pentium 150MHz processor or better
Pentium II 166MHz processor or better
Pentium II 300MHz processor or better
Pentium II 300MHz processor or better
Memory 32MB of RAM or better
64MB of RAM 64MB of RAM 64MB of RAM
Hard Drive Space
Minimum 320MB free hard-disk space
1GB free hard-disk space
2GB free hard-disk space
2GB free hard-disk space
Modem 28.8 Kbps modem or faster with current Internet connection
28.8 Kbps modem or faster with current Internet connection
56.6 Kbps modem or faster with current Internet connection
56.6 Kbps modem or faster with current Internet connection
Mouse Microsoft Mouse or compatible pointing device
Microsoft Mouse or compatible pointing device
Microsoft Mouse or compatible pointing device
Microsoft Mouse or compatible pointing device
Monitor VGA Monitor SVGA Monitor SVGA Monitor SVGA Monitor
Additional Multimedia Requirements
CD-ROM drive, Sound card, Speakers or headphones
CD-ROM drive, Sound card, Speakers or headphones
CD-ROM drive, Sound card, Speakers or headphones, Good quality microphone, Video capture card
CD-ROM drive, Sound card, Speakers or headphones, Good quality microphone, Video capture card

Chapter 6 –Windows Me
Specialized Solutions, Inc. 195
Control Panel Revisited
The look and layout of Control Panel has changed significantly from 9x. Here is the breakdown of the various areas of the Control Panel in Me. The links available are: Accessibility Options, Date/Time, Internet Options, Dial-Up Networking, Display, Printers, and Add/Remove Programs.
Accessibility Options
Accessibility Options allow those with disabilities to use Windows Me more easily.

A+ Training & Test Preparation Guide
Specialized Solutions, Inc. 196
Keyboard Tab
With this tab, you can use StickyKeys that allow keystroke commands to be performed one key at a time. FilterKeys are available as well, which ignore repeated or brief keystrokes. ToggleKeys generate sounds when pressing the Caps Lock, Num Lock, and the Scroll Lock.
Sound Tab
With Me, you can use SoundSentry to generate visual warnings when your system makes a sound. ShowSounds displays captions for sounds made.

Chapter 6 –Windows Me
Specialized Solutions, Inc. 197
Display Tab
Here you can enable higher contrast dislays for easier reading, and cursor blink rate.
Mouse Tab
If you want to control the pointer with the numeric keypad, you can enable MouseKeys with the Mouse tab.

A+ Training & Test Preparation Guide
Specialized Solutions, Inc. 198
General Tab
Here we can automatically turn off accessibility features after being idle for a fixed period.
Date/Time
Here we can adjust the date and time features of the operating system.

Chapter 6 –Windows Me
Specialized Solutions, Inc. 199
Internet Options
By right-clicking the Internet Explorer icon and selecting properties, you can also access these features.
General Tab
Here, you can change your home page, delete offline content, delete cookies, and track web history.
Security Tab
With this tab, you can determine how stringently you want web content to be filtered.
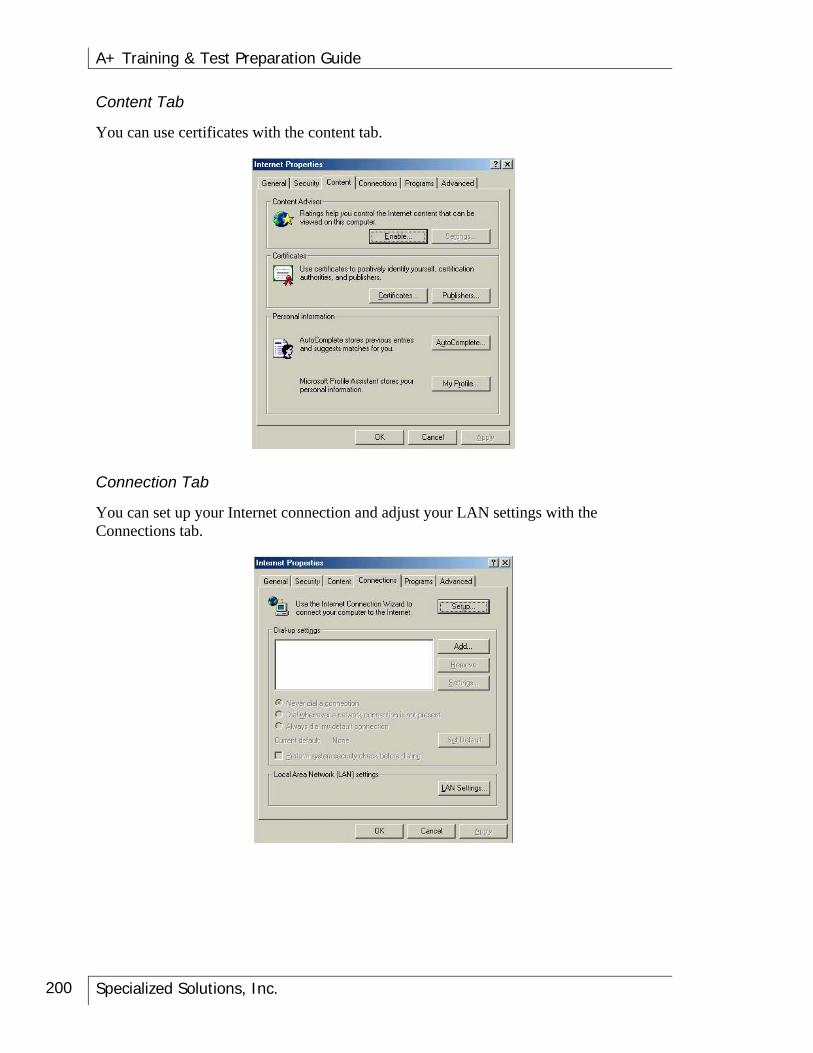
A+ Training & Test Preparation Guide
Specialized Solutions, Inc. 200
Content Tab
You can use certificates with the content tab.
Connection Tab
You can set up your Internet connection and adjust your LAN settings with the Connections tab.

Chapter 6 –Windows Me
Specialized Solutions, Inc. 201
Programs Tab
The Programs tab sets what programs are used automatically for things like e-mail and Internet calls.
Advanced Tab
With the advanced tab, we can enable or disable Internet features at a granular level. It is recommended that you do not make changes here unless you are certain it is necessary.
Dial-Up Networking
Since Dial-up Networking has already been discussed, we won’t beat a dead horse. This applet allows you to configure dial-up networking if you are using a dial-up method with your ISP.

A+ Training & Test Preparation Guide
Specialized Solutions, Inc. 202
Display
The display properties can also be accessed by right-clicking anywhere there is free space on the desktop.
Background Tab
Setting your background or wallpaper can be accomplished from the background tab from the Display properties.
Screen Saver Tab
If you want to change your screen saver or adjust power saving, use the Screen Saver tab.

Chapter 6 –Windows Me
Specialized Solutions, Inc. 203
Appearance Tab
Here you can adjust the appearance and color of your windows.
Effects Tab
If you want to change how your icons look, do it with the Effects tab.

A+ Training & Test Preparation Guide
Specialized Solutions, Inc. 204
Web Tab
The Web tab allows you to show Web content on your desktop.
Settings Tab
Resolution and colors can be adjusted with the Settings tab.

Chapter 6 –Windows Me
Specialized Solutions, Inc. 205
Printers
The printers folder can also be accessed by going to Start | Settings | Printers. Here, you can add printers and set printers as default.
Add/Remove Programs
The Add/Remove programs applet is much the same as it was in Windows 9x. You can uninstall programs, add Windows components, and create a startup disk.
Install/Uninstall Tab
Here, you can install and uninstalls various applications and programs.

A+ Training & Test Preparation Guide
Specialized Solutions, Inc. 206
Windows Setup
If you want to add Windows components, use the Windows Setup tab.
Startup Disk Tab
With the Startup Disk tab, you can create an emergency repair disk, much like you did in Windows 9x.
There is also another option for creating just a boot disk in Me. Follow these steps:
(1. Format a disk (if it isn’t formatted already)
(2. Go to the C:\Windows\Command\EBD
(3. Copy the COMMAND.COM and the IO.SYS files to the floppy

Chapter 6 –Windows Me
Specialized Solutions, Inc. 207
Updates for Windows Me
This feature is automated in Windows Me. The operating system will prompt you whenever there are applicable updates for your computer. If you need to update manually, updates for Windows Me can be found at http://windowsupdate.microsoft.com.
Driver Signing
This feature, also found in Windows 2000 and XP, allows you to check a driver to see if it has been tested and approved by Microsoft for use. Driver signing helps to protect your system from bad or unsigned drivers that might cause problems.
Power Management
Hibernation has been added to power management in Windows Me. If you use the hibernation method, information in memory is saved to hard disk and will be available again when you restart Windows.
Installing Software
Unlike 9x, installing software in Me doesn’t constantly require the installation CD.
Performance Problems in Windows Me
If you are experiencing lock ups or crashes with your Windows Me operating system, there are certain steps you can take to positively address these issues. It could even be a lack of speed. Whatever the result, there are specific areas that might hold the answer to your performance issue.
Hard Disk Issues
To see how much space is available on your hard disk, take the following steps:
(1. Double-click the My Computer icon.
(2. Right-click the hard disk you wish to check.
(3. Select Properties.
(4. If little space remains on your hard disk, select Disk Cleanup in Local Disk Properties.
(5. If, after running Disk Cleanup, you don’t have a significant amount of space, remove old programs you no longer use or purchase a bigger hard drive (or at least a second hard drive for data).
Cross-linked files can be addressed by running ScanDisk and Disk Defragmenter.

A+ Training & Test Preparation Guide
Specialized Solutions, Inc. 208
To identify and correct cross-linked files, take the following steps:
(1. Go to Start | Programs | Accessories | System Tools | ScanDisk.
(2. Click Start
(3. Once ScanDisk is finished running, defrag the hard disk.
(4. Go to Start | Programs | Accessories | System Tools | Disk Defragmenter.
(5. Select the appropriate drive.
(6. Click OK
(7. Click Yes
You can automate these tools using the Maintenance Wizard (Tuneup.exe) tool.
New Hardware and Drivers Issues
You can do a few things if your system performs poorly after installing new hardware or new drivers.
(1. Run System Restore
(2. Physically remove the new hardware
(3. Use the documentation that came with the new hardware to completely remove all drivers
(4. Confirm that the device is on the HCL for Windows Me.
Display Issues
You might be able to improve your display by adjusting hardware acceleration for the video adapter. To adjust these settings:
(1. Go to Start | Settings | Control Panel.
(2. Double-click the System applet.
(3. On the Performance tab, click Graphics.
(4. Move the Hardware Acceleration slider one notch to the left.
(5. Click OK
(6. Click OK again.
(7. Click Yes to restart your computer.

Chapter 6 –Windows Me
Specialized Solutions, Inc. 209
(8. Repeat this process until you notice a performance improvement.
(9. If your computer restarts in Safe mode, repeat steps 1-3, and move the Hardware Acceleration slider until it is one notch to the right of None (the Basic acceleration setting) and then complete the remaining steps.
Performing a “Clean Boot”
A system has you have performed a “clean-boot” on runs without third party drivers, things that automatically load themselves upon restart are disabled, so that you can add the items back that automatically loaded one-by-one until you see a performance decrease (to discover the threshold of what your Me system will allow).
The following are items that are disabled in a clean boot:
• System.ini entries
• Win.ini entries
• Static virtual device drivers (VxDs)
• Startup items
• Environment variables for MS-DOS emulation
How to Perform a Clean Boot in Windows Me:
(1. Click Start, click Run, type msconfig and then click OK.
(2. On the General tab, click Selective startup.
(3. Click to clear all of the check boxes under Selective startup.
(4. On the Startup tab, click to select the StateMgr check box.
(5. Click OK.
(6. When you are prompted to restart your computer, click Yes.
(7. After the computer restarts, Click Start, click Run, type msconfig and then click OK.
How to Return from a Clean Boot State:
(1. Click Start, click Run, type msconfig and click OK.
(2. On the General tab, click Normal startup.
(3. Click OK.
(4. Click Yes when you are prompted to restart your computer.

A+ Training & Test Preparation Guide
Specialized Solutions, Inc. 210
Troubleshooting Windows Me
Troubleshooting with Windows Me isn’t any different than troubleshooting with other Windows operating systems. It is simply a matter of forming a hypothesis and seeing it through to the end.
However, there are occasions in which it is necessary to consult with the manufacturer of the operating system on specific error messages, since those error messages have a tendency to be somewhat vague.
Some examples of specific error messages and odd situations that you might run into using your Windows Me system have been included below. This list is not meant to be an exhaustive one; it is to be used for quick reference.
PROBLEM
If you start your computer, safe mode is selected by default, and you receive the following error message, “Invalid VxD dynamic link call to device 3, service B." Your Windows configuration is invalid. Run the Windows Setup program again to correct this problem.” chances are that your System.ini file is blank.
SOLUTION
To fix this problem, you will need to extract a new copy of the System.ini file to your hard drive.
(1. Restart the computer, and select Safe Mode.
(2. Browse to C:\Windows. (Click Show Files if you don’t see anything)
(3. On the View menu, click Folder Options.
(4. On the View tab, click to clear the Hide file extensions for known file types check box, and then click to select the Show all files check box.
(5. Click OK. (Click Show Files if you don’t see anything)
(6. Right-click System.ini, click Rename, type System.old, and then press Enter.
(7. Double-click the Sysbckup folder in the same folder.
(8. On the View menu, click Details, and then click Name (to sort the files by name).
(9. Find the most recent rb*.cab file from before the date and time that the problem occurred. Double-click the rb*.cab file.
(10. Right-click System.ini, and then select Extract.

Chapter 6 –Windows Me
Specialized Solutions, Inc. 211
(11. In the Choose a Folder in which to save the files box, browse to C:\Windows, and then click OK.
(12. Close the .cab file, and then browse to C:\Windows.
(13. Double-click System.ini. If System.ini is blank, repeat steps 9 through 12, using the next most-recent .cab file.
(14. Close System.ini, and then restart the computer.
PROBLEM
Upon starting Windows Me, you get the following error message, “Not enough extended memory available to run Windows. Quit one or more applications to increase available memory or restart your computer. Press any key to continue...” The cause of this error is when the System.ini file contains too many duplicate [TTFontDimenCache] entries.
SOLUTION
You will need to remove those duplicate entries in the System.ini file. Take the following steps:
(1. Create a Startup Disk.
(2. Insert the Startup disk and restart the computer.
(3. At the command prompt, type c:, and then press Enter.
(4. Type cd\Windows, and then press Enter.
(5. Type copy system.ini system.old, and then press Enter.
(6. This creates a backup copy of the System.ini file with the name System.old.
(7. Type edit system.ini, and then press Enter.
(8. Scroll to the [TTFontDimenCache] section of the System.ini file.
(9. Delete all duplicate entries under [TTFontDimenCache] (This includes duplicate [TTFontDimenCache] headings).
(10. The [TTFontDimenCache] section should appear as follows:
[TTFontDimenCache]
0 4=2 4
0 5=3 5
0 6=4 6

A+ Training & Test Preparation Guide
Specialized Solutions, Inc. 212
0 7=4 7
0 8=5 8
0 9=5 9
0 10=6 10
0 11=7 11
0 12=7 12
0 13=8 13
0 14=8 14
0 15=9 15
0 16=10 16
0 18=11 18
0 20=12 20
0 22=13 22
(11. On the File menu, click Save.
(12. To do this by using keyboard commands, press ALT+F to open the File menu, and then press S to save the file.
(13. On the File menu, click Exit.
(14. To do this by using keyboard commands, press ALT+F, and then press X.
(15. Remove the Startup disk, and restart the computer.
PROBLEM
Your desktop appears white and gives you the following message, “Explorer has caused an error in Browseui.dll”. You receive a prompt to change the desktop settings because Active Desktop is turned off. However, when you try to change the settings, the same message appears, then the computer hangs.

Chapter 6 –Windows Me
Specialized Solutions, Inc. 213
SOLUTION
Running the Registry Scan utility can solve this problem. Take the following steps to resolve the problem:
(1. Restart your computer with the emergency startup disk.
(2. Select Start Computer Without CD-ROM Support, and then press Enter.
(3. At the prompt, type scanreg /fix, and then press Enter.
(4. After the ScanReg process is complete, restart your computer.
PROBLEM
After installing Windows Me, you might get a blue screen with the following message, “msgsrv32 has caused an error in mmsystem.dll.” This occurs if the Setupx.dll file is damaged.
SOLUTION
Here’s how to fix the problem:
(1. Go to Start | Search | For Files and Folders.
(2. In the Search for files or folders named box, type setupx.dll, click Local Hard Drives in the Look in box, and then press Enter.
(3. Right-click the Setupx.dll file, select Rename, type setupx.old, and then press Enter.
(4. Extract a new copy of the Setupx.dll file to your computer.
PROBLEM
If you try to run FDISK or ScanDisk, you receive the following error message, “No fixed disks present.”
This can occur even if POST senses the drive. The reasons vary as to why you might get this message. It could be that the hard drive or its cable is bad, the hard drive is heating up excessively, or that the drive’s jumpers are misconfigured.
SOLUTION
Contact your hard drive manufacturer. It is doubtful that it has anything to do with the operating system.
PROBLEM
If you have more than 512 MB of physical memory in your Windows Me machine, you might get the following message if you open a command prompt window,

A+ Training & Test Preparation Guide
Specialized Solutions, Inc. 214
“There is not enough memory available to run this program. Quit one or more programs, and then try again.”
It is also possible that the machine will hang and produce the following message, “Insufficient memory to initialize windows. Quit one or more memory-resident programs or remove unnecessary utilities from your Config.sys and Autoexec.bat files, and restart your computer.”
Vcache (the Windows 32-bit protected-mode cache driver) determines the maximum cache drive. If you RAM exceeds 512 MB, it is possible that the cache size can be so large that Vcache eats up all of the memory addresses in the system arena, which leaves no virtual memory for such things as a prompt window, which is essentially a virtual machine.
SOLUTION
You have three options here. You can use the MaxFileCache setting in the System.ini file to reduce the maximum amount of memory that Vcache uses to 512 megabytes (524,288 KB) or less.
You can also use the System Configuration utility to limit the amount of memory that Windows uses to 512 megabytes (MB) or less.
Reducing the amount of memory that is installed in your computer to 512 MB or less is also an option, just not a very pleasant one.
PROBLEM
You need to reset your network configuration on your Windows Me computer.
SOLUTION
(1. Begin by downloading the networking patch found at the following URL: http://support.microsoft.com/support/kb/articles/Q272/9/91.ASP.
(2. Go into Control Panel
(3. Double-click the Network applet
(4. Ensure that the following are installed:
• Client for Microsoft Networks
• Your Network adapter
• TCP/IP
• File and Printer Sharing for Microsoft Networks
(5. Double-click on Client for Microsoft Networks.

Chapter 6 –Windows Me
Specialized Solutions, Inc. 215
(6. Make sure Log on to Windows NT domain does not have a check in the box next to it.
(7. Select Logon and restore network connections.
(8. Click OK.
(9. Double-click on your network adapter
(10. Click the Bindings tab
(11. Make sure TCP/IP is listed and checked.
(12. Click OK
(13. Double-click on TCP/IP
(14. Click on the Bindings tab
(15. Uncheck File and Printer Sharing
(16. Click on the Advanced tab
(17. Make sure that the value is set to “No” where it says, “Allow Binding to ATM”.
(18. Ensure the box at the bottom of the window that says, “Set this protocol to be the default protocol,” is checked.
(19. Click OK.
(20. Double-click on File and Printer Sharing for Microsoft Networks.
(21. Click once on Browse Master.
(22. Ensure that it is set to Automatic.
(23. Click once on LM Announce.
(24. Ensure that it is set to NO.
(24. Click OK.
(25. Under the ADD button, a line reads “Primary Network Logon”.
(26. Click the down arrow in the window below the line and select “Windows Logon”.
(27. Below that, you will find a button labeled “File and Print Sharing” and click it.
(28. Ensure that “I want to be able to give others access to my files” is checked.
(29. Ensure that “I want to be able to allow others to print to my printer(s)” is checked.

A+ Training & Test Preparation Guide
Specialized Solutions, Inc. 216
(30 Click OK.
(31. Click on the Identification tab.
(32. Change your workgroup name to WORKGROUP.
(33. Click on the Access Control tab.
(34. Ensure that share-level access control is selected.
(35. After rebooting your PC, select what resources you want to share.
(36. To share the C: drive, double-click the My Computer icon, Right-click on the C: drive, click on the “Sharing” tab and select Shared As, and click OK.
(37. For sharing printers or directories, right-click on the printer you want to share, click on the “Sharing” tab select Shared As, and click OK.
(38. After rebooting, you should be able to double-click My Network Places, then double-click Entire Network, and click the View The Entire Contents Of This Folder link.
(39. If it says Hide The Contents Of This Folder, it was done correctly.
(40. The WORKGROUP should now be visible here.
(41. If you do not see this, perform the following steps to troubleshoot the problem.
(42. Click Tools.
(43. Click Folder Options.
(44. Click the View tab.
(45. Ensure that “Automatically search for network folders and printers” is checked.
(46. Click Apply.
(47. Click OK.
(48. Close all windows.
(49. Click Start.
(50. Click Run.
(51. Type REGEDIT and click OK.
(52. Click the '+' symbol next to Hkey_Current_User.
(53. Click the '+' symbol next to Software.
(54. Click the '+' symbol next to Microsoft.

Chapter 6 –Windows Me
Specialized Solutions, Inc. 217
(55. Click the '+' symbol next to Windows.
(56. Click the '+' symbol next to Current Version.
(57. Click the '+' symbol next to Explorer.
(58. Click the '+' symbol next to NetCrawl.
(59. Click on the yellow folder next to Printers.
(60. With the exception of the “(Default) value not set” item, select each item listed in the right-hand window and delete each one.
(61. Underneath the “Printers” folder, there is a “Shares” folder.
(62. Repeat the steps you performed with the “Printers” folder.
(63. Click Registry at the top of the window.
(64. Click Exit.
(65. Re-boot.
PROBLEM
When you try to update your Windows Me machine, you receive the following message, “Your organization has decided to provide software updates internally rather than through Windows Update. To download updates for your Windows computer, please see your Network Administrator".
You will generally see this message if the wupdinfo.dll file is either missing or damaged.
SOLUTION
To restore the wupdinfo.dll file, take the following steps:
(1. Go to Start | Search | For Files and Folders
(2. Type wupdinfo.dll into the Named field
(3. Ensure that it is looking at the C: drive and click Search Now
(4. When it finds the wupdinfo.dll file, right-click the file, and rename it wupdinfo.old
(5. If the file is not found, continue with the following steps
(6. Close the Search window
(7. Click on Start
(8. Click Run and type MSCONFIG

A+ Training & Test Preparation Guide
Specialized Solutions, Inc. 218
(9. Click OK
(10. This brings up the System Configuration Utility
(11. Select the General tab
(12. Click on "Extract File"
(13. Type wupdinfo.dll in the blank
(14. Click Start
(15. Click the down arrow to the right of the Restore from box and this should show the path to your install files, if not browse to their location (it may be on the installation CD)
(16. Next, click the Browse button to the right of the "Save files in" box
(17. Browse to the C:\Windows\system directory
(18. Click OK
(19. Click OK again
(20. When the file has been extracted successfully, go to Start | Run and type in "regsvr32 wupdinfo.dll"
(21. Click OK to register the file
PROBLEM
Your firewall software program tells you that Explorer.exe is trying to connect to 239.255.255.250 port 1900.
SOLUTION
If you receive this message, uninstall Universal Plug and Play.
PROBLEM
You double-click on My Network Places, and then double-click on Entire Network and receive the following error message, “Cannot browse network.”
SOLUTION
Here’s how to fix this problem:
(1. On the computer that will be up the most often, go into Control Panel
(2. Double-click the Network icon

Chapter 6 –Windows Me
Specialized Solutions, Inc. 219
(3. Double-click File and Printer Sharing for Microsoft Networks
(4. Where it says Browse Master, set it to enabled
(5. On all the other computers on the network, set the above setting to disabled, so that only one computer is running with Browse Master enabled.
Note: for an exhaustive list of errors that can occur with Windows XP, go to http://support.microsoft.com.
Uninstalling Windows Me
If you are having issues with Windows Me after upgrading, you might be able to revert to your previous version of Windows.
To actually uninstall Windows Me, you will have had to have saved the uninstall information during the initial setup process. If you used the Converter tool and changed the file system to FAT32, you won’t be able to uninstall Me. It is also unadvisable for you to attempt to uninstall Me if your partition information has changed. You will also need to reinstall software that you placed on your computer after the upgrade.
You can uninstall Windows Me from either GUI or command prompt. Here’s how to do both:
Uninstalling Me from GUI:
1. Make sure that all programs are shut down.
2. Navigate to the Control Panel (Start | Settings | Control Panel)
3. Select the Add/Remove Programs applet.
4. With the Install/Uninstall tab selected, click Uninstall Windows Millennium Edition.
5. Double-click Uninstall Windows Millennium Edition.
6. Click Yes.
7. Click Yes again (to run ScanDisk)
8. Click Yes one more time.
Uninstalling Me from a command prompt:
1. Start your computer with a startup disk (you can use the one created during the Me setup process).
2. At the Microsoft Windows Millennium Startup menu, select Minimal Boot and press Enter.

A+ Training & Test Preparation Guide
Specialized Solutions, Inc. 220
3. Change to the C: drive (type C: and press enter).
4. Change to the C:\Windows\command directory (type cd windows\command and press Enter).
5. Type uninstall.exe and press Enter.
6. Select Yes for the prompts that follow.
Note: The files that are contained in the Windows directory, the Desktop directory, and the Favorites directory will be retained during the uninstall process.
Support for Windows Me
If you want support for Windows Me, you can go to http://support.microsoft.com. Support for 98, Me, 2000, and XP products can be found here. With support, you can search the Knowledge Base, download software, contact Microsoft, or visit the Product Support Centers. This valuable tool should not be overlooked.

Chapter 6 –Windows Me
Specialized Solutions, Inc. 221
Summary
Even though Windows Me was Microsoft’s first attempt at a multimedia-centered operating system, it has definitely made its impact on their latest operating system platform with the focus on heightened audio and video experiences.
Even though Windows Me looks a lot like Windows 2000, you will have to upgrade to Windows 2000 for the full functionality of Windows 2000. Remember that Me is built on 9x, not 2000.
The following are key points from this chapter:
• Windows Me offers more protection through things like System Restore and system file protection
• Windows Me offers enhanced multimedia applications like Windows Movie Maker and Windows DVD player
• Windows Me offers increased networking and internet capabilities like NetMeeting, Home Networking Wizard, ICS, and UPnP

A+ Training & Test Preparation Guide
Specialized Solutions, Inc. 222
KEYWORDS Exercise
Define each of the following keywords. Hint: There’s a glossary in the back of this book.
Keyword Definition
Smart Menus
Help and Support
System File Protection
System Restore
Windows Movie Maker
Windows Media Player
DirectX 7
ICS
UPnP

Chapter 6 –Windows Me
Specialized Solutions, Inc. 223
Review Questions Chapter 6
1. What does system restore allow a user to do?
2. What types of files does Windows Movie maker produce?
3. How does Windows Explorer in Me recognize digital cameras?
4. What is the path you take to find the DVD player in Windows Me?
5. With what does the Accessibility Wizard help the user?
6. What does NetMeeting support?
7. What are the new links available for Control Panel in Windows Me?
8. What are StickyKeys?
9. What does SoundSentry do?
10. What is the executable used to uninstall Windows Me?

A+ Training & Test Preparation Guide
Specialized Solutions, Inc. 224

Chapter 7 – Windows NT
Specialized Solutions, Inc. 225
Chapter 7 – Windows NT
Most computer users are familiar with the Windows 9x graphical interface and are comfortable using windows-based operating systems. In fact, few users are able to distinguish between a Windows 98 interface and a Windows NT interface. Windows 95, Windows 98, and Window NT all use the same GUI. Because of this, as a proficient user of Windows 9x, you will have no problem running applications and navigating the Windows NT environment.
If this is true, you may ask, why is Windows NT so important? Two fundamental differences distinguish Windows NT from Window 9x. First, it includes a network operating system. Second, is its increased security.
In this chapter, we are going to explore those attributes that distinguish Windows NT from the Windows 9x operating systems.
Network Operating Systems
Network operating systems (NOS) are specialized operating systems designed to integrate computers in a networking environment. Some network operating systems are intended to work with an existing operating system that runs the computer only, and others are designed to run the computer as well as the network interfaces.
Not that long ago, network operating systems were designed to operate on top of an existing operating system. A computer needed two sets of software in order to function in a networking environment. Today, most networked computers run software that was specifically designed to run both the computer’s stand-alone functions as well as the networking functions.
Hardware resources such as RAM, processor time, hard disk space, and peripherals are all controlled by the operating system (the software). The operating system is also responsible for the running of applications (e.g. word-processing, spreadsheet and database programs). The main objective is to make sure that the hardware and the applications are all compatible with each other, as well as the operating system. The network operating system is responsible for connecting to a network and managing communication between other computers on the network. Windows NT integrates the features of an operating system and a network operating system.
In a network a computer must be either a server or a client. Windows NT Server is a server operating network operating system (NOS) and Windows NT Workstation is the client software.

A+ Training & Test Preparation Guide
Specialized Solutions, Inc. 226
Server/Client Software
In a peer-to-peer network, the computers act as both a client and a server. However, it is necessary to have an operating system that can perform in this environment. In a Server-based network, the purpose of a network operating system is to connect all devices on a network (computers and peripherals) and to coordinate their use. The NOS also provides accessibility and security for all devices on a network. Some network operating systems require that different versions be installed depending on whether a computer is the server (provides resources remotely over a network) or a client (provides resources locally).
Two types of networking software must be considered:
Client Software
Server Software
Client Software
If you type a command for your stand-alone computer to perform a task, the command is processed over the computer’s internal CPU via the computer’s local bus. However, if you were requesting resources or services that exist on a remote server, the operating system has to have the capability to redirect (forward) the request away from the local bus, out onto the network, and to the server. The component that handles these requests is called the redirector. The Windows 9x family of operating systems is considered client software.
Server Software
As their name implies, Servers exist to serve. They process requests from clients for resources, such as files and peripherals. They are the storage facility for the bulk of the data in a network environment, and as such are an excellent point from which to centrally manage a network. Unlike most client software, server software includes services for the following:
• Managing User Accounts
• Security
• Data Protection
Managing User Accounts
Servers make it possible to manage users from a central location. Users are required to enter a password before they can log on and gain access. Administrators set up and manage user accounts and passwords.

Chapter 7 – Windows NT
Specialized Solutions, Inc. 227
Security
Administrators can set up the accounts to determine who gets privileges to what resources and change them as needed (including denying access). The server keeps track of who is logged onto a network and what resources have been (or are being) accessed.
Data Protection
As we already discussed, most of the data is stored on the server. This makes it an excellent point from which to perform regular backups. Most network administrators provide some sort of fault-tolerance system on the server. At the very least, the server should be attached to an uninterruptible power supply (UPS). In a network with multiple servers, a process called replication performs data protection. Replication is simply making a copy of the data stored on one server on another server. This way, if one server goes down, the other server can take over immediately.
Windows NT – The Beginning
As with all software, Windows NT (New Technologies) is part of an evolutionary path. It got it roots from the Windows 3.0 operating system.
Windows for Workgroups (Windows 3.11)
Windows for Workgroups is a version of Windows 3.1 that included the capability to run a peer-to-peer network. This version included an E-mail program (Microsoft Mail) and a scheduling program (Schedule+) in its suite.
With these NOS, a group of computers was connected in a Workgroup, allowing files and peripherals to be shared. Resources have to be publicly listed as available for sharing in order for other users to see (and therefore use) them. Drive letters are assigned to shared directories, peripherals, and a redirector routes the requests to the proper location of the resource. Windows for Workgroups is compatible (if in a limited way) with NetWare.
Warp Connect
OS/2 was a joint project with IBM and Microsoft. After this project failed to meet their expectations, they dissolved the relationship. Microsoft went on to develop Windows NT and IBM released OS/2 Warp.
Warp Connect is used to combine OS/2 Warp and WIN-OS/2 peer-to-peer networking. This provides a more reliable network with better security than Windows for Workgroups.

A+ Training & Test Preparation Guide
Specialized Solutions, Inc. 228
Windows NT
Windows NT was released in the summer of 1993. It distinguished itself by addressing the professional market, which was becoming saturated with Windows 3.0. From its beginnings, it grew to its present form Windows 4.0. It is currently the most popular software for the business-networking environment.
Windows 2000
Windows 2000 is Microsoft’s replacement for Windows NT 4.0. Originally, it was going to be called Windows NT 5.0. The development time, however, exceeded what was anticipated, a new look and feel was developed, so the name was changed.
Microsoft Windows NT Network Operating System
The NT technology actually evolved from a project that was jointly developed by IBM and Microsoft (OS/2). Microsoft released the Windows NT operating system and a network operating system version, Windows NT Advanced Server, in 1993. Today, Windows NT has two versions: Server (the server software) and Workstation (the client software). Although Server and Workstation can both operate as either stand-alone or network systems, Server is much more powerful so that it may provide network management.
Windows NT’s first version was 3.1 (as in Windows 3.1) and it used the same graphical interface as Windows 3.1. Windows NT 3.5 and 3.51 followed. With these versions, the differences between Server and Workstation became apparent and NT began to use network groups called domains. NT 4.0 uses the same interface as Windows 95.
Hint: if you want to join a domain, go to System Properties and adjust the computer’s identification. You will need administrative rights.
NT’s architects had the following design goals in mind when they were starting to work on NT:
• Portability: With the addition of a new HAL (Hardware Abstraction Layer) the Operating System could be ported to a new hardware platform very quickly.
• Reliability: Since hardware was insulated from the applications by the system and the HAL, there would be less interference and crashes.
• Extensibility: Easy to patch, since pieces and parts of the system could be replaced by things called “Service Packs.” It didn’t require a whole new operating system revision just to patch small things.
• Compatibility: Standard system calls, dubbed “APIs”, would provide a set of application programming interfaces for applications and services.

Chapter 7 – Windows NT
Specialized Solutions, Inc. 229
• Performance: Speed and stability by design, programmed in C and C++ and only using assembly code in things like the command line interface.
Features of Windows NT include:
• Preemptive Multi-Tasking: This causes the applications to be swapped out.
• 32-Bit Addressing: Intel’s IA-64 or Merced chip is the chosen 64-bit processor. Compaq has quit jointly developing the Alpha processor support for 64-bit NT with Microsoft.
• Massive Multiple Processor Support: NT still only works well with up to eight processors. Multiple processor support is a function of the OS and the chipsets involved. The “Zero” processor takes on the function of watching over all the processors and their processes, which can slow down that processor and the whole machine, if not developed and implemented properly.
• Natively Runs in GUI Mode: Windows NT does not allow running the OS in command line mode. It was developed to go into GUI mode during the initialization of the OS and stay there. There is a command processor for DOS-oriented programs and utilities, called “CMD.EXE.” This command processor is fully 32-bit and very powerful.
• Win32 Subsystems Provides GUI: Win32 is the main subsystem on NT and all DOS and Windows on Windows 16-bit applications run under the Win32 subsystem.
• User-level Security: Provides user-level security for login and access to shared resources.
Windows NT File Services
Windows NT Server may be configured to store each Workstation’s directories in order to provide centralized data management and backups. Files in Windows NT may be shared by using a simple file sharing method, similar to sharing files on a peer-to-peer network. Each Workstation or Server publicly sharing a directory on the network performs this type of sharing. The attributes such as Read, Change, Full Control, or No Access may be set on the directory. You must have administrative privileges in order to share anything on a Windows NT network.

A+ Training & Test Preparation Guide
Specialized Solutions, Inc. 230
In order to take maximum advantage of the security features in Windows NT, another method of sharing must be used. With this method, you may assign directory and file-level permissions to the data, allowing restricted access to individuals or groups. The NT file system (NTFS) must be used in order to take full advantage of NT’s security features. The advanced security features of NT are not available if you choose the DOS file system (FAT – File Allocation Table) during installation. It is possible to use both the NTFS and FAT file systems as long as they are in different partitions on the hard drive. A disadvantage of this is that anyone not using NTFS cannot recognize NTFS directories, and it is limited to the publicly shared files mentioned earlier.
Windows NT Security
Security was a major concern in the development of NT. NT employs domains to deal with this problem. A domain is simply a group of workstations with a shared security database. A domain controller is assigned to each network. This server maintains and manages all accounts, permissions, and user rights. Rights must be assigned to users in order for them to use any resources or perform any tasks in NT.
The Windows NT security model consists of four components (Logon, Local Security Authority, Security Account Manager, and Security Reference Monitor).
Logon
Unlike Window 9x, Windows NT requires that all users logon with a valid user name and password. Once you complete the logon, the information is passed to the Local Security Authority (server that contains the security information) for authentication. After authentication, the user will be given access to all the files and services that have been authorized by the network administrator.
Unlike Windows 9x, you must logon on with an account. You cannot just close the logon dialog box and enter the operating system or enter a new user name and password. A network administrator must assign user names and passwords. Once an administrator assigns a user name and password, it will generate a user security ID (SID).
One unfamiliar characteristic of this logon is that a user must press [Ctrl][Alt][Delete] to initialize the process. For most Windows 9x users this is very awkward since this is the keystroke used to reboot the operating system. The reason for this is to prevent “Trojan-Horse” programs from gaining access to the operating system.
A successful logon will generate an access token. This token will provide access to everything that the user has permission to use. When the session is terminated, the access token is deleted.

Chapter 7 – Windows NT
Specialized Solutions, Inc. 231
Local Security Authority (LSA)
The function of the Local Security Authority (LSA) is to verify the user name and password by querying the Security Accounts Manager (SAM).
Security Account Manager (SAM)
The SAM is a database that keeps track of all the security for the domain. This includes user names, password, and permissions. If the NT computer is operating as a stand-alone server, the SAM will be located on the local computer. If the computer is part of a Windows NT domain, the SAM will be located on one server that has been designated as the PDC (Primary Domain Controller).
Security Reference Monitor
The function of the Security Reference Monitor is to check access tokens to verify a users access to a resource.
Workgroup or Domain
Windows NT networks are operated on either a workgroup or domain model. These models define how the computers in the network communicate and more importantly, who is responsible for the security of the network.
Workgroup Model
A workgroup model is simply a group of computers sharing a common connectivity. They all use the same protocols, standards, and physical connections. All of the computers in the workgroup are equal and each user is responsible for his/her own security. Because of this, they are easy to install and implement. This is the ideal model for a home or small business where there are less than 10 computers. A workgroup is the same thing as a peer-to-peer network.
Domain Model
Domains are designed for large numbers of computers requiring centralized security. As with a workgroup, they share common connectivity, but one computer is designated as the PDC (Primary Domain Controller). Normally, the PDC is a server that is not used by anyone. Its sole function is to monitor and control the security of the domain. Windows NT can support up to 40,000 users on a single domain. The PDC is unique to the NT environment.
Note: Multiple domains and workgroups can exist on a common network. However, the number of computers on a network talking at the same time will affect network performance. This is called reducing the bandwidth.

A+ Training & Test Preparation Guide
Specialized Solutions, Inc. 232
Windows NT Print Servers
Any workstation or server may perform as a print server in NT, which can reduce the load on the network. A printer need only be shared to the network to be accessible to anyone on the network. (Of course, a user still has to be assigned the permission to access a resource.) Installing a network printer is just like installing a local printer, except that you are asked if it is to be a network or local printer. Even if you are installing a local printer, you are given the option to share it to the network. Remember, more than one printer can be installed on a machine. Printing is as easy as selecting the printer that you want to use (assuming that you have the appropriate permissions).
Note: If your printer kicks out pages with funny-looking symbols, check to see if the cable is loose and confirm that appropriate drivers are installed. If the spooler service hangs or overloads, simply restart it. You can also print directly to the printer in Spool settings.
NTFS
One of the main reasons that Windows NT can provide enhanced security features is that is uses the NTFS (New Technologies File System) instead of FAT. If you install Windows NT on a FAT partition, you will compromise some of its security features.
Benefits of NTFS:
• Support for long file names (up to 255 characters)
• Not case-sensitive
• Recoverability – uses transaction logging to automatically log all file and directory updates so that in case of a power failure or system failure, this information can be used to redo failed operations.
• Security – local security for protecting files and directories.
• Compression – supports compressed files and directories.
• Large Partitions – supports up to 16 exabytes partitions.

Chapter 7 – Windows NT
Specialized Solutions, Inc. 233
A comparison of FAT and NTFS:
Feature FAT NTFS
File Names length 255 255
Compression Support No Yes
Dual-boot capabilities Yes No
Partition Size 4 GB 16 EB
Recommended Partition Size <200 MB > 100 MB
Use on Floppy Yes No
Recoverable No Yes
HPFS
HPFS (High Performance File System) is OS/2’s preferred native file system or disk format. Microsoft and IBM jointly created this file system. It was designed to access the large (at the time) hard drives. This new file system was the first to introduce long file names, increased security, and better organization. It was the forerunner of NTFS.
Windows NT Services
There are many services available in NT to manage network flow:
• Messenger Service monitors the network and provides pop-up messages for the user.
• Alerter Service sends the notifications that are monitored by the messenger service.
• Browser Service provides a list of all available domain and workgroup servers.
• Workstation Service is the redirector service in NT.
• Server Service provides access to network resources.
Interoperability
Interoperability is the ability for the operating system to function or communicate with other operating systems. In the case of NT, this means its ability to interact with Novell NetWare.
Since Novell NetWare was the “big kid on the block” when NT came on the scene, Microsoft wanted to make NT as compatible with NetWare as possible. The following is a list of services included with NT to ensure NetWare compatibility:

A+ Training & Test Preparation Guide
Specialized Solutions, Inc. 234
NWLink is actually a clone of Novell’s IPX/SPX protocol and is used for communication between NT and NetWare.
GSNW (Gateway Services for NetWare) provides the gateway between an NT domain and the NetWare server. This is necessary because all NT workstations in a domain must connect to a NetWare server through a single contact point. Network performance will decrease as the number of computers accessing the gateway increases.
CSNW (Client Services for NetWare) is the NT service that allows workstations to use file and print services on a NetWare server. It is part of the GSNW service.
FPNW (File and Print Service for NetWare) is a utility that enables NetWare clients to access NT file and print services. This software does not come with NT and is purchased separately.
DSMN (Directory Service Manager for NetWare) is another add-on utility that is used to integrate user and group account information between the two operating systems.
Migration Tool for NetWare is a tool used to convert from NetWare to NT. Its purpose is to move (called migrating) NetWare account information to NT’s domain controller.
Installation
Installation of Windows NT is similar to any of the Microsoft operating systems; however, there are some notable exceptions.
Hardware Compatibility
The number one problem when it comes to installing Windows NT is hardware compatibility. NT is hardware sensitive (repeat this statement to yourself three times). First, Windows NT 4.0 is NOT plug-and-play compatible. That is not to say that you cannot install plug-and-play hardware, it just means that you will have to configure the device manually (through software). Second, Windows NT will not work on all hardware (repeat this statement to yourself three times). With that said, here is what you must do before installing Windows NT.
• Make sure that your hardware is on the Microsoft Hardware Compatibility List (HCL). Check the Microsoft web site. Otherwise, drivers will have to COM from the manufacturer to install the device if you have to use it.
• Do you meet the minimum requirements for the processor, RAM, and hard disk space? If you really want to run, you had better exceed these requirements.
• Is this an upgrade or a clean installation? You will have a better chance of success with a clean installation.
• Know your file systems (FAT or NTFS).

Chapter 7 – Windows NT
Specialized Solutions, Inc. 235
• Are you installing to a workgroup or a domain?
• Know the location of the installation files. They can be on floppies, CD-ROM or on a network.
Windows NT Minimum Requirements
The following are the minimum requirements for installing Windows NT as specified by Microsoft:
Windows NT Workstation:
CPU 486DX-33
RAM 12 MB
Free Hard Drive Space 110 MB
Windows NT Server:
CPU 486DX-33
RAM 16 MB
Free Hard Drive Space 125 MB
Installation Options
You will need to consider the type of installation and the source of the installation files before you begin the install process.
Installation Types
You have a choice of three types of installation. The one that you pick will determine the amount of hard drive space you will need, and the options that will be available to you. Remember, regardless of the type of installation, you can always install or uninstall components later.
• Typical – This is the standard installation and is the best choice if you are not sure what you want or expect from Windows NT.
• Portable – Best choice if you are installing on a laptop.
• Compact – Best choice if you have limited hard drive space.
• Custom – Best choice if you know what you are doing.

A+ Training & Test Preparation Guide
Specialized Solutions, Inc. 236
Four different methods can be used to install Windows NT:
• Use three Setup Floppies and a CD
• Use a CD to create the three floppies and then install
• Over a network – creating the three floppies
• Over a network – without three floppies
Windows NT Installation Process
If you are installing Windows NT, and already have an existing operating system (Windows 95 or Windows98), you can install from the CD-ROM. Your operating system must support and have an operating CD-ROM drive. To start the installation, you start the WINNT.EXE file in the \I386 folder of the CD (use the /b switch to avoid being prompted for boot diskettes). This program will:
• Create the three NT Setup Boot disks (you will need three blank, high density formatted disks).
• Create the $WIN_NT$.~LS temporary folder and copy the contents of the I386 folder into it.
• The computer will prompt you to reboot the computer from the first disk. When NT makes the disks, it will make them in reverse order so that #1 will be in the drive when it reboots.
Note: If you are upgrading from an earlier version of NT, you will use the WINNT32.EXE program to start the installation.
Upgrading to Windows NT
You can upgrade almost any computer to run the Windows NT operating system. However, it may not be as simple as upgrading from Windows 95 to Windows 98. First, there are hardware considerations. As stated, Windows NT is hardware dependent. This means that if the hardware is not compliant with the Microsoft HCL, you most likely will not be able to upgrade.
If hardware is not an issue, let’s look at some upgrade scenarios:

Chapter 7 – Windows NT
Specialized Solutions, Inc. 237
Windows 3x
Installing Windows NT on a Windows 3.1 or 3.11 machine is no problem. By default, NT will load into the same directory as the previous version of Windows. When you boot the machine for the first time, you will be given the option to migrate all your Windows 3x settings. The settings for each account will be migrated except the administrators account. If you wish to setup a dual boot system, you will have to install Windows NT in a different directory than the Windows 3x directory. Remember, to dual boot, you must stick with FAT16 partitions.
Windows 9x
You cannot upgrade directly from Windows 9x to Windows NT. That is not to say that you can’t install Windows NT on a Windows 9x computer. What this means is that you must replace Windows 9x with Windows NT. Replacement means starting all over, including reinstalling all the applications. You can do a dual boot, but you will be restricted to the limitations of FAT16.
OS/2
LAN Manager (network operating system from IBM) is most likely to be installed on a HPFS file system. Windows NT does not support this files system so you cannot directly upgrade to Windows NT. The only way to accomplish this, short of starting all over, is to upgrade to Windows 3.5, then convert the HPFS to NTFS, and then upgrade to Windows 4.0. Before trying this, you should get exact instructions from Microsoft.
Installing Service Packs
With the release of Windows NT, Microsoft began releasing service packs to upgrade the operating system. Each service pack corrected common errors found in the software or added new features. These service packs can be downloaded from Microsoft and installed on any NT machine. Be careful, before installing a service pack, make sure that you know what service pack(s) is already installed. In some cases, you cannot skip over one. You must install them in order. The final service pack issued for Windows NT 4.0 is Service Pack 6.
Uninstalling Windows NT
If you find that you need to uninstall Windows NT, you will find that it is not a simple process. You must complete a series of steps in the correct order. The following is a summary of this process:

A+ Training & Test Preparation Guide
Specialized Solutions, Inc. 238
Convert any NTFS partitions to FAT. If the NTFS partitions do not have any system files, you can use the NT Disk Administrator program to remove the partitions. If not, follow this procedure:
1. Restart the computer with the Windows NT Setup Boot Disk.
2. When asked, insert Disk #1.
3. Press Enter at the Welcome Screen.
4. Press Enter to detect the mass storage devices.
5. When asked, insert Disk #3.
6. Press Enter to approve the list of detected mass storage devices.
7. Press Page Down repeatedly, until you reach the last page of the Licensing Agreement.
8. Press F8 to approve the Licensing Agreement.
9. Press Enter to approve the list of detected hardware components.
10. Select the desired installation partition and then press Enter.
11. Specify to convert the partition from NTFS to FAT.
12. When the conversion is complete, press F3 to exit the program and restart the computer.
13. Start the computer with a DOS bootable floppy that contains the system files.
14. From a command prompt, type SYS C: – this will transfer DOS operating system files to the drive so you can boot from it.
15. Remove all the remaining files:
All paging files (C:\pagefile.sys)
Remove all hidden, system, ready-only files – C:BOOT.INI, C:BOOTSECT.DOS, C:\NTDETECT.COM, C:\NTLDR
Delete the winnt_root folder
Delete the Program files\Windows Windows NT folder

Chapter 7 – Windows NT
Specialized Solutions, Inc. 239
Windows NT Boot Process
The Windows NT boot process is quite different from the Windows 9x boot process. First, it uses a different set of boot files.
Boot Files
The following table summarizes the Windows NT boot files.
File Name Operation
BOOT.INI Builds the boot loader menu and can be edited.
BOOTSECT.DOS Loaded by NTLDR if non-Windows NT is started from the Boot Loader Menu.
HAL.DLL Loads the Hardware Abstraction Layer
NTDETECT.COM Detects hardware and builds a hardware list.
NTBOOTDD.SYS Device driver for BIOS-disabled SCSI controllers.
NTLDR NT Loader – loads the operating system. Generates the operating system menu for multiple boots.
NTOSKRNL.EXE Windows NT kernel.
SYSTEM Loads system configuration settings
Hint: If your NTLDR file is corrupt or missing, you should run the Emergency Repair Process, which can fix problems with the boot sector, startup, system files, and the registry.
Boot Process
There are nine steps to a successful startup of Windows NT.
1. Power on: The system microprocessor executes the ROM BIOS code and initiates the POST.
2. Finds a boot sector: Locates the boot device and loads the MBR.
3. Active Partition: The MBR searches the Partition Boot Record (PBR) for the active partition and loads the boot section into memory.
4. NTLDR: Changes processor to a 32-bit linear addressing scheme.
5. NTLDR: Starts a minifile system.
6. NTLDR: Reads the BOOT.INI file and builds the Boot Loader Menu.

A+ Training & Test Preparation Guide
Specialized Solutions, Inc. 240
7. NTLDR: Loads the operating system chosen from the Boot Loader Menu. If no choice is made, the default is loaded.
8. NTLDR: Runs NTDETECT.COM and builds the hardware list.
9. NTLDR: Runs NTOSKRNL.EXE that loads and initializes Windows NT.
NT Startup Disk
Creating a Windows NT Boot Disk is not the same as creating one for Windows 9x. You cannot put enough files on a floppy to start Windows NT. Therefore, you will need to copy the appropriate files to get NT going. These files contain specific information about the hardware for an individual machine; therefore, you will need one for each machine. You must format the disk from a Windows NT machine before copying the files.
The files you need to copy are:
NTLDR
NTDETECT.COM
BOOT.INI
BOOTSECT.DOS
NTBOOTDD.SYS (if present)
Common Boot Errors
The most common boot error occurs when one of the boot files is missing or corrupt. When this happens, you will see a message indicating the file that it couldn’t find. When this happens, copy the file from your startup disk to the C:\ drive. Remember, some of these files are hardware specific and you cannot just copy them from another computer.
The second most common error is a hardware conflict. When this occurs, the progression dots on the blue startup screen will stop or not appear at all. When this happens, boot to the Last Known Good Configuration from the boot menu (accessed by pressing the spacebar).
File Management in Windows NT
As we stated earlier, Windows NT and Windows 9x use the same GUI. Because of this, for most users, there is no difference in using either operating system. Since they use the same GUI, all functions of file management are also identical.
There is one notable exception to this general rule. This exception comes into play with issues concerning security. Remember, one of the main features of Windows NT is security. Therefore, copying and moving files will be subject to any security permissions of the user.

Chapter 7 – Windows NT
Specialized Solutions, Inc. 241
Disk Management in Windows NT
Basic disk management such as formatting a floppy, copying disk, etc. is the same in Windows NT as it is in Windows 9x. There is however, a big difference when it comes to managing partitions. Windows NT uses an application called Disk Administrator when creating, removing, formatting, and viewing disk partitions. It is a graphical tool for managing disk configurations and enables you to do the following: (as long as you have the appropriate administrator permissions of course).
• View physical disk on the system
• View partition sizes
• Create and remove partitions
• Identify free space available
• Identify the file system for each partition
• Create and delete logical drives within extended partitions
• Format a partition
• View logical drives within an extended partition
• Change drive letter assignments
• Save and restore disk configuration information
Disk Administrator
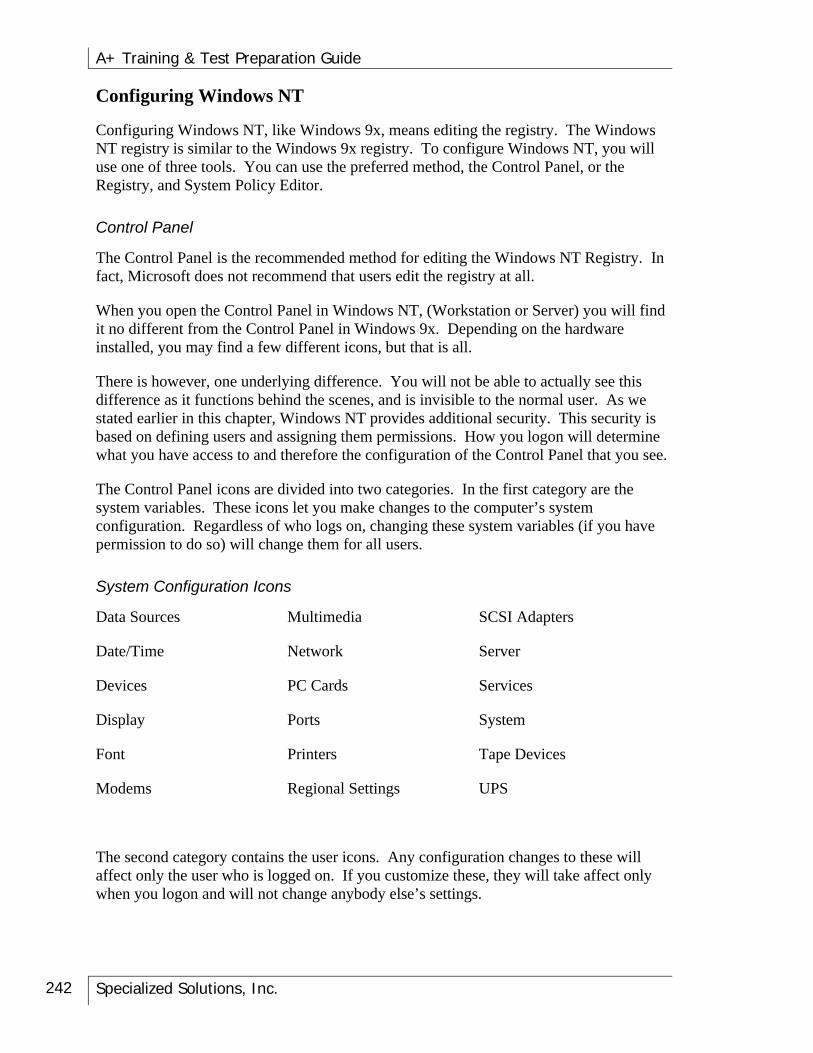
A+ Training & Test Preparation Guide
Specialized Solutions, Inc. 242
Configuring Windows NT
Configuring Windows NT, like Windows 9x, means editing the registry. The Windows NT registry is similar to the Windows 9x registry. To configure Windows NT, you will use one of three tools. You can use the preferred method, the Control Panel, or the Registry, and System Policy Editor.
Control Panel
The Control Panel is the recommended method for editing the Windows NT Registry. In fact, Microsoft does not recommend that users edit the registry at all.
When you open the Control Panel in Windows NT, (Workstation or Server) you will find it no different from the Control Panel in Windows 9x. Depending on the hardware installed, you may find a few different icons, but that is all.
There is however, one underlying difference. You will not be able to actually see this difference as it functions behind the scenes, and is invisible to the normal user. As we stated earlier in this chapter, Windows NT provides additional security. This security is based on defining users and assigning them permissions. How you logon will determine what you have access to and therefore the configuration of the Control Panel that you see.
The Control Panel icons are divided into two categories. In the first category are the system variables. These icons let you make changes to the computer’s system configuration. Regardless of who logs on, changing these system variables (if you have permission to do so) will change them for all users.
System Configuration Icons
Data Sources Multimedia SCSI Adapters
Date/Time Network Server
Devices PC Cards Services
Display Ports System
Font Printers Tape Devices
Modems Regional Settings UPS
The second category contains the user icons. Any configuration changes to these will affect only the user who is logged on. If you customize these, they will take affect only when you logon and will not change anybody else’s settings.

Chapter 7 – Windows NT
Specialized Solutions, Inc. 243
User Configuration Icons
Accessibility Options
Display
Keyboard
Mouse
Sounds
Registry
The Windows NT registry serves the same function as the Windows 9x registry. It is a central database for all system and user configurations. It looks, runs, and is edited the same way the Windows 9x registry is. Editing the registry is done through either the Regedit.exe (16-bit) or Regedit32.exe (32-bit). Both of these programs work equally well, although you will find the Regedit32.exe to have a few more options. If you are going to edit any of the security functions in NT, you will have to use Regedit32.exe. Microsoft recommends that you use Regedit.exe solely for its search capabilities and that you use Regedit32.exe when it is necessary to edit the registry. As with Windows 9x, you will not find either of these programs listed on any of the startup menus. You will have to use the RUN command to activate them.
When you first open the Registry Editor, the first thing you will notice is that the six primary keys are the same for both Windows 9x and NT. What is different, are the sub-keys. For example, the HKEY_LOCAL_MACHINE keys contain special keys for NT security. These keys are the SAM and SECURITY sub-keys:
Sub-keys

A+ Training & Test Preparation Guide
Specialized Solutions, Inc. 244
When Windows NT completes a successful boot, it creates a file called LastKnownGood.reg. This is a backup file of the registry for the last successful boot. If you encounter problems and cannot boot Windows NT, you can boot from this backup by selecting it from the boot menu.
You can use the Registry Editor to configure a remote machine. To do this, you must have remote administration enabled on the machine to be edited. Use the Registry | Select Computer to locate the machine to be edited. Once the connection is made, you can edit either the HKEY_LOCAL_MACHINE or HKEY_USERS keys. If you are logged on as an administrator, you will have access to all the keys.
System Policy Editor (Server Only)
The System Policy Editor is an advanced tool for editing the registry. While this is a more powerful tool, it must be used with caution. It is possible to alter settings that will lock you out of the computer – forever!
You can access the System Policy Editor from the Administration Tools Menu. Once you have the Policy Editor open, you will have to open the registry. To do this, click on File | Open | Registry. You will see two icons (Local Computer and Local User).
System Policy Editor
Each of these icons allows you to access either the system keys or the user keys.

Chapter 7 – Windows NT
Specialized Solutions, Inc. 245
Local User Icons
Once you have entered a set of keys, (you don’t actually see the keys as you do in regedit) you will see a user-friendly hierarchical interface. By clicking on a topic, you can drill down to the settings. Here you will notice that all you have to do to modify a configuration is to put a check in a box (or remove one).
Caution: It is very easy to make mistakes and not even notice, so be careful when using this function.
Troubleshooting Windows NT
Troubleshooting in Windows NT is quite different from troubleshooting in Windows 9x. If you recall, in Windows 9x we used two tools; the System Properties dialog box and System Tools menu. In Windows NT, you will use a different set of tools.

A+ Training & Test Preparation Guide
Specialized Solutions, Inc. 246
System Properties
Let’s first look at the System Properties dialog box.
Notice that this is different from the one we saw in Windows 9x. First, there are six tabs:
General Tab:
This tab identifies the system, registered user, and computer details.
Performance Tab:
This tab lets you adjust the performance scale or configure Virtual Memory and graphics hardware acceleration.

Chapter 7 – Windows NT
Specialized Solutions, Inc. 247
Environment Tab:
Identifies the location for the system and user variable files
Start/Shutdown Tab:
Allows you to configure the startup and shutdown parameters

A+ Training & Test Preparation Guide
Specialized Solutions, Inc. 248
Hardware Profiles Tab:
Provides a way to create hardware configurations that you can choose from at startup
User Profiles Tab:
Identifies the user profiles in the local computer

Chapter 7 – Windows NT
Specialized Solutions, Inc. 249
Administrative Tools
The administrative tools are the Windows NT version of System Tools. There are however, two major differences. First, they are far more powerful. Second, they require administration permission to access. The following is a description of each of the tools available:
Notice that some of them are available only on Windows NT Server.
Administrative Wizard (Server only)
The Administrative Wizard is a shortcut to the “Getting Started with Windows NT Server” program. It provides you access to six different wizards that will simplify configuration of your server. These wizards are: Add User Accounts, Group Management, Managing File and Folder Access, Add Printer, Add/Remove Programs, Install New Modem, Network Client Administrator, and License Compliance.
Administrative Wizard

A+ Training & Test Preparation Guide
Specialized Solutions, Inc. 250
Backup
This menu item provides access to a backup program for backing up your files to a tape backup. You must have a tape backup installed to run the program.
Backup
Disk Administrator
This tool is used to manage disks in an NT environment. Here you can get a graphic presentation of all the drives attached to the machine. From here, you can format disks, partitions drives, change the partitions on drives, and change the file system of the drives.
Note: if you need to create an emergency repair disk in Windows NT, run the RDISK.EXE command.
Disk Administrator

Chapter 7 – Windows NT
Specialized Solutions, Inc. 251
Event Viewer
The Event Viewer is a very powerful troubleshooting tool. It is used to monitor and log all the events that take place on the computer. You can configure three different logs (system log, applications log, or security log). By reviewing these lists, you can determine all activities of the computer. More importantly, an icon that looks like a stop sign will indicate that an event failed.
Note: if a BSOD (Blue Screen of Death) occurs, reboot and go into the system log to view what happened.
Event Viewer

A+ Training & Test Preparation Guide
Specialized Solutions, Inc. 252
License Manager (Server only)
This dialog box provides information about licensing for the enterprise. It is important for network administrators to maintain accurate licensing information. This handy tool will allow an administrator to track various licenses.
License Manager
Migration Tool for Netware (Server only)
As a network administrator, you may have to convert (migrate) Novell NetWare files to Microsoft files. This tool provides access for making that conversion.
Network Client Administrator (Server only)
A network administrator can use this to install or update network client workstations.

Chapter 7 – Windows NT
Specialized Solutions, Inc. 253
Performance Monitor
The same Performance Monitor is found in Windows 9x.
Performance Monitor
Remote Access Admin
This dialog box will allow you to configure the Remote Access capabilities of the computer.
Remote Access Admin

A+ Training & Test Preparation Guide
Specialized Solutions, Inc. 254
Server Manager (Server only)
This dialog box allows you to manage the shared directories and services installed on the computer.
Server Manager
User Manager (Workstation only)
This is the account manager for Windows NT Workstation. Here you can assign accounts and permissions for users of the local workstation.
User Manager

Chapter 7 – Windows NT
Specialized Solutions, Inc. 255
System Policy Editor (Server only)
The System Policy Editor is one of three methods used to edit the Windows NT Registry.
System Policy Editor
User Manager for Domains (Server only)
This is the account manager for Windows NT Server. Here you can assign accounts for users of the local workstation and the domain, if the server is the PDC.
User Manager for Domains

A+ Training & Test Preparation Guide
Specialized Solutions, Inc. 256
Windows NT Diagnostics
This is the equivalent of the device manager in the Windows 9x operating system. It includes nine tabs for identifying and troubleshooting.
Version (NT and installed service pack)
System

Chapter 7 – Windows NT
Specialized Solutions, Inc. 257
Display
Drives

A+ Training & Test Preparation Guide
Specialized Solutions, Inc. 258
Memory
Network

Chapter 7 – Windows NT
Specialized Solutions, Inc. 259
Environment
Resources

A+ Training & Test Preparation Guide
Specialized Solutions, Inc. 260
Services
Dr. Watson
Dr. Watson for Windows NT is a program error debugger that detects and diagnoses program errors, and then logs the resulting diagnostic information. It does this by taking a snapshot of the computer system at the time of the failure. In the event of a program error, Dr. Watson will start automatically. Technical support personnel can use the information logged by Dr. Watson to diagnose problems. It can be found in the C:\Winnt directory. You can use either the standard or advanced view.
In Windows 9x, you must manually start Dr. Watson before being able to use it.
Dr. Watson

Chapter 7 – Windows NT
Specialized Solutions, Inc. 261
Summary
Windows NT is both a computer operating system and a network operating system. The good news is that when we use a Windows NT system and already have experience using the Windows 9x environment, the average user will see very little difference. Both of these operating systems use the same GUI. Therefore, most of what you have already learned by using the Windows 9x operating systems will apply to Windows NT. When it comes to configuration and security issues, we begin to notice that Windows NT is truly a more reliable and better system for the business environment.
The following are key points from this chapter:
• One of the main features of the Windows NT operating system is security.
• The primary basis for converting from Windows 9x to Windows NT is for the enhanced security and it ability to function as a true server in a network environment.
• To take advantage of Windows NT’s new security features, you will have to use the new NT file system (NTFS).
• Windows NT is provided in two formats. Windows NT Workstation is the client version and Windows NT Server is the server version.
• The advantage of using Windows NT Workstation as your client instead of using Windows 98 is that NT Workstation can use the NTFS file system providing more security that the FAT file system of Windows 9x.
• One of the key factors when considering upgrading to NT is hardware compatibly. Windows NT is considered hardware dependent. You must install hardware and software that has been approved for use with the NT system. Without approved hardware and software, you will encounter many problems.
• Troubleshooting and maintaining a Windows NT system is much easier than a Windows 9x system. The NT Administrative Tool is the key to configuring and troubleshooting this operating system. From these tools (in conjunction with the Control Panel), you can configure every aspect of the computer and the network. You will however have to have administrative privileges before you can make many of the changes.

A+ Training & Test Preparation Guide
Specialized Solutions, Inc. 262
KEYWORDS Exercise
Define each of the following keywords. Hint: There’s a glossary in the back of this book.
Keyword Definition
BOOT.INI
BOOTSECT.DOS
Client/Server network
CSNW
Disk Administrator
Domain
Domain controller
DSMN
Event Viewer
FPNW
GSNW
HAL.DLL
HPFS
Interoperability
LSA
Migration Tool for NetWare
NOS
NTBOOTDD.SYS
NTDETECT.COM
NTFS
NTLDR

Chapter 7 – Windows NT
Specialized Solutions, Inc. 263
Keyword Definition
NTOSKRNL.EXE
NWLink
OS/2
Peer-to-peer network
REGEDIT or REGEDIT32
SAM
Security Reference Monitor
Service pack
SYSTEM
User Manager for Domains (Server only)
Windows 2000
Windows for Workgroups
Windows NT
WINNT.EXE
Workgroup
A+ Training & Test Preparation Guide
Specialized Solutions, Inc. 264
Review Questions Chapter 7
1. What are the two formats for the Windows NT operating system?
2. What makes Windows NT Workstation a better client software package than Windows 98?
3. You are planning to study for the Microsoft MCSE program and have a new computer that came with Windows 98 installed. Since you already have many programs and data files that you do not want to lose, you would like to install Windows NT as a dual-boot system. Can you do that, and if so how would you do it?
4. When you install Windows NT, you need to decide whether to use a domain or workgroup model. When making this decision, you are really determining two factors about the computer and network. What are they?
5. What is the SAM in a Windows NT environment?
6. Name three benefits of using NTFS.
7. What are the five services that you need to install to provide interoperability between Windows NT and Novell NetWare?
8. What is the number one problem encountered when installing or upgrading to Windows NT?
9. What are the five files critical to running Windows NT, needed to create the Windows NT boot disk?
10. Every time that Windows NT successfully boots, it creates a special file that you can use in the event that it does not boot the next time. What is the name of that file and what is it?

Chapter 8 – Windows 2000
Specialized Solutions, Inc. 265
Chapter 8 – Windows 2000
Windows 2000 is Microsoft’s latest entry into the realm of operating systems. It is not a single operating system, but a family of operating systems designed to meet the needs of multiple users from the small business environment to the largest corporate enterprise. Windows 2000 is more reliable, more scalable, and easier to deploy, manage, and use than previous versions of Windows. If implemented properly, the Windows 2000 family of products can significantly reduce cost. It is ready for the next generation of applications and provides any organization a strong base on which to build their knowledge management system.
Windows 2000 – The Beginning
The Windows 2000 Family of Operating Systems:
Windows 2000 Professional
Windows 2000 Server
Windows 2000 Advanced Server
Windows 2000 Datacenter
Windows 2000 Professional
Windows Professional (the replacement for NT Workstation) is a reliable operating system that combines the features of Windows 98 with the security and manageability of Windows NT. Windows 2000 Professional is the desktop operating system for businesses of all sizes. The operating system on which we will focus in this chapter replaces Windows 95, Windows 98, and Windows NT Workstation in the business environment.
Windows 2000 Server
Windows 2000 Server provides basic server functions for networks. It is designed to simplify network management. It provides improved network access for branch offices, and is ideal for file and print servers, Web servers, and workgroups.
Windows 2000 Advanced Server
Windows 2000 Advanced Server provides increased scalability and system availability. It is designed for servers used in a large enterprise network and for database intensive work.

A+ Training & Test Preparation Guide
Specialized Solutions, Inc. 266
Windows 2000 Datacenter
Windows 2000 Datacenter supports more memory and more CPUs per computer. It is designed for enterprise applications. Datacenter is the most powerful and functional server operating system, and is designed for large data warehouses, online transaction processing (OLTP), large-scale simulations, and server consolidation projects. Datacenter can support up to 32 processors per computer and up to 64 GB of RAM. It also uses built-in clustering and load balancing.
The History of Windows 2000
Beta 1: September 27, 1997
Beta 2: August 20, 1998
Beta 3 Release Candidate: December 16, 1998
Beta 3 Release Candidate 1: March 17, 1999
Beta 3: April 29, 1999
Release Candidate 1 (RC1): July 2, 1999
Release Candidate 2 (RC2): September 15, 1999
Release Candidate 3 (RC3): November 11, 1999
Final release (RTM): December 15, 1999
MSDN Release: January 19, 2000
Manufacturer Availability: January 24, 2000
Final release: January 24, 2000
Public Availability: February 17, 2000
Windows 2000 Datacenter Server Beta 2: May 23, 2000
Windows 2000 Service Pack 1 Release: July 31, 2000
Windows 2000 Datacenter release: September 29, 2000

Chapter 8 – Windows 2000
Specialized Solutions, Inc. 267
Features and Benefits of Windows 2000 Professional
Windows 2000 Professional comes with many new features. The following identifies a few of them:
Low Cost of Ownership
Windows 2000 Professional reduces the cost of implementation by automated installation and upgrading applications, and simplifying the setup and configuration of client computers. It also uses a familiar interface to reduce support calls.
Better Hardware Support
Professional supports USB and Plug and Play hardware.
Easier to Deploy
Windows 9x and Windows NT 4.0 can be upgraded to Windows 2000. Upgrades are managed through an updated wizard. Setup Manager makes it easier to create setup scripts and distribution points for installation files. In addition, there are more and improved tools that you can use to customize and automate the installation process.
Easier to Manage and Support
Windows 2000 comes with the Microsoft Management Console (MMC), Windows Script Host (WSH), support for self-repairing applications, and comprehensive system, application, and driver protection.
Note: drivers will usually be provided by Windows 2000 but it might be necessary to go to the manufacturer’s web site to get the appropriate driver or use the drivers found on the floppy or CD that came with the device.
File Protection
Windows 2000 has file protection available through WFP (Windows File Protection). WFP informs you when files that are necessary for Windows to run smoothly have been replaced and will allow you to restore them.
Support for Setup and Administering Corporate Networks
It is easier to configure Internet and intranet connections with new auto configuration. Windows 2000 can automatically create an intranet, by using Automatic Private IP Addressing (APIPA). Windows 2000 combines networking (intranet and Internet) and dial-up connectivity functions into the new Network and Dial-Up Connections folder in the Control Panel.

A+ Training & Test Preparation Guide
Specialized Solutions, Inc. 268
Note: APIPA will take over if a DHCP client can’t reach a DHCP server. An APIPA address is indicated by the first two octets in the IP address: 169.254.0.1 through 169.254.255.254.
Improved Performance
You will notice an improved performance over Windows 9x and Windows NT machines. Windows 2000’s full 32-bit architecture allows you to run more programs and perform more tasks at the same time (multitasking). You can further improve performance by adding more memory and two-way symmetric multiprocessing (SMP).
New Desktop Interface
Windows 2000 upgraded the look of the desktop, providing quicker access to information. Only the most frequently used items will be displayed on the Start menu, which reduces screen clutter. In addition, the dialog box interface is improved. Users can save time because the interface automatically completes words as you type and displays the most frequently used lists.
Note: If you want to rearrange Start Menu programs, right-click the Start menu button, and select explorer. If you want to remove something from the Start Menu, right-click the item in the Start Menu and delete it. It is also possible to right-click the taskbar, choose properties and remove the item in the customize start menu. Some programs will have to be removed with a third-party program. If your Start menu isn’t accessible by the Start Menu button in the taskbar, you can use the <CTRL><ESC> keystroke or left click where the taskbar would normally be.
Customizable Toolbars
You can add one or more customizable toolbars to the taskbar. This will allow single click access to the desktop, programs, and the Internet.
Show Desktop Button
With Windows 2000, you can quickly switch between the desktop and your programs by using the Show Desktop button. You will find this new button on the taskbar.
Multilingual Support
Multilingual support has been expanded in Windows 2000. You can now write, edit, view, and print in all supported languages.
Internet Connection Sharing (ICS)
Windows 2000, like 98 SE, XP, and ME allows multiple clients to share an Internet connection.

Chapter 8 – Windows 2000
Specialized Solutions, Inc. 269
Easy to Integrate
You can easily integrate Windows 2000 with your existing networking infrastructure. It can coexist with earlier versions of Windows (3.x, 95, 98, NT, Workstation 4.0, or Windows NT Server 4.0) or third-party environments such as UNIX, Novell Netware, IBM host systems, or Macintosh. UNIX interoperability is provided though an add-on pack called Windows Services for UNIX. Macintosh interoperability is provided by a number of services, including File Server for Macintosh, which allows Macintosh clients to use TCP/IP (AFP over IP) to share files and to access shares on a Windows 2000 Server-based computer. Windows 2000 also has built-in peer-to-peer support for Windows 95, 98, and NT Workstation, enabling interoperability between Windows 2000 and earlier versions.
Security
Windows 2000 provides local and network security as well as auditing for files, folders, printers, and other resources.
Windows 2000 Operating System
The Windows 2000 operating system is an improvement over its predecessors. For the most part, operating the system will be easy if you are already a proficient user of Windows 9x or Windows NT. Most of the enhancements are found under the hood, and as a user, you will not notice the difference. You will however, have to be careful. While Windows 2000 performs all the functions of previous versions, many of the names and locations of familiar dialog boxes and icons have a changed and have a new look.
File Systems
Windows 2000 supports three file systems (FAT16, FAT32, and NTFS) for use on the hard drive. Since you should be already familiar with these files systems, all we need to do is compare the features, and identify when you should select one over the others.
FAT16 and FAT32
The only reason for installing Windows 2000 on either of the FAT files systems is for dual booting.
FAT Features:
• Supports dual booting
• Directory level security
You will need to select FAT16 for drives (partitions) that are less than 2 GB. For larger partitions, select FAT32. Also, remember that early versions of Windows 95 and Windows NT 4.0 do not support FAT32.

A+ Training & Test Preparation Guide
Specialized Solutions, Inc. 270
CDFS
Windows 2000 (not unlike 9x) uses a protected mode 32-bit file system to speed up CD performance called CDFS (CD File System).
NTFS
NTFS is the preferred file system for Windows 2000.
FAT vs. NTFS
File System
FAT(16) FAT32 NTFS
Partitions are limited to 2 GB or less
8.3 naming convention
Fixed cluster size
File attributes
Partitions can be as large as 2 TB
Up to 255 characters in a filename.
Reduced cluster size
File attributes
Applications load faster
Better drive mapping
All the benefits of FAT32 plus:
Better security through file permissions
Encryption & Compression
Disk quotas
*Note: these facts should be regarded as true with respect to the operating systems they were originally used on. For example, FAT(16) can support partitions larger than 2 GB, but only if the operating system supports it (i.e. 4 GB with Windows XP).
NTFS Features:
• File-level and folder-level security
• Disk Compression
• Disk Quotas
• File encryption
• More robust
• Support for large media

Chapter 8 – Windows 2000
Specialized Solutions, Inc. 271
You will need to select NTFS when you require any of the following:
File and folder-level security – you want to be able to control sharing at the file level instead of the folder or directory level.
Disk Compression – you need to conserve space by compressing files.
Disk Quotas – you want to control disk use on a per-user basis. This means that you can limit the amount of disk space available to a user.
Encryption – you need to encrypt files on your hard drive(s).
More robust – NTFS is a transactional file system. This means that it can recover (automatically) from many different errors. You will need to run the Recovery Console to repair these errors.
Support for large media – NTFS supports up to 2 TB (terabytes). As drive sizes increase, you will not see the deterioration of performance that you will see when using large FAT drives.
The NTFS in Windows 2000 will also support remote storage, basic and dynamic volumes, and volumes mounted to folders. NTFS files can only be accessed by Windows NT or Windows 2000 operating systems.
You can convert your FAT16 and FAT32 partitions to NTFS using the Windows 2000 Convert command. You will be able to make the conversion without having to reformat the drive; therefore, you will not lose any data (you should still backup first). Convert a partition by typing the following command from a Command Prompt Window (a good example of why you need to learn some DOS commands). In this example, you will convert the E drive.
Convert E: /FS:NTFS /V
Once you convert, you cannot go back.
Initialization files (.INI), dynamic link libraries (.DLL), and information files (.INF) are visible in Windows 2000. Binary files (.BIN) and command files (.COM) files, however, are hidden and you will have to go into Explorer and turn on the show all files option in the Folder Options.
Here is a chart to help you remember what type of partitions you can use with operating systems referenced in the operating systems exam:

A+ Training & Test Preparation Guide
Specialized Solutions, Inc. 272
File Systems Used By Operating Systems
File System
FAT(16) FAT32 NTFS
DOS, Windows 3x, Windows 9x, Windows Me, Windows NT, Windows 2000, Windows XP, Windows .Net
Windows 95 OSR2, Windows 98, Windows Me, Windows 2000, Windows XP, Windows .Net
Windows NT 4.0, Windows 2000, Windows XP, Windows .Net
Caution: Compressed Windows 95 or Windows 98 drives cannot be upgraded, and need to be uncompressed before upgrading to Windows 2000.
Recovery Console
As mentioned above, you can recover from many Windows 2000 errors. The tool that you use is the Recovery Console. This is a command line program that you must start from the Windows 2000 CD or the startup disks. It’s used most often when you are unable to start the computer. The Recovery Console gives you access (limited) to any of the FAT16, FAT32, or NTFS volumes without starting the graphical interface. This is like booting to a DOS floppy in Windows 9x. The big difference is that before you can use the Recovery Console, you will have to logon to the computer as the administrator. This is for your protection as well as the protection (security) of the computer and its data. The command used to install Recovery Console on a hard drive is (x: = the hard drive):
X:\i386\winnt32.exe /cmdcons
The Recovery Console is recommended for advanced users only. Every time you use Backup to back up the system state data, a copy of the registry is placed on the local system partition in a subfolder of %SystemRoot%\Repair\RegBack. You can use the Recovery Console to copy files from %SystemRoot%\Repair\RegBack to %SystemRoot%\System32\Config (the location of the registry). Any changes you make after this point (until the next backup) will not be recoverable.
Caution: Using the registry editors bypasses the standard safeguards provided by administrative tools. Do not use a registry editor to edit the registry directly unless you have no alternative. Editing the registry directly can have serious, unexpected catastrophic consequences that can prevent the system from starting. Microsoft recommends that you use the Control Panel or Microsoft Management Console (MMC) to edit the registry.

Chapter 8 – Windows 2000
Specialized Solutions, Inc. 273
Security
The primary feature of Windows 2000, as well as its earlier version Windows NT, is security. On the surface, all you need to do is provide a valid logon and you can use the operating system. The Windows 2000 security model still uses four components of Windows NT that were discussed in the Windows NT chapter (Logon, Local Security Authority, Security Account manager, and Security Reference Monitor).
In addition to the components from Windows NT, you will find Active Directory, Kerberos authentication, object based security, and security descriptors.
Active Directory
Windows 2000 Active Directory directory services, identifies all resources on a network, and makes them accessible to users and applications. Primarily, Active Directory allows the user to create a logical directory of files and applications that is consistent with their personal or organizational needs.
For most of us, the standard organization that was provided by previous versions of Windows is sufficient. As you recall, we talked about “My Computer” being a logical representation of the file structure on the computer. Many companies have either centralized or decentralized organizational structures. With Active Directory, the network administrator can replicate the organizational management structure on the network.
You may ask how Active Directory provides security when all it does is provide organization to the file structure. Active Directory interacts with several of the new security features of Windows 2000. Active Directory stores domain security policy information that has a direct bearing on the use of the system, such as domain-wide password restrictions and system access privileges.
Kerberos Authentication
Windows 2000 uses Kerberos V5 authentication to protect your network or intranet. It protects data by tracking and verifying each user’s activity on a network. You can provide safeguards for even the most sensitive communications exchanged over a public network.
Kerberos adds three key security capabilities:
• A server that impersonates a client user to act under their identity can now pass that identity on to a second server that it can also impersonate the client user, and so forth.
• Provides authentication of the server to the client, and the client to the server.
• Server security can transport a session encryption key to be used with the new IPSEC IP packet-level encryption.

A+ Training & Test Preparation Guide
Specialized Solutions, Inc. 274
Object Based Security
Windows 2000 implements an object-based security model with access control of all objects in Active Directory. Each object in Active Directory is associated with a unique security descriptor that defines the access permissions that are required to read or update the object properties. Permissions can be assigned at the property level.
Security Descriptors
Windows 2000 associates a security descriptor with each object. The security descriptor defines the access control information that is associated with the object. Security descriptors include the following components:
Header Control flags and pointers to the four parts of the security descriptor.
Owner A SID that indicates what user or group owns the object.
Primary group A SID that is present for POSIX compliance.
Discretionary Access Control List (DACL) A list of access control entries. These define who does and does not have specific types of access to the object.
System Access Control List (SACL) A list of system access control entries. Specifies audit and alarm message generation when particular subjects attempt specific types of access to the object.
Print Servers
Setting up a Windows 2000 operating system to act as a print server is the same as is required for Windows 9x and Windows NT. For obvious reasons, (security and stability) Windows 2000 is a better platform for a print server.
Windows 2000 includes the following printing features and enhancements:
• Internet Printing Protocol (IPP)– IPP allows users to send documents to any printer in a Microsoft Windows 2000 Network that is connected to the Internet.
• Add Printer Wizard – This new wizard will simplify the process of connecting to local and network printers from within a program. You no longer need to open the Printers system folder or specify driver models, printer languages, or ports

Chapter 8 – Windows 2000
Specialized Solutions, Inc. 275
when you add printers. Going to the Start Menu button, Settings, and finally to Printers allow a user access these functions.
• Image Color Management (ICM) 2.0 – Allows you to send high-quality color documents to a printer or another computer with greater speed and reliability
If installing Windows 2000 to operate as a dedicated print server in a high-volume environment, you will need to consider the following:
• If handling large numbers of connections and support for Macintosh, UNIX, and NetWare Clients, you will need Windows Server 2000. Windows 2000 Professional is limited to 10 concurrent connections and does not support Macintosh, UNIX, or NetWare clients.
• Make sure that you have sufficient RAM to support the files being printed.
• Make sure that you have sufficient hard drive space to support the files being printed.
Note: if Windows 2000 does not have a printer driver for your printing device, you will have to install a driver manually from the manufacturer’s CD-ROM, floppy, or web site.
Interoperability
Interoperability is the ability for Windows 2000 to exist and function in an environment with other operating systems. Windows 2000 will coexist nicely with all of the previous versions of Microsoft operating systems. Unlike Windows NT, Windows 2000 will operate on a FAT32 file system. It will also coexist with other operating systems such as UNIX, Novell NetWare, IBM Host Systems and Macintosh, but you will be required to install some add-ons and configure the system for compatibility.
UNIX and Windows 2000
UNIX interoperability requires an add-on pack called Windows Services for UNIX. This provides support for the Network File System (NFS), Network Information Service (NIS), password synchronization, a UNIX command shell, and a collection of UNIX tools.
NetWare and Windows 2000
In order to interoperate with Novell NetWare, you will need to install the Client Service for NetWare and the NWLink protocol (Microsoft equivalent to the IPX/SPX). If you are upgrading from Windows 9x or Windows NT and already have Client Services and NWLink installed, Windows Professional will detect the files and automatically complete the upgrade.

A+ Training & Test Preparation Guide
Specialized Solutions, Inc. 276
IBM and Windows 2000
Microsoft and IBM have a long history of working together; therefore integrating these two operating systems is easy. To integrate Windows 2000 Professional with IBM host systems, you need to use the gateway Microsoft SNA Server. To connect directly, connect through a telnet session. This requires the IBM host to support and be configured for either TN3270 or TN5250 telnet access, and then to use host-emulation software that supports direct connection.
Macintosh and Windows 2000
Macintosh interoperability is provided by File Server for Macintosh, which allows Macintosh clients to use TCP/IP (AFP over IP) to share files and to access shares on a Windows 2000-based Server computer.
Applications and Windows 2000
Running applications in the Windows 2000 environment is no different than it was in the Windows 9x environment. The only real difference is one that we do not see in action, but is very useful. With Windows 2000, Microsoft has implemented a new installation wizard. This wizard makes installation easier and makes the systems files self-healing. If you make a mistake during the installation, or while un-installing an application, Windows 2000’s Windows Installer program will help applications repair themselves.
Tip: if you upgrade from Windows 9x to Windows 2000, some of your application may not run properly. If this is the case, try reinstalling them.
Many of us have (or will) encountered a problem with missing or corrupt DLL files. The new Windows installer is very careful with these files and will not allow replacement of old ones. It will keep them in separate folders to avoid conflicts.
While all of this sounds nice, it is not that simple. Remember with plug-n-play, you must have plug-n-play compatible hardware and software. It is the same with these self-healing applications. You must install a program that has been certified for self-repairing. Soon, this will no doubt become the standard.
Note: If you have multiple programs open, you can toggle between them using the <ALT>+<TAB> keystroke or by leaving them both maximized and minimize them when done. If you want to see what applications are presently running, you can access the Task Manager. To access the Task Manager, use either the <CTRL><ALT>&<DEL> or <CTRL><SHIFT>&<ESC> keystroke. You can also right-click the taskbar to select the task manager. Once in the task manager, you can end halted programs or shutdown. With Task Manager in Windows 9x, using the <CTRL><ALT>&<DEL> keystroke twice will shutdown as well.

Chapter 8 – Windows 2000
Specialized Solutions, Inc. 277
Installation
Installing Windows 2000 is just like installing any other Microsoft operating system. On a new machine with lots of resources, the installation will go by the book, and you will have no problems.
Hardware Compatibility
Hardware compatibility is just as important in Windows 2000 as it is with Windows NT 4.0. Before attempting an installation, you will have to confirm your hardware with the Microsoft Hardware Compatibility List (HCL). You will also have to be sure that your machine exceeds the minimum requirements for installation. Windows 2000 is resource intensive and will use all the memory and hard drive space you can give it.
Windows 2000 Minimum Requirements
Minimum Requirements Recommended Requirements
Intel Pentium or compatible 133 MHz Intel Pentium II or compatible
or higher processor. Windows 2000 300 MHz or higher processor
Professional supports single and dual
CPU systems
32 MB of RAM 64 MB (4 GB maximum)
2-GB hard disk with 650 MB free disk 2 GB of free space
space. (An additional disk is required if
installing over the network).
VGA-compatible or higher monitor, SVGA Plug and Play Monitor.
keyboard, mouse, or other keyboard, mouse, or other
pointing device. pointing device.
CD-ROM or DVD drive (required for CR-ROM or DVD drive 12x or
compact disc installation). faster.
Network adapter (required for Network Adapter
network installation)

A+ Training & Test Preparation Guide
Specialized Solutions, Inc. 278
The following is a chart that will give you a clear idea of the minimum hardware requirements for various Windows operating systems:
Minimum Hardware Requirements
Operating System
Processor RAM Hard Disk Space Other
Windows 95 386DX 4 MB 40 MB
Windows 98 486DX 66 MHz
16 MB 225 MB (FAT 16)
172 MB (FAT 32)
CD-ROM
Windows NT Workstation
486DX-33 16 MB 110 MB
Windows NT Server
486DX-33 16 MB 125 MB
Windows 2000 Professional
133 MHz 32 MB 2 GB with 650 MB free space
VGA or higher monitor, Keyboard, mouse, CD-ROM or DVD drive
Preparing to Install – Hardware
If you are not sure about hardware compatibility, you can use the Windows 2000 Professional compatibility-mode option. Run this option before the installation and Windows will examine your hardware and software for known problems. When complete, it creates a report to help determine if any hardware drivers or upgrade packs are needed to successfully complete your installation. You can print or save this report.
Preparing to Install – Make a Plan
You will find that Windows 2000 is easy to install if you are prepared and if you make a plan in advance. If you try to hurry the installation, you will no doubt encounter problems.

Chapter 8 – Windows 2000
Specialized Solutions, Inc. 279
Before you start the install, consider the following:
• Are you performing an upgrade or a clean installation?
• Do you need to have a multiple-boot configuration with other operating systems?
• How are you going to backup any critical files?
• Does the computer meet the minimum requirements for hardware and software?
• Do you have a minimum of 500 MB of free space on your hard drive (1 GB preferred)?
• If connecting to a network, do you know the name of the workgroup or domain? Do you have an assigned account name and logon?
Tip: To join a domain, right-click My Computer go into properties, and change it under Network Identification.
If you begin the installation from another operating system, Windows 2000 will ask you whether you want to upgrade or do a clean installation. By choosing to upgrade, Windows 2000 will save all your existing files and applications. This will decrease the time and effort to get the system completely up and running. However, the likelihood of having problems is much higher when upgrading than when completing a clean install. Not all applications are compatible with Windows 2000 so you will have to check to see if they run.
Windows 2000 Professional upgrades from the following operating systems:
• Microsoft Windows 95
• Microsoft Windows 98
• Microsoft Windows NT Workstation version 3.51
• Microsoft Windows NT Workstation version 4.0
Note: You cannot upgrade from Microsoft Windows 3.x, including Microsoft Windows for Workgroups, Versions of Windows NT Workstation earlier than version 3.51, Microsoft BackOffice Small Business Server, or Non-Microsoft operating systems.
When making a clean install, you will be installing the operating system in a new directory or on a new or newly formatted hard drive. This type of installation will be less likely to cause problems due to compatibility issues. You will however, have to reinstall all your programs and files. A good backup before starting a clean installation is in order.

A+ Training & Test Preparation Guide
Specialized Solutions, Inc. 280
You need to perform a clean installation of Windows 2000 Professional if the following are true:
• The computer has no operating system
• The current operating system does not support an upgrade
• You have an existing operating system, but you don't want to keep your existing files or settings
• You have more than one partition, and you want to have a multiple-boot configuration
Upgrading from Windows 9x or NT
While you can upgrade from Windows 9x products, there are some potential problems. The reasons for this are differences found in the registry and how software developers structure their applications to run in these operating systems. If in doubt, you should check with the software manufacturer to determine compatibility. The following are some issues to watch out for:
Hardware Compatibility
Windows 2000 does not migrate drivers from Windows 95 or Windows 98 to Windows 2000. You will need to find and use the Windows 2000 drivers. This means that you have to go to the manufacturers web site and download a new driver. Windows 2000 does not support the VxD (virtual device driver) model that is used in Windows 9x.
Software Compatibility
When it comes to software compatibility, you will have to look for two things. First, the system tools in Windows 9x (ScanDisk, Defrag, and DriveSpace, etc.) do not upgrade to Windows 2000 Professional. Any third-party network clients you may be using will also not upgrade. Again, you will have to look to the vendor to get upgraded client software. Second, many applications that run in the Windows 9x environment just simply do not run in Windows 2000 – you will have to upgrade these applications to continue using them.
Tip: You can use the CHKUPGRD command in Windows NT 4.0 to check for compatibility between Windows NT 4.0 and Windows 2000.

Chapter 8 – Windows 2000
Specialized Solutions, Inc. 281
Installing from a CD-ROM
Like all the Microsoft operating system installations, installing Windows 2000 is a multi-step process. There are four major steps to the installation:
• Setup Program
• Setup Wizard
• Installing the Network
• Completing the Setup
Step 1 – Running the Setup Program
You can start the Setup Program either from the CD-ROM (must have a bootable CD-ROM driver) or from Setup Boot Disk 1. All you need to do is place the CD or the disk in the appropriate drive and turn on the computer.
Note: Many new computers are set to boot from the CD or the C drive and not the A drive as with the older ones. If you are trying to install from the floppy (or in some cases the CD) and the computer will not boot to the drive you want it to, you may have to open the BIOS configuration program and change the boot drive settings.
There are six sub-steps to running the Setup Program.
1. Load Setup into memory
2. Start text-based Setup program
3. Create the Windows 2000 partition
4. Format the Windows 2000 partition
5. Copy setup files to the hard disk
6. Restart the computer

A+ Training & Test Preparation Guide
Specialized Solutions, Inc. 282
When you start the Setup program, Windows prepares the computer for installation. It does this by partitioning the drive (if necessary) and copying the basic installation files to the hard drive. There are six sub-steps preformed by the Setup Program:
• Load Setup program into memory
• Start the text-based Setup program
• Create the Windows 2000 partition
• Format the partition
• Copy the setup files to the hard disk
• Restart the computer
Step 2 – Running the Setup Wizard
This is the GUI portion of the installation. During this session, Windows collects the data required to configure the operating system to meet the requirements of the user. The following information will have to be entered:
• Regional settings
• Name and organization
• The product key (license)
• Computer name
• Password for the Administrator account
• Modem dialing information (only if a modem is installed)
• Date and time settings

Chapter 8 – Windows 2000
Specialized Solutions, Inc. 283
Step 3 – Installing the Network
During this step, Windows 2000 will install and configure the network settings for the computer. If you already have a network connection available, be sure that the network card is physically installed and that you are connected. With the network hardware ready to go, Windows can detect and configure the hardware as well as detect the network and configure it properly. If you do not have a network connection, you will have to manually configure the network settings. If you are careful, this should be no problem; however, reconfiguring the computer later could take some time. The steps to complete the network configuration are as follows:
• Detect network adapter cards and install them
• Install networking components (Client for Microsoft Network, File and Printer Sharing, TCP/IP the default protocol).
• Join a workgroup or domain
• Install and configure all the setting you have selected
Step 4 – Completing the Installation
With all the configuration settings collected and all the hardware configurations complete, Windows 2000 is ready for the final step. This step includes setting up all the menus for the user interface, preparing the registry, and restarting the computer. The sub-steps are as follows:
• Install Start-menus
• Configures register components
• Saves the configuration
• Removes any temporary files
• Restarts the computer
Installing from a Command-line Environment
If you want to install from a command-line prompt (for example: using a network boot disk), change to the directory where the I386 file is located and run the winnt32 executable.
Note: DOS, Windows 3x, and Windows 9x can be installed using the setup.exe command. Windows NT can be installed with the winnt.exe command. Windows 2000 can be installed with the winnt32.exe command. Windows XP can be installed with either the winnt.exe or winnt32.exe command.

A+ Training & Test Preparation Guide
Specialized Solutions, Inc. 284
Installing from a Network
In a large organization where you must install many systems, you can setup the installation over a network. While the installation process is essentially the same, there are some differences:
• Installation files are on a server, not a CD.
• The installation copies the files from the server to a target computer.
• Once the target computer is started, the installation continues the same as before.
Windows 2000 Boot Process
Like all operating systems, Windows 2000 must go through a boot process every time it is started. You will find it similar to all the other boot processes but it does contain some unique steps.
The preboot sequence:
During this sequence, the computer initializes itself just as it must for all startups. Four routines will be performed:
• Computer runs POST routines
• BIOS locates boot drive and runs MBR
• MBR identifies the active partition and loads boot sector into memory
• Computer initializes the Ntldr (NT loader) and loads it to memory
The boot sequence:
During the boot sequence, the computer collects all the information about hardware and drivers and prepares to load Windows 2000. There are four phases to this sequence:
• Initial Boot Loader – Ntldr switches from real mode to 32-bit memory mode and loads the minifile systems drivers.
• Operating System Selection – Ntldr displays the operating system menu and activates the default if no selection is made.
• Hardware Detection – Ntdetect.com and Ntoskrnl.exe detect all hardware and pass the appropriate information to Ntldr for insertion into the registry.
• Configuration Selection – hardware configuration takes place based on the appropriate hardware profile.

Chapter 8 – Windows 2000
Specialized Solutions, Inc. 285
Hint: To display the advanced options menu, press F8.
The Kernel Loads
After completing the configuration, the Windows 2000 kernel (Ntoskrnl.exe) loads and initializes. When this portion of the boot is complete, the Windows 2000 logon dialog box is displayed.
Important Files to Know (the names should be familiar):
File Name Boot Step
Ntldr Preboot and Boot
Boot.ini Boot
Bootsect.dos Boot (if required)
Ntdetect.com Boot
Ntbootdd.sys Boot (if required)
Ntoskrnl.exe Kernel
Hal.dll Kernel
System Kernel
Device Drivers Kernel
2000 Boot Disk
Creating a Windows 2000 boot disk is similar to creating one with Windows NT. Unlike the Windows 9x operating systems, where you can automatically create a boot disk from the Startup tab on the Add/Remove programs dialog box in the Control Panel, you will have to format a floppy (from Windows 2000) and copy a few files manually. Remember, this disk can only be used on the machine for which it was created. The files to copy are:
• Ntldr
• Ntdetect.com
• Boot.ini
• Bootsect.dos (if present)
• Ntbootdd.sys (if present)

A+ Training & Test Preparation Guide
Specialized Solutions, Inc. 286
Common Boot Errors
There are really only four common boot errors in Windows 2000. These are of course in addition to any common BIOS boot errors.
• Ntldr is missing – copy a good one from you CD or the boot disk you made.
• I/O error accessing the boot sector – restore the bootsect.dos file from your boot disk.
• Ntdetect failed – copy a good one from your CD or the boot disk you made.
• Ntoskrnl is missing or corrupt – Copy the Ntoskrnl file from the Windows 2000 CD-ROM or another Windows 2000 installation.
Here are some helpful charts you can use to remember booting information for Windows operating systems:
Startup Disk Files
Windows 9x Windows NT Windows 2000
ATTRIB.EXE
CHKDSK.EXE
COMMAND.COM
DEBUG.EXE
DRVSPACE.BIN
EBD.SYS
EDIT.COM
FDISK.EXE
FORMAT.COM
IO.SYS
MSDOS.SYS
REGEDIT.EXE
SCANDISK.EXE
SCANDISK.INI
SYS.COM
UNINSTALL.EXE
NTLDR
NTDETEC.COM
BOOT.INI
BOOTSECT.DOS
NTBOOTDD.SYS (if present)
NTLDR
NTDETEC.COM
BOOT.INI
BOOTSECT.DOS (if present)
NTBOOTDD.SYS (if present)

Chapter 8 – Windows 2000
Specialized Solutions, Inc. 287
Boot Process Comparison
Windows 95 Windows 98 Windows NT Windows 2000
Power on: ROM BIOS initiates POST
BIOS Bootstrap: Pretty much the same as the Power on.
Power on: The system microprocessor executes the ROM BIOS code and initiates POST.
Computer runs POST routines.
Finds boot sector: checks A: drive and then C: drive
Master Boot Record (MBR): Loads IO.SYS into RAM
Finds a boot sector: Locates the boot device and loads the MBR.
BIOS locates boot drive and runs MBR.
Runs the boot program: BIOS runs IO.SYS
Real Mode Boot:
Loads minimal FAT file system.
Reads MSDOS.SYS
Loads drivespace.bin and checks for drivespace.ini – for file compression.
Prompts for hardware profile.
Loads and displays LOGO.SYS.
Verifies System.dat
Loads System.dat
Initializes double-buffering for SCSI if needed.
Selects hardware profile from the Registry.
Reads and processes CONFIG.SYS
Active Partition: The MBR searches the Partition Boot Record (PBR) for the active partition and loads the boot sector into memory.
MBR identifies the active partition and loads boot sector into memory.

A+ Training & Test Preparation Guide
Specialized Solutions, Inc. 288
Reads MSDOS.SYS
Real Mode Configuration: Loads Himem.sys, Ifshlp.sys and sets several environmental variables.
NTLDR: changes processor to a 32-bit linear addressing scheme. NTLDR starts a minifile system. NTLDR reads the BOOT.INI file and builds the Boot Loader Menu.
Computer initializes the NTLDR and loads it into memory. Initial Boot Loader – NTLDR switches from real mode to 32-bit memory mode and loads the minifile system drivers.
Reads CONFIG.SYS
Protected Mode Load: Win.com loads and executes Vmm32.vxd and other virtual drivers.
NTLDR loads the operating system chosen from the Boot Loader Menu, if no choice is made, the default is loaded.
Operating System Selection: NTLDR displays the operating system menu and activates the default if no selection is made.
Reads AUTOEXEC.BAT
Windows Kernel, GDI, user libraries, the Explorer shell, and network support are loaded.
NTLDR runs NTDETECT.COM and builds the hardware list
Hardware Detection: NTDETECT.COM and NTOSKRNL.EXE detect all hardware and pass the appropriate information to NTLDR for insertion into the Registry.
Reads the Registry
Programs in the Startup Group are loaded.
NTLDR runs NTOSKRNL.EXE that loads and initializes Windows NT.
Configuration Selection: Hardware configuration takes place based on the appropriate hardware profile.
Chapter 8 – Windows 2000
Specialized Solutions, Inc. 289
Windows 2000 Administrative Tools
File management in the Windows 2000 environment is the same as you will find in the Windows 9x and Windows NT environments. For the most part, you will use My Computer and Explorer just as you have in the past. You will find a new look and feel; but within a few minutes, you will be working as efficiently as before.
The following is a list of some of the new names and/or changes that you will encounter:
My Computer Same as before, but also lists the storage devices available to the computer. You can also gain access to the Control Panel from this location, as well as others.
My Documents The My Documents folder is available on a per user basis. Each time a user logs on, they will see their My Documents folder.
My Network Places This is the replacement for Network Neighborhood. The difference is that you will now find a comprehensive list of all shared computers. While it looks different, if you look carefully, you will find everything that you were familiar with in the Network Neighborhood and more.
Offline Files A new feature with Windows 2000 is that you can work on network files even if the network goes down. The file will be saved and then synchronized the next time you are on the network.
The biggest difference between Windows 2000 and previous Windows operating systems is the administrative tools. These are located in the Control Panel. When you open the Control Panel, you will find many icons with which you are already familiar, as well as some new ones. Let’s look at some of the new ones.

A+ Training & Test Preparation Guide
Specialized Solutions, Inc. 290
Control Panel
Microsoft Management Console
The Microsoft Management Console (MMC) has been around since Windows 9x. However, it has received a face-lift and additional user-friendly tools in Windows 2000. MMC is a host for snap-ins. It is also possible to add ActiveX controls, hypertext links, folders, and tasks. MMC can be configured in several different modes including, Author, User-Full Access, and User-Limited Access. It is also possible for Administrators to prevent users from opening the MMC if they are not authorized access it. The following items may be accessed through the MMC:

Chapter 8 – Windows 2000
Specialized Solutions, Inc. 291
Windows 2000 MMC
Component Services
The Component Services Console is designed to manage administrative tasks. This area focuses on COM components and COM+ applications. By expanding the Console Root of Component Services in the Microsoft Management Console (MMC) the user (administrator) may perform system configuration tasks, install applications, and configure services used by the applications on the computer.
Note: Successfully modifying the Component Services of Windows 2000 usually requires that the user who is logged in has Administrative Privileges. Attempting to modify any of the parameters within Component Services without competent knowledge of the component(s) at hand may have disastrous affects on the system. This area must be handled with great care.
Caution: Research and a solid backup of the system should always be prerequisites before making any changes to the properties in this area.

A+ Training & Test Preparation Guide
Specialized Solutions, Inc. 292
Component Services
Computer Management
The Computer Management Console is designed to manage the local computer as well as remotely managing other computers. The design and implementation of this console allows one interface for several tools. When viewing the Computer Management Console you will find several items that are accessible from other locations residing within. For example, the Disk Defragmenter is listed in the Start Menu as well as in the Computer Management Console.
If you have been using the Microsoft Family of Operating Systems for very long, you know that there is usually more than one navigation path for most of the operating system features. Windows 2000 follows this trend and allows access to disk management tools by using the Start Menu or opening the Computer Management Console. Upon examination of this MMC, you will notice that it contains the following:
System Tools:
• Event Viewer
• System Information
• Performance Logs and Reports
• Shared Folders

Chapter 8 – Windows 2000
Specialized Solutions, Inc. 293
• Device Manager
• Local Users and Groups
Storage:
• Disk Management
• Disk Defragmenter
• Logical Drives
• Removable Storage
Services and Applications:
• WMI Control
• Services
• Indexing Service
The aforementioned are typically installed during a normal installation of Windows 2000. Additional Snap-Ins are available.
Windows 2000 Computer Management

A+ Training & Test Preparation Guide
Specialized Solutions, Inc. 294
Data Sources (ODBC)
The ODBC Data Source Administrator appears in all the Microsoft Family of operating systems. Open Database Connectivity (ODBC) is a standard protocol used for configuring and storing information about how the computer is to connect and share data or provide data through various database management systems.
Windows 2000 ODBC Administrator
Event Viewer
The Event Viewer is carried over from Windows NT. It contains log files of the “events” taking place in the system. It is a very powerful tool for diagnosing problems within the system at the application, system, and security levels. It contains errors, warnings, information, success audits, and failure audits within the logs it generates. The Event Viewer automatically starts when Windows 2000 is started.

Chapter 8 – Windows 2000
Specialized Solutions, Inc. 295
Windows 2000 Event Viewer (System Log)
Power Options
With this applet in Control Panel, you can set your power usage to better fit the computer with which you are using the operating system. Choices include: Home/office desk, presentation and portable/laptop, as well as a few others.
System Tools
Microsoft’s newest addition to the operating system family contains some familiar features previously present in Windows NT, 95, and 98. If you already know about the tools offered in the earlier operating systems, you will quickly be using the new tools (and know where to find them). If you are unfamiliar with the system tools offered in earlier versions of Windows, it will benefit from experimentation and work with the tools from all versions of Windows. The most important factor when learning about the tools offered in Windows 2000 is that these tools are a combination of Windows 9x and Windows NT system tools.
Windows 2000 offers most of the same tools as Windows 98. Several are present in different formats than Windows 98. The following table compares the system tools of Windows 9x, Windows NT, and Windows 2000.
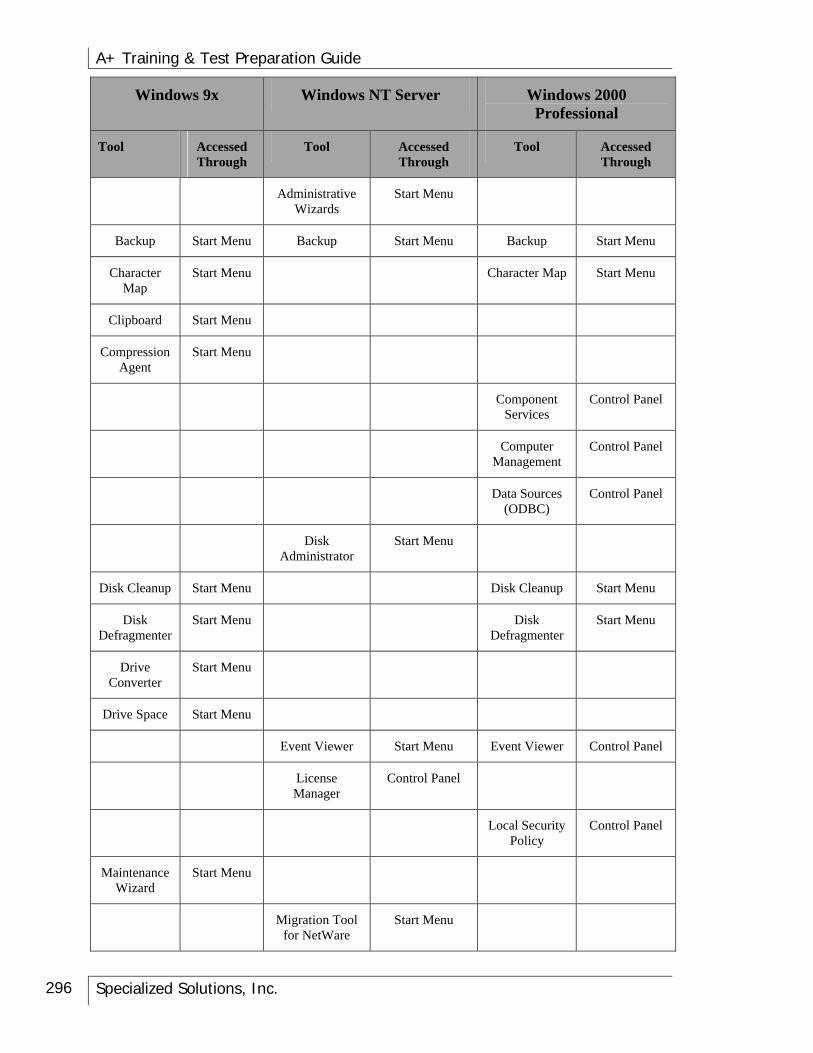
A+ Training & Test Preparation Guide
Specialized Solutions, Inc. 296
Windows 9x Windows NT Server Windows 2000 Professional
Tool Accessed Through
Tool Accessed Through
Tool Accessed Through
Administrative Wizards
Start Menu
Backup Start Menu Backup Start Menu Backup Start Menu
Character Map
Start Menu Character Map Start Menu
Clipboard Start Menu
Compression Agent
Start Menu
Component Services
Control Panel
Computer Management
Control Panel
Data Sources (ODBC)
Control Panel
Disk Administrator
Start Menu
Disk Cleanup Start Menu Disk Cleanup Start Menu
Disk Defragmenter
Start Menu Disk Defragmenter
Start Menu
Drive Converter
Start Menu
Drive Space Start Menu
Event Viewer Start Menu Event Viewer Control Panel
License Manager
Control Panel
Local Security Policy
Control Panel
Maintenance Wizard
Start Menu
Migration Tool for NetWare
Start Menu

Chapter 8 – Windows 2000
Specialized Solutions, Inc. 297
Windows 9x Windows NT Server Windows 2000 Professional
Tool Accessed Through
Tool Accessed Through
Tool Accessed Through
Network Client Administrator
Start Menu
Net Watcher Start Menu
Performance Monitor
Start Menu Performance Control Panel
Resource Meter
Start Menu
Remote Access Admin
Start Menu
Server Manager Start Menu
Services Control Panel
System Policy Editor
Start Menu
Scandisk Start Menu
Scheduled Tasks
Start Menu Scheduled Tasks
Start Menu
System Information
Start Menu System Information
Start Menu
System Monitor
Start Menu
Telnet Server Administration
Control Panel
User Manager for Domains
Start Menu
Windows NT Diagnostics
Start Menu
Welcome to Windows
Start Menu Getting Started Start Menu
Note: Table specifies the system tools of Windows 2000 Professional. Windows 2000 Server, Advanced Server, and DataCenter Server have additional features and tools that are specific to the role of the network operating system.

A+ Training & Test Preparation Guide
Specialized Solutions, Inc. 298
When comparing the system tools listed in the table, we see that many of the tools are different depending on the operating system. However, most of the tools are similar (if not identical) in function within the parameters of the operating system in question. For example, Windows NT Server has a system tool called User Manager for Domains. This particular tool does not exist in Windows 2000, because Active Directory has replaced User Manager for Domains.
As we mentioned, Windows 2000 is a combination of Windows 9x and Windows NT technologies. Like its predecessors, Windows 2000 comes in several configurations:
• Professional
• Server
• Advanced Server
• DataCenter Server
The system tools are located in the start menu and include:
Backup
The backup tools available in Windows 2000 are virtually identical to those of Windows 9x. However, there are several differences in the interface used to perform the backup tasks in Windows 2000. Using the backup utility in Windows 2000 will feel very familiar to you if you are familiar with the Windows 9x equivalent.
Keep the following in mind when performing a backup in Windows 2000:
• Creating a backup copy from an NTFS volume file, and then restoring it to a FAT volume may have undesirable results.
• Microsoft recommends restoring files from a NTFS volume back to the same.
• The most critical items for consideration are permissions, encrypting file system (EFS) settings, disk quota information, mounted drive information, and remote storage information.
• These items will be lost if restoring a backup file from an NTFS volume to a FAT or FAT32 volume.
Backup can be run from the run box in the start menu. Type in the command NTBACKUP and click OK. It brings up the same interface. This command can be used from a command prompt or in a batch file.

Chapter 8 – Windows 2000
Specialized Solutions, Inc. 299
Here is the syntax of the command:
Ntbackup backup [system state] “bks file name”
Here are the switches used with the command (use these when utilizing a bath file):
/J – Specifies the job name used in the log file
/P – Specifies the media pool from which you want to use media (i.e. – DDS; this switch cannot be used in tandem with the /A, /G, /F, and /T switches)
/G – appends the GUID name to the tape
/T – appends the tape name to the tape
/N – specifies a new name for the tape
/F – logical disk path and file name (this switch cannot be used with the /P, /G, and /T switches)
/D – Specifies a label for each backup set
/DS – backs up the directory service file name for an Exchange Server
/IS – backs up the information store file name for an Exchange Server
/A – performs an append (this must be used with either the /G or the /T but not with /P)
/V:{yes/no} – verifies the data after the backup
/R:{yes/no} – restricts access to the tape
/L:{f/s/n} – specifies the log type (full, summary, or none)
/M {backup type} – specifies the backup type (normal [this is a full], copy, differential, incremental or daily)
/RS:{yes/no} – backs up the removable storage database
/HC:{yes/no} – uses hardware compression
/UM – finds and formats the first available media
You need to be aware of three backup types: Full, Differential, and Incremental.
• The Full backup, as its name implies, will backup all data on the network. This method will take the largest amount of storage media, but will be the easiest to restore from. This type of backup is usually performed weekly.

A+ Training & Test Preparation Guide
Specialized Solutions, Inc. 300
• The Differential backup is used for backing up only the files that have changed since the last full backup. An archive bit is used to identify the files that have changed. When recovering from a failure, both the differential backup tape copies and the last full backup tape copies will need to be used.
• The Incremental backup is used for daily backups. This will reduce the amount of time needed to perform backups to the server, as only the data that has changed since the last backup will be copied (i.e. – all file that have the archive bit turned on). This method also uses an archive bit to identify files that have changed. To restore, the last full backup and the most recent incremental backup tapes will be needed.
Windows 2000 Backup Dialog Box
Character Map
The Windows 2000 Character Map is almost identical to earlier versions. Using this feature allows you to use optional characters included with various fonts loaded on the system. This feature is very useful when looking for a character in Windows, DOS, and Unicode character sets. Refer to the Character Map Overview in the Character Map Help Files for more information.

Chapter 8 – Windows 2000
Specialized Solutions, Inc. 301
Windows 2000 Character Map
Disk Cleanup
Disk Cleanup is a utility that will remove unnecessary files from your drive. This feature was included in Windows 98. Modern computers tend to leave many temporary files lying around (such as in the recycle bin and the temporary Internet files folder). When you run Disk Cleanup, the computer will search for these files and display a window that describes the type of files it found and where they are located. You then have the option (by selecting each group) to delete these files. Temporary files can also be deleted from Internet Options in either Control Panel or Internet Explorer.
Disk Cleanup.

A+ Training & Test Preparation Guide
Specialized Solutions, Inc. 302
Disk Defragmenter
In the hardware portion of the A+ certification, we learned data is stored on the hard drive in clusters. In an ideal world where you only stored new data to the hard drive, each file would be stored consecutively from the beginning to the end of the disk. However, we don’t live in a perfect world and we frequently read and write to our drives. When you start deleting files, it leaves spaces that will then be filled the next time you write files. After a while, the hard drive is a mess and files (components of them) are scattered all over the drive. When this happens, the drive will read and write more slowly. It’s the defragmenter’s job to reorganize the hard drive so each file is contiguous (located in one location on the hard drive).
As a normal course of business, you should defragment your drive about once a month. You should do this even if the operating system tells you that it is not needed.
Warning: Newer machines with large hard drives can take several hours to defragment. Do not attempt this unless you have an adequate power backup (UPS). If the process is stopped abruptly, such as when the power goes out, you will lose data and possibly may not be able to re-start the computer.
Windows 2000 Disk Defragmenter
Getting Started
The Getting Started feature of Windows 2000 is similar to the Welcome to Windows 98 feature. The splash screen appears on the first boot of Windows 2000 after a successful installation. When the user logs in to the computer this introduction runs automatically. It links to information about Windows 2000, including the Register Now, Discover Windows, and an option to Connect to the Internet features. Click on the Discover Windows link to see a multimedia presentation of Windows 2000 system features and options. Be prepared to insert the Windows 2000 installation disk if you do not already have it loaded in the CD-ROM drive.

Chapter 8 – Windows 2000
Specialized Solutions, Inc. 303
Windows 2000 Getting Started Screen
Scheduled Tasks
This feature was included with Windows 98. It functions the same in Windows 2000 as it did in Windows 98.
Task Scheduler
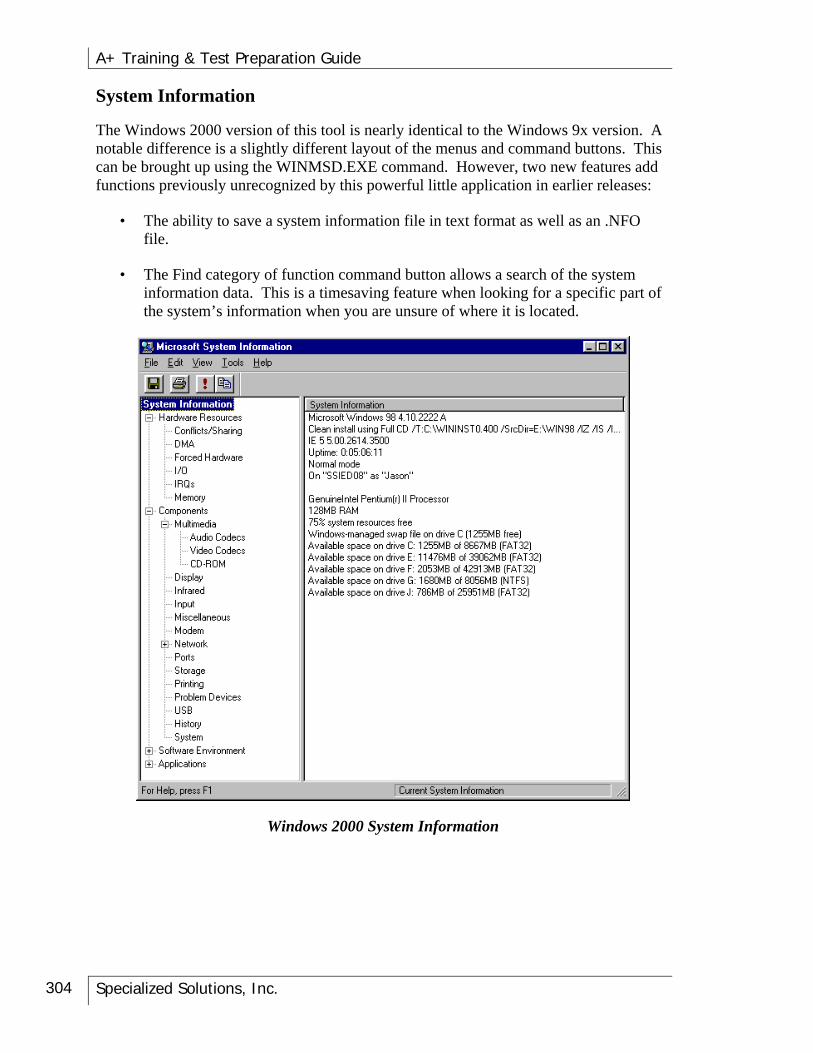
A+ Training & Test Preparation Guide
Specialized Solutions, Inc. 304
System Information
The Windows 2000 version of this tool is nearly identical to the Windows 9x version. A notable difference is a slightly different layout of the menus and command buttons. This can be brought up using the WINMSD.EXE command. However, two new features add functions previously unrecognized by this powerful little application in earlier releases:
• The ability to save a system information file in text format as well as an .NFO file.
• The Find category of function command button allows a search of the system information data. This is a timesaving feature when looking for a specific part of the system’s information when you are unsure of where it is located.
Windows 2000 System Information

Chapter 8 – Windows 2000
Specialized Solutions, Inc. 305
Event Viewer
The Event Viewer for Windows 2000 serves the same purpose as for Windows NT. We will discuss it more fully later in this section.
Windows 2000 Event Viewer
Performance
The performance tracking features of Windows 2000 allow the collection of data that can be logged, and generates reports. This allows the administrator to monitor the amount of activity on local or remote computers. The logs may be imposed manually or automatically. If uninterrupted logs are required, this is an option as well, dependant on the storage limitations of the system. The System Monitor interface is used for displaying the data in a wide variety of graphs and formats.
Windows 2000 Performance Monitor

A+ Training & Test Preparation Guide
Specialized Solutions, Inc. 306
Services
Services allow you to control the services on remote and local computers by starting, stopping, resuming, or pausing any of the services. This feature allows the administrator (or user with administrative privileges) to control services on local and remote computers.
Windows 2000 Services MMC.
Telnet Server Administration
Telnet allows users to login to a remote computer using the Telnet protocol. This requires a command line interface. Telnet is a terminal emulation protocol. A user can log on to a remote computer, and use that computer as if they were working locally.
Windows 2000 Telnet Administration Window

Chapter 8 – Windows 2000
Specialized Solutions, Inc. 307
Disk Management in Windows 2000
Managing disks in a Windows 2000 environment can be somewhat different from managing disks in Windows 9x or NT. The big difference is that you can use two different types of storage. The traditional storage scheme is basic storage, which uses partitions. Keep in mind that basic storage is the industry standard and compatible with all versions of Microsoft operating systems. It is also the default standard for Windows 2000.
Windows 2000 also supports the dynamic storage option. Dynamic storage is only supported by Windows 2000. With dynamic storage, each drive is a single partition. Partitions are then further divided into volumes to provide fault tolerance (Windows 2000 Server). With fault tolerance, the computer has the ability to recover from catastrophic events and prevent the loss of data. This is Microsoft’s answer to RAID. There are three types of volumes:
Simple A single disk – no fault tolerance.
Spanned Uses disk space from up to 32 disks allowing multiple disks to function as a single contiguous disk. When one disk is full, it writes to the next one. It provides no fault tolerance.
Striped Areas of disks (from up to 32 disks) form one logical disk. Disk storage is optimized by writing data to each disk. No fault tolerance.
With Windows Server 2000, you have two more options. Both of these provide fault tolerance:
Mirrored Data is written to two identical volumes at the same time. If one volume is lost, the data can be recovered from the other.
RAID 5 You can configure RAID 5 using Windows 2000 volumes.
To configure the disks on a computer, you must use the Disk Manager Snap-In. It functions similar to the Disk Administrator of Windows NT except that you can manage dynamic volumes.

A+ Training & Test Preparation Guide
Specialized Solutions, Inc. 308
Disk Management Console
Configuring Windows 2000
Windows 2000 configuration is no different from Windows 9x or Windows NT. The registry configures all hardware and user profiles. As with its predecessors, Windows 2000 recommends that all changes be made by using the Control Panel. However, there may be a few times when you will need to access the registry.
To edit the registry, you will use either regedt32.exe or regedit.exe. Just like previous versions of Windows, you will not find an icon on the start menu. You will have to use the RUN command to open either registry editor. When you open the registry with regedit.exe, you will see the same familiar registry that you encountered in other Windows operating systems. There are no changes to the six primary keys. You will of course find some different sub-keys, just like when looking at two registries from two different computers. Remember, no two registries are identical. Regedit.exe doesn’t have a security menu or a read-only mode and doesn’t support REG_EXPAND_SZ or REG_MULTI_SZ. It is not the recommended registry editor.
When you use the regedt32.exe to open the registry, you will have full access to the registry including those items not supported by regedit.

Chapter 8 – Windows 2000
Specialized Solutions, Inc. 309
Note: Windows 2000 Professional supports roaming profiles and local user profiles, and Windows 2000 Server supports domain user profiles, which by default, are stored in C:\Documents and Settings. Administrators can also set profiles up that are mandatory, such as standardized applications and desktops.
regedit.exe
Troubleshooting Windows 2000
Troubleshooting Windows 2000 is no different than troubleshooting any of the other Microsoft products; all you have learned so far applies. In addition, Microsoft also has included some new tools to aid with troubleshooting.
Troubleshooters
Windows 2000 provides a tool called troubleshooters. This is an integral part of the help files. If you need help troubleshooting a problem, you can open the help menus, then open the Content tab and click on Troubleshooting and Maintenance. You are now in the interactive help files. By following the instructions, you can let Windows help you isolate the problem.
Stop Messages
Stop Messages is the term Windows 2000 Professional uses for full screen text messages. These will occur when you encounter an error condition from which the system cannot recover. Errors caused by hardware failure will be designated as a hardware malfunction message. Those caused by the kernel, damaged memory or corrupted system files will be designated stop messages.

A+ Training & Test Preparation Guide
Specialized Solutions, Inc. 310
When you see one of these messages, you should read it carefully. The new messages will include some indication of the cause of the failure, and if possible, suggest what you need to do to correct the problem.
Device Management
Any time that you are having problems with hardware, be sure that you are using the latest drivers. To find the correct driver, you should go to the manufacturers Web site and download the most current one. You can also go the Windows Update Web site. For information about Windows Update, see the Windows Update link on the Web Resources page at http://windows.microsoft.com/windows2000/reskit/webresources. Any drivers used on a Windows 2000 machine need to have the “Designed for Microsoft Windows 2000 Professional/Windows NT" logo.
Event Viewer
As you know, the Event Viewer is a troubleshooting device. Event Viewer logs information about hardware, software, and system problems and monitors Windows 2000 security events. By reviewing the contents of one or more of the three logs, you can often identify or isolate the cause of a problem. The nice thing about these logs is that they keep track of events even when you are not available to watch them. If you are responsible for managing several computers, you can use the logs to determine the activities and events that took place while you were working on another computer.
Application log Contains events logged by applications or programs. For example, a spreadsheet program might record a file error in the application log.
System log Contains events logged by the Windows 2000 system components. For example, if a driver or other system component fails to load during startup, it is recorded in the system log.
Security log Can record security events such as valid and invalid logon attempts, as well as events related to resource use, such as creating, opening, or deleting files. An administrator can specify what events are recorded in the security log.

Chapter 8 – Windows 2000
Specialized Solutions, Inc. 311
Dr. Watson
Dr. Watson is another form of log. Its function is to log the information needed by technical support groups to diagnose a program error for a computer running Windows 2000. Dr. Watson does not use a Windows interface, as does Event Viewer. Instead, it generates a text file (Drwtsn32.log). This file is created whenever an error is detected. You can then send the file to the appropriate support personnel for analysis. You can also enable the option of creating a crash dump file, a binary file that a programmer uses with a debugger program to analyze the problem.
In the event of a program error Dr. Watson will automatically start. To manually start Dr. Watson, click Start, Run, and then type drwtsn32. You can also start Dr. Watson from a command prompt. From the root directory, type drwtsn32.
Dr. Watson

A+ Training & Test Preparation Guide
Specialized Solutions, Inc. 312
Summary
Windows 2000 is the most current operating system in a long trail of Microsoft operating systems. To sum up this chapter is to sum up the history of Windows. It is the culmination of over 20 years of refinements. In this short chapter, we have not attempted to provide you a complete accounting of this new a powerful operating system. It is in fact only an overview of the operating system.
The following summarizes the key points of this chapter:
• Almost everything that you have learned from DOS through this chapter is included in some format within the Windows 2000 environment. This chapter summarizes the difference between Windows 2000 and previous versions.
• Windows 2000 consists of four versions: Professional, Server, Advanced Server, and Datacenter.
• The biggest problem for proficient users of Windows NT or even Windows 9x when they migrate to Windows 2000 is learning the new names and locations for old programs. The best method you can use to review Windows 2000 environment is to sit down at a computer with Windows 2000 Professional installed and peruse the various windows and dialog boxes presented in this chapter.

Chapter 8 – Windows 2000
Specialized Solutions, Inc. 313
KEYWORDS Exercise
Define each of the following keywords. Hint: There’s a glossary in the back of this book.
Keyword Definition
Active Directory
Basic storage
Computer Management
DACL
Disk Quotas
Dr. Watson
Dynamic storage
Event Viewer
Fault tolerance
Header
IPP
Kerberos
Mirrored volume
MMC
ODBC Data Source Administrator
Owner
Primary group
Recovery Console
SACL
Simple volume
Spanned volume
Stop Messages

A+ Training & Test Preparation Guide
Specialized Solutions, Inc. 314
Keyword Definition
Striped volume
Windows 2000 Advanced Server
Windows 2000 Datacenter
Windows 2000 Professional
Windows 2000 Server

Chapter 8 – Windows 2000
Specialized Solutions, Inc. 315
Review Questions Chapter 8
1. Name the four versions of the Windows 2000 Suite.
2. What is the recommended file system for Windows 2000?
3. You want to install Windows 2000 on a machine that currently has Windows 98 and is using file compression. Can you install the new operating system without any loss of data? If so, how?
4. What tool do you use to recover from Windows 2000 errors?
5. Name the four new security features used on the Windows 2000 operating system?
6. Will Windows 2000 as installed, coexist with a UNIX network?
7. True / False – Unlike Windows NT, Windows 2000 is plug-n-play compatible, therefore you do not have to worry about hardware compatibility issues.
8. If you have a computer that is running Windows NT, you can assume that you will have sufficient hardware capabilities to support Windows 2000. Yes or No, and why:
9. What are the four major steps for installing Windows 2000?
10. To make a boot disk for Windows 2000, there are three required and two “if present” files that you must copy to the floppy. What are the names of these files?
11. What are the four common boot errors you may encounter with Windows 2000?

A+ Training & Test Preparation Guide
Specialized Solutions, Inc. 316
12. What is the function of the MMC?
13. What are the two types of disk storage options available in Windows 2000?
14. If you install dynamic storage during your installation of Windows Professional, will you be able to take advantage of the fault tolerance capabilities such as RAID? Why?
15. Event Viewer provides three logs that you can use for troubleshooting. What are they?

Chapter 9 – Windows XP
Specialized Solutions, Inc. 317
Chapter 9 – Windows XP
In this chapter, we will cover Windows XP. Windows XP is built from the foundation of Windows 2000 with the media sensibilities of Windows Me. It is beautiful, but it is powerful to boot. With less blue screens and more features, Windows XP is the system to own.
Note: This chapter is about Windows XP Professional, which is on the A+ exam.
The Windows XP Family At the time of this book’s printing, the main flavors of Windows XP are as follows:
Windows XP Professional
Windows XP Professional is one of the most powerful versions of Windows. Visually, there is no difference between XP Pro and XP Home. XP Professional’s heightened security features, recovery options, and its ability to interact with large networks set it apart from other versions of XP.
Windows XP Home Edition
The visual design of XP Home is very distinct, so much so that SVGA is a requirement for XP computers. XP Home does not have the option to set your display to 640x480 anymore. XP Home has increased support for digital media as well.
Windows XP Tablet PC Edition
This version of XP is especially designed for the new Tablet PCs. Tablets are extremely lightweight but powerful. Tablets use digital pens to convert your handwriting into text into various applications. Tables are also wireless, so networking is even easier.
Windows XP Media Center Edition
This version of XP is especially designed for digital multimedia use. It has a user interface for audio, graphics, TV, and video. It also supports the new remote control for Windows XP so you can view multimedia from various locations.
Windows XP 64-Bit Edition
This is Microsoft’s first 64-bit operating system to provide more functions to technical users who need more than XP Professional can provide.
Windows XP 64-bit edition provides the kind of power that automobile engineers and other technical and power users require while allowing them to use older 32-bit software. It supports designs that are more complex for engineers, 3-D animators, and game developers. It is also helpful in financial areas such as executing trades or analyzing

A+ Training & Test Preparation Guide
Specialized Solutions, Inc. 318
market trends. It also integrates technical and 32-bit business applications into a single desktop, eliminating the need for a separate PC.
XP 64-bit is designed to run on the Intel Itanium processor because of the memory limit with 32-bit systems. It supports a whopping 16 gigabytes of RAM and up to eight-terabytes of virtual memory. Physical RAM support can increase in the future as hardware is developed that can support it. XP 64-bit is also designed to use the floating-point feature of the Intel Itanium processor.
XP 64-bit edition can be integrated right along side XP Professional as well as other 32-bit operating systems seamlessly.
What’s New about XP?
Even though Windows XP is built on Windows 2000 and XP has a great deal in common with Windows 2000, there are many improvements made on which we will focus.
A Graphical Overhaul
One of the first things that you will notice is that Windows XP looks very different from Windows 9x and Windows 2000. The look has changed and so has the layout of commonly used tools. A good rule of thumb for people who are used to Windows 2000 is if you can’t find something to go to the Start Menu.
A New Desktop
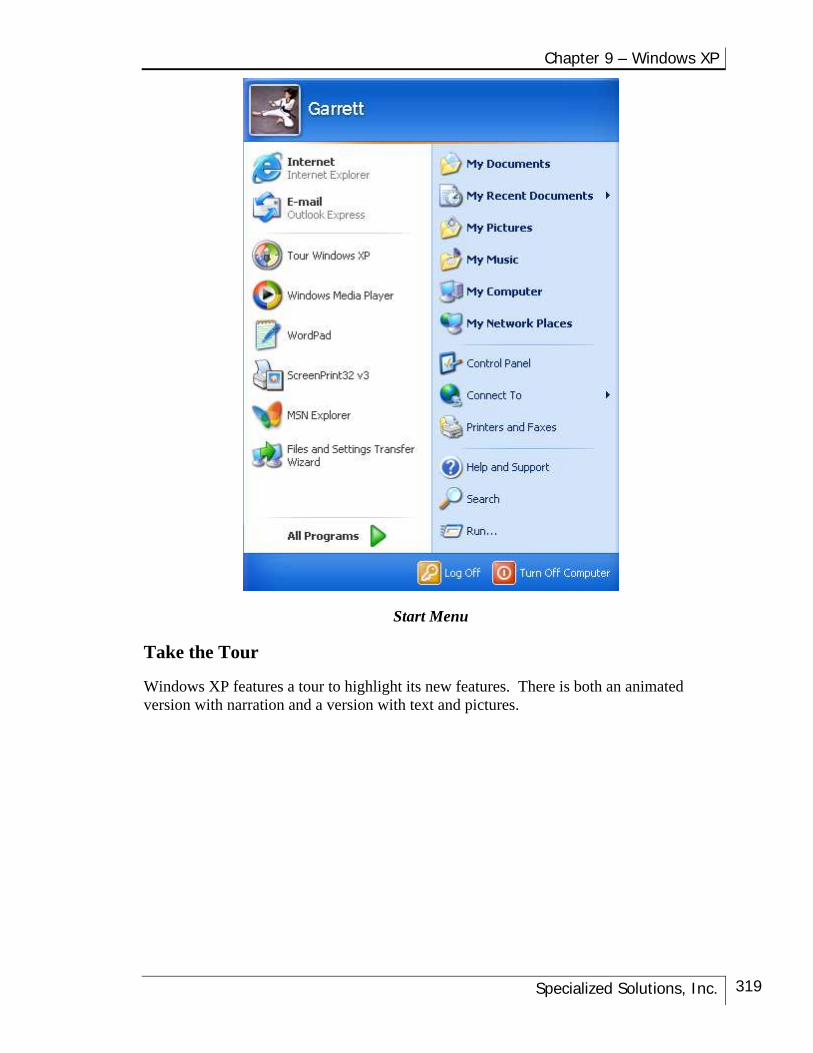
Chapter 9 – Windows XP
Specialized Solutions, Inc. 319
Start Menu
Take the Tour
Windows XP features a tour to highlight its new features. There is both an animated version with narration and a version with text and pictures.
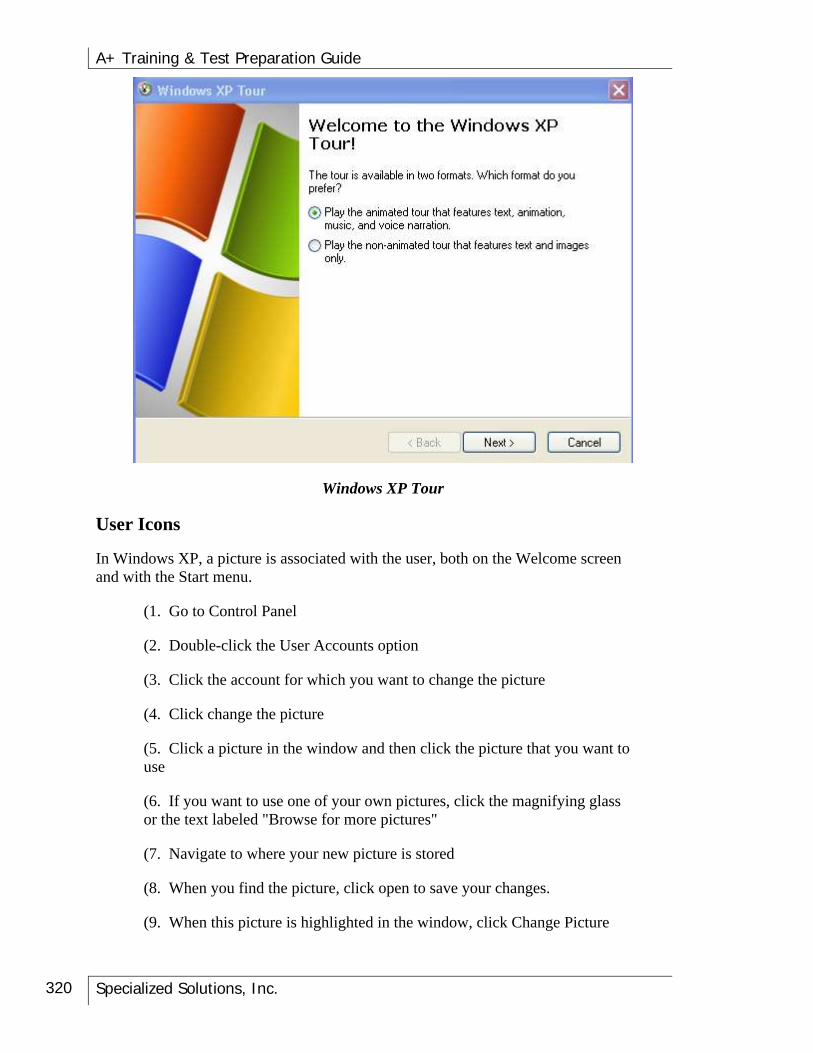
A+ Training & Test Preparation Guide
Specialized Solutions, Inc. 320
Windows XP Tour
User Icons
In Windows XP, a picture is associated with the user, both on the Welcome screen and with the Start menu.
(1. Go to Control Panel
(2. Double-click the User Accounts option
(3. Click the account for which you want to change the picture
(4. Click change the picture
(5. Click a picture in the window and then click the picture that you want to use
(6. If you want to use one of your own pictures, click the magnifying glass or the text labeled "Browse for more pictures"
(7. Navigate to where your new picture is stored
(8. When you find the picture, click open to save your changes.
(9. When this picture is highlighted in the window, click Change Picture

Chapter 9 – Windows XP
Specialized Solutions, Inc. 321
Note: Domain members cannot use this feature.
Processor Support
Windows XP Professional can support up to 2 processors, like Windows 2000 Professional. Windows XP Home, however only supports a single CPU.
Memory Support
Windows XP Professional supports up to 4 GB of RAM.
Hard Drive Support
Windows XP professional supports the following partition sizes:
• 4 GB for FAT(16)
• 32 GB for FAT32
• 2 TB for NTFS
Protocol Support
Windows XP Professional supports TCP/IP and NWLink (Window’s version of IPX/SPX).
Application Support
Windows XP supports both 16-bit and 32-bit applications. Windows XP 64-bit edition supports 64-bit applications as well.
Partition Support
Windows XP Professional can support either four primary partitions or three primary partitions and an extended partition.
Volume Support
Just like in Windows 2000 Professional, XP can have the following types of volumes:
• Simple volume (a portion of a drive or an entire drive)
• Spanned volume (a combination of 2 to 32 drives)
• Striped Volume (a combination of 2 to 32 drives where data is written to all drives in equal portions)

A+ Training & Test Preparation Guide
Specialized Solutions, Inc. 322
Hint: A volume is different from a partition because it is only a volume after the hard drive has been converted from a basic disk to a dynamic disk. You can convert your disk to dynamic in Computer Management.
Mount Support
Both Windows 2000 and Windows XP allow you to set up mount points. Mount points give you access to devices and data from a different part of your computer. For example, if you wanted to mount your CD-ROM on your root drive, it would allow you to access your CD-ROM from C:\CD-ROM.
Zip It!
Windows XP contains native support for zipping files, since this has become the de facto standard for moving files and folders.
Burn, Baby, Burn!
Windows XP also has native CD-burning ability. So, if you need to copy files and you have a CD-burner, you can drag and drop the files you want to copy to the CD-burner.
No More HPFS
Windows XP does not support HPFS (High Performance File System), a file system used by OS/2. It does, however, support the big three: FAT(16), FAT32, and NTFS.
Hint: If you need to convert from FAT(16) or FAT32 to NTFS, use the CONVERT command. The syntax should be CONVERT C: (or whatever the drive letter is) /fs:ntfs. This command is only available in Windows NT, 2000, and XP. MS-DOS, Windows 3x, and Windows 9x do not support NTFS.
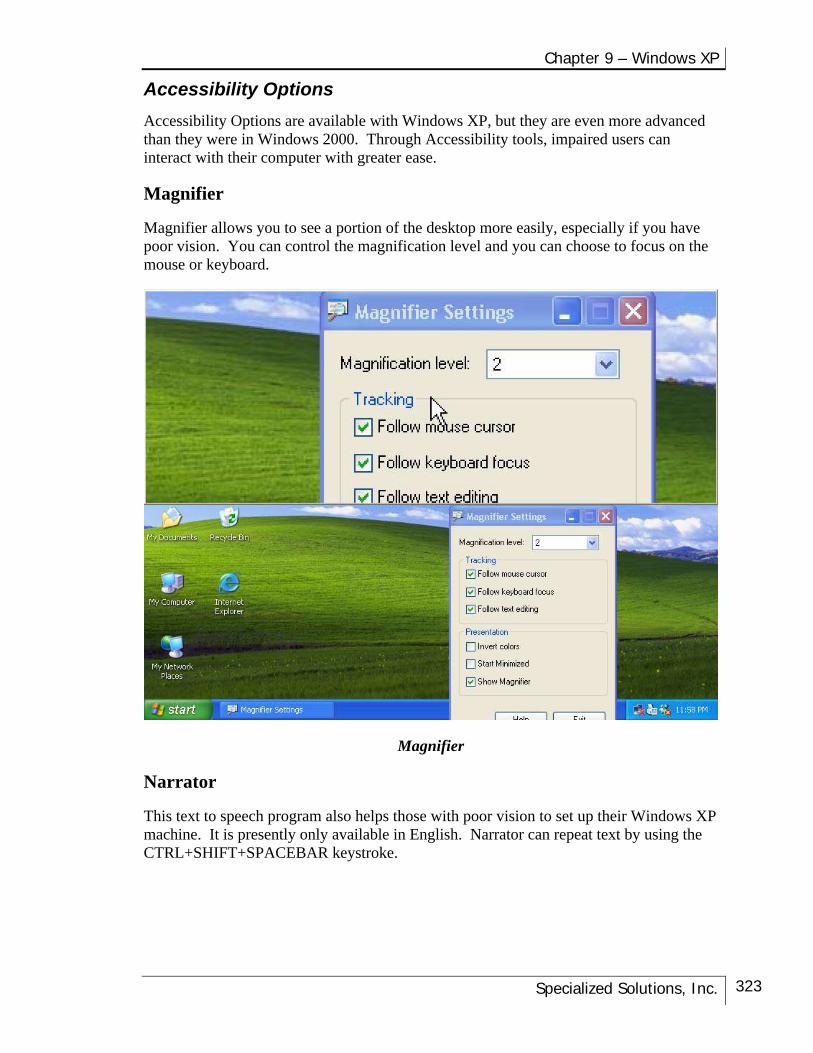
Chapter 9 – Windows XP
Specialized Solutions, Inc. 323
Accessibility Options
Accessibility Options are available with Windows XP, but they are even more advanced than they were in Windows 2000. Through Accessibility tools, impaired users can interact with their computer with greater ease.
Magnifier
Magnifier allows you to see a portion of the desktop more easily, especially if you have poor vision. You can control the magnification level and you can choose to focus on the mouse or keyboard.
Magnifier
Narrator
This text to speech program also helps those with poor vision to set up their Windows XP machine. It is presently only available in English. Narrator can repeat text by using the CTRL+SHIFT+SPACEBAR keystroke.

A+ Training & Test Preparation Guide
Specialized Solutions, Inc. 324
Microsoft Narrator
On-Screen Keyboard
This tool brings up a “virtual keyboard” for those impaired users who have trouble moving.
On Screen Keyboard Box
On Screen Keyboard

Chapter 9 – Windows XP
Specialized Solutions, Inc. 325
Utility Manager
The Utility Manager helps to manage all of the Accessibility Tools. With it, you can have these tools start automatically when you log in.
Utility Manager

A+ Training & Test Preparation Guide
Specialized Solutions, Inc. 326
Help and Support Center
This is a new and improved version of Help. There are systematic wizards and on-line help is offered as well. You can click links to help topics, ask for assistance either using remote assistance or newsgroups, download Windows updates, research compatible hardware and software for Windows XP, and use System Restore.
Help and Support Center

Chapter 9 – Windows XP
Specialized Solutions, Inc. 327
Media Support
Windows XP comes with Windows Media Player 8, Movie Maker, Windows Messenger service, digital graphics support, and more options with Autoplay.
Windows Media Player
Windows Media Player gives you the ability to play music in various formats, copy from a CD, access Internet radio stations and change the skins for the media player.
Windows Media Player

A+ Training & Test Preparation Guide
Specialized Solutions, Inc. 328
Windows Movie Maker
Windows Movie Maker allows you to edit and view movies, just as if we had our own miniature production studio.
Windows Movie Maker

Chapter 9 – Windows XP
Specialized Solutions, Inc. 329
An Ounce of Prevention…
Windows XP Professional has added some tools to keep your system from becoming inaccessible due to crashes or other problems. Here are some of the tools you can use to optimize fault tolerance in your Windows XP Professional system.
System Restore
System restore allows you to “reset” your system to a point before it was corrupted. This is done through setting up restore points when the system is in good condition.
System Restore
ASR (Automatic System Recovery)
When the system has crashed, ASR (Automatic System Recovery) allows you to restore the system partition that includes all registry settings, Windows system files, programs, applications, and data.
There is an ASR wizard available in Backup available through System Tools. It is a two-part process. It creates a floppy disk that contains system settings and a backup to another media that contains a copy of your system partition. The size of the system partition backup will be 1 to 2 GB, so a floppy disk will be inadequate and the C: drive would reformat your system – use a DVD, tape, or hard drive).

A+ Training & Test Preparation Guide
Specialized Solutions, Inc. 330
The ASR option is available during startup by pressing the F2 button but it requires the Windows XP Professional installation CD. This is when you would use your ASR backup materials.
Recovery Console
When you can’t access Safe Mode, Recovery Console is an option. This was introduced with Windows 2000. You can start Recovery Console in one of two ways:
• From a hard drive’s boot menu (after it has been installed there)
• From the installation CD
To install Recovery Console to a hard drive, take the following steps:
(1. Click the Start Menu Button
(2. Select the Run option
(3. Type the following: X:\i386\winnt32.exe /cmdcons (where X equals the drive letter assigned to your CD/DVD drive where the install CD is located)
You will need administrative rights to use Recovery Console.
Device Driver Rollback
There is a new feature with Windows XP called device driver rollback. With this option, you can “roll back” to a previous version of a device driver that doesn’t cause problems.
Whenever you update a driver, the old one is placed in a directory. If you ever need to go back to a previous device driver, you will need to do so through Device Manager.
To rollback a device driver, do the following:
1. Click the Start menu button and then select Control Panel.
2. Double-click the Performance and Maintenance icon.
3. Double-click the System icon.
4. Select the Hardware tab.
5. Click the Device Manager button.
6. Expand the device menu for the device you want to roll back.
7. Double-click the appropriate device for roll back to access its properties.
8. Select the Driver tab.
9. Click the "Roll Back Driver" button.

Chapter 9 – Windows XP
Specialized Solutions, Inc. 331
Backing Up
This backup tool is similar to the backup wizard found in Windows 2000. It can be accessed in System Tools or by typing in “NTBACKUP” in the Run box.
Note: The backup utility isn’t included in the default installation of XP Home. You will need to manually install the backup utility. To do so, double-click the Ntbackup.msi file on the Windows XP Home Edition CD-ROM (X:\VALUEADD\MSFT\NTBACKUP [X: equal your CD-ROM drive]) to start the Backup install wizard and click Finish when done.
Backup or Restore Wizard
Remote Possibilities
Windows XP has included two new remote features so users can help one another without physically being at each other’s computers.

A+ Training & Test Preparation Guide
Specialized Solutions, Inc. 332
Remote Desktop
Think of Remote Desktop as Terminal Services for clients. It is used for the same purpose, that is, to access a desktop (i.e. – your work computer) from home.
With Remote Desktop, you can allow other XP users to remotely connect to your computer. Administrators don’t need your permission to connect.
Remote Desktop Users
Remote Desktop Connection Box

Chapter 9 – Windows XP
Specialized Solutions, Inc. 333
Remote Assistance
Remote Assistance allows another user to see your desktop and control your pointer and typing activities. Remote Assistance also supports two-way chat using text or voice.
To initiate this process, an invitation must be sent from the end-user who needs help. This invitation can be sent either by email or by Windows Messenger. Invitations do expire, so, a timely response is expected.
Remote Assistance
Security Measures in Windows XP
Security has been significantly increased in Windows XP. Through encryption, firewalls, and auditing, we can rest a bit easier.
Auditing
Auditing was first introduced with Windows 2000 and it allows administrators to track events and occurrences in a networked environment where Windows clients reside.
EFS (Encrypted File System)
You can encrypt data with EFS in either a Windows 2000 or Windows XP environment.

A+ Training & Test Preparation Guide
Specialized Solutions, Inc. 334
Hint: Encryption and compression are mutually exclusive in Windows 2000/XP. You can’t have both at the same time; it is either one or the other.
ICF (Internet Connection Firewall)
This built-in firewall utility is a handy new addition in Windows XP. This is the first firewall that Microsoft has integrated into one of their operating systems.
To activate this integrated protection, go into the properties of the local area connection you wish to activate and select the Advanced tab. Check the box next to “Protect my computer and network by limiting or preventing access to this computer from the Internet”.
If you want to deactivate ICF, you simply need to clear the check box next to Protect my computer or network.
Configuring Internet Connection Firewall
If you need to manually open ports in ICF, here are the steps that you take:
(1. Click Start
(2. Click My Network Places
(3. Under Network Tasks, click View Network Connections
(4. Right-click the desired connection that you use for the Internet, and select Properties

Chapter 9 – Windows XP
Specialized Solutions, Inc. 335
(5. Click the Advanced tab
(6. Click Settings (if this isn’t available, ICF is not enabled on this connection, and you do not have to take any further action.)
(7. Click Add to open a new port
(8. In the Description box, type a friendly name
(9. In the Name or IP address of the computer hosting this service on your network box, type 127.0.0.1 or specify the IP address of another internal computer
(10. In the External port and Internal port boxes, type the port number
(11. Click either TCP or UDP, and then click OK
Installing Windows XP
Before you install Windows XP, you will need to confirm that your hardware meets minimum system requirements (hopefully you far exceed these minimum requirements to achieve better performance) and check the HCL.
In order to upgrade to Windows XP, you need one of the following operating systems:
• Windows 95 OSR 2
• Windows 98 or 98 SE
• Windows Me
• Windows NT 4.0 Workstation with Service Pack 6 installed
• Windows 2000 Professional
• Windows XP Home

A+ Training & Test Preparation Guide
Specialized Solutions, Inc. 336
Minimum System Requirements
The following are the minimum system requirements for different versions of XP. Keep in mind that you should always try to exceed the minimum requirements.
XP Professional
XP Home XP Media Center
XP Tablet XP 64-Bit
CPU 233 MHz minimum / 300 MHz recommended
233 MHz minimum / 300 MHz recommended
233 MHz minimum / 300 MHz recommended
233 MHz minimum / 300 MHz recommended
733 MHz minimum / Intel Itanium recommended
RAM 64 MB minimum / 128 megabytes (MB) recommended
64 MB minimum / 128 megabytes (MB) recommended
64 MB minimum / 128 megabytes (MB) recommended
64 MB minimum / 128 megabytes (MB) recommended
1 GB minimum / 2 GB or more recommended
Hard Drive Space
1.5 gigabytes (GB)
1.5 gigabytes (GB)
1.5 gigabytes (GB)
1.5 gigabytes (GB)
1.5 gigabytes (GB)
Video Super VGA (800 × 600)
Super VGA (800 × 600)
Super VGA (800 × 600)
Super VGA (800 × 600)
Super VGA (800 × 600)
Multimedia CD-ROM or DVD drive
CD-ROM or DVD drive
CD-ROM or DVD drive
CD-ROM or DVD drive
CD-ROM or DVD drive
Peripherals Keyboard and Mouse
Keyboard and Mouse
Keyboard and Mouse
Keyboard and Mouse
Keyboard and Mouse
It is also recommended that you refer to the HCL (Hardware Compatibility List) for Windows XP before installation. You can find the HCL at www.microsoft.com/hcl.
Since the Windows XP installation CD is bootable, all you need to get started is to place the CD in the drive and restart the computer.
Unattended installations are also possible with Windows XP (this first became available with Windows 2000 Professional). This helps if you don’t want to answer the prompts during the installation process or if you have many workstations to setup.
RIS (Remote Installation Service) was introduced with Windows 2000. It allows an administrator to create an image of either Windows 2000 Professional or Windows XP Professional and distribute it across the network. The SYSPREP tool can also be used to create an image of either Windows 2000 Professional or Windows XP Professional.

Chapter 9 – Windows XP
Specialized Solutions, Inc. 337
You can install over the network with third-party software or by using a network boot disk with the appropriate network adapter drivers. Some might use a bootable floppy drive with CD-ROM drivers to install the operating system locally.
Note: If you install the XP operating system from a command-line you will use either the WINNT.exe (used in a 16-bit environment) or the WINNT32.exe (used in a 32-bit environment) located in the I386 folder.
Product Activation
Microsoft has introduced product activation as a way to ensure that you install a registered and legitimate copy of XP that you purchased. You only have thirty days in which to register your copy of Windows XP.
Control Panel
The layout of Control Panel has changed radically, much like the layout of the Start Menu. It now changes categories into which applets are grouped. You can, if you wish, switch to the Classic View if you prefer the Windows 2000 layout.
Control Panel (Classic View)

A+ Training & Test Preparation Guide
Specialized Solutions, Inc. 338
Add or Remove Programs
Device Manager
Device manager, where you change hardware settings and install drivers for hardware, is much the same as it was in Windows 2000.

Chapter 9 – Windows XP
Specialized Solutions, Inc. 339
Device Manager
Hardware Profiles
You can have more than one hardware profile for a computer with Windows XP Professional. If you wanted to conserve power on a laptop by disabling devices you don’t need away from the docking station, an extra profile would be an ideal solution.

A+ Training & Test Preparation Guide
Specialized Solutions, Inc. 340
Hardware Profiles
MMC (Microsoft Management Console)
The MMC (Microsoft Management Console) is a great administrative tool that Microsoft introduced with Windows 2000. You can access the MMC console by typing in MMC in the Run box.
With the MMC console, you can use snap-ins. Snap-ins are specific administrative tools that can generally be accessed by going into the Administrative Tools menu. Consoles bring the utilities you use most together in one convenient place.

Chapter 9 – Windows XP
Specialized Solutions, Inc. 341
MMC Console
Networking with Windows XP
Networking functionality has also been taken to the next level in Windows XP. It has been simplified from Windows 2000 to make the average user a home networking professional.
Network Bridge
This new networking feature in Windows XP sets up a bridge between multiple network interfaces to connect segments. Dissimilar topologies and protocols will not be an issue with a network bridge. The logical bridge saves you the cost of having to buy a real bridge.
Note: if you want to prevent the Network Setup Wizard from creating a bridge, take the following steps:
(1. Start the Network Setup Wizard
(2. When you get to the "Your computer has multiple connections" message, click Let me choose the connections to my network
(3. Click Next
(4. When you receive the "Select the connections to bridge" message, click to clear the check boxes for all but one of the network devices that are listed
(5. Click Next

A+ Training & Test Preparation Guide
Specialized Solutions, Inc. 342
Support for IPv6
IPv6 replaces IP version 4. Windows XP has built-in support for IPv6. IPv6 addresses are 128-bits in length as opposed to the standard 32-bit IPv4 address. IPv6 is denoted in hexadecimal rather than dotted decimal notation.
Troubleshooting with Windows XP
Since there are so many new features in Windows XP, the time should be taken to go over some of the unique troubleshooting that you may need to fix those unique services and features. As stated with previous Windows operating systems, the list of troubleshooting scenarios is infinite, so, these scenarios are designed to address problems specific to the XP family.
PROBLEM
You aren’t sure if the problem you are having is being caused by software or if it is being caused by hardware. The problem might be blue screen error messages or spontaneous restarts. It is more than likely that a driver is the root cause for this, but it might also be the result of other issues.
SOLUTION
Try the following steps in succession until the problem is resolved (if you can start Windows XP):
(1. Attempt to remove or disable any third-party drivers to see if they are the cause
(2. Restart the computer to see if the problem persists
Try the following steps in succession until the problem is resolved (if you can’t start Windows XP):
(1. Use the Roll Back Driver option
(2. Use the System restore feature
(3. Use Recovery Console
(4. Obtain new drivers from the manufacturers
(5. Use the Last Known Good method
PROBLEM
You receive one of the following stop errors:
Stop 0xc0000218 (0xe11a30e8, 0x00000000, 0x000000000, 0x00000000)

Chapter 9 – Windows XP
Specialized Solutions, Inc. 343
UNKNOWN_HARD_ERROR
-or-
Stop: 0xc0000218 {Registry File Failure}
The registry cannot load the hive (file):
\SystemRoot\System32\Config\SYSTEM or its log or alternate.
It is corrupt, absent, or not writable.
These errors occur when a registry hive file is corrupt or missing, generally due to some sort of hardware problem, possibly a hard drive or memory issue.
SOLUTION
Try the following to fix the issue by using one of the following options:
(1. Restart the computer and use the Last Known Good configuration (press the spacebar when the message appears)
(2. Use the Recovery Console (boot with the installation CD)
PROBLEM
You receive the following error message, “Stop: 0x0000000A (parameter1, parameter2, parameter3, parameter4) IRQL_NOT_LESS_OR_EQUAL*** Address x has base at x – filename”
The parameters refer to the specific issues that are involved:
Parameter 1 – An address that was referenced improperly
Parameter 2 – An IRQL that was required to access the memory
Parameter 3 – The type of access, where 0 is a read operation and 1 is a write operation
Parameter 4 – The address of the instruction that referenced memory in parameter 1
This error message generally occurs when a driver attempts to use an incorrect memory address or if the wrong driver is being used. Incompatible software or faulty hardware could contribute to this as well.

A+ Training & Test Preparation Guide
Specialized Solutions, Inc. 344
SOLUTION
If the error occurs during installation:
(1. Check to see if the hardware you are using is on the HCL
(2. You may want to turn off the following features in your BIOS one-by-one to see if the error message goes away:
• Any caching (L2, BIOS, internal, external, write-back, etc.)
• Any shadowing
• Plug and Play
• Any BIOS-related virus protection
(3. Remove any of the following hardware components to ensure that one of them isn’t the cause:
• Network card
• Modem card
• Sound card
• Extra hard drives
• CD-ROM or DVD-ROM drives (if the installation is being performed from files on the hard drive)
(4. If you are using a SCSI card, perform the following tasks:
• Get the latest driver from the manufacturer
• Disable sync negotiation on the SCSI controller
• Make sure that the chain is properly terminated
• Make sure each device on the chain has a unique ID
• Remove all devices from the chain with the exception of the disk you are using for installation
(5. If you using an IDE configuration, perform the following tasks:
• Define the integrated IDE port to Primary only
• Verify the master/slave settings

Chapter 9 – Windows XP
Specialized Solutions, Inc. 345
• Remove all IDE devices with the exception of the disk you are using for installation
(6. Check the physical RAM modules to see if they are mismatched or if they all operate at the same speed
(7. Contact the manufacturer to see if there are any known issues with Windows XP
If the error occurs after installation:
(1. Attempt to disable any third-party drivers or software that you deem suspect and restart the computer to see if that solves the problem
(2. If you can’t restart the computer, trying using the Last Known Good Configuration
(3. You can also try repairing the installation with the installation CD
(4. Try to roll back any new drivers that have been installed
(5. You can also use System Restore
(6. Recovery Console can be used as well, but the other, less severe options should be attempted first
(7. If you suspect new hardware, remove it and see if the problem persists
PROBLEM
You want to use two monitors with different outputs (i.e. – from two different programs), but you only have a video card with two outputs.
SOLUTION
You can enable DualView in Windows XP. To do so, take the following steps:
(1. Right-click on the desktop anywhere there is free space
(2. Click Properties
(3. Select the Settings tab
(4. Select the Display Monitor
(5. Select the Extend my Windows desktop onto the monitor option

A+ Training & Test Preparation Guide
Specialized Solutions, Inc. 346
PROBLEM
You want to change the resolution to 640x480 or 256 colors, but it doesn’t seem to be an option anymore with XP.
It helps to understand that Microsoft didn’t design Windows XP to support 640x480 or 256 colors, but there is a workaround for the problem.
SOLUTION
Perform the following steps:
(1. Right-click anywhere on the desktop where there isn’t an icon
(2. In the Display Properties dialog box click the Settings tab
(3. Click the Advanced button
(4. Click the Adapter tab
(5. Click the List all modes button
(6. Select the resolution, color depth, and refresh rate that you want to use
(7. Click OK.
PROBLEM
You aren’t sure what the difference is between a quick format and a regular format when setting up Windows XP.
SOLUTION
Here’s the difference:
A regular format scans for bad sectors on the hard drive. A quick format does not. If you know that your hard disk is good, a quick format is sufficient. The best way to know this is if you have installing something else on it recently.
The option to run chkdsk command with the /r switch after installation is also available when using a quick format.
PROBLEM
When starting your computer for the first time, the shortcuts in the Startup group do not wok properly. Some programs in this group can interfere with wizards like “Configure Your Server”. So this is part of the XP design?

Chapter 9 – Windows XP
Specialized Solutions, Inc. 347
SOLUTION
Simply restart your computer and this will initialize programs in the Startup group, causing the shortcuts to work properly.
PROBLEM
The attributes to files that you copied to the staging area for CD burning are missing. This occurs if the files reside on a FAT(16) or a FAT32 partition.
SOLUTION
Copy files from an NTFS partition or convert the partition to NTFS.

A+ Training & Test Preparation Guide
Specialized Solutions, Inc. 348
New Commands used with Windows XP
The following are commands not available with Windows 2000 but only available with Windows XP:
XP Command Definition
Bootcfg Allows you to manipulate boot.ini settings.
Defrag Brings the various parts of a file, folder, or application together contiguously.
Diskpart Allows hard disk partitions and volumes to be managed.
Driverquery Queries for a drivers list and driver properties.
Eventcreate Creates an event in an event log.
Eventquery Lists events and their properties from (a) log(s).
Eventtriggers Shows and manipulates event triggers.
Fsutil Dismounts and/or extends a volume.
Getmac Grabs the MAC (Media Access Control) or physical address.
Helpctr The command to start the Help and Support Center.
Ipseccmd Sets up IPSec (Internet Protocol Security) policies.
Logman Schedules and manages performance counter and event trace log collections.
Openfiles Shows and queries open files.
Pagefileconfig Shows and configures virtual memory settings.
Perfmon Opens a performance console.
Prncnfg Shows and configures a printer.
Prndrvr Manages printer drivers.
Prnjobs Manages print jobs.
Prnmngr Manages printers or printer connections.

Chapter 9 – Windows XP
Specialized Solutions, Inc. 349
XP Command Definition
Prnport Manages standard printer ports.
Prnqctl Clears out the print queue and prints test pages.
Relog Transfers performance counters from performance counter logs into other formats such as BIN (Binary) or SQL.
Sc Manages service related tasks.
schtasks Manages scheduled tasks.
shutdown Restarts or shuts down a computer.
systeminfo Finds basic system configuration information.
taskkill Stops a task or process.
tasklist Shows applications, services, and the Process ID (PID) running on a computer.
tracerpt Processes event trace logs.
typeperf Writes performance counter data to the command-line window or to a log.
WMIC Facilitates the use of WMI (Windows Management Instrumentation).

A+ Training & Test Preparation Guide
Specialized Solutions, Inc. 350
Summary
Even though it will take some getting used to, the layout and design of Windows XP is visually very pleasing. Those who have been working with Windows operating systems for years will most likely use classis view initially, but the logic behind the new layout will start to make more sense to the user as he or she works with it.
The following summarizes the key points of this chapter:
• Windows XP contain newly integrated features such CD burning and text to speech conversion
• Windows XP contains many restoration tools such as System Restore, ASR, Recovery Console and Device Driver Rollback
• Remote Desktop and Remote Assistance allow users to help each other as if they were in the same office

Chapter 9 – Windows XP
Specialized Solutions, Inc. 351
KEYWORDS Exercise
Define each of the following keywords. Hint: There’s a glossary in the back of this book.
Keyword Definition
Auditing
EFS
HPFS
ICF
Mount points
Network Bridge
Product Activation
Remote Desktop
Simple volume
Spanned volume
Striped Volume
System Restore
Windows XP 64-Bit Edition
Windows XP Home Edition
Windows XP Media Center Edition
Windows XP Professional
Windows XP Tablet PC Edition

A+ Training & Test Preparation Guide
Specialized Solutions, Inc. 352
Review Questions Chapter 9
1.How many processors does Windows XP Home and Professional?
2.How much RAM can Windows XP Professional support?
3.What are the three different volume types that Windows XP Professional supports?
4.How would you convert a FAT or FAT32 partition to NTFS from a command-line prompt in XP?
5.Name two of the accessibility options available in Windows XP Professional?
6.Name three things you can do with the Help and Support Center?
7.What hotkey can you press to activate the ASR (Automatic System Recovery) during startup?
8.Who can use Remote Desktop on your computer without you giving them permission to do so?
9.How do you activate ICF in Windows XP Professional?
10.List three operating systems that can upgrade to Windows XP Professional?

Chapter 10 – Networks
Specialized Solutions, Inc. 353
Chapter 10 – Networks
In Volume I, we discussed networking and the hardware involved in connecting computers. This chapter deals with the software side of networking and Internetworking.
Remember from our chapter on networking, the purpose of networking is to share resources. In order for two computers to communicate, they must speak the same language. This means that without the proper protocols and compatible Network Operating Systems, computers would be unable to share information.
In this chapter, we will discuss the technologies that make successful communication possible between computers with different operating systems and hardware configurations. Two very different computers, such as a PC and a Macintosh, can share information via a network as long as they both use the same protocols (language).
Network Operating Systems
We will start our discussion with a review of Network Operating Systems. Network Operating Systems (NOS) are specialized operating systems designed to integrate computers in a networking environment. Some NOS are intended to work with an existing operating system that only runs the computer, while others are designed to run the computer as well as network interfaces. Today’s popular operating systems usually include network operating system functions at some level. In addition, there are two types of network configurations (Peer-to-Peer and Client/Server).
Peer-to-Peer NOS
Many smaller networks use the Peer-to-Peer network configuration, an excellent choice for networks that have fewer than 10 workstations, and have no need for security. A small office environment could share their resources (printers, etc.) without spending a lot of money.
In a peer-to-peer network, each workstation acts as a client or a server depending upon whether it is accessing another workstation’s resources or sharing its own. Typically, this type of network is only used to share files and peripheral devices. Each user is responsible for setting the security (deciding who can access what) on their workstations. The following operating systems will function as a NOS in a peer-to-peer environment. Please note that there are many software programs that have peer-to-peer NOS capabilities, far too many to list here, in addition, they are outside the scope of the A+ Course.

A+ Training & Test Preparation Guide
Specialized Solutions, Inc. 354
Windows for Workgroups
Windows 3.1 included the capability to operate in a peer-to-peer network and this was known as Windows for Workgroups. A group of computers could be connected in a Workgroup, and share resources. This version also included an email program called Microsoft Mail and a scheduling program called Schedule+.
Resources needed to be shared publicly and were assigned drive letters. A redirector would route the requests to the appropriate location of the resource. This NOS did not function as an operating system and ran with the DOS operating system.
Windows 9x
Windows 95 was the first Windows program to actually be an operating system. It also has peer-to-peer networking capabilities built in. Windows 9x uses “Network Neighborhood” to access and configure the network. When you double-click on Network Neighborhood, you can view and access all shared resources, which are arranged on a hierarchical basis. Just as in Windows for Workgroups, in order for others on the network to access files and resources, they need to be shared.
Hint: If you are having issues getting a Windows 9x client to join the peer-to-peer workgroup, make sure that their network adapter is recognized by the OS, that it has the appropriate drivers, that it has the Microsoft client installed, and that a protocol is installed and bound (generally TCP/IP). If you want to share resources, file and print sharing must also be installed.
Client/Server NOS
In a peer-to-peer network, the computers act as both a client and a server. In a Server-based network, the purpose of the NOS is to connect all devices on a network and coordinate their use. Two types of software must be considered:
• Client Software
• Server Software
Client Software
If you type a command for your stand-alone computer to perform a task, the command is processed over the computer’s internal CPU via the computer’s local bus. However, if you were requesting resources or services that exist on a remote server, the operating system has to have the capability to redirect (forward) the request away from the local bus, out onto the network, and to the server. The component that handles these requests is called the redirector. Client software provides these functions.

Chapter 10 – Networks
Specialized Solutions, Inc. 355
Popular versions of client software include:
• Windows 9x
• Windows NT Workstation
• Windows 2000 Professional
Note: The Redirector or Requester (as it’s called in Novell NetWare), is responsible for forwarding requests away from the local bus and out onto the network. A section of code intercepts requests and determines if they are local requests, or if they need to be redirected to the network. The Redirector does all this in such a way that the application that made the request never knows it accessed any resources that didn’t exist locally.
Server Software
As their name implies, servers exist to serve. They process requests from clients for resources such as files and peripherals. They are the storage facility for the bulk of the data in a network environment, and as such, are an excellent point from which to centrally manage a network. Unlike most client software, server software includes services for the following:
• Managing User Accounts
• Security
• Data Protection
Managing User Accounts
Servers make it possible to manage users from a central location. Users are required to enter a password before they can log on and gain access. This process is known as authentication. Administrators set up and manage user accounts and passwords.
Security
Administrators can set up accounts to determine who gets privileges to what resources and change them as needed (including denying access). This is known as setting permissions. The server keeps track of who is logged onto a network and what resources have been (or are being) accessed. This is known as auditing.
Data Protection
In a server, most of the data is stored on the server. This makes it an excellent point from which data can regularly be backed up. Most network administrators provide some sort of fault tolerance system on the server, such as a RAID system. At the very least, the server should be protected by an uninterruptible power supply (UPS).

A+ Training & Test Preparation Guide
Specialized Solutions, Inc. 356
In a network with multiple servers, a process called replication performs data protection. Replication is the process of making a copy of the data stored on one server on another server. This way, if one server goes down, the other server can take over immediately.
Popular examples of server software include:
• UNIX
• Novell NetWare
• Windows NT Server
• Windows 2000 Server
Here is a chart which categories the operating systems the A+ exam speaks to:
Network Operating Systems
Examples of NOS:
Client/Server
Windows NT Server – Server
Windows NT Workstation – Client
Windows 2000 Server – Server
Windows 2000 Professional – Client
Windows 2000 Directory Server
Windows 2000 Datacenter – Server
Peer-to-Peer Windows 95
Windows 98
Windows NT Workstation
Windows 2000 Professional
Sharing Files and Resources in Windows 9x
Sharing is what networking is all about. However, the ability to share files and folders is not the standard or the default configuration when you install client software such as Windows 9x. Before you can share anything, you will need to enable Print and File sharing.

Chapter 10 – Networks
Specialized Solutions, Inc. 357
Network Neighborhood
A computer must be configured through Network Neighborhood to access a network and enable Print and File sharing. You will find the Network Neighborhood icon in both the Explorer program and on the desktop. If you encounter a computer without this icon, it means that the computer does not have any networking devices installed. As soon as you install and configure a network device, such as a modem or a network card, the icon will be visible.
To open the Network Neighborhood dialog box, you will need to right-click on the icon and select Properties from the menu. When the dialog box opens, you will notice three tabs (Configuration, Identification, and Access Control).
Note: when you “see” the other computers in your network in Network Neighborhood, you are using NetBIOS to view those local resources on the network.
Configuration Tab
The Configuration Tab is the default tab (the one that you will see first, any time you access this dialog box). From this tab, you can access and configure all the hardware and protocols required to connect to a network. For a network connection to work, you must have at least one client, one adapter, and one protocol configured. The key is to have the same ones configured on all the computers on the network.
Hint: If you are having problems connecting one computer to the network, check the configuration list of one of the other computers, and configure the new one to match it.
Configuration Tab

A+ Training & Test Preparation Guide
Specialized Solutions, Inc. 358
To add a new client, adapter, or protocol, click on the add button. This will open a small dialog box. Double-click on the item you wish to install and follow the instructions. You may be required to insert the operating system CD to install all the files.
Add Component Dialog Box
If you need to confirm or change the configuration of one of the items, select it from the installed components list and click on the Properties button.
Notice that this tab has a button for File and Print Sharing. To enable file and print sharing, all you need to do is click on the button and put a check in the two boxes of the dialog box. File and Print Sharing will be added to the list of installed components.
File and Print Sharing Dialog box
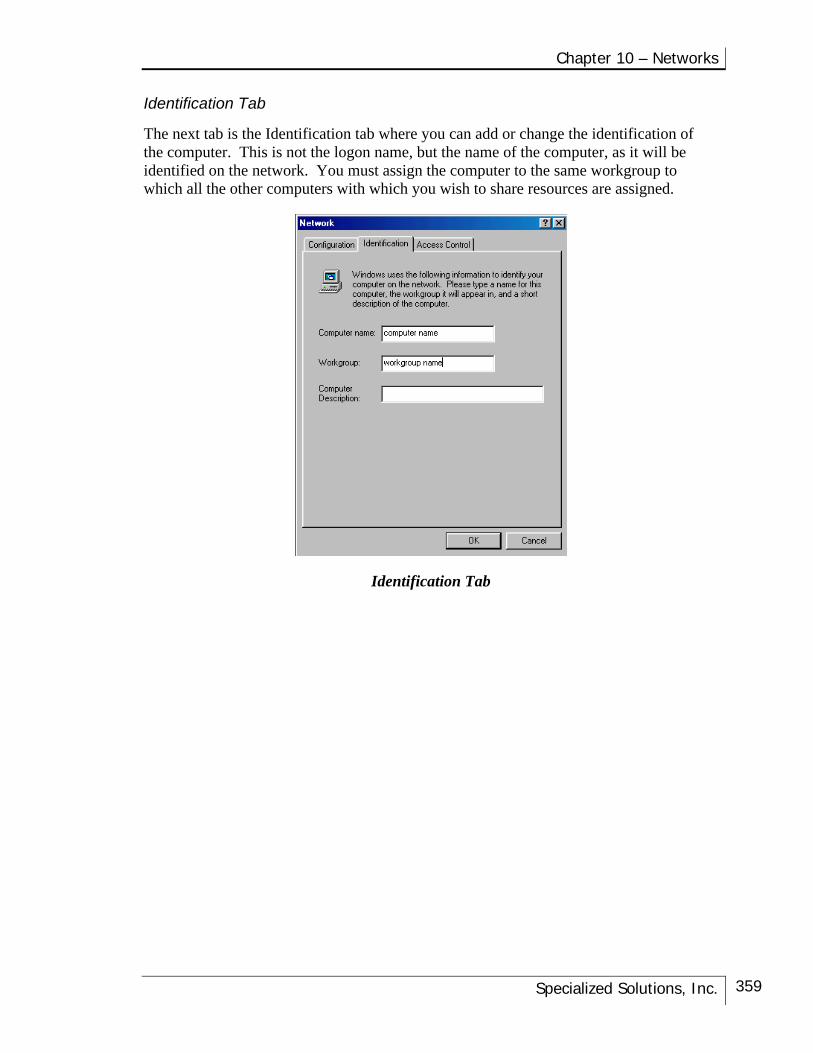
Chapter 10 – Networks
Specialized Solutions, Inc. 359
Identification Tab
The next tab is the Identification tab where you can add or change the identification of the computer. This is not the logon name, but the name of the computer, as it will be identified on the network. You must assign the computer to the same workgroup to which all the other computers with which you wish to share resources are assigned.
Identification Tab
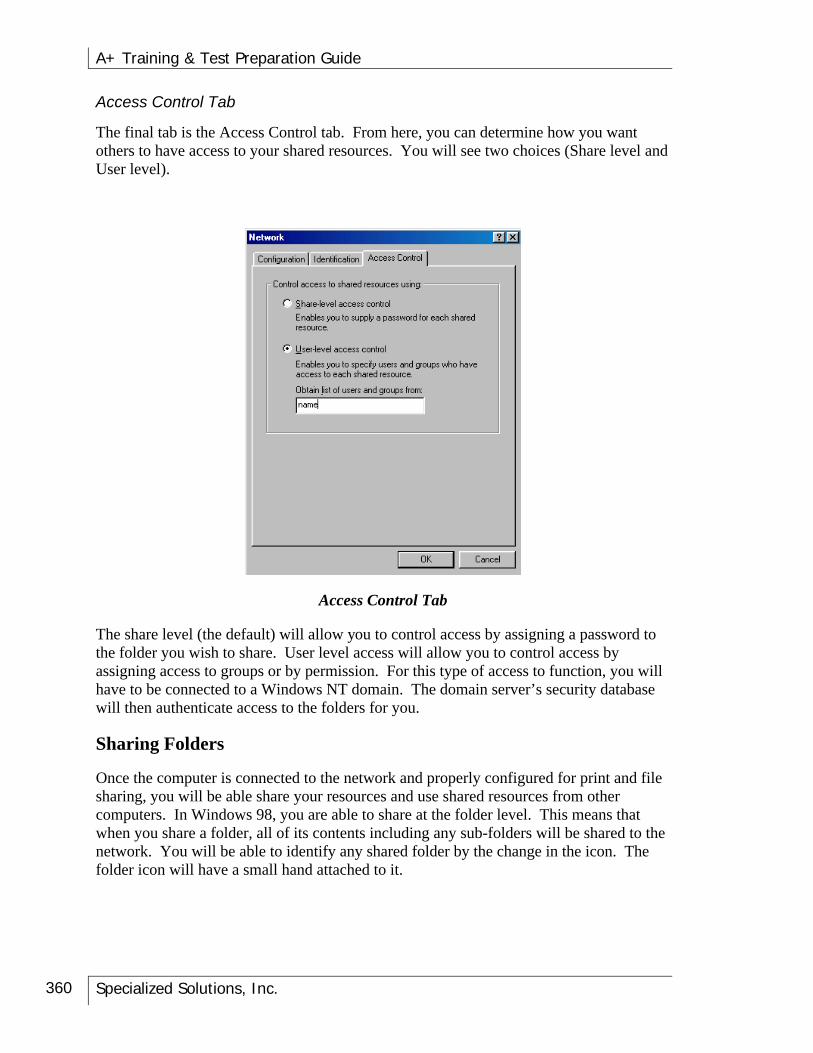
A+ Training & Test Preparation Guide
Specialized Solutions, Inc. 360
Access Control Tab
The final tab is the Access Control tab. From here, you can determine how you want others to have access to your shared resources. You will see two choices (Share level and User level).
Access Control Tab
The share level (the default) will allow you to control access by assigning a password to the folder you wish to share. User level access will allow you to control access by assigning access to groups or by permission. For this type of access to function, you will have to be connected to a Windows NT domain. The domain server’s security database will then authenticate access to the folders for you.
Sharing Folders
Once the computer is connected to the network and properly configured for print and file sharing, you will be able share your resources and use shared resources from other computers. In Windows 98, you are able to share at the folder level. This means that when you share a folder, all of its contents including any sub-folders will be shared to the network. You will be able to identify any shared folder by the change in the icon. The folder icon will have a small hand attached to it.

Chapter 10 – Networks
Specialized Solutions, Inc. 361
The following are the procedures to follow to share resources on a Windows 98 network:
To share a folder:
1. In Windows Explorer or My Computer, click the folder you want to share. 2. On the File menu, click Properties. 3. Click the Sharing tab, and then click Shared As. 4. Click the Access Type you want, and, if necessary, enter a password.
Note: Remember to have File and Print sharing enabled in your TCP/IP properties, to make sharing a folder actually work. The Client for Microsoft Network must be enabled as well.
To stop sharing a folder:
1. In Windows Explorer or My Computer, click the folder you want to stop sharing. 2. On the File menu, click Properties. 3. Click the Sharing tab, and then click Not Shared.
To share your printer:
1. Click Start, point to Settings, and then click Printers. 2. Click the printer you want to share. 3. On the File menu, click Properties. 4. Click the Sharing tab, and then click Shared As.
NOTE: If the Sharing tab is not visible, you need to enable file and print sharing services. You can only share a printer that is connected to your computer. Printers can be shared with TCP/IP, NetBEUI, and IPX/SPX.
To stop sharing your printer:
1. Click Start, point to Settings, and then click Printers. 2. Click the icon for the printer you want to stop sharing. 3. On the File menu, click Properties. 4. Click the Sharing tab, and then click Not Shared.
To use a shared network printer:
1. Double-click Network Neighborhood, and then locate the computer with the printer you want to use. 2. Click the computer with the printer you want, and then click the printer icon. 3. To set up the printer, follow the instructions on the screen.

A+ Training & Test Preparation Guide
Specialized Solutions, Inc. 362
NOTE: After you have set up a network printer, you can use it as if it were attached to your computer. To see which computers have shared printers, click on the View menu, click Details, and look for printer names or descriptions in the Comment column. You can also access a shared printer by entering the proper UNC path in the Run option: \\computername\printername.
To set up a printer:
1. Click Start, point to Settings, click Printers, and then double-click Add Printer. 2. Follow the instructions on the screen. If you want to print a test page, first make sure your printer is on and ready to print.
NOTE: If you want to use a shared network printer, you can set it up quickly by browsing for it in Network Neighborhood, clicking the printer's icon, and then clicking Install on the File menu.
To specify the default printer:
1. Click Start, Settings, and then click Printers. 2. Right-click the icon for the printer you want to use as the default printer, and then click Set As Default. If there is a check mark next to this command, the printer is set as the default printer.
NOTE: It is a good idea to set the default printer to be the one you use most often. When you choose the Print command in many Windows-based programs, the default printer is used unless you specify otherwise. If you delete the default printer, will make the remaining printer the default. An application can also be used to set the default printer.
Network Communication Standards
Standards and Protocols are the source of effective network communications. As we noted before, in order for two computers to communicate, they must speak the same language. One solution would be to have only one computer supplier (say IBM) and one software supplier (say Microsoft). In this ideal world, there would be no problems, because all computers and all software would be the same. We all know that this is not the reality and would have its own set of problems. The truth is that there are many suppliers of both computer hardware and computer software. The only solution is that an independent organization(s) step in and create common standards for communication. Then, as long as both computers use the standard, they will communicate. While this is close to reality, there are in fact several different standards that computer and software manufacturers use. What you, as a PC technician need to understand, is that as long as both computers use the same standards, they will communicate.
The International Standards Organization (ISO) has published specifications that define how hardware and software communicate in a network environment. These standards are known as the Open Systems Interconnection (OSI) model.
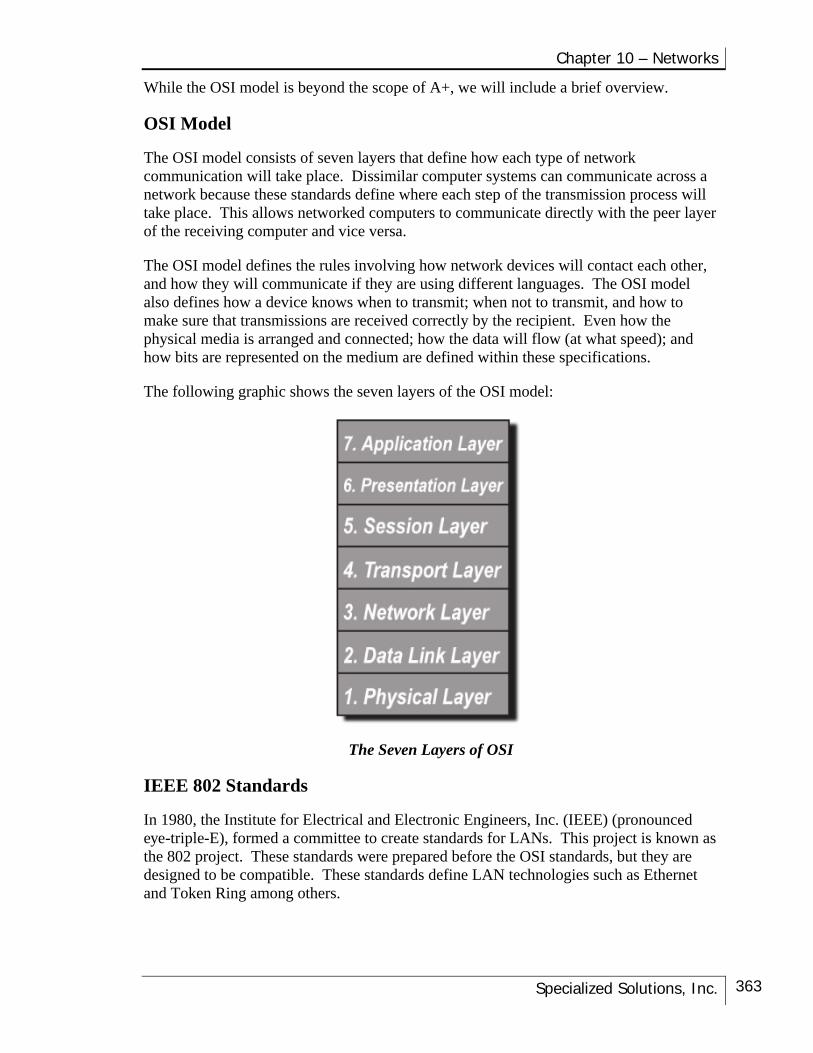
Chapter 10 – Networks
Specialized Solutions, Inc. 363
While the OSI model is beyond the scope of A+, we will include a brief overview.
OSI Model
The OSI model consists of seven layers that define how each type of network communication will take place. Dissimilar computer systems can communicate across a network because these standards define where each step of the transmission process will take place. This allows networked computers to communicate directly with the peer layer of the receiving computer and vice versa.
The OSI model defines the rules involving how network devices will contact each other, and how they will communicate if they are using different languages. The OSI model also defines how a device knows when to transmit; when not to transmit, and how to make sure that transmissions are received correctly by the recipient. Even how the physical media is arranged and connected; how the data will flow (at what speed); and how bits are represented on the medium are defined within these specifications.
The following graphic shows the seven layers of the OSI model:
The Seven Layers of OSI
IEEE 802 Standards
In 1980, the Institute for Electrical and Electronic Engineers, Inc. (IEEE) (pronounced eye-triple-E), formed a committee to create standards for LANs. This project is known as the 802 project. These standards were prepared before the OSI standards, but they are designed to be compatible. These standards define LAN technologies such as Ethernet and Token Ring among others.

A+ Training & Test Preparation Guide
Specialized Solutions, Inc. 364
Again, the OSI model, the IEEE 802 standards, and their functions are beyond the scope of A+, but should you elect to continue your training into networking (Network+ Certification, etc.) you would need to know the function of each layer or standard.
Networking Protocols
As discussed in Volume I, network protocols are sets of rules that govern the way computers communicate over a network. When more than one protocol is necessary to accomplish a task, these protocols are layered so that specific protocols handle their appropriate subtasks at specific layers of the OSI model. These subtasks are stacked in such a way that together they complete a whole task. This is called a protocol suite or protocol stack. Each protocol receives services from the layer directly below it, and provides services to the layer directly above it.
Connection vs. Connectionless Communication
Communication between computers may be connection-oriented or connectionless. A connection-oriented protocol would be like calling a friend and speaking directly with them. You know that they received your message, because they confirmed it by speaking with you. In a connectionless scenario, it would be like calling your friend and leaving a message on their answering service. You have no confirmation that they got the message (unless, of course, they called you back).
Connectionless communication is faster, but connection-oriented is more reliable.
Routable vs. Non-routable Protocols
In the early days of networking some protocols were non-routable, because routers did not usually connect multiple LANs. Protocols that are able to route messages across multiple networks are called routable; protocols that are unable to perform this function are called non-routable. Examples of routable protocols are TCP/IP and IPX/SPX; NetBEUI is a non-routable protocol. A protocol must be routable to be used on a WAN (such as the Internet).
NetBEUI
The NetBEUI (NetBIOS Extended User Interface) protocol is a protocol that is small, easy to configure, and fast. It is a good choice for a small peer-to-peer office environment, and is non-routable. Windows 9x and NT clients require NetBIOS.
IPX/SPX
IPX/SPX (Internetwork Packet Exchange/Sequenced Packet Exchange) is the Novell NetWare protocol suite. Like TCP/IP, it also contains many different protocols to handle different functions. The IPX protocol is connectionless and non-routable; the SPX is connection-oriented and routable. The latest NetWare operating systems have switched to the TCP/IP protocol.

Chapter 10 – Networks
Specialized Solutions, Inc. 365
TCP/IP (Transmission Control Protocol/Internet Protocol)
There are many different protocols covering many different functions, but TCP/IP is probably the most common protocol stack and is the Internet’s protocol. TCP is connection-oriented and IP is connectionless. TCP/IP was developed by the Department of Defense Agency (DARPA) in the 1960s and designed to accommodate a large internetworking environment. It consists of some of the following protocols:
• TCP – Transmission Control Protocol
• UDP – User Datagram Protocol
• IP – Internet Protocol
• ARP – Address Resolution Protocol
HTTP
HyperText Transfer Protocol (HTTP) is a client-server protocol that is used on the World Wide Web (www) to access HTML documents, such as web pages.
HTTPS
HTTPS (Secure Hypertext Transfer Protocol) is a Web protocol that encrypts and decrypts, using SSL as a sub layer underneath HTTP, allowing access to a secure Web server. It uses port 443, the secure SSL port instead of port 80, the HTTP port. HTTPS, as well as SSL, allow for the use of X.509 digital certificates for authentication of a user.
Protocol Binding
In order to function, a protocol must be “bound” to the NIC. This binding process is what links the protocol stacks to the NIC driver. It is possible to bind two protocols to one NIC (such as TCP/IP and IPX/SPX) or to have two NICs with one protocol bound to each one. The order in which these protocols are bound to the NIC determines which one the network operating system will attempt to use first. For example if NetBEUI is bound first, the operating system will attempt to communicate using NetBEUI first. If that fails, it will try the second protocol.
To bind an adapter to a protocol:
1. To Open the Network dialog box, click the adapter you want to bind to a protocol, and then click Properties. 2. On the Bindings tab, make sure the check box for the appropriate protocol is selected.
To verify bindings:
1. To open the Network dialog box, click your adapter, and then click Properties. 2. Click the Bindings tab.
A+ Training & Test Preparation Guide
Specialized Solutions, Inc. 366
NOTE: You can also open the Network dialog box by clicking Start, pointing to Settings, clicking Control Panel, and double-clicking Network.
To install or change software for a network adapter:
1. Open the Network dialog box. 2. Click Add. 3. Click Adapter, and then click Add. 4. Follow the instructions on the screen.
NOTE: If you have an adapter that is not listed, click Have Disk, and then follow the instructions on the screen.
To remove software for a network adapter:
1. Open the Network dialog box. 2. Click the driver that you want to remove. 3. Click Remove, and then click OK.
NOTE: When you remove the software for a network adapter, all associated components, such as the protocol, are also removed.
To specify settings for a network adapter:
1. Open the Network dialog box. 2. Click the adapter that you want to configure, and then click Properties. 3. Click the tab for the settings you want to change, change the settings, and then click OK.
Naming Systems
Naming conventions and addressing is a large part of networking and TCP/IP. Remember, we are working in two worlds, the computer world of numbers, and our world of user-friendly names. Understanding the difference between these two worlds and how to work in both of them is an important part of networking.
DNS
Domain Name Service (DNS) is a network service that translates host names to IP addresses over a TCP/IP network. The network administrator defines and configures the DNS settings using a standardized lookup table. DNS functions like a telephone directory. The network administrator need only remember the host and domain names. A domain name server is a computer that "remembers" the user-friendly names of the other computers and their IP address numbers. For example, the domain Bigcompany.com may have an IP address of 192.49.238.33. This allows users to simply remember the user-friendly name while the domain name server remembers the numbers used by the network computers.

Chapter 10 – Networks
Specialized Solutions, Inc. 367
A domain is a group of computers that share a common purpose, such as government, education, commerce, or interest. Internet domains are established in a hierarchical order. A Fully Qualified Domain Name (FQDN) consists of a hostname and a domain name. The Internet Network Information Center (InterNIC, also known as Network Solutions) controls the top-level domains. These domains require suffixes such as .com for businesses or .edu for educational institutions. It is also common practice for various companies to register domain names for you.
The following table lists some Internet domains:
.com Commercial Organizations
.net Networks (The backbone of the Internet.)
.edu Educational Institutions
.org Non-profit Organizations
.gov Non-military Government Organizations
.mil Military Government Organizations
.biz Businesses
.pro Professional
.info Information services
.xx Two Letter Country Code
For instance, Big Company Inc. in Italy might be www.Bigcompany.com.it or in Australia www.Bigcompany.com.au. Also, .tv is gaining in popularity. Tuvalu is a small country, which receives financial benefit from the registration fees.
WINS
In a Windows-based network, the Windows Internet Name Service (WINS) is used to resolve NetBIOS computer names to their IP addresses. This is a dynamic service and requires that the workstation register with the WINS server each time it logs on to the network.

A+ Training & Test Preparation Guide
Specialized Solutions, Inc. 368
NETBIOS
NetBIOS defines a session-level interface and a session management/data transport protocol so computers can converse in session mode or send messages without connection in datagram mode, leaving the responsibility for error-checking up to the application.
A NetBIOS name is a unique 16-byte address (only 15 can be used for the actual name) used to identify a NetBIOS resource on a network. There are four node types: B-node (broadcast), P-node (peer-peer), M-node (mixed – B and P) and H-node (hybrid – P and B).
DHCP
Assigning IP addresses is like assigning telephone numbers; eventually we will run out of numbers. In smaller isolated networks, IP address assignment is not a big problem and each workstation or device can have a static address. However, as the number of addresses required increases, you will eventually come up with a number shortage. To resolve this, IP addresses can be dynamically assigned. That is, assigned on an “as needed” basis. Each host will lease an address only for the period required. When not needed, the address can be leased to another host. To accomplish this, you will need to use Dynamic Host Control Protocol (DHCP). Upon logon, a DHCP server will provide a client with an IP address, subnet mask, and a default gateway if needed.
Notice that the IP addresses are leased. This means that they will expire after a specific amount of time. This is to prevent one user from monopolizing the connection. A lease can be renewed. When the term of the lease is at 50%, the client will send a request for renewal. If the demand for connections is low (there are spaces available), the lease will be renewed without interruption. If not renewed, a second request will be sent at 87.5% of the lease. If all addresses are being used, the lease will expire and the address will be assigned to another user. In this case, the original user will have to wait for an opening before getting another lease and a new IP address.
Note: static addresses are manually entered and dynamically assigned addresses are DHCP addresses.
Dial-up Networking
The terms to describe remotely accessing a network, Dial-up Network (DUN) and Remote Access Server (RAS) (pronounced RAZ) mean the same thing. The difference is how each computer is being used. With RAS, the computer is acting as the server or gateway to the network and will receive calls (via a modem) from other computers.
Dial-up networking is the client side of the connection (i.e. – for modems). For example, when you dial up your ISP (Internet Service Provider) to access the Internet, you are using a dial-up connection to a RAS server.
Tip: Remember, dial-up networking requires a protocol and an adapter.

Chapter 10 – Networks
Specialized Solutions, Inc. 369
Network Utilities
One of the advantages of using TCP/IP as your network protocol is that it comes with several utilities that you can use to validate and troubleshoot the network. Following is a list and description of some of the more important utilities:
TRACERT.EXE
TRACERT (pronounced Trace Route) is a command line utility that shows every router interface that a TCP/IP packet passes through on its way to its destination. Use TRACERT if you want to find out if a host is down. The ROUTE command is similar and will show you the routing table and allow you to make edits to it.
NBTSTAT and NETSTAT
NBTSTAT will display NetBIOS over TCP/IP statistics. NETSTAT will display all the TCP/IP protocol statistics.
IPCONFIG and WINIPCFG
IPCONFIG and WINIPCFG are the same commands. They are used to display the current configuration of a computer, such as IP Address and MAC address. IPCONFIG is entered from the command prompt (DOS prompt) and WINIPCFG can be run either from the command prompt or from RUN on the START menu.
ARP
ARP (Address Resolution Protocol) is used on LANs to enable hosts to translate IP addresses to MAC addresses. Typing ARP at the command prompt will give you a list of “switches” used to display ARP entries.
PING
PING is used to test to find out if a remote host is “alive.” PING works at the IP level, and will often respond even when higher-level TCP-based services cannot. Typing the PING Loopback Address of 127.0.0.1 at the command prompt, can tell you if your TCP/IP configuration is correct. Pinging the server’s IP address lets you test to see if the server is “up.” PING is used to test connections.
NSLOOKUP
NSLOOKUP is used to troubleshoot DNS problems and can display the DNS entry for a given IP address.
Tip: use PING and TRACERT to confirm an IP address or a DNS name. IPCONFIG /showdns or IPCONFIG /displaydns can be used to show IP address information of Internet sites and locations.

A+ Training & Test Preparation Guide
Specialized Solutions, Inc. 370
Internetworking
The Internet is the world’s largest WAN. It was brought to us by the United States Department of Defense. Its purpose was to ensure communications between military installations, government centers, and defense research facilities in the event that a nuclear war broke out. Similarly, the need to move troops and equipment quickly around the country originally brought us our Interstate highway system. It is comforting to think that we are benefiting from our military tax dollars in such non-military ways.
World Wide Web (WWW)
Many people mistakenly believe that the Internet is the World Wide Web (WWW). The WWW is, however, a collection (a very large collection) of Web pages that are connected by hyperlinks. It consists of information from all over the world that can be viewed on a Web browser. It was the vision of Tim Berners-Lee, who believed that if information were to be universally accessible, we would need a single client software that could connect with different types of servers. His vision eventually led to the browsers that we use today.
Web Browsers
A Web browser is a software program that can read HTML Web pages. HTML (HyperText Markup Language) is the language that is used on the Internet. A Web page is simply a file that resides on a Web server. When you type in a URL (Uniform Resource Locator) in your browser (such as www.specializedsolutions.com), what you are actually asking for is a file from a Web server.
The browser is the most visible aspect of your Internet connection. You will be using this interface for Internet surfing. For this reason, care should be taken when choosing a browser. Microsoft’s Internet Explorer and Netscape’s Navigator are the two most popular Web browsers used today. Most browsers are available free for download, or come with the Internet software provided by your ISP.
After downloading the browser, follow the installation instructions, and then to configure your browser for the Internet, click Tools on the menu bar and then click Internet Options, so you can set up your security and personal settings for your Internet connection.
HTTP
A Web server and Web client (browser) communicate via the HyperText Transfer Protocol (HTTP). HTTP uses the well-known port 80 for connections. When you type the URL: http://www.specializedsolutions.com, you are using the HTTP protocol to the Web server. The Web server is “listening” to port 80 (which you used by typing in the http://), and when it receives a request, it sends the response. In this case the HTML file known as specializedsolutions.com.
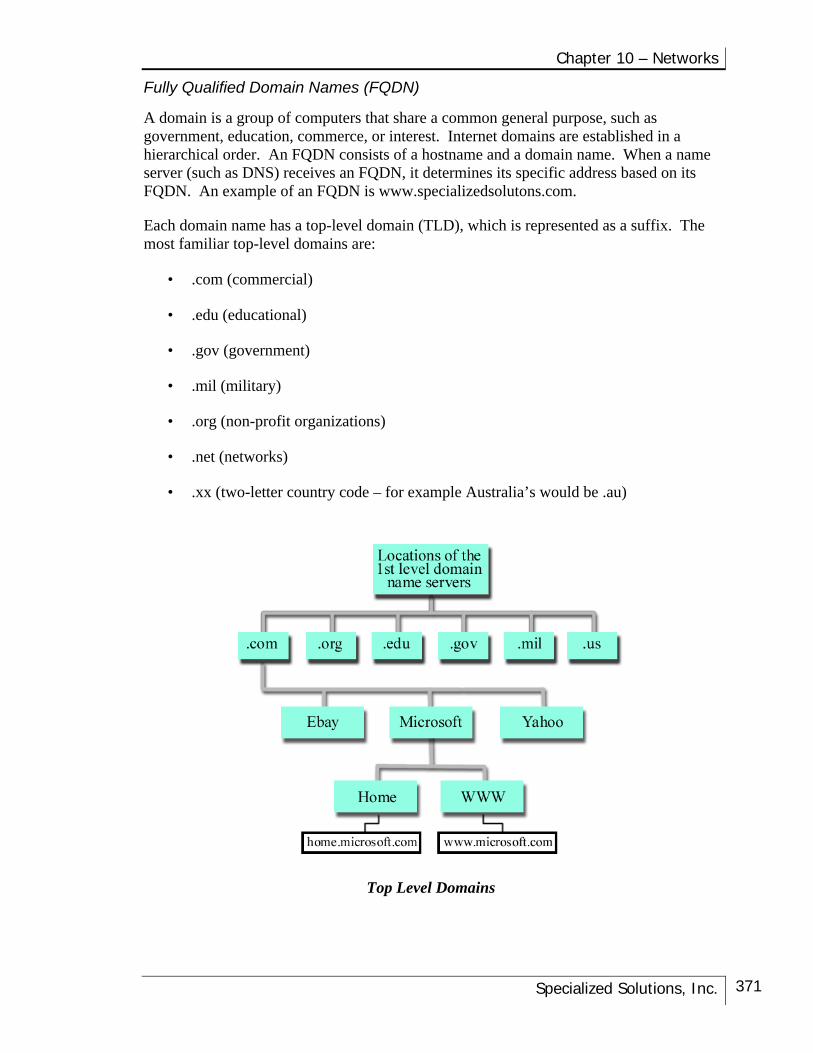
Chapter 10 – Networks
Specialized Solutions, Inc. 371
Fully Qualified Domain Names (FQDN)
A domain is a group of computers that share a common general purpose, such as government, education, commerce, or interest. Internet domains are established in a hierarchical order. An FQDN consists of a hostname and a domain name. When a name server (such as DNS) receives an FQDN, it determines its specific address based on its FQDN. An example of an FQDN is www.specializedsolutons.com.
Each domain name has a top-level domain (TLD), which is represented as a suffix. The most familiar top-level domains are:
• .com (commercial)
• .edu (educational)
• .gov (government)
• .mil (military)
• .org (non-profit organizations)
• .net (networks)
• .xx (two-letter country code – for example Australia’s would be .au)
Top Level Domains

A+ Training & Test Preparation Guide
Specialized Solutions, Inc. 372
Internet Service Providers
Internet Service Providers (ISPs) are the companies that provide Internet connectivity to users. The Internet is a collaboration of computers and operating systems using the TCP/IP protocol over the worldwide public telecommunications network. All of these Internet connections are tied together in the Internet Backbone.
The Internet in the United States is comprised of a few Network Access Points (NAPs). The National Science Foundation (NSF) originally developed the NAPs during the transition from the U.S. Government Internet to the current commercial Internet. Originally, there were four NAPs, but as NAPs provide access to the Internet backbone, more have been added by the major telecommunications companies that took them over from the NSF.
ISPs further distribute access to the Internet to end-users and businesses. Popular examples of ISPs are AOL, MSN, CompuServe, and many, many others.
The Internet is the world’s largest WAN (Wide Area Network). It works because “routers” connect each of the networks that make up the Internet. Each router looks at the destination address of a packet and routes it closer to its destination. This process continues until the message is delivered to the destination computer. The Department of Defense wanted the Internet to be accessible even in the event of a nuclear attack, and they designed it to have multiple routes to all destinations to achieve this goal.
Most end users and businesses connect to their ISP (and thereby the Internet) by a modem and dial-up connection. A typical dial-up connection has a transmission rate of up to 56K. Today, more higher speed access is becoming available. Some popular examples of high-speed access options are:
• T1-Carrier System – A type of high-speed leased telephone line that is mostly used by larger companies (and ISPs) because they are expensive. Transmission rates of up to 1.544 Mbps are possible with this technology.
• ISDN (Integrated Services Digital Network) – This an early technology for Internet connectivity. It is focused more on the business market. It uses two lines as two channels, (64 Kbps each) and thus, has a published transmission speed of 128K bps.
• Digital Subscriber Line (DSL) – This technology is intended for use by small businesses and homes. It has a transmission speed of up to 50 times faster that a dial-up connection, while using regular telephone lines.
• Cable Modem – This access type is commonly used in homes, businesses, and schools. It is similar in speed to DSL, but uses cable TV lines to deliver high-speed Internet access.
If you receive an invalid page fault error when trying to access your ISP with Internet Explorer, the file containing your passwords could be corrupted.

Chapter 10 – Networks
Specialized Solutions, Inc. 373
FTP
The File Transfer Protocol (FTP) was the method used to transfer files from one computer to another in the early days of the Internet. FTP remains popular today because of its ability to transfer files between computers of dissimilar types, while not presenting much of a security risk. FTP is included in the TCP/IP suite of protocols, and there are many third-party FTP programs available to download files to a computer or upload files from a computer.
FTP uses the well-known port number 21. To use an FTP service you would type ftp:// instead of http:// on the address line. Although FTP can use passwords, authentication generally is accomplished anonymously.
Telnet
Telnet is a terminal emulation program. You can use Telnet to log into a remote computer and enter commands on that computer as if you were working locally (actually sitting in front of that computer, using its keyboard). Telnet uses the well-known port 23, but you must possess a valid username and password to access the remote computer. Telnet is useful for business people who must work off-site or out-of-town. Using Telnet, they can log in to their network and access all the files, etc. that they have permission to access.
NNTP
NNTP is the protocol used to access newsgroups on news servers.
Electronic mail or email has proved to be the most popular and useful aspect of the Internet. Thanks to the Internet, people can keep in touch with family members and friends without the expense of long distance calls or the time required to send “snail mail.” Most businesses and individuals alike consider the ability to communicate globally and almost instantly a necessity. There are two main choices for sending email to people located outside your network: either the Internet or an X.400 service.
Note: An email address is comprised of your email name (johndoe) and a domain name (company.com). It should look something like this: [email protected].
X.400 is beyond the scope of A+ certification, but briefly, it is a message handling system that was created in 1993. It offers a more professional and secure service than the Internet, but it is very difficult and complex to administer.
Using the Internet for email is much easier, if less secure than X.400. There are two commonly used protocols for email by Internet mail servers. They are POP3 and IMAP4.
Note: The time on an email message may be different than the actual time sent if the computer it was sent from is in another time zone or if the time on the computer is incorrect.

A+ Training & Test Preparation Guide
Specialized Solutions, Inc. 374
POP3
POP3 (Post Office Protocol 3) is the most common email server protocol on the Internet. It is very limited in functionality and is used to distribute email to mailboxes from which users can download email.
IMAP4
The IMAP4 (Interactive Mail Access Protocol 4) protocol allows a little more functionality than POP3, (although it is not yet as popular). It allows an email server to function more like a file server and allows remote users to view and search through email by keywords on the server without downloading them first. Users can also download email headers only, or can download a copy of the email, so that a copy deleted locally is still accessible on the server.
SMTP
SMTP (Simple Mail Transfer Protocol) is the transport protocol for email over the Internet. It is part of the TCP/IP protocol suite and uses the well-known port 25. SMTP is used to transport mail from one point on the Internet to another and between the email client and server. Once the email is delivered to the final destination’s email server, SMTP hands off the email to a mail-handling protocol such as POP3 or IMAP4. These mail-handling protocols then distribute the mail to the mailboxes. SMTP is used for outgoing email (Send Mail To People) – it transfers email between the email client and the email server, it is not a mail system. POP3 and IMAP4 receive mail.
Warning: If you get an error message when opening an email attachment, a virus has most likely been transmitted via the attachment.

Chapter 10 – Networks
Specialized Solutions, Inc. 375
Summary
In this chapter, we have discussed the software side of networking and Internetworking. The following are key points that you should remember:
• Network operating systems may be a full operating system combined with a NOS, or designed to run over the top of an operating system.
• Know the difference between a peer-to-peer NOS and a client/server NOS, and the characteristics of each. Know which popular NOSs are which, i.e. Windows 9x is peer-to-peer.
• Know how to share disk drives and printers.
• Protocols are sets of rules that govern the way that computers communicate in a network environment. They can be connection-oriented or connectionless. The protocol that is used on a network must be “bound” to the network card, so that the NOS knows what “language” to use on the network.
• Only routable protocols may be used on the Internet or WANs.
• Remotely accessing a network is dial-up networking.
• Network utilities such as TRACERT, NBTSTAT, NETSTAT, IPCONFIG, WINIPCFG, ARP, PING, and NSLOOKUP are used to validate and troubleshoot networks. Know the function of each of these tools.
• The Internet is the world’s largest WAN.
• An Internet Service Provider (ISP) provides connectivity to the Internet for users.
• The World Wide Web (WWW) is a collection of Web pages that are connected by hyperlinks – it is part of the Internet – not the Internet.
• Web browsers are software programs that allow communication via the HyperText Transfer Protocol (HTTP) between the Web client and Web server.
• Web pages are files that were created with the HyperText Markup Language (HTML), and are stored on the Web server. When you type in a URL (Uniform Resource Locator), you are requesting that a particular file is opened and displayed in your Web browser.
• FTP (File Transfer Protocol) is a protocol that is used to transfer files between dissimilar computer types.

A+ Training & Test Preparation Guide
Specialized Solutions, Inc. 376
• Telnet is a terminal emulation program. This means that you can log on from a remote location and yet use the computer that you log into as if you were working locally. You need a valid username and password to use a terminal emulation session.
• Email is probably the most popular Internet application.
• SMTP, POP3, and IMAP4 are popular email protocols that are used on the Internet.

Chapter 10 – Networks
Specialized Solutions, Inc. 377
KEYWORDS Exercise
Define each of the following keywords. Hint: There’s a glossary in the back of this book.
Keyword Definition
ARP
Authentication
Cable Modem
Connectionless protocol
Connection-oriented protocol
DSL
DNS
FTP
FQDN
HTTP
IEEE 802 Standards
IMAP4
Internet
ISP
IPX/SPX
IPCONFIG and WINIPCFG
ISDN
NBTSTAT
NetBEUI
NETSTAT
NSLOOKUP

A+ Training & Test Preparation Guide
Specialized Solutions, Inc. 378
Keyword Definition
OSI model
PING
POP3
Replication
ROUTE
Server
SMTP
T1-Carrier System
Telnet
TRACERT.EXE
TCP/IP
Web browser
WWW

Chapter 10 – Networks
Specialized Solutions, Inc. 379
Review Questions Chapter 10
1. Windows 98 is what type of network operating system?
2. You have connected a printer to your computer on a peer-to-peer LAN, but other people on the network cannot access it. What could be the problem?
3. How do you access a shared resource on a Windows 9x network?
4. What is the most popular networking protocol that is used today?
5. Which network utility would you use to test your TCP/IP configuration and connection?
6. Which two networking utilities are used to display the current networking configuration of your computer?
7. What network utility is used to display the route that your message took on its way to its destination?
8. Name the two most popular Web browsers that are in use today.
9. Name as many top-level domains as you can.
10. Which protocol is used to upload and download files between dissimilar computers over the Internet?
11. Name the two most popular mail handling protocols.
12. For what is HTTP used?

A+ Training & Test Preparation Guide
Specialized Solutions, Inc. 380

Chapter 11 – Staying on Top of Your Profession
Specialized Solutions, Inc. 381
Chapter 11 – Staying on Top of Your Profession
In the very first part of this course, you learned that a computer professional must be a technician, a scholar, and a diplomat. So far, we have focused on the technician. In this chapter, we focus on the scholar and the diplomat. This chapter is about how to stay at the top of your profession and how to work with the most important part of your business—the customer.
A+ Technician
By virtue of choosing and completing this course, you are no doubt committed to the computer industry. You have chosen to be a part of one of the most dynamic (always-changing) industries ever.
Staying on Top
There is more to being a computer professional than simply fixing computers. The simple act of studying to become A+ Certified indicates you are committed to becoming a qualified computer technician. The truth is that the very minute you pass your A+ Certification, some new technology will come on the scene or someone will discover a new bug. You have entered a dynamic industry. It is a fast-growing, and rapidly changing industry. To stay at the top, a computer professional must never stop learning.
Many professions today require their certified members to complete CEUs (Continuing Education Units). While CEUs are not a requirement of A+ Certification, you as a professional must continue to learn all the time. Attending seminars, reading books and magazines, and listening are essential parts of the job. Achieving the status of being A+ certified is only the beginning. Remember, you will never know everything. The ability to “get the answer” is often more important than guessing or thinking you know it all.
There is no way that any person can possibly know all that there is to know about computers. In your A+ training program, you are building an understanding of computers and how they work. With this knowledge, you should be able to resolve any problem. This does not mean that you know the answer to every question, just that you know where to look and how to find the information. In addition, what we learn in our A+ training is finite in nature. That is, it can give you a level of technical knowledge and skill, but the next level is up to you. A+ provides us a snapshot in time. The problem is that as soon as you are certified, more and newer technology is already on the computer store shelves. Therefore, as a certified technician, A+ is only the beginning of our education. There are two ways to continuing your education and staying on top of your profession, reading and networking.
Reading is a continuous process. First, you must build yourself a library of good technical books. These will provide you a link to the past and a basis from which you can solve those “I never saw that before” problems. Once you begin to build your library, be sure to open the books and read them. You don’t have to know all that is inside them, just what they contain so you can find it when you need it. While your

A+ Training & Test Preparation Guide
Specialized Solutions, Inc. 382
library is good and will grow with time, there is one problem with books. They are all time-limited. This is a fast growing and ever-changing industry. You will need something to bridge the gap between your reference library and what’s new on the market. This bridge consists of magazines and technical publications. Computer magazines are a great source for news about new developments.
Note: It is your responsibility to keep up. No one can do it for you.
Another key to knowledge is networking. When we want our computers to increase their data capabilities, we network them, right? Networking means staying in touch with your colleagues. There are two approaches to keeping in touch with colleagues. First, join some local computer groups. Here you will find a wealth of knowledge as well as some that are on the same track as you. To reach a broader group, use the Internet.
As a computer professional, there is no better place to connect to your colleagues than through the Internet. Almost any question that needs to be answered is addressed somewhere on the Internet. All you need is the expertise to find it. Remember, the World Wide Web is not the Internet; it is only part of it. It happens to be the largest and the most common part, but perhaps not the most important for a computer professional. You can use many other tools to increase your knowledge and expertise. Let’s look at a few of them, by reviewing the WWW and then looking at some alternatives.
WWW – This is the commercial zone for the Internet. Most suppliers will provide some presence on the web. Usually, you can find their home page (where they advertise their products) and then find the support section. Many suppliers provide upgrades, patches, and work-arounds for most problems with their products. Many, such as Microsoft, maintain technical databases full of information for both their legacy products and the most current ones. Finding the correct Web site can often be challenging. Learn to use search engines. You may feel overwhelmed at first with your search results, as responses can literally number in the thousands. Learn how to use the “advanced” search techniques and try suppliername.com to find the correct domain (it works more often than not). A good example, and an excellent resource, is http://www.microsoft.com. Go to the support page and access the Knowledge Base. You will find a wealth of information regarding Microsoft products.
Once you find a good source, don’t forget to use the Web browser’s Favorites, Bookmarks or similar feature to organize folders with links to the most useful resources you’ve found online. For example, you could have folders for tech support by company or product.
Email – Email is used to talk to technical support people and colleagues on a one-on-one basis. Email is asynchronous communication so both parties do not have to sit beside a phone waiting for a call. Email transcends time zones. It is also a good method for providing and receiving customer service.
Chapter 11 – Staying on Top of Your Profession
Specialized Solutions, Inc. 383
Forums – Many of the larger Internet providers such as AOL and CompuServe provide forums for their members. Forums work like bulletin boards where you can post questions and receive answers. They are public so all will see anything that you or anyone else posts.
Usenet – Usenet newsgroups are similar to forums, but are not tied to a specific provider. Most news groups require that you join and when you do, you will often be entering into many on-going conversations. To get a good feel of what is going on before you open your mouth and make a fool of yourself, be sure to read the FAQs (Frequently Asked Questions). They will answer many of your questions as well as get you on your way to being an active part of the group.
Getting Technical Support
You may ask yourself why you need technical support if you are an A+ technician. The answer is simple. As stated before, you will never know everything. Using technical support wisely is part of your technical growth and part of staying on top. Sometimes, all you need is to get pointed in the right direction. In addition, there are often “undocumented” fixes to known problems. Don’t be afraid to give the manufacturer a call, especially if you are working on a new product that is under warranty. Frequently, a quick phone call will yield more than hours of searching for answers. For many of us getting help by phone is the “old fashion way.” However, it is still a valid method. Once the only way to get help, this has proven to be a expensive method of providing customer service and many companies have dropped this service, charge for the service, or make it so difficult that no one can use it. There is nothing more annoying than being on hold for 20 minutes while paying the long distance charges. Sometimes this service is free to registered users, and only for a limited amount of time.
Today’s standard method of getting help is online. Online tech support is often a better option. If you want any serious support, you will have to subscribe to a service or use a pay-as-you-go phone line. Checking the vendors’ forums on commercial networks often provides a solution without the need to contact the company. Many forums have libraries of tech support questions that have been posed about particular products. By searching these libraries, you can often get immediate answers to your questions. Some sites also have troubleshooting “wizards” that walk you through to a diagnosis and solution to your problem. If not, post questions and hope for an answer, either from the OEM or from another user.
Remember, if support is essential to you, and your OEM does not provide the level you need, you can always change OEMs (if you work in a large company, inform you supervisor of the problem)—tell them that you are considering another OEM and why! You could also point out that if the way you’ve been treated is typical of their service and support you’ll be posting it as a cautionary tale in a newsgroup or two.
Note: As an A+ technician, you will find technical support is a two-way street. You will often find yourself giving technical support as well as receiving it. In these cases, the best advice is to remember what it is like to be on the other side and, most importantly, listen to your customer.

A+ Training & Test Preparation Guide
Specialized Solutions, Inc. 384
Being Prepared
The best way to be prepared for troubleshooting is to have the right tools to do the job quickly, efficiently, and permanently. To be an effective computer professional requires four toolboxes:
Hardware Toolkit: To take things apart and put them back together.
Software Toolkit: To troubleshoot and correct operating systems, hardware, drivers, and application problems.
Technical Library: To keep track of the ever-growing base of information and find answers to the “I never saw that before” problems.
Spare Parts: Field Replaceable Units (FRUs) are pieces of a system that can be easily replaced when you’re on location.
Tip: Keeping track of technical information is always a problem. There is always too much to remember. It might be helpful to keep track of technical information and problem resolutions by using a free-form note taking and database system. It must have searching/indexing capabilities. Many commercially available software packages may provide a solution. However, with a little creativity, you can create your own custom database.
Hardware and Software Toolkits
A good hardware and software toolkit is an important part of a technician’s life. The chapter in Volume I, “Disassembly, Reassembly and Upgrading” covers the details of creating a basic toolkit. Only with time will you be able to perfect the contents of your toolkit. Your customer base (the type of computers and software used) will eventually determine the contents you need to carry. When creating your toolkit, just remember two things:
• The more tools you have, the more you have to carry.
• There is nothing more embarrassing than being on a job site without the tools to do the job.
Note: With experience you will be able to overcome these contradictory statements.
Technical Library
Keeping up with the ever-growing computer industry is a necessity, however, a good old-fashioned technical library is also necessary to keep up with the past. It is common to encounter an older machine, which is still performing its assigned task, but has developed an ailment. It may not be cost-effective to replace the machine at this time and so will require dusting off those old books just to remind yourself what you used to do.

Chapter 11 – Staying on Top of Your Profession
Specialized Solutions, Inc. 385
A technical library also helps keep up with the present. There are so many software and hardware packages in use that it would be impossible to keep track of all the details. In addition, many manufacturers no longer provide documentation. A good after-market reference manual can help solve the “I never saw that before” problems. Check with your local computer/software stores and bookstores.
Not all the information in your library needs to be purchased. Keep a record of problems and their resolutions. Any time you need to download technical information from the Internet, or get product documentation, file it for future reference. You never know when you might need it again.
Tip: If you do a lot of on-site troubleshooting, you may want to consider a notebook computer. You can take it with you and gain access to your searching/indexing software. There is even a version of a Web search engine that you can use to search for files on your own hard disk.
Spare Parts
It doesn’t hurt to have a few spare parts for testing purposes. When in doubt, exchanging a part with a known working part will help you troubleshoot. Be careful to collect only parts that you’re sure work. Exchanging a bad part with a bad part will not help the troubleshooting process and can even make matters worse.
Some suggested parts are:
Keyboard
Power Supply
I/O Card
Floppy Drive
RAM
Network Card
Variety of Cables and Connectors
Mouse
Video Card

A+ Training & Test Preparation Guide
Specialized Solutions, Inc. 386
Troubleshooting Techniques
Troubleshooting is perhaps the most difficult task of a computer professional. Once a problem has been diagnosed, there are usually several resources, or given procedures, to correct the problem. Frequently, the problems, “as reported,” are really just the symptoms and not the true cause. To make matters worse, computers never fail at a convenient time. They always fail in the middle of a job, or when there is a deadline and the user must have it fixed now.
Troubleshooting is more of an art form than an exact science. However, for a troubleshooter to be efficient and effective, you must approach the problem in an organized and methodical manner. Remember, you are looking for the cause, not the symptom. As a troubleshooter, you must be able to quickly and confidently eliminate as many alternatives as possible, so that you can focus on the things that might be the cause of the problem. In order to do this, you must be organized.
Here are five steps you can use to help with your troubleshooting. These steps will help you focus in on the cause and lead to a permanent fix:
Define the Problem
The first phase is the most critical and often the most ignored. Without a complete understanding of the problem (the entire problem), you can spend a great deal of time working on the symptoms not the cause. The only tools required for this phase are a pad of paper, a pen (or pencil), and good listening skills.
Listening to the client or co-worker (the user of the computer) is your best source of information. Don’t assume that just because you are the expert, the operator doesn’t know what caused the problem. Remember, you may know how the computer works and can find the technical cause of the failure, but they were there before, and after, the problem started and may recall the events that led up to the failure. You may have to ask some specific questions to jog their memory or help them focus on what was going on when the problem first occurred.
Ask a few questions to help identify the problem and list the events, as they occurred before the failure. You may want to create a form with these questions (and others specific to the situation) for taking notes:
• When did you first notice the problem or error?
• Was the computer recently moved?
• Any software or hardware changes?
• Did anything happen to the computer? Was it was dropped or was something dropped on it? Coffee or soda spilled on the keyboard?
• When exactly does the problem or error occur? During the startup process? After lunch? Only on Monday mornings? After using email?

Chapter 11 – Staying on Top of Your Profession
Specialized Solutions, Inc. 387
• Can you reproduce the problem or error? If so, how do you reproduce the problem?
• What does the problem or error look like?
• Describe any changes in the computer (noise, screen changes, lights, and so forth).
Isolate the Problem
The next step involves the process of isolating the problem. Isolating the problem is the art of eliminating what you know works from what you don’t know. For example, if a monitor is not working and you connect a known good monitor to the computer and it works, you have isolated the problem to the monitor or it’s cabling. There is no particular approach to follow and there is no substitute for experience. The best you can do is to eliminate any obvious problems and work towards the more complex. The purpose is to narrow the search down to one or two general categories. Be sure to observe the failure yourself. If possible, have someone demonstrate the failure to you. If it is an operator-induced problem, it is important to observe how it is created, as well as the results.
The most difficult problems to isolate are the intermittent ones. These never seem to occur when you are present. The only way to resolve these is to be able to re-create the set of circumstances that causes the failure. Sometimes, the process of elimination is all that you can do. This will take time and patience. The user will need to keep detailed records of what is being done before and when the failure occurs. One thing that might help in such cases is to tell the user to not do anything with the computer when the problem recurs, but to call you. That way the “evidence” is not disturbed.
Isolation of a problem requires a structured approach. It requires two simple steps, make a plan, and follow the plan.
Make a Plan
Create a planned approach to isolating the problem based on your knowledge at this point. Start with the most obvious or easiest solution to eliminate and move forward. Write down the plan!
The first step of any plan should be document and back up.
Do not make any assumptions. If you must make any assumptions, write them down. You may have to refer back to them later.
Follow the Plan from Beginning to End
Once a plan is created, it is important to follow it through. Jumping around and randomly trying things can often lead to problems that are more serious.

A+ Training & Test Preparation Guide
Specialized Solutions, Inc. 388
Document Every Action and its Results
If the first plan is not successful (they won’t always be), create a new plan based on what you discovered with the previous plan. Be sure to refer to any assumptions you might have made.
Make the Repair
After locating the problem, either repair or replace the defect. If the problem is software-oriented, be sure to record the “before” and “after” changes.
Confirm the Repair
No repair is complete without confirmation that the job is done. Confirmation involves two steps:
• Make sure that the problem no longer exists. Ask the user to test the solution and confirm satisfaction.
• Make sure that the fix did not create other problems. You have not done a professional job if the repair was completed at the expense of something else.
Documentation
Finally, document the problem and the repair. There is no substitute for experience in troubleshooting. Every new problem is an opportunity to expand that experience. Keeping a copy of the repair procedure in your technical library may come in handy in a year or two when the problem (or one like it) happens again. This is one way to build, maintain, and share experience.
Customer Service
Whether you are in business for yourself or part of a large corporate organization, there is more to becoming a computer professional than just fixing computers. The first section focused on staying on top of your profession. This section focuses on perhaps the most important part of the profession—the customer. Remember that whether you are a consultant, a contractor, or on the staff of a company, you are working on somebody’s computer and they are your customers. Your customers are your business.
Get Your Act Together
Repairing computers can be a time-consuming job. When a computer goes down, or has some kind of glitch, the owner/operator is inevitably in the middle of a major project and simply does not have the time or patience for the problem with which they are faced. Therefore, becoming an efficient and effective service provider is as important as being able to resolve hardware or software problems. It is as important to work smart, as it is to work hard. Being organized and keeping good records is the key to becoming efficient, effective, and successful.
Chapter 11 – Staying on Top of Your Profession
Specialized Solutions, Inc. 389
How much time do you spend checking IRQs every time you install a new card on the same computer? Do you spend entirely too much time rebuilding the CONFIG.SYS and AUTOEXEC.BAT files when an end user accidentally erases them? Spend a few minutes reviewing and updating your records every time you install a new system or perform maintenance and you can potentially save hours in the long run.
Keep a simple set of documents with the essential information for each computer that you are responsible for, or work on. Create a database, spreadsheet, or word-processor file to make updating easy. Be sure to back up the data and keep a hard copy on file for quick reference.
The following provides some suggestions about the information you may want to keep:
• Name each computer: The name itself does not matter. Make it unique and descriptive. Establish some naming conventions to make remembering them easier. Use names in addition to serial numbers.
• Document all technical information: Operating system name and version. CONFIG.SYS, AUTOEXEC.BAT, IRQs, I/O Base Address, DMA Channels, Device Driver Names, Processor Type and Speed, Size of Cache, RAM, BIOS, Monitor, Video Card, Modems, and Sound Cards
• Save startup data to floppy disks (unique data): Startup diskette (based on the current version of the operating system, AUTOEXEC.BAT and CONFIG.SYS). Device driver disks. Recovery disks—as required by antivirus or system.
• Keep an incident log: In your log of events for each computer include such things as the user, application installations (date and version), upgrades (hardware), and problems (cause of failure and actions taken for resolution).
Providing Tech Support
When working in a small company environment, providing support is simple. Everybody will call you. However, if you are part of a large organization with hundreds of computers, this method would be impractical. In addition, if you are fortunate, there will be at least one other person just like you. In these situations, you must take a layered approach to technical service.
The Bottom Layer
The lowest layer of your service pyramid will be your “first line of defense.” In these situations, you must rely on someone else to be your eyes and ears. You will need to find someone in the department, floor, or building that can handle the simple and mundane tasks. For example, say someone is complaining that their mouse doesn’t work or they can’t access a network.

A+ Training & Test Preparation Guide
Specialized Solutions, Inc. 390
One obvious and possible cause of both of these problems is that the device has become disconnected. If, your “eyes and ears” can determine and correct problems at this level, it will save you and the company a lot of time and trouble. The only problem is that you must be careful who is delegated to be your contact. They and you must know their limits and you must trust that they will stay within the defined parameters. There are many armatures out there that “think” they know how to repair a PC. Remember, you are the professional.
Remote Support
With remote support, your objective will be to handle as many problems as possible without actually showing up on-site. Here, you will use technology to bring your presence to the scene. That technology will most likely be a telephone, but could be e-mail, your intranet, or the Internet. The larger the organization (geographically), the more you will rely on this level of support.
On-Site
The final layer of support is when all else fails and you must visit the patient yourself. If your first two layers are working well, the number of times that you must go on-site will be minimized. Before going on-site, be sure you have all the information about the computer and the problem. The more you know before you get there, the less time you will have to spend on-site.
Tip: If the work will take more than a few minutes, you may be better off taking the machine back to your own workspace.
Spare Parts
Having a large supply of spare parts can definitely shorten the time to complete a repair, however, having too many spare parts can be a problem as well. Maintaining a large inventory is expensive, especially if you have a hundred items that just became obsolete. You will need to keep spare parts in stock. However, you will need to manage them as well. The following are some things that you should take into account when determining how to manage your spare parts inventory:
• Know the frequency of failures and therefore replacements for your organizational situation.
• Know how long it takes to get replacements and order appropriately.
• Buy spare components in bulk whenever possible, especially inexpensive components such as floppy drives, cables, mice, ink jet cartridges, and so forth.
• Know your suppliers and how quick they can provide parts when you need them. This way you can keep only what you need on your shelf.
• Standardize your parts to keep your inventory small (see next section).

Chapter 11 – Staying on Top of Your Profession
Specialized Solutions, Inc. 391
Keep It Simple
Standardizing equipment in large companies is very desirable. It will reduce the amount of spare parts required and simplify installations. Although desirable, it is not always possible. Many companies purchase equipment, such as computers, solely based on the best price available at the time of purchase. Therefore, whatever manufacturer happens to be offering a special deal at that time will probably be the one to get the contract—especially if the company is government-related. The result is a wide assortment of computer equipment, making any large degree of standardization difficult.
In cases such as this, standardize equipment over which you have control and group the rest of the equipment as best as you can. If you have several identical systems, using identical configurations, with standard CONFIG.SYS, AUTOEXEC.BAT and IRQ assignments, it will simplify the troubleshooting process. Even if you have many computers with little in common, adopting certain standards can be worthwhile. For example, establish common IRQs for standard equipment such as mice, modems, sound cards, network cards, and SCSI devices.
The Art of Technical Support
The bottom line in computer repair is customer service. Whether you are working for a large corporation or you are an independent consultant, the end user is your customer. This section discusses some general guidelines for setting up and managing customer service.
Support Calls
There are generally two methods for handling initial support calls to a technical service department. The first method, and perhaps the most common, is the helpdesk. Each call is routed through a central location or phone. At this point, the call is evaluated for the nature and urgency of the problem and then routed to the appropriate member of the support team for action.
The second method is that any member of the support team can pick up a call and attempt to solve the problem. If they are unable to resolve the problem, it is handed on to another (and hopefully more knowledgeable) team member for action.
It is here that you have the opportunity to become your company’s public relations and marketing person. The individual who calls you will be sensitive to how you resolve their problem, as well as how they are personally treated. If they had to call you, chances are, they are already having a bad day. Your demeanor and expertise can quickly improve their day. This is especially important if it is your own business because it can mean the difference between repeat calls or referrals and bankruptcy.
When receiving a support call, four simple stages will lead to a successful conclusion:
The Greeting: This stage should be as brief as possible. The purpose is to establish the identity of the caller and the nature of the problem. In some cases, it may also initiate a

A+ Training & Test Preparation Guide
Specialized Solutions, Inc. 392
work order or tracking code to follow and record the event. Good phone etiquette is critical, especially if it is your business and this is a new, potential customer who is “shopping around” for a computer repair professional. This may well be your potential customer’s first (and hopefully not last) impression of your company.
The Description: The second stage is used to obtain a description of the problem. It is important that you avoid any miscommunication. Try to pick up on any audible clues (note significant points, level of expertise, and sense of urgency), and guide the conversation (keep the conversation focused). However, appreciate that you, not they, are the expert. Don’t become frustrated (or sound frustrated) by their lack of understanding of the problem. After all, if they knew the exact problem, chances are they would not need you to fix it.
The Interview: This is the time to ask questions. (See “Troubleshooting” in the previous lesson.) Keep your questions short, logical, and as simple as possible. This is not the time to try to impress a customer with your expertise. Keep your questions at a level that will not intimidate them.
The Closure: By the end of the conversation, you should be able to collect all of the necessary information. Then you will be able to provide the client with a plan of action, including what the next step will be, who will be handling the problem, and when they should expect action.
Take the time to create a form and/or a database for tracking calls. This will provide a source of information for future use. The form should be based on keywords that describe the problem. This will allow easy report creation.
Reports and Logs
An independent business/sales person should also keep a client profile log. The log is a simple description of the client and his/her business. This includes notations of any relevant facts about the client that you can use in future conversations with them. Also, note any talk of future expansion or equipment upgrades that might need your help. It is best to get in the habit of writing this down as soon as possible, after your service call, when important details and observations are still fresh in your mind.
Referrals are the lifeline of any small business. If you feel that your client is satisfied with your work, do not hesitate to ask him or her for referrals. Also, ask if you can use their name as a reference. Keep a record of any referrals that they may give you and contact the referred individual with a phone call or letter as quickly as possible (see sample letters below). Also, leave a few business cards with your clients and encourage them to give the cards to anyone who might need your services. Call your client within a few days after you have serviced their equipment, and confirm that their problem has been resolved. They will appreciate it. This applies to a corporate setting as well.

Chapter 11 – Staying on Top of Your Profession
Specialized Solutions, Inc. 393
Sample Letter #1:
To build a profitable growing business you need to provide excellent customer service and create customer loyalty. One way to find out what your customers think is to do a customer survey. The example below includes a customer service survey letter to include with a survey form that you would design to your specific circumstances.
Your Company Name
Address
City, State Zip
Phone
Date:
Addressee
Address
City, State Zip
Dear Addressee:
Your feedback is very important to us. The enclosed survey focuses on you, our customer, and your requirements. Your participation will assist us in our continuing effort to provide superior service and support.
Please take a few moments to complete and return the enclosed survey. Your confidential participation will help us meet your future needs and assist our company and staff to strive for excellence.
As a busy professional, we value your time and thank you for taking the time to give us your thoughts.
Sincerely,

A+ Training & Test Preparation Guide
Specialized Solutions, Inc. 394
Sample Letter #2:
If you do not feel comfortable asking your customer for a referral, you may want to drop them a short note instead.
Your Company Name
Address
City, State Zip
Phone
Date:
Addressee
Address
City, State Zip
Dear Addressee:
We are currently in the process of developing our new brochure. I would like to feature some of our satisfied customers and their experiences with our company. We hope our new brochure will explain to potential prospects what keeps our long-term customers satisfied.
I am writing to invite you to participate. Any comments or feedback you could provide would be greatly appreciated.
Thank you for taking the time and helping us this way. We’ll be happy to return this favor for you if we are ever in a position to do so.
Sincerely,

Chapter 11 – Staying on Top of Your Profession
Specialized Solutions, Inc. 395
Sample Letter #3:
Another way to show your appreciation to customers when they do send a referral is to send them a thank-you note.
Your Company Name
Address
City, State Zip
Phone
Date:
Addressee
Address
City, State Zip
Dear Addressee:
Last week, we received a call from Susan Jones, IT manager for Bell North, requesting our services for their upcoming hardware upgrade. Susan mentioned that you had recommended our company and expressed how pleased you were with our services and pricing.
Thank you so much for the referral. I am always pleased to hear from satisfied customers and appreciate your kind words.
Please let me know if I can reciprocate someday.
Sincerely,

A+ Training & Test Preparation Guide
Specialized Solutions, Inc. 396
Difficult Clients and Co-workers
You will inevitably encounter difficult clients or co-workers. Keep in mind that it is your job to identify, and to try to resolve the problem, even if it’s not the machine. Here are a few suggestions for handling difficult clients and co-workers:
• If the user never attends training, ensure that they have information about available courses. If the individual is a co-worker, speak to their manager and identify their training needs. If it is a client, gently suggest that they would benefit form specific training or sell them some of your time for tutoring.
• If the client can never remember instructions, send them a memo, or sheet with written instructions. Save the instructions for future use.
• Dealing with technophiles (those who think they are experts) can be a challenge. The best choice is to listen carefully and make them part of the solution, not part of the problem. Remember, they did come to you for help. In a corporate/company setting, start an advanced users group and make them responsible, or at least part of the solution.
• Require users (co-workers), who constantly complain about trivial problems to put them in writing. Keep their notes as part of your records. If it is a client, charge them for your time.
Escalating Problems
Because new devices and software are introduced every day, problems commonly arise that are outside the scope of the support group or your current level of experience. In such cases, refer the user to the hardware or software supplier or contact them yourself. Whether the support is from a more-experienced team member or an original equipment manufacturer (OEM), be sure to track the progress of the problem and who retains responsibility.
Of course, if you are an independent service person, you will be responsible for the research to find a solution to the problem. Keep a record of your resources (phone numbers, individuals and company names, Internet URLs, and documentation sources) for future reference.
If the problem is resolved by some previously undocumented changes (patch or upgrade by the OEM), be sure to pass the information along to other team members. Also, be sure to keep good documentation of the solution, as you may need it for future reference.

Chapter 11 – Staying on Top of Your Profession
Specialized Solutions, Inc. 397
Conclusion
Once a service call is concluded (successful or not), there is only one more action to take. Document the closure. Make this report as detailed as possible. Include what was done to resolve the problem or what steps were taken to try to resolve the problem and the result of your efforts. If the problem was not resolved, explain to the user why it could not be fixed and give them some alternatives. If it is a relatively new unit, this might include telling them to take the computer back to the dealer from which it was purchased. If you are unable to resolve the problem, do not be afraid to pass it on to someone with more experience or someone who specializes in this type of problem.

A+ Training & Test Preparation Guide
Specialized Solutions, Inc. 398
Summary
The following information summarizes the key points of this chapter:
• A computer technician must never stop learning.
• Network with others in your field and learn how to get technical support when you need it.
• To be effective, a computer professional requires a hardware toolkit, software toolkit, a technical library, and spare parts.
• Effective troubleshooting requires approaching the problem in an organized and methodical manner. Make a plan and stick to it, and don’t forget to document!
• Good record keeping is the key to becoming an efficient and effective service provider.
• Recognize the three levels of support and how to delegate the various levels.
• Outstanding customer service will be the key to your success.

Chapter 11 – Staying on Top of Your Profession
Specialized Solutions, Inc. 399
KEYWORDS Exercise
Define each of the following keywords. Hint: There’s a glossary in the back of this book.
Keyword Definition
FRU
Hardware Toolkit
Remote support
Software Toolkit
Technical Library

A+ Training & Test Preparation Guide
Specialized Solutions, Inc. 400
Review Questions Chapter 11
1. Name three ways to stay on top of your profession.
2. How and where can you obtain technical support?
3. What four types of tools does a PC technician use?
4. What files are essential for a software toolkit?
5. What are the five phases of troubleshooting?
6. How important is record keeping?
7. What are the three levels of support?
8. Why is it important to standardize?
9. What are the four stages to follow when you receive a service call?
10.How would you deal with a difficult client or co-worker?

Conclusion
Specialized Solutions, Inc. 401
Conclusion
This concludes our A+ Training & Test Preparation guide. We hope that you have enjoyed your A+ training journey as much as we have enjoyed providing it to you.
Remember, the best thing about a self-study course is that you are able to review it as much, and as often, as you like. To measure your retention of these materials, start taking the practice exams that are on the CD-ROM that was included with this course. After taking a practice exam, be sure to review any areas that need improvement. When you are consistently achieving scores in the 90% range, you are ready to sit for your certification exam.
The following appendices are an excellent source of review material, and don’t forget to use the Glossary. When you are ready to schedule your exam, be sure to refer back to the beginning of this book for tips on what to expect at the exam site.
We love to hear from our students, so if you have any questions, or if you just want to let us know how you are doing, we’d be happy to hear from you!
Remember, at the Specialized Solutions, Inc. our success is directly tied to the success that our students have with our training and certification products.
Thank you for allowing us to be your training partner and please let us know if we can help with any of your future training needs.

A+ Training & Test Preparation Guide
Specialized Solutions, Inc. 402

Appendix A – How to Register For the A+ Exam
Specialized Solutions, Inc. 403
Appendix A – How to Register For the A+ Exam
To Register for the A+ Exam
Register for the A+ Certification Exam by calling 1-888-895-6116 for Prometric or 1-877-551-7587 for VUE. Tests are given at both Prometric and VUE Authorized Testing Centers. To register via the Internet, go to www.2test.com for Prometric or www.vue.com for VUE.
When you call, please have the following available:
Social Security Number or Testing ID
Two forms of ID (one with photo)
Mailing address and telephone number.
Date you wish to take the test.
Method of payment, credit card or voucher.
The test is available to anyone who wants to take the test. Payment is made at the time of registration, either by credit card, or by requesting an invoice be sent to you or your employer. Vouchers and coupons are also redeemed at this time. Individuals may retake the test as often as they like. Payment must be made each time you take the test. Prices subject to change without notice, and may be obtained by calling Prometric or VUE.

A+ Training & Test Preparation Guide
Specialized Solutions, Inc. 404

Appendix B – Tables
Specialized Solutions, Inc. 405
Appendix B – Tables
Popular examples of:
Operating Systems Applications
DOS Microsoft Works
DOS/Windows 3.x Microsoft Word
Windows 95/98 Microsoft Excel
Windows NT Microsoft Access
Windows Millennium Edition (ME) Microsoft Outlook
Windows 2000 WordPerfect
UNIX Lotus
Linux Adobe Photoshop
History of DOS
Version Introduced Features
1.0 8/81 Distributed on one floppy (required 8 KB of RAM)
1.1 5/82 Supported 320 KB double-sided disks
2.0 3/83 Supported hard disks, directories, background printing, ability to add device drivers
3.0 8/84 Supported hard disks larger than 10 MB and 1.2 MB floppy disks
3.1 3/85 Added networks and file sharing
3.2 1/86 Supported 3.5-inch floppy disks
3.3 4/87 Added new commands and international support
4.0 2/88 Supported hard disks greater than 32 MB, the MEM command, and DOS shell

A+ Training & Test Preparation Guide
Specialized Solutions, Inc. 406
Version Introduced Features
5.0 5/91 Added memory management tools, help, undelete, unformat, task swapping (last with printed manual)
6.0 3/93 MEMMAKER, multiple boot configurations, Windows UNFORMAT and undelete, virus protection, and backup
6.2 10/93 SCANDISK, MSD utilities, enhanced diagnostics
7.0 12/95 Bundled with Windows 95
Minimum Requirements for Windows 3.1
Minimum Requirement Comment
Processor 80386 Must have enhanced mode
Memory 2 MB Runs, but 4 MB makes it useable, 8 MB more desirable
DOS Version 3.10 The higher the version, the more tools
Free Disk Space 8 MB minimum install, 10.5 MB full install
The less RAM, the more free disk space needed
Floppy Disk Necessary for installing programs
Display Adapter VGA Any VGA or better
Printer Optional, may have to install driver
Mouse Optional Difficult to use without mouse, may require driver

Appendix B – Tables
Specialized Solutions, Inc. 407
Program files that can be edited in a Windows environment
AUTOEXEC.BAT CONFIG.SYS WIN.INI SYSTEM.INI MSDOS.SYS
PROGMAN.INI BOOT.INI
*Note: other related files, such as text (.txt) and log files (.log) can also be edited.
PIF File Settings
Setting Description
Advanced Options Setting the multitasking priority, more memory options, allow Windows to quit with application open
Close Window on Exit If unchecked, the window will stay open when an application terminates
Display Usage Determines whether the application is to be run in a window or full screen
Execution Selects whether the program is to be run in the background or exclusive
Memory Requirements Sets the minimum amount of conventional memory required for application to start
Optional Parameters Includes switches or other command settings
Program File Name Includes drive, path, and filename of DOS program
Operating systems are classified by their interface:
Command Line Prompt GUI (Graphical User Interface)
Commands are typed in on a command line.
An icon (or picture) is selected (usually with a mouse) to enter commands.

A+ Training & Test Preparation Guide
Specialized Solutions, Inc. 408
Windows 3x versus Windows 9x
Windows 3x Windows 95 Windows 98
16-bit program 32-bit program 32-bit program
DOS-based application that supplements an operating system
Operating system Operating system
Hardware upgrades require a software driver
OSR 2 version supports plug and play hardware installation
Supports plug and play hardware installation, expanded support for USB, IEEE1394, ACPI, DVD, WDM, and more
Supports only 8.3 filenames Supports filenames up to 255 characters
Supports filenames up to 255 characters
Supports multitasking Supports multitasking and multithreading
Supports multitasking and multithreading
Cannot run 32-bit applications
Can run older Windows and DOS applications and 32-bit applications
Can run older Windows and DOS applications and 32-bit applications
Program Manager and program group-centered interface
Document and work-centered interface
Document and work-centered interface, optional web-like interface
Designed to be a stand-alone single-user interface
Designed to be an interactive terminal on a LAN, WAN, remote or dial-up connection, or stand-along system
Designed to be an interactive terminal on a LAN, WAN, remote or dial-up connection, or stand-alone system
Uses Program Manager as starting point
Designed around a Start button used to launch a program or open a document
Designed around a Start button used to launch a program or open a document
Windows for Workgroups provided limited support for communication and networking
Integrated support for communication and networking, provides TCP/IP and PPP support
Improved support of communication and networking; network-card friendly; supports PPTP, VPN, Windows Sockets 2.0, WBEM and more

Appendix B – Tables
Specialized Solutions, Inc. 409
Step-by-Step
Step-by-Step Prompt A B C D
Load Double Space Driver? Yes Yes Yes Yes
Process the System Registry? Yes Yes Yes No
Create a Startup Log File (BOOTLOG.TXT)? Yes Yes Yes Yes
Process Startup Device Drivers (CONFIG.SYS)? No No Yes Yes
DEVICE=PATH/HIMEM.SYS? Yes Yes Yes Yes
DEVICE=PATH/IFSHLP.SYS? Yes Yes Yes Yes
DEVICE=PATH/SETVER.EXE? Yes Yes Yes Yes
Process your startup command file (AUTOEXEC.BAT)?
No No Yes Yes
Load the Windows Graphical User Interface? Yes Yes Yes Yes
Load all Windows Drivers? No Yes No Yes
FAT vs. NTFS
File System
FAT(16) FAT32 NTFS
Partitions are limited to 2 GB or less
8.3 naming convention
Fixed cluster size
File attributes
Partitions can be as large as 2 TB
Up to 255 characters in a filename.
Reduced cluster size
File attributes
Applications load faster
Better drive mapping
All the benefits of FAT32 plus:
Better security through file permissions
Encryption & Compression
Disk quotas
*Note: these facts should be regarded as true in respect to the operating systems they were originally used on. For example, FAT(16) can support partitions larger than 2 GB, but only if the operating system supports it (i.e. – 4 GB with Windows XP).

A+ Training & Test Preparation Guide
Specialized Solutions, Inc. 410
File Systems Used By Operating Systems
File System
FAT(16) FAT32 NTFS
DOS, Windows 3x, Windows 9x, Windows Me, Windows NT, Windows 2000, Windows XP, Windows .Net
Windows 95 OSR2, Windows 98, Windows Me, Windows 2000, Windows XP, Windows .Net
Windows NT 4.0, Windows 2000, Windows XP, Windows .Net
Minimum Hardware Requirements
Operating System Processor RAM Hard Disk Space Other
Windows 95 386DX 4 MB 40 MB
Windows 98 486DX 66 MHz 16 MB 225 MB (FAT 16)
172 MB (FAT 32)
CD-ROM
Windows NT Workstation
486DX-33 16 MB 110 MB
Windows NT Server
486DX-33 16 MB 125 MB
Windows 2000 Professional
133 MHz 32 MB 2 GB with 650 MB free space
VGA or higher monitor, Keyboard, mouse, CD-ROM or DVD drive

Appendix B – Tables
Specialized Solutions, Inc. 411
Startup Disk Files
Windows 9x Windows NT Windows 2000
ATTRIB.EXE
CHKDSK.EXE
COMMAND.COM
DEBUG.EXE
DRVSPACE.BIN
EBD.SYS
EDIT.COM
FDISK.EXE
FORMAT.COM
IO.SYS
MSDOS.SYS
REGEDIT.EXE
SCANDISK.EXE
SCANDISK.INI
SYS.COM
UNINSTALL.EXE
NTLDR
NTDETEC.COM
BOOT.INI
BOOTSECT.DOS
NTBOOTDD.SYS (if present)
NTLDR
NTDETEC.COM
BOOT.INI
BOOTSECT.DOS (if present)
NTBOOTDD.SYS (if present)
Boot Process Comparison
Windows 95 Windows 98 Windows NT Windows 2000
Power on: ROM BIOS initiates POST
BIOS Bootstrap: Pretty much the same as the Power on.
Power on: The system microprocessor executes the ROM BIOS code and initiates POST.
Computer runs POST routines.

A+ Training & Test Preparation Guide
Specialized Solutions, Inc. 412
Boot Process Comparison
Windows 95 Windows 98 Windows NT Windows 2000
Finds boot sector: checks A: drive and then C: drive
Master Boot Record (MBR): Loads IO.SYS into RAM
Finds a boot sector: Locates the boot device and loads the MBR.
BIOS locates boot drive and runs MBR.
Runs the boot program: BIOS runs IO.SYS
Real Mode Boot:
Loads minimal FAT file system.
Reads MSDOS.SYS
Loads drivespace.bin and checks for drivespace.ini – for file compression.
Prompts for hardware profile.
Loads and displays LOGO.SYS.
Verifies System.dat
Loads System.dat
Initializes double-buffering for SCSI if needed.
Selects hardware profile from the Registry.
Reads and processes CONFIG.SYS
Active Partition: The MBR searches the Partition Boot Record (PBR) for the active partition and loads the boot sector into memory.
MBR identifies the active partition and loads boot sector into memory.

Appendix B – Tables
Specialized Solutions, Inc. 413
Boot Process Comparison
Windows 95 Windows 98 Windows NT Windows 2000
Reads MSDOS.SYS Real Mode Configuration: Loads Himem.sys, Ifshlp.sys and sets several environmental variables.
NTLDR: changes processor to a 32-bit linear addressing scheme. NTLDR starts a mini file system. NTLDR reads the BOOT.INI file and builds the Boot Loader Menu.
Computer initializes the NTLDR and loads it into memory. Initial Boot Loader – NTLDR switches from real mode to 32-bit memory mode and loads the mini file system drivers.
Reads CONFIG.SYS
Protected Mode Load: Win.com loads and executes Vmm32.vxd and other virtual drivers.
NTLDR loads the operating system chosen from the Boot Loader Menu. If no choice is made, the default is loaded.
Operating System Selection: NTLDR displays the operating system menu and activates the default if no selection is made.
Reads AUTOEXEC.BAT
Windows Kernel, GDI, user libraries, the Explorer shell, and network support are loaded.
NTLDR runs NTDETECT.COM and builds the hardware list
Hardware Detection: NTDETECT.COM and NTOSKRNL.EXE detect all hardware and pass the appropriate information to NTLDR for insertion into the Registry.
Reads the Registry Programs in the Startup Group are loaded.
NTLDR runs NTOSKRNL.EXE that loads and initializes Windows NT.
Configuration Selection: Hardware configuration takes place based on the appropriate hardware profile.
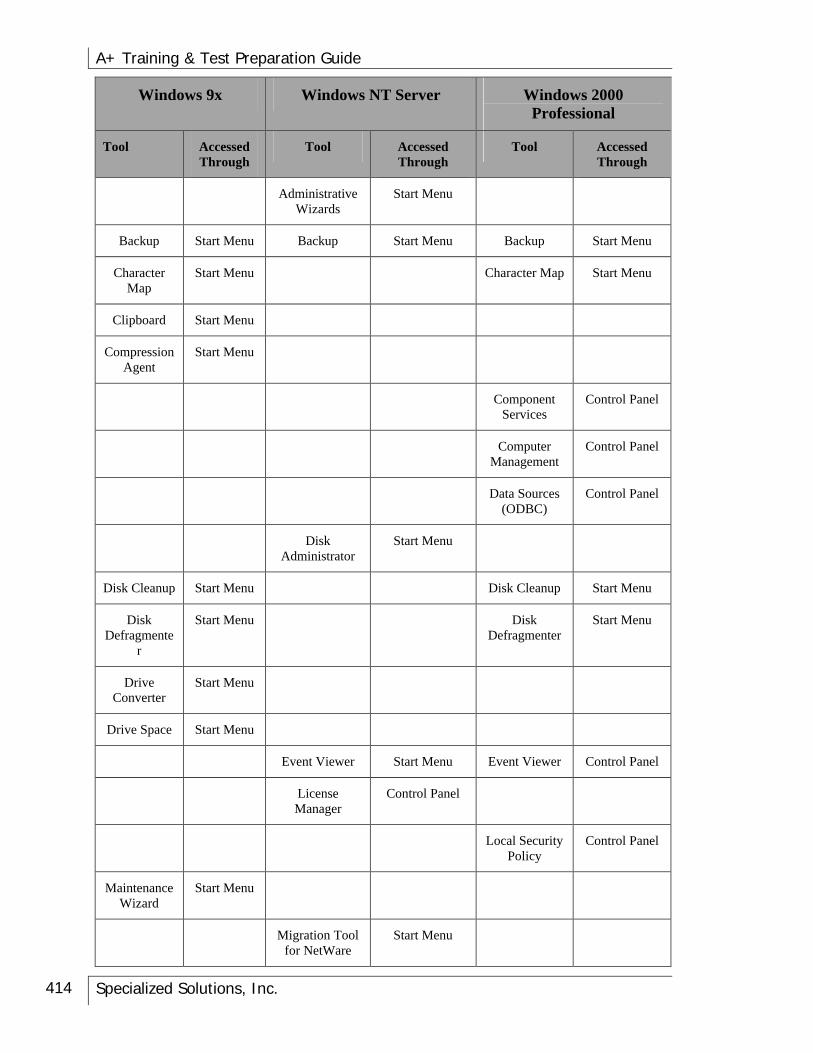
A+ Training & Test Preparation Guide
Specialized Solutions, Inc. 414
Windows 9x Windows NT Server Windows 2000 Professional
Tool Accessed Through
Tool Accessed Through
Tool Accessed Through
Administrative Wizards
Start Menu
Backup Start Menu Backup Start Menu Backup Start Menu
Character Map
Start Menu Character Map Start Menu
Clipboard Start Menu
Compression Agent
Start Menu
Component Services
Control Panel
Computer Management
Control Panel
Data Sources (ODBC)
Control Panel
Disk Administrator
Start Menu
Disk Cleanup Start Menu Disk Cleanup Start Menu
Disk Defragmente
r
Start Menu Disk Defragmenter
Start Menu
Drive Converter
Start Menu
Drive Space Start Menu
Event Viewer Start Menu Event Viewer Control Panel
License Manager
Control Panel
Local Security Policy
Control Panel
Maintenance Wizard
Start Menu
Migration Tool for NetWare
Start Menu

Appendix B – Tables
Specialized Solutions, Inc. 415
Windows 9x Windows NT Server Windows 2000 Professional
Tool Accessed Through
Tool Accessed Through
Tool Accessed Through
Network Client Administrator
Start Menu
Net Watcher Start Menu
Performance Monitor
Start Menu Performance Control Panel
Resource Meter
Start Menu
Remote Access Admin
Start Menu
Server Manager Start Menu
Services Control Panel
System Policy Editor
Start Menu
Scandisk Start Menu
Scheduled Tasks
Start Menu Scheduled Tasks
Start Menu
System Information
Start Menu System Information
Start Menu
System Monitor
Start Menu
Telnet Server Administration
Control Panel
User Manager for Domains
Start Menu
Windows NT Diagnostics
Start Menu
Welcome to Windows
Start Menu Getting Started Start Menu

A+ Training & Test Preparation Guide
Specialized Solutions, Inc. 416
Network Operating Systems
Examples of NOS:
Client/Server
Windows NT Server – Server
Windows NT Workstation – Client
Windows 2000 Server – Server
Windows 2000 Professional – Client
Windows 2000 Directory Server
Windows 2000 Datacenter – Server
Peer-to-Peer Windows 95
Windows 98
Windows NT Workstation
Windows 2000 Professional

Appendix B – Tables
Specialized Solutions, Inc. 417
.com Commercial Organizations
.net Networks (The backbone of the Internet.)
.edu Educational Institutions
.org Non-profit Organizations
.gov Non-military Government Organizations
.mil Military Government Organizations
.biz Businesses
.pro Professional
.info Information services
.xx Two Letter Country Code
For instance, Big Company Inc. in Italy might be http://www.Bigcompany.com.it or in Australia www.Bigcompany.com.au. Also, .tv is gaining in popularity. Tuvalu is a small country, which receives financial benefit from the registration fees.

A+ Training & Test Preparation Guide
Specialized Solutions, Inc. 418

Appendix C – Glossary
Specialized Solutions, Inc. 419
Appendix C – Glossary
32-Bit VFAT – Disk access is provided by the 32-bit VFAT (virtual file allocation table). This virtual device works in protected mode, requiring no time-consuming mode changes every time the system needs to write to the disk.
386 enhanced mode – With the introduction of the 386 machines and the 32-bit address bus, came a new mode called 386 enhanced mode. This is an advanced version of the protected mode designed to operate on 386 machines and take advantage of the now 4-gigabyte memory limit. It was also designed for added performance to the Windows environment. One of the key developments of the 386 enhanced mode is its ability to use what is known as virtual mode. This mode allows the processor to create virtual DOS machines.
Active Desktop – Active Desktop makes it possible for you customize your desktop, launch programs, switch between files, and keep up with the latest world news by integrating the Web with your desktop.
Active Directory – Windows 2000 Active Directory services, identifies all resources on a network and makes them accessible to users and applications. Active Directory allows the user to create a logical directory of files and applications that is consistent with their personal or organizational needs.
Archive – The user will have full access to the file. It can be opened and edited.
ARP (Address Resolution Protocol) – ARP (Address Resolution Protocol) is used on LANs to enable hosts to translate IP addresses to MAC addresses. Typing ARP at the command prompt will give you a list of “switches” to use to display ARP entries.
ATTRIB – This DOS command displays or changes a file’s attributes
Auditing – Auditing allows administrators to track events and occurrences in a networked environment where Windows clients reside.
Authentication – The process whereby users are required to enter a password before they can log on and gain access to network resources.
AUTOEXEC.BAT – Loads Terminate and Stay Resident (TSR) programs selected by the user and sets up the environmental variables such as TEMP and PATH.
Backslash (\) – This symbol is used to separate each directory level, for instance c:\windows\utilities. For this reason, it is a reserved character and cannot be used as part of a file name.
Basic storage – Basic storage is the traditional storage scheme, which uses partitions. Keep in mind that basic storage is the industry standard and compatible with all versions of Microsoft operating systems. It is also the default standard for Windows 2000.

A+ Training & Test Preparation Guide
Specialized Solutions, Inc. 420
BAT – An extension that indicates a batch file.
Batch file – Same as command file – contains operating system commands.
Binary file – Holds data or instructions in binary format.
BIOS (Basic Input/Output System) – This built-in software determines the computer’s capabilities without accessing programs from a disk. The BIOS contains all the code needed to control various functions such as the keyboard, display screen, disk drives, and serial communications. It is usually placed on a ROM chip that comes with the computer (called ROM BIOS) to make sure that it is always accessible and not in danger of being damaged by disk failure.
BIOS Bootstrap – This is the BIOS start, which is the same as it always has been with a few notable exceptions. The new machines (and their BIOS chips) have added features to address larger drives, more drives, and plug and play devices.
Boot Sector Virus – These replace the master boot record (or boot sector on a floppy). They will write themselves into memory any time the computer is started.
BOOT.INI – Builds the boot loader menu.
BOOTSECT.DOS – Loaded by NTLDR if non-Windows NT is started from the Boot Loader Menu.
BREAK – Sets or clears extended Ctrl+C checking.
Cable Modem – This access type is commonly used in homes, businesses, and schools. It is similar in speed to DSL, but uses cable TV lines to deliver high-speed Internet access.
Case Sensitivity – Case sensitivity is the ability of the operating system to distinguish between uppercase and lowercase letters. DOS commands are not case-sensitive. Traditionally DOS commands have been represented in documentation as uppercase. DOS commands may be typed in either upper or lowercase.
CD and CHDIR – Changes to a different directory or displays the current directory.
CD-ROM Support – Windows 9x uses a protected mode 32-bit file system to speed up CD performance (CDFS – CD File System).
CFGBACK.EXE – CFGBACK.EXE (Microsoft Configuration Backup) is a proprietary program that creates backups that can only be restored from inside this program. CFGBACK will allow you to create up to nine iterations, or different backup files, of a Registry.
Character Map – You can use Character Map to insert special characters into a document.
CHCP – Displays the number of the active character sets.

Appendix C – Glossary
Specialized Solutions, Inc. 421
CHKDSK – This DOS command examines the FAT and directory structure, checking for errors and inconsistencies
Client/Server network – In a Server-based network, the purpose of a network operating system is to connect all devices on a network (computers and peripherals) and to coordinate their use.
Clipboard Viewer – This is a useful tool if you are experiencing problems related to the Windows clipboard.
CLS – This DOS command clears the screen
Cold boot – The process of starting from a no-power condition is called a cold boot.
COM – An extension used to identify a file as an executable program file. Similar to the .EXE extension.
Command file – Holds operating system commands
Command line interface – A command line interface is any operating system (or software) that requires the user to type commands. Alternatively, the commands can be “read” from a software text file and executed one at a time. These are called text-based operating systems. Earlier systems such as DOS and UNIX are command line interfaces.
Command line prompt – Seeing the command line prompt is the main way users know they are in a DOS environment. The computer screen is blank except for a few lines, one of which begins with a capital letter, followed by a colon, a backslash, and ending with a greater than symbol (>). The information provided in the command line prompt must follow the proper syntax.
COMMAND.COM – The interface between the user and the operating system code.
Compression Agent – Compression Agent is used to increase the storage space on a hard drive by reducing the size of files. You can compress selected files using the settings you specify.
Computer Management – The Computer Management Console is designed to manage the local computer as well as remotely managing other computers. The Computer Management Console incorporates several utilities and tools available in other places into one convenient interface. For example, the Disk Defragmenter is listed in the Start Menu as well as in the Computer Management Console.
CONFIG.SYS – The CONFIG.SYS file is run first and set ups and configures the computer’s hardware components. It loads extra hardware and device drivers not built into the IO.SYS.
Connectionless protocol – In a connectionless scenario, it would be like calling your friend and leaving a message on their answering service. You have no confirmation that they got the message (unless, of course, they called you back).

A+ Training & Test Preparation Guide
Specialized Solutions, Inc. 422
Connection-oriented protocol – A connection-oriented protocol would be like calling a friend and speaking directly with them. You know that they received your message, because they confirmed it by speaking with you.
Control Panel – It is used to change the configuration and setup of a computer, and it edits the system registry. In fact, its role in editing the registry files was so important that Microsoft recommended (and still does) that it is the only way to edit the registry.
Conventional Memory – On DOS systems, conventional memory refers to the portion of memory that is available to standard DOS programs.
COPY – This DOS command copies one or more files to the specified location.
CSNW (Client Services for NetWare) – CSNW (Client Services for NetWare) is the NT service that allows workstations to use file and print services on a NetWare server. It is part of the GSNW service.
CTTY – Changes the terminal device used to control the computer.
Cursor – Any time you are entering data, whether in an application, or in a DOS command, the cursor (usually a small flashing line) indicates the place where the characters will be inserted. It is a good idea to always know where your cursor is.
DACL (Discretionary Access Control List) – A list of access control entries. These define who does and does not have specific types of access to the object.
Data file – Holds data
DATE – This DOS command displays or sets the current date.
Default Drive – Each drive in a computer has its own drive letter designation. The default drive is the active drive. Any commands, unless otherwise specified, will act upon the default drive. The DOS prompt indicates the current default drive. For example, if you want to see a directory (the command is DIR) of files on the A: drive and the default drive is C: you will need to type dir a:, otherwise you will see a directory of the C: drive.
DEFRAG – This DOS command reorganizes the files on a disk to make them contiguous
Defragmentation – This process rearranges disk sectors so files are stored on consecutive sectors in adjacent tracks.
DEL – This DOS command deletes files
Demand Paging – This is an advanced algorithm for paging memory to the swap file. It is faster than a permanent swap file in Windows 3.x and dynamic (adjusts according to the load on the system).

Appendix C – Glossary
Specialized Solutions, Inc. 423
Device Drivers – Drivers are small programs that connect Windows to the hardware. This allows applications to be independent of devices. When adding a new piece of hardware to a system, this driver will have to be installed (it is usually provided on a diskette with the device). Information on device drivers is recorded in the SYSTEM.INI file.
Device Manager – The Device Manager is a graphical view of all the devices on a computer. This is the place to find and resolve hardware problems. Device Manager allows you to make many changes to the hardware configuration of a computer.
Digital Subscriber Line (DSL) – This technology is intended for use by small businesses and homes. It has a transmission speed of up to 50 times faster that a dial-up connection, while using regular telephone lines.
DIR – This DOS command displays a list of the files and subfolders that exist in the current folder.
DIR/P – This DOS command views directories one page at a time
DIR/W – This DOS command displays only filename
DIR/W/P – This DOS command displays large directories, those with more than one page of columns
Directory – Directories are locations for storing files. Many users now know these as “folders.” Every disk contains a main directory known as the root directory. Below the root directory is a hierarchical structure of other (sub) directories.
Directory file – Holds bookkeeping information about files that are below it.
DirectX 7 – DirectX 7 allows you to support 3-D animation, full-color graphics, and surround sound for the ultimate in gaming experiences.
Disk Administrator – This tool is used to manage disks in an NT environment. Here you can get a graphic presentation of all the drives attached to the machine. From here, you can format disks, partitions drives, change the partitions on drives, and change the file system of the drives.
Disk cache – By creating a disk cache, the computer takes a piece of extended memory and uses it to hold repetitive files. Since access to RAM is faster than disk access, the overall performance of the system improves. The most popular disk cache is SMARTDRV.EXE that comes with DOS.
Disk Cleanup – Disk Cleanup is a utility that will remove unnecessary files from your drive. Modern computers tend to leave many temporary files lying around (such as in the recycle bin and temporary Internet files). When you run Disk Cleanup, the computer will search for these files and display a window that describes the type of files it found and where they are located. You then have the option (by selecting each group) to delete these files.

A+ Training & Test Preparation Guide
Specialized Solutions, Inc. 424
Disk Defragmenter – The job of the Defragmenter is to rearrange disk sectors so files are stored on consecutive sectors in adjacent tracks.
Disk Quotas – Allow you want to control disk use on a per-user basis. This means that you can limit the amount of disk space available to a user.
DISKCOMP – This DOS command compares two disks
DISKCOPY – This DOS command makes a copy of a complete disk
DLL (Dynamic Link Library) – DLLs provide core Windows functionality. A DLL is a shareable library of executable code modules.
Domain – A domain is simply a group of workstations with a shared security database. Domains are designed for large numbers of computer requiring centralized security.
Domain controller – A domain controller is assigned to each network.
Domain Name Service (DNS) – Domain Name Service (DNS) is a network service that translates the user-friendly names that people prefer to the IP addresses that computers need. DNS provides name-to-address mappings for applications, by maintaining a database of these names and numbers.
DOS (Disk Operating System) – The modern computer professional must be familiar with DOS because DOS remains at the heart of Windows. Although increasingly more configuration can be done through the Windows interface, there comes a time when every computer professional is faced with a screen of DOS commands.
DOS Prompt – The DOS prompt displays the active drive letter (for instance “C:”) and directory. This indicates that the operating system is ready to accept the next command.
Dr. Watson – Dr. Watson is another form of log. Its function is to log the information needed by technical support groups to diagnose a program error for a computer running Windows 2000. Dr. Watson does not use a Windows interface, as does Event Viewer. Instead, it generates a text file (Drwtsn32.log). This file is created whenever an error is detected. You can then send the file to the appropriate support personnel for analysis.
Drag-and-drop – Drag-and-drop simply means visually moving an object from one location to another. Most users know how to do this instinctively: select an object by left clicking, holding the mouse button down, moving the object to a new location (the destination folder must be highlighted), and then releasing the mouse.
Drive Converter – The Drive Converter converts a FAT16 drive to the FAT32 file system.
Drive Pointers – DOS keeps track of drives by assigning letters to each drive during the boot process.
Drive Space – Drive Space is used to compress an entire drive into a virtual drive.

Appendix C – Glossary
Specialized Solutions, Inc. 425
DSMN (Directory Service Manager for NetWare) – DSMN (Directory Service Manager for NetWare) is another add-on utility that is used to integrate user and group account information between the two operating systems.
Dumb Terminal – Some workstations that run via a network (also called a dumb terminal) must boot to the network software each time the system is started. This is often accomplished by installing a ROM or BIOS chip on the network card. All the information required to boot to the network and allow the user to logon is written on this chip.
Dynamic storage – Dynamic storage is only supported by Windows 2000. With dynamic storage, each drive is a single partition. Partitions are then further divided into volumes.
EDIT – This DOS command invokes the text editor program
EFS (Encrypted File System) – You can encrypt data with EFS in either a Windows 2000 or Windows XP environment.
EMM386.EXE – The EMM386.EXE device driver is used to simulate expanded memory on a computer with an 80386 or higher processor. EMM386.EXE also is used to provide access to the Upper Memory Area.
ERASE – Deletes the specified files.
Error Messages – Brief technical messages that are displayed when an error occurs.
ERU.EXE – The ERU.EXE program backs up all critical system files, including AUTOEXEC.BAT, COMMAND.COM, CONFIG.SYS, IO.SYS, MSDOS.SYS, PROTOCOL.INI, SYSTEM.DAT, SYSTEM.INI, USER.DAT, and WIN.INI.
Event Viewer – The Event Viewer is a very powerful troubleshooting tool. It is used to monitor and log all the events that take place on the computer. It contains log files of the “events” taking place in the system. It is a very powerful tool for diagnosing problems within the system at the application, system, and security levels. It contains errors, warnings, information, success audits, and failure audits within the logs it generates.
EXE – An extension used to identify a file as an executable program file.
Executable file – Holds a program or commands in an executable format
EXIT – This DOS command allows you to quit.
Extended Memory – The memory beyond the standard 1MB of main memory that DOS supports. Extended memory is only available in PCs with an Intel 80286 or later microprocessor.
Fault tolerance – With fault tolerance, the computer has the ability to recover from catastrophic events and prevent the loss of data.

A+ Training & Test Preparation Guide
Specialized Solutions, Inc. 426
Field Replaceable Unit (FRU) – Field Replaceable Units (FRUs) are pieces of a system that can be easily replaced when you’re on location.
File Infectors – These attach themselves to executable files and spread to other files when the program is run.
File management system – A file management system is a part of an operating system or an application that is used to organize and keep track of files on a computer.
File Transfer Protocol (FTP) – The File Transfer Protocol (FTP) was the method used to transfer files from one computer to another in the early days of the Internet. FTP remains popular today because of its ability to transfer files between computers of dissimilar types, while not presenting much of a security risk. FTP is included in the TCP/IP suite of protocols, and there are many third-party FTP programs available. FTP uses the well-known port number 21. To use an FTP service you would type ftp:// instead of http:// on the address line. FTP is used to upload and download files.
Filenames – A filename is made up of three parts; a name of up to eight characters, a period, and extension of up to three characters. The name can include any number, letter, or the following symbols: _()~’!%$&#. Spaces may not be used in DOS filenames. Example myfile.doc
Firmware – Firmware is software, but it is stored on a microchip rather than a floppy, CD, or hard drive. The most common form of firmware is the BIOS.
Flash BIOS – Flash BIOS uses a different type of chip than standard ROM. These chips are called EEPROM (Electronically Erasable Programmable Read Only Memory). Using a special program, you can change the contents of the chip. Therefore, on a new motherboard, the BIOS is recorded on a flash memory chip that can be updated when necessary. It is not uncommon these days to resolve basic hardware problems by “flashing the BIOS.”
Folders – Folders have replaced DOS directories and subdirectories. A folder is used to hold data and system objects and may reside within another folder, on a disk, or on the desktop.
FORMAT – This DOS command prepares a disk for receiving files
FORMAT/S – This DOS command formats a disk as a system disk
FPNW (File and Print Service for NetWare) – FPNW (File and Print Service for NetWare) is a utility that enables NetWare clients to access NT file and print services. This software does not come with NT and is purchased separately.
Fully Qualified Domain Names (FQDN) – A domain is a group of computers that share a common general purpose, such as government, education, commerce, or interest. Internet domains are established in a hierarchical order. An FQDN consists of a hostname and a domain name.

Appendix C – Glossary
Specialized Solutions, Inc. 427
GDI – The GDI manages all the graphics for input and output devices as well as printing subsystems.
GDI.exe – Manages display graphics and printing.
GPF (General Protection Fault) – Along with Windows protected mode, came the now-famous “GPF” (General Protection Fault). Encountering this error message generally means that some portion of the Windows protected mode has been violated (such as by a program trying to write data outside of the portion of memory allocated to it).
Greater Than (>) – This symbol is used to indicate that a command can be redirected to an output device. For example, to redirect the directory command to a printer, type dir > lpt1.
GSNW (Gateway Services for NetWare) – GSNW (Gateway Services for NetWare) provides the gateway between an NT domain and the NetWare server. This is necessary because all NT workstations in a domain must connect to a NetWare server through a single contact point. Network performance will decrease as the number of computers accessing the gateway increases.
GUI (Graphical User Interface) – A GUI, or Graphical User Interface, is the most common type of computer interface used today. These operating systems are based on objects such as icons, menus, and windows. This type of interface is considered more user-friendly and is today’s standard.
HAL.DLL – Loads the Hardware Abstraction Layer
Hardware Toolkit – To take things apart and put them back together.
Header – Control flags and pointers to the four parts of the security descriptor.
Heap – Each DLL has a storage area in memory called a “heap” (64 KB). If these heaps are full, you will receive “out of memory” error messages. Closing applications should relieve the problem.
Help and Support – A web-based tool that can help you with problems that you need to solve or give you information on various features of Windows Me.
Hidden – Files that are marked hidden will not be displayed in Explorer. This is done to protect files from being accidentally moved or deleted.
High Memory – In DOS based systems, high memory is a term that generically refers to memory above conventional memory.
HIMEM.SYS – An extended memory (XMS) driver included with DOS, Windows 3.1, Windows for Workgroups, and Windows 9x. Windows 9x automatically loads HIMEM.SYS during startup. With older versions of Windows, and with DOS, HIMEM.SYS must be explicitly loaded by placing a command in CONFIG.SYS.

A+ Training & Test Preparation Guide
Specialized Solutions, Inc. 428
HKEY_CLASSES_ROOT – This is where all the standard class objects used by Windows 9x are stored.
HKEY_CURRENT_CONFIG – This key handles Plug and Play and contains information about the current configuration of a multiple hardware-configured computer. This key works in conjunction with HKEY_LOCAL_MACHINE\Config\xxxx where xxxx is the subkey that represents the numeric value of the current hardware configuration.
HKEY_CURRENT_USER – This key holds the information about the current user. Remember, several users can have their own custom set-up and configuration. Any information for the user that has properly logged on will be located here by linking to the HKEY_USERS key. This key provides Windows 9x compatibility to applications using the Windows NT Registry structure.
HKEY_DYN_DATA – This portion of the Registry is dynamic. It’s where virtual device drivers (VDDs) are installed, where Plug and Play hardware information is maintained, and where performance statistics are calculated. Because this information is accessed and changed constantly, this portion of the Registry is never written to the hard disk. It resides in your computer’s RAM.
HKEY_LOCAL_MACHINE – This Registry key is the big one. It retains all the information about hardware and software configurations. It is the largest key in the Registry. Most, if any, editing to the registry will take place in this key. Information stored here includes hardware configuration, peripheral devices, installed software, OLE compatibility, software configuration, and Windows 9x configuration. The data stored in HKEY_LOCAL_MACHINE is stored in the SYSTEM.DAT file.
HKEY_USERS – Since many users can define their own individual profiles, there must be a place to store the information. If there is only one user listed, there will be only one subkey named: DEFAULT. If your computer has been configured for multiple users, two profiles are created when you log on: HKEY_USERS\DEFAULT and HKEY_USERS\user name\USER.DAT. If it’s a two-user system, the other user’s settings are held in memory. This makes it impossible to alter users settings without logging on under their name and password.
HMA (High Memory Area) – A 64K area of memory located between 1024K and 1088K.
HPFS (High Performance File System) – A file system used by OS/2.
HPFS (High Performance File System) – HPFS (High Performance File System) is OS/2’s preferred native file system or disk format. Microsoft and IBM jointly created this file system. It was designed to access the large (at the time) hard drives. This new file system was the first to introduce long file names, increased security, and better organization. It was the forerunner of NTFS.

Appendix C – Glossary
Specialized Solutions, Inc. 429
HyperText Transfer Protocol (HTTP) – Web server and Web client (browser) communicate via the HyperText Transfer Protocol (HTTP). HTTP uses the well-known port 80 for connections.
ICF (Internet Connection Firewall) – This built-in firewall utility is a handy new addition in Windows XP. This is the first firewall that Microsoft has integrated into one of their operating systems.
IDE and SCSI Support – Windows 9x has its own EIDE and SCSI drivers so it no longer relies on third-party drivers.
IEEE 802 Standards – In 1980, the Institute for Electrical and Electronic Engineers, Inc. (IEEE) (pronounced eye-triple-E), formed a committee to create standards for LANs. This project is known as the 802 project. These standards were prepared before the OSI standards, but they are designed to be compatible. These standards define LAN technologies such as Ethernet and Token Ring among others.
IMAP4 (Interactive Mail Access Protocol 4) – The IMAP4 (Interactive Mail Access Protocol 4) protocol allows a little more functionality than POP3, (although it is not yet as popular). It allows an email server to function more like a file server and allows remote users to view and search through email by keywords on the server without downloading them first. Users can also download email headers only, or can download a copy of the email, so that a copy deleted locally is still accessible on the server.
Internet – The Internet is the world’s largest WAN. It was brought to us by the United States Department of Defense. It ensured communications between military installations, government centers, and defense research facilities in the event that nuclear war broke out.
Internet Connection Sharing (ICS) –This allows you to share an Internet connection between computers in your home.
Internet Service Provider (ISP) – Internet Service Providers (ISP) are the companies that provide Internet connectivity to users.
Internetwork Packet Exchange/Sequenced Packet Exchange (IPX/SPX) – IPX/SPX (Internetwork Packet Exchange/Sequenced Packet Exchange) is the Novell NetWare protocol suite.
Interoperability – Interoperability is the ability of the operating system to function or communicate with other operating systems.
IO.SYS – The interface between the hardware and the operating system code. This is the real-mode operating system for Windows 9x. Most of the “old” CONFIG.SYS commands have been incorporated into the IO.SYS. If you recall, the IO.SYS does most of the work that was done by the CONFIG.SYS file in DOS. For that reason, we are no longer required to have a CONFIG.SYS with Windows 9x.

A+ Training & Test Preparation Guide
Specialized Solutions, Inc. 430
IPCONFIG and WINIPCFG – IPCONFIG and WINIPCFG are the same commands. They are used to display the current configuration of a computer, such as IP Address and MAC address. IPCONFIG is entered from the command prompt (DOS prompt) and WINIPCFG can be run either from the command prompt or from RUN on the START menu.
IPP (Internet Printing Protocol) – IPP allows users to send documents to any printer in a Microsoft Windows 2000 Network that is connected to the Internet.
ISDN (Integrated Services Digital Network) – This is one of the earlier technologies for Internet connectivity. It is also more focused on the business market. It uses two lines as two channels (64 Kbps each) and thus, has a published transmission speed of 128K bps.
Kerberos – Windows 2000 uses Kerberos V5 authentication to protect your network or intranet. It protects data by tracking and verifying each user’s activity on a network. You can provide safeguards for even the most sensitive communications exchanged over a public network.
Kernel – The Kernel is the core operating system.
Krnl386.exe – Controls and allocates system resources, handles I/O and memory management, launchs applications, and controls multitasking.
LH and LOADHIGH – Loads a program into upper memory.
Library file – Holds functions in object format
Linux – Linux is a freeware UNIX-based operating system that is distributed for the Intel architecture. It has all the utilities to provide printer services, FTP services, network file services, Web page services, mail services, and Internet services. Red Hat Linux is a popular distribution of Linux. There is also a freely distributed version of Linux available for the Macintosh computer.
Local Security Authority (LSA) – The function of the Local Security Authority (LSA) is to verify the user name and password. It does this by querying the Security Accounts Manager (SAM).
LOCK – Enables direct disk access. (Allows storage and retrieval from disk without involving the CPU.)
Long Filenames – Filenames can now be as long as 255 characters (including the path). Windows 9x long filenames are implemented without creating incompatibilities with 16-bit applications.
MacOS – MacOS is the operating system used on most Macintosh computers. The latest version is 8.01. One of the main reasons that the PC became more popular than the Mac is that Macintosh took a business approach of using a closed (proprietary) architecture. They focused on quality and not compatibility with other systems.

Appendix C – Glossary
Specialized Solutions, Inc. 431
Macro Virus – The biggest nuisances now are macro viruses (such as those that infect Word documents). These attach themselves as executable code to documents and run when the document is opened. (They can also attach to some kinds of E-mail). It used to be true that you couldn’t get a virus from opening a document, just from running a program. Unfortunately, while macros are very valuable, they mean that when you open a document you are running a program.
Maintenance Wizard – The Maintenance Wizard is a scheduling program that allows you to automatically run other maintenance utilities.
Map file – Holds a map of the program.
MD and MKDIR – Creates a folder or subfolder.
MEM – This DOS command displays information about a computer’s memory, how memory is allocated, what memory areas are free, what programs currently loaded, etc.
Microsoft Explorer – Microsoft Explorer is the preferred method (for PC professionals) to explore files and the file structure of a computer. Microsoft Explorer (not to be confused with Internet Explorer) can be defined as a utility in Windows 9x that enables the user to locate and open files and folders.
Migration Tool for NetWare – Migration Tool for NetWare is a tool used to convert from NetWare to NT. Its purpose is to move (called migrating) NetWare account information to NT’s domain controller.
Mirrored volume – Data is written to two identical volumes at the same time. If one volume is lost, the data can be recovered from the other.
MKDIR or MD – This DOS command makes a directory.
MMC (Microsoft Management Console) – The Microsoft Management Console (MMC) has been around since Windows 9x. However, it has received a face-lift and additional user-friendly tools in Windows 2000. MMC is a host for snap-ins. It is also possible to add ActiveX controls, hypertext links, folders, and tasks. MMC can be configured in several different modes including, Author, User-Full Access, and User-Limited Access. It is also possible for Administrators to prevent users from opening the MMC if they don’t have authorized access to it.
Mount points – Mount points give you access to devices and data from a different part of your computer. For example, if you wanted to mount your CD-ROM on your root drive, it would allow you to access your CD-ROM from C:\CD-ROM.
MSDOS.SYS – MSDOS.SYS is a special information file. It contains two components; paths used to locate other Windows files and options to add information that helps run older DOS programs. MSDOS.SYS is a text file that can be edited with any text editor. It is the main operating system code.

A+ Training & Test Preparation Guide
Specialized Solutions, Inc. 432
My Computer – My Computer is intended as a version of Explorer that’s easier to use and leaves out all the technical details (although you can find them if you know where to look). For most non-technical users, My Computer will do any file related operation they need.
NBTSTAT – NBTSTAT will display NetBIOS over TCP/IP statistics.
Net Watcher – With Net Watcher, you can monitor the network activity on your computer.
NetBEUI – The NetBEUI (NetBIOS Extended User Interface) protocol is a protocol that is small, easy to configure, and fast. It is a good choice for a small peer-to-peer office environment, and is non-routable.
NETSTAT – NETSTAT will display all the TCP/IP protocol statistics.
Network Bridge – This new networking feature in Windows XP sets up a bridge between multiple network interfaces to connect segments. Dissimilar topologies and protocols will not be an issue with a network bridge. The logical bridge saves you the cost of having to buy a real bridge.
Network operating systems (NOS) – Network operating systems (NOS) are specialized operating systems designed to integrate computers in a networking environment.
NSLOOKUP – NSLOOKUP is used to troubleshoot DNS problems and can display the DNS entry for a given IP address.
NTBOOTDD.SYS – Device driver for BIOS-disabled SCSI controllers.
NTDETECT.COM – Detects hardware and builds a hardware list.
NTFS (New Technologies File System) – With this method, you may assign directory and file-level permissions to data, allowing restricted access to individuals or groups. The NT file system (NTFS) must be used in order to take full advantage of NT’s security features.
NTLDR – NT Loader – loads the operating system. Generates the operating system menu for multiple boots.
NTOSKRNL.EXE – Windows NT kernel.
NWLink – NWLink is actually a clone of Novell’s IPX/SPX protocol and is used for communication between NT and NetWare.
Object file – Holds code that had been compiled
ODBC Data Source Administrator – The ODBC Data Source Administrator appears in all the Microsoft Family of operating systems. Open Database Connectivity (ODBC) is a standard protocol used for configuring and storing information about how the computer is to connect and share data or provide data through various database management systems.

Appendix C – Glossary
Specialized Solutions, Inc. 433
OS/2 – OS/2 began as a joint venture between IBM and Microsoft but was ultimately finished and marketed by IBM. There are very few business applications still running on this operating system. It uses the HPFS (High Performance File System) and is similar in capability to Windows 3.11 and Widows 95. The latest version of OS/2 is called OS/2 Warp.
OSI (Open Systems Interconnection) model – The International Standards Organization (ISO) has published specifications that define how hardware and software communicate in a network environment. These standards are known as the Open Systems Interconnection (OSI) model. The OSI model consists of seven layers that define how each type of network communication will take place.
Owner – A SID that indicates what user or group owns the object.
PATH – Specifies which folders should be searched for executable files.
Path – The address to a file. The path consists of the drive name, the location of the file in the directory structure, and the filename. Example: C:\mystuff\myfile.doc
Peer-to-peer network – In a peer-to-peer network, computers act as both a client and a server. However, it is necessary to have an operating system that can perform in this environment.
Permanent swap file – When disk space is not a problem, a permanent swap file is recommended. Permanent swap files are faster to access than temporary swap files because they use contiguous blocks (clusters) of the hard drive to store data.
PING – PING is used to test if a remote host is “alive.” PING works at the IP level, and will often respond even when higher-level TCP-based services cannot. Typing the PING Loopback Address of 127.0.0.1 at the command prompt, can tell you if your TCP/IP configuration is correct. Pinging the server’s IP address lets you test if the server is “up.” PING is used to test connections.
PnP (Plug and Play) – A plug and play device, when inserted into a computer and turned on, is designed to work without any configuration. A well-designed PNP system would eliminate the need for jumpers, switches, and installation software.
POP3 (Post Office Protocol 3) – POP3 (Post Office Protocol 3) is the most common email server protocol on the Internet. It is very limited and is used to distribute email to mailboxes from which users can download email.
Port Drivers – These 32-bit drivers communicate directly with specific disk devices, allowing a floppy to format in the background, for instance.
Primary group – A SID that is present for POSIX compliance.
Product Activation – Microsoft has introduced product activation to ensure you are using only registered and legitimate copies of Windows XP that you have purchased. You only have thirty days in which to register your copy of Windows XP.
A+ Training & Test Preparation Guide
Specialized Solutions, Inc. 434
Prompt – The command prompt—user interface provided by COMMAND.COM to signal to the user that the computer is ready to receive input (for example, C:\> or A:\>).
PROMPT – This DOS command changes the appearance of the command prompt.
Protected Mode – Protected mode, developed to exploit the “new” 286 machines that could address up to 16 MB of RAM, is a term that is used interchangeably with standard mode and 286 protected mode. It works by allocating chunks of memory to a program.
RAMDrive – RAMDrive is a DOS utility that lets you use memory (RAM) to create a virtual disk.
RD and RMDIR – Deletes a folder.
Read-only – File can be opened and viewed, but cannot be edited.
Real Mode – Real mode is a term that is generally used to define the early versions of DOS. It is a hardware-dependent mode operating within the original 1-megabyte memory limits of DOS. It is hardware dependent, as it must directly address all the hardware in the computer.
Recovery Console – You can recover from many Windows 2000 errors by using the Recovery Console. This is a command line program that you must start from the Windows 2000 CD or startup disks. It is most often used when you are unable to start the computer.
Recycle Bin – A hidden folder that holds deleted files. The files will stay safe and out of sight in this folder until they are removed from the Recycle Bin.
REGEDIT or REGEDIT32 – Editing the registry is done through either the Regedit.exe (16-bit) or Regedit32.exe (32-bit).
Registry – The registry is a binary database that keeps track of hardware and software configuration and set-up information. It is actually made up of two files called SYSTEM.DAT and USER.DAT
Remote Desktop – With Remote Desktop, you can allow other XP users to remotely connect to your computer. Administrators don’t need your permission to connect.
Remote support – With remote support, your objective will be to handle as many problems as possible without actually showing up on-site.
REN and RENAME – Changes the name of a file or files.
Replication – Replication is simply making a copy of the data stored on one server on another server. This way, if one server goes down, the other server can take over immediately.

Appendix C – Glossary
Specialized Solutions, Inc. 435
Resource Meter – The Resource Meter is used to monitor (in real-time) the use of system resources. When activated, it will add a small bar graph to the taskbar, (in the notification area) indicating the percent of free resources (based on the computers total resources).
RMDIR or RD – This DOS command deletes a directory
ROUTE – The ROUTE command is similar and will show you the routing table and allow you to make edits to it.
SACL (System Access Control List) – A list of system access control entries. Specifies audit and alarm message generation when particular subjects attempt specific types of access to the object.
Safe Mode – If it encounters difficulty starting up, Windows 95 can (and will) be loaded in safe mode. Most of the time, startup problems are caused by driver conflicts or problems. Safe mode starts Windows 95 with the minimum number of drivers.
ScanDisk – ScanDisk is used to check a hard drive for logical and physical errors.
SCANDISK – This DOS command disk analysis and repair utility that checks and fixes common disk and file errors
Security Account Manager (SAM) – The SAM is a database that keeps track of all the security for the domain. This includes user names, passwords, and permissions. If the NT computer is operating as a stand-alone server, the SAM will be located on the local computer. If the computer is part of a Windows NT domain, the SAM will be located on one server that has been designated as the PDC (Primary Domain Controller).
Security Reference Monitor – The function of the Security Reference Monitor is to check access tokens to verify a users access to a resource.
Server – As their name implies, servers exist to serve. They process requests from clients for resources such as files and peripherals. They are the storage facility for the bulk of the data in a network environment, and as such, are an excellent point from which to centrally manage a network.
Service pack – A service pack corrects common errors found in the software or adds new features.
SET – Displays, sets, or removes environment variables.
SETVER.EXE – With SETVER.EXE loaded, Windows 9x will report a correct version number to DOS applications.
Simple volume – A portion of a drive or an entire drive.
Simple volume – A single disk with no fault tolerance.
Smart Menus – These menus help you to find everything that you use most often.

A+ Training & Test Preparation Guide
Specialized Solutions, Inc. 436
SMARTDRV.EXE – SMARTDRV.EXE is a disk-caching program used to improve the performance of a DOS-based system. It operates by caching disk writes into RAM. Once there, the program can access information faster (RAM is faster and disk).
SMTP (Simple Mail Transfer Protocol) – SMTP (Simple Mail Transfer Protocol) is the transport protocol for email over the Internet. It is part of the TCP/IP protocol suite and uses the well-known port 25. SMTP is used to transport mail from one point on the Internet to another and between the email client and server. Once the email is delivered to the final destination’s email server, SMTP hands off the email to a mail-handling protocol such as POP3 or IMAP4. These mail-handling protocols then distribute the mail to the mailboxes. SMTP is used for outgoing email (Send Mail To People) – it transfers email between the email client and the email server, it is not a mail system. POP3 and IMAP4 receive mail.
Software – Software refers to any program (set of instructions) that directs a computer to carry out a task or function. Software falls into two categories—operating systems and applications.
Software Toolkit – To troubleshoot and correct operating systems, hardware, drivers, and application problems.
Spanned volume – A combination of 2 to 32 drives.
Spanned volume – Uses disk space from up to 32 disks. Allows multiple disks to function as a single contiguous disk. When one disk is full, it writes to the next one. No fault tolerance.
Stop Messages – Full screen text messages. These will occur when you encounter an error condition from which the system cannot recover.
Striped Volume – A combination of 2 to 32 drives where data is written to all drives in equal portions.
Striped volume – Areas of disks (from up to 32 disks) form one logical disk. Disk storage is optimized by writing data to each disk. No fault tolerance.
Switches – Many DOS commands can be used with a switch (“/” followed by a letter) to invoke special functions. Since no comprehensive manuals are available after DOS 5, if you follow a command with a space and “/?” a list of parameters and switches available for that command will be displayed.
Syntax – Syntax is the arrangement and inter-relationship of words in phrases and sentences. In computer jargon, it is the correct format in which to type a command. In DOS every letter, number, and space has value (Bad news, spelling counts).

Appendix C – Glossary
Specialized Solutions, Inc. 437
Sysedit – Windows provides a program for editing the system files (AUTOEXEC.BAT, CONFIG.SYS, WIN.INI, SYSTEM.INI). This program resides in the Windows directory and is called Sysedit. Windows does not provide an icon for this program in the standard setup. However, if no icon exists, Sysedit can be run by selecting File, Run from the Program Manager, and then by typing Sysedit and pressing Enter.
System – Files used by the operating system.
SYSTEM – Loads system configuration settings
System File Protection – This keeps a user from inadvertently deleting or corrupting system files
System Information – System Information collects system configuration information and displays it in a menu format.
System Monitor – The System Monitor provides real-time reports about how various system processes are performing. It displays various functions in a line graph, a bar graph, or a numeric graph.
System Restore – System restore allows you to “reset” your system to a point before it was corrupted. This is done by setting up restore points when the system is functioning properly.
System Restore – This allows you to return a system to a point at which it was functioning properly
SYSTEM.DAT – Stores the majority of data, including most of the hardware and software configurations.
SYSTEM.INI – The SYSTEM.INI is the Windows version of the DOS CONFIG.SYS file. It initializes all the hardware resources.
T1-Carrier System – A type of high-speed leased telephone line that is mostly used by larger companies (and ISPs) because they are expensive. Transmission rates of up to 1.544 Mbps are possible with this technology.
Task Scheduler – You can add tasks by double-clicking Add Scheduled Task, which starts the Scheduled Task wizard. You can add tasks by dragging scripts, programs, or documents from Windows Explorer or the desktop to the Scheduled Tasks window.
Taskbar – The taskbar provides a unified place in the interface for important information. By default, it sits at the bottom of the screen, but the user can move it.
Technical Library – To keep track of the ever-growing base of information and find answers to the “I never saw that before” problems.

A+ Training & Test Preparation Guide
Specialized Solutions, Inc. 438
Telnet – Telnet is a terminal emulation program, which allows you to log into a remote computer and enter commands on that computer as if you were working locally (actually sitting in front of that computer, using its keyboard). Telnet uses the well-known port 23, but you must possess a valid username and password to access the remote computer.
Temp files – As programs became larger and larger, they needed to store larger amounts of temporary data. To do that, they create a temporary file that can be accessed during operation and then, (hopefully) it is deleted when the program is shut down.
Temporary swap file – A temporary swap file is recommended when a computer is low on disk space because the file can increase or decrease in size as necessary. The temporary file is called \Windows\Win386.swp and it’s deleted when you exit Windows.
Text file – Holds textual data (that is, data that can be read by humans), including files created with a text editor and any file in ASCII format
The Virtual Registry – Files that are created by Windows 9x when the system is started. They are stored in RAM.
TIME – This DOS command displays or changes the system time.
TRACERT.EXE – TRACERT (pronounced Trace Route) is a command line utility that shows every router interface that a TCP/IP packet passes through on its way to its destination.
Transmission Control Protocol/Internet Protocol (TCP/IP) – There are many different protocols covering many different functions, but TCP/IP is probably the most common protocol stack and is the protocol of the Internet. TCP is connection-oriented and IP is connectionless. TCP/IP was developed by the Department of Defense Agency (DARPA) in the 1960s to accommodate a large internetworking environment.
Trojan Horses – These appear to be legitimate programs, but when loaded, they will go to work on the system.
TYPE – This DOS command displays a text file
Typos – Typos are the most common cause for “Bad command or filename” errors.
UMA (Upper Memory Area) – The memory area between the first 640K and 1024K
UNDELETE – This command can restore a file (as long as no other file has used the clusters).
UNIX (Uniplexed Information and Computing System) – a command prompt operating system that has been around since the late 60s. Ken Thompson and Dennis Ritchie invented UNIX. UNIX was the first open standard operating system. Open means that it can be improved or enhanced by anyone with the knowledge to do so. UNIX, a bulky operating system used primarily on minicomputers, is written in the C language and is a multi-tasking, multi-user, general-purpose operating system. Although it was not designed as a NOS, it can be, and is, used as such.

Appendix C – Glossary
Specialized Solutions, Inc. 439
UNLOCK – Disables direct disk access.
UPnP (Universal Plug and Play) – Universal Plug and Play allows you to connect home network appliances to your network.
User – The User provides the input and output functions. It manages the sound, communication ports, and any components that directly interact with the user (human).
User Manager for Domains (Server only) – This is the account manager for Windows NT Server. Here you can assign accounts for users of the local workstation and the domain, if the server is the PDC.
USER.DAT – Stores data about a particular user.
User.exe – Controls input and output, including mouse, keyboard, sound, timer, and COM ports. Also provides the Windows user interface.
VCACHE – Vcache is the protected mode replacement for the real mode SMARTDRV. While created for use with Windows 3.11, Windows 95 uses it exclusively for caching. One of the improvements that came with Windows 95 is vcache’s ability to cache data from CD-ROMs and networks.
Vector fonts – Vector fonts are designed as a set of lines drawn between two points.
VER – This DOS command displays the version of DOS
VERIFY – Directs the operating system to verify that files are written correctly to a disk, and displays the status of verifications.
Virtual DOS machine – These are 1-megabyte blocks of memory configured to look and run like an 8086 DOS machine. By using virtual mode, you could run several DOS computers at the same time without having to reboot the computer to switch between modes.
Virtual memory – Virtual memory allows the processor to use the hard drive to simulate RAM.
Virus – Viruses are those nasty little programs that can wreak havoc on a computer and its data. The sole purpose of a virus is to replicate and make life miserable for computer users.
VMM (Virtual Memory Manager) – The Virtual Memory Manager (VMM) controls all virtual memory. The VMM divides memory into 4-KB pages and then maintains a page table to keep track of where everything goes (in RAM or on the hard drive). When the amount of free RAM reaches a critical level, a portion of RAM is set aside for page swapping. Windows uses a temporary or permanent swap file on the disk for writing the least recently used page frames of physical RAM.
VOL – Displays the volume label and serial number for a disk.

A+ Training & Test Preparation Guide
Specialized Solutions, Inc. 440
VxD drivers (Virtual Device Drivers) – 32-bit drivers written to take full advantage of the Windows environment.
Warm boot – Resetting may be accomplished without turning off the computer by holding down the Ctrl, Alt, and Del keys at the same time. This is called a warm boot.
Web browser – A Web browser is a software program that can read HTML Web pages. HTML (HyperText Markup Language) is the language that is used on the Internet. A Web page is simply a file that resides on a Web server.
Wildcards – The question mark (?) matches any character in a specified position and the asterisk (*) matches any number of characters up to the end of the filename or extension. For example, to search for files beginning with the letter “A,” the command would be DIR A*.* or A?????.* (The second command would find files that start with the letter A and any other five characters.)
WIN.INI – The WIN.INI file is like the AUTOEXEC.BAT used by DOS, but does more. The WIN.INI file contains settings that affect the appearance of the Windows desktop, printer selections, and network connections.
Win386.exe – Handles virtual memory and DOS applications; converts extended to expanded memory if required.
Windows 2000 – Windows 2000 is Microsoft’s replacement for Windows NT 4.0. Originally, it was to be designated as Windows NT 5.0.
Windows 2000 Advanced Server – Windows 2000 Advanced Server provides increased scalability and system availability. It is designed for servers used in a large enterprise networks and for database-intensive work.
Windows 2000 Datacenter – Windows 2000 Datacenter supports more memory and more CPUs per computer. It is designed for enterprise applications. Datacenter is the most powerful and functional server operating system, is designed for large data warehouses, online transaction processing (OLTP), large-scale simulations, and server consolidation projects. Datacenter can support up to 32 processors per computer and up to 64 GB of RAM. It also uses built-in clustering and load balancing.
Windows 2000 Professional – Windows Professional (the replacement for NT Workstation) is a reliable operating system that combines the features of Windows 98 with the security and manageability of Windows NT. Windows 2000 Professional is the desktop operating system for businesses of all sizes. It replaces Windows 95, Windows 98, and Windows NT Workstation in the business environment.
Windows 2000 Server – Windows 2000 Server provides services that simplify network management. It provides improved network access to branch offices, and is ideal for file and print servers, Web servers, and workgroups.
Windows 3.11 – It was a 16-bit operating system that required DOS, but had a few enhancements such as better networking capabilities for sharing files and printers.

Appendix C – Glossary
Specialized Solutions, Inc. 441
Windows 95 – Windows 95 adds the functionality of a 32-bit system to enhance the user interface. Backwards-compatibility with Windows 3.x operating environments was one of the key features of the Windows 95 operating system. Windows 95 is a stand-alone operating system. This means that it did not require you to load and run DOS first. Windows 95 uses an improved interface that closes the gap between it and its number one competitor – the Macintosh.
Windows 98 – Windows 98 is a 32-bit operating system that is fully compatible with 16-bit programs, which can be used as an alternate for Windows NT (see next section). It is the last major version of Windows based on the old kernel running on top of DOS. One of its big features is the integration of Internet Explorer 4.
Windows Explorer – Explorer provides a visual representation of the computer and its components, as well as providing enhanced file management tools.
Windows for Workgroups – Windows for Workgroups is a version of Windows 3.1 that included the capability to run a peer-to-peer network. This version included an E-mail program (Microsoft Mail) and a scheduling program (Schedule+) in its suite.
Windows Me – The Windows Millennium Edition is the successor to Windows 98. It is marketed as Windows Me. It has few advantages over Windows 98, but does include better audio software, graphics handling and system tools. It didn’t very good reviews and most people prefered Windows 98 or Windows 2000 Professional.
Windows Media Player – Windows Me can allow you to listen to on-line radio stations, and view streaming and local video (as well as audio). Copying a music CD to your hard disk is also possible. It works with AVI, MP3 files, MPEG, and WMA files. Your player appearance can be changed (there are many selections available on the Internet).
Windows Movie Maker – Movie Maker is the first video editing software included with a Microsoft operating system. With Movie Maker, you can transfer your home movies to your computer and edit them to your liking. You can even add sound or background music to your movies as well. It produces .AVI files.
Windows NT – Windows NT is a true 32-bit operating system with a completely different architecture from that of its predecessors. Windows NT is designed for users who need stability, security, and the ability to use various types of processors such as Alpha, MIPS, and Pentium. However, Windows NT does not provide complete backwards compatibility with 16-bit programs. Windows NT was released in the summer of 1993. It distinguished itself by addressing the professional market as opposed to the home market, which was becoming saturated with Windows 3.0. From its beginnings, it grew to its present form Windows 4.0. It is currently the most popular software for the business-networking environment.
Windows XP 64-Bit Edition – This is Microsoft’s first 64-bit operating system to provide more speed and power to technical users who need more than XP Professional can provide. Auto engineers, scientists, or video producers are likely to benefit the most from the 64-bit version of XP. It supports designs that are more complex for engineers and those who create 3-D animation and game developers.

A+ Training & Test Preparation Guide
Specialized Solutions, Inc. 442
Windows XP Home Edition – The visual design of XP Home is very distinct; SVGA is required for XP computers. The option to set your display to 640x480 isn’t there anymore. XP Home has increased support for digital media as well.
Windows XP Media Center Edition – This version of XP is especially designed for digital multimedia use. It has a user interface for audio, graphics, TV, and video. It also supports the new remote control for Windows XP so you can view multimedia from various locations.
Windows XP Professional – Windows XP Professional is one of the most powerful versions of XP. Visually, the difference between XP Pro and XP Home is non-existent. Better security features, recovery options, and its ability to interact with large networks set it apart from other versions of XP.
Windows XP Tablet PC Edition – This version of XP is especially designed for the new Tablet PCs. Tablets are extremely lightweight but powerful. Tablets use digital pens to convert your handwriting into text in various applications. Networking is made even easier because tablets are also wireless.
WINNT.EXE – To start Windows NT installation, you start the WINNT.EXE file in the \I386 folder of the CD.
Workgroup – A workgroup is simply a group of computers sharing a common connectivity. They all use the same protocols, standards, and physical connections. A workgroup is the same thing as a peer-to-peer network.
World Wide Web (WWW) – Many people mistakenly believe that the Internet is the World Wide Web (WWW). The WWW is a collection (a very large collection) of Web pages that are connected by hyperlinks. It consists of information from all over the world that can be viewed on a Web browser.
XCOPY – This DOS command copies the contents of one disk to another disk.

Appendix D – Review Questions and Answers
Specialized Solutions, Inc. 443
Appendix D – Review Questions and Answers
Review Questions – Chapter 1
1. What are the two categories of software?
Operating systems and applications.
2. Name the two types of operating system interfaces.
Command line prompt and GUI.
3. What is the most common form of firmware?
BIOS
4. What does DOS stand for?
Disk Operating System
5. Name the three brands of DOS.
MS-DOS – Produced by Microsoft
PC-DOS – Produced by IBM
DR DOS – Produced by Novell
6. What are the three core files in DOS?
IO.SYS – The interface between the hardware and the operating system.
MSDOS.SYS – The main operating system code.
COMMAND.COM – The interface between the user and the operating system code.
7. Name the two other DOS startup files:
CONFIG.SYS – Loads extra hardware and device drivers not built into the IO.SYS file.
AUTOEXEC.BAT – Loads TSR programs and other environmental variables.
8. What does TSR stand for?
Terminate and Stay Resident
9. What was the first GUI-based operating environment?
Windows 3.x

A+ Training & Test Preparation Guide
Specialized Solutions, Inc. 444
10. Name the three operating modes that were used to overcome the DOS memory limits.
Real Mode
Protected Mode
386 Enhanced Mode
11. Name the first GUI-based operating system.
Windows 95
12. Name as many of the Microsoft operating systems that you can remember.
DOS
Windows 3.x
Windows 95
Windows 98
Windows Me
Windows NT Workstation
Windows NT Server
Windows 2000 Professional
Windows 2000 Server
Windows 2000 Advanced Server
Windows 2000 Datacenter Server
13. Which operating system uses the HPFS (High Performance File System) as its file system?
OS/2
14. Which operating system is free?
Linux
15. Macintosh makes an excellent computer and its users are extremely loyal. Given this, why are PCs more popular than Macs?
Macintosh uses a proprietary architecture that is not compatible with other systems.

Appendix D – Review Questions and Answers
Specialized Solutions, Inc. 445
Review Questions – Chapter 2
1. What does DOS stand for? Disk Operating System
2. What was DOS created to do? The original version of DOS was designed to support the operation of floppy disk drives.
3. What are the core operating systems within DOS? IO.SYS: The interface between the hardware and the operating system code. MSDOS.SYS: The main operating system code. COMMAND.COM: The interface between the user and the operating system code.
4. What are the two DOS startup files? CONFIG.SYS: Loads extra hardware and device drivers not built into the IO.SYS. AUTOEXEC.BAT: Loads Terminate and Stay Resident (TSRs) programs selected by the user and sets up the environment variables such as TEMP and PATH.
5. What DOS command is used to determine the amount of free space left on a disk? From the command prompt in the root directory, the DOS command DIR or directory will display the list of all the files on the drive and the amount of free space available.
6. What is the difference between real mode and protected mode? DOS operates with a 1MB memory limit. This is called real mode. Windows broke out of the DOS 1 MB barrier by engaging 286 level protected mode (Windows 2.0). Protected mode refers to using protected memory. In protected mode, Windows could address up to 16 MB of RAM. Although DOS programs could only run in the first megabyte of memory, specialized programs were written that would run in (and only in) the extended memory controlled by Windows.
7. Windows provides a GUI for the user. What does “GUI” stand for? What is its advantage over the older DOS system? GUI stands for graphical user interface. DOS used a text or command line interface. With DOS, you had to remember and type commands. With a GUI interface, you work in a graphical environment and use a mouse with icons or menus to simplify tasks.

A+ Training & Test Preparation Guide
Specialized Solutions, Inc. 446
8. What are the three kinds of fonts used in a Windows environment? Windows provides three types of font files. Each font contains a complete character set for a particular typeface. Vector fonts are designed as a set of lines drawn between two points. Each character represents a mathematical model that can be scaled to virtually any size. Raster fonts are bitmap fonts made up of a set of dots. Each character or set of dots is “painted” on the screen or printer. Because each character requires separate data for each size, only limited scaling is possible. TrueType fonts are made from an “outline” of each character. When printing (on the screen or on a printer), these outlines are filled in.
9. Name five settings that can be changed from the Windows Control Panel. Many settings can be changed from the Control Panel. Screen colors, Other desktop options (screen savers, wallpaper, etc.), Fonts, Printer, Keyboard, Mouse, International settings, COM port settings, Network settings, Date and Time, Sounds (used by system), Drivers for hardware and Multitasking and virtual memory settings.
10. What wildcard character can be used to replace a single character in a search string? The single character wildcard is the questions mark (?).

Appendix D – Review Questions and Answers
Specialized Solutions, Inc. 447
Review Questions – Chapter 3
1. Name three ways that Windows 95 differs from Windows 3.x. Windows 95 is dramatically different from Windows 3.x. Windows 95 is an operating system, whereas Windows 3.x is an operating environment. Installing devices, managing memory, optimizing the system, and troubleshooting are handled differently than in Windows 3.x.
2. What is Plug and Play? What is required for a component to be Plug and Play? The ultimate goal of any computer user is to be able to simply plug any device into a computer, turn it on, and have it work. This is the concept upon which Plug and Play (PNP) is founded. A well-designed PNP system will eliminate the need for jumpers, switches, and installation software. The three requirements of PNP are: A Plug and Play BIOS, a Plug and Play device, and a Plug and Play operating system (such as Windows 95).
3. Does Windows 9x still require DOS? Windows 9x doesn’t require DOS. DOS is provided mostly for backward compatibility.
4. What version of DOS comes with Windows 95? DOS 7.0 comes with Windows 95.
5. Is CONFIG.SYS required to install GUI drivers? CONFIG.SYS is not required to install GUI drivers, but it is required if you want to use any real-mode drivers.
6. Why would you want to set the swap file size in Windows 95? The Vcache that comes with Windows 95 is quite different from Windows 3.x. The big difference is that the cache is “sized dynamically.” As Windows needs more RAM, it takes away from the cache and vice-versa. Unfortunately, the cache sizing algorithms are very slow, especially when used with the swap file; therefore the swap file needs to be limited in size.
7. What is the main difference between Windows 3.x and Windows 95? Windows 3.X is basically an operating environment created to run on top of DOS to provide a graphical user interface and other features to make it easier to run programs and manage files. Windows 95 is a complete operating system that includes an improved GUI as well as other useful features.

A+ Training & Test Preparation Guide
Specialized Solutions, Inc. 448
8. Why can’t older versions of disk utilities be used with Windows 95? Older disk utilities do not understand many of the improvements of Windows 95 such as long files names and may consider Windows 95 a virus.
9. After turning on the power to the computer, what is the first step in the boot process? The very first step in the boot process is to run the POST.
10. In what directory do you find the external DOS commands? DOS external commands can be found in the windows\command directory of the bootable drive.
11. What is FDISK used for? FDISK for Window 9x is no different than before; it is used to partition hard drives. Windows 95 OSR2 and Windows 98 do give the option of using FAT32 file system instead of FAT16.
12. What is virtual memory? Virtual memory uses disk space to simulate RAM. This hard disk space is called the swap file.
13. The Registry is made up of two binary files. Name them. The two binary files that hold the Registry database are called SYSTEM.DAT and USER.DAT.
14. What is the difference between a DOS session and DOS mode? A DOS session runs inside a window in the GUI. Windows 9x has the new MS-DOS mode that allows creation of custom CONFIG.SYS and AUTOEXEC.BAT files for tough DOS applications. DOS mode exits the GUI; therefore, you may have to configure real-mode drivers to access hardware.
15. If you are running in DOS mode and the CD-ROM does not run, what do you have to do it get it running? You have to create (or edit) the CONFIG.SYS and AUTOEXEC.BAT files to load the appropriate real-mode drivers for the CD-ROM. You will also have to run the MSCDEX.EXE application.
16. Do you need a PIF file to run a DOS program in Windows 9x? Windows 9x no longer creates PIF files by using the PIF editor. Accessing the Properties value when a DOS application is right-clicked, creates PIF settings.

Appendix D – Review Questions and Answers
Specialized Solutions, Inc. 449
17. Windows 95 and 98 each have a five-step installation process, but they are slightly different from each other. What are the five steps of a Windows 95 installation? What are the five steps of a Windows 98 installation?
Windows 95
Step 1—Startup and System Check
Step 2—Information Collection
Step 3—Hardware Detection
Step 4—Startup Disk Creation and File Installation
Step 5—Windows Configuration
Windows 98 Step 1 – Prepare to run Windows 98 Setup
Step 2 – Information Collection
Step 3 – Copying Files
Step 4 – Restart the Computer
Step 5 – Final Adjustments and Configuration
18. What version of Windows 95 uses FAT32? Only the OSR2 version uses FAT32.
19. What is Safe Mode and what is it used for? Safe mode starts Windows 9x with a minimum of drivers. This mode is considered the Windows 9x troubleshooting mode.
20. What are the three Registry backup tools available with Widows 9x? The three primary Registry backup tools available in Windows 9x are: Microsoft Configuration Backup (CFGBACK.EXE), Emergency Recovery Utility (ERU.EXE), and REG files

A+ Training & Test Preparation Guide
Specialized Solutions, Inc. 450
21. Which version of Windows 9x offers the active desktop and what is it?
The active desktop is new with Windows 98 and is called the Web Style desktop. This is because it is designed to give the user the look and feel of a Web browser rather than the standard desktop of Windows 95.

Appendix D – Review Questions and Answers
Specialized Solutions, Inc. 451
Review Questions – Chapter 4
1. What two tools are available in Windows 9x for managing files and disks?
Windows Explorer and My Computer
2. How many characters may be used (including the path) for a filename in Windows 9x?
255 characters
3. There are at least three ways for accomplishing file management in a Windows environment. Besides using the mouse or pointing device, what are the other two methods?
Using application menus, shortcuts, and keystrokes
4. You are looking at the files on your hard drive with Windows Explorer. In the left-hand column, you notice that a folder has a plus sign (+) beside it. What does this mean?
It indicates that there are more folders inside.
5. There are several ways to open Windows Explorer. Name as many as you can remember.
Click start, point to Programs, and then click Windows Explorer.
Right click on My Computer and then click Explore.
Right click on the Start button and then click Explore.
Hold down the Windows key (sometimes called the Start key) and press the “E” key.
6. The files in the Contents window of Explorer can be sorted in a number of different orders. Name as many as you remember.
By name – The default – alphabetical
By type – Alphabetical by file type
By size – Numerical by file size
By date – Ascending order by the last modified date
Auto arrange – Sorts the objects automatically, when a file is moved or a new one added. This only works in icon view.
7. What is the keystroke command to paste a file?
Ctrl+V
A+ Training & Test Preparation Guide
Specialized Solutions, Inc. 452
8. The Find tool is extremely helpful for finding lost files and folders. What are the three options available with this tool?
Search by Name & Location
Search by Date
Advanced
9. How do you change file attributes in Windows 9x?
Click on the file or folder, click File, Properties or right click and select Properties.
10. What are the three areas of the taskbar called?
Start button
Open programs
Notification area
11. You have accidentally deleted a necessary file in Windows 98. What do you do?
Restore it from the Recycle Bin
12. Describe the procedure for formatting a floppy disk.
Follow these steps to format a floppy disk:
1. Insert a disk into the floppy drive.
2. From Explorer, right-click the drive containing the disk and select Format. Do not highlight the drive first—Windows 9x will not let you format if the drive is highlighted first.
3. Use the Capacity drop-down list to select the correct drive size.
4. In the Format group, choose from: Quick (removes files but does not check for bad sectors); Full (removes files and checks for bad sectors) or Copy System Files Only (makes a bootable disk but does not delete any data).
5. Select any other options: Label (to add a label less than 11 characters), No Label (to delete an existing label) Display Summary When Finished (displays a summary of the results of the formatting process), or Copy System Files (will add system files after formatting is complete).
6. Select Start and the formatting process will begin.
13. What is used to partition a drive?
FDISK
Appendix D – Review Questions and Answers
Specialized Solutions, Inc. 453
Review Questions – Chapter 5
1. For what is the System Monitor used?
The System Monitor provides real-time reports about how various system processes are performing. It displays various functions in a line graph, a bar graph, or a numeric graph.
2. For what is the Resource Meter used?
The Resource Meter is used to monitor (in real-time) the use of system resources. When activated, it will add a small bar graph to the taskbar (in the notification area) indicating the percent of free resources (based on the computers total resources).
3. Loading which file will cause Windows 95 to report a correct version of DOS to older DOS applications?
With SETVER.EXE loaded, Windows 95 will report a correct version number to your DOS application (even if it has to lie).
4. Which Windows 98 system tool would you use to remove unnecessary files from your hard drive?
Disk Cleanup
5. Which system tool is used to reorganize the hard drive so that files are contiguous?
Disk Defragmenter
6. It can take several hours to defrag a hard drive. What system tool can you use to make this happen automatically after hours?
Maintenance Wizard
7. How can you see who is connected to your computer over the network?
Use Net Watcher
8. You are trying to print to a network printer, but the icon for the printer is grayed out. What could be causing this?
The print driver is missing.

A+ Training & Test Preparation Guide
Specialized Solutions, Inc. 454
9. Name the four basic types of viruses and how they can be caught.
File Infectors: These attach themselves to executable files and spread to other files when the program is run. Boot Sector: These replace the master boot record (or boot sector on a floppy). They will write themselves into memory any time the computer is booted. Trojan Horses: These appear to be legitimate programs, but when loaded, they will go to work on the system. Macro Virus: The biggest nuisances now are macro viruses (such as those that infect Word documents). These attach themselves as executable code to documents and run when the document is opened. (They can also attach to some kinds of E-mail). It used to be true that you couldn’t get a virus from opening a document, just from running a program. Unfortunately, while macros are very valuable, they mean that when you open a document you are running a program. The only real protection from viruses is to never turn on the computer. The next best thing is to never copy any files or programs to your computer. Although these work well, they are impractical. As a technician, you should have and use an anti-virus program. Remember to keep it up to date as new viruses are created every day.
10. What is the most common method used to protect computers from viruses?
Install an antivirus program and keep it updated.

Appendix D – Review Questions and Answers
Specialized Solutions, Inc. 455
Review Questions – Chapter 6
1. What does system restore allow a user to do?
This allows you to reset the computer back to a point where it functioned correctly.
2. What types of files does Windows Movie maker produce?
.AVI files
3.How does Windows Explorer in Me recognize digital cameras?
Digital cameras are recognized in My Computer and Explorer just like drives.
4. What is the path you take to find the DVD player in Windows Me?
C:\WINDOWS\DVDPLAY.EXE
5.With what does the Accessibility Wizard help the user?
The Accessibility Wizard will help to set up Me to better serve the user with impaired eyesight, hearing, and mobility needs.
6.What does NetMeeting support?
NetMeeting supports video conferencing and file sharing over a network.
7.What are the new links available for Control Panel in Windows Me?
The links available are: Accessibility Options, Date/Time, Internet Options, Dial-Up Networking, Display, Printers, and Add/Remove Programs.
8.What are StickyKeys?
StickyKeys allow keystroke commands to be performed one key at a time.
9.What does SoundSentry do?
With Me, you can use SoundSentry to generate visual warning when your system makes a sound.
10.What is the executable used to uninstall Windows Me?
UNINSTALL.EXE

A+ Training & Test Preparation Guide
Specialized Solutions, Inc. 456
Review Questions – Chapter 7
1. What are the two formats for the Windows NT operating system?
Windows NT Workstation
Widows NT Server
2. What makes Windows NT Workstation a better client software package than Windows 98?
Workstation can take advantage of the NTFS files system, which provides better security for the user.
3. You are planning to study for the Microsoft MCSE program and have a new computer that came with Windows 98 installed. Since you already have many programs and data files that you do not want to lose, you would like to install Windows NT as a dual-boot system. Can you do that, and if so how would you do it.
You cannot install Windows NT and Windows 98 as a dual-boot system. Windows 98 operates on a 32bit FAT file system, which is incompatible with Windows NT. The only way to do this is to reformat the drives to FAT 16. This would require you to backup all your data files and to re-install your programs after installing both systems. Also, you will lose the advantage of security that comes with NTFS.
4. When you install Windows NT, you need to decide whether to use a domain or workgroup model. When making this decision, you are really determining two factors about the computer and network. What are they?
How the computer communicates.
Who will be responsible for security?
5. What is the SAM in a Windows NT environment?
The SAM (Security Account Manager) is a database that keeps track of all the security for the domain.
6. Name three benefits of using NTFS.
Support for long file names.
Not case sensitive
Security (file level)
Compression
Large partitions
Appendix D – Review Questions and Answers
Specialized Solutions, Inc. 457
7. What are the five services that you need to install to provide interoperability between Windows NT and Novell NetWare?
NWLink
GSNW
CSNW
FPNW
DSMN
8. What is the number one problem encountered when installing or upgrading to Windows NT?
Hardware incompatibility
9. Five files are critical to run Windows NT and are needed to create the Windows NT boot disk. What are they?
Ntldr
Ntdetect.com
Boot.ini
Bootsect.dos
Ntbootdd.sys
10. Every time that Windows NT successfully boots, it creates a special file that you can use in the event that it does not boot the next time. What is the name of that file and what is it?
LastKnownGood.reg.
It is a copy of the registry.

A+ Training & Test Preparation Guide
Specialized Solutions, Inc. 458
Review Questions – Chapter 8
1. Name the four versions of the Windows 2000 Suite.
Windows 2000 Professional
Windows 2000 Server
Windows 2000 Advanced Server
Windows 2000 Datacenter
2. What is the recommended file system for Windows 2000?
NTFS 5
3. You want to install Windows 2000 on a machine that currently has Windows 98 and is using file compression. Can you install the new operating system without any loss of data? If so, how?
Yes, but you must uncompress the drive before the installation.
4. What tool do you use to recover from Windows 2000 errors?
Recovery Console
5. Name the four new security features used on the Windows 2000 operating system?
Active Directory
Kerberos Authentication
Security Descriptors
Object Based Security
6. Will Windows 2000 as installed, coexist with a UNIX network?
No – you will have to install an add-on pack called Windows Services for UNIX before the two operating systems will coexist.
7. True/ False – Unlike Windows NT, Windows 2000 is plug-n-play compatible, therefore you do not have to worry about hardware compatibility issues.
False – Although Windows 2000 is plug-n-play compatible, you will still need to check hardware against the HCL for compatibility.

Appendix D – Review Questions and Answers
Specialized Solutions, Inc. 459
8. If you have a computer that is running Windows NT, you can assume that you will have sufficient hardware capabilities to support Windows 2000. Yes or No, and why:
No – Windows 2000 is even more hardware dependent than Windows NT.
9. What are the four major steps for installing Windows 2000?
Run the Setup Program
Run the Setup Wizard
Install the Network
Complete the Installation
10. To make a boot disk for Windows 2000, there are three required and two “if present” files that you must copy to the floppy. What are the names of these files?
Ntldr
Ntdetect.com
Boot.ini
Bootsect.dos (if present)
Ntbootdd.sys (if present)
11. What are the four common boot errors you may encounter with Windows 2000?
Ntldr is missing
I/O error accessing the boot sector
Ntdetect failed
Ntoskrnl is missing or corrupt
12. What is the function of the MMC?
It is a host for snap-ins.
13. What are the two types of disk storage available in Windows 2000?
Basic storage
Dynamic storage

A+ Training & Test Preparation Guide
Specialized Solutions, Inc. 460
14. If you install dynamic storage during your installation of Windows Professional, will you be able to take advantage of the fault tolerance capabilities such as RAID? Why?
No. Windows 2000 Professional can only use 3 of the configuration features provided with dynamic storage. These configurations are Simple, Spanned, and Striped. None of these provides fault tolerance. If you install Windows 2000 Server, you can also take advantage of disk mirroring and RAID when you configure dynamic storage.
15. Event Viewer provides three logs that you can use for troubleshooting. What are they?
Application log
System log
Security log

Appendix D – Review Questions and Answers
Specialized Solutions, Inc. 461
Review Questions – Chapter 9
1.How many processors do Windows XP and Windows XP Professional support?
Windows XP Professional can support up to 2 processors, like Windows 2000 Professional. Windows XP Home, however only supports a single CPU.
2.How much RAM can Windows XP Professional support?
Windows XP Professional supports up to 4 GB of RAM.
3.What are the three different volume types that Windows XP Professional supports?
Simple volume (a portion of a drive or an entire drive)
Spanned volume (a combination of 2 to 32 drives)
Striped Volume (a combination of 2 to 32 drives where data is written to all drives in equal portions)
4.How would you convert a FAT or FAT32 partition to NTFS from a command-line prompt in XP?
If you need to convert from FAT(16) or FAT32 to NTFS, use the CONVERT command. The syntax should be CONVERT C: (or whatever the drive letter is) /fs:ntfs.
5.Name two of the accessibility options available in Windows XP Professional?
Magnifier
Microsoft Narrator
On Screen Keyboard
6.Name three things you can do with the Help and Support Center?
You can click links to help topics, ask for assistance either using remote assistance or newsgroups, download Windows updates, research compatible hardware and software for Windows XP, and use System Restore.
7.What hotkey can you press to activate the ASR (Automatic System Recovery) during startup?
Automatic System Recovery is available during startup by pressing the F2 button.
8.Who can use Remote Desktop on your computer without you giving them permission to do so?
With Remote Desktop, you can allow other XP users to remotely connect to your computer. Administrators don’t need your permission to connect.

A+ Training & Test Preparation Guide
Specialized Solutions, Inc. 462
9.How do you activate ICF in Windows XP Professional?
ICF (Internet Connection Firewall) is a handy new addition in Windows XP. This is the first firewall that Microsoft has integrated into one of their operating systems. To activate this integrated protection, go into the properties of the local area connection you wish to activate and select the Advanced tab. Check the box next to “Protect my computer and network by limiting or preventing access to this computer from the Internet”.
10.List three operating systems that can upgrade to Windows XP Professional?
Windows 95 OSR 2
Windows 98 or 98 SE
Windows Me
Windows NT 4.0 Workstation with Service Pack 6 installed
Windows 2000 Professional
Windows XP Home

Appendix D – Review Questions and Answers
Specialized Solutions, Inc. 463
Review Questions – Chapter 10
1. Windows 98 is what type of network operating system?
Peer-to-Peer
2. You have connected a printer to your computer on a peer-to-peer LAN, but other people on the network cannot access it. What could be the problem?
You need to share the printer to the network.
3. How do you access a shared resource on a Windows 9x network?
Network Neighborhood
4. What is the most popular networking protocol that is used today?
TCP/IP
5. Which network utility would you use to test your TCP/IP configuration and connection?
PING
6. Which two networking utilities are used to display the current networking configuration of your computer?
IPCONFIG and WINIPCFG
7. What network utility is used to display the route that your message took on its way to its destination?
TRACERT
8. Name the two most popular Web browsers that are in use today.
Microsoft Internet Explorer and Netscape Navigator
A+ Training & Test Preparation Guide
Specialized Solutions, Inc. 464
9. Name as many top-level domains as you can.
.com (commercial
.edu (educational)
.gov (government)
.mil (military)
.org (non-profit organization)
.net (networks)
.xx (two letter country code)
10. Which protocol is used to upload and download files between dissimilar computers over the Internet?
FTP
11. Name the two most popular mail handling protocols.
POP and IMAP4
12. For what is HTTP used?
The communication protocol is used between the Web client and Web server.

Appendix D – Review Questions and Answers
Specialized Solutions, Inc. 465
Review Questions – Chapter 11
1. Name three ways to stay on top of your profession. Three ways to stay on top of your professions are: Continued Education Networking Reading
2. How and where can you obtain technical support? The unlimited technical support by phone, that we once took for granted, is rapidly disappearing. It is being replaced with e-mail and the web. This means that we are increasingly expected to get the job done without support from the original equipment manufacturer (OEM). Technical support is out there, but it must be used wisely to be cost effective.
3. What four types of tools does a PC technician use? Hardware toolkit, software toolkit, spare parts, and a technical library.
4. What files are essential for a software tool kit? The bare minimum software tool kit should include: ATTRIB.EXE, DEFRAG.EXE, EDIT.COM, EMM386.EXE, EXPAND.COM, FDISK.EXE (.COM), FORMAT.EXE (.COM), HIMEM.SYS, LABEL.COM, MEM.EXE, MEMMAKER, MSCDEX.EXE, MSD.EXE (.COM), QBASIC.EXE, SCANDISK.EXE, SHARE.EXE, SIZER.EXE, SMARTDRV.EXE and SYS.COM
5. What are the five steps of troubleshooting? Define the problem. Isolate the problem. Make the repair. Confirm the repair. Document the incident.
6. How important is record keeping? Good record keeping is essential if you are to become a success at your profession. It will save you lots of time in the end because you won’t have to try to remember everything.

A+ Training & Test Preparation Guide
Specialized Solutions, Inc. 466
7. What are the three levels of support? Level 1 is to provide local support by having a knowledgeable person in the department take care of minor problems. Level 2 is to provide telephone support. Level 3 is to provide on-site support.
8. Why is it important to standardize? It will reduce the amount of spare parts required and simplify installations.
9. What are the four stages to follow when you receive a service call? The greeting, the description, the interview, and the closing.
10. How would you deal with a difficult client or co-worker? If the user never attends training, ensure that they have information about available courses. If the individual is a co-worker, speak to their manager and identify their training needs. If it is a client, gently suggest that it would be to their benefit to obtain specific training or sell them some of your time for tutoring. If the client can never remember instructions, send them a memo, or instruction sheet with written instructions. Save the instructions for future use. Dealing with Technophiles (those who think they are experts) can be a challenge. The best choice is to listen carefully and make them part of the solution, not part of the problem. Remember, they did come to you for help. In a corporate/company setting – start an advanced users group and make them responsible, or at least part of the solution. Require users (co-workers), who constantly complain about trivial problems, to put them in writing. Keep their notes as part of your records. If it is a client, charge them for your time.

Index
Specialized Solutions, Inc. 467
Index
$
$WIN_NT$.~LS temporary folder, 236
*
*.VxD drivers, 109
.
.BAT, 22
.COM, 22
.EXE, 23
.GRP file, 49
.ini files, 41
.REG files, 105
[
[386Enh] group, 45 [OPTION] Group, 93 [PATH] Group of MSDOS.SYS, 93
1
16–bit applications, 229
3
32–bit, 229 32–Bit Addressing, 229 32–bit disk access, 51 32–bit FAT, 63 32–bit file access, 51, 63 32–bit VFAT, 138 32–Bit VFAT, 63 386 Enhanced icon, 51 386 Enhanced Mode, 11
4
4–gigabyte memory limit, 11
6
640K memory limits, 9
A
a virtual DOS machine, 62 A+ OS Technologies Exam, 3 access and configure the network, 354 Access Control tab, 360 access the Registry is through the
Control Panel, 100 access the System Policy Editor, 244 access token, 230 Access Type, 361 Accessibility Options, 122 Accessing and changing the registry, 100 Accessories, 67 active desktop, 63, 89 Active Desktop, 149 Active Directory, 273 active drive, 23 ActiveX, 290 Add New Hardware icon, 114, 125 add or change passwords, 127 Add Printer, 249 Add Printer icon, 114 Add User Accounts, 249 Add/Remove Programs, 249 Add/Remove Programs icon, 125 Add/Remove Programs window, 115 Add/remove/disable/enable a device,
111 Adding new hardware, 114 Additional Restore Techniques, 107 additional search techniques, 148 Adjust a device’s resources, 111 Adjust device settings, 111 adjust the boot sequence, 175 adjust the size of the swap file, 118 administrative privileges, 229 Administrative Wizard, 249 Administrators, 355

A+ Training & Test Preparation Guide
Specialized Solutions, Inc. 468
Advanced Configuration and Power Interface (ACPI), 170
Advanced Power Management (APM), 170
advanced search tab, 148 Advanced Server, 265 Advantages of Windows 9x, 66 AFP over IP, 276 Alerter Service, 233 Alpha, 12 antivirus program, 179 Anti–Virus Software, 83 APIs, 228 Application log, 310 Applications, 3 applications log, 251 Archive, 146 ARP – Address Resolution Protocol, 365 ARP (Address Resolution Protocol), 369 Arrange Icons, 143 arrange the information in the Contents
window, 143 attributes, 146, 229 auditing, 269, 355 authentication, 230, 355 Auto Arrange, 144 Autoexec.bat, 7 AUTOEXEC.BAT, 9, 28, 95 AUTOEXEC.BAT Commands, 31 automatic (scheduled) backups, 164 Automatic Private IP Addressing
(APIPA), 267 automatic updates via the web, 66
B
back up critical data files, 69 Backing up files, 164 Backing up the Windows 9x Registry,
105 backslash, 21 Backslash (, 23 Backup, 272 backup functions, 66 backup media, 164 backup program, 250 backup screen, 164 Backup status, 152
backup tools available in Windows 2000, 298
backups, 227 Bad command or filename errors, 22 bandwidth, 231 Basic Input/Output System, 5 basic storage, 307 basic toolkit, 384 batch file, 22 Batch file, 33 Benefits of NTFS, 232 binary file, 100 Binary file, 33 bind an adapter to a protocol, 365 BIOS, 5 BIOS Bootstrap, 86 boot errors in Windows 2000, 286 boot process, 86 Boot Process, 78 boot program, 78 boot sector, 78, 178 boot sequence, 27, 284 boot the CD–ROM, 6 boot to the network, 5 BOOT.INI, 239 bootable drive, 86 bootable floppy disk, 115 Booting a Windows 98 computer, 86 BOOTLOG.TXT, 98 BOOTSECT.DOS, 239 branches, 136 Browser Service, 233 Browsing Tools, 66 BUFFERS, 29, 78 BUFFERS=, 91 built in protection for the boot sector, 83 built–in software, 5 bulletin boards, 383
C
C language, 14 C++, 229 Cable Modem, 372 Case Sensitivity, 23 CBS=, 91 CDFS – CD File System, 138 CDFS.VSD, 110

Index
Specialized Solutions, Inc. 469
CD–ROM tab, 117 centralized data management and
backups, 229 centralized security, 231 centrally manage a network, 226, 355 CFGBACK.EXE (Microsoft
Configuration Backup), 106 CFGBACK.EXE Limitations:, 106 Change, 229 change an attribute, 146 Change drivers, 111 change file or folder attributes, 146 change the view, 143 Character Map, 165 clean installation, 74 clean out the temp files, 52 client, 225 Client for Microsoft Networks, 171 Client software, 354 Client Software, 226 clipboard, 165 cluster overhang, 153 CMD.EXE, 229 CMOS setup, 69 code, 5 cold boot, 28 Command file, 33 command interpreter, 30 command line, 229 Command Line Interfaces, 6 command line prompt, 21 Command Prompt Only, 81 COMMAND.COM, 8, 30, 62, 91, 96 COMMAND.DOS, 73 commands, 22 commands in Regedit, 103 Common Boot Errors, 240 comparison of FAT and NTFS, 233 Component Services Console, 291 compressed drive, 169 compressed volume file, 169 Compression Agent, 166 Computer Management Console, 292 Config.sys, 7 CONFIG.SYS, 9, 28, 95 CONFIG.SYS Settings, 29 Configuration Backup, 106
Configuration Manager (CONFIGMG.VXD), 111
configuration of the DOS operating system, 22
configuration of the network connection, 126
configuration of the system, 69 Configuration Tab, 357 configure e–mail accounts for Internet
Explorer and Outlook, 126 configure the international settings for
the computer, 127 configure the modem(s) in the computer,
126 Configuring a Swap File, 118 configuring audio, video, MIDI, CD
Music and other multimedia devices, 126
Configuring DOS, 28 Configuring the CONTROL.INI File, 48 configuring the mouse, 126 configuring the operation of the CD–
ROM, 117 Configuring the PROGMAN.INI File,
49 Configuring the SYSTEM.INI File, 45 Configuring the WIN.INI File, 46 Configuring Virtual Memory, 50 configuring Windows 9x, 115 Configuring Windows NT, 242 configuring your Internet connection,
126 Conflicting software, 69 Connect Network Registry, 103 connect to a network, 357 connectionless, 364 connection–oriented, 364 considering a dual boot system, 88 contents of your toolkit, 384 Contents window, 143 Control Panel, 41, 48, 120, 242, 308 CONTROL.INI, 99 Conventional Memory, 32 conversion utility, 66 copy a floppy disk, 151 copy operations, 144 Copy System Files, 151 Copying Files, 85

A+ Training & Test Preparation Guide
Specialized Solutions, Inc. 470
corrupt Registry, 105 COUNTRY, 29 crash dump file, 311 create a bootable floppy, 72 create a dual boot system, 88 create a PIF file, 115 Create a Windows NT Boot Disk, 240 Creating a Windows 2000 boot disk, 285 CSNW, 234 Ctrl+C (Copy), 145 Ctrl+C for Copy, 104 Ctrl+V (Paste), 145 Ctrl+V for Paste, 104 Ctrl+X (Cut), 145 Cursor, 23 custom information, 71 Custom setup, 40 customer service, 382 Customizable User Interface, 38 Cut, Copy, and Paste, 144 CVF (Compressed Virtual File), 169
D
data backups, 355 Data file, 33 Data Protection, 227, 355 Data Sharing, 38 Data storage, 135 data tree, 136 data warehouses, 266 Date/Time icon, 125 DBLSPACE.BIN, 78 debugger, 260 debugger program, 311 Default Drive, 23 default PIF file, 53 Defragmentation status, 152 Defragmenting a hard disk, 168 delete a file or folder, 149 Delete Unnecessary Files, 170 deleted files, 148 Demand Paging, 138 denying access, 227 Department of Defense Agency
(DARPA), 365 designated resources, 11 desktop, 141
desktop level, 62 destination disk, 152 destination folder, 144 Details view, 143 detection manager, 71 DETLOG.TXT, 71 DEVICE, 29 device drivers, 70 Device drivers, 71 Device Management, 310 Device Manager, 88, 111 DEVICEHIGH, 29 dial–up connection, 372 Dial–up Network (DUN), 368 Differential backup, 300 Difficult Clients and Co–workers, 396 Digital Subscriber Line (DSL), 372 Direct Cabling, 67 Directory, 23 Directory file, 33 directory services, 273 Disconnect Network Registry, 103 Discretionary Access Control List
(DACL), 274 Disk access, 63 Disk Administrator, 241 disk cache, 51 disk caching, 31, 52 Disk Cleanup, 167, 301 disk error, 36 disk management, 150 Disk Management in Windows NT, 241 disk management menu, 152 disk management options, 150 Disk Manager Snap–In, 307 Disk Operating System, 7 disk quota information, 298 Disk Quotas, 271 diskcache, 70 Display icon, 125 Display Properties, 150 DNS entry, 369 DNS problems, 369 Document, 69 document a system, 113 Document the closure, 397 domain, 230, 367 domain controller, 230

Index
Specialized Solutions, Inc. 471
Domain Model, 231 Domain Name Service (DNS), 366 DOS, 3, 6, 7 DOS 1.0, 6 DOS 7, 62 DOS Commands, 25 DOS core operating system files, 8 DOS error messages, 35 DOS external commands, 61 DOS Files Types, 33 DOS issues, 37 DOS kernel, 28 DOS manual, 22 DOS prompt, 62 DOS Prompt, 23 DOS startup files, 9 DOS Terms, 22 DOS Workarounds, 163 DOS=HIGH, 29, 78 DOS–based configuration files, 7 DOSKEY, 31 double–buffering for SCSI controller, 87 Doublespace, 94 download email, 374 DPMI (DOS Protected Mode Interface),
61 DR DOS, 7 Dr. Watson, 66, 311 Dr. Watson for Windows NT, 260 drag and drop technology, 137 Drag–and–Drop, 144 drag–and–drop operations, 100 Drive compression, 77 drive controller, 51 Drive Converter, 169 drive letter designation, 23 Drive Pointers, 24 Drive Space, 169 Drivers and Windows 9x, 109 DriveSpace 3, 166, 169 Drvspace.bin, 87 DRVSPACE.BIN, 78 Drvspace.ini, 87 Drwtsn32.log, 311 DSMN, 234 dual boot system, 237 Dual Booting Windows 95 and 98, 88 Dual Booting Windows 9x and DOS, 88
Dual Booting Windows 9x and Windows NT, 88
dual–boot systems, 82 Dual–Booting with Windows NT, 77 dumb terminal, 5 DVD, 66 Dynamic Data Exchange (DDE), 38 Dynamic Host Control Protocol
(DHCP), 368 dynamic link libraries (DLLs), 41 dynamic storage, 307 dynamic volumes, 271 dynamic–link libraries (DLLs), 62
E
edit the registry, 308 edit the Registry, 100 EDIT.COM, 42 Editing the Registry, 102 editing the Windows NT Registry, 242 EEPROM (Electronically Erasable
Programmable Read Only Memory), 5 email, 373 Email, 382 email server protocol, 374 emergency boot disk, 72 Emergency Recovery Utility
(ERU.EXE), 105, 107 EMF, 177 EMM386.EXE, 33, 92 enable File and Print Sharing, 126 enable multi–user settings, 127 encrypting file system (EFS) settings,
298 Enhanced Metafile Spooling, 177 Enhanced Print Troubleshooter (EPTS),
176 Entering Commands, 24 ERD start up disk, 85 ERD.EXE, 107 Error Messages, 24 Error–checking status, 152 ERU.EXE Limitations, 107 ERU.EXE program, 107 Event Viewer, 251, 294, 310 Example of a CONFIG.SYS file on a
boot disk, 74

A+ Training & Test Preparation Guide
Specialized Solutions, Inc. 472
Example of an AUTOEXEC.BAT file on a boot disk, 74
Executable file, 34 executable program, 142 executable program file, 23 Explorer, 89, 137, 139 Explorer toolbar, 141 Exporting a Registry, 103 Express setup, 40 extended memory manager, 70 external DOS commands, 25
F
F8 key, 62, 88 FAQs (Frequently Asked Questions),
383 FAT, 230 FAT32, 63 FAT32 partitions, 88 fault tolerance, 307, 355 fault–tolerance system, 227 FCBS, 29, 78 FDISK, 73, 153 Field Replaceable Units (FRUs), 384 File Architecture in Windows 9x, 90 file control blocks (FCBS), 29 file copy phase, 66 file extension, 135 file extensions, 34, 142 File Installation, 72 File Management in Windows NT, 240 file management system, 135 file management tasks, 120 file management tools, 89, 164 File Manager, 49 File menu, 145 File Server for Macintosh, 276 file space, 21 file structure in a windows environment,
137 File System Performance, 116 File Systems button, 116 File Transfer Protocol (FTP), 373 File Type, 149 File Types, 143 filename, 22, 24 FILES, 29
files systems, 269 FILES=, 78, 91 Find feature, 146 FireWire, 66 Firmware, 5 Flash BIOS, 5 flash memory chip, 5 flashing the BIOS, 5 folder, 236 Folder Options, 149 folder options dialog box, 149 Folders, 89 FORMAT, 73 format a floppy disk, 151 Format the C partition, 75 Forums, 383 forward slash, 22 FPNW, 234 free resources, 161 freeware, 14 full backup, 164 Full backup, 299 Full Control, 229 Fully Qualified Domain Names
(FQDN), 371
G
GDI ( Graphical Device Interface), 62 GDI16.DLL, 62 GDI32.DLL, 62 General Tab, 149 Getting Help in DOS, 27 Getting Started feature of Windows
2000, 302 GPF (General Protection Fault), 10 Group Management, 249 GSNW, 234 GUI (Graphical User Interface), 6, 9, 61
H
HAL (Hardware Abstraction Layer), 228 HAL.DLL, 239 Hard Disk tab, 116 hardware compatibility, 234 Hardware compatibility, 277 hardware considerations, 236

Index
Specialized Solutions, Inc. 473
Hardware Detection, 71 hardware malfunction message, 309 Hardware Toolkit, 384 Hardware Wizard, 114 hardware–dependent mode, 10 Have Disk option, 114 heap, 41 helpdesk, 391 hibernate feature, 169 Hidden, 146 hidden files, 9, 143 hierarchical storage, 135 hierarchy of the file structure, 22 High Memory, 32 Himem.sys, 87 HIMEM.SYS, 32, 70, 78, 91 HKEY_XXX, 100 host drive, 170 hover select, 90 HPFS (High Performance File System),
14, 233 HPFS file system, 237 HTML (HyperText Markup Language),
370 HTTP, 365 HTTPS, 365 HyperText Transfer Protocol (HTTP),
370
I
I/O error accessing the boot sector, 286 IBM and Windows 2000, 276 icon, 89 Icon views, 143 icons, 9, 37 Icons, 38 Identification tab, 359 identify device problems, 174 identify file type, 135 IEEE 1394, 66 IEEE 802 Standards, 363 Ifshlp.sys, 87 IFSHLP.SYS, 78, 91 Image Color Management (ICM), 275 IMAP4 (Interactive Mail Access
Protocol 4), 374 Importing a Registry file, 103
Incompatible hardware, 69 incompatible hardware list, 69 Incremental backup, 300 Information Collection, 71, 85 infrared connectivity, 66 INI files, 99 Initial Boot Loader, 284 Initialization Files, 99 initializing the operating system, 6 INSTALL, 29 install a hard drive and put Windows 95
on it, 75 Install New Modem, 249 install or change software for a network
adapter, 366 install Windows 98 from DOS, 86 install Windows NT on a Windows 9x
computer, 237 Install/Uninstall tab, 125 installation of Windows 98, 84 Installation Wizard, 71 installation wizard for hardware, 109 Installing a Dual–Boot System, 76 Installing and Configuring Windows 3.x,
39 Installing and Configuring Windows 95,
67 Installing and Configuring Windows 98,
82 Installing printers, 114 Installing Service Packs, 237 Installing the Network, 283 Installing Window 98 on a new
computer, 83 Installing Windows 2000, 277 Installing Windows 95 on a New
Computer or Hard Drive, 74 Installing Windows 98, 84 installing Windows NT, 234 Installing Windows NT on a Windows
3.1 or 3.11 machine, 237 Institute for Electrical and Electronic
Engineers, Inc. (IEEE), 363 integrating the Web with your desktop,
149 Interconnectivity, 67 internal DOS commands, 25, 96

A+ Training & Test Preparation Guide
Specialized Solutions, Inc. 474
International Standards Organization (ISO), 362
Internet Backbone, 372 Internet Connection Wizard (ICW), 66 Internet Explorer, 66, 126 Internet mail servers, 373 Internet Printing Protocol (IPP), 274 Internet Service Providers (ISP), 372 Interoperability, 233 Invalid VxD dynamic link call from
IFSMGR (03), 109 IO.SYS, 8, 62, 91 IP – Internet Protocol, 365 IP Address, 369 IPCONFIG, 369 IPX/SPX (Internetwork Packet
Exchange/Sequenced Packet Exchange), 364
isolation technique for troubleshooting, 88
ISP (Internet Service Provider), 368
K
keep spare parts in stock, 390 Kerberos authentication, 273 kernel, 12 Kernel, 62, 160 KERNEL16.DLL, 62 KERNEL32.DLL, 62 KEYB, 31 Keynames, 47 keystroke commands, 118
L
LAN Manager, 237 Large Icon, 143 Last Known Good Configuration, 240 last known good Registry, 107 LASTDRIVE, 29, 79 LASTDRIVE=, 91 LastKnownGood.reg, 244 legacy machines, 7 LH (LOAD HIGH), 31 Library file, 34 License Compliance, 249 License Manager, 252
Linux, 3, 14 Load and Run statements, 47 loading the data, 6 local printer, 232 Local Security Authority, 230 Local Security Authority (LSA), 231 Logged (BOOTLOG.TXT), 79 Logo.sys, 87 Logon, 230 logon identification and access control,
126 Long Filenames, 63, 138 lowercase, 23
M
MAC address, 369 MAC addresses, 369 Macintosh and Windows 2000, 276 Macintosh computers, 14 MacOS, 14 Macro Virus, 179 Mail icon, 126 Mail service, 11 mailboxes, 374 maintenance utilities, 170 Maintenance Wizard, 170 manage disks in an NT environment,
250 Managing File and Folder Access, 249 managing files, 135 Managing Files in the Windows
environment, 137 Managing User Accounts, 226, 355 Map file, 34 master boot record, 178 Master Boot Record, 73 Master Boot Record (MBR), 86 Mem / c command, 37 Memory Management, 32 memory managers, 83 Messenger Service, 233 Microsoft Configuration Backup
(CFGBACK.EXE), 105 Microsoft Explorer, 139 Microsoft Hardware Compatibility List
(HCL), 234, 277 Microsoft Mail, 227

Index
Specialized Solutions, Inc. 475
Microsoft Management Console (MMC), 267, 290
Microsoft Windows 3.x, 9 Microsoft Windows Help files, 140 migrating, 234 Migration Tool for Netware, 252 minifile systems drivers, 284 minimum requirements for installing
Windows NT, 235 Minimum Requirements for Running
Windows 3.x, 39 MIPS, 12 Mirrored, 307 missing or corrupt DLL files, 276 Modems icon, 126 monitor the network activity on your
computer, 171 monitoring printing activity, 89 mouse driver, 31 MOUSE.EXE, 31 MOUSE.SYS, 30 move and copy files, 144 move the object, 144 MSCDEX.EXE, 75 MSD (Microsoft Diagnostics), 69 MSDET.INF, 71 MS–DOS, 7 MSDOS.SYS, 8, 62, 92 Multimedia icon, 126 multiple hardware configurations, 87 Multiple Processor Support, 229 multiple users, 101 Multi–tasking, 38 My Computer, 140, 361 My Network Places, 289
N
National Science Foundation (NSF), 372 native format, 42 Navigating Text, 120 NBTSTAT, 369 Net Watcher, 171 NetBEUI (NetBIOS Extended User
Interface) protocol, 364 NETBIOS, 368 NETSTAT, 369 NetWare and Windows 2000, 275
NetWare Directory Services (NDS), 66 Network Access Points (NAPs), 372 Network Awareness, 38 Network Client Administrator, 249, 252 Network File System (NFS), 275 Network icon, 126 Network Information Service (NIS), 275 network interfaces, 225 Network Neighborhood, 354, 357 Network Operating Systems, 353 Network Operating Systems (NOS), 353 network printer, 232 Network Utilities, 369 network with multiple servers, 227 Networking Protocols, 364 No Access, 229 non–routable protocols, 364 Non–System disk, 36 non–system disk error, 6 NOS, 353 NOS – Network Operating System, 225 Notepad, 47 notification area, 148 Novell NetWare, 233 NSLOOKUP, 369 NT Disk Administrator program, 238 NT file system (NTFS), 230 NT File System (NTFS), 88 NT Setup Boot disks, 236 NTBOOTDD.SYS, 239 Ntdetect failed, 286 NTDETECT.COM, 239 NTFS, 230, 270 NTFS (New Technologies File System),
232 NTFS (NT File System), 77 NTFS in Windows 2000, 271 Ntldr, 284 NTLDR, 239 Ntldr is missing, 286 Ntoskrnl is missing or corrupt, 286 Ntoskrnl.exe, 284 NTOSKRNL.EXE, 239 number one cause of installation
problems, 69 NUMLOCK, 30 NWLink, 234

A+ Training & Test Preparation Guide
Specialized Solutions, Inc. 476
O
object based security, 273 Object file, 34 Object Linking and Embedding (OLE),
38, 100 objects, 6 ODBC Data Source Administrator, 294 ODBC drivers (Open DataBase
Connectivity), 126 OEM – Original Equipment
Manufacturer, 7 OEM product, 74 Offline Files, 289 Old_DOS.x, 70 Online Services folder, 66 Online tech support, 383 online transaction processing (OLTP),
266 Online Transaction Processing (OLTP),
13 Open Database Connectivity (ODBC),
294 Open Systems Interface (OSI) model,
362 operating environment, 9 Operating system software, 3, 5 operating system tools, 164 operation of Windows 9x, 90 operator intervention, 85 operator–induced problem, 387 Optimizing DOS, 28 optional install method, 76 options presented by the Startup menu,
79 original equipment manufacturer
(OEM), 396 OS/2, 3, 14, 227 OS/2 Warp, 14 OS=HIGH, 91 OSI Model, 363 OSR2 (OEM Service Release 2) version,
74 OtherDirectory, 97
P
page frames, 50 page swapping, 50 paging memory to the swap file, 138 Partition Boot Record (PBR), 239 partition table, 86 Partitioning a disk, 153 partitioning in Windows 9x, 153 password, 226 password synchronization, 275 patch, 228 Path, 24 PATH, 9, 31 pathname, 22 PAUSE, 31 PC–DOS, 7 PCMCIA, 66 PDC (Primary Domain Controller), 231 peer–to–peer network, 226 Peer–to–Peer network configuration, 353 Pentium, 12 Performance Monitor, 253 Performance settings, 127 Performance tab, 116 performance tracking features of
Windows 2000, 305 Performing a Clean Installation, 73 Permanent Swap File, 50 permissions, 230, 355 personalized set–up, 64 phone etiquette, 392 PIF editor utility, 53 PIF file (Program Information File), 53 PIF files, 163 PING, 369 PING Loopback Address, 369 Plug and Play, 90 Plug and Play (PNP), 110 pointing device, 9, 68 Point–to–Point Tunneling Protocol
(PPTP), 66 POP3 (Post Office Protocol 3), 374 port 23, 373 port 25, 374 port 80, 370 Port Drivers, 138 port number 21, 373

Index
Specialized Solutions, Inc. 477
Portability, 228 POST (power on self test), 27 Power on, 78 preboot sequence, 284 Preemptive Multi–Tasking, 229 Prepare to run Windows 98 Setup, 84 Preparing to Install Windows 98, 83 press F8 when you see the Starting
Windows 95 … message during boot, 76
pressing the F8 key during boot, 88 Previous Version of MS–DOS, 82 previous version of Windows, 70 Print Manager, 89 print Registry, 103 print server, 232 print spooling, 66 Print system reports, 111 Print Troubleshooter, 176 printer memory, 178 Printers folder, 114 Printers Folder, 89, 127 Private initialization files, 99 problems running DOS applications, 162 profiles, 101 PROGMAN.INI, 99 PROGMAN.INI file, 43 program group files, 73 Program groups, 89 Program Manager, 38, 47, 62 Program Manager Group files, 49 Prompt, 24 PROMPT, 31 properties, 146 Properties, 90 Properties command, 145 properties dialog box for Internet
Explorer, 126 properties dialog boxes, 90 properties sheet, 90 Proprietary DOS, 7 Protected Mode, 10 Protected Mode Disk Driver, 88 Protected Mode Load, 87 protocol stack, 364 protocol suite, 364 PROTOCOL.INI, 99
R
RAID, 307, 355 RAM, 68 RAMDrive, 51 Raster fonts, 41 RAW spooling, 178 Read, 229 Read–only, 146 Read–only memory strings, 71 Real Mode, 10 Real Mode Boot, 87 Real Mode Configuration, 87 real–mode device drivers, 110 Recovery Console, 271, 272 Recycle Bin, 148 Red Hat Linux, 14 redirect the directory command, 24 redirector, 226 Redirector, 355 reducing the bandwidth, 231 reducing the size of files, 166 reference library, 382 Referrals, 392 reformat the drive, 74 REG.DAT, 100 REGEDIT command, 100 Regedit switches, 104 regedit.exe, 308 Regedit.exe, 243 REGEDIT.EXE, 100 Regedit32.exe, 243 regedt32.exe, 308 Regional Setting icon, 127 Regional settings, 282 registered file extension, 142 Registry, 45, 64, 99, 100 Registry backup tools, 105 Registry consists of six root keys, 100 registry editor, 308 Registry Editor, 243 Registry File Was Not Found, 109 regular backups, 227 REM, 32 Remote Access Admin, 253 Remote Access Server (RAS), 66, 368 remote administration, 127, 244 remote storage, 298

A+ Training & Test Preparation Guide
Specialized Solutions, Inc. 478
remote support, 390 remove a device, 114 remove all the files, 74 remove software for a network adapter,
366 remove unnecessary files from your
drive, 167, 423 rename a file or folder, 149 replace an existing corrupt Registry, 104 Replication, 227 Requester, 355 rescue a corrupted Registry, 103 Rescue diskette, 107 resetting the computer’s internal
calendar and clock, 125 resource manager, 37 Resource Meter, 159, 161, 171 restore a Registry, 107 Restore deleted file, 148 restore the Registry in DOS mode, 108 restoring the Registry data, 105 restricted access, 230 right mouse button, 90 ROM BIOS, 5 ROM chip, 5 root directory, 23, 71 root keys, 100 routable protocols, 364 ROUTE command, 369 RUN command, 308 run ScanDisk, 152 run the old system, 76 Running DOS Applications from
Windows, 53 Running the Setup Wizard, 282 Run–Once module, 73 runtime version of Windows, 11
S
Safe Detection, 71 Safe Mode, 80 Safe Mode and Windows 98, 88 Safe Mode Command Prompt Only, 82 safe mode is enabled, 80 Safe Mode with Network Support, 80 Safe Mode without Compression, 80 sample AUTOEXEC.BAT, 31
sample CONFIG.SYS, 30 ScanDisk, 70, 172 SCANDISK, 37 schedule a new task, 173 schedule maintenance, 66 Schedule+, 11, 227 Scheduled Task, 173 screensaver password, 49 SCSI controller, 73 search a particular folder, 146 Search by Date, 147 search engines, 382 search for a file, 139 search for files or folders by name, 147 searching for multiple files, 147 Security, 227, 355 Security Account Manager, 230 Security Account Manager (SAM), 231 security descriptors, 273 security features in Windows NT, 230 security ID (SID), 230 security log, 251 Security log, 310 Security Reference Monitor, 230, 231 self–healing applications, 276 send files and folders to another
destination, 145 Send To, 145 server, 225 server consolidation projects, 13 Server Manager, 254 Server Service, 233 Server Software, 226, 355 Server–based network, 226, 354 Servers, 226 service packs, 237 Service Packs, 228 Services, 306 SET, 31 set up a printer, 362 setting the speed and language for the
keyboard, 126 setting up a dual boot computer, 77 setting your swap file size, 118 Settings for PIF Files, 54 Setup Manager, 267 Setup Program, 281 SETUP.EXE, 70

Index
Specialized Solutions, Inc. 479
SETUPLOG.TXT, 71 SETVER.EXE, 79, 91, 162 shadowing, 5 SHARE, 31 share a folder, 361 Share level, 360 share your printer, 361 shared resources, 354 Sharing tab, 361 shell, 12 SHELL, 30 SHELL=, 79, 91 shortcut is a pointer, 89 shortcut keys, 118 shortcut keys to access Startup menu
options, 82 shortcut menu, 145 Show Desktop button, 268 single beep, 78 single–click execution, 90 Small Icon, 143 smaller networks, 353 SMARTDrive, 70 SMARTDRV, 31 SMARTDRV.EXE, 52 SMTP (Simple Mail Transfer Protocol),
374 SNA Server, 276 snap–ins, 290 Software, 3 Software Toolkit, 384 Sorting Files and Folders, 143 Sounds icons, 127 source disk, 151 spare parts inventory, 390 specify settings for a network adapter,
366 specify the default printer, 362 splash screen, 176 stability, 229 STACKS, 79 STACKS=, 91 stand–alone computer, 226 standard mode, 10 Standard system calls, 228 standard system tools, 164 Standardizing equipment, 391 Start Button, 148
Start Menu, 89 startup disk, 115 Startup Disk, 115 Startup Disk Creation, 72 Startup Disk tab, 72, 125 Startup Folder, 79 Start–Up group, 47 start–up menu, 62 Startup menu, 79 startup process, 27 Step–by–Step Confirmation, 80 Stop Messages, 309 stop sharing a folder, 361 stop sharing your printer, 361 successful startup of Windows 95, 78 successful startup of Windows NT, 239 supporting DOS applications in a
Windows 9xenvironment, 115 suspend, 170 swap file, 38, 50, 118, 160 Swap File Settings, 51 swap space, 67 swapping requirements of Windows 95,
68 switch between real mode and protected
mode, 11 Switches, 24 SWITCHES, 30 symmetric multiprocessing (SMP), 268 syntax, 21 Syntax, 25 Sysedit, 49 System, 146 SYSTEM, 239 System Access Control List (SACL),
274 System Check, 70 System Commands, 97 System Configuration Icons, 242 system files, 5 System icon, 127 System Information, 174 system log, 251 System log, 310 System Manager, 112 System Monitor, 100, 159, 160, 176, 305 System Policy Editor, 105, 244, 255 System Properties dialog box, 127, 246

A+ Training & Test Preparation Guide
Specialized Solutions, Inc. 480
System Properties window, 118 System Tools, 159, 164 system tray, 148, 171 System Utility Configuration, 175 SYSTEM.1ST, 109 System.dat, 87 SYSTEM.DAT, 64, 99, 100 SYSTEM.INI, 44, 99
T
T1–Carrier System, 372 tape backup, 250 Task Scheduler, 173 taskbar, 148 task–switching, 10 TCP – Transmission Control Protocol,
365 TCP/IP (Transmission Control
Protocol/Internet Protocol), 365 TCP/IP protocol statistics, 369 technical databases, 382 technical library, 384 Technical Library, 384 technical publications, 382 technical support people, 382 Telnet, 306, 373 telnet session, 276 TEMP, 9 Temp Files, 52 temporary files, 167, 423 temporary folder, 52 temporary Internet files, 167, 423 Temporary Swap File, 50 terminal emulation program, 373 Terminate and Stay Resident (TSR)
programs, 9 text editor, 42 Text file, 34 text–based operating systems, 6 text–based system, 22 third party VxDs, 88 time to upgrade, 160 To select more than one file or folder,
145 toolbar, 141 top–level domain (TLD), 371 top–level Registry keys, 100
TRACERT, 369 transaction logging, 232 translate IP addresses to MAC addresses,
369 tree structure, 136 Trojan Horses, 178 Trojan–Horse, 230 troubleshoot startup problems using the
step–by–step method, 81 troubleshooters, 309 Troubleshooting in a DOS Environment,
35 Troubleshooting tab, 117 Troubleshooting Techniques, 386 Troubleshooting Windows 2000, 309 TrueType fonts, 41, 177 TSR (terminate and stay resident)
programs, 28 TSR programs, 70 tune your drive cache, 118 Tuning the hard drive cache, 116 turn on the Active Desktop interface,
150 type commands, 6 typical Windows setup, 67
U
UDP – User Datagram Protocol, 365 UNDELETE command, 148 Unicode character sets, 300 uninstall Windows NT, 237 uninterruptible power supply (UPS),
227, 355 UNiplexed Information and Computing
System, 14 UNIX, 3, 6, 14 UNIX command shell, 275 UNIX interoperability, 275 UNIX tools, 275 update the registry, 100 upgrading FAT 16, 66 Upgrading from Windows 3.x (Windows
95 Version A), 69 Upgrading to Windows NT, 236 uppercase, 23 URL (Uniform Resource Locator), 370 USB, 66

Index
Specialized Solutions, Inc. 481
use a keyboard to navigate, 137 use a shared network printer, 361 Usenet newsgroups, 383 User, 62 USER 16.DLL, 62 User Configuration Icons, 243 User level, 360 User Manager, 254 User Manager for Domains, 255 user profiles, 79, 127 USER.DAT, 64, 99, 100 USER32.DLL, 62 User–definable Interface, 67 User–level Security, 229 username and password, 127 Using .REG Files, 107 Using Regedit to Modify the Registry,
105 Using Sysedit, 49 utility files, 115
V
Value entry, 105 Vcache, 52, 118 VCACHE, 138 VCACHE.VXD, 110 Vector fonts, 41 VER command, 61 verify bindings, 365 VFAT (virtual file allocation table), 63,
138 VFAT.VXD, 110 View as Web Page, 150 View devices, 111 View individual device properties, 111 View menu, 143 View Tab, 149 virtual device driver, 63 virtual device drivers, 73 virtual device drivers (VDDs), 102 virtual DOS environment, 28 virtual DOS machines, 11 virtual drivers, 87 virtual machine (VM) environment, 67 Virtual Memory, 38 Virtual Memory Manager (VMM), 50 Virtual Memory Option, 118
Virtual Memory Sizing, 50 virtual mode, 11 Virtual Registry, 100 virtual root directory, 141 virus protection, 69 Viruses, 178 Vmm32.vxd, 87 VMM32.VXD, 73, 79 VMOUSE.VXD, 110 VSHARE.VXD, 110 VxDs, 98
W
WAN (Wide Area Network), 372 warm boot, 28 Warp Connect, 227 Web browser, 370 Web page, 370 Web server, 370 Web Style desktop, 89 Web Style Desktop, 90 Welcome to Windows 98 feature, 302 Wildcards, 25 Win.com, 87 WIN.INI, 44, 99 WIN.INI file, 47 Win32, 229 Win95 startup disk, 75 Windows 2000, 3, 5, 13 Windows 2000 Administrative Tools,
289 Windows 2000 Advanced Server, 13,
265 Windows 2000 Boot Process, 284 Windows 2000 Character Map, 300 Windows 2000 configuration, 308 Windows 2000 Convert command, 271 Windows 2000 Datacenter, 266 Windows 2000 Datacenter Server, 13 Windows 2000 Family of Operating
Systems, 265 Windows 2000 Minimum Requirements,
277 Windows 2000 Professional, 13 Windows 2000 Professional upgrades,
279 Windows 2000 security events, 310

A+ Training & Test Preparation Guide
Specialized Solutions, Inc. 482
Windows 2000 security model, 273 Windows 2000 Server, 13, 265 Windows 3.x, 3, 9, 37 Windows 3.x Configuration, 41 Windows 3.x Features, 37 Windows 3.x File Manager, 89 Windows 3.x Operating System Files, 40 Windows 3.x setup, 40 Windows 95, 12 Windows 95 Help system, 73 Windows 95 installation, 69 Windows 95 Installation Process, 70 Windows 95 Minimum Requirements,
67 Windows 95 OSR2 (sometimes–called
version C), 63 Windows 95 shortcuts, 73 Windows 95 troubleshooting mode, 80 Windows 95/98, 3 Windows 98, 12 Windows 98 Hardware Requirements,
82 Windows 98 splash screen, 176 Windows 98 System Tools, 164 Windows 9x, 5 Windows 9x Control Panel, 100 Windows 9x core components, 62 Windows 9x GUI, 62 Windows 9x Registry, 64 Windows 9x Release Versions, 63 Windows 9x Rescue diskette, 107 Windows clipboard, 165 Windows Configuration, 73 Windows Control Panel, 120 Windows Device Drivers, 41 Windows Explorer, 89, 361 Windows for Workgroups, 11, 51, 227,
354 Windows Help, 86 Windows Initialization Files, 42 Windows keyboard commands, 104 Windows Me, 12 Windows ME, 5 Windows Millennium Edition, 12 Windows NT, 3, 5, 12
Windows NT (New Technologies), 227 Windows NT boot files, 239 Windows NT boot process, 239 Windows NT Diagnostics, 256 Windows NT Installation Process, 236 Windows NT Print Servers, 232 Windows NT registry, 242, 243 Windows NT Server, 13, 225 Windows NT Workstation, 13, 225 Windows Professional, 265 Windows Registry, 99 Windows Runtime Version, 11 Windows Script Host (WSH), 267 Windows Services for UNIX, 275 Windows Setup, 41, 42 Windows Setup tab, 125 Windows Startup Disk, 85 Windows Tune Up Wizard, 66 Windows Update Web site, 310 Windows Update Wizard, 66 windowsdirectory, 61 WINFILE.INI, 99 Wininsto.400, 70 WINIPCFG, 369 WINNT.EXE, 236 WINS, 367 winundo.dat, 85 winundo.ini, 85 wizard for printers, 114 work–arounds, 382 Workgroup, 227 Workgroup Model, 231 Workstation Service, 233 World Wide Web (WWW), 370 www.microsoft.com, 69 WYSIWYG (What–You–See–Is–What–
You–Get), 41
X
X.400 service, 373 XMS driver, 32 XMSMMGR.EXE, 70


