A Good Practice Guide for the Butt Fusion Jointing of Polyethylene Pressure Pipes Contents 1. Introduction 2. The Butt Fusion Technique 3. Factors Affecting Weld Quality 4. Methods of Assessing Weld Quality 5. Installation Procedure 6. Standards 7. Case Studies Appendix 1 – National Standards & Procedures 1. Introduction Long lifetimes and trouble free operation are outcomes from using polyethylene pipes for pressure applications. And to achieve this, there are simple proven techniques for joining pipes during the construction phase. Of these, the technique of butt fusion welding has been shown to consistently deliver quality pipe joints under a broad range of construction situations. The purpose of this guide is to provide understanding of the butt fusion technique and how it works, leading to knowledge about how to achieve a quality outcome. There is no reason why, with the knowledge accrued over more than 50 years of combined experiences, quality joints should not be achieved as a matter of routine construction practice. In this guide then you will find important topics covered, which include: • The selection of suitable pipes for pressure applications and the harmonised standards accepted throughout the European Union to be used in their specification • The absence of a harmonised welding standard and why this is the case leading to the purpose of this document to offer the preferred approaches that can be taken • The availability of standards to assess the quality of butt fusion welds that allow you to validate your machines, people and processes at the start of the construction period as much as at the end • How to adapt the process in response to conditions you find on a particular construction site that might be unique, such as new pipe sizes not used before, ambient temperature ranges, etc This document is therefore intended as a guide to the principles of butt fusion and identification of those things that are important to consider in pursuit of high quality welds. In the preparation of this document every effort has been made to offer the most current and accurate information. However, to the broadest extent permitted in law, all information published or referenced in this document is provided without any representation or warranty of any kind expressed or implied. Changes and additions to any information contained herein may be made by TEPPFA without prior notification.
Transcript
A Good Practice Guide for the Butt Fusion Jointing of Polyethylene Pressure Pipes Contents
1. Introduction 2. The Butt Fusion Technique 3. Factors Affecting Weld Quality 4. Methods of Assessing Weld Quality 5. Installation Procedure 6. Standards 7. Case Studies Appendix 1 – National Standards & Procedures
1. Introduction Long lifetimes and trouble free operation are outcomes from using polyethylene pipes for pressure applications. And to achieve this, there are simple proven techniques for joining pipes during the construction phase. Of these, the technique of butt fusion welding has been shown to consistently deliver quality pipe joints under a broad range of construction situations.
The purpose of this guide is to provide understanding of the butt fusion technique and how it works, leading to knowledge about how to achieve a quality outcome. There is no reason why, with the knowledge accrued over more than 50 years of combined experiences, quality joints should not be achieved as a matter of routine construction practice. In this guide then you will find important topics covered, which include:
• The selection of suitable pipes for pressure applications and the harmonised standards accepted throughout the European Union to be used in their specification
• The absence of a harmonised welding standard and why this is the case leading to the purpose of this document to offer the preferred approaches that can be taken
• The availability of standards to assess the quality of butt fusion welds that allow you to validate your machines, people and processes at the start of the construction period as much as at the end
• How to adapt the process in response to conditions you find on a particular construction site that might be unique, such as new pipe sizes not used before, ambient temperature ranges, etc
This document is therefore intended as a guide to the principles of butt fusion and identification of those things that are important to consider in pursuit of high quality welds. In the preparation of this document every effort has been made to offer the most current and accurate information. However, to the broadest extent permitted in law, all information published or referenced in this document is provided without any representation or warranty of any kind expressed or implied. Changes and additions to any information contained herein may be made by TEPPFA without prior notification.
2. The Butt Fusion Technique The butt fusion technique described in this document refers to the method by which the square cut end of two pipes are first cleaned, then heated by pressing the pipes against a hot plate after which the plate is removed and the molten pipe ends then pressed together and allowed to cool. Throughout this guide, the assumption is that users are welding pipes of the same diameter, wall thickness and material type using this process. Other techniques are available which include infra-red (IR) non-contact heater plates, or bead and crevice free (BCF) butt welding forms but are not covered in this guide, nor is welding of dissimilar materials. The technique though is remarkably simple and the broad steps involved in making a satisfactory weld are detailed in the process map overleaf. That process map can have degrees of automation depending on the equipment used with three broad classifications:
• Manual butt fusion, using machines where each step requires a manual intervention by the welder that is employed. This tended to be prevalent across all sizes in the 1970’s and 1980’s but is less widespread now
• Semi-automatic butt fusion, using machines which automate some functions of the machine, such as setting of the hydraulic ram pressures to achieve the correct interface pressure between the pipe ends during welding
• Fully automatic butt fusion, using machines which automate the welding process, specifically the heating of the pipe ends, ejection of the heating plate and subsequent welding and cooling of the molten pipe ends
As we discuss in the next chapter, good quality welds are produced by attention to the core principles which affect weld quality, particular control of cleanliness, heat energy and pressure in the welding process. A suitably competent welder attending to these principles can make good welds with any level of automation and the choice of machines will depend to a larger extent on their availability at the time of construction works being made.
A fully automatic butt fusion welding machine for 630mm diameter polyethylene pipe system (Source Derby, UK, 2002)
High level process map for the butt fusion technique
Cleaning The pipe ends are cleaned to remove physical contamination deposited during transport, handling and storage and then presented to the welding station
Clamping The pipes are clamped into the machine. One side is fixed and one side can move. The pipes are clamped and checks made that their ends align
Trimming The pipes are pressed against a trimmer tool which planes the ends to remove oxidised material, physical contaminants and any damaged sections
Aligning After trimming, checks are made that the pipe ends butt squarely against each other without any gaps and any offsets are within agreed acceptance limits
Melting The pipe ends are pressed against a hot plate at a set temperature to form intimate contact after which heat is allowed to soak into the end of the pipes
Cooling The joint is immobilised in the clamps whilst the material cools and reforms its crystalline structure, only then is it removed from the machine
Checking On completion, the weld beads can be removed and non-destructive tests applied to provide feedback on the quality of each weld as the construction progresses
3. Factors Affecting Weld Quality The technique of butt fusion welding polyethylene pipes is extremely forgiving and tolerant. That said, the usual reasons for not achieving good quality often come down to basic workplace organisation for the welding operation. We summarise some of the basics in this chapter but before that it is useful to state which core principles have a direct impact on weld quality that you should keep in mind when making choices in connection with welding procedures:
• Cleanliness. In the field of welding, no matter what the material, cleanliness matters and should be emphasised throughout the process. Machines should be clean. Pipe should be clean. Welding area should be protected on the construction site. All these things are designed to prevent contaminants getting into the weld which might reduce the lifetime of the asset being installed
• Heat energy. To make a satisfactory weld the pipe must be heated such that all the material at the end of the pipes to be joined has achieved the target temperature for the operation, and holds this temperature whilst the heater plate is removed and the pipe ends pressed together. Too much heat may degrade the material, too little heat affects the weld strength, so the key is to achieve the target temperature range set out in the specifications
• Pressure. The pressure, sometimes referred to as the interfacial pressure experienced by the pipe ends when they are butted against each other matters. Pressure is used to ensure the molten pipe ends are fully squeezed together to form an intimate connection so the minimum level matters. Too much pressure though can be a bad thing as taken to an extreme, it squeezes all the molten material out of the welded area. So a target range matters.
• Time. This is the final element, each of the cycle times has a design intent behind it, whether this is ensuring adequate time for heat to soak into the pipe ends, ensuring they don’t cool down too quickly when heater plates are removed and so forth. But what also matters is allowing the joint to cool properly in clamps when the weld has been made, the material has to reform its crystalline structure to allow it to be handled without damage
These then are the overarching principles but to give some additional guidance we include a more detailed summary below of the practical steps that can be taken, or which should be taken, to create the conditions for successful welding operations. This has been loosely grouped into 4 steps covering condition of the butt fusion machine, selection of the welding parameters, control of the site conditions likely to affect quality and commissioning of the process on the construction site.
Stage 1 – Condition of the butt fusion equipment The condition of the butt fusion machine itself matters. If the machine is defective, then there is a good chance the welds will be defective. A simple checklist can be used to assess a machine each time it is set up for operation and the checks also act as good practice for ensuring a safe working environment for the machine operators:
• Chassis; the machine has a basic chassis onto which the pipe clamps (one of which is fixed and one of which is designed to be a moving half) and hydraulic pistons are fixed. The chassis should not be bent (check with straight edge tools)
• Hydraulic rams; the moving half of the machine should be cycled without pipe in the clamps to prove that minimal ram pressure is needed to slide the clamps through full cycle (proves low friction, rams or chassis not bent).
• Hydraulic hoses and connections should be checked to ensure they are leak tight, that they are connected in the right sequence so that the moving half of the machine moves to open or close correctly when directed from the control panel. Pressure gauges should be calibrated and working.
• All electrical cabling, connectors and environmental seals for motors and sensors should be checked to ensure they are undamaged either physically or from water ingress. To commission the heater plate will require a surface contact thermocouple with calibrated temperature display available on the work site
Stage 2 – Selection of butt welding parameters The parameters used for butt welding can be obtained by reference to international, national or private standards where they are available and the project fits within their scope. Equally, the pipe supplier can and will provide
butt fusion parameters for its products and would be the recommended source for advice. You can find advice on standards later in this guide. As we have said earlier though, there are basic points to keep in mind if you do venture into adapting welding parameters to suit a particular site situation.
• The temperature around the heater plate where it touches the pipe is important. If it is too low then insufficient heat will be taken up by the pipe, if it is too high then potential degradation of the pipe material might occur, so a range is specified – usually 225 to 240°C, with the setpoint typically 230°C.
• When the pipes are first pressed against the heater plate they start to melt and a small bead is formed (this is termed ‘bead up’). The bead step compensates for some out of true in the machining stage, provides some of the compensation for pipe material temperature and so on.
• After the bead is formed, heat is allowed to soak into the pipe ends. Enough heat must soak in so that it deals with the ambient temperature of the pipe material (adjust for extremes of hot and cold) and maintains at least a minimum temperature when the heater plate is removed and pipes butted
• As well as temperature, the pressure applied to the pipe ends also matters. To little pressure may be insufficient to move melt to cause defusion bonding and achievement of full strength, too much may simply squeeze all the melt out of the joint causing voids and cold lap weld conditions.
• And finally, leave the pipe in the machine when the weld is completed to allow the strength to develop – typically by allowing the bulk temperature or maximum temperature within the pipe to drop below around 80-90°C so that the material is crystallised. That is about long term reliability of the pipe
Stage 3 – Control of site conditions likely to influence quality A few simple precautions on site can deal with common problem in welding processes and mostly this is thinking about the site conditions. When ordering equipment for site works, as well as the butt fusion machine itself, a tent and some temporary pipe endcaps can help provide the controlled conditions needed for successful welding.
• In preparing the work area it is recommended that a groundsheet is laid down underneath the butt welding machine and a tent is used to enclose it. This stops biological matter being drawn from the ground into the machine and airborne matter (e.g. dust) being blown into molten pipe ends/welds
• Before using machines they should be cleaned, particularly the heater plates. These can be washed (along with their covers). Similarly there is a practice known as ‘dummy weld’ where a pipe is pressed against the heater plate to remove debris (but not made into a joint, instead trimmed when cooled)
• As well as a strong focus on cleanliness, tents also assist in preventing wind chill effects drawing heat away from the pipe ends. Using temporary stoppers in the ends of the pipes being welded (ends furthest from the weld) stops significant cooling effects for wind chill caused by chimney effects
• It is worth thinking about ambient temperature and temperature of the pipes to be welded and in extremes of hot or cold conditions adapting the process. It is reasonable to increase or decrease the heat soak times for example for temperature extremes
Stage 4 – Commissioning the process on site Commissioning a machine on site is a prelude to being confident that when multiple welds are made, which may involve considerable time and effort, that you are achieving good welds each and every time. There are many things that you can do, which include:
• First, it also helps to have competent and experienced operators. There are many national schemes for training, experience and competency certification that can be referred to, and this is highly recommended.
• We have mentioned many steps already about setting up the worksite with tents for example, checking the machine is clean and fit for purpose (mechanical and visual checks), and basic functions work like heater plate temperatures and movement of the machine chassis – really, it is worth doing
• When you start the key is to ensure that the machine you have, the operator, and your chosen parameters can produce a good weld. It is quite easy to test a weld, particularly if you have a test centre pre-booked (can be on site) to validate the process before making lots of welds (recommended practice)
o Start by cleaning the heater plate at the start of commissioning a machine and perform 1 or 2 dummy welds so that you are satisfied there is no contamination
o Make welds using your chosen parameters, either picked from a standard that you have selected
and/or any adaptation made for you site conditions o Cut the first weld out, take samples around the full circumference of the weld and destructively
test to check the weld is fully ductile (see test standards later) o It is reasonable to perform further testing through the production process at site where desired
by the client to demonstrate consistent quality is being achieved and it is quite normal
4. Methods of Assessing Weld Quality One of the great things about butt fusion welding of a polyethylene pipe is that there are a range of techniques that can be used to assess the quality of welds. This includes simple on site tests that the welder can perform, none destructive examination (NDE) and destructive testing in laboratories under reference conditions. During the formation of a butt fusion joint, an internal and an external weld bead is formed at the location of the joint. The bead formed on the outside of the pipe can be removed easily with simple mechanical tools and provides a quick and easy means of checking for common problems in welding.
• Before removing it from the pipe, the external weld bead can be visually checked. It should be uniform both in terms of its width and of each side of the bead when viewed around the circumference of the weld. If not, then it would indicate that there most likely is a problem with the heater plate (distorted, or heater elements broken)
• The width of the bead can be measured to check it falls between a minimum and maximum width. A bead too small might indicate insufficient heat in the weld, a bead too large may be too much heat or too much pressure during the welding process
• Once removed, the bead can be subjected to bending and twisting along its length. If the bead splits in a brittle fashion then it is likely that the pipe joint also has brittle areas (the bead is representative of the weld quality in the pipe wall). If the bead has brittle like defects then the pipe joint should be remade.
Non destructive examination (NDE) of butt fusion welds can be performed and tools are usually very good at detecting voids, or contamination, which may exist in the weld and need to be addressed. NDE techniques are not routinely used as the industry has very good experience of combining assessment of weld beads, together with sampling of joints by destructive testing, as the means by which it demonstrates the suitability of the technique. However, for high risk installations it may be desirable to specify NDE and one example technique, which was originally funded by the European Community Framework Programme can be found by reference to www.testpep.eu Definitive tests on weld quality can be made by conducting destructive testing. Such tests can be made on construction sites in a simplified form but in case of reference, are conducted in a laboratory. The purpose of such testing is usually to check that the butt fusion machine that is taken onto the construction site is working properly and that the welds it makes are of the expected quality, so often it is the first weld made on the site that is tested as a minimum. In section 6 we talk about the standards that can be specified for this work, usually the test is one where tensile specimens are cut from the weld and pulled to force failure which can be assessed both quantitatively and qualitatively.
5. Installation Procedure Many companies, and certain national states have preferred procedures to be followed when making butt fusion welds. Some of these are very prescriptive, with detailed step by step procedures to be followed. Appendix 1 of this guide lists relevant standards by country where these are known. Country or sector guides should be consulted in the first instance for detailed step by step instructions on welding process, together with instructions provided by the manufacturer of the butt welding machine which is to be used. These guides though will have much in common for the initial set-up of the welding machine, which we have summarised below. Positioning the Equipment
A butt welding machine is normally used inside a protective shelter, and not in an excavation. Deviations to this are allowed provided the basic principles we set out in section 3 are considered. A good location is preferably one on firm level ground where the butt welding machine can be anchored and pipe is free to move in and out of the machine without large drag forces as the butt weld is made. A shelter is specified to reduce contamination risks in welding. This would include covering the ground beneath the machine to prevent vegetation or debris being pulled up into the machine for example during the welding process. Also, roller supports are used for the pipe either side of the butt welding machine to minimise drag forces during the welding process and to allow the pipe string to be advanced out of the machine once a weld is completed.
Power generation equipment should be located outside of the shelter to ensure any fumes from exhaust systems are vented to an area that allows for rapid dispersion to avoid risks to the health of the welder and their team.
Commissioning
Many countries in the European Community have legislation about the commissioning of machines in construction environments which should be adhered to. Butt welding machines normally have moving parts, electrical and hydraulic components that should be considered in this context. It is normal to check electric cables are not damaged, nor are connectors and control units, to prevent risk of electrocution of the welder. Hydraulic hoses and components are checked for leaking fluid or damage that might cause a burst hose for example, this to avoid injury and/or contamination of welds. Mechanical parts of the machine are checked to confirm the chassis is not bent, all parts move according to the manufacturers intentions and where fitted, all guarding and emergency controls are functional. When using the machine for the first time, there are two main considerations. That the heater plate is thoroughly cleaned, and that it achieves its working temperature across the area expected to be in contact with the pipe ends during welding. A good practice recommendation for this comes in the form of a 3 step process:
• Whilst it is cold, the heater plate can be taken from its protective sleeve and cleaned. Disposable single use lint free cloths are recommended for cleaning, together with isopropanol fluid if grease or oil contamination needs to be removed. Allow the plate to go back into and out of the protective sleeve a few times to make sure it is not recontaminated.
• The heater plate should be allowed to warm up to its working temperature which is usually in the range
225 to 240C. Once stable, manual measurements of its surface temperature are taken from both sides of the plate, around the full circumference expected to be in contact with the pipe ends, to confirm the plate temperature is correct.
• A final cleaning step is then recommended to remove any fine particles of dust or contamination which may be trapped in the hollows of the textured surface of the plate, a process known as making a dummy weld. To make a dummy weld, a normal weld procedure is followed but the cycle is aborted once the initial bead up phase is completed – at this point the molten pipe end is allowed to cool so that it can be machined again ready to make a full weld. For some larger pipes it is often specified to make 2 dummy welds.
After setting up a machine on a new location and commissioning in this way, a good practice is to make a first butt fusion welded joint, to cut this out once it is cooled and send it for destructive testing. This provides full confidence that the machine has been correctly set-up, the correct welding parameters are being used for the supplied pipe and that the welder understands how to make the joints.
6. Standards A number of standards have been drafted by ISO and CEN organisations to provide reference guides to proven welding procedures and methods of testing welds. Attention though is also drawn to National Standards and Procedures which can be found in Appendix 1 which maybe more relevant in certain regions due to differences in construction practice or simply means of addressing climate variations. Standards for butt fusion welding
The main international standard is ISO 21307:2011, entitled “Plastic pipes and fittings – Butt fusion jointing procedures for polyethylene (PE) pipes and fittings used in the construction of gas and water distribution systems”. This standard provides good information about the two main welding procedures adopted in Europe including a description of the process steps and the method of calculating the parameters for each pipe diameter and wall thickness combination. The main process adopted throughout Europe is the single pressure welding method which is normally specified but the option for a dual pressure alternative is also detailed. The standard is written around historical practice and currently provides information for pipes up to 70mm in wall thickness. This not a limitation of the technique but a reflection that standards normally reflect past practice. For pipes above this thickness, the manufacturer is the competent body to advise on welding parameters.
Standards for assessment of weld integrity – short term
A weld recovered from a construction site is usually subjected to short term testing to confirm its properties match reference welds made by manufacturers. ISO 13953:2001, entitled “Polyethylene (PE) pipes and fittings – Determination of the tensile strength and failure mode of test pieces from a butt fused joint” is often specified for this assessment. The standard outlines two methods of assessment of butt fusion welds, the selection of the most appropriate technique dependent on the wall thickness of the sample to be tested:
• For pipes, usually less than 25mm thickness, a test piece is used which deliberately forces failure in the butt weld which is useful to examine the ductility of the weld in addition to measuring its strength and elongation characteristics
• For pipes above the 25mm thickness an alternate test piece is used where failure may occur in the pipe section rather than the joint. This approach still assesses the strength and elongation characteristics of a joint and will allow discrimination between good and bad joints.
The reason why two different test pieces are used is down to an issue with geometry which can affect the test results, an aspect of the standard which has not yet been resolved. Where there is a preference to force failure in the weld interface on thicker wall samples to view the joint interface, a pragmatic solution can be found in section 8 of the WIS 4-32-08 standard published in the United Kingdom ( https://www.water.org.uk/publications/WIS-IGN/plastics-rubbers ). Attention is also drawn to EN12814-1, a method of assessment using three point bending tests, EN 12814-2, a method reflecting the Type-B specimen outlined in ISO 13953, and EN 12814-3, a method reflecting the Type-A specimen outlined in ISO 13953 as alternative standards that may be specified for testing.
Standards for assessment of weld integrity – long term
Manufacturers, trade federations and research institutes have published, and continue to publish, work on the lifetime of butt welded pipe joints. Much of this is now incorporated into standards and may be used when new parameters are to be developed where none exist, or in sources of dispute about the quality of welds already made for example. In general the tests follow certain broad principles
• Hydrostatic testing of joints; in this test butt welds are made and the samples are capped so that they can be pressure tested (for example in accordance with ISO 1167, EN1555-2 or EN12201-2). The following forms of hydrostatic testing may be useful:
o Testing at 80C, this confirms that the joint has formed without notching, voids or lap weld flaws likely to cause long term failure by stress cracking of the material
o Testing at 80C, a variation where the pipe ends are offset by 10% of actual wall thickness to demonstrate tolerance to misalignment, as well as resistance to stress crack failure modes
• An alternative to full pipe form testing is to test sections of a butt welded joint and the most common method is detailed in EN 12814-3:2014, entitled “Testing of welding joints in thermoplastics – specimen tensile creep rupture test”
For the majority of end users who are making butt fusion joints, there should be little or no reason to be using standards linked to assessment of long term properties of welds but they are included here for completeness and for reference purposes to guide users new to this area.
7. Case Studies Butt fusion techniques using polyethylene pipe have been used in Europe since the 1960’s and good experience has been gained. The technique in practice is normally found on pipes 63mm in diameter or larger, and most recently has been used to join pipes of up to 2500mm. And this size is not a limitation of the technique, only it is the largest pipe produced so far. Case 1 – welding in different conditions, a tolerant technique If the simple rules are followed, then it is possible to make good quality butt fusion welds under a variety of site conditions. Temperature extremes from a warm day at the beach to a cold day in the middle of winter can be tolerated by the method of butt fusion jointing.
This example has been provided by Georg Fischer Piping Systems
Case 2 – an example of very large pipe being welded Butt fusion techniques work across all pipe sizes to form reliable high quality welds. This example is of a 2500mm pipe (2.5m diameter) for a power station project in Algeria. Here the pipe has been supplied in a continuous string and a stub flange is now being butt welded directly to the end of the pipe to enable a mechanical connection to be made.
This example has been provided by Pipelife
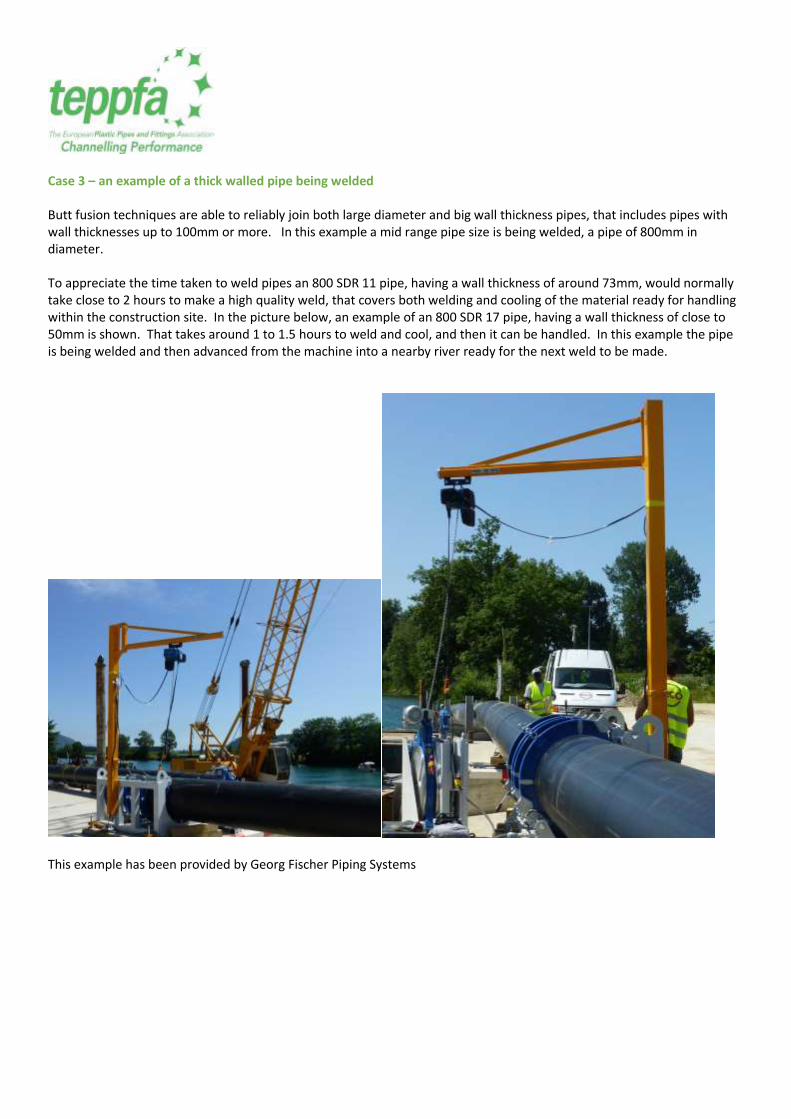
Case 3 – an example of a thick walled pipe being welded Butt fusion techniques are able to reliably join both large diameter and big wall thickness pipes, that includes pipes with wall thicknesses up to 100mm or more. In this example a mid range pipe size is being welded, a pipe of 800mm in diameter. To appreciate the time taken to weld pipes an 800 SDR 11 pipe, having a wall thickness of around 73mm, would normally take close to 2 hours to make a high quality weld, that covers both welding and cooling of the material ready for handling within the construction site. In the picture below, an example of an 800 SDR 17 pipe, having a wall thickness of close to 50mm is shown. That takes around 1 to 1.5 hours to weld and cool, and then it can be handled. In this example the pipe is being welded and then advanced from the machine into a nearby river ready for the next weld to be made.
This example has been provided by Georg Fischer Piping Systems
Case 4 – an example of welding in a trench Butt fusion is not exclusively used above ground. If you take care to control the environment around the machine then it is perfectly practicable to make butt fusion welds within a trench environment. Two examples are shown here. In the image below left, a 900 SDR 17 pipe is being welded in a trench. In the image below right, a 630mm butt fusion machine has been shelled to permit welding of 355mm diameter pipe and is being used to join a butt fusion pipe elbow to a length of pipe directly within the excavation.
This example has been provided by Georg Fischer Piping Systems
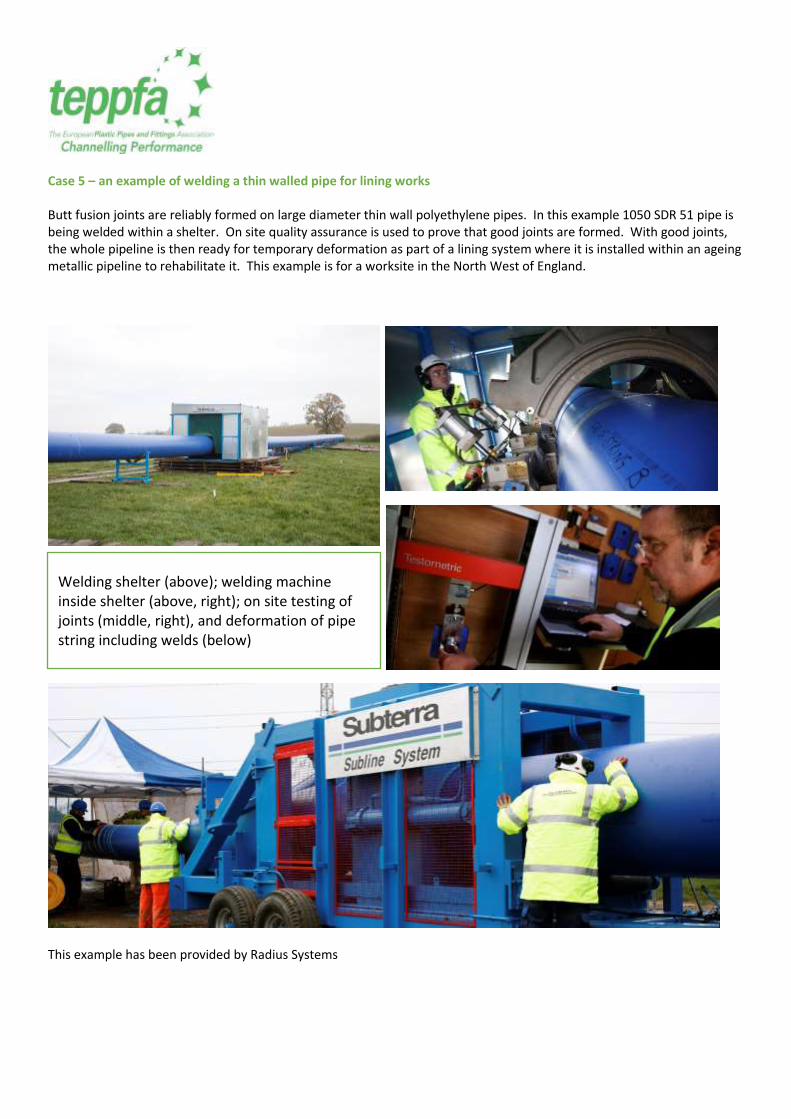
Case 5 – an example of welding a thin walled pipe for lining works Butt fusion joints are reliably formed on large diameter thin wall polyethylene pipes. In this example 1050 SDR 51 pipe is being welded within a shelter. On site quality assurance is used to prove that good joints are formed. With good joints, the whole pipeline is then ready for temporary deformation as part of a lining system where it is installed within an ageing metallic pipeline to rehabilitate it. This example is for a worksite in the North West of England.
This example has been provided by Radius Systems
Welding shelter (above); welding machine inside shelter (above, right); on site testing of joints (middle, right), and deformation of pipe string including welds (below)
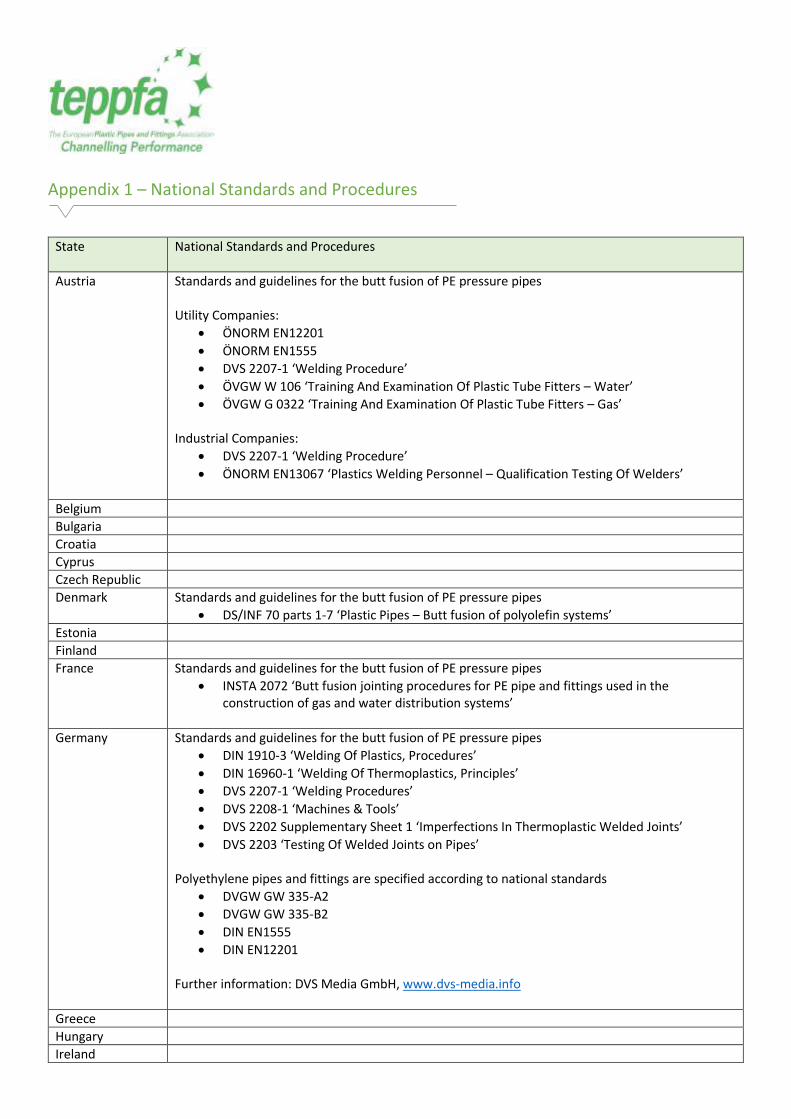
Appendix 1 – National Standards and Procedures
State National Standards and Procedures
Austria Standards and guidelines for the butt fusion of PE pressure pipes Utility Companies:
• ÖNORM EN12201
• ÖNORM EN1555
• DVS 2207-1 ‘Welding Procedure’
• ÖVGW W 106 ‘Training And Examination Of Plastic Tube Fitters – Water’
• ÖVGW G 0322 ‘Training And Examination Of Plastic Tube Fitters – Gas’ Industrial Companies:
• DVS 2203 ‘Testing Of Welded Joints on Pipes’ The welding procedure is also listed in SVGW guidelines G2 and W4. In addition to the directives, the assembly instructions of the manufacturers of the pipe components and machines is also binding.
United Kingdom Standards and guidelines for the butt fusion of PE pressure pipes Utilities
• WIS 4-32-08 ‘Fusion Jointing of PE Pressure Pipeline Systems’ The above is a public domain procedure for welding of pipelines intended for use by water and sewerage companies. There is no public domain procedure for welding of pipelines intended for use in fuel gas distribution networks. Guidance should be sought from the pipe manufacturers. Polyethylene pipes and fittings are specified according to harmonised specifications which include national forewords describing preferred approach to installation procedures.