42
VER:1.1 │ │ 20.10.2015 ABB-Welcome M22301-. M22302-. M22303-. 4.3" Video handset indoor station

VER:1.1 │ │ 20.10.2015
ABB-Welcome
Pos: 2 /Di nA4 - Anleitung en Online/Inhalt /KN X/D oorEntr y/83220- AP- xxx/Titelbl att - 83220-AP- xxx - ABB @ 19\mod_1323249806476_15.docx @ 111084 @ @ 1
M22301-.
M22302-.
M22303-.
4.3" Video handset
indoor station
=== Ende der Liste für Textmar ke Cover ===

ABB-Welcome
| — 2 —
Pos: 4 /Busch-Jaeger (Neus truktur)/M odul-Str uktur/Online-Dokumentation/Inhal tsverzeichnis (--> Für alle D okumente <--)/Inhaltsverzeichnis @ 19\mod_1320649044386_15.docx @ 109653 @ @ 1
1 Safety ............................................................................................................ 3 2 Intended use .................................................................................................. 3 3 Environment .................................................................................................. 3
3.1 ABB devices ................................................................................. 3 4 Operations ..................................................................................................... 5
4.1 Standard operations ..................................................................... 5 4.1.1 Control elements .......................................................................... 5 4.2 Control actions .............................................................................. 8 4.2.1 Incoming call / In a call ................................................................. 8 4.2.2 Display & volume settings during calling..................................... 10 4.2.3 Communication menu ................................................................. 11 4.3 Settings ....................................................................................... 14 4.3.1 Overview ..................................................................................... 14 4.3.2 Intercom call settings .................................................................. 15 4.3.3 Switch actuator settings .............................................................. 17 4.3.4 Program button settings .............................................................. 18 4.3.5 Call forward settings ................................................................... 19 4.3.6 Auto unlock settings.................................................................... 20 4.3.7 OS password settings ................................................................. 21 4.3.8 Ringtone settings ........................................................................ 22 4.3.9 Volume settings .......................................................................... 23 4.3.10 Date and time settings ................................................................ 24 4.3.11 Door entry system settings ......................................................... 25 4.3.12 Blacklist settings ......................................................................... 26 4.3.13 History review ............................................................................. 27 4.3.14 Camera List ................................................................................ 29 4.3.15 Language settings ...................................................................... 31 4.3.16 Information .................................................................................. 31 4.3.17 Reset factory default ................................................................... 32 4.4 Cleaning ..................................................................................... 33 4.5 Adjusting the device.................................................................... 34
5 Technical data ............................................................................................. 35 6 Mounting / Installation .................................................................................. 36
6.1 Requirements for the electrician ................................................. 36 6.2 General installation instructions .................................................. 37 6.3 Mounting ..................................................................................... 38

ABB-Welcome
| — 3 —
Pos: 6 /Busch-Jaeger (Neus truktur)/M odul-Str uktur/Online-Dokumentation/Überschriften (--> Für alle Dokumente <--)/1. Ebene/S - T/Sicherheit @ 18\mod_1302612791790_15.docx @ 103357 @ 1 @ 1
1 Safety Pos : 7 /Busch-Jaeger (Neus truktur)/M odul-Str uktur/Online-Dokumentation/Sicherheit (--> Für all e D okumente <--)/Warnhi nweise/Sicherheit - 230 V @ 18\mod_1302606816750_15.docx @ 103308 @ @ 1
Warning
Electric voltage!
Risk of death and fire due to electrical voltage of 100-240 V.
– Work on the 100-240V supply system may only be performed by
authorised electricians!
– Disconnect the mains power supply prior to installation and/or
disassembly!
Pos: 8 /Busch-Jaeger (Neus truktur)/M odul-Str uktur/Online-Dokumentation/Überschriften (--> Für alle Dokumente <--)/1. Ebene/A - F/Bes ti mmungsgemäßer Gebrauch @ 18\mod_1302763321316_15.docx @ 103483 @ 1 @ 1
2 Intended use Pos : 9 /Di nA4 - Anleitung en Online/Inhalt /KN X/D oorEntr y/83220- AP- xxx/Besti mmungsg emaesser Gebrauch - 83220-AP- xxx- 500 @ 20\mod_1324561168699_15.docx @ 112728 @ @ 1
The M2230x-x is an integral part of the ABB-Welcome door communication system and
operates exclusively with components from this system. The device must only be
installed in dry indoor rooms.
Pos: 10 /Busch-Jaeg er (Neustr uktur)/Modul- Struktur /Online-Dokumentati on/Überschriften (--> Für alle D okumente <--)/1. Ebene/U - Z/U mwelt @ 18\mod_1302614158967_15.docx @ 103383 @ 1 @ 1
3 Environment Pos : 11 /Busch-Jaeg er (Neustr uktur)/Modul- Struktur /Online-Dokumentati on/U mwel t (--> Für alle D okumente <--)/Hinweise/Hi nweis - U mwelt - Hinweis Elektrog eräte @ 18\mod_1302763973434_15.docx @ 103500 @ @ 1
Consider the protection of the environment!
Used electric and electronic devices must not be disposed of with
domestic waste.
– The device contains valuable raw materials which can be
recycled. Therefore, dispose of the device at the appropriate
collecting depot.
Pos: 12 /DinA4 - Anl eitungen Onli ne/Ueberschrif ten/2./ABB Geraete @ 19\mod_1323162843832_15.docx @ 110875 @ 2 @ 1
3.1 ABB devices Pos : 13 /Busch-Jaeg er (Neustr uktur)/Modul- Struktur /Online-Dokumentati on/U mwel t (--> Für alle D okumente <--)/Hinweise/Hi nweis - U mwelt - ABB El ektr ogeräte @ 19\mod_1323162745839_15.docx @ 110867 @ @ 1
All packaging materials and devices from ABB bear the markings and test seals for
proper disposal. Always dispose of the packaging material and electric devices and their
components via the authorized collecting depots and disposal companies.

ABB-Welcome
| — 4 —
ABB products meet the legal requirements, in particular the laws governing electronic
and electrical devices and the REACH ordinance.
(EU-Directive 2002/96/EG WEEE and 2002/95/EG RoHS)
(EU-REACH ordinance and law for the implementation of the ordinance (EG)
No.1907/2006)

ABB-Welcome
| — 5 —
Pos: 18 /DinA4 - Anl eitungen Onli ne/Ueberschrif ten/1./Bedi enung @ 18\mod_1302613924165_15.docx @ 103365 @ 1 @ 1
4 Operations Pos : 19 /DinA4 - Anl eitungen Onli ne/Ueberschrif ten/2./Nor maler Betrieb @ 18\mod_1302768820965_15.docx @ 103540 @ 2 @ 1
4.1 Standard operations Pos : 20 /DinA4 - Anl eitungen Onli ne/Ueberschrif ten/3./Bedi enel emente @ 20\mod_1323260220559_15.docx @ 111647 @ 3 @ 1
4.1.1 Control elements Pos : 21 /DinA4 - Anl eitungen Onli ne/Inhalt/KN X/D oor Entr y/83220-AP- xxx/Bedi enelemente - 83220- AP- xxx @ 18\mod_1303212853605_15.docx @ 103673 @ @ 1
Fig. 1 Control elements
1 2
3
9
4 5 6 7 8

ABB-Welcome
| — 6 —
No. Functions
1 Handset
1A When a call is coming, pick up handset to activate the
communication within 30 seconds and hang up handset to end the call.
1B In standby mode, pick up handset to enter the communication menu.
2 4.3" display
2A M22301-. , with B/W display.
2B M22302-. / M22303-., with color display.
3 Unlock button
3A Open the door by pressing this button at any time.
3B Auto-unlock: the door is automatically opened after incoming call (for
this function, hold this button for more than 10 seconds until the
backlit LED is on, the same operation will switch off the function and
LED will be off ).
The LED flashes slowly to indicate an incoming call.
The LED illuminates to indicate auto-unlock.
The LED flashes fast, it means system is busy or door is open exceeding
the set time (Sensor must be connected first).
4 Surveillance button
4A In standby mode, press this button to surveil the default outdoor station.
4B While the display is on, press this button to switch to surveil next
outdoor station. (Function is available depending on the installation's
type)
4C **While the display is on, hold this button to snapshot manually.
4D **In standby mode, if the LED flashes, press this button to display the
"History" menu.
**The LED flashes slowly to show the notification of the missing call.
5 Mute button
5A In standby mode, press this button to mute ringtone of this indoor
station.
5B In standby mode, long-press the button to mute ringtone of all indoor
stations in the apartment.
5C While a call is coming, press this button to reject the call.
5D During the conversation, press this button to mute microphone.
The LED illuminates to indicate mute status.
6 Programmable button 1
6A Release the lock connected with outdoor station (COM-NC-NO)

ABB-Welcome
| — 7 —
(default function).
6B In standby mode, long-press this button for 3 seconds to send SOS
alarm to guard unit. And LED flashes slowly to indicate success and
flashes fast to indicate the unsuccess.
6C *Programmable for additional function, e.g. call guard unit, intercom.....
7 Programmable button 2
*Programmable for additional function, e.g. call guard unit, intercom....
8 System setting button
Enter the system setting menu for various functions of the device.
The LED flashes fast, it means setting is busy.
9 ***Induction loop function
*For their use, please contact your electrical installer.
**The funtion is available in M22302-. / M22303-., color video handset indoor station.
***The function is only available in M22303-. Pos: 22 /Busch-Jaeg er (Neustr uktur)/Modul- Struktur /Online-Dokumentati on/Steuermodul e - Onli ne-D okumentation (--> Für all e D okumente <--)/++++++++++++ Seitenumbruch ++++++++++++ @ 9\mod_1268898668093_0.docx @ 52149 @ @ 1

ABB-Welcome
| — 8 —
Pos: 26 /DinA4 - Anl eitungen Onli ne/Ueberschrif ten/2./Bedi enaktionen @ 20\mod_1323262294281_15.docx @ 111911 @ 2 @ 1
4.2 Control actions Pos : 27 /DinA4 - Anl eitungen Onli ne/Ueberschrif ten/3./Sprech- und Videover bindung @ 20\mod_1323262368700_15.docx @ 111927 @ 3 @ 1
4.2.1 Incoming call / In a call Pos : 28 /DinA4 - Anl eitungen Onli ne/Inhalt/KN X/D oor Entr y/83220-AP- xxx/Sprech- und Videover bindung - 83220- AP- xxx @ 20\mod_1323262341852_15.docx @ 111919 @ @ 1
Fig. 2 Incoming call / in a call
During call, the following functions are available:
No. Functions
1 Pick up handset to accept the incoming call; In a call, hang up the handset
to end the call.
2 Press this button to open the door where the call is from.
3-A Press this button to survey the analog camera of the outdoor station if
there is.
3-B Hold this button to take a snapshot.
*The funtion is available in M22302-. / M22303-., color video handset
indoor station.
4 Press this button to mute the ringtone of an incoming call; In a call, press
this button to mute the microphone.
5-A Press this button to activate the function of the programmable button.
5-B If the function "release 2nd-lock" or "control switch actuator" is assigned to
the programmable button, press this button to activate the function.
6-A Press this button to enable or disable the full-screen function.
30s Outdoor 1
2 4 6
7
8
3 5 1

ABB-Welcome
| — 9 —
6-B Hold this button to enter the brightness setttings.
7 Time left of the connection.
8 Number of outdoor stations Pos: 29 /Busch-Jaeg er (Neustr uktur)/Modul- Struktur /Online-Dokumentati on/Steuermodul e - Onli ne-D okumentation (--> Für all e D okumente <--)/++++++++++++ Seitenumbruch ++++++++++++ @ 9\mod_1268898668093_0.docx @ 52149 @ @ 1

ABB-Welcome
| — 10 —
Pos: 30 /DinA4 - Anl eitungen Onli ne/Ueberschrif ten/3./Tuer oeffnen @ 20\mod_1323263277453_15.docx @ 111935 @ 3 @ 1
4.2.2 Display & volume settings during calling Pos : 31 /DinA4 - Anl eitungen Onli ne/Inhalt/KN X/D oor Entr y/83220-AP- xxx/Tuer oeffnen - 83220- AP- xxx @ 20\mod_1323267958479_15.docx @ 112109 @ @ 1
Fig. 3 Display & volume setting during calling
Hold button for 3s to enter the display & volume setttings menu during a calling or conversation, the following functions are available.
No. Functions
1 Navigation buttons ( up / down / confirm / cancel, etc)
2 Press the navigation buttons as needed.
3 Saturation
4 Brightness
5 Value set
*The funtion is available in M22302-. / M22303-., color video handset indoor station.
Pos: 32 /Busch-Jaeg er (Neustr uktur)/Modul- Struktur /Online-Dokumentati on/Steuermodul e - Onli ne-D okumentation (--> Für all e D okumente <--)/++++++++++++ Seitenumbruch ++++++++++++ @ 9\mod_1268898668093_0.docx @ 52149 @ @ 1
120s Outdoor 1
2 3
4
5
1
2

ABB-Welcome
| — 11 —
Pos: 33 /DinA4 - Anl eitungen Onli ne/Ueberschrif ten/3./Stumm schalten @ 20\mod_1323263607142_15.docx @ 111951 @ 3 @ 1 Pos : 66 /Busch-Jaeg er (Neustr uktur)/Modul- Struktur /Online-Dokumentati on/Steuermodul e - Onli ne-D okumentation (--> Für all e D okumente <--)/++++++++++++ Seitenumbruch ++++++++++++ @ 9\mod_1268898668093_0.docx @ 52149 @ @ 1
4.2.3 Communication menu Pos : 31 /DinA4 - Anl eitungen Onli ne/Inhalt/KN X/D oor Entr y/83220-AP- xxx/Tuer oeffnen - 83220- AP- xxx @ 20\mod_1323267958479_15.docx @ 112109 @ @ 1
4.2.3.1 Overview Pick up handset to enter the communication menu. The following functions are available:
No. Functions
1 Intercom call
-Touch the existing call list to make an intercom call .
2 Call to guard unit
-Call guard unit directly.
3 Broadcast
-Enable the broadcast function in this menu
4 Swtich actuator
-Activate the existing actuator list
4.2.3.2 Intercom call
Fig. 4: Intercom call
Set intercom call lists in the “System settings-intercom settings“ menu first.
After chosing a list, press button√ to make the call.
INTERCOM CALL
Intercom 1 (001)
Intercom 2

ABB-Welcome
| — 12 —
4.2.3.3 Call to guard unit
Fig. 5: Call to guard unit
4.2.3.4 Broadcast
Fig. 6: Broadcast call
The funtion is available in M22302-. / M22303-., color video handset indoor station.
CALL GUARD UNIT
Call Guard Unit
BROADCAST
Long-pressing “√“ button to broadcast

ABB-Welcome
| — 13 —
4.2.3.5 Switch actuator
Fig. 7: Switch actuator
Set the actuator list in the “system settings-switch actuator“ menu first.
After chosing a list, press button √ to enable the lock or light which is connected with the
switch actuator.
SWITCH ACTUATOR
Actuator 1 (001)

ABB-Welcome
| — 14 —
4.3 Settings
4.3.1 Overview
Press button to enter the system settings menu. The following functions are available:
No. Functions
1 Intercom settings
-Set intercom lists among different apartments or within the same
apartment
2 Switch actuator
-Set the actuator list in this menu
3 Program button
-Set functions for programmable buttons
4 Call forward
-Set the target (e.g. other indoor stations or guard units) that you want to
forward the call from visitors when you are absent from home.
5 Auto unlock
-Set the automatic unlock time range
6 Set OS password
-Set a customized door open password, which is available together with
a keypad at an outdoor station.
7 Ringtone
-Set the ringtone for outdoor bells, indoor bell or others
8 Volume
-Set ringtone volumes
9 Date and time
-Set different times.
10 Other settings
-Other settings, e.g. auto full screen
11 Blacklist
-Set a blacklist which is used to prevent unwanted calls from other
apartment(s)
12 History
-View all communication entries in the menu, e.g. received calls, missed
calls,
13 Language
-Set the local language
14 Information
15 Reset factory default Pos : 27 /DinA4 - Anl eitungen Onli ne/Ueberschrif ten/3./Sprech- und Videover bindung @ 20\mod_1323262368700_15.docx @ 111927 @ 3 @ 1

ABB-Welcome
| — 15 —
4.3.2 Intercom call settings
Fig. 8: intercom setting menu
No. Functions
1 Choose the previous selection or scroll up
2 Choose the next selection or scroll down
3 Confirm the selection you choose or enter to edit it
4 Return to the previous screen
5 Add a new intercom list . In total, up to 32 intercom lists can be added.
6 Existing intercom list: Press button √ to modify the settings.
means an external intercom from different
apartments.
*For establishing an external intercom, each apartment must have a master
indoor station.
7 Existing intercom list: Press button √ to modify the settings.
means an internal intercom in the same
apartment.
1 2 3
6
4
5
Intercom 1
(001)
Intercom 2
Add New
7

ABB-Welcome
| — 16 —
Add a new list
Fig. 9: Add new intercom
No. Functions
1 Enter to choose the call type :
-an external intercom means a call from different apartments
-an internal intercom means a call within the same apartment
2 Enter to change the target address, from 001 to 250.
*If the call type is the internal intercom, there is no need to set the target
address.
3 Rename the intercom list:
Scroll through letters of the alphabet or numbers one by one with “+” or
“-” button
After setting, press “Save” for confirmation.
1 Call Type External Intercom
Target Address
Rename 3
INTERCOM
001
mike
Save Cancel
2

ABB-Welcome
| — 17 —
4.3.3 Switch actuator settings
Fig. 10: Switch actuator settings
No. Functions
1 Existing switch actuator list: Press button √ to modify the settings.
2 Add a new actuator list:Totally, up to 10 switch actuator lists can be added.
3 Enter to change target address with “+” or “-” button from 001 to 199.
3 Rename the switch actuator list:
Scroll through letters of the alphabet or numbers one by one with “+” or
“-” button
3
4
SWITCH ACTUATOR
Actuator 1 (001)
Add New
Target Address
Rename
002
light
Save Cancel
SWITCH ACTUATOR
2
1
Add a new list
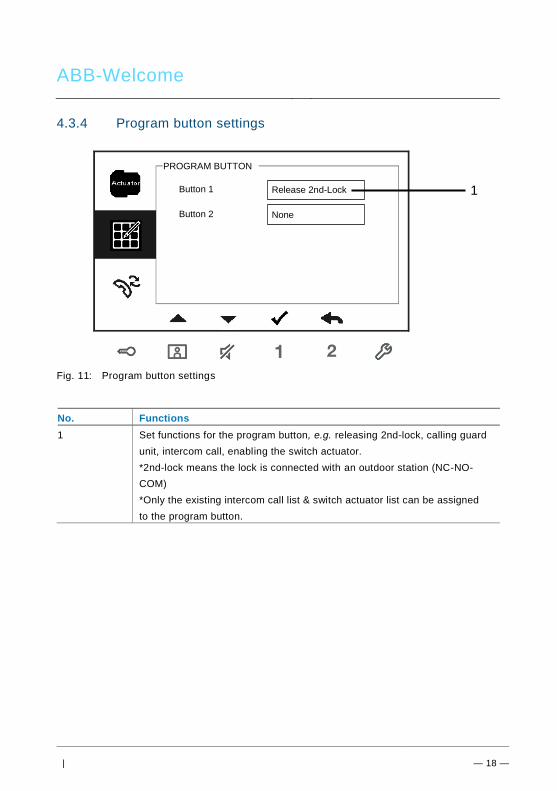
ABB-Welcome
| — 18 —
4.3.4 Program button settings
Fig. 11: Program button settings
No. Functions
1 Set functions for the program button, e.g. releasing 2nd-lock, calling guard
unit, intercom call, enabling the switch actuator.
*2nd-lock means the lock is connected with an outdoor station (NC-NO-
COM)
*Only the existing intercom call list & switch actuator list can be assigned
to the program button.
Button 1 Release 2nd-Lock
PROGRAM BUTTON
Button 2 None
1

ABB-Welcome
| — 19 —
4.3.5 Call forward settings
Fig. 12: Call forward settings
No. Functions
1 Enable/disable the call forward function.
2 Enter to choose a call type, including indoor or guard unit.
3 Enter to change the target address if the call type is an indoor station.
*If the call forward function is activated, the auto unlock function will be disabled. *The function only can be set in the master indoor station *The funtion is available in M22302-. / M22303-., color video handset indoor station.
1
2
Call Forward
Call Type
√
Indoor
Save Cancel
CALL FORWARD
Target Address 001 31

ABB-Welcome
| — 20 —
4.3.6 Auto unlock settings
Fig. 13: Auto unlock settings
No. Functions
1 Enable/disable the auto unlock function.
2 Enable/disable the auto unlock during Time 1.
3 Set starting time and ending time for Time 1
4 Enable/disable auto unlock during Time 2.
5 Set starting time and ending time for Time 2.
*If you activate the auto unlock function without setting exact working time, this function will be available for 10 hours. *If the auto unlock function is activated, the call forward function will be disabled. *The function only can be set in master indoor station.
1 Auto Unlock
Time 1
2
AUTO UNLOCK
√
√
08 00
17 00
:
:
Time 2 X
00 00
00 00
:
:
4
3
5

ABB-Welcome
| — 21 —
4.3.7 OS password settings
Fig. 14: OS password settings
No. Functions
1 Enable/disable the password functions
2 Enter the password as you wish in 3~8 digits.
*only available with the keypad. *The function only can be set in the master indoor station.
1 Enable Password
Enter Password (3-8 digits)
SET OS PASSWORD
√
12345678 2

ABB-Welcome
| — 22 —
4.3.8 Ringtone settings
Fig. 15: Ringtone
No. Functions
1 Select the bell sound for the default outdoor station.
2 Select the bell sound for other outdoor stations.
3 Select the bell sound for the apartment door.
4 Select the bell sound for others, e.g.a call from the guard unit, or an
intercom call from other apartments.
1 Default Outdoor
Other Outdoors
RING TONE
Ring Tone 1
Ring Tone 2
2
Doorbell Ring Tone 3
Others Ring Tone 4
3
4

ABB-Welcome
| — 23 —
4.3.9 Volume settings
Fig. 16: Volume settings
No. Functions
1 Set the volume of bell sound.
2 Enable/disable the feedback tone which sounds when the touch button is
pressed.
3 The ringtone can be set fixed or cycled.
1 Ringtone Volume
Touchbutton Tone
VOLUME
Volume 3
2 √
Repeated Tone √
3

ABB-Welcome
| — 24 —
4.3.10 Date and time settings
Fig. 17: Date and time settings
No. Functions
1 Set the date.
2 Set the time.
3 Enable/disable the summer time function.
*The funtion is available in M22302-. / M22303-., color video handset indoor station.
1 Date(YYYY-MM-DD)
Time
DATE AND TIME
2013
2 08
Summer Time √
: 00
- 01 - 01
3
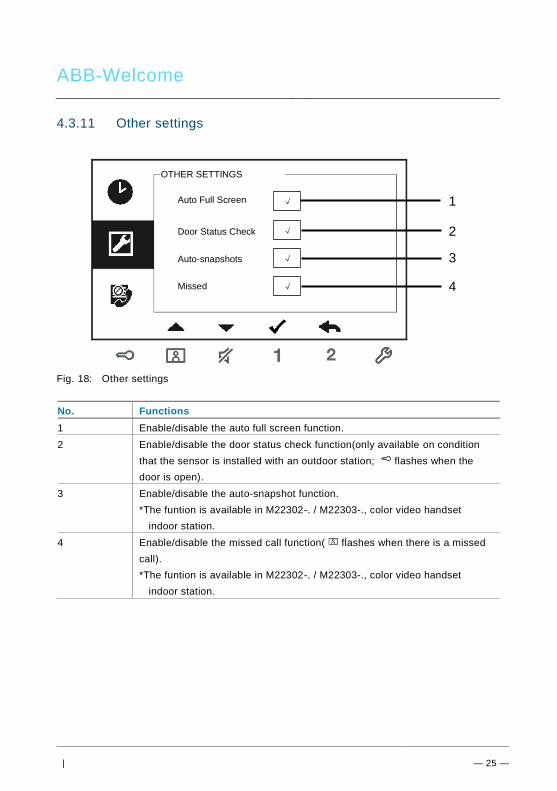
ABB-Welcome
| — 25 —
4.3.11 Other settings
Fig. 18: Other settings
No. Functions
1 Enable/disable the auto full screen function.
2 Enable/disable the door status check function(only available on condition
that the sensor is installed with an outdoor station; flashes when the
door is open).
3 Enable/disable the auto-snapshot function.
*The funtion is available in M22302-. / M22303-., color video handset
indoor station.
4 Enable/disable the missed call function( flashes when there is a missed
call).
*The funtion is available in M22302-. / M22303-., color video handset
indoor station.
1 Auto Full Screen
Auto-snapshots
OTHER SETTINGS
2
√
3
Missed Call
√
√
√ 4
Door Status Check

ABB-Welcome
| — 26 —
4.3.12 Blacklist settings
Fig. 19: Blacklist settings
No. Functions
1 The existed black list. Press √ button to modify the setting.
2 Add a new black list. Totally, up to 32 black lists can be added.
3 Enter to change target address with “+” or “-” button from 001 to 250.
*The function only can be set in the master indoor station. *The funtion is available in M22302-. / M22303-., color video handset indoor station.
Blacklist 1
Add New
BLACKLIST
(001)
Target Address
BLACKLIST
Save Cancel
002
1
2
3

ABB-Welcome
| — 27 —
4.3.13 History review
Fig. 20: History review
No. Functions
1 Up to 100 events can be recorded in the history menu.
-If the snapshot function is enabled, an icon is diplayed.If no snapshot
function, the icon is not displayed..
-Date, time and type of the event are recorded together with the
snapshot.
- Directions: means dialing calls
means receiving calls
means missed calls
●
HISTORY
1/2 Outdoor -1
1/63 2013-03-21 16:45
Outdoor - 1
● 2013-03-21 16:45
Outdoor - 1
● 2013-03-21 14:24
Outdoor - 1
1
2
3

ABB-Welcome
| — 28 —
2 Press this button to view details of this event.
Two pictures are always made when a visitor rings the bell.
3 Press this button to delete a record item
*The funtion is available in M22302-. / M22303-., color video handset indoor station.

ABB-Welcome
| — 29 —
4.3.14 Camera List
CAMERA LIST
The list is disabled
Outdoor1-1
Outdoor 1-2
Camera1
1
2
3
CAMERA LIST- Camera 1
Enable
Rename
√
Front door
Visible doorbell √
Save
Cancel
4
5

ABB-Welcome
| — 30 —
No. Functions
1 Display the status of camera list.
Only if the list is enable, user can make an surveilliance according to this
list, and also user can edit each surveilliance object in the list. -
2 Display the camera from Camera interface.
3 Press this button to enable or disable camera list.
Default is set as disable.
4 To set name of the camera.(1~14 characters)
The characters only can be number or English characters.
5 Only when a Camera interface (mode=4) is associated with this Indoor
station, this optional can be set.
Only one camera can be set available.
When press the level push button, the image from the camera connected to
Camera interface will display on the Indoor station.

ABB-Welcome
| — 31 —
4.3.15 Language settings
Fig. 21: Language settings
4.3.16 Information
Fig. 22: Information of the indoor station (scanning the QR code to get the detailed
instruction of the indoor station)
English
LANGUAGE
Française
Italiano
Português
Español
Flash Version: V2.07_150629
INFORMATION
MCU Version: V2.07_150703 M/S: Master
Default Outdoor: 1
Indoor St. Add.: 001
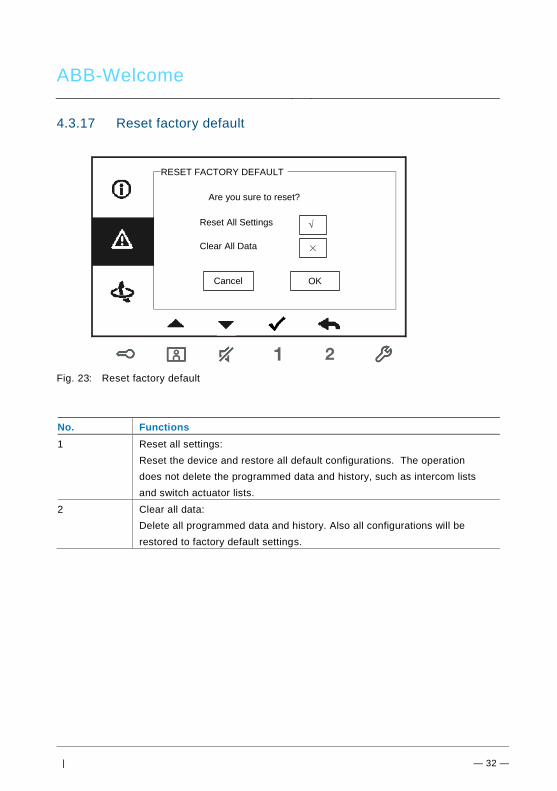
ABB-Welcome
| — 32 —
4.3.17 Reset factory default
Fig. 23: Reset factory default
No. Functions
1 Reset all settings:
Reset the device and restore all default configurations. The operation
does not delete the programmed data and history, such as intercom lists
and switch actuator lists.
2 Clear all data:
Delete all programmed data and history. Also all configurations will be
restored to factory default settings.
RESET FACTORY DEFAULT
Are you sure to reset?
Cancel
OK
Reset All Settings
Clear All Data ×
√

ABB-Welcome
| — 33 —
Pos: 67 /DinA4 - Anl eitungen Onli ne/Ueberschrif ten/2./Rei nigung @ 19\mod_1310733980533_15.docx @ 107853 @ 2 @ 1
4.4 Cleaning Pos : 68 /DinA4 - Anl eitungen Onli ne/Inhalt/KN X/D oor Entr y/Rei nigung/Rei nigung Touchscreenmonitor @ 19\mod_1310734108978_15.docx @ 107862 @ @ 1
Caution
Risk of damage to the screen surface.
The screen surface can be damaged by hard or sharp objects!
Never use such objects for entries on the touch screen monitor.
– Use your finger or a plastic stylus.
The screen surface can be damaged by cleaning fluids or abrasive
agents!
– Clean the surfaces using a soft cloth and commercially available
glass cleaner.
– Never use abrasive cleaning agents.
Pos: 69 /Busch-Jaeg er (Neustr uktur)/Modul- Struktur /Online-Dokumentati on/Steuermodul e - Onli ne-D okumentation (--> Für all e D okumente <--)/++++++++++++ Seitenumbruch ++++++++++++ @ 9\mod_1268898668093_0.docx @ 52149 @ @ 1

ABB-Welcome
| — 34 —
Pos: 70 /DinA4 - Anl eitungen Onli ne/Ueberschrif ten/2./Geraeteei nstellungen @ 18\mod_1302768847744_15.docx @ 103548 @ 2 @ 1
4.5 Adjusting the device Pos : 71 /DinA4 - Anl eitungen Onli ne/Ueberschrif ten/3./Abschlusswiderstand @ 19\mod_1321958079906_15.docx @ 110083 @ 3 @ 1 Pos : 72 /DinA4 - Anl eitungen Onli ne/Inhalt/KN X/D oor Entr y/Bedienung/Abschl usswiderstand setzen 83220-AP- xxx @ 19\mod_1310723392369_15.docx @ 107841 @ @ 1
Fig. 24: Pos : 74 /DinA4 - Anl eitungen Onli ne/Inhalt/KN X/D oor Entr y/Bedienung/Master/Sl ave Schalter setzen 83220-AP- xxx @ 19\mod_1310723320966_15.docx @ 107833 @ @
1. Station
Jumper to set the address of default outdoor station.
2. X100 X10 X1
Jumper to set the address of the indoor station.
EXAMPLE: setting address 024.
3. Master /Slave function
Only one indoor station in each apartment must be set as "Master" (Jumper should
be set as 'M/S on'). All additional indoor stations in the same apartment must be
set as "Slave" (Jumper should be set as 'M/S off').
4. Terminal resistor
In video installations or mixed audio and video installations, the Jumper must be
set as 'RC on' on the last device of the line.
5. a b = Bus connection
= Door bell connection
DC GND = Additional power supply Pos: 75 /Busch-Jaeg er (Neustr uktur)/Modul- Struktur /Online-Dokumentati on/Steuermodul e - Onli ne-D okumentation (--> Für all e D okumente <--)/++++++++++++ Seitenumbruch ++++++++++++ @ 9\mod_1268898668093_0.docx @ 52149 @ @ 1

ABB-Welcome
| — 35 —
Pos: 76 /DinA4 - Anl eitungen Onli ne/Ueberschrif ten/1./Technische D aten @ 18\mod_1302615863001_15.docx @ 103416 @ 1 @ 1
5 Technical data Pos : 77 /DinA4 - Anl eitungen Onli ne/Inhalt/KN X/D oor Entr y/83220-AP- xxx/Technische D aten - 83220-AP- xxx @ 18\mod_1303212854559_15.docx @ 103705 @ @ 1
Designation Value
Display resolution: 480 x 272
Display size: 4.3”
Operating temperature -10° C - +55° C
Storage temperature -40° C – +70° C
Protection IP 30
Single-wire clamps 2 x 0.28 mm² – 2 x 0.75 mm²
Fine-wire clamps 2 x 0.28 mm² – 2 x 0.75 mm²
Bus voltage 20-30 V
Size 144 x 198 x 45 mm
Pos: 78 /Busch-Jaeg er (Neustr uktur)/Modul- Struktur /Online-Dokumentati on/Steuermodul e - Onli ne-D okumentation (--> Für all e D okumente <--)/++++++++++++ Seitenumbruch ++++++++++++ @ 9\mod_1268898668093_0.docx @ 52149 @ @ 1

ABB-Welcome
| — 36 —
Pos: 79 /Busch-Jaeg er (Neustr uktur)/Modul- Struktur /Online-Dokumentati on/Überschriften (--> Für alle D okumente <--)/1. Ebene/M - O/Montage / Installation @ 18\mod_1302613966111_15.doc x @ 103373 @ 1 @ 1
6 Mounting / Installation Pos : 80 /Busch-Jaeg er (Neustr uktur)/Modul- Struktur /Online-Dokumentati on/Sicherheit (--> Für alle Dokumente <--)/Warnhinweise/Sicherheit - Ni ederspannungs- und 230 V-Leitungen @ 18\mod_1302617821491_15.docx @ 103465 @ @ 1
Warning
Electric voltage!
Risk of death and fire due to electrical voltage of 100-240 V.
– Low-voltage and 100-240 V cables must not be installed together
in a flush-mounted socket!
In case of a short-circuit there is the danger of a 100-240 V load
on the low-voltage line.
Pos: 81 /Busch-Jaeg er (Neustr uktur)/Modul- Struktur /Online-Dokumentati on/Sicherheit (--> Für alle Dokumente <--)/Warnhinweise/Sicherheit - Fachkenntnisse @ 18\mod_1302774384017_15.docx @ 103564 @ 2 @ 1
6.1 Requirements for the electrician
Warning
Electric voltage!
Install the device only if you have the necessary electrical engineering
knowledge and experience.
• Incorrect installation endangers your life and that of the user of
the electrical system.
• Incorrect installation can cause serious damage to property, e.g.
due to fire.
The minimum necessary expert knowledge and requirements for the
installation are as follows:
• Apply the "five safety rules" (DIN VDE 0105, EN 50110):
1. Disconnect from power;
2. Secure against being re-connected;
3. Ensure there is no voltage;
4. Connect to earth;
5. Cover or barricade adjacent live parts.
• Use suitable personal protective clothing.
• Use only suitable tools and measuring devices.
• Check the type supply network (TN system, IT system, TT system)
to secure the following power supply conditions (classic
connection to ground, protective earthing, necessary additional
measures, etc.). Pos: 82 /DinA4 - Anl eitungen Onli ne/Inhalt/KN X/D oor Entr y/Montage/M ontagehinweise - Allgemein @ 19\mod_1310563670478_15.docx @ 107743 @ 2 @ 1

ABB-Welcome
| — 37 —
6.2 General installation instructions
• Terminate all branches of the wiring system via a connected bus device (e.g.,
indoor station, outdoor station, system device).
• Do not install the system controller directly next to the bell transformer and other
power supplies (to avoid interference).
• Do not install the wires of the system bus together with 100-240 V wires.
• Do not use common cables for the connecting wires of the door openers and wires
of the system bus.
• Avoid bridges between different cable types.
• Use only two wires for the system bus in a four-core or multi-core cable.
• When looping, never install the incoming and outgoing bus inside the same cable.
• Never install the internal and external bus inside the same cable. Pos: 83 /Busch-Jaeg er (Neustr uktur)/Modul- Struktur /Online-Dokumentati on/Steuermodul e - Onli ne-D okumentation (--> Für all e D okumente <--)/++++++++++++ Seitenumbruch ++++++++++++ @ 9\mod_1268898668093_0.docx @ 52149 @ @ 1

ABB-Welcome
| — 38 —
Pos: 84 /Busch-Jaeg er (Neustr uktur)/Modul- Struktur /Online-Dokumentati on/Überschriften (--> Für alle D okumente <--)/2. Ebene/M - O/Montage @ 18\mod_1302615960458_15.docx @ 103424 @ 2 @ 1
6.3 Mounting Pos : 85.1 /DinA4 - Anl eitungen Onli ne/Inhalt/KN X/DoorEntr y/83220-AP- xxx/M ontag e - M odul e/Montage - Montagedose -- 83220-AP- xxx @ 19\mod_1323250406848_15.docx @ 111098 @ @ 1
Recommended installation height
Dismantling
Open the housing of the panel by pulling the clamp at the bottom of the device.
Installation dimension

ABB-Welcome
| — 39 —
1. The bottom of the device has screw holes for fastening on the wall according to the
above dimension instructions.
2. In addition, the bottom of the device can be fixed to the existing flush-mounted box.
The dimension of the compatible flush-mounted box is shown in graphics above.
Wiring
Fix the bottom of the device and connect it in accordance with the graphics. The
insulated section of the cable end must not be longer than 10mm.
Settings
Set addresses of the preferred outdoor stations and the address of the indoor station on
the jumper (see chapter " Adjusting the device ").

ABB-Welcome
| — 40 —
Mounted on the wall
1. Fix the bottom of the device to the wall.
2. Latch the upper part of the device onto its bottom part. ; place the upper side of the
device on the lock-in lugs and then press the bottom side onto the bottom part of
the device until it is caught by the clamp.
Mounted with flush-mounted box
1. Fix the bottom of the device to the existing flush-mounted box.
2. Latch the upper part of the device onto its bottom part;place the upper side of the
device on the lock-in lugs and then press the bottom side onto the bottom part of
the device until it is caught by the clamp.

ABB-Welcome
| — 41 —
Mounted with desktop bracket
1. Fix the bottom of the device to the desktop bracket.
2. Latch the upper part of the device onto its bottom part;place the upper side of the
device on the lock-in lugs and then press the bottom side onto the bottom part of
the device until it is caught by the clamp.
The installation of the indoor station is now complete. Pos: 94 /Busch-Jaeg er (Neustr uktur)/Modul- Struktur /Online-Dokumentati on/Steuermodul e - Onli ne-D okumentation (--> Für all e D okumente <--)/++++++++++++ Seitenumbruch ++++++++++++ @ 9\mod_1268898668093_0.docx @ 52149 @ @ 1

ABB-Welcome
Pos: 95 /DinA4 - Anl eitungen Onli ne/Inhalt/KN X/D oor Entr y/Pr ojektier ung-Mer kblatt/Proj ekti erPos: 97 /Busch-Jaeger (Neus truktur)/M odul-Str uktur/Online-Dokumentation/R ückseiten (--> Für alle D okumente <--)/Rückseite - Busch-Jaeger - Allgemein @ 20\mod_1327320074886_15.docx @ 137103 @ @ 1
Notice === Ende der Liste für Textmar ke Backcover ===
We reserve the right to at all times make technical changes as well as changes in the
contents of this document without prior notice.
The detailed specifications agreed to at the time of ordering apply to all orders. ABB
accepts no responsibility for possible errors or incompleteness in this document.
We reserve all rights to this document and the topics and illustrations contained
therein. The document and its contents, or extracts thereof, must not be reproduced,
transmitted or reused by third parties without prior written consent by ABB.


