116
Oracle® Enterprise Performance Management System Security Administration Guide Release 11.1.2.2 Updated: June 2014

Oracle® Enterprise Performance ManagementSystem
Security Administration Guide
Release 11.1.2.2
Updated: June 2014

EPM System Security Administration Guide, 11.1.2.2
Copyright © 2005,2014, Oracle and/or its affiliates. All rights reserved.
Authors: EPM Information Development Team
Oracle and Java are registered trademarks of Oracle and/or its affiliates. Other names may be trademarks of their respectiveowners.
Intel and Intel Xeon are trademarks or registered trademarks of Intel Corporation. All SPARC trademarks are used underlicense and are trademarks or registered trademarks of SPARC International, Inc. AMD, Opteron, the AMD logo, and theAMD Opteron logo are trademarks or registered trademarks of Advanced Micro Devices. UNIX is a registered trademarkof The Open Group.
This software and related documentation are provided under a license agreement containing restrictions on use anddisclosure and are protected by intellectual property laws. Except as expressly permitted in your license agreement orallowed by law, you may not use, copy, reproduce, translate, broadcast, modify, license, transmit, distribute, exhibit,perform, publish, or display any part, in any form, or by any means. Reverse engineering, disassembly, or decompilationof this software, unless required by law for interoperability, is prohibited.
The information contained herein is subject to change without notice and is not warranted to be error-free. If you findany errors, please report them to us in writing.
If this is software or related documentation that is delivered to the U.S. Government or anyone licensing it on behalf ofthe U.S. Government, the following notice is applicable:
U.S. GOVERNMENT END USERS:
Oracle programs, including any operating system, integrated software, any programs installed on the hardware, and/ordocumentation, delivered to U.S. Government end users are "commercial computer software" pursuant to the applicableFederal Acquisition Regulation and agency-specific supplemental regulations. As such, use, duplication, disclosure,modification, and adaptation of the programs, including any operating system, integrated software, any programs installedon the hardware, and/or documentation, shall be subject to license terms and license restrictions applicable to the programs.No other rights are granted to the U.S. Government.
This software or hardware is developed for general use in a variety of information management applications. It is notdeveloped or intended for use in any inherently dangerous applications, including applications that may create a risk ofpersonal injury. If you use this software or hardware in dangerous applications, then you shall be responsible to take allappropriate fail-safe, backup, redundancy, and other measures to ensure its safe use. Oracle Corporation and its affiliatesdisclaim any liability for any damages caused by use of this software or hardware in dangerous applications.
This software or hardware and documentation may provide access to or information on content, products, and servicesfrom third parties. Oracle Corporation and its affiliates are not responsible for and expressly disclaim all warranties of anykind with respect to third-party content, products, and services. Oracle Corporation and its affiliates will not be responsiblefor any loss, costs, or damages incurred due to your access to or use of third-party content, products, or services.

Contents
Documentation Accessibility . . . . . . . . . . . . . . . . . . . . . . . . . . . . . . . . . . . . . . . . . . . . . . . . . . . . . . . . . . . 7
Documentation Feedback . . . . . . . . . . . . . . . . . . . . . . . . . . . . . . . . . . . . . . . . . . . . . . . . . . . . . . . . . . . . . 9
Chapter 1. About EPM System Security . . . . . . . . . . . . . . . . . . . . . . . . . . . . . . . . . . . . . . . . . . . . . . . . . . . 11
About EPM System Products . . . . . . . . . . . . . . . . . . . . . . . . . . . . . . . . . . . . . . . . . . . . . 11
Assumed Knowledge . . . . . . . . . . . . . . . . . . . . . . . . . . . . . . . . . . . . . . . . . . . . . . . . . . . 11
Security Infrastructure Components . . . . . . . . . . . . . . . . . . . . . . . . . . . . . . . . . . . . . . . 12
User Authentication . . . . . . . . . . . . . . . . . . . . . . . . . . . . . . . . . . . . . . . . . . . . . . . . . . . 12
Authentication Components . . . . . . . . . . . . . . . . . . . . . . . . . . . . . . . . . . . . . . . . . . 12
Default EPM System Single Sign-on . . . . . . . . . . . . . . . . . . . . . . . . . . . . . . . . . . . . . 13
Single Sign-on from Access Management Systems . . . . . . . . . . . . . . . . . . . . . . . . . . . 14
Provisioning (Role-Based Authorization) . . . . . . . . . . . . . . . . . . . . . . . . . . . . . . . . . . . . 16
Roles . . . . . . . . . . . . . . . . . . . . . . . . . . . . . . . . . . . . . . . . . . . . . . . . . . . . . . . . . . . 17
Users . . . . . . . . . . . . . . . . . . . . . . . . . . . . . . . . . . . . . . . . . . . . . . . . . . . . . . . . . . . 18
Groups . . . . . . . . . . . . . . . . . . . . . . . . . . . . . . . . . . . . . . . . . . . . . . . . . . . . . . . . . . 18
Chapter 2. SSL-Enabling EPM System Components . . . . . . . . . . . . . . . . . . . . . . . . . . . . . . . . . . . . . . . . . . . 19
Assumptions . . . . . . . . . . . . . . . . . . . . . . . . . . . . . . . . . . . . . . . . . . . . . . . . . . . . . . . . 19
Information Sources . . . . . . . . . . . . . . . . . . . . . . . . . . . . . . . . . . . . . . . . . . . . . . . . . . . 19
Location References . . . . . . . . . . . . . . . . . . . . . . . . . . . . . . . . . . . . . . . . . . . . . . . . . . . 20
About SSL-Enabling EPM System Products . . . . . . . . . . . . . . . . . . . . . . . . . . . . . . . . . . 20
Supported SSL Scenarios . . . . . . . . . . . . . . . . . . . . . . . . . . . . . . . . . . . . . . . . . . . . . . . . 21
Required Certificates . . . . . . . . . . . . . . . . . . . . . . . . . . . . . . . . . . . . . . . . . . . . . . . . . . . 21
Terminating SSL at the SSL Offloader . . . . . . . . . . . . . . . . . . . . . . . . . . . . . . . . . . . . . . . 22
Deployment Architecture . . . . . . . . . . . . . . . . . . . . . . . . . . . . . . . . . . . . . . . . . . . . 22
Assumptions . . . . . . . . . . . . . . . . . . . . . . . . . . . . . . . . . . . . . . . . . . . . . . . . . . . . . 23
Configuring EPM System . . . . . . . . . . . . . . . . . . . . . . . . . . . . . . . . . . . . . . . . . . . . 24
Testing the Deployment . . . . . . . . . . . . . . . . . . . . . . . . . . . . . . . . . . . . . . . . . . . . . 24
Full SSL Deployment of EPM System . . . . . . . . . . . . . . . . . . . . . . . . . . . . . . . . . . . . . . . 24
Deployment Architecture . . . . . . . . . . . . . . . . . . . . . . . . . . . . . . . . . . . . . . . . . . . . 24
Assumptions . . . . . . . . . . . . . . . . . . . . . . . . . . . . . . . . . . . . . . . . . . . . . . . . . . . . . 25
Configuring EPM System for Full SSL . . . . . . . . . . . . . . . . . . . . . . . . . . . . . . . . . . . 27
Contents iii

Terminating SSL at the Web Server . . . . . . . . . . . . . . . . . . . . . . . . . . . . . . . . . . . . . . . . 35
Deployment Architecture . . . . . . . . . . . . . . . . . . . . . . . . . . . . . . . . . . . . . . . . . . . . 35
Assumptions . . . . . . . . . . . . . . . . . . . . . . . . . . . . . . . . . . . . . . . . . . . . . . . . . . . . . 36
Configuring EPM System . . . . . . . . . . . . . . . . . . . . . . . . . . . . . . . . . . . . . . . . . . . . 36
Testing the Deployment . . . . . . . . . . . . . . . . . . . . . . . . . . . . . . . . . . . . . . . . . . . . . 37
Enabling Encryption for Financial Reporting Studio . . . . . . . . . . . . . . . . . . . . . . . . . . . . 37
SSL for Essbase . . . . . . . . . . . . . . . . . . . . . . . . . . . . . . . . . . . . . . . . . . . . . . . . . . . . . . . 37
Overview . . . . . . . . . . . . . . . . . . . . . . . . . . . . . . . . . . . . . . . . . . . . . . . . . . . . . . . . 37
Default Deployment . . . . . . . . . . . . . . . . . . . . . . . . . . . . . . . . . . . . . . . . . . . . . . . . 38
Required Certificates and Their Location . . . . . . . . . . . . . . . . . . . . . . . . . . . . . . . . . 39
Essbase and SSL-Enabled EPM System . . . . . . . . . . . . . . . . . . . . . . . . . . . . . . . . . . . 40
Installing and Deploying Essbase Components . . . . . . . . . . . . . . . . . . . . . . . . . . . . . 40
Using Trusted Third-Party CA Certificates for Essbase . . . . . . . . . . . . . . . . . . . . . . . 41
Establishing a Per-Session SSL Connection . . . . . . . . . . . . . . . . . . . . . . . . . . . . . . . . 45
Chapter 3. Enabling SSO with Security Agents . . . . . . . . . . . . . . . . . . . . . . . . . . . . . . . . . . . . . . . . . . . . . . 47
Supported SSO Methods . . . . . . . . . . . . . . . . . . . . . . . . . . . . . . . . . . . . . . . . . . . . . . . . 47
HTTP Header . . . . . . . . . . . . . . . . . . . . . . . . . . . . . . . . . . . . . . . . . . . . . . . . . . . . . 48
Custom Login Class . . . . . . . . . . . . . . . . . . . . . . . . . . . . . . . . . . . . . . . . . . . . . . . . 48
HTTP Authorization Header . . . . . . . . . . . . . . . . . . . . . . . . . . . . . . . . . . . . . . . . . . 49
Get Remote User from HTTP Request . . . . . . . . . . . . . . . . . . . . . . . . . . . . . . . . . . . 49
Single Sign-on from Oracle Access Manager . . . . . . . . . . . . . . . . . . . . . . . . . . . . . . . . . . 49
OracleAS Single Sign-on . . . . . . . . . . . . . . . . . . . . . . . . . . . . . . . . . . . . . . . . . . . . . . . . 51
Process Flow . . . . . . . . . . . . . . . . . . . . . . . . . . . . . . . . . . . . . . . . . . . . . . . . . . . . . . 51
Prerequisites . . . . . . . . . . . . . . . . . . . . . . . . . . . . . . . . . . . . . . . . . . . . . . . . . . . . . . 52
Enabling OSSO for EPM System . . . . . . . . . . . . . . . . . . . . . . . . . . . . . . . . . . . . . . . 53
Protecting EPM System Products for SSO . . . . . . . . . . . . . . . . . . . . . . . . . . . . . . . . . . . . 57
Resources to Protect . . . . . . . . . . . . . . . . . . . . . . . . . . . . . . . . . . . . . . . . . . . . . . . . 57
Resources to Unprotect . . . . . . . . . . . . . . . . . . . . . . . . . . . . . . . . . . . . . . . . . . . . . . 58
SiteMinder SSO . . . . . . . . . . . . . . . . . . . . . . . . . . . . . . . . . . . . . . . . . . . . . . . . . . . . . . 61
Process Flow . . . . . . . . . . . . . . . . . . . . . . . . . . . . . . . . . . . . . . . . . . . . . . . . . . . . . . 61
Special Considerations . . . . . . . . . . . . . . . . . . . . . . . . . . . . . . . . . . . . . . . . . . . . . . 62
Prerequisites . . . . . . . . . . . . . . . . . . . . . . . . . . . . . . . . . . . . . . . . . . . . . . . . . . . . . . 62
Enabling SiteMinder Web Agent . . . . . . . . . . . . . . . . . . . . . . . . . . . . . . . . . . . . . . . 62
Configuring the SiteMinder Policy Server . . . . . . . . . . . . . . . . . . . . . . . . . . . . . . . . . 63
Configuring SiteMinder Web Server to Forward Requests to the EPM System WebServer . . . . . . . . . . . . . . . . . . . . . . . . . . . . . . . . . . . . . . . . . . . . . . . . . . . . . . . . . . 64
Enabling SiteMinder in EPM System . . . . . . . . . . . . . . . . . . . . . . . . . . . . . . . . . . . . 64
Kerberos Single Sign-on . . . . . . . . . . . . . . . . . . . . . . . . . . . . . . . . . . . . . . . . . . . . . . . . 64
Overview . . . . . . . . . . . . . . . . . . . . . . . . . . . . . . . . . . . . . . . . . . . . . . . . . . . . . . . . 64
iv Contents
Support Limitations . . . . . . . . . . . . . . . . . . . . . . . . . . . . . . . . . . . . . . . . . . . . . . . . 65
Assumptions: Kerberos Environment . . . . . . . . . . . . . . . . . . . . . . . . . . . . . . . . . . . . 65
Kerberos SSO with WebLogic Server . . . . . . . . . . . . . . . . . . . . . . . . . . . . . . . . . . . . 66
WebLogic Server Procedures to Support Kerberos Authentication . . . . . . . . . . . . . . . 66
Configuring the EPM System for SSO . . . . . . . . . . . . . . . . . . . . . . . . . . . . . . . . . . . . . . . 74
Single Sign-on Options for Smart View . . . . . . . . . . . . . . . . . . . . . . . . . . . . . . . . . . . . . 75
Chapter 4. Using a Custom Authentication Module . . . . . . . . . . . . . . . . . . . . . . . . . . . . . . . . . . . . . . . . . . . 77
Overview . . . . . . . . . . . . . . . . . . . . . . . . . . . . . . . . . . . . . . . . . . . . . . . . . . . . . . . . . . . 77
Use-Case Examples and Limitations . . . . . . . . . . . . . . . . . . . . . . . . . . . . . . . . . . . . . . . . 79
Prerequisites . . . . . . . . . . . . . . . . . . . . . . . . . . . . . . . . . . . . . . . . . . . . . . . . . . . . . . . . . 79
Design and Coding Considerations . . . . . . . . . . . . . . . . . . . . . . . . . . . . . . . . . . . . . . . . 80
Search Order . . . . . . . . . . . . . . . . . . . . . . . . . . . . . . . . . . . . . . . . . . . . . . . . . . . . . 80
User Directories and Custom Authentication Module . . . . . . . . . . . . . . . . . . . . . . . . 83
CSSCustomAuthenticationIF Java Interface . . . . . . . . . . . . . . . . . . . . . . . . . . 84
Deploying the Custom Authentication Module . . . . . . . . . . . . . . . . . . . . . . . . . . . . . . . . 84
Overview of Steps . . . . . . . . . . . . . . . . . . . . . . . . . . . . . . . . . . . . . . . . . . . . . . . . . . 85
Updating Settings in Shared Services . . . . . . . . . . . . . . . . . . . . . . . . . . . . . . . . . . . . 85
Testing Your Deployment . . . . . . . . . . . . . . . . . . . . . . . . . . . . . . . . . . . . . . . . . . . . 86
Chapter 5. Guidelines for Securing EPM System . . . . . . . . . . . . . . . . . . . . . . . . . . . . . . . . . . . . . . . . . . . . . 89
Implementing SSL . . . . . . . . . . . . . . . . . . . . . . . . . . . . . . . . . . . . . . . . . . . . . . . . . . . . 89
Changing the Admin Password . . . . . . . . . . . . . . . . . . . . . . . . . . . . . . . . . . . . . . . . . . . 89
Regenerating Encryption Keys . . . . . . . . . . . . . . . . . . . . . . . . . . . . . . . . . . . . . . . . . . . . 90
Changing Database Passwords . . . . . . . . . . . . . . . . . . . . . . . . . . . . . . . . . . . . . . . . . . . . 90
Securing Cookies . . . . . . . . . . . . . . . . . . . . . . . . . . . . . . . . . . . . . . . . . . . . . . . . . . . . . 91
Reducing SSO Token Timeout . . . . . . . . . . . . . . . . . . . . . . . . . . . . . . . . . . . . . . . . . . . . 91
Reviewing Security Reports . . . . . . . . . . . . . . . . . . . . . . . . . . . . . . . . . . . . . . . . . . . . . . 91
Customizing Authentication System for Strong Authentication . . . . . . . . . . . . . . . . . . . . 92
Turning off Detailed Financial Management Error Messages . . . . . . . . . . . . . . . . . . . . . . 92
Encrypting UDL File (Financial Management) . . . . . . . . . . . . . . . . . . . . . . . . . . . . . . . . 92
Disabling EPM Workspace Debugging Utilities . . . . . . . . . . . . . . . . . . . . . . . . . . . . . . . . 93
Changing Default Web Server Error Pages . . . . . . . . . . . . . . . . . . . . . . . . . . . . . . . . . . . 93
Support for Third-Party Software . . . . . . . . . . . . . . . . . . . . . . . . . . . . . . . . . . . . . . . . . 93
Appendix A. Custom Authentication Sample Code . . . . . . . . . . . . . . . . . . . . . . . . . . . . . . . . . . . . . . . . . . . 95
Sample Code 1 . . . . . . . . . . . . . . . . . . . . . . . . . . . . . . . . . . . . . . . . . . . . . . . . . . . . . . . 95
Sample Code 2 . . . . . . . . . . . . . . . . . . . . . . . . . . . . . . . . . . . . . . . . . . . . . . . . . . . . . . . 96
Data File for Sample Code 2 . . . . . . . . . . . . . . . . . . . . . . . . . . . . . . . . . . . . . . . . . . . . . 98
Contents v
Appendix B. Implementing a Custom Login Class . . . . . . . . . . . . . . . . . . . . . . . . . . . . . . . . . . . . . . . . . . . . 99
Custom Login Class Sample Code . . . . . . . . . . . . . . . . . . . . . . . . . . . . . . . . . . . . . . . . . 99
Deploying a Custom Login Class . . . . . . . . . . . . . . . . . . . . . . . . . . . . . . . . . . . . . . . . . 102
Appendix C. Using the Update Native Directory Utility . . . . . . . . . . . . . . . . . . . . . . . . . . . . . . . . . . . . . . . . 103
About the Update Native Directory Utility . . . . . . . . . . . . . . . . . . . . . . . . . . . . . . . . . . 103
Update Native Directory Utility Installation Location . . . . . . . . . . . . . . . . . . . . . . . . . . 103
Update Native Directory Utility Options . . . . . . . . . . . . . . . . . . . . . . . . . . . . . . . . . . . 103
Using Update Native Directory Utility . . . . . . . . . . . . . . . . . . . . . . . . . . . . . . . . . . . . . 104
Updating the Update Native Directory Utility Settings . . . . . . . . . . . . . . . . . . . . . . . 104
Identifying Stale Data . . . . . . . . . . . . . . . . . . . . . . . . . . . . . . . . . . . . . . . . . . . . . . 104
Deleting Stale Data . . . . . . . . . . . . . . . . . . . . . . . . . . . . . . . . . . . . . . . . . . . . . . . . 105
Log Files Generated by Update Native Directory Utility . . . . . . . . . . . . . . . . . . . . . . . . . 106
Appendix D. Migrating Users and Groups Across User Directories . . . . . . . . . . . . . . . . . . . . . . . . . . . . . . . . 107
Overview . . . . . . . . . . . . . . . . . . . . . . . . . . . . . . . . . . . . . . . . . . . . . . . . . . . . . . . . . . 107
Prerequisites . . . . . . . . . . . . . . . . . . . . . . . . . . . . . . . . . . . . . . . . . . . . . . . . . . . . . . . . 107
Migration Procedure . . . . . . . . . . . . . . . . . . . . . . . . . . . . . . . . . . . . . . . . . . . . . . . . . . 108
Export Native Directory Data . . . . . . . . . . . . . . . . . . . . . . . . . . . . . . . . . . . . . . . . 108
Prepare EPM System for Migration . . . . . . . . . . . . . . . . . . . . . . . . . . . . . . . . . . . . 109
Restart EPM System . . . . . . . . . . . . . . . . . . . . . . . . . . . . . . . . . . . . . . . . . . . . . . . 110
Edit Import Files . . . . . . . . . . . . . . . . . . . . . . . . . . . . . . . . . . . . . . . . . . . . . . . . . . 110
Import Updated Data . . . . . . . . . . . . . . . . . . . . . . . . . . . . . . . . . . . . . . . . . . . . . . 110
Run Update Native Directory Utility . . . . . . . . . . . . . . . . . . . . . . . . . . . . . . . . . . . 111
Product-Specific Updates . . . . . . . . . . . . . . . . . . . . . . . . . . . . . . . . . . . . . . . . . . . . . . 111
Planning . . . . . . . . . . . . . . . . . . . . . . . . . . . . . . . . . . . . . . . . . . . . . . . . . . . . . . . 111
Financial Management . . . . . . . . . . . . . . . . . . . . . . . . . . . . . . . . . . . . . . . . . . . . . 111
Reporting and Analysis . . . . . . . . . . . . . . . . . . . . . . . . . . . . . . . . . . . . . . . . . . . . . 112
Glossary . . . . . . . . . . . . . . . . . . . . . . . . . . . . . . . . . . . . . . . . . . . . . . . . . . . . . . . . . . . . . . . . . . . . . . . 113
vi Contents

Documentation Accessibility
For information about Oracle's commitment to accessibility, visit the Oracle Accessibility Program website athttp://www.oracle.com/pls/topic/lookup?ctx=acc&id=docacc.
Access to Oracle SupportOracle customers have access to electronic support through My Oracle Support. For information, visit http://www.oracle.com/pls/topic/lookup?ctx=acc&id=info or visit http://www.oracle.com/pls/topic/lookup?ctx=acc&id=trs if you are hearing impaired.
7

8 Documentation Accessibility

Documentation Feedback
Send feedback on this documentation to: [email protected]
Follow EPM Information Development on these social media sites:
LinkedIn - http://www.linkedin.com/groups?gid=3127051&goback=.gmp_3127051
Twitter - http://twitter.com/hyperionepminfo
Facebook - http://www.facebook.com/pages/Hyperion-EPM-Info/102682103112642
Google+ - https://plus.google.com/106915048672979407731/#106915048672979407731/posts
YouTube - http://www.youtube.com/user/OracleEPMWebcasts
9

10 Documentation Feedback

1About EPM System Security
In This Chapter
About EPM System Products.. . . . . . . . . . . . . . . . . . . . . . . . . . . . . . . . . . . . . . . . . . . . . . . . . . . . . . . . . . . . . . . . . . . . . . . . . . . . .11
Assumed Knowledge... . . . . . . . . . . . . . . . . . . . . . . . . . . . . . . . . . . . . . . . . . . . . . . . . . . . . . . . . . . . . . . . . . . . . . . . . . . . . . . . . . . . .11
Security Infrastructure Components ... . . . . . . . . . . . . . . . . . . . . . . . . . . . . . . . . . . . . . . . . . . . . . . . . . . . . . . . . . . . . . . . . . . .12
User Authentication ... . . . . . . . . . . . . . . . . . . . . . . . . . . . . . . . . . . . . . . . . . . . . . . . . . . . . . . . . . . . . . . . . . . . . . . . . . . . . . . . . . . . . .12
Provisioning (Role-Based Authorization).. . . . . . . . . . . . . . . . . . . . . . . . . . . . . . . . . . . . . . . . . . . . . . . . . . . . . . . . . . . . . . . .16
About EPM System ProductsOracle Enterprise Performance Management System products form a comprehensiveenterprisewide system that integrates modular suites of financial management and planningapplications with the most comprehensive business intelligence capabilities for reporting andanalysis. Major components of EPM System products:
l Oracle Hyperion Foundation Services
l Oracle Essbase
l Oracle Hyperion Financial Management
l Oracle Hyperion Planning
l Oracle Hyperion Reporting and Analysis
For information about the products and components in each of these product families, see OracleEnterprise Performance Management System Installation Start Here.
Assumed KnowledgeThis guide is for administrators who configure, secure, and manage EPM System products. Itassumes the following knowledge:
l A strong understanding of your organization's security infrastructure, including thefollowing:
m Directory servers; for example, Oracle Internet Directory, Sun Java System DirectoryServer, and Microsoft Active Directory
m Use of Secure Socket Layer (SSL) to secure communication channels
About EPM System Products 11
m Access Management Systems, for example, Oracle Access Manager, and SiteMinder
m Single Sign-On (SSO) infrastructure; for example, Kerberos.
l Knowledge of EPM System security concepts that are relevant to your organization.
Security Infrastructure ComponentsEPM System integrates a number of security components to ensure robust application security.When integrated into a secure infrastructure, EPM System delivers a highly secure suite ofapplications that ensures data and access security. The infrastructure components that you canuse to secure EPM System include:
l An optional access management system; for example, Oracle Access Manager to provideSSO access to EPM System products
l Use of an integrated SSO infrastructure; for example, Kerberos.
You can use Kerberos authentication with the access management system (SiteMinder) toensure that Windows users can transparently log into SiteMinder and EPM System products.
l Use of Secure Socket Layer (SSL) to secure communication channels among EPM Systemproducts and clients
User AuthenticationUser authentication enables single sign-on (SSO) functionality across EPM System products byvalidating the login information of each user to determine authenticated users. Userauthentication, along with product-specific authorization, grants the user access to EPM Systemproducts. The process of granting authorization is called provisioning.
Authentication ComponentsThe following sections describe the components that support SSO:
l “Native Directory” on page 12
l “External User Directories” on page 13
Native DirectoryNative Directory refers to the relational database that Oracle Hyperion Shared Services uses tosupport provisioning and to store seed data such as default user accounts.
Native Directory functions:
l Maintain and manage the default EPM System user accounts
l Store all EPM System provisioning information (relationships among users, groups, androles)
12 About EPM System Security
Native Directory is accessed and managed using Oracle Hyperion Shared Services Console. See“Managing Native Directory” in the Oracle Enterprise Performance Management System User andRole Security Guide.
External User DirectoriesUser directories refer to corporate user and identity management systems that are compatiblewith EPM System products.
EPM System products are supported on several user directories, including LDAP-based userdirectories; for example, Oracle Internet Directory, Sun Java System Directory Server (formerlySunONE Directory Server), and Microsoft Active Directory. Relational databases also aresupported as user directories. User directories other than Native Directory are referred to asexternal user directories throughout this document. See Oracle Enterprise PerformanceManagement Products—Supported Platforms Matrices for a list of supported user directories.
From Shared Services Console, you can configure many external user directories as the sourcefor EPM System users and groups. Each EPM System user must have a unique account in oneof the configured user directories. Generally, EPM System users are assigned to groups tofacilitate provisioning.
Default EPM System Single Sign-onEPM System support SSO across EPM System web applications by allowing authenticated usersfrom an application to seamlessly navigate to other applications without reentering credentials.SSO is implemented by integrating a common security environment that handles userauthentication and provisioning (role-based authorization) across EPM System products.
The default SSO process is depicted in the following illustration.
User Authentication 13

1. Through a browser, users access a EPM System product login screen and enter user namesand passwords.
The EPM System product queries the configured user directories (including NativeDirectory) to verify user credentials. Upon finding a matching user account in a userdirectory, the search is terminated, and the user's information is returned to the EPM Systemproduct.
Access is denied if a user account is not found in any configured user directory.
2. Using the retrieved user information, the EPM System product queries Native Directory toobtain provisioning details for the user.
3. EPM System product checks the Access Control List (ACL) in the product to determine theapplication artifacts that the user can access.
Upon receiving provisioning information from Native Directory, the EPM System product ismade available to the user. At this point, SSO is enabled for all EPM System products for whichthe user is provisioned.
Single Sign-on from Access Management SystemsTo further secure EPM System products, you can implement a supported access managementsystem such as Oracle Access Manager or SiteMinder, which can provide authenticated usercredentials to EPM System products and control access based on predefined access privileges.
SSO from security agents is available for EPM System web applications only. In this scenario,EPM System products use the user information provided by the security agent to determineaccess permissions of users. To enhance security, Oracle recommends that direct access to theservers be blocked by firewalls so that all requests are routed through an SSO portal.
14 About EPM System Security
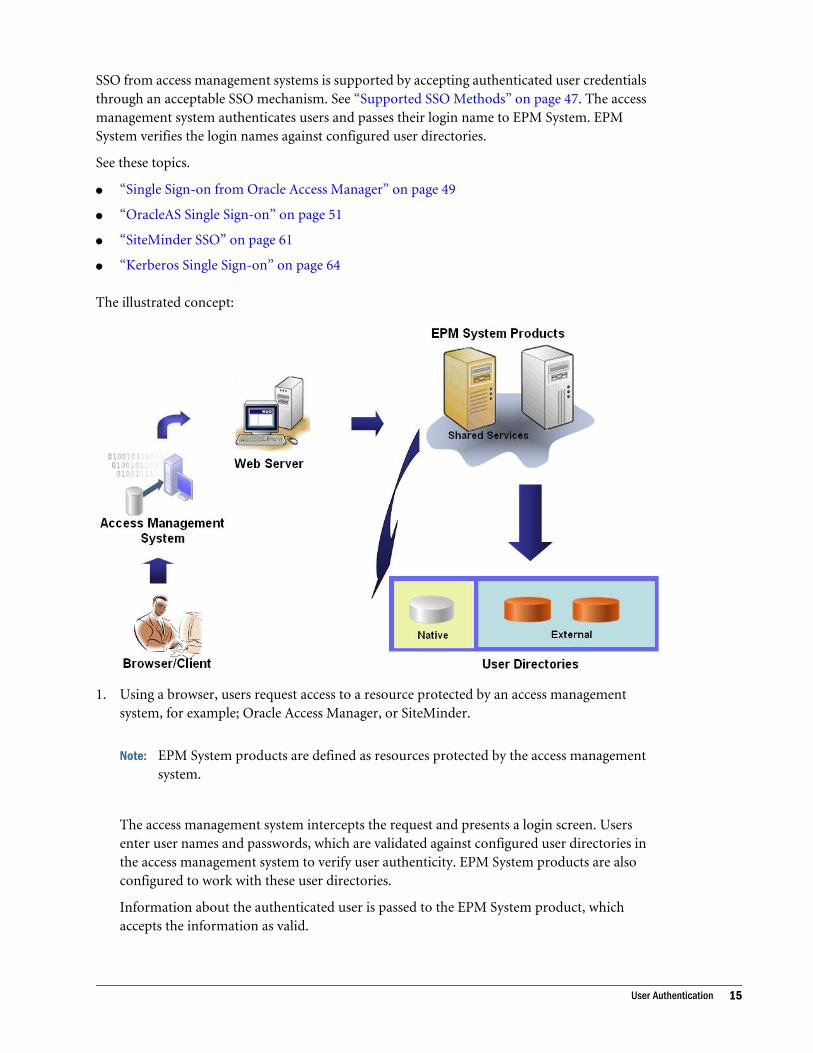
SSO from access management systems is supported by accepting authenticated user credentialsthrough an acceptable SSO mechanism. See “Supported SSO Methods” on page 47. The accessmanagement system authenticates users and passes their login name to EPM System. EPMSystem verifies the login names against configured user directories.
See these topics.
l “Single Sign-on from Oracle Access Manager” on page 49
l “OracleAS Single Sign-on” on page 51
l “SiteMinder SSO” on page 61
l “Kerberos Single Sign-on” on page 64
The illustrated concept:
1. Using a browser, users request access to a resource protected by an access managementsystem, for example; Oracle Access Manager, or SiteMinder.
Note: EPM System products are defined as resources protected by the access managementsystem.
The access management system intercepts the request and presents a login screen. Usersenter user names and passwords, which are validated against configured user directories inthe access management system to verify user authenticity. EPM System products are alsoconfigured to work with these user directories.
Information about the authenticated user is passed to the EPM System product, whichaccepts the information as valid.
User Authentication 15

The access management system passes the user's login name (value of Login Attribute)to the EPM System product using an acceptable SSO mechanism. See “Supported SSOMethods” on page 47.
2. To verify user credentials, the EPM System product tries to locate the user in a user directory.If a matching user account is found, user information is returned to the EPM Systemproduct. EPM System security sets the SSO token that enables SSO across EPM Systemproducts.
3. Using the retrieved user information, the EPM System product queries the Native Directoryto obtain provisioning details for the user.
Upon receiving user provisioning information, the EPM System product is made availableto the user. SSO is enabled for all EPM System products for which the user is provisioned.
Provisioning (Role-Based Authorization)EPM System security determines user access to applications using the concept of roles. Roles arepermissions that determine user access to application functions. Some EPM System productsenforce object-level ACLs to further refine user access to their artifacts, such as reports andmembers.
Each EPM System product provides several default roles tailored to various business needs. Eachapplication belonging to an EPM System product inherits these roles. Predefined roles from theapplications registered with Shared Services are available from Shared Services Console. Youmay also create additional roles that aggregate the default roles to suit specific requirements.These roles are used for provisioning. The process of granting users and groups specific rolesbelonging to EPM System applications and their resources is called provisioning.
Native Directory and configured user directories are sources for user and group information forthe provisioning process. You can browse and provision users and groups from all configureduser directories from Shared Services Console. You can also use application-specific aggregatedroles created in Native Directory in the provisioning process.
An illustrated overview of the authorization process:
16 About EPM System Security

1. After a user is authenticated, EPM System product queries user directories to determine theuser's groups.
2. The EPM System product uses group and user information to retrieve the user's provisioningdata from Shared Services. The product uses this data to determine which resources a usercan access.
Product-specific provisioning tasks, such as setting product-specific access control, arecompleted for each product. This data is combined with provisioning data to determine theproduct access for users.
Role-based provisioning of EPM System products uses these concepts.
RolesA role is a construct (similar to an access control list) that defines the access permissions grantedto users and groups to perform functions on EPM System resources. It is a combination ofresource or resource types (what users can access, for example, a report) and actions that userscan perform on the resource (for example, view and edit).
Access to EPM System application resources is restricted. Users can access them only after a rolethat provides access is assigned to the user or to the group to which the user belongs. Accessrestrictions based on roles enable administrators to control and manage application access.
Global RolesGlobal roles, which are Shared Services roles that span multiple products, enable users to performcertain tasks across EPM System products. For example, the Shared Services Administrator canprovision users for all EPM System applications.
Provisioning (Role-Based Authorization) 17
Predefined RolesPredefined roles are built-in roles in EPM System products. You cannot delete them. Eachapplication instance belonging to an EPM System product inherits the predefined roles of theproduct. These roles, for each application, are registered with Shared Services when you createthe application.
Aggregated RolesAggregated roles, also known as custom roles, aggregate multiple predefined roles belonging toan application. An aggregated role can contain other aggregated roles. For example, a SharedServices Administrator or Provisioning Manager can create an aggregated role that combinesthe Planner and View User roles of a Planning application. Aggregating roles can simplify theadministration of applications that has several granular roles. Global Shared Services roles canbe included in aggregated roles. You cannot create an aggregated role that spans applications orproducts.
UsersUser directories store information about the users who can access EPM System products. Boththe authentication and the authorization processes use user information. You can create andmanage Native Directory users only from Shared Services Console.
Users from all configured user directories are visible from Shared Services Console. These userscan be individually provisioned to grant access rights on the EPM System applications registeredwith Shared Services. Oracle does not recommend provisioning individual users.
GroupsGroups are containers for users or other groups. You can create and manage Native Directorygroups from Shared Services Console. Groups from all configured user directories are displayedin Shared Services Console. You can provision these groups to grant permissions for EPM Systemproducts registered with Shared Services.
18 About EPM System Security

2SSL-Enabling EPM System
Components
In This Chapter
Assumptions... . . . . . . . . . . . . . . . . . . . . . . . . . . . . . . . . . . . . . . . . . . . . . . . . . . . . . . . . . . . . . . . . . . . . . . . . . . . . . . . . . . . . . . . . . . . . .19
Information Sources ... . . . . . . . . . . . . . . . . . . . . . . . . . . . . . . . . . . . . . . . . . . . . . . . . . . . . . . . . . . . . . . . . . . . . . . . . . . . . . . . . . . . .19
Location References ... . . . . . . . . . . . . . . . . . . . . . . . . . . . . . . . . . . . . . . . . . . . . . . . . . . . . . . . . . . . . . . . . . . . . . . . . . . . . . . . . . . . .20
About SSL-Enabling EPM System Products .. . . . . . . . . . . . . . . . . . . . . . . . . . . . . . . . . . . . . . . . . . . . . . . . . . . . . . . . . . . .20
Supported SSL Scenarios ... . . . . . . . . . . . . . . . . . . . . . . . . . . . . . . . . . . . . . . . . . . . . . . . . . . . . . . . . . . . . . . . . . . . . . . . . . . . . . .21
Required Certificates ... . . . . . . . . . . . . . . . . . . . . . . . . . . . . . . . . . . . . . . . . . . . . . . . . . . . . . . . . . . . . . . . . . . . . . . . . . . . . . . . . . . .21
Terminating SSL at the SSL Offloader.. . . . . . . . . . . . . . . . . . . . . . . . . . . . . . . . . . . . . . . . . . . . . . . . . . . . . . . . . . . . . . . . . . .22
Full SSL Deployment of EPM System .... . . . . . . . . . . . . . . . . . . . . . . . . . . . . . . . . . . . . . . . . . . . . . . . . . . . . . . . . . . . . . . . .24
Terminating SSL at the Web Server .. . . . . . . . . . . . . . . . . . . . . . . . . . . . . . . . . . . . . . . . . . . . . . . . . . . . . . . . . . . . . . . . . . . . .35
Enabling Encryption for Financial Reporting Studio... . . . . . . . . . . . . . . . . . . . . . . . . . . . . . . . . . . . . . . . . . . . . . . . . . .37
SSL for Essbase ... . . . . . . . . . . . . . . . . . . . . . . . . . . . . . . . . . . . . . . . . . . . . . . . . . . . . . . . . . . . . . . . . . . . . . . . . . . . . . . . . . . . . . . . . .37
Assumptionsl You have determined the deployment topology and identified the communication links that
are to be secured using SSL.
l You have obtained the required certificates from a Certificate Authority (CA), either a well-known CA or your own, or created self-signed certificates. See “Required Certificates” onpage 21.
l You are familiar with SSL concepts and procedures such as importing certificates.
See “Information Sources” on page 19 for a list of reference documents.
Information SourcesSSL-enabling EPM System requires that you prepare components such as the application server,web server, databases, and user directories to communicate using SSL. This document assumesthat you are familiar with the tasks involved in SSL-enabling these components.
l Oracle WebLogic Server: See “Configuring SSL” in the Securing WebLogic Server Guide.
l Oracle HTTP Server: See the following topics in the Oracle HTTP Server Administrator'sGuide:
m Managing Security
Assumptions 19
m Enabling SSL for Oracle HTTP Server
l User Directories: See the documentation from the user directory vendor. Useful links:
m Oracle Internet Directory: See Oracle Internet Directory Administrator's Guide
m Sun Java System Directory Server: See “Directory Server Security” in the Sun Java SystemDirectory Server Administration Guide
m Active Directory: See these documents:
o Microsoft Windows Server 2008 Active Directory documentation
o Microsoft Windows Server 2003 Active Directory documentation
m Novell eDirectory: Novell eDirectory documentation
l Databases: See the documentation from the database vendor.
l Internet Information Services: See How to Implement SSL in IIS.
Location ReferencesThis document refers to the following installation and deployment locations:
l MIDDLEWARE_HOME refers to the location of middleware components such as WebLogicServer, and, optionally, one or more EPM_ORACLE_HOME. The MIDDLEWARE_HOME is definedduring EPM System product installation. The default MIDDLEWARE_HOME directory isOracle/Middleware.
l EPM_ORACLE_HOME refers to the installation directory containing the files required tosupport EPM System products. EPM_ORACLE_HOME resides within MIDDLEWARE_HOME. Thedefault EPM_ORACLE_HOME is MIDDLEWARE_HOME/EPMSystem11R1; for example,Oracle/Middleware/EPMSystem11R1.
EPM System products are installed in the EPM_ORACLE_HOME/products directory; forexample, Oracle/Middleware/EPMSystem11R1/products.
Additionally, during EPM System product configuration, some products deploycomponents to MIDDLEWARE_HOME/user_projects/epmsystem1; for example,Oracle/Middleware/user_projects/epmsystem1.
l EPM_ORACLE_INSTANCE denotes a location that is defined during the configuration processwhere some products deploy components. The default location ofEPM_ORACLE_INSTANCE is MIDDLEWARE_HOME/user_projects/epmsystem1; forexample, Oracle/Middleware/user_projects/epmsystem1.
About SSL-Enabling EPM System ProductsThe EPM System deployment process automatically deploys Oracle's EPM System products towork in both SSL and non-SSL modes.
While specifying the common setting for EPM System, you specify whether to SSL-enable allserver-to-server communication in your deployment.
20 SSL-Enabling EPM System Components

Selecting SSL settings during the deployment process does not automatically configure yourenvironment for SSL. It only sets a flag in the Oracle Hyperion Shared Services Registry toindicate that all EPM System components that use the Shared Services Registry must use thesecure protocol (HTTPS) for server-to-server communication. You must complete additionalprocedures to SSL-enable your environment. These procedures are discussed in this document.
Supported SSL ScenariosThe following SSL scenarios are supported:
l SSL termination at the SSL offloader. See “Terminating SSL at the SSL Offloader” on page22.
l Full SSL deployment. See “Full SSL Deployment of EPM System” on page 24.
l SSL termination at the web server. See “Terminating SSL at the Web Server” on page 35.
Note: This document assumes that you are using WebLogic Server to host web applications. Ifyou are using WebSphere, refer to WebSphere documentation for information on SSL-enabling WebSphere application server and IBM HTTP Server plug-in.
Required CertificatesSSL communication uses certificates to establish trust between components. Oraclerecommends that you use certificates from well-known third-party CAs to SSL-enable EPMSystem in a production environment.
Note: EPM System supports the use of wildcard certificates, which can secure multiplesubdomains with one SSL certificate. Using a wildcard certificate can reduce managementtime and cost.
If you are using wildcard certificates to encrypt communication, you must disable host-name verification in WebLogic Server.
You require the following certificates for each server that hosts EPM System components:
l A root CA certificate.
Supported SSL Scenarios 21

Note: You need not install a root CA certificate in the Java keystore if you are usingcertificates from a well-known third-party CA whose root certificate is alreadyinstalled in the Java keystore.
Firefox and Internet Explorer are preloaded with certificates of well-known third-party CAs. If you are acting as your own CA, you must import your CA root certificateinto the keystore used by the clients accessed from such browsers. For example; if youare acting as your own CA, Oracle Hyperion Web Analysis clients cannot establishan SSL handshake with the server if your CA root certificate is not available to thebrowser from which Web Analysis is accessed.
l Signed certificates for each Oracle HTTP Server in your deployment.
l A signed certificate for WebLogic Server host machine. Managed servers on this machinecan also use this certificate.
l Two certificates for the SSL offloader/load balancer. One of these certificates is for externalcommunication and the other is for internal communication.
Terminating SSL at the SSL Offloader
Subtopics
l Deployment Architecture
l Assumptions
l Configuring EPM System
l Testing the Deployment
Deployment ArchitectureIn this scenario, SSL is used to secure the communication link between EPM System clients (forexample, a browser) and SSL Offloader. The illustrated concept:
22 SSL-Enabling EPM System Components

Assumptions
Subtopics
l SSL Offloader and Load Balancer
l Virtual Hosts
SSL Offloader and Load BalancerA fully configured SSL offloader with a load balancer must be present in the deploymentenvironment.
The load balancer must be configured to forward all requests received by the virtual hosts toOracle HTTP Servers.
Virtual HostsSSL terminated at SSL offloader configuration uses two server aliases; for example,epm.myCompany.com and empinternal.myCompany.com, on the SSL offloader/loadbalancer, one for external communication between the offloader and browsers, and the otherfor internal communication among EPM System servers. Ensure that the server aliases point tothe IP address of the machine, and that they are resolvable through DNS.
A signed certificate to support external communication between the offloader and browsers(through epm.myCompany.com) must be installed on the offloader/load balancer.
Terminating SSL at the SSL Offloader 23
Configuring EPM System
The default deployment of EPM System components supports SSL termination at the SSLoffloader. No additional action is required.
While configuring EPM System, ensure that the logical web applications point to the alias (forexample, empinternal.myCompany.com) that was created for internal communication. Seethe following information sources to install and configure EPM System:
l Oracle Enterprise Performance Management System Installation and Configuration Guide
l Oracle Enterprise Performance Management System Installation Start Here
l Oracle Enterprise Performance Management System Installation and ConfigurationTroubleshooting Guide
Testing the DeploymentAfter completing the deployment process, verify that everything works by connecting to thesecure Oracle Hyperion Enterprise Performance Management Workspace URL:
https://virtual_host_external:SSL_PORT/workspace/index.jsp
For example, https://epm.myCompany.com:443/workspace/index.jsp where 443 is theSSL port.
Full SSL Deployment of EPM System
Subtopics
l Deployment Architecture
l Assumptions
l Configuring EPM System for Full SSL
Deployment ArchitectureIn full SSL mode, communication across all securable channels is secured using SSL. This EPMSystem deployment scenario is the most secure.
The illustrated concept:
24 SSL-Enabling EPM System Components

Note: Not all EPM System components can be SSL-enabled. Typically, back-end servers – forexample, Oracle Hyperion Strategic Finance Server, and Financial Management Server –cannot be SSL-enabled.
Assumptions
Subtopics
l Databases
l EPM System
l SSL Offloader and Load Balancer
DatabasesThe database servers and clients are SSL-enabled. See your database documentation forinformation on SSL-enabling the database server and client.
Full SSL Deployment of EPM System 25

EPM SystemEPM System components, including WebLogic Server and Oracle HTTP Server, are installedand deployed. Further, your EPM System environment has been tested to ensure that everythingis working in non-SSL mode. See the following information sources:
l Oracle Enterprise Performance Management System Installation and Configuration Guide
l Oracle Enterprise Performance Management System Installation Start Here
l Oracle Enterprise Performance Management System Installation and ConfigurationTroubleshooting Guide
If you plan to SSL-enable the database connections, during the configuration process, you mustselect the Advanced Options link in each database configuration screen, and then specify therequired settings, which include the following:
l Select Use secure connection to the database (SSL) and enter a secure database URL; forexample, jdbc:oracle:thin:@(DESCRIPTION=(ADDRESS=(PROTOCOL=TCPS)(HOST=myDBhost)(PORT=1529)(CONNECT_DATA=(SERVICE
NAME=myDBhost.myCompany.com)))
l Trusted Keystore
l Trusted Keystore Password
See the Oracle Enterprise Performance Management System Installation and ConfigurationGuide for details.
SSL Offloader and Load BalancerA fully configured SSL offloader with a load balancer must be present in the deploymentenvironment.
26 SSL-Enabling EPM System Components
Full SSL configuration uses two server aliases, for example, epm.myCompany.com andempinternal.myCompany.com, on the SSL offloader. One is for for external communicationbetween the offloader and browsers, and the other is for internal communication among EPMSystem servers. Ensure that the server aliases point to the IP address of the machine, and thatthey are resolvable through DNS.
The load balancer must be configured to forward all requests received by the virtual hosts toOracle HTTP Servers.
The two signed certificates—one to support external communication between the offloader andbrowsers (through epm.myCompany.com), and the other to support internal communication(through empinternal.myCompany.com) among applications—must be installed on theoffloader/load balancer. Oracle recommends that these certificates be tied to server aliases toprevent the exposure of server names and to enhance security.
Configuring EPM System for Full SSL
Subtopics
l Reconfiguring EPM System Common Settings
l Optional: Installing Root CA Certificate for WebLogic Server
l Installing Certificate on the WebLogic Server
l Configuring WebLogic Server
l Oracle HTTP Server Procedures
l Restarting Servers and EPM System
l Testing the Deployment
l Configuring SSL-enabled External User Directories
Reconfiguring EPM System Common SettingsDuring this process, you select the settings that force EPM System components to use SSLcommunication.
ä To reconfigure EPM System for SSL:
1 Launch Oracle Hyperion Enterprise Performance Management System Configurator.
2 Clear Uncheck All.
3 Expand Hyperion Foundation configuration task, and then select Configure Common Settings.
4 Click Next until Configure Common Settings is displayed.
5 In the Configure Common Settings screen, select settings:
Caution! Before selecting the settings to use SSL to communicate with the email server,ensure that the email server is configured for SSL.
Full SSL Deployment of EPM System 27
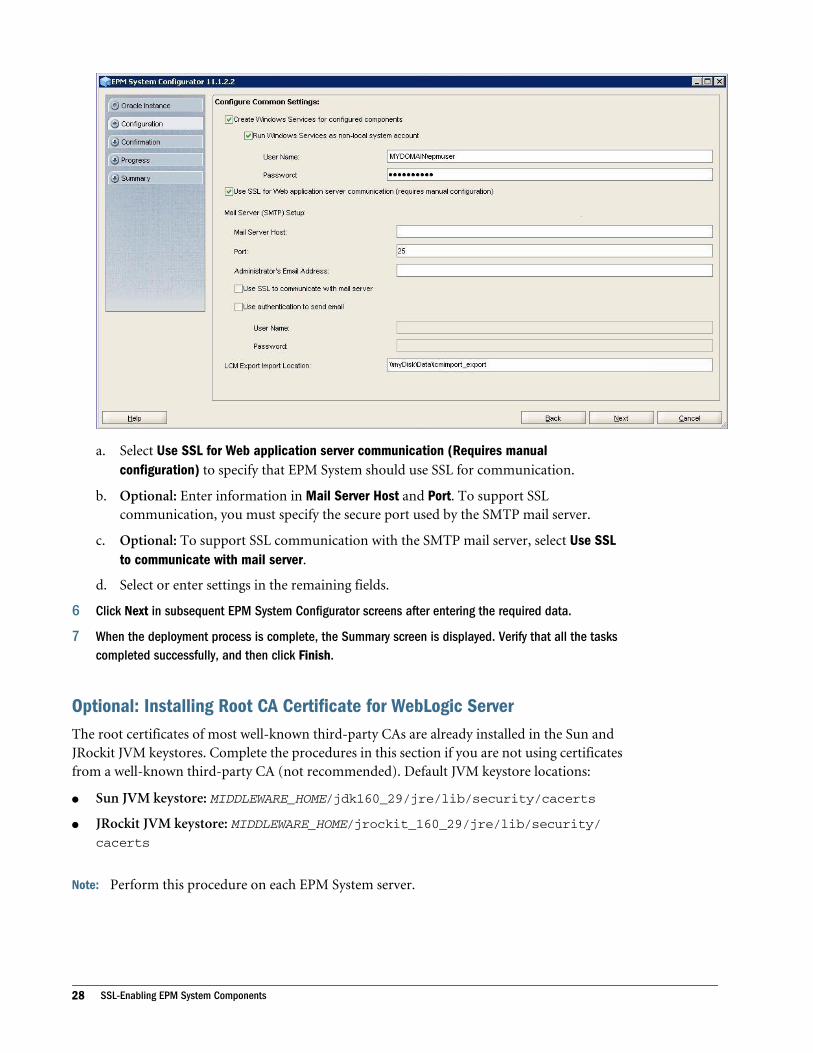
a. Select Use SSL for Web application server communication (Requires manualconfiguration) to specify that EPM System should use SSL for communication.
b. Optional: Enter information in Mail Server Host and Port. To support SSLcommunication, you must specify the secure port used by the SMTP mail server.
c. Optional: To support SSL communication with the SMTP mail server, select Use SSLto communicate with mail server.
d. Select or enter settings in the remaining fields.
6 Click Next in subsequent EPM System Configurator screens after entering the required data.
7 When the deployment process is complete, the Summary screen is displayed. Verify that all the taskscompleted successfully, and then click Finish.
Optional: Installing Root CA Certificate for WebLogic ServerThe root certificates of most well-known third-party CAs are already installed in the Sun andJRockit JVM keystores. Complete the procedures in this section if you are not using certificatesfrom a well-known third-party CA (not recommended). Default JVM keystore locations:
l Sun JVM keystore: MIDDLEWARE_HOME/jdk160_29/jre/lib/security/cacerts
l JRockit JVM keystore: MIDDLEWARE_HOME/jrockit_160_29/jre/lib/security/cacerts
Note: Perform this procedure on each EPM System server.
28 SSL-Enabling EPM System Components

ä To install the root CA certificate:
1 Copy the root CA certificate into a local directory on the machine where WebLogic Server is installed.
2 From a console, change directory to MIDDLEWARE_HOME/jdk160_29/jre/bin.
3 Execute a keytool command such as the following to install the signed certificate into the Sun JVMkeystore:
keytool -import -alias ALIAS -file CA_CERT_FILE -keystore KEYSTORE -storepass KEYSTORE_PASSWORD -trustcacerts
For example, you can use the following command to add a certificate CAcert.crt storedin the current directory into the Sun JVM keystore with Blister as the certificate alias inthe keystore. Default storepass (changeit) is assumed.
keytool -import -alias Blister -file CAcert.crt -keystore ../lib/security/cacerts -storepass changeit -trustcacerts
Note: The preceding command and example use some of the syntax for importingcertificates using keytool. See keytool documentation for a complete list of importsyntax.
4 Execute a command such as the following to install the root CA certificate into the JRockit JVM keystore:
keytool -import -alias ALIAS -file CERT_FILE -keystore KEYSTORE -storepass KEYSTORE_PASSWORD -trustcacerts
For example, you can use the following command to add a certificate CAcert.crt storedin the current directory into the JRockit JVM keystore with Blister as the certificate alias.Default storepass (changeit) is assumed.
keytool -import -alias Blister -file CAcert.crt -keystore MIDDLEWARE_HOME/jrockit_160_05/jre/lib/security/cacerts -storepass changeit -trustcacerts
Note: Ensure that you replace MIDDLEWARE_HOME with the directory path.
Installing Certificate on the WebLogic ServerThe default WebLogic Server installation uses a demo certificate to support SSL. Oraclerecommends that you install a certificate from a well-known third-party to strengthen thesecurity of your environment.
On each machine that hosts WebLogic Server, use a tool (for example, keytool) to create a customkeystore to store the signed certificate for WebLogic Server and EPM System web components.
ä To create a custom keystore and import certificate:
1 From a console, change directory to MIDDLEWARE_HOME/jdk160_29/jre/bin.
2 Execute a keytool command such as the following to create the custom keystore (identified by the -keystore directive in the command) in an existing directory:
keytool -genkey -dname "cn=myserver, ou=EPM, o=myCompany, c=US" -alias epm_ssl -keypass password -keystore C:\oracle\Middleware\EPMSystem11R1\ssl\keystore -storepass password -validity 365 -keyalg RSA
Full SSL Deployment of EPM System 29

Note: The common name (cn) that you set must match the server name. If you use fullyqualified domain name (FQDN) as the cn, you must use the FQDN while deployingweb components.
3 Generate a certificate request.
keytool -certreq -alias epm_ssl -file C:/certs/epmssl_csr -keypass password -storetype jks -keystore C:\oracle\Middleware\EPMSystem11R1\ssl\keystore -storepass password
4 Obtain a signed certificate for the WebLogic Server machine.
5 Import the signed certificate into the keystore:
keytool -import -alias epm_ssl -file C:/certs/epmssl_crt -keypass password -keystore C:\Oracle\Middleware\EPMSystem11R1\ssl\keystore -storepass password
Configuring WebLogic ServerAfter deploying EPM System web components, you must configure them for SSLcommunication.
ä To configure the web components for SSL:
1 Start the WebLogic Server by executing a file stored in MIDDLEWARE_HOME/user_projects/domains/EPMSystem/bin:
l startWebLogic.cmd (Windows)
l startWebLogic.sh (UNIX)
2 Launch the WebLogic Server Administration Console by accessing the following URL:
http://SERVER_NAME:Port/console
For example, to access the WebLogic Server console deployed to the default port onmyServer, you should use http://myServer:7001/console.
3 On the Welcome screen, enter the WebLogic Server administrator user name and password that youspecified in EPM System Configurator.
4 In Change Center, click Lock & Edit.
5 In the left pane of the console, expand Environment, and then select Servers.
6 In the Summary of Servers screen, click the name of the server that you want to SSL-enable.
For example, to SSL-enable Foundation Services components, you work with theEPMServer0 server.
7 Clear Listen Port Enabled to disable the HTTP listen port.
8 Ensure that SSL Listen Port Enabled is selected.
9 In SSL Listen Port, enter the SSL listen port where this server should listen for requests.
10 To specify the identity and trust keystores to use, select Keystores to open the Keystores tab.
11 Click Change.
12 Select an option:
30 SSL-Enabling EPM System Components

l Custom Identity and Custom Trust if you are not using a server certificate from a well-known third-party CA
l Custom Identity and Java Standard Trust if you are using a server certificate from a well-known third-party CA
13 Click Save.
14 In Custom Identity Keystore, enter the path of the keystore where the signed WebLogic Server certificateis installed.
15 In Custom Identity Keystore Type, enter jks.
16 In Custom Identity Keystore Passphrase and Confirm Custom Identity Keystore Passphrase, enterthe keystore password.
17 If you selected Custom Identity and Custom Trust in Keystores:
a. In Custom Trust Keystore, enter the path of the custom keystore where the root certificateof the CA that signed your server certificate is available.
b. In Custom Trust Keystore Type, enter jks.
c. In Custom Trust Keystore Passphrase and Confirm Custom Trust Keystore Passphrase, enterthe keystore password.
18 Click Save.
19 Specify SSL settings.
a. Select SSL.
b. In Private Key Alias, enter the alias that you specified while importing the signedWebLogic Server certificate.
c. In Private Key Passphrase and Confirm Private Key Passphrase, enter the password to beused to retrieve the private key.
d. Click Save.
20 Complete step 6 through step 19 for each managed server belonging to this host.
21 In Change Center, click Activate Changes.
Oracle HTTP Server Procedures
Subtopics
l Creating a Wallet and Installing Certificate for Oracle HTTP Server
l SSL-Enabling Oracle HTTP Server
Creating a Wallet and Installing Certificate for Oracle HTTP Server
A default wallet is automatically installed with Oracle HTTP Server. You must configure a realwallet for each Oracle HTTP Server in your deployment.
Full SSL Deployment of EPM System 31

ä To create and install Oracle HTTP Server certificate :
1 On each machine that hosts Oracle HTTP Server, launch the Wallet Manager.
l Windows: Select Start, then All Programs, Oracle-OHxxxxxx, then Integrated ManagementTools, and then Wallet Manager.
xxxxxx is the Oracle HTTP Server instance number.
l UNIX: Execute MIDDLEWARE_HOME/ohs/bin/owm to launch the Wallet Manager fromthe command line.
Note: The Wallet Manager requires a graphical environment.
2 Create a new, empty Wallet.
a. In Oracle Wallet Manager, select Wallet, and then New.
b. Click Yes to create a default wallet directory, or No to create the Wallet file in a locationof your choice.
c. In Wallet Password and Confirm Password on the New Wallet screen, enter the passwordthat you want to use.
d. Click OK.
e. In the confirmation dialogbox, click No.
3 Optional: If you are not using a CA that is known to Oracle HTTP Server, import the root CA certificateinto the Wallet.
a. In Oracle Wallet Manager, right-click Trusted Certificates and select Import TrustedCertificate.
b. Browse and select the root CA certificate.
c. Select Open.
4 Create a certificate request.
a. In Oracle Wallet Manager, right-click Certificate: [Empty] and select Add CertificateRequest.
b. In Create Certificate Request, enter the required information.
For the common name, enter the fully qualified server alias; for example,epm.myCompany.com or epminternal.myCompany.com, available in the hosts fileon your system.
c. Click OK.
d. In the confirmation dialogbox, click OK.
e. Right-click the certificate request that you created, and then select Export CertificateRequest.
f. Specify a name for the certificate request file.
5 Using the certificate request files, obtain signed certificates from the CA.
6 Import signed certificates.
32 SSL-Enabling EPM System Components

a. In Oracle Wallet Manager, right-click the certificate request that was used to obtain thesigned certificate, and then select Import User Certificate.
b. In Import Certificate, click OK to import the certificate from a file.
c. In Import Certificate, select the Certificate file, and then click Open.
7 Save the Wallet to a convenient location; for example, EPM_ORACLE_INSTANCEhttpConfig/ohs/config/OHS/ohs_component/keystores/epmsystem.
8 Select Wallet, and then Auto Login to activate auto login.
SSL-Enabling Oracle HTTP Server
After reconfiguring the web server on each machine that hosts Oracle HTTP Server, updateOracle HTTP Server configuration file by replacing the location of the default Wallet with thelocation of the wallet that you created.
ä To configure Oracle HTTP Server for SSL:
1 Reconfigure the web server on each Oracle HTTP Server host machine in your deployment.
a. Start EPM System Configurator for the instance.
b. In configuration task selection screen, complete these steps, and then click Next.
i. Clear the selection (uncheck) from Uncheck All.
ii. Expand Hyperion Foundation task group, and select (check) Configure Web Server.
c. In Configure Web Server, click Next.
d. In Confirmation, click Next.
e. In Summary, click Finish.
2 Update the configuration settings of each Oracle HTTP Server in your deployment.
a. Using a text editor, open EPM_ORACLE_INSTANCE/httpConfig/ohs/config/OHS/ohs_component/ssl.conf.
b. Locate the SSLWallet directive and change its value so that it points to the wallet whereyou installed the certificate. If you created the wallet inEPM_ORACLE_INSTANCEhttpConfig/ohs/config/OHS/ohs_component/
keystores/epmsystem, your SSLWallet directive may be as follows:
SSLWallet "${ORACLE_INSTANCE}/config/${COMPONENT_TYPE}/${COMPONENT_NAME}/keystores/epmsystem"
c. Save and close ssl.conf.
3 Update mod_wl_ohs.conf on each Oracle HTTP Server in your deployment.
a. Using a text editor, open EPM_ORACLE_INSTANCE/httpConfig/ohs/config/OHS/ohs_component/mod_wl_ohs.conf.
b. Ensure that the WLSSLWallet directive points to the Oracle Wallet where the SSLcertificate is stored.
WLSSLWallet MIDDLEWARE_HOME/ohs/bin/wallets/myWallet
Full SSL Deployment of EPM System 33

For example, C:/Oracle/Middleware/ohs/bin/wallets/myWallet
c. Save and close mod_wl_ohs.conf.
Restarting Servers and EPM SystemRestart all the servers in the deployment, and then start EPM System on each server.
Testing the DeploymentAfter completing the SSL deployment, verify that everything works.
ä To test your deployment:
1 Using a browser, access the secure EPM Workspace URL:
If you used epm.myCompany.com as the server alias for external communication and4443 as the SSL port, the EPM Workspace URL is
https://epm.myCompany.com:4443/workspace/index.jsp
2 On the Logon screen, enter a user name and password.
3 Click Log On.
4 Verify that you can securely access the deployed EPM System components.
Configuring SSL-enabled External User Directories
Subtopics
l Assumptions
l Import the root CA certificate
l Configure External User Directories
Assumptions
l The external user directories that you plan to configure in Shared Services Console are SSL-enabled.
l If you did not use a certificate from a well-known third-party CA to SSL-enable the userdirectory, you have a copy of the root certificate of the CA that signed the server certificate.
Import the root CA certificate
If you did not use a certificate from a well-known third-party CA to SSL-enable the user directory,you must import the root certificate of the CA that signed the server certificate into the followingJVMs:
Use a tool such, as keytool, to import the root CA certificate.
l All EPM System servers:
34 SSL-Enabling EPM System Components
m Sun JVM keystore: MIDDLEWARE_HOME/jdk160_11/jre/lib/security/cacerts
m JRockit JVM keystore: MIDDLEWARE_HOME/jrockit_160_05/jre/lib/security/cacerts
l The keystore used by the JVM on each EPM System component host machine. By default,EPM System components use the following keystore:
MIDDLEWARE_HOME/jdk160_11/jre/lib/security/cacerts
Configure External User Directories
You configure user directories using the Shared Services Console. While configuring userdirectories, you must select the SSL Enabled option that instructs EPM System security to usethe secure protocol to communicate with the user directory. You can SSL-enable a connectionbetween EPM System security and LDAP-enabled user directories; for example, Oracle InternetDirectory and Microsoft Active Directory.
See “Configuring User Directories” in the Oracle Enterprise Performance Management SystemUser and Role Security Guide.
Terminating SSL at the Web Server
Subtopics
l Deployment Architecture
l Assumptions
l Configuring EPM System
l Testing the Deployment
Deployment ArchitectureIn this scenario, SSL is used to secure the communication link between EPM System clients (forexample, a browser) and Oracle HTTP Server. The illustrated concept:
Terminating SSL at the Web Server 35
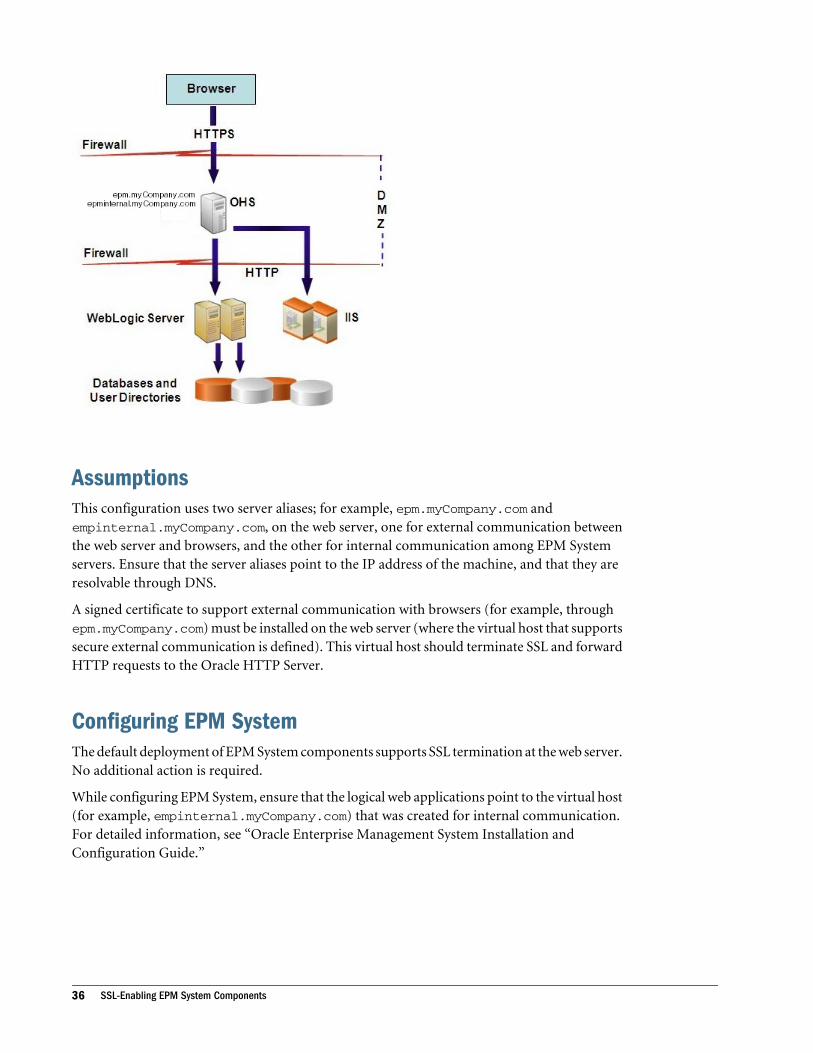
AssumptionsThis configuration uses two server aliases; for example, epm.myCompany.com andempinternal.myCompany.com, on the web server, one for external communication betweenthe web server and browsers, and the other for internal communication among EPM Systemservers. Ensure that the server aliases point to the IP address of the machine, and that they areresolvable through DNS.
A signed certificate to support external communication with browsers (for example, throughepm.myCompany.com) must be installed on the web server (where the virtual host that supportssecure external communication is defined). This virtual host should terminate SSL and forwardHTTP requests to the Oracle HTTP Server.
Configuring EPM SystemThe default deployment of EPM System components supports SSL termination at the web server.No additional action is required.
While configuring EPM System, ensure that the logical web applications point to the virtual host(for example, empinternal.myCompany.com) that was created for internal communication.For detailed information, see “Oracle Enterprise Management System Installation andConfiguration Guide.”
36 SSL-Enabling EPM System Components

Testing the DeploymentAfter completing the deployment process, verify that everything works by connecting to thesecure EPM Workspace URL:
https://virtual_host_external:SSL_PORT/workspace/index.jsp
For example, https://epm.myCompany.com:443/workspace/index.jsp where 443 is theSSL port.
Enabling Encryption for Financial Reporting Studio
To configure Oracle Hyperion Financial Reporting Studio for encrypted RMI communication,add the following to the JVM startup parameters (shell script files in UNIX servers) orJVMOption Windows registry entries (Windows servers).
-Djavax.net.ssl.trustStore=TRUSTSTORE_LOCATION
Replace TRUSTSTORE_LOCATION with the absolute location of the keystore where you installedthe CA root certificate.
The registry location for adding this parameter for Financial Reporting Studio on a Windowsserver is HKEY_LOCAL_MACHINE\SOFTWARE\Hyperion Solutions\Hyperion Reports\HReports\JVM.
The location for adding JVM parameters for the Financial Reporting web application isHKEY_LOCAL_MACHINE\SOFTWARE\Hyperion Solutions
\FinancialReporting0\HyS9FRReports.
SSL for Essbase
Subtopics
l Overview
l Default Deployment
l Required Certificates and Their Location
l Essbase and SSL-Enabled EPM System
l Installing and Deploying Essbase Components
l Using Trusted Third-Party CA Certificates for Essbase
l Establishing a Per-Session SSL Connection
OverviewEssbase supports one-way SSL only, in which the Essbase instance (server and agent) is securedusing certificates.
Enabling Encryption for Financial Reporting Studio 37

This section explains the procedures for replacing the default certificates that are used to securecommunication between an Essbase instance and components such as MaxL, Oracle EssbaseAdministration Services Server, Oracle Essbase Studio Server, Oracle Hyperion ProviderServices, Foundation Services, Planning, Financial Management, and Shared Services Registry.
Default DeploymentEssbase can be deployed to work in SSL and non-SSL modes. Essbase Agent listens on a non-secure port; it also can be configured to listen on a secure port. All connections accessing thesecure port are treated as SSL connections. If a client connects to the Essbase Agent on the non-SSL port, the connection is treated as a non-SSL connection. Components can establishconcurrent non-SSL and SSL connections to an Essbase Agent.
You can control SSL on a per-session basis by specifying the secure protocol and port when youlog in. See “Establishing a Per-Session SSL Connection” on page 45.
If SSL is enabled, all communication within an Essbase instance is encrypted to ensure datasecurity.
Default deployments of Essbase components in secure mode uses self-signed certificates toenable SSL communication, mainly for testing purposes. Oracle recommends that you usecertificates from well-known third-party CAs to SSL-enable Essbase in productionenvironments.
38 SSL-Enabling EPM System Components
Typically, an Oracle Wallet stores the certificate that enables SSL communication with clientsthat use Essbase RTC (C APIs) and a Java keystore stores the certificate that enables SSLcommunication with components that utilize JAPI for communication. To establish SSLcommunication, Essbase clients and tools store the root certificate of the CA that signed theEssbase Server and Agent certificates. See “Required Certificates and Their Location” on page39.
Required Certificates and Their LocationOracle recommends the use of certificates from well-known third-party CAs to SSL-enableEssbase in a production environment. You may use the default self-signed certificates for testpurposes.
Note: Essbase supports the use of wildcard certificates, which can secure multiple subdomainswith one SSL certificate. Using a wildcard certificate can reduce management time andcost.
Wildcard certificates cannot be used if host-name check is enabled.
You require the following certificates:
l A root CA certificate.
Components that use Essbase RTC (C APIs) to establish a connection to Essbase requirethat the root CA certificate be stored in Oracle Wallet. Components that use JAPI to establisha connection require that the root CA certificate be stored in a Java keystore. The requiredcertificate and their location are indicated in the following table.
Note: You may not need to install root CA certificate if you are using certificates from awell-known third-party CA whose root certificate is already installed in Oracle Wallet.
l Signed certificate for Essbase Server and Essbase Agent.
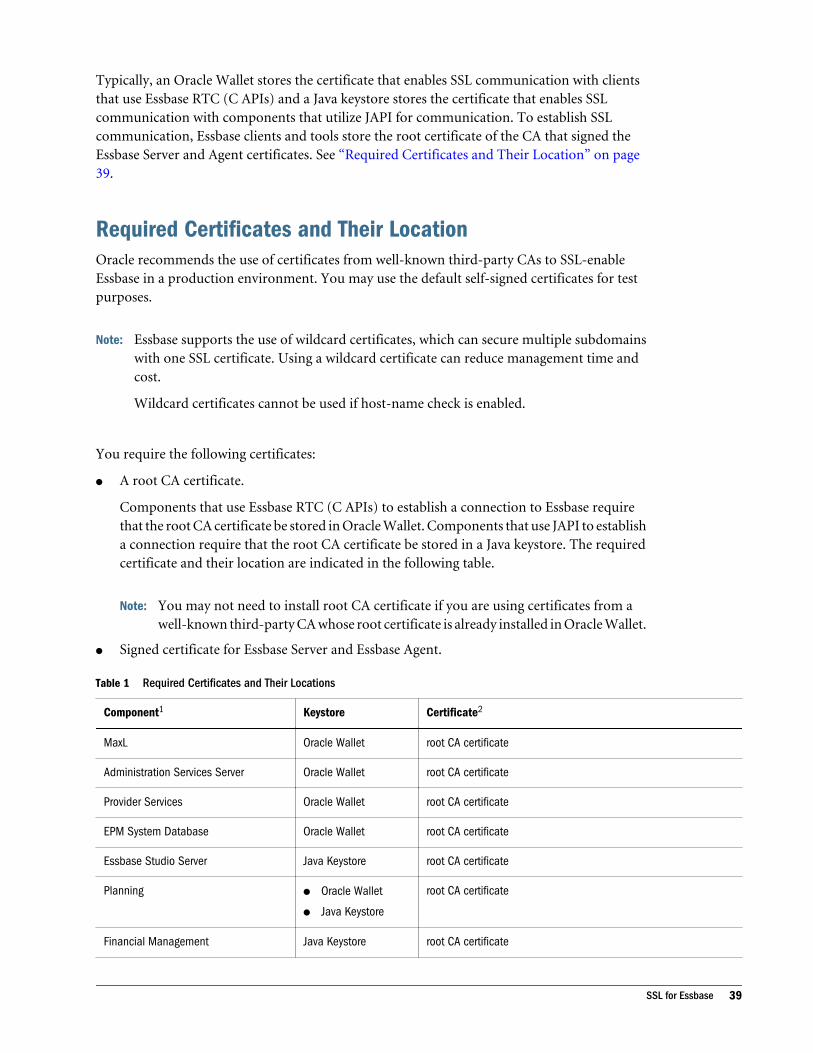
Table 1 Required Certificates and Their Locations
Component1 Keystore Certificate2
MaxL Oracle Wallet root CA certificate
Administration Services Server Oracle Wallet root CA certificate
Provider Services Oracle Wallet root CA certificate
EPM System Database Oracle Wallet root CA certificate
Essbase Studio Server Java Keystore root CA certificate
Planningl Oracle Wallet
l Java Keystore
root CA certificate
Financial Management Java Keystore root CA certificate
SSL for Essbase 39
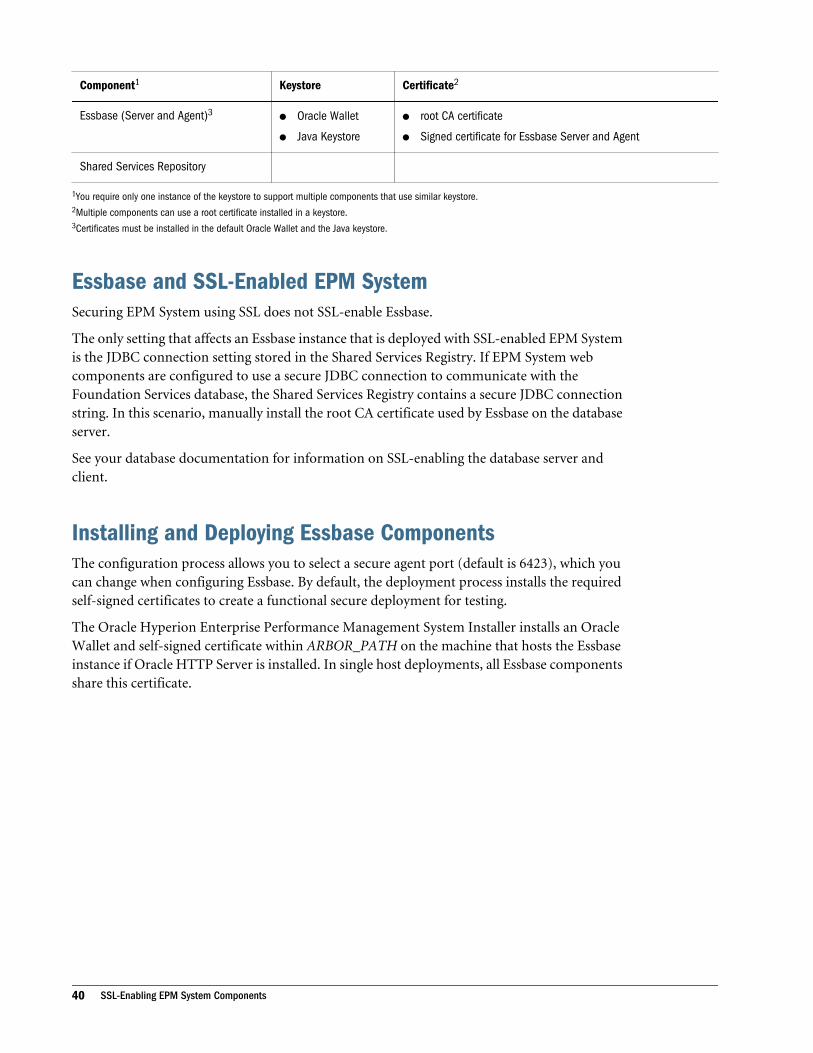
Component1 Keystore Certificate2
Essbase (Server and Agent)3l Oracle Wallet
l Java Keystore
l root CA certificate
l Signed certificate for Essbase Server and Agent
Shared Services Repository
1You require only one instance of the keystore to support multiple components that use similar keystore.2Multiple components can use a root certificate installed in a keystore.3Certificates must be installed in the default Oracle Wallet and the Java keystore.
Essbase and SSL-Enabled EPM SystemSecuring EPM System using SSL does not SSL-enable Essbase.
The only setting that affects an Essbase instance that is deployed with SSL-enabled EPM Systemis the JDBC connection setting stored in the Shared Services Registry. If EPM System webcomponents are configured to use a secure JDBC connection to communicate with theFoundation Services database, the Shared Services Registry contains a secure JDBC connectionstring. In this scenario, manually install the root CA certificate used by Essbase on the databaseserver.
See your database documentation for information on SSL-enabling the database server andclient.
Installing and Deploying Essbase ComponentsThe configuration process allows you to select a secure agent port (default is 6423), which youcan change when configuring Essbase. By default, the deployment process installs the requiredself-signed certificates to create a functional secure deployment for testing.
The Oracle Hyperion Enterprise Performance Management System Installer installs an OracleWallet and self-signed certificate within ARBOR_PATH on the machine that hosts the Essbaseinstance if Oracle HTTP Server is installed. In single host deployments, all Essbase componentsshare this certificate.
40 SSL-Enabling EPM System Components

Using Trusted Third-Party CA Certificates for Essbase
Subtopics
l Creating Certificate Requests and Obtaining Certificates
l Obtaining and Installing Root CA certificate
l Installing Signed Certificates
l Updating Default Settings
Creating Certificate Requests and Obtaining CertificatesGenerate a certificate request to obtain a certificate for the server that hosts Essbase Server andEssbase Agent. A certificate request contains encrypted information specific to yourDistinguished Name (DN). You submit the certificate request to a signing authority to obtainan SSL certificate.
You use a tool such as keytool or Oracle Wallet Manager to create a certificate request. Fordetailed information on creating a certificate request, see the documentation of the tool that youare using.
If you are using keytool, use a command such as the following to create a certificate request:
keytool -certreq -alias essbase_ssl -file C:/certs/essabse_server_csr -keypass password -storetype jks -keystore C:\oracle\Middleware\EPMSystem11R1\Essbase_ssl\keystore -storepass password
Obtaining and Installing Root CA certificateThe root CA certificate attests to the validity of the certificate that is used to support SSL. itcontains the public key against which the private key that was used to sign the certificate ismatched to verify the certificate. You can obtain the root CA certificate from the certificateauthority that signed your SSL certificates.
Install the root certificate of the CA that signed the Essbase Server certificate on clients thatconnect to the Essbase Server or Agent. Ensure that the root certificate is installed in the keystoreappropriate for the client. See “Required Certificates and Their Location” on page 39.
Note: Multiple components can use a root CA certificate installed on a server machine.
Oracle Wallet
Refer to Table 1, “Required Certificates and Their Locations” for a list of components that requirethe CA root certificate in an Oracle Wallet. You can create a wallet or install the certificate inthe demo wallet where the default self-signed certificate is installed.
See Oracle Wallet Manager documentation for detailed procedures to create wallets and toimport root CA certificate.
SSL for Essbase 41

Java Keystore
Refer to Table 1, “Required Certificates and Their Locations” for a list of components that requirethe root CA certificate in an Java keystore. You can add the certificate into the keystore wherethe default self-signed certificate is installed or create a keystore for storing the certificate.
Note: The root CA certificates of many well-known third-party CAs are already installed in theJava keystore.
Refer to the documentation of the tool you are using for detailed instructions. If you are usingkeytool, use a command, such as the following, to import the root certificate:
keytool -import -alias blister_CA -file c:/certs/CA.crt -keypasspassword -trustcacerts -keystore C:\Oracle\Middleware\EPMSystem11R1\Essbase_ssl\keystore -storepass password
Installing Signed CertificatesYou install the signed SSL certificates on the server that hosts Essbase Server and Essbase Agent.Components that use Essbase RTC (C APIs) to establish a connection to Essbase Server or Agentrequire that the certificate be stored in an Oracle Wallet along with the root CA certificate.Components that use JAPI to establish a connection to Essbase Server or Agent require that theroot CA certificate and signed SSL certificate be stored in a Java keystore. For detailed procedures,see these information sources:
l Oracle Wallet Manager documentation
l Documentation or online help of the tool; for example, keytool, that you use to import thecertificate
If you are using keytool, use a command, such as the following, to import the certificate:
keytool -import -alias essbase_ssl -file C:/certs/essbase_ssl_crt -keypass password -keystore C:\Oracle\Middleware\EPMSystem11R1\Essbase_ssl\keystore -storepass password
Updating Default Settings
Subtopics
l Updating Essbase SSL Settings
l Customizing SSL Properties of JAPI Clients
l Available Cipher Suites for Components that Use Essbase C APIs
You customize the SSL settings for components that use C APIs (Essbase Server and clients) byspecifying their value in essbase.cfg.
You customize Essbase Server SSL settings by specifying their value in essbase.cfg.
42 SSL-Enabling EPM System Components

Updating Essbase SSL Settings
Edit essbase.cfg to customize Essbase SSL settings, such as:
l Setting to enable secure mode
l Setting to enable clear mode
l Preferred mode to communicate with clients (used by clients only)
l Secure port
l Cipher suites
l Oracle Wallet path
ä To update essbase.cfg:
1 Using a text editor, open EPM_ORACLE_INSTANCE/EssbaseServer/essbaseserver1/bin/essbase.cfg.
2 Enter settings as needed. See Table 2.
Table 2 Essbase SSL Settings
Setting Description1
EnableClearMode2 Enables unencrypted communication between Essbase applications and Essbase Agent. If thisproperty is set to FALSE, Essbase does not handle non-SSL requests.
Default: TRUE
Example: EnableClearMode FALSE
EnableSecureMode Enables SSL encrypted communication between Essbase clients and Essbase Agent. This propertymust be set to TRUE to support SSL.
Default: FALSE
Example: EnableSecureMode TRUE
SSLCipherSuites A list of cipher suites, in order of preference, to use for SSL communication. See “Available CipherSuites for Components that Use Essbase C APIs” on page 45. Essbase Agent uses one of thesecipher suites for SSL communication. The first cipher suite in the list is accorded the highest prioritywhen the agent chooses a cipher suit.
Default: SSL_RSA_WITH_RC4_128_MD5
Example: SSLCipherSuites SSL_RSA_WITH_AES_256_CBC_SHA, SSL_RSA_WITH_DES_CBC_SHA
AgentSecurePort The secure port at which the agent listens.
Default: 6423
Example: AgentSecurePort 16001
WalletPath Location of the Oracle Wallet (fewer than 1024 characters) that stores the root CA certificate andsigned certificate.
Default: ARBORPATH/bin/wallet
Example: WalletPath/usr/local/wallet
SSL for Essbase 43

Setting Description1
ClientPreferredMode3 The mode (Secure or Clear) for the client session. If this property is set to Secure, SSL mode is usedfor all sessions.
If this property is set to Clear, transport is chosen based on whether the client login request containsthe secure transport keyword. See “Establishing a Per-Session SSL Connection” on page 45.
Default: CLEAR
Example: ClientPreferredMode SECURE
1The default value is enforced if the property is missing from essbase.cfg.2Essbase becomes inoperational if EnableClearMode and EnableSecureMode are set to FALSE.3Clients use this setting to determine whether they should establish a secure or non-secure connection with Essbase.
3 Save and close essbase.cfg.
Customizing SSL Properties of JAPI Clients
A number of default properties are set for you when you deploy Essbase components that relyon JAPI. These customizable properties are externalized in essbase.properties.
ä To update SSL properties of JAPI clients:
1 Using a text editor, open EPM_ORACLE_HOMEcommon\EssbaseJavaAPI\11.1.2.0\bin\essbase.properties.
2 Updates the properties as needed. See Table 3 for description of customizable JAPI client properties.
Table 3 Default SSL properties for JAPI Clients
Property Description
olap.server.ssl.alwaysSecure
Sets the mode that clients should use against all Essbase instances. Change this property valueto true to enforce SSL mode.
Default: false
olap.server.ssl.securityHandler
Package name for handling the protocol. You can change this value to indicate another handler.
Default: java.protocol.handler.pkgs
olap.server.ssl.securityProvider
Oracle uses the Sun SSL protocol implementation. You can change this value to indicate anotherprovider.
Default: com.sun.net.ssl.internal.www.protocol
olap.server.ssl.supportedCiphers
A comma -separated list of additional ciphers to be enabled for secure communication. Youmust specify only ciphers that Essbase supports. See “Available Cipher Suites for Componentsthat Use Essbase C APIs” on page 45.
Example: SSL_RSA_WITH_AES_256_CBC_SHA,SSL_RSA_WITH_AES_128_CBC_SHA
44 SSL-Enabling EPM System Components

Property Description
olap.server.ssl.trustManagerClass
The TrustManager class to use to validate SSL certificate by verifying the signature and checkingcertificate expiration date.
By default, this property is not set to enforce all verification checks.
To not enforce verification checks, set the value of this parameter to com.essbase.services.olap.security.EssDefaultTrustManager, which is the defaultTrustManager class that allows all validation checks to succeed.
To implement a custom TrustManager, specify a fully qualified class name of the TrustManagerclass that implements javax.net.ssl.X509TrustManager interface.
Example:com.essbase.services.olap.security.EssDefaultTrustManager
olap.server.ssl.keyManagerClass
This parameter is not used in this release.
3 Save and close essbase.properties.
4 Restart all Essbase components.
Available Cipher Suites for Components that Use Essbase C APIs
These cipher suites are supported by the SSL implementation on Essbase Server:
l SSL_RSA_WITH_AES_256_CBC_SHA
l SSL_RSA_WITH_AES_128_CBC_SHA
l SSL_RSA_WITH_3DES_EDE_CBC_SHA
l SSL_RSA_WITH_DES_CBC_SHA
l SSL_RSA_WITH_RC4_128_SHA
l SSL_RSA_WITH_RC4_128_MD5
Establishing a Per-Session SSL ConnectionEssbase components; for example, MaxL, can control SSL at session level by connecting toEssbase Agent using secure as the transport keyword. For example, you can establish a secureconnection between MaxL and Essbase Agent by executing one of the following commands froma MaxL Console:
login admin welcome1 on hostA:PORT:secure
login admin welcome1 on hostA:secure
Per-session control takes priority over configuration settings specified in essbase.cfg. If notransport keyword is specified, Essbase clients use the value set for ClientPreferredMode todetermine whether to initiate a secure connection with Oracle Essbase. IfClientPreferredMode setting is not set to secure, the communication always occurs over anonsecure channel.
SSL for Essbase 45

46 SSL-Enabling EPM System Components
3Enabling SSO with Security
Agents
In This Chapter
Supported SSO Methods... . . . . . . . . . . . . . . . . . . . . . . . . . . . . . . . . . . . . . . . . . . . . . . . . . . . . . . . . . . . . . . . . . . . . . . . . . . . . . . .47
Single Sign-on from Oracle Access Manager.. . . . . . . . . . . . . . . . . . . . . . . . . . . . . . . . . . . . . . . . . . . . . . . . . . . . . . . . . . .49
OracleAS Single Sign-on ... . . . . . . . . . . . . . . . . . . . . . . . . . . . . . . . . . . . . . . . . . . . . . . . . . . . . . . . . . . . . . . . . . . . . . . . . . . . . . . .51
Protecting EPM System Products for SSO ... . . . . . . . . . . . . . . . . . . . . . . . . . . . . . . . . . . . . . . . . . . . . . . . . . . . . . . . . . . . .57
SiteMinder SSO ... . . . . . . . . . . . . . . . . . . . . . . . . . . . . . . . . . . . . . . . . . . . . . . . . . . . . . . . . . . . . . . . . . . . . . . . . . . . . . . . . . . . . . . . . .61
Kerberos Single Sign-on... . . . . . . . . . . . . . . . . . . . . . . . . . . . . . . . . . . . . . . . . . . . . . . . . . . . . . . . . . . . . . . . . . . . . . . . . . . . . . . . .64
Configuring the EPM System for SSO ... . . . . . . . . . . . . . . . . . . . . . . . . . . . . . . . . . . . . . . . . . . . . . . . . . . . . . . . . . . . . . . . . .74
Single Sign-on Options for Smart View ... . . . . . . . . . . . . . . . . . . . . . . . . . . . . . . . . . . . . . . . . . . . . . . . . . . . . . . . . . . . . . . .75
Supported SSO Methods
Subtopics
l HTTP Header
l Custom Login Class
l HTTP Authorization Header
l Get Remote User from HTTP Request
SSO requires that the web identity management solution pass the login name of authenticatedusers to EPM System products. You can use the following standard EPM System methods tointegrate EPM System with commercial and custom Web-based SSO solutions.
l “HTTP Header” on page 48
l “Custom Login Class” on page 48
l “HTTP Authorization Header” on page 49
l “Get Remote User from HTTP Request” on page 49
Caution! As a security measure, Oracle recommends that you implement client certificateauthentication (two-way SSL) between the web server and the application server ifyour organization uses methods that carry user identity in the header for identitypropagation.
Supported SSO Methods 47

HTTP HeaderIf you are using Oracle Access Manager or SiteMinder (or a custom SSO provider) as the webidentity management solution, use an HTTP header to pass the login name of the authenticateduser to EPM System products.
The login name of an EPM System product user is determined by the Login Attribute thatis specified while configuring user directories in Shared Services. See “Configuring OID, ActiveDirectory, and Other LDAP-Based User Directories” in the Oracle Enterprise PerformanceManagement System User and Role Security Guide for a brief description of the LoginAttribute.
The HTTP header must contain the value of the attribute that is set as the Login Attribute.For example, if uid is the Login Attribute value, the HTTP header must carry the value ofthe uid attribute.
See your web identity management solution documentation for detailed information on definingand issuing custom HTTP headers.
EPM System security parses the HTTP header and validates the login name that it carries againstthe user directories configured on Shared Services.
Custom Login ClassWhen a user logs in, the web identity management solution authenticates the user against adirectory server and encapsulates the credentials of the authenticated user in an SSO mechanismto enable SSO with downstream systems. If the web identity management solution uses amechanism unsupported by EPM System products, or if the value of the Login Attribute isnot available in the SSO mechanism, you can use a custom login class to derive and pass thevalue of the Login Attribute to EPM System products.
This method allows EPM System to integrate with security agents that use X509 certificate-basedauthentication. Using a custom login class as the authentication mechanism requires usingstandard Shared Services APIs to define the SSO interface between EPM System products andthe web identity management solution. The custom login class must pass the value of theLogin Attribute to EPM System products. See “Configuring OID, Active Directory, andOther LDAP-Based User Directories” in the Oracle Enterprise Performance Management SystemUser and Role Security Guide for a brief description of Login Attribute. For sample code andimplementation steps, see Appendix B, “Implementing a Custom Login Class”.
To use a custom login class, an implementation ofcom.hyperion.css.CSSSecurityAgentIF interface must be available in the classpath.CSSSecurityAgentIF defines the getter method for retrieving user name and password(optional). If the interface returns a null password, security authentication treats the provideras trusted and verifies the existence of the user in configured providers. If the interface returnsa non-null value for password, EPM System attempts to authenticate the request using the username and password returned by this implementation.
CSSSecurityAgentIF comprises two methods: getUserName and getPassword.
48 Enabling SSO with Security Agents
getUserName MethodThis method returns the user name for authentication.
java.lang.String getUserName( javax.servlet.http.HttpServletRequest req, javax.servlet.http.HttpServletResponse res) throws java.lang.Exception
The req parameter identifies the HTTP request that carries the information that is used todetermine the user name. The res parameter is not used (preset for backward compatibility).
getPassword MethodThis method returns clear-text password for authentication. Password retrieval is optional.
java.lang.String getPassword( javax.servlet.http.HttpServletRequest req, javax.servlet.http.HttpServletResponse res) throws java.lang.Exception
The req parameter identifies the HTTP request that carries the information that is used todetermine the password. The res parameter is not used (preset for backward compatibility).
HTTP Authorization HeaderEPM System security supports the use of an HTTP authorization header to pass value the ofLogin Attribute to EPM System products from web identity management solutions. EPMSystem products parse the authorization header to retrieve the user's login name.
Get Remote User from HTTP RequestEPM System security supports the use of an HTTP request to pass the value of LoginAttribute to EPM System products from web identity management solutions. Use this SSOmethod if the web identity management solution passes an HTTP request containing the valueof the Login Attribute, which is set using the setRemoteUser function.
This method is used for OracleAS Single Sign-on (OSSO) and Oracle Application Serverintegrated with Integrated Windows Authentication.
Single Sign-on from Oracle Access ManagerEPM System integrates with Oracle Access Manager by accepting a custom HTTP header (defaultname HYPLOGIN) that contains the login attribute value. The login attribute is set when youconfigure an external user directory in Shared Services. See “Configuring OID, Active Directory,and Other LDAP-Based User Directories” in theOracle Enterprise Performance ManagementSystem User and Role Security Guide for a brief description of Login Attribute.
Single Sign-on from Oracle Access Manager 49

You can use any header name that provides the value of login attribute to EPM System. You usethe header name while configuring Shared Services for SSO from Oracle Access Manager.
EPM System uses the value of the login attribute to authenticate the user against a configureduser directory (in this case, the user directory against which Oracle Access Manager authenticatesusers) and then generates an EPM SSO token that enables SSO across EPM System. Provisioninginformation of the user is checked in Native Directory to authorize the user to EPM Systemresources.
Note: Administration Services console, which is a thick client, does not support SSO from OracleAccess Manager.
Information about configuring Oracle Access Manager and performing tasks such as setting upthe HTTP header and policy domains is available in the Oracle Access Manager documentation.This guide assumes a working Oracle Access Manager deployment where you have completedthe following tasks:
l Setup the required policy domains forEPM System components.
l Configured an HTTP header to pass login attribute value to EPM System.
l Protected the EPM System resources listed in “Resources to Protect” on page 57. Requeststo access protected resources are challenged by Oracle Access Manager.
l Unprotected the EPM System resources listed in “Resources to Unprotect” on page 58.Requests to access unprotected resources are not challenged by Oracle Access Manager.
ä To configure EPM System for SSO from Oracle Access Manager:
1 Add the user directory that Oracle Access Manager uses to authenticate users as an external userdirectory in EPM System. See “Configuring OID, Active Directory, and Other LDAP-Based User Directories”in the Oracle Enterprise Performance Management System User and Role Security Guide.
Note: Ensure that the Trusted check box in the Connection Information screen is selectedto indicate that the user directory is a trusted SSO source.
2 Configure EPM System for SSO. See “Configuring the EPM System for SSO” on page 74.
Select Oracle Access Manager from the SSO Provider or Agent list. If the HTTP header fromOracle Access Manager uses a name other than HYPLOGIN, enter the name of the customheader in the text box next to the SSO Mechanism list.
3 Oracle Hyperion Data Relationship Management only:
a. Configure Data Relationship Management for Shared Services authentication.
b. Enable SSO in Data Relationship Management Console.
See Data Relationship Management documentation for detailed information.
50 Enabling SSO with Security Agents
OracleAS Single Sign-onThe OracleAS Single Sign-on (OSSO) solution provides SSO access to web applications usingOracle Internet Directory (OID) as the user directory. Users use a user name and passworddefined in an OID to log in to EPM System products.
Process Flow
The OSSO process:
1. Using an EPM System URL, for example, http://OSSO_OHS_Server_NAME:OSSO_OHS_Server_PORT/interop/index.jsp, usersaccess an EPM System component that is defined as an OSSO protected application.
2. Because the URL is under OSSO protection, mod_osso, deployed on Oracle HTTP Server,intercepts the request. Using mod_osso, Oracle HTTP Server checks for a valid cookie. If avalid cookie is not available in the request, Oracle HTTP Server redirects users to the OSSOServer, which challenges users for credentials, which it authenticates against OID.
3. OSSO Server creates the obSSOCookie and returns control to the mod_osso module on theOracle HTTP Server, which sets the obSSOCookie in the browser. It also redirects the requestto the EPM System resource through mod_wl_ohs (WebLogic Server) or mod_proxy (IISServer). Before forwarding the request to an EPM System resource, Oracle HTTP Server setsthe Proxy-Remote-User header which EPM System security uses to enable SSO.
OracleAS Single Sign-on 51
4. The EPM System component verifies that the user whose identity is retrieved from Proxy-Remote-User is present in OID. For this process to work, the OID that is configured withthe OSSO Server should be configured as an external user directory in Shared Services.
Prerequisites1. A fully functional Oracle Application Server Infrastructure.
To establish an Oracle Application Server Infrastructure, install and configure OracleIdentity Management Infrastructure 10.1.4. Ensure that OSSO is enabled. Oracle IdentityManagement Infrastructure 10.1.4 installation includes the following components tosupport OSSO.
l Oracle 10g OSSO Server.
l An OID, which the OSSO Server uses to validate credentials. See the following guides:
m Oracle Fusion Middleware Installation Guide for Oracle Identity Management
m Oracle Fusion Middleware Administrator's Guide for Oracle Internet Directory
l Oracle HTTP Server as a front-end to the OSSO Server. This installation includesmod_osso that allows you to define partner applications for OSSO.
Note: This Oracle HTTP Server instance is a part of the OSSO infrastructure; it is notdirectly used for configuring OSSO for EPM System components.
During the installation process ensure that mod_osso is registered with the OSSO Serveras a partner application.
2. A fully functional EPM System deployment.
When you configure the web server for EPM System components, EPM System Configuratorconfigures the following on the Oracle HTTP Server to proxy requests to the applicationserver:
l mod_wl_ohs.conf to proxy requests to WebLogic Server
l mod_proxy to proxy requests to IIS Server
52 Enabling SSO with Security Agents

Enabling OSSO for EPM System
Subtopics
l Registering EPM System Web Server as a Partner Application
l Optional: Defining Virtual Host
l Creating mod_osso.conf
l Relocating osso.conf
l Adding Cache Management Configuration for Reporting and Analysis
l Configuring EPM System for OSSO
l Optional: Enabling Debug Messages on OSSO Server
l Optional: Enabling Debug Messages for Protected Resources
This section assumes that you have a fully configured OSSO infrastructure. See the OracleApplication Server Administrator's Guide.
Registering EPM System Web Server as a Partner ApplicationYou use the Oracle Identity Manager SSO registration tool (ssoreg.sh or ssoreg.bat) toregister EPM System web server as a partner application on the Oracle HTTP Server that front-ends the OSSO Server.
Perform this procedure on the server that hosts the Oracle HTTP Server that front-ends theOSSO Server. This process generates and stores an obfuscated osso.conf in the location ofyour choice.
ä To register EPM System web server as a partner application:
1 Open a console on the server that hosts the Oracle HTTP Server that front-ends the OSSO Server andnavigate to ORACLE_HOME/sso/bin directory of Oracle HTTP Server, for example to C:/OraHome_1/sso/bin (Windows).
2 Execute a command similar to the following with -remote_midtier option:
ssoreg.bat -site_name epm.myCompany.com -mod_osso_url http://epm.myCompany.com:19400 -config_mod_osso TRUE-update_mode CREATE -remote_midtier -config_file C:\OraHome_1\myFiles\osso.conf
The following explans the parameters used in this command. In this description, partnerapplication refers to the Oracle HTTP Server that is used as the EPM System web server.
l -site_name identifies the web site of the partner application; for example,epm.myCompany.com.
l -mod_osso_url indicates the partner application URL, in PROTOCOL://HOST_NAME:PORT format. This is the URL at which the EPM System web server acceptsincoming client requests, for example, http://epm.myCompany.com:19000.
l -config_mod_osso identifies that the partner application uses mod_osso. You mustinclude the config_mod_osso parameter to generate osso.conf.
OracleAS Single Sign-on 53

l -update_mode indicates the update mode. Use CREATE, the default, to generate a newrecord.
l -remote_midtier specifies that the mod_osso partner application is at a remote mid-tier. Use this option when the partner application is at a different ORACLE_HOME thanthat of the OSSO Server.
l -virtualhost indicates that the partner application URL is a virtual host. Do not usethis parameter if you are not using a virtual host.
If you are registering a partner application URL tied to a virtual host, you must definethe virtual host in httpd.conf. See “Optional: Defining Virtual Host” on page 54.
l -config_file indicates the path where osso.conf file is to be generated.
Optional: Defining Virtual HostIf you used a virtual host URL while registering the partner application, you must define thevirtual host by updating httpd.conf on the Oracle HTTP Server that is used as the EPM Systemweb server.
ä To define a virtual host:
1 Using a text editor, open EPM_ORACLE_INSTANCE/httpConfig/ohs/config/OHS/ohs_component/httpd.conf.
2 Add a definition similar to the following. This definition assumes that the web server is running on thevirtual server epm.myCompany.com at port epm.myCompany.com:19400. Modify the settingsto suit your requirements.
NameVirtualHost epm.myCompany.com:19400Listen 19400 <VirtualHost epm.myCompany.com:19400>DocumentRoot "C:/Oracle/Middleware/user_projects/epmsystem1/httpConfig/ohs /config/OHS/ohs_component/private-docs" include "${ORACLE_INSTANCE}/config/${COMPONENT_TYPE} /${COMPONENT_NAME}/mod_osso.conf"</VirtualHost>
Creating mod_osso.confCreate mod_osso.conf on the Oracle HTTP Server that front-ends the EPM System web server.
ä To create mod_osso.conf:
1 Using a text editor, create a file.
2 Copy the following content into the file and modify it for your environment.
LoadModule osso_module C:/Oracle/Middleware/ohs/ohs/modules/mod_osso.so<IfModule mod_osso.c> OssoIpCheck off OssoIdleTimeout off OssoSecureCookies off
54 Enabling SSO with Security Agents

OssoConfigFile C:/Oracle/Middleware/user_projects/epmsystem1/httpConfig/ ohs/config/OHS/ohs_component/osso/osso.conf
3 Within the <IfModule mod_osso.c definition, include location definitions similar to the followingto identify each resource that you plan to protect using OSSO.
<Location /interop/> require valid user AuthType Osso </Location></IfModule>
4 Save the file as mod_osso.conf.
Relocating osso.confThe process of registering EPM System web server as a partner application (see “RegisteringEPM System Web Server as a Partner Application” on page 53) creates an obfuscatedosso.conf in the location identified by the -config_file directive.
ä To relocate osso.conf:
1 Locate the osso.conf that was created when you registered EPM System web server as a partnerapplication (see “Registering EPM System Web Server as a Partner Application” on page 53.
2 Copy osso.conf into the directory (on Oracle HTTP Server that front-ends the OSSO Server) identifiedby the OssoConifgFile property defined in mod_osso.conf (see “Creatingmod_osso.conf” on page 54).
Adding Cache Management Configuration for Reporting and AnalysisEdit httpd.conf of Oracle HTTP Server and add cache management configuration settings forReporting and Analysis.
ä To add cache management configuration settings:
1 Using a text editor, open EPM_ORACLE_INSTANCE/httpConfig/ohs/config/OHS/ohs_component/httpd.conf.
2 Append the following directives for Reporting and Analysis cache management:
<Location /WebAnalysis/>OssoSendCacheHeaders off</Location><Location /workspace/>OssoSendCacheHeaders off</Location><Location /hr/>OssoSendCacheHeaders off</Location><Location /HReports/>OssoSendCacheHeaders off</Location>
3 Save and close httpd.conf.
OracleAS Single Sign-on 55

Configuring EPM System for OSSOConfigure the OID that is integrated with the OSSO solution as an external user directory inEPM System, and then enable SSO.
ä To configure EPM System for OSSO:
1 Configure the OID that the OSSO solution uses as an external user directory. See "Configuring OID,Active Directory, and Other LDAP-Based User Directories” in the Oracle Enterprise PerformanceManagement System User and Role Security Guide.
2 Enable SSO in the EPM System. “Configuring the EPM System for SSO” on page 74
Note: To configure OSSO as the identity management solution, you must choose Other inSSO Provider or Agent, Custom HTTP Header in SSO Mechanism, and enter Proxy-Remote-User as the name of the custom HTTP header.
3 Provision at least one OID user as Shared Services administrator.
4 Restart EPM System products and custom applications that use the Shared Services security APIs.
Note: Ensure that the OID configured with Shared Services is running before starting EPMSystem products.
Optional: Enabling Debug Messages on OSSO ServerTo record debug messages on OSSO server, modify policy.properties. Debug messages arewritten to ORACLE_HOME/sso/log/ssoServer.log.
ä To record debug messages:
1 Using a text editor, open ORACLE_HOME/sso/conf/policy.properties; for example, C:\OraHome_1\sso\conf\policy.properties, on the OSSO server.
2 Set the value of debugLevel property to DEBUG.
debugLevel = DEBUG
3 Save and close policy.properties.
Optional: Enabling Debug Messages for Protected ResourcesTo record OSSO debug messages for resources protected using mod_osso.conf, modifyhttpd.conf on the EPM System web server. Debug messages are written toEPM_ORACLE_INSTANCE/httpConfig/ohs/diagnostics/logs/OHS/ohs_component/
ohs_component.log.
ä To record debug messages for protected resources:
1 Using a text editor, open EPM_ORACLE_INSTANCE/httpConfig/ohs/config/OHS/ohs_component/httpd.conf.
56 Enabling SSO with Security Agents
2 Set the value of OraLogSeverity property to TRACE.
OraLogSeverity TRACE:32
3 Save and close httpd.conf.
Protecting EPM System Products for SSO
Subtopics
l Resources to Protect
l Resources to Unprotect
You must protect EPM System resources so that SSO requests from users are redirected to thesecurity agent (OAM, OSSO, or SiteMinder).
Oracle HTTP Server uses mod_osso to redirect users to the OSSO server. Users are redirectedonly if the URLs that they request are configured in mod_osso to be protected. See ManagingSecurity in the Oracle HTTP Server Administrator's Guide.
For information on protecting resources for SiteMinder SSO, see SiteMinder documentation.
Resources to ProtectTable 4 lists the contexts that must be protected. The syntax for protecting a resource (usinginterop as an example) for OSSO:
<Location /interop>Require valid-userAuthType Basicorder deny,allowdeny from allallow from myServer.myCompany.comsatisfy any</Location>
The allow from parameter specifies servers from which the protection of the context can bebypassed.
For EPM Workspace, Financial Reporting, and Web Analysis, you need to set only the parametersindicated in the following example:
<Location /workspace>Require valid-userAuthType Basic</Location>
Table 4 EPM System Resources to Protect
EPM System Product Context to Protect
Shared Services /interop
Protecting EPM System Products for SSO 57

EPM System Product Context to Protect
Oracle Hyperion Reporting and Analysis Frameworkl /raframework
l /biplus_webservices
EPM Workspace /workspace
Financial Reporting /hr
Web Analysis /WebAnalysis
Oracle Hyperion EPM Architect /awb
Planning /HyperionPlanning
Oracle Hyperion Performance Scorecardl /HPSWebReports
l /HPSAlerter
Oracle Hyperion Strategic Finance /HSFWebServices
Oracle Integrated Operational Planning /interlace
Financial Managementl /hfmadf
l /hfmofficeprovider
l /hfmsmartviewprovider
Data Relationship Management /drm-web-client
Administration Services /hbrlauncher
Oracle Hyperion Financial Data Quality Management /HyperionFDM
Oracle Hyperion Calculation Manager /calcmgr
Oracle Hyperion Provider Services /aps
Oracle Hyperion Profitability and Cost Management /profitability
Account Reconciliation Manager /arm
Oracle Hyperion Financial Close Management /fcc
Oracle Hyperion Disclosure Management1 /mappingtool
Oracle Hyperion Financial Data Quality Management ERP Integration Adapter for Oracle Applications /aif
1Full certificates chain (starting from root certificate) is required on the client machine to support the use of Disclosure Management client withSSL protected web services.
Resources to UnprotectTable 5 lists the contexts that must be unprotected. The syntax for unprotecting a resource(using /interop/framework(.*) as an example) for OSSO:
<LocationMatch /interop/framework(.*)> Require valid-user
58 Enabling SSO with Security Agents
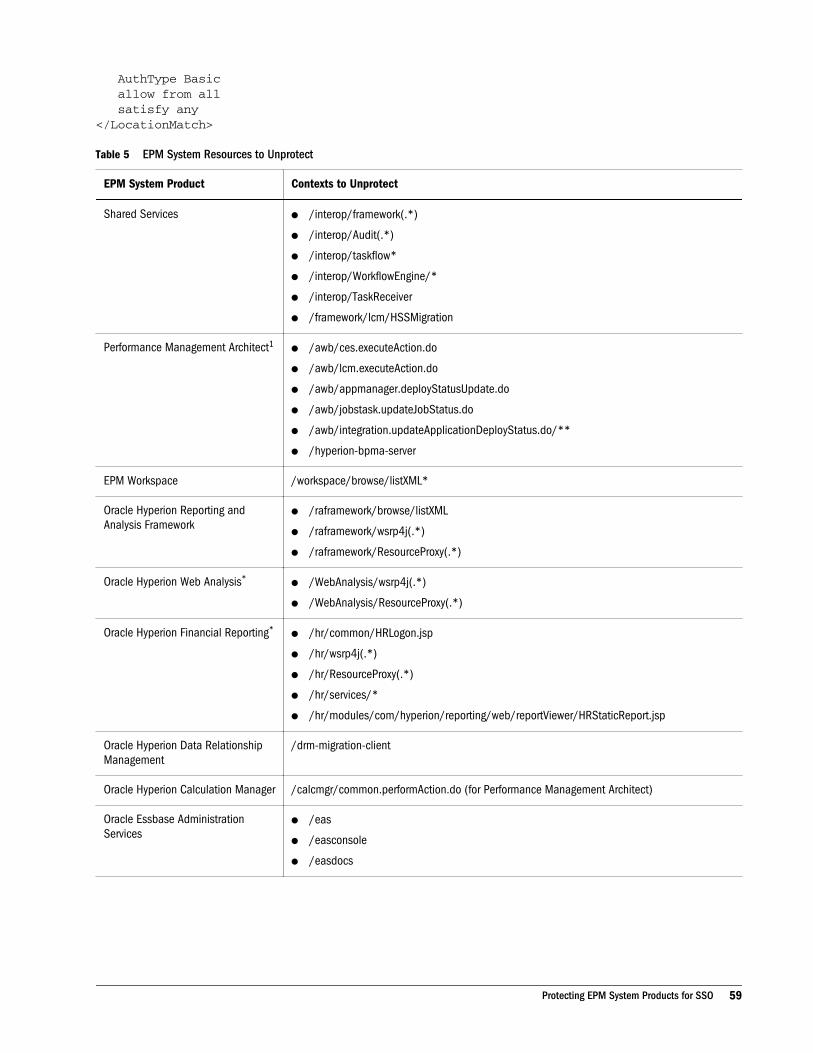
AuthType Basic allow from all satisfy any</LocationMatch>
Table 5 EPM System Resources to Unprotect
EPM System Product Contexts to Unprotect
Shared Servicesl /interop/framework(.*)
l /interop/Audit(.*)
l /interop/taskflow*
l /interop/WorkflowEngine/*
l /interop/TaskReceiver
l /framework/lcm/HSSMigration
Performance Management Architect1l /awb/ces.executeAction.do
l /awb/lcm.executeAction.do
l /awb/appmanager.deployStatusUpdate.do
l /awb/jobstask.updateJobStatus.do
l /awb/integration.updateApplicationDeployStatus.do/**
l /hyperion-bpma-server
EPM Workspace /workspace/browse/listXML*
Oracle Hyperion Reporting andAnalysis Framework
l /raframework/browse/listXML
l /raframework/wsrp4j(.*)
l /raframework/ResourceProxy(.*)
Oracle Hyperion Web Analysis*l /WebAnalysis/wsrp4j(.*)
l /WebAnalysis/ResourceProxy(.*)
Oracle Hyperion Financial Reporting*l /hr/common/HRLogon.jsp
l /hr/wsrp4j(.*)
l /hr/ResourceProxy(.*)
l /hr/services/*
l /hr/modules/com/hyperion/reporting/web/reportViewer/HRStaticReport.jsp
Oracle Hyperion Data RelationshipManagement
/drm-migration-client
Oracle Hyperion Calculation Manager /calcmgr/common.performAction.do (for Performance Management Architect)
Oracle Essbase AdministrationServices
l /eas
l /easconsole
l /easdocs
Protecting EPM System Products for SSO 59

EPM System Product Contexts to Unprotect
Financial Managementl /hfm/EIE/EIEListener.asp
l /hfmapplicationservice
l /oracle-epm-fm-webservices
l /hfmlcmservice
Planningl /HyperionPlanning/servlet/HspLCMServlet
l /HyperionPlanning/servlet/HspAppManagerServlet (for Performance Management Architect)
l /HyperionPlanning/Smartview
l /HyperionPlanning/servlet/PlanningDMEAdapter
Oracle Hyperion PerformanceScorecard
l /HPSWebReports/wsrp4j(.*)
l /HPSWebReports/ResourceProxy(.*)
l /HPSWebReports/action/lcmCallBack
Performance Management ArchitectData Synchronization
/DataSync/services*
Oracle Hyperion Strategic Financel /HSFWebServices/HSFWebService.asmx
l /HSFWebServices/HSFEntityWebService.asmx
Oracle Integrated OperationalPlanning
l /interlace/services/(.*)
l /interlace/anteros/(.*)
l /interlace/interlace/(.*)
l /interlace/WebHelp/(.*)
l /interlace/html/(.*)
l /interlace/email-book/(.*)
Profitability and Cost Managementl /profitability/cesagent
l /profitability/lcm
l /profitability/control
l /profitability/ApplicationListener
Oracle Hyperion Financial DataQuality Management ERP IntegrationAdapter for Oracle Applications
l /aif/services/FDMRuleService
l /aif/services/RuleService
Oracle Hyperion DisclosureManagement
l /discmanwebservices
l /mappingtool/MappingToolWS
1 /awb/integration.updateApplicationDeployStatus.do/** should be unprotected for Oracle Access Managerintegration only.
60 Enabling SSO with Security Agents

SiteMinder SSO
Subtopics
l Process Flow
l Special Considerations
l Prerequisites
l Enabling SiteMinder Web Agent
l Configuring the SiteMinder Policy Server
l Configuring SiteMinder Web Server to Forward Requests to the EPM System Web Server
l Enabling SiteMinder in EPM System
SiteMinder is a Web-only solution. Desktop applications and their add-ins (for example,Microsoft Excel and Report Designer) cannot use authentication through SiteMinder. However,Oracle Hyperion Smart View for Office can use SiteMinder authentication.
Process FlowIllustrated overview of SiteMinder-enabled SSO:
The SiteMinder SSO process:
1. Users try to access a SiteMinder protected EPM System resource. They use a URL thatconnects them to the web server that front-ends the SiteMinder policy server; for example,
SiteMinder SSO 61

http://WebAgent_Web_Server_Name:WebAgent_Web_ServerPort/interop/
index.jsp.
2. The web server redirects users to the policy server, which challenges users for credentials.After verifying credentials against configured user directories, the policy server passes thecredentials to the web server that hosts the SiteMinder Web Agent.
3. The web server that hosts the SiteMinder Web Agent redirects the request to the OracleHTTP Server that front-ends EPM System. Oracle HTTP Server redirects users to therequested application deployed on WebLogic Server or IIS Server.
4. The EPM System component checks provisioning information and serves up content. Forthis process to work, the user directories that SiteMinder uses to authenticate users must beconfigured as external user directories in the EPM System. These directories must beconfigured as trusted.
Special ConsiderationsSiteMinder is a Web-only solution. Desktop applications and their add-ins (for example,Microsoft Excel and Report Designer) cannot use authentication through SiteMinder. However,Smart View can use SiteMinder authentication.
Prerequisites1. A fully functional SiteMinder installation comprising the following components:
l SiteMinder Policy Server on which policies and agent objects have been defined
l SiteMinder Web Agent installed on the web server that front-ends the SiteMinder PolicyServer
2. A fully functional EPM System deployment.
When you configure the web server for EPM System components, EPM System Configuratorconfigures the following on the Oracle HTTP Server to proxy requests to the applicationserver:
l mod_wl_ohs.conf to proxy requests to WebLogic Server
l mod_proxy to proxy requests to IIS
Enabling SiteMinder Web AgentThe web agent is installed on a web server that intercepts requests for EPM System resources.Attempts by unauthenticated users to access a protected EPM System resources forces the webagent to challenge users for SSO credentials. When a user is authenticated, the policy server addsthe login name of the authenticated user, which is carried by the header. Thereafter, the HTTPrequest is passed to the EPM System web server, which redirects the requests. EPM Systemcomponents extracts the authenticated user credentials from headers.
62 Enabling SSO with Security Agents
SiteMinder supports SSO across EPM System products running on heterogeneous web serverplatforms. If EPM System products use different web servers, you must ensure that theSiteMinder cookie can be passed among web servers within the same domain. You do so byspecifying the appropriate EPM System application domain as the value of theCookiedomain property in the WebAgent.conf file of each web server.
See the “Configuring Web Agents” in the Netegrity SiteMinder Agent Guide.
Note: Because Shared Services uses basic authentication to protect its content, the web serverthat intercepts requests to Shared Services should enable basic authentication to supportSSO with SiteMinder.
You configure the web Agent by running the SiteMinder Web Agent Configuration wizard (byexecuting WEBAGENT_HOME/install_config_info/nete-wa-config;for example, C:\netegrity\webagent\install_config_info\nete-wa-config.exe on Windows).The configuration process creates a WebAgent.conf for the SiteMinder web server.
ä To enable SiteMinder Web Agent:
1 Using a text editor, open WebAgent.conf. The location of this file depends on the web server thatyou are using. If you are configuring the an IIS Server as the SiteMinder web server, the location ofWebAgent.conf is WEB_AGENT_HOME/bin/IIS; for example, C:\SiteMinder\webagent\bin\iis\WebAgent.conf.
2 Set the value of enableWebAgent property to Yes.
enableWebAgent=”YES”
3 Save and close the web agent configuration file.
Configuring the SiteMinder Policy ServerA SiteMinder administrator must configure the policy server to enable SSO to EPM Systemproducts.
The configuration process involves:
l Creating a SiteMinder Web Agent and adding configuration objects appropriate for theSiteMinder web server
l Creating a realm for each EPM System resource that should be protected and adding theweb agent to the realm. See “Resources to Protect” on page 57
l Within the realm that was created for protected EPM System resources, create realms forunprotected resources. See “Resources to Unprotect” on page 58
l Creating HTTP header reference. The header should provide the value of LoginAttribute to EPM System applications. See “Configuring OID, Active Directory, andOther LDAP-Based User Directories” in the Oracle Enterprise Performance ManagementSystem User and Role Security Guide for a brief description of Login Attribute.
l Creating rules within the realms with Get, Post, and Put as web agent actions
SiteMinder SSO 63
l Creating a response attribute with hyplogin=<%userattr="SM_USERLOGINNAME"%> asthe value
l Creating a policy, assigning user directory access, and adding rules that you created for EPMSystem to Current Members list
l Setting responses for the rules you created for EPM System components
Configuring SiteMinder Web Server to Forward Requests tothe EPM System Web ServerConfigure the web server that hosts the SiteMinder web agent to forward requests fromauthenticated users (containing the header identifying the user) to the EPM System web server.
For Apache-based web servers, use directives similar to the following to forward authenticatedrequests:
ProxyPass / http://EPM_WEB_SERVER:EPM_WEB_SERVER_PORT/ProxyPassReverse / http://EPM_WEB_SERVER:EPM_WEB_SERVER_PORT/ProxyPreserveHost On#If SiteMinder Web Server is using HTTPS but EPM Web Server is using HTTPRequestHeader set WL-Proxy-SSL true
In this directive, replace EPM_WEB_SERVER and EPM_WEB_SERVER_PORT with the actual valuesfor your environment.
Enabling SiteMinder in EPM SystemIntegration with SiteMinder requires that you enable SiteMinder authentication for EPM Systemproducts. See “Configuring the EPM System for SSO” on page 74.
Kerberos Single Sign-on
Subtopics
l Overview
l Support Limitations
l Assumptions: Kerberos Environment
l Kerberos SSO with WebLogic Server
l WebLogic Server Procedures to Support Kerberos Authentication
OverviewEPM System products support Kerberos SSO if the application server that hosts EPM Systemproducts is set up for Kerberos authentication.
Kerberos is a trusted authentication service, where each Kerberos client trusts the identities ofother Kerberos clients (users, network services, and so on) to be valid.
64 Enabling SSO with Security Agents
The following steps list what happens when a user accesses an EPM System product:
l From a Windows computer, the user logs in to a Kerberos realm.
l Using a browser that is configured to use Integrated Windows Authentication, the user triesto log into EPM System products running on the application server.
l The application server (Negotiate Identity Asserter) intercepts the request and gets theSimple and Protected Generic Security Services API (GSSAPI) Negotiation Mechanism(SPNEGO) token with the Kerberos ticket from the browser's authorization header.
l The asserter validates the user's identity included in the token against its identity store topass information about the user to EPM System product. The EPM System product validatesthe user name against an Active Directory. The EPM System product issues an SSO tokenthat supports SSO across all EPM System products.
Support LimitationsKerberos SSO is supported for all EPM System products, with the following exceptions:
l Kerberos SSO is not supported for thick clients including Smart View.
l Kerberos SSO support for IIS-embedded EPM System products (for example, FinancialManagement) is available only through EPM Workspace. SSO access to Oracle HyperionFinancial Data Quality Management, is provided through Financial Management.
Assumptions: Kerberos EnvironmentThis document assumes the following:
l A fully functional Kerberos-enabled network environment
m The corporate Active Directory is configured for Kerberos authentication.
m The application server and HTTP server machines that host EPM System products arewithin the Kerberos realm.
m The machines from which EPM System products are accessed are part of the Kerberosrealm.
m Browsers used to access EPM System products are configured for Integrated WindowsAuthentication. For information on enabling Integrated Windows Authentications, see:
Internet Explorer documentation on the Microsoft Help and Support web site.
Firefox documentation on the Firefox Support web site.
l EPM System product users have Kerberos credentials that enable them to log in to clientmachines in the domain.
l Integrated Windows Authentication is disabled in IIS if it is used as the web server for EPMSystem products.
Kerberos Single Sign-on 65

Kerberos SSO with WebLogic ServerWebLogic Server Kerberos SSO uses the Negotiate Identity Asserter to negotiate and decodeSPNEGO tokens to enable SSO with Microsoft clients. WebLogic Server decodes SPNEGOtokens to obtain Kerberos ticket and validates and maps the ticket to a WebLogic Server user.You can use the Active Directory Authenticator of WebLogic Server with the Negotiate IdentityAsserter to configure Active Directory as the user directory for WebLogic Server users.
When the browser requests access to an EPM System product, KDC issues a Kerberos ticket tothe browser, which creates a SPNEGO token containing the supported GSS token types. TheNegotiate Identity Asserter decodes the SPNEGO token and uses GSSAPIs to accept the securitycontext. The identity of the user who initiated the request is mapped to a user name and passedback to WebLogic Server. Additionally, the WebLogic Server determines the groups to whichthe user belongs. At this stage, the requested EPM System product is made available to the user.
Note: The user must use a browser that supports the SPNEGO (for example, Internet Exploreror Firefox) to access the EPM System products running on WebLogic Server. WebLogicServer can run on a UNIX or Windows platform.
Using the user ID derived from the authentication process, the EPM System productauthorization process checks for provisioning data. Access to EPM System product is restrictedbased on provisioning data.
This document is based on the following assumptions. See “Assumptions: KerberosEnvironment” on page 65 for assumptions related to the network environment.
l Active Directory security groups and users are available to support the WebLogic Server toActive Directory handshake. See “Configuring Single Sign-on with Microsoft Clients” inOracle Fusion Middleware Securing Oracle WebLogic Server.
The Active Directory user must be able to log in to WebLogic Server as a power user,preferably as WebLogic Server Administrator. The user account is updated by selectingUse DES encryption types for this account.
See Microsoft documentation for detailed information.
The configuration must support the use of the web server DNS name (reverse proxy) asKerberos Service Principal Name.
l The myrealm security realm in the WebLogic Server domain is modified to add ActiveDirectory as the authentication provider. See WebLogic Server documentation for detailedinformation.
WebLogic Server Procedures to Support KerberosAuthenticationA WebLogic Server administrator should complete these tasks to support Kerberosauthentication:
66 Enabling SSO with Security Agents
l Configure the WebLogic domain of EPM System. See “Configuring EPM System WebLogicDomain” on page 67.
l Create an authentication provider. See “Creating an LDAP Authentication Provider inWebLogic Server” on page 67.
l Create a Negotiate Identity Asserter. See “Creating a Negotiate Identity Asserter” on page68.
l Create a Kerberos identification. See “Creating Kerberos Identification for WebLogicServer” on page 68.
l Create a Kerberos configuration file. See “Creating Kerberos Configuration File” on page68.
l Update WebLogic startup script. See “Updating WebLogic Startup Script” on page 69.
l Configure authorization policies. See “Configuring Authorization Policies” on page 69.
l Deploy and use SSODiag to verify that the WebLogic Server is ready to support KerberosSSO for EPM System. See “Using SSODiag to Test the Kerberos Environment” on page70.
Configuring EPM System WebLogic DomainGenerally, EPM System products are deployed into epmsystem1, which is the default WebLogicdomain. This domain is identified also as EPM_ORACLE_INSTANCE.
ä To configure the EPM System WebLogic domain for Kerberos authentication:
1 Install EPM System components.
2 Create the WebLogic domain by configuring and deploying Foundation Services only.
3 Configure the WebLogic domain from the preceding step for Kerberos authentication. See “ConfiguringSingle Sign-on with Microsoft Clients” in Oracle Fusion Middleware Securing Oracle WebLogic Serverguide.
Steps involved:
l “Creating an LDAP Authentication Provider in WebLogic Server” on page 67
l “Creating a Negotiate Identity Asserter” on page 68
l “Creating Kerberos Identification for WebLogic Server” on page 68
l “Updating WebLogic Startup Script” on page 69
l “Configuring Authorization Policies” on page 69
Creating an LDAP Authentication Provider in WebLogic ServerAn LDAP Authentication provider stores user and group information in an external LDAPserver. LDAP v2- or v3- compliant LDAP server should work with WebLogic Server. SeeConfiguring LDAP authentication providers in Oracle Fusion Middleware Securing OracleWebLogic Server guide.
Kerberos Single Sign-on 67
Creating a Negotiate Identity AsserterThe Negotiate Identity Assertion provider enables SSO with Microsoft clients. It decodesSPNEGO tokens to obtain Kerberos tokens, validates the Kerberos tokens, and maps the tokensto WebLogic users. The Negotiate Identity Assertion provider, an implementation of the SecurityService Provider Interface (SSPI) as defined by the WebLogic Security Framework, provides thenecessary logic to authenticate a client based on the client's SPNEGO token. See Configuringnegotiate identity assertion provider in the Oracle Fusion Middleware Securing Oracle WebLogicServer guide.
While creating the Negotiate Identity Assertion provider, set the JAAS Control Flag option toOPTIONAL for all Authenticators. See “Set the JAAS control flag” in Oracle Fusion MiddlewareOracle WebLogic Server Administration Console Online Help.
Creating Kerberos Identification for WebLogic ServerCreate Active Directory user objects that represent WebLogic Server and EPM System web serverand map them to service principal names (SPN). SPNs are unique identifiers that identify theservice to clients on the network.
ä To create Kerberos identification for WebLogic Server:
1 Create an Active Directory user that complies with the Kerberos protocol. The user account's encryptiontype must be DES. See Creating Kerberos identification for WebLogic Server in the Oracle FusionMiddleware Securing Oracle WebLogic Server guide.
For example, Active Directory user wls-myServer0055 may represent the WebLogic Serverrunning on computer myServer0055.
l While creating the user, do not select password options.
l After creating the user, modify the user properties and select Use DES encryptiontypes for this account.
l Reset the password of the user account.
2 Use the setspn command similar to the following to map the Kerberos SPN, HTTP/WEBLOGIS_SERVER_HOST_NAME to a Microsoft user account.
setspn -A HTTP/myServer0055.myexample.com wls-myServer0055
3 Create a Kerberos keytab file using a command such as the following and make it available to WebLogicServer:
ktpass -out c:\temp\wls-myServer0055.keytab -princ HTTP/[email protected] -mapuser wls-myExample0055 -pass PASSWORD -DesOnly
Creating Kerberos Configuration FileKerberos configuration properties are defined in kerb5.ini. This configuration file is requiredto use Kerberos administration tools such as kinit and ktab.
68 Enabling SSO with Security Agents
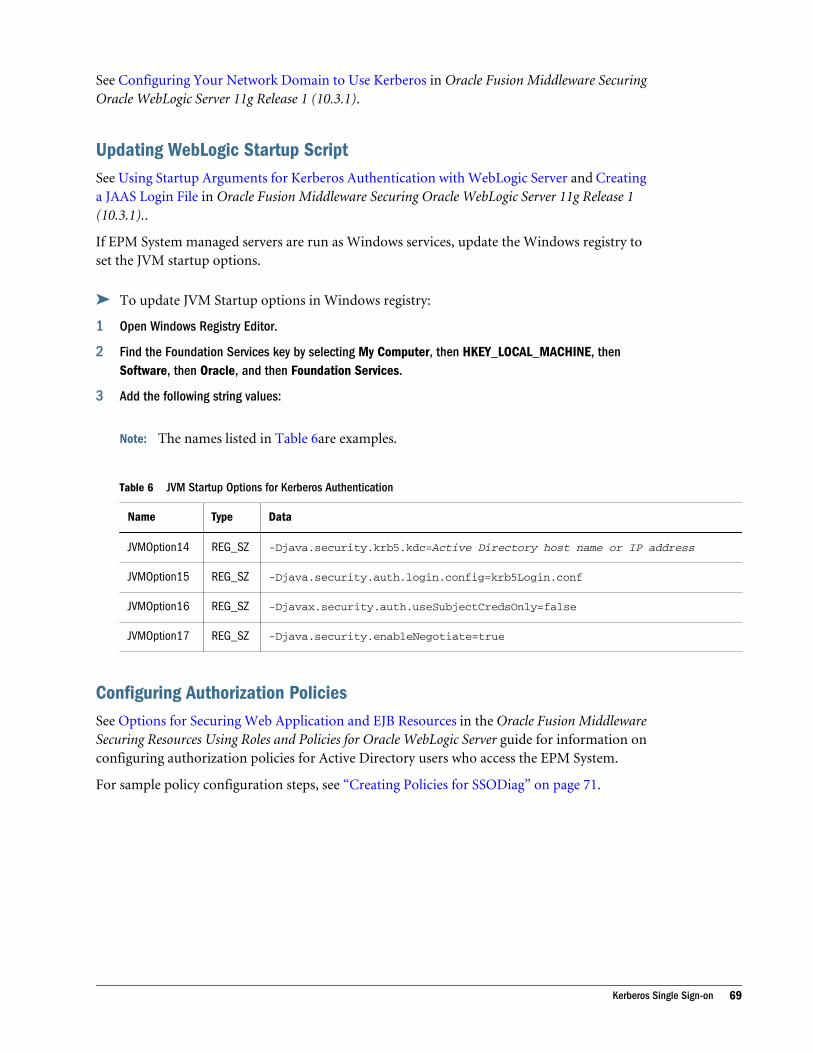
See Configuring Your Network Domain to Use Kerberos in Oracle Fusion Middleware SecuringOracle WebLogic Server 11g Release 1 (10.3.1).
Updating WebLogic Startup ScriptSee Using Startup Arguments for Kerberos Authentication with WebLogic Server and Creatinga JAAS Login File in Oracle Fusion Middleware Securing Oracle WebLogic Server 11g Release 1(10.3.1)..
If EPM System managed servers are run as Windows services, update the Windows registry toset the JVM startup options.
ä To update JVM Startup options in Windows registry:
1 Open Windows Registry Editor.
2 Find the Foundation Services key by selecting My Computer, then HKEY_LOCAL_MACHINE, thenSoftware, then Oracle, and then Foundation Services.
3 Add the following string values:
Note: The names listed in Table 6are examples.
Table 6 JVM Startup Options for Kerberos Authentication
Name Type Data
JVMOption14 REG_SZ -Djava.security.krb5.kdc=Active Directory host name or IP address
JVMOption15 REG_SZ -Djava.security.auth.login.config=krb5Login.conf
JVMOption16 REG_SZ -Djavax.security.auth.useSubjectCredsOnly=false
JVMOption17 REG_SZ -Djava.security.enableNegotiate=true
Configuring Authorization PoliciesSee Options for Securing Web Application and EJB Resources in the Oracle Fusion MiddlewareSecuring Resources Using Roles and Policies for Oracle WebLogic Server guide for information onconfiguring authorization policies for Active Directory users who access the EPM System.
For sample policy configuration steps, see “Creating Policies for SSODiag” on page 71.
Kerberos Single Sign-on 69

Using SSODiag to Test the Kerberos Environment
Subtopics
l Deploying SSODiag
l Configuring Oracle HTTP Server for SSODiag
l Creating Policies for SSODiag
l Using SSODiag to Test WebLogic Server Configuration for Kerberos Authentication
SSODiag is a diagnostic web application that tests whether WebLogic Server in your Kerberosenvironment is ready to support EPM System.
Deploying SSODiag
Use the credentials (default user name is epm_admin) that you specified while deployingFoundation Services to deploy SSODiag.
ä To deploy an configure SSOdiag:
1 Log on to the WebLogic Server Administration Console for EPM System domain.
2 Using the Install Application Assistant, select EPM_ORACLE_HOME/products/Foundation/AppServer/InstallableApps/common/SSODiag.war as the web application to install.
3 Deploy SSODiag as an application (choose Install this deployment as an application as targeting style)using CustomRolesAndPolicies security option.
4 Activate the changes you made.
Configuring Oracle HTTP Server for SSODiag
Update mod_wl_ohs.conf to configure Oracle HTTP Server to forward SSODiag URL requeststo the WebLogic Server.
ä To configure URL forwarding in Oracle HTTP Server:
1 Using a text editor, open EPM_ORACLE_INSTANCE/httpConfig/ohs/config/OHS/ohs_component/mod_wl_ohs.conf.
2 Add a LocationMatch definition for SSODiag:
<LocationMatch /SSODiag/> SetHandler weblogic-handler WeblogicCluster myServer:28080</LocationMatch>
In the preceding sample, myServer denotes the Foundation Services host machine and28080 represents the port at which Shared Services listens for requests.
3 Save and close mod_wl_ohs.conf.
4 Restart Oracle HTTP Server.
70 Enabling SSO with Security Agents
Creating Policies for SSODiag
Create a policy in the WebLogic Server Administrative Console to protect the following SSODiagURL.
http://OHS_HOST_NAME:PORT/SSODiag/krbssodiag
In this sample, OHS_HOST_NAME indicates the name of the server that hosts Oracle HTTP Serverand PORT indicates the port where Oracle HTTP Server listens for requests.
ä To create policies to protect SSODiag:
1 In the Change Center in WebLogic Server Administration Console for EPM System domain, select Lock& Edit.
2 Select Deployments, then SSODiag, then Security, then Roles, and then URL Patterns.
3 Create the following URL patterns:
l /
l /index.jsp
4 Modify each URL pattern that you created:
a. From the list of URL patterns in Stand-Alone Web Application URL Patterns, open thepattern (/) that you created by clicking it.
b. Select Add Conditions.
c. In Predicate List, select User.
d. Select Next.
e. In User Argument Name, enter the Active Directory user whose account is used to accessa client desktop configured for Kerberos authentication; for example, krbuser1, andselect Add.
f. Select Finish.
5 Select Save.
Using SSODiag to Test WebLogic Server Configuration for Kerberos Authentication
If WebLogic Server configuration for Kerberos authentication works correctly, the OracleHyperion Kerberos SSO diagnostic Utility V 1.0 page displays the following message:
Retrieving Kerberos User principal name... Success.Kerberos principal name retrieved... SOME_USER_NAME
Caution! Do not configure EPM System components for Kerberos authentication if SSODiagcannot retrieve the Kerberos principal name.
ä To test WebLogic Server configuration for Kerberos authentication:
1 Start Foundation Services and Oracle HTTP Server.
Kerberos Single Sign-on 71

2 Using WebLogic Server Administration Console, start SSODiag web application to service all requests.
3 Log on to a client machine configured for Kerberos authentication using valid Active Directory credentials.
4 Using a browser, connect to the following SSODiag URL:
http://OHS_HOST_NAME:PORT/SSODiag/krbssodiag
In this sample, OHS_HOST_NAME indicates the name of the server that hosts Oracle HTTPServer, and PORT indicates the port where Oracle HTTP Server listens for requests.
If Kerberos authentication works properly, SSODiag displays the following information:
Retrieving Kerberos User principal name... Success.Kerberos principal name retrieved... SOME_USER_NAME
If Kerberos authentication does not work properly, SSODiag displays the followinginformation:
Retrieving Kerberos User principal name... failed.
Configuring Foundation Services for Kerberos Authentication
Subtopics
l Changing the Security Model
l Updating EPM System Security Configuration
l Testing Kerberos SSO
Caution! Complete this step only after SSODiag successfully retrieves the Kerberos principalname. See “Using SSODiag to Test WebLogic Server Configuration for KerberosAuthentication” on page 71.
Changing the Security Model
The default security model for web applications secured by the security realm is DDonly. Youmust change the security model to CustomRolesAndPolicies.
ä To change the security model:
1 Using a text editor, open MIDDLEWARE_HOME/user_projects/domains/EPMSystem/config/config.xml.
2 Locate the following element in the application deployment descriptor for each Foundation Servicescomponent:
<security-dd-model>DDOnly</security-dd-model>
3 Change the security model as follows for each component:
<security-dd-model>CustomRolesAndPolicies</security-dd-model>
4 Save and close config.xml.
72 Enabling SSO with Security Agents

Updating EPM System Security Configuration
Change EPM System security configuration to enable Kerberos SSO.
ä To configure EPM System for Kerberos authentication:
1 Log on to Shared Services Console as administrator.
2 Add the Active Directory domain that is configured for Kerberos authentication as an external userdirectory in Shared Services. See “Configuring OID, Active Directory, and Other LDAP-based UserDirectories” in the Oracle Enterprise Performance Management System User and Role SecurityGuide.
3 Enable SSO. See “Setting Security Options” in the Oracle Enterprise Performance Management SystemUser and Role Security Guide.
In Security Options, select the settings in Table 7 to enable Kerberos SSO.
Table 7 Settings to Enable Kerberos SSO
Field Required Setting
Enable SSO Selected
SSO Provider or Agent Other
SSO Mechanism Get Remote User from HTTP Request
4 Restart Foundation Services.
Testing Kerberos SSO
Log in to Foundation Services to verify that Kerberos SSO is working properly.
ä To test Kerberos SSO:
1 Verify that Foundation Services and Oracle HTTP Server are running.
2 Log on to a client machine configured for Kerberos authentication using a valid Active Directorycredentials.
3 Using a browser, connect to the Foundation Services URL.
Configuring Other EPM System ComponentsUsing EPM System Configurator, configure and deploy other EPM System components into theWebLogic domain where Foundation Services is deployed.
Change the security model for each EPM System Component deployed into the WebLogicdomain where Foundation Services is deployed. See “Changing the Security Model” on page72.
Kerberos Single Sign-on 73

Configuring the EPM System for SSOEPM System products must be configured to support security agent for SSO. The configurationspecified in Shared Services determines the following for all EPM System products:
l Whether to accept SSO from a security agent
l The authentication mechanism to accept for SSO
In an SSO-enabled environment, the EPM System product that is first accessed by the user parsesthe SSO mechanism to retrieve the authenticated user ID contained in it. The EPM Systemproduct checks the user ID against the user directories configured in Shared Services todetermine that the user is a valid EPM System user. It also issues a token that enables SSO acrossEPM System products.
The configuration specified in Shared Services enables SSO and determines the authenticationmechanism to accept for SSO for all EPM System products.
ä To enable SSO from a web identity management solution:
1 Launch the Shared Services Console. See "Launching Shared Services Console” in the Oracle EnterprisePerformance Management System User and Role Security Guide. Log in as a Shared ServicesAdministrator.
2 Select Administration, then Configure User Directories.
3 Verify that the user directories used by the web identity management solution are configured as externaluser directories in Shared Services.
For example, to enable Kerberos SSO, you must configure the Active Directory that isconfigured for Kerberos authentication as an external user directory.
See “Configuring User Directories” in the Oracle Enterprise Performance Management SystemUser and Role Security Guide.
4 Select Security Options.
5 Select Show Advanced Options.
6 In Single Sign-on Configuration in the Defined User Directories screen, perform the following steps.
a. Select Enable SSO.
b. From SSO Provider or Agent, select a web identity management solution. Choose Otherif you are configuring SSO with Kerberos.
The recommended SSO mechanism is automatically selected. See Table 8. See“Supported SSO Methods” on page 47.
Note: If you are not using the recommended SSO mechanism, you must chooseOther in SSO Provider or Agent. For example, to use a mechanism other thanHTTP Header for SiteMinder, choose Other in SSO Provider or Agent and thenselect the SSO Mechanism that you want to use in SSO Mechanism.
74 Enabling SSO with Security Agents

Table 8 Preferred SSO Mechanisms for Web Identity Management Solutions
Web IdentityManagement Solution
Recommended SSO Mechanism
Oracle Access Manager Custom HTTP Header1
OSSO Select Other in SSO Provider or Agent and Custom HTTP Header in SSO Mechanism. EnterProxy-Remote-User as the name of the custom HTTP header.
SiteMinder Custom HTTP Header
Kerberos WebLogic Server: Custom HTTP Header
1The default HTTP Header name is HYPLOGIN. If you are using a custom HTTP Header, replace the name.
7 Click OK.
Single Sign-on Options for Smart ViewAlthough Smart View is a thick client and not a browser, it connects to server components usingHTTP and behaves much like a browser from a system perspective. Smart View supports allstandard web-based integration methods that browser interfaces support. However, there aresome limitations:
l Smart View is not supported in Kerberos-enabled environments.
l SSO mechanisms are supported for shared connections only. SSO mechanisms are notsupported with private connections, which are used primarily for backward compatibility.
l If Smart View is launched from an existing browser session that is connected to an EPMSystem component, users must sign into Smart View again because it does not share thecookie from the existing session.
Single Sign-on Options for Smart View 75

76 Enabling SSO with Security Agents

4Using a Custom Authentication
Module
In This Chapter
Overview ... . . . . . . . . . . . . . . . . . . . . . . . . . . . . . . . . . . . . . . . . . . . . . . . . . . . . . . . . . . . . . . . . . . . . . . . . . . . . . . . . . . . . . . . . . . . . . . . . .77
Use-Case Examples and Limitations ... . . . . . . . . . . . . . . . . . . . . . . . . . . . . . . . . . . . . . . . . . . . . . . . . . . . . . . . . . . . . . . . . . .79
Prerequisites.. . . . . . . . . . . . . . . . . . . . . . . . . . . . . . . . . . . . . . . . . . . . . . . . . . . . . . . . . . . . . . . . . . . . . . . . . . . . . . . . . . . . . . . . . . . . . . .79
Design and Coding Considerations... . . . . . . . . . . . . . . . . . . . . . . . . . . . . . . . . . . . . . . . . . . . . . . . . . . . . . . . . . . . . . . . . . . . .80
Deploying the Custom Authentication Module ... . . . . . . . . . . . . . . . . . . . . . . . . . . . . . . . . . . . . . . . . . . . . . . . . . . . . . . .84
OverviewA custom authentication module is a Java module that customers develop and implement toauthenticate EPM System users. Generally, EPM System products use a logon screen to capturethe user name and password, which are used to authenticate users. Instead of using EPM Systemauthentication, you can use a custom authentication module to authenticate users and passauthenticated user credentials to EPM System for further processing. Implementing a customauthentication module does not involve modifying EPM System products.
You can use a custom authentication module with both the thick clients (for example, OracleHyperion Smart View for Office, and Oracle Essbase Studio) and thin clients (for example, EPMWorkspace).
The custom authentication module uses the information a user enters when logging in to anEPM System product. If enabled for a user directory, it authenticates users through the customauthentication module. On successfully authenticating the user, the custom authenticationmodule returns the user name to EPM System.
The following illustration presents a sample custom authentication scenario:
Overview 77

For example, you can use RSA SecurID infrastructure as the custom provider to ensuretransparent strong authentication to the EPM System. An overview:
1. The user enters credentials (generally, user name and password) to access an EPM Systemproduct. These credentials should uniquely identify the user to the provider used by thecustom authentication module. For example, if you are using an RSA SecurID infrastructureto authenticate users, the user enters an RSA user ID and PIN (not an EPM System user IDand password).
2. Using the search order (see “Search Order” on page 80), EPM System cycles throughconfigured user directories to locate the user.
l If the current user directory is not configured for custom authentication, EPM Systemtries to locate and authenticate the user through EPM System authentication.
l If the user directory is configured for custom authentication, EPM System delegates theauthentication process to the custom module.
3. If EPM System delegates authentication to the custom module, the custom authenticationmodule accepts the credentials and uses its own logic to direct user authentication againsta custom provider, for example, RSA SecurID infrastructure.
4. If the custom authentication module authenticates the user against its provider, it returnsthe user name to the EPM System, or it returns a Java exception.
The user name returned by the custom authentication module must be identical to a username in one of the user directories that is enabled for custom authentication.
l If the custom authentication module returns a user name, EPM System locates the userin a user directory that is enabled for custom authentication. At this stage, EPM Systemdoes not search the user directories that are not configured for custom authentication.
78 Using a Custom Authentication Module
l If the custom authentication module throws an exception or returns a null user, EPMSystem continues to search for the user in the remaining user directories in the searchorder that are not enabled for custom authentication. If a user who matches thecredentials is not found, EPM System displays an error.
Use-Case Examples and LimitationsCustom authentication implementation scenarios include the following:
l Adding one-time password Support
l Performing authentication against a Resource Access Control Facility (RACF)
l Adding Simple Authentication and Security Layer (SASL) bind to LDAP-enabled userdirectories instead of simple LDAP binds
Authentication with challenge/response mechanism may not work well if you implement acustom authentication module. Custom messages thrown by the custom authentication moduleare not propagated to the clients. Because clients, for example, EPM Workspace, override theerror message to display a generic message, the following scenarios are not valid:
l Two consecutive RSA SecurID PINs
l Password variant with challenges, such as enter first, last, and third characters of password
Prerequisitesl A fully tested Java archive named CustomAuth.jar that contains custom authentication
module libraries. CustomAuth.jar must implement the public interfaceCSSCustomAuthenticationIF, defined in com.hyperion.css package as a part of thestandard Shared Services APIs. See http://download.oracle.com/docs/cd/E12825_01/epm.111/epm_security_api_11111/client/com/hyperion/css/CSSCustomAuthenticationIF.html.
l Access to Shared Services as Shared Services administrator
Use-Case Examples and Limitations 79

Design and Coding Considerations
Subtopics
l Search Order
l User Directories and Custom Authentication Module
l CSSCustomAuthenticationIF Java Interface
Search OrderIn addition to Native Directory, multiple user directories can be configured in Shared Services.A default search order position is assigned to all configured user directories. You can modify thesearch order from Shared Services Console. Excepting Native Directory, you can removeconfigured user directories from the search order. EPM System does not use the user directoriesthat are not included in the search order. See the Oracle Enterprise Performance ManagementSystem User and Role Security Guide.
The search order determines the order in which EPM System cycles through the user directoriesto authenticate users. If the user is authenticated in a user directory, EPM System stops the searchand returns the user. EPM System denies authentication and returns an error if the user cannotbe authenticated against user directories in the search order.
Impact of Custom Authentication on Search OrderCustom authentication affects how EPM System security interprets the search order.
If the custom authentication module returns a user name, EPM System locates the user only ina user directory that is enabled for custom authentication. At this stage, EPM System ignoresuser directories that are not configured for custom authentication.
Understanding the Custom Authentication FlowThe following use case scenarios are used to explore custom authentication flow:
l “Use Case Scenario 1” on page 80
l “Use-case Scenario 2” on page 82
l “Use-case Scenario 3” on page 82
Use Case Scenario 1
Table 9 details the EPM System user directory configuration and search order used in thisscenario. This scenario assumes that the custom authentication module uses an RSAinfrastructure to authenticate users.
80 Using a Custom Authentication Module
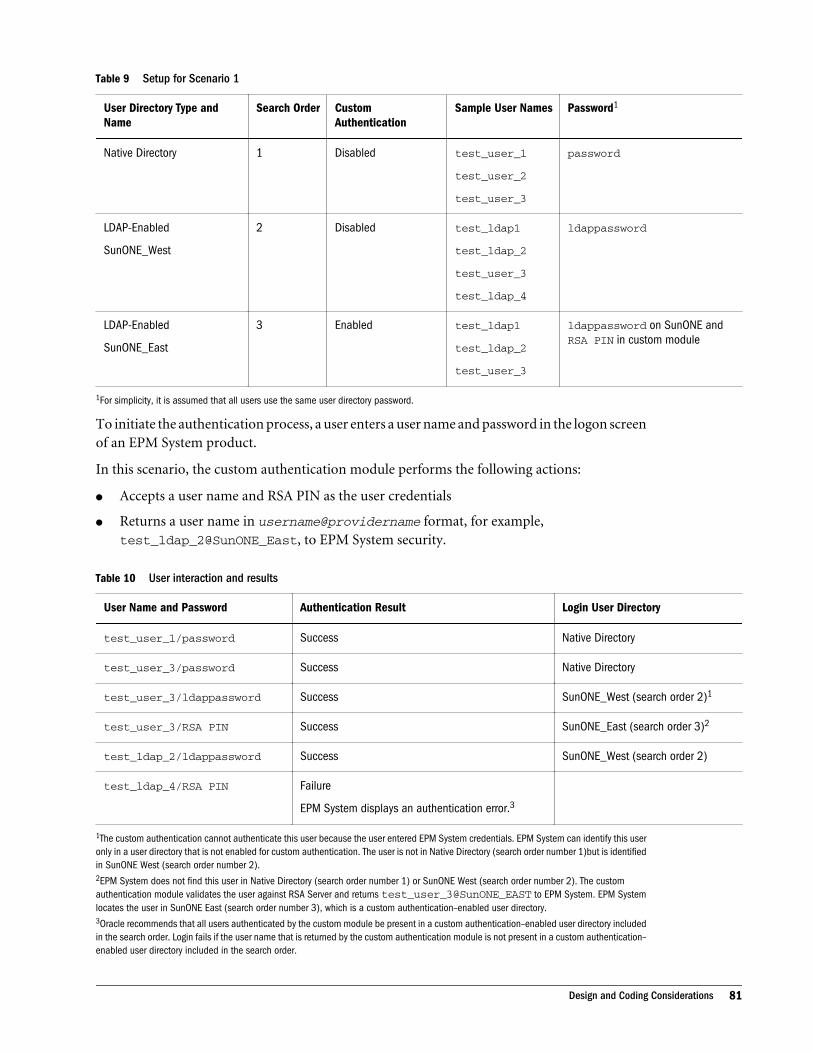
Table 9 Setup for Scenario 1
User Directory Type andName
Search Order CustomAuthentication
Sample User Names Password1
Native Directory 1 Disabled test_user_1
test_user_2
test_user_3
password
LDAP-Enabled
SunONE_West
2 Disabled test_ldap1
test_ldap_2
test_user_3
test_ldap_4
ldappassword
LDAP-Enabled
SunONE_East
3 Enabled test_ldap1
test_ldap_2
test_user_3
ldappassword on SunONE andRSA PIN in custom module
1For simplicity, it is assumed that all users use the same user directory password.
To initiate the authentication process, a user enters a user name and password in the logon screenof an EPM System product.
In this scenario, the custom authentication module performs the following actions:
l Accepts a user name and RSA PIN as the user credentials
l Returns a user name in username@providername format, for example,test_ldap_2@SunONE_East, to EPM System security.
Table 10 User interaction and results
User Name and Password Authentication Result Login User Directory
test_user_1/password Success Native Directory
test_user_3/password Success Native Directory
test_user_3/ldappassword Success SunONE_West (search order 2)1
test_user_3/RSA PIN Success SunONE_East (search order 3)2
test_ldap_2/ldappassword Success SunONE_West (search order 2)
test_ldap_4/RSA PIN Failure
EPM System displays an authentication error.3
1The custom authentication cannot authenticate this user because the user entered EPM System credentials. EPM System can identify this useronly in a user directory that is not enabled for custom authentication. The user is not in Native Directory (search order number 1)but is identifiedin SunONE West (search order number 2).2EPM System does not find this user in Native Directory (search order number 1) or SunONE West (search order number 2). The customauthentication module validates the user against RSA Server and returns test_user_3@SunONE_EAST to EPM System. EPM Systemlocates the user in SunONE East (search order number 3), which is a custom authentication–enabled user directory.3Oracle recommends that all users authenticated by the custom module be present in a custom authentication–enabled user directory includedin the search order. Login fails if the user name that is returned by the custom authentication module is not present in a custom authentication–enabled user directory included in the search order.
Design and Coding Considerations 81

Use-case Scenario 2
Table 11 details the EPM System user directory configuration and search order used in thisscenario. This scenario assumes that the custom authentication module uses an RSAinfrastructure to authenticate users.
In this scenario, the custom authentication module performs the following actions:
l Accepts a user name and RSA PIN as the user credentials
l Returns a user name, for example, test_ldap_2, to EPM System security
Table 11 A sample search order
User Directory Search Order Custom Authentication Sample User Names Password1
Native Directory 1 Disabled test_user_1
test_user_2
test_user_3
password
LDAP-Enabled, forexample, SunONE
2 Enabled test_ldap1
test_ldap2
test_user_3
ldappassword on SunONE and RSA PIN incustom module
1For simplicity, it is assumed that all users use the same user directory password.
To initiate the authentication process, a user enters a user name and password on the login screenof an EPM System product.
Table 12 User interaction and results
User Name and Password Login Result Login User Directory
test_user_1/password Success Native Directory
test_user_3/password Success Native Directory
test_user_3/ldappassword Failure SunONE1
test_user_3/RSA PIN Success SunONE2
1Authentication of user against Native Directory fails because of password mismatch. Authentication of user using the custom authenticationmodule fails because the password used is not a valid RSA PIN. EPM System does not try to authenticate this user in SunONE (search order2), because custom authentication settings override EPM System authentication in this directory.2Authentication of user against Native Directory fails because of password mismatch. The custom authentication module authenticates the userand returns the user name test_user_3 to EPM System.
Use-case Scenario 3
Table 13 details the EPM System user directory configuration and search order used in thisscenario. This scenario assumes that the custom authentication module uses an RSAinfrastructure to authenticate users.
For clarity in such scenarios, Oracle recommends that your custom authentication modulereturn the user name in username@providername format; for example,test_ldap_4@SunONE.
82 Using a Custom Authentication Module

Table 13 A sample search order
User Directory Search Order Custom Authentication Sample User Names Password1
Native Directory 1 Enabled test_user_1
test_user_2
test_user_3
RSA_PIN
LDAP-Enabled, forexample, MSAD
2 Disabled test_ldap1
test_ldap4
test_user_3
ldappassword
LDAP-Enabled, forexample, SunONE
3 Enabled test_ldap1
test_ldap4
test_user_3
ldappassword on SunONE and RSA PIN incustom module
1For simplicity, it is assumed that all users use the same user directory password.
To initiate the authentication process, a user enters a user name and password in the logon screenof an EPM System product.
Table 14 User interaction and results
User Name and Password Authentication Result Login User Directory
test_user_1/password Success Native Directory
test_user_3/RSA_PIN Success Native Directory
test_user_3/ldappassword Success MSAD (search order 2)
test_ldap_4/ldappassword Success MSAD (search order 2)
test_ldap_4/RSA PIN Success SunONE (search order 3)
User Directories and Custom Authentication ModuleTo use the custom authentication module, user directories that contain EPM System user andgroup information can be individually configured to delegate authentication to the custommodule.
EPM System users who are authenticated using a custom module must be present in one of theuser directories included in the search order (see “Search Order” on page 80). Also, the userdirectory must be configured to delegate authentication to the custom module.
The identity of the user in the custom provider (for example, 1357642 in RSA SecurIDinfrastructure) may be different from the user name in the user directory (for example, jDoe inan Oracle Internet Directory) configured in Shared Services. After authenticating the user, thecustom authentication module must return the user name jDoe to EPM System.
Design and Coding Considerations 83
Note: As a best practice, Oracle recommends that the user name in the user directoriesconfigured in EPM System be identical to those available on the user directory used bythe custom authentication module.
CSSCustomAuthenticationIF Java InterfaceThe custom authentication module must use the CSSCustomAuthenticationIF Java interfaceto integrate with EPM System security framework. It must return a user name string if customauthentication is successful or a an error message if authentication is not successful. For theauthentication process to be completed, the user name returned by the custom authenticationmodule must be present in one of the user directories included in Shared Services search order.EPM System security framework supports the username@providerName format.
Note: Ensure that the user name that the custom authentication module returns does notcontain an * (asterisk), because EPM System security framework interprets it as a wildcardcharacter while searching for users.
See “Sample Code 1” on page 95 for CSSCustomAuthenticationIF interface signature.
Your custom authentication module can be a class file must be included in CustomAuth.jar.The package structure is unimportant.
For detailed information about the CSSCustomAuthenticationIF interface, see Security APIdocumentation.
The authenticate method of CSSCustomAuthenticationIF supports customauthentication. The authenticate method accepts credentials (user name and password) thatthe user entered while trying to access the EPM System as input parameters. This method returnsa string (user name) if custom authentication is successful. It throws ajava.lang.Exception if authentication is unsuccessful. The user name returned by themethod should uniquely identify a user in one of the user directories included in Shared Servicessearch order. EPM System security framework supports the username@providerName format.
Note: To initialize resources, for example, a JDBC connection pool use the class constructor.Doing so improves performance by not loading resources for every authentication.
Deploying the Custom Authentication Module
Subtopics
l Overview of Steps
l Updating Settings in Shared Services
l Testing Your Deployment
Only one custom module is supported for an EPM System deployment. You can enable customauthentication for one or more user directories in the search order.
84 Using a Custom Authentication Module
The custom authentication module must implement the public interfaceCSSCustomAuthenticationIF, defined in the com.hyperion.css package. This documentassumes that you have a fully functional custom module that defines the logic for authenticatingusers against the user provider of your choice. After you develop and test a custom authenticationmodule, you must implement it in EPM System environment.
Overview of Steps
Note: Your custom authentication code should not use log4j for error logging. If the code thatyou used in a previous release uses log4j, you must remove it from the code before usingit with this release.
To implement the custom authentication module, complete the following steps:
l Stop EPM System products including Shared Services and any systems that use SharedServices APIs.
l Copy CustomAuth.jar into EPM_ORACLE_HOME/user_projects/domains/WEBLOGIC_DOMAIN/lib, typically, Oracle/Middleware/user_projects/domains/EPMSystem/lib.
Note: If you are upgrading from Release 11.1.2.0 or 11.1.2.1 that had an implementation ofcustom authentication module, move CustomAuth.jar from EPM_ORACLE_HOME/common/jlib/11.1.2.0 into EPM_ORACLE_HOME/user_projects/domains/WEBLOGIC_DOMAIN/lib.
l Update user directory settings in Shared Services. See “Updating Settings in Shared Services ”on page 85.
l Start Shared Services followed by other EPM System products.
l Test your implementation. See “Testing Your Deployment” on page 86.
Updating Settings in Shared Services
Subtopics
l Updating User Directory Configurations
l Updating Security Options
By default, custom authentication is disabled for all user directories. You can override the defaultbehavior to enable custom authentication for specific external user directories or for NativeDirectory.
Deploying the Custom Authentication Module 85

Updating User Directory ConfigurationsYou must update the configuration of the user directory for which custom authentication mustbe enabled.
ä To update user directory configuration:
1 Start Foundation Services.
2 Log in to Shared Services Console as a Shared Services administrator.
3 Select Administration, and then Configure User Directories.
4 In the Defined User Directories screen, select the user directory for which you want to change the customauthentication setting.
Note: EPM System uses only the user directories included in the search order.
5 Click Edit.
6 Select Show Advanced Options.
7 In Custom Module, select Authentication Module to enable custom module for the current userdirectory.
8 Click Finish.
9 Repeat this procedure to update the configuration of other user directories in the search order.
Updating Security OptionsEnsure that CustomAuth.jar is available in EPM_ORACLE_HOME/user_projects/domains/WEBLOGIC_DOMAIN/lib, typically, Oracle/Middleware/user_projects/domains/EPMSystem/lib before starting the following procedure.
ä To update security options:
1 Log in to Shared Services Console as a Shared Services administrator.
2 Select Administration, and then Configure User Directories.
3 Select Security Options.
4 Select Show Advanced Options.
5 In Authentication Module, enter the fully qualified class name of the custom authentication modulethat should be used to authenticate users on all user directories for which the custom authenticationmodule is selected. For example, com.mycompany.epm.CustomAuthenticationImpl.
6 Click OK.
Testing Your DeploymentIf Native Directory is not configured for custom authentication, do not use Native Directoryusers to test custom authentication.
86 Using a Custom Authentication Module

Note: It is your responsibility to identify and correct any issues with the custom authenticationmodule. Oracle assumes that your custom module works flawlessly to map a user fromthe user directory used by the custom module to a user on a custom authentication-enabled user directory available in EPM System search order.
To test your deployment, log in to EPM System using user credentials from the user directory,for example, an RSA SecurID infrastructure, used by the custom module. These credentials maybe different from the EPM System credentials.
Your implementation is considered successful if EPM System products allow you to access theirresources. An error indicating that the user was not found is not always an indicator of anunsuccessful implementation. In such cases, verify that the credentials that you entered arepresent in the custom user store and that a matching user is present in one of the customauthentication-enabled user directories in EPM System search order.
ä To test custom authentication:
1 Ensure that EPM System products are running.
2 Access an EPM System product; for example, EPM Workspace.
3 Log in as a user defined on a user directory for which custom authentication is enabled.
a. In Username, enter your user identifier; for example, an RSA User ID.
b. In Password, enter a password; for example; an RSA PIN.
c. Click Login.
4 Verify that you can access EPM System product resources.
Deploying the Custom Authentication Module 87

88 Using a Custom Authentication Module
5Guidelines for Securing EPM
System
In This Chapter
Implementing SSL ... . . . . . . . . . . . . . . . . . . . . . . . . . . . . . . . . . . . . . . . . . . . . . . . . . . . . . . . . . . . . . . . . . . . . . . . . . . . . . . . . . . . . . .89
Changing the Admin Password ... . . . . . . . . . . . . . . . . . . . . . . . . . . . . . . . . . . . . . . . . . . . . . . . . . . . . . . . . . . . . . . . . . . . . . . . .89
Regenerating Encryption Keys ... . . . . . . . . . . . . . . . . . . . . . . . . . . . . . . . . . . . . . . . . . . . . . . . . . . . . . . . . . . . . . . . . . . . . . . . . .90
Changing Database Passwords... . . . . . . . . . . . . . . . . . . . . . . . . . . . . . . . . . . . . . . . . . . . . . . . . . . . . . . . . . . . . . . . . . . . . . . . .90
Securing Cookies... . . . . . . . . . . . . . . . . . . . . . . . . . . . . . . . . . . . . . . . . . . . . . . . . . . . . . . . . . . . . . . . . . . . . . . . . . . . . . . . . . . . . . . . .91
Reducing SSO Token Timeout.. . . . . . . . . . . . . . . . . . . . . . . . . . . . . . . . . . . . . . . . . . . . . . . . . . . . . . . . . . . . . . . . . . . . . . . . . . . .91
Reviewing Security Reports .. . . . . . . . . . . . . . . . . . . . . . . . . . . . . . . . . . . . . . . . . . . . . . . . . . . . . . . . . . . . . . . . . . . . . . . . . . . . . .91
Customizing Authentication System for Strong Authentication ... . . . . . . . . . . . . . . . . . . . . . . . . . . . . . . . . . . . . .92
Turning off Detailed Financial Management Error Messages ... . . . . . . . . . . . . . . . . . . . . . . . . . . . . . . . . . . . . . . .92
Encrypting UDL File (Financial Management) .. . . . . . . . . . . . . . . . . . . . . . . . . . . . . . . . . . . . . . . . . . . . . . . . . . . . . . . . . .92
Disabling EPM Workspace Debugging Utilities .. . . . . . . . . . . . . . . . . . . . . . . . . . . . . . . . . . . . . . . . . . . . . . . . . . . . . . . . .93
Changing Default Web Server Error Pages... . . . . . . . . . . . . . . . . . . . . . . . . . . . . . . . . . . . . . . . . . . . . . . . . . . . . . . . . . . . .93
Support for Third-Party Software... . . . . . . . . . . . . . . . . . . . . . . . . . . . . . . . . . . . . . . . . . . . . . . . . . . . . . . . . . . . . . . . . . . . . . . .93
Implementing SSLSSL uses a cryptographic system that encrypts data. SSL creates a secure connection between aclient and a server, over which data can be sent securely.
To secure your EPM System environment, secure all communication channels used by your webapplications and user directory connections using SSL. See Chapter 2, “SSL-Enabling EPMSystem Components”.
Changing the Admin PasswordThe default Native Directory admin user account provides access to all Shared Services functions.This password is set when you deploy Foundation Services. You must periodically change thepassword of this account.
Edit the admin user account to change the password. See “Modifying User Accounts” in theOracle Enterprise Performance Management System User and Role Security Guide.
Implementing SSL 89
Regenerating Encryption KeysUse the Shared Services Console to periodically regenerate the following:
l Single Sign-On Token
Caution! Taskflows used by Financial Management; Oracle Hyperion EPM Architect andOracle Hyperion Profitability and Cost Management are invalidated when yougenerate a new keystore. After regenerating the keystore, open and save thetaskflows to revalidate them.
l Trusted Services key
l Provider Configuration key
See “Setting Encryption Options” in the Oracle Enterprise Performance Management System Userand Role Security Guide for detailed procedures.
Changing Database PasswordsPeriodically change the password for all EPM System product databases. The procedure forchanging the database password in Shared Services Registry is detailed in this section.
For detailed procedures to change an EPM System product database password, see the OracleEnterprise Performance Management System Installation and Configuration Guide.
ä To change EPM System product database passwords in Shared Services Registry:
1 Using the database administration console, change the password of the user whose account was usedto configure EPM System product database.
2 Stop EPM System products (web applications, services and processes).
3 Using the EPM System Configurator, reconfigure the database using one of the following procedures.
Shared Services Only:
Note: In distributed environments where EPM System products are on machines differentthan Shared Services, you must perform this procedure on all servers.
a. From the Foundation tasks in EPM System Configurator, select Configure Database.
b. On the Shared Services and Registry Database Configuration page, select Connect to apreviously configured Shared Services database.
c. Specify the new password of the user whose account was used to configure SharedServices database. Do not change any other settings.
d. Continue the configuration and click Finish when you are done.
EPM System Products Other Than Shared Services:
90 Guidelines for Securing EPM System

Note: Follow these steps for the EPM System products deployed on the current server only.
a. From the configuration task list of the product in EPM System Configurator, selectConfigure Database.
b. On the Database Configuration page, select Perform 1st-time configuration of database.
c. Specify the new password of the user whose account was used to configure EPM Systemproduct database. Do not change any other settings.
d. Click Next.
e. Select Reuse the existing database.
f. Continue the configuration, and click Finish when you are done.
See the Oracle Enterprise Performance Management System Installation and ConfigurationGuide for detailed instructions.
4 Start EPM System products and services.
Securing CookiesEPM System web application sets a cookie to track the session. While setting a cookie, especiallya session cookie, the server can set the secure flag, which forces the browser to send the cookieover a secure channel. This behavior reduces the risk of session hijacking.
Note: Secure cookies only if EPM System products are deployed in an SSL-enabled environment.
Modify the WebLogic Server session descriptor to secure WebLogic Server cookies. Set the valueof cookieSecure attribute in the session-param element to true.
Reducing SSO Token TimeoutDefault SSO token timeout is 480 minutes. You should reduce the SSO token timeout, forexample, to 60 minutes to minimize token reuse if it is exposed. See “Setting Security Options”in the Oracle Enterprise Performance Management System User and Role Security Guide.
Reviewing Security ReportsThe Security Report contains audit information related to the security tasks for which auditingis configured. Generate and review this report from Shared Services Console on a regular basis,especially to identify failed login attempts across EPM System products and provisioningchanges. Select Detailed View as a report generation option to group the report data based onattributes that were modified and the new attribute values. See “Generating Reports” in theOracle Enterprise Performance Management System User and Role Security Guide.
Securing Cookies 91

Customizing Authentication System for StrongAuthenticationYou can use a custom authentication module to add strong authentication to EPM System. Forexample, you can use RSA SecurID two-factor authentication in nonchallenge response mode.The custom authentication module is transparent for thin and thick clients and does not requireclient-side deployment changes. See Chapter 4, “Using a Custom Authentication Module”.
Turning off Detailed Financial Management ErrorMessagesYou can hide detailed Financial Management error messages containing technical informationfrom users by updating Windows registry entries.
ä To hide error messages containing detailed technical information:
1 On Windows server that hosts Financial Management, launch the Windows Registry Editor.
2 Navigate to HKEY_LOCAL_MACHINE\SOFTWARE\Hyperion Solutions\HyperionFinancial Management
3 Create a new DWORD value using these settings:
Value name: DisableTechnicalError
Value data: 1 (set this to 0 to display detailed messages)
4 On the Windows server that hosts the IIS Server that hosts Financial Management, launch the WindowsRegistry Editor.
5 Navigate to HKEY_LOCAL_MACHINE\SOFTWARE\Hyperion Solutions\HyperionFinancial Management\web
6 Create a new DWORD value using these settings:
Value name: DisableAspTechnicalErrorMessage
Value data: 1 (set this to 0 to display detailed messages)
Encrypting UDL File (Financial Management)While configuring Financial Management, EPM System Configurator creates an unencryptedUDL file by default. You can encrypt this file by selecting an option in the Advanced DatabaseOptions page of the Oracle Hyperion Enterprise Performance Management SystemConfigurator or by running the EncryptHFMUDL utility after configuration is complete.
See “Encrypting UDL Files” in Oracle Enterprise Performance Management System Installationand Configuration Guide.
92 Guidelines for Securing EPM System

Disabling EPM Workspace Debugging Utilitiesl For troubleshooting purposes, EPM Workspace ships with uncrunched JavaScript files. For
security purposes, you should remove these uncrunched JavaScript files from yourproduction environment:
m Create a backup copy of EPM_ORACLE_HOME/common/epmstatic/wspace/js/directory.
m Except for the file DIRECTORY_NAME.js, delete the .js files from each subdirectory ofEPM_ORACLE_HOME/common/epmstatic/wspace/js.
Each subdirectory contains a .js file that bears the name of the directory. For example,EPM_ORACLE_HOME/common/epmstatic/wspace/js/com/hyperion/bpm/web/
common contains Common.js. Remove all .js files except the one that bears the nameof the directory, in this case; Common.js.
l EPM Workspace provides some debug utilities and test applications, which becomeaccessible if EPM Workspace is deployed in debug mode. For security purposes,administrators should turn off client side debugging in EPM Workspace.
To turn off debugging mode:
1. Log in to Oracle Hyperion Enterprise Performance Management Workspace, asadministrator.
2. Select Navigate, then Administer, and then Workspace Server Settings.
3. In ClientDebugEnabled in Workspace Server Settings, select No.
4. Click OK.
Changing Default Web Server Error PagesWhen application servers are not available to accept requests, the web server plug-in for theback-end application server (for example, Oracle HTTP Server plug-in for Oracle WebLogicServer) returns a default error page that displays plug-in build information. web servers displaytheir default error page on other occasions as well. Attackers can use this information to findknown vulnerabilities from public web sites.
Customize the error pages (of web application server plug-in and web server) so that they donot contain information about production system components, for example, server version,server type, plug-in build date, and plug-in type. Consult your application server and web servervendor documentation for more information.
Support for Third-Party SoftwareOracle acknowledges and supports the backward-compatibility assertions made by third-partyvendors. Therefore, where vendors assert backward-compatibility, subsequent maintenancereleases and service packs may be used. If an incompatibility is identified, Oracle will specify a
Disabling EPM Workspace Debugging Utilities 93
patch release on which the product should be deployed (and remove the incompatible versionfrom the supported matrix) or provide a maintenance release or service fix to the Oracle product.
Server-side Updates: Support for upgrades to third-party server-side components is governedby the Subsequent Maintenance Release Policy. Typically, Oracle supports upgrading third-partyserver-side components to the next maintenance release of service pack of the currentlysupported release. Upgrades for the next major release are not supported.
Client-side updates: Oracle supports automatic updates to client components, includingupdates to the next major release of third-party client components. For example, you can updatethe browser JRE version from 1.5 to 1.6.
94 Guidelines for Securing EPM System
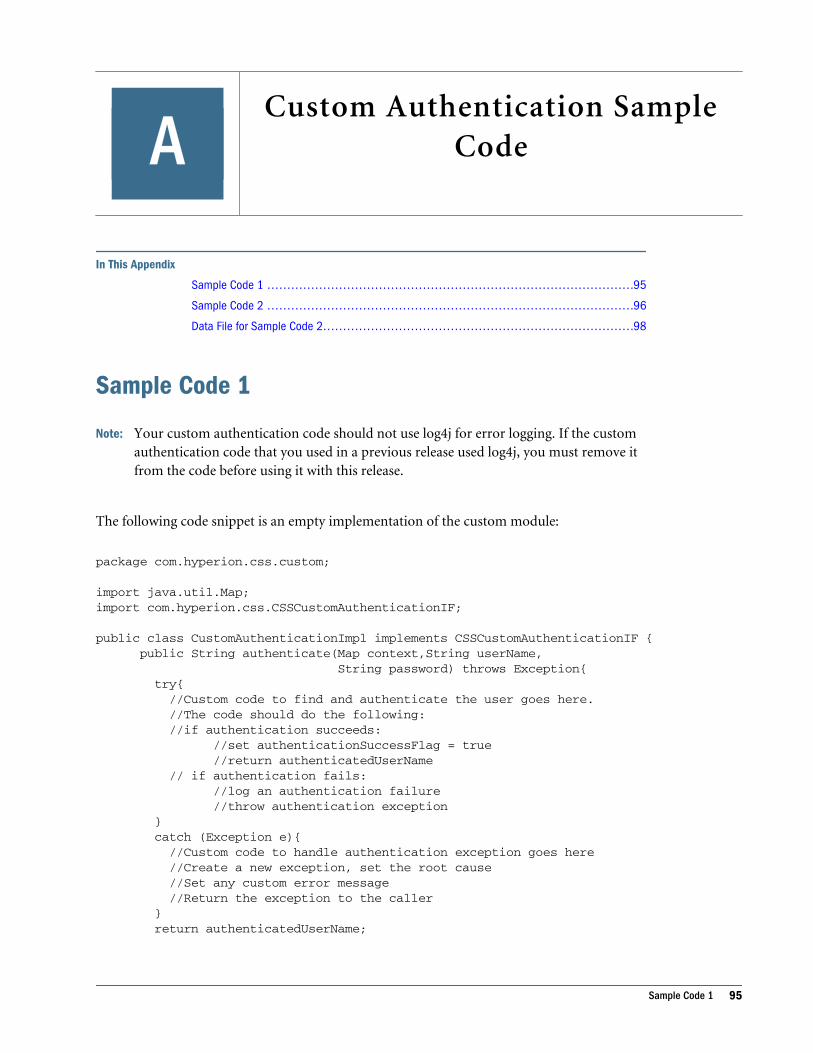
ACustom Authentication Sample
Code
In This Appendix
Sample Code 1 ... . . . . . . . . . . . . . . . . . . . . . . . . . . . . . . . . . . . . . . . . . . . . . . . . . . . . . . . . . . . . . . . . . . . . . . . . . . . . . . . . . . . . . . . . .95
Sample Code 2 ... . . . . . . . . . . . . . . . . . . . . . . . . . . . . . . . . . . . . . . . . . . . . . . . . . . . . . . . . . . . . . . . . . . . . . . . . . . . . . . . . . . . . . . . . .96
Data File for Sample Code 2... . . . . . . . . . . . . . . . . . . . . . . . . . . . . . . . . . . . . . . . . . . . . . . . . . . . . . . . . . . . . . . . . . . . . . . . . . . .98
Sample Code 1
Note: Your custom authentication code should not use log4j for error logging. If the customauthentication code that you used in a previous release used log4j, you must remove itfrom the code before using it with this release.
The following code snippet is an empty implementation of the custom module:
package com.hyperion.css.custom;
import java.util.Map;import com.hyperion.css.CSSCustomAuthenticationIF;
public class CustomAuthenticationImpl implements CSSCustomAuthenticationIF { public String authenticate(Map context,String userName, String password) throws Exception{ try{ //Custom code to find and authenticate the user goes here. //The code should do the following: //if authentication succeeds: //set authenticationSuccessFlag = true //return authenticatedUserName // if authentication fails: //log an authentication failure //throw authentication exception } catch (Exception e){ //Custom code to handle authentication exception goes here //Create a new exception, set the root cause //Set any custom error message //Return the exception to the caller } return authenticatedUserName;
Sample Code 1 95
}}
Input parameters:
l Context: A map that contains key-value pair of locale information
l User name: An identifier that uniquely identifies the user to the user directory where thecustom module authenticates the user. The user enters the value of this parameter whilelogging into an EPM System product.
l Password: The password set for the user in the user directory where the custom moduleauthenticates the user. The user enters the value of this parameter while logging into an EPMSystem product.
Sample Code 2The following sample code demonstrates custom authentication of users using user name andpassword contained in a flat file. You must initialize user and password lists in the classconstructor to make custom authentication work.
package com.hyperion.css.security;
import java.util.Map;import java.util.HashMap;import com.hyperion.css.CSSCustomAuthenticationIF;import java.io.*;
public class CSSCustomAuthenticationImpl implements CSSCustomAuthenticationIF{ static final String DATA_FILE = "datafile.txt";
/** * authenticate method includes the core implementation of the * Custom Authentication Mechanism. If custom authentication is * enabled for the provider, authentication operations * are delegated to this method. Upon successful authentication, * this method returns a valid user name, using which EPM System * retrieves the user from a custom authentication enabled provider. * User name can be returned in the format username@providerName, * where providerName indicates the name of the underlying provider * where the user is available. authenticate method can use other * private methods to access various core components of the * custom authentication module.
* @param context * @param userName * @param password * @return * @throws Exception*/
Map users = null;
public CSSCustomAuthenticationImpl(){ users = new HashMap();
96 Custom Authentication Sample Code

InputStream is = null; BufferedReader br = null; String line; String[] userDetails = null; String userKey = null; try{ is = CSSCustomAuthenticationImpl.class.getResourceAsStream(DATA_FILE); br = new BufferedReader(new InputStreamReader(is)); while(null != (line = br.readLine())){ userDetails = line.split(":"); if(userDetails != null && userDetails.length==3){ userKey = userDetails[0]+ ":" + userDetails[1]; users.put(userKey, userDetails[2]); } } } catch(Exception e){ // log a message } finally{ try{ if(br != null) br.close(); if(is != null) is.close(); } catch(IOException ioe){ ioe.printStackTrace(); } }}
/* Use this authenticate method snippet to return username from a flat file */
public String authenticate(Map context, String userName, String password) throws Exception{ //userName : user input for the userName //password : user input for password //context : Map, can be used to additional information required by // the custom authentication module.
String authenticatedUserKey = userName + ":" + password;
if(users.get(authenticatedUserKey)!=null) return(String)users.get(authenticatedUserKey); else throw new Exception("Invalid User Credentials"); }
/* Refer to this authenticate method snippet to return username in username@providername format */
public String authenticate(Map context, String userName, String password) throws Exception{
//userName : user input for userName //password : user input for password //context : Map can be used to additional information required by // the custom authentication module.
Sample Code 2 97
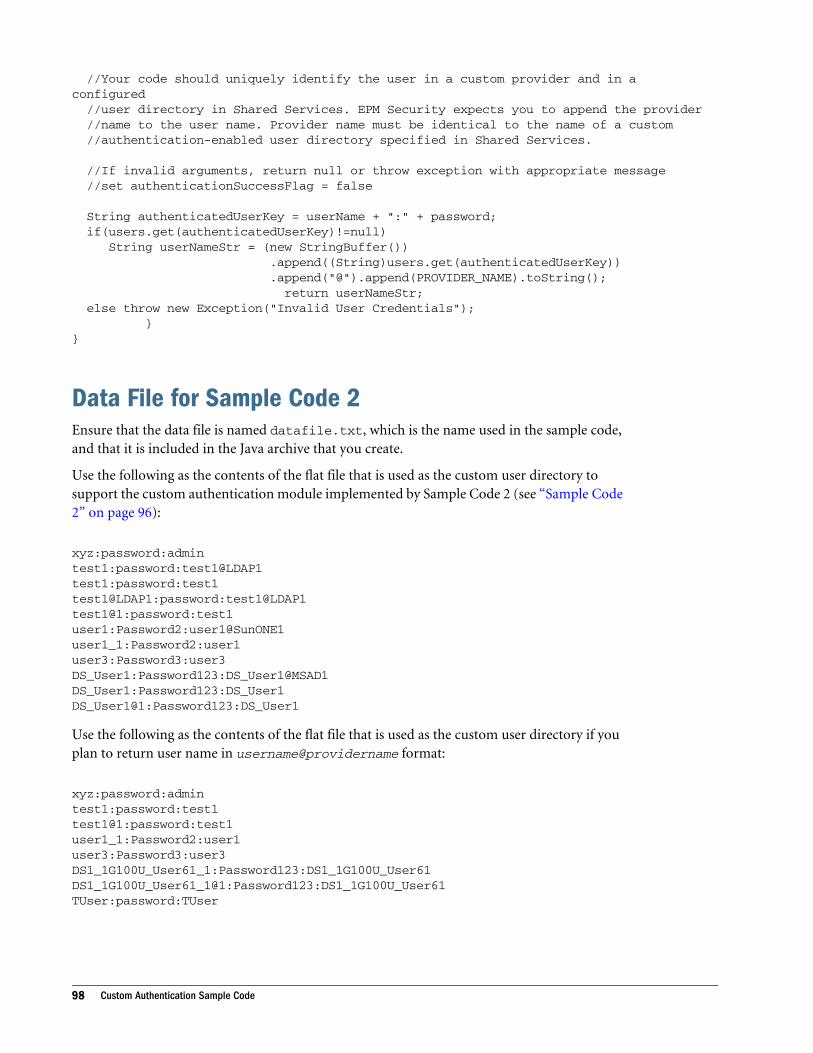
//Your code should uniquely identify the user in a custom provider and in a configured //user directory in Shared Services. EPM Security expects you to append the provider //name to the user name. Provider name must be identical to the name of a custom //authentication-enabled user directory specified in Shared Services.
//If invalid arguments, return null or throw exception with appropriate message //set authenticationSuccessFlag = false
String authenticatedUserKey = userName + ":" + password; if(users.get(authenticatedUserKey)!=null) String userNameStr = (new StringBuffer()) .append((String)users.get(authenticatedUserKey)) .append("@").append(PROVIDER_NAME).toString(); return userNameStr; else throw new Exception("Invalid User Credentials"); }}
Data File for Sample Code 2Ensure that the data file is named datafile.txt, which is the name used in the sample code,and that it is included in the Java archive that you create.
Use the following as the contents of the flat file that is used as the custom user directory tosupport the custom authentication module implemented by Sample Code 2 (see “Sample Code2” on page 96):
xyz:password:admintest1:password:test1@LDAP1test1:password:test1test1@LDAP1:password:test1@LDAP1test1@1:password:test1user1:Password2:user1@SunONE1user1_1:Password2:user1user3:Password3:user3DS_User1:Password123:DS_User1@MSAD1DS_User1:Password123:DS_User1DS_User1@1:Password123:DS_User1
Use the following as the contents of the flat file that is used as the custom user directory if youplan to return user name in username@providername format:
xyz:password:admintest1:password:test1test1@1:password:test1user1_1:Password2:user1user3:Password3:user3DS1_1G100U_User61_1:Password123:DS1_1G100U_User61DS1_1G100U_User61_1@1:Password123:DS1_1G100U_User61TUser:password:TUser
98 Custom Authentication Sample Code

BImplementing a Custom Login
Class
In This Appendix
Custom Login Class Sample Code ... . . . . . . . . . . . . . . . . . . . . . . . . . . . . . . . . . . . . . . . . . . . . . . . . . . . . . . . . . . . . . . . . . . . .99
Deploying a Custom Login Class ... . . . . . . . . . . . . . . . . . . . . . . . . . . . . . . . . . . . . . . . . . . . . . . . . . . . . . . . . . . . . . . . . . . . . 102
EPM System providescom.hyperion.css.sso.agent.X509CertificateSecurityAgentImpl to extract theuser identity (DN) from x509 certificates.
If you must derive user identity from an attribute in the certificate other than DN, you mustdevelop and implement a custom login class similar tocom.hyperion.css.sso.agent.X509CertificateSecurityAgentImpl, as described inthis appendix.
Custom Login Class Sample CodeThis sample code illustrates the implementation of the defaultcom.hyperion.css.sso.agent.X509CertificateSecurityAgentImpl. Generally, youshould customize the parseCertificate(String sCertificate) method of thisimplementation to derive the user name from a certificate attribute other than DN:
package com.hyperion.css.sso.agent;
import java.io.ByteArrayInputStream;import java.io.UnsupportedEncodingException;import java.security.Principal;import java.security.cert.CertificateException;import java.security.cert.CertificateFactory;import java.security.cert.X509Certificate;import com.hyperion.css.CSSSecurityAgentIF;import com.hyperion.css.common.configuration.*;import java.util.HashMap;import java.util.Locale;import java.util.Map;
import javax.servlet.http.HttpServletRequest;import javax.servlet.http.HttpServletResponse;
/** * X509CertificateAuthImpl implements the CSSSecurityAgentIF interface It accepts * the X509 certificate of the authenticated user from the Web Server via a
Custom Login Class Sample Code 99
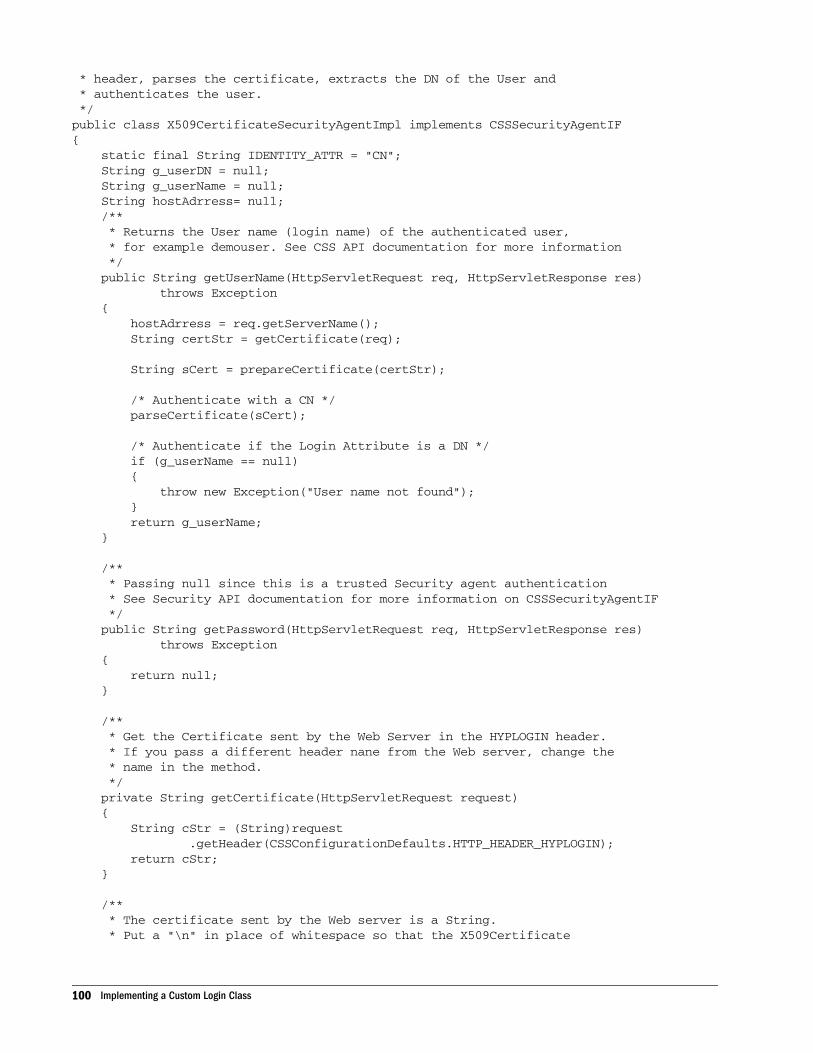
* header, parses the certificate, extracts the DN of the User and * authenticates the user. */public class X509CertificateSecurityAgentImpl implements CSSSecurityAgentIF{ static final String IDENTITY_ATTR = "CN"; String g_userDN = null; String g_userName = null; String hostAdrress= null; /** * Returns the User name (login name) of the authenticated user, * for example demouser. See CSS API documentation for more information */ public String getUserName(HttpServletRequest req, HttpServletResponse res) throws Exception { hostAdrress = req.getServerName(); String certStr = getCertificate(req); String sCert = prepareCertificate(certStr);
/* Authenticate with a CN */ parseCertificate(sCert);
/* Authenticate if the Login Attribute is a DN */ if (g_userName == null) { throw new Exception("User name not found"); } return g_userName; }
/** * Passing null since this is a trusted Security agent authentication * See Security API documentation for more information on CSSSecurityAgentIF */ public String getPassword(HttpServletRequest req, HttpServletResponse res) throws Exception { return null; }
/** * Get the Certificate sent by the Web Server in the HYPLOGIN header. * If you pass a different header nane from the Web server, change the * name in the method. */ private String getCertificate(HttpServletRequest request) { String cStr = (String)request .getHeader(CSSConfigurationDefaults.HTTP_HEADER_HYPLOGIN); return cStr; }
/** * The certificate sent by the Web server is a String. * Put a "\n" in place of whitespace so that the X509Certificate
100 Implementing a Custom Login Class

* java API can parse the certificate. */ private String prepareCertificate(String gString) { String str1 = null; String str2 = null;
str1 = gString.replace("-----BEGIN CERTIFICATE-----", ""); str2 = str1.replace("-----END CERTIFICATE-----", ""); String certStrWithNL = "-----BEGIN CERTIFICATE-----" + str2.replace(" ", "\n") + "-----END CERTIFICATE-----"; return certStrWithNL; }
/** * Parse the certificate * 1. Create X509Certificate using the certificateFactory * 2. Get the Principal object from the certificate * 3. Set the g_userDN to a certificate attribute value (DN in this sample) * 4. Parse the attribute (DN in this sample) to get a unique username */ private void parseCertificate(String sCertificate) throws Exception { X509Certificate cert = null; String userID = null; try { X509Certificate clientCert = (X509Certificate)CertificateFactory .getInstance("X.509") .generateCertificate( new ByteArrayInputStream(sCertificate .getBytes("UTF-8"))); if (clientCert != null) { Principal princDN = clientCert.getSubjectDN(); String dnStr = princDN.getName(); g_userDN = dnStr; int idx = dnStr.indexOf(","); userID = dnStr.substring(3, idx); g_userName = userID; } } catch (CertificateException ce) { throw ce; } catch (UnsupportedEncodingException uee) { throw uee; } } //end of getUserNameFromCert}// end of class
Custom Login Class Sample Code 101

Deploying a Custom Login ClassTo implement the custom login class, complete the following steps:
l Create and test the custom login class. Ensure that you do not have any references tolog4j in your code. See “Custom Login Class Sample Code” on page 99.
You can use any name for your custom class.
l Package the custom login class into CustomAuth.jar
l Copy CustomAuth.jar into EPM_ORACLE_HOME/user_projects/domains/WEBLOGIC_DOMAIN/lib, typically, Oracle/Middleware/user_projects/domains/EPMSystem/lib.
Note: If you are upgrading from Release 11.1.2.0 or 11.1.2.1 that had an implementation ofcustom login class, move CustomAuth.jar from EPM_ORACLE_HOME/common/jlib/11.1.2.0 into EPM_ORACLE_HOME/user_projects/domains/WEBLOGIC_DOMAIN/lib.
Oracle recommends that you enable Client Certificate Authentication if you are using a customlogin class.
102 Implementing a Custom Login Class

CUsing the Update Native
Directory Utility
In This Appendix
About the Update Native Directory Utility. . . . . . . . . . . . . . . . . . . . . . . . . . . . . . . . . . . . . . . . . . . . . . . . . . . . . . . . . . . . . . 103
Update Native Directory Utility Installation Location... . . . . . . . . . . . . . . . . . . . . . . . . . . . . . . . . . . . . . . . . . . . . . . . 103
Update Native Directory Utility Options ... . . . . . . . . . . . . . . . . . . . . . . . . . . . . . . . . . . . . . . . . . . . . . . . . . . . . . . . . . . . . . 103
Using Update Native Directory Utility. . . . . . . . . . . . . . . . . . . . . . . . . . . . . . . . . . . . . . . . . . . . . . . . . . . . . . . . . . . . . . . . . . . 104
Log Files Generated by Update Native Directory Utility. . . . . . . . . . . . . . . . . . . . . . . . . . . . . . . . . . . . . . . . . . . . . . . 106
About the Update Native Directory UtilityNative Directory contains information that references user and group identities defined in manyexternal user directories. For example, Native Directory groups can contain users defined inexternal user directories. Changes in external user directories, such as the deletion of a useraccount or the migration of users from an external user directory to another (see Appendix D,“Migrating Users and Groups Across User Directories”) may cause stale data within NativeDirectory because EPM System security is not synchronized to be aware of such changes. In suchcases, use Update Native Directory Utility to identify and remove stale data from NativeDirectory.
Update Native Directory Utility Installation LocationThe Update Native Directory Utility is installed in EPM_ORACLE_HOME/common/utilities/UpdateNativeDir; for example, in C:\Oracle\Middleware\EPMSystem11R1\common\utilities\UpdateNativeDir on a Windows server.
Update Native Directory Utility OptionsUpdate Native Directory Utility creates log files and CSS_MIGRATION_DELETE_LIST.csv. See“Log Files Generated by Update Native Directory Utility” on page 106.
Caution! Update Native Directory Utility considers provisioning data of users and groupsfrom user directories that are not included in the search order as stale data. If youneed to retain such data, you must remove it fromCSS_MIGRATION_DELETE_LIST.csv.
About the Update Native Directory Utility 103

Table 15 Update Native Directory Utility Command Line Options
Option Description
-noprompt Optional: Use this option to invoke silent mode operation. Used to schedule jobs involving Update NativeDirectory Utility.
Example: updateNativeDir –noprompt updates Native Directory in silent mode.
-delete all Optional: Use this option to delete all stale Native Directory identities that are marked for deletion.
-delete PATH_OF_DELETE_LIST
Optional: Use this option to delete stale Native Directory identities listed in CSS_MIGRATION_DELETE_LIST.csv. See “Identifying Stale Data” on page 104.
-cssLocation Optional: Use this option to specify the absolute path of the EPM security configuration file. If you do notspecify this option, the utility initializes using the security configuration file available in Shared ServicesRegistry.
Using Update Native Directory UtilityGenerally, you complete the following steps to manage stale Native Directory data:
l “Identifying Stale Data” on page 104
l “Deleting Stale Data” on page 105
l Resolve ambiguous identities. Ambiguous identities are identities that the utility failed toresolve. You must manually resolve these identities.
Updating the Update Native Directory Utility SettingsModify parameter values in updateNativeDir.bat (Windows) or updateNativeDir.sh(UNIX) located in EPM_ORACLE_HOME/common/utilities/UpdateNativeDir.
ä To update utility settings:
1 Using a text editor, open updateNativeDir.bat (Windows) or updateNativeDir.sh (UNIX)located in EPM_ORACLE_HOME/common/utilities/UpdateNativeDir.
2 Update the value of EPM_ORACLE_INSTANCE to reflect the instance location in your environment.By default, EPM_ORACLE_INSTANCE is C:\Oracle\Middleware\user_projects\epmsystem1 (Windows).
3 Save and close the file.
Identifying Stale DataRun Update Native Directory Utility without specifying options to generateCSS_MIGRATION_DELETE_LIST.csv that identifies the stale identities in Native Directory thatcan be deleted.
104 Using the Update Native Directory Utility
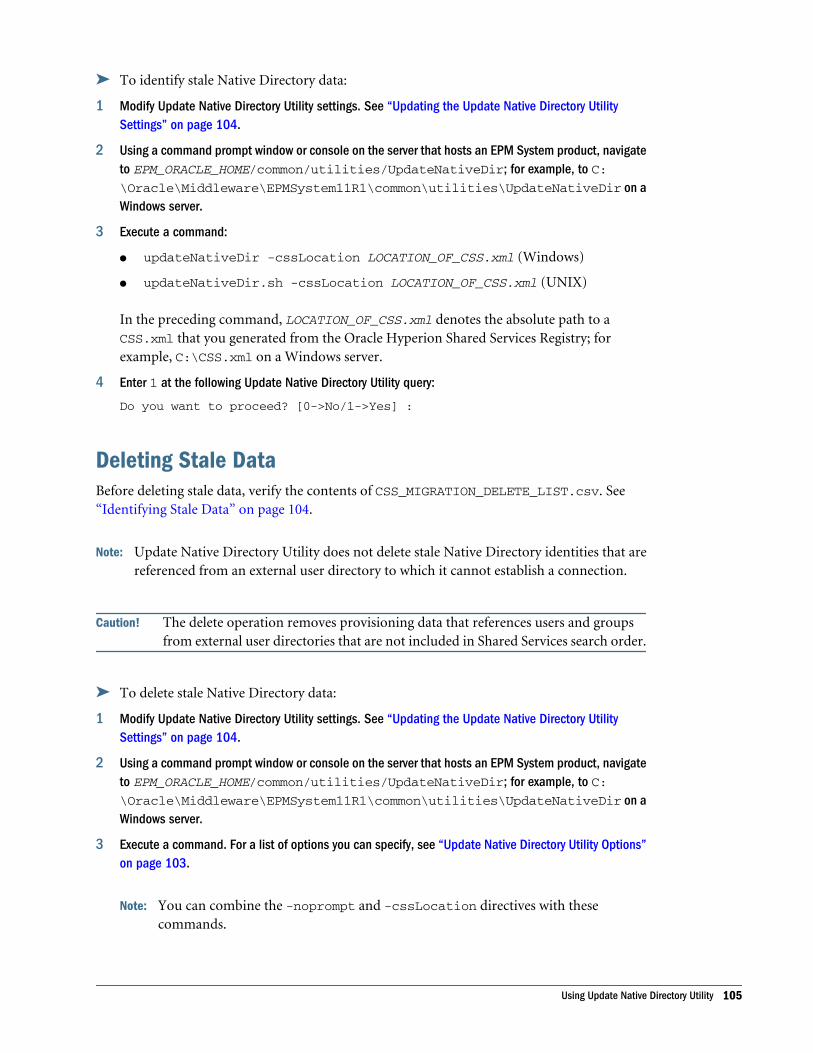
ä To identify stale Native Directory data:
1 Modify Update Native Directory Utility settings. See “Updating the Update Native Directory UtilitySettings” on page 104.
2 Using a command prompt window or console on the server that hosts an EPM System product, navigateto EPM_ORACLE_HOME/common/utilities/UpdateNativeDir; for example, to C:\Oracle\Middleware\EPMSystem11R1\common\utilities\UpdateNativeDir on aWindows server.
3 Execute a command:
l updateNativeDir -cssLocation LOCATION_OF_CSS.xml (Windows)
l updateNativeDir.sh -cssLocation LOCATION_OF_CSS.xml (UNIX)
In the preceding command, LOCATION_OF_CSS.xml denotes the absolute path to aCSS.xml that you generated from the Oracle Hyperion Shared Services Registry; forexample, C:\CSS.xml on a Windows server.
4 Enter 1 at the following Update Native Directory Utility query:
Do you want to proceed? [0->No/1->Yes] :
Deleting Stale DataBefore deleting stale data, verify the contents of CSS_MIGRATION_DELETE_LIST.csv. See“Identifying Stale Data” on page 104.
Note: Update Native Directory Utility does not delete stale Native Directory identities that arereferenced from an external user directory to which it cannot establish a connection.
Caution! The delete operation removes provisioning data that references users and groupsfrom external user directories that are not included in Shared Services search order.
ä To delete stale Native Directory data:
1 Modify Update Native Directory Utility settings. See “Updating the Update Native Directory UtilitySettings” on page 104.
2 Using a command prompt window or console on the server that hosts an EPM System product, navigateto EPM_ORACLE_HOME/common/utilities/UpdateNativeDir; for example, to C:\Oracle\Middleware\EPMSystem11R1\common\utilities\UpdateNativeDir on aWindows server.
3 Execute a command. For a list of options you can specify, see “Update Native Directory Utility Options”on page 103.
Note: You can combine the -noprompt and -cssLocation directives with thesecommands.
Using Update Native Directory Utility 105

l updateNativeDir -delete PATH_OF_DELETE_LIST
l updateNativeDir -delete all
In this command, PATH_OF_DELETE_LIST refers to the absolute location ofCSS_MIGRATION_DELETE_LIST.csv; for example, C:\Oracle\Middleware\EPMSystem11R1\common\utilities\UpdateNativeDir\logs\security-
migration\CSS_MIGRATION_DELETE_LIST.csv on a Windows server.
4 Enter 1 at the following Update Native Directory Utility query:
Do you want to proceed? 0->No/1->Yes] :
Log Files Generated by Update Native Directory UtilityBy default, Update Native Directory Utility creates log files in EPM_ORACLE_HOME/common/utilities/UpdateNativeDir/logs/security-migration.
l CSSMigration-Ambiguous_time_stamp.log lists ambiguous identities that UpdateNative Directory Utility could not resolve. You must manually update the identities listedin this file.
l CSSMigration-Deleted_time_stamp.log lists the identities that Update NativeDirectory Utility deleted from Native Directory.
l CSSMigration-Updated_time_stamp.log lists the Native Directory identities thatUpdate Native Directory Utility updated in Native Directory to reflect the changes to theidentity in an external user directory.
l CSSMigration-Ignored_time_stamp.log lists the entries on which no action was takenbecause they needed no update.
106 Using the Update Native Directory Utility

DMigrating Users and Groups
Across User Directories
In This Appendix
Overview ... . . . . . . . . . . . . . . . . . . . . . . . . . . . . . . . . . . . . . . . . . . . . . . . . . . . . . . . . . . . . . . . . . . . . . . . . . . . . . . . . . . . . . . . . . . . . . . . 107
Prerequisites.. . . . . . . . . . . . . . . . . . . . . . . . . . . . . . . . . . . . . . . . . . . . . . . . . . . . . . . . . . . . . . . . . . . . . . . . . . . . . . . . . . . . . . . . . . . . . 107
Migration Procedure ... . . . . . . . . . . . . . . . . . . . . . . . . . . . . . . . . . . . . . . . . . . . . . . . . . . . . . . . . . . . . . . . . . . . . . . . . . . . . . . . . . . 108
Product-Specific Updates ... . . . . . . . . . . . . . . . . . . . . . . . . . . . . . . . . . . . . . . . . . . . . . . . . . . . . . . . . . . . . . . . . . . . . . . . . . . . . 111
OverviewThere are many scenarios that may cause the user and group identities of provisioned EPMSystem users to become stale. EPM System components become inaccessible if the provisioninginformation available to them is stale. Scenarios that may create stale provisioning data include:
l Retiring a user directory: Organizations may retire a user directory after moving users toanother.
l Version upgrade: User directory version upgrade may involve changes in host machine nameor operating system environments requiring.
l Vendor change: Organizations may discontinue the use of a user directory in favor of a userdirectory from another vendor. For example, an organization may replace its Oracle InternetDirectory with a SunONE Directory Server.
Note: In this appendix, the user directory that you are phasing out is referred to as the sourceuser directory, and the user directory to which you moved the user accounts is referredto as the target user directory.
Prerequisitesl EPM System users and groups whose provisioning data is being migrated across user
directories must be available in the target user directory.
Group relationships that exist in the source user directory must be maintained in the targetuser directory.
l User names of EPM System users must be identical across source and target user directories.
Overview 107

Migration Procedure
Subtopics
l Export Native Directory Data
l Prepare EPM System for Migration
l Restart EPM System
l Edit Import Files
l Import Updated Data
l Run Update Native Directory Utility
Export Native Directory DataUse Oracle Hyperion Enterprise Performance Management System Lifecycle Management toexport the following from Native Directory:
l Native Directory Groups
l Assigned roles
l Delegated lists
Lifecycle Management creates multiple export files, generally in EPM_ORACLE_INSTANCE/import_export/USER_NAME/EXPORT_DIR/resource/Native Directory, whereUSER_NAME is the identity of the user; for example, admin@Native Directory, whoperformed the export operation and EXPORT_DIR is the name of the export directory. Typically,these files are created:
l Groups.csv
l Roles.csv
l Delegated Lists.csv
l Assigned Roles/PROD_NAME.csv for each deployed application, where PROD_NAME isthe name of an EPM System component; for example, Shared Services.
Note: See the Oracle Enterprise Performance Management System Lifecycle Management Guidefor detailed instructions on exporting data using Lifecycle Management.
ä To export provisioning data from Native Directory:
1 In the View pane of Shared Services Console, select Shared Services application within Foundationapplication group.
2 Select the type of artifacts for which you want to export provisioning information.
3 Select Define Migration.
4 Set source options and then click Next.
5 Enter a file system location for storing export files and then click Next.
6 Click Next in Destination Options.
108 Migrating Users and Groups Across User Directories
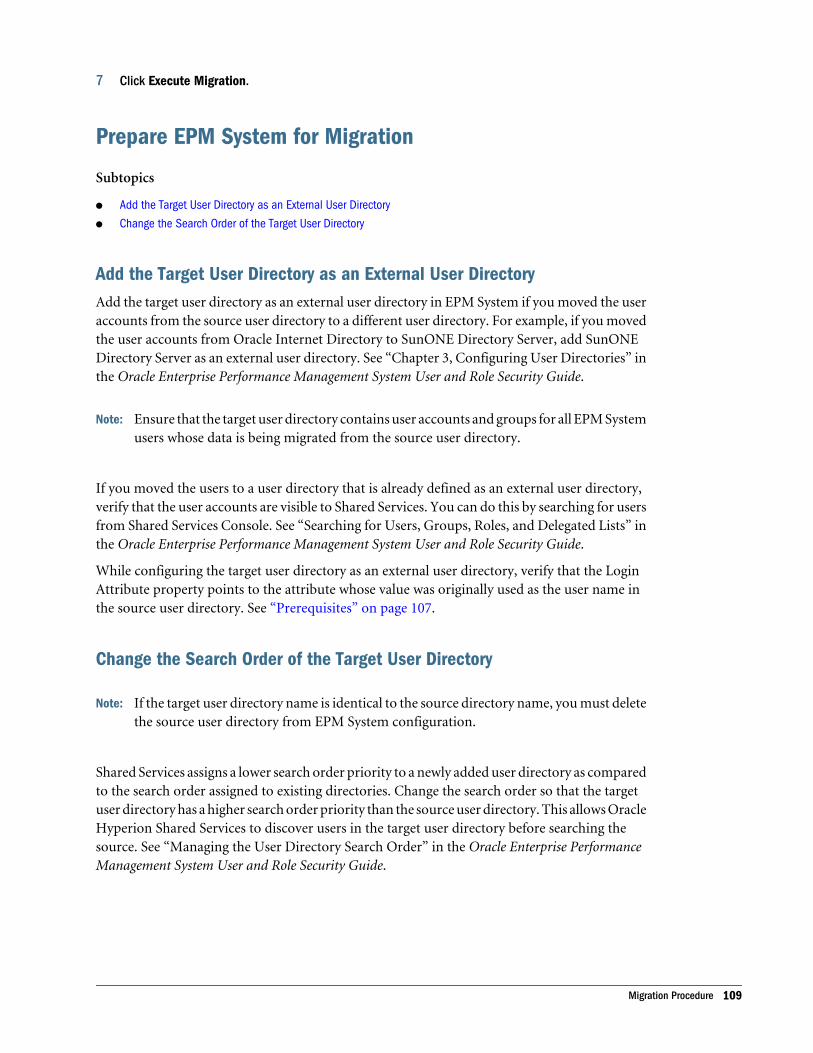
7 Click Execute Migration.
Prepare EPM System for Migration
Subtopics
l Add the Target User Directory as an External User Directory
l Change the Search Order of the Target User Directory
Add the Target User Directory as an External User DirectoryAdd the target user directory as an external user directory in EPM System if you moved the useraccounts from the source user directory to a different user directory. For example, if you movedthe user accounts from Oracle Internet Directory to SunONE Directory Server, add SunONEDirectory Server as an external user directory. See “Chapter 3, Configuring User Directories” inthe Oracle Enterprise Performance Management System User and Role Security Guide.
Note: Ensure that the target user directory contains user accounts and groups for all EPM Systemusers whose data is being migrated from the source user directory.
If you moved the users to a user directory that is already defined as an external user directory,verify that the user accounts are visible to Shared Services. You can do this by searching for usersfrom Shared Services Console. See “Searching for Users, Groups, Roles, and Delegated Lists” inthe Oracle Enterprise Performance Management System User and Role Security Guide.
While configuring the target user directory as an external user directory, verify that the LoginAttribute property points to the attribute whose value was originally used as the user name inthe source user directory. See “Prerequisites” on page 107.
Change the Search Order of the Target User Directory
Note: If the target user directory name is identical to the source directory name, you must deletethe source user directory from EPM System configuration.
Shared Services assigns a lower search order priority to a newly added user directory as comparedto the search order assigned to existing directories. Change the search order so that the targetuser directory has a higher search order priority than the source user directory. This allows OracleHyperion Shared Services to discover users in the target user directory before searching thesource. See “Managing the User Directory Search Order” in the Oracle Enterprise PerformanceManagement System User and Role Security Guide.
Migration Procedure 109

Restart EPM SystemRestart Oracle Hyperion Foundation Services and other EPM System components to enforcethe changes you made.
Edit Import Files
Note: This step is not required if the target user directory name in EPM System configurationis identical to the source user directory name.
You use the export files that Lifecycle Management created as the source for recreating the datain Native Directory. The export files are generated in the directory that you specified whileexporting data from Native Directory. See “Export Native Directory Data” on page 108.
In each export file, replace all references to the source user directory with references to the targetuser directory. Generally, you edit the assigned roles export files and, optionally, the followingfiles.
l Groups.csv if users from the source user directory are members of Native Directorygroups.
l Delegated Lists.csv if users from the source user directory are assigned to delegatedlists.
The import files are in EPM_ORACLE_INSTANCE/import_export/USER_NAME/EXPORT_DIR/resource/Native Directory, where USER_NAME is the identity of the user;for example, admin@Native Directory, who performed the export operation, andEXPORT_DIR is the name of the export directory.
ä To edit an import file:
1 Using a text editor, open an import file.
2 Replace the name of the source user directory with the name of the target user directory as displayedin the Directory Name column in the Defined User Directories screen.
3 Save and close the import file.
Import Updated DataRun Lifecycle Management with create/update option to import the data you exported earlierfrom Native Directory. See “Export Native Directory Data” on page 108.
Note: See the Oracle Enterprise Performance Management System Lifecycle Management Guidefor detailed instructions on importing data using Oracle Hyperion EnterprisePerformance Management System Lifecycle Management.
110 Migrating Users and Groups Across User Directories
ä To import updated provisioning data into Native Directory:
1 In the View pane of Oracle Hyperion Shared Services Console, expand File System.
2 Select the file system location of the import files.
3 Select the type of artifacts for which you want to import provisioning information.
4 Click Define Migration.
5 In Source Options, click Next.
6 In Destination, click Next.
7 In Destination Options, verify that Import Operation Type is set to create/update.
8 Click Next.
9 Click Execute Migration.
Run Update Native Directory UtilityClean stale data from Native Directory by running the Update Native Directory Utility. SeeAppendix C, “Using the Update Native Directory Utility.”
Product-Specific Updates
Caution! Oracle recommends that you back up the user and group data in the repository usedby the Oracle Enterprise Performance Management System component beforestarting product-specific updates. After updating information in the local productrepository, you can revert to the old user and group data in the local productrepository from backups only.
PlanningPlanning stores information about provisioned users and groups in the Planning repository. Ifa user identity was changed in Native Directory as a result of migrating users and groups acrossuser directories, you must synchronize the information in the Planning repository with that inNative Directory by selecting Migrate Users/Groups. This button is available in Oracle HyperionPlanning when assigning access to data forms, members, or task lists.
Financial ManagementFinancial Management records information about users and groups provisioned to accessobjects in a local Financial Management repository. If user and group information in NativeDirectory has changed as a result of migrating users and groups across user directories, you mustsynchronize the information in the Oracle Hyperion Financial Management, repository withthat in Native Directory.
Product-Specific Updates 111
Reporting and AnalysisReporting and Analysis uses the syncCSSId utility to synchronize user and group identities storedin its relational database to reflect the identities available in Native Directory. You must run thisutility before users are allowed to access Oracle Hyperion Reporting and Analysis after migratingprovisioning data in Native Directory. The syncCSSId utility is installed inEPM_ORACLE_INSTANCE/bin/ReportingAnalysis/syncCSSId directory; for example,C:/Oracle/Middleware/user_projects/epmsystem1/bin/ReportingAnalysis/
syncCSSId.
See EPM_ORACLE_INSTANCE/bin/ReportingAnalysis/syncCSSId/ReadmeSyncCSSId_BI.txt for detailed instructions to run the syncCSSId utility.
112 Migrating Users and Groups Across User Directories
Glossary
access permissions A set of operations that a user can
perform on a resource.
aggregated role A custom role that aggregates multiple
predefined roles within a Hyperion product.
application 1) A software program designed to run a specific
task or group of tasks such as a spreadsheet program or
database management system; 2) A related set of dimensions
and dimension members that are used to meet a specific set
of analytical requirements, reporting requirements, or both.
Application Migration Utility A command-line utility for
migrating applications and artifacts.
artifact An individual application or repository item; for
example, scripts, forms, rules files, Interactive Reporting
documents, and financial reports. Also known as an object.
authentication Verification of identity as a security measure.
Authentication is typically based on a user name and
password. Passwords and digital signatures are forms of
authentication.
automated stage A stage that does not require human
intervention; for example, a data load.
backup A duplicate copy of an application instance.
business process A set of activities that collectively
accomplish a business objective.
context variable A variable that is defined for a particular task
flow to identify the context of the taskflow instance.
external authentication Logging on to Oracle EPM System
products with user information stored outside the
application. The user account is maintained by the EPM
System, but password administration and user
authentication are performed by an external service, using
a corporate directory such as Oracle Internet Directory
(OID) or Microsoft Active Directory (MSAD).
filter A constraint on data sets that restricts values to specific
criteria; for example, to exclude certain tables, metadata, or
values, or to control access.
group A container for assigning similar access permissions
to multiple users.
identity A unique identification for a user or group in
external authentication.
integration A process that is run to move data between
Oracle's Hyperion applications using Shared Services. Data
integration definitions specify the data moving between a
source application and a destination application, and they
enable the data movements to be grouped, ordered, and
scheduled.
lifecycle management The process of migrating an
application, a repository, or individual artifacts across
product environments.
link 1) A reference to a repository object. Links can reference
folders, files, shortcuts, and other links; 2) In a taskflow, the
point where the activity in one stage ends and another
begins.
link condition A logical expression evaluated by the taskflow
engine to determine the sequence of launching taskflow
stages.
load balancing Distribution of requests across a group of
servers, which helps to ensure optimal end user
performance.
managed server An application server process running in its
own Java Virtual Machine (JVM).
manual stage A stage that requires human intervention.
migration The process of�copying applications, artifacts, or
users from one environment or computer to another; for
example, from a testing environment to a production
environment.
Glossary 113

migration audit report A report generated from the migration
log that provides tracking information for an application
migration.
migration definition file (.mdf) A file that contains migration
parameters for an application migration, enabling batch
script processing.
migration log A log file that captures all application migration
actions and messages.
migration snapshot A snapshot of an application migration
that is captured in the migration log.
model 1) In data mining, a collection of an algorithm's
findings about examined data. A model can be applied
against a wider data set to generate useful information about
that data; 2) A file or content string containing an
application-specific representation of data. Models are the
basic data managed by Shared Services, of two major types:
dimensional and nondimensional application objects; 3) In
Business Modeling, a network of boxes connected to
represent and calculate the operational and financial flow
through the area being examined.
product In Shared Services, an application type, such as
Planning or Performance Scorecard.
project An instance of Oracle's Hyperion products grouped
together in an implementation. For example, a Planning
project may consist of a Planning application, an Essbase
cube, and a Financial Reporting Server instance.
provisioning The process of granting users and groups
specific access permissions to resources.
repository Storage location for metadata, formatting, and
annotation information for views and queries.
role The means by which access permissions are granted to
users and groups for resources.
security agent A Web access management provider (for
example, Oracle Access Manager, Oracle Single Sign-On, or
CA SiteMinder) that protects corporate Web resources.
security platform A framework enabling Oracle EPM System
products to use external authentication and single sign-on.
Shared Services Registry The part of the Shared Services
repository that manages EPM System deployment
information for most EPM System products, including
installation directories, database settings, computer names,
ports, servers, URLs, and dependent service data.
single sign-on (SSO) The ability to log on once and then access
multiple applications without being prompted again for
authentication.
stage 1) A task description that forms one logical step
within a taskflow, usually performed by an individual. A
stage can be manual or automated; 2) For Profitability,
logical divisions within the model that represent the steps
in the allocation process within your organization.
stage action For automated stages, the invoked action that
executes the stage.
sync Synchronization of Shared Services and application
models.
synchronized The condition that exists when the latest
version of a model resides in both the application and in
Shared Services. See also model.
task list A detailed status list of tasks for a particular user.
taskflow The automation of a business process in which
tasks are passed from one taskflow participant to another
according to procedural rules.
taskflow definition Business processes in the taskflow
management system that consist of a network of stages and
their relationships; criteria indicating the start and end of
the taskflow; and information about individual stages, such
as participants, associated applications, associated activities,
and so on.
taskflow instance A single instance of a taskflow including its
state and associated data.
taskflow management system A system that defines, creates,
and manages the execution of a taskflow, including
definitions, user or application interactions, and
application executables.
taskflow participant The resource that performs the task
associated with the taskflow stage instance for both manual
and automated stages.
token An encrypted identification of one valid user or group
on an external authentication system.
114 Glossary

transformation 1) A process that transforms artifacts so that
they function properly in the destination environment after
application migration; 2) In data mining, the modification
of data (bidirectionally) flowing between the cells in the
cube and the algorithm.
upgrade The process of deploying a new software release and
moving applications, data, and provisioning information
from an earlier deployment to the new deployment.
user directory A centralized location for user and group
information, also known as a repository or provider.
Popular user directories include Oracle Internet Directory
(OID), Microsoft Active Directory (MSAD), and Sun Java
System Directory Server.
Glossary 115

116 Glossary


