264
Accu-Chek ® Inform II BLOOD GLUCOSE MONITORING SYSTEM Operator’s Manual

Accu-Chek® Inform IIBLOOD GLUCOSE MONITORING SYSTEM
Operator’s Manual
08424705001 (03) 2020-08 USA • Accu-Chek Inform II Operator’s Manual Version 7.1
Revision History
Manual versions 1, 2, 3 and 3.x are for Accu-Chek Inform II meters with serial number versions UU13000000 to less than UU14000000. Manual versions 4, 5, 6 and 7.x are for Accu-Chek Inform II meters with serial number versions greater than or equal to UU14000000.
Manual version Revision date Changes
Version 1.0 2012-10 New document
Version 2.0 2013-02 Upgrade to FW 03.04; Revise critically ill statement
Version 3.0 2013-03 Update cleaning and disinfecting chapter
Version 3.1 2017-04 Add “Rx only” to Version 3.0 Operator’s Manual.
Version 3.2 2020-08 Upgrade to FW 03.07; Revise critically ill statement.
Version 4.0 2014-02 Transition to new meter hardware; 2D barcode scanner, modifications to wireless LAN option (separate insertable RF card replaced by integrated WLAN component); new battery pack. Update to SW 04.00; misc. editorial revisions.
Version 5.0 2015-03 Correct two typographical errors in chapter 1, Introduction, Overview of the Accu-Chek Inform II Base Unit Hub section.
Version 6.0 2017-04 SW 04.01 and low power icons implemented; update to SW 04.02; new Base Unit in “System overview”; new section “What is new…”; new Appendix E for legacy Base Unit; misc. editorial revisions.
Version 7.0 2020-02 Update text for CLIA Waiver and modified Intended Use statement; implementation of supplements for SW 04.03
Version 7.1 2020-08 Update, new SW version 04.04
08424705001 (03) 2020-08 USA
Operator’s Manual
Version 7.1
AACCU-CCU-CHEKHEK ® Inform II System

08424705001 (03) 2020-08 USA • Accu-Chek Inform II Operator’s Manual Version 7.1
© 2012-2020, Roche Diagnostics. All rights reserved.
The contents of this document, including all graphics, are the property of Roche Diagnostics. No part of this document may be reproduced or transmitted in any form or by any means, electronic or mechanical, for any purpose, without the express written permission of Roche Diagnostics. Roche Diagnostics has made every reasonable effort to ensure that all the information contained in this manual is correct at the time of printing. However, Roche Diagnostics reserves the right to make any changes necessary without notice as part of ongoing product development.
Please send questions or comments about this document to your local Roche representative.
ACCU-CHEK, ACCU-CHEK INFORM, ACCU-CHEK PERFORMA and COBAS are trademarks of Roche.All other trademarks are the property of their respective owners.
The Wi-Fi CERTIFIED Logo is a certification mark of the Wi-Fi Alliance.

08424705001 (03) 2020-08 USA • Accu-Chek Inform II Operator’s Manual Version 7.1
On the packaging, on the identification plate of the meter, the battery pack, the base unit, or the code key reader you may encounter the following symbols, shown here with their meaning:
On meters with WLAN capability:
For other WLAN certifications, see label on bottom of battery compartment.
Caution, consult accompanying documents. Refer to safety-related notes in the instructions for use accompanying this product.
Temperature limitation (Store at)
Admissible humidity range (Store at)
Manufacturer
Date of manufacture
Catalog number
In vitro diagnostic medical device
Global Trade Item Number
Serial Number
The system fulfills the Canadian and U.S. safety requirements (UL LISTED, in accordance with UL 61010-1 and CAN/CSA-C22.2 No. 61010-1).
Power supply connection (Base Unit and Base Unit Light, legacy version)
Power supply connection (Base Unit and Base Unit Light)
Rx only Caution: Federal law restricts this device to sale by or on the order of a physician
This device complies with Part 15 of the FCC Rules and with RSS-210 of Industry Canada.
The compliance mark indicates that the product complies with the applicable standard and establishes a traceable link between the equipment and the manufacturer, importer or their agent responsible for compliance and for placing it on the Australian and New Zealand market.
IVD
SN
7.5V 1.7
12V 1,25A

08424705001 (03) 2020-08 USA • Accu-Chek Inform II Operator’s Manual Version 7.1
What is new in publication version 7.1?
This section provides an overview of all major changes from Operator’s Manual version 7 to version 7.1. Deletions or minor corrections are not listed.
SW 04.04 Based on customer feedback, new features have been added and existing ones improved.
■ Order new strips, see page 93.
■ Improvement of data privacy. Automatic deletion of outdated patient data, see page 165.
■ Audit trail of Operator logins, see page 44.

7
08424705001 (03) 2020-08 USA • Accu-Chek Inform II Operator’s Manual Version 7.1
What is new in publication version 7.1? 6SW 04.04................................................................................................................................................ 6
1 Introduction 131.1 Before you start......................................................................................................................................... 13
CLIA Categorization ........................................................................................................................ 13Intended use ...................................................................................................................................... 14Important information regarding use ....................................................................................... 15If you need help ................................................................................................................................ 16Note on the use of “base unit” in this manual...................................................................... 16Note on illustrations in this manual .......................................................................................... 16What can the system do for you? .............................................................................................. 17Test principle ..................................................................................................................................... 17
1.2 Important safety instructions and additional information......................................................... 18Important information regarding safety................................................................................... 19Disposal of the system ................................................................................................................... 20Product safety.................................................................................................................................... 20General care....................................................................................................................................... 21Accessory box ................................................................................................................................... 21Meter .................................................................................................................................................... 21Power off meter ................................................................................................................................ 21Automatic power-off....................................................................................................................... 21Shut down meter.............................................................................................................................. 22Automatic shutdown....................................................................................................................... 23Battery Pack ....................................................................................................................................... 23Touchscreen....................................................................................................................................... 26Electromagnetic compatibility (EMC)....................................................................................... 26Electrostatic discharge (ESD)...................................................................................................... 27Wireless connectivity ...................................................................................................................... 28Radiofrequency radiation exposure information.................................................................. 28Local Area Network: protection from unauthorized access ............................................ 30Wired network connection ........................................................................................................... 30
1.3 System components................................................................................................................................ 321.4 Overview of the meter ............................................................................................................................ 331.5 Overview of the code key reader ....................................................................................................... 351.6 Overview of the Accu-Chek Inform II Base Unit .......................................................................... 361.7 Overview of the Accu-Chek Inform II Base Unit Hub................................................................. 381.8 Overview of the accessory box ........................................................................................................... 391.9 Reagents and consumables................................................................................................................. 391.10 Instructions for initial setup.................................................................................................................. 40

8
08424705001 (03) 2020-08 USA • Accu-Chek Inform II Operator’s Manual Version 7.1
2 Powering Up and Entering an Operator ID 412.1 Powering up the meter........................................................................................................................... 41
Adjusting the display ...................................................................................................................... 42Enabling/disabling wireless connectivity ................................................................................ 42Closing startup .................................................................................................................................. 44
2.2 Entering the operator ID........................................................................................................................ 44Entering an operator ID with barcode scanner .................................................................... 45Entering the operator ID manually............................................................................................. 46Entering a password ....................................................................................................................... 46
3 Patient Glucose Testing 473.1 Information regarding blood glucose testing ................................................................................ 47
Preparing to test ............................................................................................................................... 483.2 Performing a patient glucose test...................................................................................................... 50
Overview of test procedure .......................................................................................................... 50Entering or selecting the patient ID .......................................................................................... 51Entering the patient ID manually................................................................................................ 53Selecting the patient ID from a list ............................................................................................ 54Entering a patient ID with barcode scanner .......................................................................... 55Confirming or selecting the test strip lot................................................................................. 56Patient identification information............................................................................................... 58Inserting test strips .......................................................................................................................... 59Obtaining a blood sample............................................................................................................. 60Applying a blood sample............................................................................................................... 61Results screen ................................................................................................................................... 62Adding comments............................................................................................................................ 65Add barcode content to a result................................................................................................. 67Additional Patient Test ................................................................................................................... 68
4 Glucose Control Testing 694.1 Information regarding glucose control tests.................................................................................. 69
Glucose control testing intervals ................................................................................................ 70Information stored during glucose control testing.............................................................. 71Control solutions............................................................................................................................... 72Preparing to run a glucose control test ................................................................................... 72
4.2 Performing glucose control tests ....................................................................................................... 73Overview of test procedure .......................................................................................................... 73Starting a glucose control test .................................................................................................... 74Confirming or selecting the lot number for control solutions ......................................... 75Confirming or selecting the test strip lot................................................................................. 76Inserting test strips .......................................................................................................................... 77Applying the control solution....................................................................................................... 78Results screen ................................................................................................................................... 79Performing a STAT test .................................................................................................................. 81

9
08424705001 (03) 2020-08 USA • Accu-Chek Inform II Operator’s Manual Version 7.1
5 Review Results 835.1 Displaying test results from the memory ........................................................................................ 83
Information stored in data records for test results.............................................................. 83List of results stored in the memory ......................................................................................... 84
6 Storing Test Strip, Control Solution, and Linearity Solution Information in the Meter 87
6.1 Storing information about test strips ................................................................................................ 87Transferring code key information to the meter .................................................................. 88Editing test strip data...................................................................................................................... 91Order test strips ................................................................................................................................ 93
6.2 Storing control solution information ................................................................................................. 94Entering the lot number of the control solution ................................................................... 94Selecting a stored lot number as the current lot number ................................................ 97
6.3 Storing linearity test information........................................................................................................ 99Entering the lot number of the linearity test .......................................................................... 99Selecting a stored lot number as the current lot number ............................................. 101
7 Linearity Testing 1037.1 Information regarding linearity tests.............................................................................................. 103
Linearity testing intervals ........................................................................................................... 104Information stored during linearity testing.......................................................................... 104Linearity test kit ............................................................................................................................. 105Preparing to run a linearity test ............................................................................................... 105
7.2 Performing a linearity test.................................................................................................................. 106Overview of test procedure ....................................................................................................... 106Starting a linearity test ................................................................................................................ 106Confirming or selecting the lot number for linearity test kits....................................... 107Confirming or selecting the test strip lot.............................................................................. 107Inserting test strips ....................................................................................................................... 108Applying a linearity test sample .............................................................................................. 109Results screen ................................................................................................................................ 110
8 Proficiency Testing 1118.1 Information regarding proficiency tests ....................................................................................... 111
Information stored during proficiency testing.................................................................... 112Preparing a proficiency test ...................................................................................................... 112
8.2 Performing a proficiency test............................................................................................................ 113Overview of test procedure ....................................................................................................... 113Starting a proficiency test .......................................................................................................... 113Entering the proficiency sample ID ........................................................................................ 114Confirming or selecting the test strip lot.............................................................................. 114Inserting test strips ....................................................................................................................... 115Applying a proficiency sample................................................................................................. 116Results screen ................................................................................................................................ 117

10
08424705001 (03) 2020-08 USA • Accu-Chek Inform II Operator’s Manual Version 7.1
9 Initial Startup 1199.1 Connecting the base unit .................................................................................................................. 1199.2 Installing or replacing the battery pack........................................................................................ 121
Removing the battery pack........................................................................................................ 122Installing the battery pack ......................................................................................................... 124
9.3 Docking the meter ................................................................................................................................ 126Docked screen - battery status .............................................................................................. 126Improved charging performance............................................................................................. 127Docked screen - meter status.................................................................................................. 128
9.4 Initial setup on the meter ................................................................................................................... 130Menu overview............................................................................................................................... 131
9.5 Opening the Setup Menu................................................................................................................... 1359.6 Date and time format........................................................................................................................... 1369.7 Display options and optional tests.................................................................................................. 1379.8 Options for test strips .......................................................................................................................... 1389.9 Options for glucose control tests .................................................................................................... 1409.10 Value ranges (normal, critical, reportable) .................................................................................. 1429.11 Options for Operator ID Entry........................................................................................................... 1439.12 Patient ID options.................................................................................................................................. 1449.13 Creating a setup password................................................................................................................ 1459.14 Setting the date and time................................................................................................................... 1469.15 Beeper options ....................................................................................................................................... 147
10 Maintenance and Care 14910.1 Conditions for storage and shipping ............................................................................................. 149
General operating conditions ................................................................................................... 149Shipping............................................................................................................................................ 150Storage .............................................................................................................................................. 151
10.2 Cleaning/disinfecting the Accu-Chek Inform II system.......................................................... 151Guide to cleaning and disinfecting the Accu-Chek Inform II system ....................... 152Cleaning and disinfecting the meter...................................................................................... 152Acceptable cleaning/disinfecting agents............................................................................. 153What to clean/disinfect ............................................................................................................... 154Technical assistance .................................................................................................................... 154
10.3 How to clean and disinfect the Accu-Chek Inform II system............................................... 155Cleaning the meter ....................................................................................................................... 156Disinfecting the meter ................................................................................................................. 157
10.4 Logging maintenance activities ....................................................................................................... 15810.5 Diagnostics view.................................................................................................................................... 15910.6 Unlocking a Download Lockout ...................................................................................................... 16110.7 Service menu .......................................................................................................................................... 163
Deleting patient information ..................................................................................................... 163Manual deletion............................................................................................................................. 164Automatic deletion........................................................................................................................ 165

11
08424705001 (03) 2020-08 USA • Accu-Chek Inform II Operator’s Manual Version 7.1
11 Troubleshooting 167Errors and unusual behavior without error messages .................................................... 167Low power icons ........................................................................................................................... 171Pop-up messages ......................................................................................................................... 172Table of Information, Warning, and Error messages ....................................................... 174Meter reset ...................................................................................................................................... 181
12 General Product Information 18312.1 Technical data ....................................................................................................................................... 18312.2 Further Information .............................................................................................................................. 188
Ordering .......................................................................................................................................... 188Accu-Chek Inform II Operator’s Manual and Quick Reference Guide..................... 190Reagents and Solutions.............................................................................................................. 190Product Limitations ...................................................................................................................... 190Information about software licenses...................................................................................... 191Contact Roche................................................................................................................................ 192
A Appendix 193A.1 Table of configuration options ......................................................................................................... 193A.2 Example of barcode symbologies ................................................................................................... 209
B Appendix 213B.1 Option: Wireless network (WLAN) ................................................................................................. 213
Preliminary note............................................................................................................................. 213Background..................................................................................................................................... 213Technical implementation.......................................................................................................... 214RF specific functionalities and effective performance claims...................................... 216
C Supplement for Other Test Entry 219C.1 Before you start...................................................................................................................................... 219
Description ...................................................................................................................................... 219C.2 Overview of Other Test Entry (OTE) ............................................................................................... 220
Introduction ..................................................................................................................................... 220C.3 Recording Other Patient Tests ......................................................................................................... 223C.4 Recording Other Control Tests ........................................................................................................ 230
Introduction ..................................................................................................................................... 230Other Control Testing Intervals ................................................................................................ 230Stored Control Information........................................................................................................ 230Warning messages ....................................................................................................................... 236
C.5 Reviewing Other Test Results........................................................................................................... 237C.6 Other Test Entry Configuration Options ....................................................................................... 240
D Supplement for Observed Test Sequence 241Observed Test Sequence (OTS)............................................................................................... 241Using the OTS function............................................................................................................... 242

12
08424705001 (03) 2020-08 USA • Accu-Chek Inform II Operator’s Manual Version 7.1
E Supplement for Enhanced Workflows 245E.1 Configurable workflows..................................................................................................................... 245
Blood sample type selection ..................................................................................................... 246Isolation Room Workflow ........................................................................................................... 248Test procedure for patients in an isolation room.............................................................. 248
F Appendix for Accu-Chek Inform II Base Unit (legacy version) 251F.1 Overview of the base unit with older hardware......................................................................... 251F.2 Connecting the base unit (legacy version) ................................................................................ 253F.3 Technical data ....................................................................................................................................... 254
G Limited Warranty 255Accu-Chek® Inform II meter LIMITED WARRANTY ........................................................ 255
Index 257

Intr
oduc
tion
• 1
13
08424705001 (03) 2020-08 USA • Accu-Chek Inform II Operator’s Manual Version 7.1
1 Introduction
1.1 Before you start
CLIA Categorization This is a CLIA Waived system. A Certificate of CLIA Waiver (or higher) is required to perform the test. Infor-mation on obtaining CLIA certificates can be found at www.cms.hhs.gov/clia. Facilities performing testing must have a CLIA Certificate of Waiver. 42 USC 263a(c)(2).
Laboratories with a certificate of waiver must follow the manufacturer’s instructions for performing the test. 42 CFR 493.15(e)(1). Any modifications and/or failure to follow test system instructions, including those for limitations/intended use and performance of QC testing as a failure alert mechanism, results in use that is considered high complexity and subject to all applicable CLIA requirements. All applicable state and local laws must be met.
Any adverse reactions experienced with the use of this product, and/or quality problems should also be reported to the FDA’s MedWatch Adverse Event Reporting program online (at www.fda.gov/MedWatch/report.htm), by phone (1-800-FDA-1088), or by returning the postage-paid FDA form 3500 (which may be downloaded from www.fda.gov/MedWatch/getforms.htm) by mail to (MedWatch, 5600 Fishers Lane, Rockville, MD 20852-9787) or fax (1-800-FDA-0178).
If there are any problems with the Accu-Chek Inform II System, notify CMS at http://www.cms.hhs.gov/clia/ro-map.asp

14
08424705001 (03) 2020-08 USA • Accu-Chek Inform II Operator’s Manual Version 7.1
Intended use The Accu-Chek Inform II test strips are for use with the Accu-Chek Inform II meter to quantitatively measure glucose (sugar) in venous whole blood, arterial whole blood, neonatal heel stick, or fresh capillary whole blood samples drawn from the fingertip as an aid in monitoring the effectiveness of glucose control.
The system is not for use in diagnosis or screening of diabetes mellitus, nor for testing neonate cord blood samples.
The Accu-Chek Inform II Blood Glucose Monitoring System is intended for testing outside the body (in vitro diagnostic use) and is intended for multiple-patient use in professional healthcare settings. This system should only be used with single-use, auto-disabling lancing devices.
The multiple-patient use Accu-Chek Inform II Blood Glucose Monitoring System will consist of:
■ Meter: Accu-Chek Inform II Meter
■ Test Strip: Accu-Chek Inform II Test Strip
■ Controls: Accu-Chek Inform II Control Solutions
■ Linearity: Accu-Chek Linearity Kit
Intr
oduc
tion
• 1
15
08424705001 (03) 2020-08 USA • Accu-Chek Inform II Operator’s Manual Version 7.1
Important information regarding use
Read this operator's manual, as well as the package inserts for all relevant consumables, before using the system for the first test.
You must configure the Accu-Chek Inform II system according to your needs before initial use. You can con-figure the system either directly on the meter or by using a suitable data management system. Refer to Chapter 9 “Initial setup on the meter” for on-meter configuration. Refer to Appendix A for configuration via a data manage-ment system.
Be sure to read the “Important safety instructions and additional information” section in this chapter before operating the system.
The FDA, CDC, and CMS recommend that Point of Care blood testing devices such as the Accu-Chek Inform II meter should be used only on one patient and not shared. If dedicating blood glucose meters to a single patient is not possible, the meters must be properly cleaned and disinfected after every use following the guidelines provided in this manual (see section “Maintenance and Care”).

16
08424705001 (03) 2020-08 USA • Accu-Chek Inform II Operator’s Manual Version 7.1
If you need help Information about using the system, the screen menus and performing a test can be found in this operator's manual.
Error messages that appear on screen include informa-tion or instructions on how to correct the error.
For all questions about the Accu-Chek Inform II system that are not answered in this manual, contact the Roche Customer Support Center at 1-800-440-3638 24 hours a day, 365 days a year. In order to expedite trou-bleshooting, please have ready your Accu-Chek Inform II meter, its serial number, this manual, and all related con-sumables when you call. If you suspect a communication error beyond the meter, also have your Accu-Chek Inform II Base Unit serial number ready to help assist our cus-tomer care group in troubleshooting.
Note on the use of “base unit” in this manual
Note on illustrations in this manual
Unless otherwise specified, the term “base unit” refers to both the Accu-Chek Inform II Base Unit and the Accu-Chek Inform II Base Unit Light.
Illustrations in this manual show two different kinds of hands:
Hand without glove Hand with glove
A dashed arrow between screen illustrations indicates that some screens have been skipped in these illustrations.

Intr
oduc
tion
• 1
17
08424705001 (03) 2020-08 USA • Accu-Chek Inform II Operator’s Manual Version 7.1
What can the system do for you? The Accu-Chek Inform II system has the following features and properties:
■ Perform patient blood glucose tests and glucose control tests with control solution.
■ Automatically record all relevant data for the appli-cation, which includes:
– Time and date of test
– IDs for operator, patient, and samples
– Information about control solutions, test strips, and linearity
– Test results and comments
– Patient sample type based on configuration.
■ Record patient test results, quality control test results and reagent information for certain off-meter manual tests.
■ For purposes of quality assurance, information on the following areas can be collected, stored, and transferred:
– Meters
– Test strips
– Glucose control solutions
– Linearity solutions
– Test results
Test principle An enzyme on the test strip converts the glucose in the blood sample to gluconolactone. This reaction creates a harmless DC electrical current that the meter interprets and converts into a blood glucose result. The sample and environmental conditions are also evaluated using AC and DC signals.
For more details, refer to the test strip package insert.
18
08424705001 (03) 2020-08 USA • Accu-Chek Inform II Operator’s Manual Version 7.1
1.2 Important safety instructions and additional information
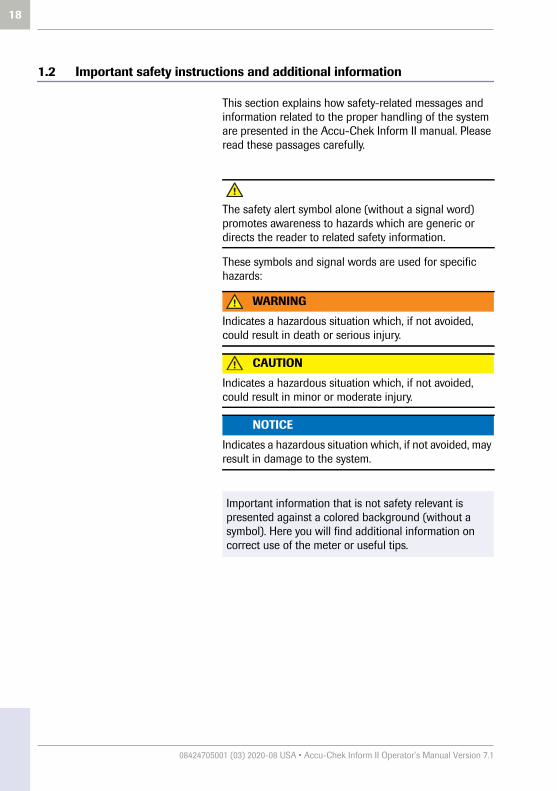
This section explains how safety-related messages and information related to the proper handling of the system are presented in the Accu-Chek Inform II manual. Please read these passages carefully.
These symbols and signal words are used for specific hazards:
The safety alert symbol alone (without a signal word) promotes awareness to hazards which are generic or directs the reader to related safety information.
WARNING
Indicates a hazardous situation which, if not avoided, could result in death or serious injury.
CAUTION
Indicates a hazardous situation which, if not avoided, could result in minor or moderate injury.
NOTICE
Indicates a hazardous situation which, if not avoided, may result in damage to the system.
Important information that is not safety relevant is presented against a colored background (without a symbol). Here you will find additional information on correct use of the meter or useful tips.

Intr
oduc
tion
• 1
19
08424705001 (03) 2020-08 USA • Accu-Chek Inform II Operator’s Manual Version 7.1
Important information regarding safety
Operator qualification Only trained healthcare professionals may operate the Accu-Chek Inform II system. Operators must also have received comprehensive instruction in the operation, quality control, and care of the Accu-Chek Inform II system.
WARNING
Protection against infection and blood-borne pathogensHealthcare professionals using the Accu-Chek Inform II system to perform tests must be aware that any object coming into contact with human blood is a potential source of infection. Operators need to adhere to Standard Precautions when handling or using the Accu-Chek Inform II system. All parts of this system should be considered potentially infectious and are capable of transmitting blood-borne pathogens between patients and between patients and healthcare professionals. ■ Use gloves. Wear a new pair of clean gloves for testing
each patient.■ Wash hands thoroughly with soap and water before
putting on a new pair of gloves and performing the next patient test.
■ Use an auto-disabling single-use lancing device for each patient.
■ Dispose of used lancets in a sturdy sharps container with lid.
■ Dispose of used test strips from patient and proficiency tests according to your institution’s infection control policy.
■ Follow all health and safety regulations in force locally.■ For more information, refer to the following practice
guidelines:
– “Guideline for Isolation Precautions: Preventing Transmission of Infectious Agents in Healthcare Settings 2007”, http://www.cdc.gov/hicpac/2007ip/2007isolationprecautions.html.
– “Biosafety in Microbiological and Biomedical Laboratories (BMBL)” found at http://www.cdc.gov/biosafety/publications/bmbl5/
– “CLSI. Protection of Laboratory Workers From Occupationally Acquired Infections”; Approved Guideline - Fourth Edition. CLSI document M29-A4. Wayne, PA: Clinical and Laboratory Standards Institute; 2014.
20
08424705001 (03) 2020-08 USA • Accu-Chek Inform II Operator’s Manual Version 7.1
Disposal of the system
Product safety Observe the following information to ensure product safety:
■ The system is suitable for continuous operation.
■ The system is not protected against the harmful ingress of fluids (IP X0 rating according to IEC 60529).
WARNING
Avoidance of electrical shock, fire, and explosions■ Only use Roche original accessories (cables, power
supply units, battery packs, and spare parts). Third-party cables, power supply units, and battery packs can cause the battery pack to explode or the meter to become damaged.
■ Do not use loose power sockets or damaged power supply units, cables, plugs, or battery packs.
■ Do not short circuit the power supply unit, the base unit charging contacts, or the battery pack.
■ Do not drop the Accu-Chek Inform II meter, the power supply unit, or the battery pack and protect these against shaking and vibrations.
WARNING
Infection by a potentially biohazardous instrumentThe Accu-Chek Inform II system or its components must be treated as potentially biohazardous waste. Decontam-ination (i.e., a combination of processes including clean-ing, disinfection and/or sterilization) is required before reuse, recycling, or disposal.
Dispose of the system or its components according to the appropriate local regulations or your facility policy. For more information, contact Roche Customer Support Center.

Intr
oduc
tion
• 1
21
08424705001 (03) 2020-08 USA • Accu-Chek Inform II Operator’s Manual Version 7.1
General care
Accessory box
Meter Dispose of the meter in accordance with applicable laws and regulations. See “Disposal of the system” on page 20.
Power off meter When you power off the meter by pressing the On/Off button briefly (less than a second) or the meter powers off automatically (see below), the screen goes blank. However, the meter is in standby mode and contin-ues to draw power from the battery pack to maintain date/time and run various functions in the background such as wireless communication.
Automatic power-off ■ Unless otherwise configured, the system automati-cally powers off and goes into standby mode to save power after 5 minutes of inactivity (e.g., no screen touches, strip insertions).
■ In measurement mode only: If you are performing a test (patient, control, proficiency, or linearity), the meter will power off after 10 minutes of inactivity (no screen touches), independently of configured automatic power-off time. If a result is already pres-ent, the meter will emit three warning beeps every minute after 5 minutes of inactivity and will save the result before powering off after 10 minutes of inac-tivity. The result will be flagged with a standard comment (“Result not confirmed”) when it is trans-mitted to the DMS.
NOTICE
To avoid damaging the system, use only solutions recom-mended to clean and disinfect the system. Using other solutions may result in incorrect operation and possible failure of the system.
NOTICE
Carry the accessory box carefully by the handle for easy transport. Dropping or hitting the box may damage it.

22
08424705001 (03) 2020-08 USA • Accu-Chek Inform II Operator’s Manual Version 7.1
Shut down meter In standby mode (“Automatic power off”), energy contin-ues to be drawn from the battery and it depletes within a day if not docked. Shutting down the meter shuts down wireless communication and all other functionalities. Date and time, however, are maintained. Powering up the meter will take slightly longer than from power-off (standby) mode.
To shut down the meter, press the On/Off button for about 5 seconds and release the button as soon as the Roche logo is displayed and the meter beeps. The screen goes blank and the meter is shut down.
Use meter shutdown when you want to remove or replace the battery pack (see page 122).
If you press the On/Off button for too long, a meter reset will be triggered after about 12 seconds (see page 181) and date and time will be lost.
Intr
oduc
tion
• 1
23
08424705001 (03) 2020-08 USA • Accu-Chek Inform II Operator’s Manual Version 7.1
Automatic shutdown In case of a Download Lockout (see page 161) or if the battery pack is critically low (see page 171), wireless communication and all other functionalities are shut down (although date and time are maintained).
The meter can be configured to automatically shut down 30 minutes after power-off when it is NOT docked. This feature is enabled by default. However, with this config-urable automatic shutdown feature, the meter will auto-matically wake up on a regular basis for wireless communication. The setting for this wake-up timer is configurable (see Appendix A.1, “Table of configuration options”).
If you configure the meter to wake up more often from shutdown for wireless communication (if WLAN is ena-bled and the meter is not docked), more power will be drawn from the battery pack and the meter will need to be recharged more frequently. If you choose to leave the meter in shutdown until you power it up manually or opt for longer time intervals between waking up for wireless communication, the battery will last longer but synchroni-zation with the DMS may also take longer. In this case however, the meter’s database will probably need to be synchronized before you can start testing.
Which option you choose will be determined by the work-flow needs of your institution.
Battery Pack The meter contains a rechargeable battery pack that begins charging as soon as it is placed in an active base unit (i.e., one connected to a power supply).
NOTICE
Use only the specially designed battery pack provided by Roche Diagnostics. Using any other type of battery may damage the system.

24
08424705001 (03) 2020-08 USA • Accu-Chek Inform II Operator’s Manual Version 7.1
WARNING
Possible hazards posed by the battery packDamaged or swollen battery packs can overheat, catch fire, or leak. Immediately cease use of Accu-Chek Inform II meters with damaged or swollen battery packs and under no circumstances recharge them (do not place in the base unit).
Overheating can cause the battery pack to catch fire or explode.
■ Never throw the battery pack or the meters onto a fire. Do not dismantle, compress, or pierce the battery pack as this could cause an internal short circuit that leads to overheating.
■ Do not place either the battery pack or the Accu-Chek Inform II meter on or in heating appliances, such as a microwave, conventional oven, or radiator.
■ Avoid prolonged exposure to direct sunlight, e.g., when the meter is docked in the base unit. Keep this in mind when positioning the base unit.
Battery fluid or materials leaking from damaged battery packs can irritate your skin or cause burns due to high temperatures.
■ Avoid contact with leaking battery fluid. In the event of accidental contact with the skin, rinse with water. If you get battery fluid in your eye(s), you should also seek medical attention.
Handle and dispose of battery packs with care.
Extreme temperatures reduce the charging capacity and usage period of the meter and the battery pack.

Intr
oduc
tion
• 1
25
08424705001 (03) 2020-08 USA • Accu-Chek Inform II Operator’s Manual Version 7.1
Observe the following general safety instructions for handling batteries:
■ When storing or disposing of the battery pack, use the manufacturer's original packaging.
■ Always shut down the meter before removing the battery pack (see page 122).
■ When the Battery Low warning is displayed, the meter must be returned as soon as possible to the base unit for recharging.
■ The Battery Critically Low warning indicates that the meter must be returned immediately to the base unit for recharging. No more tests can be performed.
Disposal of used batteriesDo not dispose of the battery pack with normal domestic waste. As a component of the Accu-Chek Inform II system, it must be deemed as potentially biohazardous. Treat it accordingly. See “Disposal of the system” on page 20.
Save or download data from the meter prior to replacing the battery pack to prevent loss of data (see Chapter 9).
If the meter displays a large red battery icon instead of powering up when you press the On/Off but-ton, this indicates that the battery is empty. Return the meter to the base unit immediately for recharging. See Troubleshooting, “Low power icons” on page 171.

26
08424705001 (03) 2020-08 USA • Accu-Chek Inform II Operator’s Manual Version 7.1
Touchscreen
Electromagnetic compatibility (EMC)
The Accu-Chek Inform II system complies with the emission and immunity requirements described in IEC 61326-2-6. It has been designed and tested to CISPR 11 Class B.
In a domestic environment it may cause radio interfer-ence, in which case, you may need to take measures to mitigate the interference.
The electromagnetic environment in which the Accu-Chek Inform II device will be operated should be thoroughly evaluated prior to operation of the device.
This equipment has been tested and found to comply with the limits for a Class B digital device, pursuant to Part 15 of the FCC Rules. These limits are designed to provide reasonable protection against harmful interfer-ence in a residential installation. This equipment gener-ates, uses and can radiate radio frequency energy and, if not installed and used in accordance with the instruc-tions, may cause harmful interference to radio communi-cations. However, there is no guarantee that interference will not occur in a particular installation. If this equipment does cause harmful interference to radio or television reception, which can be determined by powering the equipment off and on, the user is encouraged to try to correct the interference by one or more of the following measures:
NOTICE
■ Use only your finger to touch the screen elements. Using a sharp-edged object (e.g., tip of a pen) can damage the touchscreen.
■ Do not use the system in direct sunlight. Direct sun-light may reduce the life expectancy and functionality of the display, as well as the integrity of test strips.
Intr
oduc
tion
• 1
27
08424705001 (03) 2020-08 USA • Accu-Chek Inform II Operator’s Manual Version 7.1
■ Reorient or relocate the receiving antenna.
■ Increase the separation between the equipment and receiver.
■ Connect the equipment into an outlet on a circuit different from that to which the receiver is con-nected.
■ Consult the dealer or an experienced radio/TV technician for help.
This Class B digital apparatus complies with Canadian ICES-003.
The Accu-Chek Inform II system complies with both the electromagnetic immunity requirements and radio inter-ference immunity requirements at the frequency and test levels according to ISO 15197.
Electrostatic discharge (ESD) The Accu-Chek Inform II system complies with the elec-trostatic discharge (ESD) immunity requirements as specified in IEC 61326-2-6. Electrostatic discharge (ESD) is an electrical charge at rest, most commonly known as static electricity. If the meter experiences ESD during a blood glucose test, an error message is displayed and no blood glucose result is displayed by the meter or stored in the meter’s memory. The blood glucose test will need to be repeated.
To avoid ESD, do not use the meter in a very dry environ-ment, particularly one in which synthetic materials (e.g., carpets) are present that might cause damaging static discharges.
If the Accu-Chek Inform II meter experiences a form of ESD before or after running a blood glucose test, the test result will be stored in the meter memory and trans-mitted when the meter is docked in a connected base unit or when a wireless connection is established.

28
08424705001 (03) 2020-08 USA • Accu-Chek Inform II Operator’s Manual Version 7.1
Wireless connectivity If the meter is equipped with WLAN functionality: Wireless connectivity allows the meter to send data (test results, patient IDs, operator IDs, etc.) to the data man-agement system without the need to return the meter to the base unit. This feature must be configured by the system administrator. Observe the guidelines of your facility for using wireless local area network connections. For information about how to temporarily enable or disa-ble this function, see page 42. For a description of the Accu-Chek Inform II meter’s ability to connect to Wireless Local Area Networks (WLAN, Wi-Fi), see appendix B.
Radiofrequency radiation exposure information
The Industrial, Scientific and Medical (ISM) radio frequencies may contain emissions from microwave ovens, heaters, and other noncommunication devices. While these types of devices usually pose no threat of interference as they are low-powered devices, the possi-bility exists that some industrial high power systems may wipe out any attempted communication use of a WLAN. Therefore, perform a site survey and interference analysis with a spectrum analyzer to view the entire spectrum, looking for signals that might not only be within the fre-quency range of the intended WLAN but also could be near or at the same frequency and cause interference.
Glossary:
■ “FCC” stands for “Federal Communications Commission” (USA).
■ “RF” stands for “radio frequency”■ “RSS” stands for “Radio Standards Specification”
(Canada).■ “WLAN” stands for “Wireless Local Area Network”

Intr
oduc
tion
• 1
29
08424705001 (03) 2020-08 USA • Accu-Chek Inform II Operator’s Manual Version 7.1
Roche supports industry wireless standards and recom-mends using products that have Wi-Fi certification. This certification tests products to the 802.11 industry stand-ards for basic connectivity, security, authentication, Qual-ity of Service (QoS), interoperability and reliability. The Wi-Fi CERTIFIED logo is an assurance that the Wi-Fi Alli-ance has tested a product in numerous configurations and with a diverse sampling of other devices to ensure compatibility with other Wi-Fi CERTIFIED equipment that operates in the same frequency band. The Wi-Fi Alliance network of independent test labs conducts interoperabil-ity testing programs to ensure that wireless devices work together and support secure connections.
The Accu-Chek Inform II system complies with FCC radi-ation exposure limits set forth for an uncontrolled envi-ronment. This equipment should be installed and operated with minimum distance of 20 cm (8 inches) between the radiator and your body.
This transmitter must not be co-located or operated in conjunction with any other antenna or transmitter.
Changes or modifications made to this equipment not expressly approved by Roche Diagnostics may void the FCC authorization to operate this equipment.
This device complies with Part 15 of the FCC Rules and with RSS-210 of Industry Canada. Operation is subject to the following two conditions:
(1) this device may not cause harmful interference,
and
(2) this device must accept any interference received, including interference that may cause undesired operation.
30
08424705001 (03) 2020-08 USA • Accu-Chek Inform II Operator’s Manual Version 7.1
Local Area Network: protection from unauthorized access
If this product is connected to a local area network, this network must be protected against unauthorized access. In particular, it must not be linked directly to any other network or the Internet. Customers are responsible for the security of their local area network, especially in pro-tecting it against malicious software and attacks. This protection might include measures, such as a firewall, to separate the device from uncontrolled networks as well as measures that ensure that the connected network is free of malicious code.
Wired network connection If connected to a local area network, the Accu-Chek Inform II Base Unit or Accu-Chek Inform II Base Unit Hub must be protected against unauthorized access by means of a strong password management. For additional information about the Accu-Chek Inform II Base Unit or Accu-Chek Inform II Base Unit Hub, refer to the Accu-Chek Inform II Base Unit Hub Operator’s Manual or the “Technical Note” stored on the Accu-Chek Inform II Base Unit as a PDF file (see page 191 of this manual). Or contact Roche Customer Support Center for technical assistance.
Observe your own facility guidelines on password management where available, or apply the following rules:
Intr
oduc
tion
• 1
31
08424705001 (03) 2020-08 USA • Accu-Chek Inform II Operator’s Manual Version 7.1
Characteristics of strong passwords
■ Passwords must not contain the user’s account name or parts of the user’s full name that exceed two consecutive characters.
■ Passwords must be at least eight characters in length.
■ Passwords must contain characters from at least three of the following four categories:
– English uppercase alphabetic characters (A through Z)
– English lowercase alphabetic characters (a through z)
– Numeric characters (0 through 9)
– Non-alphabetic characters (for example, !, $, #, %)
Examples of weak passwords
■ uhxwze11 contains no upper case letter.
■ UHXW13SF contains no lower case letter.
■ uxxxxx7F contains the same character more than four times.
■ x12useridF contains a substring of the user ID longer than four characters.
32
08424705001 (03) 2020-08 USA • Accu-Chek Inform II Operator’s Manual Version 7.1
1.3 System components
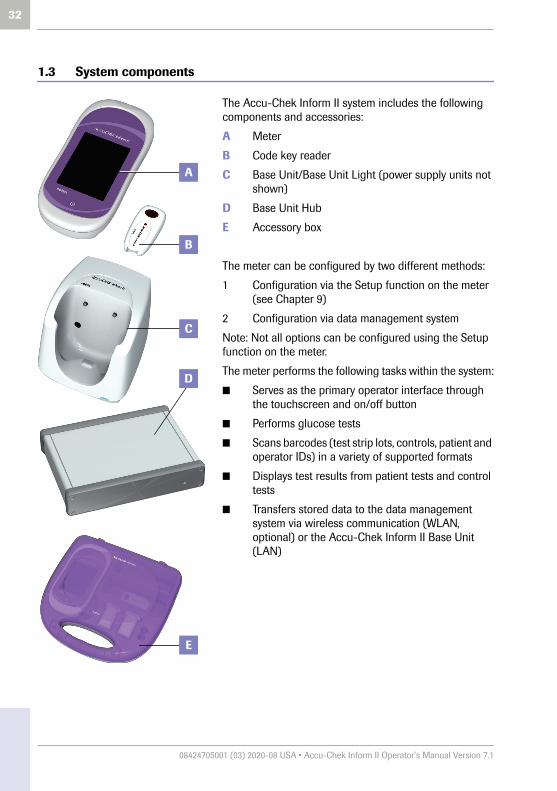
The Accu-Chek Inform II system includes the following components and accessories:
A Meter
B Code key reader
C Base Unit/Base Unit Light (power supply units not shown)
D Base Unit Hub
E Accessory box
The meter can be configured by two different methods:
1 Configuration via the Setup function on the meter (see Chapter 9)
2 Configuration via data management system
Note: Not all options can be configured using the Setup function on the meter.
The meter performs the following tasks within the system:
■ Serves as the primary operator interface through the touchscreen and on/off button
■ Performs glucose tests
■ Scans barcodes (test strip lots, controls, patient and operator IDs) in a variety of supported formats
■ Displays test results from patient tests and control tests
■ Transfers stored data to the data management system via wireless communication (WLAN, optional) or the Accu-Chek Inform II Base Unit (LAN)
A
C
E
D
B

Intr
oduc
tion
• 1
33
08424705001 (03) 2020-08 USA • Accu-Chek Inform II Operator’s Manual Version 7.1
1.4 Overview of the meter
The meter has the following elements:
1 Test strip portInsert the test strip here.
2 Touchscreen(touch-sensitive display)This screen allows you to perform patient tests, per-form controls tests, and review results. To select any of these functions, simply touch the button on the screen.
3 On/Off buttonPress this button to power the meter on or off.
4 Barcode scannerThe integrated barcode scanner can be used to read operator and patient IDs, and patient information.
5 Battery compartment coverRemove to insert the battery pack.
6 Charging contactsThese contacts are used to charge the battery pack when the meter is in the base unit.
7 Infrared windowFacilitates data communication with code key reader and base unit.
1
2
3
4
5
7
6

34
08424705001 (03) 2020-08 USA • Accu-Chek Inform II Operator’s Manual Version 7.1
8 Battery packPowers the device.
9 Wireless LAN labelIf the meter supports wireless connectivity: This label displays registration numbers that are specific to the meter RF hardware.
10 Interface(For manufacturer’s use only.)
11 Battery pack connector socketConnect battery pack here.
8
9
10
11
8

Intr
oduc
tion
• 1
35
08424705001 (03) 2020-08 USA • Accu-Chek Inform II Operator’s Manual Version 7.1
1.5 Overview of the code key reader
Test strip vials include a code key.1 This code key is read by the code key reader and the data is sent to the meter. For additional information about the code key reader, see Chapter 6.
The code key reader has the following elements:
12 Code key slot
13 LED (green) for displaying status
14 Infrared window for transmitting the code file to the meter
1. The code key is also frequently referred to as a code chip. The terms are synonymous.
Do not replace code keys while the code key reader is still flashing. If the green LED status light is still flashing, the code key reader will continue to transmit the previ-ously loaded code file and ignore the code file on the newly inserted code key. You may get an error message on the meter.
12
13
14

36
08424705001 (03) 2020-08 USA • Accu-Chek Inform II Operator’s Manual Version 7.1
1.6 Overview of the Accu-Chek Inform II Base Unit
To provide flexibility in line with customer requirements, two versions of the base unit are available.
■ The Accu-Chek Inform II Base Unit
■ The Accu-Chek Inform II Base Unit Light
Both versions of the base unit can:
■ charge the meter battery pack.
In addition, the Accu-Chek Inform II Base Unit supports:
■ communication with a data management system.1
■ communication with a computer.
Both versions of the base unit have the following elements:
15 Charging contacts
16 Infrared window for communication with the meter
17 Status LED (lights up when power is connected):
– Lights up red: Power supply is connected, applica-tion is starting up (Accu-Chek Inform II Base Unit only)
– Lights up green: Ready
– Flashes red: Error
– Lights up blue: Configuration mode (Accu-Chek Inform II Base Unit only)
1. The Accu-Chek Inform II Base Unit Light can support communication with a data management system only when used together with the Accu-Chek Inform II Base Unit Hub.
16
15
17
Intr
oduc
tion
• 1
37
08424705001 (03) 2020-08 USA • Accu-Chek Inform II Operator’s Manual Version 7.1
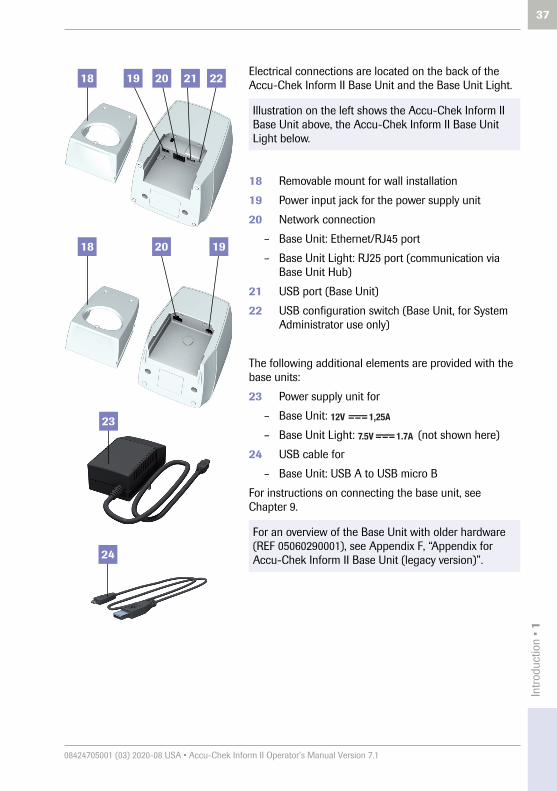
Electrical connections are located on the back of the Accu-Chek Inform II Base Unit and the Base Unit Light.
18 Removable mount for wall installation
19 Power input jack for the power supply unit
20 Network connection
– Base Unit: Ethernet/RJ45 port
– Base Unit Light: RJ25 port (communication via Base Unit Hub)
21 USB port (Base Unit)
22 USB configuration switch (Base Unit, for System Administrator use only)
The following additional elements are provided with the base units:
23 Power supply unit for
– Base Unit:
– Base Unit Light: (not shown here)
24 USB cable for
– Base Unit: USB A to USB micro B
For instructions on connecting the base unit, see Chapter 9.
Illustration on the left shows the Accu-Chek Inform II Base Unit above, the Accu-Chek Inform II Base Unit Light below.
For an overview of the Base Unit with older hardware (REF 05060290001), see Appendix F, “Appendix for Accu-Chek Inform II Base Unit (legacy version)”.
18 19 20 21 22
18 20 19
23
24
12V 1,25A
7.5V 1.7A
38
08424705001 (03) 2020-08 USA • Accu-Chek Inform II Operator’s Manual Version 7.1
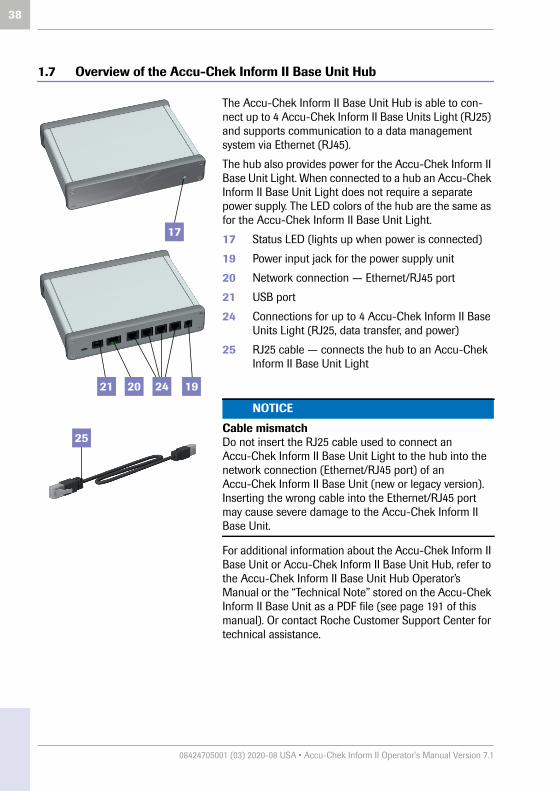
1.7 Overview of the Accu-Chek Inform II Base Unit Hub
The Accu-Chek Inform II Base Unit Hub is able to con-nect up to 4 Accu-Chek Inform II Base Units Light (RJ25) and supports communication to a data management system via Ethernet (RJ45).
The hub also provides power for the Accu-Chek Inform II Base Unit Light. When connected to a hub an Accu-Chek Inform II Base Unit Light does not require a separate power supply. The LED colors of the hub are the same as for the Accu-Chek Inform II Base Unit Light.
17 Status LED (lights up when power is connected)
19 Power input jack for the power supply unit
20 Network connection — Ethernet/RJ45 port
21 USB port
24 Connections for up to 4 Accu-Chek Inform II Base Units Light (RJ25, data transfer, and power)
25 RJ25 cable — connects the hub to an Accu-Chek Inform II Base Unit Light
For additional information about the Accu-Chek Inform II Base Unit or Accu-Chek Inform II Base Unit Hub, refer to the Accu-Chek Inform II Base Unit Hub Operator’s Manual or the “Technical Note” stored on the Accu-Chek Inform II Base Unit as a PDF file (see page 191 of this manual). Or contact Roche Customer Support Center for technical assistance.
NOTICE
Cable mismatchDo not insert the RJ25 cable used to connect an Accu-Chek Inform II Base Unit Light to the hub into the network connection (Ethernet/RJ45 port) of an Accu-Chek Inform II Base Unit (new or legacy version). Inserting the wrong cable into the Ethernet/RJ45 port may cause severe damage to the Accu-Chek Inform II Base Unit.
20 19
17
2421
25

Intr
oduc
tion
• 1
39
08424705001 (03) 2020-08 USA • Accu-Chek Inform II Operator’s Manual Version 7.1
1.8 Overview of the accessory box
The accessory box provides an area for storing and trans-porting consumables needed for performing point-of-care blood glucose tests.
1.9 Reagents and consumables
You need the following reagents to perform patient tests and glucose control tests:
■ Accu-Chek Inform II Test Strips
■ Accu-Chek Inform II Control Solutions: Available for purchase separately, consists of two 2.5 mL bottles. One bottle contains the Level 1 (Lo) control, while the other bottle contains the Level 2 (Hi) control.
■ Accu-Chek Linearity Kit (if required by your facility guidelines): Available for purchase separately, contains six 2.5 mL bottles. These bottles span the glucose range in six levels (L1 to L6).
Your facility provides additional consumables such as blood collection supplies. Observe the current rules and safety guidelines for collecting and handling blood samples.

40
08424705001 (03) 2020-08 USA • Accu-Chek Inform II Operator’s Manual Version 7.1
1.10 Instructions for initial setup
The meter must be configured prior to initial use. During this setup, the following parameters are configured:
■ Date and time format
■ Input mode for Patient ID
■ Input mode for Operator ID
■ Glucose controls: Type and schedule
■ Results screen for glucose control
■ Comments for entry after a test
■ Settings for data transfer
You can perform these settings on a limited basis directly in the Setup Menu of the meter. For more information about configuration using the Setup Menu, see Chapter 9, as well as Appendix A. In addition to this option, the meter can be configured using a data man-agement system. Suitable data management systems provide a range of functions for configuring the meter that go beyond what is possible with the meter-based configuration feature.
For questions about using data management systems, contact Roche Customer Support Center (see Chapter 12).
To ensure standardized configuration within a facility, the meter-based Setup Menu may be disabled.

Pow
erin
g U
p an
d En
terin
g an
Ope
rato
r ID
• 2
41
08424705001 (03) 2020-08 USA • Accu-Chek Inform II Operator’s Manual Version 7.1
2 Powering Up and Entering an Operator ID
2.1 Powering up the meter
1 Press and release the On/Off button . The meter is now on.
2 The Power Up screen appears.
3 Check in the Power Up screen whether the date (lower left) and time (upper right) are displayed correctly. If necessary, refer to the instructions for updating these settings in Chapter 9.
■ If during self-check an error is detected, the appro-priate error message appears on screen.
■ If the QC Lockout feature is enabled and glucose control is required, a corresponding message is displayed.
■ The battery icon shows the current battery level. A completely filled icon indicates a fully charged battery, and a partial charge is displayed as a partially filled battery icon . If the battery is nearly empty, the battery icon turns red .
Contrast
Power Up 12:48 pm
03/17/20
Performing self-checks...

42
08424705001 (03) 2020-08 USA • Accu-Chek Inform II Operator’s Manual Version 7.1
Adjusting the display Using the Display options, you can adjust the display con-trast to the ambient light conditions.
1 In the Power Up screen, touch Contrast. The Display screen appears.
2 Touch or to make the display lighter or darker.
3 Touch to confirm the setting.
Enabling/disabling wireless connectivity
If the meter supports wireless connectivity, you can tem-porarily enable or disable this functionality as required.
Wireless connectivity is automatically reactivated the next time you power on the meter. You can then disable it again temporarily, if required.
After 30 seconds without any activity (e.g., without a screen touch) the meter automatically dims the display backlight to conserve energy (“Low Power Mode”).
Display
Lighter Darker
12:48 pm
03/17/20
WARNING
If you suspect that the RF emissions of wireless commu-nication are harming the patient or affecting other devices, you should carefully reassess the appropriate-ness of continued use of the WLAN functionality of the Accu-Chek Inform II system using the guidelines of your facility.
Pow
erin
g U
p an
d En
terin
g an
Ope
rato
r ID
• 2
43
08424705001 (03) 2020-08 USA • Accu-Chek Inform II Operator’s Manual Version 7.1
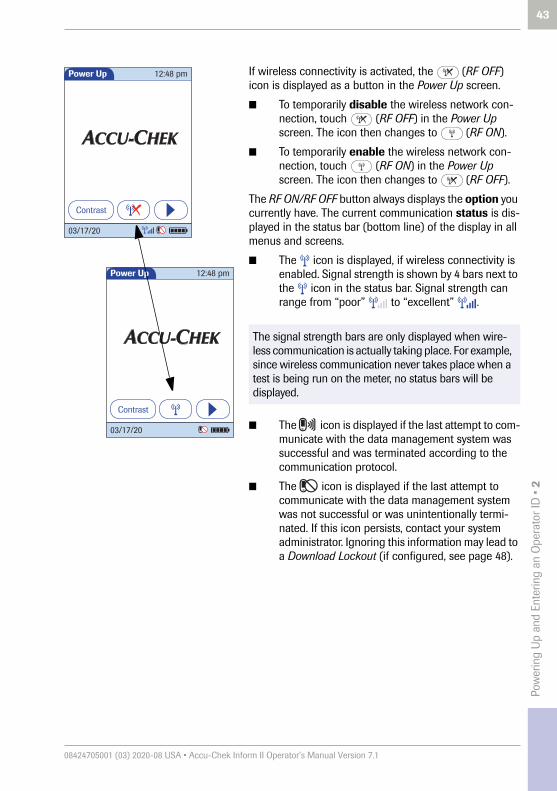
If wireless connectivity is activated, the (RF OFF) icon is displayed as a button in the Power Up screen.
■ To temporarily disable the wireless network con-nection, touch (RF OFF) in the Power Up screen. The icon then changes to (RF ON).
■ To temporarily enable the wireless network con-nection, touch (RF ON) in the Power Up screen. The icon then changes to (RF OFF).
The RF ON/RF OFF button always displays the option you currently have. The current communication status is dis-played in the status bar (bottom line) of the display in all menus and screens.
■ The icon is displayed, if wireless connectivity is enabled. Signal strength is shown by 4 bars next to the icon in the status bar. Signal strength can range from “poor” to “excellent” .
■ The icon is displayed if the last attempt to com-municate with the data management system was successful and was terminated according to the communication protocol.
■ The icon is displayed if the last attempt to communicate with the data management system was not successful or was unintentionally termi-nated. If this icon persists, contact your system administrator. Ignoring this information may lead to a Download Lockout (if configured, see page 48).
The signal strength bars are only displayed when wire-less communication is actually taking place. For example, since wireless communication never takes place when a test is being run on the meter, no status bars will be displayed.
Contrast
Power Up 12:48 pm
03/17/20
Contrast
Power Up 12:48 pm
03/17/20

44
08424705001 (03) 2020-08 USA • Accu-Chek Inform II Operator’s Manual Version 7.1
Closing startup Once you have completed all the necessary changes,
■ touch to proceed to the screen used to enter the operator ID, or
■ wait 5 seconds and the meter automatically pro-ceeds to the screen used to enter the operator ID.
2.2 Entering the operator ID
How and when an operator ID is entered and if a pass-word is required, depends on the configuration of the system. It is also, for example, possible to require the operator ID only when starting control tests. In general, the system can manage and check operator IDs as well as make additional functions ID-dependent.
Every successful operator login will be logged as a meter event in an audit trail (ID, date and time).
If an operator name matching the entered operator ID is available on the meter, this name will be displayed in the Main Menu (shown here as “Maria S.”).
There are a number of options for entering operator IDs and these depend on the configuration of the system:
■ Via barcode scanner only (a list of supported barcode symbologies can be found in Appendix A.2)
■ Manually or optionally via barcode scanner
Operator IDs can consist of up to 20 alphanumeric characters.
Alphanumeric characters are any combination of A - Z and 0 - 9, additionally “.” (period), or “-” (hyphen) may be used. See also page 46.
Barcode masking can be used to eliminate any charac-ters not belonging to the Operator ID. See information on “Operator and patient ID barcode masks” on page 206.
Main Menu
Review Results
Control Test
Patient Test
Maria S.
12:48 pm
03/17/20
Pow
erin
g U
p an
d En
terin
g an
Ope
rato
r ID
• 2
45
08424705001 (03) 2020-08 USA • Accu-Chek Inform II Operator’s Manual Version 7.1
Entering an operator ID with barcode scanner
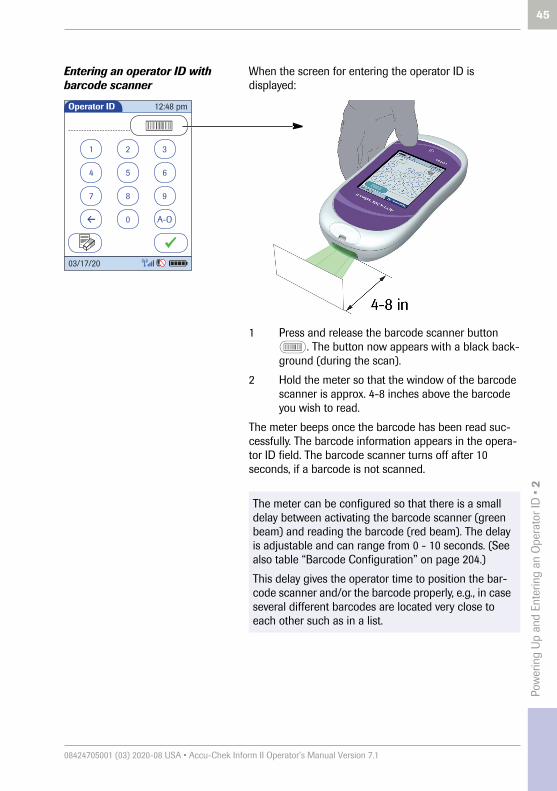
When the screen for entering the operator ID is displayed:
1 Press and release the barcode scanner button . The button now appears with a black back-
ground (during the scan).
2 Hold the meter so that the window of the barcode scanner is approx. 4-8 inches above the barcode you wish to read.
The meter beeps once the barcode has been read suc-cessfully. The barcode information appears in the opera-tor ID field. The barcode scanner turns off after 10 seconds, if a barcode is not scanned.
1 2 3
4 5 6
7 8 9
A-O0
Operator ID 12:48 pm
03/17/20
The meter can be configured so that there is a small delay between activating the barcode scanner (green beam) and reading the barcode (red beam). The delay is adjustable and can range from 0 - 10 seconds. (See also table “Barcode Configuration” on page 204.)
This delay gives the operator time to position the bar-code scanner and/or the barcode properly, e.g., in case several different barcodes are located very close to each other such as in a list.

46
08424705001 (03) 2020-08 USA • Accu-Chek Inform II Operator’s Manual Version 7.1
Entering the operator ID manually
When the screen for entering the operator ID is displayed:
1 Touch the letters or numbers to enter the ID.
2 Use the following buttons to toggle between ranges of characters:
– for letters A-O
– for letters P-Z, period and hyphen
– for numbers 0-9
3 Touch to backspace and delete a character entered incorrectly. Touch to delete the whole entry. Touch to enter a space.
4 Touch to confirm.
If the operator ID you have entered is not valid (or the operator is not stored in the meter), an error message is displayed. Confirming the message allows you to enter the ID again.
Entering a password Once the operator ID has been entered correctly, a screen for entering a password may appear (if config-ured). Enter the password manually in the same manner as described above for the operator ID.
Once all entries are complete, the Main Menu appears.
1 2 3
4 5 6
7 8 9
A-O0
Operator ID 12:48 pm
03/17/20
A B C D E
F G H I J
K L M N O
P-Z123
Operator ID
MARIA
12:48 pm
03/17/20
P Q R S T
U V W X Y
Z .
123 A-O
Operator ID
MARIA S.
12:48 pm
-
03/17/20
A-O
P-Z
123
Patie
nt G
luco
se T
estin
g • 3
47
08424705001 (03) 2020-08 USA • Accu-Chek Inform II Operator’s Manual Version 7.1
3 Patient Glucose Testing
3.1 Information regarding blood glucose testing
Before performing a blood glucose test, observe the following safety precautions:■ Observe the applicable regulations and directives for
hygiene and safety when collecting blood samples.■ Observe the applicable regulations and directives for
disposing of potentially infectious samples and mate-rials.
■ Refer to the section “Important information regarding safety” starting on page 19 of this manual, in particu-lar: “Protection against infection and blood-borne pathogens”
■ Use gloves. Wear a new pair of clean gloves for testing each patient.
■ Wash hands thoroughly with soap and water before putting on a new pair of gloves and performing the next patient test.
■ Use an auto-disabling single-use lancing device for each patient
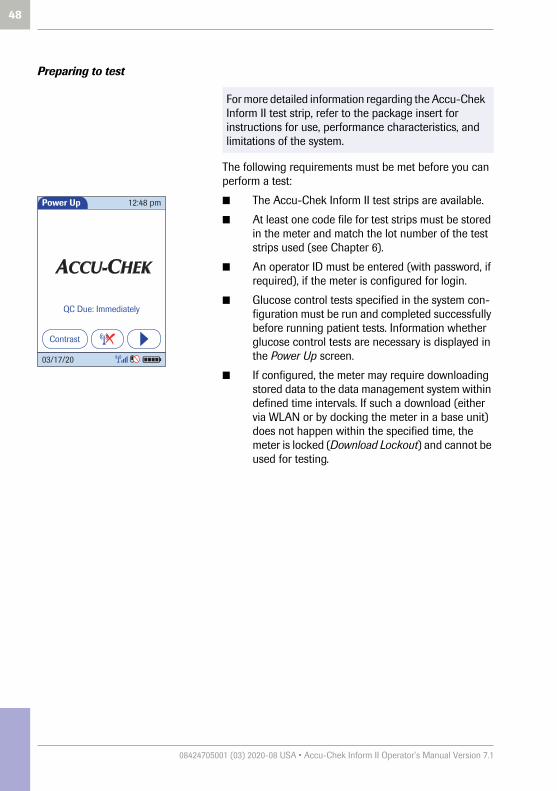
48
08424705001 (03) 2020-08 USA • Accu-Chek Inform II Operator’s Manual Version 7.1
Preparing to test
The following requirements must be met before you can perform a test:
■ The Accu-Chek Inform II test strips are available.
■ At least one code file for test strips must be stored in the meter and match the lot number of the test strips used (see Chapter 6).
■ An operator ID must be entered (with password, if required), if the meter is configured for login.
■ Glucose control tests specified in the system con-figuration must be run and completed successfully before running patient tests. Information whether glucose control tests are necessary is displayed in the Power Up screen.
■ If configured, the meter may require downloading stored data to the data management system within defined time intervals. If such a download (either via WLAN or by docking the meter in a base unit) does not happen within the specified time, the meter is locked (Download Lockout) and cannot be used for testing.
For more detailed information regarding the Accu-Chek Inform II test strip, refer to the package insert for instructions for use, performance characteristics, and limitations of the system.
Contrast
Power Up
QC Due: Immediately
12:48 pm
03/17/20

Patie
nt G
luco
se T
estin
g • 3
49
08424705001 (03) 2020-08 USA • Accu-Chek Inform II Operator’s Manual Version 7.1
If a glucose control test is shown as required, patient glu-cose testing cannot be performed until the controls are run successfully.
For emergencies, STAT (Short TurnAround Time) tests can be configured in the meter by the system administrator based on your facility policies. This option allows the meter to perform a limited number of patient glucose tests, if circumstances require, despite the meter being in QC Lockout or Download Lockout (see page 81).
Depending on how your meter is configured (see page 140), QC Lockout occurs when
■ patient testing is attempted and controls have not been run in the time interval or frequency estab-lished by your facility.
■ controls have been run but the control values were not in range.
■ new software has been installed.■ a test strip lot other than the “current” lot is selected
(default setting).■ you use a new test strip lot for the first time
■ Observe the applicable regulations and directives for hygiene and safety when collecting blood samples.
■ Observe the applicable regulations and directives for disposing of potentially infectious samples and mate-rials.

50
08424705001 (03) 2020-08 USA • Accu-Chek Inform II Operator’s Manual Version 7.1
3.2 Performing a patient glucose test
Overview of test procedure A patient glucose test comprises the following steps:
■ Enter the patient ID. This can be done either man-ually or by using the barcode scanner.
■ Confirm that the test strip lot matches the test strips in use (if configured).
■ Perform the test.
■ Optionally a test may be categorized as an Observed Test Sequence (see page 241).

Patie
nt G
luco
se T
estin
g • 3
51
08424705001 (03) 2020-08 USA • Accu-Chek Inform II Operator’s Manual Version 7.1
Entering or selecting the patient ID
After preparing the meter as described, you can proceed to the steps directly related to testing:
1 From the Main Menu screen touch Patient Test.
2 Enter or select the Patient ID as described on the following pages.
3 If the function Patient Confirmation is enabled, verify and confirm the displayed patient informa-tion, after you entered or selected the ID.
A B C D E
F G H I J
K L M N O
P-Z 123
Patient ID
123456789
12:48 pm
03/17/20
Patient ID: 123456789 Name: Mary-Jane MillerDOB: 12/03/56
Is this correct?
Patient Confirmation
Main Menu
Review Results
Control Test
Patient Test
12:48 pm
03/17/20
1 2 3
4 5 6
7 8 9
A-O0
Patient ID 12:48 pm
03/17/20
123456789

52
08424705001 (03) 2020-08 USA • Accu-Chek Inform II Operator’s Manual Version 7.1
You now have three different options, depending on setup, for assigning the subsequent test to a patient.
The patient ID function can be configured by your system administrator to:
■ Enter any combination of up to 20 alphanumeric characters, with specified minimum and maximum lengths.
Alphanumeric characters are any combination of A - Z and 0 - 9, additionally “.” (period), or “-” (hyphen) may be used.
■ Enter patient ID via barcode scanner.1
■ Select a patient from a list.2
The following options are available for validating patient IDs:
■ Manual entries can be validated based on an down-loaded list.
■ Confirmation of patient name, date of birth, and ID can be required.2
■ Barcode masking can be used to eliminate any characters not belonging to the Patient ID. See information on “Operator and patient ID barcode masks” on page 206.
1. A list of supported barcode symbologies can be found in Appendix A.2.
2. Depending on the DMS you are using, this feature may be disabled.

Patie
nt G
luco
se T
estin
g • 3
53
08424705001 (03) 2020-08 USA • Accu-Chek Inform II Operator’s Manual Version 7.1
Entering the patient ID manually Use the displayed keypad to enter the patient ID. You can select characters in the same manner as when entering an operator ID.
1 Touch the letters or numbers to enter the ID.
2 Use the following buttons to toggle between ranges of characters:
– for letters A-O
– for letters P-Z
– for numbers 0-9
3 Touch to backspace and delete a character entered incorrectly. Touch to delete the whole entry. Touch to enter a space.
4 Touch to confirm, or touch to cancel this procedure and return to the Main Menu.
■ If the patient ID you have entered is not valid (does not match configured max/min length) an error message is displayed. Confirming the error mes-sage allows you to enter the ID again.
■ If the patient is not found in the downloaded list, a decision message may be displayed (depending on configuration, see Appendix A.1). Cancelling the decision message also allows you to enter the ID again.
■ Confirming the decision message allows you to perform a test on the patient if the ID complies with the configured maximum/minimum length. However, the patient ID will not be automatically added to the list.
A B C D E
F G H I J
K L M N O
P-Z123
Patient ID 12:48 pm
03/17/20
A-O
P-Z
123

54
08424705001 (03) 2020-08 USA • Accu-Chek Inform II Operator’s Manual Version 7.1
Selecting the patient ID from a list
Choose the patient ID from a list1, if a list has been down-loaded to the meter (from the data management system).
1 Touch or to scroll up or down in the list.
If one of the buttons is hidden, you have reached the top or bottom of the list.
2 Touch the desired entry to select a patient, or touch to cancel this procedure and return to the
Main Menu.
1. Depending on the DMS you are using, this feature may be disabled.
Patient ID
Keyboard
ID: 2222222222Name: Jane DoeID: 3333333333
Name: John DoeID: 4444444444Name: Jenny Doe
ID: 123456789
Name: James Doe
12:48 pm
03/17/20

Patie
nt G
luco
se T
estin
g • 3
55
08424705001 (03) 2020-08 USA • Accu-Chek Inform II Operator’s Manual Version 7.1
Entering a patient ID with barcode scanner
When the screen for entering the patient ID is displayed:
1 Press and release . The button now appears with a black background (during the scan).
2 Hold the meter so that the window of the barcode scanner is approx. 4-8 inches above the barcode you wish to read.
The meter beeps once the barcode has been read suc-cessfully.
3 If the function Barcode Confirmation is enabled, verify and confirm the barcode information.
The extracted patient ID1 appears in the patient ID field of the succeeding screens. The barcode scanner turns off after 10 seconds if a barcode is not scanned.
A B C D E
F G H I J
K L M N O
P-Z123
Patient ID 12:48 pm
03/17/20
Patient ID
Keyboard
ID: 2222222222Name: Jane DoeID: 3333333333
Name: John DoeID: 4444444444Name: Jenny Doe
ID: 123456789
Name: James Doe
12:48 pm
03/17/20
If the Barcode Confirmation screen appears (before or without the Patient Confirmation screen), the function to add barcode content to a test result is enabled. See page 67.
1. See also section “Operator and patient ID barcode masks” starting on page 206.

56
08424705001 (03) 2020-08 USA • Accu-Chek Inform II Operator’s Manual Version 7.1
Confirming or selecting the test strip lot
Once you have entered and confirmed the patient ID, you are asked to choose the lot number for the test strips. Compare the number displayed by the meter to the number on the label of the test strip vial.
1 Select the lot number as follows:
■ To read the lot number from the test strip vial via barcode scanner, press and release . Follow the instructions for scanning IDs (see note below).
■ If you want to use the preselected lot number dis-played by the meter, touch to confirm.
■ To use a different lot number than the one dis-played, touch to display a list of stored lot numbers. Select the desired lot number from the list.
2 Touch to confirm the selected or scanned lot number.
The meter can be configured so that no QC lockout occurs when you switch between stored test strip lots. However, the selected test strip lot must already have passed a glucose control test.
A QC Lockout will still occur if a test strip lot is stored in the meter but no glucose control test has been run. A glucose control test must always be performed before using a lot for the first time.
Patient TestPatient 123456789
Use Strip Lot
12:48 pm
123456?
03/17/20
Strip Lots
344789
545794
545777
344654
12:48 pm
03/17/20

Patie
nt G
luco
se T
estin
g • 3
57
08424705001 (03) 2020-08 USA • Accu-Chek Inform II Operator’s Manual Version 7.1
If the meter is configured to use the “Isolation Room Workflow” (see Appendix A.1) the strip lot will be con-firmed before a patient ID is entered or selected.
For additional information about storing lot numbers for test strips, see page 87.
Patient Test
Use Strip Lot
12:48 pm
123456?
03/17/20
Strip Lots
344789
545794
545777
344654
12:48 pm
03/17/20
1 2 3
4 5 6
7 8 9
A-O0
Patient ID 12:48 pm
03/17/20
123456789
The meter can be configured so that manual confirma-tion is not necessary. In this setup, only the lot number is displayed. Additional options are not available.
The meter can be configured so that lot numbers are entered via barcode scanner only (see note below).
Note: Barcodes on control solutions may not be availa-ble in all countries. In this case either
■ manually enter the lot number each time (recommended),
■ pick a previously entered lot number from the list, or■ configure the meter to only display the lot number
(without confirmation by the operator).

58
08424705001 (03) 2020-08 USA • Accu-Chek Inform II Operator’s Manual Version 7.1
Patient identification information
All available patient ID information for the selected patient is displayed on the Patient Test screen. Additional patient identifiers such as name and date of birth help verify patient identity. When performing a test, the operator can easily check whether the gender and age of the patient match the patient details shown on the screen. The display cycles (every second) between displaying patient ID and (if available) patient name. In a second line the date of birth (DOB) is displayed. If no DOB is available, a dash (-) is shown instead. See illustrations below.
Patient TestPatient John Doe
Strip Lot 545794
12:48 pm
03/17/20
DOB: 12/05/70
Patient TestPatient 123456789
Strip Lot 545794
12:48 pm
03/17/20
DOB: 12/05/70
Patient TestPatient John Doe
Strip Lot 545794
12:48 pm
DOB: 12/05/70
03/17/20
Patient TestPatient 123456789
Strip Lot 545794
12:48 pm
DOB: 12/05/70
03/17/20
The DOB is not displayed on the patient test result screens, stored test results, or OTE test screens.

Patie
nt G
luco
se T
estin
g • 3
59
08424705001 (03) 2020-08 USA • Accu-Chek Inform II Operator’s Manual Version 7.1
Inserting test strips After confirming the test strip lot, a flashing green arrow appears on screen and prompts you to insert the test strip.
1 Remove the test strip from the test strip vial and close the vial with the cap.
2 Hold the test strip so the lettering “ACCU-CHEK” is facing upward.
3 Slide the test strip into the test strip port as far as it goes in the direction indicated by the arrows on the test strip.
The meter beeps. The hourglass icon appears and indi-cates that the meter is checking the test strip. Do not apply blood while it is displayed.
Patient TestPatient 123456789
Strip Lot 545794
12:48 pm
03/17/20
DOB: 12/05/70
Patient TestPatient 123456789
Strip Lot 545794
12:48 pm
03/17/20
DOB: 12/05/70

60
08424705001 (03) 2020-08 USA • Accu-Chek Inform II Operator’s Manual Version 7.1
Obtaining a blood sample Prepare the selected blood collection site and obtain blood from the patient per facility policy.
Recommendations for the collection of capillary blood
If no facility policy exists for obtaining capillary blood, the patient's hands (or heel in the case of small children) should be washed with warm water and soap, and then dried thoroughly. If you are using alcohol wipes or other disinfectants when obtaining capillary blood, the patient's skin must be completely dry before you lance the site to obtain blood.
Use an auto-disabling single-use lancing device for each patient. The lancing device must be intended for use by healthcare professionals in a multiple patient setting. Follow the manufacturer's instructions for use.
We recommend obtaining the capillary blood sample from the side of the fingertip as this part is the least sensitive to pain.
WARNING
Potential risk of incorrect results due to residues on skin■ Traces of food on the fingers or fatty residues from
hand cremes or soap products may contaminate the sample and lead to incorrect results. Wash the punc-ture site thoroughly and rinse with plenty of water.
■ Residues of water or disinfectant on the skin can dilute the drop of blood and lead to incorrect results. After you have washed and disinfected the site, ensure that the patient's skin is completely dry before lancing the site to obtain a capillary blood sample.

Patie
nt G
luco
se T
estin
g • 3
61
08424705001 (03) 2020-08 USA • Accu-Chek Inform II Operator’s Manual Version 7.1
Applying a blood sample Once the meter has checked the test strip, the hourglass icon disappears and you are prompted to apply a blood sample.
1 Wait until the flashing drop appears in the display before applying the blood. The meter beeps.
2 Apply the drop of blood to the front edge (yellow dosing area) of the test strip. Blood is pulled into the test strip by capillary action. Do not apply the blood to the top of the strip. Blood on top of the test strip is not available for testing because it will not be pulled into the strip.
Once a sufficient blood sample has been detected, the meter beeps and the measurement begins. Do not touch test strip once the meter beeps. Wait for the glucose test result to show on screen.
Patient TestPatient 123456789
Strip Lot 545794
12:48 pm
DOB: 12/05/70
03/17/20
When applying the sample, position the meter so that the test strip port is always higher or on the same level as the blood drop. This prevents any excess blood from flowing down the strip and entering the meter.

62
08424705001 (03) 2020-08 USA • Accu-Chek Inform II Operator’s Manual Version 7.1
Results screen The hourglass icon indicates the test is running. When the test is completed and the result is ready, the meter beeps again.
When the result is displayed, a message or warning may also appear (depending on system configuration) notify-ing you if the result exceeds the specified limit values. Additionally, a red flashing arrow next to the test result indicates that a result is out of range.
: the value is above the normal/critical upper range.
: the value is below the normal/critical lower range.
Example: For the ranges shown above, a value between 40 and 69 mg/dL would be rated as “below normal range” but “within critical range”.
These limit values define ranges that can either be con-figured individually by the system administrator in line with facility guidelines, or are the (technical) limits of the system. The characteristics of these ranges are explained on the following page.
The results screen contains a button that changes its name based on the result (Range or Out of ... Range). Touch this button to display the configured limit values.
Patient TestPatient 123456789Date 03/17/20 12:48 pm
150
L22
12:48 pm
03/17/20
RangesNormal Range:
Critical Range:
Reportable Range:
70-200 mg/dL
40-301 mg/dL
11-600 mg/dL
[I-HBD]
Patient TestPatient 123456789
Strip Lot 545794
12:48 pm
03/17/20
DOB: 12/05/70
Patient Test
Range
150
Patient 123456789Date 03/17/20 12:48 pm
mg/dL
12:48 pm
03/17/20

Patie
nt G
luco
se T
estin
g • 3
63
08424705001 (03) 2020-08 USA • Accu-Chek Inform II Operator’s Manual Version 7.1
■ The System Measuring Range refers to the meas-urement range of the system itself (strips and meter) and is the only range which cannot be con-figured. With Accu-Chek Inform II test strips this fixed range is 10 to 600 mg/dL (0.6 to 33.3 mmol/L). If a result falls outside this range, the message HI or LO appears, i.e., the result cannot be quantified.
■ Glucose results above or below the Reportable Range, as defined by the institution or local regula-tory body, are above the highest or below the lowest numerical results to be reported. Results outside this range must not be used for intervention decisions.
■ Glucose results above or below the Critical Range, as defined by the institution, require immediate action as defined by hospital policy.
■ Glucose results within the Normal Range, as defined by the institution, are considered normal and require no therapeutic action.
Patient Test
Out of Reportable Range
RR HI
Patient 12345678912:48 pm
03/17/20
Date 03/17/20 12:48 pm
Patient Test
Out of Normal Range
220
Patient 123456789Date 03/17/20 12:48 pm
mg/dL
12:48 pm
03/17/20
Patient Test
Out of Critical Range
305
Patient 123456789Date 03/17/20 12:48 pm
mg/dL
12:48 pm
03/17/20
Patient Test
Out of Crit. Range
34
Patient 123456789Date 03/17/20 12:48 pm
mg/dL
12:48 pm
03/17/20
Patient Test
Out of Critical Range
CR LO
Patient 123456789Date 03/17/20 12:48 pm
12:48 pm
03/17/20

64
08424705001 (03) 2020-08 USA • Accu-Chek Inform II Operator’s Manual Version 7.1
The following messages1 may appear in instead of a numeric test result:
■ CR LO (below the Critical Range threshold, but within the Reportable Range)
■ CR HI (above the Critical Range threshold, but within the Reportable Range)
■ RR LO (below the Reportable Range threshold, but within the System Measurement Range)
■ RR HI (above the Reportable Range threshold, but within the System Measurement Range)
■ LO (below the System Measurement Range)
■ HI (above the System Measurement Range)
Instructions on how to add comments are provided in the following section.
1. Results that are below or above the Critical Range thresh-old, but within the Reportable Range can be configured to display as either numeric results or as CR LO or CR HI. All other results exceeding specified limit values will always be displayed as RR LO, RR HI, LO, or HI.
For test results that lie outside the critical or reportable range, a message (up to 100 characters in length) can be configured during setup. This message is then dis-played with the corresponding test results.

Patie
nt G
luco
se T
estin
g • 3
65
08424705001 (03) 2020-08 USA • Accu-Chek Inform II Operator’s Manual Version 7.1
If comments are not set as required and you do not wish to add a comment to the test result, touch to return to the Main Menu.
Remove the test strip and dispose of it in accordance with applicable regulations and directives for disposal of potentially infectious samples and materials.
Adding comments You can add up to three comments to a test result. Comments can provide, for example, additional information about the test conditions or the patient.
The meter can be configured so that comments are always required, required depending on the result range, optional, or disabled. You can call up the function for adding comments directly in the results screen. If com-ments are set as required, the meter will not accept an empty comment field.
Test results are saved automatically if the meter is pow-ered off or if it powers itself off after 10 minutes of inac-tivity/no screen touches (see “Automatic power-off” on page 21).
Of these three comments only one can be a custom comment; the others can be selected from the prede-fined comments list.

66
08424705001 (03) 2020-08 USA • Accu-Chek Inform II Operator’s Manual Version 7.1
To add comments:
1 In the Patient Test screen, touch .
2 Select up to three desired predefined comment(s) from the display list (if configured) or touch to enter up to one custom comment (if custom com-menting is enabled). Use the keypad (as with login) to enter your comment(s).
3 Once you have selected the desired comment(s), touch to return to the results screen.
4 Touch to return to the Main Menu.
Add Comments
New Strip Lot
Will Repeat Test
RN Notified
Doctor Notified
12:48 pm
03/17/20
Patient Test
Out of Normal Range
220
Patient 123456789Date 03/17/20 12:48 pm
mg/dL
New Strip LotDoctor NotifiedWill Repeat Test
12:48 pm
03/17/20
Patient Test
Out of Normal Range
220
Patient 123456789Date 03/17/20 12:48 pm
mg/dL
12:48 pm
03/17/20

Patie
nt G
luco
se T
estin
g • 3
67
08424705001 (03) 2020-08 USA • Accu-Chek Inform II Operator’s Manual Version 7.1
Add barcode content to a result It is possible to read and display the complete content of a barcode (not only the extracted ID) and add it as a com-ment to the test result, to be further processed by the DMS. This option can only be configured via a DMS. The following options can be set:
■ Barcode content will not be added to the result
■ Barcode content will be added to the result
■ Barcode content will be displayed for confirmation after scanning and then added to the result
If the meter is set to the last option (enabled with confir-mation), you can choose to display the complete barcode content in the confirmation screen as follows:
■ The barcode is displayed as a continuous string of characters without any formatting. The separator characters (“~%$+?”) are shown. See example in top screen in the illustration on the left.
■ The barcode is divided into separate lines for easier reading. The separator characters (“~%$+?”) are replaced by line breaks. See example in the bottom screen in the illustration on the left.
The replacement of separator characters by line breaks is only applied temporarily for display in the Barcode Confirmation screen. The barcode information stored with the test result contains the original separator characters.
During a patient test, the Barcode Confirmation screen appears before the Patient Confirmation screen, if both are enabled.
A B C D E
F G H I J
K L M N O
P-Z 123
Patient ID 12:48 pm
03/17/20
~Jane Doe%$X1234567+5715486266Z?01-09-1979
Barcode Confirmation
A B C D E
F G H I J
K L M N O
P-Z 123
Patient ID 12:48 pm
03/17/20
Jane Doe
X12345675715486266Z01-09-1979
Barcode Confirmation
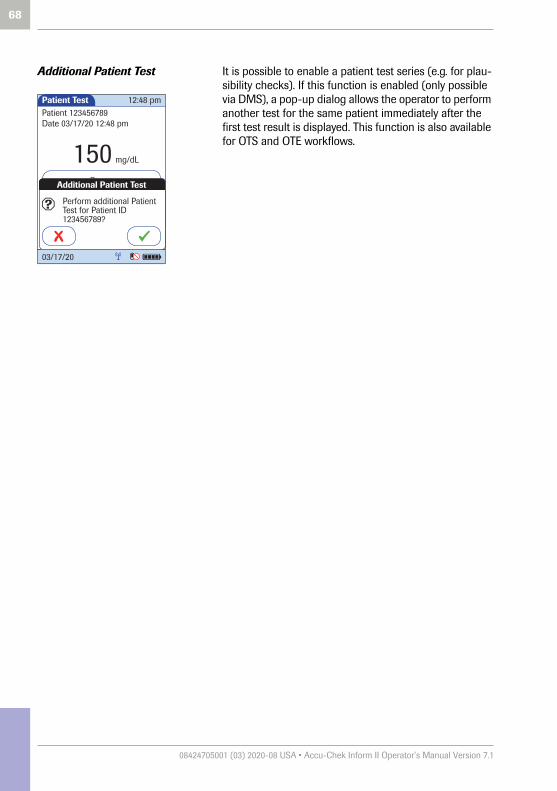
68
08424705001 (03) 2020-08 USA • Accu-Chek Inform II Operator’s Manual Version 7.1
Additional Patient Test It is possible to enable a patient test series (e.g. for plau-sibility checks). If this function is enabled (only possible via DMS), a pop-up dialog allows the operator to perform another test for the same patient immediately after the first test result is displayed. This function is also available for OTS and OTE workflows.
Patient Test
Range
150
Patient 123456789
mg/dL
12:48 pm
03/17/20
Date 03/17/20 12:48 pm
Perform additional Patient Test for Patient ID 123456789?
Additional Patient Test

Glu
cose
Con
trol
Tes
ting
• 4
69
08424705001 (03) 2020-08 USA • Accu-Chek Inform II Operator’s Manual Version 7.1
4 Glucose Control Testing
4.1 Information regarding glucose control tests
Observe the applicable regulations and directives of the responsible regulatory agencies when performing glu-cose control tests.
Accurately testing known levels of glucose ensures that the system and your technique used in testing give accu-rate results on patient tests. Glucose control solutions have defined (known) values. The results for these solu-tions must first fall within a certain acceptable range in order to allow valid patient testing.
The system may be configured to require in-range glu-cose control testing before patient testing is allowed. This is called QC Lockout, and the system actually prevents patient and proficiency testing when the control results are not within the accepted range.

70
08424705001 (03) 2020-08 USA • Accu-Chek Inform II Operator’s Manual Version 7.1
Glucose control testing intervals Intervals between running glucose control tests are determined by your facility. These intervals are entered when the system is configured. At the end of the speci-fied interval (or after a specific event such as starting to test with a new test strip lot), a warning is displayed when the meter is powered on and when the Glucose Test function is selected.
Glucose control tests should be run in the following cir-cumstances:
■ Before using the meter for patient testing the first time
■ At the glucose control intervals established by your facility
■ When using a new test strip vial for the first time
■ When using a new test strip lot for the first time (and as a result a new test strip code)
■ If a test strip vial was left open
■ If questionable test results are displayed repeatedly
■ If you wish to test the performance of the system
In addition, the following events can be specified during setup as a reason for a glucose control test:
■ If a previous control test is out of range
■ If glucose control tests were not run at the proper intervals
If a glucose control test is required (as shown in the illus-tration on the left), you will not be able to test blood glu-cose until the controls have been run successfully. For emergencies, STAT tests can be configured in the meter. This option allows the meter to perform a limited number of blood glucose tests, if circumstances require, despite the meter being in QC Lockout (see page 81).
Contrast
Power Up
QC Due: Immediately
12:48 pm
03/17/20

Glu
cose
Con
trol
Tes
ting
• 4
71
08424705001 (03) 2020-08 USA • Accu-Chek Inform II Operator’s Manual Version 7.1
Information stored during glucose control testing
The following information is stored for every glucose con-trol test using control solution:
■ Glucose control test result
■ Lot number of the control solution
■ Operator ID (if configured)
■ Level of control solution (L1 or L2)
■ Lot number of the test strips
■ Time and date of test
■ Comments (if applicable)
■ Out of range measurements
72
08424705001 (03) 2020-08 USA • Accu-Chek Inform II Operator’s Manual Version 7.1
Control solutions For blood glucose test strips, control solutions have two levels:
■ Level 1 (L1): Lo (low values in test results)
■ Level 2 (L2): Hi (high values in test results)
Preparing to run a glucose control test
Aside from special preparations (see the following sec-tion), a glucose control test is run in the same manner as a patient test:
■ At least one code file for test strips must be stored in the meter and match the lot number of the test strips used (see Chapter 6).
■ The proper test strips must be available.
■ An operator ID must be entered (with password, if applicable), if the meter is configured for login.

Glu
cose
Con
trol
Tes
ting
• 4
73
08424705001 (03) 2020-08 USA • Accu-Chek Inform II Operator’s Manual Version 7.1
4.2 Performing glucose control tests
Overview of test procedure A glucose control test using control solution comprises the following steps:
■ Select the desired level of control solution for the test.
■ Check the lot number of the control solution.
■ Check the lot number of the test strips.
■ Perform the test with the control solution.
The result must fall within the specified range (as shown on the label of the test strip vial or defined per configura-tion) for the control test to be completed successfully. Patient tests can now be performed (again).
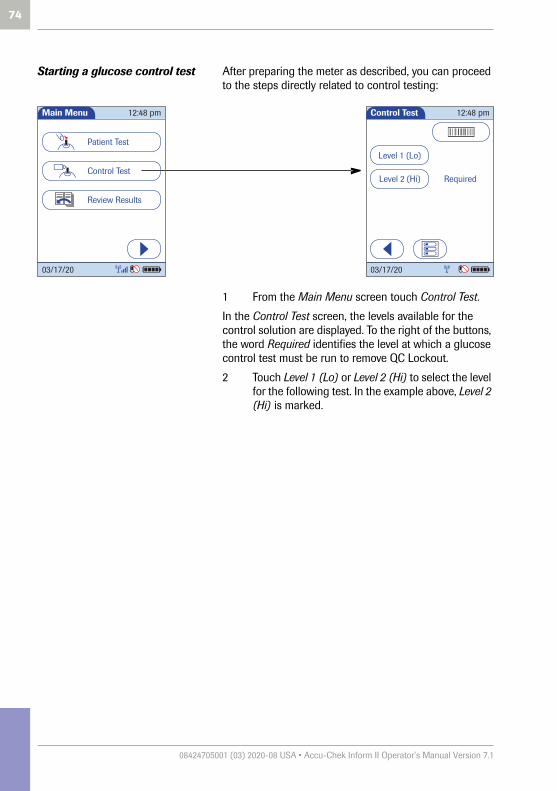
74
08424705001 (03) 2020-08 USA • Accu-Chek Inform II Operator’s Manual Version 7.1
Starting a glucose control test After preparing the meter as described, you can proceed to the steps directly related to control testing:
1 From the Main Menu screen touch Control Test.
In the Control Test screen, the levels available for the control solution are displayed. To the right of the buttons, the word Required identifies the level at which a glucose control test must be run to remove QC Lockout.
2 Touch Level 1 (Lo) or Level 2 (Hi) to select the level for the following test. In the example above, Level 2 (Hi) is marked.
Control Test
Level 2 (Hi)
Level 1 (Lo)
Required
12:48 pm
03/17/20
Main Menu
Review Results
Control Test
Patient Test
12:48 pm
03/17/20

Glu
cose
Con
trol
Tes
ting
• 4
75
08424705001 (03) 2020-08 USA • Accu-Chek Inform II Operator’s Manual Version 7.1
Confirming or selecting the lot number for control solutions
Once you have selected the level, you are asked to con-firm or enter the lot number of the control solution. Com-pare the number displayed by the meter to the number on the label of the control solution.
1 Select the lot number as follows:
■ To read the lot number from the control solution bottle via barcode scanner, press and release
. Follow the instructions for scanning IDs (see page 45).
■ If you want to use the preselected number dis-played by the meter, touch to confirm.
■ If you want to use a different number than the lot number displayed, touch to open the keypad and enter the number manually, or
2 Touch to confirm the selected test strip lot number.
For additional information about storing lot numbers for control solutions, see page 94.
The meter can be configured so that manual confirma-tion is not necessary. In this setup, only the lot number is displayed. Additional options are not available.
The meter can be configured so that lot numbers are entered via barcode scanner only.
Control TestControl L2 (Hi)
123456?Use Control Lot
12:48 pm
03/17/20
1 2 3
4 5 6
7 8 9
0
Control Lot 12:48 pm
03/17/20

76
08424705001 (03) 2020-08 USA • Accu-Chek Inform II Operator’s Manual Version 7.1
Confirming or selecting the test strip lot
Once you have entered and confirmed the lot number of the control solution, you are asked to choose the lot number for the test strips. Compare the number dis-played by the meter to the number on the label of the test strip vial.
1 Select the lot number as follows:
■ To read the lot number from the test strip vial via barcode scanner, press and release . Follow the instructions for scanning IDs.
■ If you want to use the preselected lot number dis-played by the meter, touch to confirm.
■ To use a different lot number than the one dis-played, touch to open the keypad and enter the number manually, or to display a list of stored lot numbers and then select the desired lot number from the list.
2 Touch to confirm the selected test strip lot number.
For additional information about storing lot numbers for test strips, see page 87.
The meter can be configured so that manual confirmation is not necessary. In this setup, only the lot number is displayed. Additional options are not availa-ble.
The meter can be configured so that lot numbers are entered via barcode scanner only.
The meter can be configured so that lot numbers can only be selected from a list.
Control TestControl L2 (Hi) 123456
Use Strip Lot
12:48 pm
123456?
03/17/20
Strip Lots
344789
545794
545777
344654
12:48 pm
03/17/20
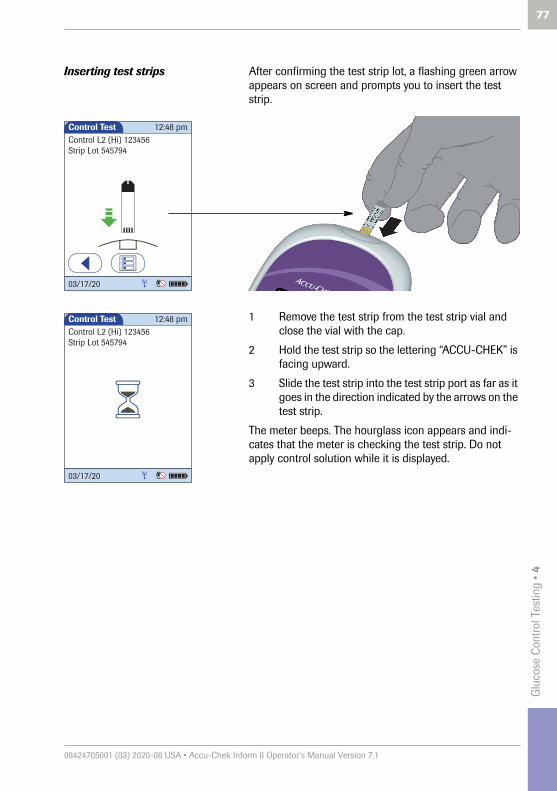
Glu
cose
Con
trol
Tes
ting
• 4
77
08424705001 (03) 2020-08 USA • Accu-Chek Inform II Operator’s Manual Version 7.1
Inserting test strips After confirming the test strip lot, a flashing green arrow appears on screen and prompts you to insert the test strip.
1 Remove the test strip from the test strip vial and close the vial with the cap.
2 Hold the test strip so the lettering “ACCU-CHEK” is facing upward.
3 Slide the test strip into the test strip port as far as it goes in the direction indicated by the arrows on the test strip.
The meter beeps. The hourglass icon appears and indi-cates that the meter is checking the test strip. Do not apply control solution while it is displayed.
Control TestControl L2 (Hi) 123456Strip Lot 545794
12:48 pm
03/17/20
Control TestControl L2 (Hi) 123456Strip Lot 545794
12:48 pm
03/17/20
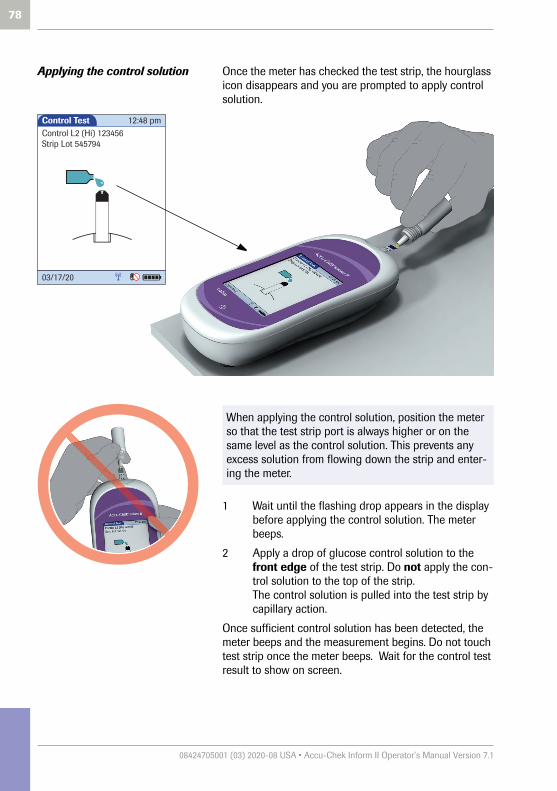
78
08424705001 (03) 2020-08 USA • Accu-Chek Inform II Operator’s Manual Version 7.1
Applying the control solution Once the meter has checked the test strip, the hourglass icon disappears and you are prompted to apply control solution.
1 Wait until the flashing drop appears in the display before applying the control solution. The meter beeps.
2 Apply a drop of glucose control solution to the front edge of the test strip. Do not apply the con-trol solution to the top of the strip.The control solution is pulled into the test strip by capillary action.
Once sufficient control solution has been detected, the meter beeps and the measurement begins. Do not touch test strip once the meter beeps. Wait for the control test result to show on screen.
Control TestControl L2 (Hi) 123456Strip Lot 545794
12:48 pm
03/17/20
When applying the control solution, position the meter so that the test strip port is always higher or on the same level as the control solution. This prevents any excess solution from flowing down the strip and enter-ing the meter.

Glu
cose
Con
trol
Tes
ting
• 4
79
08424705001 (03) 2020-08 USA • Accu-Chek Inform II Operator’s Manual Version 7.1
Results screen The hourglass icon indicates the test is running. When the test is completed and the result is ready, the meter beeps again.
Depending on configuration, the result is displayed either as a value or only as a qualitative result Pass or Fail. Your system may be configured to disallow further testing until all the required glucose control levels are successfully run (QC Lockout).
When the results are displayed as a value, the results screen contains a button that changes its name based on the result (Range or Out of … Range). Touch this button to display the minimum and maximum target values for the control levels.
Control Test
PASS
Control L2 (Hi) 123456Date 03/17/20 12:48 pm
12:48 pm
03/17/20
Control Test
Range
Control L2 (Hi) 123456Date 03/17/20 12:48 pm
290mg/dL
12:48 pm
03/17/20
Control TestControl L2 (Hi) 123456Date 03/17/20 12:48 pm
FAIL
12:48 pm
03/17/20

80
08424705001 (03) 2020-08 USA • Accu-Chek Inform II Operator’s Manual Version 7.1
You can add comments to a control test result (as with blood glucose tests) (see page 65).
If you do not wish to add a comment to the test result, touch to continue to the next level of the control test, if necessary, or to return to the Main Menu.
Remove the test strip and dispose of it in accordance with applicable regulations and directives.
For control tests, comments are only required if the result is outside the specified range (whether this is displayed as a value or as FAIL). If the result is within the specified range (displayed as a value or as PASS), comments are optional.
Test results are saved automatically if the meter is pow-ered off or if it powers itself off after 10 minutes of inac-tivity/no screen touches (see “Automatic power-off” on page 21).
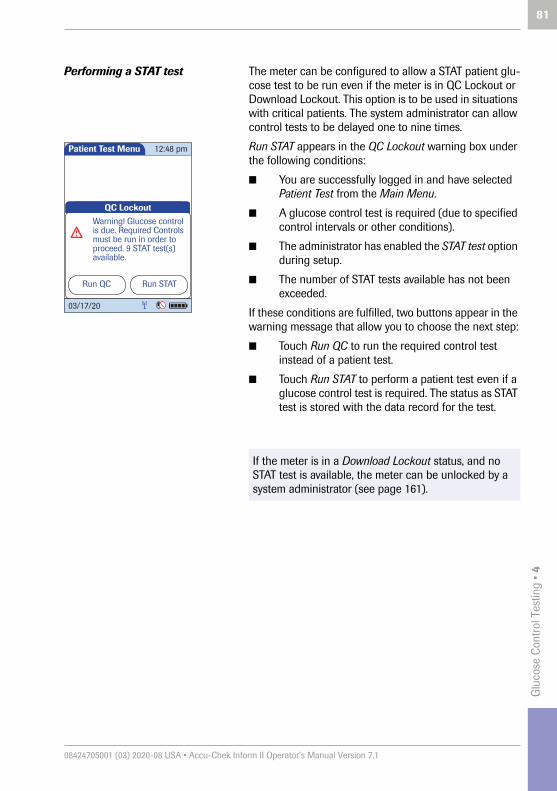
Glu
cose
Con
trol
Tes
ting
• 4
81
08424705001 (03) 2020-08 USA • Accu-Chek Inform II Operator’s Manual Version 7.1
Performing a STAT test The meter can be configured to allow a STAT patient glu-cose test to be run even if the meter is in QC Lockout or Download Lockout. This option is to be used in situations with critical patients. The system administrator can allow control tests to be delayed one to nine times.
Run STAT appears in the QC Lockout warning box under the following conditions:
■ You are successfully logged in and have selected Patient Test from the Main Menu.
■ A glucose control test is required (due to specified control intervals or other conditions).
■ The administrator has enabled the STAT test option during setup.
■ The number of STAT tests available has not been exceeded.
If these conditions are fulfilled, two buttons appear in the warning message that allow you to choose the next step:
■ Touch Run QC to run the required control test instead of a patient test.
■ Touch Run STAT to perform a patient test even if a glucose control test is required. The status as STAT test is stored with the data record for the test.
If the meter is in a Download Lockout status, and no STAT test is available, the meter can be unlocked by a system administrator (see page 161).
Glucose Test
Patient Test Menu
Run QC Run STAT
QC LockoutWarning! Glucose control is due. Required Controls must be run in order to proceed. 9 STAT test(s) available.
12:48 pm
03/17/20

82
08424705001 (03) 2020-08 USA • Accu-Chek Inform II Operator’s Manual Version 7.1
This page intentionally left blank.
Revi
ew R
esul
ts •
5
83
08424705001 (03) 2020-08 USA • Accu-Chek Inform II Operator’s Manual Version 7.1
5 Review Results
5.1 Displaying test results from the memory
Information stored in data records for test results
When you retrieve the data record for stored test results, the following information is displayed.
■ Patient ID, glucose control, or sample ID
■ The test result
■ The lot numbers of the reagents used for glucose control and linearity tests
■ Date and time of the test
■ Comments entered at the time the test was per-formed
Maintenance results (for documentation of maintenance activities) are stored and displayed with date and time only if comments were added.
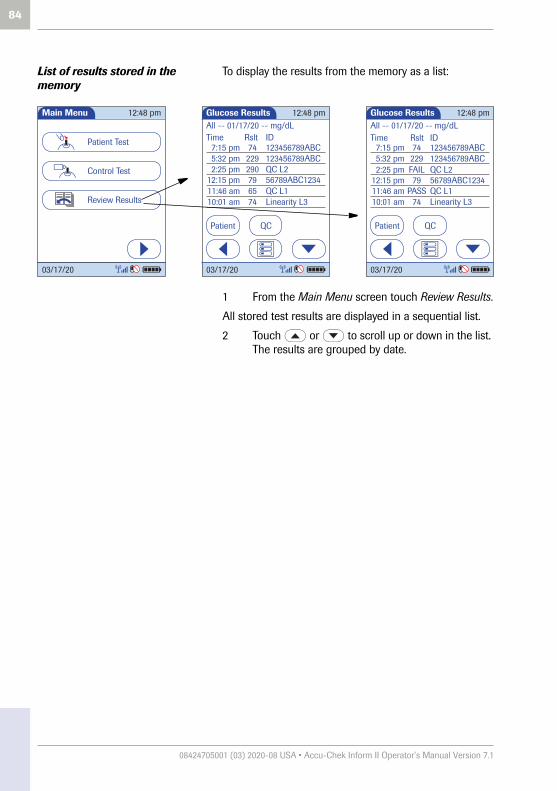
84
08424705001 (03) 2020-08 USA • Accu-Chek Inform II Operator’s Manual Version 7.1
List of results stored in the memory
To display the results from the memory as a list:
1 From the Main Menu screen touch Review Results.
All stored test results are displayed in a sequential list.
2 Touch or to scroll up or down in the list. The results are grouped by date.
Glucose Results
Patient QC
All -- 01/17/20 -- mg/dLTime Rslt
7:15 pm 74 123456789ABC5:32 pm 229 123456789ABC2:25 pm FAIL QC L2
12:15 pm 79 56789ABC123411:46 am PASS QC L110:01 am 74 Linearity L3
ID
12:48 pm
03/17/20
Main Menu
Review Results
Control Test
Patient Test
12:48 pm
03/17/20
Glucose Results
Patient QC
All -- 01/17/20 -- mg/dLTime Rslt
7:15 pm 74 123456789ABC5:32 pm 229 123456789ABC2:25 pm 290 QC L2
12:15 pm 79 56789ABC123411:46 am 65 QC L110:01 am 74 Linearity L3
ID
12:48 pm
03/17/20

Revi
ew R
esul
ts •
5
85
08424705001 (03) 2020-08 USA • Accu-Chek Inform II Operator’s Manual Version 7.1
3 Touch an entry in the list to display the related details.
4 Touch Patient, if you wish to display results for a specific patient only.
– If you touch Patient from the full list view, you will be asked to enter the patient ID manually or via bar-code scanner. The list now contains only the results for the selected patient.
– If you touch Patient in the Patient Result view (middle screen above), the list of test results for this patient will be displayed.
Glucose Results
Patient QC
All -- 01/17/20 -- mg/dLTime Rslt
7:15 pm 74 123456789ABC5:32 pm 229 123456789ABC2:25 pm FAIL QC L2
12:15 pm 79 56789ABC123411:46 am PASS QC L110:01 am 74 Linearity L3
ID
12:48 pm
03/17/20
Patient ResultID: 123456789ABCDEFGName: Joe M. DoeStrip Lot: 400433229 mg/dL01/17/20 05:32 pmComment 1Comment 2Comment 3
Patient QC
12:48 pm
03/17/20
Glucose Results
All QC
ID: 123456789ABCDEFGPatient -- 01/16/20 -- mg/dL
Time Rslt7:15 pm 1535:12 pm 1121:01 pm 99
11:20 am 2319:25 am 142
12:48 pm
03/17/20

86
08424705001 (03) 2020-08 USA • Accu-Chek Inform II Operator’s Manual Version 7.1
5 Touch QC, if you wish to display a list of glucose control tests.
6 Touch All in the Glucose Results screen to remove the Patient or QC selection and display all results.
7 Touch to return to the previous menu screen, or touch to return to the Main Menu.
If the meter is configured to show PASS/FAIL instead of a numerical QC result, you can use the list to check whether a meter lockout is due to a failed or overdue control test.
Glucose Results
Patient QC
All -- 01/17/20 -- mg/dLTime Rslt
7:15 pm 74 123456789ABC5:32 pm 229 123456789ABC2:25 pm FAIL QC L2
12:15 pm 79 56789ABC123411:46 am PASS QC L110:01 am 74 Linearity L3
ID
12:48 pm
03/17/20
Stor
ing
Test
Str
ip, C
ontr
ol S
olut
ion,
and
Lin
earit
y So
lutio
n In
form
atio
n in
the
Met
er •
6
87
08424705001 (03) 2020-08 USA • Accu-Chek Inform II Operator’s Manual Version 7.1
6 Storing Test Strip, Control Solution, and Linearity Solution Information in the Meter
6.1 Storing information about test strips
Each box of test strips contains a code key.1 Each code key belongs to a single lot number and provides impor-tant information about the lot-specific properties of the test strip. The properties of the test strips are downloaded (as a code file) from the code key using the code key reader and sent to the meter. The code file is stored in the meter.
This procedure also allows the code key information to be stored centrally in the data management system, from where it can be sent to all the meters used in your facility.
Make sure with each test that the code stored (and selected by you) matches the lot number of the test strips in use.
Aside from the unchangeable data directly linked to the lot-specific properties, some of the information from the code key can be modified (depending on your meter setup). This information includes:
■ Expiration date (can be set to a date before the date stored in the key)
■ Parameters for control solutions (minimum and maximum values for levels L1/Lo and L2/Hi)
1. The code key is also frequently referred to as a code chip. The terms are synonymous.
When using a data management system for configura-tion, it is possible to partially or fully disable the func-tions described in this chapter. In this case, the respective buttons in Main Menu 2 do not appear. See also Appendix A.

88
08424705001 (03) 2020-08 USA • Accu-Chek Inform II Operator’s Manual Version 7.1
Transferring code key information to the meter
The following description assumes that the meter is pow-ered on and the Main Menu is displayed.
1 Touch to open the Main Menu 2 screen.
2 Touch Strip Lots to open the related menu.
3 Touch Add if you want to add the information for a new test strip lot from a new code key. The Add Strip Lot screen opens.
4 Insert the new code key into the opening of the code key reader. The LED starts flashing green and signals that the reader is ready to transfer data.
Main Menu
Review Results
Control Test
Patient Test
12:48 pm
03/17/20
Main Menu 2
Maintenance
Strip Lots
Proficiency
Control Lots
Beeper
Linearity
Diagnostics
Linearity Lots
Admin.
12:48 pm
03/17/20
Order Strips
Strip Lots
Add
Strip06/31/20 855732
* 05/21/20 845678
Strip 06/21/20 845723
Type Exp. Date Lot Num.
Strip
12:48 pm
03/17/20
The code key reader remains ready to send for a few seconds after it has transmitted data. As a result, you can perform the following procedure on multiple meters without having to reinsert the code key.

Stor
ing
Test
Str
ip, C
ontr
ol S
olut
ion,
and
Lin
earit
y So
lutio
n In
form
atio
n in
the
Met
er •
6
89
08424705001 (03) 2020-08 USA • Accu-Chek Inform II Operator’s Manual Version 7.1
5 Place the code key reader on a level surface such as a bench. Hold the meter 4-6 inches above the code key reader so that a connection can be made between the two infrared windows.
6 Touch to begin downloading data.
Once the connection is made, the meter provides you with status information on the download.
■ The code file is ready for transmission as long as the LED on the code key reader is flashing, even if the code key is removed.
– After the LED stops flashing, remove the code key and insert a new code key for download, if required.
– If you get an error message that the download was not successful, re-insert the same code key and try again.
■ Do not replace code keys while the code key reader is still flashing. If the code key reader is still flashing, it will continue to transmit the previously loaded code file and ignore the code file on the newly inserted code key. You may get an error message on the meter.
Add Strip Lot
Please Wait
Connecting to code key reader...
12:48 pm
03/17/20
Place Meter above the Code Key Reader and then press the Right Arrow button to start.
Add Strip Lot 12:48 pm
03/17/20
Add Strip Lot
Please Wait
Receiving code key contents...
12:48 pm
03/17/20

90
08424705001 (03) 2020-08 USA • Accu-Chek Inform II Operator’s Manual Version 7.1
Information about the expiration date and parameters for control solutions is subsequently displayed.
1 Touch to store the data for this lot number in the meter without changes, or touch to modify the data for this lot number before storing it in the meter.
If you accept the suggested values the following screen appears. You can use this screen to select the lot number you have just transmitted as the current lot number.
2 Touch to confirm that you want this lot number to be the lot number currently in use, or touch to store the entries without making the lot number the current lot number.
3 Continue entering additional lot numbers, or touch to return to the Main Menu.
The current lot number is provided automatically for use with subsequent tests.
Add Strip Lot
Strip Lot Confirmation
Do you want to use the suggested values for strip 545603?Use by: 12/10/20L1(Lo): 43-74 mg/dLL2(Hi): 288-389 mg/dL
12:48 pm
03/17/20
Add Strip Lot 12:48 pm
Place Meter above the Code Key Reader and then press the Right Arrow button to start.
03/17/20
Do you want to make Strip lot: 545603 the 'current' lot?
Make 'Current'
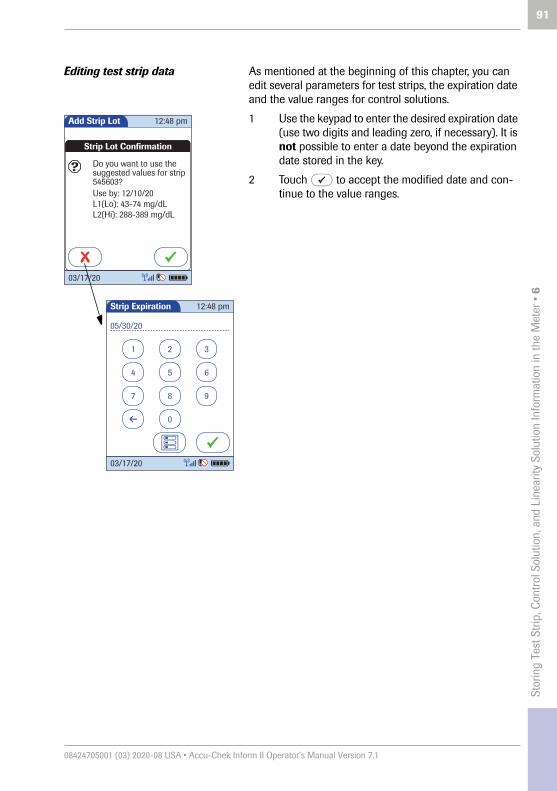
Stor
ing
Test
Str
ip, C
ontr
ol S
olut
ion,
and
Lin
earit
y So
lutio
n In
form
atio
n in
the
Met
er •
6
91
08424705001 (03) 2020-08 USA • Accu-Chek Inform II Operator’s Manual Version 7.1
Editing test strip data As mentioned at the beginning of this chapter, you can edit several parameters for test strips, the expiration date and the value ranges for control solutions.
1 Use the keypad to enter the desired expiration date (use two digits and leading zero, if necessary). It is not possible to enter a date beyond the expiration date stored in the key.
2 Touch to accept the modified date and con-tinue to the value ranges.
Add Strip Lot
Strip Lot Confirmation
Do you want to use the suggested values for strip 545603?Use by: 12/10/20L1(Lo): 43-74 mg/dLL2(Hi): 288-389 mg/dL
12:48 pm
03/17/20
1 2 3
4 5 6
7 8 9
0
Strip Expiration
05/30/20
12:48 pm
03/17/20
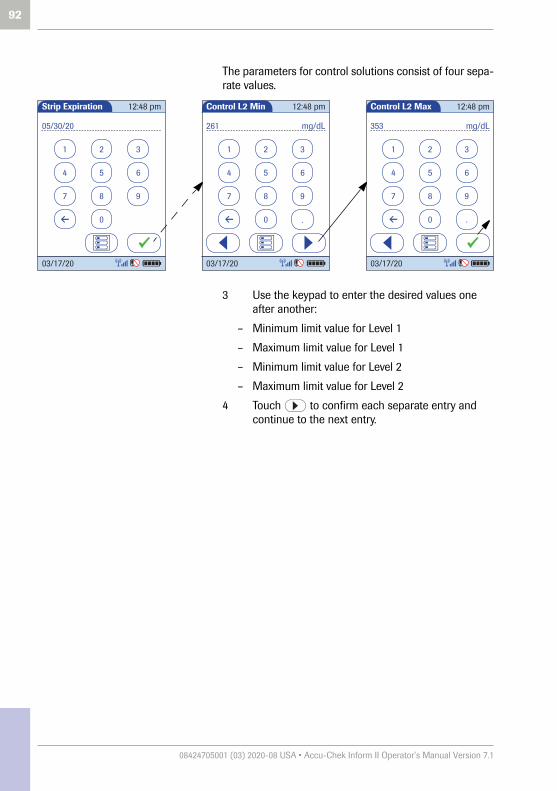
92
08424705001 (03) 2020-08 USA • Accu-Chek Inform II Operator’s Manual Version 7.1
The parameters for control solutions consist of four sepa-rate values.
3 Use the keypad to enter the desired values one after another:
– Minimum limit value for Level 1
– Maximum limit value for Level 1
– Minimum limit value for Level 2
– Maximum limit value for Level 2
4 Touch to confirm each separate entry and continue to the next entry.
1 2 3
4 5 6
7 8 9
0
Control L2 Max
353 mg/dL
12:48 pm
.
03/17/20
1 2 3
4 5 6
7 8 9
0
Control L2 Min
261 mg/dL
12:48 pm
.
03/17/20
1 2 3
4 5 6
7 8 9
0
Strip Expiration
05/30/20
12:48 pm
03/17/20
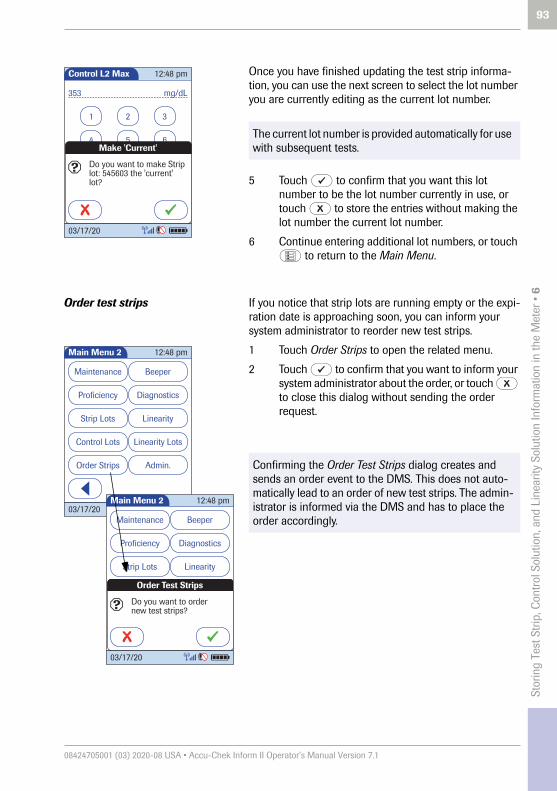
Stor
ing
Test
Str
ip, C
ontr
ol S
olut
ion,
and
Lin
earit
y So
lutio
n In
form
atio
n in
the
Met
er •
6
93
08424705001 (03) 2020-08 USA • Accu-Chek Inform II Operator’s Manual Version 7.1
Once you have finished updating the test strip informa-tion, you can use the next screen to select the lot number you are currently editing as the current lot number.
5 Touch to confirm that you want this lot number to be the lot number currently in use, or touch to store the entries without making the lot number the current lot number.
6 Continue entering additional lot numbers, or touch to return to the Main Menu.
Order test strips If you notice that strip lots are running empty or the expi-ration date is approaching soon, you can inform your system administrator to reorder new test strips.
1 Touch Order Strips to open the related menu.
2 Touch to confirm that you want to inform your system administrator about the order, or touch to close this dialog without sending the order request.
The current lot number is provided automatically for use with subsequent tests.
1 2 3
Control L2 Max
353 mg/dL
12:48 pm
4 5 6
03/17/20
Do you want to make Strip lot: 545603 the 'current' lot?
Make 'Current'
Confirming the Order Test Strips dialog creates and sends an order event to the DMS. This does not auto-matically lead to an order of new test strips. The admin-istrator is informed via the DMS and has to place the order accordingly.
Main Menu 2
Maintenance
Strip Lots
Proficiency
Control Lots
Beeper
Linearity
Diagnostics
Linearity Lots
Admin.
12:48 pm
03/17/20
Order Strips
Main Menu 2
Maintenance
Strip Lots
Proficiency
Control Lots
Beeper
Linearity
Diagnostics
Linearity Lots
Admin.
12:48 pm
03/17/20
Order Strips
Order Test Strips
Do you want to order new test strips?
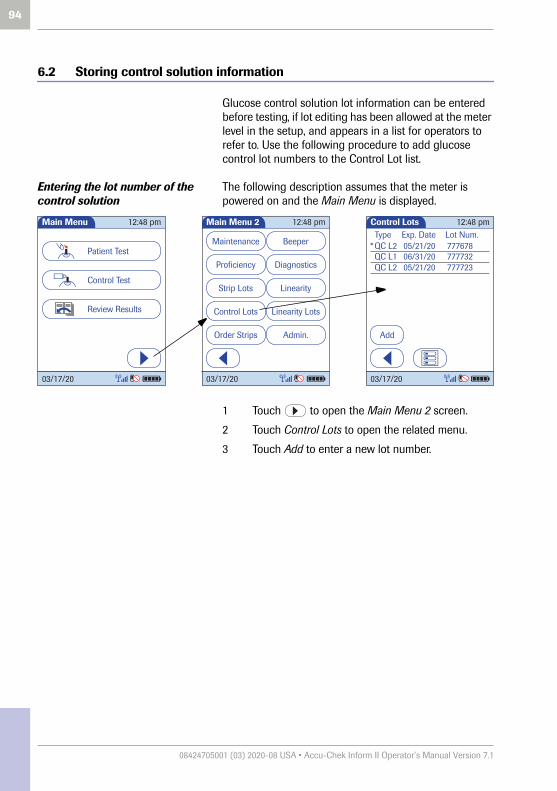
94
08424705001 (03) 2020-08 USA • Accu-Chek Inform II Operator’s Manual Version 7.1
6.2 Storing control solution information
Glucose control solution lot information can be entered before testing, if lot editing has been allowed at the meter level in the setup, and appears in a list for operators to refer to. Use the following procedure to add glucose control lot numbers to the Control Lot list.
Entering the lot number of the control solution
The following description assumes that the meter is powered on and the Main Menu is displayed.
1 Touch to open the Main Menu 2 screen.
2 Touch Control Lots to open the related menu.
3 Touch Add to enter a new lot number.
Main Menu
Review Results
Control Test
Patient Test
12:48 pm
03/17/20
Main Menu 2
Maintenance
Strip Lots
Proficiency
Control Lots
Beeper
Linearity
Diagnostics
Linearity Lots
Admin.
12:48 pm
03/17/20
Order Strips
Control Lots
Add
* QC L2 05/21/20 77767806/31/20 77773205/21/20 777723
QC L1QC L2
Type Exp. Date Lot Num.12:48 pm
03/17/20

Stor
ing
Test
Str
ip, C
ontr
ol S
olut
ion,
and
Lin
earit
y So
lutio
n In
form
atio
n in
the
Met
er •
6
95
08424705001 (03) 2020-08 USA • Accu-Chek Inform II Operator’s Manual Version 7.1
4 Select the level (L1/Lo or L2/Hi).
5 Use the keypad to enter the lot number. Touch to confirm the entered lot number, or press and release to read the lot number from the control solution bottle via barcode scan-ner. Follow the instructions for scanning IDs (see page 45).
6 Use the keypad to enter the expiration date as stated on the control solution bottle.
7 Touch to confirm the entered expiration date.
1 2 3
4 5 6
7 8 9
0
Control Lot 12:48 pm
03/17/20
123456
Add Control Lot
Level 2 (Hi)
Level 1 (Lo)
12:48 pm
03/17/20
1 2 3
4 5 6
7 8 9
0
Control Expiration
05/30/20
12:48 pm
03/17/20

96
08424705001 (03) 2020-08 USA • Accu-Chek Inform II Operator’s Manual Version 7.1
Once you have finished updating the control solution information, you can use the next screen to select the lot number you are currently editing as the current lot num-ber.
8 Touch to confirm that you want this lot number to be the lot number currently in use, or touch to store the entries without making the lot number the current lot number.
9 Continue entering additional lot numbers, or touch to return to the Main Menu.
The current lot number is provided automatically for use with subsequent tests.
1 2 3
Control Expiration
05/30/20
12:48 pm
4 5 6
03/17/20
Do you want to make Control lot 134526 the 'current' lot for Level 1 (Lo)?
Make 'Current'

Stor
ing
Test
Str
ip, C
ontr
ol S
olut
ion,
and
Lin
earit
y So
lutio
n In
form
atio
n in
the
Met
er •
6
97
08424705001 (03) 2020-08 USA • Accu-Chek Inform II Operator’s Manual Version 7.1
Selecting a stored lot number as the current lot number
You can select any stored lot number as the current lot number.
1 Touch in the Main Menu to open the Main Menu 2 screen.
2 Touch Control Lots to open the related menu. The current lot number is indicated by an asterisk (*).
Main Menu
Review Results
Control Test
Patient Test
12:48 pm
03/17/20
Main Menu 2
Maintenance
Strip Lots
Proficiency
Control Lots
Beeper
Linearity
Diagnostics
Linearity Lots
Admin.
12:48 pm
03/17/20
Order Strips
Control Lots
Add
* QC L2 05/21/20 77767806/31/20 77773205/21/20 777723
QC L1QC L2
Type Exp. Date Lot Num.12:48 pm
03/17/20

98
08424705001 (03) 2020-08 USA • Accu-Chek Inform II Operator’s Manual Version 7.1
3 Touch the lot number you wish to select as the cur-rent lot number. This opens the related detail view.
4 Touch Make Current to make the lot number the current lot number. The information Current is then also displayed in the detail view.
5 Touch to return to the list of lot numbers, or touch to return to the Main Menu.
Control Lot Details
Edit Delete
Control Lot: 777732Control Level: 1Use by 06/31/20Current
12:48 pm
03/17/20
Control Lot Details
Edit Delete
Control Lot: 777732Control Level: 1Use by 06/31/20
Make Current
12:48 pm
03/17/20
Control Lots
Add
* QC L2 05/21/20 77767806/31/20 77773205/21/20 777723
QC L1QC L2
Type Exp. Date Lot Num.12:48 pm
03/17/20

Stor
ing
Test
Str
ip, C
ontr
ol S
olut
ion,
and
Lin
earit
y So
lutio
n In
form
atio
n in
the
Met
er •
6
99
08424705001 (03) 2020-08 USA • Accu-Chek Inform II Operator’s Manual Version 7.1
6.3 Storing linearity test information
Observe the applicable regulations and directives of the responsible regulatory agencies when performing linearity tests.
Entering the lot number of the linearity test
The following description assumes that the meter is powered on and the Main Menu is displayed.
1 Touch to open the Main Menu 2 screen.
2 Touch Linearity Lots to open the related menu.
3 Touch Add to enter a new lot number.
Main Menu
Review Results
Control Test
Patient Test
12:48 pm
03/17/20
Main Menu 2
Maintenance
Strip Lots
Proficiency
Control Lots
Beeper
Linearity
Diagnostics
Linearity Lots
Admin.
12:48 pm
03/17/20
Order Strips
Linearity Lots
Add
* Lin. 12/31/20 77773205/15/21 777723Lin.
Type Exp. Date Lot Num.12:48 pm
03/17/20

100
08424705001 (03) 2020-08 USA • Accu-Chek Inform II Operator’s Manual Version 7.1
4 Use the keypad to enter the lot number.
5 Touch to confirm the entered lot number.
6 Enter the expiration date (use two digits and lead-ing zero, if necessary) and touch to confirm the expiration date you have entered.
Once you have finished updating the linearity test infor-mation, you can use the next screen to select the lot number you are currently editing as the current lot num-ber.
7 Touch to confirm that you want this lot number to be the lot number currently in use, or touch to store the entries without making the lot number the current lot number.
8 Continue entering additional lot numbers, or touch to return to the Main Menu.
1 2 3
4 5 6
7 8 9
A-O0
Linearity Lot 12:48 pm
03/17/20
777678
1 2 3
4 5 6
7 8 9
0
Linearity Expiration
03/31/20
12:48 pm
03/17/20
The current lot number is provided automatically for use with subsequent tests.
Linearity Lots
Do you want to make Linearity lot 777678 the 'current' lot?
Make 'Current'
* 12/31/20 777732Lin.05/15/21 777723Lin.
Exp. Date Lot Num.Type12:48 pm
03/17/20

Stor
ing
Test
Str
ip, C
ontr
ol S
olut
ion,
and
Lin
earit
y So
lutio
n In
form
atio
n in
the
Met
er •
6
101
08424705001 (03) 2020-08 USA • Accu-Chek Inform II Operator’s Manual Version 7.1
Selecting a stored lot number as the current lot number
You can select any stored lot number as the current lot number.
1 Touch in the Main Menu to open the Main Menu 2 screen.
2 Touch Linearity Lots to open the related menu. The current lot number is indicated by an asterisk (*).
Main Menu
Review Results
Control Test
Patient Test
12:48 pm
03/17/20
Main Menu 2
Maintenance
Strip Lots
Proficiency
Control Lots
Beeper
Linearity
Diagnostics
Linearity Lots
Admin.
12:48 pm
03/17/20
Order Strips
Linearity Lots
Add
* Lin. 06/21/20 77767807/31/20 77773206/21/20 777723
Lin.Lin.
Type Exp. Date Lot Num.12:48 pm
03/17/20

102
08424705001 (03) 2020-08 USA • Accu-Chek Inform II Operator’s Manual Version 7.1
3 Touch the lot number you wish to select as the cur-rent lot number. This opens the related detail view.
4 Touch Make Current to make this lot number the current lot number. The Current information is then also displayed in the detail view.
5 Touch to return to the list of lot numbers, or touch to return to the Main Menu.
Linear. Lot Details
Edit Delete
Linearity Lot: 777732Use by 12/31/20Current
12:48 pm
03/17/20
Linearity Lots
Add
* Lin. 06/21/20 77767807/31/20 77773206/21/20 777723
Lin.Lin.
Type Exp. Date Lot Num.12:48 pm
03/17/20
Linear. Lot Details
Edit Delete
Linearity Lot: 777732Use by 12/31/20
Make Current
12:48 pm
03/17/20

Line
arity
Tes
ting
• 7
103
08424705001 (03) 2020-08 USA • Accu-Chek Inform II Operator’s Manual Version 7.1
7 Linearity Testing
7.1 Information regarding linearity tests
Observe the applicable regulations and directives of the responsible regulatory agencies when performing linearity tests. For information about sources for products required during linearity testing or for technical assistance, contact Roche Customer Support Center.
Linearity tests can help you to check the function and accuracy of the entire system over the full range of specified values. Linearity samples should be treated in exactly the same manner as previously described for control solutions used in glucose control testing.
The term “Linearity” describes the ability of the system to maintain a constant accuracy over the full range of spec-ified values. If test results were plotted against reference values as a curve over the full range of these values, the ideal (high linearity) would be a straight line. Linearity is the range of values from the lowest to the highest for which an instrument is proven capable of giving accurate results.
When using a data management system for configura-tion, it is possible to partially or fully disable the func-tions described in this chapter. In this case, the respective buttons in Main Menu 2 do not appear. See also Appendix A.

104
08424705001 (03) 2020-08 USA • Accu-Chek Inform II Operator’s Manual Version 7.1
Linearity testing intervals The linearity of the system should be checked before it is used the first time for patient testing. The intervals for subsequent linearity tests are determined by the facility that operates the system. Linearity testing can also be run when you want to check the overall performance of the system.
Information stored during linearity testing
The following information is stored for every linearity test:
■ Test result
■ Lot number of the linearity solution
■ Level of linearity solution (L1 to L6)
■ Operator ID (if configured)
■ Lot number of the test strips
■ Time and date of test
■ Comments (if applicable)

Line
arity
Tes
ting
• 7
105
08424705001 (03) 2020-08 USA • Accu-Chek Inform II Operator’s Manual Version 7.1
Linearity test kit The linearity test kit contains glucose solutions in six levels (6 vials, 2.5 mL each). For additional information about the contents and handling of the kit, refer to the package insert.
Preparing to run a linearity test Aside from special preparations (see the following sec-tion), a linearity test is run the same as a patient test. Please check the following:
■ At least one code file for test strips must be stored in the meter and match the lot number of the test strips used (see Chapter 6).
■ The proper test strips must be available.
■ An operator ID must be entered (with password, if applicable), if the meter is configured for login.

106
08424705001 (03) 2020-08 USA • Accu-Chek Inform II Operator’s Manual Version 7.1
7.2 Performing a linearity test
Overview of test procedure A linearity test comprises the following steps:
■ Check the lot number of the linearity solutions.
■ Check the lot number of the test strips.
■ Perform the test with a minimum of three linearity solutions.
Starting a linearity test The following description assumes that the meter is powered on and the Main Menu is displayed.
1 Touch in the Main Menu to open the Main Menu 2 screen.
2 Touch Linearity to start the linearity test. The Line-arity Test screen opens.
Linearity Test
12345678?Use Linearity Lot
12:48 pm
03/17/20
Main Menu
Review Results
Control Test
Patient Test
12:48 pm
03/17/20
Main Menu 2
Maintenance
Strip Lots
Proficiency
Control Lots
Beeper
Linearity
Diagnostics
Linearity Lots
Admin.
12:48 pm
03/17/20
Order Strips
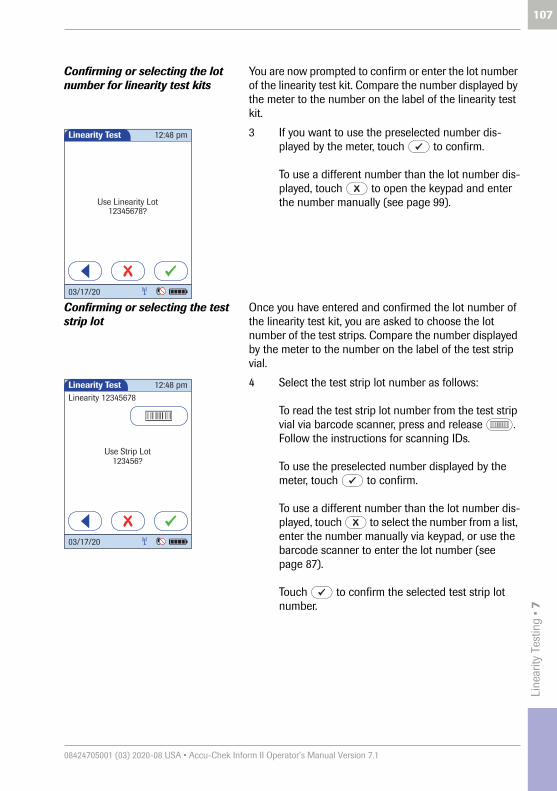
Line
arity
Tes
ting
• 7
107
08424705001 (03) 2020-08 USA • Accu-Chek Inform II Operator’s Manual Version 7.1
Confirming or selecting the lot number for linearity test kits
You are now prompted to confirm or enter the lot number of the linearity test kit. Compare the number displayed by the meter to the number on the label of the linearity test kit.
3 If you want to use the preselected number dis-played by the meter, touch to confirm.
To use a different number than the lot number dis-played, touch to open the keypad and enter the number manually (see page 99).
Confirming or selecting the test strip lot
Once you have entered and confirmed the lot number of the linearity test kit, you are asked to choose the lot number of the test strips. Compare the number displayed by the meter to the number on the label of the test strip vial.
4 Select the test strip lot number as follows:
To read the test strip lot number from the test strip vial via barcode scanner, press and release . Follow the instructions for scanning IDs.
To use the preselected number displayed by the meter, touch to confirm.
To use a different number than the lot number dis-played, touch to select the number from a list, enter the number manually via keypad, or use the barcode scanner to enter the lot number (see page 87).
Touch to confirm the selected test strip lot number.
Linearity Test
12345678?Use Linearity Lot
12:48 pm
03/17/20
Linearity TestLinearity 12345678
Use Strip Lot
12:48 pm
123456?
03/17/20

108
08424705001 (03) 2020-08 USA • Accu-Chek Inform II Operator’s Manual Version 7.1
In the Linearity Test menu, the levels available for the linearity test are displayed.
5 Touch L1 to start the subsequent test with this (first) level.
Inserting test strips After selecting the level, a flashing green arrow appears on screen and prompts you to insert the test strip.
1 Remove the test strip from the test strip vial and close the vial again with the cap.
2 Hold the test strip so the lettering “ACCU-CHEK” is facing upward.
3 Slide the test strip into the test strip port as far as it will go in the direction indicated by the arrows on the test strip.
The meter beeps. The hourglass icon appears and indi-cates that the meter is checking the test strip. Do not apply linearity solution while it is displayed.
Linearity Test
L1
L5
L3
L6
L4
L2
Linearity 12345678Strip Lot 545794
12:48 pm
03/17/20
Linearity TestLinearity 12345678 L1Strip Lot 545794
12:48 pm
03/17/20
Linearity TestLinearity 12345678 L1Strip Lot 545794
12:48 pm
03/17/20

Line
arity
Tes
ting
• 7
109
08424705001 (03) 2020-08 USA • Accu-Chek Inform II Operator’s Manual Version 7.1
Applying a linearity test sample Once the meter has checked the test strip, the hourglass icon disappears and you are prompted to apply linearity solution.
1 Wait until the flashing drop appears in the display before applying the solution. The meter beeps.
2 Apply a drop of the linearity solution to the front edge of the test strip. Do not apply the solution to the top of the strip.The linearity solution is pulled into the test strip area by capillary action.
Once sufficient linearity solution has been detected, the meter beeps and the measurement begins. Do not touch test strip once the meter beeps. Wait for the linearity solution result to show on screen.
Linearity TestLinearity 12345678 L1Strip Lot 545794
12:48 pm
03/17/20
When applying the linearity solution, position the meter so that the test strip port is always higher or on the same level as the linearity solution. This prevents any excess solution from flowing down the strip and enter-ing the meter.
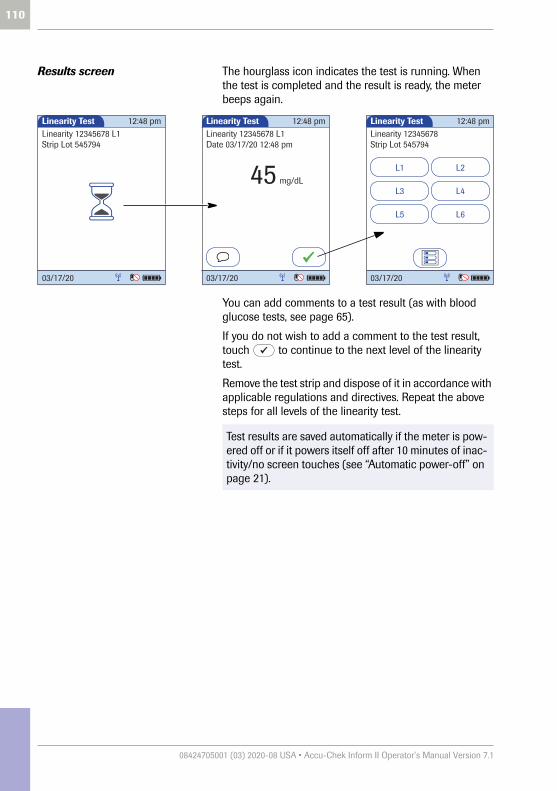
110
08424705001 (03) 2020-08 USA • Accu-Chek Inform II Operator’s Manual Version 7.1
Results screen The hourglass icon indicates the test is running. When the test is completed and the result is ready, the meter beeps again.
You can add comments to a test result (as with blood glucose tests, see page 65).
If you do not wish to add a comment to the test result, touch to continue to the next level of the linearity test.
Remove the test strip and dispose of it in accordance with applicable regulations and directives. Repeat the above steps for all levels of the linearity test.
Linearity Test
45
Linearity 12345678 L1Date 03/17/20 12:48 pm
mg/dL
12:48 pm
03/17/20
Linearity TestLinearity 12345678 L1Strip Lot 545794
12:48 pm
03/17/20
Linearity Test
L1
L5
L3
L6
L4
L2
Linearity 12345678Strip Lot 545794
12:48 pm
03/17/20
Test results are saved automatically if the meter is pow-ered off or if it powers itself off after 10 minutes of inac-tivity/no screen touches (see “Automatic power-off” on page 21).

Prof
icie
ncy
Test
ing
• 8
111
08424705001 (03) 2020-08 USA • Accu-Chek Inform II Operator’s Manual Version 7.1
8 Proficiency Testing
8.1 Information regarding proficiency tests
Observe the applicable regulations and directives of the responsible regulatory agencies when performing proficiency tests.
Blood glucose proficiency tests are run on samples whose values are unknown to the operator performing the test. These samples are provided by an outside source, and the results should be forwarded to the appro-priate source after completing the test. The supplied samples are treated in the same manner as regular patient samples.
Blood glucose proficiency testing provides another means to verify that your technique, reagents, system, and testing performance are as they should be. Some regulatory agencies require that these proficiency sam-ples be tested as part of an institution's quality assurance program before certification of the institution is allowed.
When using a data management system for configura-tion, it is possible to partially or fully disable the func-tions described in this chapter. In this case, the respective buttons in Main Menu 2 do not appear. See also Appendix A.

112
08424705001 (03) 2020-08 USA • Accu-Chek Inform II Operator’s Manual Version 7.1
Information stored during proficiency testing
The following information is stored for every proficiency test:
■ Test result
■ Sample ID
■ Lot number of the test strips
■ Time and date of test
■ Comments (if applicable)
■ Operator ID (if configured)
Preparing a proficiency test To perform a proficiency test you need the following:
■ At least one code file for test strips must be stored in the meter and match the lot number of the test strips used (see Chapter 6).
■ The proper test strips must be available.
■ An operator ID must be entered (with password, if applicable), if the meter is configured for login.
For blood glucose proficiency tests, the sample ID (instead of patient ID) must be stored as identification. Sample IDs with up to 20 characters can be entered.

Prof
icie
ncy
Test
ing
• 8
113
08424705001 (03) 2020-08 USA • Accu-Chek Inform II Operator’s Manual Version 7.1
8.2 Performing a proficiency test
Overview of test procedure A proficiency test comprises the following steps:
■ Enter a sample ID for the proficiency sample.
■ Check the lot number of the test strips.
■ Perform the actual test with the proficiency sample.
Starting a proficiency test The following description assumes that the meter is powered on and the Main Menu is displayed.
1 Touch in the Main Menu to open the Main Menu 2 screen.
2 Touch Proficiency to start the proficiency test.
Main Menu
Review Results
Control Test
Patient Test
12:48 pm
03/17/20
Main Menu 2
Maintenance
Strip Lots
Proficiency
Control Lots
Beeper
Linearity
Diagnostics
Linearity Lots
Admin.
12:48 pm
03/17/20
Order Strips
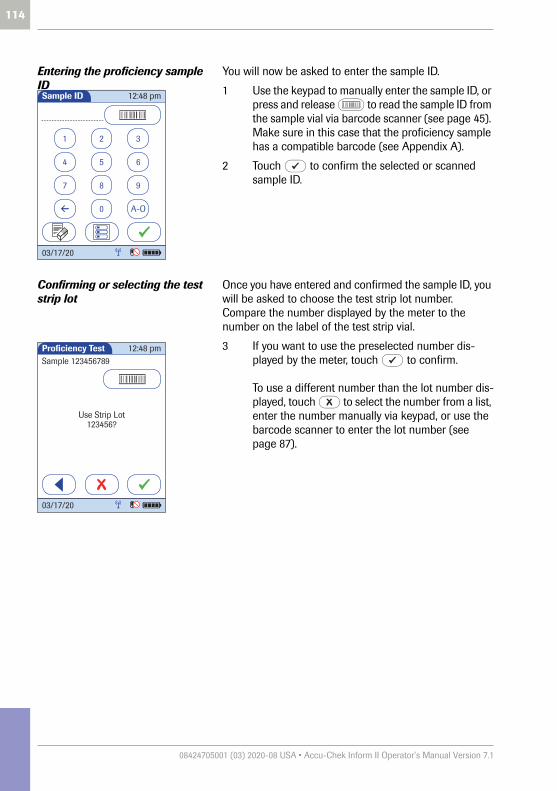
114
08424705001 (03) 2020-08 USA • Accu-Chek Inform II Operator’s Manual Version 7.1
Entering the proficiency sample ID
You will now be asked to enter the sample ID.
1 Use the keypad to manually enter the sample ID, or press and release to read the sample ID from the sample vial via barcode scanner (see page 45). Make sure in this case that the proficiency sample has a compatible barcode (see Appendix A).
2 Touch to confirm the selected or scanned sample ID.
Confirming or selecting the test strip lot
Once you have entered and confirmed the sample ID, you will be asked to choose the test strip lot number. Compare the number displayed by the meter to the number on the label of the test strip vial.
3 If you want to use the preselected number dis-played by the meter, touch to confirm.
To use a different number than the lot number dis-played, touch to select the number from a list, enter the number manually via keypad, or use the barcode scanner to enter the lot number (see page 87).
1 2 3
4 5 6
7 8 9
A-O0
Sample ID 12:48 pm
03/17/20
Proficiency TestSample 123456789
Use Strip Lot
12:48 pm
123456?
03/17/20

Prof
icie
ncy
Test
ing
• 8
115
08424705001 (03) 2020-08 USA • Accu-Chek Inform II Operator’s Manual Version 7.1
Inserting test strips After confirming the test strip lot, a flashing green arrow appears on screen and prompts you to insert the test strip.
1 Remove the test strip from the test strip vial and close the vial with the cap.
2 Hold the test strip so the lettering “ACCU-CHEK” is facing upward.
3 Slide the test strip into the test strip port as far as it will go in the direction indicated by the arrows on the test strip.
The meter beeps. The hourglass icon appears and indi-cates that the meter is checking the test strip. Do not apply the proficiency sample while it is displayed.
Proficiency TestSample 123456789Strip Lot 545794
12:48 pm
03/17/20
Proficiency TestSample 123456789Strip Lot 545794
12:48 pm
03/17/20

116
08424705001 (03) 2020-08 USA • Accu-Chek Inform II Operator’s Manual Version 7.1
Applying a proficiency sample Once the meter has checked the test strip, the hourglass icon disappears and you are prompted to apply the profi-ciency sample.
1 Wait until the flashing drop appears in the display before applying the sample. The meter beeps.
2 Apply a drop of sample to the front edge of the test strip. Do not apply the sample to the top of the strip.The sample is pulled into the test strip area by capillary action.
Once sufficient sample has been detected, the meter beeps and the measurement begins. Do not touch test strip once the meter beeps. Wait for the proficiency test result to show on screen.
Proficiency TestSample 123456789Strip Lot 545794
12:48 pm
03/17/20
When applying the proficiency sample, position the meter so that the test strip port is always higher or on the same level as the sample. This prevents any excess sample from flowing down the strip and entering the meter.

Prof
icie
ncy
Test
ing
• 8
117
08424705001 (03) 2020-08 USA • Accu-Chek Inform II Operator’s Manual Version 7.1
Results screen The hourglass icon indicates the test is running. When the test is completed and the result is ready, the meter beeps again.
The result is displayed as a numerical value, unless it falls outside the system measurement range. In this case, the message Hi or Lo is displayed.
You can add comments to a test result (as with blood glucose tests) (see page 65).
If you do not wish to add a comment to the test results, touch to complete the test and store the result.
Remove the test strip and dispose of it in accordance with applicable regulations and directives for disposal of potentially infectious samples and materials.
Proficiency Test
HI
Sample 123456789Date 03/17/20 12:48 pm
12:48 pm
03/17/20
Proficiency Test
150
Sample 123456789Date 03/17/20 12:48 pm
mg/dL
12:48 pm
03/17/20
Proficiency Test
LO
Sample 123456789Date 03/17/20 12:48 pm
12:48 pm
03/17/20
Test results are saved automatically if the meter is pow-ered off or if it powers itself off after 10 minutes of inac-tivity/no screen touches (see “Automatic power-off” on page 21).

118
08424705001 (03) 2020-08 USA • Accu-Chek Inform II Operator’s Manual Version 7.1
This page intentionally left blank.
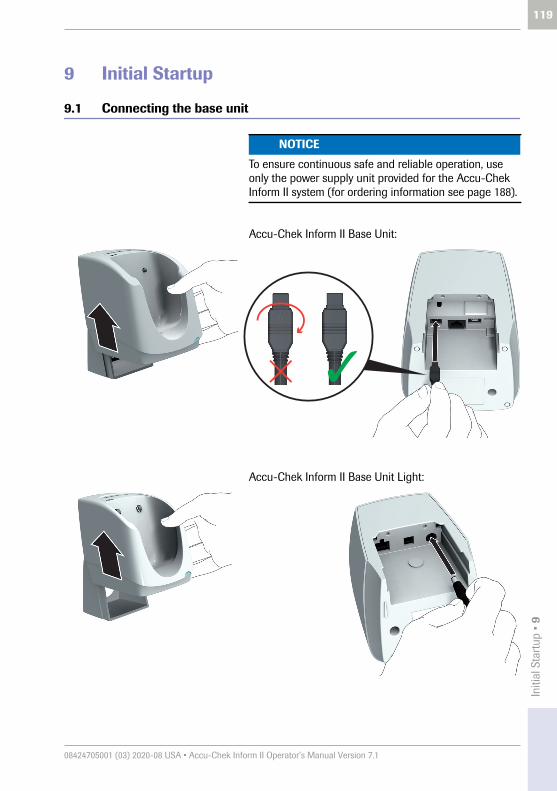
Initi
al S
tart
up •
9
119
08424705001 (03) 2020-08 USA • Accu-Chek Inform II Operator’s Manual Version 7.1
9 Initial Startup
9.1 Connecting the base unit
Accu-Chek Inform II Base Unit:
Accu-Chek Inform II Base Unit Light:
NOTICE
To ensure continuous safe and reliable operation, use only the power supply unit provided for the Accu-Chek Inform II system (for ordering information see page 188).

120
08424705001 (03) 2020-08 USA • Accu-Chek Inform II Operator’s Manual Version 7.1
1 Slide the base unit upward and remove it from the wall mount (if in use).
2 Connect the power supply to the power input jack.
3 If you want to connect the Accu-Chek Inform II Base Unit in a wired environment: Connect the Ethernet (RJ45) cable or the USB cable to the respective port. Use only the USB cable pro-vided with the Accu-Chek Inform II system.
4 Slide the base unit back onto the wall mount (if in use).
For details on configuring the Accu-Chek Inform II Base Unit, contact Roche Customer Support Center for tech-nical assistance.
Note for System Administrator: For further technical information on setting up and configuring the Accu-Chek Inform II Base Unit, consult the package insert accompanying the device and the “Technical Note” stored on the Accu-Chek Inform II Base Unit as a PDF file. You can access this file by connecting the base unit to a PC with the USB cable.
For connecting the Base Unit with older hardware (REF 05060290001), see Appendix F, “Appendix for Accu-Chek Inform II Base Unit (legacy version)”.

Initi
al S
tart
up •
9
121
08424705001 (03) 2020-08 USA • Accu-Chek Inform II Operator’s Manual Version 7.1
9.2 Installing or replacing the battery pack
When shipped, the battery pack is not installed in the Accu-Chek Inform II meter.
Unused battery packs lose their charge over time and have to be recharged before they can be used. After installing a new battery pack, the meter should be charged for at least 8 hours (e.g., overnight) in the base unit before testing.
Whenever the meter is in the base unit, the icon is displayed. This icon shows that power is available and the meter can charge, if necessary.
Make sure that the allowable temperature range for charging the battery pack (37-108 °F or 3-42 °C) is maintained during installation and initial setup.
Replace the battery pack within approximately 10 minutes to retain the date and time settings. Beyond this period of time, you may have to re-enter date and timetime, or you may return the meter to the base unit to obtain the correct date and time. Replace the battery pack only in shutdown mode, see page 122.
Data stored in the memory (see section 12.1) is kept when replacing the battery pack even if no battery is inserted. All settings (other than date/time - see above) are also retained.
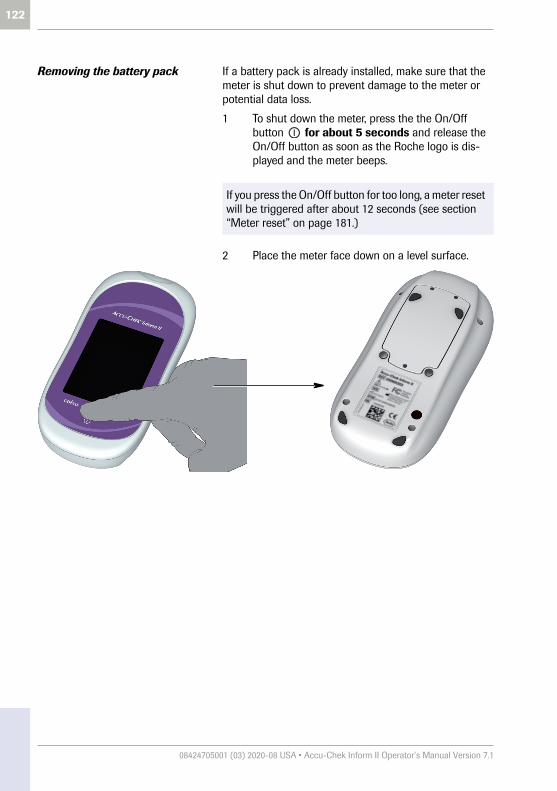
122
08424705001 (03) 2020-08 USA • Accu-Chek Inform II Operator’s Manual Version 7.1
Removing the battery pack If a battery pack is already installed, make sure that the meter is shut down to prevent damage to the meter or potential data loss.
1 To shut down the meter, press the the On/Off button for about 5 seconds and release the On/Off button as soon as the Roche logo is dis-played and the meter beeps.
2 Place the meter face down on a level surface.
If you press the On/Off button for too long, a meter reset will be triggered after about 12 seconds (see section “Meter reset” on page 181.)

Initi
al S
tart
up •
9
123
08424705001 (03) 2020-08 USA • Accu-Chek Inform II Operator’s Manual Version 7.1
3 Using a Torx screwdriver size T5, remove the three screws holding the battery compartment cover in place.
4 Remove the battery compartment cover from the meter. The battery pack now visible is connected to the meter by a plug.
5 Carefully lift the battery pack and remove the plug connector.
Disposal of used batteriesDo not dispose of the batteries with normal domestic waste. Dispose of used batteries in accordance with applicable local regulations and directives and your facility’s guidelines on the disposal of electronic waste equipment.

124
08424705001 (03) 2020-08 USA • Accu-Chek Inform II Operator’s Manual Version 7.1
Installing the battery pack 1 Loosen the screws on the battery compartment cover until they are protruding about 2/10 inch.
2 Hold the battery pack in your hand, with the wires and the plug pinched between your thumb and index finger.
3 Plug the connector plug into the socket.
4 Place the battery pack inside the battery compart-ment as shown above.
To position the battery pack correctly, always align the ridges on the side of the battery pack with the ridges on the inside of the battery compartment.

Initi
al S
tart
up •
9
125
08424705001 (03) 2020-08 USA • Accu-Chek Inform II Operator’s Manual Version 7.1
5 Close the battery compartment with the cover. Make sure that the plug connector wires do not get pinched between meter and cover.
6 Tighten all three screws until snug (do not over-tighten).
After inserting a new battery pack, the meter powers on automatically.
■ The Roche logo is displayed. If the meter does not power on automatically, the battery pack may be nearly empty. Place the meter in a base unit for a minimum of 15 minutes, then remove the meter and try to power it on. If it powers on, the battery pack is charging properly.
■ Within a short period of time, the start screen should appear.
■ If the meter has been without power for too long, a message may appear informing you that the date and time settings have been lost due to power loss.
■ The screens for entering the date and the time appear.
7 Enter the date and time. After you have entered the correct information, confirm each screen with .
■ Unless your QC configuration is Always OK (see page 140), the meter will now be in QC Lockout due to the manually entered date/time.
8 Synchronize the meter’s date/time with the date/time of your facility via base unit or, if working wire-lessly, wait at least ten minutes for the next WLAN synchronization before performing any further tests.
After installing a new battery pack, the meter should be charged for at least 8 hours (e.g., overnight) in the base unit before testing.
1 2 3
4 5 6
7 8 9
0
Date
03/17/20
12:00 am
03/17/20
1 2 3
4 5 6
7 8 9
AM/PM0
Time 12:00 am
12:48 pm
03/17/20
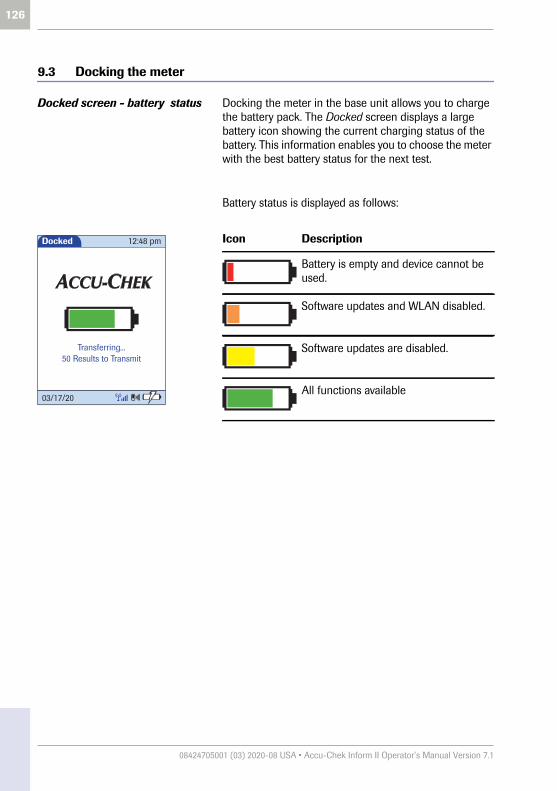
126
08424705001 (03) 2020-08 USA • Accu-Chek Inform II Operator’s Manual Version 7.1
9.3 Docking the meter
Docked screen - battery status Docking the meter in the base unit allows you to charge the battery pack. The Docked screen displays a large battery icon showing the current charging status of the battery. This information enables you to choose the meter with the best battery status for the next test.
Battery status is displayed as follows:
Icon Description
Battery is empty and device cannot be used.
Software updates and WLAN disabled.
Software updates are disabled.
All functions available
Docked
Transferring...50 Results to Transmit
12:48 pm
03/17/20

Initi
al S
tart
up •
9
127
08424705001 (03) 2020-08 USA • Accu-Chek Inform II Operator’s Manual Version 7.1
Improved charging performance After 2 minutes in the base unit, the meter powers off and goes into standby mode. The screen goes blank and the charging process starts. Charging the battery pack in standby mode improves charging performance.
When the screen is blank during the charging process, you can power on the meter at any time to check the battery charging status or that the meter is properly docked by touching the screen or pressing the On/Off button . The screen lights up for 2 minutes and dis-plays the Docked screen with the colored battery icon best showing the current battery status.
When the battery pack is fully charged, the meter powers on automatically and stays on. The screen displays the green battery icon to show that the battery is fully charged.
If the meter is NOT properly docked, a short “humming” noise sporadically occurs and the battery charging icon
flashes in the status bar.
■ Remove the meter from the base unit.■ Redock it by gently pushing it into the base unit to
ensure proper contact. Once the meter is properly docked and charging, the battery charging icon stops flashing. See section “Low power icons” on page 171.

128
08424705001 (03) 2020-08 USA • Accu-Chek Inform II Operator’s Manual Version 7.1
Docked screen - meter status When docked, the meter shows different messages according to the current meter status.
The following displays appear on the meter when it is docked in an Accu-Chek Inform II Base Unit or an Accu-Chek Inform II Base Unit Light and communi-cating. The same displays appear whether the meter is transferring data via base unit or via wireless connection.
This display is visible when communication is still active but the meter is busy processing the data received or waiting for the next data message from the Data Management System (DMS).
Docked
Connecting...
12:48 pm
03/17/20
Docked
Synchronizing Database...
12:48 pm
03/17/20
Docked
Transferring...50 Results to Transmit
12:48 pm
03/17/20
Docked
Busy...
12:48 pm
03/17/20
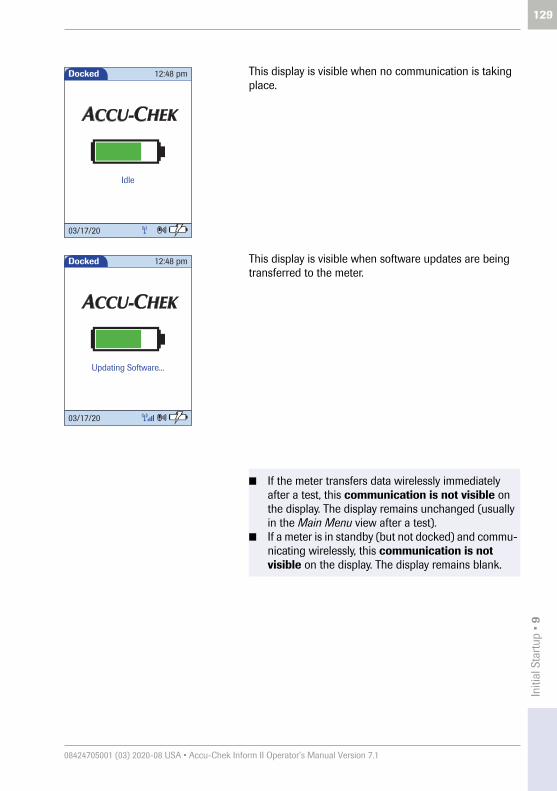
Initi
al S
tart
up •
9
129
08424705001 (03) 2020-08 USA • Accu-Chek Inform II Operator’s Manual Version 7.1
This display is visible when no communication is taking place.
This display is visible when software updates are being transferred to the meter.
■ If the meter transfers data wirelessly immediately after a test, this communication is not visible on the display. The display remains unchanged (usually in the Main Menu view after a test).
■ If a meter is in standby (but not docked) and commu-nicating wirelessly, this communication is not visible on the display. The display remains blank.
Docked
Idle
12:48 pm
03/17/20
Docked
Updating Software...
12:48 pm
03/17/20

130
08424705001 (03) 2020-08 USA • Accu-Chek Inform II Operator’s Manual Version 7.1
9.4 Initial setup on the meter
There are two ways to customize the setup of the meter: directly on the meter (see the following menu overview) or via the data management system (see Appendix A). The two methods differ according to the range of options available.
The meter is delivered with preconfigured default set-tings. The following settings can be configured on the meter:
■ Date and time format
■ Date and time editing enabled
■ Units
■ Test types
■ Lot information editing enabled
■ Methods for verifying lot information
■ Enable barcode scanner
■ Normal, critical, and reportable ranges
■ Operator ID options
■ Patient ID options
■ Settings for glucose controls and QC Lockout
■ Beeper
If the meter is configured by a system administrator using a data management system, the configuration options on the meter may be disabled to avoid conflicts in the settings. These options then appear grayed out on the display.
The option Service Menu (see section 10.7) with the feature “Delete Patient Information” is not available in the preconfigured default setting. The Service Menu can only be activated via DMS.

Initi
al S
tart
up •
9
131
08424705001 (03) 2020-08 USA • Accu-Chek Inform II Operator’s Manual Version 7.1
Menu overview The following tables contain a brief overview of the menu structure. The menus can be used to operate the meter fully and enter the most important basic settings.
Main Menu
Patient Test Observer Login – Enter Observer ID– Enter Observer Password
Glucose Test – Enter Patient ID– Verify Test Strip Lot– Insert Test Strip– Apply Sample– View Test Results– Add Comments
Other Test – Pregnancy– Visual Urinalysis (UA)– Rapid Streptococcus– Rapid Drugs of Abuse Tests (DAT)– Fecal Occult– Gastric Occult– Ketones– Rapid-Acting Insulin– Regular Insulin– Intermediate-Acting Insulin– Long-Acting Insulin– Insulin Mixtures
Control Test Glucose Control Test – Select Level– Verify Control Lot– Verify Test Strip Lot– Insert Test Strip– Apply Control Solution– View Test Results– Add Comments
Other Control Tests – Select Type of Control– Enter Date/Time tested– Enter/Confirm Kit or Test Strip Lot
Number– Enter Kit or Test Strip Expiration
Date– Enter/Confirm Control Lot Number– Enter Control Lot Expiration Date– Select Control Result(s).
Review Results Review Glucose Test – Review All Test Results
Review Other Test – Review All OTE Results

132
08424705001 (03) 2020-08 USA • Accu-Chek Inform II Operator’s Manual Version 7.1
Main Menu 2Maintenance – Add Comment
– Maintenance Result
Proficiency – Enter Sample ID– Verify Test Strip Lot– Insert Test Strip– Apply Sample– View Test Results– Add Comments
Strip Lots – View Lot List– Add Lot– Enter Expiration Date– Set Control Ranges– View Lot Details– Make Lot Current– Edit/Delete Lot
Control Lots – View Lot List– Select Control Level– Add Lot– Enter Expiration Date– Make Lot Current– Edit/Delete Lot
Order Strips – Trigger ordering of test strips
Beeper – Set Beeper Volume
Diagnostics – List Software Versions– Test Barcode Scanner– Meter Events Log– Statistics– Configuration– Ranges– Wireless Setup– Wireless Status– Wireless Test
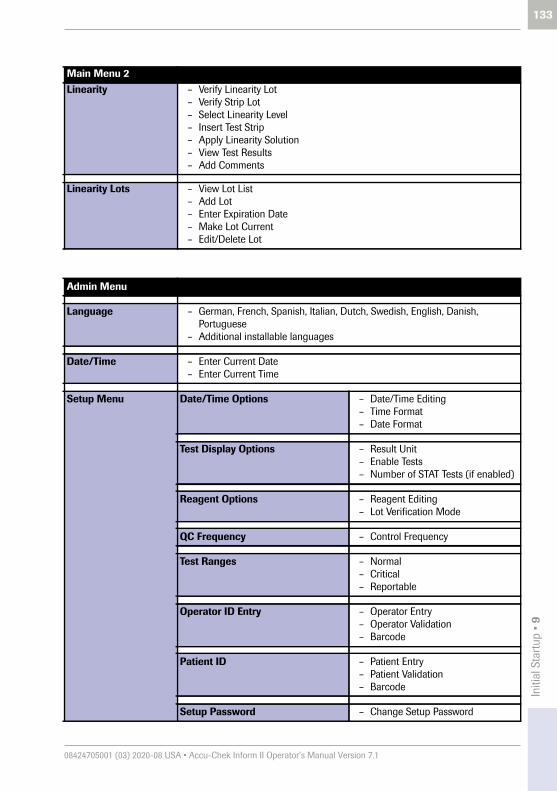
Initi
al S
tart
up •
9
133
08424705001 (03) 2020-08 USA • Accu-Chek Inform II Operator’s Manual Version 7.1
Linearity – Verify Linearity Lot– Verify Strip Lot– Select Linearity Level– Insert Test Strip– Apply Linearity Solution– View Test Results– Add Comments
Linearity Lots – View Lot List– Add Lot– Enter Expiration Date– Make Lot Current– Edit/Delete Lot
Main Menu 2
Admin Menu
Language – German, French, Spanish, Italian, Dutch, Swedish, English, Danish, Portuguese
– Additional installable languages
Date/Time – Enter Current Date– Enter Current Time
Setup Menu Date/Time Options – Date/Time Editing– Time Format– Date Format
Test Display Options – Result Unit– Enable Tests– Number of STAT Tests (if enabled)
Reagent Options – Reagent Editing– Lot Verification Mode
QC Frequency – Control Frequency
Test Ranges – Normal– Critical– Reportable
Operator ID Entry – Operator Entry– Operator Validation– Barcode
Patient ID – Patient Entry– Patient Validation– Barcode
Setup Password – Change Setup Password

134
08424705001 (03) 2020-08 USA • Accu-Chek Inform II Operator’s Manual Version 7.1
Service Menu1 Delete Patient Information – Delete all patient-related data (patient list and results)
Touch to confirm and save any changes to the settings.
1. Only if activated via DMS
Admin Menu
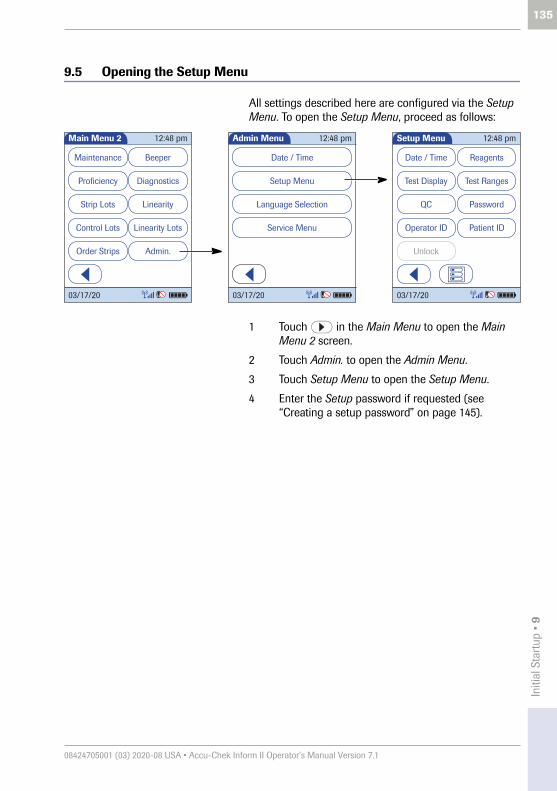
Initi
al S
tart
up •
9
135
08424705001 (03) 2020-08 USA • Accu-Chek Inform II Operator’s Manual Version 7.1
9.5 Opening the Setup Menu
All settings described here are configured via the Setup Menu. To open the Setup Menu, proceed as follows:
1 Touch in the Main Menu to open the Main Menu 2 screen.
2 Touch Admin. to open the Admin Menu.
3 Touch Setup Menu to open the Setup Menu.
4 Enter the Setup password if requested (see “Creating a setup password” on page 145).
Main Menu 2
Maintenance
Strip Lots
Proficiency
Control Lots
Beeper
Linearity
Diagnostics
Linearity Lots
Admin.
12:48 pm
03/17/20
Order Strips
Admin Menu
Date / Time
Language Selection
Setup Menu
12:48 pm
Service Menu
03/17/20
Setup Menu
Date / Time
QC
Test Display
Password
Test Ranges
Reagents
Operator ID Patient ID
Unlock
12:48 pm
03/17/20
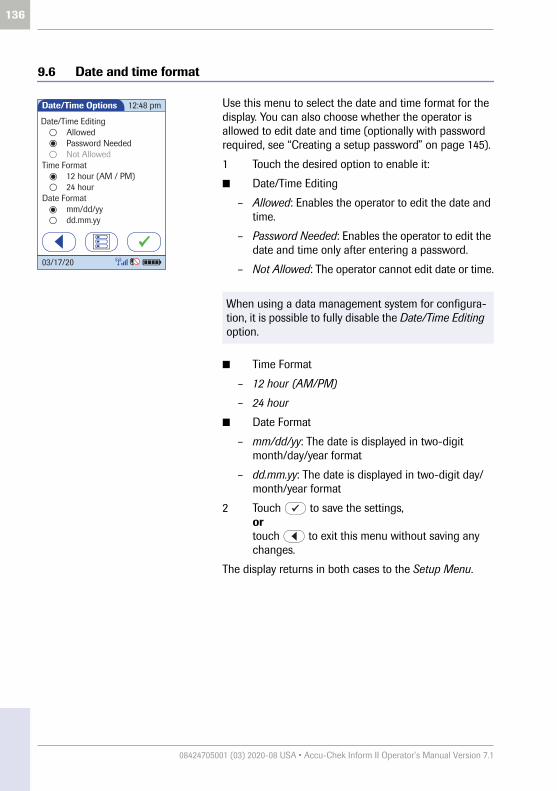
136
08424705001 (03) 2020-08 USA • Accu-Chek Inform II Operator’s Manual Version 7.1
9.6 Date and time format
Use this menu to select the date and time format for the display. You can also choose whether the operator is allowed to edit date and time (optionally with password required, see “Creating a setup password” on page 145).
1 Touch the desired option to enable it:
■ Date/Time Editing
– Allowed: Enables the operator to edit the date and time.
– Password Needed: Enables the operator to edit the date and time only after entering a password.
– Not Allowed: The operator cannot edit date or time.
■ Time Format
– 12 hour (AM/PM)
– 24 hour
■ Date Format
– mm/dd/yy: The date is displayed in two-digit month/day/year format
– dd.mm.yy: The date is displayed in two-digit day/month/year format
2 Touch to save the settings, or touch to exit this menu without saving any changes.
The display returns in both cases to the Setup Menu.
When using a data management system for configura-tion, it is possible to fully disable the Date/Time Editing option.
Date/Time Options
Date/Time EditingAllowedPassword Needed
Time Format12 hour (AM / PM)24 hour
Date Formatmm/dd/yydd.mm.yy
Not Allowed
12:48 pm
03/17/20

Initi
al S
tart
up •
9
137
08424705001 (03) 2020-08 USA • Accu-Chek Inform II Operator’s Manual Version 7.1
9.7 Display options and optional tests
Use this menu to select the unit of measure for test results and enable or disable optional tests.
1 Touch the desired option to enable it:
■ Result Units
– mg/dL
– mmol/L
■ Enable Tests
– STAT: STAT tests may be performed. When this option is enabled, you must enter the number of STAT tests allowed (after confirming the settings).
– Linearity is displayed in the Main Menu 2 screen
– Proficiency is displayed in the Main Menu 2 screen
– Maintenance is displayed in the Main Menu 2 screen
2 Touch to save the settings. If the STAT option is enabled, enter the number of STAT tests allowed, or touch to exit this menu without saving any changes.
The display returns in both cases to the Setup Menu (after entering the number of STAT tests allowed).
Test Disp. Options
mg/dLmmol/L
Enable Tests:StatLinearityProficiencyMaintenance
Display Strip LimitationsWarning
Result Units
12:48 pm
03/17/20
1 2 3
4 5 6
7 8 9
0
STAT Test Allowed
8
12:48 pm
03/17/20

138
08424705001 (03) 2020-08 USA • Accu-Chek Inform II Operator’s Manual Version 7.1
9.8 Options for test strips
This menu allows you to select options for handling lot numbers and specify whether the operator is allowed to add or delete reagent lots, edit the expiration date and limit values on the meter (see “Creating a setup pass-word” on page 145).
1 Touch the desired option to enable it:
■ Reagent Editing
– Allowed: Enables the operator to edit the reagent information without needing a password.
– Password Needed: Enables the operator to edit the reagent information only after entering a password.
– Not Allowed: The operator cannot edit reagent information.
■ Strip Lot Verification
– Display only: The lot number is shown on screen but the operator cannot confirm it or select a different lot number.
– Confirmation: The operator must confirm the lot number displayed and can enter alternative lot numbers manually or via barcode scanner.
– List selection: The operator can also select from a list of stored lot numbers.
– Scan only: Lot numbers can be verified via barcode scanner only.
2 Touch to change to the second screen of options, or touch to exit this menu without saving any changes.
When using a data management system for configura-tion, it is possible to fully disable the Reagent Editing option.
Reagent Options
AllowedPassword Needed
Display onlyConfirmationList selectionScan only
Reagent Editing
Strip Lot VerificationNot Allowed
12:48 pm
03/17/20

Initi
al S
tart
up •
9
139
08424705001 (03) 2020-08 USA • Accu-Chek Inform II Operator’s Manual Version 7.1
On the second settings screen, you can select options for handling lot numbers with glucose control and linearity tests.
1 Touch the desired option to enable it:
■ Control Lot Verification
– Display only: The lot number is shown on screen but the operator cannot confirm it or select a different lot number.
– Confirmation: The operator must confirm the lot number displayed and can enter alternative lot numbers manually or via barcode scanner.
– Lot entry: The operator must enter the lot number.
– Scan only: Lot numbers can be verified via barcode scanner only.
■ Linearity Lot Verification
– Display only: The lot number is shown on screen but the operator cannot confirm it or select a different lot number.
– Confirmation: The operator must confirm the lot number displayed and can enter alternative lot numbers manually.
– Lot entry: The operator must enter the lot number.
2 Touch to save the settings (for both settings screens), or touch to return to the first settings screen.
Reagent Options
Control Lot Verification
ConfirmationDisplay only
Scan onlyLinearity Lot Verification
Display onlyConfirmation
Lot entry
Lot entry
12:48 pm
03/17/20

140
08424705001 (03) 2020-08 USA • Accu-Chek Inform II Operator’s Manual Version 7.1
9.9 Options for glucose control tests
This menu contains options that allow you to specify whether and at what intervals glucose control tests are performed. If you require control tests, check your set-tings for STAT tests (see page 137).
1 Touch the desired option to enable it:
■ Control Frequency
– Always OK: QC Lockout is disabled, patient tests can be performed at any time. This applies regard-less of the result of running glucose control tests.
– Last QC OK: QC Lockout is activated only when the last glucose control test is out of range or a control test is not available (e.g., when changing the test strip lot).
– Hours: QC Lockout is activated after the specified time. When a glucose control test is run success-fully, the counter is reset to “0”.
– Strip Count: QC Lockout is activated after reaching the specified number of tests. When a glucose con-trol test is run successfully, the test strip counter is reset to “0”.
QC Frequency
Control Frequency
Last QC OKAlways OK
Strip CountHours
Rotating QC
ShiftTime Of Day
12:48 pm
03/17/20
1 2 3
4 5 6
7 8 9
0
QC Hours
50
12:48 pm
03/17/20
1 2 3
4 5 6
7 8 9
0
QC Strips
50
12:48 pm
03/17/20

Initi
al S
tart
up •
9
141
08424705001 (03) 2020-08 USA • Accu-Chek Inform II Operator’s Manual Version 7.1
– Shift: QC Lockout is activated per shift.
– Time Of Day: QC Lockout is activated at the speci-fied time of day. (Up to six times per day can be configured.)
– Rotating QC: QC tests require alternating use of L1 and L2 controls, instead of requiring both controls when performing a QC test.
2 Touch to save the settings. If the Hours or Strip Count option is enabled, enter the desired number, or touch to exit this menu without saving any changes.
The display returns in both cases to the Setup Menu.
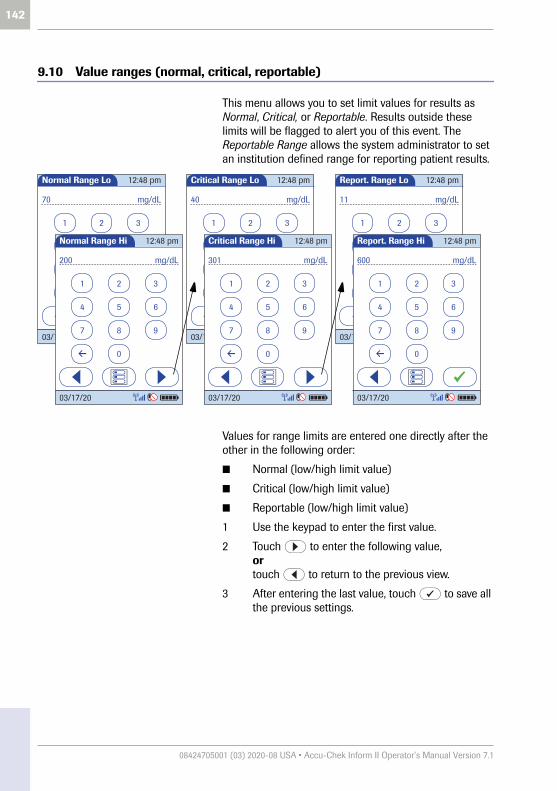
142
08424705001 (03) 2020-08 USA • Accu-Chek Inform II Operator’s Manual Version 7.1
9.10 Value ranges (normal, critical, reportable)
This menu allows you to set limit values for results as Normal, Critical, or Reportable. Results outside these limits will be flagged to alert you of this event. The Reportable Range allows the system administrator to set an institution defined range for reporting patient results.
Values for range limits are entered one directly after the other in the following order:
■ Normal (low/high limit value)
■ Critical (low/high limit value)
■ Reportable (low/high limit value)
1 Use the keypad to enter the first value.
2 Touch to enter the following value, or touch to return to the previous view.
3 After entering the last value, touch to save all the previous settings.
1 2 3
4 5 6
7 8 9
0
Report. Range Lo
11 mg/dL
12:48 pm
03/17/20
1 2 3
4 5 6
7 8 9
0
Normal Range Lo
70 mg/dL
12:48 pm
03/17/20
1 2 3
4 5 6
7 8 9
0
Critical Range Lo
40 mg/dL
12:48 pm
03/17/20
1 2 3
4 5 6
7 8 9
0
Report. Range Hi
600 mg/dL
12:48 pm
03/17/20
1 2 3
4 5 6
7 8 9
0
Normal Range Hi
200 mg/dL
12:48 pm
03/17/20
1 2 3
4 5 6
7 8 9
0
Critical Range Hi
301 mg/dL
12:48 pm
03/17/20
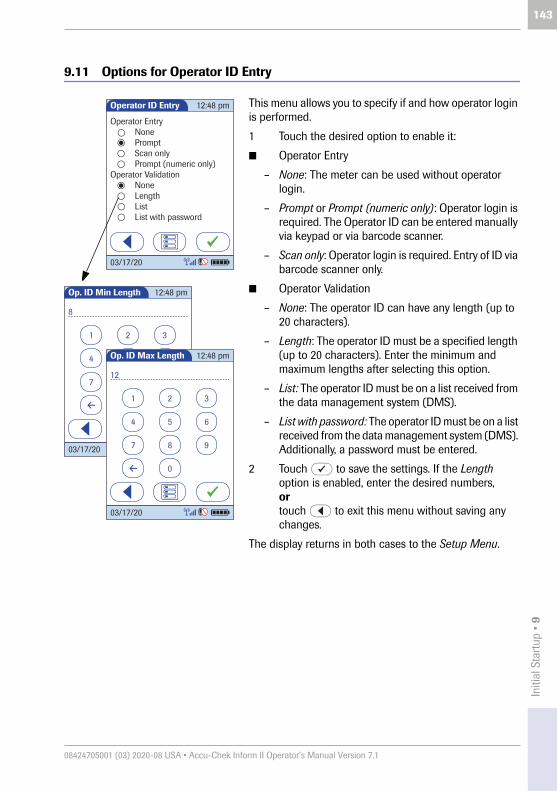
Initi
al S
tart
up •
9
143
08424705001 (03) 2020-08 USA • Accu-Chek Inform II Operator’s Manual Version 7.1
9.11 Options for Operator ID Entry
This menu allows you to specify if and how operator login is performed.
1 Touch the desired option to enable it:
■ Operator Entry
– None: The meter can be used without operator login.
– Prompt or Prompt (numeric only): Operator login is required. The Operator ID can be entered manually via keypad or via barcode scanner.
– Scan only: Operator login is required. Entry of ID via barcode scanner only.
■ Operator Validation
– None: The operator ID can have any length (up to 20 characters).
– Length: The operator ID must be a specified length (up to 20 characters). Enter the minimum and maximum lengths after selecting this option.
– List: The operator ID must be on a list received from the data management system (DMS).
– List with password: The operator ID must be on a list received from the data management system (DMS). Additionally, a password must be entered.
2 Touch to save the settings. If the Length option is enabled, enter the desired numbers, or touch to exit this menu without saving any changes.
The display returns in both cases to the Setup Menu.
Operator ID Entry
PromptNone
Length
Scan only
None
Operator Entry
Operator ValidationPrompt (numeric only)
ListList with password
12:48 pm
03/17/20
1 2 3
4 5 6
7 8 9
0
Op. ID Min Length
8
12:48 pm
03/17/20
1 2 3
4 5 6
7 8 9
0
Op. ID Max Length
12
12:48 pm
03/17/20

144
08424705001 (03) 2020-08 USA • Accu-Chek Inform II Operator’s Manual Version 7.1
9.12 Patient ID options
This menu allows you to specify the criteria for entering a patient ID.
1 Touch the desired option to enable it:
■ Patient Entry
– Prompt or Prompt (numeric only): The Patient ID can be entered manually via keypad or via barcode scanner.
– Scan only: Entry of ID via barcode scanner only.
– Prompt or List: The Patient ID can be entered manually via keypad or via barcode scanner, or can be picked from a list received from the DMS.
■ Patient Validation
– None: The patient ID can have any length (up to 20 characters).
– Length: The patient ID must be a specified length (up to 20 characters). Enter the minimum and maximum lengths after selecting this option.
– Length if numeric: Only numeric patient IDs are validated for their length. Alphabetic patient IDs are not validated.
– List - must be on list: The patient ID must be on a list received from the DMS.
– List - allowed to add new: The patient ID will be checked against a list received from the DMS. However, it is allowed to create a new patient ID using the meter.
2 Touch to save the settings. If the Length option is enabled, enter the desired numbers, or touch to exit this menu without saving any changes.
The display always returns to the Setup Menu (after entering the desired numbers).
Patient ID Options
Scan onlyPrompt (numeric only)
Patient EntryPrompt
12:48 pm
03/17/20
Prompt or List
1 2 3
4 5 6
7 8 9
0
Pat. ID Min Length
8
12:48 pm
03/17/20
1 2 3
4 5 6
7 8 9
0
Pat. ID Max Length
12
12:48 pm
03/17/20
Patient ID Options
LengthNone
Patient Validation
Length if numeric
12:48 pm
03/17/20
List - allowed to add newList - must be on list

Initi
al S
tart
up •
9
145
08424705001 (03) 2020-08 USA • Accu-Chek Inform II Operator’s Manual Version 7.1
9.13 Creating a setup password
This screen allows you to create a password for all the settings described in this chapter as well as for editing date/time and lot information (if password protected). The setup password ensures that only authorized persons can make changes to the setup.
1 Use the keypad to enter the password.
2 Touch to save the password and enable pass-word protection or touch to exit this screen without saving any changes. The display returns to the Main Menu. Password protection will take effect only after the next power on.
To disable password protection:
1 Open the Setup Menu (you must enter the current password).
2 Touch Password.
3 Delete the current password by touching .
4 Touch to disable password protection.
Please note that password protection can only be reset or modified after entering the current password. Proper authentication is required to access the Setup Menu. Store your password in a safe place.
1 2 3
4 5 6
7 8 9
A-O0
Setup Password 12:48 pm
03/17/20

146
08424705001 (03) 2020-08 USA • Accu-Chek Inform II Operator’s Manual Version 7.1
9.14 Setting the date and time
This setting can be hidden or require entry of the setup password, based on configuration.
1 Touch in the Main Menu to open the Main Menu 2 screen.
2 Touch Admin. to open the Admin Menu.
3 Touch Date/Time to begin entering the date.
4 Enter the date first, then time (all values are two-digit with a leading zero, if necessary) by touching
.
If the time format is “12h”, touch am/pm to select the correct time.
Main Menu
Review Results
Control Test
Patient Test
12:48 pm
03/17/20
Main Menu 2
Maintenance
Strip Lots
Proficiency
Control Lots
Beeper
Linearity
Diagnostics
Linearity Lots
Admin.
12:48 pm
03/17/20
Order Strips
Admin Menu
Date / Time
Language Selection
Setup Menu
12:48 pm
Service Menu
03/17/20
1 2 3
4 5 6
7 8 9
0
Date
11/30/20
12:48 pm
03/17/20
1 2 3
4 5 6
7 8 9
AM/PM0
Time 12:48 pm
12:15 pm
03/17/20
Admin Menu
Date / Time
Language Selection
Setup Menu
12:15 pm
03/17/20
Service Menu

Initi
al S
tart
up •
9
147
08424705001 (03) 2020-08 USA • Accu-Chek Inform II Operator’s Manual Version 7.1
9.15 Beeper options
This setting can be used to set the volume of the beeper.
1 Touch in the Main Menu to open the Main Menu 2 screen.
2 Touch Beeper to set the volume.
3 Touch the button with the desired volume. When you touch a button, the meter will beep at the corresponding volume.
4 Touch to save the setting and return to the Main Menu 2 screen.
Main Menu
Review Results
Control Test
Patient Test
12:48 pm
03/17/20
Main Menu 2
Maintenance
Strip Lots
Proficiency
Control Lots
Beeper
Linearity
Diagnostics
Linearity Lots
Admin.
12:48 pm
03/17/20
Order Strips
Beeper Setup
Medium
Low
High
Beeper Volume:12:48 pm
03/17/20

148
08424705001 (03) 2020-08 USA • Accu-Chek Inform II Operator’s Manual Version 7.1

Mai
nten
ance
and
Car
e • 1
0
149
08424705001 (03) 2020-08 USA • Accu-Chek Inform II Operator’s Manual Version 7.1
10 Maintenance and Care
10.1 Conditions for storage and shipping
General operating conditions Please observe the following points to ensure the reliable operation of your system over the long term:
■ Handle the meter and its system components with care. Avoid dropping it or banging it.
■ Protect the base unit from dripping liquid.
■ Do not immerse the meter or base unit in any liquid.
■ Following cleaning or disinfection, ensure the meter is dry before placing in base unit.
■ Follow the instructions for cleaning, beginning on page 151.
■ Do not expose the meter to excessive sources of heat for prolonged periods of time when perform-ing a test. Potential sources of heat can be, but are not limited to:
– Leaving the meter under a bilirubin light or photo therapy light
– Leaving the meter on a bed warmer
– Leaving the meter in an isolette
See Chapter 12 for operating and storage temperature ranges.
All information given on maintenance and care of the “base unit” in this chapter applies to both the Accu-Chek Inform II Base Unit and the Accu-Chek Inform II Base Unit Light.
Observe the following safety information to ensure the system functions properly. Improper handling can lead to erroneous test results.
150
08424705001 (03) 2020-08 USA • Accu-Chek Inform II Operator’s Manual Version 7.1
Shipping
■ If the meter has to be shipped or transported over long distances, always remove the battery pack from the meter. This eliminates the possibility of the battery pack overheating due to a short circuit. It also prevents deep discharge and other damage to the battery pack or meter.
■ Only ship undamaged battery packs. Damaged bat-tery packs must be disposed of locally. See page 24 for the risks associated with damaged battery packs and disposal information.
■ Package the battery pack for shipping so that it cannot move around in the packaging. Also observe any other applicable national regulations.
■ When shipping via third parties (e.g., by air or parcel service), work with the carrier to check whether specific requirements need to be met in relation to the lithium-ion battery packs on the basis of national or international laws on hazardous goods and, where applicable, if special packaging and labeling requirements apply.
Observe the following safety information when shipping the meter and battery pack. Failure to do so may result in injury to persons or damage to the meter or battery pack.
For short distances - example between a facility’s sites - users may transport the battery packs (either installed in the meter or separately) by road without having to meet further requirements.

Mai
nten
ance
and
Car
e • 1
0
151
08424705001 (03) 2020-08 USA • Accu-Chek Inform II Operator’s Manual Version 7.1
Storage ■ Store the system and test strips in the same envi-ronment in which they are used.
■ Do not store the meter in direct sunlight or under extreme temperature conditions.
■ Observe the limits for temperature and humidity when storing and using the meter (see Chapter 12).
10.2 Cleaning/disinfecting the Accu-Chek Inform II system
Cleaning and disinfecting the exterior surface of the meter is, at minimum, recommended daily for dedicated patient devices. Meters used with multiple patients may require more frequent cleaning and disinfecting. Follow recommendations from the FDA, CDC, and CMC and your facility’s policies and procedures for infection control.1, 2
The FDA recommends that Point of Care testing devices, such as blood glucose meters, should be used only on one patient and not shared. If dedicating blood glucose meters to a single patient is not possible, the meters must be properly cleaned and disinfected after every use fol-lowing the guidelines given in this section.3
1. FDA Public Health Notification: Use of Fingerstick Devices on More than One Person Poses Risk for Transmitting Bloodborne Pathogens: Initial Communication, (2010). http://www.fda.gov/MedicalDevices/Safety/AlertsandNotices/ucm224025.htm
2. CDC Clinical Reminder: Use of Fingerstick Devices on More than One Person Poses Risk for Transmitting Bloodborne Pathogens, (2010). http://www.cdc.gov/injectionsafety/FingerstickDevicesBGM.html
3. Healthcare Infection Control Practices Advisory Committee (HICPAC), William A. Rutala, Ph.D., M.P.H., and David J. Weber, M.D., M.P.H. Centers for Disease Control and Prevention, 2008. Guideline for Disinfection and Sterilization in Healthcare Facilities. Atlanta, GA.
For technical assistance or questions on cleaning and disinfecting, please contact Roche Customer Support Center at 1-800-440-3638.

152
08424705001 (03) 2020-08 USA • Accu-Chek Inform II Operator’s Manual Version 7.1
Guide to cleaning and disinfecting the Accu-Chek Inform II system
Prior to cleaning and disinfecting a blood glucose testing equipment:
1 Follow the infection control procedures of your institution when handling blood glucose testing equipment
2 Wear gloves
3 The gloves worn during cleaning and disinfecting should be removed and hands washed thoroughly with soap and water before performing the next patient test
Cleaning and disinfecting the meter
■ Clean the meter to remove visible soil and organic material prior to disinfecting.1
■ Disinfect the meter to destroy pathogenic and other types of microorganisms. Disinfection destroys most recognized pathogenic microorganisms but not necessarily all microbial forms (e.g., bacterial spores).1
NOTE: The meter should be cleaned and disinfected between each patient use.
1. Healthcare Infection Control Practices Advisory Committee (HICPAC), William A. Rutala, Ph.D., M.P.H., and David J. Weber, M.D., M.P.H. Centers for Disease Control and Prevention, 2008. Guideline for Disinfection and Sterilization in Healthcare Facilities. Atlanta, GA.
Mai
nten
ance
and
Car
e • 1
0
153
08424705001 (03) 2020-08 USA • Accu-Chek Inform II Operator’s Manual Version 7.1
Acceptable cleaning/disinfecting agents
■ To purchase approved disinfecting products, please refer to your facility’s guidelines, which may include instructions on direct purchase from the agent manufacturer or through an approved distributor. For additional information on product availability for purchase, refer to manufacturer’s website: http://www.cloroxprofessional.com for Clorox® Germicidal Wipes or http://www.pdipdi.com/ for Super Sani-Cloth® Germicidal Disposable Wipes.
■ Dispose of acceptable cleaning and disinfection solutions per facility guidelines.
Acceptable active ingredients and products for cleaning and disinfecting are:
– Clorox® Germicidal Wipes (Environmental Protection Agency (EPA) reg. no. 67619-12) Pre-moistened disinfecting cloths (active ingredient 1% (or less) solution of sodium hypochlorite in water)
– Super Sani-Cloth® Germicidal Disposable Wipes (EPA reg. no. 9480-4) Pre-moistened disinfecting cloths (active ingredient 0.5% quaternary ammonium chlorides and up to 60% isopropanol)
■ Cleaners and disinfectants were validated sepa-rately and only one cleaning/disinfecting solution should be used on the device as the effect of using more than one cleaner/disinfectant interchangea-bly has not been evaluated.
NOTE: Always use Clorox Germicidal Wipes (EPA reg. no. 67619-12) or Super Sani-Cloth Germicidal Disposable Wipes (EPA reg. no. 9480-4) to clean and disinfect the meter. Do not use any other cleaning or disinfecting solu-tion. Using solutions other than Clorox Germicidal Wipes (EPA reg. no. 67619-12) or Super Sani-Cloth Germicidal Disposable Wipes (EPA reg. no. 9480-4) could result in damage to the system components.
NOTE: Roche has tested the approved cleaning and dis-infecting product for a total of 12,045 cycles, which is equal to cleaning and disinfecting after each patient use simulating 3 years of device use.

154
08424705001 (03) 2020-08 USA • Accu-Chek Inform II Operator’s Manual Version 7.1
What to clean/disinfect The following parts of the meter and system components may be cleaned and disinfected:
■ The area around the test strip port
■ The meter display (touchscreen)
■ The meter housing (entire meter surface)
Technical assistance If you notice any of the following signs of deterioration after cleaning or disinfecting of your meter system, stop using the system component and contact Roche Customer Support Center at 1-800-440-3638 for assistance:
■ clouding of the touchscreen display
■ on/off button button malfunction
■ clouding of the infrared data port and/or barcode scanner
■ quality control results outside of the specified range

Mai
nten
ance
and
Car
e • 1
0
155
08424705001 (03) 2020-08 USA • Accu-Chek Inform II Operator’s Manual Version 7.1
10.3 How to clean and disinfect the Accu-Chek Inform II system
WARNING
Avoid getting liquid into the test strip port!Failure to follow these instructions may damage the meter and stop it from working properly.
■ Do Not clean or disinfect the meter while performing a blood glucose or control test.
■ Do Not get any moisture in the test strip port.■ Do Not spray anything onto the meter.■ Do Not immerse the meter in liquid.
If you suspect that moisture may have entered the test strip port, perform a glucose control test.
NOTICE
Do not allow liquid to enter the test strip port or allow pooling of liquid on the touchscreen. If liquid does get into the test strip port, immediately dry the components with a dry cloth or gauze. If solution is allowed to collect in any meter opening, severe damage to the system can occur.

156
08424705001 (03) 2020-08 USA • Accu-Chek Inform II Operator’s Manual Version 7.1
Cleaning the meter
1 Place the meter on a level surface prior to cleaning.
2 Power off the meter.
Be certain that solutions contain acceptable active ingre-dients for cleaning the system. When using commercially available pre-moistened cleaning cloths, squeeze off excess cleaning solution or blot on a dry paper towel to remove any excess cleaning solution before cleaning the surface of the meter.
3 Use a Clorox Germicidal Wipe or Super Sani-Cloth Germicidal Disposable Wipe to clean by gently wiping the outside of the meter and carefully wipe around the test strip port area, making sure that no liquid enters the test strip port and then wipe dry with a tissue.
4 Dry the meter thoroughly with a dry cloth or gauze. Visually verify that no solution is seen anywhere on the meter at the completion of cleaning and dis-infecting. Ensure that the meter is thoroughly dried after cleaning (see safety message “Avoid getting liquid into the test strip port!” and NOTICE in this section).

Mai
nten
ance
and
Car
e • 1
0
157
08424705001 (03) 2020-08 USA • Accu-Chek Inform II Operator’s Manual Version 7.1
Disinfecting the meter
NOTE: The meter should be cleaned prior to each disinfection step.
Remember to keep the meter on a level surface prior to disinfecting and powered off. Be certain that solutions contain acceptable active ingredients for disinfecting the system. When using commercially available pre-moistened disinfecting cloths, squeeze off excess disinfecting solution or blot on a dry paper towel to remove any excess disinfecting solution before disinfecting the surface of the meter.
1 Use a fresh Clorox Germicidal Wipe or Super Sani-Cloth Germicidal Disposable Wipe to disinfect by gently wiping the outside of the meter three times horizontally and three times vertically and carefully wipe around the test strip port area, making sure that no liquid enters the test strip port.
2 Allow the surface of the meter to remain damp with the recommended disinfecting solution. The recommended contact times are as follows: Clorox Germicidal Wipes, a 1-minute contact time, and Super Sani-Cloth Germicidal Disposable Wipe, a 2-minute contact time.
NOTE: Meter surface should stay moist for the entire contact time.
3 Dry the meter thoroughly with a dry cloth or gauze. Visually verify that no solution is seen anywhere on the meter at the completion of cleaning and dis-infecting. Ensure that the meter is thoroughly dried after cleaning (see safety message “Avoid getting liquid into the test strip port!” and NOTICE in this section).
4 If further testing is not needed, return the meter to the base unit to charge the battery.

158
08424705001 (03) 2020-08 USA • Accu-Chek Inform II Operator’s Manual Version 7.1
10.4 Logging maintenance activities
Cleaning, disinfecting, and other maintenance activities can be logged in the meter. Make sure that all cleaning activities are complete and the system is thoroughly dry before powering on the meter.
To store cleaning information in the meter, proceed as follows:
1 Touch in the Main Menu to open the Main Menu 2 screen.
2 Touch Maintenance to open the screen for adding comments.
3 Select the desired comment(s) from the list or touch to enter your own comment via keypad.
4 Once you have entered your comments, touch to save the maintenance comments. The Mainte-nance Test screen opens up.
5 Touch to return to Main Menu 2.
All logged maintenance comments can be reviewed later using the Review Results function of the meter (see page 83ff).
Main Menu
Review Results
Control Test
Patient Test
12:48 pm
03/17/20
Main Menu 2
Maintenance
Strip Lots
Proficiency
Control Lots
Beeper
Linearity
Diagnostics
Linearity Lots
Admin.
12:48 pm
03/17/20
Order Strips
Add Comments
Cleaned Meter
12:48 pm
03/17/20
You can add up to three comments. For details see section “Adding comments” on page 65.
Maintenance Test
NEW BATTERY PACK
Cleaned Meter12:48 pm
03/17/20

Mai
nten
ance
and
Car
e • 1
0
159
08424705001 (03) 2020-08 USA • Accu-Chek Inform II Operator’s Manual Version 7.1
10.5 Diagnostics view
Under Diagnostics you can find information about the system, such as software version, number of data records stored, and configuration details. Use this menu to dis-play stored error messages and test the barcode scanner and the wireless status (if your meter is equipped with the WLAN option). The Diagnostics screens shown here are for illustration purposes only. Information shown on your meter may differ.
1 Touch in the Main Menu to open the Main Menu 2 screen.
2 Touch Diagnostics to call up the main screen for this menu.
3 Touch or to scroll between screens.
Main Menu
Review Results
Control Test
Patient Test
12:48 pm
03/17/20
Main Menu 2
Maintenance
Strip Lots
Proficiency
Control Lots
Beeper
Linearity
Diagnostics
Linearity Lots
Admin.
12:48 pm
03/17/20
Order Strips
Diagnostics
S/W Version: 04.03.02BSP Version: 07.01.00Last Download: 03/15/20Battery Voltage: 3.976 VBattery Percent: 83Battery Condition: Good
Log
Serial No: 14300740
12:48 pm
03/17/20
Scan:
Diagnostics
TestAuthenticated:
RF activated:Associated:
Received IP:IP:Subnet:Gateway:DNS:Contacted DMS:Connected to DMS:Completed:
192.168.4.117
Wireless Status:12:48 pm
03/17/20
Diagnostics
SSID:cobasserver
WLAN:MAC: b8:78:79:11:74:e4
Use DNS: DisabledUse DHCP:Wireless Setup: Page 5
Enabled
12:48 pm
03/17/20
Diagnostics
List - allowed to add newReagent Editing:Date/Time Editing:STATs:
Patient Validation:
9
NoneOperator Validation:
0
Configuration: Page 3
HoursQC Freq:Strip Limitations Warning:
Used:
Disabled
Enabled
Allowed:Allowed
12:48 pm
03/17/20

160
08424705001 (03) 2020-08 USA • Accu-Chek Inform II Operator’s Manual Version 7.1
4 Touch Log to display stored error messages.
5 Touch to test the barcode scanner.
6 Touch to return to the Main Menu.
Diagnostics
S/W Version: 04.03.02BSP Version: 07.01.00Last Download: 03/15/20Battery Voltage: 3.976 VBattery Percent: 83Battery Condition: Good
Log
Serial No: 14300740
12:48 pm
03/17/20
Scan:
Log Details
ErrorMessage Code: E-NCBBattery Critically Low
Event Type:Date 03/15/20 10:39 am
12:48 pm
03/17/20
Log Entry 1

Mai
nten
ance
and
Car
e • 1
0
161
08424705001 (03) 2020-08 USA • Accu-Chek Inform II Operator’s Manual Version 7.1
10.6 Unlocking a Download Lockout
When using a data management system for configura-tion, a Download Lockout can be configured. This lockout prevents a meter from being used for testing, if the meter data have not been downloaded for a defined period of time. If a download lockout occurs, the operator may use a STAT test to temporarily override the lockout. If no STAT test is configured or left, the meter cannot be used until the stored data is downloaded via network (either wire-less or by docking the meter).
In cases of e.g., network failures (which make a download impossible), or other emergencies, it may be necessary to unlock a meter without access to the data management system. Since unlocking is a function of the Setup Menu, it is restricted to persons who know the setup password.

162
08424705001 (03) 2020-08 USA • Accu-Chek Inform II Operator’s Manual Version 7.1
To unlock a meter:
1 Touch in the Main Menu to open the Main Menu 2 screen.
2 Touch Admin. to open the Admin Menu.
3 Touch Setup Menu to open the Setup Menu.
4 Enter the Setup password if requested.
5 Touch Unlock to reset the lockout timer.
The meter shuts down, and is ready for testing after powering up again.
Main Menu 2
Maintenance
Strip Lots
Proficiency
Control Lots
Beeper
Linearity
Diagnostics
Linearity Lots
Admin.
12:48 pm
03/17/20
Order Strips
Admin Menu
Date / Time
Language Selection
Setup Menu
12:48 pm
Service Menu
03/17/20
Setup Menu
Date / Time
QC
Test Display
Password
Test Ranges
Reagents
Operator ID Patient ID
Unlock
12:48 pm
03/17/20
Mai
nten
ance
and
Car
e • 1
0
163
08424705001 (03) 2020-08 USA • Accu-Chek Inform II Operator’s Manual Version 7.1
10.7 Service menu
Deleting patient information Deletion of data stored on the meter is not only a mainte-nance measure to conserve or restore meter memory. It may become necessary to comply with data protection and privacy policies when sending a meter back to the manufacturer or passing it on to another facility. You can delete data manually and/or automatically.
The option Service Menu with the feature “Delete Patient Information” is not available in the preconfig-ured default setting. The Service Menu can only be acti-vated via DMS.

164
08424705001 (03) 2020-08 USA • Accu-Chek Inform II Operator’s Manual Version 7.1
Manual deletion This feature allows you to delete all patient-related data (patient lists and results) manually.
To ensure deleted data is not transferred back through an unwanted automatic synchronization with the DMS, remove the battery pack immediately after deleting patient data.
Service Menu
Delete Patient Information
12:15 pm
03/17/20
Admin Menu
Date / Time
Language Selection
Setup Menu
12:48 pm
Service Menu
03/17/20
Delete Patient Information
Service Menu 12:15 pm
QC
Test Display
Password
Test Ranges
Operator ID Patient ID
Unlock Delete Pat.
03/17/20
Delete Data:
Are you sure you want to delete all patients and all results from this meter? This operation cannot be undone.
Confirm Deletion
Be aware that the function Delete Patient Information irrevocably deletes all data once you touch to confirm. The system will delete any patient results regardless of whether they have been synchronized with a data management system or not. Therefore, always ensure that you have downloaded all relevant patient results before you use this function.

Mai
nten
ance
and
Car
e • 1
0
165
08424705001 (03) 2020-08 USA • Accu-Chek Inform II Operator’s Manual Version 7.1
Automatic deletion By configuring a retention time (only via DMS) you can enable an automatic deletion of outdated results. Results will only be automatically deleted, if they meet both the following criteria:
■ The result has already been transmitted to the DMS
■ The result is older than the configured retention time
These results will be deleted automatically when power-ing up the meter and before each test.
Automatic deletion of patient data is not sufficient when sending a meter back to the manufacturer or passing it on to another facility. Make sure to manually delete all data stored in the meter for that purpose.

166
08424705001 (03) 2020-08 USA • Accu-Chek Inform II Operator’s Manual Version 7.1
This page intentionally left blank.

Trou
bles
hoot
ing
• 11
167
08424705001 (03) 2020-08 USA • Accu-Chek Inform II Operator’s Manual Version 7.1
11 Troubleshooting
The Accu-Chek Inform II meter continually checks its sys-tems for unexpected and unwanted conditions.
A troubleshooting table follows that will help you when the system is not performing as expected. Most concerns can be resolved quickly by referring to this table for help. Take the following steps when an unexpected condition arises:
■ Find the displayed message or condition in the Troubleshooting Table.
■ Take the action suggested under the column header Possible Solution.
If further assistance is required, contact Roche Customer Support Center.
Errors and unusual behavior without error messages
Some conditions may arise that have no associated error message. Refer to the following table, if such a condition arises on the Accu-Chek Inform II system.
Display/symptom Possible solution
No message or unusual behavior
If you notice any issues with the display functionality (e.g. unexpected lines/marks on the meter display) stop using the system and contact the Roche Customer Support Center.
Meter display does not power on – Wait 10 seconds and try powering on the unit again. – Place the meter in the base unit and confirm that it is
charging.– Check that the battery pack is correctly installed and
connected.
Follow the instructions in Chapter 9 to avoid data loss when replacing the battery pack.
Meter displays an unexpected result Refer to the package insert for the test strips.
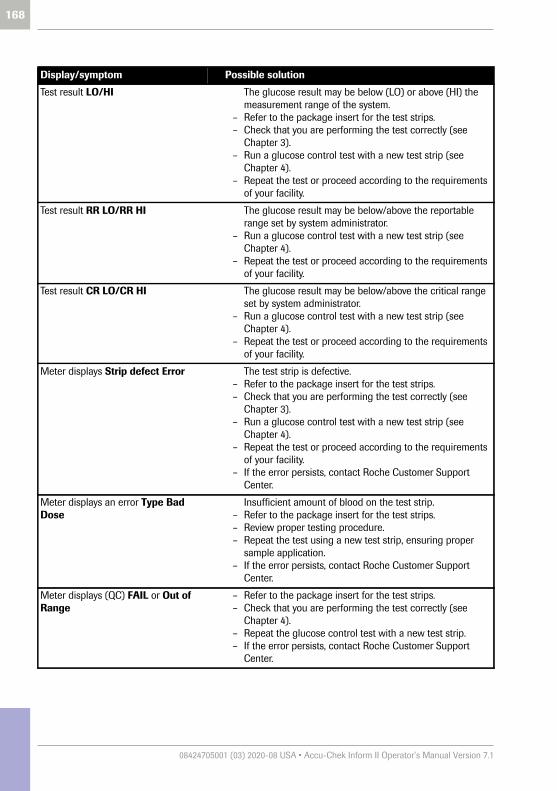
168
08424705001 (03) 2020-08 USA • Accu-Chek Inform II Operator’s Manual Version 7.1
Test result LO/HI The glucose result may be below (LO) or above (HI) the measurement range of the system.
– Refer to the package insert for the test strips.– Check that you are performing the test correctly (see
Chapter 3).– Run a glucose control test with a new test strip (see
Chapter 4).– Repeat the test or proceed according to the requirements
of your facility.
Test result RR LO/RR HI The glucose result may be below/above the reportable range set by system administrator.
– Run a glucose control test with a new test strip (see Chapter 4).
– Repeat the test or proceed according to the requirements of your facility.
Test result CR LO/CR HI The glucose result may be below/above the critical range set by system administrator.
– Run a glucose control test with a new test strip (see Chapter 4).
– Repeat the test or proceed according to the requirements of your facility.
Meter displays Strip defect Error The test strip is defective.– Refer to the package insert for the test strips.– Check that you are performing the test correctly (see
Chapter 3).– Run a glucose control test with a new test strip (see
Chapter 4).– Repeat the test or proceed according to the requirements
of your facility.– If the error persists, contact Roche Customer Support
Center.
Meter displays an error Type Bad Dose
Insufficient amount of blood on the test strip.– Refer to the package insert for the test strips.– Review proper testing procedure.– Repeat the test using a new test strip, ensuring proper
sample application.– If the error persists, contact Roche Customer Support
Center.
Meter displays (QC) FAIL or Out of Range
– Refer to the package insert for the test strips.– Check that you are performing the test correctly (see
Chapter 4).– Repeat the glucose control test with a new test strip.– If the error persists, contact Roche Customer Support
Center.
Display/symptom Possible solution
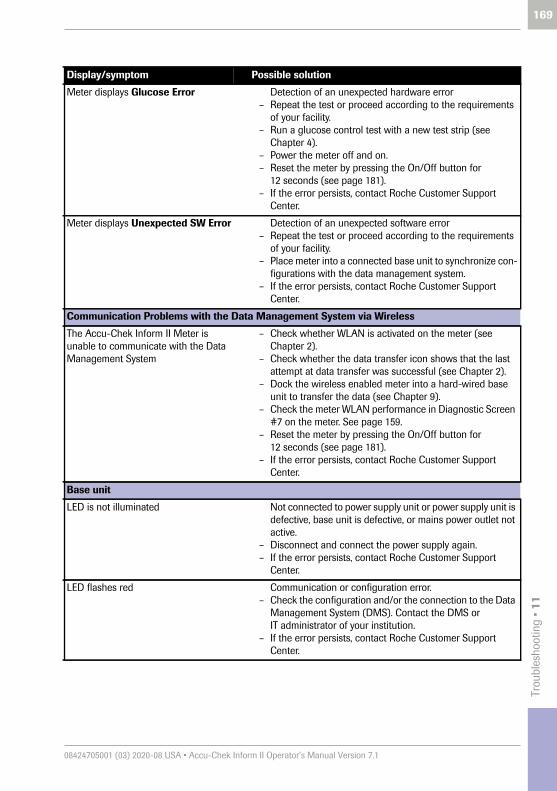
Trou
bles
hoot
ing
• 11
169
08424705001 (03) 2020-08 USA • Accu-Chek Inform II Operator’s Manual Version 7.1
Meter displays Glucose Error Detection of an unexpected hardware error– Repeat the test or proceed according to the requirements
of your facility.– Run a glucose control test with a new test strip (see
Chapter 4).– Power the meter off and on.– Reset the meter by pressing the On/Off button for
12 seconds (see page 181).– If the error persists, contact Roche Customer Support
Center.
Meter displays Unexpected SW Error Detection of an unexpected software error– Repeat the test or proceed according to the requirements
of your facility.– Place meter into a connected base unit to synchronize con-
figurations with the data management system.– If the error persists, contact Roche Customer Support
Center.
Communication Problems with the Data Management System via Wireless
The Accu-Chek Inform II Meter is unable to communicate with the Data Management System
– Check whether WLAN is activated on the meter (see Chapter 2).
– Check whether the data transfer icon shows that the last attempt at data transfer was successful (see Chapter 2).
– Dock the wireless enabled meter into a hard-wired base unit to transfer the data (see Chapter 9).
– Check the meter WLAN performance in Diagnostic Screen #7 on the meter. See page 159.
– Reset the meter by pressing the On/Off button for 12 seconds (see page 181).
– If the error persists, contact Roche Customer Support Center.
Base unit
LED is not illuminated Not connected to power supply unit or power supply unit is defective, base unit is defective, or mains power outlet not active.
– Disconnect and connect the power supply again.– If the error persists, contact Roche Customer Support
Center.
LED flashes red Communication or configuration error.– Check the configuration and/or the connection to the Data
Management System (DMS). Contact the DMS or IT administrator of your institution.
– If the error persists, contact Roche Customer Support Center.
Display/symptom Possible solution

170
08424705001 (03) 2020-08 USA • Accu-Chek Inform II Operator’s Manual Version 7.1
Automatic power-off
The meter powers off after a configurable time without activity (e.g., pressing a key, touching the screen) and goes into standby mode to save power. In addition, the meter may power off automatically for the reasons listed below. Reactivate the meter/screen as described in the following:
Power-off after time specified by system administrator (default is 5 minutes, configurable by system administrator)
– Press the On/Off button on the meter.
Battery Low – Charge the battery by placing the meter in the base unit.
Battery Critically Low – Charge the battery by placing the meter in the base unit.– Check that the battery pack is correctly installed and
connected.– Replace the defective battery pack.
Follow the instructions in Chapter 9 to avoid data loss when replacing the battery pack.
Display/symptom Possible solution

Trou
bles
hoot
ing
• 11
171
08424705001 (03) 2020-08 USA • Accu-Chek Inform II Operator’s Manual Version 7.1
Low power icons If the battery pack is running low or not charging prop-erly, the meter will display a series of low power icons. Refer to the following table for their meaning.
Display/symptom What it means/Remedy
Meter displays when you try to power on:
– Battery is empty. Dock the meter.
When docked, meter displays :
– Charging status is indicated by a single red segment that grows gradually until the required threshold for booting the meter is reached.
Avoid using the meter in case of low power to guarantee full functionality. The On/Off button cannot be used. If not docked, the meter will shut down automatically after 1 minute.
Flashing icon in status bar If the meter is not properly docked, a short “humming” noise sporadically occurs and the battery charging icon flashes.
– Remove the meter from the base unit. – Redock it by gently pushing it into the base unit to ensure
proper contact.
Once the meter is properly docked and charging, the battery charging icon stops flashing.
e

172
08424705001 (03) 2020-08 USA • Accu-Chek Inform II Operator’s Manual Version 7.1
Pop-up messages There are different message types displayed by the meter, namely decision, information, warning, and error mes-sages. All except the decision messages contain a letter code on the lower left side of the screen. The first letter of this code identifies the message type (Information, Warning, Error).
All information, warning, and error messages displayed by the system are accompanied by a description and, if necessary, a possible solution. Take the action suggested on screen to resolve the problem.
The different message types are illustrated in the following table.
Sample message type Description
– Decision; To confirm, touch . To reject, touch .
– Information; touch to confirm.
Linearity Lots
Do you want to make Linearity lot 777678 the 'current' lot?
Make 'Current'
* 12/31/20 777732Lin.05/15/21 777723Lin.
Exp. Date Lot Num.Type12:48 pm
03/17/20
Patient TestPatient 123456789Date 03/17/20 12:48 pm
150
L22
12:48 pm
03/17/20
RangesNormal Range:
Critical Range:
Reportable Range:
70-200 mg/dL
40-301 mg/dL
11-600 mg/dL
[I-HBD]

Trou
bles
hoot
ing
• 11
173
08424705001 (03) 2020-08 USA • Accu-Chek Inform II Operator’s Manual Version 7.1
– Warning; touch to confirm.
– Error; touch to confirm. To resolve the problem, take the actions suggested.
Sample message type Description
Loss of Date/Time
[W-SBD]
D/T settings lost due to meter reset or loss of power. Before performing further tests: Enter D/T manually and synchronize meter. OR: Ask System Admin. for help.
1 2 3
Operator ID 12:48 pm
03/17/20
Invalid Scan
Invalid Scan. The scan returned an entry > 20 characters. Please see your System Administrator.
[E-FCG]
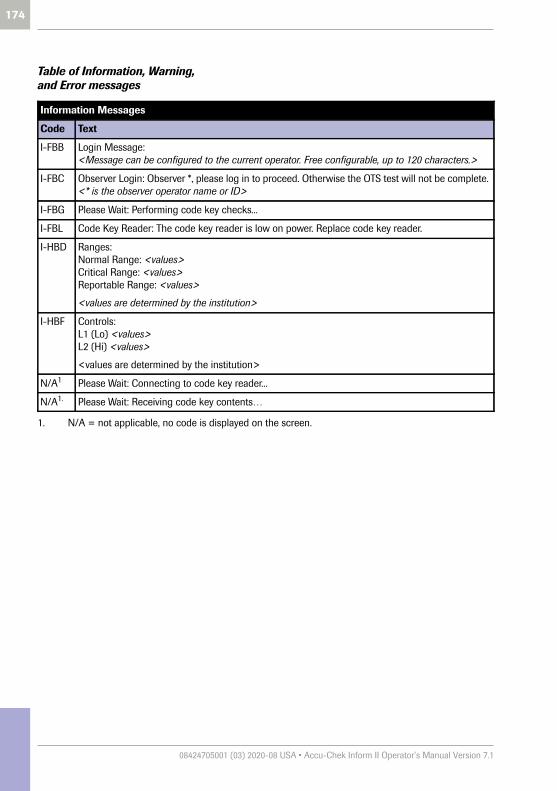
174
08424705001 (03) 2020-08 USA • Accu-Chek Inform II Operator’s Manual Version 7.1
Table of Information, Warning, and Error messages
Information Messages
Code Text
I-FBB Login Message: <Message can be configured to the current operator. Free configurable, up to 120 characters.>
I-FBC Observer Login: Observer *, please log in to proceed. Otherwise the OTS test will not be complete. <* is the observer operator name or ID>
I-FBG Please Wait: Performing code key checks...
I-FBL Code Key Reader: The code key reader is low on power. Replace code key reader.
I-HBD Ranges:Normal Range: <values>Critical Range: <values>Reportable Range: <values>
<values are determined by the institution>
I-HBF Controls:L1 (Lo) <values>L2 (Hi) <values>
<values are determined by the institution>
N/A1 Please Wait: Connecting to code key reader...
N/A1. Please Wait: Receiving code key contents…
1. N/A = not applicable, no code is displayed on the screen.
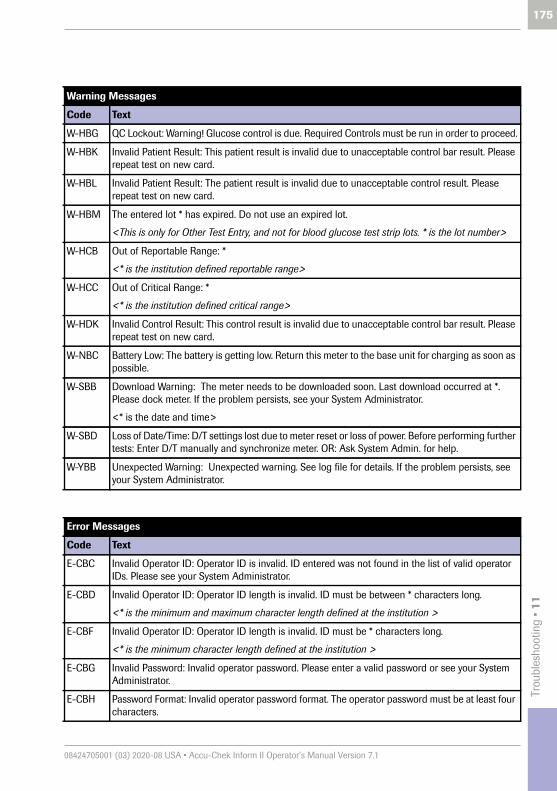
Trou
bles
hoot
ing
• 11
175
08424705001 (03) 2020-08 USA • Accu-Chek Inform II Operator’s Manual Version 7.1
Warning Messages
Code Text
W-HBG QC Lockout: Warning! Glucose control is due. Required Controls must be run in order to proceed.
W-HBK Invalid Patient Result: This patient result is invalid due to unacceptable control bar result. Please repeat test on new card.
W-HBL Invalid Patient Result: The patient result is invalid due to unacceptable control result. Please repeat test on new card.
W-HBM The entered lot * has expired. Do not use an expired lot.
<This is only for Other Test Entry, and not for blood glucose test strip lots. * is the lot number>
W-HCB Out of Reportable Range: *
<* is the institution defined reportable range>
W-HCC Out of Critical Range: *
<* is the institution defined critical range>
W-HDK Invalid Control Result: This control result is invalid due to unacceptable control bar result. Please repeat test on new card.
W-NBC Battery Low: The battery is getting low. Return this meter to the base unit for charging as soon as possible.
W-SBB Download Warning: The meter needs to be downloaded soon. Last download occurred at *. Please dock meter. If the problem persists, see your System Administrator.
<* is the date and time>
W-SBD Loss of Date/Time: D/T settings lost due to meter reset or loss of power. Before performing further tests: Enter D/T manually and synchronize meter. OR: Ask System Admin. for help.
W-YBB Unexpected Warning: Unexpected warning. See log file for details. If the problem persists, see your System Administrator.
Error Messages
Code Text
E-CBC Invalid Operator ID: Operator ID is invalid. ID entered was not found in the list of valid operator IDs. Please see your System Administrator.
E-CBD Invalid Operator ID: Operator ID length is invalid. ID must be between * characters long.
<* is the minimum and maximum character length defined at the institution >
E-CBF Invalid Operator ID: Operator ID length is invalid. ID must be * characters long.
<* is the minimum character length defined at the institution >
E-CBG Invalid Password: Invalid operator password. Please enter a valid password or see your System Administrator.
E-CBH Password Format: Invalid operator password format. The operator password must be at least four characters.

176
08424705001 (03) 2020-08 USA • Accu-Chek Inform II Operator’s Manual Version 7.1
E-CBK Invalid Password: Invalid Setup password. Please enter valid password or see your System Administrator.
E-CBL No Operators Loaded: There are no operators loaded in this meter. In order to continue, operators must be downloaded. Please see your System Administrator.
E-CBM QC not allowed: The Operator ID entered was not found in the list of valid operator IDs for QC. Please see your System Administrator.
E-CBN Invalid Observer ID: Observer ID is invalid. ID entered was not found in the list of valid observer IDs. Please see your System Administrator.
E-CCB Invalid Observer ID: Invalid Observer ID: The observer ID is invalid. The observer supervising the current OTS test must log in again.
E-DNL Invalid Time: Time entered is in the future. Please enter the time in HH:MM AM/PM format. (If in 24 hr mode the AM/PM is removed.)
E-DNM Invalid Date: Date entered is beyond the code key expiration date. Please re-enter date.
E-DNN Invalid Date: Date entered is in the future. Please enter the date in MM/DD/YY format.
E-FBB Invalid Date: Date entered is expired. Please check the package and re-enter date.
<for control and linearity lots expiry dates>
E-FBC Invalid Time: Time entered is invalid. Please enter the time in HH:MM AM/PM format.
E-FBD Invalid Date: Date entered is invalid. Please enter the date in MM/DD/YY format.
E-FBF Invalid Patient ID: Patient ID is invalid. ID entered was not found in the list of valid patient IDs. Please see your System Administrator.
E-FBG Invalid Patient ID: Patient ID length is invalid. ID must be between * characters long.
<* is the minimum and maximum character length defined at the institution >
E-FBH Invalid Patient ID: Patient ID length is invalid. ID must be * characters long.
<* is the minimum character length defined at the institution >
E-FBL Comment required: A comment is required for this result. Please enter at least one comment.
E-FBM Invalid Lot Number: A valid lot number must be provided. Please enter a lot number.
E-FCB Invalid Control Range: Level 1 (Lo) Max must be greater than Level 1 (Lo) Min (currently *). Please re-enter.
<* is the L1 Control Range minimum value defined by the Control Lot information on the device>
E-FCC Invalid Control Range: Level 2 (Hi) Max must be greater than Level 2 (Hi) Min (currently *). Please re-enter.
<* is the L2 Control Range minimum value defined by the Control Lot information on the device>
E-FCD Invalid Control Range: Level 2 (Hi) Min must be greater than Level 1 (Lo) Max (currently *). Please re-enter.
<* is the L1 Control Range maximum value defined by the Control Lot information on the device>
E-FCF Invalid Sample ID: Invalid sample ID, length is invalid. ID must be at least one character. Please re-enter.
Error Messages
Code Text

Trou
bles
hoot
ing
• 11
177
08424705001 (03) 2020-08 USA • Accu-Chek Inform II Operator’s Manual Version 7.1
E-FCG Invalid Scan: Invalid Scan. The scan returned an entry > 20 characters. Please see your System Administrator.
E-FCH Invalid Range: The range entered must be between 10 and 600 mg/dl. Please re-enter.
E-FCK Invalid Range: The Normal Range Hi value must be greater than the Normal Range Lo value (currently *). Please re-enter.
<* is the Normal Range value defined by the institution on the device>
E-FCL Invalid Range: The Critical Range Hi value must be greater than the Critical Range Lo value (currently *). Please re-enter.
<* is the Critical Range value defined by the institution on the device>
E-FCM Invalid Range: The Reportable Range Hi value must be greater than the Reportable Range Lo value (currently *). Please re-enter.
<* is the Reportable Range value defined by the institution on the device>
E-FCN Invalid Range: The Reportable Range Lo value must be less than or equal to the Critical Range Lo value (currently *). Please re-enter.
<* is the Critical Range value defined by the institution on the device>
E-FDB Invalid Range: The Reportable Range Hi value must be greater than or equal to the Critical Range Hi value (currently *). Please re-enter.
<* is the Critical Range value defined by the institution on the device>
E-FDC Invalid Range: The Critical Range Hi value must be greater than or equal to the Normal Range Hi value (currently *). Please re-enter.
<* is the Normal Range value defined by the institution on the device>
E-FDD Invalid QC Hours: QC Hours must be greater than 0 and less than 10,000. Please re-enter.
E-FDF Invalid Strip Limit: QC Strips must be greater than 0 and less than 1,000. Please re-enter.
E-FDH Invalid Strip Lot Barcode: The scanned in barcode is invalid for a Strip lot barcode. Please scan in a valid barcode, or see your System Administrator
E-FDK Undefined Strip Lot: The barcode scanned strip lot: * is not defined on this meter. Please see your System Administrator.
<* is the test strip lot number>
E-FDL Invalid Limit: The length entered must be between 0 and 20. Please enter a valid length.
E-FDM Invalid Limit: The Operator ID Max length must be greater than or equal to the Operator ID Min length (currently *). Please re-enter.
<* is the Operator ID minimum length defined by the institution >
E-FDN Invalid Limit: The Patient ID Max length must be greater than or equal to the Patient ID Min length (currently *). Please re-enter.
<* is the Patient ID minimum length defined by the institution >
E-FFB Invalid Operator Barcode: The barcode scanned is not a valid operator barcode. Please scan a valid operator barcode or see your System Administrator.
Error Messages
Code Text
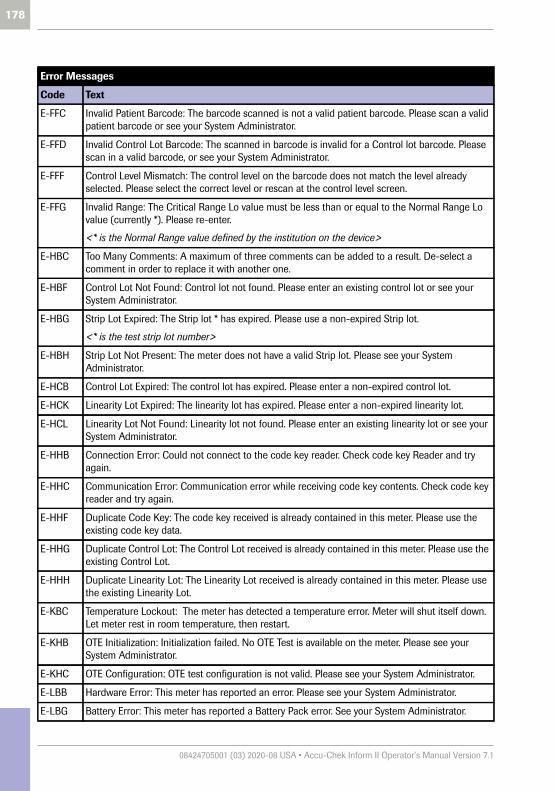
178
08424705001 (03) 2020-08 USA • Accu-Chek Inform II Operator’s Manual Version 7.1
E-FFC Invalid Patient Barcode: The barcode scanned is not a valid patient barcode. Please scan a valid patient barcode or see your System Administrator.
E-FFD Invalid Control Lot Barcode: The scanned in barcode is invalid for a Control lot barcode. Please scan in a valid barcode, or see your System Administrator.
E-FFF Control Level Mismatch: The control level on the barcode does not match the level already selected. Please select the correct level or rescan at the control level screen.
E-FFG Invalid Range: The Critical Range Lo value must be less than or equal to the Normal Range Lo value (currently *). Please re-enter.
<* is the Normal Range value defined by the institution on the device>
E-HBC Too Many Comments: A maximum of three comments can be added to a result. De-select a comment in order to replace it with another one.
E-HBF Control Lot Not Found: Control lot not found. Please enter an existing control lot or see your System Administrator.
E-HBG Strip Lot Expired: The Strip lot * has expired. Please use a non-expired Strip lot.
<* is the test strip lot number>
E-HBH Strip Lot Not Present: The meter does not have a valid Strip lot. Please see your System Administrator.
E-HCB Control Lot Expired: The control lot has expired. Please enter a non-expired control lot.
E-HCK Linearity Lot Expired: The linearity lot has expired. Please enter a non-expired linearity lot.
E-HCL Linearity Lot Not Found: Linearity lot not found. Please enter an existing linearity lot or see your System Administrator.
E-HHB Connection Error: Could not connect to the code key reader. Check code key Reader and try again.
E-HHC Communication Error: Communication error while receiving code key contents. Check code key reader and try again.
E-HHF Duplicate Code Key: The code key received is already contained in this meter. Please use the existing code key data.
E-HHG Duplicate Control Lot: The Control Lot received is already contained in this meter. Please use the existing Control Lot.
E-HHH Duplicate Linearity Lot: The Linearity Lot received is already contained in this meter. Please use the existing Linearity Lot.
E-KBC Temperature Lockout: The meter has detected a temperature error. Meter will shut itself down. Let meter rest in room temperature, then restart.
E-KHB OTE Initialization: Initialization failed. No OTE Test is available on the meter. Please see your System Administrator.
E-KHC OTE Configuration: OTE test configuration is not valid. Please see your System Administrator.
E-LBB Hardware Error: This meter has reported an error. Please see your System Administrator.
E-LBG Battery Error: This meter has reported a Battery Pack error. See your System Administrator.
Error Messages
Code Text

Trou
bles
hoot
ing
• 11
179
08424705001 (03) 2020-08 USA • Accu-Chek Inform II Operator’s Manual Version 7.1
E-LVL Internal Communication: Communication error with barcode scanner module. Power meter off and on, and repeat last procedure. If problem persists, see your System Administrator.
E-NCB Battery Critically Low: Battery is critically low. Return meter immediately to the base unit for charging before further use.
E-QBB Reagent Database Full: Reagent database is full. Please see your System Administrator.
E-QBC Database Full: No further test can be performed until a download occurs. Please synchronize the meter or see your System Administrator.
E-QBD Database Failure: The meter has detected a result database error. Please see your System Administrator.
E-QBF Database Failure: The meter has detected a reagent database error. Please see your System Administrator.
E-QBG Database Failure: The meter has detected an operator database error. Please see your System Administrator.
E-QBH Database Failure: The meter has detected a patient database error. Please see your System Administrator.
E-QBK Database Failure: The meter has detected a comments database error. Please see your System Administrator.
E-QBL Database Failure: The meter has detected a strip lot database error. Please see your System Administrator.
E-QBN Database Failure: The meter has detected a config database error. Please see your System Administrator.
E-QCC Database Failure: The meter has detected an event database error. Please see your System Administrator.
E-SBC Download Lockout: The meter needs to be downloaded soon. Last download occurred at *. Please dock meter. If the problem persists, see your System Administrator
E-SBD Download Lockout: The meter has detected a config database error and needs to be downloaded. Please dock meter. If the problem persists, see your System Administrator.
E-VBB Glucose Error: An unexpected internal error has occurred. If problem persists, see your System Administrator.
E-VBC Strip defect Error: This strip is defective. Please insert a new strip and only apply sample when prompted.
E-VBD Code Key Error: The meter has reported an error. Restart the test procedure with the correct code key. If the problem persists, see your System Administrator.
E-VBF Glucose Error: Error detected. Repeat bG test with new strip. If this error shows twice for the same patient, perform QC and repeat bG test. If problem still persists, use another method.
E-VBG Glucose Error: This strip is defective. Please insert a new strip and only apply sample when prompted.
E-VBH Glucose Error: Strip removed during test. Repeat test with new strip.
E-VBK Glucose Error: Strip lot expired. Use new strip lot.
Error Messages
Code Text

180
08424705001 (03) 2020-08 USA • Accu-Chek Inform II Operator’s Manual Version 7.1
E-VBL Hardware Error: A hardware or electronic error has occurred. If problem persists, see your System Administrator.
E-VBM Glucose Error: Place meter immediately in base unit to recharge. If problem persists, see your System Administrator.
E-VBN Glucose Error: Place meter in base unit to recharge. If problem persists, see your System Administrator.
E-VCB Glucose Error: A real time clock error has occurred. Set date and time or dock meter. If problem persists, see your System Administrator.
E-VCC Glucose Error: An internal communication error has occurred. If problem persists, see your System Administrator.
E-VCD Glucose Error: An unexpected internal error has occurred. If problem persists, see your System Administrator.
E-VCF Glucose Error: A SW error has occurred. If problem persists, see your System Administrator.
E-VCG Glucose Error: The meter has reported an error. Type Unknown Command. Please see your System Administrator.
E-VCH Temperature Lockout: The meter has detected a temperature error. Let meter rest in room temperature and repeat the test. If problem persists, see your System Administrator.
E-VCK Code key changed error: An unexpected internal error has occurred. If problem persists, see your System Administrator.
E-VCL Sample Detection Error: The meter detected an incorrect sample during the test. Repeat the test using a new strip.
E-VCM Sample Detection Error: The meter detected an incorrect control sample during the test. Repeat the test using a new strip.
E-VCN Sample Detection Error: The meter detected an incorrect linearity sample during the test. Repeat the test using a new strip.
E-VDB Software Error: A software error has occurred. Repeat the test, using a new test strip. If problem persists, see your System Administrator.
E-VDC Date/Time Setting Mismatch: The meter is set to an earlier date than current code file production date. Set date and time properly or dock meter. If problem persists, see your Admin.
E-YBB Unexpected SW Error: An application SW-error has occurred. The meter will be turned off. If problem persists, see your System Administrator.
Error Messages
Code Text

Trou
bles
hoot
ing
• 11
181
08424705001 (03) 2020-08 USA • Accu-Chek Inform II Operator’s Manual Version 7.1
Meter reset A meter reset should only be performed if all other reme-dies have failed.
1 Place the meter on a level surface.
2 Press the On/Off button for at least 12 seconds and release the button.
■ The meter powers off and on again.
■ The Roche logo is displayed. If the Roche logo does not appear within 15 seconds, place the meter in a base unit for a minimum of 15 minutes to recharge the battery.
■ The meter performs a system check. During the system check, the Versions screen appears for a few seconds, then disappears. The Versions screen shows the version numbers of the meter compo-nents. (The Versions screen shown here is for illus-tration purposes only. Version numbers on your meter may differ.)
■ A message appears informing you that the date and time settings have been lost due to the meter reset.
3 Confirm the message Loss of Date/Time.
Before performing any further tests, you must now either enter date/time manually and then synchronize the meter, or contact your system administrator for help.
To enter date/time manually and synchronize the meter, follow the instructions on the next page.
Kernel:
RootFS:
App:
Boot:
Build:
Versions
04.01.00
04.01.00
02.12.00
02.04.02
02.09.02
Checking system...
Performing self-checks...
Performing self-checks...
Loss of Date/Time
[W-SBD]
D/T settings lost due to meter reset or loss of power. Before performing further tests: Enter D/T manually and synchronize meter. OR: Ask System Admin. for help.

182
08424705001 (03) 2020-08 USA • Accu-Chek Inform II Operator’s Manual Version 7.1
■ Once you have confirmed the message Loss of Date/Time, the screens for entering the date and the time appear.
4 Enter the date and time. After you have entered the correct information, confirm each screen with .
■ Unless your QC configuration is Always OK (see page 140), the meter will now be in QC Lockout due to the manually entered date/time.
5 Synchronize the meter’s date/time with the date/time of your facility via base unit or, if working wire-lessly, wait at least ten minutes for the next WLAN synchronization before performing any further tests.
Even if your configuration does not require it, we recommend always performing a QC test after a meter reset.
1 2 3
4 5 6
7 8 9
0
Date
03/17/20
12:00 am
03/17/20
1 2 3
4 5 6
7 8 9
AM/PM0
Time 12:00 am
12:48 pm
03/17/20

Gen
eral
Pro
duct
Info
rmat
ion
• 12
183
08424705001 (03) 2020-08 USA • Accu-Chek Inform II Operator’s Manual Version 7.1
12 General Product Information
12.1 Technical data
Specification Meter Base unit Power supply unit
Height 1.73 in / 44 mm (max.) Base Unit: 4.84 in / 123 mm (max.)
Base Unit Light: 4.33 in / 110 mm (max.)
1.38 in / 35 mm + AC plug (1.1-1.6 in / 28-40 mm)
Width 3.74 in / 95 mm (max.) Base Unit: 5.12 in / 130 mm (max.)
Base Unit Light: 4.65 in / 118 mm (max.)
2.01 in / 51 mm
Length 7.60 in / 193 mm (max.) Base Unit: 5.12 in / 130 mm (max.)
Base Unit Light: 4.06 in / 103 mm (max.)
3.43 in / 87 mm
Weight approx. 347 g (with rechargeable battery)
Base Unit: 671 g with wall mount
Base Unit Light: 573 g with wall mount
170 g
User interface Touchscreen and barcode scanner
Base Unit: LED (tricolor: red, green, blue)
Base Unit Light: LED (bicolor: red, green)
LED: green
Display resolution(touchscreen)
320 x 240 pixel N/A N/A
Memory – 1,000 Results– 5,000 Operator ID records – 4,000 Patient ID records– 300 Predefined comments– 20 Code Files
(test strip lots)– 100 Reagent Lots (control,
linearity, OTE)– 250 Events
N/A N/A

184
08424705001 (03) 2020-08 USA • Accu-Chek Inform II Operator’s Manual Version 7.1
Operating temperature 37 to 108 °F3 to 42 °C
37 to 122 °F3 to 50 °C
32 to 104 °F0 to 40 °C
Measurement temperature
Test strip dependent: Refer to the test strip package insert
Storage conditions (long-term storage)
41 to 104 °F / 5 to 40 °C at 10 - 85% RH (non-condensing)(Remove battery pack from meter for long-term storage.)
Humidity (operating) 10 - 90 % RH (non-condensing)
Air pressure 0.7 to 1.06 bar70 to 106 kPa
0.7 to 1.06 bar70 to 106 kPa
N/A
Specification Meter Base unit Power supply unit

Gen
eral
Pro
duct
Info
rmat
ion
• 12
185
08424705001 (03) 2020-08 USA • Accu-Chek Inform II Operator’s Manual Version 7.1
Specification Meter Base unit Power supply unit
Battery voltage/type 3.7 volt rechargeable (lithium technology)
N/A N/A
Input voltage +7.5 V DC Base Unit: +12 V DC
legacy Base Unit Light:+7.5 V DC
NEW Base Unit Light: +12V DC
100 to 240 V AC
Input frequency DC DC 50 to 60 Hz
Input current 1.7 A (max) Base Unit: 1.25 A (max)
legacy Base Unit Light: 1.7 A (max)
NEW Base Unit Light: 1.25 A (max)
350 to 150 mA (REF 07006098001, 07455976190)
400 to 200 mA (REF 08692432001, 08692432160)
Battery capacity 30 (subsequent) measurements possible after 90 min of charging1
N/A N/A
Interfaces Charging contactsIR portBarcode scanner WLAN(Channel 1-11 only)
Charging contactsIR portRJ45 Ethernet (Base Unit)RJ25 (Base Unit Light)USB type B *
DC connectorReplaceable AC input contacts
1. A fully charged battery pack will provide sufficient power for at least 100 tests within 5 hours including wireless communication (WLAN, if available and enabled).
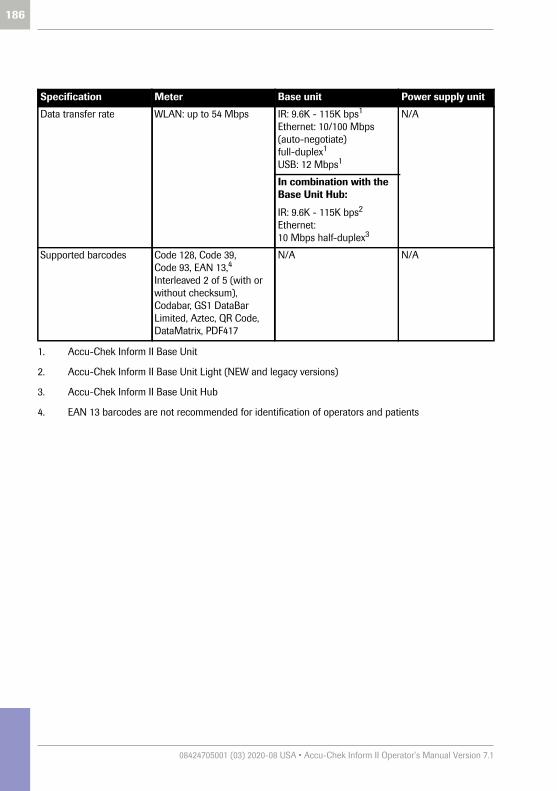
186
08424705001 (03) 2020-08 USA • Accu-Chek Inform II Operator’s Manual Version 7.1
Specification Meter Base unit Power supply unit
Data transfer rate WLAN: up to 54 Mbps IR: 9.6K - 115K bps1
Ethernet: 10/100 Mbps (auto-negotiate) full-duplex1
USB: 12 Mbps1
N/A
In combination with the Base Unit Hub:
IR: 9.6K - 115K bps2
Ethernet: 10 Mbps half-duplex3
Supported barcodes Code 128, Code 39, Code 93, EAN 13,4 Interleaved 2 of 5 (with or without checksum), Codabar, GS1 DataBar Limited, Aztec, QR Code, DataMatrix, PDF417
N/A N/A
1. Accu-Chek Inform II Base Unit
2. Accu-Chek Inform II Base Unit Light (NEW and legacy versions)
3. Accu-Chek Inform II Base Unit Hub
4. EAN 13 barcodes are not recommended for identification of operators and patients

Gen
eral
Pro
duct
Info
rmat
ion
• 12
187
08424705001 (03) 2020-08 USA • Accu-Chek Inform II Operator’s Manual Version 7.1
The system has not received FDA clearance for use with patients receiving intensive medical intervention or therapy. For more information about the Accu-Chek Inform II test strip, refer to the package insert for instructions for use, performance characteristics, and limitations of the system.
Specification Accessory box Code key reader Base unit hub
Height 3.35 in / 85 mm 0.72 in / 18.4 mm 1.38 in / 35 mm
Width 11.02 in / 280 mm 1.37 in / 34.8 mm 6.65 in / 169 mm
Length 10.71 in / 272 mm 2.78 in / 70.7 mm 5 in / 127 mm
Weight approx. 1100 g approx. 28 g approx. 470 g
Operating temperature N/A 37 to 122 °F3 to 50 °C
37 to 122 °F3 to 50 °C
Storage temperature (short-term)
-13 to 158 °F-25 to 70 °C
37 to 122 °F3 to 50 °C
-13 to 158 °F-25 to 70 °C
Relative humidity(short-term storage)
< 93% < 93% < 93%
Battery voltage/type N/A Not replaceable N/A
Interfaces N/A IR portCode key socket
LED (red, green, blue)
Input voltage N/A N/A +12 V DC
Input current N/A N/A 2.0 A
Specification Accu-Chek Inform II Test Strip
System measurement range 10-600 mg/dL
Hematocrit 10-65 %
Altitude up to 10,000 feet
Measurement temperature 61 to 95 °F (16 to 35 °C)
Operating humidity 10-80 %
Acceptable samples: Whole Blood: capillary, venous, arterial, and neonate heelstick
Sample size 0.6 μL

188
08424705001 (03) 2020-08 USA • Accu-Chek Inform II Operator’s Manual Version 7.1
12.2 Further Information
Ordering
Item Description REF/Catalog Number
Accu-Chek Inform II Meter Meter, equipped with built-in WLAN functionality 05060303001
Accu-Chek Inform II Battery Pack Rechargeable battery pack (for meters with serial no. above UU14000000)
06869904001
Accu-Chek Inform II Battery Compartment Cover
Replacement cover for meter battery compartment (for meters with serial no. above UU14000000)
06869823001
Accu-Chek Inform II Base Unit (NEW) Equipped with charging and connectivity functionality
07671717190
Accu-Chek Inform II Base Unit Light (NEW)
Equipped with charging functionality 08376824190
Power Supply* Power supply (international edition) for Base Unit Light (NEW) REF 08376824190/Base Unit (NEW) REF 07671717190
08692432001
Power Supply* Power supply (North America) for Base Unit Light (NEW) REF 08376824190/Base Unit (NEW) REF 07671717190
08692432160
* Important notePower supply REF 07006098001, (International edition) and Power supply REF 07455976190, (North America), Type: FW7555M/12, Input: 100-240V/50-60Hz/350-150 mA, Output: have been discontinued and replaced by:
Power supply REF 08692432001, (International edition) and Power supply REF 08692432160, (North America), Type: FW8001M/12, Input: 100-240V/50-60Hz/400-150 mA, Output:
The change in power supply has no effect on product performance. Type: FW7555M/12 and Type: FW8001M/12 can be used in parallel.
12V 1.25A
12V 1.50A

Gen
eral
Pro
duct
Info
rmat
ion
• 12
189
08424705001 (03) 2020-08 USA • Accu-Chek Inform II Operator’s Manual Version 7.1
Accu-Chek Inform II Base Unit Light (legacy version)
Equipped with charging functionality (discontinued)
05920353001
Power Supply Power supply (North America) for legacy Base Unit Light REF 05920353001/legacy Base Unit REF 05060290001
05388805001
Accu-Chek Inform II Base Unit Wall Mount
Wall Mount for Base Unit/Base Unit Light (fits legacy and new versions)
05404878001
Accu-Chek Inform II Base Unit Hub Equipped with power and connectivity functionality for the Accu-Chek Inform II Base Unit Light
05888760001
Power Cord Required to power the Base Unit Hub (North America)
03868133001
Accu-Chek Inform II Code Key Reader 04884671001
Accu-Chek Inform II Accessory Box 05060281001
Accu-Chek Inform II Battery Pack Rechargeable battery pack (for meters with older hardware and serial no. below UU14000000)
04882326001
Accu-Chek Inform II RF Card Kit Wi-Fi card replacement (for meters with older hardware and serial no. below UU14000000)
05112699001
Item Description REF/Catalog Number

190
08424705001 (03) 2020-08 USA • Accu-Chek Inform II Operator’s Manual Version 7.1
Accu-Chek Inform II Operator’s Manual and Quick Reference Guide
The Accu-Chek Inform II Operator’s Manual and the Accu-Chek Inform II Quick Reference Guide are available on the Roche Diagnostics USA website at diagnostics.roche.com
Reagents and Solutions Supplies are available through Roche Diagnostics. Contact Roche Customer Support Center.
Product Limitations Read the information in the package insert supplied with the reagents and solutions for detailed product data and limitations.

Gen
eral
Pro
duct
Info
rmat
ion
• 12
191
08424705001 (03) 2020-08 USA • Accu-Chek Inform II Operator’s Manual Version 7.1
Information about software licenses
This product incorporates software modules developed under open source licenses. The source code of this soft-ware can be requested on a standard data exchange medium from the manufacturer at the following address:
Roche Diagnostics GmbHSandhofer Str. 11668305 MannheimGermany
The complete license agreements are stored as a text file (file name “license.pdf”) on the Accu-Chek Inform II Base Unit of the Accu-Chek Inform II system. The file “license.pdf” is located in the same folder as the PDF file “ROCHE BU Technical Note UDS5”.1
You can access these files by connecting the Accu-Chek Inform II Base Unit to a PC with the USB cable. For detailed instructions on how to do this, see the instruction sheet “Setting Up the Base Unit” included in the Accu-Chek Inform II Base Unit Kit.
Everyone is permitted to copy and distribute verbatim copies of this license document, but changing it is not allowed.
1. On legacy base units the respective PDF file is called “ROCHE HBU-BU-BUH Technical Note”.

192
08424705001 (03) 2020-08 USA • Accu-Chek Inform II Operator’s Manual Version 7.1
Contact Roche For all questions about the Accu-Chek Inform II system that are not answered in this manual, contact Roche Customer Support Center. If you do not already have con-tact details, visit our website at www.roche.com. Click on “Menu”, then select “Worldwide” to find the appropriate local office contact information.
The Accu-Chek Inform II system is manufactured for and distributed by:
In the United States:
Roche Diagnostics9115 Hague RoadIndianapolis, IN 46256
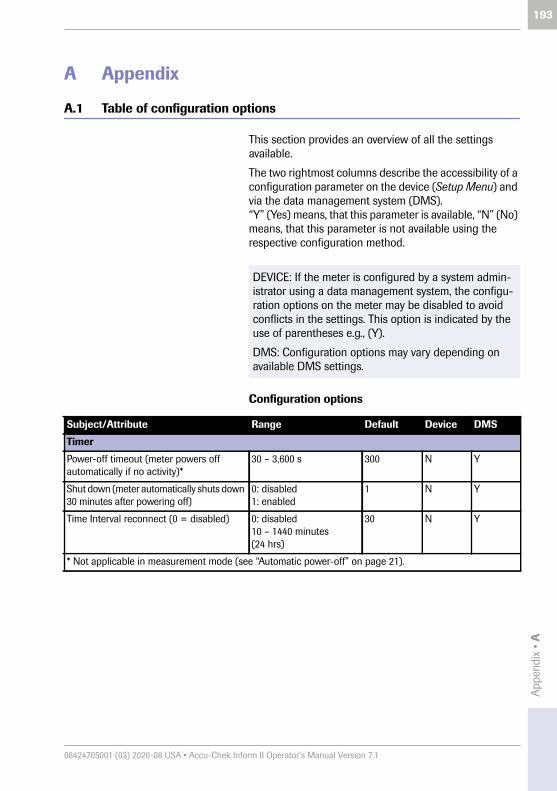
App
endi
x • A
193
08424705001 (03) 2020-08 USA • Accu-Chek Inform II Operator’s Manual Version 7.1
A Appendix
A.1 Table of configuration options
This section provides an overview of all the settings available.
The two rightmost columns describe the accessibility of a configuration parameter on the device (Setup Menu) and via the data management system (DMS).“Y” (Yes) means, that this parameter is available, “N” (No) means, that this parameter is not available using the respective configuration method.
Configuration options
DEVICE: If the meter is configured by a system admin-istrator using a data management system, the configu-ration options on the meter may be disabled to avoid conflicts in the settings. This option is indicated by the use of parentheses e.g., (Y).
DMS: Configuration options may vary depending on available DMS settings.
Subject/Attribute Range Default Device DMS
Timer
Power-off timeout (meter powers off automatically if no activity)*
30 – 3,600 s 300 N Y
Shut down (meter automatically shuts down 30 minutes after powering off)
0: disabled1: enabled
1 N Y
Time Interval reconnect (0 = disabled) 0: disabled10 – 1440 minutes (24 hrs)
30 N Y
* Not applicable in measurement mode (see “Automatic power-off” on page 21).

194
08424705001 (03) 2020-08 USA • Accu-Chek Inform II Operator’s Manual Version 7.1
Beeper
Beeper volume 0: low1: medium2: high
2 Y Y
Measurement Flow
Comments required* 0: optional1: out of range2: required3: disabled
0 N Y
Comments requirement level: if out of…(only valid if Comments required = 1)*
0: normal range1: critical range2: reportable range3: measurement range
0 N Y
Custom comments* 0: disabled 1: enabled
1 N Y
* Does not apply to QC measurement workflow
Control lot verification 0: display only1: yes / no confirmation2: prompt for entry3: scan only
1 Y Y
Control result display 0: value (numeric)1: PASS / FAIL
0 N Y
Critical range display 0: value (numeric)1: HI / LO
0 N Y
Critical range HI limit 10 – 600 mg/dL0.6 – 33.3 mmol/L
600 mg/dL33.3 mmol/L
Y Y
Critical range LO limit 10 – 600 mg/dL0.6 – 33.3 mmol/L
10mg/dL0.6 mmol/L
Y Y
Critical range message enabled Whether to display the out-of-critical range warning message (1) or not (0)
1 N Y
Critical range text 0 – 100 characters “Out of Critical Range”
N Y
Normal range HI limit 10 – 600 mg/dL0.6 – 33.3 mmol/L
600 mg/dL33.3 mmol/L
Y Y
Normal range LO limit 10 – 600 mg/dL0.6 – 33.3 mmol/L
10mg/dL0.6 mmol/L
Y Y
STAT tests allowed 0: no1: yes
0 Y Y
Number of STAT tests allowed 0 – 9 9 Y Y
Reportable range HI limit 10 – 600 mg/dL0.6 – 33.3 mmol/L
600 mg/dL33.3 mmol/L
Y Y
Subject/Attribute Range Default Device DMS

App
endi
x • A
195
08424705001 (03) 2020-08 USA • Accu-Chek Inform II Operator’s Manual Version 7.1
Reportable range LO limit 10 – 600 mg/dL0.6 – 33.3 mmol/L
10mg/dL0.6 mmol/L
Y Y
Reportable range message Whether to display a reportable range message (1) or not (0)
1 N Y
Reportable range message text 0 – 100 characters “Out of Reportable Range”
N Y
Strip limitations warning Configuration, whether to display the strip limita-tions warning (1) or not (0).
0 Y Y
Strip lot verification 0: display only1: yes/no confirmation2: list selection3: scan only
1 Y Y
Linearity lot verification 0: display only1: yes/no confirmation2: prompt for lot entry
1 Y Y
Additional Patient Test: enables consecu-tive tests on the same patient (creating a patient test series)
0: disabled1: enabled
0 N Y
Blood sample type selection 0: disabled1: enabled
0 N Y
Isolation Room 0: disable (select patient ID before strip lot selection)1: enable (select strip lot before patient ID selection)
0 N Y
Subject/Attribute Range Default Device DMS

196
08424705001 (03) 2020-08 USA • Accu-Chek Inform II Operator’s Manual Version 7.1
Display
Contrast 0 - 15 7 Y Y
Formats and Language
Date format 1: MM/DD/YY2: DD.MM.YY
1 Y Y
Time format 1: 24 hours 2: 12 hours
2 Y Y
Language setting * 1: German3: French4: Spanish5: Italian6: Dutch7: Swedish8: English (USA)9: Danish11: Portuguese
8 Y Y
* Other languages: For the availability of languages not listed above, contact Roche.
Glucose result units 0: mg/dL1: mmol/L
0 Y Y
Power Up
Location (a string to show where a certain meter ought to be located); to be shown on the Power Up screen.
0 – 20 characters “” N Y
Subject/Attribute Range Default Device DMS
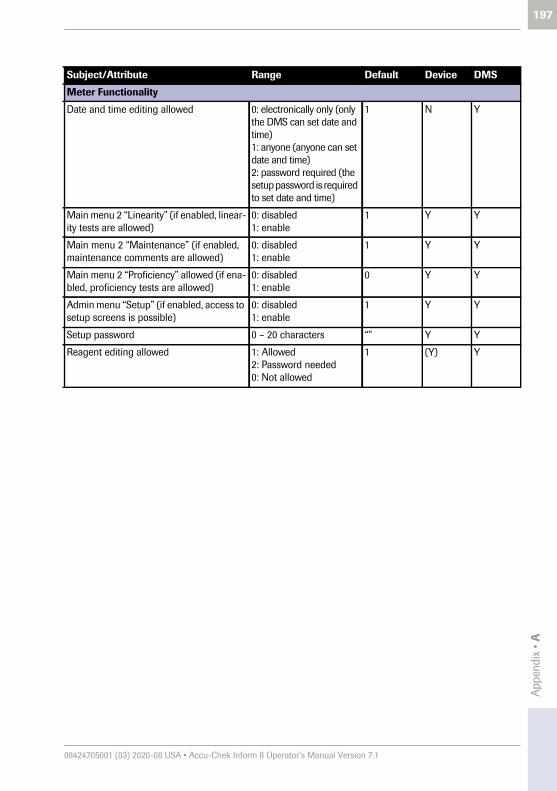
App
endi
x • A
197
08424705001 (03) 2020-08 USA • Accu-Chek Inform II Operator’s Manual Version 7.1
Meter Functionality
Date and time editing allowed 0: electronically only (only the DMS can set date and time)1: anyone (anyone can set date and time)2: password required (the setup password is required to set date and time)
1 N Y
Main menu 2 “Linearity” (if enabled, linear-ity tests are allowed)
0: disabled1: enable
1 Y Y
Main menu 2 “Maintenance” (if enabled, maintenance comments are allowed)
0: disabled1: enable
1 Y Y
Main menu 2 “Proficiency” allowed (if ena-bled, proficiency tests are allowed)
0: disabled1: enable
0 Y Y
Admin menu “Setup” (if enabled, access to setup screens is possible)
0: disabled1: enable
1 Y Y
Setup password 0 – 20 characters “” Y Y
Reagent editing allowed 1: Allowed2: Password needed0: Not allowed
1 (Y) Y
Subject/Attribute Range Default Device DMS

198
08424705001 (03) 2020-08 USA • Accu-Chek Inform II Operator’s Manual Version 7.1
Operator ID
Operator ID entry control 0: None1: Prompt2: Scan only3: Prompt (numeric only)
1 Y Y
Operator ID entry control on Glucose control only
0: yes (on controls only) 1: no (always)
1 Y Y
Operator ID validation(Any character allowed [except non-print-able ones, represented as hexadecimal ASCII values by 0x01 - 0x1F and 0x7F]. Via the meter keyboard only A-Z/a-z, 0-9, “.” [period], “-” [hyphen] can be entered.)Remark: leading and trailing spaces are truncated.
0: none1: length2: list3: list & password
0 Y Y
Operator ID maximum length (used to validate an operator ID if operator ID validation mode is set to “Length”)
0 – 20 20 Y Y
Operator ID minimum length (used to validate an operator ID if operator ID validation mode is set to “Length”)
0 – 20 0 Y Y
Operator ID timeout (determines the time in sec. before the operator is logged out after power-off). 0 = immediately logged out.
0 – 3,600sec 0 N Y
Operator password length 4-20 characters (only a-z, 0-9 allowed)
N/A N N
Operator certification expiry warning 0-90 days 0 (=off) N Y
Operator Name length 0-25 characters N/A N N
Operator ID and patient ID barcode masks
Operator ID barcode mask (see separate table at the end of this chapter)
0 – 300 characters* “” N Y
Patient ID barcode mask (see separate table at the end of this chapter)
0 – 300 characters* “” N Y
* The number of characters in the unmasked barcode may not exceed 20.
Subject/Attribute Range Default Device DMS
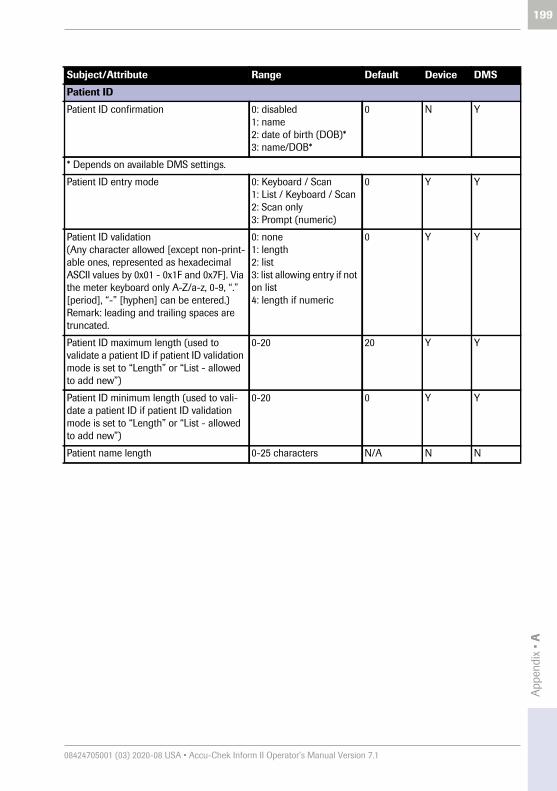
App
endi
x • A
199
08424705001 (03) 2020-08 USA • Accu-Chek Inform II Operator’s Manual Version 7.1
Patient ID
Patient ID confirmation 0: disabled1: name2: date of birth (DOB)*3: name/DOB*
0 N Y
* Depends on available DMS settings.
Patient ID entry mode 0: Keyboard / Scan1: List / Keyboard / Scan 2: Scan only3: Prompt (numeric)
0 Y Y
Patient ID validation(Any character allowed [except non-print-able ones, represented as hexadecimal ASCII values by 0x01 - 0x1F and 0x7F]. Via the meter keyboard only A-Z/a-z, 0-9, “.” [period], “-” [hyphen] can be entered.)Remark: leading and trailing spaces are truncated.
0: none1: length2: list3: list allowing entry if not on list4: length if numeric
0 Y Y
Patient ID maximum length (used to validate a patient ID if patient ID validation mode is set to “Length” or “List - allowed to add new”)
0-20 20 Y Y
Patient ID minimum length (used to vali-date a patient ID if patient ID validation mode is set to “Length” or “List - allowed to add new”)
0-20 0 Y Y
Patient name length 0-25 characters N/A N N
Subject/Attribute Range Default Device DMS

200
08424705001 (03) 2020-08 USA • Accu-Chek Inform II Operator’s Manual Version 7.1
QC algorithm
QC Algorithm 0: None (always OK)1: Last result OK2: Time of day (DMS only)3: Shift (DMS only)4: Hours5: Strip count6: Time of day rotate (DMS only)7: Shift rotate (DMS only)8: Hours rotate (DMS only)9: Strip count rotate (DMS only)
0 (Y) Y
QC hours (Number of hours between required control measurements if QC algo-rithm is set to “Hours” or “hours rotate”)
1 – 9,999 hours 24 Y Y
QC shift length (a PASS control remains valid for twice this amount in time after shift start if the QC algorithm is set to “Shift” or “Shift rotate”)
1, 2, 3, 4, 6, 8, 12, 24 hours 8 N Y
QC shift start (time of the shift start if the QC algorithm is set to “Shift” or “Shift rotate”)
0 – 23 hours 6 N Y
QC strip count (number of tests a PASS control remains valid)
1 – 999 50 Y Y
QC time of day 6 POCT1-A data fields 00:00 – 23:59
06:0009:0012:0015:0018:0022:00
N Y
QC time of day set 6 POCT1-A data fields 0 or 1
1 0 0 0 0 0 N Y
Subject/Attribute Range Default Device DMS

App
endi
x • A
201
08424705001 (03) 2020-08 USA • Accu-Chek Inform II Operator’s Manual Version 7.1
Result deletion
Result deletion algorithm. Automatic or First in First out.
0: automatic1: FIFO
1 N Y
Result retention time: Number of days since a result was measured before it will be deleted automatically if result deletion algorithm is set to “automatic”. Results are then deleted when powering up the meter or performing a test.
1 – 1,000 d 30 N Y
Result download required 0: disabled1: enabled
0 N Y
Electronic communication
Download warning 0 – 999 h 0: disabled N Y
Download Lockout 0 – 999 h 0: disabled N Y
Maximum number of list items transferred in one POCT1-A message
1 – 500 75 N Y
Application timeout (within this time the application expects a response by the DMS to any POCT1-A command)
30 – 3,600 s 60 N Y
TLS Encryption of communication 0: disabled1: enabled
0 N Y
Compression of data communication 0: disabled1: enabled
0 N Y
Subject/Attribute Range Default Device DMS

202
08424705001 (03) 2020-08 USA • Accu-Chek Inform II Operator’s Manual Version 7.1
WLAN settings (general)
WLAN enabled 0: disabled1: enabled
0 N Y
Use DHCP 0: disabled1: enabled
0 N Y
IP (the meter‘s static IP-address if no DHCP is used)
0.0.0.0 – 255.255.255.255 0.0.0.0 N Y
Subnet Mask (subnet mask to be used by the meter if static IP is used. Note: if DHCP is used; the DHCP-subnet mask will be used.)
0.0.0.0 – 255.255.255.255 0.0.0.0 N Y
Use DNS 0: disabled1: enabled
0 N Y
DMS host (the host’s DNS name if DNS is used)
0 – 60 characters “” N Y
DMS IP address (the host’s IP address if no DNS is used)
0.0.0.0 – 255.255.255.255 0.0.0.0 N Y
DMS port (the port number to request open socket from the DMS. Roche recom-mends use of port numbers 1024.)
0 – 65,535 0 N Y
DNS IP (IP address of the DNS-server if DHCP is not used and DNS is configured)
0.0.0.0 – 255.255.255.255 0.0.0.0 N Y
Gate IP (static gateway IP address) 0.0.0.0 – 255.255.255.255 0.0.0.0 N Y
Subject/Attribute Range Default Device DMS

App
endi
x • A
203
08424705001 (03) 2020-08 USA • Accu-Chek Inform II Operator’s Manual Version 7.1
WLAN settings (security)
Cipher Type (encyrption method) 0: None (no cipher type)1: AES (symmetric key cryptography)2: TKIP (using dynamic keys)3: AES | TKIP (AES and TKIP together)4: WEP40 (WEP with 64 bit key length)5: WEP104 (WEP with 128 bit key length)
0: disabled N Y
Security Type * 0: open (no secu-rity/encryption)1: WEP2: WPA_PSK (WPA with pre-shared key)3: -4: EAP**
0 N Y
* Note: Only those combinations of cipher type and security type are allowed that are listed below, see table “Allowed combinations of cipher and security type”.
**Note: When using option 4 ensure that an appropriate WLAN EAP package has already been downloaded from the DMS to the meter. Within this EAP container, the appropriate EAP type (TLS, PEAP or TTLS) and the diverse EAP configuration settings have to be configured.)
SSID 0 – 32 characters “” N Y
WEP-key (40 or 104 bits) NUL-terminated string of 10 or 26chs (HEX)
“” N Y
WEP-authentication 0: open system authenti-cation1: shared key authentica-tion
0 N Y
WPA Key Type 0: Passphrase1: Key
0 N Y
WPA Key string of 64 characters (HEX)
“” N Y
WPA pass phrase (Un-encrypted text used to generate the 256-bit preshared key.)
8 – 63 characters “” N Y
Subject/Attribute Range Default Device DMS

204
08424705001 (03) 2020-08 USA • Accu-Chek Inform II Operator’s Manual Version 7.1
Subject/Attribute Range Default Device DMS
Other Test Entry (OTE)
OTE functionality * 0: disabled1: enabled
0 N Y
* Depends on available DMS settings.
Barcode Configuration
Code 128 0: disabled1: enabled
1 N Y
Code 39 0: disabled1: enabled
1 N Y
Code 93 0: disabled1: enabled
1 N Y
EAN 13 0: disabled1: enabled
1 N Y
Interleaved 2 of 5 0: disabled1: enabled
1 N Y
Codabar 0: disabled1: enabled
1 N Y
GS1 DataBar Limited 0: disabled1: enabled
1 N Y
QR Code 0: disabled1: enabled
1 N Y
DataMatrix 0: disabled1: enabled
1 N Y
PDF417 0: disabled1: enabled
1 N Y
Aztec 0: disabled1: enabled
1 N Y
PreAimer Delay (in milliseconds) 0 - 9,999 500 N Y
Interleaved 2 of 5checksum validation
0: disabled1: enabled
0 N Y
Add barcode to patient test result 0: disabled1: enabled2: enabled and confirm
0 N Y
Barcode Separators: List of separator characters (readable characters, or hexa-decimal ASCII values* preceded by a back-slash) to be replaced by line breaks on the confirmation screen. Only valid if Add bar-code to patient test result=2.
0-30 characters “” N Y
* See the table of ASCII characters on page 208.

App
endi
x • A
205
08424705001 (03) 2020-08 USA • Accu-Chek Inform II Operator’s Manual Version 7.1
Allowed combinations of cipher and security type
security_type cipher_type wep_auth_type wep_key wpa_key_type wpa_key wpa_passphrase
0 - open 0 - none - - - - -
1 - WEP 4 - WEP40 0 - open / 1 - shared
10 charac-ters HEX
- - -
1 - WEP 5 - WEP104 0 - open / 1 - shared
26 charac-ters HEX
- - -
2 - WPA_PSK 1 - AES (WPA2)
- - 0 - passphrase - 8-63 characters
2 - WPA_PSK 1 - AES (WPA2)
- - 1 - key 64 charac-ters HEX
-
2 - WPA_PSK 2 - TKIP (WPA)
- - 0 - passphrase - 8-63 characters
2 - WPA_PSK 2 - TKIP (WPA)
- - 1 - key 64 charac-ters HEX
-
2 - WPA_PSK 3 - AES/TKIP (WPA2/WPA)
- - 0 - passphrase - 8-63 characters
2 - WPA_PSK 3 - AES/TKIP (WPA2/WPA)
- - 1 - key 64 charac-ters HEX
-
3 - - - - - - -
4 - EAP - - - - - -

206
08424705001 (03) 2020-08 USA • Accu-Chek Inform II Operator’s Manual Version 7.1
Operator and patient ID barcode masks
Barcode mask character Definition
A-Z, 0-9 If not preceded by the Caret (“^”), the scan data character must be the same as the mask character. This character is not saved as part of the ID. If the characters are not the same, the scan data is not a valid ID.
Dollar (“$”) The scan data character in this position is kept as part of the ID.
Asterisk (“*“) The scan data character in this position is not kept as part of the ID.
Tilde (“~”) The scan data character in this position must be a number, 0-9, and it is not kept as part of the ID. If the scan data character is not a number, the scan data is not a valid ID.
Plus (“+”) The scan data character in this position must be an alpha character, A – Z, and it is not kept as part of the ID. If the scan data character is not an alpha character, the scan data is not a valid ID.
Caret (“^”) This mask character denotes that the scan data character must be equal to the next character in the barcode mask after the “^”, and that the scan data character is kept as part of the ID. If the scan data character is not equal to the mask character following the “^”, the barcode reading is invalid as an ID.
Caret Plus (“^+”) The “^” can be combined with the plus (“+”). This denotes that the scan data character in this position must be an alpha character, A – Z/a-z, and that it is kept as part of the ID. If the scan data character is not an alpha character, the scan data is not a valid ID.
Caret Tilde (“^~”) The “^” can be combined with the tilde (“~”). This denotes that the scan data character in this position must be a number, 0-9, and that it is kept as part of the ID. If the scan data character is not a number, the scan data is not a valid ID.
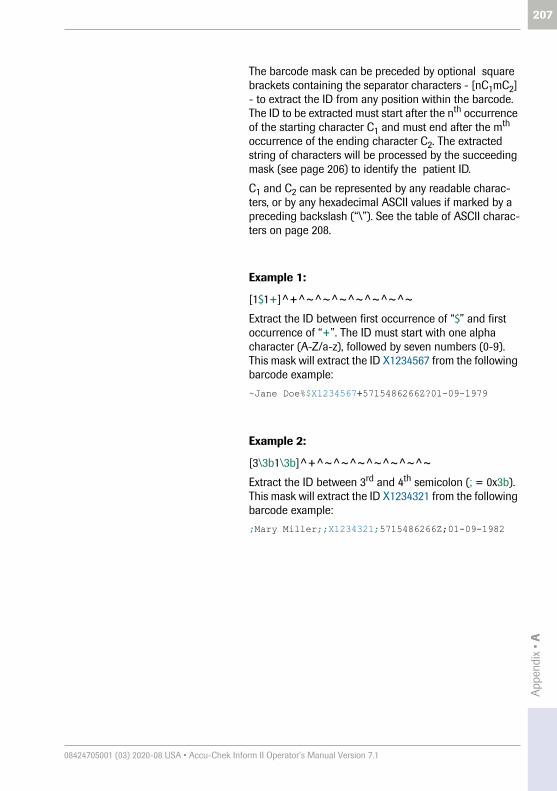
App
endi
x • A
207
08424705001 (03) 2020-08 USA • Accu-Chek Inform II Operator’s Manual Version 7.1
The barcode mask can be preceded by optional square brackets containing the separator characters - [nC1mC2] - to extract the ID from any position within the barcode. The ID to be extracted must start after the nth occurrence of the starting character C1 and must end after the mth occurrence of the ending character C2. The extracted string of characters will be processed by the succeeding mask (see page 206) to identify the patient ID.
C1 and C2 can be represented by any readable charac-ters, or by any hexadecimal ASCII values if marked by a preceding backslash (“\”). See the table of ASCII charac-ters on page 208.
Example 1:
[1$1+]^+^~^~^~^~^~^~^~
Extract the ID between first occurrence of “$” and first occurrence of “+”. The ID must start with one alpha character (A-Z/a-z), followed by seven numbers (0-9). This mask will extract the ID X1234567 from the following barcode example:
~Jane Doe%$X1234567+5715486266Z?01-09-1979
Example 2:
[3\3b1\3b]^+^~^~^~^~^~^~^~
Extract the ID between 3rd and 4th semicolon (; = 0x3b). This mask will extract the ID X1234321 from the following barcode example:
;Mary Miller;;X1234321;5715486266Z;01-09-1982

208
08424705001 (03) 2020-08 USA • Accu-Chek Inform II Operator’s Manual Version 7.1
Table of ASCII characters
Dec Hex Char Dec Hex Char Dec Hex Char Dec Hex Char
0 0 [NULL] 32 20 [SPACE] 64 40 @ 96 60 `
1 1 [START OF HEADING] 33 21 ! 65 41 A 97 61 a
2 2 [START OF TEXT] 34 22 " 66 42 B 98 62 b
3 3 [END OF TEXT] 35 23 # 67 43 C 99 63 c
4 4 [END OF TRANSMISSION] 36 24 $ 68 44 D 100 64 d
5 5 [ENQUIRY] 37 25 % 69 45 E 101 65 e
6 6 [ACKNOWLEDGE] 38 26 & 70 46 F 102 66 f
7 7 [BELL] 39 27 ' 71 47 G 103 67 g
8 8 [BACKSPACE] 40 28 ( 72 48 H 104 68 h
9 9 [HORIZONTAL TAB] 41 29 ) 73 49 I 105 69 i
10 A [LINE FEED] 42 2A * 74 4A J 106 6A j
11 B [VERTICAL TAB] 43 2B + 75 4B K 107 6B k
12 C [FORM FEED] 44 2C , 76 4C L 108 6C l
13 D [CARRIAGE RETURN] 45 2D - 77 4D M 109 6D m
14 E [SHIFT OUT] 46 2E . 78 4E N 110 6E n
15 F [SHIFT IN] 47 2F / 79 4F O 111 6F o
16 10 [DATA LINK EXCAPE] 48 30 0 80 50 P 112 70 p
17 11 [DEVICE CONTROL 1] 49 31 1 81 51 Q 113 71 q
18 12 [DEVICE CONTROL 2] 50 32 2 82 52 R 114 72 r
19 13 [DEVICE CONTROL 3] 51 33 3 83 53 S 115 73 s
20 14 [DEVICE CONTROL 4] 52 34 4 84 54 T 116 74 t
21 15 [NEGATIVE ACKNOWLEDGE] 53 35 5 85 55 U 117 75 u
22 16 [SYNCHRONOUS IDLE] 54 36 6 86 56 V 118 76 v
23 17 [ENG OF TRANS. BLOCK] 55 37 7 87 57 W 119 77 w
24 18 [CANCEL] 56 38 8 88 58 X 120 78 x
25 19 [END OF MEDIUM] 57 39 9 89 59 Y 121 79 y
26 1A [SUBSTITUTE] 58 3A : 90 5A Z 122 7A z
27 1B [ESCAPE] 59 3B ; 91 5B [ 123 7B {
28 1C [FILE SEPARATOR] 60 3C < 92 5C \ 124 7C |
29 1D [GROUP SEPARATOR] 61 3D = 93 5D ] 125 7D }
30 1E [RECORD SEPARATOR] 62 3E > 94 5E ^ 126 7E ~
31 1F [UNIT SEPARATOR] 63 3F ? 95 5F _ 127 7F [DEL]

App
endi
x • A
209
08424705001 (03) 2020-08 USA • Accu-Chek Inform II Operator’s Manual Version 7.1
A.2 Example of barcode symbologies
To reduce the probability of the barcode being misread, it is strongly recommended that you use the configuration options for patient and/or operator ID validation as appli-cable to your specific workflow. These options are:
■ check ID against list or
■ check ID for length1
■ use barcodes with check digits
In combination with the above options or as a single measure, use an appropriate barcode mask if this is com-patible with the structure of your barcode content.
WARNING
Risk of barcode read errorsIf a barcode is read incorrectly, this may lead to patient misidentification and therefore to inappropriate therapy decisions.
When creating patient or operator barcodes, always adhere to the applicable international IEC/ISO standards for the respective barcode symbology. In particular, ensure that barcode size and print quality (as defined in ISO/IEC 15416 and 15415) are adequate. Inadequate print size and/or quality may lead to erroneous decoding. In addition every user must carry out a plausibility check on all data scanned into and displayed by the instrument.
1. If no operator/patient list can be used, it is recommended that you at least set a minimum length for the respective ID, even if your facility uses IDs of varying length.

210
08424705001 (03) 2020-08 USA • Accu-Chek Inform II Operator’s Manual Version 7.1
Always make sure that the entire barcode is covered by the green light beam when scanning.
For questions about working with barcodes that are not answered in this manual and for best practice guidelines on creating and reading barcodes, contact Roche Customer Support Center (see Chapter 12).
EAN 13 barcodes, although widely used in retail, are less recommendable for patient/operator barcodes. If used, they demand the very highest quality standards of barcode creation and reproduction.
It is possible to selectively enable or disable the barcode types used for scanning Patient IDs or Operator IDs. Barcode types that are not used can be disabled (see “Barcode Configuration” on page 204). This feature is only available via a Data Management System (DMS).
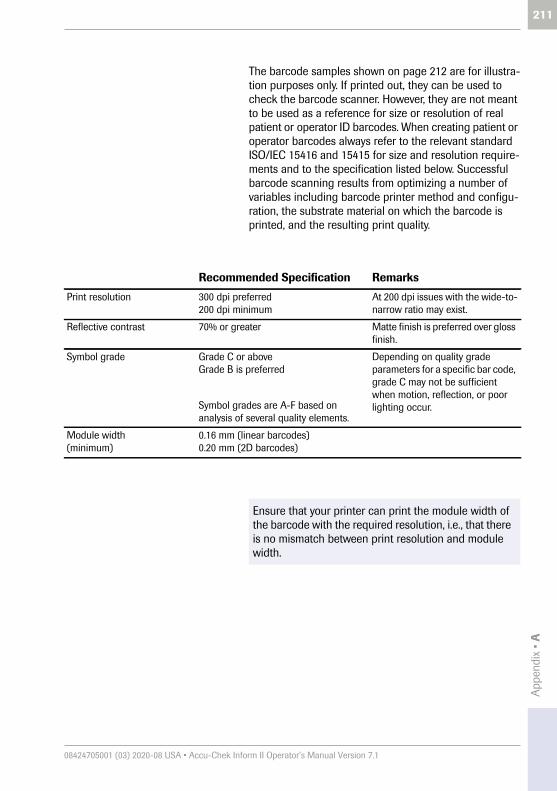
App
endi
x • A
211
08424705001 (03) 2020-08 USA • Accu-Chek Inform II Operator’s Manual Version 7.1
The barcode samples shown on page 212 are for illustra-tion purposes only. If printed out, they can be used to check the barcode scanner. However, they are not meant to be used as a reference for size or resolution of real patient or operator ID barcodes. When creating patient or operator barcodes always refer to the relevant standard ISO/IEC 15416 and 15415 for size and resolution require-ments and to the specification listed below. Successful barcode scanning results from optimizing a number of variables including barcode printer method and configu-ration, the substrate material on which the barcode is printed, and the resulting print quality.
Recommended Specification Remarks
Print resolution 300 dpi preferred200 dpi minimum
At 200 dpi issues with the wide-to-narrow ratio may exist.
Reflective contrast 70% or greater Matte finish is preferred over gloss finish.
Symbol grade Grade C or aboveGrade B is preferred
Symbol grades are A-F based on analysis of several quality elements.
Depending on quality grade parameters for a specific bar code, grade C may not be sufficient when motion, reflection, or poor lighting occur.
Module width (minimum)
0.16 mm (linear barcodes)0.20 mm (2D barcodes)
Ensure that your printer can print the module width of the barcode with the required resolution, i.e., that there is no mismatch between print resolution and module width.
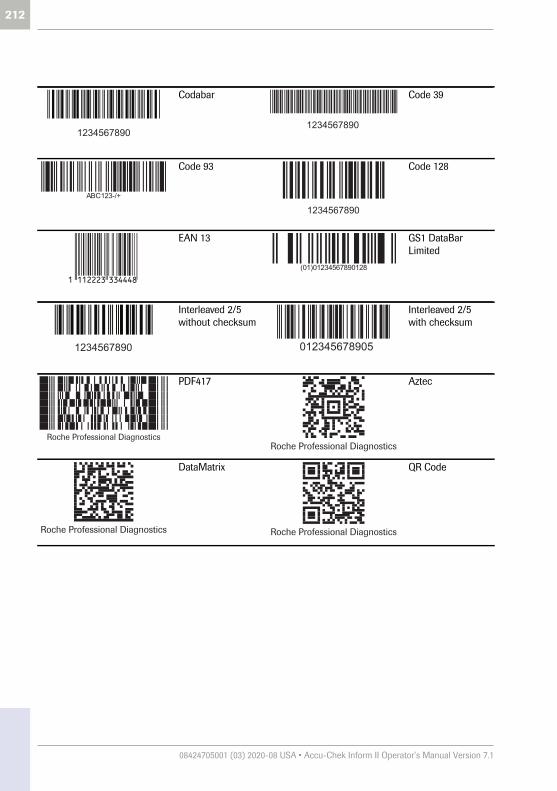
212
08424705001 (03) 2020-08 USA • Accu-Chek Inform II Operator’s Manual Version 7.1
Codabar Code 39
Code 93 Code 128
EAN 13 GS1 DataBar Limited
Interleaved 2/5 without checksum
Interleaved 2/5 with checksum
PDF417 Aztec
DataMatrix QR Code
Roche Professional DiagnosticsRoche Professional Diagnostics
Roche Professional Diagnostics Roche Professional Diagnostics

App
endi
x • B
213
08424705001 (03) 2020-08 USA • Accu-Chek Inform II Operator’s Manual Version 7.1
B Appendix
B.1 Option: Wireless network (WLAN)
Preliminary note Appendix B has been developed to explain the wireless communication principles of the Accu-Chek Inform II system1 and to help your facility’s information technology/management team(s) in effectively deploying the Accu-Chek Inform II system on your wireless network.
Whether your meter has wireless capability or not depends on the system configuration that you purchased.
Background The Accu-Chek Inform II meter can only be configured through a data management system to communicate wire-lessly. The data management system is also used to set-up and configure the meter to connect to one hospital specific Wireless Local Area Network (WLAN2). WLANs use electromagnetic waves in the 2.4 and/or 5.0 GHz frequency range to wirelessly transmit data3. The Accu-Chek Inform II system adheres to IEEE Standard 802.11g (2.4 GHz range)4. The system is backwards compatible to 802.11b. During wireless communication to an Access Point (AP), the Accu-Chek Inform II meter recognizes the existent AP WLAN protocol configuration (802.11b or 802.11g) and automatically transmits data using the appropriate com-munication protocol5.
1. The Accu-Chek Inform II system is certified by the Wi-Fi Alliance.
2. WLAN is also commonly referred to as wireless LAN or Wi-Fi.
3. For the wireless functionality to work properly, the wire-less module must first be configured by your system administrator.
4. While the Accu-Chek Inform II system adheres to the 802.11g standard, it uses only channels 1-11. Channels 12-14 are not used by the system.
5. WLANs are organized in cells. A typical WLAN cell con-sists of Access Point(s) that are connected to the (wired) Local Area Network and one or more clients, e.g., Accu-Chek Inform II meters along with other clients such as portable computers.

214
08424705001 (03) 2020-08 USA • Accu-Chek Inform II Operator’s Manual Version 7.1
The loss of signal or access to bandwidth of one particu-lar client may vary depending on one or more of the following situations: the type and number of other clients, the performance of the Access Point, the presence of electromagnetic disturbances, and other potential inter-fering factors, e.g., concrete walls.
The Accu-Chek Inform II meter uses a burst-like commu-nication protocol that will only consume bandwidth if there is actually data to be transferred. Compared to other applications, such as Voice over Internet Protocol (VoIP) or multi-media applications, the meter’s band-width consumption is minimal. If the WLAN that the Accu-Chek Inform II meter seeks to connect to is degraded, the meter design minimizes the impact on functionality.
Technical implementation Prior to connecting any wireless device to a wireless net-work, it is recommended that a WLAN site survey be per-formed. The goal of a WLAN site survey is to ensure that Access Points will provide enough coverage and perfor-mance to support any new radio frequency (RF) applica-tion or device. The survey will also detail RF signals, including all existing WLANs along with any competing RF signals and interferences (building structure related and other wireless equipment / devices).
As part of an RF implementation of the Accu-Chek Inform II system, it is recommended that at minimum one base unit be hard wired per floor. A networked base unit provides redundancy if a wireless network malfunctions or loses service. If the Accu-Chek Inform II meter with RF is used in an area with low signal or interferences, it is recommended to install a connected base unit for redun-dancy. The redundancy of the connected base unit allows immediate transmission of patient results when the meter is docked.
The facility wireless network infrastructure (hardware and software) is integral in maintaining wireless com-munication. Prior to changing or upgrading the facility wireless network infrastructure, contact Roche Customer Support Center for technical assessment and assistance.
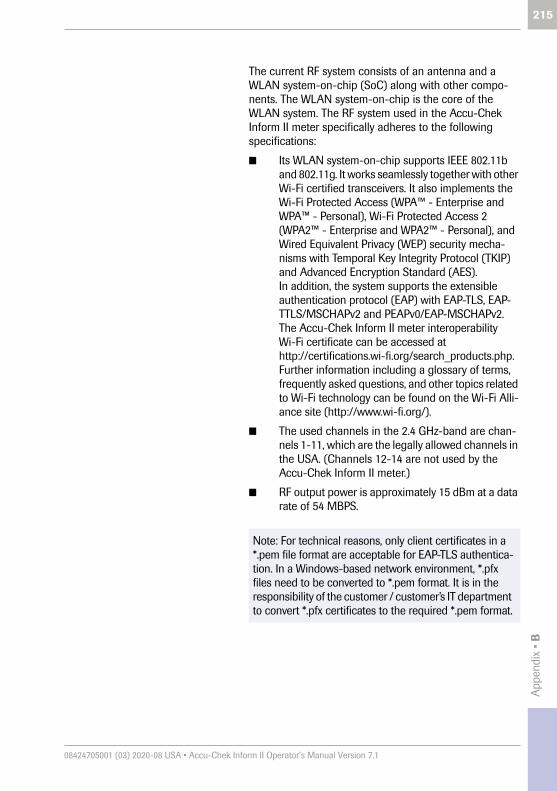
App
endi
x • B
215
08424705001 (03) 2020-08 USA • Accu-Chek Inform II Operator’s Manual Version 7.1
The current RF system consists of an antenna and a WLAN system-on-chip (SoC) along with other compo-nents. The WLAN system-on-chip is the core of the WLAN system. The RF system used in the Accu-Chek Inform II meter specifically adheres to the following specifications:
■ Its WLAN system-on-chip supports IEEE 802.11b and 802.11g. It works seamlessly together with other Wi-Fi certified transceivers. It also implements the Wi-Fi Protected Access (WPA™ - Enterprise and WPA™ - Personal), Wi-Fi Protected Access 2 (WPA2™ - Enterprise and WPA2™ - Personal), and Wired Equivalent Privacy (WEP) security mecha-nisms with Temporal Key Integrity Protocol (TKIP) and Advanced Encryption Standard (AES). In addition, the system supports the extensible authentication protocol (EAP) with EAP-TLS, EAP-TTLS/MSCHAPv2 and PEAPv0/EAP-MSCHAPv2. The Accu-Chek Inform II meter interoperability Wi-Fi certificate can be accessed at http://certifications.wi-fi.org/search_products.php. Further information including a glossary of terms, frequently asked questions, and other topics related to Wi-Fi technology can be found on the Wi-Fi Alli-ance site (http://www.wi-fi.org/).
■ The used channels in the 2.4 GHz-band are chan-nels 1-11, which are the legally allowed channels in the USA. (Channels 12-14 are not used by the Accu-Chek Inform II meter.)
■ RF output power is approximately 15 dBm at a data rate of 54 MBPS.
Note: For technical reasons, only client certificates in a *.pem file format are acceptable for EAP-TLS authentica-tion. In a Windows-based network environment, *.pfx files need to be converted to *.pem format. It is in the responsibility of the customer / customer’s IT department to convert *.pfx certificates to the required *.pem format.

216
08424705001 (03) 2020-08 USA • Accu-Chek Inform II Operator’s Manual Version 7.1
RF specific functionalities and effective performance claims
The Accu-Chek Inform II system offers the option of wire-less network connectivity (WLAN/Wi-Fi). If you purchase a system with this option, the WLAN function is enabled during production.
This module can only be configured by a data manage-ment system (DMS), which activates the meter’s wireless communication and data transfer capabilities. Wireless connectivity can help to ensure that updates to informa-tion in the DMS are sent immediately to all networked meters.
Meters with an integrated and activated wireless option use the base unit for recharging and/or as a redundant communication option to exchange data with the DMS.
The meter also has to be docked if the hospital changes security protocols. When this change occurs, it may lock out all meters until docked and reconfigured with the new protocol.
As described above, the Accu-Chek Inform II meter supports the 802.11g standard. This translates into the following RF specific performance claims:

App
endi
x • B
217
08424705001 (03) 2020-08 USA • Accu-Chek Inform II Operator’s Manual Version 7.1
■ The Accu-Chek Inform II meter is capable of trans-ferring to a suitable DMS, via WLAN, a data set of up to 1000 result records, 100 reagent records, and 500 operator ID records in less than 15 minutes, when operated in a typical WLAN environment (correct WLAN administration, typical population of other clients present, any of the supported security models enabled).
■ Immediately after the operator has initiated the sending of a blood glucose result, the Accu-Chek Inform II meter will attempt to connect to the DMS. In line with the industry communication standard POCT1-A, the DMS must acknowledge the meter’s request for connection and actively query for the result. Only upon receipt of this DMS query, the meter will send the result. Hence the effective time for transmitting results depends on infrastructure, DMS workload, etc. Once the DMS sends a query, however, the meter will respond within a few seconds.
■ An Accu-Chek Inform II meter with wireless con-nectivity enabled will communicate results after every test1 or, when the meter is idle; it will auto-matically attempt to communicate with the DMS every 10 minutes.
1. The meter will attempt to transmit the result after touching . If the meter is left to power off automatically (see
page 21) or powered off manually using the On/Off button the result will be transmitted only after another 10 minutes in the next communication cycle.

218
08424705001 (03) 2020-08 USA • Accu-Chek Inform II Operator’s Manual Version 7.1
A typical range for direct connection between the Accu-Chek Inform II meter and the access point (air, direct view, low disturbances) is up to 49 to 66 feet (15 to 20 meters). The actual range depends on the positioning of the access point’s antennas and other topological properties of the space between WLAN device and AP. Additionally, dynamic control of the transmitting power of the access point may reduce the maximum distance between WLAN device and AP within which communica-tion can be guaranteed.
The Accu-Chek Inform II system is designed such that it coexists with other wirelessly communicating devices. The Accu-Chek Inform II system does NOT include any real-time or even time critical wireless functionality. It communicates exclusively single, digital data fields. It does NOT communicate continuous waveform data.
Note: The Accu-Chek Inform II meter monitors the Quality of Service (QoS) of the WLAN communication connection. Should the last attempt to communicate have failed, an icon appears on the screen (see page 42). A degraded QoS will not impact the function-ality of the meter but may delay the communication of results to the DMS. Users should be aware that real-time communication of blood glucose readings cannot be guaranteed by the Accu-Chek Inform II meter.

Supp
lem
ent f
or O
ther
Tes
t Ent
ry •
C
219
08424705001 (03) 2020-08 USA • Accu-Chek Inform II Operator’s Manual Version 7.1
C Supplement for Other Test Entry
C.1 Before you start
Description The Other Test Entry (OTE) feature is designed to allow the professional user to document patient test results from certain off-meter tests or other related information (e.g., prescribed insulin type, number of units).
External controls are entered in the Control Test section. The meter facilitates the transfer of this information to a data management system (DMS).
The examples in this manual are for illustration purposes only. Consult the instructions that come with the DMS for details and configuration options.
The activation of this feature is only possible via a suit-able DMS.
Activating this feature permanently adds an additional step to the Patient Test or a Control Test sequence. Once this feature is activated, you will have to select the type of test (Glucose Test/Other Test or Glucose Control Test/Other Control Tests) each time.

220
08424705001 (03) 2020-08 USA • Accu-Chek Inform II Operator’s Manual Version 7.1
C.2 Overview of Other Test Entry (OTE)
Introduction The Other Test Entry (OTE) feature allows you to enter patient results for the following tests:
■ Pregnancy
■ Visual Urinalysis (UA)
■ Rapid Streptococcus
■ Rapid Drugs of Abuse Tests (DAT)
■ Fecal Occult
■ Gastric Occult
■ Ketones
The Other Test Entry feature also allows you to add information about prescribed insulin type and number of units:
■ Rapid-Acting Insulin
■ Regular Insulin
■ Intermediate-Acting Insulin
■ Long-Acting Insulin
■ Insulin Mixtures

Supp
lem
ent f
or O
ther
Tes
t Ent
ry •
C
221
08424705001 (03) 2020-08 USA • Accu-Chek Inform II Operator’s Manual Version 7.1
In the Review Results listing, the test names for the above tests and insulin information will be abbreviated as follows:
■ Pregnancy (Preg)
■ Visual UA (VUA)
■ Rapid Strep (Strep)
■ Rapid DAT (DAT)
■ Fecal Occult (F Occ)
■ Gastric Occult (G Occ)
■ Ketones (Ket)
■ Rapid-Acting (Rap-I)
■ Regular (Reg-I)
■ Intermediate-Acting (Int-I)
■ Long-Acting (Long-I)
■ Insulin Mixtures (Mix-I)

222
08424705001 (03) 2020-08 USA • Accu-Chek Inform II Operator’s Manual Version 7.1
Entering patient test results using the Other Test Entry feature comprises the following steps:
■ Enter the patient ID.1
■ Enter the date and time the test was performed.
■ Enter or confirm the test strip, kit and/or other reagent lot numbers.
■ Enter the test strip, kit and/or other reagent expira-tion date the first time a lot number is entered.
■ Enter the onboard control result(s) if available.
■ Enter the test result(s).
■ Select appropriate comments.
This can be done either manually or by using the barcode scanner.
1. Note: The display of date of birth (DOB) is not available for OTE workflows.
This can be done either manually or by using the barcode scanner (if a barcode is available).

Supp
lem
ent f
or O
ther
Tes
t Ent
ry •
C
223
08424705001 (03) 2020-08 USA • Accu-Chek Inform II Operator’s Manual Version 7.1
C.3 Recording Other Patient Tests
The following steps must be completed already:
■ The meter is powered on.
■ You have entered your operator ID.
■ You have completed login by selecting and the Main Menu screen is displayed.
1 From the Main Menu screen touch Patient Test.
2 From the Patient Test Menu touch Other Test. The Other Patient Tests menu list is displayed.
Main Menu
Review Results
Control Test
Patient Test
12:48 pm
03/17/20
Other Patient Tests
Pregnancy
Visual UA (MS)
Visual UA (CS)
Rapid Strep
Rapid DAT
12:48 pm
03/17/20
Patient Test Menu
Glucose Test
Other Test
12:48 pm
03/17/20
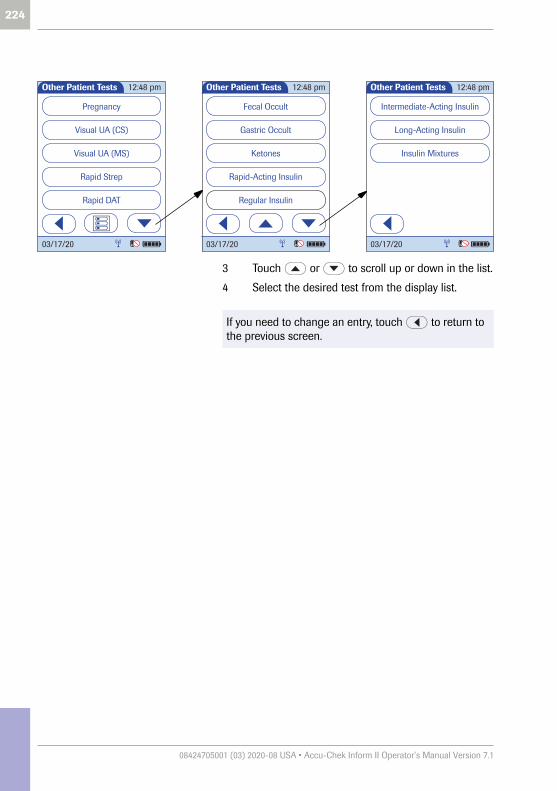
224
08424705001 (03) 2020-08 USA • Accu-Chek Inform II Operator’s Manual Version 7.1
3 Touch or to scroll up or down in the list.
4 Select the desired test from the display list.
Other Patient Tests
Pregnancy
Visual UA (MS)
Visual UA (CS)
Rapid Strep
Rapid DAT
12:48 pm
03/17/20
Other Patient Tests
Intermediate-Acting Insulin
Insulin Mixtures
Long-Acting Insulin
12:48 pm
03/17/20
Other Patient Tests
Fecal Occult
Ketones
Gastric Occult
Rapid-Acting Insulin
Regular Insulin
12:48 pm
03/17/20
If you need to change an entry, touch to return to the previous screen.

Supp
lem
ent f
or O
ther
Tes
t Ent
ry •
C
225
08424705001 (03) 2020-08 USA • Accu-Chek Inform II Operator’s Manual Version 7.1
5 Enter or select the Patient ID. Touch to proceed to the next screen1.
6 Use the keypad to enter the date the test was per-formed. For single digit numbers, add a leading zero. Touch to proceed to the next screen.
7 Use the keypad to enter the time the test was per-formed. For single digit numbers, add a leading zero. Touch to proceed to the next screen.
Other Patient Tests
Fecal Occult
Ketones
Gastric Occult
Rapid-Acting Insulin
Regular Insulin
12:48 pm
03/17/20
1 2 3
4 5 6
7 8 9
A-O0
Patient ID 12:48 pm
03/17/20
123456789
1. See also section “Entering or selecting the patient ID” in Chapter 3.
1 2 3
4 5 6
7 8 9
0
Date Tested
03/17/20
12:48 pm
03/17/20
1 2 3
4 5 6
7 8 9
0
Time Tested
AM/PM
12:48 pm
12:48 pm
03/17/20

226
08424705001 (03) 2020-08 USA • Accu-Chek Inform II Operator’s Manual Version 7.1
8 Use the keypad or barcode scanner to enter the Fecal Card Lot number, and touch to proceed to the next screen. OR, if configured:
■ Touch to confirm that you want to use the pre-selected lot number displayed by the meter.
■ Touch to enter a new lot number, if you want to use a different lot number than the one displayed.
9 Use the keypad to enter the Fecal Card Lot expira-tion date. Touch to proceed to the next screen.
1 2 3
4 5 6
7 8 9
0
Expiration Date
12/30/20
12:48 pm
03/17/20
1 2 3
4 5 6
7 8 9
A-O0
Fecal Card Lot
111363
12:48 pm
03/17/20
Fecal Card Lot
Use card 131163?
ID: 150 88 25603/17/20 9:12 am
12:48 pm
03/17/20
If you touch to confirm the displayed lot number, the meter will not prompt for expiration date.

Supp
lem
ent f
or O
ther
Tes
t Ent
ry •
C
227
08424705001 (03) 2020-08 USA • Accu-Chek Inform II Operator’s Manual Version 7.1
10 Use the keypad or the barcode scanner (if a bar-code is available) to enter the Fecal Developer Lot number, and touch to proceed to the next screen. Or, if configured:
■ Touch to confirm that you want to use the pre-selected lot number displayed by the meter.
■ Touch to enter a new lot number, if you want to use a different lot number than the one displayed.
11 Use the keypad to enter the Fecal Developer Lot expiration date. Touch to proceed to the next screen.
1 2 3
4 5 6
7 8 9
0
Expiration Date
12/30/20
12:48 pm
03/17/20
1 2 3
4 5 6
7 8 9
A-O0
Fecal Developer Lot 12:48 pm
03/17/20
Fecal Developer Lot
Use developer 131163?
ID: 150 88 25603/17/20 9:12 am
12:48 pm
03/17/20
If you touch to confirm the displayed lot number, the meter will not prompt for expiration date.

228
08424705001 (03) 2020-08 USA • Accu-Chek Inform II Operator’s Manual Version 7.1
12 Select the result of the Positive Control as accept-able or not acceptable by touching the appropriate button.
13 Select the result of the Negative Control as accept-able or not acceptable by touching the appropriate button.
14 Select the patient test result as positive or negative by touching the appropriate button.
Fecal Occult Pat.ID: 150 88 256
Positive CtrlSelect a positive control result.
acceptablenot
acceptable
12:48 pm
03/17/20
Fecal Occult Pat.ID: 150 88 256
Negative CtrlSelect a negative control result.
acceptablenot
acceptable
12:48 pm
03/17/20
Fecal Occult Pat.ID: 150 88 256
ResultSelect a Fecal Occult result.
positive negative
12:48 pm
03/17/20

Supp
lem
ent f
or O
ther
Tes
t Ent
ry •
C
229
08424705001 (03) 2020-08 USA • Accu-Chek Inform II Operator’s Manual Version 7.1
Once the result(s) are entered, the Fecal Occult Pat. result screen is displayed.
15 To change an entry or a result, touch the appropriate button.
To add comments1:
16 In the result screen, touch .
17 Select the desired predefined comment from the display list (if configured) or touch to enter your own custom comment. Use the keypad (as with login) to enter your comment.
18 Once you have selected the desired comment(s), touch to return to the results screen.
19 Touch to return to the Main Menu.
Fecal Occult Pat.
Card Lot #
D/T Tested
Dev Lot #
ID: 150 88 256
Positive Ctrl
Negative Ctrl acceptable
acceptable
03/17/209:12 am
4523311/30/20
128312/30/20
12:48 pm
03/17/20
Fecal Occult Pat.
Result
ID: 150 88 256
negative
12:48 pm
03/17/20
Fecal Occult Pat.
Doctor Notified
Result
ID: 150 88 256
negative
12:48 pm
03/17/20
1. See also section “Adding comments” in Chapter 3.
Test results are also saved when the meter is powered off in the results screen or automatically powers off.
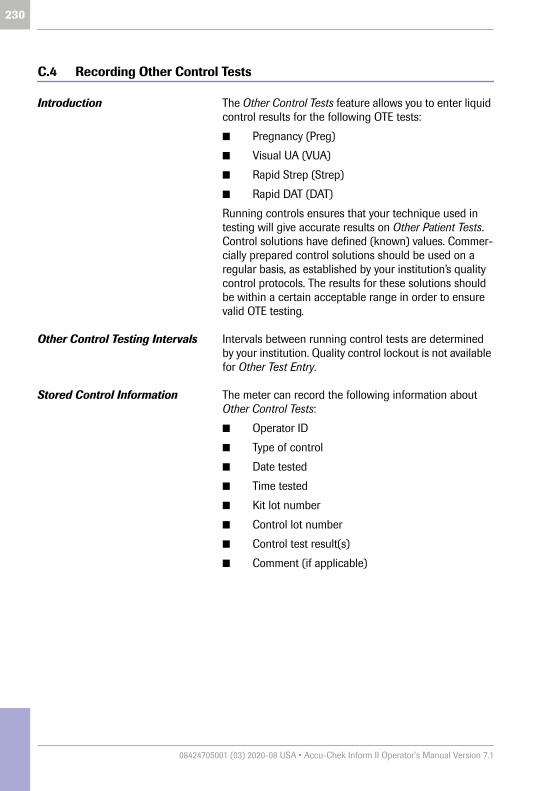
230
08424705001 (03) 2020-08 USA • Accu-Chek Inform II Operator’s Manual Version 7.1
C.4 Recording Other Control Tests
Introduction The Other Control Tests feature allows you to enter liquid control results for the following OTE tests:
■ Pregnancy (Preg)
■ Visual UA (VUA)
■ Rapid Strep (Strep)
■ Rapid DAT (DAT)
Running controls ensures that your technique used in testing will give accurate results on Other Patient Tests. Control solutions have defined (known) values. Commer-cially prepared control solutions should be used on a regular basis, as established by your institution’s quality control protocols. The results for these solutions should be within a certain acceptable range in order to ensure valid OTE testing.
Other Control Testing Intervals Intervals between running control tests are determined by your institution. Quality control lockout is not available for Other Test Entry.
Stored Control Information The meter can record the following information about Other Control Tests:
■ Operator ID
■ Type of control
■ Date tested
■ Time tested
■ Kit lot number
■ Control lot number
■ Control test result(s)
■ Comment (if applicable)

Supp
lem
ent f
or O
ther
Tes
t Ent
ry •
C
231
08424705001 (03) 2020-08 USA • Accu-Chek Inform II Operator’s Manual Version 7.1
Entering control test results using the Other Control Tests menu comprises the following steps:
■ Select the type of control to be recorded.
■ Enter the date tested (if required).
■ Enter the time tested (if required).
■ Enter or confirm the kit or test strip lot number.
■ Enter the kit or test strip expiration date.
■ Enter or confirm the control lot number.
■ Enter the control lot expiration date.
■ Select the control result(s).
The control solution results must fall into the acceptable range indicated on the test kit or reagent packaging, or as defined by your institution, before being considered successful.
This can be done either manually or by using the barcode scanner (if a barcode is available).

232
08424705001 (03) 2020-08 USA • Accu-Chek Inform II Operator’s Manual Version 7.1
The following steps must be completed already:
1 The meter is powered on.
2 You have entered your operator ID.
3 You have completed login by selecting and the Main Menu screen is displayed.
1 From the Main Menu screen touch Control Test.
2 From the Control Test Menu touch Other Control Tests.
3 Select the desired test from the display list.(Pregnancy control will be used as the example.)
4 Select the type (level) of control being used.
Main Menu
Review Results
Control Test
Patient Test
12:48 pm
03/17/20
Other Control Tests
Pregnancy
Visual UA (MS)
Visual UA (CS)
Rapid Strep
Rapid DAT
12:48 pm
03/17/20
Control Test Menu
Glucose Control Test
Other Control Tests
12:48 pm
03/17/20
Other Control Tests
Pregnancy
Visual UA (MS)
Visual UA (CS)
Rapid Strep
Rapid DAT
12:48 pm
03/17/20
Pregnancy Control
Positive Liquid Control
Negative Liquid Control
12:48 pm
03/17/20
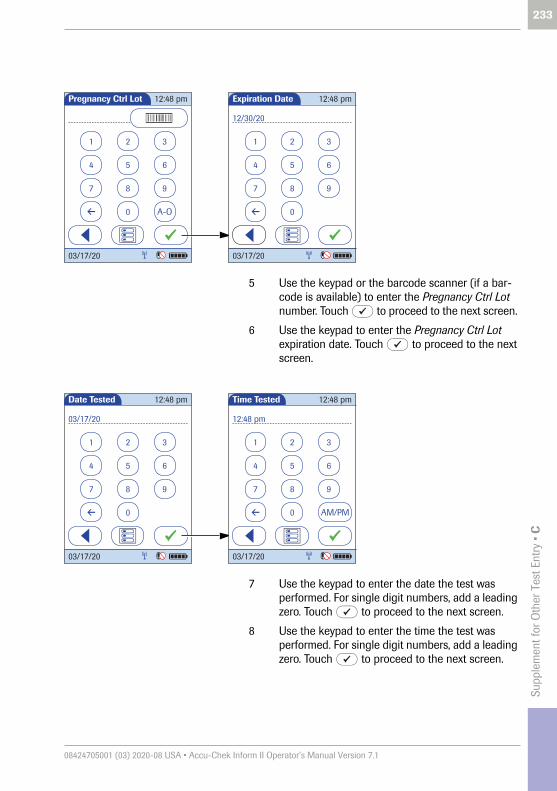
Supp
lem
ent f
or O
ther
Tes
t Ent
ry •
C
233
08424705001 (03) 2020-08 USA • Accu-Chek Inform II Operator’s Manual Version 7.1
5 Use the keypad or the barcode scanner (if a bar-code is available) to enter the Pregnancy Ctrl Lot number. Touch to proceed to the next screen.
6 Use the keypad to enter the Pregnancy Ctrl Lot expiration date. Touch to proceed to the next screen.
7 Use the keypad to enter the date the test was performed. For single digit numbers, add a leading zero. Touch to proceed to the next screen.
8 Use the keypad to enter the time the test was performed. For single digit numbers, add a leading zero. Touch to proceed to the next screen.
1 2 3
4 5 6
7 8 9
A-O0
Pregnancy Ctrl Lot 12:48 pm
03/17/20
1 2 3
4 5 6
7 8 9
0
Expiration Date
12/30/20
12:48 pm
03/17/20
1 2 3
4 5 6
7 8 9
0
Date Tested
03/17/20
12:48 pm
03/17/20
1 2 3
4 5 6
7 8 9
0
Time Tested
AM/PM
12:48 pm
12:48 pm
03/17/20
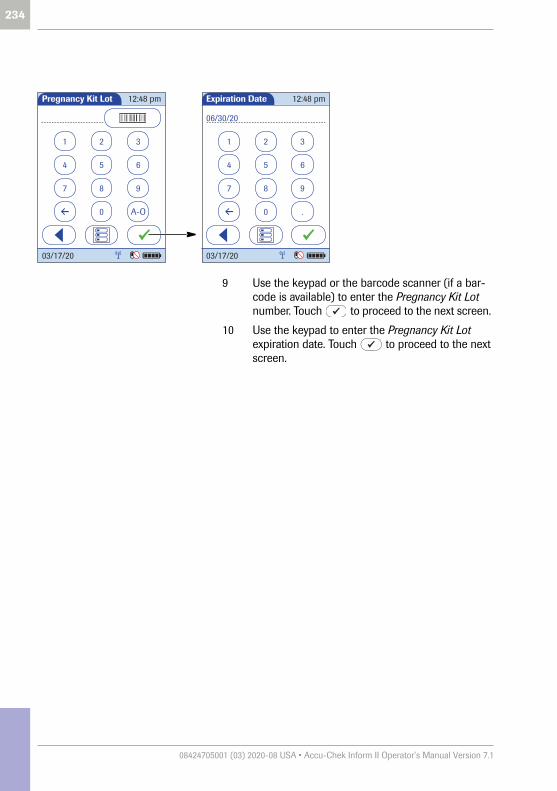
234
08424705001 (03) 2020-08 USA • Accu-Chek Inform II Operator’s Manual Version 7.1
9 Use the keypad or the barcode scanner (if a bar-code is available) to enter the Pregnancy Kit Lot number. Touch to proceed to the next screen.
10 Use the keypad to enter the Pregnancy Kit Lot expiration date. Touch to proceed to the next screen.
1 2 3
4 5 6
7 8 9
A-O0
Pregnancy Kit Lot 12:48 pm
03/17/20
1 2 3
4 5 6
7 8 9
0
Expiration Date
06/30/20
.
12:48 pm
03/17/20

Supp
lem
ent f
or O
ther
Tes
t Ent
ry •
C
235
08424705001 (03) 2020-08 USA • Accu-Chek Inform II Operator’s Manual Version 7.1
11 Select the result of the Control bar test as accept-able or not acceptable by touching the appropriate button.
12 Select the result of the liquid control test (Ctrl Result) as acceptable or not acceptable by touching the appropriate button.
Once the results are entered, the Pregnancy Control result screen is displayed.
13 To change an entry or a result, touch the appropriate button.
Pregnancy ControlPositive Liquid Control
Control Bar
Select a Pregnancy control bar result.
acceptablenot
acceptable
12:48 pm
03/17/20
Pregnancy ControlPositive Liquid Control
Ctrl Result
Select a Pregnancy liquid control result.
acceptablenot
acceptable
12:48 pm
03/17/20
Pregnancy Control
Control Lot #
D/T Tested
Kit Lot #
Positive Liquid Control
Control Bar
Ctrl Result acceptable
acceptable
03/17/20 8:30 am
4523311/30/20
128312/30/20
12:48 pm
03/17/20

236
08424705001 (03) 2020-08 USA • Accu-Chek Inform II Operator’s Manual Version 7.1
To add comments1:
14 In the result screen, touch .
15 Select the desired predefined comment(s) from the display list (if configured) or touch to enter your own custom comment(s). Use the keypad (as with login) to enter your comment.
16 Once you have selected the desired comment(s), touch to return to the results screen.
17 Touch to return to the Main Menu.
Warning messages The meter may display error or warning messages when you enter Other Patient Tests and Other Control Tests. These error or warning messages occur when the validity of the recorded result is questionable. These messages caution that test information may not be valid or accurate. (See also “Pop-up messages” in Chapter 11)
When entering other patient and other control test results, the user may be prompted to enter a control test (control bar) result as either acceptable or not accept-able. If the result is entered as not acceptable, subse-quent patient results may not be valid due to the invalid control bar result.
1. See also section “Adding comments” in Chapter 3.
Test results are also saved when the meter is powered off in the results screen or automatically powers off.
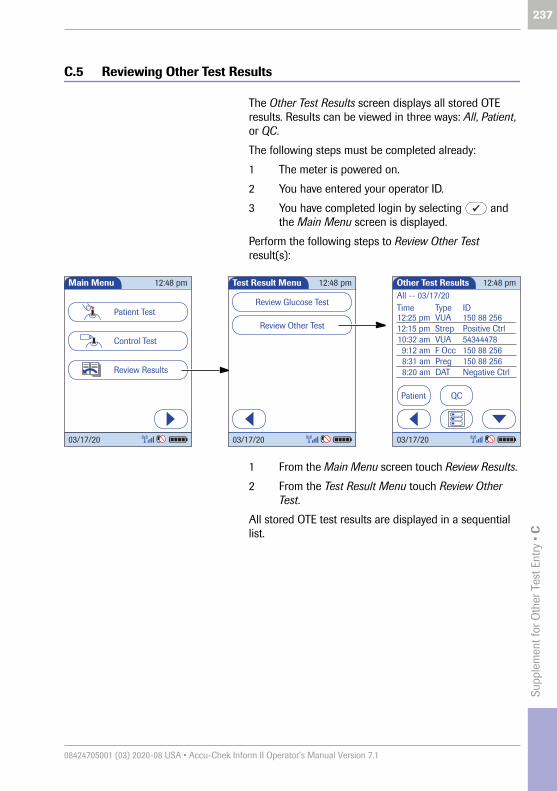
Supp
lem
ent f
or O
ther
Tes
t Ent
ry •
C
237
08424705001 (03) 2020-08 USA • Accu-Chek Inform II Operator’s Manual Version 7.1
C.5 Reviewing Other Test Results
The Other Test Results screen displays all stored OTE results. Results can be viewed in three ways: All, Patient, or QC.
The following steps must be completed already:
1 The meter is powered on.
2 You have entered your operator ID.
3 You have completed login by selecting and the Main Menu screen is displayed.
Perform the following steps to Review Other Test result(s):
1 From the Main Menu screen touch Review Results.
2 From the Test Result Menu touch Review Other Test.
All stored OTE test results are displayed in a sequential list.
Main Menu
Review Results
Control Test
Patient Test
12:48 pm
03/17/20
Other Test Results
Patient QC
All -- 03/17/20Type ID
12:15 pm12:25 pm
StrepVUA
Positive Ctrl10:32 am9:12 am
VUAF Occ
Negative Ctrl8:20 am DAT
54344478
8:31 am Preg 150 88 256
Time
150 88 256
150 88 256
12:48 pm
03/17/20
Test Result Menu
Review Glucose Test
Review Other Test
12:48 pm
03/17/20
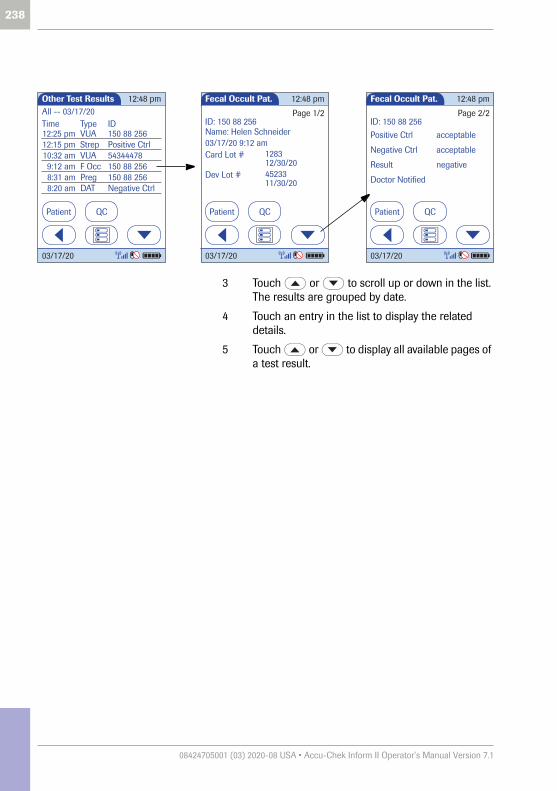
238
08424705001 (03) 2020-08 USA • Accu-Chek Inform II Operator’s Manual Version 7.1
3 Touch or to scroll up or down in the list. The results are grouped by date.
4 Touch an entry in the list to display the related details.
5 Touch or to display all available pages of a test result.
Other Test Results
Patient QC
All -- 03/17/20Type ID
12:15 pm12:25 pm
StrepVUA
Positive Ctrl10:32 am9:12 am
VUAF Occ
Negative Ctrl8:20 am DAT
54344478
8:31 am Preg 150 88 256
Time
150 88 256
150 88 256
12:48 pm
03/17/20
Fecal Occult Pat.
QCPatient
ID: 150 88 256
Dev Lot #
Card Lot #
Name: Helen Schneider
4523311/30/20
128312/30/20
03/17/20 9:12 am
Page 1/2
12:48 pm
03/17/20
Fecal Occult Pat.
QCPatient
ID: 150 88 256
Doctor Notified
Negative Ctrl
Positive Ctrl
Page 2/2
acceptable
negativeResult
acceptable
12:48 pm
03/17/20

Supp
lem
ent f
or O
ther
Tes
t Ent
ry •
C
239
08424705001 (03) 2020-08 USA • Accu-Chek Inform II Operator’s Manual Version 7.1
6 Touch Patient, if you wish to display results for a specific patient only.
– If you touch Patient from the full list view, you will be asked to enter the patient ID manually or via bar-code scanner. The list now contains only the results for the selected patient.
7 Touch QC, if you wish to display a list of other control tests.
8 Touch All in the Other Test Results screen to remove the Patient or QC selection and display all results.
9 Touch to return to the previous menu screen, or touch to return to the Main Menu.
Other Test Results
Patient QC
All -- 03/17/20Type ID
12:15 pm12:25 pm
StrepVUA
Positive Ctrl10:32 am9:12 am
VUAF Occ
Negative Ctrl8:20 am DAT
54344478
8:31 am Preg 150 88 256
Time
150 88 256
150 88 256
12:48 pm
03/17/20
Other Test Results
QCAll
ID: 150 88 256
Type12:25 pm VUA9:12 am F Occ
TimePatient -- 03/17/20
8:31 am Preg8:02 am DAT7:25 am Strep
12:48 pm
03/17/20
Other Test Results
Patient All
QC -- 03/17/20Type ID
12:15 pm Strep Positive Ctrl8:20 am DAT Negative Ctrl
Time
12:48 pm
03/17/20
240
08424705001 (03) 2020-08 USA • Accu-Chek Inform II Operator’s Manual Version 7.1
C.6 Other Test Entry Configuration Options
Other Test Entry options can only be configured using a DMS. The availability of configuration options will thus vary according to the data management software utilized by your institution. Consult your system administrator.

Supp
lem
ent f
or O
bser
ved
Test
Seq
uenc
e • D
241
08424705001 (03) 2020-08 USA • Accu-Chek Inform II Operator’s Manual Version 7.1
D Supplement for Observed Test Sequence
Observed Test Sequence (OTS) The Observed Test Sequence (OTS) function allows an observer (supervisor) to assess and record an operator’s performance (e.g., for recertification purposes). The observer monitors an operator during a test to check that the test is being performed according to the recom-mended procedures. He/she then evaluates the perfor-mance and passes or fails the operator. This assessment is saved together with the glucose test result and any desired comments.
If so configured, the operator may receive a message from the DMS when he or she tries to log in to the meter. This message informs the operator that they have to renew their certification. The contents of the message is created on the DMS and may vary. The screen message shown here is for illustration purposes only.
This function needs to be configured by the system administrator and depends on available DMS settings. Electronic configuration options will thus vary accord-ing to the data management software utilized by your institution.
Login Message
Hello Dan Brown.You have to perform anOTS training before youcan use the meter.
[I-FBB]

242
08424705001 (03) 2020-08 USA • Accu-Chek Inform II Operator’s Manual Version 7.1
Using the OTS function A request for an Observed Test Sequence comes from the DMS.
Observer:
1 Touch Patient Test.
In the Patient Test Menu, the Glucose Test button is grayed out (disabled) until the observer has logged in.
2 Touch Observer Login.
3 Wait until the Observer ID screen is displayed.
4 Enter your operator ID or scan your operator ID bar-code. Enter the (optional) password in the Observer Password screen, and touch to log in.
The Patient Test Menu is displayed again. The Glucose Test button is now available.
5 Hand the meter to the operator who can now perform the patient test under supervision.
Main Menu
Review Results
Control Test
Patient Test
12:48 pm
03/17/20
1 2 3
4 5 6
7 8 9
A-O0
Observer ID 12:48 pm
03/17/20
Patient Test Menu
Observer Login
Glucose Test
Other Test
12:48 pm
03/17/20
Other Test
Patient Test Menu
Observer Login
Glucose Test
12:48 pm
03/17/20
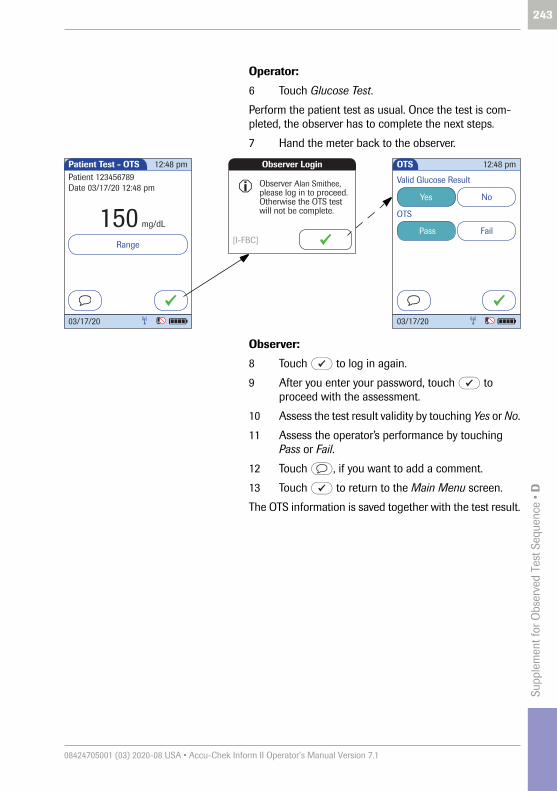
Supp
lem
ent f
or O
bser
ved
Test
Seq
uenc
e • D
243
08424705001 (03) 2020-08 USA • Accu-Chek Inform II Operator’s Manual Version 7.1
Operator:
6 Touch Glucose Test.
Perform the patient test as usual. Once the test is com-pleted, the observer has to complete the next steps.
7 Hand the meter back to the observer.
Observer:
8 Touch to log in again.
9 After you enter your password, touch to proceed with the assessment.
10 Assess the test result validity by touching Yes or No.
11 Assess the operator’s performance by touching Pass or Fail.
12 Touch , if you want to add a comment.
13 Touch to return to the Main Menu screen.
The OTS information is saved together with the test result.
[I-FBC]
Observer Login
Observer Alan Smithee, please log in to proceed. Otherwise the OTS test will not be complete.
OTS
Valid Glucose Result
NoYes
OTS
Pass Fail
12:48 pm
03/17/20
Patient Test - OTS
Range
150
Patient 123456789Date 03/17/20 12:48 pm
mg/dL
12:48 pm
03/17/20

244
08424705001 (03) 2020-08 USA • Accu-Chek Inform II Operator’s Manual Version 7.1
This page intentionally left blank.

Supp
lem
ent f
or E
nhan
ced
Wor
kflo
ws
• E
245
08424705001 (03) 2020-08 USA • Accu-Chek Inform II Operator’s Manual Version 7.1
E Supplement for Enhanced Workflows
E.1 Configurable workflows
The Accu-Chek Inform II system offers enhanced config-uration options for adapting the default patient testing workflow described in chapter 3 “Patient Glucose Testing” to meet a facility’s specific requirements or needs. See Appendix A.1, “Table of configuration options”.
The activation of these features is only possible via a suitable data management System (DMS). See Appendix A.1, “Table of configuration options”.

246
08424705001 (03) 2020-08 USA • Accu-Chek Inform II Operator’s Manual Version 7.1
Blood sample type selection This feature allows you to select and document the blood sample type used for a patient test.
After you have confirmed or selected the test strip lot (see page 56) or Patient ID (in case of the Isolation Room Workflow described below), the blood sample type selec-tion screen appears.
Or
Patient TestPatient 123456789
Use Strip Lot
12:48 pm
123456?
03/17/20
Patient Test
Sample Type:
Arterial
Capillary
Venous
Heel Stick
12:48 pm
03/17/20
1 2 3
4 5 6
7 8 9
A-O0
Patient ID 12:48 pm
03/17/20
123456789
Patient Test
Sample Type:
Arterial
Capillary
Venous
Heel Stick
12:48 pm
03/17/20
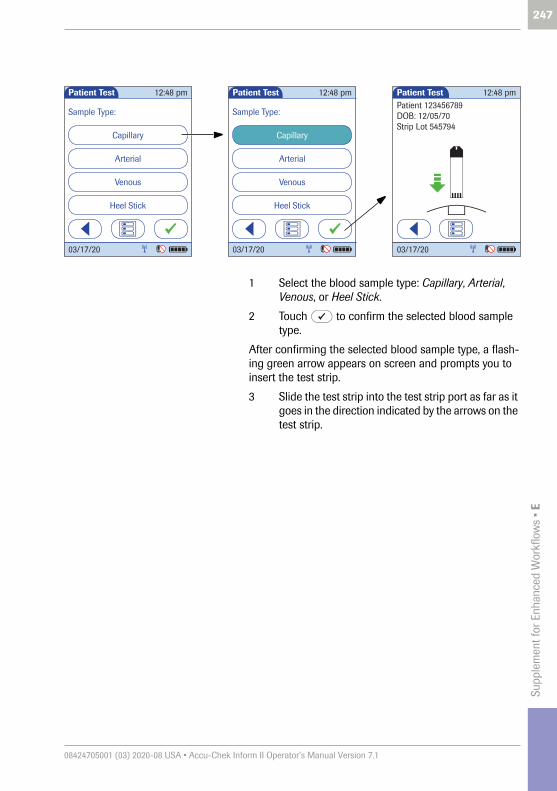
Supp
lem
ent f
or E
nhan
ced
Wor
kflo
ws
• E
247
08424705001 (03) 2020-08 USA • Accu-Chek Inform II Operator’s Manual Version 7.1
1 Select the blood sample type: Capillary, Arterial, Venous, or Heel Stick.
2 Touch to confirm the selected blood sample type.
After confirming the selected blood sample type, a flash-ing green arrow appears on screen and prompts you to insert the test strip.
3 Slide the test strip into the test strip port as far as it goes in the direction indicated by the arrows on the test strip.
Patient Test
Sample Type:
Arterial
Capillary
Venous
Heel Stick
12:48 pm
03/17/20
Patient TestPatient 123456789
Strip Lot 545794
12:48 pm
03/17/20
DOB: 12/05/70
Patient Test
Sample Type:
Arterial
Capillary
Venous
Heel Stick
12:48 pm
03/17/20

248
08424705001 (03) 2020-08 USA • Accu-Chek Inform II Operator’s Manual Version 7.1
Isolation Room Workflow If configured, this feature allows you to reverse the order of the steps “Entering or selecting the patient ID” and “Confirming or selecting the test strip lot” to avoid con-tamination issues. This workflow allows you to test a patient in an isolation room without having to take the test strip vial to the patient.
Test procedure for patients in an isolation room
1 Confirm or select the test strip lot. For more details see page 56.
2 Take the meter and the test strip to the isolation room.
1 2 3
4 5 6
7 8 9
A-O0
Patient ID 12:48 pm
03/17/20
123456789
Patient TestPatient 123456789
Use Strip Lot
12:48 pm
123456?
03/17/20
Once a test strip has been removed from the vial, the blood sample must be applied within 3 minutes.

Supp
lem
ent f
or E
nhan
ced
Wor
kflo
ws
• E
249
08424705001 (03) 2020-08 USA • Accu-Chek Inform II Operator’s Manual Version 7.1
3 Enter or select the patient ID. For more details see pages 51 - 55.
4 Perform the test. For more details see pages 58 - 61.
1 2 3
4 5 6
7 8 9
A-O0
Patient ID 12:48 pm
03/17/20
123456789
A B C D E
F G H I J
K L M N O
P-Z 123
Patient ID
123456789
12:48 pm
03/17/20
Patient ID: 123456789 Name: Mary-Jane MillerDOB: 12/03/56
Is this correct?
Patient Confirmation
Patient TestPatient 123456789
Strip Lot 545794
12:48 pm
03/17/20
DOB: 12/05/70
The test strips should be used immediately after remov-ing them from the test strip vial (see package insert). However, where this is not possible due to an altered workflow (example: Isolation Room Workflow), studies show that the test strips remain stable for 3 minutes between removing them from the vial and applying a blood sample.

250
08424705001 (03) 2020-08 USA • Accu-Chek Inform II Operator’s Manual Version 7.1
This page intentionally left blank.

App
endi
x fo
r Acc
u-C
hek
Info
rm II
Bas
e U
nit (
lega
cy v
ersi
on) •
F
251
08424705001 (03) 2020-08 USA • Accu-Chek Inform II Operator’s Manual Version 7.1
F Appendix for Accu-Chek Inform II Base Unit (legacy version)
The legacy version of the Accu-Chek Inform II Base Unit (REF 05060290001) differs in some technical aspects from the newer Accu-Chek Inform II Base Unit (REF 07671717190) that is described in section 1.6 “Over-view of the Accu-Chek Inform II Base Unit”. This chapter describes the elements and technical data of the legacy base unit version with older hardware.
F.1 Overview of the base unit with older hardware
The Accu-Chek Inform II Base Unit (legacy version) can:
■ charge the meter battery pack.
■ communicate with a data management system.
■ communicate with a computer.
The base unit has the following elements:
1 Charging contacts
2 Infrared window for communication with the meter
3 Status LED (lights up when power is connected):
– Lights up red: Power supply is connected, applica-tion is starting up
– Lights up green: Ready
– Flashes red: Error
– Lights up blue: Configuration mode
2
1
3

252
08424705001 (03) 2020-08 USA • Accu-Chek Inform II Operator’s Manual Version 7.1
Electrical connections are located on the back of the base unit.
4 Removable mount for wall installation
5 Network connection — Ethernet/RJ45 port
6 USB port
7 Jack for the power supply unit provided
8 USB configuration switch (for System Administrator use only)
4 5 6 7
8
7.5V 1.7A
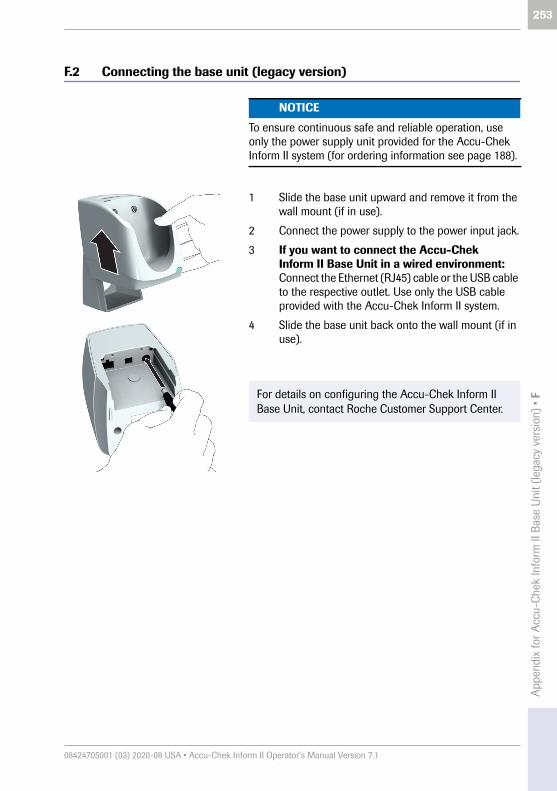
App
endi
x fo
r Acc
u-C
hek
Info
rm II
Bas
e U
nit (
lega
cy v
ersi
on) •
F
253
08424705001 (03) 2020-08 USA • Accu-Chek Inform II Operator’s Manual Version 7.1
F.2 Connecting the base unit (legacy version)
1 Slide the base unit upward and remove it from the wall mount (if in use).
2 Connect the power supply to the power input jack.
3 If you want to connect the Accu-Chek Inform II Base Unit in a wired environment: Connect the Ethernet (RJ45) cable or the USB cable to the respective outlet. Use only the USB cable provided with the Accu-Chek Inform II system.
4 Slide the base unit back onto the wall mount (if in use).
NOTICE
To ensure continuous safe and reliable operation, use only the power supply unit provided for the Accu-Chek Inform II system (for ordering information see page 188).
For details on configuring the Accu-Chek Inform II Base Unit, contact Roche Customer Support Center.

254
08424705001 (03) 2020-08 USA • Accu-Chek Inform II Operator’s Manual Version 7.1
F.3 Technical data
Specification Base unit (legacy version) Power supply unit
Height 4.33 in / 110 mm (max.) 1.38 in / 35 mm + AC plug (1.1-1.6 in / 28-40 mm)
Width 4.65 in / 118 mm (max.) 2.01 in / 51 mm
Length 4.06 in / 103 mm (max.) 3.43 in / 87 mm
Weight Accu-Chek Inform II Base Unit (legacy version)615 g with wall mount
N/A
User interface LED (tricolor: red, green, blue) LED: green
Operating temperature 37 to 122 °F3 to 50 °C
32 to 104 °F0 to 40 °C
Storage conditions (long-term storage)
41 to 104 °F / 5 to 40 °C at 10 - 85% RH (non-condensing)
Humidity (operating) 10 - 90 % RH (non-condensing)
Air pressure 0.7 to 1.06 bar70 to 106 kPa
N/A
Input voltage +7.5 V DC 100 to 240 V AC
Input frequency DC 50 to 60 Hz
Input current 1.7 A (max) 350 to 150 mA
Interfaces Charge contactsIR portRJ45 Ethernet USB type B
DC connectorReplaceable AC input contacts
Data transfer rate IR: 9.6K - 115K bps Ethernet: 10 Mbps half-duplexUSB: 12 Mbps
N/A

Lim
ited
War
rant
y • G
255
08424705001 (03) 2020-08 USA • Accu-Chek Inform II Operator’s Manual Version 7.1
G Limited Warranty
Accu-Chek® Inform II meter LIMITED WARRANTY
Roche Diagnostics warrants to the original purchaser that the Accu-Chek® Inform II meter will be free from defects in materials and workmanship for 1 year from the date of purchase.
If, during the warranty period, the meter does not work properly because of a defect in materials or workmanship, Roche Diagnostics will repair it or replace it with a new or refurbished Accu-Chek® Inform II meter or equivalent product free of charge. The warranty of the repaired or replacement meter will expire on the date of the original warranty expiration or 90 days after shipment of a replace-ment meter, whichever period is longer. The purchaser’s sole and exclusive remedy with respect to the Accu-Chek® Inform II meter shall be repair or replacement, in Roche Diagnostics sole discretion.
This warranty does not apply to the performance of an Accu-Chek® Inform II meter that has been damaged by accident or has been altered, misused, tampered with or abused in any way.
THE ABOVE WARRANTY IS EXCLUSIVE OF ALL OTHER WARRANTIES, AND ROCHE DIAGNOSTICS MAKES NO OTHER WARRANTIES, EXPRESS OR IMPLIED, INCLUDING WITHOUT LIMITATION THE IMPLIED WARRANTY OF MERCHANTABILITY OR FITNESS FOR A PARTICULAR PURPOSE.
IN NO EVENT SHALL ROCHE DIAGNOSTICS BE LIABLE TO THE PURCHASER OR ANY OTHER PERSON FOR ANY INCIDENTAL, CONSEQUENTIAL, INDIRECT, SPECIAL OR PUNITIVE DAMAGES ARISING FROM OR IN ANY WAY CONNECTED WITH THE PURCHASE OR USE OF THE ACCU-CHEK® INFORM II METER. NO WARRANTY OF MERCHANTABILITY OR FITNESS FOR A PARTICULAR PURPOSE, IF ANY IS IMPLIED FROM THE SALE OF THE METER, SHALL EXTEND FOR A LONGER DURATION THAN 1 YEAR FROM THE DATE OF PURCHASE.
Some states do not allow limitations on how long an implied warranty will last or the exclusion of incidental or consequential damages, so the above limitation and exclusion may not apply to you. This warranty gives you specific legal rights, which vary from state to state.

256
08424705001 (03) 2020-08 USA • Accu-Chek Inform II Operator’s Manual Version 7.1
This page intentionally left blank.

Inde
x
257
08424705001 (03) 2020-08 USA • Accu-Chek Inform II Operator’s Manual Version 7.1
Index
AAccessory box
Overview .............................................................39Adresses (Roche) ................................................ 190Automatic power-off .............................................21
BBarcode
Masks ............................................................... 204Symbologies ................................................... 210
Base Unit (legacy version)Connecting ..................................................... 251Overview .......................................................... 249
Base Unit Hub ..........................................................38Base Unit, Base Unit Light
Connecting ..................................................... 119Overview .............................................................36
Battery packInstalling or replacing .......................121–125
Beeper ...................................................................... 146
CCipher ....................................................................... 203Cleaning agents ................................................... 151Code chip
See code keyCode key .............................................................35, 87Code key reader
Downloading code key information .........88Overview .............................................................35
CommentsAdding .................................................................66Maintenance log .......................................... 156
Components ..............................................................32Configuration .............................130–146, 191–204
Menu overview ....................................131–133Control frequency ................................................ 139Control lots
Editing control lot data ..........................94–98Selecting .............................................................75Storing information .............................. 87–102
Control solutionLot number ........................................................75
CR LO/HI ....................................................................64Critical range .................................................. 64, 141
DDate and time ........................................................ 145Date and time format ......................................... 135Delete patient ........................................................ 162Diagnostics ............................................................. 157Display options ..................................................... 136Disposal ......................................................................20Docking the meter ............................................... 128Download lockout ............................................48, 81
Unlocking ........................................................ 159
EError messages ..................................................... 170Errors (without error message) ..............165–168
GGlucose control
Control solutions .............................................72Intervals ..............................................................70Performing a test ..................................... 73–80Preparing ............................................................72STAT test ............................................................81
Glucose control options ..................................... 139Glucose control testing ................................. 69–81
Results .................................................................79
HHI ...................................................................................64
IIcons
Identification plate ............................................ 5Packaging ............................................................ 5
Information service .............................................. 190Initial startup .................................................120–158Isolation Room Workflow .................................. 246
LLicense (GPL) ........................................................ 189Linearity lots
Editing linearity lot data ...................... 99–102Storing information ............................... 87–102

258
08424705001 (03) 2020-08 USA • Accu-Chek Inform II Operator’s Manual Version 7.1
Linearity testing ...........................................103–110Intervals ........................................................... 104Performing a test .................................106–110Preparing ......................................................... 105Results .............................................................. 110
LO .................................................................................64Lots ..................................................................... 87–102
MMaintenance .................................................147–163
Log ..................................................................... 156Meter
cleaning ........................................................... 154Diagnostics ..................................................... 157disinfecting ..................................................... 155Overview .............................................................33Powering off ......................................................21Powering up ......................................................41Reset ................................................................. 179Setup ........................................................191–204Shut down ..........................................................22
Meter setup ...................................................130–146Menu overview .....................................131–133
NNormal range .................................................. 64, 141
OObserved Test Sequence (OTS) ..................... 240Operating conditions (general) ...................... 147Operator ID ........................................................ 44–46
Barcode Scanner .............................................45Entering manually ...........................................46Options ............................................................. 142Password ............................................................46
Ordering .................................................................. 186Other Test Entry (OTE) ..............................217–237
PPassword ................................................................. 144Patient glucose testing ................................. 48–68
Performing a test ..................................... 50–65Preparing ............................................................48Results .................................................................63
Patient ID ............................................................ 51–55Barcode scanner ............................................ 55Entering manually .......................................... 53Options ............................................................. 143
Powering off ............................................................. 21Powering up ............................................................. 41Power-off (automatic) .......................................... 21Product information .................................. 181–189Proficiency test
Preparing ......................................................... 112Proficiency testing ..................................... 111–117
Performing a test ................................ 113–117Results .............................................................. 117
QQC lockout ................................................................ 69
RRanges (results) ...................................................... 63Reagent options .................................................... 138Reagents .................................................................... 39Records (Patient ID, Operator ID) .........181, 215REF (catalog numbers) ...................................... 186Reportable range ...........................................64, 141Reset ......................................................................... 179Result memory ................................................. 83–86Results screen ............................... 63, 79, 110, 117RF (radio frequency) ....................................28, 212RR LO/HI ................................................................... 64
SSafety
Protection against infection ....................... 19User qualification ........................................... 19
Safety information ........................................... 20–29Sample
Applying ................................... 61, 78, 109, 116Select type ...................................................... 244
Service menu ......................................................... 161

Inde
x
259
08424705001 (03) 2020-08 USA • Accu-Chek Inform II Operator’s Manual Version 7.1
Setup ............................................130–146, 191–204Beeper .............................................................. 146Date and time ................................................ 145Date and time format ................................. 135Display options ............................................. 136Glucose control options ............................ 139Menu overview ....................................131–133Operator ID entry ......................................... 142Password ......................................................... 144Patient ID entry ............................................. 143Reagent options ........................................... 138Setup menu ...........................................134, 160Test strip options .......................................... 137Value ranges .................................................. 141
Shut down meter .....................................................22Specifications ...............................................181, 252STAT test ....................................................................81Storage ..................................................................... 149Strip lot
Selecting ......................................................56, 76System
Components ......................................................32General information ...........................181–189Initial startup .........................................120–158Maintenance .........................................147–163Overview (accessory box) ............................39Overview (base unit hub) .............................38Overview (base unit) ......................................36Overview (code key reader) ........................35Overview (meter) .............................................33Technical data ......................................181, 252Troubleshooting ..................................165–180
TTechnical data ..............................................181, 252Telephone number (information service) ... 190Test strip lots
Storing information ............................... 87–102Test strip options .................................................. 137Test strips
Applying blood sample .................................61Applying control solution .............................78Applying linearity sample .......................... 109Applying proficiency sample ................... 116Editing data ............................................... 91–93Inserting ....................................59, 77, 108, 115Setup options ................................................. 137
Troubleshooting ...........................................165–180
UUnit (results) .......................................................... 136
WWi-Fi ......................................................................28, 29Wireless connectivity
Disabling temporarily ....................................42WLAN ................................................................ 28, 211WLAN security ...................................................... 203

260
08424705001 (03) 2020-08 USA • Accu-Chek Inform II Operator’s Manual Version 7.1
This page intentionally left blank.

261
Notes

262
Notes

263
0842
4705
001
(03)
202
0-08
USA
OS-
0130
8-02
ACCU-CHEK, ACCU-CHEK INFORM, and COBAS are trademarks of Roche.
MRoche Diagnostics GmbH Sandhofer Strasse 116 68305 Mannheim, Germany
Manufactured for and distributed in the U.S.A. by:Roche Diagnostics9115 Hague RoadIndianapolis, IN 46256
Rx only
diagnostics.roche.com


