80
MICRO CONTROLS INC. ADVANCED U s e r M a n u a l Manual #: 940-0D092

MICRO CONTROLS INC.ADVANCED
User
M
anual
Manual #: 940-0D092

GENERAL INFORMATION
Important User InformationThe products and application data described in this manual are useful in a wide variety of different applica-tions. Therefore, the user and others responsible for applying these products described herein are responsible for determining the acceptability for each application. While efforts have been made to provide accurate infor-mation within this manual, AMCI assumes no responsibility for the application or the completeness of the information contained herein.UNDER NO CIRCUMSTANCES WILL ADVANCED MICRO CONTROLS, INC. BE RESPONSIBLE OR LIABLE FOR ANY DAMAGES OR LOSSES, INCLUDING INDIRECT OR CONSEQUENTIAL DAM-AGES OR LOSSES, ARISING FROM THE USE OF ANY INFORMATION CONTAINED WITHIN THIS MANUAL, OR THE USE OF ANY PRODUCTS OR SERVICES REFERENCED HEREIN.No patent liability is assumed by AMCI, with respect to use of information, circuits, equipment, or software described in this manual.The information contained within this manual is subject to change without notice.This manual is copyright 2012 by Advanced Micro Controls Inc. You may reproduce this manual, in whole or in part, for your personal use, provided that this copyright notice is included. You may distribute copies of this complete manual in electronic format provided that they are unaltered from the version posted by Advanced Micro Controls Inc. on our official website: www.amci.com. You may incorporate portions of this documents in other literature for your own personal use provided that you include the notice “Portions of this document copyright 2011 by Advanced Micro Controls Inc.” You may not alter the contents of this document or charge a fee for reproducing or distributing it.
Standard WarrantyADVANCED MICRO CONTROLS, INC. warrants that all equipment manufactured by it will be free from defects, under normal use, in materials and workmanship for a period of [18] months. Within this warranty period, AMCI shall, at its option, repair or replace, free of charge, any equipment covered by this warranty which is returned, shipping charges prepaid, within eighteen months from date of invoice, and which upon examination proves to be defective in material or workmanship and not caused by accident, misuse, neglect, alteration, improper installation or improper testing.The provisions of the "STANDARD WARRANTY" are the sole obligations of AMCI and excludes all other warranties expressed or implied. In no event shall AMCI be liable for incidental or consequential damages or for delay in performance of this warranty.
Returns PolicyAll equipment being returned to AMCI for repair or replacement, regardless of warranty status, must have a Return Merchandise Authorization number issued by AMCI. Call (860) 585-1254 with the model number and serial number (if applicable) along with a description of the problem during regular business hours, Monday through Friday, 8AM - 5PM Eastern. An "RMA" number will be issued. Equipment must be shipped to AMCI with transportation charges prepaid. Title and risk of loss or damage remains with the customer until shipment is received by AMCI.
24 Hour Technical Support Number24 Hour technical support is available on this product. If you have internet access, start at www.amci.com. Product documentation and FAQ’s are available on the site that answer most common questions.If you require additional technical support, call (860) 583-7271. Your call will be answered by the factory dur-ing regular business hours, Monday through Friday, 8AM - 5PM Eastern. During non-business hours an auto-mated system will ask you to enter the telephone number you can be reached at. Please remember to include your area code. The system will page an engineer on call. Please have your product model number and a description of the problem ready before you call.
We Want Your FeedbackManuals at AMCI are constantly evolving entities. Your questions and comments on this manual are both wel-comed and necessary if this manual is to be improved. Please direct all comments to: Technical Documenta-tion, AMCI, 20 Gear Drive, Terryville CT 06786, or fax us at (860) 584-1973. You can also e-mail your questions and comments to [email protected]
ADVANCED MICRO CONTROLS INC.
TABLE OF CONTENTS
General InformationImportant User Information ..................... 2Standard Warranty ................................... 2Returns Policy .......................................... 224 Hour Technical Support Number ........ 2We Want Your Feedback ......................... 2
About this ManualAudience .................................................. 7Applicable Units ...................................... 7Navigating this Manual ............................ 7Manual Conventions ................................ 8Trademarks and Other Legal Stuff .......... 8Revision Record ....................................... 8
Revision History ............................ 8
Where to Go From Here .......................... 9
Chapter 1: Introduction to the NR25Overview .................................................. 11Electrical Specifications .......................... 12Mechanical Specifications ....................... 12Environmental Specifications .................. 12Part Number Description ......................... 13Available Data ......................................... 13Programmable Parameters ....................... 13
Direction Counting Toggle ............ 13Scaling Function Control ............... 13Counts per Turn ............................. 14Preset Value ................................... 14Velocity Format ............................. 14Device Type ................................... 14
Calculating Position and Velocity Data ... 14Total Measurement Range Parameter ...... 15
Storage of Internal Position Offset 15Roll Over on Fractional Travel ...... 16Quasi-Absolute Multi-turn ............ 17
Effects of Reversing Count Direction ...... 17
Chapter 2: InstallationServo Mount Outline Drawing ................ 19
Aluminum Body, End Connect ..... 19Aluminum Body, Side Connect ..... 19Stainless Steel Body, End Connect 20Stainless Steel Body, Side Connect 20Alternate Shafts ............................. 21Shaft Loading ................................ 21
Chapter 2: Installation(continued)
Flange Mount Outline Drawings .............. 22Aluminum Body, End Connect ..... 22Aluminum Body, Side Connect .... 22Stainless Steel Body, End Connect 23Stainless Steel Body, Side Connect 23Alternate Shafts ............................. 24Shaft Loading ................................ 245/8" Shaft, Aluminum Body,
End Connect ............................... 255/8" Shaft, Aluminum Body,
Side Connect ............................... 265/8" Shaft, Stainless Steel Body,
End Connect ............................... 275/8" Shaft, Stainless Steel Body,
Side Connect ............................... 28Shaft Loading ................................ 28
Hub Shaft Mount Outline Drawings ........ 29Aluminum Body, End Connect ..... 29Aluminum Body, Side Connect .... 30Stainless Steel Body, End Connect 31Stainless Steel Body, Side Connect 32Available Shaft Diameters ............ 32Shaft Loading ................................ 32
End View .................................................. 33Status LED’s ............................................ 33
Network Status LED ..................... 33Module Status LED ...................... 33Link/Activity LED ........................ 34
Connector Pinout ...................................... 34TIA/EIA-568 Color Codes ............ 34
Compatible Connectors and Cordsets ...... 34Connectors .................................... 34Ethernet Cordsets .......................... 35
Power over Ethernet (PoE) ....................... 35
Chapter 3: NR25 ConfigurationFactory Default ......................................... 37Assumptions ............................................. 37Firewalls ................................................... 37Download the AMCI
Net Configurator Software ..................... 37Configure Your Network
Interface Card (NIC) .............................. 37Attach the NR25 ....................................... 39
20 Gear Drive, Plymouth Ind. Park, Terryville, CT 06786Tel: (860) 585-1254 Fax: (860) 584-1973 http://www.amci.com
3
TABLE OF CONTENTS
Chapter 3: NR25 Configuration(continued)
Using the AMCI Net Configurator ........... 39Start the Software .......................... 39Scanning for your
NR25 Encoder ............................ 40The Meaning of the
Product Name ............................. 41Manually Connecting
to your NR25 .............................. 41Changing the IP Address .............. 42Setting Communications
Protocol ....................................... 43Cycle Power to the NR25 ............. 43Testing the New Address .............. 43NR25 Tab ...................................... 43
Using the Ping Command ........................ 44
Chapter 4: RSLogix 5000 EtherNet/IP Configuration
Implicit Messaging ................................... 45RSLogix 5000 Configuration ................... 45
Configuring a Built-in Ethernet Port (As Needed) .......... 45
Configure Bridge Module(As Needed) ................................ 46
Adding the NR25 to Your Project ......................................... 47
Buffering Read Data ..................... 48
Configuring the NR25 .............................. 49The NR25 Must be Configured .... 49Assembly Instance = 102 .............. 49Assembly Instance = 103
(revision 2.3+ only) .................... 50Module Fault Code 16#0110 ........ 51
Reading Data from the NR25 ................... 51Assembly Instance = 1 .................. 52Assembly Instance = 3 .................. 52Assembly Instance = 104 .............. 52Assembly Instance = 105 .............. 53
Writing Data to the NR25 ........................ 53Presetting the Position Value ........ 53Storing Configuration Data and
the Internal Position Offset ......... 54
Chapter 5: RSLogix 500 EtherNet/IP Configuration
Explicit Messaging ................................... 55RSLogix 500 Configuration ..................... 55
Configuring a Built-in Ethernet Port ............................... 55
Read Data Format ..................................... 56Assembly Instance = 1 .................. 56Assembly Instance = 3 .................. 56Assembly Instance = 104
(revision 2.3+ only) ..................... 57Assembly Instance = 105
(revision 2.3+ only) ..................... 57
Write Data Format .................................... 57Assembly Instance = 102 .............. 58Assembly Instance = 103
(revision 2.3+ only) ..................... 59
Presetting the Position Value .................... 60Saving Configuration Data and
Position Offset ........................................ 60Determining Needed Registers ................. 61Configuring a Message Instruction ........... 62
Read Message Instructions ............ 63Write Configuration Message
Instructions .................................. 64Apply Preset Message
Instruction ................................... 66Save Configuration and Offset
Message Instruction .................... 67Setting the MultiHop Address ....... 68
Troubleshooting Message Instructions ..... 68Configuration Error Response ....... 68
Chapter 6: Modbus TCP Configuration
NR25 Memory Layout .............................. 69Supported Modbus Functions ................... 69Supported Modbus Exceptions ................. 70Multi-Word Format .................................. 70Output Data Format .................................. 70
Command Word ............................ 71Configuration Word ...................... 72
Input Data Format ..................................... 72
ADVANCED MICRO CONTROLS INC.4

TABLE OF CONTENTS
Chapter A: IP Address Setup with BOOTP
Initial Configuration ................................ 73Start Your Bootp Server .......................... 73Changing the IP Address ......................... 73
Enabling Bootp Protocol ............... 74Setting the IP Address ................... 75Disabling the Bootp Protocol ........ 75
Testing the New IP Address .................... 76Continue with Chapter 3 .......................... 76
Chapter B: CIP Position SensorObject
Common Industrial Protocol .................... 77Supported Services .................................. 77Supported Class Attributes ...................... 77Supported Instance Attributes .................. 78Supported Alarms .................................... 79
20 Gear Drive, Plymouth Ind. Park, Terryville, CT 06786Tel: (860) 585-1254 Fax: (860) 584-1973 http://www.amci.com
5

TABLE OF CONTENTS
Notes
ADVANCED MICRO CONTROLS INC.6

ABOUT THIS MANUAL
AudienceThis manual explains the installation and operation of AMCI’s NR25 Networked Resolver encoders. It is written for the engineer responsible for incorporating the NR25 into a design as well as the engineer or tech-nician responsible for its actual installation. If there are any unanswered questions after reading this manual, call the factory. An applications engineer will be available to assist you.
Applicable UnitsThe release of this manual coincides with the release of firmware version 2.3. Important changes to the units based on firmware revisions are listed below.
Revision 1.4 and below: These units only support the EtherNet/IP protocol and their IP addresses must be set with a Bootp server. Instructions for using the Bootp server from Rockwell Automation can be found in Appendix A, starting on page 73. The AMCI Net Configurator software can be used to set remaining param-eter of the NR25.
Revisions 1.5 and 1.6: These units only support the EtherNet/IP protocol but you have the ability to set the IP address of the NR25 by using the AMCI Net Configurator software.
Revision 1.7, 1.8, and 1.9: NR25 units now support both the EtherNet/IP and Modbus TCP protocols. The factory default is EtherNet/IP. These units can be scanned by the AMCI Net Configurator software to deter-mine the IP address of the NR25 as long as your computer and the NR25 are on the same subnet.
Revision 2.3: NR25 units now have one additional parameter, Total Measuring Range and two additional data values, Time Stamp and Actual Sensor Reading. Revision 2.3 units are backwards compatible with older NR25 Ethernet encoders. They can be used to replace all older NR25 units without changes to your system.
Starting with firmware revision 1.7, the firmware revision was printed on the serial number tag. If you don’t see a firmware revision number on the tag, then you have an older unit and you must attach to it with the AMCI Net Configurator software to determine the unit’s firmware revision.
Units that have a firmware revision of 1.4 and below cannot have their IP address set with the AMCI Net Configurator software. The IP address of these units can only be set by using a Bootp server.
Note: NR25 encoders with firmware revision 1.9 and below cannot be upgraded to revision 2.3+. Revi-sion 2.3 introduces a board revision with a switch to FRAM high endurance non-volatile memory.
Navigating this ManualThis manual is designed to be used in both printed and on-line forms. Its on-line form is a PDF document, which requires Adobe Acrobat Reader version 7.0+ to open it. If you decide to print out this manual, all chapters contain an even number of pages which allows you to easily print out a single chapter on a duplex (two-sided) printer.
Bookmarks of all the chapter names, section headings, and sub-headings are in the PDF file to help you navi-gate through it. The bookmarks should have appeared when you opened the file. If they didn’t, press the F5 key on Windows platforms to bring them up. Throughout this manual you will also find blue text that func-tions as a hyperlink in HTML documents. Clicking on the text will immediately jump you to the referenced section of the manual. If you are reading a printed manual, most links include page numbers.
The PDF file is password protected to prevent changes to the document. You are allowed to select and copy sections for use in other documents and, if you own Adobe Acrobat version 7.0 or later, you are allowed to add notes and annotations.
Read this chapter to learn how to navigate through this manual and familiarize yourself with the conventions used in it. The last section of this chapter high-lights the manual’s remaining chapters and their target audience.
20 Gear Drive, Plymouth Ind. Park, Terryville, CT 06786Tel: (860) 585-1254 Fax: (860) 584-1973 http://www.amci.com
7

ABOUT THIS MANUAL
Manual ConventionsThree icons are used to highlight important information in the manual:
NOTES highlight important concepts, decisions you must make, or the implications of those decisions.
CAUTIONS tell you when equipment may be damaged if the procedure is not followed properly.
WARNINGS tell you when people may be hurt or equipment may be damaged if the pro-cedure is not followed properly.
The following table shows the text formatting conventions:
Trademarks and Other Legal StuffThe AMCI logo is a trademark of Advanced Micro Controls Inc. “CIP” is a trademark of Open DeviceNet Vendor Association, Inc. “EtherNet/IP” is a trademark of ControlNet International, Ltd. under license by Open DeviceNet Vendor Association, Inc. “Adobe” and “Acrobat” are registered trademarks of Adobe Sys-tems Incorporated.
All other trademarks contained herein are the property of their respective holders.
Revision RecordThis manual, 940-0D092 is the third release of this manual. It was first released on November 6th, 2012. It adds information on the new parameter and data values added with revision 2.3 of the NR25 and the additions to the Ethernet/IP and Modbus definitions to support them.
Revision History
940-0D091: 04/19/2011 Added Modbus protocol and stainless steel package outline drawings
940-0D090: 07/12/2010 Initial Release
Format Description
Normal Font Font used throughout this manual.
Emphasis Font Font used for parameter names and the first time a new term is introduced.
Cross ReferenceWhen viewing the PDF version of the manual, clicking on the cross reference text jumps you to referenced section or section of the AMCI website if you have Internet access.
ADVANCED MICRO CONTROLS INC.8

ABOUT THIS MANUAL
Where to Go From HereThis manual contains information that is of interest to everyone from engineers to operators. The table below gives a brief description of the content of each chapter to help you find the information you need to assist you in your job.
CHP NUM. Chapter Title Chapter Description
1 INTRODUCTION TO THE NR25
Intended for anyone new to the NR25 Networked Resolver encoder, this chapter gives a basic overview of the unit, including an explana-tion of its programmable features. The chapter also explains the NR25 part numbering system.
2 INSTALLATIONThis chapter is intended for the engineer or technician responsible for installing and wiring the NR25 Networked Resolver encoder. Information in this chapter includes mechanical drawings, installa-tion guidelines and connector pinout.
3 NR25 CONFIGURATION
This chapter is intended for anyone responsible for configuring the NR25 either before or after actual installation. It includes detailed information on using the AMCI Net Configurator utility that is freely available on the AMCI website.
4RSLogix 5000 EtherNet/IP
CONFIGURATION
This chapter covers how to communicate with the NR25 using the EtherNet/IP protocol and implicit messaging. The RSLogix 5000 software is used as a programming example.
5RSLogix 500 EtherNet/IP
CONFIGURATION
This chapter covers how to communicate with the NR25 using the EtherNet/IP protocol and explicit messaging. The RSLogix 500 software is used as a programming example.
6 Modbus TCP CONFIGURATION
This chapter covers how to communicate with the NR25 using the Modbus TCP protocol.
A IP ADDRESS SETUP WITH BOOTP
Older NR25 units must use a Bootp server to set their IP address. This appendix is a step by step guide to using the Bootp server from Rockwell Automation to change the default IP address of the NR25.
B CIP POSITION SENSOR OBJECT
When using the EtherNet/IP protocol, the NR25 conforms to the Encoder Device Profile as defined by the Common Industrial Proto-col (CIP). This chapter explains the Position Sensor Object that is implemented by the NR25 as part of this profile.
20 Gear Drive, Plymouth Ind. Park, Terryville, CT 06786Tel: (860) 585-1254 Fax: (860) 584-1973 http://www.amci.com
9

ABOUT THIS MANUAL
Notes
ADVANCED MICRO CONTROLS INC.10

20 Gear Drive, Plymouth IndTel: (860) 585-1254 Fax: (8
CHAPTER 1
INTRODUCTION TO THE NR25OverviewThe NR25 is a new line of heavy-duty resolver based encoder products from AMCI. The initial offerings in this line communicate over a standard Ethernet network. A version that communicates over Profibus is also available and is covered in a separate manual.
Two different protocol stacks are built into each NR25 Ethernet product:
An ODVA compliant EtherNet/IP protocol stack A Modbus TCP compliant protocol stack
Having both protocols available allows the NR25 to be used in a vast majority of applications today and allows machine builders to confidently choose a sin-gle solution that can be used regardless of the proto-col their end customers are using.
Power over Ethernet (PoE) is also a standard feature on all NR25 Ethernet products, allowing you to reduce cabling requirements if you use a network switch that supports PoE. Side connect units have only the Ethernet connector and must use PoE while end connect units have a second connector that can be used for power. This connector allows you to use these NR25 encoders as drop in replacements for other EtherNet/IP encoders.
The NR25 series is composed of absolute single- or multi-turn sensors in an IP67 rated, 2.5 inch diameter package. All NR25 Networked Resolvers offer a maximum single turn position resolution of 16 bits, which is programmable from 1 to 65,536 counts per turn. Two multi-turn units are available in addition to the single turn NR25. One encodes 4,096 turns (12 bit + 16 bit = 28 bit encoder) and the other encodes 16,384 turns (14 bit + 16 bit = 30 bit encoder).
A flange mount unit with end connectors is shown in figure 1.1. The following mounting styles are available:
Size 25 standard flange mount with 3/8", 1/4", or 10mm shafts Size 25 standard servo mount with 3/8", 1/4", or 10mm shafts Blind shaft mount for 3/8", 1/2", 10mm, and 12mm shafts, mounting bracket designed for 63mm B.C. AMCI face mount with 5/8" shaft for high radial and axial loads
Side and end connect versions of all of these mounting styles are available. Body material is either aluminum with a powder coat finish or 316 stainless steel for use in caustic environments. Outline drawings of all of the packing options are available in the Outline Drawings section of the INSTALLATION chapter, starting on page 19.
Every NR25 resolver based encoder is programmable over its Ethernet interface. Initial configuration can be accomplished with the AMCI Net Configurator software while setting the IP address of the unit. Additional configuration can be accomplished once the unit is installed on your machine through simple data reads and writes programmed into your controller. Parameters allow you to set the count direction, the number of counts per turn, the format of the velocity data, and preset the position data to any value within its range. The current version of the firmware also allows you to set the number of counts before returning to zero.
All NR25 resolver based encoders have three status LED’s to help you determine the state of the device. These LED’s are always located on the back cover of the NR25.
Module Status – Operating status of the NR25 itself Network Status – Operating state of the EtherNet/IP or Modbus TCP protocol Link/Activity – Physical state of Ethernet connection
Figure 1.1 NR25 Resolver Based Encoder
. Park, Terryville, CT 0678660) 584-1973 http://www.amci.com
11

INTRODUCTION TO THE NR251
Electrical SpecificationsOperating Voltage (External Supply)12Vdc to 54Vdc
Power Requirements2.5W max.100mA @ 24Vdc typical
Ethernet Capability10/100 Mbit autosense with auto-switch capability.
Auto-switch eliminates the need of a crossover cable in all applications.
Power over Ethernet (PoE)Compatible with Power over Ethernet standard.
With only data pairs available, the power sourc-ing equipment (PSE) must be able to output power on these two pairs (Mode A)
Single Turn ResolutionProgrammable from 1 to 65,536 counts per turn
(16 bit resolution max.)
Multi-turn Resolution4,096 turns (12 bit) or 16,384 (14 bit)
Direction of Increasing CountsDefault of CW increasing when looking at the
shaft.
Programmable to CCW increasing over the Ether-Net/IP interface.
Preset PositionPosition can be preset to any value within its range
over the Ethernet interface. Internal Position Offset can be stored in non-volatile memory and retrieved on power up.
Positional Accuracy±10 arc-minutes
Response Time1 millisecond
Mechanical SpecificationsPackage Style
2.5 inch housing with flange, servo, or hub shaft mounting
Connector LocationSide or End
Mechanical Specifications (cont’d)Housing
Powder coated aluminum or 316 stainless steel
Shaft 0.250", 0.375", 0.625", or 10 mm Blind shaft with 0.375", 0.500", 10mm or 12mm
hole
Max. Starting Torque @ 25°C2.0 oz-in: 0.250", 0.375", and 10 mm shafts6.0 oz-in: All blind shafts6.0 oz-in: 0.625" shaft
Moment of Inertia (oz-in-sec2)6.00 X 10⁻⁴: 0.250", 0.375", and 10 mm shafts7.00 X 10-4: All blind shafts8.50 X 10-4: 0.625" shaft
Max. Operating Speed6000 RPM max.
Max. Shaft Loading (0.625” shaft) Axial: 50lbs. (222N)Radial: 100lbs. (445N)At specified max. loads, minimum bearing life is
2X10⁹ revolutions.
Max. Shaft Loading (All other shafts) Axial: 20lbs. (89N)Radial: 40lbs. (178N)At specified max. loads, minimum bearing life is
2X10⁹ revolutions.
Environmental SpecificationsOperating Temperature
–40°F to +185°F (–40°C to +85°C)
Shock 50g, 11 millisecond duration
Vibration 20g, 5 to 2000Hz
Enclosure Rating IP67
Approximate Weight 2.0lbs. (0.91kg) 0.625" shaft - Aluminum Body3.8lbs. (1.73kg) 0.625" shaft - 316 Steel Body1.4lbs. (0.65kg) All other shafts - Aluminum Body2.9lbs. (1.32kg) All other shafts - 316 Steel Body
ADVANCED MICRO CONTROLS INC.12

INTRODUCTION TO THE NR25 1
Part Number DescriptionFigure 1.2 Part Number Description
Available DataAll NR25 encoders offer position and velocity data that can be scaled with the programmable parameters as described in the following section. The position data can also be preset which allows you to align the position data with your machine position without having to physically rotate the shaft.
NR25 encoders that have firmware revision 2.3 and above can transmit the following additional data:
Time Stamp: The time stamp is an unsigned double integer value with an interval of 400 nanoseconds. It will roll over every 1717.9869184 seconds. The time stamp can be used to verify active communica-tions between the NR25 and your host controller.
Actual Sensor Reading: This unsigned double integer value is the raw position data from the NR25. Changing the position scaling parameters will have no effect on this value.
Programmable ParametersThe following parameters are available on all NR25 encoders. Note that most of these parameter names are pulled from the ODVA (EtherNet/IP) specification. They are generic, and sometimes confusing, but they are what is defined in the specification. AMCI has decided to adopt these parameter names for all NR25s to avoid additional translations between protocols with one exception. In the ODVA specification, the parame-ter that sets the number of counts per turn of the shaft is called the ‘Measurement Units per Span’. This generic name can be applied to both rotary and linear encoders. Being that the NR25 is a rotary encoder, this manual refers to the parameter as Counts per Turn.
Direction Counting Toggle
This parameter allows you to set the direction of shaft rotation needed to produce increasing counts. A value of “0” sets the direction of increasing counts to clockwise when looking at the shaft. A value of “1” sets the direction of increasing counts to counter-clockwise when looking at the shaft. The factory default value is clockwise increasing counts.
Scaling Function Control
The NR25 has a maximum resolution of 65,536 counts per turn and it can be programmed to scale the counts per turn from 1 to 65,536. Scaling is only performed if this parameter is in its “enabled” state. A value of “0” disabled the scaling function and a value of “1” enables the scaling function. Note that the Scaling Function Control parameter only affects the scaling of the position data. Once this parameter is enabled, the velocity data will always be scaled by the Counts per Turn parameter until power is cycled to the unit. This is true even if the Scaling Function Control is returned to it disabled state. See Calculating Position and Velocity Data on page 14 for the reasoning behind this behavior.
CONNECTOR E04 = End M12 Connectors 4 pin Female D-Type: Network 4 pin Male A-Type: Power S02 = Side M12 Connector 4 pin Female D-Type: Network
NR25
HOUSING F = Square Flange S = 2.5" Dia. Servo Mount H = 63mm Blind Shaft Mount
–
SHAFT DIA.Standard Shaft 1 = 0.375" Dia. 2 = 10 mm Dia. 3 = 0.250" Dia. 5 = 0.625" Dia
6 = 12 mm Dia.
Flange Mount Only Housing = 'F'
Blind Shaft Hole1 = 0.375" Dia.
2 = 10 mm Dia. 4 = 0.500" Dia
DURACODER TYPE E = Ethernet Interface
OUTPUT CONFIG. 1 = 16 bit Single Turn 2 = 28 bit (12+16) Multi-Turn 3 = 30 bit (14+16) Multi-Turn
E
SHAFT SEAL A = Nitrile Seal, 316 SS Body B = Nitrile Seal, Aluminum Body C = Viton Seal, 316 SS Body V = Viton Seal, Aluminum Body
OUTPUT CODE A = EtherNet/IP & Modbus/TCP protocols
20 Gear Drive, Plymouth Ind. Park, Terryville, CT 06786Tel: (860) 585-1254 Fax: (860) 584-1973 http://www.amci.com
13

INTRODUCTION TO THE NR251
Programmable Parameters (continued)Counts per Turn
(ODVA: Measuring Units Per Span)
This parameter can range from 1 to 65,536. Note that this parameter is only used to scale the position value when the Scaling Function Control parameter is set to “1”. If the Scaling Function Control parameter is set to “0”, the NR25 will report position data at its full resolution of 65,536 counts per turn. This parameter will always be applied to the velocity data reported by the NR25, regardless of the state of the Scaling Function Control parameter. If you are not using the Counts per Turn parameter, set it to its default value of 65,536.
Preset Value
This parameter allows you to preset the position to any value in its single or multi-turn range without rotating the shaft. The minimum value for this parameter is zero. Its maximum value depends on the NR25 version you have. For single turn NR25’s, the maximum value is 65,535. For 28 bit multi-turn NR25’s, the maxi-mum value is 268,435,455. For 30 bit multi-turn NR25’s, the maximum value is 1,073,741,823. If your NR25 is revision 2.3 or greater, the maximum value of this parameter can be limited by the Total Measure-ment Range parameter. See the Total Measurement Range Parameter (Rev. 2.3+) section on page 15 for a description of this parameter
Velocity Format
The NR25 reports velocity data as well as position data over the network. This parameter sets the units of measure for the velocity data. This parameter has four fixed values.
0x1F04 = pulses/second 0x1F05 = pulses/millisecond 0x1F07 = pulses/minute 0x1F0F = RPM
Once the Scaling Function Control parameter is enabled, the velocity data will always be scaled by the Counts per Turn parameter until power is cycled to the unit. This is true even if the Scaling Function Control is returned to it disabled state. See Calculating Position and Velocity Data below for the reasoning behind this behavior.
Device Type
You can program how the NR25 defines itself to the EtherNet/IP network and is only available when the NR25 is configured to use the EtherNet/IP protocol. This parameter has a double integer (32 bit) data type and two fixed values.
0x22 = Encoder Device (factory default value) 0x00 = Generic Device
Calculating Position and Velocity DataThe maximum position resolution of an NR25 is 65,536 counts per turn. This value is used unless the Scal-ing Function Control is set to its Enabled state. If this parameter is set to its enabled state, the number of counts per turn is set to the value specified by the Counts per Turn parameter.
Note that the Scaling Function Control parameter is a true enable/disable control. The Counts per Turn parameter is only used to scale the position data if the Scaling Function Control is in its enabled state. If you change the Scaling Function Control parameter to its disabled state, the NR25 will begin to report position data with a resolution of 65,536 counts per turn as soon as the state change is accepted.
The velocity data calculation is also affected by the Counts per Turn parameter. The velocity data will always be calculated based on the last value of the Counts per Turn parameter. This is true even if the Scaling Func-tion Control is never set to its Enabled state. Therefore, leave the Counts per Turn parameter at its default value of 65,536 if you do not want to scale the velocity data.
ADVANCED MICRO CONTROLS INC.14

INTRODUCTION TO THE NR25 1
Calculating Position and Velocity Data (continued)For example, if you enable the Scaling Function Control and set the Counts per Turn parameter to 10,000, the position will be calculated at 10,000 counts per turn and the velocity will also be calculated at 10,000 counts per turn. If you then disable the Scaling Function Control, the position will be calculated at 65,536 counts per turn and the velocity will still be calculated at 10,000 counts per turn. Additionally, if you change the Counts per Turn parameter to 5,000 and do not enable the Scaling Function Control parameter, the position will still be calculated at 65,536 counts per turn and the velocity will now be calculated at 5,000 counts per turn. This behavior may be confusing to some users, but may be exactly what other users need. (One exam-ple is a packaging machine where you want the position at full resolution, but the velocity data scaled to boxes-per-minute.) If this behavior would not be beneficial to you, then the best way to avoid any issues is to always leave the Scaling Function Control parameter enabled and use the Counts per Turn parameter, even when setting the counts per turn to 65,536.
Total Measurement Range Parameter (Rev. 2.3+)The Total Measurement Range parameter sets the total number of counts before the position value returns to zero. It is always used when determining the position value. Its use is not affected by the state of the Scaling Function Control parameter. If the Total Measurement Range parameter is left at its default value of zero, the roll over position is determined by the Counts per Turn parameter and the number of turns the NR25 can encode. This is the same the way NR25 encoders with a revision of 1.9 or less operate. If the Total Measure-ment Range is non-zero, it places an upper limit on the position value and the Preset Value parameter. Total Measurement Range parameter ranges are as follows:
Single Turn NR25: Range of 0, 2 to 65,536 28 bit Multi-turn NR25: Range of 0, 2 to 268,435,455 30 bit Multi-turn NR25: Range of 0, 2 to 1,073,741,823
There is no fixed relationship between the Total Measurement Range and Counts per Turn parameters, which leads to interesting applications that use the two parameters.
Storage of Internal Position Offset
The Total Measurement Range parameter affects how the internal position offset, which is generated when you preset the position value, is stored. When the Total Measurement Range parameter is zero, the position offset is stored in RAM and lost when power is removed from the NR25. You must issue a command to save the position offset to non-volatile memory. This is exactly how NR25 encoders with a revision of 1.9 or below operate. When the Total Measurement Range parameter is non-zero, the internal position offset is automatically stored in non-volatile FRAM memory. You do not need to issue a command to save the internal position offset. If you set the Total Measurement Range parameter as follows, the parameter will have no effect on the position value and the internal position offset will be stored in FRAM.
Single Turn NR25: 65,536 or the value of the Counts per Turn parameter if the Scaling Function Con-trol parameter is set to ‘True’.
28 bit Multi-turn NR25: 268,435,455, or the value of the Counts per Turn parameter multiplied by 4,096 if the Scaling Function Control parameter is set to ‘True’.
30 bit Multi-turn NR25: 1,073,741,823, or the value of the Counts per Turn parameter multiplied by 16,386 if the Scaling Function Control parameter is set to ‘True’.
Using the Total Measurement Range parameter this way only affects how the internal position offset is stored. You must still issue a command to save the programmable parameters to non-volatile memory.
20 Gear Drive, Plymouth Ind. Park, Terryville, CT 06786Tel: (860) 585-1254 Fax: (860) 584-1973 http://www.amci.com
15

INTRODUCTION TO THE NR251
Total Measurement Range Parameter (continued)Roll Over on Fractional Travel
When the Total Measurement Range is less than the total counts available from the NR25, which is (Counts per Turn multiplied by the number of turns the NR25 can encode), the position will return to zero before the full mechanical travel is completed. Two examples are shown below.
Figure 1.3 Fractional Turn Examples
The top half of figure 1.3 shows what occurs when the Total Measurement Range parameter is used to divide the full range of travel of the NR25 into equal parts. In this case, a twenty-eight bit NR25 has its 4,096 turns evenly divided into five cycles of 819.2 turns.
The bottom half of figure 1.3 shows a single turn NR25 where the Total Measurement Range parameter is not used to divide the full range of travel into equal parts. In this case, the position value will roll over to zero after 225 degrees of rotation.
If the value of {Total Counts ÷ Total Measurement Range} is an integer, the NR25 remains an absolute rotary sensor. You can remove power from the NR25, rotate it as far as you want, re-apply power, and the NR25 will give you the correct position value. The top half of figure 1.3 is an example of this setup because the divi-sion of the two parameters results in the quotient value of five.
It is also possible for the value of {Total Counts ÷ Total Measurement Range} to be a real number instead of an integer. This case is shown in the bottom half of figure 1.3, where the quotient is 1.6. In these cases, the NR25 becomes what AMCI terms a quasi-absolute rotary sensor.
Quasi-absolute means that the NR25 will power up with the correct position value as long as the shaft was rotated less than half of the complete span of the encoder while power was removed. In practical terms:
For 30-bit NR25 encoders: If you remove power from the sensor and rotate the shaft less than 8,192 turns in either direction, when you re-apply power, the position reading will be correct.
For 28-bit NR25 encoders: If you remove power from the sensor and rotate the shaft less than 2,048 turns in either direction, when you re-apply power, the position reading will be correct.
For 16-bit NR25 encoders: If you remove power from the sensor and rotate the shaft less than 180 degrees in either direction, when you re-apply power, the position reading will be correct.
If the shaft rotates further than the limits listed above while power is removed, the position value from the NR25 will be off by at least ±1 turn when power is applied.
28 bit NR25: 4096 Turns Counts per Turn = 1,000 Counts
Total Counts = 4,096,000 0
0 0 0 0
0
Total Measurement Range = 819,200 CountsNR25 outputs five cycles of counts from 0 to 819,199 over 4,096 turns
One Rotation of a Single Turn NR25 Counts per Turn = 36,000 Counts
0
0 0 0 0
Total Measurement Range = 22,500 CountsNR25 outputs one cycle of counts from 0 to 22,499 for every 225 degrees of rotation.
ADVANCED MICRO CONTROLS INC.16

INTRODUCTION TO THE NR25 1
Total Measurement Range Parameter (continued)Quasi-Absolute Multi-turn
When the Total Measurement Range is greater than the total counts available from the NR25, which is (Counts per Turn multiplied by the number of turns the NR25 can encode), multiple rotations of the shaft are required before the position value reaches the roll over count. For example, assume a single turn NR25 that has its Counts per Turn parameter set to 360 and its Total Measurement Range parameter set to 64,800. With this setup, the shaft of the NR25 must rotate 180 turns, {64,800 ÷ 360}, before the position returns to zero. In this application, the single turn NR25 acts as a 180 turn encoder with one degree position resolution.
The same trade off between resolution and number of turns encoded can be made with the multi-turn NR25 encoders. For example, if a 30-bit NR25 encoder has its Counts per Turn parameter set to 360 and its Total Measurement Range parameter set to its maximum of 1,073,741,824, the NR25 will encode 2,982,616.17 turns with one degree resolution.
In all of these applications, the NR25 will act as a quasi-absolute encoder, with the same motion restrictions listed in the Roll Over on Fractional Travel section above. Exceeding these limits will result in a position value error when power is re-applied.
Effects of Reversing Count DirectionChanging the Direction Counting Toggle parameter changes the way the position value is calculated. When you reverse the count direction, the position changes from your current position value to (Maximum number of counts – current position value). For example, assume a 30 bit NR25 with its default of 65,536 counts per turn. If the current position value is 100,000 and you change the Direction Counting Toggle parameter, the current position will change to (230 – 100,000 = 1,073,741,824 – 100,000) = 1,073,641,824. Most applica-tions do not require you to change the count direction after the machine is setup, so the count direction is typ-ically set before the position value is preset.
Changing the count direction on your machine while maintaining the current position value is a three step process. First, read and store the current position value from the NR25. Second, change the Direction Count-ing Toggle value. Third, write the stored position value back to the NR25 as a preset value.
20 Gear Drive, Plymouth Ind. Park, Terryville, CT 06786Tel: (860) 585-1254 Fax: (860) 584-1973 http://www.amci.com
17

INTRODUCTION TO THE NR251
NotesADVANCED MICRO CONTROLS INC.18

20 Gear Drive, Plymouth IndTel: (860) 585-1254 Fax: (8
CHAPTER 2
INSTALLATIONServo Mount Outline Drawing
Aluminum Body, End Connect
Figure 2.1 Servo Mount, End Connector Outline Drawing
Aluminum Body, Side Connect
Figure 2.2 Servo Mount, Side Connector Outline Drawing
This chapter is intended for the engineer or technician responsible for installing and wiring the NR25 networked resolver encoder. Information in this chapter includes mechanical drawings, installation guidelines and connector pinout.
NR25 Ethernet Output Servo Mount End Connector
#8-32 UNC- 2B. 0.18" min depth. Sixplaces, 60° apart on a 1.875" B.C.
(4.6)(47.63)
(58.64)
( ) = Dimensions in millimeters
(22.86)(31.75)
0.55" max. Additional clearance needed for removal
of mating connector.
(14.0)
(7.62)
(58.6)
#8-32 UNC-2B. 0.18" min. depth.Six places, 60° apart on 1.875" B.C.
(4.6)
(47.62)
( ) = Dimensions in millimeters
(22.86)
(7.62)
(31.75)
2.50"
dia.(63.5)
(35.6)
Industry StandardM12 ConnectorD-Coded, 4 pin Female
NR25 Ethernet Output Servo Mount Side Connector PoE only
. Park, Terryville, CT 0678660) 584-1973 http://www.amci.com
19

INSTALLATION2
Servo Mount Outline Drawings (continued)Stainless Steel Body, End Connect
Figure 2.3 Servo Mount, End Connector Outline Drawing
Stainless Steel Body, Side Connect
Figure 2.4 Servo Mount, Side Connector Outline Drawing
(7.62)
(58.6)
#8-32 UNC-2B. 0.18" min. depth.Six places, 60° apart on 1.875" B.C.
(4.6)
(47.62)
( ) = Dimensions in millimeters
(22.86)
(31.75)
NR25 316 Stainless Servo Mount End Connectors
0.55" max. Additional clearance needed for
removal of mating connector.
(14.0)
(7.62)
(58.6)
#8-32 UNC-2B. 0.18" min. depth.Six places, 60° apart on 1.875" B.C.
(4.6)
(47.62)
( ) = Dimensions in millimeters
(22.86)
(30.5)
(31.75)
L
(44.7)
L
NR25 316 Stainless Servo Mount Side Connect M12 Connector PoE Only
Industry StandardM12 ConnectorD-Coded, 4 pin Female
ADVANCED MICRO CONTROLS INC.20
INSTALLATION 2
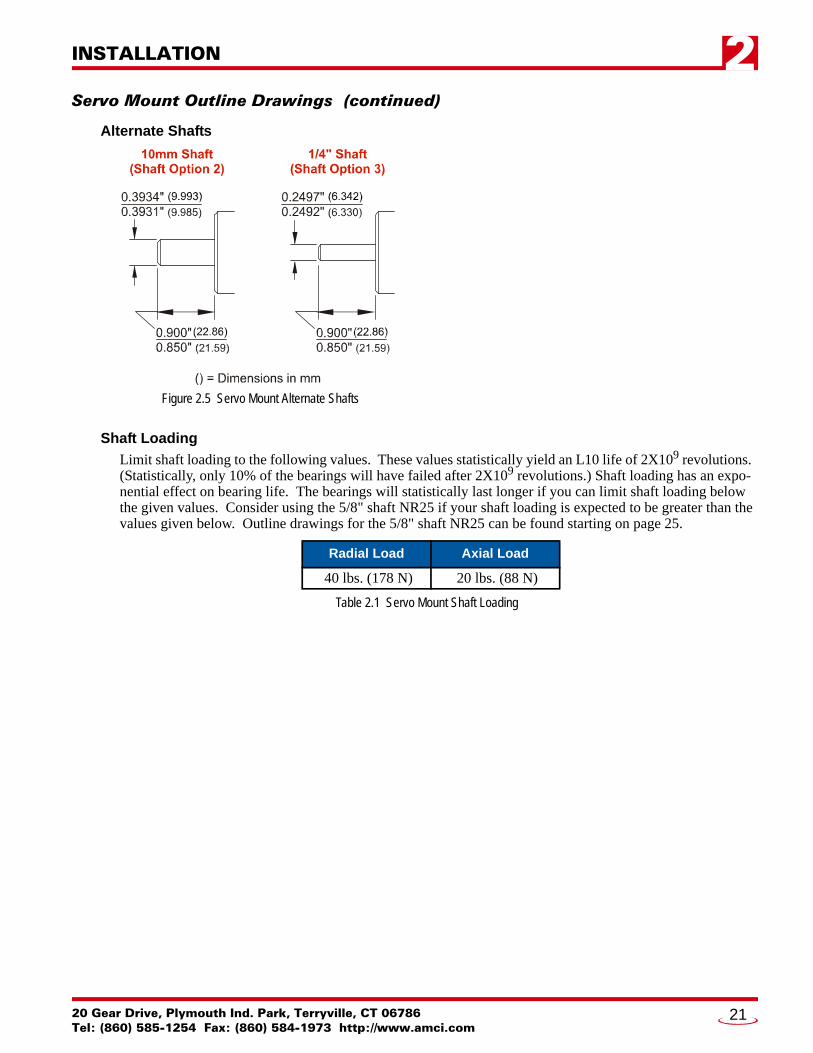
Servo Mount Outline Drawings (continued)Alternate Shafts
Shaft Loading
Limit shaft loading to the following values. These values statistically yield an L10 life of 2X10⁹ revolutions. (Statistically, only 10% of the bearings will have failed after 2X10⁹ revolutions.) Shaft loading has an expo-nential effect on bearing life. The bearings will statistically last longer if you can limit shaft loading below the given values. Consider using the 5/8" shaft NR25 if your shaft loading is expected to be greater than the values given below. Outline drawings for the 5/8" shaft NR25 can be found starting on page 25.
Table 2.1 Servo Mount Shaft Loading
Radial Load Axial Load
40 lbs. (178 N) 20 lbs. (88 N)
Figure 2.5 Servo Mount Alternate Shafts
20 Gear Drive, Plymouth Ind. Park, Terryville, CT 06786Tel: (860) 585-1254 Fax: (860) 584-1973 http://www.amci.com
21

INSTALLATION2
Flange Mount Outline DrawingsAluminum Body, End Connect
Figure 2.6 Flange Mount, End Connector Outline Drawing
Aluminum Body, Side Connect
Figure 2.7 Flange Mount, Side Connector Outline Drawing
NR25 Ethernet Output Flange Mount End Connector
(67.3)
(67.3)
(6.35)(26.21)
(26.21)
( ) = Dimensions in millimeters 0.55" max. Additional clearance needed for removal
of mating connector.
(14.0)
(31.75)
L
L
(26.21)
(67.3)
(26.21)
max.
2.50"
dia.(63.5)
( ) = Dimensions in millimeters
(22.86)
(31.75)L
L
(6.35)
(35.6)
NR25 Ethernet Output Flange Mount Side Connector PoE only
Industry StandardM12 ConnectorD-Coded, 4 pin Female
ADVANCED MICRO CONTROLS INC.22

INSTALLATION 2
Flange Mount Outline Drawings (continued)Stainless Steel Body, End Connect
Figure 2.8 Flange Mount, End Connector Outline Drawing
Stainless Steel Body, Side Connect
Figure 2.9 Flange Mount, Side Connector Outline Drawing
(67.3)
(26.21)
(6.35)
( ) = Dimensions in millimeters
(22.86)
(31.75)L
L
(26.21)
NR25 316 Stainless Flange Mount End Connectors
0.55" max. Additional clearance needed for
removal of mating connector.
(14.0)
(67.3)
(26.21)
(6.35)
( ) = Dimensions in millimeters
(22.86)
(31.75)L
L
(26.21)
(29.2)
L
(44.7)
NR25 316 Stainless Flange Mount Side Connect M12 Connector PoE Only
Industry StandardM12 ConnectorD-Coded, 4 pin Female
20 Gear Drive, Plymouth Ind. Park, Terryville, CT 06786Tel: (860) 585-1254 Fax: (860) 584-1973 http://www.amci.com
23

INSTALLATION2
Flange Mount Outline Drawings (continued)Alternate Shafts
Shaft Loading
Limit shaft loading to the following values. These values statistically yield an L10 life of 2X10⁹ revolutions. (Statistically, only 10% of the bearings will have failed after 2X10⁹ revolutions.) Shaft loading has an expo-nential effect on bearing life. The bearings will statistically last longer if you can limit shaft loading below the given values. Consider using the 5/8" shaft NR25 if your shaft loading is expected to be greater than the values given below. Outline drawings for the 5/8" shaft NR25 can be found starting on page 25.
Table 2.2 Flange Mount Shaft Loading
Radial Load Axial Load
40 lbs. (178 N) 20 lbs. (88 N)
Figure 2.10 Flange Mount Alternate Shafts
ADVANCED MICRO CONTROLS INC.24

INSTALLATION 2
Flange Mount Outline Drawings (continued)5/8" Shaft, Aluminum Body, End Connect
Figure 2.11 5/8" Shaft, Flange Mount, End Connect Outline Drawing
KEYWAY SPECIFICATIONS
KEY
KEYWAY0.1895" 0.1885" (4.788)
X0.108"0.106" (2.69)
NOTES:
Deep
See KeywaySpecifications
0.750"(19.05)1.500"
(38.10)
0.470"(11.95)
See Note 1
1.032"(26.21)
1.032"(26.21)
0.94"(23.9)
L
(36.8)
0.125" (3.18)
1.500" 1.499" (38.07)
(38.10)diameter
L
See Note 2
0.6247" 0.6237" (15.842)
(15.867)
0.188"0.187" (4.75)
Sq. X 1.00" (25.4)
0.55" max.See Note 3(14.0)
( ) = Dimensions in millimeters
typ.
typ.
1.00"(25.4)
NR25 Ethernet Output 5/8" Shaft Flange Mount End Connector
1) Integral Shaft Seal.
2) 1/4-20 UNC-2B 0.50" (12.7) minimum depth. Six Places.
3) Additional clearance needed for removal of mating connectors.
20 Gear Drive, Plymouth Ind. Park, Terryville, CT 06786Tel: (860) 585-1254 Fax: (860) 584-1973 http://www.amci.com
25

INSTALLATION2
Flange Mount Outline Drawings (continued)5/8" Shaft, Aluminum Body, Side Connect
Figure 2.12 5/8" Shaft, Flange Mount, Side Connect Outline Drawing
max.
1.46" ) max. See Note 3
(37.1
NOTES:
See KeywaySpecifications
0.750"(19.05)1.500"
(38.10)
0.470"(11.95)
See Note 1
1.032"(26.21)
0.94"(23.9)
(36.8)
0.125" (3.18)
1.500" 1.499" (38.07)
(38.10) diameter
L
0.6247" 0.6237" (15.842)
(15.867)
( ) = Dimensions in millimeters
NR25 Ethernet Output 5/8" Shaft Flange Mount Side Connector PoE onlytyp.
See Note 2
KEYWAY SPECIFICATIONS
KEY
KEYWAY0.1895" 0.1885" (4.788)
X0.108"0.106" (2.69)
Deep
0.188"0.187" (4.75)
Sq. X 1.00" (25.4)1.00"(25.4)
L
1.032" typ.(26.21)
(35.6)
2.50"
dia.(63.5)
1) Integral Shaft Seal.
2) 1/4-20 UNC-2B 0.50" (12.7) minimum depth. Six Places.
3) Additional clearance) needed for removal of mating connector.
Industry StandardM12 ConnectorD-Coded, 4 pin Female
ADVANCED MICRO CONTROLS INC.26

INSTALLATION 2
Flange Mount Outline Drawings (continued)5/8" Shaft, Stainless Steel Body, End Connect
Figure 2.13 5/8" Shaft, Flange Mount, End Connect Outline Drawing
KEYWAY SPECIFICATIONS
KEY
KEYWAY0.1895" 0.1885" (4.788)
X0.108"0.106" (2.69)
NOTES:
Deep
See KeywaySpecifications
0.750"(19.05)1.500"
(38.10)
0.470"(11.95)
See Note 1
1.032"(26.21)
1.032"(26.21)
0.94"(23.9)
L
(36.8)
0.125" (3.18)
1.500" 1.499" (38.07)
(38.10)diameter
L
See Note 2
0.6247" 0.6237" (15.842)
(15.867)
0.188"0.187" (4.75)
Sq. X 1.00" (25.4)
0.55" max.See Note 3(14.0)
( ) = Dimensions in millimeters
typ.
typ.
1.00"(25.4)
NR25 316 Stainless 5/8" Shaft End Connector
1) Integral Shaft Seal.
2) 1/4-20 UNC-2B 0.50" (12.7) minimum depth. Six Places.
3) Additional clearance needed for removal of mating connectors.
20 Gear Drive, Plymouth Ind. Park, Terryville, CT 06786Tel: (860) 585-1254 Fax: (860) 584-1973 http://www.amci.com
27

INSTALLATION2
Flange Mount Outline Drawings (continued)5/8" Shaft, Stainless Steel Body, Side Connect
Figure 2.14 5/8" Shaft, Flange Mount, Side Connect Outline Drawing
Shaft Loading
Limit shaft loading to the following values. These values statistically yield an L10 life of 2X10⁹ revolutions. (Statistically, only 10% of the bearings will have failed after 2X10⁹ revolutions.) Shaft loading has an expo-nential effect on bearing life. The bearings will statistically last longer if you can limit shaft loading below the given values.
Table 2.3 Flange Mount, 5/8" Shaft Loading
Radial Load Axial Load
100 lbs. (445 N) 50 lbs. (222 N)
1.76"(44.7)max.
0.43" ) max. See Note 3
(10.9
NOTES:1) Integral Shaft Seal.2) 1/4-20 UNC-2B 0.50" (12.7) minimum depth. Six Places.3) Additional clearance needed for removal of mating connector.
See KeywaySpecifications
0.750"(19.05)1.500"
(38.10)
0.470"(11.95)
See Note 1
1.032"(26.21)
0.94"(23.9)
L
(36.8)
0.125" (3.18)
1.500" 1.499" (38.07)
(38.10) diameter
L
0.6247" 0.6237" (15.842)
(15.867)
( ) = Dimensions in millimeters
typ.
1.032" typ.(26.21)
See Note 2
KEYWAY SPECIFICATIONS
INCLUDED KEY
KEYWAY0.1895" 0.1885" (4.788)
X0.108"0.106" (2.69) Deep
0.188"0.187" (4.75) Sq. X
1.00" (25.4)
2.50"(63.5)dia.
1.00"(25.4)
L
NR25 316 Stainless Flange Mount Side Connect M12 Connector PoE Only
Industry StandardM12 ConnectorD-Coded, 4 pin Female
ADVANCED MICRO CONTROLS INC.28
INSTALLATION 2
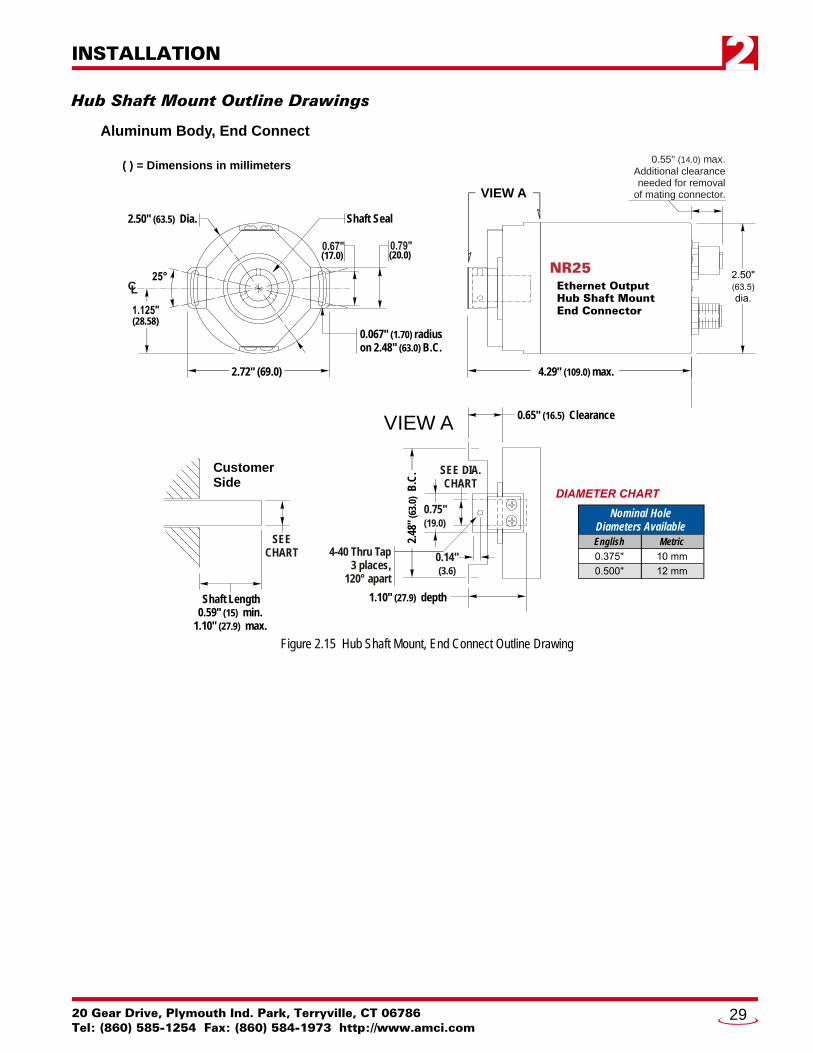
Hub Shaft Mount Outline DrawingsAluminum Body, End Connect
Figure 2.15 Hub Shaft Mount, End Connect Outline Drawing
CL
0.067" radius on 2.48" B.C.
(1.70)(63.0)
(28.58)
2.72" (69.0)
(17.0) (20.0)
SEE DIA.CHART
CustomerSide
0.75"(19.0)
2.4
8"
B.C
. (6
3.0)
0.65" Clearance(16.5)
1.10" depth(27.9)
2.50" Dia.(63.5)
VIEW A
0.14"(3.6)
4-40 Thru Tap3 places,
120° apart
Shaft Length0.59" min.
1.10" max.(15)
(27.9)
SEECHART
VIEW A
4.29 max. (109.0)"
NR25 Ethernet Output Hub Shaft Mount End Connector
Shaft Seal
English Metric
Nominal HoleDiameters Available
( ) = Dimensions in millimeters0.55" max.
Additional clearance needed for removal
of mating connector.
(14.0)
20 Gear Drive, Plymouth Ind. Park, Terryville, CT 06786Tel: (860) 585-1254 Fax: (860) 584-1973 http://www.amci.com
29

INSTALLATION2
Hub Shaft Mount Outline Drawings (Continued)Aluminum Body, Side Connect
Figure 2.16 Hub Shaft Mount, Side Connect Outline Drawing
CL
0.067" radius on 2.48" B.C.
(1.70)(63.0)
VIEW A
4.29" max.(109.0)
(28.58)
2.72" (69.0)
(17.0) (20.0)
2.50" Dia.(63.5)
Shaft Seal
( ) = Dimensions in millimeters
SEE DIA.CHART
0.75"(19.0)
2.4
8"
B.C
. (6
3.0)
0.65" Clearance
(16.5)
1.10" depth(27.9)
VIEW A
0.14"(3.6)
4-40 Thru Tap3 places,
120° apart
CustomerSide
Shaft Length0.59" min.
1.10" max.(15)
(27.9)
SEECHART
English Metric
Nominal HoleDiameters Available
(35.6)
Industry StandardM12 ConnectorD-Coded, 4 pin Female
NR25 Ethernet Output Hub Shaft Mount Side Connector PoE only
ADVANCED MICRO CONTROLS INC.30

INSTALLATION 2
Hub Shaft Mount Outline Drawings (Continued)Stainless Steel Body, End Connect
Figure 2.17 Hub Shaft Mount, End Connect Outline Drawing
CL
0.067" radius on 2.48" B.C.
(1.70)(63.0)
(28.58)
2.72" (69.0)
(17.0) (20.0)
SEE DIA.CHART
CustomerSide
0.75"(19.0)
2.4
8"
B.C
. (6
3.0)
0.65" Clearance(16.5)
1.10" depth(27.9)
2.50" Dia.(63.5)
VIEW A
0.14"(3.6)
4-40 Thru Tap3 places,
120° apart
Shaft Length0.59" min.
1.10" max.(15)
(27.9)
SEECHART
VIEW A
4.32 max. (109.7)"
NR25 316 Stainless Hub Shaft Mount End Connector
Shaft Seal
English Metric
Nominal HoleDiameters Available
( ) = Dimensions in millimeters0.55" max.
Additional clearance needed for removal
of mating connector.
(14.0)
20 Gear Drive, Plymouth Ind. Park, Terryville, CT 06786Tel: (860) 585-1254 Fax: (860) 584-1973 http://www.amci.com
31

INSTALLATION2
Hub Shaft Mount Outline Drawings (Continued)Stainless Steel Body, Side Connect
Figure 2.18 Hub Shaft Mount, Side Connect Outline Drawing
Available Shaft Diameters
The diameter of the drive shaft must be specified when ordering a blind shaft DuraCoder. Available options are given in the table below. Other diameter options may have become available after the release of this manual. Please check our website, www.amci.com, if you do not see the shaft diameter that fits your application.
Table 2.4 Available Blind Shaft Diameters
Shaft Loading
The load that the NR25 presents to your input shaft, which is equal to the load presented to the NR25 by your input shaft, is difficult to calculate and depends on the accuracy of the mounting. The flexible metal mounting bracket will be able to absorb most of the radial loading forces, but accurate mounting of the NR25 is important.
Nominal Hole Diameters
English Metric
0.375" 10 mm
0.500" 12 mm
SEECHART
0.75"(19.0)
2.4
8"
B.C
. (6
3.0)
0.65" Clearance(16.5)
1.10" depth(27.9)
VIEW A
0.14"(3.6)
4-40 Thru Tap3 places,
120° apart
VIEW A
4.32" (109.7)
English Metric
Nominal HoleDiameters Available
(28.58)
2.72" (69.0)
0.067" radius on 2.48" B.C.
(1.70)(63.0)
(17.0) (20.0)
CustomerSide
2.50" Dia.(63.5)
Shaft Length0.59" min.
1.10" max.(15)
(27.9)
SEECHART
Shaft Seal
max.
0.45" max. Total clearance of 5.4" (137)needed for removal of mating connector.
(11.4)( ) = Dimensions in millimeters
1.76"(44.7)
NR25 316 Stainless Hub Shaft Mount Side Connect M12 Connector PoE Only
2.29" (58.2)
L
LIndustry StandardM12 ConnectorD-Coded, 4 pin Female
ADVANCED MICRO CONTROLS INC.32
INSTALLATION 2
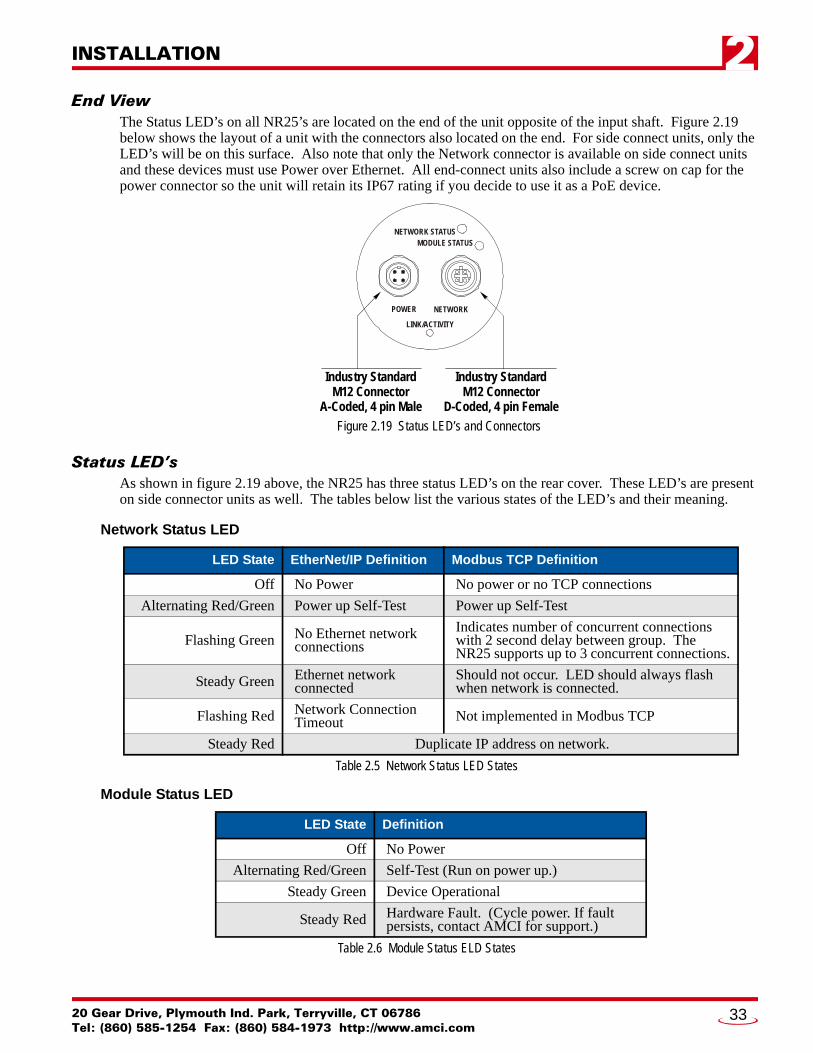
End ViewThe Status LED’s on all NR25’s are located on the end of the unit opposite of the input shaft. Figure 2.19 below shows the layout of a unit with the connectors also located on the end. For side connect units, only the LED’s will be on this surface. Also note that only the Network connector is available on side connect units and these devices must use Power over Ethernet. All end-connect units also include a screw on cap for the power connector so the unit will retain its IP67 rating if you decide to use it as a PoE device.
Status LED’sAs shown in figure 2.19 above, the NR25 has three status LED’s on the rear cover. These LED’s are present on side connector units as well. The tables below list the various states of the LED’s and their meaning.
Network Status LED
Table 2.5 Network Status LED States
Module Status LED
Table 2.6 Module Status ELD States
LED State EtherNet/IP Definition Modbus TCP Definition
Off No Power No power or no TCP connections
Alternating Red/Green Power up Self-Test Power up Self-Test
Flashing Green No Ethernet network connections
Indicates number of concurrent connections with 2 second delay between group. The NR25 supports up to 3 concurrent connections.
Steady Green Ethernet network connected
Should not occur. LED should always flash when network is connected.
Flashing Red Network Connection Timeout Not implemented in Modbus TCP
Steady Red Duplicate IP address on network.
LED State Definition
Off No Power
Alternating Red/Green Self-Test (Run on power up.)
Steady Green Device Operational
Steady Red Hardware Fault. (Cycle power. If fault persists, contact AMCI for support.)
Figure 2.19 Status LED’s and Connectors
NETWORK STATUSMODULE STATUS
LINK/ACTIVITY
NETWORKPOWER
Industry StandardM12 Connector
D-Coded, 4 pin Female
Industry StandardM12 Connector
A-Coded, 4 pin Male
20 Gear Drive, Plymouth Ind. Park, Terryville, CT 06786Tel: (860) 585-1254 Fax: (860) 584-1973 http://www.amci.com
33

INSTALLATION2
Status LED’s (continued)Link/Activity LED
This orange LED is on when a Ethernet hardware connection exists to the NR25 and blinks when there is activity on the NR25 Ethernet network segment. Note that this LED shows the state of the hardware network, not the EtherNet/IP or Modbus TCP protocols.
Connector PinoutThe diagram below shows the pinout of the NR25 connectors. The Power and Network connectors are both available on units with end connectors. Side connect units only have the Network connector and must be powered using the Power over Ethernet feature of the NR25.All end-connect units also include a screw on cap for the power connector so the unit will retain its IP67 rating if you decide to use it as a PoE device.
Figure 2.20 Connector Pinout
TIA/EIA-568 Color Codes
There are two color codes in common use when wiring Ethernet connections with twisted pairs. Either one of these standards is acceptable. The Phoenix Contact cordsets that are suggested by AMCI all follow the 568B standard. Note that accidently reversing the Tx/Rx pairs will not affect the operation of the NR25. The NR25 has an “auto-sense” port that will automatically adjust for swapped pairs.
Table 2.7 TIA/EIA Color Codes
Compatible Connectors and CordsetsMany different connectors and cordsets are available on the market, all of which will work with the NR25 provided that the manufacturer follows the connector and ethernet standards. AMCI has reviewed the follow-ing connectors and ethernet cordsets for compatibility with the NR25.
Connectors
Table 2.8 Compatible Connectors
Signal 568A Color 568B Color
+Transmit (+Tx) White/Green Tracer White/Orange tracer
–Transmit (–Tx) Solid Green Solid Orange
+Receive (+Rx) White/Orange Tracer White/Green Tracer
–Receive (–Rx) Solid Orange Solid Green
AMCI # Binder # Description
MS-28 99-3729-810-04Mating connector for Data/PoE connector. Screw terminal connections. 6 to 8 mm dia. cable.Straight, IP67 rated when properly installed.
MS-29 99-0430-12-04Mating connector for Power connector.Screw terminal connections. 6 to 8 mm dia. cable.Straight, IP67 rated when properly installed.
NETWORKPOWER
Industry StandardM12 ConnectorD-Coded, 4 pin Female
Industry StandardM12 Connector
A-Coded, 4 pin Male
Pin 1 (+Tx)Pin 2 (+Vin)
Pin 4 (–Rx)Pin 3 (NC)
Pin 2 (+Rx)Pin 1 (NC)
Pin 3 (–Tx)Pin 4 (Gnd)
ADVANCED MICRO CONTROLS INC.34
INSTALLATION 2
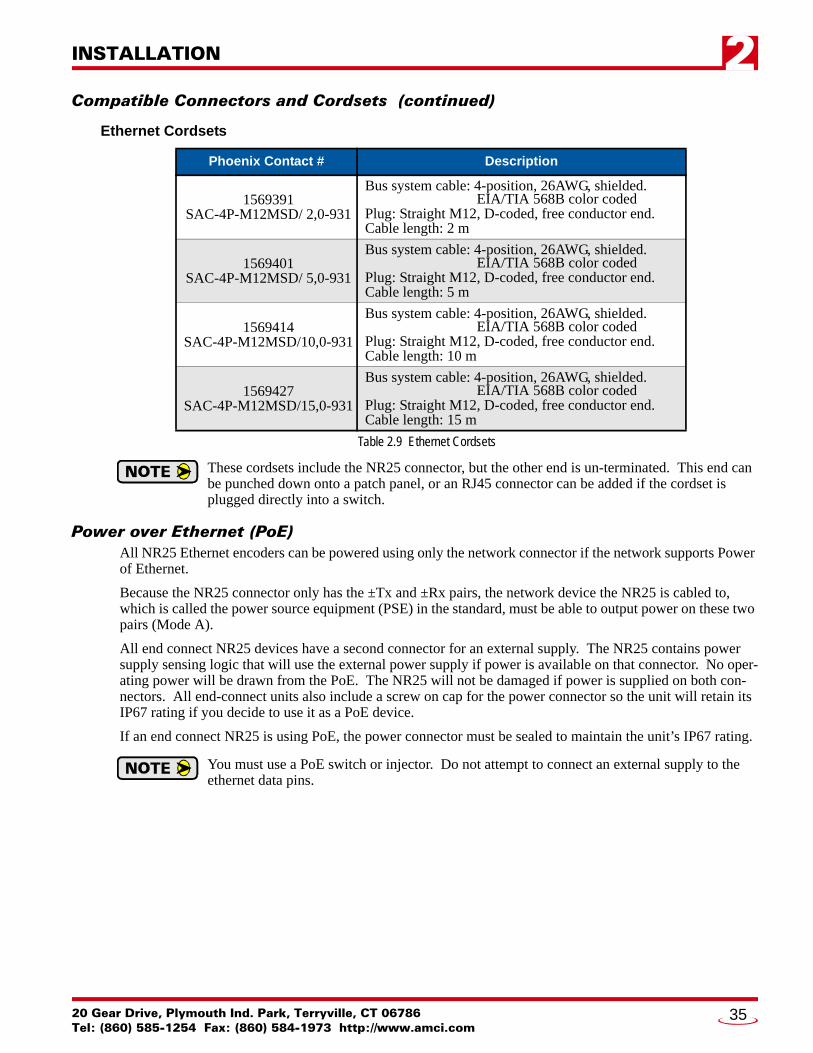
Compatible Connectors and Cordsets (continued)Ethernet Cordsets
Table 2.9 Ethernet Cordsets
These cordsets include the NR25 connector, but the other end is un-terminated. This end can be punched down onto a patch panel, or an RJ45 connector can be added if the cordset is plugged directly into a switch.
Power over Ethernet (PoE)All NR25 Ethernet encoders can be powered using only the network connector if the network supports Power of Ethernet.
Because the NR25 connector only has the ±Tx and ±Rx pairs, the network device the NR25 is cabled to, which is called the power source equipment (PSE) in the standard, must be able to output power on these two pairs (Mode A).
All end connect NR25 devices have a second connector for an external supply. The NR25 contains power supply sensing logic that will use the external power supply if power is available on that connector. No oper-ating power will be drawn from the PoE. The NR25 will not be damaged if power is supplied on both con-nectors. All end-connect units also include a screw on cap for the power connector so the unit will retain its IP67 rating if you decide to use it as a PoE device.
If an end connect NR25 is using PoE, the power connector must be sealed to maintain the unit’s IP67 rating.
You must use a PoE switch or injector. Do not attempt to connect an external supply to the ethernet data pins.
Phoenix Contact # Description
1569391 SAC-4P-M12MSD/ 2,0-931
Bus system cable: 4-position, 26AWG, shielded. EIA/TIA 568B color coded
Plug: Straight M12, D-coded, free conductor end.Cable length: 2 m
1569401SAC-4P-M12MSD/ 5,0-931
Bus system cable: 4-position, 26AWG, shielded. EIA/TIA 568B color coded
Plug: Straight M12, D-coded, free conductor end.Cable length: 5 m
1569414SAC-4P-M12MSD/10,0-931
Bus system cable: 4-position, 26AWG, shielded. EIA/TIA 568B color coded
Plug: Straight M12, D-coded, free conductor end.Cable length: 10 m
1569427SAC-4P-M12MSD/15,0-931
Bus system cable: 4-position, 26AWG, shielded. EIA/TIA 568B color coded
Plug: Straight M12, D-coded, free conductor end.Cable length: 15 m
20 Gear Drive, Plymouth Ind. Park, Terryville, CT 06786Tel: (860) 585-1254 Fax: (860) 584-1973 http://www.amci.com
35

INSTALLATION2
NotesADVANCED MICRO CONTROLS INC.36
20 Gear Drive, Plymouth IndTel: (860) 585-1254 Fax: (8
CHAPTER 3
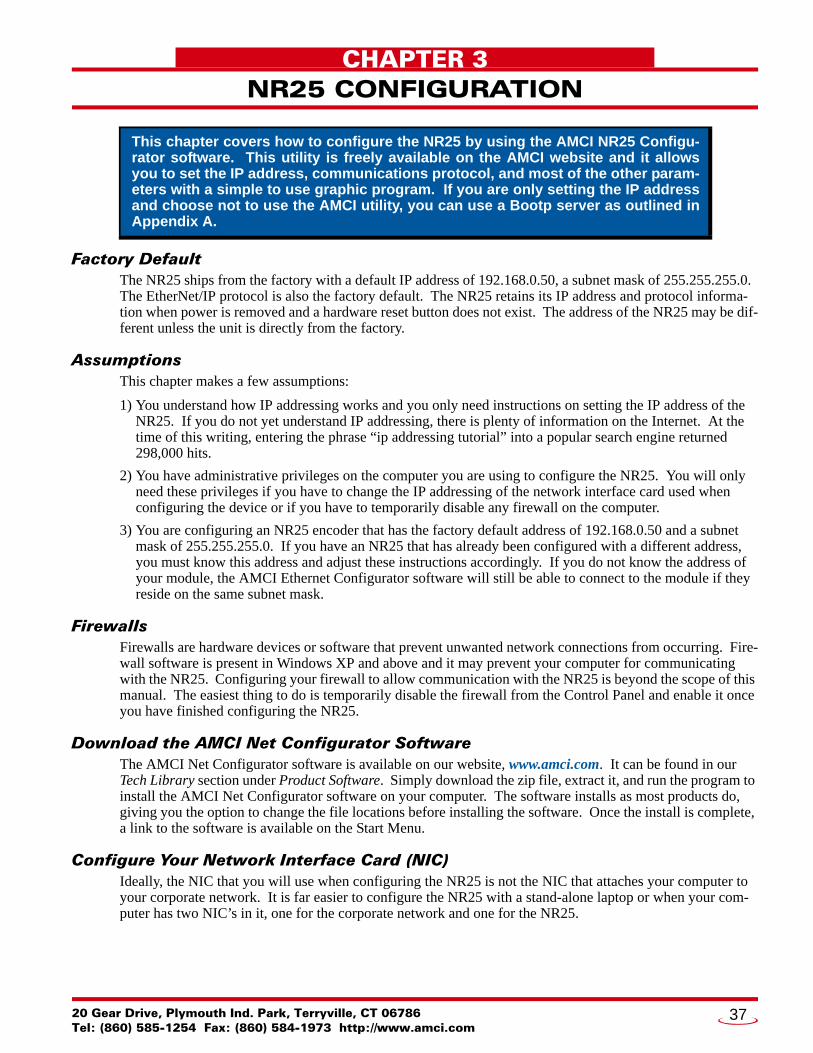
NR25 CONFIGURATIONFactory DefaultThe NR25 ships from the factory with a default IP address of 192.168.0.50, a subnet mask of 255.255.255.0. The EtherNet/IP protocol is also the factory default. The NR25 retains its IP address and protocol informa-tion when power is removed and a hardware reset button does not exist. The address of the NR25 may be dif-ferent unless the unit is directly from the factory.
AssumptionsThis chapter makes a few assumptions:
1) You understand how IP addressing works and you only need instructions on setting the IP address of the NR25. If you do not yet understand IP addressing, there is plenty of information on the Internet. At the time of this writing, entering the phrase “ip addressing tutorial” into a popular search engine returned 298,000 hits.
2) You have administrative privileges on the computer you are using to configure the NR25. You will only need these privileges if you have to change the IP addressing of the network interface card used when configuring the device or if you have to temporarily disable any firewall on the computer.
3) You are configuring an NR25 encoder that has the factory default address of 192.168.0.50 and a subnet mask of 255.255.255.0. If you have an NR25 that has already been configured with a different address, you must know this address and adjust these instructions accordingly. If you do not know the address of your module, the AMCI Ethernet Configurator software will still be able to connect to the module if they reside on the same subnet mask.
FirewallsFirewalls are hardware devices or software that prevent unwanted network connections from occurring. Fire-wall software is present in Windows XP and above and it may prevent your computer for communicating with the NR25. Configuring your firewall to allow communication with the NR25 is beyond the scope of this manual. The easiest thing to do is temporarily disable the firewall from the Control Panel and enable it once you have finished configuring the NR25.
Download the AMCI Net Configurator SoftwareThe AMCI Net Configurator software is available on our website, www.amci.com. It can be found in our Tech Library section under Product Software. Simply download the zip file, extract it, and run the program to install the AMCI Net Configurator software on your computer. The software installs as most products do, giving you the option to change the file locations before installing the software. Once the install is complete, a link to the software is available on the Start Menu.
Configure Your Network Interface Card (NIC)Ideally, the NIC that you will use when configuring the NR25 is not the NIC that attaches your computer to your corporate network. It is far easier to configure the NR25 with a stand-alone laptop or when your com-puter has two NIC’s in it, one for the corporate network and one for the NR25.
This chapter covers how to configure the NR25 by using the AMCI NR25 Configu-rator software. This utility is freely available on the AMCI website and it allows you to set the IP address, communications protocol, and most of the other param-eters with a simple to use graphic program. If you are only setting the IP address and choose not to use the AMCI utility, you can use a Bootp server as outlined in Appendix A.
. Park, Terryville, CT 0678660) 584-1973 http://www.amci.com
37

NR25 CONFIGURATION3
Configure Your Network Interface Card (NIC) (continued)If you only have one NIC, and it is used to attach your computer to your corporate network, you must discon-nect your computer from this network before configuring the NR25. DO NOT place a router between your computer and the corporate network so you can try to have access to the network and the NR25 at the same time. The Network Administrator at AMCI can testify to the fact that “Bad Things” can happen when a rogue DHCP server in engineering starts to offer network information to computers around it. Save yourself and your IT department some headaches and disconnect yourself from your corporate network if you only have one NIC in the computer that you will used to configure the NR25.
A wireless adapter does count as a network interface and it should be possible to connect to your corporate network with the wireless interface and use a NIC to configure the NR25. It should also be possible to con-figure the NR25 over a wireless connection by attaching it to a wireless router. However, this configuration has not yet been tested by AMCI.
The easiest way to check the current settings for your NIC is with the ‘ipconfig’ command.
For Windows XP, click on the [Start] button, and click on [Run...]. A dialog box will open. Enter ‘cmd’ on the text line and press [Enter] on the keyboard.
For Vista and Windows 7, click on the [Start] button, and type “cmd” in the “Search programs and files” text box. Press [Enter] on the keyboard.
A DOS like terminal will open. Type in ‘ipconfig’, press [Enter] on the keyboard and the computer will return the present Address, Subnet Mask, and Default Gateway for all of your network interfaces. If your present address is 192.168.0.x, where ‘x’ does not equal 50, and your subnet mask is 255.255.255.0, then you are ready to configure your NR25 encoder. Figure 3.1 shows the output of an ipconfig command that shows the “Local Area Connection 2” interface on the 192.168.0 subnet.
Figure 3.1 ipconfig Command
If your present address in not in the 192.168.0.x range, type in ‘ncpa.cpl’ at the command prompt and hit [Enter] on the keyboard.
In XP, this opens the Network and Dial-up Connections window. Right click on the appropriate inter-face and select ‘Properties’ from the menu. This will open the Properties windows for the selected interface. Click on the ‘Internet Protocol (TCP/IP)’ component and then click on the [Properties] but-ton.
For Vista and Windows 7, this open the Network Connections window. Double click on the appropriate interface. In the window that opens, select “Internet Protocol Version 4 (TCP/IP v4)” from the list and then click on the [Properties] button.
Set the address and subnet mask to appropriate values. (192.168.0.1 and 255.255.255.0 will work for an NR25 that has factory default settings.) The default gateway and DNS server settings can be ignored.
ADVANCED MICRO CONTROLS INC.38
NR25 CONFIGURATION 3
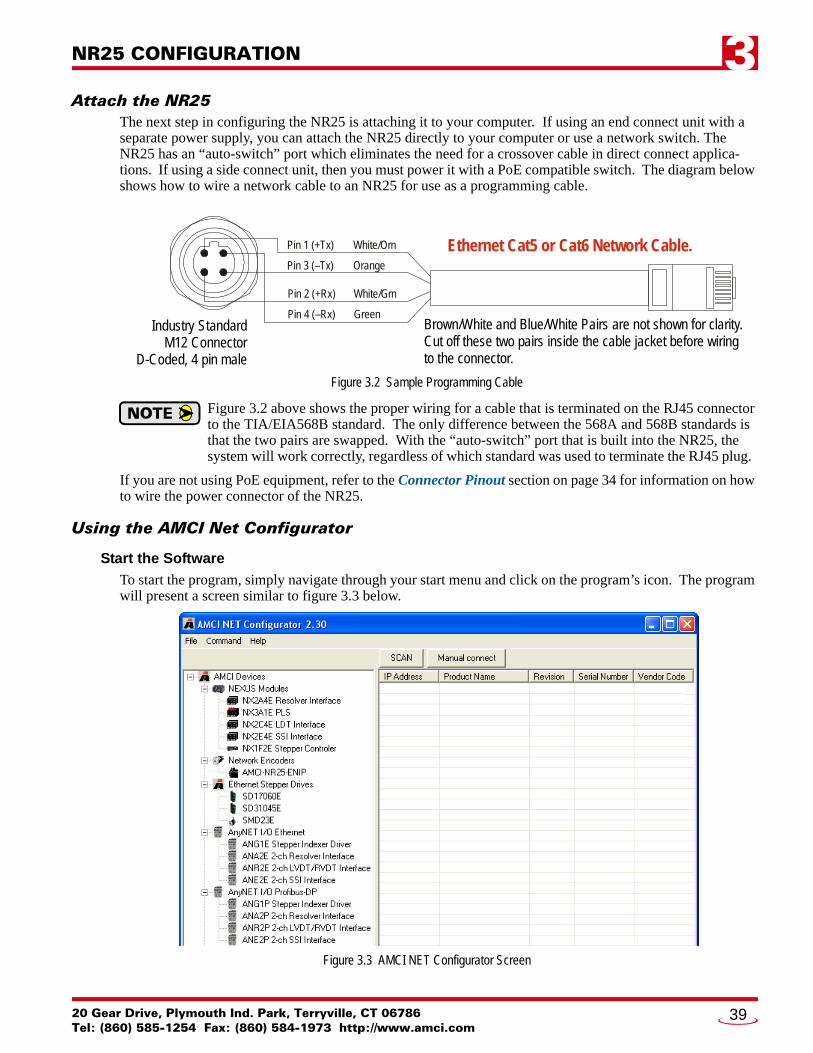
Attach the NR25The next step in configuring the NR25 is attaching it to your computer. If using an end connect unit with a separate power supply, you can attach the NR25 directly to your computer or use a network switch. The NR25 has an “auto-switch” port which eliminates the need for a crossover cable in direct connect applica-tions. If using a side connect unit, then you must power it with a PoE compatible switch. The diagram below shows how to wire a network cable to an NR25 for use as a programming cable.
Figure 3.2 Sample Programming Cable
Figure 3.2 above shows the proper wiring for a cable that is terminated on the RJ45 connector to the TIA/EIA568B standard. The only difference between the 568A and 568B standards is that the two pairs are swapped. With the “auto-switch” port that is built into the NR25, the system will work correctly, regardless of which standard was used to terminate the RJ45 plug.
If you are not using PoE equipment, refer to the Connector Pinout section on page 34 for information on how to wire the power connector of the NR25.
Using the AMCI Net Configurator
Start the Software
To start the program, simply navigate through your start menu and click on the program’s icon. The program will present a screen similar to figure 3.3 below.
Figure 3.3 AMCI NET Configurator Screen
Industry StandardM12 Connector
D-Coded, 4 pin male
Brown/White and Blue/White Pairs are not shown for clarity.Cut off these two pairs inside the cable jacket before wiring to the connector.
Pin 1 (+Tx) White/Orn
Pin 4 (–Rx) Green
Pin 2 (+Rx) White/Grn
Pin 3 (–Tx) Orange
Ethernet Cat5 or Cat6 Network Cable.
20 Gear Drive, Plymouth Ind. Park, Terryville, CT 06786Tel: (860) 585-1254 Fax: (860) 584-1973 http://www.amci.com
39
NR25 CONFIGURATION3
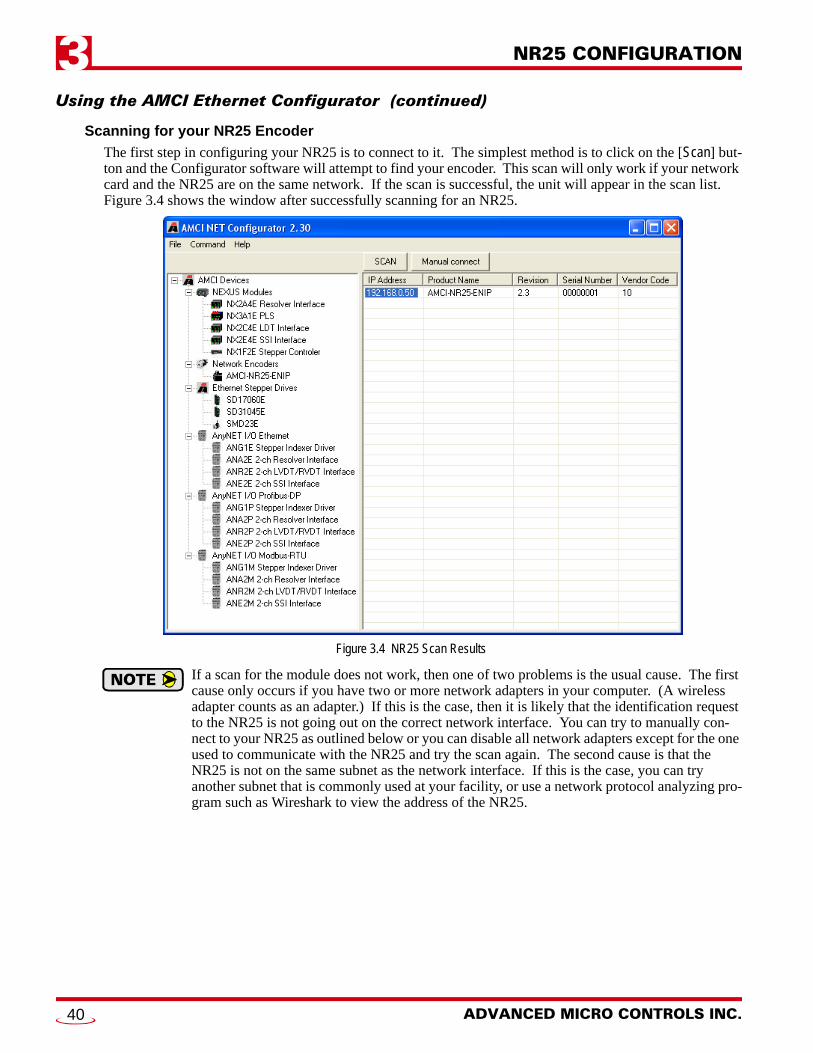
Using the AMCI Ethernet Configurator (continued)Scanning for your NR25 Encoder
The first step in configuring your NR25 is to connect to it. The simplest method is to click on the [Scan] but-ton and the Configurator software will attempt to find your encoder. This scan will only work if your network card and the NR25 are on the same network. If the scan is successful, the unit will appear in the scan list. Figure 3.4 shows the window after successfully scanning for an NR25.
Figure 3.4 NR25 Scan Results
If a scan for the module does not work, then one of two problems is the usual cause. The first cause only occurs if you have two or more network adapters in your computer. (A wireless adapter counts as an adapter.) If this is the case, then it is likely that the identification request to the NR25 is not going out on the correct network interface. You can try to manually con-nect to your NR25 as outlined below or you can disable all network adapters except for the one used to communicate with the NR25 and try the scan again. The second cause is that the NR25 is not on the same subnet as the network interface. If this is the case, you can try another subnet that is commonly used at your facility, or use a network protocol analyzing pro-gram such as Wireshark to view the address of the NR25.
ADVANCED MICRO CONTROLS INC.40

NR25 CONFIGURATION 3
Using the AMCI Configurator Software (continued)The Meaning of the Product Name
Once you successfully scan and connect to the NR25, the Product Name will show up in the scan list. The Product Name gives you clues to the configuration of the NR25. As shown in figure 3.5 below, the Product Name is broken down into two parts.
Figure 3.5 Product Name Description
Once you’ve located the NR25 that you wish to configure, double click on its IP address to open the configu-ration window for the stack.
Manually Connecting to your NR25
You have the option to manually connect to your NR25 if you already know the address of the unit. If you have multiple network adapters, you may have to use this method to guarantee that the identification requests use the correct network adapter to reach your module.
To start a manual connection, press the [Manual connect] button. This will result in the window shown in fig-ure 3.6 below.
Figure 3.6 Manually Connect to an NR25
From here, you can enter the IP address and press the [Connect] button.
AMCI–NR25–ENIP
Fix
“ENIP” = EtherNet/IP Protocol Enabled“MDBS” = Modbus TCP Protocol Enabled
ed
20 Gear Drive, Plymouth Ind. Park, Terryville, CT 06786Tel: (860) 585-1254 Fax: (860) 584-1973 http://www.amci.com
41
NR25 CONFIGURATION3
Using the AMCI Configurator Software (continued)Changing the IP Address
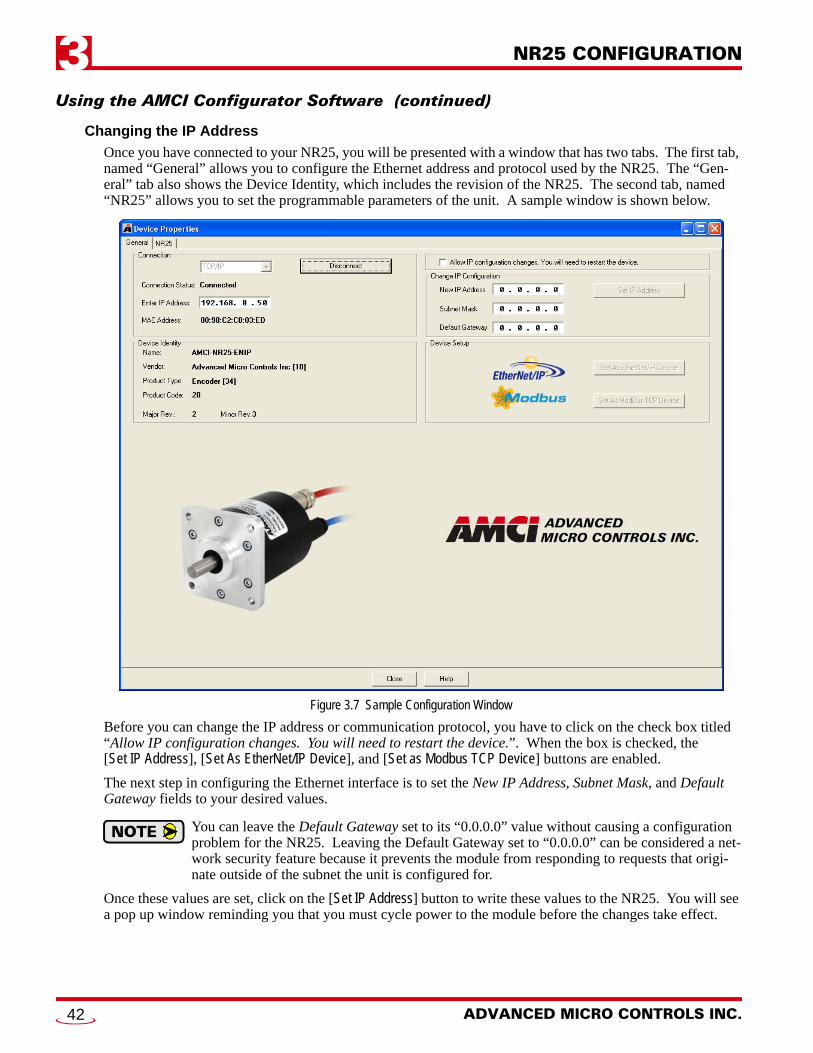
Once you have connected to your NR25, you will be presented with a window that has two tabs. The first tab, named “General” allows you to configure the Ethernet address and protocol used by the NR25. The “Gen-eral” tab also shows the Device Identity, which includes the revision of the NR25. The second tab, named “NR25” allows you to set the programmable parameters of the unit. A sample window is shown below.
Figure 3.7 Sample Configuration Window
Before you can change the IP address or communication protocol, you have to click on the check box titled “Allow IP configuration changes. You will need to restart the device.”. When the box is checked, the [Set IP Address], [Set As EtherNet/IP Device], and [Set as Modbus TCP Device] buttons are enabled.
The next step in configuring the Ethernet interface is to set the New IP Address, Subnet Mask, and Default Gateway fields to your desired values.
You can leave the Default Gateway set to its “0.0.0.0” value without causing a configuration problem for the NR25. Leaving the Default Gateway set to “0.0.0.0” can be considered a net-work security feature because it prevents the module from responding to requests that origi-nate outside of the subnet the unit is configured for.
Once these values are set, click on the [Set IP Address] button to write these values to the NR25. You will see a pop up window reminding you that you must cycle power to the module before the changes take effect.
ADVANCED MICRO CONTROLS INC.42

NR25 CONFIGURATION 3
Using the AMCI Configurator Software (continued)Setting Communications Protocol
Click on either button to set the communications protocol for your Ethernet Interface. When you click on either, you will see a pop up window reminding you that you must cycle power to the NR25 before the changes take effect.
Cycle Power to the NR25
The NR25 will not use the new IP address and protocol settings until the next time it powers up. You must cycle power to the unit before you can test the new IP address.
Testing the New Address
Once the NR25 finishes its power up sequence, close the “Device Properties” window and press the [Scan] button to re-connect to the unit or re-connect to it manually. Use this step will verify the new address and Network Protocol settings.
If you have changed the network address that the NR25 response to, you may have to adjust the address set-tings of your network interface card before you can reconnect to the module. If you have to change the address of your NIC, refer back to the Configure Your Network Interface Card (NIC) section of this chapter, starting on page 37 if you need additional information.
NR25 Tab
When you are connected to your device, you will notice a tab at the top of the window named “NR25”. This tabs allow you to configure the encoder and test it before attaching it to your host controller.
When using RSLogix 5000 as your programming software, you will have to enter data into the associated configuration tags before the NR25 will communicate with your controller. This data will overwrite any settings you make on this screen.
20 Gear Drive, Plymouth Ind. Park, Terryville, CT 06786Tel: (860) 585-1254 Fax: (860) 584-1973 http://www.amci.com
43

NR25 CONFIGURATION3
Using the Ping CommandIf you do not have access to the AMCI Net Configurator software in the field, the easiest way to test the address of the NR25 is with the “ping” command. Before you can use the command, you have to be sure the encoder and your computer are still on the same subnet. For example, if the new address of the module is 192.168.0.42 and your computer has an address of 192.168.0.1, with a subnet mask of 255.255.255.0, then the two pieces of equipment are on the same subnet. (In this case, the first three numbers of the IP address must match.) If the new address of the module is 192.168.50.50, then the computer and module are not on the same subnet and you must go back into the Network Configuration panel and change your adapter’s TCP/IP settings. Refer back to the Configure Your Network Interface Card (NIC) section of this chapter, starting on page 37.
Once you are sure your computer and NR25 are on the same subnet, open the DOS terminal if necessary:
For Windows XP, click on the [Start] button, and click on [Run...]. A dialog box will open. Enter ‘cmd’ on the text line and press [Enter] on the keyboard.
For Vista and Windows 7, click on the [Start] button, and type “cmd” in the “Search programs and files” text box. Press [Enter] on the keyboard.
Once the terminal is open, type in ‘ping aaa.bbb.ccc.ddd’ where ‘aaa.bbb.ccc.ddd’ in the new IP address of your NR25. The computer will ping the module and the message “Reply from aaa.bbb.ccc.ddd: bytes=32 time<10ms TTL=128” should appear four times.
Figure 3.8 IP Address Changed Successfully
If the message “Request timed out.” or “Destination host unreachable” appears, then one of four things has occurred:
You set the new IP address, but have not yet cycled power to the NR25. You did not enter the correct address in the ping command. The new IP address of the NR25 was not set correctly. The NR25 and the computer are not on the same subnet.
ADVANCED MICRO CONTROLS INC.44

20 Gear Drive, Plymouth IndTel: (860) 585-1254 Fax: (8
CHAPTER 4
RSLogix 5000 EtherNet/IP CONFIGURATIONImplicit MessagingEvery PLC that is programmed using RSLogix 5000 software supports implicit messaging. These include the ControlLogix and CompactLogix platforms. Implicit messaging means that the PLC processor will automat-ically exchange data with the NR25 at the programmed RPI time, thereby simplifying the use of the NR25.
The other form of communication is explicit messaging. In explicit messaging, the PLC processor will only communicate with the NR25 when explicitly told to through instructions that are programmed into your lad-der logic. You can use explicit messages in your RSLogix 5000 programs, but for most users the additional complexity is not necessary. Explicit messaging is explained in the next chapter, RSLogix 500 EtherNet/IP CONFIGURATION, starting on page 55 because explicit messaging is the only form of communication sup-ported by platforms that are programmed with the RSLogix 500 software package.
RSLogix 5000 ConfigurationWhen using the ControlLogix and CompactLogix platforms, you have the option of using the Ethernet port that is built into some processors, or a separate Ethernet Bridge module.
If the Ethernet port is built into processor, the only step you have to take before adding the NR25 is to create a new project with the correct processor or modify an existing project. Once this is done, the Ethernet port will automatically appear in the Project Tree. If you are using an Ethernet Bridge module, you will have to add the module to the I/O Configuration tree and configure it before adding the NR25 to your project.
If you are using an Ethernet Bridge module and have difficulty communicating with the NR25, you may have to upgrade the firmware of the Ethernet Bridge module to its latest version.
Configuring a Built-in Ethernet Port (As Needed)
You have to set an IP address for the Ethernet Port if the port is built into your processor. Right click on the port name in the I/O Configuration screen and select “Properties”. A Module Properties window similar to the one shown in figure 4.1 will open. In this window you must set an IP Address for the port, not the IP address of the NR25.
Figure 4.1 Setting Ethernet Port Parameters
Rockwell Automation Ethernet products use the EtherNet/IP protocol. This chap-ter shows how to configure communications between an NR25 and your PLC using RSLogix 5000 software. It also shows how to use the data tags assigned to the NR25 to read and write data to the encoder.
. Park, Terryville, CT 0678660) 584-1973 http://www.amci.com
45

RSLogix 5000 EtherNet/IP CONFIGURATION4
RSLogix 5000 Configuration (continued)Configure Bridge Module (As Needed)
The first step is to create a new project or open an existing one. The 1756-L1 processor is used in the screen images below.
1) Insert a bridge module into the I/O Configuration tree. As shown in figure 4.2 on the right, right click on the I/O Configuration folder and select “New Module...” in the pop-up menu.
2) In the Select Module Type windows that opens, select the proper Ethernet Bridge module. (In this example, the 1756-ENET/B.) Click on the [OK] button.
3) Enter the following information in the Module Properties window that opens. All parameters not listed here are optional. Figure 4.3 shows a completed screen.
Name: A descriptive name for the Bridge Module.
IP Address: Must be the address you want for the module, not the address you set for the NR25.
Slot: The slot the module will reside in.
Figure 4.3 Ethernet Bridge Module Parameters
4) When done, click on [Finish>>] to complete the setup of the Ethernet Bridge module.
Figure 4.2 Defining a Bridge Module
ADVANCED MICRO CONTROLS INC.46

RSLogix 5000 EtherNet/IP CONFIGURATION 4
RSLogix 5000 Configuration (continued)Adding the NR25 to Your Project
You can add the NR25 to your project once the Ethernet port (Built-in or bridge module) is configured.
1) As shown in figure 4.4 on the right, the Ethernet port will be listed under the I/O Configuration tree. Right click on the port and then click on “New Module...” in the pop-up menu.
2) In the resulting window, scroll down the list until you find the entry that has a description of “Generic Ethernet Module”. (Module Type is ETHERNET-MODULE in figure.) Click on the module name to select and then click the [OK] button. A Module Properties window will open.
3) Set the following parameters in the Module Properties window. All parameters not listed here are optional. Figure 4.5 shows a completed screen.
Name: A descriptive name for the NR25.
Comm Format: Data - INT (MUST be changed from the default Data - DINT.)
IP Address: Must be the address you set for the NR25. Refer to Chapter 3, NR25 CONFIGURATION starting on page 37 for information on setting the IP Address of the NR25.
Input: You have four choices:
Table 4.1 Input Assembly Instances
Assembly Size Data Available with:
1 2 Position Value All firmware revisions
3 4 Position Value and Velocity Data All firmware revisions
104 4 Position Value and Time Stamp Revision 2.3 and above
105 4 Position Value and Actual Sensor Reading Revision 2.3 and above
Figure 4.4 Adding an NR25
20 Gear Drive, Plymouth Ind. Park, Terryville, CT 06786Tel: (860) 585-1254 Fax: (860) 584-1973 http://www.amci.com
47

RSLogix 5000 EtherNet/IP CONFIGURATION4
RSLogix 5000 Configuration (continued)Adding the NR25 to Your Project (continued)
Output: Assembly Instance = 101, Size = 3
Configuration: You have two choices:
Table 4.2 Configuration Assembly Instances
The NR25 must have valid data in the Configuration Registers before it will communicate with the network. This is true even if you have saved a valid configuration to the NR25 with the AMCI Net Configurator software. You must put valid data into the Configuration Assem-bly Instance before the NR25 will send data through the Input Assembly Instance. See Con-figuring the NR25 on page 49.
Figure 4.5 Sample NR25 Configuration Screen
4) Click on [OK] to close the window.
5) Double click on the name you gave the NR25 in the I/O Configuration tree. A “Module Properties” window will open. Click on the “Connections” tab and set the RPI time that is required for your system. The minimum RPI time for an NR25 is two milliseconds. The number of nodes on the network has an effect on the minimum RPI time. You may have to increase this RPI time if your network is heavily loaded. When done, click on [OK] to complete the setup.
Buffering Read Data
Ethernet Data is read asynchronously to the scan at the RPI time, therefore, you must buffer the data from the NR25. Data must be buffered with Synchronous Copy instructions (CPS) to ensure that the data is not updated during the copy. If the data is not buffered, it can change during a program scan, resulting in logical errors that may result in machine malfunction.
Assembly Size Data Available with:
102 8Direction Counting Toggle, Scaling Function Control, Measuring Units per Span, Velocity Format
All firmware revisions
103 12Direction Counting Toggle, Scaling Function Control, Measuring Units per Span, Total Measurement Range, Velocity Format
Revision 2.3 and above
ADVANCED MICRO CONTROLS INC.48

RSLogix 5000 EtherNet/IP CONFIGURATION 4
Configuring the NR25The NR25 Must be Configured
The NR25 must have valid data in the Configuration Registers before it will communicate with the network. This is true even if you have saved a valid configuration to the NR25 with the AMCI Net Configurator software. This requirement includes setting values for the Counts per Turn and Velocity Format parameters, even if they are not used in your application. The suggested value for the Counts per Turn parameter is 64,536 (0x0100) and Velocity Format is 0x1F04 (7,940). A non-configured NR25 is the most common cause of technical support calls to AMCI for the NR25 product family.
Assembly Instance = 102
The NR25 is configured through the eight bytes in the Configuration Assembly Instance assigned to it when you added the encoder to your project. These bytes are accessed through the data tags assigned to the NR25. Table 4.3 below shows the layout of the parameters programmed through the configuration bytes.
Table 4.3 Configuration Bits
More information on these configuration parameters can be found in chapter 1, starting with the section Programmable Parameters, starting on page 13.
A valid Counts per Turn value must be entered even if you have disabled the Counts per Turn value by setting the Scaling Function Control set to zero. The default value of 65,536 is a sug-gested value. (Bytes 2, 3, 5 = 0. Byte 4 = 1.)
Byte # Parameter Description
0 Direction Counting Toggle “0” = Clockwise increasing counts looking at shaft.“1” = Counter-Clockwise increasing counts looking at shaft.
1 Scaling Function Control
“0” = Disable Scaling Function. The full resolution of 65,536 counts per turn is used for the Measuring Units per Span.
“1” = Enable Scaling Function. The number of counts per turn is set by the Measuring Units of Span parameter below.
2
Counts per TurnSets the number of counts generated over a single turn if the Scaling Function Control parameter equals “1”. This value requires four bytes and ranges from 1 to 65,536. A value of 39,370 (16#99CA) is shown to the right.
CA
3 99
4 00
5 00
6Velocity Format
Format of the velocity data. Byte 7 must always equal “1F”. Byte 6 = “04” for pulses/second, “05” for pulses/millisecond, “07” for pulses/minute or “0F” for revolutions/minute. A value of “1F04” to the right would set the unit of measure to pulses/second.
04
7 1F
20 Gear Drive, Plymouth Ind. Park, Terryville, CT 06786Tel: (860) 585-1254 Fax: (860) 584-1973 http://www.amci.com
49

RSLogix 5000 EtherNet/IP CONFIGURATION4
Configuring the NR25 (continued)Assembly Instance = 103 (revision 2.3+ only)
The NR25 is configured through the twelve bytes in the Configuration Assembly Instance assigned to it when you added the encoder to your project. These bytes are accessed through the data tags assigned to the NR25. Table 4.3 below shows the layout of the parameters programmed through the configuration bytes.
Table 4.4 Configuration Bits
More information on these configuration parameters can be found in chapter 1, starting with the section Programmable Parameters, starting on page 13.
A valid Counts per Turn value must be entered even if you have disabled the Counts per Turn value by setting the Scaling Function Control set to zero. The default value of 65,536 is a sug-gested value. (Bytes 2, 3, 5 = 0. Byte 4 = 1.)
Byte # Parameter Description
0 Direction Counting Toggle “0” = Clockwise increasing counts looking at shaft.“1” = Counter-Clockwise increasing counts looking at shaft.
1 Scaling Function Control
“0” = Disable Scaling Function. The full resolution of 65,536 counts per turn is used for the Measuring Units per Span.
“1” = Enable Scaling Function. The number of counts per turn is set by the Measuring Units of Span parameter below.
2
Counts per TurnSets the number of counts generated over a single turn if the Scaling Function Control parameter equals “1”. This value requires four bytes and ranges from 1 to 65,536. A value of 39,370 (16#99CA) is shown to the right.
CA
3 99
4 00
5 00
6
Total Measurement Range
Sets the number of counts before returning to zero. This value is used regardless of the state of the Scaling Function Control parameter. Parameter ranges: Single Turn NR25: Range of 0, 2 to 65,536 28 bit Multi-turn NR25: Range of 0, 2 to 268,435,455 30 bit Multi-turn NR25: Range of 0, 2 to 1,073,741,823
A value of 648,000 (16#0009 E340) is shown to the right.
40
7 E3
8 09
9 00
10Velocity Format
Format of the velocity data. Byte 11 must always equal “1F”. Byte 10 = “04” for pulses/second, “05” for pulses/millisecond, “07” for pulses/minute or “0F” for revolutions/minute. A value of “1F04” to the right would set the unit of measure to pulses/second.
04
11 1F
ADVANCED MICRO CONTROLS INC.50
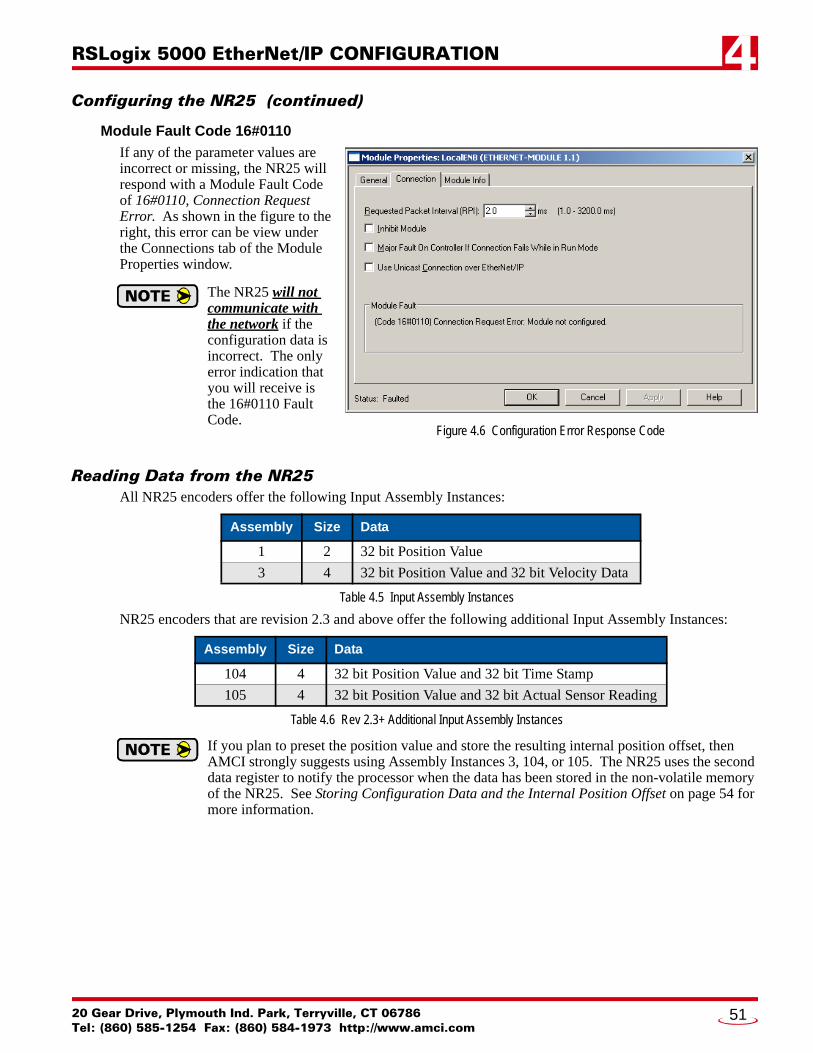
RSLogix 5000 EtherNet/IP CONFIGURATION 4
Configuring the NR25 (continued)Module Fault Code 16#0110
If any of the parameter values are incorrect or missing, the NR25 will respond with a Module Fault Code of 16#0110, Connection Request Error. As shown in the figure to the right, this error can be view under the Connections tab of the Module Properties window.
The NR25 will not communicate with the network if the configuration data is incorrect. The only error indication that you will receive is the 16#0110 Fault Code.
Reading Data from the NR25All NR25 encoders offer the following Input Assembly Instances:
Table 4.5 Input Assembly Instances
NR25 encoders that are revision 2.3 and above offer the following additional Input Assembly Instances:
Table 4.6 Rev 2.3+ Additional Input Assembly Instances
If you plan to preset the position value and store the resulting internal position offset, then AMCI strongly suggests using Assembly Instances 3, 104, or 105. The NR25 uses the second data register to notify the processor when the data has been stored in the non-volatile memory of the NR25. See Storing Configuration Data and the Internal Position Offset on page 54 for more information.
Assembly Size Data
1 2 32 bit Position Value
3 4 32 bit Position Value and 32 bit Velocity Data
Assembly Size Data
104 4 32 bit Position Value and 32 bit Time Stamp
105 4 32 bit Position Value and 32 bit Actual Sensor Reading
Figure 4.6 Configuration Error Response Code
20 Gear Drive, Plymouth Ind. Park, Terryville, CT 06786Tel: (860) 585-1254 Fax: (860) 584-1973 http://www.amci.com
51
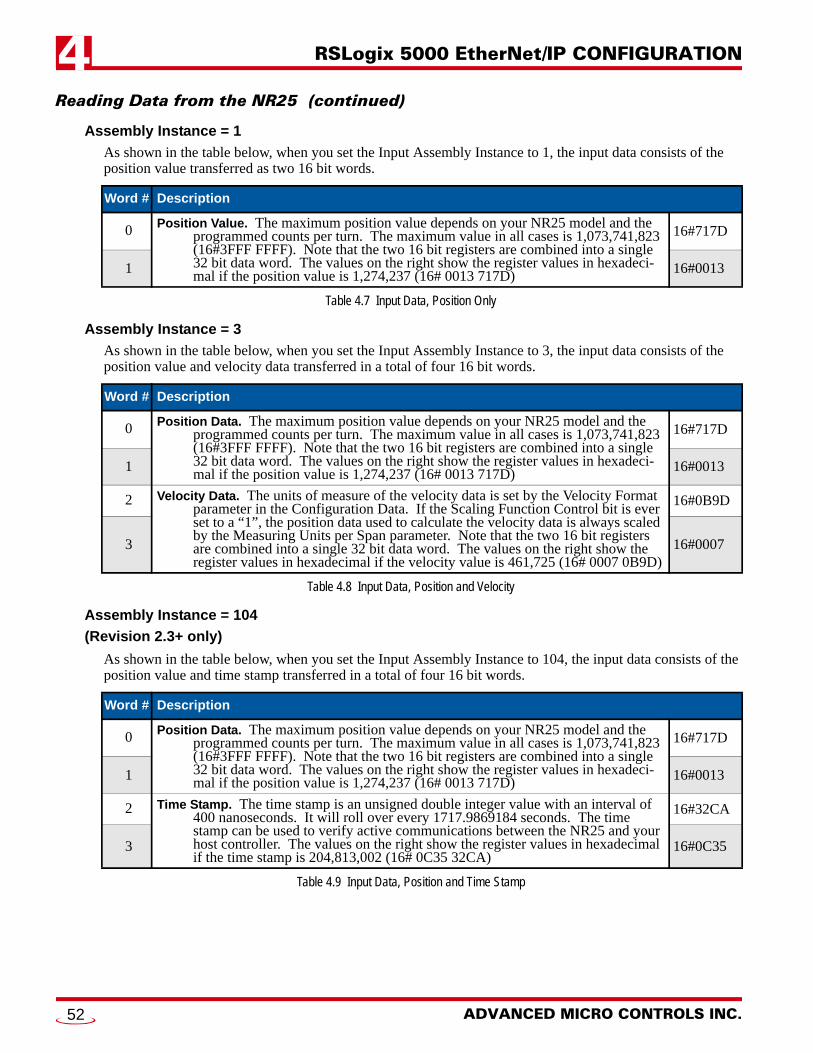
RSLogix 5000 EtherNet/IP CONFIGURATION4
Reading Data from the NR25 (continued)Assembly Instance = 1
As shown in the table below, when you set the Input Assembly Instance to 1, the input data consists of the position value transferred as two 16 bit words.
Table 4.7 Input Data, Position Only
Assembly Instance = 3
As shown in the table below, when you set the Input Assembly Instance to 3, the input data consists of the position value and velocity data transferred in a total of four 16 bit words.
Table 4.8 Input Data, Position and Velocity
Assembly Instance = 104
(Revision 2.3+ only)
As shown in the table below, when you set the Input Assembly Instance to 104, the input data consists of the position value and time stamp transferred in a total of four 16 bit words.
Table 4.9 Input Data, Position and Time Stamp
Word # Description
0 Position Value. The maximum position value depends on your NR25 model and the programmed counts per turn. The maximum value in all cases is 1,073,741,823 (16#3FFF FFFF). Note that the two 16 bit registers are combined into a single 32 bit data word. The values on the right show the register values in hexadeci-mal if the position value is 1,274,237 (16# 0013 717D)
16#717D
1 16#0013
Word # Description
0 Position Data. The maximum position value depends on your NR25 model and the programmed counts per turn. The maximum value in all cases is 1,073,741,823 (16#3FFF FFFF). Note that the two 16 bit registers are combined into a single 32 bit data word. The values on the right show the register values in hexadeci-mal if the position value is 1,274,237 (16# 0013 717D)
16#717D
1 16#0013
2 Velocity Data. The units of measure of the velocity data is set by the Velocity Format parameter in the Configuration Data. If the Scaling Function Control bit is ever set to a “1”, the position data used to calculate the velocity data is always scaled by the Measuring Units per Span parameter. Note that the two 16 bit registers are combined into a single 32 bit data word. The values on the right show the register values in hexadecimal if the velocity value is 461,725 (16# 0007 0B9D)
16#0B9D
3 16#0007
Word # Description
0 Position Data. The maximum position value depends on your NR25 model and the programmed counts per turn. The maximum value in all cases is 1,073,741,823 (16#3FFF FFFF). Note that the two 16 bit registers are combined into a single 32 bit data word. The values on the right show the register values in hexadeci-mal if the position value is 1,274,237 (16# 0013 717D)
16#717D
1 16#0013
2 Time Stamp. The time stamp is an unsigned double integer value with an interval of 400 nanoseconds. It will roll over every 1717.9869184 seconds. The time stamp can be used to verify active communications between the NR25 and your host controller. The values on the right show the register values in hexadecimal if the time stamp is 204,813,002 (16# 0C35 32CA)
16#32CA
3 16#0C35
ADVANCED MICRO CONTROLS INC.52

RSLogix 5000 EtherNet/IP CONFIGURATION 4
Reading Data from the NR25 (continued)Assembly Instance = 105
(Revision 2.3+ only)
As shown in the table below, when you set the Input Assembly Instance to 105, the input data consists of the position value and the actual sensor position reading transferred in a total of four 16 bit words.
Table 4.10 Input Data, Position and Actual Sensor Reading
Writing Data to the NR25The three output words assigned to the NR25 are used to preset the position value and to save the resulting offset into non-volatile memory. Configuration data is also saved. The format of the output assembly words is shown below.
Table 4.11 Output Assembly Instance Data Format
Presetting the Position Value
The position value is preset when the NR25 detects the proper bit transitions in the Command Word. You begin the process by writing the desired Preset Value into words 1 and 2 and setting the Command Word to 16#0002. (2 decimal, the last four bits in binary are 0010). You must then hold these values for a length of time greater than the RPI time you programmed for the NR25 when you added it to your project. This is to guarantee that these values have been written to the NR25. After the RPI time has elapsed, change the Com-mand Word value to 16#000D. (13 in decimal, the last four bits in binary are 1101.) The NR25 will respond by changing the position value to the Preset Value by calculating and applying an internal position offset.
The internal position offset is stored in volatile RAM memory and is lost when power is cycled to the NR25. This is acceptable in some applications because the machine has to be aligned on every power up. If you want to preset the position value once and have it apply the internal position offset on every power up, then you must command the NR25 to store the internal offset in non-volatile memory. NR25 encoders with a firmware revision 2.3 and above will automatically store the internal position offset to non-volatile memory if the value of the Total Measurement Range parameter is non-zero.
The AMCI RSLogix 5000 sample program for the NR25 includes the code to preset the position value. The sample program is available on our website, www.amci.com.
Word # Description
0 Position Data. The maximum position value depends on your NR25 model and the programmed counts per turn. The maximum value in all cases is 1,073,741,823 (16#3FFF FFFF). Note that the two 16 bit registers are combined into a single 32 bit data word. The values on the right show the register values in hexadeci-mal if the position value is 1,274,237 (16# 0013 717D)
16#717D
1 16#0013
2 Actual Sensor Reading. This unsigned double integer value is the raw position data from the NR25. Changing the position scaling parameters have no effect on this value. The values on the right show the register values in hexadecimal if the Actual Sensor Reading value is 637,091,550 (16# 25F9 3EDE)
16#3EDE
3 16#25F9
Word # Description
0 Command Word. Transitions on bits in this word will either preset the position value or store the resulting position offset in non-volatile memory.
1 Preset Value. The value that you want the position to become when you issue the Pre-set Command. The Preset Value can be any number between 0 and the config-ured full scale count of the encoder. The values on the right show the register values in hexadecimal if the Preset Value is 704,303 (16# 000A BF2F)
16#BF2F
2 16#000A
20 Gear Drive, Plymouth Ind. Park, Terryville, CT 06786Tel: (860) 585-1254 Fax: (860) 584-1973 http://www.amci.com
53

RSLogix 5000 EtherNet/IP CONFIGURATION4
Writing Data to the NR25 (continued)Storing Configuration Data and the Internal Position Offset
The data sent to the NR25 through the configuration tags, as well as the internal position offset, is stored when the NR25 detects the proper bit transitions in the Command Word. The parameters that are set with the configuration data are listed in the Configuring the NR25 section of this chapter, starting on page 49.
1) You begin the process by setting the Command Word to 16#0020. (32 decimal, the last eight bits in binary are 0010 0000).
2) You must then hold this value for a length of time greater than the RPI time you programmed for the NR25 when you added it to your project. This guarantees that the value is written to the NR25.
3) After the RPI time has elapsed, change the Command Word value to 16#00D0. (208 in decimal, the last eight bits in binary are 1101 0000.)
4) The NR25 will store the values. If you are using Assembly Instances 3, 104, or 105 the NR25 responds by changing the Velocity, Time Stamp, or Actual Sensor Reading to a value of 16#EEEE EEEE on a successful write or a value of 16#AAAA AAAA on an error. The data in the second 32 bit word will remain at this value until power to the NR25 is cycled.
1) Once the command to store the internal position offset is accepted, the NR25 will not respond to any further commands, including another save command, until power is cycled to the unit. This is to prevent damage to the non-volatile memory of the NR25 by attempt-ing to write to it too many times.
2) If you are using Assembly Instance 1 for your input tags, then you are only receiving the position data and the NR25 will not be able to indicate that the store command was com-pleted successfully. Because of this, AMCI strongly suggests that you use Assembly Instances 3, 104, or 105 for your input tags if your application requires you to store the con-figuration data or internal position offset.
3) If your NR25 encoder is revision 2.3 or greater, the unit will automatically store the internal position offset in non-volatile memory if the Total Measurement Range parameter is non-zero.
The AMCI RSLogix 5000 sample program for the NR25 includes the code to store the internal offset in non-volatile memory. The sample program is available on our website, www.amci.com.
ADVANCED MICRO CONTROLS INC.54

20 Gear Drive, Plymouth IndTel: (860) 585-1254 Fax: (8
CHAPTER 5
RSLogix 500 EtherNet/IP CONFIGURATIONExplicit MessagingEvery PLC that is programmed using RSLogix 500 software, such as the MicroLogix platform, must use explicit messaging to communicate with the NR25. In explicit messaging, the PLC processor will only com-municate with the NR25 when explicitly told to through Message Instructions that are programmed into your ladder logic.
The other form of communication is implicit messaging. Implicit messaging is only supported by Allen Bradley PLC platforms that are programmed using the RSLogix 5000 software. Implicit messaging means that the PLC processor will automatically exchange data with the NR25 at the programmed RPI time, thereby simplifying the use of the NR25. Implicit messaging is explained in the previous chapter, RSLogix 5000 Eth-erNet/IP CONFIGURATION, which started on page 45.
You can use explicit messaging on platforms that are programmed using the RSLogix 5000 software. The configuration and use of Message Instructions given here are also applicable to the RSLogix 5000 software.
RSLogix 500 ConfigurationWhen using the MicroLogix platforms, you have to configure the Ethernet port that is built into some processors before adding the NR25 to your project.
Only RSLogix 500 version 8.0 or above can be used to configure Message Instruc-tions to communicate with an Ethernet IP device.
Configuring a Built-in Ethernet Port
You have to set an IP address for the built in Ethernet port before communicating with the NR25. Right click on the port name in the I/O Configuration screen and select “Properties”. A Module Properties window similar to the one shown in figure 5.1 will open. In this window you must set the IP Address for the port, not the IP address of the NR25.
Rockwell Automation Ethernet products use the EtherNet/IP protocol. This chap-ter shows you how to configure communications between an NR25 and your PLC using RSLogix 500 software. A MicroLogix 1400 will be used as an example. This chapter also shows you how to use the registers you create for the NR25 to read and write data to the encoder.
Figure 5.1 Setting Ethernet Port Parameters
. Park, Terryville, CT 0678660) 584-1973 http://www.amci.com
55

RSLogix 500 EtherNet/IP CONFIGURATION5
Read Data FormatThe Assembly Instance of a Message Instruction that is used to read data from an NR25 defines the data that is transferred. All NR25 encoders respond to the following Input Assembly Instances:
Table 5.1 Input Assembly Instances
NR25 encoders that are revision 2.3 and above respond to the following additional Input Assembly Instances:
Table 5.2 Rev 2.3+ Additional Input Assembly Instances
Assembly Instance = 1
When you use an Assembly Instance to 1, the input data consists of the position value transferred as two 16 bit words.
Table 5.3 Input Data, Position Only
Assembly Instance = 3
When you use an Assembly Instance to 3, the input data consists of the position value and velocity data trans-ferred in a total of four 16 bit words.
Table 5.4 Input Data, Position and Velocity
Assembly Size Data
1 2 32 bit Position Value
3 4 32 bit Position Value and 32 bit Velocity Data
Assembly Size Data
104 2 32 bit Position Value and 32 bit Time Stamp
105 4 32 bit Position Value and 32 bit Actual Sensor Reading
Word # Description
0 Position Value. The maximum position value depends on your NR25 model and the programmed counts per turn. The maximum value in all cases is 1,073,741,823 (16#3FFF FFFF). Note that the two 16 bit registers are combined into a single 32 bit data word. The values on the right show the register values in hexadeci-mal if the position value is 1,274,237 (16# 0013 717D)
16#717D
1 16#0013
Word # Description
0 Position Data. The maximum position value depends on your NR25 model and the programmed counts per turn. The maximum value in all cases is 1,073,741,823 (16#3FFF FFFF). Note that the two 16 bit registers are combined into a single 32 bit data word. The values on the right show the register values in hexadeci-mal if the position value is 1,274,237 (16# 0013 717D)
16#717D
1 16#0013
2 Velocity Data. The units of measure of the velocity data is set by the Velocity Format parameter in the Configuration Data. If the Scaling Function Control bit is ever set to a “1”, the position data used to calculate the velocity data is always scaled by the Measuring Units per Span parameter. Note that the two 16 bit registers are combined into a single 32 bit data word. The values on the right show the register values in hexadecimal if the velocity value is 461,725 (16# 0007 0B9D)
16#0B9D
3 16#0007
ADVANCED MICRO CONTROLS INC.56

RSLogix 500 EtherNet/IP CONFIGURATION 5
Read Data Format (continued)Assembly Instance = 104 (revision 2.3+ only)
When you use an Assembly Instance to 104, the input data consists of the position value and time stamp transferred in a total of four 16 bit words.
Table 5.5 Input Data, Position and Time Stamp
Assembly Instance = 105 (revision 2.3+ only)
When you use an Assembly Instance to 105, the input data consists of the position value and the actual sensor position reading transferred in a total of four 16 bit words.
Table 5.6 Input Data, Position and Actual Sensor Reading
Write Data FormatThe Assembly Instance of a Message Instruction that is used to write configuration data to an NR25 defines the data that is transferred. All NR25 encoders respond to the following Input Assembly Instances:
Table 5.7 Write Assembly Instances
NR25 encoders that are revision 2.3 and above respond to the following additional Input Assembly Instances:
Table 5.8 Rev 2.3+ Additional Write Assembly Instances
Word # Description
0 Position Data. The maximum position value depends on your NR25 model and the programmed counts per turn. The maximum value in all cases is 1,073,741,823 (16#3FFF FFFF). Note that the two 16 bit registers are combined into a single 32 bit data word. The values on the right show the register values in hexadeci-mal if the position value is 1,274,237 (16# 0013 717D)
16#717D
1 16#0013
2 Time Stamp. The time stamp is an unsigned double integer value with an interval of 400 nanoseconds. It will roll over every 1717.9869184 seconds. The time stamp can be used to verify active communications between the NR25 and your host controller. The values on the right show the register values in hexadecimal if the time stamp is 204,813,002 (16# 0C35 32CA)
16#32CA
3 16#0C35
Word # Description
0 Position Data. The maximum position value depends on your NR25 model and the programmed counts per turn. The maximum value in all cases is 1,073,741,823 (16#3FFF FFFF). Note that the two 16 bit registers are combined into a single 32 bit data word. The values on the right show the register values in hexadeci-mal if the position value is 1,274,237 (16# 0013 717D)
16#717D
1 16#0013
2 Actual Sensor Reading. This unsigned double integer value is the raw position data from the NR25. Changing the position scaling parameters have no effect on this value. The values on the right show the register values in hexadecimal if the Actual Sensor Reading value is 637,091,550 (16# 25F9 3EDE)
16#3EDE
3 16#25F9
Assembly Size Data
102 8 Direction Counting Toggle, Scaling Function Control, Counts per Turn, Velocity Format
Assembly Size Data
103 12Direction Counting Toggle, Scaling Function Control, Counts per Turn, Total Measurement Range, Velocity For-mat
20 Gear Drive, Plymouth Ind. Park, Terryville, CT 06786Tel: (860) 585-1254 Fax: (860) 584-1973 http://www.amci.com
57
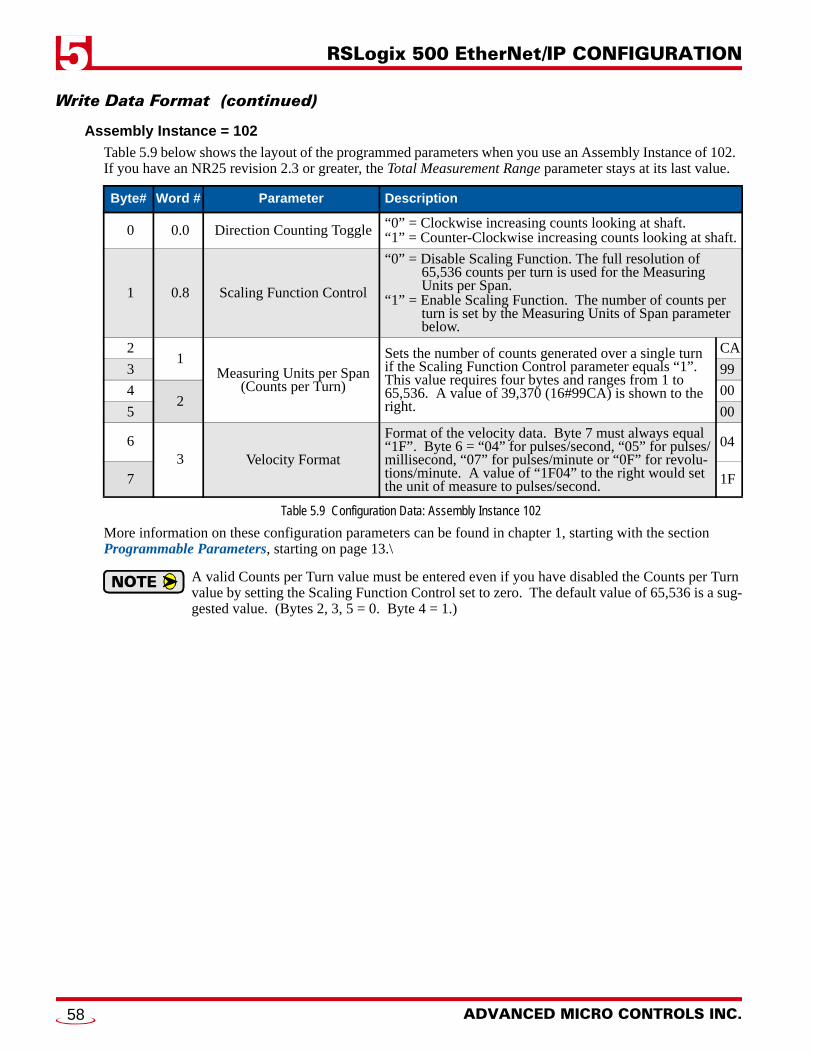
RSLogix 500 EtherNet/IP CONFIGURATION5
Write Data Format (continued)Assembly Instance = 102
Table 5.9 below shows the layout of the programmed parameters when you use an Assembly Instance of 102. If you have an NR25 revision 2.3 or greater, the Total Measurement Range parameter stays at its last value.
Table 5.9 Configuration Data: Assembly Instance 102
More information on these configuration parameters can be found in chapter 1, starting with the section Programmable Parameters, starting on page 13.\
A valid Counts per Turn value must be entered even if you have disabled the Counts per Turn value by setting the Scaling Function Control set to zero. The default value of 65,536 is a sug-gested value. (Bytes 2, 3, 5 = 0. Byte 4 = 1.)
Byte# Word # Parameter Description
0 0.0 Direction Counting Toggle “0” = Clockwise increasing counts looking at shaft.“1” = Counter-Clockwise increasing counts looking at shaft.
1 0.8 Scaling Function Control
“0” = Disable Scaling Function. The full resolution of 65,536 counts per turn is used for the Measuring Units per Span.
“1” = Enable Scaling Function. The number of counts per turn is set by the Measuring Units of Span parameter below.
21
Measuring Units per Span (Counts per Turn)
Sets the number of counts generated over a single turn if the Scaling Function Control parameter equals “1”. This value requires four bytes and ranges from 1 to 65,536. A value of 39,370 (16#99CA) is shown to the right.
CA
3 99
42
00
5 00
63 Velocity Format
Format of the velocity data. Byte 7 must always equal “1F”. Byte 6 = “04” for pulses/second, “05” for pulses/millisecond, “07” for pulses/minute or “0F” for revolu-tions/minute. A value of “1F04” to the right would set the unit of measure to pulses/second.
04
7 1F
ADVANCED MICRO CONTROLS INC.58
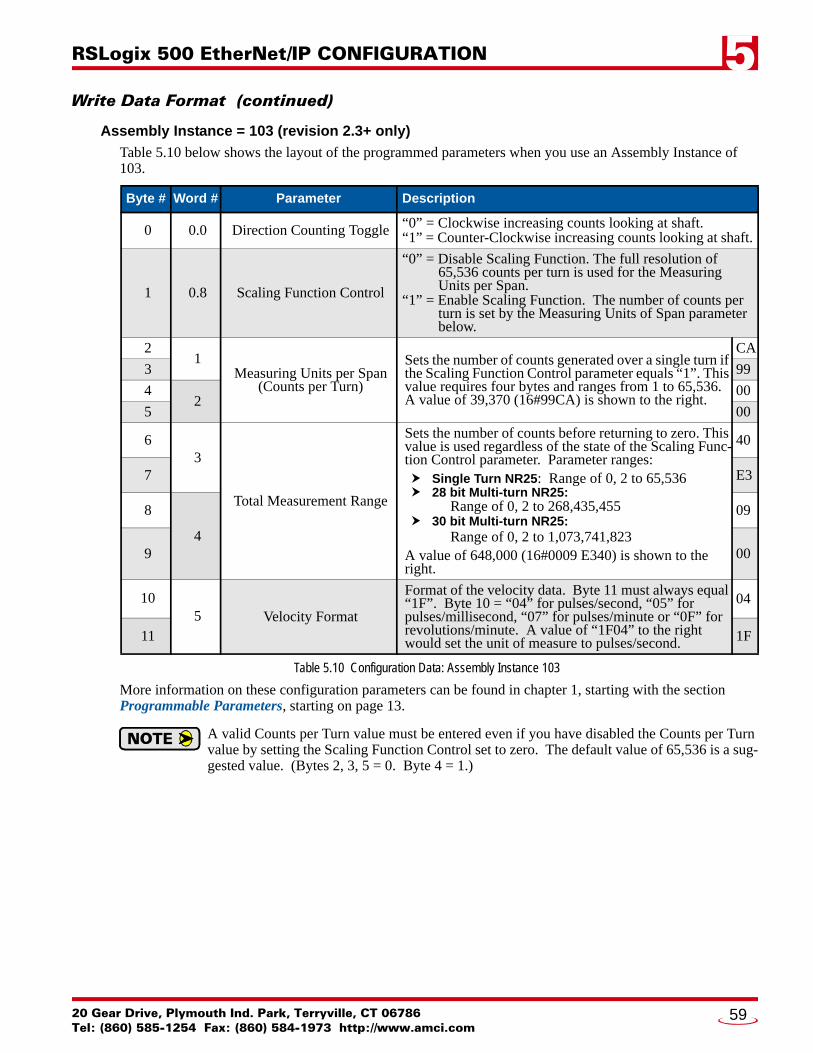
RSLogix 500 EtherNet/IP CONFIGURATION 5
Write Data Format (continued)Assembly Instance = 103 (revision 2.3+ only)
Table 5.10 below shows the layout of the programmed parameters when you use an Assembly Instance of 103.
Table 5.10 Configuration Data: Assembly Instance 103
More information on these configuration parameters can be found in chapter 1, starting with the section Programmable Parameters, starting on page 13.
A valid Counts per Turn value must be entered even if you have disabled the Counts per Turn value by setting the Scaling Function Control set to zero. The default value of 65,536 is a sug-gested value. (Bytes 2, 3, 5 = 0. Byte 4 = 1.)
Byte # Word # Parameter Description
0 0.0 Direction Counting Toggle “0” = Clockwise increasing counts looking at shaft.“1” = Counter-Clockwise increasing counts looking at shaft.
1 0.8 Scaling Function Control
“0” = Disable Scaling Function. The full resolution of 65,536 counts per turn is used for the Measuring Units per Span.
“1” = Enable Scaling Function. The number of counts per turn is set by the Measuring Units of Span parameter below.
21
Measuring Units per Span (Counts per Turn)
Sets the number of counts generated over a single turn if the Scaling Function Control parameter equals “1”. This value requires four bytes and ranges from 1 to 65,536. A value of 39,370 (16#99CA) is shown to the right.
CA
3 99
42
00
5 00
63
Total Measurement Range
Sets the number of counts before returning to zero. This value is used regardless of the state of the Scaling Func-tion Control parameter. Parameter ranges: Single Turn NR25: Range of 0, 2 to 65,536 28 bit Multi-turn NR25:
Range of 0, 2 to 268,435,455 30 bit Multi-turn NR25:
Range of 0, 2 to 1,073,741,823A value of 648,000 (16#0009 E340) is shown to the right.
40
7 E3
8
4
09
9 00
105 Velocity Format
Format of the velocity data. Byte 11 must always equal “1F”. Byte 10 = “04” for pulses/second, “05” for pulses/millisecond, “07” for pulses/minute or “0F” for revolutions/minute. A value of “1F04” to the right would set the unit of measure to pulses/second.
04
11 1F
20 Gear Drive, Plymouth Ind. Park, Terryville, CT 06786Tel: (860) 585-1254 Fax: (860) 584-1973 http://www.amci.com
59

RSLogix 500 EtherNet/IP CONFIGURATION5
Presetting the Position ValueA custom Message Instruction with the Generic Set_Attribute_Single service type is used to preset the posi-tion value of the NR25. The format of the data for this Message Instruction is shown below.
Table 5.11 Preset Position Data Format
1) The internal position offset is stored in volatile RAM memory and is lost when power is cycled to the NR25. This is acceptable in some applications because the machine has to be aligned on every power up. If you want to preset the position value once and have it apply the internal position offset on every power up, then you must issue a Message Instruction with the Save command. (See the Saving Configuration Data and Position Offset section below.) This command stores the configuration data and the internal position offset in non-volatile memory.
2) The Flash memory in the NR25 revision 1.9 or less is guaranteed for a minimum of 10,000 write cycles.
3) The FRAM memory in the NR25 revision 2.3 and above does not have a limited number of write cycles.
NR25 encoders with a firmware revision 2.3 and above will automatically store the internal position offset to non-volatile memory if the value of the Total Measurement Range parameter is non-zero. You do not have to issue a Save command to store the internal position offset if the Total Measurement Range parameter is non-zero.
The AMCI RSLogix 500 sample program for the NR25 includes the code to preset the position value. The sample program is available on our website, www.amci.com.
Saving Configuration Data and Position OffsetThe internal position offset, as well as the configuration data, is stored in non-volatile memory when the NR25 detects a Save command. The Message Instruction that sends the Save command is a custom instruc-tion that has no data. (The Class and Service Code of the Message Instruction are used by the NR25 to deter-mine that the instruction is a Save command.).
Once the command is issued, the data is stored when the Done bit of the Message Instruction is set. You must cycle power to the NR25 before another Save command will be accepted.
1) The Flash memory in the NR25 revision 1.9 or less is guaranteed for a minimum of 10,000 write cycles.
2) The FRAM memory in the NR25 revision 2.3 and above does not have a limit on the num-ber of permitted write cycles.
Byte # Word # Description
01 Preset Value. The value that you want the position to become when you issue this
command. The Preset Value can be any number between 0 and the configured full scale count of the encoder. The values on the right show the register val-ues in hexadecimal if the Preset Value is 704,303 (16# 000A BF2F)
2F
1 BF
22
0A
3 00
ADVANCED MICRO CONTROLS INC.60

RSLogix 500 EtherNet/IP CONFIGURATION 5
Determining Needed RegistersBefore adding the logic needed to communicate with the NR25 and use the data from it, you have to assign registers that will be used to hold the data. The top of the following table lists the types and sizes of all of the data that can be read from or written to the NR25.
The center section of the table lists the additional registers needed to buffer the data from the Message Instructions that read data from the NR25. These registers are required because the Message Instructions complete asynchronously to the program scan.
If data read with Message Instructions is not buffered, this data can change during a pro-gram scan, resulting in logical errors that may result in machine malfunction.
The bottom section of the table lists the Message (MG) data file and Extended Routing Information (RIX) data file types needed to control the Message Instructions. Each NR25 requires a separate file of each type, and these files must have one element for each Message Instruction associated with the NR25.
Table 5.12 Suggested Register Allocation
Additional registers will most likely be needed in your application. For example, the NR25 sample program available on the AMCI website uses a block of seven Long integers to convert the buffered data from 16-bit integers to 32-bit long values. An additional Long integer is used to store the Preset Value that is then con-verted to the two integers listed above before it is written to the NR25.
Value Type Size Availability
Position Integer 2 Words All NR25 encoders
Position and Velocity Integer 4 Words All NR25 encoders
Position and Time Stamp Integer 4 Words NR25 revision 2.3+ only
Position andActual Sensor Reading Integer 4 Words NR25 revision 2.3+ only
Direction Counting Toggle Upper byte of Integer 1/2 Word All NR25 encoders
Scaling Function Control Lower byte of Integer 1/2 Word All NR25 encoders
Measuring Units per Span Integer 2 Words All NR25 encoders
Total Measurement Range Integer 2 Words NR25 revision 2.3+ only
Velocity Format Integer 2 Words All NR25 encoders
Preset Value Integer 2 Words All NR25 encoders
Buffered Position Integer 2 Words
Buffered Velocity Integer 2 Words
Buffered Time Stamp Integer 2 Words
Buffered Actual Sensor Reading Integer 2 Words
Message Element Message (MG) –Each NR25 requires a separate file, and each Message Instruction requires a separate element in that file.
RIX Element (RIX) –Each NR25 requires a separate file, and each Message Instruction requires a separate element in that file.
20 Gear Drive, Plymouth Ind. Park, Terryville, CT 06786Tel: (860) 585-1254 Fax: (860) 584-1973 http://www.amci.com
61
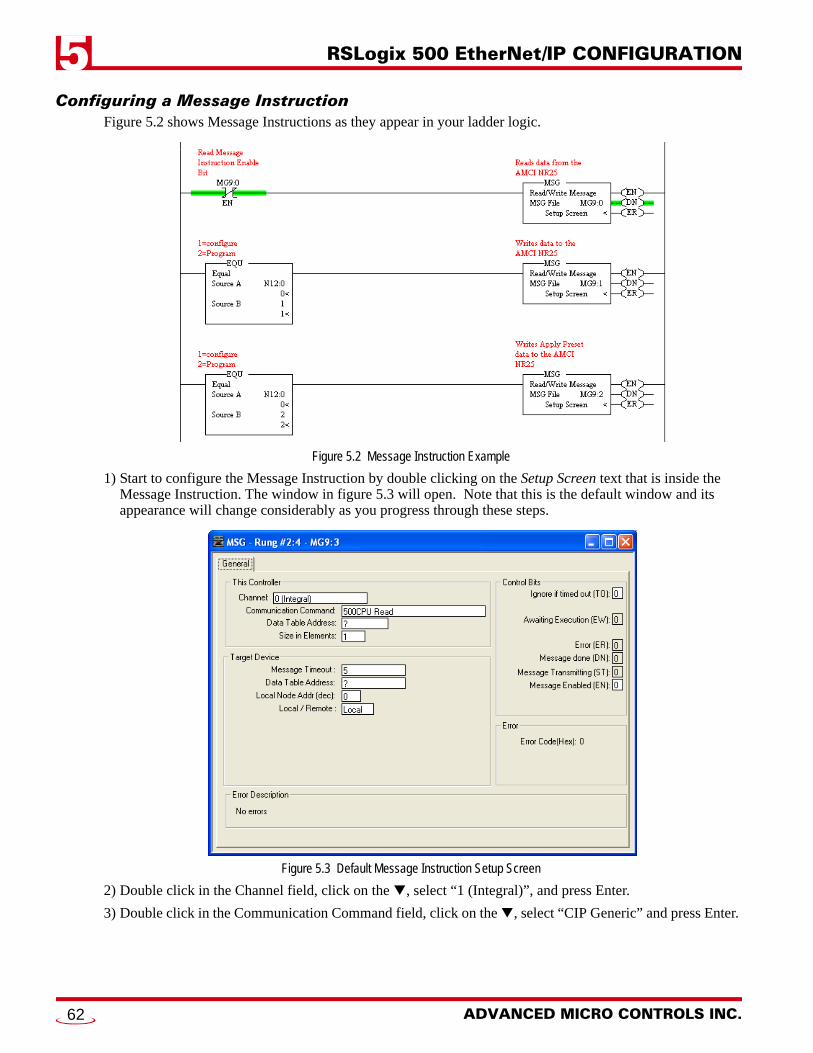
RSLogix 500 EtherNet/IP CONFIGURATION5
Configuring a Message InstructionFigure 5.2 shows Message Instructions as they appear in your ladder logic.
Figure 5.2 Message Instruction Example
1) Start to configure the Message Instruction by double clicking on the Setup Screen text that is inside the Message Instruction. The window in figure 5.3 will open. Note that this is the default window and its appearance will change considerably as you progress through these steps.
Figure 5.3 Default Message Instruction Setup Screen
2) Double click in the Channel field, click on the , select “1 (Integral)”, and press Enter.
3) Double click in the Communication Command field, click on the , select “CIP Generic” and press Enter.
ADVANCED MICRO CONTROLS INC.62

RSLogix 500 EtherNet/IP CONFIGURATION 5
Configuring a Message Instruction (continued)The rest of this section is broken down into four parts. Continue with the sub-section that is specific to the Message Instruction you are programming.
Read Message Instructions: See below Write Configuration Message Instructions: Starts on page 64 Apply Preset Message Instruction: Starts on page 66. Save Configuration and Offset Message Instruction: Starts on page 67.
Read Message Instructions
As shown in the table below, the NR25 will respond to four different Read Message Instructions. NR25 encoders with a revision of 1.9 or less will only respond to Assembly Instances 1 and 3. An error will result if you attempt to read from one of these NR25 encoders with an Assembly Instance 104 or 105. NR25 encod-ers with a revision of 2.3 or higher will respond to all four types of Assembly Instances.
Table 5.13 Attributes: Explicit Read Message Instructions
1) Enter the integer file address where the data will be placed in the Data Table Address (Received) field and press Enter.
2) Enter the correct value in the ‘Size in Bytes (Receive)’ field. The size is determined by the data you wish to transfer from the NR25. Refer to table 5.13 above to determine the correct value for this field.
3) Enter a RIX address in the Extended Routing Info field. Please note that each Message Instruction must have its own RIX address.
4) Double click in the Service field, select “Read Assembly” for a Message Instruction type and press Enter.
5) The Service Code field will change to “E” (hex), the Class field will change to “4” (hex), and the Attribute field will change to “3” (hex).
6) Enter the correct value in the ‘Instance’ field. This value determines the data that will be transferred by the NR25. Refer to table 5.13 above to determine the correct value for this field.
Position ValueOnly
Position Valueand
Velocity Data
Position Valueand
Time Stamp
Position Valueand
Actual Sensor Reading
Size in Bytes 4 bytes 8 bytes 8 bytes 8 bytes
Instance 1 (decimal) 3 (decimal) 104 (decimal) 105 (decimal)
20 Gear Drive, Plymouth Ind. Park, Terryville, CT 06786Tel: (860) 585-1254 Fax: (860) 584-1973 http://www.amci.com
63

RSLogix 500 EtherNet/IP CONFIGURATION5
Configuring a Message Instruction (continued)Read Message Instructions (continued)
The figure below shows a typical configuration for a Message Instruction that reads data from an NR25. Please note that the Data Table Address (Receive), Size in Bytes (Receive), and RIX fields may be different in your application.
Figure 5.4 Read Message Instruction Setup Screen
7) Jump to the section, Setting the MultiHop Address, which is on page 68, to finish configuring the Message Instruction.
Write Configuration Message Instructions
Write Message Instructions are used to write programmable parameters to the NR25. As shown in the table below, the NR25 will respond to two different Write Message Instructions. NR25 encoders with a revision of 1.9 or less will only respond to Assembly Instance 102. An error will result if you attempt to write to one of these NR25 encoders with an Assembly Instance 103. NR25 encoders with a revision of 2.3 or higher will respond to both types of Assembly Instances.
Table 5.14 Attributes: Explicit Write Message Instructions
1) Enter the integer file address where the source data is located into the ‘Data Table Address (Send)’ field and press Enter.
2) Enter the correct value in the ‘Size in Bytes (Send)’ field. The size is determined by the data you wish to transfer to the NR25. Refer to table 5.14 above to determine the correct value for this field.
3) Enter a RIX address in the Extended Routing Info field. Please note that each Message Instruction must have its own RIX address.
Direction Counting ToggleScaling Function ControlMeasuring Units per Span
Velocity Format
Direction Counting ToggleScaling Function ControlMeasuring Units per SpanTotal Measurement Range
Velocity Format
Length 8 bytes 12 bytes
Instance 102 (decimal) 103 (decimal)
ADVANCED MICRO CONTROLS INC.64

RSLogix 500 EtherNet/IP CONFIGURATION 5
Configuring a Message Instruction (continued)Write Configuration Message Instructions (continued)
4) Double click in the Service field, select “Write Assemble”, and press Enter.
5) The Service Code field will change to “10” (hex). The Class field will change to “4” (hex), and the Attribute field will change to “3” (hex).
6) Enter the correct value in the ‘Instance’ field. This value determines the data that will be transferred to the NR25. Refer to table 5.14 above to determine the correct value for this field.
The figure below show a typical Message Instruction for writing configuration data to an NR25. Please note that the Data Table Address (Send) field and RIX field may be different in your application.
Figure 5.5 Configuration Message Instruction Setup Screen
7) Jump to the section, Setting the MultiHop Address, which is on page 68, to finish configuring the Message Instruction.
20 Gear Drive, Plymouth Ind. Park, Terryville, CT 06786Tel: (860) 585-1254 Fax: (860) 584-1973 http://www.amci.com
65

RSLogix 500 EtherNet/IP CONFIGURATION5
Configuring a Message Instruction (continued)Apply Preset Message Instruction
A Generic Message Instruction is used to preset the position value of the NR25.
1) Enter the integer file address where the desired position preset value is located into the ‘Data Table Address (Send)’ field and press Enter.
2) Enter a value of “4” in the Size In Bytes (Send) field.
3) Enter a RIX address in the Extended Routing Info field. Please note that each Message Instruction must have its own RIX address.
4) Double click in the Service field, select “Generic Set Attribute Single”, and press Enter.
5) The Service Code field will change to “10” (hex).
6) Enter a value of 16#23 into the Class field.
7) Enter a value of 1 into the Instance field.
8) Enter a value of 16#13 into the Attribute field.
The figure below show a typical Message Instruction for issuing a Preset Command to an NR25. Please note that the Data Table Address (Send) field and RIX field may be different in your application.
Figure 5.6 Preset Message Instruction Setup Screen
9) Jump to the section, Setting the MultiHop Address, which is on page 68, to finish configuring the Message Instruction.
ADVANCED MICRO CONTROLS INC.66

RSLogix 500 EtherNet/IP CONFIGURATION 5
Configuring a Message Instruction (continued)Save Configuration and Offset Message Instruction
A Custom Message Instruction is used to save the present configuration of the NR25. The instruction will also save the internal position offset that is modified by an Apply Preset Message Instruction.
If your NR25 is revision 2.3 or above, setting the Total Measurement Range parameter to a non-zero value will force the NR25 to automatically store the internal position offset to non-volatile FRAM. Using the Total Measurement Range parameter this way only affects how the internal position offset is stored. You must still issue this Message Instruction to save the pro-grammable parameters to non-volatile memory. See Storage of Internal Position Offset found on page 15 for information on how to set the Total Measurement Range parameter.
1) The Save Configuration and Offset Message Instruction does not write any data to the NR25 so you can ignore the Data Table Address and Size in Byte parameters. Once you save this instruction and re-open the window, you will see that the address field has been removed and the length fields are set to zero.
2) Enter a RIX address in the Extended Routing Info field. Please note that each Message Instruction must have its own RIX address.
3) Double click in the Service field, select “Custom”, and press Enter.
4) Change the Service Code field to 16#16.
5) Change the Class field to 16#23 (35 decimal).
6) Change the Instance field and Attribute field to zero.
The figure below show a typical Message Instruction for issuing a Save Command to an NR25. Please note that the RIX field may be different in your application.
Figure 5.7 Save Message Instruction Setup Screen
7) Continue to the section, Setting the MultiHop Address, which is on the next page, to finish configuring the Message Instruction.
20 Gear Drive, Plymouth Ind. Park, Terryville, CT 06786Tel: (860) 585-1254 Fax: (860) 584-1973 http://www.amci.com
67

RSLogix 500 EtherNet/IP CONFIGURATION5
Configuring a Message Instruction (continued)Setting the MultiHop Address
After setting the fields on the General tab, click on the MultiHop tab in the setup window. You must enter the IP address of the NR25 in the “To Address” field. The default NR25 address is show in the figure below.
Figure 5.8 Message Instruction MultiHop Settings
Troubleshooting Message InstructionsThese are the main causes of communication errors when using an NR25:
The IP address or netmask are not set correctly when the processor’s Ethernet was configured. The Message Instruction Instance or Length parameters are not set correctly. The To Address field of the Message Instruction, found under the MultiHop tab, is not set to the address
the NR25 is configured for. The Configuration data is not formatted correctly. The proper format of the Configuration data is
shown in the next section.
Configuration Error Response
If any of the parameter values are incorrect, the NR25 will respond by setting the Message Instruction’s Error bit. As shown in the figure below, the error can be view under the General tab of the Message Instruction Setup Window. The following message is in response to an invalid Velocity Format parameter.
Figure 5.9 Configuration Error Response
ADVANCED MICRO CONTROLS INC.68

20 Gear Drive, Plymouth IndTel: (860) 585-1254 Fax: (8
CHAPTER 6
Modbus TCP CONFIGURATIONNR25 Memory LayoutAll NR25 encoders, regardless of revision, use six 16-bit input registers and seven 16-bit output registers to communicate through the Modbus protocol. NR25 encoders with revision 2.3+ require eight 16-bit input reg-isters and nine 16-bit output registers to access the time stamp value and to program the Total Measurement Range parameter. Figure 6.1 shows how these registers are mapped to the Modbus data reference. The com-plete specification for the Modbus protocol can be downloaded at http://www.modbus.org/specs.php.
Figure 6.1 Modbus Data Reference Map
Supported Modbus Functions
Table 6.1 Supported Modbus Functions
Function Code Function Name NR25 Register Addressing method
1 Read Coils OUTPUT Bit: Address 16,384 through 16,527
2 Read Discrete Inputs INPUT Bit: Address 0 through 127
3 Read Holding Registers OUTPUT & INPUT Word: Out Regs. 1024 through 1032In Regs. 0 though 7
4 Read Input Registers INPUT Word: Registers 0 through 7
5 Write Single Coil OUTPUT Bit: Address 16,384 through 16,527
6 Write Single Register OUTPUT Word: Registers 1024 through 1032
15 Write Multiple Coils OUTPUT Bit: Address 16,384 through 16,527
16 Write Multiple Registers OUTPUT Word: Registers 1024 through 1032
22 Mask Write Register OUTPUT Word: Registers 1024 through 1032
23 Read/Write Registers INPUT/OUTPUT Word: Out Regs. 1024 through 1032In Regs. 0 though 5
Register 0 Register 0
INPUTRegisters
Register 5
Register 7
Not Implemented
Not Implemented
Register 1024 Register 1024
OUTPUTRegisters
Register 1030
Register 1032
0 015 15
80 80
112
95 95
127
LSB and MSBNumbers
16,384 16,38416,399 16,399
16,480
16,512
16,495
16,527
Mapped as:Discrete InputsHolding RegistersInput Registers
Mapped as:CoilsHolding Registers
Register Map for All NR25 EncodersMust be used by NR25 revision 1.9 or less
Optional Register Map for NR25 Encodersof revision 2.3 or greater
. Park, Terryville, CT 0678660) 584-1973 http://www.amci.com
69
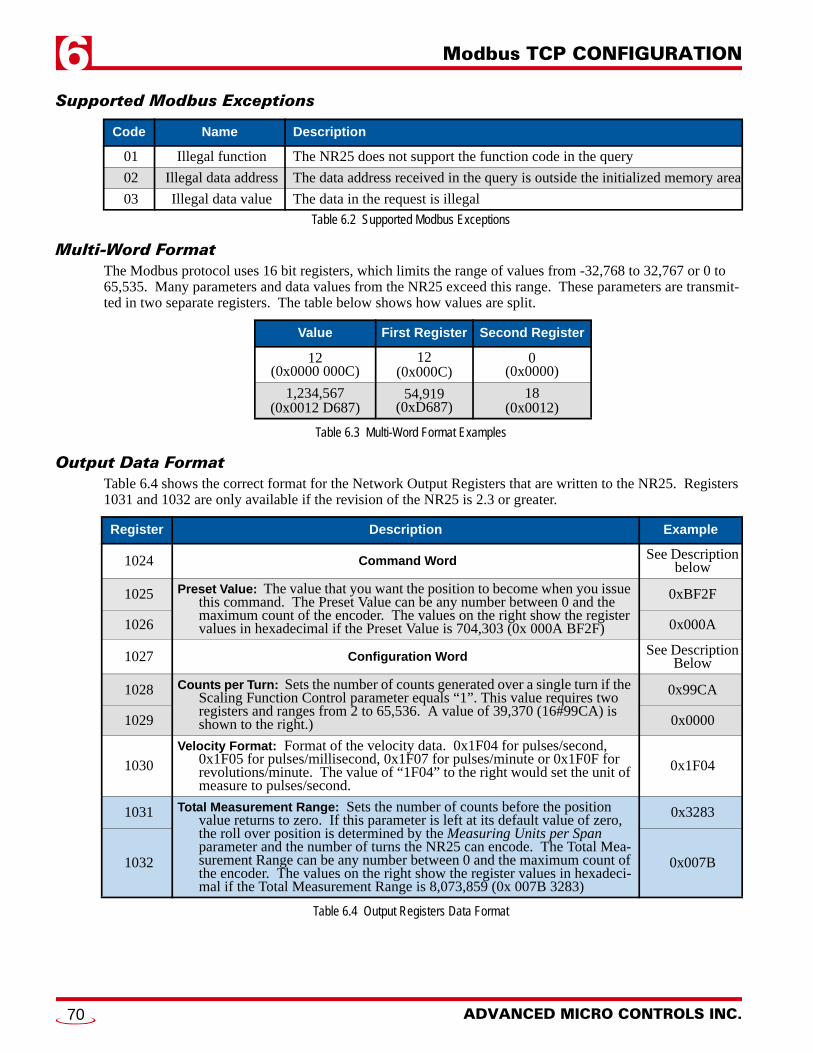
Modbus TCP CONFIGURATION6
Supported Modbus ExceptionsTable 6.2 Supported Modbus Exceptions
Multi-Word FormatThe Modbus protocol uses 16 bit registers, which limits the range of values from -32,768 to 32,767 or 0 to 65,535. Many parameters and data values from the NR25 exceed this range. These parameters are transmit-ted in two separate registers. The table below shows how values are split.
Table 6.3 Multi-Word Format Examples
Output Data FormatTable 6.4 shows the correct format for the Network Output Registers that are written to the NR25. Registers 1031 and 1032 are only available if the revision of the NR25 is 2.3 or greater.
Table 6.4 Output Registers Data Format
Code Name Description
01 Illegal function The NR25 does not support the function code in the query
02 Illegal data address The data address received in the query is outside the initialized memory area
03 Illegal data value The data in the request is illegal
Value First Register Second Register
12(0x0000 000C)
12(0x000C)
0(0x0000)
1,234,567(0x0012 D687)
54,919(0xD687)
18(0x0012)
Register Description Example
1024 Command Word See Description below
1025 Preset Value: The value that you want the position to become when you issue this command. The Preset Value can be any number between 0 and the maximum count of the encoder. The values on the right show the register values in hexadecimal if the Preset Value is 704,303 (0x 000A BF2F)
0xBF2F
1026 0x000A
1027 Configuration Word See Description Below
1028 Counts per Turn: Sets the number of counts generated over a single turn if the Scaling Function Control parameter equals “1”. This value requires two registers and ranges from 2 to 65,536. A value of 39,370 (16#99CA) is shown to the right.)
0x99CA
1029 0x0000
1030Velocity Format: Format of the velocity data. 0x1F04 for pulses/second,
0x1F05 for pulses/millisecond, 0x1F07 for pulses/minute or 0x1F0F for revolutions/minute. The value of “1F04” to the right would set the unit of measure to pulses/second.
0x1F04
1031 Total Measurement Range: Sets the number of counts before the position value returns to zero. If this parameter is left at its default value of zero, the roll over position is determined by the Measuring Units per Span parameter and the number of turns the NR25 can encode. The Total Mea-surement Range can be any number between 0 and the maximum count of the encoder. The values on the right show the register values in hexadeci-mal if the Total Measurement Range is 8,073,859 (0x 007B 3283)
0x3283
1032 0x007B
ADVANCED MICRO CONTROLS INC.70
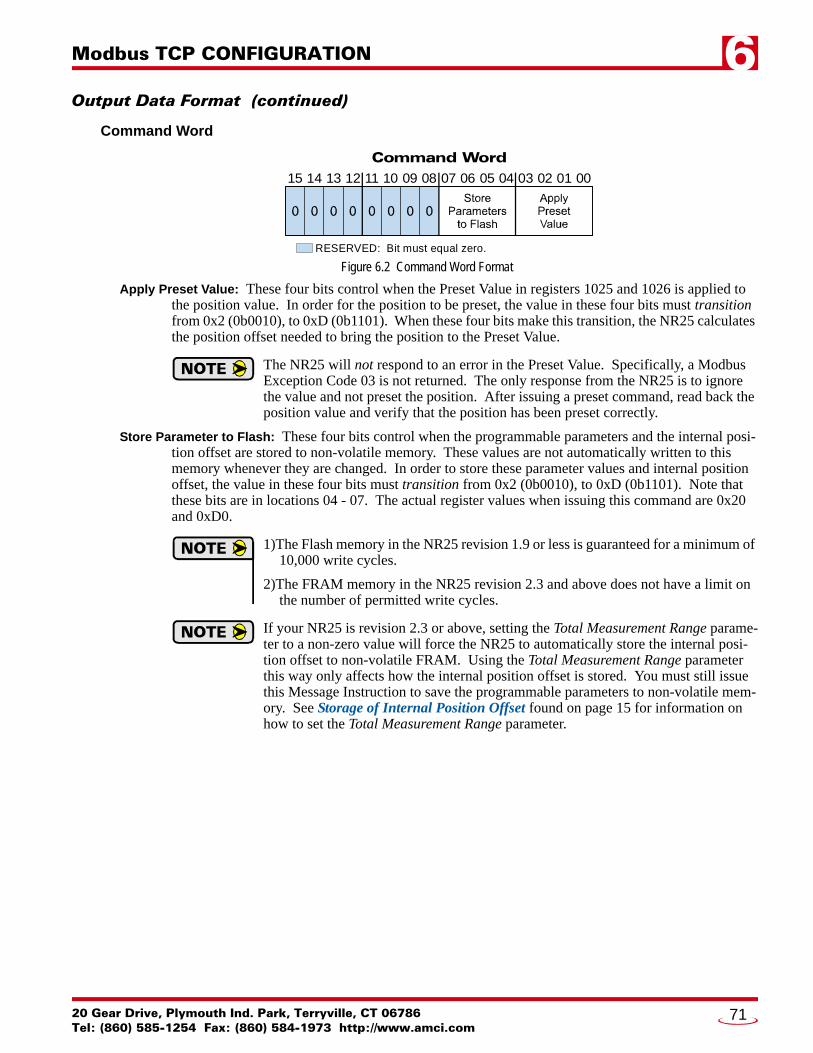
Modbus TCP CONFIGURATION 6
Output Data Format (continued)Command Word
Figure 6.2 Command Word Format
Apply Preset Value: These four bits control when the Preset Value in registers 1025 and 1026 is applied to the position value. In order for the position to be preset, the value in these four bits must transition from 0x2 (0b0010), to 0xD (0b1101). When these four bits make this transition, the NR25 calculates the position offset needed to bring the position to the Preset Value.
The NR25 will not respond to an error in the Preset Value. Specifically, a Modbus Exception Code 03 is not returned. The only response from the NR25 is to ignore the value and not preset the position. After issuing a preset command, read back the position value and verify that the position has been preset correctly.
Store Parameter to Flash: These four bits control when the programmable parameters and the internal posi-tion offset are stored to non-volatile memory. These values are not automatically written to this memory whenever they are changed. In order to store these parameter values and internal position offset, the value in these four bits must transition from 0x2 (0b0010), to 0xD (0b1101). Note that these bits are in locations 04 - 07. The actual register values when issuing this command are 0x20 and 0xD0.
1)The Flash memory in the NR25 revision 1.9 or less is guaranteed for a minimum of 10,000 write cycles.
2)The FRAM memory in the NR25 revision 2.3 and above does not have a limit on the number of permitted write cycles.
If your NR25 is revision 2.3 or above, setting the Total Measurement Range parame-ter to a non-zero value will force the NR25 to automatically store the internal posi-tion offset to non-volatile FRAM. Using the Total Measurement Range parameter this way only affects how the internal position offset is stored. You must still issue this Message Instruction to save the programmable parameters to non-volatile mem-ory. See Storage of Internal Position Offset found on page 15 for information on how to set the Total Measurement Range parameter.
Command Word
RESERVED: Bit must equal zero.
15 14 13 12 11 10 09 08 07 06 05 04 03 02 01 00
20 Gear Drive, Plymouth Ind. Park, Terryville, CT 06786Tel: (860) 585-1254 Fax: (860) 584-1973 http://www.amci.com
71

Modbus TCP CONFIGURATION6
Output Data Format (continued)Configuration Word
Figure 6.3 Configuration Word Format
DCTog: Direction Control Toggle bit. When this bit equals “0”, the position value will increase with clock-wise rotation when looking at the front of the shaft. When this bit equals “1” the position value will increase with counter-clockwise rotation when looking at the front of the shaft.
SFCtrl: Scaling Function Control bit. When this bit equals “0”, the position resolution will be 65,536 counts per turn. When this bit equals “1”, the position resolution will be set by the Measuring Units per Span parameter value contained in registers 1028 and 1029. As explained in the Calculating Posi-tion and Velocity Data section found on page 14, once the Measuring Units per Span parameter is applied, the velocity data will always be scaled by this parameter, regardless of the state of the Scal-ing Function Control bit. NR25 encoders with a revision of 2.3 and above have the Total Measure-ment Range parameter. This parameter is not affected by the state of the Scaling Function Control bit.
Input Data FormatTable 6.5 shows the format of the data read from the NR25. Note that registers 4 through 7 are only available if your NR25 is revision 2.3 or greater.
Table 6.5 Modbus Input Data Format
Register Data Value Example
032 bit Scaled Position Value. This data is the calculated position data. Its
value is affected by the Measuring Units per Span parameter if the Scaling Function Control bit equals “1”. This value can also be preset to any value within its range by using the Apply Preset Value command. The lower 16 bits of this value are in register 0. A Position Value of 84,742,977 (0x050D 1341) is shown as an example.
0x1341
1 0x050D
232 bit Velocity data. This data is the calculated change in position over time.
The unit of measure is set with the Velocity Format parameter. If the Scaling Function Control bit is ever set to a “1”, the position data used to calculate the velocity data is always scaled by the Measuring Units per Span parameter. The lower 16 bits of this value are in register 2. A Velocity reading of 76,754 (0x0001 2BD2) is shown as an example.
0x2BD2
3 0x0001
432 bit Raw Position Value. This data is the actual position value read from
the resolver. The resolution is always 65,536 counts per turn. This data is not affected by the value of the Measuring Units per Span parameter nor the Scaling Function Control bit. This value is also not affected by the Preset Value. The lower 16 bits of this value are in register 4. A Raw Position Value of 571,942,153 (0x2217 2509) is shown as an example.
0x2509
5 0x2217
632 bit Time Stamp data. This register is incremented every 400 nanoseconds
while power is applied to the NR25. This register rolls over every 1717.9869184 seconds. The time stamp can be used to verify active com-munications between the NR25 and your host controller.
0x2BD2
7 0x0001
Configuration Word
SF
Ctr
l
RESERVED: Bit must equal zero.
15 14 13 12 11 10 09 08 07 06 05 04 03 02 01 00
ADVANCED MICRO CONTROLS INC.72

20 Gear Drive, Plymouth IndTel: (860) 585-1254 Fax: (8
APPENDIX A
IP ADDRESS SETUP WITH BOOTPInitial ConfigurationStarting at the beginning of chapter 3, NR25 CONFIGURATION, follow the instructions up to the point where you have the NR25 attached to your computer. This is explained in the Attach the NR25 section on page 39.
Start Your Bootp ServerIf needed, start your Bootp server. The Bootp-DHCP server software, version 2.3, from Rockwell Automation is used in this example. As shown in figure 6.4, the R.A. Bootp server window is bro-ken down into two panes, “Request History” and “Relation List”. “Request History” tells you what responses come over the net-work and the “Relation List” shows the setup data you have entered.
Changing the IP AddressChanging the IP address of the NR25 requires you to enable the Bootp protocol on the encoder before you can change the IP address. The NR25 has the Bootp protocol disabled by default. This decreases the boot time by about 30 seconds when power is applied to the device because it doesn’t have to wait for the Bootp request to time out before continuing with its stored address.
If your NR25 is firmware 1.4 or below, then you cannot use the AMCI Net Configu-rator software to set the IP address of your unit. You must use a Bootp server to set the IP address of these units. This appendix explains how to use the Bootp server from Rockwell Automation to set the IP address.
Figure 6.4 Rockwell Automation Bootp Server
. Park, Terryville, CT 0678660) 584-1973 http://www.amci.com
73

IP ADDRESS SETUP WITH BOOTPA
Changing the IP Address (continued)Enabling Bootp Protocol
1) Make sure power is removed from the NR25.
2) In the “Relation List” pane of the RA Bootp Server software, click on [New]. In the window that opens, enter the MAC address of the NR25 which is printed on a white label near the serial number tag. You do not have to enter the “-” characters when entering the address on the screen. You must also enter the current IP address of the NR25. This is 192.168.0.50 by default. The hostname and Description fields can be left blank. Click [OK].
3) Apply power to the NR25 and wait for the Module Status LED to come on solid green and the Network Status LED to be flashing green.
4) Click on your new entry in the “Relation List”. This will activate the buttons in the pane. Click on the [Enable BOOTP] button. The message “[Enable BOOTP] Command successful” should appear instantly in the status line at the bottom of the window.
5) The BOOTP protocol is now enabled on the NR25. Remove power from the encoder before continuing.
Figure 6.5 Add New Relation Entry
ADVANCED MICRO CONTROLS INC.74

IP ADDRESS SETUP WITH BOOTP A
Changing the IP Address (continued)Setting the IP Address
With the Bootp protocol now enabled, you can now change the IP address of the NR25.
1) Double click on your new entry in the “Relation List” This will bring up the Properties window again. Enter the new IP address for the NR25 and click [OK].
2) Apply power to the NR25 and wait for the Module Status LED to come on solid green and the Network Status LED to be flashing green. At this point, you should also have a message in the “Request History” pane that lists the MAC address of the NR25 along with the IP address you requested.
Disabling the Bootp Protocol
Even though not strictly necessary, disabling the Bootp protocol will allow the NR25 to boot up faster and prevent inadvertent changes to the IP address of the NR25 if there is a network misconfiguration on your machine or plant floor.
1) With power still applied to the NR25, click on your new entry in the “Relation List”. This will enable the buttons above it.
2) Click on the [Disable BOOTP/DHCP] button. The message “[Disable BOOTP] Command successful” should appear instantly in the status line at the bottom of the window.
The new IP address for the NR25 is now configured.
Figure 6.6 Setting New IP Address
20 Gear Drive, Plymouth Ind. Park, Terryville, CT 06786Tel: (860) 585-1254 Fax: (860) 584-1973 http://www.amci.com
75
IP ADDRESS SETUP WITH BOOTPA
Testing the New IP AddressThe easiest way to test the new address of the NR25 is with the “ping” command. Before you can use the command, you have to be sure the NR25 and your computer are still on the same subnet. For example, if the new address of the NR25 is 192.168.0.42 and your computer has an address of 192.168.0.1, with a subnet mask of 255.255.255.0, then the two pieces of equipment are on the same subnet. (In this case, the first three numbers of the IP address must match.) If the new address of the NR25 is 192.168.50.50, then the computer and NR25 are not on the same subnet and you must go back into the Network Configuration panel and change your adapter’s TCP/IP settings. Refer back to the Configure Your Network Interface Card (NIC) section of this chapter, starting on page 37.
Once you are sure your computer and NR25 are on the same subnet, open the DOS terminal if necessary by clicking on the [Start] button, and clicking on [Run...]. A dialog box will open. Enter ‘cmd’ on the text line and press [Enter] on the keyboard.
Once the terminal is open, type in ‘ping aaa.bbb.ccc.ddd’ where ‘aaa.bbb.ccc.ddd’ in the new IP address of the NR25. The computer will ping the NR25 and the message “Reply from aaa.bbb.ccc.ddd: bytes=32 time<10ms TTL=128” should appear four times.
If the message “Request timed out.” or “Destination host unreachable” appears, then one of three things has occurred:
You did not enter the correct address in the ping command.
The new IP address of the NR25 was not set correctly.
The NR25 and the computer are not on the same subnet and the gateway setting on the computer are not configured to correctly forward packets to the subnet the NR25 is on.
Continue with Chapter 3If you haven’t already, you can now use the NR25 Configurator software to perform the initial setup of your NR25. Refer to Using the AMCI Net Configurator starting on page 39 for additional instructions.
ADVANCED MICRO CONTROLS INC.76

20 Gear Drive, Plymouth IndTel: (860) 585-1254 Fax: (8
APPENDIX B
CIP POSITION SENSOR OBJECTCommon Industrial ProtocolEtherNet/IP is a protocol stack that implements the Common Industrial Protocol (CIP) over Ethernet using TCP/IP. The CIP is sponsored by the Open DeviceNet Vendors Association (ODVA) and is implemented over a variety of networks. The NR25 follows the Encoder Device Profile that is defined in the CIP specifi-cation. The Configuration and Programming instances explained in chapters 4 and 5 are actually custom instances that simplify configuring and programming the encoder when using implicit messaging.
In addition to these custom instances, the NR25 implements the Position Sensor Object, which is a mandatory object for every product that implements the Encoder Device Profile as defined in the specification. The explicit messages that are used to preset the position value and save the programmed parameters are two com-mands defined in the Position Sensor Object.
The NR25 implements the CIP revision 2 definition of the Position Sensor Object.
Using the Position Sensor Object to communicate with the NR25 is completely optional. Most applications should communicate with the NR25 using the custom instances as explained in the previous two chapters because it will greatly simplify your PLC programming. The only reasons to use the Position Sensor Object is if you need extremely fine grain control over com-munications with the NR25 or if you use EtherNet/IP encoders from multiple vendors and you decide to write code that can be used with any of these sensors.
Supported ServicesThe following table lists the common services implemented by the NR25 for the Position Sensor Object.
The services that are implemented only on the Class level (not on the Instance) should address Instance 0.
Table 6.6 Supported Services
Service Code 16#0E, Get_Attribute_Single is used to read data from the Position Sensor Object class.
Service Code 16#10, Set_Attribute_Single is used to write data to the Position Sensor Object class.
Supported Class AttributesThe only supported Class attribute is 1 and it returns the revision number of the definition of the object. Because the NR25 implements the CIP revision 2 definition of the Position Sensor Object, this attribute will always return a value of “2”.
Service Code
ImplementedService Name Description of Service
Class Instance
16#05 Yes No Reset Resets all parameter values to the factory default
16#0E Yes Yes Get_Attribute_Single Returns the contents of the specified attribute
16#10 No Yes Set_Attribute_Single Modifies an attribute value
16#15 Yes No Restore Restores all parameter values from non-volatile storage
16#16 Yes No SaveSaves all programmable parameters to the non-vola-tile storage including the position offset derived from setting the Preset Value, (Attribute 16#13)
. Park, Terryville, CT 0678660) 584-1973 http://www.amci.com
77

POSITION SENSOR OBJECTB
Supported Instance AttributesTable 6.8 on the following two pages lists all of instance attributes implemented by the NR25. Table 6.7 below describes the Data Type values used in this table.
Table 6.7 Explanation of Data Types
When programming these instances, always use a Class Code of 16#23.
Data Type Length Description
BOOLEAN 8 bits Holds single on/off (true/false) value
BYTE 8 bits Holds up to 8 bits of data which should not be considered to be a scalar value
USINT 8 bits Unsigned 8 bit value
WORD 16 bits Holds up to 16 bits of data which should not be considered to be a scalar value
UINT 16 bits Unsigned 16 bit integer value
DINT 32 bits Signed 32 bit integer value
UDINT 32 bits Unsigned 32 bit integer value
Attrib. ID Access Name Data Type Description
16#01 - 1 Get Number of Attributes USINT Number of supported Attributes = 21
16#02 - 2 Get Attribute List Array of BYTE
List of supported Attributes = 01, 02, 0A, 0B, 0C …71hex
16#0A - 10 Get Position Value Signed DINT Current position value
16#0B - 11 Get Position Sensor Type WORD Specifies the device type 1 = Single turn absolute rotary encoder2 = Multi-turn absolute rotary encoder
16#0C - 12 Set Direction CountingToggle BOOLEAN Controls the counting direction:
0 = CW 1 = CCW
16#0E - 14 Set Scaling FunctionControl BOOLEAN
Enables Scaling function 0 = OFF (65,536 counts per turn)1 = ON (Scaling set by Measuring Units per Span, attribute 10hex)
16#10 - 16 Set Measuring Units per Span (Counts per Turn) UDINT Resolution for one revolution:
1 to 65,536 counts per turn
16#11 - 17 Set Total Measurement Range UDINT
Counts before roll over to zero.Single Turn NR25: Range of 0, 2 to 65,53628 bit Multi-turn NR25: Range of 0, 2 to
268,435,45530 bit Multi-turn NR25: Range of 0, 2 to
1,073,741,823
16#13 - 19 Set Preset Value DINT Sets the position to the specified value. Calculates an internal offset that will be saved to the non-volatile storage if Save service (code 16#16) is issued.
16#18 - 24 Get Velocity Value DINT Current speed. The value is in the format specified by attribute 16#19
(Table is continued on next page)
ADVANCED MICRO CONTROLS INC.78

POSITION SENSOR OBJECT B
Supported Instance Attributes (continued)Table 6.8 Supported Instance Attributes
For detailed description of the Attributes, see the CIP definition.
Supported AlarmsThe NR25 supports the following operational alarm.
Diagnostic Error
This alarm is set when the NR25 fails its power up diagnostics. The Position Error alarm is also set to indi-cate that the position data may be incorrect.
Attributes 16#2D, Supported Alarms, 16#2C, Alarms, and 16#2E Alarm Flag indicate something about the alarms supported by the NR25.
16#2D: Supported Alarms – Reading this attribute returns a value of 3, indicating that the Position Error alarm and Diagnostic Error alarms are both used.
16#2C: Alarms – Reading this attribute will return a value of zero if no alarms have occurred and a value of three if an alarm has occurred.
16#2E: Alarm Flag – Reading this attribute will return a value of zero if no alarms have occurred and a value of one if an alarm has occurred.
Attrib. ID Access Name Data Type Description
16#19 - 25 Set Velocity Format WORDFormat of the velocity attribute:16#1F04 = pulses/s 16#1F05 = pulses/ms 16#1F07 = steps/min 16#1F0F = RPM
16#29 - 41 Get Operating Status BYTEEncoder diagnostic operating status. Bit 0 = Value of attribute 16#0C (12)Bit 1 = Value of attribute 16#0E (14)
16#2A - 42 Get Physical Resolution Span UDINT Physical resolution of the single-turn
resolver sensor
16#2B - 43 Get Number of Spans UINT Maximum number of revolutions that could be measured.
16#2C - 44 Get Alarms WORD Indicates a malfunction has occurred.
16#2D - 45 Get Supported Alarms WORD Information about supported alarms
16#2E - 46 Get Alarm Flag BOOLEANIndicates that an alarm error occurred: 0 = No errors1 = Alarm Error
16#33 - 51 Get Offset Value DINTThe internal position offset that is calcu-lated after applying the Preset Value through attribute 13hex (19)
16#64 - 100 Set Device Type DINTThe way the device identifies itself: 16#22 (default) = Encoder device 16#00 = Generic device
16#70 - 112 Get Actual Sensor Reading UDINT Raw position value read from NR25
16#71 - 113 Get Time Stamp UDINT Value increments every 400 nanoseconds.
20 Gear Drive, Plymouth Ind. Park, Terryville, CT 06786Tel: (860) 585-1254 Fax: (860) 584-1973 http://www.amci.com
79

ADVANCED MICRO CONTROLS INC.
LEADERS IN ADVANCED CONTROL PRODUCTS


