notes 1 Advanced Selection Skills With KATRIN EISMANN Katrin Eismann is one-third artist, one-third author, and one-third educator, whose passions and responsibilities mesh perfectly; allowing her to travel, teach, write, and create images to her heart’s content. She received her BFA degree in Photographic Illustration from the Rochester Institute of Technology and her MFA degree in Design from the School of Visual Arts. She has co-authored: Real World Digital Photography, Web Design Studio Secrets, Adobe Photoshop Studio Secrets, and authored Photoshop Restoration and Retouching and most recently Photoshop Masking & Compositing. Her clients include Apple Computer, Adobe Systems, Eastman Kodak, Nikon USA, Fuji Film, and the US Navy. She spends a great deal of time in airports waiting for flights to domestic and international destinations where she teaches and presents on a wide variety of digital imaging topics. To learn more about Katrin please visit: www.photoshopdiva.com, www.digitalretouch.org, www.binge-golfers.com and (in October, 2004) www.photoshopmasking.com. “Making detailed selections shouldn’t be a hair-raising experience!” Excerpted from the to be released book “Photoshop Masking & Compositing” for Peachpit Press, October 2004. When it comes to silhouetting people with a full head of hair, animals with fur, or scenes with fine detail, I sometimes wish that everyone was as bald as Michael Jordan, that all ani- mals were fish, and that I only worked with pictures of skyscrapers. But of course we don’t live in a world where smooth selections play a key role in evolutionary development – people have hair, mammals have fur, and the fine details of the natural world are to be enjoyed and celebrated. Making selections of fine details requires patience, practice, and creative thinking. One tech- nique may work perfectly well on one type of image but not on another. You may need to combine techniques, and most of the time you’ll need to fine-tune the mask with careful handiwork. In this session you’ll learn about: • Using Adjustment Layers to create selections • Discovering the mask in each image • Using painting tools and Blend Modes to maintain detail • Work with the Apply Image and Calculate commands
Transcript
notes
1
Advanced Selection SkillsWith KATRIN EISMANN
Katrin Eismann is one-third artist, one-third author, and one-third educator, whose passions and responsibilities mesh perfectly; allowing her to travel, teach, write, and create images to her heart’s content. She received her BFA degree in Photographic Illustration from the Rochester Institute of Technology and her MFA degree in Design from the School of Visual Arts. She has co-authored: Real World Digital Photography, Web Design Studio Secrets, Adobe Photoshop Studio Secrets, and authored Photoshop Restoration and Retouching and most recently Photoshop Masking & Compositing. Her clients include Apple Computer, Adobe Systems, Eastman Kodak, Nikon USA, Fuji Film, and the US Navy. She spends a great deal of time in airports waiting for fl ights to domestic and international destinations where she teaches and presents on a wide variety of digital imaging topics. To learn more about Katrin please visit: www.photoshopdiva.com, www.digitalretouch.org, www.binge-golfers.com and (in October, 2004) www.photoshopmasking.com.
“Making detailed selections shouldn’t be a hair-raising experience!”
Excerpted from the to be released book
“Photoshop Masking & Compositing” for Peachpit Press, October 2004.
When it comes to silhouetting people with a full head of hair, animals with fur, or scenes
with fine detail, I sometimes wish that everyone was as bald as Michael Jordan, that all ani-
mals were fish, and that I only worked with pictures of skyscrapers. But of course we don’t
live in a world where smooth selections play a key role in evolutionary development –
people have hair, mammals have fur, and the fine details of the natural world are to be
enjoyed and celebrated.
Making selections of fine details requires patience, practice, and creative thinking. One tech-
nique may work perfectly well on one type of image but not on another. You may need to
combine techniques, and most of the time you’ll need to fine-tune the mask with careful
handiwork.
In this session you’ll learn about:
• Using Adjustment Layers to create selections
• Discovering the mask in each image
• Using painting tools and Blend Modes to maintain detail
• Work with the Apply Image and Calculate commands
notes
2
With INSTRUCTOR KATRIN EISMANN
Advanced Selection Skills
ACCENTUATING DIFFERENCESThinking in Black and White
The primary goal when separating images with fi ne detail from the background is to maintain as much detail as possible. The concept of preserving detail is so important that this session focuses solely on how to accentuate existing image information by separating light and dark areas, while maintaining subtle transitional tones. In the end it amounts to creating a silhouette that looks like it was precisely cut using a fi ne-edged scalpel rather than shredded with dull hedge clippers.
All Photoshop masks are black and white with shades of gray. When you make a mask based on a complicated subject, imagining the image in high-contrast black and white is very helpful. While making a fi ne mask, it may even look like you’re ruining the image with excessive contrast, but as long as you use empty layers and Adjustment Layers; the original image will not be affected. In the following example, I’ll show you how to use high contrast Adjustment Layers to build a mask with fi ne detail.
Figure 1 shows an original studio photograph of a little girl by Mark Beckelman. One of the fi rst steps in compositing this photo with a new background was to separate the girl from the studio background. A bad cutout job can really call attention to itself, as shown in fi gure 2 – the telltale fringing and lack of detail attest to a poorly made silhouette. Figure 3 shows the same image with a silhouette that separates the girl from the background while maintaining the strands of hair.
The fi rst selection was done with the Magic Wand, while the second selection was created with a combination of Adjustment Layers and painting. All in all, the second selection only took a few minutes more, but the results are certainly worth it.
Although the little girl was correctly photographed with a simple, white background – separating her from it will require a number of steps. One method to approach such an image is to temporarily increase the tonal difference between the subject, in this case the little girl, and the background using a Curves Adjustment Layer to separate the subject from the background. The goal is to make a contrasty black and white image that maintains edge transitions.
3
With INSTRUCTOR KATRIN EISMANN
Advanced Selection Skills
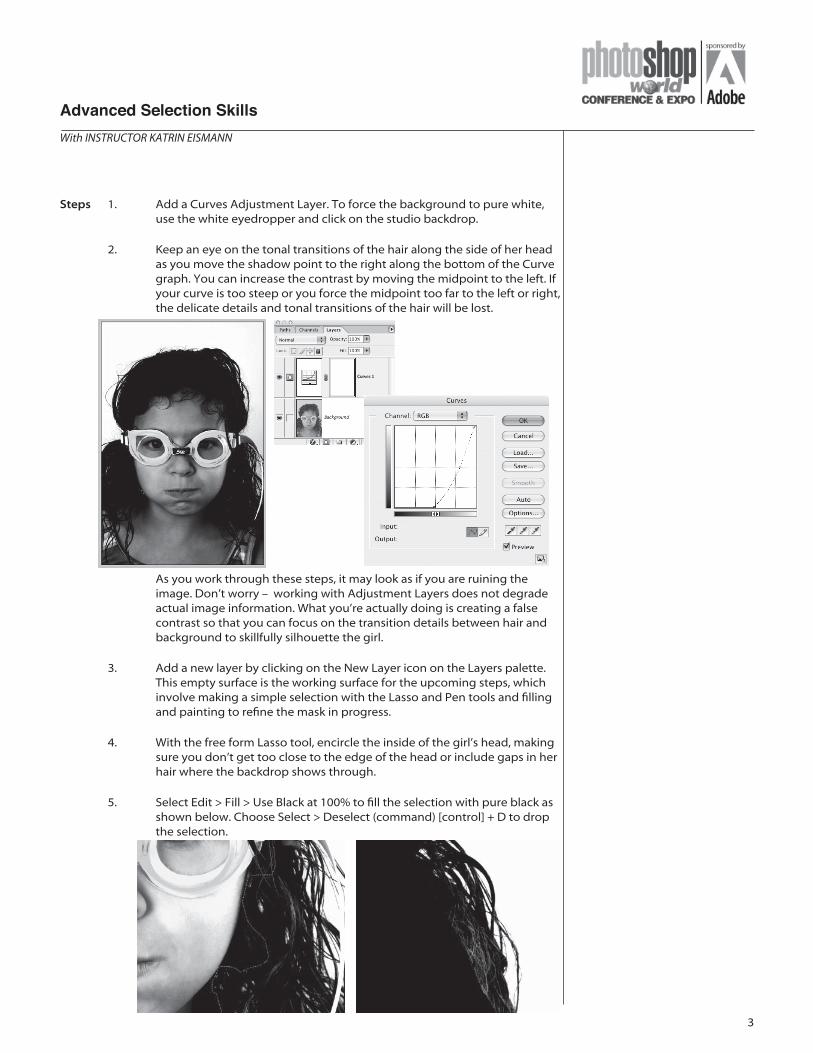
Steps 1. Add a Curves Adjustment Layer. To force the background to pure white, use the white eyedropper and click on the studio backdrop.
2. Keep an eye on the tonal transitions of the hair along the side of her head as you move the shadow point to the right along the bottom of the Curve graph. You can increase the contrast by moving the midpoint to the left. If your curve is too steep or you force the midpoint too far to the left or right, the delicate details and tonal transitions of the hair will be lost.
As you work through these steps, it may look as if you are ruining the image. Don’t worry – working with Adjustment Layers does not degrade actual image information. What you’re actually doing is creating a false contrast so that you can focus on the transition details between hair and background to skillfully silhouette the girl.
3. Add a new layer by clicking on the New Layer icon on the Layers palette. This empty surface is the working surface for the upcoming steps, which involve making a simple selection with the Lasso and Pen tools and fi lling and painting to refi ne the mask in progress.
4. With the free form Lasso tool, encircle the inside of the girl’s head, making sure you don’t get too close to the edge of the head or include gaps in her hair where the backdrop shows through.
5. Select Edit > Fill > Use Black at 100% to fi ll the selection with pure black as shown below. Choose Select > Deselect (command) [control] + D to drop the selection.
notes
4
With INSTRUCTOR KATRIN EISMANN
Advanced Selection Skills
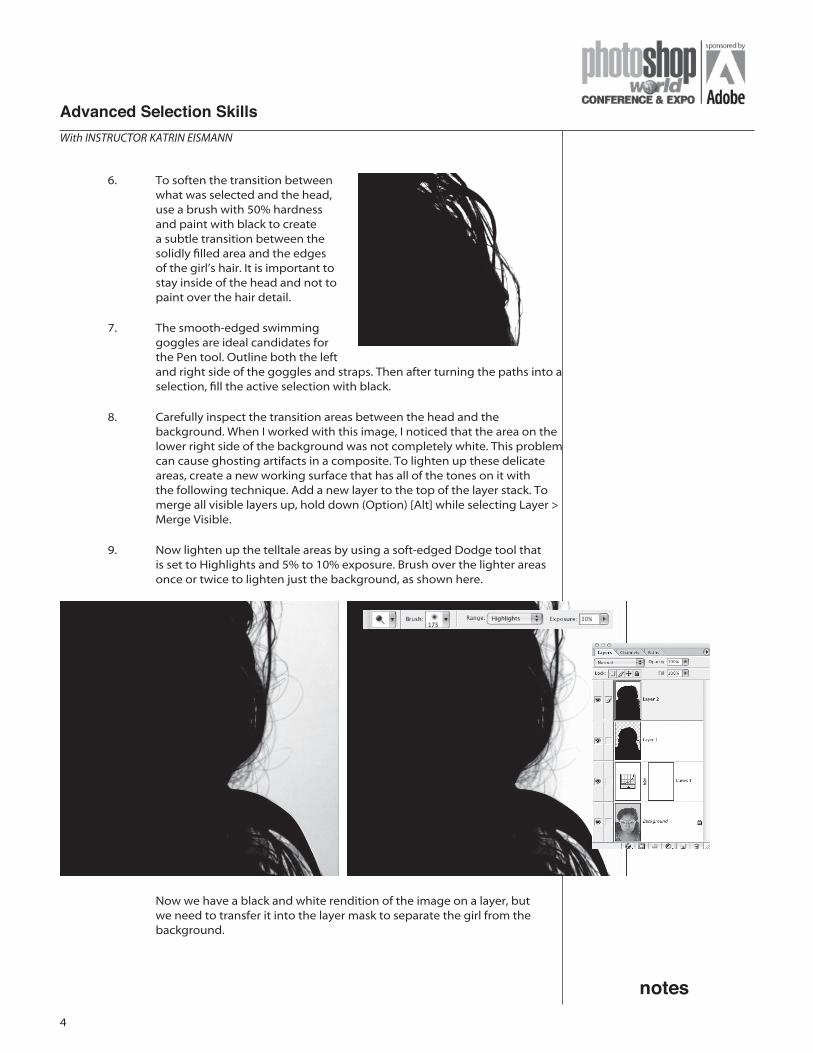
6. To soften the transition between what was selected and the head, use a brush with 50% hardness and paint with black to create a subtle transition between the solidly fi lled area and the edges of the girl’s hair. It is important to stay inside of the head and not to paint over the hair detail.
7. The smooth-edged swimming goggles are ideal candidates for the Pen tool. Outline both the left and right side of the goggles and straps. Then after turning the paths into a selection, fi ll the active selection with black.
8. Carefully inspect the transition areas between the head and the background. When I worked with this image, I noticed that the area on the lower right side of the background was not completely white. This problem can cause ghosting artifacts in a composite. To lighten up these delicate areas, create a new working surface that has all of the tones on it with the following technique. Add a new layer to the top of the layer stack. To merge all visible layers up, hold down (Option) [Alt] while selecting Layer > Merge Visible.
9. Now lighten up the telltale areas by using a soft-edged Dodge tool that is set to Highlights and 5% to 10% exposure. Brush over the lighter areas once or twice to lighten just the background, as shown here.
Now we have a black and white rendition of the image on a layer, but we need to transfer it into the layer mask to separate the girl from the background.
5
With INSTRUCTOR KATRIN EISMANN
Advanced Selection Skills
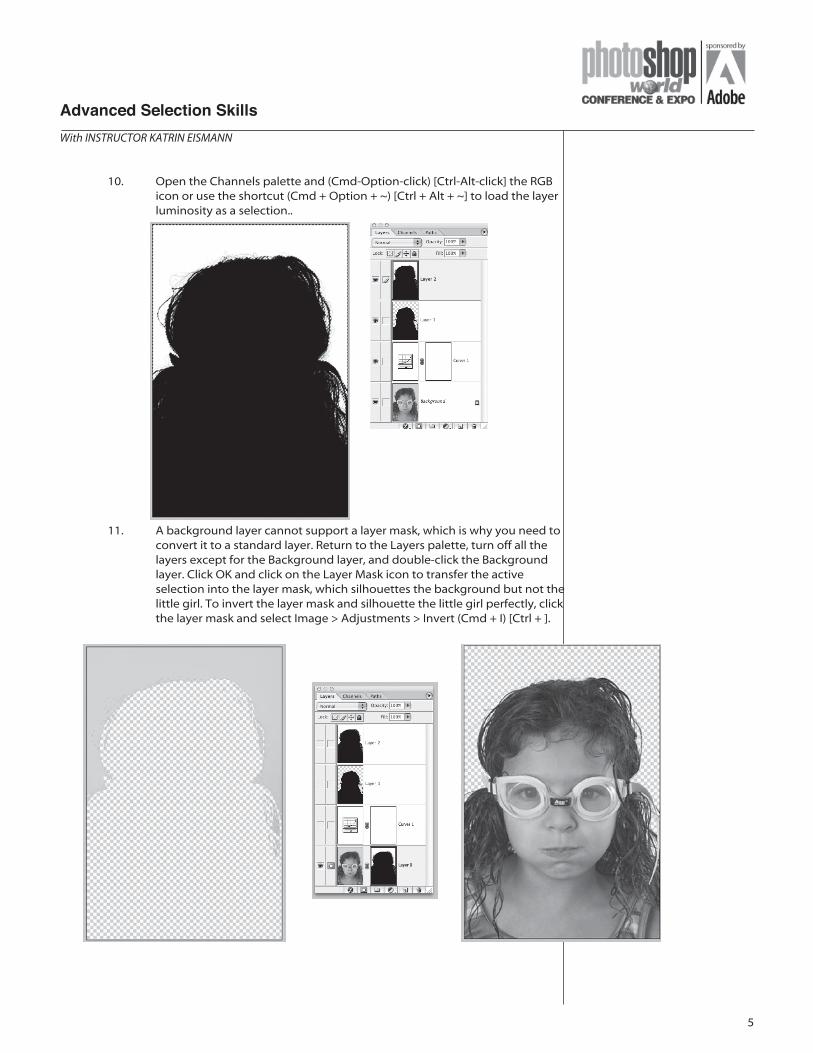
10. Open the Channels palette and (Cmd-Option-click) [Ctrl-Alt-click] the RGB icon or use the shortcut (Cmd + Option + ~) [Ctrl + Alt + ~] to load the layer luminosity as a selection..
11. A background layer cannot support a layer mask, which is why you need to convert it to a standard layer. Return to the Layers palette, turn off all the layers except for the Background layer, and double-click the Background layer. Click OK and click on the Layer Mask icon to transfer the active selection into the layer mask, which silhouettes the background but not the little girl. To invert the layer mask and silhouette the little girl perfectly, click the layer mask and select Image > Adjustments > Invert (Cmd + I) [Ctrl + ].
notes
6
With INSTRUCTOR KATRIN EISMANN
Advanced Selection Skills
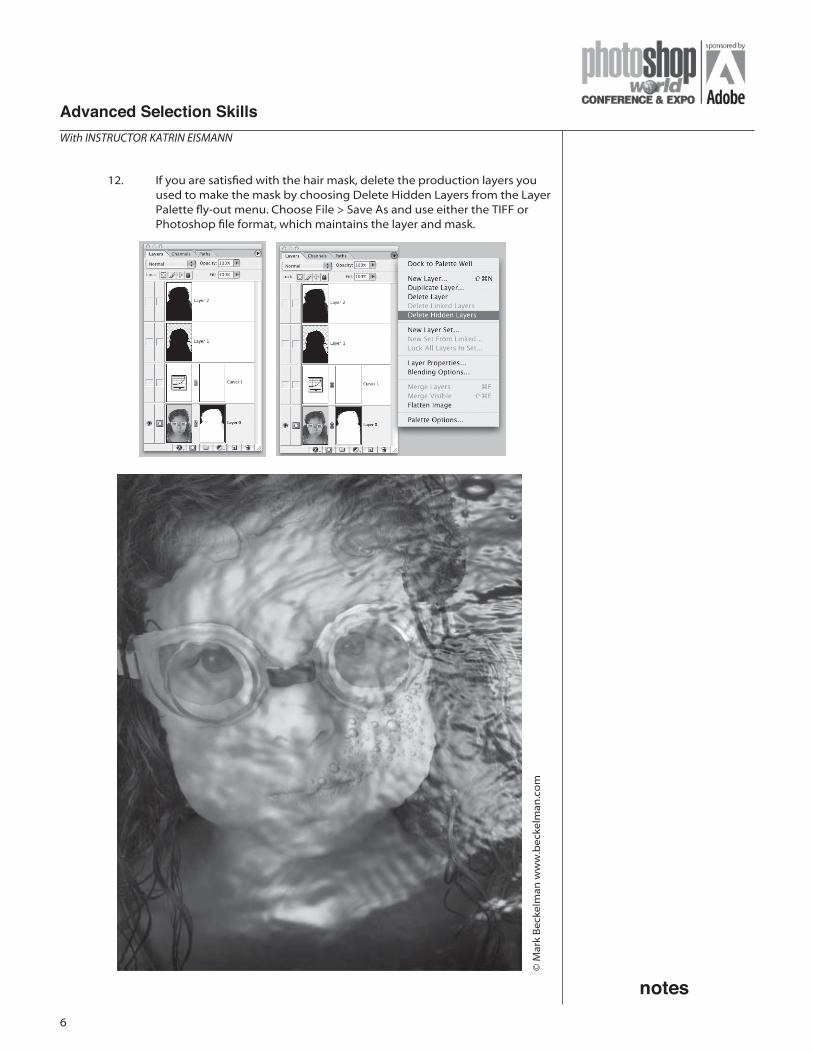
12. If you are satisfi ed with the hair mask, delete the production layers you used to make the mask by choosing Delete Hidden Layers from the Layer Palette fl y-out menu. Choose File > Save As and use either the TIFF or Photoshop fi le format, which maintains the layer and mask.
Working with Blending ModesTeasing out the Details
Blending modes is one of the best Photoshop features that infl uence how pixels interact. They can be found throughout the program in the Layers palette, Layer Styles, the Fill, Stroke and Fade commands, painting tools, and Apply and Calculate commands – but not in the Channels palette. Or are they? Shan Canfi eld introduced me to the following technique, and it taught me that channels can take advantage of blending modes, if you know where to look. For additional information on Blending Modes please see the “Ten Reasons to Love Adjustment Layers” session handout.
Here is a high-school portrait in which the background is too dark and drab. By making a quick “paste and fade” mask, a studio backdrop was added and the photo was enhanced with an insinuation of greater depth.
Steps 1. Start by inspecting the three color channels to identify the one with the best contrast and tonal defi nition. In this case, the red channel is the best. Drag it down to the Create New Channel button.
2. With the copy of the red channel active, choose Select > All, then Edit > Copy, and then Edit > Paste. It will look as if nothing has changed in the image. Immediately after pasting, select Edit > Fade.
Please note: You have to select fade immediately after pasting or else it will not be active. If your Fade is grayed out, you must repeat the select, copy, paste steps and then choose fade.
It is in the Fade command where the magic happens. The fade command includes the blending modes. By using a blending mode that builds contrast, you darken the darks and lighten the lighter areas to build a better mask.
3. On this image, use Color Dodge to effectively increase the contrast.
4. To exaggerate the contrast even more, repeat Steps 2 and 3 to copy the high contrast channel 4 and paste it onto itself. Use Edit > Fade with Color Dodge to create a very high contrast mask, as shown here.
When using this technique on your own images, you may not have to copy/paste the channel twice, the less aggressive blending modes may be more effective, and adjusting the Fade opacity may be helpful.
9
With INSTRUCTOR KATRIN EISMANN
Advanced Selection Skills
5. Verify the density of the mask using the Info palette. Make sure that the blacks are black and the whites white. As seen below the black density is not 100%. Choose Image > Adjustments > Levels and move the black slider to the right until the Info palette reads 100%.
6. Select the inside of the boy using the Lasso tool and fi ll with white. Then choose Select > Deselect. Use a white brush set to Overlay to paint over his hair and to create a transition between the selected and fi lled area and the edges of the fi gure.
notes
10
With INSTRUCTOR KATRIN EISMANN
Advanced Selection Skills
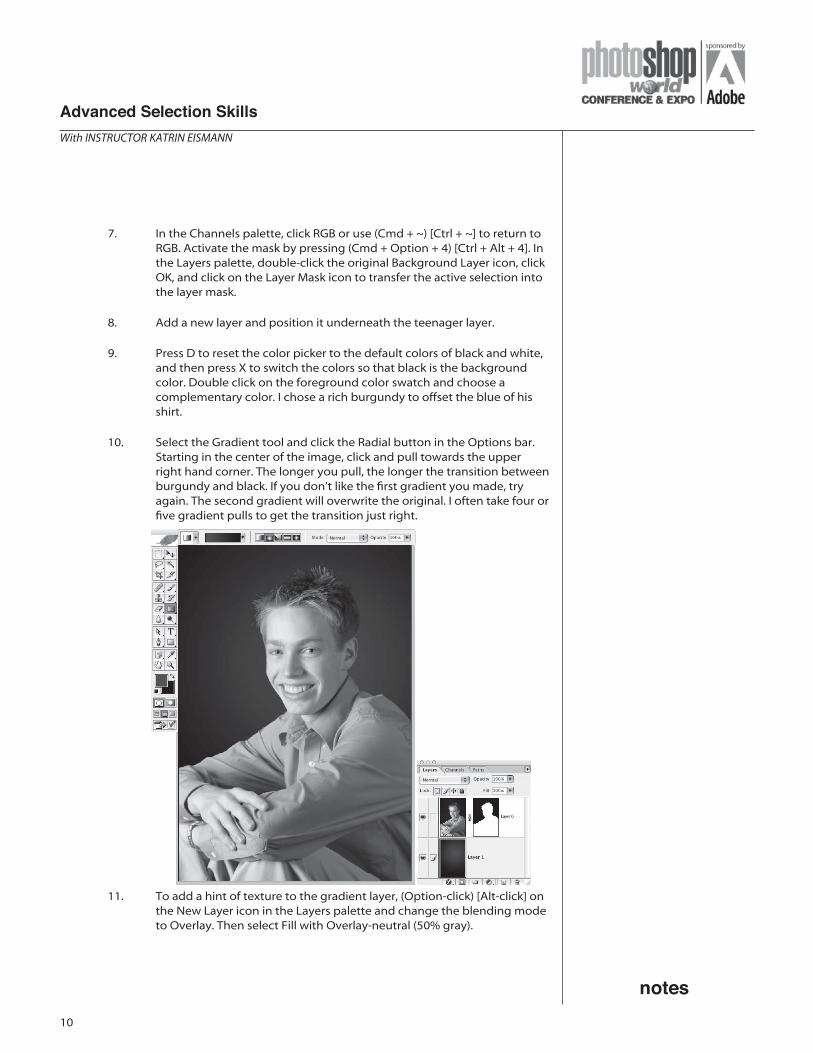
7. In the Channels palette, click RGB or use (Cmd + ~) [Ctrl + ~] to return to RGB. Activate the mask by pressing (Cmd + Option + 4) [Ctrl + Alt + 4]. In the Layers palette, double-click the original Background Layer icon, click OK, and click on the Layer Mask icon to transfer the active selection into the layer mask.
8. Add a new layer and position it underneath the teenager layer.
9. Press D to reset the color picker to the default colors of black and white, and then press X to switch the colors so that black is the background color. Double click on the foreground color swatch and choose a complementary color. I chose a rich burgundy to offset the blue of his shirt.
10. Select the Gradient tool and click the Radial button in the Options bar. Starting in the center of the image, click and pull towards the upper right hand corner. The longer you pull, the longer the transition between burgundy and black. If you don’t like the fi rst gradient you made, try again. The second gradient will overwrite the original. I often take four or fi ve gradient pulls to get the transition just right.
11. To add a hint of texture to the gradient layer, (Option-click) [Alt-click] on the New Layer icon in the Layers palette and change the blending mode to Overlay. Then select Fill with Overlay-neutral (50% gray).
11
With INSTRUCTOR KATRIN EISMANN
Advanced Selection Skills
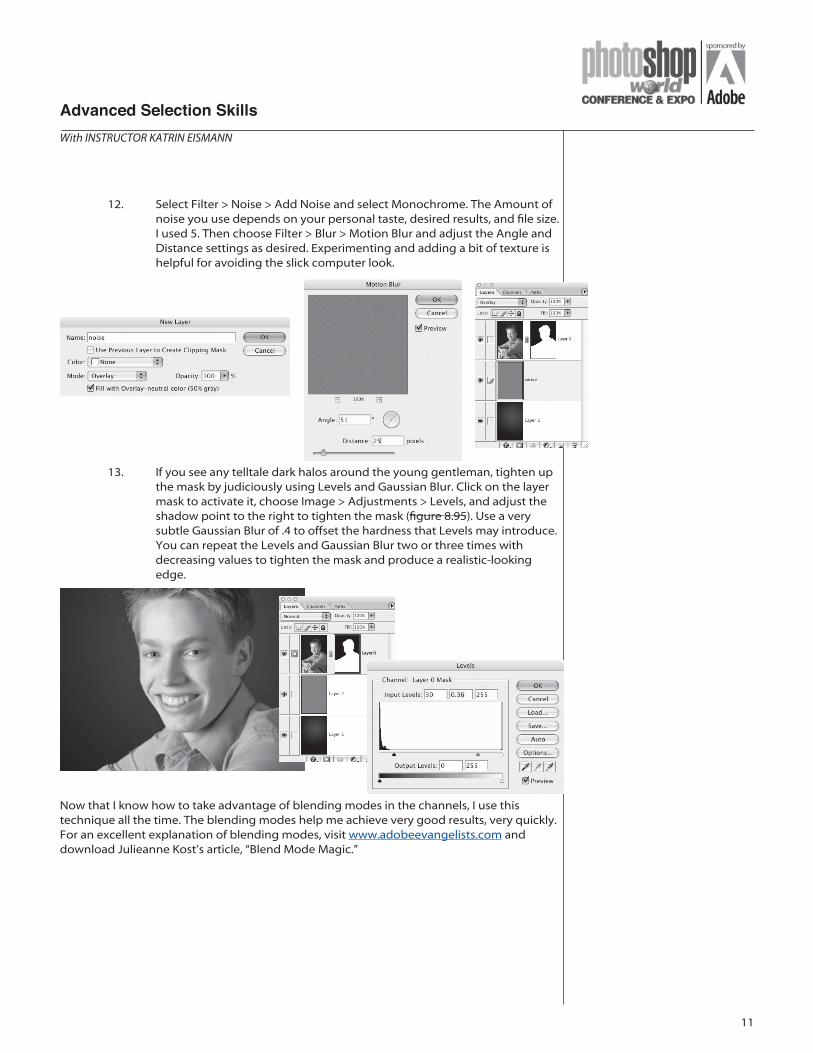
12. Select Filter > Noise > Add Noise and select Monochrome. The Amount of noise you use depends on your personal taste, desired results, and fi le size. I used 5. Then choose Filter > Blur > Motion Blur and adjust the Angle and Distance settings as desired. Experimenting and adding a bit of texture is helpful for avoiding the slick computer look.
13. If you see any telltale dark halos around the young gentleman, tighten up the mask by judiciously using Levels and Gaussian Blur. Click on the layer mask to activate it, choose Image > Adjustments > Levels, and adjust the shadow point to the right to tighten the mask (fi gure 8.95). Use a very subtle Gaussian Blur of .4 to offset the hardness that Levels may introduce. You can repeat the Levels and Gaussian Blur two or three times with decreasing values to tighten the mask and produce a realistic-looking edge.
Now that I know how to take advantage of blending modes in the channels, I use this technique all the time. The blending modes help me achieve very good results, very quickly. For an excellent explanation of blending modes, visit www.adobeevangelists.com and download Julieanne Kost’s article, “Blend Mode Magic.”
notes
12
With INSTRUCTOR KATRIN EISMANN
Advanced Selection Skills
Understanding Apply Image and Image Calculations...don’t worry they don’t bite!
Under the Image menu you’ll fi nd two useful commands – Apply Image and Calculations. Before the introduction of layers with Photoshop 3.0 image compositing and controlling effects relied heavily on channel masking. The most advanced method to create fi ne-edged masks was to use the Image Calculation commands to combine and refi ne images and channels. Today with the use of layers and blending modes many of their results can be achieved with more easily but, these commands still offer useful methods for creating image composites and building masks that maintain fi ne tonal and edge detail. Since Image Calculations use interchannel math that compares channel values to create the results they are often called chops (channel operations).
Please note: A discussion of Calculations would not be complete without a sincere tip of the hat to John Knoll, Kai Krause, David Biedny, Bert Monroy, and Bryan Guignard. It is with great appreciation that I learned from all of your lectures, books, articles, and on-line tutorials.
The Apply Image and the Calculate commands have similarities and differences that make them more daunting to understand than they really need to be.
The two commands share the following requirements:
Images you want to calculate need to be open. You can’t navigate to a closed fi le on your hard drive to use it during a calculate session.
Images you want to calculate together need to be the exact same (to the very pixel) width and height. With the booming popularity of digital cameras, this requirement is becoming easier and easier to meet.
You can mix and match RGB, LAB, CMYK, and grayscale images with the Calculate command.
Both commands can be used to move selections between fi les.
In addition to the standard blending modes, both Apply Image and Calculate include the Add and Subtract blending modes (see the sidebar “The Math behind Blending Modes” for more information).
The primary differences are:
The Apply Image command uses the composite color image or single channel as its source to create color images or channels. It cannot create a new document, channel, or layer.
The Calculate command lets you choose a source from any open image with the same image resolution, but it only uses a single grayscale channel. Calculate creates a new channel, black-and-white document, or an active selection but never a color fi le.
To be completely accurate, the Duplicate command is also a calculate function, and it is the fastest way to duplicate a fi le – especially one with many layers and channels. Holding down the (Option) [Alt] key while selecting Image > Duplicate bypasses the duplicate window. (You also have to keep your mouse button down during this maneuver, if you release the mouse when the menu drops down, while holding the Alt key, the menu disappears.) Since the Apply Image command overwrites the active source, I recommend you either duplicate
13
With INSTRUCTOR KATRIN EISMANN
Advanced Selection Skills
the fi le before using Apply Image or make 100 percent sure you’re working on a copy of your original fi le.
The Apply Image Settings
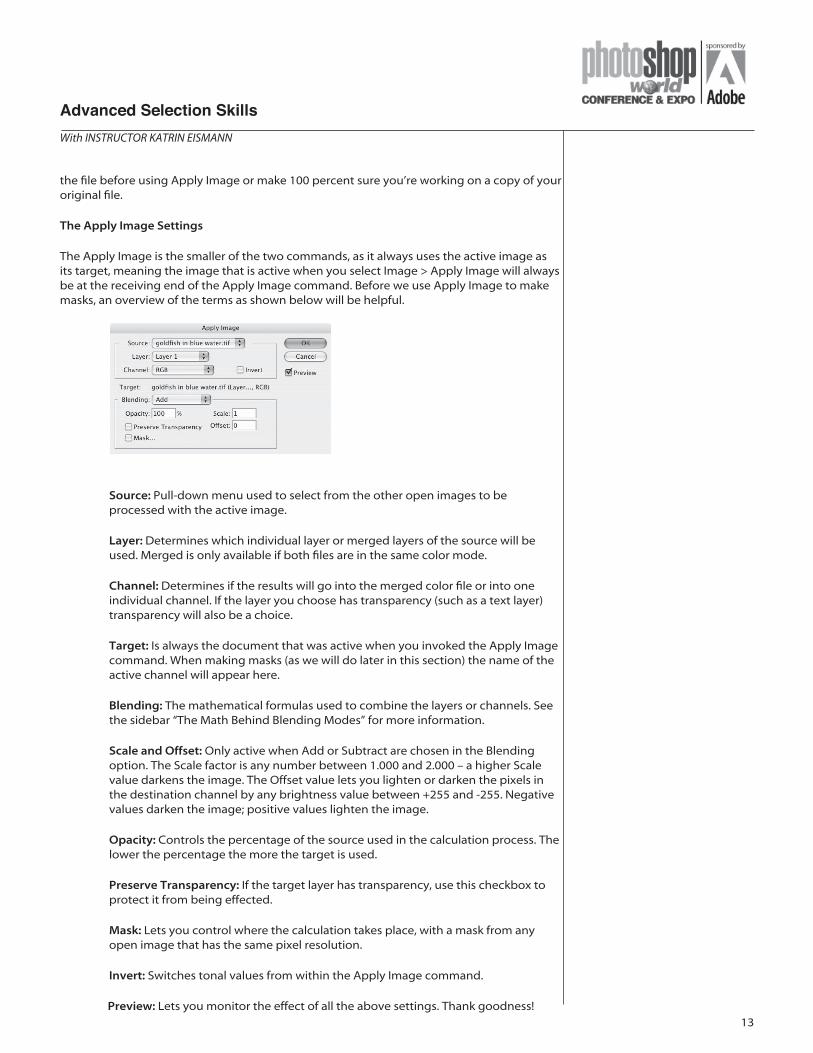
The Apply Image is the smaller of the two commands, as it always uses the active image as its target, meaning the image that is active when you select Image > Apply Image will always be at the receiving end of the Apply Image command. Before we use Apply Image to make masks, an overview of the terms as shown below will be helpful.
Source: Pull-down menu used to select from the other open images to be processed with the active image.
Layer: Determines which individual layer or merged layers of the source will be used. Merged is only available if both fi les are in the same color mode.
Channel: Determines if the results will go into the merged color fi le or into one individual channel. If the layer you choose has transparency (such as a text layer) transparency will also be a choice.
Target: Is always the document that was active when you invoked the Apply Image command. When making masks (as we will do later in this section) the name of the active channel will appear here.
Blending: The mathematical formulas used to combine the layers or channels. See the sidebar “The Math Behind Blending Modes” for more information.
Scale and Offset: Only active when Add or Subtract are chosen in the Blending option. The Scale factor is any number between 1.000 and 2.000 – a higher Scale value darkens the image. The Offset value lets you lighten or darken the pixels in the destination channel by any brightness value between +255 and -255. Negative values darken the image; positive values lighten the image.
Opacity: Controls the percentage of the source used in the calculation process. The lower the percentage the more the target is used.
Preserve Transparency: If the target layer has transparency, use this checkbox to protect it from being effected.
Mask: Lets you control where the calculation takes place, with a mask from any open image that has the same pixel resolution.
Invert: Switches tonal values from within the Apply Image command.
Preview: Lets you monitor the effect of all the above settings. Thank goodness!
notes
14
With INSTRUCTOR KATRIN EISMANN
Advanced Selection Skills
In a nutshell, before using the Apply Image command, make sure the image, layer, or channel you want to composite or make a mask for is active.
USING THE APPLY IMAGE COMMAND ON MULTIPLE CHANNELS
I wanted to replace the drab studio background to place the young woman into a more interesting sunset scene. The Apply Image command can be used to mathematically blend the one channel into itself, or as in this example, to blend two channels to make a mask.
This image relies on the delicate sunset colors and may not reproduce well in black and white.
Isolating Soft-focus Hair
Steps 1. Before entering the Apply Image dialog box, inspect the color channels of the portrait to see which ones have the best tonal information. In this example both the red and the green channels contain valuable tonal information (seen from left to right - red, green, and blue). Since the green channel offers the best tonal differentiation, duplicate it by dragging it down to the Create new channel button on the Channels palette.
15
With INSTRUCTOR KATRIN EISMANN
Advanced Selection Skills
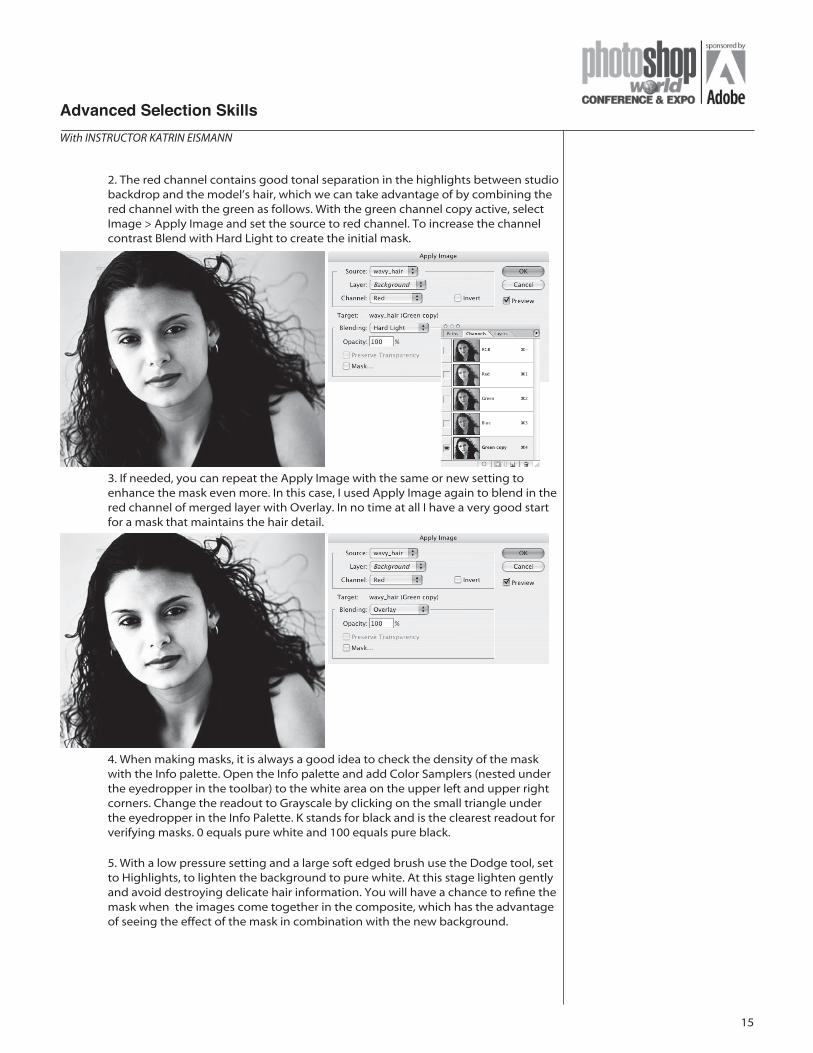
2. The red channel contains good tonal separation in the highlights between studio backdrop and the model’s hair, which we can take advantage of by combining the red channel with the green as follows. With the green channel copy active, select Image > Apply Image and set the source to red channel. To increase the channel contrast Blend with Hard Light to create the initial mask.
3. If needed, you can repeat the Apply Image with the same or new setting to enhance the mask even more. In this case, I used Apply Image again to blend in the red channel of merged layer with Overlay. In no time at all I have a very good start for a mask that maintains the hair detail.
4. When making masks, it is always a good idea to check the density of the mask with the Info palette. Open the Info palette and add Color Samplers (nested under the eyedropper in the toolbar) to the white area on the upper left and upper right corners. Change the readout to Grayscale by clicking on the small triangle under the eyedropper in the Info Palette. K stands for black and is the clearest readout for verifying masks. 0 equals pure white and 100 equals pure black.
5. With a low pressure setting and a large soft edged brush use the Dodge tool, set to Highlights, to lighten the background to pure white. At this stage lighten gently and avoid destroying delicate hair information. You will have a chance to refi ne the mask when the images come together in the composite, which has the advantage of seeing the effect of the mask in combination with the new background.
notes
16
With INSTRUCTOR KATRIN EISMANN
Advanced Selection Skills
6. Select the interior of the woman and fi ll with black to create the results seen below.
Tip: When selecting large areas of a mask with the Lasso or Marquee tools, make sure the feather is set to 0 before making the selection. Using a feathered selection tool may impact the edge quality of the mask in unexpected and undesired ways.
Compositing the Woman into the Sunset
6. Return to the RGB channel. Choose Select > Load Select and choose Green copy.
17
With INSTRUCTOR KATRIN EISMANN
Advanced Selection Skills
7. Open the sunset image and use the Move tool to drag the sunset over to the woman image and click on the ‘Add layer mask’ button to create the initial composite. For an preliminary composite the image doesn’t look too bad – but the light halos caused by the lighter studio backdrop around her hair are distracting and the sunset is too strong, which distracts from her.
8. By adjusting the opacity of the sunset layer to 65% its color dominance is reduced, which allows the focus of the image to be the woman and not the sunset as shown here.
Apply Image works extremely well on large fi les and once you’ve tried them a few times and become familiar with the terms and effects you’ll fi nd yourself using it often. Of course you’ll need to experiment with the channels and blending modes that work best for your own images.
notes
18
With INSTRUCTOR KATRIN EISMANN
Advanced Selection Skills
WORKING WITH THE CALCULATIONS COMMAND
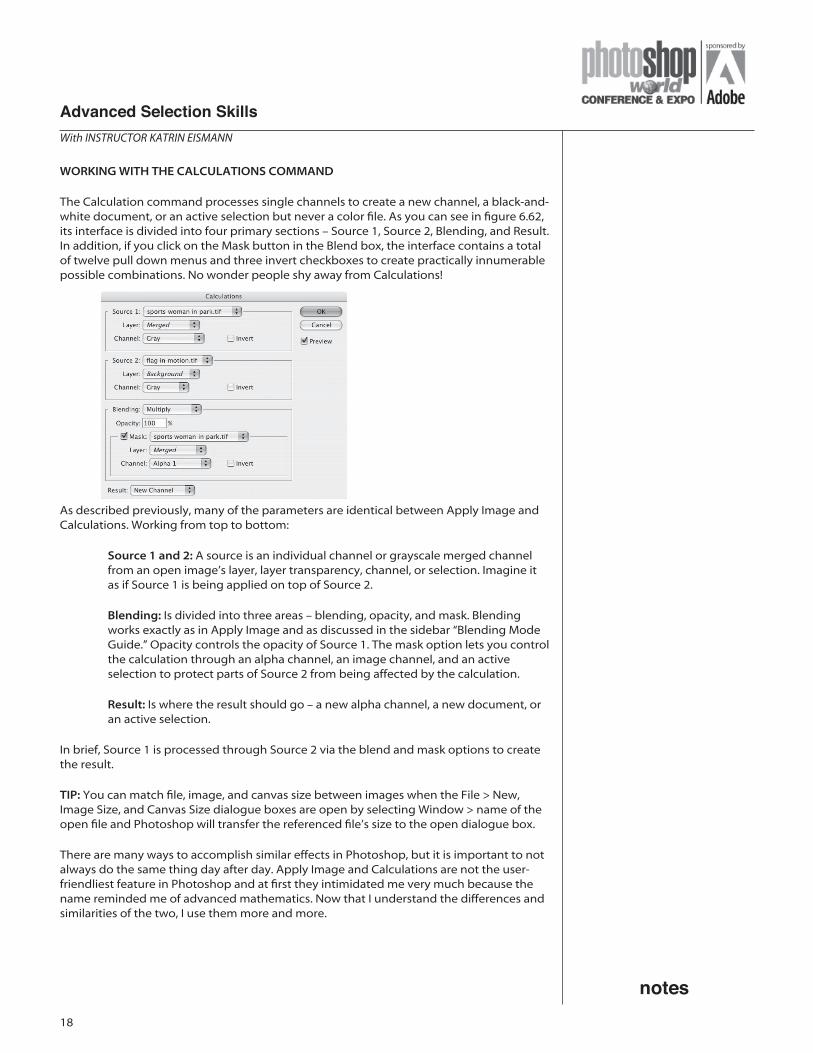
The Calculation command processes single channels to create a new channel, a black-and-white document, or an active selection but never a color fi le. As you can see in fi gure 6.62, its interface is divided into four primary sections – Source 1, Source 2, Blending, and Result. In addition, if you click on the Mask button in the Blend box, the interface contains a total of twelve pull down menus and three invert checkboxes to create practically innumerable possible combinations. No wonder people shy away from Calculations!
As described previously, many of the parameters are identical between Apply Image and Calculations. Working from top to bottom:
Source 1 and 2: A source is an individual channel or grayscale merged channel from an open image’s layer, layer transparency, channel, or selection. Imagine it as if Source 1 is being applied on top of Source 2.
Blending: Is divided into three areas – blending, opacity, and mask. Blending works exactly as in Apply Image and as discussed in the sidebar “Blending Mode Guide.” Opacity controls the opacity of Source 1. The mask option lets you control the calculation through an alpha channel, an image channel, and an active selection to protect parts of Source 2 from being affected by the calculation.
Result: Is where the result should go – a new alpha channel, a new document, or an active selection.
In brief, Source 1 is processed through Source 2 via the blend and mask options to create the result.
TIP: You can match fi le, image, and canvas size between images when the File > New, Image Size, and Canvas Size dialogue boxes are open by selecting Window > name of the open fi le and Photoshop will transfer the referenced fi le’s size to the open dialogue box.
There are many ways to accomplish similar effects in Photoshop, but it is important to not always do the same thing day after day. Apply Image and Calculations are not the user-friendliest feature in Photoshop and at fi rst they intimidated me very much because the name reminded me of advanced mathematics. Now that I understand the differences and similarities of the two, I use them more and more.
19
Advanced Selection SkillsWith INSTRUCTOR KATRIN EISMANN