Private and Confidential, Internal Use Only, Not for External Distribution 5/20/2015 | 2 of 19
REQUIREMENTS
ESCALATION PROCESS
Agents at home are required to use their existing escalation process for all issues.
TROUBLESHOOTING REMINDERS/TIPS
Logging Off: It is essential that you use the log off process provided in this job aid. Failing to properly log off after being in the Citrix environment can cause system issues.
Disconnecting: Never disconnect from either the virtual machine or the Citrix connection.
USB Devices: Users must NOT have USB devices plugged into their computer. Devices may inhibit home system performance.
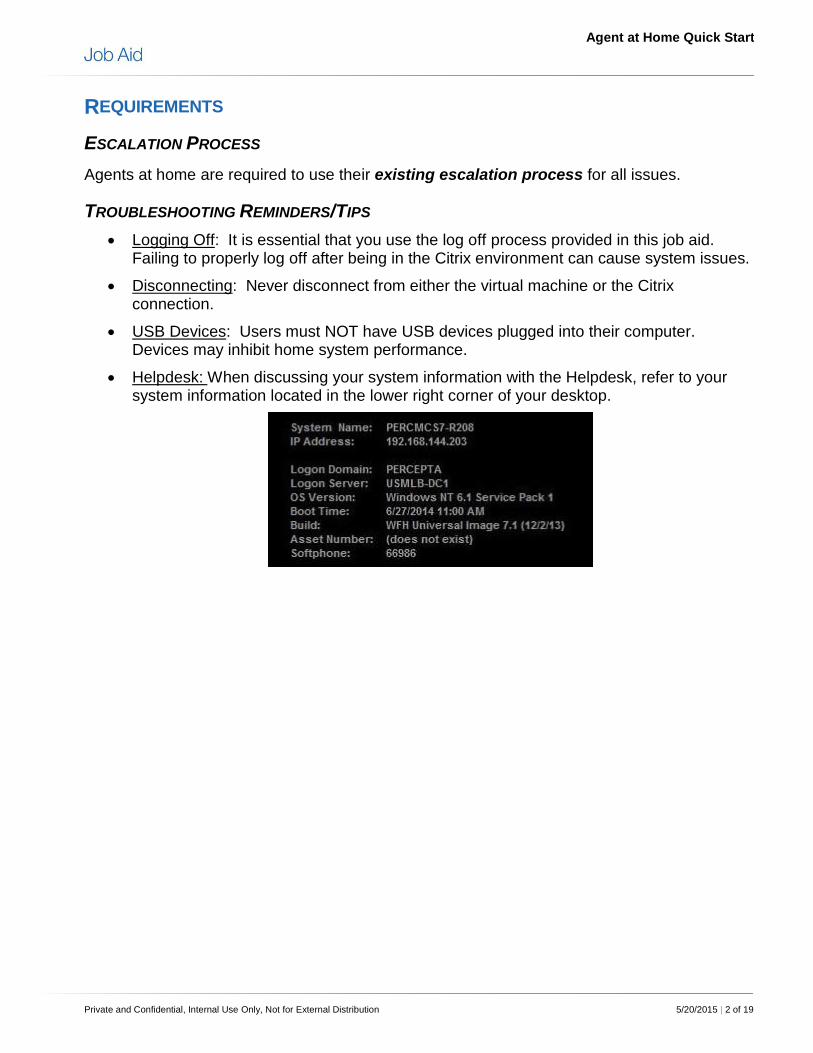
Helpdesk: When discussing your system information with the Helpdesk, refer to your system information located in the lower right corner of your desktop.
Agent at Home Quick Start
Private and Confidential, Internal Use Only, Not for External Distribution 5/20/2015 | 3 of 19
CITRIX LOGIN INSTRUCTIONS
Agent @home requires Internet Explorer version 8 or version 11.
1. Have your CryptoCard key
fob ready(hard token). Note: If you
have a soft token, enter your PIN only
on the soft token and then take the
code it displays and enter that into the
CryptoCard Password field without the
PIN.
2. Open up Internet Explorer.
3. Navigate to athome.percepta.com to
access the Percepta Agent @home
portal.
4. The new window provides three links:
Click “Launch @Home Portal” to
launch Citrix Access Gateway, The
Quick Start Guide, Documentation
(Help and System Requirements).
5. Citrix Access Gateway displays in a
new window. Enter the following
information:
Windows Username- Percepta
domain user name
(firstname.lastname)
Windows Password- Windows
domain password
CryptoCard Password- 4 or 5
digit PIN + 8 digits displayed on the
CryptoCard key fob
firstname.lastname
Make sure you
press the key
fob button.
Agent at Home Quick Start
Private and Confidential, Internal Use Only, Not for External Distribution 5/20/2015 | 4 of 19
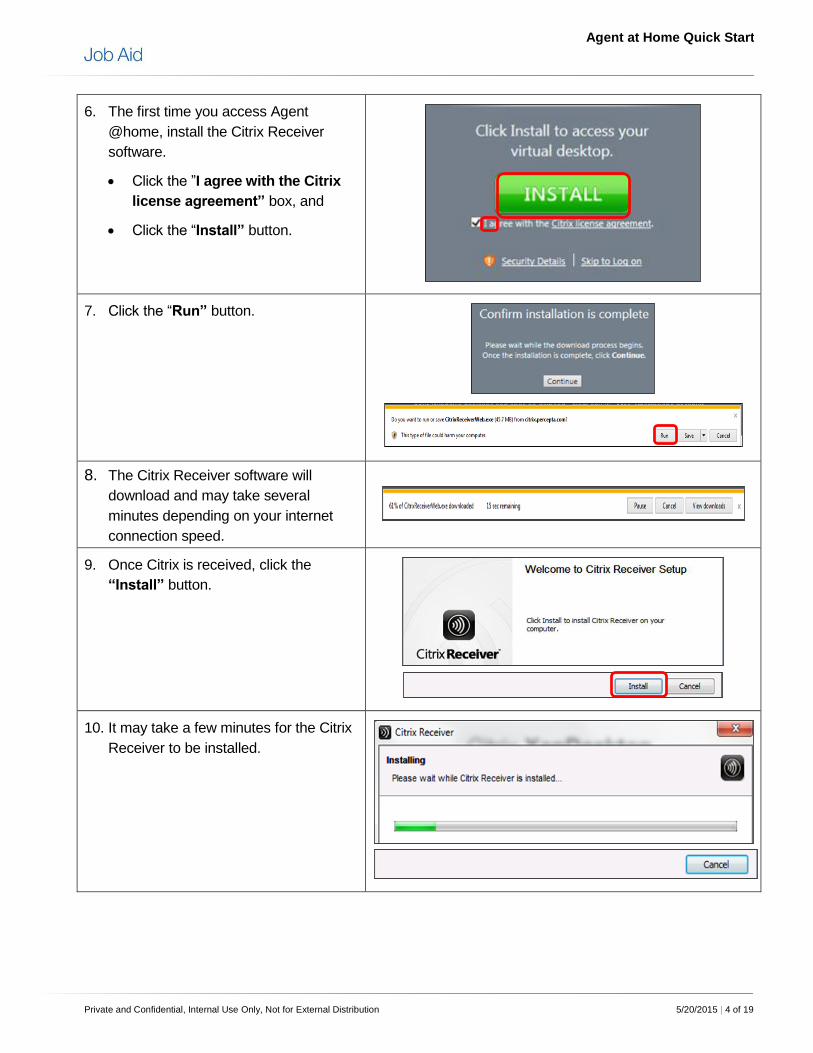
6. The first time you access Agent
@home, install the Citrix Receiver
software.
Click the ”I agree with the Citrix
license agreement” box, and
Click the “Install” button.
7. Click the “Run” button.
8. The Citrix Receiver software will
download and may take several
minutes depending on your internet
connection speed.
9. Once Citrix is received, click the
“Install” button.
10. It may take a few minutes for the Citrix
Receiver to be installed.
Agent at Home Quick Start
Private and Confidential, Internal Use Only, Not for External Distribution 5/20/2015 | 5 of 19
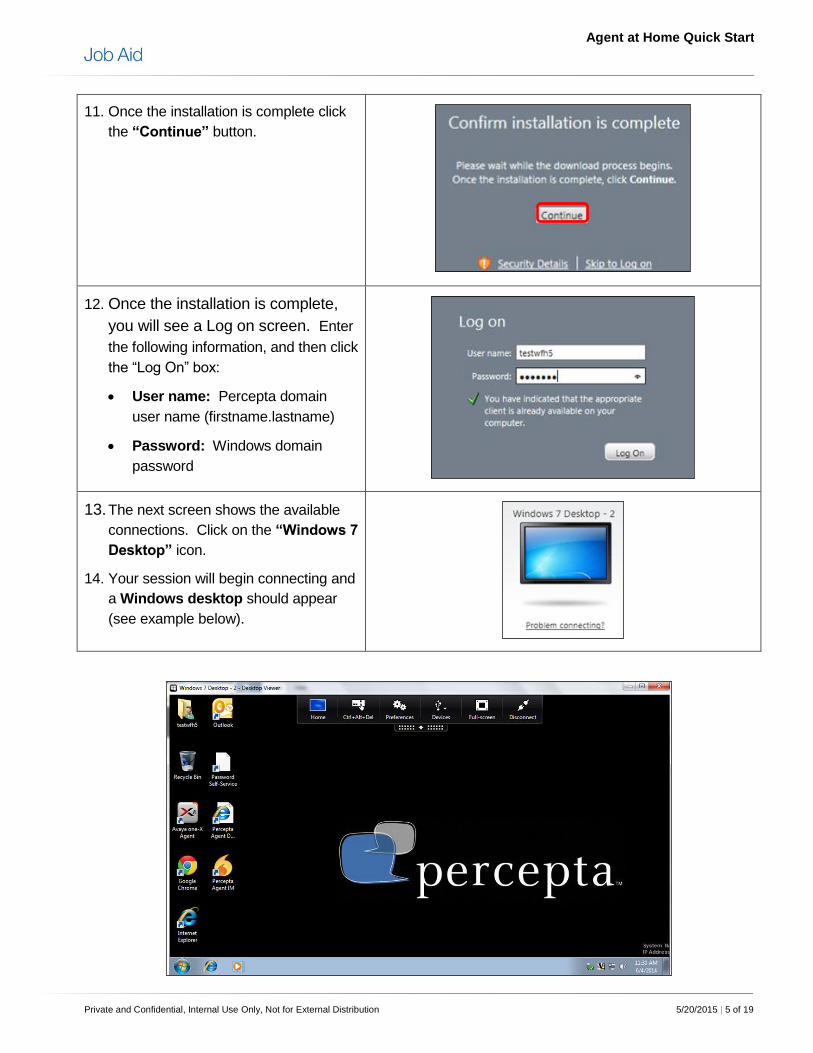
11. Once the installation is complete click
the “Continue” button.
12. Once the installation is complete,
you will see a Log on screen. Enter
the following information, and then click
the “Log On” box:
User name: Percepta domain
user name (firstname.lastname)
Password: Windows domain
password
13. The next screen shows the available
connections. Click on the “Windows 7
Desktop” icon.
14. Your session will begin connecting and
a Windows desktop should appear
(see example below).
Agent at Home Quick Start
Private and Confidential, Internal Use Only, Not for External Distribution 5/20/2015 | 6 of 19
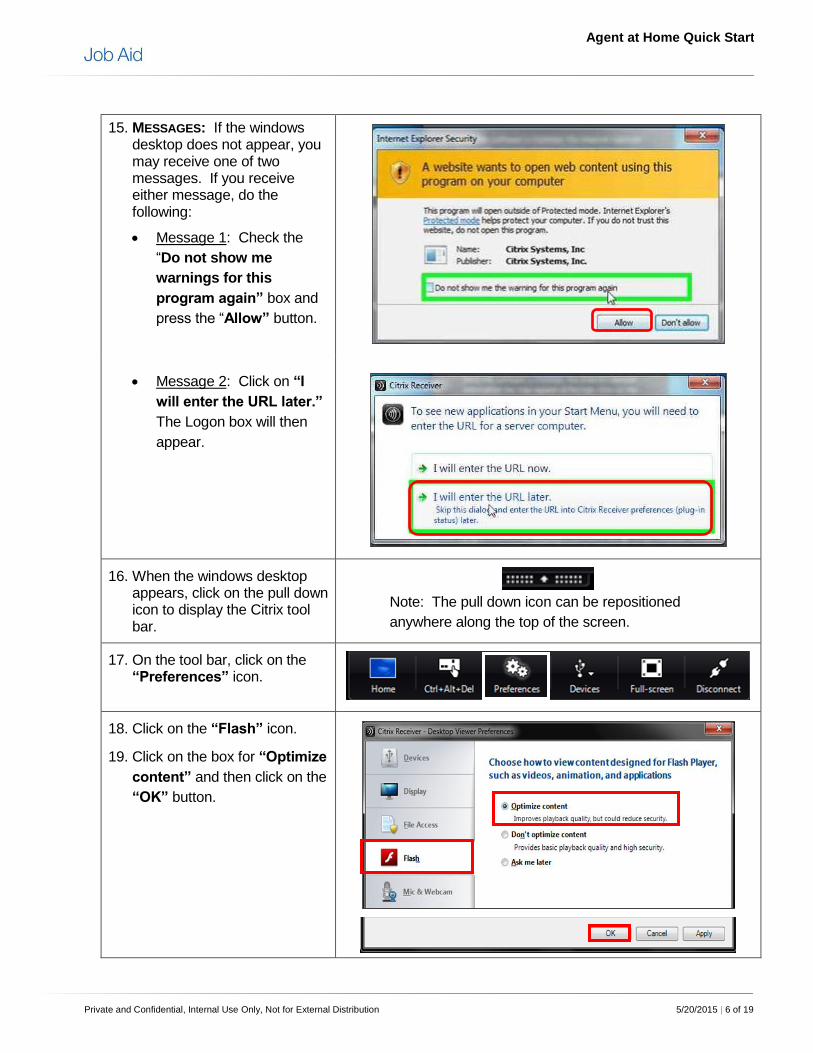
15. MESSAGES: If the windows desktop does not appear, you may receive one of two messages. If you receive either message, do the following:
Message 1: Check the
“Do not show me
warnings for this
program again” box and
press the “Allow” button.
Message 2: Click on “I
will enter the URL later.”
The Logon box will then
appear.
16. When the windows desktop appears, click on the pull down icon to display the Citrix tool bar.
Note: The pull down icon can be repositioned
anywhere along the top of the screen.
17. On the tool bar, click on the “Preferences” icon.
18. Click on the “Flash” icon.
19. Click on the box for “Optimize
content” and then click on the
“OK” button.
Agent at Home Quick Start
Private and Confidential, Internal Use Only, Not for External Distribution 5/20/2015 | 7 of 19
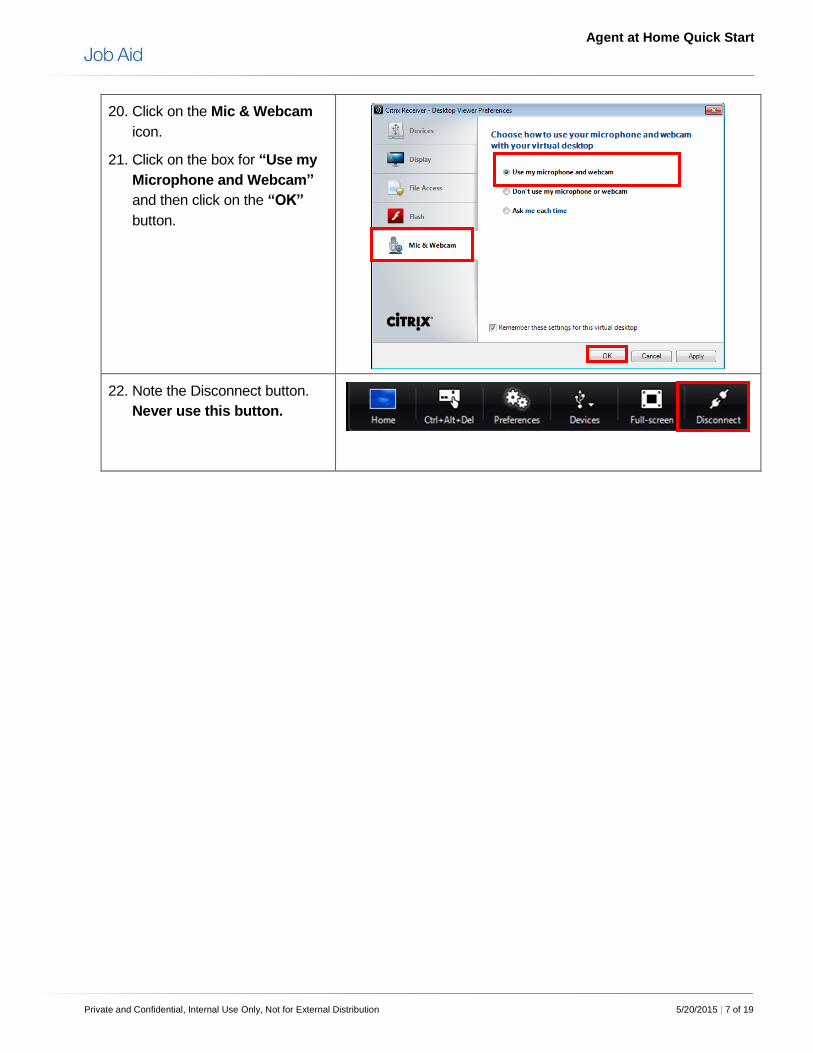
20. Click on the Mic & Webcam
icon.
21. Click on the box for “Use my
Microphone and Webcam”
and then click on the “OK”
button.
22. Note the Disconnect button.
Never use this button.
Agent at Home Quick Start
Private and Confidential, Internal Use Only, Not for External Distribution 5/20/2015 | 8 of 19
CITRIX LOG OFF INSTRUCTIONS
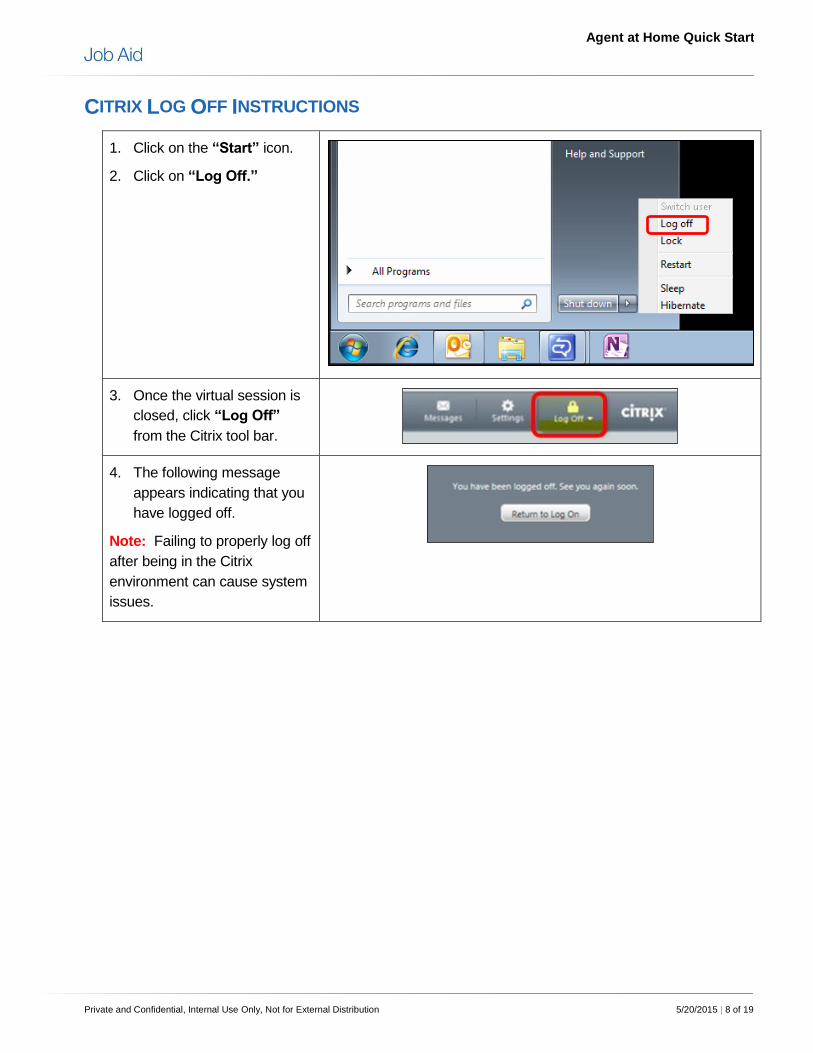
1. Click on the “Start” icon.
2. Click on “Log Off.”
3. Once the virtual session is
closed, click “Log Off”
from the Citrix tool bar.
4. The following message
appears indicating that you
have logged off.
Note: Failing to properly log off
after being in the Citrix
environment can cause system
issues.
Agent at Home Quick Start
Private and Confidential, Internal Use Only, Not for External Distribution 5/20/2015 | 9 of 19
MULTIPLE MONITOR SETUP
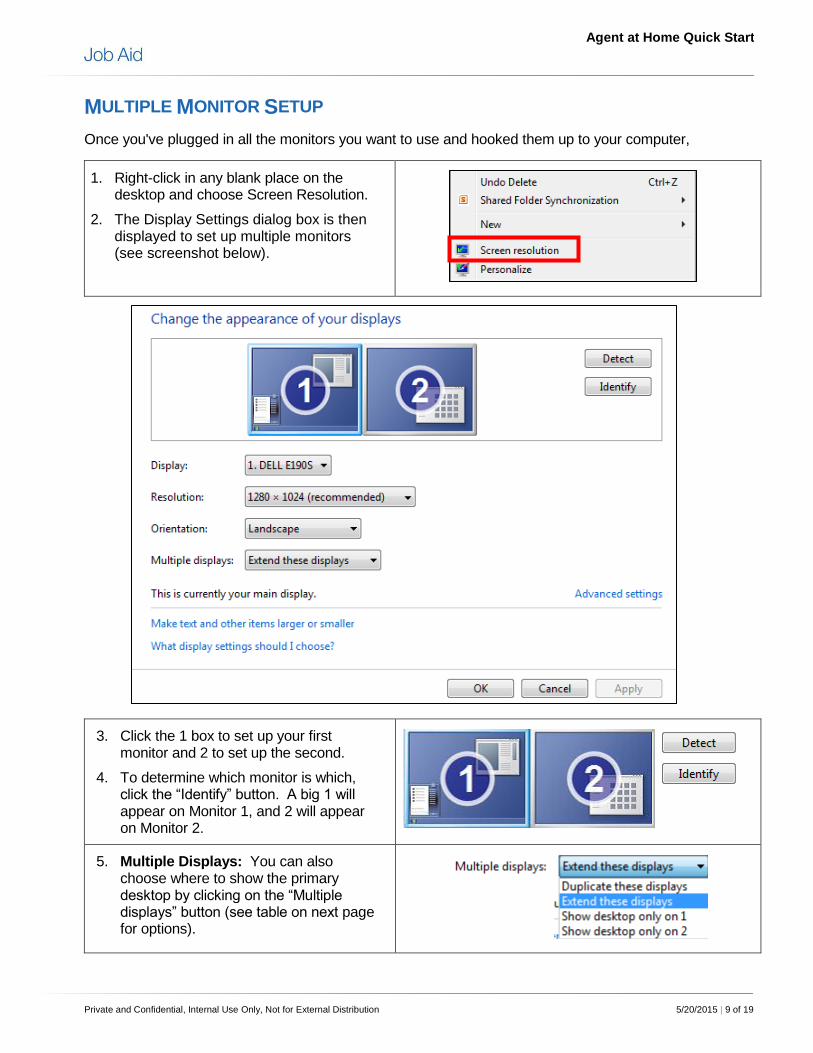
Once you've plugged in all the monitors you want to use and hooked them up to your computer,
1. Right-click in any blank place on the desktop and choose Screen Resolution.
2. The Display Settings dialog box is then displayed to set up multiple monitors (see screenshot below).
3. Click the 1 box to set up your first monitor and 2 to set up the second.
4. To determine which monitor is which, click the “Identify” button. A big 1 will appear on Monitor 1, and 2 will appear on Monitor 2.
5. Multiple Displays: You can also choose where to show the primary desktop by clicking on the “Multiple displays” button (see table on next page for options).
Private and Confidential, Internal Use Only, Not for External Distribution 5/20/2015 | 10 of 19
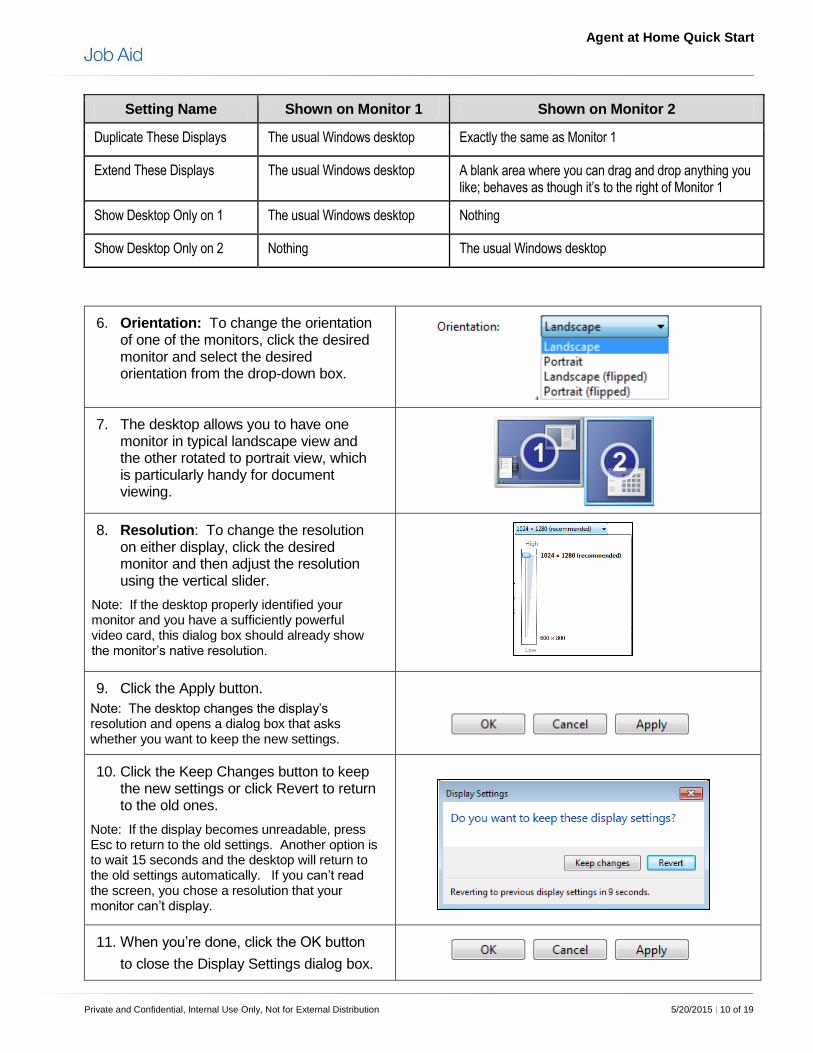
Setting Name Shown on Monitor 1 Shown on Monitor 2
Duplicate These Displays The usual Windows desktop Exactly the same as Monitor 1
Extend These Displays The usual Windows desktop A blank area where you can drag and drop anything you like; behaves as though it’s to the right of Monitor 1
Show Desktop Only on 1 The usual Windows desktop Nothing
Show Desktop Only on 2 Nothing The usual Windows desktop
6. Orientation: To change the orientation of one of the monitors, click the desired monitor and select the desired orientation from the drop-down box.
7. The desktop allows you to have one monitor in typical landscape view and the other rotated to portrait view, which is particularly handy for document viewing.
8. Resolution: To change the resolution on either display, click the desired monitor and then adjust the resolution using the vertical slider.
Note: If the desktop properly identified your monitor and you have a sufficiently powerful video card, this dialog box should already show the monitor’s native resolution.
9. Click the Apply button.
Note: The desktop changes the display’s resolution and opens a dialog box that asks whether you want to keep the new settings.
10. Click the Keep Changes button to keep the new settings or click Revert to return to the old ones.
Note: If the display becomes unreadable, press Esc to return to the old settings. Another option is to wait 15 seconds and the desktop will return to the old settings automatically. If you can’t read the screen, you chose a resolution that your monitor can’t display.