61
An Introduction to the Windows 10 Environment
An Introduction to the Windows 10 Environment

The Windows 10 Environment
The Windows 10 environment, or operating system, works within a structure, or framework, of programs (or Apps) where each one is opened, or activated, within it’s own Page or Window.
All of which are directly based on, or linked to the Desktop or Start Screen.
A Page, or Window, is very much like having a book or a sheet of paper laying on your coffee table, waiting to be opened or used.
Windows Basic Structure
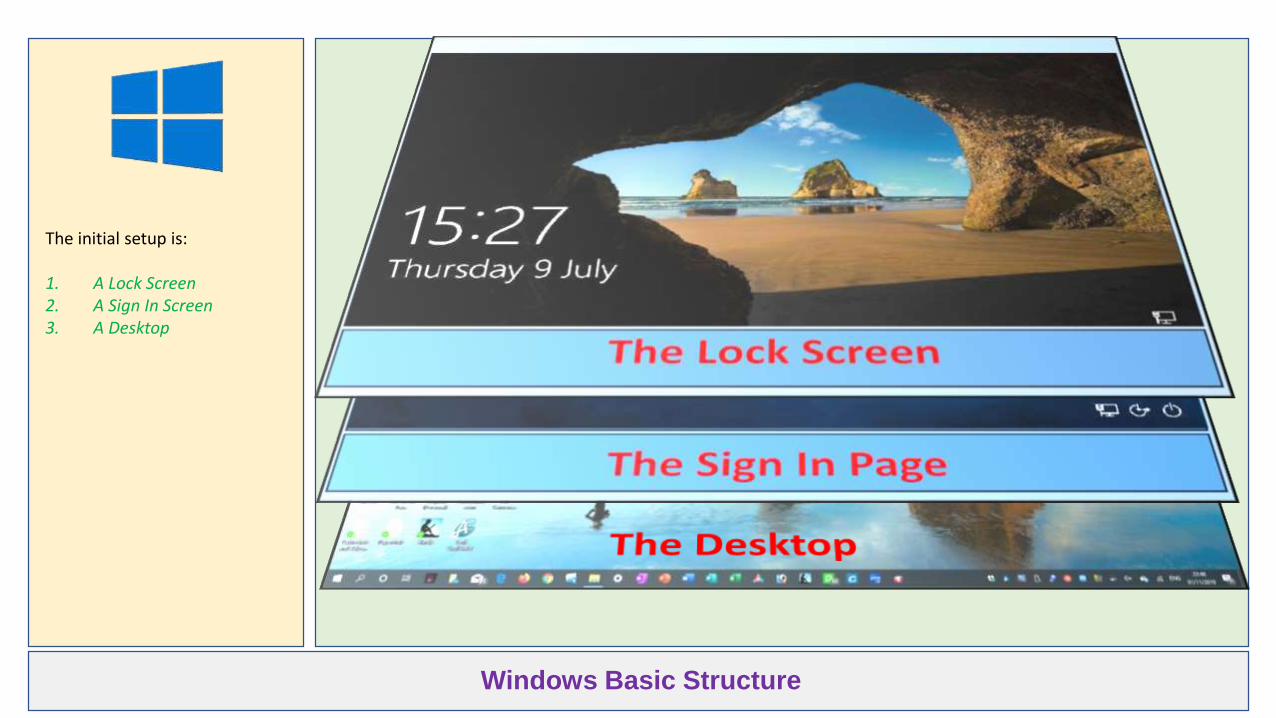
The initial setup is:
1. A Lock Screen2. A Sign In Screen3. A Desktop

The Lock Screen
The first 2 layers are designed to control authorised access to the computer.The first layer being the Lock Screen.
When you switch on (or Boot Up) your computer, you will see the ‘’Lock Screen’’
Click on the screen to remove this layer.

The Sign In Page
The second layer is the Sign-In Page.
If you are a registered Microsoft user, you will be presented with this screen.(If you are not registered with Microsoft, then this display is by-passed.)
Here you will be asked to enter one of the following: • Password • Pin Number• Eye Scan• Fingerprint
These options can be set up by you in Windows Settings.

The Desktop Screen
The third and most important layer is the “Desktop” Screen.
Every program or app that you start to use will be placed here in multiple layers, each one with it’s own window.
A Page, or Window, is very much like having a book or a sheet of paper laying on your coffee table, waiting to be opened or used.
Just like using a desk

The Desktop Layout
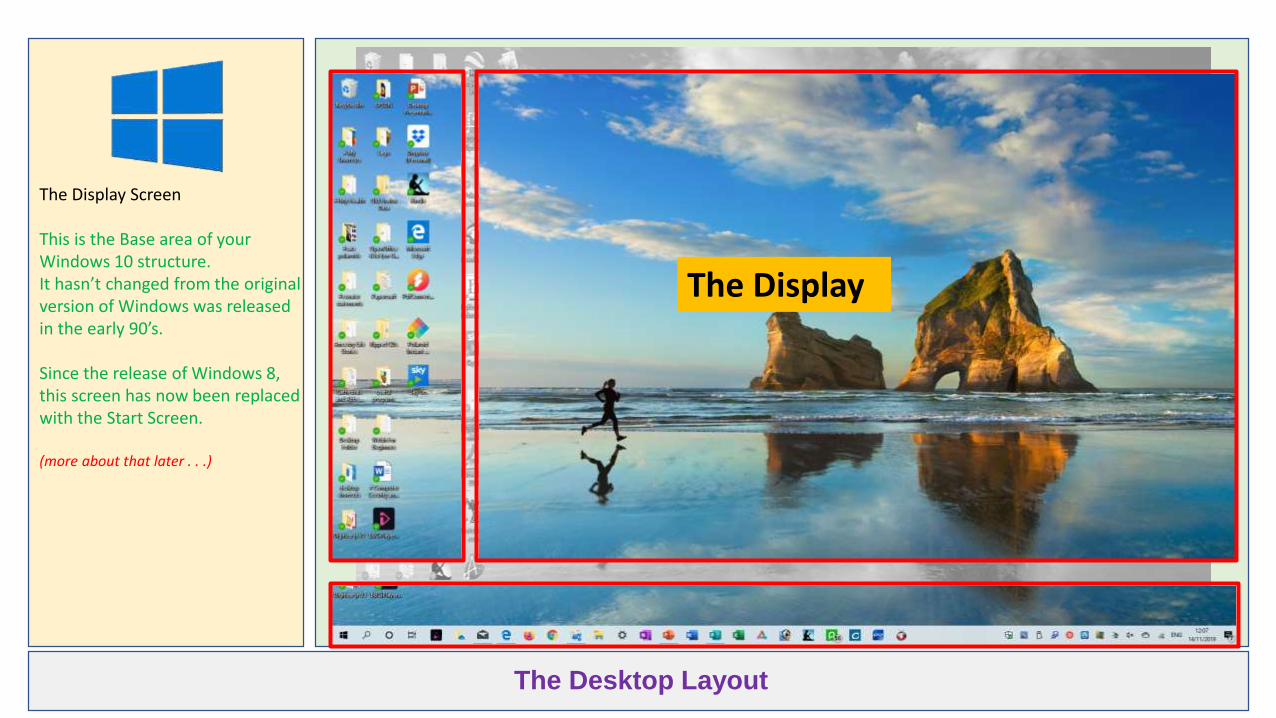
The physical layout of the Desktop is broken down into three distinct areas:
1. The Display2. Application Shortcuts3. The Task Bar
The DisplayApplication Shortcuts
The Task Bar
The Desktop Layout
The Display Screen
This is the Base area of your Windows 10 structure. It hasn’t changed from the original version of Windows was released in the early 90’s.
Since the release of Windows 8, this screen has now been replaced with the Start Screen.
(more about that later . . .)
The Display

The Desktop Layout
Application Shortcuts
The images which have been placed on the Desktop are quick links, or “Shortcuts” to some (not all) programs or apps which are available on the computer.
To activate a Shortcut, Doube Left Click on an image (known as an Icon) and the program will start and appear in it’s own window.
Application Shortcuts

The Desktop Layout
And then we have the Taskbar.
The Taskbar is usually visible at all times and is therefore a more useful and convenient way to access applications.
It can be positioned at the top or bottom or either side of the display.
The Task Bar

Taskbar Layout – Right Side
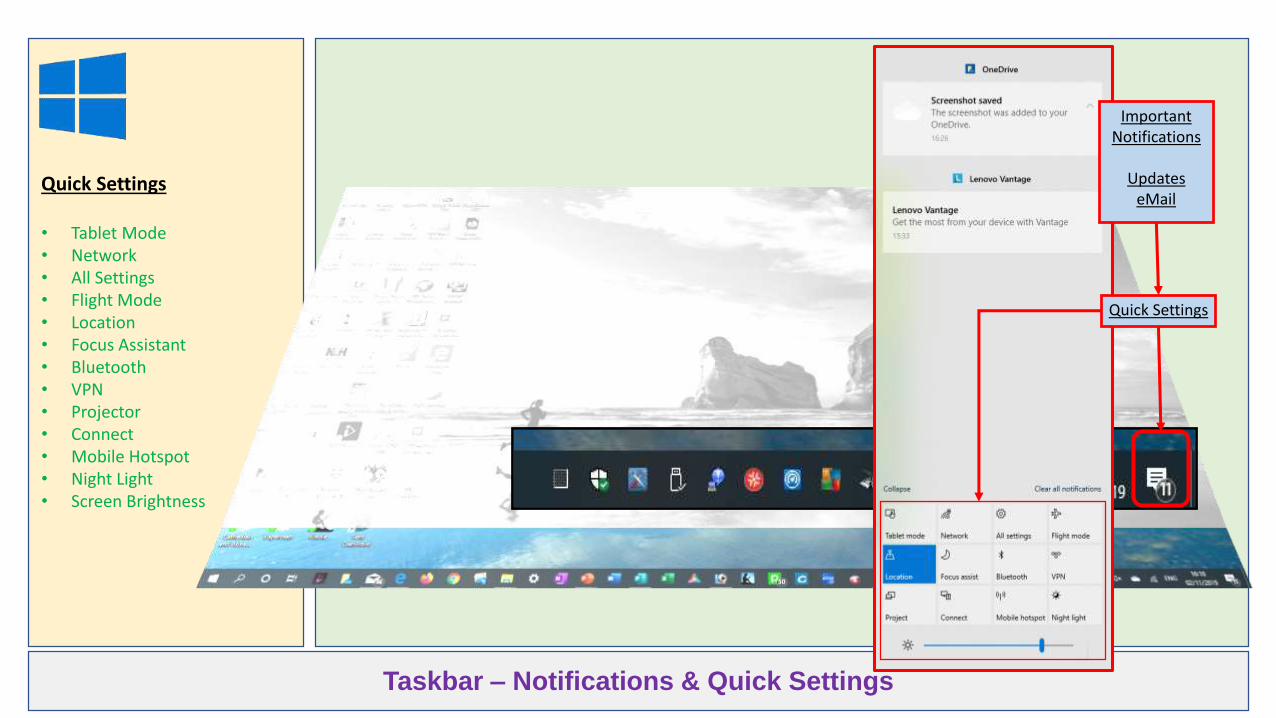
Important Notifications
UpdateseMail
Quick Settings
Miscellaneous System Status Information
Speakers On or Off & Volume Control
OneDrive Available
System Language - English
Wireless / Internet Status
Current Date and Time / Quick Calendar
The Taskbar Right Side
There are 2 areas of the Task Bar.-:-
The Left Side is where the action takes place.
-:-The Right Side provides system information.
-:-This is the Right Side of the Task Bar.
Taskbar – Notifications & Quick Settings
Important Notifications
UpdateseMail
Quick Settings
Quick Settings
• Tablet Mode• Network• All Settings• Flight Mode• Location• Focus Assistant• Bluetooth• VPN• Projector• Connect• Mobile Hotspot• Night Light• Screen Brightness
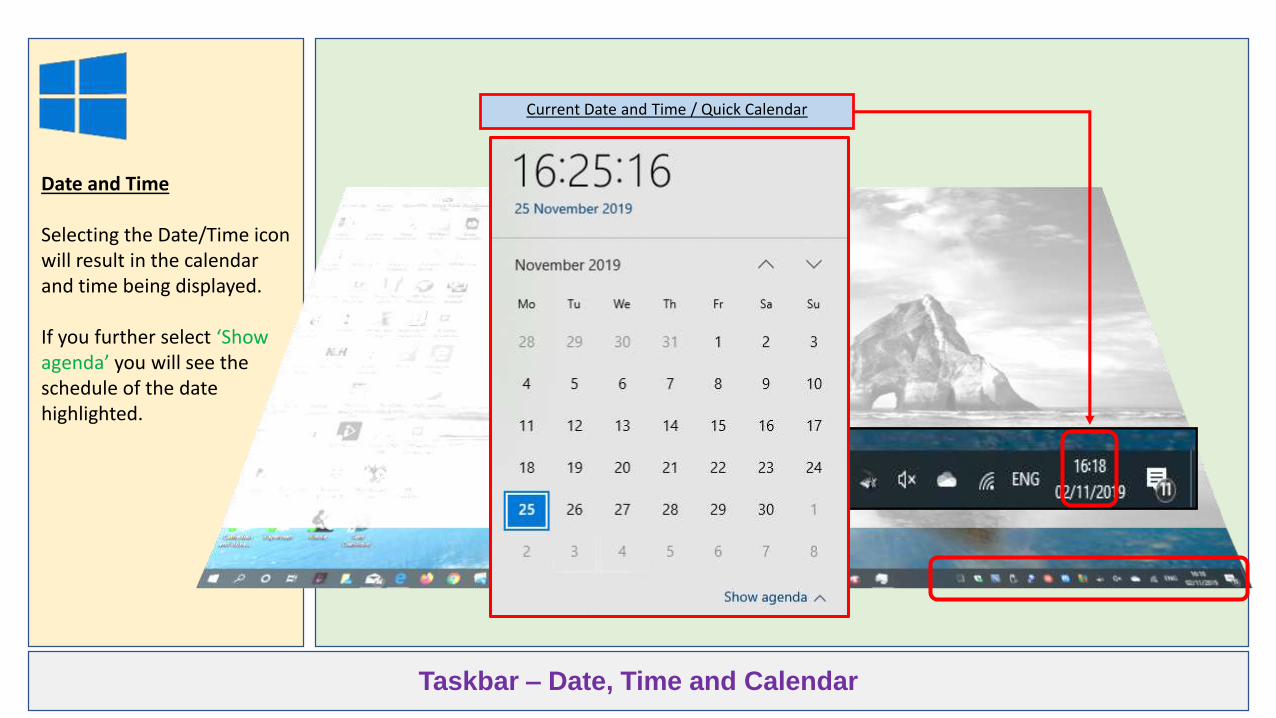
Taskbar – Date, Time and Calendar
Current Date and Time / Quick Calendar
Date and Time
Selecting the Date/Time icon will result in the calendar and time being displayed.
If you further select ‘Show agenda’ you will see the schedule of the date highlighted.

Taskbar – Wireless & Internet Status
Wireless / Internet Status
Wireless/Internet Status
Displays available internet connections.
At the bottom there are a few related Network and Internet setting options:
e.g.• WiFi• Flight Mode• Mobile Hotspot
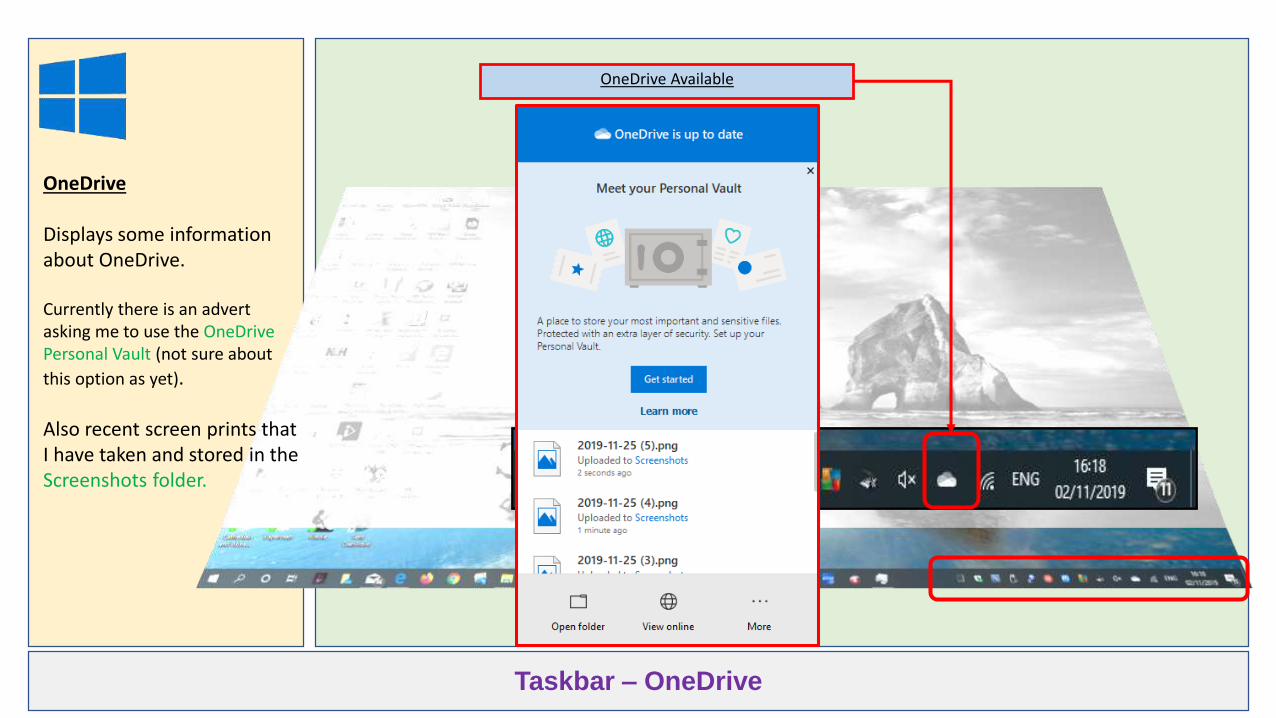
Taskbar – OneDrive
OneDrive Available
OneDrive
Displays some information about OneDrive.
Currently there is an advert asking me to use the OneDrive Personal Vault (not sure about
this option as yet).
Also recent screen prints that I have taken and stored in the Screenshots folder.

App or Program Icons, some are permanently positioned here, some only when they are active.
Active Apps will be underlined.Task View.Displays all open programs as mini windows.
The Windows Icon.Gives access to a lot of the system information and settings.
Search for information on the computeror Talk to “Cortana”
Taskbar Layout – Left Side
Taskbar Left Side
This is the Left Side of the Task Bar.

Displaying active windows
Taskbar “Hover” Feature
If you ‘Hover’ the mouse pointer over the icon of an opened App, you will see a miniature preview of the App. In this case, Photos.

Displaying active windows
Taskbar “Hover” Feature
If there are multiple versions of an active or open App, you will see a preview of them all.
Here we have Explorer with 4 versions open.
Hovering over one of the previews will show that particular window, and the rest of the active windows will become transparent.

The Windows Icon.Gives access to a lot of the system information and settings.
The Window or Start Icon
The Window Icon
The most important, and therefore most used, icon on the Task Bar is the Window Icon or Start Button.

The Windows Icon.Gives access to a lot of the system information and settings.
Quick Links, Applications and the Start Menu
Quick Links
Application Listing
The Start Menu
Window Left Click
If you select the Window Icon (using the mouse Left Click) the following links will be displayed:
• Quick Links,• Application Listing• Start Menu

The Windows Icon.Gives access to a lot of the system information and settings.
The Start Menu
Start Menu
The Start Menu contains the shortcut links which can be organised into groups according to your preference.Links are placed in the start Menu from the Application Listing.
The Start Menu

The Windows Icon.Gives access to a lot of the system information and settings.
The Application Listing
Applications Listing
All installed programs or applications are shown on the Application Listing and are activated when selected with a Left Click.
Application Listing

The Windows Icon.Gives access to a lot of the system information and settings.
The Application Listing
The swiftly get to a part of the listing when you know the application name, for example ‘’Office’’:
1) Click on a letter in the listing.
2) Select a letter from the block of letters.
3) Select your app from the new listing.
1
2
3

The Windows Icon.Gives access to a lot of the system information and settings.
The Application Listing
App Properties
Use the Right Click to reveal the Office App properties:
• Pin to Start Menu• Uninstall App• More …
• Pin to Taskbar• App Settings• Rant and Rave• Share

The Windows Icon.Gives access to a lot of the system information and settings.
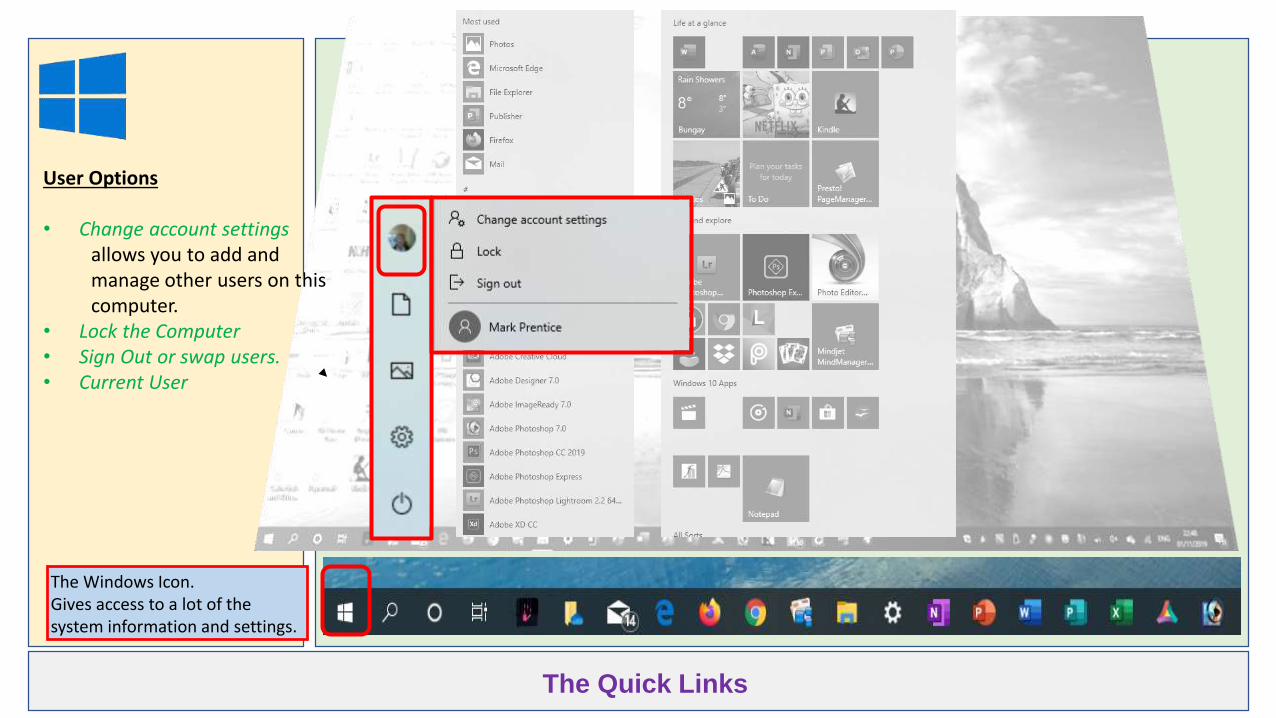
The Quick Links
Quick Links:
1) Users2) Documents3) Photos4) Settings5) Power Options
Quick Links
The Windows Icon.Gives access to a lot of the system information and settings.
The Quick Links
User Options
• Change account settingsallows you to add and manage other users on this computer.
• Lock the Computer• Sign Out or swap users.• Current User

The Windows Icon.Gives access to a lot of the system information and settings.
The Quick Links
User Options:• Change account settings,
allows you to add and manage other users on this computer.
• Lock the Computer• Sign Out as a user.

The Windows Icon.Gives access to a lot of the system information and settings.
The Quick Links
Select Documents or Photos:
Opens File Explorer or the Photos app.

The Windows Icon.Gives access to a lot of the system information and settings.
The Quick Links
Settings
Opens the Settings App

The Windows Icon.Gives access to a lot of the system information and settings.
The Quick Links
Power Options
• SleepPuts the computer system into standby mode.
• Shut downSwitch off the computer
• RestartSwitch off and switch on the computer. Especially useful after installing updates to the system or Apps.
- IMPORTANT NOTE -WHEN TO USE - SLEEP MODE - SHUT DOWN - SWITCHING OFF
Only use Sleep Mode when you leaving the computer for a while and returning later the same day. This usually happens when you close the lid of your laptop.
Use Shut Down to close the computer properly, allowing Windows to systematically shut down the internal processing which goes on behind the scenes. This may include completing downloaded updates to the system or programs, allowing them space with no conflict with other programs.
Never just pull the plug.
You can program the computer to shut down properly when you press the on/off button.

The Windows Icon.Gives access to a lot of the system information and settings.
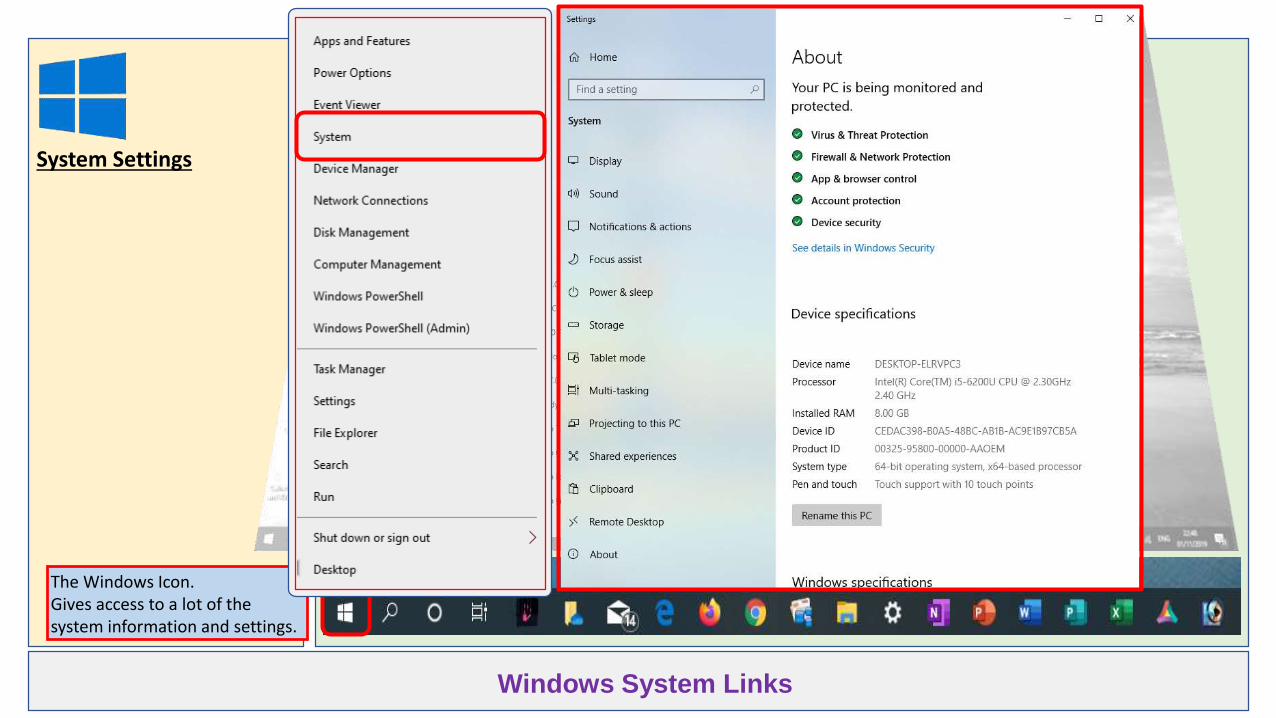
Windows System Links
Window Right Click
If you select the Window Icon (using the mouse Right Click) the system links will be displayed:

The Windows Icon.Gives access to a lot of the system information and settings.
Windows System Links
Apps and Features

Power Options
The Windows Icon.Gives access to a lot of the system information and settings.
Windows System Links

The Windows Icon.Gives access to a lot of the system information and settings.
Windows System Links
Event Viewer
The Windows Icon.Gives access to a lot of the system information and settings.
Windows System Links
System Settings

The Windows Icon.Gives access to a lot of the system information and settings.
Windows System Links
Device Management
The Windows Icon.Gives access to a lot of the system information and settings.
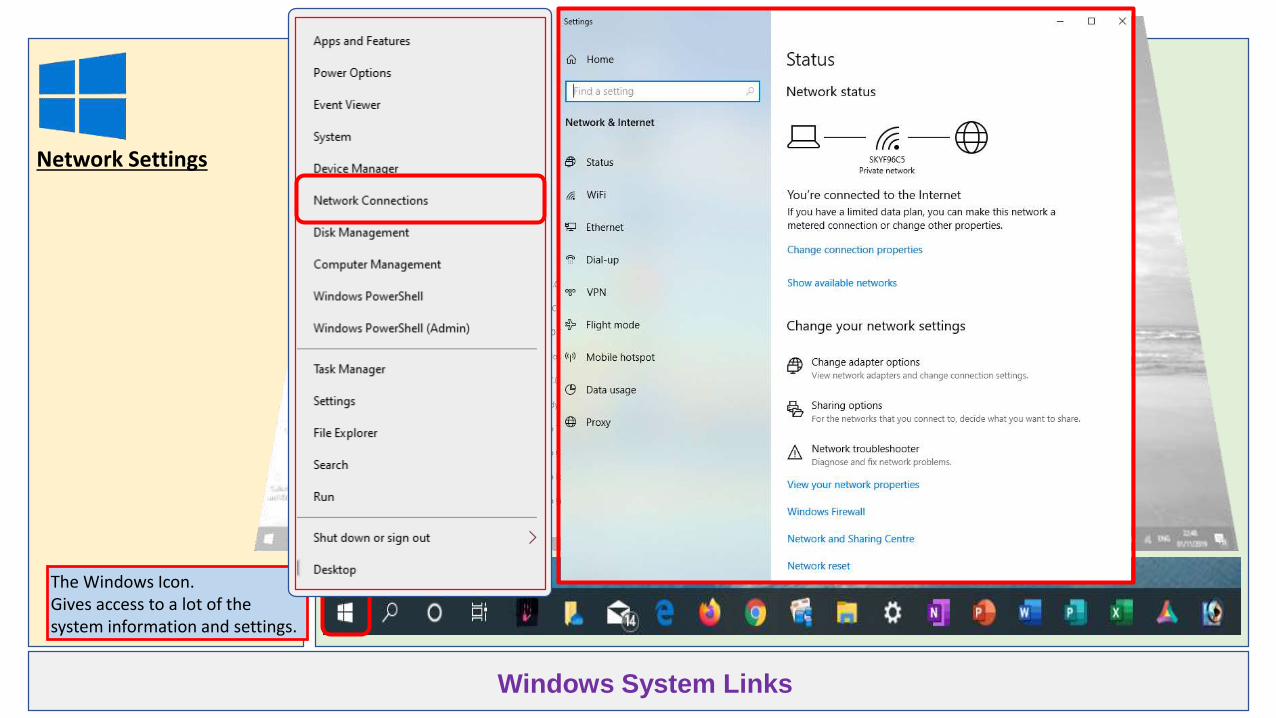
Windows System Links
Network Settings

The Windows Icon.Gives access to a lot of the system information and settings.
Windows System Links
Disk Management

The Windows Icon.Gives access to a lot of the system information and settings.
Windows System Links
Computer Management

The Windows Icon.Gives access to a lot of the system information and settings.
Windows System Links
Windows Powershell
The Powershell is used by computer “Experts” who are supposed to know what they are doing.It enables them to access the Windows system through the “back door”

The Windows Icon.Gives access to a lot of the system information and settings.
Windows System Links
Task Management

The Windows Icon.Gives access to a lot of the system information and settings.
Windows System Links
Windows Settings
The Windows Icon.Gives access to a lot of the system information and settings.
Windows System Links
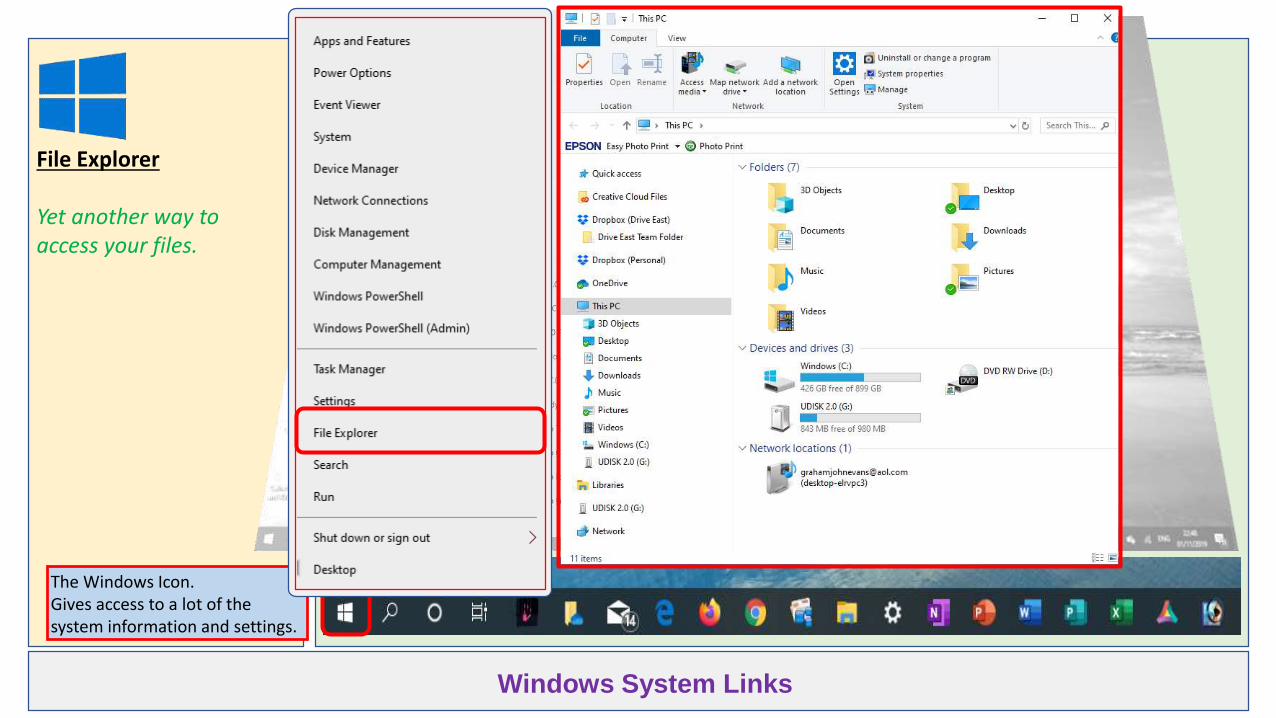
File Explorer
Yet another way to access your files.

The Windows Icon.Gives access to a lot of the system information and settings.
Windows System Links
Search
Another way to search for stuff.This is an alternative to using the Search icon or Cortana.

The Windows Icon.Gives access to a lot of the system information and settings.
Windows System Links
Run
This is known as the “Command Prompt”, and once again allows the “Experts” to access the system or run programs etc. using the “old fashioned DOS”.
The Windows Icon.Gives access to a lot of the system information and settings.
Windows System Links
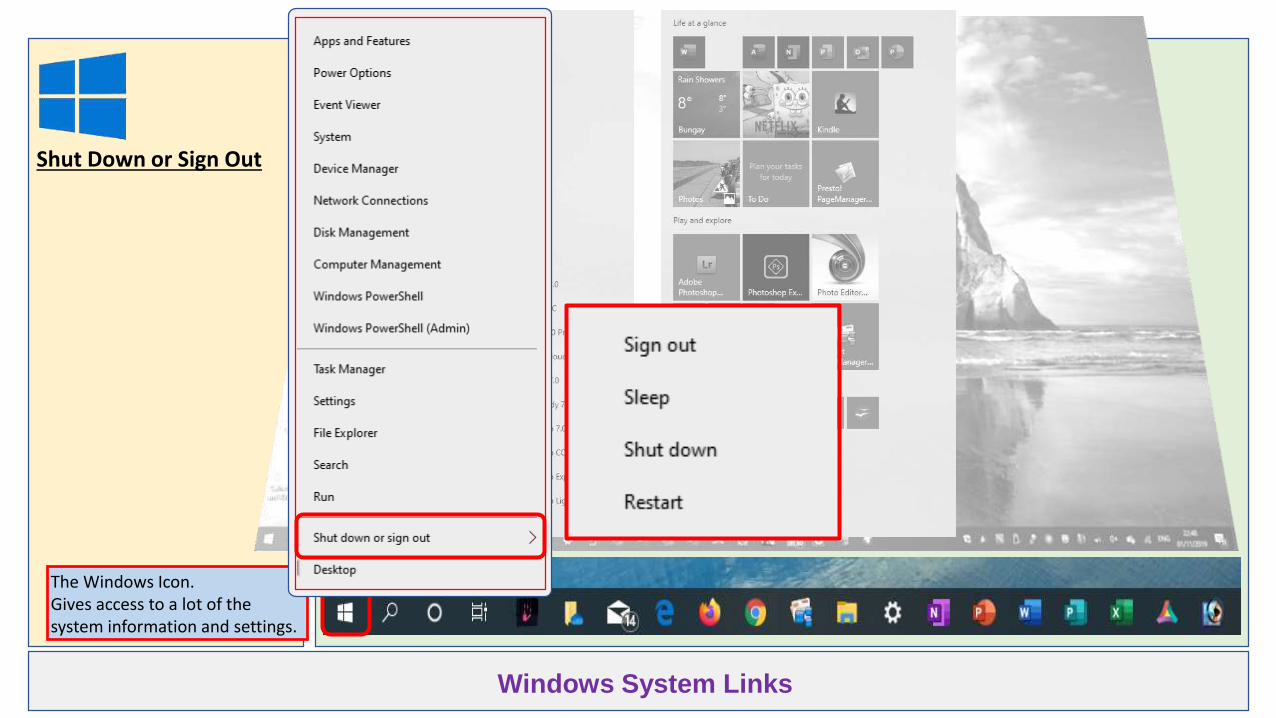
Shut Down or Sign Out

The Windows Icon.Gives access to a lot of the system information and settings.
Windows System Links
Goto Desktop
Move directly from any open window to the Desktop.
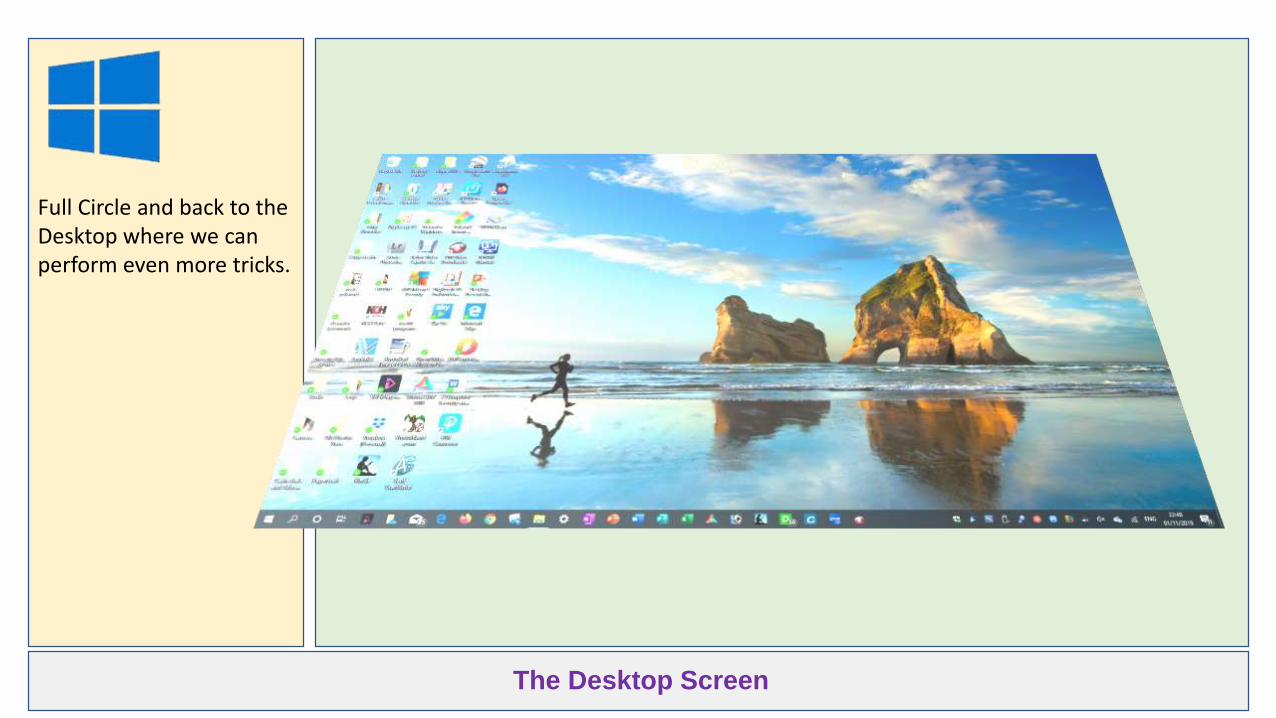
The Desktop Screen
Full Circle and back to the Desktop where we can perform even more tricks.
The Desktop Screen
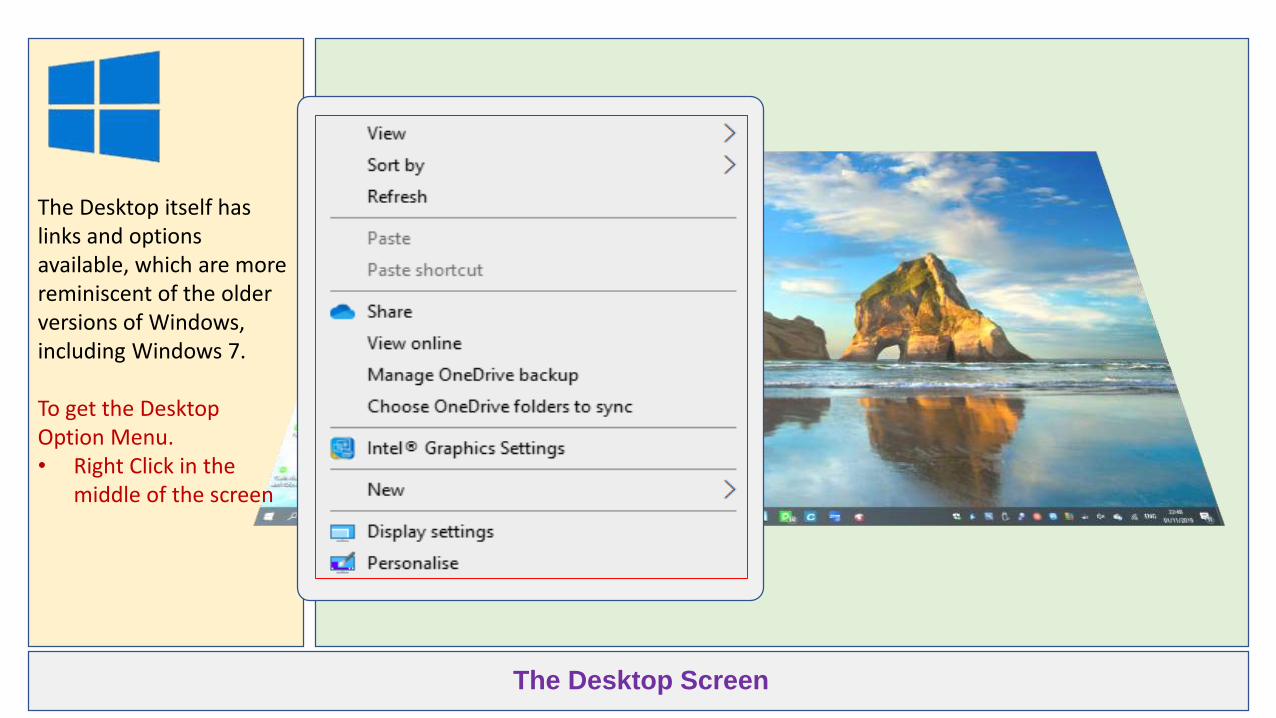
The Desktop itself has links and options available, which are more reminiscent of the older versions of Windows, including Windows 7.
To get the Desktop Option Menu.• Right Click in the
middle of the screen
The Desktop Screen
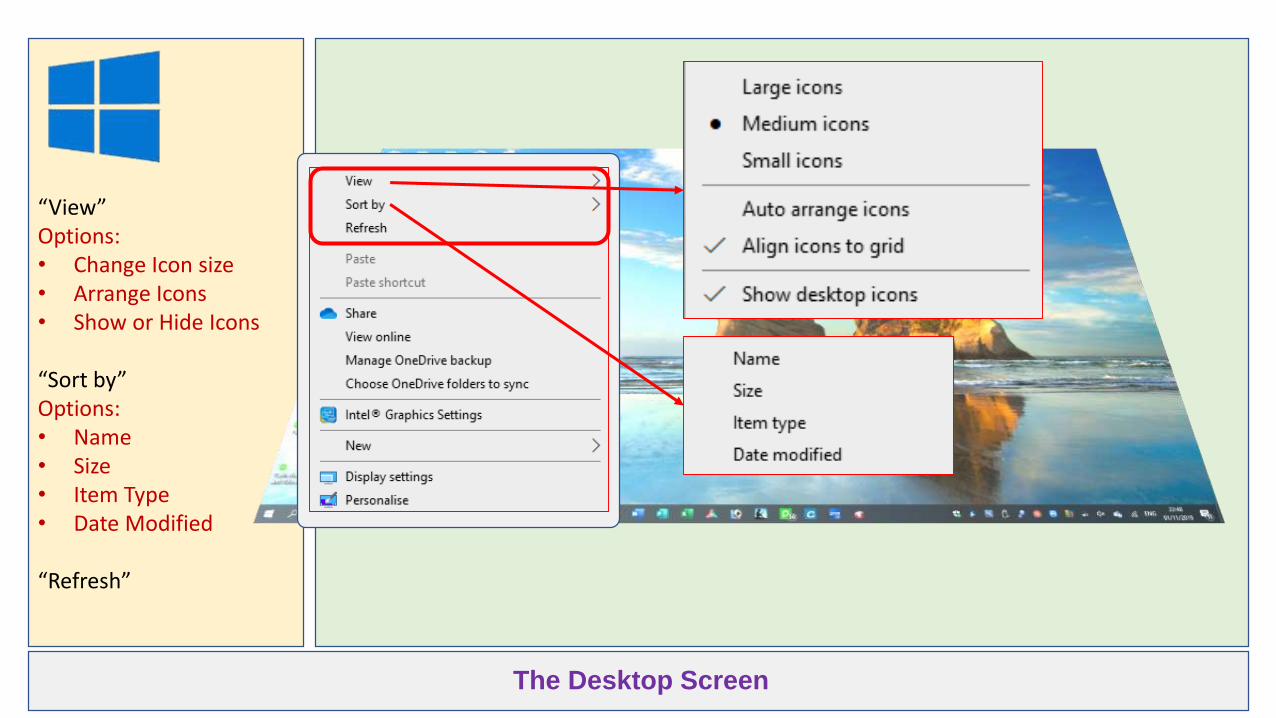
“View”Options:• Change Icon size• Arrange Icons• Show or Hide Icons
“Sort by”Options:• Name• Size• Item Type• Date Modified
“Refresh”
The Desktop Screen
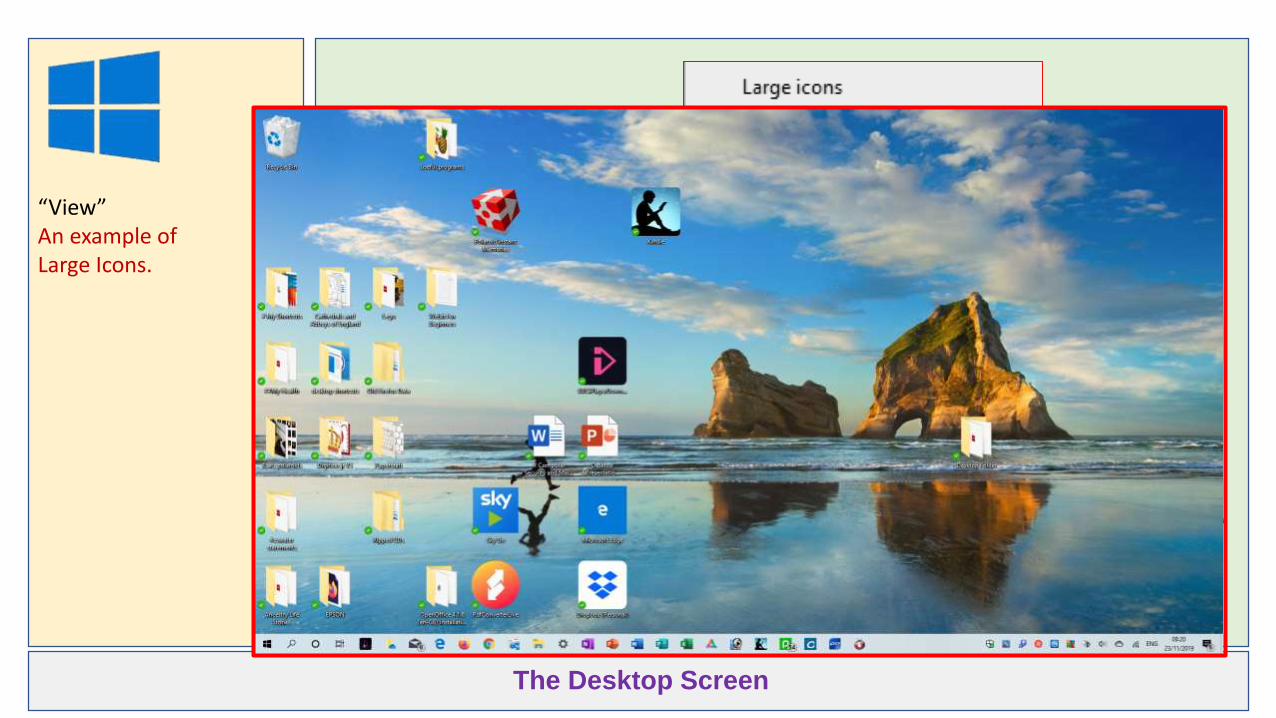
“View”An example of Large Icons.

The Desktop Screen
“Share”
Selecting the Share option enables you to send a link to another computer, within your local network.
Not an option I have ever selected.

The Desktop Screen
“View Online”
Displays the contents of your Desktop as a Web Page.
Helps to navigate the desktop and keep it more accessible.

The Desktop Screen
“OneDrive”
Settings for:• Manage Backups• Syncronisation
“A whole new ball game.”

The Desktop Screen
“Graphics Settings”
This will be probably be different on each computer depending on the manufacturer.
Something that is worth knowing about if you work with photos or graphics.

The Desktop Screen
“New”
This option enables you to create a new item, such as a folder, link (shortcuts) or file, on the Desktop.

The Desktop Screen
“Display Settings”
Changes the physical set up of the computer screen.• Brightness• Night Light• HD Colour• Scale and Layout

The Desktop Screen
“Personalise”
Change the overall Windows appearancegiving it a personal touch.• Background• Colours• Lock Screen• Themes• Fonts• Start• Taskbar

The Desktop Screen
That’s the end of our introduction to the Windows 10 environment.
If you feel inclined, have a look at the various settings.
But before changing something, make a note of the original setting, so that you can always go back.

This is a slide presentation created for the Beccles U3A Computer Confidence Group by Mark Prentice ©


![Windows 10 Personalization - Windows 10 Troubleshooting …Windows 10 Personalization - Windows 10 Troubleshooting Guide 1/24/2019 1:06:36 PM]](https://static.documents.pub/doc/80x56/5f73ff735a50aa01df310daf/windows-10-personalization-windows-10-troubleshooting-windows-10-personalization.jpg)


