Rebuild the Timing Belt Tensioner - $20 (Version 20081027) (and good for all Gold Wings GL1000, GL1100, GL1200, GL1500) Information developed on or about March 1, 2008 by sandiegobrass ([email protected]) It is for use by the Gold Wing community and may be copied or distributed with inclusion of this heading and proper acknowledgement of the origin. Summary: You can rebuild your timing belt tensioner for less than $20 with quality parts (the same ones used on automobiles). New OEM tensioners are available for $60 to $80 each. And this is still a reasonable price considering that it is the complete assembly, so I am not necessarily recommending that anyone abandon the OEM solution when it is still available. However, this part is often in short supply and in many cases backordered, so at least those of you that are somewhat handy with tools may be happy to substitute something different that is equally as good, if not better in “fit and function”. This also might be particularly useful on the road for an emergency repair, or the very “budget minded” who would rather spend some time to save a few bucks. Below there are more possible methods than you probably want to know. I’ve summarized some of the best choices below with a descriptive title. (This will all be edited later.) • Quick and Dirty 3/8” Hardware Method (Method 1) • Quick and Dirty 7/16” Hardware Method (Method 2) • Quick and Dirty 12mm Stud Method (Method 3) • My “Editor’s” Choice Custom Hex Bolt Method (Method 4) • Better 12mm Stud Method (Method 5) • A Good 10mm Stud Method (Method 6) • Weld Type Options (Method 7) Background After I changed my timing belts last winter, I noticed that the tensioners were a bit looser than I thought they should be. I didn’t change them, but ordered a new set. They were backordered and I was told that it would take about 4 weeks to get them. If I had been “out of a ride” for this 4 weeks during good weather, I would have been a bit miffed, so I immediately determined to find a way to rebuild the old ones. To do that in a sound manner would require some research. It was determined that GL1000 and GL1100 tensioners are identical. Likewise, GL1200 and GL1500 tensioners are identical but different than 1000/1100 tensioners. Ebay yielded a pair of worn out tensioners off a GL1000 and also a single one off a GL1200 for the project experiments. After receiving them, it was immediately evident that the only difference between the two kinds were the backing plates. The bearings and pulleys are identical for all models of Gold Wings (except of course the GL1800 that has no timing belts). This is to say that any of these methods will work equally well on any Gold Wing. The only exception to that statement would be for the GL1000 when you are fitting back the original heat shields that were later dropped from the 1100.
Transcript
Rebuild the Timing Belt Tensioner - $20 (Version 20081027) (and good for all Gold Wings GL1000, GL1100, GL1200, GL1500)
Information developed on or about March 1, 2008 by
sandiegobrass ([email protected]) It is for use by the Gold Wing community and may be copied or distributed with inclusion of this heading and proper acknowledgement of the origin.
Summary: You can rebuild your timing belt tensioner for less than $20 with quality parts (the same ones used on automobiles). New OEM tensioners are available for $60 to $80 each. And this is still a reasonable price considering that it is the complete assembly, so I am not necessarily recommending that anyone abandon the OEM solution when it is still available. However, this part is often in short supply and in many cases backordered, so at least those of you that are somewhat handy with tools may be happy to substitute something different that is equally as good, if not better in “fit and function”. This also might be particularly useful on the road for an emergency repair, or the very “budget minded” who would rather spend some time to save a few bucks. Below there are more possible methods than you probably want to know. I’ve summarized some of the best choices below with a descriptive title. (This will all be edited later.)
• Quick and Dirty 3/8” Hardware Method (Method 1) • Quick and Dirty 7/16” Hardware Method (Method 2) • Quick and Dirty 12mm Stud Method (Method 3) • My “Editor’s” Choice Custom Hex Bolt Method (Method 4) • Better 12mm Stud Method (Method 5) • A Good 10mm Stud Method (Method 6) • Weld Type Options (Method 7)
Background After I changed my timing belts last winter, I noticed that the tensioners were a bit looser than I thought they should be. I didn’t change them, but ordered a new set. They were backordered and I was told that it would take about 4 weeks to get them. If I had been “out of a ride” for this 4 weeks during good weather, I would have been a bit miffed, so I immediately determined to find a way to rebuild the old ones. To do that in a sound manner would require some research. It was determined that GL1000 and GL1100 tensioners are identical. Likewise, GL1200 and GL1500 tensioners are identical but different than 1000/1100 tensioners. Ebay yielded a pair of worn out tensioners off a GL1000 and also a single one off a GL1200 for the project experiments. After receiving them, it was immediately evident that the only difference between the two kinds were the backing plates. The bearings and pulleys are identical for all models of Gold Wings (except of course the GL1800 that has no timing belts). This is to say that any of these methods will work equally well on any Gold Wing. The only exception to that statement would be for the GL1000 when you are fitting back the original heat shields that were later dropped from the 1100.
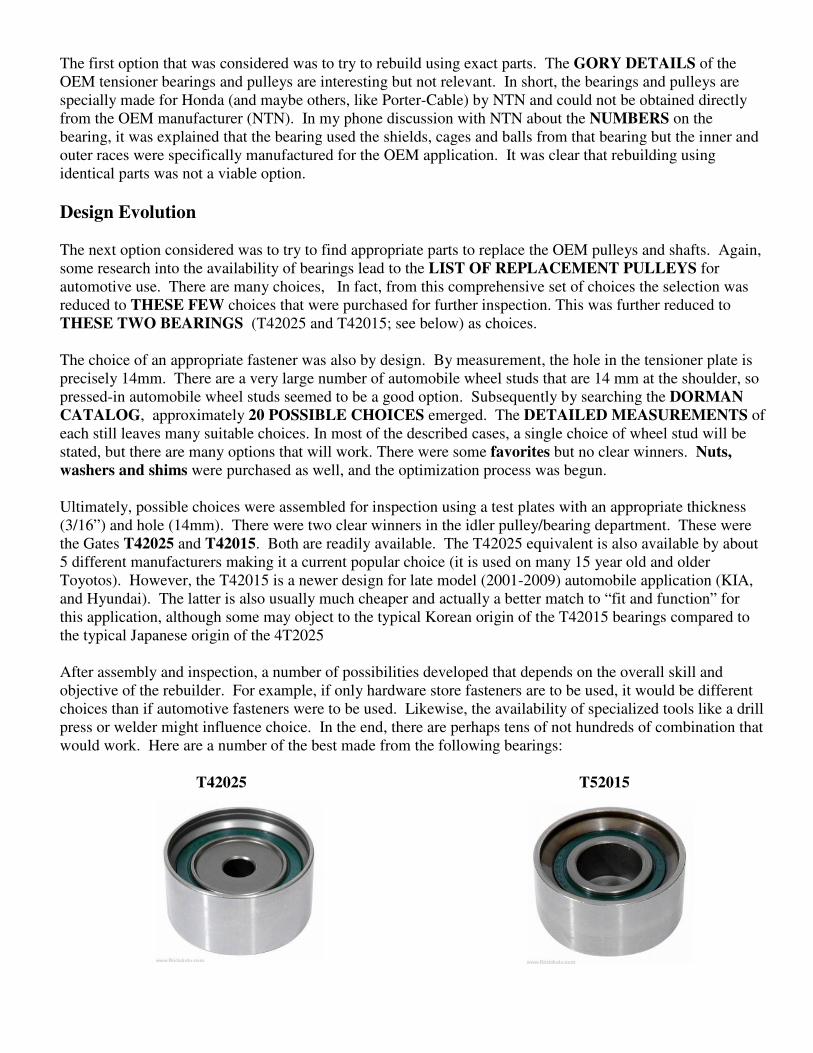
The first option that was considered was to try to rebuild using exact parts. The GORY DETAILS of the OEM tensioner bearings and pulleys are interesting but not relevant. In short, the bearings and pulleys are specially made for Honda (and maybe others, like Porter-Cable) by NTN and could not be obtained directly from the OEM manufacturer (NTN). In my phone discussion with NTN about the NUMBERS on the bearing, it was explained that the bearing used the shields, cages and balls from that bearing but the inner and outer races were specifically manufactured for the OEM application. It was clear that rebuilding using identical parts was not a viable option. Design Evolution The next option considered was to try to find appropriate parts to replace the OEM pulleys and shafts. Again, some research into the availability of bearings lead to the LIST OF REPLACEMENT PULLEYS for automotive use. There are many choices, In fact, from this comprehensive set of choices the selection was reduced to THESE FEW choices that were purchased for further inspection. This was further reduced to THESE TWO BEARINGS (T42025 and T42015; see below) as choices. The choice of an appropriate fastener was also by design. By measurement, the hole in the tensioner plate is precisely 14mm. There are a very large number of automobile wheel studs that are 14 mm at the shoulder, so pressed-in automobile wheel studs seemed to be a good option. Subsequently by searching the DORMAN CATALOG, approximately 20 POSSIBLE CHOICES emerged. The DETAILED MEASUREMENTS of each still leaves many suitable choices. In most of the described cases, a single choice of wheel stud will be stated, but there are many options that will work. There were some favorites but no clear winners. Nuts, washers and shims were purchased as well, and the optimization process was begun. Ultimately, possible choices were assembled for inspection using a test plates with an appropriate thickness (3/16”) and hole (14mm). There were two clear winners in the idler pulley/bearing department. These were the Gates T42025 and T42015. Both are readily available. The T42025 equivalent is also available by about 5 different manufacturers making it a current popular choice (it is used on many 15 year old and older Toyotos). However, the T42015 is a newer design for late model (2001-2009) automobile application (KIA, and Hyundai). The latter is also usually much cheaper and actually a better match to “fit and function” for this application, although some may object to the typical Korean origin of the T42015 bearings compared to the typical Japanese origin of the 4T2025 After assembly and inspection, a number of possibilities developed that depends on the overall skill and objective of the rebuilder. For example, if only hardware store fasteners are to be used, it would be different choices than if automotive fasteners were to be used. Likewise, the availability of specialized tools like a drill press or welder might influence choice. In the end, there are perhaps tens of not hundreds of combination that would work. Here are a number of the best made from the following bearings:
T42025 T52015
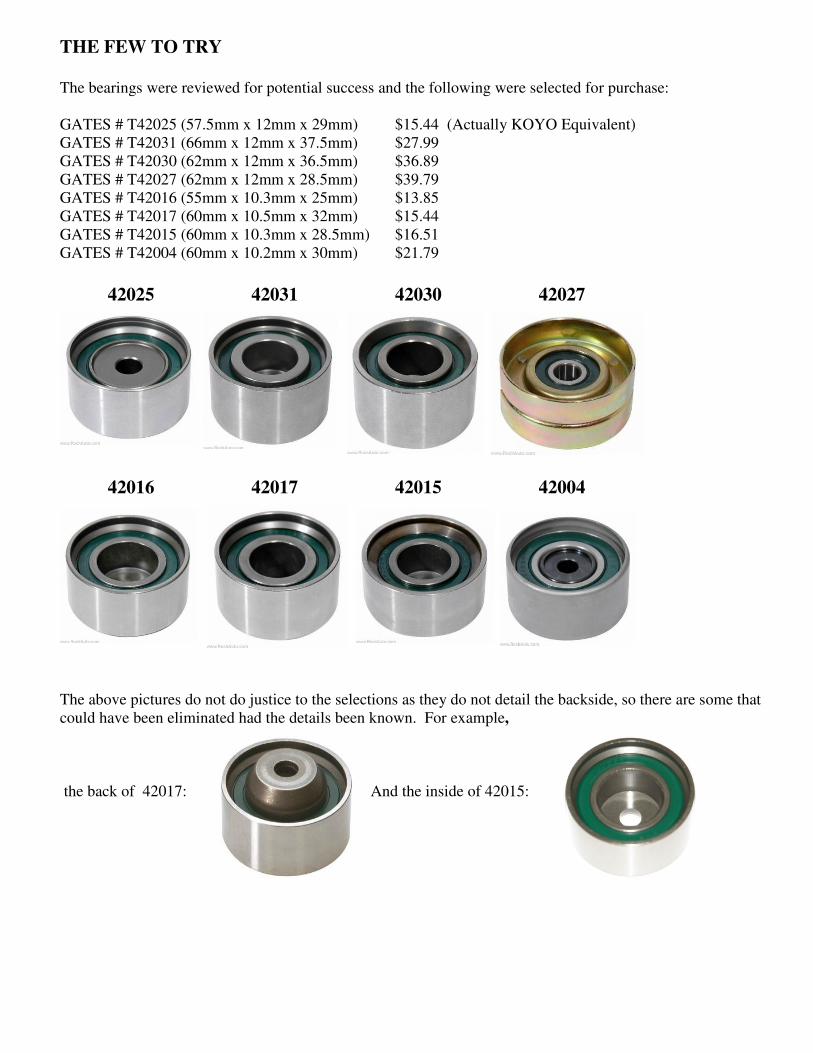
THE FEW TO TRY The bearings were reviewed for potential success and the following were selected for purchase: GATES # T42025 (57.5mm x 12mm x 29mm) $15.44 (Actually KOYO Equivalent) GATES # T42031 (66mm x 12mm x 37.5mm) $27.99 GATES # T42030 (62mm x 12mm x 36.5mm) $36.89 GATES # T42027 (62mm x 12mm x 28.5mm) $39.79 GATES # T42016 (55mm x 10.3mm x 25mm) $13.85 GATES # T42017 (60mm x 10.5mm x 32mm) $15.44 GATES # T42015 (60mm x 10.3mm x 28.5mm) $16.51 GATES # T42004 (60mm x 10.2mm x 30mm) $21.79
42025 42031 42030 42027 42016 42017 42015 42004
The above pictures do not do justice to the selections as they do not detail the backside, so there are some that could have been eliminated had the details been known. For example, the back of 42017: And the inside of 42015:
TWO BEARINGS The T42025 The T42025 is a close fit (not exact) to the OEM tensioner pulley. In particular the OEM bearing is 60mm outside diameter and the T42025 is 57.5mm. This is smaller but quite acceptable (but for those concerned with this, the other choice (T42015) matches the OD exactly). The widths are identical at 29mm. This bearing is used in early Toyota applications from 1988 through 1997 for the 2.0 and 2.2 liter engines. For the best selection of parts use the 1997 Camry LE 2.2 liter engine lower timing idler. www.RockAuto.com lists the following applications: TOYOTA CAMRY (1988 - 2001), TOYOTA CAMRY ALL TRAC (1989 - 1991), TOYOTA CAMRY CE 1997, TOYOTA CAMRY DLX (1983 - 1992), TOYOTA CAMRY DLX ALL TRAC (1988 - 1991), TOYOTA CAMRY DX (1993 - 1996), TOYOTA CAMRY LE (1983 - 1997), TOYOTA CAMRY LE ALL TRAC (1988 - 1991), TOYOTA CAMRY XLE (1992 - 1997), TOYOTA CELICA 1999, TOYOTA CELICA ALL TRAC (1988 - 1992), TOYOTA CELICA GT (1986 - 1998), TOYOTA CELICA GTS (1990 - 1992), TOYOTA CELICA GTS ALL TRAC 1993, TOYOTA CELICA GTS SPORT (1986 - 1993), TOYOTA CELICA ST (1987 - 1989), TOYOTA CELICA ST SPORT 1986, TOYOTA MR2 (1991 - 1995), TOYOTA RAV4 (1996 - 2000), TOYOTA RAV4 2-DOOR (1996 - 1997), TOYOTA SOLARA (1999 - 2001)
Likewise they list the following equivalent choices for the lower timing belt pulley: Steel Smooth (57.5mm x 12mm x 29mm): KOYO Part # 1350363011 $15.24 BECK/ARNLEY Part # 0241006 $19.26 GATES Part # T42025 $27.79 CLOYES Part # 95302 $27.79 SEALED POWER Part # 222111BT $39.79 ACDELCO Part # T42025 (#89049141) $27.99 - - - - - - - - - - - - - - - - - - - - - - - - - - - - - - - - - - - - - - - - - - - - - - - - - - - - - - - - - - - - - - - - - - - - - - - - - - - The T42015 The T42015 is a near exact fit to the OEM tensioner pulley. In particular the OEM bearing is 60mm outside diameter and the T42015 is 60mm, the OEM width is 29mm and the T42015 is 30mm. This bearing is used in late model KIA and Hyundai applications from 1997 through 2008 for the 1.8L (and maybe others) engines. www.RockAuto.com lists the following: HYUNDAI ELANTRA (1996 - 2001), HYUNDAI ELANTRA GL 2008, HYUNDAI ELANTRA GLS (1996 - 2008), HYUNDAI ELANTRA GLS SPORT 2008, HYUNDAI ELANTRA GT (2002 - 2006), HYUNDAI ELANTRA L 2008, HYUNDAI ELANTRA LIMITED (2006 - 2008), HYUNDAI ELANTRA SE (2007 - 2008), HYUNDAI TIBURON (1997 - 2004), HYUNDAI TIBURON FX (1997 - 1998), HYUNDAI TIBURON GS (2005 - 2007), HYUNDAI TUCSON GL (2005 - 2008), HYUNDAI TUCSON GLS (2007 - 2008), HYUNDAI TUCSON L 2008, HYUNDAI TUCSON LIMITED 2008, KIA SPECTRA EX (2004 - 2008), KIA SPECTRA LX (2004 - 2008), KIA SPECTRA LX CONVENIENCE 2008, KIA SPECTRA LX PREMIUM 2008, KIA SPECTRA SX (2005 - 2008), KIA SPECTRA5 (2005 - 2006, KIA SPECTRA5 LX 2008, KIA SPECTRA5 LX CONVENIENCE 2008, KIA SPECTRA5 SX (2007 - 2008), KIA SPORTAGE LX (2005 - 2008), KIA SPORTAGE LX CONVENIENCE 2008
Likewise there are the following equivalent choices for the timing belt pulley: Steel Smooth (60mm x 10.3mm x 28.5mm): BECK/ARNLEY Part # 0241282 $16.72 GATES Part # T42015 $17.88 CLOYES Part # 95471 $14.65 NAPA NTP 95471 $23.49 NAPA NBH T42015 $26.49
Quick and Dirty 3/8” Hardware Method This is probably the quickest and easiest solution of them all. The only thing needed is a drill, a ½” drill bit, a hammer, and something to use as a blunt punch (example, an extra 1/4” or 3/8” bolt?) and some common wrenches. Pros:
(1) Easiest, quickest (2) Bearing is best match for fit and function (3) Late model bearing used in 1997 to 2009 cars. (4) Hardware parts available at hardware store.
Cons: (1) Slightly loose at bearing plate; requires proper tightening. (2) Stainless steel, or Grade 5 carriage bolts may not be available and therefore limited to Grade 2. (3) Requires spacer/washer under the head.
steel is not recommended but if used, do not exceed 20 ft-lb.) (3) Nut: 3/8” preferably same materials (4) Lock washer (optional): (5) One thin ½” washer/shim: any thickness greater than 0.010” (6) Thread Locker(optional): Thread Locker(medium strength)
Installation:
(1) Drill back side of OEM tensioner stud using ½” drill. Drill about 1/8” deep. Use a drill press if available, or if using hand drill, use care to drill straight and centered; the ½” drill is only about 0.050” smaller than the 14mm hole diameter.
(2) Drive out the old tensioner stud and pulley using a hammer and a “punch”, i.e., support tensioner between vise jaws supported by the tensioner plate (or other methods: 2” PVC pipe coupling, a 2-1/2” hole in a 2x4, two boards, etc.).
(3) Install bearing: Use stainless steel carriage bolt with thin ½” diameter washer/shim on head side. (This is to prevent the square part of the carriage bolt from interfering with the seating of the bearing.) Apply thread locker and/or add lock washer. Install nut and torque to about 35 ft-lb. (Using Grade 2 carbon steel is not recommended but if used, do not exceed 20 ft-lb.)
3/8" stainless steel carriage bolts areused as the fasteners and the 42015
bearing as-is. There must be a 0.010"shim (or greater) under the head of the bolt
when using 42015.
Quick and Dirty 7/16” Hardware Method This is another quick and dirty solution and can be adapted to the use of either bearing. It uses 7/16” bolts and requires a little grinding at the head. Using T42015 requires enlarging of the bearing mounting hole from 10 mm to 7/16”. Needed is a drill, a ½” drill bit, a 7/16” drill bit, a hammer, and something to use as a blunt punch (example, an extra 1/4” or 3/8” bolt?) and some common wrenches. A drill press would be preferable but not necessary. Pros:
(1) Easy, Quick (2) Bearing T42015 is the size best match (or use T42025 with 12mm hole) (3) Late model bearing used in 1997 to 2009 cars (or use the older Toyota version). (4) Fastener parts may mostly be available at hardware store.
Cons: (1) Stainless steel carriage bolts may not be available. Grade 5 bolts may be hard to find but suitable. (2) Drilling out ID of T42015 is required and (3) Washer under head is required. (4) Trial and Error fit.
steel is not recommended but if used, do not exceed 20 ft-lb.) Note: use longer 7/16” carriage (or Hex?) bolt if using T42025 bearing. Concept is the same for Hex bolts with some grinding of the head hex diameter to 14mm.
(3) Nuts: 7/16” stainless steel, or Grade 5 or better. (Grade 2 not recommended.) (4) Lock washer (optional): (5) For T42015 use ½” washer/shims of appropriate thickness to shim on carriage head side head or for
using T42025, about a 9.5 to 10.0mm stack of washers ( 5mm stack of 14mm (or ½”) and 5mm stack of 12mm (or 7/16”)
(1) Drill back side of OEM tensioner stud using ½” drill. Drill about 1/8” deep. Use a drill press if available, or if using hand drill, use care to drill straight and centered; the ½” drill is only about 0.050” smaller than the hole diameter.
(2) Drive out the old tensioner stud and pulley using a hammer and a “punch”, i.e., support tensioner between vise jaws supported by the tensioner plate (or other methods: 2” PVC pipe coupling, a 2-1/2” hole in a 2x4, two boards, etc.).
(3) Grind square part of Carriage bolt to about 14mm (9/16”) diameter at the underside of the head or if using Hex bolt, grind the bottom portion of the head to about 9/16” diameter
(4) Install bearing: a. If using T42015: First drill out 10mm hole in bearing to 7/16”, then use 7/16” carriage bolt
with ½” diameter washer/shim on head side. Apply thread locker and/or add lock washer. Install nut and torque to 35 ft-lb. (Using Grade 2 carbon steel is not recommended but if used, do not exceed 20 ft-lb.). If using hex bolt, washer are not required.
b. If using T42025: Space bearing 1.0 to 1.5mm (0.040” to 0.060”) off of the tensioner plate using appropriate number of 14 mm (or ½”) and 12 mm (or 7/16”) washers. Use 7/16” bolt. Apply thread locker and/or add lock washer. Install nut and torque to about 35-40 ft-lb. (Using Grade 2 carbon steel is not recommended but if used, do not exceed 20 ft-lb.)
7
MAJOR PARTSBearing: 42025
Bolts: Grade 5 or SS 7/16" Carriage boltWashers: 14mm, 12mm, 10mm (1/2", 7/16" or 3/8")
Nut: Select per specified bolt size.
Method 42025 - 7/16" Carriage
Method 42025 - 7/16" Carriage
7/16" stainless steel or Grade 5 carriage bolts are used as the fasteners but requires
knocking the corners off the head and the 42025 bearing as-is. Washers or spacers
are required. Bearing 42015 could be usedwithout washer underhead with 14mm
counter bore part way into bearing.
Quick and Dirty 12mm Stud Method This is the quickest and easiest stud solution. The only thing needed is a drill, a ½” drill bit, a hammer, and something to use as a blunt punch (example, a 1/4” or 3/8” bolt?) and some Pros:
(1) Easy, quick (2) Used wheel stud available from auto parts store. (3) Bearing is available from many manufacturers from $15-$40 (4) Currently very common, used on many Toyota models from 1983 to 2000
Cons: (1) Pulley OD slightly small (57.5mm compared to 60mm OEM) (2) Uses too many parts (3) May become obsolete; most recent bearing application is 9 years old. (4) Requires trial and error fit-up. (5) Probably not the cheapest.
Parts:
(1) Idler Pulley: Gates T42025 (See notes for equivalents) (2) Fastener: Wheel Stud Dorman 610-276 (or many other choices: see STUDS.) (3) Nut: M12x1.5 Nut (or Wheel Nut 611-066) or other appropriate choices (4) Lock washer (optional): M12 (or 7/16”) (5) Thread Locker(optional): Thread Locker(medium strength) (6) Washers: About a 9.5 to 10.0mm stack of washers ( 5mm stack of 14mm (or ½”) and 5mm stack of
12mm (or 7/16”) ) Installation:
(1) Drill back side of OEM tensioner stud using ½” drill. Drill about 1/8” deep. Use a drill press if available or if using hand drill, use care to drill straight and centered; the ½” drill is only about 0.050” smaller than the hole diameter.
(2) Drive out the old tensioner stud and pulley using a hammer and a “punch”, i.e., support tensioner between vise jaws supported by the tensioner plate (or other methods: 2” PVC pipe coupling, a 2-1/2” hole in a 2x4, two boards, etc.)
(3) Install stud: Draw the stud into the tensioner hole and seat it by tightening the nut over a spacer (spacer could be an appropriate ½” drive socket or a stack of washers),. Note that the beveled edge of the plate is the stud head side. (If you have a torque wrench, you may use up to 80 ft-lb if necessary. The head must be seated. You may use a press if available.) Remove nut and spacer(s) before the next step.
(4) Install bearing: Space bearing 1.0 to 1.5mm (0.040” to 0.060”) off of the tensioner plate using appropriate number of 14 mm (or ½”) and 12 mm (or 7/16”) washers. A few of larger washers must be nearest the plate to clear the protruding 14mm diameter shoulder of the stud. Use thread locker and/or lock washer. Install nut and torque to at least 40 ft-lb.
1
118.5
12
8.5
10
5
Method 42025 - Stud
38.9
0.193
Method 42025 - Stud
12mm wheel studs and washers (or custom spacers) as the fasteners and the 442025 bearing (or equivalent)
MAJOR PARTSBearing: 42025
Stud: 610-275(long) or 610-276(shorter)Washers: 14mm and 12mm (or 1/2" and 7/16")
Nut: 12mmx1.5 (or 611-066)
A Good 10mm Stud Method This is a good 10mm stud method in that it uses the 42015 bearing and fewer parts. The only thing needed is a drill, a ½” drill bit, a hammer, and something to use as a blunt punch (example, a 1/4” or 3/8” bolt?) and some common tools. A drill press is desired, but not absolutely necessary. Also, a shim/shoulder bushing needs to be made for the head of the 10mm stud. Pros:
(1) 10mm wheel stud available from auto parts store. (2) T42015 Bearing is cheap. (3) Currently very common, used on late model KIA and Hyundai
Cons: (1) Requires a bushing at the shoulder of the stud.
(1) Drill back side of OEM tensioner stud using ½” drill. Drill about 1/8” deep. Use a drill press if available or if using hand drill, use care to drill straight and centered; the ½” drill is only about 0.050” smaller than the hole diameter.
(2) Drive out the old tensioner stud and pulley using a hammer and a “punch”, i.e., support tensioner between vise jaws supported by the tensioner plate (or other methods: 2” PVC pipe coupling, a 2-1/2” hole in a 2x4, two boards, etc.)
(3) Install chosen stud: Draw the stud into the tensioner hole and seat it by tightening the nut over a spacer (spacer could be an appropriate ½” drive socket or a stack of washers),. Note that the beveled edge of the plate is the stud head side. (If you have a torque wrench, use at least 50 ft-lb torque and up to 80 ft-lb if necessary. The head must be seated. Use a press if available.) Remove nut and spacer(s) before the next steps.
(4) Install bearing: Use thread locker and/or lock washer. Install nut and torque to about 35 ft-lb.
4
Method 42015 - 10mm Stud
10mm wheel studs as the fasteners and the 442015 bearing as-is. 14mm holeshimmed to 10mm with tubing shim.
My “Editor’s” Choice – Custom Hex Bolt Method This is my favorite solution of them all. It uses my favorite bearing choice (and the cheapest); it uses high strength Hex bolts prperly sized for the plate and bearing hole. Needed is a drill, a ½” drill bit, a hammer, and something to use as a blunt punch (example, an extra 1/4” or 3/8” bolt?) and some common wrenches. It does require some machine work that can be done with a grinder although a lathe and/or drill press would make it easier.. Pros:
(1) Best fit of parts (2) Bearing is best match for fit and function (3) Late model bearing used in 2005 to 2009 cars. (4) Hardware parts available at hardware store.
Cons: (1) Requires some grinding or machining. (2) Grade 5 or Grade 8 bolts may be harder to find..
Parts:
(1) Idler Pulley: Gates T42015 (2) Fastener: 3/8” diameter, 1-1/2” long Grade 5 or 8 Hex bolts (Stainless okay, but using Grade 2
carbon steel is not recommended but if used, do not exceed 20 ft-lb.) (3) Nut: 3/8” (4) Lock washer (optional): (5) Thread Locker: Thread Locker(medium strength)
Installation:
(1) Drill back side of OEM tensioner stud using ½” drill. Drill about 1/8” deep. Use a drill press if available, or if using hand drill, use care to drill straight and centered; the ½” drill is only about 0.050” smaller than the hole diameter.
(2) Drive out the old tensioner stud and pulley using a hammer and a “punch”, i.e., support tensioner between vise jaws supported by the tensioner plate (or other methods: 2” PVC pipe coupling, a 2-1/2” hole in a 2x4, two boards, etc.).
(3) Grind or machine stepped (4) Install bearing: Use stainless steel carriage bolt with thin ½” diameter washer/shim on head side.
(This is to prevent the square part of the carriage bolt from interfering with the seating of the bearing.) Apply thread locker and/or add lock washer. Install nut and torque to about 35 ft-lb. (Using Grade 2 carbon steel is not recommended but if used, do not exceed 20 ft-lb.)
6
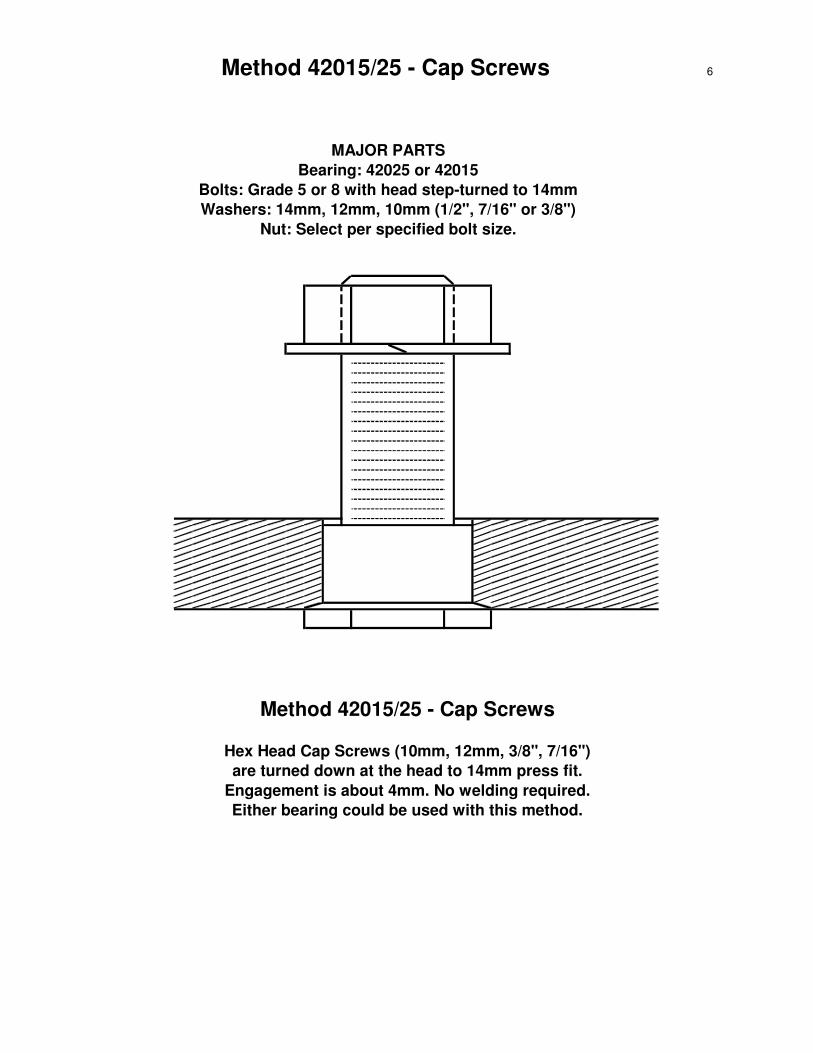
Method 42015/25 - Cap Screws
Hex Head Cap Screws (10mm, 12mm, 3/8", 7/16")are turned down at the head to 14mm press fit.
Engagement is about 4mm. No welding required.Either bearing could be used with this method.
MAJOR PARTSBearing: 42025 or 42015
Bolts: Grade 5 or 8 with head step-turned to 14mmWashers: 14mm, 12mm, 10mm (1/2", 7/16" or 3/8")
Nut: Select per specified bolt size.
Method 42015/25 - Cap Screws
A Better 12mm Stud Method This is a better 12mm stud method in that it uses the 42015 bearing and fewer parts. The only thing needed is a drill, a ½” drill bit, a 14mm drill bit (or 7/16”), a hammer, and something to use as a blunt punch (example, a 1/4” or 3/8” bolt?) and some common tools. A drill press is desired, but not absolutely necessary. Pros:
(4) Used wheel stud available from auto parts store. (5) T42015 Bearing is cheap. (6) Currently very common, used on late model KIA and Hyundai
Cons: (2) Requires drilling the bearing.
Parts:
(7) Idler Pulley: Gates T42015. (8) Fastener: Wheel Stud Dorman 610-276 (or many other choices: see STUDS.) (9) Nut: M12x1.5 Nut (or Wheel Nut 611-066) or other appropriate choices for correct thread. (10) Lock washer (optional): M12 (or 7/16”) (11) Thread Locker: Thread Locker(medium strength)
Installation:
(5) Drill back side of OEM tensioner stud using ½” drill. Drill about 1/8” deep. Use a drill press if available or if using hand drill, use care to drill straight and centered; the ½” drill is only about 0.050” smaller than the hole diameter.
(6) Drive out the old tensioner stud and pulley using a hammer and a “punch”, i.e., support tensioner between vise jaws supported by the tensioner plate (or other methods: 2” PVC pipe coupling, a 2-1/2” hole in a 2x4, two boards, etc.)
(7) Install chosen stud: Draw the stud into the tensioner hole and seat it by tightening the nut over a spacer (spacer could be an appropriate ½” drive socket or a stack of washers),. Note that the beveled edge of the plate is the stud head side. (If you have a torque wrench, use at least 50 ft-lb torque and up to 80 ft-lb if necessary. The head must be seated. Use a press if available.) Remove nut and spacer(s) before the next steps.
(8) Drill out the 42015 bearing hole to 14mm (9/16”) to fit over the exposed 14mm shoulder. (9) Install bearing: Use thread locker and/or lock washer. Install nut and torque to at least 40 ft-lb.
3Method 42015 - 12mm Stud
Method 42015 - 12mm Stud
12mm wheel studs as the fasteners and the 442015 bearing drilled out to 14mm.
MAJOR PARTSBearing: 42015
Stud: 610-276(medium) or 610-322(short) Washers: None (except optional lock washer)
Nut: 12mmx1.5 (611-066) or 12mmx1.25 (611-065)
Method AMethod B
Weld Type Options This is mentioned as a possibility as it has been developed by others in parallel at about the same time as the stud method has been developed. I think that the stud and hardware methods are better, but for those with welding skills they may find merit in this method. This method will eliminate any protusion from the back side, but this is not an issue except maybe for the GL1000 when the heat shield is retained. This method was discussed by another “inventor” HERE. (I’ll put link in later SDB/Jim)
2
Zero to 10mm??
MAJOR PARTSBearing: 42025 or 42015
Bolts: Grade 5 or 8 head turned to 14mmWashers: 14mm, 12mm, 10mm (1/2", 7/16" or 3/8")
Nut: Select per specified bolt size.
Method 42015/25 - Weld
Method 42015/25 - Weld
10mm (or 3/8") or 12mm(or 7/16") Hex Head cap screws and washers (or custom spacers) turned down as ne-cessary. Exact method depends on bearing choice. Use washers with 42025 and head height is zero for 42015. All or part of the head are options.