TMA; Reviewed:
SPOC 1/26/2010
Solution & Interoperability Test Lab Application Notes
©2010 Avaya Inc. All Rights Reserved.
1 of 23
Ascom-i75-AACMB
Avaya Solution & Interoperability Test Lab
Application Note for Configuring the Ascom wireless i75
VoWiFi Handset with an Avaya Aura™ Telephony
Infrastructure using Avaya Aura™ Communication Manager
Branch in a Converged Voice over IP and Data Network
- Issue 1.0
Abstract
These Application Notes describe a solution for supporting wireless interoperability between
the Ascom wireless i75 VoWiFi Handsets with an Avaya Aura™ telephony infrastructure
using of Avaya Aura™ Communication Manager Branch in a converged Voice over IP and
Data Network. Emphasis of the testing was placed on verifying good voice quality of calls
with Ascom wireless SIP handsets registered to the Avaya Aura™ telephony infrastructure.
Information in these Application Notes has been obtained through DevConnect compliance
testing and additional technical discussions. Testing was conducted via the DevConnect
Program at the Avaya Solution and Interoperability Test Lab.
TMA; Reviewed:
SPOC 1/26/2010
Solution & Interoperability Test Lab Application Notes
©2010 Avaya Inc. All Rights Reserved.
2 of 23
Ascom-i75-AACMB
1. Introduction Implementing wireless telephony requires interoperability between the wireless telephony products
and the telephony infrastructure. As IP telephony evolves, potential implementers of this
technology look for flexibility and choice when deciding on which particular technology to
implement. Regardless of the technology chosen the telephony infrastructure needs to be flexible
enough to support solutions using all available technologies.
These Application Notes describe the configuration process necessary to provide interoperability
between Avaya Aura™ Communication Manager Branch and Ascom wireless i75 VoWiFi SIP
Handsets in a Converged Voice over IP and Data Network.
1.1. Interoperability Compliance Testing
Testing was conducted via the DevConnect Program at the Avaya Solution and Interoperability
Test Lab. Compliance testing focused on verifying interoperability of the Ascom wireless i75
VoWiFi Handset with Avaya Aura™ Communication Manager Branch. Additional testing verified
proper operation between the Ascom wireless i75 VoWiFi Handset with Avaya 9600 & 1600 Series
SIP & H.323 IP Telephones and the Avaya 2410 Digital Telephone. Voicemail and MWI was
verified to operate correctly. Network level tests included verifying roaming from access point to
access point and validating Quality of Service for voice calls in a converged voice and data network
configuration.
Avaya’s formal testing and Declaration of Conformity is provided only on the headsets/handsets
that carry the Avaya brand or logo. Avaya may conduct testing of non-Avaya headset/handset to
determine interoperability with Avaya phones. However, Avaya does not conduct the testing of
non-Avaya headsets/handsets for: Acoustic Pressure, Safety, Hearing Aid Compliance, EMC
regulations, or any other tests to ensure conformity with safety, audio quality, long-term reliability
or any regulation requirements or scalability. As a result, Avaya makes no representations whether
a particular non-Avaya headset will work with Avaya’s telephones or with a different generation of
the same Avaya telephone.
Since there is no industry standard for handset interfaces, different manufacturers utilize different
handset/headset interfaces with their telephones. Therefore, any claim made by a headset vendor
that its product is compatible with Avaya telephones does not equate to a guarantee that the headset
will provide adequate safety protection or audio quality.
1.2. Support
Technical support for the Ascom wireless i75 VoWiFi handset can be obtained through your local
Ascom supplier.
Ascom global technical support:
Phone: +46 31 559450
Email: [email protected]
TMA; Reviewed:
SPOC 1/26/2010
Solution & Interoperability Test Lab Application Notes
©2010 Avaya Inc. All Rights Reserved.
3 of 23
Ascom-i75-AACMB
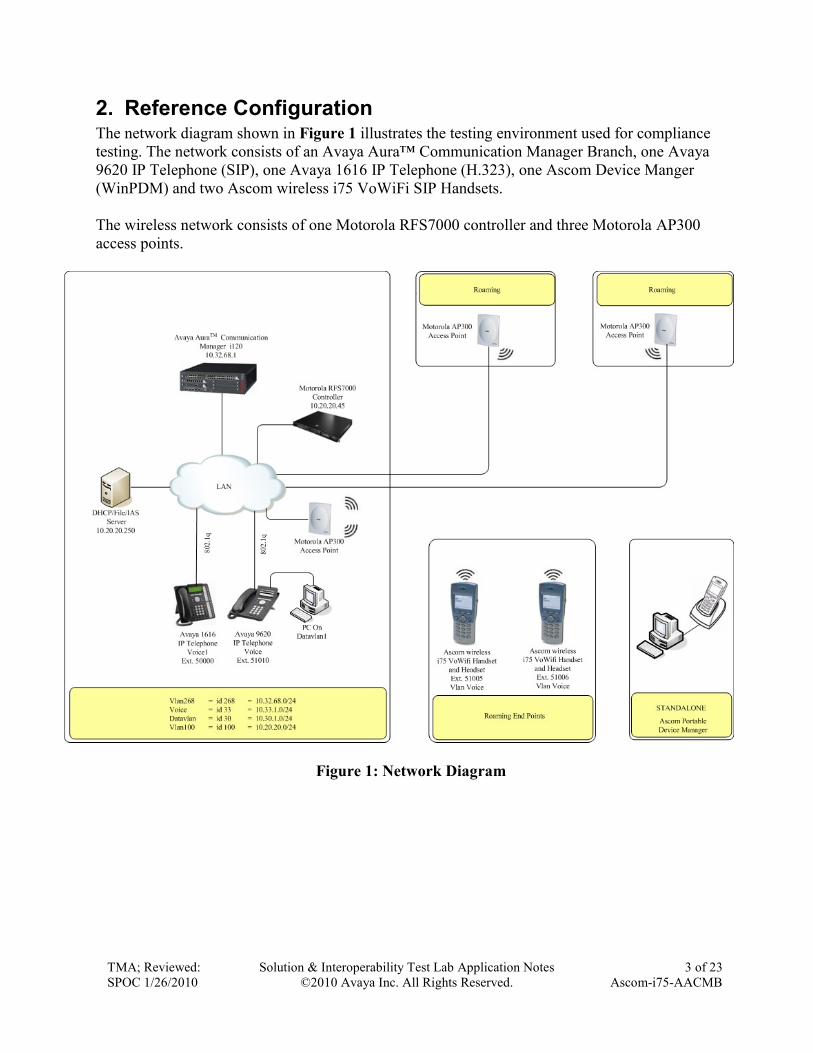
2. Reference Configuration The network diagram shown in Figure 1 illustrates the testing environment used for compliance
testing. The network consists of an Avaya Aura™ Communication Manager Branch, one Avaya
9620 IP Telephone (SIP), one Avaya 1616 IP Telephone (H.323), one Ascom Device Manger
(WinPDM) and two Ascom wireless i75 VoWiFi SIP Handsets.
The wireless network consists of one Motorola RFS7000 controller and three Motorola AP300
access points.
Figure 1: Network Diagram
TMA; Reviewed:
SPOC 1/26/2010
Solution & Interoperability Test Lab Application Notes
©2010 Avaya Inc. All Rights Reserved.
4 of 23
Ascom-i75-AACMB
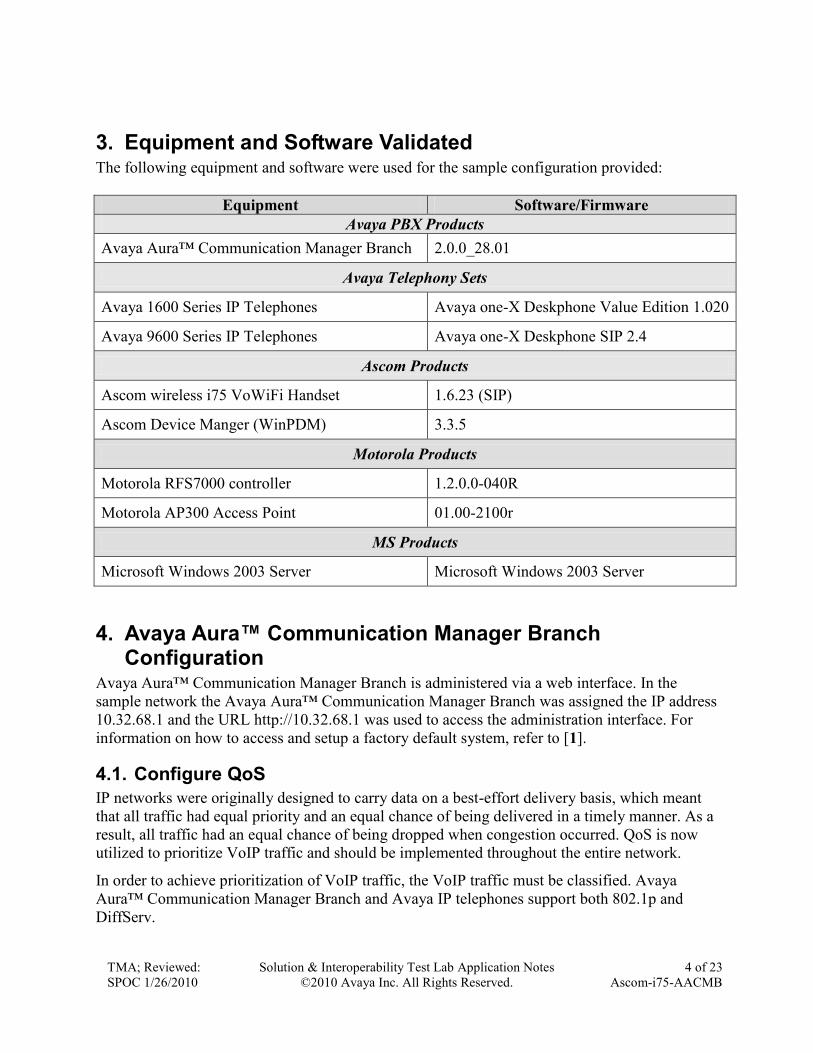
3. Equipment and Software Validated The following equipment and software were used for the sample configuration provided:
Equipment Software/Firmware
Avaya PBX Products
Avaya Aura™ Communication Manager Branch 2.0.0_28.01
Avaya Telephony Sets
Avaya 1600 Series IP Telephones Avaya one-X Deskphone Value Edition 1.020
Avaya 9600 Series IP Telephones Avaya one-X Deskphone SIP 2.4
Ascom Products
Ascom wireless i75 VoWiFi Handset 1.6.23 (SIP)
Ascom Device Manger (WinPDM) 3.3.5
Motorola Products
Motorola RFS7000 controller 1.2.0.0-040R
Motorola AP300 Access Point 01.00-2100r
MS Products
Microsoft Windows 2003 Server Microsoft Windows 2003 Server
4. Avaya Aura™ Communication Manager Branch Configuration
Avaya Aura™ Communication Manager Branch is administered via a web interface. In the
sample network the Avaya Aura™ Communication Manager Branch was assigned the IP address
10.32.68.1 and the URL http://10.32.68.1 was used to access the administration interface. For
information on how to access and setup a factory default system, refer to [1].
4.1. Configure QoS
IP networks were originally designed to carry data on a best-effort delivery basis, which meant
that all traffic had equal priority and an equal chance of being delivered in a timely manner. As a
result, all traffic had an equal chance of being dropped when congestion occurred. QoS is now
utilized to prioritize VoIP traffic and should be implemented throughout the entire network.
In order to achieve prioritization of VoIP traffic, the VoIP traffic must be classified. Avaya
Aura™ Communication Manager Branch and Avaya IP telephones support both 802.1p and
DiffServ.
TMA; Reviewed:
SPOC 1/26/2010
Solution & Interoperability Test Lab Application Notes
©2010 Avaya Inc. All Rights Reserved.
5 of 23
Ascom-i75-AACMB
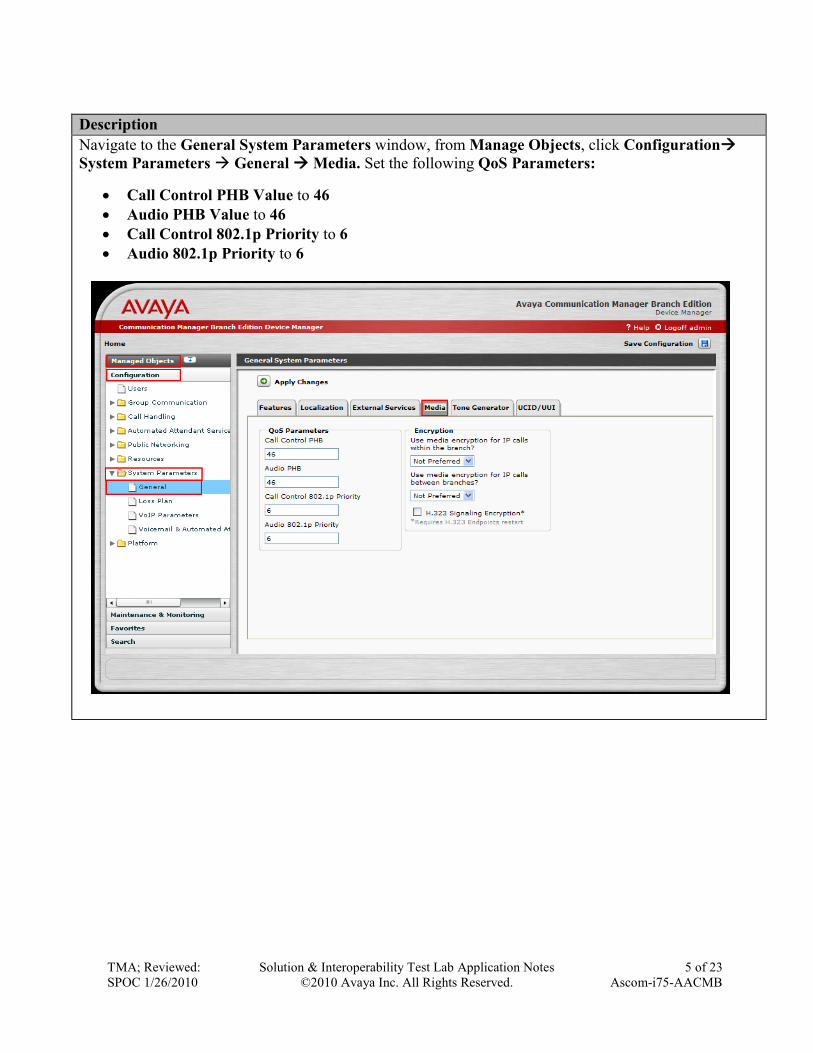
Description
Navigate to the General System Parameters window, from Manage Objects, click Configuration
System Parameters General Media. Set the following QoS Parameters:
Call Control PHB Value to 46
Audio PHB Value to 46
Call Control 802.1p Priority to 6
Audio 802.1p Priority to 6
TMA; Reviewed:
SPOC 1/26/2010
Solution & Interoperability Test Lab Application Notes
©2010 Avaya Inc. All Rights Reserved.
6 of 23
Ascom-i75-AACMB
4.2. Configure Station
Step Description
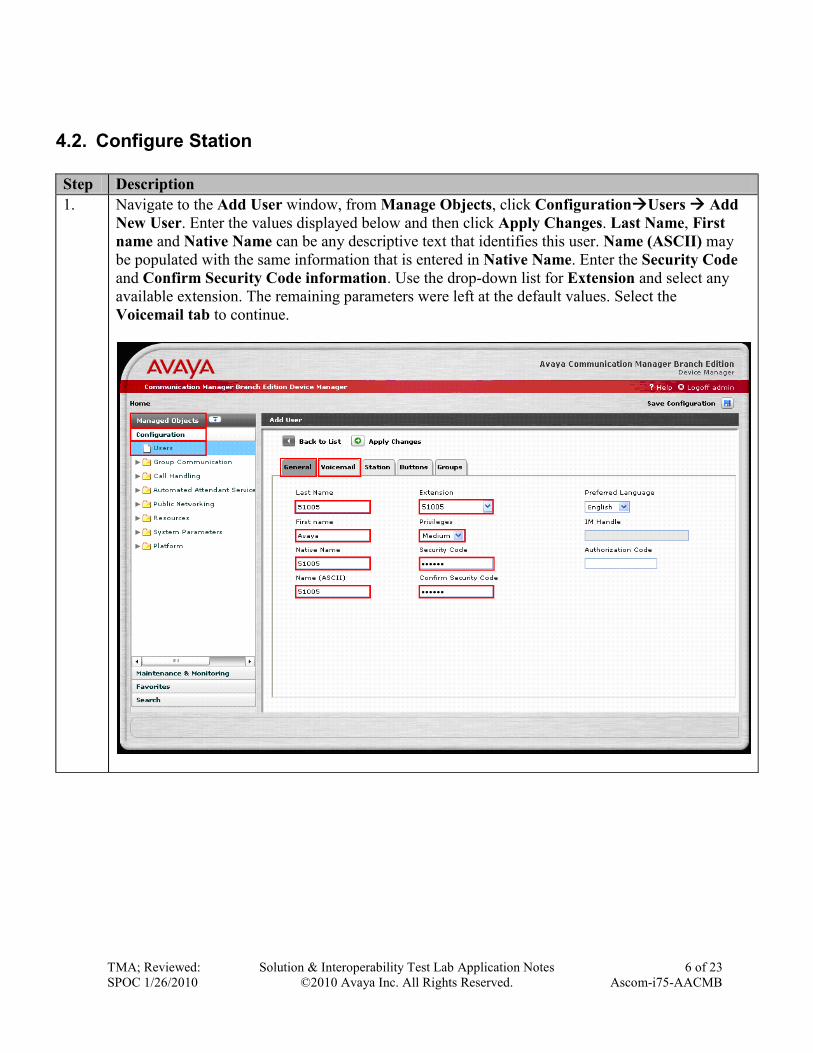
1. Navigate to the Add User window, from Manage Objects, click ConfigurationUsers Add
New User. Enter the values displayed below and then click Apply Changes. Last Name, First
name and Native Name can be any descriptive text that identifies this user. Name (ASCII) may
be populated with the same information that is entered in Native Name. Enter the Security Code
and Confirm Security Code information. Use the drop-down list for Extension and select any
available extension. The remaining parameters were left at the default values. Select the
Voicemail tab to continue.
TMA; Reviewed:
SPOC 1/26/2010
Solution & Interoperability Test Lab Application Notes
©2010 Avaya Inc. All Rights Reserved.
7 of 23
Ascom-i75-AACMB
Step Description
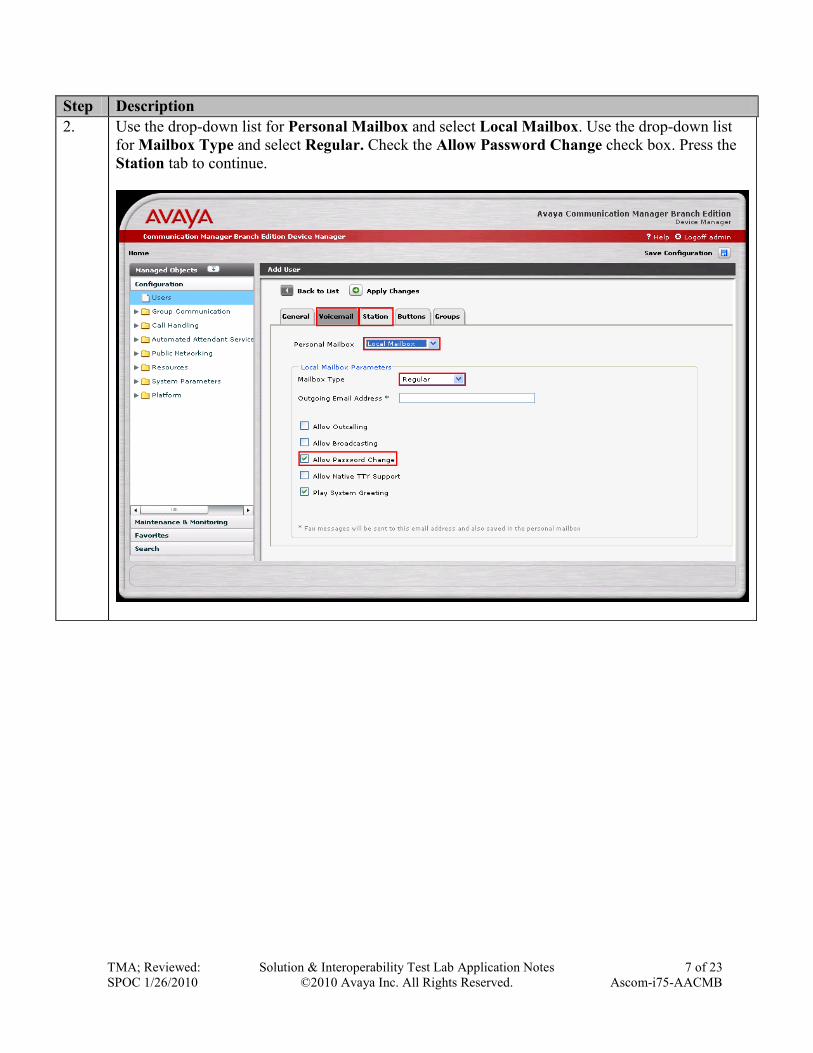
2. Use the drop-down list for Personal Mailbox and select Local Mailbox. Use the drop-down list
for Mailbox Type and select Regular. Check the Allow Password Change check box. Press the
Station tab to continue.
TMA; Reviewed:
SPOC 1/26/2010
Solution & Interoperability Test Lab Application Notes
©2010 Avaya Inc. All Rights Reserved.
8 of 23
Ascom-i75-AACMB
Step Description
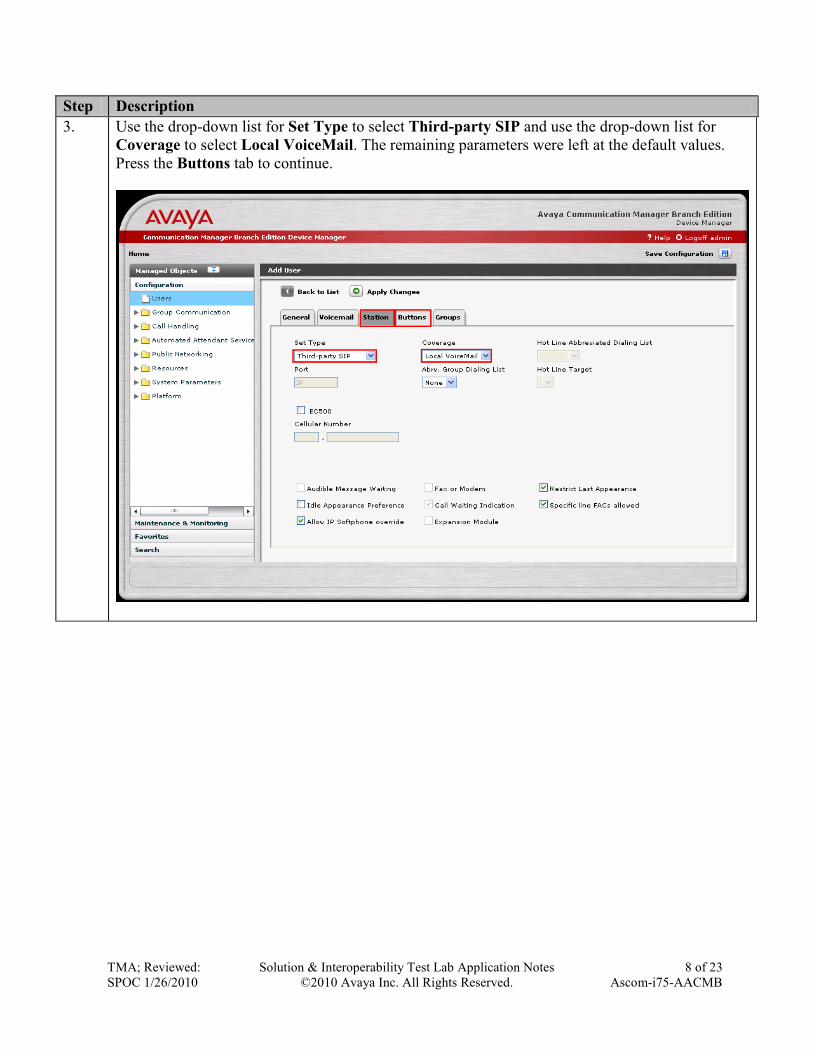
3. Use the drop-down list for Set Type to select Third-party SIP and use the drop-down list for
Coverage to select Local VoiceMail. The remaining parameters were left at the default values.
Press the Buttons tab to continue.
TMA; Reviewed:
SPOC 1/26/2010
Solution & Interoperability Test Lab Application Notes
©2010 Avaya Inc. All Rights Reserved.
9 of 23
Ascom-i75-AACMB
Step Description
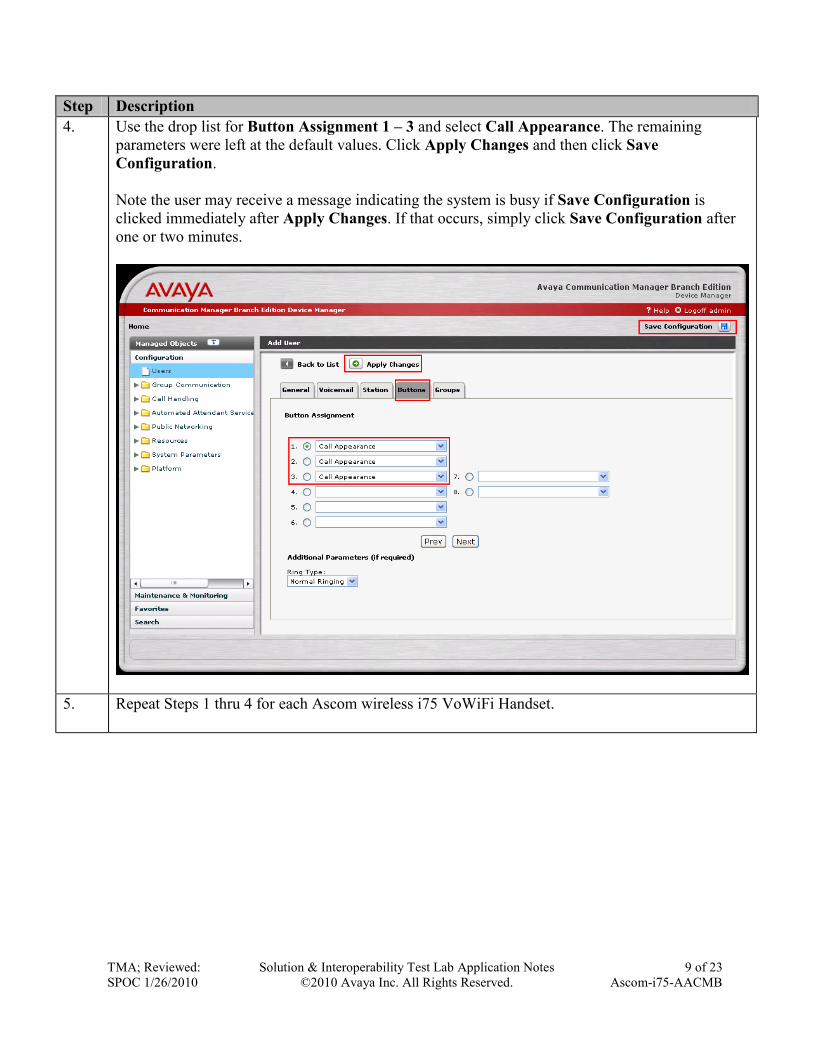
4. Use the drop list for Button Assignment 1 – 3 and select Call Appearance. The remaining
parameters were left at the default values. Click Apply Changes and then click Save
Configuration.
Note the user may receive a message indicating the system is busy if Save Configuration is
clicked immediately after Apply Changes. If that occurs, simply click Save Configuration after
one or two minutes.
5. Repeat Steps 1 thru 4 for each Ascom wireless i75 VoWiFi Handset.
TMA; Reviewed:
SPOC 1/26/2010
Solution & Interoperability Test Lab Application Notes
©2010 Avaya Inc. All Rights Reserved.
10 of 23
Ascom-i75-AACMB
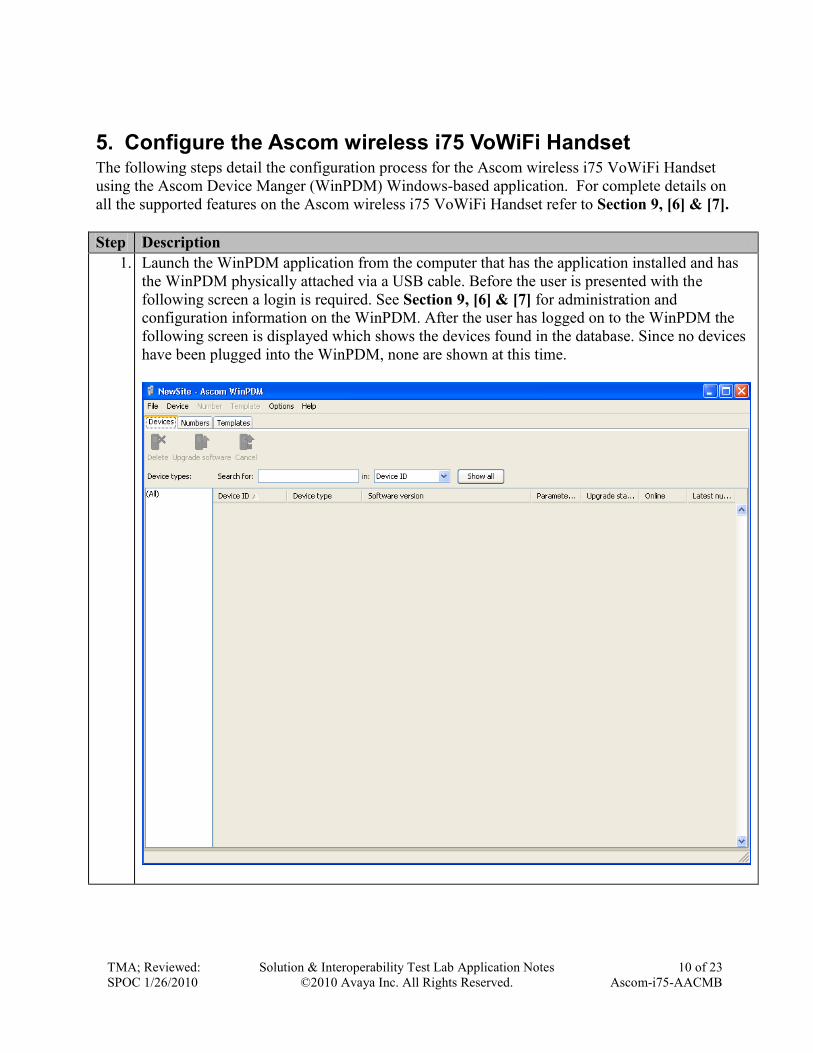
5. Configure the Ascom wireless i75 VoWiFi Handset The following steps detail the configuration process for the Ascom wireless i75 VoWiFi Handset
using the Ascom Device Manger (WinPDM) Windows-based application. For complete details on
all the supported features on the Ascom wireless i75 VoWiFi Handset refer to Section 9, [6] & [7].
Step Description
1. Launch the WinPDM application from the computer that has the application installed and has
the WinPDM physically attached via a USB cable. Before the user is presented with the
following screen a login is required. See Section 9, [6] & [7] for administration and
configuration information on the WinPDM. After the user has logged on to the WinPDM the
following screen is displayed which shows the devices found in the database. Since no devices
have been plugged into the WinPDM, none are shown at this time.
TMA; Reviewed:
SPOC 1/26/2010
Solution & Interoperability Test Lab Application Notes
©2010 Avaya Inc. All Rights Reserved.
11 of 23
Ascom-i75-AACMB
Step Description
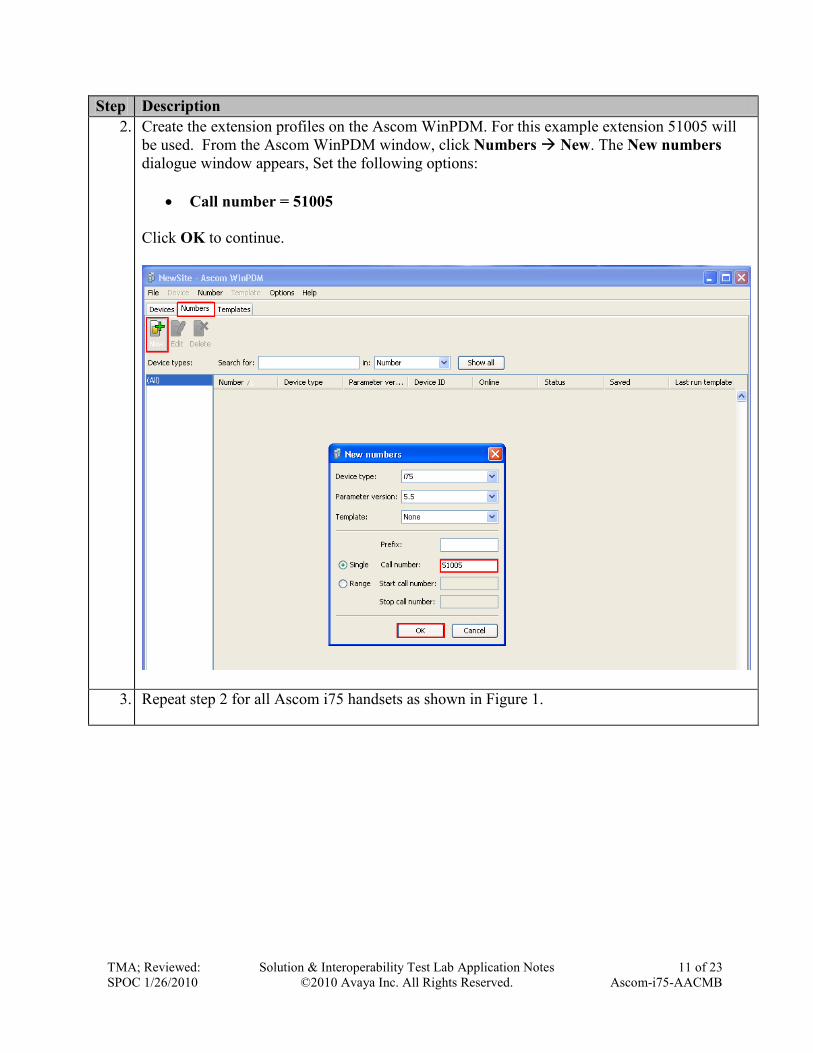
2. Create the extension profiles on the Ascom WinPDM. For this example extension 51005 will
be used. From the Ascom WinPDM window, click Numbers New. The New numbers
dialogue window appears, Set the following options:
Call number = 51005
Click OK to continue.
3. Repeat step 2 for all Ascom i75 handsets as shown in Figure 1.
TMA; Reviewed:
SPOC 1/26/2010
Solution & Interoperability Test Lab Application Notes
©2010 Avaya Inc. All Rights Reserved.
12 of 23
Ascom-i75-AACMB
Step Description
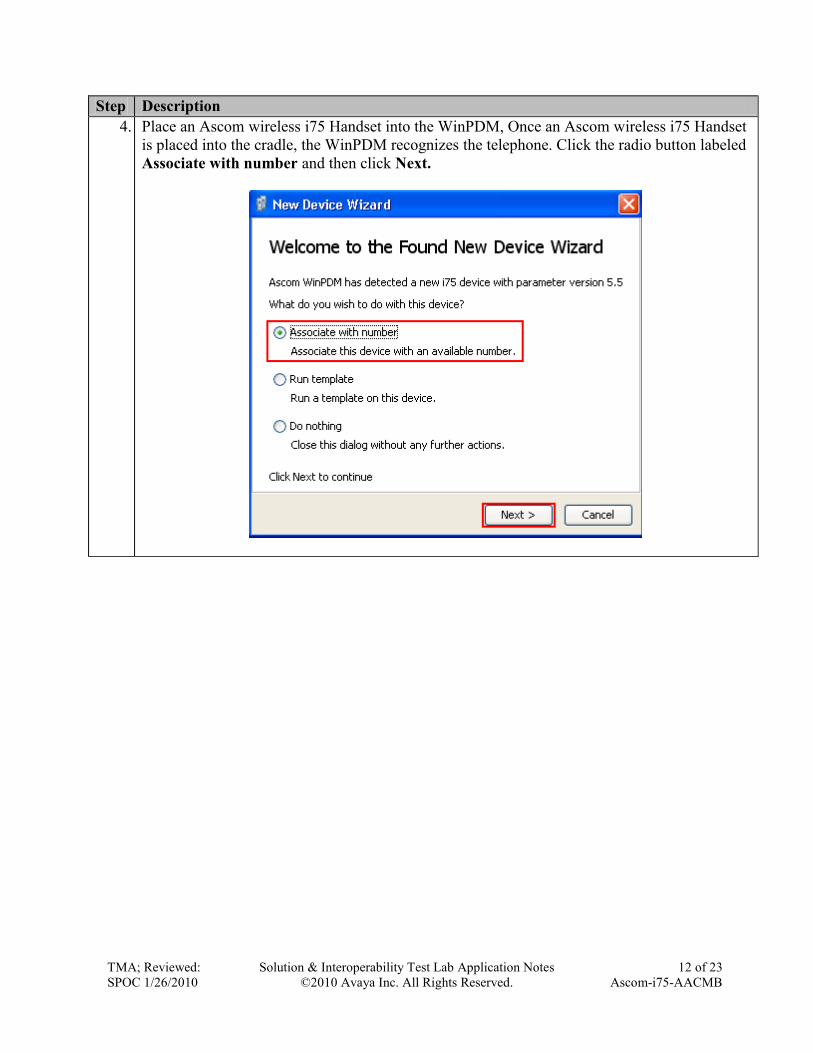
4. Place an Ascom wireless i75 Handset into the WinPDM, Once an Ascom wireless i75 Handset
is placed into the cradle, the WinPDM recognizes the telephone. Click the radio button labeled
Associate with number and then click Next.
TMA; Reviewed:
SPOC 1/26/2010
Solution & Interoperability Test Lab Application Notes
©2010 Avaya Inc. All Rights Reserved.
13 of 23
Ascom-i75-AACMB
Step Description
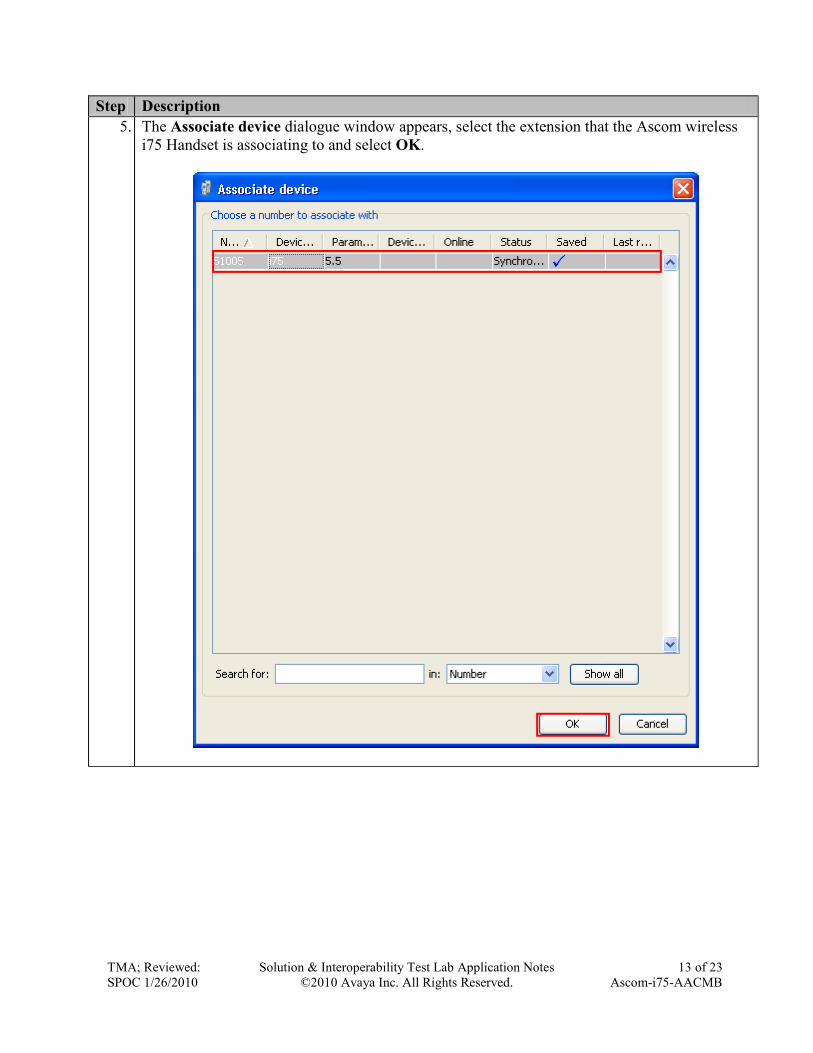
5. The Associate device dialogue window appears, select the extension that the Ascom wireless
i75 Handset is associating to and select OK.
TMA; Reviewed:
SPOC 1/26/2010
Solution & Interoperability Test Lab Application Notes
©2010 Avaya Inc. All Rights Reserved.
14 of 23
Ascom-i75-AACMB
Step Description
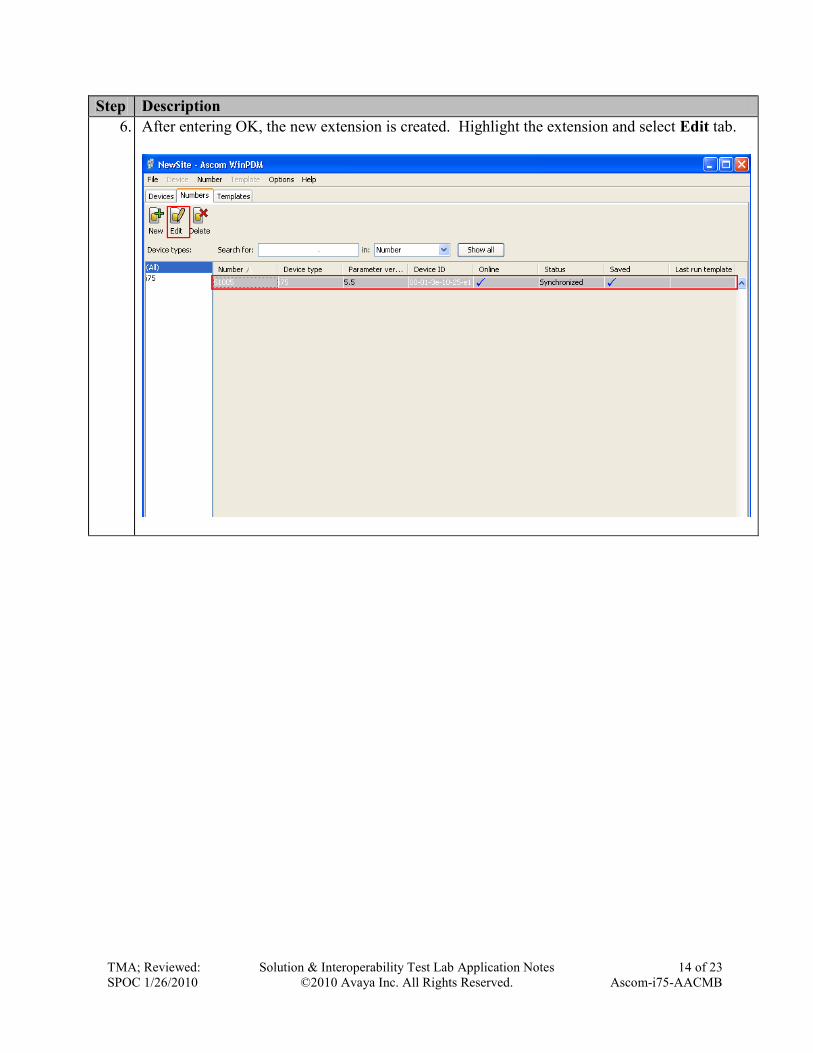
6. After entering OK, the new extension is created. Highlight the extension and select Edit tab.
TMA; Reviewed:
SPOC 1/26/2010
Solution & Interoperability Test Lab Application Notes
©2010 Avaya Inc. All Rights Reserved.
15 of 23
Ascom-i75-AACMB
Step Description
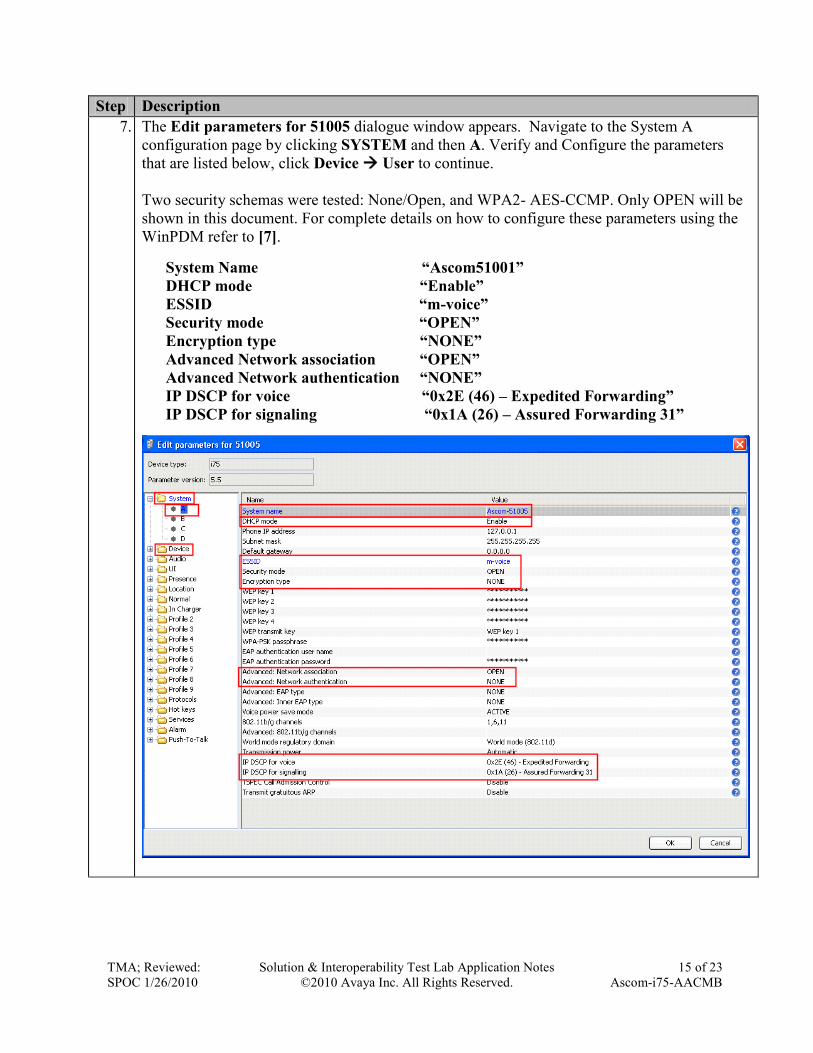
7. The Edit parameters for 51005 dialogue window appears. Navigate to the System A
configuration page by clicking SYSTEM and then A. Verify and Configure the parameters
that are listed below, click Device User to continue.
Two security schemas were tested: None/Open, and WPA2- AES-CCMP. Only OPEN will be
shown in this document. For complete details on how to configure these parameters using the
WinPDM refer to [7].
System Name “Ascom51001”
DHCP mode “Enable”
ESSID “m-voice”
Security mode “OPEN”
Encryption type “NONE”
Advanced Network association “OPEN”
Advanced Network authentication “NONE”
IP DSCP for voice “0x2E (46) – Expedited Forwarding”
IP DSCP for signaling “0x1A (26) – Assured Forwarding 31”
TMA; Reviewed:
SPOC 1/26/2010
Solution & Interoperability Test Lab Application Notes
©2010 Avaya Inc. All Rights Reserved.
16 of 23
Ascom-i75-AACMB
Step Description
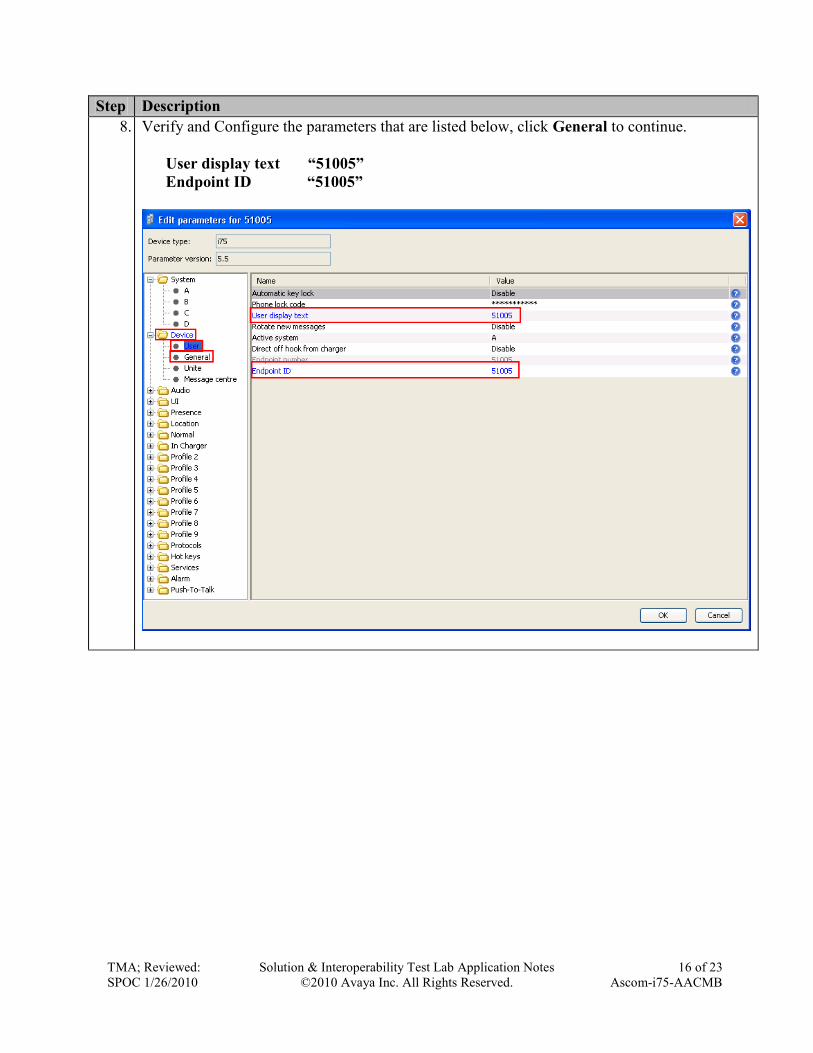
8. Verify and Configure the parameters that are listed below, click General to continue.
User display text “51005”
Endpoint ID “51005”
TMA; Reviewed:
SPOC 1/26/2010
Solution & Interoperability Test Lab Application Notes
©2010 Avaya Inc. All Rights Reserved.
17 of 23
Ascom-i75-AACMB
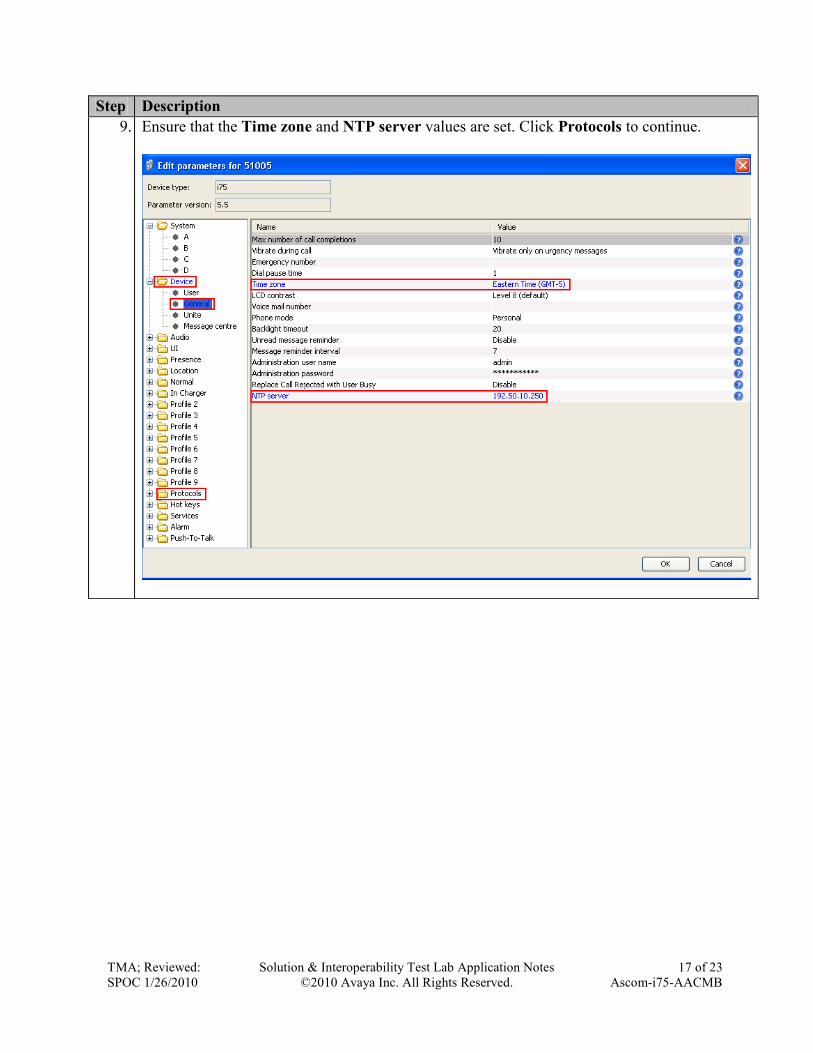
Step Description
9. Ensure that the Time zone and NTP server values are set. Click Protocols to continue.
TMA; Reviewed:
SPOC 1/26/2010
Solution & Interoperability Test Lab Application Notes
©2010 Avaya Inc. All Rights Reserved.
18 of 23
Ascom-i75-AACMB
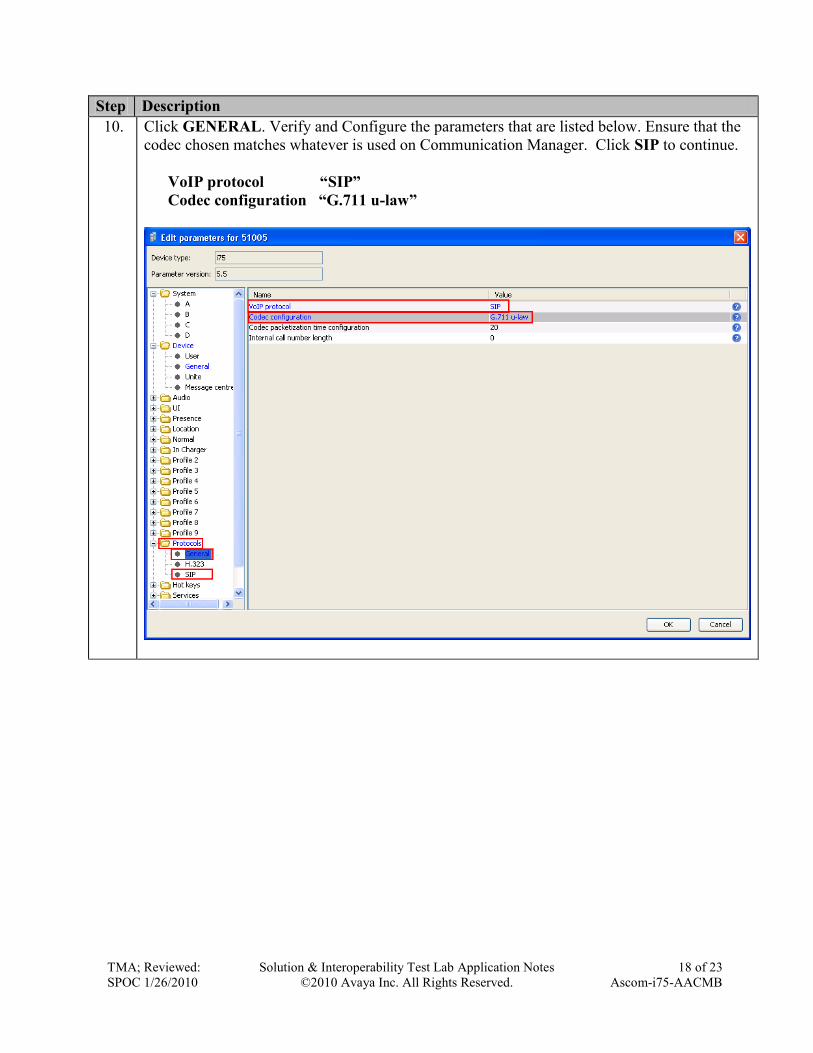
Step Description
10. Click GENERAL. Verify and Configure the parameters that are listed below. Ensure that the
codec chosen matches whatever is used on Communication Manager. Click SIP to continue.
VoIP protocol “SIP”
Codec configuration “G.711 u-law”
TMA; Reviewed:
SPOC 1/26/2010
Solution & Interoperability Test Lab Application Notes
©2010 Avaya Inc. All Rights Reserved.
19 of 23
Ascom-i75-AACMB
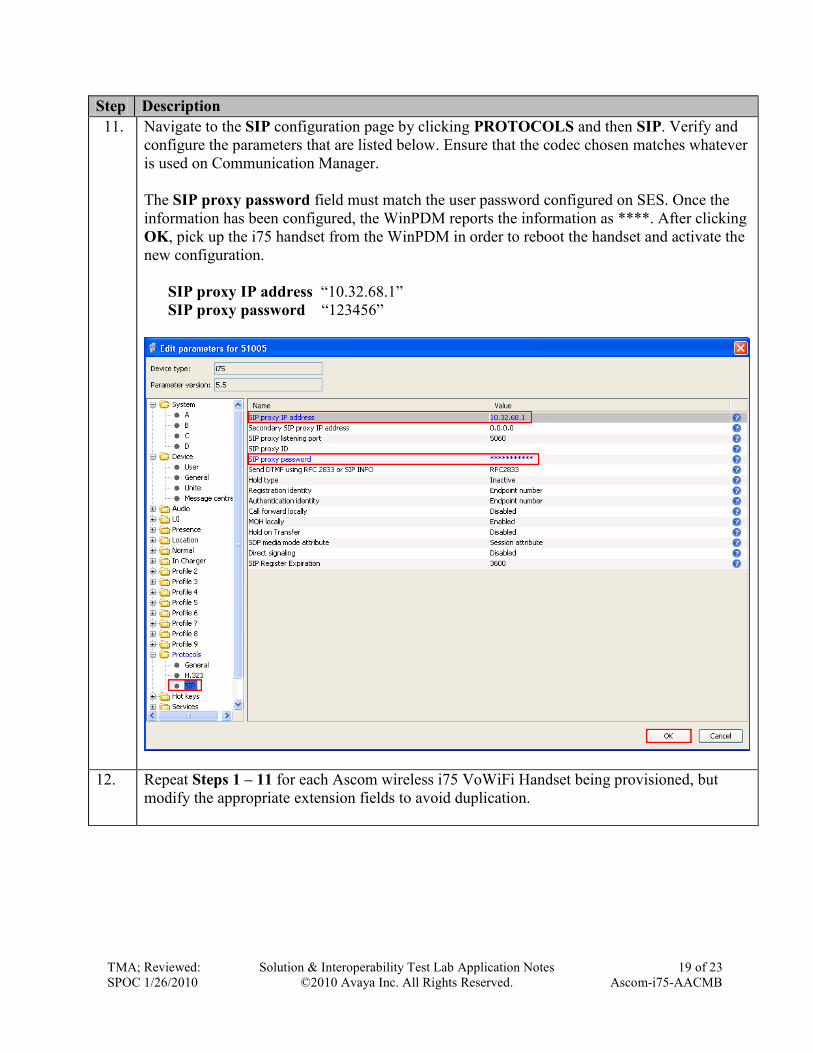
Step Description
11. Navigate to the SIP configuration page by clicking PROTOCOLS and then SIP. Verify and
configure the parameters that are listed below. Ensure that the codec chosen matches whatever
is used on Communication Manager.
The SIP proxy password field must match the user password configured on SES. Once the
information has been configured, the WinPDM reports the information as ****. After clicking
OK, pick up the i75 handset from the WinPDM in order to reboot the handset and activate the
new configuration.
SIP proxy IP address “10.32.68.1”
SIP proxy password “123456”
12. Repeat Steps 1 – 11 for each Ascom wireless i75 VoWiFi Handset being provisioned, but
modify the appropriate extension fields to avoid duplication.
TMA; Reviewed:
SPOC 1/26/2010
Solution & Interoperability Test Lab Application Notes
©2010 Avaya Inc. All Rights Reserved.
20 of 23
Ascom-i75-AACMB
6. General Test Approach and Test Results
6.1. General Test Approach
All feature functionality test cases were performed manually. The general test approach entailed
verifying the following:
Registration, re-registration of Ascom i75 VoWiFi Portable Handsets with Avaya Aura™
Communication Manager Branch.
Verify Message Waiting Indicator and message retrieval
VoIP calls between Ascom and Avaya Digital Telephones, Avaya SIP and Avaya H.323 IP
Telephones.
Inter-office calls using SIP, G.711 codec, shuffling, conferencing, voicemail, DTMF and
sending low priority data traffic over the LAN.
Wireless Roaming, Wireless Security, Wireless Authentication and Wireless Quality of
Service.
Verifying that QoS directed the voice signaling and voice media to the higher priority queue
based on WMM QoS.
6.2. Test Results
The Ascom wireless i75 VoWiFi Handset passed all test cases. Ascom wireless i75 VoWiFi
Handsets were verified to successfully register with Avaya Aura™ Communication Manager
Branch. The compliance testing also focused on verifying WMM Quality of Service for voice
traffic while low priority wireless background traffic was competing for bandwidth. The Ascom
wireless i75 VoWiFi Handset was verified to roam successfully between access points while
maintaining voice calls. Multiple security schemas, OPEN and WPA2-AES-CCMP were used for
testing. Telephone calls using codec G.711MU were verified to operate correctly with the media
path direct between the telephones (shuffling enabled) and with the media path centralized through
Avaya Aura™ Communication Manager Branch (shuffling disabled). Calls were maintained for
durations over one minute without degradation to voice quality. The telephony features verified to
operate correctly included attended/unattended transfer, conference call participation, conference
call add/drop, multiple call appearances, caller ID operation, call forwarding unconditional, call
forwarding clear, call park, call pickup, bridged appearance alerting, voicemail, MWI, hold and
return from hold.
TMA; Reviewed:
SPOC 1/26/2010
Solution & Interoperability Test Lab Application Notes
©2010 Avaya Inc. All Rights Reserved.
21 of 23
Ascom-i75-AACMB
7. Verification Steps The following steps can be used to verify proper operation of the Ascom wireless i75 VoWiFi
Handset.
Ensure that the ESSID value of the wireless network matches the ESSID field value
configured in Section 5 Step 7 on the Ascom wireless i75 VoWiFi Handset.
Check that the Ascom wireless i75 VoWiFi Handset have successfully registered with
Avaya Aura™ Communication Manager Branch. Log into Avaya Aura™ Communication
Manager Branch using the appropriate credentials, under Managed Objects, select
Maintenance & Monitoring → Telephony → Users, look for in service.
Ensure that the VoIP Protocol and Codec configuration field values are set correctly, see
Section 5, Step 10.
Ensure that the SIP proxy IP address and SIP proxy password field values are set
correctly, see Section 5, Step 11.
Ensure that the Ascom wireless i75 VoWiFi Handset was removed from the Device
Manager after completing the configuration to apply the changes and reboot the handset.
Place calls from the Ascom wireless i75 VoWiFi Handset and verify two-way audio.
Place a call to the Ascom wireless i75 VoWiFi Handset, allow the call to be directed to
voicemail, leave a voicemail message and verify the MWI message is received.
Using the Ascom wireless i75 VoWiFi Handset that received the voicemail, connect to the
voicemail system to retrieve the voicemail and verify the MWI message clears.
Place calls to the Ascom wireless i75 VoWiFi Handset and exercise calling features such as
transfer, conference and hold.
8. Conclusion These Application Notes illustrate the procedures necessary for configuring the Ascom wireless i75
VoWiFi Handset with an Avaya Aura™ telephony infrastructure using Avaya Aura™
Communication Manager Branch. All feature functionality test cases described in Section 6.1
passed.
TMA; Reviewed:
SPOC 1/26/2010
Solution & Interoperability Test Lab Application Notes
©2010 Avaya Inc. All Rights Reserved.
22 of 23
Ascom-i75-AACMB
9. Additional References The documents referenced below were used for additional support and configuration information.
The following Avaya product documentation can be found at http://support.avaya.com.
[1] Avaya Aura™ Communication Manager Branch i120 Installation Quick Start, May 2009,
Document Number 03-602289.
[2] Avaya Aura™ Communication Manager Branch voice mail Quick Reference Guide. May
2009, Document Number 03-602108
[3] Avaya one-X Deskphone Value Edition 1600 Series IP Telephones Installation and
Maintenance Guide Release 1, Document # 16-601443.
[4] Avaya one-X Deskphone SIP for 9600 Series IP Telephones Installation and Maintenance
Guide Release 2.0, Document Number 16-601943.
[5] 4600 Series IP Telephone LAN Administrator Guide, Document Number: 555-233-507.
The Ascom wireless documentation was obtained from http://www.Ascom wireless.com.
[6] Installation and Operation Manual – Device Manager (WinPDM), Windows version,
December 2006, Version C, Document Number TD 92325GB
[7] User Manual Ascom i75 VoWiFi Handset, September 2006, Version B, Document Number
TD 92319GB
10. Change History
Issue Date Reason
1.0 1/26/2010 Initial issue
TMA; Reviewed:
SPOC 1/26/2010
Solution & Interoperability Test Lab Application Notes
©2010 Avaya Inc. All Rights Reserved.
23 of 23
Ascom-i75-AACMB
©2010 Avaya Inc. All Rights Reserved.
Avaya and the Avaya Logo are trademarks of Avaya Inc. All trademarks identified by ® and
™ are registered trademarks or trademarks, respectively, of Avaya Inc. All other trademarks
are the property of their respective owners. The information provided in these Application
Notes is subject to change without notice. The configurations, technical data, and
recommendations provided in these Application Notes are believed to be accurate and
dependable, but are presented without express or implied warranty. Users are responsible for
their application of any products specified in these Application Notes.
Please e-mail any questions or comments pertaining to these Application Notes along with the
full title name and filename, located in the lower right corner, directly to the Avaya
DevConnect Program at [email protected].