252
� � � �� � � � � � � �� � �� � � � � � � � � �� � User’s Guide

Microsoft
® Office S
mall B
usiness Accounting 20
06
User’s G
uide
Part No. X11-29551
Need more information?
For more information about Microsoft® Office Small Business Accounting 2006, Microsoft Office Small Business Management Edition, or Microsoft Office Editions, visit us on the Web:
• Microsoft Office Small Business Accounting 2006 Learn more about the new financial management program from Microsoft at www.microsoft.com/office/accounting
• Microsoft Office Small Business Management Edition 2006 Learn more about the new financial management solution from Microsoft at www.microsoft.com/office/editions/prodinfo/smallbusiness/management/default.mspx
• Microsoft Office Editions Find out which Microsoft Edition is right for your company at www.microsoft.com/office/editions/prodinfo/smallbusiness
• Microsoft Office Small Business Accounting Add-on Services Learn more about add-on services that can help you save time at sba.microsoft.com
Need help?
Free and paid support plans are available to keep you up and running. If you need to speak to a Microsoft support engineer, call us at 1-800-MICROSOFT. You can also visit us on the Web at www.support.microsoft.com to find out more about:
• Free product setup and support calls
• Paid support plans
• Frequently asked questions
• Knowledge Base articles
If you encounter problems installing this product, our support engineers can help you. Free installation support is available at 1-800-MICROSOFT.
����������������������� ����
User’s Guide
Microsoft® Office
Small Business Accounting 2006
User’s Guide

Information in this document, including URL and other Internet Web site references, is subject to change without notice. Unless otherwise noted, the example companies, organizations, products, domain names, e-mail addresses, logos, people, places, and events depicted herein are fictitious, and no association with any real company, organization, product, domain name, e-mail address, logo, person, place, or event is intended or should be inferred. Complying with all applicable copyright laws is the responsibility of the user. Without limiting the rights under copyright, no part of this document may be reproduced, stored in or introduced into a retrieval system, or transmitted in any form or by any means (electronic, mechanical, photocopying, recording, or otherwise), or for any purpose, without the express written permission of Microsoft Corporation. Microsoft may have patents, patent applications, trademarks, copyrights, or other intellectual property rights covering subject matter in this document. Except as expressly provided in any written license agreement from Microsoft, the furnishing of this document does not give you any license to these patents, trademarks, copyrights, or other intellectual property. © 2005 Microsoft Corporation. All rights reserved. Microsoft, MS-DOS, Outlook, PivotTable, Windows, Windows NT, and Windows Server are either registered trademarks or trademarks of Microsoft Corporation in the United States and/or other countries. ©2005, ADP, Inc. ADP Payroll, ADP Payroll Plus, and ADP Total Payroll are service marks of ADP of North America, Inc. The names of actual companies and products mentioned herein may be the trademarks of their respective owners. September 2005 Part No. X11-29551 Printed in the United States of America.

Contents
Welcome to Small Business Accounting ............................................................. 1 Part 1: Getting Started ......................................................................................... 5
Chapter 1: Installing and Setting Up ............................................................................................ 9 Chapter 2: Taking a Tour.............................................................................................................23 Chapter 3: Refining Your Company Setup ...............................................................................29 Chapter 4: Managing User Roles and Permissions...................................................................41
Part 2: Managing Your Company...................................................................... 45 Chapter 5: Setting Up and Managing Accounts .......................................................................49 Chapter 6: Recording Account Activity.....................................................................................59 Chapter 7: Tracking and Paying Sales Tax ................................................................................65 Chapter 8: Managing Your Company Data...............................................................................69
Part 3: Selling to Customers .............................................................................. 77 Chapter 9: Working with Customers .........................................................................................81 Chapter 10: Offering a Quote.....................................................................................................87 Chapter 11: Taking a Sales Order...............................................................................................91 Chapter 12: Submitting an Invoice.............................................................................................95 Chapter 13: Managing Payments ..............................................................................................101 Chapter 14: Managing Jobs .......................................................................................................111
Part 4: Buying from Vendors ............................................................................ 117 Chapter 15: Working with Vendors .........................................................................................121 Chapter 16: Setting Up Product and Service Items ...............................................................127 Chapter 17: Placing an Order....................................................................................................137 Chapter 18: Receiving Items .....................................................................................................141 Chapter 19: Entering and Paying Vendor Bills.......................................................................145
Part 5: Managing Employees ........................................................................... 155 Chapter 20: Working with Employees.....................................................................................159 Chapter 21: Tracking Employee Time.....................................................................................165 Chapter 22: Managing Payroll ...................................................................................................171
Part 6: Keeping Bank Records ......................................................................... 175 Chapter 23: Managing Bank Accounts ....................................................................................179 Chapter 24: Recording Banking Activity .................................................................................187 Chapter 25: Using Online Banking ..........................................................................................199

iv Microsoft Office Small Business Accounting 2006
Part 7: Generating Reports...............................................................................205 Chapter 26: Working with Reports ..........................................................................................209 Chapter 27: Keeping Track of Company Data.......................................................................215
Glossary ............................................................................................................227 Small Business Bookshelf ................................................................................237 Index.................................................................................................................239

Welcome to Small Business Accounting Microsoft® Office Small Business Accounting 2006 is a comprehensive, easy-to-use business-management program designed to help you run your company more effectively and profitably while reducing the time you spend on administrative tasks. After you finish the easy, step-by-step setup, you’ll be able to: • Forecast the cash flow of income and expenses into and out of your accounts. • Monitor the status of ongoing projects and track the time spent on work for your
customers. • Manage inventory and pricing of products and services you sell. • Generate reports to prioritize your daily activities and better forecast sales and
control expenses.
Working with Microsoft Office As part of the Microsoft Office software family, Small Business Accounting works with other Office applications to bring you a full range of easy-to-use features that look and work like other Office applications. • Build stronger customer relationships by integrating a wealth of business
information in your Microsoft Office Outlook® 2003 with Business Contact Manager Update records with the invoicing and time-tracking features in Small Business Accounting.
• Export your company data to Microsoft Office Excel, where you can analyze your company’s books in a familiar spreadsheet format.
• Work with Microsoft Office Word to create form letters to send to a mailing list of customers, vendors, or employees and to design custom templates for company forms.
• Use Microsoft Office Outlook to send e-mail messages, forms, and documents directly from Small Business Accounting to your customers, vendors, and employees.
Using this guide This Microsoft Office Small Business Accounting 2006 User’s Guide provides complete instructions for managing your business electronically, with step-by-step instructions for using key product features, along with notes, tips, and cautions to guide you through the finer points.

Welcome to Small Business Accounting
2 Microsoft Office Small Business Accounting 2006
What if . . . I need a little extra help? You will see shaded information highlighting special cases and solutions throughout this User’s Guide.
For more information As a Small Business Accounting user, you have a wealth of information available to you.
Getting help If you need further information while you are working with Small Business Accounting, help is always available. To open the Help table of contents, press F1. To get information specific to the page, form, report, list, dialog box, or wizard where you are currently working, do one of the following: • On the Help menu, click Help with this Window. • Press ALT+F1. • On forms, click the Help button on the toolbar. • In a dialog box or wizard, click the Help button. Browse or search to find information in Help. When you are done, you can switch between Help and Small Business Accounting by clicking the appropriate button on the taskbar, or you can click the Close button to exit.
Learning the basics in the Quick Start Guide The Microsoft Office Small Business Accounting 2006 Quick Start Guide included in your software package provides easy step-by-step instructions for installing Small Business Accounting and setting up your company’s accounts. With a brief introduction to the main areas of the product — Company, Customers, Vendors, Employees, Banking, and Reports — the Quick Start Guide helps you become acquainted with the robust features you can use to track your day-to-day income and expenses and understand how they affect your company’s bottom line.
Researching products and services online You can leverage online services to access a wide range of products and services that will save you time and will help you manage your company.

For more information
Microsoft Office Small Business Accounting 2006 3
The following table gets you started with the online services available to you from Small Business Accounting. Before you begin, make sure you have an active Internet connection.
To Do this
Find an accounting or software consultant in your area
On the Help menu, click Find an Accountant.
Find information on ADP PayrollSM, the only payroll service that is fully integrated with Small Business Accounting
On the Company menu, point to Business Services, and then click Payroll.
Find information about online credit card processing services
On the Company menu, point to Business Services, and then click Accept Credit Cards.
Find information about setting up online bank accounts
On the Company menu, point to Business Services, and then click Bank Online.
Find a Web site where you can purchase preprinted and custom checks and other supplies
On the Company menu, point to Business Services, and then click Buy Checks and Forms.
Find regularly updated information about Small Business Accounting and other services available to you
In the Navigation Pane, click Company, and then click a link in the Spotlight pane on the right.
Check for updates to the Small Business Accounting software
On the Help menu, click Check for Updates.
Accessing Microsoft Office online resources If you are connected to the Internet, you have access to updated information and links to training courses, articles, and product updates from Microsoft Office. Before you begin, make sure you have an active Internet connection. 1 On the Help menu, click Office Online. 2 Follow the instructions on the Web page. 3 When you are done, click the Close button to return to Small Business
Accounting.
Contacting us If you have questions or comments about Small Business Accounting, we want to hear from you.

Welcome to Small Business Accounting
4 Microsoft Office Small Business Accounting 2006
The following table lists ways you can contact Small Business Accounting customer support. Before you begin, make sure you have an active Internet connection.
To Do this
Send a message On the Help menu, click Contact Us, and then follow the instructions on the Web page to send a message to the Small Business Accounting team.
Access support services On the Help menu, click Support Services, and then follow the instructions on the Web page to access customer support.
Provide feedback On the Help menu, click Customer Feedback, and then follow the instructions on the Web page to submit your comments to our customer service representatives.

Part 1: Getting Started
In this part Overview.......................................................................................................................................... 6 Keyboard shortcuts ........................................................................................................................ 7
Chapter 1: Installing and Setting Up................................................................... 9 Gathering your company information ......................................................................................... 9 Checking hardware and software requirements........................................................................10 Installing Small Business Accounting ........................................................................................11 Starting Small Business Accounting ...........................................................................................11 Setting up your company with the Startup Wizard ..................................................................13
Setting up accounts...............................................................................................................15 Importing data from another program..............................................................................16 Importing data from an exported file ................................................................................16 Importing data from a backup file .....................................................................................17
Setting up your company with QuickBooks data .....................................................................18 Preparing your QuickBooks file .........................................................................................18 Importing QuickBooks data................................................................................................18
Setting up a multiuser environment ...........................................................................................19 Sharing data with Business Contact Manager for Outlook.....................................................20 Working with add-ins...................................................................................................................21 Removing Small Business Accounting.......................................................................................22
Chapter 2: Taking a Tour................................................................................... 23 Monitoring financial accounts.....................................................................................................23 Making sales to customers...........................................................................................................24 Making purchases from vendors ................................................................................................25 Managing employees ....................................................................................................................26 Managing bank accounts..............................................................................................................27 Keeping track of company data in reports ................................................................................27 Exiting Small Business Accounting............................................................................................28

Part 1: Getting Started
6 Microsoft Office Small Business Accounting 2006
Chapter 3: Refining Your Company Setup ........................................................ 29 Changing the Company home page ...........................................................................................29
Adding or removing content...............................................................................................30 Updating account balances..................................................................................................30 Adding or removing reminders ..........................................................................................31
Customizing company information............................................................................................31 Changing company preferences..................................................................................................32 Planning your fiscal year ..............................................................................................................35
Changing the posting date ...................................................................................................36 Closing a fiscal year ..............................................................................................................36 Working with your fiscal year .............................................................................................36
Working with support lists ..........................................................................................................37 Designing templates for business forms and letters ................................................................38
Modifying a template for business forms..........................................................................39 Modifying a template for form letters................................................................................39 Adding security in Word......................................................................................................40
Chapter 4: Managing User Roles and Permissions............................................41 Understanding roles and permissions ........................................................................................41 Managing user access ...................................................................................................................42
Assigning a role.....................................................................................................................42 Changing a user’s role ..........................................................................................................42 Removing a user’s access.....................................................................................................43 Changing a user’s password ................................................................................................43
Overview Microsoft Office Small Business Accounting 2006 consists of six areas: Company, Customers, Vendors, Employees, Banking, and Reports, which organize your company data and help you to track your day-to-day income and expenses, so you can understand how they affect your company’s bottom line. As part of the Microsoft Office software family, Small Business Accounting brings you a full range of easy-to-use features that look and work like other Office programs.

Keyboard shortcuts
Microsoft Office Small Business Accounting 2006 7
Keyboard shortcuts You can use keyboard shortcuts to streamline your work in Microsoft Office Small Business Accounting 2006. You can use the following shortcuts to select menus and commands: • To open a menu or select a command from a menu, press and hold the ALT key,
and then press the underlined letter in the menu or command name; for example, to open the File menu, press ALT+F.
• To select a command from the shortcut menu, click an item to select it, right-click, and then click a command.
If a command appears dimmed, it is unavailable. You can use the following shortcuts to move the insertion point and perform actions: • In forms, press the TAB key to move the insertion point to the next field. • In wizards, press the TAB key to move the insertion point to the next field
containing data or to the next button, and then press ENTER to perform the action for the selected button: get help for the current page, cancel your selections, or accept your changes and move to the next page.
• In dialog boxes, press the TAB key to move the insertion point to the next field containing data or to the next button, and then press ENTER to perform the action for the selected button: get help for the current page, cancel your selections, or accept your changes and exit.
• In lists, press the UP ARROW key or the DOWN ARROW key to select the next and previous record, respectively. Press ENTER to open the record.
The following table lists the keyboard shortcuts available from the home pages: Company, Customers, Vendors, Employees, Banking, and Reports. Keyboard shortcuts are not available in dialog boxes or wizards. Note If a shortcut contains more than one key, press and hold a key, and then press the next key.
To Press Open the Help table of contents F1 Get help for the current page ALT+F1 View product information about Microsoft Office Small Business Accounting 2006
F2
Refresh the screen display F5 Go to the Company home page CTRL+1 Go to the Customers home page CTRL+2 Go to the Vendors home page CTRL+3

Part 1: Getting Started
8 Microsoft Office Small Business Accounting 2006
To Press Go to the Employees home page CTRL+4 Go to the Banking home page CTRL+5 Go to the Reports home page CTRL+6 Open the Chart of Accounts CTRL+SHIFT+A Open the Bills and Item Receipts list CTRL+SHIFT+B Open the Customers list CTRL+SHIFT+C Open the Employees list CTRL+SHIFT+E Open the Invoices list CTRL+SHIFT+I Open the Jobs list CTRL+SHIFT+J Open the Payments list CTRL+SHIFT+M Open the Purchase Orders list CTRL+SHIFT+P Open the Quotes list CTRL+SHIFT+Q Open the Sales Orders list CTRL+SHIFT+S Open the Time Entries list CTRL+SHIFT+T Open the Items list CTRL+SHIFT+U Open the Vendors list CTRL+SHIFT+V Open the Journal Entries list CTRL+SHIFT+Y Exit Small Business Accounting ALT+F4

Chapter 1: Installing and Setting Up
Microsoft Office Small Business Accounting 2006 provides familiar Microsoft Office wizards to guide you as you install the Small Business Accounting software and set up your company accounts. You can set up your accounts entirely from scratch or import account data from another Small Business Accounting data file, from the QuickBooks program, from Microsoft Office Excel, or from other programs.
Gathering your company information The following table lists the information to have ready before you install and set up Small Business Accounting.
To Do this
Define your company’s fiscal year
Select a standard calendar year, or use another time period for your company’s accounting year.
Determine a start date Select a date on which you want to begin using Small Business Accounting to track your company’s finances, typically, the beginning of a fiscal year or the beginning of a month. Note You cannot change the Start date after you set up your company.
Collect your current account statements, dated just before the start date
Gather the following account statements: • Checking account • Savings account • Credit card account • Any other bank and credit card account statements
Determine outstanding amounts owed and to be paid as of the start date
Gather the following records: • Unpaid customer invoices, and customer names and addresses • Bills that your company has not paid, and vendor names and
addresses • Sales taxes owed, and sales tax agency names and addresses

Part 1: Getting Started
10 Microsoft Office Small Business Accounting 2006
To Do this
Collect other financial documents with outstanding amounts as of the start date
Gather the following documents: • Checkbook with any remaining, uncleared checks that you
have written but that have not yet shown up on your checking account statement
• Bank receipts or any other record of any remaining, uncleared deposits, withdrawals, or transfers that have not yet shown up on your account statement
• Credit card receipts or any other record of any credit card charges that have not yet shown up on your account statement
• Account balances for any other assets, such as stocks • Account balances for any other debts, such as loans
Checking hardware and software requirements To install and run Microsoft Office Small Business Accounting 2006, your computer must meet or exceed the following system requirements: • Computer/processor: PC with Pentium 233 MHz or higher processor;
Pentium III recommended • Memory: 128 MB or more of RAM recommended • Hard disk: 380 MB of available hard disk space (hard disk usage will vary
depending on configuration; custom installation choices may require more or less hard disk space)
• Display: Super VGA (800x600) or higher-resolution monitor • Operating system: Microsoft Windows® 2000 with Service Pack 3 or later, or
Microsoft Windows XP or later • Installation of Microsoft Office Outlook 2003 with Business Contact
Manager Update (optional): 190 MB of additional hard disk space • Installation files cache (optional, recommended): 280 MB of additional hard
disk space Additional items or services are required to use certain features: • Internet functionality: dial-up or broadband Internet access, provided separately;
local or long-distance charges may apply • Integration functionality (including export to Word or Excel): Microsoft Office
XP or later is required to export data to Word or Excel. Microsoft Office Outlook 2003 with Business Contact Manager Update is required to share financial data with the Outlook messaging and collaboration client.
• Sharing functionality: The host machine must be running Microsoft Windows 2000 with Service Pack 3 or Windows XP Professional Edition to enable sharing.

Installing Small Business Accounting
Microsoft Office Small Business Accounting 2006 11
Installing Small Business Accounting To install and set up Small Business Accounting, you must have administrator access to the computer where you want to install the software. 1 Close any open applications. 2 Insert the Small Business Accounting CD into your CD-ROM drive. 3 If the setup program does not run automatically, click Start on the taskbar, and
then click Run. Type drive:\setup.exe (where drive stands for the letter designation of your CD-ROM drive, usually drive D), and then click the OK button.
4 Click the Next button. 5 To agree to the terms on the License Agreement page and continue installing
Small Business Accounting, click I accept the terms in the license agreement, and then click the Next button.
6 On the Destination Folder page, do one of the following: • To install the program to the default folder, click the Next button. • To select a different folder, click the Change button. Browse to select the
folder, and then click the OK button. When you are done, click the Next button.
7 On the Ready to Install the Program page, click the Install button. The installation process may take several minutes.
8 On the Installation Complete page, click the Finish button. Tip You can create a shortcut to start Small Business Accounting from your desktop. To create a shortcut on your desktop: 1 Right-click, point to New, and then click Shortcut. 2 Click the Browse button and navigate to the directory where Small Business
Accounting is installed (usually drive:\Program Files\Microsoft Small Business Accounting\Small Business Accounting).
3 Select SBA.exe, and then click the OK button 4 Click the Next button, and then click the Finish button.
Starting Small Business Accounting To work with all of the features in Small Business Accounting, you must activate the software. We recommend that you activate your software over the Internet when you first start Small Business Accounting. Note You can activate the software, over the Internet or by phone, at a later time.

Part 1: Getting Started
12 Microsoft Office Small Business Accounting 2006
1 Double-click the Small Business Accounting shortcut on your desktop. If the shortcut is not available, click Start on the taskbar, point to Programs, point to Microsoft Small Business Accounting, and then click Microsoft Small Business Accounting.
2 On the Enter Product Key page, type the 25-character sequence from the sticker on the back of the CD case.
3 To read the Microsoft privacy policy, click the Privacy Statement link. When you are done, click the Close button .
4 When you are done, click the Next button. 5 To agree to the terms on the Read the License Agreement page, click I accept
the terms of this license agreement, and then click the Next button. 6 Do one of the following:
• To activate the software at this time, click I want to activate the software over the Internet (Recommended), and then click the Next button.
• To activate the software over the telephone, click I want to activate the software by telephone (Not available for trial), and then click the Next button. Follow the directions in the wizard. Type the confirmation ID and registration ID provided by the customer service representative. If an entry is not correct, the box number turns red. When you are done, click the Next button to activate the software. On the Thank You page, click Close.
• To activate the software at a later time, click the Remind Me Later button at the bottom of the page. You can start Small Business Accounting 20 times. You will see a reminder to activate the software each time you start Small Business Accounting. After 20 starts, the Remind Me Later button appears dimmed, and you must activate the software or it will close.
Tip If you need assistance, click the Remind Me Later button and start Small Business Accounting without activating the software. On the Help menu, click Support Services.
7 If you elected to activate the software over the Internet, read the privacy policy, if you have not already done so, and then click the Next button.
8 On the Provide Your Company Information page, enter your company contact information and complete your company profile, and then click the Next button.
9 On the Select Contact Preferences page, select the contact options for your company, and then click the Next button to activate the software.
10 On the Thank You page, click the Close button. 11 On the Start page, do one of the following:
• To set up your company data by using information you provide or data you import from a program other than QuickBooks, from a backup file, or from an exported file, click Set up your company. For instructions, see “Setting up your company with the Startup Wizard,” on page 13.

Setting up your company with the Startup Wizard
Microsoft Office Small Business Accounting 2006 13
• To set up your company by using QuickBooks data, click Import data from QuickBooks. For instructions, see “Setting up your company with QuickBooks data,” on page 18.
Setting up your company with the Startup Wizard The Startup Wizard guides you step by step through the process of setting up your company data. Follow the instructions in the Startup Wizard as it takes you through a series of pages. As you complete each page, press the TAB key to move from field to field, and press ENTER or click the Next button to continue to the next page. Note If you exited the Startup Wizard, you can click New Company on the File menu to restart it. Click the Yes button to confirm. 1 Read the instructions on the Welcome page, confirm that you have the
information you need to set up your company, and then click the Next button. Tip If you need professional assistance to set up and run your company, Small Business Accounting can help you find an accountant or a software consultant in your area. Make sure you have an active Internet connection, and then click the link on the Welcome page.
2 Read the instructions on the Company details page, and then click the Next button.
3 On the Add company details page, enter your company contact information that will appear in communications, in reports, on purchase orders, on sales orders, and in other documents. • (Required) In the Company name field, type your company name, and then
press the TAB key. • (Required) Your company name appears in the Legal name field. To change
it, type your company’s legal name in the field, and then press the TAB key. • In the Federal tax ID field, type your federal tax ID number. When you are done, click the Next button.
4 On the Set up accounts page, do one of the following: • To set up a standard set of accounts, click Select your business type and
have Small Business Accounting suggest accounts, and then click the Next button. On the Set up Accounts page, click the arrow next to the Business type field, and select the type that best fits your business. When you are done, click the Next button. Note The business type you select does not need to be an exact match. You can edit or add accounts later.
• To postpone setting up accounts until later, click Create accounts later in this Startup Wizard, and then click the Next button.

Part 1: Getting Started
14 Microsoft Office Small Business Accounting 2006
5 On the Select a fiscal year and start date page, click the arrow next to a field and then select a date from the calendar, or retain the default settings. When you are done, click the Next button.
6 Read the instructions on the Preferences page, and then click the Next button. 7 On the Select jobs preferences page, click Yes to track income and expenses by
project, or click No. Click the Next button. 8 On the Select sales tax preferences page, do one of the following:
• If your company pays taxes at a single tax rate to one tax agency, click Yes. Click I collect a single tax rate and pay it to a single tax agency, and then click the Next button. Fill in your sales tax information — name, rate (in percent), and sales tax agency, and then click the Next button.
• If your company pays taxes at a more than one tax rate or to more than one tax agency, click Yes. Click I collect a multiple tax rates or pay multiple tax agencies, and then click the Next button. You will set up your sales tax settings later.
• If you do not collect sales taxes or if you are not sure, click No, and then click the Next button.
9 On the Select form layout preferences page, select the option that best describes your company: Sells services or Sells products, or both products and services. The sample form illustrates the ways your company forms will look, based on your selection. Click the Next button.
10 On the Select numbering preferences page, select the check box next to the account types where you want to use sequential identification numbers, and then click the Next button.
11 On the Set up payroll page, click Yes or No to indicate whether you are interested in signing up for ADP Payroll SM, the only online payroll service that is fully integrated with Small Business Accounting. Click the Next button. Note If you click Yes, you will see a Signup for payroll reminder on the Company home page.
12 On the Select cash basis or accrual basis reporting page, select the accounting method to use in reports: • To recognize revenues when payments for products and services are received
from customers or made to vendors, click Cash basis reports, and then click the Next button.
• To recognize revenues when products and services are sold to customers or bought from vendors, regardless of when payment is received or made, click Accrual basis reports (Recommended), and then click the Next button.
13 Read the instructions on the Company details and preferences completed page, and then click the Finish button.
14 To create your company file, accept the default name or enter a new file name, and then click Save.

Setting up your company with the Startup Wizard
Microsoft Office Small Business Accounting 2006 15
15 The Small Business Accounting Startup Wizard progress checklist appears. Do one of the following: • To continue setting up your company with information you provide, see
“Setting up accounts,” on page 15. • To set up your company with data from Excel or a program other than
QuickBooks, see “Importing data from another program,” on page 16. • To set up your company with data from an exported company file, see
“Importing data from an exported file,” on page 16. • To set up your company with data from a backup company file, see
“Importing data from a backup file,” on page 17.
Setting up accounts The Startup Wizard progress checklist guides you step by step through the process of setting up accounts and records. Follow the instructions in the Startup Wizard progress checklist as it takes you through a series of pages. As you complete each page, press ENTER or click the Next button to continue to the next page. Note If you exited the Startup Wizard progress checklist, you can click Start Wizard on the File menu to restart it where you left off. 1 The opening page lists the accounts and records you can set up. A checkmark
indicates the sections that you have completed. To continue setting up your company, click one of the remaining sections: • Click Accounts to review the accounts that Small Business Accounting has
set up for your company, to add new accounts, and to enter opening balances for your company’s accounts. For instructions on creating new accounts, see Chapter 5, “Setting Up and Managing Accounts.” When you are done, click the Finish button.
• Click Customers to add, edit, or delete customer records and to enter any opening balances that customers owe to your company as of the start date. For instructions on creating new customer records, see Chapter 9, “Working with Customers.” When you are done, click the Finish button.
• Click Vendors to add, edit, or delete vendor records and to enter any opening balances that your company owes to vendors as of the start date. For instructions on creating new vendor records, see Chapter 15, “Working with Vendors.” When you are done, click the Finish button.
• Click Items to add, edit, or delete product and service items that your company sells to customers or buys from vendors. You can also enter opening balances. For instructions on creating new items, see Chapter 16, “Setting Up Product and Service Items.” When you are done, click the Finish button.
• If you have an active Internet connection, click Business Services to open a Web page with links to online services available to your company. When you

Part 1: Getting Started
16 Microsoft Office Small Business Accounting 2006
are done, click the Close button to return to the Small Business Accounting Startup Wizard progress checklist.
2 When you are done, click the Close button.
Importing data from another program After you have set up your company, you can import data from another program: a comma-separated values (.csv) file, a Microsoft Office Access (.mdb) database file, or a Microsoft Office Excel (.xls) worksheet file. You must have administrator access to import data from another program. 1 On the File menu, point to Utilities, and then click Import. 2 Select the type of data to import, and then click the OK button. 3 To select the source file, click the Browse button, locate the file to import, and
then click the Open button. 4 Under Options, select your import settings, and then click the Next button. 5 Follow the instructions for the data type you selected. When you are done, click
the Next button. 6 To see a list of records that were imported, click the log file link. To exit, click the
Close button. 7 Click the Finish button.
What if . . . I want to import data from Peachtree Accounting? Peachtree Accounting uses an accounting system different from Small Business Accounting. You need to reverse the signs on all liabilities, income, and equity accounts, or these records will not be initially matched when importing. To import Peachtree data, first export data from Peachtree Accounting to Excel, and then import the master records from Excel to Small Business Accounting.
Importing data from an exported file You can create a new company with information from an existing company file. This method imports your records (including customer, vendor, employee, and item records; and support lists) only; it does not import transactions. You must have Owner access to import data from an exported file. First, open the company file you want to use as the basis for your new company, and then export the data to an .xml file. For instructions, see “Exporting Company Data” in Chapter 8, “Managing Your Company Data.” Next, create a new company: 1 On the File menu, click New Company. 2 To close the open company file, click the Yes button.

Setting up your company with the Startup Wizard
Microsoft Office Small Business Accounting 2006 17
3 In the Small Business Accounting Startup Wizard, set up a company into which you can import data. For instructions, see “Setting up your company with the Startup Wizard,” on page 13.
4 When you are done, the Small Business Accounting Startup Wizard progress checklist opens. To exit, click the Close button.
Finally, import the data to create a new company file: 1 On the File menu, point to Utilities, and then click Import. 2 Select Microsoft Office Small Business Accounting Data, and then click the
OK button. 3 Click the Browse button and locate the file to import, and then click the Open
button. 4 Under Options, select your import settings, and then click the Import button. 5 To confirm, click the OK button. 6 To exit, click the Close button.
Importing data from a backup file You can create a new company, with transactions, by backing up an existing company data file in Small Business Accounting and then restoring it with a new company name. This method imports your records (including accounts with balances; customer, vendor, employee, and item records; and support lists) as well as all transactions posted to the Chart of Accounts. You must have administrator access to import data from a backup file. First, back up the company file. For instructions, see “Backing up company data,” in Chapter 8, “Managing Your Company Data.” Next, restore the backup copy with a new company name. For instructions, see “Restoring company data,” in Chapter 8, “Managing Your Company Data.” Be sure to specify a new company name for the restored file. To work with your new company, restart Small Business Accounting and open the new company file. 1 On the File menu, click Open Company. 2 Select the name of the restored file. 3 Click the Open button.

Part 1: Getting Started
18 Microsoft Office Small Business Accounting 2006
Setting up your company with QuickBooks data Small Business Accounting supports importing data from QuickBooks Basic or Pro Edition 2002, 2003, and 2004. This method imports your QuickBooks master records (including accounts with balances; customer, vendor, employee, and item records; and support lists) only; it does not import transactions. You must have Owner access to import QuickBooks data.
Preparing your QuickBooks file 1 Open your QuickBooks file and check the following settings:
• Make sure your QuickBooks file is set to single user. If it is multiuser, change your setting to single user before importing QuickBooks data.
• Make sure your credit card accounts are set up explicitly as credit card accounts, not simply as liability accounts.
• Show account numbers and assign numbers to accounts that do not currently have them. Small Business Accounting will assign numbers to blank accounts.
• Make unused accounts inactive. • Close your books to close all transactions in QuickBooks. Small Business
Accounting will import your account balances, not the associated transactions. 2 Exit QuickBooks.
Importing QuickBooks data 1 On the File menu, click Close Company. 2 Click Import data from QuickBooks®. 3 Read the Introduction page, and then click the Next button. 4 On the Company Contact Details page, enter your company contact
information that will appear in communications, in reports, on purchase orders, on sales orders, and in other documents. When you are done, click the Next button. • (Required) In the Company name field, type your company name, and then
press the TAB key. • (Required) Your company name appears in the Legal name field. To change
it, type your company’s legal name in the field, and then press the TAB key. • In the Federal tax ID field, type your federal tax ID number.
5 On the Select a fiscal year and start date page, click the arrow next to a field and then select a date from the calendar, or retain the default settings. When you are done, click the Next button.
6 Read the Instructions for Migration page, and then click the Next button.

Setting up a multiuser environment
Microsoft Office Small Business Accounting 2006 19
7 On the Select QuickBooks® master records page, select the master records you want to import.
8 Under File to import from, click the Browse button, select the QuickBooks file with a .qbw extension that you want to import, and then click the Open button.
9 When you are done, click the Next button. 10 Read the instructions on the Importing data page, and then click the Import
button. 11 Specify a company file name, and click the Save button. 12 To see a list of records that were imported, click the log file link. To exit, click the
Close button. 13 To review the accounts imported into the Chart of Accounts, click the System
Accounts button. To exit, click the OK button. 14 Click the Finish button. Small Business Accounting imports account balances only, so if you have open transactions, you will need to make new journal entries in the Chart of Accounts in order to close them.
Setting up a multiuser environment Multiple users can work with Small Business Accounting from different computers at the same time. When there is any conflict, the last user to write data in the area will update that data. This way, one user cannot change information while it is being accessed by another user. You must have administrator access to install and set up Small Business Accounting. 1 Install Small Business Accounting, and set up your company file. 2 Add users to Small Business Accounting. For instructions, see “Managing user
access,” on page 42. If the user is a member of a domain, there is no need to add the user to the Windows user group on the computer where the database resides. The administrator must enable the multiuser environment and add the user to Small Business Accounting. • For a workgroup environment, the user should be added as a Windows user
to each computer that he or she is going to use. Note For workgroups, the user should have the same password on each computer.
• In multiple domains, you do not need to assign the same user name on each domain. If domains are connected, the administrator of the computer needs to add the user (who is a member of a different domain) to Small Business Accounting by entering his or her domain name in the Domain field of the Manage Users dialog box. To get instructions on managing Windows users, see your Windows documentation.

Part 1: Getting Started
20 Microsoft Office Small Business Accounting 2006
3 To make sure that the user has access to the shared company file (with the .sbc extension), do one of the following: • Copy the company file to the My Documents\Small Business
Accounting\Companies folder on the user’s computer. • Send an e-mail message to the user, inserting the file as an attachment and
instructing the user to save the file to the My Documents\Small Business Accounting\Companies folder on the user’s computer.
4 To enable multiple users, select Multi-User Settings from the File menu. 5 To grant multiple users access to the company database, click Enable. 6 In the File location field, click the Change button, and then specify the location
of the company database, or copy the path from this field and make it available to users.
7 Log in as a non-administrator user, for example, Guest, and open Small Business Accounting.
8 On the Start page, click Open an existing company. Browse to find the .sbc file, and then click the OK button to open the shared company.
Sharing data with Business Contact Manager for Outlook You can connect Small Business Accounting to Microsoft Office Outlook 2003 with Business Contact Manager Update to perform the following tasks: • Add customer records, contacts, and product and service items from Small
Business Accounting to Business Contact Manager for Outlook. Customer records are added as Account records.
• After adding product and service items, update your Product and Service Items List with new items and data from Small Business Accounting.
• Add Account records from Business Contact Manager for Outlook to Small Business Accounting as customer records.
• Link a Business Contact Manager for Outlook Account record to a Small Business Accounting customer record to view and update financial information in Business Contact Manager.
• Import product and service items from Small Business Accounting into Business Contact Manager for Outlook.
• Create a quote, a sales order, or an invoice from a Business Contact Manager for Outlook Account record.
• Create a quote, a sales order, or an invoice from a Business Contact Manager for Outlook Opportunity record.
• Create a Time Entry to invoice a customer from a Business Contact Manager for Outlook appointment, phone log, or task.

Working with add-ins
Microsoft Office Small Business Accounting 2006 21
Each user of Business Contact Manager for Outlook who wants to use Small Business Accounting must have Small Business Accounting access. If you are the administrator of the computer on which Small Business Accounting is installed, you already have access, and you can grant access to Business Contact Manager for Outlook users. For more information, see “Managing user access,” on page 42.
Working with add-ins An add-in is a supplemental program that adds features or custom commands to Small Business Accounting. You usually purchase these add-ins from software manufacturers other than Microsoft. The Add-in Manager helps users with administrator or Owner access to install, enable, and remove add-ins. The following table lists the tasks you can do to manage add-ins.
To Do this
Install and enable an add-in
1 Copy the add-in file to the same location on each computer where it will be used with Small Business Accounting — either in the installation directory, which is usually drive:\Program Files\Microsoft Small Business\Small Business Accounting or in the Global Assembly Cache on that computer.
2 On the File menu, point to Utilities, and then click Add-in Manager. The Available add-ins list contains the names of the add-ins that are installed on your computer. If the add-in is not in the list, click the Install New button to locate add-ins that are ready to be added and enabled, or browse for add-ins in another location.
3 Select the add-in, and then select the Enabled check box. Disable an add-in 1 On the File menu, point to Utilities, and then click Add-in
Manager. The Available add-ins list contains the names of the add-ins that are installed on your computer.
2 Select the add-in to disable, and then clear the Enabled check box.
Remove an add-in 1 On the File menu, point to Utilities, and then click Add-in Manager. The Available add-ins list contains the names of the add-ins that are installed on your computer.
2 Select an add-in from the Available add-ins list, and then click the Remove button.

Part 1: Getting Started
22 Microsoft Office Small Business Accounting 2006
Removing Small Business Accounting To remove Small Business Accounting from your computer, remove Small Business Accounting and the database engine. This deletes the program and the sample database files from your computer; it does not delete your company files. You must have administrator access to your computer to remove programs. 1 Close all open applications. 2 On the Windows Start menu, point to Settings, and then click Control Panel. 3 Double-click Add/Remove Programs. 4 Click Microsoft Office Small Business Accounting 2006. 5 Click the Remove button. 6 To confirm, click the Yes button. 7 Select Microsoft SQL Server Desktop Engine (MICROSOFTSMLBIZ). 8 Click the Remove button. 9 To confirm, click the Yes button.

Chapter 2: Taking a Tour
Microsoft Office Small Business Accounting 2006 provides data for two sample companies, which you can use to familiarize yourself with the product. For a quick introduction to the program features, we’ll tour the product-based sample file. 1 Start Small Business Accounting.
Note If you have already set up your company, you see your company file. Click Close Company on the File menu.
2 From the Start page, click Open a sample company. 3 To select the default, product-based sample company, click the OK button.
Monitoring financial accounts The Company home page opens automatically. It provides a snapshot of your company’s overall financial condition, so you can identify areas that require your attention as soon as you start Small Business Accounting.
The Company home page is divided into content panes, each displaying up-to-date information on your company’s financial accounts. The Start a Task list in the Navigation Pane contains shortcuts for key tasks.
Company home page: CTRL+1

Part 1: Getting Started
24 Microsoft Office Small Business Accounting 2006
To update the screen display: • Click the Refresh button on the toolbar. To check your current cash flow: 1 Under Start a Task, click Forecast Cash Flow.
The Cash Flow Forecast depicts your company’s accounts receivable and accounts payable totals for a period you define.
2 To exit, click the Close button on the toolbar. To view reminders, 1 In the Today’s Reminders pane, double-click Overdue Invoices. You see a list
of customers with outstanding invoices at or past their due date. 2 To view the invoice, double-click the customer name. 3 To exit, click Close from the File menu. You can change the Company home page to suit your company’s information needs. For instructions, see “Changing the Company home page,” on page 29.
Making sales to customers The Customers home page includes a task flow that guides you through all the tasks related to customers and receivables. To open the Customers home page, click Customers in the Navigation Pane.
Customers home page: CTRL+2

Making purchases from vendors
Microsoft Office Small Business Accounting 2006 25
You can begin a sale in one of three ways: • To propose a sale, create a quote. Later, you can convert the quote to either a sales
order or an invoice. • If the products or services will not be delivered immediately, create a sales order
instead. Later, you can convert the sales order to an invoice. • When the customer agrees to terms, and the products or services are available,
create an invoice. To view the records used in customer transactions: 1 Under Find, click a list name. 2 To view the transaction record, double-click an item in the list. 3 To exit, click Close from the File menu.
Making purchases from vendors The Vendors home page includes a task flow that guides you through all the tasks related to vendors and payables. To open the Vendors home page, click Vendors in the Navigation Pane.
You can begin a purchase in one of three ways: • Create a purchase order and send it to the vendor in an e-mail message or as a
Microsoft Office Word document.
Vendors home page: CTRL+3

Part 1: Getting Started
26 Microsoft Office Small Business Accounting 2006
• If the items arrive before the bill, you can receive the items to create an item receipt. You can create the item receipt from the purchase order.
• When the bill arrives, you enter the bill. You can create the bill from a purchase order or an item receipt.
To view the records used in vendor transactions: 1 Under Find, click a list name. 2 To view the transaction record, double-click an item in the list. 3 To exit, click Close from the File menu.
Managing employees The Employees home page includes a task flow that guides you through all the tasks related to employees and time tracking. To open the Employees home page, click Employees in the Navigation Pane.
You can track the hours worked by employees for payroll purposes and to monitor the amount of time required for a job and to track the cost of time to charge to a customer. Enter hours worked by day, in Time Entries, or by week, in timesheets. To view a list of employees or hours worked by employees: 1 Under Find, click Employees or Time Entries. 2 To view the record, double-click an entry in the list. 3 To exit, click Close from the File menu.
Employees home page: CTRL+4

Managing bank accounts
Microsoft Office Small Business Accounting 2006 27
Managing bank accounts The Banking home page includes a task flow that guides you through all the tasks related to bank and credit card accounts. To open the Banking home page, click Banking in the Navigation Pane.
To view a list of financial accounts: 1 Under Find, click Chart of Accounts. 2 The Chart of Accounts lists all of your company’s accounts. 3 To find a list of bank accounts, click the Find button in the toolbar. 4 In the Look for field, type bank. 5 In the Search under field, click the arrow and select Type. 6 Click the Find button. You see a list of bank accounts. 7 To view the account register, double-click an account name. 8 To exit, click Close. 9 When you are done, click the Clear button on the toolbar to return to the full list.
Keeping track of company data in reports The Reports home page provides a variety of standard reports containing data from your company accounts. To open the Reports home page, click Reports in the Navigation Pane.
Banking home page: CTRL+5
Reports home page: CTRL+6

Part 1: Getting Started
28 Microsoft Office Small Business Accounting 2006
To view company data in one of the standard reports: 1 Select the report type from the Report type list. 2 Double-click a report in the Report list. 3 To exit, click Close from the File menu.
Exiting Small Business Accounting When you have finished exploring, you can close the program. If you have already set up your company, you can switch to your company file. Click Open Company on the File menu, select your company file, and then click Open. The next time you start the program, your current company data will open automatically. • On the File menu, click Exit.
Exit: ALT+F4

Chapter 3: Refining Your Company Setup
After you set up your company, you can make adjustments to many of your company settings as you work with Microsoft Office Small Business Accounting 2006. Caution Be careful when making changes to settings that affect existing accounts and records as well as new ones. You may risk losing data. If you need further information, help is always available. To open the Help table of contents, press F1. To get Help for the current page, press ALT+F1. On forms, click the Help button on the toolbar. In dialog boxes and wizards, click the Help button.
Changing the Company home page The Company home page offers a snapshot of your company’s financial accounts, to identify areas that require your attention when you open Small Business Accounting. The following table lists the content available on the Company home page.
Content Description
Profitability Graph illustrating the Profit and Loss report for your company. The Profit and Loss report calculates the net income for your business from Income and Expense accounts listed in the Chart of Accounts.
Today’s Reminders List of current reminders. See “Adding or removing reminders,” on page 31.
Cash Flow Graph illustrating the Cash Flow report for your company. Bank Account Summary
List of all your bank and credit card accounts, with transaction details, including account balances.
Company Reports List of company and financial reports. Vendors to Pay Today
List of vendors with an outstanding balance due.
Spotlight Links to Web pages with additional information about Small Business Accounting and other services available to you. This information is refreshed regularly.
Overdue Customer Accounts
List of customers with invoiced amounts that are past due.
Account Balances List of accounts and their current account balances. You can select up to five financial accounts to display.
Help: F1

Part 1: Getting Started
30 Microsoft Office Small Business Accounting 2006
Adding or removing content You can add or remove content from the Company home page. 1 In the Navigation Pane, click Company. 2 Click the Add/Remove Content link in the bar on the upper right. 3 In the Add/Remove Content dialog box, do one or more of the following:
• To add content, select the check box next to a name. • To remove content, clear the check box next to a name. • To change the order in which content appears on the Company home page,
select a name, and then click the Move Up button or the Move Down button to reposition it in the list.
4 When you are done, click the OK button.
Updating account balances The following table lists the tasks for updating account balances on the Company home page.
To Do this
Update online account balances (available if you use online banking)
1 Before you begin, make sure you have an active Internet connection and your online account access information ready.
2 On the Company home page, in the Bank Account Summary pane, click the Download Transactions button.
3 Follow the instructions in the Connect to Online Banking dialog box.
4 Click the Connect button. 5 To copy your online records added since the last download, click
the Download Transactions button. 6 To return to Small Business Accounting, click the OK button.
Add or remove account balances
1 On the Company home page, in the Account Balances pane, click the Add or Remove button.
2 Follow the instructions in the Select Accounts dialog box. 3 Do one or more of the following:
• To add an account to the report, click the report name in the list on the left, and then click the Add button.
• To remove an account from the report, click the report name in the list on the right, and then click the Remove button.
Add or remove content: F7

Customizing company information
Microsoft Office Small Business Accounting 2006 31
Adding or removing reminders On the Company home page, the Today’s Reminders pane lists active reminders that you have set. The following table lists the reminders available.
Reminder Description
Inventory reorder points
The quantity on hand for one or more items in inventory has dropped below the reorder point.
Checks to print One or more checks marked To be printed have not yet been printed. Overdue invoices One or more unpaid invoices are past their due dates. Bills to pay One or more unpaid vendor bills are at or past their due dates. Money to deposit You have received a payment that you have not yet deposited in an
account. Expired quotes One or more quotes have passed their expiration dates. Back orders You have one or more sales orders for goods or services that are not
available or will not be delivered immediately. Sales orders ready for invoicing
One or more sales orders have not been fully invoiced.
Signup for payroll If you have an active Internet connection, click the Sign up for payroll now link to access a Web page with enrollment information for variety of simple and affordable plans from ADP.®
You can add or remove reminders from the Today’s Reminders pane. 1 On the Company home page, click the Add/Remove button in the Reminders
pane. 2 Do one of the following:
• To add a reminder, select the check box next to its name. • To remove a reminder, clear the check box next to its name.
Some reminders are removed automatically when they no longer apply. 3 When you are done, click the OK button.
Customizing company information To customize company information that appears on forms and communications, click Company Information on the Company menu. You must have administrator or Owner access to change Company Information settings.

Part 1: Getting Started
32 Microsoft Office Small Business Accounting 2006
The following table lists the tasks for changing for company information.
To Do this
Change your company name
1 On the Company menu, click Company Information. 2 Under Company details, change the company name and legal
name. Change your company contact information
1 On the Company menu, click Company Information. 2 Under Phone and fax numbers, change your phone number
and fax number. 3 Under E-mail and internet, change your e-mail address and
Web page address. Change your company address
1 On the Company menu, click Company Information. 2 Under Addresses, click the arrow, select Business, Legal, or
Shipping, and then type the address in the field. Change your federal tax ID number
1 On the Company menu, click Company Information. 2 Under Other, type your federal tax ID number in the Federal
tax ID field.
Changing company preferences To change company preferences you selected when you set up your company and to refine how Small Business Accounting tracks your account information, click Preferences on the Company menu.
To Do this
Add or remove account numbers
1 On the Company menu, click Preferences. 2 Select or clear the Use account numbers check box.
Organize transactions by class
1 On the Company menu, click Preferences. 2 Select the Use class check box.
Use classes to group transactions so they appear together on reports.
3 To specify class names, on the Company menu, point to Manage Support Lists, and then click Class List. In the Modify Class Name dialog box, click the Add button.
4 For more information, see “Working with support lists,” on page 37.
Track your income and expenses by job
1 On the Company menu, click Preferences. 2 Select the Use job check box. For more information, see Chapter 14, “Managing Jobs.”
Changing company preferences
Microsoft Office Small Business Accounting 2006 33
To Do this
Track transactions in the Change Log
1 On the Company menu, click Preferences. 2 Under Tracking, select the Use change log check box to track
changes made to your company’s records. 3 To remove information from the change log, click the Clear Log
button. Click the arrow next to the End date field, and then select a date in the calendar. When you are done, click the OK button.
Note Users with Owner, Office Manager, or Accountant access can display the Change Log from the list of Company and Financial reports on the Reports home page.
Change the appearance of forms
1 On the Company menu, click Preferences. 2 Under Forms, do one of the following:
• To allow or prevent the use of duplicate numbers for document transactions, select or clear the Allow duplicate document numbers check box.
• To specify the type of forms you want to use for your business, click the arrow next to the Our company sells field, and select Services or Products, or both Products and Services.
Set up sales tax liability
1 On the Company menu, click Preferences. 2 Under Taxes, select the Do you pay sales tax? check box. 3 Do one of the following:
• To be liable when the invoice is sent, click Accrual basis (When customer is invoiced).
• To be liable when the invoice is paid, click Cash basis (When customer has paid invoice).
For more information, see “Setting up sales tax,” in Chapter 7, “Tracking and Paying Sales Tax.”
Change the fiscal year 1 On the Company menu, click Preferences. 2 Under Fiscal Year, do one of the following:
• To set a beginning date for posting new entries to accounts, click the arrow next to the Prevent posting before field, select a date in the calendar, and then click the OK button.
• To add, edit or remove a fiscal year, click the Fiscal Year button.
For instructions, see “Planning your fiscal year,” on page 35.

Part 1: Getting Started
34 Microsoft Office Small Business Accounting 2006
To Do this
Change the financial basis for reports
1 On the Company menu, click Preferences. 2 Under Cash vs. Accrual, do one of the following:
• To recognize revenues when products and services are sold to customers or bought from vendors, regardless of when payment is received or made, click Accrual basis (Recommended).
• To recognize revenues when payments for products and services are received from customers or made to vendors, click Cash basis.
Add or remove customer numbers
1 On the Company menu, click Preferences, and then click the Customers tab.
2 Select or clear the Use customer ID check box. Set up default shipping terms
1 On the Company menu, click Preferences, and then click the Customers tab.
2 To select the shipping term that you use most often, click the arrow next to the Default shipping term field, and then select a term or add a shipping term.
For more information, see “Working with support lists,” on page 37. Set up finance charges
1 On the Company menu, click Preferences, and then click the Customers tab.
2 Under Finance Charge, select the terms for charges applied to customers for overdue accounts or accounts that they pay over time.
Add or remove vendor numbers
1 On the Company menu, click Preferences, and then click the Vendors tab.
2 Select or clear the Use vendor ID check box. Specify categories for 1099 vendors
1 On the Company menu, click Preferences, and then click the Vendors tab.
2 To add, edit, or remove categories for 1099 vendors, click the 1099 Categories button. These categories are used in the 1099 Summary and 1099 Detail reports to help you to create accurate 1099-MISC tax forms at year-end.
For more information, see “Working with support lists,” on page 37. Change inventory settings
1 On the Company menu, click Preferences, and then click the Vendors tab.
2 Under Inventory Settings, select the settings for managing items your company holds in inventory.
For more information, see Chapter 16, “Setting Up Product and Service Items.”
Add or remove employee numbers
1 On the Company menu, click Preferences, and then click the Employees tab.
2 Select or clear the Use employee ID check box.

Planning your fiscal year
Microsoft Office Small Business Accounting 2006 35
To Do this
Change the start day for timesheets
1 Click Preferences on the Company menu, and then click the Employees tab.
2 Click the arrow next to the First day of the week in timesheet field, and then select a day from the list. Click the OK button.
For more information, see “Filling in a timesheet,” in Chapter 21, “Tracking Employee Time.”
Change system accounts
1 Click Preferences on the Company menu, and then click the System accounts tab.
2 Click the arrow next to the account you want to change, and then select another account from the list or add a new account. Caution Take care in changing system accounts. It is not advisable to change the Accounts Receivable or Accounts Payable account.
For more information, see “System accounts,” in Chapter 5, “Setting Up and Managing Accounts.”
Change user settings 1 Click Preferences on the Company menu, and then click the General tab.
2 To generate a sound or to prevent a sound when a user makes changes in the system, select or clear the Provide feedback with sound to screen elements check box.
3 To see all default messages, click the Restore Settings button. Select this option if you have selected In the future, do not show this warning on a message, and you now want to see all messages.
Track online transactions
1 Click Preferences on the Company menu, and then click the General tab.
2 To create a log file containing a record of your online transactions, for example, credit card processing, payroll processing or banking, select the Log online activities check box. The log file is stored by default in the administrator’s \My Documents\Small Business Accounting\Logs folder.
Planning your fiscal year Your fiscal year setting defines your company’s accounting year. You can start and end your fiscal year with a standard calendar year (January 1 to December 31), or you can define another time period for accounting and reporting purposes. You set up your fiscal year when you set up your company. You must have Owner, Accountant, or Office Manager access to change your fiscal year settings. Note Users with Office Manager access cannot reopen a closed fiscal year.

Part 1: Getting Started
36 Microsoft Office Small Business Accounting 2006
Changing the posting date The start date sets a beginning limit for new entries into your accounts. For example, if you set up Microsoft Office Small Business Accounting after the start of your fiscal year, you can specify a start date for all new entries. You cannot change the start date for your accounts, but you can specify a beginning date for posting new entries to accounts. This way, if you close out a quarter during your fiscal year, you can prevent additions dated during the closed fiscal year period. Note To close out accounts on a monthly or a quarterly basis, change the posting date. To close out accounts for the year, close the fiscal year. If you later reopen a fiscal year period, select Use change log in Company Preferences to track changes to your accounts. 1 On the Company menu, click Preferences. 2 In the Company Preferences dialog box, under Fiscal Year, click the arrow next
to the Prevent posting before field, and then select a date in the calendar. 3 Click the OK button.
Closing a fiscal year 1 Before closing the fiscal year, verify that all accounts are correct. All income and
expenses at the end of the fiscal year will be moved to the Retained Earnings account.
2 On the Company menu, click Manage Fiscal Year. 3 Select the fiscal year period you want to close. 4 Click the Close Fiscal Year button. 5 To confirm, click the Yes button. Note If you want to make changes to a closed fiscal year, you can reopen it, make your changes, and then close the fiscal year again.
Working with your fiscal year The following table lists the changes you can make to your fiscal year setting.
To Do this
Add a new fiscal year 1 On the Company menu, click Manage Fiscal Year. 2 Click the New Fiscal Year button.

Working with support lists
Microsoft Office Small Business Accounting 2006 37
To Do this
Edit a fiscal year 1 On the Company menu, click Manage Fiscal Year. You can change the end date of the fiscal year if you have not entered transactions after the new end date.
2 Select the fiscal year period you want to edit. If the list of periods contains three or more entries, you can edit only the first and last fiscal years in the list.
3 Click the Edit Fiscal Year button Reopen a fiscal year 1 On the Company menu, click Manage Fiscal Year.
You must have Owner or Accountant access to reopen a closed fiscal year.
2 Select the closed fiscal year period you want to reopen. 3 Click the Open Fiscal Year button.
Delete a fiscal year 1 On the Company menu, click Manage Fiscal Year. 2 Select the fiscal year period you want to delete.
You can delete a fiscal year only if you have not entered transactions that refer to it.
3 Click the Delete Fiscal Year button.
Working with support lists Support lists contain the standard data, for example, group names, that you need to manage sales to customers and purchases from vendors. The following table lists the support lists that specify terms and settings that you can select from lists in forms.
Name Description
Customer Group Includes a set of customers, which you can use to generate reports by customer group.
Vendor Group Includes a set of vendors, which you can use to generate reports by vendor group.
Payment Terms Includes a list of your payment terms (for example, rules for calculating payment due date and discount for early payment) for customers, vendors, and sales tax agencies.
Shipping Method Includes the means of transport for order deliveries (both sales to customers and purchases from vendors).
Shipping Term Describes the terms for payment of shipping and handling by customers or to vendors.
Price Level Includes standard price adjustments (percent) of discounts or markups to groups of customers for products and services that your company sells.

Part 1: Getting Started
38 Microsoft Office Small Business Accounting 2006
Name Description
Item Group Includes a set of items, which you can use to generate reports by item group.
Job Group Includes a set of jobs, which you can use to generate reports by job group. Jobs are available only if you selected Use jobs in Company Preferences.
Credit Rating Describes a level of creditworthiness. Class Includes a category for creating a set of transactions that you define.
Classes are available only if you selected Use class in Company Preferences.
1099 Category Includes the tax categories for payments to 1099 vendors. Country/Region Includes a category for a country or region where customers and
vendors are located.
The following table lists the tasks you can do to manage support list data.
To Do this
Add data to support lists
1 On the Company menu, point to Manage Support Lists, and then click one of the list names.
2 In the Modify dialog box, click the Add button. Edit data in support lists
1 On the Company menu, point to Manage Support Lists, and then click one of the list names.
2 In the Modify dialog box, select an item to edit. Changes that you make to secondary lists will apply to new data; changes do not apply to existing data.
3 Click the Edit button. Remove data from support lists
1 On the Company menu, point to Manage Support Lists, and then click one of the list names.
2 In the Modify dialog box, select an item to remove. You cannot remove financial data that is used in a posted transaction.
3 Click the Remove button. 4 If data in the support list is in active use, you cannot remove it.
If you see an error message, click the OK button to clear it.
Designing templates for business forms and letters Small Business Accounting provides a set of templates that you can customize for your company’s forms and correspondence. Using Microsoft Office Word, you can modify a standard template or create a new one. Note For best results, start with a template provided by Small Business Accounting and modify it to suit your needs.

Designing templates for business forms and letters
Microsoft Office Small Business Accounting 2006 39
Modifying a template for business forms Microsoft Office Small Business Accounting 2006 provides a variety of templates for the forms you use in your business: invoices, sales orders, quotes, customer credit memos, customer statements, and purchase orders. You can customize a template to use when printing forms or sending forms to customers or vendors. 1 On the Company menu, click Manage Word Templates. 2 In the Manage Microsoft Word Templates dialog box, select the template type:
Invoice, Sales Order, Quote, Customer Credit Memo, Customer Statement, or Purchase Order.
3 In the Templates list, select the template you want to modify. 4 To open the template in Microsoft Office Word, click the Modify button.
Note To get instructions on making changes to your form template, click Microsoft Office Word Help on the Help menu.
5 When you have finished, click Save on the File menu. Note If you edit one of the templates provided with Small Business Accounting, you must save it under a new file name. You cannot edit or delete a template provided with Small Business Accounting.
6 Specify a file name for the template, then click the Save button. 7 To return to the Manage Word Templates dialog box, click the Close button
. 8 To exit, click the Close button.
Modifying a template for form letters Small Business Accounting provides several templates for form letters that you can send to customers, vendors, or employees. You can customize a template to use when you want to send a letter to a group. Note Form letters use mail merge fields in Word documents. To get instructions on creating and editing mail merge fields, see your Word documentation. 1 On the Company menu, click Write Letters. 2 In the Write Letters Wizard, click the Next button. 3 On the Select a Letter Template page, select the recipient type: Customer,
Vendor, or Employee. 4 In the Available templates list, select the template you want to modify. 5 To open the template in Word, click the Modify button.
Note To get instructions on editing your form letter, click Microsoft Office Word Help on the Help menu.
6 When you have finished, click Save on the File menu.

Part 1: Getting Started
40 Microsoft Office Small Business Accounting 2006
Note If you edit one of the templates provided with Small Business Accounting, you must save it under a new file name. You cannot edit or delete a template provided with Small Business Accounting.
7 To return to the Write Letters Wizard, click the Close button . 8 To exit the Write Letters Wizard, click the Cancel button.
Adding security in Word You can use the security features in Word to preserve your template designs. 1 Click Options on the Tools menu, and then click the Security tab. 2 Do one or more of the following:
• Select the Read-only recommended check box, and then click the OK button.
• In the Password to open box, type a password, and then click OK. In the Reenter password to open box, type the password again, and then click OK.
• In the Password to modify box, type a password, and then click OK. In the Reenter password to modify box, type the password again, and then click OK.
3 On the File menu, click Save.

Chapter 4: Managing User Roles and Permissions
Microsoft Office Small Business Accounting 2006 features a system of permissions for accessing your company data. This ensures that sensitive financial data is not visible to the people who do not need to view it and that only authorized users can carry out specified business functions.
Understanding roles and permissions The Microsoft Windows user name and password identify a user in Small Business Accounting. All users must belong to a Windows user group with access to the computer running Small Business Accounting. To get instructions on managing users in Windows, see your Windows documentation. All members of the Windows Administrator group have full access to Small Business Accounting, including installation, setting up the company, managing user roles, installing add-ins, creating or importing an accountant’s backup copy, setting up access for multiple users, and using any of the Data Utilities commands on the File menu. Caution To safeguard your company records, make sure that only appropriate users are listed in the Windows Administrator group on the computer or in the domain where Small Business Accounting is installed. Authorized Windows users can be assigned to the following preset roles (with associated permissions) in Small Business Accounting: • Owner has limited access to all product features. An owner cannot create a new
company, install Small Business Accounting, manage user roles, install add-ins, create or import an accountant’s backup copy, set up access for multiple users, or use any of the Data Utilities commands on the File menu, unless he or she is an administrator on the computer running Small Business Accounting.
• Office Manager is responsible for managing the day-to-day financial records of the company, including customer transactions, vendor transactions, banking transactions, and payroll. The Office Manager role has full access to most product areas but cannot set up the company, manage user roles, install add-ins, create or import an accountant’s backup copy, set up access for multiple users, use any of the Data Utilities commands on the File menu, import data, or open a closed fiscal year.
• Accountant is responsible for reviewing, updating, and managing the financial data of the company. The Accountant role has all of the permissions of the Office Manager role and can open a closed fiscal year.

Part 1: Getting Started
42 Microsoft Office Small Business Accounting 2006
• Salesperson is responsible for handling customer transactions and most vendor transactions. The Salesperson role cannot carry out any banking, accounting (such as journal entries), or payroll transactions.
• Read-only User can view customer and vendor transaction information but cannot add, delete, or update any information.
Note These roles are built into Small Business Accounting. You cannot change them. All users assigned to any role can belong to any Windows group with access to the computer running Small Business Accounting.
Managing user access To work with Small Business Accounting, users must belong to a Windows group with access to the computer running the program. Only a member of the Windows Administrator group on the computer where Small Business Accounting is installed can assign roles, change users’ roles, remove users’ access, and change passwords.
Assigning a role 1 On the File menu, click Manage Users. 2 Click the Select button.
Note You can add a user only one time; you cannot assign multiple roles to the same user name.
3 Do one of the following: • Type the Windows user name in the User Name field, and type the Windows
domain name in the Domain field. • If you do not know the Windows domain and user name, click the Select
User button to locate it. 4 Click the Next button. 5 Select the role for the user.
The Tasks table outlines the permissions for the selected role. You cannot change the permissions associated with a role.
6 Click the Finish button. 7 To exit, click the Close button.
Changing a user’s role After you add a user to Small Business Accounting, you can change the user’s role and permissions.

Managing user access
Microsoft Office Small Business Accounting 2006 43
Caution Your changes to a user’s role and its associated permissions will not take effect until the user logs off from and logs back onto Small Business Accounting again. If the user is working from a remote computer, instruct the user to log off from and log back onto Small Business Accounting. 1 On the File menu, click Manage Users. 2 In the Manage Users dialog box, select a user name. 3 Click the Edit button. 4 Select a new role for the user. 5 The Tasks table outlines the permissions for the new role. 6 Click the OK button. 7 To exit, click the Close button.
Removing a user’s access You can remove a user’s access to Small Business Accounting. Caution Your changes to a user’s permissions will not take effect until the user logs off and logs on again. If the user is working from a remote computer, instruct the user to log off and log on again. 1 On the File menu, click Manage Users. 2 In the Manage Users dialog box, select a user name. 3 Click the Remove button. 4 To confirm, click the OK button. 5 To exit, click the Close button.
Changing a user’s password For instructions on changing a password, see your Windows documentation. Be sure to change passwords regularly. If you write your password down, keep it in a safe place. Use strong passwords that combine uppercase and lowercase letters, numbers, and symbols. Weak passwords don’t mix these elements. • Strong password: Y6dh!et5 • Weak password: House27

Part 1: Getting Started
44 Microsoft Office Small Business Accounting 2006

Part 2: Managing Your Company
In this part Overview........................................................................................................................................46 Keyboard shortcuts ......................................................................................................................46
Chapter 5: Setting Up and Managing Accounts ............................................... 49 Setting up the Chart of Accounts ...............................................................................................50
Balance sheet accounts.........................................................................................................50 Income and Expense accounts ...........................................................................................51 System accounts....................................................................................................................51
Working with the Chart of Accounts.........................................................................................53 Viewing an account register ........................................................................................................54 Adding an account........................................................................................................................55 Editing an account........................................................................................................................56 Merging accounts..........................................................................................................................56 Deleting an account......................................................................................................................57 Inactivating an account ................................................................................................................57
Chapter 6: Recording Account Activity............................................................. 59 Viewing the Journal Entries list ..................................................................................................59 Making a journal entry .................................................................................................................60 Editing a journal entry..................................................................................................................62 Voiding a journal entry ................................................................................................................62 Working with journal entries.......................................................................................................63
Chapter 7: Tracking and Paying Sales Tax........................................................ 65 Setting up sales tax........................................................................................................................65 Paying sales tax..............................................................................................................................66
Checking sales tax liability ...................................................................................................67 Adjusting sales tax due.........................................................................................................67 Paying sales tax......................................................................................................................68
Chapter 8: Managing Your Company Data....................................................... 69 Protecting your data files .............................................................................................................69
Backing up company data....................................................................................................70 Restoring company data ......................................................................................................70

Part 2: Managing Your Company
46 Microsoft Office Small Business Accounting 2006
Preparing a company data file for copying or moving ....................................................71 Removing a company from Small Business Accounting.................................................72
Working with data files ................................................................................................................72 Sharing company data with an accountant................................................................................73
Creating an accountant’s backup copy...............................................................................73 Working with your accountant ...........................................................................................74 Importing an accountant’s backup copy ...........................................................................74
Exporting company data..............................................................................................................75
Overview Microsoft Office Small Business Accounting 2006 helps you set up accounts in the Chart of Accounts to record your company’s income and expenses. When you make a journal entry to record a transaction or make an adjustment (debit or credit) to an account, you apply an equal amount (credit or debit) to another account, vendor, customer, or tax code. This way, you can keep your accounts balanced. If you pay taxes on sales of products or services, you can track your sales tax liability and calculate the amount you owe to each sales tax agency you identify. You may want to consult an accountant to assist you with your record keeping. You can create an accountant’s copy of your records in Small Business Accounting and integrate the accountant’s work on your books with your company’s copy of the books. Refrain from adding entries to your accounts while the accountant’s copy is in use. Your company data is an important business asset, which you should protect. Be sure you back up your company file on a regular basis and store the backup copy on a separate computer or removable hard disk drive, which you can store in a safe place.
Keyboard shortcuts You can use keyboard shortcuts to streamline your work in Small Business Accounting. To open the Company home page, click Company in the Navigation Pane. The following table lists the keyboard shortcuts available from the Company home page, in lists, and in records and on forms. Keyboard shortcuts are not available in dialog boxes or wizards. Note If a shortcut contains more than one key, press and hold a key, and then press the next key.

Keyboard shortcuts
Microsoft Office Small Business Accounting 2006 47
To Press
Open the Help table of contents F1
Get Help for the current page ALT+F1
Add or remove content F7
Open the Company home page CTRL+1
Open the Chart of Accounts CTRL+SHIFT+A
Open the Customers list CTRL+SHIFT+C
Open the Employees list CTRL+SHIFT+E
Open the Jobs list CTRL+SHIFT+J
Open the Items list CTRL+SHIFT+U
Open the Vendors list CTRL+SHIFT+V
Open the Journal Entries list CTRL+SHIFT+Y
In a list, you can use the following keyboard shortcuts.
To Press
Create a new record or account CTRL+N
Add or remove the Find toolbar CTRL+F
Open the selected records or accounts CTRL+O
Delete a record or an account CTRL+D or DELETE
Add or remove content F7
Preview the printed list CTRL+F2
Print the list CTRL+P
On Company forms, you can use the following keyboard shortcuts.
To Press
Create a new form CTRL+N
Close the form ESC or ALT+F4

Part 2: Managing Your Company
48 Microsoft Office Small Business Accounting 2006

Chapter 5: Setting Up and Managing Accounts
Microsoft Office Small Business Accounting 2006 tracks your accounts so you can keep tighter control over the flow of funds into and out of your company. The Company home page is the starting point for monitoring your company’s financial accounts. To open the Company home page, click Company in the Navigation Pane.
For a detailed description of the Company home page, see “Monitoring financial accounts,” in Chapter 2, “Taking a Tour.” If you need further information, help is always available. To open the Help table of contents, press F1. To get Help for the current page, press ALT+F1. On forms, click the Help button on the toolbar. In dialog boxes and wizards, click the Help button.
Company home page: CTRL+1
Help: F1

Part 2: Managing Your Company
50 Microsoft Office Small Business Accounting 2006
Setting up the Chart of Accounts You set up your company accounts when you set up your company in Small Business Accounting. You can use the Startup Wizard to set up a standard set of accounts for your business, or you can set up your accounts later. Small Business Accounting sets up required system accounts automatically when you set up your company, regardless of how you choose to set up your other accounts. You can add balance sheet accounts and Income and Expense accounts and sub-accounts for your company. You cannot change the type of account after you add an account. Note Use sub-accounts to keep related entries in one place. A sub-account must be the same account type as the parent account. A sub-account’s balance is included in the parent’s account balance in the Chart of Accounts.
Balance sheet accounts Balance sheet accounts contain equal (balanced) entries for debits (positive amounts) and credits (negative amounts).
Account type Description
Cash An account for money that you have not yet deposited in the bank, such as petty cash or undeposited funds.
Bank An account your company has at a bank or other financial institution.
Other Current Assets Assets that are likely to be converted to cash or retired within one year, such as notes receivable due within a year, prepaid expenses, and security deposits.
Inventory Asset A product or service purchased or produced for sale and entered into inventory.
Other Asset Any asset that is neither a current asset nor a fixed asset, such as long-term notes receivable and long-term deposits.
Fixed Asset Depreciable assets purchased for use by your company, rather than for resale, that are not likely to be converted into cash within a year, such as equipment or furniture.
Credit Card Credit card purchases, bills, and liabilities. Current Liability Obligations that are scheduled to be paid within one year, such as
sales tax, payroll taxes, accrued or deferred salaries, and short-term loans. You can create a Current Liability sub-account for the Pending Item Receipts system account.
Long-term Liability Obligations that are scheduled to be paid over periods longer than one year, such as loans or mortgages.

Setting up the Chart of Accounts
Microsoft Office Small Business Accounting 2006 51
Account type Description
Equity Starting or ending balances that reflect your company’s net worth (assets minus liabilities). You can create an Equity sub-account for the following system accounts: • Opening Balances • Retained Earnings
Income and Expense accounts Income and Expense accounts are directly related to each other. Note At the end of your fiscal year, balances from your Income and Expense accounts are moved to the Retained Earnings account.
Account type Description
Income Revenues from the sale of products and services to your customers. You can create an Income sub-account for the following system accounts: • Job Resell Account • Cash Discount Given • Write Off
Other income Revenue received for something other than normal business operations, such as interest income.
Expense Amounts spent on products and services related to your normal business operations, for example, phone or rent.
Other Expense Amounts spent on products and services other than normal business operations, such as interest expense.
Cost of Goods Sold The cost of products and services entered into inventory and then sold. You can create a Cost of Goods Sold sub-account for the Cash Discount Taken account.
System accounts System accounts are set up automatically, when you set up your company, regardless of how you add accounts. They cannot be deleted, though you can change the account name and number in Company Preferences. Caution Take care in changing system accounts. If you selected Use account numbers in Company Preferences, the new account number will change the account’s position within its grouping in the Chart of Accounts.

Part 2: Managing Your Company
52 Microsoft Office Small Business Accounting 2006
You cannot change the following system accounts: • Accounts Receivable • Accounts Payable Your balance sheet and Income and Expense accounts include some or all of the following system accounts:
Account Description
Opening Balances An Equity Account containing the account balance as of the start date for your company or as an offset for a new account. Normally, this account should have a balance of zero (0) if your assets equal your liabilities plus equity (assets = liabilities + equities).
Accounts Receivable An account for amounts owed to your company from sales of products and services, for example, invoices, payments, refunds, and credit memos. This account provides an overview of all customers’ transactions. You cannot post directly to the Accounts Receivable account, nor can you change it in Company Preferences.
Accounts Payable An account for amounts your company owes to vendors and customers for products and services, for example, bills, bill payments, and credits. You cannot post directly to the Accounts Payable account, nor can you change it in Company Preferences.
Sales Tax Payable A Current Liability account for sales taxes owed.
Cash Discount Given An account that offsets to Income for customer payments where a cash discount applies, based on the payment terms.
Cash Discount Taken An account that offsets to Income for customer payments where a cash discount applies, based on the payment terms.
Undeposited Funds A Cash account for amounts received but not posted to any other account.
Bank Charge An Expense account for fees your company pays to the bank, for example, checking account fees, transfer charges, returned (insufficient funds) check fees.
Retained Earnings An Equity account for balances from Income and Expense accounts at the close of the fiscal year. Note When you close a fiscal year, all Income and Expense account balances are moved to the Retained Earnings account.
Pending Item Receipts
A Current Liability account for amounts owed for products or services that your company has received, but the related bill has not yet been received.
Job Resell Account An Income account applied to an expense that is associated with a job.

Working with the Chart of Accounts
Microsoft Office Small Business Accounting 2006 53
Account Description
Write-Off An account that reduces Income for amounts deducted from a total amount owed, for example, when you enter an amount in the Write Off field on the customer payment form.
Working with the Chart of Accounts The Chart of Accounts lists all of your company’s accounts. To view the Chart of Accounts: 1 In the Navigation Pane, click Company. 2 Under Find, click Chart of Accounts. Balance sheet accounts appear at the top of the list, followed by Income and Expense accounts. Accounts are then grouped by type. If you selected Use account numbers in Company Preferences, the account number determines the account’s position within its grouping in the list. You cannot sort the Chart of Accounts. Tip You can use the entry in the Type column to locate accounts. The following table contains basic tasks you can do with the Chart of Accounts.
To Do this
View accounts by status Click the arrow next to the Current View field, and then select Active, Inactive, or All.
Add or remove account numbers
1 On the Company menu, click Preferences. 2 Select or clear the Use account numbers check box.
Add, remove, or reorganize content
On the View menu, click Add/Remove Content.
Resize column width Click the column divider next to the column heading and drag it to a new width.
Change the column order
Select a column title and drag it to a new position.
Find an account 1 On the toolbar, click the Find button. 2 Enter a keyword to look for and a column title to search under,
and then click the Find button. Open selected accounts 1 In the Chart of Accounts, select one or more (up to 10)
records in the list. 2 On the File menu, click Open Selected Items. 3 To navigate through account details, click the Previous Item
button or the Next Item button on the toolbar. Print the Chart of Accounts
On the toolbar, click the Print button .
Chart of Accounts: CTRL+ SHIFT+A
Find: CTRL+F
Print: CTRL+P
Open: CTRL+O
Add or remove content: F7

Part 2: Managing Your Company
54 Microsoft Office Small Business Accounting 2006
To Do this
Export the Chart of Accounts to a Microsoft Office Excel spreadsheet
On the toolbar, click the Export to Excel button .
Viewing an account register Every account has its own account register in the Chart of Accounts. Every transaction is entered into the account register. After you add a transaction, you cannot delete it. If an entry is not valid, you can edit it or mark it void. Tip Keep your accounts current by entering transactions regularly and by reconciling bank and credit card accounts when you receive your account statement. For more information about working with bank and credit card accounts, see Chapter 23 “Managing Bank Accounts.” 1 In the Chart of Accounts, double-click the account name. 2 To close the account register, click the Close button on the toolbar. The following table contains basic tasks you can do with an account register.
To Do this
Sort the list Click a column title to switch between ascending and descending order. An arrow indicates the sort order. Note If you sort the account register by any column other than the Date column, the Balance column changes. The ending balance, however, remains the same.
Resize column width Click the column divider next to the column heading and drag it to a new width.
Change the column order
Select a column title and drag it to a new position.
View account details On the Actions menu, click Open Account Details. Set up an online account For a bank or credit card account, click Setup online banking on
the Actions menu. For more information, see Chapter 25, “Using Online Banking.”
Add a new transaction Click the New transaction (for a bank or credit card account) or New journal entry (for all other account types) link at the bottom of the list.
View transaction details Double-click an entry in the account register to view the details of the transaction.

Adding an account
Microsoft Office Small Business Accounting 2006 55
To Do this
Change the status of a transaction
1 Select an entry in a bank or credit card account register. 2 On the Actions menu, point to Mark as, and then click
Unmatched, Unreconciled, or Reconciled. Note After you reconcile a transaction, a reconciled stamp appears next to the transaction in its account register.
Adding an account 1 In the Navigation Pane, click Company. 2 Under Start a Task, click New Account. 3 Select the account type, and then click the OK button.
On the Account form, the Account type field appears dimmed. You cannot change the account type after you select it.
4 (Required) The Account no. field appears on the account form if you selected Use account numbers in Company Preferences. Type an account number or retain the default number. Note The account number determines the account’s position within its grouping in the Chart of Accounts.
5 (Required) In the Account name field, type a name for the account. 6 For most account types, if you are carrying over balances from another
accounting system, type an account balance in the Balance field.

Part 2: Managing Your Company
56 Microsoft Office Small Business Accounting 2006
The opening balance represents the balance in the account as of your company’s start date. If you add an account after the start date, the opening balance is zero, and your beginning balance is added to the account as a journal entry.
7 Click the arrow next to the Cash Flow category field, and then select Operating, Investing, or Financing. Your selection determines how the account appears in your company’s Cash Flow Statement.
8 Do one of the following: • On the toolbar, click the Save and Close button. • To save the account and create another account, click the Save and New
button. You can do the following additional tasks when you create an account.
To Do this
Change the account’s status to Inactive
Clear the Active check box. Note The account status is Active by default.
Create a sub-account Click the arrow next to the Sub-account of field, and then select an account of the same type from the list. A sub-account’s balance is included in the parent’s account balance in the Chart of Accounts.
Assign a 1099 category Make sure the account requires a 1099 category for payments to vendors who require a 1099 tax form. Click the arrow next to the 1099 category field, and then select a category from the list or add a new 1099 category.
Add a comment to the account
Type additional information in the Comments field. You can read comments only when you open the account.
Editing an account If you want to change the information you have entered into an account, you can edit it. 1 In Chart of Accounts, select the account name. 2 On the Actions menu, click Edit Account. 3 Enter the information on the Account form. 4 When you are done, click the Save and Close button on the toolbar.
Merging accounts If you find that you have duplicate accounts, for example, if you have set up two financial accounts for the same purpose, you can merge them. You can combine two active records of the same type: customer, vendor, item, and financial account. You cannot merge bank or credit card accounts.

Deleting an account
Microsoft Office Small Business Accounting 2006 57
Caution After you merge two accounts, you cannot separate them. If you plan to merge a large number of accounts, you may want to back up your company data before you begin. 1 On the Company menu, point to Merge Accounts, and then click Merge
Financial Accounts. 2 Click the arrow next to the Merge from account field and select an account to
merge. Caution This account will be deleted after it is incorporated into another account.
3 Click the arrow next to the Merge to account field and select an account to merge into.
4 When you are done, click the OK button.
Deleting an account If an account is not a system account and does not have an opening balance or transactions associated with it, you can delete it. 1 In the Chart of Accounts, select the account. 2 On the toolbar, click the Delete button . 3 To confirm, click the Yes button.
Inactivating an account You cannot delete a system account or an account that has transactions or documents associated with it, but you can change its status to Inactive. Note An account with Inactive status does not appear in lists in dialog boxes, forms, and wizards. When you change an account status to Inactive, you will no longer be able to select it from those lists, though you can still post entries to its account register, which you can find in the Chart of Account’s Inactive or All view. 1 In the Chart of Accounts, select one or more active accounts. 2 On the Edit menu, click Make Inactive.

Part 2: Managing Your Company
58 Microsoft Office Small Business Accounting 2006

Chapter 6: Recording Account Activity
Microsoft Office Small Business Accounting 2006 tracks your transactions and adjustments to accounts in journal entries that balance debits (positive amounts) and credits (negative amounts). It is possible to record all your business transactions by journal entry; however, it is a good practice to use journal entries to record special entries that are not covered by the normal transactions of your company, for example, you can make a journal entry to enter an account opening balance, to record depreciation charges, to record sales of assets, to adjust previously recorded entries, or to enter CPA adjustments. Keep your accounts current by entering transactions and adjustments regularly and by reconciling bank and credit card accounts soon after you receive your account statement. For more information, see Chapter 24, “Recording Banking Activity.” The Transaction Detail by Account report provides a detailed look at the entries posted to the Chart of Accounts over a period of time. For more information, see Chapter 27, “Keeping Track of Company Data.”
Viewing the Journal Entries list The Journal Entries list contains all of the transactions and adjustments recorded as journal entries in your company’s accounts. To view the Journal Entries list: 1 In the Navigation Pane, click Company. 2 Under Find, click Journal Entries. The following table contains basic tasks you can do with the Journal Entries list:
To Do this
View Journal entries by status
Click the arrow next to the Current View field, and then select All, Voided, or Non Voided.
Add or remove journal entry numbers
1 On the Company menu, click Preferences 2 Select or clear the Use account numbers check box.
Sort the list Click a column title to switch between ascending and descending order. An arrow indicates the sort order.
Add, remove, or reorganize content
On the View menu, click Add/Remove Content.
Resize column width Click the column divider next to the column heading and drag it to a new width.
Change the column order
Select a column title and drag it to a new position.
Journal Entries list: CTRL+ SHIFT+Y
Add or remove content: F7

Part 2: Managing Your Company
60 Microsoft Office Small Business Accounting 2006
To Do this
Find a journal entry 1 On the toolbar, click the Find button. 2 Enter a keyword to look for and a column title to search under,
and then click the Find button. Open selected journal entries
1 Select one or more (up to 10) entries in the list. 2 On the File menu, click Open Selected Items.
Print the Journal Entries list
On the toolbar, click the Print button .
Print selected journal entries
1 Select one or more journal entries. 2 On the toolbar, click the Print button .
Export the Journal Entries list to a Microsoft Office Excel spreadsheet
On the toolbar, click the Export to Excel button .
Making a journal entry A journal entry records or adjusts a business transaction for a group of company accounts. Each journal entry requires at least two separate lines: debit and credit. The debit and credit amounts must be of equal value, or the entry will not be recorded. 1 In the Navigation Pane, click Company. 2 Under Start a Task, click New Journal Entry.
Find: CTRL+F
Print: CTRL+P
Open: CTRL+O
New journal entry: CTRL+N

Making a journal entry
Microsoft Office Small Business Accounting 2006 61
3 Today’s date appears in the top right of the Journal Entry form. To change the date, click the arrow next to the field, and then select a day in the calendar.
4 (Required) In the Journal number field, type a journal entry number or retain the default number. Small Business Accounting adds a sequential number to every journal entry, regardless of your selections in Company Preferences. It is a good practice to retain the number that Small Business Accounting assigns automatically. The Balance field appears dimmed. You cannot change it.
5 The Memo field at the top of the Journal Entry form appears in the Journal Entries list. It is a good practice to fill in the Memo field with a brief description of the contents of the journal entry.
6 (Required) Add a balanced (debit and credit) set of line entries, identifying the account by name and type. The debit and credit amounts must match. • To identify the account by type, click an entry in the Type column, click the
arrow, and then select Financial Account, Vendor, Customer, or Tax Code.
• To identify the account by name, click an entry in the Account column, click the arrow, and then select an account of the type you selected. You can select only one Vendor or Customer entry on a Journal Entry form.
• In the Debit or Credit column, type the amount of the transaction or adjustment in dollars and cents, for example, $123.45. Debits and credits must appear on separate lines, and the debit and credit totals must equal each other. If you attempt to save an entry, and the debits and credits do not equal, a warning message appears.
Tip If you want to delete a row, right-click the arrow next to the row, and then select Delete. You cannot delete the last remaining row on a Journal Entry form.
7 When the total debit and credit amounts match, do one of the following: • On the toolbar, click the Save and Close button. • To save the new journal entry and make another journal entry, click the Save
and New button. You can do the following additional tasks when you make a journal entry.
To Do this
Change the voucher number
Click an entry in the Voucher No. column, and then type a number to identify the entry you are creating. You should change the number when you start a new entry to differentiate it from a previous one. Small Business Accounting changes the number when an entry is made in balance.

Part 2: Managing Your Company
62 Microsoft Office Small Business Accounting 2006
To Do this
Add a note to a line entry
Click an entry in the Memo column, and then type a note for the line entry. This Memo column is associated with the line entry only; it does not appear in the Journal Entries list.
Assign an expense to a class
If you selected Use Class in Company Preferences, click an entry in the Class column, click the arrow, and then select a class or add a new class.
Assign an expense to a job
If you selected Use job in Company Preferences, click an entry in the Job Name column, click the arrow, and then select a job or add a new job.
Bill an expense to a customer
If an expense is billable to a customer, select the Billable check box.
Editing a journal entry To make adjustments to a recorded transaction, you can edit the journal entry. 1 In the Journal Entries list, double-click the entry you want to edit. 2 On the toolbar, click the Edit button. 3 Enter the information on the Journal Entry form. 4 When you are done, click the Save and Close button on the toolbar.
Voiding a journal entry You cannot delete a journal entry, but you can void it. When you void a journal entry, it is marked Void and it remains in the account register with the status of Void. 1 In the Journal Entries list, double-click the entry you want to void. 2 On the Actions menu, click Void. 3 To confirm, click the Yes button.
What if . . . I want to delete a transaction? When a transaction is saved (or posted) to an account, it becomes part of your company’s official record, and you cannot delete it. You must keep track of all activity in each account, so you cannot remove a transaction or the account where it is posted. If a transaction is not valid, you can edit it or mark it void.

Working with journal entries
Microsoft Office Small Business Accounting 2006 63
Working with journal entries After you have recorded transactions and adjustments in journal entries, you can work with the entries themselves or use the information in the entries to generate reports to better manage your company. For information, see Chapter 27, “Keeping Track of Company Data.” The following table contains additional tasks you can do with journal entries.
To Do this
Navigate through journal entries
1 In the Journal Entries list, double-click an entry. 2 Click the Previous Item button or the Next Item
button on the toolbar. Copy a journal entry 1 In the Journal Entries list, double-click the entry you want to
copy. 2 To create a new entry with the same information, click Copy
and Edit on the File menu. If you selected Use account numbers in Company Preferences, Small Business Accounting applies the next available number to the entry.
View a detailed report of the transaction
In the Journal Entries list, double-click the entry you want to view. • To view the status of the entry, click Transaction History on
the Actions menu. • To view the complete journal entry, click Transaction Journal
on the Actions menu.

Part 2: Managing Your Company
64 Microsoft Office Small Business Accounting 2006

Chapter 7: Tracking and Paying Sales Tax
Sales tax is a state or local tax on products or services, based on a percentage of the sales price. You can set up sales tax codes for the state and local sales tax agencies where you do business. The sales tax agency is a vendor that your company pays. For more information, see Chapter 15, “Working with Vendors.” You can track whether a customer is responsible for paying sales tax or is exempt from paying tax; for example, if the customer is a diplomat or if a purchase will be shipped to a state without a sales tax, then you will not collect sales tax on the purchase. Set up a sales tax group for each type of customer, and select the sales tax group in your invoices. State and local tax regulations also determine whether a specific product or service is subject to sales tax. You can define whether or not an item is taxable in a separate item tax setting.
Setting up sales tax You can specify whether or not your company is liable for sales taxes when you set up your company. To change your sales tax setting: 1 On the Company menu, click Preferences. 2 Under Taxes, select the Do you pay sales tax? check box. 3 To specify when you are liable for sales taxes, do one of the following:
• To be liable when the invoice is sent, even if the customer has not paid you yet, click Accrual basis (When customer is invoiced).
• To be liable when the invoice is paid, click Cash basis (When customer has paid invoice).
4 To exit, click the OK button. The following table lists the sales tax settings you can use to satisfy your state or local tax requirements.
To Set up
Sales tax agency: the state or local government organization to which your company pays the sales taxes you collect from customers.
Identify sales tax to collect
Sales tax code: the sales tax name and tax rate (as a percent of the sales price) for the sales tax agency you specify.
Identify tax status of customers
Sales tax group: the sales tax codes that apply to a group, for example, tax-exempt customers or customers who ship purchases out of state.

Part 2: Managing Your Company
66 Microsoft Office Small Business Accounting 2006
To Set up
Identify tax status of product and service items your company sells
Item sales tax: the sales tax status (taxable or nontaxable) for the product and service items you select.
Consider the range of tax situations you will encounter when selling products and services to customers. For example, a sale may be taxable if a customer purchases an item in a local store where state taxes apply, but it may not be taxable if you ship the same item to a state without sales taxes. The following table contains the tasks to complete when you set up sales tax settings for the products and services you sell.
To Do this
Add a sales tax agency 1 On the Company menu, point to Sales Tax, and then click New Tax Agency. For instructions on filling in a vendor form, see “Creating a Vendor record,” in Chapter 15, “Working with Vendors.”
2 When you are done, click the Save and Close button on the toolbar.
Add a sales tax code 1 On the Company menu, point to Sales Tax, and then click Manage Sales Tax Codes.
2 Click the Add button. Add a sales tax group 1 On the Company menu, point to Sales Tax, and then click
Manage Sales Tax Groups. 2 Click the Add button.
Add an item tax 1 On the Company menu, point to Sales Tax, and then click Manage Item Sales Tax.
2 Click the Add button.
Paying sales tax Small Business Accounting tracks sales taxes paid to you by customers. To calculate sales taxes for invoices and customer credit memos, the following two conditions must be met: • The sales tax group contains tax codes. • The item is marked as taxable. When sales taxes are due, you can see the amount you owe to each sales tax agency, adjust any sales tax amounts that are not correct, and enter sales tax payments.

Paying sales tax
Microsoft Office Small Business Accounting 2006 67
Checking sales tax liability Before paying sales tax, check the Sales Tax Liability report to see what your company owes to each tax agency. 1 On the Company menu, point to Sales Tax, and then click View Sales Tax
Liability. The Sales Tax Liability report lists amounts owed to sales tax agencies for each tax code.
2 To exit, click Close on the File menu.
Adjusting sales tax due If the amount of sales tax you owe is not correct, you can increase or decrease the amount due to a sales tax agency. 1 On the Company menu, point to Sales Tax, and then click Adjust Sales Tax
Due. 2 Today’s date appears in the Date effective field. To change the date, click the
arrow next to the Date effective field, and then select a date from the calendar. 3 (Required) In the Journal entry no. field, type a journal entry number or retain
the default number. Small Business Accounting adds a sequential number to every journal entry, regardless of your selections in Company Preferences. It is a good practice to retain the number that Small Business Accounting assigns automatically.
4 (Required) Click the arrow next to the Tax income or expense field, and select a financial account to debit or credit for the tax adjustment, or add a new financial account.
5 (Required) Click the arrow next to the Tax Code to adjust field, and select the tax code for the tax payment you want to adjust, or add a new tax code.
6 (Required) To specify the adjustment to your tax payment for the selected tax code, do one of the following: • To raise your tax payment and create a journal entry debiting the selected
financial account and crediting the selected tax code, click Increase and then type the amount in dollars and cents, for example, $123.45.
• To lower your tax payment and create a journal entry crediting the selected financial account and debiting the selected tax code account, click Decrease and then type the amount in dollars and cents, for example, $123.45.
7 When you are done, click the OK button.

Part 2: Managing Your Company
68 Microsoft Office Small Business Accounting 2006
Paying sales tax 1 In the Navigation Pane, click Company. 2 Under Start a Task, click Pay Sales Tax.
3 Today’s date appears in the Date field. To change the date, click the arrow next to the Date field, and then select a date from the calendar.
4 (Required) Click the arrow next to the Pay from field, and then select a bank or credit card account.
5 (Required) Click the arrow next to the Payment method field, and then select Cash, Check, or Credit Card.
6 (Required) Select the check box next to each tax bill you want to pay. Note To select all of the bills in the list, select the check box to the left of the Tax Agency column heading.
7 To pay less than the full amount of a bill, change the amount in the Amount to pay field.
8 The amount of the payment displays in the Amount to pay field. The Total field automatically adjusts the payment and calculates the total tax payment.
9 When you are done, click the Pay Sales Tax button.

Chapter 8: Managing Your Company Data
Your company data is crucial to the success of your business. Take as much care to protect it from loss as you would any other critical business asset. Tip For assistance in setting up your company, consult a software or accounting professional. To find a list of consultants, click Find an Accountant on the Help menu.
Protecting your data files Microsoft Office Small Business Accounting 2006 stores data in seven separate files with the following extensions.
Extension Description
.sbd A data file, stored by default in the SQL server folder (Program Files\Microsoft SQLServer\MSSQL$MICROSOFTSMLBIZ\Data).
.sbc A company file, a shortcut pointing to the location of the data file, stored by default in the My Documents\Small Business Accounting\Companies folder of the administrator who set up your company in Small Business Accounting.
.sbl An SQL log file, generated when you create a new company, import data from an XML file, or restore a backup file to a new company. It is stored by default in the SQL server folder (Program Files\Microsoft SQLServer\ MSSQL$MICROSOFTSMLBIZ\Data).
.xml An XML file, containing data exported from Small Business Accounting, stored by default in the My Documents\Small Business Accounting\Exported Data folder of the administrator who set up your company in Small Business Accounting. You can create a new company from an existing company file by exporting your company data from one data file and then importing it into a new data file.
.log A log file, generated by importing QuickBooks data, by repairing a data file, by upgrading your software, and by accessing online banking or payroll processing by ADP®, if you have selected Log online activities on the General tab in Company Preferences. It is stored by default in the My Documents\Small Business Accounting\Logs folder of the administrator who set up your company in Small Business Accounting.
.sbb An uncompressed backup file, generated when you upgrade your software or extracted when you open the compressed (.zip) file in the My Documents\ Small Business Accounting\Backups folder of the administrator who set up your company in Small Business Accounting. Create a backup file to protect your company data, to send to your accountant, to import into a new company file, or to move Small Business Accounting to a different computer.

Part 2: Managing Your Company
70 Microsoft Office Small Business Accounting 2006
Extension Description
.zip A compressed backup file, stored by default in the My Documents\Small Business Accounting\Backups folder of the administrator who set up your company in Small Business Accounting.
Backing up company data It is a good practice to back up your data regularly. In addition, you may want to create a backup copy on a server in a remote location or on a removable hard disk drive. This way, you are protected in the event of hardware or software failure. You must have administrator access to back up your company data file. Note You can back up only the file that is currently open in Small Business Accounting. 1 On the File menu, point to Utilities, and then click Data Utilities. 2 In the Data Tools dialog box, under Backup company data, click the Backup
button. Note If the Backup button appears dimmed, it is unavailable. You do not have sufficient access to use it.
3 In the Create a Backup File dialog box, click the Browse button and specify a file name for the backup file (with a .zip extension), and then click the Save button.
4 If you want to password protect your backup file, enter a password, and then enter the same password to verify it. Note If you specify a password, you will need to provide it whenever you access the backup file; for example, if you use the backup file to restore company data.
5 Click the OK button. 6 To confirm, click the OK button. 7 To exit, click the Close button.
Restoring company data If you experience a problem with your company data, you can restore it — if you have backed up your data regularly. When you restore your data, you overwrite the entire database with the backup copy. You can also restore a backup file to create a new company file. For more information, see “Importing data from a backup file,” in Chapter 1, “Installing and Setting Up.” You must have administrator access to restore company data.

Protecting your data files
Microsoft Office Small Business Accounting 2006 71
1 On the File menu, point to Utilities, and then click Data Utilities. 2 In the Data Tools dialog box, under Restore a backup file, click the Restore
button. Note If the Restore button appears dimmed, it is unavailable. You do not have sufficient access to use it.
3 In the Database Restore dialog box, click the Browse button to locate the backup file for your company, and then click the Open button.
4 Click the Browse button to locate the company file to restore or type a new company file name, and then click the Save button.
5 If the file already exists, click the Yes button to replace it. 6 If your data is password protected, enter your password. 7 Click the OK button. 8 To confirm, click the OK button. 9 To exit, click the Close button. 10 To work with your restored data file, restart Small Business Accounting.
Preparing a company data file for copying or moving First, you can detach the file from the SQL server: 1 On the File menu, point to Utilities, and then click Data Utilities. 2 In the Data Tools dialog box, click the Advanced Tools tab. 3 Under Detach data file, click the Detach button. 4 In the Detach a Database dialog box, select the data file you want to detach.
Note You cannot detach the database that is currently open. 5 Click the Detach button. 6 To confirm, click the OK button. 7 To close the dialog box, click the Close button. After you copy or move the date file, you can reattach it to the SQL server: 1 On the File menu, point to Utilities, and then click Data Utilities. 2 In the Data Tools dialog box, click the Advanced Tools tab. 3 Under Attach data file, click the Attach button. 4 In the Attach a Database dialog box, click the Browse button, navigate to the
SQL server’s Data folder (Program Files\Microsoft SQLServer\ MSSQL$MICROSOFTSMLBIZ\Data) on your local drive, select the data file (with an .sbd extension) that you want to attach, and then click the Open button.
5 In the Database name field, enter a name for the new company data file. 6 Click the Attach button. 7 To confirm, click the OK button.

Part 2: Managing Your Company
72 Microsoft Office Small Business Accounting 2006
Removing a company from Small Business Accounting First, delete the data file: 1 On the File menu, point to Utilities, and then click Data Utilities. 2 In the Data Tools dialog box, under Delete a company, click the Delete button. 3 In the Delete a Database dialog box, select the file name. 4 You cannot delete the database that is currently open. 5 Click the Delete button. 6 To confirm, click the Yes button. 7 To close the dialog box, click the Close button. Then, delete the associated company file: 1 Log in to Windows as the administrator who installs and sets up the software. 2 On the Start menu, point to Documents, and then click My Documents. 3 Click the Small Business Accounting folder to open it. 4 Click the Companies folder to open it. 5 Select the company file name. 6 On the File menu, click Delete. 7 To confirm, click the Yes button.
Working with data files If you encounter a problem with your company files or your connection to the SQL server, you can use the Data Utilities commands to fix them. You must have administrator access to work with any of the Data Utilities commands. Note If your data file is corrupted and you cannot open it, click Programs on the Start menu. Point to Microsoft Small Business Accounting, and then click Data Tools. Users with administrator access can use all of the Data Utilities commands found in Small Business Accounting, except Backup. The following table lists the tasks you can do when you encounter a problem with your data files.
To Do this
Rebuild a deleted or corrupted company file
1 On the File menu, point to Utilities, and then click Data Utilities.
2 In the Data Tools dialog box, under Rebuild company file, click Rebuild.
To work with your rebuilt file, restart Small Business Accounting.

Sharing company data with an accountant
Microsoft Office Small Business Accounting 2006 73
To Do this
Repair a company file 1 On the File menu, point to Utilities, and then click Data Utilities.
2 In the Data Tools dialog box, click the Advanced Tools tab. 3 Under Repair data file, click Repair. Note You cannot repair an open database. You can switch to another company, or open a sample company. To work with your repaired file, restart Small Business Accounting.
Change your SQL server connection
1 On the File menu, point to Utilities, and then click Data Utilities.
2 In the Data Tools dialog box, click the Settings tab. 3 In the Instance name field, enter the name of your local
connection to the Microsoft SQL server. 4 Do one of the following:
• To reset your connection to the Microsoft SQL server, click the Reset button.
• To apply the new name to your current connection, click the Apply button.
5 To confirm, click the OK button.
Sharing company data with an accountant If you employ an accountant to assist you with your books, you can create an accountant’s backup copy (with a .zip extension) of your company file to send to the accountant. When the accountant’s backup copy is returned from the accountant, you import it into your company file. Caution Do not enter, edit, or void transactions while your accountant is working on the backup copy. When you import the accountant’s backup copy, any changes you have made to your company records may be lost.
Creating an accountant’s backup copy 1 On the File menu, point to Accountant’s Backup, and then click Create
Accountant’s Backup. 2 To continue, click the OK button. 3 In the Create Accountant’s Backup dialog box, click the Browse button and
specify a file name for the backup file, and then click the Save button. 4 To confirm, click the Yes button. 5 If you want to password-protect your backup file, enter a password, and then
enter the same password again to verify it. 6 To create a backup copy, click the OK button.

Part 2: Managing Your Company
74 Microsoft Office Small Business Accounting 2006
Working with your accountant To work with your company file, the accountant must have a copy of Small Business Accounting installed on a computer on which he or she is an authorized Windows user. • If your accountant has administrator access to the computer where Small
Business Accounting is installed, he or she will have Owner access to your company file.
• If the accountant does not have administrator access to the computer, the administrator for the computer will need to assign the Accountant role to the accountant’s user name.
For more information on roles and permissions, see Chapter 4, “Managing User Roles and Permissions.” Note If you specify a password for your company file, be sure to communicate the password to your accountant. To work with the accountant’s backup copy of your company file, the accountant, or the administrator for the computer where the accountant will work with your file, should do the following: 1 Save the database’s compressed (.zip) file to a secure location, for example,
\My Documents\Small Business Accounting\Backup. 2 Start Small Business Accounting. 3 On the Start page, click Restore a Backup. For instructions, see “Restoring
company data,” on page 70. Tip If the Start page does not appear, click Close Company on the File menu, and then click Restore a Backup. You can also click Programs on the Start menu on the desktop. Point to Microsoft Small Business Accounting, and then click Data Tools. Users with administrator access can use all of the Data Utilities commands found in Small Business Accounting, except Backup.
Importing an accountant’s backup copy After receiving the accountant’s backup copy containing your accountant’s changes, do the following: 1 Start Small Business Accounting, and open the company.
Caution Any changes to the company file will be lost when the accountant’s backup copy is imported. To protect your data, back up your company file before importing the accountant’s backup copy.
2 On the File menu, point to Accountant’s Backup, and then click Import Accountant’s Backup.
3 To continue, click the OK button. 4 In the Create a Backup File dialog box, click the Browse button.

Exporting company data
Microsoft Office Small Business Accounting 2006 75
5 Specify a file name for the backup file, and then click the Save button. 6 To confirm, click the Yes button. 7 If the file is password protected, enter the password. 8 Click the OK button. 9 To confirm, click the OK button.
The Start page appears after the backup is completed. 10 Click Import Accountant’s Backup. 11 Click the Browse button to select the compressed (.zip) file with accountant’s
changes, and then click the OK button to import the backup data. 12 Click the OK button.
Exporting company data You can export your company data (customer, vendor, employee, and item records, and support lists) to an XML file for use in another program. Note You cannot export transactions. If you want to use your company data to create a new company with transactions, see “Importing data from a backup file,” in Chapter 1, “Installing and Setting Up.” You must have Owner, Office Manager, or Accountant access to export data. 1 Open the company file containing the data you want to export. 2 On the File menu, point to Utilities, and then click Export. 3 In the Export Data dialog box, click the Browse button, specify a path and a file
name for the XML file that will hold your exported company data, and then click the Save button.
4 Do one of the following: • Under Data to export, select one or more check boxes. • Click Select All.
5 Click Export. 6 To confirm, click OK. 7 To exit, click Close.

Part 2: Managing Your Company
76 Microsoft Office Small Business Accounting 2006

Microsoft Office Small Business Accounting 2006 77
Part 3: Selling to Customers
In this part Overview........................................................................................................................................78 Keyboard shortcuts ......................................................................................................................79
Chapter 9: Working with Customers ..................................................................81 Working with the Customers list ................................................................................................82 Creating a Customer record ........................................................................................................82 Editing a Customer record ..........................................................................................................84 Deleting a Customer record ........................................................................................................84 Working with Customer records ................................................................................................85
Chapter 10: Offering a Quote ............................................................................ 87 Working with the Quotes list ......................................................................................................87 Creating a quote ............................................................................................................................88 Editing a quote..............................................................................................................................89 Deleting a quote............................................................................................................................89 Working with quotes ....................................................................................................................90
Chapter 11: Taking a Sales Order .......................................................................91 Working with the Sales Orders list .............................................................................................91 Creating a sales order ...................................................................................................................92 Editing a sales order .....................................................................................................................93 Deleting a sales order ...................................................................................................................93 Working with sales orders ...........................................................................................................94
Chapter 12: Submitting an Invoice .................................................................... 95 Working with the Invoices list ....................................................................................................95 Creating an invoice .......................................................................................................................96 Editing an invoice.........................................................................................................................97 Voiding an invoice........................................................................................................................98 Working with invoices .................................................................................................................98

Part 3: Selling to Customers
78 Microsoft Office Small Business Accounting 2006
Chapter 13: Managing Payments ..................................................................... 101 Working with the Payments list ................................................................................................101 Receiving a payment...................................................................................................................102 Voiding a payment......................................................................................................................103 Working with customer payments............................................................................................103 Handling cash sales.....................................................................................................................103 Editing a cash sale form.............................................................................................................105 Voiding a cash sale form............................................................................................................105 Working with cash sale forms...................................................................................................105 Accepting credit card payments................................................................................................106 Adjusting payments ....................................................................................................................106 Editing a customer credit memo ..............................................................................................107 Voiding a customer credit memo .............................................................................................107 Working with customer credit memos.....................................................................................108 Handling customer exchanges, returns, and refunds .............................................................109
Chapter 14: Managing Jobs .............................................................................. 111 Working with the Jobs list .........................................................................................................113 Creating a job ..............................................................................................................................114 Editing a job ................................................................................................................................115 Deleting a job ..............................................................................................................................116 Working with jobs ......................................................................................................................116
Overview Microsoft Office Small Business Accounting 2006 helps you manage your customer sales by maintaining information about your customers and the items you sell. After you create a Customer record for each customer, either in the Startup Wizard or after you begin using Small Business Accounting, you can sell to that customer. After you create an Item record for each product or service item you sell, you can sell the items you purchase or produce. For information about items and inventory, see Chapter 16, “Setting Up Product and Service Items.” If you use jobs, and you have selected the Use job check box in Company Preferences, you can create Job records to track information related to jobs. For information about jobs, see Chapter 14, “Managing Jobs.” The Customers home page includes a task flow that guides you through all the tasks related to customers and receivables. Each task, or type of transaction, is recorded on a particular form, and you can find any record or form in a list, which you can open from the Find pane.

Keyboard shortcuts
Microsoft Office Small Business Accounting 2006 79
You can begin a sale in one of three ways: • To propose a sale, create a quote. Later, you can convert the quote to either a sales
order or an invoice. • If the products or services will not be delivered immediately, create a sales order
instead. Later, you can convert the sales order to an invoice. • When the customer agrees to terms, and the products or services are available,
create an invoice. You can send a quote, a sales order, or an invoice to a customer in an e-mail message or export it to a Microsoft Office Word document and send it. If you sell items to a customer with instant payment, you can create a cash sale form to record the transaction. You can also print customer statements to send to customers and write form letters for mass mailings. When the payment arrives, you receive the payment. If the customer is due money, you can create a customer credit memo and either refund the payment or apply it to an invoice. If a customer payment is late, you can apply a finance charge. The Customers and Receivables reports track customer transactions, including amounts owed to your company and payments received, and the level of profit by customer. For information about reports, see Chapter 27, “Keeping Track of Company Data.”
Keyboard shortcuts You can use keyboard shortcuts to streamline your work in Small Business Accounting. To open the Customers home page, click the Customers button in the Navigation Pane. The following table lists the keyboard shortcuts available from the Customers home page, in lists, in records, and on forms. Keyboard shortcuts are not available in dialog boxes or wizards. Note If a shortcut contains more than one key, press and hold a key, and then press the next key.
To Press
Open the Help table of contents F1
Get Help for the current page ALT+F1
Open the Customers home page CTRL+2
Open the Customers list CTRL+SHIFT+C
Open the Jobs list CTRL+SHIFT+J
Open the Items list CTRL+SHIFT+U
Open the Quotes list CTRL+SHIFT+Q
Open the Sales Orders list CTRL+SHIFT+S

Part 3: Selling to Customers
80 Microsoft Office Small Business Accounting 2006
To Press
Open the Invoices list CTRL+SHIFT+I
Open the Payments list CTRL+SHIFT+M
In a list, you can use the following keyboard shortcuts.
To Press
Create a new record CTRL+N
Add or remove the Find toolbar CTRL+F
Open selected records CTRL+O
Delete a record CTRL+D or DELETE
Add or remove content F7
Preview the printed list CTRL+F2
Print the list CTRL+P
On Customer forms, you can use the following keyboard shortcuts.
To Press
Create a new form CTRL+N
Close the form ESC or ALT+F4

Microsoft Office Small Business Accounting 2006 81
Chapter 9: Working with Customers
When you install and set up Microsoft Office Small Business Accounting 2006, you enter your customer information in the Startup Wizard. You can enter contact information and custom information you define to create a Customer record. After you begin to use Small Business Accounting, you can add more Customer records as needed. You can find all your Customer records in a list, where you can work with them in several ways or open them to do other tasks. You can also edit Customer records, inactivate them, or delete them. You can perform all the tasks related to customers and sales from the Customers home page. To open the Customers home page, click the Customers button in the Navigation Pane.
For a detailed description of the Customers home page, see “Making Sales to Customers,” in Chapter 2, “Taking a Tour.” If you need further information, help is always available. To open the Help table of contents, press F1. On forms, click the Help button on the toolbar. To get Help for the current page, press ALT+F1. In dialog boxes and wizards, click the Help button.
Customers home page: CTRL+2
Help: F1

Part 3: Selling to Customers
82 Microsoft Office Small Business Accounting 2006
Working with the Customers list The Customers list contains your Customer records. To view the Customers list: 1 In the Navigation Pane, click Customers. 2 Under Find, click Customers.
The following table contains basic tasks you can do with the Customers list.
To Do this
View Customer records by status
Click the arrow next to the Current View field, and then select Active, Inactive, or All.
Add or remove customer numbers
1 On the Company menu, click Preferences, and then click the Customers tab.
2 Select or clear the Use customer ID check box. Sort the list Click a column title to switch between ascending and descending
order. An arrow indicates the sort order. Add, remove, or reorganize content
On the View menu, click Add or Remove Content.
Resize column width Click the column divider next to the column heading and drag it to a new width.
Change the column order
Select a column title and drag it to a new position.
Find a Customer record 1 On the toolbar, click the Find button. 2 Enter a keyword to look for and a column title to search under,
and then click the Find button. Open selected records 1 Select one or more (up to 10) records in the list.
2 On the File menu, click Open Selected Items. Print the Customers list On the toolbar, click the Print button . Export the Customers list to a Microsoft Office Excel spreadsheet
On the toolbar, click the Export to Excel button .
Creating a Customer record If you did not create a Customer record by using the Startup Wizard, you can follow this procedure. If you have a customer who is also a vendor, you must create both a Customer and a Vendor record, so that transactions can be recorded properly. 1 In the Navigation Pane, click Customers. 2 Under Start a Task, click New Customer.
Customers list: CTRL+ SHIFT+C
Open: CTRL+O
Print: CTRL+P
New customer: CTRL+N
Find: CTRL+F
Add or remove content: F7

Creating a Customer record
Microsoft Office Small Business Accounting 2006 83
3 (Required) In the Customer name field, type the customer’s name. 4 Enter information in the other fields on the General tab. 5 (Required) On the Details tab, click the arrow next to the Tax group field, and
then select or add a sales tax group. 6 Enter information in the other fields on the Details tab. 7 You can add or remove custom fields that appear on all new Customer forms and
saved Customer records. Click the Custom Fields tab, and then click the Customize button at the bottom of the page. All users can see custom fields. Caution When you remove a custom field, the field and any information saved in it is removed from all saved Customer records.
8 When you are done, do one of the following: • On the toolbar, click the Save and Close button. • To save the Customer record and create another Customer record, click the
Save and New button. You can do the following additional tasks when you create a Customer record.
To Do this
Change the customer ID On the General tab, type a number or a text identifier in the Customer ID field. Note If you selected Use customer ID in Company Preferences, Small Business Accounting adds a sequential number to each Customer record you create. You cannot enter a duplicate customer ID.

Part 3: Selling to Customers
84 Microsoft Office Small Business Accounting 2006
To Do this
Link one or more files to the Customer form
1 On the General tab, at the bottom of the Customer form, click the Add links button.
2 Navigate to the file location, select the file, and then click Open.
Note To unlink, select the file name, and then press DELETE.
Select a primary contact, whose contact information appears on transaction forms
On the General tab, if you enter more than one contact, click the Primary column in the line for the primary contact.
Adjust the unit prices of all items on sales forms
On the Details tab, click the arrow next to the Price level field, and then select or add a price level. Note See “Set price levels,” in “Working with Customer records,” on page 85.
Group customers On the Details tab, click the arrow next to the Customer group field, and then select or add a customer group.
What if . . . I want to create a Customer record for a tax-exempt customer? You can specify that a customer is always exempt from taxes and identify the reason for the exemption in case of an audit. For each type of tax exemption, create a sales tax group, and then select it in the Tax group field on the Details tab of the Customer record.
Editing a Customer record If you want to change the information in a Customer record, you can edit it. 1 In the Customers list, double-click the record. 2 Enter the information on the Customer form. 3 When you are done, click the Save and Close button on the toolbar.
Deleting a Customer record If you will not be doing business with a customer, you can delete the Customer record, provided that you have not done any business with the customer, and the customer has no financial history. You cannot retrieve a deleted Customer record. If the record has associated transactions, you can change its status to Inactive. 1 In the Customers list, double-click the record. 2 On the toolbar, click the Delete button . 3 To confirm, click the Yes button.
Working with Customer records
Microsoft Office Small Business Accounting 2006 85
Working with Customer records The following table contains additional tasks you can do with Customer records.
To Do this
Change the status of one or more customers
In the Customers list, select one or more Customer records, and then click Make Active or Make Inactive on the Edit menu. Note A record with Inactive status does not appear in lists in dialog boxes, forms, and wizards, but you can still find it in the Customers list Inactive or All view.
Merge duplicate Customer records
1 On the Company menu, point to Merge Accounts, and then click Merge Customers.
2 In the Merge Customers dialog box, click the arrow next to the Merge from customer field and select a record to merge. Caution This record will be deleted after it is incorporated into the other record.
3 Click the arrow next to the Merge to customer field and select a record to merge into.
Send an e-mail message to a customer
In the Customers list, select a Customer record, and then click the E-mail button on the toolbar.
Send a form letter to customers
On the Customers menu, click Write Letters.
See a summary of all the customer’s transactions
1 In the Customers list, double-click the Customer record. 2 Click the Financial Summary tab.
See the history of all the customer’s transactions
1 In the Customers list, double-click the Customer record. 2 Click the Financial History tab.
Set price levels On the Customers menu, click Price Levels. Print a single customer statement
1 In the Customers list, double-click the Customer record. 2 On the Actions menu, point to Generate Customer
Statement, and then click Print. Print multiple customer statements
On the Customers menu, click Create Statement.
Work with a Microsoft Office Word template
On the Company menu, click Manage Word Templates.
Export a customer statement to Word
1 In the Customers list, double-click the Customer record. 2 On the Actions menu, click Generate Customer Statement,
and then click Export to Word. Access customer services
Before you begin, make sure you have an active Internet connection. On the Customers menu, point to Customer Services, and then click the appropriate command.

Part 3: Selling to Customers
86 Microsoft Office Small Business Accounting 2006
To Do this
Share Customer records with Microsoft Office Outlook 2003 with Business Contact Manager Update
If you use both Small Business Accounting and Business Contact Manager for Outlook, you can share and link customer information. See Help in Business Contact Manager for Outlook.

Microsoft Office Small Business Accounting 2006 87
Chapter 10: Offering a Quote
A quote is a proposed sales agreement between a company and a customer. It contains contact information for the customer and lists the products and services being offered. It also contains delivery and expiration dates, payment terms, and prices.
Working with the Quotes list The Quotes list contains all your company’s quotes. To view the Quotes list: 1 In the Navigation Pane, click Customers. 2 Under Find, click Quotes. The following table contains basic tasks you can do with the Quotes list.
To Do this
View quotes by status Click the arrow next to the Current View field, and then select Open, Rejected, Accepted, Expired, or All.
Sort the list Click a column title to switch between ascending and descending order. An arrow indicates the sort order.
Add, remove, or reorganize content
On the View menu, click Add or Remove Content.
Resize column width Click the column divider next to the column heading and drag it to a new width.
Change the column order
Select a column title and drag it to a new position.
Find a quote 1 On the toolbar, click the Find button. 2 Enter a keyword to look for and a column title to search under,
and then click the Find button. Open selected quotes 1 Select one or more (up to 10) quotes in the list.
2 On the File menu, click Open Selected Items. Print the Quotes list On the toolbar, click the Print button . Print selected quotes 1 Select one or more quotes in the list.
2 On the toolbar, click the Print button . Export the Quotes list to a Microsoft Office Excel spreadsheet
On the toolbar, click the Export to Excel button .
Open: CTRL+O
Find: CTRL+F
Quotes list: CTRL+ SHIFT+Q
Print: CTRL+P
Add or remove content: F7

Part 3: Selling to Customers
88 Microsoft Office Small Business Accounting 2006
Creating a quote You can create a quote for any customer with Active status. Tip To create a quote that is similar to an existing one, open the quote, and then click Copy and Edit on the File menu. 1 In the Navigation Pane, click Customers. 2 Under Start a Task, click New Quote.
3 (Required) Click the arrow next to the Customer name field, and then select a name from the list or add a new customer.
4 Enter the information in the other fields on the quote. To add a line item, click the first column of the first open line, and then select a line item type: Item, Comment, Sales Tax, or Account. Note To delete a line item, click the column to the left of the icon. An arrow appears, and the line is highlighted. Press DELETE.
5 When you are done, do one of the following: • On the toolbar, click the Save and Close button. • To save the quote and create a new quote, click the Save and New button.

Editing a quote
Microsoft Office Small Business Accounting 2006 89
You can do the following additional tasks when you create a quote.
To Do this
Create a quote for a fixed fee job or a time and materials job
Click the arrow next to the Job name field, and then select a job from the list or add a new job.
Enter a date for the quote to expire
Click the arrow next to the Expiration date field, and then select a date from the list or add a new date.
Have expired quotes appear in Today’s Reminders
Enter a date in the Expiration date field, and select the Expired quotes reminder on the Company home page.
Group quotes by class Click the arrow next to the Class field, and then select a class from the list or add a new class, for example, for a department.
Add a reference In the Reference field, type the reference information, for example, a customer purchase order number.
Link one or more files to the quote
1 At the bottom of the quote, click the Add links button. 2 Navigate to the file location, select the file, and then click Open. Note To unlink, select the file name, and then press DELETE.
Editing a quote Before a quote has been accepted, or after it has been rejected, if the customer changes the order or you need to correct an error, you can edit it. 1 In the Quotes list, double-click the quote. 2 Enter the information on the quote. 3 When you are done, click the Save and Close button on the toolbar.
Deleting a quote A quote is not posted; it does not affect accounting, so if it has not been accepted and it has not been converted to a sales order or an invoice, you can delete it. You can also delete a rejected quote, but you might want to keep it for reporting. You cannot retrieve a deleted quote. 1 In the Quotes list, double-click the quote. 2 On the toolbar, click the Delete button . 3 To confirm, click the Yes button.
Company home page: CTRL+1

Part 3: Selling to Customers
90 Microsoft Office Small Business Accounting 2006
Working with quotes The following table contains additional tasks you can do with quotes.
To Do this
Change a quantity or a price
1 In the Quotes list, double-click the quote. 2 In the Qty., Markup, Unit Price, or Line Total column, type
a new value. Discount a line item 1 In the Quotes list, double-click the quote.
2 In the Discount column for the line item, type either a percentage or a dollar amount preceded by a dollar sign ($).
Discount the entire order
1 In the Quotes list, double-click the quote. 2 Click the first column of the first open line, and then select
Account. 3 Click the Name column, click the arrow in the column, and
then select an account from the list or add a new account. 4 In the Unit Price column, type the amount of the discount. 5 In the Qty. column, type -1.
Indicate when items are delivered
1 In the Quotes list, double-click the quote. 2 Click the arrow next to the Delivery Date field, and then
select a date from the calendar. Work with a Microsoft Office Word template
On the Company menu, click Manage Word Templates.
Send the quote in an e-mail message to a customer
In the Quotes list, select the quote, and then click the E-mail button on the toolbar.
Export the quote to Word
In the Quotes list, double-click the quote, and then click the Export to Word button on the toolbar.
Create a quote from Microsoft Office Outlook 2003 with Business Contact Manager Update
See Help in Business Contact Manager for Outlook.
Handle an accepted quote
1 In the Quotes list, double-click the quote. 2 On the toolbar, click the Convert to button, and then select a
form to convert to: a sales order, an invoice, or a progress invoice.
Handle a rejected quote 1 In the Quotes list, double-click the quote. 2 You can add an internal memo that tells if the customer or you
rejected the quote and why. At the bottom of the quote, type text in the Memo field.
3 On the toolbar, click the Reject button.

Microsoft Office Small Business Accounting 2006 91
Chapter 11: Taking a Sales Order
A sales order settles an agreement between a company and a customer. You can use it when a customer orders products or services that are not available or will not be delivered immediately. Service-based companies can use sales orders as internal work orders. You cannot create a sales order for a job.
Working with the Sales Orders list The Sales Orders list contains all your company’s sales orders. To view the Sales Orders list: 1 In the Navigation Pane, click Customers. 2 Under Find, click Sales Orders. The following table contains basic tasks you can do with the Sales Orders list.
To Do this
View sales orders by status
Click the arrow next to the Current View field, and then select Open, Fully Invoiced, or All.
Sort the list Click a column title to switch between ascending and descending order. An arrow indicates the sort order.
Add, remove, or reorganize content
On the View menu, click Add or Remove Content.
Resize column width Click the column divider next to the column heading and drag it to a new width.
Change the column order
Select a column title and drag it to a new position.
Find a sales order 1 On the toolbar, click the Find button. 2 Enter a keyword to look for and a column title to search under,
and then click the Find button. Open selected sales orders
1 Select one or more (up to 10) sales orders in the list. 2 On the File menu, click Open Selected Items.
Print the Sales Orders list
On the toolbar, click the Print button .
Print selected sales orders
1 Select one or more sales orders in the list. 2 On the toolbar, click the Print button .
Export the Sales Orders list to a Microsoft Office Excel spreadsheet
On the toolbar, click the Export to Excel button .
Find: CTRL+F
Sales Orders list: CTRL+ SHIFT+S
Open: CTRL+O
Print: CTRL+P
Add or remove content: F7

Part 3: Selling to Customers
92 Microsoft Office Small Business Accounting 2006
Creating a sales order You can create a sales order for any customer with Active status. If you selected that your company sells products in Company Preferences, a sales order has shipping information and, for inventory items, the quantity on hand and on back order. Tip To create a sales order that is similar to an existing one, open the sales order, and then click Copy and Edit on the File menu. 1 In the Navigation Pane, click Customers. 2 Under Start a Task, click New Sales Order.
Note You can create a sales order from a quote. On the toolbar, click the Create from button, and then select the quote.
3 (Required) Click the arrow next to the Customer name field, and then select a name from the list or add a new customer.
4 Enter the information in the other fields on the sales order. To add a line item, click the first column of the first open line, and then select a line item type: Item, Comment, Sales Tax, or Account. Note To delete a line item, click the column to the left of the icon. An arrow appears, and the line is highlighted. Press DELETE.
5 When you are done, do one of the following: • On the toolbar, click the Save and Close button. • To save the sales order and create a new sales order, click the Save and New
button.

Editing a sales order
Microsoft Office Small Business Accounting 2006 93
You can do the following additional tasks when you create a sales order.
To Do this
Change the sales order template from the form type selected in Company Preferences
On the Actions menu, point to Select Template, and then click Service or Product. Note The product template includes the Shipping terms and Shipping method fields and the Back Order column.
Change the shipping terms from those selected in Company Preferences
Click the arrow next to the Shipping terms field, and then select shipping terms from the list or add new shipping terms. Note This field only appears on the product template.
Group sales orders by class
Click the arrow next to the Class field, and then select a class from the list or add a new class, for example, for a department.
Add a reference In the Reference field, type the reference information, for example, a customer purchase order number.
Link one or more files to the sales order
1 At the bottom of the sales order, click the Add links button. 2 Navigate to the file location, select the file, and then click Open. Note To unlink, select the file name, and then press DELETE.
Create a sales order from Microsoft Office Outlook 2003 with Business Contact Manager Update
See Help in Business Contact Manager for Outlook.
Editing a sales order If the customer changes the order or you need to correct an error, you can edit a sales order. 1 In the Sales Orders list, double-click the sales order. 2 Enter the information on the sales order. 3 When you are done, click the Save and Close button on the toolbar.
Deleting a sales order A sales order is not posted; it does not affect accounting or reserve inventory, so if a sales order has not been accepted and it has not been converted to a sales order or an invoice, you can delete it. You can also delete a rejected sales order, but you might want to keep it for reporting. You cannot retrieve a deleted sales order. 1 In the Sales Orders list, double-click the sales order. 2 On the toolbar, click the Delete button . 3 To confirm, click the Yes button.

Part 3: Selling to Customers
94 Microsoft Office Small Business Accounting 2006
Working with sales orders The following table contains additional tasks you can do with sales orders.
To Do this
Change a quantity or a price
1 In the Sales Orders list, double-click the sales order. 2 In the Qty., Unit Price, or Line Total column, type a new
value. Discount a line item 1 In the Sales Orders list, double-click the sales order.
2 In the Discount column for the line item, type either a percentage or a dollar amount preceded by a dollar sign ($).
Discount the entire order
1 In the Sales Orders list, double-click the sales order. 2 Click the first column of the first open line, and then select
Account. 3 Click the Name column, click the arrow in the column, and
then select an account from the list or add a new account. 4 In the Unit Price column, type the amount of the discount. 5 In the Qty. column, type -1.
Have back orders and sales orders ready for invoicing appear in Today’s Reminders
Select the Back Orders and Sales Orders Ready for Invoicing reminders on the Company home page.
Work with a Microsoft Office Word template
On the Company menu, click Manage Word Templates.
Send a sales order in an e-mail message to a customer
In the Sales Orders list, select the sales order, and then click the E-mail button on the toolbar.
Export a sales order to Word
In the Sales Orders list, double-click the sales order, and then click the Export to Word button on the toolbar.
Create an invoice for a sales order
1 In the Sales Orders list, double-click the sales order. 2 On the toolbar, click the Create Invoice button. Note The sales order status tells if it has been partially or fully invoiced.
Manage a back order Do one of the following, if the customer agrees: • Lower the quantity. • Send the available items, create a partial invoice, and send the
remaining items when you can.
Company home page: CTRL+1

Microsoft Office Small Business Accounting 2006 95
Chapter 12: Submitting an Invoice
An invoice is a bill to the customer for the products and services that are being sold.
Working with the Invoices list The Invoices list contains all the invoices, cash sale forms, customer credit memos, and finance charges from your company. To view the Invoices list: 1 In the Navigation Pane, click Customers. 2 Under Find, click Invoices. The following table contains basic tasks you can do with the Invoices list.
To Do this
View forms by status Click the arrow next to the Current View field, and then select Open, Overdue, Voided, or All.
Sort the list Click a column title to switch between ascending and descending order. An arrow indicates the sort order.
Add, remove, or reorganize content
On the View menu, click Add or Remove Content.
Resize column width Click the column divider next to the column heading and drag it to a new width.
Change the column order
Select a column title and drag it to a new position.
Find an invoice, a cash sale form, a customer credit memo, or a finance charge
1 On the toolbar, click the Find button. 2 Enter a keyword to look for and a column title to search under,
and then click the Find button.
Open selected forms 1 Select one or more (up to 10) forms in the list. 2 On the File menu, click Open Selected Items.
Print the Invoices list On the toolbar, click the Print button . Print selected forms 1 Select one or more forms in the list.
2 On the toolbar, click the Print button . Export the Invoices list to a Microsoft Office Excel spreadsheet
On the toolbar, click the Export to Excel button .
Invoices list: CTRL+ SHIFT+I
Find: CTRL+F
Open: CTRL+O
Print: CTRL+P
Add or remove content: F7

Part 3: Selling to Customers
96 Microsoft Office Small Business Accounting 2006
Creating an invoice You can create an invoice for any customer with Active status. Tip To create an invoice that is similar to an existing one, open the invoice, and then click Copy and Edit on the File menu. 1 In the Navigation Pane, click Customers. 2 Under Start a Task, click New Invoice.
Note You can create an invoice from a quote or a sales order. On the toolbar, click the Create from button, and then select the quote or the sales order.
3 (Required) Click the arrow next to the Customer name field, and then select a name from the list or add a new customer.
4 Enter the information in the other fields on the invoice. To add a line item, click the first column of the first open line, and then select a line item type: Item, Comment, Sales Tax, or Account. Note To delete a line item, click the column to the left of the icon. An arrow appears, and the line is highlighted. Press DELETE.
5 When you are done, do one of the following: • On the toolbar, click the Save and Close button. • To save the invoice and create a new invoice, click the Save and New button.

Editing an invoice
Microsoft Office Small Business Accounting 2006 97
You can do the following additional tasks when you create an invoice.
To Do this
Create an invoice for a fixed fee job or a time and materials job
Click the arrow next to the Job name field, and then select a job from the list or add a new job.
Change the shipping terms from the default selected in Company Preferences
Click the arrow next to the Shipping terms field, and then select shipping terms from the list or add new shipping terms. Note This field only appears on the product template.
Change the due date for the invoice
Click the arrow next to the Due date field, and then select a date from the calendar. Note The date is set for 30 days from the current date.
Group invoices by class Click the arrow next to the Class field, and then select a class from the list or add a new class, for example, for a department.
Add a reference In the Reference field, type the reference information, for example, a customer purchase order number.
Link one or more files to the invoice
1 At the bottom of the invoice, click the Add links button. 2 Navigate to the file location, select the file, and then click
Open. Note To unlink, select the file name, and then press DELETE.
Create a partial invoice For a back order or a partial order, type the quantity that you provided in the Qty. column.
Create an invoice from Microsoft Office Outlook 2003 with Business Contact Manager Update
See Help in Business Contact Manager for Outlook.
Editing an invoice If the customer changes the order or you need to correct an error, you can edit it. Microsoft Office Small Business Accounting 2006 keeps an audit trail of the original invoice and the edited invoice. 1 In the Invoices list, double-click the invoice. 2 On the toolbar, click the Edit button. 3 Enter the information on the invoice. 4 When you are done, click the Save and Close button on the toolbar.

Part 3: Selling to Customers
98 Microsoft Office Small Business Accounting 2006
Voiding an invoice When you save an invoice, it is posted. Because an invoice affects accounting, you cannot delete it. If you need to redo an invoice, you can either edit it or void it. The only way to work with a voided invoice is to copy and edit it. 1 In the Invoices list, double-click the invoice. 2 On the Actions menu, click Void. 3 To confirm, click the Yes button. Note Do not send a voided invoice in an e-mail message; the Void stamp disappears. Instead, insert the invoice as an attachment.
Working with invoices The following table contains additional tasks you can do with invoices.
To Do this
Add job costs 1 In the Invoices list, double-click the invoice. 2 On the toolbar, click the Edit button. 3 On the toolbar, click the Job Costs button.
Change a quantity or a price
1 In the Invoices list, double-click the invoice. 2 On the toolbar, click the Edit button. 3 In the Qty., Unit Price, or Line Total column, type a new
value. Discount a line item 1 In the Invoices list, double-click the invoice.
2 On the toolbar, click the Edit button. 3 In the Discount column, type either a percentage or a dollar
amount preceded by a dollar sign ($). Discount the entire order
1 In the Invoices list, double-click the invoice. 2 On the toolbar, click the Edit button. 3 Click the first column of the first open line, and then select
Account. 4 Click the Name column, click the arrow in the column, and
then select an account from the list or add a new account. 5 In the Unit Price column, type the amount of the discount. 6 In the Qty. column, type -1.
Have overdue invoices appear in Today’s Reminders
Select the Overdue Invoices reminder on the Company home page.
Send a invoice in an e-mail message to a customer
In the Invoices list, select the invoice, and then click the E-mail button on the toolbar.
Company home page: CTRL+1

Working with invoices
Microsoft Office Small Business Accounting 2006 99
To Do this
Work with a Microsoft Office Word template
On the Company menu, click Manage Word Templates.
Export an invoice to Word
In the Invoices list, double-click the invoice, and then click the Export to Word button on the toolbar.
Print a packing slip 1 In the Invoices list, double-click the invoice. 2 On the Actions menu, click Print Packaging Slip.
Drop ship an order 1 Create a purchase order for the items. For information, see Chapter 17, “Placing an Order.”
2 In the Ship To field, type the customer’s address. When you send the purchase order in an e-mail message or export it to Word, your address appears at the bottom.
3 When you enter the vendor bill, create an invoice. Apply a finance charge to late and unpaid invoices
1 On the Customers tab of Company Preferences, enter finance charge information.
2 Because a finance charge is calculated for all open invoices, apply all payments and customer credits to invoices before you apply a finance charge.
3 On the Customers menu, click Finance Charge.

Part 3: Selling to Customers
100 Microsoft Office Small Business Accounting 2006

Microsoft Office Small Business Accounting 2006 101
Chapter 13: Managing Payments
When a customer sends you a payment, you receive the customer payment. You can then apply the payment to the invoice or invoices that are due for payment. You select the invoice or invoices to pay, and you select the amount to apply to each invoice. If the customer has a customer credit memo, you can apply it to an invoice. If a payment is not received by the due date on the invoice, you can apply a finance charge. If you cannot collect a payment that is due to you, you can write off a portion or all of the customer’s balance as a bad debt.
Working with the Payments list The Payments list contains all your company’s customer payments. To view the Payments list: 1 In the Navigation Pane, click Customers. 2 Under Find, click Payments. The following table contains basic tasks you can do with the Payments list.
To Do this
View payments by status Click the arrow next to the Current View field, and then select All, Open, Fully Applied, or Voided.
Sort the list Click a column title to switch between ascending and descending order. An arrow indicates the sort order.
Add, remove, or reorganize content
On the View menu, click Add or Remove Content.
Resize column width Click the column divider next to the column heading and drag it to a new width.
Change the column order
Select a column title and drag it to a new position.
Find a payment 1 On the toolbar, click the Find button. 2 Enter a keyword to look for and a column title to search under,
and then click the Find button. Open selected payments 1 Select one or more (up to 10) payments in the list.
2 On the File menu, click Open Selected Items. Print the Payments list On the toolbar, click the Print button . Export the Payments list to a Microsoft Office Excel spreadsheet
On the toolbar, click the Export to Excel button .
Open: CTRL+O
Find: CTRL+F
Payments list: CTRL+ SHIFT+M
Print: CTRL+P
Add or remove content: F7

Part 3: Selling to Customers
102 Microsoft Office Small Business Accounting 2006
Receiving a payment When you receive a payment from a customer, you can apply it to any unpaid invoices. 1 On the Customers menu, click Receive Payment.
2 (Required) Click the arrow next to the Received from field, and then select a name from the list or add a new customer. The unpaid or partially paid invoices that are due for payment appear.
3 In the Amount field, type the amount that the customer paid. If a message asks if you want to distribute the payment to the outstanding invoices: • To apply the payment to the first invoice in the list, click the Yes button. • To select one or more invoices to apply the payment to, click the No button
and select the appropriate check box or check boxes. 4 (Required) Click the arrow next to the Payment method field, and then select the
method that the customer used to make the payment. 5 When you are done, do one of the following:
• On the toolbar, click the Save and Close button. • To save the customer payment and create a new customer payment, click the
Save and New button.
Voiding a payment
Microsoft Office Small Business Accounting 2006 103
Voiding a payment When you save a customer payment, it is posted. Because a customer payment affects accounting, you cannot delete it. If you need to redo a customer payment, you can void it. The only way to work with a voided customer payment is to copy and edit it. 1 In the Payments list, double-click the customer payment. 2 On the Actions menu, click Void. 3 To confirm, click the Yes button.
Working with customer payments The following table contains additional tasks you can do with customer payments.
To Do this
Handle a customer prepayment
1 Receive the payment without applying it to an invoice. 2 When you receive the order, if you do not have an invoice,
create an invoice. 3 To open the invoice, double-click it in the Invoices list. 4 On the toolbar, click the Receive Payment button. 5 On the Customer Payment form, make sure that the Apply
check box in the line for the invoice is selected. 6 In the line for the invoice, click the Credits button. 7 Select the check box next to the prepayment in the Apply
Credits and Payments dialog box, and then click the Adjust button.
8 Print a customer statement showing that the payment has been applied to the invoice, and send it to the customer along with the invoice.
Write off an amount from a customer as a bad debt
1 In the Customers list, double-click the Customer record. 2 On the Actions menu, click Write Off.
Write off a payment from a customer as a bad debt
1 In the Payments list, double-click the customer payment. 2 In the Apply column for the payment, select the check box. 3 In the Write Off column, type the amount to write off.
Handling cash sales When you make a cash sale to a customer, you can create a cash sale form. Cash sale forms follow the same format as invoices, and you can find all cash sale forms in the Invoices list. Tip To create a cash sale form that is similar to an existing one, open the cash sale form, and then click Copy and Edit on the File menu.
Invoices list: CTRL+ SHIFT+I
Customers list: CTRL+ SHIFT+C

Part 3: Selling to Customers
104 Microsoft Office Small Business Accounting 2006
1 In the Navigation Pane, click Customers. 2 Under Start a Task, click New Cash Sale. 3 (Required) Click the arrow next to the Customer name field, and then select a
name from the list or add a new customer. 4 Enter the information in the other fields on the cash sale form. To add a line item,
click the first column of the first open line, and then select a line item type: Item, Comment, Sales Tax, or Account. Note To delete a line item, click the column to the left of the icon. An arrow appears, and the line is highlighted. Press DELETE.
5 When you are done, do one of the following: • On the toolbar, click the Save and Close button. • To save the cash sale form and create a new cash sale form, click the Save
and New button. You can do the following additional tasks when you create a cash sale form.
To Do this
Change the cash sale form template from the form type selected in Company Preferences
On the Actions menu, point to Select Template, and then click Service or Product. Note The product template includes the Shipping terms and Shipping method fields.
Create a cash sale form for a fixed fee job or a time and materials job
Click the arrow next to the Job name field, and then select a job from the list or add a new job.
Select a deposit account
Click the arrow next to the Deposit in field, and then select an account from the list or add a new account. Note The default account is Undeposited Funds.
Change the shipping terms from those selected in Company Preferences
Click the arrow next to the Shipping terms field, and then select shipping terms from the list or add new shipping terms.
Group cash sale forms by class
Click the arrow next to the Class field, and then select a class from the list or add a new class, for example, for a department.
Add a reference In the Reference field, type the reference information, for example, a customer purchase order number.
Link one or more files to the cash sale form
1 At the bottom of the cash sale form, click the Add links button.
2 Navigate to the file location, select the file, and then click Open. Note To unlink, select the file name, and then press DELETE.

Editing a cash sale form
Microsoft Office Small Business Accounting 2006 105
Editing a cash sale form If the customer changes the order or you need to correct an error, you can edit it. 1 In the Invoices list, double-click the cash sale form. 2 On the toolbar, click the Edit button. 3 Enter the information on the cash sale form. 4 When you are done, click the Save and Close button on the toolbar.
Voiding a cash sale form When you save a cash sale form, it is posted. Because a cash sale form affects accounting, you cannot delete it. If you need to redo a cash sale form, you can either edit it or void it and then copy and edit it. The only way to work with a voided cash sale form is to copy and edit it. 1 In the Invoices list, double-click the cash sale form. 2 On the Actions menu, click Void. 3 To confirm, click the Yes button.
Working with cash sale forms The following table contains additional tasks you can do with cash sale forms.
To Do this
Change a quantity or a price
1 In the Invoices list, double-click the cash sale form. 2 In the Qty., Unit Price, or Line Total column, type a new
value. Discount a line item 1 In the Invoices list, double-click the cash sale form.
2 In the Discount column, type either a percentage or a dollar amount preceded by a dollar sign ($).
Discount the entire order
1 In the Invoices list, double-click the cash sale form. 2 Click the first column of the first open line, and then select
Account. 3 Click the Name column, click the arrow in the column, and
then select an account for the discount or add a new account. 4 In the Unit Price column, type the amount of the discount. 5 In the Qty. column, type -1.
Send a cash sale form in an e-mail message to a customer
In the Invoices list, select the cash sale form, and then click the E-mail button on the toolbar.
Export a cash sale form to Word
In the Invoices list, double-click the cash sale form, and then click the Export to Word button on the toolbar.

Part 3: Selling to Customers
106 Microsoft Office Small Business Accounting 2006
Accepting credit card payments You can offer your customers the convenience of using credit cards to pay for the products and services you sell. When you sign up for credit card processing, you can verify that the credit card is valid and is authorized to fund the amount. You can also deposit the payment faster with online banking. To sign up for credit card processing or to manage credit card processing: 1 Make sure you have an active Internet connection. 2 On the Customers menu, point to Credit Card Processing, and then click one
of the following: • Sign Up for Credit Card Processing • Manage Credit Card Processing
Adjusting payments If you need to adjust a payment, you can create a customer credit memo. Customer credit memos follow the same format as invoices, and you can find all customer credit memos in the Invoices list. Tip To create a customer credit memo that is similar to an existing one, open the customer credit memo, and then click Copy and Edit on the File menu. 1 In the Navigation Pane, click Customers. 2 Under Start a Task, click New Credit Memo.
Note You can create a customer credit memo from an invoice. On the toolbar, click the Create from button, and then select the invoice.
3 (Required) Click the arrow next to the Customer name field, and then select a name from the list or add a new customer.
4 Enter the information in the other fields on the customer credit memo. To add a line item, click the first column of the first open line, and then select a line item type: Item, Comment, Sales Tax, or Account. Note To delete a line item, click the column to the left of the icon. An arrow appears, and the line is highlighted. Press DELETE.
5 When you are done, do one of the following: • On the toolbar, click the Save and Close button. • To save the customer credit memo and create a new customer credit memo,
click the Save and New button.

Editing a customer credit memo
Microsoft Office Small Business Accounting 2006 107
You can do the following additional tasks when you create a customer credit memo.
To Do this
Create a customer credit memo for a fixed fee job or a time and materials job
Click the arrow next to the Job name field, and then select a job from the list or add a new job.
Group customer credit memos by class
Click the arrow next to the Class field, and then select a class from the list or add a new class, for example, for a department.
Add a reference In the Reference field, type the reference information, for example, a customer purchase order number.
Link one or more files to the customer credit memo
1 At the bottom of the customer credit memo, click the Add links button.
2 Navigate to the file location, select the file, and then click Open. Note To unlink, select the file name, and then press DELETE.
Editing a customer credit memo If the customer changes the order or you need to correct an error, you can edit it. 1 In the Invoices list, double-click the customer credit memo. 2 On the toolbar, click the Edit button. 3 Enter the information on the customer credit memo. 4 When you are done, click the Save and Close button on the toolbar.
Voiding a customer credit memo When you save a customer credit memo, it is posted, so it cannot be deleted. You can edit it or void it and then copy and edit it. The only way to work with a voided customer credit memo is to copy and edit it. 1 In the Invoices list, double-click the customer credit memo. 2 On the Actions menu, click Void. 3 To confirm, click the Yes button.

Part 3: Selling to Customers
108 Microsoft Office Small Business Accounting 2006
Working with customer credit memos The following table contains additional tasks you can do with customer credit memos.
To Do this
Add job costs 1 In the Invoices list, double-click the customer credit memo. 2 On the toolbar, click the Job Costs button.
Change a quantity or a price
1 In the Invoices list, double-click the customer credit memo. 2 In the Qty., Unit Price, or Line Total column, type a new
value. Discount a line item 1 In the Invoices list, double-click the customer credit memo.
2 In the Discount column, type either a percentage or a dollar amount preceded by a dollar sign ($).
Discount the entire order
1 In the Invoices list, double-click the customer credit memo. 2 Click the first column of the first open line, and then select
Account. 3 Click the Name column, click the arrow in the column, and
then select an account for the discount or add a new account. 4 In the Unit Price column, type the amount of the discount. 5 In the Qty. column, type -1.
Work with a Microsoft Office Word template
On the Company menu, click Manage Word Templates.
Send a customer credit memo in an e-mail message to a customer
In the Invoices list, select the customer credit memo, and then click the E-mail button on the toolbar.
Export a customer credit memo to Word
In the Invoices list, double-click the customer credit memo, and then click the Export to Word button on the toolbar.
Apply a customer credit to an invoice
1 In the Navigation Pane, click Customers. 2 Under Start a Task, click Receive Payment. 3 On the Customer Payment form, in the Received from field,
select the customer. 4 Select the check box in the Apply column for the invoice. 5 Click the Credits button in the line for the invoice. 6 In the Apply Credits and Payments dialog box, select the
check box next to the credit. 7 Click the Adjust button.

Handling customer exchanges, returns, and refunds
Microsoft Office Small Business Accounting 2006 109
What if . . . I only want to apply part of the credit to the invoice, or I am not receiving a payment? If the credit is greater than the invoice amount, change the amount in the Amount to Use column of the Apply Credits and Payments dialog box. If you are only applying a credit and not receiving a payment, reduce the amount in the Payment column of the Customer Payment form to zero, so the remaining balance is not recorded as a payment.
Handling customer exchanges, returns, and refunds You can follow these procedures when customers want to exchange or return items.
Handling a customer exchange If a customer wants to exchange an item, your method for handling it depends on the price of the new item. • If the customer wants to exchange for an item that costs more, create a new
invoice. Add a line item that includes the returned item as a negative quantity, that is, preceded by a minus sign (–).
• If the customer wants to exchange for an item that costs less, create a customer credit memo for the original item, and then create a new invoice.
Handling a customer return 1 For a return, depending on your company policies, you might do one of the
following to handle the inventory: • If the returned item is in good condition, return the product to inventory. • If the returned item cannot be resold, adjust your inventory.
2 Create a customer credit memo and include the item that was returned. 3 Refund the customer payment.
Refunding a customer payment If a customer requires a refund, you can refund the payment by check or by credit card. 1 Create a customer credit memo, and save it without closing by clicking Save on
the File menu. 2 In the Invoices list, double-click the customer credit memo.

Part 3: Selling to Customers
110 Microsoft Office Small Business Accounting 2006
3 Do one of the following: • To refund by check, on the toolbar, click the Check Refund button. • To refund by credit card, if you have signed up for credit card processing, on
the toolbar, click the Credit Card Refund button.

Microsoft Office Small Business Accounting 2006 111
Chapter 14: Managing Jobs
A job is a sales agreement between a company and a customer for products and services that are delivered over a period of time, such as remodeling a room. A job is always associated with one customer. Use jobs if you are interested in more than whether your customer has paid: the purpose of tracking jobs is to compare profitability between jobs. When you use jobs, you can link labor costs (time), product items, and service items to invoices to track profitability from a job perspective as well as from a customer perspective. To track jobs and have job fields appear on forms, select the Use job check box in Company Preferences. Then create a Job record for each job. You can create a job to fit either of two situations: • When a customer agrees to pay for a job based on its actual costs plus your profit
margin, create a time and materials job. • When a customer agrees to pay a fixed price for a job, regardless of its actual
costs, create a fixed fee job. When you use jobs, create two types of service items: • To track time for your own employees, create service items that you do not buy
(clear the I buy this item check box). In the Standard cost field, include the average cost of the service. Use service items on Time Entries and Timesheets to relate your payroll costs to jobs. For more information, see Chapter 21, “Tracking Employee Time.”
• To track expenses for services performed by subcontractors or vendors, create service items that you buy (select the I buy this item check box). Do not include an amount in the Standard cost field, so they are not included in the payroll costs for the job. Include amounts in the Purchase price field and in the Sales price field. Give them a name or description that indicates that they are for subcontracting, and use them on quotes, on invoices, on purchase orders, and on vendor bills. For more information, see Chapter 10, “Offering a Quote,” Chapter 12, “Submitting an Invoice,” Chapter 17, “Placing an Order,” and Chapter 19, “Entering and Paying Vendor Bills.”
Fixed Fee vs. Time and Materials Jobs The following table summarizes the differences between how you handle fixed fee jobs and time and materials jobs.

Part 3: Selling to Customers
112 Microsoft Office Small Business Accounting 2006
Fixed Fee Jobs Time and Materials Jobs
Creating a quote: To track how well you estimate and price a job, create a quote.
Enter the fixed fee and as much detail as required. If you will create an invoice from the quote, do not use items with a standard cost, or that cost will appear in your Profitability reports in addition to the actual costs from bills and Time Entries.
Enter the estimated cost of each item needed and the markup for each cost as an estimate for the price. Include as much detail as you want for comparison on the Job Estimates vs. Actuals reports.
Tracking actual job costs: Tracking services bought from vendors and labor costs for your employees is crucial for tracking costs. Enter the job name on Time Entries, on journal entries, and on vendor forms: purchase orders, item receipts, vendor bills, and checks to vendors.
• For non-inventory items you buy and service items you subcontract, select the job on the vendor form or the journal entry.
• For Time Entries for your company’s employees, use service items with an amount in the Standard cost field.
The cost assigned to the items on the invoice depends on the type of item being sold: • Inventory items: Cost is calculated using
the FIFO method. • Non-inventory and service items you
buy: From the Standard cost field on the Item form. Set it to zero for non-inventory and subcontracted service items you will add to an invoice.
• Service items your employees select in Time Entries: From the Standard cost field. Set it equal to the cost of wages and benefits for the employee.
• For service items you sell by creating Time Entries for your employees, select the job on the Time Entry form or the Timesheet.
• For expenses you incur, select the job on the item line on the vendor form or the journal entry.
• For inventory and non-inventory items you buy and service items you subcontract, select the job on the item line on the vendor form or the journal entry.
Costs are taken from the Item form. • Inventory items: Cost is calculated using
the FIFO method. • Non-inventory and service items,
including Time Entries: From the Standard cost field on the Item form.
Note Avoid tracking the same cost twice. Do not include items with a standard cost, or your Profitability by Job report will be incorrect.
Creating an invoice: To charge the customer, enter time and costs on an invoice. Make any necessary adjustments to the sales price, quantity, description, and discount.
Create an invoice from the quote, or create progress invoices from the quote based on the percentage of completion. Select items for the invoice in the Time and Materials dialog box. Note Even if your customer has agreed to pay a fixed fee for the job, you can still set up the job so that you can find what parts of it are profitable and what parts might be more profitable to subcontract by using Job costs.
Create an invoice from job costs. Select items for the invoice in the Job Costs dialog box: • Time: Service items from Time Entries. • Expense: Expense line items from
checks, bills, and item receipts. Note Do not use journal entries to bill customers. The expense will appear again in the Time and Materials dialog box, and you will charge the customer twice.
• Items: Item line items from checks, bills, and item receipts.

Working with the Jobs list
Microsoft Office Small Business Accounting 2006 113
Fixed Fee Jobs Time and Materials Jobs
Using reports: The Job Estimates vs. Actuals reports give you an overview of how well you estimate a price for a job. To verify the impact of an invoice, see the Job Profitability reports.
Inventory costs posted to the job appear on the Profitability by Job reports when you create an invoice for them. Actual costs charged to the job from Time Entries, journal entries, and vendor forms appear as non-invoiced costs.
Costs posted to the job appear on the Profitability by Job reports when you create an invoice for them. Actual costs appear as non-invoiced costs on the job reports until they are included on a Job Cost invoice. Then they appear in the invoiced section of the job reports.
Handling change orders: After an invoice has been made from a quote, the quote cannot be changed. Use one of these methods to handle changes.
• For price changes without a change to the workload, or for small changes to the workload, add lines to the invoice.
• To reduce the price after you have received payment, create a customer credit memo with the job selected in the Job name field, and then refund the payment.
• For large changes to the workload, especially if the job is not done, create a separate quote with the job selected in the Job name field. Include a Comment line item with a description that states that this is a change order. Create an invoice from this quote.
• Create a new job for the customer. The change order is not included in the profitability for the original job.
• For price changes without a change to the workload, or for small changes to the workload, add lines to the invoice.
• For large changes to the workload, especially if the job is not done, track additional costs and create a separate invoice from the Job costs dialog box. Include a Comment line item with a description that states that the invoice is for changes that were agreed upon.
• If there are many items or costs being added to the job, create a second quote for the same job that lists just the new items or costs.
• Create a new job for the customer. The change order is not included in the profitability for the original job.
Working with the Jobs list The Jobs list contains all your company’s jobs. It is available if you selected the Use job check box in Company Preferences. To view the Jobs list: 1 In the Navigation Pane, click Customers. 2 Under Find, click Jobs. The following table contains basic tasks you can do with the Jobs list.
To Do this
View Job records by status
Click the arrow next to the Current View field, and then select Open, In Progress, Completed, Not Started, or All.
Sort the list Click a column title to switch between ascending and descending order. An arrow indicates the sort order.
Jobs list: CTRL+ SHIFT+J

Part 3: Selling to Customers
114 Microsoft Office Small Business Accounting 2006
To Do this
Add, remove, or reorganize content
On the View menu, click Add or Remove Content.
Resize column width Click the column divider next to the column heading and drag it to a new width.
Change the column order
Select a column title and drag it to a new position.
Find a Job record 1 On the toolbar, click the Find button. 2 Enter a keyword to look for and a column title to search under,
and then click the Find button. Open selected records 1 Select one or more (up to 10) records in the list.
2 On the File menu, click Open Selected Items. Print the Jobs list On the toolbar, click the Print button . Export the Jobs list to a Microsoft Office Excel spreadsheet
On the toolbar, click the Export to Excel button .
Creating a job 1 In the Navigation Pane, click Customers. 2 Under Start a Task, click New Job.
3 (Required) In the Job name field, type a name for the job.
Find: CTRL+F
Open: CTRL+O
Print: CTRL+P
Add or remove content: F7

Editing a job
Microsoft Office Small Business Accounting 2006 115
4 (Required) Click the arrow next to the Customer name field, and then select a name from the list or add a new customer.
5 Enter information in the other fields on the General tab. 6 You can add or remove custom fields that appear on all new Job forms and saved
Job records. Click the Custom Fields tab, and then click the Customize button at the bottom of the page. All users can see custom fields. Caution When you remove a custom field, the field and any information saved in it is removed from all saved Job records.
7 When you are done, do one of the following: • On the toolbar, click the Save and Close button. • To save the Job record and create another Job record, click the Save and
New button. You can do the following additional tasks when you create a Job record.
To Do this
Change the job type On the General tab, under Job type, click Fixed fee. Note The default job type is time and materials.
Group jobs On the General tab, click the arrow next to the Job group field, and then select a job group from the list or add a new job group.
Link one or more files to the Job form
1 On the General tab, at the bottom of the Job form, click the Add links button.
2 Navigate to the file location, select the file, and then click Open.
Note To unlink, select the file name, and then press DELETE.
Editing a job If information changes or you need to correct an error, you can edit a job. 1 In the Jobs list, double-click the job. 2 Enter the information on the Job form. 3 When you are done, click the Save and Close button on the toolbar.

Part 3: Selling to Customers
116 Microsoft Office Small Business Accounting 2006
Deleting a job If no costs have been tracked against a job, and it has not been selected on a quote, an invoice, a cash sale receipt, or a customer credit memo, you can delete it. You cannot retrieve a deleted job. 1 In the Jobs list, either click or double-click the record. 2 On the toolbar, click the Delete button . 3 To confirm, click the Yes button.
Working with jobs The following table contains additional tasks you can do with Job records.
To Do this
Change the status of the job
1 In the Jobs list, double-click the Job record. 2 On the General tab, click the arrow next to the Status field,
and then select Not Started, In Progress, or Complete. Note To view jobs by status, you must update the Status field. However, if you bill time on a timesheet to a job that has not been started, its status changes to In Progress.
Update the percentage of job completion
1 In the Jobs list, double-click the Job record. 2 On the General tab, in the Percent complete field, type the
percentage of the job that is complete. Create a new quote, invoice, credit memo, or cash sale form for a job
1 In the Jobs list, double-click the Job record. 2 On the Actions menu, click the appropriate command.
Track custom items for a customer or a job
1 Create a non-inventory item for each item you order. On the Non-inventory Item form, select both the I sell this item check box and the I buy this item check box.
2 On the purchase form, enter the custom item as a line item, and enter the job in the Job name field.

Microsoft Office Small Business Accounting 2006 117
Part 4: Buying from Vendors
In this part Overview......................................................................................................................................118 Keyboard shortcuts ....................................................................................................................119
Chapter 15: Working with Vendors................................................................... 121 Working with the Vendors list ..................................................................................................122 Creating a Vendor record ..........................................................................................................122 Editing a Vendor record ............................................................................................................124 Deleting a Vendor record ..........................................................................................................124 Working with Vendor records ..................................................................................................125
Chapter 16: Setting Up Product and Service Items.......................................... 127 Service items................................................................................................................................127 Inventory items ...........................................................................................................................127 Non-inventory items ..................................................................................................................128 Kits ...............................................................................................................................................128 Working with the Items list .......................................................................................................128 Creating an Item record.............................................................................................................129 Editing an Item record...............................................................................................................133 Deleting an Item record.............................................................................................................133 Working with Item records .......................................................................................................133 Managing inventory....................................................................................................................134
Chapter 17: Placing an Order ........................................................................... 137 Working with the Purchase Orders list....................................................................................137 Creating a purchase order..........................................................................................................138 Editing a purchase order............................................................................................................139 Deleting a purchase order..........................................................................................................139 Working with purchase orders..................................................................................................140

Part 4: Buying from Vendors
118 Microsoft Office Small Business Accounting 2006
Chapter 18: Receiving Items............................................................................. 141 Working with the Bills and Item Receipts list.........................................................................141 Receiving items ...........................................................................................................................142 Editing an item receipt...............................................................................................................143 Voiding an item receipt..............................................................................................................144 Working with item receipts .......................................................................................................144
Chapter 19: Entering and Paying Vendor Bills................................................. 145 Entering a vendor bill.................................................................................................................145 Editing a vendor bill ...................................................................................................................147 Voiding a vendor bill ..................................................................................................................147 Working with vendor bills .........................................................................................................147 Making a cash purchase .............................................................................................................148 Editing a cash purchase form....................................................................................................149 Voiding a cash purchase form...................................................................................................149 Working with cash purchase forms..........................................................................................149 Paying bills ...................................................................................................................................150 Working with vendor bills .........................................................................................................151 Adjusting vendor payments.......................................................................................................151 Editing a vendor credit memo ..................................................................................................153 Voiding a vendor credit memo .................................................................................................153 Working with vendor credit memos ........................................................................................153 Returning an item to a vendor ..................................................................................................154
Overview Microsoft Office Small Business Accounting 2006 helps you manage your vendor purchases by maintaining information about your vendors and the items you purchase. After you create a Vendor record for each vendor, either in the Startup Wizard or after you begin using Small Business Accounting, you can purchase from that vendor. After you create an Item record for each product or service item you purchase, you can purchase the items for your own use or for resale. For information about items and inventory, see Chapter 16, “Setting Up Product and Service Items.” The Vendors home page includes a task flow that guides you through all the tasks related to vendors and payables. Each task, or type of transaction, is recorded on a particular form, and you can find any record or form in a list, which you can open from the Find pane.

Keyboard shortcuts
Microsoft Office Small Business Accounting 2006 119
You can begin a purchase in one of three ways: • Create a purchase order and send it to the vendor in an e-mail message or export
it to a Microsoft Office Word document and send it. • If the items arrive before the bill, receive the items to create an item receipt. If
you created a purchase order, you can create the item receipt from it. • When the bill arrives, enter the bill. You can create the bill from a purchase order
or an item receipt. If you purchase items for cash, you can create a cash purchase form to record the transaction. You can also write form letters for mass mailings. When bills are due, pay your vendor bills. If you are owed money, you can create a vendor credit memo. The Vendors and Payables reports track vendor transactions, including amounts your company owes to vendors. For more information, see Chapter 27, “Keeping Track of Company Data.”
Keyboard shortcuts You can use keyboard shortcuts to streamline your work in Small Business Accounting. To open the Vendors home page, click the Vendors button in the Navigation Pane. The following table lists the keyboard shortcuts available from the Vendors home page, in lists, in records, and on forms. Keyboard shortcuts are not available in dialog boxes or wizards. Note If a shortcut contains more than one key, press and hold a key, and then press the next key.
To Press
Open the Help table of contents F1
Get Help for the current page ALT+F1
Open the Vendors home page CTRL+3
Open the Vendors list CTRL+SHIFT+V
Open the Items list CTRL+SHIFT+U
Open the Purchase Orders list CTRL+SHIFT+P
Open the Bills and Item Receipts list CTRL+SHIFT+B

Part 4: Buying from Vendors
120 Microsoft Office Small Business Accounting 2006
In a list, you can use the following keyboard shortcuts:
To Press
Create a new record CTRL+N Add or remove the Find toolbar CTRL+F Open selected records CTRL+O Delete a record CTRL+D or DELETE Add or remove content F7
Preview the printed list CTRL+F2 Print the list CTRL+P
On Vendor forms, you can use the following keyboard shortcuts:
To Press
Create a new form CTRL+N
Close the form ESC or ALT+F4

Microsoft Office Small Business Accounting 2006 121
Chapter 15: Working with Vendors
When you install and set up Microsoft Office Small Business Accounting 2006, you enter your vendor information in the Startup Wizard. You can enter contact information and custom information you define to create a Vendor record. After you begin to use Small Business Accounting, you can add more Vendor records as needed. You can find all your Vendor records in a list, where you can work with them in several ways or open them to do other tasks. You can also edit Vendor records, inactivate them, or delete them. You can perform all the tasks related to vendors and payables on the Vendors home page. To open the Vendors home page, click the Vendors button in the Navigation Pane.
For a detailed description of the Vendors home page, see “Making Purchases from Vendors,” in Chapter 2, “Taking a Tour.” If you need further information, help is always available. To open the Help table of contents, press F1. On forms, click the Help button on the toolbar. To get Help for the current page, press ALT+F1. In dialog boxes and wizards, click the Help button.
Vendors home page: CTRL+3
Help: F1

Part 4: Buying from Vendors
122 Microsoft Office Small Business Accounting 2006
Working with the Vendors list The Vendors list contains your Vendor records. To view the Vendors list: 1 In the Navigation Pane, click Vendors. 2 Under Find, click Vendors. The following table contains basic tasks you can do with the Vendors list.
To Do this
View Vendor records by status
Click the arrow next to the Current View field, and then select Active, Inactive, or All.
Add or remove vendor numbers
1 On the Company menu, click Preferences, and then click the Vendors tab.
2 Select or clear the Use vendor ID check box. Sort the list Click a column title to switch between ascending and descending
order. An arrow indicates the sort order. Add, remove, or reorganize content
On the View menu, click Add or Remove Content.
Resize column width Click the column divider next to the column heading and drag it to a new width.
Change the column order
Select a column title and drag it to a new position.
Find a Vendor record 1 On the toolbar, click the Find button. 2 Enter a keyword to look for and a column title to search under,
and then click the Find button. Open selected records 1 Select one or more (up to 10) records in the list.
2 On the File menu, click Open Selected Items. Print the Vendors list On the toolbar, click the Print button . Export the Vendors list to a Microsoft Office Excel spreadsheet
On the toolbar, click the Export to Excel button .
Creating a Vendor record If you did not create a Vendor record by using the Startup Wizard, you can follow this procedure. If you have a vendor who is also a customer, you must create both a Vendor and a Customer record, so that transactions can be recorded properly. Note A sales tax vendor is a type of vendor. 1 In the Navigation Pane, click Vendors. 2 Under Start a Task, click New Vendor.
New vendor: CTRL+ N
Vendors list: CTRL+ SHIFT+V
Find: CTRL+F
Open: CTRL+O
Print: CTRL+P
Add or remove content: F7

Creating a Vendor record
Microsoft Office Small Business Accounting 2006 123
3 (Required) In the Vendor name field, type the vendor’s name. 4 Enter information in the other fields on the General tab. 5 Enter the information on the Details tab. 6 You can add or remove custom fields that appear on all new Vendor forms and
saved Vendor records. Click the Custom Fields tab, and then click the Customize button at the bottom of the page. All users can see custom fields. Caution When you remove a custom field, the field and any information saved in it is removed from all saved Vendor records.
7 When you are done, do one of the following: • On the toolbar, click the Save and Close button. • To save the Vendor record and create another Vendor record, click the Save
and New button. You can do the following additional tasks when you create a Vendor record.
To Do this
Change the vendor ID On the General tab, type a number or a text identifier in the Vendor ID field. Note If you selected Use vendor ID in Company Preferences, Small Business Accounting adds a sequential number to each Vendor record you create. You cannot enter a duplicate vendor ID.
Link one or more files to the Vendor form
1 On the General tab, at the bottom of the Vendor form, click the Add links button.
2 Navigate to the file location, select the file, and then click Open.
Note To unlink, select the file name, and then press DELETE.
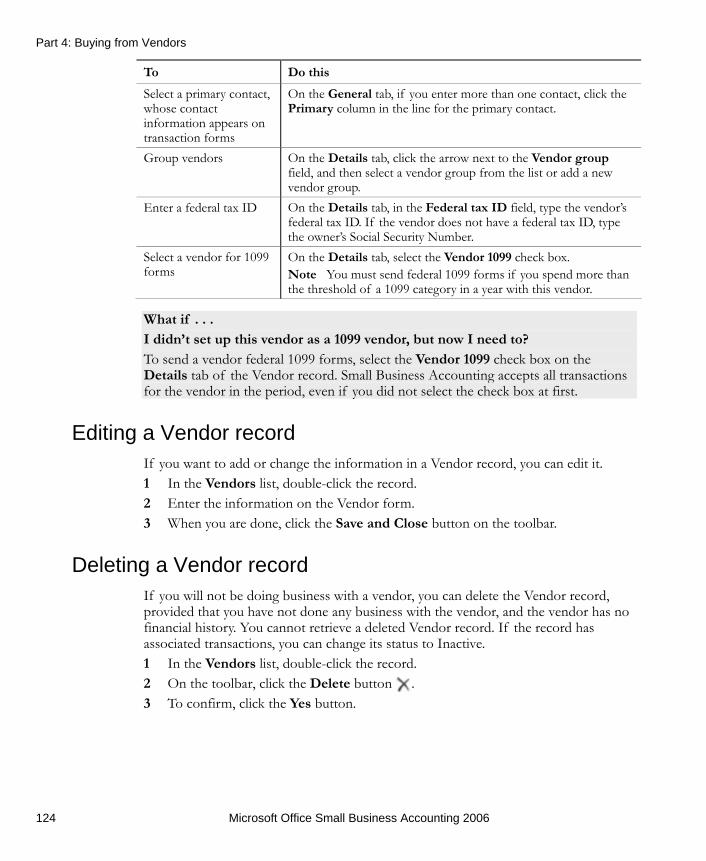
Part 4: Buying from Vendors
124 Microsoft Office Small Business Accounting 2006
To Do this
Select a primary contact, whose contact information appears on transaction forms
On the General tab, if you enter more than one contact, click the Primary column in the line for the primary contact.
Group vendors On the Details tab, click the arrow next to the Vendor group field, and then select a vendor group from the list or add a new vendor group.
Enter a federal tax ID On the Details tab, in the Federal tax ID field, type the vendor’s federal tax ID. If the vendor does not have a federal tax ID, type the owner’s Social Security Number.
Select a vendor for 1099 forms
On the Details tab, select the Vendor 1099 check box. Note You must send federal 1099 forms if you spend more than the threshold of a 1099 category in a year with this vendor.
What if . . . I didn’t set up this vendor as a 1099 vendor, but now I need to? To send a vendor federal 1099 forms, select the Vendor 1099 check box on the Details tab of the Vendor record. Small Business Accounting accepts all transactions for the vendor in the period, even if you did not select the check box at first.
Editing a Vendor record If you want to add or change the information in a Vendor record, you can edit it. 1 In the Vendors list, double-click the record. 2 Enter the information on the Vendor form. 3 When you are done, click the Save and Close button on the toolbar.
Deleting a Vendor record If you will not be doing business with a vendor, you can delete the Vendor record, provided that you have not done any business with the vendor, and the vendor has no financial history. You cannot retrieve a deleted Vendor record. If the record has associated transactions, you can change its status to Inactive. 1 In the Vendors list, double-click the record. 2 On the toolbar, click the Delete button . 3 To confirm, click the Yes button.

Working with Vendor records
Microsoft Office Small Business Accounting 2006 125
Working with Vendor records The following table contains additional tasks you can do with Vendor records.
To Do this
Change the status of one or more vendors
In the Vendors list, select one or more Vendor records, and then click Make Active or Make Inactive on the Edit menu. Note A record with Inactive status does not appear in lists in dialog boxes, forms, and wizards, but you can still find it in the Vendors list Inactive or All view.
Merge duplicate Vendor records
1 On the Company menu, point to Merge Accounts, and then click Merge Vendors.
2 In the Merge Vendors dialog box, click the arrow next to the Merge from vendor field and select a record to merge. Caution This record will be deleted after it is incorporated into the other record.
3 Click the arrow next to the Merge to vendor field and select a record to merge into.
Send an e-mail message to a vendor
In the Vendors list, select a Vendor record, and then click the E-mail button on the toolbar.
Send a form letter to vendors
On the Vendors menu, click Write Letters.
See a summary of all the vendor’s transactions
1 In the Vendors list, double-click the Vendor record. 2 Click the Financial Summary tab.
See the history of all the vendor’s transactions
1 In the Vendors list, double-click the Vendor record. 2 Click the Financial History tab.
Print the 1099 Detail report
On the Vendors menu, click Print 1099 Report. Note The 1099 Detail report includes all vendors with the Vendor 1099 check box selected on the Details tab of the Vendor record.
Access vendor services Before you begin, make sure you have an active Internet connection. On the Vendors menu, point to Vendor Services, and then click the appropriate command.

Part 4: Buying from Vendors
126 Microsoft Office Small Business Accounting 2006

Microsoft Office Small Business Accounting 2006 127
Chapter 16: Setting Up Product and Service Items
An item is a product or service that a company purchases and/or sells. An item can be one of the following types: • Service Work performed, such as consulting or design. Service items appear on
Customer forms if you select the I sell this item check box on the Service Item form and on Vendor forms if you select the I buy this item check box on the Service Item form.
• Inventory A product that is purchased for sale and is tracked in inventory and on the balance sheet. Inventory items appear on both Customer and Vendor forms.
• Non-Inventory A product that is purchased and/or sold but whose quantity is not tracked. A non-inventory item might be a product purchased for company use or a custom product purchased for a job. Non-inventory items appear on Customer forms if you select the I sell this item check box and on Vendor forms if you select the I buy this item check box on the Non-Inventory Item form.
• Kit A collection of related items that are frequently sold together, grouped for quick entry and reporting. Kits appear only on Customer forms.
Service items You can create service items for each type of work and each level of experience or billing rate. On the Service Item form, if your employees perform the work, select only the I sell this item check box. If you subcontract, select both the I sell this item and the I buy this item check boxes. On employees’ Time Entry forms, you then select the service item that is appropriate for each individual’s work and rate. You can bill at different rates for the same individual by selecting different service items. You can use standard costs to evaluate your profitability by using the Item Profitability report. If you use jobs, you can use standard costs to relate payroll costs to a job on the Profitability by Job Detail report. For information about jobs, see Chapter 14, “Managing Jobs.”
Inventory items When you set up your company, until you close your books, you enter items and beginning quantities and values in the Startup Wizard. When you create a new inventory item, you also enter inventory information, including the reorder point and the quantity on hand. When you create an item with a quantity on hand, the total value of the items is added to your Opening Balances account with a posted date of your company start date.

Part 4: Buying from Vendors
128 Microsoft Office Small Business Accounting 2006
When you purchase and receive items, they are added to inventory. When you add items to an invoice and save it, the items are subtracted from inventory. You can print a worksheet to take a physical inventory and, if necessary, adjust inventory. Small Business Accounting uses the FIFO (First-In, First-Out) method of costing inventory, which assumes that oldest items are sold first. The cost of the oldest item is assigned to the first item sold; the cost of the newest item is assigned to inventory. The value of the inventory on hand is therefore close to its actual replacement cost. You might purchase items at one price, and then purchase more of the same items at another price. The FIFO method treats items that are purchased at the same price as a layer of inventory. Although the sales price is the same for all the layers, the cost of goods sold is determined from the purchase price of the first layer until all its items are gone, and then from each succeeding layer until all its items are gone.
Non-inventory items You can track profitability for non-inventory items by using standard costs. On the Non-Inventory form, when you select the I sell this item check box, you must type a value in the Sales price field. When you select the I buy this item check box, you must type a value in the Purchase price field. The price you enter also appears in the Standard cost field, although you can change it. The Item Profitability report compares the standard cost to sales amounts for each item. If you use jobs, the Profitability by Job Detail report compares the standard cost to the invoiced amount for each item. For information about jobs, see Chapter 14, “Managing Jobs.”
Kits A kit is a collection of service, inventory, and/or non-inventory items for sale. Unlike creating an assembly in a Bill of Materials system, creating a kit does not affect inventory quantities or values; they are deducted when the kit is sold. If you discount the unit price of a kit, the discount percentage is subtracted from each kit item. A kit inherits the tax status of the items in it, but you can change that on the sales form, if necessary. When you include a kit on a sales form, each item in the kit appears on an indented line below the kit. In the item lines, you can only edit the Tax field. When you print a sales form that includes a kit, you can select options in the Print dialog box that determine which kit details to print.
Working with the Items list The Items list contains all the items your company purchases or sells. To view the Items list: 1 In the Navigation Pane, click Company, Customers, or Vendors.
Items list: CTRL+ SHIFT+U

Creating an Item record
Microsoft Office Small Business Accounting 2006 129
2 Under Find, click Items. The following table shows the basic tasks you can do in the Items list.
To Do this
View Item records by status
Click the arrow next to the Current View field, and then select Active, Inactive, or All.
Sort the list Click a column title to switch between ascending and descending order. An arrow indicates the sort order.
Add, remove, or reorganize content
On the View menu, click Add or Remove Content.
Resize column width Click the column divider next to the column heading and drag it to a new width.
Change the column order
Select a column title and drag it to a new position.
Find an Item record 1 On the toolbar, click the Find button. 2 Enter a keyword to look for and a column title to search under,
and then click the Find button. Open selected records 1 Select one or more (up to 10) records in the list.
2 On the File menu, click Open Selected Items. Print the Items list On the toolbar, click the Print button . Export the Items list to an Excel spreadsheet
On the toolbar, click the Export to Excel button .
Creating an Item record If you did not create Item records by using the Startup Wizard, you can follow these procedures to create a Service Item record, an Inventory Item record, a Non-Inventory Item record, or a Kit record. The forms are similar.
Creating a Service Item record or a Non-Inventory Item record 1 In the Navigation Pane, click Customers or Vendors. 2 Under Start a Task, click New Item. 3 In the Select Item Type dialog box, select one of the following:
• Service • Non-Inventory item
4 Click the OK button.
Print: CTRL+P
Open: CTRL+O
New item: CTRL+ N
Find: CTRL+F
Add or remove content: F7

Part 4: Buying from Vendors
130 Microsoft Office Small Business Accounting 2006
5 (Required) In the Item name field, type the item name. 6 If you sell the item, select the I sell this item check box, which activates the sales
fields. If you select this check box: • Type a value in the Sales price field. That price appears on sales forms,
although you can change it on the forms. • (Required) Click the arrow next to the Income account field, and then select
an account from the list or add a new account to be charged when the item is sold.
• (Required) Click the arrow next to the Item tax field, and then select an item tax code from the list or add a new item tax code.
7 If you buy the item, select the I buy this item check box, which activates the purchase fields. If you select this check box: • Type a value in the Purchase price field. The price you enter also appears in
the Standard cost field, although you can change it. If you update the Purchase price field later, the Standard cost field does not change.
• (Required) Click the arrow next to the Expense account field, and then select an account from the list or add a new account to be charged when the item is purchased.
8 Enter information in the other fields on the General tab. 9 You can add or remove custom fields that appear on all new Item forms of this
type (Service or Non-Inventory) and saved Item records of this type. Click the Custom Fields tab, and then click the Customize button at the bottom of the page. All users can see custom fields. Caution When you remove a custom field, the field and any information saved in it is removed from all saved Item records of this type.

Creating an Item record
Microsoft Office Small Business Accounting 2006 131
10 When you are done, do one of the following: • On the toolbar, click Save and Close. • If you want to add another item, click Save and New.
You can do the following additional tasks when you create a Service or Non-Inventory Item record.
To Do this
Group items for reporting purposes
On the General tab, click the arrow next to the Item group field, and then select an item group from the list or add a new item group.
Change the item’s status to Inactive
On the General tab, clear the Active check box.
Set the standard cost The price you enter in the Purchase price field appears in the Standard cost field. To change it, type a new value.
Creating an Inventory Item record 1 In the Navigation Pane, click Customers or Vendors. 2 Under Start a Task, click New Item. 3 In the Select Item Type dialog box, select Inventory, and then click the OK
button. 4 (Required) In the Item name field, type the item name. 5 (Required) Click the arrow next to the Income account field, and then select an
account from the list or add a new account to be charged when the item is sold. 6 (Required) Click the arrow next to the Item tax field, and then select an item tax
code from the list or add a new item tax code. 7 (Required) Click the arrow next to the Asset account field, and then select an
account from the list or add a new account to be charged when the item is purchased.
8 (Required) Click the arrow next to the COGS account field, and then select an account from the list or add a new account to be charged when the item is sold.
9 Enter information in the other fields on the General tab. 10 You can add or remove custom fields that appear on all new Inventory Item
forms and saved Inventory Item records. Click the Custom Fields tab, and then click the Customize button at the bottom of the page. All users can see custom fields. Caution When you remove a custom field, the field and any information saved in it is removed from all saved Inventory Item records.
11 When you are done, do one of the following: • On the toolbar, click Save and Close. • If you want to add another item, click Save and New.

Part 4: Buying from Vendors
132 Microsoft Office Small Business Accounting 2006
You can do the following additional tasks when you create an Inventory Item record.
To Do this
Group items for reporting purposes
On the General tab, click the arrow next to the Item group field, and then select an item group from the list or add a new item group.
Change the item’s status to Inactive
On the General tab, clear the Active check box.
Set the reorder point On the General tab, in the Reorder point field, type the number of items remaining when you want a caution symbol to appear in the Reorder column of the Items list.
Have the inventory item appear in Today’s Reminders when it reaches its reorder point
Type a quantity in the Reorder point field, and select the Inventory reorder points reminder on the Company home page.
Receive a warning message for negative inventories
On the Vendors tab of Company Preferences, select the Check for item quantity on hand check box.
Creating a Kit record 1 In the Navigation Pane, click Customers or Vendors. 2 Under Start a Task, click New Item. 3 In the Select Item Type dialog box, select Kit, and then click the OK button. 4 (Required) In the Item name field, type the item name. 5 Enter information in the other fields on the General tab. 6 Click the Item Name column, click the arrow in the column, and then select an
item from the list or add a new item to include in the kit. 7 In the Qty. column, type the quantity of the item to add to the kit. 8 Continue adding items to the kit. 9 You can add or remove custom fields that appear on all new Kit forms and saved
Kit records. Click the Custom Fields tab, and then click the Customize button at the bottom of the page. All users can see custom fields. Caution When you remove a custom field, the field and any information saved in it is removed from all saved Kit records.
Company home page: CTRL+1

Editing an Item record
Microsoft Office Small Business Accounting 2006 133
10 When you are done, do one of the following: • On the toolbar, click Save and Close. • If you want to add another item, click Save and New.
You can do the following additional tasks when you create a Kit record.
To Do this
Change the item’s status to Inactive
On the General tab, clear the Active check box.
Discount the kit On the General tab, do one of the following: • In the Discount field, type a dollar amount for the discount. • In the Sales price field, type a sales price.
Editing an Item record If you want to change the information in an Item record, you can edit it. 1 In the Items list, double-click the item. 2 Enter the information on the Item form. 3 When you are done, click the Save and Close button on the toolbar.
Deleting an Item record If you will not be purchasing or selling an item, you can delete the Item record, provided that it has not been added to a saved document, and it has not had a beginning inventory balance entered. You cannot retrieve a deleted Item record. If the record has associated transactions, you can change its status to Inactive. 1 In the Items list, double-click the record. 2 On the toolbar, click the Delete button . 3 To confirm, click the Yes button.
Working with Item records The following table contains additional tasks you can do with Item records.
To Do this
Change the status of one or more items
In the Items list, select one or more Item records, and then click Make Active or Make Inactive on the Edit menu. Note A record with Inactive status does not appear in lists in dialog boxes, forms, and wizards, but you can still find it in the Items list Inactive or All view.

Part 4: Buying from Vendors
134 Microsoft Office Small Business Accounting 2006
To Do this
Create a new invoice, quote, sales order, or purchase order that includes an item
1 In the Items list, click the item or items you want on the form.
2 On the Actions menu, click the appropriate command. Merge duplicate Item records
1 On the Company menu, point to Merge Accounts, and then click Merge Items.
2 In the Merge Items dialog box, click the arrow next to the Merge from item field and select a record to merge. Caution This record will be deleted after it is incorporated into the other record.
3 Click the arrow next to the Merge to item field and select a record to merge into.
Change the financial account for an item for transactions going forward
On the General tab, in the Income account, Expense account, Asset account, or COGS account field, select a new account. Note Account types depend on the item type.
See the quantities of an inventory item on purchase orders and sales orders
On the General tab, see the On PO and On SO fields. Note These fields appear after you save and close the record.
Change multiple item prices 1 In the Items list, on the Actions menu, click Change Item Prices.
2 Enter the information in the Change Item Price dialog box, and then click Calculate.
Note You can change additional item prices and calculate again.
Update Item record prices to match vendor bills
On the Vendors tab of Company Preferences, select the Update cost automatically check box.
Share item information with Microsoft Outlook 2003 with Business Contact Manager Update
See Help in Business Contact Manager for Outlook.
Managing inventory To count actual numbers of items in stock and compare them to your records, click Physical Inventory Worksheet on the Vendors menu to print a worksheet. If you find that you have losses or gains in inventory items, you can adjust your inventory. Note An inventory adjustment cannot be voided. 1 In the Items list, on the toolbar, click Adjust Inventory. 2 Click one of the following:
• Adjust Quantity • Adjust Quantity and Value

Managing inventory
Microsoft Office Small Business Accounting 2006 135
The inventory quantities and values are accurate for any date you select.


Microsoft Office Small Business Accounting 2006 137
Chapter 17: Placing an Order
When you want to order from a vendor, you can create a purchase order. A purchase order is usually used for purchasing stock items. It contains contact information for the vendor and lists the items being ordered. It also contains payment and shipping terms and prices.
Working with the Purchase Orders list The Purchase Orders list contains all your company’s purchase orders. To view the Purchase Orders list: 1 In the Navigation Pane, click Vendors. 2 Under Find, click Purchase Orders. The following table contains basic tasks you can do with the Purchase Orders list.
To Do this
View purchase orders by status
Click the arrow next to the Current View field, and then select Open, Received, or All.
Sort the list Click a column title to switch between ascending and descending order. An arrow indicates the sort order.
Add, remove, or reorganize content
On the View menu, click Add or Remove Content.
Resize column width Click the column divider next to the column heading and drag it to a new width.
Change the column order
Select a column title and drag it to a new position.
Find a purchase order 1 On the toolbar, click the Find button. 2 Enter a keyword to look for and a column title to search under,
and then click the Find button. Open selected purchase orders
1 Select one or more (up to 10) purchase orders in the list. 2 On the File menu, click Open Selected Items.
Print the Purchase Orders list
On the toolbar, click the Print button .
Print selected purchase orders
1 Select one or more purchase orders in the list. 2 On the toolbar, click the Print button .
Export the Purchase Orders list to an Excel spreadsheet
On the toolbar, click the Export to Excel button .
Find: CTRL+F
Purchase Orders list: CTRL+ SHIFT+P
Open: CTRL+O
Print: CTRL+P
Add or remove content: F7

Part 4: Buying from Vendors
138 Microsoft Office Small Business Accounting 2006
Creating a purchase order You can create a purchase order for any vendor with Active status. Tip To create a purchase order that is similar to an existing one, open the purchase order, and then click Copy and Edit on the File menu. 1 In the Navigation Pane, click Vendors. 2 Under Start a Task, click New Purchase Order.
3 (Required) Click the arrow next to the Vendor name field, and then select a name from the list or add a new vendor.
4 Enter the information in the other fields on the purchase order. To add a line item, click the first column of the first open line, and then select a line item type: Expense, Item, or Comment. Note To delete a line item, click the column to the left of the icon. An arrow appears, and the line is highlighted. Press DELETE.
5 When you are done, do one of the following: • On the toolbar, click the Save and Close button. • To save the purchase order and create a new purchase order, click the Save
and New button.

Editing a purchase order
Microsoft Office Small Business Accounting 2006 139
You can do the following additional tasks when you create a purchase order.
To Do this
Assign a line item to a class
Click the Class column in the line item, click the arrow, and then select a class from the list or add a new class, for example, for a department.
Assign a line item to a job
Click the Job Name column in the line item, click the arrow, and then select a job from the list or add a new job.
Mark a line item to be billed to a customer
In the line item, select the Billable check box.
Add a reference In the Reference field, type the reference information, for example, a number from a vendor’s invoice.
Link one or more files to the purchase order
1 At the bottom of the purchase order, click the Add links button.
2 Navigate to the file location, select the file, and then click Open. Note To unlink, select the file name, and then press DELETE.
Editing a purchase order Because a purchase order is not posted, If you want to change your order or you need to correct an error, you can edit a purchase order. 1 In the Purchase Orders list, double-click the purchase order. 2 Enter the information on the purchase order. 3 When you are done, click the Save and Close button on the toolbar.
Deleting a purchase order If no items or expenses have been received against a purchase order, and no item receipts or bills have been created from it, you can delete it. You cannot retrieve a deleted purchase order. 1 In the Purchase Orders list, double-click the purchase order. 2 On the toolbar, click the Delete button . 3 To confirm, click the Yes button.

Part 4: Buying from Vendors
140 Microsoft Office Small Business Accounting 2006
Working with purchase orders The following table contains additional tasks you can do with purchase orders.
To Do this
Change payment terms 1 In the Purchase Orders list, double-click the purchase order. 2 Click the arrow next to the Payment terms field, and then
select a term from the list or add a new term. Change a quantity or a price
1 In the Purchase Orders list, double-click the purchase order. 2 In the Qty., Unit Price, or Line Total column, type a new
value. Work with a Microsoft Office Word template
On the Company menu, click Manage Word Templates.
Send a purchase order in an e-mail message to a vendor
In the Purchase Orders list, select the purchase order, and then click the E-mail button on the toolbar.
Export a purchase order to Word
In the Purchase Orders list, double-click the purchase order, and then click the Export to Word button on the toolbar.

Microsoft Office Small Business Accounting 2006 141
Chapter 18: Receiving Items
When purchased items arrive before the bill, you can either wait for the bill or receive the items, which generates an item receipt. • If you sent a purchase order to the vendor, create an item receipt from the
purchase order. Otherwise the purchase order stays in the system until you void it. • If you did not send a purchase order to the vendor, receive the items.
Working with the Bills and Item Receipts list The Bills and Item Receipts list contains all your company’s bills, item receipts, cash purchase forms, vendor credit memos, and checks to vendors. To view the Bills and Item Receipts list: 1 In the Navigation Pane, click Vendors. 2 Under Find, click Bills and Item Receipts. The following table contains basic tasks you can do with the Bills and Item Receipts list.
To Do this
View forms by status Click the arrow next to Current View field, and then select Open, Voided, Overdue, or All.
Sort the list Click a column title to switch between ascending and descending order. An arrow indicates the sort order.
Add, remove, or reorganize content
On the View menu, click Add or Remove Content.
Resize column width Click the column divider next to the column heading and drag it to a new width.
Change the column order
Select a column title and drag it to a new position.
Find a bill, an item receipt, a cash purchase form, a vendor credit memo, or a check to a vendor
1 On the toolbar, click the Find button. 2 Enter a keyword to look for and a column title to search under,
and then click the Find button.
Open selected forms 1 Select one or more (up to 10) forms in the list. 2 On the File menu, click Open Selected Items.
Print the Bills and Item Receipts list
On the toolbar, click the Print button .
Find: CTRL+F
Bills and Item Receipts list: CTRL+ SHIFT+B
Open: CTRL+O
Print: CTRL+P
Add or remove content: F7

Part 4: Buying from Vendors
142 Microsoft Office Small Business Accounting 2006
To Do this
Export the Bills and Item Receipts list to an Excel spreadsheet
On the toolbar, click the Export to Excel button .
Receiving items When you receive items ordered from a vendor before you receive the bill, you can receive items, which creates an item receipt. Tip To create an item receipt that is similar to an existing one, open the item receipt, and then click Copy and Edit on the File menu. 1 In the Navigation Pane, click Vendors. 2 Under Start a Task, click Receive Items.
Note You can create an item receipt from a purchase order. On the toolbar, click the Create from button, and then select the purchase order. Or open the purchase order and click the Receive Items button on the toolbar.
3 (Required) Click the arrow next to the Vendor name field, and then select a name from the list or add a new vendor.
4 Enter the information in the other fields on the item receipt. To add a line item, click the first column of the first open line, and then select a line item type: Expense, Item, or Comment. Note To delete a line item, click the column to the left of the icon. An arrow appears, and the line is highlighted. Press DELETE.

Editing an item receipt
Microsoft Office Small Business Accounting 2006 143
5 When you are done, do one of the following: • On the toolbar, click the Save and Close button. • To save the item receipt and create a new item receipt, click the Save and
New button. You can do the following additional tasks when you create an item receipt.
To Do this
Assign a line item to a class
Click the Class column in the line item, click the arrow, and then select a class from the list or add a new class, for example, for a department.
Assign a line item to a job
Click the Job Name column in the line item, click the arrow, and then select a job from the list or add a new job.
Mark a line item to be billed to a customer
In the line item, select the Billable check box.
Add a reference In the Reference field, type the reference information, for example, a number from a vendor’s invoice.
Link one or more files to the item receipt
1 At the bottom of the item receipt, click the Add links button. 2 Navigate to the file location, select the file, and then click Open. Note To unlink, select the file name, and then press DELETE.
What if . . . I didn’t receive the quantity I ordered? If the quantity received is different from the quantity on the purchase order, edit the item receipt. Change the value in the Qty. field to the quantity you received.
Editing an item receipt If you want to make a change or correct an error, you can edit an item receipt. 1 In the Bills and Item Receipts list, double-click the item receipt. 2 On the toolbar, click the Edit button. 3 Enter the information on the item receipt. 4 When you are done, click the Save and Close button on the toolbar.

Part 4: Buying from Vendors
144 Microsoft Office Small Business Accounting 2006
Voiding an item receipt When you save an item receipt, it is posted. An item receipt affects accounting, so you cannot delete it. If you need to redo an item receipt, you can edit it or void it. After you void an item receipt, you can create a duplicate item receipt that you can edit. The only way to work with a voided item receipt is to copy and edit it. Note Item receipts are kept in the Pending Item Receipts account until you enter the bill. If you create an item receipt, be sure to either create the vendor bill from it or void the item receipt when you enter the vendor bill. 1 In the Bills and Item Receipts list, double-click the item receipt. 2 On the Actions menu, click Void. 3 To confirm, click the Yes button.
Working with item receipts The following table contains additional tasks you can do with item receipts.
To Do this
Change payment terms 1 In the Bills and Item Receipts list, double-click the item receipt.
2 On the toolbar, click the Edit button. 3 Click the arrow next to the Payment terms field, and then
select payment terms from the list or add new payment terms. Change a quantity or a price
1 In the Bills and Item Receipts list, double-click the item receipt.
2 In the Qty., Unit Price, or Line Total column, type a new value.

Microsoft Office Small Business Accounting 2006 145
Chapter 19: Entering and Paying Vendor Bills
When you receive a bill for items you have purchased, you enter the vendor bill. If you have a credit with a vendor, you can apply it to a vendor bill. If you return a product or receive a refund, you can create a vendor credit memo. You can view vendor bills, cash purchase forms, vendor credit memos, and checks written to vendors in the Bills and Item Receipts list. For more information, see Chapter 18, “Receiving Items.”
Entering a vendor bill You can create a vendor bill for any vendor with Active status. Tip To create a vendor bill that is similar to an existing one, open the vendor bill, and then click Copy and Edit on the File menu. 1 In the Navigation Pane, click Vendors. 2 Under Start a Task, click Enter Bills.
Note You can create a vendor bill from a purchase order or an item receipt. On the toolbar, click the Create from button. • If you created a purchase order but no item receipt, create the vendor bill
from the purchase order, or else it stays in the system until you void it. • If you created an item receipt, create the vendor bill from the item receipt, or
else the items are counted twice in inventory and in liability accounts.

Part 4: Buying from Vendors
146 Microsoft Office Small Business Accounting 2006
3 (Required) Click the arrow next to the Vendor name field, and then select a name from the list or add a new vendor.
4 Enter the information in the other fields on the vendor bill. To add a line item, click the first column of the first open line, and then select a line item type: Expense, Item, or Comment. Note To delete a line item, click the column to the left of the icon. An arrow appears, and the line is highlighted. Press DELETE.
5 When you are done, do one of the following: • On the toolbar, click the Save and Close button. • To save the vendor bill and create a new vendor bill, click the Save and New
button. You can do the following additional tasks when you create a vendor bill.
To Do this
Assign a line item to a class
Click the Class column in the line item, click the arrow, and then select a class from the list or add a new class, for example, for a department.
Assign a line item to a job
Click the Job Name column in the line item, click the arrow, and then select a job from the list or add a new job.
Mark a line item to be billed to a customer
In the line item, select the Billable check box.
Add a reference In the Reference field, type the reference information, for example, a number from a vendor’s invoice.
Handle sales tax on purchases
Use one of these methods: • Create an account for the sales tax and enter it as a line item on
the bill. This method does not relate the taxes to the individual expenses.
• Calculate the amount of tax per item and include it in the price in the line item on the bill.
Link one or more files to the vendor bill
1 At the bottom of the vendor bill, click the Add links button. 2 Navigate to the file location, select the file, and then click Open. Note To unlink, select the file name, and then press DELETE.
What if . . . The price on the vendor bill is different from the price on the purchase order or the item receipt? If the price is different, either correct the vendor bill when you enter it or edit it later. Change the amount in the Unit Price field or the Line Total field to the price on the bill you receive.

Editing a vendor bill
Microsoft Office Small Business Accounting 2006 147
Editing a vendor bill If you want to make a change or correct an error, you can edit a vendor bill. 1 In the Bills and Item Receipts list, double-click the vendor bill. 2 On the toolbar, click the Edit button. 3 Enter the information on the vendor bill. 4 When you are done, click the Save and Close button on the toolbar.
Voiding a vendor bill When you save a vendor bill, it is posted. Because a bill affects accounting, you cannot delete it. If you need to redo a vendor bill, you can edit it or void it. After you void a vendor bill, you can create a duplicate vendor bill that you can edit. The only way to work with a voided vendor bill is to copy and edit it. 1 In the Bills and Item Receipts list, double-click the vendor bill. 2 On the Actions menu, click Void. 3 To confirm, click the Yes button.
Working with vendor bills The following table contains additional tasks you can do when you enter vendor bills.
To Do this
Change payment terms 1 In the Bills and Item Receipts list, double-click the vendor bill.
2 On the toolbar, click the Edit button. 3 Click the arrow next to the Payment terms field, and then
select payment terms from the list or add new payment terms. Change a quantity or a price
1 In the Bills and Item Receipts list, double-click the vendor bill.
2 On the toolbar, click the Edit button. 3 In the Qty., Unit Price, or Line Total column, type a new
value. Have bills due for payment appear in Today’s Reminders
Select the Bills to Pay reminder on the Company home page.
Have checks ready for printing appear in Today’s Reminders
Select the Checks to Print reminder on the Company home page.
Company home page: CTRL+1

Part 4: Buying from Vendors
148 Microsoft Office Small Business Accounting 2006
Making a cash purchase You might buy office supplies, for example, at a store and pay with cash. To enter the store receipt and your payment into Small Business Accounting, you can create a cash purchase form. Cash purchase forms follow the same format as vendor bills, and you can find all cash purchase forms on the Bills and Item Receipts list. Tip To create a cash purchase form that is similar to an existing one, open the cash purchase form, and then click Copy and Edit on the File menu. 1 In the Navigation Pane, click Vendors. 2 Under Start a Task, click New Cash Purchase. 3 (Required) Click the arrow next to the Vendor name field, and then select a name
from the list or add a new vendor. The contact information from the Vendor record appears on the cash purchase form.
4 (Required) Click the arrow next to the Pay from field, and then select an account from the list or add a new account to which you want record the cash purchase.
5 Enter the information in the other fields on the cash purchase form. To add a line item, click the first column of the first open line, and then select a line item type: Expense, Item, or Comment. Note To delete a line item, click the column to the left of the icon. An arrow appears, and the line is highlighted. Press DELETE.
6 When you are done, do one of the following: • On the toolbar, click the Save and Close button. • To save the cash purchase form and create a new cash purchase form, click
the Save and New button. You can do the following additional tasks when you create a cash purchase form.
To Do this
Handle sales tax on purchases
Use one of these methods: • Create an account for the sales tax and enter it as a line item on
the cash purchase form. This method does not relate the taxes to the individual expenses.
• Calculate the amount of tax per item and include it in the price in the line item on the cash purchase form.
Assign a line item to a class
Click the Class column in the line item, click the arrow, and then select a class from the list or add a new class, for example, for a department.
Assign a line item to a job
Click the Job Name column in the line item, click the arrow, and then select a job from the list or add a new job.
Mark a line item to be billed to a customer
In the line item, select the Billable check box.
Add a reference In the Reference field, type the reference information, for example, a number from a vendor’s invoice.

Editing a cash purchase form
Microsoft Office Small Business Accounting 2006 149
To Do this
Link one or more files to the cash purchase form
1 At the bottom of the cash purchase form, click the Add links button.
2 Navigate to the file location, select the file, and then click the Open button.
Note To unlink, select the file name, and then press DELETE.
Editing a cash purchase form If you want to make a change or correct an error, you can edit a cash purchase form. 1 In the Bills and Item Receipts list, double-click the cash purchase form. 2 On the toolbar, click the Edit button. 3 Enter the information on the cash purchase form. 4 When you are done, click the Save and Close button on the toolbar.
Voiding a cash purchase form When you save a cash purchase form, it is posted. Because a cash purchase form affects accounting, you cannot delete it. If you need to redo a cash purchase form, you can either edit it or void it and then copy and edit it. The only way to work with a voided cash purchase form is to copy and edit it. 1 In the Bills and Item Receipts list, double-click the cash purchase form. 2 On the Actions menu, click Void. 3 To confirm, click the Yes button.
Working with cash purchase forms The following table contains additional tasks you can do with cash purchase forms.
To Do this
Change payment terms 1 In the Bills and Item Receipts list, double-click the cash purchase form.
2 On the toolbar, click the Edit button. 3 Click the arrow next to the Payment terms field, and then
select a term from the list or add a new term. Change a quantity or a price
1 In the Bills and Item Receipts list, double-click the cash purchase form.
2 On the toolbar, click the Edit button. 3 In the Qty., Unit Price, or Line Total column, type a new
value.

Part 4: Buying from Vendors
150 Microsoft Office Small Business Accounting 2006
Paying bills 1 In the Navigation Pane, click Vendors. 2 Under Start a Task, click Pay Bills. The Pay Bills form displays all the vendor
bills that are due.
3 (Required) Click the arrow next to the Pay from field, and then select a financial account from the list or add a new financial account.
4 (Required) Click the arrow next to the Payment method field, and then select a payment method from the list.
5 Select the check box of each bill you want to pay. 6 When you are done, click the Save and Close button on the toolbar.
What if . . . I only want to pay part of the bill? If the amount that is due is greater than the amount that you want to pay, change the amount in the Payment column of the Pay Bills form.
You can do the following additional tasks when you pay bills.
To Do this
Take a cash discount If a vendor gives you a discount, for early payment, for example, type the dollar amount in the Cash Discount column.

Working with vendor bills
Microsoft Office Small Business Accounting 2006 151
To Do this
Apply a credit 1 Select the check box in the Pay column for the vendor 2 In the Apply column in that line, click the Credits button. 3 Follow the instructions in the Apply Credits and Payments
dialog box. 4 Click the Adjust button.
What if . . . I only want to apply part of the credit? If the credit is greater than the amount you want to apply, change the amount in the Amount to Use column of the Apply Credits and Payments dialog box.
Working with vendor bills The following table contains additional tasks you can do when you pay vendor bills.
To Do this
Print checks 1 In the Navigation Pane, click Vendors. 2 Under Start a Task, click Print Checks.
Prepay a vendor bill 1 Write a check for the amount without entering line items. 2 When you receive the bill, enter the bill. 3 When you pay bills, select the check box in the Pay column for
the vendor. 4 In the Apply column for the vendor, click the Credits button. 5 In the Apply Credits and Payments dialog box, select the
check box next to the vendor payment. 6 Click the Adjust button.
What if . . . I only want to use part of the credit when I prepay? If the amount in the Total credit amount field is greater than the amount that you want to pay, change the amount in the Amount to Use column of the Apply Credits and Payments dialog box.
Adjusting vendor payments If you return items, you can adjust a vendor payment by creating a vendor credit memo. Vendor credit memos follow the same format as vendor bills, and you can find all vendor credit memos on the Bills and Item Receipts list. You can create a vendor credit memo for any vendor. If the vendor does not have Active status, you can type the vendor name in the vendor credit memo.

Part 4: Buying from Vendors
152 Microsoft Office Small Business Accounting 2006
Tip To create a vendor credit memo that is similar to an existing one, open the vendor credit memo, and then click Copy and Edit on the File menu. 1 In the Navigation Pane, click Vendors. 2 Under Start a Task, click New Credit Memo.
Note You can create a vendor credit memo from a vendor bill. On the toolbar, click the Create from button, and then select the vendor bill.
3 (Required) Click the arrow next to the Vendor name field, and then select a name from the list or add a new vendor. The contact information from the Vendor record appears on the vendor credit memo.
4 Enter the information in the other fields. To add a line item, click the first column of the first open line, and then select a line item type: Expense, Item, or Comment. Note To delete a line item, click the column to the left of the icon. An arrow appears, and the line is highlighted. Press DELETE.
5 When you are done, do one of the following: • On the toolbar, click the Save and Close button. • To save the vendor credit memo and create a new vendor credit memo, click
the Save and New button.
What if . . . I’ve already paid for the items? You can create a vendor credit memo from a bill that has been paid, a cash purchase form, or a credit card charge. In the Bills and Item Receipts list, click the arrow next to the Current View field, and then select All. Double-click the bill, the cash purchase form, or the credit card charge. On the Actions menu, click Create Vendor Credit Memo.
You can do the following additional tasks when you create a vendor credit memo.
To Do this
Add a reference In the Reference field, type the reference information, for example, a number from a vendor’s invoice.
Link one or more files to the vendor credit memo
1 At the bottom of the vendor credit memo, click the Add links button.
2 Navigate to the file location, select the file, and then click Open. Note To unlink, select the file name, and then press DELETE.
Editing a vendor credit memo
Microsoft Office Small Business Accounting 2006 153
Editing a vendor credit memo If you want to make a change or correct an error, you can edit a vendor credit memo. 1 In the Bills and Item Receipts list, double-click the vendor credit memo. 2 On the toolbar, click the Edit button. 3 Enter the information on the vendor credit memo. 4 When you are done, click the Save and Close button on the toolbar.
Voiding a vendor credit memo When you save a vendor credit memo, it is posted, so it cannot be deleted. You can either edit it or void it and then copy and edit it. The only way to work with a voided vendor credit memo is to copy and edit it. 1 In the Bills and Item Receipts list, double-click the vendor credit memo. 2 On the Actions menu, click Void. 3 To confirm, click the Yes button.
Working with vendor credit memos The following table contains additional tasks you can do with vendor credit memos.
To Do this
Change a quantity or a price
1 In the Bills and Item Receipts list, double-click the vendor credit memo.
2 In the Qty., Unit Price, or Line Total column, type a new value.
Send a vendor credit memo in an e-mail message to a vendor
In the Bills and Item Receipts list, select the vendor credit memo, and then click the E-mail button on the toolbar.
Export a vendor credit memo to Word
In the Bills and Item Receipts list, double-click the vendor credit memo, and then click the Export to Word button on the toolbar.

Part 4: Buying from Vendors
154 Microsoft Office Small Business Accounting 2006
Returning an item to a vendor You might need to return an item to a vendor if you find that it is not what you expected or you do not need it.
If you have not paid for the item If you have not paid for the item, you can create a vendor credit memo to credit the bill with the amount from the return. 1 Enter the bill. 2 Create a vendor credit memo from the unpaid bill with the item you returned. 3 Pay the bill.
If you have paid with cash or a check If you have paid with cash or a check, you can create a vendor credit memo. 1 Enter the bill. 2 Create a vendor credit memo from the paid bill with the item you returned. 3 Do one of the following:
• Contact the vendor and request a refund. • Apply the credit to another bill from the same vendor.
If you have paid by credit card If you have paid for the item with a credit card, you can create a credit card credit. 1 In the Navigation Pane, click Company. 2 Under Find, click Chart of Accounts. 3 Double-click the credit card account. 4 On the Actions menu, click New Transaction. 5 In the Select Transaction dialog box, select Credit, and then click the OK
button. 6 On the Credit Card Credit form, enter the vendor and the items you returned.

Part 5: Managing Employees
In this part Overview......................................................................................................................................155 Keyboard shortcuts ....................................................................................................................156
Chapter 20: Working with Employees.............................................................. 159 Working with the Employees list..............................................................................................159 Creating an Employee record....................................................................................................160 Editing an Employee record .....................................................................................................162 Deleting an Employee record ...................................................................................................162 Working with Employee records..............................................................................................162
Chapter 21: Tracking Employee Time ............................................................. 165 Working with the Time Entries list ..........................................................................................165 Filling in a timesheet...................................................................................................................166 Creating a Time Entry................................................................................................................168 Editing a Time Entry..................................................................................................................169 Deleting a Time Entry................................................................................................................170 Working with Time records ......................................................................................................170
Chapter 22: Managing Payroll.......................................................................... 171 Setting up payroll accounts........................................................................................................171 Adding payroll payments manually ..........................................................................................172 Using ADP payroll processing..................................................................................................172
Signing up for ADP Payroll ..............................................................................................172 Working with your ADP account online.........................................................................173 Downloading payroll..........................................................................................................173
Overview Microsoft Office Small Business Accounting 2006 provides the record-keeping tools you need to manage your employees. Employee records store relevant information about each employee, and Time records track the employees’ hours worked. The Time Report shows how your employees are accounting for their recorded hours.

Part 5: Managing Employees
156 Microsoft Office Small Business Accounting 2006
Payroll accounts in the Chart of Accounts track payments for payroll expenses, including employees’ wages, state and federal taxes, and other related expenses, such as employment insurance. You can manage payroll activities manually, by posting entries into the Chart of Accounts directly, or you can sign up for one of several online payroll management plans available from ADP® that are designed to work with Small Business Accounting.
Keyboard shortcuts You can use keyboard shortcuts to streamline your work in Small Business Accounting. To open the Employees home page, click Employees in the Navigation Pane. The following table lists the keyboard shortcuts available from the Employees home page, in lists, and in records and on forms. Keyboard shortcuts are not available in dialog boxes or wizards. Note If a shortcut contains more than one key, press and hold a key, and then press the next key.
To Press
Open the Help table of contents F1
Get Help for the current page ALT+F1
Open the Employees home page CTRL+4
Open the Employees list CTRL+SHIFT+E
Open the Time Entries list CTRL+SHIFT+T
In the Employees list or Time Entries list, you can use the following keyboard shortcuts.
To Press
Create a new record CTRL+N
Add or remove the Find toolbar CTRL+F
Open the selected records CTRL+O
Delete a record CTRL+D or DELETE
Add or remove content F7
Preview the printed list CTRL+F2
Print the list CTRL+P

Keyboard shortcuts
Microsoft Office Small Business Accounting 2006 157
On Employee forms, timesheets, and Time Entry forms, you can use the following keyboard shortcuts.
To Press
Create a new form CTRL+N
Close the form ESC or ALT+F4

Part 5: Managing Employees
158 Microsoft Office Small Business Accounting 2006

Chapter 20: Working with Employees
Microsoft Office Small Business Accounting 2006 maintains your Employee records and tracks hours worked, applying billable hours to customer invoices. With online payroll processing powered by ADP®, you can automate your payroll. The Employees home page is the starting point for managing your Employee records. To open the Employees home page, click Employees in the Navigation Pane.
For a detailed description of the Employees home page, see “Managing employees,” in Chapter 2, “Taking a Tour.” If you need further information, help is always available. To open the Help table of contents, press F1. To get Help for the current page, press ALT+F1. On forms, click the Help button on the toolbar. In dialog boxes and wizards, click the Help button.
Working with the Employees list The Employees list contains your Employee records. To view the Employees list: 1 In the Navigation Pane, click Employees. 2 Under Find, click Employees.
Employees list: CTRL+ SHIFT+E
Employees home page: CTRL+4
Help: F1

Part 5: Managing Employees
160 Microsoft Office Small Business Accounting 2006
The following table contains basic tasks you can do with the Employees list.
To Do this
View Employee records by status
Click the arrow next to the Current View field, and then select Active, Inactive, or All.
Add or remove employee numbers
1 On the Company menu, click Preferences, and then click the Employees tab.
2 Select or clear the Use employee ID check box. Sort the list Click a column title to switch between ascending and descending
order. An arrow indicates the sort order. Add, remove, or reorganize content
On the View menu, click Add/Remove Content.
Resize column width Click the column divider next to the column heading and drag it to a new width.
Change the column order
Select a column title and drag it to a new position.
Find an Employee record
1 On the toolbar, click the Find button. 2 Enter a keyword to look for and a column title to search under,
and then click the Find button. Open selected records 1 Select one or more (up to 10) records in the list.
2 On the File menu, click Open Selected Items. Print the Employees list On the toolbar, click the Print button . Export the Employees list to a Microsoft Office Excel spreadsheet
On the toolbar, click the Export to Excel button .
Creating an Employee record Any user with access other than Read-only or Salesperson can create an Employee record for any employee. 1 In the Navigation Pane, click Employees. 2 Under Start a Task, click New Employee.
Find: CTRL+F
Open: CTRL+O
New employee: CTRL+N
Print: CTRL+P
Add or remove content: F7

Creating an Employee record
Microsoft Office Small Business Accounting 2006 161
3 (Required) Type the employee’s name in the Employee name field. 4 You can add or remove custom fields that appear on all new Employee forms and
saved Employee records. Click the Custom Fields tab, and then click the Customize button at the bottom of the page. All users can see custom fields. Caution When you remove a custom field, the field and any information saved in it is removed from all saved Employee records.
5 When you are done, do one of the following: • On the toolbar, click the Save and Close button. • To save the Employee record and create another Employee record, click the
Save and New button. You can do the following additional tasks when you create an Employee record.
To Do this
Change the employee ID
Type a number or a text identifier in the Employee ID field. Note If you selected Use employee ID in Company Preferences, Small Business Accounting adds a sequential number to each Employee record you create. You cannot enter a duplicate employee ID.
Change the employee’s status to Inactive
Clear the Active check box. Note The Employee record status is Active by default.

Part 5: Managing Employees
162 Microsoft Office Small Business Accounting 2006
To Do this
Link one or more files to the Employee form
1 At the bottom of the Employee form, click the Add links button.
2 Navigate to the file location, select the file, and then click the Open button.
Note Because the file is linked, rather than attached, you always see the current version.
Editing an Employee record If you want to add or change the information in an Employee record, you can edit it. 1 In the Employees list, double-click the employee record. 2 Enter the information on the Employee form. 3 When you are done, click the Save and Close button on the toolbar.
Deleting an Employee record If an Employee record does not have transactions, such as invoices or Time Entries, associated with it, you can delete it. If the record has associated transactions, you can change its status to Inactive. 1 In the Employees list, double-click the employee record. 2 On the toolbar, click the Delete button . 3 To confirm, click the Yes button.
Working with Employee records After you have added your employees’ information into records, you can work with the records themselves or use the information in the records to communicate with your employees. The following table contains additional tasks you can do with Employee records.
To Do this
Change the status of one or more employees
In the Employees list, select one or more Employee records, and then click Make Active or Make Inactive on the Edit menu. Note A record with Inactive status does not appear in lists in dialog boxes, forms, and wizards, but you can still find it in the Employees list Inactive or All view.

Working with Employee records
Microsoft Office Small Business Accounting 2006 163
To Do this
Navigate through records
1 In the Employees list, double-click an Employee record. 2 Click the Previous Item button or the Next Item button
on the toolbar. Create a new timesheet for the employee
1 In the Employees list, double-click the Employee record. 2 On the Actions menu, click Open Weekly Timesheet.
Unlink a file from the Employee record
1 In the Employees list, double-click the Employee record. 2 At the bottom of the Employee form, next to the Add links
button, click the file name. 3 Press DELETE.
Send an e-mail message to an employee
In the Employees list, select an Employee record, and then click the E-mail button on the toolbar.
Send a form letter to employees
On the Employees menu, click Write Letters.
Buy preprinted checks or custom forms
Before you begin, make sure you have an active Internet connection. On the Employees menu, point to Employee Services, and then click Buy Checks and Forms.
What if ... I need to reimburse an employee for expenses? When an employee uses his or her own money to purchase work items, you can write a check to reimburse the expenses. You can keep track of these expenses and (optionally) bill them to a customer or assign them to a job. See “Writing a check,” in Chapter 24, “Recording Banking Activity.” It is a good practice to require employees to submit a proof of purchase, such as a receipt, before reimbursing expenses.

Part 5: Managing Employees
164 Microsoft Office Small Business Accounting 2006

Chapter 21: Tracking Employee Time
Microsoft Office Small Business Accounting 2006 measures the amount of time required for work performed by your employees, tracks the cost of time to charge to a customer, and ensures that your employees are paid for their hours worked. You can create Time records to track time worked by your employees on a daily (Time Entry) or weekly (timesheet) basis. The Time Report shows how your employees are accounting for their recorded hours. For more information, see Chapter 27, “Keeping Track of Company Data.” Note More reports are available if you sign up for ADP Payroll SM. For more information, see “Signing up for ADP Payroll ,” in Chapter 22, “Managing Payroll.”
Working with the Time Entries list The Time Entries list contains your Time records. To view the Time Entries list: 1 In the Navigation Pane, click Employees. 2 Under Find, click Time Entries. The following table contains basic tasks you can do with the Time Entries list.
To Do this
View Time records by status Click the arrow next to the Current View field, and then select Not Invoiced or All.
Sort the list Click a column title to switch between ascending and descending order. An arrow indicates the sort order.
Add, remove, or reorganize content
On the View menu, click Add/Remove Content.
Resize column width Click the column divider next to the column heading and drag it to a new width.
Change the column order Select a column title and drag it to a new position. Find a Time record 1 On the toolbar, click the Find button.
2 Enter a keyword to look for and a column title to search under, and then click the Find button.
Open selected records 1 Select one or more (up to 10) records in the list. 2 On the File menu, click Open Selected Items.
Print the Time Entries list On the toolbar, click the Print button . Export the Time Entries list to an Excel spreadsheet
On the toolbar, click the Export to Excel button .
Time Entries List: CTRL+ SHIFT+T
Find: CTRL+F
Open: CTRL+O
Print: CTRL+P
Add or remove content: F7

Part 5: Managing Employees
166 Microsoft Office Small Business Accounting 2006
Filling in a timesheet You can use a timesheet to quickly enter multiple Time Entries for one employee. Any user with access other than Read-only can enter a timesheet for any employee. The timesheet shows the days of the workweek, starting with the day specified in Company Preferences. 1 In the Navigation Pane, click Employees. 2 Under Start a Task, click New Timesheet.
3 (Required) Click the arrow next to the Employee name field, and then select a name from the list or add a new employee.
4 Click the arrow next to the Select week field, and then select a day in the week when the hours were worked.
5 Do one of the following: • To enter the hours worked, click the field corresponding to the day of the
week, and then type the number of hours spent working on that day. • To reuse a timesheet for the same employee covering the previous week, click
the Copy Last Week button on the toolbar. Double-check the copied information before you continue.
Caution Your entries on the timesheet are saved automatically when you fill in a time field and move to the next time field on the form.

Filling in a timesheet
Microsoft Office Small Business Accounting 2006 167
Tip If you want to delete a row, right-click the arrow next to the row, and then select Delete. You cannot delete the last remaining row in a timesheet.
6 When you are done, do one of the following: • On the toolbar, click the Save and Close button. • To save the timesheet and create a new timesheet, click the Save and New
button. You can do the following additional tasks when you create a timesheet.
To Do this
Print a blank timesheet On the Actions menu, click Print Blank Timesheet. Change the start day 1 Click Preferences on the Company menu, and then click the
Employees tab. 2 Click the arrow next to the First day of the week in timesheet
field, and then select a day from the list. Mark time billable to a customer
1 Select the Billable check box. 2 Click an entry in the Customer column, click the arrow, and
then select a customer from the list or add a new customer. 3 Click an entry in the Billing Item column, click the arrow, and
then select the item that best describes the work that was done or add a new item.
Mark time billable to another customer on the same timesheet
1 Select the Billable check box. 2 Click the next line in the form. 3 Click an entry in the Customer column, click the arrow, and
then select a customer or add a new customer. Mark hours worked billable to a job
To bill the hours worked to a job, click an entry in the Job column, click the arrow, and then select a job or add a new job. Note If you selected Use job in Company Preferences, the Job field appears on the timesheet.
Specify pay type Select a Pay type option. Note If you sign up for payroll processing by ADP®, the Pay type field is available in timesheets after you download payroll for the first time. For more information, see “Using ADP PayrollSM,” in Chapter 22, “Managing Payroll Processing.”
Export the timesheet to an Excel spreadsheet
Click the Export to Excel button on the toolbar.
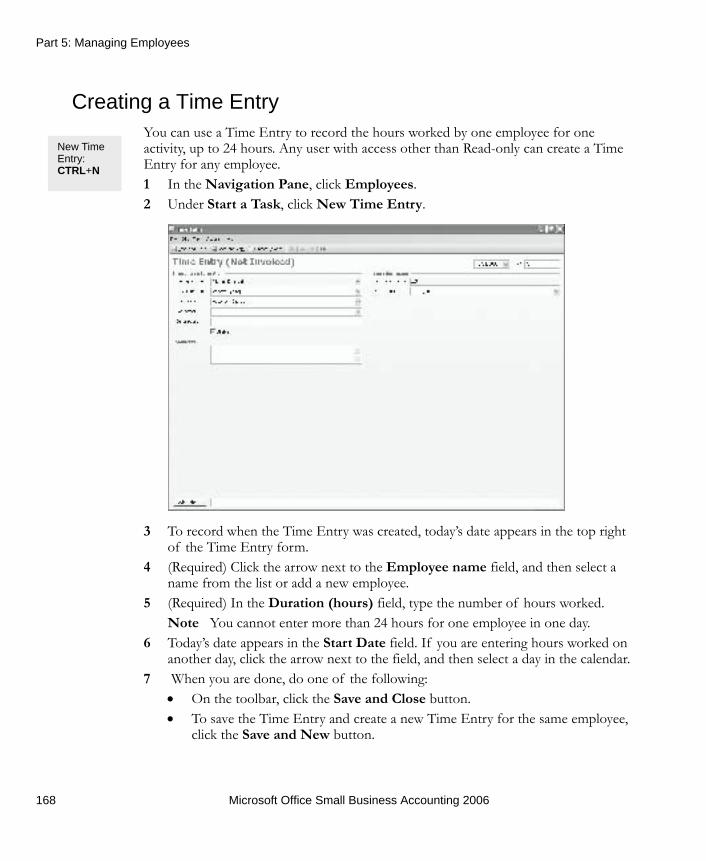
Part 5: Managing Employees
168 Microsoft Office Small Business Accounting 2006
Creating a Time Entry You can use a Time Entry to record the hours worked by one employee for one activity, up to 24 hours. Any user with access other than Read-only can create a Time Entry for any employee. 1 In the Navigation Pane, click Employees. 2 Under Start a Task, click New Time Entry.
3 To record when the Time Entry was created, today’s date appears in the top right of the Time Entry form.
4 (Required) Click the arrow next to the Employee name field, and then select a name from the list or add a new employee.
5 (Required) In the Duration (hours) field, type the number of hours worked. Note You cannot enter more than 24 hours for one employee in one day.
6 Today’s date appears in the Start Date field. If you are entering hours worked on another day, click the arrow next to the field, and then select a day in the calendar.
7 When you are done, do one of the following: • On the toolbar, click the Save and Close button. • To save the Time Entry and create a new Time Entry for the same employee,
click the Save and New button.
New Time Entry: CTRL+N

Editing a Time Entry
Microsoft Office Small Business Accounting 2006 169
You can do the following additional tasks when you create a Time Entry.
To Do this
Change the Time Entry number
Edit the No. field. Note Small Business Accounting adds a sequential number to each Time Entry you create.
Mark time billable to a customer
1 Click the arrow next to the Customer name field, and then select a customer from the list or add a new customer.
2 Click the arrow next to the Billing Item field, and then select the item that best describes the work done or add a new item.
3 Select the Billable check box. Mark hours worked billable to a job
Click the Job name field, click the arrow, and then select a job from the list or add a new job. Note The Job name field appears on the Time Entry form if you selected Use job in Company Preferences.
Specify pay type Select an option in the Pay type field. Note If you use ADP Payroll SM, the Pay type field is available on the Time Entry form after you first download payroll.
Create an invoice If you specify a customer name and a billing item, you can create an invoice to bill the customer. Click the Create Invoice button on the toolbar, and then click the OK button. An invoice opens. For more information, see Chapter 12, “Submitting an Invoice.”
Link one or more files to the Time Entry
1 At the bottom of the Time Entry form, click the Add links button.
2 Navigate to the file location, select the file, and then click the Open button.
Note Because the file is linked, rather than attached, you always see the current version.
Editing a Time Entry If you want to add or make changes to a Time Entry or a timesheet, you can edit it. 1 In the Time Entries list, double-click the Time Entry. 2 Enter the information on the Time Entry form. 3 When you are done, click the Save and Close button on the toolbar.

Part 5: Managing Employees
170 Microsoft Office Small Business Accounting 2006
Deleting a Time Entry If a Time Entry has not been invoiced, you can delete it. 1 In the Time Entries list, double-click the Time Entry. 2 On the toolbar, click the Delete button . 3 To confirm, click the Yes button.
Working with Time records After you have added your employees’ time information into records, you can work with the records themselves or use the information in the records to track time spent on work for a customer and to track employee hours for payroll. For more information, see Chapter 22, “Managing Payroll.” The following table lists additional tasks you can do with Time records.
To Do this
Navigate through records 1 In the Time Entries list, double-click a Time record. 2 Click the Previous Item button or the Next Item button
on the toolbar.
Unlink a file from the Time record
1 In the Time Entries list, double-click the Time record. 2 At the bottom of the Time Entry form, next to the Add links
button, select the file name, and then press DELETE.
Invoice time to a customer
1 In the Time Entries list, click the arrow next to the Current View field, and then select Not Invoiced.
2 Select one or more Time records for one customer. 3 You can create an invoice for only one customer at a time. 4 On the Actions menu, click Convert Time Entry to Invoice.
Create a Time Entry from Microsoft Office Outlook with Business Contact Manager Update
See Help in Business Contact Manager for Outlook.

Chapter 22: Managing Payroll
If your company has employees, you have payroll responsibilities. Payroll costs include not only the employee’s wages but also state and federal taxes, FICA, unemployment insurance, and any deductions for health plans, insurance, and other employer-sponsored benefit plans. You can manage payroll through ADP Payroll SM — the only online payroll service designed to work directly with Microsoft Office Small Business Accounting 2006. If you use another payroll service or manage payroll within your company, you can add payroll payments to your payroll accounts manually.
Setting up payroll accounts Your payroll accounts are listed in the Chart of Accounts. Payroll accounts include some or all of the following accounts.
Account Account type When to use
Wages Expense If you write paychecks. Note To get more detailed accounting, add Expense sub-accounts for specific wage types, for example, Overtime or Bonuses.
Federal Tax Current Liability To record your federal tax liability.
State Tax Current Liability If your payroll is subject to state taxes.
Local Tax Current Liability If your payroll is subject to local taxes.
Unemployment Current Liability If your payroll is subject to an unemployment fee.
If you set up your company by using standard accounts, your payroll accounts are set up automatically. You can rename accounts or delete accounts that you will not use. To check your payroll accounts: 1 Click Company in the Navigation Pane. 2 Under Find, click Chart of Accounts. 3 You can use the entry in the Type column to locate your payroll accounts. If you did not set up your company accounts in the Small Business Accounting Startup Wizard, you can add your payroll accounts manually. For more information, see Chapter 5, “Setting Up and Managing Accounts.”

Part 5: Managing Employees
172 Microsoft Office Small Business Accounting 2006
Adding payroll payments manually Small Business Accounting works directly with ADP Payroll online. If you do not sign up for ADP Payroll, however, you can use another payroll service or manage payroll within your company, and then add your payroll payments to your payroll accounts manually. First, check the Chart of Accounts to make sure your payroll accounts are set up, and then record the payroll payment. • If you write payroll checks, record payroll payments in the Check form and assign
the payment to a payroll account. • If you employ a payroll service other than ADP® to write payroll checks, record
the payroll payments in a journal entry and assign the payment to a payroll account.
Using ADP Payroll SM You can save time and avoid errors and penalties by signing up for ADP Payroll SM. You can select from a variety of simple and affordable plans for online payroll management from the ADP® Web site. If you clicked the Yes button to use ADP Payroll in the Small Business Accounting Startup Wizard when you set up your company, you will see a reminder to set up payroll services on your Company home page.
Signing up for ADP Payroll First, check the Chart of Accounts to make sure your payroll accounts are set up, and then make sure you have an active Internet connection. 1 On the Employees menu, point to Online Payroll, and then click Sign Up for
Payroll Service. The ADP Web site provides detailed instructions for signing up for an online payroll management plan.
2 When you are done, click the Close button to return to Small Business Accounting.

Using ADP Payroll SM
Microsoft Office Small Business Accounting 2006 173
What if . . . I need to track the payroll transactions that I enter online? To create a log file containing a record of your payroll account activities online, select Log online activities on the General tab in Company Preferences. The log file is stored by default in the My Documents\Small Business Accounting\Logs folder of the administrator who set up your company in Small Business Accounting. The online log file may contain sensitive information from your online payroll accounts, so it is a good practice to check the log file carefully before making it available to other users.
Working with your ADP® account online When you sign up for ADP Payroll, your Time records provide the basis for your payroll expenses. You can enter Time records directly into Small Business Accounting and upload them to your online payroll account, or you can enter payroll information into your online payroll account and download your payroll records to Small Business Accounting. Caution If you add employee and time information into Small Business Accounting and into ADP, the ADP records may be overwritten by information in the Small Business Accounting records. Before you begin, have your ADP Payroll SM account information (user ID and password) ready and make sure you have an active Internet connection. 1 On the Employees menu, point to Online Payroll, and then click Manage
Payroll. 2 To work with your ADP payroll account, follow the instructions on the ADP Web
site. 3 When you are done, click the Close button to return to Small Business
Accounting.
Downloading payroll To keep your payroll accounts up to date, download your payroll records from your ADP Payroll account to journal entries in the Chart of Accounts on a regular basis. The journal entries include the total payment and may be grouped by employee or company. Note The journal entries contain pay type information that you can view in the Transaction Detail by Account report. After you download payroll for the first time, the Pay type field is available in the Time Entry form and in timesheets.

Part 5: Managing Employees
174 Microsoft Office Small Business Accounting 2006
Before you begin, have your ADP Payroll account information (user ID and password) ready and make sure you have an active Internet connection. 1 In the Navigation Pane, click Employees. 2 Under Start a Task, click Download Pay Runs. 3 Follow the instructions on the Download Pay Runs page. 4 To save your payroll records in a journal entry, click the Save and Close button.

Part 6: Keeping Bank Records
In this part Overview......................................................................................................................................176 Keyboard shortcuts ....................................................................................................................176
Chapter 23: Managing Bank Accounts ............................................................ 179 Working with the Chart of Accounts.......................................................................................179 Adding a bank account ..............................................................................................................180 Adding a credit card account.....................................................................................................182 Editing an account......................................................................................................................184 Deleting an account....................................................................................................................184 Inactivating an account ..............................................................................................................184 Working with accounts ..............................................................................................................185
Chapter 24: Recording Banking Activity.......................................................... 187 Viewing an account register ......................................................................................................187 Adding a transaction...................................................................................................................188 Editing a transaction...................................................................................................................188 Voiding a transaction .................................................................................................................189 Writing a check ...........................................................................................................................189 Printing a batch of checks .........................................................................................................192 Making a deposit .........................................................................................................................193 Transferring funds ......................................................................................................................194 Paying bills ...................................................................................................................................195 Reconciling an account ..............................................................................................................196 Working with transactions.........................................................................................................198
Chapter 25: Using Online Banking .................................................................. 199 Setting up online banking ..........................................................................................................199 Transferring funds online ..........................................................................................................200 Paying bills online .......................................................................................................................201 Downloading transactions.........................................................................................................202 Matching downloaded transactions..........................................................................................203

Part 6: Keeping Bank Records
176 Microsoft Office Small Business Accounting 2006
Overview Microsoft Office Small Business Accounting 2006 helps you track your company’s income and expenses when you record all your banking transactions, for example, deposits, withdrawals, credit card charges, and transfers. When you add funds to an account, you debit the bank or credit card account and credit an Expense account set up in the Chart of Accounts; likewise, when you withdraw funds from an account, you credit the account and debit an Income or an Asset account. This way, you can keep your accounts balanced. If you use online banking, you can set up your bank and credit card accounts in the Chart of Accounts and work directly with the corresponding online accounts by means of an Internet connection to your bank or other financial institution. You can pay bills, transfer funds, and download your transactions directly from your online account to the account register in the Chart of Accounts. Be sure to reconcile all of your bank and credit card accounts on a regular basis.
Keyboard shortcuts You can use keyboard shortcuts to streamline your work in Small Business Accounting. To open the Banking home page, click Banking in the Navigation Pane. The following table lists the keyboard shortcuts available from the Banking home page, in lists, and in records and on forms. Keyboard shortcuts are not available in dialog boxes or wizards. Note If a shortcut contains more than one key, press and hold a key, and then press the next key.
To Press
Open the Help table of contents F1
Get Help for the current page ALT+F1
Open the Banking home page CTRL+5
Open the Chart of Accounts CTRL+SHIFT+A

Keyboard shortcuts
Microsoft Office Small Business Accounting 2006 177
From the Chart of Accounts, you can use the following keyboard shortcuts.
To Press
Open an account register CTRL+R
Create a new account CTRL+N
Add or remove the Find toolbar CTRL+F
Open the selected accounts CTRL+O
Delete an account CTRL+D or DELETE
Add or remove content F7
Preview the printed list CTRL+F2
Print the list CTRL+P
On Banking forms, you can use the following keyboard shortcuts.
To Press
Create a new form CTRL+N
Close the form ESC or ALT+F4

Part 6: Keeping Bank Records
178 Microsoft Office Small Business Accounting 2006

Chapter 23: Managing Bank Accounts
Microsoft Office Small Business Accounting 2006 tracks your banking activities so you can keep tighter control over the flow of funds into and out of your company. The Banking home page is the starting point for managing your company’s banking activities. To open the Banking home page, click Banking in the Navigation Pane.
For a detailed description of the Banking home page, see “Managing bank accounts,” in Chapter 2, “Taking a Tour.” If you need further information, help is always available. To open the Help table of contents, press F1. To get Help for the current page, press ALT+F1. On forms, click the Help button on the toolbar. In dialog boxes and wizards, click the Help button.
Working with the Chart of Accounts The Chart of Accounts lists all of your company’s accounts. To view the Chart of Accounts: 1 In the Navigation Pane, click Banking.
Banking home page: CTRL+5
Chart of Accounts: CTRL+ SHIFT+A
Help: F1

Part 6: Keeping Bank Records
180 Microsoft Office Small Business Accounting 2006
2 Under Find, click Chart of Accounts. Balance sheet accounts appear at the top of the list, followed by Income and Expense accounts. Accounts are then grouped by type. If you selected Use account numbers in Company Preferences, the account number determines the account’s position within its grouping in the list. You cannot sort the Chart of Accounts. Tip You can use the entry in the Type column to help locate accounts. The following table contains basic tasks you can do with the Chart of Accounts. To Do this
View accounts by status Click the arrow next to the Current View field, and then select Active, Inactive, or All.
Add or remove account numbers
1 On the Company menu, click Preferences. 2 Select or clear the Use account numbers check box.
Add, remove, or reorganize content
On the View menu, click Add/Remove Content.
Resize column width Click the column divider next to the column heading and drag it to a new width.
Change the column order
Select a column title and drag it to a new position.
Find an account 1 On the toolbar, click the Find button. 2 Enter a keyword to look for and a column title to search under,
and then click the Find button. Open selected accounts 1 In the Chart of Accounts, select one or more (up to 10)
records in the list. 2 On the File menu, click Open Selected Items.
Print the Chart of Accounts
On the toolbar, click the Print button .
Export the Chart of Accounts to a Microsoft Office Excel spreadsheet
On the toolbar, click the Export to Excel button .
For a detailed description of the Chart of Accounts, see “Setting up the Chart of Accounts,” in Chapter 5, “Setting Up and Managing Accounts.”
Adding a bank account 1 In the Navigation Pane, click Banking. 2 Under Start a Task, click New Bank Account.
Find: CTRL+F
Print: CTRL+P
Open: CTRL+O
Add or remove content: F7

Adding a bank account
Microsoft Office Small Business Accounting 2006 181
Note The Account type field appears dimmed. You cannot change the account type after you select it.
3 (Required) The Account no. field appears on the account form if you selected Use account numbers in Company Preferences. Type an account number or retain the default number. Note The account number determines the account’s position within its grouping in the Chart of Accounts. It is not necessarily the same as the bank account number.
4 (Required) Type an account name in the Account name field. 5 Click the arrow next to the Bank name field, and then select a bank from the list
or add a new bank. 6 (Required) Click the arrow next to the Bank account type field, and then select
Checking, Saving, or Money Market. 7 Type the bank account number in the Bank account no. field. 8 If you are carrying over balances from another accounting system, type an
account balance in the Balance field. The opening balance represents the balance in the account as of your company’s start date. If you add an account after the start date, the opening balance is zero, and your beginning balance is added to the account as a journal entry.
9 Click the arrow next to the Cash Flow category field, and then select Operating, Investing, or Financing. Your selection determines how the account appears in your company’s Cash Flow Statement.

Part 6: Keeping Bank Records
182 Microsoft Office Small Business Accounting 2006
10 Do one of the following: • On the toolbar, click the Save and Close button. • To save the account and create another account, click the Save and New
button. You can do the following additional tasks when you create an account.
To Do this
Change the account’s status to Inactive
Clear the Active check box. Note The account status is Active by default.
Add a comment to the account record
Type additional information in the Comments field. You can read comments only when you open the account.
Set up an online account
On the Actions menu, click Setup online banking. For more information, see Chapter 25, “Using Online Banking.”
What if . . . I have accounts with two separate branches of the same bank. How do I track them? In the Chart of Accounts, accounts are grouped by type and then by number or name. Add each bank account individually, and then assign a name or number to place them next to each other in the Chart of Accounts.
Adding a credit card account 1 In the Navigation Pane, click Company. 2 Under Start a Task, click New Account. 3 Under Balance Sheet Accounts, select Credit Card, and then click the OK
button.

Adding a credit card account
Microsoft Office Small Business Accounting 2006 183
Note The Account type field appears dimmed. You cannot change the account type after you select it.
4 (Required) The Account no. field appears on the account form if you selected Use account numbers in Company Preferences. Type an account number or retain the default number. Note The account number determines the account’s position within its grouping in the Chart of Accounts.
5 (Required) Type an account name in the Account name field. 6 Click the arrow next to the Bank name field, and then select a bank from the list
or add a new bank. 7 You can type the credit limit that is allowed by the bank issuing the card. 8 In the Credit card (4-digits) field, type the last four digits of the account
number that is associated with this account. Caution This field is not encrypted, so this information is not secure.
9 If you are carrying over balances from another accounting system, type an account balance in the Balance field. The opening balance represents the balance in the account as of your company’s start date. If you add an account after the start date, the opening balance is zero, and your beginning balance is added to the account as a journal entry.
10 Click the arrow next to the Cash Flow category field, and then select Operating, Investing, or Financing. Your selection determines how the account appears in your company’s Cash Flow Statement.

Part 6: Keeping Bank Records
184 Microsoft Office Small Business Accounting 2006
11 Do one of the following: • On the toolbar, click the Save and Close button. • To save the account and create another account, click the Save and New
button. You can do the following additional tasks when you create a credit card account.
To Do this
Change the account’s status to Inactive
Clear the Active check box. Note The account status is Active by default..
Add a comment to the account
Type additional information in the Comments field. You can read comments only when you open the account.
Set up an online account
On the Actions menu, click Setup online banking. For more information, see Chapter 25 “Using Online Banking.”
Editing an account If you want to change the information you have entered into a bank account, you can edit it. 1 In the Chart of Accounts, select the account name. 2 On the Actions menu, click Edit Account. 3 Enter the information on the Account form. 4 When you are done, click the Save and Close button on the toolbar.
Deleting an account If a bank account does not have an opening balance or transactions associated with it, you can delete it. 1 In the Chart of Accounts, select the account. 2 On the toolbar, click the Delete button . 3 To confirm, click the Yes button.
Inactivating an account You cannot delete an account that has transactions or documents associated with it, but you can change its status to Inactive. Note An account with Inactive status does not appear in lists in dialog boxes, forms, and wizards. When you change an account status to Inactive, you will no longer be

Working with accounts
Microsoft Office Small Business Accounting 2006 185
able to select it from those lists, though you can still post entries to its account register, which you can find it in the Chart of Accounts Inactive or All view. 1 In the Chart of Accounts, select one or more active accounts. 2 On the Edit menu, click Make Inactive.
Working with accounts After you have added your bank accounts, you can add transactions to the accounts or use the information in the accounts to generate reports to better manage your company. For more information, see Chapter 24, “Recording Banking Activity,” and Chapter 27, “Keeping Track of Company Data.” The following table contains additional tasks you can do with bank accounts.
To Do this
Navigate through accounts
1 In the Chart of Accounts, double-click an account. 2 Click the Previous Item button or the Next Item
button on the toolbar. Change the status of one or more accounts
In the Chart of Accounts, select one or more accounts, and then click Make Active or Make Inactive on the Edit menu.
View a summary of bank accounts
In the Navigation Pane, click Company. The Company home page contains a snapshot of your company’s financial condition: • The Bank Account Summary pane lists your current
accounts. • The Account Balances pane lists current balances for the
accounts you select. Buy preprinted checks or custom forms
Before you begin, make sure you have an active Internet connection. 1 In the Navigation Pane, click Banking. 2 Under Start a Task, click Buy Checks and Forms.
Accept credit cards Before you begin, make sure you have an active Internet connection. 1 On the Banking menu, point to Banking Services, and then
click Accept Credit Cards. 2 Follow the instructions on the Web page to sign up for the
online credit card processing service.

Part 6: Keeping Bank Records
186 Microsoft Office Small Business Accounting 2006

Chapter 24: Recording Banking Activity
Microsoft Office Small Business Accounting 2006 tracks your banking transactions in a bank or credit card account register. Be sure to enter transactions regularly and to reconcile each account soon after you receive your account statement. The Bank Transactions report lists all transactions for all your bank accounts over a selected period of time. You can also view specialized reports for deposit details, check details, missing checks, and reconciliation details. For more information, see Chapter 27, “Keeping Track of Company Data.”
Viewing an account register Every bank or credit card account has its own account register of transactions. Every transaction is entered into the account register. After you add a transaction, you cannot delete it. If an entry is not valid, you can edit it or mark it void. Tip Keep your account current by entering transactions regularly and by reconciling the account soon after you receive your bank account statement. 1 In the Navigation Pane, click Banking. 2 Under Start a Task, click Account Register. 3 To view transactions for an account, click the arrow next the Bank account field,
and then select the bank or credit card account. 4 To close the account register, click the Close button on the toolbar. The following table contains basic tasks you can do with an account register.
To Do this
Sort the list Click a column title to switch between ascending and descending order. An arrow indicates the sort order. Note If you sort the account register by any column other than the Date column, the Balance column changes. The ending balance, however, remains the same.
Resize column width Click the column divider next to the column heading and drag it to a new width.
Change the column order
Select a column title and drag it to a new position.
View account details On the Actions menu, click Open Account Details. Set up an online account On the Actions menu, click Setup online banking.
For more information, see Chapter 25, “Using Online Banking.”
Account register: CTRL+R

Part 6: Keeping Bank Records
188 Microsoft Office Small Business Accounting 2006
To Do this
Add a new transaction Click the New transaction link at the bottom of the list. View transaction details Double-click an entry in the account register to view the details of
the transaction. Change the status of a transaction
1 Select an entry in the account register. 2 On the Actions menu, point to Mark as, and then click
Unmatched, Unreconciled, or Reconciled. Note After you reconcile a transaction, a reconciled stamp appears next to the transaction in its account register.
Adding a transaction 1 In the Navigation Pane, click Banking. 2 Under Start a Task, click Account Register. 3 Click the arrow next to the Bank account field, and then select a bank or credit
card account. 4 Click the New transaction link at the bottom of the account register. 5 In the Select Transaction dialog box, select a transaction. 6 Click the OK button. 7 Enter the information in the form or dialog box for the transaction. 8 When you are done, do one of the following:
• On a form, click the Save and Close button in the toolbar. • In a dialog box, click the OK button.
9 To add another transaction, click the New transaction link at the bottom of the register.
10 To exit, click the Close button on the toolbar.
Editing a transaction 1 In the bank or checking account register, double-click the transaction you want to
edit. 2 On the toolbar, click the Edit button.
Note You cannot edit a bill payment you make to a vendor or a deposit for a customer payment. If you want to change a bill payment or customer payment deposit, you must void it and add a new transaction.

Voiding a transaction
Microsoft Office Small Business Accounting 2006 189
3 Enter the information on the transaction form. 4 When you are done, click the Save and Close button on the toolbar.
Voiding a transaction You cannot delete a bank or credit card transaction, but you can void it. When you void a transaction, it is marked Void and it remains in the account register with the status of Void. 1 In the bank or checking account register, double-click the transaction you want to
void. 2 On the toolbar, click the Void button. 3 To confirm, click the Yes button. 4 To close the transaction record, click Close on the File menu. 5 To exit the account register, click the Close button on the toolbar.
Writing a check You can write a check and mark it to be printed. The Check Detail report lists all checks and amounts issued from your bank accounts over a selected period of time. The Missing Checks report shows all numbered transactions missing from the check sequence for the current month, arranged by bank account. For more information, see Chapter 27, “Keeping Track of Company Data.” 1 In the Navigation Pane, click Banking. 2 Under Start a Task, click Write Checks.

Part 6: Keeping Bank Records
190 Microsoft Office Small Business Accounting 2006
3 (Required) Click the arrow next to the Bank Account field, and then select an account from the list or add a new bank account.
4 The Balance field contains the current balance in the account. 5 In the No. field, type a check number to match your checkbook. If you leave it
blank, Small Business Accounting will fill in the next check number. 6 Today’s date appears in the Date field. To change the date, click the arrow next to
the Date field, and then select a date from the calendar. 7 (Required) Click the arrow next to the Pay to field, and select a payee or add a
new payee. Note If you are writing a check to a party who has multiple relationships with your company (for example, as a customer and as a vendor), make sure you select the payee name from the correct list.
8 (Required) In the Amount field, type the amount of the check in dollars and cents, for example, $123.45.
9 If you have preprinted checks, or if you want to print the check to a blank sheet of paper, select the To be printed check box.
10 Under Items and expenses, add a line item, specifying a line total or an amount to pay, depending on the payee type. Tip If you want to delete a row, right-click the arrow next to the row, and then select Delete. You cannot delete the last remaining row in a Check form.
11 When the payment in the Amount field matches the Total field, do one of the following: • On the toolbar, click the Save and Close button.

Writing a check
Microsoft Office Small Business Accounting 2006 191
• To save the check and write another check for the same bank account, click the Save and New button.
You can do the following additional tasks when you write a check.
To Do this
Write a check payable to cash
Create a vendor named Cash, and then select the Cash vendor in the Pay to field on the Check form. For more information, see “Creating a vendor record,” in Chapter 15, “Working with Vendors.”
Pay a vendor’s bill 1 In the Pay to field, select the vendor name. 2 Under Items and expenses, click the first column of the first
open line, and then select Item. Select the item name, enter the quantity, and then adjust the unit price, as necessary.
3 If you selected Use Class in Company Preferences, you can assign the payment to a class. Click an entry in the Class column, click the arrow, and then select a class or add a new class.
4 If you selected Use job in Company Preferences, you can assign the payment to a job. Click an entry in the Job name field, click the arrow, and then select a job or add a new job.
5 If the item is billable to a customer, select the Billable check box.
Pay sales taxes 1 In the Pay to field, select the sales tax agency. 2 Under Items and expenses, click the an entry in the Tax
Code column, click the arrow, and then select the tax code name.
3 In the Amount to pay field, type the amount to pay the sales tax agency, in dollars and cents, for example, $123.45.
Refund a customer payment
1 In the Pay to field, select the customer name. 2 Under Items and expenses, click the first column of the first
open line, and then select Item. 3 Select the item name, enter the quantity, and then adjust the
unit price, as necessary. Reimburse an employee for expenses
1 In the Pay to field, select the employee name. 2 Under Items and expenses, click the first column of the first
open line, and then select Expense. 3 Select the item name, enter the quantity, and then adjust the
unit price, as necessary. Add a note Type a note in the Memo field. If you print the check, the
contents of the Memo field will print on the check.

Part 6: Keeping Bank Records
192 Microsoft Office Small Business Accounting 2006
To Do this
Print the check 1 On the File menu, click Print, and then click OK to save the check.
2 In the Print Checks dialog box, select the checks to print, and then click the Print button.
3 Specify your print settings, and then click the OK button.
What if . . . The bank returns my check for insufficient funds? Void the check, and add any bank fees you were charged for the returned check. Any vendor bills covered by the voided check now appear as bills to be paid.
Printing a batch of checks If you have preprinted checks, or if you want to print checks on blank sheets of paper, you can print a batch of checks for which you have selected To be printed on the Check form. 1 In the Navigation Pane, click Banking. 2 Under Start a Task, click Print Checks. 3 Click the arrow next to the Bank account field, and then select the checking
account. 4 In the Starting check no. field, specify a check number for the first check to
print. Note Small Business Accounting tracks the number of the last check printed and automatically fills in the next check number.
5 Select one or more checks you want to print. Tip To select all the checks in the list, select the check box next to the Date heading.
6 Click Print. 7 Follow the instructions in the Print dialog box.
Tip To ensure that checks print correctly, click the Alignment button, and then print a test page on blank paper. When you are satisfied with the result, click the OK button to return to the Print dialog box.
8 Click the OK button. 9 Confirm that the selected checks printed, and then click the Close button.

Making a deposit
Microsoft Office Small Business Accounting 2006 193
What if . . . My checks do not print correctly? Make sure that your checks print correctly before you close the Print Checks dialog box. To reprint checks, select Reprint Now or Reprint Later.
Making a deposit You can deposit customer payments to an account and apply the payment to invoiced items. You can also record payments from vendors or deposits from other accounts. You cannot edit a deposit from a customer, a vendor, or other account made on the Deposit form. If you want to change a deposit, you must void it and add a new transaction. The Deposit Detail report lists all deposit transactions for your bank accounts for a selected period of time. For more information, see Chapter 27, “Keeping Track of Company Data.” 1 In the Navigation Pane, click Banking. 2 Under Start a Task, click Make Deposit.
3 Today’s date appears in the Date field. To change the date, click the arrow next to the Date field, and then select a date from the calendar.
4 (Required) Click the arrow next to the Deposit in field, and select the bank account where you want to add the deposit.

Part 6: Keeping Bank Records
194 Microsoft Office Small Business Accounting 2006
5 You can deposit customer payments from the Undeposited Funds account. In the Payments received list, select one or more customer payments you want to deposit. Tip To select all payments in the list, select the check box next to the Date heading.
6 You can make an additional deposit that is not related to a customer payment. On the toolbar, click the New Deposit Line button. Select an account (customer, vendor, or other), and then type the amount of the deposit in dollars and cents, for example, $123.45. When you are done, click the Record button.
7 If you do not want to deposit the full amount in the Total deposit field, click the arrow next to the Cash-back account field and select an account, and then type an amount in the Cash-back amount field.
8 Do one of the following: • Print a deposit slip.
1 Click Print on the File menu. 2 Click the OK button to save the deposit. 3 In the Print dialog box, click the OK button.
• To exit, click the Save and Close button on the toolbar. • To save the deposit and make another deposit to the same account, click the
Save and New button. What if . . . The bank returns a customer’s payment check for insufficient funds? If the customer’s check was one of many items in a deposit, make a journal entry to cancel the transaction. In the Journal Entry form, select Customer in the Type column, debit the customer for the amount of the returned check and any bank fee, and then credit the full amount to the account where the check was deposited. For more information, see “Making a journal entry,” in Chapter 6, “Recording Account Activity.” If the check was the single item in a deposit, first void the deposit in the account register and then void the customer payment. Add any bank fee that you were charged for the returned check to the account register. To charge the customer for the fee, add the bank fee to the customer invoice, and then resend the invoice to the customer.
Transferring funds You can transfer funds between any two accounts, except inventory asset accounts and accounts linked to a sales tax agency. 1 In the Navigation Pane, click Banking. 2 Under Start a Task, click Transfer Funds.

Paying bills
Microsoft Office Small Business Accounting 2006 195
3 Today’s date appears in the Date field. To change the date, click the arrow next to the Date field, and then select a date from the calendar.
4 (Required) Under Transfer from, click the arrow next to the Account name field, and select the account where you want to withdraw funds.
5 (Required) Under Transfer to, click the arrow next to the Account name field, and select the account where you want to deposit funds.
6 (Required) In the Amount field, type the amount you want to transfer. 7 Click the Transfer button.
Paying bills After you enter a bill payment you make to a vendor, you cannot edit it or delete it. If you want to change a bill payment, you must void it and add a new bill payment. 1 In the Navigation Pane, click Banking. 2 Under Start a Task, click Pay Bills.
3 Today’s date appears in the Date field. To change the date, click the arrow next to the Date field, and then select a date from the calendar.
4 (Required) Click the arrow next to the Pay from field, and then select a bank or credit card account.
5 (Required) Click the arrow next to the Payment method field, and then select Cash, Check, or Credit Card.
6 (Required) Select the check box next to each bill you want to pay.

Part 6: Keeping Bank Records
196 Microsoft Office Small Business Accounting 2006
The amount of the payment appears in the Amount field. The Ending balance field automatically subtracts the payment and calculates the amount left in the selected account.
7 When you are done, do one of the following: • On the toolbar, click the Save and Close button. • To save the bill payment and enter another bill payment, click the Save and
New button. You can do the following additional tasks when you pay bills.
To Do this
Apply a cash discount If the vendor gives you a discount, for example, for early payment, select the check box next to the bill, and then enter the amount in dollars and cents in the Cash Discount column.
Apply a vendor credit 1 Select the check box next to the bill, and then click the Credits button in the Apply column.
2 Specify a credit amount, and then click the Adjust button. Enter a partial payment To pay less than the full amount of the bill, select the check box
next to the bill, and then change the amount in the Payment column.
Print checks 1 If the Payment method is Check, select Print Checks on the Actions menu.
2 Click the OK button to save the bill payment. 3 In the Print Checks dialog box, in the Starting check no.
field, specify a check number for the first check to print or retain the number set automatically.
4 Select one or more checks you want to print. 5 Click the Print button.
Reconciling an account When you receive a statement from a bank or other financial institution, match the transactions in your account register with the bank records. Be sure to correct any inconsistencies promptly. The Reconciliation Detail report lists all cleared and uncleared transactions as of a given statement date, plus all post-statement deposits and checks as of the current date for your financial accounts. For details, see Chapter 27, “Keeping Track of Company Data.” 1 In the Navigation Pane, click Banking. 2 Under Start a Task, click Reconcile Account. 3 (Required) Click the arrow next to the Account field, and then select a bank or
credit card account.

Reconciling an account
Microsoft Office Small Business Accounting 2006 197
4 (Required) The Beginning balance field contains the balance in your account when the account was last reconciled. If this is the first time you are reconciling this account, enter the account’s opening balance.
5 (Required) Enter the ending balance from your bank statement in the Ending balance field. Note If you left off during a previous reconciliation, you see a message asking if you want to open a partial reconciliation. Click the OK button to continue.
6 Click the Next button. 7 On the Reconcile Account page, select the transactions that match your bank
statement. The totals at the bottom of the page adjust according to your selections.
8 To change the order of the transactions in the list, click the arrow next to the View by field, and then select a view option.
9 If your account is missing transactions or if transactions do not match, you can add, edit, or void transactions. • To add a transaction, click the New transaction link at the bottom of the list. • To edit a transaction, double-click it, and then click the Edit button on the
toolbar. • To void a transaction, double-click it, and then click the Void button on the
toolbar. To confirm, click the Yes button. When the amount in the Difference field is 0 (zero), your account balanced.
10 Do one of the following: • If the amount in the Difference field is 0 (zero), click the Reconcile button
to reconcile the account, and then click the Display Report button to open the Reconciliation Detail report or click the Close button.
• If the amount in the Difference field is not 0 (zero), click the Reconcile button, and then click the OK button to exit without reconciling your account or click the Cancel button to return to the Reconcile Account dialog box. Note If you have matched some transactions in the list, you will create a partial reconciliation. When you next reconcile the account, you can continue where you left off.

Part 6: Keeping Bank Records
198 Microsoft Office Small Business Accounting 2006
Working with transactions The following table contains additional ways to add bank and credit card transactions. To Do this
Record a cash withdrawal
1 Under Start a Task, click Transfer Funds. 2 Under Transfer from, click the arrow next to the Account
name field, and select the account where you want to withdraw funds.
3 Under Transfer to, click the arrow next to the Account name field, and select the cash account where you want to record the cash withdrawal.
4 In the Amount field, enter the dollar amount of the funds you want to withdraw.
5 Click the Transfer button. Add a cash deposit or to deposit from another account
1 Open the bank account register. 2 Click the New transaction link at the bottom of the list. 3 Select Make Other Deposit, and then click the OK button.
Record a bank fee 1 Open the bank account register. 2 Click the New transaction link at the bottom of the list. 3 Select Enter Bank Fee, and then click the OK button.
Add interest income 1 Open the bank account register. 2 Click the New transaction link at the bottom of the list. 3 Select Enter Interest Income, and then click the OK button.
Record a credit card charge
1 In the Navigation Pane, click Banking. 2 Under Start a Task, click Credit Card Charge.
Add a credit card credit 1 Open the credit card account register. 2 Click the New transaction link at the bottom of the list. 3 In the Select Transaction dialog box, click Credit, and then
click the OK button. Record a credit card fee 1 Open the credit card account register.
2 Click the New transaction link at the bottom of the list. 3 In the Select Transaction dialog box, click Misc. Fee, and
then click the OK button.

Chapter 25: Using Online Banking
If you do your banking with a bank or other financial institution that supports online banking, you can set up your bank and credit card accounts in Microsoft Office Small Business Accounting 2006 to work directly with your online accounts by means of an Internet connection.
Setting up online banking First, you need to work with your bank or other financial institution to set up an online account, including a secure user ID and password, before you can access the account in Small Business Accounting. Next, add the account to the Chart of Accounts. For instructions, see “Adding a bank account,” or “Adding a credit card account,” in Chapter 23, “Managing Bank Accounts.” Before you begin, have your account access information (user ID and password) ready and make sure you have an active Internet connection. 1 In the Navigation Pane, click Banking. 2 Under Start a Task, click Online Banking. 3 In the Online Banking Wizard, read about online accounts, and then click the
Next button. Note If your bank or other financial institution changes its online banking requirements, Small Business Accounting displays a message. To enter revised information, return to the Online Banking Wizard.
4 Select the account name, and then click the Next button. 5 Select the bank name, and then click the Next button. 6 On the Log On page, type your user ID and password, and then click the Next
button. A Lock symbol in the taskbar indicates that your server connection is secure. Tip To enter your password automatically the next time you log on, select the Remember my password check box.
7 Match your online account with the account you set up in Small Business Accounting, and then click the Next button. Note You can set up all the accounts your company has with this bank or financial institution to work with your online accounts. If you want to set up accounts with another bank or financial institution, you must run the Online Banking Wizard again to set them up separately.

Part 6: Keeping Bank Records
200 Microsoft Office Small Business Accounting 2006
You can add a new online account only if you already added the account to the Chart of Accounts in Small Business Accounting.
8 Select your settings for downloading transactions from your online account, and then do one of the following: • Click the Next button to open the Setup Overview page, where you can
review your settings and the services that are available for this account. When you are done, click the Close button.
• Click the Finish button to exit without reviewing your account setup.
What if . . . I need to track the banking transactions I enter online? To create a log file containing a record of your online banking transactions, select Log online activities on the General tab in Company Preferences. The log file is stored by default in the My Documents\Small Business Accounting\Logs folder of the administrator who set up your company in Small Business Accounting. The online log file may contain sensitive information from your online bank or credit card accounts, so it is a good practice to check the log file carefully before making it available to other users.
Transferring funds online If you have set up more than one account to work directly with the same bank or financial institution by means of an Internet connection, you can transfer funds between your online accounts. Note You cannot transfer funds between online accounts at different banks or other financial institutions. If you want to change an online transfer, you cannot edit it or mark it void online. Contact your bank or financial institution directly, by phone or through their Web site, to correct or cancel an online transfer, and then edit or void the transaction in the account register. Before you begin, have your account access information (user ID and password) ready and make sure you have an active Internet connection. 1 In the Navigation Pane, click Banking. 2 Under Start a Task, click Transfer Funds. 3 Today’s date appears in the Date field. To change the date, click the arrow next to
the Date field, and then select a date from the calendar. 4 (Required) Under Transfer from, click the arrow next to the Account name
field, and then select the online account where you want to withdraw funds. 5 (Required) Under Transfer to, click the arrow next to the Account name field,
and then select the online account where you want to deposit funds. 6 (Required) In the Amount field, type the amount you want to transfer.
Paying bills online
Microsoft Office Small Business Accounting 2006 201
7 (Required) Select the Transfer funds online check box. Note If both accounts are not online accounts, the Transfer funds online check box appears dimmed and it is unavailable.
8 Click the Transfer button. 9 Follow the instructions in the Connect to Online Banking dialog box. 10 Click the Connect button. 11 To verify the account names and amount to transfer, click the Yes button. 12 To return to Small Business Accounting, click the OK button.
Paying bills online If you have set up an account to work directly with your bank or financial institution by means of an Internet connection, you can pay bills from your online account. The bill payment may be an online transfer or a check written to your vendor, depending on the services available from your bank or other financial institution. If you want to change an online payment, you cannot edit it or mark it void online. Contact your bank or financial institution directly, by phone or through their Web site, to correct or cancel an online payment, and then edit or void the transaction in the account register. Before you begin, have your account access information (user ID and password) ready and make sure you have an active Internet connection. 1 In the Navigation Pane, click Banking. 2 Under Start a Task, click Pay Bills. 3 Today’s date appears in the Date field. To change the date, click the arrow next to
the Date field, and then select a date from the calendar. 4 (Required) Click the arrow next to the Pay from field, and then select an online
account. 5 (Required) Click the arrow next to the Payment method field, and then select
Electronic Payment. 6 (Required) Select the check box next to each bill you want to pay.
The amount of the payment appears in the Amount field. The Ending balance field automatically subtracts the payment and calculates the amount left in the selected account.
7 If the vendor gives you a discount, for example, for early payment, enter the amount in dollars and cents in the Cash Discount column.
8 To apply a vendor credit, click the Credits button in the Apply column, specify a credit amount, and then click the Adjust button.
9 To pay less than the full amount of a bill, change the amount in the Payment column.
10 When you are done, click the Save and Close button on the toolbar.

Part 6: Keeping Bank Records
202 Microsoft Office Small Business Accounting 2006
11 Follow the instructions in the Connect to Online Banking dialog box. 12 Click the Connect button. 13 To verify the account names and bill payments, click the Yes button. 14 To return to Small Business Accounting, click the OK button.
Downloading transactions To keep your account register in sync with your online bank account, connect to your bank or other financial institution, and then download its records of your account transactions into Small Business Accounting. You can later match the downloaded transactions to the entries in your account register. Before you begin, have your account access information (user ID and password) ready and make sure you have an active Internet connection. 1 In the Navigation Pane, click Banking. 2 Under Start a Task, click Download Transactions. 3 Follow the instructions in the Connect to Online Banking dialog box. 4 Click the Connect button. 5 To copy your online records added since the last download, click the Download
Transactions button. 6 To return to Small Business Accounting, click the OK button.
What if . . . I see an error message when working with my online account? If you encounter a problem when you are setting up, adding transactions to, or downloading transactions from your online account, you will see an error message. Do one of the following: • To send the request again, click the Retry button. Select this option if you think
that a problem with your Internet connection caused the error. • To cancel the transaction and remove it from Small Business Accounting, click the
Void button. Click the Yes button to confirm. • To close the message box and retain the transaction in Small Business Accounting,
click the Close button. You can complete the transaction by calling the bank or other financial institution. If you are making a bill payment, you can use another method to pay the vendor, for example, by check or by credit card. Be sure to void the entry for the online payment before adding a new payment.

Matching downloaded transactions
Microsoft Office Small Business Accounting 2006 203
Matching downloaded transactions After you download transactions from your online account, you can update your records by matching downloaded transactions to entries in your account register. 1 In the Navigation Pane, click Banking. 2 Under Start a Task, click Match Transactions. 3 In the Match Downloaded Transactions dialog box, click the arrow next to the
Bank account field, and then select a bank or credit card account name. 4 You see a list of transactions downloaded from the online account. 5 If the list of transactions from your online account is not current, and you have
an active Internet connection, click the Download Transactions button. For more information on downloading transactions, see “Downloading transactions,” page 202.
6 Under Account Register, select a transaction. 7 Under Download Transactions, select the corresponding transaction from your
online account. 8 Click the Match button. If you mismatch transactions, click Undo to clear your
selections. Note You can match some or all transactions in the list. When you next click Match Downloaded Transactions on the Banking menu, you can continue where you left off.
9 If your account register is missing transactions or if transactions do not match, you can add, edit, or void transactions. • To add a transaction, click the Add to Register button, and then select a
bank or credit card transaction to add. When you are done, click the Save and Close button on a form or click the OK button in a dialog box.
• To edit a transaction, double-click it, and then click the Edit button on the toolbar. When you are done, click the Save and Close button on the toolbar.
• To void a transaction, double-click it, and then click Void on the Actions menu. To confirm, click the Yes button. When you are done, click Close on the File menu.
10 When you are done, click the Save button. When you next receive a statement from your bank or financial institution, reconcile the account promptly. For more information, see “Reconciling an account,” in Chapter 24, “Recording Banking Activity.”

Part 6: Keeping Bank Records
204 Microsoft Office Small Business Accounting 2006

Part 7: Generating Reports
In this part Overview......................................................................................................................................207 Keyboard shortcuts ....................................................................................................................207
Chapter 26: Working with Reports ...................................................................209 Displaying a report .....................................................................................................................209 Modifying and filtering a report................................................................................................210
Changing the financial basis of a report ..........................................................................210 Filtering report data............................................................................................................211 Modifying columns.............................................................................................................211 Changing the appearance of text and numbers ..............................................................212 Changing report titles.........................................................................................................212
Saving a report ............................................................................................................................213 Deleting a saved report ..............................................................................................................213 Working with reports .................................................................................................................214
Chapter 27: Keeping Track of Company Data.................................................215 Company and Financial reports................................................................................................215
Chart of Accounts ..............................................................................................................215 Profit and Loss....................................................................................................................215 Balance Sheet ......................................................................................................................216 Cash Flow Statement .........................................................................................................216 Trial Balance........................................................................................................................216 Transaction Detail by Account.........................................................................................216 Transaction Journal ............................................................................................................217 Change Log .........................................................................................................................217 Sales Tax Liability ...............................................................................................................217 Transaction Detail by Tax Code.......................................................................................217
Customers and Receivables reports .........................................................................................218 A/R Aging Summary .........................................................................................................218 A/R Aging Detail ...............................................................................................................218 Customer Transaction History .........................................................................................218

Part 7: Generating Reports
206 Microsoft Office Small Business Accounting 2006
Profitability by Customer Summary.................................................................................218 Profitability by Customer Detail.......................................................................................219
Sales reports.................................................................................................................................219 Sales by Customer Summary.............................................................................................219 Sales by Customer Detail...................................................................................................219 Sales by Salesperson Summary..........................................................................................219 Sales by Salesperson Detail................................................................................................219 Sales by Item Summary......................................................................................................220 Sales by Item Detail............................................................................................................220
Vendors and Payables reports...................................................................................................220 A/P Aging Summary..........................................................................................................220 A/P Aging Detail................................................................................................................220 Vendor Transaction History .............................................................................................221 1099 Summary.....................................................................................................................221 1099 Detail...........................................................................................................................221
Purchases reports........................................................................................................................221 Purchases by Vendor Summary........................................................................................221 Purchases by Vendor Detail..............................................................................................221 Purchases by Item Summary.............................................................................................222 Purchases by Item Detail ...................................................................................................222
Inventory reports ........................................................................................................................222 Item Price List.....................................................................................................................222 Inventory Valuation ...........................................................................................................222 Inventory Stock Status by Item ........................................................................................222 Physical Inventory Worksheet ..........................................................................................223 Item Profitability.................................................................................................................223
Jobs and Time reports................................................................................................................223 Profitability by Job Summary............................................................................................223 Profitability by Job Detail ..................................................................................................223 Job Estimates vs. Actuals Summary.................................................................................223 Job Estimates vs. Actuals Detail.......................................................................................224 Job Progress Invoices vs. Quotes.....................................................................................224

Overview
Microsoft Office Small Business Accounting 2006 207
Banking reports...........................................................................................................................224 Deposit Detail .....................................................................................................................224 Check Detail ........................................................................................................................224 Bank Transactions ..............................................................................................................225 Missing Checks ...................................................................................................................225 Reconciliation Detail ..........................................................................................................225
Employees and Payroll report...................................................................................................225 Time Report ........................................................................................................................225
Monitoring company data in reports .......................................................................................226 Using the Analysis Tools ...........................................................................................................226
Overview Now that your business accounts are set up and you have started recording your day-to-day business activities, you have collected a great deal of information that can help you manage your business. You can analyze your company data to help you to keep track of your company’s resources and make informed decisions. Note The reports on the Company home page provide a snapshot of your company’s accounts. For a description, see “Monitoring financial accounts,” in Chapter 2 , “Taking a Tour.” Microsoft Office Small Business Accounting 2006 provides a comprehensive set of reports for every area of your business. These reports provide the tools you need to fulfill your responsibilities for providing information on your business activities to your business partners, to government agencies, to your bank, or to other parties with a financial interest in your company. Some reports track the smallest details of each transaction, and other reports provide a “big picture” overview of your company’s profitability. To find more information about a specific item in a report, you can click through (drill down) to the original transaction record.
Keyboard shortcuts You can use keyboard shortcuts to streamline your work in Small Business Accounting. To open the Reports home page, click Reports in the Navigation Pane. The following table lists the keyboard shortcuts available from the Reports home page, and when a report is open. Keyboard shortcuts are not available in dialog boxes or wizards.

Part 7: Generating Reports
208 Microsoft Office Small Business Accounting 2006
Note If a shortcut contains more than one key, press and hold a key, and then press the next key.
To Press
Open the Help table of contents F1
Get Help for the current page ALT+F1
Open the Reports home page CTRL+6
Delete a saved report CTRL+D or DELETE
When a report is open, you can use the following shortcuts:
To Press
Refresh the screen display F5
Select filter options CTRL+F
Open the Modify Report pane CTRL+M
Preview the printed report CTRL+F2
Print the current report CTRL+P
Save the report in a file CTRL+S

Chapter 26: Working with Reports
Maintaining your records in electronic format makes it easier to analyze your company data and to prepare reports for day-to-day financial management, for taxes, and for long-range and short-range planning. The Reports home page provides a variety of standard reports for your company accounts. To open the Reports home page, click Reports in the Navigation Pane.
For a detailed description of the Reports home page, see “Keeping track of company data in reports,” in Chapter 2, “Taking a Tour.” If you need further information, help is always available. To open the Help table of contents, press F1. To get Help for the current page, press ALT+F1. On forms, click the Help button on the toolbar. In dialog boxes and wizards, click the Help button.
Displaying a report Microsoft Office Small Business Accounting 2006 automatically generates a variety of standard report types to organize and track your business activities, to forecast sales, and to define business goals. Some reports track the smallest details of each
Reports home page: CTRL+6
Help: F1

Chapter 26: Working with Reports
210 Microsoft Office Small Business Accounting 2006
transaction, and other reports provide a “big picture” overview of your company’s profitability. To find more information about a specific item in a report, you can click through (drill down) to the original transaction record. Each report type in the Reports pane opens a list of reports available for that area. 1 In the Navigation Pane, click Reports. 2 In the Report type list, select a report type. For a description of the report types,
see Chapter 27, “Keeping Track of Company Data.” 3 In the Report list, select a report. 4 Specify the date or date range for the report.
If the Select Date Range or Select As of Date fields do not appear in the lower-left corner of the main window, then they are unavailable for the selected report.
5 To view the report, click the Display button.
Modifying and filtering a report You can create a report from the standard report types in Small Business Accounting and then make changes to the report and save it with a separate name.
Changing the financial basis of a report Most businesses use one of two accounting methods to keep track of their transactions. These accounting methods consist of rules that are used to determine when and how revenues and expenses are reported. You can select the financial basis when you set up your company, and you can change the settings in Company Preferences and when you modify the basis for the following reports: • Balance Sheet • Profit and Loss • Sales by Customer Detail • Sales by Customer Summary • Sales by Item Detail • Sales by Item Summary • Sales Tax Liability • Transaction Detail by Account • Transaction Detail by Tax Code

Modifying and filtering a report
Microsoft Office Small Business Accounting 2006 211
To change the financial basis setting for a report, click the arrow next to the Report Basis field on the toolbar and select one of the following: • Accrual to recognize revenues when products and services are sold to customers
or bought from vendors, regardless of when payment is received or rendered. • Cash to recognize revenues when payments for products and services are received
from customers or made to vendors. Note If the Report Basis field does not appear, then it is not available for the selected report.
Filtering report data 1 To change the data that appears in your report, so you can focus on a particular
area, click the Filter Options button on the toolbar. 2 In the Select Filter Options dialog box, select a filter name in the Filter list.
Tip To reset the filter options to the default settings for the selected report type, click Clear. For more information on filter settings for a particular report, see the report description in Chapter 27, “Keeping Track of Company Data.”
3 Do one of the following: • To modify your report with the options in the selected filter, click the Apply
button. • Specify new settings for the options in the Filter options list, then click the
Apply button. 4 When you are done, click the OK button.
Modifying columns 1 On the toolbar, click Modify Report. 2 In the Modify Report pane, click Columns.
Note If the Columns option does not appear in the Modify Report pane, it is unavailable for the selected report.
3 Do one of the following: • To add a column, select the check box next to the column name. • To remove a column, clear the check box next to the column name. Note If a column title appears dimmed, it is a required element; you cannot change it.
4 For some reports, in the Display Column by list, select an option to display the report by totals only or by one of the following calendar segments: month, quarter, year, fiscal quarter, or fiscal year.
Modify: CTRL+M
Filter: CTRL+F

Chapter 26: Working with Reports
212 Microsoft Office Small Business Accounting 2006
5 For some reports, you can select the Compare to options to highlight trends in the business by comparing current data to previous periods and years by dollar or percent change and by tracking individual line items as a percentage of total income.
Changing the appearance of text and numbers 1 Click Modify Report on the toolbar. 2 In the Modify Report pane, click Fonts and Numbers. 3 Double-click the number element you want to change, and then click an option to
change: Note If an option does not appear in the Modify Fonts and Numbers pane, it is unavailable for the selected report. • To select the style settings to format the text for the row labels, click Row
Label. • To select the style settings to format the text for the column labels, click
Column Label. • To select the style settings to format the text and numbers in the body of the
report, click Report Data. You can specify the number format: divide numbers by 1,000, hide amounts equal to 0 (zero), or hide decimals; display negative numbers with a – (minus sign), in parentheses, or in red; and show or hide zero lines.
• To format the text, and then specify the underlining style for the Sub total row, click Sub total and select the style settings.
• To format the text, and then specify the underlining style for the Total row, click Total and select the style settings.
• To format the text, and then specify the underlining style for the Grand Total row, click Grand Total and select the style settings.
Changing report titles 1 Click Modify Report on the toolbar. 2 In the Modify Report pane, click Header and Footer. 3 Double-click the title element you want to change, and then click an option to
change: • To show, hide, or edit the company name that appears at the top of the
report, click Company Name Options. • To show, hide, or edit the name of the report. The default title is the standard
report name, click Report Title Options. • To show or hide a date range for the report, click Date Range Options.

Saving a report
Microsoft Office Small Business Accounting 2006 213
• To show or hide a line that lists the basic settings for the report, select Filter Text Options.
• To show or hide the date when you first saved the report as a custom report, click Date Created Options.
• To show or hide a text line you specify at the top of the report, click Subtitle Options.
• To show or hide additional text you specify at the top of the report, click Notes Options.
• To show or hide additional text you specify on the bottom of each page in the report, click Footer Options.
• To select the style settings to format the text for the title, click Change Font. 4 Follow the instructions in the option dialog box. 5 When you are done, click the OK button.
Saving a report You cannot alter or remove the report types or standard reports installed with Small Business Accounting. If you modify a standard report and want to retain it for future use, you can save the report with a separate name. Caution A saved report contains the filters and modifications that you set; it does not save the data in the report. Note In certain reports, column width customizations are not saved. 1 Display a report and make modifications to it. 2 To create a separate report file that you can modify and save, click the Save
Report button on the toolbar. 3 Type a report name in the Save Report dialog box.
Tip Use a name that distinguishes the saved report from the standard report on which it is modeled, for example, Profit and Loss by Class.
4 Click the OK button.
Deleting a saved report When you no longer need a saved report, you can delete it. 1 In the Navigation Pane, click Reports. 2 In the Reports pane, click Saved Reports.
Save: CTRL+S

Chapter 26: Working with Reports
214 Microsoft Office Small Business Accounting 2006
3 Click the name of the report you want to delete. 4 On the Edit menu, click Delete. 5 To confirm, click the Yes button.
Working with reports The following table lists tasks you can do with an open report.
To Do this
Sort a column Click its title to switch between ascending and descending order. An arrow indicates the sort order.
Resize a column Click the column divider and drag it to a new width. Change the column order
For some reports, select a column title and drag it to a new position.
Preview the printed report
On the toolbar, click the Print Preview button .
Print the report On the toolbar, click the Print button . Export the report to a Microsoft Office Excel spreadsheet
On the toolbar, click the Export to Excel button .
Delete: CTRL+D
Preview: CTRL+F2
Print: CTRL+P

Chapter 27: Keeping Track of Company Data
Microsoft Office Small Business Accounting 2006 makes it easy to leverage your company data, including the day-to-day transactions and adjustments you record, so you can keep current with the flow of income and expenses and forecast your company’s prospects for long-term growth. The Reports home page stores standard reports in lists by report type. To display a report, you first select the report type, and then select the report name. You can rearrange columns in the report and modify the way text and numbers are displayed. To change the data that displays in a report, click the Filter Options button on the toolbar. The report descriptions in this chapter include the filters you can use on each report. For more information on using filters, see “Modifying and filtering a report,” in Chapter 26, “Working with Reports.”
What if . . . I want to see the original transaction or adjustment for an entry in a report? In many reports, when a line item contains further information, the pointer changes to a pointing finger, which indicates that you can click through (drill down) to the original transaction form. Double-click the entry to open a detail report, and then double-click a line item to open the original.
Company and Financial reports The Company and Financial reports assist you in day-to-day management of accounts and provide an overall picture of the financial health of your company.
Chart of Accounts The Chart of Accounts is a complete listing of all the account names that have been created for your business and their balances. These accounts can be used to create various reports that you can use to determine profitability, cash liquidity, how much is due to you, and how much your company owes. You can filter the data in this report by account name and type and by account status.
Profit and Loss The Profit and Loss statement reports your company’s financial results in detail over a period of time. The report displays the current month to date when you first open it. Graphs and tables can be very useful when you view performance over time. You can see important details in graphic form that might not be apparent in a text-based

Chapter 27: Keeping Track of Company Data
216 Microsoft Office Small Business Accounting 2006
report. The Profit and Loss statement is the only Small Business Accounting report that you can view in a chart. To view the Profit and Loss data in a chart: • Click the Show Chart button on the toolbar. You can filter the data in this report by account name and type, class, date range, and name.
Balance Sheet The Balance Sheet reports your company’s financial position in detail at a point in time. To make analysis easier, this report is grouped into categories, such as current assets, fixed assets, current liabilities, and equity. The report displays the current date when you first open it. You can filter the data in this report by date and date range.
Cash Flow Statement The Cash Flow Statement shows the cash sources that have come into your business and how cash has been spent. This report is broken into three main categories: Operating, Investing, and Financing activities. Cash sources include cash sales, collection of customer accounts, bank loans, and the sale of fixed assets; cash use includes vendor account payments, employee wages paid, purchases of fixed assets, and payments to owners. The report displays the current month to date when you first open it. You can filter the data in this report by date range.
Trial Balance The Trial Balance is a listing of all the account balances from the Chart of Accounts on a given day. Total debits must equal total credits; otherwise, an error has been made. You can filter the data in this report by date.
Transaction Detail by Account The Transaction Detail by Account report provides a detailed look at the entries posted to the Chart of Accounts over a period of time. The report displays the current month to date when you first open it. You can filter the data in this report by account name and type, amount, date range, name, number, and transaction type.

Company and Financial reports
Microsoft Office Small Business Accounting 2006 217
Transaction Journal The Transaction Journal provides a detailed, chronological view of the entries posted to the Chart of Accounts over a period of time. The report displays the current month to date when you first open it. You can filter the data in this report by account name and type, date range, name, number, and transaction type.
Change Log The Change Log is a complete listing of changes to company lists and information in Small Business Accounting. This report is helpful for auditing purposes and can be used to trace fraudulent activity and other unknown adjustments or errors. The Change Log report contains current data if you selected Use Change log in Company Preferences. Users with Owner, Office Manager, or Accountant access can view the Change Log. You can filter the data in this report by date range.
Sales Tax Liability The Sales Tax Liability report details sales tax funds collected from customers and owed to each tax agency. The report displays the current month to date when you first open it. The Sales Tax Liability report contains current data if you selected Do you pay sales tax? in Company Preferences. This setting also determines how the liability is reported: based on when the customer is billed or when the customer pays you. You can filter the data in this report by amount, date range, and vendor name.
Transaction Detail by Tax Code The Transaction Detail by Tax Code report lists all transactions relating to taxes, arranged by tax code. The report displays the current month to date when you first open it. The Transaction Detail by Tax Code report contains current data if you selected Do you pay sales tax? in Company Preferences. This setting also determines how the liability is reported: based on when the customer is billed or when the customer pays you. You can filter the data in this report by date range and vendor name.

Chapter 27: Keeping Track of Company Data
218 Microsoft Office Small Business Accounting 2006
Customers and Receivables reports The Customers and Receivables reports track customer transactions, including amounts owed to your company and payments received, and the level of profit by customer.
A/R Aging Summary The A/R Aging Summary report helps you maintain control of the cash flow into your company. It displays the amounts owed to you by each customer as of a given date and is arranged by the number of days outstanding. The report displays the current date when you first open it. You can filter the data in this report by date, balance, customer group, and customer name.
A/R Aging Detail The A/R Aging Detail report provides an in-depth view of the amounts your customers owe to your company as of a given date. The report displays the current date when you first open it. You can filter the data in this report by date, balance, customer group, customer name, and void status.
Customer Transaction History The Customer Transaction History report displays all transactions with your customers over any date range you select. The report displays the current month to date when you first open it. You can filter the data in this report by amount, class, customer group, customer name, date range, transaction type, and void status.
Profitability by Customer Summary The Profitability by Customer Summary report helps you focus your marketing efforts by displaying profits on sales to each of your customers over a selected time range. The report displays the current month to date when you first open it. You can filter the data in this report by customer group, customer name, date range, and margin.

Sales reports
Microsoft Office Small Business Accounting 2006 219
Profitability by Customer Detail The Profitability by Customer Detail report gives you an in-depth view of the profits made on sales to each of your customers over a selected time. The report displays the current date when you first open it. You can filter the data in this report by customer group, customer name, date range, and margin.
Sales reports The Sales reports track sales by customer, salesperson, and items.
Sales by Customer Summary The Sales by Customer Summary report helps you to adjust your marketing efforts by listing total sales made to your customers over a period of time. The report displays the current month to date when you first open it. You can filter the data in this report by active status, amount, customer group, customer name, date range, and void status.
Sales by Customer Detail The Sales by Customer Detail report provides in-depth information about the total sales made to your customers over a selected time range. The report displays the current month to date when you first open it. You can filter the data in this report by amount, customer group, customer name, date range, and void status.
Sales by Salesperson Summary The Sales by Salesperson Summary report helps you track your salespersons’ performance by displaying their total sales made to your customers over a selected time range. The report displays the current month to date when you first open it. You can filter the data in this report by amount, class, date range, item name and type, salesperson name, and void status.
Sales by Salesperson Detail The Sales by Salesperson Detail report provides in-depth information for tracking salesperson performance. The report displays the current month to date when you first open it.

Chapter 27: Keeping Track of Company Data
220 Microsoft Office Small Business Accounting 2006
You can filter the data in this report by amount, class, date range, item name and type, salesperson name, transaction type, and void status.
Sales by Item Summary The Sales by Item Summary report helps you to adjust your marketing efforts by tracking which items are selling well or selling poorly. The report displays the current month to date when you first open it. You can filter the data in this report by amount, date range, and item name and type.
Sales by Item Detail The Sales by Item Detail report provides an in-depth look at item sales over a period of time. The report displays the current month to date when you first open it. You can filter the data in this report by amount, class, customer name, date range, item name and type, and void status.
Vendors and Payables reports The Vendors and Payables reports track vendor transactions, including amounts your company owes to vendors.
A/P Aging Summary The A/P Aging Summary report helps you control your cash flow by displaying all of your company’s outstanding debt to vendors arranged by the number of days outstanding as of a given date. The report displays the current date when you first open it. You can filter the data in this report by date, balance, vendor group, and vendor name.
A/P Aging Detail The A/P Aging Detail report displays an in-depth view of the amounts your company owes to its vendors as of a given date. The report displays the current date when you first open it. You can filter the data in this report by date, balance, vendor group, vendor name, and void status.

Purchases reports
Microsoft Office Small Business Accounting 2006 221
Vendor Transaction History The Vendor Transaction History report displays all transactions with your vendors through any date range you select. The report displays the current month to date when you first open it. You can filter the data in this report by amount, date range, transaction type, vendor group, vendor name, and void status.
1099 Summary The 1099 Summary report summarizes payments made to 1099 vendors during the last calendar year. This information can be used to prepare federal 1099-MISC tax forms. The report displays all dates when you first open it. You can filter the data in this report by date range.
1099 Detail The 1099 Detail report lists the details for all payments made to 1099 vendors over a period of time. The report displays all dates when you first open it. You can filter the data in this report by date range and vendor name.
Purchases reports The Purchases reports track the number and value of items you buy from vendors.
Purchases by Vendor Summary The Purchases by Vendor Summary report displays purchases made from your vendors in a summarized form over a selected date range. The report displays the current month to date when you first open it. You can filter the data in this report by amount, date range, vendor group, vendor name, and void status.
Purchases by Vendor Detail The Purchases by Vendor Detail report gives you an in-depth view of purchases made from your vendors over any date range you select. The report displays the current month to date when you first open it. You can filter the data in this report by amount, class, date range, vendor group, vendor name, and void status.

Chapter 27: Keeping Track of Company Data
222 Microsoft Office Small Business Accounting 2006
Purchases by Item Summary The Purchases by Item Summary report displays item purchases in a condensed form over any date range you select. The report displays the current month to date when you first open it. You can filter the data in this report by amount, date range, and item name and type.
Purchases by Item Detail The Purchases by Item Detail report gives you an in-depth view of purchases over a selected date range. The report displays the current month to date when you first open it. You can filter the data in this report by amount, class, date range, item name and type, item group, and void status.
Inventory reports The Inventory reports track prices, profitability, and transactions affecting the value of items in inventory, as well as the current status and count of items in inventory.
Item Price List The Item Price List shows the current price for all your product and service items as of a given date. You can filter the data in this report by active status, item name and type, item group, and price.
Inventory Valuation The Inventory Valuation report lists all transactions affecting each inventory item and the impact on the number and value of stock on hand. You can filter the data in this report by active status, date range, item name and type, and item group.
Inventory Stock Status by Item The Inventory Stock Status by Item report lists items currently in stock as of a given date by Item Group. You can filter the data in this report by active status, date, item name and type, item group, and on-hand balance.

Jobs and Time reports
Microsoft Office Small Business Accounting 2006 223
Physical Inventory Worksheet The Physical Inventory Worksheet is a printable checklist that can be used to take a physical count of your inventory. You can use this information to trace theft, track shrinkage, and make adjustments to the financial records to bring them in line with the physical count. You can filter the data in this report by active status and by date.
Item Profitability The Item Profitability report helps you fine-tune your marketing efforts by providing a detailed view of the profit margin from the sales of items over a period of time. The report displays the current month to date when you first open it. You can filter the data in this report by date range, item name and type, and item group.
Jobs and Time reports The Jobs and Time reports help you manage sales to customers by job or project. These reports are available if you selected Use job in Company Preferences.
Profitability by Job Summary The Profitability by Job Summary report allows you to track which jobs are profitable and which are not by listing sales amounts, costs, and margins in dollar and percentage format, grouped by customer. The report displays all dates when you first open it. You can filter the data in this report by customer name, date range, job group and job status.
Profitability by Job Detail The Profitability by Job Detail report provides an in-depth view of job success by including details of what was sold. The report displays all dates when you first open it. You can filter the data in this report by customer group, customer name, date range, job group, and margin.
Job Estimates vs. Actuals Summary The Job Estimates vs. Actuals Summary report helps you to determine how your job success compares to your plans. This report compares job revenues and costs broken out by dollar and percentage. The report displays all dates when you first open it.

Chapter 27: Keeping Track of Company Data
224 Microsoft Office Small Business Accounting 2006
You can filter the data in this report by customer name, date range, job group, and job status.
Job Estimates vs. Actuals Detail The Job Estimates vs. Actuals Detail report displays a detailed listing of all actual job performance and estimates over a period of time. The report provides more information for use in analyzing why job performance varied from the estimates. The report displays all dates when you first open it. You can filter the data in this report by customer name, date range, and item name and type.
Job Progress Invoices vs. Quotes The Job Progress Invoices vs. Quotes report tracks the billing of jobs to customers by comparing the amount billed in progress invoices against the total amount quoted for customer jobs. The report displays all dates when you first open it. You can filter the data in this report by customer name, date range, job group, number, and quote status.
Banking reports The Banking reports help you manage your company’s bank accounts.
Deposit Detail The Deposit Detail report lists all deposit transactions for your bank accounts over a designated period of time. The report displays the current month to date when you first open it. You can filter the data in this report by amount, bank account name and type, date range, name, and transaction type.
Check Detail The Check Detail report lists all checks and amounts issued from your bank accounts over a designated period of time. The report displays the current month to date when you first open it. You can filter the data in this report by amount, bank account name and type, date range, name, transaction type, and void status.

Employees and Payroll report
Microsoft Office Small Business Accounting 2006 225
Bank Transactions The Bank Transactions report lists all transactions, including deposits and withdrawals, for all of your bank accounts over a designated period of time. The report displays the current month to date when you first open it. You can filter the data in this report by amount, bank account name and type, date range, and void status.
Missing Checks The Missing Checks list shows all numbered transactions that are missing from the check sequence over a designated period of time, arranged by bank account. The report displays the current month to date when you first open it. You can filter the data in this report by amount, bank account name and type, and date range.
Reconciliation Detail The Reconciliation Detail report lists all cleared and uncleared transactions as of a given statement date, plus all post-statement deposits and checks as of the current date for your financial accounts. The book balance for an account as of the statement date is shown as “Balance As Of (the statement date).” The current balance for an account is shown as “Ending Balance.” The report displays the most recent reconciled statement date when you first open it. You can filter the data in this report by amount, bank account name and type, and statement date.
Employees and Payroll report The Employees and Payroll report tracks the number of work hours reported by your employees. Note More reports are available if you sign up for ADP Payroll SM. For more information, see “Using ADP payroll processing,” in Chapter 22, “Managing Payroll.”
Time Report The Time report shows how your employees are accounting for their recorded hours. It helps you to determine whether billable job time is properly accounted for and included in invoices that are sent to your customers. The report displays the current month to date when you first open it.

Chapter 27: Keeping Track of Company Data
226 Microsoft Office Small Business Accounting 2006
You can filter the data in this report by date range, employee name, and item name and type.
Monitoring company data in reports To keep a close check on your company’s financial health, monitor your company accounts in the Company home page daily. For more information, see “Monitoring financial accounts,” in Chapter 2, “Taking a Tour.” You accountant or financial officer can offer guidance on your company’s quarterly and annual reporting responsibilities. Every month, though, you should take a step back from your day-to-day concerns and check on your long-term goals. Depending on your business needs, you may display the following reports on a monthly basis: • Profit and Loss • Balance Sheet • Cash Flow Statement • Chart of Accounts • Physical Inventory Worksheet • Item Profitability • 1099 Summary • 1099 Detail • Sales Tax Liability • Transaction Detail by Tax Code
Using the Analysis Tools The Analysis Tools create reports containing your company data in Microsoft Office Excel and in Microsoft Office Access 2003. Using the Analysis Tools, you can extend your accounting system by connecting to your Small Business Accounting database and generating Microsoft Office Excel PivotTable® dynamic views and Microsoft Office Access database reports. With these PivotTable views and reports, you can see comparisons, reveal patterns and relationships, and analyze trends. The Analysis Tools dialog box provides two PivotTable views and eight Access reports. You can also create new PivotTable views in Excel or create new reports in Access and add them to the list of available information. To open the Analysis Tools dialog box: • Click Start, point to Programs, point to Microsoft Small Business
Accounting, and then click Analysis Tools. For more information about the Analysis Tools, click the Help button.

Glossary This Glossary defines terms used in Microsoft Office Small Business Accounting 2006, as well as some general accounting terms and computer terms. Terms defined in this Glossary appear in italic font in definitions. For additional entries, see the Microsoft Office Small Business Accounting Help.
1099 category A category for payments to 1099 vendors, set by the federal government. If the annual sum of payments to a vendor exceeds the threshold of the category, you must report it on tax form 1099-MISC. You may also send 1099-MISC forms to vendors with whom you spend less than the threshold amount in a year.
1099 vendor A vendor to whom you send federal 1099-MISC tax forms.
account A category of financial transactions.
account balance The difference between an account’s debits and credits.
Account record A record that includes information about an account.
account register A list of transactions for a single financial account, which appears when you double-click the account in the Chart of Accounts.
accounting The process of recording, classifying, summarizing, and reporting a company’s business transactions and interpreting their effects on the company.
Accounts Payable (A/P) account
An account for the amounts your company owes to vendors for the purchase of products and services. You cannot post directly to the Accounts Payable account.
Accounts Receivable (A/R) account
An account for the amounts owed to your company for the sale of products and services. You cannot post directly to the Accounts Receivable account.
accrual basis accounting
An accounting method that recognizes revenues when they are earned and expenses when they are incurred, regardless of when they are received or paid, as opposed to cash basis accounting.
activate To verify that Small Business Accounting has been legitimately licensed after installation.
actual balance Today’s balance. Actual balance equals the opening balance plus transactions on the account through today’s date.
adjustment A change to an account to correct or update the balance. For example, you can adjust the quantity or value of inventory for damaged items by charging the Cost of Goods Sold account.
A/P See Accounts Payable.
A/R See Accounts Receivable.
asset Something owned, such as cash, inventory, buildings, or equipment. Assets equal liabilities plus equity.

Glossary
228 Microsoft Office Small Business Accounting 2006
backup file A file in Small Business Accounting with the extension .sbb that contains a copy of your company’s data. A backup file can be kept in a remote, secure location for protection from hardware or software failure.
Balance Sheet A financial statement that provides a snapshot of your company as of a specific date. The information is grouped into account categories such as current assets, fixed assets, current liabilities, long-term liabilities, and equity.
bank account An account your company has at a bank or another financial institution. Bank Charge An Expense account for fees your company pays to the bank, for example: checking
account fees, transfer charges, or returned (NSF) check fees. bill See vendor bill.
budget A statement that estimates projected income and expenses for a period of time.
cash account A category of cash that is not held in a financial institution, such as Petty Cash or Undeposited Funds.
cash back An amount of cash you retain when depositing customer payments.
cash basis accounting
An accounting method that recognizes revenues when they are received and expenses when they are paid, as opposed to accrual basis accounting.
cash discount A reduction in price for early payment.
Cash Discount Given
An account that reduces total income for early payment discounts given to customers.
Cash Discount Taken
An account that reduces the total Cost of Goods Sold account for early payment discounts from vendors that your company takes when paying bills.
Cash Flow Forecast
A tool for projecting future cash balances based on estimated cash receipts and estimated cash disbursements.
Cash Flow Statement
A financial statement that shows the sources of the cash flowing into your business and the destination of the cash flowing out. The report is divided into Operating Activities, Investing Activities, and Financing Activities.
cash purchase form
A receipt for a purchase from a vendor in which the items or services sold are paid for at the time of the sale.
cash sale form A receipt for a sale to a customer in which the items or services sold are paid for at the time of the sale (the most common transaction in retail).
Chart of Accounts (COA)
A list of all your company’s accounts and their balances.
check A form that tells a financial institution to pay an amount of money to the person named on it.
class A category for transactions, often used for a department of a company.
clear To turn a setting off or to remove a value.
COA See Chart of Accounts.
COGS See Cost of Goods Sold.

Glossary
Microsoft Office Small Business Accounting 2006 229
company A commercial organization; a business.
company data file A file in Small Business Accounting with the extension .sdb that contains all the information for a company.
Company Preferences
Options for customizing Small Business Accounting to best suit the needs of your company. Company Preferences relate to areas such as accounts, jobs, taxes, numbering on forms, and reminders.
contra-account An account that offsets or reduces an account to produce the correct book value.
contract A written agreement between two or more parties.
Cost of Goods Sold (COGS)
An account that tracks the cost of goods, materials, or services entered into inventory and then sold.
credit An entry on the right side of an account; an entry on the left side is a debit. A credit increases liabilities, equity, or income and decreases assets or expenses.
credit card account
A liability account that tracks credit card purchases or bills.
credit card charge A form, accessed from the Banking menu, on which you can enter information about a credit card purchase.
credit card processing
A service offered through Small Business Accounting that authorizes and settles customer credit card transactions. Authorization verifies that the account is valid and has sufficient funds for the transaction. Settlement transfers the funds.
creditor Someone to whom something is owed.
current assets Assets, such as cash or inventory, that are used in the normal business cycle, usually one year.
current liabilities Obligations that are scheduled to be paid within one year, such as sales taxes, payroll taxes, accrued or deferred salaries, and short-term loans.
customer A person or company to whom your company sells products or services.
customer credit memo
A form that states an amount a company owes a customer for a return or refund.
customer payment See payment.
Customer record A record in Small Business Accounting that includes all the information about a customer.
customer statement
A form that can be sent to a customer that includes the customer’s balance and the amount due for the statement period.
debit An entry on the left side of an account; an entry on the right side is a credit. A debit increases assets or expenses and decreases liabilities, equity, or income.
default An option that is selected for you and will be used unless you change it.
deposit Funds, either cash or checks, placed in a bank account.
discount A dollar or percentage reduction in the price of items sold or the total amount of a bill that is due. A discount can be an incentive for early payment, a reward for a history of volume purchases, or an inducement to buy.

Glossary
230 Microsoft Office Small Business Accounting 2006
download transactions
To copy records of account transactions from your online bank account into Small Business Accounting.
Employee record A record in Small Business Accounting that includes all the information about an employee.
equity An owner’s interest; the balance that reflects your company’s net worth. Equity equals assets minus liabilities.
expense An amount spent on products or services related to your normal business operations, such as phone or rent.
export To copy data to a file of a different format for use in another program.
federal tax ID A nine-digit number used by most businesses for legal and tax purposes. Same as employer identification number (EIN) or taxpayer identification number (TIN).
field An area on a form or in a record that holds one piece of information.
FIFO First-in, first-out. The inventory valuation method used in Small Business Accounting. It assumes that oldest items are sold first. The cost of the oldest item is assigned to the first item sold; the cost of the newest unsold item is assigned to inventory. Other methods are LIFO (last-in, first-out) and weighted average.
filter A feature you can use to narrow the range of data on a report.
finance charge A charge to a customer for carrying a balance past the payment date for the invoice.
financial statement
A report of a company’s financial information. It includes the Balance Sheet, the Profit and Loss statement (income statement), and the Cash Flow Statement.
Find list A list on the left side of each Small Business Accounting home page with links to lists of records specific to that area.
first in, first out See FIFO.
fiscal year An accounting period used to calculate a company’s financial operations. Many companies maintain a fiscal year that is different from the calendar year to accommodate the physical nature of their business or the business cycle of their industry.
fixed assets Depreciable assets purchased for use by your company, rather than for resale, that are not likely to be converted into cash within a year, such as a piece of equipment or furniture.
form A printable document with fill-in blanks, or fields, for entering information, that may or may not generate a financial transaction, such as a purchase order or an invoice.
form letter A custom letter you can send to selected customers, employees, or vendors.
form template A file that shapes the style and page layout of a form.
General Ledger A report in some accounting systems of the transactions of all accounts in the Chart of Accounts. In Small Business Accounting, see the following reports: Transaction Detail by Account, Transaction Journal, Profit and Loss statement, Balance Sheet, Cash Flow Statement, and Trial Balance.
GL See General Ledger.

Glossary
Microsoft Office Small Business Accounting 2006 231
GL entry A journal entry, through which you can enter a business transaction into any account except Inventory Asset accounts. In Small Business Accounting, you select a customer to change Accounts Receivable, you select a vendor to change Accounts Payable, or you select a tax code to change Sales Tax Payable.
group A set of associated records for customers, items, jobs, sales taxes, or vendors. You can use the support lists to manage groups.
Help Information you can use to learn more about a computer program. In Small Business Accounting, for information on a page, a form, a report, a list, a dialog box, or a wizard, press ALT+F1; for information organized by content, press F1.
home page 1 In Small Business Accounting, the main page within a functional area (Company, Customers, Vendors, Employees, Banking, or Reports).
2 The start page of a Web site. import To copy data from word processing, spreadsheet, or database programs into your
company data file in Small Business Accounting. income Revenue from the sale of products and services to your customers. inventory A record of the number and value of products purchased or produced for resale.
inventory asset A product purchased or produced for sale and entered into inventory. inventory item A product for which a company maintains a record of quantity and that is reflected in
the Balance Sheet. invoice A request to a customer for payment for products and/or services sold.
item A product or service that a company buys from a vendor and/or sells to a customer.
item receipt A form to be completed when purchased items arrive before the vendor bill. It lists the quantity received for each item.
item tax code A code that identifies whether and why an item your company sells is taxable or nontaxable.
job A sales agreement between a company and a customer. Payment can be based either on a fixed price or on consumption of time and materials. Job fields appear on forms only if you select jobs in Company Preferences.
job cost invoice An invoice that includes time and materials, that is, expenses and items, that have been charged to a job.
Job Resell An Income account that is applied to an invoice for an item bought for resale on a job.
journal entry (GL entry)
An entry to a company account to record a business transaction.
kit A collection of sale items created for quick entry into forms, such as quotes. Kits are commonly used for a group of related items that are frequently sold together.
late payment A payment that is received after the invoice’s due date.
liability A debt. Something owed, such as accounts payable, sales taxes, loans, and deferred items. Liabilities equal assets minus equity.

Glossary
232 Microsoft Office Small Business Accounting 2006
Long-Term Liability
An account that tracks obligations that are scheduled to be paid over periods longer than one year, such as loans or mortgages.
match transactions
To update your records by selecting the downloaded online transactions that correspond to those in your account register.
menu A list of commands that appears when you click a menu name (File, Edit, View, Company, Customers, Vendors, Employees, Banking, Reports, Actions, or Help) on the menu bar at the top of the Small Business Accounting window.
menu bar The horizontal bar below a window’s title bar. It contains the names of menus.
merge accounts To combine two active records of the same type (Customers, Vendors, Items, or Accounts). After they are combined, they cannot be separated.
migrate To move data from one software product to another.
navigation buttons Buttons in the Navigation Pane to open the home pages: Company, Customers, Vendors, Employees, Banking, and Reports.
Navigation Pane The pane on the left side of the Small Business Accounting window that includes the Start a Task list, the Find list, and the navigation buttons.
non-inventory item
A product that a company buys and/or sells but for which it does not maintain inventory. A non-inventory item is not reflected in the Balance Sheet.
NSF check Non Sufficient Funds check. A check from an account with a balance insufficient to cover the check amount. Check writers are often charged a fee for NSF checks.
online banking Banking over the Internet. You can set up your bank accounts in Small Business Accounting to work directly with your bank or financial institution.
online payroll Payroll Services for Microsoft Office Small Business Accounting Powered by ADP®.
opening balance The balance in each account when a company begins using Small Business Accounting or opens an account.
Opening Balances An Equity account containing the offset to account balances as of the start date for your company or for a new account.
opening date The date on which an opening balance is entered.
Other Asset An account that tracks assets that are neither current assets nor fixed assets, such as long-term notes receivable.
Other Current Assets
An account that tracks assets that are likely to be converted to cash or used up within one year, such as petty cash, notes receivable due within a year, prepaid expenses, and security deposits.
Other Expense An account that tracks amounts spent on products and services outside of normal business operations, such as interest expense on debt.
Other Income An account that tracks revenue received for something outside of normal business operations, such as interest income.
partial invoice An invoice that covers only the part of an order that is fulfilled, when the rest is back ordered or will be delivered later.
pay item A payment or deduction of one type, such as overtime or vacation, on an employee’s pay slip. A pay item is categorized by a pay type.

Glossary
Microsoft Office Small Business Accounting 2006 233
pay run A periodic processing of the payroll.
pay slip The documentation given to the employee every payday that shows each pay item and the calculations for the payment.
pay type A category of pay that is directly linked to an hourly pay rate. Examples of pay types are normal hours, vacation, and sickness. Pay types are set up in the payroll service.
payment Funds received from a customer to be applied to one or more invoices.
payment terms A set of conditions for payment: the due date and any discount for early payment. payroll The list of employees and all the information related to paying them: wages, state and
federal taxes, FICA, unemployment insurance, and any deductions for health plans, insurance, and other employer-sponsored benefit plans.
Payroll Services for Microsoft Office Small Business Accounting Powered by ADP
Services provided by ADP, offered through Small Business Accounting, to manage and process a company’s payroll.
Pending Item Receipts
A Current Liability account for amounts owed for products or services that have been received before the vendor bill.
permission An authorization to access a Small Business Accounting feature associated with a role. Roles and permissions ensure that sensitive data is not visible to those who should not view it, and that only authorized users can perform specific business functions.
Physical Inventory Worksheet
A printable form that can be used to take a physical count of inventory. It lists each item currently in stock and its quantity, according to your company data as of a specific date, and contains spaces in which you can enter a count.
PO See purchase order.
post To enter a debit or a credit into an account.
price level A standard price adjustment for all items sold to a customer, based on a percentage change (plus or minus).
product A physical item for sale or purchase. One of two types of items; the other is a service.
product template A file that shapes the style and page layout of a sales order or a cash sale form for a product. Unlike a service template, it has shipping information.
Profit and Loss statement
A financial statement that calculates the net income for your business from income, cost of goods sold, and expense accounts listed in the Chart of Accounts.
progress invoice A partial invoice to a customer for a percentage of work completed on a job.
purchase order (PO)
A request from a company to a vendor, usually for purchasing stock items. A purchase order can be sent to the vendor or only used internally by the company.
quote A proposed sales agreement between a company and a customer. In Small Business Accounting, an accepted quote can be converted into a sales order or an invoice.
receive payment To enter a payment received from a customer for one or more invoices into Small Business Accounting.

Glossary
234 Microsoft Office Small Business Accounting 2006
reconcile To match local records of transactions in an account register with bank records.
record A computer program’s collection of data about a particular thing. A record is made up of fields.
refund A return of a payment or a credit for an overpayment or a purchase return.
register 1 A list of the transactions for an account. 2 To provide your name and contact information so you can receive information
about Small Business Accounting updates and special offers from Microsoft. reminder A notification you can set up in Small Business Accounting Company Preferences to
appear on your Company home page when you need to perform a task. reorder point In Small Business Accounting, the point at which a warning symbol appears in the
Items list to remind you to reorder inventory items, and a reminder appears on the Company home page if you set it.
Retained Earnings
An Equity account for balances from income and expense accounts at the close of the fiscal year.
returned check An NSF check.
revenue The value received from a third party, such as a customer, when an asset is transferred to that party.
role A set of permissions for Small Business Accounting functions that are related to a job: the Accountant role, the Office Manager role, the Owner role, or the Salesperson role.
sales order A sales agreement between a company and a customer. In Small Business Accounting, a sales order can be created from a quote and converted to an invoice. It can be used for a back order and partial invoicing and as a work order in service-based companies.
sales tax A state or local tax on products or services, based on a percentage of the sales price.
sales tax agency The government institution to which your company pays the taxes you collect from sales to customers.
sales tax code A code for a tax that consists of an ID, a name, and a tax rate (as a percentage of the sales price).
Sales Tax Payable A Current Liability account for sales taxes owed.
sample company A company data file provided with Small Business Accounting that you can use to familiarize yourself with the product.
saved report A standard report with custom changes to the appearance or the content of the data.
service Work performed for sale or purchase, such as consulting or design. One of two types of items; the other is a product.
service template A file that shapes the style and page layout of a sales order or a cash sale form for a service. For products, use a product template.
settle 1 To apply a payment or credit to an invoice. 2 To transfer funds to complete a transaction.

Glossary
Microsoft Office Small Business Accounting 2006 235
shipping method A means of transport for order deliveries (both sales to customers and purchases from vendors).
shipping term An agreement for customer payment of shipping and handling. shortcut key A function key or a key combination, such as F5 or CTRL+A, that you can use to
carry out a menu command. Start a Task list A list on the left side of each Small Business Accounting home page that contains the
primary tasks specific to that area. start date The earliest date on which you start entering transactions into Small Business
Accounting, typically the beginning of a fiscal year or the beginning of a month. Startup Wizard A feature in Small Business Accounting that asks questions and then sets up your
company according to your answers. statement A document that summarizes the status of an account.
support lists Small Business Accounting lists that contain the standard data, for example, groups and terms, that you can use to manage sales and purchases.
System accounts The basic financial accounts in Small Business Accounting, which cannot be deleted or changed: Opening Balances, Accounts Receivable, Accounts Payable, Sales Tax Payable, Cash Discount Given, Cash Discount Taken, Undeposited Funds, Bank Charge, Retained Earnings, Pending Item Receipts, Job Resell, and Write-Off.
system administrator
The person who administers the Windows operating system on your computer. The person who installs Small Business Accounting on your computer must belong to the Windows Administrator group on that computer.
task A piece of work. In Small Business Accounting, tasks appear on the Start a Task list.
tax agency In Small Business Accounting, the government institution to which your company pays the taxes you collect from sales to customers.
tax code An item tax code or a sales tax code
Tax Payable A Current Liability account for sales taxes owed.
template A form template, a product template, a service template, or a Word template.
Time Entry record A record of an employee’s work hours for one day.
Timesheet A record of an employee’s work hours for one week.
toolbar A horizontal bar at the top of a software program window that contains buttons and options you can use to carry out commands.
transaction A deposit, a withdrawal, or another exchange that changes the financial position of a business. Transactions are recorded in a journal and are then posted to a ledger.
transfer funds To move money from one account to another.
Trial Balance A listing of all account balances from the Chart of Accounts at a given point in time. Total debit balances must equal total credit balances.
Undeposited Funds
A Cash account for amounts received from customers but not yet deposited to any other account.
vendor A person or company from whom your company buys products or services.

Glossary
236 Microsoft Office Small Business Accounting 2006
vendor bill A request for payment from a vendor for products and services sold to a company.
vendor credit memo
A form that states an amount a vendor owes your company for a return or refund.
Vendor record A record in Small Business Accounting that includes all the information about a vendor.
void To invalidate a posted document. You can view voided documents in a list by selecting the appropriate view from the Current View field.
Windows logon The user name and password you use in Windows programs on your computer. Your Windows user name and password identify you in Small Business Accounting.
wizard A feature that asks questions and then creates an item, such as a form, according to your answers.
Word template A file that shapes the style and page layout of a Word document.
write off To cancel an amount that is owed, but will not be paid, and transfer it to the Write-Off account.
Write-Off An offset to Income for amounts deducted from a total amount owed.

Small Business Bookshelf For more information about using Microsoft Office Small Business Accounting 2006, see the following Microsoft book: • Frye, Chris and Stan Snyder. Introducing Microsoft Small Business Accounting.
Redmond, WA: Microsoft Press, 2005. For more information on starting and running a small business, we recommend the following books: • DuBoff, Leonard D. The Law (in Plain English) for Small Businesses. Naperville, IL:
Sphinx Pub., 2004. • Harroch, Richard D. Small Business Kit for Dummies. 2nd ed. Hoboken, NJ: Wiley,
2004. • Mohr, Angie. Bookkeepers’ Boot Camp: Get a Grip on Accounting Basics. Bellingham,
WA; North Vancouver, BC: Self-Counsel Press, 2003. • Pinson, Linda. Keeping the Books: Basic Recordkeeping and Accounting for the Successful
Small Business. 6th ed. Chicago: Dearborn Trade Pub., 2004. • Tracy, John A. Accounting for Dummies. 3rd ed. Hoboken, NJ: Wiley, 2005. • Tyson, Eric and Jim Schell. Small Business for Dummies. 2nd ed. New York: John
Wiley, 2003. • Weltman, Barbara. J.K. Lasser’s Small Business Taxes: Your Complete Guide to a Better
Bottom Line. New York: Wiley, 2005. To find additional references, click Office Online on the Help menu.

Small Business Bookshelf
238 Microsoft Office Small Business Accounting 2006

Index 1099 categories, 38
assigning to an account, 56 selecting a vendor, 124 setting up, 34
1099 Detail report, 221 1099 Summary report, 221 A/P Aging Detail report, 220 A/P Aging Summary report, 220 A/R Aging Detail report, 218 A/R Aging Summary report, 218 access
for multiple users, 19 managing, 42
access levels types of, 41–42
Access reports using Analysis Tools, 226
account numbers adding or removing, 32
account registers, 54–55, 187 Accountant access, 41 accountants
finding, 3 sharing data with, 73–75
accounts changing system accounts, 35 inactivating, 57 payroll, 171 setting up, 15, 50 updating balances, 30 viewing balances, 29 working with, 53–57
Accounts Payable reports, 220 Accounts Receivable reports, 218 accrual basis accounting
in reports, 34, 211 activating
Customer records, 85 Item records, 133 Small Business Acccounting, 11 Vendor records, 125
Add-in Manager, 21 add-ins, 21 adjustments. See journal entries administrator access, 41 ADP payroll processing, 3
managing, 173 signing up, 172
Analysis Tools for reports, 226
assigning roles, 42 back orders
creating partial invoices, 97 managing, 94
backing up company data, 70 backup files
accountant’s copy, 73 compressed, 70 uncompressed, 69
bad debts writing off, 103
Balance Sheet, 216 balance sheet accounts
setting up, 50 bank accounts, 29
collecting statements, 9 online, 54, 199 reconciling, 196 tracking, 182 working with, 179–85, 198
bank fees, 198 bank transactions
adding, 188 adding deposits, 193 changing status, 55, 188 downloading, 202 editing, 188 matching, 197, 203 paying bills, 195 printing batch of checks, 192,
196 reconciling, 196 transfers, 194 viewing details, 54, 188 voiding, 189 writing checks, 189
Bank Transactions report, 225 banking
creating online log file, 200 online, 3, 199 tracking online transactions, 200 workflow, 27
Banking home page, 27, 179 touring, 27
Banking reports, 224 billing
Time Entries, 169 timesheets, 167
billing to customers cash purchase forms, 148 item receipts, 143 purchase orders, 139 vendor bills, 146
bills. See vendor bills
Bills and Item Receipts list, 141 exporting to Excel, 142 printing, 141
Business Contact Manager for Outlook
creating Time Entries from, 170
working with, 1, 20 buying checks and forms, 3, 163,
185 buying from vendors, 25 cases. See jobs cash basis accounting
in reports, 34, 211 cash discounts
taking on vendor bills, 150 Cash Flow Statement, 29, 216
checking, 24 cash purchase forms
adding references, 148 billing to customers, 148 changing payment terms, 149 changing quantities or prices,
149 classes, 148 creating, 148 editing, 149 finding, 141 handling taxes on purchases,
148 jobs, 148 linking files, 149 opening, 141 viewing by status, 141 voiding, 149
cash purchases, 148 cash sale forms
adding references, 104 changing quantities or prices,
105 classes, 104 creating, 103 creating for jobs, 104 discounting, 105 editing, 105 exporting to Word, 105 finding, 95 linking files, 104 opening, 95 printing, 95 sending in e-mail messages, 105 viewing by status, 95

Index
240 Microsoft Office Small Business Accounting 2006
cash sales, 103 cash withdrawals
recording, 198 Change Log, 217 change orders
handling for jobs, 113 charging credit cards, 198 Chart of Accounts, 215
changing system accounts, 35 downloading payroll entries,
173 exporting to Excel, 54, 180 finding accounts, 27 order of accounts, 53, 180 payroll accounts, 171 printing, 53, 180 rearranging, 53, 180 setting up, 50 viewing, 27
charts viewing, 215
Check Detail report, 224 checks
buying, 3 buying online, 163, 185 insufficient funds, 192, 194 printing, 151, 192, 193 printing batch of, 192, 196 returned, 192, 194 writing, 189
checks to vendors, 141 classes
cash purchase forms, 148 cash sale forms, 104 customer credit memos, 107 invoices, 97 item receipts, 143 organizing transactions by, 32 purchase orders, 139 quotes, 89 sales orders, 93 using, 38 vendor bills, 146
closing out fiscal years, 36 Company and Financial reports, 215 company data
backing up, 70 changing settings, 29 corrupted, 72 exporting, 75 from Business Contact
Manager, 20 importing, 16, 17 in support lists, 37 monitoring in reports, 226 restoring, 70 setting up, 13
company files .sbc, 69 removing, 72 switching, 28
Company home page, 49 touring, 23 working with, 29–31
company information changing, 31 gathering, 9
company preferences changing, 32 log online activities, 173, 200
consultants finding, 3
contact information changing, 31
contacting Small Business Accounting customer support, 3
copying company data, 71 journal entries, 63 timesheets, 166
cost plus jobs. See time and materials jobs
costing inventory, 128 costs
tracking for jobs, 112 counting inventory, 134 country categories, 38 credit card accounts
collecting statements, 9 working with, 182–84
credit card processing managing, 106 signing up, 106 tracking, 35
credit cards accepting, 3, 106, 185 working with, 198
credit ratings, 38 credits
applying to vendor bills, 151 custom items
tracking for customers or jobs, 116
customer credit memos adding references, 107 applying to invoices, 108 changing quantities or prices,
108 classes, 107 creating for jobs, 107 discounting, 108 editing, 106, 107 exporting to Word, 108 finding, 95 job costs, 108 linking files, 107 opening, 95 printing, 95 sending in e-mail messages, 108 viewing by status, 95 voiding, 107 Word templates, 108
Customer forms linking files, 84
customer groups, 37, 84 customer IDs
adding or removing, 82 changing, 83
customer nunbers. See customer IDs customer payments. See payments Customer records
adding fields, 83 creating, 82 deleting, 84 editing, 84 finding, 82 inactivating or activating, 85 merging, 85 opening, 82 viewing by status, 82
customer services, 85 customer statements
exporting to Word, 85 managing Word templates, 85 printing, 85
Customer Transaction History report, 218
customers billing expenses, 62 billing time, 167, 169 changing status, 85 Financial History, 85 Financial Summary, 85 handling exchanges or returns,
109 handling prepayments, 103 invoicing time, 170 refunding payments, 109 selecting a primary contact, 84 sending a form letter, 85 sending e-mail messages, 85 setting price levels, 84, 85 sharing information with
Business Contact Manager for Outlook, 86
tax-exempt, 84 tracking custom items for, 116 with outstanding invoices, 29 workflow, 25
Customers and Receivables reports, 218
Customers home page, 81 keyboard shortcuts, 79 touring, 24
Customers list, 82 exporting to Excel, 82 printing, 82 rearranging, 82
data files accountant’s backup copy, 73 backing up, 70 deleting, 72 protecting, 69

Index
Microsoft Office Small Business Accounting 2006 241
restoring, 70 types of, 69 working with, 69–75
Data Tools menu, 72, 74 defining
fiscal years, 9 start dates, 9
deposit account selecting on cash sale forms,
104 Deposit Detail report, 224 deposits
adding, 193, 198 designing templates for forms, 39 discounting
kits, 133 on cash sale forms, 105 on customer credit memos, 108 on invoices, 98 on quotes, 90 on sales orders, 94
downloading payroll, 173 downloading transactions, 30, 202 drop shipping, 99 due dates
changing on invoices, 97 e-mail messages
sending cash sale forms, 105 sending customer credit memos,
108 sending invoices, 98 sending purchase orders, 140 sending quotes, 90 sending sales orders, 94 sending to customers, 85 sending to employees, 163 sending to vendors, 125 sending vendor credit memos,
153 Employee forms
adding fields, 161 employee IDs
adding or removing, 160 changing, 161
employee numbers. See employee IDs
Employee records adding fields, 161 navigating, 185 payroll, 173 working with, 159–63
employees changing status of, 161, 162 reimbursing, 163, 191 sending a form letter, 163 sending e-mail messages, 163 workflow, 26
Employees and Payroll reports, 225 Employees home page, 159
touring, 26 Employees list, 159
exporting to Excel, 160 printing, 160 rearranging, 160
enabling add-ins, 21 entering vendor bills, 145 Excel
exporting Bills and Item Receipts list to, 142
exporting Chart of Accounts to, 54, 180
exporting Customers list to, 82 exporting Employees list to, 160 exporting Invoices list to, 95 exporting Items list to, 129 exporting Jobs list to, 114 exporting Journal Entries list to,
60 exporting Payments list to, 101 exporting Purchase Orders list
to, 137 exporting Quotes list to, 87 exporting reports, 214 exporting Sales Orders list to,
91 exporting Time Entries list to,
165 exporting timesheets to, 167 exporting Vendors list to, 122 using Analysis Tools, 226 working with, 1
exchanges customers, 109
exiting Small Business Accounting, 28
Expense accounts setting up, 51
expenses billing on a journal entry, 62 reimbursing, 163, 191
expiration dates for quotes, 89 exporting
Bills and Item Receipts list, 142 cash sale forms to Word, 105 Chart of Accounts, 54, 180 company data, 75 customer credit memos to
Word, 108 customer statements, 85 Customers list, 82 Employees list, 160 Invoices list, 95 invoices to Word, 99 Items list, 129 Jobs list, 114 Payments list, 101 Purchase Orders list, 137 purchase orders to Word, 140 Quotes list, 87 quotes to Word, 90 reports to Excel, 214 Sales Orders list, 91
sales orders to Word, 94 Time Entries list, 165 timesheets, 167 vendor credit memos to Word,
153 Vendors list, 122
features, 1 federal tax ID
changing, 32 vendors, 124
feedback providing, 4
fees credit cards, 198
FIFO inventory, 128 filtering reports, 211, 215 finance charges
applying to invoices, 99 finding, 95 opening, 95 printing, 95 setting up, 34 viewing by status, 95
financial accounts changing for items, 134
financial basis changing, 34 of reports, 210
First-In, First-Out. See FIFO inventory
fiscal years adding, 36 changing, 33, 36 closing out, 36 defining, 9 deleting, 37 editing, 37 planning, 35 reopening, 37
fixed fee jobs, 111 forecasting cash flow, 24 forms
buying, 3 buying online, 163, 185 changing layout, 33 designing templates for, 39
gathering company information, 9 hardware requirements
checking, 10 Help, 2, 29, 49 importing
accountant’s backup copy, 74 from a backup file, 17 from an exported file, 16 from comma-separated values
files, 16 from Micosoft Office Excel, 16 from Microsoft Office Access,
16 from Peachtree Accounting, 16 QuickBooks data, 18

Index
242 Microsoft Office Small Business Accounting 2006
Small Business Accounting data, 16, 17
inactivating accounts, 57, 184 Customer records, 85 Item records, 133 Vendor records, 125
Income accounts setting up, 51
installing add-ins, 21 Small Business Accounting, 11
interest income, 198 inventory, 128
adjusting quantity, 134 adjusting quantity and value,
134 costing, 128 counting, 134 FIFO, 128 low quantity warning, 132 setting up, 34 valuation, 128
Inventory Item records adding fields, 131 creating, 131
inventory items changing status, 132 quantities on purchase orders
and sales orders, 134 Inventory reports, 222 Inventory Stock Status by Item
report, 222 Inventory Valuation report, 222 invoices, 95
adding references, 97 applying finance charges to, 99 changing quantities or prices, 98 classes, 97 creating, 96 creating for jobs, 97, 112 creating from sales orders, 94 creating from Time Entries, 169 creating from Time records, 170 creating in Business Contact
Manager for Outlook, 97 creating with items, 134 discounting on, 98 editing, 97 exporting to Word, 99 finding, 95 job costs, 98 linking files, 97 managing Word templates, 99 opening, 95 printing, 95 sending in e-mail messages, 98 viewing by status, 95
Invoices list, 95 exporting to Excel, 95 printing, 95
rearranging, 95 invoicing Time Entries, 170 item groups, 38
service items, 131, 132 Item Price List report, 222 Item Profitability report, 223 item receipts, 141
adding references, 143 billing to customers, 143 changing payment terms, 144 changing quantities or prices,
144 classes, 143 creating, 142 editing, 143 finding, 141 jobs, 143 linking files, 143 opening, 141 viewing by status, 141 voiding, 144
Item records deleting, 133 editing, 133 finding, 129 inactivating or activating, 133 merging, 134 opening, 129 viewing by status, 129
items changing financial accounts,
134 changing status, 133 counting inventory, 134 creating forms with, 134 kits, 128 product or service, 127 receiving, 142 returning to vendor, 154 sharing information with
Business Contact Manager for Outlook, 134
updating cost automatically, 134 Items list, 128
exporting to Excel, 129 printing, 129
job costs customer credit memos, 108 invoices, 98
Job Estimates vs. Actuals Detail report, 224
Job Estimates vs. Actuals Summary report, 223
Job forms linking files, 115
job groups, 38, 115 Job Progress Invoices vs. Quotes
report, 224 Job records
adding fields, 115 finding, 114
opening, 114 viewing by status, 113
job types changing, 115
jobs, 32, 111 cash purchase forms, 148 cash sale forms, 104 changing status, 116 creating, 114 creating invoices for, 112 creating quotes for, 112 creating service items for, 111 customer credit memos, 107 deleting, 116 editing, 115 fixed fee, 111 handling change orders for, 113 invoices, 97 item receipts, 143 non-inventory items, 128 purchase orders, 139 quotes, 89 service items, 127 time and materials, 111 tracking costs for, 112 tracking custom items for, 116 updating percent complete, 116 using reports for, 113 vendor bills, 146
Jobs and Time reports, 223 Jobs list, 113
exporting to Excel, 114 printing, 114 rearranging, 114
journal entries billing customers, 62 changing voucher number, 61 copying, 63 creating for payroll, 173 description, 59 editing, 62 finding, 60 making, 60 navigating, 63 opening, 60 printing, 60 viewing by status, 59 viewing details, 63 voiding, 62
Journal Entries list, 59 exporting to Excel, 60 printing, 60 rearranging, 59
journal entry numbers adding or removing, 59
keyboard shortcuts, 7 Banking home page, 176 Company home page, 46 Customers home page, 79 Employees home page, 156 Reports home page, 207

Index
Microsoft Office Small Business Accounting 2006 243
Vendors home page, 119 Kit records
adding fields, 132 creating, 132
kits, 128 changing status, 133 discounting, 133 taxes, 128
letters designing templates for letters,
39 sending to customers, 85 sending to employees, 163 sending to vendors, 125
log files, 69 Change Log, 217 SQL server, 69 tracking online activity, 35 tracking online transactions, 200 tracking payroll transactions,
173 matching downloaded transactions,
203 matching transactions, 197 merging
accounts, 56 Customer records, 85 Item records, 134 Vendor records, 125
message settings changing, 35
Microsoft Office online resources, 3 working with, 1
Microsoft Office Outlook 2003 with Business Contact Manager Update creating invoices, 97 creating quotes, 90 creating sales orders, 93 sharing customer information,
86 sharing item information, 134
Missing Checks report, 225 modifying reports, 210 monitoring company data, 226 moving company data file, 71 multiuser environment
setting up, 19 Non-Inventory Item records
adding fields, 130 creating, 129
non-inventory items changing status, 131
NSF checks, 192, 194 Office Manager access, 41 online accounts
downloading transactions, 30 updating balances, 30
online banking, 3 downloading transactions, 202
error messages, 202 matching downloaded
transactions, 203 paying bills, 201 setting up, 54, 182, 199 tracking, 35 transferring funds, 200
online features, 2, 15 online Help. See Help online payroll. See payroll online resources
Microsoft Office resources, 3 online transactions
tracking, 35 Outlook
working with, 1 Owner access, 41 packing slips
printing, 99 partial invoices
back orders, 97 passwords
changing, 43 for Word templates, 40
pay runs. See payroll paying
sales taxes, 68, 191 vendor bills, 150, 191
payment terms, 37 changing on cash purchase
forms, 149 changing on item receipts, 144 changing on purchase orders,
140 changing on vendor bills, 147
payments, 101 adjusting, 106 finding, 101 opening, 101 receiving, 102 refunding, 109, 191 viewing by status, 101 writing off, 103
Payments list, 101 exporting to Excel, 101 printing, 101 rearranging, 101
payroll, 3 adding payments manually, 172 creating journal entries, 173 creating log file, 173 downloading pay runs, 173 Employee records, 173 managing online, 173 setting up accounts, 171 signing up for ADP processing,
172 Time records, 173 tracking, 35 tracking transactions, 173
Peachtree Accounting data
importing, 16 permissions, 41 Physical Inventory Worksheet, 223
printing, 134 PivotTable dynamic views
using Analysis Tools, 226 policies. See jobs posting dates
changing, 36 preferences
changing, 32 setting up, 13
prepayments customers, 103 vendor bills, 151
price levels, 37 selecting, 84
prices adjusting on all sales forms, 84
primary contact customers, 84 vendors, 124
printing 1099 Detail report, 125 batch of checks, 192, 196 Bills and Item Receipts list, 141 blank timesheets, 167 cash sale forms, 95 Chart of Accounts, 53, 180 checks, 151, 192, 193 customer credit memos, 95 customer statements, 85 Customers list, 82 Employees list, 160 finance charges, 95 invoices, 95 Invoices list, 95 Items list, 129 Jobs list, 114 journal entries, 60 Journal Entries list, 60 packing slips, 99 Payments list, 101 Physical Inventory Worksheet,
134 purchase orders, 137 Purchase Orders list, 137 quotes, 87 Quotes list, 87 reports, 214 sales orders, 91 Sales Orders list, 91 Time Entries list, 165 Vendors list, 122
Profit and Loss report, 29 Profit and Loss statement, 215
showing a chart, 215 Profitability by Customer Detail
report, 219 Profitability by Customer Summary
report, 218

Index
244 Microsoft Office Small Business Accounting 2006
Profitability by Job Detail report, 223
Profitability by Job Summary report, 223
projects. See jobs purchase orders, 137
adding references, 139 billing to customers, 139 changing payment terms, 140 changing quantities or prices,
140 classes, 139 creating, 138 creating with items, 134 deleting, 139 editing, 139 exporting to Word, 140 finding, 137 jobs, 139 linking files, 139 managing Word templates, 140 opening, 137 printing, 137 sending in e-mail messages, 140 viewing by status, 137
Purchase Orders list, 137 exporting to Excel, 137 printing, 137
purchases cash, 148
Purchases by Item Detail report, 222
Purchases by Item Summary report, 222
Purchases by Vendor Detail report, 221
Purchases by Vendor Summary report, 221
Purchases reports, 221 Quick Start Guide, 2 QuickBooks data
importing, 18 quotes, 87
accepted, 90 adding references, 89 changing quantities or prices, 90 classes, 89 creating, 88 creating for jobs, 89, 112 creating in Business Contact
Manager for Outlook, 90 creating with items, 134 discounting on, 90 editing, 89 expiration dates, 89 exporting to Word, 90 finding, 87 linking files, 89 managing Word templates, 90 opening, 87 printing, 87
rejected, 90 sending in e-mail messages, 90 viewing by status, 87
Quotes list, 87 exporting to Excel, 87 printing, 87 rearranging, 87
Read-only user access, 42 rebuilding company data, 72 receiving
items, 142 payments, 102
Reconciliation Detail report, 225 reconciling accounts, 196 refunding payments, 109, 191 region categories, 38 reimbursing employees, 163 reimbursing expenses, 191 rejecting quotes, 90 reminders, 29
adding, 31 removing, 31 vewing, 24
removing companies, 72 content from Company home
page, 30 roles, 43 Small Business Accounting, 22 user access, 43
reorder point setting, 132
repairing company data, 73 reports, 29
adding columns, 211 arranging, 214 changing text and numbers, 212 changing the financial basis, 34 changing titles, 212 comparing data, 212 descriptions, 215–26 drilling down, 209, 215 exporting to Excel, 214 filtering, 211, 215 highlighting trends, 212 keeping track of data, 215 modifying, 210 monitoring company data, 226 printing, 214 rearranging, 211 removing columns, 211 saving, 213 using Analysis Tools, 226 using for jobs, 113 viewing, 28 viewing details, 209, 215 workflow, 28
Reports home page, 27, 209, 215 touring, 27
restoring company data, 70 returning items to vendor, 154
returns by customers, 109 roles, 41 sales
cash, 103 Sales by Customer Detail report,
219 Sales by Customer Summary report,
219 Sales by Item Detail report, 220 Sales by Item Summary report, 220 Sales by Salesperson Detail report,
219 Sales by Salesperson Summary, 219 sales order templates
selecting, 93, 104 sales orders, 91
adding references, 93 changing quantities or prices, 94 classes, 93 creating, 92 creating in Business Contact
Manager for Outlook, 93 creating invoices from, 94 creating with items, 134 deleting, 93 discounting on, 94 editing, 93 exporting to Word, 94 finding, 91 linking files, 93 managing Word templates, 94 opening, 91 printing, 91 sending in e-mail messages, 94 viewing by status, 91
Sales Orders list, 91 exporting to Excel, 91 printing, 91 rearranging, 91
Sales reports, 219 Sales Tax Liability report, 217 sales taxes
adding settings, 66 adjusting liability, 67 cash purchase forms, 148 checking liability, 67 description, 65 identifying settings, 65 paying, 66, 68, 191 Sales Tax Liability report, 217 setting up, 33, 65 Transaction Detail by Tax Code
report, 217 vendor bills, 146
Salesperson access, 42 sample files
touring Small Business Accounting, 23
saving reports, 213 selling to customers, 25 Service Item records

Index
Microsoft Office Small Business Accounting 2006 245
adding fields, 130 creating, 129
service items changing status, 131 creating for jobs, 111
setting price levels, 84, 85 reorder point of inventory items,
132 standard cost of non-inventory
or service items, 131 setting up, 13
accounts, 15 Chart of Accounts, 50 company data, 13 multiuser environment, 19 online accounts, 54, 182 online banking, 199 payroll accounts, 171 preferences, 13 sales tax, 65
settings changing, 29
sharing data with Business Contact Manager,
20 shipping methods, 37 shipping terms, 37
changing on cash sale forms, 104
changing on invoice, 97 changing on sales orders, 93 setting up, 34
shortcuts, 11 showing a chart
Profit and Loss, 215 signing up
credit card processing, 106 payroll, 172
Social Security Number vendors, 124
software checking for updates, 3 checking requirements, 10
sound settings changing, 35
Spotlight, 3, 29 SQL server
attaching data files, 71 changing connection, 73 data files, 69 detaching data files, 71 log file, 69
standard cost non-inventory items, 131 service items, 131
Start a Task list, 23 start date, 36
defining, 9 starting Small Business Accounting,
11
Startup Wizard, 13 Startup Wizard progress checklist,
15 support lists, 37 support services, 4 switching company files, 28 system accounts
changing, 35 setting up, 51
system requirements checking, 10
taxes 1099 vendors, 221 cash purchase forms, 148 kits, 128 vendor bills, 146
tax-exempt customers, 84 templates
for form letters, 39 for forms, 39 using passwords, 40
time and materials jobs, 111 Time Entries
billing customers, 169 creating, 168 creating from Business Contact
Manager for Outlook, 170 creating invoices, 169 deleting, 170 editing, 169 finding, 165 pay type, 169
Time Entries list, 165 exporting to Excel, 165 invoicing time, 170 printing, 165 rearranging, 165
Time Entry form linking files, 169 unlinking files, 170
Time Entry numbers changing, 169
Time records creating invoices, 169 finding, 165 invoicing time, 170 navigating, 170 opening, 165 Pay type field, 173 payroll, 173 viewing by status, 165
Time report, 225 time tracking
workflow, 26 timesheets
billing a job, 167 billing customers, 167 changing start day, 35 copying last week, 166 creating, 163, 166 deleting rows, 167
exporting to Excel, 167 pay type, 167 printing a blank timesheet, 167
touring Small Business Accounting, 23
tracking company data, 226 online activities, 35 online transactions, 173
Transaction Detail by Account report, 216
Transaction Detail by Tax Code report, 217
Transaction History viewing, 63
Transaction Journal viewing, 63
Transaction Journal report, 217 transactions. See journal entries transferring funds, 194
online, 200 Trial Balance, 216 updates
checking for, 3 updating account balances, 30 updating cost automatically
items, 134 users
adding, 42 changing access, 42 removing access, 43
valuation inventory, 128
vendor bills adding references, 146 applying credits, 151 billing to customers, 146 changing payment terms, 147 changing quantities or prices,
147 classes, 146 creating, 145 editing, 147 entering, 145 finding, 141 handling taxes on purchases,
146 jobs, 146 linking files, 146 opening, 141 paying, 150 prepaying, 151 taking cash discounts, 150 viewing by status, 141
vendor credit memos adding references, 152 changing quantities or prices,
153 creating, 151 editing, 153 exporting to Word, 153

Index
246 Microsoft Office Small Business Accounting 2006
finding, 141 linking files, 152 opening, 141 sending in e-mail messages, 153 viewing by status, 141 voiding, 153
Vendor forms adding fields, 123 linking files, 123
vendor groups, 37, 124 vendor IDs
adding or removing, 122 changing, 123
vendor numbers. See vendor IDs vendor payments
adjusting, 151 Vendor records
adding fields, 123 creating, 122 deleting, 124 editing, 124 finding, 122 inactivating or activating, 125 merging, 125 opening, 122 viewing by status, 122
vendor services, 125 Vendor Transaction report, 221 vendors
1099, 34, 221 1099 categories, 124
changing status, 125 Federal tax ID, 124 Financial History, 125 Financial Summary, 125 selecting a primary contact, 124 sending a form letter, 125 sending e-mail messages, 125 Social Security Number, 124 with outstanding bills, 29 workflow, 25
Vendors home page, 121 keyboard shortcuts, 119 touring, 25
Vendors list, 122 exporting to Excel, 122 printing, 122
viewing details in reports, 209, 215
voiding bank transactions, 189 cash purchase forms, 149 customer credit memos, 107 invoices, 98 item receipts, 144 journal entries, 62 vendor credit memos, 153
voucher numbers changing in journal entries, 61
Windows access adminstrator, 41
Windows passwords
changing, 43 Word
exporting cash sale forms to, 105
exporting customer credit memos to, 108
exporting customer statements to, 85
exporting invoices to, 99 exporting purchase orders to,
140 exporting quotes to, 90 exporting sales orders to, 94 exporting vendor credit memos
to, 153 working with, 1
Word templates customer credit memos, 108 customer statements, 85 invoices, 99 making read-only, 40 purchase orders, 140 quotes, 90 sales orders, 94 using passwords, 40
workflows, 24–28 writing checks, 189 writing off
bad debts or customer payments, 103
XML files, 69

Microsoft
® Office S
mall B
usiness Accounting 20
06
User’s G
uide
Part No. X11-29551
Need more information?
For more information about Microsoft® Office Small Business Accounting 2006, Microsoft Office Small Business Management Edition, or Microsoft Office Editions, visit us on the Web:
• Microsoft Office Small Business Accounting 2006 Learn more about the new financial management program from Microsoft at www.microsoft.com/office/accounting
• Microsoft Office Small Business Management Edition 2006 Learn more about the new financial management solution from Microsoft at www.microsoft.com/office/editions/prodinfo/smallbusiness/management/default.mspx
• Microsoft Office Editions Find out which Microsoft Edition is right for your company at www.microsoft.com/office/editions/prodinfo/smallbusiness
• Microsoft Office Small Business Accounting Add-on Services Learn more about add-on services that can help you save time at sba.microsoft.com
Need help?
Free and paid support plans are available to keep you up and running. If you need to speak to a Microsoft support engineer, call us at 1-800-MICROSOFT. You can also visit us on the Web at www.support.microsoft.com to find out more about:
• Free product setup and support calls
• Paid support plans
• Frequently asked questions
• Knowledge Base articles
If you encounter problems installing this product, our support engineers can help you. Free installation support is available at 1-800-MICROSOFT.
����������������������� ����
User’s Guide


