108
Outreach Version 10.0.2 Guide for Business Users Oracle ATG One Main Street Cambridge, MA 02142 USA

Outreach
Version 10.0.2
Guide for Business Users
Oracle ATG One Main Street Cambridge, MA 02142 USA

ATG Outreach Guide for Business Users
Document Version ACO10.0.2 BUSINESSv1 04/15/2011
Copyright Copyright © 1997, 2011, Oracle and/or its affiliates. All rights reserved.
This software and related documentation are provided under a license agreement containing restrictions on use and disclosure and are protected by intellectual property laws. Except as expressly permitted in your license agreement or allowed by law, you may not use, copy, reproduce, translate, broadcast, modify, license, transmit, distribute, exhibit, perform, publish, or display any part, in any form, or by any means. Reverse engineering, disassembly, or decompilation of this software, unless required by law for interoperability, is prohibited.
The information contained herein is subject to change without notice and is not warranted to be error-free. If you find any errors, please report them to us in writing.
If this software or related documentation is delivered to the U.S. Government or anyone licensing it on behalf of the U.S. Government, the following notice is applicable:
U.S. GOVERNMENT RIGHTS Programs, software, databases, and related documentation and technical data delivered to U.S. Government customers are "commercial computer software" or "commercial technical data" pursuant to the applicable Federal Acquisition Regulation and agency-specific supplemental regulations. As such, the use, duplication, disclosure, modification, and adaptation shall be subject to the restrictions and license terms set forth in the applicable Government contract, and, to the extent applicable by the terms of the Government contract, the additional rights set forth in FAR 52.227-19, Commercial Computer Software License (December 2007). Oracle America, Inc., 500 Oracle Parkway, Redwood City, CA 94065.
This software or hardware is developed for general use in a variety of information management applications. It is not developed or intended for use in any inherently dangerous applications, including applications that may create a risk of personal injury. If you use this software or hardware in dangerous applications, then you shall be responsible to take all appropriate fail-safe, backup, redundancy, and other measures to ensure its safe use. Oracle Corporation and its affiliates disclaim any liability for any damages caused by use of this software or hardware in dangerous applications.
Oracle and Java are registered trademarks of Oracle and/or its affiliates. Other names may be trademarks of their respective owners.
Intel and Intel Xeon are trademarks or registered trademarks of Intel Corporation. All SPARC trademarks are used under license and are trademarks or registered trademarks of SPARC International, Inc. AMD, Opteron, the AMD logo, and the AMD Opteron logo are trademarks or registered trademarks of Advanced Micro Devices. UNIX is a registered trademark licensed through X/Open Company, Ltd.
This software or hardware and documentation may provide access to or information on content, products, and services from third parties. Oracle Corporation and its affiliates are not responsible for and expressly disclaim all warranties of any kind with respect to third-party content, products, and services. Oracle Corporation and its affiliates will not be responsible for any loss, costs, or damages incurred due to your access to or use of third-party content, products, or services.
For information about Oracle's commitment to accessibility, visit the Oracle Accessibility Program website at http://www.oracle.com/us/corporate/accessibility/index.html.
Oracle customers have access to electronic support through My Oracle Support. For information, visit http://www.oracle.com/support/contact.html or visit http://www.oracle.com/accessibility/support.html if you are hearing impaired.

A T G O u t r e a c h G u i d e f o r B u s i n e s s U s e r s
i i i
C o n t e n t s
μ
Contents
1 Introduction 1 Installing and Configuring ATG Outreach 1 Accessing the ATG Outreach User Interface 1
Using the Operations Menu 3 Using the To Do List 3
Using the Browse Campaigns Page 4 Using the Back Button in the Browser 5
2 ATG Outreach Overview 7 ATG Outreach Terms 7
Stages 7 Events 7 Actions 7 Landing Pages 8 Segments 8 Opt-In and Opt-Out Segments 8 Global Opt-Out 8
ATG Content Administration Terms 8 Projects and Workflows 9 Deployment 9 Assets 9 Versioning 9
Using ATG Outreach in a Multisite Environment 10 Example of a Campaign 10
3 Creating a Campaign 13 Starting a New Campaign 16 Defining the Root Stage 17 Adding Actions 19
Send Email Communication 19 Wait for Timer 20 Wait for Event 21 Publish Web Content 22 Exit Campaign 26 Perform Action 27 Configuring Actions 28
Adding Segments 31

A T G O u t r e a c h G u i d e f o r B u s i n e s s U s e r s
i v
C o n t e n t s
μCreating a New Segment 33 Working with User Segments in a Multisite Environment 35 Adding and Editing Existing Segments 37 Examples of Expressions 38 Browsing the Profiles that Make Up a Segment 41
Adding Landing Pages 41 Creating a New Landing Page 43 Editing a Landing Page 45 Adding Events to a Landing Page 45 Understanding Landing Page Deployment 45
Adding Events 46 Configuring Events 49 Understanding Multisite Events 51 Adding a Visits (Page) Event 51
Adding Child Stages 52 Configuring Preemptive Stages 53
Removing Actions or Child Stages 53 Editing a Campaign 54
Editing Actions and Events Created Before ATG Outreach 2006.5 54 Deleting Editable Campaigns 55 Finishing and Deploying a Campaign 55
Verifying Campaign Deployment 58 Testing Campaigns on a Staging Server 59
Creating Campaigns for Use with a Staging Server 61
4 Using Opt-In and Opt-Out Segments 65 Adding Opt-In or Opt-Out Segments to a Campaign 66
5 Importing Mailing Lists 67 Importing a New Mailing List 68
Duplicating Records 70 Browsing Imported Lists 70 Deleting an Imported List 71
6 Using Campaign Templates and Copies 73 Creating and Using Campaign Templates 73
Browsing Campaign Templates 74 Editing and Deleting Templates 74
Copying Campaigns 74
7 Using the HTML E-Mail Editor 77 Downloading the HTML Editor Applet 77 Using the HTML Editor 78
Inserting Links to Landing Pages 79 Personalizing the Message 80 Adding Images 80

A T G O u t r e a c h G u i d e f o r B u s i n e s s U s e r s
v
C o n t e n t s
μInserting Page Fragments 81 Inserting Coupons 83 Tracking Opened E-Mail 83
Previewing the Message 84
8 Modifying, Stopping, and Deleting Deployed Campaigns 85 Modifying a Deployed Campaign 85 Modifying a Running Campaign 85 Stopping a Campaign 86 Deleting a Deployed Campaign 86
9 Using ATG Outreach Projects 89 Displaying the Project Tabs 89 Tasks Tab 90 Assets Tab 92 History Tab 93 Lock Conflicts Tab 94
10 Using ATG Outreach Reports 95 Campaign Overview Report 95 Email Campaign Details Report 96 Campaign Revenue Report 97
Index 100

A T G O u t r e a c h G u i d e f o r B u s i n e s s U s e r s
v i
C o n t e n t s
μ

A T G O u t r e a c h G u i d e f o r B u s i n e s s U s e r s
1
1 - I n t r o d u c t i o n
μ1 Introduction
This guide is designed to give business users a comprehensive understanding of ATG Outreach. It provides information on how to use ATG Outreach to create and manage customer interactions in the form of marketing and service-oriented campaigns, for example product promotions, purchasing incentives, or alerts that tell customers about a change in service. Campaigns can be as simple as a “Welcome” e-mail that you send to all users who register at one of your Web sites, or you can create complex, multi-step, multi-channel campaigns that respond to individual users according to their behavior over a specified period of time. Campaigns can be list driven, event driven, or a combination of both types, giving you a high degree of flexibility in the campaigns you create. ATG Outreach also provides you with reporting tools to understand and measure the effectiveness of your campaigns, allowing you to refine them for future deployments.
ATG Outreach consists of two modules:
ATG Outreach Server: Provides access to the campaign creation and management interface. Through this interface, you set up customer segments, create personalized e-mails, and structure your campaigns to send e-mails or deliver Web and other content to your sites. It also provides reporting functionality that allows you to track the status of your campaigns.
ATG Outreach Production/Staging module: Sometimes referred to as the runtime server. This module contains the customer-facing part of the application. It handles the delivery of campaigns to your customers and logs data from customer responses for use in reporting. This module is typically managed by an application administrator. For information on how to configure and maintain it, refer to the ATG Outreach Administration and Development Guide.
Installing and Configuring ATG Outreach For information about installing and configuring ATG Outreach, refer to the ATG Outreach Administration and Development Guide.
Accessing the ATG Outreach User Interface You access the ATG Outreach user interface through the Operations menu in the ATG Business Control Center, which is installed with ATG Content Administration. The instructions below assume that the ATG Outreach Server and the database it uses have both been started. For more information, refer to the ATG Outreach Administration and Development Guide.

A T G O u t r e a c h G u i d e f o r B u s i n e s s U s e r s
2
1 - I n t r o d u c t i o n
μ1. Point your Web browser to the URL that represents the ATG Business Control Center.
The URL you enter depends on the application server on which ATG Outreach is running. The default URLs are as follows:
JBoss Application Server: http://hostname:8080/atg/bcc
IBM WebSphere: http://hostname:9080/atg/bcc
Oracle WebLogic: http://hostname:7001/atg/bcc
For example, if you want to access the ATG Business Control Center on JBoss on your local machine, which is common for product evaluation, enter http://localhost:8080/atg/bcc.
2. When the ATG Business Control Center login dialog box appears, enter the login name and password defined in your ATG user profile. Note that the fields are case sensitive. If you are denied access, check you have the appropriate permissions. As well as an ATG user profile, you need an ATG Outreach role and an ATG Portal role. For more information, refer to the ATG Outreach Administration and Development Guide.
The following image shows the BCC Home page, which appears after you log in:
The sections that follow describe how to use the Operations menu and the To Do list.

A T G O u t r e a c h G u i d e f o r B u s i n e s s U s e r s
3
1 - I n t r o d u c t i o n
μUsing the Operations Menu
The Operations menu in the left pane contains the options you use to access ATG Outreach features:
Import Email List: Select this option to create a mailing list containing the e-mail addresses you want to use as targets of your campaigns. See Importing Mailing Lists.
Create a Campaign Template: Allows you to set up a template that can be used as a quick way to create common or similar campaigns. See Using Campaign Templates and Copies.
Create a Campaign: Select to create a new ATG Outreach campaign. See Creating a Campaign.
Browse Imported Lists: Select to view any mailing lists you have already created. See Browsing Imported Lists for more information.
Browse Campaigns: Shows you a list of existing campaigns. See Using the Browse Campaigns Page.
Browse Campaign Templates: Shows a list of existing templates. See Using Campaign Templates and Copies.
Copy Existing Campaign: Allows you to make a new campaign from one that has already been deployed.
Create Campaign from Template: Starts the process of creating a new campaign from a reusable template.
For details on using the ATG Content Administration menu item shown in the image, see the ATG Content Administration Guide for Business Users. For information on the Personalization menu item, see the ATG Business Control Center User’s Guide. If you have any other ATG applications, additional options may appear. Refer to the documentation for those applications.
Note: If no items appear under the Outreach option, your ATG session may have expired. Log out of the ATG Business Control Center, close and restart your browser, and log in again.
Using the To Do List
The To Do List in the right pane of the BCC Home page allows you to view and edit projects that you have created or that contain tasks assigned to you. “Projects” are an ATG Content Administration concept. In ATG Outreach, projects are campaigns, templates, and imported mailing lists. If you create any of these items through the Operations menu, but you do not complete them, you can use the To Do List to access them later for editing. For more information, see Using ATG Outreach Projects.
Note that only campaigns, templates, and imported lists that can currently be edited appear in the To Do List (these items have the status Edit or Edit Running). Items that are not in an editing stage do not appear. For information on how to access items that are not editable, as well as more information about campaign status, see the next section, Using the Browse Campaigns Page.
A T G O u t r e a c h G u i d e f o r B u s i n e s s U s e r s
4
1 - I n t r o d u c t i o n
μUsing the Browse Campaigns Page
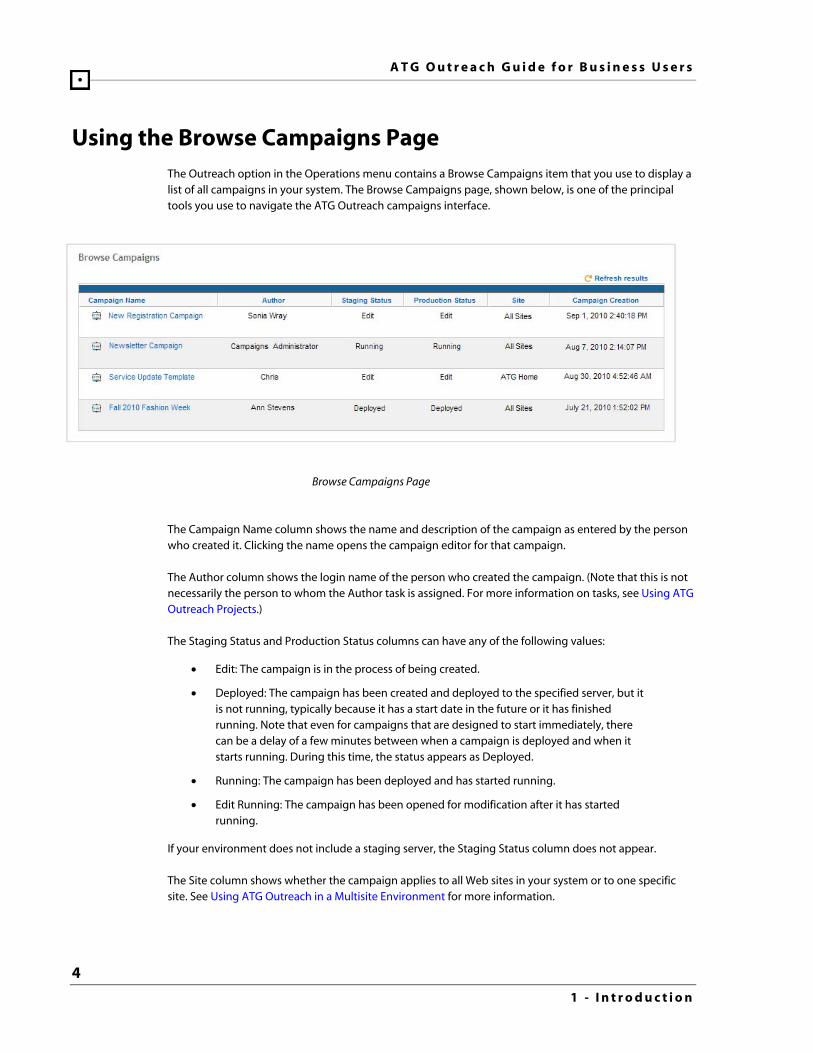
The Outreach option in the Operations menu contains a Browse Campaigns item that you use to display a list of all campaigns in your system. The Browse Campaigns page, shown below, is one of the principal tools you use to navigate the ATG Outreach campaigns interface.
Browse Campaigns Page
The Campaign Name column shows the name and description of the campaign as entered by the person who created it. Clicking the name opens the campaign editor for that campaign.
The Author column shows the login name of the person who created the campaign. (Note that this is not necessarily the person to whom the Author task is assigned. For more information on tasks, see Using ATG Outreach Projects.)
The Staging Status and Production Status columns can have any of the following values:
Edit: The campaign is in the process of being created.
Deployed: The campaign has been created and deployed to the specified server, but it is not running, typically because it has a start date in the future or it has finished running. Note that even for campaigns that are designed to start immediately, there can be a delay of a few minutes between when a campaign is deployed and when it starts running. During this time, the status appears as Deployed.
Running: The campaign has been deployed and has started running.
Edit Running: The campaign has been opened for modification after it has started running.
If your environment does not include a staging server, the Staging Status column does not appear.
The Site column shows whether the campaign applies to all Web sites in your system or to one specific site. See Using ATG Outreach in a Multisite Environment for more information.

A T G O u t r e a c h G u i d e f o r B u s i n e s s U s e r s
5
1 - I n t r o d u c t i o n
μThe Campaign Creation column shows the date and time that the campaign was created in ATG Outreach.
If a campaign you recently created does not appear in the list, click Refresh Results.
The Browse Campaigns page contains a List Options box (shown in the image below) that you can use to search for a specific campaign or filter the display. Enter any characters from the name or description of the campaign and click Go. The display changes to show only campaigns that include those characters. To show all campaigns, leave the Title & Description box blank.
Using the Back Button in the Browser Please be aware that using your browser’s Back button to navigate the ATG Business Control Center is not recommended. Depending on the operation you are performing, using the Back button to redisplay a page may occasionally cause data conflict, resulting in errors. Wherever possible, use the links and other navigation controls in the ATG Business Control Center to move from one page to another.
If an error does appear after using the Back button, close the browser and restart it.

A T G O u t r e a c h G u i d e f o r B u s i n e s s U s e r s
6
1 - I n t r o d u c t i o n
μ

A T G O u t r e a c h G u i d e f o r B u s i n e s s U s e r s
7
2 - A T G O u t r e a c h O v e r v i e w
μ2 ATG Outreach Overview
This chapter introduces important terms used in ATG Outreach and ATG Content Administration and includes an example of a simple campaign.
ATG Outreach Terms This section defines principal ATG Outreach terms:
Stages
Events
Actions
Landing Pages
Segments
Opt-In and Opt-Out Segments
Global Opt-Out
Stages
A stage is a step or a phase in a campaign. Every campaign has an initial stage (also called the root stage) that defines the actions that begin the campaign, for example sending an e-mail to customers or displaying content on the Web site. A campaign can also have one or more child stages, which are triggered by customer responses to earlier campaign actions. You can create a child stage after you add an event to a campaign.
Events
Events represent the customer behavior that you want to use as a trigger for the next activity in a campaign. Logging into a Web site, changing a profile, and clicking a specified link are examples of events.
Actions
While events represent customer activity, actions represent ATG Outreach activity, for example sending an e-mail to a group of customers or publishing content to a Web site. Actions can also be used to
A T G O u t r e a c h G u i d e f o r B u s i n e s s U s e r s
8
2 - A T G O u t r e a c h O v e r v i e w
μrespond to an event. For example, a campaign could include an action that sends an e-mail in response to a customer visit to a given site page (an event).
Landing Pages
E-mails that you send to the targets of your campaigns can include links to Web site pages. A landing page is the page that appears when a user follows one of these links. For example, you could include a link such as the following in the body of an e-mail: “See photos of our Fall collection at New York Fashion Week,” where “Fall collection” is a link to a landing page called fall_NYC.jsp.
Segments
Campaigns are targeted to specific groups of people called “segments,” which are analogous to profile groups in earlier versions of ATG Personalization. A segment is defined as a set of profile properties. Any user whose profile includes the specified properties is included in the segment.
For example, you could create a segment called “Boston Women” with the following characteristics:
Gender is female, and
Home address’s city is Boston
Opt-In and Opt-Out Segments
You can use opt-in segments to target customers who have explicitly subscribed to a particular e-mail category. Opt-out segments give you a way to exclude customers who have specified they do not want to receive a given category of e-mails. For more information, see the Using Opt-In and Opt-Out Segments chapter.
Global Opt-Out
ATG Outreach provides global opt-out features that you can use to allow customers to opt out of all e-mail communication. A page developer creates a Web page that includes a form customers can use to specify they want to opt out of all campaigns. In any e-mail you send as part of a campaign, you include a link to that page. You can use ATG Outreach reporting features to track the number of customers who elect to opt out of all e-mail communication after receiving a message as part of a specific campaign.
ATG Content Administration Terms ATG Outreach uses the content management features of ATG Content Administration to manage campaign content (for example, any text or images that appear in an e-mail). You create and manage your content for campaigns on an internal server. The content is then published, or deployed, to your customer-facing Web sites by ATG Content Administration.
The following definitions are provided to help you understand how campaigns are managed and deployed. For more information, see the ATG Content Administration Programming Guide and the ATG Content Administration Guide for Business Users.

A T G O u t r e a c h G u i d e f o r B u s i n e s s U s e r s
9
2 - A T G O u t r e a c h O v e r v i e w
μProjects and Workflows
Projects represent business activities that involve several tasks that can be completed over a period of time by one or more people. Each project is associated with an underlying workflow, which controls the lifecycle of the project, determining the number of tasks it has and the order in which they should be completed. ATG Outreach has three project types: a campaign project, which you use to create and manage campaigns, a campaign template project, and a list import project, which you use to import mailing lists for use in campaign segments.
Projects allow you to share the work of creating campaigns and mailing lists with other people in your organization; for example one person can be assigned the task of creating a campaign, and a second person can be assigned the task of approving the campaign and deploying it to the production server. For more information, see Using ATG Outreach Projects.
Deployment
Deployment is the process of copying campaigns and their associated assets from the internal campaign creation server to your Web sites after the campaign is approved. Campaigns start running automatically after they have been deployed (or after any future start date specified for them has been reached).
The default ATG Outreach workflow is designed to deploy from the ATG Outreach server to a production (customer-facing) server. However, ATG Outreach can also be configured to use a workflow that deploys first to a staging server and then to a production server. Including a staging server in your environment allows you to test campaigns before they are made visible to customers through the live production site.
You must perform some configuration steps in ATG Content Administration before you can deploy any campaigns or other ATG Outreach projects. Refer to the ATG Outreach Administration and Development Guide for more information.
Assets
A campaign is made up of various editable objects, referred to as “assets,” that must be available on the production server for the campaign to work correctly. Assets must be deployed together when the campaign is started. For example, a campaign that sends an e-mail to a group of customers must contain a file that holds the text for the message, and the file must be deployed with the campaign for it to work correctly. Examples of campaign assets are segments, landing pages, slots, and image files.
Versioning
Versioning is the mechanism that allows users to view the change history of assets, resolve conflicts between different versions of assets, and revert changes. All assets have an associated version number. Every time a campaign is edited and deployed, the assets in the campaign are assigned a new version number. This behavior ensures that when anyone edits a campaign, he or she is working on the most recent version of its assets.

A T G O u t r e a c h G u i d e f o r B u s i n e s s U s e r s
1 0
2 - A T G O u t r e a c h O v e r v i e w
μUsing ATG Outreach in a Multisite Environment
The term multisite refers to running multiple Web sites from a single ATG instance. For example, a clothing manufacturer with two brands, a bargain brand and a luxury brand, could create and manage a separate Web site for each brand from one instance of the ATG product suite. The sites could be configured to share items such as user profiles and shopping carts. For more information, refer to the ATG Multisite Administration Guide.
ATG Outreach campaigns support a multisite environment as follows:
You can choose to have a campaign apply to one site or all sites. Campaigns that apply to all sites are known as global campaigns.
Some campaign actions and events are site aware. For example, if you add a landing page link to an e-mail message, and your campaign applies to all sites, you are prompted to specify the site that contains the landing page so customers are sent to the appropriate site when they click the link. Note, however, that you cannot mix sites within a campaign; for example, you cannot configure a campaign so that a user who logs into site A gets a promotion for use on Site B.
User segments can be configured to behave differently for each site. This option is particularly helpful in situations where the segment criteria are relative. For example, you could have a segment called “frequent buyers” that has different definitions of “frequent” for each site. For more information, see Working with User Segments in a Multisite Environment.
ATG Outreach reports show multisite information; for example, they display the name of the Web site that provided a specific piece of data.
You must register and configure your Web sites in the Site Administration utility before you can create multisite campaigns. See the ATG Multisite Administration Guide for details.
Example of a Campaign The diagram below shows how stages, actions, and events work together to form a campaign. The example shows a simple campaign that sends an e-mail to prospective customers inviting them to register at a Web site.

A T G O u t r e a c h G u i d e f o r B u s i n e s s U s e r s
1 1
2 - A T G O u t r e a c h O v e r v i e w
μ
The campaign contains three stages: the initial or root stage, a Thank You stage, and a Reminder stage. The Thank You and Reminder stages are child stages of the root.
Root Stage
The root or initial stage starts as soon as the campaign is deployed to the production server (or any future start date specified for the campaign is reached). In the example, the root stage contains two actions that are executed simultaneously:
Send Email. The first action sends an e-mail asking customers to register on the Web site. The e-mail can be targeted to specific segments. The e-mail also can contain a link to a landing page on the site where users can fill out a registration form. If the user does register (an event), the Thank You stage of the campaign is triggered.
Wait 2 Weeks. The second action is a timer that waits for two weeks. When the timer expires, the Reminder stage is started for those customers who have not passed through the Thank You stage.
Thank You Child Stage
The Thank You stage of the campaign has one action that sends a follow-up e-mail to customers who register at the site.
Reminder Child Stage
The Reminder stage of the campaign has two actions. It sends an e-mail reminding the customer to register, and it also publishes a reminder on the Web site. The stage is configured to include only customers who have not completed the Thank You stage. For more information, see Configuring Preemptive Stages.

A T G O u t r e a c h G u i d e f o r B u s i n e s s U s e r s
1 2
2 - A T G O u t r e a c h O v e r v i e w
μ

A T G O u t r e a c h G u i d e f o r B u s i n e s s U s e r s
1 3
3 - C r e a t i n g a C a m p a i g n
μ3 Creating a Campaign
This chapter describes how to create a campaign. It includes an example that is similar to the one in the previous chapter -- it sends an e-mail inviting a targeted segment of customers to register at a Web site. The campaign in the example is structured as follows:
Send an e-mail to a specified group of people. The e-mail includes a link to a registration page. Customers who register receive a “Thank You” e-mail.
Wait for two weeks and then send an e-mail prompt to those customers who have not yet responded. In addition, publish a reminder on the Web site.
Important: Your ATG Outreach installation may be set up to test campaigns on a staging server before deploying them to a production server. You create campaigns differently if you plan to test them on a staging server. If you use a staging environment, please read the section Testing Campaigns on a Staging Server in this guide before start creating campaigns.
The following image shows the campaign design page (the Structure tab):

A T G O u t r e a c h G u i d e f o r B u s i n e s s U s e r s
1 4
3 - C r e a t i n g a C a m p a i g n
μ
The left pane of the window contains the Stages list, which shows the stages that make up this campaign. It is also a navigation tool, allowing you to display details and an editing window for any stage or any action by clicking the item’s name. In the image, the root stage is selected in the left pane, and the editing window for this stage appears on the right.
The Stages list displays stages and actions in a hierarchy:

A T G O u t r e a c h G u i d e f o r B u s i n e s s U s e r s
1 5
3 - C r e a t i n g a C a m p a i g n
μ
The list uses icons to indicate stages and actions and their state of completion:
Icon Indicates
Stage
Stage that is incomplete, meaning that one or more required elements are missing.
If an action contains an event that triggers another stage, the stage name includes the name of the event in parentheses.
Action
Incomplete action
Action that has an associated event
Action that has an associated an event. Either the action or the event is incomplete.
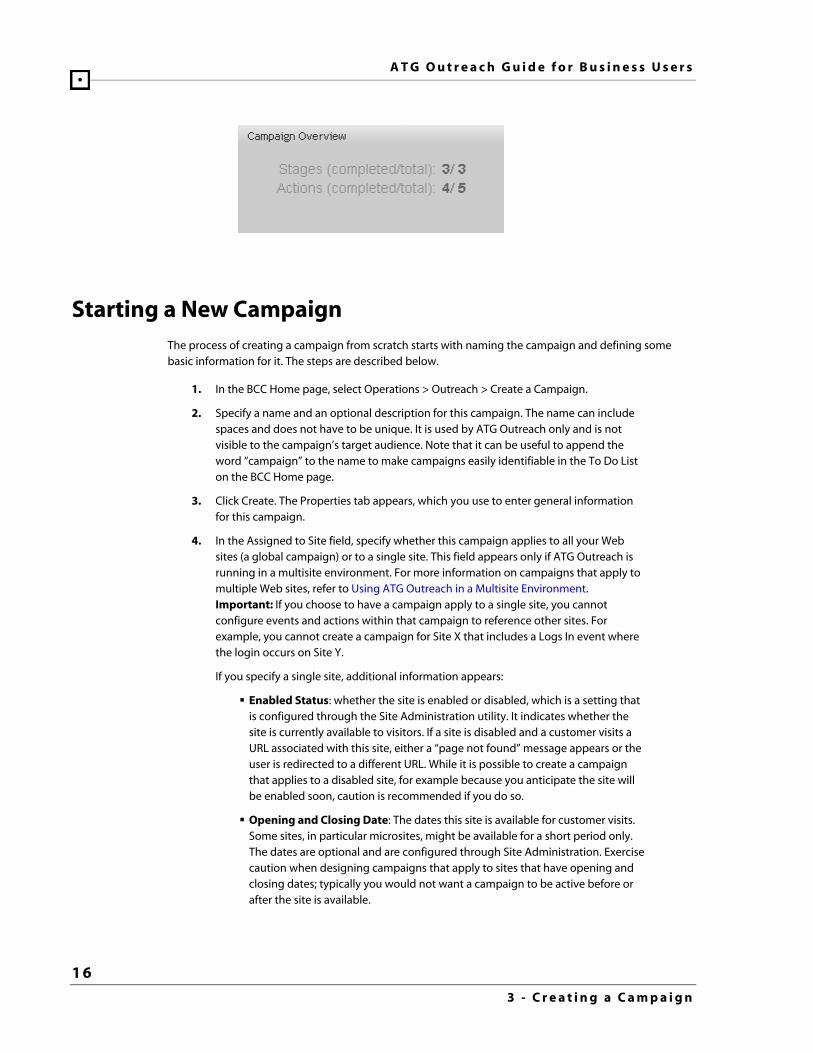
Below the Stages list is the Campaign Overview, which shows the total number of stages and actions and the number that need to be completed before the campaign can be deployed.
A T G O u t r e a c h G u i d e f o r B u s i n e s s U s e r s
1 6
3 - C r e a t i n g a C a m p a i g n
μ
Starting a New Campaign The process of creating a campaign from scratch starts with naming the campaign and defining some basic information for it. The steps are described below.
1. In the BCC Home page, select Operations > Outreach > Create a Campaign.
2. Specify a name and an optional description for this campaign. The name can include spaces and does not have to be unique. It is used by ATG Outreach only and is not visible to the campaign’s target audience. Note that it can be useful to append the word “campaign” to the name to make campaigns easily identifiable in the To Do List on the BCC Home page.
3. Click Create. The Properties tab appears, which you use to enter general information for this campaign.
4. In the Assigned to Site field, specify whether this campaign applies to all your Web sites (a global campaign) or to a single site. This field appears only if ATG Outreach is running in a multisite environment. For more information on campaigns that apply to multiple Web sites, refer to Using ATG Outreach in a Multisite Environment. Important: If you choose to have a campaign apply to a single site, you cannot configure events and actions within that campaign to reference other sites. For example, you cannot create a campaign for Site X that includes a Logs In event where the login occurs on Site Y.
If you specify a single site, additional information appears:
Enabled Status: whether the site is enabled or disabled, which is a setting that is configured through the Site Administration utility. It indicates whether the site is currently available to visitors. If a site is disabled and a customer visits a URL associated with this site, either a “page not found” message appears or the user is redirected to a different URL. While it is possible to create a campaign that applies to a disabled site, for example because you anticipate the site will be enabled soon, caution is recommended if you do so.
Opening and Closing Date: The dates this site is available for customer visits. Some sites, in particular microsites, might be available for a short period only. The dates are optional and are configured through Site Administration. Exercise caution when designing campaigns that apply to sites that have opening and closing dates; typically you would not want a campaign to be active before or after the site is available.

A T G O u t r e a c h G u i d e f o r B u s i n e s s U s e r s
1 7
3 - C r e a t i n g a C a m p a i g n
μIf you want to select a single site but no sites appear in the list, make sure the Web sites you want have been registered in Site Administration and deployed through an ATG Content Administration project. For more information, refer to the ATG Multisite Administration Guide.
5. (Optional) Enter the campaign’s start and end dates and times using the formats shown. Specifying a start date allows you to control when the campaign begins. If you leave the start date blank, the campaign starts as soon as it is deployed and its first event is triggered.
Specifying an end date is strongly recommended for all campaigns. If you leave the end date blank, the campaign runs until you stop it manually, and unexpected results can occur. This consideration is especially important for campaigns containing events that wait for customer behavior (for example, visiting a given Web page). If the campaign does not have an end date, the event waits until you stop the campaign manually, and during that time the campaign advances for any participant who completes the event.
If you specify start and end dates but do not define times, the default time is used, which is midnight in both cases.
6. The Information fields are optional and allow you to enter data you can use to manage your campaigns and track their effectiveness. For example, if you enter an amount in the Estimated Cost field, you can compare this data to the actual cost when the campaign is complete. You can enter any text you like in any of these fields. The data you enter is displayed in Campaign Overview reports.
7. Click OK. Note: In some places in the ATG Business Control Center, you can switch between tabs or pages without losing any changes you have made. However, in the Properties tab, you must click OK (or Apply) before moving to another page. Otherwise your changes are lost.
The Structure tab is displayed. See the next section, Defining the Root Stage, for information on how to use this tab.
To edit any of the information in the Properties tab at a later date, locate the campaign through the Browse Campaigns list or the To Do List in the BCC Home page. For more information, see Editing a Campaign. Note that you may have to click Refresh in the Browse Campaigns page for a new campaign to appear.
Defining the Root Stage The following procedure shows how to set up the initial or root stage of the campaign.
1. Display the Structure tab, either by creating a new campaign, as described in the previous section, or by displaying the campaign through the To Do list or the Browse Campaigns option in the BCC Home page.
2. Enter a name for the stage. The name is used by ATG Outreach only and is not seen by customers. A note about stage names: If you plan to use ATG Outreach reports, make sure that each stage name is unique within a campaign. The reporting engine combines report rows for any stages that have the same name.

A T G O u t r e a c h G u i d e f o r B u s i n e s s U s e r s
1 8
3 - C r e a t i n g a C a m p a i g n
μ3. (Optional) Enter a description.
4. From the New Action dropdown menu, select the first action you want to occur in this stage of the campaign.
5. Click Add New Action, which changes the display in the right pane to show fields corresponding to the action you chose.
6. Complete the fields for this action and click Apply. For detailed information on configuring the different elements available, see Configuring Actions. Note also that any events that you want to add to this stage must be added through the action display, and only certain actions allow you to add events. For more information, see Adding Events.
The image below shows the Structure tab as it looks after you have defined one action.
At this point, you can do the following:
Add other actions to this stage. Any actions you add to the root stage start at the same time and run parallel to one another. To continue building the campaign shown at the beginning of this chapter, you would add another action, Wait for Timer, and configure it to wait for two weeks.
If the action you just added contains an event, you can start a child stage that is triggered if the event occurs. To do so, click Add Next Stage. This button does not

A T G O u t r e a c h G u i d e f o r B u s i n e s s U s e r s
1 9
3 - C r e a t i n g a C a m p a i g n
μappear if no events have been added to the action. See Adding Child Stages for more information.
Delete the campaign by selecting Cancel from the Task Actions list. See Deleting Editable Campaigns.
Finish the campaign. See Finishing and Deploying a Campaign for more information.
Adding Actions You can add the following actions to an ATG Outreach campaign:
Send Email Communication
Wait for Timer
Wait for Event
Publish Web Content
Exit Campaign
Perform Action (acts as a parent action that allows you to insert a number of other actions, including Add Items to Slot)
ATG Commerce-related actions are also available if your ATG installation includes ATG Commerce.
Send Email Communication
When you add a Send Email Communication action to a stage, you provide the following information to define the action:
Name (required). Used by ATG Outreach only and not visible to customers. Defaults to New Send Email Communication. For reporting purposes, make sure the name of each action is unique within a campaign.
Description (optional).
Segments (required): One or more groups of customers that you want to receive the e-mail. You can specify an existing segment or create a new one. For information, see Adding Segments.
Override Frequency of Contact Policy: Your application administrator can set a limit on the number of e-mails that can be sent to customers. The limit works by requiring that a certain amount of time (days or hours) must pass between e-mails to a single customer. For example, if the limit is five days, any customers who receive an e-mail on Monday cannot receive another e-mail until Saturday, and they will be automatically excluded from the recipient list for any e-mail you send on Thursday. To ignore this limit and send the e-mail to all customers in the specified segments, check the Override Frequency of Contact Policy option.
Landing Pages (optional): Specify one or more landing pages, which are the pages on your site where you want customers to arrive after clicking links in the e-mail.

A T G O u t r e a c h G u i d e f o r B u s i n e s s U s e r s
2 0
3 - C r e a t i n g a C a m p a i g n
μThe HTML editor you can use to create the text for the e-mail has a menu that allows you to insert a link to a landing page automatically. By adding the landing pages here, you make them available to the editor.
For detailed information, including information on how to add an event that is related to a landing page, see Adding Landing Pages.
Email Content: Use these fields to set up the template that defines the e-mail message, including the text and any images that you want the message to contain.
Subject (required): Type the subject line of the e-mail as you want customers to see it in their e-mail clients.
From (required): Type a valid e-mail address that represents the address you want customers to see in the From field of their e-mail clients (for example [email protected]).
Reply-To (optional): A return e-mail address that is different from the e-mail address of the server that sends the mailing. For example, you might want recipients to send replies to a specific customer support address.
HTML content (optional): Click Create to specify the contents of the message template in HTML format. Click Browse to select an existing template. For detailed information , see the Using the HTML E-Mail Editor chapter.
Note that you are required to supply either HTML content or text content.
Text content (optional): You can create e-mail content in both HTML and text format so that e-mail is sent in multi-part MIME format. Use the Text Content fields to supply an alternative, text-only version of the message. If a customer’s e-mail system does not support HTML-based messages, he or she automatically receives the plain text version.
If you do not provide a text version, and the customer’s mail system does not support HTML, the HTML version is automatically converted to text. However, the results of an automatic conversion from HTML can be undesirable. Supplying a text version is recommended because it gives you better control over the results.
Wait for Timer
The Wait for Timer action allows you to specify a period of time that must pass before another action occurs. The action can be set for the following increments: hours, days, weeks, months, or years. The timer can also be set to expire on a given time and/or date. The Wait for Timer action automatically creates a new event, Timer Expires, allowing you to add a new child stage to the campaign.
In the example given at the beginning of this chapter, a Wait for Timer action is used to start the second stage of the campaign.
To create a new Wait for Timer action, complete the following steps:
1. Select Wait for Timer from the New Action list, and click Add New Action.

A T G O u t r e a c h G u i d e f o r B u s i n e s s U s e r s
2 1
3 - C r e a t i n g a C a m p a i g n
μ2. Name (required). Used by ATG Outreach only and not visible to customers. Defaults to
New Wait for Timer. For reporting purposes, make sure the name of each action is unique within a campaign.
3. Description (optional).
4. Segments (required): One or more groups of customers that you want the timer to apply to. You can specify an existing segment or create a new one. For information, see Adding Segments.
5. Fill in the Set the Timer fields, supplying a period of time to wait or specifying a date when the timer expires. Optionally you can also specify a time of day on that date. The time defaults to midnight.
The following image shows the Set the Timer fields with some sample data:
The Wait for Timer action automatically creates a Timer Expires event, which allows you to add a new child stage, as shown below. The image shows how the actions appear in the parent stage:
Wait for Event
This action allows you to use a customer event as a trigger for further campaign activity. For example, you could set up a Wait for Event action that waits for a customer to visit a given page on your site (perhaps a page that offers a time-limited promotion) and then add a Send Email Communication action that responds to the page visit with an additional offer.
To create a new Wait for Event action, complete the following steps:
1. Select Wait for Event from the New Action list, and click Add New Action.
2. Name (required). Used by ATG Outreach only and not visible to customers. Defaults to New Wait for Event. For reporting purposes, make sure the name of each action is unique within a campaign.
3. Description (optional).

A T G O u t r e a c h G u i d e f o r B u s i n e s s U s e r s
2 2
3 - C r e a t i n g a C a m p a i g n
μ4. Segments (required): One or more groups of customers that you want the action to
apply to. You can specify an existing segment or create a new one. For information, see Adding Segments.
5. Click Choose Event, and then either search for an existing event or click Create New Event.
The Event Picker appears and allows you to search for an existing event or create a new one. To search for an event, enter the first few characters from its name in the Keyword field in the Search tab and click Go. Leaving the Keyword field blank acts as a wildcard, causing ATG Outreach to search for all events.
See Adding Events for information on how to create a new event.
Publish Web Content
You use the Publish Web Content action to add text or images to a Web site page. The action sends content to a slot, which is a page area such as a banner that is typically used to display content which changes independently from the rest of the page. You could use this action to display a promotional image to segments of your targeted audience as part of a multi-channel campaign, for example.
For a global campaign, the action publishes content to all your Web sites. If the campaign applies to a specific site, content is published to that site only. For more information, see Using ATG Outreach in a Multisite Environment. In addition, the content is published only if the triggering event occurs in the context of the site to which the campaign applies. For example, you could have a Publish Web Content action that is triggered by a Logs In event. If a user logs into Site A, but the campaign applies only to Site B, the Publish Web Content action is not triggered.
You can also use this action to remove content from a slot, which allows you to change text or images as a response to customer behavior during a campaign.
To create a new Publish Web Content action, complete the following steps:
1. Select Publish Web Content from the New Action list, and click Add New Action.
2. Name (required). Used by ATG Outreach only and not visible to customers. Defaults to New Publish Web Content. For reporting purposes, make sure the name of each action is unique within a campaign.
3. Description (optional).
4. Segments (required): One or more groups of customers that you want the action to apply to. You can specify an existing segment or create a new one. For information, see Adding Segments.
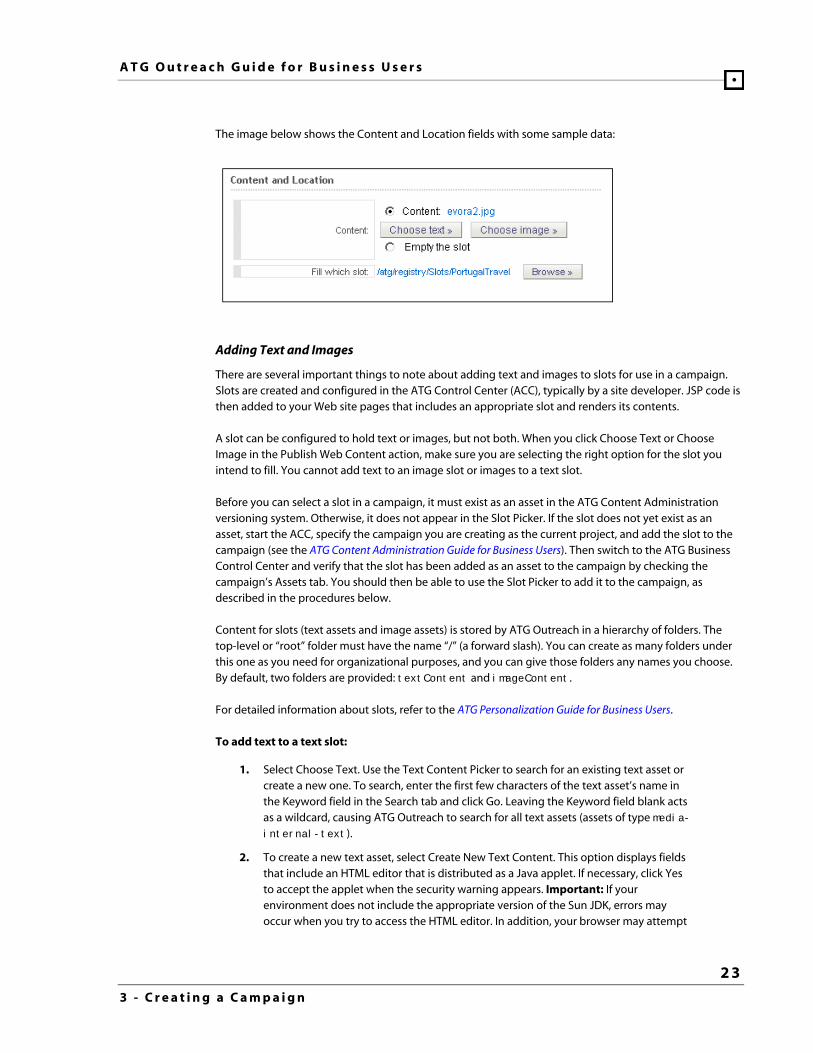
5. Use the Content and Location fields as follows:
To add content to a slot, select Content and then select Choose Text or Choose Images as appropriate. Then use the Fill Which Slot field to specify the slot to which you want to add the content. See Adding Text and Images below for more information.
To remove content from a slot, select Empty the Slot and then specify the slot.
A T G O u t r e a c h G u i d e f o r B u s i n e s s U s e r s
2 3
3 - C r e a t i n g a C a m p a i g n
μThe image below shows the Content and Location fields with some sample data:
Adding Text and Images
There are several important things to note about adding text and images to slots for use in a campaign. Slots are created and configured in the ATG Control Center (ACC), typically by a site developer. JSP code is then added to your Web site pages that includes an appropriate slot and renders its contents.
A slot can be configured to hold text or images, but not both. When you click Choose Text or Choose Image in the Publish Web Content action, make sure you are selecting the right option for the slot you intend to fill. You cannot add text to an image slot or images to a text slot.
Before you can select a slot in a campaign, it must exist as an asset in the ATG Content Administration versioning system. Otherwise, it does not appear in the Slot Picker. If the slot does not yet exist as an asset, start the ACC, specify the campaign you are creating as the current project, and add the slot to the campaign (see the ATG Content Administration Guide for Business Users). Then switch to the ATG Business Control Center and verify that the slot has been added as an asset to the campaign by checking the campaign’s Assets tab. You should then be able to use the Slot Picker to add it to the campaign, as described in the procedures below.
Content for slots (text assets and image assets) is stored by ATG Outreach in a hierarchy of folders. The top-level or “root” folder must have the name “/” (a forward slash). You can create as many folders under this one as you need for organizational purposes, and you can give those folders any names you choose. By default, two folders are provided: textContent and imageContent.
For detailed information about slots, refer to the ATG Personalization Guide for Business Users.
To add text to a text slot:
1. Select Choose Text. Use the Text Content Picker to search for an existing text asset or create a new one. To search, enter the first few characters of the text asset’s name in the Keyword field in the Search tab and click Go. Leaving the Keyword field blank acts as a wildcard, causing ATG Outreach to search for all text assets (assets of type media-internal-text).
2. To create a new text asset, select Create New Text Content. This option displays fields that include an HTML editor that is distributed as a Java applet. If necessary, click Yes to accept the applet when the security warning appears. Important: If your environment does not include the appropriate version of the Sun JDK, errors may occur when you try to access the HTML editor. In addition, your browser may attempt

A T G O u t r e a c h G u i d e f o r B u s i n e s s U s e r s
2 4
3 - C r e a t i n g a C a m p a i g n
μto download and install an unsupported JDK when it detects that the applet is required. If the editor does not load properly, check you have the correct version. See the Supported Environments page on www.atg.com: http://www.atg.com/en/products-services/commerce/supported-environments/
3. Enter a name for the text asset and (optionally) a description. The name is not visible to customers. You are not required to give the asset any file extension, but it is suggested that you use the extension .txt, which enables you and other ATG Outreach users to identify the asset more easily.
4. (Required) Click Edit Folder and select the folder where you want to store this asset. You can also create a new folder at this point. For information, refer to the ATG Content Administration Guide for Business Users.
5. In the Data field, use the editor to enter the text that you want to appear in the slot, including items such as links, as needed.
6. Click OK when you have finished adding text.
7. In the Fill Which Slot field, click Browse. Use the Slot Picker to locate the slot to which you want to add this content, making sure you specify a slot that was configured to hold text.
Like several other asset types, slots have the file extension .properties. As noted at the beginning of this section, the slot must already exist as an asset in the ATG Content Administration versioning system. Slots are identified by the icon shown:
To browse all slots, use the Browse tab. Look in the root/atg/registry/slots folder.
To search for a slot, use the Search tab. Enter the first few characters from the segment’s name in the Keyword field in the Search tab and click Go. Leaving the Keyword field blank acts as a wildcard, causing ATG Outreach to search for all slots.
The image below shows the text editor with some sample data:

A T G O u t r e a c h G u i d e f o r B u s i n e s s U s e r s
2 5
3 - C r e a t i n g a C a m p a i g n
μ
To add an image to an image slot:
1. Select Choose Image. The Binary Content Picker appears.
To search for an image file that already exists as an asset in the versioning system, enter the first few characters from the file’s name in the Keyword field and click Go. Leaving the Keyword field blank acts as a wildcard, causing ATG Outreach to search for all images (all assets of type media-internal-binary).
To add a new image file, click Create New Binary Content.
2. Enter a name for the image asset. Important: The name must be the same as the name and extension of the image file that you specify in the Data field (see below), minus any path information. For example, if the file is called \food\sardines123.jpg, the name must be sardines123.jpg. See the image at the end of this procedure for another example.
The name is not visible to customers.
3. (Optional): Enter a description.
4. (Required) Click Edit Folder and select the folder where you want to store this asset. You can also create a new folder at this point. For information, refer to the ATG Content Administration Guide for Business Users.
5. In the Data field, specify the file you want to add as the image asset. Either type the path and file name or (recommended) use the Browse button to locate the image.

A T G O u t r e a c h G u i d e f o r B u s i n e s s U s e r s
2 6
3 - C r e a t i n g a C a m p a i g n
μ6. (Optional) Click the Upload button to load the image into the ATG Business Control
Center. You can then preview it in this page.
7. Click OK.
8. In the Fill Which Slot field, click Browse. Use the Slot Picker to locate the slot to which you want to add this content, making sure you specify a slot that was configured to hold images. See the previous procedure for instructions on using the Slot Picker.
The following image shows the binary content editor with some sample data:
Note that the value in the URL field is displayed after you click OK. It is calculated by ATG Outreach from the file name and the path to the repository. The URL is then used by the page that displays the slot content.
Exit Campaign
The Exit Campaign action is used to remove customers from a campaign after they have completed a given stage. Although this action is not required, adding it to certain types of campaign is strongly recommended to prevent undesirable results. Consider the following example: you set up a campaign that waits for registered customers to log in and then sends them an e-mail containing a promotional discount. You intend the e-mail to be sent once only to each qualifying customer. However, unless you add an Exit Campaign action, customers will receive the discount e-mail every time they log in while the campaign is active. Adding an Exit Campaign action ensures that ATG Outreach does not continue to wait for the customer response after it has occurred once.
Add the Exit Campaign action whenever you need to prevent a customer from repeating a stage in a campaign by triggering an event multiple times.
The action can similarly be used to stop showing slot content to customers in a given stage. When participants reach the Exit Campaign action, any slot content being shown to them as a result of the campaign is removed.

A T G O u t r e a c h G u i d e f o r B u s i n e s s U s e r s
2 7
3 - C r e a t i n g a C a m p a i g n
μTo create a new Exit Campaign action, complete the following steps:
1. Select Exit Campaign from the New Action list, and click Add New Action.
2. Name (required). Used by ATG Outreach only and not visible to customers. Defaults to New Exit Campaign. For reporting purposes, make sure the name of each action is unique within a campaign.
3. Description (optional).
4. Segments: One or more groups of customers that you want this action to apply to. For the Exit Campaign action, you would in most cases not need to supply additional segments here; you would just use the inherited segments so that all customers who reach this stage in the campaign are removed. For more information, see Adding Segments.
Perform Action
The Perform Action option allows you to add any of the following actions to a stage:
Add Items to Slot
Change (changes a profile property, a parent organization, or roles)
Redirect To Page
If your ATG product suite includes ATG Commerce, you can also add the following actions to a campaign stage:
Add Item to Order
Give Promotion
Revoke Promotion
You can also create custom actions for use in campaigns. For example, your environment could be configured to include a “Send Brochure” action that sends qualifying customers’ names and home addresses to a mailing list. Custom actions appear as part of the Perform Action option.
You can also add events through the Perform Action element. See Adding Events for more information.
Important: Any repository items you reference as part of creating an action are versioned items on the asset management server. Be aware that these items (the latest versions of them) may not have been deployed yet to the production server.
Adding an Action
To add one of the actions listed above, complete the following steps:
1. Add a Perform Action element to your campaign stage as described at the beginning of this section.
2. Click the Add Action button. The Action Picker appears, allowing you to create a new action or select an existing one. If you choose to add a new action, click Create New Action. The Edit Action page appears, as shown:

A T G O u t r e a c h G u i d e f o r B u s i n e s s U s e r s
2 8
3 - C r e a t i n g a C a m p a i g n
μ
3. Enter a display name for this action. The name is used by ATG Outreach only and is not visible to customers. After you create this campaign, the action you are adding here will be available to other campaigns, and the name you enter will be used to identify this action in, for example, the Action Picker.
4. (Optional) Enter a description.
5. Use the Action fields to specify the parameters that make up the action. In many cases, you can click the element to see the options available for it. In others you type the value directly into the field. For information on how to configure specific actions, see the next section, Configuring Actions.
6. Click OK.
Configuring Actions
This section describes some of the more frequently used actions that you can add to campaigns through the Perform Action element and shows how to supply parameters for them.
Add Items to Slot
A slot is an area on a Web page, such as a banner, that is typically used to hold rotating content or content that changes more frequently than the rest of the page. You can use this action to add items to a given slot. The slot must already exist in the system.
To configure this action, select the slot you want to change. The editor then allows you to choose the items you want to add.
Use the At Priority option to specify the order to show items in cases where there is more than one campaign (or scenario) contributing items to the slot. If you leave the priority option at the default setting the system shows items in the order in which the slot receives them (usually the order in which you enter

A T G O u t r e a c h G u i d e f o r B u s i n e s s U s e r s
2 9
3 - C r e a t i n g a C a m p a i g n
μthem here). If you change the priority, the system shows the items in relative order. Enter any integer. 1 is the lowest priority. For example, items that you define as priority 2 appear before items at priority 1 from a different contributing campaign, regardless of the order in which the slot receives the items.
For detailed information on slots, refer to Using Slots in the ATG Personalization Guide for Business Users.
Change
Change the value of a profile property for any customer to whom the action applies. For example, you could add a custom property called “Likes Opera” to all profiles, and then use this action to change the property’s value to “Yes” if a customer submits a Web site form indicating he or she has attended an opera performance in the last year. You can also use this action to change a person’s parent organization or roles. See the ATG Business Control Center Administration and Development Guide for more information on organizations and roles.
Use this action to change a person’s profile property, parent organization, or roles. In all cases, click the element in the expression and then use the item picker to find and select the new value.
If you are using this action to change a person’s roles, you can either specify all the roles you want the person to have when the action is complete, or append to his or her existing roles. For example, if a person has roles A, B, and C, and you want his new roles to be A, B, C, and F, you can specify either A, B, C, and F as the values of the Roles element, or specify just F.
Redirect to Page
Send customers automatically from one page on a Web site to another. For example, if a customer visits a landing page, and his or her browser does not support the features used on the page, this action could be used to send the customer automatically to a different page that displays the same content in a version supported by older browsers.
To configure this action, specify the target page by filling in one of these options:
With path: Enter the Web application name followed by a colon and the relative path to the page from the root of the deployed Web application.
For the Web application name, use the value of the <display-name> tag in the application’s web.xml file, usually located in its WEB-INF directory (for example, the web.xml file for the Quincy Funds demo is located at <ATG10dir>\DSSJ2EEDemo\j2ee-apps\QuincyFunds\web-app\WEB-INF). The following example shows part of contents of this file for Quincy Funds:
<!DOCTYPE web-app (View Source for full doctype...)>
<web-app>
<display-name>Quincy Funds J2EE DAF Demo</display-name>
<description>Quincy Funds J2EE Demo running in DAF</description>
Note that in this case the display name includes spaces. You would include the spaces in the With Path value for the Redirect to Page option.
The following example shows the relevant part of the same file (web.xml) for Outreach:

A T G O u t r e a c h G u i d e f o r B u s i n e s s U s e r s
3 0
3 - C r e a t i n g a C a m p a i g n
μ<!DOCTYPE web-app (View Source for full doctype...)>
<web-app>
<display-name>OutreachCommon</display-name>
<description>An application used by the Outreach common
module.</description>
After the name, specify the page as a path relative to the root of the deployed Web application.
Examples:
Redirect to page with path Quincy Funds J2EE DAF Demo:/index.jsp
Redirect to page with path OutreachCommon:/collections/listOptIns.jsp
With Dynamo path: Exists mostly for backwards compatibility and replicates the way users specified document paths in earlier versions of the product. If you choose this option, you must type the fully qualified path, including the ATG document root or the J2EE context root, to the page you want to use.
Redirect to page with dynamo path /atg/outreach/collections/listOptIns.jsp
Add Item to Order
Allows you to add the specified item to the user’s shopping cart. Enter the SKU ID and the associated product ID (both of which you can select from an item picker). SKUs are identified by a bar code icon. Product IDs are identified by a small blue diamond. You must also specify the quantity of the item to add.
Give Promotion
Allows you to give one or more discounts or other promotions to users who have reached this stage in the campaign. The promotions must already exist in ATG Commerce.
This action simply adds the promotions to the activePromotions property in the user’s profile. They can then be processed as appropriate by ATG Commerce (for example, if the user views an image of an item that is on promotion, the system can check the activePromotions profile property and change the displayed price accordingly). If you want the users in this campaign to be aware that they have been given a promotion, you must communicate that information to them, for example through an e-mail.
For detailed information on promotions, see Creating and Maintaining Promotions in the ATG Commerce Guide to Setting Up a Store.
Revoke Promotion
Allows you to remove one or more existing promotions. The action removes the specified promotions from the activePromotions property in the user’s profile. See the description of the Give Promotion action above.

A T G O u t r e a c h G u i d e f o r B u s i n e s s U s e r s
3 1
3 - C r e a t i n g a C a m p a i g n
μAdding Segments
When you add an action to a campaign, you must specify the segment of customers to whom the action applies (unless it inherits a segment from the root stage). For example, if you add a Send Email Communication action to a stage, you must specify the segment who will receive the e-mail. Note: If you create an action with multiple segments, always add the segments in order from most restrictive (fewest members) to least restrictive (most members). Doing so will produce a more efficient campaign.
The following image shows the Segments fields:
The Inherited Segments field shows any segments that have been added to the parent action in this campaign (the action that spawns the current stage). Those segments are also applied to this action and effectively narrow the range of people to whom this action can be targeted. For example, if an action in a parent stage contains a segment targeting people whose locale is en_US, and you add a segment here that targets people whose last name is Jones, this action can apply only to people whose locale is en_US and whose last name is Jones.
The Qualifying Users field shows the number of customer profiles that meet the criteria for the segments. If you use ATG Outreach with a staging environment, note that the number always shows actual customer profiles stored in the production database. It does not include any test profiles you have set up on the staging server. See Testing Campaigns on a Staging Server for more information.
In most cases the field shows only one number. For the Send Email Communication action, however, the field has two numbers, as shown in the image above. The number on the right shows the total number of profiles that meet the segment criteria. The number on the left shows the subset of those who are able to receive e-mail, meaning that the Receive Email property in their profile is set to “yes” and the Email Status property is set to “valid.” (Anyone who has chosen to opt out of all campaigns, for example, has this property set to “no.”) In the example above, 700 profiles meet the following criteria:
They are members of the NewMembers segment, and
They are members of either the November2005 or FrequentTravelers segments
Of those 700, 629 are able to receive e-mail:
Their Receive Email property is set to “yes” and
A T G O u t r e a c h G u i d e f o r B u s i n e s s U s e r s
3 2
3 - C r e a t i n g a C a m p a i g n
μ Their Email Status property is set to “valid”
Note also that the number on the left (or the only number, for actions other than Send Email Communication) is a link that you can use to examine the profiles that are included in the segment. For more information, see Browsing the Profiles that Make Up a Segment.
You can add as many segments as you need for this action. The Users In field allows you to specify Any/All behavior for actions that have more than one segment. If you select All of These Segments, only users who belong to all specified segments qualify for the action.
To add a segment to the action, click Add Segment. (For information about adding opt-in or opt-out segments, see the Using Opt-in and Opt-out Segments chapter.)
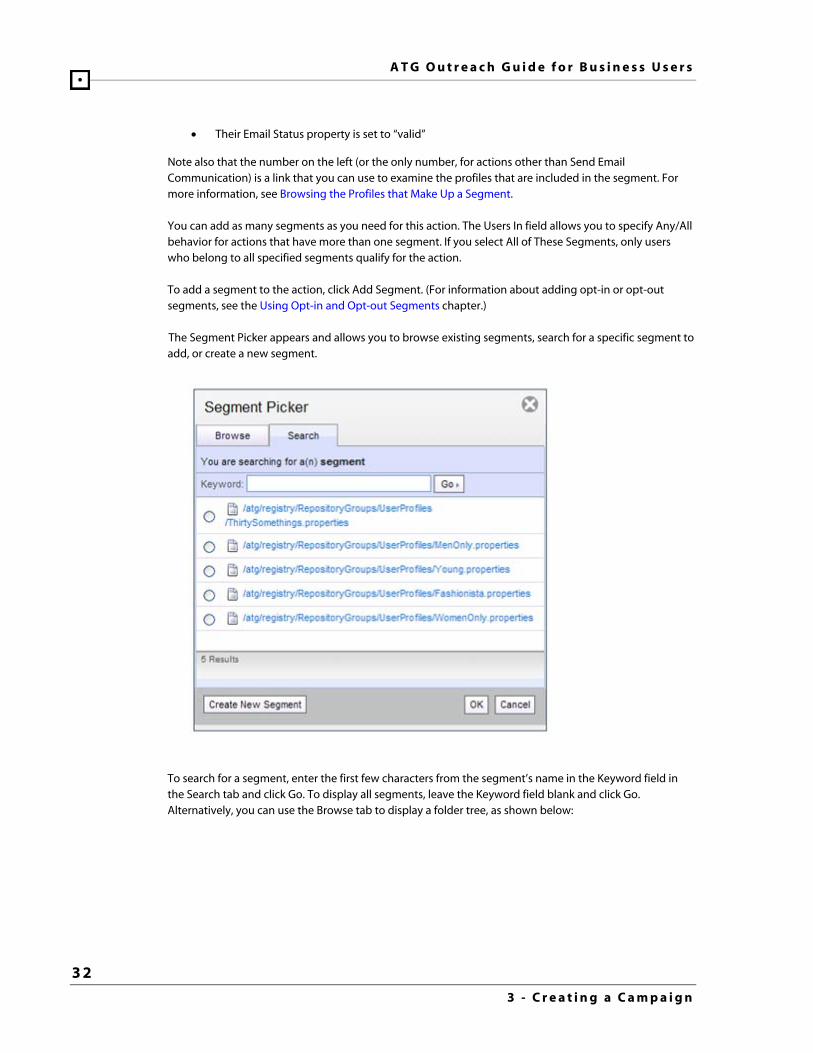
The Segment Picker appears and allows you to browse existing segments, search for a specific segment to add, or create a new segment.
To search for a segment, enter the first few characters from the segment’s name in the Keyword field in the Search tab and click Go. To display all segments, leave the Keyword field blank and click Go. Alternatively, you can use the Browse tab to display a folder tree, as shown below:

A T G O u t r e a c h G u i d e f o r B u s i n e s s U s e r s
3 3
3 - C r e a t i n g a C a m p a i g n
μ
Segment files are identified by the people icon shown in the image above. One segment, anyone.properties, is provided by default with ATG Outreach and located in the /root/atg/registry/repositoryGroups/Campaigns folder. It is designed to include all profiles in your repository, and it is updated to include any new profiles you add, for example by importing a mailing list. Segments that you create are stored by default in the /root/atg/registry/repositoryGroups/Campaigns/ folder.
Note that you cannot include anonymous (unregistered) user profiles in ATG Outreach segments.
For important information about adding an existing segment to a campaign, see Adding and Editing Existing Segments.
See the next section for information on creating a new segment.
Creating a New Segment
To create a segment, complete the following steps:
1. Click Create New Segment in the Segment Picker (see the previous section).
2. Enter a name for the segment and optionally a description. These values are not visible to customers.

A T G O u t r e a c h G u i d e f o r B u s i n e s s U s e r s
3 4
3 - C r e a t i n g a C a m p a i g n
μFor the segment name, use alphanumeric characters only. Segment names that contain other characters, such as periods, are handled incorrectly by the segment editor, which can cause errors to occur.
3. In the Parent Folder field, specify a folder under the location /atg/registry/RepositoryGroups, which represents a RepositoryGroups folder under a registry folder under the root atg folder. For example, you could specify /atg/registry/RepositoryGroups/MyFolder. Note that you may need to create the folders as assets if they do not already exist in your versioning system, and then add them to this project.
If you do not change this setting, the default folder /atg/registry/RepositoryGroups is used.
4. Use the Segment Characteristics field to specify the profile properties and expressions that define the rules for this user segment. Click Include or Exclude, as necessary, and then specify the criteria, for example Include People whose gender is female. To add more than one qualifying statement to an Include or Exclude rule, select And or Or as needed from the dropdown menu at the end of the segment, as shown:
Perform this step as many times as required to add all the qualifications that make up the segment. Alternatively you can create multiple criteria by inserting additional Include or Exclude statements.
To add more properties to the dropdown menus, you must add corresponding properties to the user profile repository. For information, refer to the ATG Personalization Programming Guide.
If you are using ATG Outreach to support multiple Web sites, the display includes a Default Rule heading and an Add Override Rule button. For information on using these, see Working with User Segments in a Multisite Environment in this guide.
See also Examples of Expressions.
5. Click Apply.
The image below shows the segment editor with some sample data:

A T G O u t r e a c h G u i d e f o r B u s i n e s s U s e r s
3 5
3 - C r e a t i n g a C a m p a i g n
μ
Note that you can also create segments by adding them as an asset to an ATG Content Administration project, which is described in the ATG Content Administration Guide for Business Users. Select atg/epub/file/ConfigFileSystem as the repository and Folder as the asset type.
For more information on user profiles and how properties are added to them, refer to the ATG Personalization Programming Guide.
Working with User Segments in a Multisite Environment
If your ATG installation has been configured to support more than one Web site, the segment editor includes a Default Rule heading and an Add Override Rule button, as shown in the image below:

A T G O u t r e a c h G u i d e f o r B u s i n e s s U s e r s
3 6
3 - C r e a t i n g a C a m p a i g n
μ
Any segment rules you add under the Default Rule heading apply to all the Web sites supported by your system. However, there may be situations where you want the definition of a segment to differ depending on the site. For example, a company that supports two Web sites, one selling luxury items and another selling regularly priced items, might want to define a segment called “high income” and send e-mail promotions to customers who qualify. However, the definition of “high income” would need to be different for each site -- more than $100,000 for the luxury brand and more than $50,000 for the regular brand, for example.
To achieve this result, ATG Outreach allows you to create a site override rule that overrides the default rule for one or more specific sites. The image below shows an example:

A T G O u t r e a c h G u i d e f o r B u s i n e s s U s e r s
3 7
3 - C r e a t i n g a C a m p a i g n
μ
In this example, you could create a default rule that defined “high income” as “greater than $50,000” and add an override for the luxury site that changed the income criteria to $100,000. All customer profiles are stored in the same profile repository regardless of the number of registered sites your ATG instance is running. A profile whose income property was $75,000, for example, would be included in the “high income” segment for the regular brand but would not be included in that segment for the luxury brand. You could then create an e-mail campaign that applied to the luxury site only and included the “high income” segment. In this case the campaign e-mails would be sent only to customers whose income profile property was greater than $100,000. Alternatively you could create a Publish Web Content campaign that applied to all sites and displayed a promotion on each site to the “high income” segment. Customers whose income property was greater than $100,000 would see the promotion if they visited either site. Customers whose income was greater than $50,000 but less than $100,000 would see the promotion only on the site for the regular brand.
To create a segment rule that applies to one or more specific sites only, click Add Override Rule and create the new rule. You can add as many override rules as you need. However, a site can appear in only one override rule. Note that you must have at least one default rule per segment.
For more information on override rules for segments, refer to the ATG Business Control Center User’s Guide. For additional information on using ATG Outreach with multiple Web sites, refer to Using ATG Outreach in a Multisite Environment in this guide.
Adding and Editing Existing Segments
You can add an existing segment to a campaign by selecting it in the Segment Picker as described in the previous section. You can then make changes to it as required. Bear in mind, however, that any changes you make to an existing segment are saved as a new version of the segment, which then becomes the

A T G O u t r e a c h G u i d e f o r B u s i n e s s U s e r s
3 8
3 - C r e a t i n g a C a m p a i g n
μversion used by other campaigns. In other words, the changes are not made exclusively for the current campaign. Any other campaign that is being edited, as well as any campaigns created in the future, will see the new version of the segment. If you do not want the changes used elsewhere, create a new segment rather than editing one that exists already.
Examples of Expressions
This section shows how to use the segment editor to create some common types of expressions. Note that the examples use the > symbol to indicate separate dropdown menus in the expression editor.
Including a Segment in the Expression
To include an existing segment, either alone or as part of a more complex expression, use the People in group option and then select the segment you want from the list that appears.
Expressions Using “Or”
To create an expression that uses either of two different properties to define a segment, for example People whose country is USA or whose locale is en_US, create two expressions and use “or” between them, as shown:
Days Before an Annual Event
If your profile repository has been set up to include a property that can calculate the number of days before an annual event (see the ATG Outreach Administration and Development Guide), you can create expressions that use the number of days before the event to create the segment group. For example:
People whose > DaysBeforeBirthday > is > 10 > .
Expressions Using Age
Your profile repository may include a custom age property that you can use to include people of a given age (see the ATG Outreach Administration and Development Guide). Otherwise, you can specify an age using the date of birth property, which is provided by default, with the “relative date” expression. For example,
A T G O u t r e a c h G u i d e f o r B u s i n e s s U s e r s
3 9
3 - C r e a t i n g a C a m p a i g n
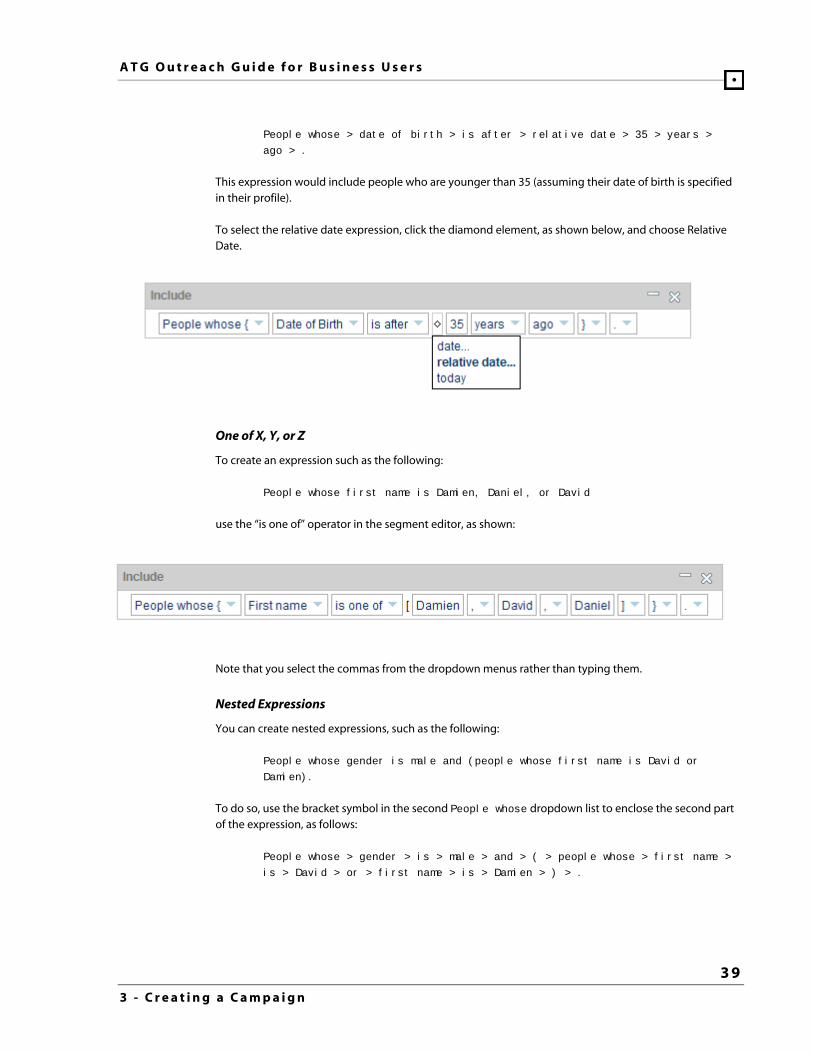
μPeople whose > date of birth > is after > relative date > 35 > years >
ago > .
This expression would include people who are younger than 35 (assuming their date of birth is specified in their profile).
To select the relative date expression, click the diamond element, as shown below, and choose Relative Date.
One of X, Y, or Z
To create an expression such as the following:
People whose first name is Damien, Daniel, or David
use the “is one of” operator in the segment editor, as shown:
Note that you select the commas from the dropdown menus rather than typing them.
Nested Expressions
You can create nested expressions, such as the following:
People whose gender is male and (people whose first name is David or
Damien).
To do so, use the bracket symbol in the second People whose dropdown list to enclose the second part of the expression, as follows:
People whose > gender > is > male > and > ( > people whose > first name >
is > David > or > first name > is > Damien > ) > .

A T G O u t r e a c h G u i d e f o r B u s i n e s s U s e r s
4 0
3 - C r e a t i n g a C a m p a i g n
μ
Expressions Using One-To-Many or Many-to-Many Tables
ATG Outreach supports expressions that query one-to-many database table relationships, where a record in one table can have a reference to multiple records in another. It also supports many-to-many relationships, where one record in either table can refer to many records in the other table. In ATG Outreach, you use this type of query to set up expressions such as the following:
People who have at least one child who is 9 months old
where “people” is a record in one table and “child” is a record in another table. The “people” record has a property called “child” that points to the other table. Use this syntax in the segment editor:
People whose > children > contains an item whose > ageDays > is > 270 > .
You could use this expression as part of a retention campaign, for example, where you run the campaign every day to remind parents to sign their children up for a toddler program that starts when the child is 1 year old. Every day, the segment includes a different set of people (people whose children are exactly 270 days old).
Relative Dates
To create an expression that uses a relative date rather than a specific date, for example
People whose registration date is at least one year ago
use the following expression:
People whose > registration date > is before > relative date > 1 >
years > ago > .

A T G O u t r e a c h G u i d e f o r B u s i n e s s U s e r s
4 1
3 - C r e a t i n g a C a m p a i g n
μ“Is Between” with Relative Dates in the Past
To create an expression that uses “is between” with relative dates in the past, for example to include people whose birthday was 1 or 2 weeks ago, use the following syntax:
People whose > date of birth > is between > relative date > 2 >
weeks > ago > and > relative date > 1 > weeks > ago > .
Note the order of the constants in this example. Usually the greater constant appears on the right side of an operator. In this case, the rule appears to be reversed. But because the expression is in the past (“ago”), 1 is greater than 2 and therefore appears on the right of the operator “is between.”
Browsing the Profiles that Make Up a Segment
To view the profiles that meet the criteria for the segment or segments specified in the Structure tab, click the number in the Qualifying Users field. (For the Send Email Communication action, click the number on the left -- for example, if the field displays 687 of 2000, click 687).
The Profile Browser appears and shows the profiles that will be targeted by the current campaign element. Click Next or Previous to page through the list.
Clicking the Update Count button in the segment editor also displays the Profile Browser.
By default, the properties that appear for each profile are the login name, first name, last name, e-mail address, and registration date. For information on how to display different properties, see Configuring the Profile Browser in the ATG Outreach Administration and Development Guide.
Adding Landing Pages To add a landing page to an action, complete the following steps:
1. Click Add Landing Page in the action’s Structure tab display.

A T G O u t r e a c h G u i d e f o r B u s i n e s s U s e r s
4 2
3 - C r e a t i n g a C a m p a i g n
μ
The Landing Page Picker appears, which you can use to search for an existing landing page or add a new one:
2. To search for a landing page, enter the first few characters from the page’s name in the Keyword field in the Search tab and click Go. To search for all existing landing pages, leave the Keyword field blank and click Go. (Existing landing pages are any pages that have already been added to an ATG Outreach campaign. In technical terms, this is any page that has been checked into the ATG Content Administration versioning system as a landingPage repository item).
Select the landing page you want to use, and click OK.
To add a new landing page, click Create New Landing Page, and follow the procedure in the next section.
You can add as many landing pages to an action as you require.

A T G O u t r e a c h G u i d e f o r B u s i n e s s U s e r s
4 3
3 - C r e a t i n g a C a m p a i g n
μCreating a New Landing Page
The landing page editor appears when you click Create New Landing Page in the dialog box described in the previous section. The image below shows the editor with some sample data:
To create a new landing page to add to an action, complete the following steps:
1. Enter a name and an optional description for the landing page. The name is used by the HTML Editor as the default name for the link that you add in the body of the e-mail message. Therefore, unless you change the text that appears for the link when you create the message, the name you enter here is visible to customers. The description is used only by the internal application.
2. Specify the page to add. You can add any page that has the extension .html, .jhtml, or .jsp. There are several ways to specify the page, as described below.
Option 1: To add a page that already exists on one of your sites, select Already On the Website, URL, and enter the context root of the Web application that represents the site, followed by the path and name of the page. In most cases you can determine an application’s context root by looking at the <context-root> property in its application.xml file. The file for the Quincy Funds demo application, for example, is located as follows: <ATG10dir\DSSJ2EEDemo\j2ee-apps\QuincyFunds\META-INF\application.xml.
Example :
/QuincyFunds/en/login.jsp

A T G O u t r e a c h G u i d e f o r B u s i n e s s U s e r s
4 4
3 - C r e a t i n g a C a m p a i g n
μFor pages on Web sites that are registered in Site Administration, you can also specify a URL that uses a virtual context root. To determine the value, find the Site Base URL property in Site Administration. Then add the path and name of the page to complete the URL. For example, the Site Base URL property value for the ATG Store demo site is /crs/storeus. The URL for the ATG Store login page is as follows:
/crs/storeus/myaccount/login.jsp
For more information on the correct path to enter, see your application administrator. For information about Site Administration, refer to the ATG Multisite Administration Guide.
Option 2: To add a URL as the landing page, select Already On the Website, URL, and enter the URL (for example http://www.example.com). Make sure you include the full http:// protocol.
Option 3: To add the current version of a page that exists in the ATG Content Administration versioning system, select A JSP File Asset and then use the Browse button to locate the page from the JavaServer Page Picker.
Option 4: To add an entirely new page, select A JSP File Asset, click Browse, and then click Create New JavaServer Page. Complete the fields that define the new page. For instructions, refer to the ATG Content Administration Guide for Business Users. Note: when the campaign is deployed, the new page is deployed as both a file asset and a landingPage repository item. For more information, see Understanding Landing Page Deployment.
In a multisite environment, you deploy the same pages to all your Web sites. The pages contain code that determines how to display appropriate content for each site. For options 3 and 4 above, if you are creating a campaign that applies to all your Web sites (a global campaign), you must also specify the site whose instance of the page will be used as the landing page. Use the On Site option to select the Web site. If the site you want does not appear in the list, make sure it has been registered in the Site Administration utility and deployed. See Using ATG Outreach in a Multisite Environment in this guide, or refer to the ATG Multisite Administration Guide.

A T G O u t r e a c h G u i d e f o r B u s i n e s s U s e r s
4 5
3 - C r e a t i n g a C a m p a i g n
μ
3. If you want to set up an event that is triggered when a customer visits this landing page, click Add Event. See Adding Events to a Landing Page for more information.
4. When you have finished adding the landing page, click OK.
Editing a Landing Page
Important: If you need to change a landing page element after you have added it to the e-mail body (in either a campaign that has not yet been deployed or a running one that you have opened for edits), you must delete the existing landing page element and re-add it to the e-mail. If you simply edit the landing page by clicking the existing link in the HTML editor, the change is not made correctly.
Adding Events to a Landing Page
You can set up events that are related to landing pages. For example, you can configure a campaign so that a Visits Page event is triggered when a customer visits a given landing page, and then use that event to start another stage in the campaign.
To add an event to a landing page, click Add Event in the landing page editor. For information on how to configure the event, see Adding Events later in this guide.
Understanding Landing Page Deployment
The ATG Content Administration versioning system is used to keep track of all assets that are deployed to your Web sites as part of a project. Assets can have multiple versions; for example, if you add an asset such as a JSP page to your sites with a project that you deploy in October, and then edit and deploy it in a subsequent project in November, two versions of it exist: the original version and the latest, or “checked in,” version. For detailed information on deployment, see the ATG Content Administration Programming Guide and the ATG Content Administration Guide for Business Users.

A T G O u t r e a c h G u i d e f o r B u s i n e s s U s e r s
4 6
3 - C r e a t i n g a C a m p a i g n
μWhen you deploy a campaign, you deploy all ATG Outreach assets that you have added to it. These include segments, e-mail templates, and the scenario that makes up the campaign. Landing pages are also deployed as assets, but the way they are deployed and the effect this has on your Web sites depend on the landing page. There are several possibilities:
If the page already exists on your Web sites, it must already exist in the ATG Content Administration versioning system. In this case, the landing page is added to the campaign and deployed not as a page (a file asset) but as a repository item of type landingPage. The landing page information is sent to the production server so that the campaign works as intended, but the Web site page is not affected by the deployment. The option Already On the Website, URL corresponds to this type of deployment.
A similar situation results if you add an existing landing page by using the Search tab in the Landing Page Picker. The landing page must have been added already to at least one other ATG Outreach campaign, and so it exists in the versioning system. The landing page is deployed as a landingPage repository item.
The same is true if you select the option A JSP File Asset and browse to an existing JSP page, or add a URL to another site. The page or URL is deployed as a landingPage repository item, not as a file asset.
You can select the option A JSP File Asset and then choose to add a new JSP page, one that does not currently exist in the versioning system. In this case, when you deploy the campaign, the page is deployed as a landingPage repository item, and it is also deployed as a file asset. The page does appear on your Web sites.
You can use the campaign’s Assets tab to see the type of asset that is created for any landing page you have added to the campaign. To display the Assets tab, complete the following steps:
1. Click the campaign’s name in the Current Project field at the top of the page.
2. Display the Assets tab.
To return to the Structure tab from the Assets tab, display the Current Task: Author link.
Adding Events As described earlier in this guide, actions represent activities performed by the ATG Outreach software, for example sending an e-mail or displaying content in a slot. Events, by contrast, represent activities performed by customers, such as logging into a Web site or clicking a landing page link. When you include an event in a campaign, ATG Outreach waits for any targeted customer to complete the event and then progresses to the next part of the campaign.
You can add events to campaign stages in several ways:

A T G O u t r e a c h G u i d e f o r B u s i n e s s U s e r s
4 7
3 - C r e a t i n g a C a m p a i g n
μ Through a Send Email Communication action that includes a landing page, which in
turn includes an event.
Through any of the following actions:
Wait for Event
Publish Web Content
Perform Action
Note: If you want to add another stage to a campaign, you must add an event. The child stage follows the event.
The following events are provided by default with ATG Outreach:
A Form Is Submitted
An Email Is Received
Logs In
Logs Out
Profile Property Updated by User
Registers
Switches Site Context
User Opted Out
Views (an item on a page)
Visits (a page)
If your ATG product suite includes ATG Commerce, the following events are also available:
Abandoned Order Converted
Abandoned Order Lost
Abandoned Order Reanimated
Gift Purchased
Item Added to Order
Item Quantity Changed in Order
Item Removed from Order
Order Abandoned
Order Saved
Order Submitted
Promotion Closeness Disqualification
Promotion Closeness Qualification
Promotion Offered

A T G O u t r e a c h G u i d e f o r B u s i n e s s U s e r s
4 8
3 - C r e a t i n g a C a m p a i g n
μ Promotion Revoked
Uses Promotion
To add an event to an action, perform the following steps:
1. In the Structure tab for the action you are creating, click Add Event or Choose Event. These options appear only in the following circumstances:
You are adding a landing page to a Send Email Communication action.
You are adding a Wait for Event action.
You are adding a Perform Action element.
The event editor appears.
2. Enter a name for the event. The name is used only by ATG Outreach and is not visible to customers. After you create this campaign, the event you are adding here will be available to other campaigns, and the name you enter will be used to identify this event, for example in the Event Picker.
3. Optionally, enter a description.
4. Select the event to add.
5. Fill in the Event fields as needed. Click any element in the expression to see the options for that element. The event editor works the same way as the segment editor, so for detailed information on how to use the UI here, refer to Adding Segments. For information on the values to supply for specific events, see Configuring Events later in this section.
6. Click OK when you have finished configuring the event.
The image below shows the event editor with some sample data:

A T G O u t r e a c h G u i d e f o r B u s i n e s s U s e r s
4 9
3 - C r e a t i n g a C a m p a i g n
μ
Configuring Events
The table below provides some information on supplying parameters for specific ATG Outreach events.
Event Configuration
A Form Is Submitted Can be configured to fire when any form is submitted, or when a specified form is submitted.
To specify a form, type the name of the form as it appears in the JSP page. Example: A form is submitted where form name is registrationForm.
An Email Is Received Can be configured to fire when any e-mail is received, or when an e-mail with specific properties is received.
If appropriate, select the properties of the e-mail that you want to trigger the event. Example: An e-mail is received where Bounced is true.
Logs In No parameters. This event is triggered when a registered user logs into the site.
Logs Out No parameters. This event is triggered when a registered user logs out.

A T G O u t r e a c h G u i d e f o r B u s i n e s s U s e r s
5 0
3 - C r e a t i n g a C a m p a i g n
μEvent Configuration
Profile Property Updated by User
Can be configured to fire when any profile property is changed, or when a specified property is changed.
Note that you cannot specify the value to which the property is changed, only that the property has a different value. For example, you can create an event that is fired when a user changes her Receive Email property, but you cannot specify that the event should be fired only when the property is changed to No.
Registers No parameters. This event is triggered when a user registers at your site (typically by completing a registration form).
Switches Site Context This event is triggered when a customer navigates from one Web site to another, usually by following a link. Note that the event is designed only for use with sites supported by a multisite ATG installation (sites registered and deployed through Site Administration).
This event is available only for site-specific campaigns.
User Opted Out This event is triggered when a customer chooses to opt out of all e-mails (global opt-out). In technical terms, global opt-out occurs when a customer submits a form that changes his or her Receive Email profile property from Yes to No.
Views (an item on a page)
Can be configured to fire when any repository item is viewed; when any item from a given repository is viewed; or when a specific item is viewed.
Examples: Views an item from Claimable whose Expiration Date is 1 day ago
In the example, Claimable is the name of the repository.
Visits (a page) Can be configured to fire when any page is displayed; when any page in a given folder is displayed; or when a specific page is displayed. For more information, see Adding a Visits (Page) Event.
For information on ATG Commerce events, refer to the ATG Commerce Guide to Setting Up a Store.
A Note about Promotion Events: If you use the ACC to view the scenario that is generated for a campaign containing a Promotion Offered or Promotion Revoked event, and the event contains a specific promotion ID, the scenario appears to be incomplete -- specifically, the element that represents the promotion event appears in red with the text “Promotion offered\revoked and product named (no product specified)”. This behavior occurs because the event picker code required to configure this event in the ATG Business Control Center does not exist in the older ACC. Despite the apparent error, however, the campaign works as designed.

A T G O u t r e a c h G u i d e f o r B u s i n e s s U s e r s
5 1
3 - C r e a t i n g a C a m p a i g n
μUnderstanding Multisite Events
A campaign can apply to all Web sites in your system (a global campaign) or to one specific site. For global campaigns, an event is triggered when it occurs on any Web site supported by your system. For example, in a global campaign, a Logs In event is triggered when a customers logs into any Web site. For campaigns that apply to a specific site, an event is triggered only when it occurs on that site. For example, for a campaign that applies only to Site A, a Registers event is triggered when a customer registers on Site A but not when a customer registers on Site B or Site C.
One implication of this behavior is that you cannot mix sites in a global campaign. For example, you cannot set up a Visits Page event that waits for a customer to visit a page on Site A and triggers a Publish Web Content action that displays content on Site B. All events and actions apply to all sites. Nor can you mix sites in a site-specific campaign. For more information, see Using ATG Outreach in a Multisite Environment.
Adding a Visits (Page) Event
The Visits event includes some complex parameters, and for this reason it can be more difficult to configure correctly than some of the simpler events. The parameters in the Visits event are described below.
Named: Fires when a specified page is displayed. Enter the Web application name followed by a colon and the path to the page. For the Web application name, use the value of the <display-name> tag in the application’s web.xml file, usually located in its WEB-INF directory (for example, the web.xml file for the Quincy Funds demo is located at <ATG10dir>\DSSJ2EEDemo\j2ee-apps\QuincyFunds\web-app\WEB-INF).
After the name, specify the page as a path relative to the root of the deployed Web application.
Examples:
Visits a page named Quincy Funds J2EE DAF Demo:/index.jsp
Visits a page named Quincy Funds J2EE DAF Demo:/en/login.jsp
In folder: The event fires when any page in the given folder is displayed. Specify the application name followed by a colon, and then the folder name and path relative to the root of the deployed Web application. Example:
Visits a page in folder Quincy Funds J2EE DAF Demo:/en
With Dynamo path: Fires the event when a specified page is displayed. This option has the same effect as Named, but it exists mostly for backwards compatibility and replicates the way users specified document paths in earlier versions of ATG products. If you choose this option, you must type the fully qualified path, including the ATG document root or the J2EE context root, to the page you want to use. Example:
/demo/home/index.jsp
In Dynamo folder: Fires when any page in the given folder is displayed. This option has the same effect as In Folder, but like With Dynamo Path it exists mostly for

A T G O u t r e a c h G u i d e f o r B u s i n e s s U s e r s
5 2
3 - C r e a t i n g a C a m p a i g n
μbackwards compatibility. Type the fully qualified path, including the ATG document root or the J2EE context root, to the page you want to use. Example:
/demo/home/
Whose: Allows you to specify additional parameters, including the following:
Profile ID: The profile ID of the person who visited the page.
Session ID: The ID of the session during which the page was displayed.
The Whose option also allows you to use a variety of operators to create complex conditions using folders and specific pages. For example:
Visits a page whose folder is not one of Quincy Funds J2EE DAF
Demo/EmailDemo/en, Quincy Funds J2EE DAF Demo/EmailDemo/fr
Adding Child Stages Any actions that you add to the root stage occur simultaneously. In the example given at the beginning of this chapter, the root stage has two actions, Send Email Communication and Wait Two Weeks. Those actions start at the same time (as soon as the campaign is deployed or its start date is reached) and run parallel to each other. If you want to add campaign elements that occur sequentially (if a customer responds with behavior X, perform action Y), you must add a child stage.
ATG Outreach controls the creation of child stages, allowing you to add them only after you have added an event to an existing stage. When you add an event, an Add Next Stage option appears in the Structure tab, as shown below, allowing you to add a child stage to the campaign.
Click the Add Next Stage button to start creating the child stage. You enter the stage name and description and add actions to the child stage just as you do with the root stage. Note: For reporting purposes, make sure the name of each stage is unique within a campaign. The reporting engine combines report rows for any stages that have the same name, which is usually not the behavior you expect.

A T G O u t r e a c h G u i d e f o r B u s i n e s s U s e r s
5 3
3 - C r e a t i n g a C a m p a i g n
μConfiguring Preemptive Stages
When the root stage has two or more actions with child stages, you can configure the campaign so that the actions in a child stage do not occur if another child stage has been reached by participants. The structure of a campaign that has multiple actions with child stages can be represented as follows:
1. Root stage
1.1 action1
1.1.1 event1
1.1.2 child stage1
1.2 action2
1.2.1 event2
1.2.2 child stage2
By default, participants who meet the segment criteria pass through both child stages. You can configure the campaign so that people who pass through one child stage are excluded from another. To do so, select the following option in the Actions to Take field in the Structure tab for the child stage from which you want to exclude people:
Don't do these actions if these stages have been reached:
Then use the checkbox to select the stage that triggers the exclusion from other stages. In the example shown at the beginning of this chapter, you would configure the Reminder stage, selecting the check box for the Thank You for Registering stage (if the Thank You stage is reached, the Reminder stage does not occur).
The option appears only when you have appropriate child stages (in other words, a campaign with parallel actions waiting for events that trigger follow-on actions).
Removing Actions or Child Stages To remove an action or a child stage, display the Structure tab for the root stage by clicking its name in the Stages list. Then use the Remove Action or Remove Next Stage buttons to delete the appropriate element. See the image below.

A T G O u t r e a c h G u i d e f o r B u s i n e s s U s e r s
5 4
3 - C r e a t i n g a C a m p a i g n
μ
Editing a Campaign You can edit any aspect of a campaign whose Author or Review task has not yet been completed. (You can also make limited edits to a deployed campaign; see Modifying, Stopping, and Deleting Deployed Campaigns for more information.)
To access a campaign for editing, complete the following steps:
1. Display the BCC Home page.
2. Locate the campaign in the To Do list, expand the entry, and click Author or Review (depending on which task is active). The Structure tab for the selected campaign is displayed.
Alternatively, select Outreach > Browse Campaigns and then select the name of the campaign to edit. The campaign’s Properties tab is displayed.
Editing Actions and Events Created Before ATG Outreach 2006.5
An enhanced action and event editing UI was added to ATG Outreach in version 2006.5 of the product. If you try to edit an existing campaign that has actions or events created before ATG Outreach 2006.5, the elements appear empty in the UI (no parameters appear in the editor, and the choice of element defaults to the first one in the list). You must recreate these actions and events using the new UI in order for the campaign to be generated correctly.

A T G O u t r e a c h G u i d e f o r B u s i n e s s U s e r s
5 5
3 - C r e a t i n g a C a m p a i g n
μThis behavior does not affect running campaigns (campaigns that have been saved and started already). Nor does it affect a campaign that has old actions or events that you do not need to edit. For example, if you make a copy of an older campaign and change only elements that are not actions or events, you can save the campaign without needing to recreate the actions and events.
Deleting Editable Campaigns If a campaign’s Author or Review task is active, you can remove the campaign from ATG Outreach by selecting Cancel from the Task Actions list at the top of the Structure tab and then clicking Go.
You can also select the Delete Project outcome from the Actions list in the Tasks tab. For more information, see Tasks Tab.
For information on deleting a deployed campaign, see Modifying, Stopping, and Deleting Deployed Campaigns.
Finishing and Deploying a Campaign When you have finished creating a campaign, you must typically submit it for review before it can be deployed to your staging or production server. The campaign starts running as soon as the deployment is complete (unless the campaign includes a start date, in which case the campaign starts after it has been deployed and when that date has been reached).
Note that the tasks and outcomes described in the following sections are included in the default campaign workflow. The actions may vary if the workflow has been customized for your installation. For example, your ATG Outreach environment may include multiple reviews or no Content Review task.
To indicate that the campaign is ready for review, complete the following steps:
1. Select Ready for Review from the Task Actions list at the top of the Structure tab.
2. Click Go.
3. In the Confirmation dialog box, enter any notes you want. This step is optional. The notes appear on the History page for this campaign.
4. Click OK.

A T G O u t r e a c h G u i d e f o r B u s i n e s s U s e r s
5 6
3 - C r e a t i n g a C a m p a i g n
μ5. Locate the campaign project in the To Do list on the BCC Home page and click Go To
Project.
6. In the Tasks tab, complete the Content Review task by selecting Approve Content in the Actions column and clicking Go. (Note that you may not have access to this task. See Using ATG Outreach Projects for more information.)
If the campaign is incomplete (one ore more required elements have not been supplied), an error message similar to the following appears when you attempt to approve the campaign for deployment:
Campaign scenario cannot be generated due to an incomplete stage
<name of stage> for <name of campaign>. Please complete the
required information and try again.
7. Optionally, enter a note in the Confirmation dialog box, and click OK.
The steps you complete to deploy the campaign depend on whether your environment includes a staging server.
Deploying to Staging and Production Servers
The image below shows the tasks that make up the deployment stages for a campaign if your ATG Outreach environment includes both a staging server and a production server.
After you have completed the Author and Content Review tasks, complete the following steps to deploy the campaign.
1. From the To Do list in the BCC Home page, click the Go to Project link for this campaign. The campaign’s Tasks tab is displayed.
2. Complete the Approve for Staging Deployment task by selecting one of the following options:
Approve and Deploy to Staging: Generates the internal elements that represent the campaign, and initiates deployment to the staging server.
Approve for Staging Deployment: Generates the campaign but does not initiate deployment. Progress through the workflow is interrupted, and the campaign

A T G O u t r e a c h G u i d e f o r B u s i n e s s U s e r s
5 7
3 - C r e a t i n g a C a m p a i g n
μmust be deployed manually through the Admin Console in ATG Content Administration. For more information, refer to the ATG Content Administration Programming Guide.
Reject Staging Deployment: The workflow returns the project to the Author stage so the campaign can be edited again.
3. The next task, Wait for Staging Deployment Completion, requires no user action unless it fails. If a failure does occur, the workflow reverts to the beginning of the Approve for Staging Deployment task, and you must attempt to approve the campaign for deployment again. Otherwise, when ATG Outreach determines that deployment to the staging server is complete, the next task, Approve for Production Deployment, becomes active in the Tasks tab. Note that you may have to refresh the page to see that the next task is active.
4. Complete the Approve for Production Deployment task by selecting one of the following options:
Approve and Deploy to Production: Initiates deployment to the production server.
Approve for Production Deployment: Does not initiate deployment. Progress through the workflow is interrupted, and the campaign must be deployed manually through the Admin Console in ATG Content Administration. For more information, refer to the ATG Content Administration Programming Guide.
Reject Production Deployment: The workflow engine removes the deployment from the staging server and returns the project to the Author stage so the campaign can be edited again.
5. If you selected Reject Production Deployment, the Wait for Revert to Complete task becomes active. Again, this task requires no user action unless it fails. If a failure does occur, the workflow reverts to the beginning of the Approve for Production Deployment task, and you must reject the deployment again.
6. The final task, Wait for Production Deployment Completion, also requires no user action unless it fails. If a failure does occur, the Approve for Production Deployment task becomes active again, and you must approve the campaign for deployment again. Otherwise, the system checks the campaign’s assets into the ATG Content Administration versioning system and changes the project’s status to Complete.
For more information on deploying in an environment that uses a staging server as well as a production server, refer to Testing Campaigns on a Staging Server.
Deploying to a Production Server
The image below shows the tasks that make up the deployment stages for a campaign if your ATG Outreach environment includes just a production server.
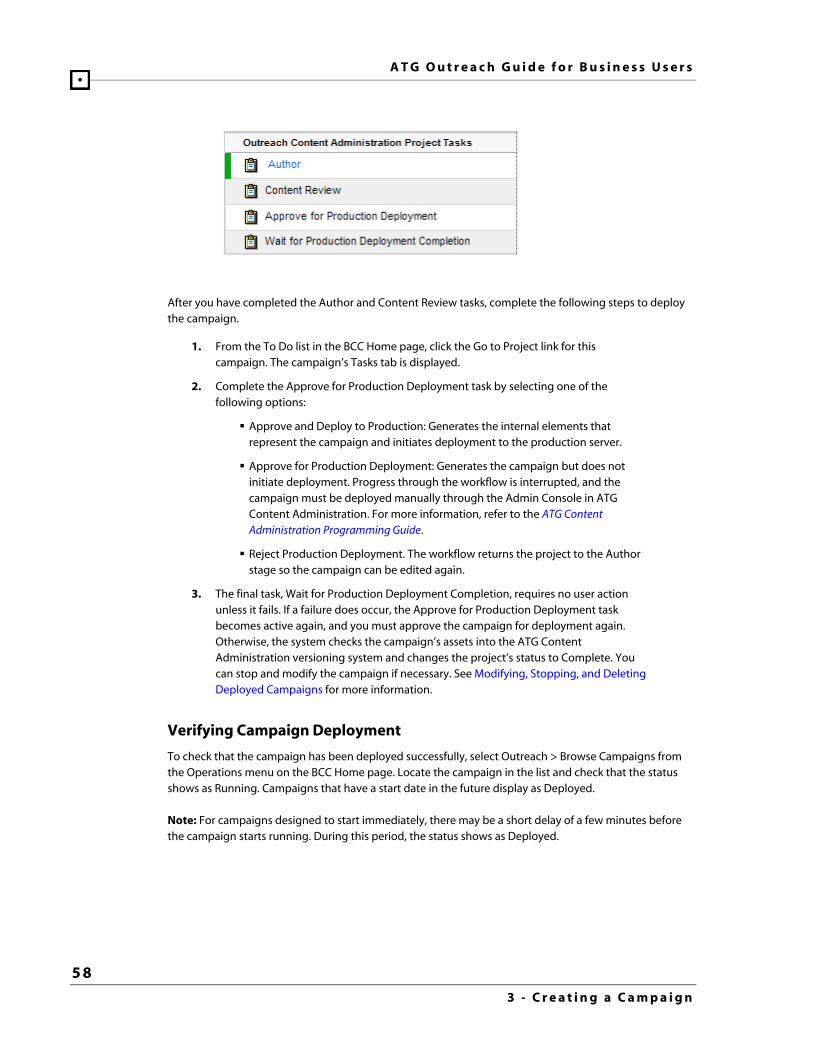
A T G O u t r e a c h G u i d e f o r B u s i n e s s U s e r s
5 8
3 - C r e a t i n g a C a m p a i g n
μ
After you have completed the Author and Content Review tasks, complete the following steps to deploy the campaign.
1. From the To Do list in the BCC Home page, click the Go to Project link for this campaign. The campaign’s Tasks tab is displayed.
2. Complete the Approve for Production Deployment task by selecting one of the following options:
Approve and Deploy to Production: Generates the internal elements that represent the campaign and initiates deployment to the production server.
Approve for Production Deployment: Generates the campaign but does not initiate deployment. Progress through the workflow is interrupted, and the campaign must be deployed manually through the Admin Console in ATG Content Administration. For more information, refer to the ATG Content Administration Programming Guide.
Reject Production Deployment. The workflow returns the project to the Author stage so the campaign can be edited again.
3. The final task, Wait for Production Deployment Completion, requires no user action unless it fails. If a failure does occur, the Approve for Production Deployment task becomes active again, and you must approve the campaign for deployment again. Otherwise, the system checks the campaign’s assets into the ATG Content Administration versioning system and changes the project’s status to Complete. You can stop and modify the campaign if necessary. See Modifying, Stopping, and Deleting Deployed Campaigns for more information.
Verifying Campaign Deployment
To check that the campaign has been deployed successfully, select Outreach > Browse Campaigns from the Operations menu on the BCC Home page. Locate the campaign in the list and check that the status shows as Running. Campaigns that have a start date in the future display as Deployed.
Note: For campaigns designed to start immediately, there may be a short delay of a few minutes before the campaign starts running. During this period, the status shows as Deployed.

A T G O u t r e a c h G u i d e f o r B u s i n e s s U s e r s
5 9
3 - C r e a t i n g a C a m p a i g n
μTesting Campaigns on a Staging Server
As explained elsewhere in this guide, campaigns are deployed to the target server specified in the ATG Outreach project workflow. ATG Outreach includes two workflows, a single-target workflow that is typically used to deploy campaigns to a production server, and a dual-target workflow that can be used to deploy to both a staging server and a production server. The use of a staging server allows you to test campaigns before you deploy them to your live site. You deploy first to the staging server, where you verify that the campaign works as designed. Then you deploy to the live production server, at which point the campaigns are visible to customers.

A T G O u t r e a c h G u i d e f o r B u s i n e s s U s e r s
6 0
3 - C r e a t i n g a C a m p a i g n
μOther ATG products, for example ATG Content Administration and ATG Merchandising, also use staging servers for test purposes. With these products, you usually deploy exactly the same content to both staging and production. Because of the nature of campaigns, however, you cannot typically deploy exactly the same campaign to the production server that you deployed to the staging server. You must usually edit the campaign after you deploy it to the staging server so that it works correctly on the production server. For example, you typically would not include landing pages that refer to your production site in a test campaign, because visits by test users to those pages could affect report data.

A T G O u t r e a c h G u i d e f o r B u s i n e s s U s e r s
6 1
3 - C r e a t i n g a C a m p a i g n
μYou can determine whether or not your ATG Outreach installation is using a staging server by looking at the tasks in the campaign project workflow, which you can see in the Tasks tab for any campaign. In a staging environment, you should see two Approve tasks, Approve for Deployment to Staging and Approve for Deployment to Production. A production-only environment has only the second Approve task. (If you think your environment includes a staging server, but you do not see the appropriate Approve for Deployment to Staging task, make sure the ATG Outreach server has been started with the correct workflow option. See Starting ATG Outreach in the ATG Outreach Administration and Development Guide for more information.)
Creating Campaigns for Use with a Staging Server
This section presents some guidelines for creating campaigns in an environment that includes a staging server. It also includes some detailed examples that show the typical steps involved in creating and editing campaigns that you test on a staging server and then deploy to production.
Campaigns that you verify on a staging server must include test profiles rather than real customer profiles. You can create these test profiles through the ATG Business Control Center that is running on the staging server. The test profiles should be external user profiles. Make sure at least one of them includes a valid e-mail address (for example, your own e-mail address) that will allow you to receive and verify any e-mails sent as part of a campaign. For information on how to create profiles, refer to the ATG Business Control Center User’s Guide.
Important: In addition, make sure you do not store real customer profiles on the staging server. If you do so, any customers whose profiles exist on both the staging and production servers and who belong to the qualifying segments will receive campaigns twice, once when the campaigns are deployed to staging and again when they are deployed to production. Typically, this behavior is not desirable.
For each campaign, edit the test profiles so they will be included in the segments used by the campaign. For example, if the campaign sends an e-mail to a segment that includes all customers whose first name is Henry, change the first name property of the test profiles to Henry.
Any landing pages that you add to a campaign should refer to the staging server. After testing is complete, edit the campaign to include landing pages that refer to the production server ( see Staging and Production Workflow: Simple E-Mail Campaign). This step is important so that your report data is correct. If you included production landing pages in a test campaign, visits by test users to those landing pages would be reflected in the data for the Email Campaign Details report.
The same principal applies to other campaign elements that reference Web site pages, such as slots and promotions. Configure them first to refer to pages on the staging server. When testing is complete, edit them to refer to the production server.
In the case of timer events, use short timers when you deploy the campaign to staging so that testing can be completed quickly. Edit the elements to use real times after testing is complete.
To edit a campaign after testing, revert it so the Author task is active and make any changes necessary. Then redeploy. See the use cases in the next section for details on how this process works.

A T G O u t r e a c h G u i d e f o r B u s i n e s s U s e r s
6 2
3 - C r e a t i n g a C a m p a i g n
μ The Qualifying Users field in the ATG Outreach segment interface always shows the
number of qualifying user profiles that are stored in the production database (actual customer profiles). The figure never includes test profiles on the staging server.
ATG Outreach reports do not include data generated by campaigns on the staging server or by test profiles, assuming the campaigns are created according to the recommendations in this section.
After a campaign is deployed to the production site, it is running in two places: on the staging server and on the production server. The Browse Campaigns page shows the status of the campaign on both servers.
Staging and Production Workflow: Simple E-Mail Campaign
This section presents a use case that shows how a campaign is created for an environment that uses a staging and production workflow.
Ann is a marketer at a company that sells home furnishings online. She is creating an e-mail campaign with ATG Outreach and wants to test it on a staging server before deploying it to production.
The campaign e-mail is intended to go to a segment called “Newsletter subscribers.” This segment currently includes 350,000 profiles.
Ann wants to test the campaign to make sure the e-mail looks correct before sending it to customers. Ann typically has campaigns reviewed by three other people at her company. Each reviewer has a test profile in the external profile repository on the staging server. Each profile includes a valid e-mail address. No customer profiles are stored in the profile repository on staging.
Ann updates the three test profiles on the staging server so they will be included in the “Newsletter subscribers” segment.
She creates the campaign and adds a Send Email Communication action. She selects the segment “Newsletter subscribers.”
Ann selects the appropriate e-mail template and enters the content for the campaign. She includes links to a number of landing pages that she has configured to be used in the e-mail. The links all point to landing pages on the staging server.
Ann completes the Content Review and Approve for Staging Deployment tasks, which deploys the campaign to the staging server. The three users who have profiles on the staging server receive the e-mail. They open the e-mail, check its format, and click on the landing page links to make sure they work correctly.
When the testing is complete, Ann reverts the campaign to the Author state. To do so, she selects the Reject Production Deployment option in the Approve for Production Deployment task. The workflow reverts the deployment from the staging target and returns the project to the Author stage so the campaign can be edited again. She modifies the landing page links so they point to the production server.
Because she is using a Staging workflow, Ann cannot deploy directly to production. Instead she redeploys to the staging server.
When staging deployment is complete, Ann deploys the campaign to production.

A T G O u t r e a c h G u i d e f o r B u s i n e s s U s e r s
6 3
3 - C r e a t i n g a C a m p a i g n
μStaging and Production Workflow: Timer Element and Visits Page Action
The use case below develops the example in the previous section. As before, Ann wants to create an e-mail campaign that she tests on a staging server before deployment to production. The e-mail is intended to go to a segment called “Newsletter subscribers.” This segment currently includes 350,000 profiles.
The e-mail includes a landing page link that generates a Visits Page event for that particular page. Ann has configured a follow-on stage that sends an e-mail to people who trigger the Visits Page event.
The campaign also includes a Wait for Timer action. The timer element waits for two weeks and then sends a “Reminder” e-mail to anyone who has not triggered the Visits Page event.
Ann updates the three test profiles on the staging server so they qualify for the “Newsletter subscribers” segment.
Ann creates the campaign and adds a Send Email Communication action. She selects the segment “Newsletter subscribers.”
Ann selects the appropriate e-mail template and enters the content for the message. She includes links to a number of landing pages, one of which has been configured for the Visits Page event. The landing page links all point to the staging server.
Ann creates a follow-on stage from the Visits Page event. She creates a Send EMail element as the follow-on action. She creates the content for the e-mail, including the appropriate landing page links to use in the e-mail. All the links point to pages on the staging server.
Ann also creates a Wait for Timer action. She selects the same target segment for the action (“New members”). For testing purposes, she sets the timer to 10 minutes.
Ann creates a follow-on stage from the Timer Expires event. She creates a Send EMail element as the follow-on action. She adds the content for the e-mail, including the appropriate landing page links. Again, all landing page links point to pages on the staging server. She also checks the box: “Don’t do this if the following stages have been reached” and selects the stage that was the follow-on to the page visit.
Ann deploys the campaign to staging. The three users who have profiles on the staging server receive the e-mail. One of them opens the e-mail, checks its format, and clicks the landing page links to make sure they work correctly. He verifies that the follow-on e-mail is triggered when he clicks on the landing page with the Visits Page event.
The other two test users wait for 10 minutes to verify they receive the “reminder” e-mail.
When testing is complete, Ann reverts the campaign to the Author state. She changes the Wait for Timer action from 10 minutes to two weeks. She also changes the landing page links so they point to the production server.
Ann re-deploys the campaign to the staging server and then to the production server.
A T G O u t r e a c h G u i d e f o r B u s i n e s s U s e r s
6 4
3 - C r e a t i n g a C a m p a i g n
μ

A T G O u t r e a c h G u i d e f o r B u s i n e s s U s e r s
6 5
4 - U s i n g O p t - I n a n d O p t - O u t S e g m e n t s
μ4 Using Opt-In and Opt-Out Segments
Segments define the target audience for your campaigns (men over the age of 30, or people who live in New York, for example). ATG Outreach includes two specialized segment types, opt-in segments and opt-out segments, to help you target your campaigns with even more precision and also to help you comply with anti-spam legislation.
An opt-in segment includes only those customers who (1) elect to receive e-mails (in other words, they have not globally opted out of all e-mail communications) and (2) explicitly subscribe to a particular e-mail category, typically via an “e-mail preferences” form on a company’s Web site. For example:
This sample Web form lists four “opt in” e-mail categories: Sunny Beach Escapes, Cruise Deals, Family Vacations and Last Minute Deals. Each category corresponds to an opt-in segment created by an ATG Outreach administrator or developer. When a customer selects an opt-in category, his user profile is updated accordingly and he automatically becomes a member of the corresponding opt-in segment. (Conversely, if the customer unchecks an e-mail option, he is removed from that opt-in segment.) When you are creating a campaign, you can select any of these opt-in segments to define your target audience. For example, you could create an e-mail campaign specifically for people who opt into both the “Sunny Beach Escapes” and “Last Minute Deals” categories. Bear in mind, however, that all opt-in segments are empty at first; they have no members unless customers choose to opt in.
Opt-out segments work a little differently. These segments include all customers initially; the people who specifically opt out of the corresponding e-mail category are excluded from the segment. In other words, opt-out segments include everyone except the people who have explicitly opted out. For example, the following “opt out” Web form lists four e-mail categories, each of which corresponds to an opt-out segment.

A T G O u t r e a c h G u i d e f o r B u s i n e s s U s e r s
6 6
4 - U s i n g O p t - I n a n d O p t - O u t S e g m e n t s
μ
All customers are implicitly subscribed to each opt-out category. If a customer does not want to receive a certain type of communication, she must explicitly opt out of that category.
For example, if you selected the Special Deals opt-out segment as the target audience for a campaign, that campaign would target everyone except the people who opted out of the Special Deals category. Because opt-out segments can be broad in scope, you may want to use them in combination with at least one other regular segment to restrict the initial list of e-mail recipients.
Adding Opt-In or Opt-Out Segments to a Campaign Follow the steps below to add an opt-in or opt-out segment to your campaign. Opt-in and opt-out segments are usually created by an application administrator. For more information, see the ATG Outreach Administration and Development Guide.
Note: If you create an action with multiple segments, always add the segments in order from most restrictive (fewest members) to least restrictive (most members). Doing so will produce a more efficient campaign.
1. Display the Segments field for the Send Email Communication action.
2. In the Add field, select Opt In Segment or Opt Out Segment.
3. Click Add Segment.
4. Use the Segment Picker as described in the previous section to find and add the segment you require.
The opt-in or opt-out segment you chose appears in the Segments field.
The Qualifying Users field is updated to show the number of profiles that will be targeted by the campaign. If you include any opt-in or opt-out segments, the number on the right is reduced by the number of profiles in those segments that cannot receive e-mail (their receive email property is set to “no,” possibly because of a global opt-out choice). For example, if you have one profile whose receive e-mail property is “no,” and you add a segment that includes that profile, the Qualifying Users count shows 0 of 0. This behavior is different from the behavior described in the previous section for the Qualifying Users count, where the number on the left is reduced by the number of profiles that cannot receive e-mail.

A T G O u t r e a c h G u i d e f o r B u s i n e s s U s e r s
6 7
5 - I m p o r t i n g M a i l i n g L i s t s
μ5 Importing Mailing Lists
You can import purchased or rented mailing lists from external sources for use in campaign segments, using the names, postal addresses, e-mail addresses, and other information in the lists to target your campaigns. ATG Outreach also helps you manage lists by tracking their source and date of expiration, and it allows you to purge the names of non-engaged customers or prospects when a list has expired.
ATG Outreach supports importing lists that are in CSV (comma-separated-value) files (also known as comma delimited files). CSV files are plain text files with a .csv extension that store data in a very simple format, with one record on each line and fields within that record separated by commas. The first line defines the columns of data. In the example below, the columns are email, name1, name2, and state. Each line after that represents a record for a customer.
email,name1,name2,state
[email protected],Jennifer,Rodriguez,MA
[email protected],Betty,Wilson,IL
[email protected],Edson,White,CA
[email protected],Mary,Gant,CT
[email protected],Brett,Williams,NC
During the import process, you specify the properties in the profile repository where you want to store each column of data (see the next section). You can use any available property you like for any column; for example, you can choose to store Marital Status data in an unused property called Favorite Food. You cannot, however, create completely new profile properties simply by importing the columns in the list. If you wanted to store Marital Status data in a property called Marital Status, and there was no existing property by that name, the system administrator would have to extend the profile to include that property before you imported the data.
Notes:
Make sure that none of the column headers include non-alphanumeric characters (for example “.” or “?”). These characters are not supported for use with the Skip This Column option described in the next section.
The number of commas for each row in the imported list must be correct, regardless of whether any field is empty, or the import operation may fail. For example, the list below contains four columns separated by three commas:
firstname,lastname,city,state
The following entry contains commas in all expected positions and imports correctly, even though one field is empty:

A T G O u t r e a c h G u i d e f o r B u s i n e s s U s e r s
6 8
5 - I m p o r t i n g M a i l i n g L i s t s
μjim,,boston,MA
The following entries fail:
jim,jones,,,,MA
,jones,boston,MA,
As a guide, importing one million profiles takes approximately six hours depending on your environment.
Importing a New Mailing List Note that your ATG Outreach environment must be configured to use the import lists feature. For information, see the ATG Outreach Administration and Development Guide.
1. On the Home page of the ATG Business Control Center, select Operations > Outreach > Import Email List. The Import an Email List page appears.
2. Enter a name and description for the new list.
If you want to create a segment from this list automatically (see step 7), use alphanumeric characters only for the list name. If you use other characters, such as periods, the resulting segment name may be mishandled by the segment editor, causing errors to occur.
3. Click Next.
4. Use the following optional fields to enter additional information that will be used to keep track of this list.
List Type: Enter any text you want to categorize or identify lists.
List Source: The origin of the list (if the list was acquired).
Cost: The cost of the list, if it was acquired.
Purchase Date
Expiration Date. If you enter a date here, it will be tracked for all members of the list. On the expiration date, the members of the list are deleted from the user repository if they are not part of any other imported list, and/or if they were not already in the user profile repository before this list was imported. In addition, your application administrator can set properties that ensure that engaged prospects or customers whose names came from a list are not deleted from the repository. For example, if a user has registered with your site and logged in, or has clicked a link in a campaign e-mail, he or she will not be deleted from the repository when the list expires.
5. In the Upload File field, enter the path and name of the CSV file that contains the list, or click the Browse button to locate the file.
6. Select the Create User Segment from List option if you want ATG Outreach to use the records in the list to create a new segment automatically. It gives the segment the

A T G O u t r e a c h G u i d e f o r B u s i n e s s U s e r s
6 9
5 - I m p o r t i n g M a i l i n g L i s t s
μsame name as the imported list. If you do not select this option, the names can still be used to create other segments or target users in other ways.
7. Click Next. A page appears that allows you to preview the data in the list (by default, the first five entries). For each column of data that the list contains, select the property in the ATG user profile repository that you want to use to store that piece of data. If the names of the columns in your CSV file correspond to existing profile properties, ATG Outreach automatically makes the association, but you can typically map any field to any user profile property that is available. (The exceptions are certain required properties -- by default, the Email Address property is required. An error appears if required properties are not given a mapping.)
In the example shown below, the list contains columns called email, name1, name2, and state, which correspond to the profile properties Email Address, First Name, Last Name, and Home Address's State:
If the list contains any columns of data that you do not want to import, select None --Skip This Column from the dropdown list in that column. The columns are ignored by the import mechanism.
8. When you have finished configuring the list, click Import List.
The Browse Imported Lists page appears. Click Refresh to display the new import, which appears with the status Import Completed.
Note that you do not have to complete the import procedure in one session. You can name the new list and specify other general information for it (steps 1 to 4 above), and then return to the task at a later date to configure the data columns and perform the import. To return to an imported list that you have started:
1. Locate the list in the To Do panel in the Home page of the ATG Business Control Center.
2. Click Go to Project.
3. Display the Tasks tab.
4. Click Import List.

A T G O u t r e a c h G u i d e f o r B u s i n e s s U s e r s
7 0
5 - I m p o r t i n g M a i l i n g L i s t s
μDuplicating Records
When you import a mailing list, ATG Outreach examines the records to determine if any already exist in the profile repository. By default it uses the email property to do so -- if any profile contains an email property whose value is the same as one that already exists, the import record is considered to be a duplicate, and a new profile is not added. The application administrator can configure any property or several properties to be used in this way.
If an existing record is found, its data is not overwritten by default. However, data that does not exist in the record is added by the import. Consider this example:
The following profile already exists in the repository:
email first name last name home state
[email protected] Jenn Rodriguez
The import file contains the following:
email,name1,name2,state
[email protected],Jennifer,Rodriguez,MA
After the import, during which the columns are mapped to appropriate profile properties, the profile appears as follows:
email first name last name home state
[email protected] Jenn Rodriguez MA
E-mail addresses are considered to be unique if they use different capitalization from existing entries or include extra blank spaces. For example, the three addresses shown below are treated as different items:
A new profile is created in each case.
Browsing Imported Lists To view all mailings lists that have been created in ATG Outreach, select the Browse Imported Lists option from the Operations > Outreach menu on the BCC Home page. Note that the display includes completed

A T G O u t r e a c h G u i d e f o r B u s i n e s s U s e r s
7 1
5 - I m p o r t i n g M a i l i n g L i s t s
μlists as well as lists that have been started but that have not necessarily had any data imported into them -- in other words, the process of creating the imported lists may not be complete for all the items you see.
You can search for a specific list or lists by using the List Options box on the right. Enter any characters from a list’s name or description and click Go.
The display shows the following data for each list:
Author: the name of the person who created the import list project
Campaign Creation: the date the project was created
Status. The column is blank for lists whose data has not yet been imported
Import Count: the number of records that were imported
Errors: the number of errors that occurred during the import. The count shows the number of records that failed the import because of incorrect data types, missing values, or other database-related problems.
Deleting an Imported List The following procedure shows how to delete ATG Outreach information associated with importing a list. For example, this procedure removes the name of a list from the Browse Imported Lists page. It does not remove any profile information that was imported or changed by the list, nor does it affect the segment that was created automatically as part of the list import (if any). Import-based information can be removed from profiles only by expiration. If you set an expiration date when the list was created (see Importing a New Mailing List), the profile information is removed when the date is reached. If you did not set an expiration date, the only way to remove the list information from profiles is by expiring the list manually through the ATG Dynamo Server Admin.
To delete an imported list, complete the following steps:
1. Locate the list in the To Do list on the BCC Home page.
2. Click Go to Project.
3. Display the Tasks tab.
4. In the After Import task, select Delete Import Info as the action, and click Go.
5. Click OK in the Confirmation dialog box.

A T G O u t r e a c h G u i d e f o r B u s i n e s s U s e r s
7 2
5 - I m p o r t i n g M a i l i n g L i s t s
μ

A T G O u t r e a c h G u i d e f o r B u s i n e s s U s e r s
7 3
6 - U s i n g C a m p a i g n T e m p l a t e s a n d C o p i e s
μ6 Using Campaign Templates and
Copies
If you expect to use the same campaign several times with only minor changes, you can set up a template and then reuse it as needed. You can also reuse an existing campaign by copying it and modifying it as necessary.
Creating and Using Campaign Templates Campaign templates are deployed to the ATG Outreach Production/Staging server or servers so that their assets are available to campaigns that you create from them. However, the templates do not run as campaigns after deployment.
Campaign templates are included in ATG Outreach reports, even though in this case the data is not applicable.
To create a new template, complete the following steps:
1. Select Create a Campaign Template from the Operations menu on the BCC Home page.
2. Create the template exactly as you would create a campaign, supplying information in the Properties and Structure tabs as needed. Note that you must complete all required properties.
3. When the template is finished, select Ready for Review from the Task Action list at the top of the Structure tab.
4. From the To Do list in the BCC Home page, click the Go to Project link for this template. The template’s Tasks tab is displayed.
5. Complete the content review and deployment tasks for this template. The procedure is the same as the procedure for deploying a campaign. See Finishing and Deploying a Campaign for more information.
To verify that the template has been deployed, select Outreach > Browse Campaign Templates from the Operations menu. The status for a successfully deployed template is Completed.
To use a template to create a new campaign:
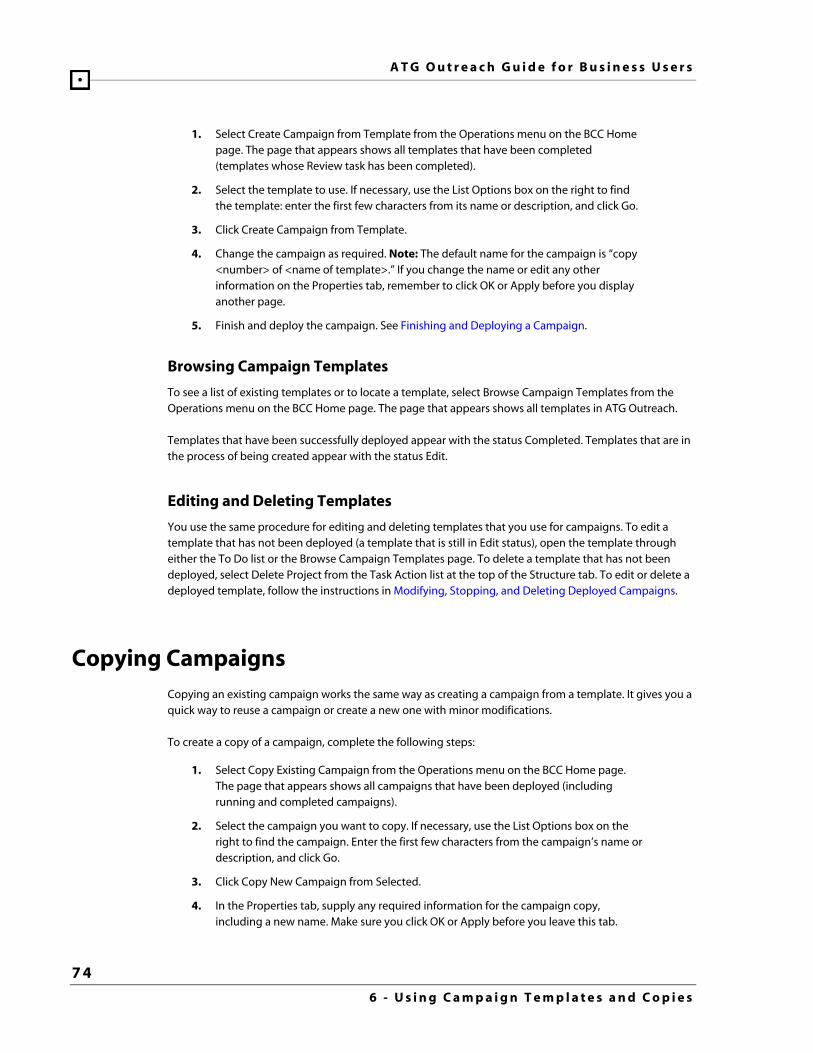
A T G O u t r e a c h G u i d e f o r B u s i n e s s U s e r s
7 4
6 - U s i n g C a m p a i g n T e m p l a t e s a n d C o p i e s
μ1. Select Create Campaign from Template from the Operations menu on the BCC Home
page. The page that appears shows all templates that have been completed (templates whose Review task has been completed).
2. Select the template to use. If necessary, use the List Options box on the right to find the template: enter the first few characters from its name or description, and click Go.
3. Click Create Campaign from Template.
4. Change the campaign as required. Note: The default name for the campaign is “copy <number> of <name of template>.” If you change the name or edit any other information on the Properties tab, remember to click OK or Apply before you display another page.
5. Finish and deploy the campaign. See Finishing and Deploying a Campaign.
Browsing Campaign Templates
To see a list of existing templates or to locate a template, select Browse Campaign Templates from the Operations menu on the BCC Home page. The page that appears shows all templates in ATG Outreach.
Templates that have been successfully deployed appear with the status Completed. Templates that are in the process of being created appear with the status Edit.
Editing and Deleting Templates
You use the same procedure for editing and deleting templates that you use for campaigns. To edit a template that has not been deployed (a template that is still in Edit status), open the template through either the To Do list or the Browse Campaign Templates page. To delete a template that has not been deployed, select Delete Project from the Task Action list at the top of the Structure tab. To edit or delete a deployed template, follow the instructions in Modifying, Stopping, and Deleting Deployed Campaigns.
Copying Campaigns Copying an existing campaign works the same way as creating a campaign from a template. It gives you a quick way to reuse a campaign or create a new one with minor modifications.
To create a copy of a campaign, complete the following steps:
1. Select Copy Existing Campaign from the Operations menu on the BCC Home page. The page that appears shows all campaigns that have been deployed (including running and completed campaigns).
2. Select the campaign you want to copy. If necessary, use the List Options box on the right to find the campaign. Enter the first few characters from the campaign’s name or description, and click Go.
3. Click Copy New Campaign from Selected.
4. In the Properties tab, supply any required information for the campaign copy, including a new name. Make sure you click OK or Apply before you leave this tab.

A T G O u t r e a c h G u i d e f o r B u s i n e s s U s e r s
7 5
6 - U s i n g C a m p a i g n T e m p l a t e s a n d C o p i e s
μ5. Use the Structure tab to change the campaign elements as required.
6. Deploy the campaign. See Finishing and Deploying a Campaign.

A T G O u t r e a c h G u i d e f o r B u s i n e s s U s e r s
7 6
6 - U s i n g C a m p a i g n T e m p l a t e s a n d C o p i e s
μ

A T G O u t r e a c h G u i d e f o r B u s i n e s s U s e r s
7 7
7 - U s i n g t h e H T M L E - M a i l E d i t o r
μ7 Using the HTML E-Mail Editor
As described earlier, the Send Email Communication action allows you to send an e-mail to a targeted group of customers. ATG Outreach includes an HTML editor that you can use to create the body of the message in HTML format. This chapter describes how to use the editor.
Downloading the HTML Editor Applet The HTML editor provided with ATG Outreach is a Java applet that appears when you click the Create button in the HTML Content field for a new Send Email Communication action, shown below:
The first time you click the Create button, you are prompted to accept the applet for use. When the security certificate appears, click Run to accept the applet and display the editor.
Important: The applet requires a specific version of the Java SDK, which is available from the Oracle Web site. If your environment does not include the appropriate version of the SDK, errors may occur when you try to display the HTML editor. In addition, when your browser detects that the applet is required, it may attempt to download and install the latest version of the SDK automatically. However, the latest version may not be the one that is supported for use with the applet.
If the HTML editor does not load properly, check you have the correct version of the SDK, and install it if necessary. See the Supported Environments page on www.atg.com for more information: http://www.atg.com/en/products-services/commerce/supported-environments/

A T G O u t r e a c h G u i d e f o r B u s i n e s s U s e r s
7 8
7 - U s i n g t h e H T M L E - M a i l E d i t o r
μIf you click Cancel to reject the applet, and later you want to use the HTML editor, you must clear your browser’s cache and then open the campaign again.
Using the HTML Editor The controls at the top of the editor give you access to a range of standard HTML formatting tools, including a table creation tool and a spell checker. Detailed information on using the editor is available through the Help menu.
In addition to the standard menus, the editor includes an Outreach menu that you can use to insert ATG Outreach-specific elements, such as landing page links, into the e-mail. The image below shows the options on the Outreach menu:
Note that the Insert Coupon item appears only if your installation includes ATG Commerce.
The following image shows the editor with some sample data:

A T G O u t r e a c h G u i d e f o r B u s i n e s s U s e r s
7 9
7 - U s i n g t h e H T M L E - M a i l E d i t o r
μ
The aco: tags shown in the example are added when you insert elements from the Outreach menu as described in the following sections of this chapter. For example, the two aco:profile tags are references to properties in the user profile. Move the mouse over any aco: tag for more information about it.
Note also the Design and Code tabs at the bottom of the editor. The Design tab allows you to create the message in WYSIWYG mode. Use the Code tab to view or create the message as HTML code.
Inserting Links to Landing Pages
If you have added a landing page to the Send Email Communication action (see Adding Landing Pages), you can include a link to that landing page by selecting Insert Landing Page from the Outreach menu. The link is inserted at the cursor position as aco:landing tags separated by the landing page name. You can change the link’s display name if necessary.

A T G O u t r e a c h G u i d e f o r B u s i n e s s U s e r s
8 0
7 - U s i n g t h e H T M L E - M a i l E d i t o r
μPersonalizing the Message
You can personalize the message for each person in the segment by including properties from the user profile in the body of the message. In the example at the beginning of this chapter, the salutation includes tags that reference the first name and last name profile properties.
Each recipient sees the values of the properties in his or her profile:
To include a profile property, select Insert Profile Property from the Outreach menu, and then select the property to add. A corresponding aco:profile tag is inserted at the cursor location. Move the mouse over the tag to identify the property.
Note that you can also use the Insert Page Fragment option to personalize the body of the message. See Inserting Page Fragments.
Adding Images
Use the Insert Asset Image option on the Outreach menu to add an image to the message. To add any image file (for example, a JPG file) that already exists in the campaign, select the image from the Image Picker and click Add. The image is inserted at the cursor location.
To add a new image, complete the following steps:
1. Save any changes you have already made to the message in the HTML editor. Note that this step is important; if you do not save your changes, they will be lost when the new image appears in the message body.
2. Click Create New Image in the Image Picker. The Edit WebAppOutreachImage page appears.
3. In the File Name field, enter the name and extension of the image file (with no path information). Use the exact name of the image file. For example, if the image has the location C:\Pictures\Portugal\lisbon2010.jpg, enter lisbon2010.jpg as the file name.
4. Click Browse to locate the file.

A T G O u t r e a c h G u i d e f o r B u s i n e s s U s e r s
8 1
7 - U s i n g t h e H T M L E - M a i l E d i t o r
μ5. Click Upload. At this point you can use the Display and Hide Image links to verify the
image if you want to do so.
6. Click Change in the Parent Folder field. The Folder Picker appears.
7. Leave the Keyword field blank and click Go.
8. Select /Outreach.war and click Add.
9. Click OK. The HTML Editor is displayed again.
10. Select Outreach > Insert Asset Image. In the Image Picker, locate the image you just created, and click Add.
An aco:image tag is added at the cursor location. Use the Preview As button to view the image as it will appear in the customer’s e-mail client. See Previewing the Message for more information.
Inserting Page Fragments
Use the Insert Page Fragment option on the Outreach menu to add previously created JavaServer Page (JSP) code snippets that perform advanced personalization of your e-mail content or represent commonly used elements, such as a company address or disclaimer. The JSP fragments are typically created by site developers and can be reused as needed in any campaign.
To insert a page fragment, complete the following steps:
1. Move the cursor to the position in the text where you want the fragment to appear.
2. Select Outreach > Insert Page Fragment.
3. Use the Search tab to locate the JSP fragment you want to use. Either enter some characters from the file name of a specific fragment into the Keyword field, or leave the field blank and click Go to display all available fragments. Note that page fragments must be deployed as assets; otherwise, they will not appear here. See the note at the end of this section for more information.
4. Select the fragment you want and click Add. A corresponding dspel: include tag is inserted at the cursor location. Move the mouse over the tag to identify the fragment.
Each e-mail recipient sees the contents of the JSP fragment. Any profile property references in the fragment show the values from his or her profile. The following image shows an example dspel: include tag as it appears in the e-mail editor:
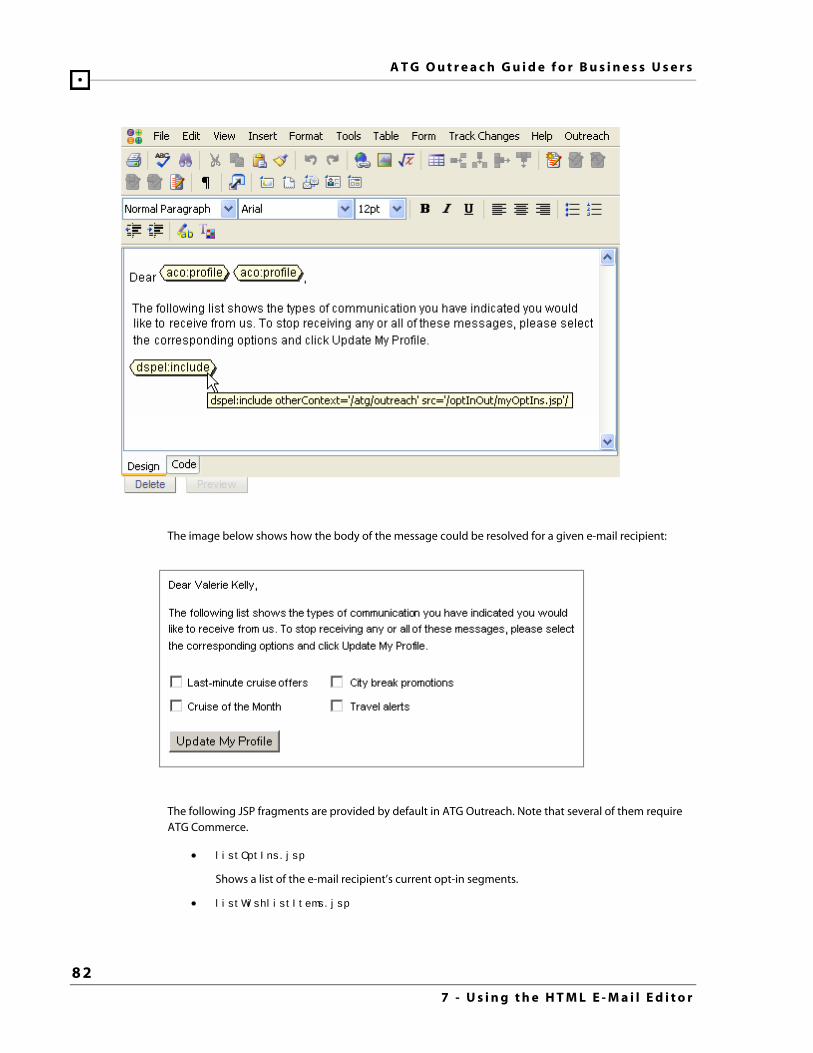
A T G O u t r e a c h G u i d e f o r B u s i n e s s U s e r s
8 2
7 - U s i n g t h e H T M L E - M a i l E d i t o r
μ
The image below shows how the body of the message could be resolved for a given e-mail recipient:
The following JSP fragments are provided by default in ATG Outreach. Note that several of them require ATG Commerce.
listOptIns.jsp
Shows a list of the e-mail recipient’s current opt-in segments.
listWishlistItems.jsp

A T G O u t r e a c h G u i d e f o r B u s i n e s s U s e r s
8 3
7 - U s i n g t h e H T M L E - M a i l E d i t o r
μShows the items in the e-mail recipient’s wishlist as a comma-separated list of item display names. Requires ATG Commerce.
renderItems.jsp
Displays a collection of items stored in a user profile property. By editing the fragment, you can specify the property to use and the property that represents the name to display for each item. For an example, see listActivePromos.jsp below.
listActivePromos.jsp
Displays the e-mail recipient’s active promotions as a comma-separated list of promotion names. The fragment works by including renderItems.jsp and setting the profile property to activePromotions and the property to use for the name of the items to displayName. You could change this fragment to display used promotions or descriptions of the active promotions, for instance. Requires ATG Commerce.
Note: These files are not automatically available from the Insert Page Fragment menu; to be able to use them, you must first deploy them through the ATG Business Control Center. For instructions, see Configuring Page Fragments in the ATG Outreach Administration and Development Guide. In addition, the fragments themselves typically need to be edited to make them applicable to your campaigns.
The JSP files for the sample fragment described above are located in <ATG10dir>\ACO10.0.2\ACO\communication\common\j2ee-
apps\Outreach.ear\Outreach.war\collections.
Inserting Coupons
The Insert Coupon option on the Outreach menu allows you to add a coupon that you created previously to your e-mail message. This option is available only if you are using ATG Outreach with ATG Commerce.
1. Create the coupon in ATG Commerce. For more information, refer to the ATG Commerce documentation (the ATG Merchandising User Guide and the ATG Commerce Guide to Setting Up a Store).
2. In the HTML editor, move the cursor to the position in the text where you want the coupon text to appear.
3. Select Outreach > Insert Coupon.
4. Use the Coupon Picker dialog box to select the coupon you want to use.
Tracking Opened E-Mail
You can select Insert E-mail Tracker from the Outreach menu to track whether or not the recipient opens the e-mail. The option adds a hidden <aco:trackOpenEmail/> tag that contains an image with information about the campaign, the stage, and the profile ID. When the recipient opens the e-mail, and if the e-mail client he or she is using is configured to display images, the tracking information is sent to the ATG Outreach server and logged to the database. You can then view tracking-related data in ATG Outreach reports (specifically, in the Opened column in the Email Campaign Details report).

A T G O u t r e a c h G u i d e f o r B u s i n e s s U s e r s
8 4
7 - U s i n g t h e H T M L E - M a i l E d i t o r
μPreviewing the Message
ATG Outreach provides a Preview feature you can use before you deploy the campaign to see how the e-mail message body will be rendered for a sample user profile.
To preview the message, click the Preview button at the bottom of the HTML editor (shown below) and then use the Select a User for Preview dialog box to select the profile you want to use for the preview. The e-mail message appears in a separate window as the selected user would see it in his or her e-mail client. Depending on the preview pages that are set up, you may also be able to follow landing page links and browse to other pages.
Notes:
If the Preview button is inactive, ATG Outreach may not have been started with the required Preview config layer. For information on how to configure ATG Outreach for use with Preview, including instructions on setting up preview profiles, adding preview pages, and starting the ATG Outreach server with the Preview config layer, see the ATG Outreach Administration and Development Guide.
A limitation exists for previewing landing pages if your ATG installation is running on JBoss application server. To be able to preview a landing page as a different user, you must access the ATG Business Control Center so that the hostname in the URL you use when you log into the ATG Business Control Center is specified the same way as the hostname used when the landing page link was added to the e-mail. Otherwise, the content that appears on the landing page will be personalized for the logged-in user, not the preview user. For example, if you used the server’s IP address (123.44.55) to log in when you created the landing page link, do not then use the actual host name (localhost) when you log in to preview the e-mail.
The preview features in ATG Content Administration and ATG Outreach have different capabilities. The preview provided with ATG Content Administration allows you to see the effect of changes to personalization and scenario assets (segments, targeters, slots, or scenarios) that you are editing in an active project. ATG Outreach cannot be used to preview the results of changes to personalization and scenario assets.

A T G O u t r e a c h G u i d e f o r B u s i n e s s U s e r s
8 5
8 - M o d i f y i n g , S t o p p i n g , a n d D e l e t i n g D e p l o y e d C a m p a i g n s
μ8 Modifying, Stopping, and Deleting
Deployed Campaigns
This chapter describes how to make changes to a deployed or running campaign, stop a campaign that you have started, and delete a campaign.
For information on modifying a campaign that has not yet been deployed, refer to Editing a Campaign.
Modifying a Deployed Campaign You can make any changes you need to a campaign that has been deployed but has not yet started running (for example, because it has a start date in the future). The campaign is redeployed when you have completed the changes.
1. Display the BCC Home page.
2. Select Operations > Outreach > Browse Campaigns, and locate the campaign to modify. The status shows as Deployed.
3. Click the campaign’s name.
4. Select Stop and Modify from the Task Action dropdown menu, and click Go.
5. Make changes to the campaign as required.
6. Finish and deploy the campaign as you would for a new campaign; see Finishing and Deploying a Campaign.
Modifying a Running Campaign If a campaign has started and is running on the ATG Outreach Production/Staging server, you can still make a limited number of changes to it. After you have finished making changes, the campaign is redeployed.
Note that the ATG Business Control Center interface does not enforce any limit on the changes you can make to a running campaign. You can change any element and redeploy. However, the effect of the changes depends on the progress the campaign had made when you chose to modify it, and also on the nature of the changes. In general terms you can edit any element that does not require a structural change to the campaign. For example, if you have a Visits Page event that has not been reached in the

A T G O u t r e a c h G u i d e f o r B u s i n e s s U s e r s
8 6
8 - M o d i f y i n g , S t o p p i n g , a n d D e l e t i n g D e p l o y e d C a m p a i g n s
μcampaign by any participant, you can change the page that is specified by the event. However, editing the segment in an initial Send Email Communication action or adding a new child stage has a structural impact on the campaign. In this case, the campaign is simply restarted from the beginning. Potentially, users who have already received a campaign e-mail, for example, may receive the e-mail again.
Note for users familiar with ATG scenarios: You can make any changes that would be migratable in the scenario generated from the campaign. For information, see Changing an Enabled Scenario in the ATG Personalization Guide for Business Users.
It is strongly recommended that you stop the running campaign and create a new one that contains the changes rather than modifying the running one.
To change a running campaign, complete the following steps:
1. Display the BCC Home page.
2. Select Operations > Outreach > Browse Campaigns and locate the campaign to delete. The status shows as Running.
3. Click the campaign’s name.
4. Select Modify from the Task Action dropdown menu and click Go.
5. Make changes to the campaign as required.
6. Finish and deploy the campaign as you would for a new campaign. See Finishing and Deploying a Campaign.
Stopping a Campaign To stop a running campaign, complete the following steps:
1. Display the BCC Home page.
2. Select Operations > Outreach > Browse Campaigns, and locate the campaign to stop. The status shows as Running.
3. Click the campaign’s name.
4. Select End from the Task Action dropdown menu and click Go.
In the Browse Campaigns page, the status of the campaign changes to Deployed, indicating that the campaign is on the production server but is not running. See the next section, Deleting a Deployed Campaign, for information on how to remove the campaign.
Deleting a Deployed Campaign You can delete a campaign that is still in the editing process by selecting Cancel as the outcome of the Author task. For more information, see Deleting Editable Campaigns. The procedure below shows how to delete a campaign that has been deployed to the ATG Outreach production server.

A T G O u t r e a c h G u i d e f o r B u s i n e s s U s e r s
8 7
8 - M o d i f y i n g , S t o p p i n g , a n d D e l e t i n g D e p l o y e d C a m p a i g n s
μ1. If the campaign has started running (its status shows as Running in the Browse
Campaigns page), complete the procedure in the previous section to stop it. This step is required in order to delete the campaign.
2. Display the BCC Home page.
3. Select Operations > Outreach > Browse Campaigns, and locate the campaign to delete. The status shows as Deployed.
4. Click the campaign’s name.
5. Select Delete from the Task Action dropdown menu and click Go.
The campaign is removed from ATG Outreach.

A T G O u t r e a c h G u i d e f o r B u s i n e s s U s e r s
8 8
8 - M o d i f y i n g , S t o p p i n g , a n d D e l e t i n g D e p l o y e d C a m p a i g n s
μ

A T G O u t r e a c h G u i d e f o r B u s i n e s s U s e r s
8 9
9 - U s i n g A T G O u t r e a c h P r o j e c t s
μ9 Using ATG Outreach Projects
Projects are an ATG Business Control Center mechanism for managing the tasks and assets involved in creating and deploying Web content for a variety of ATG applications. Each project is associated with an underlying workflow that defines the tasks necessary to complete the project. Typically, a project starts with an authoring task, progresses to an approval phase where the content is reviewed, and ends with deployment to the customer-facing Web site. The tasks involved in a project can be carried out by different people over a period of time.
ATG Outreach campaigns, campaign templates, and imported lists are all instances of projects. When you create a new campaign, template, or imported list, you use the project interface, although you do so transparently -- the Properties and Structure tab for campaigns and templates, for example, works on top of the underlying project. The same is true if you want to edit an incomplete item. However, you do have to access the project interface directly if you want to do any of the following:
Edit a deployed or running campaign
Stop or delete a campaign
View all the tasks associated with an ATG Outreach project
View a list of the project’s assets
View the notes associated with a project (its history)
This chapter explains how to work with these items in the context of a project. For more general information about projects and the ATG Business Control Center, refer to the ATG Content Administration Guide for Business Users.
Displaying the Project Tabs To display the project tabs for a campaign, template, or mailing list, complete the following steps:
1. Display the BCC Home page.
2. Locate the item in the To Do list. For example, select All Projects and Tasks, and then find the name of the campaign. For detailed information on using the Show options, refer to the ATG Content Administration Guide for Business Users.
3. Click Go to Project (see the image below).

A T G O u t r e a c h G u i d e f o r B u s i n e s s U s e r s
9 0
9 - U s i n g A T G O u t r e a c h P r o j e c t s
μ
Alternatively, use the Operations > Business Control Center > Browse Projects option, which displays a list of all projects (including those created for projects other than ATG Outreach) in an Available Projects page. The display contains some advanced filtering options, which may be helpful if your system contains a large number of projects. After you have located the appropriate item in the Available Projects page, click its name to display the project tabs.
There are four ATG Outreach project tabs:
Tasks tab
Assets tab
History tab
Lock Conflicts tab
Tasks Tab The Tasks tab for an ATG Outreach project is shown in the image below.

A T G O u t r e a c h G u i d e f o r B u s i n e s s U s e r s
9 1
9 - U s i n g A T G O u t r e a c h P r o j e c t s
μ
The Tasks tab shows you all the tasks associated with the project. Note that the tasks vary depending on the type of ATG Outreach project -- in the example above, the project is a campaign. Templates and imported lists have different sets of tasks.
You can assign tasks to yourself or to other users depending on the permissions you have been granted. You can complete any task that is assigned to you or that is marked as unassigned.
The Modify/Delete tasks at the top of the display become active only when the campaign has been deployed. For information on using them to edit or delete a campaign, see Modifying, Stopping, and Deleting Deployed Campaigns.
The set of tasks in the bottom half of the display represents the tasks that make up the creation phase of the project; the default tasks for a campaign are as follows:
Author
Content Review
Wait for Production Deployment Completion
Revert Failed Deployment
Wait for Production Revert Deployment Completion
For the current task, the Actions column contains options that represent the possible outcomes of the task. The following image shows the Actions options for the Author task:

A T G O u t r e a c h G u i d e f o r B u s i n e s s U s e r s
9 2
9 - U s i n g A T G O u t r e a c h P r o j e c t s
μ
Selecting an action typically moves the project to the next task in the workflow. For example, selecting Ready for Review for the Author task activates the Content Review task.
Note that the Wait for… tasks and the Revert Failed Deployment tasks represent stages in the workflow where you wait for the system to complete the specified activity. You cannot take any action until the stage is complete, so no dropdown menu appears for these tasks in the Actions column. For more information on these tasks, refer to the ATG Content Administration Guide for Business Users.
Assets Tab The Assets Tab displays all the assets that are included in your campaign, such as events, landing pages, segments, and folders. Although you do not add folders to a campaign explicitly, any folder associated with other campaign assets is automatically added to the campaign so it can be deployed.
The following image shows the Assets tab with some sample data:
The base and current version numbers show which version of the asset has been added to the project. ATG Content Administration uses the version numbers to track an asset’s editing history and to ensure that the latest version of any asset is always available for editing. For detailed information on assets and version numbering, see the ATG Content Administration Guide for Business Users.

A T G O u t r e a c h G u i d e f o r B u s i n e s s U s e r s
9 3
9 - U s i n g A T G O u t r e a c h P r o j e c t s
μTo remove an asset from a project, select the box next to it and then click Remove Assets from Project. Important: Be aware that removing assets through the Assets tab is not recommended. It is always preferable to remove them through the Structure tab when possible. ATG Outreach links assets into a logical data model that represents the campaign, and removing the assets through the Structure tab allows ATG Outreach to ensure the data model is rebuilt correctly. Removing them through the Assets tab could create unresolvable references from the campaign to the missing assets.
History Tab The History tab displays information showing when the project was created and when each task was completed, with any user- or system-defined notes associated with task completion. Notes cannot be removed from a project.
For each entry, the following information appears:
The name of the person who performed the action
The date and time that the action occurred
The name of the action. The text is the display name of the workflow element associated with this action.
To create a new entry, click Add Note, and then enter the note text. Be aware that you cannot edit or delete the text after the note is created.

A T G O u t r e a c h G u i d e f o r B u s i n e s s U s e r s
9 4
9 - U s i n g A T G O u t r e a c h P r o j e c t s
μLock Conflicts Tab
When a campaign project is in the deployment stage of a workflow, its assets are locked, and they remain locked until the project is checked in by the system, which occurs when deployment is complete. During that time, other projects cannot deploy those assets. If you attempt to deploy an ATG Outreach project and receive asset lock errors, you can use the Lock Conflicts tab to view a list of all the projects that are holding assets locks for any of the assets in the current project. For more information, refer to the ATG Content Administration Guide for Business Users.

A T G O u t r e a c h G u i d e f o r B u s i n e s s U s e r s
9 5
1 0 - U s i n g A T G O u t r e a c h R e p o r t s
μ10 Using ATG Outreach Reports
For each running or completed ATG Outreach campaign, you can generate the following reports:
Campaign Overview report: shows the target audience, estimated cost, and estimated response rate that you entered in the campaign’s Properties tab. Also shows the number of people who opted out of a campaign.
Email Campaign Details report: provides detailed information about each stage and action in an e-mail-initiated campaign, showing data such as the number of e-mails sent, the number successfully delivered, and the number of people who opted out of the campaign.
Campaign Revenue report: Available if your ATG product suite includes ATG Commerce. Shows order-related data such as the total revenue attributed to this campaign, the number of orders submitted by campaign participants, and the conversion rate.
To generate a report, complete the following steps:
1. From the BCC Home page, select Operations > Outreach > Browse Campaigns, and then click the name of any existing campaign. Alternatively, create a new campaign.
2. Display the Reports tab.
3. Click the link that appears in the tab: “Click here to view campaign reports in the Reporting Center.”
Note: If the error message “HTTP Status 404 - /arc” appears when you click the link, make sure that ATG Customer Intelligence has been installed and configured correctly. See the ATG Outreach Administration and Development Guide for more information.
4. When the Reporting Center main page appears, navigate to the ATG Outreach reports, typically by clicking through this folder path: ATG > Marketing > Campaigns.
5. Select the report you want to view. In some cases you then complete additional fields that allow you to select a specific campaign or define the reporting time period. See Campaign Overview Report, Email Campaign Details Report, or Campaign Revenue Report for more information.
Campaign Overview Report The Campaign Overview report shows a list of all campaigns in your system. It includes the following data for each campaign:

A T G O u t r e a c h G u i d e f o r B u s i n e s s U s e r s
9 6
1 0 - U s i n g A T G O u t r e a c h R e p o r t s
μ The Web site to which the campaign applies (all sites or a single site). Appears only if
ATG Outreach is running in a multisite environment.
Target audience size, estimated cost, and estimated response rate. The data that appears here is not calculated by the reporting engine – it is the information that was entered in the Properties tab for this campaign by the person who created it.
The number of people who elected a global opt-out as a result of receiving an e-mail from this campaign. Note: For the report to be able to show this data, the e-mail must include a landing page link to a page containing a global-opt out form, and the campaign must include an event tracking the submission of that form.
You can click the name of any campaign in the list to go directly to the Email Campaign Details report for that campaign.
Email Campaign Details Report The Email Campaign Details report provides data for campaigns that are initiated by a Send Email Communication action. After you select the Email Campaign Details option in the Reporting Center, you specify options that determine the report and time frame to display:
1. Campaign Name: Identify the campaign you want to report on by entering a keyword from the campaign’s name and click Search (note that the campaign name must start with this keyword – to select a different type of keyword search, click Options).
Alternatively, to display a list of all campaigns, type a percent symbol and click Search.
Then select the campaign from the Choices list.
2. Start Date/End Date: Select the time period for which you want to view report data. The report includes any campaign that exists in your system during the specified time frame. The report shows data from 12:00 AM GMT on the start date to 11:59 PM GMT on the end date. Depending on your location, you may have to take the time difference into account when you view the report data.
3. Show Percentages: If you select Yes here, the report includes columns that show percentage data (see below). If you select No, these columns do not appear, which reduces the width of the report and may make it easier to view and print.
4. Click Finish.
The Email Campaign Details report includes the following information (if applicable) about each stage and action in the specified campaign:
The names of any landing pages included in any e-mails sent.
Segment size (the number of profiles that ATG Outreach was able to target for the specified element). The value is the number of profiles in the segment minus any whose “receive e-mail” property is set to No.
Example: You have a Send Email Communication action targeted to a segment that includes five profiles. These profiles have the following e-mail addresses and associated profile properties:

A T G O u t r e a c h G u i d e f o r B u s i n e s s U s e r s
9 7
1 0 - U s i n g A T G O u t r e a c h R e p o r t s
μ[email protected] (e-mail status = valid; receive e-mail = yes) [email protected] (receive e-mail = no) [email protected] (e-mail status = invalid) mary@123456 (e-mail status = invalid) [email protected] (e-mail status = invalid)
The segment size shown in this column for this example would be 4, or the number of profiles in the segment (5) minus any that have the “receive e-mail” property set to No (1).
Note that this number can change according to when you generate the report. For example, the number of people who have completed an event affects the number of people to whom a responding action can be targeted.
The number and percentage of e-mails sent.
The number and percentage of delivery failures.
The number and percentage of e-mails delivered.
The number and percentage of e-mails that were confirmed as opened. Appears if you used the Insert E-mail Tracker option for the e-mail (see Tracking Opened E-Mail).
The number and percentage of hard bounces (e-mails that were not delivered because of errors and that cannot be redelivered, for example because the e-mail address did not exist).
The number and percentage of soft bounces (e-mails that were not delivered because of a temporary lack of services and that can be redelivered).
The number and percentage of people who elected a global opt-out as a result of receiving an e-mail from this campaign. Note that you would have to include a landing page link to a page including a global-opt out form, and an event that would track the submission of that form, for the report to be able to show this data.
The number and percentage of people who clicked each landing page link.
In the report columns that contain segment-related data, the number that appears is a link you can use to view the profiles that made up the segment. For example, in the Sent column, you can click the number to see the profiles to which the e-mails were sent.
If ATG Outreach is running in a multisite environment, the report heading shows the Web site to which the campaign applies (all sites or a single site).
Campaign Revenue Report The Campaign Revenue report is available if your ATG product suite includes ATG Commerce. After you select the Campaign Revenue option in the Reporting Center, you can specify the time period for which you want to view data. The report shows revenue from any orders that were submitted during that time period. For example, you can use it to show revenue generated from campaigns during the previous month.

A T G O u t r e a c h G u i d e f o r B u s i n e s s U s e r s
9 8
1 0 - U s i n g A T G O u t r e a c h R e p o r t s
μNote: The report shows data from 12:00 AM GMT on the start date to 11:59 PM GMT on the end date. Depending on your location, you may have to take the local time into account when you view the report data.
The report provides the following information for each campaign:
The Web site to which the campaign applies (all sites or a single site). Appears only if ATG Outreach is running in a multisite environment.
Number of participants. For campaigns that are initiated by actions (for example, a Send Email Communication action), this value represents the segment count at the beginning of the campaign. For event-driven campaigns (for example, a campaign that is started when a user registers or visits a given page), the value represents the number of people who triggered that initial event during the time frame specified for this report.
Number of orders submitted by those participants. Any order placed by the participants in this time frame is included.
Number of participants who have submitted orders.
Conversion rate (the number of participants submitting orders divided by the total number of participants).
Total revenue from participant orders. Any revenue generated by these participants during the reporting time frame is attributed to this campaign. For example, if a user called Bill is a participant in this campaign, and he buys $200 worth of items during the reporting time frame, that revenue is assumed to be the result of this campaign and is included in this number. If Bill also participates in another campaign, the revenue is counted for that campaign as well. This behavior means that the total reported revenue for all campaigns will exceed the actual amount.
After a campaign ends, any revenue generated by its participants is not added to the total in this column.
Average value of participant orders (the total revenue from all participants divided by the number of orders submitted).

A T G O u t r e a c h G u i d e f o r B u s i n e s s U s e r s
9 9 I n d e x
μ

A T G O u t r e a c h G u i d e f o r B u s i n e s s U s e r s
1 0 0
I n d e x
μIndex
A actions
adding events to, 46 adding, to campaigns, 19 definition, 7 removing, 53
Add Item to Order action, 30 Add Items to Slot action, 27, 28 anonymous users in segments, 33 Assets tab, 92 assets, definition, 9 ATG Business Control Center, starting, 1 ATG Outreach Production/Staging server, 1 ATG Outreach server, 1
B beacons, adding, to e-mails, 83 bounced e-mails, viewing number of, 97 Browse Campaigns page, 4
C Campaign Overview report, 95 Campaign Revenue report, 97 campaign templates
browsing, 74 creating, 73 deleting, 74 editing, 74
campaigns adding internal notes to, 93 approving, 55 browsing, 4 copying, 74 creating new, 16 deleting, 55, 86 deploying, 55 editing, 54 editing deployed, 85 editing running, 85 removing participants, 26 running, 55 start date, 17 status, 4 stopping, 86 testing, 59
Change action, 29 child stages
adding, 52 configuring, to preempt each other, 53 definition, 11 removing, 53
coupons, adding, to e-mails, 83 CSV files
using, to import e-mail lists, 67
D deploying
campaigns, 55 templates, 73
deployment definition, 9 verifying, 58
E Email Campaign Details report, 96 e-mail lists. See imported e-mail lists e-mails
adding action that sends, 19 adding content to, 20 adding coupons to, 83 adding images to, 80 adding JSP fragments to, 81 adding landing pages to, 79 bounced or failed, viewing, 97 personalizing content of, 80 previewing, 84 tracking opened, 83
end date/time for campaigns, 17 events
action that waits for, 21 adding, to campaigns, 46 adding, to landing pages, 45 definition, 7 multisite, 51

A T G O u t r e a c h G u i d e f o r B u s i n e s s U s e r s
1 0 1 I n d e x
μExit Campaign action, 26 expressions, example of segment, 38
F Frequency of Contact Policy, overriding for an e-mail, 19
G Give Promotion action, 30 global opt-out, 8, 97
H History tab, 93 HTML editor
downloading, 77 using, 78
I icons used in Stages list, 15 images
adding, to e-mails, 80 adding, to slots, 25
imported e-mail lists browsing, 70 creating, 68 creating segments from, 68 deleting, 71 duplication in, 70 example, 67 expiration of, 68 viewing number of errors in, 70
inherited segments, 31 Insert Coupon, 83 Insert E-mail Tracker, 83 Insert Page Fragment option, 81
J JSP fragments, adding to e-mails, 81
L landing pages
adding, to body of e-mails, 79 adding, to campaigns, 41 asset type of, 45 changing, 45 definition, 8
Lock Conflicts tab, 94
M multisite campaigns, 10, 35
N notes, adding, to campaigns, 93
O Operations menu, 3 opt-in/out segments
adding, to a campaign, 66 creating, 66 definition, 8, 65
opt-out, global, 8, 97 Override Frequency of Contact Policy, 19 override rules for user segments, 35
P Perform Action action, 27 preemptive stages, 53 projects
definition, 9 displaying UI for, 89 using, with ATG Outreach, 89
promotions, adding, to e-mails, 83 Properties tab, editing, 17 Publish Web Content action, 22
Q Qualifying Users field, 31
R Redirect to Page action, 29 reports
Campaign Overview, 95 Campaign Revenue, 97 Email Campaign Details, 96 generating, 95
Revoke Promotion action, 30 root stage
creating, 17 definition, 11
S security warning for HTML editor, 77 segment count, 31 Segment Picker, 32 segments
anonymous users, 33 asset type of, 35 created from imported e-mail lists, 68

A T G O u t r e a c h G u i d e f o r B u s i n e s s U s e r s
1 0 2
I n d e x
μcreating new, 33 definition, 8 editing existing, 37 examples of, 38 inherited, 31 multisite, 35 override rules, 35 repository for, 35 viewing profiles that make up, 41
Send Email Communication action, 19, 77 slots
adding images to, 25 adding text to, 23 definition, 22
stages adding new, 52 child, 52 definition, 7 icons for, 15 preemptive, 53 removing, 53 root, 17
staging server, testing campaigns on, 59 start date/time for campaigns, 17
T Tasks tab, 90 templates. See campaign templates testing campaigns on a staging server, 59 To Do List, 3
V versioning, definition, 9 Visits (page) event, 51
W Wait for Event action, 21 Wait for Timer action, 20 workflows, definition, 9


