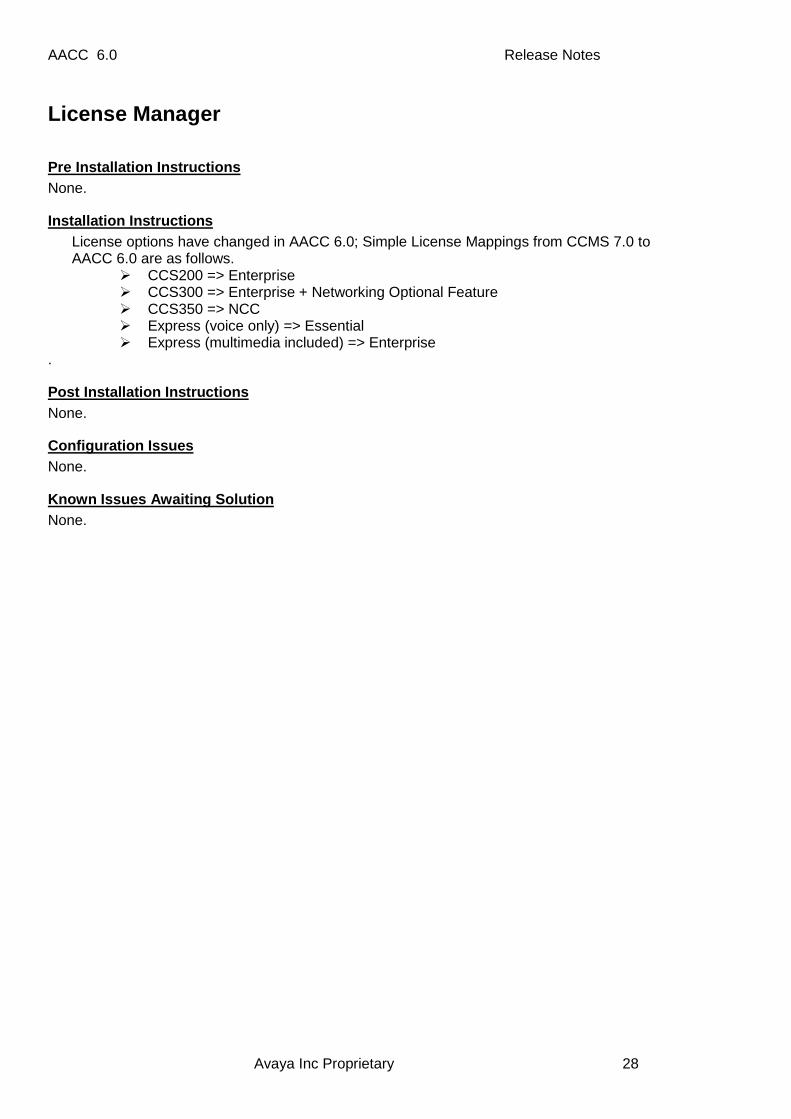
AACC 6.0 Release Notes Avaya Inc Proprietary 1 Avaya Aura™ Contact Center 6.0 RELEASE NOTES DOCUMENT VERSION : 0.003 DVD : 8.0.0.152 MIN SUPPORTED DVD : 8.0.0.140 SERVICE PACK : SERVICE_PACK_01 ISSUE DATE : AUGUST 26 TH , 2010
Transcript
AACC 6.0 Release Notes
Avaya Inc Proprietary 1
Avaya Aura™ Contact Center 6.0
RELEASE NOTES
DOCUMENT VERSION : 0.003 DVD : 8.0.0.152 MIN SUPPORTED DVD : 8.0.0.140 SERVICE PACK : SERVICE_PACK_01 ISSUE DATE : AUGUST 26TH, 2010
APPENDIX C – CERTIFICATES ......................... ....................... 63
HOW TO … PREPARE FOR SECURITY CERTIFICATES ................................................................ 63 WHAT YOU NEED TO SIGN A CSR – INFRASTRUCTURE ........................................................... 64 SIGNING THE CERTIFICATE REQUEST (CSR) ...................................................................... 65 OBTAINING A CA ROOT CERTIFICATE .............................................................................. 69
APPENDIX D – WINDOWS FIREWALL ..................... ................ 71
AACC 6.0 Release Notes
Avaya Inc Proprietary 5
Purpose This document contains known issues, patches and workarounds specific to this build and does not constitute a quick install guide for Contact Centre components. Please refer to the information below to identify any issues relevant to the component(s) you are installing and then refer to the Avaya Aura Contact Center Installation and Commissioning guides for full installation instructions. Details of fixed issues (CRs) are included in the readme instructions with each Service Pack.
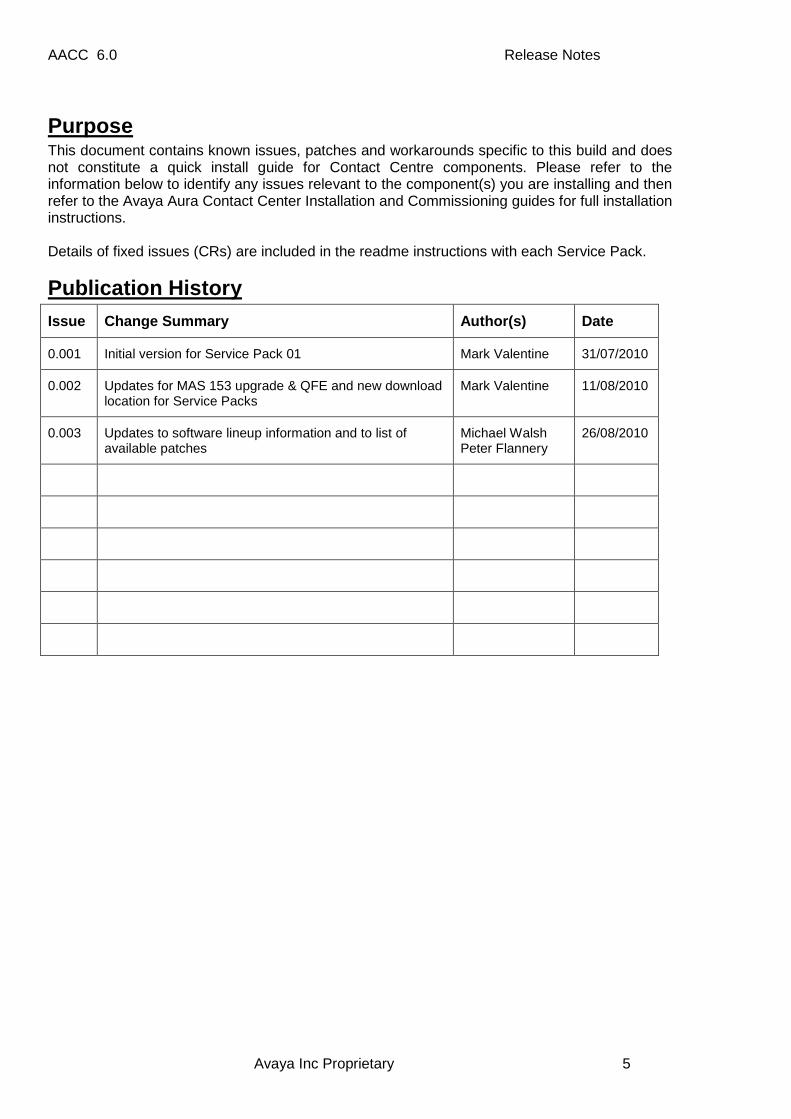
Publication History Issue Change Summary Author(s) Date
0.001 Initial version for Service Pack 01 Mark Valentine 31/07/2010
0.002 Updates for MAS 153 upgrade & QFE and new download location for Service Packs
Mark Valentine 11/08/2010
0.003 Updates to software lineup information and to list of available patches
Michael Walsh Peter Flannery
26/08/2010
AACC 6.0 Release Notes
Avaya Inc Proprietary 6
Avaya Aura™ Contact Center Software
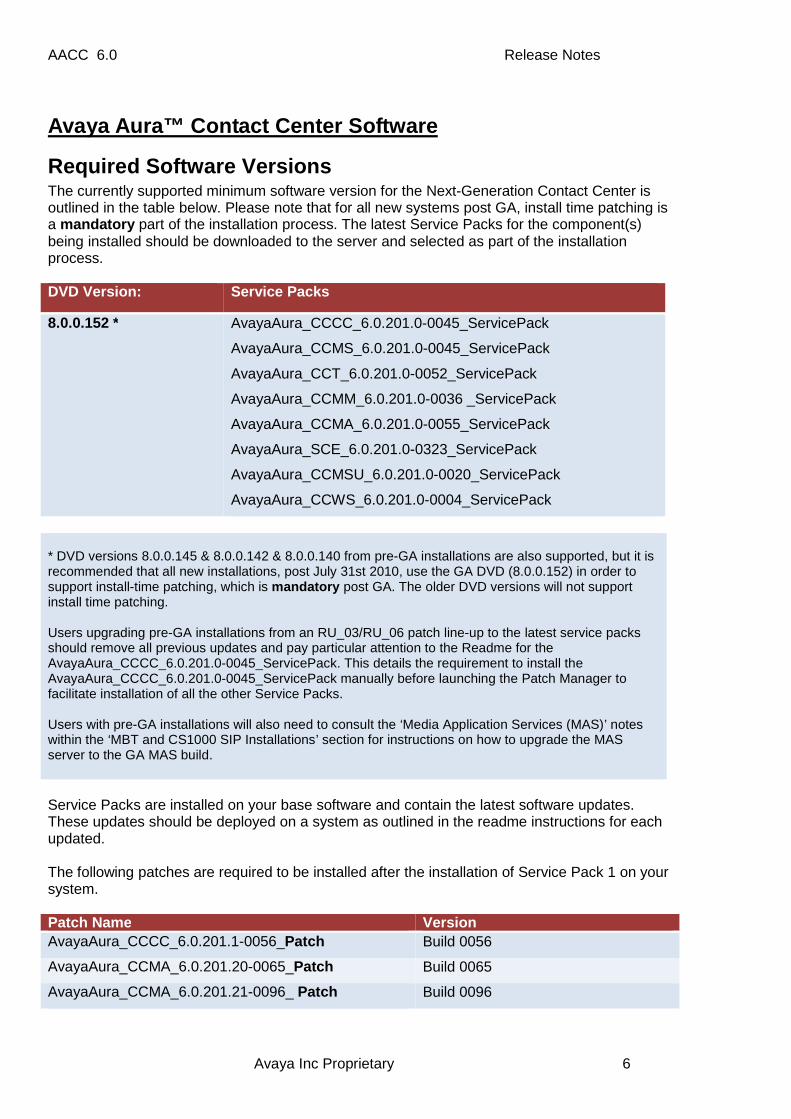
Required Software Versions The currently supported minimum software version for the Next-Generation Contact Center is outlined in the table below. Please note that for all new systems post GA, install time patching is a mandatory part of the installation process. The latest Service Packs for the component(s) being installed should be downloaded to the server and selected as part of the installation process. DVD Version: Service Pack s
* DVD versions 8.0.0.145 & 8.0.0.142 & 8.0.0.140 from pre-GA installations are also supported, but it is recommended that all new installations, post July 31st 2010, use the GA DVD (8.0.0.152) in order to support install-time patching, which is mandatory post GA. The older DVD versions will not support install time patching. Users upgrading pre-GA installations from an RU_03/RU_06 patch line-up to the latest service packs should remove all previous updates and pay particular attention to the Readme for the AvayaAura_CCCC_6.0.201.0-0045_ServicePack. This details the requirement to install the AvayaAura_CCCC_6.0.201.0-0045_ServicePack manually before launching the Patch Manager to facilitate installation of all the other Service Packs. Users with pre-GA installations will also need to consult the ‘Media Application Services (MAS)’ notes within the ‘MBT and CS1000 SIP Installations’ section for instructions on how to upgrade the MAS server to the GA MAS build. Service Packs are installed on your base software and contain the latest software updates. These updates should be deployed on a system as outlined in the readme instructions for each updated. The following patches are required to be installed after the installation of Service Pack 1 on your system. Patch Name Version AvayaAura_CCCC_6.0.201.1-0056_Patch Build 0056
AvayaAura_CCMA_6.0.201.20-0065_Patch Build 0065
AvayaAura_CCMA_6.0.201.21-0096_ Patch Build 0096
AACC 6.0 Release Notes
Avaya Inc Proprietary 7
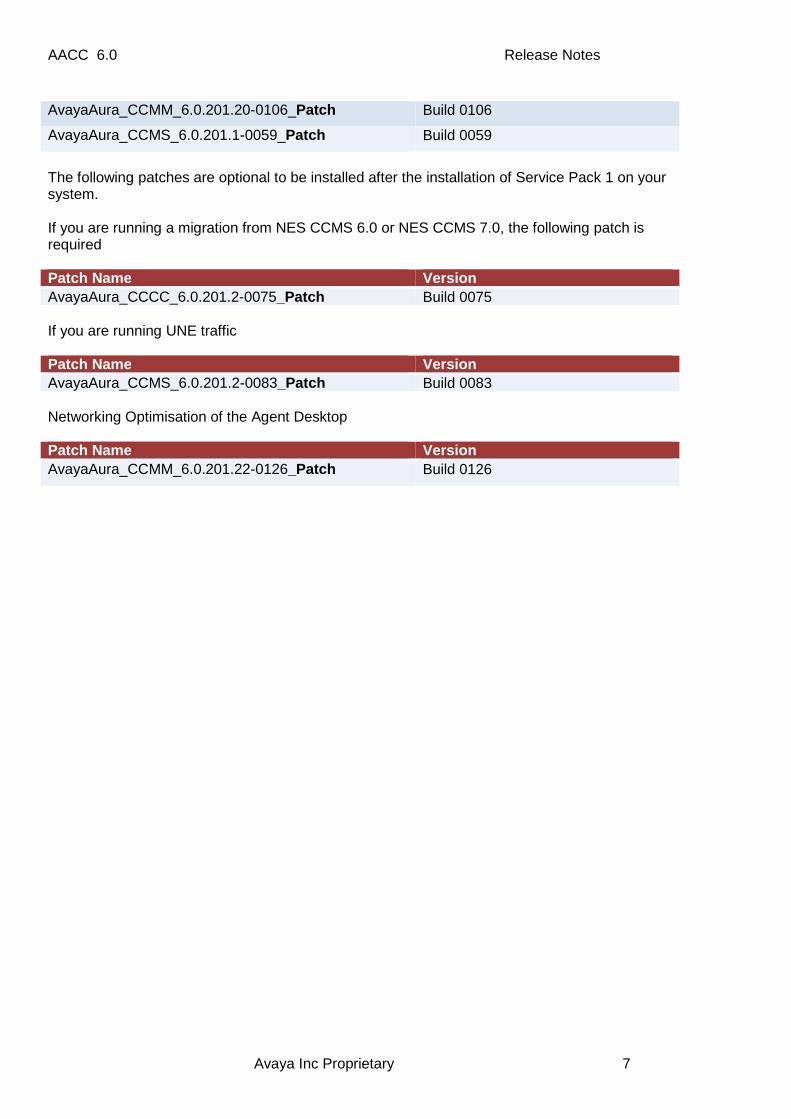
AvayaAura_CCMM_6.0.201.20-0106_Patch Build 0106
AvayaAura_CCMS_6.0.201.1-0059_Patch Build 0059
The following patches are optional to be installed after the installation of Service Pack 1 on your system. If you are running a migration from NES CCMS 6.0 or NES CCMS 7.0, the following patch is required Patch Name Version AvayaAura_CCCC_6.0.201.2-0075_Patch Build 0075 If you are running UNE traffic Patch Name Version AvayaAura_CCMS_6.0.201.2-0083_Patch Build 0083 Networking Optimisation of the Agent Desktop Patch Name Version AvayaAura_CCMM_6.0.201.22-0126_Patch Build 0126
AACC 6.0 Release Notes
Avaya Inc Proprietary 8
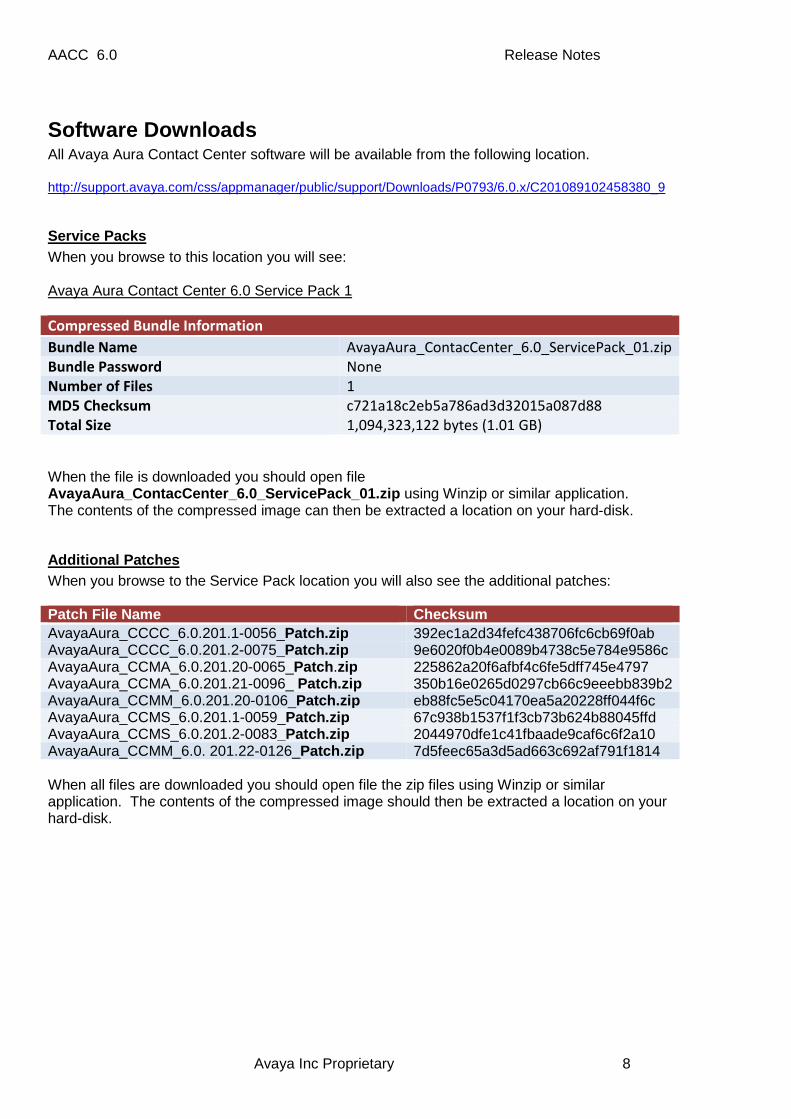
Software Downloads All Avaya Aura Contact Center software will be available from the following location. http://support.avaya.com/css/appmanager/public/support/Downloads/P0793/6.0.x/C201089102458380_9
Service Packs When you browse to this location you will see: Avaya Aura Contact Center 6.0 Service Pack 1 Compressed Bundle Information
Bundle Name AvayaAura_ContacCenter_6.0_ServicePack_01.zip
Bundle Password None
Number of Files 1
MD5 Checksum c721a18c2eb5a786ad3d32015a087d88
Total Size 1,094,323,122 bytes (1.01 GB) When the file is downloaded you should open file AvayaAura_ContacCenter_6.0_ServicePack_01.zip using Winzip or similar application. The contents of the compressed image can then be extracted a location on your hard-disk.
Additional Patches When you browse to the Service Pack location you will also see the additional patches: Patch File Name Checksum AvayaAura_CCCC_6.0.201.1-0056_Patch .zip 392ec1a2d34fefc438706fc6cb69f0ab AvayaAura_CCCC_6.0.201.2-0075_Patch .zip 9e6020f0b4e0089b4738c5e784e9586c AvayaAura_CCMA_6.0.201.20-0065_Patch .zip 225862a20f6afbf4c6fe5dff745e4797 AvayaAura_CCMA_6.0.201.21-0096_ Patch.zip 350b16e0265d0297cb66c9eeebb839b2 AvayaAura_CCMM_6.0.201.20-0106_Patch.zip eb88fc5e5c04170ea5a20228ff044f6c AvayaAura_CCMS_6.0.201.1-0059_Patch.zip 67c938b1537f1f3cb73b624b88045ffd AvayaAura_CCMS_6.0.201.2-0083_Patch .zip 2044970dfe1c41fbaade9caf6c6f2a10 AvayaAura_CCMM_6.0. 201.22-0126_Patch.zip 7d5feec65a3d5ad663c692af791f1814 When all files are downloaded you should open file the zip files using Winzip or similar application. The contents of the compressed image should then be extracted a location on your hard-disk.
AACC 6.0 Release Notes
Avaya Inc Proprietary 9
Remote Access The AACC product will be supported during beta trial using the Remote Desktop Connection (RDC) Microsoft Windows utility. This utility will allow the Avaya support or design resource to remotely access the customer server from a remote PC and be able to administer the server as if logged in directly to that server. RDC uses port 3389 so this port should be enabled on all co-resident or standalone servers in the AACC solution installed.
AACC 6.0 Release Notes
Avaya Inc Proprietary 10
AACC Product Installation
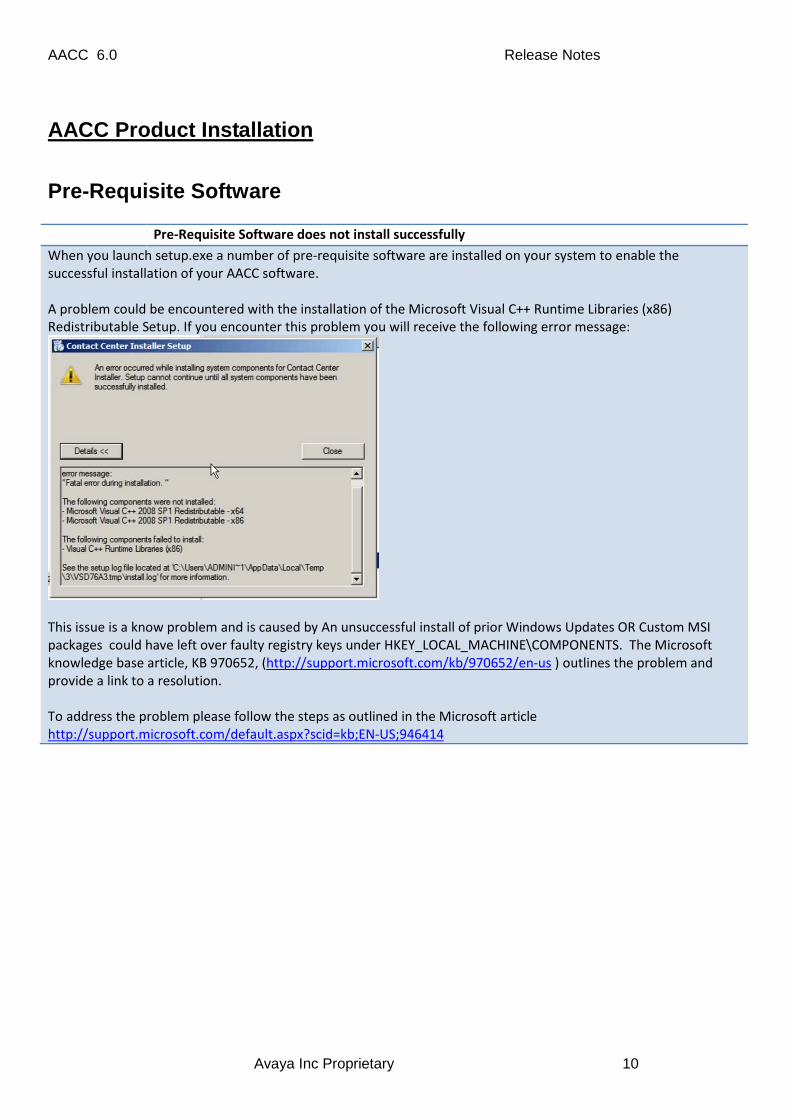
Pre-Requisite Software Pre-Requisite Software does not install successfully
When you launch setup.exe a number of pre-requisite software are installed on your system to enable the
successful installation of your AACC software.
A problem could be encountered with the installation of the Microsoft Visual C++ Runtime Libraries (x86)
Redistributable Setup. If you encounter this problem you will receive the following error message:
This issue is a know problem and is caused by An unsuccessful install of prior Windows Updates OR Custom MSI
packages could have left over faulty registry keys under HKEY_LOCAL_MACHINE\COMPONENTS. The Microsoft
knowledge base article, KB 970652, (http://support.microsoft.com/kb/970652/en-us ) outlines the problem and
provide a link to a resolution.
To address the problem please follow the steps as outlined in the Microsoft article
Pre Installation Instructions INSTALLATION OF PRODUCT UPDATES It is highly recommended that that you update your system with the latest product updates when setting up your system. Product Updates should be downloaded to the local system prior to the installation of your AACC software. During the installation you will be prompted to provide the folder where these updates are located. ADDING ADDITIONAL AACC SOFTWARE COMPONENTS: This is only applicable if you are adding new software components to an already installed system. Before proceeding with the installation of additional components ensure that the following services are stopped:
• All Contact Center Services via SCMU • CCMA SymposiumWC service via Microsoft Services console • CCT Contact Center Tomcat Service via Microsoft Services console
INSTALLING ON A TRADITIONAL CHINESE OPERATING SYSTEM: If you are performing an installation of Avaya Aura Contact Center 6.0 on a Traditional Chinese operating system please contact your Avaya account Manager/representative prior to continuing with your installation.
Installation Instructions
Q02155356 Error during migration from 7.0 to AACC 1.0 with install time patching
During the installation of the CCMM component with a database migration from NES Contact Center 7.0 an error is
sometimes displayed when applying ReleaseUpdate_06 at install-time.
Work Around:
To avoid an installation problem during the an install-time migration with an install-time patch it is recommended
that you perform the following steps:
1. Perform you Contact Center 7.0 Backup as recommended in the AACC 1.0 documentation
2. Install your AACC 1.0 CCMM component follow the installation instruction as outlined in the Installation
Guide with the following exception:
a. Do not select to migrate your data during the installation
b. Select the Service Packs to install on your system.
3. After the installation of the CCMM component perform the migration of your data from your backed-up
Contact Center 7.0 database
Post Installation Instructions None
Configuration Issues None.
AACC 6.0 Release Notes
Avaya Inc Proprietary 12
Known Issues Awaiting Solution
Uninstalling Contact Center Components does not remove patches or service packs
During the un-installation of a contact center components the associated service pack and patches installed on the
system are not automatically removed during the un-installation process.
Work Around:
To avoid this problem occurring please remove all patches and service packs for the selected component prior to its
un-installation from the system.
To remove the patch with Contact Center Patch Manager
1. Launch the 'Contact Center Patch Manager' application
(Start Menu > Programs > Avaya > Contact Center > Common Utilities > Contact Center Patch Manager)
2. Select the patch for the component being uninstalled and click 'Remove'.
.
AACC 6.0 Release Notes
Avaya Inc Proprietary 13
Co-Res Installations
Pre Installation Instructions None.
Installation Instructions None.
Post Installation Instructions None.
Configuration Issues None.
Known Issues Awaiting Solution None.
AACC 6.0 Release Notes
Avaya Inc Proprietary 14
PVI Checker
Pre Installation Instructions Please refer to the Planning &Engineering Guide (NN44400-210), for all recommendations regarding the minimum machine specification required. The PVI checker will block installation of AACC1.0 on any machine that does not meet the minimum specifications.
Installation Instructions None.
Post Installation Instructions None.
Configuration Issues None.
Known Issues Awaiting Solution None.
AACC 6.0 Release Notes
Avaya Inc Proprietary 15
Contact Center Patch Manager
Pre Installation Instructions None.
Installation Instructions Install time patching of the AvayaAura_CCCC__ServicePack is mandatory.
Post Installation Instructions None.
Configuration Issues Prior to using the Contact Center Patch Manager for the first time you must have installed the latest Common Components Service Pack
Known Issues Awaiting Solution
AACC 6.0 Release Notes
Avaya Inc Proprietary 16
Contact Center Routine Maintenance
Pre Installation Instructions None.
Installation Instructions None
Post Installation Instructions None.
Configuration Issues When a Restore is running do not stop the process or reboot the server. If the restore process is interrupted, this can lead to issues with the database. If the restore process has been interrupted, check that the Cache Instance Service is running. If the service is running, procede with completing the restore. If the service is not running and cannot be started from Windows Service, contact Avaya support
Known Issues Awaiting Solution
AACC 6.0 Release Notes
Avaya Inc Proprietary 17
MBT and CS1000 SIP Installations This section of the release notes deals with the AACC – Avaya MBT and CS1000 SIP integrations. These should be used in conjunction with the Installation Guide.
1a) REQUIRED PATCHES ON MBT The following list of patches is required for the AACC / MBT integration. Note that version 5.2.1.3.6 is the GA version of MBT, with which AACC is aligned. On top of this, the following patches need to be added:
• AES Super Patch 2
The patch can be downloaded from the Avaya support location: http://support.avaya.com/css/appmanager/public/support/Downloads/P0358/5.2.x/C20106101032583520_7
1b) REQUIRED PATCHES ON CS1000 The following list of packages and patches are required for the AACC / CS1000 integration:
215, 218, 247, 311, 324 Apply CS 1000 Patch MPLR29656 (required for call co ntrol and reporting) Apply CS 1000 Patch MPLR28954 (required for TR87 co ntrol on CS1k Rls 6.0 only ) Apply CS 1000 Patch MPLR28884 (resolves 1-way speec h path on SIP REFER) Apply CS 1000 Patch MPLR27991 (resolves SIP REFER i ssue on Sig Server) Apply CS 1000 Patch MPLR29180 (required for DNIS Su pport)
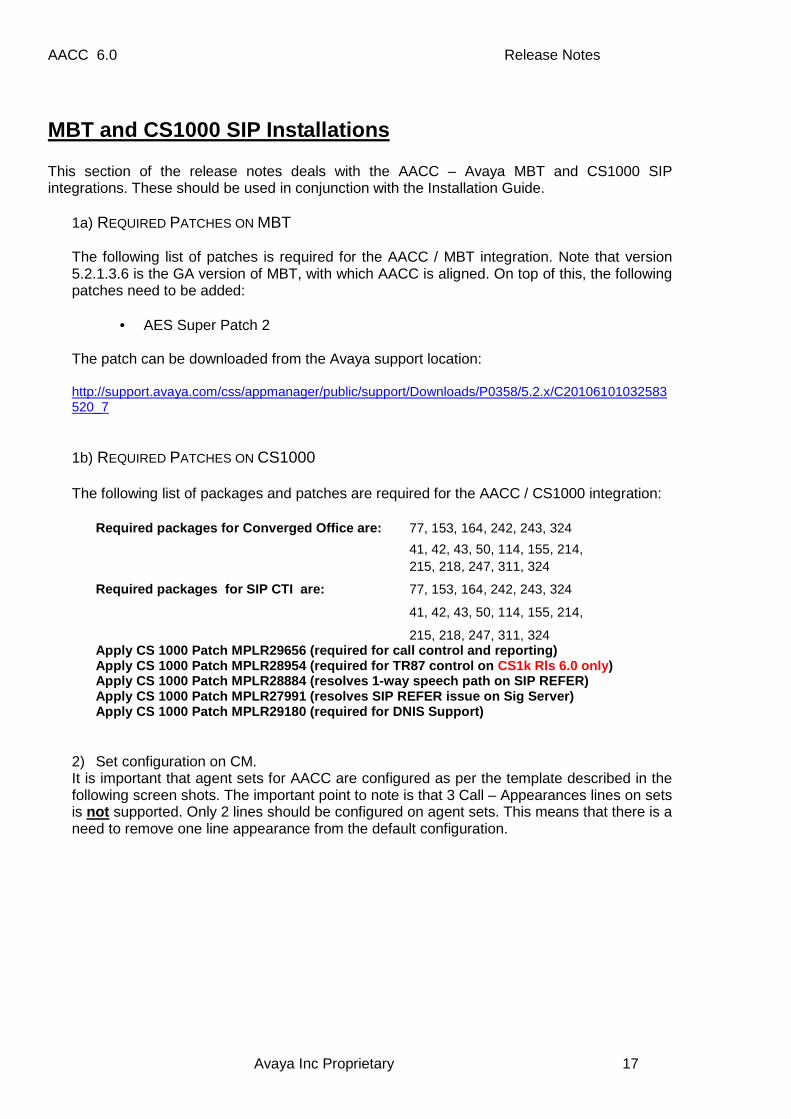
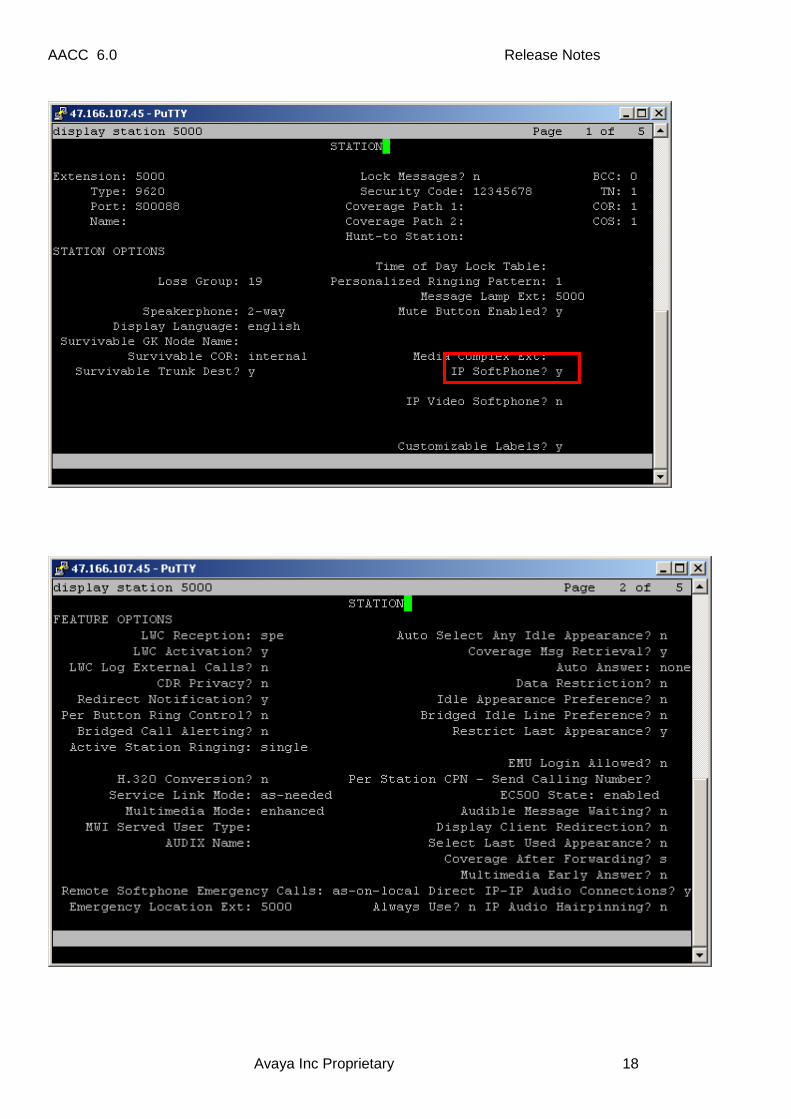
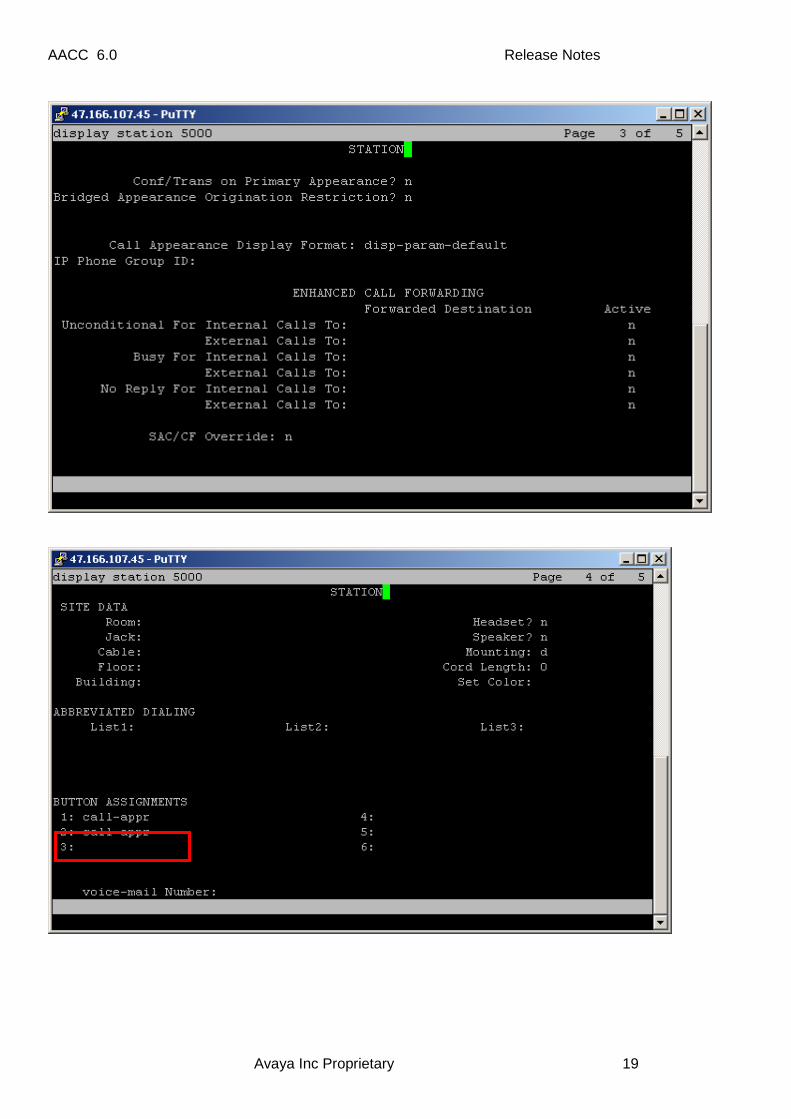
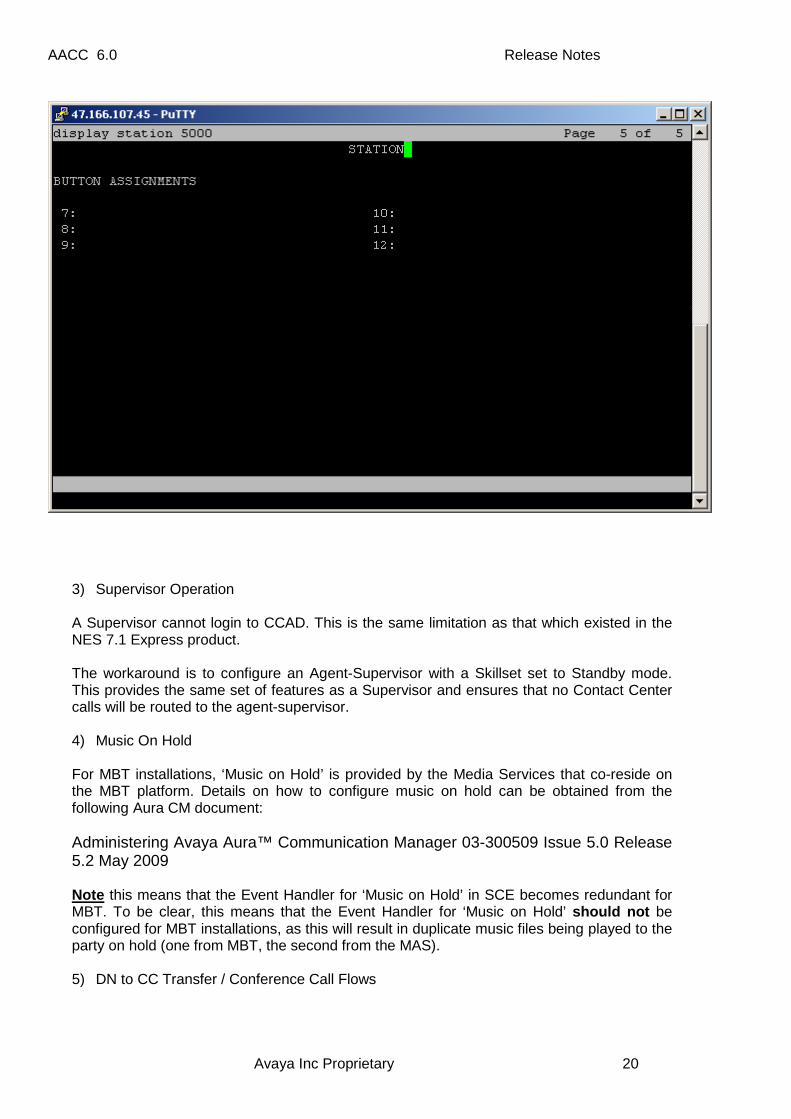
2) Set configuration on CM. It is important that agent sets for AACC are configured as per the template described in the following screen shots. The important point to note is that 3 Call – Appearances lines on sets is not supported. Only 2 lines should be configured on agent sets. This means that there is a need to remove one line appearance from the default configuration.
AACC 6.0 Release Notes
Avaya Inc Proprietary 18
AACC 6.0 Release Notes
Avaya Inc Proprietary 19
AACC 6.0 Release Notes
Avaya Inc Proprietary 20
3) Supervisor Operation A Supervisor cannot login to CCAD. This is the same limitation as that which existed in the NES 7.1 Express product. The workaround is to configure an Agent-Supervisor with a Skillset set to Standby mode. This provides the same set of features as a Supervisor and ensures that no Contact Center calls will be routed to the agent-supervisor. 4) Music On Hold For MBT installations, ‘Music on Hold’ is provided by the Media Services that co-reside on the MBT platform. Details on how to configure music on hold can be obtained from the following Aura CM document: Administering Avaya Aura™ Communication Manager 03-300509 Issue 5.0 Release 5.2 May 2009 Note this means that the Event Handler for ‘Music on Hold’ in SCE becomes redundant for MBT. To be clear, this means that the Event Handler for ‘Music on Hold’ should not be configured for MBT installations, as this will result in duplicate music files being played to the party on hold (one from MBT, the second from the MAS). 5) DN to CC Transfer / Conference Call Flows
AACC 6.0 Release Notes
Avaya Inc Proprietary 21
The following call flow is not supported for MBT Integration with AACC. This is the same limitation as that which existed in the NES 7.1 Express product, as the call flow in question is not a typical contact center call flow. - Agent is active on a DN call (i.e. a call that was made out from the agent set, or a call
that came directly to the agent’s DN). - This call cannot be transferred/conferenced to the Contact Center’s Route Point
Address.
6) Default URI In a SIP-enabled AACC the Default URI needs to be explicitly configured. The reason for this is that since the call is not anchored on a VDN on the CM, there is no default destination to send a call that has encountered a routing issue. The Default URI can be configured in the Global Settings page of CCMA, and should be configured as a numeric value. 7) TLS Certification The TLS certification between the AACC and the AES needs to be completed to ensure that Agent sets can be controlled by AACC. The knowledge transfer slides have covered this certification and should be referred to here: http://uconnect.demoavaya.com/atk00884oenevent/event/event_info.html 8) If using trunks, CM should be configured with adequate resources to support incoming
and outgoing calls. For e.g. trunk-to-trunk transfer, this may need to be enabled in CM -> sat -> ‘change system-parameters feature’ -> Trunk-to-Trunk Transfer.
9) Known Limitations (as per the Product Spec)
a. SIP Sets are not Supported, H323 sets only. b. Networking is not supported c. Support for IM Contacts on MBT is not available in AACC Rls 1. d. No Call Forward settings can be configured on Agent Sets.
AACC 6.0 Release Notes
Avaya Inc Proprietary 22
Configuration Issues Transport Layer Security (TLS) configuration Issue An issue has been observed when creating the Server certificate for AES. The issue was caused by an incorrect time zone setting on the MBT server. The time zone was set to Etc/GMT+1, but should have been Europe/Berlin, which is GMT+2 (during Daylight Savings Time). This meant that the Cert would not be activated until an hour later since the time zone was incorrect. Resolution: To avoid this problem, ensure that the time zone on the MBT server is correct. Q02138231 IM Presence data not populated in Server Config GUI
1) IM Proxy fields are not being populated in the GUI. If IM Presence is selected during the install
the data is written correctly to the database and registry, but it is not being loaded in the GUI. If a
user enters the data and applies the changes, the changes will be applied correctly, but they won't
be loaded on a reload of Server Config.
2) After upgrade from Essential CTI check box is selected but associated fields show as disabled.
The data is still populated. If the user deselects & then reselects the check box it functions as
normal.
3) Presence, Registration and CTI fields only validate IPs and not FQDN.
Transport Layer Security (TLS) protocol selected SIP Contact Centre (CC) has the ability to communicate in UDP, TCP and TLS protocols. Avaya MBT requires that secure communication for CTI control be established between it and any client who wishes to communicate with it. Transport Security Layer (TLS) is the required protocol used to establish this secure communication. Once the system has been configured to use TLS for CTI control, to enable SIP to communicate in TLS a new utility has been created called Certificate Manager, see Appendix A for textual description of how to use the Certificate Manager. This utility will allow the customer to create and store certificates in a secure manner on the server and then enable TLS communication with Avaya’s MBT. Appendix B also contains a series of screen shots on how to use the Certificate Manager. This complements Appendix A which has more detail. Note : Services must be restarted if the securities certificates have not been configured beforehand see Appendix A; and/or if TLS has been selected from another protocol already been used, i.e. A change from TCP to TLS for example. This is due to the fact that SIP needs to load in the security certificates once they have been created and this can only be done on start-up.
AACC 6.0 Release Notes
Avaya Inc Proprietary 23
Appendix C is a step by step guide on how to sign a certificate, get a root certificates from a Certificate Authority. This appendix has a series of screen shots which will guide the user through this process.
SIP Resiliency Issues Acquisition failure for agents connecting to CCT fo llowing a HA switchover. Upon connecting to CCT, multiple agents could get an acquisition failure error after a HA switchover. The reason this occurs is because all the CSTA sessions for agent's DN have been used up. This will happen to an agent who has not received any voice calls during the switchover. The solution is to increase number of sessions for the DNs (the default number of sessions per DN on CS1K is set to 3). Procedure steps Step Action 1 Contact the Avaya Communication Server 1000 expert to make configuration changes to number of sessions for a DN. HA Utility becomes unresponsive After a large number of switchovers, the HA utility may become unresponsive and a delay will be noticed between switching between tabs. Procedure steps Step Action 1 If this occurs, launch Windows Task Manager. The HA utility will be running under a java*32 executable. Kill this process and re-launch the HA utility. This operation will have no effect on the HA operation
Media Application Services (MAS) All SIP Contact Center Installations require a MAS server to provide media services. This section details the steps required to install the latest MAS QFE (Patch) on the MAS server. There is also a section detailing the MAS upgrade process for Pre-GA installations. Installing MAS QFE A QFE (MAS Patch) is available for the GA Contact Center MAS build (MAS 6.4.0.153) and should be applied to all MAS systems, both Co-Res and standalone. The QFE (QFE-platform-6.4.0.153-0001-win.zip ) is available from the following location: http://support.avaya.com/css/appmanager/public/support/Downloads/P0793/6.0.x/C201089102458380_9 Please download the file and extract the README.txt file to a separate location. Then follow the instructions contained within the readme to install the QFE on your MAS. Upgrading Pre-GA versions of MAS Contact Center MAS installations installed with a DVD Version lower than the GA (152) version, have the Beta (6.4.0.112) build of MAS installed. These installations must have the MAS installation upgraded to the GA (6.4.0.153) build.
AACC 6.0 Release Notes
Avaya Inc Proprietary 24
The MAS update (InstallerMAS_6.4.0.153_2010.06.02.exe ) is available from the /MAS/MAS_153 folder at the following FTP location:
FTP Server Top Level Folder Login Username Guest Password
Download the file and copy to your NGCC/MAS server. Now double click on the InstallerMAS_6.4.0.153_2010.06.02.exe and follow the instructions to install the upgrade. You do not need to remove the previous version of MAS. Once the upgrade to build 153 is complete, follow the ‘Installing MAS QFE’ section above to install the latest QFE on the upgraded MAS.
AACC 6.0 Release Notes
Avaya Inc Proprietary 25
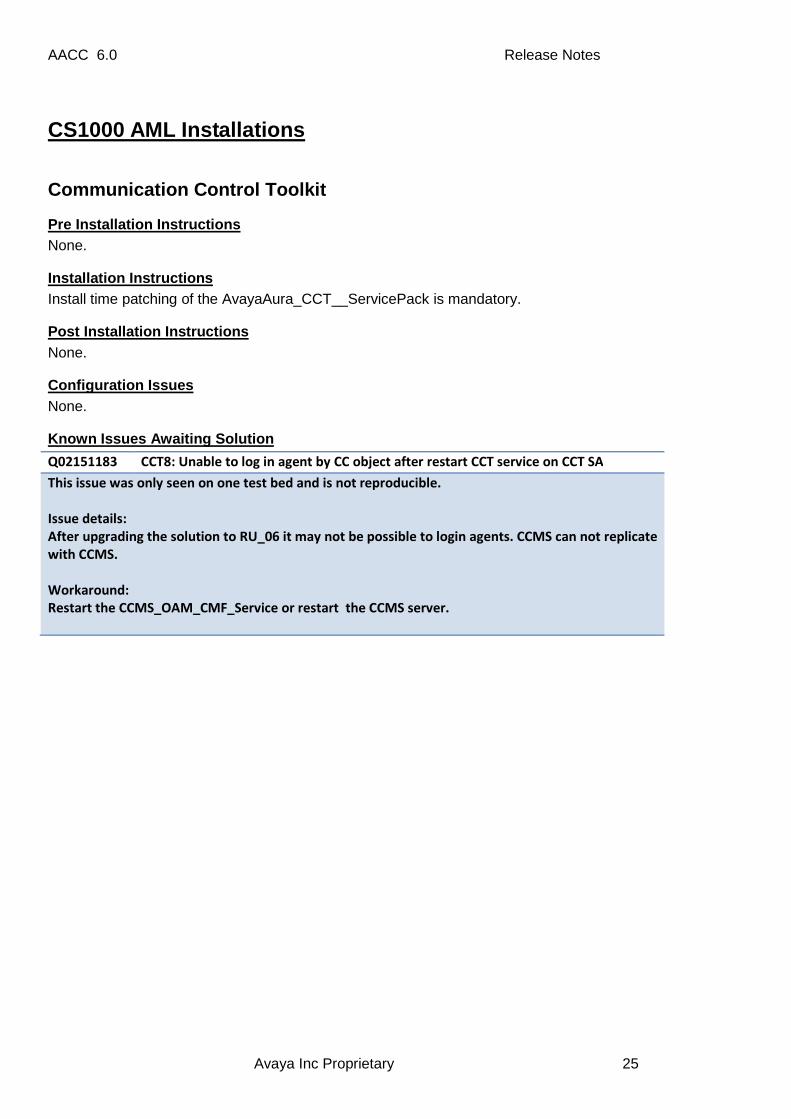
CS1000 AML Installations
Communication Control Toolkit
Pre Installation Instructions None.
Installation Instructions Install time patching of the AvayaAura_CCT__ServicePack is mandatory.
Post Installation Instructions None.
Configuration Issues None.
Known Issues Awaiting Solution
Q02151183 CCT8: Unable to log in agent by CC object after restart CCT service on CCT SA
This issue was only seen on one test bed and is not reproducible.
Issue details:
After upgrading the solution to RU_06 it may not be possible to login agents. CCMS can not replicate
with CCMS.
Workaround:
Restart the CCMS_OAM_CMF_Service or restart the CCMS server.
AACC 6.0 Release Notes
Avaya Inc Proprietary 26
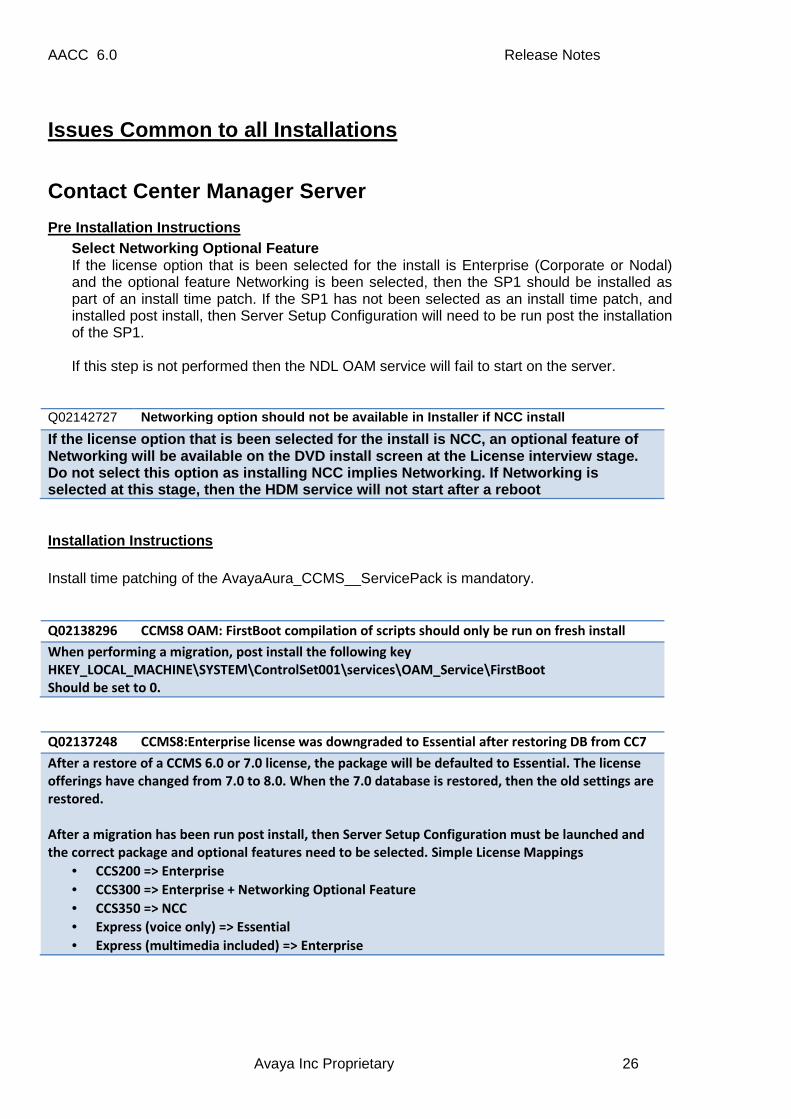
Issues Common to all Installations
Contact Center Manager Server
Pre Installation Instructions Select Networking Optional Feature If the license option that is been selected for the install is Enterprise (Corporate or Nodal) and the optional feature Networking is been selected, then the SP1 should be installed as part of an install time patch. If the SP1 has not been selected as an install time patch, and installed post install, then Server Setup Configuration will need to be run post the installation of the SP1. If this step is not performed then the NDL OAM service will fail to start on the server.
Q02142727 Networking o ption should not be available in Installer if NCC i nstall
If the license option that is been selected for the install is NCC, an optional feature of Networking will be available on the DVD install scr een at the License interview stage. Do not select this option as installing NCC implies Networking. If Networking is selected at this stage, then the HDM service will n ot start after a reboot
Installation Instructions Install time patching of the AvayaAura_CCMS__ServicePack is mandatory. Q02138296 CCMS8 OAM: FirstBoot compilation of scripts should only be run on fresh install
When performing a migration, post install the following key
Installation Instructions Install time patching of the AvayaAura_CCMSU__ServicePack is mandatory.
Post Installation Instructions None.
Configuration Issues None.
Known Issues Awaiting Solution None.
AACC 6.0 Release Notes
Avaya Inc Proprietary 30
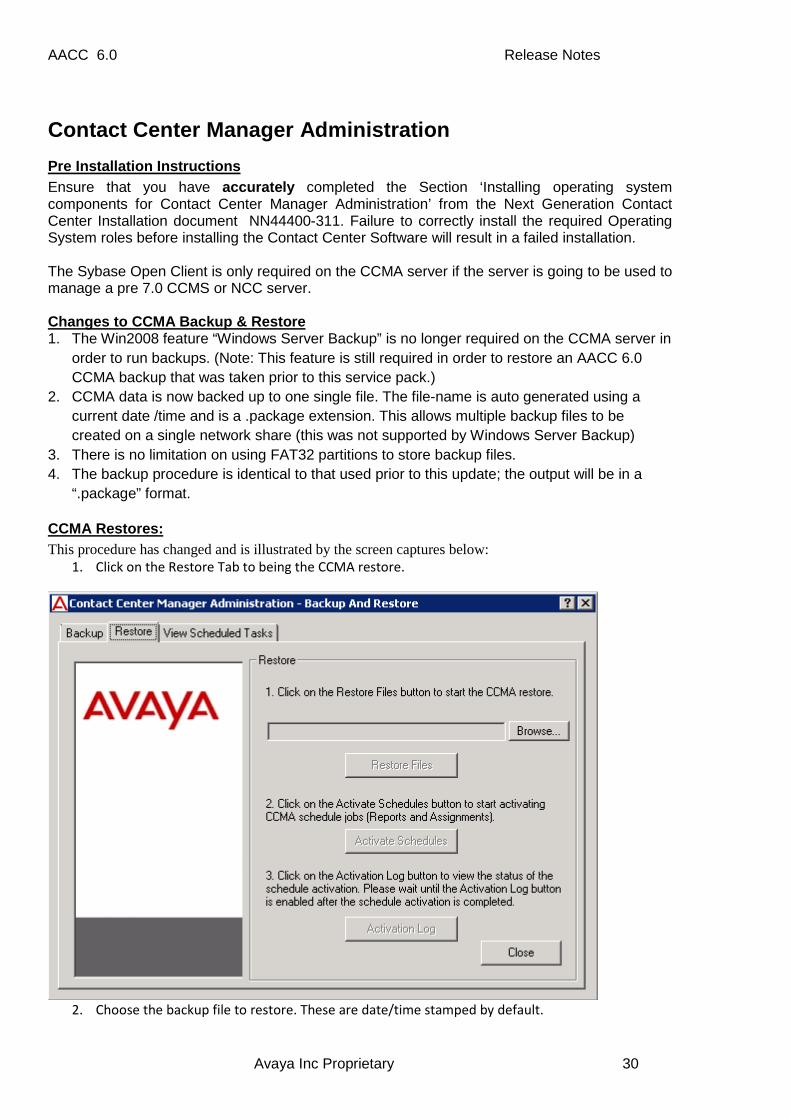
Contact Center Manager Administration
Pre Installation Instructions Ensure that you have accurately completed the Section ‘Installing operating system components for Contact Center Manager Administration’ from the Next Generation Contact Center Installation document NN44400-311. Failure to correctly install the required Operating System roles before installing the Contact Center Software will result in a failed installation. The Sybase Open Client is only required on the CCMA server if the server is going to be used to manage a pre 7.0 CCMS or NCC server. Changes to CCMA Backup & Restore 1. The Win2008 feature “Windows Server Backup” is no longer required on the CCMA server in
order to run backups. (Note: This feature is still required in order to restore an AACC 6.0 CCMA backup that was taken prior to this service pack.)
2. CCMA data is now backed up to one single file. The file-name is auto generated using a current date /time and is a .package extension. This allows multiple backup files to be created on a single network share (this was not supported by Windows Server Backup)
3. There is no limitation on using FAT32 partitions to store backup files. 4. The backup procedure is identical to that used prior to this update; the output will be in a
“.package” format.
CCMA Restores: This procedure has changed and is illustrated by the screen captures below:
1. Click on the Restore Tab to being the CCMA restore.
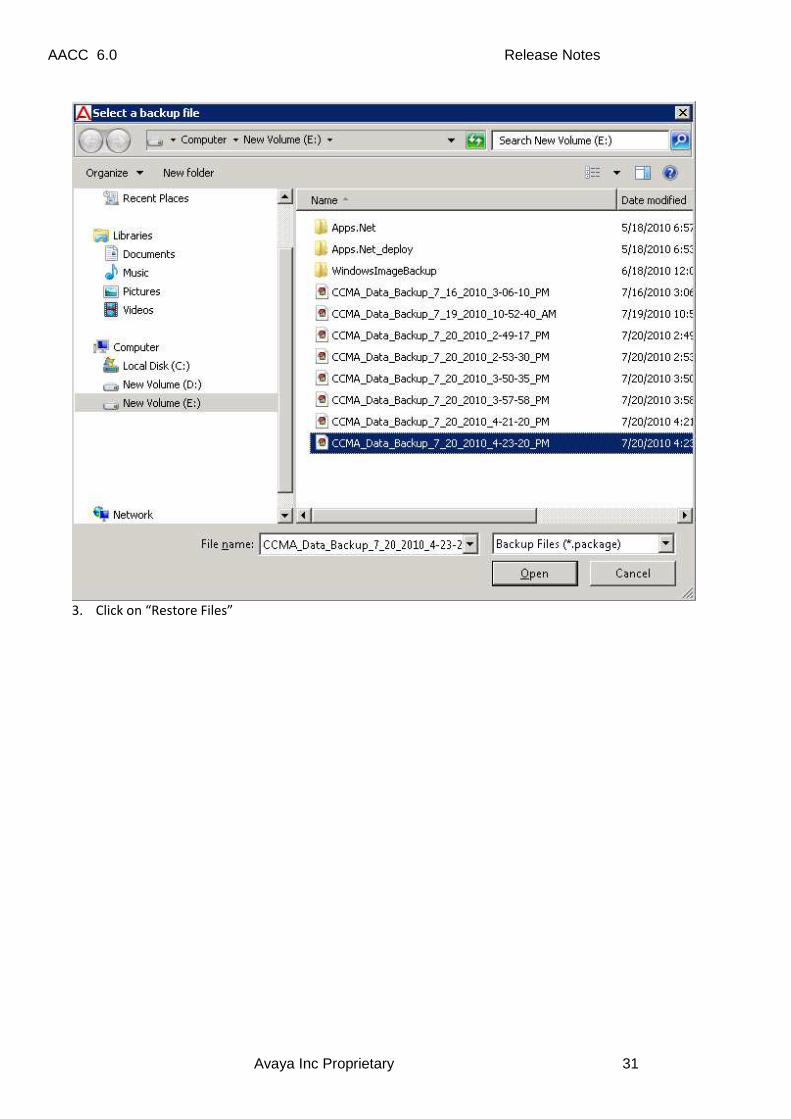
2. Choose the backup file to restore. These are date/time stamped by default.
AACC 6.0 Release Notes
Avaya Inc Proprietary 31
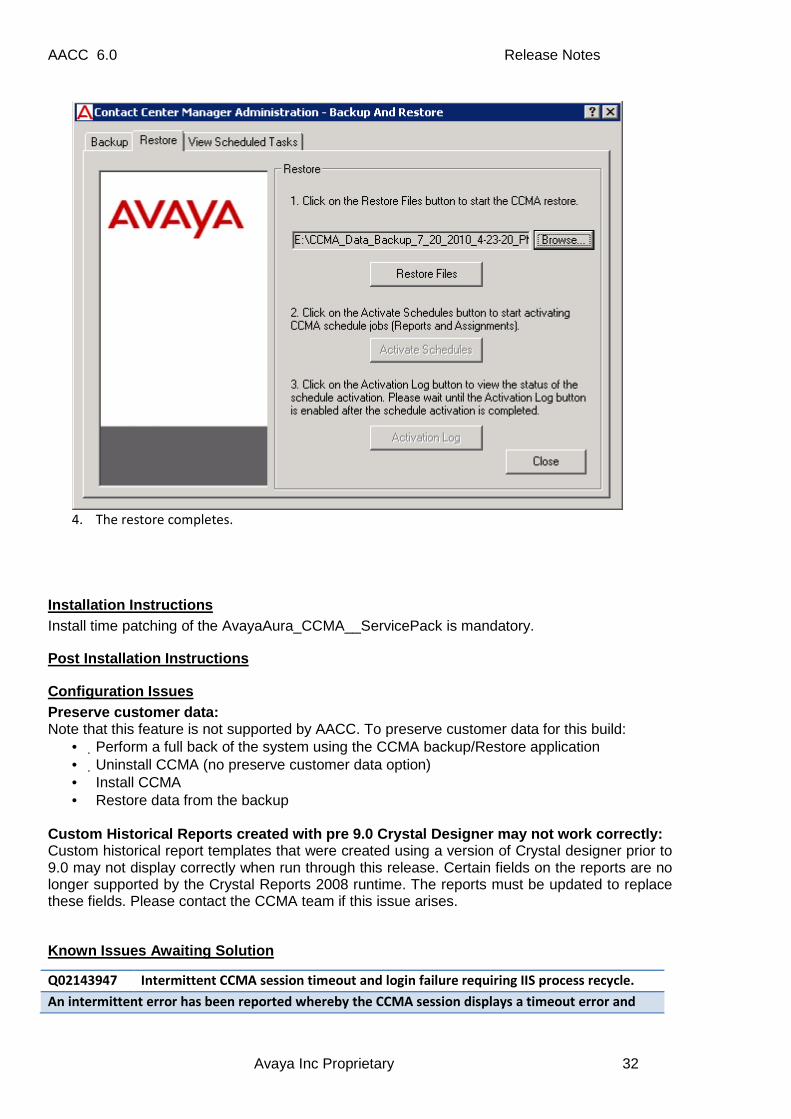
3. Click on “Restore Files”
AACC 6.0 Release Notes
Avaya Inc Proprietary 32
4. The restore completes.
Installation Instructions Install time patching of the AvayaAura_CCMA__ServicePack is mandatory.
Post Installation Instructions
Configuration Issues Preserve customer data: Note that this feature is not supported by AACC. To preserve customer data for this build:
• Perform a full back of the system using the CCMA backup/Restore application • Uninstall CCMA (no preserve customer data option) • Install CCMA • Restore data from the backup
Custom Historical Reports created with pre 9.0 Crystal Designer may not work correctly: Custom historical report templates that were created using a version of Crystal designer prior to 9.0 may not display correctly when run through this release. Certain fields on the reports are no longer supported by the Crystal Reports 2008 runtime. The reports must be updated to replace these fields. Please contact the CCMA team if this issue arises.
Known Issues Awaiting Solution
Q02143947 Intermittent CCMA session timeout and login failure requiring IIS process recycle.
An intermittent error has been reported whereby the CCMA session displays a timeout error and
AACC 6.0 Release Notes
Avaya Inc Proprietary 33
subsequently login attempts to CCMA fails with an “invalid password” or “http:500” error. If this
issue occurs on a system that is co-res with CCMM, the CCMA_DefaultAppPool should be recycled
within the IIS management console. If the issue occurs on a system that is not co-res with CCMM,
IIS should be reset on the CCMA server using the “iisreset” command from the “Start-Run”
command box.
In addition, the Wclient_DA_COM.exe process should be killed it appears within the Windows Task
Manager.
Q02143947 Unable to launch OCMT on certain client PCs.
When launching the OCMT client, a “Permission Denied” dialog appears on certain client PCs. This is
caused by a Microsoft patch which restricts access to the functionality required to lauch the OCMT
client.
This issue is resolved by patch AvayaAura_CCMA_6.0.201.21-0077_Patch.
Q02165524 Error adding SIP agent with multiple sections in domain portion of URI e.g.
sip.avaya.com
Incorrect validation on the SIP URI field results in an error popup when the domain portion of the
URI contains more than one “.”.
This issue is resolved by patch AvayaAura_CCMA_6.0.201.21-0077_Patch.
Q02166844 XML Error on NCC routing table assignment page
An error appears when clicking on a site under the Assignments node for an NCC. The error states
that “Load XML string failed”. This will be resolved in the next software patch.
AACC 6.0 Release Notes
Avaya Inc Proprietary 34
Communication Control Toolkit
Pre Installation Instructions None.
Installation Instructions Install time patching of the AvayaAura_CCT__ServicePack is mandatory.
Post Installation Instructions None.
Configuration Issues None.
Known Issues Awaiting Solution
Q02154002 CCT8.0 - Admin: Unable to add user with underscore (_) in Login Name
The CCT WebAdmin tool will not allow the adding of Windows user names which contain an
underscore “_”.
Workaround
Use CCMA to add and assign Windows users to agents. This is the preferred method.
Q02142519 CCT8 a blank address appears after launching CCT WebAdmin
After launching the CCT WebAdmin using IE8, the browser flags a dialog asking to add a blank URL
http:// even if the CCT server address has been added as a trusted site.
Workaround
Click the cancel button to continue or selection the option to not present the dialog in future and
continue.
AACC 6.0 Release Notes
Avaya Inc Proprietary 35
Contact Centre Multimedia
Pre Installation Instructions Ensure that you have accurately completed the Section ‘Installing operating system components for Contact Center Manager Administration’ on page 57 of the Next Generation Contact Center Installation document NN44400-311. Failure to correctly install the required Operating System roles before installing the Contact Center Software will result in a failed installation.
Installation Instructions Install time patching of the AvayaAura_CCMM__ServicePack is mandatory.
Note: AAAD web page can state that “This machine has the correct version of the .NET Framework 3.5 installed.” When it is not installed as on an Agent Desktop PC if the Microsoft .NET 3.5 framework is installed and then uninstalled from the PC the Microsoft Internet Explorer browser sometimes does not pick up on the uninstall and sends the incorrect information to the CCMM Server. This does not affect install or launch functionality of the web page.
Post Installation Instructions
Migration from 6.0/7.0 system If the CCMA name is different from the CCMA being used to launch the CCMM Admin, you will be unable to launch the CCMM admin tool.
• Launch the "Service Control Utility" in D:\ Ayava\Contact Center\Multimedia Server\Common Utilities\SericeControlUtility.exe
• Right click on the CCMA Server in the lower left and click Edit • Login and Change the CCMA to the correct CCMA name. Use the login credentials U:
“GeneralAdmin” P: “__ccmm!”. • Launch CCMM Admin from the CCMA
Important Note: Predictive Outbound is not supported in DVD142.
Configuration Issues None.
Known Issues Awaiting Solution Q02121544 CCMM8: Agent browser incorrect after uninstall of .NET 3.5.
After uninstalling the Microsoft .NET 3.5 framework on an Agent desktop. Launching Agent Desktop
does not detect that .NET 3.5 isn’t on the client. This is due to Internet Explorer passing incorrect
information about its environment to CCMM server. This is a core Microsoft issue.
Q02165421 AAAD performance in a high latency network
Running AAAD over a network with high latency will adversely impact its performance. AAAD
should run over a network with sufficient speed and bandwidth. Minimum requirements for the
network will be specified in the P&E guide.
AACC 6.0 Release Notes
Avaya Inc Proprietary 36
Q02164298 CCMM: MCMC Service restarting after service shutdown on SIP/CoRes Systems
The MCMC service restarts intermittently after getting shutdown. This is due to the service recovery
settings in Windows Service Control. By default these are set to restart the service after 1 minute if
it terminates. On shutting down the MCMC service there is an intermittent issue where the service
terminates instead of shutting down cleanly hence the service is restarted by service recovery.
Workaround(to get MCMC service to remain shutdown):
Switch off the failure recovery in Windows Service manager using the following steps:
1. Launch Start->Run
2. Enter “services.msc” and enter
3. Select the service “CCMM Multimedia Contact Manager”, Right click and select properties.
4. Select the “Recovery” tab.
5. Change the settings under First, Second and Subsequent failures from “Restart the Service”
to “Take no Action”
Note: Setting should be changed back to “Restart the Service” when system operational.
** Users who did not install the AvayaAura_CCMM_6.0.201.0-0036 _ServicePack at install time and are installing the Service pack manually (e.g. Beta users) may encounter an error during the AvayaAura_CCMM_6.0.201.0-0036 _ServicePack installation because of MCMC restarting. Carry out steps 1 -> 5 above to prevent MCMC restarts and install the service pack again.
AACC 6.0 Release Notes
Avaya Inc Proprietary 37
Service Creation Environment
Pre Installation Instructions None.
Installation Instructions Install time patching of the AvayaAura_SCE__ServicePack is mandatory.
Post Installation Instructions None.
Configuration Issues None.
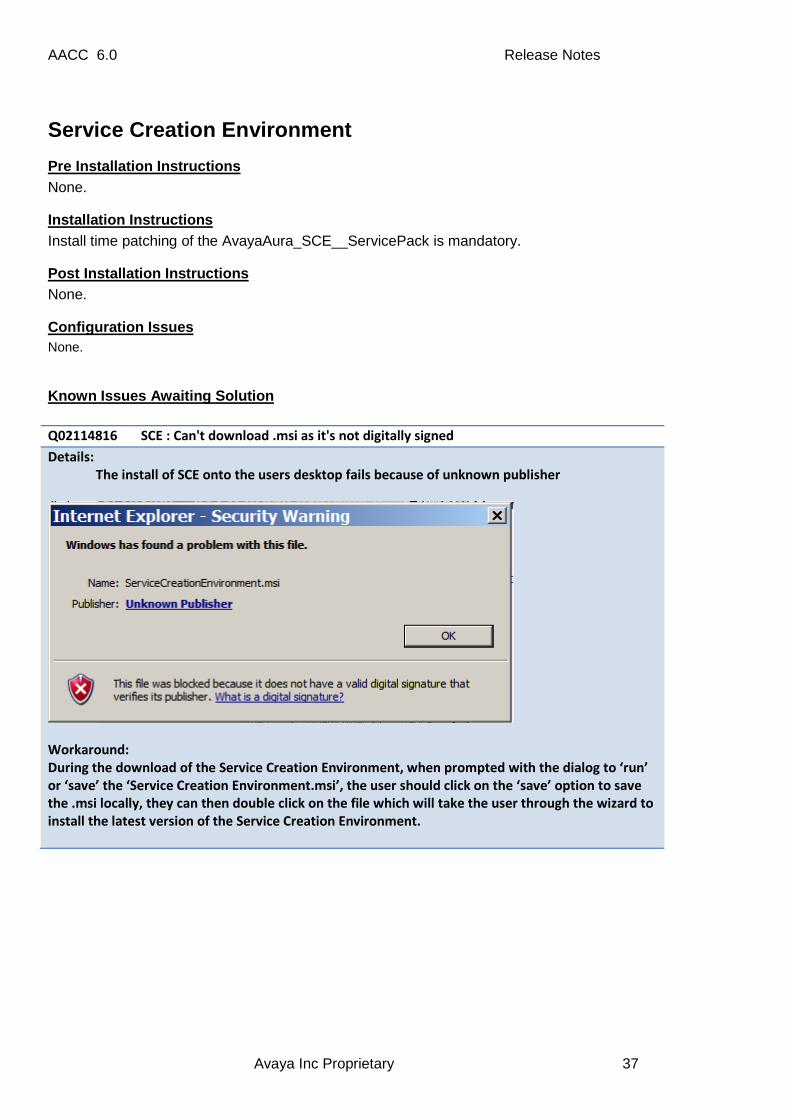
Known Issues Awaiting Solution Q02114816 SCE : Can't download .msi as it's not digitally signed
Details:
The install of SCE onto the users desktop fails because of unknown publisher
Workaround:
During the download of the Service Creation Environment, when prompted with the dialog to ‘run’
or ‘save’ the ‘Service Creation Environment.msi’, the user should click on the ‘save’ option to save
the .msi locally, they can then double click on the file which will take the user through the wizard to
install the latest version of the Service Creation Environment.
AACC 6.0 Release Notes
Avaya Inc Proprietary 38
Q02143115 The wrong SimpleGreeting appears for a SIP/OCS system
Details:
By default, during an install of SIP, the wrong version of SimpleGreeting is copied onto the server.
The version that is copied over is intended for CS1k (AML) as it has references to Play Prompt. The
user will know it’s incorrect as it will have an invalid state.
Workaround Steps:
1) Right click on the invalid SimpleGreeting application
2) From the context menu select delete and delete the applications
3) Right mouse click on the application folder and from the context-menu, select new
application.
4) Type in the name of the flow i.e. SimpleGreeting
5) From the drop-down menu select the SimpleGreeting template.
AACC 6.0 Release Notes
Avaya Inc Proprietary 39
Security Framework
Pre Installation Instructions None.
Installation Instructions None.
Post Installation Instructions None.
Configuration Issues None.
AACC 6.0 Release Notes
Avaya Inc Proprietary 40
Trace Control Utility
Pre Installation Instructions None.
Installation Instructions None.
Post Installation Instructions None.
Configuration Issues None.
Known Issues Awaiting Solution None.
AACC 6.0 Release Notes
Avaya Inc Proprietary 41
Log Archiver Utility
Pre Installation Instructions None.
Installation Instructions None.
Post Installation Instructions None.
Configuration Issues The Log Archiver provides a feature where archives can be copied (or mirrored) to a DVD. There is, however, a limitation in a Microsoft API that is used by this feature to communicate with the DVD drive hardware. As a result, certain DVD drives will not work. Microsoft does not provide a list of compatible drives so it is impossible to comprehensively state which drives will or will not work. The following two lists detail the hardware that was tested in the Avaya test labs. Drives that work: LG GSA-2164D, LG GCC-4482B, LG GCC-T10N, LG GCC-T20N, Optiarc AD-5560A, TEAC DV-W28EAW, TSST SH-S182M Drives that do not work: TSST TS-L463A It is expected that most drives will not exhibit the problem. To check if your drive is supported, open the Log Archiver configuration window, click the Settings tab, click the Mirror Settings button, select the Disc tab and click on the Detect Media button. If you see the error message below, your drive is not supported.
Known Issues Awaiting Solution None.
AACC 6.0 Release Notes
Avaya Inc Proprietary 42
Feature Specific: Multiplicity
Pre Installation Instructions None.
Installation Instructions None.
Post Installation Instructions None.
Configuration Issues None.
Known Issues Awaiting Solution: Q02137735 [M&I] Agent By Skillset Post Call Processing stat not working with Multiplicity
Details:
Post Call Processing (also known as After Call Work) is the time the agent spends performing
activities relating to the contact that has just been completed. The agent signals the start of PCP by
entering the Not Ready state. When the agent is working on multiple contacts PCP is not pegged
until the last contact is released.
Workaround:
No workaround currently available.
AACC 6.0 Release Notes
Avaya Inc Proprietary 43
Appendix A – Certificate Manager User Guide
Certificate management for SIP-CCMS
Session Initiated Protocol (SIP) is an application-layer control (signaling) protocol for creating, modifying, and terminating sessions with one or more participants.
In Next Generation Contact Center, SIP-CCMS enables secure communication between the Media Application Server (MAS) and the PABX platform.
The SIP CTI link between CCMS and AES employs the protocol, Transport Layer Security (TLS), to provide this secure communication. TLS is enabled through the use of signed security certificates, utilizing public and private encryption keys, which enable SIP-CCMS to recognize other servers over a network.
The SIP-CCMS Certificate Manager is a graphical user interface application which is password protected. It generates certificate signing requests (CSR). Certificate Authorities use the certificate signing requests to create a signed certificate. The certificate Authority also supplies a root certificate. The signed and root certificates are stored in the Certificate Manager.
A signed certificate has to be signed by a certificate authority. The certificate manager does not have this feature.
Prerequisites • Install Contact Center Manager Server. See Avaya Next Generation
Contact Center Installation (NN44400311).
• Commission Contact Center Manager Server. See Avaya Next Generation Contact Center Commissioning (NN44400312).
Navigation • Creating a Certificate Store using Certificate Manager
• Generating a Certificate Signing Request File
• Signing aGenerating a Certificate Signing Request File
Signing aGenerating a Certificate Signing Request F ile (CSR) When the Certificate Manager has generated a Certificate Signing Request (CSR), it must be signed by a trusted Certificate Authority (CA) before it can be used to establish a secure communication channel with another server. The user has the choice of several companies which deal with signing certificate signing requests for customers. The other option is to promote a windows server to be a certificate authority, but please note this private CA will not be trusted by other companies and is trusted inside that organisation sphere of influence only.
AACC 6.0 Release Notes
Avaya Inc Proprietary 44
The following steps are based on having your own CA and not using a third party CA 1. Using the CA web service to issue requests : type in http:\\ CAserverName\certsrv into
a browser
NOTE: When creating certificates for SIP CC and MBT connectivity there is a requirement for a custom certificate template. It is based on a Web Template but with the addition of Client and Server Authentication. Please refer to Annex D of the Avaya Aura Application Enablement Services I mplementation Guide for MS LCS 2005 or MS OCS 2007 on how to create this template.
Create this custom certificate template on your CA before attempting to sign a certificate that is to be used for SIP CC � MBT connectivity
2. Enter in the Administrator username and password: This allows access to the CA server
web site. See below 3. From the options shown, select the Request a Certificate option and then
select Advanced Certificate Request 4. Select the second option Submit a certificate request by using a base-64-enc oded
CMC or PKCS #10 file, or submit a renewal request b y using a base-64-encoded PKCS #7 file.
5. The next stage is where we copy the contents of the CSR file generated earlier into the Saved Request field. SIP CC and MBT require a custom template to be generated; it is basically a Web Server template with the addition of client and server authentication. Select this template before hitting Submit
6. Leave the encoded option in DER and select the Download certificate link. 7. Save the file onto your server. It will be named certnew.cer. 8. This is now the signed certificate. Place this back on the server for which it is assigned
to and then add it to the certificate store using the Certificate Manager Utility.
• Adding a Certificate File to the Certificate Store
• Removing a Certificate File from the Certificate Store
• Examining the contents of Certificates in the Certificate Store
Creating a Certificate Store using Certificate Mana ger The Certificate Manager creates a store which holds the private keys, signed certificates and Certificate Authority root certificates. Create the certificate store after CCMS is installed. The certificate store is password protected.
Procedure steps StepAction
1 Log on to the server where you want to create the certificate store.
2 Click Start , All Programs , Avaya, Contact Center, Common Utilities .
3 Select Certificate Manager .
4 In the Certificate Store tab, FQDN and Password fields are mandatory,
AACC 6.0 Release Notes
Avaya Inc Proprietary 45
The rest of the fields are optional. They can be left blank if desired. But it is recommended to fill in these fields if an external Certificate Authority is signing a Certificate Signing Request (CSR).
Attention: The FQDN must be the full machine name of the server that the Certificate Store resides on. It is also case sensitive. This field is auto populated with the FQDN read from the underlying operating system. It can be modified if required. The password fields have been pre-populated with a default password “__avaya” (double underscore followed by name). This can be changed to a bespoke password if desired
5 Once all of the information required is entered, Select Create Store , the private key is created that is used in the private-public key encryption.
6. This will automatically bring up the Certificate Request tab displaying the newly created Certificate Signing Request file contents.
--End--
Variable definitions
Variable Value
Full Computer Name (FQDN) The hostname and parent domain which fully qualifies the computer where the store is created.
For example: <computerX.DomainY.com>
Name of Organization unit The department or division within a company.
Name of Organization The company name.
City or Locality The city or district where the system is located.
State or Province The state or province where the system is located.
Two Letter Country Code The country code where the system is located.
Certificate Store password
Confirm Store password
Choose a password to access the certificate store. This must be at least six characters long.
Enter in the same password entered in the Certificate Store password field.
Variable definitions
Gaining access to the certificate Manager after cre ating the store Once the store has been created, the next time the certificate manager is launched a dialog will prompt for a password. The user will only have to enter in this password once and if successful will have access to the certificate manager features. If the password is entered incorrectly, certificate manager will still launch, but once the user attempts to access the store via certificate manager they will be denied and a message informing them so.
AACC 6.0 Release Notes
Avaya Inc Proprietary 46
Generating a Certificate Signing Request File The Certificate Manager generates Certificate Signing Requests (CSR) automatically when the store is created. The Certificate Request tab is shown to the user when they first create the Certificate Store.
The tab displays the contents of the Certificate Signing Request (CSR) file which can be copied directly and signed. Or if they wish to, the tab also displays the location of the physical CSR file on the hard disk. This can also be copied and emailed to an external Certificate Authority for signing.
The customer can take the CSR to a Certificate Authority or its own Certificate Authority and receive a signed security certificate. The system can use the signed security certificate to configure a trust relationship between servers.
If the Certificate Signing Request (CSR) is not signed straight away, the next time the user logs in they have to select the tab and the contents of the CSR file will still be present along with the Signing Request Status field indicating Pending status.
Once signed and placed into the store via the Add Certificate Tab this status will change to Signed status to indicate to the returning user that this CSR has been signed already.
Prerequisites
• Speak with your System Administrator on how to obtain a signed certificate and root certificate from a Certificate Authority.
• Save both signed and root certificates as DER format using the custom AES template.
Procedure steps StepAction
1 Log on to server containing the store.
2 Click Start , All Programs , Avaya, Contact Center, Common Utilities .
3 Select Certificate Manager .
4 Select Certificate Request tab.
5. Check to see if the CSR has been signed, if not proceed to sign it.
9 Select Close .
Attention: After you complete this process, the certificate must be signed by a Certificate Authority. Contact your System Administrator for the preferred method for obtaining the signed certificate request file. Save the signed certificate on the server containing the Certificate Store.
--End--
AACC 6.0 Release Notes
Avaya Inc Proprietary 47
Variable definitions
Variable Value
Certificate Store Status Indicates if the Certificate Store has been created.
Signing Request Status Indicates if the generated Certificate Signing Request being displayed has been signed and added back into the store
Pending being no and waiting for a signed certificate to be added back into the store
Signed being yes, it has been taken away, signed by a specific Certificate Authority and added back into the store.
File Location
Contents Field
Location of the Certificate Signing Request file.
Displays the contents of the Certificate Signing Request file, this can be copied directly from the field and signed.
Variable definitions
Signing aGenerating a Certificate Signing Request F ile (CSR) When the Certificate Manager has generated a Certificate Signing Request (CSR), it must be signed by a trusted Certificate Authority (CA) before it can be used to establish a secure communication channel with another server. The user has the choice of several companies which deal with signing certificate signing requests for customers. The other option is to promote a windows server to be a certificate authority, but please note this private CA will not be trusted by other companies and is trusted inside that organisation sphere of influence only. The following steps are based on having your own CA and not using a third party CA 1. Using the CA web service to issue requests : type in http:\\ CAserverName\certsrv into
a browser
NOTE: When creating certificates for SIP CC and MBT connectivity there is a requirement for a custom certificate template. It is based on a Web Template but with the addition of Client and Server Authentication. Please refer to Annex D of the Avaya Aura Application Enablement Services I mplementation Guide for MS LCS 2005 or MS OCS 2007 on how to create this template.
Create this custom certificate template on your CA before attempting to sign a certificate that is to be used for SIP CC � MBT connectivity
AACC 6.0 Release Notes
Avaya Inc Proprietary 48
2. Enter in the Administrator username and password: This allows access to the CA server web site. See below
3. From the options shown, select the Request a Certificate option and then select Advanced Certificate Request
4. Select the second option Submit a certificate request by using a base-64-enc oded CMC or PKCS #10 file, or submit a renewal request b y using a base-64-encoded PKCS #7 file.
5. The next stage is where we copy the contents of the CSR file generated earlier into the Saved Request field. SIP CC and MBT require a custom template to be generated; it is basically a Web Server template with the addition of client and server authentication. Select this template before hitting Submit
6. Leave the encoded option in DER and select the Download certificate link. 7. Save the file onto your server. It will be named certnew.cer. 8. This is now the signed certificate. Place this back on the server for which it is assigned
to and then add it to the certificate store using the Certificate Manager Utility.
Adding a Certificate File to the Certificate Store The certificate manager can add both signed certificates and Certificate Authority root certificates to the store. There are two options when adding signed and root certificates.
Automatically
This is where the user selects the folder which contains the signed and root certificates. Once folder is selected they can select Add all Certificates which will automatically determine which a signed certificate is and which is a root certificate and add them to the store accordingly.
Note : If multiple signed and root CA certificates reside in the store, the will all be added blindly, but there can only be one signed certificate and if one exists already the user will be prompted to overwrite or cancel the operation. Subsequent signed certificates are then added but are not used in this release.
Manually
This is where the user can browse for individual signed and root CA certificates and are added on a one by one basis. There are individual fields specifically for signed and root CA certificates.
A check is performed before the certificate of choice is added and if an attempt to add a signed certificate in the root CA certificate field the user will be informed.
The same applies in the manual insertion of signed certificates, if one exists already the user will be prompted to overwrite or cancel.
Prerequisites • Save the Certificate files on your certificate store computer.
AACC 6.0 Release Notes
Avaya Inc Proprietary 49
Procedure steps StepAction
1 Log on to server containing the store.
2 Click Start , All Programs , Avaya, Contact Center, Common Utilities .
3 Select Certificate Manager .
4. Go to the Add Certificate tab.
6 Depending on what insertion option taken:
Auto : Browse to a directory which contains the certificates and then select the Add all Certificates button
Manual : Based on the type of certificate you wish to add, browse to its location and either selects Add CA Certificate button or Add Signed Certificate button
7 Select Close .
--End--
Variable definitions
Variable Value
Radio Buttons Add Certificates Automatically is enabled by default
Add Certificates Manually is disabled by default
To enable/disable either select its radio button.
Auto: Browse button
Auto: Select folder field
Auto: Add All Certificates button
Manual: Browse (signed and root)
Manual: Add Root Certificate
Manual: Add CA Certificate button
Manual: Add Signed Certificate
Select the folder on the server where the certificates are stored
This will list all of the certificates that reside in the directory selected.
Once pressed all certificates in the directory will be added. If a signed certificate exists already a dialog will prompt to overwrite or cancel.
There are two separate browse buttons, one for signed certificates and one for manual. Both allow the user to select the file to be inserted in the store.
This will display the certificate selected.
This will add the root CA certificate to the store
This will display the certificate selected
AACC 6.0 Release Notes
Avaya Inc Proprietary 50
Manual: Add Signed Certificate button
This will add the root signed certificate to the store.
Variable definitions
Removing a Certificate File from the Certificate St ore The certificates added to the store manager can be removed using the Store Maintenance tab of the Certificate Manager.
Prerequisites • Save the Certificate files on your certificate store computer.
Procedure steps StepAction
1 Log on to server containing the store.
2 Click Start , All Programs , Avaya, Contact Center, Common Utilities .
3 Select Certificate Manager .
4 Select the Store Maintenance tab,
5 In Certificates list, select the certificate(s) to remove.
6 Select Remove , to remove the selected certificates from the store.
7 Select Close .
--End--
Variable definitions
Variable Value
Certificates List of certificates saved in the store. One or
AACC 6.0 Release Notes
Avaya Inc Proprietary 51
Refresh button
certificates can be selected for removal.
Will refresh the list if required. The list is automatically updated when a certificate(s) is removed.
Examining a Certificate from the Certificate Store The certificates added to the store manager can be viewed using the Display Certificates tab of the Certificate Manager.
Prerequisites • Certificates must have been added already to the store to view them
Procedure steps StepAction
1 Log on to server containing the store.
2 Click Start , All Programs , Avaya, Contact Center, Common Utilities .
3 Select Certificate Manager .
4 Select the Display Certificates tab,
5 Select the certificate in the list to view its details.
6 Select Close .
--End--
Variable definitions
Variable Value
Select Certificate Choose a certificate to examine.
Certificate Detail
Refresh button
Displays detail of the certificate selected
Updates list if required.
AACC 6.0 Release Notes
Avaya Inc Proprietary 52
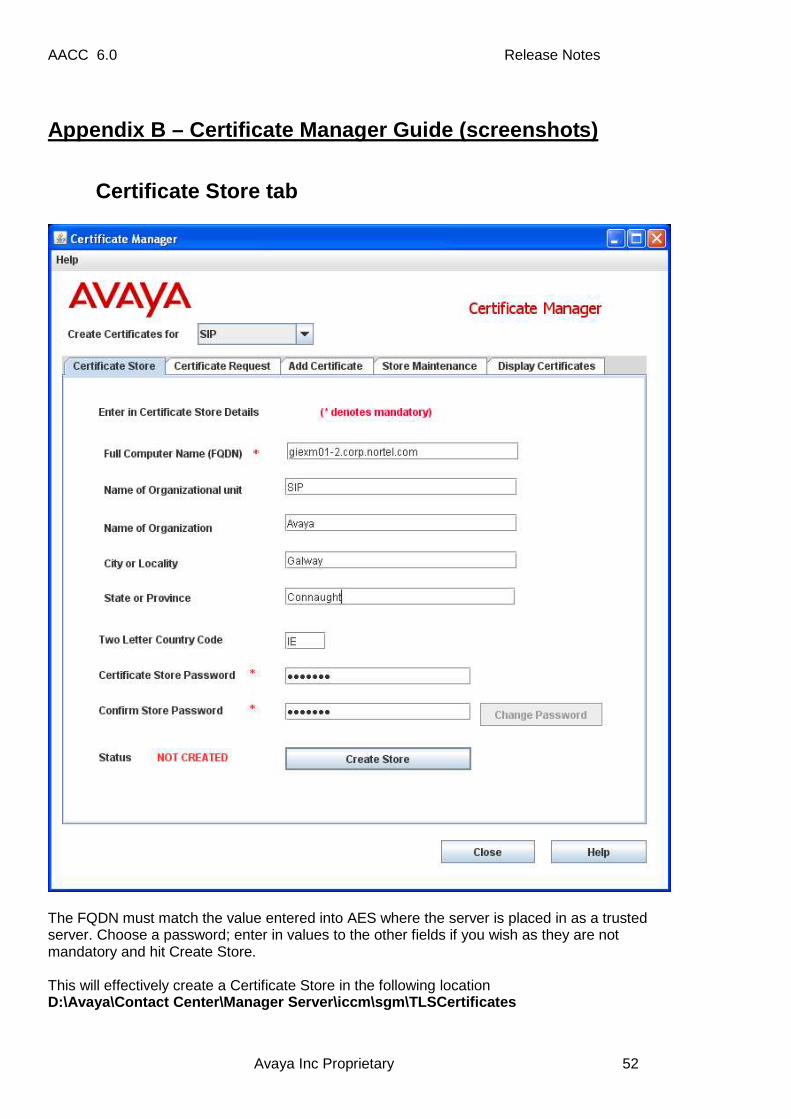
Appendix B – Certificate Manager Guide (screenshots )
Certificate Store tab
The FQDN must match the value entered into AES where the server is placed in as a trusted server. Choose a password; enter in values to the other fields if you wish as they are not mandatory and hit Create Store. This will effectively create a Certificate Store in the following location D:\Avaya\Contact Center\Manager Server\iccm\sgm\TLS Certificates
AACC 6.0 Release Notes
Avaya Inc Proprietary 53
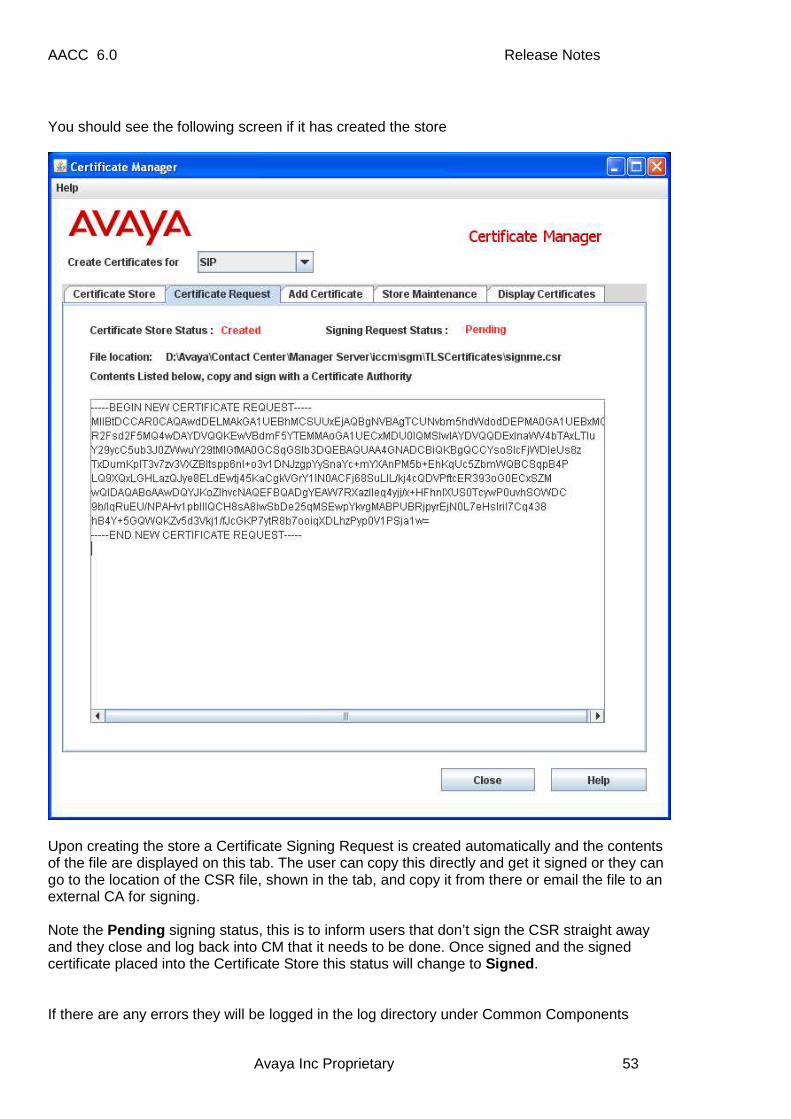
You should see the following screen if it has created the store
Upon creating the store a Certificate Signing Request is created automatically and the contents of the file are displayed on this tab. The user can copy this directly and get it signed or they can go to the location of the CSR file, shown in the tab, and copy it from there or email the file to an external CA for signing. Note the Pending signing status, this is to inform users that don’t sign the CSR straight away and they close and log back into CM that it needs to be done. Once signed and the signed certificate placed into the Certificate Store this status will change to Signed . If there are any errors they will be logged in the log directory under Common Components
AACC 6.0 Release Notes
Avaya Inc Proprietary 54
D:\Avaya\Logs\Common Components File Name : CC_CMLogging.log
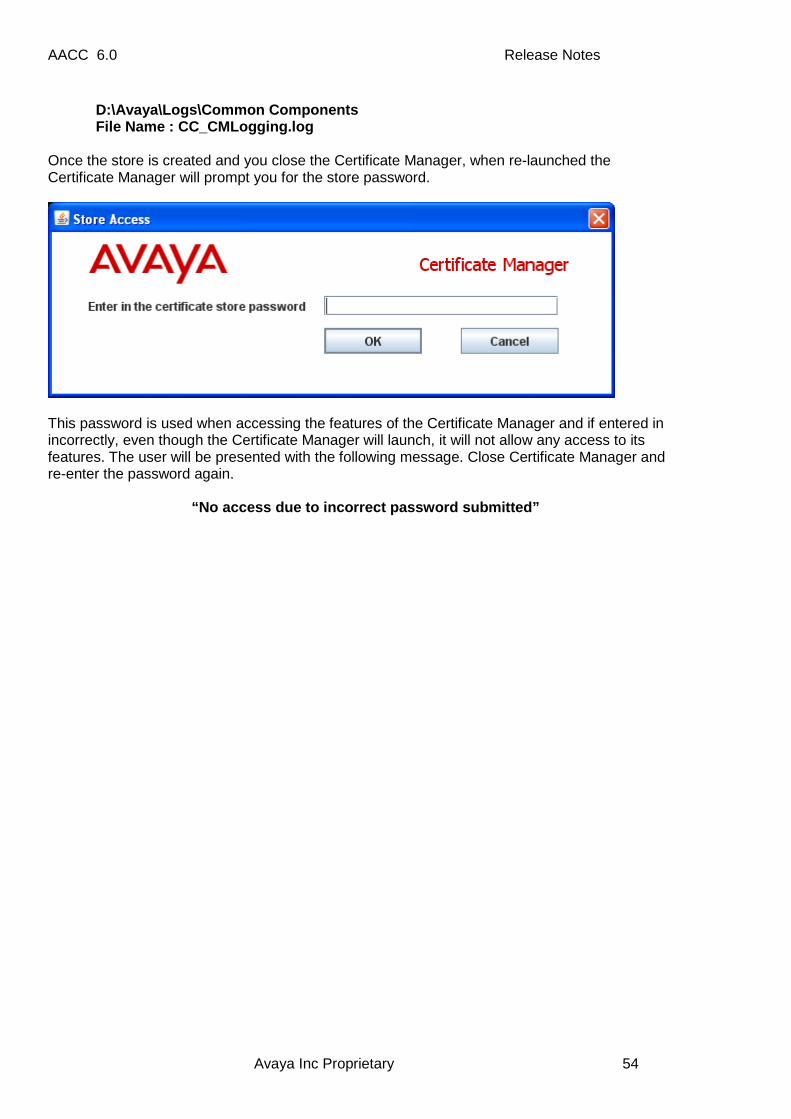
Once the store is created and you close the Certificate Manager, when re-launched the Certificate Manager will prompt you for the store password.
This password is used when accessing the features of the Certificate Manager and if entered in incorrectly, even though the Certificate Manager will launch, it will not allow any access to its features. The user will be presented with the following message. Close Certificate Manager and re-enter the password again. “No access due to incorrect password submitted”
AACC 6.0 Release Notes
Avaya Inc Proprietary 55
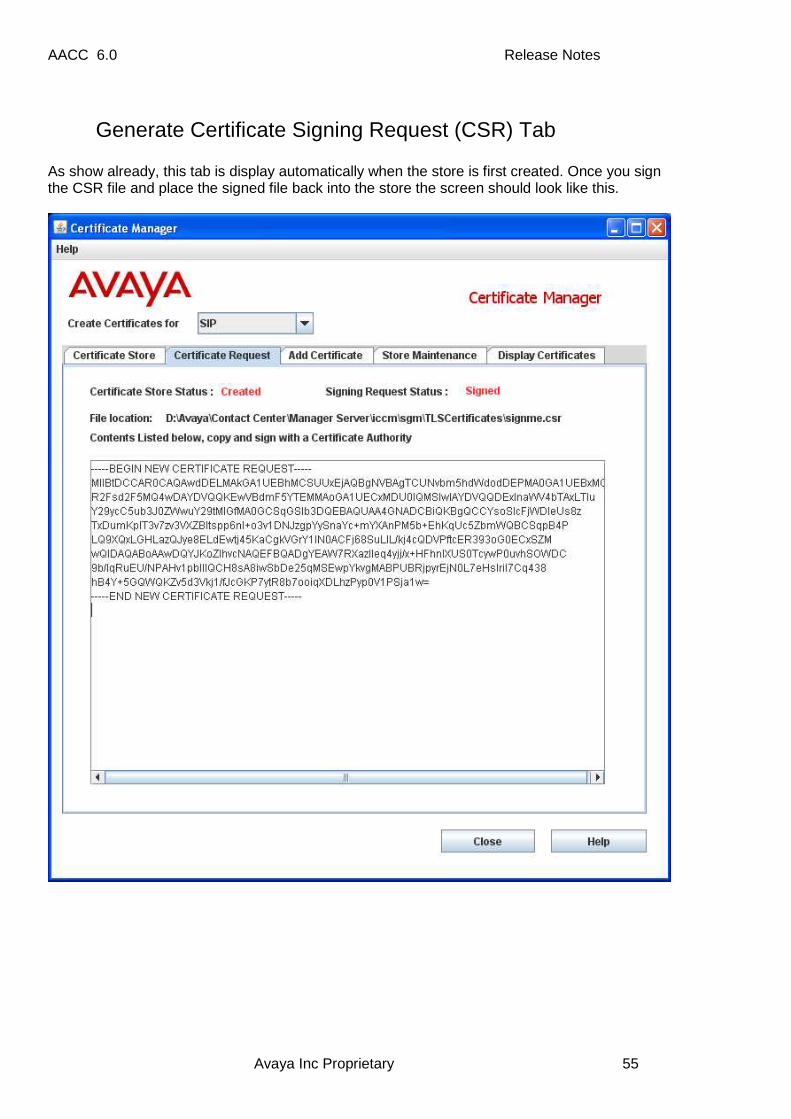
Generate Certificate Signing Request (CSR) Tab As show already, this tab is display automatically when the store is first created. Once you sign the CSR file and place the signed file back into the store the screen should look like this.
AACC 6.0 Release Notes
Avaya Inc Proprietary 56
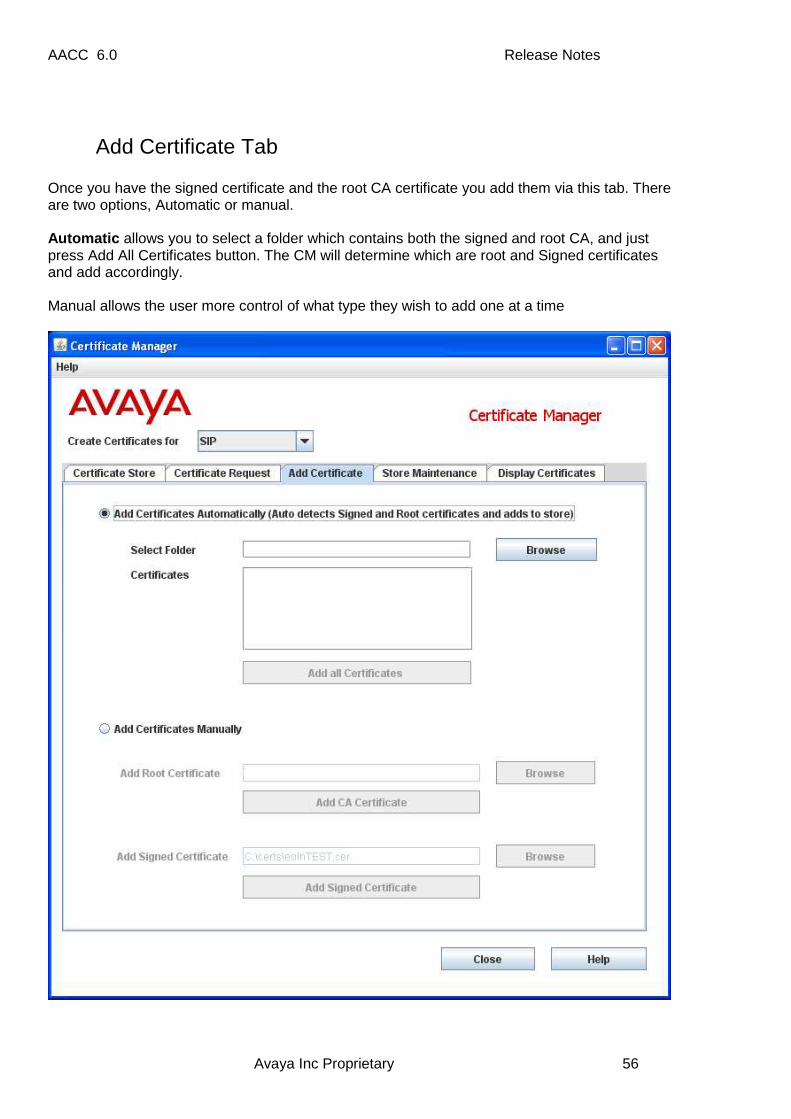
Add Certificate Tab Once you have the signed certificate and the root CA certificate you add them via this tab. There are two options, Automatic or manual. Automatic allows you to select a folder which contains both the signed and root CA, and just press Add All Certificates button. The CM will determine which are root and Signed certificates and add accordingly. Manual allows the user more control of what type they wish to add one at a time
AACC 6.0 Release Notes
Avaya Inc Proprietary 57
You should see the message: “Certificate successfully added” If not then go the log to see what might be wrong. Certificates to be added As before you must add a signed and root certificate for SGM to launch.
AACC 6.0 Release Notes
Avaya Inc Proprietary 58
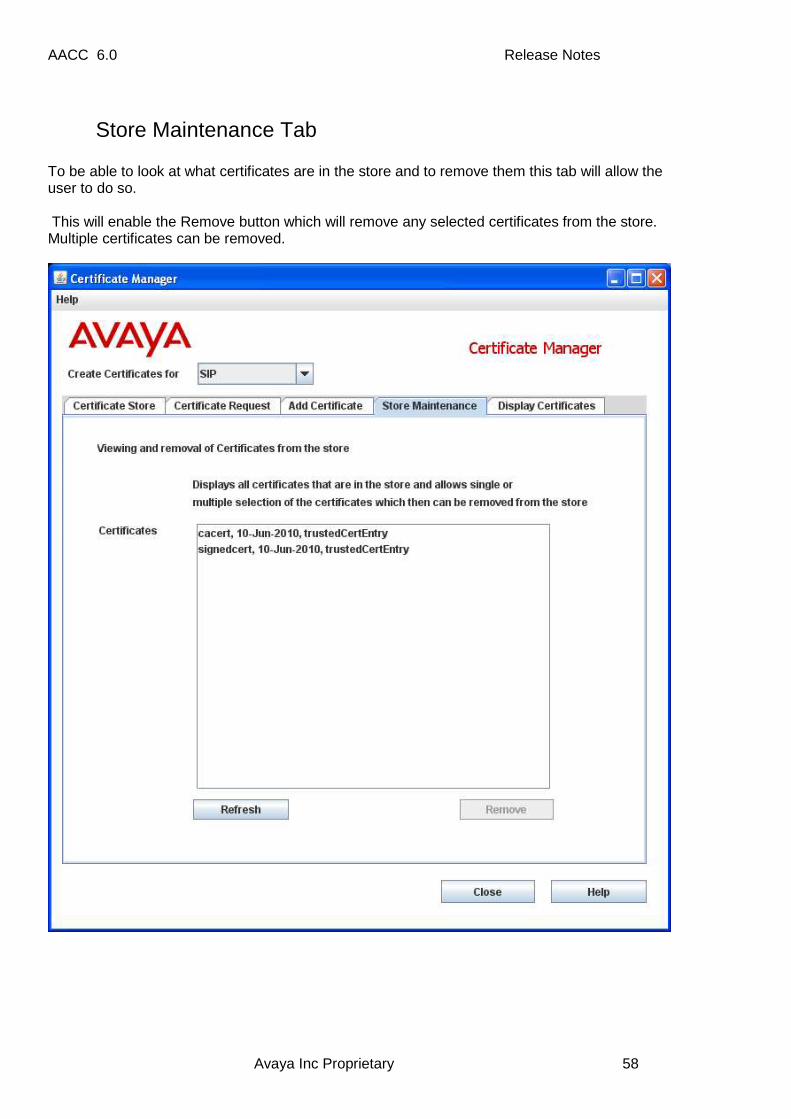
Store Maintenance Tab To be able to look at what certificates are in the store and to remove them this tab will allow the user to do so. This will enable the Remove button which will remove any selected certificates from the store. Multiple certificates can be removed.
AACC 6.0 Release Notes
Avaya Inc Proprietary 59
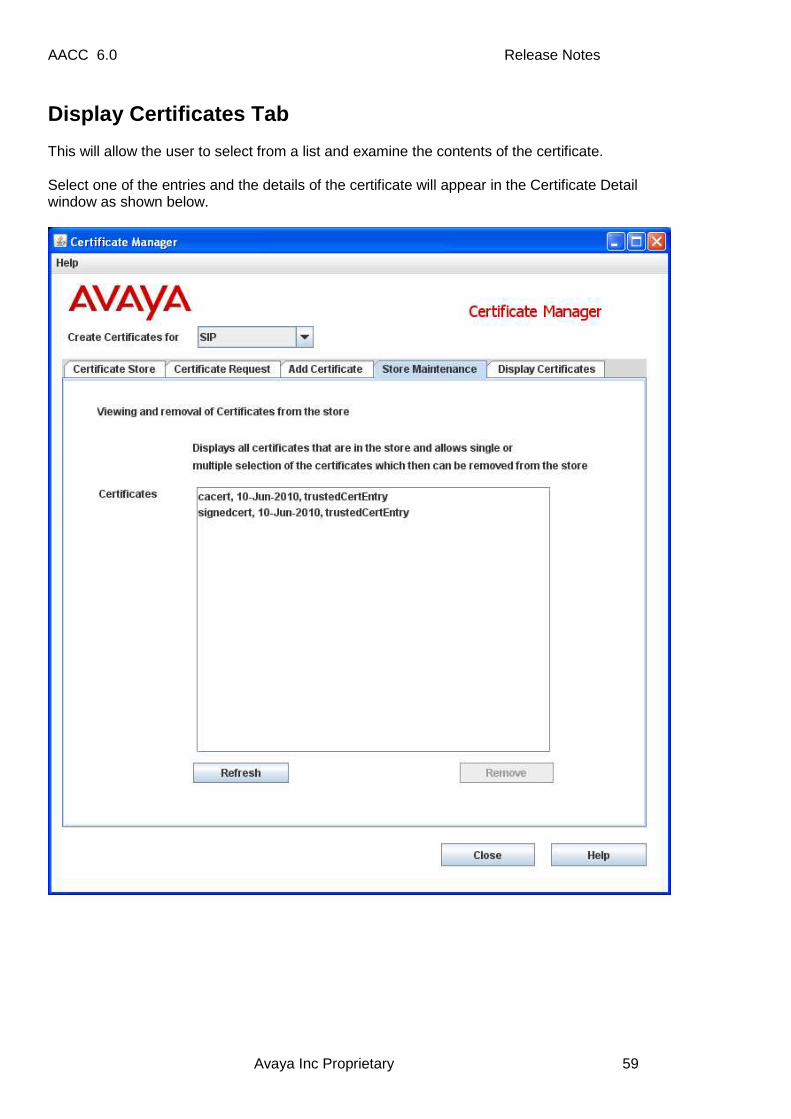
Display Certificates Tab This will allow the user to select from a list and examine the contents of the certificate. Select one of the entries and the details of the certificate will appear in the Certificate Detail window as shown below.
AACC 6.0 Release Notes
Avaya Inc Proprietary 60
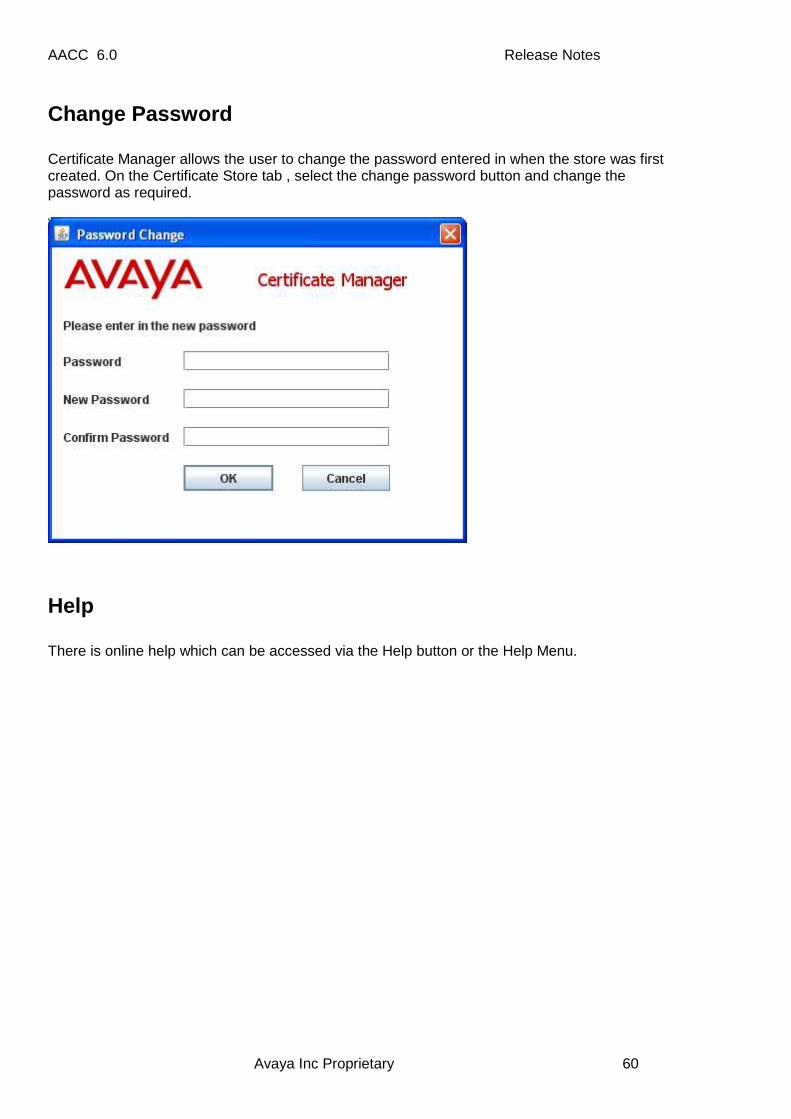
Change Password Certificate Manager allows the user to change the password entered in when the store was first created. On the Certificate Store tab , select the change password button and change the password as required.
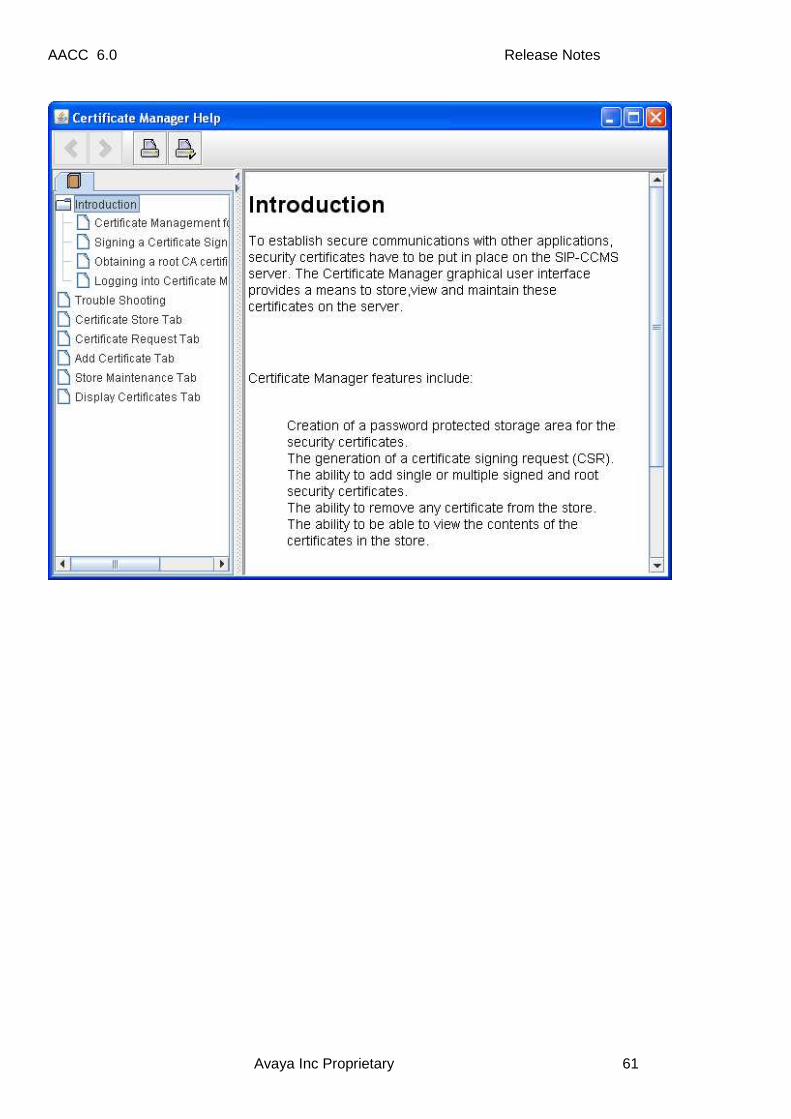
Help There is online help which can be accessed via the Help button or the Help Menu.
AACC 6.0 Release Notes
Avaya Inc Proprietary 61
AACC 6.0 Release Notes
Avaya Inc Proprietary 62
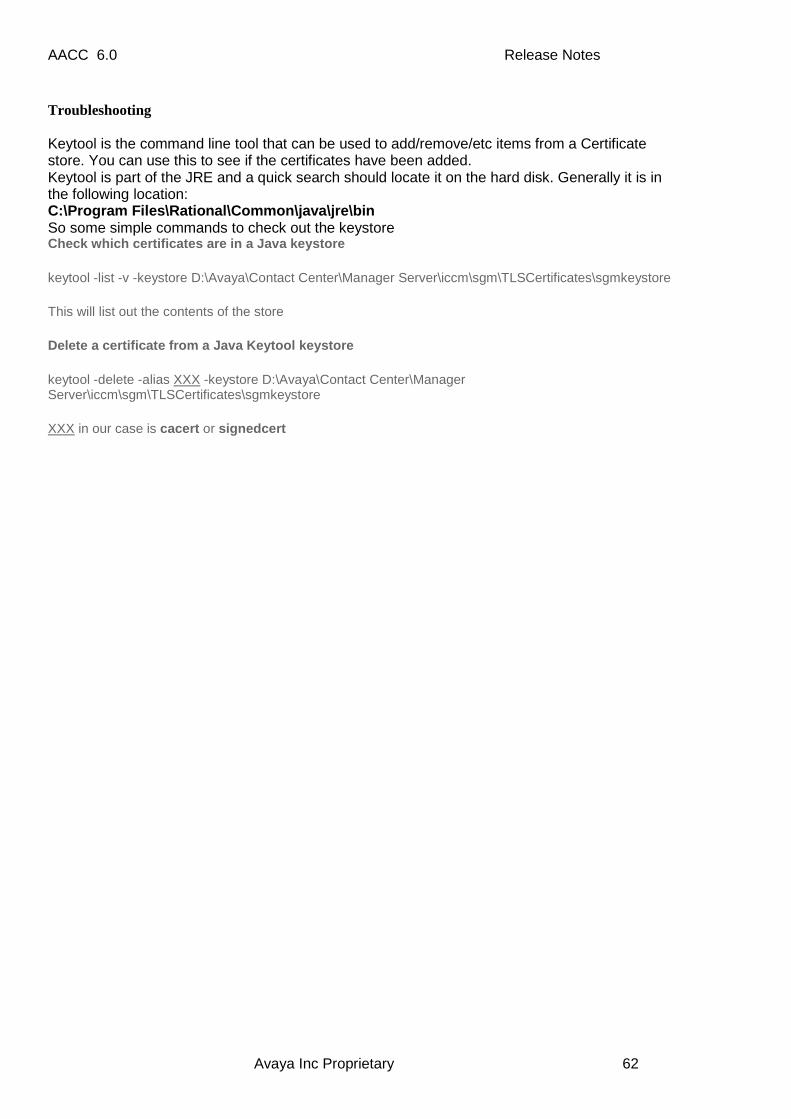
Troubleshooting Keytool is the command line tool that can be used to add/remove/etc items from a Certificate store. You can use this to see if the certificates have been added. Keytool is part of the JRE and a quick search should locate it on the hard disk. Generally it is in the following location: C:\Program Files\Rational\Common\java\jre\bin So some simple commands to check out the keystore Check which certificates are in a Java keystore
How to … prepare for security certificates Certificate Manager The new Certificate Manager utility has the ability to generate certificate signing requests (CSR). The generation of these files is only the first step in obtaining a security certificate for the SIP contact center. See Appendix A for step by step guide of the Certificate Manager The next step is to sign the request, and to do this requires the following infrastructure to be in place beforehand. Note: To establish TLS communication not only is a signed certificate required, but also a CA Root certificate. This document will show you how to obtain both
AACC 6.0 Release Notes
Avaya Inc Proprietary 64
What you need to sign a CSR – Infrastructure There are two choices when signing a CSR. 1. Go to a commercially available security certificate company and get them to sign the CSR. This would involve a fee for a proper security certificate OR you could get a temporary certificate with limited life from them for free. Either way you would have to pick one and send them the CSR file to be signed. 2. Make one of your servers/domain controllers a Certificate Authority and sign the CSR inside your own organisation. This has obvious advantages in that you can sign as many certificates as you want and they are free with no time limitations. Disadvantages are that you CANNOT use these certificates outside your organisation as other organisations would have no idea who signed the certificates and therefore will not trust them. To make a Windows 200X server a CA you need the OS DVD and add/Remove windows components and install the additional CA component. Windows installation guides should have the relevant information on this procedure. So once you have a CA in place you can sign the CSR file.
AACC 6.0 Release Notes
Avaya Inc Proprietary 65
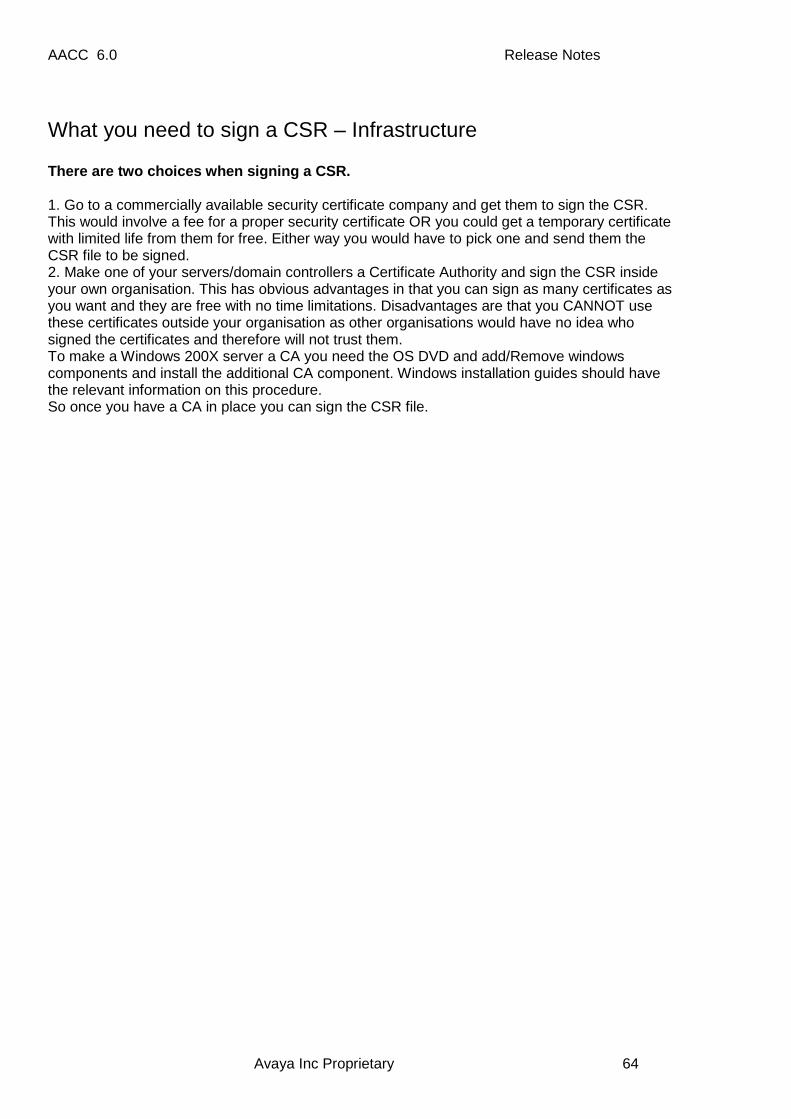
Signing the certificate request (CSR) The following steps are based on having your own CA and not using a third party CA Using the CA web service to issue requests http:\\ CAserverName\certsrv we perform the following steps. NOTE: When creating certificates for SIP CC and MBT connectivity there is a requirement for a custom certificate template. It is based on a Web Template but with the addition of Client and Server Authentication. Please refer to Annex D of the Avaya Aura Application Enablement Services Implementation Guide for MS LCS 2005 or MS OCS 2007 on how to create this template. Create this custom certificate template on your CA before attempting to sign a certificate that is to be used for SIP CC � MBT connectivity Enter in the Administrator username and password: This allows access to the CA server web site. See below
Access to the site gives you several options
AACC 6.0 Release Notes
Avaya Inc Proprietary 66
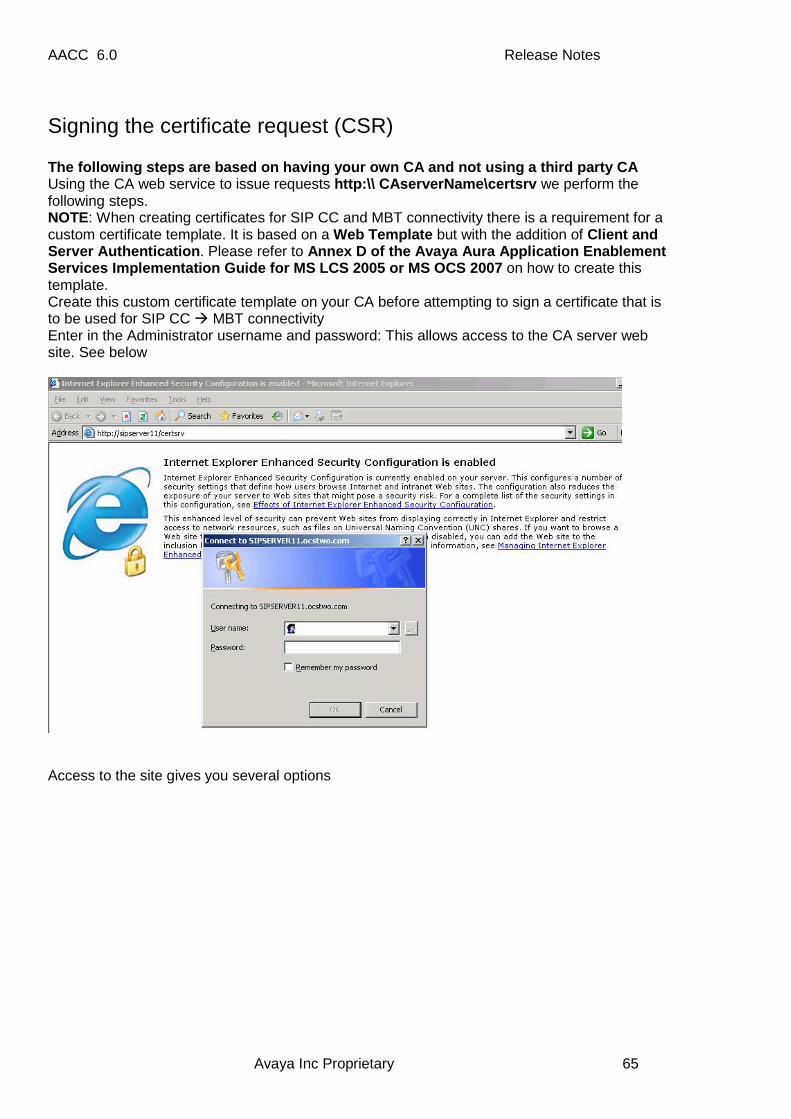
Select the Request a Certificate option and then Select Advanced Certificate Request. See next
Then select the second option Submit a certificate request by using a base-64-enc oded CMC or PKCS #10 file, or submit a renewal request b y using a base-64-encoded PKCS #7 file
AACC 6.0 Release Notes
Avaya Inc Proprietary 67
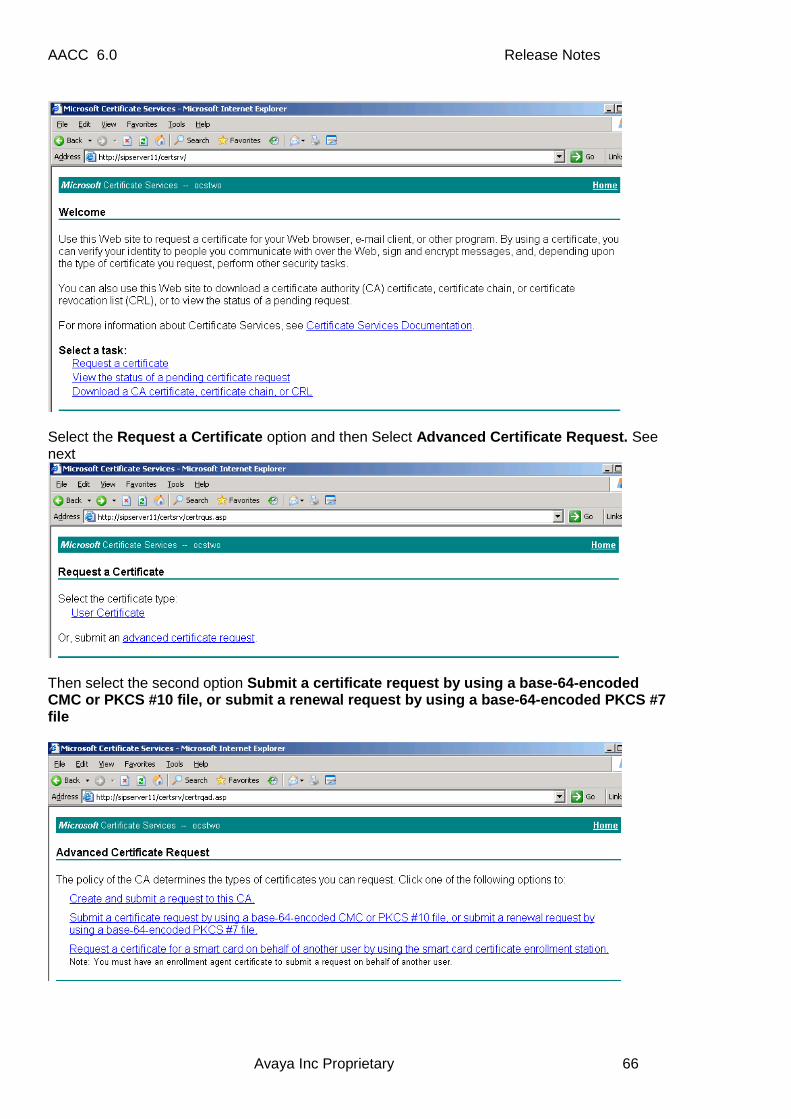
The next stage is where we copy the contents of the CSR file generated earlier into the Saved Request field. SIP CC and MBT require a custom template to be ge nerated; it is basically a Web Server template with the addition of client and server authentication. Create this template and name it appropriately and then select it in the Certificate template drop box,
The screen show below shows a standard web Server template; please use the custom one you have created instead.
Now hit the submit button to generate the signed certificate. Leave the encoded option in DER and select the Download certificate link
Save the file onto your server. It will be named certnew.cer.
AACC 6.0 Release Notes
Avaya Inc Proprietary 68
This is now the signed certificate. Place this back on the server for which it is assigned to and then add it to the certificate store using the Certificate Utility.
AACC 6.0 Release Notes
Avaya Inc Proprietary 69
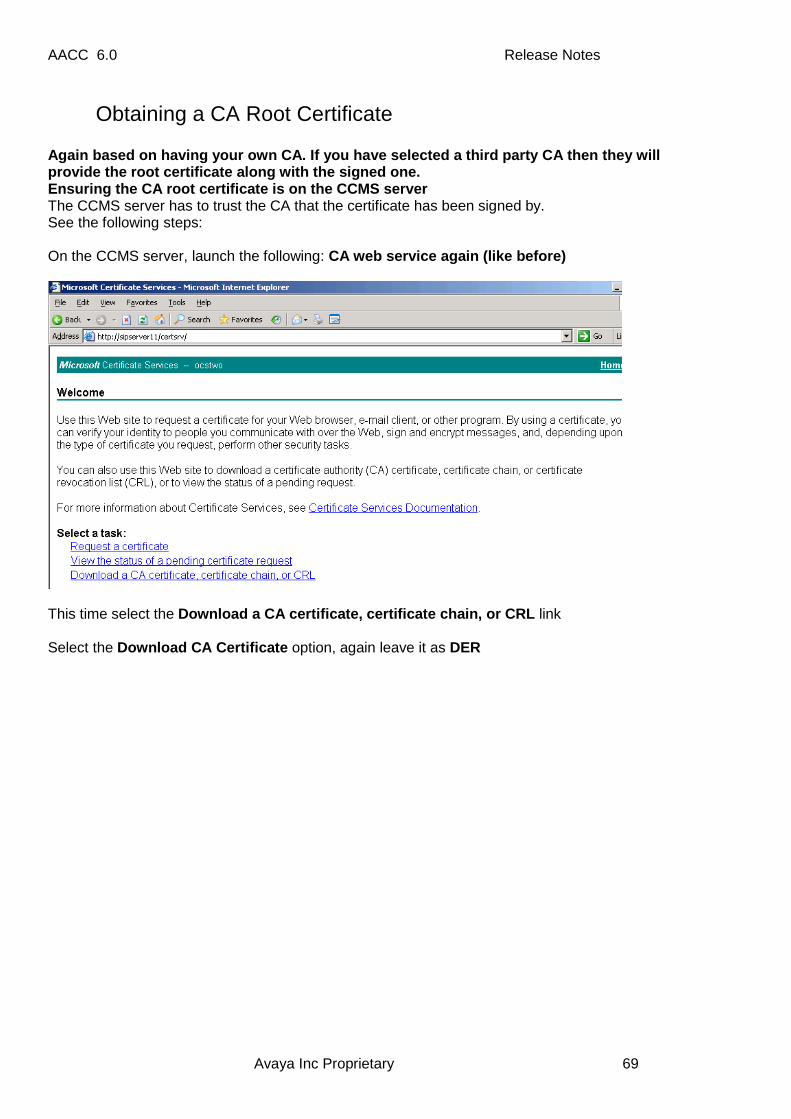
Obtaining a CA Root Certificate Again based on having your own CA. If you have sele cted a third party CA then they will provide the root certificate along with the signed one. Ensuring the CA root certificate is on the CCMS ser ver The CCMS server has to trust the CA that the certificate has been signed by. See the following steps: On the CCMS server, launch the following: CA web service again (like before)
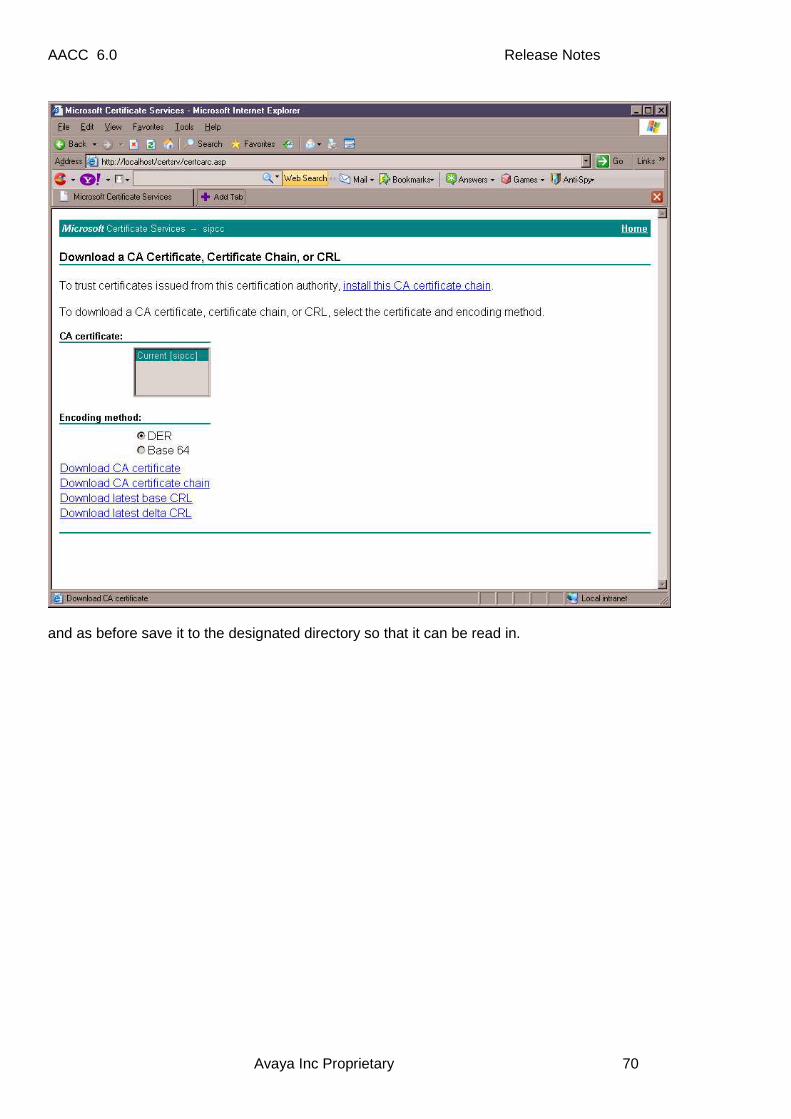
This time select the Download a CA certificate, certificate chain, or C RL link Select the Download CA Certificate option, again leave it as DER
AACC 6.0 Release Notes
Avaya Inc Proprietary 70
and as before save it to the designated directory so that it can be read in.
AACC 6.0 Release Notes
Avaya Inc Proprietary 71
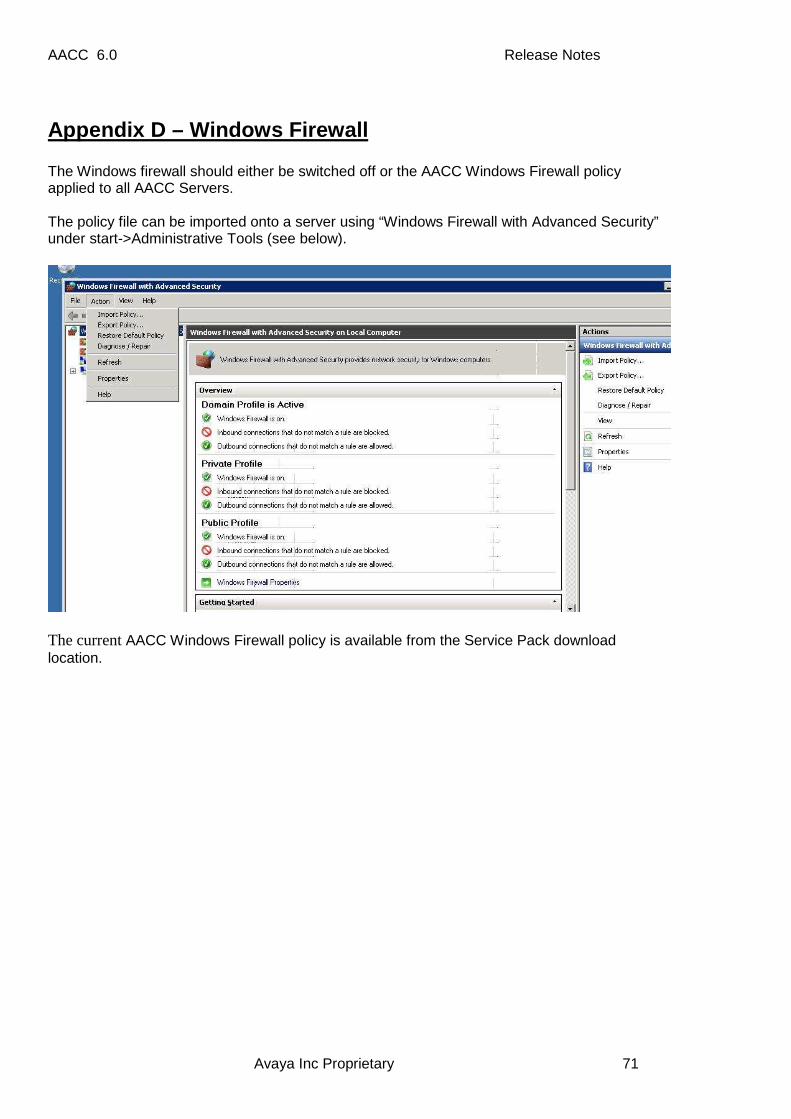
Appendix D – Windows Firewall The Windows firewall should either be switched off or the AACC Windows Firewall policy applied to all AACC Servers. The policy file can be imported onto a server using “Windows Firewall with Advanced Security” under start->Administrative Tools (see below).
The current AACC Windows Firewall policy is available from the Service Pack download location.