Copyright INDEX GLOSSARY HELP NEXT Avaya TM Modular Messaging Telephone User Interface Online Guide Select from the following Introduction Sending voice messages Getting started Sending faxes Reviewing messages Recording prompts and greetings Replying to messages Personalizing your mailbox Forwarding messages Setting notifications Printing messages and inbox listing to a fax device Changing the fax number Understanding caller options Enabling rules March 2003
Transcript
Copyright
INDEX GLOSSARY HELP
NEXT
AvayaTM Modular Messaging Telephone User Interface Online Guide
Select from the following
Introduction Sending voice messages
Getting started Sending faxes
Reviewing messages Recording prompts and greetings
Replying to messages Personalizing your mailbox
Forwarding messages Setting notifications
Printing messages and inbox listing to a fax device Changing the fax number
IntroductionAvaya Modular Messaging (MM) through the telephone user interface provides an easy way to stay in touch and communicate with people. You can send and reply to voice and fax messages over the telephone.
In addition to voice and fax messages, MM allows you to also receive text and e-mail messages. MM’s text-to-speech capability allows you to listen to these messages. You can also forward these e-mail messages to others.
E-mail messages may arrive at your mailbox from a variety of sources:
Subscribers that reside in your messaging network but use other Avaya systems like INTUITY AUDIX R5.1 Messaging, IA770 INTUITY AUDIX Messaging, or Unified Messenger
Subscribers on other systems whose messages arrive through an NM100 Networked Message Converter
Subscribers on your MM system or another networked MM system
CAUTION:The system’s text-to-speech capability is limited. As a result, high volumes of e-mail could limit your ability to retrieve and listen to e-mail with your telephone. MM also was not designed to replace your e-mail system, and frequent use of MM for e-mail may significantly slow the speed with which you and others can retrieve messages.
Introduction MM Online TUI Guide
Issue 1TUI Reference - 3 March 2003
INDEX GLOSSARY HELPCONTENTS
BACK NEXT
MM is easy to use. Menus are read out and you select an option by pressing a number on your telephone keypad. You can interrupt or skip voice prompts as you become more familiar with using the system.
The telephone user interface has three functions:
As a voice messaging system for sending, reviewing, and replying to voice and fax messages.
Reviewing and replying to a small number of e-mail messages that you may receive across a unified messaging network, intranet, or internet.
As an automated attendant that controls call handling.
NOTE:Note:If callers call your extension directly, the automated attendant options do not apply.
Introduction MM Online TUI Guide
Issue 1TUI Reference - 4 March 2003
INDEX GLOSSARY HELPCONTENTS
BACK NEXT
Composing and sending voice messages: an overview
You can compose and send voice messages by using a telephone to dial in to your mailbox.
When you compose a voice message, follow these basic steps:
1. Record your message, see the Recording voice messages section for details.
2. Specify the recipients, see the Addressing voice messages section for details.
3. Specify the delivery options, see the Specifying delivery options section for details.
4. Send your message, see the Sending voice messages section for details.
Introduction MM Online TUI Guide
Issue 1TUI Reference - 5 March 2003
INDEX GLOSSARY HELPCONTENTS
BACK NEXT
Receiving messages
Any messages you receive are stored in your mailbox. By dialing in to your mailbox, you can listen to all messages. You can then reply to, forward, save, or delete the messages. You can also send fax messages to a fax device for printing.
You can set up your mailbox so that it works as your personalized call answering service. To do this, you can record prompts and greetings and specify how these are used when someone calls your extension. You can record prompts and greetings either by using the telephone user interface (see the Recording or changing prompts and greetings section for details) or by using Subscriber Options. For more information see the online help.
End of section.
Getting started MM Online TUI Guide
Issue 1TUI Reference - 6 March 2003
INDEX GLOSSARY HELPCONTENTS
BACK NEXT
Getting startedThis section describes the following tasks:
What information you need to dial in to the voice mail system.
Accessing your mailbox.
Exiting your mailbox.
Restarting a session.
Repeating Main menu options.
Getting started MM Online TUI Guide
Issue 1TUI Reference - 7 March 2003
INDEX GLOSSARY HELPCONTENTS
BACK NEXT
Before you begin
Before you can dial in to your mailbox, your system administrator has to provide you with the following information:
The access number. This is the telephone number you use to dial in to your mailbox.
Your mailbox number. This is typically your extension number.
Your mailbox password. This password ensures that you are the only one who can access your messages.
A list of special features that you are authorized to use. Your system administrator decides which system features you are able to use (for example, call screening).
NOTE:Note:You can change your password at any time. For more information, see the Changing your password section. You cannot use a password that begins with 0 (zero). If you enter zero at the password prompt, the system will either ask you to enter another password or will disconnect you.
Getting started MM Online TUI Guide
Issue 1TUI Reference - 8 March 2003
INDEX GLOSSARY HELPCONTENTS
BACK NEXT
Accessing your mailbox
All messages and some configuration options are stored in your mailbox. You can dial in to your mailbox to:
Listen to, reply to, and forward messages.
Compose and send messages.
Change your greetings and personalize your mailbox.
Important:Depending on your organization’s PBX and PBX setup, you can access your mailbox differently from the way described here. If you can’t access your mailbox, contact your system administrator.
To access your mailbox for the first time
When you dial in to your mailbox for the first time you may hear "Hello. This Avaya messaging system can help you increase your communications efficiency. Your system manager has assigned you a temporary password...". This means your system administrator has switched on the setup tutorial, which helps guide you through the process of personalizing your mailbox. You only hear it the first time you dial in to your mailbox. The setup tutorial prompts you to change your password and to record your personalized prompts. This ensures that your mailbox is set up in the way you want it.
Even after you’ve set up your mailbox, you can change these settings at any time. How to change them is described later in this chapter.
If the tutorial is not turned on, you should still change your password immediately, and record your name prompt and personal greeting.
Getting started MM Online TUI Guide
Issue 1TUI Reference - 9 March 2003
INDEX GLOSSARY HELPCONTENTS
BACK NEXT
To access your mailbox from your office extension
1. Dial your organization’s voice mail access number.
2. Enter your password followed by .
You cannot use a password that begins with 0 (zero). If you enter zero at the password prompt, the system will either ask you to enter another password or will disconnect you.
To access your mailbox from the office extension of someone else who has a mailbox on the system
1. Dial your organization’s voice mail access number.
2. Press , followed by .
3. Enter your mailbox number.
4. Enter your password, followed by .
To access your mailbox from the extension of someone else who has no mailbox on the system or from outside your organization
1. Dial your organization’s voice mail access number.
2. Press .
3. Enter your mailbox number.
4. Enter your password, followed by .
#
* #
#
#
#
Getting started MM Online TUI Guide
Issue 1TUI Reference - 10 March 2003
INDEX GLOSSARY HELPCONTENTS
BACK NEXT
Using Playback controls when using the tutorial
If you are using the tutorial, you can use the following commands.
When listening to instructions
When recording prompts and greetings
Continue
Repeat the information
Accept the recording
Re-record
Erase the recording
Exit the tutorialNote: You can’t use to exit from the tutorial while you are changing your password.
1
2
1
2
3
**
Getting started MM Online TUI Guide
Issue 1TUI Reference - 11 March 2003
INDEX GLOSSARY HELPCONTENTS
BACK NEXT
Exiting your mailbox
You exit your mailbox by pressing repeatedly until you hear "Goodbye".
Important:Don’t hang up while listening to a message. Press instead. Otherwise, you can tie up a voice port for some time, reducing the number of voice ports available for others to access the system.
Repeating Main menu options
If you want to hear the Main menu options again and the number of messages received, press while the Main menu is playing.
Restarting a session
You can restart a session, in other words, exit your mailbox but remain in the system by pressing while the Main menu is playing. You can then transfer to an extension or enter
to access your mailbox again.
End of section.
*
*
0
9#
Reviewing messages MM Online TUI Guide
Issue 1TUI Reference - 12 March 2003
INDEX GLOSSARY HELPCONTENTS
BACK NEXT
Reviewing messagesYou can review voice, e-mail, or fax messages stored in your mailbox. You can also search for messages from a particular sender.
NOTE:Note:Whether you have fax capability depends on your system configuration.
When accessing your mailbox, you are informed of the following:
The total number of new voice, e-mail, and fax messages you have received.
The total number of saved messages you have stored.
NOTE:Note:Saved messages are all messages in your Inbox that you have already reviewed and have moved to the saved category.
Reviewing messages MM Online TUI Guide
Issue 1TUI Reference - 13 March 2003
INDEX GLOSSARY HELPCONTENTS
BACK NEXT
By default, you hear the most recently received messages first. You can change this setting in Subscriber Options to listen to urgent messages first instead. For more information, see the online help.
NOTE:Note:If you receive a multi-part message, for example, a forwarded message, and it consists of mixed voice, e-mail, and fax parts, the message classification can be voice, e-mail, or fax.
Once you have selected that you want to review messages, the system starts playing new messages, if there are any new messages in your mailbox. The status of voice messages on an integrated e-mail client may be affected when you review the messages using the telephone. See Avaya™ Modular Messaging Client Access to a Subscriber Mailbox, 585-310-790.
After you review a message, the End of Message Options menu is played automatically. You hear options, such as for replying to or forwarding messages.
Listening to private messages
Although you can’t send private voice messages through the telephone user interface, you can listen to private messages. You will hear ‘Private’ before the message contents are played.
Important:Unlike with some other voice mail products, you can forward private messages through the telephone user interface.
Reviewing messages MM Online TUI Guide
Issue 1TUI Reference - 14 March 2003
INDEX GLOSSARY HELPCONTENTS
BACK NEXT
To review voice messages
1. Access your mailbox. For more information, see page 5.
2. Press to select the Review Messages menu.
3. Press to listen to all voice messages. Alternatively, if you want to listen to one message type only, press for new, for saved, and for deleted messages before the first message is played.
By default, you hear the most recent messages are played first followed by the first saved voice message, which may be followed by the first deleted voice message. For information on playback controls, see the Playback controls while reviewing messages section.
Continue, press PAGE DOWN.
1 1
1
NOTE:Note:
You can press at any time to go to the next message type, in other words, from new to saved messages or from saved to deleted messages.
11 1 1 2 1 3
# #
Reviewing messages MM Online TUI Guide
Issue 1TUI Reference - 15 March 2003
INDEX GLOSSARY HELPCONTENTS
BACK NEXT
4. After listening to a voice message, use one of the following options:
Continue, press PAGE DOWN.
To do this Press
Rewind a voice message.The message moves back a set number of seconds. The system default is 5 seconds.
Replay the voice message.
Listen to the following envelope information:Date and time the message was received.Sender’s name.Caller ID.Duration of a message.Importance, if the message is other than Normal.Sensitivity, if the message is marked Private.
If you are copied on a message, you hear “You were copied on this message”.
List all message recipients.
Forward the voice message. See the Forwarding messages section.
1
4
5
5 5
6
Reviewing messages MM Online TUI Guide
Issue 1TUI Reference - 16 March 2003
INDEX GLOSSARY HELPCONTENTS
BACK NEXT
Procedure completed.
To do this PressErase the voice message.For information on how an integrated e-mail client handles voice messages that you delete by using the telephone, see Avaya™ Modular Messaging Client Access to a Subscriber Mailbox, 585-310-790.Note: You cannot erase an already deleted message.
Reply to the voice message. For more information, see the Replying to messages section.
Save the voice message.Note: You cannot save a saved or deleted message.
Skip this message and go to the next voice message.
7
8
9
#
Reviewing messages MM Online TUI Guide
Issue 1TUI Reference - 17 March 2003
INDEX GLOSSARY HELPCONTENTS
BACK NEXT
To review e-mail messages
1. Access your mailbox. For more information, see the Accessing your mailbox section.
2. Press to select the Review Messages menu.
3. Press to listen to e-mail messages. Alternatively, if you want to listen to one message type only, press for new, for saved, and for deleted messages before the first message is played. Text is converted to voice using the *text-to-speech (TTS) feature.
By default, you hear the first new e-mail message. Depending on your system setup, the first e-mail message may be followed by the first deleted e-mail message. For information on playback controls, see the Playback controls while reviewing messages section.
If your message has no attachments, you hear “Message from <name>. Subject <text in subject field>. Message will take approximately <time> to review” followed by the message contents.
If your message has attachments, you hear one of the following:
If your message is an e-mail message “Message from <name>. Subject <text in subject field>. Attachments cannot be reviewed” followed by the message contents.
1 1
2
*. English text-to-speech is powered by DECtalk® text-to-speech technology.
22 1 2 2 2 3
Reviewing messages MM Online TUI Guide
Issue 1TUI Reference - 18 March 2003
INDEX GLOSSARY HELPCONTENTS
BACK NEXT
Continue, press PAGE DOWN.
Notes:
If a message is urgent, you hear “Message marked urgent” before the message text is played.
If you want to skip the information in the message header, press while listening to the message header. You are taken to the start of the message, and the message text is played back.
You can press at any time to go to the next message type, in other words, from new to saved messages or from saved to deleted messages.
If the e-mail message is voiced is the wrong language, press to switch to another language. If the language is still incorrect, press again until the message is voiced in the correct language. Which languages are available depends on which languages are installed on your system. For more information, check with your system administrator.
3
# #
88
Reviewing messages MM Online TUI Guide
Issue 1TUI Reference - 19 March 2003
INDEX GLOSSARY HELPCONTENTS
BACK NEXT
4. After listening to an e-mail message, use one of the following options:
To do this Press
Print the e-mail message to a fax device, depending on your system configuration. For more information, see the Printing messages section.
Replay the e-mail message.
Listen to the following envelope information:Date and time the message was received.Sender’s name.Duration of a message (the estimated time to play back the message using *text-to-speech).Note: If you want to receive envelope information while listening to a long e-mail message, don’t request it at the start of the message since it takes some time to obtain this information.Importance, if the message is other than Normal.Sensitivity, if the message is marked Private.
If you are copied on a message, you hear “You were copied on this message.”
*. English text-to-speech is powered by DECtalk® text-to-speech technology.
2
4
5
Reviewing messages MM Online TUI Guide
Issue 1TUI Reference - 20 March 2003
INDEX GLOSSARY HELPCONTENTS
BACK NEXT
Procedure completed.
To do this PressList all message recipients.
Forward the e-mail message. For more information, see the Forwarding messages section.
Erase the e-mail message. For information on how an integrated e-mail client handles messages you delete by using the telephone, see Avaya™ Modular Messaging Client Access to a Subscriber Mailbox, 585-310-790.Note: You cannot erase a deleted message.
Reply to the e-mail message. For more information, see the Replying to messages section.
Save the e-mail message.Note: You cannot save a saved or deleted message.
Skip this message and go to the next e-mail message.
5 5
6
7
8
9
#
Reviewing messages MM Online TUI Guide
Issue 1TUI Reference - 21 March 2003
INDEX GLOSSARY HELPCONTENTS
BACK NEXT
To review fax messages
Fax messages are listed separately. You can listen to the message subject and the number of pages of the fax.
Important:Whether you can use this feature depends on your organization’s system configuration.
1. Access your mailbox. For more information, see the Accessing your mailbox section.
2. Press to select the Review Messages menu.
3. Press to listen to fax messages. Alternatively, if you want to listen to one message type only, press for new, for saved, and for deleted messages before the first message is played.
You normally hear new fax messages first. Depending on your system setup, the new message may be followed by the first saved fax message or the first deleted fax message. For information on playback controls, see the Playback controls while reviewing messages section.
Continue, press PAGE DOWN.
1 1
3 33 1 3 2 3 3
Reviewing messages MM Online TUI Guide
Issue 1TUI Reference - 22 March 2003
INDEX GLOSSARY HELPCONTENTS
BACK NEXT
You hear “Subject <text in subject field>,” followed by the number of pages.
Continue, press PAGE DOWN.
Notes:
If a message is urgent, you hear “Message marked urgent” before the message text is played.
You can press at any time to go to the next message type, in other words, from new to saved messages or from saved to deleted messages.
# #
Reviewing messages MM Online TUI Guide
Issue 1TUI Reference - 23 March 2003
INDEX GLOSSARY HELPCONTENTS
BACK NEXT
4. After listening to a fax message, use one of the following options:
To do this PressPrint the fax message to a fax device. For more information, see the Changing the fax number section.
Replay the fax message.
Listen to the following envelope information.Date and time the message was received.Name of the service that sent the fax message.The length of the fax, in the number of pages.Importance, if the fax is other than Normal.Sensitivity, if the fax is marked Private.
If you have been copied, you hear “You are copied on this message”.
Forward the fax message. See Forwarding messages.
Erase the fax message. For information on how an e-mail client handles messages you delete by using the telephone, see Avaya™ Modular Messaging Client Access to a Subscriber Mailbox, 585-310-790.Note: You cannot erase a deleted message.
Save the fax message.Note: You cannot save a saved or deleted message.
Skip this message and go to the next fax message.
2
4
5
6
7
9
#
Reviewing messages MM Online TUI Guide
Issue 1TUI Reference - 24 March 2003
INDEX GLOSSARY HELPCONTENTS
BACK NEXT
Playback controls while reviewing messages
While listening to a message, you can use one of the following options.
Continue, press PAGE DOWN.
To do this PressRewind a message.The message moves back a set number of seconds. The system default is 5 seconds.
Rewind to the start of a message.Note: If your message consists of several parts, in other words, if it has been forwarded several times, you are returned to the beginning of the current message part.
Pause a message.Press again to restart the message.Messages paused are automatically restarted after a specified number of seconds. The system default is 5 seconds.
Fast-forward a message.The message moves forward a set number of seconds. The system default is five seconds.
Fast-forward to the end of a message.
1
1 1
22
3
3 3
Reviewing messages MM Online TUI Guide
Issue 1TUI Reference - 25 March 2003
INDEX GLOSSARY HELPCONTENTS
BACK NEXT
Continue, press PAGE DOWN.
To do this PressList all recipients to whom the message was sent.
NOTE:Note:Recipients receiving blind carbon copies (BCC) are not voiced.
Increase the playback speed.Press again to increase the speed further.
Decrease the playback volume.Press again to decrease the volume further.
5 5
66
77
Reviewing messages MM Online TUI Guide
Issue 1TUI Reference - 26 March 2003
INDEX GLOSSARY HELPCONTENTS
BACK NEXT
Continue, press PAGE DOWN.
To do this PressDepending on how your system is set up and what type of message you are listening to, pressing does one of the following:
If the multilingual *TTS feature has not been installed, it returns the playback volume to normal.If the multilingual TTS feature has been installed, when reviewing e-mail messages, you can change the language in which the message is voiced. This can be used when the TTS voices the e-mail message in the wrong language. Press until the e-mail message is voiced in the correct language. You can choose between English, Dutch, French, German, Italian, Brazilian Portuguese, Spanish, Japanese, Chinese and Korean.
*. English text-to-speech is powered by DECtalk® text-to-speech technology.
Increase the playback volume.Press again to increase the volume further.
Return the playback speed to normal.
8
8
8
99
0
Reviewing messages MM Online TUI Guide
Issue 1TUI Reference - 27 March 2003
INDEX GLOSSARY HELPCONTENTS
BACK NEXT
End of section.
To do this PressCancel the playback and return to previous menu.
Skip to the next message.
When you skip a new message, it is listed as a new message the next time you call your mailbox.
*#
Replying to messages MM Online TUI Guide
Issue 1TUI Reference - 28 March 2003
INDEX GLOSSARY HELPCONTENTS
BACK NEXT
Replying to messagesAfter listening to a message, you can do one of the following:
Reply with a voice message to the sender only. For more information, see the Replying to the message sender only section.
Reply to all recipients. For more information, see the Replying to all message recipients section.
Reply with a voice message to the sender only and including the original message. For more information, see the Replying to the message sender only including the original message section.
Reply to all recipients and include the original message. For more information, see the Replying to all message recipients including the original message section.
Reply by calling the sender, if this feature is available. For more information, see the Replying by calling the sender section.
Listen to a list of all message recipients. For more information, see the Listening to a list of all message recipients section.
Replying to messages MM Online TUI Guide
Issue 1TUI Reference - 29 March 2003
INDEX GLOSSARY HELPCONTENTS
BACK NEXT
Replying to a message with a voice message
You can reply with a voice message to the sender only or to all recipients of the message. You can reply with a voice message to the sender only or to all recipients of the message and include a copy of the original message. You can reply to a message if the sender of the message is a subscriber or has an e-mail account. You can’t reply to voice messages that were left in your mailbox by outside callers.
Replying to the message sender only
If you reply to a message with a voice message, you can send the reply directly to the sender’s mailbox. You don’t have to address the message before sending it.
To reply to the sender only
1. Listen to the message.
2. Press .
3. Press .
4. Record your reply.
Continue, press PAGE DOWN.
8 8
1 1
Replying to messages MM Online TUI Guide
Issue 1TUI Reference - 30 March 2003
INDEX GLOSSARY HELPCONTENTS
BACK NEXT
5. Press when you have finished recording.
6. After listening to a message, use one of the following options.
Procedure completed.
To do this PressSend the reply.For more information, see the Replying to messages section.Note: If you don’t specify delivery options, the message is sent as a normal message.
Specify delivery options. For more information, see the Specifying delivery options section.
Cancel the reply and return to the Message menu.
#
#
2
*
Replying to messages MM Online TUI Guide
Issue 1TUI Reference - 31 March 2003
INDEX GLOSSARY HELPCONTENTS
BACK NEXT
Replying to all message recipients
If you reply to a message with a voice message, you can send the reply to all message recipients. You don’t have to address the message before sending it.
To reply to all recipients
1. Listen to the message.
2. Press .
3. Press .
4. Record your reply.
5. Press when you have finished recording.
Continue, press PAGE DOWN.
8 8
2 2
#
Replying to messages MM Online TUI Guide
Issue 1TUI Reference - 32 March 2003
INDEX GLOSSARY HELPCONTENTS
BACK NEXT
6. After recording your reply, use one of the following options.
To do this PressSend the reply.For more information, see Replying to messages on page 28.Note: If you don’t specify delivery options, the message is sent as a normal message.
Mark a message with normal priority as urgent. For more information, see the Specifying delivery options section.
Cancel the reply and return to the Message menu.
#
2
*
Replying to messages MM Online TUI Guide
Issue 1TUI Reference - 33 March 2003
INDEX GLOSSARY HELPCONTENTS
BACK NEXT
Replying to the message sender only including the original message
If you reply to a message with a voice message, you can send the reply directly to the sender’s mailbox and include the original message. You don’t have to address the message before sending it.
To reply to the sender only including the original message
1. Listen to the message.
2. Press .
3. Press .
4. Record your reply.
5. Press when you have finished recording.
Continue, press PAGE DOWN.
8 8
3 3
#
Replying to messages MM Online TUI Guide
Issue 1TUI Reference - 34 March 2003
INDEX GLOSSARY HELPCONTENTS
BACK NEXT
6. After recording your reply, use one of the following options.
Procedure completed.
To do this PressSend the reply.For more information, see the Replying to messages section.Note: If you don’t specify delivery options, the message is sent as a normal message.
Specify delivery options. For more information, see the Specifying delivery options section.
Cancel the reply and return to the Message menu.
#
2
*
Replying to messages MM Online TUI Guide
Issue 1TUI Reference - 35 March 2003
INDEX GLOSSARY HELPCONTENTS
BACK NEXT
Replying to all message recipients including the original message
If you reply to a message with a voice message, you can send the reply to all message recipients and include the original message. You don’t have to address the message before sending it.
To reply to all recipients including the original message
1. Listen to the message.
2. Press .
3. Press .
4. Record your reply.
5. Press when you have finished recording.
Continue, press PAGE DOWN.
8 8
4 4
#
Replying to messages MM Online TUI Guide
Issue 1TUI Reference - 36 March 2003
INDEX GLOSSARY HELPCONTENTS
BACK NEXT
6. After recording your reply, use one of the following options.
Procedure completed.
To do this PressSend the reply.For more information, see Replying to messages on page 28.Note: If you don’t specify delivery options, the message is sent as a normal message.
Mark a message with normal priority as urgent. For more information, see the Specifying delivery options section.
Cancel the reply and return to the Message menu.
#
2
*
Replying to messages MM Online TUI Guide
Issue 1TUI Reference - 37 March 2003
INDEX GLOSSARY HELPCONTENTS
BACK NEXT
Replying by calling the sender
After listening to a message, you can call the extension of the sender directly.
For more information, contact your system administrator.
To reply by calling the sender
1. Listen to the message.
2. Press .
3. Press again to call the sender’s extension.
Procedure completed.
NOTE:Note:This option is available only if:
The message was sent by an internal caller.
The internal caller is in the same voice mail domain.
Your PBX can handle extension number details.
8 8
8 8
Replying to messages MM Online TUI Guide
Issue 1TUI Reference - 38 March 2003
INDEX GLOSSARY HELPCONTENTS
BACK NEXT
Listening to a list of all message recipients
You can identify the other recipients of a message you have received.
To listen to a list of all message recipients
1. Listen to the message.
2. Press .
3. Press to listen to a list of all message recipients.
End of section.
8 8
9 9
Forwarding messages MM Online TUI Guide
Issue 1TUI Reference - 39 March 2003
INDEX GLOSSARY HELPCONTENTS
BACK NEXT
Forwarding messagesAfter you listen to a message, you can forward a copy of it to another subscriber.
Notes:
Unlike with some other voice mail products, you can forward private messages through the telephone user interface.
If you are forwarding a message which has a voice attachment and the recipients review this message through their e-mail application, they then see an additional attachment entitled “Trouble playing this message?”. This attachment tells them what to do if they don’t have Avaya Modular Messaging (MM) installed.
Forwarding messages MM Online TUI Guide
Issue 1TUI Reference - 40 March 2003
INDEX GLOSSARY HELPCONTENTS
BACK NEXT
To forward a message
1. Listen to the message.
2. Press to forward a message.
3. Then, do one of the following:
Press to forward a message without recording a comment.
Press to record a comment before forwarding the message.
Press to cancel the forwarding of the message.
4. Enter the recipient’s mailbox number or numeric address followed by . For more information, see the Addressing voice messages section.
5. Press when you have entered all addresses.
Continue, press PAGE DOWN.
6 6
1
2
*#
# #
Forwarding messages MM Online TUI Guide
Issue 1TUI Reference - 41 March 2003
INDEX GLOSSARY HELPCONTENTS
BACK NEXT
6. Use one of the following options.
Procedure completed.
To do this PressSend the message.Note: If you forward a message without specifying delivery options, the message is sent as a regular message.
Mark a message as urgent. For more information, see the Specifying delivery options section.
Cancel the destination. Press again to erase the new message and return to the Message menu.
#
2
* *
Forwarding messages MM Online TUI Guide
Issue 1TUI Reference - 42 March 2003
INDEX GLOSSARY HELPCONTENTS
BACK NEXT
Searching for specific messages
You can search your mailbox for messages sent by a specific sender. The search facility lists all messages from this sender regardless of whether the messages are new or saved. If no messages are found, you are returned to the Search menu.
To search for messages
1. Access your mailbox. For more information, see the Accessing your mailbox section.
2. Press to select the Message Locator menu.
3. Search for the sender by entering one of the following:
The sender’s local mailbox number or numeric address. For more information, see the Entering local mailbox numbers or numeric addresses section.
for all external callers.
to use Dial-by-Name. For more information, see the Searching for a recipient’s name section.
to return to the main menu.
End of section.
3 3
1 #
#
*
Printing messages and inbox listings to a fax device MM Online TUI Guide
Issue 1TUI Reference - 43 March 2003
INDEX GLOSSARY HELPCONTENTS
BACK NEXT
Printing messages and inbox listings to a fax deviceYou can print all new fax messages without reviewing them or you can print individual fax and e-mail messages to a fax device after reviewing them. You can also print your Inbox listing showing all messages or showing new messages only.
Important:If you hear fax tones when you answer your phone, do one of the following to receive the fax:
To send the fax to your inbox, transfer the call to your own extension number.
To print the fax directly, transfer the call to your fax machine number.
Printing messages
To save time, you can print all new fax messages at once without reviewing them. You can also print individual fax and e-mail messages to a fax device.
CAUTION:Messages you send to a printer are marked as saved. And although the system tells you when a fax or message is queued to a print destination, do not delete the message until you confirm that printing is successful. Printing can still fail after the print job has queued.
Continue, press PAGE DOWN.
Printing messages and inbox listings to a fax device MM Online TUI Guide
Issue 1TUI Reference - 44 March 2003
INDEX GLOSSARY HELPCONTENTS
BACK NEXT
To print all new fax messages
1. Access your mailbox. For more information, see the Accessing your mailbox section.
2. Press to select the Review Messages menu.
3. Press to select the Print Options menu.
4. Press to print all new fax messages.
5. Then, press one of the following:
to print to your default fax destination.
to print to an alternate fax destination.
CAUTION:Although the system tells you when a fax or message is queued to a print destination, do not delete the message until you confirm that printing is successful. Printing can still fail after the print job has queued.
Continue, press PAGE DOWN.
1 1
8 8
1
NOTE:Note:You hear this prompt only if a default fax destination is set.
1
1
2
Printing messages and inbox listings to a fax device MM Online TUI Guide
Issue 1TUI Reference - 45 March 2003
INDEX GLOSSARY HELPCONTENTS
BACK NEXT
6. If you print to an alternate fax destination, do one of following:
Enter the phone number of the fax device, including the country and area code, if required, for example, 14083243000.
Enter the country code, the area code and the phone number of the fax destination separately. You hear, “Enter a country code now or to use <yyy>, press ”, where yyy is the default country code, for example, 1. You are then prompted to “Enter the area code now or to use <zzz>, press ,” where zzz is the default area code, for example, 408. Then, you hear, “Enter the phone number now,” for example, 3243000.
All new fax messages are printed to the fax device specified.
Procedure completed.
##
Printing messages and inbox listings to a fax device MM Online TUI Guide
Issue 1TUI Reference - 46 March 2003
INDEX GLOSSARY HELPCONTENTS
BACK NEXT
To print messages after reviewing
1. Listen to the message.
2. Press to print the message.
3. If you are printing an e-mail message with attachments, you are prompted to press:
to print the e-mail message without attachments.
to print the e-mail message with attachments.
4. Then, press one of the following:
to print to your default fax device.
to print to an alternate fax device.
if you are calling from a fax machine, to print using you current connection.
to forward the fax to someone else.
NOTE:Note:Only TIFF file attachments and MM e-mail messages are printed.
NOTE:Note:You hear this prompt only if a default fax destination is set.
2
1
2
1
2
3
4
Printing messages and inbox listings to a fax device MM Online TUI Guide
Issue 1TUI Reference - 47 March 2003
INDEX GLOSSARY HELPCONTENTS
BACK NEXT
5. If you print to an alternate fax device, do one of following, depending on your system’s configuration:
Enter the phone number of the fax device, including the country and area code, if required, for example, 14083243000.
Enter the country code, the area code, and the phone number of the fax device separately. You hear, “Enter a country code now or to use <yyy>, press ,” where yyy is the default country code, for example, 1. You are then prompted to “Enter the area code now or to use <zzz>, press ,” where zzz is the default area code, for example, 408. Then, you hear “Enter the phone number now,” for example, 3243000.
The e-mail or fax message is printed to the fax device specified.
Procedure completed.
#
#
Printing messages and inbox listings to a fax device MM Online TUI Guide
Issue 1TUI Reference - 48 March 2003
INDEX GLOSSARY HELPCONTENTS
BACK NEXT
Printing your inbox listing
You can also print your Inbox listing showing all messages or showing new messages only.
To print an inbox listing showing all messages
1. Access your mailbox. For more information, see the Accessing your mailbox section.
2. Press to select the Review Messages menu.
3. Press to select the Print Options menu.
4. Press to print your Inbox listing showing all messages.
5. Then, press one of the following:
to print to your default fax device.
to print to an alternate fax device.
if you are calling from a fax machine to print using you current connection.
to forward the fax to someone else.
Continue, press PAGE DOWN.
1 1
8 8
2 2
1
2
3
4
Printing messages and inbox listings to a fax device MM Online TUI Guide
Issue 1TUI Reference - 49 March 2003
INDEX GLOSSARY HELPCONTENTS
BACK NEXT
6. If you print to an alternate fax device, do one of following, depending on your system’s configuration:
Enter the phone number of the fax device including the country and area code, if required, for example, 14083243000.
Enter the country code, the area code, and the phone number of the fax device separately. You hear, “Enter a country code now or to use <yyy>, press ,” where yyy is the default country code, for example, 1. You are then prompted to “Enter the area code now or to use <zzz>, press ,” where zzz is the default area code, for example, 408. Then you hear “Enter the phone number now,” for example, 3243000.
The Inbox listing is printed to the fax device specified.
Procedure completed.
#
#
Printing messages and inbox listings to a fax device MM Online TUI Guide
Issue 1TUI Reference - 50 March 2003
INDEX GLOSSARY HELPCONTENTS
BACK NEXT
To print an inbox listing showing new messages only
1. Access your mailbox. For more information, see the Accessing your mailbox section.
2. Press to select the Review Messages menu.
3. Press to select the Print Options menu.
4. Press to print your Inbox listing showing new messages only.
5. Then, press one of the following:
to print to your default fax device.
to print to an alternate fax device.
if you are calling from a fax machine, to print using you current connection.
to forward the fax to someone else.
Continue, press PAGE DOWN.
1 1
8 8
3 3
1
2
3
4
Printing messages and inbox listings to a fax device MM Online TUI Guide
Issue 1TUI Reference - 51 March 2003
INDEX GLOSSARY HELPCONTENTS
BACK NEXT
6. If you print to an alternate fax device, do one of following, depending on your fax server:
Enter the phone number of the fax device, including the country and area code, if required, for example, 14083243000.
Enter the country code, the area code, and the phone number of the fax device separately. You hear, “Enter a country code now or to use <yyy>, press ,” where yyy is the default country code, for example, 1. You are then prompted to “Enter the area code now or to use <zzz>, press ,” where zzz is the default area code, for example, 408. Then, you hear, “Enter the phone number now,” for example, 3243000.
End of section.
#
#
Sending voice messages MM Online TUI Guide
Issue 1TUI Reference - 52 March 2003
INDEX GLOSSARY HELPCONTENTS
BACK NEXT
Sending voice messagesYou are guided through recording and sending voice messages by voice prompts.
When you compose a voice message, follow these basic steps:
1. Access your mailbox. For more information, see the Accessing your mailbox section.
2. Record your message. For more information, see the Recording voice messages section.
3. Address the message. For more information, see the Addressing voice messages section.
4. Specify delivery options, if required. For more information, see the Specifying delivery options section.
5. Send the message. For more information, see the Sending voice messages section.
Sending voice messages MM Online TUI Guide
Issue 1TUI Reference - 53 March 2003
INDEX GLOSSARY HELPCONTENTS
BACK NEXT
Recording voice messages
The telephone user interface automatically takes you through all the steps necessary for sending a voice message. The first step is to record the message.
To record a voice message
1. Access your mailbox. For more information, see the Accessing your mailbox section.
2. Press .
3. Record your message.
Notes:
To cancel a recording, press . You are returned to the Main menu.
4. When you are finished recording, press .
The Address Options menu is played. For more information, see the Addressing voice messages section.
Procedure completed.
2 2
*#
Sending voice messages MM Online TUI Guide
Issue 1TUI Reference - 54 March 2003
INDEX GLOSSARY HELPCONTENTS
BACK NEXT
Reviewing your recording
When reviewing your recording, you can choose to replay, pause, or cancel it.
To replay your recording
You can replay your recording at any time. Press while recording the message or after you have finished recording to replay your recording. Then, do one of the following:
Continue, press PAGE DOWN.
To do this PressContinue recording.
Finish your recording and play the Address Options menu.
Cancel your recording. You are returned to the Main menu.
1
2
#
*
Sending voice messages MM Online TUI Guide
Issue 1TUI Reference - 55 March 2003
INDEX GLOSSARY HELPCONTENTS
BACK NEXT
To pause your recording
You can pause your recording at any time. Press while recording the message to pause your recording. Then, do one of the following:
NOTE:Note:The system default is to pause your recording for 5 seconds.
Procedure completed.
To do this PressContinue recording.
Finish your recording and play the Address Options menu.
Cancel your recording. You are returned to the Main menu.
2
2
#
*
Sending voice messages MM Online TUI Guide
Issue 1TUI Reference - 56 March 2003
INDEX GLOSSARY HELPCONTENTS
BACK NEXT
Addressing voice messages
After you record a voice message, you are prompted to address the message. You can address a message to one or several recipients. When addressing a message, you can enter any of the following address types:
Local mailbox numbers.
Numeric addresses.
Recipients’ names spelled out by using Dial-by-Name.
Distribution lists.
NOTE:Note:Local mailbox numbers are numbers within your voice mail domain. A numeric address is a unique number for each subscriber in all voice mail domains within an organization.
Sending voice messages MM Online TUI Guide
Issue 1TUI Reference - 57 March 2003
INDEX GLOSSARY HELPCONTENTS
BACK NEXT
Entering local mailbox numbers or numeric addresses
Enter one or several addresses in the following way:
1. Enter the mailbox number or numeric address of the first recipient and press .
2. If you want to send the message to several people, enter the next mailbox number or numeric address and press .
3. Press after entering all addresses required.
Procedure completed.
NOTE:Note:If you have entered a wrong address, you can press to delete the last address
entered. You can then enter the correct address. If you press when no recipient
is specified, the message is deleted.
#
#
**
# #
Sending voice messages MM Online TUI Guide
Issue 1TUI Reference - 58 March 2003
INDEX GLOSSARY HELPCONTENTS
BACK NEXT
Searching for a recipient’s name
When you want to send a voice message but don’t know the recipient’s mailbox number, you can search for the recipient by using Dial-by-Name. With Dial-by-Name, you can spell a name using the keys on your telephone keypad.
To search for a recipient’s name
1. Call up Dial-by-Name by pressing whenever you are prompted to enter an address.
2. Begin spelling the recipient’s last name first.
The system then returns with one or more matches or tell you that no name was found.
Continue, press PAGE DOWN.
NOTE:Note:When spelling a name, enter the last and first name. Ignore any spaces, hyphens, or apostrophes that appear in the name.
#
Sending voice messages MM Online TUI Guide
Issue 1TUI Reference - 59 March 2003
INDEX GLOSSARY HELPCONTENTS
BACK NEXT
3. Use one of the following options:
Procedure completed.
To do this PressAccept your entry. The system attempts to find a match.Note: If up to nine matches are found, you hear the names listed. Sometimes you hear a spoken name. Sometimes the name is voiced using text-to-speech. Select the name from the list. If more than nine matches are found, you are requested to enter more letters. You can enter up to 20 letters.
Do one of the following:Clear your entry and enter a new name, if you have entered letters already.Exit Dial-by-Name, if you have not entered any letters.
Exit Dial-by-Name, if you entered any letters.
#
*
* *
Sending voice messages MM Online TUI Guide
Issue 1TUI Reference - 60 March 2003
INDEX GLOSSARY HELPCONTENTS
BACK NEXT
Addressing voice messages to a distribution list
You can use any system-wide distribution lists created by your system administrator by entering the numeric address of the distribution list. Press when you have entered all addresses.
Notes:
You can also use Dial-by-Name.
All distribution lists must be set up by your system administrator.
You can’t create a personal distribution list or use your personal address book through the telephone user interface.
# #
Sending voice messages MM Online TUI Guide
Issue 1TUI Reference - 61 March 2003
INDEX GLOSSARY HELPCONTENTS
BACK NEXT
Specifying delivery options
Before you send a voice message, you can assign a priority level or specify that you want the message to be sent at a future time.
The default priority level is normal. You change the priority level by pressing . Each time you press , the telephone user interface assigns the next priority level, as shown in the following diagram.
Continue, press PAGE DOWN.
22
Normal Urgent Low2 2
2
Sending voice messages MM Online TUI Guide
Issue 1TUI Reference - 62 March 2003
INDEX GLOSSARY HELPCONTENTS
BACK NEXT
After you’ve pressed to indicate the end of addressing, do one of the following:
Procedure completed.
To do this PressMark a message with normal priority as urgent.Note: Depending on your system settings, urgent messages may be delivered sooner.
Mark a message with normal priority as low priority.
Delay delivery of a message until a future time. For more information Sending future delivery messages.
# #
2
2 2
4
Sending voice messages MM Online TUI Guide
Issue 1TUI Reference - 63 March 2003
INDEX GLOSSARY HELPCONTENTS
BACK NEXT
Sending future delivery messages
A message can be scheduled for future delivery up to one year from the time at which it was created.
You send future delivery messages by specifying a date and time for delivery. Alternatively, you can specify the amount of time, in hours and minutes, by which you want to delay delivery of the message. The delay time starts at the time that you press to send the message.
Important:Once you have marked a message for future delivery and have pressed , the message is sent at the time you specified. You cannot choose not to send the message.
To specify a date and time for future delivery messages
1. From the Delivery Options menu, press to select the Future Delivery menu.
2. Press .
Continue, press PAGE DOWN.
#
#
4
1
Sending voice messages MM Online TUI Guide
Issue 1TUI Reference - 64 March 2003
INDEX GLOSSARY HELPCONTENTS
BACK NEXT
3. Enter the month by using one of the following options:
4. Enter the day of the month using one of the following options:
Continue, press PAGE DOWN.
To do this PressUse the current month.
Enter the month by pressing the appropriate key(s) in the range 1 (January) through 12 (December).
_
To do this PressUse the current day.
Enter the day of the month by pressing the appropriate key or keys in the range 1 (first day of the month) through 31 (last day of the month).Note: The maximum number you are allowed to enter can be lower depending on the month that you selected in Step 3.
_
#
1 1 2
#
1 3 1
Sending voice messages MM Online TUI Guide
Issue 1TUI Reference - 65 March 2003
INDEX GLOSSARY HELPCONTENTS
BACK NEXT
5. Enter the time by entering three or four digits.
6. Select AM or PM by selecting one of the following options:
Continue, press PAGE DOWN.
NOTE:Note:When entering the time, enter one or two digits for the hour (1 through 12), and two digits for the minutes (00 through 59). For example, if you want to send the message at 7:30, press
To do this PressSelect AM.
Select PM.
7 3 0
1
2
Sending voice messages MM Online TUI Guide
Issue 1TUI Reference - 66 March 2003
INDEX GLOSSARY HELPCONTENTS
BACK NEXT
To specify a delay for future delivery messages
1. From the Delivery Options menu, press for the Future Delivery menu.
2. Press .
3. Enter the number of hours by which you want the message to be delayed, by entering the appropriate number. You can delay delivery of a message by up to 8759 hours (one year).
4. Enter the number of minutes by which you want the message to be delayed, by entering the appropriate number. You can enter 0 through 59 minutes.
Procedure completed.
4
2
Sending voice messages MM Online TUI Guide
Issue 1TUI Reference - 67 March 2003
INDEX GLOSSARY HELPCONTENTS
BACK NEXT
Sending voice messages
After you record a message, address it, and specify delivery options, you are prompted to send it.
To send a voice message
Press on your keypad.
Important:If you hear “Message canceled” when sending a message, you have probably exceeded your mailbox limit or you have run out of disk space. In either case, you need to delete as many messages as possible before sending another message. Voice message files can take up a considerable amount of space in your mailbox.
Sending a voice message to a non-MM user
Before sending voice messages to non-Avaya Modular Messaging (MM) users, make sure that recipients’ PCs have multimedia play capabilities. A PC has multimedia play capabilities if it is equipped with a sound card and speakers to play back sound.
When sending voice messages, the system checks whether recipients have MM software installed on their PCs. If recipients are non-MM users, your voice message automatically has an e-mail message attached to it explaining what they must do to listen to your voice message.
End of section.
#
Sending Faxes MM Online TUI Guide
Issue 1TUI Reference - 68 March 2003
INDEX GLOSSARY HELPCONTENTS
BACK NEXT
Sending FaxesYou cannot actually create a fax using the MMS Telephone User Interface. However, you can send a fax to your mailbox from a fax machine and then forward the fax to other users.
Sending a fax to your mailbox from a fax machine
To send a fax to a mailbox from a fax machine:
1. Place the document in the fax machine.
2. Call the mailbox phone number using the handset of the fax machine.
3. At the mailbox greeting, press Start on your fax machine and hang up the handset.
4. See Sending a fax to other users.
NOTE:Note:You can also leave a voice message along with the fax. To do so, simply record your message after you hear the record prompt, then press Start as in Step 3.
Sending Faxes MM Online TUI Guide
Issue 1TUI Reference - 69 March 2003
INDEX GLOSSARY HELPCONTENTS
BACK NEXT
Sending a fax to other users
To send a fax to other users:
1. Send a fax to your mailbox. For more information, see page 68.
2. Access your mailbox. For more information, see page 5.
3. Review the message that contains the fax. For more information, see page 12.
4. Forward the message. For more information, see page 39.
Recording prompts and greetings MM Online TUI Guide
Issue 1TUI Reference - 70 March 2003
INDEX GLOSSARY HELPCONTENTS
BACK NEXT
Recording prompts and greetingsYou can set up the telephone user interface to play personalized prompts and greetings. Prompts are used when callers are transferred to your extension and you are unable to answer calls. Greetings assure callers that, although you are unable to take their call at the moment, you are checking your mailbox regularly and will return their calls. For more information, see the Personalizing your mailbox section.
Before setting these call handling options, you need to record or change the following prompts and greetings:
Personal greeting
Extended Absence greeting
Optional greetings
Please Hold prompt
Name prompt
Recording prompts and greetings MM Online TUI Guide
Issue 1TUI Reference - 71 March 2003
INDEX GLOSSARY HELPCONTENTS
BACK NEXT
Normally, greetings should include the following information:
Your name, department, and company.
A time or day when callers can expect a response.
An alternative contact for immediate assistance.
Depending on how your system is set up, you can also advise callers in your greeting that they can press to change the language in which the prompts are played that guide them through the system.
Personal greeting The Personal greeting can be used to add a personal touch when callers are transferred to your mailbox because your extension is busy or there is no answer.
To play your personal greeting, you don’t have to specify any call handling options. Once recorded, your personal greeting becomes your default. An example of a Personal greeting is, “Hi this is John, I’m sorry I can’t take your call right now. Please leave a message and I’ll return your call within 24 hours.” For more information, see the Recording prompts and greetings section.
7
Recording prompts and greetings MM Online TUI Guide
Issue 1TUI Reference - 72 March 2003
INDEX GLOSSARY HELPCONTENTS
BACK NEXT
Extended Absence greeting
Record an Extended Absence greeting to advise callers that you are away from the office and may be checking your mailbox infrequently. Callers are given the option to leave a message, enter another number, or are returned to the automated attendant. The Extended Absence greeting overrides all call handling and Intercom paging options.
Every time you dial in to your mailbox after recording the greeting, you are asked whether you want to turn the greeting off. The greeting is then deleted from the system. For more information, see the Recording prompts and greetings section.
NOTE:Note:If you don’t want to delete the Extended Absence greeting but want only to disable it, you can do so by using Subscriber Options. For more information, see the online help.
Recording prompts and greetings MM Online TUI Guide
Issue 1TUI Reference - 73 March 2003
INDEX GLOSSARY HELPCONTENTS
BACK NEXT
Optional greetings You can use your mailbox as a personalized answering system by recording one or both of the Optional greetings. You can choose to play these greetings if your extension is busy or if unanswered or incoming calls are blocked. “Hi, this is Amy Brown. I’m in a meeting and cannot receive your call right now” is an example of an Optional greeting. For more information on using Optional greetings, see the Personalizing your mailbox section. For information on recording, see the Recording prompts and greetings section.
NOTE:Note:You can use Optional greetings only if your system administrator has enabled call handling and it is supported by your PBX.
Please Hold prompt The Please Hold prompt informs callers of the extension they selected while they are being transferred to that extension. For example, a typical Please Hold prompt is, “Please hold for [name].” If you don’t record a Please Hold prompt, the caller hears “Please hold and someone will be with you shortly.” For more information, see the Recording prompts and greetings section.
Recording prompts and greetings MM Online TUI Guide
Issue 1TUI Reference - 74 March 2003
INDEX GLOSSARY HELPCONTENTS
BACK NEXT
Name prompt The Name prompt consists of your first and last name only. The system uses this prompt for telephone answering. For example, a caller is greeted by the phrase “Please leave a voice message for [name]” when your extension is busy or unanswered and you haven’t recorded a Personal greeting. The Name prompt identifies you as the message sender when you send a message to other users who use the voice form or the telephone user interface to listen to the message.
NOTE:Note:If you haven’t recorded your Name prompt or Personal greeting, the system uses text-to-speech to voice your mailbox display name.
For more information, see the Recording prompts and greetings section.
Recording prompts and greetings MM Online TUI Guide
Issue 1TUI Reference - 75 March 2003
INDEX GLOSSARY HELPCONTENTS
BACK NEXT
Recording or changing prompts and greetings
All prompts and greetings are recorded in exactly the same way.
To record or change prompts and greetings
1. Access your mailbox. For more information, see the Accessing your mailbox section.
2. Press to go to the Personal Configuration menu.
3. Press to go to the Record Prompts menu.
4. When prompted, choose the prompt or greeting you want to record or change by pressing one of the following:
4 4
1
Personal greeting
Extended Absence greetingAs soon as you record the Extended Absence greeting, it is automatically turned on.
Optional greeting 1
Optional greeting 2
Please Hold prompt
Spoken name
1
1
2
3
4
5
6
Recording prompts and greetings MM Online TUI Guide
Issue 1TUI Reference - 76 March 2003
INDEX GLOSSARY HELPCONTENTS
BACK NEXT
5. Do one of the following:
Record the new prompt or greeting.
Change an existing prompt or greeting by listening to the existing prompt or greeting and then doing one of the following:
6. Use the playback controls, if required. For more information, see the Using playback controls during recording section.
7. Press to return to the Personal Configuration menu.
Procedure completed.
To do this PressAccept the existing recording.
Re-record the prompt or greeting.
Delete the prompt or greeting.
NOTE:Note:The maximum length of the Name prompt is 7 seconds. The maximum length of all other prompts is set by your system administrator.
1
2
3
*
Recording prompts and greetings MM Online TUI Guide
Issue 1TUI Reference - 77 March 2003
INDEX GLOSSARY HELPCONTENTS
BACK NEXT
Using playback controls during recording
During recording you can pause and replay your recording.
To replay your recording
1. Press to replay your recording.
2. To continue recording, press .
3. When you are finished recording, press .
4. If you want to re-record the prompt or greeting, press .
To pause your recording
1. Press to pause during your recording.
2. To continue recording, press .
3. When you have finished recording, press .
4. If you want to re-record the prompt or greeting, press .
End of section.
1
2
#
*
2
2
#
*
Personalizing your mailbox MM Online TUI Guide
Issue 1TUI Reference - 78 March 2003
INDEX GLOSSARY HELPCONTENTS
BACK NEXT
Personalizing your mailboxThe system default is to answer calls when your extension is busy or when there is no answer. You can customize call handling to meet your requirements.
You can do the following:
Choose a greeting to be played when you are away from the office for an extended period of time. See the Turning on the Extended Absence greeting section.
Block all incoming calls. See the Blocking all incoming calls section.
Choose a greeting to be played when your extension is not answered or your extension is busy. See the Selecting an optional greeting section.
Screen your calls. See the Screening your calls section.
Be intercom paged when your extension is not answered. See the Turning on intercom paging section.
NOTE:Note:Depending on your system configuration, some options may not be available to you. For more information, contact your system administrator.
Personalizing your mailbox MM Online TUI Guide
Issue 1TUI Reference - 79 March 2003
INDEX GLOSSARY HELPCONTENTS
BACK NEXT
Turning on the Extended Absence greeting
When you are away from the office for any length of time, you can inform callers of your absence and ask them to leave a message.
If you use this option, the greetings set for when your extension is not answered or busy are ignored. The system returns to the settings specified for these options as soon as you no longer have an Extended Absence greeting.
To turn on an Extended Absence greeting
1. Access your mailbox. For more information, see the Accessing your mailbox section.
2. Press to go to the Personal Configuration menu.
3. Press to go to the Record Prompts menu.
4. Press to record your Extended Absence Greeting.
5. Press to accept the recording. The Extended Absence greeting is turned on.
NOTE:Note:The next time you access your mailbox you are asked whether you want to turn the Extended Absence Greeting off. When you turn the Extended Absence greeting off, it is automatically deleted from the system.
4 4
1 1
22
1
Personalizing your mailbox MM Online TUI Guide
Issue 1TUI Reference - 80 March 2003
INDEX GLOSSARY HELPCONTENTS
BACK NEXT
Blocking all incoming calls
You can block all incoming calls to your extension and select the prompt that callers will hear.
To block all incoming calls
1. Access your mailbox. For more information, see the Accessing your mailbox section.
2. Press to go to the Personal Configuration menu.
3. Press to go to the Call Handling menu.
4. Press to block all incoming calls.
Notes:
This option is available only if your system administrator has enabled it for you.
Only calls through the automated attendant are blocked. Calls placed directly to your extension are not affected.
If you use this option, greetings set for when your extension is not answered or busy are ignored. The system returns to the settings specified for these options as soon as you no longer block calls to your extension.
4 4
3 3
1 1
Personalizing your mailbox MM Online TUI Guide
Issue 1TUI Reference - 81 March 2003
INDEX GLOSSARY HELPCONTENTS
BACK NEXT
5. Then, do one of the following:
6. Press to return to the Personal Configuration menu.
NOTE:Note:If you no longer want to block incoming calls, press when you are in the Call Handling menu. You are returned to the default call handling setup.
Procedure completed.
To do this PressActivate Optional greeting 1.
Activate Optional greeting 2.
Notes:
If you select a greeting but haven’t recorded it, you are prompted to do so at this time. For more information, see the Recording or changing prompts and greetings section.
If you select an Optional greeting for this option and then delete the greeting, the setting is lost, and the system returns to the default settings.
1
2
*
9
Personalizing your mailbox MM Online TUI Guide
Issue 1TUI Reference - 82 March 2003
INDEX GLOSSARY HELPCONTENTS
BACK NEXT
Selecting an optional greeting
By default and if recorded, callers hear your Personal greeting when your extension is not answered. You can change this default by specifying to play Optional greeting 1 or Optional greeting 2 instead. Whether you can use Optional greetings depends on your PBX integration.
NOTE:Note:This option is available only if your system administrator has given you access to change it and you are not blocking incoming calls. If you are blocking incoming calls, this option is ignored.
To select a greeting when your extension is not answered
1. Access your mailbox. For more information, see the Accessing your mailbox section.
2. Press to go to the Personal Configuration menu.
3. Press to go to the Call Handling menu.
4. Press to change the greeting played when your extension is not answered.
Continue, press PAGE DOWN.
4 4
3 3
2 2
Personalizing your mailbox MM Online TUI Guide
Issue 1TUI Reference - 83 March 2003
INDEX GLOSSARY HELPCONTENTS
BACK NEXT
5. Then, do one of the following:
6. Press to return to the Personal Configuration menu.
Procedure completed.
To do this PressActivate Optional greeting 1.
Activate Optional greeting 2.
Notes:
If you select an Optional greeting that isn’t yet recorded, you are prompted to record it now. For more information, see the Recording or changing prompts and greetings section.
If you select an Optional greeting for this option and then delete the greeting, the setting is lost, and the system returns to the default settings.
1
2
*
Personalizing your mailbox MM Online TUI Guide
Issue 1TUI Reference - 84 March 2003
INDEX GLOSSARY HELPCONTENTS
BACK NEXT
To select a greeting when your extension is busy
1. Access your mailbox. For more information, see the Accessing your mailbox section.
2. Press to go to the Personal Configuration menu.
3. Press to go to the Call Handling menu.
4. Press to change the greeting played when your extension is busy.
Continue, press PAGE DOWN.
4 4
3 3
3 3
Personalizing your mailbox MM Online TUI Guide
Issue 1TUI Reference - 85 March 2003
INDEX GLOSSARY HELPCONTENTS
BACK NEXT
5. Then, do one of the following:
6. Press to return to the Personal Configuration menu.
Procedure completed.
To do this PressActivate Optional greeting 1.
Activate Optional greeting 2.
Notes:
If you select an Optional greeting that isn’t recorded yet, you are prompted to record it now. For more information, see the Recording or changing prompts and greetings section.
If you select an Optional greeting for this option and then delete the greeting, the setting is lost, and the system returns to the default settings.
1
2
*
Personalizing your mailbox MM Online TUI Guide
Issue 1TUI Reference - 86 March 2003
INDEX GLOSSARY HELPCONTENTS
BACK NEXT
Reviewing active call handling options
If you are unsure of which call handling options you have set up, you can review the options you have selected.
NOTE:Note:This option is available only if you have set up customized call handling options.
To review active call handling options
1. Access your mailbox. For more information, see the Accessing your mailbox section.
2. Press to go to the Personal Configuration menu.
3. Press to go to the Call Handling menu.
4. Press to review any active options.
5. Press to return to the Personal Configuration menu.
Procedure completed.
4 4
3 3
8 8
*
Personalizing your mailbox MM Online TUI Guide
Issue 1TUI Reference - 87 March 2003
INDEX GLOSSARY HELPCONTENTS
BACK NEXT
Returning to default call handling
You can return to the system defaults for call handling. The system defaults are to put calls through to your extension and to play the Personal greeting when your extension is busy or when there is no answer.
NOTE:Note:You hear this option only if you have blocked all incoming calls or chosen an Optional greeting to be played when your extension is busy or not answered.
To return to default call handling
1. Access your mailbox. For more information, see the Accessing your mailbox section.
2. Press to go to the Personal Configuration menu.
3. Press to go to the Call Handling menu.
4. Press to cancel all call handling options and return to the system default.
5. Press to return to the Personal Configuration menu.
Procedure completed.
4 4
3 3
9 9
*
Personalizing your mailbox MM Online TUI Guide
Issue 1TUI Reference - 88 March 2003
INDEX GLOSSARY HELPCONTENTS
BACK NEXT
Screening your calls
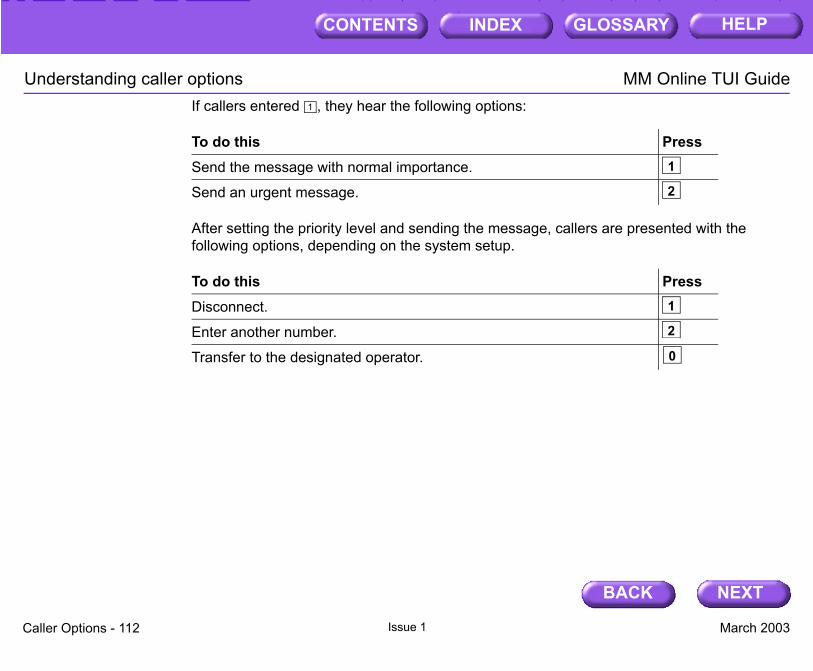
You can set up the telephone user interface so that callers have to announce themselves before you answer their calls. You can then decide whether to take the call. The caller hears, “Please speak your name at the tone, so I may say who is calling.” Before the caller is transferred you hear, “Call from [name]. To accept the call, press . To reject the call, press
.”
If you screen calls but are not at your desk to pick up your calls, callers are offered the choice of leaving a message or of being diverted to a different extension or to the operator.
Notes:
This option is available only if your system administrator has set your system up to use it.
This option applies only to calls coming through the automated attendant. Calls placed directly to your extension are not affected.
#1
Personalizing your mailbox MM Online TUI Guide
Issue 1TUI Reference - 89 March 2003
INDEX GLOSSARY HELPCONTENTS
BACK NEXT
To screen your calls
1. Access your mailbox. For more information, see the Accessing your mailbox section.
2. Press to go to the Personal Configuration menu.
3. Press to go to the Special Features menu.
4. Press to screen your calls.
5. When calls are announced, you can do one of the following:
6. Press to return to the Personal Configuration menu.
NOTE:Note:If you no longer want to screen calls, press when you are in the Special Features menu. All calls are then put through to your extension as usual.
4 4
2 2
5
To do this PressAccept a call.
Reject a call.The caller is told that there is no answer at your extension and has the opportunity to try another extension, leave a message, or transfer to the operator.
5
#
1
*
5
Personalizing your mailbox MM Online TUI Guide
Issue 1TUI Reference - 90 March 2003
INDEX GLOSSARY HELPCONTENTS
BACK NEXT
Turning on intercom paging
You can set the system so that you are automatically paged by intercom when your telephone is not answered. Once you are paged, you must return to your extension to pick up the call. Callers are able to leave messages only if you can’t be paged.
Notes:
This option is available only if your system administrator has set your system up to use it and your PBX supports Intercom paging. For more information, check with your system administrator.
This option is ignored if the Extended Absence greeting has been switched on.
If you have specified call handling options, the call handling options take priority over intercom paging.
Personalizing your mailbox MM Online TUI Guide
Issue 1TUI Reference - 91 March 2003
INDEX GLOSSARY HELPCONTENTS
BACK NEXT
To turn on intercom paging
1. Access your mailbox. For more information, see the Accessing your mailbox section.
2. Press to go to the Personal Configuration menu.
3. Press to go to the Special Features menu.
4. Press to hear the intercom paging options.
5. Then, do one of the following:
6. Press to return to the Personal Configuration menu.
Procedure completed.
4 4
2 2
7
To do this PressTurn off intercom paging.
Turn on intercom paging. If you choose this option and have not specified call handling options, callers are asked whether they want you to be paged.
Set intercom paging to Automatic. If there is no answer at your extension, you are paged automatically. Call handling options are offered only if you don’t respond to being paged.
7
1
2
3
*
Personalizing your mailbox MM Online TUI Guide
Issue 1TUI Reference - 92 March 2003
INDEX GLOSSARY HELPCONTENTS
BACK NEXT
Reviewing active Special Feature options
If you are unsure of which Special Feature options you have set up, you can review the options you have selected.
NOTE:Note:This option is available only if you have set up call screening or intercom paging options.
To review active Special Feature options
1. Access your mailbox. For more information, see the Accessing your mailbox section.
2. Press to go to the Personal Configuration menu.
3. Press to go to the Special Features menu.
4. Press to review any active options.
5. Press to return to the Personal Configuration menu.
Procedure completed.
4 4
2 2
9 9
*
Personalizing your mailbox MM Online TUI Guide
Issue 1TUI Reference - 93 March 2003
INDEX GLOSSARY HELPCONTENTS
BACK NEXT
Reviewing announcements
You can review, record and re-record any announcements that you have recorded for a caller application.
NOTE:Note:This option is only available if your system administrator has set you up to use caller applications.
To review announcements
1. Access your mailbox. For more information, see the Accessing your mailbox section.
2. Press to go to the Personal Configuration menu.
3. Press to go to the Review Announcements menu.
You are told how many announcements are recorded and asked to enter the number of an announcement to review.
Continue, press PAGE DOWN.
4 4
55
Personalizing your mailbox MM Online TUI Guide
Issue 1TUI Reference - 94 March 2003
INDEX GLOSSARY HELPCONTENTS
BACK NEXT
4. Enter the number of the announcement you want to review.
If the announcement exists, the system plays the announcement.
If the announcement does not exist, you are invited to record an announcement.
Note:Make a note of the number and content of each announcement that you record.
5. Then do one of the following:
6. Press to return to the Personal Configuration menu.
Procedure completed.
To do this PressAccept the current announcement.
Record or re-record an announcement.
Delete an announcement.
1
2
3
*
Personalizing your mailbox MM Online TUI Guide
Issue 1TUI Reference - 95 March 2003
INDEX GLOSSARY HELPCONTENTS
BACK NEXT
Changing your password
Setting up a password is a security measure to restrict access to your mailbox by unauthorized callers through the telephone user interface. This is important because an unauthorized caller may otherwise gain access to your voice, e-mail, and fax messages.
Depending on how your system administrator has set up your system, you may be prompted to change your password at regular intervals. If not, it is strongly recommended that you change your password at regular intervals. You can change your password at any time through the telephone user interface or by using Subscriber Options.
NOTE:Note:When you access your mailbox for the first time through the telephone user interface, make sure that your system administrator has provided you with the default password.
Personalizing your mailbox MM Online TUI Guide
Issue 1TUI Reference - 96 March 2003
INDEX GLOSSARY HELPCONTENTS
BACK NEXT
Password rules These are the rules for selecting a password:
Passwords must be numeric.
Passwords cannot be the same as the mailbox number.
Passwords cannot include leading zeros, , or .
Note:You cannot use a password that begins with 0 (zero). If you enter zero at the password prompt, the system will either ask you to enter another password or will disconnect you.
The minimum length of the password is specified by your system administrator. If you enter a password that is shorter than the minimum number of digits, you receive an error message and are prompted to start again. The maximum length is 32 digits.
If you enter the wrong password for a set number of times specified by your system administrator, you are locked out of the system. In this case, you must contact your system administrator to reset your mailbox.
When changing your password, you cannot use the same password. It is also recommended that you don’t reuse any previous password.
If your password expires, you are prompted to change it before you can send or retrieve messages through the telephone user interface.
* #
Personalizing your mailbox MM Online TUI Guide
Issue 1TUI Reference - 97 March 2003
INDEX GLOSSARY HELPCONTENTS
BACK NEXT
To change your password
1. Access your mailbox. For more information, see the Accessing your mailbox section.
2. Press to go to the Personal Configuration menu.
3. Press to change your password.
4. Enter your new password.
5. Press .
6. Re-enter your password.
7. Press again.
End of section.
4 4
9
NOTE:Note:If the two passwords don’t match, you are prompted to try again.
9
#
#
Setting Notify Me MM Online TUI Guide
Issue 1TUI Reference - 98 March 2003
INDEX GLOSSARY HELPCONTENTS
BACK NEXT
Setting Notify MeWith Notify Me, you can use a pager, SMS-enabled digital phone, or other device to alert you when a call is placed to your extension.
There are two types of Notify Me:
Caller requested notification
If Notify Me is set to Caller requested notification, callers can request that you be notified that they called.
Automatic notification
If Notify Me is set to Automatic notification, you can determine whether you should be notified either when any caller has left a message in your mailbox or only when callers leave urgent messages.
Setting Notify Me MM Online TUI Guide
Issue 1TUI Reference - 99 March 2003
INDEX GLOSSARY HELPCONTENTS
BACK NEXT
Setting caller requested notification
Depending on your system configuration, you can set Notify Me to allow callers to have you notified that they called.
You can set the message content to be sent to your notification device in Subscriber Options. For more information, see the Subscriber Options online help. The default message is the caller’s phone number.
To set caller requested notification
1. Access your mailbox. For more information, see the Accessing your mailbox section.
2. Press to go to the Personal Configuration menu.
3. Press to go to the Special Features menu.
4. Press to go to the Notify Me menu.
5. Press to enable caller requested notification.
6. Press to return to the Notify Me menu.
Procedure completed.
4 4
2 2
4
Note: To disable caller requested notification, select again.
4
1
1
*
Setting Notify Me MM Online TUI Guide
Issue 1TUI Reference - 100 March 2003
INDEX GLOSSARY HELPCONTENTS
BACK NEXT
Setting automatic notification
Depending on your system configuration, you can set Notify Me to notify you automatically if a caller leaves a message in your mailbox. You can decide whether you are notified of all messages or of urgent messages only.
You can set the message content to be sent to your notification device in Subscriber Options. For more information, see the Subscriber Options online help. The default message is the caller’s phone number.
To set automatic notification
1. Access your mailbox. For more information, see the Accessing your mailbox section.
2. Press to go to the Personal Configuration menu.
3. Press to go to the Special Features menu.
4. Press to go to the Notify Me menu.
5. Press to go to the Automatic Notification menu.
Continue, press PAGE DOWN.
4 4
2 2
4 4
2
Setting Notify Me MM Online TUI Guide
Issue 1TUI Reference - 101 March 2003
INDEX GLOSSARY HELPCONTENTS
BACK NEXT
6. Do one of the following:
7. Press to return to the Personal Configuration menu.
Procedure completed.
To do this PressTurn off automatic notification.
Be notified of all phone messages.
Be notified of urgent phone messages only.
Exit this menu.
1
2
3
**
Enabling rules MM Online TUI Guide
Issue 1TUI Reference - 102 March 2003
INDEX GLOSSARY HELPCONTENTS
BACK NEXT
Enabling rulesYou can set up the system to alert you of calls or new messages by using Find Me and Call Me.
Find Me
With Find Me, you can set up rules to enable your mailbox to redirect unanswered calls to a list of phone numbers. Calls are directed to each phone number in the list, unless you answer. If you do not answer at any number in the list, callers are asked if they would like to leave a message.
Call Me
With Call Me, you can set up rules to enable your mailbox to call you at a designated phone number, each time you receive a message that meets certain criteria. For example, you may choose to be notified on your cell phone each time you receive an urgent message during your morning commute. When you receive a Call Me notification, you are invited to log in to your mailbox to review the message.
You set up rules for Find Me and Call Me in the Subscriber Options, Assistant page. For more information, see the Subscriber Options online help.
NOTE:Note:These options are available only if your system administrator has set your system up to use them.
Enabling rules MM Online TUI Guide
Issue 1TUI Reference - 103 March 2003
INDEX GLOSSARY HELPCONTENTS
BACK NEXT
Enabling Find Me
With Find Me you can set up rules to enable your mailbox to redirect unanswered calls to a list of phone numbers. Calls are directed to each phone number in the list, unless you answer. If you do not answer at any number in the list, callers are asked if they would like to leave a message.
You set up Find Me rules in Subscriber Options. For more information, see the online help.
To enable Find Me
1. Access your mailbox. For more information, see the Accessing your mailbox section.
2. Press to go to the Personal Configuration menu.
3. Press to go to the Special Features menu.
4. Press to go to the Find Me menu.
5. Press to enable Find Me.
6. Press to return to the Personal Configuration menu.
Procedure completed.
4 4
2 2
2
Note: If Find Me is already enabled, press to disable it.
2
1
1
*
Enabling rules MM Online TUI Guide
Issue 1TUI Reference - 104 March 2003
INDEX GLOSSARY HELPCONTENTS
BACK NEXT
Enabling Call Me
With Call Me you can set up rules to enable your mailbox to call you at a designated phone number, each time you receive a message that meets certain criteria. For example, you can choose to be notified on your cell phone each time you receive an urgent message during your morning commute. When you receive a Call Me notification, you are invited to log in to your mailbox in order to review the message.
You set Call Me rules in Subscriber Options. For more information, see the online help.
To enable Call Me
1. Access your mailbox. For more information, see the Accessing your mailbox section.
2. Press to go to the Personal Configuration menu.
3. Press to go to the Special Features menu.
4. Press to go to the Call Me menu.
5. Press to enable Call Me.
6. Press to return to the Personal Configuration menu.
4 4
2 2
3
Note: If Call Me is already enabled, press to disable it.
3
1
1
*
Changing the fax number MM Online TUI Guide
Issue 1TUI Reference - 105 March 2003
INDEX GLOSSARY HELPCONTENTS
BACK NEXT
Changing the fax numberYou can change the default fax telephone number for printing fax and e-mail messages.
To change the default fax telephone number
1. Access your mailbox. For more information, see the Accessing your mailbox section.
2. Press to go to the Personal Configuration menu.
3. Press for fax options.
Continue, press PAGE DOWN.
4 4
4 4
Changing the fax number MM Online TUI Guide
Issue 1TUI Reference - 106 March 2003
INDEX GLOSSARY HELPCONTENTS
BACK NEXT
4. Enter the new fax telephone number in one of the following two ways:
Enter the phone number of the fax device including the country and area code, if required, for example, 14083243000.
Enter the country code, the area code, and the phone number of the fax device separately.
You hear, “Enter a country code now or to use <yyy>, press ,” where yyy is the default country code, for example, 1. You are then prompted to “Enter the area code now or to use <zzz>, press ,” where zzz is the default area code, for example, 408. Then, you hear, “Enter the phone number now”, for example, 3243000.
All fax messages are sent to the default fax device for printing unless you specify an alternative fax number before printing fax or e-mail messages to a fax device. If you specify an alternative fax number, messages are sent to this fax device for this session only.
CAUTION:Although the system tells you when a fax or message is queued to a print destination, do not delete the message until you confirm that printing is successful. Printing can still fail after the print job has queued.
End of section.
#
#
Changing the fax number MM Online TUI Guide
Issue 1TUI Reference - 107 March 2003
INDEX GLOSSARY HELPCONTENTS
BACK NEXT
Understanding caller options MM Online TUI Guide
Issue 1Caller Options - 108 March 2003
INDEX GLOSSARY HELPCONTENTS
BACK NEXT
INDEX GLOSSARY HELPCONTENTS
Understanding caller optionsWhen callers call in to the Avaya Modular Messaging (MM) system they are presented with either the automated attendant or the call answering interface.
If your telephone system supports Direct Inward Dialing (DID or DDI), callers bypass the automated attendant main menu since DID enables the caller to dial your extension directly. If your extension is busy or unanswered, callers can leave a message directly in your mailbox.
If your telephone system does not support DID, external callers must dial in to your organization’s access number. They are then presented with the automated attendant. For more information, see the Calling through the automated attendant section.
Understanding caller options MM Online TUI Guide
Issue 1Caller Options - 109 March 2003
INDEX GLOSSARY HELPCONTENTS
BACK NEXT
INDEX GLOSSARY HELPCONTENTS
Calling through the automated attendant
If your telephone system does not support DID, external callers must dial in to your organization’s access number. The automated attendant then guides callers through the available options from the menus.
Depending on your system configuration, external callers are taken to your mailbox or presented with the following options.
Options when there is no answer at an extension
If there is no answer at the extension, callers are presented with the following options, depending on the system setup.
To do this PressDial a new extension.
Leave a voice message.
Request the operator’s assistance, if applicable. or
Page the subscriber, if the subscriber has turned on intercom paging.
Notify the subscriber.
Cancel the selection.
1
2
3 0
49
*
Understanding caller options MM Online TUI Guide
Issue 1Caller Options - 110 March 2003
INDEX GLOSSARY HELPCONTENTS
BACK NEXT
INDEX GLOSSARY HELPCONTENTS
Options when an extension is busy
If the extension is busy, callers are presented with the following options, depending on the system setup.
Options while recording a message
While recording a message, callers can use the following playback controls.
To do this PressDial a new extension.
Leave a voice message.
Dial the same extension.
Request the operator’s assistance, if applicable.
Notify subscriber.
Cancel the selection.
1
2
30
9
*
To do this PressReplay the message.
Pause the message.
Finished recording.
Request the operator’s assistance, if applicable.
Cancel the message.
1
2
#
0
*
Understanding caller options MM Online TUI Guide
Issue 1Caller Options - 111 March 2003
INDEX GLOSSARY HELPCONTENTS
BACK NEXT
INDEX GLOSSARY HELPCONTENTS
Options after completing message recording
After callers are finished recording messages and enter , they can use the following options.
NOTE:Note:The following options are available only if the caller leaves a message directly in the subscriber’s mailbox. They cannot be used if the caller records a message by selecting option in the Main menu.
To do this PressSend the message.
Replay the message.The message is played back and the menu is repeated.
Erase and rerecord the message.The “At the tone, please record your message” prompt is repeated, and callers can re-record their message.
Append to a message already recorded.Callers can append to a message they have already recorded.
Cancel.
#
2
1
2
3
4
*
Understanding caller options MM Online TUI Guide
Issue 1Caller Options - 112 March 2003
INDEX GLOSSARY HELPCONTENTS
BACK NEXT
INDEX GLOSSARY HELPCONTENTS
If callers entered , they hear the following options:
After setting the priority level and sending the message, callers are presented with the following options, depending on the system setup.
To do this PressSend the message with normal importance.
Send an urgent message.
To do this PressDisconnect.
Enter another number.
Transfer to the designated operator.
1
1
2
1
2
0
Understanding caller options MM Online TUI Guide
Issue 1Caller Options - 113 March 2003
INDEX GLOSSARY HELPCONTENTS
BACK NEXT
INDEX GLOSSARY HELPCONTENTS
Transferring callers to a mailbox
When you pick up a call, you can transfer a caller directly to the mailbox of a subscriber.
To transfer a caller to a mailbox
1. Put the caller on hold.
2. Transfer the caller to the MM access number.
3. Do one of the following:
If you are transferring from an extension that has an associated MM mailbox, press , then go to Step 4.
If you are transferring from an extension without an associated MM mailbox, go to Step 4.
4. Press .
5. Enter the number of the mailbox to which the caller wants to be transferred.
6. Complete the transfer.
*
# #
Understanding caller options MM Online TUI Guide
Issue 1Caller Options - 114 March 2003
INDEX GLOSSARY HELPCONTENTS
BACK NEXT
INDEX GLOSSARY HELPCONTENTS
Transferring faxes to your mailbox
If you hear fax tones when you pick up a call, do one of the following to receive the fax:
To send the fax to your inbox, transfer the call to your own extension number. To transfer a call, you must use the specific transfer feature of you telephone system. For example, if your telephone system is an Avaya S8300 Media Server, you normally press the Transfer button, dial your extension, and press Transfer again.
To print the fax directly, transfer the call to your fax machine number in the same way you would transfer the call to your extension.
Understanding caller options MM Online TUI Guide
Issue 1Caller Options - 115 March 2003
INDEX GLOSSARY HELPCONTENTS
BACK NEXT
INDEX GLOSSARY HELPCONTENTS
Caller applications
Caller applications are used to customize the call answering interface. Caller applications can extend the functions of the Automated Attendant or be attached to an individual mailbox.
If the subscriber’s system has been customized using caller applications, incoming external callers can be:
Played a message.
Transferred to a customized menu.
Routed to a specified extension.
Routed to a specified mailbox.
Transferred to another caller application.
Transferred to the operator.
Disconnected from the system.
Understanding caller options MM Online TUI Guide
Issue 1Caller Options - 116 March 2003
INDEX GLOSSARY HELPCONTENTS
BACK NEXT
INDEX GLOSSARY HELPCONTENTS
Calling a Teletypewriter enabled mailbox
If you call a mailbox enabled for Teletypewriter (TTY) you hear an announcement telling you that the mailbox is enabled for TTY.
To do this PressLeave a message using spoken English.
Leave a message using TTY English.
Cancel.
1
2
*
Understanding caller options MM Online TUI Guide
Issue 1Caller Options - 117 March 2003
INDEX GLOSSARY HELPCONTENTS
BACK NEXT
INDEX GLOSSARY HELPCONTENTS
Calling Find Me
If you call a mailbox that is enabled for Find Me and the call is not answered, you hear an announcement telling you that the system is trying to locate the person you have called. You are asked for your name and given the option to leave a message. You are invited to hold while the system tries a list of alternative numbers to locate the person you are calling.
To do this PressLeave a message.
Cancel.
1
*
INDEXCONTENTS HELP
Issue 1 March 2003Glossary - 118
A B C D E F G H I J K L M N O P Q R S T U V W X Y Z
BACK NEXT
MM Online TUI Guide
Glossary
Access number The number you dial to get into your voice mail system.
Announcement A prompt that is used by a caller application and is stored in a subscriber's mailbox. Up to 99 announcements are permitted per subscriber.
Automated attendant
An automated service that does the work of a receptionist. It greets callers and instructs them on how to proceed. The automated attendant also allows you to screen calls and use intercom paging.
Automatic notification
If Notify Me is set to Automatic notification, you can determine whether you should be notified if callers have left a message in your mailbox or if callers have left urgent messages only.
Call Me A feature that enables your mailbox to call you at a designated phone number each time you receive a message that meets certain criteria. For example, you can choose to be notified on your cell phone Call Me notification, you are invited to log in to your mailbox in order to review the message.
Call handling A feature that can be set up to screen or block calls and to specify what greetings are played when an extension is busy or not answered.
Call screening A call handling option that requires callers to announce themselves before a call is answered. If a call is screened and you are not at your desk to answer it, the caller has the choice of leaving a message or being forwarded to a different extension or to the operator.
Issue 1 March 2003Glossary - 119
A B C D E F G H I J K L M N O P Q R S T U V W X Y Z
INDEXCONTENTS HELP
BACK NEXT
INDEXCONTENTS HELP
MM Online TUI Guide
Caller applications Extensions to the telephone user interface used to customize how the system interacts with callers.
Caller requested notification
If Notify Me is set to Caller requested notification, callers are asked if they wish to have you notified that they called.
Dial-by-Name A method of addressing that enables callers to spell the recipient's name, or e-mail alias, on the telephone keypad when using the telephone user interface.
DID Short for Direct Inward Dialing. Using DID, you can dial inside an organization to reach a telephone extension directly without going through a receptionist.
Distribution list A name assigned to a group of recipients. When you address a message to a distribution list, each recipient in the list receives the message.
Tutorial The setup tutorial that guides you through personalizing your mailbox. You only hear it the first time you dial in to your mailbox.
Envelope information
Information that shows the name of the person who sent a message, the date and time sent, and the message length.
Extended absence greeting
A greeting that advises callers that you are away from the office and may be checking messages infrequently.
Issue 1 March 2003Glossary - 120
A B C D E F G H I J K L M N O P Q R S T U V W X Y Z
INDEXCONTENTS HELP
BACK NEXT
INDEXCONTENTS HELP
MM Online TUI Guide
Find Me A feature that enables your mailbox to redirect unanswered calls to a list of phone numbers. Calls are directed to each phone number in the list, unless you answer. If you do not answer at any phone number in the list, callers are asked if they would like to leave a message.
Forward A command that is used to forward a copy of a message. You can include your comments in the message by attaching a voice message.
Greetings The message that callers hear when your extension is busy or not answered or you are away from the office.
Global System for Mobile Communications (GSM)
A format for storing sound files. Files encoded in this format can be opened by using the Microsoft Sound Recorder.
Inbox A folder in which you normally receive your new mail.
Intercom paging A method of automatically paging you if you are not at your desk. If you don’t respond to the page, the caller is transferred to your mailbox.
Local mailbox number
A method of addressing voice messages through the telephone user interface to recipients in a voice mail domain.
Mailbox Enables you to send and receive voice messages and listen to e-mail messages.
Issue 1 March 2003Glossary - 121
A B C D E F G H I J K L M N O P Q R S T U V W X Y Z
INDEXCONTENTS HELP
BACK NEXT
INDEXCONTENTS HELP
MM Online TUI Guide
Multi-part message A message that consists of several parts. Every time you forward a voice message or reply to a voice message including the original, a new part is added to the original message.
Notify Me A feature that enables you to use a pager, SMS-enabled digital phone, or other device to alert you to calls to your inbox.
Numeric address A string of digits that uniquely identifies a recipient or a distribution list across the organization. A numeric address is used by the telephone user interface as a means of addressing a message.
Optional greetings A personalized answering system for greeting callers if your extension is busy or unanswered, or if incoming calls are blocked.
Issue 1 March 2003Glossary - 122
A B C D E F G H I J K L M N O P Q R S T U V W X Y Z
INDEXCONTENTS HELP
BACK NEXT
INDEXCONTENTS HELP
MM Online TUI Guide
Password You must enter your password to gain access to the system through the telephone user interface. You can change your password through the telephone user interface or in Subscriber Options.
PBX Short for Private Branch Exchange. A telephone exchange local to a particular organization that uses, rather than provides, telephone services.
PBX integration PBX integration establishes communication between the PBX and the voice mail system. The PBX supplies information such as who is calling on internal calls and the extension that the caller is trying to reach.
Personal greeting A personalized prompt that greets callers when they are transferred to your mailbox if the extension is busy or if there is no answer.
Playback controls CD-type controls with which you can play, pause, forward, and rewind messages.
Please hold prompt A personalized prompt which informs callers of the extension they selected when they are transferred to an extension.
Private messages Messages that are marked private. You cannot send private messages through the telephone user interface. However, you can reply to and forward private messages through the telephone user interface.
Prompts A spoken greeting or instruction that directs callers whose calls have come through the automated attendant.
Issue 1 March 2003Glossary - 123
A B C D E F G H I J K L M N O P Q R S T U V W X Y Z
INDEXCONTENTS HELP
BACK NEXT
INDEXCONTENTS HELP
MM Online TUI Guide
Properties See Envelope information.
Replying Use to reply to a message. Normally, the original message is not included in your reply.
Sent items folder A folder in your e-mail application that normally stores a copy of each message you sent.
Spoken name A personalized prompt that states your name when, for example, your extension is busy or unanswered and you haven’t recorded a Personal greeting.
Subscriber Options An application that allows you to configure your mailbox from your PC. You can record all personal greetings, personalize your call handling options, and select the audio device for voice mail recording and playback (multimedia or telephone).
Subscriber prompt Prompts that are stored in a subscriber's mailbox (these are sometimes referred to as announcements).
Telephone user interface
An interface through which you and other callers can access the system from a telephone.
Text-to-speech The conversion of text into speech (speech synthesis). Using the text-to-speech facility, you can listen to your e-mail messages over the telephone.
Voice mail domain A group of messaging application servers that share a common set of properties. All subscribers who are provided with telephone answering by these messaging servers are also said to “belong” to the same voice mail domain.
CONTENTS HELPGLOSSARY
Issue 1 March 2003Index - 124
A B C D E F G H I J K L M N O P Q R S T U V W X Y Z
BACK NEXT
Index MM Online TUI Guide
IndexAAccess number, definitionaddressing
Dial-by-Namedistribution listlocal mailbox numbersnumeric addressessearching for recipient’s namevoice messages
announcementdefinition
automated attendantdefinition
Bblocking calls
Ccall handling
definitionreverting to defaultreviewing customized settingssetting up
printing listing to fax destinationintercom paging
definitionreviewing settingssetting
Llistening to
private messagesSee also reviewing
local mailbox numbersdefinitionentering
Mmailbox
accessingdefinitionexitingpersonalizingtransferring a caller totransferring a fax to
Main Menu Options, repeatingmessages
fast forwardingforwarding
CONTENTS HELPGLOSSARY
Issue 1 March 2003Index - 127
A B C D E F G H I J K L M N O P Q R S T U V W X Y Z
BACK NEXT
Index MM Online TUI Guide
listening to list of all message recipientsoptions after recording messages by outside callersoptions when leaving a messagepausingplayback controls while reviewingprinting to fax destination
e-mail messagesfax messages
replying toreplying to by calling senderreviewingrewindingsearching forvolume control