392
Avaya Modular Messaging for the Avaya Message Storage Server (MSS) Configuration Release 5.1 Installation and Upgrades June 2009
Avaya Modular Messaging for the Avaya Message Storage Server (MSS) Configuration Release 5.1Installation and Upgrades
June 2009
© 2009 Avaya Inc. All Rights Reserved.
NoticeWhile reasonable efforts were made to ensure that the information in this document was complete and accurate at the time of printing, Avaya Inc. can assume no liability for any errors. Changes and corrections to the information in this document might be incorporated in future releases.
Documentation disclaimerAvaya Inc. is not responsible for any modifications, additions, or deletions to the original published version of this documentation unless such modifications, additions, or deletions were performed by Avaya. Customer and/or End User agree to indemnify and hold harmless Avaya, Avaya's agents, servants and employees against all claims, lawsuits, demands and judgments arising out of, or in connection with, subsequent modifications, additions or deletions to this documentation to the extent made by the Customer or End User.
Link disclaimerAvaya Inc. is not responsible for the contents or reliability of any linked Web sites referenced elsewhere within this documentation, and Avaya does not necessarily endorse the products, services, or information described or offered within them. We cannot guarantee that these links work all the time and we have no control over the availability of the linked pages.
WarrantyAvaya Inc. provides a limited warranty on this product. See your sales agreement to establish the terms of the limited warranty. In addition, Avaya’s standard warranty language, as well as information regarding support for this product, while under warranty, is available through the Avaya Support Web site:http://www.avaya.com/support
LicenseUSE OR INSTALLATION OF THE PRODUCT INDICATES THE END USER'S ACCEPTANCE OF THE TERMS SET FORTH HEREIN AND THE GENERAL LICENSE TERMS AVAILABLE ON THE AVAYA WEB SITE http://support.avaya.com/LicenseInfo/ ("GENERAL LICENSE TERMS"). IF YOU DO NOT WISH TO BE BOUND BY THESE TERMS, YOU MUST RETURN THE PRODUCT(S) TO THE POINT OF PURCHASE WITHIN TEN (10) DAYS OF DELIVERY FOR A REFUND OR CREDIT.Avaya grants End User a license within the scope of the license types described below. The applicable number of licenses and units of capacity for which the license is granted will be one (1), unless a different number of licenses or units of capacity is specified in the Documentation or other materials available to End User. "Designated Processor" means a single stand-alone computing device. "Server" means a Designated Processor that hosts a software application to be accessed by multiple users. "Software" means the computer programs in object code, originally licensed by Avaya and ultimately used by End User, whether as stand-alone Products or pre-installed on Hardware. "Hardware" means the standard hardware Products, originally sold by Avaya and ultimately used by End User.
License Type(s)Designated System(s) License (DS). End User may install and use each copy of the Software on only one Designated Processor, unless a different number of Designated Processors is indicated in the Documentation or other materials available to End User. Avaya may require the Designated Processor(s) to be identified by type, serial number, feature key, location or other specific designation, or to be provided by End User to Avaya through electronic means established by Avaya specifically for this purpose.Concurrent User License (CU). End User may install and use the Software on multiple Designated Processors or one or more Servers, so long as only the licensed number of Units are accessing and using the Software at any given time. A "Unit" means the unit on which Avaya, at its sole discretion, bases the pricing of its licenses and can be, without limitation, an agent, port or user, an e-mail or voice mail account in the name of a person or corporate function (e.g., webmaster or helpdesk), or a directory entry in the administrative database utilized by the Product that permits one user to interface with the Software. Units may be linked to a specific, identified Server.Named User License (NU). Customer may: (i) install and use the Software on a single Designated Processor or Server per authorized Named User (defined below); or (ii) install and use the Software on a Server so long as only authorized Named Users access and use the Software. "Named User," means a user or device that has been expressly authorized by Avaya to access and use the Software. At Avaya's sole discretion, a "Named User" may be, without limitation, designated by name, corporate function (e.g., webmaster or helpdesk), an e-mail or voice mail account in the name of a person or corporate function, or a directory entry in the administrative database used by the Product that permits one user to interface with the Product. Shrinkwrap License (SR). With respect to Software that contains elements provided by third party suppliers, End user may install and use the Software in accordance with the terms and conditions of the "shrinkwrap" or "clickwrap" license accompanying the Software ("Shrinkwrap License"). The text of the
Shrinkwrap License will be available from Avaya on End User's request (see "Copyright" below for more information).
Copyright Except where expressly stated otherwise, the Product is protected by copyright and other laws respecting proprietary rights. Unauthorized reproduction, transfer, and or use can be a criminal, as well as a civil, offense under the applicable law.
Third-party ComponentsCertain software programs or portions thereof included in the Product may contain software distributed under third party agreements ("Third Party Components"), which may contain terms that expand or limit rights to use certain portions of the Product ("Third Party Terms"). Information identifying Third Party Components and the Third Party Terms that apply to them is available on the Avaya Support Web site:http://support.avaya.com/ThirdPartyLicense/
Preventing Toll Fraud"Toll fraud" is the unauthorized use of your telecommunications system by an unauthorized party (for example, a person who is not a corporate employee, agent, subcontractor, or is not working on your company's behalf). Note that there might be a risk of toll fraud associated with your system and that, if toll fraud occurs, it can result in substantial additional charges for your telecommunications services.
Avaya Fraud InterventionIf you suspect that you are being victimized by toll fraud and you need technical assistance or support, call Technical Service Center Toll Fraud Intervention Hotline at +1-800-643-2353 for the United States and Canada. For additional support telephone numbers, see the Avaya Support Web site:http://www.avaya.com/support
Providing Telecommunications SecurityTelecommunications security (of voice, data, and/or video communications) is the prevention of any type of intrusion to (that is, either unauthorized or malicious access to or use of) your company's telecommunications equipment by some party.Your company's "telecommunications equipment" includes both this Avaya product and any other voice/data/video equipment that can be accessed by this Avaya product (that is, "networked equipment").An "outside party" is anyone who is not a corporate employee, agent, subcontractor, or is not working on your company's behalf. Whereas, a "malicious party" is anyone (including someone who might be otherwise authorized) who accesses your telecommunications equipment with either malicious or mischievous intent.Such intrusions might be either to/through synchronous (time-multiplexed and/or circuit-based), or asynchronous (character-, message-, or packet-based) equipment, or interfaces for reasons of:
• Use (of capabilities special to the accessed equipment)• Theft (such as, of intellectual property, financial assets, or toll
facility access)• Eavesdropping (privacy invasions to humans)• Mischief (troubling, but apparently innocuous, tampering)• Harm (such as harmful tampering, data loss or alteration,
regardless of motive or intent)Be aware that there might be a risk of unauthorized intrusions associated with your system and/or its networked equipment. Also realize that, if such an intrusion should occur, it might result in a variety of losses to your company (including but not limited to, human/data privacy, intellectual property, material assets, financial resources, labor costs, and/or legal costs).
Responsibility for Your Company’s Telecommunications SecurityThe final responsibility for securing both this system and its networked equipment rests with you — Avaya’s customer system administrator, your telecommunications peers, and your managers. Base the fulfillment of your responsibility on acquired knowledge and resources from a variety of sources including but not limited to:
• Installation documents• System administration documents• Security documents• Hardware-/software-based security tools• Shared information between you and your peers• Telecommunications security experts
To prevent intrusions to your telecommunications equipment, you and your peers should carefully program and configure:
• Your Avaya-provided telecommunications systems and their interfaces
• Your Avaya-provided software applications, as well as their underlying hardware/software platforms and interfaces
• Any other equipment networked to your Avaya products

TCP/IP FacilitiesCustomers might experience differences in product performance, reliability and security depending upon network configurations/design and topologies, even when the product performs as warranted.
Standards ComplianceAvaya Inc. is not responsible for any radio or television interference caused by unauthorized modifications of this equipment or the substitution or attachment of connecting cables and equipment other than those specified by Avaya Inc. The correction of interference caused by such unauthorized modifications, substitution or attachment is the responsibility of the user. Pursuant to Part 15 of the Federal Communications Commission (FCC) Rules, the user is cautioned that changes or modifications not expressly approved by Avaya Inc. might void the user’s authority to operate this equipment.
Federal Communications Commission Statement
Part 15:
Canadian Department of Communications (DOC) Interference InformationThis Class A digital apparatus complies with Canadian ICES-003.Cet appareil numérique de la classe A est conforme à la norme NMB-003 du Canada.This equipment meets the applicable Industry Canada Terminal Equipment Technical Specifications. This is confirmed by the registration number. The abbreviation, IC, before the registration number signifies that registration was performed based on a Declaration of Conformity indicating that Industry Canada technical specifications were met. It does not imply that Industry Canada approved the equipment.
European Union Declarations of Conformity
Avaya Inc. declares that the equipment specified in this document bearing the "CE" (Conformité Europeénne) mark conforms to the European Union Radio and Telecommunications Terminal Equipment Directive (1999/5/EC), including the Electromagnetic Compatibility Directive (89/336/EEC) and Low Voltage Directive (73/23/EEC).Copies of these Declarations of Conformity (DoCs) can be obtained by contacting your local sales representative and are available on the Avaya Support Web site:http://www.avaya.com/support
TrademarksAria, AUDIX, Avaya, DEFINITY, INTUITY, and Serenade are registered trademarks of Avaya Inc.COMPAS is the trademark of Avaya Inc.All non-Avaya trademarks are the property of their respective owners.
Document ordering information:Avaya Publications CenterFor the most current versions of documentation, go to the Avaya Support Web site:http://www.avaya.com/support
COMPASThis document is also available from the COMPAS database. The COMPAS ID for this document is 140193 .
Avaya supportAvaya provides a telephone number for you to use to report problems or to ask questions about your product. The support telephone number is 1-800-242-2121 in the United States. For additional support telephone numbers, see the Avaya Support Web site:http://www.avaya.com/support
Note: This equipment is and found to comply with the limits for a Class A digital device, pursuant to Part 15 of the FCC Rules. These limits provide reasonable protection against harmful interference when the equipment is operated in a commercial environment. This equipment generates, uses, and can radiate radio frequency energy and, if not installed and used in accordance with the instruction manual, may cause harmful interference to radio communications. Operation of this equipment in a residential area is likely to cause harmful interference in which case the user will be required to correct the interference at his own expense.

Issue 1.0 June 2009 i
Avaya - Proprietary. Use pursuant to the terms of your signed agreement or Avaya policy.
About this book . . . . . . . . . . . . . . . . . . . . . . . . . . . . . . . . . . . . . . 1Intended audience . . . . . . . . . . . . . . . . . . . . . . . . . . . . . . . . . 1Changes to this book . . . . . . . . . . . . . . . . . . . . . . . . . . . . . . . 2
How to use this book . . . . . . . . . . . . . . . . . . . . . . . . . . . . . . . . . 3Installing a new system . . . . . . . . . . . . . . . . . . . . . . . . . . . . . . 3Upgrading a system . . . . . . . . . . . . . . . . . . . . . . . . . . . . . . . . 3Migrating a system . . . . . . . . . . . . . . . . . . . . . . . . . . . . . . . . 4Using links in this document . . . . . . . . . . . . . . . . . . . . . . . . . . . 4
Trademarks. . . . . . . . . . . . . . . . . . . . . . . . . . . . . . . . . . . . . . . 4Related resources . . . . . . . . . . . . . . . . . . . . . . . . . . . . . . . . . . . 5
User Documentation. . . . . . . . . . . . . . . . . . . . . . . . . . . . . . . . 5Technical assistance . . . . . . . . . . . . . . . . . . . . . . . . . . . . . . . 5
Remote support center . . . . . . . . . . . . . . . . . . . . . . . . . . . . 5Help on the system . . . . . . . . . . . . . . . . . . . . . . . . . . . . . . 5
Training. . . . . . . . . . . . . . . . . . . . . . . . . . . . . . . . . . . . . . . 6How to comment on this book . . . . . . . . . . . . . . . . . . . . . . . . . . 6
Chapter 1: Preinstallation requirements . . . . . . . . . . . . . . . . . . . . . . . . . 7Software shipped with the system . . . . . . . . . . . . . . . . . . . . . . . . . . 8Obtaining the DCT data file . . . . . . . . . . . . . . . . . . . . . . . . . . . . . . 9Downloading required software and documentation . . . . . . . . . . . . . . . . 9
Downloading software updates. . . . . . . . . . . . . . . . . . . . . . . . . . 10Downloading configuration notes . . . . . . . . . . . . . . . . . . . . . . . . 11Downloading the installation and upgrade checklists . . . . . . . . . . . . . 11Downloading user documentation . . . . . . . . . . . . . . . . . . . . . . . . 12
Security considerations . . . . . . . . . . . . . . . . . . . . . . . . . . . . . . . . 13On-site security considerations . . . . . . . . . . . . . . . . . . . . . . . . . 13
Password security protection. . . . . . . . . . . . . . . . . . . . . . . . . 13System security protection during installation . . . . . . . . . . . . . . . 13
Ongoing system security considerations . . . . . . . . . . . . . . . . . . . . 14Test equipment recommendations . . . . . . . . . . . . . . . . . . . . . . . . . . 14Initial switch and LAN administration . . . . . . . . . . . . . . . . . . . . . . . . 15
Initial switch or PBX administration . . . . . . . . . . . . . . . . . . . . . . . 15Initial LAN administration . . . . . . . . . . . . . . . . . . . . . . . . . . . . . 15
Private Windows domain consideration with MM Fax Sender service. . . . . . . 16Corporate Windows domain requirements. . . . . . . . . . . . . . . . . . . . . . 16
Creating user accounts in the corporate Windows domain . . . . . . . . . . 17Creating computer accounts in the corporate Windows domain. . . . . . . . 18Adding RAS and IAS permissions to the technical support account . . . . . 19
Contents

Contents
ii Avaya Modular Messaging for Avaya MSS Release 5.1 Installation and Upgrades
Chapter 2: Performing initial MSS administration. . . . . . . . . . . . . . . . . . . . 21Logging on to the MSS . . . . . . . . . . . . . . . . . . . . . . . . . . . . . . . . 22
Adjusting the display settings, if needed . . . . . . . . . . . . . . . . . . . . 23Starting the MSS configuration using a DCT data file. . . . . . . . . . . . . . . . 24Configuring the MSS manually . . . . . . . . . . . . . . . . . . . . . . . . . . . . 26
Setting up network addressing . . . . . . . . . . . . . . . . . . . . . . . . . . 27Setting the time and date . . . . . . . . . . . . . . . . . . . . . . . . . . . . . 31Setting up the MSS local machine . . . . . . . . . . . . . . . . . . . . . . . . 32Setting up the trusted servers . . . . . . . . . . . . . . . . . . . . . . . . . . 33
Adding each MAS as a trusted server . . . . . . . . . . . . . . . . . . . . 33Adding the MWI trusted server, if used . . . . . . . . . . . . . . . . . . . 35Adding optional trusted servers . . . . . . . . . . . . . . . . . . . . . . . 36Updating the IMAP4 password and the system protocols . . . . . . . . . 37
Rebooting the MSS . . . . . . . . . . . . . . . . . . . . . . . . . . . . . . . . 39
Chapter 3: Configuring the Avaya MAS . . . . . . . . . . . . . . . . . . . . . . . . . 41Displaying an MAS from the console. . . . . . . . . . . . . . . . . . . . . . . . . 42Completing MAS configuration prerequisites . . . . . . . . . . . . . . . . . . . . 43 . . . . . . . . . . . . . . . . . . . . . . . . . . . . . . . . . . . . . . . . . . . . . Configuring MASs using an existing DCT data file. . . . . . . . . . . . . . . . . . . . . . . . 44
Preparing the new server . . . . . . . . . . . . . . . . . . . . . . . . . . . . . . . 47Updating Windows Internet Explorer 7 security . . . . . . . . . . . . . . . . . 47Installing and administering anti-virus software . . . . . . . . . . . . . . . . 48Updating Microsoft Windows . . . . . . . . . . . . . . . . . . . . . . . . . . . 49Entering RAS IP addresses on each MAS . . . . . . . . . . . . . . . . . . . . 50
Configuring MAS port boards. . . . . . . . . . . . . . . . . . . . . . . . . . . . . 52Configuring the voice mail system . . . . . . . . . . . . . . . . . . . . . . . . . . 53
Configuring required domain-wide features . . . . . . . . . . . . . . . . . . . 54Specifying languages . . . . . . . . . . . . . . . . . . . . . . . . . . . . . 55Verifying that Modular Messaging service has started on MAS#1 . . . . . 55Configuring TUI and audio settings on MAS#1 . . . . . . . . . . . . . . . 56Configuring the PBX type on MAS#1 . . . . . . . . . . . . . . . . . . . . . 57Configuring serviceability settings on MAS#1. . . . . . . . . . . . . . . . 58Obtaining and installing a license on MAS#1 . . . . . . . . . . . . . . . . 60
Verifying license installation and specifying TTS sessions . . . . . . . . . . 62Adding the Supplementary server name into the security configuration . . . 62Entering Product ID for current MAS . . . . . . . . . . . . . . . . . . . . . . . 63Configuring specific features as needed. . . . . . . . . . . . . . . . . . . . . 64
Configuring Call Me service. . . . . . . . . . . . . . . . . . . . . . . . . . 65Configuring Notify Me . . . . . . . . . . . . . . . . . . . . . . . . . . . . . 65
Contents
Issue 1.0 June 2009 iii
Avaya - Proprietary. Use pursuant to the terms of your signed agreement or Avaya policy.
Configuring MWI service . . . . . . . . . . . . . . . . . . . . . . . . . . . 66Configuring MM Audit Service . . . . . . . . . . . . . . . . . . . . . . . . 67Configuring the MM Fax Sender server . . . . . . . . . . . . . . . . . . . 68Configuring languages and multi-lingual TTS . . . . . . . . . . . . . . . . 71Configuring offline access to messages . . . . . . . . . . . . . . . . . . . 73
Configuring MAS-specific parameters . . . . . . . . . . . . . . . . . . . . . . 74Configuring Modem Dialout alarming, if used . . . . . . . . . . . . . . . . 74Configuring port boards and switch integration. . . . . . . . . . . . . . . 75
Restarting the messaging services. . . . . . . . . . . . . . . . . . . . . . . . 77Verifying basic operation of the MAS . . . . . . . . . . . . . . . . . . . . . . 80
Verifying call-handling capability . . . . . . . . . . . . . . . . . . . . . . . 80Verifying alarming setup . . . . . . . . . . . . . . . . . . . . . . . . . . . 81Verifying Tracing Service operation . . . . . . . . . . . . . . . . . . . . . 82Verifying Audit service . . . . . . . . . . . . . . . . . . . . . . . . . . . . 83
Continuing the installation . . . . . . . . . . . . . . . . . . . . . . . . . . . . . . 83
Chapter 4: Configuring a customer-provided MAS . . . . . . . . . . . . . . . . . . . 85CPE MAS configuration prerequisites . . . . . . . . . . . . . . . . . . . . . . . . 86Preparing the CPE MAS . . . . . . . . . . . . . . . . . . . . . . . . . . . . . . . . 87
Installing Microsoft Windows 2003 R2 operating system. . . . . . . . . . . . 87Setting a computer name . . . . . . . . . . . . . . . . . . . . . . . . . . . . . 87Running recommended disk checks . . . . . . . . . . . . . . . . . . . . . . . 88Installing and enabling Microsoft Windows services on CPE MAS . . . . . . 88
Installing Microsoft Windows services . . . . . . . . . . . . . . . . . . . . 88Enabling Microsoft Windows services . . . . . . . . . . . . . . . . . . . . 89
Installing Microsoft Windows 2003 SP2 . . . . . . . . . . . . . . . . . . . . . 90Installing Microsoft Windows updates and security patches. . . . . . . . . . 90Adjusting system values . . . . . . . . . . . . . . . . . . . . . . . . . . . . . 90Network connections . . . . . . . . . . . . . . . . . . . . . . . . . . . . . . . 92Disabling hyper-threading for IP H.323. . . . . . . . . . . . . . . . . . . . . . 93Installing modem drivers on the MAS . . . . . . . . . . . . . . . . . . . . . . 93Verifying network adapters and bindings . . . . . . . . . . . . . . . . . . . . 94Changing the Power Management settings . . . . . . . . . . . . . . . . . . . 94
Configuring the CPE MAS. . . . . . . . . . . . . . . . . . . . . . . . . . . . . . . 95Running the Modular Messaging Configuration wizard. . . . . . . . . . . . . 95
Completing the CPE MAS configuration . . . . . . . . . . . . . . . . . . . . . . . 99Entering the RAS IP addresses on CPE MAS . . . . . . . . . . . . . . . . . . 99Setting logging location . . . . . . . . . . . . . . . . . . . . . . . . . . . . . . 99Installing anti-virus software . . . . . . . . . . . . . . . . . . . . . . . . . . . 100Configuring the port boards . . . . . . . . . . . . . . . . . . . . . . . . . . . 100

Contents
iv Avaya Modular Messaging for Avaya MSS Release 5.1 Installation and Upgrades
Continuing with CPE MAS configuration . . . . . . . . . . . . . . . . . . . . 101
Chapter 5: Completing initial MSS administration . . . . . . . . . . . . . . . . . . . 103Continuing the MSS configuration using a DCT data file . . . . . . . . . . . . . . 104Continuing the MSS configuration manually . . . . . . . . . . . . . . . . . . . . 105
Updating MAS host information . . . . . . . . . . . . . . . . . . . . . . . . . 105Updating MAS host information in a private Windows domain. . . . . . . 105Updating MAS host information in a corporate Windows domain . . . . . 108
Placing the MSS in a Windows domain . . . . . . . . . . . . . . . . . . . . . 110Placing the MSS in the private Windows domain . . . . . . . . . . . . . . 110Placing the MSS in the corporate Windows domain . . . . . . . . . . . . 111
Administering classes of service . . . . . . . . . . . . . . . . . . . . . . . . . 112Setting up a cos for required special mailboxes . . . . . . . . . . . . . . 112Setting up a cos for test subscribers. . . . . . . . . . . . . . . . . . . . . 113
Administering special mailboxes . . . . . . . . . . . . . . . . . . . . . . . . . 114Adding test subscribers. . . . . . . . . . . . . . . . . . . . . . . . . . . . . . 116
Configuring the MSS modem . . . . . . . . . . . . . . . . . . . . . . . . . . . . . 117Installing any software updates. . . . . . . . . . . . . . . . . . . . . . . . . . . . 118
Verifying network adapters and bindings . . . . . . . . . . . . . . . . . . . . 118
Chapter 6: Performing acceptance tests for a new installation . . . . . . . . . . . . 119Setting up monitoring tools—optional . . . . . . . . . . . . . . . . . . . . . . . . 120
Using the Operation History Viewer . . . . . . . . . . . . . . . . . . . . . . . 120Setting up the port monitor . . . . . . . . . . . . . . . . . . . . . . . . . . . . 121
Running acceptance tests. . . . . . . . . . . . . . . . . . . . . . . . . . . . . . . 122Leaving a call answer message. . . . . . . . . . . . . . . . . . . . . . . . . . 122Retrieving test messages in integrated mode . . . . . . . . . . . . . . . . . . 123Creating and sending a test message in nonintegrated mode . . . . . . . . . 125Testing the outcalling capability . . . . . . . . . . . . . . . . . . . . . . . . . 126Creating and printing a fax message . . . . . . . . . . . . . . . . . . . . . . . 129
Removing the test subscribers on the MSS . . . . . . . . . . . . . . . . . . . . . 130
Chapter 7: Setting up support and making system backups . . . . . . . . . . . . . . 131Setting up logins and remote access . . . . . . . . . . . . . . . . . . . . . . . . 132
Registering the system in ART . . . . . . . . . . . . . . . . . . . . . . . . . . 132Registering an MSS . . . . . . . . . . . . . . . . . . . . . . . . . . . . . . 132Registering an MAS . . . . . . . . . . . . . . . . . . . . . . . . . . . . . . 132
Administering logins and passwords . . . . . . . . . . . . . . . . . . . . . . 133Setting up the PPP server configuration . . . . . . . . . . . . . . . . . . . . . 134
Setting up alarming on the MSS . . . . . . . . . . . . . . . . . . . . . . . . . . . 135
Contents
Issue 1.0 June 2009 v
Avaya - Proprietary. Use pursuant to the terms of your signed agreement or Avaya policy.
Specifying MSS alarm origination . . . . . . . . . . . . . . . . . . . . . . . . 135Testing alarming origination . . . . . . . . . . . . . . . . . . . . . . . . . . . 137
Using the DCT to analyze the current configuration . . . . . . . . . . . . . . . . 138Copying the DCT data file for backup . . . . . . . . . . . . . . . . . . . . 140
Backing up the system . . . . . . . . . . . . . . . . . . . . . . . . . . . . . . . . 141Running backups on each MAS . . . . . . . . . . . . . . . . . . . . . . . . . 141Setting up and running a backup on the MSS . . . . . . . . . . . . . . . . . . 143
Completing the installation . . . . . . . . . . . . . . . . . . . . . . . . . . . . . . 144Installing the client software . . . . . . . . . . . . . . . . . . . . . . . . . . . 144Turning over the system . . . . . . . . . . . . . . . . . . . . . . . . . . . . . 145
Chapter 8: Upgrading to Modular Messaging Release 5.1 on S3500-family server . . 147Upgrading from Release 5.0 to Release 5.1 . . . . . . . . . . . . . . . . . . . . . 149Planning for the upgrade from Release 3.x or Release 4.0 . . . . . . . . . . . . . 150
Upgrade requirements. . . . . . . . . . . . . . . . . . . . . . . . . . . . . . . 152Switching the monitor to show the correct server . . . . . . . . . . . . . . . 153
Performing pre-upgrade tasks . . . . . . . . . . . . . . . . . . . . . . . . . . . . 154Preparing for the upgrade . . . . . . . . . . . . . . . . . . . . . . . . . . . 154Preparing for the upgrade on the MAS . . . . . . . . . . . . . . . . . . . . 156Installing the Pre-upgrade and Backup Verification tool . . . . . . . . . . 157Running the Pre-upgrade tool . . . . . . . . . . . . . . . . . . . . . . . . 157Completing pre-upgrade tasks . . . . . . . . . . . . . . . . . . . . . . . . 159
Using the DCT to collect information from an MAS . . . . . . . . . . . . . . . 160Collecting DCT data . . . . . . . . . . . . . . . . . . . . . . . . . . . . . . 160Verifying DCT data . . . . . . . . . . . . . . . . . . . . . . . . . . . . . . . 160Busying out ports on each MAS . . . . . . . . . . . . . . . . . . . . . . . 163
Checking the spool folder on each MAS . . . . . . . . . . . . . . . . . . . . . 164Backing up each MAS . . . . . . . . . . . . . . . . . . . . . . . . . . . . . . . 165Backing up the MSS . . . . . . . . . . . . . . . . . . . . . . . . . . . . . . . . 166Running the Backup Verification tool . . . . . . . . . . . . . . . . . . . . . . 168
Upgrading the MSS from Release 3.x or Release 4.0 . . . . . . . . . . . . . . . . 170Upgrading an MAS from Release 3.x or Release 4.0 . . . . . . . . . . . . . . . . 172
Logging off all remote logins . . . . . . . . . . . . . . . . . . . . . . . . . . . 172Upgrading overnight. . . . . . . . . . . . . . . . . . . . . . . . . . . . . . . . 172Upgrading RealSpeak . . . . . . . . . . . . . . . . . . . . . . . . . . . . . . . 172
Stopping all MM services . . . . . . . . . . . . . . . . . . . . . . . . . . . 173Uninstalling and re-installing RealSpeak. . . . . . . . . . . . . . . . . . . 173Starting all MM services . . . . . . . . . . . . . . . . . . . . . . . . . . . . 175
Upgrading Dialogic drivers . . . . . . . . . . . . . . . . . . . . . . . . . . . . 175Upgrading the MAS software . . . . . . . . . . . . . . . . . . . . . . . . . . . 176
Contents
vi Avaya Modular Messaging for Avaya MSS Release 5.1 Installation and Upgrades
Installing software updates . . . . . . . . . . . . . . . . . . . . . . . . . . . . 179Completing the upgrade from Release 3.x or Release 4.0 . . . . . . . . . . . . . 180
Completing the upgrade. . . . . . . . . . . . . . . . . . . . . . . . . . . . . . 180Converting Supplementary server to run a 0 port MAS on the Supplementary server182Changing switch integration . . . . . . . . . . . . . . . . . . . . . . . . . . . . . 185
Changing from DSE or Analog to QSIG . . . . . . . . . . . . . . . . . . . 185Changing from DSE or QSIG to H.323 . . . . . . . . . . . . . . . . . . . . 187Changing from DSE or QSIG to SIP . . . . . . . . . . . . . . . . . . . . . 188Changing from QSIG T1 to QSIG E1 . . . . . . . . . . . . . . . . . . . . . 189Changing from H.323 to SIP. . . . . . . . . . . . . . . . . . . . . . . . . . 191
Moving to the corporate Windows domain after upgrade. . . . . . . . . . . . . . 192Preparing to join an upgrade to the corporate Windows domain . . . . . . . 193Moving subsequent servers to the corporate Windows domain . . . . . . . . 194
Preparing the system before moving subsequent servers . . . . . . . . . 194Moving subsequent servers. . . . . . . . . . . . . . . . . . . . . . . . . . 195
Moving the MSS to the corporate Windows domain . . . . . . . . . . . . . . 197Moving MAS#1 to the corporate Windows domain . . . . . . . . . . . . . . . 198
Enabling offline access to messages . . . . . . . . . . . . . . . . . . . . 200Completing the move to the corporate Windows domain . . . . . . . . . . . 200
Chapter 9: Migrating to Modular Messaging Release 5.1 on S8730-family server . . 205Migration requirements . . . . . . . . . . . . . . . . . . . . . . . . . . . . . . 206Switching the monitor to show the correct server . . . . . . . . . . . . . . . 207
Preparing for the migration . . . . . . . . . . . . . . . . . . . . . . . . . . . . . . 208Performing pre-upgrade tasks . . . . . . . . . . . . . . . . . . . . . . . . . . 209
Installing the Pre-upgrade and Backup Verification tool . . . . . . . . . . 209Running the Pre-upgrade tool . . . . . . . . . . . . . . . . . . . . . . . . 209Completing pre-migration tasks . . . . . . . . . . . . . . . . . . . . . . . 210Adding a new server . . . . . . . . . . . . . . . . . . . . . . . . . . . . . . 210
Using the DCT to collect information from an MAS . . . . . . . . . . . . . . . 210Collecting DCT data . . . . . . . . . . . . . . . . . . . . . . . . . . . . . . 210Verifying DCT data . . . . . . . . . . . . . . . . . . . . . . . . . . . . . . . 211
Migrating MSS and MAS to the S8730-family server . . . . . . . . . . . . . . . . 214Preparing MAS#1 for the migration. . . . . . . . . . . . . . . . . . . . . . . . 215
Busying out ports on MAS . . . . . . . . . . . . . . . . . . . . . . . . . . 215Checking the spool folder on each MAS . . . . . . . . . . . . . . . . . . . 215
Backing up each MAS . . . . . . . . . . . . . . . . . . . . . . . . . . . . . . . 216Backing up the MSS . . . . . . . . . . . . . . . . . . . . . . . . . . . . . . . . 216Running the Backup Verification tool . . . . . . . . . . . . . . . . . . . . . . 217Migrating the MSS hardware . . . . . . . . . . . . . . . . . . . . . . . . . . . 217
Contents
Issue 1.0 June 2009 vii
Avaya - Proprietary. Use pursuant to the terms of your signed agreement or Avaya policy.
Restoring data on the MSS . . . . . . . . . . . . . . . . . . . . . . . . . . . . 217Migrating each MAS . . . . . . . . . . . . . . . . . . . . . . . . . . . . . . . . . . 221
Starting the MAS migration . . . . . . . . . . . . . . . . . . . . . . . . . . . . 221Preparing the new server . . . . . . . . . . . . . . . . . . . . . . . . . . . . . 224
Installing and administering anti-virus software . . . . . . . . . . . . . . 224Updating Microsoft Windows . . . . . . . . . . . . . . . . . . . . . . . . . 224Reapply the remote access settings for each MAS . . . . . . . . . . . . . 225
Updating settings in the VMSC . . . . . . . . . . . . . . . . . . . . . . . . . . 226Creating the offline message share, if needed. . . . . . . . . . . . . . . . 229Restarting messaging services . . . . . . . . . . . . . . . . . . . . . . . . 231Completing VMSC setup . . . . . . . . . . . . . . . . . . . . . . . . . . . 233
Continuing the MAS migration . . . . . . . . . . . . . . . . . . . . . . . . . . 234Enabling Offline Access to messages . . . . . . . . . . . . . . . . . . . . . . 234
Completing MSS administration . . . . . . . . . . . . . . . . . . . . . . . . . . . 234Verify the MAS host information . . . . . . . . . . . . . . . . . . . . . . . . . 236Placing the MSS in the Windows domain—MAS#1 only . . . . . . . . . . . . 237
Restoring data on each MAS . . . . . . . . . . . . . . . . . . . . . . . . . . . . . 238Stopping all MM services . . . . . . . . . . . . . . . . . . . . . . . . . . . . . 239Restoring backed-up MAS data. . . . . . . . . . . . . . . . . . . . . . . . . . 240Restoring Caller Applications—MAS#1 only. . . . . . . . . . . . . . . . . . . 242Restarting Modular Messaging services . . . . . . . . . . . . . . . . . . . . . 243Installing software updates . . . . . . . . . . . . . . . . . . . . . . . . . . . . 244Performing acceptance tests for a migration . . . . . . . . . . . . . . . . . . 245
Completing the system migration . . . . . . . . . . . . . . . . . . . . . . . . . . 246Running a DCT analyze on the migrated system . . . . . . . . . . . . . . . . 246Backing up the system . . . . . . . . . . . . . . . . . . . . . . . . . . . . . . 246
Running backups on each MAS . . . . . . . . . . . . . . . . . . . . . . . 246Removing old backup files from the MSS . . . . . . . . . . . . . . . . . . 248Backing up the MSS . . . . . . . . . . . . . . . . . . . . . . . . . . . . . . 249
Completing the Modular Messaging system migration . . . . . . . . . . . . . 251Updating or installing client software . . . . . . . . . . . . . . . . . . . . . . 252
Reducing servers by replacing S3400 servers with S8730 servers . . . . . . . . 253Changing switch integration . . . . . . . . . . . . . . . . . . . . . . . . . . . . . 255Moving to the corporate Windows domain after migration . . . . . . . . . . . . . 256
Appendix A: Installation and upgrade checklists . . . . . . . . . . . . . . . . . . . . 257Modular Messaging on Avaya MAS installation checklist . . . . . . . . . . . . . 258Modular Messaging on a customer-provided MAS installation checklist . . . . . 264Modular Messaging Release 5.1 upgrade and migration checklists . . . . . . . . 269
Modular Messaging Release 3.x or 4.0 on S3500-family server upgrade checklist269

Contents
viii Avaya Modular Messaging for Avaya MSS Release 5.1 Installation and Upgrades
Modular Messaging Release 5.1 system migration checklist. . . . . . . . . . 273Moving the MM system to the corporate Windows domain checklist . . . . . . . 278
Appendix B: Configuring and testing port boards . . . . . . . . . . . . . . . . . . . 279Overview . . . . . . . . . . . . . . . . . . . . . . . . . . . . . . . . . . . . . . . . 279When to configure port boards . . . . . . . . . . . . . . . . . . . . . . . . . . . . 280
Supported port boards . . . . . . . . . . . . . . . . . . . . . . . . . . . . . . 281Configuring port boards. . . . . . . . . . . . . . . . . . . . . . . . . . . . . . . . 281
Configuring T1-QSIG or E1-QSIG boards . . . . . . . . . . . . . . . . . . . . 283Configuring set emulation boards . . . . . . . . . . . . . . . . . . . . . . . . 284Configuring analog port boards . . . . . . . . . . . . . . . . . . . . . . . . . 286
Testing the port boards . . . . . . . . . . . . . . . . . . . . . . . . . . . . . . . . 291Preparing for the test . . . . . . . . . . . . . . . . . . . . . . . . . . . . . . . 291Testing the ports. . . . . . . . . . . . . . . . . . . . . . . . . . . . . . . . . . 292
Appendix C: Installing Dialogic port boards in a customer-provided MAS . . . . . . 295Supported MAS port boards . . . . . . . . . . . . . . . . . . . . . . . . . . . . . 296Installing MAS port boards . . . . . . . . . . . . . . . . . . . . . . . . . . . . . . 298
Preparing for the installation . . . . . . . . . . . . . . . . . . . . . . . . . . . 298Setting jumpers and switches . . . . . . . . . . . . . . . . . . . . . . . . . . 299
D/480JCT-1T1and D/600JCT-1E1 or D/600JCT-2E1 QSIG board settings . 300D/480JCT-1T1-EW and D/600JCT-E1-120-EW QSIG board settings . . . . 300D/82JCT-U PCI Univ set emulation board settings . . . . . . . . . . . . . 301D/82JCT-U EW set emulation board settings . . . . . . . . . . . . . . . . 302D/120JCT-LS 12-port analog board settings . . . . . . . . . . . . . . . . . 303D/120JCT-LS-EW port analog board settings . . . . . . . . . . . . . . . . 303D/41JCT-LS 4-port analog board settings . . . . . . . . . . . . . . . . . . 304D/41JCT-LS-EW analog board settings. . . . . . . . . . . . . . . . . . . . 306
Installing the port boards . . . . . . . . . . . . . . . . . . . . . . . . . . . . . 308Disabling the Dialogic hardware . . . . . . . . . . . . . . . . . . . . . . . . . 309
Connecting MAS port boards to the switch . . . . . . . . . . . . . . . . . . . . . 310Completing the hardware installation . . . . . . . . . . . . . . . . . . . . . . . . 311Configuring port boards. . . . . . . . . . . . . . . . . . . . . . . . . . . . . . . . 311
Configuring T1-QSIG or E1-QSIG boards . . . . . . . . . . . . . . . . . . . . 313Configuring set emulation boards . . . . . . . . . . . . . . . . . . . . . . . . 314Configuring analog port boards . . . . . . . . . . . . . . . . . . . . . . . . . 315
Testing the port boards . . . . . . . . . . . . . . . . . . . . . . . . . . . . . . . . 316
Appendix D: Creating a new tone file . . . . . . . . . . . . . . . . . . . . . . . . . . 317Learning tones automatically . . . . . . . . . . . . . . . . . . . . . . . . . . . . . 318

Contents
Issue 1.0 June 2009 ix
Avaya - Proprietary. Use pursuant to the terms of your signed agreement or Avaya policy.
Running the PBXpert wizard . . . . . . . . . . . . . . . . . . . . . . . . . . . 318Consolidating and saving the TSF file . . . . . . . . . . . . . . . . . . . . . . 320Using the new TSF in Dialogic Configuration Manager . . . . . . . . . . . . . 321
Learning tones manually . . . . . . . . . . . . . . . . . . . . . . . . . . . . . . . 321Running PBXpert . . . . . . . . . . . . . . . . . . . . . . . . . . . . . . . . . 321Adding a new tone set. . . . . . . . . . . . . . . . . . . . . . . . . . . . . . . 322Learning tone definitions . . . . . . . . . . . . . . . . . . . . . . . . . . . . . 323Testing the tone set . . . . . . . . . . . . . . . . . . . . . . . . . . . . . . . . 323Consolidating and saving the TSF file . . . . . . . . . . . . . . . . . . . . . . 324Using the new TSF in Dialogic Configuration Manager . . . . . . . . . . . . . 324
Appendix E: Updating Modular Messaging software . . . . . . . . . . . . . . . . . . 325Getting software updates from the Web . . . . . . . . . . . . . . . . . . . . . . . 326Installing software updates on each MAS . . . . . . . . . . . . . . . . . . . . . . 327
Copying files to the MAS . . . . . . . . . . . . . . . . . . . . . . . . . . . . . 327Installing the updates on each MAS . . . . . . . . . . . . . . . . . . . . . . . 328
Installing software updates on the MSS . . . . . . . . . . . . . . . . . . . . . . . 330
Appendix F: Moving Modular Messaging services . . . . . . . . . . . . . . . . . . . 331Disabling Modular Messaging services you plan to move . . . . . . . . . . . . . 332Moving Modular Messaging services among servers. . . . . . . . . . . . . . . . 333
Moving Call Me, MWI, and Mailbox Monitor . . . . . . . . . . . . . . . . . 334Moving MM Fax Sender service. . . . . . . . . . . . . . . . . . . . . . . . 336Moving Audit server . . . . . . . . . . . . . . . . . . . . . . . . . . . . . . 338Moving Tracing service . . . . . . . . . . . . . . . . . . . . . . . . . . . . 338
Enabling the services on the correct server . . . . . . . . . . . . . . . . . . . . . 340Stopping all Modular Messaging services . . . . . . . . . . . . . . . . . . . . 340Enabling the appropriate services . . . . . . . . . . . . . . . . . . . . . . . . 340Restarting messaging services . . . . . . . . . . . . . . . . . . . . . . . . . . 341
Appendix G: Adding an MAS or a Supplementary server to an existing system . . . 343MAS configuration prerequisites . . . . . . . . . . . . . . . . . . . . . . . . . . . 344Adding a new server to a system in service . . . . . . . . . . . . . . . . . . . . . 345
Installing the new MAS or a Supplementary server . . . . . . . . . . . . . . . 346Preparing the MSS for the new servers . . . . . . . . . . . . . . . . . . . . . 347
Adding a new trusted server on the MSS . . . . . . . . . . . . . . . . . . 347Using the DCT to analyze the current configuration . . . . . . . . . . . . . . 348
Configuring the new server . . . . . . . . . . . . . . . . . . . . . . . . . . . . . . 351Running the configuration wizard . . . . . . . . . . . . . . . . . . . . . . . . 351Completing new server configuration . . . . . . . . . . . . . . . . . . . . . . 353
Contents
x Avaya Modular Messaging for Avaya MSS Release 5.1 Installation and Upgrades
Completing the Add New MAS or Supplementary server . . . . . . . . . . . . 354
Appendix H: Reloading MAS and MSS software . . . . . . . . . . . . . . . . . . . . 355Loading new MAS software . . . . . . . . . . . . . . . . . . . . . . . . . . . . . . 355
Switching the monitor to show the correct server . . . . . . . . . . . . . . . 355Loading the new software. . . . . . . . . . . . . . . . . . . . . . . . . . . . . 356Activating Microsoft Windows . . . . . . . . . . . . . . . . . . . . . . . . . . 357
Activating Microsoft Windows through the Internet. . . . . . . . . . . . . 357Activating Microsoft Windows using a telephone . . . . . . . . . . . . . . 358
Preparing the server to boot . . . . . . . . . . . . . . . . . . . . . . . . . . . 359Loading new MSS software . . . . . . . . . . . . . . . . . . . . . . . . . . . . . . 360
Appendix I: Installing and configuring the AudioCodes gateway . . . . . . . . . . . 363Installation prerequisites . . . . . . . . . . . . . . . . . . . . . . . . . . . . . . . 364Installing and configuring the AudioCodes gateway at switch location . . . . . . 365Continue configuring the AudioCodes gateway. . . . . . . . . . . . . . . . . . . 368
Index . . . . . . . . . . . . . . . . . . . . . . . . . . . . . . . . . . . . . . . . 371

Issue 1.0 June 2009 1
Avaya - Proprietary. Use pursuant to the terms of your signed agreement or Avaya policy.
About this book
This book, Avaya Modular Messaging for Avaya MSS Release 5.1 Installation and Upgrades, provides instructions for the installation and upgrade of the Avaya Modular Messaging software in an Avaya Message Storage Server (MSS) configuration.
In Release 5.1, new installations of the MSS reside on the Avaya-provided S8730 server hardware that runs on Linux Operating System (OS). All new installations of Messaging Application Server (MAS) software can either reside on Avaya-provided S8730 server hardware that runs on Microsoft Windows 2003 R2 Operating System or customer-provided equipment (CPE) server. Both MAS and MSS on S3500 server hardware can be upgraded to Release 5.1.
Customer-provided equipment (CPE) for a Modular Messaging install or upgrade must comply with the specifications described in Avaya Modular Messaging Concepts and Planning Guide.
Note:Note: Starting with Release 5.0, Avaya no longer supports the S3400-family server
hardware. However, this book provides instructions to migrate to the S8730-family server running Release 5.1.
Information in this book includes:
● Instructions to install the software for Modular Messaging system that includes initial administration, and acceptance testing
● Instructions to upgrade the software from a Modular Messaging Release 3.x or Release 4.0 system to Release 5.1
● Instructions to migrate Modular Messaging system Release 2.0, Release 3.x or Release 4.0 from an S3400 or an S3500 server to an S8730 server.
Note:Note: Use this document to install an Avaya Modular Messaging system. After the
software installation, customers must modify the Modular Messaging system parameters for use at their site. For more information, see the administration topics of the user documentation. For instructions to download the documents, see Downloading user documentation on page 12.
Intended audienceThe book will be useful to designated experts who are responsible for:
● Installation and configuration of hardware and software for the Avaya S8730-family servers and for the customer-provided (CPE) MAS.
● Upgrade from Release 3.x or Release 4.0 that runs on the S3500 server to Modular Messaging Release 5.1.
About this book
2 Avaya Modular Messaging for Avaya MSS Release 5.1 Installation and Upgrades
● Upgrade from Modular Messaging Release 5.0 to Release 5.1.
● Migration from Release 2.0, Release 3.x or Release 4.0 to Modular Messaging Release 5.1 that runs on a S8730-family server.
Avaya assumes that the users of this book have completed a relevant hardware installation training course. For more information about training, see Related resources on page 5.
Changes to this bookThis book includes the following enhancements:
● New upgrade procedures
Note:Note: If the system is already on Modular Messaging Release 5.0, you must use the
Modular Messaging Release 5.1 Upgrade application to upgrade to Release 5.1. For complete information about how to use the application, see the documentation for Modular Messaging Release 5.1 Upgrade application available at http://www.avaya.com/support.
● Improved MAS port capacities when using S8730 servers.
Note:Note: This document only provides the information on software installation, upgrades
and migration of the Avaya Modular Messaging system in an Avaya Message Storage Server (MSS) configuration. See Installing the Avaya S8730 Server for Modular Messaging guide for information on procedures to install and maintain the new hardware.

How to use this book
Issue 1.0 June 2009 3
Avaya - Proprietary. Use pursuant to the terms of your signed agreement or Avaya policy.
How to use this bookReview the appropriate section, depending on whether you are installing a new Avaya Modular Messaging system, upgrading or migrating a Modular Messaging system that is already in service.
Installing a new system To install a Modular Messaging system:
1. A project planner must create an Avaya Modular Messaging Data Collection Tool (DCT) data file before the installation is started. Send the DCT data file to the technical support representative at the customer’s site.
2. Print the checklist for a new installation from Modular Messaging on Avaya MAS installation checklist on page 258. Use it to track your progress.
3. Read Chapter 1: Preinstallation requirements on page 7. This chapter describes installation requirements and site preparation, including where to find required documentation, software, and tools that are required to install the Modular Messaging system.
4. Read and use each chapter in the order presented. Follow the procedures in the same sequence as given in the book.
Upgrading a systemTo upgrade a Modular Messaging system from Release 3.x or Release 4.0:
1. Obtain the following before you start the upgrade:
a. The original DCT file for the system or planning forms for the system that runs on Release 3.x.
b. The latest analyzed DCT file for the system.
2. Print the upgrade checklist from Modular Messaging Release 3.x or 4.0 on S3500-family server upgrade checklist on page 269 to use as a guide.
3. Follow the instructions in Upgrading to Modular Messaging Release 5.1 on S3500-family server on page 147 to upgrade each server.
To upgrade Modular Messaging system from Release 5.0, you must use the latest Modular Messaging Release 5.1 Upgrade application available at the Avaya Support Web site (http://www.avaya.com/support).

About this book
4 Avaya Modular Messaging for Avaya MSS Release 5.1 Installation and Upgrades
Migrating a systemTo migrate a Modular Messaging system from Release 2.0, Release 3.x or Release 4.0:
1. Obtain the following before you start the migration:
a. The original DCT file for the system or planning forms for the system that runs on Release 2.0 or Release 3.x.
b. The latest analyzed DCT file for the system
2. Print the migration checklist from Modular Messaging Release 5.1 system migration checklist on page 273 to use as a guide.
3. Follow the instructions in Migrating to Modular Messaging Release 5.1 on S8730-family server on page 205 to migrate each server.
Using links in this documentThe PDF version of the guide provides links to other files or pages. Links are shown in blue text and operate as follows:
● Internal links within this document always work when you use the PDF version of this guide. Internal links include links to tables, figures, or other sections of the book.
● You can use the PDF version of the guide on a system that is connected to the Internet. If you do, you can click the link to any Web site address, such as http://www.avaya.com, to go directly to the site.
TrademarksAvaya and the Avaya Logo are trademarks of Avaya Inc. and might be registered in certain jurisdictions. Unless otherwise specified, all trademarks identified by ® and ™ are registered trademarks or trademarks, respectively, of Avaya Inc.
Microsoft is a registered trademark of Microsoft Corporation. All other trademarks are the properties of their respective owners.
Related resources
Issue 1.0 June 2009 5
Avaya - Proprietary. Use pursuant to the terms of your signed agreement or Avaya policy.
Related resourcesThis section describes additional documentation and training available to you.
User DocumentationAlways use the appropriate user documentation to obtain specific information to plan, to install, to administer, or to maintain an Avaya Modular Messaging system. To view or download the user documentation, see Downloading user documentation on page 12.
Technical assistanceThe following technical assistance is available if needed.
Remote support center
Your project manager or systems consultant provides you the telephone number of the appropriate remote support center.
Use the following numbers for technical assistance with Avaya products and services:
● Within the United States and Canada: call 1-800-242-2121
● Any other country, call your local distributor
Help on the system
Online help is available as follows:
● MAS: Use the Help menu, press F1, or click the Help button (if available) from the application or the wizard for which you need help.
● MSS: On the Web-interface pages, click the Help button.
Note:Note: To close the help window, click Close situated at the bottom of the page. If you
use the browser button to close the help window, you might leave a hidden help window open. You must close all open Help windows before you can close the browser.
About this book
6 Avaya Modular Messaging for Avaya MSS Release 5.1 Installation and Upgrades
Training For information about product training, go to the Avaya Web site at http://www.avaya.com and click Training.
How to comment on this bookAvaya is interested in your suggestions for improving this information. Use [email protected] to communicate with us.
Be sure to include the name, issue number, and date of this book:
Avaya Modular Messaging for Avaya MSS Release 5.1 Installation and Upgrades, Issue 1.0, June 2009.

Issue 1.0 June 2009 7
Avaya - Proprietary. Use pursuant to the terms of your signed agreement or Avaya policy.
Chapter 1: Preinstallation requirements
This chapter describes the prerequisites for installing an Avaya Modular Messaging system that uses Avaya S8730-family message servers.
Topics in this chapter include:
● Software shipped with the system on page 8
● Obtaining the DCT data file on page 9
● Downloading required software and documentation on page 9
● Security considerations on page 13
● Test equipment recommendations on page 14
● Initial switch and LAN administration on page 15
● Private Windows domain consideration with MM Fax Sender service on page 16
● Corporate Windows domain requirements on page 16
For information on specifications, site requirements, switch and LAN demarcation points for Avaya-provided server, see Installing the Avaya S8730 Server for Modular Messaging.

Preinstallation requirements
8 Avaya Modular Messaging for Avaya MSS Release 5.1 Installation and Upgrades
Software shipped with the systemAvaya ships the following software with each Modular Messaging system:
Table 1: Required Modular Messaging software
Media Purpose
Avaya Modular Messaging R5.1 MAS Application—2 DVDs
Use this software to:● Install the Modular Messaging software and optional
application programs running on Avaya-provided servers and CPE servers
● Upgrade to Release 5.1 from Release 3.x or 4.0
Avaya Modular Messaging R5.1—MSS Application disk and MSS OS disk— 2 DVDs
Use this software to upgrade to Release 5.1 from Release 3.x or 4.0 or to reload the software.
For S8730:Avaya MODULAR MESSAGING R5.1MAS for Avaya StoreModel S8730 Boot diskFor S3500:Avaya MODULAR MESSAGING R5.1MAS for Avaya StoreModel S3500 Boot disk
Use this software to reinstall the boot-image software to recover from a hard-disk failure.
Obtaining the DCT data file
Issue 1.0 June 2009 9
Avaya - Proprietary. Use pursuant to the terms of your signed agreement or Avaya policy.
Obtaining the DCT data fileA DCT data file is used to configure the MSS and each MAS. A person responsible for planning the installation creates the file using the Modular Messaging Data Collection Tool (DCT) before the Modular Messaging system is installed. The project manager, customer representative, or any responsible person creates this file. The DCT data file has an extension mmdct, such as sitefile.mmdct.
1. Obtain the DCT data file from the appropriate person.
2. Copy the DCT data file to a CD-ROM, DVD or USB storage device that you carry with you to the customer site.
! CAUTION:CAUTION: The USB drive must be formatted only as a FAT16 or a FAT32 file system and not
as an NTFS file system.
Note:Note: For more information about the DCT, obtain the Avaya Modular Messaging Data
Collection Tool Online Help; see Downloading user documentation on page 12.
Downloading required software and documentationYou must download and use the software and documentation described in this section to install or upgrade an Avaya Modular Messaging system. You can obtain this information only from the Avaya Support Web site. Download the information before you visit the customer site. Some of the sites, where Modular Messaging system is installed might not have access to Internet.
! Important:Important: Always check the Avaya Support Web site at http://www.avaya.com/support for
any latest updates and information before you install or upgrade. Note that links and paths on the Avaya Support Web site might change.
The following topics explain how to download or print the required software and documentation from the Web:
● Downloading software updates on page 10
● Downloading configuration notes on page 11
● Downloading the installation and upgrade checklists on page 11
● Downloading user documentation on page 12
Preinstallation requirements
10 Avaya Modular Messaging for Avaya MSS Release 5.1 Installation and Upgrades
Downloading software updatesYou must update the Avaya Modular Messaging software for each installation or upgrade to bring it up to date with the latest changes. To obtain the latest Avaya Service Pack (SP) and software patches for the system:
1. Go to Avaya Support Web site at http://www.avaya.com/support.
2. Click Find Documentation and Technical Information by Product Name.
3. Under M, click Modular Messaging.
4. On the Modular Messaging page, select Release 5.1 from the drop-down list.
5. Click Downloads.
6. Download any files needed for the Release 5.1 system. Ensure that you download any instructions required to install the Service Pack or software update.
7. In addition to any other files, download the following:
● Avaya Modular Messaging 5.1 Outlook Client● Avaya Modular Messaging 5.1 DCT Tool. You will use this file to update the DCT data
file.
● (Release 2.0, Release 3.x or Release 4.0 upgrade to R 5.1) Avaya Modular Messaging 5.1 MSS Pre-upgrade and Backup Verification Tool
● The latest Modular Messaging service pack.
● The latest Modular Messaging Patch.
8. Copy the downloaded files to a storage device.
9. Bring the storage device with you to the installation site.
Downloading required software and documentation
Issue 1.0 June 2009 11
Avaya - Proprietary. Use pursuant to the terms of your signed agreement or Avaya policy.
Downloading configuration notesObtain the configuration notes required to integrate the MAS with the PBX or telephony switch at this site. To obtain the recent copy, complete the following:
1. Go to the Avaya Support Web site at http://www.avaya.com/support.
2. Click Find Documentation and Technical Information by Product Name.
3. Under M, click Modular Messaging.
4. On the Modular Messaging page, select Release 5.1 from the drop-down list.
5. Click Configuration Notes.
6. Download or print the configuration notes for the switch integration.
For AudioCodes gateway configuration notes, see http://www.audiocodes.com/avaya.
Downloading the installation and upgrade checklistsAccess the PDF version of the checklists for installation and upgrade from the Avaya Support Web site. You can also find the checklists in Appendix A: Installation and upgrade checklists on page 257. To download the checklists:
1. See the Avaya Support Web site at http://www.avaya.com/support.
2. Click Find Documentation and Technical Information by Product Name.
3. Under M, click Modular Messaging.
4. On the Modular Messaging page, select Release 5.1 from the drop-down list.
5. On the Modular Messaging page, click Installation, Migrations, Upgrades and Configurations.
6. Click the following link: Modular Messaging with an Avaya MSS Release 5.1 Installation and Upgrade Checklists.
7. Click Download.
8. From the File Download dialog box, open or save the checklists file.

Preinstallation requirements
12 Avaya Modular Messaging for Avaya MSS Release 5.1 Installation and Upgrades
Downloading user documentationUser documentation needed for installing a new system is on the Avaya Support Web site:
1. Go to Avaya Support Web site at http://www.avaya.com/support.
2. Under Resource Library, click Find Documentation and Technical Information by Product Name.
3. Under M, click Modular Messaging. The browser opens Modular Messaging page.
4. In the release field, click 5.1.
5. On the Modular Messaging page, click Documentation Library (CD Collections).6. Click Avaya Modular Messaging Release 5.1 Documentation.
7. Click View HTM.
8. Click Avaya Modular Messaging with the Avaya MAS and MSS.
9. To find the user documentation you must do one the following:
● continue to click the document links on the left side of the page
● click the Search link on the right side of the page and enter the title of a document, such as Administering trusted servers on the MSS.
10. After you find the relevant documentation, either click the document link to view or print the files, or right-click to download the files.

Security considerations
Issue 1.0 June 2009 13
Avaya - Proprietary. Use pursuant to the terms of your signed agreement or Avaya policy.
Security considerationsThe following security-related issues apply to all Modular Messaging installations.
On-site security considerationsOn-site installers must take precautions to protect passwords and restrict access to the system.
Password security protection
To protect password security:
● Do not leave written passwords lying out or allow anyone to see the passwords.
● At the first opportunity, give the passwords directly to the designated customer representative.
● If you suspect that the security of the system was compromised, notify the project manager or the system administrator.
System security protection during installation
To protect system security during the installation:
● Remove all test subscribers and test mailboxes from the system when the procedures instruct you.
● Do not configure any unassigned mailboxes. Unassigned mailboxes are mailboxes that have an extension, but no subscriber assignment.
● Always log off or lock the server if you leave it unattended, even for a short period.

Preinstallation requirements
14 Avaya Modular Messaging for Avaya MSS Release 5.1 Installation and Upgrades
Ongoing system security considerationsCustomers must obtain and install the anti-virus software on any Microsoft Windows computer that is to run Avaya Modular Messaging software. Customers must also routinely install updates for Microsoft Windows systems to protect the system from known security weaknesses. Updates include operating system updates and security patches. For more information, obtain "Modular Messaging and security;" see Downloading user documentation on page 12.
Note:Note: Avaya technical support representatives must follow the specified internal
procedures to verify the installed software. If required, the technician must update the software with the latest patches as instructed.
Test equipment recommendationsRecommended test equipment for a successful installation includes:
● At least two telephones connected through the switch or private branch exchange (PBX). The telephones must be of the same type as the majority of telephones the customer plans to use on the system.
- Preferably the test telephones have a data display for testing the PBX integration and the Find Me and Call Me features.
- If the system uses the lamp as the message waiting indicator (MWI), the test telephone must have a lamp. If the system uses a stutter tone as MWI, the telephone must provide the stutter notification.
- Arrange the test telephones so that you can easily see the monitor while using the telephones.
● Access to a fax machine, if you plan to install MM Fax functionality.
Initial switch and LAN administration
Issue 1.0 June 2009 15
Avaya - Proprietary. Use pursuant to the terms of your signed agreement or Avaya policy.
Initial switch and LAN administrationThis section describes the initial switch or Private Branch Exchange (PBX) and local area network (LAN) administration required for the installation. Customers must complete this administration before or during a new Avaya Modular Messaging installation.
! CAUTION:CAUTION: It is crucial to coordinate the IP addresses that are to be used with the Avaya
Modular Messaging system with those on the corporate LAN. If you specify an IP address for a message server that conflicts with another Ethernet endpoint, the resulting traffic problems on the local area network can be difficult to diagnose and solve.
Initial switch or PBX administrationInitial switch or PBX administration might or might not be complete when you arrive on site, depending on the contract or customer agreements. When you install a new server, the switch administration must support:
● Testing the system with at least one test subscriber.
● Cut to service procedures that provide the subscribers with an active coverage path.
● For configurations that use analog and DSE port boards, the ability for testers to call each channel individually. The appropriate party must test each channel to be connected to the system before assigning the channels to the server or another application.
Verify that initial switch administration and testing is complete before you start.
Initial LAN administrationThe LAN administrator must administer the corporate LAN for the messaging system. Some LANs might be administered before the on-site installation starts. Other LANs require that the administration for a new server be done at the time of installation.
Note:Note: Avaya is not responsible for the installation, administration, or test of
communications between customer computers and the LAN.

Preinstallation requirements
16 Avaya Modular Messaging for Avaya MSS Release 5.1 Installation and Upgrades
Private Windows domain consideration with MM Fax Sender service
When you configure the MM Fax Sender server, an account with the credentials to create a trust relationship between the private and corporate Windows domains must be available or a person from customer’s corporate IT group who has details for an account with the credentials is available. If the IT representative cannot provide the account information during installation, skip the MM Fax Sender configuration and complete the rest of the Modular Messaging installation. Return to Configuring the MM Fax Sender server on page 68 and complete the configuration of the one-way trust when the account information is available.
Corporate Windows domain requirementsNote:
Note: If the MM system will use the private Windows domain, you can skip these requirements.
Before installing a system that uses a corporate Windows domain, the administrator of the corporate Windows domain must create the user and computer accounts in the corporate Windows domain:
● Creating user accounts in the corporate Windows domain on page 17.
● Creating computer accounts in the corporate Windows domain on page 18.
● Adding RAS and IAS permissions to the technical support account on page 19

Corporate Windows domain requirements
Issue 1.0 June 2009 17
Avaya - Proprietary. Use pursuant to the terms of your signed agreement or Avaya policy.
Creating user accounts in the corporate Windows domain
! Important:Important: Perform this procedure only if you plan to join the Modular Messaging system to
the corporate Windows domain.
The administrator of the corporate Windows domain creates the technical support account, which is the user account name used for remote access, and the customer administration account in the corporate Windows domain:
1. The corporate Windows domain administrator logs into the Active Directory server using a logon that has privileges to add a user account to the corporate Windows domain.
2. Click Start > Programs > Administrative Tools > Active Directory Users and Computers. The system opens the Active Directory Users and Computers window.
3. Expand the directory for the corporate Windows domain.
4. Right-click Users and from the pop-up menu, select New > User. 5. In the New Object window, type the user account name, such as techacct or custacct, in
both the Full Name and the User logon name fields.
6. Click Next. 7. Type the user account password in both the Password and Confirm Password fields.
8. Select the Password never expires check box.
Note:Note: If you need to change the password for a Modular Messaging customer account,
contact technical support for the procedure to change the password.
9. Click Next. 10. Click Finish.
11. Repeat this process as needed to make sure you create both technical support and the customer administration support accounts.

Preinstallation requirements
18 Avaya Modular Messaging for Avaya MSS Release 5.1 Installation and Upgrades
Creating computer accounts in the corporate Windows domain
! Important:Important: Perform this procedure only if you plan to join the Modular Messaging system to
the corporate Windows domain.
The corporate Windows domain administrator creates computer accounts in the corporate Windows domain for all servers in the VMD. This includes the MSS, all MASs, and, if present, the Supplementary server and optional servers, such as the Modular Messaging Web Client:
1. The corporate Windows domain administrator logs into the Active Directory server using a log in that has privileges to add a computer account to the corporate Windows domain.
2. Click Start > Programs > Administrative Tools > Active Directory Users and Computers. The system opens Active Directory Users and Computers dialog box.
3. Expand the directory for the corporate Windows domain.
4. Right-click Computers and from the pop-up menu, select New > Computer. 5. In the New Object window, in the Computer name field, type the server name you want to
create, such as mymss or mymas1.
6. Click Change. This specifies that a different user or group can add this computer to the corporate Windows domain.
7. In the Select User or Group window, enter the customer administration account, such as custacct, that you created previously; see Creating user accounts in the corporate Windows domain on page 17.
8. Click Check Names.
9. Click OK.
10. Click Next. 11. Make sure that This is a managed computer check box is NOT selected.
12. Click Next. 13. Click Finish.
14. Repeat this process for each MAS and Supplementary server (if present) in the VMD.
Corporate Windows domain requirements
Issue 1.0 June 2009 19
Avaya - Proprietary. Use pursuant to the terms of your signed agreement or Avaya policy.
Adding RAS and IAS permissions to the technical support account
You must add RAS and IAS permissions to the technical support account:
1. The corporate Windows domain administrator logs into the Active Directory server using a logon that has privileges to add a user account to the corporate Windows domain.
2. Click Start > Programs > Administrative Tools > Active Directory Users and Computers. The system opens the Active Directory Users and Computers window.
3. Expand the directory for the corporate Windows domain.
4. Click Users.
5. In the right pane of the window, double-click RAS and IAS Servers to open the Properties window.
6. In the RAS and IAS Servers Properties window, click the Members tab.
7. Click Add. The system opens the Add window.
8. Make sure that Select These Object Types includes Computers in the list. If not, click Object Types and select the Computers check box, then click OK.
9. In the Object Name field, type the server name, such as MYMAS1, and click Check Names.
10. Verify that the correct computer name is shown underlined in the list box.
11. Repeat the last two steps to add all Modular Messaging servers to this list.
12. Click OK to close this window.
13. Click OK to close the RAS and IAS Servers Properties window.
14. In the right pane, double-click the technical support account.
15. In the Properties window for the remote access account, click the Dial-in tab.
16. Under Remote Access Permission (Dial-in or VPN), select Allow access.
17. Leave CallBack Options set at No Callback.
18. Click OK on each open window until they are closed.
Preinstallation requirements
20 Avaya Modular Messaging for Avaya MSS Release 5.1 Installation and Upgrades
Issue 1.0 June 2009 21
Avaya - Proprietary. Use pursuant to the terms of your signed agreement or Avaya policy.
Chapter 2: Performing initial MSS administration
This chapter describes how to perform initial administration on the Message Storage Server (MSS).
Note:Note: Ensure that you have completed the tasks described in Installing the Avaya
S8730 Server for Modular Messaging guide.
Installing a Modular Messaging system involves many steps, therefore, use the system installation checklist in Appendix A: Installation and upgrade checklists on page 257. Check off the step as you complete it, to track your progress.
Topics in this chapter include:
● Logging on to the MSS on page 22
● Starting the MSS configuration using a DCT data file on page 24
● Configuring the MSS manually on page 26
● Setting the time and date on page 31. You can configure the MSS automatically or manually, however, you must set the time and date manually.
Performing initial MSS administration
22 Avaya Modular Messaging for Avaya MSS Release 5.1 Installation and Upgrades
Logging on to the MSS After you turn on the hardware, log on to the Message Storage Server (MSS). As you have not yet administered the system, you can access the MSS only from the console that is connected to the KVM switch.
To log on to the MSS from the console:
1. If the Message Storage Server (MSS) is not turned on, press the power button to turn on the server now.
2. Verify that the monitor shows the MSS.
● For a 2-port KVM switch, the MSS is connected to one of the computer ports.
● For an 8-port Belkin KVM switch, the MSS usually is connected to the first computer port on the switch. The port is labeled VGA 01.
3. If the monitor displays a different server, toggle the port to show the MSS.
● To have a 2-port Belkin KVM switch show a different server:
a. Press Scroll Lock twice.
The LED on top of the Belkin KVM switch starts to blink.
b. Type the port number. For example, type 1 for port 1.
● To have an 8-port Belkin KVM switch show a different server:
a. Press Scroll Lock twice within 2 seconds.
b. Select the server that you want to be displayed on the monitor using one of the following methods:
- Press the up (or down) arrow key to change to the server connected to a higher (or lower) port number.
- Type the port number using the keyboard. For example, type 1 for port 1.
For complete user and troubleshooting instructions on KVM switch, see the KVM switch documentation.
4. When the boot is complete, you see the message Press Enter to return to prompt.... Press Enter.
5. At the localhost login: prompt, log on to the MSS as craft.The server displays the Messaging Administration web interface.
Note:Note: If the system displays any certificate warnings, click OK.

Logging on to the MSS
Issue 1.0 June 2009 23
Avaya - Proprietary. Use pursuant to the terms of your signed agreement or Avaya policy.
Adjusting the display settings, if neededCheck the display quality of the monitor screen.
● If the display is poor, correct the display quality using the steps in this section.
● If the monitor displays system information well enough for an initial administration, continue with Setting the time and date on page 31.
To adjust the monitor display settings:
1. Click Log Off. If the display is so poor that you cannot see the mouse pointer, exit by press Ctrl+Alt+Backspace to exit.
2. Log on to the console as monitor. Use the password of monitor. 3. In the Display Settings window:
a. Click Settings to adjust the resolution of the screen or the depth of the color.
b. Click Hardware to change the type of the monitor or the video board.
1. To change the type of the monitor or the video board, click Configure.
2. Select the required hardware type, and click OK.
4. Click OK to close the Display Settings window.
5. If the system prompts you to confirm, click OK.
6. At the localhost login prompt, log on to the system as craft. Check if the display quality has improved.
7. If the display quality is still poor, return to Step 2 and change the settings.
8. If the changed settings do not improve the display, the customer must use a different monitor.
Performing initial MSS administration
24 Avaya Modular Messaging for Avaya MSS Release 5.1 Installation and Upgrades
Starting the MSS configuration using a DCT data fileThis section explains how to start the automatic configuration of the MSS using a DCT data file. Do not use a DCT data file prepared from a system analysis or from an earlier release of the system. For more information, see Obtaining the DCT data file on page 9.
The MSS configuration happens in two phases. This procedure explains the first phase. You must then configure each MAS and Supplementary server (if present), as explained in Configuring the Avaya MAS on page 41 for Avaya MAS or Configuring a customer-provided MAS on page 85 for a CPE MAS and proceed with the second phase of the MSS configuration as outlined in Completing initial MSS administration on page 103.
Use the following steps to configure the MSS using a DCT data file:
1. Log on to the MSS as craft. See Logging on to the MSS on page 22.
2. Insert the storage device that contains the DCT data file into the MSS.
3. If you want to change the time, manually set the time and date of your system, even if you plan to use an NTP server. See Setting the time and date on page 31. You cannot set up the NTP server now.
4. From the Server Administration menu on the Messaging Administration web interface, click Configure Using DCT. The system opens Configure MSS using DCT page.
Note:Note: If the DCT file is configured for INADS alarming, ensure that the modem is
connected or the configuration fails.
5. Select the DCT data file from the storage device and click Fresh Configuration.
6. On the page that displays the configuration information from the DCT data file, click ONE of the following:
● If the configuration information is correct, click Continue Configuration to continue with the next step.
● If the configuration information is incorrect, you must change the information in DCT file using the following steps:
a. Click Cancel Configuration
b. Return to the Windows computer and change the information
c. Save the data file on the storage device. For information about changing the DCT data file, see Avaya Modular Messaging Data Collection Tool Online Help.
d. If you are able to correct the DCT data file, repeat tasks from step 1, using the updated DCT data file. However, if you cannot make the corrections, contact technical support.
7. On the pop-up screen that appears, click OK to continue with the configuration.
The page displays the status of the configuration, automatically refreshing the information until this part of the configuration is complete.

Starting the MSS configuration using a DCT data file
Issue 1.0 June 2009 25
Avaya - Proprietary. Use pursuant to the terms of your signed agreement or Avaya policy.
8. If this part of the MSS configuration is successful, the page displays ’Finish MAS installation before continuing MSS configuration.’ message at the bottom of the page. Do one of the following:
● If you are installing a Supplementary server with this Modular Messaging system, modify the Supplementary server trusted server entry that was create by the MSS automatic configuration tool:
a. Under the Messaging Administration of the Messaging Administration web interface, click Trusted Servers. The system displays Manage Trusted Servers page.
b. Highlight the Trusted Server with a service name of Supplementary Server. Click Edit the Selected Trusted Server.
The server displays the Edit Trusted Server page.
c. In the Special Type field, click Messaging Application Server from the drop-down list.
d. Click Save.
● Start MAS configuration using the procedures outlined in Configuring the Avaya MAS for an Avaya-provided MAS or Configuring a customer-provided MAS for a customer-provided MAS. You may now set up an NTP server, if one is available as instructed in Setting the time and date on page 31.
Note:Note: Do not click Continue Configuration at this time. You must proceed with phase
two of the MSS installation as described in Completing initial MSS administration on page 103 only after you complete MAS configuration.
● If you see FAILURE on the status display, contact Avaya technical support. When you make the corrections, return to Step 4, except that the button on the Configure MSS using DCT page now displays Continue Configuration.

Performing initial MSS administration
26 Avaya Modular Messaging for Avaya MSS Release 5.1 Installation and Upgrades
Configuring the MSS manuallyYou do not need to configure the MSS manually. You can use the DCT data file to configure the MSS. Use the following procedures if you choose not to use the DCT data file or if you choose to change any configuration while the installation is underway.
Use the following procedures to configure the MSS manually:
● Setting up network addressing on page 27
● Setting the time and date on page 31
● Setting up the MSS local machine on page 32
● Setting up the trusted servers on page 33
● Rebooting the MSS on page 39

Configuring the MSS manually
Issue 1.0 June 2009 27
Avaya - Proprietary. Use pursuant to the terms of your signed agreement or Avaya policy.
Setting up network addressingYou must configure the MSS to work on both the corporate LAN and the private LAN.
! CAUTION:CAUTION: Do not use the examples shown in this book!
To set up the MSS to work on the corporate and private LANs:
1. Log on to the MSS as craft; see Logging on to the MSS on page 22.
2. From the Server Administration menu on the Messaging Administration web interface, click TCP/IP Network Configuration.
3. Complete the following information on the Configure Network Addressing page (for more information about each field, click the Help button or the field name):
a. For Host Name, enter the MSS NetBIOS machine name, such as mymss.
b. For Default Gateway Address, enter the corporate default gateway IP address for the MSS.
4. To administer Corporate LAN settings (you will verify Private LAN settings later in this section):
a. For Primary Name + Domain, enter the full corporate computer name for the MSS, such as mymss.loc.avaya.com.
Note:Note: The Primary Name + Domain name is a combination of the Host Name and the
Domain Name fields on this page. However, the Primary Name might be different from the host name, depending on the corporate setup. For example, primname.loc.avaya.com.
b. For IP Address, enter the corporate IP address for the MSS.
c. If the system prompts you that changing the IP address will cause a momentary loss of service, click OK.
! Important:Important: Remember when you verify the corporate subnet mask, the private IP address
and the corporate IP address must not use the same subnet. If same subnet is in use, change the private subnet mask; see step c on page 28. For example in the following table, ensure that the IP address part (in bold) of both the corporate and private network are different.

Performing initial MSS administration
28 Avaya Modular Messaging for Avaya MSS Release 5.1 Installation and Upgrades
d. For Subnet Mask, type the corporate subnet mask for the MSS.
e. Optional: For Aliases, type any required aliases for this interface. All aliases must be unique and cannot duplicate any other computer names or aliases, either on the Modular Messaging system or on the corporate network. To enter multiple aliases, separate the names with a space.
If you leave the field blank, the system automatically provides an alias for the corporate full computer name of the MSS. The alias is the corporate NetBIOS name for the MSS, which is the primary name for the MSS full computer name up to the first period. For example, the system provides the alias mymss for the full computer name mymss.loc.avaya.com.
f. For Network Media Type, use the default auto detect option unless you have a problem connecting to the network switch. Some routers do not automatically detect the correct settings. For more information about media types, click Help.
5. Verify the Private LAN settings and update only if necessary:
a. For Primary Name + Domain, the system displays the predefined private system name for the MSS, mss1.
b. For IP Address, use the correct MSS private IP address from the range of IP addresses that the private network uses at this site.
! CAUTION:CAUTION: You must use the same private IP address range for the MSS that you use for
each MAS. Ensure that the private network settings in the Modular Messaging Data Collection Tool (DCT) match the settings on this page. For more information, see Configuring MASs using an existing DCT data file on page 44.
The private IP address of the MSS must use the subnet that you have chosen for the private LAN. If the system prompts you that changing the IP address will cause a momentary loss of service, click OK.
Table 2: Example for valid private and corporate IP addresses
Example Corporate IP address
Corporate subnet mask
Private IP address
Private subnet mask
Valid 135.9.83.107 255.255.255.0 192.168.1.1 255.255.255.0
Invalid 192.168.1.100 255.255.255.0 192.168.1.1 255.255.255.0
Configuring the MSS manually
Issue 1.0 June 2009 29
Avaya - Proprietary. Use pursuant to the terms of your signed agreement or Avaya policy.
! Important:Important: Remember when you verify the private subnet mask, the private IP address, and
the corporate IP addresses must not use the same subnet. If the same subnet is in use, change the private subnet mask. See Example for valid private and corporate IP addresses on page 28.
c. For Subnet Mask, verify the private subnet mask for the MSS.
d. Leave Aliases for the private network blank.
e. For Network Media Type, verify if you have selected the correct type. The type is usually auto detect. For more information about media types, click Help.
6. Administer the DNS (Domain Name Service) server as appropriate:
● If you do not use a corporate DNS, set the Enable DNS field to No. Continue with Step 7.
● To use a corporate DNS, set Enable DNS to Yes. Continue with the following steps:
a. For Domain Name, type the corporate domain name.
b. For Name Server, add any IP addresses listed for corporate DNS servers that the MSS uses. Press Enter after each IP address.
Note:Note: The MSS accepts only IP addresses in this field, even if the system uses
Dynamic Host Configuration Protocol (DHCP) to assign most IP addresses.
c. You must specify a Search Order only if the system must search across multiple domains. If a Search Order is required:
1. Always enter the name of the corporate domain shown in the Domain Name field first. Press Enter.
2. Add any other domain names listed for the MSS Search order of DNS domains. Press Enter after each domain name.
7. Click Save.
Performing initial MSS administration
30 Avaya Modular Messaging for Avaya MSS Release 5.1 Installation and Upgrades
8. After the system displays the Network Addressing status, click Log Off (which appears in the menu at the top left of the page).
Note:Note: If you do not log off, the system times out and logs off automatically.
Ensure that no Help windows are open in the background, or they prevent the browser from closing. To close a Help window, click the close link at the bottom of the Help page.
The system displays the prompt:
hostname login:
Note:Note: Avaya recommends you to wait for at least 1 minute before you log into the
system again.
9. Verify that hostname in the login prompt is the same as that you entered in Step 3-a under Setting up network addressing on page 27. If the hostname is not the same:
a. Log on and return to the Network Addressing page using the craft account. See Steps 2 and 3 under Setting up network addressing on page 27.
b. Type the host name correctly. Verify all your network configuration settings.
c. Click Save.
d. Log off from the MSS.

Configuring the MSS manually
Issue 1.0 June 2009 31
Avaya - Proprietary. Use pursuant to the terms of your signed agreement or Avaya policy.
Setting the time and date
! Important:Important: Set the time and date the first time you log on to a new MSS and BEFORE you
configure any MAS.
This topic explains how to set the time and date on the MSS:
1. Log on to the MSS as craft; see Logging on to the MSS on page 22.
2. From the Server Administration menu, click Date/Time/NTP Server. The server displays the Administer Linux Date and Time page.
3. If the time zone is incorrect, from the Time Zone drop-down menu select the correct time zone (changing Time Zone requires a reboot).
4. Do one of the following to manually set the time or connect to an NTP server:
● For manual entry, click Manual:a. For Date, select the month and day. Type the current year, for example 2008.
b. For AM/PM, select the type of time you use: AM, PM, or 24-hour clock.
c. For Time, select the hours and minutes.
● To connect to an NTP server, click NTP Time Server: a. Enter the name of the NTP server or the IP address.
b. Click Add NTP Server. The server will automatically update and maintain your system’s time and date.
5. If you made any changes to the page, click Save.
6. If you see a security warning about unencrypted information, click Continue.
7. If the system prompts you to run the time.bat file to synchronize the time with all MASs, click OK. The Date and Time page displays the new settings.
8. Click Log Off. 9. If the system again prompts you to run the time.bat file on all MASs, click OK.
10. Log on to the MSS as craft once again, see Logging on to the MSS on page 22.
11. If you are manually configuring the MSS, continue with Setting up the MSS local machine on page 32.
Performing initial MSS administration
32 Avaya Modular Messaging for Avaya MSS Release 5.1 Installation and Upgrades
Setting up the MSS local machine To set up a profile for the local machine for MSS:
1. If not already logged in, log on to the MSS as craft; see Logging on to the MSS on page 22.
2. From the Messaging Administration menu on the Messaging Administration web interface, click Networked Machines. The system opens Manage Networked Machines page.
3. Highlight the MSS that you are administering.
4. Click Edit the Selected Networked Machine.
5. On the Edit Networked Machine page, complete only the following fields:
a. For Machine Name, verify the customer-specified MSS host name. If no corporate LAN is available, the Machine Name remains as LocalHost (with an IP of 127.0.0.1).
b. For Mailbox Number Length, select a number from the list.
c. For Password, type the password to use for LDAP directory updates. This password enables networking with other messaging servers, such as other MSS or Message Networking servers. Type the same password in the Confirm Password field.
d. Under Mailbox Number Ranges, you might require the Prefix field.
e. In the field Starting Mailbox Number field, type the appropriate starting mailbox extension number for the address range. For example, for a five-digit dial plan, you might type 55000.
f. In the Ending Mailbox Number field, type the appropriate ending mailbox extension number for the address range. For example, for a five-digit dial plan, you might type 55999. To enter multiple address ranges, repeat Steps e and f.
Note:Note: If you are enabling MultiSite feature, you do not have to set the start and end mail
box number. Ignore step 5e and step 5f.
6. Scroll down, and click Save.
7. At the confirmation message, click OK.

Configuring the MSS manually
Issue 1.0 June 2009 33
Avaya - Proprietary. Use pursuant to the terms of your signed agreement or Avaya policy.
Setting up the trusted serversYou must add a trusted server for each MAS and Supplementary server, if present, that is to run Avaya Messaging Application Server (MAS) software. You must also set up all other required servers that are in this voice mail domain.
Note:Note: You can have a maximum of six MASs that includes a Supplementary server (if
present) in the system. However, only five of the MASs can handle calls. The sixth MAS can be an Avaya-provided or customer-provided Supplementary server. The Supplementary server can provide all other services except handling calls. This section describes how to set up MASs and the Supplementary server, if present, as trusted servers.
See the following tasks for setting up trusted servers:
● Adding each MAS as a trusted server on page 33
● Adding the MWI trusted server, if used on page 35
● Adding optional trusted servers on page 36
● Updating the IMAP4 password and the system protocols on page 37
Adding each MAS as a trusted server
To set up each MAS or Supplementary server in the system as a trusted server:
1. Log on to the MSS as craft; see Logging on to the MSS on page 22.
2. On the Messaging Administration web interface, under Messaging Administration, click Trusted Servers.
The system opens the Manage Trusted Servers page.
3. Click Add a New Trusted Server. The system opens the Add Trusted Server page.
4. Complete the following fields:
a. In the Trusted Server Name field, type the customer-specified NetBIOS name for this MAS, such as mymas1.
b. In the Password field, type the LDAP password used for all MASs in this Modular Messaging system. Type the password again in the Confirm Password field.

Performing initial MSS administration
34 Avaya Modular Messaging for Avaya MSS Release 5.1 Installation and Upgrades
c. In the Machine Name / IP Address field, enter the correct private IP address for this MAS. To find the correct private IP address for this MAS, see Table 3: Private IP addresses for each MAS by IP address range on page 34. Use the IP address that matches the MAS you are currently entering and the IP address range that is used for this site. To determine the correct IP address range for this site.
! CAUTION:CAUTION: You must use the same private IP address range on the MSS that you will use on
each MAS. Ensure that the private network settings in the Modular Messaging Data Collection Tool match the settings on this page. For more information, see Configuring MASs using an existing DCT data file on page 44.
d. In the Special Type field, click Messaging Application Server, when you add a trusted server for an MAS or a Supplementary server.
The Special Type selection populates the other fields with the required values.
5. After you verify or update the information, click Save.
6. At the confirmation message, click OK.
7. To add a subsequent MAS or a Supplementary server, if any, repeat Steps 3 through 6 for each MAS in the system.
Table 3: Private IP addresses for each MAS by IP address range
Private network IP address range
MAS#1 IP address
MAS#2IP address
MAS#3IP address
MAS#4IP address
MAS#5IP address
MAS#6 IP address
10.0.0.1 to 10.255.255.254
10.255.1.250 10.255.1.249 10.255.1.248 10.255.1.247 10.255.1.246 10.255.1.245
172.16.0.1 to 172.31.255.254
172.31.1.250 172.31.1.249 172.31.1.248 172.31.1.247 172.31.1.246 172.31.1.245
192.168.0.1 to 192.168.255.254
192.168.1.250 192.168.1.249 192.168.1.248 192.168.1.247 192.168.1.246 192.168.1.245

Configuring the MSS manually
Issue 1.0 June 2009 35
Avaya - Proprietary. Use pursuant to the terms of your signed agreement or Avaya policy.
Adding the MWI trusted server, if used
If the Message Waiting Indicator (MWI) Server is to be installed on any MAS, add a trusted server for it now.
To add a Message Waiting Indicator (MWI) trusted server:
1. On the Messaging Administration menu of the Messaging Administration web interface, click Trusted Servers. The system displays Manage Trusted Servers page.
2. Click Add a New Trusted Server. The server displays the Add Trusted Server page.
3. Complete the following fields on the Add Trusted Server page:
a. For Password and Confirm Password, type a password that identifies the MWI server to all messaging servers in this Modular Messaging system.
b. For Machine Name / IP Address, type the private IP address of the MAS or Supplementary server on which you want to install the MWI Server feature
! CAUTION:CAUTION: You must use the same private IP address range on the MSS that you use on the
MAS. Ensure that the private network settings in the Data Collection Tool match with the settings on this page. For more information, see Configuring MASs using an existing DCT data file on page 44.
c. For Special Type, select MWI Server from the drop-down list.
The Special Type selection populates the other fields with the required values. Do not change the value VVSTS in the Server Name field.
4. Click Save.
5. At the confirmation message, click OK.
6. Continue as appropriate:
● If you have to install a Supplementary server at this site, continue with Adding each MAS as a trusted server on page 33.
● If you have added all trusted servers for this site, continue with Updating the IMAP4 password and the system protocols on page 37.
Performing initial MSS administration
36 Avaya Modular Messaging for Avaya MSS Release 5.1 Installation and Upgrades
Adding optional trusted servers
You use the Add Trusted Server page to add other trusted servers to the messaging network. Servers might include a Unimax 2nd Nature (R) server, a Provision server, or a Site Administration (ASA) server. Often, the customer administrator adds these servers after initial installation.
If directed, you can add one or more optional trusted servers as follows:
1. On the Messaging Administration menu of the Messaging Administration web interface, click Trusted Servers. The system displays Manage Trusted Servers page.
2. Click Add a New Trusted Server. The server displays the Add Trusted Server page.
3. Complete the following fields on the Add Trusted Server page:
a. In Trusted Server Name field, type the customer-specified NetBIOS name for this server, such as mymas6.
b. In Password field, type the LDAP password to be used for all MASs in this Modular Messaging system. Type the password again in the Confirm Password field.
c. In Machine Name / IP Address field, continue as appropriate:
● For a corporate setup that uses DHCP addressing, type the full corporate computer name using all lowercase letters. For example, type provision.loc.avaya.com.
● For a corporate setup that uses static IP addresses, type the corporate IP address for this server.
● For Supplementary server, type the private network IP address for this server as. To enter the correct private IP address for this server, see Table 3: Private IP addresses for each MAS by IP address range on page 34.
d. Enter any other information required for this type of server and connection.
e. In the Special Type field, click Messaging Application Server to add a trusted server for an MAS or for a Supplementary server.
The Special Type selection populates the other fields with the required values.
Note:Note: For more information, use the help or obtain "Administering trusted servers on
the MSS;" see Downloading user documentation on page 12.
4. Click Save. At the confirmation message, click OK.
Configuring the MSS manually
Issue 1.0 June 2009 37
Avaya - Proprietary. Use pursuant to the terms of your signed agreement or Avaya policy.
Updating the IMAP4 password and the system protocols
On all systems, you must update the password for the IMAP trusted server as follows:
1. From the Messaging Administration web interface, click System Administration.
The server displays the Administer System Attributes and Ports page.
2. Under SYSTEM ATTRIBUTES, enter the password for Internet Message Access Protocol (IMAP) in this messaging network:
a. Type the IMAP4 TUI Password.
b. Type the same password in the Confirm IMAP4 TUI Password field.
3. Scroll down to the SYSTEM TCP/IP PORTS section. Enable any required protocols and access permissions for desktop clients, web applications, or other required services at this site. For a list of protocols required for various applications, see Table 4: TCP ports to enable for Modular Messaging client applications.
For example, to enable Microsoft Outlook client access:
a. Next to LDAP Port 389, select Enabled.
b. Next to IMAP4 Port 143 and SMTP Port 25, select Enabled.

Performing initial MSS administration
38 Avaya Modular Messaging for Avaya MSS Release 5.1 Installation and Upgrades
Note:Note: To provide desktop client access, you must also set the options for MAS Privacy
as appropriate and Restrict Client Access for the appropriate class of service. For more information, see Administering classes of service on page 112.
4. Click Save.
Table 4: TCP ports to enable for Modular Messaging client applications
Client LDAP Port 389
LDAP Dir Update Port 56389
IMAP4 Port 143
IMAP4 SSL Port 993
POP3 Port 110
POP3 SSL Port 995
SMTP Port 25
SMTP SSL Port 465
IBM Lotus Notes client
X X X
Microsoft Outlook client
X X X
Modular Messaging Web client
X X X
Standard IMAP client Optional X X
Standard IMAP client with SSL
Optional X X Optional
Standard POP3 client Optional X X
Standard POP3 client with SSL
Optional X X Optional
UCC server for Speech Access
X X X
Networked Modular Messaging or Message Networking
X X
Avaya Multi-site or Site Administration
X
Unimax 2nd Nature(R)
X
Provision X

Configuring the MSS manually
Issue 1.0 June 2009 39
Avaya - Proprietary. Use pursuant to the terms of your signed agreement or Avaya policy.
Rebooting the MSSTo reboot the MSS, complete the following:
1. From the Utilities menu, click Reboot Server. The server displays the Reboot Server page.
2. Click Reboot. 3. At the reboot warning message, click OK to continue.
The system displays status messages as the server shuts down the messaging software. The software shutdown can take several minutes.
Note:Note: You do not have to wait for the reboot process to complete to continue with the
installation.

Performing initial MSS administration
40 Avaya Modular Messaging for Avaya MSS Release 5.1 Installation and Upgrades

Issue 1.0 June 2009 41
Avaya - Proprietary. Use pursuant to the terms of your signed agreement or Avaya policy.
Chapter 3: Configuring the Avaya MAS
This chapter applies only to an Avaya-provided Messaging Application Server (Avaya MAS) and Supplementary server installation. This chapter describes how to configure an Avaya Messaging Application Server (MAS) and a Supplementary server, if any. You must configure each Avaya Messaging Application Server (MAS) and Supplementary server in the VMD beginning with the first MAS. The servers must work both on the corporate local area network (LAN) and on the private LAN used for the Modular Messaging system.
If you are using customer-provided MAS, use the procedures described in Configuring a customer-provided MAS on page 85 to configure the CPE MAS.
Topics in this chapter include:
● Displaying an MAS from the console on page 42
● Completing MAS configuration prerequisites on page 43
● Configuring MASs using an existing DCT data file on page 44
● Preparing the new server on page 47
● Configuring MAS port boards on page 52
● Configuring the voice mail system on page 53
● Continuing the installation on page 83
Configuring the Avaya MAS
42 Avaya Modular Messaging for Avaya MSS Release 5.1 Installation and Upgrades
Displaying an MAS from the console Since you have not logged on as an administrator to the system, you cannot access the server from the console (monitor) that is connected to another server through the KVM switch.
1. To turn on the S8730-family server, press the power button on the front of the server, until the LED turns green. For more information, see Installing the Avaya S8730 Server for Modular Messaging guide.
2. Verify that the monitor is showing the correct server:
● For a 2-port Belkin KVM switch, you must connect the MAS to one of the two computer ports.
● For an 8-port Belkin KVM switch, the first MAS port is labeled VGA 02. You must connect the subsequent MASs to the computer ports VGA 03, VGA 04, and so on.
3. If the monitor displays a different server, toggle the ports to show the correct server:
● To have a 2-port Belkin KVM switch show a different server:
a. Gently press Scroll Lock twice.
The LED on top of the Belkin KVM switch starts to blink.
b. Type the port number on the keyboard. For example, type 2 for port 2.
● To have an 8-port Belkin KVM switch show a different server:
a. Gently press Scroll Lock twice within 2 seconds.
b. Select the server to display using one of the following methods:
- Press the up (or down) arrow key to change to the server connected to a higher (or lower) port number.
- Type the port number on the keyboard. For example, type 2 for port 2.
- You might see System Event Log Full message when the system boots. You can ignore this error message. Modular Messaging does not use this log.
For complete user and troubleshooting instructions, see the KVM switch documentation.

Completing MAS configuration prerequisites
Issue 1.0 June 2009 43
Avaya - Proprietary. Use pursuant to the terms of your signed agreement or Avaya policy.
Completing MAS configuration prerequisitesEnsure that you complete these requirements before you begin the MAS configuration:
● Obtain the required software and documentation; see Downloading required software and documentation on page 9.
● Obtain the current DCT (MMDCT.exe) from the Avaya support web site (do NOT use the DCT on the applications DVD); see Downloading software updates on page 10.
● For systems that join the corporate Windows domain, create the user and the computer accounts in the corporate Windows domain; see Creating user accounts in the corporate Windows domain on page 17 and Creating computer accounts in the corporate Windows domain on page 18.
● Install the required system hardware; see Installing the Avaya S8730 Server for Modular Messaging guide.
● Complete the initial MSS administration; see Chapter 2: Performing initial MSS administration on page 21.
● Continue to use the "New Modular Messaging installation" checklist in Appendix A: Installation and upgrade checklists on page 257.

Configuring the Avaya MAS
44 Avaya Modular Messaging for Avaya MSS Release 5.1 Installation and Upgrades
Configuring MASs using an existing DCT data fileUse the Avaya Modular Messaging Configuration wizard to access the DCT data file to configure most of the MAS information automatically.
! CAUTION:CAUTION: Configure each Avaya Messaging Application Server (MAS) beginning with
MAS#1. If you are configuring additional MASs or Supplementary server, use the same data file that you used for MAS#1. Do not create a new DCT data file for each MAS or Supplementary server.
1. Verify that you completed the prerequisites before you configure MAS. For more information, see Completing MAS configuration prerequisites on page 43.
2. Ensure that the MSS is running.
3. Boot the MAS you want to configure and display it using the console; see Displaying an MAS from the console on page 42.
When an MAS server boots at this stage of an installation, the Avaya Modular Messaging Configuration wizard runs automatically.
4. Insert the storage device that contains the DCT data file into the server.
5. On the Welcome screen of the Avaya Modular Messaging Configuration wizard, click Next.
6. On the Locate Configuration Data screen, select the appropriate DCT data file for the site. If the required DCT data file is not populated, click Browse and complete the following:
a. In the Open window, click the drop-down list next to Look in.
b. Select the storage device.
c. Navigate to the appropriate folder on the storage device and double-click the appropriate data file, such as sitefile.mmdct.
7. Click Next. 8. When the system prompts you to confirm the data file, click Yes.
The wizard opens the Avaya Modular Messaging Data Collection Tool.
9. On each DCT window you must do the following:
a. Verify the data on each screen and click Next.
Note:Note: For more information about completing or verifying the data on each screen, see
the DCT online help.
b. Under MM servers, select Message store. The system displays the Message store screen.
Configuring MASs using an existing DCT data file
Issue 1.0 June 2009 45
Avaya - Proprietary. Use pursuant to the terms of your signed agreement or Avaya policy.
c. For an Avaya-provided server, select MSS with Avaya MAS servers.
d. Click Complete to continue the configuration process.
The system prompts you to save the file.
e. You must Save the file even if no changes were made.
The system returns you to the Avaya Modular Messaging Configuration Wizard.
Note:Note: Do not click Cancel, as this may result in a need for a re-install of the system.
10. On the Messaging Application Server Number screen, verify that the MAS number field shows the correct number for this server.
● You must configure MAS#1 first.
● Configure each server in order, including the Supplementary server, if present.
● If required, change the MAS number field to show the correct number for this server.
11. Click Next. The Configuring System screen shows the progress information of the MAS configuration. The Sysprep window opens. The server then reboots. After the reboot, the system runs the Windows Setup wizard.
12. Do the following to complete the wizard:
a. On the License Agreement screen, select I accept this agreement. Click Next. b. On the Your Product Key screen, type the Windows product key for this server.
- Each Windows computer has a unique product key for the Windows 2003 R2 operating system. Enter the exact number.
- On an S8730 server, the product key sticker is located on the right-hand edge of the server chassis.
c. Click Next.The Avaya Modular Messaging Configuration Wizard displays the configuration status on the Configuring System screen. The server reboots several times. However, you do not need to log on manually. The entire process takes about 30 minutes.
Note:Note: If the system displays a Configuration Credential LDAP failure, verify that the
MSS is running. The MSS must be available during the MAS configuration process. If the MSS is running, do the following:
- Verify that LDAP password in the DCT data file match with that of MSS. See Setting up the MSS local machine on page 32.
- Verify that you have properly connected the private network LAN cable.
When the server configuration is complete, the progress bar stretches across the screen and the Next button becomes active.

Configuring the Avaya MAS
46 Avaya Modular Messaging for Avaya MSS Release 5.1 Installation and Upgrades
13. Click Next. 14. On the Avaya Modular Messaging Wizard Completed screen, click Finish.
15. Complete all tasks outlined in Preparing the new server on page 47 applicable for the server before you run the Avaya Modular Messaging Configuration Wizard on the subsequent MAS.
Preparing the new server
Issue 1.0 June 2009 47
Avaya - Proprietary. Use pursuant to the terms of your signed agreement or Avaya policy.
Preparing the new serverThis section describes how to update and protect the new server. See the following:
● Updating Windows Internet Explorer 7 security on page 47
● Installing and administering anti-virus software on page 48
● Updating Microsoft Windows on page 49
● Entering RAS IP addresses on each MAS on page 50
Updating Windows Internet Explorer 7 security
Note:Note: Use this procedure if you have to install any third-party software from a mapped
network drive. If you install the third-party software from a disk or other removable media, such as a USB storage device, you can skip this procedure and continue with Installing and administering anti-virus software on page 48.
Before you install any third-party software, such as anti-virus software, from a mapped network drive, you need to update Windows Internet Explorer 7 security. If you do not make this update and use a domain account, such as custacct, to install third-party software, Windows will not allow you to install.
1. If you have not already updated, map the network drive which contains the third-party software.
2. Launch the Windows Internet Explorer 7 browser.
3. A window appears that states Windows Internet Explorer Enhanced Security is enabled; click OK.
4. From the browser, select Tools > Internet Options.
5. From the Internet Options window, select the Security tab.
6. In the "Select a zone to view or change security settings" box, click Local intranet. 7. Click Sites.
8. On the Local intranet window, in the "Add this web site to the zone" field, type the universal naming convention (UNC) path of your mapped network drive, using the \\computername\share format, and click Add.
9. Click OK to close the Local intranet window.
10. Click OK to close the Internet Options window.
Configuring the Avaya MAS
48 Avaya Modular Messaging for Avaya MSS Release 5.1 Installation and Upgrades
Installing and administering anti-virus software Avaya strongly recommends that you install anti-virus software on any Microsoft Windows computer that runs Avaya Modular Messaging software. The anti-virus software used and the method of installation depends on customer requirements and the local implementation.
1. You might need to install the anti-virus software using the local administrator account. If you cannot install the required files using the customer account login, log off and then log in using the local administration account name.
2. Install the anti-virus software using the installation method that is appropriate for this site.
3. Configure the anti-virus software to work correctly with Avaya Modular Messaging software.
! CAUTION:CAUTION: Some anti-virus software such as McAfee VirusScan Enterprise 8.0i blocks the
port 25 by default. The Modular Messaging system uses TCP/IP port 25 to send messages from the MAS to the MSS. To enable port 25, open the anti-virus program. Change the access protection properties to unblock port 25.
Guidelines for using anti-virus software on an Avaya Modular Messaging server include:
● Avoid using a message-scanning method that can greatly impact the performance of the Avaya servers. Avaya recommends to use "on-demand" scanning, where scans run at scheduled intervals. Do not use "on access" scanning that runs when the system access a file. This reduces the performance of the server. Some anti-virus software applications, by default, sets to on-access scanning at system startup. To disable this feature, you must change the on-access scan properties.
● Avaya recommends you administer the anti-virus software as follows:
- Scan the hard disk at least once in a week during off peak hours. Avaya recommends a daily scan. You can run scans on multiple Modular Messaging servers simultaneously. However, do not schedule the anti-virus scan when the system saves the backup data on the MAS. By default, the MAS backups start between 9:00 PM and 11:00 PM every night, depending on the number of MASs in the system.
- Schedule virus definition updates to occur automatically at least once per week. Have the updates occur before the next scheduled scan time to ensure that the scan uses the latest data (DAT) files. However, do not schedule updates to occur during a virus scan. For example, you might implement a virus definition update at 8:45 PM, and schedule the anti-virus scan for midnight, after the MAS backup completes.
- If the anti-virus software identifies a virus, the program takes a backup of the detected files before they are cleaned or deleted by the scanner. You can configure to automatically delete the infected files after a specified number of days and manage the files.
For more information about anti-virus software, obtain "Modular Messaging and security;" see Downloading user documentation on page 12.
Preparing the new server
Issue 1.0 June 2009 49
Avaya - Proprietary. Use pursuant to the terms of your signed agreement or Avaya policy.
Updating Microsoft WindowsA new Avaya MAS contains the most current Microsoft Windows software at the time it is shipped. After installation, you must install the latest updates for Microsoft Windows, including operating system updates and security patches. These software updates protect the system from known security weaknesses. Check with the appropriate Windows administrator for the software update procedures to use at this site.
Note:Note: Avaya technical support representatives must follow the specified internal
procedures to verify the software that is installed. If required, the support representative must update the software with the latest patches as instructed.

Configuring the Avaya MAS
50 Avaya Modular Messaging for Avaya MSS Release 5.1 Installation and Upgrades
Entering RAS IP addresses on each MAS The Avaya Modular Messaging Configuration Wizard automatically sets up inbound remote access to each MAS modem. You must edit the preprogrammed RAS IP addresses to use the addresses required by the technical support organization.
! CAUTION:CAUTION: If Avaya is to support this system, you must enter the RAS IP addresses that the
Avaya Automatic Registration Tool (ART) provides. Otherwise, remote access for Avaya technical support will not work. For more information, see Registering the system in ART on page 132.
Complete the following steps for each MAS to set up the IP addresses on MAS to allow remote access:
1. Double-click the Configure icon on the desktop.
2. In the left pane of the Configure window, expand Routing and Remote Access.
3. Expand the server name, such as MYMAS1.
4. Verify authentication:
a. Highlight Remote Access Policies.
b. On the right-pane, double-click Connections to Microsoft routing and remote access.
c. Click the Edit Profile... button.
d. On the window that appears, select the Authentication tab.
e. Make sure that all check boxes (except for the Unauthenticated access) are selected. If necessary, clear the Unauthenticated access check box.
f. Click OK.
g. If a dialog box appears, click No.
h. Click OK again.
5. Right-click the server name, such as MYMAS1 and from the pop-up menu, select Properties.
6. Set up authentication methods:
a. In the local Properties window for the server, click the Security tab.
b. Click Authentication Methods...c. On the window that appears, select the Microsoft encrypted authentication version 2
(MS-CHAP v2) and the Microsoft encrypted authentication (MS-CHAP) check boxes.
d. Make sure all other check boxes are clear. If necessary, clear the check boxes.
e. Click OK.

Preparing the new server
Issue 1.0 June 2009 51
Avaya - Proprietary. Use pursuant to the terms of your signed agreement or Avaya policy.
7. Set up a static IP address pool as follows:
a. In the local Properties window for the server, click the IP tab.
b. Under IP address assignment, select Static address pool. c. Add or edit the address range as follows:
● If the window shows an incorrect IP address range, select the displayed range and click Edit. For example, the range might show all zeroes or start with 192.168.2.
! CAUTION:CAUTION: If Avaya will support this server, do not use the preprogrammed IP addresses,
such as 192.168.2.200. You must Edit or Remove these addresses for remote access to work.
● If no address range is already entered, click Add.
d. In the Address Range dialog box, enter the correct start and end IP addresses for this server. To get the start and end IP addresses, you must register your system.
e. Verify that the number of addresses is 2.
f. Click OK.
g. In the Adapter field, select Allow RAS to select adapter. h. Click OK to close the properties window.
i. If a dialog box appears, click No.
8. Close the Configure window.

Configuring the Avaya MAS
52 Avaya Modular Messaging for Avaya MSS Release 5.1 Installation and Upgrades
Configuring MAS port boards! Important:
Important: If this MAS does not contain Dialogic port boards, skip the rest of this section and continue with Configuring the voice mail system on page 53.
The Avaya Modular Messaging Configuration Wizard automatically configures the dialogic port boards for the following switch integrations.
● Avaya (QSIG)
● Cisco (QSIG)
● Nortel NT M-1 (QSIG)
● Siemens Hipath (QSIG)
If this MAS does not use one of the automatic-configuration switch integrations, you must configure the Dialogic port boards manually.
1. Continue with Appendix B: Configuring and testing port boards on page 279.
2. After you configure and test the Dialogic port boards, continue with Configuring the voice mail system on page 53.
Configuring the voice mail system
Issue 1.0 June 2009 53
Avaya - Proprietary. Use pursuant to the terms of your signed agreement or Avaya policy.
Configuring the voice mail system Voice mail system configuration falls into three areas:
● Domain-wide administration that must be done once for each new installation. You usually configure these settings on MAS#1.
● Domain-wide features, such as Call Me or Message Waiting Indicator (MWI) that can be enabled on any MAS.
● Configuration information specific to an MAS, such as Modem Dialout alarming or port board administration.
This section describes how to configure the key parameters to make the new system operational. Complete the tasks in this section to obtain the Modular Messaging system up and running with the basic required features. After the installation is complete, Avaya encourages customers to tailor the Voice Mail System Configuration (VMSC) parameters for their site. For more information, see Downloading user documentation on page 12 in Avaya Modular Messaging MAS Administration Guide.
Note:Note: The system prompts you to restart the MAS Voice Server service several times
during this procedure. However, you must restart the service only as directed in this guide. Restart the service before you enter the modem extension numbers as instructed in Configuring MAS-specific parameters on page 74. Restart the service again when you complete the configuration.
! CAUTION:CAUTION: You can complete some procedures in this section only if you use the required
configuration notes for a specific PBX. For instructions to obtain the configuration notes, see Downloading configuration notes on page 11.
Topics in this section include:
● Configuring required domain-wide features on page 54
● Verifying license installation and specifying TTS sessions on page 62
● Adding the Supplementary server name into the security configuration on page 62
● Entering Product ID for current MAS on page 63
● Configuring specific features as needed on page 64
● Configuring MAS-specific parameters on page 74
● Restarting the messaging services on page 77
● Verifying basic operation of the MAS on page 80
● Continuing the installation on page 83
Configuring the Avaya MAS
54 Avaya Modular Messaging for Avaya MSS Release 5.1 Installation and Upgrades
Configuring required domain-wide features
Note:Note: Do the following tasks only for MAS#1. For additional MASs, go to Configuring
specific features as needed on page 64
This section describes how to configure domain-wide features that are required for each Modular Messaging system. The required features include:
● Specifying languages on page 55
● Verifying that Modular Messaging service has started on MAS#1 on page 55
● Configuring TUI and audio settings on MAS#1 on page 56
● Configuring the PBX type on MAS#1 on page 57
● Configuring serviceability settings on MAS#1 on page 58
● Obtaining and installing a license on MAS#1 on page 60
For a new installation, do these tasks on MAS#1.
For information on MultiSite concepts and requirements, see Modular Messaging MultiSite Guide. For MultiSite specific configuration, see the Voice Mail System Configuration section in Avaya Modular Messaging MAS Administration Guide.

Configuring the voice mail system
Issue 1.0 June 2009 55
Avaya - Proprietary. Use pursuant to the terms of your signed agreement or Avaya policy.
Specifying languages
! Important:Important: If you change the language settings of the Modular Messaging system, the
change only affects the display language for applications and tools on the Modular Messaging system, and does not impact TUI prompting languages. To configure the TUI languages, see Avaya Modular Messaging MAS Administration Guide.
Specify the preferred Modular Messaging language:
1. Click Start > Programs > Avaya Modular Messaging > Languages.
2. In the Modular Messaging User Properties window, select the Preferred language from the drop-down list.
3. Click OK.
Verifying that Modular Messaging service has started on MAS#1
Verify if Modular Messaging service has started before you configure the voice mail system.
1. Double-click the Monitor icon on the desktop.
2. Click Services (Local) in the left pane, if the item is not already selected.
3. In the right pane, scroll down to MM Messaging Application Server. 4. Check the Status column, and if the status is Started, close Monitor and proceed with the
steps in Configuring TUI and audio settings on MAS#1 on page 56.
5. If the Modular Messaging service has not started, right-click MM Messaging Application Server and select Start. The system starts the messaging service. When you restart the messaging service, the Monitor window immediately displays status as Started. However, the service might actually take several minutes to start. The time taken to start the service depends on the number of port boards installed and the integration method used.
6. Expand the Event Viewer (Local) in the left pane to track the progress in startup. Click Application.
7. Refresh the Monitor window until you see Telephony User Interface event 1241, TUI service has been enabled.
8. Verify if MM Service Connector service has also started:
a. Repeat steps 3 and 4.
b. Right-click MM Service Connector and select Start9. Minimize Monitor window. You will use it later.
10. Proceed with the next task.

Configuring the Avaya MAS
56 Avaya Modular Messaging for Avaya MSS Release 5.1 Installation and Upgrades
Configuring TUI and audio settings on MAS#1
You must configure the settings in this section once for each Modular Messaging system. For a new installation, do these procedures on MAS#1.
To configure settings that are required for all Modular Messaging setups:
1. Click Start > Programs > Avaya Modular Messaging > Voice Mail System Configuration.
The Voice Mail System Configuration window opens. You can see a list of MASs that are present in the messaging system.
Note:Note: Perform the steps in this section for entries under the voice mail domain, such as
vmdom. Do not click the similar entries for a specific MAS under Message Application Servers at this time.
2. Under the voice mail domain, such as vmdom, double-click Telephone User Interface.
a. On the General tab, set Number of Digits in a Mailbox to match the length of Mailbox numbers required for this system. If MultiSite is enabled, the Number of Digits in a Mailbox field is unavailable.
b. Click OK to close this window.
c. If the system notifies you that the changes to mailbox number will invalidate all previous mailboxes, click Yes to continue.
3. Double-click Audio Encoding.
a. In the Audio Encoding window, change the Default Audio Encoding Format to:
● G.711 μ-Law (mu-Law) for the United States and Japan
● G.711 Α-Law for most other countries, especially those in Europe
Note:Note: The default Microsoft GSM encoding produces smaller files but poorer voice
quality. For better sound quality, set the audio encoding to G.711 μ-Law for SIP integration. G.711 encoding is required to support TTY/TDD devices.
b. Click OK to close this window.
c. If you changed the audio encoding, a "restart" box appears. Click OK, but you do not have to restart now.
Configuring the voice mail system
Issue 1.0 June 2009 57
Avaya - Proprietary. Use pursuant to the terms of your signed agreement or Avaya policy.
Configuring the PBX type on MAS#1
You must configure the PBX service settings for each Modular Messaging system using the appropriate configuration notes for the type of PBX or switch integration you use. Obtain the configuration notes as instructed in Downloading configuration notes on page 11. For a new installation, do this procedure on MAS#1.
Use the following steps to configure the switch integration in the Voice Mail System Configuration window:
1. The Avaya Modular Messaging Configuration Wizard automatically configures many settings for some switch integrations. Proceed as appropriate:
● If you are using one of the automatically configured switch types, the appropriate entry is already listed under PBXs. Continue with step 3.
● If no PBX type is listed, continue with step 2.
2. If no PBXs are available for the Modular Messaging system, right-click PBXs and select Add New PBX Type.
a. For Telephony Type, select the type of port board that is installed in this MAS, such as Dialogic Set Emulation.
b. In the PBXs list box, select the type of switch integration that you have, such as Avaya G3 Set Emulation.
c. Click OK to close the window.
d. In the Voice Mail System Configuration window, expand PBXs.
e. If PBXs are already available, expand the PBXs item under the voice mail domain, such as vmdom.
3. Double-click the PBX entry under PBXs.
4. Use the configuration notes to set up or verify the specific PBX parameters required for the type of switch integration you use. Obtain the configuration notes as instructed in Downloading configuration notes on page 11.
Obtain the configuration notes for the switch that is connected through AudioCodes gateway as instructed in Downloading configuration notes on page 11.

Configuring the Avaya MAS
58 Avaya Modular Messaging for Avaya MSS Release 5.1 Installation and Upgrades
Configuring serviceability settings on MAS#1
You must setup domain wide serviceability (alarming) settings once for each Modular Messaging system.
For a new installation, perform these procedures on MAS#1.
To set up serviceability settings for the system:
1. In the Voice Mail System Configuration window, double-click Serviceability.
2. In the Serviceability - Voice Mail Domain window, on the General tab, select the Alarm Origination type of alarming to be used for the Modular Messaging system: Inactive, SNMP, Modem Dialout, or Internet.
Note:Note: The MAS must have a modem connected if you select Modem Dialout alarming.
You must also set up the correct type of alarming on the MSS. For more information, see Setting up alarming on the MSS on page 135.
3. Unless directed otherwise, you must accept the default values for the following parameters:
● The conditions for sending an alarm notification
● The alarm level at which notification is to be sent: minor or major
● The system behavior for stopping Modular Messaging service
4. If you selected SNMP alarming, you may need to set your community. To set the community, click the Communities tab, select Add and complete the following:
● For Community, click the field and enter a community name. This name is used as validation in communications between the SNMP client and the SNMP server.
● For Apply To, from the drop-down menu, select either Traps or Both (do not select Queries).
5. If you selected SNMP alarming, click the SNMP Trap Destinations tab.
Note:Note: During an upgrade, enter the SNMP trap destination and community details that
you recorded from the Release 3.x or Release 4.0 system.
Configuring the voice mail system
Issue 1.0 June 2009 59
Avaya - Proprietary. Use pursuant to the terms of your signed agreement or Avaya policy.
6. To set, click Add and complete the following:
● For IP Address/Host, enter the IP address or host name for the trap destination.
● For Community, select a community name from the drop-down menu. This name is used as security validation in communications between the SNMP client and the SNMP server. The drop-down menu list is populated from the Communities tab.
● For Type:
- Select INADS to send alarms back to Avaya through older Service Selection Gateway (SSG) devices.
- Select OAM (Operations, Administration, and Maintenance) for use with customer NMSs.
● For Port, usually accept the default value (162); otherwise, specify a port.
7. If you selected Internet alarming, click the Internet Proxies tab. To set, click Add:
● For Avaya/Business Partner Primary Destination, enter the Avaya proxy primary IP address or fully qualified domain name (FQDN).
● For Avaya/Business Partner Secondary Destination enter the Avaya proxy secondary IP address or FQDN.
● For Enable Customer Proxy Servers, if the enterprise network configuration does not pass HTTP, then set Internal alarming to use proxy servers by clicking this selection to enable. The following fields become active:
- For Customer Primary Proxy Server, enter the customer proxy primary IP address or FQDN.
- For Customer Secondary Proxy Server, enter the customer proxy secondary IP address or FQDN.
8. Click OK to close the Serviceability - Voice Mail Domain window.

Configuring the Avaya MAS
60 Avaya Modular Messaging for Avaya MSS Release 5.1 Installation and Upgrades
Obtaining and installing a license on MAS#1
You must obtain a license and install it for each Modular Messaging system. Do this procedure on MAS#1.
Note:Note: You must use Remote Feature Activation (RFA) to obtain a license for all new
and upgraded systems. For the latest information, go to http://rfa.avaya.com Web site. For complete licensing steps and contact information for RFA assistance, see Getting Started with RFA for Modular Messaging on the RFA Web site.
If the Modular Messaging system is being implemented with an Avaya Aura™ Communication Manager server, and if a T1-QSIG, E1-QSIG, or IP H.323 switch integration is used, the person who requests the Modular Messaging RFA license must also request the QSIG Supplementary Services package. The QSIG Supplementary Services package is an entitlement captured within the Communication Manager RFA license. It must be set to ON and uploaded to the Communication Manager server, in addition to the Modular Messaging RFA License. Contact your Avaya representative for more information.
To obtain and install a license for the Modular Messaging system, complete the following steps:
1. A registered RFA user must generate a license request for the new system using RFA. The request must include all the required information described in Getting Started with RFA for Modular Messaging. The procedure varies with location. However, the on-site installer must provide the voice mail domain identifier (VMD ID) to complete the license request.
2. Obtain the unique VMD ID that identifies this Modular Messaging system to complete a license request. To obtain the VMD ID:
a. In the Voice Mail System Configuration window, right-click Licensing and select Copy Host ID to clipboard.
b. Open a text-editor application such as Notepad to record this information.
! CAUTION:CAUTION: Use the copy-and-paste method of recording the VMD ID if possible. If you
manually enter the VMD ID, there is possibility that you make a mistake. The VMD ID in the generated license must exactly match that of the target system, or the license will fail to install.
c. Right-click and select Paste to copy the VMD ID from the clipboard to the document.
d. Save the file. For example, save the file into My Documents as mymas1-vmdid.txt.
e. Send the file that contains the VMD ID to a location that can access the Internet or e-mail location. Use any method that is required, such as FTP, memory stick, and so on. Send the file to the RFA-authorized party, or use the file yourself to complete the RFA license request through the RFA Web site. Procedures vary according to location.

Configuring the voice mail system
Issue 1.0 June 2009 61
Avaya - Proprietary. Use pursuant to the terms of your signed agreement or Avaya policy.
3. The authorized person completes the license request using RFA. The person then downloads or sends the license file by e-mail to the appropriate location.
4. If another party must complete the license request, you can continue with the installation until you receive a valid license file. At that time, return to Installing the license on page 61.
! CAUTION:CAUTION: For most switch integrations, you can continue with the installation through
acceptance testing using a default license that supports up to ten subscribers.
For IP SIP integrations, however, you must receive and install a valid license before you can complete acceptance testing (you can, however, add subscribers before installing the license).
Installing the licenseAfter you obtain the license file, install the license as follows:
1. Copy the license file, such as wlmNNNNNlicense.xml, to the MAS using the method preferred by the customer, such as FTP, memory stick, and so on. Avaya recommends to copy the license file on MAS#1 in the C:\Avaya_Support directory.
2. To install the license, in the Voice Mail System Configuration window, right-click Licensing and select Import License.
3. On the License Import Wizard welcome screen, click Next. 4. On the Importing the license screen, click Browse.
5. Navigate to the location where the license file is stored, such as C:\Avaya_Support.
6. Double-click the appropriate *.xml license file. If more than one file is present, verify that you select the correct one.
7. Click Next to install the license.
8. When the procedure is complete, click Finish.
! CAUTION:CAUTION: If an error message states that the license is not valid, you must obtain a new
license file. The event log on the MAS on which the license import failed might contain additional information about the reason for failure. Verify that the license request contains the correct VMD ID for this system. Return to Step 2 and submit a new license request through RFA.
9. Continue with Verifying license installation and specifying TTS sessions on page 62.
Configuring the Avaya MAS
62 Avaya Modular Messaging for Avaya MSS Release 5.1 Installation and Upgrades
Verifying license installation and specifying TTS sessions After you install the license file, verify the license values and set up the TTS sessions on the MAS you are configuring:
1. In the Voice Mail System Configuration window, double-click Licensing.
2. In the Licensing - Voice Mail Domain window, on the General tab, verify that the system displays the correct values as per the license agreement.
3. Click the Text-to-Speech tab.
a. For the current MAS, double-click the TTS engine to set up, such as Text to speech, ScanSoft RealSpeak, Any Language.
b. In the Edit Sessions window, enter 12 sessions for the MAS if it handles calls.
c. Click OK.
d. Repeat this step for each licensed TTS engine.
4. Click OK to close the Licensing - Voice Mail Domain window.
Note:Note: After you complete the licensing procedure, you must restart service for the
changes to take effect. For this procedure, see Restarting the messaging services on page 77.
Adding the Supplementary server name into the security configuration
Use this procedure only when you configure the Supplementary server.
When you install Supplementary server into an existing VMD, you must add the Supplementary server name to the Security Admin access control list (ACL) in the VMSC. If you do not add the server to the Security Admin ACL, the services installed on the Supplementary server fail to run.
Use the following steps to add the Supplementary server to the access control list in VMSC:
1. Click Start > Programs > Avaya Modular Messaging > Voice Mail System Configuration. The system opens the Voice Mail System Configuration window.
2. Double-click Security Roles.
3. Click Servers.
4. Click Add.
5. Click Object Types and select the Computers check box.
6. In the Enter object field, enter the Supplementary server machine name (that is, name$).

Configuring the voice mail system
Issue 1.0 June 2009 63
Avaya - Proprietary. Use pursuant to the terms of your signed agreement or Avaya policy.
7. Click Check Names.
8. Click OK.
After you complete the configuration of the new Supplementary server, move the required Modular Messaging services to the server. Use the procedures described in Moving Modular Messaging services on page 331.
Entering Product ID for current MASIf Avaya is to support this system, you must enter the MAS product ID that ART (Automatic Registration Tool) provides. You can view the product IDs using Maestro. For more information, see Registering the system in ART on page 132.
1. From the VMSC (Start > Programs > Avaya Modular Messaging > Voice Mail System Configuration), double-click Message Application Servers.
2. Double-click the MAS you are currently configuring and select Serviceability.
3. On the Serviceability window, type the product ID for the MAS in the Product Identifier field.
4. Click OK.
Configuring the Avaya MAS
64 Avaya Modular Messaging for Avaya MSS Release 5.1 Installation and Upgrades
Configuring specific features as neededDuring installation, MMCW enables services and TTS languages specified in the DCT. However, you need to configure features such as Call Me, MWI, Fax, and Offline message store after the installation. Use the procedures in this section to manually configure the other features and TTS, if necessary. Unless otherwise specified, you can configure these features on any MAS in the VMD or on a remote computer running the VMSC application.
Note:Note: Some of the important notes to be considered while configuring these features:
- In a multiple-MAS system, configure specific features only after you complete basic configuration of all MASs in the system. Some features, such as MWI and offline access to messages, require all MASs in the VMD to be working.
- You must have the relevant permissions to configure screens in the VMSC application. For more information about security roles required for VMSC configuration, see Avaya Modular Messaging MAS Administration Guide.
- If any of these features were enabled improperly or on the wrong server by the MMCW, manually configure the affected feature. For more information on moving the services to another server, see Moving Modular Messaging services among servers on page 333.
- If you are enabling the MultiSite feature, see Avaya Modular Messaging MultiSite Feature Description Guide to configure the MultiSite specific features. For information on MultiSite specific configuration, see the Voice Mail System Configuration section in Avaya Modular Messaging Release 5.1 with the Avaya MSS MAS Administration Guide.
To configure specific features on an MAS:
1. Use the Voice Mail System Configuration (VMSC) program.
If this window is not already open, click Start > Programs > Avaya Modular Messaging > Voice Mail System Configuration.
2. Configure the features that are required for this MAS:
● Configuring Call Me service on page 65
● Configuring Notify Me on page 65
● Configuring MWI service on page 66
● Configuring MM Audit Service on page 67
● Configuring the MM Fax Sender server on page 68
● Configuring languages and multi-lingual TTS on page 71
● Configuring offline access to messages on page 73
Configuring the voice mail system
Issue 1.0 June 2009 65
Avaya - Proprietary. Use pursuant to the terms of your signed agreement or Avaya policy.
Configuring Call Me service
To configure the Call Me service for the VMD:
1. In the Voice Mail System Configuration window, under the VMD, such as vmdom, double-click Call Me.
2. In the Call Me - Voice Mail Domain window, on the General tab, click the Enable Call Me check box.
3. For MAS Call Me Server, specify the name of the server on which the Call Me service will be enabled, such as MYMAS2. If this field is blank:
a. Click ... next to the field.
b. In the Select Computer window, enter the name of the MAS you chose as your MAS Call Me server.
c. Click Check Names.
d. Click OK to accept the MAS name and close the window.
4. Click OK to close this window.
Note:Note: Because Call Me service and Message Waiting Indicator (MWI) service use the
Mailbox Monitor Server, you must enable both services on the same server.
Configuring Notify Me
The Notify Me feature is configured by default. To configure the Notify Me for the VMD:
1. In the Voice Mail System Configuration window, under the VMD, double-click Notify Me.
2. On the General tab, select the Enable Notify Me check box.
3. Click OK.
Configuring the Avaya MAS
66 Avaya Modular Messaging for Avaya MSS Release 5.1 Installation and Upgrades
Configuring MWI service
To configure the Message Waiting Indicator (MWI) service for the VMD:
1. In the Voice Mail System Configuration window, under the VMD, such as vmdom, double-click Message Waiting Indicator.
2. In the Message Waiting Indicator - Voice Mail Domain window, on the General tab, select the Enable Message Waiting Indicator (MWI) check box.
3. For MAS MWI server, specify the name of the server on which to enable the MWI service, such as MYMAS2. If this field is blank:
a. Click ... next to the field.
b. In the Select Computer window, enter the name of the MAS you chose as your MAS MWI server.
c. Click Check Names.
d. Click OK to accept the MAS name and close the window.
4. For the Limit requests and Maximum requests per minute fields, use the values specified in the configuration notes for your PBX integration type.
5. In the Messaging Application Servers that support MWI box, list all MASs that have a port group set up to support MWI. To add a server name:
a. Click the Add button at the top of the list box. The Add button looks like a dashed box.
b. The list box displays a data entry field and a ... button. Click the ... button.
c. In the Select Computer window, double-click the name of each MAS that has ports allocated to support MWI, such as MYMAS2.
d. Repeat Steps b and c to add any other MASs that support MWI, such as MYMAS1.
e. Click OK to close the Select Computer window.
The arrow icons move the selected MAS up or down the list. MWI requests start with the first MAS in the list, and continue to each additional MAS if needed.
6. Click OK to close this window.
Note:Note: Because Call Me service and Message Waiting Indicator (MWI) service use the
Mailbox Monitor Server, you must enable both services on the same server.

Configuring the voice mail system
Issue 1.0 June 2009 67
Avaya - Proprietary. Use pursuant to the terms of your signed agreement or Avaya policy.
Configuring MM Audit Service
To configure the MM Audit service for the VMD:
1. In the Voice Mail System Configuration window, under the VMD, double-click Auditing.
2. On the General tab, select the Enable Auditing check box.
3. In the Audit server field, enter the name of the server that hosts the MM Audit server, or use the browse button ... to select the name:
a. In the Select Computer window, enter the name of the MAS you chose as your Audit server.
b. Click Check Names.
c. Click OK to accept the MAS name and close the window.
MM Audit service is installed and running on each MAS and Supplementary servers in the VMD. The name that you enter here is the name of the server, MAS or supplementary, that you select and configure as the MM Audit Server.
4. In the Audit event retention (days) field, enter the number of days before events are purged from the audit database.
5. In the Database server field, enter the name of the server where the Audit database resides or use the browse button ... to select the server.
6. In the Database name field, enter the name of the Audit Server SQL database.
7. In the Database instance field, enter the name of the Audit Server SQLDatabase instance containing audit events.
8. Click OK to close this window.
Audit service can be configured to use the syslog protocol to allow third-party system administration tools to be used with Modular Messaging. For more information, see the Avaya Modular Messaging MAS Administration Guide.

Configuring the Avaya MAS
68 Avaya Modular Messaging for Avaya MSS Release 5.1 Installation and Upgrades
Configuring the MM Fax Sender server
IP H.323 switch integration does not support fax.
Complete the following steps on the MAS in your VMD that runs the Modular Messaging Fax Sender service.
Note:Note: To configure the Fax dialog box in VMSC, you must be a member of a security
role that is assigned the Fax-Administer task.
To configure the MM Fax Sender server:
● Configure the MM Fax Sender server in VMSC
● Configure one-way trust in a private Windows domain
● Share the MM Fax Printer
● Assign permissions to the Fax Service Manager
● Create a dialing rule
To configure MM Fax Sender server, complete the following steps:
1. In the Voice Mail System Configuration window, under VMD, such as vmdom, double-click Fax.
2. In the Fax - Voice Mail Domain window, on the General tab:
a. Select the Fax Enable check box.
b. Next to MM Fax Sender server, click Browse.
c. In the Select Computer window, enter the name of the MAS you chose as your MM Fax Sender server.
d. Click Check Names.
e. Click OK to accept the MAS name and close the window.
f. For Fax Mailbox, enter the mailbox number that is used for outgoing faxes on the MSS.
Note:Note: The mailbox number must match the number configured in the Fax Mailbox
Number field of Configure Subscriber Management page in Messaging Administration > Messaging Attributes of the Messaging Administration web interface. For more information, see Administering special mailboxes on page 114.
g. For Company Fax Number, enter the number of the customer’s central fax machine.
Configuring the voice mail system
Issue 1.0 June 2009 69
Avaya - Proprietary. Use pursuant to the terms of your signed agreement or Avaya policy.
3. Click the Advanced button.
a. In the Advanced Fax window, change the value of the Max Concurrent Outgoing Calls to the customer-specified number.
b. Change other options if required.
c. Click OK to close the window.
4. Click OK to close the Fax - Voice Mail Domain window.
The system displays a "restart" window.
5. Click OK.
6. In the Voice Mail System Configuration window, expand Security.
7. Double-click Messaging Servers Administration.
8. In the Message Servers - Voice Mail Domain window, on the Message Servers tab:
a. Note that the Credentials list shows entries for LDAP, IMAPI, and IMAP4.
b. Click the key button above the list to add a new entry for fax.
The system displays FAX in the box.
c. Click in the Password column next to the new Fax entry.
d. Type the password for the fax mailbox and press Enter. This value must be numeric.
9. Click OK to close this window.
Note:Note: The Application Event Viewer displays an error stating that the fax mailbox could
not be opened. This is because the fax mailbox is not yet created. The fax mailbox is created in phase 2 of MSS administration as described in Completing initial MSS administration on page 103. The fax feature does not work until the MSS administration is complete.
Use the following steps to configure one-way trust between the private Windows domain and the customer’s corporate Windows domain.
Use the following steps only for systems that run in the private Windows domain:
! Important:Important: When you configure the MM Fax Sender server, an account with the credentials
to create a trust relationship between the private and corporate Windows domains must be available or a person from customer’s corporate IT group who has an account with the credentials is available.If the IT representative cannot provide the account information during installation, skip the MM Fax Sender server configuration and complete the rest of the Modular Messaging installation. Proceed with Configuring the MM Fax Sender server on page 68 and complete the configuration of the one-way trust when the account information is available.
Configuring the Avaya MAS
70 Avaya Modular Messaging for Avaya MSS Release 5.1 Installation and Upgrades
1. Log into the Active Directory server (MAS#1).
2. Click Start > Programs > Administrative Tools > Active Directory Domains and Trusts.
3. In the Active Directory Domains and Trusts window, right-click the private Windows domain and then left-click Properties.
4. Click the Trusts tab.
5. On the Trusts tab, click New Trust and then click Next. 6. Enter the name of the corporate Windows domain you want the private Windows domain to
trust and then click Next. 7. Click One-Way: Outgoing and then click Next. 8. Click Both this Domain and the Specified Domain and then click Next. 9. The customer’s corporate I/T person types the account name and password for an account
in the corporate Windows domain that has privileges to create a trust relationship and then click Next.
10. Click Validate the Trust and then click Next. 11. Click Finish.
To share the MM Fax Printer, perform this procedure on the same MAS that runs the MM Fax Sender service:
1. Verify that Windows Fax Service is Started and set to Automatic.
2. Click Start > Settings > Printers and Faxes.
3. In the Printers and Faxes window, right-click the Fax and select Properties.
4. Click the Security tab.
5. Add the Network Service user and assign that user Print, Manage Printers, and Manage Documents permissions.
6. Click the Sharing tab.
7. Select the Share this printer check box. Leave the share name as Fax.
8. Select the List in the directory check box.
9. Click Additional Drivers. The system opens the Additional Drivers dialog box.
10. Select the client operating systems installed on the network that can use the Fax Printer. The Fax Printer drivers are downloaded when you first connect the system to the Fax Printer.
11. Click OK.
12. Click the Security tab.
13. Verify that Everyone is assigned Fax permissions on the share.

Configuring the voice mail system
Issue 1.0 June 2009 71
Avaya - Proprietary. Use pursuant to the terms of your signed agreement or Avaya policy.
Note:Note: If you want to limit the access to the Fax printer share, remove the Everyone
group and add Fax permission to the Active Directory Users or Groups you want to provide access to print faxes using the MM Fax Printer.
To assign permissions to the Fax Service Manager, use the following steps:
1. Click the Configuration tab.
2. Select Fax Service Manager. 3. Right-click Fax (local) and select Properties.
4. Click the Security tab.
5. Add the Network Service Account to the list of users and groups with access.
6. Assign Fax, Manage Fax Configuration and Manage Fax Documents permissions to the Network Service Account.
Note:Note: If you want to limit the access to the Fax printer share, make the same
permission changes to the Fax Service Manager as that of the Fax printer share.
7. Exit all windows.
To create a dialing rule for the Phone and Modem, complete the following:
1. Click Start > Settings > Control Panel > Phone and Modem Options.
2. If a dialing rule is not already created, click New in the Dialing Rules tab to create a dialing rule.
3. Specify the location details and the dialing rules for the MAS.
4. Click OK to save the dialing rule and close the New Location window.
5. Click OK.
Configuring languages and multi-lingual TTS
Enable Multi-Lingual TTS only if it is required at the site. To configure multiple languages or Text-to-Speech (TTS) feature:
1. In the Voice Mail System Configuration window, under the VMD, such as vmdom, double-click Languages.
2. In the Languages - Voice Mail Domain window:
a. For Primary Language, select the primary announcement language (prompt set) that is to be used at this site.
b. If multi-lingual Text-to-Speech (TTS) is used at this site:
1. Select the Enable Multilingual Text to Speech check box.
Configuring the Avaya MAS
72 Avaya Modular Messaging for Avaya MSS Release 5.1 Installation and Upgrades
2. In the list box, select all the languages to be used for TTS at this site.
3. Click OK to close this window.
Configuring the voice mail system
Issue 1.0 June 2009 73
Avaya - Proprietary. Use pursuant to the terms of your signed agreement or Avaya policy.
Configuring offline access to messages
! CAUTION:CAUTION: Set up offline access only after all MASs in the system are configured, including
the Supplementary server, if present.
To configure offline access to subscriber messages:
1. In the Voice Mail System Configuration window, under VMD, such as vmdom, double-click Messaging.
2. In the Messaging - Voice Mail Domain window, click the Offline Access tab.
3. Select the Enable offline access to messages check box.
4. If this system has multiple MASs:
a. Select the Synchronize offline messages with remote store check box.
b. Click Browse to select an existing, shared directory in the domain for the remote offline message store. If the directory does not exist, create it first, then browse to the directory. The name must use one of the following formats:
● In the private Windows domain: \\computername.privdom.local\sharename, such as:
\\mymas2.privdom.local\RemoteOfflineStore
● In the corporate Windows domain: \\computername.corpdom.com\sharename, such as:
\\mymas2.corpdom.com\RemoteOfflineStore
5. Change any other parameters in this window as needed. For more information, see Avaya Modular Messaging MAS Administration Guide; see Downloading user documentation on page 12.
6. Click OK to close the window.
7. Restart the MAS service on all MASs in the VMD:
a. Double-click the Monitor icon on the desktop.
b. Select Services (Local) in the left pane, if the item is not already selected.
c. In the right pane, select MM Messaging Application Server from the available services.
d. Right-click MM Messaging Application Server and select Restart.
Configuring the Avaya MAS
74 Avaya Modular Messaging for Avaya MSS Release 5.1 Installation and Upgrades
Configuring MAS-specific parametersAfter you configure the domain-wide parameters, complete the configuration of this specific MAS in the VMSC. Do the procedures in this section under the specific entry for this MAS, and not under the voice mail domain.
Complete the following tasks for each MAS as required:
● Configuring Modem Dialout alarming, if used on page 74
● Configuring port boards and switch integration on page 75
Configuring Modem Dialout alarming, if used
If the MAS uses Modem Dialout alarming, configure the service now. You must administer Modem Dialout alarming individually for each server that uses it. The server requires a modem and the Messaging Application Server service to be enabled for Modem Dialout alarming to work.
To set up Modem Dialout alarming on this MAS:
1. In the Voice Mail System Configuration window, expand Message Application Servers.
2. Expand the entry for the MAS, such as MYMAS1.
3. Double-click Serviceability to set up dial-out information for this MAS.
4. In the Serviceability window on the Modem Dialout tab:
a. For COM port, select the communications port that the modem is to use to make calls for alarm notification. Avaya recommends COM3 for the recommended USB port on the MAS. For more information, see Installing the Avaya S8730 Server for Modular Messaging guide.
b. For Phone number, enter the complete telephone number that the modem must dial to place an alarm notification with the remote service center. Include any special characters needed. For example, to access an outside line, insert pauses, and so on.
c. For Modem setup, enter the modem initialization (setup) string if one is required for the modem to make alarm notification calls.
5. Click OK to close this window.
6. When prompted restart service.

Configuring the voice mail system
Issue 1.0 June 2009 75
Avaya - Proprietary. Use pursuant to the terms of your signed agreement or Avaya policy.
Configuring port boards and switch integration
Note:Note: You must restart service at the end of the previous procedure before continuing.
The Configuration Wizard automatically configures many of the port board and PBX settings for the MAS. However, you must always verify the configuration settings against the most current configuration notes.
Note:Note: The configuration notes for the PBX or switch might include some of these steps.
However, read through this section to get an overview of the configuration procedure. You can repeat steps to verify the setup. You can also modify this information later if required.
Automatic configuration The Configuration Wizard automatically configures many of the MAS settings for the following switch integrations:
● Avaya SIP
● Avaya (IP H323)
● Avaya (QSIG)
● Cisco (QSIG)
● Nortel NT M-1 (QSIG)
● Siemens Hipath (QSIG)
If you use any of these switch types:
1. Use the MM configuration notes to complete and verify the MAS settings.
2. Administer all required settings on the switch and PBX on the MAS.
Manual configurationIf you specified Other for the switch integration type, you must always configure both the MAS settings and the PBX settings for each MAS.
To set up the basic PBX integration details for each MAS in this domain:
1. In the Voice Mail System Configuration window, expand Message Application Servers.
2. Expand the entry for this MAS, such as MYMAS1.
3. Right-click the server name, select Telephony Configuration Wizard.
4. Complete all steps in the wizard, as prompted. Use the configuration notes as required.

Configuring the Avaya MAS
76 Avaya Modular Messaging for Avaya MSS Release 5.1 Installation and Upgrades
5. After you complete the configuration wizard, you must restart messaging service to configure the voice ports:
a. Restore the Monitor window if you minimized it, or double-click the Monitor icon on the desktop.
b. Click Services (Local) in the left pane, if the item is not already selected.
c. In the right pane of the Monitor window, select MM Messaging Application Server. Right-click and select Stop. Do not use Restart.
d. When service is stopped, right-click MM Messaging Application Server again and select Start.The system restarts the messaging service.
Note:Note: When you restart messaging service, the Monitor window immediately shows the
status as Started. However, service might actually take several minutes to start, depending on the number of port boards installed and the integration method.
e. Track the startup progress as follows:
1. In the left pane, expand Event Viewer (Local), and then click Application.
2. Refresh the window display periodically until you see Telephony User Interface event 1241, TUI service has been enabled. You can then proceed.
3. Ignore error event 1807. This error is normal until you configure the postmaster mailbox.
f. When service is restarted, minimize the Monitor window.
6. In the Voice Mail System Configuration window, expand Message Application Servers. Some values might already be set. Use the configuration notes for this PBX integration.
a. Expand the entry for this MAS, such as MYMAS1.
b. Double-click Telephony Interface. Configure the port boards in this MAS. Use the configuration notes; see Downloading configuration notes on page 11.
c. Double-click PBX Type. Select the same type of PBX service as you did in Configuring the PBX type on MAS#1 on page 57. Verify that the entry in the PBXs box is highlighted, and click OK.
d. If multiple port groups are used, double-click Port Groups. For example, you might use a unique group to support MWI.
e. Double-click PBX Integration and configure the integration for this system. Use the configuration notes to specify or confirm the settings that this switch integration requires.
f. Determine the maximum number of MWI sessions to specify at one time.

Configuring the voice mail system
Issue 1.0 June 2009 77
Avaya - Proprietary. Use pursuant to the terms of your signed agreement or Avaya policy.
Restarting the messaging servicesWhen you complete configuring the server, restart the messaging services:
1. Restore the Monitor window if you minimized it, or double-click the Monitor icon on the desktop.
2. Click Services (Local) in the left pane, if the item is not already selected.
3. Restart messaging service to enable any changes you made in the VMSC:
a. In the right pane of the Monitor window, select MM Messaging Application Server. b. Right-click and select Stop.
c. When service is stopped, right-click MM Messaging Application Server again and select Start.The system restarts the messaging service.
When you restart the messaging service, the Monitor window immediately shows the status as Started. However, the service might actually take several minutes to start. The time it takes depends on the number of port boards installed and the integration method. Track the status as follows:
d. In the left pane, expand Event Viewer (Local), and then click Application.
e. Refresh the window display periodically until you see Telephony User Interface event 1241, TUI service has been enabled. You can then proceed.
4. Verify that the Modular Messaging services required for the MAS are started:
a. In the Monitor window, select Services (Local) in the left pane.
b. In the right pane, scroll down to the list of Modular Messaging services. These services start with the abbreviation MM. Verify that the Status column shows the correct state for each messaging service:
● Services that are required for this server must show Started and a startup type as Automatic.
● Services that are not required on this server must show a blank status and a startup type as Disabled. For more information, see Table 5: Enabling Modular Messaging services in a VMD.

Configuring the Avaya MAS
78 Avaya Modular Messaging for Avaya MSS Release 5.1 Installation and Upgrades
● If the Startup Type for any MM service that is not required for this server is Manual: 1. Double-click the service to open the Properties window.
2. Set the Startup Type to Disabled.
3. Click OK.
4. Refresh the screen to verify that all MM services that are not required for this server are Disabled. Repeat for each service as needed.
! CAUTION:CAUTION: All MM services that are not required for this server must be set to Disabled
before you perform the next step (4 c). Serious problems occur if you activate a service on multiple servers when it is supposed to run on only one server in the VMD.
Table 5: Enabling Modular Messaging services in a VMD
Modular Messaging service name Condition for enabling service
MM Messaging Application ServerMM Service ConnectorAvaya SPIRITMM Alarming ServerMM Audit Service MM Event Monitor ServerMM Fault MonitorMM Performance Monitor ServerMM Process Monitor Server
Enable on each MAS and the Supplementary server, if present.
MM Call Me 1 MM Fax Sender 2MM Mailbox Monitor 2MM MWI 2MM Tracing Service
1. The Call Me, MWI, and Mailbox Monitor services must always be enabled on the same server.
2. IP H.323 switch integration does not support MM Fax Sender functionary.
Enable on only one server in each VMD, either on an MAS or the Supplementary server, if present.
See the Avaya Modular Messaging Concepts and Planning Guide for the recommended load balancing of services between multiple servers.
Configuring the voice mail system
Issue 1.0 June 2009 79
Avaya - Proprietary. Use pursuant to the terms of your signed agreement or Avaya policy.
c. If the Status for any MM service that is required for this server is Stopped or blank:
1. Click Start > Run to open the Run window.
2. In the Open field, type the following and press Enter: C:\Avaya_Support\Scripts\serverrecovery.vbs
The script takes a few seconds to run. The program sets up all MM services correctly.
3. Refresh the screen to verify that all MM services required for this server are Started and set to Automatic.
4. If any required MM services are not set up correctly, repeat Step c.
5. When configuration is complete, close all open windows.
6. For a multiple-MAS system, after you configure the last MAS, you must restart service on all servers in the VMD. The following properties require a restart of all servers in the voice mail domain:
● Audio Encoding
● Fax
● Languages
● Licensing
● Messaging
● Offline Access
● PBXs
Note:Note: Any feature that you alter in the VMSC that produces a prompt to restart voice
service requires a restart of all servers in the VMD. For convenience, you can restart all the MASs in the VMD once at the end of the installation.
To restart the Modular Messaging services on all MASs in the voice mail domain, switch the console to each MAS and repeat this procedure, Restarting the messaging services on page 77.

Configuring the Avaya MAS
80 Avaya Modular Messaging for Avaya MSS Release 5.1 Installation and Upgrades
Verifying basic operation of the MASBefore continuing, verify the basic functionality of the MAS. Continue with:
● Verifying call-handling capability on page 80
● Verifying alarming setup on page 81
● Verifying Tracing Service operation on page 82
● Verifying Audit service on page 83
● Continuing the installation on page 83
Verifying call-handling capability
Perform this task on each MAS that is set up to handle calls.
This test confirms basic connectivity between the MAS and the switch:
1. If the MAS is in a multiple-MAS system, display the port monitor to ensure that the test call comes in on this MAS. For this procedure, see Setting up the port monitor on page 121.
2. From a telephone on the system, dial the message retrieval number for the Modular Messaging system.
3. Listen for the Modular Messaging system to answer.
4. Hang up.
Configuring the voice mail system
Issue 1.0 June 2009 81
Avaya - Proprietary. Use pursuant to the terms of your signed agreement or Avaya policy.
Verifying alarming setup
This test requires the receiving computer, to be set up and ready to receive alarms.
● For a Modem Dialout setup, the USB modem must be connected and configured for the MAS to send or receive alarming information. The MAS must be set up with a valid product ID; see Entering Product ID for current MAS on page 63.
● For information about setting up SNMP alarming, obtain "Administering SNMP on the MSS;" see Downloading user documentation on page 12. Avaya recommends that you do any additional SNMP administration after the Modular Messaging system is set up and running.
Run the following test to verify that alarm notification is working:
1. Click Start > Run.
2. In the Run window Open field, type cmd and press Enter.3. In the command prompt window, type the following and press Enter:
testaom -v
The test shows alarm setup details such as the type of alarm that is set up, the product ID for the MAS. The test takes about 1 minute to run.
4. Verify that the last line of the test reads:
Alarm origination test successful Continue with Step 6.
5. If the alarm test fails, the last line of the test reads:
Negative acknowledgement of transmissionIf the test fails, check your alarm settings, and then run the test again:
● For all systems, see Configuring serviceability settings on MAS#1 on page 58.
● For systems that use Modem Dialout, also check Configuring Modem Dialout alarming, if used on page 74.
6. Type exit and press Enter to close this window.
Note:Note: For instructions on accessing the MAS alarm or error logs, obtain Avaya Modular
Messaging Software Messaging Application Server Administration; see Downloading user documentation on page 12.
Configuring the Avaya MAS
82 Avaya Modular Messaging for Avaya MSS Release 5.1 Installation and Upgrades
Verifying Tracing Service operation
If you have enabled the Tracing Service software on an MAS or Supplementary server, test the Tracing Service operation as follows:
1. Click Start > Programs > Avaya Modular Messaging > Operation History Viewer.2. Set up a live mode session for all MASs in the voice mail domain (VMD):
a. In the Operation History Viewer window, click File > New.
b. In the Session Properties window, verify that Message Application Server shows All Servers.
c. Select the Live Mode check box.
d. Verify that all the Select Types check boxes are selected.
e. Under Selection Activities, verify that the All Activities check box is selected.
f. Click OK.
3. Confirm that the Tracing Service can connect to all MASs in the VMD.
4. Confirm that the Operation History (OPH) viewer displays the collected OPH events.
5. Close the OPH Viewer. If the system prompts you to save the session, click No.
Note:Note: Without additional configuration, the Operation History Viewer will only function
properly on the server with the Tracing Service running. For more information about using the Operation History Viewer, obtain the Avaya Modular Messaging MAS Administration Guide; see Downloading user documentation on page 12.

Continuing the installation
Issue 1.0 June 2009 83
Avaya - Proprietary. Use pursuant to the terms of your signed agreement or Avaya policy.
Verifying Audit service
Use the MM Audit Log Viewer to view the information captured by the MM Audit Service:
1. Click Start > Programs > Avaya Modular Messaging > MM Audit Log Viewer.2. To connect to the database on the Audit server (use this if you are running the viewer on an
MAS that is not the Audit server):
a. On the MM Audit Log Viewer window, in the left-hand pane, right-click All Events.
b. Click Connect to Database.
c. From the dialog box, in the Server field, enter the name of the MAS you set up as the Audit server.
d. Click Connect. 3. On the MM Audit Log Viewer window, in the left-hand pane, click All Events.
4. In the right-hand pane, verify that events appear in the Audit Log.
5. Close the MM Audit Log Viewer window.
For more information, see the Avaya Modular Messaging MAS Administration Guide.
Continuing the installationContinue the installation as appropriate:
● If you have additional MASs to configure, repeat the tasks in this chapter for the next MAS. Return to Configuring MASs using an existing DCT data file on page 44.
● If all MASs are now configured, continue with Chapter 5: Completing initial MSS administration on page 103.
Configuring the Avaya MAS
84 Avaya Modular Messaging for Avaya MSS Release 5.1 Installation and Upgrades
Issue 1.0 June 2009 85
Avaya - Proprietary. Use pursuant to the terms of your signed agreement or Avaya policy.
Chapter 4: Configuring a customer-provided MAS
This chapter applies only to a customer-provided equipment (CPE) MAS installation. The chapter describes how to set up a Messaging Application Server (MAS) or a Supplementary Server that is provided by the customer to support Avaya Modular Messaging software. The CPE MAS must have two network interface cards (NICs), one to connect to the corporate LAN and the other to connect to the private LAN.
If you are installing an Avaya-provided MAS, do not use the procedures described in this chapter. See Chapter 3: Configuring the Avaya MAS on page 41.
! Important:Important: Customer-provided equipment (CPE) for a Modular Messaging install or upgrade
must match the specifications described in Avaya Modular Messaging Concepts and Planning Guide.
Obtain the current DCT data file for this site before you configure the customer-provided equipment (CPE) MAS. A person responsible for planning the installation creates the file using the Modular Messaging Data Collection Tool (DCT) before the Modular Messaging system is installed. The DCT data file has an extension mmdct, such as sitefile.mmdct. For more information, see Data Collection Tool guide.
Topics in this chapter include:
● CPE MAS configuration prerequisites on page 86
● Preparing the CPE MAS on page 87
● Configuring the CPE MAS on page 95
● Completing the CPE MAS configuration on page 99

Configuring a customer-provided MAS
86 Avaya Modular Messaging for Avaya MSS Release 5.1 Installation and Upgrades
CPE MAS configuration prerequisitesEnsure that you complete these requirements before you start the CPE MAS configuration:
● Obtain the required software and documentation; see Downloading required software and documentation on page 9.
● Obtain the current DCT (MMDCT.exe) from the Avaya support web site (do NOT use the DCT on the applications DVD); see Downloading software updates on page 10.
● For systems that join the corporate Windows domain, create the user and the computer accounts in the corporate Windows domain; see Creating user accounts in the corporate Windows domain on page 17 and Creating computer accounts in the corporate Windows domain on page 18.
● Install the required dialogic port boards only on the CPE MAS, which uses switch integration that use Telephony boards. For more information, see Installing Dialogic port boards in a customer-provided MAS on page 295.
● Complete the relevant pre-installation requirements, as described in Preinstallation requirements on page 7.
● Complete the initial MSS administration as described in Performing initial MSS administration on page 21.
● Continue to use the "New Modular Messaging installation" checklist in Modular Messaging on a customer-provided MAS installation checklist on page 264.

Preparing the CPE MAS
Issue 1.0 June 2009 87
Avaya - Proprietary. Use pursuant to the terms of your signed agreement or Avaya policy.
Preparing the CPE MASComplete the following procedures to set up each CPE MAS server to support Avaya Modular Messaging services.
● Installing Microsoft Windows 2003 R2 operating system on page 87
● Setting a computer name on page 87
● Running recommended disk checks on page 88
● Installing and enabling Microsoft Windows services on CPE MAS on page 88
● Installing Microsoft Windows 2003 SP2 on page 90
● Installing Microsoft Windows updates and security patches on page 90
● Adjusting system values on page 90
● Network connections on page 92
● Disabling hyper-threading for IP H.323 on page 93
● Installing modem drivers on the MAS on page 93
● Verifying network adapters and bindings on page 94
● Changing the Power Management settings on page 94
Installing Microsoft Windows 2003 R2 operating systemAvaya recommends that you complete a new installation of Windows 2003 R2, when you perform new installations of Modular Messaging with CPE hardware. While installing Windows 2003 R2, ensure that you only install the Windows services listed in Installing and enabling Microsoft Windows services on CPE MAS on page 88.
Setting a computer nameWhen installing Windows 2003 R2 on the server, provide a name to the computer.
When you run the Modular Messaging Configuration Wizard, the system does not automatically change the name of the computer as in Avaya-provided MAS. You must manually provide the name of the computer before you run the Modular Messaging Configuration wizard.
Configuring a customer-provided MAS
88 Avaya Modular Messaging for Avaya MSS Release 5.1 Installation and Upgrades
Running recommended disk checksPerform this procedure only for a supplementary server.
Avaya recommends that the hard disk drive in the server be maintained to prevent possible problems. The system administrator must run the following tools periodically:
● disk Defragmenter system tool
● chkdsk command
If this server is in service and is not maintained, run the two recommended procedures.
Installing and enabling Microsoft Windows services on CPE MASYou must install and enable the Microsoft Windows services on each CPE MAS that handles voice calls as described in this section.
Installing Microsoft Windows services
Complete the following steps to install the required Windows services:
1. Log on to the CPE MAS using an account that has permissions to install software on this computer, such as the local administrator account.
2. Insert the Microsoft Windows Operating System disk 1 in the CPE MAS drive.
3. Open Control Panel, and then double-click Add or Remove Programs.
4. On the left pane, click Add/Remove Windows Components.
5. Install Microsoft Windows services:
a. In the Windows Components Wizard window, highlight Application Server, and click Details.
b. In the Application Server window, ensure that you select the following items:
● Application Server Console
● ASP.NET
● Internet information Services (IIS)
● Message Queuing
c. In the Application Server window, highlight Internet Information Services (IIS), select if the check box is clear.
d. Click Details.e. Ensure that you select the following services:
Preparing the CPE MAS
Issue 1.0 June 2009 89
Avaya - Proprietary. Use pursuant to the terms of your signed agreement or Avaya policy.
● NNTP Service
● SMTP Service
● World Wide Web Service
f. Click OK.
g. In the same window, highlight World Wide Web Server and click Details. Ensure that the World Wide Web Service check box is selected.
h. Click OK. The system closes the World Wide Web Service window.
i. Click OK. The system closes the Internet Information Services (IIS) window.
j. Click OK. The system closes the Application Server window.
6. In the Windows Components Wizard window, highlight Management and Monitoring Tools and click Details.
a. Select Simple Network Management Protocol check box and click OK. The system closes the Management and Monitoring Tools window.
7. In the Windows Components Wizard window, select the Microsoft .NET Framework 2.0 check box.
8. In the Windows Components Wizard window, highlight Networking Services and click Details.a. Select Domain Name System (DNS) and click OK. The system closes the Networking
Services window.
9. In the Windows Components Wizard window, select the Fax Services check box.
10. Click Next.a. Select Do Not Share Fax Printer.b. Click OK.
11. Complete the wizard to install the selected services.
12. When the installation is complete, close the Add or Remove Programs window.
Enabling Microsoft Windows services
After you have installed the software, use the following steps to enable each installed service:
1. Right-click My Computer and select Manage.
2. In the Computer Management window, in the left pane, expand Services and Applications, and then click Services.
3. In the right pane, scroll down to the first new service that you installed and double-click the service. The system opens the Properties window.
a. On the General tab, set the Startup type to Automatic.
b. Click Apply.
Configuring a customer-provided MAS
90 Avaya Modular Messaging for Avaya MSS Release 5.1 Installation and Upgrades
c. Under Service status, click Start. d. Wait for the service to start, and then click OK to close this window.
4. Repeat steps 2 and 3 to enable each service you installed. Note that only a subset of these services might be present on a MAS.
5. When you have enabled the services, close all open windows.
Installing Microsoft Windows 2003 SP2
Verify the service pack version on each CPE MAS and install an update if needed.Complete the following to verify the version of the service pack installed:
1. Right-click My Computer and select Explore.
a. In Windows Explorer, click Help > About Windows.
b. In the version description, verify that Microsoft Windows Service Pack 2 is installed.
c. Click OK to close this window.
d. Close Windows Explorer window.
2. If needed, install Microsoft Windows Service Pack 2 on this MAS.
Installing Microsoft Windows updates and security patchesYou must install the latest Microsoft Windows software, including operating system updates and security patches. These software updates protect the system from known security weaknesses. Check with the appropriate Windows administrator for the software update procedures to use at this site.
Avaya technical support representatives must follow the specified internal procedures to verify the software that is installed. If required, the support representative must update the software with the latest patches as instructed.
Adjusting system valuesYou must set some default values on the server to support Modular Messaging. Verify the following settings, and adjust them if needed:
Note:Note: Modular Messaging Release 5.1 configures the server to use a 3GB address
space. if you want to revert back to the Windows default value, then contact Avaya support.

Preparing the CPE MAS
Issue 1.0 June 2009 91
Avaya - Proprietary. Use pursuant to the terms of your signed agreement or Avaya policy.
1. Adjust the values for the Event Viewer:
a. Right-click My Computer and select Manage.
b. In the Computer Management window, in the left pane, expand Event Viewer. c. Adjust the application log values:
1. Right-click Application and select Properties.
2. On the General tab of the Application Properties window, under Log size, adjust the following values:
- Avaya recommends that you set Maximum log size to at least 102400 KB.
- Select Overwrite events as needed.
3. Click OK to close this window.
d. Adjust the system log values:
1. In the right pane, right-click System and select Properties.
2. On the General tab of the System Properties window, under Log size, adjust the following values:
- Set Maximum log size to at least 4032 KB.
- Select Overwrite events as needed.
3. Click OK to close this window.
e. Close the Computer Management window.
2. Right-click Start and select Explore. Adjust File and Printer Sharing properties:
a. Right-click My Network Places and select Properties.
b. Right-click Local Area Connection and click Properties.
c. Select File and Printer Sharing for Microsoft Networks in the list box and click Properties.
d. On the Server Optimization tab, select Maximize data throughput for network applications.
e. Click OK to close this window.
f. Close the Local Area Connection Properties and Network Connections windows.
3. Adjust the values for Windows 2003 R2:
a. Right-click My Computer and select Properties.
b. Click the Advanced tab.
c. Under Performance, click Settings.
d. In the Performance Options window, click the Advanced tab.
1. In Processor Scheduling, select Background services.

Configuring a customer-provided MAS
92 Avaya Modular Messaging for Avaya MSS Release 5.1 Installation and Upgrades
2. In Virtual memory, click Change.
3. The Initial size and Maximum size fields for the Paging file size for selected drive value vary by machine. Tailor these fields by adding 11 to the default value that is displayed as follows:
- In Paging file size for selected drive, set both the Initial size and Maximum size to the default value plus 11 MB.
- Click Set.- Click OK to close this window.
4. Click OK to close the Performance Options window.
e. On the Advanced tab, under Startup and Recovery, click Settings.
f. In the Startup and Recovery window, under System failure, verify that the Automatically restart is selected. Click OK.
g. Click OK. The system closes the System Properties window.
4. Restart the server.
● If you are prompted to restart the server, click Yes.
● If the system does not prompt you, manually restart the server now. Use one of the following steps:
a. Press Ctrl + Alt + Del, and then click Shut Down.
b. Select Restart from the drop-down list and click OK.
The server restarts.
Network connections For a CPE MAS install of Modular Messaging, the Modular Messaging Configuration Wizard assumes that any network connection, called Local Area Connection, is connected to the corporate LAN.
To ensure that the network connections are correctly set up, you must use the Network settings control panel. Use the following steps to set up the network connections:
1. From the Start menu, select All Programs > Accessories > Communications and Network Connections. Or from the control panel, double-click Network Connections or right-click on Network Connection icon in the notification area and select Open Network Connections.
2. Ensure that the Network Connections window is in Details mode.
● On View menu, click Details.
3. Ensure that Name and Status columns are visible.
4. Disconnect all LAN cables from the server.

Preparing the CPE MAS
Issue 1.0 June 2009 93
Avaya - Proprietary. Use pursuant to the terms of your signed agreement or Avaya policy.
5. Insert the corporate LAN cable into one of the network adaptors. In the Network Connections window, observe which of the connection changes its state from Unplugged to Connected.
● If the state of Local Area Connection changes to Connected, then the corporate LAN cable is inserted into the correct Network Adaptor for the Corporate LAN. Do not change the position of the network cable.
● If the state of Local Area Connection remains Unplugged, then move the corporate LAN cable to the other Network Adapter.
Note:Note: If you have installed a CPE MAS or a Supplementary server, which runs a
non-English version of Windows 2003 R2 operating system, you must rename the display name of corporate local area connection to Local Area Connection and other connection to Local Area Connection 2.
! Important:Important: The system does not support more than two network cards.
6. Connect the private LAN (Local Area Connection 2) cable to the vacant Network Adapter.
Do not manually configure the IP addresses for the NICs. The Modular Messaging Configuration wizard configures the IP Addresses using the information in the DCT data file.
Disabling hyper-threading for IP H.323
! Important:Important: If you have CPE MAS that supports hyper-threading and that uses an IP H.323
switch integration, complete this task before doing anything with the Avaya Modular Messaging Configuration wizard.
Follow hardware-specific requirements to disable hyper-threading.
Installing modem drivers on the MASFor CPE MAS, the customer must install the drivers for serial adapters, serial port and the modem. Avaya does not take the responsibility of installing modems on the CPE MAS.

Configuring a customer-provided MAS
94 Avaya Modular Messaging for Avaya MSS Release 5.1 Installation and Upgrades
Verifying network adapters and bindingsYou must complete the following steps to verify the search order in which private and corporate LANs are ordered on an CPE MAS.
1. On Windows desktop, select My Network Places.
2. Right-click and select Properties. The system opens the Network Connections window.
3. From the Advanced menu, click Advanced Settings.
4. In the Adapters and Bindings tab, from the list of connections, ensure that the connection to the private LAN (Local Area Connection) appears above the connection to the corporate LAN (Local Area Connection 2). This is to ensure that MAS accesses private LAN before the corporate LAN.
Note:Note: If the Local Area Connection is not the first entry, select Local Area Connection.
Use the up arrow key to move the item to the first position. Click OK.
5. Click OK.
6. Close all open Windows.
Changing the Power Management settingsUse the following steps to change the Power Management settings for the LAN connection:
1. Click Start > Settings > Network Connections.
The system opens the Network Connections window.
2. Select the LAN connection, right-click and select Properties.a. Click Configure in the General tab.
b. Click the Power Management tab.
c. Clear the Allow the computer to turn off this device to save power check box.
3. Close the Network Connections window.
Configuring the CPE MAS
Issue 1.0 June 2009 95
Avaya - Proprietary. Use pursuant to the terms of your signed agreement or Avaya policy.
Configuring the CPE MASBefore you use the updated DCT data file and run the Avaya Modular Messaging Configuration wizard to configure the server, you must complete the following procedures.
● Obtain the latest MMDCT.exe file. For details, see Downloading software updates on page 10.
● Obtain the required DCT data file (.mmdct).
● Ensure that the DCT file is accessible to the server that you install. Usually, this means inserting a storage device with the file into the server.
! WARNING:WARNING: Though the Avaya Modular Messaging Data Collection software allows you to
specify a location other than the C:\ drive to install the Avaya Modular Messaging MAS software, the tool installs only on the C:\ drive. Regardless of the value you enter in the Software installation path field under MM server > Voice Mail Domain, the configuration wizard always installs the MAS software in the location C:\Program Files\Avaya Modular Messaging.
Running the Modular Messaging Configuration wizard
The Modular Messaging Configuration wizard (MMCW) uses the DCT data file to configure the CPE MAS. You must install the Modular Messaging Configuration wizard (MMCW) to configure each CPE MAS.Complete the following to configure the CPE MAS server using Modular Messaging DCT:
1. Insert the ’Avaya Modular Messaging R5.1 MAS Application DVD 1 of 2’ disk into the DVD drive of the CPE MAS server.
2. Navigate to the Install\MISCM directory and double-click the MMConfigurationWizard.msi file. Do not select the check box that launches the Modular Messaging configuration wizard.
The system installs the configuration wizard in the C:\Program Files\Avaya Modular Messaging\Install\MISCM directory and launches the Modular Messaging configuration wizard.
3. Click Finish.
4. Copy the MMDCT.exe file from your storage device to C:\Program Files\Avaya Modular Messaging\Install\MISCM directory.
5. Run C:\Program Files\Avaya Modular Messaging\Install\MISCM\MISCM.exe.
The system opens the Modular Messaging DCT Tool window.

Configuring a customer-provided MAS
96 Avaya Modular Messaging for Avaya MSS Release 5.1 Installation and Upgrades
6. On the Modular Messaging Welcome screen, click Next.7. On the Locate Configuration Data screen, click Browse.
a. In the Open window, click the drop-down list next to Look in.
b. Navigate to the storage device.
If the server fails to recognize the storage device, you can:
1. In the Open window, click My Computer in the left pane. After the Look in field shows My Computer, press F5 to refresh the screen.
2. If the system fails to display the storage device, unplug the device and insert the device again.
c. Double-click the most current DCT data file.
8. On the Locate Configuration Data screen, click Next.9. When the system prompts you to confirm the data file, click Yes. The system opens Avaya
Modular Messaging Data Collection Tool window.
10. Click complete and save the data file to the storage device, even if no changes were made.
The system returns you to the Avaya Modular Messaging Configuration Wizard.
11. On the Messaging Application Server Number screen:
a. Change the MAS number field to show the correct number for this server.
b. Click Next.12. When the system prompts you to log in, log in to the CPE MAS using the administrator
account.
13. When the configuration wizard prompts you to locate the Dialogic installation file, insert the ’Modular Messaging R5.1 MAS Application DVD 1 of 2’ disk.
Note:Note: The configuration wizard prompts you for the Dialogic installation file only if you
install the Dialogic port boards on the CPE MAS.
14. Navigate to the DVD drive and double-click the Dialogic_Drivers\MMDialogicInstall.bat file. The system opens the Dialogic driver installation wizard.
a. Click Next and accept the licence agreement.
b. Click Next. Repeat this step until the system displays the Choose Destination Location screen.
c. Click Browse.
d. On the Choose Folder screen in the Path: field, change the drive letter to match the drive where Modular Messaging is being installed. This drive is set in the DCT file. Do not browse to find the new location. The path will read <drive letter>:\Program Files\Dialogic.
e. Click Next and continue to accept default values to complete the wizard.

Configuring the CPE MAS
Issue 1.0 June 2009 97
Avaya - Proprietary. Use pursuant to the terms of your signed agreement or Avaya policy.
f. The system launches the Found New Hardware Wizard. Complete the wizard to install the Dialogic driver software.
g. When the system prompts you to use Windows update, select No, not at this time and click Next.
h. When the system prompts you to choose the software, select Install the software automatically and click Next.
i. When the Security Alert - Driver Installation window opens, select Yes to install the driver.
j. Click Finish.
k. Repeat steps f to j for each Dialogic board on this MAS.
l. When the system prompts you, In the Setup Complete dialog box, select No, I will restart my computer later, and click Finish.
15. On the Remote Shutdown dialog, click Cancel.16. When the configuration wizard prompts you to locate the InstallRSEngine file, insert the
’Modular Messaging R5.1 MAS Application DVD 2 of 2’ disk.
17. Navigate to the <drive>\RealSpeak\InstallRSEngine.bat file and double-click. The system opens the RealSpeak 4.0 InstallShield Wizard.a. On the RealSpeak 4.0 InstallShield Wizard, and click Next. b. Select I accept the terms in the license agreement.c. Click Next. Repeat this step until you see Change Current Destination Folder screen
d. On the Change Current Destination Folder screen, in the Folder name: field change the drive letter to match the drive where Modular Messaging is installed. This drive is set in the DCT file. Do not browse to find the new location. The path reads <drive letter>:\Program Files\ScanSoft\RealSpeak 4.0\.
e. Click OK and continue to accept default values to complete the wizard.
f. After the installation is complete, click Finish.
g. When the system prompts you, click Yes to restart the system.
After the machine restarts, Modular Messaging Configuration Wizard launches automatically, the system starts the installation of the RealSpeak languages automatically and displays the status of installation of each language.
h. Remove the ’Modular Messaging R5.1 MAS Application DVD 2 of 2’ disk.
18. When prompted for Setup.exe, insert the’ Modular Messaging R5.1 MAS Application DVD 1 of 2’ disk and double-click <drive>\Install\Setup.exe.
The configuration wizard continues the installation of the Modular Messaging MAS components. After the installation of the MM components, the server reboots automatically and MM MISCM continues to run.

Configuring a customer-provided MAS
98 Avaya Modular Messaging for Avaya MSS Release 5.1 Installation and Upgrades
19. If JRE is installed during the system upgrade, the system may display ‘Revocation information for the security certificate for this site is not available’. Do you want to proceed?' message. Click Yes to continue.
20. On the WSO configuration wizard, click Next and click Finish.
These steps do not complete the configuration of the CPE MAS. To complete the configuration, you must proceed with the next sections.
Completing the CPE MAS configuration
Issue 1.0 June 2009 99
Avaya - Proprietary. Use pursuant to the terms of your signed agreement or Avaya policy.
Completing the CPE MAS configurationPerform the following tasks to complete the configuration of the CPE MAS:
● Entering the RAS IP addresses on CPE MAS on page 99
● Setting logging location on page 99
● Installing anti-virus software on page 100
● Configuring the port boards on page 100
Entering the RAS IP addresses on CPE MASRemote access to the server allows the technical support staff to dial into a system to correct problems and perform routine maintenance. You must provide a method for remote services to access the system.
The Avaya Modular Messaging Configuration Wizard automatically sets up remote access to each MAS modem. You must edit the preprogrammed RAS IP addresses to use the correct addresses that the technical support organization requires. Perform the steps described in Entering RAS IP addresses on each MAS on page 50, to set up IP addresses on each MAS to allow remote access.
Setting logging location
! CAUTION:CAUTION: Ensure that you have adequate space on the drive where your logs are located. If
you do not have adequate space, your system may fail to operate correctly.
You may want to change the default location for recording logs when you:
● do not have adequate space on the default C: drive location.
● want to record logs in the same location where you installed Modular Messaging software.
To change the location for recording logs, complete the following steps:
1. Navigate to the following location on the drive where Modular Messaging was installed: <drive letter>:\Avaya_Support\Tools
2. Double-click the MM_Logging.exe file.
The Modular Messaging Verbose Logging Window opens.
3. Complete the following steps for each type of log displayed at the top of the screen with the exception of the Client.

Configuring a customer-provided MAS
100 Avaya Modular Messaging for Avaya MSS Release 5.1 Installation and Upgrades
a. Click the log-type button.
b. In the Folder for Log Files: field, edit the drive letter to the drive where you want logs stored. If you have installed Modular Messaging to an alternate drive, edit the field to show the drive where Modular Messaging was installed.
c. Click Apply at the bottom of the screen.
4. When the log location has been changed for all log types, click Close at the bottom of the screen.
The MM Debug Log Viewer should be set up to open log files automatically after installation. If for some reason this association is not made or it becomes changed, do the following manual setup.
To manually set up MM Debug Log Viewer:
1. From the desktop, open My Documents (or any Windows Explorer window).
2. Click Tools > Folder Options > File Types.
3. Is LOG4 listed in the extensions list?
● If YES, skip to step 7.
● If NO, continue with step 4.
4. Click New.
5. In the Create New Extension box, type log4. Click OK.
6. In the extensions list, at the top, highlight LOG4. Click Change.
7. Click Select the program from a list.8. In the Open With window, highlight MM Debug Log Viewer. If that selection is not present,
click Browse and navigate to and select C:\AVAYA_Support\Tools\LogViewer\MMLogViewer.exe.
9. Click OK.
Close all windows.
Installing anti-virus softwareYou must install and administer the anti-virus software as described in Installing and administering anti-virus software on page 48.
Configuring the port boardsDo this task only if you do not use SIP, H.323 or QSIG.
Completing the CPE MAS configuration
Issue 1.0 June 2009 101
Avaya - Proprietary. Use pursuant to the terms of your signed agreement or Avaya policy.
Configure the port boards as described in Configuring port boards and switch integration on page 75.
Continuing with CPE MAS configurationTo complete the configuration of the CPE MAS use the following steps:
1. Continue with Configuring the voice mail system on page 53 through Verifying Audit service on page 83.
2. Continue the installation as appropriate:
● If you have additional MASs or the supplementary server to configure, repeat the tasks in this chapter for the next MAS through Continuing with CPE MAS configuration on page 101.
● If all MASs and the supplementary server (if any) is now configured, continue with Chapter 5: Completing initial MSS administration on page 103.
Configuring a customer-provided MAS
102 Avaya Modular Messaging for Avaya MSS Release 5.1 Installation and Upgrades
Issue 1.0 June 2009 103
Avaya - Proprietary. Use pursuant to the terms of your signed agreement or Avaya policy.
Chapter 5: Completing initial MSS administration
This chapter describes how to complete initial administration on the Message Storage Server (MSS), and how to administer test subscribers for acceptance testing. After you configure all MASs in the Modular Messaging system, you must return to the MSS to complete the basic messaging administration. You can then set up test subscribers, either using a DCT data file or manually, for the system-wide acceptance tests. The amount of administration that you must do on the MSS depends on the optional features that the customer has chosen.
Note:Note: Before you can do the tasks described in this chapter, you must have completed
the tasks in Configuring the Avaya MAS on page 41 for Avaya-provided MAS or Configuring a customer-provided MAS on page 85 for a CPE MAS.
Topics in this chapter include:
● Continuing the MSS configuration using a DCT data file on page 104
● Continuing the MSS configuration manually on page 105
● Configuring the MSS modem on page 117
● Installing any software updates on page 118
● Verifying network adapters and bindings on page 118

Completing initial MSS administration
104 Avaya Modular Messaging for Avaya MSS Release 5.1 Installation and Upgrades
Continuing the MSS configuration using a DCT data fileThis topic explains how to continue the automatic configuration of the MSS using a DCT data file:
1. Log onto the MSS as craft; see Logging on to the MSS on page 22.
2. From the Server Administration menu on the Messaging Administration web interface, click Configure Using DCT.
The system displays the configuration information from the DCT data file.
3. Click ONE of the following:
● If the configuration information is correct, click Continue Configuration and continue with the next step.
! Important:Important: If you click Fresh Configuration, as explained below, you will also have to
reconfigure each MAS.
● If the configuration information is incorrect, you must change the information using the DCT file (return to a Windows computer, change the information in the DCT file and copy the file to the storage device) and click Fresh Configuration. See the DCT online help for information about changing the DCT data file. If you have to change the DCT data file you must configure the MSS from the beginning; see Starting the MSS configuration using a DCT data file on page 24.
If you are unable to make the necessary corrections, contact support.
4. On the pop-up screen, click OK to continue the configuration.
The page displays the status of the configuration, automatically refreshing the information until the configuration is complete.
5. After the MSS configuration is successfully completed, complete the following:
a. Click Reboot the system before proceeding.
b. On the Reboot Server page, click Reboot.c. On the pop-up screen that appears, click OK.
d. Proceed with Configuring the MSS modem on page 117.

Continuing the MSS configuration manually
Issue 1.0 June 2009 105
Avaya - Proprietary. Use pursuant to the terms of your signed agreement or Avaya policy.
Continuing the MSS configuration manuallyIf you chose to configure the MSS manually, this section explains how to complete the configuration. If you chose to configure the MSS using a DCT data file, see Continuing the MSS configuration using a DCT data file on page 104:
● Updating MAS host information on page 105
● Placing the MSS in a Windows domain on page 110
● Administering classes of service on page 112
● Administering special mailboxes on page 114
● Adding test subscribers on page 116
Updating MAS host informationContinue to do the appropriate procedures:
● If using a private Windows domain, proceed with Updating MAS host information in a private Windows domain on page 105.
● If using a corporate Windows domain, proceed with Updating MAS host information in a corporate Windows domain on page 108.
Updating MAS host information in a private Windows domain
If the MM system uses the corporate Windows domain, see Updating MAS host information in a corporate Windows domain on page 108.
Updated MAS host information must be sent to each server in the Modular Messaging system:
1. On the Messaging Administration web interface, click Server Administration > MAS Host Setup.
The system displays the Set Up MAS Host Information page.
2. Select the MAS whose information you want to change, such as MAS1.
3. Click Edit. 4. Update the host information to identify this MAS on the corporate and private networks.

Completing initial MSS administration
106 Avaya Modular Messaging for Avaya MSS Release 5.1 Installation and Upgrades
! CAUTION:CAUTION: Complete the Public fields only if the corporate MAS network connection uses
static IP addresses.
Continue as follows for the type of network connection used at this site:
● For corporate MAS connections that use DHCP addressing, continue with Step 5.
● For corporate MAS connections that use static IP addresses, complete the Public fields:
a. In the Public System Name field, enter the corporate full computer name for the MAS, such as mymas1.loc.avaya.com.
b. In the Public IP Address field, enter the corporate IP address of the MAS.
! CAUTION:CAUTION: Do not enter the MAS Windows NetBIOS (such as mymas1) in the Public Aliases
field.
Do not enter same name in two fields. A name must be unique across a TCP/IP Network configuration, External hosts and MAS Host Setup web forms. For example, if a domain qualifier appears in a Public Aliases name, such as mymas1.loc.avaya.com, you must use a different name in Private Aliases, such as mymas1.privdom1.local.
c. In the Public Aliases field, enter only aliases that the corporate network requires.
You can enter up to five aliases if required. Any names you enter must be unique on the Modular Messaging system and on the network. Separate each name with a space.
5. For all servers, verify the private LAN information:
! CAUTION:CAUTION: Do not change the Private System Name or Address fields for a new system. A
change to the private name, or using a private IP address outside of the three allowable ranges, can prevent the system from working. If you must change the private name or use a unique private IP address, contact remote support for the special procedures required to change these values.
a. Verify that the Private IP Address field shows the correct private IP address range for this site. If required, edit the private IP address for this server to use the right range.
Continuing the MSS configuration manually
Issue 1.0 June 2009 107
Avaya - Proprietary. Use pursuant to the terms of your signed agreement or Avaya policy.
b. In the Private Aliases field, enter the following:
● The private full computer name for this MAS on the private network, such as mymas1.privdom1.local.
● If the Public System Name entry includes a domain qualifier, such as loc.avaya.com, you must include the MAS Windows NetBIOS name in the Private Aliases field. For example, you must enter mymas1 as an alias for the corporate computer name mymas1.loc.avaya.com.
For example, to complete the Private Aliases field, you would enter the following two names for MAS#1, separated by a space:
mymas1.privdom1.local mymas1
c. For Administrator Login, enter the domain administration account, such as dom-admin, and the Administrator Password for the account. The account enables the MAS to accept information updates.
6. Click Save.
7. Repeat the above process for each MAS and the Supplementary server.
8. On the Messaging Administration Web admin page, click Server Administration > MAS Host Send.
The system displays the Send MAS Information page.
9. Click Send.
● The system sends the host information to all MASs at the same time and reports whether the information was updated successfully. Verify that all servers in the network are updated. If so, continue with Placing the MSS in the private Windows domain on page 110.
● If an update to a server failed, check the network operation, using a ping test:
a. From the Diagnostics menu, click Ping Another Server.b. On the ping test page, enter the IP address of the failed MAS.
c. Click Ping Test to establish connectivity.
Note:Note: You must ping by IP address to test the connectivity. The test fails if you ping by
name and the MAS host file.
d. Repeat the test, as needed, to isolate the problem.
e. Once the problem is corrected, try to send the host information again.
10. Reboot the MSS; see Rebooting the MSS on page 39.

Completing initial MSS administration
108 Avaya Modular Messaging for Avaya MSS Release 5.1 Installation and Upgrades
Updating MAS host information in a corporate Windows domain
If the MM system uses the private Windows domain, see Updating MAS host information in a private Windows domain on page 105.
Each MAS server in the Modular Messaging system must receive updated host information.
To update the host information for each MAS:
1. From the Server Administration main menu, click MAS Host Setup.
The system displays the Set Up MAS Host Information page.
2. Select the MAS whose information you want to change, such as MAS1.
3. Click Edit. 4. On the MAS Host Information Setup page, update the host information to identify the MAS
on the corporate and private networks.
! CAUTION:CAUTION: Complete the Public fields only if the corporate network connection uses static IP
addresses.
Continue as follows for the type of network connection used at this site:
● For corporate connections that use DHCP addressing, continue with Step 5.
● For corporate connections that use static IP addresses, complete the Public fields:
a. In the Public System Name field, enter the corporate full computer name for the MAS, such as mymas1.loc.avaya.com.
b. In the Public IP Address field, enter the corporate IP address of the MAS.
! CAUTION:CAUTION: Do not enter the MAS Windows NetBIOS (such as mymas1) in the Public Aliases
field.
Do not list the same name in two fields. For example, if a domain qualifier appears in a Public Aliases name, such as mymas1.loc.avaya.com, you would use a different name in Private Aliases, such as mymas1.privdom1.local.
c. In the Public Aliases field, only enter aliases that the corporate network requires.
You can enter up to five aliases if required. that are unique on the Modular Messaging system and on the network. Separate each name with a space.

Continuing the MSS configuration manually
Issue 1.0 June 2009 109
Avaya - Proprietary. Use pursuant to the terms of your signed agreement or Avaya policy.
5. For all servers, verify the private LAN information:
! CAUTION:CAUTION: Do not change the Private System Name or Address fields for a new system.
Changing the private name, or using a private IP address outside of the three allowable ranges, can prevent the system from working. If you must change the private name or use a unique private IP address, contact remote support for the special procedures required to change these values.
a. Verify that the Private IP Address field shows the correct private IP address range for this site. If required, edit the private IP address for this server to use the appropriate range.
b. For Private Aliases, if the Public System Name entry includes a domain qualifier, such as loc.avaya.com, you must include the MAS Windows NetBIOS name in the Private Aliases field. For example, you must enter mymas1 as an alias for the corporate computer name mymas1.loc.avaya.com.
c. For Administrator Login, enter the customer account, such as custacct, and the Administrator Password for this account. This account enables the MAS to accept information updates.
6. Click Save.
7. Repeat the above process for each MAS.
8. From the Server Administration menu, click MAS Host Send.
The system displays the Send MAS Information page.
9. Click Send.
● The system sends the host information to all MASs at the same time and reports if the information was updated successfully. Verify that all servers that are currently in the network are updated. If so, continue with Placing the MSS in the corporate Windows domain on page 111.
● If an update to a server failed, check the network operation, using a ping test:
a. From the Diagnostics menu, click Ping Another Server.b. On the ping test page, enter the IP address of the failed MAS.
c. Click Ping Test to establish connectivity.
Note:Note: You must ping by IP address to test connectivity. The test fails if you ping by
name and the MAS host file.
d. Repeat the test, as needed, to isolate the problem.
e. Once the problem is corrected, try to send the host information again.
10. Reboot the MSS; see Rebooting the MSS on page 39.
Completing initial MSS administration
110 Avaya Modular Messaging for Avaya MSS Release 5.1 Installation and Upgrades
Placing the MSS in a Windows domainContinue to the appropriate procedures:
● If using a private Windows domain, continue to Placing the MSS in a Windows domain on page 110.
● If using a corporate Windows domain, continue to Placing the MSS in the corporate Windows domain on page 111.
Placing the MSS in the private Windows domain
If the MM system uses the corporate Windows domain, see Placing the MSS in the corporate Windows domain on page 111.
You must add the MSS to the private Windows domain that you set up on MAS#1. To do this task, you must have completed Updating MAS host information in a private Windows domain on page 105.
To add the MSS to the private Windows domain:
1. From the Server Administration menu, click Windows Domain Setup.
The system displays the Set Up Windows Domain page.
2. Ensure that you clear the Use Corporate LAN? check box.
Note:Note: The Kerberos Realm and Authentication Method fields are disabled for private
Windows domain.
3. Enter the following information:
a. In the MSS NetBIOS Name field, type the MSS private system name, which is mss1.
b. In the NetBIOS Domain Name field, type the NetBIOS domain name for the private Windows domain that was created on MAS#1. For example, if the Fully Qualified Domain Controller name as shown in the DCT data file is mymas1.privdom1.local, enter privdom1 in the NetBIOS Domain Name field.
c. In the Fully Qualified Domain Controller Name field, type the full computer name for MAS#1 on the private network, such as mymas1.privdom1.local.
d. For Account for Joining The Domain using a private Windows domain, enter the domain administrator login, such as dom-admin. This account enables the MAS to accept information updates.
e. In the Password for Joining the Domain field, type the password for the account to the domain you used in step 3d.
4. Click Save.
The page displays the Windows domain setup status.
Continuing the MSS configuration manually
Issue 1.0 June 2009 111
Avaya - Proprietary. Use pursuant to the terms of your signed agreement or Avaya policy.
Placing the MSS in the corporate Windows domain
If the MM system uses the private Windows domain, see Placing the MSS in the private Windows domain on page 110.
You must add the MSS to the corporate Windows domain. To do this task, you must have completed Updating MAS host information in a corporate Windows domain on page 108.
To add the MSS to the corporate Windows domain:
1. From the Server Administration menu, click Windows Domain Setup.
The system displays the Set Up Windows Domain page.
2. Ensure that the Use Corporate LAN? check box is checked.
3. Enter the following information in each field:
a. For Authentication Method, select default, Winbind or Kerberos from the list as appropriate.
By default, the system uses Winbind access method.
b. If you have selected Kerberos in step 3a, for Kerberos Realm, enter the fully qualified Kerberos Realm name.
c. For MSS NetBIOS Name, type the Host Name.
d. For NetBIOS Domain Name, type the NetBIOS corporate domain name for the corporate Windows network, such as loc.
e. For Fully Qualified Domain Controller Name, type the full computer name of the corporate network.
f. For Account for Joining the Domain using a corporate Windows domain, enter the customer account, such as custacct. This account enables the MAS to accept information updates.
g. For Password for Joining the Domain, type the password for the account to the domain you used in step 3f.
4. Click Save.
The page displays the Windows domain setup status.

Completing initial MSS administration
112 Avaya Modular Messaging for Avaya MSS Release 5.1 Installation and Upgrades
Administering classes of service You must administer classes of service for the special mailboxes, such as postmaster or fax, and for all test subscribers.
● Setting up a cos for required special mailboxes on page 112
● Setting up a cos for test subscribers on page 113
Setting up a cos for required special mailboxes
Set up a unique class of service (cos) for the special mailboxes. Special mailboxes include the required postmaster mailbox and the optional fax mailbox, if the fax service is installed.
To set up a class of service for the special mailboxes:
1. From the Messaging Administration web interface, click Classes-of-Service.
The system displays the Manage Classes-of-Service page.
2. Select the class of service to modify, such as class00.
3. Click Edit the Selected COS.
4. On the Edit a Class-of-Service page, change the Class of Service Name to a descriptive name, such as SpecialMailbox.
5. In the MAILBOX AND MESSAGE SIZES section:
a. Change the units for Maximum Mailbox Size to Mbytesb. Enter 64 to change Maximum Mailbox Size to 64 Mbytes.
6. In the SUBSCRIBER FEATURES AND SERVICES section, activate the following features:
! CAUTION:CAUTION: Set MWI for special mailboxes to No. Otherwise, system performance is affected.
a. Set Message Waiting Indication Allowed to no.
b. Set all supported notification options to yes. For example, set Call Me, Find Me, and Notify Me to Yes.
c. To access a mailbox using a desktop client, set Restrict Client Access to No. Desktop clients include the Microsoft Outlook client and the IBM Lotus Notes client.
7. Click Save.
The system displays the Manage Classes-of-Service page.
Continuing the MSS configuration manually
Issue 1.0 June 2009 113
Avaya - Proprietary. Use pursuant to the terms of your signed agreement or Avaya policy.
Setting up a cos for test subscribers
Set up a unique class of service (cos) for each telephone user interface (TUI) that this Modular Messaging system supports. To set up classes of service for the test subscribers:
1. On the Manage Classes-of-Service page, select the class of service to modify, such as class01.
2. Click Edit the Selected COS.
3. On the Edit a Class-of-Service page, change the Class of Service Name to a descriptive name, such as AriaTUI.
4. Scroll down to the SUBSCRIBER FEATURES AND SERVICES section. Activate the following features:
a. Leave Message Waiting Indication Allowed set to yes.
b. Set all supported notification options to yes. For example, set Call Me, Find Me, and Notify Me to yes.
c. If fax service is required, set Outbound Fax Calls to yes.
d. Set Record Mailbox Greetings to yes.
e. To access the mailbox, set Restrict Client Access to no. Mailbox clients include the Microsoft Outlook client and the IBM Lotus Notes client.
f. For Telephone User Interface, select the interface required for this class of service. TUI interfaces include MM Aria, MM AUDIX, and MM Serenade.
5. Click Save.
6. To set up another class of service, repeat Steps 1 through 5. For example, you might set up a class of service for each type of telephone user interface, such as AudixTUI or SerenadeTUI.
Completing initial MSS administration
114 Avaya Modular Messaging for Avaya MSS Release 5.1 Installation and Upgrades
Administering special mailboxesYou must set up a postmaster mailbox on each system, or the system will fail to work. If fax service is to be installed, you must also set up the required fax service mailbox.
To set up the required mailboxes:
1. Set up the required Postmaster Mailbox.
Note:Note: Usually you set up a special mailbox to act as the Postmaster Mailbox. Because
this mailbox is required for the system to function properly, it should not be a mailbox likely to be deleted or have changes made to it. It will, however, have administrative messages delivered to it upon occasion and should be checked regularly (on a daily basis if possible).
a. From the Messaging Administration web interface, click Messaging Administration > Subscriber Management. The system opens Manage Subscribers page.
b. Next to the Local Subscriber Mailbox Number field, click Add or Edit. c. On the Add Local Subscriber page, enter the following information:
1. For Last Name, type postmaster. Use lower-case letters.
2. Leave First Name blank.
3. For Password, type the password for the postmaster mailbox.
4. For Mailbox Number, type a valid mailbox number. Enter 3-to-10 digits as required by the dial plan.
5. For Numeric Address, type an address that is unique for the messaging network. The numeric address can be identical to the Mailbox Number, or you can alter them to facilitate easier addressing by remote subscribers. For example, you might prepend a 1 or the area code to the mailbox number.
6. For Class Of Service, select the cos that you set up for special mailboxes. See Setting up a cos for required special mailboxes on page 112.
Note:Note: The Email Handle will be auto populated when you save this information. It must
be postmaster in lower-case letters. Any other email address causes an error. All fields in the SUBSCRIBER DIRECTORY will also be saved.
2. Scroll down and click Save.
3. At the confirmation prompt, click OK.

Continuing the MSS configuration manually
Issue 1.0 June 2009 115
Avaya - Proprietary. Use pursuant to the terms of your signed agreement or Avaya policy.
4. If fax service is installed, set up the required fax service mailbox.
Note:Note: The IP H.323 switch integration does not support fax service.
On the Manage Subscribers page:
a. Click Add or Edit.b. On the Add Local Subscriber page, enter the following information:
1. For Last Name, type fax.
2. For Password, type the password that was entered in the DCT data file.
3. For Mailbox Number, type a valid mailbox number. This is the same mailbox number that you configured earlier on the MAS; see page 32.
Note:Note: This number must not be a real telephone (PBX) extension on the system, or the
fax feature will not work correctly.
4. For Numeric Address, type an address that is unique among all the addresses in the messaging network. The numeric address can include or be identical to the Mailbox Number.
5. For Class Of Service, select the cos that you set up for special mailboxes. See Setting up a cos for required special mailboxes on page 112.
c. Scroll down and click Save.
d. At the confirmation prompt, click OK.
5. From the Messaging Administration web interface, select Messaging Attributes. The system displays the Configure Subscriber Management page.
a. In the SYSTEM MAILBOXES section:
1. For the Internet postmaster Mailbox Number, enter the extension for the Mailbox Number that you used in Step 1.
2. If fax is installed, for the Fax Mailbox Number, enter the extension for the Mailbox Number that you used in Step 4.
b. Scroll down and click Save.
Completing initial MSS administration
116 Avaya Modular Messaging for Avaya MSS Release 5.1 Installation and Upgrades
Adding test subscribersSet up at least one local subscriber to test the system. If you have to test multiple types of telephone user interface (TUI), set up a test subscriber for each TUI. For instructions on how to add and configure the mailbox, see the Avaya Modular Messaging MAS Administration Guide.
To add test subscribers:
1. From the Manage Subscribers page, next to the Local Subscriber Mailbox Number field, click Add or Edit. The system displays the Add Local Subscriber page.
2. Fill in the fields in the Subscriber Information section as shown in Table 6: Subscriber page sample settings. Click Help if you need more information about completing any fields on this page.
3. Scroll down and click Save.
4. At the confirmation prompt, click OK.
5. If you want to test multiple user interfaces, repeat Steps 1 through 4 to set up an MM AUDIX or MM Serenade test subscriber, as required.
Table 6: Subscriber page sample settings
Field Setting
Last Name Aria
First Name Test
Password 1
Mailbox Number Type a valid number for the test subscriber mailbox. Usually this is the same number as the primary telephone (PBX) extension for that subscriber. Enter 3-to-50 digits as required by the dial plan.
Class of Service Use the one you modified for Setting up a cos for test subscribers on page 113, or as directed. It must have all the features that you need to test activated.
Numeric Address Type an address that is unique within the messaging network. The numeric address can include or be identical to the Mailbox Number. Enter 3-to-50 digits as required by the dial plan.
Configuring the MSS modem
Issue 1.0 June 2009 117
Avaya - Proprietary. Use pursuant to the terms of your signed agreement or Avaya policy.
Configuring the MSS modemTo configure the optional USB modem on the MSS, complete the following:
Note:Note: Configure the USB modem only after you have physically connected the modem.
1. From the Messaging Administration web interface, on the Server Administration menu, click Modem/Terminal Configuration.
2. On the Configure Modem/Terminal page, locate the correct modem either inside the Serial Modems and Terminals box or the USB Modem box. For a serial modem you need to know if it’s connected to COM1 or COM2. For a USB modem, the "USB Modem Connected?" column will be marked YES.
3. From the Modem Type drop-down menu, select the type of modem you are use. If you select Other, you will need to fill in the Modem Init String.
4. From the Speed drop-down menu, select the applicable speed of the modem.
5. Click the check box in the far-left column for that modem, click Save.
Configuration status displays "successfully registered."

Completing initial MSS administration
118 Avaya Modular Messaging for Avaya MSS Release 5.1 Installation and Upgrades
Installing any software updatesA new Modular Messaging system ships with the most current software that is available at the time of shipping. However, you must update the software after an installation or upgrade to include the latest changes. The updates might be in the form of an Avaya Service Pack (SP) or a software patch.
Complete the following steps to update Modular Messaging software:
1. Locate any relevant Avaya software updates on the Avaya Support Web site at http://www.avaya.com/support. For complete steps, see Getting software updates from the Web on page 326.
Note:Note: If you followed the procedure for Downloading software updates on page 10, you
already downloaded any required software updates.
2. Complete the update procedure before you do acceptance testing:
a. Follow the instructions provided in Appendix E: Updating Modular Messaging software on page 325 to update the system with the latest changes.
b. After you install the updates, continue with Chapter 6: Performing acceptance tests for a new installation on page 119.
Verifying network adapters and bindingsAfter you install an Avaya S8730 MAS or a Supplementary server, complete the following steps to verify the search order in which private and corporate LANs are ordered on an MAS or a Supplementary server.
1. On Windows desktop, select My Network Places.
2. Right-click and select Properties. The system opens the Network Connections window.
3. From the Advanced menu, click Advanced Settings.
4. In the Adapters and Bindings tab, from the list of connections, ensure that the connection to the private LAN (Local Area Connection) appears above the connection to the corporate LAN (Local Area Connection 2). This is to ensure that MAS accesses private LAN before the corporate LAN.
Note:Note: If the Local Area Connection is not the first entry, select Local Area Connection.
Use the up arrow key to move the item to the first position. Click OK.
5. Close all open Windows.

Issue 1.0 June 2009 119
Avaya - Proprietary. Use pursuant to the terms of your signed agreement or Avaya policy.
Chapter 6: Performing acceptance tests for a new installation
This chapter describes how to run acceptance tests for each Messaging Application Server (MAS) that is set up to take calls. Acceptance tests verify that the Modular Messaging system is working correctly. You can run these tests from any MAS.
! CAUTION:CAUTION: You must first install any software updates before performing acceptance tests,
see Installing any software updates on page 118 for information.
You must wait about one minute for the MSS and MAS to synchronize their data after you add any test subscribers. Otherwise, the acceptance tests will not run correctly.
Topics in this chapter include:
● Setting up monitoring tools—optional on page 120
● Running acceptance tests on page 122
● Removing the test subscribers on the MSS on page 130

Performing acceptance tests for a new installation
120 Avaya Modular Messaging for Avaya MSS Release 5.1 Installation and Upgrades
Setting up monitoring tools—optionalYou can use the monitoring tools described in this section to help you complete the acceptance tests.
Using the Operation History ViewerYou can use the Operation History Viewer to monitor the call progress for any MAS. You can also identify the cause for the problems that occur during testing.
Note:Note: Without additional configuration, the Operation History Viewer will function on the
server only where the Tracing Service is running. For more information about using the Operation History Viewer, obtain the Avaya Modular Messaging MAS Administration Guide; see Downloading user documentation on page 12.
To open the Operation History Viewer:
1. Click Start > Programs > Avaya Modular Messaging > Operation History Viewer.2. Set up a live mode session for all MASs in the voice mail domain:
a. In the Operation History Viewer window, click File > New.
b. In the Session Properties window, verify that Message Application Server shows All Servers.
c. Select the Live Mode check box.
d. Verify that all the Select Types check boxes are selected.
e. Under Selection Activities, verify that All Activities check box is selected.
f. Click OK.
3. During testing, monitor Operation History (OPH) events in the OPH Viewer. The OPH Viewer displays events as they happen on the system.
4. After testing is complete, close the OPH Viewer.
5. If the system prompts you to save the session, click No.
Setting up monitoring tools—optional
Issue 1.0 June 2009 121
Avaya - Proprietary. Use pursuant to the terms of your signed agreement or Avaya policy.
Setting up the port monitorTest calls come in through the ports on various MASs in the system depending on how the hunt group is set up on the PBX. Use the port monitor to verify that the test calls you make come in through the ports of the MAS that you want to test.
To display the port monitor:
1. Switch the monitor to show the correct MAS. For more information, see Displaying an MAS from the console on page 42.
2. Click Start > Programs > Avaya Modular Messaging > Port Monitor.3. When the system prompts for the Message Application Server, select the MAS that you
want to test, such as mymas2. Click Select.The Port Monitor displays the ports for this MAS.
4. Repeat Steps 1 through 3 to bring up Port Monitor windows on multiple MASs if desired.
5. After you dial the message retrieval number for the Modular Messaging system during the acceptance tests, check the Port Monitor window.
● Verify that the call is coming in on a port of the MAS that you want to test.
● If you notice that the test call does not come through the desired MAS, hang up. Dial the message retrieval number again, until you reach the correct MAS.
The number of times you might have to dial depends on the switch administration. For example, the hunt group might be administered to send each new call to the next MAS in the system. Alternatively, the hunt group might be administered to send all the calls to one MAS before it sends any calls to a subsequent MAS.
Performing acceptance tests for a new installation
122 Avaya Modular Messaging for Avaya MSS Release 5.1 Installation and Upgrades
Running acceptance testsTest each MAS that is set up to handle calls.
Leaving a call answer messageThe following test works only if call-coverage is assigned on the switch to route unanswered calls to the extension for the test subscriber.
To place a test call that can be answered by the Modular Messaging system:
1. Call the first test subscriber extension from another telephone. Use an extension for which you have access to the physical telephone. Allow the Modular Messaging system to answer.
2. Speak into the telephone and record test message after the tone, for example:
"This is a test call answer message."
3. Hang up the telephone to disconnect.
4. If you have to test multiple telephone user interfaces, repeat steps 1 through 3 to leave a call answer message for the next test subscriber.

Running acceptance tests
Issue 1.0 June 2009 123
Avaya - Proprietary. Use pursuant to the terms of your signed agreement or Avaya policy.
Retrieving test messages in integrated modeTest the fully integrated operation of the system as directed in this section. Use an extension for which you have access to the physical telephone.
To verify the receipt of the test messages in integrated mode:
1. If MWI is installed, check the message waiting indicator (MWI) on the test subscriber telephone. The MWI can be a light, a screen display, or a dial-tone stutter that you hear when you pick up the telephone.
Note:Note: The message waiting lamp can take up to 1 minute to light on the appropriate
telephone after a test message is sent.
If the MWI does not indicate that a message was received:
a. Verify that the Mailbox Monitor and MWI services are started on the server designated as the MWI server (and on no other server).
b. Verify that the Mailbox Monitor and MWI services are started:
1. Double-click the Monitor icon on the desktop of the MAS designated as the MWI server, and then scroll down to these MM services in the right pane.
2. If the Mailbox Monitor or MWI service is stopped or if the Status column is blank, right-click the appropriate MM service and select Start.
3. Close this window.
c. If the Mailbox Monitor and MWI services are started, check for any problem in the following:
● test subscriber administration. MWI service must be enabled both in the Class of Service and in Subscriber Options for the subscriber.
● switch integration
● switch number administration for the test telephone
2. From the test subscriber telephone, dial the message retrieval number for the Modular Messaging system.
3. Enter the password for this mailbox and press the pound key (#).
The system voices the name of the test subscriber.
4. The first time you access this mailbox, you answer a series of prompts to set up the mailbox for operation. Answer all voice prompts as directed.

Performing acceptance tests for a new installation
124 Avaya Modular Messaging for Avaya MSS Release 5.1 Installation and Upgrades
5. After the mailbox is set up, retrieve the test message.
The system uses different commands to retrieve messages, depending on the type of user interface you use. Continue with the appropriate user interface:
● On the MM Aria interface:
a. Press 1 1 to review the new voice messages.
b. Listen to the test message. If the message does not play properly, contact the remote support center.
c. Press 7 to erase this message.
d. Repeat Steps b and c to review the next message, if any.
e. Press the star key (*) to return to the main menu.
f. Continue with Step 6.
● On the MM AUDIX interface:
a. Press 2 to review the new messages.
b. Press 0 to listen to the test message. If the message does not play properly, contact the remote support center.
c. Press star (*) D, or star (*) 3, to erase this message.
d. Repeat Steps b and c to review the next message, if any.
e. Press star (*) R, or star (*) 7, to return to the main menu.
f. Continue with Step 6.
● On the MM Serenade interface:
a. Press 5 to review the new messages.
b. Listen to the test message. If the message does not play properly, contact the remote support center.
c. Press 3 to erase this message.
d. Repeat Steps b and c to review the next message, if any.
e. Press the pound key (#) to return to the Ready menu.
6. Hang up the telephone to disconnect.
7. If MWI is installed, check the MWI on the test subscriber telephone. The MWI should be off. If it is not off, check the MWI administration on the MAS and the PBX.
Running acceptance tests
Issue 1.0 June 2009 125
Avaya - Proprietary. Use pursuant to the terms of your signed agreement or Avaya policy.
Creating and sending a test message in nonintegrated modeThe system uses slightly different commands for each telephone user interface. Note the differ-ences in the text.
Use the following steps to create and send a test message in nonintegrated mode:
1. Dial the message retrieval number for the Modular Messaging system from any telephone that is not administered on the system.
The system voices the "Welcome to Avaya Messaging" prompt.
2. Press the pound key (#) to skip the system introduction.
3. Enter the extension number for test subscriber mailbox.
4. Enter the password for this mailbox and press the pound key (#).
The system voices the name of the test subscriber.
5. To create a new voice message:
● On the MM Aria interface, press 2.
● On the MM AUDIX interface, press 1.
● On the MM Serenade interface, press 6.
6. Speaking into the telephone, record the following or a similar test message after the tone: "This is a test voice mail message."
7. Press the pound key (#) to approve the message.
8. When the system prompts you for the mailbox number, enter the mailbox number of another test subscriber. Then press the pound key (#).
The system voices the name of the test subscriber.
9. To approve the message and address list:
● On the MM Aria interface, press the pound key (#) twice.
● On the MM AUDIX interface, press the pound key (#).
● On the MM Serenade interface, press the pound key (#) twice.
10. Press the pound key (#) again to send the test message to the test subscriber mailbox.
11. Hang up the telephone to disconnect.
12. Retrieve the message as described in Retrieving test messages in integrated mode on page 123.
Performing acceptance tests for a new installation
126 Avaya Modular Messaging for Avaya MSS Release 5.1 Installation and Upgrades
Testing the outcalling capabilityTest the outcalling capability of the system:
To test system outcalling:
1. Switch the monitor to show the appropriate MAS. For more information, see Displaying an MAS from the console on page 42.
2. Run the Modular Messaging Client software:
a. On the Avaya MAS, open Internet Explorer. b. If the system displays a warning that the Internet Explorer Enhanced Security
Configuration is enabled, click OK.
c. In the Internet Explorer main window, select Tools > Internet Options.
d. In the Internet Options window, click the Security tab.
e. Click Trusted Sites so the item is highlighted, and then click the Sites button.
f. In the Trusted sites window, verify that the Require server verification (https:) for all sites in this zone check box is clear.
g. Under Add this Web site to the zone, enter the full corporate computer name of the MSS and click Add. Use the format mymss.loc.avaya.com, for example, enter mss.dr.avaya.com.
! Important:Important: Do not enter http:// or https:// in front of the computer name, or the browser
might not find the server automatically.
h. Click OK to close the Trusted sites window.
i. Click OK to close the Internet Options window.
j. In the address field of the Internet Explorer main window, enter http://mss1, the private address of the MSS and then press Enter. Use the format mymss.loc.avaya.com, for example, type mss.dr.avaya.com.
k. Continue logging in to the MSS.
3. Launch Subscriber Options:
a. On the Messaging Administration web interface, Click Messaging Administration > Subscriber Management.
b. On the Manage Subscribers page, type a mailbox number into the Local Subscriber Mailbox Number field and click Add or Edit.
c. On the Edit Local Subscriber page, scroll to the bottom of the page and click Launch Subscriber Options.
d. On the File Download window, click Open.
Running acceptance tests
Issue 1.0 June 2009 127
Avaya - Proprietary. Use pursuant to the terms of your signed agreement or Avaya policy.
4. Set up the recording and playback options to use a telephone near you:
a. In the Modular Messaging User Properties window, click the Media Setup tab.
b. For When composing voice messages, select Telephone.
c. Click Configure.
d. In the Telephone Properties window, enter the extension number of a telephone near you.
e. Select or enter the name of this MAS if needed. Click OK.
f. For When reviewing voice messages, select Telephone.
g. Repeat Steps c through e to set up telephone playback.
h. Click Apply.
5. Record a personal greeting:
a. In the Modular Messaging User Properties window, click the Greetings tab.
b. Verify that system will use the telephone to record and playback:
1. Check the icon to the left of the status display. If it shows a telephone, continue with Step c.
2. If the icon shows a terminal, right-click and select Telephone. The icon changes to show a telephone. Continue with Step c.
c. Under Rules:
1. Under Default call handling, select Play my personal greeting.
2. Click red Record button on the player near the bottom of the window.
3. When the telephone rings, answer the call and record a personal greeting for the test subscriber.
4. After you record the test greeting, hang up the phone.
5. Click Apply.
Performing acceptance tests for a new installation
128 Avaya Modular Messaging for Avaya MSS Release 5.1 Installation and Upgrades
6. Play back the greeting to test outcalling, as follows:
a. Click the black, single-arrow Play button on the player near the bottom of the window.
b. Answer the telephone when it rings.
The picture of the telephone changes to off-hook.
c. Listen for the system to play the greeting of the test subscriber.
d. Hang up the telephone.
The picture of the telephone changes back to being on-hook in two seconds.
7. Set up the MWI rule:
a. On the Assistant tab, right-click Message Waiting Indicator and click New Rule. Make sure that the option is checked.
b. Click the Message Waiting Indicator rule that appears. Text for the rule appears near the bottom of the tab.
c. Click Apply.
8. Click OK to close the Modular Messaging User Properties window.
9. Close all open windows.
Running acceptance tests
Issue 1.0 June 2009 129
Avaya - Proprietary. Use pursuant to the terms of your signed agreement or Avaya policy.
Creating and printing a fax messageDo this test only under the following circumstances:
● When the MM Fax Sender server is installed in the vmd.
● On the MAS that hosts the MM Fax Sender server.
To create and send a test fax message:
1. From a fax machine, send a fax to the test subscriber mailbox. The subscriber's class of service must have both Inbound Fax and Outbound Fax Calls set to Yes.
2. Wait a few minutes for the fax to be delivered. The MWI lamp, if present, on the test subscriber telephone should light.
3. From a telephone (NOT the fax machine), dial the message retrieval number for the Modular Messaging system.
4. Press the pound key (#) to access the test subscriber mailbox.
5. Enter the extension number for the test subscriber mailbox.
6. Enter the password and press the pound key (#).
The system speaks the name of the test subscriber.
7. Retrieve and print the fax as follows:
● On the MM Aria interface:
a. Press 1 to retrieve new messages.
b. Press 3 to retrieve the fax message.
c. After the prompt finishes, press 2 and follow the prompts.
● On the MM AUDIX interface:
a. Press 2 to retrieve new messages.
b. Press star (*) 1 to print the fax.
c. Press star star (**) 6 and follow the prompts.
● On the MM Serenade interface:
a. Press 1 9 to retrieve new messages.
b. Press 8 to print the fax.
c. Press 3 and follow the prompts.
8. Verify that the fax prints correctly.
9. If MWI is installed, check the MWI on the test subscriber telephone again. The MWI should be off.

Performing acceptance tests for a new installation
130 Avaya Modular Messaging for Avaya MSS Release 5.1 Installation and Upgrades
Removing the test subscribers on the MSSBefore you remove the test subscribers, ensure that you complete any other testing, such as ELA or Broadcast testing. When acceptance testing is complete, remove the test subscribers:
1. Switch the monitor to show the MSS.
2. From the Messaging Administration web interface, click Subscriber Management. The system displays the Manage Subscribers page.
3. On the line Local Subscribers for this MSS, such as mymss, click Manage.
4. On the Manage Local Subscribers page:
a. Select the test subscriber to delete.
b. Click Delete the Selected Subscriber. c. If the system prompts you to confirm removing the subscriber, click OK.
d. At the confirmation prompt, click OK.
5. Repeat Step 4 to remove all test subscribers.

Issue 1.0 June 2009 131
Avaya - Proprietary. Use pursuant to the terms of your signed agreement or Avaya policy.
Chapter 7: Setting up support and making system backups
This chapter describes how to complete the serviceability configuration for the Message Storage Server (MSS), backup the Modular Messaging system information and complete the new installation on Modular Messaging system.
This chapter includes the following topics:
● Setting up logins and remote access on page 132
● Setting up alarming on the MSS on page 135
● Backing up the system on page 141
● Completing the installation on page 144
Setting up support and making system backups
132 Avaya Modular Messaging for Avaya MSS Release 5.1 Installation and Upgrades
Setting up logins and remote accessSet up the required logins and remote access as described in this section. These steps allow a remote service center to dial in to the system for troubleshooting or system maintenance.
Registering the system in ARTYou must register the Modular Messaging system through the Avaya Automatic Registration Tool (ART) to obtain the information that is required to complete the installation. The information that you need for installation includes:
● Product identifier (ID) for each MAS, used to identify the server that generates an alarm
● IP addresses to remotely access each server:
- the tscppp point-to-point protocol (PPP) login on the MSS for Avaya technical support
- IP addresses that the remote access service (RAS) uses to access each MAS. You can register an MAS to obtain the product ID and IP addresses in advance. For more information about using ART, see your local procedures.
Registering an MSS
The MSS must be running and remote access must be established when you register the server. For example, you can register the MSS first, and continue with the installation.
When you register the MSS, the Avaya expert system dials in and automatically programs the server with the product ID and tscppp IP addresses. The ART registration process reprograms certain system passwords for improved security.
Registering an MAS
You can register an MAS before you install it because the Avaya expert systems do not automatically dial in or program any information on an MAS. You must register each MAS in the system, including the Supplementary server, if present. The registration process populates the customer login and password information in Maestro and provides RAS IP addresses and product IDs for each server.
To register an MAS, call the Product Registration group. The registration group must add the Cust Assigned Login ID and the Cust Assigned Password in the Maestro. The login and password must match the technical support account for you to access an MAS.
After you register each MAS, record the RAS IP addresses in the DCT data file. To enter RAS IP addresses on the MAS, see Entering RAS IP addresses on each MAS on page 50.
Setting up logins and remote access
Issue 1.0 June 2009 133
Avaya - Proprietary. Use pursuant to the terms of your signed agreement or Avaya policy.
Administering logins and passwords
Note:Note: You can set this up in the DCT. In that case, these logins and passwords should
already be configured for all logins except for dadmin (Business Partners). If you use dadmin, complete this procedure.
You must administer logins and passwords for all Modem Dialout-supported systems to support remote maintenance. You can set up any additional required logins, such as the dadmin login that Avaya Business Partners use to administer or maintain the system.
You can set up additional logins either from the console or from another computer on the customer LAN. You can use the craft login to activate dadmin or other required logins and grant permission.
To administer additional logins:
1. From the Security menu, click Local Administrators.
The system displays the Manage Local Administration Accounts page.
2. Select an account, such as sa or vm, and then click Edit the Selected Admin.
The system displays the Edit Local Administration Account page.
a. From the Local Authentication Enabled? drop-down menu, select yes (if it’s not already selected).
b. For Password, enter the appropriate password.
c. For Confirm Password, type the same password.
d. Click Save.
3. Repeat Step 2 for each additional login that you must administer. The logins include:
● craftppp for technical support remote access
● dadmin for Business Partners support
● sa and vm for customer administration

Setting up support and making system backups
134 Avaya Modular Messaging for Avaya MSS Release 5.1 Installation and Upgrades
Setting up the PPP server configuration Perform this task if you need to provide local and remote IP addresses for point-to-point protocol (PPP) remote access because the system does not provide other connectivity, such as through the Internet. Types of login you might administer this way are craftppp or sappp.
Note:Note: You can set this up in the DCT. In that case, this should already be configured.
Also, the ART registration process automatically programs the tscppp login for Avaya remote technical support.
To set up the PPP service on this server:
1. From the Security menu, click PPP Configuration.
The system displays the Configure PPP Users page.
2. For each login account that you must administer, enter the following information:
a. For Local IP Address, type the customer-provided IP address for PPP access through the MSS modem.
b. For Remote IP Address, type the IP address for the remote device that is to connect to this MSS. Either the customer or remote support might provide this IP address.
c. For Password, type the password for the login account.
d. For Confirm Password, type the same password for the login account.
3. Repeat Step 2 for each of the PPP logins that you must set up.
4. After you administer all required logins, click Save.

Setting up alarming on the MSS
Issue 1.0 June 2009 135
Avaya - Proprietary. Use pursuant to the terms of your signed agreement or Avaya policy.
Setting up alarming on the MSSComplete and test the setup for alarm on the MSS as described in this section.
Specifying MSS alarm originationActivate alarm origination to enable the appropriate party to receive notification of alarms that occur on the system. This might be a remote service center or a corporate NMS.
To set up alarm origination through the MSS:
1. Clear all alarms. For instructions, obtain "MSS alarms;" see Downloading user documentation on page 12.
2. Insert a labeled, writable DVD-RAM into the DVD drive for the nightly backup.
3. From the Alarming menu, click Alarming Configuration.
The system displays the Configure Alarms page.
4. Enter the Product ID for the MSS.
Note:Note: The ART registration process automatically programs the MSS product ID. A
valid product ID must be present, or this test will not work.
5. Set the Alarm Origination for the type of alarm used on this system or indicate that alarm is inactive:
● INACTIVE● Modem Dialout ● SNMP ● Internet
6. Verify that Alarm Suppression is set to INACTIVE. You can use the default settings for Alarm Level and Clear Alarm Notification. For more information about completing each field, click Help.

Setting up support and making system backups
136 Avaya Modular Messaging for Avaya MSS Release 5.1 Installation and Upgrades
7. Complete the alarming information for the site:
● If you selected Modem Dialout alarming, enter the Modem Dialout Destination telephone number and then click Save.
● If you selected SNMP alarming:
a. Click Save on the Configure Alarms page.
b. From the Alarming menu, select SNMP Community.
c. On the Administer SNMP Community page, click Add to add the community you need for SNMP trap destination. If the community already exists, skip to step g.
d. For Community, click the field and enter a community name. This name is used to validate when communicating between the SNMP client and the SNMP server.
e. For Apply To, from the drop-down menu, select either Traps or Both.
f. Click Save, a window appears if the add was successful.
g. From the Alarming menu, select SNMP Trap Destination.
h. Click Add.
i. Complete the appropriate fields. For more information about completing each field, see the SNMP Trap Destination setup in the task Configuring serviceability settings on MAS#1 on page 58.
j. Click Save.
● If you selected Internet alarming:
a. Click Save on the Configure Alarms page.
b. From the Alarming menu, select HTTPS Servers.
c. On the Administer HTTP Proxy Servers page:
- If Internet alarming is not using proxy servers, verify the default addresses in both Destination fields.
- If the enterprise network configuration does not pass HTTP, then set Internal alarming to use proxy servers. From the "Enable Customer HTTPS Proxy Servers" drop-down menu, select Enabled and then complete both Proxy Server fields.
d. Click Save.

Setting up alarming on the MSS
Issue 1.0 June 2009 137
Avaya - Proprietary. Use pursuant to the terms of your signed agreement or Avaya policy.
Testing alarming origination For alarming setups, test the alarm origination to verify that alarms are logged correctly and are sent to the correct destination.
Note:Note: This test requires the receiving system, either Modem Dialout, SNMP, or Internet,
to be set up by the appropriate party and ready to receive alarms.
For more information about setting up SNMP alarming at a site, obtain "Administering SNMP on the MSS;" see Downloading user documentation on page 12. Do additional SNMP administration beyond the steps in this installation guide after the Modular Messaging system is set up and running.
To test the alarm origination:
1. From the Diagnostics menu, click Alarm Origination.
The system displays the Test Alarm Origination page.
2. Click Run Test. 3. If the alarm origination test must use the modem, log off as quickly as possible.
4. Wait for five minutes for the test alarm to be acknowledged and resolved.
5. Access the Alarm Log. From the Logs menu, click Alarm.
6. On the Alarm Log page, click Display to determine if the minor alarm VM type ALARM_ORIG is still active. If the alarm is resolved before 30 minutes has elapsed, consider that the alarm is working. If during the 30 minutes the alarm is still active:
a. Click Back on the Web browser.
b. Wait a few more minutes, and then click Display again.
7. When the active alarm no longer appears in the alarm list:
a. On the Alarm Log page, set the Alarm Type to Resolve.
b. Click Display.
c. Locate the VM alarm type ALARM_ORIG at alarm level MIN. Verify that the alarm was acknowledged with a Y in the Ack column, and resolved.
8. If the test fails, that means the alarm only cleared after a reboot or after 30 minutes had elapsed (the MAINT process clears the alarm automatically after 30 minutes), verify that the remote service center is connected. Correct any settings, and test the alarm.

Setting up support and making system backups
138 Avaya Modular Messaging for Avaya MSS Release 5.1 Installation and Upgrades
Using the DCT to analyze the current configurationAs a final installation task, you must ensure that the DCT data file for the Avaya Modular Messaging system is complete and current. To do this, you must collect information from each MAS in the system.
To collect current data from each MAS and the Supplementary server, if present:
1. Replace the MMDCT.exe file found in C:\Program Files\Avaya Modular Messaging\Install\MISCM with the most current version (see Downloading software updates on page 10). This must be done on each MAS and Supplementary server.
2. Verify that the Modular Messaging system is working correctly and all servers are running.
3. Switch the monitor to show the server to analyze.
! CAUTION:CAUTION: For a new installation, start with MAS#1 and analyze MASs in order: MAS#1 and
then MAS#2, and so on.
4. Insert a storage device into the server.
5. In Windows Explorer, navigate to the directory that contains the DCT program. You can find a copy of the DCT executable file in C:\Program Files\Avaya Modular Messaging\Install\MISCM.
6. Double-click the MMDCT.exe file.
7. In the Avaya Modular Messaging Data Collection Tool window, select Analyze existing system, and then click OK.
8. When the program asks if you want to use an existing DCT file, click Yes.
9. In the Open window, click the drop-down list next to Look in.
10. Complete one of the following:
● For MAS#1, navigate to the location of the site’s original DCT data file.
● For subsequent MASs, navigate to the location of the most current DCT data file on the storage device, such as sitefile-analyzed.mmdct.
! CAUTION:CAUTION: For a multiple-MAS system, you must open the same data file that you saved
from the previous MAS. Otherwise, the data from the previous server is lost. Do not manually enter the data for subsequent servers! Use the DCT to analyze each server in turn. The tool collects some data that does not appear on the DCT screens.
11. Double-click the appropriate data file.
Using the DCT to analyze the current configuration
Issue 1.0 June 2009 139
Avaya - Proprietary. Use pursuant to the terms of your signed agreement or Avaya policy.
12. On the MM System Analysis screen, use the MAS Information is being collected from drop-down menu to select the appropriate MAS, such as First MAS (#1) or Second MAS (#2).
13. Click Start.The system displays the data collection process in the window. After the information is collected successfully, which could take several minutes, the system displays a confirmation window.
14. Click OK.
15. On the Avaya Modular Messaging Data Collection Tool window, click Save.
16. In the Save As window, navigate to the storage device.
17. Complete one of the following:
● For MAS#1, type the name of the date file in the File name field. Use a new filename to indicate that this is the most current data file. For example, you might type sitefile-analyzed.
● For subsequent MASs, select the same file you saved for MAS#1, such as sitefile-analyzed, in the File name field.
18. Click Save. For subsequent MASs, then click Yes when asked if you want to replace this file.
19. On the Avaya Modular Messaging Data Collection Tool window, click Cancel. 20. Click No when asked to save the current configuration (you already saved the file above).
21. Double-click the icon on the task bar to Safely Remove Hardware and follow the prompts to safely remove the storage device.
22. Repeat this task for each subsequent MAS.
23. When you have analyzed all MASs and the Supplementary server:
a. Get the original DCT file.
b. Get the analyzed DCT file.
c. In the analyzed DCT file, enter the values in fields that are not populated by the analyzed DCT file with the data from the original DCT file. Use DCT tool to enter the information.
Setting up support and making system backups
140 Avaya Modular Messaging for Avaya MSS Release 5.1 Installation and Upgrades
Copying the DCT data file for backup
Once all MAS servers in the voice mail domain have been analyzed, copy the most recent version of the DCT data file from the storage device to the MSS. This is to keep a backup of the data.
To copy the most current DCT data file from the storage device:
1. Insert the storage device into an MAS.
2. Log on to the same account that you used on the Windows Domain Setup page for Placing the MSS in a Windows domain on page 110:
● In a private Windows domain, use the domain administrator account name, such as dom-admin.
● In a corporate Windows domain, use the customer account name, such as custacct.
3. Copy the updated DCT data file from the storage device to \\mss1\masbackup location on the MSS.
a. Click Start > Run. The system opens Run window.
b. Enter \\mss1\masbackup and click OK. The system opens the Windows Explorer window.
c. Copy the DCT data file to the \\mss1\masbackup directory.
4. Remove the storage device from an MAS.

Backing up the system
Issue 1.0 June 2009 141
Avaya - Proprietary. Use pursuant to the terms of your signed agreement or Avaya policy.
Backing up the systemAs a final installation task, back up the information that you administered on the system. Do an attended (manual) backup to save your work and to verify the backup function.
Running backups on each MASDo this task on each MAS.
You must send MAS backup data to the MSS, so it can be backed up with the rest of the system data on DVD-RAM.
To back up the data on each MAS:
1. Switch the monitor to show MAS#1. For more information, see Displaying an MAS from the console on page 42.
2. Log on to the same account that you used on the Windows Domain Setup page for Placing the MSS in a Windows domain on page 110:
● In a private Windows domain, use the domain administrator account name, such as dom-admin.
● In a corporate Windows domain, use the customer account name, such as custacct.
3. To view the scheduled backup program for the MAS, double-click the Scheduled Tasks icon on the desktop.
4. In the Scheduled Tasks window, run an attended backup on this MAS:
a. Right-click the task named MAS Backup and select Run.
The system immediately starts to back up the data on this MAS to the MSS. The Status column shows Running. When the backup is complete, the Status column goes blank. This process takes about a minute.
When the backup completes successfully, continue with Step 5.

Setting up support and making system backups
142 Avaya Modular Messaging for Avaya MSS Release 5.1 Installation and Upgrades
b. Optional: To verify if the backup process is successful:
1. Double-click the Monitor icon on the desktop.
2. In the left pane, expand Event Viewer (Local), and then click Application.
3. Refresh the window display periodically until you see the following events.
- ntbackup 8009, End Verify: The operation was successfully completed.
- ntbackup 8019, End Operation: The operation was successfully completed.
Note:Note: On MAS#1, the event viewer shows two sets of backup events because the
backup program generates two files on the MSS: MYMAS#1MASSingle.bkf and MYMAS#1MASAll.bkf. The process of backup on subsequent MASs generate only the MASAll.bkf file for each MAS, so only one set of backup events is present.
c. If the backup fails to run, verify the account settings:
1. Double-click the task MAS Backup to view the properties window.
2. In the MAS Backup window, click the Task tab. Verify that the account in the Run as field is the correct account that has permissions to run backups manually. If the account is incorrect, you can type the correct value now. For more information, see Placing the MSS in a Windows domain on page 110.
3. If you change the account, or if you want to verify the password, click Set password. In the Set Password window, enter and confirm the password for the required account. Click OK.
4. Click OK to close the MAS Backup window.
5. Repeat Step 4-a to run the backup again.
5. Close the Scheduled Tasks window.
6. Repeat this procedure for each MAS in the system.
Backing up the system
Issue 1.0 June 2009 143
Avaya - Proprietary. Use pursuant to the terms of your signed agreement or Avaya policy.
Setting up and running a backup on the MSSAfter you have run an attended backup of each MAS, run an attended backup on the MSS now. Make the first system backup to DVD-RAM.
1. Log on to the MSS server as craft using the appropriate password.
The system displays the Messaging Administration web interface.
2. From the Backup/Restore menu, click Backup.
The system displays the Backup page.
3. Make a backup of the new Release 5.1 system data:
a. Because the system is not yet in service, you do not necessarily have to stop the voice system.
b. Verify that Media Type is set to DVD-RAM.
c. Set all the data fields to back up to Yes.
d. Click Start Backup.
e. If the system prompts you to continue, click Continue.
f. The system estimates the number of DVDs that it requires. Verify that you have the correct number of DVDs available. Click Continue.
g. When the system prompts you to insert the DVD, click Continue.
The system saves the new system configuration to the DVD. Allow about 30 minutes for each DVD.
Note:Note: If you have not inserted a writable DVD, the system displays the following error
message: Wrong media, Please use DVD-RAM media.
h. Follow the prompts on the screen to track and complete the backup process. Scroll to the bottom of the page to see the most recent status messages. The message FULL-MANUAL BACKUP completed successfully indicates that the backup is complete.
4. Consult the customer to decide the time and the method used to run the periodic unattended backups of the system data.
The system supports backups to DVD-RAM or through the customer network using FTP or SFTP. For instructions, obtain "Backing up the MSS;" see Downloading user documentation on page 12. For overview information, see Avaya Modular Messaging Concepts and Planning Guide.
5. When you are finished, log off from the system.

Setting up support and making system backups
144 Avaya Modular Messaging for Avaya MSS Release 5.1 Installation and Upgrades
Completing the installationUse the following steps to complete the installation of a new system:
● Installing the client software on page 144
● Turning over the system on page 145
Installing the client softwareInstall the appropriate client software, which includes the following:
● Modular Messaging Web Client. This software must be on its own server and not on an MAS or a Supplementary server
● Modular Messaging Web Subscriber Options, if installed on a non-MAS server
● Avaya Modular Messaging Notes Client
● Avaya Modular Messaging Outlook Client, Avaya Modular Messaging Outlook Restricted Client, Subscriber Options.
Note:Note: The Subscriber Options components are automatically installed on the MAS
as part of Release 5.1. Do not manually install or delete any MM Clients, including Subscriber Options, on any MAS. For more information, see the Avaya Modular Messaging Subscriber Options User Guide and see Downloading configuration notes on page 11.

Completing the installation
Issue 1.0 June 2009 145
Avaya - Proprietary. Use pursuant to the terms of your signed agreement or Avaya policy.
Turning over the systemThe system is now considered ready for handoff to the customer. Complete the following steps as part of the handoff procedure.
1. Make a copy of the original DCT data file used to configure the new system and the analyzed DCT data file created at the end of the installation.
2. Distribute the copies of DCT data files to the following:
● Customer
● Project planner
● Organization that remotely supports the system
● Appropriate technical support group
3. Delete the data files from your storage device for security purposes.
4. Advise the customer about the initial administration that was completed. The customer can customize the following:
a. The feature parameters in the Voice Mail System Configuration (VMSC) program. For more information, see Configuring the voice mail system on page 53.
b. The method used for automatic (scheduled) system backups. For example, customers might want to implement FTP backup over the LAN instead of using DVD-RAM.
c. The classes of service to use for subscribers might need to be updated or expanded. For more information, see Setting up a cos for test subscribers on page 113.
5. Advise the customer about the ongoing administration that is required, such as customizing parameters, installing client packages, and maintaining the system. For more information, direct the customer to Downloading user documentation on page 12.
Note:Note: The system is set up to send alarm information and receive incoming technical
support calls. If the customer does not want this service, suppress alarm notification. To suppress the alarm notification, select Suppress alarm notifications on the Serviceability page, in the Voice Mail System Configuration. For more information, see Avaya Modular Messaging MAS Administration Guide.
Setting up support and making system backups
146 Avaya Modular Messaging for Avaya MSS Release 5.1 Installation and Upgrades

Issue 1.0 June 2009 147
Avaya - Proprietary. Use pursuant to the terms of your signed agreement or Avaya policy.
Chapter 8: Upgrading to Modular Messaging Release 5.1 on S3500-family server
This chapter describes how to upgrade MAS or a Supplementary server to Modular Messaging Release 5.1 from:
● Release 5.0 using the Modular Messaging Release 5.1 Upgrade application.
● Release 3.x or Release 4.0 running on S3500 server.
Note:Note: You cannot upgrade from Release 2.0 to Release 5.1 or from S3400 server to
Release 5.1. Migrating to S8730 hardware is the only way to move the Modular Messaging system from:
- Releases earlier than 3.0 to Release 5.1
- S3400 server to Release 5.1
If you are migrating to Modular Messaging Release 5.1 from Release 2.0 or replacing S3400 servers with S8730 servers, see Migrating to Modular Messaging Release 5.1 on S8730-family server on page 205.
If you are moving the Modular Messaging system to the corporate Windows domain, first complete the entire upgrade, then move the system to the corporate Windows domain. For complete information, see Moving to the corporate Windows domain after upgrade on page 192.
If you are changing the switch integration, perform the procedure before or after you complete the upgrade process. For more information on how to change the switch integration, see Changing switch integration on page 185.
Topics in this chapter include:
Upgrading from Release 5.0:
● Upgrading from Release 5.0 to Release 5.1 on page 149
Upgrading from Release 3.x or Release 4.0:
● Planning for the upgrade from Release 3.x or Release 4.0 on page 150
● Performing pre-upgrade tasks on page 154
● Upgrading the MSS from Release 3.x or Release 4.0 on page 170
● Upgrading an MAS from Release 3.x or Release 4.0 on page 172
● Completing the upgrade from Release 3.x or Release 4.0 on page 180
● Converting Supplementary server to run a 0 port MAS on the Supplementary server on page 182
Upgrading to Modular Messaging Release 5.1 on S3500-family server
148 Avaya Modular Messaging for Avaya MSS Release 5.1 Installation and Upgrades
● Changing switch integration on page 185
● Moving to the corporate Windows domain after upgrade on page 192

Upgrading from Release 5.0 to Release 5.1
Issue 1.0 June 2009 149
Avaya - Proprietary. Use pursuant to the terms of your signed agreement or Avaya policy.
Upgrading from Release 5.0 to Release 5.1Use the procedures described in this section to upgrade an MAS and MSS that is running Modular Messaging Release 5.0 to Release 5.1.
To upgrade from Modular Messaging Release 5.0 to Release 5.1, you must use the latest Modular Messaging Release 5.1 Upgrade application available at the Avaya Support Web site (http://www.avaya.com/support).
Before you upgrade the Modular Messaging system to Release 5.1, ensure that you meet the following requirements:
● Obtain the latest release notes for the Modular Messaging Release 5.1 Upgrade application and follow the instructions provided in the notes while you upgrade Modular Messaging Release 5.0.
● Do not use the media to complete the upgrade. The procedure to upgrade Release 5.0 to Release 5.1 is different from the procedure you follow to upgrade from Modular Messaging Release 3.x or Release 4.0 to Release 5.1.
Upgrading to Modular Messaging Release 5.1 on S3500-family server
150 Avaya Modular Messaging for Avaya MSS Release 5.1 Installation and Upgrades
Planning for the upgrade from Release 3.x or Release 4.0Consider the requirements to upgrade the Modular Messaging system given in section Upgrade requirements on page 152.
In Modular Messaging Release 5.1, the process that you use to upgrade a Supplementary server is the same process that you use to upgrade the MAS. Upgrade each MAS and then upgrade the Supplementary server.
You must complete the following before you upgrade from Release 3.x or Release 4.0:
1. Assemble and review the required documentation. For more information about how to access these items on the Web site, see Downloading required software and documentation on page 9:
● Data Collection Tool (DCT). You do not need a DCT data file for an upgrade. However, you must analyze the system to create a DCT file before the upgrade to save any important system information for backup.
● Upgrade checklists
● Web Client Installation and Upgrades guide
● Web Subscriber Options Installation and Upgrades guide.
2. Manually check for the following:
a. Ensure that there are no errors or warnings on the system.
b. Resolve major and minor alarms.
c. Verify that backups are completed.
d. Verify that the private IP addresses are in the correct range.
! Important:Important: When you verify the steps e and f, remember that private IP addresses and
corporate IP addresses must not use the same subnet.
e. Verify that private IP addresses are on the same subnet.
f. Verify that corporate IP addresses are on the same subnet.
g. Verify that the private name of the MSS is mss1.
h. Verify that the corporate NetBIOS name is not mss1. For example, the corporate name cannot be mss1.loc.avaya.com.
3. Review product functionality with the customer:
● Differences that are noticeable to the customer.
● Known issues; see Product Support Notices (PSNs) on the Avaya support Web site.
● Rollout plan for new features.

Planning for the upgrade from Release 3.x or Release 4.0
Issue 1.0 June 2009 151
Avaya - Proprietary. Use pursuant to the terms of your signed agreement or Avaya policy.
● Security concerns.
4. Coordinate with MMTAC to provide implementation schedule for Tiered Support.
Upgrading to Modular Messaging Release 5.1 on S3500-family server
152 Avaya Modular Messaging for Avaya MSS Release 5.1 Installation and Upgrades
Upgrade requirementsTo upgrade a Modular Messaging system, you need:
● Avaya Modular Messaging R5.1.—MSS Application disk, MSS OS disk and MAS Application disks. For more information about these disks, see Table 1: Required Modular Messaging software on page 8.
● To install the Modular Messaging system, get the following before you start the upgrade:
a. Planning forms for the system that runs on Release 3.x or the original DCT file for the system that runs on Release 4.0.
b. The latest analyzed DCT file for the system.
● The following information and software from the Avaya Support Web site at http://www.avaya.com/support. For more information about how to access these items on the Web site, see Downloading required software and documentation on page 9.
- The most current copy of the configuration notes for this switch integration.
- The Avaya Modular Messaging MSS Pre-upgrade and Backup Verification Tool. For more information, see Installing the Pre-upgrade and Backup Verification tool on page 157.
- The latest applicable Modular Messaging software updates from the Avaya Support Web site at http://www.avaya.com/support including release notes.
● Print the upgrade checklist from Modular Messaging Release 5.1 upgrade and migration checklists on page 269. Use the checklist to track your progress.

Planning for the upgrade from Release 3.x or Release 4.0
Issue 1.0 June 2009 153
Avaya - Proprietary. Use pursuant to the terms of your signed agreement or Avaya policy.
Switching the monitor to show the correct serverYou must switch the display from one server to another during a system upgrade.
To display the correct server, complete the following steps:
1. Verify that the monitor is showing the MSS.
● For a 2-port KVM switch, the MSS is connected to one of the computer port.
● For an 8-port Belkin KVM switch, the MSS usually is connected to the first computer port on the switch. The port is labeled VGA 01.
2. If the monitor displays a different server, toggle the port to show the MSS.
● To have a 2-port Belkin KVM switch show a different server:
a. Gently press Scroll Lock twice.
The LED on top of the Belkin KVM switch starts to blink.
b. Type the port number on the keyboard. For example, type 1 for port 1.
● To have an 8-port Belkin KVM switch show a different server:
a. Gently press Scroll Lock twice within 2 seconds.
b. Select the server to display using one of the following methods:
- Press the up (or down) arrow key to change to the server connected to a higher (or lower) port number.
- Type the port number using the keyboard. For example, type 1 for port 1.
For complete user and troubleshooting instructions on KVM switch, see the KVM switch documentation.
Upgrading to Modular Messaging Release 5.1 on S3500-family server
154 Avaya Modular Messaging for Avaya MSS Release 5.1 Installation and Upgrades
Performing pre-upgrade tasksPerform the following tasks before you upgrade the system:
● Preparing for the upgrade on page 154
● Preparing for the upgrade on the MAS on page 156
● Installing the Pre-upgrade and Backup Verification tool on page 157
● Running the Pre-upgrade tool on page 157
● Completing pre-upgrade tasks on page 159
Preparing for the upgrade
You must complete the following tasks before you upgrade the system.
1. Download any Avaya software updates required to bring the Avaya Modular Messaging software up-to-date after an upgrade. Download this software to a storage device. See Downloading software updates on page 10.
2. As a precaution (this is information you might need later if you need to recover), verify and record the key settings on the MSS and MAS:
a. Record non-default port groups.
b. Record RAS IP addresses for each MAS.
c. Back up Caller Application files on a separate computer.
d. Record associations for Caller Applications. You will need this for performing a re-association later.
e. Record SNMP trap destination and community details from the Serviceability - Voice Mail Domain window.
3. Obtain and review the configuration notes for any changes, that might be needed regarding board configuration, switch programming, and application configuration. Make any necessary changes as part of the upgrade.
4. Perform this step only if you upgrade from Release 3.0.
a. Verify that the Modular Messaging Release 3.0 system is at least at Service Pack 7 Patch 4, patch MM300704 (which included RFU M7025rf+m (MM300700) and M7025pt+a (MM300704) for the MSS), and installed on both MAS and MSS.
b. If the system is not at the required SP level, you must update the Release 3.0 system. Use the following steps to verify the service pack and patch installed on the MAS:
1. Log on to MAS.
2. Select Start > Programs > Avaya Modular Messaging.

Performing pre-upgrade tasks
Issue 1.0 June 2009 155
Avaya - Proprietary. Use pursuant to the terms of your signed agreement or Avaya policy.
3. Click the About Modular Messaging tab.
This identifies the version of Modular Messaging installed.
4. Click the Patches tab.
This identifies which Service Packs and Patches are installed.
c. Verify the RFU level on the MSS:
1. On the Messaging Administration web interface, click Software Management > Messaging Software Display.
5. Perform this step only if you are upgrading from Release 3.1.
a. Verify if the MSS has RFU M7040rf+k from Service Pack 9 installed, as explained in subsequent steps. If RFU M7040rf+k is not on the MSS, skip the following step.
b. To verify RFU level on the MSS, on the Messaging Administration web interface, click Software Management > Messaging Software Display.
c. If RFU M7040rf+k is installed on the MSS, remove M7040rf+k:
1. On the Messaging Administration web interface, click Software Management > Software Removal.
2. Select M7040rf+k and click Submit.3. On the next page, click Proceed with removal.
6. Perform this step only if you are upgrading from Release 4.0
a. Verify that the Modular Messaging Release 4.0 system is at least at Service Pack 3 (which included RFUs M8017rf+h, A6016rf+g, E6016rf+c and U8017rf+b).
b. If the system is not at the required SP level, update the Release 4.0 system. Use the following steps to verify the service pack and patch installed on the MAS:
1. Log on to MAS.
2. Select Start > Programs > Avaya Modular Messaging.
3. Click the About Modular Messaging tab.
4. This identifies the version of Modular Messaging installed.
5. Click the Patches tab.
This identifies which Service Packs and Patches are installed.
c. Verify the RFU level on the MSS:
1. On the Messaging Administration web interface, click Software Management > Messaging Software Display.
Upgrading to Modular Messaging Release 5.1 on S3500-family server
156 Avaya Modular Messaging for Avaya MSS Release 5.1 Installation and Upgrades
Preparing for the upgrade on the MAS
Complete the following:
1. Switch the monitor to show the correct server; see Switching the monitor to show the correct server on page 153.
2. Verify that all messaging servers and services are running.
3. Verify the DCT data file. A DCT data file is not required for the upgrade; however, analyze the system to create one prior to the upgrade to save important system information for backup. For more information, see Using the DCT to analyze the current configuration on page 138.

Performing pre-upgrade tasks
Issue 1.0 June 2009 157
Avaya - Proprietary. Use pursuant to the terms of your signed agreement or Avaya policy.
Installing the Pre-upgrade and Backup Verification tool
The Pre-upgrade and Backup Verification tools are packaged together. You install the tools simultaneously. However, you do not run them at the same time. For information on running the tools, see Running the Pre-upgrade tool on page 157 and Running the Backup Verification tool on page 168.
To install the Pre-upgrade and Backup Verification Tool on MSS:
1. From the Avaya Support Web site, click Modular Messaging and then click Installation, Migrations, Upgrades and Configurations.
2. Download the Pre-upgrade and Backup Verification Tool and copy it to a disk.
You cannot copy the file in any sub folders on that disk.
3. At the prompt on the MSS you are upgrading, login as either tsc, craft, or dadmin.
The server displays the Messaging Administration main menu.
4. From the main menu, click Utilities > Software Management > Software Installation.
5. Insert the disk that contains Pre-upgrade and Backup Verification tool.
6. From the Software Installation menu, click CD.
7. On the screen that appears, click Continue this operation without current system backup.
This installation does not affect the service.
8. On the screen that appears, check pubvt. 9. Click Install selected packages.
The installation begins and takes about one minute. You must see a message that the install completed successfully.
10. Click Return to Main.
Running the Pre-upgrade tool
A member of the installation team from Avaya or the business partner uses the Pre-upgrade tool to identify potential pitfalls and to help plan for the upgrade. This tool produces a report that includes:
● The expected number of disks necessary for a complete backup, including all data categories.
● The expected duration of the upgrade.
● An indication of whether the MAS backup files on the MSS are current (or when the MAS last performed a backup of its data to the MSS).
● An analysis of the active alarms and their effect upon the upgrade.
Running the pre-upgrade tool does not affect your service. Run the Pre-upgrade tool twice:
Upgrading to Modular Messaging Release 5.1 on S3500-family server
158 Avaya Modular Messaging for Avaya MSS Release 5.1 Installation and Upgrades
● First time two or three weeks before the upgrade.
● Second time the day of the upgrade:
Do the following to run the pre-upgrade tool:
1. At the MSS prompt, log in as either tsc, craft, or dadmin.
2. From the Messaging Administration main menu, click Utilities > Pre-Upgrade Information.
The Show Last Summary button only appears if someone has run the tool before. Click Show Last Summary to view the previous summary information.
3. Click Start to begin the pre-upgrade tool.
The tool takes about two minutes to run and you get the output every 30 seconds to let you know that the tool is still running. If needed, click Abort to stop the tool from running.
4. Review the output information from the tool.
Ideally, there will not be any errors and warnings and you can proceed with the upgrade.
5. If you find any errors or warnings, you must resolve them before you continue with the upgrade.
Performing pre-upgrade tasks
Issue 1.0 June 2009 159
Avaya - Proprietary. Use pursuant to the terms of your signed agreement or Avaya policy.
Completing pre-upgrade tasks
Complete the following tasks before you start upgrade to Release 5.1:
1. If not running, start the MSS.
2. Using the latest DCT file or planning form (if you upgrade from Release 3.x), verify the key settings on the MSS and MAS that includes:
● Switch integration settings
● Port board settings and extensions
● Domain information
● Basic system setup
● SNMP trap destination and community details from the Serviceability - Voice Mail Domain window
3. On the Messaging Administration web interface, complete the following:
a. Under the Alarming menu, click Alarming Configuration.
b. The system opens Configure Alarms page.
c. In the Alarm Suppression field, click ACTIVE.
4. On the MAS, complete the following steps to record all Personal Operator Schedules. You need this information to verify the schedules following the upgrade:
a. Click Start > Programs > Avaya Modular Messaging > Voice Mail System Configuration.
b. Under the voice mail domain name, double-click Telephone User Interface.
c. Select the Personal Operator Schedules tab.
d. Click each schedule listed in the Schedules box and record the times set for each schedule.
5. On the MAS, disable alarms:
a. Click Start > Programs > Avaya Modular Messaging > Voice Mail System Configuration.
b. Under the voice mail domain name, double-click Serviceability.
c. On the Serviceability page, on the General tab, select Suppress alarm notifications.
d. Close all windows.
6. On each MAS, record the IP addresses for the MAS modems in the remote access service (RAS) group. You must manually re-enter the RAS IP addresses.
7. If the site has Caller Applications, ensure that copies of all editable files are on a separate computer, not the MAS. The data restoration procedure restores only the deployed Caller Applications. The deployed version is not editable; always use the administrator version. Ensure that all editable Caller Applications scripts are in a separate working folder before
Upgrading to Modular Messaging Release 5.1 on S3500-family server
160 Avaya Modular Messaging for Avaya MSS Release 5.1 Installation and Upgrades
the upgrade, such as on the administrator personal computer. Use the Caller Applications editor to see a list of the deployed applications.
8. Review the configuration notes for any changes that might be needed about the board configuration, switch programming, and application configuration. Make any necessary changes as part of the upgrade.
Using the DCT to collect information from an MASUse the Avaya Modular Messaging Data Collection Tool (DCT) to collect information from each MAS and Supplementary server. The tool copies the server system information into a data file, allowing for easy reconfiguration of the servers.
Always check the Avaya Support Web site at http://www.avaya.com/support to obtain the most recent version of the DCT program. Download the mmdct.exe file to a storage device and use it instead of the one on the applications DVD.
Collecting DCT data
Use the DCT to collect the system data:
1. Run a DCT analyze on the system, see Using the DCT to analyze the current configuration on page 138.
2. Proceed with Verifying DCT data on page 160.
Verifying DCT data
After analyzing the last MAS to be upgraded, the Avaya Modular Messaging Data Collection Tool (DCT) displays the results of the last analysis. The DCT collects most of the system information. However, you must enter some of the data manually, and verify the information as described in this section.
! Important:Important: You must verify the data in the analyzed DCT file only after you have analyzed all
MASs and Supplementary servers in your MM System.
For more information about completing the DCT screens, click the Help button in the Avaya Modular Messaging Data Collection Tool window. You can also use the printed document, Avaya Modular Messaging Data Collection Tool Online Help; see Downloading user documentation on page 12.

Performing pre-upgrade tasks
Issue 1.0 June 2009 161
Avaya - Proprietary. Use pursuant to the terms of your signed agreement or Avaya policy.
Do not change data that is populated by the DCT.
! Important:Important: If the DCT left pane shows a red X for an item, the data is incomplete or incorrect
on that screen. Click each flagged item and correct the problem before you continue. Information must be complete and valid to continue with the upgrade. If you cannot fix a bad entry, do not continue with the upgrade.
1. From the DCT window, on the Customer details screen:
a. Complete all fields on this screen.
b. Click Next. 2. Verify the settings on the Regional settings screen. Click Next. 3. Verify that the message store is MSS with Avaya MAS servers. Click Next. 4. On the Voice Mail Domain screen:
a. Verify the name for the voice mail domain (VMD).
b. Verify the number of MASs in the voice mail domain.
c. Click Next. 5. Verify the corporate network setting. Click Next. 6. On the Corporate MM server networking details screen:
a. Verify the server names and other settings, depending on the connection type. If necessary, fill in the IP address and the Full computer name fields.
The DCT updates this information with each MAS that it analyzes.
b. Click Next. 7. On the Corporate network details screen:
a. Verify the domain name server (DNS), corporate default gateway, and WINS values. If the WINS field shows 127.0.0.0, change it to the correct value.
b. Click Next. 8. On the Private network screen, verify that all the settings are correct. Click Next. 9. On the Exchange message store screen, click Next.
10. On the Domino message store screen, click Next. 11. On the MSS message store screen, verify that the information matches with your configuration.
For more information, see Avaya Modular Messaging Data Collection Tool Online Help.
12. Verify the MSS trusted server passwords are populated.
13. Click Next.14. On the MAS accounts and passwords screen:
a. Enter the correct logon name for each MAS administration account.
Upgrading to Modular Messaging Release 5.1 on S3500-family server
162 Avaya Modular Messaging for Avaya MSS Release 5.1 Installation and Upgrades
b. Enter the password for each account. By design, the DCT tool does not automatically insert passwords.
c. Click Next. 15. On the Logon accounts and passwords screen:
a. Enter the correct logon name and password for the technical support account and the customer administration account. The names and passwords must comply with the security standards.
b. Click Next. 16. On the MAS service account screen, verify that Run MAS services using LocalSystem is
selected. Click Next. 17. On the TTS and announcements screen, click Next. 18. On the MM service selection screen:
a. Verify that the correct services are selected for each server. The DCT updates this information with each MAS that it analyzes.
b. To activate the Web Subscriber Options (WSO) application on an MAS, click the appropriate column.
You can activate Web Subscriber Options only once per voice mail domain.
c. Click Next. 19. On the Switch Integration screen, do not change the settings. Click Next. 20. After you have opened each DCT screen and cleared any red-flagged items, the Cancel
button changes to a Complete button. After you have entered and verified all required data, click Complete. The system displays a Save window. Save the .mmdct data file to a storage device.
21. After you save the file, the Data Collection Tool window closes.
22. Remove the storage device from the server to prevent any damage to the data file.
23. Continue with Busying out ports on each MAS on page 163.
Performing pre-upgrade tasks
Issue 1.0 June 2009 163
Avaya - Proprietary. Use pursuant to the terms of your signed agreement or Avaya policy.
Busying out ports on each MAS
Modular Messaging system should not take any calls during the upgrade. To achieve this, busyout the ports on the each MAS and on the switch before you start the upgrade. Otherwise, messages spool on the MAS, and delay the upgrade.
Busyout the ports on each server and on the switch before you upgrade that server.
To busyout the ports on each MAS:
1. The PBX administrator must use the procedures appropriate for this PBX to busyout the ports for the MAS being upgraded. Depending on the switch integration, the administrator might be able to temporarily reroute calls to other MASs. Otherwise, callers into the system might hear ring-no answer or a busy signal.
2. Switch the monitor to show the correct MAS. For more information, see Switching the monitor to show the correct server on page 153.
3. Unplug all modems to the Modular Messaging system. Otherwise, the system sends unnecessary alarms to the remote technical support group throughout the upgrade procedure.
4. Use the Port Monitor to disable ports on each MAS:
a. Click Start > Programs > Avaya Modular Messaging > Port Monitor. The system opens the Port Monitor window.
b. Select all ports in the list: Click on the first port, hold down the Shift key, and click on the last port.
c. Right-click the port list and select Disable.
d. Verify that the status of all ports is Disabled.
e. Close the Port Monitor window.
5. Proceed with Checking the spool folder on each MAS on page 164.

Upgrading to Modular Messaging Release 5.1 on S3500-family server
164 Avaya Modular Messaging for Avaya MSS Release 5.1 Installation and Upgrades
Checking the spool folder on each MASBefore you upgrade the MAS, verify that any spooled messages are delivered:
1. Switch the monitor to show the applicable MAS.
2. Open Windows Explorer.
3. Navigate to the folder C:\Program Files\Avaya Modular Messaging\Server\Spool
4. Verify that the Spool folder contains no message files.
! CAUTION:CAUTION: If the folder contains spooled messages, wait for the system to deliver them,
which can take awhile.
5. When the Spool folder is empty, you can proceed with upgrading the MASs.
Performing pre-upgrade tasks
Issue 1.0 June 2009 165
Avaya - Proprietary. Use pursuant to the terms of your signed agreement or Avaya policy.
Backing up each MAS You must backup the data on each MAS in the system before you back up the MSS.
To back up all the data on the Modular Messaging system, first send backup data from each MAS to the MSS. The MAS information will be backed up along with the MSS system data on the DVD-RAM disks.
To back up the data on each MAS:
1. Switch the monitor to show the correct MAS. See Switching the monitor to show the correct server on page 153.
2. To view the scheduled backup program for this MAS, double-click the Scheduled Tasks icon on the desktop.
3. In the Scheduled Tasks window, run an attended backup on this MAS:
a. Right-click the backup task that is already set up. This task is named MAS Backup on most systems, but might have a customer-specified name for upgrades. Select Run.
The system backs up the data on this MAS to the MSS. The Status column shows Running. When the backup is complete, the Status column goes blank.
b. To verify the success of the backup:
1. Double-click the Monitor icon on the desktop.
2. In the left pane, expand Event Viewer (Local), and then double-click Application.
3. Refresh the window display periodically until you see the two 8009 ntbackup events.
When the events indicate a successful backup, continue with Step 4.
Note:Note: If the backup fails to run, verify the backup settings:
- Double-click the task MAS Backup to view the properties window.
- In the MAS Backup window, click the Task tab. Verify that the Run as field shows an account that has permissions to run manual backups, such as privdom1\dom-admin. If the account is incorrect, enter the correct value.
- If you change the account, or to verify the password, click Set password. In the Set Password window, enter and confirm the password for the account. Click OK.
- Click OK to close the MAS Backup window.
- Run the backup again.
4. Close the Scheduled Tasks window.
5. Repeat steps 1 - 5 on each MAS in the system.
Upgrading to Modular Messaging Release 5.1 on S3500-family server
166 Avaya Modular Messaging for Avaya MSS Release 5.1 Installation and Upgrades
! CAUTION:CAUTION: If any MAS backup fails to complete, Do not proceed with the upgrade. Contact
your remote support center for assistance.
Backing up the MSSAfter you back up each MAS to the MSS, you then back up all data from the MSS to the DVD:
1. Connect the console to the MSS by switching the KVM.
2. Log on to the MSS server as craft.The system displays the Messaging Administration main menu.
3. Verify the number of subscribers:
a. From the Messaging Administration menu, click Subscriber Management.b. Make a note of the number of subscribers.
4. Stop the messaging service:
a. From the Utilities menu, click Stop Messaging.
The system opens the Stop Messaging Software page.
b. Click Stop.
5. After the system reports that the voice system has completely stopped, begin an attended backup:
a. From the Backup/Restore menu, click Backup.
b. On the Backup page, set all data types to Yes.
c. Verify that Media Type is set to DVD-RAM.
d. Click Save or Start Backup.
e. If the system opens an SSH Authorization window, log in as craft. f. The system warns you to not exit the backup page. Click OK.
6. The system estimates the number of DVDs required. Verify that you have enough DVDs. Press Enter or click Continue.
7. Insert a labeled, writable DVD-RAM into the DVD drive. Press Enter or click Continue.
8. The system saves the new system configuration to the DVD. Allow about 30 minutes for each DVD.
9. Follow the prompts on the screen to track and complete the backup process. Scroll to the bottom of the page to see the most recent status messages. The message FULL-MANUAL BACKUP completed successfully indicates that the backup is complete.
Performing pre-upgrade tasks
Issue 1.0 June 2009 167
Avaya - Proprietary. Use pursuant to the terms of your signed agreement or Avaya policy.
! CAUTION:CAUTION: If the attended backup does not complete successfully, DO NOT proceed with the
upgrade. Contact your remote support center for assistance.
10. After the backup is complete, press the eject button on the front of the DVD-RAM drive, and remove the DVD-RAM backup medium. Change the tab on the DVD-RAM backup to write-protect.
11. Continue with Running the Backup Verification tool on page 168.

Upgrading to Modular Messaging Release 5.1 on S3500-family server
168 Avaya Modular Messaging for Avaya MSS Release 5.1 Installation and Upgrades
Running the Backup Verification toolThe Backup Verification tool examines each disk and verifies if the system's data has a reliable backup. Use this tool after a preupgrade backup, before you proceed with an "irreversible" upgrade. To install the Backup Verification tool, see Installing the Pre-upgrade and Backup Verification tool on page 157.
Running the Backup Verification tool does not affect service. Run the Backup Verification tool on the day of the upgrade:
1. At the MSS prompt, log in as tsc, craft, or dadmin.
The server displays the Messaging Administration main menu.
2. On the main menu, click Utilities > Backup/Restore > Backup Verification Tool. The Show Last Summary button only appears if someone has run the tool once before. Click the button if you want to view the previous summary information.
3. Insert the first DVD into the MSS.
4. On the Backup Verification Tool menu, click Start. 5. The system displays a warning if you verify a backup from a different Modular Messaging
system. Click Yes to proceed or Abort to stop.
Once the Backup Verification tool begins to run, the output displays the percentage of the verification that is complete and what file it is being verified.
6. If you use Netscape, the system might display the Netscape is unable to locate the server localhost error dialog box. This can happen for various reasons, such as if the verification takes longer than 15 minutes.
If the system displays Netscape error dialog box:
a. On the error dialog box, click OK.
b. On your browser, click Reload.
You must reload the page so that the output can continue to display the status of the backup verification.
7. If you abort the Backup Verification tool (by clicking Abort) for whatever reason, when you next try to run the tool do the following:
a. On the Backup Verification Tool menu, click Stop Runaways if the button is available.
Anytime you are starting the Backup Verification tool and the Stop Runaways button appears on the menu, click it.
b. Click Start. When the verification is complete, a validation box appears.
8. Click OK.
The system displays verification output.
Performing pre-upgrade tasks
Issue 1.0 June 2009 169
Avaya - Proprietary. Use pursuant to the terms of your signed agreement or Avaya policy.
9. Review the output for the current DVD:
● A successful backup displays Backup Verification Succeeded with no Errors. If successful, proceed with step 10.
● If the tool detects a bad backup the output log displays: The Following Errors (or Warnings) Were Found in the Backup Set. Return to the MSS main menu and redo the backup.
10. Repeat this procedure for every backup DVD.
11. After you verify that backup of every DVD is successful, return to the Messaging Administration main menu.

Upgrading to Modular Messaging Release 5.1 on S3500-family server
170 Avaya Modular Messaging for Avaya MSS Release 5.1 Installation and Upgrades
Upgrading the MSS from Release 3.x or Release 4.0Perform the following and make sure you install software from both the OS and Application DVDs before you reboot the system:
1. Log on to the MSS as craft; see Logging on to the MSS on page 22.
2. Insert the Modular Messaging R5.1 MSS OS disk into the MSS.
3. From the Messaging Administration main menu, under Software Management, click Software Update > CD/DVD.
4. Click Install the newer software management software.
5. From the status page that appears, click Continue.
6. A warning page may appear saying that you have not backed up your system recently. If this page appears, do one of the following:
● Click Continue without current system backup if you do not want to back up the system.
● Click Cancel to stop the software update, at which time you can perform a system backup. After the backup is complete, repeat this process from the beginning.
7. On the page which lists the upgrade packages, click Install selected packages.
8. If a pop-up window appears, click Continue.
9. On the page which lists the upgrade packages, click Proceed with Installation.
10. On the status page that appears, scroll to the bottom of the page to see the most recent status messages.
11. After the system successfully installs the packages, remove the Modular Messaging R5.1 MSS OS disk.
! Important:Important: Do not reboot now; wait until you have finished with the MSS Application disk as
explained below.
12. Insert the Modular Messaging R5.1 MSS Application disk into the MSS.
13. Click Update software from other media.
14. On the page that appears, click CD/DVD.
15. A warning page may appear saying that you have not backed up your system recently. If this page appears, do one of the following:
● Click Continue without current system backup if you do not want to back up the system.
● Click Cancel to stop the software update, at which time you can perform a system backup. After the backup is complete, repeat this process from the beginning.
Upgrading the MSS from Release 3.x or Release 4.0
Issue 1.0 June 2009 171
Avaya - Proprietary. Use pursuant to the terms of your signed agreement or Avaya policy.
16. On the page that appears, which lists the upgrade packages, click Install selected packages.
17. If a pop-up window appears, click Continue.
18. On the page that appears, which lists the upgrade packages, click Proceed with update.
19. On the status page that appears, scroll to the bottom of the page to see the most recent status messages.
20. After the system successfully installs the packages, remove the Modular Messaging R5.1 MSS Application DVD, and then click Reboot.
Note:Note: After this update, when you log into the console browser you might see a
message about Firefox updates; if the message appears, click Cancel.

Upgrading to Modular Messaging Release 5.1 on S3500-family server
172 Avaya Modular Messaging for Avaya MSS Release 5.1 Installation and Upgrades
Upgrading an MAS from Release 3.x or Release 4.0Upgrading an MAS from Release 3.x or Release 4.0 to Release 5.1 involves performing the following procedures on each MAS. Complete the processes on one before you proceed to the next MAS:
● Logging off all remote logins on page 172
● Upgrading overnight on page 172
● Upgrading RealSpeak on page 172
● Upgrading Dialogic drivers on page 175
● Upgrading the MAS software on page 176
After you complete the upgrade for each MAS, proceed with the procedures in Completing the upgrade from Release 3.x or Release 4.0 on page 180 to complete the upgrade process.
Logging off all remote loginsUse these steps to log off all remote logins:
1. Bring up your Task Manager and select the Users tab.
2. Select remote logins and click Logoff.
Upgrading overnightIf you run the upgrade overnight, use the Voice Mail System Configuration application to disable the tracing database nightly tasks. After you complete the upgrade, enable the tasks again. After you complete the upgrade successfully, you must enable the scheduled tasks again when you perform the procedures in Completing the upgrade from Release 3.x or Release 4.0 on page 180.
If you upgrade from Release 4.0, proceed with instructions outlined in Upgrading Dialogic drivers on page 175.
Upgrading RealSpeakComplete the following tasks only if you are upgrading from Release 3.x.
● Stopping all MM services on page 173
● Uninstalling and re-installing RealSpeak on page 173

Upgrading an MAS from Release 3.x or Release 4.0
Issue 1.0 June 2009 173
Avaya - Proprietary. Use pursuant to the terms of your signed agreement or Avaya policy.
● Starting all MM services on page 175
Stopping all MM services
You need to stop all MM services on each MAS that you upgrade. Perform these steps only if you are upgrading from a Release 3.x system:
1. Make a list of all MM Services running on this MAS, you need this list later.
2. Switch the monitor to show the correct MAS.
3. Stop all Modular Messaging services as follows:
a. Click Start > Run to open the Run window.
b. In the Open field, type the following and press Enter: C:\Avaya_Support\Tools\ServiceControl\StopMMServices.exe
A command window displays the status of the Modular Messaging services shutdown. The script might take several minutes to complete.
Note:Note: This script also stops Intel Dialogic services and some Windows services.
4. Confirm that all Modular Messaging services are stopped:
a. Double-click the Monitor icon on the desktop or from the command prompt, run services.msc.
b. Click Services (Local) in the left pane, if the item is not already selected.
c. If the Monitor window was already open, refresh the screen.
d. In the right pane, scroll down to the list of installed Modular Messaging services. These all start with the abbreviation MM.
e. Verify that the Status column is blank. If any service is not stopped, repeat Steps 3 and 4.
Uninstalling and re-installing RealSpeak
Perform these steps only if you are upgrading from a Release 3.x system:
You must complete the following when performing an upgrade:
1. Log onto the MAS using the Windows Account used to install the original RealSpeak.
For MAS#1, this will be the domain administrator account, and for subsequent MASs this is the local administrator account.
2. Insert the ’Modular Messaging R5.1 MAS Application DVD 2 of 2’ disk into the MAS.
3. From the DVD, run the RealSpeak\uninstallRealspeak.bat file.
4. The MAS should automatically reboot; if it does not, manually reboot the MAS.
Upgrading to Modular Messaging Release 5.1 on S3500-family server
174 Avaya Modular Messaging for Avaya MSS Release 5.1 Installation and Upgrades
5. Log back onto the MAS using the Windows Account used in Step 1.
6. On the MAS, delete the folder: C:\Program Files\ScanSoft.7. From the Modular Messaging R5.1 MAS Application DVD 2 of 2 disk, run the RealSpeak\
installRSEngine.bat file.
8. On the InstallShield Wizard, click Next. 9. Select I accept the terms in the license agreement and click Next.
10. On Custom Setup, keep the default settings and click Next. 11. On RealSpeak Host service, keep the default setting and click Next. 12. On Ready to Install the Program, click Install.
A window shows the installation status.
13. When the installation is complete, click Finish.
14. On the pop-up window, click Yes to restart the system.
15. Log back onto the MAS using the customer account.
16. In the Modular Messaging R5.1 MAS Application DVD 2 of 2 disk, locate and launch the RealSpeak\installRSLangs.bat file to install RealSpeak languages.
The system displays the status of each language installation.
17. Remove the Modular Messaging R5.1 MAS Application DVD 2 of 2 disk.

Upgrading an MAS from Release 3.x or Release 4.0
Issue 1.0 June 2009 175
Avaya - Proprietary. Use pursuant to the terms of your signed agreement or Avaya policy.
Starting all MM services
Restart the MM services and verify that the services are running. Perform these steps only if you are upgrading from a Release 3.x system:
1. Click Start > Run to open the Run window.
2. In the Open field, type the following and press Enter: C:\Avaya_Support\Scripts\serverrecovery.vbs The script takes a few seconds to run. The program sets up all Modular Messaging services correctly.
3. Verify that the Modular Messaging services are set correctly.
Upgrading Dialogic driversComplete this procedure for upgrades from Release 3.x and Release 4.0.
If the MASs use Dialogic port boards or if the MASs have the Dialogic driver installed, complete the following.
1. Log onto the MAS using the customer account.
2. Insert the Modular Messaging R5.1 MAS Application DVD 1 of 2 into the MAS.
3. Uninstall Dialogic drivers:
a. From the DVD, run the Dialogic_Drivers\MMDialogicUnInstall.bat file.
b. On the Question window that prompts for a backup, click No.
c. On the Confirm Uninstall window, click OK.
A window appears that displays the uninstall status.
d. On the Maintenance Complete window, select Yes, I want to restart my computer now and then click Finish.
4. Log onto the MAS using the customer account.
The system runs the Clean-up Utility automatically.
5. On the Hardware Update Wizard, click Cancel. 6. Reinstall Dialogic drivers:
a. From the DVD, run the Dialogic_Drivers\MMDialogicUpgrade.bat file.
b. On the Dialogic(R) System Release window, click Next. c. On the Customer Information window, keep the default names and click Next. d. On the Choose Destination Location window, keep the default location and click Next. e. On the Select Features window, keep the default selection(s) and click Next.

Upgrading to Modular Messaging Release 5.1 on S3500-family server
176 Avaya Modular Messaging for Avaya MSS Release 5.1 Installation and Upgrades
f. On the Question window, click Yes.
g. If a warning window about Java appears, click OK.
h. On the Select Program Folder window, keep the default folder and click Next. i. On the Start Copying Files window, click Next.
The Setup Status window displays the installation status. After the Dialogic files install, a Found New Hardware window appears.
j. Select No, not this time, and click Next. k. Select Install the software automatically, and click Next. l. If an unsigned driver dialog box appears, click Yes.
m. After the board is set up, click Finish.
n. Repeat this for all Dialogic boards installed on this MAS.
o. On the Setup Complete window, select to restart your computer at this time and click Finish.
7. Log on to the MAS using the customer account.
8. From the DVD, run the Dialogic_Drivers\mm_install\SetDialogicSettings.exe file. This restores the Dialogic configuration for your MAS.
9. Start the Dialogic drivers:
a. Click Start > Programs > Intel Dialogic System Release > Configuration Manager - DCM.
b. The Intel Dialogic product Configuration Manager window opens.
c. From the Intel Dialogic product Configuration Manager window, on the button bar, click the green > (Start) button.
d. Wait for the devices to start and the installed boards to show a green light.
e. Close the DCM window.
Upgrading the MAS softwareThe following steps explain how to upgrade the MAS software.
Note:Note: Remote Desktop updates are not supported.
It is important to perform the tasks in the following order:
1. Log onto the MAS using the customer account.
2. Verify that MM Service Connector is set to Automatic.
3. Ensure that all Windows applications are closed.

Upgrading an MAS from Release 3.x or Release 4.0
Issue 1.0 June 2009 177
Avaya - Proprietary. Use pursuant to the terms of your signed agreement or Avaya policy.
4. Close all monitoring tools, such as the port monitor.
5. Insert the ’Avaya Modular Messaging R5.1 MAS Application DVD 1 of 2’ disk.
6. From the DVD, run Install\setup.exe and complete the following:
a. Verify that Select Configuration lists Avaya MSS.
b. Make sure that you select the Enable Windows Installer logging check box in the lower left-hand corner. Select the check box if it is not already selected.
c. Make sure that you select the MM Configuration Tools check box.
d. Expand the prompts and select any prompts that are not already selected.
e. Click Install. f. On the System Upgrade window, click Run System Upgrade.
g. When the system prompts you, on the Installation Wizard window, click Restart. The system restarts.
h. Log on using the customer account.
i. If any patches exists on the system:
1. The system displays a window that lists the patches to be uninstalled. Follow the prompts.
2. Patch uninstaller may require server restarts. If the system prompts you, restart the server.
3. If the server restarts, the MM Installation wizard automatically launches. If it does not, then manually run Install\setup.exe.
4. Return to Step a to verify the configuration settings.
The system upgrades the Modular Messaging software components. As the components window shows which component is installing it pauses on Avaya SPIRIT Agent for several minutes. This is an expected behavior.
j. Restart the server when prompted.
7. When the server starts, log in to the server using the customer account.
The MM Configuration Wizard runs automatically, displaying the Service configuration window.
8. Follow the installation Configuration Wizard prompts.
9. When complete, click Finish.
10. Verify that all the appropriate Modular Messaging services are enabled on an MAS. For the list of services that are to be enabled on each MAS, see Enabling Modular Messaging services in a VMD on page 78.
11. Install the latest Avaya Service Pack (SP). For more information, see Installing software updates on page 179. The patch install notes will be in the patch distribution folder along with the patch. The system restarts Modular Messaging services automatically.
Upgrading to Modular Messaging Release 5.1 on S3500-family server
178 Avaya Modular Messaging for Avaya MSS Release 5.1 Installation and Upgrades
12. You must obtain a new RFA license for your upgraded system, which includes setting up 12 TTS sessions per MAS. For instructions, see Obtaining and installing a license on MAS#1 on page 60.
13. Perform the following steps if you are upgrading from Release 3.x.
a. Enter the product ID for the current MAS; see Entering Product ID for current MAS on page 63.
b. Configure the SNMP trap destination and community details using the Serviceability - Voice Mail Domain window of the Voice Mail System Configuration program. Enter the SNMP trap destination and community information you recorded before beginning the upgrade. For additional information, see Configuring serviceability settings on MAS#1 on page 58.
c. Configure the MM Audit Service; see Configuring MM Audit Service on page 67.
d. Configure the MM Fax Service:
- Run C:\Avaya_Support\Utils\FaxSenderEnable.exe on the machine that hosts the MM Fax Sender service.
- Restart the Microsoft Fax Service.
- Complete all of the steps in Configuring the MM Fax Sender server on page 68.
14. Do the following as appropriate:
a. If you have additional MASs or Supplementary server to upgrade, continue with Upgrading an MAS from Release 3.x or Release 4.0 on page 172.
b. Proceed with Completing the upgrade on page 180.

Upgrading an MAS from Release 3.x or Release 4.0
Issue 1.0 June 2009 179
Avaya - Proprietary. Use pursuant to the terms of your signed agreement or Avaya policy.
Installing software updatesThe Modular Messaging Release 5.1 software is the most current version available at the time of shipping. However, you need to update the software after an upgrade to include the latest changes. Avaya provides these updates in the form of an Avaya Service Pack (SP) or a software patch.
Complete the following steps to update Modular Messaging software:
1. Locate any relevant Avaya software updates on the Avaya Support Web site at http://www.avaya.com/support. For complete steps, see Getting software updates from the Web on page 326.
Note:Note: If you followed the procedure for Downloading software updates on page 10, you
already downloaded any required software updates.
2. Follow the instructions provided in Updating Modular Messaging software on page 325 to update the system with the latest changes before you do acceptance testing.

Upgrading to Modular Messaging Release 5.1 on S3500-family server
180 Avaya Modular Messaging for Avaya MSS Release 5.1 Installation and Upgrades
Completing the upgrade from Release 3.x or Release 4.0This section describes the topics required to complete the upgrade of Modular Messaging system to Release 5.1.
Completing the upgrade
Note:Note: You do not need to upgrade the offline access (OLA) server, as the server does
not run any Modular Messaging services.
After you complete the upgrade of all MASs and the Supplementary server, if present (Upgrading an MAS from Release 3.x or Release 4.0 on page 172), perform the following procedures:
1. Do the acceptance tests that are appropriate for each server; see Performing acceptance tests for a new installation on page 119. For example:
a. For an MAS, test to check if the server can send and receive calls.
b. For all servers, verify that the services run on the appropriate server.
2. Run a DCT analyze on the system; see Using the DCT to analyze the current configuration on page 138.
3. Back up the DCT data files; see Copying the DCT data file for backup on page 140.
4. Only when you upgrade from Release 3.0, verify all Personal Operator Schedules:
a. Click Start > Programs > Avaya Modular Messaging > Voice Mail System Configuration.
b. Under the voice mail domain name, double-click Telephone User Interface.
c. Select the Personal Operator Schedules tab.
d. Verify that all Personal Operator Schedules recorded before the upgrade are included in the list. If a schedule is missing, complete the following steps:
1. Click the Add button
2. In the Enter Personal Operator Schedule Name dialog box in the Schedule Name field, enter the name of the missing schedule.
3. Click OK to return to the Personal Operator Schedules tab.
4. In the schedule grid, enter the schedule times.
e. Click each Personal Operator Schedule in the schedule list and verify that the schedule times correspond to the times recorded before the upgrade. Correct any discrepancies in the schedule grid.

Completing the upgrade from Release 3.x or Release 4.0
Issue 1.0 June 2009 181
Avaya - Proprietary. Use pursuant to the terms of your signed agreement or Avaya policy.
f. Close all windows.
5. Review event and alarm logs and resolve any problems; obtain the Avaya Modular Messaging MAS Administration Guide; see Downloading user documentation on page 12.
6. Run backups on each MAS; see Backing up each MAS on page 165. You DO NOT need to remove the old backup files from the MSS.
7. Run a backup on the MSS; see Backing up the MSS on page 166. If using DVD-RAM, use a separate DVD-RAM disk to avoid overwriting the backup data from the previous release that is saved during the pre-upgrade steps.
8. Perform this step only if you are upgrading from Release 3.x. Due to a change in file names, older logs might remain on the system. Remove older logs from c:\avaya_support\logs folder on each MAS and delete any logs that are older than the upgrade’s start time.
9. On the Messaging Administration web interface, complete the following:
a. Under the Alarming menu, click Alarming Configuration.
The system opens Configure Alarms page.
b. In the Alarm Suppression field, click INACTIVE.
10. On the MAS, enable alarms:
a. Click Start > Programs > Avaya Modular Messaging > Voice Mail System Configuration.
b. Under the voice mail domain name, double-click Serviceability.
c. On the Serviceability page, on the General tab, clear Suppress alarm notifications check box, to turn on the alarm notifications options.
d. Click Save to save the changes.
e. Close all windows.
This completes the upgrade of Modular Messaging system to Release 5.1.
Upgrading to Modular Messaging Release 5.1 on S3500-family server
182 Avaya Modular Messaging for Avaya MSS Release 5.1 Installation and Upgrades
Converting Supplementary server to run a 0 port MAS on the Supplementary server
This section is optional, you only need to complete this procedure if your Modular Messaging support organization has advised you to do so.
Use the following steps on the Supplementary server to convert the Supplementary server to run a 0 port MAS on the Supplementary server:
Note:Note: These steps only need to be completed on supplementary severs, which have
been upgraded to Modular Messaging Release 5.1.
1. Run the registry file, C:\Avaya_Support\Registry_Keys\convertsupp_2_0portmas.reg.
2. Under the Messaging Administration of the Messaging Administration web interface, click Trusted Servers. The system displays Manage Trusted Servers page. Do one of the following:
● Change the trusted server for the Supplementary server using the following steps:
a. Highlight the Trusted Server with a service name of Supplementary Server. Click Edit the Selected Trusted Server.
The server displays the Edit Trusted Server page.
b. In the Special Type field, click Messaging Application Server from the drop-down list.
c. Click Save.
● Create the trusted server for the Supplementary server using the following steps:
a. Click Add a New Trusted Server.The server displays the Add Trusted Server page.
b. In the Special Type field, click Messaging Application Server from the drop-down list.
c. Click Save.
3. Install MMFEDB.
a. Copy all the contents from <cd drive>\Install\System Upgrade\SQL2005EXP of the ’Avaya Modular Messaging R5.1 MAS Application DVD 1 of 2’ disk to the C:\MM_SYSTEM_UPGRADE directory of the MAS.
b. If the system prompts you, select to overwrite all existing files.
c. Double-click the C:\MM_SYSTEM_UPGRADE\setup.bat file.
d. Click Option 1 to install MMFEDB.

Converting Supplementary server to run a 0 port MAS on the Supplementary server
Issue 1.0 June 2009 183
Avaya - Proprietary. Use pursuant to the terms of your signed agreement or Avaya policy.
e. Wait for MMFEDB install to complete.
Installation process takes some time. The system opens and closes various windows installation dialogs boxes automatically. Do not make any manual intervention.
4. Set the MM MAS service to Automatic. Do not start the service at this time.
5. Ensure that the MM Service Connector service is set to Automatic. Do not start the service at this time.
6. Ensure that the MM Fault Monitor service is set to Automatic. Do not start the service at this time.
7. Ensure that the following MM Alarming Services are set to Automatic:
● MM Alarming Server
● MM Event Monitor Server
● MM Performance Monitor Server
● MM Process Monitor Server
Do not start the services at this time.
8. Locate and run gvconfig.exe:
a. Locate and run C:\Program Files\Avaya Modular Messaging\VServer\Config\gvconfig.exe file.
b. When prompted, enter the name of the Peer Message Storage Server for your system.
c. Click Next.d. When prompted, select Subsequent Server in an existing VMD
e. Click Next.f. Enter the LDAP Security Password for your Modular Messaging system.
g. Click Next.h. Click the name of your MM VMD from the drop down list.
i. Click Next.j. If the system prompts you to install missing prompts, insert the ’Avaya Modular
Messaging R5.1 MAS Application DVD 1 of 2’ disk in to the Supplementary server DVD drive.
k. Click Next.l. Select the Skip Caller Application deployment check box.
m. Click Next.n. Click Next on User Information screen.
This User Information screen remains displayed and disabled while user information is populated on the server. The time taken to populate the user information depends on the number of users supported by the MM System.
Upgrading to Modular Messaging Release 5.1 on S3500-family server
184 Avaya Modular Messaging for Avaya MSS Release 5.1 Installation and Upgrades
o. Click Finish.
9. Configure MAS Host Setup on the Supplementary server.
a. On the Messaging Administration web interface, click Server Administration > MAS Host Setup.The system opens Setup MAS Host Information page.
b. In the MAS ID field, click the appropriate MAS for the supplementary server.
Use the lowest available MAS. For example, if you have two MASs and one Supplementary server, then add the Supplementary server as MAS Host Setup for MAS3.
10. Send the MAS host information to all MASs.
a. On the Messaging Administration web interface, click Server Administration > MAS Host Send.The system opens Send MAS Host Information page.
b. Click Send.
The system sends the host information to all MASs at the same time and reports whether the information was updated successfully. For more information, see Updating MAS host information on page 105.
11. Double-click the C:\Avaya_Support\Tools\ServiceControl\StopMMServices.exe file to stop all MM services.
12. Double-click the C:\Avaya_Support\Scripts\serverrecovery.vbs file to start all MM services.

Changing switch integration
Issue 1.0 June 2009 185
Avaya - Proprietary. Use pursuant to the terms of your signed agreement or Avaya policy.
Changing switch integrationThis topic describes how to change the switch integration after an upgrade. This assumes you only change the switch integration type of the MASs and that MAS servers remain the same. These procedures vary with the type of switch integration involved:
● Changing from DSE or Analog to QSIG on page 185
● Changing from DSE or QSIG to H.323 on page 187
● Changing from DSE or QSIG to SIP on page 188
● Changing from QSIG T1 to QSIG E1 on page 189
● Changing from H.323 to SIP on page 191
If changing from H.323 to QSIG, contact support for instructions.
Changing from DSE or Analog to QSIG
The following explains how to change from the DSE or Analog switch integration to the QSIG switch integration:
1. Upgrade all MASs in the Voice Mail Domain (VMD) to Release 5.1 as explained in this chapter.
2. Using VMSC, complete the following changes to the switch integration and telephony interface settings for the MAS you plan to move to QSIG:
a. Set Switch Integration to None.
b. Set number of ports to 0.
3. Set all MM services to Manual that are running on the MAS:
a. Double-click the Monitor icon on the desktop or from command prompt, run services.msc.
b. Select Services (Local) in the left pane.
c. In the right pane, scroll down to the list of Modular Messaging services.
These services start with the abbreviation MM.
d. Double-click the service to open the Properties window.
e. Set the Startup type to Manual. f. Click OK.
g. Repeat this procedure for all appropriate MM services.
4. Shutdown the MAS.

Upgrading to Modular Messaging Release 5.1 on S3500-family server
186 Avaya Modular Messaging for Avaya MSS Release 5.1 Installation and Upgrades
5. Remove the Dialogic boards from the MAS.
See the Avaya Modular Messaging S3500-Family Hardware Maintenance and Additions for board removal and installation.
6. Start the MAS without any Dialogic boards installed.
7. Shutdown the MAS.
8. Install the Dialogic QSIG boards into the MAS and connect the QSIG trunks to each Dialogic board.
9. Start the MAS.
10. Configure the boards using DCM; see Configuring port boards on page 281.
11. Start the MAS service:
a. Once configured, double-click the Monitor icon on the desktop or from command prompt, run services.msc.
b. Select Services (Local) in the left pane, if the item is not already selected.
c. In the right pane, scroll down to MM Messaging Application Server. d. Right-click MM Messaging Application Server and select Start.
12. Using VMSC, configure the Switch Integration and the telephony interface settings for the MAS to match the recommended settings in the QSIG Switch Configuration note (for note information, see the Avaya Support Web site at http://www.avaya.com/support).
13. To restart Modular Messaging services, see Restarting Modular Messaging services on page 243.
14. Test the QSIG integration; see Verifying call-handling capability on page 80.
15. Repeat steps 2 through 14 for each of the remaining MASs you are moving to a QSIG integration.
16. After you confirm that the new switch integration is working on the MASs, create and verify the DCT for all MASs in your VMD; see Using the DCT to collect information from an MAS on page 160.

Changing switch integration
Issue 1.0 June 2009 187
Avaya - Proprietary. Use pursuant to the terms of your signed agreement or Avaya policy.
Changing from DSE or QSIG to H.323
The following explains how to change from the DSE or QSIG switch integration to the H.323 switch integration:
1. Upgrade all MASs in the Voice Mail Domain (VMD) to Release 5.1 as explained in this chapter.
2. Using VMSC, complete the following changes to the switch integration and telephony interface settings for the MAS you plan to move to H.323:
a. Set Switch Integration to None.
b. Set number of ports to 0.
3. Set all MM services to Manual that are running on the MAS:
a. Double-click the Monitor icon on the desktop or from the command prompt, run services.msc.
b. Select Services (Local) in the left pane.
c. In the right pane, scroll down to the list of Modular Messaging services.
These services start with the abbreviation MM.
d. Double-click the service to open the Properties window.
e. Set the Startup type to Manual. f. Click OK.
g. Repeat this procedure for all appropriate MM services.
4. Shutdown the MAS.
5. Remove the Dialogic boards from the MAS.
See the Avaya Modular Messaging S3500-Family Hardware Maintenance and Additions for board removal and installation.
6. Start the MAS.
7. Start the MAS service:
a. Once configured, double-click the Monitor icon on the desktop or from command prompt, run services.msc.
b. Select Services (Local) in the left pane, if the item is not already selected.
c. In the right pane, scroll down to MM Messaging Application Server. d. Right-click MM Messaging Application Server and select Start.
8. Using VMSC, configure the Switch Integration and the telephony interface settings for the MAS to match the recommended settings in the H.323 Switch Configuration note (for note information, see the Avaya Support Web site at http://www.avaya.com/support).
9. To restart Modular Messaging services, see Restarting Modular Messaging services on page 243.
Upgrading to Modular Messaging Release 5.1 on S3500-family server
188 Avaya Modular Messaging for Avaya MSS Release 5.1 Installation and Upgrades
10. After the messaging service has restarted and the system has produced the NT Application 1241 event, run the utility C:\Avaya_Support\Tools\ConfigureMMIPSEC\ConfigureMMIPSEC.exe
11. Test the H.323 integration; see Verifying call-handling capability on page 80.
12. Repeat steps 2 through 14 for each of the remaining MASs you are moving to a H.323 integration.
13. After you confirm that the new switch integration is working on the MASs, create and verify the DCT for all MASs in your VMD; see Using the DCT to collect information from an MAS on page 160.
Changing from DSE or QSIG to SIP
The following explains how to change from the DSE or QSIG integration to the SIP switch integration:
1. Create and verify the DCT for all MASs in your VMD; see Using the DCT to collect information from an MAS on page 160.
You will not be changing the Switch Integration type at this time.
2. Upgrade all MASs in the Voice Mail Domain (VMD) to Release 5.1 as explained in this chapter.
3. After completing the upgrade, use the VMSC to apply your new Modular Messaging Release 5.1 license, which will include the SIP certificate; see Obtaining and installing a license on MAS#1 on page 60.
4. Using VMSC, change the Switch Integration type to SIP for the MAS (start with MAS#1) and make all VMSC configuration changes as documented in the SIP Switch Integration Configuration note (for note information, see the Avaya Support Web site at http://www.avaya.com/support).
5. Using VMSC, change the number of ports for the MAS to the number of ports required with your SIP integration.
6. To restart Modular Messaging services, see Restarting Modular Messaging services on page 243.
7. After the messaging service has restarted and the system has produced the NT Application 1241 event, run the utility C:\Avaya_Support\Tools\ConfigureMMIPSEC\ConfigureMMIPSEC.exe
8. Test the SIP integration; see Verifying call-handling capability on page 80.
9. Shutdown the MAS.
10. Remove the Dialogic boards from the MAS.
See Avaya Modular Messaging S3500-Family Hardware Maintenance and Additions guide for information on board removal and installation.
11. Start the MAS without any Dialogic boards installed.
Changing switch integration
Issue 1.0 June 2009 189
Avaya - Proprietary. Use pursuant to the terms of your signed agreement or Avaya policy.
12. Ensure that all MM Services start up properly.
13. Repeat steps 4 through 12 for each MAS you plan to move to the SIP integration.
14. Create and verify the DCT for all MASs in your VMD; see Using the DCT to collect information from an MAS on page 160.
Changing from QSIG T1 to QSIG E1
The following explains how to change from the QSIG T1 to the QSIG E1 switch integration:
1. Upgrade all MASs in the Voice Mail Domain (VMD) to Release 5.1 as explained in this chapter.
2. Using VMSC, complete the following changes to the switch integration and telephony interface settings for the MAS you plan to move to QSIG:
a. Set Switch Integration to None.
b. Set number of ports to 0.
3. Set all MM services to Manual that are running on the MAS:
a. Double-click the Monitor icon on the desktop or from the command prompt, run services.msc.
b. Select Services (Local) in the left pane.
c. In the right pane, scroll down to the list of Modular Messaging services.
These services start with the abbreviation MM.
d. Double-click the service to open the Properties window.
e. Set the Startup type to Manual. f. Click OK.
g. Repeat this procedure for all appropriate MM services.
4. Shutdown the MAS.
5. Remove the Dialogic boards from the MAS.
See the Avaya Modular Messaging S3500-Family Hardware Maintenance and Additions guide for information on board removal and installation.
6. Start the MAS without any Dialogic boards installed.
7. Shutdown the MAS.
8. Install the Dialogic QSIG E1 boards into the MAS and connect the QSIG E1 trunks to each Dialogic board. See Avaya Modular Messaging S3500-Family Hardware Maintenance and Additions guide.
9. Start the MAS.
10. Configure the boards using DCM; see Configuring port boards on page 281.

Upgrading to Modular Messaging Release 5.1 on S3500-family server
190 Avaya Modular Messaging for Avaya MSS Release 5.1 Installation and Upgrades
11. Start the MAS service:
a. Once configured, double-click the Monitor icon on the desktop or from the command prompt, run services.msc.
b. Select Services (Local) in the left pane, if the item is not already selected.
c. In the right pane, scroll down to MM Messaging Application Server. d. Right-click MM Messaging Application Server and select Start.
12. Using VMSC, configure the Switch Integration and the telephony interface settings for the MAS to match the recommended settings in the QSIG E1 Switch Configuration note (for note information, see the Avaya Support Web site at http://www.avaya.com/support).
13. To restart Modular Messaging services, see Restarting Modular Messaging services on page 243.
14. Test the QSIG integration; see Verifying call-handling capability on page 80.
15. Repeat steps 2 through 14 for each of the remaining MASs you are moving to a QSIG integration.
16. After you confirm that the new switch integration is working on the MASs, create and verify the DCT for all MASs in your VMD; see Using the DCT to collect information from an MAS on page 160.

Changing switch integration
Issue 1.0 June 2009 191
Avaya - Proprietary. Use pursuant to the terms of your signed agreement or Avaya policy.
Changing from H.323 to SIP
The following explains how to change from the H.323 to the SIP switch integration:
1. Upgrade all MASs in the Voice Mail Domain (VMD) to Release 5.1 as explained in this chapter.
2. After completing the upgrade, use the VMSC to apply your new Modular Messaging Release 5.1 license, which will include the SIP certificate; see Obtaining and installing a license on MAS#1 on page 60.
3. Using VMSC, change the Switch Integration type to SIP for the MAS (start with MAS#1) and make all VMSC configuration changes as documented in the SIP Switch Integration Configuration note (for note information, see the Avaya Support Web site at http://www.avaya.com/support).
4. Using VMSC, change the number of ports for the MAS to the number of ports required with your SIP integration.
5. To restart Modular Messaging services, see Restarting Modular Messaging services on page 243.
6. After the messaging service has restarted and the system has produced the NT Application 1241 event, run the utility C:\Avaya_Support\Tools\ConfigureMMIPSEC\ConfigureMMIPSEC.exe
7. Test the SIP integration; see Verifying call-handling capability on page 80.
8. Repeat steps 3 through 7 for each MAS in the VMD you plan to move to the SIP integration.
9. Create and verify the DCT for all MASs in your VMD; see Using the DCT to collect information from an MAS on page 160.

Upgrading to Modular Messaging Release 5.1 on S3500-family server
192 Avaya Modular Messaging for Avaya MSS Release 5.1 Installation and Upgrades
Moving to the corporate Windows domain after upgrade! Important:
Important: If the system will remain in the private Windows domain, you can skip this entire section.
After you upgrade to Release 5.1, you can move the Avaya Modular Messaging system to the customer’s corporate Windows domain. This feature is optional and is beneficial to those customers who do not want a separate private Windows domain within their network.
Perform the following tasks to move a system during an upgrade to the customer’s corporate Windows domain:
● Preparing to join an upgrade to the corporate Windows domain on page 193.
● Moving subsequent servers to the corporate Windows domain on page 194.
● Moving the MSS to the corporate Windows domain on page 197.
● Moving MAS#1 to the corporate Windows domain on page 198.
● Completing the move to the corporate Windows domain on page 200.

Moving to the corporate Windows domain after upgrade
Issue 1.0 June 2009 193
Avaya - Proprietary. Use pursuant to the terms of your signed agreement or Avaya policy.
Preparing to join an upgrade to the corporate Windows domainThe following explains how to prepare an MM system that is joining the corporate Windows domain after an upgrade:
1. Complete the upgrade to Release 5.1, as described in this chapter.
2. Create user accounts in the corporate Windows domain; see Creating user accounts in the corporate Windows domain on page 17.
3. Create computer accounts in the corporate Windows domain; see Creating computer accounts in the corporate Windows domain on page 18.
4. Update the DNS. If the customer is going to use a different DNS server, update the corporate LAN DNS settings for each MAS and the MSS. This step MAY NOT be necessary as the existing DNS configuration may be correct. Make sure that the Corporate Domain Name can be resolved with this configuration or joining the MM system to the corporate Windows domain will fail. Complete the following:
a. Change the DNS settings for the MSS; see Setting up network addressing on page 27.
5. Continue with Moving subsequent servers to the corporate Windows domain on page 194.

Upgrading to Modular Messaging Release 5.1 on S3500-family server
194 Avaya Modular Messaging for Avaya MSS Release 5.1 Installation and Upgrades
Moving subsequent servers to the corporate Windows domainWhen moving your MM system to the corporate Windows domain, you must first move all subsequent MASs (MAS#2 and above) and, if present, the Supplementary server and optional servers BEFORE you move the MSS or MAS#1.
! Important:Important: DO NOT MOVE the MSS or the MAS#1 at this time. These servers are covered
later in this section.
Preparing the system before moving subsequent servers
To prepare the system before moving subsequent servers (MAS#2 and above) to the Corporate Windows Domain:
1. Verify that logon accounts in the corporate Windows domain were created during the pre-installation stage; see Creating user accounts in the corporate Windows domain on page 17.
2. Be sure that you have the local administrative account and password for all MASs and, if present, the Supplementary server and optional servers. To be sure, log into each server to verify.
Determine if the customer’s corporate Windows domain has a policy established to change the local administrative account and password when new machines move to the corporate Windows domain. If this is the case, then make sure you have the local administrative account name and password that will be assigned after all MASs move to the corporate Windows domain.
3. Click Start > Run.
4. In the Run window Open field, type cmd and press Enter. 5. In the command prompt window, type the following and press Enter:
net time /setsntp 6. Run a DCT analyze on the system; see Using the DCT to analyze the current
configuration on page 138.
7. Back up the DCT data files; see Copying the DCT data file for backup on page 140.
8. Manually run a backup of all MASs and, if present, the Supplementary server and optional servers; see Backing up each MAS on page 165.
Moving to the corporate Windows domain after upgrade
Issue 1.0 June 2009 195
Avaya - Proprietary. Use pursuant to the terms of your signed agreement or Avaya policy.
9. Run a backup of the MSS; see Backing up the MSS on page 166.
! Important:Important: Make sure you complete steps 1 through 9 before continuing.
10. Disable the Offline Access feature. Otherwise, errors occur as the system searches for the missing offline store.
a. For MAS#1, in the Voice Mail System Configuration window, double-click Messaging.
b. In the Messaging - Voice Mail Domain window, click the Offline Access tab.
c. Clear the Enable offline access to messages check box. Click OK.
! Important:Important: The following step is extremely important. All access to the VMD will be lost if this
step is not completed.
11. Using VMSC, add Everyone to the VMD System Administration ACL using the following steps:
1. In the Permissions window, click Add.
2. In the Select Users, Computers, or Groups window, type the first letter of the account to add in the Enter the object names to select box.
For example, type e for Everyone.
3. Click Check Names.
4. In the Multiple Names Found window, double-click the correct account.
5. Verify that the account is listed and underlined in the list box.
6. Click OK.
7. Optional: Repeat this task to add other logon accounts, if required.
8. Give the correct share permissions to the accounts. In the Permissions window:
- Select each account in turn.
- In the Permissions box, under Allow, select the permissions Change and Read, so the boxes are checked.
- Repeat this task for each logon account.
12. Click OK to close the Permissions window.
Moving subsequent servers
! Important:Important: Complete Preparing the system before moving subsequent servers on page 194
before continuing.
Upgrading to Modular Messaging Release 5.1 on S3500-family server
196 Avaya Modular Messaging for Avaya MSS Release 5.1 Installation and Upgrades
To move subsequent servers (MAS#2 and above) and Supplementary servers to the corporate Windows domain:
1. Log into the MAS using the private domain administrator account.
2. Stop all MM Services on the server you are moving to the corporate Windows domain; see Starting all MM services on page 175.
3. Set the MM Services that are not disabled to Manual:
a. Double-click the Monitor icon on the desktop or from command prompt, run services.msc.
b. Select Services (Local) in the left pane.
c. In the right pane, scroll down to the list of Modular Messaging services.
These services start with the abbreviation MM.
d. Double-click the service to open the Properties window.
e. Set the Startup type to Manual. f. Click OK.
g. Repeat this procedure for all appropriate MM services.
4. Delete the lmhosts file found in:
C:\Windows\system32\drivers\etc\5. Move the MAS directly from the private Windows domain to the corporate Windows domain:
a. Right-click My Computer and click Properties.
b. Click the Computer Name tab.
c. Click Change.
d. In the Member of box, select Workgroup and type WORKGROUP into the provided field.
e. Click OK and then select to restart the computer.
f. After the restart, log back on as the local administrator account.
g. If necessary, reconfigure the Corporate LAN settings.
h. Right-click My Computer and click Properties.
i. Click the Computer Name tab.
j. Click Change.
k. In the Member of box, select Domain and type the corporate Windows domain name into the provided field.
l. Click OK and then select to restart the computer.
6. After the restart, log back on as the local administrator account.
Moving to the corporate Windows domain after upgrade
Issue 1.0 June 2009 197
Avaya - Proprietary. Use pursuant to the terms of your signed agreement or Avaya policy.
7. Add the corporate Windows domain customer account and technical support account to the local machine’s Administrators group:
a. Right-click My Computer and click Manage.
b. Click Local Users and Groups.
c. Double-click Groups.
d. Double-click Administrators.
e. Click Add.
f. Change From this Location to point to the corporate Windows domain.
g. In the Enter the object names to select field, enter the name of the corporate Windows domain customer account (or technical support account) and click Check Names.
h. Highlight the customer account (or technical support account) from the list of accounts resolved.
i. Click OK.
j. Repeat steps e through i as needed to add both the technical support account and the customer administration account to the local machine’s Administrators group.
8. Log off the server.
9. Log on to the server and the corporate Windows domain using the corporate Windows domain customer account.
10. Start all MM services that where previously running on this MAS and set them to automatic startup; see Starting all MM services on page 175.
11. Repeat these steps for all subsequent MASs and, if present, the Supplementary server and optional servers.
12. When MAS#1 is the only server left in the private Windows domain, continue with Moving the MSS to the corporate Windows domain on page 197.
Moving the MSS to the corporate Windows domainTo move the MSS to the corporate Windows domain:
1. Update the MAS host information; see Updating MAS host information in a corporate Windows domain on page 108.
2. Place the MSS in the corporate Windows domain; see Placing the MSS in the corporate Windows domain on page 111.
Upgrading to Modular Messaging Release 5.1 on S3500-family server
198 Avaya Modular Messaging for Avaya MSS Release 5.1 Installation and Upgrades
Moving MAS#1 to the corporate Windows domainTo move MAS#1 to the corporate Windows domain:
1. Stop all MM Services on MAS#1; see Starting all MM services on page 175.
2. Set the MM Services that are not disabled to Manual:
a. Double-click the Monitor icon on the desktop or from command prompt, run services.msc.
b. Select Services (Local) in the left pane.
c. In the right pane, scroll down to the list of Modular Messaging services.
These services start with the abbreviation MM.
d. Double-click the service to open the Properties window.
e. Set the Startup type to Manual. f. Click OK.
g. Repeat this procedure for all appropriate MM services.
3. Delete the lmhosts file found in:
C:\Windows\system32\drivers\etc\4. Run the setsntp command:
a. Click Start > Run.
b. In the Run window Open field, type cmd and press Enter. c. In the command prompt window, type the following and press Enter:
net time /setsntp 5. Run DCPromo to demote MAS#1 from being the Domain Controller for the private Windows
domain:
a. On MAS#1, click Start > Run...b. In the Run dialog box, type dcpromo, then click OK.
c. Click Next. d. In the Warning dialog box, click OK.
e. Click the This server is the last Domain Controller in the Domain check box.
f. Click Next.g. Click Next.h. Click the Delete all application partitions on this DC check box.
i. Click Next.

Moving to the corporate Windows domain after upgrade
Issue 1.0 June 2009 199
Avaya - Proprietary. Use pursuant to the terms of your signed agreement or Avaya policy.
j. Enter and confirm the Local Administrator password.
k. Restart MAS#1.
l. Click Next.m. Click Next.n. Click Finish.
o. Click Restart Now.
6. Log on to MAS#1 using the local administrative account.
7. Move MAS#1 to the corporate Windows domain:
a. Right-click My Computer and click Properties.
b. Click the Computer Name tab.
c. Click Change.
d. In the Domain name field, replace the existing private Windows domain name with the corporate Windows domain name.
e. Click OK.
f. Click OK.
g. Restart the server.
8. Log on to MAS#1 using the local administrative account.
9. Add the corporate Windows domain customer account and technical support account to the MAS#1 Administrators group:
a. Right-click My Computer and click Manage.
b. Click Local Users and Groups.
c. Double-click Groups.
d. Double-click Administrators.
e. Click Add.
f. Change From this Location to point to the corporate Windows domain.
g. In the Enter the object names to select field, enter the name of the corporate Windows domain customer account (or technical support account) and click Check Names.
h. Highlight the customer account (or technical support account) from the list of accounts resolved.
i. Click OK.
j. Repeat steps e through i as needed to add both the technical support account and the customer administration account to the MAS#1 Administrators group.
k. Go back to Local Users and Groups.

Upgrading to Modular Messaging Release 5.1 on S3500-family server
200 Avaya Modular Messaging for Avaya MSS Release 5.1 Installation and Upgrades
l. If necessary, rename the local administrator account name from Administrator to the name that appears on the planning form.
10. Log off MAS#1.
11. Log on to MAS#1 and the corporate Windows domain using the corporate Windows domain customer account.
12. Start all MM services that where previously running on this MAS and set them to automatic startup; see Starting all MM services on page 175.
Enabling offline access to messages
After you upgrade all servers in the system, enable Offline Access feature:
1. In the VMSC window, double-click Messaging, and then click the Offline Access tab.
2. Select the Enable offline access to messages check box.
3. Select the Synchronize offline messages with remote store check box.
4. Click Browse to select an existing, shared folder in the domain for the remote offline message store. The name must use the format \\computername.privdom.local\sharename, such as \\mymas2.privdom.local\RemoteOfflineStore.
5. Click OK to close this window.
Completing the move to the corporate Windows domainTo complete the move to the corporate Windows domain during an upgrade you must reset the MM System shares, the backup tasks, and the time server configuration:
1. Recreate the Offline Store share and add computer$ accounts for all MASs in your VMD on the server that hosts the Offline Store feature:
a. Using Windows Explorer locate the Remote Offline Store folder.
b. Right-click the folder name and click Properties.
c. Click the Sharing tab.
d. Click Share this folder.e. Click Permissions.
f. Under Groups and Users, click Add.
g. Add Computers into the list of Object Types.
h. In the Object name window, enter the corporate domain name of the MAS.
i. Click Check Names.
j. Highlight the name of the MAS and click OK.

Moving to the corporate Windows domain after upgrade
Issue 1.0 June 2009 201
Avaya - Proprietary. Use pursuant to the terms of your signed agreement or Avaya policy.
k. Set the permissions for the MAS local machine account to Allow Change and Read.
l. Repeat steps g to k for all MASs that handle calls.
2. Change the mini backup batch file so that it contains the corporate Windows domain name for the MSS:
a. Locate file: C:\Avaya_Support\CMD\MASminiBackup.batb. Open the file so that you can edit its content.
c. Change the line:
net use v: \mss1\masbackup
to
net use v: \msscorporatename\masbackup where msscorporatename is the corporate Windows domain name of the MSS.
d. Save and close the file.
3. Change backup batch file so that it contains the corporate Windows domain name for the MSS:
a. Locate file: C:\Avaya_Support\CMD\MASBackup.batb. Open the file so that you can edit its content.
c. Change the line:
net use v: \mss1\masbackup
to
net use v: \msscorporatename\masbackup where msscorporatename is the corporate Windows domain name of the MSS.
d. Save and close the file.
4. Change the DCT Analyze scheduled tasks so that they run under the new corporate Windows domain customer account:
a. Double-click the Schedule Tasks icon on the desktop.
b. In the list of Scheduled Tasks, open the DCT Analyze properties.
c. Click the Task tab.
d. Change the Run as entry to be the corporate Windows domain customer account.
e. Click Set Password.
f. Enter and confirm the corporate Windows domain customer account password.
g. Click OK.
h. Click the Security tab.
i. In the Group or User Names window, remove the Private Domain Administrators Group.

Upgrading to Modular Messaging Release 5.1 on S3500-family server
202 Avaya Modular Messaging for Avaya MSS Release 5.1 Installation and Upgrades
j. Add the corporate Windows domain customer account to the security list.
k. Change the permissions for the corporate Windows domain customer account to Full Control.
5. Change the scheduled tasks Nightly backup so they run under the new corporate customer account:
a. Double-click the Schedule Tasks icon on the desktop.
b. In the list of Scheduled Tasks, open the MAS Backup properties.
c. Click the Task tab.
d. Change the Run as entry to be the corporate Windows domain customer account.
e. Click Set Password.
f. Enter and confirm the corporate Windows domain customer account password.
g. Click OK.
h. Click the Security tab.
i. In the Group or User Names window, remove the Private Domain Administrators Group.
j. Add the corporate Windows domain customer account to the security list.
k. Change the permissions for the corporate Windows domain customer account to Full Control.
6. Change security settings in VMSC for all accounts (corporate customer and technical support accounts, as well as all MAS computer accounts):
a. Click Start > Programs > Avaya Modular Messaging > Voice Mail System Configuration to open the VMSC window.
b. Expand Security.
c. Double-click System Administration.
d. In the Permissions for System Administration window, click Add.
e. In the Select Users, Computers, or Groups window, type the first letter of the account to add in the Enter the object names to select box.
f. Click Check Names.
g. In the Multiple Names Found window, double-click the correct account.
h. Verify that the account is listed underlined in the list box, and then click OK.
i. Perform steps a through h for all accounts:
● Corporate customer account
● Corporate technical support account
● All MAS computer accounts.
j. Select each Account Unknown entry, and then click Remove.
Moving to the corporate Windows domain after upgrade
Issue 1.0 June 2009 203
Avaya - Proprietary. Use pursuant to the terms of your signed agreement or Avaya policy.
k. Select the Everyone account, and then click Remove.
l. Click OK to close the permissions window.
m. Return to Security and then double-click Subscriber Administration.
n. Add the corporate customer and technical support accounts, as well as all MAS computer accounts.
o. Remove all Account Unknown entries and also remove the Everyone account. Update the MAS host information on the MAS.
7. Run a DCT analyze on the system; see Using the DCT to analyze the current configuration on page 138.
8. Back up the DCT data files; see Copying the DCT data file for backup on page 140.

Upgrading to Modular Messaging Release 5.1 on S3500-family server
204 Avaya Modular Messaging for Avaya MSS Release 5.1 Installation and Upgrades

Issue 1.0 June 2009 205
Avaya - Proprietary. Use pursuant to the terms of your signed agreement or Avaya policy.
Chapter 9: Migrating to Modular Messaging Release 5.1 on S8730-family server
The chapter describes how to migrate from Modular Messaging Release 2.0, Release 3.x, or Release 4.0 that runs on an S3400 or S3500 server to Modular Messaging Release 5.1 system that runs on S8730 server.
Note:Note: You cannot upgrade from Release 2.0 to Release 5.1 or from S3400 server to
S8730 server. Migration is the only way you can move the Modular Messaging system from:
- Release 2.0 to Release 5.1
- S3400 server to S8730 server
If you are upgrading to Release 5.1, and still use the S3500 server, use the procedures described in Upgrading to Modular Messaging Release 5.1 on S3500-family server on page 147.
If you are performing a staged upgrade, see Avaya Modular Messaging Staged Upgrades for the Avaya Message Store Server (MSS) Release 5.0 guide.If you are moving the Modular Messaging system to the corporate Windows domain, first complete the entire migration and then move the system to the corporate Windows domain. See Moving to the corporate Windows domain after migration on page 256 for more information.
You may change the switch integration after you complete the process of migration. See Changing switch integration on page 255 for more information.
Topics in this chapter include:
● Migration requirements on page 206
● Preparing for the migration on page 208
● Migrating MSS and MAS to the S8730-family server on page 214
● Migrating each MAS on page 221
● Completing MSS administration on page 234
● Restoring data on each MAS on page 238
● Completing the system migration on page 246
● Reducing servers by replacing S3400 servers with S8730 servers on page 253
● Changing switch integration on page 255
● Moving to the corporate Windows domain after migration on page 256.

Migrating to Modular Messaging Release 5.1 on S8730-family server
206 Avaya Modular Messaging for Avaya MSS Release 5.1 Installation and Upgrades
Migration requirementsTo successfully migrate a Modular Messaging system, you need:
● Planning forms for the system that runs on Release 2.0 and Release 3.x or the original DCT file for the system that runs on Release 4.0.
● The latest analyzed DCT file for the system.
● The following information and software from the Avaya Support Web site at http://www.avaya.com/support. For more information about how to access these items on the Web site, see Downloading required software and documentation on page 9.
- The most current copy of the configuration notes for this switch integration.
- The Avaya Modular Messaging MSS Pre-upgrade and Backup Verification Tool. For more information, see Installing the Pre-upgrade and Backup Verification tool on page 209.
- The latest version of MMDCT.exe file.
- Any Avaya software updates required to bring the Avaya Modular Messaging software up to date after the migration is complete. Download this software to a USB storage device such as a flash drive, memory stick, or equivalent.
● Print the migration checklist from Modular Messaging Release 5.1 system migration checklist on page 273. Use the checklist to track your progress.
● When migrating from Release 2.0, all account names and passwords must conform to Windows 2003 R2 security rules. If they do not conform to the new rules, you must change account names and passwords before you analyze your system with the DCT executable file (MMDCT.exe). If you must change your Modular Messaging account names or passwords, contact your support organization for more information.
Issue 1.0 June 2009 207
Avaya - Proprietary. Use pursuant to the terms of your signed agreement or Avaya policy.
Switching the monitor to show the correct serverYou must switch the display from one server to another during a system migration. The Modular Messaging system might use a Belkin KVM switch or a customer-provided KVM switch. See Switching the monitor to show the correct server on page 153 for more information.
Migrating to Modular Messaging Release 5.1 on S8730-family server
208 Avaya Modular Messaging for Avaya MSS Release 5.1 Installation and Upgrades
Preparing for the migrationThis section describes how to prepare the Modular Messaging system that runs on S3400 or S3500 server while you migrate to Modular Messaging Release 5.1, that runs on Avaya S8730 server.
Avaya S8730 servers are supplied with MSS and MAS software pre-loaded on them.
When migrating from S3400 hardware, you may reduce the number of MASs in your VMD. For complete procedures to reduce MASs, see Reducing servers by replacing S3400 servers with S8730 servers on page 253.
Note:Note: The Modular Messaging Release 4.0 system must be at least at SP 3 and RFU
level must be at least M8017rf+g, A6016rf+f, Z8017rf+c, E6016rf+b or U8017rf+b before you do the backup that will be used in the migration to Release 5.1 on an S8730 server.
Perform the following tasks to prepare the Modular Messaging system for the migration:
● Performing pre-upgrade tasks on page 209
● Using the DCT to collect information from an MAS on page 210.

Preparing for the migration
Issue 1.0 June 2009 209
Avaya - Proprietary. Use pursuant to the terms of your signed agreement or Avaya policy.
Performing pre-upgrade tasksPerform the following tasks before you migrate the system:
● Installing the Pre-upgrade and Backup Verification tool on page 209
● Running the Pre-upgrade tool on page 209
● Completing pre-migration tasks on page 210
Installing the Pre-upgrade and Backup Verification tool
Install the MSS Pre-upgrade and Backup Verification Tool as outlined in Installing the Pre-upgrade and Backup Verification tool on page 157.
Running the Pre-upgrade tool
A member of the Avaya or business partner installation team uses the Pre-upgrade tool to identify potential pitfalls and plan for the migration. Run the Pre-upgrade tool using the steps outlined in Running the Pre-upgrade tool on page 157.

Migrating to Modular Messaging Release 5.1 on S8730-family server
210 Avaya Modular Messaging for Avaya MSS Release 5.1 Installation and Upgrades
Completing pre-migration tasks
Complete the tasks outlined in Completing pre-upgrade tasks on page 159, before you start migrating to Release 5.1.
Adding a new server
If you are adding a new MAS to an existing Modular Messaging system, first migrate the system. After the migration is complete, install the new MAS. See Adding an MAS or a Supplementary server to an existing system on page 343.
Using the DCT to collect information from an MASUse the Avaya Modular Messaging Data Collection Tool (DCT) to collect information from each MAS and Supplementary server. The tool puts the server system information into a data file. This allows you to easily configure the servers.
Always check the Avaya Support Web site at http://www.avaya.com/support to obtain the most recent version of the DCT program. Download the mmdct.exe file to a storage device and use the latest version rather than the one on the applications DVD.
Collecting DCT data
Run a DCT analyze on each MAS and Supplementary server to collect system data as instructed in Using the DCT to analyze the current configuration on page 138.

Preparing for the migration
Issue 1.0 June 2009 211
Avaya - Proprietary. Use pursuant to the terms of your signed agreement or Avaya policy.
Verifying DCT data
After analyzing the last MAS to be migrated, the Avaya Modular Messaging Data Collection Tool (DCT) window displays the results of the last analysis. The DCT collects the information that the system requires to migrate an MAS to Release 5.1. However, you must enter some data manually, and verify the information as described in this section.
For more information about completing the DCT screens, click the Help button in the Avaya Modular Messaging Data Collection Tool window. You can also use the printed document, Avaya Modular Messaging Data Collection Tool Online Help; see Downloading user documentation on page 12.
Do not change the data that was populated by the DCT.
! Important:Important: If the DCT left pane shows a red X for any item, the data is incomplete or
incorrect on that screen. Click each flagged item and correct the problem before you proceed. Information must be complete and valid to continue with the migration. If you cannot fix a bad entry, do not proceed with the migration.
All account names and passwords must conform to Windows 2003 R2 security rules. If your account names and passwords do not conform to the new rules, you must change them before you analyze your system with the DCT executable file (MMDCT.exe). If you must change your Modular Messaging account names or passwords, contact your support organization for more information.
1. On the DCT window, click Customer details screen. The system opens the Customer details page:
a. Complete all of the fields on this screen.
b. Click Next. 2. Verify the settings on the Regional settings page. Click Next. 3. Verify that the message store is MSS with Avaya MAS servers. Click Next. 4. On the Voice Mail Domain screen:
a. Verify the name for the voice mail domain (VMD).
b. Verify the number of MASs in the voice mail domain.
c. Click Next. 5. Verify the setting on the Corporate network details page. Click Next.
Migrating to Modular Messaging Release 5.1 on S8730-family server
212 Avaya Modular Messaging for Avaya MSS Release 5.1 Installation and Upgrades
6. On the Corporate MM server networking details screen:
a. Verify the server names and other settings, depending on the connection type. If necessary, fill in the IP address and the Full computer name fields.
The DCT updates this information with each MAS that it analyzes.
b. Click Next. 7. On the Corporate network details screen:
a. Verify the domain name server (DNS), corporate default gateway, and WINS values. If the WINS field shows 127.0.0.0, change it to the correct value.
b. Click Next. 8. On the Private network screen, verify that all the settings are correct. Click Next. 9. On the Exchange message store screen, click Next.
10. On the Domino message store screen, click Next. 11. On the MSS message store screen:
a. Select Join the Private Windows Domain (default configuration). If the customer wants the system to move to the corporate domain, you complete this move AFTER you the migrate the system. For more information, see Moving to the corporate Windows domain after migration on page 256.
b. In the Private Windows Domain name field you can enter a new name if needed. To change the name, first select the Change default information check box and then type the new name in the field.
c. Ignore the Corporate Windows Domain field.
d. Click Next. 12. Verify the MSS trusted server passwords are populated.
13. Click Next.14. On the MAS accounts and passwords screen:
a. Enter the correct logon name for each MAS administration account.
b. Enter the password for each account. By default, the DCT tool does not automatically insert passwords.
c. Click Next.

Preparing for the migration
Issue 1.0 June 2009 213
Avaya - Proprietary. Use pursuant to the terms of your signed agreement or Avaya policy.
15. On the Logon accounts and passwords screen:
a. Enter the correct logon name and password for the technical support account and the customer administration account. The names and passwords must comply with the security standards.
b. Click Next. 16. On the MAS service account screen, verify that Run MAS services using LocalSystem is
selected. Click Next. 17. On the TTS and announcements screen, click Next. 18. On the MM service selection screen:
! CAUTION:CAUTION: Do not use the DCT to try to move services from one MAS to another during the
migration! Moving services might require changes elsewhere in the system, such as on the MSS and in the VMSC. Move Modular Messaging services only after the migration is complete.
a. Verify that the correct services are selected for each server.
b. To activate the Web Subscriber Options (WSO) application on an MAS, click the appropriate column.
You can activate Web Subscriber Options only once per voice mail domain.
c. Click Next. 19. On the Switch Integration screen, do not change the settings. Click Next.
! CAUTION:CAUTION: When you are migrating a Modular Messaging system, you must complete the
migration with the same PBX integration used for the previous release. Changes to the PBX integration can be made only after you complete the migration. For more information, see Changing switch integration on page 255.
20. After you have opened each DCT screen and cleared any red-flagged items, the Cancel button changes to a Complete button. After you have entered and verified all required data, click Complete. A Save window appears.
21. Save the .mmdct data file to the storage device.
22. After you save the file, the Data Collection Tool window closes.
23. Remove the storage device from the server to prevent damage to the data file.

Migrating to Modular Messaging Release 5.1 on S8730-family server
214 Avaya Modular Messaging for Avaya MSS Release 5.1 Installation and Upgrades
Migrating MSS and MAS to the S8730-family serverMigrate the Message Storage Server (MSS) before you migrate any other server in the Modular Messaging system. The MSS Release 5.1 migration involves:
● Preparing MAS#1 for the migration on page 215
● Backing up each MAS on page 216
● Backing up the MSS on page 216
● Running the Backup Verification tool on page 217
● Migrating the MSS hardware on page 217
● Restoring data on the MSS on page 217
Migrating MSS and MAS to the S8730-family server
Issue 1.0 June 2009 215
Avaya - Proprietary. Use pursuant to the terms of your signed agreement or Avaya policy.
Preparing MAS#1 for the migrationBefore you start the process of migration, the current Modular Messaging system must be made non-operational. Backup the data on each MAS and then backup the data on MSS.
You must prepare the first MAS for the migration before you start to migrate the MSS. These tasks are essential for a successful migration.
Busying out ports on MAS
You must not take calls during the migration. To achieve this, busyout the ports on each MAS and on the switch before you start the migration. Otherwise, messages spool on the MAS. Any spooled messages that have not been delivered to the MSS prior to performing the MSS backup will get lost. Perform the tasks as outlined in Busying out ports on each MAS on page 163 to busyout ports on the first and the subsequent MASs. This process makes the entire system inactive.
Checking the spool folder on each MAS
Before you migrate the MAS, verify that any spooled messages are delivered to the MSS:
1. Switch the monitor to show the applicable MAS.
2. Open Windows Explorer.
3. Navigate to the folder C:\Program Files\Avaya Modular Messaging\Server\Spool
4. Verify that the Spool folder contains no message files.
! CAUTION:CAUTION: If the folder contains spooled messages, wait for the system to deliver them,
which can take awhile.
5. When the Spool folder is empty, continue with the process of migration of MASs.

Migrating to Modular Messaging Release 5.1 on S8730-family server
216 Avaya Modular Messaging for Avaya MSS Release 5.1 Installation and Upgrades
Backing up each MAS You must back up the data on each MAS in the system before you back up the MSS.
To back up all the data on the Modular Messaging system, first send backup data from each MAS to the MSS. The MAS information will be backed up with the MSS system data on the DVD-RAM disks. Perform the tasks outlined in Backing up each MAS on page 165.
Backing up the MSSYou must stop the voice system completely and backup all data from MSS to the DVD as instructed in Backing up the MSS on page 166. You must then leave the voice system out of service so that the subscribers cannot access the MSS. This is because any changes you make to mailbox or message after you take the backup will get lost.
Note:Note: Do not shut down the entire system until you complete verifying the backup data
as described in Running the Backup Verification tool on page 217.

Migrating MSS and MAS to the S8730-family server
Issue 1.0 June 2009 217
Avaya - Proprietary. Use pursuant to the terms of your signed agreement or Avaya policy.
Running the Backup Verification toolUse the Backup Verification tool after a pre-upgrade backup before continuing with the migration. To install the Backup Verification tool, see Installing the Pre-upgrade and Backup Verification tool on page 209. For more information on running the tool, see Running the Backup Verification tool on page 168.
Run the Backup Verification tool on the day you want to migrate. After you verify that every backup DVD is successful, return to the MSS main menu.
Migrating the MSS hardwareAvaya supports the following hardware migrations to an S8730:
● S3400-family or S3500-family Avaya Message Storage Server High Availability version (MSS-H) to an S8730-family MSS-H
● S3400-family or S3500-family Avaya Message Storage Server Standard Availability version (MSS-S) to an S8730-family MSS-S
● S3400-family or S3500-family MSS-S to an S8730-family MSS-H
Note:Note: For complete procedures to do a staged upgrade, see Avaya Modular Messaging
Staged Upgrades for the Avaya Message Store Server (MSS) Release 5.0 guide.
To migrate your existing MSS to S8730-family MSS:
1. Turn off the S3400-family MSS.
2. Label all cables so you can easily reconnect them.
3. Unplug all cables to the old server.
4. Remove the S3400-family MSS from the stacked configuration or customer cabinet.
5. Install the S8730-family MSS. For more information, see Installing the Avaya S8730 Server for Modular Messaging guide.
Restoring data on the MSSYou must restore the customer data on to Modular Messaging system Release 5.1 running on S8730 server.

Migrating to Modular Messaging Release 5.1 on S8730-family server
218 Avaya Modular Messaging for Avaya MSS Release 5.1 Installation and Upgrades
! CAUTION:CAUTION: A software restoration after a migration takes longer than a usual restore
procedure, because the software does additional steps to migrate the data. Do not reboot the server until the software restoration is complete, or you will have to reload the software and restore the data again. The time required for the data restoration to complete depends on the number of subscribers in the system.
To restore data on the MSS:
1. Stop the messaging service:
a. From the Utilities menu, click Stop Messaging.
b. On the Stop Messaging Software page, click Stop.
The system displays the status of stopping the messaging system.
2. After the system reports that the voice system has completely stopped, insert the DVD-RAM backup disk with the full manual backup in the DVD drive of the new hardware:
Note:Note: S8730 server does not support reading the DVD-RAM disk when it is still inside
the cartridge. You must remove the disk from the cartridge to restore the backed up data onto the new server. If you have multiple backup disks, get them labeled with the correct number in sequence. Data is recorded on the unprinted side of the disk. Do not touch the unprinted side of the disk.
Complete the following steps to safely remove the disk from the cartridge without damaging the data:
a. Using a pointed object, break the disk locking pin. Depending on the type of disk, you might have more than one locking pin.
b. Remove the locking pin (or pins).
c. Unlatch the cover by using the pointed object to press the indentation on the front left-hand corner of the cartridge.
d. Remove the disk.
e. When placing the disk into the cartridge, ensure that the printed side of the cartridge and the printed side of the disk face the same direction.
3. Start the data restoration:
a. From the Backup/Restore menu, click Restore.
b. On the Restore page, set all the data types to Yes.
c. Click Start Restore. When you see the overwrite warning, click OK.

Migrating MSS and MAS to the S8730-family server
Issue 1.0 June 2009 219
Avaya - Proprietary. Use pursuant to the terms of your signed agreement or Avaya policy.
d. On the Restore status screen, when the system prompts you to insert the first DVD, click Continue.
You may get the following warning message:
The following package needs to be installed before continuing: pubvt Pre-Upgrade and Backup Verification Tools for Avaya Modular Messaging
e. If the following appears:
1. Would you like to stop the restore and install the missing software now? [ n ]:, click Continue.
2. Attempt to continue without updating or installing software? [ y ]:, click Continue.
The system starts restoring all data to the system. Allow up to 40 minutes for the system to restore the data from each backup DVD. To follow the progress of the data restoration, press Page Down or scroll down to see the bottom of the screen.
4. After the restore is complete, reboot the system.
a. From the Utilities menu, click Reboot Server. b. On the Reboot Server page, click Reboot. c. At the prompt that you will lose access to the system, click OK.
The reboot starts. The system displays several login prompts.
d. Ignore all login prompts until you see Press Enter to return to prompt...e. Press Enter.
The login prompt appears.
5. Prepare for the next system backup:
a. Remove the DVD-RAM backup medium from the drive. File the pre-upgrade backup DVDs in a safe place.
b. Insert a new, writable DVD-RAM in the drive to support a Release 5.1 attended backup.
6. At the prompt, log on to the MSS as craft. The server displays the Messaging Administration web interface.
7. As a sanity check, display the Configure Network Addressing page:
a. From the Server Administration menu, click TCP/IP Network Configuration.
b. Verify the settings on this page. See Setting up network addressing on page 27. Verify that the corporate and private LANs are not backward.
8. From the Messaging Administration web interface, click Subscriber Management:a. Verify that the correct number of subscribers is restored. You recorded this number
before backing up the MSS.

Migrating to Modular Messaging Release 5.1 on S8730-family server
220 Avaya Modular Messaging for Avaya MSS Release 5.1 Installation and Upgrades
b. On the Manage Classes-of-Service page, verify that the classes of service are correctly restored.
9. The system does not back up passwords for the remote-access login accounts. You must re-enter the correct passwords to enable remote access.
a. From the Security menu, click Local Administrators.
The system displays the Manage Local Administration Accounts page.
b. Select an account, such as sa or vm, and then click Edit the Selected Admin.
The system displays the Edit Local Administration Account page.
c. From the Local Authentication Enabled? drop-down menu, select yes (if it is not already selected).
d. In the Password field, enter the appropriate password.
e. In the Confirm Password field, enter the password again for verification.
f. Click Save.
g. Repeat Step b for each additional login that you must administer.
h. Set the administrative password defaults (sa and vm) and give the passwords to the customer.
Migrating each MAS
Issue 1.0 June 2009 221
Avaya - Proprietary. Use pursuant to the terms of your signed agreement or Avaya policy.
Migrating each MASDo this procedure on each MAS.
After you complete the migration of the MSS, you must migrate each MAS. Server migrations involve:
● Starting the MAS migration on page 221
● Preparing the new server on page 224
● Updating settings in the VMSC on page 226
● Continuing the MAS migration on page 234
Starting the MAS migrationTo start migrating the MAS server:
1. Insert the storage device that contains the analyzed DCT file from your old server into the S8730 server. You must start with MAS #1.
2. Press the power button to reboot the MAS.
The Avaya Modular Messaging Configuration wizard runs automatically.
3. On the Welcome screen, click Next. 4. If the data file (such as sitefile.mmdct) is on the Locate Configuration Data screen,
highlight the file and then click Next; otherwise, do the following:
a. Click Browse.
b. In the Open window, click the drop-down list next to Look in.
c. Select the storage device, and navigate to the appropriate folder that contains the data file for this site. If the server fails to recognize the storage device, do one of the following:
1. In the Open window, click My Computer in the left pane. After the Look in field shows My Computer, press F5 to refresh the screen.
2. If the storage device still fails to appear, remove and then insert the device again.
d. Double-click the analysed DCT file you have edited earlier for this site, such as sitefile.mmdct.
e. On the Locate Configuration Data screen, select the correct data file.
f. Click Next. 5. When the system prompts you to confirm the data file, click Yes.
The system opens Avaya Modular Messaging Data Collection Tool window.
Migrating to Modular Messaging Release 5.1 on S8730-family server
222 Avaya Modular Messaging for Avaya MSS Release 5.1 Installation and Upgrades
a. If desired, page through each screen to verify the data. Click Next on each screen.
Note:Note: For more information about completing or verifying the data on each screen, see
Verifying DCT data on page 211.
b. To continue the configuration process, click Complete.
The system automatically saves the updated data to the MISCM folder on the server.
! CAUTION:CAUTION: Be sure to save the file back to the storage device, irrespective of whether you
updated any information in the DCT data file or not. You need a current copy for technical support and for subsequent server migrations.
The system returns you to the Avaya Modular Messaging Configuration Wizard.
6. On the Messaging Application Server Number screen, verify that the MAS number field shows the correct number for this server.
● Start with MAS#1.
● If required, change the MAS number field to show the correct number for this server.
7. Click Next. The Configuring System screen shows the MAS configuration starting. The Sysprep window opens. The server then reboots.
8. After the reboot, a Windows Setup wizard runs. To complete the wizard:
a. On the License Agreement screen, select I accept this agreement. Click Next. b. On the Your Product Key screen, type the Windows product key for this server.
Note:Note: Each Windows computer has a unique product key for the Windows 2003 R2
operating system. Enter the number exactly as shown. Record the product key.
- For an S8730 server, the product key sticker is located on the right-hand edge of the server chassis.
- Use only the new Windows product key received with the new S8730 and do not use the Windows product key from S3400 or S3500.
c. Click Next.The Avaya Modular Messaging Configuration Wizard displays its configuration status on the Configuring System screen. The server reboots several times, but you do not need to log on manually. The entire process takes about 30 minutes.
9. If the system displays a Configuration Credential LDAP failure, verify that the MSS is running. The MSS must be available during the MAS configuration process. If the MSS is running, try the following:
Migrating each MAS
Issue 1.0 June 2009 223
Avaya - Proprietary. Use pursuant to the terms of your signed agreement or Avaya policy.
● Verify that LDAP passwords in the DCT data file and on the MSS match. See Setting up the MSS local machine on page 32.
● Verify that the private network LAN cable is connected.
● If the above doesn’t work, contact support.
10. When the server configuration is complete, the progress bar stretches across the screen and the Next button becomes active. Click Next.
Note:Note: If you leave the server unattended, the server can time out. If you see a message
indicating that the computer is locked, press Ctrl+Alt+Del to log on.
11. On the Avaya Modular Messaging Wizard Completed screen, click Finish.
! CAUTION:CAUTION: Do not run the Avaya Modular Messaging Configuration Wizard on any
subsequent server until you complete the configuration of each server in turn.

Migrating to Modular Messaging Release 5.1 on S8730-family server
224 Avaya Modular Messaging for Avaya MSS Release 5.1 Installation and Upgrades
Preparing the new serverThis section describes how to update and protect the new server.
Installing and administering anti-virus software
Avaya strongly recommends that anti-virus software be installed on any Microsoft Windows computer that runs Avaya Modular Messaging software. The anti-virus software used and the method of installation depends on customer requirements and the local implementation. To install the anti-virus software, use the instructions in
For more information about anti-virus software, obtain "Modular Messaging and security;" see Downloading user documentation on page 12.
Updating Microsoft Windows
A new Avaya MAS contains the most current Microsoft Windows software at the time it is shipped. After installation, you must install the latest updates for Microsoft Windows, including operating system updates and security patches. These software updates protect the system from known security weaknesses. Check with the appropriate Windows administrator for the software update procedures to use at this site.
Note:Note: Avaya technical support representatives must follow the specified internal
procedures to verify the software that is installed. If required, the support representative must update the software with the latest patches as instructed.

Migrating each MAS
Issue 1.0 June 2009 225
Avaya - Proprietary. Use pursuant to the terms of your signed agreement or Avaya policy.
Reapply the remote access settings for each MAS
Do this task on each MAS.
Enter the IP addresses on each MAS to allow remote access:
1. Double-click the Configure icon on the desktop.
2. In the left pane of the Configure window:
a. Expand Routing and Remote Access.
b. Expand the server name, such as MYMAS1.
3. Set up a static IP address pool as follows:
a. In the left pane, right-click the server name, such as MYMAS1. Select Properties.
b. In the local Properties window for the server, click the IP tab.
c. Under IP address assignment, select Static address pool. d. Add or edit the address range as follows:
● If the window shows an incorrect IP address range, select the displayed range and click Edit. For example, the range might show all zeroes or start with 192.168.2.
! CAUTION:CAUTION: If Avaya is to support this server, do not use the preprogrammed IP addresses,
such as 192.168.2.200. You must Edit or Remove these addresses for Avaya remote access to work.
● If no address range is already entered, click Add.
e. In the Address Range window, enter the start and end IP addresses for this server.
f. Verify that the number of addresses is 2.
g. Click OK.
h. For the Adapter field, select Allow RAS to select adapter. i. Click OK to close the properties window.
4. Close the Configure window.

Migrating to Modular Messaging Release 5.1 on S8730-family server
226 Avaya Modular Messaging for Avaya MSS Release 5.1 Installation and Upgrades
Updating settings in the VMSCAfter the migration, you must verify and update certain key settings in the Voice Mail System Configuration (VMSC) program, as described in this section.
Note:Note: The system prompts you to restart service several times during this procedure.
You need to restart service only when this guide instructs you. You must restart service before entering the port board extension numbers in Configuring MAS-specific parameters on page 74. You must restart service again at the end, when configuration is complete.
Use the following steps to verify and update the following key settings:
1. In the Voice Mail System Configuration window, double-click the appropriate voice mail domain.
2. Verify key settings such as TUI settings, switch integration settings, and port board extensions.
3. Verify port board settings and port groups using the following steps:
a. Double-click Message Application Servers.
Note:Note: These values are already be set. Use the most current configuration notes for this
PBX integration.
b. Expand the appropriate MAS, such as MYMAS1.
c. Double-click Telephony Interface. Verify the port board settings for this MAS. Use the configuration notes, download the configuration notes as instructed in see Downloading configuration notes on page 11.
Note:Note: To verify Dialogic board configuration settings, see Appendix B: Configuring and
testing port boards on page 279.

Migrating each MAS
Issue 1.0 June 2009 227
Avaya - Proprietary. Use pursuant to the terms of your signed agreement or Avaya policy.
4. Update the access permissions for the Modular Messaging system:
a. In the Voice Mail System Configuration window, expand Security.
! CAUTION:CAUTION: You must complete all updates to permissions in Steps b and c before you exit
the VMSC. Otherwise, you can lose access to the system, and you must start over from Migrating each MAS on page 221.
b. Double-click System Administration.
1. Add the appropriate Modular Messaging logon accounts.
In an MSS configuration, the Microsoft Windows Domain Admins account includes the other logon accounts. To add the Domain Admins account:
- In the Permissions for System Administration window, click Add.
- In the Select Users, Computers, or Groups window, type the first letter of the account to add in the Enter the object names to select box. For example, type d for Domain Admins. Click Check Names.
- In the Multiple Names Found window, double-click the correct account.
- Verify that the account is underlined in the list box. Click OK.
- Optional: Repeat this task to add other logon accounts, if required.
2. Add the Modular Messaging local service account for each server in the system.
- In the Permissions for System Administration window, click Add.
- In the Select Users, Computers, or Groups window, click Object Types.
- In the Object Types window, select Computers so the box is checked. Click OK.
- In the Select Users, Computers, or Groups window, type the first letter of the server name in the Enter the object names to select box. For example, type m for mymas1. Click Check Names.
- In the Multiple Names Found window, double-click the server name. The Logon Name field shows the local account for this server in the form MASNAME$(privdom1\masname$), such as MYMAS1$(PRIVDOM1\MYMAS#1$).
- Verify that the local server name is listed and underlined in the list box. Click OK.
- Repeat this procedure to add the local service account for each MAS and the Supplementary server in the VMD to the System Administration ACL.
3. Select each Account Unknown entry. Click Remove.
4. Select the Everyone account. Click Remove.
5. Click OK to close the permissions window.

Migrating to Modular Messaging Release 5.1 on S8730-family server
228 Avaya Modular Messaging for Avaya MSS Release 5.1 Installation and Upgrades
! CAUTION:CAUTION: You must complete all updates to access permissions in Steps b and c before you
exit the VMSC. Otherwise, you can lose access to the system, and you must start over from Migrating each MAS on page 221.
c. Double-click Subscriber Administration.
In the Permissions for Subscriber Administration window:
1. Add the same Modular Messaging logon accounts as you did in Step 4-b.
2. Add the local account for each server in the system, as you did in Step 4-b.
3. Select each Account Unknown entry. Click Remove.
4. Select the Everyone account. Click Remove.
5. Click OK to close the permissions window.
5. Double-click Audio Encoding.
a. In the Audio Encoding window, change the Default Audio Encoding Format to:
● G.711 μ-Law (mu-Law) for the United States and Japan
● G.711 Α-Law for other countries, particularly Europe
Note:Note: The default Microsoft GSM encoding produces smaller files but poorer voice
quality. Update the audio encoding to provide better sound quality, especially for H.323 and SIP integrations. G.711 encoding is required to support TTY/TDD devices.
b. Click OK to close this window.
6. You must obtain a new RFA license for your migrated system, which includes setting up 12 TTS sessions per MAS. For instructions, see Obtaining and installing a license on MAS#1 on page 60.
7. In a multiple-MAS system, disable the Offline Access feature until all the servers are migrated. Otherwise, errors occur as the system searches for the missing offline store.
a. For MAS#1, in the Voice Mail System Configuration window, double-click Messaging.
b. Click the Offline Access tab.
c. Clear the Enable offline access to messages check box and click OK.
You must enable the Offline Access feature only after you complete the migration of all MASs as described in Enabling Offline Access to messages on page 234.
8. Complete the following steps to verify all Personal Operator Schedules:
a. In the Voice Mail System Configuration window, double-click the appropriate voice mail domain.
b. Double-click Telephone User Interface.
Migrating each MAS
Issue 1.0 June 2009 229
Avaya - Proprietary. Use pursuant to the terms of your signed agreement or Avaya policy.
c. Select the Personal Operator Schedules tab.
d. Verify that all Personal Operator Schedules recorded before the migration are included in the list. If a schedule is missing, complete the following steps:
1. Click Add.
2. In the Enter Personal Operator Schedule Name dialog box in the Schedule Name field, enter the name of the missing schedule.
3. Click OK to return to the Personal Operator Schedules tab.
4. In the schedule grid, enter the schedule times.
e. Click each Personal Operator Schedule in the schedule list and verify that the schedule times correspond to the times recorded before the migration, which in Release 2.0 would be on the Attendant Schedules tab. Correct any discrepancies in the schedule grid.
f. Close all windows.
Creating the offline message share, if needed
Do this task only on the server that is to host the Offline Message Store.
In a multiple-MAS system that uses the Offline Access feature, the system requires an offline message store to synchronize messages among the MASs. If the folder for offline message access is to be located on this server, you must first create the shared folder for the offline messages. The folder must be available before you can administer the Offline Access feature.
To create a shared folder for offline messages with the correct permissions:
1. Using Windows Explorer, create a new folder on this server. For example, create RemoteOfflineStore on the C: drive.
2. Right-click the folder name and select Sharing and Security.
3. In the Properties window, on the Sharing tab:
a. Select Share this folder. b. Verify the Share name, such as RemoteOfflineStore.
c. Click Permissions.
d. In the Permissions window, verify that the Everyone account exists. If it does exist, continue with step 4. If the Everyone account does not exist, do the following to add it:
1. In the Permissions window, click Add.
2. In the Select Users, Computers, or Groups window, type the first letter of the account to add in the Enter the object names to select box.
For example, type e for Everyone.
3. Click Check Names.
4. In the Multiple Names Found window, double-click the correct account.

Migrating to Modular Messaging Release 5.1 on S8730-family server
230 Avaya Modular Messaging for Avaya MSS Release 5.1 Installation and Upgrades
5. Verify that the account is listed and underlined in the list box.
6. Click OK.
7. Optional: Repeat this task to add other logon accounts, if required.
8. Give the correct share permissions to the accounts. In the Permissions window:
- Select each account in turn.
- In the Permissions box, under Allow, select the permissions Change and Read, so the boxes are checked.
- Repeat this task for each logon account.
9. Click OK to close the Permissions window.
4. In the Properties window, click the Security tab.
a. Click Add and add all Modular Messaging computer accounts that will access the offline storage server:
1. In the Select Users, Computers, or Groups window, click Object Types.
2. In the Object Types window, select Computers so the box is checked. Click OK.
3. In the Select Users, Computers, or Groups window, type the first letter of the server name in the Enter the object names to select box. For example, type m for mymas1.
4. Click Check Names.
5. In the Multiple Names Found window, double-click the server name.
The Logon Name field shows the local account for this server in the form MASNAME$(privdom1\masname$), such as MYMAS1$(PRIVDOM1\MYMAS#1$).
6. Verify that the local server name is listed and underlined in the list box. Click OK.
7. Repeat this procedure to add a local service account for each server in the system.
b. Give the correct share permissions to these accounts. In the Properties window:
1. Select each account in turn.
2. In the Permissions box, under Allow, select the following permissions so the boxes are checked:
- Modify
- Read & Execute
- List Folder Contents
- Read
- Write
3. Repeat this task for each logon account and each MAS computer account.
5. Click OK to close the Properties window.
6. Reboot each MAS in the system for the offline access permissions to take effect.

Migrating each MAS
Issue 1.0 June 2009 231
Avaya - Proprietary. Use pursuant to the terms of your signed agreement or Avaya policy.
Restarting messaging services
After you verify and update all required settings, you must restart the messaging service for the configuration changes to take effect. Verify that the system is working.
To restart messaging service:
1. Double-click the Monitor icon on the desktop.
2. Click Services (Local) in the left pane, if the item is not already selected.
3. Restart messaging service to accept any changes you made in the VMSC:
a. In the right pane of the Monitor window, scroll down to MM Messaging Application Server. Right-click it and select Stop.
! CAUTION:CAUTION: Do not select the Restart option. Always stop, and then start, as described.
b. When service is stopped, right-click MM Messaging Application Server again and select Start. The system restarts the messaging service.
Note:Note: When you restart messaging service, the Monitor window displays the status of
the service as Started. However, the service might take several minutes to start, depending on the number of port boards installed and the integration method.
c. Track the startup progress as follows:
1. In the left pane, expand Event Viewer (Local), and then click Application.
2. Refresh the window display periodically until you see Telephony User Interface event 1241, TUI service has been enabled. You can then proceed.
4. Verify that the correct messaging services required for this MAS are started.
a. In the Monitor window, click Services (Local) in the left pane, if the item is not already selected.
b. In the right pane, scroll down to the list of Modular Messaging services. These services start with the abbreviation MM. Verify that the Status column shows the correct state for each messaging service:
● The following services, see Table 7, are automatically installed on every MAS. Enable them based on the information in the table.
● Services that are required for this server must show Started and a startup type of Automatic.
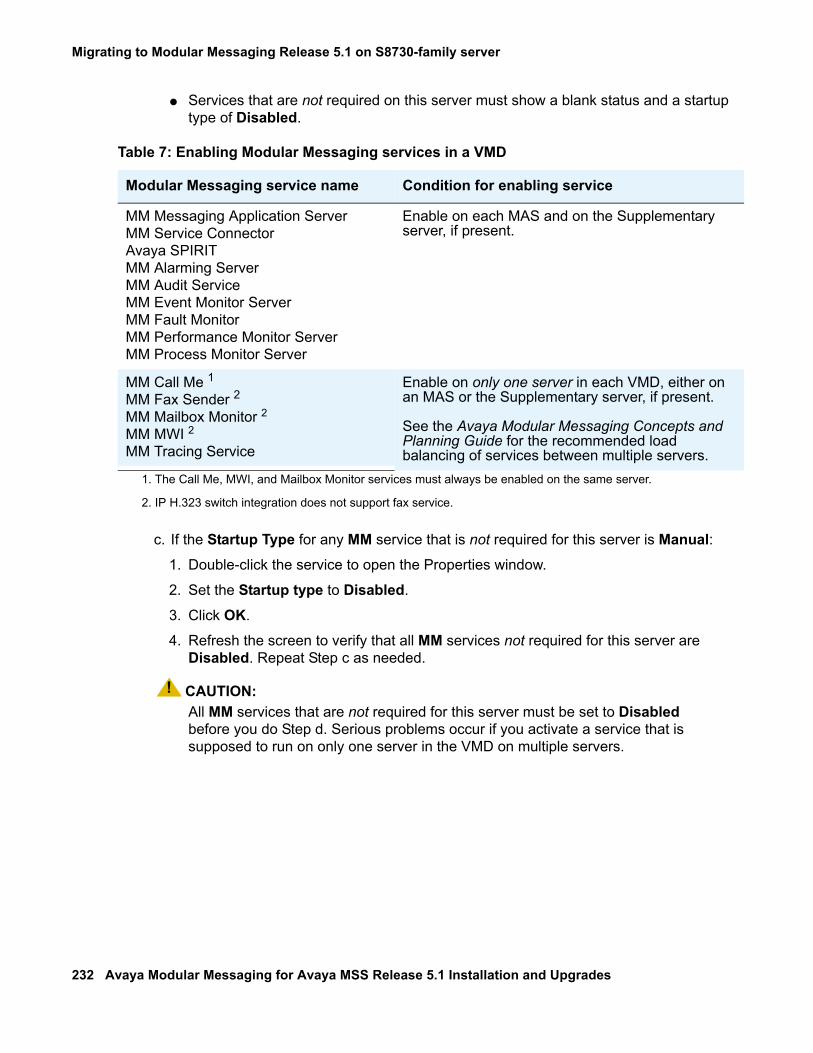
Migrating to Modular Messaging Release 5.1 on S8730-family server
232 Avaya Modular Messaging for Avaya MSS Release 5.1 Installation and Upgrades
● Services that are not required on this server must show a blank status and a startup type of Disabled.
c. If the Startup Type for any MM service that is not required for this server is Manual: 1. Double-click the service to open the Properties window.
2. Set the Startup type to Disabled.
3. Click OK.
4. Refresh the screen to verify that all MM services not required for this server are Disabled. Repeat Step c as needed.
! CAUTION:CAUTION: All MM services that are not required for this server must be set to Disabled
before you do Step d. Serious problems occur if you activate a service that is supposed to run on only one server in the VMD on multiple servers.
Table 7: Enabling Modular Messaging services in a VMD
Modular Messaging service name Condition for enabling service
MM Messaging Application ServerMM Service ConnectorAvaya SPIRITMM Alarming ServerMM Audit Service MM Event Monitor ServerMM Fault MonitorMM Performance Monitor ServerMM Process Monitor Server
Enable on each MAS and on the Supplementary server, if present.
MM Call Me 1 MM Fax Sender 2MM Mailbox Monitor 2MM MWI 2MM Tracing Service
1. The Call Me, MWI, and Mailbox Monitor services must always be enabled on the same server.
2. IP H.323 switch integration does not support fax service.
Enable on only one server in each VMD, either on an MAS or the Supplementary server, if present.
See the Avaya Modular Messaging Concepts and Planning Guide for the recommended load balancing of services between multiple servers.
Migrating each MAS
Issue 1.0 June 2009 233
Avaya - Proprietary. Use pursuant to the terms of your signed agreement or Avaya policy.
d. If the Status for any MM service that is required for this server is Stopped or blank:
1. Click Start > Run to open the Run window.
2. In the Open field, type the following and press Enter: C:\Avaya_Support\Scripts\serverrecovery.vbs
The script takes a few seconds to run. The program sets up all MM services correctly.
3. Refresh the screen to verify that all MM services required for this server are Started and set to Automatic.
4. If any required MM services are not set up correctly, repeat Step d.
5. When configuration is complete, close all open windows.
6. For a multiple-MAS system, after you configure the last MAS, restart MM services on all servers in the VMD. A restart ensures that the voice mail domain-wide properties are consistent across the VMD. To restart MM services on all MASs in the voice mail domain:
a. Switch the monitor to show the next MAS in the system.
b. Repeat steps 3 through 5 under Restarting messaging services on page 231 to restart messaging service.
c. Repeat step 6 for each MAS in the system.
Completing VMSC setup
Complete the following for the current MAS:
1. Enter product IDs for the current MAS; see Entering Product ID for current MAS on page 63.
2. Configure the SNMP trap destination and community details using the Serviceability - Voice Mail Domain window of the Voice Mail System Configuration program. Enter the SNMP trap destination and community information you recorded before beginning the migration. For additional information, see Configuring serviceability settings on MAS#1 on page 58.
3. Configure the following services as applicable:
● MM Audit Service; see Configuring MM Audit Service on page 67.
● MM Fax Sender server; see Configuring the MM Fax Sender server on page 68.
4. Verify each service:
● MM Audit Service; see Verifying Audit service on page 83.
● MM Fax Sender server; see Creating and printing a fax message on page 129.
Migrating to Modular Messaging Release 5.1 on S8730-family server
234 Avaya Modular Messaging for Avaya MSS Release 5.1 Installation and Upgrades
Continuing the MAS migrationAfter you migrate an MAS, continue as appropriate:
● For MAS#1, continue the migration all the way through Completing MSS administration on page 234. If you restore the data onto MAS#1 and redeploy the caller applications, all subsequent MASs will automatically get the deployed Caller Applications.
● For subsequent MASs and Supplementary server:
1. Ensure that the most current data file is on the storage device.
! CAUTION:CAUTION: When you update any information in the DCT data file, save the updated file to
the storage device. You must use the most current copy for subsequent server migrations. Copy the most recent DCT data file to the storage device:
2. Configure each MAS:
● If you have another MAS or Supplementary server, continue with Migrating each MAS on page 221.
● If all MASs and Supplementary servers are now migrated, continue with Restoring data on each MAS on page 238.
Enabling Offline Access to messagesAfter you complete the migration of all MASs in the system, enable Offline Access feature:
1. In the VMSC window, double-click Messaging, and then click the Offline Access tab.
2. Select the Enable offline access to messages check box.
3. Click the Synchronize offline messages with remote store check box.
4. Click Browse to select an existing, shared folder in the domain for the remote offline message store. The name must use the format \\computername.privdom.local\sharename, such as \\mymas2.privdom.local\RemoteOfflineStore. For more information, see Creating the offline message share, if needed on page 229.
5. Click OK to close this window.
Completing MSS administrationComplete the following tasks on the MSS:
Completing MSS administration
Issue 1.0 June 2009 235
Avaya - Proprietary. Use pursuant to the terms of your signed agreement or Avaya policy.
● Verify the MAS host information on page 236
● Placing the MSS in the Windows domain—MAS#1 only on page 237

Migrating to Modular Messaging Release 5.1 on S8730-family server
236 Avaya Modular Messaging for Avaya MSS Release 5.1 Installation and Upgrades
Verify the MAS host information Repeat this task for each MAS you migrate.
MSS updates the host information, and then sends the updated information to all MASs in the Modular Messaging system as outlined in Updating MAS host information on page 105.
Verify that all servers that are currently in the Modular Messaging system are updated.
1. On the Messaging Administration web interface, click Server Administration> MAS Host Send.
The system displays the Send MAS Host Information page.
2. Click Send.
The system sends the host information to all MASs at the same time and reports whether the information was updated successfully.

Completing MSS administration
Issue 1.0 June 2009 237
Avaya - Proprietary. Use pursuant to the terms of your signed agreement or Avaya policy.
Placing the MSS in the Windows domain—MAS#1 onlyDo this task only once per each migration, after you migrate MAS#1.
Because you reloaded the software on MAS#1, you must add the MSS to the created Windows domain.
To add the MSS to the private Windows domain:
1. From the Server Administration menu, click Windows Domain Setup.
The system displays the Windows Domain Setup page.
2. Enter the following information in each field:
a. In the MSS NetBIOS Name field, type the MSS private system name, which is mss1.
b. In the NetBIOS Domain Name field, type the NetBIOS domain name for the private Windows domain that was created on MAS#1. For example, if the Fully Qualified Domain Controller name as shown in the DCT data file is mymas1.privdom1.local, enter privdom1 in the NetBIOS Domain Name field.
c. In the Fully Qualified Domain Controller Name field, type the full computer name for MAS#1 on the private network, such as mymas1.privdom1.local.
! CAUTION:CAUTION: In the following step, you must enter the current account name and password for
the MAS administrator or else MAS backups will fail. You must use the same account to set up system backups on each MAS. For more information, see Backing up the system on page 141.
d. In the Account For Joining The Domain field, type the domain administrator account name, such as dom-admin.
e. In the Password For Joining The Domain field, type the password for this account.
Note:Note: At this time make sure that the User Corporate LAN? check box is clear.
If joining the MM system to the corporate Windows domain DO NOT select Use Corporate LAN? check box at this time. You need to return after completing the corporate Windows domain setup and check this field.
If the system will remain on the private Windows domain, ensure that the Use Corporate LAN? check box is clear.
3. Click Save.
The page displays the Windows domain setup status.
Migrating to Modular Messaging Release 5.1 on S8730-family server
238 Avaya Modular Messaging for Avaya MSS Release 5.1 Installation and Upgrades
Restoring data on each MASRestore the backed-up data onto each MAS.
This section includes the following topics:
● Stopping all MM services on page 239
● Restoring backed-up MAS data on page 240
● Restoring Caller Applications—MAS#1 only on page 242 —required on MAS#1 only
● Restarting Modular Messaging services on page 243
● Installing software updates on page 244
● Updating Microsoft Windows on page 49
● Performing acceptance tests for a migration on page 245
Restoring data on each MAS
Issue 1.0 June 2009 239
Avaya - Proprietary. Use pursuant to the terms of your signed agreement or Avaya policy.
Stopping all MM servicesTo stop all Modular Messaging services:
1. Switch the monitor to show the correct MAS.
2. Stop all Modular Messaging services as follows:
a. Click Start > Run to open the Run window.
b. In the Open field, type the following and press Enter: C:\Avaya_Support\Tools\ServiceControl\StopMMServices.exe
A command window displays the status of the Modular Messaging services shutdown. The script might take several minutes to complete.
Note:Note: This script also stops Intel Dialogic services and some Windows services.
3. Confirm that all Modular Messaging services are stopped:
a. Double-click the Monitor icon on the desktop.
b. Click Services (Local) in the left pane, if the item is not already selected.
c. If the Monitor window was already open, refresh the screen.
d. In the right pane, scroll down to the list of installed Modular Messaging services. These all start with the abbreviation MM.
e. Verify that the Status column is blank. If any service is not stopped, repeat Steps 2 and 3.

Migrating to Modular Messaging Release 5.1 on S8730-family server
240 Avaya Modular Messaging for Avaya MSS Release 5.1 Installation and Upgrades
Restoring backed-up MAS data Restore the data on the MAS from the most recent backup. Data includes any customized caller applications, prompts, and tone files.
To restore the backed-up MAS data:
1. Map to the backup drive for this MAS on the MSS:
a. On the desktop, right-click the My Computer icon and select Map Network Drive.
Note:Note: If you renamed the icon label, the computer icon shows the server name, such as
mymas1.
b. In the Map Network Drive window, in the Folder field, type \\mss1\masbackup.
c. Clear the Reconnect at logon check box.
d. Click Connect using a different user name.
e. In the Connect As window, for User name, enter the private Windows domain name and the domain administrator account name in the format domain\account name. For example, type privdom1\dom-admin.
f. Enter the password for this account. Click OK.
g. In the Map Network Drive window, click Finish.
The system opens a window to the designated drive letter, such as Z:.
2. Double-click the Backup icon on the desktop.
3. In the Backup Utility window, on the Welcome tab, click Restore Wizard.
4. On the Welcome screen for the Restore Wizard, click Next. 5. On the What to Restore screen, click Browse.
a. In the Open Backup File window, click Browse.
b. In the Select file to catalog window, under Look in, navigate to the mapped drive.
c. Double-click the backup file for this MAS. For example, MYMAS1DailyBackup.bkf.
d. In the Open Backup File window, click OK.
The system returns to the What to Restore screen.
6. Verify that the system displays the full name of the MAS backup file in the right pane under Media Location. For example, Z:\MYMAS1DailyBackup.bkf.

Restoring data on each MAS
Issue 1.0 June 2009 241
Avaya - Proprietary. Use pursuant to the terms of your signed agreement or Avaya policy.
7. In the left pane under Items to restore, expand File.
a. Expand the correct entry for the daily backup of this MAS. The file uses the naming convention from the previous software release, such as Daily Backup of MYMAS1.
b. Expand C:.
8. Select the folders and files to be restored:
a. Select the Avaya_Support check box. This folder includes the Tone_Files folder, which contains any custom tone files.
b. Expand the folders Program Files > Avaya Modular Messaging > VServer. c. Select the VServer check box.
! CAUTION:CAUTION: Do not restore the System State! You also do not need to restore the hosts file,
because you already resent the most current version from the MSS.
d. Click Next. 9. On the Completing the Restore Wizard screen, click Advanced.
a. On the Where to Restore screen, select Original location. Click Next. b. On the How to Restore screen, select Replace existing files. Click Next. c. On the Advanced Restore Options screen, verify the following settings:
1. Clear the Restore security setting check box and the Restore junction points, not the folders and file data they reference check box.
2. Leave the Preserve existing volume mount points check box selected.
3. Click Next. 10. On the Completing the Restore Wizard screen, review the restore information. Click
Finish.
The Restore Progress window displays restore information.
11. When the data restoration is complete, close the Restore Progress window.
12. Close the Backup Utility window.
13. If the system asks if you want to restart, select to restart.
14. Close the mapped drive window, such as Z:\.
! CAUTION:CAUTION: You must disconnect the mapped drive, or automatic nightly backups might fail.
15. Disconnect the mapped drive:
a. On the desktop, right-click the My Computer icon and select Disconnect Network Drive.

Migrating to Modular Messaging Release 5.1 on S8730-family server
242 Avaya Modular Messaging for Avaya MSS Release 5.1 Installation and Upgrades
b. In the Disconnect Network Drives window, under Network Drives, select \\mss1\masbackup. Click OK.
Restoring Caller Applications—MAS#1 only Do this task only on MAS#1.
If Caller Applications were installed on the system, run the Caller Applications restore script:
1. Click Start > Run to open a Command prompt window.
2. In the Run window Open field, type the following and press Enter: C:\Avaya_Support\CMD\CARestore.bat A command window opens. The script shuts down all Modular Messaging services, and copies the Caller Applications to the server. The script takes a few seconds to run.
Note:Note: The system deploys Caller Applications automatically after migration. Restore the
Caller Applications on MAS#1 before you migrate any subsequent MASs. The additional MASs then have the Caller Applications automatically.

Restoring data on each MAS
Issue 1.0 June 2009 243
Avaya - Proprietary. Use pursuant to the terms of your signed agreement or Avaya policy.
Restarting Modular Messaging servicesAfter you restore the data, you must restart the Modular Messaging services for this MAS.
1. To restart Modular Messaging services:
a. Click Start > Run to open the Run window.
b. In the Open field, enter the following text and press Enter: C:\Avaya_Support\Scripts\serverrecovery.vbs
The script takes a few seconds to run.
2. Verify that all the Modular Messaging services required for the MAS are started:
a. Double-click the Monitor icon on the desktop or from the command prompt run services.msc.
b. Click Services (Local) in the left pane, if the item is not already selected.
c. If the Monitor window is already open, refresh the screen.
d. In the right pane, scroll down to the list of Modular Messaging services. All services start with the abbreviation MM. Verify that the Status column shows the correct state for each messaging service:
● Services that are required for this server must show Started and a startup type of Automatic.
● Services that are not required for this server must show a blank status and a startup type of Disabled. For more information, see Restarting messaging services on page 231.
e. If the Status for any MM service that is required for this server is Stopped or blank, repeat Steps 1 and 2.
The system starts a messaging service startup.
f. Track the startup progress as follows:
1. In the left pane, expand Event Viewer (Local), and then click Application.
2. Refresh the window display periodically until you see Telephony User Interface event 1241, TUI service has been enabled. You can then proceed.
g. Close the Monitor window.

Migrating to Modular Messaging Release 5.1 on S8730-family server
244 Avaya Modular Messaging for Avaya MSS Release 5.1 Installation and Upgrades
Installing software updatesThe Modular Messaging Release 5.1 software is the most current version available at the time of release. However, you need to update the software after a migration to include the latest changes. Avaya provides these updates in the form of an Avaya Service Pack (SP) or a software patch.
Complete the following steps to update Modular Messaging software:
1. Locate any relevant Avaya software updates on the Avaya Support Web site at http://www.avaya.com/support. For complete steps, see Getting software updates from the Web on page 326.
Note:Note: If you followed the procedure for Downloading software updates on page 10, you
already downloaded any required software updates.
2. Follow the instructions provided in Updating Modular Messaging software on page 325 to update the system with the latest changes before you do acceptance testing.

Restoring data on each MAS
Issue 1.0 June 2009 245
Avaya - Proprietary. Use pursuant to the terms of your signed agreement or Avaya policy.
Performing acceptance tests for a migrationTo verify that the migrated system is working correctly:
1. Continue with Running acceptance tests on page 122.
2. Do all acceptance tests that are appropriate for each server. For example:
● For an MAS, test that the server can send and receive calls.
● For all servers, verify that the services installed on that server are working. For example, if Message Waiting Indication (MWI) or Tracing Service is installed on a server, verify that these services work.
If you have migrated all MASs and Supplementary servers, continue with Completing the system migration on page 246.

Migrating to Modular Messaging Release 5.1 on S8730-family server
246 Avaya Modular Messaging for Avaya MSS Release 5.1 Installation and Upgrades
Completing the system migrationComplete the migration of Modular Messaging system as follows:
● Running a DCT analyze on the migrated system on page 246
● Backing up the system on page 246
● Completing the Modular Messaging system migration on page 251
● Updating or installing client software on page 252
Running a DCT analyze on the migrated system
Use the DCT to analyze the migrated system; see Using the DCT to analyze the current configuration on page 138.
Backing up the systemAfter the migration, back up the Modular Messaging system to save the new Release 5.1 data. First back up each MAS. Remove old backup files to free up space, and then back up the MSS.
Running backups on each MAS
Do this task on each MAS and the Supplementary server, if present.
To back up the Release 5.1 data on each MAS:
1. Switch the monitor to show the correct MAS.
2. Double-click the Scheduled Tasks icon on the desktop.
3. In the Scheduled Tasks window, run an attended backup on this MAS:
a. Right-click the MAS Backup task that is already set up.
b. Select Run.
The system immediately starts to back up the data on this MAS to the MSS. The Status column shows Running. When the backup is complete, the Status column goes blank. This backup takes about one minute.

Completing the system migration
Issue 1.0 June 2009 247
Avaya - Proprietary. Use pursuant to the terms of your signed agreement or Avaya policy.
4. Optional: To verify the success of the backup:
a. Double-click the Monitor icon on the desktop.
b. In the left pane, expand Event Viewer (Local), and then click Application.
1. Refresh the window display periodically until you see the following events:
- ntbackup 8009, End Verify of C:- ntbackup 8019, End Operation: The operation was successfully completed.
Note:Note: On MAS#1, the event viewer shows two sets of backup events because the
backup program generates two files on the MSS: MYMAS#1MASSingle.bkf and MYMAS#1MASAll.bkf. Backups on subsequent MASs generate only the MASAll.bkf file for each MAS, so only one set of backup events is present.
c. If the backup fails to run, verify the account settings:
1. Double-click the task MAS Backup to view the properties window.
2. In the MAS Backup window, click the Task tab. Verify that the account in the Run as field is the correct account that has permissions to run backups manually, such as privdom1\dom-admin. If the account is incorrect, type the correct value now. For more information, see Placing the MSS in the Windows domain—MAS#1 only on page 237.
3. If you change the account, or to verify the password, click Set password. In the Set Password window, enter and confirm the password for the required account. Click OK.
4. Click OK to close the MAS Backup window.
5. Repeat Step 3a to run the backup again.
5. Close the Scheduled Tasks window.
6. Repeat this procedure for each MAS in the system.

Migrating to Modular Messaging Release 5.1 on S8730-family server
248 Avaya Modular Messaging for Avaya MSS Release 5.1 Installation and Upgrades
Removing old backup files from the MSS
The Modular Messaging backup file names may have changed from the release that your system was running to Release 5.1. You must remove the old backup file from each MAS in the system so it does not use up valuable disk space on the MSS.
! CAUTION:CAUTION: Do not remove the old backup files until you confirm that data restoration is
complete and that the new MAS backup procedure is working.
To remove the old backup files from each MAS:
1. Switch the monitor to show the MAS.
2. Map to the backup drive on the MAS:
a. On the desktop, right-click the My Computer icon and select Map Network Drive.
Note:Note: If you renamed the label, the computer icon shows the server name, such as
mymas1.
b. In the Map Network Drive window, in the Folder field, type \\mss1\masbackup.
c. Clear the Reconnect at logon check box.
d. Click Connect using a different user name.
e. In the Connect As window, in the User name field, enter the Windows domain name and the domain administrator account name in the format domain\account name. For example, type privdom1\dom-admin.
f. Enter the password for this account. Click OK.
g. In the Map Network Drive window, click Finish.
The system opens a window to the designated drive letter, such as Z:\.
3. In Windows Explorer, locate the backup file for the pre-migrated system on the MSS. The old backup file is at least 264 MB in size and uses the format MYMASDailyBackup.bkf, where MYMAS is the host name of the MAS.
! CAUTION:CAUTION: The following backup files support Release 5.1. Do not delete any of the following
files, where MYMAS is the host name of the MAS.
- MYMAS#1MASSingle.bkf contains deployed Caller Applications data for the system, the *.uma files. Only MAS#1 generates this file.
- MYMAS#MASAll.bkf contains tone files, custom prompts, and PBX configuration information. Each MAS in the system generates its own MASAll.bkf file.

Completing the system migration
Issue 1.0 June 2009 249
Avaya - Proprietary. Use pursuant to the terms of your signed agreement or Avaya policy.
4. Delete the old backup file for this MAS:
a. Right-click the old backup file, such as MYMASDailyBackup.bkf. Select Delete.
b. When the system prompts you to confirm the deletion, click Yes.
c. Close the window to the mapped drive.
5. Disconnect the mapped drive:
a. On the desktop, right-click the My Computer icon and select Disconnect Network Drive.
b. In the Disconnect Network Drives window, under Network Drives, select \\mss1\masbackup. Click OK.
Note:Note: You must disconnect the mapped drive, or automatic nightly backups might fail.
6. Repeat this task for each MAS in the system.
Backing up the MSS
After you have run an attended backup of each MAS, run an attended backup on the MSS now. Make the first system backup to DVD-RAM.
1. Log on to the MSS server as craft using the appropriate password.
The system displays the Messaging Administration web interface.
2. Insert a labeled, writable DVD-RAM into the DVD drive for the system backup.
3. To run an attended backup, from the Backup/Restore menu, click Backup.
The system displays the Backup page.
4. Make a backup of the new Release 5.1 system data:
a. Because the system is not yet in service, you do not have to stop the voice system.
b. Verify that Media Type is set to DVD-RAM.
c. Set all the data fields to back up to Yes.
d. Click Start Backup.
e. If the system prompts you to continue, click Continue.
f. The system estimates the number of DVDs that it requires. Verify that you have the correct number of DVDs available. Click Continue.
g. When the system prompts you to insert the DVD, click Continue.
The system saves the new system configuration to the DVD. Allow about 30 minutes for each DVD.
h. Follow the prompts on the screen to track and complete the backup process. Scroll to the bottom of the page to see the most recent status messages. The message

Migrating to Modular Messaging Release 5.1 on S8730-family server
250 Avaya Modular Messaging for Avaya MSS Release 5.1 Installation and Upgrades
FULL-MANUAL BACKUP completed successfully indicates that the backup is complete.
5. After the backup is complete, restart the messaging service:
a. From the Utilities menu, click Start Messaging.
b. On the Start Messaging Software page, the system displays the status of starting the messaging system. Verify that voice messaging restarts.
6. After the backup is complete, leave the DVD-RAM backup medium in the DVD-RAM drive to support the next unattended backup.
7. Consult with the customer about the method to use at this site for running regular unattended (scheduled) backups of the system data.
The system supports backups to DVD-RAM or through the customer network using FTP/SFTP. For instructions, obtain "Backing up the MSS;" see Downloading user documentation on page 12. For overview information, see Avaya Modular Messaging Concepts and Planning Guide.
Completing the system migration
Issue 1.0 June 2009 251
Avaya - Proprietary. Use pursuant to the terms of your signed agreement or Avaya policy.
Completing the Modular Messaging system migration Use the following steps to complete the Modular Messaging system migration:
1. Connect any disconnected modems to restore normal alarming for the Modular Messaging system.
2. Review event and alarm logs and resolve any problems; see the Avaya Modular Messaging MAS Administration Guide.
3. On the Messaging Administration web interface, complete the following:
a. Under the Alarming menu, click Alarming Configuration.
The system opens Configure Alarms page.
b. In the Alarm Suppression field, click INACTIVE.
4. On the MAS, enable alarms:
a. Click Start > Programs > Avaya Modular Messaging > Voice Mail System Configuration.
b. Under the voice mail domain name, double-click Serviceability.
c. On the Serviceability page, on the General tab, clear the Suppress alarm notifications check box to turn it on the alarm notifications options.
d. Close all windows.
5. If you are adding a new MAS to the system, install the new server now.
- Print Modular Messaging on Avaya MAS installation checklist on page 258 or Modular Messaging on a customer-provided MAS installation checklist on page 264 as appropriate and use as a guide.
a. Install the new server. For more information, see Installing the Avaya S8730 Server for Modular Messaging guide.
b. Update the DCT data file, configure the new server, and redistribute the Modular Messaging services to all installed servers.
c. Send a copy of the most current DCT data file to the appropriate technical support group. Afterwards, erase the data file from your storage device for security purposes.

Migrating to Modular Messaging Release 5.1 on S8730-family server
252 Avaya Modular Messaging for Avaya MSS Release 5.1 Installation and Upgrades
Updating or installing client softwareAfter the Modular Messaging system migration is complete, you might need to update or install new client software. Client software includes:
● Modular Messaging Web Client—must be on its own server, not on an MAS or a Supplementary server
● Modular Messaging Web Subscriber Options, if installed on a non-MAS server
● Avaya Modular Messaging Notes Client
● Avaya Modular Messaging Outlook Client, Avaya Modular Messaging Outlook Restricted Client, Subscriber Options.
Note that Subscriber Options components are installed automatically on the MAS as part of the migration to Release 5.1. Do not manually install or delete any MM Clients, including Subscriber Options. For more information, see the Avaya Modular Messaging Subscriber Options User Guide; see Downloading configuration notes on page 11.
Reducing servers by replacing S3400 servers with S8730 servers
Issue 1.0 June 2009 253
Avaya - Proprietary. Use pursuant to the terms of your signed agreement or Avaya policy.
Reducing servers by replacing S3400 servers with S8730 servers
This migration scenario describes how to reduce the number of MASs in your VMD by replacing S3400-family servers with S8730 family servers.
Note:Note: Use this procedure only to reduce the number of S3400 MASs.
The modular Messaging system in this example has four S3400-family server MASs, each running 23 ports of T1 QSIG. You are upgrading to Release 5.1 so the customer is required to use the S8730-family servers. Since S8730 server has more port capacity, you need only two S8730 servers, each running 46 ports of T1 QSIG.
Note:Note: Ensure that the current system is in a like-for-like state prior to the upgrade in
terms of the number of MASs, boards, and port configurations or the upgrade will fail. Which means you must consolidate and configure the T1 QSIG port boards into two MASs for the current S3400-family servers.
1. Move and configure the T1 QSIG port boards:
a. Move the T1 QSIG board from S3400 MAS#3 to S3400 MAS#1.
b. Configure the boards using DCM; see Configuring port boards on page 281.
c. Double-click the Monitor icon on the DCM.
d. Click Services (Local) in the left pane, if the item is not already selected.
e. In the right pane, scroll down to MM Messaging Application Server. f. Right-click MM Messaging Application Server and select Start.
g. Using VMSC, increase the number of ports in S3400 MAS#1 to 46 and allocate the ports to the required port groups.
h. Restart the Message Application service on the S3400 MAS#1.
i. Repeat this process to move the T1 QSIG board from S3400 MAS#4 to S3400 MAS#2.
j. Confirm that all of the ports in each server are working properly before continuing.
2. Remove MAS#3 and MAS#4 as Trusted Servers from the MSS:
a. At the MSS prompt, log on as craft. The server displays the Messaging Administration web interface.
b. Click Trusted Servers.
c. On the Manage Trusted Servers page, click Delete the Selected Trusted Server to remove the Trusted Server information for MAS#3 and MAS#4.
Migrating to Modular Messaging Release 5.1 on S8730-family server
254 Avaya Modular Messaging for Avaya MSS Release 5.1 Installation and Upgrades
3. Remove the MAS host information for MAS#3 and MAS#4:
a. From the Server Administration menu, click MAS Host Setup.
b. Click Remove to remove the Host information for MAS#3 and MAS#4.
4. Remove MAS#3 and MAS#4 from the VMD:
a. Sign onto MAS#3 as craft.b. Click Start > Programs > Avaya Modular Messaging > Voice Mail System
Configuration to open the VMSC window.
c. In the VMSC window, double-click Message Application Servers.
d. Right-click MAS#3 and from the pop-up menu, click Remove.
e. Repeat this process for MAS#4.
f. Shutdown the MAS#3 and MAS#4 S3400-family servers.
! CAUTION:CAUTION: Do not use the DCT to move services from one MAS to another during the
migration! Moving services might require changes elsewhere in the system, such as on the MSS and in the VMSC. Move Modular Messaging services only after the migration is complete.
5. Obtain and run the DCT (mmdct.exe) to collect data and analyze the remaining S3400 MASs; see Using the DCT to collect information from an MAS on page 210.
6. Continue with the migration to Release 5.1; see Migrating MSS and MAS to the S8730-family server on page 214.

Changing switch integration
Issue 1.0 June 2009 255
Avaya - Proprietary. Use pursuant to the terms of your signed agreement or Avaya policy.
Changing switch integration The switch integrations may use different Dialogic port boards or may not use a Dialogic port board. If you are changing the switch integration as part of the migration procedure, the system does not restore the configuration for switch configuration and Dialogic port boards. Therefore, you must manually configure them. Use the procedures described in Configuring port boards and switch integration on page 75 and procedures described in Configuring and testing port boards on page 279.
If you have to change the switch integration while migrating the Modular Messaging system to Release 5.1, you must first complete the migration of the MSS and all of the MASs using the procedures outlined in this chapter.
You do not have to perform this procedure if you are not changing switch integration. The migration process restores the initial switch configurations.

Migrating to Modular Messaging Release 5.1 on S8730-family server
256 Avaya Modular Messaging for Avaya MSS Release 5.1 Installation and Upgrades
Moving to the corporate Windows domain after migrationAfter you migrate to Release 5.1, you can move the Avaya Modular Messaging system to the customer’s corporate Windows domain. This option is beneficial to customers who do not want a separate private Windows domain within their network. For complete procedure to move the Avaya Modular Messaging system to the corporate Windows domain, see Moving to the corporate Windows domain after upgrade on page 192.
Issue 1.0 June 2009 257
Avaya - Proprietary. Use pursuant to the terms of your signed agreement or Avaya policy.
Appendix A: Installation and upgrade checklists
This appendix provides checklists to help guide you through the various installation, upgrades and migration tasks.
● Before you start a new Modular Messaging installation or upgrade, print the checklist relevant to the procedure that you must do.
● Check off the steps as you complete to ensure that you do not miss any important task.
Note:Note: If you want to add a new MAS to an existing Modular Messaging system,
upgrade the software first if one is required. Install the new MAS using the new installation checklist.
The checklists include:
● New Installation
- Modular Messaging on Avaya MAS installation checklist on page 258
- Modular Messaging on a customer-provided MAS installation checklist on page 264
● Upgrades and migration
● Modular Messaging Release 5.1 upgrade and migration checklists on page 269
- Modular Messaging Release 3.x or 4.0 on S3500-family server upgrade checklist on page 269
- Modular Messaging Release 5.1 system migration checklist on page 273
● Moving Modular Messaging system after an upgrade or migration
- Moving the MM system to the corporate Windows domain checklist on page 278

Installation and upgrade checklists
258 Avaya Modular Messaging for Avaya MSS Release 5.1 Installation and Upgrades
Modular Messaging on Avaya MAS installation checklistUse the following checklist to install a new Avaya Modular Messaging system. As you complete a task, make a check mark in the column.
Modular Messaging on Avaya-provided MAS installation checklist
Description Page Comments
Complete preinstallation planning:
If Avaya is to maintain this system, pre-register each MAS in ART to obtain the server product ID and IP addresses for remote access.
You can obtain the required information for each MAS in advance.
Obtain the DCT data file for this site. 9 Local procedures vary.
Assemble and review the required documentation. 9 Web access required.
Download any required Avaya software updates (including Outlook Client, DCT Tool, and the Pre-upgrade and Backup Verification Tool).
10 Web access required.
Obtain user documentation. 12
Review security issues. 13
Obtain the required anti-virus software for the MAS. 14 Customer gets the needed software.
Collect any software media that is needed for the installation, such as Microsoft Windows updates.
14 Leave customer DVDs on-site.
Gather the necessary test equipment. 14
Gather the necessary tools for installation. See Installing the Avaya S8730 Server for Modular Messaging guide
Arrange for LAN administration of the Modular Messaging system. Register MAS and MSS corporate computer names on the DNS.
Note: Avaya Inc. is not responsible for the installation, administration, or test of communications between customer PCs and the LAN.
15 See LAN administrator.
Verify that the PBX or switch is administered. 15 See switch administrator.
Create user accounts in the corporate Windows domain. Performed by the corporate domain admin
17 Only for systems that join the corporate Windows domain.
Table page 1 of 6
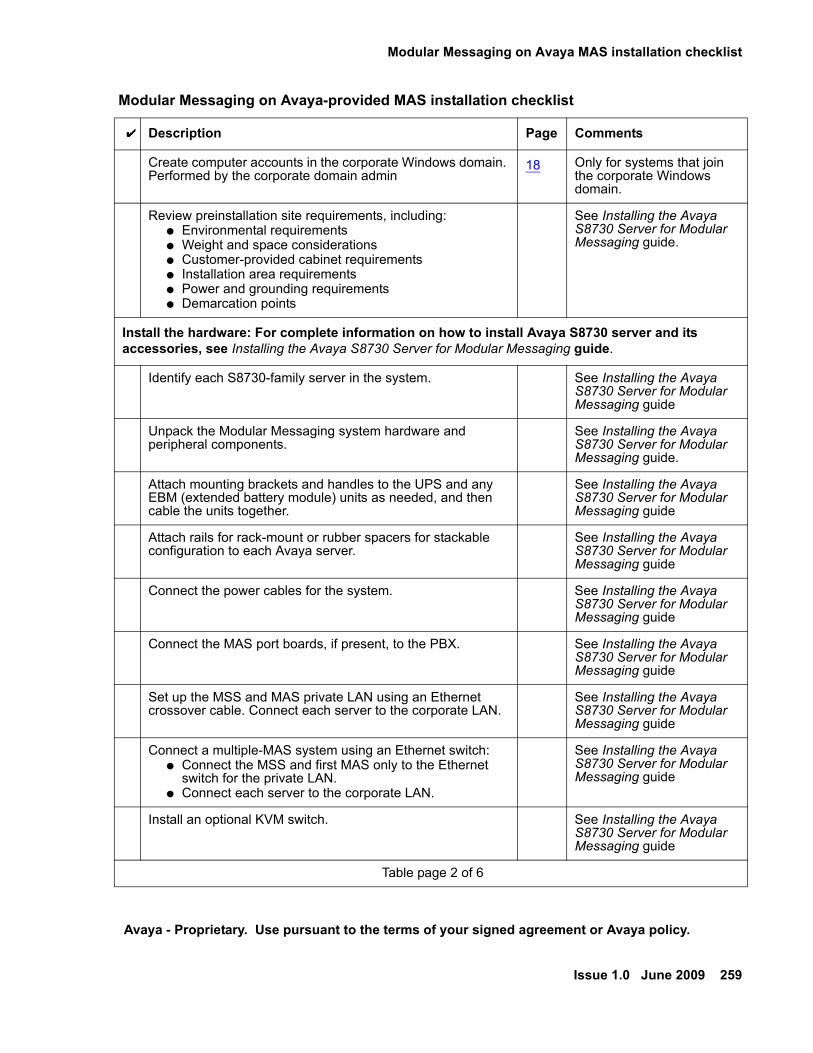
Modular Messaging on Avaya MAS installation checklist
Issue 1.0 June 2009 259
Avaya - Proprietary. Use pursuant to the terms of your signed agreement or Avaya policy.
Create computer accounts in the corporate Windows domain. Performed by the corporate domain admin
18 Only for systems that join the corporate Windows domain.
Review preinstallation site requirements, including:● Environmental requirements● Weight and space considerations● Customer-provided cabinet requirements● Installation area requirements● Power and grounding requirements● Demarcation points
See Installing the Avaya S8730 Server for Modular Messaging guide.
Install the hardware: For complete information on how to install Avaya S8730 server and its accessories, see Installing the Avaya S8730 Server for Modular Messaging guide.
Identify each S8730-family server in the system. See Installing the Avaya S8730 Server for Modular Messaging guide
Unpack the Modular Messaging system hardware and peripheral components.
See Installing the Avaya S8730 Server for Modular Messaging guide.
Attach mounting brackets and handles to the UPS and any EBM (extended battery module) units as needed, and then cable the units together.
See Installing the Avaya S8730 Server for Modular Messaging guide
Attach rails for rack-mount or rubber spacers for stackable configuration to each Avaya server.
See Installing the Avaya S8730 Server for Modular Messaging guide
Connect the power cables for the system. See Installing the Avaya S8730 Server for Modular Messaging guide
Connect the MAS port boards, if present, to the PBX. See Installing the Avaya S8730 Server for Modular Messaging guide
Set up the MSS and MAS private LAN using an Ethernet crossover cable. Connect each server to the corporate LAN.
See Installing the Avaya S8730 Server for Modular Messaging guide
Connect a multiple-MAS system using an Ethernet switch:● Connect the MSS and first MAS only to the Ethernet
switch for the private LAN. ● Connect each server to the corporate LAN.
See Installing the Avaya S8730 Server for Modular Messaging guide
Install an optional KVM switch. See Installing the Avaya S8730 Server for Modular Messaging guide
Modular Messaging on Avaya-provided MAS installation checklist
Description Page Comments
Table page 2 of 6
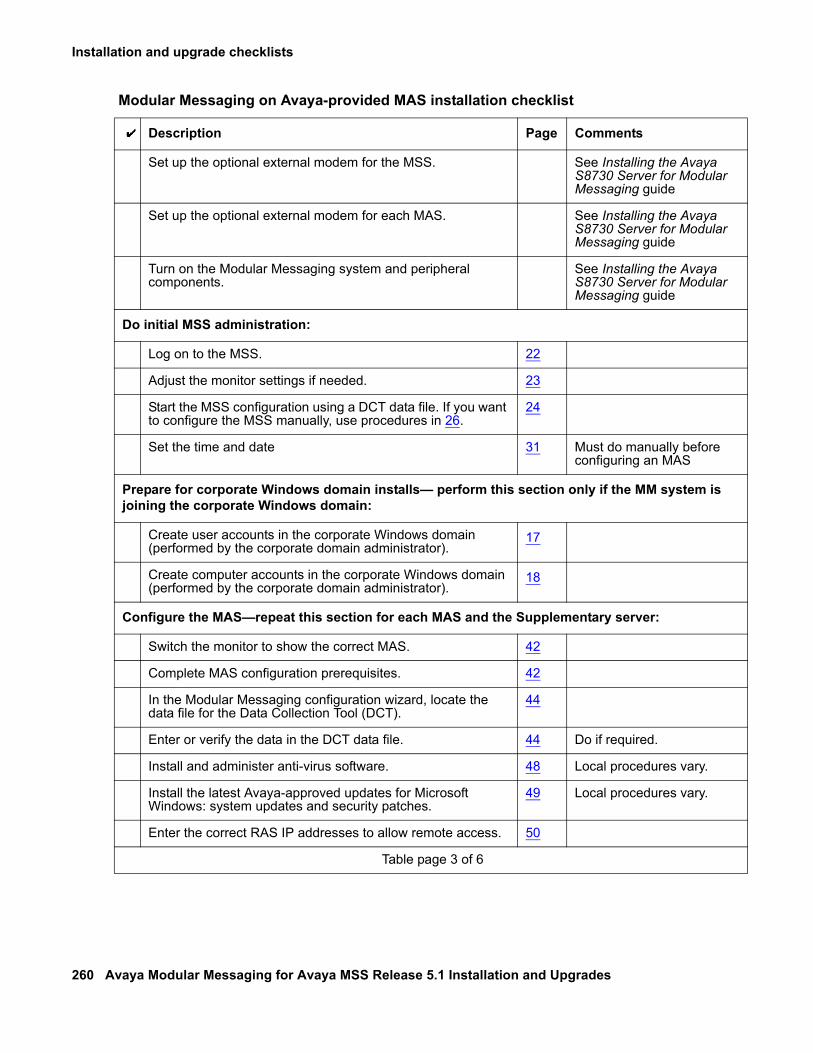
Installation and upgrade checklists
260 Avaya Modular Messaging for Avaya MSS Release 5.1 Installation and Upgrades
Set up the optional external modem for the MSS. See Installing the Avaya S8730 Server for Modular Messaging guide
Set up the optional external modem for each MAS. See Installing the Avaya S8730 Server for Modular Messaging guide
Turn on the Modular Messaging system and peripheral components.
See Installing the Avaya S8730 Server for Modular Messaging guide
Do initial MSS administration:
Log on to the MSS. 22
Adjust the monitor settings if needed. 23
Start the MSS configuration using a DCT data file. If you want to configure the MSS manually, use procedures in 26.
24
Set the time and date 31 Must do manually before configuring an MAS
Prepare for corporate Windows domain installs— perform this section only if the MM system is joining the corporate Windows domain:
Create user accounts in the corporate Windows domain (performed by the corporate domain administrator).
17
Create computer accounts in the corporate Windows domain (performed by the corporate domain administrator).
18
Configure the MAS—repeat this section for each MAS and the Supplementary server:
Switch the monitor to show the correct MAS. 42
Complete MAS configuration prerequisites. 42
In the Modular Messaging configuration wizard, locate the data file for the Data Collection Tool (DCT).
44
Enter or verify the data in the DCT data file. 44 Do if required.
Install and administer anti-virus software. 48 Local procedures vary.
Install the latest Avaya-approved updates for Microsoft Windows: system updates and security patches.
49 Local procedures vary.
Enter the correct RAS IP addresses to allow remote access. 50
Modular Messaging on Avaya-provided MAS installation checklist
Description Page Comments
Table page 3 of 6
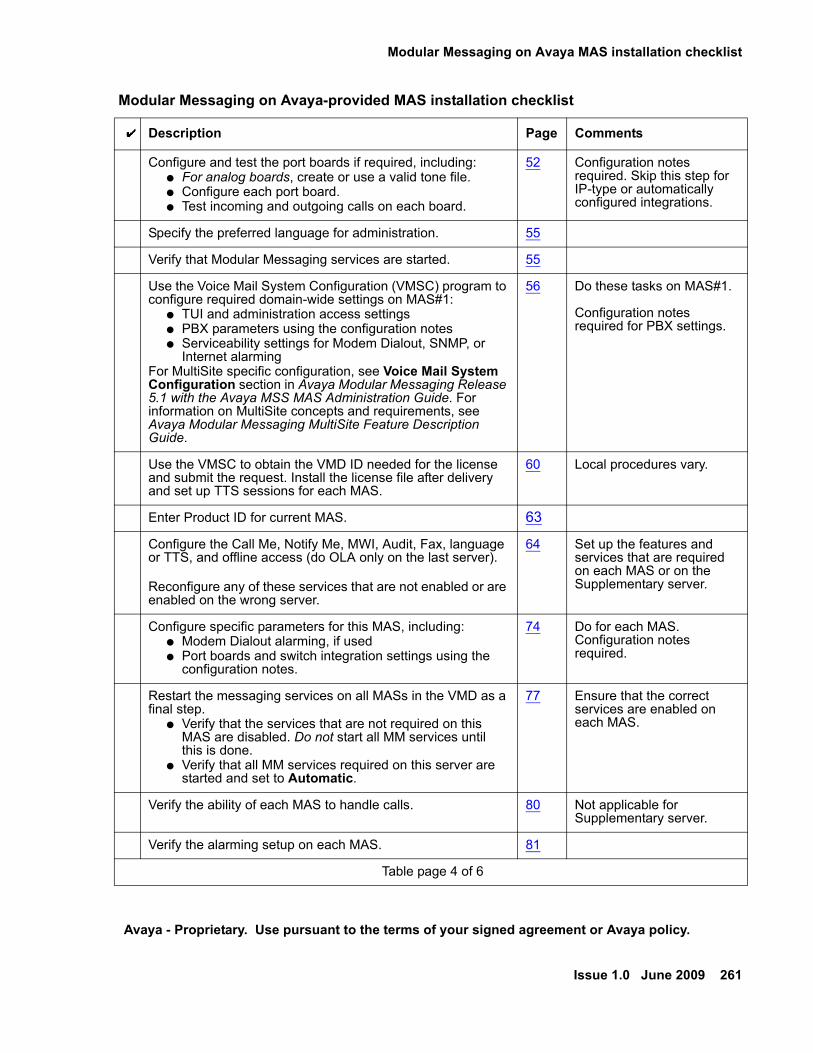
Modular Messaging on Avaya MAS installation checklist
Issue 1.0 June 2009 261
Avaya - Proprietary. Use pursuant to the terms of your signed agreement or Avaya policy.
Configure and test the port boards if required, including:● For analog boards, create or use a valid tone file.● Configure each port board.● Test incoming and outgoing calls on each board.
52 Configuration notes required. Skip this step for IP-type or automatically configured integrations.
Specify the preferred language for administration. 55
Verify that Modular Messaging services are started. 55
Use the Voice Mail System Configuration (VMSC) program to configure required domain-wide settings on MAS#1:
● TUI and administration access settings● PBX parameters using the configuration notes● Serviceability settings for Modem Dialout, SNMP, or
Internet alarmingFor MultiSite specific configuration, see Voice Mail System Configuration section in Avaya Modular Messaging Release 5.1 with the Avaya MSS MAS Administration Guide. For information on MultiSite concepts and requirements, see Avaya Modular Messaging MultiSite Feature Description Guide.
56 Do these tasks on MAS#1.
Configuration notes required for PBX settings.
Use the VMSC to obtain the VMD ID needed for the license and submit the request. Install the license file after delivery and set up TTS sessions for each MAS.
60 Local procedures vary.
Enter Product ID for current MAS. 63
Configure the Call Me, Notify Me, MWI, Audit, Fax, language or TTS, and offline access (do OLA only on the last server).
Reconfigure any of these services that are not enabled or are enabled on the wrong server.
64 Set up the features and services that are required on each MAS or on the Supplementary server.
Configure specific parameters for this MAS, including:● Modem Dialout alarming, if used● Port boards and switch integration settings using the
configuration notes.
74 Do for each MAS. Configuration notes required.
Restart the messaging services on all MASs in the VMD as a final step.
● Verify that the services that are not required on this MAS are disabled. Do not start all MM services until this is done.
● Verify that all MM services required on this server are started and set to Automatic.
77 Ensure that the correct services are enabled on each MAS.
Verify the ability of each MAS to handle calls. 80 Not applicable for Supplementary server.
Verify the alarming setup on each MAS. 81
Modular Messaging on Avaya-provided MAS installation checklist
Description Page Comments
Table page 4 of 6
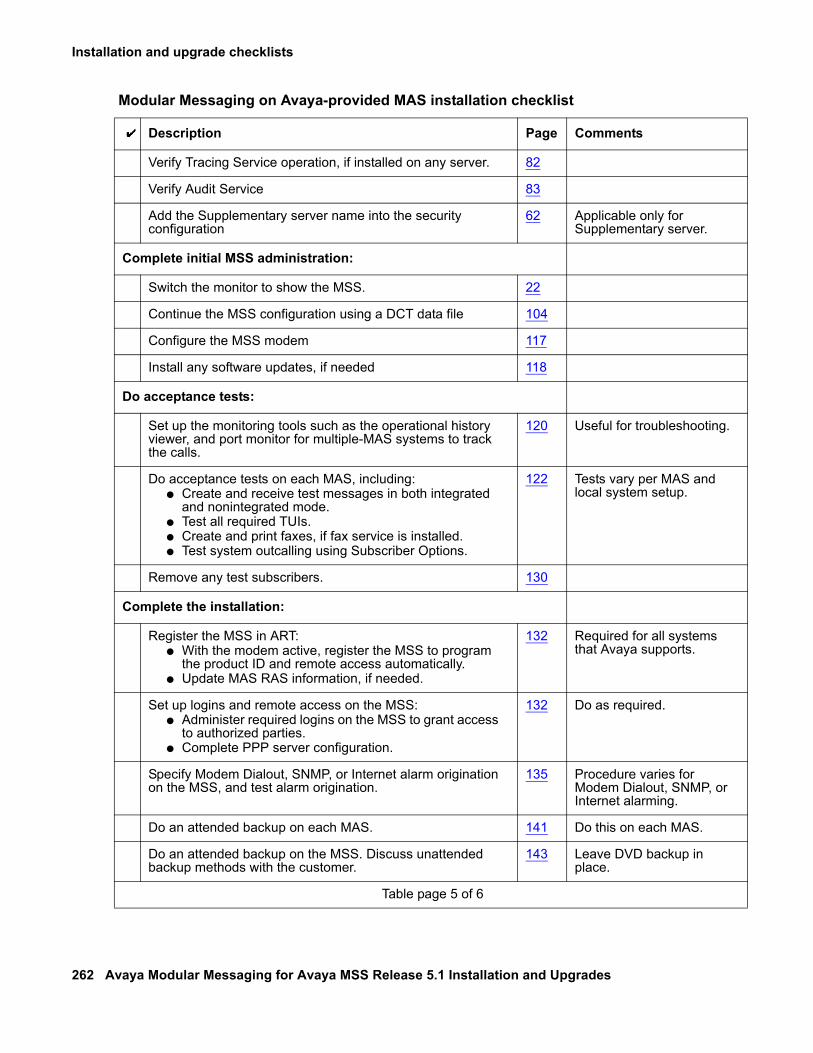
Installation and upgrade checklists
262 Avaya Modular Messaging for Avaya MSS Release 5.1 Installation and Upgrades
Verify Tracing Service operation, if installed on any server. 82
Verify Audit Service 83
Add the Supplementary server name into the security configuration
62 Applicable only for Supplementary server.
Complete initial MSS administration:
Switch the monitor to show the MSS. 22
Continue the MSS configuration using a DCT data file 104
Configure the MSS modem 117
Install any software updates, if needed 118
Do acceptance tests:
Set up the monitoring tools such as the operational history viewer, and port monitor for multiple-MAS systems to track the calls.
120 Useful for troubleshooting.
Do acceptance tests on each MAS, including:● Create and receive test messages in both integrated
and nonintegrated mode. ● Test all required TUIs. ● Create and print faxes, if fax service is installed. ● Test system outcalling using Subscriber Options.
122 Tests vary per MAS and local system setup.
Remove any test subscribers. 130
Complete the installation:
Register the MSS in ART: ● With the modem active, register the MSS to program
the product ID and remote access automatically. ● Update MAS RAS information, if needed.
132 Required for all systems that Avaya supports.
Set up logins and remote access on the MSS: ● Administer required logins on the MSS to grant access
to authorized parties. ● Complete PPP server configuration.
132 Do as required.
Specify Modem Dialout, SNMP, or Internet alarm origination on the MSS, and test alarm origination.
135 Procedure varies for Modem Dialout, SNMP, or Internet alarming.
Do an attended backup on each MAS. 141 Do this on each MAS.
Do an attended backup on the MSS. Discuss unattended backup methods with the customer.
143 Leave DVD backup in place.
Modular Messaging on Avaya-provided MAS installation checklist
Description Page Comments
Table page 5 of 6
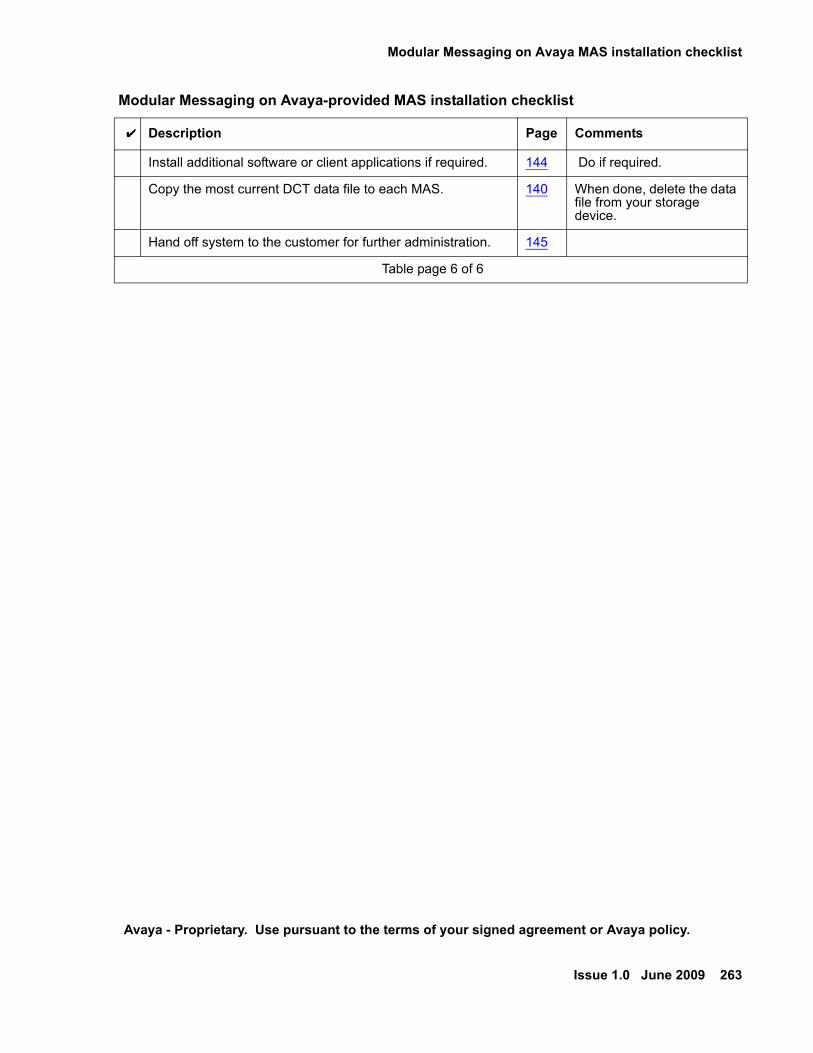
Modular Messaging on Avaya MAS installation checklist
Issue 1.0 June 2009 263
Avaya - Proprietary. Use pursuant to the terms of your signed agreement or Avaya policy.
Install additional software or client applications if required. 144 Do if required.
Copy the most current DCT data file to each MAS. 140 When done, delete the data file from your storage device.
Hand off system to the customer for further administration. 145
Modular Messaging on Avaya-provided MAS installation checklist
Description Page Comments
Table page 6 of 6
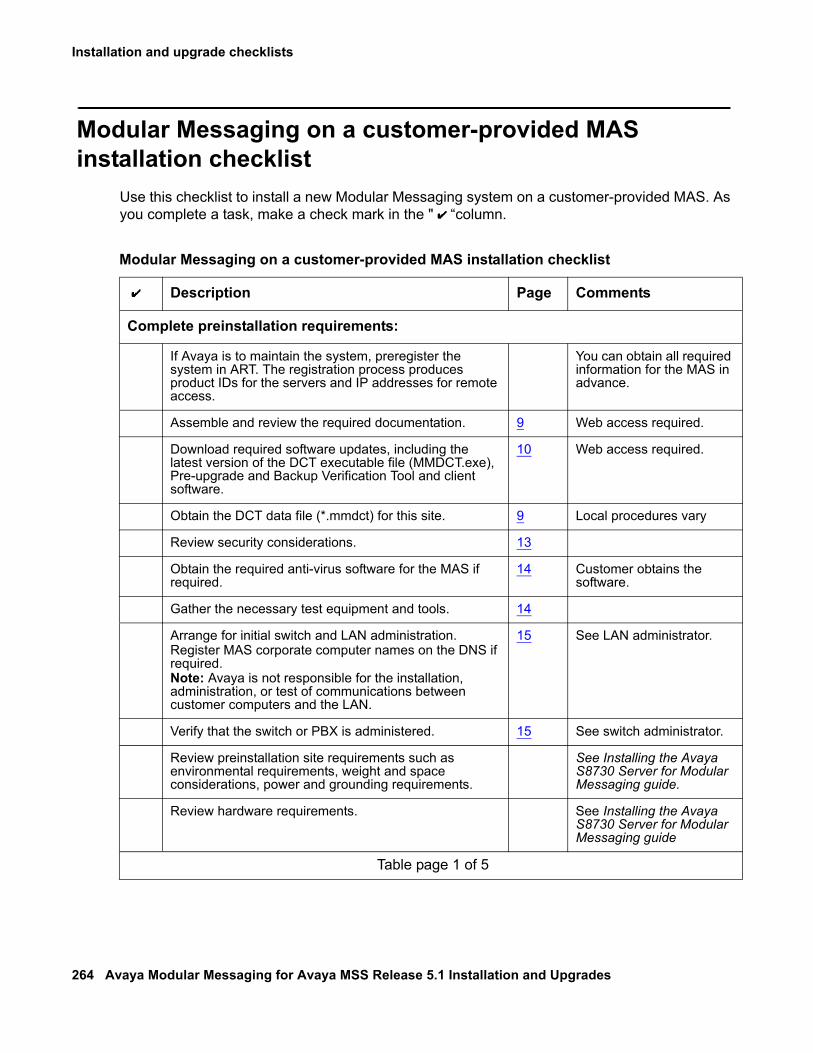
Installation and upgrade checklists
264 Avaya Modular Messaging for Avaya MSS Release 5.1 Installation and Upgrades
Modular Messaging on a customer-provided MAS installation checklist
Use this checklist to install a new Modular Messaging system on a customer-provided MAS. As you complete a task, make a check mark in the " “column.
Modular Messaging on a customer-provided MAS installation checklist
Description Page Comments
Complete preinstallation requirements:
If Avaya is to maintain the system, preregister the system in ART. The registration process produces product IDs for the servers and IP addresses for remote access.
You can obtain all required information for the MAS in advance.
Assemble and review the required documentation. 9 Web access required.
Download required software updates, including the latest version of the DCT executable file (MMDCT.exe), Pre-upgrade and Backup Verification Tool and client software.
10 Web access required.
Obtain the DCT data file (*.mmdct) for this site. 9 Local procedures vary
Review security considerations. 13
Obtain the required anti-virus software for the MAS if required.
14 Customer obtains the software.
Gather the necessary test equipment and tools. 14
Arrange for initial switch and LAN administration.Register MAS corporate computer names on the DNS if required.Note: Avaya is not responsible for the installation, administration, or test of communications between customer computers and the LAN.
15 See LAN administrator.
Verify that the switch or PBX is administered. 15 See switch administrator.
Review preinstallation site requirements such as environmental requirements, weight and space considerations, power and grounding requirements.
See Installing the Avaya S8730 Server for Modular Messaging guide.
Review hardware requirements. See Installing the Avaya S8730 Server for Modular Messaging guide
Table page 1 of 5
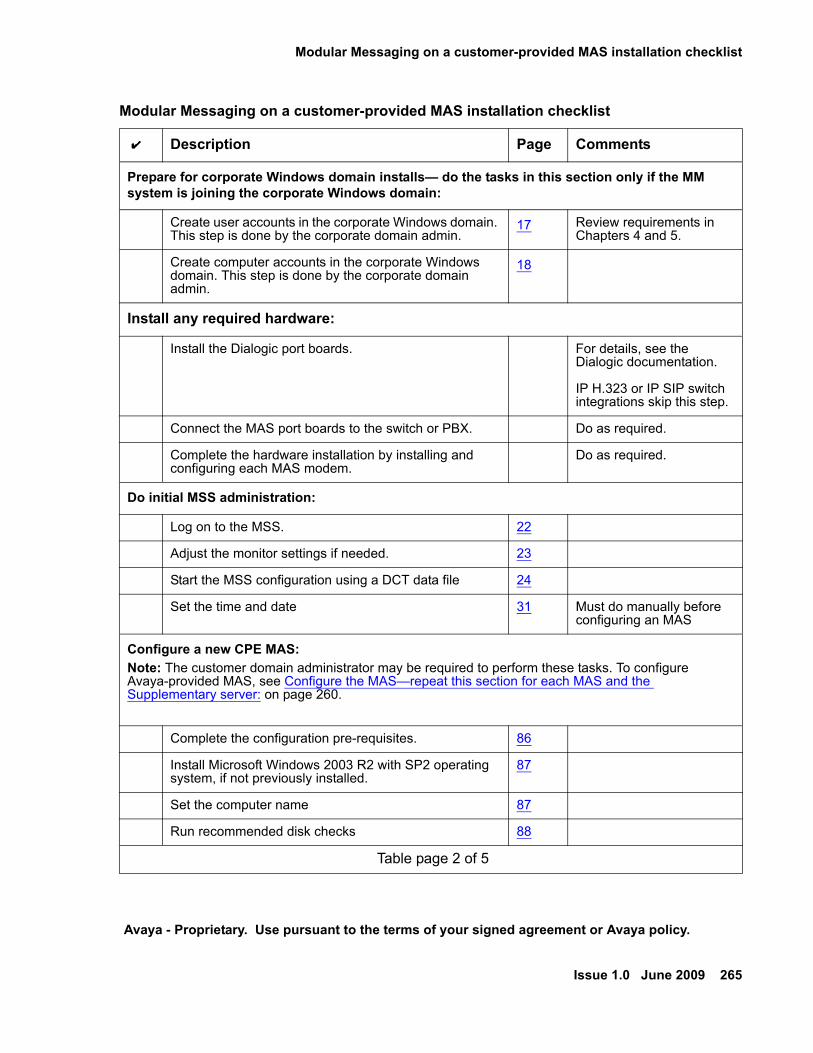
Modular Messaging on a customer-provided MAS installation checklist
Issue 1.0 June 2009 265
Avaya - Proprietary. Use pursuant to the terms of your signed agreement or Avaya policy.
Prepare for corporate Windows domain installs— do the tasks in this section only if the MM system is joining the corporate Windows domain:
Create user accounts in the corporate Windows domain. This step is done by the corporate domain admin.
17 Review requirements in Chapters 4 and 5.
Create computer accounts in the corporate Windows domain. This step is done by the corporate domain admin.
18
Install any required hardware:
Install the Dialogic port boards. For details, see the Dialogic documentation.
IP H.323 or IP SIP switch integrations skip this step.
Connect the MAS port boards to the switch or PBX. Do as required.
Complete the hardware installation by installing and configuring each MAS modem.
Do as required.
Do initial MSS administration:
Log on to the MSS. 22
Adjust the monitor settings if needed. 23
Start the MSS configuration using a DCT data file 24
Set the time and date 31 Must do manually before configuring an MAS
Configure a new CPE MAS: Note: The customer domain administrator may be required to perform these tasks. To configure Avaya-provided MAS, see Configure the MAS—repeat this section for each MAS and the Supplementary server: on page 260.
Complete the configuration pre-requisites. 86
Install Microsoft Windows 2003 R2 with SP2 operating system, if not previously installed.
87
Set the computer name 87
Run recommended disk checks 88
Modular Messaging on a customer-provided MAS installation checklist
Description Page Comments
Table page 2 of 5

Installation and upgrade checklists
266 Avaya Modular Messaging for Avaya MSS Release 5.1 Installation and Upgrades
Install and enable required MS Windows services. 88 Requires Microsoft Windows media.
Install required Microsoft Windows updates and security patches
90
Install Microsoft Windows 2003 SP2 90
Adjust system values 90
Verify if the Network Connections are set up correctly. 92 See Installing the Avaya S8730 Server for Modular Messaging guide.
Disable hyper-threading for IP H.323
Install modem drivers on the MAS Optional
Verify network adapters and bindings 94
Change the Power Management settings 94
Install and launch the Modular Messaging Configuration Wizard.
95
Complete the CPE MAS configuration:
Enter the RAS IP addresses 99
Set logging location 99
Install anti-virus software 100
Configure and test the port boards if required, including:● For analog boards, create or use a valid tone file.● Configure each port board.● Test incoming and outgoing calls on each board.
100 Configuration notes required. Skip this step for IP-type or automatically configured integrations.
Specify the preferred language for administration. 55
Verify that Modular Messaging services are started. 55
Modular Messaging on a customer-provided MAS installation checklist
Description Page Comments
Table page 3 of 5

Modular Messaging on a customer-provided MAS installation checklist
Issue 1.0 June 2009 267
Avaya - Proprietary. Use pursuant to the terms of your signed agreement or Avaya policy.
Use the Voice Mail System Configuration (VMSC) program to configure required domain-wide settings on MAS#1:
● TUI and administration access settings● PBX parameters using the configuration notes● Serviceability settings for Modem Dialout, SNMP,
or Internet alarmingFor MultiSite specific configuration, see Voice Mail System Configuration section in Avaya Modular Messaging MAS Administration Guide. For information on MultiSite concepts and requirements, see Avaya Modular Messaging MultiSite Feature Description Guide.
56 Do these tasks on MAS#1.
Configuration notes required for PBX settings.
Use the VMSC to obtain the VMD ID needed for the license and submit the request. Install the license file after delivery and set up TTS sessions for each MAS.
60 Local procedures vary.
Configure the Call Me, Notify Me, MWI, Audit, Fax, language or TTS, and offline access (do OLA only on the last server).
Reconfigure any of these services that are not enabled or are enabled on the wrong server.
64 Set up the features and services that are required on each MAS or on the Supplementary server.
Configure specific parameters for this MAS, including:● Modem Dialout alarming, if used● Port boards and switch integration settings using
the configuration notes.
74 Do for each MAS. Configuration notes required.
Restart the messaging service. ● Verify that the services that are not required on
this MAS are disabled. Do not start all MM services until this is done.
● Verify that all MM services required on this server are started and set to automatic.
77 Ensure that the correct services are enabled on each MAS.
Restart service on all MASs in the VMD as a final step. Do after last MAS.
Complete initial MSS administration:
Switch the monitor to show the MSS. 22
Continue the MSS configuration using a DCT data file 104
Configure the MSS modem 117
Install any software updates, if needed 118
Verify Network adaptors and bindings 118
Modular Messaging on a customer-provided MAS installation checklist
Description Page Comments
Table page 4 of 5
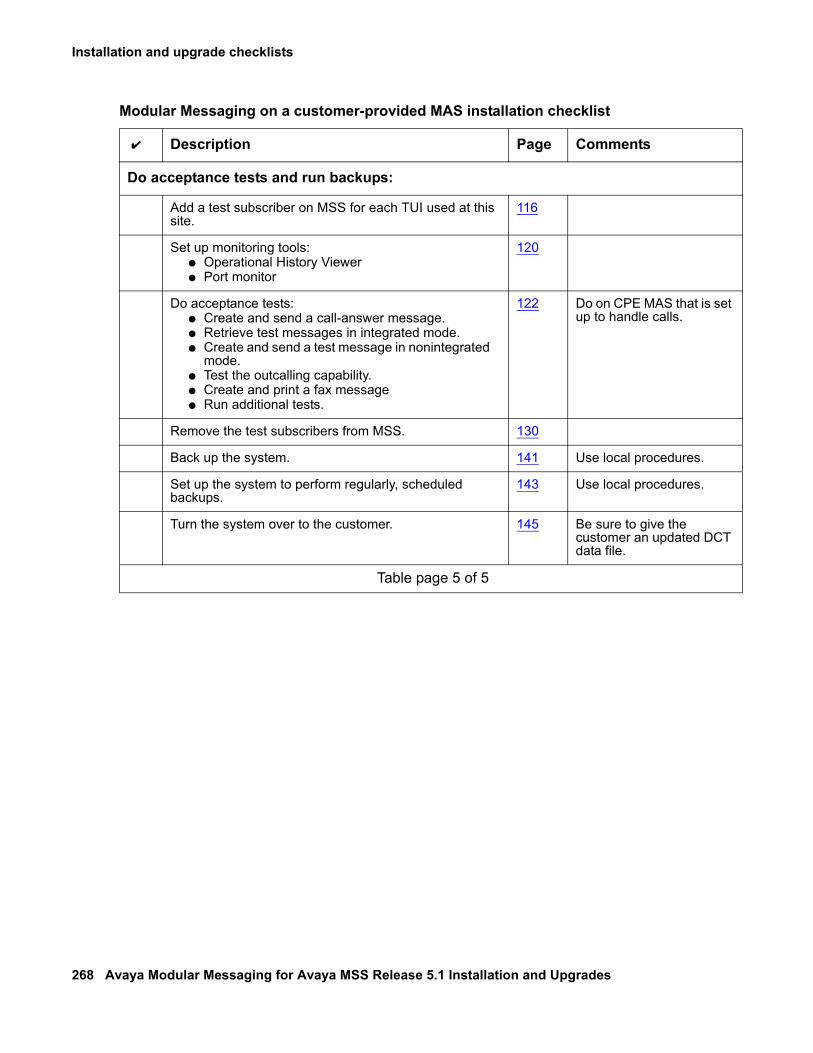
Installation and upgrade checklists
268 Avaya Modular Messaging for Avaya MSS Release 5.1 Installation and Upgrades
Do acceptance tests and run backups:
Add a test subscriber on MSS for each TUI used at this site.
116
Set up monitoring tools:● Operational History Viewer● Port monitor
120
Do acceptance tests:● Create and send a call-answer message.● Retrieve test messages in integrated mode.● Create and send a test message in nonintegrated
mode.● Test the outcalling capability.● Create and print a fax message● Run additional tests.
122 Do on CPE MAS that is set up to handle calls.
Remove the test subscribers from MSS. 130
Back up the system. 141 Use local procedures.
Set up the system to perform regularly, scheduled backups.
143 Use local procedures.
Turn the system over to the customer. 145 Be sure to give the customer an updated DCT data file.
Modular Messaging on a customer-provided MAS installation checklist
Description Page Comments
Table page 5 of 5

Modular Messaging Release 5.1 upgrade and migration checklists
Issue 1.0 June 2009 269
Avaya - Proprietary. Use pursuant to the terms of your signed agreement or Avaya policy.
Modular Messaging Release 5.1 upgrade and migration checklists
This section of the Appendix provides two check lists that can be used to:
● Upgrade to Modular Messaging Release 5.1 from Release 3.x or Release 4.0 that runs on S3500 hardware.
● Migrate from Release 2.0, Release 3.x or Release 4.0 to Modular Messaging Release 5.1 system that runs on S8730-family server.
After you complete a task, make a checkmark in the column.
! Important:Important:
● If you are moving the Modular Messaging system to the corporate Windows domain, first complete the entire upgrade (all releases), and then go to Moving the MM system to the corporate Windows domain checklist on page 278.
● If you must add a new MAS to an existing Modular Messaging system, first complete the entire upgrade for release that you planned. You must then install the new MAS using the new installation checklist.
The following check lists are covered in the subsequent sections:
● Modular Messaging Release 3.x or 4.0 on S3500-family server upgrade checklist on page 269.
● Modular Messaging Release 5.1 system migration checklist on page 273.
Modular Messaging Release 3.x or 4.0 on S3500-family server upgrade checklist
Use this checklist to upgrade Modular Messaging Release 3.x or Release 4.0 on S3500 server.
Note:Note: To upgrade Modular Messaging Release 5.0 to Release 5.1, use the procedure
described in Upgrading from Release 5.0 to Release 5.1 on page 149.

Installation and upgrade checklists
270 Avaya Modular Messaging for Avaya MSS Release 5.1 Installation and Upgrades
As you complete a task, make a check mark in the " “column. Modular Messaging Release 3.x or 4.0 on S3500-family server upgrade checklist
Description Page Comments
Plan for the upgrade:
Assemble and review the required software and the documentation:
● Installation and Upgrade Guide ● Data Collection Tool (DCT) ● Pre-Upgrade and Backup Verification Tool● System Checklists ● Planning for upgrade of clients in addition to the
Modular Messaging system (such as Outlook Client, Web Client, Speech Access, Web Subscriber Options).
9 Web access required (see http:\\support.avaya.com > Modular Messaging > Installation, Migrations, Upgrades and Configurations)
Manually check the following items: ● No errors or warnings are shown on the system ● Resolve major and minor alarms ● Backups are done ● Private IP addresses are in the correct range ● Private IP addresses on the same subnet● Corporate IP addresses on the same subnet
- Make sure that the private IP and corporate IP addresses do not use the same subnet
● Private name of the MSS is MSS1 ● Corporate name is not mss1.b.c ● List of non-standard installations (need help from the
MMIUS team for a complete list) ● Correct errors● Use the time estimates to set customer expectations
for the time required to complete the upgrade.
Review product functionality with the customer:● Customer noticeable differences for MM 3.x, 4.0 or 5.0 ● Known issues (see Product Support Notices) ● Rollout plan for new features ● Security concerns.
159
Coordinate with MMTAC: ● Submit DCT for approval ● Provide implementation schedule for Tiered Support.
Prepare for the upgrade:
Download any required Avaya software updates, including the Outlook Client.
10 Web access required.
Table page 1 of 3

Modular Messaging Release 5.1 upgrade and migration checklists
Issue 1.0 June 2009 271
Avaya - Proprietary. Use pursuant to the terms of your signed agreement or Avaya policy.
Verify the key settings on the MSS and MAS, such as switch integration, port board settings, and domain information:
● Verify if the MM system is at required Patch and SP level
● Verify the MSS has recommended RFU installed● Record information for non-default port groups ● Record RAS IP addresses for each MAS ● Back up Caller Applications files on separate computer ● Record associations for Caller Application (will be
needed for re-association later).● Record SNMP trap destination and community details
from the Serviceability - Voice Mail Domain window
154
Obtain and review the configuration notes for any changes. 154 Web access required.
Use the Pre-Upgrade tool (PUBVT): ● Download and run the Pre-upgrade tool ● Correct errors ● Use the time estimates to set the customer
expectations for the time required to complete the upgrade.
154
Be prepared to delay the upgrade if everything is not in order. It is better to delay and do it right than to go ahead and get it wrong!
Prepare for the upgrade on the MAS:
Switch the monitor to show the correct server. 153
Verify that all Modular Messaging servers and services are running.
Run the Pre-Upgrade Tool 157
Analyze every MAS and create a Data Collection Tool (DCT) file:
● Download the current version of the DCT ● Run the DCT in "analyze" mode on each MAS● Verify the DCT file.
160
Busy out ports on each MAS. 163
Check for any spooled messages. 164
Back up each MAS. 165
Back up the MSS. 166
Run Backup Verification tool 168
Modular Messaging Release 3.x or 4.0 on S3500-family server upgrade checklist
Description Page Comments
Table page 2 of 3

Installation and upgrade checklists
272 Avaya Modular Messaging for Avaya MSS Release 5.1 Installation and Upgrades
Perform the upgrade:
Load the updated software on the MSS. 170
Upgrade the MSS. 170
Log off all remote logins. 172
Upgrade overnight 172
Upgrade RealSpeak only if you are upgrading from Release 3.x.
172
Upgrade Dialogic drivers on the MAS. 175 For any MAS that already has drivers installed.
Upgrade the MAS software. Includes software (Windows updates, service pack(s), and patches) and configuration of Fax and Audit services.
176
Complete the upgrade:
Complete the upgrades. 180
Convert the Supplementary server to run a 0 port MAS:
Optional: Convert the Supplementary server to run a 0 port MAS on the Supplementary server.
182
Change the switch integration:
Optional: Change the switch integration as appropriate depending on the type of switch integration involved.
185
Modular Messaging Release 3.x or 4.0 on S3500-family server upgrade checklist
Description Page Comments
Table page 3 of 3
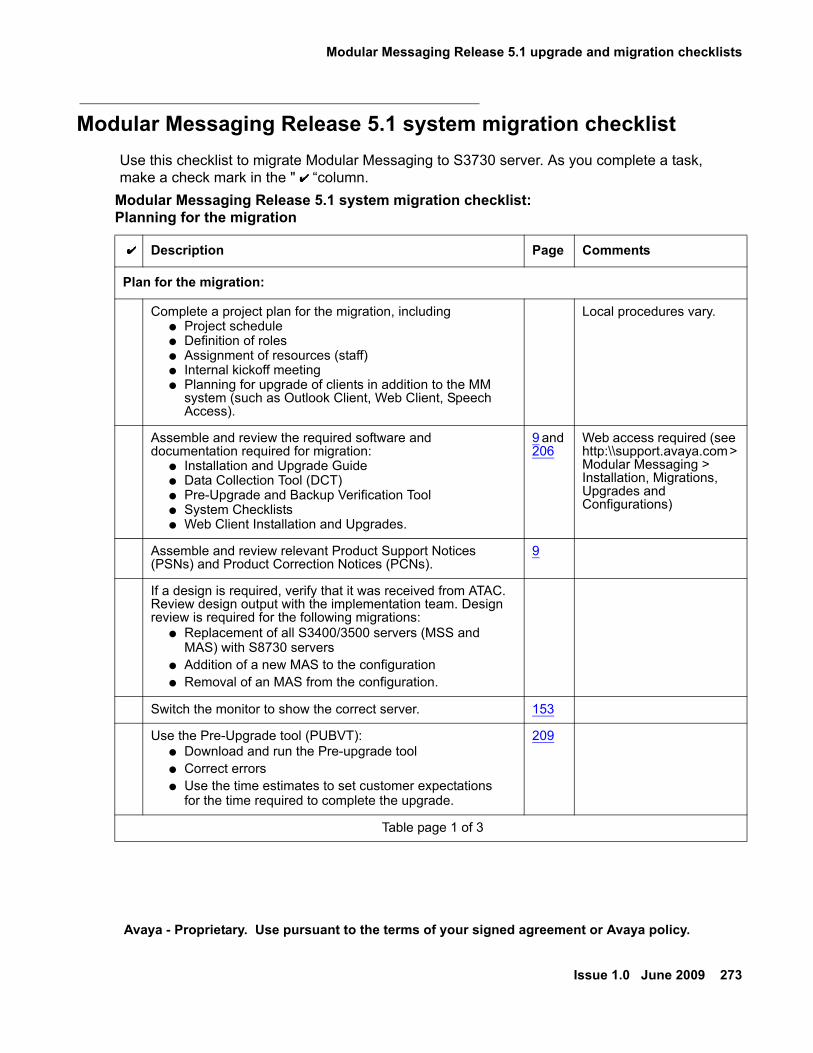
Modular Messaging Release 5.1 upgrade and migration checklists
Issue 1.0 June 2009 273
Avaya - Proprietary. Use pursuant to the terms of your signed agreement or Avaya policy.
Modular Messaging Release 5.1 system migration checklistUse this checklist to migrate Modular Messaging to S3730 server. As you complete a task, make a check mark in the " “column.
Modular Messaging Release 5.1 system migration checklist:Planning for the migration
Description Page Comments
Plan for the migration:
Complete a project plan for the migration, including ● Project schedule ● Definition of roles ● Assignment of resources (staff) ● Internal kickoff meeting ● Planning for upgrade of clients in addition to the MM
system (such as Outlook Client, Web Client, Speech Access).
Local procedures vary.
Assemble and review the required software and documentation required for migration:
● Installation and Upgrade Guide ● Data Collection Tool (DCT) ● Pre-Upgrade and Backup Verification Tool ● System Checklists ● Web Client Installation and Upgrades.
9 and 206
Web access required (see http:\\support.avaya.com > Modular Messaging > Installation, Migrations, Upgrades and Configurations)
Assemble and review relevant Product Support Notices (PSNs) and Product Correction Notices (PCNs).
9
If a design is required, verify that it was received from ATAC. Review design output with the implementation team. Design review is required for the following migrations:
● Replacement of all S3400/3500 servers (MSS and MAS) with S8730 servers
● Addition of a new MAS to the configuration● Removal of an MAS from the configuration.
Switch the monitor to show the correct server. 153
Use the Pre-Upgrade tool (PUBVT): ● Download and run the Pre-upgrade tool ● Correct errors ● Use the time estimates to set customer expectations
for the time required to complete the upgrade.
209
Table page 1 of 3
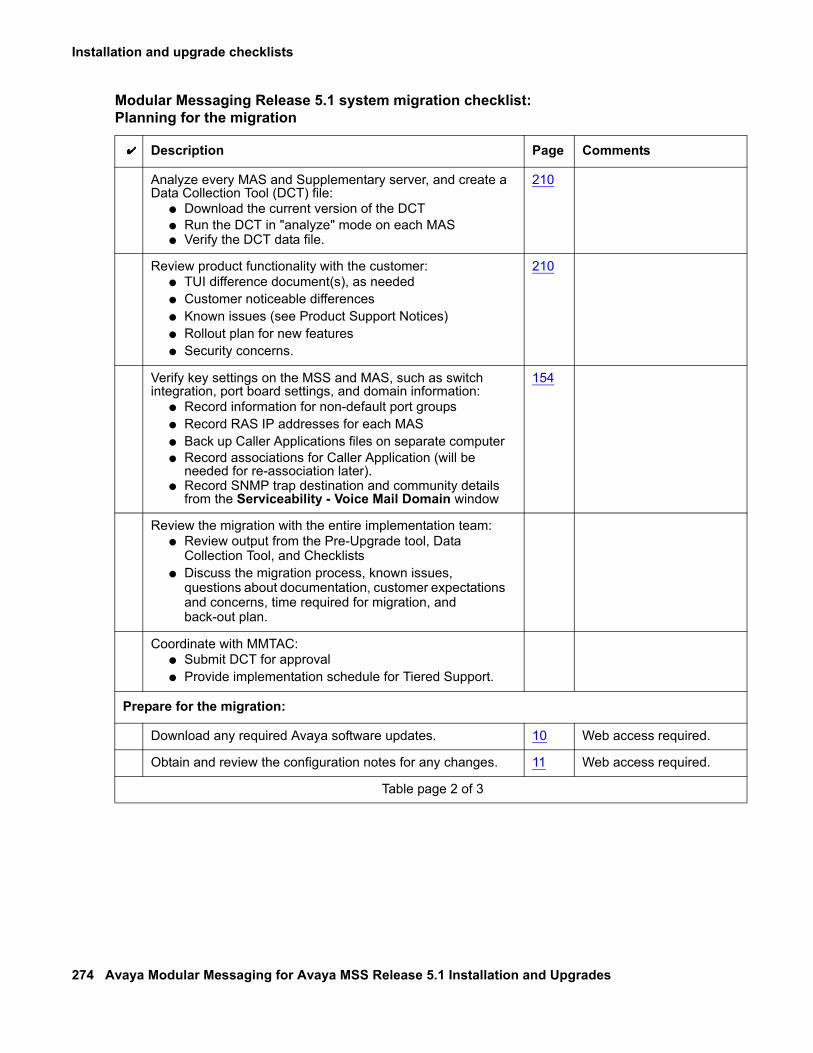
Installation and upgrade checklists
274 Avaya Modular Messaging for Avaya MSS Release 5.1 Installation and Upgrades
Analyze every MAS and Supplementary server, and create a Data Collection Tool (DCT) file:
● Download the current version of the DCT ● Run the DCT in "analyze" mode on each MAS● Verify the DCT data file.
210
Review product functionality with the customer:● TUI difference document(s), as needed ● Customer noticeable differences ● Known issues (see Product Support Notices) ● Rollout plan for new features ● Security concerns.
210
Verify key settings on the MSS and MAS, such as switch integration, port board settings, and domain information:
● Record information for non-default port groups ● Record RAS IP addresses for each MAS ● Back up Caller Applications files on separate computer ● Record associations for Caller Application (will be
needed for re-association later). ● Record SNMP trap destination and community details
from the Serviceability - Voice Mail Domain window
154
Review the migration with the entire implementation team: ● Review output from the Pre-Upgrade tool, Data
Collection Tool, and Checklists ● Discuss the migration process, known issues,
questions about documentation, customer expectations and concerns, time required for migration, and back-out plan.
Coordinate with MMTAC: ● Submit DCT for approval ● Provide implementation schedule for Tiered Support.
Prepare for the migration:
Download any required Avaya software updates. 10 Web access required.
Obtain and review the configuration notes for any changes. 11 Web access required.
Modular Messaging Release 5.1 system migration checklist:Planning for the migration
Description Page Comments
Table page 2 of 3

Modular Messaging Release 5.1 upgrade and migration checklists
Issue 1.0 June 2009 275
Avaya - Proprietary. Use pursuant to the terms of your signed agreement or Avaya policy.
Process and set up new hardware (replacement S8730s for MSS and/or MAS, S8730 for additional MAS):
● Unpack equipment ● Review inventory checklist ● Pre-register new hardware ● Rack and stack only (power off, no software
installation).
See Installing the Avaya S8730 Server for Modular Messaging guide.
Be prepared to delay the migration if everything is not in order. It is better to delay and do it right than to go ahead and get it wrong!
Prepare for the migration on the MAS:
Busy out ports on MAS 215
Check the spooled messages 215
Do a fresh, attended backup on each MAS 216 Do not use old backups.
Backup the data from the MSS 216
Modular Messaging Release 5.1 system migration checklist:Implementing the migration
Description Page Comments
Migrate the MSS:
Run the Backup Verification tool 217
Restore data on the MSS. 217
Migrate each MAS and the Supplementary server, if present:
Start the MAS migration. 221
Install and administer anti-virus software. 224 Local procedures vary.
Install the latest Avaya-approved updates for Microsoft Windows: system updates and security patches.
224 Local procedures vary.
Reapply the remote access settings to each MAS. 225
Table page 1 of 3
Modular Messaging Release 5.1 system migration checklist:Planning for the migration
Description Page Comments
Table page 3 of 3

Installation and upgrade checklists
276 Avaya Modular Messaging for Avaya MSS Release 5.1 Installation and Upgrades
Verify and update settings in the VMSC, including: ● Update Security permissions for system administration.● Verify license settings and TTS sessions per MAS. ● Verify port board and telephony interface settings.● Set up additional port groups, if required at this site.
226 Verify settings for switch integration and configured features as required.
Optional -Create offline message store on the server that hosts offline messages.
229
Restart messaging services. ● Verify that all services not required on this MAS are
disabled. Do not start all MM services until this is done. ● Verify that all MM services required on this server are
started and set to Automatic.
231 Do after last MAS.
Complete VMSC setup (enter MAS product IDs, configure Fax and Audit services, verify services)
233
Complete MSS administration:
Verify the MAS host information for each MAS. 236 Logins and passwords changed on the MAS because of the W2003 server so make sure you do this step.
Place the MSS in the private Windows domain. 237 Do this once per migration.
Restore data on each MAS:
Stop all Modular Messaging services. 239
Restore data on each MAS from most current backup. 240
Restore Caller Applications on MAS#1. 242 Do if Caller Applications are used on the system.
Restart messaging services and verify correct services are started.
243 Make sure MM service connector is started.
Install any Avaya software updates. 244 You must install software updates if they’re available.
Repeat data restoration for each MAS. 240
Modular Messaging Release 5.1 system migration checklist:Implementing the migration
Description Page Comments
Table page 2 of 3
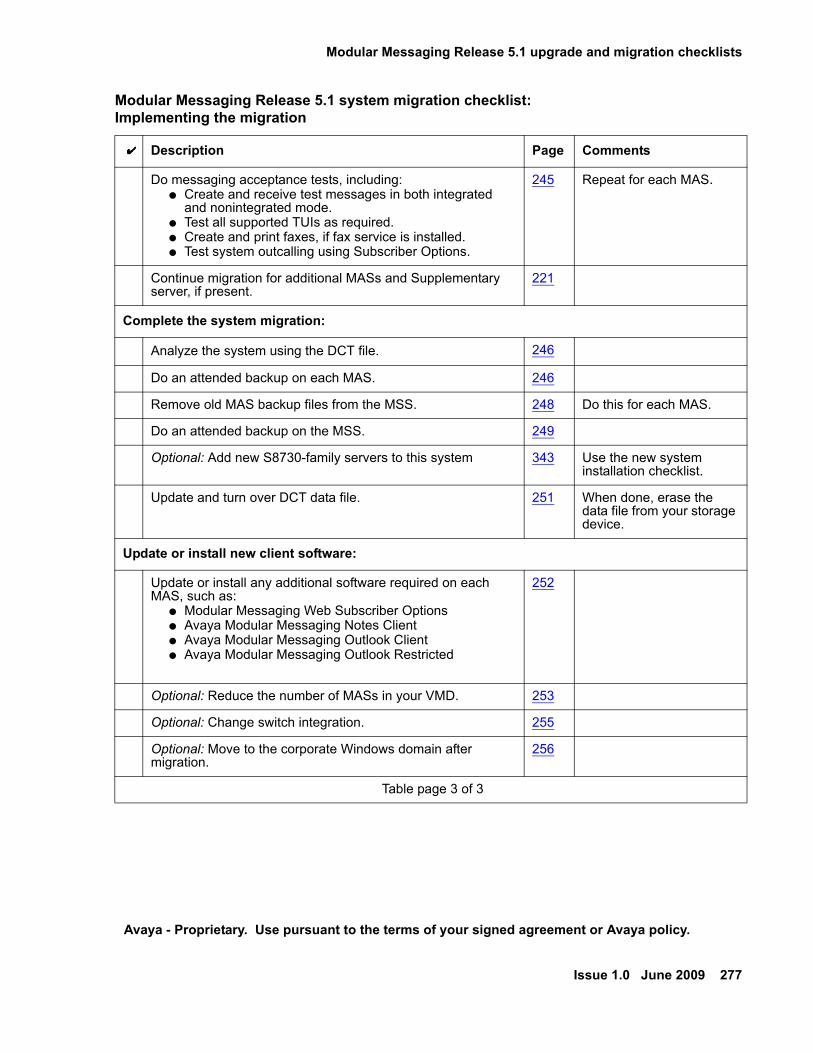
Modular Messaging Release 5.1 upgrade and migration checklists
Issue 1.0 June 2009 277
Avaya - Proprietary. Use pursuant to the terms of your signed agreement or Avaya policy.
Do messaging acceptance tests, including:● Create and receive test messages in both integrated
and nonintegrated mode. ● Test all supported TUIs as required. ● Create and print faxes, if fax service is installed. ● Test system outcalling using Subscriber Options.
245 Repeat for each MAS.
Continue migration for additional MASs and Supplementary server, if present.
221
Complete the system migration:
Analyze the system using the DCT file. 246
Do an attended backup on each MAS. 246
Remove old MAS backup files from the MSS. 248 Do this for each MAS.
Do an attended backup on the MSS. 249
Optional: Add new S8730-family servers to this system 343 Use the new system installation checklist.
Update and turn over DCT data file. 251 When done, erase the data file from your storage device.
Update or install new client software:
Update or install any additional software required on each MAS, such as:
● Modular Messaging Web Subscriber Options● Avaya Modular Messaging Notes Client● Avaya Modular Messaging Outlook Client● Avaya Modular Messaging Outlook Restricted
252
Optional: Reduce the number of MASs in your VMD. 253
Optional: Change switch integration. 255
Optional: Move to the corporate Windows domain after migration.
256
Modular Messaging Release 5.1 system migration checklist:Implementing the migration
Description Page Comments
Table page 3 of 3
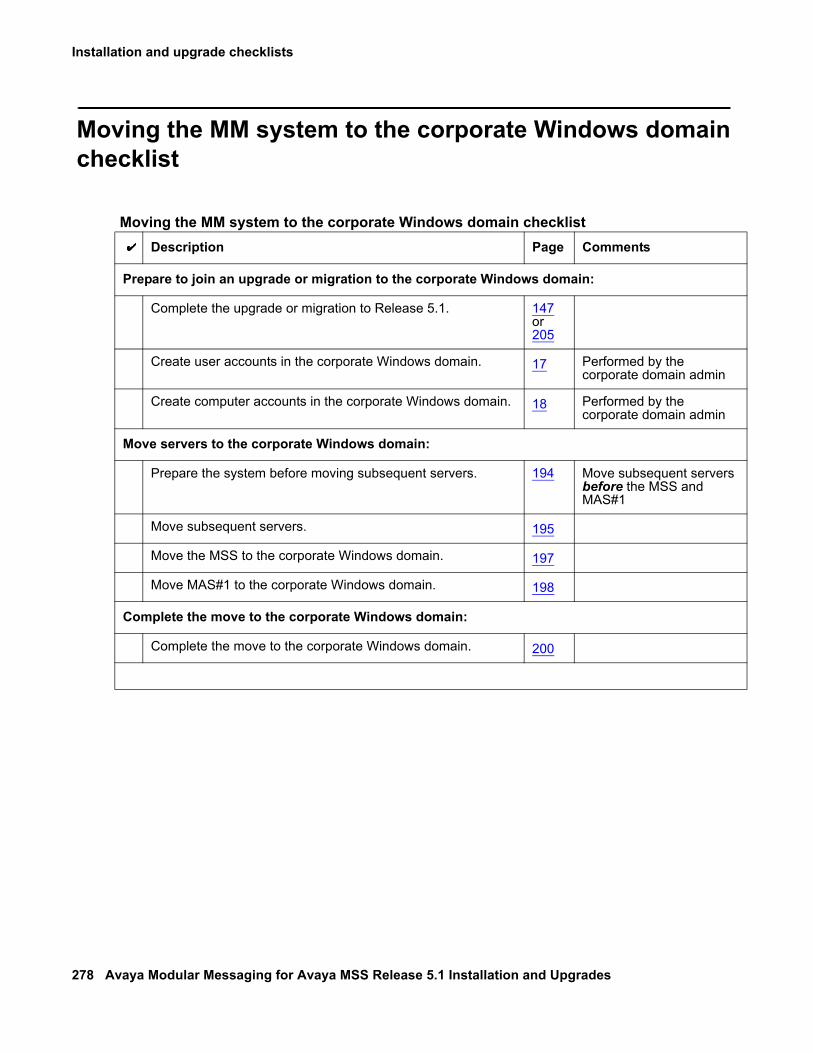
Installation and upgrade checklists
278 Avaya Modular Messaging for Avaya MSS Release 5.1 Installation and Upgrades
Moving the MM system to the corporate Windows domain checklist
Moving the MM system to the corporate Windows domain checklistDescription Page Comments
Prepare to join an upgrade or migration to the corporate Windows domain:
Complete the upgrade or migration to Release 5.1. 147 or 205
Create user accounts in the corporate Windows domain. 17 Performed by the corporate domain admin
Create computer accounts in the corporate Windows domain. 18 Performed by the corporate domain admin
Move servers to the corporate Windows domain:
Prepare the system before moving subsequent servers. 194 Move subsequent servers before the MSS and MAS#1
Move subsequent servers. 195
Move the MSS to the corporate Windows domain. 197
Move MAS#1 to the corporate Windows domain. 198
Complete the move to the corporate Windows domain:
Complete the move to the corporate Windows domain. 200
Issue 1.0 June 2009 279
Avaya - Proprietary. Use pursuant to the terms of your signed agreement or Avaya policy.
Appendix B: Configuring and testing port boards
OverviewThis appendix describes how to configure and test Dialogic port boards. Dialogic port boards are installed in some MASs, depending on the switch integration.
Note:Note: An MAS that uses an IP H.323 or IP SIP switch integration has no port boards.
You do all configuration for these switch integrations using the Voice Mail System Configuration (VMSC) program. For more information, see Configuring the voice mail system on page 53.
This section contains the following topics:
● When to configure port boards on page 280
● Configuring port boards on page 281
● Testing the port boards on page 291
Configuring and testing port boards
280 Avaya Modular Messaging for Avaya MSS Release 5.1 Installation and Upgrades
When to configure port boards In Release 5.1, you must configure Dialogic port boards only if:
● Dialogic port boards are installed in this MAS and
● The Avaya Modular Messaging Configuration Wizard does not automatically configure the Dialogic port boards.
The Avaya Modular Messaging Configuration Wizard automatically configures any installed Dialogic port boards for several switch integrations, including:
● Avaya (QSIG)
● Cisco (QSIG)
● Nortel NT M-1 (QSIG)
● Siemens Hipath (QSIG)
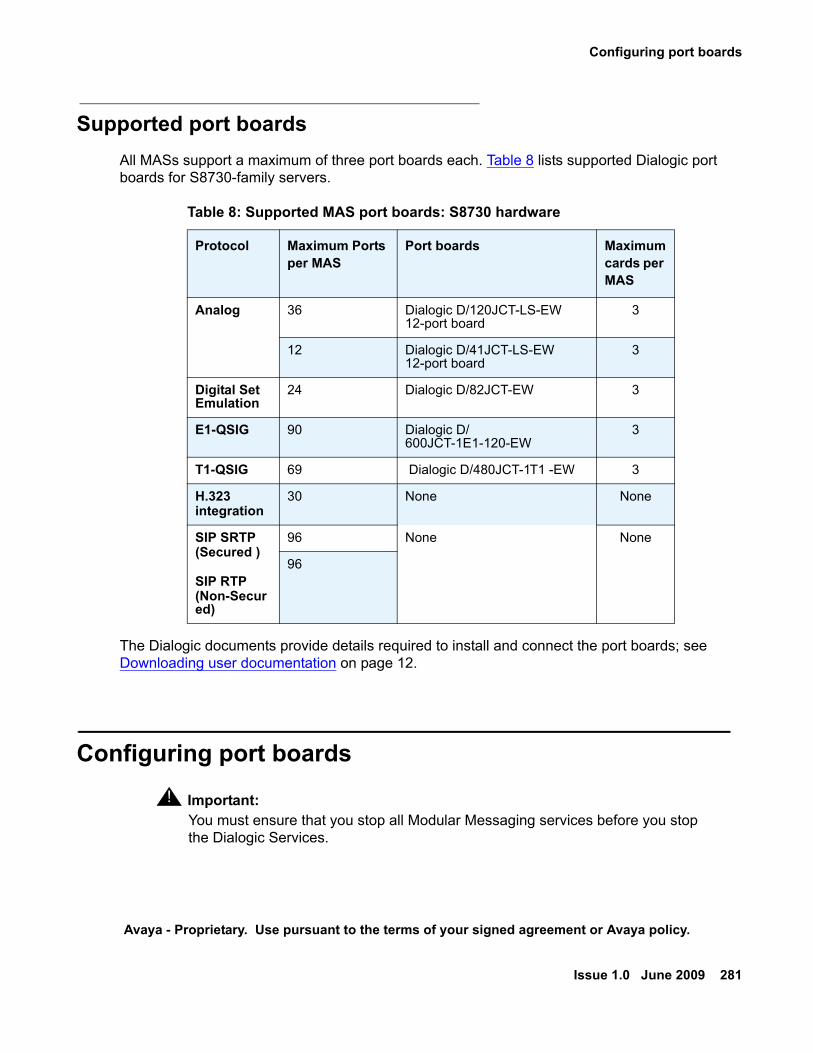
Configuring port boards
Issue 1.0 June 2009 281
Avaya - Proprietary. Use pursuant to the terms of your signed agreement or Avaya policy.
Supported port boardsAll MASs support a maximum of three port boards each. Table 8 lists supported Dialogic port boards for S8730-family servers.
The Dialogic documents provide details required to install and connect the port boards; see Downloading user documentation on page 12.
Configuring port boards! Important:
Important: You must ensure that you stop all Modular Messaging services before you stop the Dialogic Services.
Table 8: Supported MAS port boards: S8730 hardware
Protocol Maximum Ports per MAS
Port boards Maximum cards per MAS
Analog 36 Dialogic D/120JCT-LS-EW 12-port board
3
12 Dialogic D/41JCT-LS-EW 12-port board
3
Digital Set Emulation
24 Dialogic D/82JCT-EW 3
E1-QSIG 90 Dialogic D/600JCT-1E1-120-EW
3
T1-QSIG 69 Dialogic D/480JCT-1T1 -EW 3
H.323integration
30 None None
SIP SRTP(Secured )
SIP RTP(Non-Secured)
96 None None
96

Configuring and testing port boards
282 Avaya Modular Messaging for Avaya MSS Release 5.1 Installation and Upgrades
Manual port board configuration involves three phases:
1. The appropriate party must administer the switch for the port boards using the configuration notes for this particular switch (PBX) integration. For instructions to obtain the most recent configuration notes, see Downloading configuration notes on page 11.
! CAUTION:CAUTION: You can only install this system by using the required configuration notes for this
switch or PBX. The PBX administrator must have administered the ports on the switch before you can proceed.
2. Configure and test the port boards as described in this section. Some steps require you to use the configuration notes.
3. You must complete the port board configuration as described in Configuring port boards and switch integration on page 75.
Continue based on the type of port boards installed in this MAS:
● Configuring T1-QSIG or E1-QSIG boards on page 283
● Configuring set emulation boards on page 284
● Configuring analog port boards on page 286
! CAUTION:CAUTION: If the window displays no port boards when you run the Dialogic Configuration
Manager, you might need to reseat or replace some of the boards. For more information, obtain the appropriate maintenance information for this Modular Messaging system; see Downloading user documentation on page 12:
● For S8730-family servers, see Maintaining the Avaya S8730 Server for Modular Messaging guide.
● For S3500-family servers, see Avaya Modular Messaging S3500-Family Hardware Maintenance and Additions.
Configuring port boards
Issue 1.0 June 2009 283
Avaya - Proprietary. Use pursuant to the terms of your signed agreement or Avaya policy.
Configuring T1-QSIG or E1-QSIG boards Any of the following QSIG port boards might be installed in an MAS:
● Dialogic D/480JCT-1T1
● Dialogic D/480JCT-1T1- EW
● Dialogic D/600JCT-1E1
● Dialogic D/600JCT-2E1
● Dialogic D/600JCT-1E1- 120- EW
The maximum number of port boards per MAS varies, depending on the server hardware. For more information, see Supported port boards on page 281.
To configure either of these QSIG boards:
1. Click Start > Programs > Intel Dialogic System Release > Configuration Manager - DCM.
The Intel Dialogic Product Configuration Manager window opens.
2. If a popup window opens, connect to the MAS as follows:
a. In the Computer Name window, verify that Local is selected and that the correct server name is shown, such as MYMAS1.
b. Click Connect. The system displays this window only the first time that you access the Dialogic Configuration Manager application.
The Dialogic software locates any installed port boards.
3. Verify that all Intel Dialogic services are stopped. All boards should show a red icon.
4. If the board icon shows an X, the board is disabled. To enable it, right-click the board and select Enable device(s).
5. Under Configured Devices, double-click the name of the first Dialogic board, such as #0.
6. In the Intel Dialogic product Configuration Manager - Properties window:
a. Click the Interface tab and select the ISDNProtocol parameter.
b. Select the correct value for this board from the pull-down list:
● For E1-QSIG: select QTE● For T1-QSIG: select QTU
c. Click the Telephony Bus tab and select the PCMEncoding parameter.
d. Select the correct value for the installed board from the pull-down list:
● For E1-QSIG: select A-Law for most countries, particularly Europe

Configuring and testing port boards
284 Avaya Modular Messaging for Avaya MSS Release 5.1 Installation and Upgrades
● For T1-QSIG: select μ-Law (mu-Law) for the United States and Japan
e. Click the Misc tab.
f. For the FirmwareFile parameter, verify that the value is default.g. Select the FirmwareFile2 parameter. Type spfax.fwl in the Value field, which is editable.
h. Click the Country tab and select the Country parameter.
i. On the pull-down list of values, always use United States for either type of board.
j. Click OK to close the window.
7. Repeat steps 5 and 6 for any other installed Dialogic boards, such as #1.
8. After all boards are configured, click the green Start button on the button bar.
Wait for service to start. When service is started, the Stop button becomes active and the installed boards show a green light.
9. Verify that the port boards are operating correctly.
a. Check the LED display on the Dialogic board faceplate.
● A red status LED lights on the back of the port board during driver startup.
● If the drivers start successfully, the board whose port is connected to the PBX shows a green LED within 30 seconds. LEDs on the other boards remain red.
b. If a problem occurs, check the board configuration, the physical connections between the board and the PBX, or the PBX configuration. Repeat Steps 5 through 9 as needed.
10. Close the Intel Dialogic product Configuration Manager window.
11. Continue with Testing the port boards on page 291.
Configuring set emulation boards An MAS supports 8-port Dialogic Digital Set Emulation (DSE) boards. The maximum number of port boards per MAS varies, depending on the server hardware. For more information, see Supported port boards on page 281.
Note:Note: Avaya supports the non-universal Dialogic D/82JCT-EW board for upgrades only.
To configure digital set emulation boards:
1. Click Start > Programs > Dialogic System Release > Configuration Manager - DCM.
The Dialogic product Configuration Manager window opens.
2. If a popup window opens, connect to the MAS as follows:
Configuring port boards
Issue 1.0 June 2009 285
Avaya - Proprietary. Use pursuant to the terms of your signed agreement or Avaya policy.
a. In the Computer Name window, verify that Local is selected and that the correct server name is shown, such as MYMAS1.
b. Click Connect.
Note:Note: The system displays this window only the first time that you access the Dialogic
Configuration Manager application.
The Dialogic software locates any installed port boards.
3. Verify that all Dialogic services are stopped. All boards should show a red icon.
Note:Note: If the board icon shows an X, the board is disabled. To enable it, right-click the
board and select Enable device(s). 4. Under Configured Devices, double-click the name of the first Dialogic board, such as #0.
5. In the Dialogic product Configuration Manager - Properties window:
a. Click the Telephony Bus tab and select the PCMEncoding parameter.
b. On the pull-down list of values, select either A-Law or μ-Law, depending on your location. Usually, A-Law is Europe and μ-Law (mu-Law) is United States and Japan.
c. Click the Misc tab.
1. Select the FirmwareFile parameter. In the Value field, select or type D82U.fwl. The Value field is editable.
2. Select the PBXSwitch parameter. On the pull-down list of values, select the name of the PBX. For example, use Lucent 2-wire for an Avaya G3 switch.
Note:Note: For a Siemens Hicom 300/9006 PBX, select Siemens Rolm 9006.
d. Click the Country tab and select the Country parameter. On the pull-down list of values, select the country.
e. Click OK to close the window.
6. Repeat Steps 4 and 5 for any other installed Dialogic boards, such as #1.
! CAUTION:CAUTION: If the DSE boards are connected to a Nortel (NTM-1) PBX, you must reboot the
MAS before you start the Dialogic drivers. Close the DCM and reboot the system now. When the reboot is complete, log back in and reopen the DCM as in Step 1, and then continue with Step 7.
7. After all boards are configured, click the green Start button on the button bar.
Wait for service to start. When service is started, the Stop button becomes active and the installed boards show a green light.

Configuring and testing port boards
286 Avaya Modular Messaging for Avaya MSS Release 5.1 Installation and Upgrades
8. Verify that the port boards are operating correctly.
a. Check the LED display on the Dialogic board faceplate. Verify the code for each port:
● Ports that are connected to a telephone line and functioning correctly show 0 and the port number, such as 00 or 01.
● Ports that are not connected to a telephone line or not functioning correctly show En, where n is the port number. For example, the display reads E3 if port 3 has an error.
b. If the system displays any En error, check the board configuration, the physical connections between the board and the PBX, or the PBX configuration. For example, verify that you configured the correct PBX. Repeat Steps 4 through 8 as needed.
9. Close the Dialogic product Configuration Manager window.
10. Continue with Testing the port boards on page 291.
Configuring analog port boards The following analog port boards might be installed in an MAS:
● Dialogic D/41JCT-LS 4-port Tip/Ring
● Dialogic D/41JCT-LS- EW 4-port
● Dialogic D/120JCT-LS 12-port Tip/Ring
● Dialogic D/120JCT-LS- EW 12-port
The maximum number of port boards per MAS varies, depending on the server hardware. For more information, see Supported port boards on page 281.
To configure either of these analog boards:
1. Click Start > Programs > Dialogic System Release > Configuration Manager - DCM.
The Dialogic product Configuration Manager window opens.
2. If a popup window opens, connect to the MAS as follows:
a. In the Computer Name window, verify that Local is selected and that the correct server name is shown, such as MYMAS1.
b. Click Connect.
Note:Note: The system displays this window only the first time that you access the Dialogic
Configuration Manager application.
The Dialogic software locates any installed port boards.
3. Verify that all Dialogic services are stopped. All boards should show a red icon.
Configuring port boards
Issue 1.0 June 2009 287
Avaya - Proprietary. Use pursuant to the terms of your signed agreement or Avaya policy.
Note:Note: If the board icon shows an X, the board is disabled. To enable it, right-click the
board and select Enable device(s). 4. For a D/120JCT-LS board: You must load the new firmware separately in Release 5.1, or
the 12-port boards will not work correctly. For example, fax service will not work.
Note:Note: The D/41JCT-LS board uses the default.fwl file and does not need to be set. If
this server uses 4-port analog boards, continue with Step 6.
To load the new firmware for a 12-port analog board in Release 5.1:
a. Under Configured Devices, double-click the name of the Dialogic board, such as #0.
b. In the Dialogic product Configuration Manager - Properties window, click the Misc tab.
1. Click the FirmwareFile parameter. In the value field, select or type spfax.fwl. 2. Click OK to close the window.
c. Repeat Steps a and b for any other installed Dialogic boards, such as #1.
! CAUTION:CAUTION: Make no other property changes at this time.
5. Reload firmware:
a. After you set the firmware parameter on all installed boards, close the Dialogic Product Configuration Manager window.
b. Wait 30 seconds for all the Dialogic processes to completely stop.
c. Reopen the Dialogic product Configuration Manager application to load the new firmware file. For more information, see Step 1.
d. Click the green Start button on the button bar.
e. Wait for the device to start. When service is started, the Stop button becomes active and the installed boards show a green light.
Note:Note: If the drivers fail to start, complete Steps 6 through 16. You must then completely
power down and power up the MAS. After the server boots, continue with Testing the port boards on page 291.
f. Click the Stop button to stop the Dialogic drivers.
Note:Note: You must ensure that you stop all Modular Messaging services before you stop
the Dialogic Services.
g. After all boards show a red icon, continue with Step 6.
Configuring and testing port boards
288 Avaya Modular Messaging for Avaya MSS Release 5.1 Installation and Upgrades
6. Under Configured Devices, double-click the name of the first Dialogic board, such as #0.
! CAUTION:CAUTION: If you cannot find a suitable TSF file for this PBX, you must build an appropriate
tone file now or the integration will not work. Click Cancel in this window, and see Appendix D: Creating a new tone file on page 317.
7. In the Dialogic product Configuration Manager - Properties window:
a. Click the Files tab.
b. Select the TSFFileName parameter, if it is not already selected.
Note:Note: For a D/41JCT-LS board, you must highlight the Configured Devices parameter
on the DCM display when you select Configure Device. You can then view the TSFFileName parameter.
c. Locate the prerecorded TSF file for this PBX or switch:
1. Click the ... button to browse. In the Look In field, navigate toC:\Avaya_Support\Tone_Files.
2. In the Search File window, select a TSF file that is appropriate for the PBX to which you are connecting, such as Avaya-G3-US.tsf. Double-click the file name.
The system displays the appropriate TSF file in the Value field.
Note:Note: You can type in the Value field. This field is editable.
8. After an appropriate TSF file is selected, click the Misc tab.
a. Click the TSFFileSupport parameter.
! CAUTION:CAUTION: You must have selected an appropriate TSF file for this PBX before you set the
TSFFileSupport value to Yes, or errors might occur.
b. From the Value drop-down list, select Yes.
c. Click the DisconnectTone parameter. From the Value drop-down list, select Yes.
d. Click OK to close the window.
9. Repeat Steps 6 through 13 for any other installed Dialogic boards, such as #1. Verify that the settings are correct, and set any values if needed.
10. After all boards are configured, click the green Start button on the button bar.
Wait for service to start. When service is started, the Stop button becomes active and the installed boards show a green light.
Configuring port boards
Issue 1.0 June 2009 289
Avaya - Proprietary. Use pursuant to the terms of your signed agreement or Avaya policy.
Note:Note: For a D/120JCT-LS board: If the drivers failed to start in Step 4, you must
completely power down and power up the MAS. After the server boots, continue with Testing the port boards on page 291.
11. Close the Dialogic product Configuration Manager window.
Continue with Testing the port boards on page 291.
12. In the Dialogic product Configuration Manager - Properties window:
a. Click the Files tab.
b. Select the TSFFileName parameter, if it is not already selected.
Note:Note: For a D/41JCT-LS board, you must highlight the Configured Devices parameter
on the DCM display when you select Configure Device. You can then view the TSFFileName parameter.
c. Locate the prerecorded TSF file for this PBX or switch:
1. Click the ... button to browse. In the Look In field, navigate toC:\Avaya_Support\Tone_Files.
2. In the Search File window, select a TSF file that is appropriate for the PBX to which you are connecting, such as Avaya-G3-US.tsf. Double-click the file name.
The system displays the appropriate TSF file in the Value field.
Note:Note: You can type in the Value field. This field is editable.
13. After an appropriate TSF file is selected, click the Misc tab.
a. Click the TSFFileSupport parameter.
! CAUTION:CAUTION: You must have selected an appropriate TSF file for this PBX before you set the
TSFFileSupport value to Yes, or errors might occur.
b. From the Value drop-down list, select Yes.
c. Click the DisconnectTone parameter. From the Value drop-down list, select Yes.
d. Click OK to close the window.
14. Repeat Steps 6 through 13 for any other installed Dialogic boards, such as #1. Verify that the settings are correct, and set any values if needed.
15. After all boards are configured, click the green Start button on the button bar.
Wait for service to start. When service is started, the Stop button becomes active and the installed boards show a green light.
Configuring and testing port boards
290 Avaya Modular Messaging for Avaya MSS Release 5.1 Installation and Upgrades
Note:Note: For a D/120JCT-LS board: If the drivers failed to start in Step 4, you must
completely power down and power up the MAS. After the server boots, continue with Testing the port boards on page 291.
16. Close the Dialogic product Configuration Manager window.
17. Continue with Testing the port boards on page 291.

Testing the port boards
Issue 1.0 June 2009 291
Avaya - Proprietary. Use pursuant to the terms of your signed agreement or Avaya policy.
Testing the port boards Test all port boards and channels to verify that they can send and receive calls.
Note:Note: Sometimes after you apply settings to a port board, the board comes up in a bad
state. The Dialogic drivers consistently fail to start, and the Event Viewer shows dlgc_log errors. If this problem occurs, turn off and then turn on the server for the port board to work. The power cycle corrects the port board problems.
Preparing for the testPrepare for port board testing as follows:
1. Stop Modular Messaging voice service:
a. Double-click the Monitor icon on the desktop.
b. Click Services (Local) in the left pane, if the item is not already selected.
c. In the right pane, scroll down to MM Messaging Application Server. d. Right-click MM Messaging Application Server and select Stop.
2. For T1-QSIG or E1-QSIG boards, set up the test options as follows:
a. Click Start > Programs > Avaya Modular Messaging > Dialogic Line Tester. b. In the Dialogic Line Test Application window, click Tools > Options.
c. In the Options window, select the correct values for each field. Use the configuration notes to identify the correct values:
● For Layer 1 Protocol, select the required ISDN protocol from the drop-down list.
● For Number Type, select the destination number type.
● For Number Plan, select the destination number plan.
Note:Note: The values you select here must be the same as those entered on the PBX or
switch. Check the configuration notes.
d. After you select the correct values, click OK.
Configuring and testing port boards
292 Avaya Modular Messaging for Avaya MSS Release 5.1 Installation and Upgrades
Testing the portsTo test Dialogic port board functionality:
1. Access the Dialogic Line Test application. Click Start > Programs > Avaya Modular Messaging > Dialogic Line Tester. The Dialogic QSIG - Line Test Application (or DLTest) window opens. The name of the window varies, depending on the type of port boards installed.
2. Verify that all port numbers and channel designations are listed.
3. Test the incoming call connectivity of all ports as follows:
a. From a handset on the same PBX, dial each port individually.
● For QSIG boards, repeatedly dial the number for that group of ports. The switch connects to the next port in the list for each new call.
● For analog and set emulation boards, use individual port extensions.
b. Check the Status column.
● Verify that each port shows Received call followed by Connected.
● For different status conditions, see Table 9.
The system should answer each connected call with a standard welcome message.

Testing the port boards
Issue 1.0 June 2009 293
Avaya - Proprietary. Use pursuant to the terms of your signed agreement or Avaya policy.
4. Test the outcalling capability of all ports.
a. Select a port in the Dialogic Line Test Application window under Port Number. b. Type the number of an extension on this PBX in the Dial Number field.
c. Click Dial Number.d. When the dialed extension rings, answer the call and hang up.
e. Select the next port number, and click Dial Number again.
f. Repeat Steps d and e until all ports are tested.
5. After testing is complete, close the Dialogic Line Test Application window.
Table 9: Status messages for Dialogic Line Test
Status Description Highlight
Channel starting… The channel is being started. Normal
Channels idle… The channel is idle. Normal
Waiting for call… The channel is waiting for an incoming call. Normal
Received call… An incoming call is being processed. Normal
Dialling number… A number is being dialed to make an outgoing call. Normal
Resetting… The user reset the channel. Normal
Line Busy. An outgoing call was made, but a busy tone was detected. Normal
No Answer. An outgoing call was made, but the call was not answered. Normal
Connected. An incoming or outgoing call was answered, so the call is now connected.
Normal
Call was disconnected.
An incoming or outgoing call was disconnected. Normal
Error. A general error with the channel occurred. Error
Error, No Dial tone detected.
An outgoing call was made, but no dial tone was detected before dialing.
Error

Configuring and testing port boards
294 Avaya Modular Messaging for Avaya MSS Release 5.1 Installation and Upgrades
6. If a problem occurs, check:
● the board configuration
● the physical connections between the board and the PBX
● the PBX configuration itself
For example, verify that you have configured the correct PBX type and administered the values according to the current configuration notes.
7. After port board testing is complete, continue as appropriate:
● For new installations, continue with Configuring MAS port boards on page 52.
● For migrations, continue with Updating settings in the VMSC on page 226.

Issue 1.0 June 2009 295
Avaya - Proprietary. Use pursuant to the terms of your signed agreement or Avaya policy.
Appendix C: Installing Dialogic port boards in a customer-provided MAS
This chapter describes how to install Dialogic port boards and their drivers in a customer-provided equipment (CPE) server, also called a customer-provided MAS. A customer might have several servers that support Avaya Modular Messaging software and services.
● One to five servers that handles call-processing functions. These are called Messaging Application Server (MAS) servers. An MAS can contain port boards, depending on the switch integration.
● One Supplementary server that is configured like an MAS, but does not handle calls and does not contain port boards.
● Multiple optional servers that handle special services only. An optional server never contains port boards.
! CAUTION:CAUTION: Use the procedures in this chapter only to install Dialogic port boards in a
customer-provided equipment (CPE) server that is to handle calls.
Continue with Performing initial MSS administration on page 21 if:
● you are using Avaya-provided hardware, For detailed procedures, see Installing the Avaya S8730 Server for Modular Messaging guide or Maintaining the Avaya S8730 Server for Modular Messaging guide.
● this Avaya Modular Messaging system is to use an IP H.323 or IP SIP integration. These IP switch integration methods do not use port boards.
Avaya recommends that you connect a modem to each server to support remote dial in.
Note:Note: Before you can do the tasks described in this section, verify that all preinstallation
requirements were met as described in Preinstallation requirements on page 7.
Topics in this chapter include:
● Supported MAS port boards on page 296
● Installing MAS port boards on page 298
● Connecting MAS port boards to the switch on page 310
● Completing the hardware installation on page 311
● Configuring port boards on page 311
● Testing the port boards on page 316

Installing Dialogic port boards in a customer-provided MAS
296 Avaya Modular Messaging for Avaya MSS Release 5.1 Installation and Upgrades
Supported MAS port boardsTable 10 lists the Dialogic port boards that Avaya supports for all new installations that use customer-provided equipment (CPE) servers. The type of port boards required depends on the switch integration, but each MAS can have only one type of port board installed. For example, all the boards in the server must be T1-QSIG or DSE.
Table 10: Supported MAS port boards for customer-provided servers
Protocol Ports per MAS
Port boards Maximum Number
Dialogic files on documentation media
Analog 36
12
Dialogic D/120JCT-LS 12-port boardDialogic D/120JCT-LS- EW 12-port boardDialogic D/120JCT-LS- EWEU (Europe) 12-port board
Dialogic D/41JCT-LS 4-port boardDialogic D/41JCT-LS- EW 4-port boardDialogic D/41JCT-LS- EWEU (Europe) 4-port board
3
3
D/120JCT-LS (PDF)D/120JCT-LS -EW (PDF)
D/41JCT-LS (PDF)D/41JCT-LS- EW (PDF)
Digital Set Emulation
24 Dialogic D/82JCT-U-PCI-UNIV Dialogic D/82JCT-EW
3 D/82JCT-U PCI Univ(PDF)D/82JCT-EW (PDF)
E1-QSIG 90 Dialogic D/600JCT-1E1 1 or D/600JCT-2E1Dialogic D/600JCT-1E1- 120- EW
3 D/600JCT-1E1 or D/600JCT-2E1 (PDF)D/600JCT-1E1-120-EW
T1-QSIG 69 Dialogic D/480JCT-1T1 1Dialogic D/480JCT-1T1- EW
3 D/480JCT-1T1 (PDF)D/480JCT-1T1-EW (PDF)
H.323 30 None None
SIP SRTP 96 None None
SIP RTP(Non-Secured)
96 None None
1. Early D/600JCT-1E1 and D/480JCT-1T1 QSIG port boards have a plug in the unused connector on the faceplate. Dialogic D/600JCT-1E1 or D/480JCT-1T1 QSIG port boards that shipped after mid-2005 have only a single connector. Both types of QSIG boards operate identically.

Supported MAS port boards
Issue 1.0 June 2009 297
Avaya - Proprietary. Use pursuant to the terms of your signed agreement or Avaya policy.
Note:Note: To support the capacities shown in Table 10, the minimum CPE server hardware
specifications must match the specifications for the S8730-family MAS. For information on the port capacities for CPE server hardware with specifications that matches with S3500-family server hardware, see the Avaya Modular Messaging Concepts and Planning Guide.
a. The Dialogic documents provide details about installing and connecting the port boards. The documents are available on the Avaya Modular Messaging Documentation media or from the www.avaya.com/support Web site. For instructions on how to obtain the documents, see Downloading required software and documentation on page 9.
Note:Note: The Dialogic documentation describes more setups than the ones used for Avaya
Modular Messaging. If information in a Dialogic document conflicts with this Avaya document, follow the steps in the Avaya documentation. Use the Dialogic documentation to locate various items on the board or verify cable connections.

Installing Dialogic port boards in a customer-provided MAS
298 Avaya Modular Messaging for Avaya MSS Release 5.1 Installation and Upgrades
Installing MAS port boardsDo this task only on a customer-provided server.
Before you can install the Modular Messaging software on a customer-provided equipment (CPE) server, you must first install any required port boards in each MAS.
Note:Note: The number of port boards you can install in a customer-provided MAS depends
on the type of board and the number of PCI slots in the server. These instructions assume that up to four PCI slots are available in the server, and that board installation starts with the fourth PCI slot. Modify these instructions as appropriate for the server that you are using.
Preparing for the installationTo install Dialogic port boards in a customer-provided MAS:
1. Verify that this MAS meets the minimum requirements needed to support Modular Messaging software. For more information, see the Avaya Modular Messaging Concepts and Planning Guide.
2. Print the appropriate Dialogic PDF file for more information. For a list of the Dialogic documents that support each type of board, see Table 10: Supported MAS port boards for customer-provided servers on page 296.
3. If the server is already in operation, take it out of service to install the port boards. Schedule and publicize a time.
4. When you are ready to start the installation, shut down the system software and turn off the server. Unplug the AC power cord for safety.
! CAUTION:CAUTION: Electrostatic discharge can severely damage sensitive electronic circuits. Before
handling any electronic hardware, be sure to wear a grounding wrist strap or other static-dissipating device. The antistatic wrist strap must touch your bare skin and the strap cable must connect to an earth ground. For complete ESD instructions, see "Protecting against ESD damage" on the documentation media.
5. Open the chassis to access the PCI card slots.
6. Remove the cover for the PCI slot in which you want to install the new board. Set the retaining screw aside. ● If you are installing multiple boards, remove as many card slot covers as are needed.
● Note the maximum number of boards of a certain type that you can install in one MAS. See Table 10: Supported MAS port boards for customer-provided servers on page 296.

Installing MAS port boards
Issue 1.0 June 2009 299
Avaya - Proprietary. Use pursuant to the terms of your signed agreement or Avaya policy.
Note:Note: When you insert boards, start from the right-most slot if possible. For example, if
six PCI slots are in the server, start with PCI slot 6 to insert the port boards.
Setting jumpers and switchesSet the jumpers and switches for board position, bus termination, and other features as described in this section. For more information about jumper or switch locations, see the Dialogic documentation listed in Table 10: Supported MAS port boards for customer-provided servers on page 296.
Note:Note: The Dialogic documentation describes more setups than the ones used for Avaya
Modular Messaging. If information in a Dialogic document conflicts with this Avaya document, follow the steps in the Avaya documentation. Use the Dialogic documentation to locate various items on the board or verify cable connections.
To set the jumpers and switches on each board:
1. Remove the new port board from its packaging. Do not touch the circuit board surface.
2. Set the jumpers and switches as required for this type of board:
● D/480JCT-1T1and D/600JCT-1E1 or D/600JCT-2E1 QSIG board settings on page 300
● D/480JCT-1T1-EW and D/600JCT-E1-120-EW QSIG board settings on page 300
● D/82JCT-U PCI Univ set emulation board settings on page 301
● D/82JCT-U EW set emulation board settings on page 302
● D/120JCT-LS 12-port analog board settings on page 303
● D/120JCT-LS-EW port analog board settings on page 303
● D/41JCT-LS 4-port analog board settings on page 304
● D/41JCT-LS-EW analog board settings on page 306

Installing Dialogic port boards in a customer-provided MAS
300 Avaya Modular Messaging for Avaya MSS Release 5.1 Installation and Upgrades
D/480JCT-1T1and D/600JCT-1E1 or D/600JCT-2E1 QSIG board settings
To set up Dialogic T1 or E1 QSIG boards, you must set only the board ID for the port board.
1. Turn the rotary switch, located on the top of the port board. Set the board ID according to the slot number in which the board is installed.
The Dialogic port boards usually are placed in the PCI slots starting from the right side of the cabinet. For the board ID numbers for a 6-PCI slot MAS, see Table 11.
Note:Note: Do not set the Computer Telephony (CT) bus for bus termination.
2. Continue with Installing the port boards on page 308.
D/480JCT-1T1-EW and D/600JCT-E1-120-EW QSIG board settings
If a system has two boards, they must be installed in adjacent slots.
For the D/480JCt-1T1-EW and D/600JCT-E1-120-EW boards, set the board ID and turn off power budgeting.
1. Turn the rotary switch, located on the top of the port board. Set the board ID according to the slot number in which the board is installed.
The Dialogic port boards usually are placed in the PCI slots starting from the right side of the cabinet. For the board ID numbers for a 6-PCI slot MAS, see Table 11.
2. Move the P3 jumper on the top of the board on to pins 1-2 to disable power budgeting.
Table 11: D/480JCT-1T1 and D/600JCT-1E1 or D/600JCT-2E1 QSIG board ID settings
Card number Board ID number PCI slot number
1 0 6
2 1 5
Table 12: D/480JCT-1T1-EW and D/600JCT-E1-120-EW QSIG board ID settings
Board ID number PCI slot number
0 3
1 4

Installing MAS port boards
Issue 1.0 June 2009 301
Avaya - Proprietary. Use pursuant to the terms of your signed agreement or Avaya policy.
D/82JCT-U PCI Univ set emulation board settings
To set up Dialogic digital set emulation (DSE) boards, you must set only the bus termination.
1. If the server contains more than one port board, set the boards on both ends of the Computer Telephony (CT) bus for bus termination. Use jumper P8 to set CT bus termination as shown in Table 13.
Figure 1 shows the P8 jumper settings.
● The setting on the left is ON. Pins 1 and 2 are jumpered. If set, the CT bus is terminated.
● The setting on the right is OFF.
2. Continue with Installing the port boards on page 308.
Table 13: D/82JCT-U set emulation board settings for CT bus termination
Number of cards P8 jumper CT bus termination
1 OFF Do not terminate bus.
2 Card 1: ON pins 1 and 2Card 2: ON pins 1 and 2
Terminate bus on both boards.
Figure 1: D/82JCT-U board settings for CT bus termination: ON or OFF
jpvyd82 LAO 081803
4
3
2
1
P8
4
3
2
1
P8

Installing Dialogic port boards in a customer-provided MAS
302 Avaya Modular Messaging for Avaya MSS Release 5.1 Installation and Upgrades
D/82JCT-U EW set emulation board settings
To set up Dialogic digital set emulation (DSE) boards, you must set only the bus termination.
1. If the server contains more than one port boards, set the boards on both ends of the Computer Telephony (CT) bus for bus termination and turn off power budgeting on all boards. Use jumper P8 to set CT bus termination as shown in Table 13.
2. Set the P8 jumper to the appropriate position for the system configuration:
● For a system with two boards, move the P8 jumper on to pins 1 and 2.
● For a system with one board, verify that the P8 jumper is only on pin 1.
Figure 2 shows the P8 jumper settings.
● The setting on the left is ON. Pins 1 and 2 are jumpered. If set, the CT bus is terminated.
● The setting on the right is OFF.
3. Move the P11 jumper on the top of the board on to pins 1–2 to disable power.
Table 14: D/82JCT-U set emulation board settings for CT bus termination
Number of cards P8 jumper CT bus termination
1 OFF Do not terminate bus.
2 Card 1: ON pins 1 and 2Card 2: ON pins 1 and 2
Terminate bus on both boards.
Figure 2: D/82JCT-U board settings for CT bus termination: ON or OFF
jpvyd82 LAO 081803
4
3
2
1
P8
4
3
2
1
P8

Installing MAS port boards
Issue 1.0 June 2009 303
Avaya - Proprietary. Use pursuant to the terms of your signed agreement or Avaya policy.
D/120JCT-LS 12-port analog board settings
To set up Dialogic 12-port analog boards:
1. Set the unique board ID for the port board. Turn the rotary switch, located on the top of the board. Set the board ID according to the slot number in which the port board is installed.
The Dialogic port boards usually are placed in the PCI slots starting from the right side of the cabinet. For the board ID numbers for a 6-PCI slot MAS, see Table 15.
2. Set the hook-switch state of the port board to ON so callers hear a busy signal when the board is not initialized. Use the SW1 switch, located at the top of the board, to set the hook-switch state. See Figure 3.
3. Continue with Installing the port boards on page 308.
D/120JCT-LS-EW port analog board settings
Determine in which slot in the PCI cage you will be installing the board. Slots in the PCI cage are number 3 (bottom slot) 4 (middle slot) and 5 (top slot). If a system has two boards, they must be installed in adjacent slots. For the D/120JCT-LS-EW board, set the board ID, the hook-switch state and turn off power budgeting.
1. Set the unique board ID for the port board. Turn the rotary switch, located on the top of the board. Set the board ID according to the slot number in which the port board is installed.
Table 15: D/120JCT-LS 12-port analog board ID settings
Card number Board ID number PCI slot number
1 0 6
2 1 5
Figure 3: D/120JCT-LS analog board setting for on-hook switch
jpvysw1 LAO 081803
1 ON
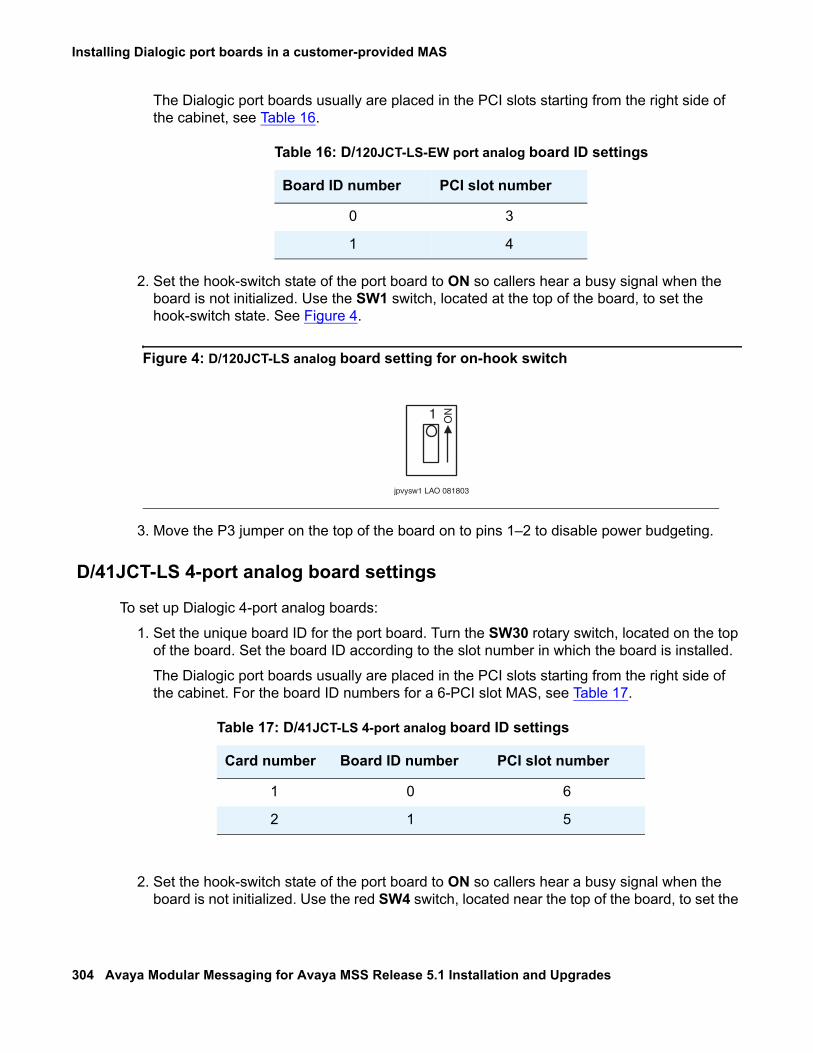
Installing Dialogic port boards in a customer-provided MAS
304 Avaya Modular Messaging for Avaya MSS Release 5.1 Installation and Upgrades
The Dialogic port boards usually are placed in the PCI slots starting from the right side of the cabinet, see Table 16.
2. Set the hook-switch state of the port board to ON so callers hear a busy signal when the board is not initialized. Use the SW1 switch, located at the top of the board, to set the hook-switch state. See Figure 4.
3. Move the P3 jumper on the top of the board on to pins 1–2 to disable power budgeting.
D/41JCT-LS 4-port analog board settings
To set up Dialogic 4-port analog boards:
1. Set the unique board ID for the port board. Turn the SW30 rotary switch, located on the top of the board. Set the board ID according to the slot number in which the board is installed.
The Dialogic port boards usually are placed in the PCI slots starting from the right side of the cabinet. For the board ID numbers for a 6-PCI slot MAS, see Table 17.
2. Set the hook-switch state of the port board to ON so callers hear a busy signal when the board is not initialized. Use the red SW4 switch, located near the top of the board, to set the
Table 16: D/120JCT-LS-EW port analog board ID settings
Board ID number PCI slot number
0 3
1 4
Figure 4: D/120JCT-LS analog board setting for on-hook switch
jpvysw1 LAO 081803
1 ON
Table 17: D/41JCT-LS 4-port analog board ID settings
Card number Board ID number PCI slot number
1 0 6
2 1 5

Installing MAS port boards
Issue 1.0 June 2009 305
Avaya - Proprietary. Use pursuant to the terms of your signed agreement or Avaya policy.
hook-switch state. See Figure 5: D/41JCT-LS analog board setting for on-hook switch on page 305.
3. If the server contains more than one port board, set the boards on both ends of the Computer Telephony (CT) bus for bus termination. Use jumper JP2 to set CT bus termination as shown in Table 18.
Figure 6 shows the JP2 jumper settings.
● The setting on the left is ON. Pins 1 and 2 are jumpered. If set, the CT bus is terminated.
● The setting on the right is OFF.
Figure 5: D/41JCT-LS analog board setting for on-hook switch
Table 18: D/41JCT-LS analog board settings for CT bus termination
Number of cards JP2 jumper CT bus termination
1 OFF Do not terminate bus.
2 Card 1: ON pins 1 and 2 Card 2: ON pins 1 and 2
Terminate bus on both boards.
Figure 6: D/41JCT-LS analog board settings for CT bus termination: ON or OFF
jpvysw1 LAO 081803
1 ON
jpvyd41 LAO 081803
1
1
2
2
JP2
1
1
2
2
JP2

Installing Dialogic port boards in a customer-provided MAS
306 Avaya Modular Messaging for Avaya MSS Release 5.1 Installation and Upgrades
D/41JCT-LS-EW analog board settings
Determine in which slot in the PCI cage you will be installing the board. Slots in the PCI cage are number 3 (bottom slot) 4 (middle slot) and 5 (top slot). If a system has two boards, they must be installed in adjacent slots. For the D/41JCT-LS-EW board, set the board ID, the hook-switch state and Computer Telephony (CT) bus termination. CT bus termination is set by adjusting the JP2 jumper on the side of the board.
1. Set the unique board ID for the port board. Turn the SW30 rotary switch, located on the top of the board. Set the board ID according to the slot number in which the board is installed.
The Dialogic port boards usually are placed in the PCI slots starting from the right side of the cabinet, see Table 19.
2. Set the hook-switch state of the port board to ON so callers hear a busy signal when the board is not initialized. Use the red SW4 switch, located near the top of the board, to set the hook-switch state. See Figure 7: D/41JCT-LS analog board setting for on-hook switch on page 306.
Table 19: D/41JCT-LS 4-port analog board ID settings
Board ID number PCI slot number
0 3
1 4
Figure 7: D/41JCT-LS analog board setting for on-hook switch
jpvysw1 LAO 081803
1 ON
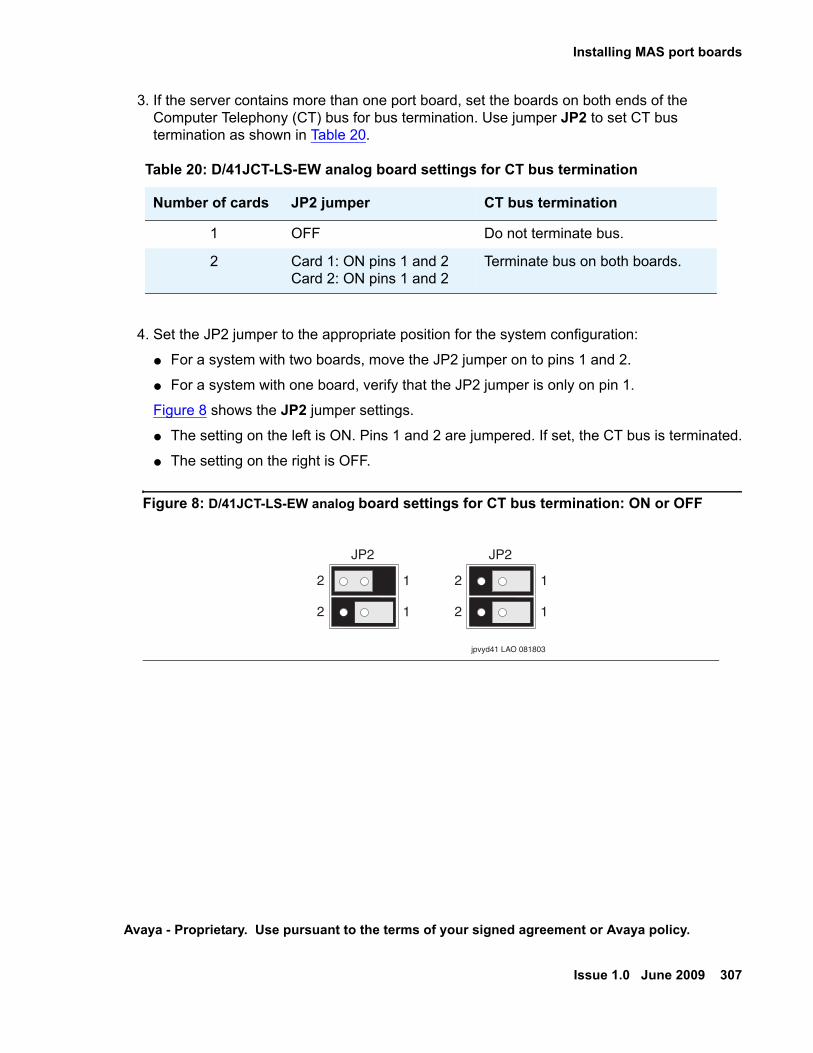
Installing MAS port boards
Issue 1.0 June 2009 307
Avaya - Proprietary. Use pursuant to the terms of your signed agreement or Avaya policy.
3. If the server contains more than one port board, set the boards on both ends of the Computer Telephony (CT) bus for bus termination. Use jumper JP2 to set CT bus termination as shown in Table 20.
4. Set the JP2 jumper to the appropriate position for the system configuration:
● For a system with two boards, move the JP2 jumper on to pins 1 and 2.
● For a system with one board, verify that the JP2 jumper is only on pin 1.
Figure 8 shows the JP2 jumper settings.
● The setting on the left is ON. Pins 1 and 2 are jumpered. If set, the CT bus is terminated.
● The setting on the right is OFF.
Table 20: D/41JCT-LS-EW analog board settings for CT bus termination
Number of cards JP2 jumper CT bus termination
1 OFF Do not terminate bus.
2 Card 1: ON pins 1 and 2 Card 2: ON pins 1 and 2
Terminate bus on both boards.
Figure 8: D/41JCT-LS-EW analog board settings for CT bus termination: ON or OFF
jpvyd41 LAO 081803
1
1
2
2
JP2
1
1
2
2
JP2
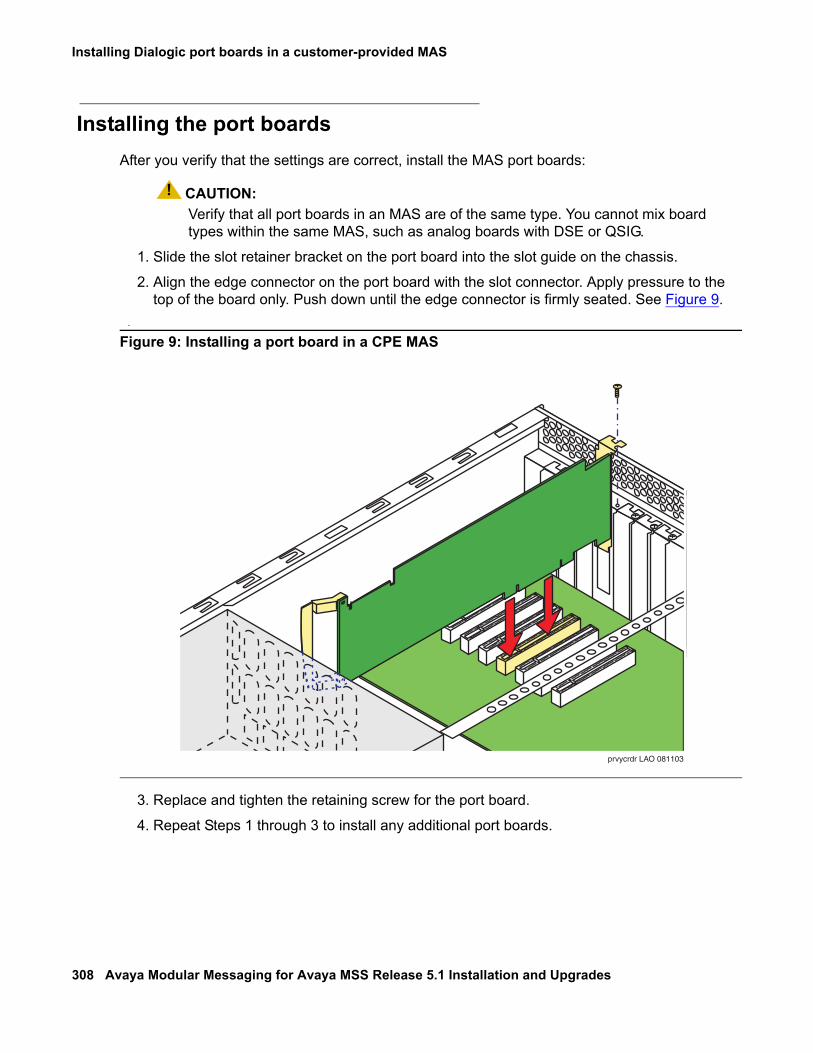
Installing Dialogic port boards in a customer-provided MAS
308 Avaya Modular Messaging for Avaya MSS Release 5.1 Installation and Upgrades
Installing the port boards After you verify that the settings are correct, install the MAS port boards:
! CAUTION:CAUTION: Verify that all port boards in an MAS are of the same type. You cannot mix board
types within the same MAS, such as analog boards with DSE or QSIG.
1. Slide the slot retainer bracket on the port board into the slot guide on the chassis.
2. Align the edge connector on the port board with the slot connector. Apply pressure to the top of the board only. Push down until the edge connector is firmly seated. See Figure 9.
.
3. Replace and tighten the retaining screw for the port board.
4. Repeat Steps 1 through 3 to install any additional port boards.
Figure 9: Installing a port board in a CPE MAS
prvycrdr LAO 081103
Installing MAS port boards
Issue 1.0 June 2009 309
Avaya - Proprietary. Use pursuant to the terms of your signed agreement or Avaya policy.
5. If the MAS has multiple port boards, attach the Computer Telephony (CT) bus cable to connect all the port boards:
a. Position the CT bus cable so the colored stripe on the ribbon cable faces the ports at the back of the chassis.
b. Start with the board in the highest numbered slot. Attach the end connector on the bus cable to the CT bus edge connector at the top of the board.
c. Connect the next bus connector to the next port board, and so on.
d. If the cable has extra connectors or loose ribbon cable, tuck down the cable so it does not snag when you replace the cover.
6. Replace the chassis cover.
7. Plug in the AC power cord.
8. Restore power to the server.
The server boots.
Disabling the Dialogic hardwareThe Microsoft Windows software automatically detects the Dialogic port boards that you just installed. You configure these boards later as part of the Modular Messaging software installation. Do not install the Dialogic drivers at this time.
To temporarily disable the Dialogic port boards:
1. After the server boots, log on using an account that has permission to install software, such as the local administrator.
2. The system runs a Found New Hardware Wizard once for each new Dialogic port board installed in the MAS. To complete the wizard:
a. On the Welcome screen, use the default option to Install the software automatically. Click Next.
b. Wait while the system searches for a driver.
c. When the wizard reports that it Cannot Install this Hardware, click Finish.
3. Repeat Step 2 for each repetition of the Found New Hardware Wizard.
Note:Note: You install the Dialogic drivers later with the rest of the Modular Messaging
software.

Installing Dialogic port boards in a customer-provided MAS
310 Avaya Modular Messaging for Avaya MSS Release 5.1 Installation and Upgrades
Connecting MAS port boards to the switchConnect the MAS port boards to the PBX (switch), as described in this section.
To connect MAS port boards to the switch:
1. Assemble the required cables.
Note:Note: Port boards ordered through Avaya ship with the correct cables.
2. Connect each port on the port boards to the switch (PBX) as required:
Note:Note: Check the numbering on the board faceplate to verify that you are connecting the
correct cable to the correct port.
● For E1-QSIG or T1-QSIG boards: a. Connect the port on the Dialogic E1-QSIG or T1-QSIG board using an RJ-48C Ethernet
cable.
b. The other end of the cable must be connected to the QSIG board on the corporate switching system. The organization responsible for maintaining the corporate switch must make this connection. See the customer contract or the statement of work.
● For set emulation boards: a. Connect each port on the Dialogic set emulation (DSE) board using the D/82U cable.
b. The other end of the cable must be connected to a 4-wire punch-down block on the corporate switching system. The organization responsible for maintaining the corporate switch must make this connection. See the customer contract or the statement of work.
● For analog boards: a. Connect each port on the installed analog boards to one end of a standard RJ-11 tip/ring
cord. You can also use individual tip/ring cables and a 12-port harmonica. Note which cables connect to which ports.
b. The other end of the cable must be connected to an analog line on the corporate switching system. The organization responsible for maintaining the corporate switch must make this connection. See the customer contract or the statement of work.
Completing the hardware installation
Issue 1.0 June 2009 311
Avaya - Proprietary. Use pursuant to the terms of your signed agreement or Avaya policy.
Completing the hardware installationThe Dialogic port boards require their own drivers and software for board configuration. To complete the hardware installation on a customer-provided equipment (CPE) server, install the Dialogic drivers and software as part of the Modular Messaging software installation. For more information, see Running the Modular Messaging Configuration wizard on page 95.
Configuring port boards! Important:
Important: You must ensure that you stop all Modular Messaging services before you stop the Dialogic Services.
Note:Note: An MAS that uses an IP H.323 or IP SIP switch integration has no port boards.
You do all configuration for these switch integrations using the Voice Mail System Configuration (VMSC) program. For more information, see Configuring the voice mail system on page 53.
Manual port board configuration involves three phases:
1. The appropriate party must administer the switch for the port boards using the configuration notes for this particular switch (PBX) integration. For instructions to get the most recent configuration notes, see Downloading configuration notes on page 11.
! CAUTION:CAUTION: You can only install this system by using the required configuration notes for this
switch or PBX. The PBX administrator must have administered the ports on the switch before you can proceed.
2. Configure and test the port boards as described in this section. Some steps require you to use the configuration notes.
3. You must complete the port board configuration as described in Configuring port boards and switch integration on page 75.
Continue based on the type of port boards installed in this MAS:
● Configuring T1-QSIG or E1-QSIG boards on page 313
● Configuring set emulation boards on page 314
● Configuring analog port boards on page 315

Installing Dialogic port boards in a customer-provided MAS
312 Avaya Modular Messaging for Avaya MSS Release 5.1 Installation and Upgrades
! CAUTION:CAUTION: If the window displays no port boards when you run the Dialogic Configuration
Manager, you might need to reseat or replace some of the boards. For more information, get the appropriate maintenance information for this Modular Messaging system; see Downloading user documentation on page 12:
● For S8730-family servers, get Maintaining the Avaya S8730 Server for Modular Messaging.
● For S3500-family servers, get "Circuit card replacement."

Configuring port boards
Issue 1.0 June 2009 313
Avaya - Proprietary. Use pursuant to the terms of your signed agreement or Avaya policy.
Configuring T1-QSIG or E1-QSIG boards Any of the following QSIG port boards might be installed in an MAS:
● Dialogic D/480JCT-1T1
● Dialogic D/480JCT-1T1- EW
● Dialogic D/600JCT-1E1
● Dialogic D/600JCT-2E1
● Dialogic D/600JCT-1E1- 120- EW
The maximum number of port boards per MAS varies, depending on the server hardware. For more information, see Configuring port boards on page 311.
To configure either of these QSIG boards:
1. Click Start > Programs > Dialogic System Release > Configuration Manager - DCM.
The Dialogic Product Configuration Manager window opens.
2. If a popup window opens, connect to the MAS as follows:
a. In the Computer Name window, verify that Local is selected and that the correct server name is shown, such as MYMAS1.
b. Click Connect. The system displays this window only the first time that you access the Dialogic Configuration Manager application.
The Dialogic software locates any installed port boards.
3. Verify that all Dialogic services are stopped. All boards should show a red icon.
4. If the board icon shows an X, the board is disabled. To enable it, right-click the board and select Enable device(s).
5. Under Configured Devices, double-click the name of the first Dialogic board, such as #0.
6. In the Dialogic product Configuration Manager - Properties window:
a. Click the Interface tab and select the ISDNProtocol parameter.
b. Select the correct value for this board from the pull-down list:
● For E1-QSIG: select QTE● For T1-QSIG: select QTU
c. Click the Telephony Bus tab and select the PCMEncoding parameter.
d. Select the correct value for the installed board from the pull-down list:
● For E1-QSIG: select A-Law for most countries, particularly Europe
Installing Dialogic port boards in a customer-provided MAS
314 Avaya Modular Messaging for Avaya MSS Release 5.1 Installation and Upgrades
● For T1-QSIG: select μ-Law (mu-Law) for the United States and Japan
e. Click the Misc tab.
f. For the FirmwareFile parameter, verify that the value is default.g. Select the FirmwareFile2 parameter. Enter spfax.fwl in the Value field.
h. Click the Country tab and select the Country parameter.
i. On the pull-down list of values, always use United States for either type of board.
j. Click OK to close the window.
7. Repeat Steps 5 and 6 for any other installed Dialogic boards, such as #1.
8. After all boards are configured, click the green Start button on the button bar.
Wait for service to start. When service is started, the Stop button becomes active and the installed boards show a green light.
9. Verify that the port boards are operating correctly.
a. Check the LED display on the Dialogic board faceplate.
● A red status LED lights on the back of the port board during driver startup.
● If the drivers start successfully, the board whose port is connected to the PBX shows a green LED within 30 seconds. LEDs on the other boards remain red.
b. If a problem occurs, check the board configuration, the physical connections between the board and the PBX, or the PBX configuration. Repeat Steps 5 through 9 as needed.
10. Close the Dialogic product Configuration Manager window.
11. Continue with Testing the port boards on page 316.
Configuring set emulation boards An MAS supports 8-port Dialogic Digital Set Emulation (DSE) boards. The maximum number of port boards per MAS varies, depending on the server hardware. For more information, see Configuring port boards on page 311.
Configure the port boards as outlined in Configuring set emulation boards on page 284. You may install Dialogic D/82JCT-EW board in an MAS.
Note:Note: Avaya supports the non-universal Dialogic D/82JCT-U-PCI-UNIV board for
upgrades only.

Configuring port boards
Issue 1.0 June 2009 315
Avaya - Proprietary. Use pursuant to the terms of your signed agreement or Avaya policy.
Configuring analog port boards The following analog port boards might be installed in an MAS:
● Dialogic D/41JCT-LS 4-port Tip/Ring
● Dialogic D/41JCT-LS- EW 4-port
● Dialogic D/120JCT-LS 12-port Tip/Ring
● Dialogic D/120JCT-LS- EW 12-port
The maximum number of port boards per MAS varies, depending on the server hardware. For more information, see Configuring port boards on page 311.
Configure the analog port boards as outlined in Configuring analog port boards on page 286.

Installing Dialogic port boards in a customer-provided MAS
316 Avaya Modular Messaging for Avaya MSS Release 5.1 Installation and Upgrades
Testing the port boards Test all port boards and channels to verify that port boards can send and receive calls using the procedures outlined in Testing the port boards on page 291.
Note:Note: Sometimes after you apply settings to a port board, the board comes up in a bad
state. The Dialogic drivers consistently fail to start, and the Event Viewer shows dlgc_log errors. If this problem occurs, turn off and then turn on the server again. The power cycle corrects the port board problems.
Issue 1.0 June 2009 317
Avaya - Proprietary. Use pursuant to the terms of your signed agreement or Avaya policy.
Appendix D: Creating a new tone file
This appendix describes how to build a tone file for Dialogic analog port boards by using the PBXpert utility to learn PBX tones.
Do this procedure after you administer the port boards on the switch, but before you configure the port boards using the Intel Dialogic product Configuration Manager. For more information, see Configuring analog port boards on page 286.
! CAUTION:CAUTION: Use the configuration notes for the PBX or switch integration to administer the
port boards. For instructions to get the configuration notes, see Downloading required software and documentation on page 9. Administer the port boards on the switch before you can continue.
PBXpert learns the call progress tones for this PBX and stores in a Tone Set File (TSF). You can store many tone sets in a single TSF file.
You can use the PBXpert utility either automatically or manually:
● Automatic Learning: PBXpert uses two different channels on the Dialogic port board to set up tones and learn the resulting call progress tones automatically. To use this procedure, see Learning tones automatically on page 318.
● Manual Learning: PBXpert uses one channel on the Dialogic port board and a telephone to set up tones and learn the resulting call progress tones manually. PBXpert prompts you how and when to use the telephone. To use this procedure, see Learning tones manually on page 321.
Note:Note: If only one line is connected to the Dialogic port board, you must use Manual
Learning.
Creating a new tone file
318 Avaya Modular Messaging for Avaya MSS Release 5.1 Installation and Upgrades
Learning tones automaticallyThis section describes:
● Running the PBXpert wizard on page 318
● Consolidating and saving the TSF file on page 320
● Using the new TSF in Dialogic Configuration Manager on page 321
Running the PBXpert wizardThe PBXpert wizard guides you to learn the tones used by the PBX and save the information as a TSF file. PBXpert can learn the following tones:
● Dial tone
● Ringback
● Busy
● Reorder (fast busy)
● Disconnect
To run the PBXpert wizard:
1. Start the Dialogic port boards.
2. You must ensure that you stop all Modular Messaging services before you stop the Dialogic Services.
The Intel Dialogic product Configuration Manager window must be open
a. To open the DCM application, click Start > Programs > Intel Dialogic System Release > Configuration Manager - DCM.
b. Click the green Start button on the button bar.
When the service starts, the Stop button becomes active and the installed boards show a green light.
3. Click Start > Programs > Intel Dialogic System Release > PBX Expert.The PBXpert main window opens. Most fields are blank until tones are learned.
● If you are using PBXpert for the first time after installation, the PBXpert wizard starts automatically.
● If the PBXpert wizard does not start automatically, click Tones > Tone Wizard.

Learning tones automatically
Issue 1.0 June 2009 319
Avaya - Proprietary. Use pursuant to the terms of your signed agreement or Avaya policy.
Note:Note: You can change the default settings in the wizard if you are familiar with this PBX
environment and the Dialogic API. The program saves any settings that you change when you exit PBXpert. For help on a particular screen, click the Help button in the wizard.
After the PBXpert Wizard window opens, complete the screens as follows:
1. On the Welcome screen, click Next. 2. On the PBX Information screen:
● Under PBX, enter the name of the Manufacturer, such as Mitel.
● Enter the Model of the PBX, such as SX-2000.
● You can use the automatically created Tone Set File name, or change the file name.
● Click Next.3. On the Select a Board screen:
● Select the port board to use.
● Click Next.4. On the Select the Calling Resource screen, for the Line A (Calling Channel):
● For Select the Channel, enter the port number or the channel to use.
● For Phone Number, enter the extension number of this port.
● Click Next.5. On the Select the Called Resource screen, for the Line B (Called Channel):
● For Select the Channel, enter a port number or the channel that is different from Line A.
● For Phone Number, enter the extension number of this port.
● Click Next.6. On the Settings Confirmation screen:
● Verify the settings. Click Back if you have change any of the settings.
● Verify if you have checked the Run Wizard Auto-Test box.
● Click Next.7. The Auto Line Test window opens while PBXpert verifies the connection between the two
specified channels.
● If you see a Test finished successfully! message, click OK. Close this window and continue.
● If the line test fails:
a. Click OK. Close this window.
b. Click Back, adjust the settings, and try the test again.
Creating a new tone file
320 Avaya Modular Messaging for Avaya MSS Release 5.1 Installation and Upgrades
8. On the Learning Tones screen, click Next to start learning tones automatically.
The Learn Tones window opens.
Note:Note: You can click Cancel anytime during the test to stop automated learning.
9. When PBXpert completes learning, choose to keep or discard the data.
● If the tones were learned without errors, select Keep Data. The Learn Tones window closes and you can continue.
● If errors occurred, select Discard Data. The window closes.
- Click Back, adjust the settings, and learn the tones again.
You cannot test or save the tone file if it contains errors.
10. On the Verifying the Learn screen, click Next to test the learned tones.
● If the test succeeds, click OK to close the test window and continue.
● If the test fails, click OK to close this window. Click Back on the wizard, adjust the settings, and try the test again.
11. The Summary of Results screen shows the final wizard status and the tone definitions. Click Finish.
The PBXpert main window displays the tone definitions.
Consolidating and saving the TSF fileYou must consolidate and save the new TSF file so you can use it with the Dialogic voice driver. To do this:
1. Click Tones > Consolidate.
2. After consolidation is complete, click File > Save to save the new TSF file.
a. In the Save As window, navigate to the C:\Avaya_Support\Tone_Files directory to ensure that you have saved the file.
Note:Note: If you use the default DATA directory, the system will not save the customized
tone file automatically.
b. Specify a file name of TSF file type, such as Mitel-SX-2000.tsf.

Learning tones manually
Issue 1.0 June 2009 321
Avaya - Proprietary. Use pursuant to the terms of your signed agreement or Avaya policy.
Using the new TSF in Dialogic Configuration ManagerTo use the new TSF that you just created:
1. Return to the Intel Dialogic product Configuration Manager window.
2. Click the red Stop button on the button bar.
3. Return to Step 6 in Configuring analog port boards on page 286 and complete board configuration and testing.
Learning tones manuallyThis section describes:
● Running PBXpert on page 321
● Adding a new tone set on page 322
● Learning tone definitions on page 323
● Testing the tone set on page 323
● Consolidating and saving the TSF file on page 324
● Using the new TSF in Dialogic Configuration Manager on page 324
Running PBXpertTo run PBXpert manually:
1. Start the Dialogic port boards.
a. The Intel Dialogic product Configuration Manager window must be open.
To open the DCM application, click Start > Programs > Intel Dialogic System Release > Configuration Manager - DCM.
b. Click the green Start button on the button bar.
When the service starts, the Stop button becomes active and the installed boards show a green light.
2. Click Start > Programs > Intel Dialogic System Release > PBX Expert.The system opens the PBXpert main window. Most fields are blank until tones are learned. If you are using PBXpert for the first time after installation, the PBXpert wizard starts automatically.

Creating a new tone file
322 Avaya Modular Messaging for Avaya MSS Release 5.1 Installation and Upgrades
3. Select the Don’t run wizard at startup check box and then click Cancel.A new, empty TSF is now active.
4. In the PBXpert main window, click Settings on the button bar. The system opens the Settings window.
5. Click the Dialing tab, complete the following:
a. Under Line A, enter the Board Number, such as 1.
b. Enter the Channel Number or Port number.c. Verify that the Manual mode check box is checked.
d. For Phone Number, enter the extension for this port or channel.
You can use the default values for all other fields in this window. Click Help for more information if needed.
e. Repeat Steps a through d for Line B.
Note:Note: If you are familiar with this PBX environment and the Dialogic API, you can
change these default settings. The program saves any settings that you change when you exit PBXpert.
f. Click OK.
Adding a new tone setTo add a new tone set to a TSF:
1. From the PBXpert main window, click Edit > New Tone Set.2. In the New Toneset window:
a. Enter the PBX Manufacturer, such as Mitel, and the Model name, such as SX-2000.
b. Click OK.
The PBXpert main window shows the manufacturer and the model names you entered. The tone definitions are set to zero.

Learning tones manually
Issue 1.0 June 2009 323
Avaya - Proprietary. Use pursuant to the terms of your signed agreement or Avaya policy.
Learning tone definitionsTo add tone definitions to the new tone set:
1. From the PBXpert main window, click Tones > Learn.
2. On the Start Learn window:
a. Select the tones for the Dialogic boards to learn. The default is all tones.
b. Click Start Learn to have PBXpert start learning tones.
The Learn Tones window opens.
Note:Note: Click Cancel anytime to stop learning.
3. The system prompts you to listen for ringing, and to pick up or replace the telephone handset, during the test. When a message box pops up, do the requested action, and then click OK.
4. When the learning process is complete, the system displays the tone definitions in the Learn Tones window. Choose to keep or discard the data:
● If the tones were learned without errors, select Keep Data. The Learn Tones window closes and you can continue.
● If errors occurred, select Discard Data. The window closes.
- Click Back on the wizard, adjust the settings, and try to learn the tones again.
- You cannot test or save the tone file if it contains errors.
The Learn Tone window closes. The PBXpert main window displays the new tone definitions.
Testing the tone setThe Test function verifies that the consolidated tone set in the active TSF works correctly with Perfect Call, a call progress analysis utility.
To test the newly learned tones:
1. In the main PBXpert window, click Tones > Test.2. A Test window opens.
When testing is complete, the Test window displays the test results.
3. Verify that the tone definitions of the learned tones are correct.

Creating a new tone file
324 Avaya Modular Messaging for Avaya MSS Release 5.1 Installation and Upgrades
Consolidating and saving the TSF fileYou must consolidate and save the new TSF file so you can use it with the Dialogic voice driver. To do this:
1. Click Tones > Consolidate.
2. Click File > Save to save the new TSF file.
a. In the Save As window, navigate to the following directory to ensure that the file is backed up: C:\Avaya_Support\Tone_Files
Note:Note: If you use the default DATA directory, the system will not back up the customized
tone file automatically.
b. Specify a file name of TSF file type, such as Mitel-SX-2000.tsf.
Using the new TSF in Dialogic Configuration ManagerTo use the new TSF that you just created:
1. Return to the Intel Dialogic product Configuration Manager window.
2. Click the red Stop button on the button bar.
Note:Note: You must ensure that you stop all Modular Messaging services before you stop
the Dialogic Services.
3. Return to Step 6 in Configuring analog port boards on page 286 and complete board configuration and testing.

Issue 1.0 June 2009 325
Avaya - Proprietary. Use pursuant to the terms of your signed agreement or Avaya policy.
Appendix E: Updating Modular Messaging software
You might update the Avaya Modular Messaging software after an installation or upgrade to bring it up to date with the latest changes. Software updates might include the latest Avaya Service Pack (SP) or Avaya software patches.
Topics in this appendix include:
● Getting software updates from the Web on page 326
● Installing software updates on each MAS on page 327
● Installing software updates on the MSS on page 330
Considerations for applying updates include:
● You can apply multiple patches to a system.
● You can apply multiple updates to Modular Messaging components.
● If you apply a Service Pack, the program automatically uninstalls all previously applied patches and Service Packs.

Updating Modular Messaging software
326 Avaya Modular Messaging for Avaya MSS Release 5.1 Installation and Upgrades
Getting software updates from the WebGet the latest Avaya software updates from the Web.
To get any Avaya software updates for the system:
1. Use a computer that can access the Internet.
2. Go to the Avaya Support Web site at http://www.avaya.com/support.
3. Click the link to FIND DOCUMENTATION and TECHNICAL INFORMATION by PRODUCT NAME.
4. Under M, click Modular Messaging.
5. On the Modular Messaging page, select Release 5.1 from the drop-down list.
6. Click Downloads.
7. Download the files needed to update the Modular Messaging system.
Note:Note: Ensure that you download both the software files and any instructions required to
install the Service Pack or software patch.
8. Copy the downloaded files to a storage device.
9. Use the appropriate tools on your computer to extract the files into an appropriate directory. The files are often in a compressed form, such as a zip file.

Installing software updates on each MAS
Issue 1.0 June 2009 327
Avaya - Proprietary. Use pursuant to the terms of your signed agreement or Avaya policy.
Installing software updates on each MASTo start the update procedure, you must copy the Avaya software updates to each MAS. You then run an installation wizard to install the updates.
Copying files to the MASTo copy the Avaya software updates to an MAS:
1. Switch the monitor to show the appropriate MAS. For more information, see Switching the monitor to show the correct server on page 153.
2. Insert the storage device into the server.
3. Copy the software update files to the MAS:
a. Open Windows Explorer.
b. Navigate to the appropriate directory on the storage device.
c. Right-click the software update file that you downloaded in Getting software updates from the Web on page 326. For example, file MAS300100.exe. Select Copy.
d. Navigate to the C:\Avaya_Support directory.
e. Right-click in a blank area in the right pane, and select Paste.
f. Verify that the correct file is pasted in the C:\Avaya_Support directory.
g. If you have downloaded more than one file, repeat Steps c through f to copy the software files and the update instructions to the MAS.
4. Remove the storage device from the server:
5. Repeat Steps 1 through 4 for each MAS in the system.
6. Open and review the installation instructions for this specific software update.
Note:Note: A software update might contain updates for the MAS only, the MSS only, or both
servers. To complete the update, use the instructions as a guideline, altering the instructions to fit the update situation.

Updating Modular Messaging software
328 Avaya Modular Messaging for Avaya MSS Release 5.1 Installation and Upgrades
Installing the updates on each MAS
! Important:Important: Always read the Release notes for each software update which provide specific
information about the software update. The following are general instructions for installing updates on each MAS.
To install the Avaya software updates on the MAS:
1. Log on as the Domain Administrator or Service Pack Installer account so that you can copy the updates to the MSS.
2. Double-click the software update file for this MAS, such as MAS300100.exe.
The program unpacks the file and then runs the Modular Messaging Installation Wizard.
3. In the Modular Messaging Installation Wizard window:
a. Select all applicable patches for this system.
Note:Note: You must install updates for the MSS once for each software update. If you want
to update a subsequent MAS and have already installed the MSS update, ensure that you cleared the Message Storage Server Update check box.
b. Click Install.
Note:Note: If the Install button is not active, you do not need to apply these software updates
to the system. Continue with Step 6.
4. If you are installing a Service Pack (SP), an Installation Wizard - Update Warning window opens. The window displays the patches and Service Packs that the program must remove before the update can continue. Click Continue.
5. After you click Install, monitor the software update progress:
a. In the Services window, the Modular Messaging Installation Wizard stops all appropriate Modular Messaging and related services.
b. Windows Installer then installs all relevant software updates on the MAS.
c. If any updates apply to the MSS, the program transfers the appropriate files to the MSS.
d. If prompted, reboot the system.
6. To verify the software updates installed on the MAS:
a. Logon to the MAS.
b. Select Start > Programs > Avaya Modular Messaging.
c. Click the About Modular Messaging tab.
The About tab shows the version of MM installed

Installing software updates on each MAS
Issue 1.0 June 2009 329
Avaya - Proprietary. Use pursuant to the terms of your signed agreement or Avaya policy.
d. Click the Patches tab.
You can see the Service Packs and Patches installed on the system.
7. After installation and verification is complete, close all open windows.
Updating Modular Messaging software
330 Avaya Modular Messaging for Avaya MSS Release 5.1 Installation and Upgrades
Installing software updates on the MSS! Important:
Important: Read the Release notes for each software update for specific information. The following sections only contain general instructions for installing updates on the MSS.
To continue the software update procedure, you must install any available updates on the MSS.
1. Toggle the port on the KVM switch to have the monitor show the MSS. For more information, see Switching the monitor to show the correct server on page 153.
2. Log on to the MSS server as craft using the appropriate password.
3. From the Software Management menu, click Software Update > Service Pack.
! CAUTION:CAUTION: If you see a warning about the backup that is incomplete within the last 2 hours,
click Cancel. Save the server data before you continue. For more information, see Setting up and running a backup on the MSS on page 143.
4. The system might report that the installed version is current. In this case, the MSS already has the most recent software updates installed. Do not take any further action. Log off the server.
5. If an update is present, click Proceed with Service Pack Installation.
The system reports that a reboot is required.
6. Click Proceed with Installation.
The system installs the updates on the MSS.
7. Verify that the installation completed successfully.
8. Click Reboot servername.
9. At the reboot warning message, click OK to continue.
The system displays status messages as the server shuts down the messaging software. The shutdown process can take several minutes.

Issue 1.0 June 2009 331
Avaya - Proprietary. Use pursuant to the terms of your signed agreement or Avaya policy.
Appendix F: Moving Modular Messaging services
You must distribute the Modular Messaging services across all installed MASs, and the Supplementary server if present. This practice balances the load on the system for optimum performance.
Use the procedures described in this section to redistribute Modular Messaging services:
● after you add a new MAS or a Supplementary server to the system
● to optimize performance the system in service.
This appendix describes how to move the Modular Messaging services across MASs, and the Supplementary server if present.
This section includes the following topics:
● Disabling Modular Messaging services you plan to move on page 332
● Moving Modular Messaging services among servers on page 333
● Enabling the services on the correct server on page 340
See Avaya Modular Messaging Concepts and Planning Guide guide on recommendations for the distribution of Modular Messaging services and tools among MASs that use S8730-family hardware.

Moving Modular Messaging services
332 Avaya Modular Messaging for Avaya MSS Release 5.1 Installation and Upgrades
Disabling Modular Messaging services you plan to moveBefore you move any Modular Messaging services, you must disable the service on the server where it is currently running.
! CAUTION:CAUTION: You must set any MM services that you intend to move to another server to
Disabled before you enable them on a different server. Serious problems occur if you activate a service on multiple servers that is supposed to run on only one.
Use the following steps to disable services that are currently running on a server:
1. Log on to each server that you intend to move Modular Messaging services from.
2. Double-click the Monitor icon on the desktop or from command prompt, run services.msc.
3. Click Services (Local) in the left pane, if the service is not already selected.
4. In the right pane of the Monitor window, scroll down to the service you plan to move.
a. Right-click the service and select Stop.
b. Double-click the service to open the Properties window.
c. Set the Startup type to Disabled.
d. Click OK.
5. Repeat Step 4 to disable each service you intend to move. Services you can move include:
● MM Call Me—must be on the same server with the Mailbox Monitor Server
● MM Mailbox Monitor—must be on the same server with Call Me and MWI
● MM MWI—must be on the same server with the Mailbox Monitor Server
● MM Fax Sender Service —enable on a server with voice ports that support Fax calls
● MM Tracing Service—enable on only one server in the VMD
6. Refresh the screen to verify that all MM services that you plan to move are Disabled.

Moving Modular Messaging services among servers
Issue 1.0 June 2009 333
Avaya - Proprietary. Use pursuant to the terms of your signed agreement or Avaya policy.
Moving Modular Messaging services among serversMoving the Modular Messaging services involves the following steps:
1. Log on to the MAS or Supplementary server to which you intend to move Modular Messaging services.
2. Click Start > Programs > Avaya Modular Messaging > Voice Mail System Configuration.
3. Move the following services as required:
● Moving Call Me, MWI, and Mailbox Monitor on page 334
● Moving MM Fax Sender service on page 336
● Moving Audit server on page 338
● Moving Tracing service on page 338
Moving Modular Messaging services
334 Avaya Modular Messaging for Avaya MSS Release 5.1 Installation and Upgrades
Moving Call Me, MWI, and Mailbox Monitor
You must enable Call Me, Message Waiting Indicator (MWI), and Mailbox Monitor services only once in the voice mail domain. All three services must be enabled on the same server.
Updating the Call Me configurationUse the following steps to change the parameters for Call Me configuration:
1. In the voice mail domain, such as vmdom, double-click Call Me.
2. Click the General tab.
3. In the MAS Call Me server field, specify the server on which to enable the Call Me service. If the field is blank:
a. Click the ... next to the field.
b. In the Select Computer window, enter the name of the MAS you chose as your MAS Call Me server.
c. Click Check Names.
d. Click OK to accept the MAS name and close the window.
Note:Note: As Call Me and Message Waiting Indicator (MWI) services use the Mailbox
Monitor, you must enable both services on the same server.

Moving Modular Messaging services among servers
Issue 1.0 June 2009 335
Avaya - Proprietary. Use pursuant to the terms of your signed agreement or Avaya policy.
Updating the MWI configurationUse the following steps to change the Message Waiting Indicator (MWI) configuration parameters:
1. In the voice mail domain, such as vmdom, double-click Message Waiting Indicator.2. In the Message Waiting Indicator - Voice Mail Domain window, click the General tab.
3. in the MAS MWI server field, specify the server on which the MWI Service is enabled. If the field is blank.
a. Click the ... button next to the field.
b. In the Select Computer window, enter the name of the MAS you chose as your MAS Call Me server.
c. Click Check Names.
d. Click OK to accept the MAS name and close the window.
e. Click OK to close this window.
4. For the Limit requests and Maximum requests per minute fields, use the values specified in the configuration notes for your PBX integration type.
5. In the Messaging Application Servers that support MWI box, list all MASs that have a port group set up to support MWI. Use the following steps to add a server name:
a. Double-click inside the top of the big list box, or click the Add just above the list box. The Add button looks like a dashed box.
b. The list box displays a data entry field and a ... button. Click the ... button.
c. In the Select Computer window, double-click the name of each MAS that has ports allocated to support MWI, such as MYMAS2.
d. Repeat Steps b and c to add any other MASs that support MWI, such as MYMAS1.
e. Click OK to close the Select Computer window.
Note:Note: The arrow icons move the selected MAS up or down the list. MWI requests start
with the first MAS in the list, and proceed to each additional MAS if needed.
6. Click OK to close this window.
7. Log on to the MSS server as craft using the appropriate password.
8. Click Messaging Administration >Trusted Servers.
The system opens the Manage Trusted Servers page.
9. Select and edit the VVSTS entry:
a. Change the IP address to the IP address of the new MWI server.
b. Click Save.
c. Click OK.

Moving Modular Messaging services
336 Avaya Modular Messaging for Avaya MSS Release 5.1 Installation and Upgrades
Moving MM Fax Sender service
The Supplementary server is not an Avaya-recommended location for the fax service as it is recommended for the fax service to run on a system that has voice ports. IP H.323 switch integration does not support fax service.
Use the following steps to move MM Fax Sender service:
Enable MM Fax Sender service on the MAS that will now host MM Fax Sender service:
1. Run C:\Avaya_Support\Utils\FaxSenderEnable.exe on the MAS that will now host MM Fax Sender.
2. Restart the Microsoft Fax service.
Remove the MM Fax Printer from the MAS that no longer hosts the MM Fax Sender service:
1. Click Start > Settings > Printers and Faxes.
2. In the Printers and Faxes window, right-click the Fax and select Properties.
3. Click the Security tab.
4. Remove the Network Service user.
5. Click the Sharing tab.
6. Clear the Share this printer check box.
7. Click the Security tab.
8. Remove any Fax permissions.
Share the MM Fax Printer on the MAS that will now host MM Fax Sender:
1. Verify that Windows Fax Service is Started and set to Automatic.
2. Click Start > Settings > Printers and Faxes. The system opens the Printers and Faxes window.
3. Right-click the Fax and select Properties.
4. Click the Security tab.
5. Add the Network Service user and assign that user Print, Manage Printers, and Manage Documents permissions.
6. Click the Sharing tab.
7. Select the Share this printer check box. Leave the share name as Fax.
8. Select the List in the directory check box.
9. Click Additional Drivers. The system opens the Additional Drivers dialog box.
10. Select the client operating systems installed on the network that can use the Fax Printer.
The Fax Printer drivers are downloaded when you first connect the system to the Fax Printer.
11. Click OK.

Moving Modular Messaging services among servers
Issue 1.0 June 2009 337
Avaya - Proprietary. Use pursuant to the terms of your signed agreement or Avaya policy.
12. Click the Security tab.
13. Verify that Everyone is assigned Fax permissions on the share.
Note:Note: To reduce access to the Fax printer share, remove the Everyone group and add
Fax permission to the Active Directory Users or Groups you want to have access to print faxes using the MM Fax Printer.
Start MM Fax Sender on the MAS that will now host it:
1. Disable MM Fax Sender on the server that was previously running it; see Disabling Modular Messaging services you plan to move on page 332
2. Open the Monitor window on the MAS that will now host MM Fax Sender or from the command prompt, run services.msc.
3. Click Services (Local) in the left pane, if the item is not already selected.
4. In the right pane, scroll down to MM Fax Sender Server.5. Right-click MM Fax Sender Server and select Start.6. Double-click MM Fax Sender Server to open the Properties window.
7. Set the Startup type to Automatic.
8. Click OK and then close the Monitor window.
Create the Phone and Modem dialing rule on the MAS that will now host MM Fax Sender:
1. On the on the MAS that will now host MM Fax Sender, click Start > Settings > Control Panel > Phone and Modem Options.
2. If a dialing rule is not already created, click New in the Dialing Rules tab.
3. Specify the location details and the dialing rules for the MAS.
4. Click OK to save the dialing rule and close the New Location window.
5. Click OK.
Configure MM Fax Sender on the new location:
1. In the Voice Mail System Configuration window, under the voice mail domain, such as vmdom, double-click Fax.
2. In the Fax - Voice Mail Domain window, on the General tab:
a. Next to MM Fax Sender server, click Browse.
b. In the Select Computer window, enter the name of the MAS you now chose as your MM Fax Sender server.
c. Click Check Names.
d. Click OK to accept the MAS name and close the window.
3. Click OK to close the Fax - Voice Mail Domain window.

Moving Modular Messaging services
338 Avaya Modular Messaging for Avaya MSS Release 5.1 Installation and Upgrades
4. On the "restart" window, click OK.
Moving Audit server
Audit service is installed on each MAS in the VMD. Complete the following steps to change the MAS that acts as an MM Audit Server:
1. In the Voice Mail System Configuration window, in the voice mail domain, double-click Auditing.
2. In the Auditing - Voice Mail Domain window, on the General tab, select the Enable Auditing check box.
3. in the Audit server field, specify the server that acts as the MM Audit server. If the field is blank.
a. Click the ... button next to the field.
b. In the Select Computer window, enter the name of the MAS you chose as your MAS Call Me server.
c. Click Check Names.
d. Click OK to accept the MAS name and close the window.
e. Click OK to close this window.
4. In the Database server field, enter the name of the server where the database resides or click browse (...) and select the server.
5. Click OK to close this window.
Moving Tracing service
To move the Tracing Service to a different server:
1. Log in to the MAS to which you intend to move the Tracing Service.
2. Access the Voice Mail System Configuration program. Click Start > Programs > Avaya Modular Messaging > Voice Mail System Configuration.
3. Under the voice mail domain, such as vmdom, double-click Tracing System.
The system may display a warning that the current Home Message Application Server is not valid. You must then click OK.
4. In the Tracing System - Voice Mail Domain window, on the General tab:
● The MAS Tracing Server Machine Name field displays the name of the server that is now running the tracing system. The new server can be an MAS or a supplementary tracing server.
● The Home Message Application Server field shows the first MAS that the tracing system connects to when doing an operation. You do not have to update this field.
5. Click OK to close this window.

Moving Modular Messaging services among servers
Issue 1.0 June 2009 339
Avaya - Proprietary. Use pursuant to the terms of your signed agreement or Avaya policy.
6. Remove the scheduled tasks from the server that previously hosted the Tracing Service:
a. Click Start > Run to open the Run window.
b. In the Open field, type the following and press Enter: C:\Avaya_Support\Tools\Tracing\RemoveSchedTasks.exe
! CAUTION:CAUTION: This script automatically removes the tasks that were assigned to the original
tracing server. If you fail to run this script after you move Tracing Service from one server to another, errors occur when the originally scheduled tasks fail.
Moving Modular Messaging services
340 Avaya Modular Messaging for Avaya MSS Release 5.1 Installation and Upgrades
Enabling the services on the correct serverAfter you set up the services correctly in the VMSC, you must enable them on the appropriate servers. You must stop all Modular Messaging services to do this task.
Stopping all Modular Messaging servicesYou must stop all Modular Messaging services on all servers that you are moving services to or from. Stopping and then restarting all services gets the entire voice mail domain configured with the correct services running on the correct servers.
To stop all Modular Messaging services:
1. Switch the monitor to show the first MAS.
2. Stop all Modular Messaging services as follows:
a. Click Start > Run to open the Run window.
b. In the Open field, type the following and press Enter: C:\Avaya_Support\Tools\ServiceControl\StopMMServices.exe
A command window displays the status of the Modular Messaging services shutdown. The script might take several minutes to complete.
Note:Note: This script also stops Dialogic services and some Windows services.
3. Confirm that all Modular Messaging services are stopped:
a. Double-click the Monitor icon on the desktop or from command prompt, run services.msc.
b. Click Services (Local) in the left pane, if the item is not already selected.
c. In the right pane, scroll down to the list of installed Modular Messaging services. These all start with the abbreviation MM.
d. Verify that the Status column is blank. If any service is not stopped, repeat Steps 2 and 3.
4. Repeat this procedure on each server that you are moving services to or from.
Enabling the appropriate servicesAfter all Modular Messaging services are stopped, you must enable the appropriate services on each server.

Enabling the services on the correct server
Issue 1.0 June 2009 341
Avaya - Proprietary. Use pursuant to the terms of your signed agreement or Avaya policy.
To enable the appropriate Modular Messaging services:
1. In the Monitor window or from command prompt, run services.msc.
2. Click Services (Local) in the left pane, if the item is not already selected.
3. In the right pane, scroll down to the list of Modular Messaging services. These services start with the abbreviation MM.
! CAUTION:CAUTION: You must enable some Modular Messaging services only once in a voice mail
domain, or serious problems will occur. For more information, see Table 5.
4. To enable an MM service on this server:
a. Double-click the service to open the Properties window.
b. Set the Startup type to Automatic.
c. Click OK.
d. Repeat Step 4 to update the status for each MM service as required.
5. Refresh the screen. Verify that the Status column shows the correct state for each Modular Messaging service.
● Services that are required for this server must show a startup type of Automatic.
● Services that are not required on this server must show a blank status and a startup type of Disabled.
! CAUTION:CAUTION: You must set all MM services to the correct state before you restart Modular
Messaging services. Serious problems occur if you activate a service that is supposed to run on only one server in the VMD on multiple servers.
6. Repeat this procedure on each server that you are moving services to or from.
Restarting messaging servicesAfter you verify and update all required settings on all servers in the voice mail domain, you must restart the services on each server.
To restart messaging service:
1. Click Start > Run to open the Run window.
2. In the Open field, type the following and press Enter: C:\Avaya_Support\Scripts\serverrecovery.vbs
The script takes a few seconds to run. The program sets up all MM services correctly.
Moving Modular Messaging services
342 Avaya Modular Messaging for Avaya MSS Release 5.1 Installation and Upgrades
3. Refresh the screen to verify that all MM services required for this server are Started and set to Automatic.
4. If any required MM services are not set up correctly, return to Enabling the appropriate services on page 340. Correct the problem, and then restart service again.
5. Restart all Modular Messaging services on each Modular Messaging server in the voice mail domain after you finish moving services. A restart ensures that the voice mail domain-wide properties are consistent across the VMD.

Issue 1.0 June 2009 343
Avaya - Proprietary. Use pursuant to the terms of your signed agreement or Avaya policy.
Appendix G: Adding an MAS or a Supplementary server to an existing system
This appendix describes how to add an Avaya Messaging Application Server (MAS) or a Supplementary server to an existing Modular Messaging system that is already in service.
All servers must meet the requirements listed in the Avaya Modular Messaging Concepts and Planning Guide. You can download the document using the instructions provided in Downloading user documentation on page 12.
Topics in this chapter include:
● MAS configuration prerequisites on page 344
● Adding a new server to a system in service on page 345
● Configuring the new server on page 351

Adding an MAS or a Supplementary server to an existing system
344 Avaya Modular Messaging for Avaya MSS Release 5.1 Installation and Upgrades
MAS configuration prerequisitesTo set up a server, you need:
● All required hardware installed. For more information about how to install the server, see Installing the Avaya S8730 Server for Modular Messaging guide.
● The following software from the Avaya Support Web site at http://www.avaya.com/support. For more information about how to access these items on the Web site, see Downloading required software and documentation on page 9.
- Avaya software updates that are required to bring the Modular Messaging software up to date after an installation. Download the software to a storage device.
- The latest copy of the Data Collection Tool and DCT data file. Download the MMDCT.exe file from the Avaya support Web site to a storage device. If a DCT file was created for this installation, download MMDCT.exe to the same storage device as the DCT data file.
● Microsoft Windows Service Pack 2, if not previously installed for customer-provided server only.

Adding a new server to a system in service
Issue 1.0 June 2009 345
Avaya - Proprietary. Use pursuant to the terms of your signed agreement or Avaya policy.
Adding a new server to a system in serviceThe section describes how to add an MAS or a Supplementary server to a Modular Messaging system that is already in service.
! CAUTION:CAUTION: You cannot add a new server to a Modular Messaging system during an upgrade
to Release 5.1. You can replace the server hardware with a new model, but you cannot change the number of servers until after the upgrade is complete. Follow the instructions outlined in Migrating to Modular Messaging Release 5.1 on S8730-family server on page 205 to migrate to S8730. If you have not upgraded the system to Release 5.1, complete the upgrade as instructed in Upgrading to Modular Messaging Release 5.1 on S3500-family server on page 147 and proceed with instructions in this section to add a new server.
Adding an MAS or a Supplementary server to an existing system
346 Avaya Modular Messaging for Avaya MSS Release 5.1 Installation and Upgrades
Installing the new MAS or a Supplementary serverYou can install one or more servers after an initial upgrade or new installation. You can add one or more of the following servers, one at a time:
● One or more Messaging Application Server (MAS)s, up to the limit allowed by the system.
● A Supplementary server, if one is not already present in the system.
● A combination of MASs and a Supplementary server.
To install a new Avaya Messaging Application Server (MAS) or a Supplementary server:
1. Install the S8730-family MAS or Supplementary server hardware. For more information, see Installing the Avaya S8730 Server for Modular Messaging guide.
Tip:Tip: Use the new server installation checklist for this configuration of Modular
Messaging system as a guide to avoid missing steps. See Installation and upgrade checklists on page 257.
2. Before you configure the new servers, prepare the message store to recognize the new servers. Continue with Preparing the MSS for the new servers on page 347.
Adding a new server to a system in service
Issue 1.0 June 2009 347
Avaya - Proprietary. Use pursuant to the terms of your signed agreement or Avaya policy.
Preparing the MSS for the new serversIf you add one or more MASs or a Supplementary server to a system, you must configure the MSS so that it can identify the new server.
Adding a new trusted server on the MSS
You must add a trusted server for each MAS or Supplementary server in the voice mail domain.
! CAUTION:CAUTION: Use the DCT file to enter the correct values for the trusted servers.
Use the following steps to set up the new server as a trusted server on the MSS:
1. Toggle the port on the KVM switch to have the monitor show the MSS.
2. Log on to the MSS as craft. 3. On the Messaging Administration web interface, click Messaging Administration
>Trusted Servers.The system opens Manage Trusted Servers page.
4. Click Add a New Trusted Server and enter the following information:
a. In the Trusted Server Name field, enter the customer-specified NetBIOS name for this MAS, such as mymas1.
b. In the Password field, enter the LDAP password to be used for all MASs in this Modular Messaging system. Type the password again in the Confirm Password field.
c. In the Machine Name / IP Address field, enter the correct private IP address for this MAS as listed in Private IP addresses for each MAS by IP address range on page 34.
! CAUTION:CAUTION: You must use the same private IP address range on the MSS that you will use on
each MAS. Ensure that the private network settings in the Modular Messaging Data Collection Tool match with the settings on this page.
d. In the Special Type field, click Messaging Application Server from the drop-down list, to add a trusted server for an MAS or a Supplementary server.
The Special Type selection populates the other fields with the required values.
5. After you verify or update the information, click Save.
6. At the confirmation message, click OK.
7. If you are adding an MAS or a Supplementary server, repeat the process for each MAS and Supplementary server.

Adding an MAS or a Supplementary server to an existing system
348 Avaya Modular Messaging for Avaya MSS Release 5.1 Installation and Upgrades
Using the DCT to analyze the current configurationBefore you can configure the new server, you must ensure that the DCT data file for the Avaya Modular Messaging system is complete and current. To do this, you must collect information from each MAS in the system, including the Supplementary server, if present. The data file allows the Avaya Modular Messaging Configuration wizard to configure the new server automatically.
Use the following steps to collect data from each MAS and the Supplementary server, if present:
1. Verify that the Modular Messaging system works normally and that the correct services run on each MAS and Supplementary server.
2. Ensure that you have a current copy of the DCT file to use as a guide.
3. Switch the monitor to show the server to analyze.
! CAUTION:CAUTION: Do not stop or disable any Modular Messaging services that you plan to move at
this stage. All currently installed services must run normally for the DCT analysis to be successful.
4. Verify that the required messaging services on this server are running:
a. Double-click the Monitor icon on the desktop.
b. Click Services (Local) in the left pane, if the item is not already selected.
c. In the right pane, scroll down to the list of Modular Messaging services. All services start with the abbreviation MM.
d. Verify that the Status column shows Started for each messaging service that belongs on this server. For a list of required services, see DCT data file.
Note:Note: If service is not started for a required messaging service, right-click the specific
MM service and select Start. The system starts the messaging service.
5. Insert a storage device that contains the DCT program, MMDCT.exe into the MAS.
a. Copy the MMDCT.exe to the C:\Program Files\Avaya Modular Messaging\Install\MISCM directory.
b. Double-click the C:\Program Files\Avaya Modular Messaging\Install\MISCM\MMDCT.exe file. The system opens Avaya Modular Messaging Data Collection Tool window.
6. Update the most current data file for the system:
a. In the Select the DCT Configuration to use dialog box, select Analyze existing system. Click OK.
b. When the program prompts you to use an existing DCT file, click Yes.

Adding a new server to a system in service
Issue 1.0 June 2009 349
Avaya - Proprietary. Use pursuant to the terms of your signed agreement or Avaya policy.
c. In the Open window, click the drop-down list next to Look in.
d. Navigate to the location of the most current DCT data file.
● For MAS#1, navigate to the MAS directory
C:\Program Files\Avaya Modular Messaging\Install\MISCM\cfg.
● For a subsequent MAS or the Supplementary server, navigate to the most current data file on the storage device, Removable disc (E:).
e. Double-click the current data file for this site, such as sitefile.mmdct.
The system opens the MM System Analysis window.
! CAUTION:CAUTION: For a multiple-MAS system, you must open the same data file that you saved on
the previous MAS. Otherwise, the data from that server is lost. Do not enter the data for subsequent servers manually! Use the DCT to analyze each server in turn. The tool collects some data that does not appear on the DCT screens.
7. Click the appropriate number for the server. In the MAS Information is being collected from field, click the appropriate number for the server:
● For MAS#1, select First MAS (#1). ● For a subsequent MAS or a Supplementary server, select the appropriate number for
this server, such as Second MAS (#2).
Note:Note: Analyze the MASs in numeric order, first to last.
8. Click Start.The system displays the process of data collection. When the analysis is complete, the system displays "information has been successfully collected” message and then opens Avaya Modular Messaging Data Collection Tool window.
9. Verify the data on each screen. For more information, see Avaya Modular Messaging Data Collection Tool Online Help.
10. Click Complete.
11. Save the data file to the storage device:
a. When the system prompts you to save the file, click Yes.
b. In the Save As window, navigate to the storage device.
c. Enter the name of the data file in the File name field, such as sitefile.
d. Leave the file type set as MM DCT Files (*.mmdct).
e. Click Save.
f. If the system prompts you to replace an existing data file, click Yes.
The system closes the Avaya Modular Messaging Data Collection Tool window.

Adding an MAS or a Supplementary server to an existing system
350 Avaya Modular Messaging for Avaya MSS Release 5.1 Installation and Upgrades
12. Safely remove the storage device from the server to prevent damage to the data file:
a. Double-click the icon on the task bar to Safely Remove Hardware.
b. Follow the prompts to safely remove the hardware.
c. Close all open windows.
13. Continue as appropriate:
● If the system has additional MASs or a Supplementary server, return to Step 3.
● After all servers in the system are analyzed, continue with Configuring the new server on page 351.
Configuring the new server
Issue 1.0 June 2009 351
Avaya - Proprietary. Use pursuant to the terms of your signed agreement or Avaya policy.
Configuring the new serverUse the updated DCT data file and the Avaya Modular Messaging Configuration wizard to configure the new server.
Running the configuration wizardAfter the server boots, the Avaya Modular Messaging Configuration wizard runs automatically.
Note:Note: Before you turn on the server you want to configure, insert the storage device.
The server can easily recognize the storage device if the device is already inserted when the server boots.
To configure the new server:
1. On the Welcome screen, click Next. 2. On the Locate Configuration Data screen, click Browse.
a. In the Open window, click the drop-down list next to Look in.
b. Navigate to the storage device, Removable disc (E:). If the server fails to recognize the storage device, you can:
1. In the Open window, click My Computer in the left pane. After the Look in field shows My Computer, press F5 to refresh the screen.
2. If the storage device still fails to appear, remove and then insert the device again.
c. Double-click the most current data file on the storage device, such as sitefile.mmdct.
3. On the Locate Configuration Data screen, click Next. 4. When the system prompts you to confirm the data file, click Yes.
The Avaya Modular Messaging Data Collection Tool window opens.
5. Update the following screens:
a. Navigate through the first few screens and verify the data. Click Next on each screen.
b. Under MM servers, Click Message store. On the system Message store screen complete the following:
● For an Avaya-provided server, select MSS with Avaya MAS servers.
● For a customer-provided server, select MSS with customer’s MAS servers. This selection tells the system that you want to install customer-provided equipment.
c. Under MM servers, click Voice Mail Domain. On the system Voice Mail Domain screen complete the following:
Adding an MAS or a Supplementary server to an existing system
352 Avaya Modular Messaging for Avaya MSS Release 5.1 Installation and Upgrades
1. Update the Number of MASs in the VMD. Include all additional servers that you are installing, whether they are MASs or a Supplementary server.
2. The system displays a warning that you are changing the number of MAS servers in the Voice Mail Domain. You must analyze the system at the end of this procedure to ensure that the data file reflects the changes you make. Click OK.
3. Click Next.d. Under Networking, click Corporate server networking details. The system displays
Corporate server networking details screen.
● Enter the values in Full Computer Name field and IP address field for each MAS and Supplementary server
e. Under Accounts and passwords, click MAS accounts and passwords. The system displays MAS accounts and passwords screen.
● Enter the Local administrator account details in the Logon name and the Password fields for each MAS and Supplementary server.
f. If the server is to run the Messaging Application Server service and handle calls, then in TTS sessions and languages, click TTS and announcements. The system displays TTS and announcements screen.
● Select required announcement and TTS languages. Also enter the TTS sessions for each MAS.
g. In MAS servers, click MM service selection. The system displays MM service selection screen.
! CAUTION:CAUTION: Do not attempt to move services using this screen! Leave all the Modular
Messaging services set exactly as they are. Do not move services from one column to another, or you will damage the operation of the system.
● For an MAS, select only the Message Application check box. Leave all other services set as they are.
● For a Supplementary server, do not select the Message Application check box. Do not select any other services. Leave the MAS column for the new server blank.
h. Click Save.
6. Save the updated data file to the storage device:
a. When the system prompts you to save the file, click Yes.
b. In the Save As window, navigate to the storage device.
c. Type the name of the data file in the File name field, such as sitefile.
d. Leave the file type set as .mmdct.
e. Click Save.
f. If the system prompts you to replace an existing data file, click Yes.

Configuring the new server
Issue 1.0 June 2009 353
Avaya - Proprietary. Use pursuant to the terms of your signed agreement or Avaya policy.
Note:Note: When the server configuration is complete, copy this updated DCT data file to the
other servers in the system, so all servers have the same data. You must also send a copy of the current data file to the technical support group using the procedures appropriate for this site. For more information, see Completing the Add New MAS or Supplementary server on page 354.
7. To continue the configuration process, click Complete.
The system automatically saves the updated data file to the C:\Program Files\Avaya Modular Messaging\Install\MISCM\cfg directory on the new server.
The system returns you to the Avaya Modular Messaging Configuration Wizard.
8. On the Messaging Application Server Number screen:
a. Change the MAS number field to show the correct number for this server.
b. Click Next. The Configuring System screen shows the MAS configuration starting. The Sysprep window opens. The server then reboots.
9. After the reboot starts, a Windows Setup wizard runs. To complete the wizard:
a. On the License Agreement screen, select I accept this agreement. Click Next. b. On the Your Product Key screen, type the Windows product key for this server.
- Each Windows computer has a unique product key for the Windows 2003 R2 operating system. Enter the number exactly as shown.
- On a new S8730-family server, the product key sticker is located on the right hand edge of the server chassis.
c. Click Next.The Avaya Modular Messaging Configuration Wizard displays the configuration status. The server reboots several times, but you do not need to log on manually. The entire process takes about 25 minutes.
10. When the server configuration is complete, the progress bar stretches across the screen and the Next button becomes active. Click Next.
11. On the Avaya Modular Messaging Wizard Completed screen, click Finish.
Completing new server configurationUse the following steps to complete the new server configuration and setup:
1. Configure the new MAS or a Supplementary server and test that the server works. Use the procedures described in Configuring the Avaya MAS on page 41. For a customer-provided server, use the procedure Configuring a customer-provided MAS on page 85.
Adding an MAS or a Supplementary server to an existing system
354 Avaya Modular Messaging for Avaya MSS Release 5.1 Installation and Upgrades
2. Proceed with Moving Modular Messaging services on page 331.
! CAUTION:CAUTION: Before you activate the Modular Messaging services on a new server, complete
all other VMSC administration required for this server. For more information on VMSC configuration see Configuring the voice mail system on page 53.
Completing the Add New MAS or Supplementary serverUse the following steps to complete adding new MAS or a Supplementary server:
1. Verify basic server operation and do the appropriate acceptance tests as instructed in Running acceptance tests on page 122.
2. Because you moved Modular Messaging services, the DCT data file currently on the system is now out of date. To update the system configuration data:
a. Use the most recent DCT data file, which is on your USB storage device.
b. Use the DCT to analyze all the servers in the system again. For more information, see Using the DCT to analyze the current configuration on page 348.
3. To ensure that all servers have the most current information, copy the updated DCT data file from the USB storage device to each server:
a. Using Windows Explorer, copy the updated DCT data file to the MAS directory C:\Program Files\Avaya Modular Messaging\Install\MISCM\cfg
Tip:Tip: Rename the existing data file in this directory before you copy the new one, as a
backup. For example, rename the existing data file sitefile-old.mmdct.
b. Remove the storage device from the server to prevent damage to the data file:
1. Double-click the icon on the task bar to Safely Remove Hardware.
2. Follow the prompts to safely remove the storage device.
c. Insert the storage device into the next MAS or Supplementary server.
d. Repeat Steps a through c for each MAS and Supplementary server in the system.
4. Update and turn over DCT data file.
a. Send a copy of the most current DCT data file to the appropriate technical support group.
b. Erase the copy of the DCT data file from your USB storage device.
Issue 1.0 June 2009 355
Avaya - Proprietary. Use pursuant to the terms of your signed agreement or Avaya policy.
Appendix H: Reloading MAS and MSS software
This appendix describes how to reload the operating system and the application software on an Avaya Messaging Application Server (MAS) (or an Avaya-provided supplementary server) and Message Storage Server (MSS).
Topics in this appendix include:
● Loading new MAS software on page 355
● Loading new MSS software on page 360
Loading new MAS softwareComplete the procedures described in this section to reload Modular Messaging software to the Avaya Messaging Application Server (MAS) or Avaya-provided Supplementary server.
Switching the monitor to show the correct server1. If the server is not on, turn on the server.
2. Verify that the monitor shows the correct server.
● For a 2-port KVM switch, the MSS is connected to one of the computer port.
● For an 8-port Belkin KVM switch, the MSS usually is connected to the first computer port on the switch. The port is labeled VGA 01.
3. If the monitor displays a different server, toggle the port to show the correct MAS.
● To have a 2-port Belkin KVM switch show a different server:
a. Press Scroll Lock twice.
The LED on top of the Belkin KVM switch starts to blink.
b. Type the port number on the keyboard. For example, type 1 for port 1.
● To have an 8-port Belkin KVM switch show a different server:
a. Gently press Scroll Lock twice within 2 seconds.
b. Select the server to display using one of the following methods:
- Press the up (or down) arrow key to change to the server connected to a higher (or lower) port number.
- Type the port number using the keyboard. For example, type 1 for port 1.

Reloading MAS and MSS software
356 Avaya Modular Messaging for Avaya MSS Release 5.1 Installation and Upgrades
4. For complete user and troubleshooting instructions on KVM switch, see the KVM switch documentation.
Loading the new softwareTo load the new software on the MAS or the supplementary server:
1. Insert the following disks into the DVD drive:
● For S8730 server, insert the ’Avaya Modular Messaging R5.1 MAS for Avaya Store Model S8730 Boot’ disk.
● For S3500 server, insert the ’Avaya Modular Messaging R5.1 MAS for Avaya Store Model S3500 Boot’ disk.
Wait for green LED on the drive to turn off.
2. Close the DVD drive tray.
3. Press Ctrl+Alt+Delete to reboot the system.
a. In the Windows Security window, click Shut Down... b. In the Shut Down Windows window, select Restart. Click OK.
4. When the computer starts to boot, the system displays a warning that the hard drive contents will be overwritten.
a. Press any key to continue. The system displays a message to confirm that the hard disk drive will be overwritten.
b. Press any key to continue.
The MAS starts to copy the disk image to the hard disk.
5. After the software is copied, the program prompts you to remove the media before the system reboots.
a. Remove the disk from the drive and close the drive tray.
b. Press Ctrl+Alt+Delete to continue.
The system reboots, and runs a Windows Setup program.
6. If you have Intel Dialogic cards installed, the system opens a Security Alert window that prompts you to install the driver for the Dialogic card. Click Yes.
7. If you have connected a modem, a Hardware Installation window opens. Click Yes to continue the installation.
8. A Windows Setup wizard runs. To complete the wizard:
a. On the Welcome screen, click Next.b. On the License Agreement screen, select I accept this agreement. Click Next. c. On the Your Product Key screen, type the Windows product key for the server.
Loading new MAS software
Issue 1.0 June 2009 357
Avaya - Proprietary. Use pursuant to the terms of your signed agreement or Avaya policy.
Note:Note: Each Windows computer has a unique product key for the Windows 2003 R2
operating system. Enter the number exactly as shown.
- For a new S8730-family server, the product key sticker is located on the right hand side of the server chassis.
- For an S3500-family server, which uses the Windows 2003 operating system, the product key sticker is located inside the empty drive tray on the lower-left of the server chassis.
d. Click Next.The server automatically reboots.
Note:Note: On servers that use the latest motherboard, you might see System Event Log
Full when the system boots. You can ignore this error message.
Activating Microsoft WindowsYou must activate the Microsoft Windows operating system when you reload the operating system.
The Microsoft Windows activation procedure requires you to use either the Internet or a telephone. Use the most appropriate method for the customer site:
● Activating Microsoft Windows through the Internet on page 357
● Activating Microsoft Windows using a telephone on page 358
Activating Microsoft Windows through the Internet
Note:Note: To activate the Microsoft Windows operating system through the Internet, the
MAS must be on the LAN. If you wish to use the Internet to perform the activation, you will not be able to do it until you reach the Preparing the new server on page 47. At that point during the installation process, you can activate Windows through the Internet.
To activate the Microsoft Windows operating system through the Internet:
1. Double-click the Internet Explorer icon on the desktop.
2. At the Enhanced Security message, click OK.
3. In the Internet Explorer window, click Tools > Internet Options.
a. In the Internet Options window, click the Connections tab.
b. Click LAN Settings.
Reloading MAS and MSS software
358 Avaya Modular Messaging for Avaya MSS Release 5.1 Installation and Upgrades
c. In the Local Area Connection (LAN) Settings window, specify the settings to use for this site. Click OK.
d. Click OK to close the Internet Options window.
e. Close Internet Explorer.
4. Click Start > Activate Windows.
5. In the Activate Windows window:
a. Click Yes, let’s activate Windows over the Internet now.
b. Click Next. The program checks for Internet connectivity. If connectivity fails, you can set up or adjust the Internet connections. Complete the screen and click Next to continue.
6. On the Thank you screen, click OK.
Activating Microsoft Windows using a telephone
To activate the Microsoft Windows operating system using a telephone:
1. Click Start > Activate Windows.
2. In the Activate Windows window:
a. Click Yes, I want to telephone a customer service representative to activate Windows.
b. Click Next. The program generates a new installation ID.
3. On the Activate Windows by phone screen:
a. Select the country in which you installed the Modular Messaging system.
b. Call the appropriate telephone number shown on the screen.
c. Follow the voice prompts or the directions from the customer service representative to provide the unique installation ID shown on the screen.
d. Enter the confirmation ID that the automated system or the customer service representative gives you.
e. Click Next. 4. On the confirmation screen, click Finish.
Loading new MAS software
Issue 1.0 June 2009 359
Avaya - Proprietary. Use pursuant to the terms of your signed agreement or Avaya policy.
Preparing the server to bootYou must load all required information and activate the operating system before you activate the server configuration program:
1. When the system prompts you to log on:
a. Press Ctrl+Alt+Del. b. In the Log On to Windows window, leave the user name as Administrator. c. Leave the password field blank.
d. Press Enter or click OK.
2. You must activate the Microsoft Windows operating system before you restart the server. Use one of the following procedures:
● Activating Microsoft Windows through the Internet on page 357, to activate the Microsoft Windows operating system through Internet, see Activating Microsoft Windows through the Internet on page 357.
● Activating Microsoft Windows using a telephone on page 358, to activate the Microsoft Windows operating system using a telephone.
3. To complete the software reload, double-click the MM_Setup icon on the desktop.
a. On the MM_Setup window, when the system prompts you, insert the ’Modular Messaging R5.1 MAS Application DVD 1 of 2’ disk into the MAS, and press any key to continue.
b. Follow instructions that appear.
c. When the system prompts you, remove the disk from the MAS and press any key to continue.
MM_Setup reports that the Modular Messaging configuration program will run after the server reboots.
d. Press any key to continue.
The computer stores the information and shuts down.
4. To bring the server into service, continue with the appropriate procedure:
● For a new system installation, continue with the procedure, which has pointed you to this section.
● For a hard disk drive repair or other system problem, continue with the maintenance procedure. For more information, see the appropriate document:
- Maintaining the Avaya S8730 Server for Modular Messaging
- Avaya Modular Messaging S3500-Family Hardware Maintenance and Additions
- Avaya Modular Messaging MAS Catastrophic Disk Failure Recovery

Reloading MAS and MSS software
360 Avaya Modular Messaging for Avaya MSS Release 5.1 Installation and Upgrades
Loading new MSS softwareTo copy new software to the MSS:
1. If the Message Storage Server (MSS) is not on, turn on the server.
2. Verify that the monitor is showing the MSS. For more information, see Switching the monitor to show the correct server on page 355.
3. Remove any storage device attached to the MSS, as this can interfere with the reload.
4. Insert the Modular Messaging R5.1 MSS OS disk into the MSS.
5. To reboot the system, do one of the tasks:
● From the monitor:
a. If the MSS displays the Web interface, click Logoff.b. From the localhost login: prompt, press Ctrl+Alt+Del.
● From the MSS: Reset the server using the console on the front of the server.
Note:Note: You might see the System Event Log Full error message when the S3500
system boots. You can ignore this message. Modular Messaging does not use this log.
The computer starts to boot. The system then displays the following options:2U Standard Availability (S3500)!standard2U <ENTER>.HP Standard Availability (S8730)!standardHP <ENTER>.2U High Availability (S3500)!high2U <ENTER>.HP High Availability (S8730)!highHP <ENTER>.
6. At the boot: prompt, type the word for this model of MSS (the names are case sensitive, type exactly as shown) and then press Enter:● Type standard2U for an S3500-type MSS-S. This model has one horizontal disk drive.
● Type standardHP for an S8730-type MSS-S. This model has two vertical disk drives, indicated by lit LEDs on the server drive bays.
● Type high2U for an S3500-type MSS-H. This model has four horizontal disk drives, indicated by lit LEDs on the server drive bays.
● Type highHP for an S8730-type MSS-H. This model has four vertical disk drives, indicated by lit LEDs on the server drive bays.
The system takes up to 20 minutes to copy the software. The system notifies when the software installation is complete.
7. Remove the Modular Messaging R5.1 MSS OS disk.

Loading new MSS software
Issue 1.0 June 2009 361
Avaya - Proprietary. Use pursuant to the terms of your signed agreement or Avaya policy.
! Important:Important: Do not leave the disk in the drive, or the system will boot from the disk. If you
cannot eject the disk from the drive, start the system reboot, and then remove the disk. Click Reboot. The server reboots. To speed up the server reboot, press Escape to exit the splash screen. For S3500 server, you must press Space to skip the memory test.
8. On the Time Date Selection screen, set the time and date as follows:
a. Use the up or down arrow keys to highlight the time zone.
b. Press Tab key to move to the New Time section.
c. Enter the current time in hh:mm (hours and minutes) format, based on a 24-hour clock.
d. Press Tab key to move to the New Date section.
e. Enter the current time in mm/dd/yy (month, day, and year) format, such as 12/03/09 for December 3, 2009.
f. Press Tab key to move to the OK field. Press Enter.9. When the system displays the localhost login prompt, type root and then press Enter.
10. Insert the Modular Messaging R5.1 MSS Application disk into the MSS.
! CAUTION:CAUTION: Wait for the drive light to stop flashing and go out before you continue.
11. At the prompt, type /etc/autoinstall and press Enter. 12. If the system prompts you to continue or quit, press Enter to continue.
13. The system prompts you to change several passwords.
● Enter the passwords that are provided for the following logins: root, craft, tsc, sroot, and craftppp.
● You can ignore any warnings, such as the passwords being too short.
When the installation is complete, the system prompts you to remove the media from the drive.
14. Remove the Modular Messaging R5.1 MSS Application disk.
15. Press Enter to reboot the system.
The system displays Press Enter to return to prompt..., press Enter. 16. At the localhost login prompt, log on to the MSS as craft.
The server displays the Messaging Administration web interface.
17. To bring the server into service, continue with the appropriate procedure:
● For new system installations, continue with Performing initial MSS administration on page 21.
Reloading MAS and MSS software
362 Avaya Modular Messaging for Avaya MSS Release 5.1 Installation and Upgrades
● For upgrades, continue with Checking the spool folder on each MAS on page 164.
● For a hard disk drive repair or other system problem, continue with the appropriate maintenance procedure. For more information about the procedures on maintenance and repair, see Maintaining the Avaya S8730 Server for Modular Messaging.

Issue 1.0 June 2009 363
Avaya - Proprietary. Use pursuant to the terms of your signed agreement or Avaya policy.
Appendix I: Installing and configuring the AudioCodes gateway
This appendix describes how to install and configure the AudioCodes gateway.
The procedure has two parts:
Field Configuration: This procedure must be performed by a technician on the site where the PBX switch and the AudioCodes gateway are physically located. This procedure must be completed before you attempt to configure the AudioCodes gateway remotely.
Remote Configuration: This procedure can either be performed by a technician at a remote site using remote access tools or by the technician on the site where PBX and AudioCodes gateway are located.
Topics in this appendix include:
● Installation prerequisites on page 364
● Installing and configuring the AudioCodes gateway at switch location on page 365
● Continue configuring the AudioCodes gateway on page 368
Installing and configuring the AudioCodes gateway
364 Avaya Modular Messaging for Avaya MSS Release 5.1 Installation and Upgrades
Installation prerequisitesEnsure that you have the following before you start the AudioCodes gateway installation:
● DCT file and MM DCT tool (MMDCT.exe)
● AudioCodes gateway with interface modules required for this installation.
● Configuration notes for AudioCodes gateway downloaded from the AudioCodes Web site at http://www.audiocodes.com/avaya.
● Avaya PBX configuration note where required.
● Download AudioCodes firmware and details of the firmware version required for this installation from the AudioCodes Web site at http://www.audiocodes.com/avaya.
● The following information from the AudioCodes gateway configuration notes:
- Cabling requirements
- PBX configuration requirements. See section 3.0 of configuration notes for AudioCodes gateway.
● X-Over cable
● A laptop
● Machine on customer’s corporate LAN with access to Internet Explorer used to configure the AudioCodes gateway.

Installing and configuring the AudioCodes gateway at switch location
Issue 1.0 June 2009 365
Avaya - Proprietary. Use pursuant to the terms of your signed agreement or Avaya policy.
Installing and configuring the AudioCodes gateway at switch location
Perform the following steps where the AudioCodes gateway is physically located.
1. Configure the PBX. Use the configuration notes downloaded from the AudioCodes Web site.
2. Complete the PBX connection patching.
3. Complete ethernet connection patching.
4. Complete the following steps to physically install the gateway:
a. Unpack the AudioCodes gateway.
b. Mount the AudioCodes gateway in the rack.
c. Connect the PBX to the AudioCodes gateway.
d. Connect one end of the X-Over cable to the left Ethernet port on the AudioCodes gateway.
5. Prepare the computer for initial AudioCodes gateway configuration:
a. Connect the other end of X-Over cable to the NIC on the laptop.
b. Change the IP Address of the computer using the following steps:
1. Open Control and double-click Network Connections. The system opens the Network Connections window.
2. Select the LAN connection, right-click and select Properties.
3. In the General tab, click Internet Protocol (TCP/IP).4. Click Use the following IP address and change the IP address to 10.1.10.11.
5. Click OK.
6. Close all open Windows.
c. Launch the Internet Explorer (IE) and complete the following to clear the proxy server settings.
1. Click Tools >Internet Options.
2. In the Internet Options dialog box, click Connections tab.
3. Click LAN Settings. The system opens Local Area Networks (LAN) Setting dialog box.
4. Clear the Use a proxy server for your LAN check box.
5. Click OK to close IE and for the changes to take effect.

Installing and configuring the AudioCodes gateway
366 Avaya Modular Messaging for Avaya MSS Release 5.1 Installation and Upgrades
Figure 10: Configuring AudioCodes gateway
6. Complete the initial IP configuration of the AudioCodes gateway:
a. Launch Internet Explorer.
b. Enter 10.1.10.10 in the IE address bar. This is the factory default IP address for the Audiocodes gateway.
c. When prompted, enter Admin as the account name and the password. Note that the account name and password are case-sensitive.
The system opens the AudioCodes Gateway WebAdmin Home Page.
d. Click the Configuration tab on the left pane.
e. Click Full.f. Expand Network Settings by selecting the + symbol.
g. Click IP Settings.
The system displays IP Settings page.
h. In the IP Networking Mode field, click Single IP Networki. Change the IP Address to the value assigned to the gateway for your network.
j. Change the Subnet Mask to match the subnet mask for your network.
k. Change the Default Gateway Address to match the default gateway for your network.
l. Click Submit to save the changes.

Installing and configuring the AudioCodes gateway at switch location
Issue 1.0 June 2009 367
Avaya - Proprietary. Use pursuant to the terms of your signed agreement or Avaya policy.
! WARNING:WARNING: Ensure that you do not disconnect the power to the AudioCodes gateway at this
stage. If you disconnect the power, you loose the changes made to IP Address, until you save the settings in step 4d described in Continue configuring the AudioCodes gateway on page 368.
if the power to the device is disconnected then the IP Address changes will be lost until we reach step x, the step where the burn occurs
Note:Note: When you submit the changes, the connection between the AudioCodes gateway
and the computer is lost. Therefore, you must complete step 7 before you continue. You can now set the computer back to its original network configuration.
7. Connect the AudioCodes gateway to the network.
a. Remove X-Over cable from the Ethernet port on the AudioCodes gateway.
b. Connect the network cable for the customers corporate LAN to the first Ethernet port on the AudioCodes gateway.
8. Connect to the AudioCodes Gateway WebAdmin from the machine which is connected to the customer’s corporate LAN.
a. On the machine connected to the customer’s corporate LAN, launch IE.
b. In the IE Address bar, enter the IP Address for the AudioCodes gateway.
The IP Address you enter is the one you configured in step 6i.
c. When prompted, enter Admin as the account name and the password.
The system opens the AudioCodes Gateway WebAdmin Home Page.
9. Update Administrative password for the gateway:
a. In the left pane, expand Security Settings.b. Click WEB User Accounts.
c. Click Change Password.
d. Set the gateway Admin account name if required.
e. Set the Admin password to the value that is provided in the DCT data file.
f. Click Submit.
Installing and configuring the AudioCodes gateway
368 Avaya Modular Messaging for Avaya MSS Release 5.1 Installation and Upgrades
Continue configuring the AudioCodes gatewayComplete the following steps to configure the AudioCodes locally or from a location remote to the Audiocodes:
Note:Note: Ensure that you have the required AudioCodes gateway, Avaya Modular
Messaging and PBX configuration notes available.
1. Connect to the customer site using the standard remote access method, if required.
2. Complete the following steps from the machine referred in Installation prerequisites on page 364, to connect to the AudioCodes gateway:
a. Launch Internet Explorer (IE).
b. In the IE Address bar, enter the IP address for the AudioCodes gateway
c. When prompted, enter the account name and the password set by the field technician as outlined in Installing and configuring the AudioCodes gateway at switch location on page 365.
The system opens the AudioCodes Web Admin Home Page.
3. On the AudioCodes Gateway Home page, confirm that the gateway firmware version matches with that provided in section 1.2 of the AudioCodes gateway configuration notes.
4. If the Firmware loaded on the gateway does not match the required version, then complete the following steps:
a. Click Device Actions > Software Upgrade Wizard.
b. Click Browse and locate the Firmware .CMP file.
c. Click Next.d. Click Burn to save the changes to flash memory.e. Click Device Actions > Reset.
5. Make the required changes in the template.INI file using the steps described in AudioCodes configuration notes.
6. Upload the template.INI file to the gateway:
a. Click Device Actions > Load INI file.b. Click Browse and locate the template.INI file.
c. Click Load INI file. The system displays a warning message.
d. When the system prompts you, click OK.
7. In the AudioCodes Web Admin Home Page, verify that the AudioCodes gateway configuration matches with the details provided in section 4 of AudioCodes gateway configuration notes.
Continue configuring the AudioCodes gateway
Issue 1.0 June 2009 369
Avaya - Proprietary. Use pursuant to the terms of your signed agreement or Avaya policy.
8. Configure the Avaya MASs in Modular Messaging system.
Use section 5 in AudioCodes gateway configuration notes as a guide to configure MASs. If you add a new MAS to your VMD, then you may need to update the Audiocodes gateway configuration for the added MAS.
9. Perform the acceptance tests on MASs using the AudioCodes gateway you have just configured as described in Performing acceptance tests for a new installation on page 119.
Installing and configuring the AudioCodes gateway
370 Avaya Modular Messaging for Avaya MSS Release 5.1 Installation and Upgrades
Issue 1.0 June 2009 371
Avaya - Proprietary. Use pursuant to the terms of your signed agreement or Avaya policy.
Index
Index
Aabout this book . . . . . . . . . . . . . . . . . . . 1acceptance tests. . . 119, 122, 123, 125, 126, 129, 245activating Microsoft Windows . . . . . . . . . 357, 358Add Local Subscriber page . . . . . . . . 114, 115, 116add new MAS to the system . . . . . 83, 101, 251, 257Add Trusted Server page . . . . . . . . . . . . .35, 36adding a server to a system . . . . . . . . . . . . 343adding test subscribers. . . . . . . . . . . . . . . 116adding the MSS to the corporate Windows domain . . 111adding the MSS to the private Windows domain . . . 110adding the MSS to the Windows domain (upgrade). . 237Address Range window . . . . . . . . . . . . . . 225administering classes of service . . . . . . . .112, 113administering special mailboxes on MSS . . . . . . 114Alarm Log page . . . . . . . . . . . . . . . . . . 137alarm logs on MAS. . . . . . . . . . . . . . . . . 81Alarm Management page. . . . . . . . . . . . . . 135alarm origination . . . . . . . . . . . . . 81, 135, 137alarming
disconnect modems for upgrades . . . . . 163, 251method to use . . . . . . . . . . . . . . . 58, 135setup . . . . . . . . . . . . . . . . . . . 58, 135telephone number . . . . . . . . . . . . . . . 74
analog boardscabling . . . . . . . . . . . . . . . . . . . . . 310changing to QSIG. . . . . . . . . . . . . . . . 185configuring . . . . . . . . . . . . . . . . 286, 315initial switch (PBX administration) . . . . . . . . 15jumper settings . . . . . . . . . . . . 303, 304, 306supported boards . . . . . . . . . . . . . 281, 296testing . . . . . . . . . . . . . . . . . . 291, 316tone file . . . . . . . . . . 288, 289, 317, 318, 321
announcement languages . . . . . . . . 71, 162, 213anti-virus software
administering and using . . . . . . . . . . . . . 48obtaining and installing . . . . . . . . . 14, 48, 224
ARTlogin account . . . . . . . . . . . . . . . . . . 132passwords . . . . . . . . . . . . . . . . . . . 132PPP logins . . . . . . . . . . . . . . . . 132, 134product ID . . . . . . . . . . . . . . 63, 132, 135RAS IP addresses . . . . . . . . . . . . . 50, 132registering a server . . . . . . . . . . . . . . . 132
Assign/Change Password page . . . . . . . . . . . 133assigning IP addresses. . . . . . . . . . . 27, 51, 225assistance (technical) . . . . . . . . . . . . . . . . 5attended backup . . . . . 141, 143, 165, 166, 246, 249
audio encoding . . . . . . . . . . . . . . . . .56, 228Audit Service
Configuring . . . . . . . . . . . . . . . . . . . 67Avaya Automatic Registration Tool, see ARTAvaya Modular Messaging Configuration wizard 44, 138,
221, 280, 348, 351Avaya Modular Messaging Data Collection Tool, see DCTAvaya Multi-site or Site Administration, see ASAAvaya software updates, see software updates
Bbacking up the system . . 141, 143, 165, 166, 246, 249Backup page . . . . . . . . . . . . . . .143, 166, 249Backup Utility window. . . . . . . . . . . . . . . 240Backup Verification tool . . . . . . . . . . . . 154, 209
installing . . . . . . . . . . . . . . . . . . . 157running . . . . . . . . . . . . . . . . . . 168, 217
balance Modular Messaging services across servers 331browser . . . . . . . . . . . . . . . . . . . . . . 47busyout ports. . . . . . . . . . . . . . . . . . . 163
Ccabling
MAS port boards . . . . . . . . . . . . . . . 310call answer test. . . . . . . . . . . . . . . . . . 122Call Me - Voice Mail Domain window. . . . . . .65, 334Call Me Server . . . . . . . . . . . . . . . . .65, 334Caller Applications
back up files . . . . . . . . . . . . . . . 160, 248restoring . . . . . . . . . . . . . . . . . 234, 242
changes from last issue of book . . . . . . . . . . . . 2changing DSE or analog to QSIG . . . . . . . . . 185changing DSE or QSIG to H.323 . . . . . . . . . 187changing DSE or QSIG to SIP. . . . . . . . . . . 188changing from DSE . . . . . . . . . . . . . . . . 185changing H.323 to SIP . . . . . . . . . . . . . . 191changing QSIG T1 to QSIG E1 . . . . . . . . . . 189checklist for installing new servers . . . . . . . . . 346checklists
installing new system . . . . . . . . . . 3, 21, 258obtaining . . . . . . . . . . . . . . . . . . . . 11upgrades . . . . . . . . . . . . 3, 4, 152, 206, 269
class of service on MSS. . . . . . . . . . 38, 112, 113comment on this book . . . . . . . . . . . . . . . . 6completing initial MSS administration . . . . . . . 103computer accounts . . . . . . . . . . . . . . . . . 18configuration notes . . . . . . . . . . . . . . . . 226
372 Avaya Modular Messaging for Avaya MSS Release 5.1 Installation and Upgrades
Index
configuring VMSC . . . . . . . . . . . . 53, 75, 76obtaining . . . . . . . . . . . . . . . . . . . . .11PBX integration settings. . . . . . . . . . . . . 57port boards . . . . . . . . . . . .282, 291, 311, 317upgrades. . . . . . . . . . . . . . . 152, 160, 206
Configure Network Addressing page . . . . . . . . 27Configure Subscriber Management page . . . . . . 115Configure window . . . . . . . . . . . . . . . . . 225configuring a new server . . . . . . . . . . . . . . 351configuring domain-wide features . . . . . . . . . . 54configuring MAS-specific parameters . . . . . . . . 75configuring Messaging Application Servers . . 74, 75, 76configuring port boards . . . . 52, 76, 226, 279, 282, 311Configuring System screen . . . . . . . . 45, 222, 353configuring the voice mail system . . . . 53, 64, 74, 226Connect As window . . . . . . . . . . . . . 240, 248contact information. . . . . . . . . . . . . . . . . . 6corporate administrator
creating computer accounts . . . . . . . . . . . 18creating user accounts . . . . . . . . . . . . . 17preparing corporate Windows domain . . . . . . 16
corporate LANsettings on MSS . . . . . . . . . . . . . . . . 27testing addresses with ping . . . . . . . . 107, 109
Corporate MM server networking details screen 161, 212Corporate network details screen . . . . . . . 161, 212Corporate network screen . . . . . . . . . . 161, 211corporate Windows domain
backup DCT . . . . . . . . . . . . . . . . . . 140creating computer accounts . . . . . . . . . . . 18creating technical support accounts . . . . . . . 17creating user accounts . . . . . . . . . . . . . 17join (upgrade) . . . . . . . . . . . . . . . . . 212MAS backup . . . . . . . . . . . . . . . . . . 141moving to after upgrade . . . . . . . . . . . . . 192placing MSS in domain . . . . . . . . . . . . . 111preparing. . . . . . . . . . . . . . . . . . . . 16remote access account . . . . . . . . . . . .17, 19updating MAS host information . . . . . . . . . 108
coverage path . . . . . . . . . . . . . . . . . . . 15create the offline message share . . . . . . . . . . 229creating a new tone file. . . . . . . . . . 317, 318, 321creating computer accounts . . . . . . . . . . . . 18creating test messages. . . . . . . . . . . . 122, 125CT bus cable . . . . . . . . . . . . . . . . . . . 309customer administration account . . . . . . . 162, 213Customer details screen . . . . . . . . . . . 161, 211customer handoff . . . . . . . . . . . . . . . . . 145customer responsibility for system security . . . . . 13customer-provided equipment
port boards . . . . . . . . . . . . . . . . . . . 296customer-provided MAS
adjusting system values . . . . . . . . . . . . . 90installation checklist. . . . . . . . . . 264, 269, 273
Ddadmin login . . . . . . . . . . . . . . . . . . . 133Data Collection Tool, see DCTdate and time setup. . . . . . . . . . . . . . . . . 31DCT
analyze servers . . . . . . . . . . . .138, 348, 354collecting data for upgrades . . . . . . . . 160, 210configuring a new server . . . . . . . . . . . . 351copy most recent data file to all servers . . . . . 140copying data file to all servers . . . . . . . 140, 354correcting errors. . . . . . . . . . . . . . 161, 211Data Collection Tool window . 44, 138, 139, 162, 213,
221, 348, 349, 351data file . . . . . . . 3, 138, 145, 206, 251, 348, 354final handoff of data file . . . . . . . .145, 251, 354help . . . . . . . . . . . . . . . . . . 9, 160, 211saving data file . . . . . . .139, 162, 213, 349, 352updating DCT data file . . . . . . . . . . . 138, 348using existing data file . . . . . . . . . 44, 138, 349
deploying caller applications. . . . . . . . . . . . 242desktop client access . . . . . . . . . . . . . . . . 38dial plan . . . . . . . . . . . . . . . . . . . 114, 116
specifying on MSS. . . . . . . . . . . . . . . . 32Dialogic Configuration Manager 283, 284, 286, 313, 314,
315, 317Dialogic drivers . . . . . . . . . . . . . . . . 309, 311Dialogic Line Test Application window . . .291, 292, 293disabling Modular Messaging services . . . 78, 232, 332Disconnect Network Drives window . . . . . . 242, 249Display Settings window . . . . . . . . . . . . . . 23displaying the correct server. . . . . . . . . . . . 207distribute Modular Messaging services across servers 331DNS server . . . . . . . . . . . . . . . . . 161, 212DNS setup . . . . . . . . . . . . . . . . . . . . . 27documentation . . . . . . . . . . . . . . . . . . . . 5
library . . . . . . . . . . . . . . . . . . . . . 12media . . . . . . . . . . . . . . . . . . . . . 12requirements . . . . . . . . . . . . . . . . . . . 9Web access. . . . . . . . . . . . . . . . . . . . 9
doing acceptance tests . . 119, 122, 125, 126, 129, 245domain administrator account107, 109, 110, 111, 237, 240,
248Domain Admins group . . . . . . . . . . . . . . 227domain name
MSS administration . . . . . . . . . . . . . . . 29domain-wide feature setup . . . . . . . . . . . . . 54Domino message store screen . . . . . . . . 161, 212DSE
changing to H.323 . . . . . . . . . . . . . . . 187changing to QSIG . . . . . . . . . . . . . . . 185changing to SIP . . . . . . . . . . . . . . . . 188
DSE boardsinitial switch (PBX administration) . . . . . . . . 15
DVD contents . . . . . . . . . . . . . . . . . . . . 8

Issue 1.0 June 2009 373
Avaya - Proprietary. Use pursuant to the terms of your signed agreement or Avaya policy.
Index
EE1-QSIG boards
cabling . . . . . . . . . . . . . . . . . . . . . 310configuring . . . . . . . . . . . . . . . . 283, 313jumper settings . . . . . . . . . . . . . . . . . 300plug for unused connector . . . . . . . . . . . . 296supported boards . . . . . . . . . . . . . 281, 296testing . . . . . . . . . . . . . . . . . . 291, 316
Edit a Class-of-Service page . . . . . . . . . .112, 113edit TTS sessions . . . . . . . . . . . . . . . . . 62enabling services on the correct server . . . . 340, 341error logs on MAS . . . . . . . . . . . . . . . . . 81Ethernet interface . . . . . . . . . . . . . . . . . 27event viewer55, 69, 76, 77, 142, 165, 231, 243, 247, 291Exchange message store screen . . . . . . . 161, 212
FF1 key (help) . . . . . . . . . . . . . . . . . . . . 5Fax
Configuring Microsoft Windows Fax service . . . 70Moving Microsoft Windows Fax service . . . . . 336
Fax - Voice Mail Domain window . . . . . . . . 68, 337Fax Sender Server . . . . . . . . . . . . 68, 129, 338fax service mailbox. . . . . . . . . . . . . . .112, 115fax testing . . . . . . . . . . . . . . . . . . . . . 129Fax User . . . . . . . . . . . . . . . . . . . . . 69
Ggateway to corporate network. . . . . . . 27, 161, 212
HH.323
changing from DSE or QSIG. . . . . . . . . . . 187changing to SIP . . . . . . . . . . . . . . . . 191
handoff procedures . . . . . . . . . . . . . . . . 145hardware installation
adding a new server . . . . . . . . . . . . . . 346cabling . . . . . . . . . . . . . . . . . . . . . 310port board cables . . . . . . . . . . . . . . . . 310preinstallation requirements . . . . . . . . . . . 298
help using the system . . . . . . . . . . . . . . . . 5host information for MAS machines . . . . . . 105, 236how to use this book . . . . . . . . . . . . . . . . . 3
IIAS permissions . . . . . . . . . . . . . . . . . . 19IE . . . . . . . . . . . . . . . . . . . . . . . . . 47information on the Web. . . . . . . . . . . . . . . . 9
initial administration for PBX or switch and LAN . . . 15initial MSS administration
logging in . . . . . . . . . . . . . . . . . . . . 22monitor setup . . . . . . . . . . . . . . . . . . 23MSS local machine profile . . . . . . . . . . . . 32MSS trusted servers . . . . . . . . . . . . . 33, 35network addressing . . . . . . . . . . . . . . . 27reboot MSS . . . . . . . . . . . . . . . . . . . 39set time and date . . . . . . . . . . . . . . . . 31
installationadministering the MAS. . . . . . . . . . . . . . 41backing up the system . . . . . . . . .141, 143, 249checklist . . . . . . . . . . . . . . . . . . . 258configuring port boards . . . . . . . . . . .52, 279creating a new tone file . . . . . . . . . . . . 317hardware installation. . . . . . . . . . . . . . 295initial MSS administration . . . . . . . . . .21, 103license . . . . . . . . . . . . . . . . . . . . . 61site requirements . . . . . . . . . . . . . . . . . 7turning over system to customer . . . . . . . . 145
integrated mode test . . . . . . . . . . . . . . . 123Intel Dialogic Configuration Manager window283, 284, 286,
287, 313, 318, 321, 324Intel Dialogic Configuration Manager, see Dialogic
Configuration Managerintended audience . . . . . . . . . . . . . . . . . . 2Internet alarming . . . . . . . . . . . . . . . . . 135Internet Information Services (IIS), see also IIS Admin
service . . . . . . . . . . . . . . . . . . . . . . 88IP address administration . . . . . 27, 51, 132, 134, 225IP H.323 integration . . . . . . . . . . . 60, 279, 311IP SIP integration . . . . . . . . . . . . . . . 279, 311
Jjoin a Windows domain . . . . . . . . . . . . . . 237join corporate Windows domain . . . . . . . . . . . 111join private Windows domain . . . . . . . . . . . .110
KKVM switch
showing the correct server . . . . . . . 22, 207, 360
LLAN
administration . . . . . . . . . . . . . . . . . . 27initial administration . . . . . . . . . . . . . . . 15
language preference on MAS . . . . . . . . . . . . 55Languages - Voice Mail Domain window . . . . . . . 71LDAP
credentials . . . . . . . . . . . . . . . . .69, 223enabling . . . . . . . . . . . . . . . . . . . . 37password . . . . . . . . . . . . . . . . 32, 33, 347

374 Avaya Modular Messaging for Avaya MSS Release 5.1 Installation and Upgrades
Index
Learn Tones window . . . . . . . . . . . . . 320, 323learning tones . . . . . . . . . . . . . . 317, 318, 321license
obtain or install . . . . . . . . . . . . . . . .60, 61request file or support . . . . . . . . . . . . .60, 61
License Import wizard . . . . . . . . . . . . . . . 61Licensing - Voice Mail Domain window . . . . . . . 62links to other files . . . . . . . . . . . . . . . . . . 4Linux Date and Time page . . . . . . . . . . . . . 31local machine profile setup . . . . . . . . . . . . . 32LocalSystem account . . . . . . . . . . . . 162, 213Log On to Windows window . . . . . . . . . . 48, 359logging in to MSS . . . . . . . . . . . . . . . . . 22logon accounts . . . . . . . . . . 132, 133, 161, 212Logon accounts and passwords screen . . . . 162, 213logs, changing default location . . . . . . . . . . . 99
MMaestro . . . . . . . . . . . . . . . . . . . . . . 132Mailbox Monitor Server
configuring Call Me and MWI . . . . . . . . 65, 334moving service . . . . . . . . . . . . . . . . . 334testing . . . . . . . . . . . . . . . . . . . . . 123
Manage Classes-of-Service page . . . . . 112, 113, 220Manage Local Administration Accounts page . . . . 220Manage Local Subscribers page . . . . . . . . . . 130Manage Networked Machines page . . . . . . . . . 32Manage Trusted Servers page . . . . . 33, 35, 36, 347Managing Subscribers page . . . . . 114, 115, 116, 130Map Network Drive window. . . . . . . . . . 240, 248MAS
add new MAS to the system . . . . 83, 101, 251, 257adding a new server . . . . . . . . . . . . . . 343balance MM services across servers . . . . . . . 331configuring a new server . . . . . . . . . . . . 351installing software updates . . . 327, 328, 366, 368restoring data. . . . . . . . . . . . . . . . . . 238trusted server setup. . . . . . . . . . . 33, 35, 347updating MAS host information . . . . . . 105, 108upgrades. . . . . . . . . . . . . . . . . . . . 221
MAS accounts and passwords screen . . . . . 161, 212MAS administration
access permissions . . . . . . . . . . . . . . . 227back up data . . . . . . . . . . . . . . . 141, 165busyout ports . . . . . . . . . . . . . . . . . . 163overview . . . . . . . . . . . . . . . . . . . . 41preparing the server for service . . . . . . . 47, 224registering in ART . . . . . . . . . . . . . . . 132scheduling backups . . . . . . . . . . . . . . . 141setting up remote access . . . . . . . . . . 50, 225showing the correct server . . . . . . . . . . . 207testing port boards . . . . . . . . . . . . 291, 316updating host information on MSS . . . . . . . . 105verifying basic operation . . . . . . . . . . . . 80
MAS backup file . . . . . . . . . . . . . . . . . 240MAS Backup window . . . . . . . . . . .142, 165, 247MAS Host Information Setup page . . . . .105, 108, 236MAS port board installation . . . . . . . . . . . . 308MAS service account screen . . . . . . . . . 162, 213MAS services and features . . . . . . . . . . 162, 213MAS-specific parameters . . . . . . . . . . . . 64, 74maximum number of supported ports . . . . . . . 296Message Servers - Voice Mail Domain window . . . . 69Message store screen . . . . . . . . . . . . 161, 211Message Waiting Indicator - Voice Mail Domain window66,
335, 338Message Waiting Indicator (MWI), see MWIMessaging - Voice Mail Domain window . . 73, 195, 228Messaging Application Server Credentials . . . . . . 69Messaging Application Server Number screen45, 222, 353messaging services to install . . . . . . . . . 162, 213Microsoft Windows activation . . . . . . . . . 357, 358Microsoft Windows Fax service . . . . . . . . .70, 336Microsoft Windows updates . . . . . . . 14, 49, 90, 224MISCM directory . . . . . . . . . . 138, 222, 348, 354MM Aria interface
acceptance tests . . . . . . . . . . .124, 125, 129set up on server . . . . . . . . . . . . . . 113, 116
MM Audit ServiceSee Audit Service . . . . . . . . . . . . . . . . 67
MM AUDIX interfaceacceptance tests . . . . . . . . . . .124, 125, 129set up on server . . . . . . . . . . . . . . 113, 116
MM Fax User. . . . . . . . . . . . . . . . . . . . 69MM Serenade interface
acceptance tests . . . . . . . . . . .124, 125, 129set up on server . . . . . . . . . . . . . . 113, 116
MM service selection screen . . . . . . . . . 162, 213MM_Setup window . . . . . . . . . . . . . . . . 359modem
configuring . . . . . . . . . . . . . . . . . . . 74disconnect for upgrades . . . . . . . . . . 163, 251RAS IP addresses. . . . . . . . . . . . . .50, 132
Modem Dialout alarming . . . . . . . . . . 58, 74, 135Modular Messaging Installation wizard . . . . . . . 328Modular Messaging services
balance across servers . . . . . . . . . . . . 331disable . . . . . . . . . . . . . . . . 78, 232, 332enable . . . . . . . . . . . . . . . . . . 340, 341moving among servers. . . . . . . . . . . . . 333restart . . . . . . . . . . . . 76, 77, 231, 243, 341start . . . . . . . . . . . . . . . . . . . . 55, 76stop . . . . . . . . . . . . 76, 173, 239, 332, 340testing services . . . . . . . . . . . . . . . . 245verify correct services are started on MAS . 231, 243
Modular Messaging User Properties window 55, 127, 128monitor
display quality . . . . . . . . . . . . . . . . . . 23setup . . . . . . . . . . . . . . . . . . . . . . 23showing the correct server . . . . . . . . . .22, 207

Issue 1.0 June 2009 375
Avaya - Proprietary. Use pursuant to the terms of your signed agreement or Avaya policy.
Index
Monitor window . . . . . . . 55, 76, 77, 231, 243, 332monitoring tools for acceptance tests . . . . . . . . 120moving Modular Messaging services among servers . 333moving to corporate Windows domain after upgrade . 192MSS
adding a new server . . . . . . . . . . . . . . 347administering classes of service . . . . . . .112, 113alarm origination . . . . . . . . . . . . . 135, 137assigning IP addresses . . . . . . . . . . . . . 27back up data . . . . . . . . . . 143, 166, 216, 249host name setup . . . . . . . . . . . . . . . . 27initial administration . . . . . . . . . . 21, 103, 132installing software updates . . . . . . . . 328, 330join a Windows domain (upgrade) . . . . . . . . 237join corporate Windows domain . . . . . . . . . 111join private Windows domain . . . . . . . . . . 110local machine profile . . . . . . . . . . . . . . 32logins and access. . . . . . . . . . . 133, 134, 220network addressing . . . . . . . . . . . . . . . 27placing MSS in Windows domain . . . . . . . . 110rebooting. . . . . . . . . . . . . . . . . . . . 39registering in ART . . . . . . . . . . . . . . . 132restoring data. . . . . . . . . . . . . . . . . . 217setting up alarming . . . . . . . . . . . . . . . 135setting up logins . . . . . . . . . . . . . . . . 133setting up remote access . . . . . . . . . . . . 132setting up special mailboxes. . . . . . . . .112, 114setting up subscribers. . . . . . . . . . . .113, 116trusted servers . . . . . . . . 33, 35, 161, 212, 347updating MAS host information . . . . . . 105, 236upgrading . . . . . . . . . . . . . . . . 214, 234upgrading to S3500-family server . . . . . . . . 217
MSS trusted server passwords screen . . . . 161, 212MWI
configuring . . . . . . . . . . . . . . . . . . . 66maximum number of sessions . . . . . . . . . . 76moving service . . . . . . . . . . . . . . 334, 335testing operation . . . . . . . . . . . . . 123, 129trusted server. . . . . . . . . . . . . . . . . . 35
Nnetwork addressing on MSS . . . . . . . . . . . . 27Network Addressing page . . . . . . . . . . . . . 219nonintegrated mode test . . . . . . . . . . . . . . 125Notify me . . . . . . . . . . . . . . . . . . . . . 65NTP Time Server . . . . . . . . . . . . . . . . . 31
OOAM . . . . . . . . . . . . . . . . . . . . . . . 59obtain a license . . . . . . . . . . . . . . . . . . 60offline access feature. . . . . . . . . 73, 195, 228, 229offline access server . . . . . . . . . . . . . . . . 180OLA. . . . . . . . . . . . . . . . . . . . . . . . 180
ongoing system security . . . . . . . . . . . . . . 14online help . . . . . . . . . . . . . . . . . . . . . . 5on-site security . . . . . . . . . . . . . . . . . . . 13Operation History (OPH) viewer . . . . . . . . .82, 120outcalling test . . . . . . . . . . . . . . . . 126, 293
Ppasswords
LDAP networking . . . . . . . . . . . . . . . . 32logon accounts . . . . . . . . . . . . . . 161, 212MSS logins . . . . . . . . . . . . . . . . 133, 220security . . . . . . . . . . . . . . . . . . . . . 13
patches to Avaya software . . . 10, 118, 179, 244, 325PBX
configuration notes11, 53, 57, 75, 76, 226, 282, 311, 317configuring . . . . . . . . . . . . . . . . . . . 57initial administration . . . . . . . . . . . . . . . 15integration . . . . . . . . . . . . . . . . . . . 76selecting integration . . . . . . . . . . . . 162, 213supported integrations . . . . . . . . . . . . . . 57test equipment . . . . . . . . . . . . . . . . . 14
PBXpert utility for tones file . . . . . . . . . . 317, 321PBXpert wizard. . . . . . . . . . . . . . . . 318, 319performing pre-upgrade tasks . . . . . . . . . 154, 209permissions
Subscriber Administration window . . . . . . . 228system access . . . . . . . . . . . .195, 227, 228System Administration window . . 195, 202, 227, 229
ping test . . . . . . . . . . . . . . . . . . . 107, 109planning forms
upgrades . . . . . . . . . . . . . . .159, 206, 210verifying data to enter . . . . . . . . . . . . . 347verifying services to enable on a server .340, 341, 348
port boardsconfiguring 52, 76, 226, 279, 282, 283, 284, 311, 313,
314, 315connecting cables . . . . . . . . . . . . . . . 310CPE servers . . . . . . . . . . . . . . . . . 296disable ports on MAS . . . . . . . . . . . . . 163drivers and software . . . . . . . . . . . . 309, 311enabling . . . . . . . . . . . . 283, 285, 287, 313errors. . . . . . . . . . . . . . . . . . . 291, 293installation . . . . . . . . . . . . . .295, 298, 308jumper settings . . . . . . . . . . . . . . . . 299ports supported per MAS . . . . . . . . . . . 296supported boards . . . . . . . . . . . . . . . 281testing . . . . . . . . . . . . . 286, 291, 293, 316
Port Monitor . . . . . . . . . . . . . . . . . 121, 163PostMaster mailbox. . . . . . . . . . . . 112, 114, 115PPP
logins and access . . . . . . . . 132, 133, 134, 220PPP Server Configuration page . . . . . . . . . . 134preferred language . . . . . . . . . . . . . . . . . 55preinstallation requirements . . . . . . . . . . . . . . 7

376 Avaya Modular Messaging for Avaya MSS Release 5.1 Installation and Upgrades
Index
LAN and PBX or switch administration . . . . . . 15security . . . . . . . . . . . . . . . . . . . . 13test equipment . . . . . . . . . . . . . . . . . 14
pre-upgradecompleting pre-upgrade tasks . . . . . . . 159, 210installing Pre-upgrade/Backup Verification tool . . 157performing pre-upgrade tasks . . . . . . . 154, 209running the Backup Verification tool . . . . 168, 217running the Pre-upgrade tool . . . . . . . . . . 158
primary language . . . . . . . . . . . . . . . . . 71printing a test fax . . . . . . . . . . . . . . . . . 129private LAN
setup . . . . . . . . . . . . . . . . . . . . . 28testing addresses with ping . . . . . . . . 107, 109
Private network screen . . . . . . . . . . . . 161, 212private Windows domain
backup DCT . . . . . . . . . . . . . . . . . . 140join (upgrade) . . . . . . . . . . . . . . . . . 212MAS backup . . . . . . . . . . . . . . . . . . 141MM Fax User . . . . . . . . . . . . . . . . . . 69placing MSS in domain . . . . . . . . . . . . . 110updating MAS host information . . . . . . . . . 105
product ID number . . . . . . . . . . . . . . . 63, 132Provision . . . . . . . . . . . . . . . . . . . . . 134
QQSIG . . . . . . . . . . . . . . . . . . . . . . . 185
changing to H.323 . . . . . . . . . . . . . . . 187changing to SIP . . . . . . . . . . . . . . . . 188QSIG T1 to QSIG E1 . . . . . . . . . . . . . . 189
QSIG E1changing from QSIG T1 . . . . . . . . . . . . . 189
QSIG Supplementary Services package. . . . . . . 60
RRAS IP addresses . . . . . . . .50, 132, 159, 210, 225RAS permissions . . . . . . . . . . . . . . . . . 19Reboot System page. . . . . . . . . . . . . . 39, 219Regional settings screen . . . . . . . . . . . 161, 211registering the system in ART. . . . . . . . . . . . 132related resources . . . . . . . . . . . . . . . . . . 5remote access
MAS setup . . . . . . . . . . . . . . . . . 50, 225MSS accounts . . . . . . . . . . . . 133, 134, 220MSS setup . . . . . . . . . . . . . . . . . . . 132
remote access accounts . . . . . . . . . . . . .17, 19Remote Feature Activation (RFA) . . . . . . . . .60, 61remote support center . . . . . . . . . . . . . . . . 5remove test subscribers . . . . . . . . . . . . . . 130removing scheduled tasks if you move the Tracing Service
339required documentation and software . . . . . . . . . 9requirements . . . . . . . . . . . . . . . . . . . . 7
restart Modular Messaging service. . . . . . . . . . 76restarting messaging service . . . . . . . . . . . 341restore MAS data files . . . . . . . . . . . . 240, 241Restore page. . . . . . . . . . . . . . . . . . . 218Restore Wizard window . . . . . . . . . . . . . . 240restoring data onto the system
caller applications . . . . . . . . . . . . . . . 242MAS . . . . . . . . . . . . . . . . . . . 238, 240MSS . . . . . . . . . . . . . . . . . . . . . 217
retrieve test messages . . . . . . . . . . . . . . 123Run window . . . . . . . . . . . . . . . . . . . . 79running acceptance tests . . . . . . . . . . . 119, 122
SS3400-family server upgrade . . . . . . . . . . . 217S3500-family servers
upgrading to new server . . . . . . . . . . . . 217scheduled backup . . . . . . . . . 141, 143, 249, 250scheduled tasks on tracing server . . . . . . . . . 339Scheduled Tasks window . . . . . . . . . . . 141, 246Security
Updating Windows Internet Explorer . . . . . . . 47security . . . . . . . . . . . . . . . . . . . . . . 13
Avaya technical support . . . . . . . . . . . . . 14during installation . . . . . . . . . . . . . . . . 13ongoing. . . . . . . . . . . . . . . . . . . . . 14on-site . . . . . . . . . . . . . . . . . . . . . 13passwords . . . . . . . . . . . . . . . . . . . 13permissions to access system . . . . .195, 227, 228
Security - Voice Mail Domain window . . . . . . . 227security patches . . . . . . . . . . . . 14, 49, 90, 224Select Computer window . . . . . . 65, 66, 67, 68, 337Select Users, Computers or Groups window195, 202, 227,
229sending test messages . . . . . . . . . .122, 125, 129serverrecovery script . . . . . . 79, 175, 233, 243, 341Service Pack page . . . . . . . . . . . . . . . . 330Service Pack updates. . . . . . 10, 118, 179, 244, 325service patches. . . . . . . . . . . . . . . . . . . 90Serviceability - Voice Mail Domain window . . . . . . 58Serviceability window . . . . . . . . . . . . . . . . 74set emulation boards
cabling . . . . . . . . . . . . . . . . . . . . 310configuring . . . . . . . . . . . . . .284, 314, 315jumper settings . . . . . . . . . . . . . . 301, 302supported boards . . . . . . . . . . . . . 281, 296testing . . . . . . . . . . . . . . . . . . 291, 316
setting up alarming . . . . . . . . . . . . . . . . 135setting up MSS logins. . . . . . . . . . . . . . . 133setting up remote access . . . . . . . . . 50, 132, 225setting up the monitor . . . . . . . . . . . . . . . . 23Shut Down Windows window . . . . . . . . . . . 356SIP
changing from DSE or QSIG . . . . . . . . . . 188

Issue 1.0 June 2009 377
Avaya - Proprietary. Use pursuant to the terms of your signed agreement or Avaya policy.
Index
changing from H.323 . . . . . . . . . . . . . . 191site requirements . . . . . . . . . . . . . . . . . . 7SNMP
alarming setup . . . . . . . . . . . . 81, 135, 137software
required for Modular Messaging . . . . . . . . . . 9requirements . . . . . . . . . . . . . . . . . . . 9shipped with system . . . . . . . . . . . . . . . 8
software updatesinstalling . . . . . . . . . . .10, 118, 179, 244, 325obtaining . . . . . . . . . . . . . 10, 206, 326, 365
special mailboxes on MSS . . . . . . . . . . .112, 114Speech Access, see UCC SAStart Messaging Software page . . . . . . . . . . . 250static IP addresses. . . . . . . . . . . . . . . 51, 225Stop Messaging Software page . . . . . . . . 166, 218Subscriber Options package
installing . . . . . . . . . . . . . . . . . 144, 252testing outcalling . . . . . . . . . . . . . . . . 126
supplementary serveradding . . . . . . . . . . . . . . . . . . . . . 346administration . . . . . . . . . . . . . . . .33, 36installing CPE server . . . . . . . . . . . . . . 295
support center (remote) . . . . . . . . . . . . . . . 5switch integration
changing boards during upgrade. . . . . . . . . 185Switch integration screen . . . . . . . . . . . 162, 213switch, see PBXSysprep window . . . . . . . . . . . . . 45, 222, 353System Administration page . . . . . . . . . . . . 37system security . . . . . . . . . . . . . . . . . . 13
TT1-QSIG boards
cabling . . . . . . . . . . . . . . . . . . . . . 310configuring . . . . . . . . . . . . . . . . 283, 313jumper settings . . . . . . . . . . . . . . . . . 300plug for unused connector . . . . . . . . . . . . 296supported boards . . . . . . . . . . . . . 281, 296testing . . . . . . . . . . . . . . . . . . 291, 316
TCP/IP port access . . . . . . . . . . . . . . . . 38TCP/IP settings . . . . . . 27, 105, 132, 134, 219, 236technical assistance . . . . . . . . . . . . . . . . . 5technical support account . . . . 17, 19, 132, 162, 213
RAS and IAS permissions . . . . . . . . . . . . 19technical support accounts . . . . . . . . . . . . . 17technical support staff . . . . . . . . . . . . . . . . 2Telephone User Interface, see also MM Aria interface, MM
AUDIX interface, MM Serenade interface, TUIs. . . 56telephones for acceptance testing. . . . . . . . 14, 122Telephony Configuration wizard. . . . . . . . . . . 75Telephony Interface configuration . . . . . . . . 76, 226Test Alarm Origination page . . . . . . . . . . . . 137test equipment. . . . . . . . . . . . . . . . . 14, 122
test subscriberadding . . . . . . . . . . . . . . . . . . . . .116initial switch (PBX administration) . . . . . . . . 15removing . . . . . . . . . . . . . . . . . . . 130
testing alarm origination. . . . . . . . . . . . .81, 137testing outcalling capability . . . . . . . . . . 126, 293testing port boards . . . . . . . . . . . . . . 291, 316testing server function . . . . . . . . . . . . . . 245testing the system . . . . . . . . . . . . . . 119, 245Text-to-Speech (TTS) feature
enabling . . . . . . . . . . . . . . . . . . . . 71specifying sessions per MAS. . . . . . . . . . . 62verifying values . . . . . . . . . . . . . . 162, 213
time and date setup. . . . . . . . . . . . . . . . . 31time zone settings . . . . . . . . . . . . . . . . . 31tone file
backup . . . . . . . . . . . . . 240, 248, 320, 324creating. . . . . . . . . . . . . . . . . . 317, 321restoring . . . . . . . . . . . . . . . . . . . 241selecting . . . . . . . . . . . . . . . . . . . 288
Tracing Server service . . . . . . . . . . . . . . 338verifying operation. . . . . . . . . . . . . . . . 82
track messaging service startup . . . . 55, 76, 231, 243trademarks. . . . . . . . . . . . . . . . . . . . . . 4training . . . . . . . . . . . . . . . . . . . . . . . 6trusted servers
adding on MSS . . . . . . . . . . . . . 33, 35, 347MAS settings . . . . . . . . . . . . . . . 161, 212
TTS and announcements screen . . . . . . . 162, 213TUIs
setup on MSS . . . . . . . . . . . . . . . 113, 116turning over system to customer . . . . . . . . . . 145
Uunattended backup . . . . . . . . . . . . . . 143, 250Unified Communication Center Speech Access, see UCC
SAupdating MAS host information
corporate Windows domain . . . . . . . . . . 108private Windows domain . . . . . . . . . . . . 105
Updating Windows Internet Explorer security . . . . . 47upgrades
acceptance tests . . . . . . . . . . . . . . . 245add new MAS to the system . . . . . . . . 251, 257administering ports on switch. . . . . . . . . . 160backing up MAS. . . . . . . . . . . .165, 216, 246backing up MSS. . . . . . . . . . . . . . 166, 216changing DSE or analog to QSIG. . . . . . . . 185changing DSE or QSIG to H.323 . . . . . . . . 187changing DSE or QSIG to SIP . . . . . . . . . 188changing H.323 to SIP . . . . . . . . . . . . . 191changing QSIG T1 to QSIG E1 . . . . . . . . . 189changing switch integrations . . . . . . . . . . 185check MAS spool directory . . . . . . . . . 164, 215
378 Avaya Modular Messaging for Avaya MSS Release 5.1 Installation and Upgrades
Index
checklist . . . . . . . . . . . . . . . . . . . . 269completing the upgrade . . . . . . . . . . 246, 251configuration notes . . . . . . . . . . . . . . . 160configuring port boards . . . . . . . . . . . . . 279MAS and supplementary Tracing server . . . . . 221move to corporate Windows domain . . . . . . . 192overview . . . . . . . . . . . . . . . . . 3, 4, 205preparing the server for service . . . . . . . . . 224pre-upgrade tasks . . . . . . . 154, 159, 209, 210remove old MAS backup files . . . . . . . . . . 248restarting messaging service . . . . . . . . . . 231restoring data. . . . . . . . . . . . . . . 217, 238supported port boards. . . . . . . . . 281, 284, 314updating host information on MSS . . . . . . . . 236updating VMSC settings. . . . . . . . . . . . . 226upgrading the MSS . . . . . . . . . . . . 214, 234upgrading to S3500-family server . . . . . . . . 217verify correct MM services are started . . . 231, 243verifying DCT data . . . . . . . . . . . . 160, 211
USB driveinserting into server . . . . . . . . . . . . . . . 327
USB modemalarming connection . . . . . . . . . . . . 81, 145configuring . . . . . . . . . . . . . . . . . . . 74
USB storage devicegetting system to recognize . . . . . . . . 221, 351inserting into server . . . . . . 24, 44, 138, 327, 348safely remove hardware. . . . . 139, 162, 213, 350
user accounts . . . . . . . . . . . . . . . . . .17, 19using links in this book . . . . . . . . . . . . . . . . 4
Vverifying alarming setup . . . . . . . . . . . . 81, 137verifying MAS call-handling ability . . . . . . . . . . 80Verifying the private LAN . . . . . . . . . . . . . . 28virtual memory size for MAS . . . . . . . . . . . . 92virus-checking software . . . . . . . . . . 14, 48, 224VMD ID, obtaining . . . . . . . . . . . . . . . . . 60VMSC setup . . . . . . . . . . . . 53, 56, 64, 74, 226
Audio Encoding. . . . . . . . . . . . . . . 56, 228Call Me Server . . . . . . . . . . . . . . . 65, 334Fax Sender Server . . . . . . . . . . . . . 68, 338Languages . . . . . . . . . . . . . . . . . . . 71Licensing. . . . . . . . . . . . . . . . . . .60, 62Message Waiting Indicator Server . . . . . . . . 66Messaging Application Servers . . . . . . 74, 75, 76MWI Server . . . . . . . . . . . . . . . . . . 335Notify Me. . . . . . . . . . . . . . . . . . . . 65Offline Access . . . . . . . . . . . . . . . . . 73PBXs . . . . . . . . . . . . . . . . . . . .57, 76port boards . . . . . . . . . . . . . . . . . 76, 226Security . . . . . . . . . . . . . . . . . . . . 227Serviceability . . . . . . . . . . . . . . . . .58, 74Telephone User Interface . . . . . . . . . . . . 56
Tracing Server . . . . . . . . . . . . . . . . 338voice mail domain . . . . . 56, 64, 161, 211, 333, 338Voice Mail Domain screen . . . . . . . . . . 161, 211Voice Mail System Configuration (VMSC), see VMSCVoice Mail System Configuration window56, 57, 58, 60, 61,
62, 64, 69, 74, 75, 76, 226, 333, 338
WWeb access to documentation. . . . . . . . . . . . . 9Web Client . . . . . . . . . . . . . . . . . . . . . 18Web Client server
updating . . . . . . . . . . . . . . . . . 144, 252Web Subscriber Options
installing on server . . . . . . . . . . . . 162, 213updating software . . . . . . . . . . . . . 144, 252
Windows Components wizard . . . . . . . . . . 88, 89Windows domain . . . . . . . . . . . . .237, 240, 248Windows Domain Setup page . . . . . . . 110, 111, 237Windows Internet Explorer . . . . . . . . . . . . . 47Windows product key . . . . . . . . . 45, 222, 353, 356Windows Security window. . . . . . . . . . . . . 356Windows services . . . . . . . . . . . . . . . . 340
stopping . . . . . . . . . . . . 173, 239, 281, 311Windows Setup wizard . . . . . . . . 45, 222, 353, 356WINS settings . . . . . . . . . . . . . . . . 161, 212World Wide Web Server, see Windows services . . . 89


