328
AXIGEN ® Mail Server User Manual Product version 2.0 Last update on: 12/22/2006 4:20:21 PM Document version: 2.0
AXIGEN® Mail Server User Manual
Product version 2.0
Last update on: 12/22/2006 4:20:21 PM Document version: 2.0
AXIGEN User Manual
Copyright © 2006 GECAD Technologies S.R.L.
http://www.axigen.com
2
Copyright & trademark notices
This edition applies to version 2.0 of the licensed program AXIGEN and to all subsequent releases and modifications until otherwise indicated in new editions.
Notices
References in this publication to GECAD TECHNOLOGIES S.R.L. products, programs, or services do not imply that GECAD TECHNOLOGIES S.R.L. intends to make these available in all countries in which GECAD TECHNOLOGIES S.R.L. operates. Evaluation and verification of operation in conjunction with other products, except those expressly designated by GECAD TECHNOLOGIES S.R.L., are the user's responsibility. GECAD TECHNOLOGIES S.R.L. may have patents or pending patent applications covering subject matter in this document. Supplying this document does not give you any license to these patents. You can send license inquiries, in writing, to the GECAD TECHNOLOGIES S.R.L. marketing department, [email protected] .
Copyright Acknowledgement (c) GECAD TECHNOLOGIES S.R.L. 2006. All rights reserved.
All rights reserved. This document is copyrighted and all rights are reserved by GECAD TECHNOLOGIES S.R.L. No part of this document may be reproduced or transmitted in any form or by any means, electronic or mechanical, including photocopying and recording, or by any information storage and retrieval system without the permission in writing from GECAD TECHNOLOGIES S.R.L.
The information contained in this document is subject to change without notice. If you find any problems in the documentation, please report them to us in writing. GECAD TECHNOLOGIES S.R.L. will not be responsible for any loss, costs or damages incurred due to the use of this documentation.
AXIGENTM Mail Server is a SOFTWARE PRODUCT of GECAD TECHNOLOGIES S.R.L. GECAD TECHNOLOGIES and AXIGENTM are trademarks of GECAD TECHNOLOGIES S.R.L. Other company, product or service names may be trademarks or service marks of others.
GECAD TECHNOLOGIES S.R.L.
10A Dimitrie Pompei Blvd., Connect Business Center, 2nd fl., Bucharest 2, ROMANIA; phone: +40-21-303-2080; fax: +40-21-303-2081; e-mai l:
Sales: [email protected]
Technical support: [email protected]
Website: http://www.axigen.com
(c) Copyright GECAD TECHNOLOGIES S.R.L. 2006. All r ights reserve d.
AXIGEN User Manual
Copyright © 2006 GECAD Technologies S.R.L.
http://www.axigen.com
3
Table of Contents Introduction.......................................................................................................................................................................... 9
Purpose of this Document ..................................................................................................................................................... 9 Structure of this document..................................................................................................................................................... 9 Audience and knowledge requirements..................................................................................................................................... 9 Related documentation....................................................................................................................................................... 10
Chapter 1. Mail Server Overview.............................................................................................................................................. 11 Chapter 2. Getting Started with AXIGEN .................................................................................................................................... 13
2.1. Software and Hardware requirements ............................................................................................................................... 13 Software requirements .................................................................................................................................................... 13 Hardware requirements ................................................................................................................................................... 13 Tested platforms............................................................................................................................................................ 13
2.2. Installing on Linux........................................................................................................................................................ 14 General installation steps ................................................................................................................................................. 14 Files Provided for Installation............................................................................................................................................. 14 2.2.1. Installing under RHEL, Fedora Core, Mandrake and SuSE (gcc3) ....................................................................................... 16 2.2.2. Installing under Fedora Core, Mandriva and SuSE (gcc4).................................................................................................. 16 2.2.3. Installing under Debian/Ubuntu .................................................................................................................................. 17 2.2.4. Installing under Gentoo............................................................................................................................................ 17 2.2.5. Installing under Slackware ........................................................................................................................................ 18
2.3. Installing on BSD......................................................................................................................................................... 19 2.3.1. Installing on FreeBSD ............................................................................................................................................. 19 2.3.2. Installing on NetBSD ............................................................................................................................................... 19 2.3.3. Installing on OpenBSD ............................................................................................................................................ 20
2.4. Installing on Solaris...................................................................................................................................................... 20 2.5. Uninstalling under Linux ................................................................................................................................................ 21
2.5.1. Uninstalling under RHEL, Fedora Core, Mandriva /Mandrake and SuSE (gcc3, gcc4) ............................................................... 21 2.5.2. Uninstalling under Debian / Ubuntu ............................................................................................................................. 21 2.5.3. Uninstalling under Gentoo ........................................................................................................................................ 22 2.5.4. Uninstalling under Slackware .................................................................................................................................... 22
2.6. Uninstalling under BSD ................................................................................................................................................. 23 2.6.1. Uninstalling under FreeBSD ...................................................................................................................................... 23 2.6.2. Uninstalling under NetBSD ....................................................................................................................................... 23 2.6.3. Uninstalling under OpenBSD..................................................................................................................................... 24
2.7. Uninstalling under Solaris .............................................................................................................................................. 24 2.8. Upgrading from AXIGEN Mail Server version 1.2 ................................................................................................................. 25
2.8.1. AXIGEN Upgrade Tool ............................................................................................................................................ 25 2.9. Starting / Stopping / Restarting the server .......................................................................................................................... 28 2.10. Initial Server Configuration ........................................................................................................................................... 29
2.10.1. Setting the Admin Password.................................................................................................................................... 29 2.10.2. Enabling and Logging on to the Webadmin Interface ...................................................................................................... 29 2.10.3. Creating a New Domain ......................................................................................................................................... 31 2.10.4. Adding an Account to an Existing Domain ................................................................................................................... 32 2.10.5. Automated Configuration with AXIGEN Configuration Wizard ........................................................................................... 34
Chapter 3. Mail Server Architecture .......................................................................................................................................... 44 Services and Modules ........................................................................................................................................................ 44 Architecture Features......................................................................................................................................................... 44 Administration Tools .......................................................................................................................................................... 44 Security.......................................................................................................................................................................... 44 3.1. Generic Server Configuration.......................................................................................................................................... 45
3.1.1. Running Services................................................................................................................................................... 45 3.1.2. Other Generic Server Parameters............................................................................................................................... 45
Primary domain ................................................................................................................................................................ 45 SSL Random File.............................................................................................................................................................. 46
3.1.3. DNR Settings ........................................................................................................................................................ 46 Domain Name Resolver...................................................................................................................................................... 46 DNR Attributes ................................................................................................................................................................. 46 3.2. Services and Modules .................................................................................................................................................. 48
3.2.1. SMTP Incoming ..................................................................................................................................................... 48 Connection Error Control .................................................................................................................................................... 48 Connection Thread Control.................................................................................................................................................. 49 Log Control ..................................................................................................................................................................... 49 Authentication.................................................................................................................................................................. 49 Message Acceptance Policies .............................................................................................................................................. 50 Listener Control................................................................................................................................................................ 50
3.2.2. Processing ........................................................................................................................................................... 51 Local Mail Delivery ............................................................................................................................................................ 51 Interactions with Other Modules............................................................................................................................................ 51 AXIGEN Queue................................................................................................................................................................ 51 Message statuses ............................................................................................................................................................. 52 Mail Scheduling................................................................................................................................................................ 52 Processing policies............................................................................................................................................................ 52
AXIGEN User Manual
Copyright © 2006 GECAD Technologies S.R.L.
http://www.axigen.com
4
Log Control ..................................................................................................................................................................... 52 3.2.3. POP3.................................................................................................................................................................. 54
Connection Error Control .................................................................................................................................................... 54 Connection Thread Control.................................................................................................................................................. 55 Log Control ..................................................................................................................................................................... 55 Secure Connections .......................................................................................................................................................... 55 Listener Control................................................................................................................................................................ 56
3.2.4. SMTP Outgoing ..................................................................................................................................................... 57 Relay Policies .................................................................................................................................................................. 57 Connection Thread Control.................................................................................................................................................. 57 Log Control ..................................................................................................................................................................... 58
3.2.5. IMAP .................................................................................................................................................................. 59 Authentication.................................................................................................................................................................. 59 Public folders................................................................................................................................................................... 60 Connection Error Control .................................................................................................................................................... 60 Connection Thread Control.................................................................................................................................................. 60 Log Control ..................................................................................................................................................................... 61 Listener Control................................................................................................................................................................ 61
3.2.6. Logging ............................................................................................................................................................... 62 Log Service Overview ........................................................................................................................................................ 62 Log types........................................................................................................................................................................ 62 AXIGEN Log levels............................................................................................................................................................ 63 Logging format ................................................................................................................................................................. 63 Rules............................................................................................................................................................................. 64 Attributes of the Log service................................................................................................................................................. 64
3.2.7. Reporting............................................................................................................................................................. 66 Description of the reporting service ........................................................................................................................................ 66 Graphics ........................................................................................................................................................................ 66 Usage............................................................................................................................................................................ 67
3.2.8. WebMail .............................................................................................................................................................. 68 AXIGEN WebMail Features ................................................................................................................................................. 68 HTML mail filtering levels .................................................................................................................................................... 69 Connection Thread Control.................................................................................................................................................. 70 Log Control ..................................................................................................................................................................... 70 Webmail Connection and Session Control ............................................................................................................................... 70 HTTP Limits for Webmail .................................................................................................................................................... 70
3.2.9. Storage ............................................................................................................................................................... 71 Filling the Containers ......................................................................................................................................................... 71 Space saving filling procedure .............................................................................................................................................. 72
3.2.10. FTP Backup Service.............................................................................................................................................. 73 Connection Error Control .................................................................................................................................................... 73 Connection Thread Control.................................................................................................................................................. 74 Log Control ..................................................................................................................................................................... 74 Listener Control................................................................................................................................................................ 74 3.3. Connectivity and Threading............................................................................................................................................ 75
3.3.1. Listeners.............................................................................................................................................................. 75 3.3.2. Rules.................................................................................................................................................................. 76
IP Rules ......................................................................................................................................................................... 76 Rule Enforcement Policy..................................................................................................................................................... 77
3.3.3. Threads............................................................................................................................................................... 77 4. Mail Server Security .......................................................................................................................................................... 79
4.1. Authentication and Encryption......................................................................................................................................... 81 Secure/Plain Connections and Authentication Methods ............................................................................................................... 81 SSL parameters ............................................................................................................................................................... 81 4.2. SPF and DomainKeys .................................................................................................................................................. 83
4.2.1. AXIGEN Signing Module Usage and Configuration.......................................................................................................... 83 Command line parameters .................................................................................................................................................. 84 DomainKeys Verifier configuration......................................................................................................................................... 84 DomainKeys Signer configuration.......................................................................................................................................... 85 Starting/Stopping/Restarting the Domain Keys Daemons ............................................................................................................. 86 4.3. Mail Filtering .............................................................................................................................................................. 87 Filter Types ..................................................................................................................................................................... 87 Active Filters.................................................................................................................................................................... 88 Filtering Levels................................................................................................................................................................. 88
4.3.1. Message Acceptance Policies ................................................................................................................................... 89 4.3.2. Processing and Relay Policies................................................................................................................................... 90 4.3.3. Antivirus / Antispam Filters ....................................................................................................................................... 91 4.3.4. Message Rules...................................................................................................................................................... 92
4.3.4.1. SIEVE Overview and Implementation in AXIGEN....................................................................................................... 93 SIEVE Overview............................................................................................................................................................... 93 The AXIGEN SIEVE interpreter............................................................................................................................................. 94
Action interaction ........................................................................................................................................................... 95 Vacation interaction ........................................................................................................................................................ 95 Vacation Extension......................................................................................................................................................... 96 4.3.5. The AXIGEN Filtering Module.................................................................................................................................... 96
AXIGEN User Manual
Copyright © 2006 GECAD Technologies S.R.L.
http://www.axigen.com
5
4.3.5.1. Filtering Module Implementation in AXIGEN ............................................................................................................. 97 4.3.5.2. Configuring the AXIGEN Filtering Module ................................................................................................................ 98
AXIMilter configuration ....................................................................................................................................................... 98 4.3.5.3. AXIGEN Filtering Module Commands..................................................................................................................... 99
Command line parameters .................................................................................................................................................. 99 Debian........................................................................................................................................................................... 99 Gentoo..........................................................................................................................................................................100 RPM-based distributions ....................................................................................................................................................100 Slackware......................................................................................................................................................................100 Ubuntu..........................................................................................................................................................................100
4.3.6. Activating and Prioritising Filters and Rules ..................................................................................................................101 Filter Priority ...................................................................................................................................................................101 Activation Inheritance........................................................................................................................................................101
4.3.7. Language Specifications for Policy Configuration ...........................................................................................................102 Basic structure ................................................................................................................................................................102 SMTP Events .................................................................................................................................................................102 Methods ........................................................................................................................................................................103 Contexts........................................................................................................................................................................103 Variables .......................................................................................................................................................................104 Structures ......................................................................................................................................................................105 Conditions .....................................................................................................................................................................105 Functions.......................................................................................................................................................................106 SMTP Functionalities ........................................................................................................................................................106 onConnect .....................................................................................................................................................................107 onEhlo ..........................................................................................................................................................................107 onMailFrom....................................................................................................................................................................109 onRcptTo.......................................................................................................................................................................110 onDataReceived..............................................................................................................................................................112 onRelay ........................................................................................................................................................................113 onDeliveryFailure.............................................................................................................................................................114 onTemporaryDeliveryFailure ...............................................................................................................................................115
5. User and Domain Configuration...........................................................................................................................................117 5.1. Domains ..................................................................................................................................................................117 5.2. User Accounts...........................................................................................................................................................118 5.3. Forwarders ...............................................................................................................................................................119 5.4. Lists .......................................................................................................................................................................119 Administration of the Mail List..............................................................................................................................................120 Templates explained.........................................................................................................................................................120 5.5. Public Folders ...........................................................................................................................................................121 Configuring Public Folders..................................................................................................................................................121 Associating Folder Recipients to Public Folders .......................................................................................................................123
6. Working with the WebMail Module in AXIGEN .........................................................................................................................125 6.1. Accessing the WebMail Interface ....................................................................................................................................125 Connecting to AXIGEN WebMail ..........................................................................................................................................125 6.2. WebMail Features and Configuration ...............................................................................................................................127 WebMail Account Settings..................................................................................................................................................132
6.2.1. Configuring Personal Data.......................................................................................................................................132 6.2.2. Adding Contacts in Webmail ....................................................................................................................................134 6.2.3. WebMail Data Settings ...........................................................................................................................................137 6.2.4. Mail Filtering in WebMail .........................................................................................................................................138
6.2.4.1. WebMail Filters Overview...................................................................................................................................140 Supported Headers/Operators/Values ...................................................................................................................................141 Action Data ....................................................................................................................................................................141 Filter Container ...............................................................................................................................................................142 Examples ......................................................................................................................................................................142
6.2.5. WebMail Account Information ...................................................................................................................................146 7. Administration Tools Overview ............................................................................................................................................147 8. Configuring AXIGEN using WebAdmin ..................................................................................................................................148
WebAdmin Overview ........................................................................................................................................................148 WebAdmin Features .........................................................................................................................................................148
Connection Thread Control ..............................................................................................................................................148 Log Control .................................................................................................................................................................149 WebAdmin Connection and Session Control.........................................................................................................................149 HTTP Limits for WebAdmin..............................................................................................................................................149 Secure WebAdmin Connections........................................................................................................................................149
Working with WebAdmin....................................................................................................................................................150 Updating/Committing Changes in WebAdmin........................................................................................................................150 Confirmation / Error Messages .........................................................................................................................................151 Displaying full details for a parameter / all parameters on a page ...............................................................................................151 Resetting to default values...............................................................................................................................................152
8.1. Server tab ................................................................................................................................................................153 8.1.1. Global Settings.....................................................................................................................................................153 8.1.2. Filter Configuration ................................................................................................................................................154
8.1.2.1. Configuring Message Rules ................................................................................................................................155 8.1.2.2. Configuring Antivirus/Antispam Filters....................................................................................................................156
AXIGEN User Manual
Copyright © 2006 GECAD Technologies S.R.L.
http://www.axigen.com
6
8.1.2.3. Configuring Active Filters ...................................................................................................................................159 8.2. DNR tab ..................................................................................................................................................................161
8.2.1. General Settings ...................................................................................................................................................161 8.2.2. Nameservers settings.............................................................................................................................................162 8.2.3. DNR Log Control Parameters ...................................................................................................................................163
8.3. Processing tab...........................................................................................................................................................165 8.3.1. Managing Mail Scheduling.......................................................................................................................................165 8.3.2. Managing the Queue..............................................................................................................................................166 8.3.3. Specifying Threads for Local Delivery .........................................................................................................................167 8.3.4. Configuring Mailbox Related Parameters .....................................................................................................................167 8.3.5. Configuring Log Control Parameters...........................................................................................................................168
8.4. SMTP-In Tab ............................................................................................................................................................170 8.4.1. Configuring SMTP-In Connection Error Control Parameters ..............................................................................................170
Specifying a Maximum Number of Errors for SMTP Incoming Connections ......................................................................................170 Specifying a max. number of authentication errors for SMTP Incoming connections ...........................................................................170
8.4.2. Configuring SMTP-In Connection Thread Control Parameters ...........................................................................................171 8.4.3. Configuring SMTP-In Log Control Parameters...............................................................................................................172
Specifying SMTP Incoming Log Level....................................................................................................................................172 Specifying SMTP Incoming Log Type ....................................................................................................................................172 Specifying SMTP Incoming Log Host.....................................................................................................................................172
8.4.4. Maximum Received Headers Parameter......................................................................................................................173 8.5. SMTP-Out tab ...........................................................................................................................................................174
8.5.1. Configuring SMTP-Out Connection Thread Parameters ...................................................................................................174 8.5.2. Configuring SMTP Out Log Control Parameters.............................................................................................................175
8.6. POP3 tab .................................................................................................................................................................176 8.6.1. Configuring POP3 Connection Error Control Parameters..................................................................................................176 8.6.2. Configuring POP3 Connection Thread Control Parameters...............................................................................................177 8.6.3. Configuring POP3 Log Control Parameters ..................................................................................................................178 8.6.4. POP3 Secure Connections ......................................................................................................................................179
8.7. IMAP tab..................................................................................................................................................................180 8.7.1. Configuring IMAP Connection Error Control Parameters ..................................................................................................180 8.7.2. Configuring IMAP Connection Thread Control Parameters ...............................................................................................181 8.7.3. Configuring IMAP Log Control Parameters ...................................................................................................................182 8.7.4. Configuring IMAP Encryption and Authentication Parameters............................................................................................183
8.8. WebMail tab..............................................................................................................................................................185 8.8.1. WebMail Connection Thread Control ..........................................................................................................................185 8.8.2. WebMail Log Control..............................................................................................................................................186 8.8.3. WebMail Connection and Session Control....................................................................................................................187 8.8.4. HTTP Limits for WebMail.........................................................................................................................................188 8.8.5. Setting Further General Parameters ...........................................................................................................................189 8.8.6. URL Redirects for WebMail......................................................................................................................................190 8.8.7. Hostname Resolver for Webmail ...............................................................................................................................192
8.9. WebAdmin tab...........................................................................................................................................................193 8.9.1. WebAdmin Connection Thread Control .......................................................................................................................193 8.9.2. WebAdmin Log Control...........................................................................................................................................194 8.9.3. Specifying the HSP Path .........................................................................................................................................195 8.9.4. WebAdmin Connection and Session Control.................................................................................................................195 8.9.5. HTTP Limits for WebAdmin......................................................................................................................................196 8.9.6. URL Redirects for WebAdmin ...................................................................................................................................197
8.10. CLI Tab..................................................................................................................................................................199 8.10.1. Configuring CLI Connection Error Control Parameters ...................................................................................................199 8.10.2. Configuring CLI Connection Thread Control Parameters ................................................................................................200 8.10.3. Configuring CLI Log Control Parameters....................................................................................................................201
8.11. Log tab ..................................................................................................................................................................203 8.11.1. General Log Service Parameters .............................................................................................................................203 8.11.2. Adding and Editing Log Rules .................................................................................................................................205 8.11.3. Log files Page.....................................................................................................................................................209
8.12. FTP Backup Tab ......................................................................................................................................................210 8.12.1. Configuring FTP Backup Connection Error Control Parameters ........................................................................................210 8.12.2. Configuring FTP Backup Connection Thread Control Parameters .....................................................................................211 8.12.3. Configuring FTP Backup Log Control Parameters.........................................................................................................211
8.13. Domains tab............................................................................................................................................................213 8.13.1. General Domain Configuration ................................................................................................................................215 8.13.2. Domain WebMail Data ..........................................................................................................................................217 8.13.3. Domain Migration Data .........................................................................................................................................219 8.13.4. Domain Public Folders Configuration ........................................................................................................................221
8.13.4.1. General Public Folders Configuration...................................................................................................................221 8.13.4.2. Public Folder Quota Configuration.......................................................................................................................222
8.13.5. Domain Filter Configuration ....................................................................................................................................223 8.13.6. Domain Info Page................................................................................................................................................224
8.14. Accounts tab ...........................................................................................................................................................225 8.14.1. General Account Configuration................................................................................................................................226 8.14.2. Account WebMail Data..........................................................................................................................................228 8.14.3. Account Quota Parameters ....................................................................................................................................231 8.14.4. Account Limits ....................................................................................................................................................232
AXIGEN User Manual
Copyright © 2006 GECAD Technologies S.R.L.
http://www.axigen.com
7
8.14.5. Account Mboxes Page ..........................................................................................................................................236 8.14.6. Account Filter Configuration ...................................................................................................................................238 8.14.7. Account Info.......................................................................................................................................................238
8.15. Lists tab .................................................................................................................................................................239 8.15.1. General List Configuration......................................................................................................................................240 8.15.2. Advanced List Settings..........................................................................................................................................243 8.15.3. Adding New List Users..........................................................................................................................................245 8.15.4. List WebMail Settings ...........................................................................................................................................247 8.15.5. List Quota Parameters ..........................................................................................................................................249 8.15.6. List Limits ..........................................................................................................................................................251 8.15.7. Lists Mboxes ......................................................................................................................................................254 8.15.8. List Filter Configuration .........................................................................................................................................256 8.15.9. Lists Info ...........................................................................................................................................................256
8.16. Forwarders Tab........................................................................................................................................................257 8.17. Folder Recipients......................................................................................................................................................260
8.17.1. General Folder Recipients Parameters ......................................................................................................................261 8.17.2. Folder Recipients Filter Configuration........................................................................................................................262 8.17.3. Folder Recipients Info ...........................................................................................................................................262
8.18. Queue Tab..............................................................................................................................................................263 8.19. Reporting tab...........................................................................................................................................................265
8.19.1. General Reporting Parameters................................................................................................................................265 8.19.2. Reporting Template Configuration ............................................................................................................................267 8.19.3. Reporting Database Configuration............................................................................................................................268 8.19.4. Reporting Graphics Configuration ............................................................................................................................271
8.20. Graphics Tab...........................................................................................................................................................274 8.21. Commands tab ........................................................................................................................................................275 8.22. Adding and Editing TCP Listeners .................................................................................................................................276 General Tab Parameters....................................................................................................................................................277
Connection parameters ..................................................................................................................................................277 8.22.1. Adding and Editing TCP Listener Rules .....................................................................................................................280 Connection parameters ..................................................................................................................................................281
Deny Rules ....................................................................................................................................................................282 8.22.2. SSL Parameters for Listeners .................................................................................................................................284 8.22.3. Example of Listener Configuration............................................................................................................................287
Limiting the Number of Allowed Connections for a Given Listener .................................................................................................290 Limiting the Number of Accepted Connections for a Specific IP Address .........................................................................................290 Limiting the Inactivity for a Given Listener...............................................................................................................................291 8.23. Adding and Editing UDP Listeners.................................................................................................................................292
9. Configuring AXIGEN using CLI............................................................................................................................................294 Service Description ..........................................................................................................................................................294 9.1. Special Contexts ........................................................................................................................................................295 Login Context .................................................................................................................................................................295 Initial Context..................................................................................................................................................................296 Reporting Context ............................................................................................................................................................296 Server Context ................................................................................................................................................................296 Commands Context..........................................................................................................................................................297 Commands-Server Context ................................................................................................................................................297 Commands-Storage Context...............................................................................................................................................298 9.2. Common commands ...................................................................................................................................................299 9.3. Connecting to CLI.......................................................................................................................................................300 9.4. Troubleshoot the CLI Connection....................................................................................................................................300 9.5. Context Specific Commands .........................................................................................................................................301 Login Context <login> .......................................................................................................................................................301 Initial Conext <#>.............................................................................................................................................................301
10. Configuring AXIGEN using the Configuration File....................................................................................................................320 10.1. Working with axigen.cfg..............................................................................................................................................320 Restrictions ....................................................................................................................................................................320 Definitions......................................................................................................................................................................321 Structure of the axigen.cfg file .............................................................................................................................................321 10.2. Contents of the account.cfg File....................................................................................................................................322 10.3. Contents of the domain.cfg file .....................................................................................................................................323 Example of a Possible Domain Configuration ..........................................................................................................................324
11. Command Line Parameters for AXIGEN...............................................................................................................................325 Display version................................................................................................................................................................325 Run in foreground ............................................................................................................................................................325 Crash control ..................................................................................................................................................................325 Process ID .....................................................................................................................................................................325 Path to configuration file ....................................................................................................................................................325 Using mqview tool to view status for messages in the queue........................................................................................................325 POP3 Authentication ........................................................................................................................................................326
12. RFCs Currently Implemented by AXIGEN .............................................................................................................................327 POP3 ...........................................................................................................................................................................327 POP3 and IMAP Specifications............................................................................................................................................327 SMTP specifications .........................................................................................................................................................327 SMTP service extensions...................................................................................................................................................327
AXIGEN User Manual
Copyright © 2006 GECAD Technologies S.R.L.
http://www.axigen.com
8
IMAP specifications ..........................................................................................................................................................327 Implementation Recommendations .......................................................................................................................................327 HTTP specifications:.........................................................................................................................................................328 DNS specifications ...........................................................................................................................................................328 Sieve extensions implemented in AXIGEN..............................................................................................................................328 Generic RFCs.................................................................................................................................................................328
AXIGEN User Manual
Copyright © 2006 GECAD Technologies S.R.L.
http://www.axigen.com
9
Introduction Purpose of this Document
Congratulations on your decision to choose AXIGEN Mail Server as your messaging solution. This document serves as User Guide for AXIGEN Mail Server version 2.0 and subsequent versions until specified otherwise. Full information about AXIGEN product versions and licensing options can be found on the AXIGEN website.
For an overview of AXIGEN Mail Server architecture and functionalities, see Chapter 3. Mail Server Architecture.
Intended as reference guide for system administrators, this manual includes full documentation on mail server architecture, functionalities and configuration options.
Structure of this document
This document is divided in 12 main Chapters as follows:
• Chapter 1 - Brief overview of main AXIGEN features (commercial and technical differentiators)
• Chapter 2 –Server startup instructions (requirements / install / uninstall / initial configuration)
• Chapters 3 through 6 – Descriptions of architecture (modules/services), security functions and user management. These chapters provide general information about the server capabilities and functionalities. They also include direct references to configuration instructions for each feature/set of parameters in Chapter 8.
• Chapter 7 – Brief overview of all existing AXIGEN configuration tools
• Chapter 8 – WebAdmin (Web configuration interface) Adminstration Guide. This chapter provides detailed configuration instructions for all functionalities mentioned in Chapters 3-5. It also maps Configuration options provided by WebAdmin to configuration parameters present in the axigen.cfg file, the AXIGEN text-editable configuration file.
• Chapters 9 through 10 – Descriptions of the alternate configuration tools: Command Line Interface, Configuration file (axigen.cfg).
• Chapter 11 – List of command line parameters allowing you to perform different basic administration tasks
Audience and knowledge requirements
The intended audience for this User Manual is represented by administrators of the mail servers in companies where the version 2.0 of the product AXIGEN Mail Server is installed and evaluated.
In order to build, extract and acquire the correct information from this manual, a regular audience should have:
• A detailed knowledge of general mail server abilities and functions
• Knowledge of network protocols

AXIGEN User Manual
Copyright © 2006 GECAD Technologies S.R.L.
http://www.axigen.com
10
Related documentation
Additional information regarding AXIGEN can be found in the following sources:
• AXIGEN HSP manual - Contains detailed instructions on HSP – AXIGEN proprietary server-side scripting language information. This provides administrators with expansion capabilities for the AXIGEN Webadmin / Webmail modules.
• AXIGEN Online documentation – an online version of this user manual
• AXIGEN Quick Installation and Configuration guide – everything you need to get your server up and running
• AXIGEN Knowledgebase – articles containing specific instructions in response to Support queries and troubleshooting procedures
AXIGEN User Manual
Copyright © 2006 GECAD Technologies S.R.L.
http://www.axigen.com
11
Chapter 1. Mail Server Overview
AXIGEN Mail Server is a fully self developed solution, truly innovative in several respects, particularly scalable and configurable . This messaging solution offers the entire range of mail services -SMTP, POP3, IMAP, Webmail - includes List server, Logging, Reporting and FTP Backup modules and provides various, flexible administration options (including a central Web administration interface - Web Admin).
OS Compatibility It is currently available for several Linux distributions, FreeBSD, OpenBSD, NetBSD and Solaris, but development road map includes versions for Windows, Mac OS and other operating systems. AXIGEN uses MPA (Multi Platform Architecture) , a proprietary cutting-edge technology that allows porting the AXIGEN server on multiple platforms while keeping the same set of features. This makes it possible to adapting the product to any demanded platform, while guaranteeing stability, and makes it easier for users to switch to a different platform, whenever their requirements change.
Integrated Messaging Solution AXIGEN is an integrated service server, being able to successfully replace a solution based on several Open source solutions. It is also modular, as it can run with any number of services inhibited. For instance, if you only want to run the SMTP service, AXIGEN can run with all other services inhibited by
allocating all processing threads to SMTP. Thus, AXIGEN can accommodate any usage scenario - main mail server, backup server, mail relay server.
High Configurability Built with administration needs in mind, AXIGEN provides System Administrators with unmatched configuration possibilities for each and every module or feature. For each and every AXIGEN module and feature, you can fine tune connection control, client management and make advanced settings for every domain and account you are managing. An example of advanced service configuration options in AXIGEN would be Webmail account and domain settings: mailbox quota, attachment size limit, mail size limit, session idle & activity timeout, maximum number of messages sent per hour by one account, HTML filtering level for HTML email messages, etc.
Innovative Storage AXIGEN Mail Storage uses a proprietary technology which optimizes space and mail flow. This innovative storage architecture, doubled by a similar queue architecture, with index based access reduces I/O operations and disk access. Messages are stored in container files, a proprietary format that supports an effective space-saving filling procedure, allowing system administrator to specify the locations and number of directories/files allowed for message storage.
Advanced Security Tools In terms of security , an extensive security tool set is implemented, which is also highly configurable. System Administrators can flexibly use the filtering rules available at server, domain and user level, by specifying what filters to use, the order of applicable filters and the actions to be taken according to the results of the scanning process. Filtering in AXIGEN includes Antivirus/Antispam, Antispoofing (SPF authentication rules) Domain Keys and custom SIEVE scripts. AXIGEN integrates at present connectors for Open source Antispam and Antivirus applications (SpamAssassin and ClamAV) but thanks to its script interface for external connectors, it can integrate with virtually any AS/AV application requested by users.
Automation Options AXIGEN addresses automation requirements of system administrators by comes with an alternative configuration interface - CLI (Command Line Interface). Apart from providing an alternate method of performing basic configuration tasks, CLI automates repetitive tasks, which can be really time-
AXIGEN User Manual
Copyright © 2006 GECAD Technologies S.R.L.
http://www.axigen.com
12
consuming when performed manually. Automatic domain data migration is also available in Webadmin, where you can easily set migration related parameters. These are some of the distinctive AXIGEN features - to read more about them, their configuration procedures, and many more facilities and configuration options provided by AXIGEN, browse through this user manual.

AXIGEN User Manual
Copyright © 2006 GECAD Technologies S.R.L.
http://www.axigen.com
13
Chapter 2. Getting Started with AXIGEN This section gets you started with AXIGEN Mail Server, by outlining the software and hardware requirements your system needs to fulfill before you can install AXIGEN, and the install and uninstall procedure for all available Linux distributions, BSD and Solaris platforms as well as initial configuration steps needed for the initial server run.
2.1. Software and Hardware requirements
Software requirements
AXIGEN has the following minimal software requirements:
• Linux OS, kernel 2.4/2.6 • glibc version 2.2.93 or later • libstdc++ version 3.2 or later
For BSD platforms requirements are as follows:
• FreeBSD 5.4 • NetBSD 3.0 • OpenBSD 3.8 or OpenBSD 3.9
For Solaris requirements are as follows:
• Solaris 10
Hardware requirements
AXIGEN has the following minimal hardware requirements:
• Processor: x86, minimum frequency 300 MHz • RAM: 128 MB. • Available space on HDD: 20 MB free space for installation purposes and default configuration
files. The actual space AXIGEN will take on your hard disk depends on the numbers of accounts, domains and mailboxes and the size of messages stored on the mail server.
Tested platforms
AXIGEN has been tested extensively and is guaranteed to work on the following Linux distributions: Gentoo, Redhat/Fedora Core, Slackware, Debian, Ubuntu, Mandrake/Mandriva, SUSE. AXIGEN also runs on BSD platforms (FreeBSD, NetBSD and OpenBSD) and on Solaris 10.
AXIGEN User Manual
Copyright © 2006 GECAD Technologies S.R.L.
http://www.axigen.com
14
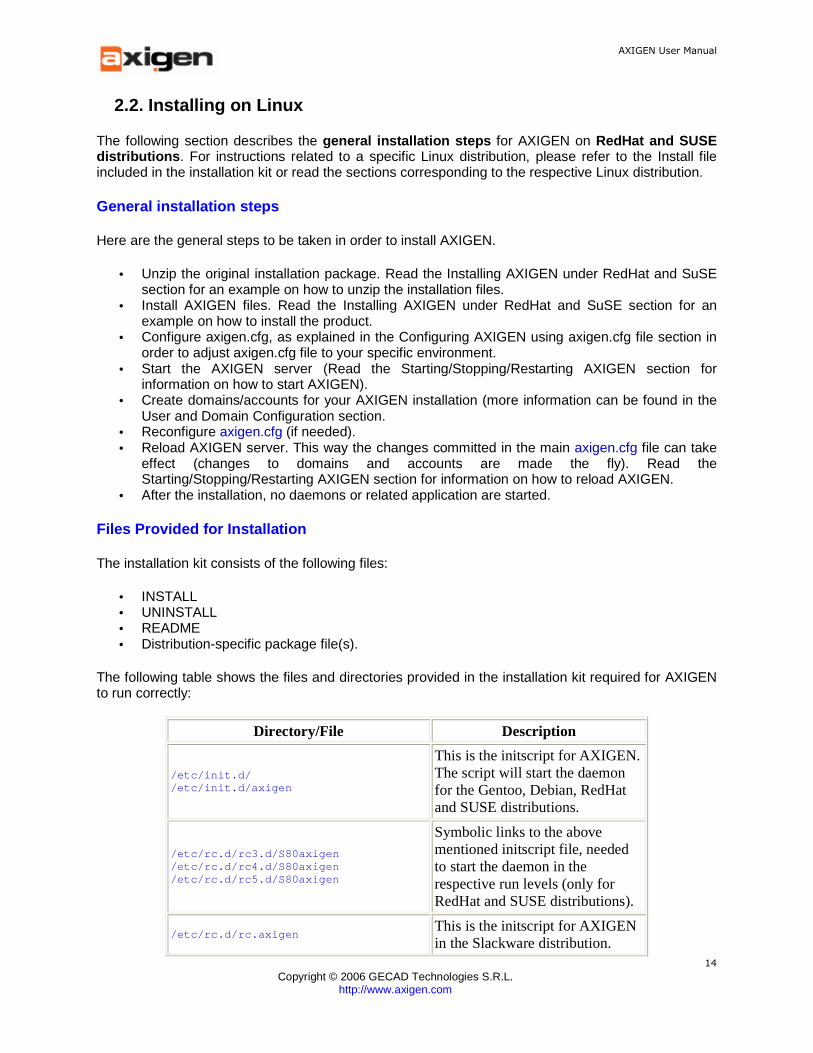
2.2. Installing on Linux
The following section describes the general installation steps for AXIGEN on RedHat and SUSE distributions . For instructions related to a specific Linux distribution, please refer to the Install file included in the installation kit or read the sections corresponding to the respective Linux distribution.
General installation steps
Here are the general steps to be taken in order to install AXIGEN.
• Unzip the original installation package. Read the Installing AXIGEN under RedHat and SuSE section for an example on how to unzip the installation files.
• Install AXIGEN files. Read the Installing AXIGEN under RedHat and SuSE section for an example on how to install the product.
• Configure axigen.cfg, as explained in the Configuring AXIGEN using axigen.cfg file section in order to adjust axigen.cfg file to your specific environment.
• Start the AXIGEN server (Read the Starting/Stopping/Restarting AXIGEN section for information on how to start AXIGEN).
• Create domains/accounts for your AXIGEN installation (more information can be found in the User and Domain Configuration section.
• Reconfigure axigen.cfg (if needed). • Reload AXIGEN server. This way the changes committed in the main axigen.cfg file can take
effect (changes to domains and accounts are made the fly). Read the Starting/Stopping/Restarting AXIGEN section for information on how to reload AXIGEN.
• After the installation, no daemons or related application are started.
Files Provided for Installation
The installation kit consists of the following files:
• INSTALL • UNINSTALL • README • Distribution-specific package file(s).
The following table shows the files and directories provided in the installation kit required for AXIGEN to run correctly:
Directory/File Description
/etc/init.d/ /etc/init.d/axigen
This is the initscript for AXIGEN. The script will start the daemon for the Gentoo, Debian, RedHat and SUSE distributions.
/etc/rc.d/rc3.d/S80axigen /etc/rc.d/rc4.d/S80axigen /etc/rc.d/rc5.d/S80axigen
Symbolic links to the above mentioned initscript file, needed to start the daemon in the respective run levels (only for RedHat and SUSE distributions).
/etc/rc.d/rc.axigen This is the initscript for AXIGEN in the Slackware distribution.

AXIGEN User Manual
Copyright © 2006 GECAD Technologies S.R.L.
http://www.axigen.com
15
/etc/conf.d/axigen This is the configuration file used by the AXIGEN initscript in the Gentoo distribution
/etc/opt/ /etc/opt/axigen/ /etc/opt/axigen/axigen.cfg
This is the main configuration file for AXIGEN.
/opt/axigen/ /opt/axigen/bin/ /opt/axigen/bin/axigen
This is the AXIGEN daemon.
/opt/axigen/bin/mqview
This is the executable to be used for viewing the status of the queued messages. Please refer to the Command Line Parameters section for instructions on using this tool.
/opt/axigen/share/ /opt/axigen/share/doc/ /opt/axigen/share/doc/README
Document containing the release notes for this version of AXIGEN.
/opt/axigen/share/doc/INSTALL Document containing the installation instructions for AXIGEN
/opt/axigen/share/doc/UNINSTALL Document containing the instructions for uninstalling AXIGEN.
/opt/axigen/share/doc/LICENSE Document containing the license for AXIGEN.
/opt/axigen/share/examples/ /opt/axigen/share/examples/axigen.cfg /opt/axigen/share/examples/domain.cfg /opt/axigen/share/examples/account.cfg
Sample configuration files, containing the default values for AXIGEN parameters, as presented in this User Manual.
/var/opt/ /var/opt/axigen/ /var/opt/axigen/Webmail/
Default directory used for storing files pertaining to AXIGEN Webmail module.

AXIGEN User Manual
Copyright © 2006 GECAD Technologies S.R.L.
http://www.axigen.com
16
2.2.1. Installing under RHEL, Fedora Core, Mandrake and SuSE (gcc3)
Here are the installation steps for RedHat and SuSE distributions. 1. Unzip the download file, by issuing the following command in the same directory as the
downloaded file: tar xzvf <install kit file>
For example, to unpack the AXIGEN RPM package for the i386 architecture, type in the same directory as the file: tar xzvf axigen.i386.rpm.tar.gz
2. Installation In order to install the RPM package, you must issue (while logged in as root) the following command, from the same directory with the rpm file: rpm -ivh axigen-version-build.i386.rpm
To install AXIGEN Mail Server version 1.2.2, build 1, the corresponding command will be: rpm -ivh axigen-1.2.2-1.i386.rpm
After the installation, no daemons or related application will be started. 3. Configuration
Before you start AXIGEN, you need to configure it. You can do that by modifying the main configuration file (please refer to the Initial Configuration section for more information).
4. Start AXIGEN. In both RedHat and SUSE, the AXIGEN server can be started via its initscript, by issuing this command: /etc/init.d/axigen start
The above installation steps apply for the following gcc3 distributions: Redhat Enterprise Linux 3 and 4 Fedora Core 3 or lower SuSE Linux Enterprise Server 9 SUSE Linux 9.3 or lower Mandrake Linux 10.2
These installation instructions apply for all RPM based distros (RHEL, Fedora Core, SUSE, Mandrake / Mandriva).
2.2.2. Installing under Fedora Core, Mandriva and S uSE (gcc4)
Here are the install instructions for RPM based distros with gcc4 (Fedora Core 4, Mandriva 2006, SUSE 10):
1. Installation
In order to install the RPM package, you must issue (while logged in as root) the following command, from the same directory with the rpm file: rpm -ivh axigen-version.gcc4-build.i386.rpm
To install AXIGEN Mail Server version 1.2.2, build 1, the corresponding command will be: rpm -ivh axigen-1.2.2.gcc4-1.i386.rpm
After the installation, no daemons or related application will be started.
2. Configuration
Before you start AXIGEN, you need to configure it. You can do that by modifying the main configuration file (please refer to the Initial Configuration section for more information).
AXIGEN User Manual
Copyright © 2006 GECAD Technologies S.R.L.
http://www.axigen.com
17
3. Start AXIGEN.
In both RedHat and SUSE, the AXIGEN server can be started via its initscript, by issuing this command: /etc/init.d/axigen start
The above installation steps apply for the following gcc4 distributions: Fedora Core 4 or higher SUSE Linux 10.0 of higher Mandriva 2006.0 Mandriva 2007.0
2.2.3. Installing under Debian/Ubuntu
To install AXIGEN under Debian, go through the following steps:
1. Installation
In order to install the DEB package, you must issue (while logged in as root) the following command, from the same directory with the deb file: dpkg -i axigen_version-build_i386.deb
To install AXIGEN Mail Server version 1.2.2, build 1, the corresponding command is: dpkg -i axigen_1.2.2-1_i386.deb
After the installation, no daemons or related application will be started.
2. Configuration
Before you start AXIGEN, you need to configure it. You can do that by modifying the main configuration file and the other specific configuration files (please refer to the README file from the installation kit, for more information about their names and locations). More information about each configuration setting can be found in the sample configuration files installed by default, as comments.
3. Start AXIGEN
In Debian, AXIGEN can be started via its initscript, by issuing: /etc/init.d/axigen start
These same instructions also apply to the Ubuntu distribution, except for the install command: dpkg -i axigen_1.2.2-1ubuntu1_i386.deb
2.2.4. Installing under Gentoo
To install AXIGEN under Gentoo, go through the following steps:
1. Installation
In order to install the ebuild package, you must issue the following commands (while logged in as root) from the same directory as the ebuild file: ./prepare.sh emerge Axigen
After the installation, no daemons or related applications are started.
AXIGEN User Manual
Copyright © 2006 GECAD Technologies S.R.L.
http://www.axigen.com
18
2. Configuration
Before you start AXIGEN, you need to configure it. You can do that by modifying the main configuration file and the other specific configuration files (please refer to the README file from the installation kit, for more information about their names and locations). More information about each configuration setting can be found in the sample configuration files installed by default, as comments.
3. Start AXIGEN
In Gentoo, AXIGEN can be started via its initscript, by issuing: /etc/init.d/axigen start
Several settings for the AXIGEN initscript are available via the following file (please read the comments from this file for information about using them): /etc/conf.d/axigen
2.2.5. Installing under Slackware
To install AXIGEN under Slackware, go through the following steps:
1. Installation
In order to install the Slackware TGZ package, you must issue (while logged in as root) the following command, from the same directory with the tgz file: installpkg axigen-version.i386-1.tgz
To install AXIGEN version 1.2.2, the corresponding command is: installpkg axigen-1.2.2-i386-1.tgz
After the installation, no daemons or related applications are started.
2. Configuration
Before you start AXIGEN, you need to configure it. You can do that by modifying the main configuration file (please refer to the Initial Configuration of AXIGEN Mail Server section in this User Manual for more information)
3. Start AXIGEN
In Slackware, AXIGEN can be started via its initscript, by issuing: /etc/rc.d/rc.axigen start
In order to start AXIGEN initscript at boot time, you need to add the following line in the /etc/rc.d/rc.local file: [ -x /etc/rc.d/rc.axigen ] && /etc/rc.d/rc.axigen s tart
and set the executable bit for the script: chmod +x /etc/rc.d/rc.axigen

AXIGEN User Manual
Copyright © 2006 GECAD Technologies S.R.L.
http://www.axigen.com
19
2.3. Installing on BSD
AXIGEN is available for several BSD platforms: FreeBSD, NetBSD and OpenBSD. As a general rule, for BSD platforms, the install command is: pkg_add axigen-version.tgz
2.3.1. Installing on FreeBSD
In order to install the AXIGEN Mail Server on FreeBSD, follow these instructions:
1. Installation
Issue (while logged in as root), the following command, from the same directory as the tgz file: pkg_add axigen-version_build.tgz
For instance, for the 1.2.2 version, build 1, the corresponding command will be: pkg_add axigen-1.2.2_1.tgz
After the installation, no daemons or related application will be started.
2. Configure AXIGEN
Before you start the AXIGEN server, you need to configure it. You can do that by modifying the main configuration file and the other specific configuration files (please refer to the README file from the installation kit, for more information about their names and locations). More information on each configuration setting can be found in the sample configuration files installed by default, as comments.
3. Start the AXIGEN server
4. In FreeBSD, the AXIGEN server can be started via its initscript, by issuing: /usr/local/etc/rc.d/axigen.sh start
2.3.2. Installing on NetBSD
1. Installation
In order to install the NetBSD package, you must issue (while logged in as root), the following command, from the same directory as the tgz file: pkg_add axigen-version_build.tgz
For instance, for AXIGEN version 1.2.2, build 1, the corresponding command will be: pkg_add axigen-1.2.2_1.tgz
After the installation, no daemons or related application will be started.
2. Configure AXIGEN
Before you start the AXIGEN server, you need to configure it. You can do that by modifying the main configuration file and the other specific configuration files (please refer to the README file from the installation kit, for more information about their names and locations). More information about each configuration setting can be found in the sample configuration files installed by default, as comments.
AXIGEN User Manual
Copyright © 2006 GECAD Technologies S.R.L.
http://www.axigen.com
20
3. Start the AXIGEN server
In NetBSD, the AXIGEN server can be started via its initscript, by issuing: /etc/rc.d/axigen start
2.3.3. Installing on OpenBSD
1. Installation
In order to install the OpenBSD package, you must issue (while logged in as root), the following command, from the same directory as the tgz file: pkg_add axigen-version_build.tgz For instance, for AXIGEN version 1.2.2, build 1, the corresponding command will be: pkg_add axigen-1.2.2_1.tgz After the installation, no daemons or related application will be started.
2. Configure AXIGEN
Before you start the AXIGEN server, you need to configure it. You can do that by modifying the main configuration file and the other specific configuration files (please refer to the README file from the installation kit, for more information about their names and locations) More information about each configuration setting, can be found in the sample configuration files installed by default, as comments.
3. Start the AXIGEN server
In OpenBSD, the AXIGEN server can be started via its initscript, by issuing: /usr/local/bin/axigen.sh start
2.4. Installing on Solaris
In order to install the AXIGEN Mail Server on FreeBSD, follow these instructions:
1. Installation In order to install the Solaris/SunOS package, you must issue (while logged in as root), the following command, from the same directory as the AXIGEN uncompressed installation kit: gunzip axigen-version.tar.gz tar xvf axigen-version.tar pkgadd -d For instance, the corresponding commands for AXIGEN version number 2.0.0 will be: gunzip axigen-2.0.0.tar.gz tar xvf axigen-2.0.0.tar pkgadd -d After the installation, no daemons or related application will be started.
2. Configuration Before you start the AXIGEN server, you need to configure it. You can do that by modifying the main configuration file and the other specific configuration files (please refer to the README file from the installation kit, for more information about their names and locations). More information about each configuration setting can be found in the sample configuration files installed by default, as comments.
AXIGEN User Manual
Copyright © 2006 GECAD Technologies S.R.L.
http://www.axigen.com
21
3. Start the AXIGEN server.
In Solaris/SunOS, the AXIGEN server can be started via its initscript, by issuing: /etc/init.d/axigen start
2.5. Uninstalling under Linux
This section provides instructions on how to uninstall the AXIGEN Mail Server under all available Linux distributions.
2.5.1. Uninstalling under RHEL, Fedora Core, Mandri va /Mandrake and SuSE (gcc3, gcc4)
To uninstall the AXIGEN mail server under Redhat and SuSE:
1. Remove the AXIGEN RPM package
In order to remove the AXIGEN package and its related files and directories, you can issue the following command, while logged in as root: rpm -e axigen The command explained above will also stop the AXIGEN daemon.
2. Optional: Remove the rest of the files/directories
The command from the first step does not automatically remove the files that were modified after the installation (such as configuration files), non-empty directories and other files or directories that were not created as a result of the installation. All the files and/or directories that are contained in the following locations must be deleted manually:
/etc/opt/axigen/ /var/opt/axigen/ /opt/axigen/
The above installation steps apply for the following gcc3 distributions: Redhat Enterprise Linux 3 and 4 Fedora Core 3 or lower SuSE Linux Enterprise Server 9 SUSE Linux 9.3 or lower Mandrake Linux 10.2 and the following gcc4 distributions: Fedora Core 4 or higher SUSE Linux 10.0 of higher Mandriva 2006.0 Mandriva 2007.0
2.5.2. Uninstalling under Debian / Ubuntu
To uninstall AXIGEN under Debian or Ubuntu, go through the following steps:
AXIGEN User Manual
Copyright © 2006 GECAD Technologies S.R.L.
http://www.axigen.com
22
1. Remove the AXIGEN package
In order to remove AXIGEN package and its related files and directories, you have two options:
o while logged in as root, issue the command: dpkg -P AXIGEN (to "purge" the package) - this is the recommended option
o while logged in as root, issue the command: dpkg -r AXIGEN (to "remove" the package).
These commands also stop AXIGEN daemon.
2. Optional: Remove the rest of the files/directories
The commands on Step 1 do not automatically remove the files that were modified after the installation (such as configuration files), non-empty directories and other files or directories that were not created as a result of the installation. All the files and/or directories that are contained in the following locations must be deleted manually:
/etc/opt/axigen/ /var/opt/axigen/ /opt/axigen/
2.5.3. Uninstalling under Gentoo
Here are the steps to be taken in order to uninstall AXIGEN under Gentoo.
1. Remove AXIGEN ebuild package
In order to remove AXIGEN package and its related files and directories, you can issue the following command, while logged in as root: emerge --unmerge AXIGEN
This command also stops the AXIGEN daemon.
2. Optional: Remove the rest of the files/directories
The command in Step 1 does not automatically remove the files that were modified after the installation (such as configuration files), non-empty directories and other files or directories that were not created as a result of the installation. All the files and/or directories that are contained in the following locations must be deleted manually: /etc/opt/axigen/ /var/opt/axigen/
/opt/axigen /
2.5.4. Uninstalling under Slackware
Here are the steps to be taken in order to uninstall AXIGEN under Slackware.
1. Remove the AXIGEN Slackware TGZ package
In order to remove AXIGEN package and its related files and directories, you can issue the following command, while logged in as root:

AXIGEN User Manual
Copyright © 2006 GECAD Technologies S.R.L.
http://www.axigen.com
23
First, stop AXIGEN’ daemon: /etc/rc.d/rc.axigen stop Then remove AXIGEN package: removepkg axigen-version-i386-build
For instance, to remove AXIGEN Mail Server version 1.2.2 build 1, the corresponding command will be: removepkg axigen-1.2.2-i386-1
2. Optional: Remove the rest of the files/directories
The command on Step 1 does not automatically remove the files that were modified after the installation (such as configuration files), non-empty directories and other files or directories that were not created as a result of the installation. All the files and/or directories that are contained in the following locations must be deleted manually: /etc/opt/axigen/ /var/opt/axigen/ /opt/axigen/ Also, you can remove the following line from the /etc/rc.d/rc.local: [ -x /etc/rc.d/rc.axigen ] && /etc/rc.d/rc.axigen s tart
2.6. Uninstalling under BSD
The generic command used to uninstall the AXIGEN Mail Server for BSD platforms is: pkg_delete axigen-version
2.6.1. Uninstalling under FreeBSD
To uninstall AXIGEN Mail Server, follow these instructions: To uninstall AXIGEN Mail Server, follow these instructions:
1. Remove the AXIGEN package
In order to remove the AXIGEN package and its related files and directories, you can issue the following command, while logged in as root:
o first, stop the AXIGEN daemon /usr/local/etc/rc.d/axigen.sh stop
o then remove the package pkg_delete axigen-version To install version 1.2.2._1, the corresponding command is: pkg_delete axigen-1.2.2._1
2. Optional: Remove the rest of the files/directories
The command from the first step does not automatically remove the files that were modified after the installation (such as configuration files), non-empty directories and other files or directories that were not created as a result of the installation. These files must be removed manually.
2.6.2. Uninstalling under NetBSD

AXIGEN User Manual
Copyright © 2006 GECAD Technologies S.R.L.
http://www.axigen.com
24
1. Remove the AXIGEN package
In order to remove the AXIGEN package and its related files and directories, you can issue the following command, while logged in as root:
First, stop the AXIGEN daemon: /etc/rc.d/axigen stop Then remove the package: pkg_delete axigen-version For AXIGEN Mail Server version 1.2.2_1 the corresponding command would be: pkg_delete axigen-1.2.2_1
2. Optional: Remove the rest of the files/directories
The command from the first step does not automatically remove the files that were modified after the installation (such as configuration files), non-empty directories and other files or directories that were not created as a result of the installation. These files must be removed manually.
2.6.3. Uninstalling under OpenBSD
1. Remove the AXIGEN package
In order to remove the AXIGEN package and its related files and directories, you can issue the following command, while logged in as root:
First, stop the AXIGEN daemon: /usr/local/bin/axigen.sh stop Then remove the package: pkg_delete axigen-version
To remove AXIGEN Mail Server version 1.2.2_1, the corresponding command is: pkg_delete axigen-1.2.2_1
2. Optional: Remove the rest of the files/directories
The command from the first step does not automatically remove the files that were modified after the installation (such as configuration files), non-empty directories and other files or directories that were not created as a result of the installation. These files must be removed manually.
2.7. Uninstalling under Solaris
Here are the steps to be taken in order to uninstall AXIGEN under Solaris:
1. Remove the AXIGEN package
In order to remove the AXIGEN package and its related files and directories, you can issue the following command, while logged in as root:
First stop the AXIGEN deamon: /etc/init.d/axigen stop
Then remove the package: pkgrm GCADAxigen

AXIGEN User Manual
Copyright © 2006 GECAD Technologies S.R.L.
http://www.axigen.com
25
2. Optional: Remove the rest of the files/directories
The command from the first step does not automatically remove the files that were modified after the installation (such as configuration files), non-empty directories and other files or directories that were not created as a result of the installation. These files must be removed manually.
2.8. Upgrading from AXIGEN Mail Server version 1.2
Version 2.0 of the AXIGEN Mail Servers has a new and improved storage unit, a specific file structure with index based access allowing fast mail delivery, retrieve and query. However, the new storage is incompatible with previous storage versions offered with 1.2 version AXIGEN Mail Servers.
In order to transfer all their existing domains and accounts to AXIGEN Mail Server version 2.0, system administrators need to upgrade the v1.2 storage.
To make this process easier and faster, version 2.0 offers the AXIGEN Upgrading Tool and the AXIGEN Automatic Upgrade Script. System administrators can either use the tool to upgrade their storage or run the AXIGEN script to render the upgrade process automatic. Both methods are described in the subsequent sections of this chapter.
Caveats There are two important changes in version 2.0 that must be kept in mind when performing the storage upgrade.
Firstly, the quota concept, no longer exists at domain level, but only at account level. The default settings of version 1.2 contained an inherited quota of accounts from the domain level. If the value set at the domain level is "0", the upgrade tool and script will read it incorrectly and return an upgrade error. Secondly, the maximum quota value in version 2.0 of AXIGEN 1048576Kb (1GB), while in version 1.2 it was of 2GB. If the maximum quota is set in version 1.2, the upgrade process will return an error.
In order to ensure a successful upgrade, system administrators should make sure that: 1. the account and domain quotas of version 1.2 are not "0" 2. no quota within the 1.2 version is larger than 1048576Kb
2.8.1. AXIGEN Upgrade Tool
Overview The AXIGEN Upgrade Tool allows system administrator to upgrade their version 1.2.x storage to AXIGEN Mail Server 2.0.
Parameters There are four types of parameters used by the AXIGEN Upgrade Tool: Invocation, Input, Output and Upgrade control parameters. The available parameters for each type are described below.
AXIGEN User Manual
Copyright © 2006 GECAD Technologies S.R.L.
http://www.axigen.com
26
Invocation Usage: mig_1.2_2.0 [option...[value...]]
Flags: -h, --help - Print this help -v, --version - Print program's version Options: -i, --input inputDDB - The path for the Domain Database (DDB) that has the domain -d, --domain domainName - The name of the domain from the DDB that will be upgraded -o, --output ds - The domain storage output URI -a, --aux dos - The domain object storage output URI -m, --message msg - The domain message storages output URI -c, --dryRun dry - Dry Run, it will do everything except copy the messages, but it will allocate space for them -s, --structureOnly struct - It will do everything except copy the messages (it will not even allocate space for them) and the folder structure. Input parameters
• -i will set the path for the 1.2 AXIGEN DDB, note that the DDB itself records the path to auxiliary files so the path (absolute path) of the DDB has to be the one that it was created in. This parameter is required.
• -d will select a domain from that DDB, if this parameter is not given the program will simply list the domains from that DDB.
Output parameters
• -o will set the path for the 2.0 AXIGEN domain storage, if -d is given, then this parameter is required, otherwise is ignored.
• -a will set the path for the 2.0 AXIGEN object storage, if this parameter is given -o and -m have to be given also.
• -m will take one or more paths for the 2.0 AXIGEN message storage, if this parameter is given -a and -o have to be given also.
Important! For each storage space of 100GB, a separate domain location (formerly known as domain database) is recommended. For multiples of 100GB, the corresponding number of domain locations must be created. Therefore, the -m parameters can be used to specify more paths for message storages.
All the paths of these output parameters are normally nonexistent or empty directories, note that after an unsuccessful upgrade the paths to the 2.0 storages will not be good for another try until the directories are erased. Upgrade control parameters
• -s will upgrade only the configuration information and will not upgrade any messages or folders, this save time on upgrade with lots of messages and can be used for upgrade diagnostics.
• -c will do like -s but will also upgrade folder structures and will allocate space in storage, this will save time on actual copy of the info but will create a storage that will have even the size of the real upgrade output.
AXIGEN User Manual
Copyright © 2006 GECAD Technologies S.R.L.
http://www.axigen.com
27
If neither -s nor -c is given then the upgrade will be done completely.
Errors Two types of errors can occur during the upgrading process: normal and fatal errors.
• Normal errors: are generated by errors in inserting users/maillist/forwarders, by errors in setting values (the old value is not valid in the new storage), by errors in creating folders or by errors in copying messages.
• Fatal errors: are generated by errors in loading the DDB and 1.2 domain or by creating the 2.0 storage
Fatal errors will cause the program to stop, normal errors will not, all errors will be displaied on stdout in a format like this: CONTEXT=CONTEXT_VALUE;...;ERROR=ERROR_DESCRIPTION Example: DOMAIN=foo;USER=postmaster;VALUE=AID_PASSWORD;ERROR=Cannot upgrade value.
Running the upgrade Prerequisites
• The server must not be running (on the old storage and on the new storage) • Enough disk space for the upgrade must be available (make sure that there is at least as
much free space as the old storage occupies). • The upgrade operation is time consuming - make sure the server downtime does not affect
users. • A backup of the old storage is recommended before running the upgrade.
Flow A normal flow when upgrading will be as described below: 1. List the domains in a DDB mig_1_2_2_0 -i $(ddbPath)
2. Dry-run
• Run a 'trial' upgrade - without copying the messages but reporting all the errors encountered.
mig_1_2_2_0 -i $(ddbPath) -d $(domainName) -o $(storagePath) -c
• Erase the storage created in the dry-run.
rm -r $(storagePath)
The administrator will eliminate the errors and repeat step 2, if there are no errors or the errors can be ignored, proceed to step 3.
3. Run the actual upgrade mig_1_2_2_0 -i $(ddbPath) -d $(domainName) -o $(sto ragePath)
AXIGEN User Manual
Copyright © 2006 GECAD Technologies S.R.L.
http://www.axigen.com
28
2.9. Starting / Stopping / Restarting the server
This section lists common commands meant to start / stop / restart the server for various Linux distributions and FreeBSD.
1. Linux o For RedHat, Debian, Gentoo and SUSE distributions
You can start the server with the following command: /etc/init.d/axigen start To stop the server, you can issue: /etc/init.d/axigen stop In order to restart the AXIGEN daemon (in order to reload the new configuration settings, for instance), you can use the 'restart' parameter: /etc/init.d/axigen restart To view the status of the AXIGEN demon, you can pass the 'status' parameter: /etc/init.d/axigen status
o In Slackware, you can use the same commands, applied to the /etc/rc.d/rc.axigen initscript, instead of /etc/init.d/axigen. For instance, to start the server, you can issue:
o /etc/rc.d/rc.axigen start 2. FreeBSD
In FreeBSD, the AXIGEN server can be started via its initscript, by issuing: /usr/local/etc/rc.d/axigen.sh start
3. Solaris
In Solaris/SunOS, the AXIGEN server can be started via its initscript, by issuing: /etc/init.d/axigen start
To stop the server, you can issue: /etc/init.d/axigen stop
In order to restart the AXIGEN daemon, you can use: /etc/init.d/axigen restart
To reload the AXIGEN daemon (i.e. for new configuration settings to take effect), you can pass the 'reload' parameter to the initscript: /etc/init.d/axigen reload
To view the AXIGEN daemon status, you can pass the 'status' parameter: /etc/init.d/axigen status

AXIGEN User Manual
Copyright © 2006 GECAD Technologies S.R.L.
http://www.axigen.com
29
2.10. Initial Server Configuration
This section describes basic server configurations that you need to do in order to get your server up and running: setting the admin password, enabling the Web configuration interface, creating a domain and adding accounts. Some of these actions can also be performed automatically using the AXIGEN Configuration Wizard, also described in this section.
2.10.1. Setting the Admin Password
Before accessing the WebAdmin interface it is mandatory to set the password for the AXIGEN admin account. To do that, go through these steps:
1. If the AXIGEN server is running, first stop it, using the following command: /etc/init.d/axigen stop
2. Run AXIGEN only with -A (or --admin-passwd) option. Example: /opt/axigen/bin/axigen -A <password>
3. Restart the server. /etc/init.d/axigen restart
Note: Currently you can use this password only with the admin username.
For details on how to set the password using the Configuration Wizard, see the corresponding section.
2.10.2. Enabling and Logging on to the Webadmin Int erface
In AXIGEN 2.0, the WebAdmin service is enabled by default, so you can directly skip to Step 4 of this procedure. If you’re using an older version of AXIGEN, or if you have disabled your WebAdmin service and need to enable it again, steps 1-3 explain how to enable it using the configuration file. By default, the WebAdmin module listens to the 9000/tcp port and can be enabled by editing the AXIGEN configuration file (installed by default in the this location: /var/opt/axigen/run/axigen.cfg ) and set it as instructed below:
1. Add the WebAdmin service to the services {} list: Server { services = (imap log pop3 processing smtp webadmi n) ...
2. In the webadmin {} context, configure and enable the default listener: webadmin = { ...
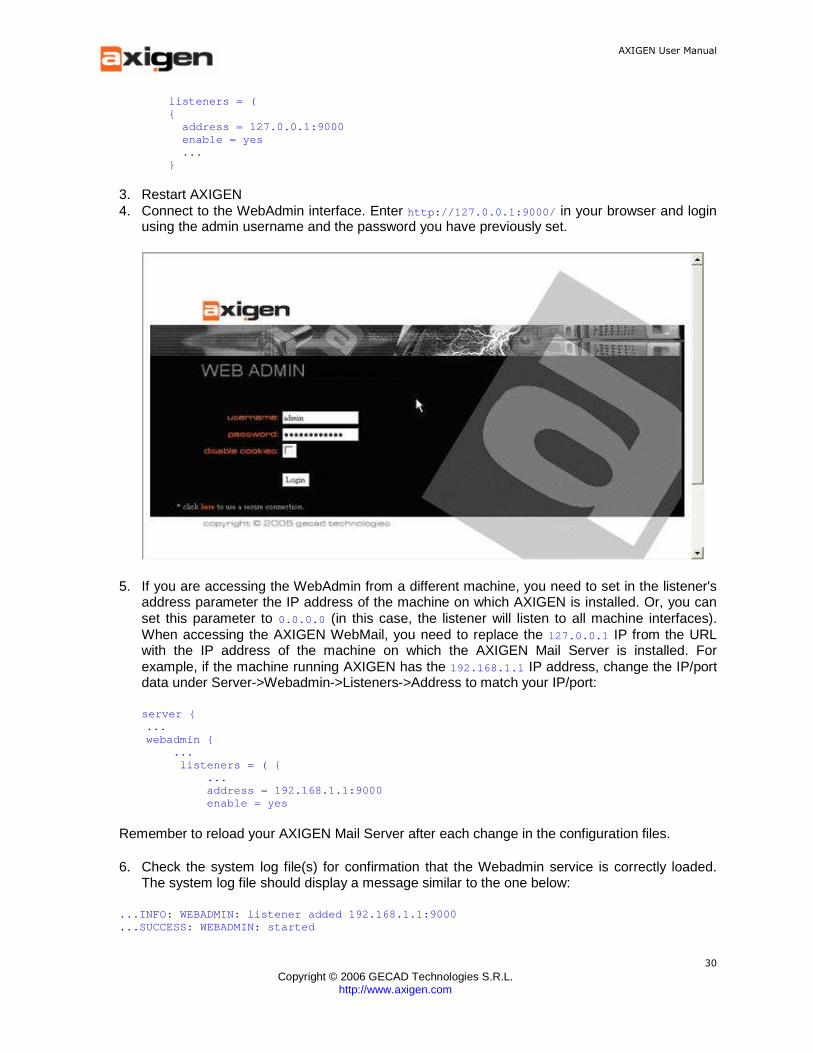
AXIGEN User Manual
Copyright © 2006 GECAD Technologies S.R.L.
http://www.axigen.com
30
listeners = ( { address = 127.0.0.1:9000 enable = yes ... }
3. Restart AXIGEN 4. Connect to the WebAdmin interface. Enter http://127.0.0.1:9000/ in your browser and login
using the admin username and the password you have previously set.
5. If you are accessing the WebAdmin from a different machine, you need to set in the listener's address parameter the IP address of the machine on which AXIGEN is installed. Or, you can set this parameter to 0.0.0.0 (in this case, the listener will listen to all machine interfaces). When accessing the AXIGEN WebMail, you need to replace the 127.0.0.1 IP from the URL with the IP address of the machine on which the AXIGEN Mail Server is installed. For example, if the machine running AXIGEN has the 192.168.1.1 IP address, change the IP/port data under Server->Webadmin->Listeners->Address to match your IP/port:
server { ... webadmin { ... listeners = ( { ... address = 192.168.1.1:9000 enable = yes Remember to reload your AXIGEN Mail Server after each change in the configuration files.
6. Check the system log file(s) for confirmation that the Webadmin service is correctly loaded. The system log file should display a message similar to the one below:
...INFO: WEBADMIN: listener added 192.168.1.1:9000
...SUCCESS: WEBADMIN: started
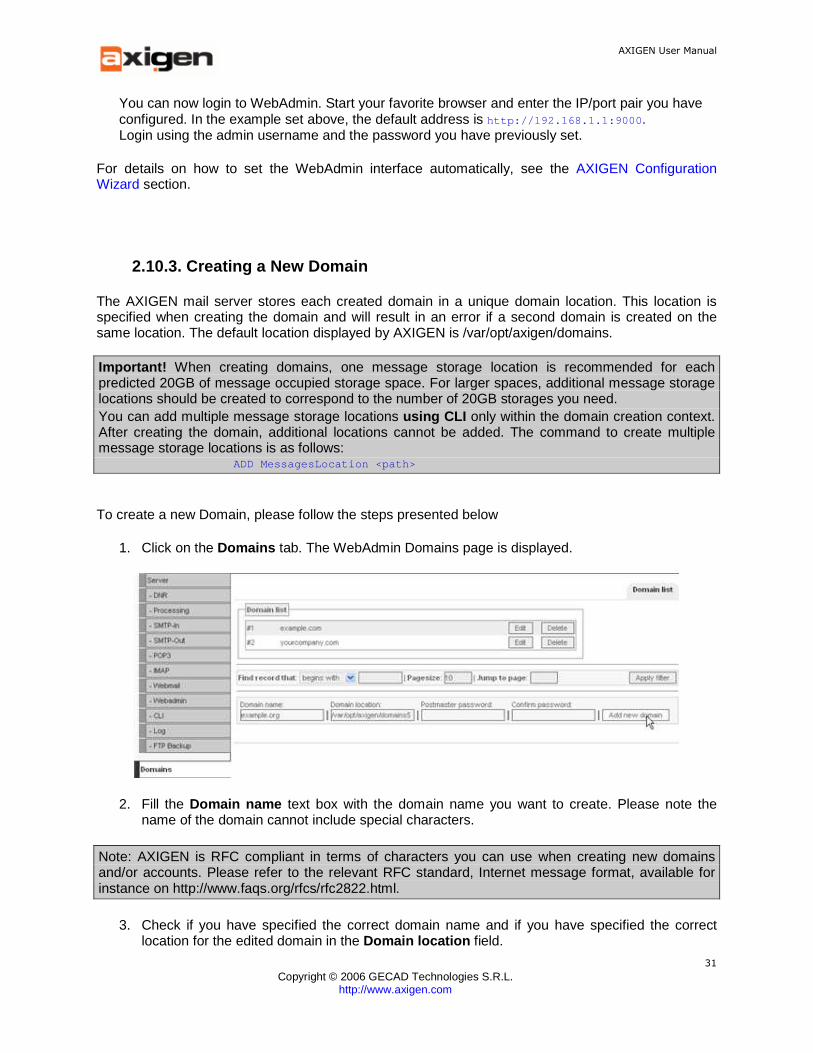
AXIGEN User Manual
Copyright © 2006 GECAD Technologies S.R.L.
http://www.axigen.com
31
You can now login to WebAdmin. Start your favorite browser and enter the IP/port pair you have configured. In the example set above, the default address is http://192.168.1.1:9000 . Login using the admin username and the password you have previously set.
For details on how to set the WebAdmin interface automatically, see the AXIGEN Configuration Wizard section.
2.10.3. Creating a New Domain
The AXIGEN mail server stores each created domain in a unique domain location. This location is specified when creating the domain and will result in an error if a second domain is created on the same location. The default location displayed by AXIGEN is /var/opt/axigen/domains.
Important! When creating domains, one message storage location is recommended for each predicted 20GB of message occupied storage space. For larger spaces, additional message storage locations should be created to correspond to the number of 20GB storages you need. You can add multiple message storage locations using CLI only within the domain creation context. After creating the domain, additional locations cannot be added. The command to create multiple message storage locations is as follows: ADD MessagesLocation <path>
To create a new Domain, please follow the steps presented below
1. Click on the Domains tab. The WebAdmin Domains page is displayed.
2. Fill the Domain name text box with the domain name you want to create. Please note the name of the domain cannot include special characters.
Note: AXIGEN is RFC compliant in terms of characters you can use when creating new domains and/or accounts. Please refer to the relevant RFC standard, Internet message format, available for instance on http://www.faqs.org/rfcs/rfc2822.html.
3. Check if you have specified the correct domain name and if you have specified the correct location for the edited domain in the Domain location field.
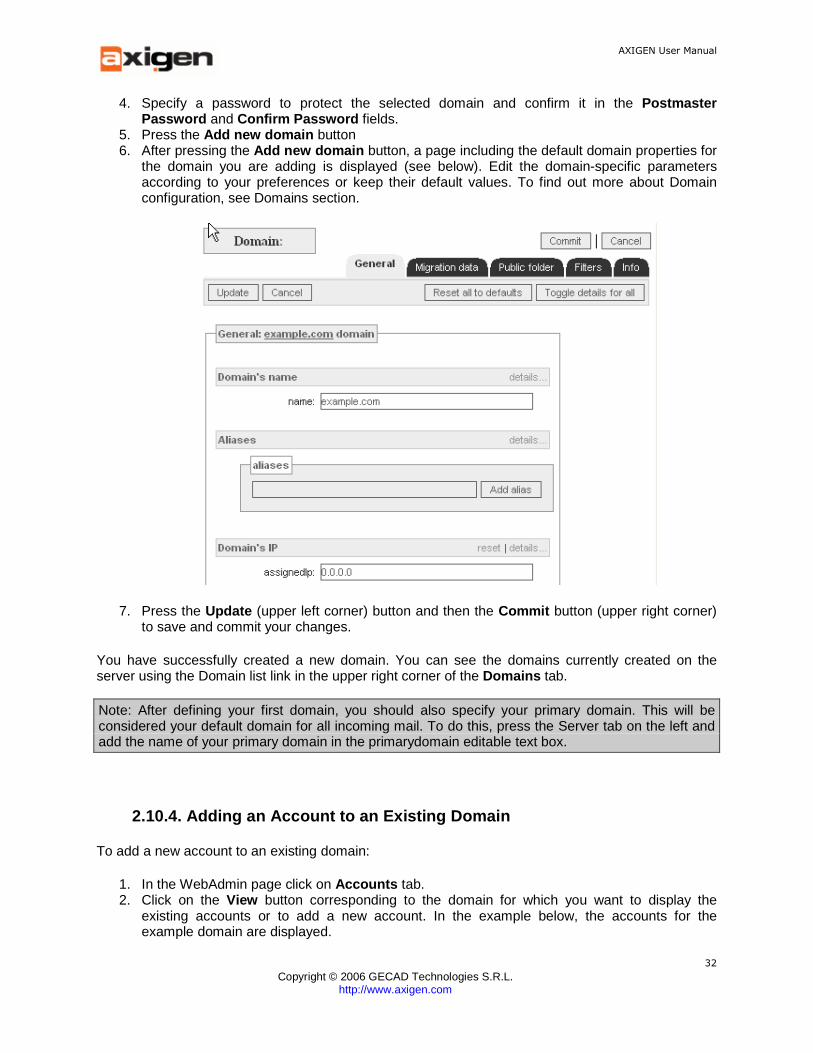
AXIGEN User Manual
Copyright © 2006 GECAD Technologies S.R.L.
http://www.axigen.com
32
4. Specify a password to protect the selected domain and confirm it in the Postmaster Password and Confirm Password fields.
5. Press the Add new domain button 6. After pressing the Add new domain button, a page including the default domain properties for
the domain you are adding is displayed (see below). Edit the domain-specific parameters according to your preferences or keep their default values. To find out more about Domain configuration, see Domains section.
7. Press the Update (upper left corner) button and then the Commit button (upper right corner) to save and commit your changes.
You have successfully created a new domain. You can see the domains currently created on the server using the Domain list link in the upper right corner of the Domains tab.
Note: After defining your first domain, you should also specify your primary domain. This will be considered your default domain for all incoming mail. To do this, press the Server tab on the left and add the name of your primary domain in the primarydomain editable text box.
2.10.4. Adding an Account to an Existing Domain
To add a new account to an existing domain:
1. In the WebAdmin page click on Accounts tab. 2. Click on the View button corresponding to the domain for which you want to display the
existing accounts or to add a new account. In the example below, the accounts for the example domain are displayed.

AXIGEN User Manual
Copyright © 2006 GECAD Technologies S.R.L.
http://www.axigen.com
33
3. The existing accounts for the domain you have selected are displayed. To add a new account to this domain, enter the name of the account to be created in the Account name text box, a password in the Password text (required, needs to have at least one character), and confirm it in the Confirm Password field. Then press the Add new account button. In this example, an account named 'barry_fields' is added to the 'example' domain.
4. After pressing on the Add new account button, a page presenting the default account properties for the account you are creating is displayed (see below). Edit the account-specific parameters to suit your needs or leave them with their default values. For advanced account settings, see Accounts section.
5. Press the Update button (lower left corner) and the Commit button (upper right corner) to save and commit your changes.
You have successfully added the 'barry_fields' account to the 'example' domain. You can see the accounts currently associated with your domains using the Account list link. The link is available in
AXIGEN User Manual
Copyright © 2006 GECAD Technologies S.R.L.
http://www.axigen.com
34
the upper right corner of the page displaying the available accounts for the selected domain (see above).
2.10.5. Automated Configuration with AXIGEN Configu ration Wizard
Aiming to enhance, simplify and render the initial setup automatic, starting with version 1.2.6, the AXIGEN Mail server includes the AXIGEN Configuration Wizard . In three easy steps, the wizard enables system administrators to instantly set the admin password, configure the primary domain and set up an interface for the WebAdmin management tool. These actions were previously performed partly manually, partly using the WebAdmin interface.
The AXIGEN Configuration Wizard is provided as part of all the AXIGEN Mail Server 2.0 installation packages, available for download on the AXIGEN site.
Firstly, the wizard needs to be launched by issuing one of the following commands, depending on the platform you have installed the AXIGEN Mail Server on:
1. On Solaris and all Linux platforms: /opt/axigen/bin/axigen-cfg-wizard 2. On OpenBSD and FreeBSD: /usr/local/bin/axigen-cfg-wizard 3. On NetBSD: /usr/pkg/bin/axigen-cfg-wizard
1. Configuring the Admin Password
After launching the AXIGEN Configuration Wizard, the first step you are prompted to take is specify the admin password. The password is required and therefore system administrators must type at least one character.

AXIGEN User Manual
Copyright © 2006 GECAD Technologies S.R.L.
http://www.axigen.com
35
Use the Pasword field to type your password and the Validate field to retype it for validation.
To move from one field to another, please use the Tab or Enter keys. To proceed to the next step, when located on the Next button, press the Enter key.
2. Configuring your Primary Domain
The next stage of running the wizard consists in configuring AXIGEN’s primary domain. The wizard will automatically detect the machine’s FQDN (Fully Qualified Domain Name) and based on it will propose the domain name as primary. If no domain can be detected, the default ‘localdomain’ will be displayed. System Administrators can edit the fields of this tab at any time.

AXIGEN User Manual
Copyright © 2006 GECAD Technologies S.R.L.
http://www.axigen.com
36
In the Primary Domain field, the wizard will display the automatically detected domain. Use the Domain Location field to edit the default storage path for the primary domain, /var/opt/axigen/domains . To configure the primary domain password for the account postmaster, use the Postmaster account password field. To move from one field to another, please use the Tab or Enter keys. To proceed to the next step, when located on the Next button, press the Enter key. 3. Alias Configuration When running the wizard, this step allows system administrators to select the alias they would like to configure for the primary domain defined at the previous step. There are three available options:
• Redirect all mails for root account to postmaster • Add the 'localhost' alias to this domain • Add the 'localhost.localdomain' alias to this domain
AXIGEN User Manual
Copyright © 2006 GECAD Technologies S.R.L.
http://www.axigen.com
37
To select or deselect one of the listed options, press Enter .
4. Configuring the WebAdmin Interface
This following step performed by the AXIGEN Configuration Wizard is to select the WebAdmin Interface. The wizard will list all the existing interfaces with their respective IP addresses and ports, enabling system administrators to select a listener for WebAdmin. In the previous versions, the WebAdmin was initially accessed on its default listener, http://127.0.0.1:9000/ .

AXIGEN User Manual
Copyright © 2006 GECAD Technologies S.R.L.
http://www.axigen.com
38
Select one of the listed interfaces, then move to the OK button (using the Tab or Enter keys) and then press Enter again. If you choose the first option, all, all the listed interfaces will be used as listeners for the WebAdmin management tool. If you choose a different interface, you will be prompted to confirm the choice you have made.
5. Configuring the SMTP Interface
The next step performed by the AXIGEN Configuration Wizard is to select the SMTP Interface. The wizard will list all the existing interfaces with their respective IP addresses and ports, enabling system administrators to select a listener for SMTP.
Select one of the listed interfaces, then move to the OK button (using the Tab or Enter keys) and then press Enter again. If you choose the first option, all, all the listed interfaces will be used as listeners for the SMTP service. If you choose a different interface, you will be prompted to confirm the choice you have made.
6. Services Selection
The sixth step of the automatic configuration process allows system administrators to select the active services for the AXIGEN server. For each of the selected services, POP3, IMAP or WebMail, further settings are available within the following steps. If none of the three services is enabled, the wizard will skip directly to step 10 of the configuration.
AXIGEN User Manual
Copyright © 2006 GECAD Technologies S.R.L.
http://www.axigen.com
39
To select or deselect one of the listed options, press Enter .
7. Configuring the POP 3 Interface
The next step performed by the AXIGEN Configuration Wizard is to select the POP3 Interface. The wizard will list all the existing interfaces with their respective IP addresses and ports, enabling system administrators to select a listener for the POP3 service.

AXIGEN User Manual
Copyright © 2006 GECAD Technologies S.R.L.
http://www.axigen.com
40
Select one of the listed interfaces, then move to the OK button (using the Tab or Enter keys) and then press Enter again. If you choose the first option, all, all the listed interfaces will be used as listeners for the POP3 service. If you choose a different interface, you will be prompted to confirm the choice you have made. 8. Configuring the IMAP Interface
Step 8 performed by the AXIGEN Configuration Wizard is to select the IMAP Interface. The wizard will list all the existing interfaces with their respective IP addresses and ports, enabling system administrators to select a listener for the POP3 service.
Select one of the listed interfaces, then move to the OK button (using the Tab or Enter keys) and then press Enter again. If you choose the first option, all, all the listed interfaces will be used as listeners for the POP3 service. If you choose a different interface, you will be prompted to confirm the choice you have made.
9. Configuring the WebMail Interface
For the next step, the AXIGEN Configuration Wizard will allow system administrators to select the WebMail Interface. The wizard will list all the existing interfaces with their respective IP addresses and ports, enabling system administrators to select a listener for the WebMail service.
AXIGEN User Manual
Copyright © 2006 GECAD Technologies S.R.L.
http://www.axigen.com
41
Select one of the listed interfaces, then move to the OK button (using the Tab or Enter keys) and then press Enter again. If you choose the first option, all, all the listed interfaces will be used as listeners for the WebMail service. If you choose a different interface, you will be prompted to confirm the choice you have made.
10. Configuring Relay Policies.
The AXIGEN Configuration Wizard will then prompt system administrators to select the networks allowed to relay emails through the AXIGEN server without prior authentication. To select or deselect one of the listed options, press Enter .
When one of the available networks is selected, a script configuring a Relay Policy is automatically created. For details on Relay Polices, please see the corresponding section of the online documentation.

AXIGEN User Manual
Copyright © 2006 GECAD Technologies S.R.L.
http://www.axigen.com
42
11. Sendmail Wrapper Configuration
This configuration steps is required if system administrators want command line applications such as mailix to be able to send emails via AXIGEN. Such applications use the Sendmail Wrapper which thus needs to be configured to work correctly with AXIGEN.
The Wizard describes in detail the actions taken when selecting "Yes" at this step.
After completing these steps, the Wizard will initially display a message prompting you to wait for the changes to be applied to your existing configuration and will then respond with a successful operation message.

AXIGEN User Manual
Copyright © 2006 GECAD Technologies S.R.L.
http://www.axigen.com
43
After completing these steps, the wizard will display a message summarizing the steps just taken. It will also instruct system administrators to start the AXIGEN service and then access the WebAdmin interface on the selected IP-port combination.
Troubleshooting Firstly, on some distributions, the operating system sets the console display encoding to UTF-8. Thus all the wizard’s messages would be displayed incorrectly. For troubleshooting, please consult this Knowledgebase article. Secondly, if the any other message except the successful one is displayed by the wizard after taking the configuration steps, please contact the AXIGEN Support team at [email protected].
AXIGEN User Manual
Copyright © 2006 GECAD Technologies S.R.L.
http://www.axigen.com
44
Chapter 3. Mail Server Architecture
AXIGEN is an integrated service SMTP, IMAP, POP, secured SSL/TLS, WebMail and list server, integrating advanced technologies and messaging services.
Services and Modules
AXIGEN Mail Server is an Internet-based mail server that provides messaging services over the Internet via connections using a Transmission Control Protocol/Internet Protocol (TCP/IP) network. AXIGEN Mail Server sends mail messages using the Simple Mail Transfer Protocol (SMTP). The messages can be retrieved using the Post Office Protocol version 3 (POP3), the Internet Message Access Protocol (IMAP) and WebMail . AXIGEN Mail Storage integrates a proprietary technology that allows storing messages in a special directory structure, guaranteeing an effective, fast mail flow and optimizing space-saving.
Architecture Features
AXIGEN incorporates a multi-threaded engine , which can break server activity into multiple parallel processing threads. This enables system administrators to allocate a certain number of processing threads to specific modules (SMTP incoming / SMTP outgoing / WebMail / IMAP, etc.) Running services can be configured at service, domain and account level.
Most AXIGEN services (SMTP Incoming, SMTP Outgoing, POP, IMAP, WebMail) make use of configurable listeners to define rules for accepting or denying connections.
Administration Tools
The administration tools enable both centralized configuration (WebAdmin and Command Line Interface ) and manual configuration (configuration file ).
For each service described in the Architecture chapter, configuration options are available in each of these tools (WebAdmin, CLI and the configuration file, axigen.cfg.
Security
AXIGEN incorporates an advanced filtering system and other innovative security tools (Antivirus, AntiSpam, Antispoofing - SPF Authentication, SSL/TLS authentication).
Highly configurable logging and reporting services are also available, and an FTP Backup service allowing you to securely backup and restore your domain and user configuration.
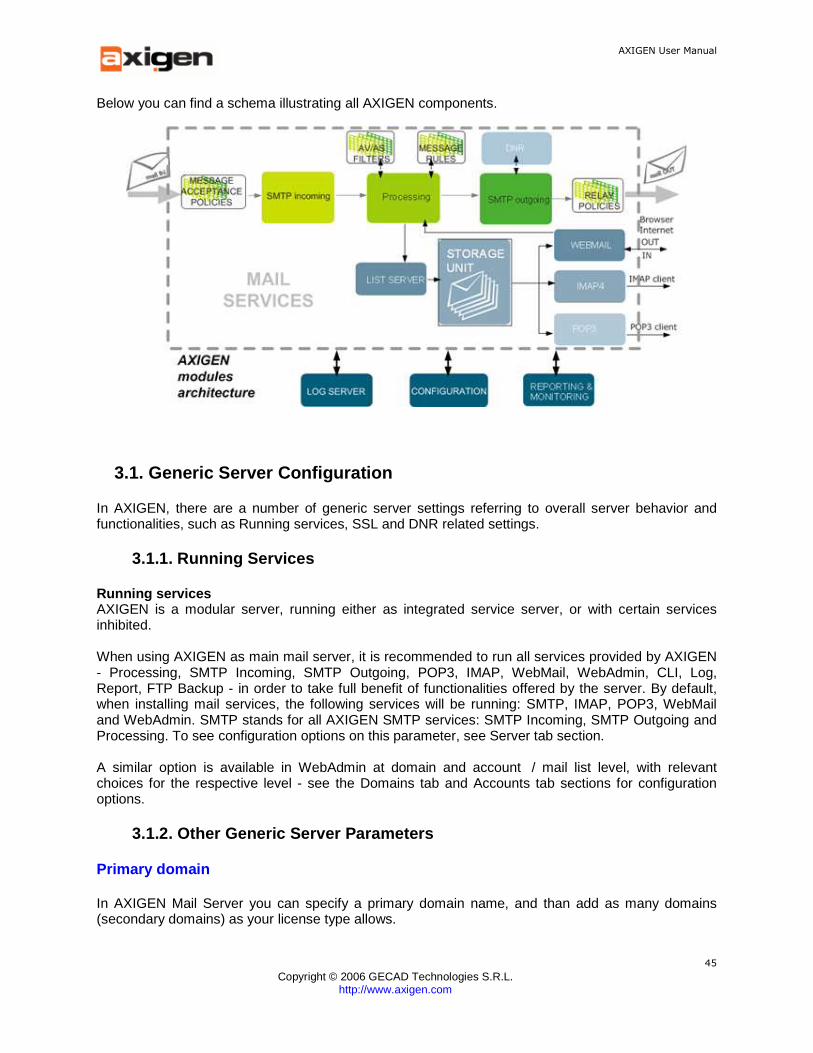
AXIGEN User Manual
Copyright © 2006 GECAD Technologies S.R.L.
http://www.axigen.com
45
Below you can find a schema illustrating all AXIGEN components.
3.1. Generic Server Configuration
In AXIGEN, there are a number of generic server settings referring to overall server behavior and functionalities, such as Running services, SSL and DNR related settings.
3.1.1. Running Services
Running services AXIGEN is a modular server, running either as integrated service server, or with certain services inhibited. When using AXIGEN as main mail server, it is recommended to run all services provided by AXIGEN - Processing, SMTP Incoming, SMTP Outgoing, POP3, IMAP, WebMail, WebAdmin, CLI, Log, Report, FTP Backup - in order to take full benefit of functionalities offered by the server. By default, when installing mail services, the following services will be running: SMTP, IMAP, POP3, WebMail and WebAdmin. SMTP stands for all AXIGEN SMTP services: SMTP Incoming, SMTP Outgoing and Processing. To see configuration options on this parameter, see Server tab section. A similar option is available in WebAdmin at domain and account / mail list level, with relevant choices for the respective level - see the Domains tab and Accounts tab sections for configuration options.
3.1.2. Other Generic Server Parameters
Primary domain
In AXIGEN Mail Server you can specify a primary domain name, and than add as many domains (secondary domains) as your license type allows.
AXIGEN User Manual
Copyright © 2006 GECAD Technologies S.R.L.
http://www.axigen.com
46
The primary domain is the default domain for your mail server. This means that email sent to "user_name" will automatically be transmitted to "user_name@primarydomain".
The primary domain default value is the result of the 'getdomainname' function, which is the current domain name (local domain).
SSL Random File
In order to establish SSL connections, a file containing entropy data is used for generating random numbers. The path to this file needs to be defined in the Server Global settings.
For more information on SSL in AXIGEN, see Authentication and Encryption.
SSL parameters are also provided when defining listeners (see corresponding section).
For more information on how to set generic server parameters using WebAdmin, see Server Tab.
3.1.3. DNR Settings
Domain Name Resolver
AXIGEN includes a Domain Name Resolver (DNR) module used to extract information from domain servers. The module implements the specifications from RFC1034 and RFC1035. It communicates with domain name servers using UDP sockets on port 53. AXIGEN services using DNR:
• The SMTP Incoming service uses DNR for performing the SPF tests (this action involves PTR and TXT queries).
• The SMTP outgoing service queries DNR for MX and A information about the domain where to relay the mail messages.
DNR Attributes
DNR needs to be initialized with a list of name server IP addresses which will be used as base for executing the DNS queries if the DNR's internal cache does not contain information about name servers of the domain searched. AXIGEN indexes automatically the DNS specified in the operating system, by assigning them levels of priority according to the order in which they are found in the OS. Name servers are identified by an IP and are assigned a set of parameter values, which can be subsequently user-defined. DNR sends queries to the first IP and in case of error it will send the same query to the same IP address after an interval specified in seconds by the timeout parameter. If after a number of retries specified using the retries parameter, the name server still returns an error, AIXGEN goes on to the next name server IP. The same procedure is applied until the end of the list is
AXIGEN User Manual
Copyright © 2006 GECAD Technologies S.R.L.
http://www.axigen.com
47
reached. If the end of the list is reached without obtaining an appropriate response, a general DNR TIMEOUT error is returned.
Each nameserver IP has an associated level of priority (specified using the priority parameter). By default, the server will assign values incremeted by 5 units (5, 10, 15, etc) according to the order defined in the operating system. You can however assign different priority values and define a different order in which you wish to query nameservers (the servers with the higher priority are queried first).
The retries and timeout parameters can be defined both at service level, for all name servers defined, and at name server level, if you wish to set different values for a particular name server. The module queries name servers for information of type A, NS, MX, PTR and TXT and it can maintain a cache with this information in order to limit the bandwidth and time consumed with DNS traffic. For each query type (A, NS, MX, PTR, TXT) it caches cacheSize number of responses. For information on how to configure these parameters, please see DNR tab.

AXIGEN User Manual
Copyright © 2006 GECAD Technologies S.R.L.
http://www.axigen.com
48
3.2. Services and Modules
This section includes brief overviews of all services and modules included in AXIGEN Mail Server.
3.2.1. SMTP Incoming
The AXIGEN SMTP Incoming module is responsible with accepting connections initiated by other entities via SMTP/ESMTP protocols.
AXIGEN SMTP Incoming establishes the dialogue, receives the mail message if all conditions set by the System Administrator are fulfilled and forwards the mail message to the Processing module. The SMTP Incoming module is compliant with ESMTP RFCs, therefore implementing all the corresponding features.
This module includes functions such as configurable listeners, thread and client management, user authentication and a built-in SPF authentication procedure. This module has not only the role of receiving the mail messages from other entities, but also to protect the Mail Server against attacks and ensure a good functionality adjusted to the processing power of the hardware, the bandwidth, and other factors. In order to ensure this, the module has a number of attributes managing connectivity, clients (using listeners) and client authentication. It also provides numerous logging options and advanced parameters to manage them. In AXIGEN, at SMTP Incoming level, SPF tests are being performed, thus ensuring basic email sorting before they reach the queue. The SMTP Incoming module accepts connections as specified by the SMTP listeners defined in configuration file, receives the message, performs the SPF test and if the message passes the test, it is placed in the Queue. By default the server accepts connections on 127.0.0.1:25.
Connection Error Control
In order to protect the server, the system administrator can limit the number of failed/wrong commands that can be received from SMTP clients during one session. This way, incomplete connections or connections that are not RFC compliant are dropped and the corresponding messages are not accepted, thus freeing important bandwidth.
You can limit the number of authentication errors allowed for one SMTP client per session by using the maxAuthErrors parameter. If this limit is exceeded, AXIGEN server drops the connection with that

AXIGEN User Manual
Copyright © 2006 GECAD Technologies S.R.L.
http://www.axigen.com
49
SMTP client. You can limit the number of errors allowed for one SMTP client per session by using the maxErrors parameter. If this limit is exceeded, AXIGEN server drops the connection with that SMTP client.
Important: If you do not specify a limit for the maximum number of (authentication) errors allowed for a SMTP client's session, security risks may arise.
For information on how to configure connection error control parameters for SMTP-In using WebAdmin, see Configuring Connection Error Control Parameters.
Connection Thread Control
AXIGEN can run on a large variety of systems and machines, in networks with very different traffic loads, structures, domain configurations, user rights, authorization procedures, etc. Depending on your specific network specifications and conditions, you can adapt the workload to the server's processing power, in order to prevent a system overload (with maxConnThreads ) or to improve server performance (with minConnThreads ). These two complementary parameters define the lower and upper limit for the number of threads that are opened at any given moment by AXIGEN SMTP Incoming module. With maxConnThreads you can set the maximum number of threads that can be opened at a specific moment of time and prepare for unforeseen peaks in server activity to avoid a system overload. With minConnThreads you can set the minimum number of threads that can be opened at a specific moment of time. This is important because even when there is no activity for AXIGEN Mail Server, a burst of new messages, i.e. a large workload, can arrive at any moment. At that time, the number of threads specified using minConnThreads threads will already have a "waiting" status, thus ready to process the message "burst" in good conditions, without delays. For information on how to configure connection thread control parameters for SMTP-In using WebAdmin, see Configuring Connection Thread Control Parameters.
Log Control
Just like all the other AXIGEN main services, the SMTP Incoming module can log different types of events. The system administrator can specify what events are logged, where and how they are logged. The SMTP Incoming's Log Control function can be configured using the following three attributes: logLevel , logType and logHost . See Logging service for more details on logging in AXIGEN For information on how to configure log control parameters for SMTP-In using WebAdmin, see Configuring Log Control Parameters.
Authentication
Authentication is a method for preventing non-desirable actions and granting access to AXIGEN server's SMTP Incoming features only for authenticated users.
Note: AXIGEN server supports authentication, meaning it can be instructed to accept only connections/messages from authenticated entities. However, not all mail clients support this feature. If your mail client does not support SMTP authentication, this feature will not be available.
AXIGEN User Manual
Copyright © 2006 GECAD Technologies S.R.L.
http://www.axigen.com
50
The SMTP Incoming authentication process can be executed over secure connections (TLS enabled). The SMTP Incoming authentication process can also be executed in plain text (the username and password are sent to AXIGEN server in "base64" format; the server only accepts users correctly defined in account storage and that supply the corresponding passwords) or using CRAM MD5 (same data is provided, this time using the MD5 coding format). Below you can find a short explanation on the procedure for choosing the authentication method in AXIGEN's SMTP Incoming. From the list of authentication methods supplied by the client as answer to EHLO command, one of the CRAM-MD5, LOGIN and PLAIN methods is chosen (in this order). In case the CRAM-MD5 or LOGIN method is selected, if an error after the AUTH command occurs, AXIGEN tries to use one of the other methods supplied by the server. Authentication parameters in SMTP-in are secureConnAuthTypes and plainConnAuthTypes which allow you to specify allowed authentication types for secure and respectively plain connections. For information on how to configure authentication parameters for SMTP-In using the SMTP policy system, see Message Acceptance Policies.
Message Acceptance Policies
AXIGEN 2.0 implements a set of message acceptance policies at SMTP-connection level. The system administrator can configure and implement message acceptance policies and adjust them to best suit their security requirements. Incoming connections established via SMTP and the message flow can be easily managed using the established policies. Moreover, they allow adding headers, changing addresses and other such actions. For more details, see the Message Acceptance Policies section.
Listener Control
AXIGEN Mail Server can use different Listeners for its SMTP Incoming service. The usage of listeners is helpful for defining and applying different apply/deny rules for AXIGEN services you are using. For additional information on listeners and their use in AXIGEN, please see Listeners. For information on adding and editing listeners in SMTP-In using WebAdmin, see Adding and Editing TCP Listeners.
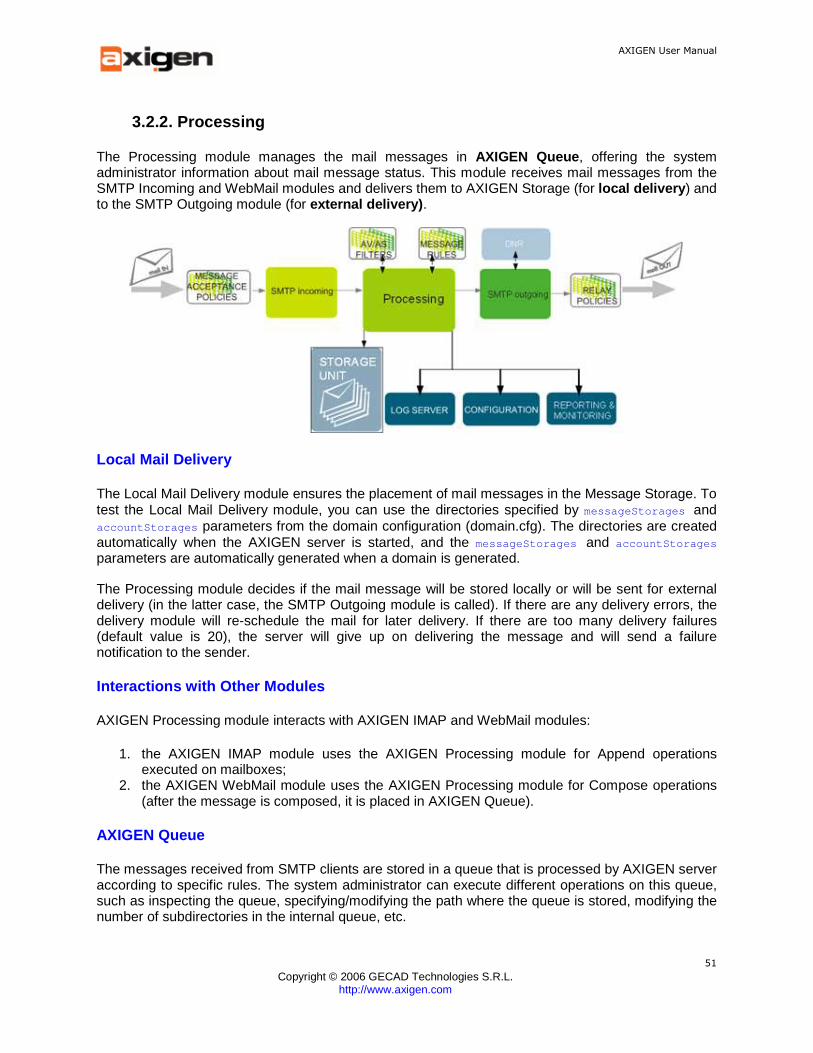
AXIGEN User Manual
Copyright © 2006 GECAD Technologies S.R.L.
http://www.axigen.com
51
3.2.2. Processing
The Processing module manages the mail messages in AXIGEN Queue , offering the system administrator information about mail message status. This module receives mail messages from the SMTP Incoming and WebMail modules and delivers them to AXIGEN Storage (for local delivery ) and to the SMTP Outgoing module (for external delivery) .
Local Mail Delivery
The Local Mail Delivery module ensures the placement of mail messages in the Message Storage. To test the Local Mail Delivery module, you can use the directories specified by messageStorages and accountStorages parameters from the domain configuration (domain.cfg). The directories are created automatically when the AXIGEN server is started, and the messageStorages and accountStorages parameters are automatically generated when a domain is generated.
The Processing module decides if the mail message will be stored locally or will be sent for external delivery (in the latter case, the SMTP Outgoing module is called). If there are any delivery errors, the delivery module will re-schedule the mail for later delivery. If there are too many delivery failures (default value is 20), the server will give up on delivering the message and will send a failure notification to the sender.
Interactions with Other Modules
AXIGEN Processing module interacts with AXIGEN IMAP and WebMail modules:
1. the AXIGEN IMAP module uses the AXIGEN Processing module for Append operations executed on mailboxes;
2. the AXIGEN WebMail module uses the AXIGEN Processing module for Compose operations (after the message is composed, it is placed in AXIGEN Queue).
AXIGEN Queue
The messages received from SMTP clients are stored in a queue that is processed by AXIGEN server according to specific rules. The system administrator can execute different operations on this queue, such as inspecting the queue, specifying/modifying the path where the queue is stored, modifying the number of subdirectories in the internal queue, etc.
AXIGEN User Manual
Copyright © 2006 GECAD Technologies S.R.L.
http://www.axigen.com
52
The queue is stored physically on several sub-folders. The numbers of these subfolders is specified in the configuration file using the queueEntryCount parameter.
For information on how to manage queues management parameters using WebAdmin, see Managing the Queue.
The mqview tool can be used to inspect the status of the files currently stored in AXIGEN queue. Please refer to the Command Line Parameters for details on using this tool.
Note: Currently any change in the parameters specific to the Processing module requires a sever restart to become effective.
Message statuses
A message in a queue can have one of the following statuses:
• Incoming: The message is currently being received. It has not been treated in either way by AXIGEN;
• Received: The message has been received. No action has been taken on it yet.
• Processing: Message processing is underway.
• Processed: The message processing ended. The message processing could end successfully or not successfully. If the message is successfully processed, the next specific action (for instance delivery) specified for the message is carried out. If the message processing ends unsuccessfully, the message remains in Processed status.
• Sending: The process of sending the message is underway.
• Sent: The message has been sent.
Mail Scheduling
When a message can not be delivered by AXIGEN SMTP service for some non-critical reason, it can be re-scheduled, meaning AXIGEN server can try to re-send after some time interval is elapsed. You can adjust AXIGEN server's mail scheduling feature using the following three parameters: schedInterval, maxSchedInterval and maxRetryCount . The schedule interval is calculated using a formula detailed in Managing Mail Scheduling section.
Processing policies
The Processing policies correspond to the SMTP Processing module and enable administrators to define the NDR (Non-Delivery Receipt) text and the conditions when such a message is returned. For further information, see the dedicated section in the Mail Server Security chapter.
Log Control
Just like all the other AXIGEN main services, the Processing module can log different types of events. The system administrator can specify what events are logged, where and how they are logged.

AXIGEN User Manual
Copyright © 2006 GECAD Technologies S.R.L.
http://www.axigen.com
53
The Processing Log Control function can be configured using the following three attributes: logLevel , logType and logHost . See Logging service for more details on logging in AXIGEN. For information on how to configure log control parameters for Processing using WebAdmin, see Configuring Log Control Parameters.
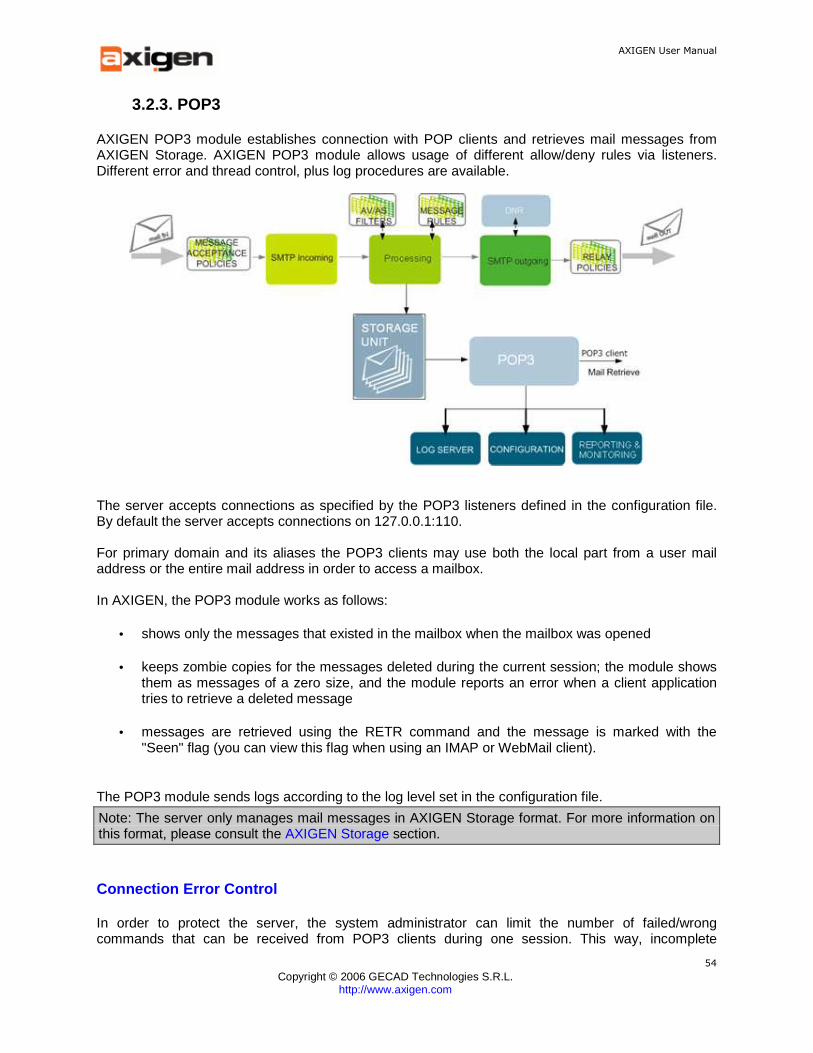
AXIGEN User Manual
Copyright © 2006 GECAD Technologies S.R.L.
http://www.axigen.com
54
3.2.3. POP3
AXIGEN POP3 module establishes connection with POP clients and retrieves mail messages from AXIGEN Storage. AXIGEN POP3 module allows usage of different allow/deny rules via listeners. Different error and thread control, plus log procedures are available.
The server accepts connections as specified by the POP3 listeners defined in the configuration file. By default the server accepts connections on 127.0.0.1:110. For primary domain and its aliases the POP3 clients may use both the local part from a user mail address or the entire mail address in order to access a mailbox. In AXIGEN, the POP3 module works as follows:
• shows only the messages that existed in the mailbox when the mailbox was opened
• keeps zombie copies for the messages deleted during the current session; the module shows them as messages of a zero size, and the module reports an error when a client application tries to retrieve a deleted message
• messages are retrieved using the RETR command and the message is marked with the "Seen" flag (you can view this flag when using an IMAP or WebMail client).
The POP3 module sends logs according to the log level set in the configuration file.
Note: The server only manages mail messages in AXIGEN Storage format. For more information on this format, please consult the AXIGEN Storage section.
Connection Error Control
In order to protect the server, the system administrator can limit the number of failed/wrong commands that can be received from POP3 clients during one session. This way, incomplete

AXIGEN User Manual
Copyright © 2006 GECAD Technologies S.R.L.
http://www.axigen.com
55
connections or connections that are not RFC compliant are dropped and the corresponding messages are not accepted, thus freeing important bandwidth.
You can limit the number of authentication errors allowed for one POP client per session by using the maxAuthErrors parameter. If this limit is exceeded, AXIGEN server drops the connection with that POP3 client.
You can limit the number of errors allowed for one POP3 client per session by using the maxErrors
parameter. If this limit is exceeded, AXIGEN server drops the connection with that POP3 client.
Important: If you do not specify a limit for the maximum number of (authentication) errors allowed for a POP3 client's session, security risks may arise.
For information on how to configure connection error control parameters for POP3 using WebAdmin, see Configuring POP3 Connection Error Control Parameters.
Connection Thread Control
AXIGEN can run on a large variety of systems and machines, in networks with very different traffic loads, structures, domain configurations, user rights, authorization procedures, etc. Depending on your specific network specifications and conditions, you can adapt the workload to the server's processing power, in order to prevent a system overload (with maxConnThreads ) or to improve server performance (with minConnThreads ). These two complementary parameters define the lower and upper limit for the number of threads that are opened at any given moment by AXIGEN POP3 module. With maxConnThreads you can set the maximum number of threads that can be opened at a specific moment of time and prepare for unforeseen peaks in server activity to avoid a system overload. With minConnThreads you can set the minimum number of threads that can be opened at a specific moment of time. This is important because even when there is no activity for AXIGEN Mail Server, a large number of service requests may arrive at any moment. At that time, the number of threads specified using minConnThreads threads will already have a "waiting" status, thus ready to process service requests in good conditions, without delays. For information on how to configure connection thread control parameters for POP3 using WebAdmin, see Configuring POP3 Connection Thread Control Parameters.
Log Control
Just like all the other AXIGEN main services, the POP3 module can log different types of events. The system administrator can specify what events are logged, where and how they are logged. The POP3 Log Control function can be configured using the following three attributes: logLevel , logType and logHost . See Logging service for more details on logging in AXIGEN. For information on how to configure log control parameters for POP using WebAdmin, see Configuring POP3 Log Control Parameters.
Secure Connections
Secure (TLS enabled) connections can be established with POP3 clients by using the allowStartTLS parameter. See POP3 Secure Connections for details on how to configure this parameter.
AXIGEN User Manual
Copyright © 2006 GECAD Technologies S.R.L.
http://www.axigen.com
56
Listener Control
AXIGEN Mail Server can use different Listeners for its POP3 service. The usage of listeners is helpful for defining and applying different apply/deny rules for AXIGEN services you are using. For additional information on listeners and their use in AXIGEN, please see Listeners. For information on adding and editing TCP listeners using WebAdmin, see Adding and Editing TCP Listeners. Compatibility with various POP3 Mail Clients AXIGEN has been thoroughly tested and it is proven to work with Mozilla, Outlook, Outlook Express, ThunderBird, The BAT!, Eudora. For information on how to set up your POP3 account, the corresponding section of the AXIGEN website.
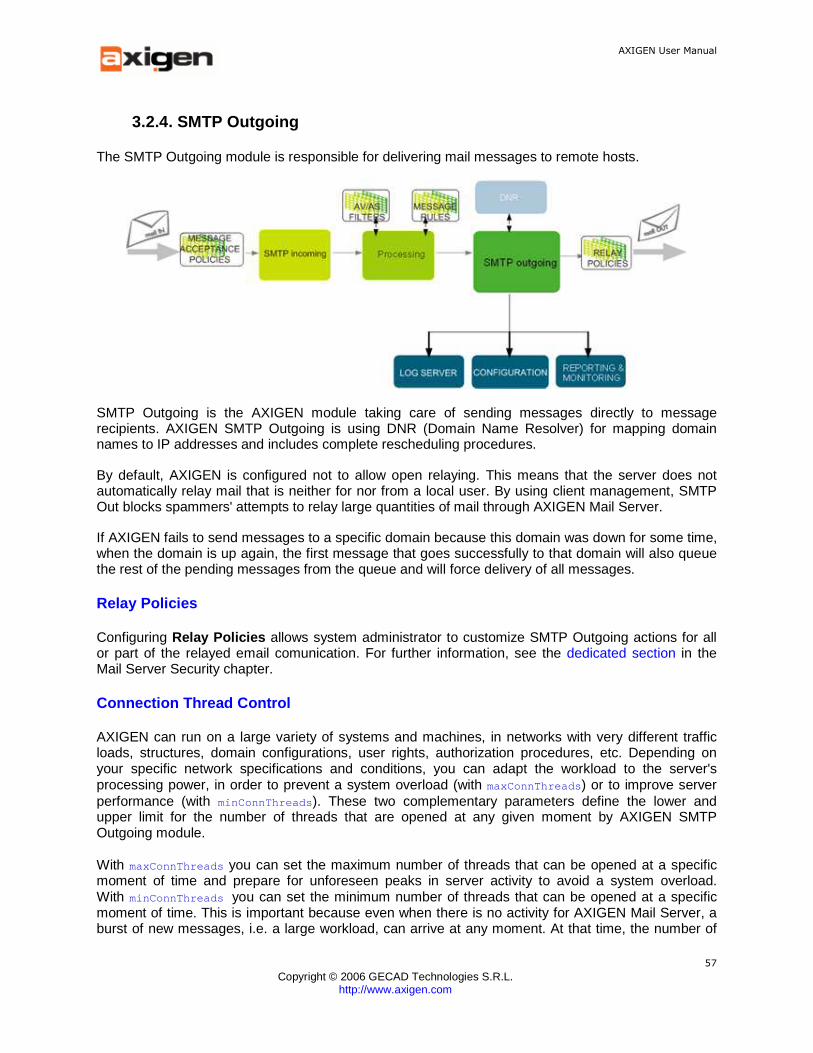
AXIGEN User Manual
Copyright © 2006 GECAD Technologies S.R.L.
http://www.axigen.com
57
3.2.4. SMTP Outgoing
The SMTP Outgoing module is responsible for delivering mail messages to remote hosts.
SMTP Outgoing is the AXIGEN module taking care of sending messages directly to message recipients. AXIGEN SMTP Outgoing is using DNR (Domain Name Resolver) for mapping domain names to IP addresses and includes complete rescheduling procedures.
By default, AXIGEN is configured not to allow open relaying. This means that the server does not automatically relay mail that is neither for nor from a local user. By using client management, SMTP Out blocks spammers' attempts to relay large quantities of mail through AXIGEN Mail Server.
If AXIGEN fails to send messages to a specific domain because this domain was down for some time, when the domain is up again, the first message that goes successfully to that domain will also queue the rest of the pending messages from the queue and will force delivery of all messages.
Relay Policies
Configuring Relay Policies allows system administrator to customize SMTP Outgoing actions for all or part of the relayed email comunication. For further information, see the dedicated section in the Mail Server Security chapter.
Connection Thread Control
AXIGEN can run on a large variety of systems and machines, in networks with very different traffic loads, structures, domain configurations, user rights, authorization procedures, etc. Depending on your specific network specifications and conditions, you can adapt the workload to the server's processing power, in order to prevent a system overload (with maxConnThreads ) or to improve server performance (with minConnThreads ). These two complementary parameters define the lower and upper limit for the number of threads that are opened at any given moment by AXIGEN SMTP Outgoing module. With maxConnThreads you can set the maximum number of threads that can be opened at a specific moment of time and prepare for unforeseen peaks in server activity to avoid a system overload. With minConnThreads you can set the minimum number of threads that can be opened at a specific moment of time. This is important because even when there is no activity for AXIGEN Mail Server, a burst of new messages, i.e. a large workload, can arrive at any moment. At that time, the number of
AXIGEN User Manual
Copyright © 2006 GECAD Technologies S.R.L.
http://www.axigen.com
58
threads specified using minConnThreads threads will already have a "waiting" status, thus ready to process the message "burst" in good conditions, without delays. For information on how to configure connection thread control parameters for SMTP-Out using WebAdmin, see Configuring Connection Thread Control Parameters.
Log Control
Just like all the other AXIGEN main services, the SMTP Outgoing module can log different types of events. The system administrator can specify what events are logged, where and how they are logged. The SMTP Outgoing Log Control function can be configured using the following three attributes: logLevel , logType and logHost . See Logging service for more details on logging in AXIGEN. For information on how to configure log control parameters for SMTP-In using WebAdmin, see Configuring SMTP-Out Log Control Parameters.
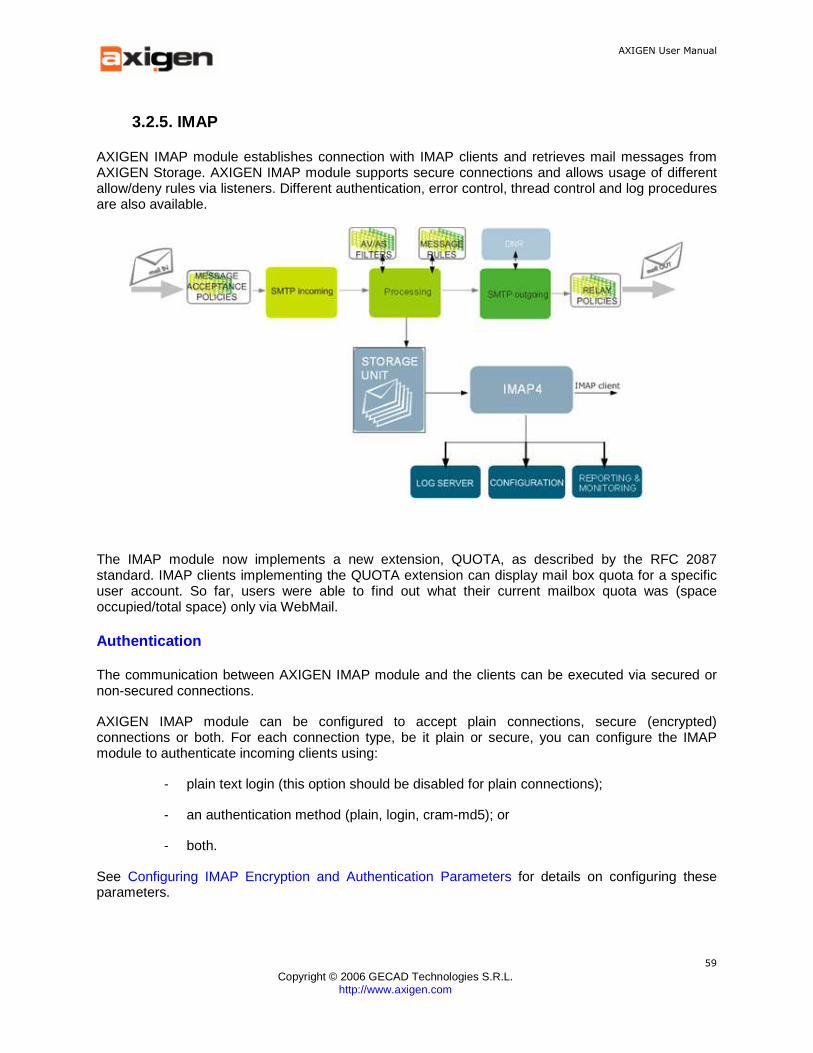
AXIGEN User Manual
Copyright © 2006 GECAD Technologies S.R.L.
http://www.axigen.com
59
3.2.5. IMAP
AXIGEN IMAP module establishes connection with IMAP clients and retrieves mail messages from AXIGEN Storage. AXIGEN IMAP module supports secure connections and allows usage of different allow/deny rules via listeners. Different authentication, error control, thread control and log procedures are also available.
The IMAP module now implements a new extension, QUOTA, as described by the RFC 2087 standard. IMAP clients implementing the QUOTA extension can display mail box quota for a specific user account. So far, users were able to find out what their current mailbox quota was (space occupied/total space) only via WebMail.
Authentication
The communication between AXIGEN IMAP module and the clients can be executed via secured or non-secured connections.
AXIGEN IMAP module can be configured to accept plain connections, secure (encrypted) connections or both. For each connection type, be it plain or secure, you can configure the IMAP module to authenticate incoming clients using:
- plain text login (this option should be disabled for plain connections);
- an authentication method (plain, login, cram-md5); or
- both.
See Configuring IMAP Encryption and Authentication Parameters for details on configuring these parameters.
AXIGEN User Manual
Copyright © 2006 GECAD Technologies S.R.L.
http://www.axigen.com
60
Public folders
Users may now share email messages by simply copying and/or moving them to a public folder. System administrator can also associate a certain email address with a public folder. Thus, emails can be sent directly to the public folder, archiving options being also available.
Internationalized Search
When running an IMAP search for any IMAP client, the search text may contain language-specific characters (i.e. using diacritics).
Connection Error Control
In order to protect the server, the system administrator can limit the number of failed/wrong commands that can be received from IMAP clients during one session. This way, incomplete connections or connections that are not RFC compliant are dropped and the corresponding messages are not accepted, thus freeing important bandwidth.
You can limit the number of authentication errors allowed for one IMAP client per session by using the maxAuthErrors parameter. If this limit is exceeded, AXIGEN server drops the connection with that IMAP client. You can limit the number of errors allowed for one IMAP client per session by using the maxErrors parameter. If this limit is exceeded, AXIGEN server drops the connection with that IMAP client.
Important: If you do not specify a limit for the maximum number of (authentication) errors allowed for an IMAP client's session, security risks may arise.
For information on how to configure connection error control parameters for IMAP using WebAdmin, see Configuring IMAP Connection Error Control Parameters.
Connection Thread Control
AXIGEN can run on a large variety of systems and machines, in networks with very different traffic loads, structures, domain configurations, user rights, authorization procedures, etc. Depending on your specific network specifications and conditions, you can adapt the workload to the server's processing power, in order to prevent a system overload (with maxConnThreads ) or to improve server performance (with minConnThreads ). These two complementary parameters define the lower and upper limit for the number of threads that are opened at any given moment by AXIGEN IMAP module. With maxConnThreads you can set the maximum number of threads that can be opened at a specific moment of time and prepare for unforeseen peaks in server activity to avoid a system overload. With minConnThreads you can set the minimum number of threads that can be opened at a specific moment of time. This is important because even when there is no activity for AXIGEN Mail Server, a large number of service requests may arrive at any moment. At that time, the number of threads specified using minConnThreads threads will already have a "waiting" status, thus ready to process service requests in good conditions, without delays. For information on how to configure connection thread control parameters for IMAP using WebAdmin, see Configuring IMAP Connection Thread Control Parameters.
AXIGEN User Manual
Copyright © 2006 GECAD Technologies S.R.L.
http://www.axigen.com
61
Log Control
Just like all the other AXIGEN main services, the IMAP module can log different types of events. The system administrator can specify what events are logged, where and how they are logged. The IMAP Log Control function can be configured using the following three attributes: logLevel , logType and
logHost .
See Logging service for more details on logging in AXIGEN. For information on how to configure log control parameters for IMAP using Webadmin, see Configuring IMAP Log Control Parameters.
Listener Control
AXIGEN Mail Server can use different Listeners for its IMAP service. The usage of listeners is helpful for defining and applying different apply/deny rules for AXIGEN services you are using. For additional information on listeners and their use in AXIGEN, please see Listeners. For information on adding and editing TCP listeners using WebAdmin, see Adding and Editing TCP Listeners. Compatibility with various IMAP Mail Clients AXIGEN has been thoroughly tested and it is proven to work with Mozilla, Outlook, Outlook Express, ThunderBird, The BAT!, Eudora. For information on how to set up your IMAP account, the corresponding section of the AXIGEN website.

AXIGEN User Manual
Copyright © 2006 GECAD Technologies S.R.L.
http://www.axigen.com
62
3.2.6. Logging
Log Service Overview
AXIGEN offers an extremely flexible logging service, allowing you to select among different logging levels (how detailed the information logged should be), logging types (internal, external and system services are available) and where to store the information logged. You can set all these options for each AXIGEN TCP service and for the Log Service itself. The Log Service is responsible with collecting events relevant for the System Administrator. You can log (internally, remotely or using the system log) the activity of all services available in AXIGEN. AXIGEN Log Service can log internal data coming from other AXIGEN modules/services or data coming from the UDP port 2000 (default option). This data can be logged in the same location or in different locations for separate services, depending on the configuration applied by the system administrator. For AXIGEN Log service, you can also specify the following information:
• on what address the Log listener should be listening (see the Log Listener section for more information);
• what hosts should be rejected by the Log service (using the listener denyRules, a priority and an enable/disable switch);
• what hosts should be accepted by the Log service (using the listener allowRules, a priority and an enable/disable switch).
Log types
AXIGEN modules should define the log type using the "logtype" parameter, which can have any single values from the following three:
- "internal", - "remote" or - "system" log.
Use the "internal" option to send events to the Log Service running on the same AXIGEN server. The Server should have the Log Service activated. Use the "remote" option to send events to a Log Service running in another AXIGEN server, remotely, at the address specified using the "hostname" attribute. This AXIGEN Server must have the Log Service activated. Use the "system" option to send events to the syslog (for instance sysklogd) with facility "LOG_MAIL" and levels mapped as:
• 0 - no message sent • 1 - LOG_CRIT • 2 - LOG_ERR • 4 - LOG_WARNING • 8 - LOG_INFO • 16 - LOG_DEBUG
AXIGEN User Manual
Copyright © 2006 GECAD Technologies S.R.L.
http://www.axigen.com
63
AXIGEN Log levels
In AXIGEN the events are organized in 6 categories and you can select which category of events to collect. AXIGEN modules must define the "loglevel" parameter. In order to specify the desired sets of events to log you have to specify the correspondent log levels or a combination of thereof. The log levels in AXIGEN Mail Server are:
• 0: no messages are logged • 1: log critical messages • 2: log errors • 4: log warnings • 8: log informative messages • 16: log protocol communication
and the corresponding one-time combinations. Therefore the accepted values for the loglevel parameter are from 0 to 31.
Example 1 - Combining log levels in AXIGEN Mail Server:
If you set
loglevel=15 = 1+2+4+8
AXIGEN Mail Server will log the following information: critical errors and errors and warnings and information.
Example 2 Disabling the log service for one AXIGEN service
Remember the log service is configured separately for AXIGEN Mail Server main services (IMAP, POP3, SMTP Incoming), so if you set loglevel = 0 in the IMAP log service section, no data for that specific service will be logged by the Log Server for the AXIGEN IMAP service. However, the Log server will continue logging other AXIGEN Mail Server services according to the settings defined for logging the respective services.
Logging format
The format used for data logging is the following: 'date hostname modulename:sessionId: user_message\n '
AXIGEN Log service then transforms this data in a format similar to the one described below: 'date loglevel hostname modulename:sessionId: user_ message\n' 05-19 17:08:01 0300 08 johnd-l SMTP:00000005: conne ction accepted from [127.0.0.1]
Example of log service configuration using the axigen.cfg file:
• loglevel = 01-31
• hostname = 'yourcompany.com' (this is the result of the standard 'hostname' command)
• modulename = 'SMTP' (other accepted values are: POP3, IMAP, WEBMAIL, RELAY, PROCESSING)
AXIGEN User Manual
Copyright © 2006 GECAD Technologies S.R.L.
http://www.axigen.com
64
• sessionId (this is an UINT value written in hexa incremented separately for each connection of a protocol. For the processing module, as there is no relevant protocol, the value is currently 0; future versions will provide however as value the ID of the message in the working queue.
• loglevel is a 5 bits mask for the following values:
LOG_none = 0x00, /// critical LOG_crit = 0x01, /// errors LOG_err = 0x02, /// warnings LOG_warn = 0x04, /// information LOG_info = 0x08, /// log protocol communication LOG_proto = 0x10,
Rules
Log Rules are used to define circumstances under which certain restrictions will be imposed on log files and the log level. Rules can be associated with host names, module names or both. For instance, a rule can be defined in order to specify the size, duration and number of old files kept for logs generated on a certain host, for a certain module (e.g. SMTP In). An ordered list is created with all log rules configurations using the 'priority' parameters as ordering key. You can define the Log rules at the AXIGEN main module's level, in the corresponding sections of the configuration file. The Log Service will check if the information sent by the modules is the information that is supposed to receive, according to the Log Service configuration. A log rule set includes the following information:
• the rule's priority ("1" means the rule has the highest priority possible) • the hostname of the user of this rule • the module of the user of this rule • the level of log generated by the user of this log • the name of the destination file • the maximum size of the destination file in KB • the maximum duration the destination file is used in seconds • the maximum number of old files (saved) to be kept • the rotate period (how often a new log file is created - daily, monthly, yearly)
Attributes of the Log service
AXIGEN Log service can log internal data coming from other modules/services or data coming from the UDP port 2000 (default value). This data can be logged in the same location or in different locations for separate services, depending on the configuration applied by system administrator. AXIGEN main modules must define the log type to be used by that specific module. The definition is executed via the "logtype" parameter that can have any of the following three values: "internal", "remote" or "system" log.
AXIGEN User Manual
Copyright © 2006 GECAD Technologies S.R.L.
http://www.axigen.com
65
The value for the loglevel parameter from the log clients (the services sending information for logging to AXIGEN Log service) specifies for themselves the log levels sent to the Log service. The value for the loglevel parameter from the log service's rule specifies the log levels accepted by the service from clients. Therefore if:
• clientlevel = 15 (the log level specified in the SMTP-In service page in WebAdmin for instance)
and
• rulelevel = 9 (the log level specified in the rule defined for the SMTP-In module)
the Log service will only log the lines on level 9 (critical information), even if the information retrieved from client also contains errors and warnings (this information is ignored). For information on how to configure log rules using WebAdmin, see the Adding and Editing Log Rules.
AXIGEN User Manual
Copyright © 2006 GECAD Technologies S.R.L.
http://www.axigen.com
66
3.2.7. Reporting
Description of the reporting service
This additional service can help you check server activity, on the global traffic level and by module. From an architectural point of view, the Reporting feature includes three passive elements, one active element and a graphic library:
• passive element 1 (PE1) : a dedicated tree in the machine's memory, where all the other services of AXIGEN are writing information about their activity. The storage of the information is the fastest possible, the Reporting module generating in this case a minimum burden on the machine's resources. However, this reporting-specific information will be lost in case of a fatal error (resetting the machine, for instance);
• passive element 2 (PE2): items (called report buffers) used for temporary data storage used for sample computation;
• passive element 3 (PE3) : a group of files where the information pertaining to the Reporting module is written;
• active element (AE, acts as a synchronizer and a dumper): a thread that moves the information from PE1 to PE2 and resets PE1; when the value set for the sampleInterval parameter is reached, a sample is computed from PE2 and dumped to PE3;
• graphic library: a set of functions used by the WebAdmin service to draw the gathered data diagrams.
When the Reporting service is enabled (by adding the "report" object in the "services" parameter from the configuration file), the machine allows for a specific period of time (defined by the syncTime value, in seconds) to be elapsed. Then the Reporting module starts the AE1. When doing that, the launching of the service after another syncTime seconds is scheduled and AE1 is executed. In case of a reconfiguration (assuming the value for syncTime is changed), the scheduling is cancelled and rescheduled after the new syncTime value (in seconds).
The Monitor collects information delivered by a set of probes placed in the all modules responsible with communication: SMTP, IMAP, POP3 and WebMail.
There is a set of templates defined by three parameters: name, sampleInterval and rotateCount . Each file from PE3 corresponds to a database defined by a specific template, a sampling function and a reporting parameter. At each syncTime , data is gathered and placed in a report buffer corresponding to a database, until sampleInterval is reached. At that specific moment data from that buffer is transformed into a sample (using the specified sampling function: min, max, total, average), which is in turn written to the database.
Data is written to the database until a specific number of values is reached (rotateCount ), when rotation occurs (round-robin manner). This round-robin manner of dumping report data guaranties fixed size databases and fixed periods of time for each database (daily, weekly, monthly, yearly etc.). Although data is gathered in the PE1 for all AXIGEN's services, only the data you previously chosen using templates and databases defined in WebAdmin is actually sampled and written to PE3.
Graphics
The last set of objects under the reporting tab are the graphics objects, defined by a databaseName and parameters like type , fillColor , outlineColor , page .
AXIGEN User Manual
Copyright © 2006 GECAD Technologies S.R.L.
http://www.axigen.com
67
These are used by the graphics library to render a set of reporting data, using a specific graphic type, specific colors and page.
Usage
For information on how to modify reporting settings as well as to define your own set of reporting data and graphics, see Reporting tab. For details on graphics view in WebAdmin, see Graphics tab.

AXIGEN User Manual
Copyright © 2006 GECAD Technologies S.R.L.
http://www.axigen.com
68
3.2.8. WebMail
AXIGEN WebNail establishes connection with the corresponding mail client via Web browsers, sends mail messages to from AXIGEN Storage and retrieves mail messages from it.
AXIGEN WebMail works with all major web browsers (Internet Explorer, Netscape, Mozilla) With this module the users can securely access their mailboxes from Internet browsers, while the system administrators are in complete control of the content, functionality and look of the web pages.
AXIGEN WebMail Features
Complex customization You can easily change the skin and behavior of AXIGEN WebMail module. For more information about how you can change the look and feel of your Web interface, please consult the WebMail Tab section. Easy to use, secure and user-friendly Features like tree structure for folders view, common actions applied on folders (rename, delete, move, create), built in HTTP server, etc. make AXIGEN WebMail easy to use, secure and user-friendly. Server Side Scripting Language The WebMail module implements a proprietary server side scripting language (called HSP) and it is used to generate HTML code. You can specify the location where these HSP files are stored using the path parameter, as described in the Path section of this User Manual. For more information about the HSP language structure, please refer to the HSP manual.

AXIGEN User Manual
Copyright © 2006 GECAD Technologies S.R.L.
http://www.axigen.com
69
Listeners In the corresponding configuration section you can activate different listeners for AXIGEN WebMail service. Read more about listener control in the Listeners section. Address Book The WebMail Contacts give users the possibility to select recipients from their personal contact list
when composing new email messages. New addresses can be added to the existing address book
either manually or automatically, when receiving new emails.
Automatically set filters and replies As an improvement to message rules usage, AXIGEN allows this type of filters to be configured
via the WebMail interface wizards. The vacation/ out-of-office messages are also based on such
rules. When not available, they can define and enable messages to be sent automatically as a
response to all received emails.
Login Domain Selection To facilitate login procedures for multi-domain environments, AXIGEN 2.0 implements login
domain selection. Users can select the domain from a drop-down list and then login with their
username and password only.
Internationalized search and multiple languages sup port The Search function has also been enhanced by adding internationalized searches. Having this
new feature, language-specific characters can now be used when running a search.
Public folders Users may now share email messages by simply copying and/or moving them to a public folder.
System administrator can also associate a certain email address with a public folder. Thus, emails
can be sent directly to the public folder, archiving options being also available.
Compose while attach Using IFrame technology, AXIGEN server's WebMail service allows users to continue the Compose action while attaching files to their messages. URL redirect rules and virtual host support AXIGEN server's WebMail service allows users to implement URL redirect rules. URL redirect rules can be used for redirecting plain connections established on one listener towards a secure domain:port location. Also, redirects can be used to redirect connections from a specified listener to a virtual host. This way, you can define several domain names for the same IP address and host several domains on one single IP. This is useful, for instance, when you wish to have two different webmail login pages for two different local domains hosted at the same IP.
HTML mail filtering levels
WebMail implements a HTML Generator internal extension that parses the HTML code from the e-mails and generates a safer (i.e. removes possibly unsafe scripts) and cleaner (i.e. converts to XHTML-like) HTML code.
This provides WebMail account users with the ability to set the HTML filtering level to be applied to all mail in HTML format. For information on different HTML filtering levels available and how to select them, see WebMail Features and Configuration.

AXIGEN User Manual
Copyright © 2006 GECAD Technologies S.R.L.
http://www.axigen.com
70
Connection Thread Control
AXIGEN can run on a large variety of systems and machines, in networks with very different traffic loads, structures, domain configurations, user rights, authorization procedures, etc. Depending on your specific network specifications and conditions, you can adapt the workload to the server's processing power, in order to prevent a system overload (with maxConnThreads ) or to improve server performance (with minConnThreads ). These two complementary parameters define the lower and upper limit for the number of threads that are opened at any given moment by AXIGEN WebMail module. With maxConnThreads you can set the maximum number of threads that can be opened at a specific moment of time and prepare for unforeseen peaks in server activity to avoid a system overload. With minConnThreads you can set the minimum number of threads that can be opened at a specific moment of time. This is important because even when there is no activity for AXIGEN Mail Server, a large number of service requests may arrive at any moment. At that time, the number of threads specified using minConnThreads threads will already have a "waiting" status, thus ready to process service requests in good conditions, without delays. For information on how to configure connection thread control parameters for WebMail using WebAdmin, see WebMail Connection Thread Control.
Log Control
Just like all the other AXIGEN main services, the WebMail module can log different types of events. The system administrator can specify what events are logged, where and how they are logged. The WebMail Log Control function can be configured using the following three attributes: logLevel , logType and logHost . See Logging service for more details on logging in AXIGEN. For information on how to configure log control parameters for WebMail using WebAdmin, see Configuring WebMail Log Control Parameters.
Webmail Connection and Session Control
In WebMail, you can either allow or disallow persistent connections to WebMail and impose time limits on sessions, either active or idle. By doing this, you can better manage security and resource related issues. For information on how to configure connection and session control parameters for WebMail, see WebMail Connection and Session Control.
HTTP Limits for Webmail
WebMail allows you to set HTTP limits for any request made to the Webmail service. This prevents you from automatically accepting excessive amounts of data (HTTP headers, HTTP body and upload data).
For information on how to configure HTTP limits for Webmail, see HTTP Limits for WebMail.
AXIGEN User Manual
Copyright © 2006 GECAD Technologies S.R.L.
http://www.axigen.com
71
3.2.9. Storage
AXIGEN Storage is a specific file structure with index based access allowing fast mail delivery, retrieve and query. AXIGEN Mail Storage checks the consistency of the messages placed in the storage and empties the queue only if the mail message is correctly stored. All domain and user configuration along with user messages are stored in Axigen specific storage. Each Axigen storage is defined by three elements:
• storage directory: the directory where all storage file will be created • max file size: maximum size of a data file (Storage Container) • max files: maximum number of files
Therefore the maximum capacity of a storage is maxFileSize * maxFiles .
Inside storage directory, a list of files, named with 2 hexa digits followed by the .hsf extension -- e.g. 2A.hsf -- are created. There is also a file named hsf.dat which contains an unique id of the storage and the relation with other storages of the same domain. This information is usefull in case some of the storage directories are moved to other locations.
Another feature of Axigen storage is that it supports transactions, so that some critical operations of domain configuration changes are made safely.
Filling the Containers
When a Storage Container approches its maximum size, (defined by the maxFileSize parameter), another Storage Container will be created and the new messages will be stored herein. If the number of Storage Containers reaches the maximum value (defined by the maxFiles paramter) and all of them have reached the maximum size, the storage is considered full and no more messages will be inserted. The data in the Storage Containers is written in blocks of 4KB, theferore usually the files size is a multiple of 4KB. These memory blocks are called nodes. Smaller blocks of memory are also available, for message parts smaller than 4KB. These smaller blocks are called formatted nodes. Each storage file can contain a maximum of 16 millions messages, and the maximum theoretical file size is 64GB (some limitation might apply, depending on your system configuration; currently axigen limits this maximum size to 2GB). There can be maximum 128 files in one storage, and one domain can have over 4 billion message storages defined. For each domain, at least three storages are used:
• one storage for domain configuration , where all domain specific configuration, the public folder and the list of domain objects (users, maillist, forwarders, etc) are stored;
• one storage for domain objects configuration , where all domain objects configurations and folders are stored;
• one or more storages for messages , where all mails and other data associated with mails are stored; it is recommended to define each message storage on a different physical disk, since Axigen will use these storages in parallel.

AXIGEN User Manual
Copyright © 2006 GECAD Technologies S.R.L.
http://www.axigen.com
72
Space saving filling procedure
The storage files with more free space have a priority when it comes to selecting the files in which a new message is added. The usage of the free space is also enhanced by message deletion. Each message in a storage file is identified by a pointerID (type UINT). The information related to these pointers-to-messages is stored in the same storage file.
AXIGEN User Manual
Copyright © 2006 GECAD Technologies S.R.L.
http://www.axigen.com
73
3.2.10. FTP Backup Service
AXIGEN Mail Server provides a FTP backup/restore service meant to enable regular backup operations for your entire domain and user configuration. This service is based on FTP (File Transfer Protocol, standard RFC 959). AXIGEN FTPBackup service allows using any FTP client (including standard Web browsers) in order to connect to the backup machine using the admin user name and password. You can replicate the entire domain and user (accounts, lists forwarders, folder recipients) folder structure on the backup machine. The FTP service generates a virtual structure, from which you can retrieve files whenever you need them.
The directory structure created by the FTP service is similar to the one given below.
/ domains -> domains root director |-example.org -> domain name directory |-domainRegistry.bin -> domain config file (binary) |-domainCoreConfig.cfg -> domain config file (text) |-users -> users root directory |-postmaster -> user directory |-Registry.bin -> user config file (binary) |-CoreConfig.cfg -> user config file (text) |-folders -> user folders root directory |-INBOX -> user folder |-... -> other user folders |-maillists -> maillists root directory |-... -> same folder structure as for `users |-forwarders -> forwarders root directory |-... -> same folder structure as for `users' |-publicFolder -> domain public folder root
Connection Error Control
In order to protect the server, the system administrator can limit the number of failed/wrong commands that can be received from FTP clients during one session. This way, incomplete connections or connections that are not RFC compliant are dropped and the corresponding messages are not accepted, thus freeing important bandwidth.
You can limit the number of authentication errors allowed for one POP client per session by using the maxAuthErrors parameter. If this limit is exceeded, AXIGEN server drops the connection with that FTP client. You can limit the number of errors allowed for one FTP client per session by using the maxErrors parameter. If this limit is exceeded, AXIGEN server drops the connection with that FTP client.
Important: If you do not specify a limit for the maximum number of (authentication) errors allowed for a FTP client's session, security risks may arise.
For information on how to configure connection error control parameters for FTP Backup using WebAdmin, see Configuring FTP Backup Connection Error Control Parameters.
AXIGEN User Manual
Copyright © 2006 GECAD Technologies S.R.L.
http://www.axigen.com
74
Connection Thread Control
Depending on your specific network specifications and conditions, you can adapt the workload to the server's processing power, in order to prevent a system overload (with maxConnThreads ) or to improve server performance (with minConnThreads ). These two complementary parameters define the lower and upper limit for the number of threads that are opened at any given moment by AXIGEN FTP Backup module. With maxConnThreads you can set the maximum number of threads that can be opened at a specific moment of time and prepare for unforeseen peaks in server activity to avoid a system overload. With minConnThreads you can set the minimum number of threads that can be opened at a specific moment of time. This is important because even when there is no activity for AXIGEN Mail Server, a large number of service requests may arrive at any moment. At that time, the number of threads specified using minConnThreads threads will already have a "waiting" status, thus ready to process service requests in good conditions, without delays. For information on how to configure connection thread control parameters for FTP Backup using WebAdmin, see Configuring FTP Backup Connection Thread Control Parameters.
Log Control
Just like all the other AXIGEN main services, the FTP Backup service module can log different types of events. The system administrator can specify what events are logged, where and how they are logged. The FTP Backup Log Control function can be configured using the following three attributes: logLevel , logType and logHost . See Logging service for more details on logging in AXIGEN. For information on how to configure log control parameters for POP using WebAdmin, see Configuring FTP Backup Log Control Parameters.
Listener Control
AXIGEN Mail Server can use different Listeners for its FTP Backup service. The usage of listeners is helpful for defining and applying different apply/deny rules for AXIGEN services you are using. For additional information on listeners and their use in AXIGEN, please see Listeners. For information on adding and editing TCP listeners using WebAdmin, see Adding and Editing TCP Listeners.

AXIGEN User Manual
Copyright © 2006 GECAD Technologies S.R.L.
http://www.axigen.com
75
3.3. Connectivity and Threading
All AXIGEN modules implement a set of connectivity and threading functionalities and features that make it faster and easier to manage.
3.3.1. Listeners
AXIGEN Mail Server can use different Listeners for its TCP services (SMTP Incoming, POP3, IMAP, WebMail, WebAdmin, CLI) and for its Log service (its single UDP service). Listeners are network points of entry, associated with an interface address and port number that grant access to a specific TCP or UDP service. Listeners add extra flexibility and configurability to each AXIGEN service, as they can be used to grant differentiated access to the same services for different categories of users (e.g users within a specific domain). Moreover, listeners can be associated with a variety of IP and TCP rules that allow defining specific limitations for connections coming from IPs within specified IP sets. The Listeners for each TCP service (SMTP Incoming, POP3, IMAP, Webmail, CLI and WebAdmin) are defined in the section from the configuration file corresponding to that TCP service as of type "TcpListener" OBJECT-SET, using various parameters. The same definition parameters are available through WebAdmin, the web configuration interface. UDP service listeners (Log service listeners) have fewer parameters associated, as connection related parameters do not apply to them. The following attributes are available for each listener:
• address - the "point of entry" address and port number
• enable - specifies whether the listener is enabled or not (this way you won't have to delete the listener from the configuration file when you want to discontinue its use)
• maxConnections , maxIntervalConnections , timeInterval - parameters specifying limitations for network connections accepted for this listener
• peerMaxConnections , peerMaxIntervalConnections , peerTimeInterval - parameters specifying limitations for network connections from the same IP address accepted for this listener
TCP listeners can also be set to support SSL connections. Further SSL parameters are available for TCP listeners in AXIGEN:
• allowedVersions
• certFile
• dhParamFile
• maxChainDepth
• cipherSuite
• useEphemeralKey
• requestClientAuth

AXIGEN User Manual
Copyright © 2006 GECAD Technologies S.R.L.
http://www.axigen.com
76
Note: For UDP listeners, the 'allowRules' attribute is of type 'IpRules' OBJECT-SET (and not 'TcpAllowRules' OBJECT-SET, as for a 'TcpListener' object), because you cannot limit the process of accepting connections, as long as there are no connections under UDP.
Below you can find a scheme for a quick understanding of the Log listeners: (here ':' can be translated by 'of type'): TCP service:
• 'listeners' : 'TcpListener' OBJECT-SET • 'allowRules' : 'TcpAllowRule' OBJECT-SET • 'denyRules' : 'IpRule' OBJECT-SET
UDP service :
• 'listeners' : 'IpListener' OBJECT-SET • 'allowRules' : 'IpRule' OBJECT-SET • 'denyRules' : 'IpRule' OBJECT-SET
Note: Currently the 'allowRules' and 'denyRules' attributes are not functional for the Log service's listeners. Therefore, specifying such rules will be considered in the configuration file, but it will not affect the functioning of the Log service.
For more information about the usage of these parameters in Webadmin and specific details on their values and how to set them, see Adding and Editing TCP Listeners and Adding and Editing UDP Listeners. You can also configure listeners using the CLI tool, see Configuring AXIGEN using CLI.
3.3.2. Rules
Different rules can be associated with listeners, meant to sort connections based on various parameters, and to reject (deny rules) or accept (allow rules) them accordingly. In AXIGEN, you can define two types of rules fpr TCP Listeners: IP rules and Allow rules .
IP Rules
Using deny and allow rules, you can automatically accept/deny connections from specific IP addresses. IP Rules (both allow and deny rules) are defined using the following attributes:
• 'ipSet' specifies a set of IP addresses for which the reject/allow rule is applied, • 'enable' specifies if the rule is enabled or not • 'priority' specifies a priority when applying the rule.
Allow rules enable you to specify the rules for accepting connections when these connections follow the limitations imposed by the listener. Deny rules enable you to stop connections initiated by an address within a specified IP range.
AXIGEN User Manual
Copyright © 2006 GECAD Technologies S.R.L.
http://www.axigen.com
77
TCP Allow Rules TCP allow rules are actually IP allow rules which impose a few extra limitations:
• maxConnections , maxIntervalConnections , timeInterval - these parameters impose limitations on the number of connections initiated by any address within the rule IP set
• peerMaxConnections , peerMaxIntervalConnections , peerTimeInterval - these parameters impose limitations on the number of connections initiated by the same address within the rule IP set
Rule Enforcement Policy
The policy for applying accept and deny rules for connections to listeners is described below:
1. The IP address from which the connection has been initiated is exposed. 2. AXIGEN verifies if this IP address is part of a set of IP addresses associated to one or more
deny rules; if yes, the deny rule with the highest priority (meaning LOWEST value for the priority attribute) is applied.
3. AXIGEN verifies if this IP address is part of a set of IP addresses associated to one or more accept rules; if yes, the accept rule with the highest priority (meaning LOWEST value for priority attribute) is applied.
4. If the IP address from which the connection has been initiated is associated only with a deny rule, the connection is denied (closed)
5. If the IP address from which the connection has been initiated is associated with both a deny AND an allow rule, the rule with the highest priority is applied. If the rule with the highest priority is a deny rule, the connection is denied (closed). If the rule with the highest priority is an allow rule, the limitations (if any) for the specified connections from the allow rule are applied. If the allow rule and the deny rule have the same priority, the connection is accepted.
6. If the IP address from which the connection has been initiated is associated only with an accept rule, the verifications defined for connections in the accept rule are applied, and if fulfilled and the connection is accepted.
After applying the limitations imposed by the rules, the global limitations defined at listener level are applied. Only then the connection is accepted (and the respective service protocol is applied on the accepted connection). If no IP rule is defined for the IP address from which the connection has been initiated, then the connection is considered as fulfilling the IP rules and the verifications defined globally (if any) for the current listener are applied. For details on how to configure rules using WebAdmin, see Adding and Editing TCP Rules. You can also configure Rules using CLI (see Configuring AXIGEN using CLI)
3.3.3. Threads
AXIGEN has a multi-threaded engine which allows for separate module thread allocation. Combined with Linux OS multi processor capabilities, the multi-threaded engine can break server activity into multiple parallel processing threads. By allocating a number of threads to certain modules, (SMTP incoming / SMTP outgoing / Web Mail / IMAP, etc.) resource (memory/CPU) distribution is adapted to usage scenario (main mail server / backup server / gateway mail server) and hardware resources. Thread allocation is performed using the connection thread control parameters available for most AXIGEN modules.

AXIGEN User Manual
Copyright © 2006 GECAD Technologies S.R.L.
http://www.axigen.com
78
Depending on your specific network specifications and conditions, you can adapt the workload to the server's processing power, in order to prevent a system overload (with maxConnThreads ) or to improve server performance (with minConnThreads ). These two complementary parameters define the lower and upper limit for the number of threads that are opened at any given moment by an AXIGEN module. For information on how to set connection thread control using WebAdmin, see: Configuring SMTP-In Connection Thread Control Parameters Configuring SMTP-Out Connection Thread Control Parameters Configuring POP3 Connection Thread Control Parameters Configuring IMAP Connection Thread Control Parameters Configuring WebMail Connection Thread Control Parameters Configuring WebAdmin Connection Thread Control Parameters Configuring CLI Connection Thread Control Parameters These parameters are also accessible for configuration, in each service section from axigen.cfg (see Configuring AXIGEN using the Configuration File). You can also configure connection thread parameters in each service context from CLI, see Configuring AXIGEN using CLI.

AXIGEN User Manual
Copyright © 2006 GECAD Technologies S.R.L.
http://www.axigen.com
79
4. Mail Server Security
AXIGEN Mail Server comes with a full security feature set, guaranteeing secure reception, transit and delivery of email and protection for your confidential data.
Authentication
AXIGEN server supports authentication, meaning it can be instructed to accept only connections/messages from authenticated entities. CRAM-MD5, LOGIN and PLAIN methods (in this order) are available for client authentication, reducing the risk of unauthorized connections.
Encryption
(SSL/TLS) All AXIGEN communication protocols can benefit from SSL/TLS technology which allows sending encrypted messages across networks and preventing plain text messages to be intercepted on the way from sender to recipient. This encryption method guarantees secure data transmission over networks.
Anti-spoofing (SPF and DomainKeys Compliant)
SPF authentication is used by the SMTP Incoming module in AXIGEN to determine whether the mail message comes from an authorized source. DomainKeys is an e-mail authentication system designed to verify both the DNS domain of an email sender and the message integrity. This additional authentication method significantly reduces spoofing attempts, that is, unauthorized attempts to gain server access, or assuming a fake identity when sending an email.
Message Acceptance Policies
The system administrator can configure and implement message acceptance policies and adjust them to best suit their security requirements. Incoming connections established via SMTP and the message flow can be easily managed using the established policies.
Antivirus / Antispam
The AXIGEN Mail Server can easily integrate with a large number of antivirus/antispam applications, either commercial, or open source.
Available Antivirus and Antispam applications: ClamAv, SpamAssassin, KAV (Kaspersky) for Mail Servers, BitDefender, Sophos, F-Prot, DrWeb, Symantec, F-Secure, Avast, eTrust, Norman, Panda and McAfee.
Processing Policies
The Processing policies correspond to the SMTP Processing module and enable administrators to define the NDR (Non-Delivery Receipt) text and the conditions when such a message is returned.
Message rules
Message rules instruct the AXIGEN Mail Server to take certain actions on processed email messages based on pieces of information contained by the message headers.
AXIGEN User Manual
Copyright © 2006 GECAD Technologies S.R.L.
http://www.axigen.com
80
Relay Policies Relay Policies allow system administrator to customize SMTP Outgoing actions for all or part of the relayed email comunication.

AXIGEN User Manual
Copyright © 2006 GECAD Technologies S.R.L.
http://www.axigen.com
81
4.1. Authentication and Encryption
AXIGEN Mail Server provides a variety of security options related to authentication and encryption for all connections established by/with the mail server.
Secure/Plain Connections and Authentication Methods
AXIGEN supports TLS enabled connections. TLS-enabled connections are connections that support the Transport Layer Security, a standard providing encryption and authentication service that can be negotiated during the startup phase of many Internet protocols, including SMTP, POP3 and IMAP, and used for general communication authentication and encryption over TCP/IP networks.
All AXIGEN mail services (SMTP, IMAP, POP3) provide an AllowStartTLS parameter that you can enable and have the server advertise TLS capability.
Authentication methods are available both for TLS-enabled connections and plain connections (non TLS-enabled).
The methods supported by AXIGEN are: PLAIN, LOGIN, CRAM-MD5.
The PLAIN mechanism consists of a single message from the client to the server, in which the client sends the authorization identity (identity to login as), the authentication identity (identity whose password will be used) and the clear-text password. If left empty, the authorization identity is the same as the authentication identity. The PLAIN authentication mechanism is not recommended for use over an unencrypted network connection.
The LOGIN mechanism is a non-standard mechanism, and is similar to the PLAIN mechanism except that this mechanism lacks the support for authorization identities.
The CRAM-MD5 is a challenge-response mechanism that transfers hashed passwords instead of clear text passwords. For insecure channels (e.g., when TLS is not used), it is safer than PLAIN.
For information on configuring TLS and authentication methods related parameters, see: Configuring IMAP Authentication and Encryption Parameters Secure POP3 Connections Also, for all AXIGEN services, authentication error control parameters are available. That is, if on attempting to connect, clients fail to authenticate correctly a number of times, the connection is dropped. For information on these parameters, see the Connection Error Control sections for each module in Configuring AXIGEN using Webadmin.
SSL parameters
AXIGEN supports SSL-enabled connections, providing advanced SSL parameters for TCP Listener configuration available for all its TCP Services (SMTP, IMAP, POP3, Webmail, CLI and Webadmin). See SSL Parameters for Listeners for information on these parameters and how to configure them using WebAdmin. The path to the SSL certificate file used can be specified at server level, for all SSL enabled connections. See Server Global Settings for information on how to configure SSL parameters at server level using WebAdmin.

AXIGEN User Manual
Copyright © 2006 GECAD Technologies S.R.L.
http://www.axigen.com
82
For WebMail and WebAdmin, you can configure SSL redirect rules, enabling you to redirect plain connections to these modules on secure sockets. For information on how to configure SSL redirect rules using WebAdmin, see: URL Redirects for WebMail URL Redirects for WebAdmin Using Listeners and SSL redirect rules, you can effectively create and manage differentiated security policies for certain clients.
AXIGEN User Manual
Copyright © 2006 GECAD Technologies S.R.L.
http://www.axigen.com
83
4.2. SPF and DomainKeys
SPF (Sender Policy Framework) is a sender authentication method developed in order to ensure mail server's security by applying different anti-spoofing mechanisms. This mechanism consists in making a DNS request in order to determine whether the mail message comes from an authorized source, which is described in a SPF record, registered on the DNS. SPF records contain domain attributes that uniquely describe mail messages.
The query may have one of the following seven possible results:
• pass: meaning the message meets the domain's definition for legitimate messages; • neutral • none • soft fail • fail: meaning the message does not meet the domain's definition for legitimate messages; • temp error • permanent error
In case of permanent error, AXIGEN rejects the mail message generating the respective error. If a temporary error is generated, the AXIGEN returns an error message to the sending party. In all other cases the mail message is accepted.
To enable SPF in AXIGEN or to add a SPF header to emails, use the Message Acceptance Policies. DomainKeys Compliance
Starting with version 2.0, the AXIGEN Mail Server is also DomainKeys compliant . DomainKeys is an e-mail authentication system designed to verify both the DNS domain of an email sender and the message integrity, imbedded in AXIGEN through the AXIGEN Signing Module . The DomainKeys specification has adopted aspects of Identified Internet Mail to create an enhanced protocol called DomainKeys Identified Mail (DKIM).
The AXIGEN Signing Module is only available for the commercial versions of the AXIGEN Mail Server. It does not work within free of evaluation versions. To test this specific feature, please contact our sales department.
4.2.1. AXIGEN Signing Module Usage and Configuratio n
AXIGEN Signing Module is a module that provides AXIGEN with a tool to prevent forgery and possible repudiation. It implements the Yahoo DomainKeys concept that basically works by signing the contents of an email and allows mail servers to verify that signature.
The DomainKeys module is composed of two daemons that run independently of AXIGEN and of each other: the DomainKeys Signer and the DomainKeys Verifier. Each of them has a configuration file and communicates with AXIGEN using an AFSL connector.
AXIGEN User Manual
Copyright © 2006 GECAD Technologies S.R.L.
http://www.axigen.com
84
The signer's role is to sign emails that come from AXIGEN and the verifier’s role is to verify the mail which applies only if the mails were previously signed.
For the AXIGEN - DomainKeys integration, DomainKeys (both signer and verifier) must be configured first, to know on which address and port it listens for connections from AXIGEN. When these parameters are correctly defined in the configuration file, you have to set up two Antivirus/Antispam filters in AXIGEN, specifying the AFSL file for protocol communication and the address and port to connect to DomainKeys. After installing the DomainKeys package, the AFSL file can be found in /var/opt/AXIGEN/filters/. Besides defining the AV/AS filters, you must also activate them.
For details on how to create AV/AS Filters, see Configuring Antivirus/Antispam Filters.
For information on how to activate filters in AXIGEN, see Configuring Active Filters.
We strongly recommend that the DomainKeys Verifier AV/AS configuration filter to be activated with the highest priority and the signer with the lowest.
Command line parameters
The below listed command line parameters are to be used both for the signer and the verifier.
• -h displays this help message • -v displays the version • -f run in foreground • -u <user> run as user. DEFAULT: 'AXIGEN' • -g <group> run as group. DEFAULT: 'AXIGEN' • -c -c <path>: path to the configuration file; the default paths are as follows:
• /etc/opt/AXIGEN/axidkd.conf for DomainKeys Verifier • /etc/opt/AXIGEN/axidksd.conf for DomainKeys Signer
DomainKeys Verifier configuration
• bindIp <ip> - The address used to listen for connections from AXIGEN. • bindPort <port> - The port used for connections from AXIGEN. - DEFAULT: 1982 • logType <type> - This parameter defines where to log messages. It can be "system","file" or
"stdout". The "system" value means that messages will be logged to the system log, "file" that they will be logged in a file and "stdout" that messages will be logged at standard output. WARNING: if "file" is selected for this property, the logFile must also be set. - DEFAULT "system"
• logFile <file> - In case that logType has the value "file", this defines the file where messages are logged. - DEFAULT: "none"
• logLevel <level> - The level at which messages will be logged. Possible values are: o 0 - only error messages will be logged o 1 - error and warning message will be logged o 2 - all messages will be logged o DEFAULT: 2
• addAuthHeader - This options enables/disables adding the "Authentication-Results" header to the message after verification. It can take the values: yes or no. - DEFAULT: "yes"
• actionOnPass - This option specifies what action should be sent to AXIGEN when the domainkeys verification yields a pass action (details on the actions that can be sent to AXIGEN in the AFSL documentation). The possible values are pass|match|discard|error. - DEFAULT: "pass"
AXIGEN User Manual
Copyright © 2006 GECAD Technologies S.R.L.
http://www.axigen.com
85
• actionOnFail - This option specifies what action should be sent to AXIGEN when the domainkeys verification yelds a fail action. Possible values are: pass|match|discard|error. - DEFAULT: "match"
• actionOnSoftFail - This option specifies what action should be sent to AXIGEN when the domainkeys verification yelds a softfail action. Possible values: pass|match|discard|error. - DEFAULT: "match"
• actionOnNeutral - This option specifies what action should be sent to AXIGEN when the domainkeys verification yelds a neutral action. Possible values: pass|match|discard|error. - DEFAULT: "pass"
• actionOnTempError - This option specifies what action should be sent to AXIGEN when the domainkeys verification yelds a temperror action. Possible values: pass|match|discard|error. - DEFAULT: "error"
• actionOnPermError - This option specifies what action should be sent to AXIGEN when the domainkeys verification yelds a permerror action. Possible values: pass|match|discard|error. - DEFAULT: "match"
• rwTimeout <value> - This option specifies the timeout used when communicating with AXIGEN and with the Milter Implementation (in milisecconds). The range for this value is 1 - 65535. - DEFAULT: 400
• processingThreads <threads> - The number of processing threads which also reflects the maximum number of connections made to the milter implementation. The range for this value is 1 - 128. - DEFAULT: 16
DomainKeys Signer configuration
• bindIp <ip> - The address used to listen for connections from AXIGEN. • bindPort <port> - The port used for connections from AXIGEN. - DEFAULT: 1982 • logType <type> - This parameter defines where to log messages. It can be "system","file" or
"stdout". The "system" value means that messages will be logged to the system log, "file" that they will be logged in a file and "stdout" that messages will be logged at standard output. WARNING: if "file" is selected for this property, the logFile must also be set. - DEFAULT "system"
• logFile <file> - In case that logType has the value "file", this defines the file where messages are logged. - DEFAULT: "none"
• logLevel <level> - The level at which messages will be logged. Possible values are: o 0 - only error messages will be logged o 1 - error and warning message will be logged o 2 - all messages will be logged o DEFAULT: 2
• rwTimeout <value> - This option specifies the timeout used when communicating with AXIGEN and with the Milter Implementation (in milliseconds). The range for this value is 1 - 65535. - DEFAULT: 400
• privateKeyPath - This path to the private key used for signing. This parameter is required. • selector - The selector used to form the query for the public-key. This parameter is required • canonicalization - The canonicalization algorithm type. Possible values: simple|nofws. -
DEFAULT: "nofws" • removeHeaders - This option, if yes removes duplicate headers from the signature. Possible
values: yes|no. - DEFAULT: "no" • processingThreads <threads> - The number of processing threads which also reflects the
maximum number of connections made to the milter implementation. The range for this value is 1 - 128. - DEFAULT: 16

AXIGEN User Manual
Copyright © 2006 GECAD Technologies S.R.L.
http://www.axigen.com
86
Starting/Stopping/Restarting the Domain Keys Daemon s
Slackware:
• To start the deamons, issue the following command: /etc/rc.d/rc.axigendk start
• To stop the deamons, you can issue: /etc/rc.d/rc.axigendk stop
• In order to restart the deamons, issue the command: /etc/rc.d/rc.axigendk restart
Others (rmp-based, Ubuntu, Gentoo, Debian)
• To start the deamons, issue the following command: /etc/init.d/axigendk start
• To stop the deamons, you can issue: /etc/init.d/axigendk stop
• In order to restart the deamons, issue the command: /etc/init.d/axigendk restart

AXIGEN User Manual
Copyright © 2006 GECAD Technologies S.R.L.
http://www.axigen.com
87
4.3. Mail Filtering
AXIGEN provides various types of filters at each level of mail processing that allow you to increase mail traffic security and block any type of unwanted mail messages from reaching their intended recipient mailbox. The filtering system in AXIGEN is highly effective and allows maximum flexibility in defining what email messages should be scanned, what filters should be used, the order in which these filters are applied and the actions taken according to the results of the scanning process. The filters can be applied both for incoming and for outgoing email traffic.
Filter Types
1. Message Acceptance Policies
AXIGEN 2.0 implements a set of message acceptance policies at SMTP-connection level. The system administrator can configure and implement message acceptance policies and adjust them to best suit their security requirements. Incoming connections established via SMTP and the message flow can be easily managed using the established policies. Moreover, they allow adding headers, changing addresses and other such actions. For more details, see the Message acceptance policies section. 2. Processing and Realy Policies
To further fin-tune email communication management at SMTP level, AXIGEN 2.0 implements Processing and Relay Policies. The Processing policies correspond to the SMTP Processing module and enable administrators to define the NDR (Non-Delivery Receipt) text and the conditions when such a message is returned. Relay Policies allow system administrator to customize SMTP Outgoing actions for all or part of the relayed email comunication. For further information, see the dedicated section in this chapter.
Important! The following filter types are have the following filter types defined in the WebAdmin interface and in the configuration file: type script - for Message rules type socket - for Antivirus/Antispam rules
3. Message rules
Message rules instruct the AXIGEN Mail Server to take certain actions on processed email messages based on pieces of information contained by the message headers. Using Message rules is safe since they do not operate on the mail content but only extract information from the mail header and take actions according to the pre-defined rules. See the Message rules section for further details. 4. Antivirus / Antispam Filters Antivirus / Antispam Filters can be easily used with the AXIGEN Mail Server to ensure a high security level for email communication. Commercial Antivirus applications can communicate with
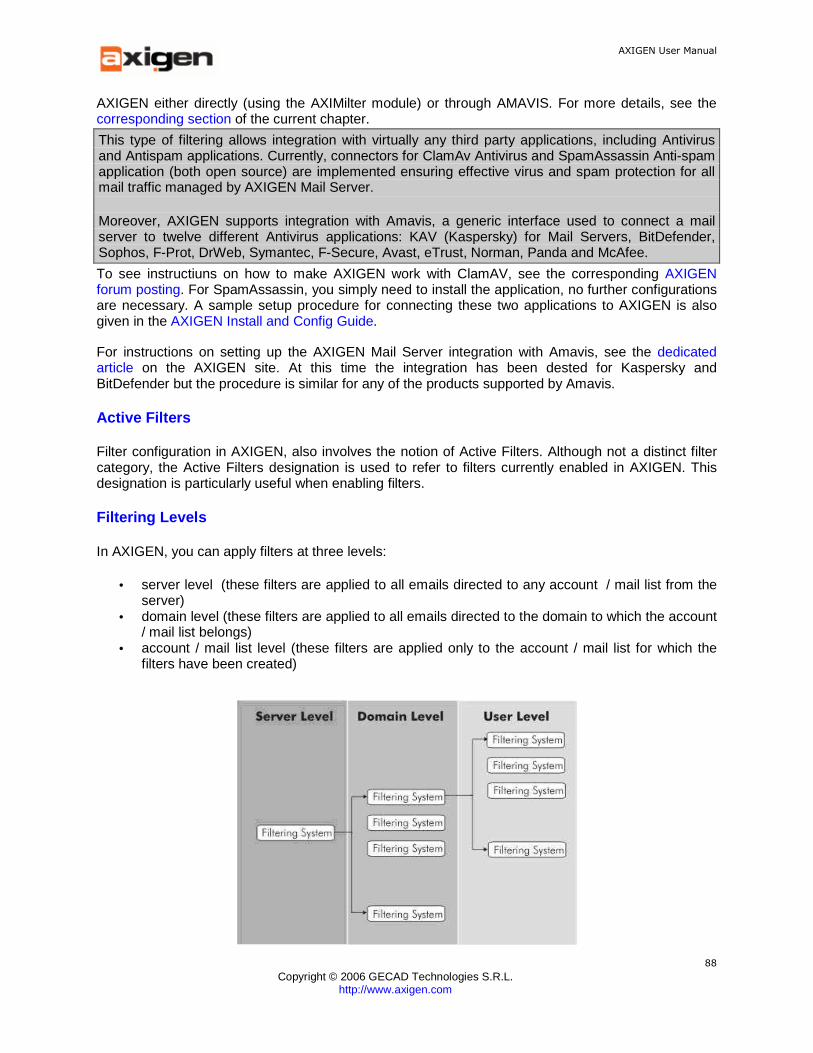
AXIGEN User Manual
Copyright © 2006 GECAD Technologies S.R.L.
http://www.axigen.com
88
AXIGEN either directly (using the AXIMilter module) or through AMAVIS. For more details, see the corresponding section of the current chapter.
This type of filtering allows integration with virtually any third party applications, including Antivirus and Antispam applications. Currently, connectors for ClamAv Antivirus and SpamAssassin Anti-spam application (both open source) are implemented ensuring effective virus and spam protection for all mail traffic managed by AXIGEN Mail Server. Moreover, AXIGEN supports integration with Amavis, a generic interface used to connect a mail server to twelve different Antivirus applications: KAV (Kaspersky) for Mail Servers, BitDefender, Sophos, F-Prot, DrWeb, Symantec, F-Secure, Avast, eTrust, Norman, Panda and McAfee.
To see instructiuns on how to make AXIGEN work with ClamAV, see the corresponding AXIGEN forum posting. For SpamAssassin, you simply need to install the application, no further configurations are necessary. A sample setup procedure for connecting these two applications to AXIGEN is also given in the AXIGEN Install and Config Guide.
For instructions on setting up the AXIGEN Mail Server integration with Amavis, see the dedicated article on the AXIGEN site. At this time the integration has been dested for Kaspersky and BitDefender but the procedure is similar for any of the products supported by Amavis.
Active Filters
Filter configuration in AXIGEN, also involves the notion of Active Filters. Although not a distinct filter category, the Active Filters designation is used to refer to filters currently enabled in AXIGEN. This designation is particularly useful when enabling filters.
Filtering Levels
In AXIGEN, you can apply filters at three levels:
• server level (these filters are applied to all emails directed to any account / mail list from the server)
• domain level (these filters are applied to all emails directed to the domain to which the account / mail list belongs)
• account / mail list level (these filters are applied only to the account / mail list for which the filters have been created)
AXIGEN User Manual
Copyright © 2006 GECAD Technologies S.R.L.
http://www.axigen.com
89
Thus, a typical filtering chain in AXIGEN will contain different types of filters, applied on different levels.
If one of the filters in the filtering chain yields an error (internal error, AFSL or any type of error), the email being processed is kept in the processing queue and it will go through the filtering chain all over again, at a later time until all the filters in the chain can be applied. If all the filters in the filtering chain yield a PASS action, and the last one yields REJECT, the email is rejected. In case one of the filters situated in the middle of the chain triggers a REJECT or DISCARD action, the email will go through the filtering chain again.
The order in which these filters will be applied, is based on their level and on their priority. See Activating Filters for details on activation inheritance and priority levels.
AXIGEN Mail Servers can easily integrate with other third party applications through a simple interface which is made available as part of SDK (Software Development Kit). For more details on SDK delivery, please contact the AXIGEN Sales Department.
4.3.1. Message Acceptance Policies
AXIGEN 2.0 implements a set of message acceptance policies at SMTP-connection level. The system administrator can configure and implement message acceptance policies and adjust them to best suit their security requirements. Incoming connections established via SMTP and the message flow can be easily managed using the established policies. Moreover, they allow adding headers, changing addresses and other such actions. Examples of message acceptance rules:
• allow incoming messages from a specific domain • deny incoming messages with attachments exceeding 3 MB • allow authenticated users only • accept secured connections only • deny looping emails (when the number of Received headers exceeds 20)
The message acceptance policies can consist in any number of such rules applied following a given priority.
These rules can be set at SMTP Incoming level and help save space and resources for email processing. The policies are defined using an AXIGEN proprietary scripting language and are at this time contained, along with the Processing and Relay policy scripts in a single file per installed server. They will also be created automatically via the WebAdmin Wizard which will be available in the next AXIGEN version. Through the Message acceptance policy, a wide range of event handlers associated with the SMTP events are available, along with various methods, message headers, envelopes and peer information. The events are predefined blocks within the script that will be executed at specific moments by the

AXIGEN User Manual
Copyright © 2006 GECAD Technologies S.R.L.
http://www.axigen.com
90
server. For each event, the server calls certain methods which can have a configurable or predefined behavior. The available events at SMTP Incoming level are:
• onConnect • onEhlo • onMailFrom • onRcptTo • onDataReceived
Message acceptance policies are based on a proprietary scripting language. For an overview of this language, please see the Language Specifications section. The policies will be soon created using a WebAdmin Wizard, but presently they are configured within the server context using WebAdmin. For details on how to access the configuration file via WebAdmin, see the section presenting the Server tab.
4.3.2. Processing and Relay Policies
To further fin-tune email communication management at SMTP level, AXIGEN 2.0 implements Processing and Relay Policies . The Processing policies correspond to the SMTP Processing module and enable administrators to define the NDR (Non-Delivery Receipt) text and the conditions when such a message is returned. As an example, NDR responses are sent when the specified recipient of an email message is invalid. Relay Policies allow system administrator to customize SMTP Outgoing actions for all or part of the relayed email communication. For example, they can
• establish a certain address where all emails from a certain domain are relayed, or • specify a username/password authentication before relaying emails to a certain address.
Processing and Relay policies can contain any number of predefined rules, thus being easily adapted to various security requirements.
The policies are defined using an AXIGEN proprietary scripting language and are at this time contained, along with the Messace acceptance policy scripts in a single file per installed server. They will also be created automatically via the WebAdmin Wizard which will be available in the next AXIGEN version.
A wide range of event handlers associated with the SMTP events are available, along with various methods, message headers, envelopes and peer information are available when defining Processing and Relay policies .
The events defined for the Processing and Relay policies and their contexts are as follows:
Event Context
onRelay SMTPOut
onDeliveryFailure SMTPProc
onTemporaryDeliveryFailure SMTPProc

AXIGEN User Manual
Copyright © 2006 GECAD Technologies S.R.L.
http://www.axigen.com
91
The policies can presently be configured within the server context using WebAdmin. For details on how to access the file via WebAdmin, see the section presenting the Server tab. For a detailed description of the scripting language the policies are based on, please see the Language Specifications section.
4.3.3. Antivirus / Antispam Filters
Antivirus / Antispam Filters can be easily used with the AXIGEN Mail Server to ensure a high security level for email communication.
IMPORTANT! The AXIGEN Mail Server can integrate with more than 14 antivirus and antispam applications such as KAV (Kaspersky) for Mail Servers, BitDefender, Sophos, F-Prot, DrWeb, Symantec, F-Secure, Avast, eTrust, Norman, Panda, McAfee, ClamAV and SpamAssassin.
1. Simple Integration with ClamAV and SpamAssassin
To see instructiuns on how to make AXIGEN work with ClamAV, see the corresponding AXIGEN forum posting. For SpamAssassin, you simply need to install the application, no further configurations are necessary. A sample setup procedure for connecting these two applications to AXIGEN is also given in the AXIGEN Install and Config Guide.
2. Integration with Commercial Antivirus Applications
Commercial Antivirus applications can communicate with AXIGEN either directly (using the AXIMilter module) or through AMAVIS.
The AXIMilter module can communicate with any Antivirus application that has milter support, while AMAVIS provides support for the following security solutions: KAV (Kaspersky) for Mail Servers, BitDefender, Sophos, F-Prot, DrWeb, Symantec, F-Secure, Avast, eTrust, Norman, Panda, McAfee. For instructions on setting up AXIMilter, see the AXIMilter section.
For instructions on setting up the AXIGEN Mail Server integration with Amavis, see the dedicated article on the AXIGEN site.
Antivirus / Antispam Filters are dynamic filters executed by external processes. These types of filters are based on a file defining the communication protocol between AXIGEN and the external process executing the filter.
Antivirus/Antispam Filters can also interact with Message rules , via two headers appended to email messages. These headers contain a spam or virus level value which actually indicates the likelihood of that particular email message being virus or spam. Based on these levels, actions imposed by the message rules can be taken, for instance moving email messages above a certain level to a specified Quarantine folder.
AXIGEN supports creating customized filter chain. This means system administrators can define and use as many Antivirus/Antispam Filters and Message rules as required by their security policies.
In AXIGEN, antispam/antivirus filters calls are multithreaded - this means that filters can be applied on several emails at the same time, improving thus service availability and processing speed. If one of the filters in the filtering chain does not respond, AXIGEN provides a failsafe mode , which
AXIGEN User Manual
Copyright © 2006 GECAD Technologies S.R.L.
http://www.axigen.com
92
allows pinging the filter regularly until the connection is reestablished. At that moment, the email message filtering chain is resumed. This guarantees that every message goes through the entire filtering chain.
AXIGEN Mail Servers can easily integrate with other third party applications through a simple interface which is made available as part of SDK (Software Development Kit). For more details on SDK delivery, please contact the AXIGEN Sales Department.
For information on how to configure Antivirus/Antispam filters at different levels using WebAdmin, see: Configuring Antivirus/Antispam Filters Domain Filter Configuration Account Filter Configuration List Filter Configuration Antivirus/Antispam filters can also be configured using the CLI Filters context. For information on how to use the Command Line Interface, see Configuring AXIGEN using CLI.
4.3.4. Message Rules
Message rules instruct the AXIGEN Mail Server to take certain actions on processed email messages based on pieces of information contained by the message headers. Thus you can create rules like:
• messages from [email protected] copy to alex@localdomain; • messages from [email protected] move to folder Jokes; • all messages reply with "Out-of-office" message;
Message rules are easily created using the provided Web Wizard by each individual user via the WebMail module of AXIGEN. For more details on Wizard usage, please see Mail Filtering in WebMail. More complex message rules can be created by the system administrator using a simple scripting language called SIEVE. The same language is used by the WebMail Wizard when defining message rules automatically.
Using Message rules is safe since they do not operate on the mail content but only extract information from the mail header and take actions according to the pre-defined rules. They work basically by comparing different keys using different comparators and comparison methods, against headers of a mail message. Based on the result of the comparison, you can apply different actions to the corresponding mail message, i.e. reject, discard, redirect, etc.
Message rules are static filters, where the filter itself is contained in a separate file. Different user-defined scripts can be included in any AXIGEN Filtering System. The supported language provides an extremely flexible filtering methodology, as users can define any number of script filters according to their needs.
AXIGEN also implements the vacation extension . This means that message rules can be created and applied for generating out-of-office type automatic replies. Thus, auto-generated messages can be sent when the user of the account for which the vacation applies, is on vacation, out of office or in general away for an extended period of time. The vacation extension is an extra functionality also available via script files.

AXIGEN User Manual
Copyright © 2006 GECAD Technologies S.R.L.
http://www.axigen.com
93
Antivirus/Antispam Filters can also interact with Message rules , via two headers appended to email messages. These headers contain a spam or virus level value which actually indicates the likelihood of that particular email message being virus or spam. Based on these levels, actions imposed by the message rules can be taken, for instance moving email messages above a certain level to a specified Quarantine folder.
AXIGEN supports creating customized filter chain. This means system administrators can define and use as many Antivirus/Antispam Filters and Message rules as required by their security policies.
For a complete description of message rules implementation in AXIGEN, see the SIEVE Language section. For a complete description of this language, see RFC 3028. For information on how to configure script filters at different levels using WebAdmin, see: Configuring Message Rules Domain Filter Configuration Account Filter Configuration List Filter Configuration Filters can also be configured using the CLI Filters context (see Configuring AXIGEN using CLI) and by editing the configuration file (see Configuring AXIGEN using the Configuration File)
4.3.4.1. SIEVE Overview and Implementation in AXIGEN
SIEVE Overview
Sieve is a language created and used for mail filtering either on the server or on the client. The language is completely described in the RFC 3028. Sieve is an interpreted language that can be described as relatively simple. It has no loop structures, no variables (in the basic form) it has only an if control structure. Sieve works basically by comparing different keys using different comparators and comparison methods, against headers of a mail message and based on the result applies actions to the message, like reject, discard, redirect. The structure of Sieve as described in the RFC 3028 is: SIEVE defines 5 actions: keep, fileinto, reject, discard, redirect which are self-explanatory. It also defines 3 control commands:
• <stop> - which stops the processing to that point • <if elsif else> structure • require command - which defines an extension of the language. It tells the interpreter that the
respective extension will be used in the script
The if structure has the form: if <test> <block> elsif <test> <block> else <block>
A block is a block of commands (actions and control commands - including other ifs) and a test can be one of the following:
AXIGEN User Manual
Copyright © 2006 GECAD Technologies S.R.L.
http://www.axigen.com
94
1. address - tests a set of the address headers against a set of keys using different comparison methods
2. envelope - optional test 3. header - tests a set of the headers against a set of keys using different comparison methods:
• true, false - constants • allof <other tests> - logic and between several tests • anyof <other tests> - logic or between several tests • not <test> - negation of a test • exists - test if a set of headers exist • size - test against the size of a message
A test can take 2 values: true or false.
After parsing a script against a mail message, several actions can result which may interact. Several constrains are defined regarding action interaction which will be explained in the next paragraph. If no action is to be taken after a complete parse of the script, or an error occurs, an implicit keep will ensure delivery of the message to the inbox.
The AXIGEN SIEVE interpreter
The interpreter uses the following restrictions and constrains in implementing the RFC 3028:
• it implements the extensions described in the rfcs: fileinto, reject, envelope, copy, relational, spamtest, virustest, subaddress
• the relational test :count can only be used with the i;ascii-numeric comparator and when there are more then one strings in the second string list, only the first will be considered
• it implements the "i;octet", "i;ascii-ccasemap" and "i;ascii-numeric" comparators for the "i;ascii-numeric" comparator, the :matches and :contains tags, cannot be used. Error otherwise.
• it allows only require with (fileinto, reject, envelope, copy, vacation) arguments, gives an error message otherwise
• allows address and envelope test with the second string list (the values list) not tested for valid addresses (i.e. it allows part of addresses put in the values list)
• it allows only the: "From", "To", "CC", "Bcc", "Sender", "Resent-From", "Resent-To" headers to appear in the address test and only "To", "From" headers in the envelope test. Error otherwise.
• the require group of commands must appear first and must contain only required commands. Error otherwise.
• elsif and else must appear only after an if or an elsif. error otherwise • there is one type of warning and five types of error messages:
1. "[Syntax Error]: given if there is a syntax error in the script 2. "[Parse Error]: if a semantic error appears 3. "[Semantic Error]: similar to parse error 4. "[Validation Error]: if the script is not compliant to this document 5. "[Run-time Error]: if something is wrong during a message parse
• numbers in the size test cannot be negative and cannot exceed 2^32-1. error otherwise • numbers when using the i;ascii-numeric comparator cannot exceed 2^32-1 and cannot be
negative. If a string used with this comparator starts with something other than a digit, or is null, or is negative, or it exceeds 2^32-1, it gets the value 2^32. Leading whitespace (SP,HTAB,CRLF) is ignored
AXIGEN User Manual
Copyright © 2006 GECAD Technologies S.R.L.
http://www.axigen.com
95
• it does not allow two or more comparator, address-part, match-type tags in the address, hearer and envelope tests. Error otherwise.
Action interaction
General action interaction: the following constrains apply (error otherwise):
• reject can only be by itself and only once (eventually with stop) • keep can appear with any action (except reject) several times, and a move to Inbox (or similar)
will be executed once • discard can appear with any action (except reject) several times and the result will be a
discard only when solely discard actions are present or there is an implicit keep by using the :copy tag
• fileinto can appear several times with any action (except reject) and a move to the specified folder will be executed (if a move to the same folder is specified, it is treated as an error but a duplicate move will not be performed - a warning will be issued)
• redirect can appear several times and with any action (except reject), the result consisting in redirecting to the specified address only once (without giving an error if a duplicate reject with the same address appears) - a warning will be issued
• any action except stop, fileinto, vacation and redirect used with the :copy tag will cancel the implicit keep
Vacation interaction
• vacation can appear once per script and all other appearances will be disregarded. • vacation used with discard, redirect, fileinto or explicit keep will not be an error and will not be
considered to break the respective actions interaction rules
Spamtest and Virustest Extension This implementation supports the spamtest and virustest extensions as described in the RFC 3685, but in each case, the following constrains appear: Spamtest
• a separate tool will be implemented that will map vendor specific information from antispam tool and
• a new header named "X-AxigenSpam-Level" will be added which can have the following values:
1- message was tested and is clear of spam 2 -9- message was tested and has a varying likelihood of containing spam in increasing order 10- message was tested and definitely contains spam
Virustest
• a separate tool will be implemented that will map vendor specific information from antivirus tool and
• a new header named "X-AxigenVirus-Level" will be added which can have the following values:
1 - message was tested and contains no known viruses
AXIGEN User Manual
Copyright © 2006 GECAD Technologies S.R.L.
http://www.axigen.com
96
2 - message was tested and contained a known virus which was replaced with harmless content 3 - message was tested and contained a known virus which was "cured" such that it is now harmless 4 - message was tested and possibly contains a known virus 5 - message was tested and definitely contains a known virus The possible values of the header SHOULD be only numbers and if so MUST be only the above numbers but may also have leading and trailing spaces and may contain alphanumeric characters after the numbers. There may be maximum one header of each type at a given moment, and when the tool has a value to assign to the header, it will assign it only if it is greater than the value already contained in the header.
Vacation Extension
The vacation extension is implemented using the draft: draft-ietf-sieve-vacation-04. The vacation extension is used to send auto-generated messages when the user of the account for which the vacation applies, is in vacation, out of office, in general away for an extended period of time. For a description of the syntax of this extension, please consult the SIEVE related documents and the draft this implementation is based of. Implementation specific issues like restrictions and constrains, and in general issues that appear in the draft with SHOULD or MAY, are defined below. The minimum value for the vacation: days argument is 1 and the maximum is 45. If the value given to the days argument is less that 1 it will be considered 1 and if greater that 45, it will be considered 45. The default value if the days parameter is omitted is 7. The Previous Response Tracking feature (section 4.2 of the draft) is implemented using a CRC32 hash and the date when the response was sent. This means that there may be cases when a second response will be generated even though it was not supposed to, but the chances of that is negligible compared to the speed gain. The Limiting Replies to Personal Messages feature (section 4.6 of the draft) was implemented considering the same cases as in the draft, but this will change in a way to allow the administrator to define custom rules for recognizing auto-generated mails. The vacation response message is generated with all the features defined in the Section 5 of the draft except the References field that is not generated in this version of the implementation. The interaction between vacation and other actions is described above, under Action Interaction.
4.3.5. The AXIGEN Filtering Module
Based on the Sendmail's Content Management Protocol (Milter), the AXIGEN Filtering Module (AXIMilter) provides an interface for third-party software (such as antivirus/antispam) to validate and modify messages as they pass through AXIGEN Mail Server. Through AXIMilter, AXIGEN can be integrated with various Antivirus and Antispam applications. At this time, the AXIGEN Messaging Solution integration with AXIMilter has been sucessfully tested for Kaspersky (kavmilter), Symantec Brightmail, Avast and Avira.
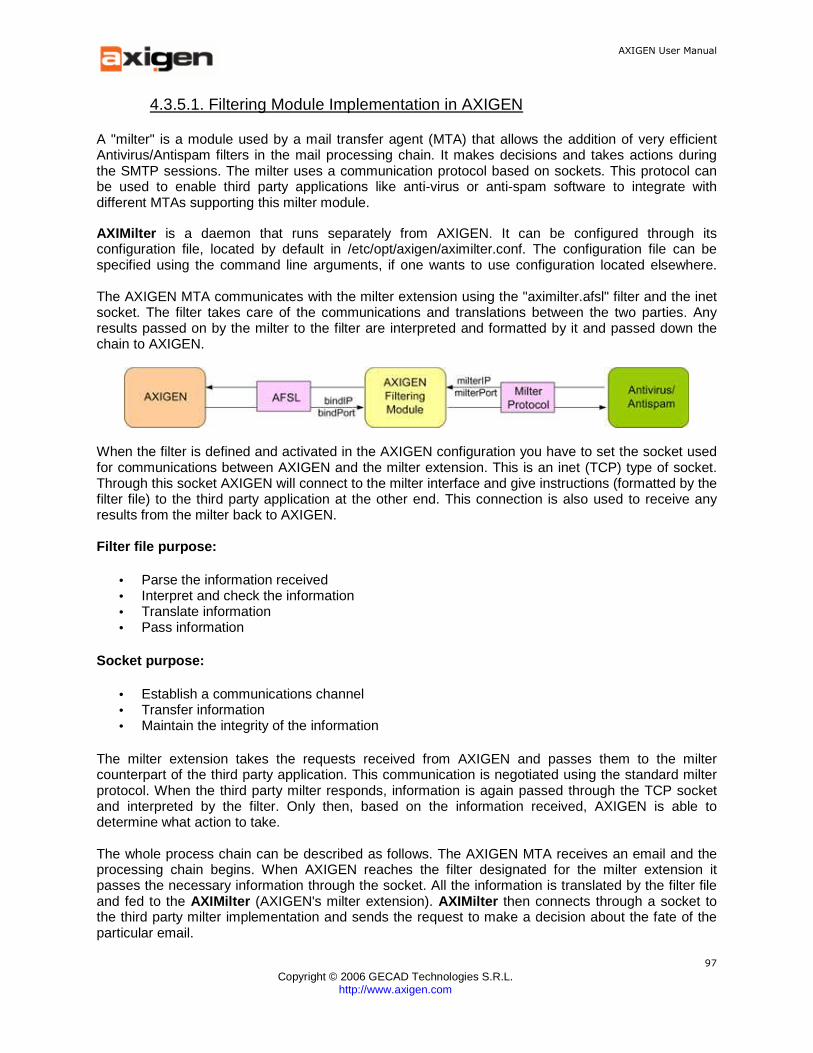
AXIGEN User Manual
Copyright © 2006 GECAD Technologies S.R.L.
http://www.axigen.com
97
4.3.5.1. Filtering Module Implementation in AXIGEN
A "milter" is a module used by a mail transfer agent (MTA) that allows the addition of very efficient Antivirus/Antispam filters in the mail processing chain. It makes decisions and takes actions during the SMTP sessions. The milter uses a communication protocol based on sockets. This protocol can be used to enable third party applications like anti-virus or anti-spam software to integrate with different MTAs supporting this milter module.
AXIMilter is a daemon that runs separately from AXIGEN. It can be configured through its configuration file, located by default in /etc/opt/axigen/aximilter.conf. The configuration file can be specified using the command line arguments, if one wants to use configuration located elsewhere. The AXIGEN MTA communicates with the milter extension using the "aximilter.afsl" filter and the inet socket. The filter takes care of the communications and translations between the two parties. Any results passed on by the milter to the filter are interpreted and formatted by it and passed down the chain to AXIGEN.
When the filter is defined and activated in the AXIGEN configuration you have to set the socket used for communications between AXIGEN and the milter extension. This is an inet (TCP) type of socket. Through this socket AXIGEN will connect to the milter interface and give instructions (formatted by the filter file) to the third party application at the other end. This connection is also used to receive any results from the milter back to AXIGEN. Filter file purpose:
• Parse the information received • Interpret and check the information • Translate information • Pass information
Socket purpose:
• Establish a communications channel • Transfer information • Maintain the integrity of the information
The milter extension takes the requests received from AXIGEN and passes them to the milter counterpart of the third party application. This communication is negotiated using the standard milter protocol. When the third party milter responds, information is again passed through the TCP socket and interpreted by the filter. Only then, based on the information received, AXIGEN is able to determine what action to take. The whole process chain can be described as follows. The AXIGEN MTA receives an email and the processing chain begins. When AXIGEN reaches the filter designated for the milter extension it passes the necessary information through the socket. All the information is translated by the filter file and fed to the AXIMilter (AXIGEN's milter extension). AXIMilter then connects through a socket to the third party milter implementation and sends the request to make a decision about the fate of the particular email.
AXIGEN User Manual
Copyright © 2006 GECAD Technologies S.R.L.
http://www.axigen.com
98
After deciding the action to be taken on the respective email (to accept it or not and why) the information is again passed to AXIMilter through the socket between the two milter implementations. AXIMilter sends the results back to AXIGEN through the socket defined in the filter setup and it is again translated. When the AXIGEN MTA receives the information, it takes the necessary steps to deliver or discard the message.
4.3.5.2. Configuring the AXIGEN Filtering Module
For the AXIGEN - AXIMilter integration, AXIMilter must be configured first, to know on which address and port it listens for connections from AXIGEN. After these parameter were correctly defined in the configuration file, you have to set up an AV/AS filter in AXIGEN, specifying the AFSL file for protocol communication and the address and port to connect to AXIMilter.
Afer installing the AXIMilter package, the AFSL file can be found in /var/opt/axigen/filters/. After defining the Antivirus/Antispam filter you must then activate this filter.
Example of an AV/AS filter:
name: AxiMilter address: inet://127.0.0.1:1981 protocolFile: /var/opt/axigen/filters/aximilter.afs l idleTimeout: 60 actionOnMatch: reject maxConnections: 10
For information on how to define Antivirus/Antispam Filters in AXIGEN, see Configuring Antivirus/Antispam Filters.
For details on how to activate filters in AXIGEN, see Configuring Active Filters.
AXIMilter configuration
The milter configuration resides in the /etc/opt/axigen/aximilter.conf file. Depending on the setup you want to achieve there are multiple options to consider. Due to the TCP style of sockets used you can decide you want to use one machine as mail server and another one on the network as mail scanner. You can also use the same machine. There are some other options you should consider like the number of threads and/or connections you want to allow at any given time. This can have serious productivity and security implications. Below you can find explanations for the available configuration options:
• bindIp <ip> is the variable that sets the interface AXIMilter will use to listen for connections from AXIGEN. If the machine running AXIMilter has more than one interface you should change this variable to the IP of the interface available to the AXIGEN server. This should be set to a LAN IP address ensuring that the traffic between your MTA and AXIMilter is not visible to anyone else. If you run AXImilter and AXIGEN on the same machine you can leave this option unchanged.
• bindPort <port> is the port that AXIGEN connects to when establishing a connection to the AXImilter extension. You can set this port to whatever you like as long as the port is not already bind by another process. This port must be used when creating the filter in the AXIGEN configuration. When AXIGEN initiates the connection to the socket, AXIMilter has to be listening for connections. If the port is not used by another process you can leave this option unchanged. DEFAULT: 1981
AXIGEN User Manual
Copyright © 2006 GECAD Technologies S.R.L.
http://www.axigen.com
99
• rwTimeout <value> is the maximum amount of time allocated to a connection session. It is expressed in milliseconds. Setting this value too high on a high traffic server might saturate all the available connections. Setting this too low on a slow machine might interfere with the communications transmitted. The range for this value is 1 - 65535. - DEFAULT: 400
• milterIp <ip> is the IP address of the machine running the third party milter implementation. As with the "bindIp" variable this should be set to the local IP address of that particular machine or left unchanged if the other milter runs locally. DEFAULT: "127.0.0.1"
• milterPort <port> is the port number AXIMilter connects to when establishing a connection with the third party milter implementation. This port has to be the same as the one specified in the configuration file of the third party software. This port is crucial in setting up a working milter implementation. If you change the port in the configuration of your software, you have to change it here too. Most anti-virus scanners use different ports so make sure to check which port you have to set here before testing your implementation. DEFAULT: 1990
• logType <type> - This parameter defines where to log messages. It can be "system","file" or "stdout". The "system" value means that messages will be logged to the system log, "file" that they will be logged in a file and "stdout" that messages will be logged at standard output. WARNING: if "file" is selected for this property, the logFile must also be set. - DEFAULT "system"
• logFile <file> - If logType has the value "file", this defines the file where messages are logged. - DEFAULT: "none"
• logLevel <level> - The level at which messages will be logged. Possible values are: o 0 - only error messages will be logged o 1 - error and warning message will be logged o 2 - all messages will be logged o DEFAULT: 2
• processingThreads <threads> is the number of threads ready to process requests. This number also limits the maximum connections that can be established to the AXIMilter extension. This means that if for example you set this value to 3, only a maximum 3 requests can be sent at any given time, thus only the fate of 3 emails can be decided. When one of these connections is closed a new one can be opened. Make sure you balance this value so that you don't overload the server and at the same time you don't keep too many emails waiting if you have a lot of traffic. The default value should be sufficient for most modern computers and at the same time should be reasonable enough on a medium-sized server. The range for this value is 1 - 128. - DEFAULT: 16
4.3.5.3. AXIGEN Filtering Module Commands
Command line parameters
• -h displays this help message • -v displays the version • -f run in foreground • -u <user> run as user. DEFAULT: 'AXIGEN' • -g <group> run as group. DEFAULT: 'AXIGEN' • -c <path> : path to the configuration file DEFAULT: /etc/opt/AXIGEN/aximilter.conf
Below you will find a list of the commands needed to start, stop, restart the AXIMilter daemon or to check its status. The commands are distribution-specific.
Debian
• In Debian, the daemon can be started via its initscript, by issuing: /etc/init.d/aximilter start
AXIGEN User Manual
Copyright © 2006 GECAD Technologies S.R.L.
http://www.axigen.com
100
• To stop the server, you can issue: /etc/init.d/aximilter stop
• In order to restart AXIGEN daemon, you can use: /etc/init.d/aximilter restart
• To view the AXIGEN daemon status, you can pass the 'status' parameter: /etc/init.d/aximilter status
Gentoo
• In Gentoo, the daemon can be started via its initscript, by issuing: /etc/init.d/aximilter start
• To stop the server, you can issue: /etc/init.d/aximilter stop
• In order to restart AXIGEN daemon, you can use: /etc/init.d/aximilter restart
• To view the AXIGEN daemon status, you can pass the 'status' parameter: /etc/init.d/aximilter status
RPM-based distributions
• In RedHat, SUSE, Fedora Core, and Mandrake/Mandriva distributions, you can use the initscript to start the daemon(s), by issuing: /etc/init.d/aximilter start
• To stop the server, you can issue: /etc/init.d/aximilter stop
• In order to restart AXIGEN daemon, you can use: /etc/init.d/aximilter restart
• To view the AXIGEN daemon status, you can pass the 'status' parameter: /etc/init.d/aximilter status
Slackware
• In Slackware, the daemon can be started via its initscript, by issuing: /etc/rc.d/rc.aximilter start
• In order for the initscript to start at boot time, you need to set the executable bit for the script: chmod +x /etc/rc.d/rc.aximilter
• To stop the server, you can issue: /etc/rc.d/rc.aximilter stop
• In order to restart AXIGEN daemon, you can use: /etc/rc.d/rc.aximilter restart
• To view the AXIGEN daemon status, you can pass the 'status' parameter: /etc/rc.d/rc.aximilter status
Ubuntu
• In Ubuntu, the daemon can be started via its initscript, by issuing: sudo /etc/init.d/aximilter start
• To stop the server, you can issue: sudo /etc/init.d/aximilter stop
• In order to restart AXIGEN daemon, you can use: sudo /etc/init.d/aximilter restart
• To view the AXIGEN daemon status, you can pass the 'status' parameter: sudo /etc/init.d/aximilter status

AXIGEN User Manual
Copyright © 2006 GECAD Technologies S.R.L.
http://www.axigen.com
101
4.3.6. Activating and Prioritising Filters and Rule s
In AXIGEN Mail Server, you can activate Antivirus / Antispam filters and Message rules by adding them in the Active filters lists, available in the Active Filter tabs in WebAdmin. Active Filters are not a separate filter category, but merely a way of selecting among the available filters the ones you wish to apply at server level, domain level or user level.
Filter Priority
When being activated, each filter is assigned a priority value. The notion of priority is used to define the order of filters in the filtering chain. This means that filters with higher priority will be applied first.
Important - A lower priority value stands for an actual higher priority. Thus, the filter with priority 1 will always have the highest priority over filters with higher priority values.
Available priority values vary according to the filter level:
• server level: 1-500 • domain level: 100-400 • account / mail list level: 200-300
Note: Although not similar in terms of functionality, accounts and mail lists are considered similar (same level) entities when applying filters.
When filters on different levels have the same priority, these filters will be applied in decreasing order of importance , which is as follows:
1. server level filter 2. domain level filter 3. account / mail list level filter
Activation Inheritance
All filters activated at server level, will automatically be applied at all filtering levels, according to their respective priority levels. The same is true for domain level filters, which can be activated at account / mail list level. Filters activated at domain level, are applied to all accounts belonging to the respective domain. Filters activated only at account level, will only be applied to that specific account. For information on how to activate filters using WebAdmin see the following pages: Configuring Active Filters Domain Filter Configuration Account Filter Configuration List Filter Configuration
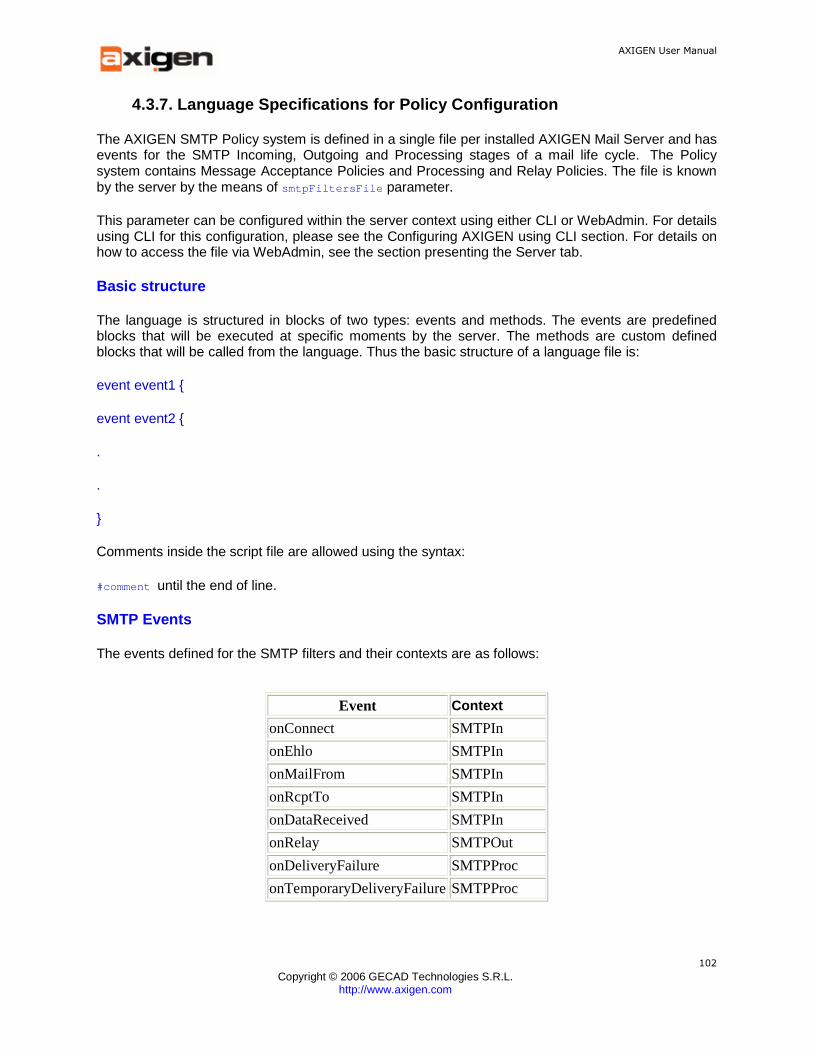
AXIGEN User Manual
Copyright © 2006 GECAD Technologies S.R.L.
http://www.axigen.com
102
4.3.7. Language Specifications for Policy Configura tion
The AXIGEN SMTP Policy system is defined in a single file per installed AXIGEN Mail Server and has events for the SMTP Incoming, Outgoing and Processing stages of a mail life cycle. The Policy system contains Message Acceptance Policies and Processing and Relay Policies. The file is known by the server by the means of smtpFiltersFile parameter.
This parameter can be configured within the server context using either CLI or WebAdmin. For details using CLI for this configuration, please see the Configuring AXIGEN using CLI section. For details on how to access the file via WebAdmin, see the section presenting the Server tab.
Basic structure
The language is structured in blocks of two types: events and methods. The events are predefined blocks that will be executed at specific moments by the server. The methods are custom defined blocks that will be called from the language. Thus the basic structure of a language file is:
event event1 {
event event2 {
.
.
}
Comments inside the script file are allowed using the syntax:
#comment until the end of line.
SMTP Events
The events defined for the SMTP filters and their contexts are as follows:
Event Context
onConnect SMTPIn
onEhlo SMTPIn
onMailFrom SMTPIn
onRcptTo SMTPIn
onDataReceived SMTPIn
onRelay SMTPOut
onDeliveryFailure SMTPProc
onTemporaryDeliveryFailure SMTPProc
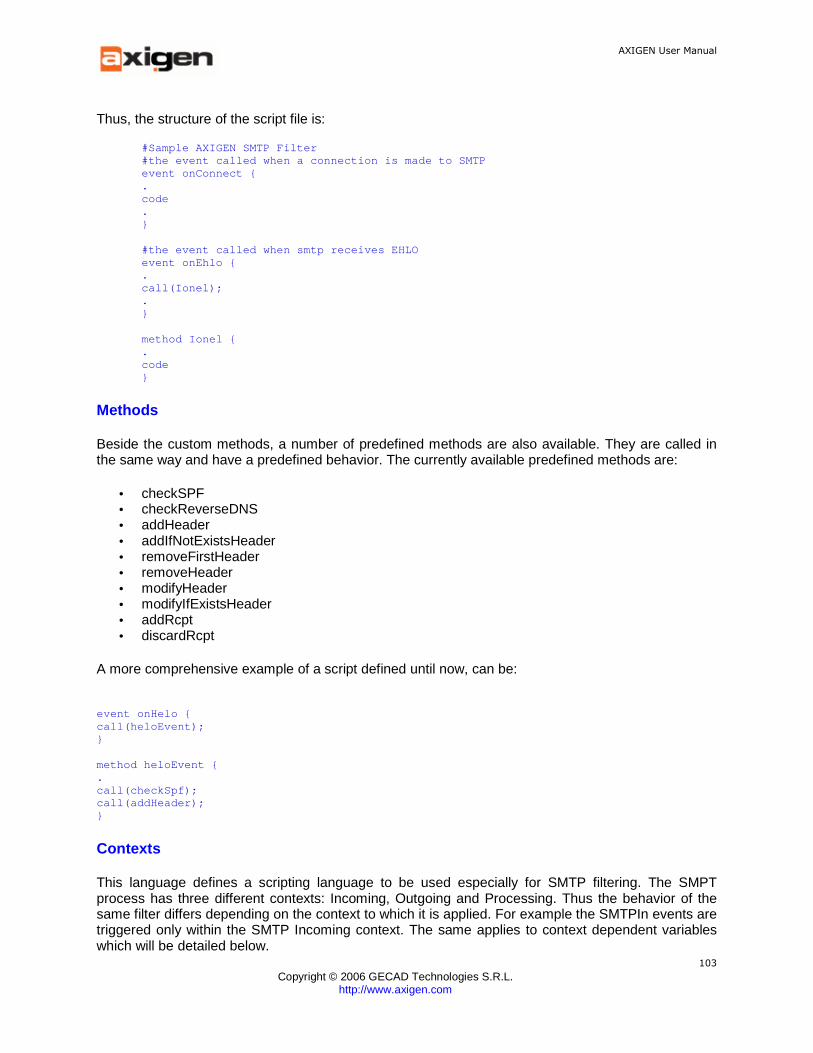
AXIGEN User Manual
Copyright © 2006 GECAD Technologies S.R.L.
http://www.axigen.com
103
Thus, the structure of the script file is:
#Sample AXIGEN SMTP Filter #the event called when a connection is made to SMTP event onConnect { . code . } #the event called when smtp receives EHLO event onEhlo { . call(Ionel); . } method Ionel { . code }
Methods
Beside the custom methods, a number of predefined methods are also available. They are called in the same way and have a predefined behavior. The currently available predefined methods are:
• checkSPF • checkReverseDNS • addHeader • addIfNotExistsHeader • removeFirstHeader • removeHeader • modifyHeader • modifyIfExistsHeader • addRcpt • discardRcpt
A more comprehensive example of a script defined until now, can be:
event onHelo { call(heloEvent); } method heloEvent { . call(checkSpf); call(addHeader); }
Contexts
This language defines a scripting language to be used especially for SMTP filtering. The SMPT process has three different contexts: Incoming, Outgoing and Processing. Thus the behavior of the same filter differs depending on the context to which it is applied. For example the SMTPIn events are triggered only within the SMTP Incoming context. The same applies to context dependent variables which will be detailed below.
AXIGEN User Manual
Copyright © 2006 GECAD Technologies S.R.L.
http://www.axigen.com
104
Variables
After methods and events, the next as level of importance are the variables. They act as input and output to functions and also act as actions to be taken by the SMTP engine. All variables are considered to be string or numbers and can be of three types:
• read-only variables (input variables); • read-write variables (input/output variables); • action variables - these variables can be either read-only or read-write but they are in this
category because they can cause the SMTP engine to take an action or are involved in an action.
Variable behavior is context-dependent. If a variable is an input variable for the SMTP Incoming context it will be set only in that context and will be "" in the SMTP Outgoing context. Furthermore, a variable will be set only after that variable's value is known. For example, the MailFromDomain variable will be "" in the onConnect and onEhlo events and will be set only in onMailFrom event.
Some variables are set/read by the engine but there are methods for reading/writing them from the code. The reading of a variable implies the comparing of the variable's value with another value or variable. This is done using test functions that form the test block of a conditional block. To set a variable, the function set is used:
set(SPFResult, "some value");
When a predefined method is called, it usually sets one or more variables as its output and usually requires setting one or more variable as its input. Apart from the predefined variables, custom variables also exist and they can be used later in the code. To define a variable you just set its value: set(aVariable, "aValue").
The previous function defines a variable named aVariable and sets its value to "aValue".
A custom defined variable has lifetime that lasts until the end of a block. To preserve a variable across blocks and across contexts, the export function is used:
export(aVariable) The lifetime of a filter with its contexts is per email message so the export function can be used to preserve the value of a variable specific to one email message through different stages of SMTP. For example, at the SMTP Outgoing context, the value of MailFromDomain is not set but can be, if in one of the SMTP Incoming events, an export(MailFromDomain) was made.
Within the SMTP Filter Language, the concept of variable expanding means that, within a string, a variable name may appear and at runtime the name will be replaced by the variable's value. In order for a variable to be expanded, its name must appear between "%" characters. An example of variable expanding is:
event onConnect { set(aVariable, "Hello."); set(SMTPGreeting, "%aVariable% This is my AXIGEN se rver"); } When you connect on the SMTP port, the greeting will be: "Hello. This is my AXIGEN server"

AXIGEN User Manual
Copyright © 2006 GECAD Technologies S.R.L.
http://www.axigen.com
105
This expanding mechanism also works for comparing two variables: event onConnect { set(aVariable, "value"); set(bVariable, "value"); if (is(aVariable,"%bVariable%) { set(SMTPAction,"reject"); } }
Structures
Condition blocks
There are only block, sub-block, if and switch structures. The block structures were defined above. The ‘if’ structure has the following form:
if (conditions) { } else { }
The sub-blocks mentioned above are part of the ‘if’ and ‘switch’ structure and as in the case of blocks, start with a "{" and end with a "}".
The switch structure has the following form:
switch (variable) { case <value>: { } case <value>: { } default: { } }
Both the ‘if’ and the ‘switch’ structures can imbricate a maximum of 16 levels of imbrication. The case statements are exclusive, that means that if a case is matched, after the execution of the block, the switch structure is exited.
Conditions
The conditions are Boolean functions that are used in the ‘if’ and ‘switch’ tests. They split into 2 types: single conditions and logical groups.
The single conditions are as follows:
• is(variable,value) - matches for equality; • isCase(variable,value) - matches for equality and if strings, the match is case insensitive; • match(variable,regexp) - regular expression match • lessThen(variable,value) - number comparison • greaterThen(variable,value) - number comparison • greaterOrEqual(variable, value) - number comparison • lessOrEqual(variable, value) - number comparison
AXIGEN User Manual
Copyright © 2006 GECAD Technologies S.R.L.
http://www.axigen.com
106
• iprange(variable, range) - matches if the variable's value is in range. If the variable is not an ipAddress, the function returns false. Emample of how to define IP ranges:
o 192.168.1.1-192.168.1.10 (range) o 192.168.1.1/24 (cidr) o 192.168.1.1/255.255.255.0 (netmask)
The logical groups are:
• not(condition) - negation of a condition • allof(condition,condition,...) - similar to an AND between conditions • anyof(condition,condition,...) - similar to an OR between conditions
The logical groups allow a maximum of 16 levels of imbrication.
Functions
The functions can be looked at as keywords from other languages. They are the building blocks of the language and their behavior is hard-coded. The functions available are:
• all the Boolean functions described above; • call (method) - this executes a predefined of custom defined method. If the method is custom
defined, it must be defined in the same script file as the call; • export (variable) - this function exports a variable name and value to be used in another
context. If the variable is custom defined it must be defined in the same script file; • set (variable, value) - this sets the value of a RW variable; • return - this function ends the current event or method execution.
SMTP Functionalities
A list of all events and all variables and methods that can be used by each event is presented below. The type (IN or OUT) and the access method (RO - read only, RW - read write, WO - write only) will be specified for each variable.
Important! Certain variables are only interpreted within some events, while the remaining events ignore them. Therefore setting such a variable for an event that will ignore it will take no effect. This is also applicable to predefined methods. In what the SMTPIN context events are concerned (at this moment all except onRelay), the <smtpAction> and <smtpExplanation> variables are accessible, therefore they will not be repeated for each event. Not all variables marked as RO or not presented for a certain event will generate an error if set. The reason is they can be marked as RW for other events of the same context. However, setting them will have no effect.
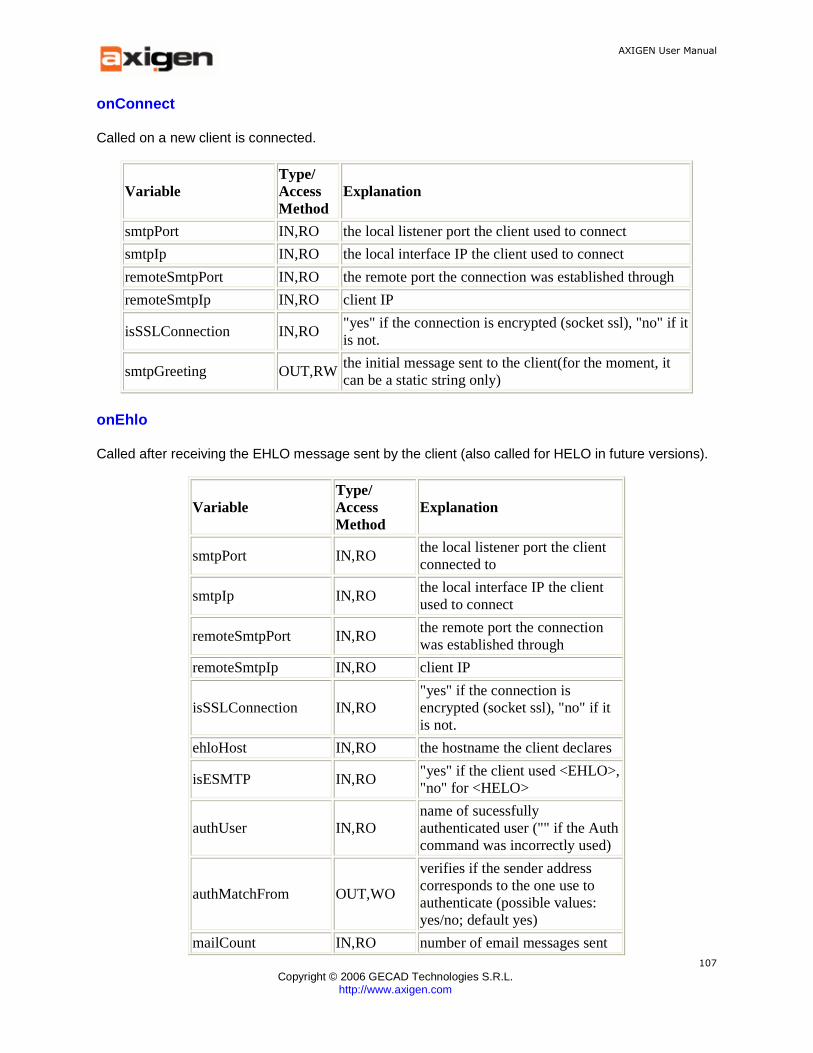
AXIGEN User Manual
Copyright © 2006 GECAD Technologies S.R.L.
http://www.axigen.com
107
onConnect
Called on a new client is connected.
Variable Type/ Access Method
Explanation
smtpPort IN,RO the local listener port the client used to connect
smtpIp IN,RO the local interface IP the client used to connect
remoteSmtpPort IN,RO the remote port the connection was established through
remoteSmtpIp IN,RO client IP
isSSLConnection IN,RO "yes" if the connection is encrypted (socket ssl), "no" if it is not.
smtpGreeting OUT,RW the initial message sent to the client(for the moment, it can be a static string only)
onEhlo
Called after receiving the EHLO message sent by the client (also called for HELO in future versions).
Variable Type/ Access Method
Explanation
smtpPort IN,RO the local listener port the client connected to
smtpIp IN,RO the local interface IP the client used to connect
remoteSmtpPort IN,RO the remote port the connection was established through
remoteSmtpIp IN,RO client IP
isSSLConnection IN,RO "yes" if the connection is encrypted (socket ssl), "no" if it is not.
ehloHost IN,RO the hostname the client declares
isESMTP IN,RO "yes" if the client used <EHLO>, "no" for <HELO>
authUser IN,RO name of sucessfully authenticated user ("" if the Auth command was incorrectly used)
authMatchFrom OUT,WO
verifies if the sender address corresponds to the one use to authenticate (possible values: yes/no; default yes)
mailCount IN,RO number of email messages sent
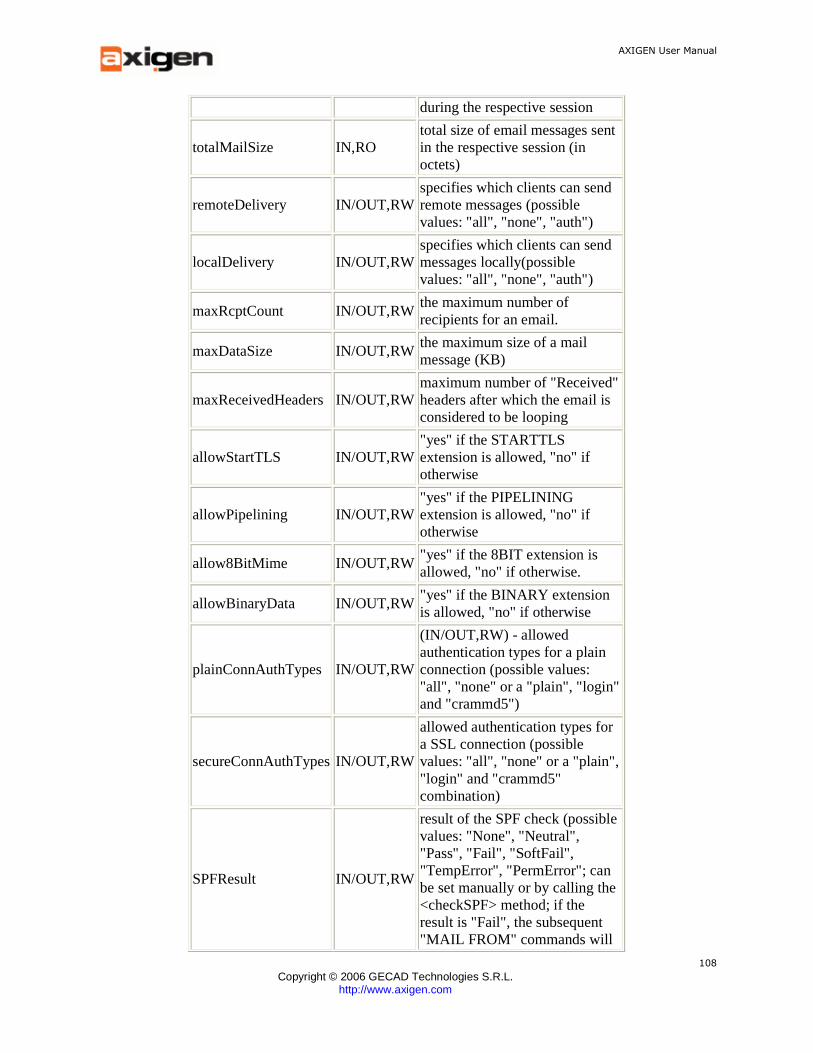
AXIGEN User Manual
Copyright © 2006 GECAD Technologies S.R.L.
http://www.axigen.com
108
during the respective session
totalMailSize IN,RO total size of email messages sent in the respective session (in octets)
remoteDelivery IN/OUT,RW specifies which clients can send remote messages (possible values: "all", "none", "auth")
localDelivery IN/OUT,RW specifies which clients can send messages locally(possible values: "all", "none", "auth")
maxRcptCount IN/OUT,RW the maximum number of recipients for an email.
maxDataSize IN/OUT,RW the maximum size of a mail message (KB)
maxReceivedHeaders IN/OUT,RW maximum number of "Received" headers after which the email is considered to be looping
allowStartTLS IN/OUT,RW "yes" if the STARTTLS extension is allowed, "no" if otherwise
allowPipelining IN/OUT,RW "yes" if the PIPELINING extension is allowed, "no" if otherwise
allow8BitMime IN/OUT,RW "yes" if the 8BIT extension is allowed, "no" if otherwise.
allowBinaryData IN/OUT,RW "yes" if the BINARY extension is allowed, "no" if otherwise
plainConnAuthTypes IN/OUT,RW
(IN/OUT,RW) - allowed authentication types for a plain connection (possible values: "all", "none" or a "plain", "login" and "crammd5")
secureConnAuthTypes IN/OUT,RW
allowed authentication types for a SSL connection (possible values: "all", "none" or a "plain", "login" and "crammd5" combination)
SPFResult IN/OUT,RW
result of the SPF check (possible values: "None", "Neutral", "Pass", "Fail", "SoftFail", "TempError", "PermError"; can be set manually or by calling the <checkSPF> method; if the result is "Fail", the subsequent "MAIL FROM" commands will
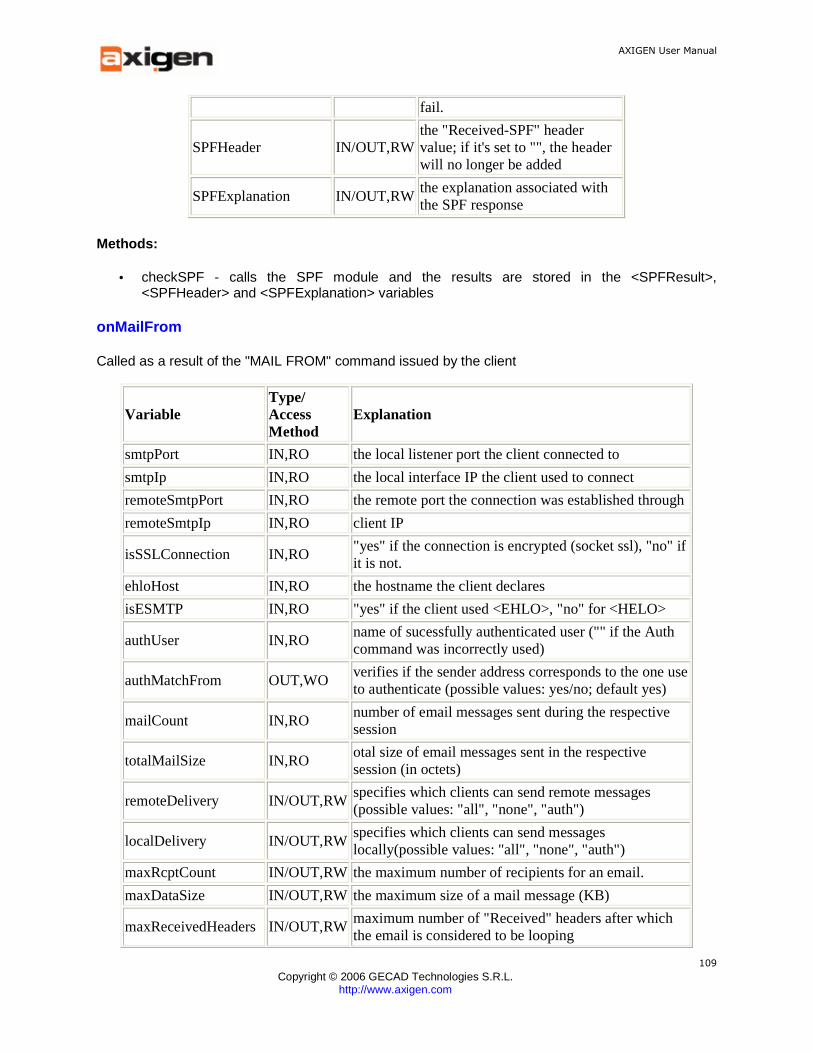
AXIGEN User Manual
Copyright © 2006 GECAD Technologies S.R.L.
http://www.axigen.com
109
fail.
SPFHeader IN/OUT,RW the "Received-SPF" header value; if it's set to "", the header will no longer be added
SPFExplanation IN/OUT,RW the explanation associated with the SPF response
Methods:
• checkSPF - calls the SPF module and the results are stored in the <SPFResult>, <SPFHeader> and <SPFExplanation> variables
onMailFrom
Called as a result of the "MAIL FROM" command issued by the client
Variable Type/ Access Method
Explanation
smtpPort IN,RO the local listener port the client connected to
smtpIp IN,RO the local interface IP the client used to connect
remoteSmtpPort IN,RO the remote port the connection was established through
remoteSmtpIp IN,RO client IP
isSSLConnection IN,RO "yes" if the connection is encrypted (socket ssl), "no" if it is not.
ehloHost IN,RO the hostname the client declares
isESMTP IN,RO "yes" if the client used <EHLO>, "no" for <HELO>
authUser IN,RO name of sucessfully authenticated user ("" if the Auth command was incorrectly used)
authMatchFrom OUT,WO verifies if the sender address corresponds to the one use to authenticate (possible values: yes/no; default yes)
mailCount IN,RO number of email messages sent during the respective session
totalMailSize IN,RO otal size of email messages sent in the respective session (in octets)
remoteDelivery IN/OUT,RW specifies which clients can send remote messages (possible values: "all", "none", "auth")
localDelivery IN/OUT,RW specifies which clients can send messages locally(possible values: "all", "none", "auth")
maxRcptCount IN/OUT,RW the maximum number of recipients for an email.
maxDataSize IN/OUT,RW the maximum size of a mail message (KB)
maxReceivedHeaders IN/OUT,RW maximum number of "Received" headers after which the email is considered to be looping

AXIGEN User Manual
Copyright © 2006 GECAD Technologies S.R.L.
http://www.axigen.com
110
SPFResult IN/OUT,RW
result of the SPF check (possible values: "None", "Neutral", "Pass", "Fail", "SoftFail", "TempError", "PermError"; can be set manually or by calling the <checkSPF> method; if the result is "Fail", "PermError" the command will fail with a permanent error, and if it is "TempError" the command will fail with a temporary error.
SPFHeader IN/OUT,RW the "Received-SPF" header value; if it is set to "", the header will no longer be added
SPFExplanation IN/OUT,RW the explanation associated with the SPF result
mailFrom IN/OUT,RW the address specified in mail from; if set manually, the new address will be used
mailFromLocalPart IN,RO the lcoal part of the address specified in mail from; modified automatically along with the <mailFrom> value.
mailFromDomain IN,RO the domain of the mail from address; modified automatically along with the
mailFromAuthUser IN,RO the authenticated user specified in the mail from command
mailFromSize IN,RO the email size specified in the mail from command
HeaderName OUT,WO see header usage methods
HeaderValue OUT,WO see header usage methods
Methods:
• checkSPF - calls the SPF module and the results are stored in the <SPFResult>, <SPFHeader> and <SPFExplanation> variables
• addHeader - adds the specified header through the <HeaderName> and <HeaderValue> variables
• addIfNotExistsHeader - adds the heather only if no other field with the same name exists • removeFirstHeader - deletes the first instance of a field with the <HeaderName> name from
the header • removeHeader - deletes or instances of the field named <HeaderName> from the header • modifyHeader - modifies or adds a header • modifyIfExistsHeader - modifies a header
onRcptTo
Called as a result of the "RCPT TO" command issued by the client
Variable Type/ Access Method
Explanation
smtpPort IN,RO the local listener port the client connected to
smtpIp IN,RO the local interface IP the client used to connect
remoteSmtpPort IN,RO the remote port the connection was established through
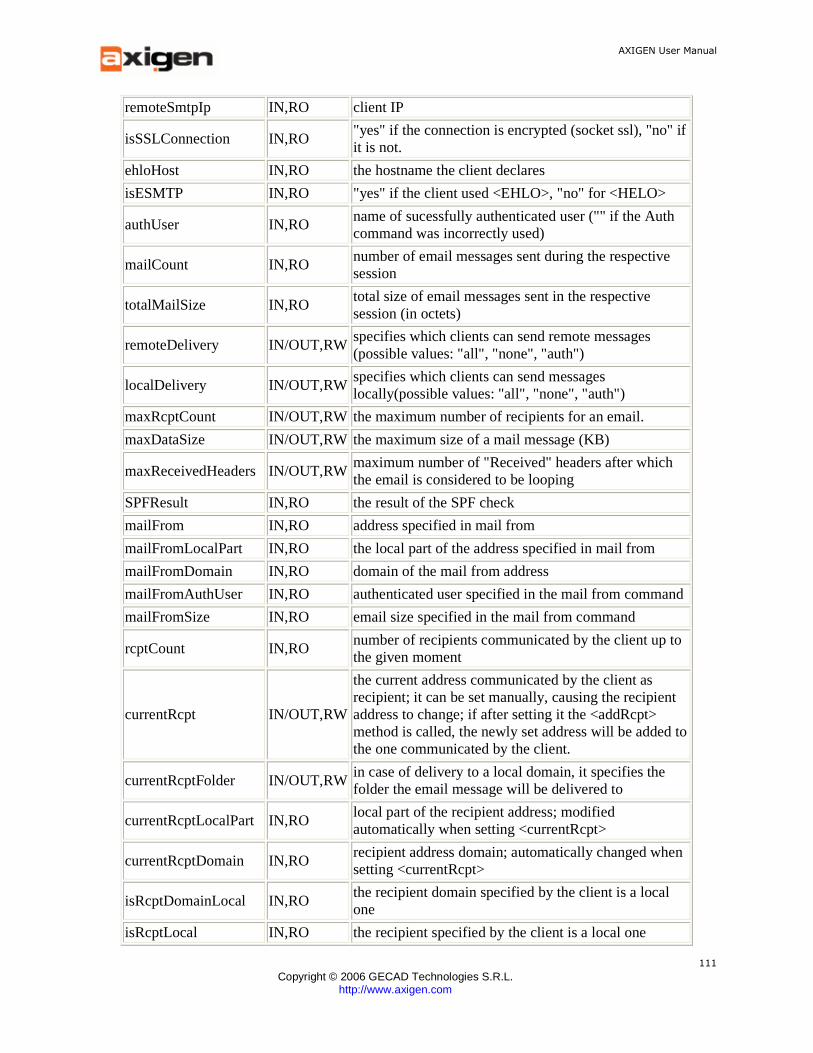
AXIGEN User Manual
Copyright © 2006 GECAD Technologies S.R.L.
http://www.axigen.com
111
remoteSmtpIp IN,RO client IP
isSSLConnection IN,RO "yes" if the connection is encrypted (socket ssl), "no" if it is not.
ehloHost IN,RO the hostname the client declares
isESMTP IN,RO "yes" if the client used <EHLO>, "no" for <HELO>
authUser IN,RO name of sucessfully authenticated user ("" if the Auth command was incorrectly used)
mailCount IN,RO number of email messages sent during the respective session
totalMailSize IN,RO total size of email messages sent in the respective session (in octets)
remoteDelivery IN/OUT,RW specifies which clients can send remote messages (possible values: "all", "none", "auth")
localDelivery IN/OUT,RW specifies which clients can send messages locally(possible values: "all", "none", "auth")
maxRcptCount IN/OUT,RW the maximum number of recipients for an email.
maxDataSize IN/OUT,RW the maximum size of a mail message (KB)
maxReceivedHeaders IN/OUT,RW maximum number of "Received" headers after which the email is considered to be looping
SPFResult IN,RO the result of the SPF check
mailFrom IN,RO address specified in mail from
mailFromLocalPart IN,RO the local part of the address specified in mail from
mailFromDomain IN,RO domain of the mail from address
mailFromAuthUser IN,RO authenticated user specified in the mail from command
mailFromSize IN,RO email size specified in the mail from command
rcptCount IN,RO number of recipients communicated by the client up to the given moment
currentRcpt IN/OUT,RW
the current address communicated by the client as recipient; it can be set manually, causing the recipient address to change; if after setting it the <addRcpt> method is called, the newly set address will be added to the one communicated by the client.
currentRcptFolder IN/OUT,RW in case of delivery to a local domain, it specifies the folder the email message will be delivered to
currentRcptLocalPart IN,RO local part of the recipient address; modified automatically when setting <currentRcpt>
currentRcptDomain IN,RO recipient address domain; automatically changed when setting <currentRcpt>
isRcptDomainLocal IN,RO the recipient domain specified by the client is a local one
isRcptLocal IN,RO the recipient specified by the client is a local one

AXIGEN User Manual
Copyright © 2006 GECAD Technologies S.R.L.
http://www.axigen.com
112
Methods:
• addHeader - adds the specified header through the <HeaderName> and <HeaderValue> variables
• addIfNotExistsHeader - adds the heather only if no other field with the same name exists • removeFirstHeader - deletes the first instance of a field with the <HeaderName> name from
the header • removeHeader - deletes all instances of the <HeaderName> name field from the header • modifyHeader - modifies or adds a header • modifyIfExistsHeader - modifies a header • addRcpt - ands the rcpt specified in <currentRcpt> and <currentRcptFolder> • discardRcpt - ignores a client’s request of adding a RCPT, without responding with an error
NOTE! If the address has a local domain (isRcptDomainLocal="yes" ), but the RCPT is not found within the respective domain (isRcptLocal="no" ), the email will be treated as message to an inexistent user. The default action in this case is to reject the RCPT; to alter this action you need to either explicitly set <smtpAction > to the “accept ” value, or to to set the RCPT to a different value, or to call the discartRcpt method.
onDataReceived
Called after receiving the message successfully through the DATA or BDAT commands.
Variable Type/ Access Method
Explanation
smtpPort IN,RO the local listener port the client connected to
smtpIp IN,RO the local interface IP the client used to connect
remoteSmtpPort IN,RO the remote port the connection was established through
remoteSmtpIp IN,RO client IP
isSSLConnection IN,RO "yes" if the connection is encrypted (socket ssl), "no" if it is not.
ehloHost IN,RO the hostname the client declares
isESMTP IN,RO "yes" if the client used <EHLO>, "no" for <HELO>
authUser IN,RO name of sucessfully authenticated user ("" if the Auth command was incorrectly used)
mailCount IN,RO number of email messages sent during the respective session
totalMailSize IN,RO total size of email messages sent in the respective session (in octets)
remoteDelivery IN/OUT,RW specifies which clients can send remote messages (possible values: "all", "none", "auth")
localDelivery IN/OUT,RW specifies which clients can send messages locally(possible values: "all", "none", "auth")
maxRcptCount IN/OUT,RW the maximum number of recipients for an email.
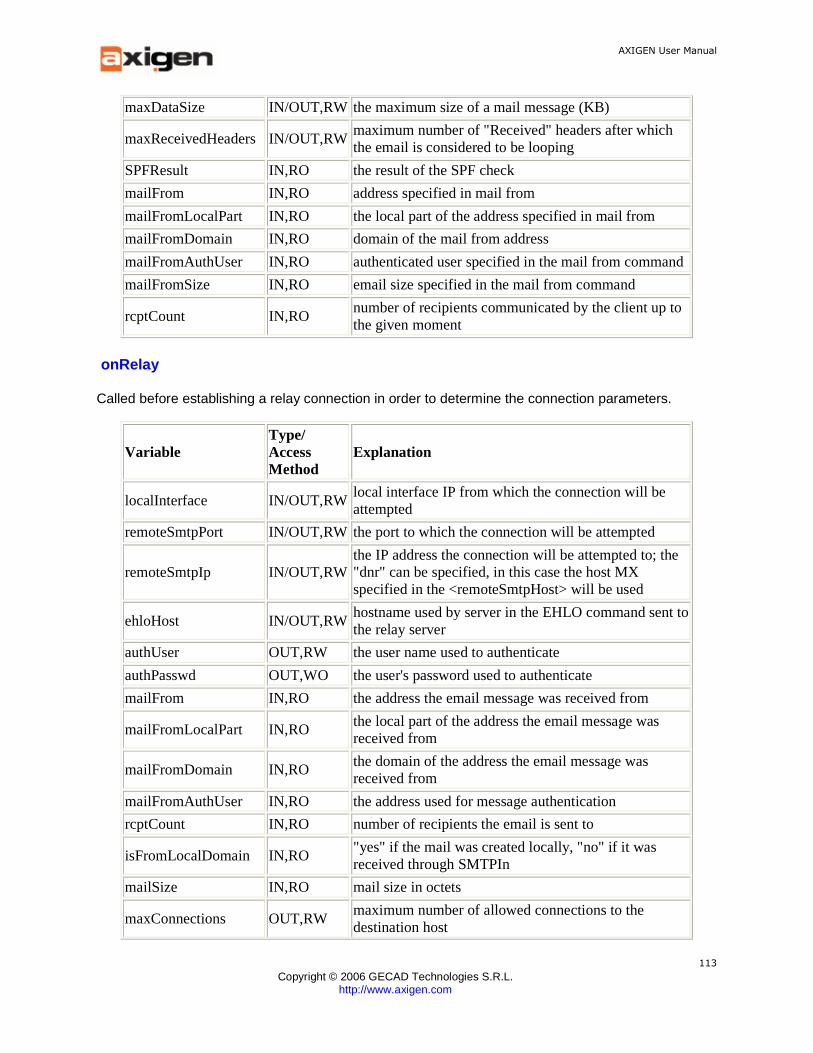
AXIGEN User Manual
Copyright © 2006 GECAD Technologies S.R.L.
http://www.axigen.com
113
maxDataSize IN/OUT,RW the maximum size of a mail message (KB)
maxReceivedHeaders IN/OUT,RW maximum number of "Received" headers after which the email is considered to be looping
SPFResult IN,RO the result of the SPF check
mailFrom IN,RO address specified in mail from
mailFromLocalPart IN,RO the local part of the address specified in mail from
mailFromDomain IN,RO domain of the mail from address
mailFromAuthUser IN,RO authenticated user specified in the mail from command
mailFromSize IN,RO email size specified in the mail from command
rcptCount IN,RO number of recipients communicated by the client up to the given moment
onRelay
Called before establishing a relay connection in order to determine the connection parameters.
Variable Type/ Access Method
Explanation
localInterface IN/OUT,RW local interface IP from which the connection will be attempted
remoteSmtpPort IN/OUT,RW the port to which the connection will be attempted
remoteSmtpIp IN/OUT,RW the IP address the connection will be attempted to; the "dnr" can be specified, in this case the host MX specified in the <remoteSmtpHost> will be used
ehloHost IN/OUT,RW hostname used by server in the EHLO command sent to the relay server
authUser OUT,RW the user name used to authenticate
authPasswd OUT,WO the user's password used to authenticate
mailFrom IN,RO the address the email message was received from
mailFromLocalPart IN,RO the local part of the address the email message was received from
mailFromDomain IN,RO the domain of the address the email message was received from
mailFromAuthUser IN,RO the address used for message authentication
rcptCount IN,RO number of recipients the email is sent to
isFromLocalDomain IN,RO "yes" if the mail was created locally, "no" if it was received through SMTPIn
mailSize IN,RO mail size in octets
maxConnections OUT,RW maximum number of allowed connections to the destination host
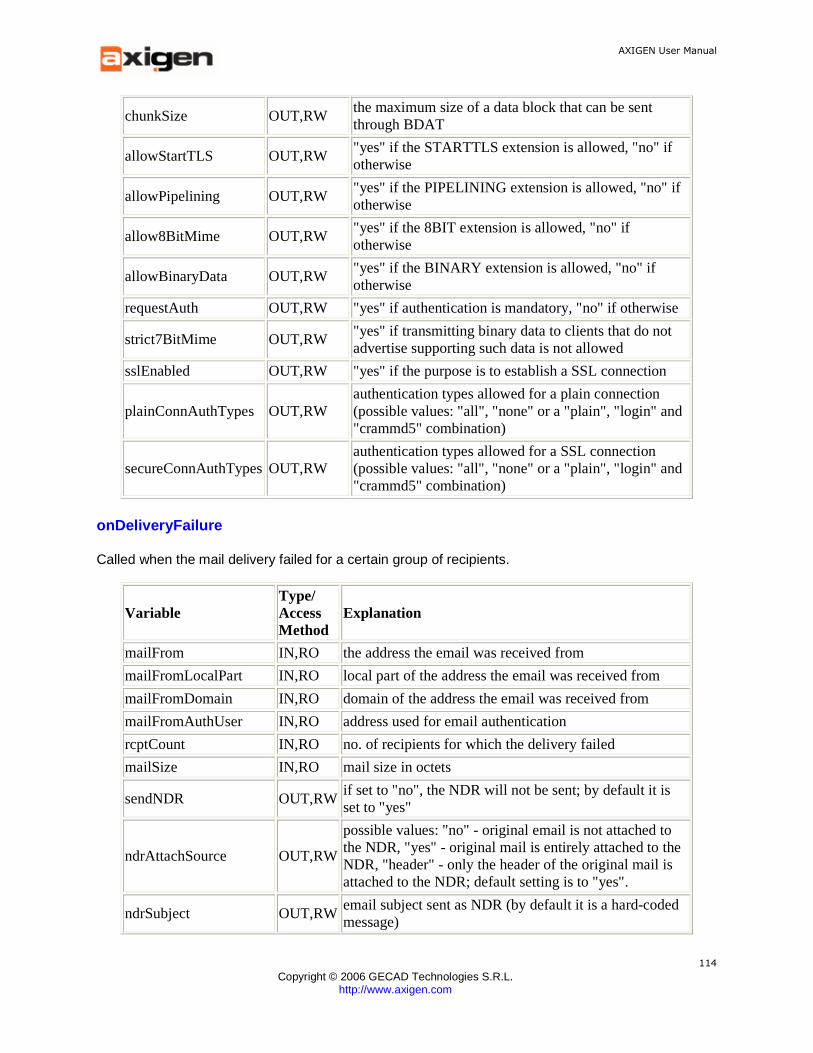
AXIGEN User Manual
Copyright © 2006 GECAD Technologies S.R.L.
http://www.axigen.com
114
chunkSize OUT,RW the maximum size of a data block that can be sent through BDAT
allowStartTLS OUT,RW "yes" if the STARTTLS extension is allowed, "no" if otherwise
allowPipelining OUT,RW "yes" if the PIPELINING extension is allowed, "no" if otherwise
allow8BitMime OUT,RW "yes" if the 8BIT extension is allowed, "no" if otherwise
allowBinaryData OUT,RW "yes" if the BINARY extension is allowed, "no" if otherwise
requestAuth OUT,RW "yes" if authentication is mandatory, "no" if otherwise
strict7BitMime OUT,RW "yes" if transmitting binary data to clients that do not advertise supporting such data is not allowed
sslEnabled OUT,RW "yes" if the purpose is to establish a SSL connection
plainConnAuthTypes OUT,RW authentication types allowed for a plain connection (possible values: "all", "none" or a "plain", "login" and "crammd5" combination)
secureConnAuthTypes OUT,RW authentication types allowed for a SSL connection (possible values: "all", "none" or a "plain", "login" and "crammd5" combination)
onDeliveryFailure
Called when the mail delivery failed for a certain group of recipients.
Variable Type/ Access Method
Explanation
mailFrom IN,RO the address the email was received from
mailFromLocalPart IN,RO local part of the address the email was received from
mailFromDomain IN,RO domain of the address the email was received from
mailFromAuthUser IN,RO address used for email authentication
rcptCount IN,RO no. of recipients for which the delivery failed
mailSize IN,RO mail size in octets
sendNDR OUT,RW if set to "no", the NDR will not be sent; by default it is set to "yes"
ndrAttachSource OUT,RW
possible values: "no" - original email is not attached to the NDR, "yes" - original mail is entirely attached to the NDR, "header" - only the header of the original mail is attached to the NDR; default setting is to "yes".
ndrSubject OUT,RW email subject sent as NDR (by default it is a hard-coded message)
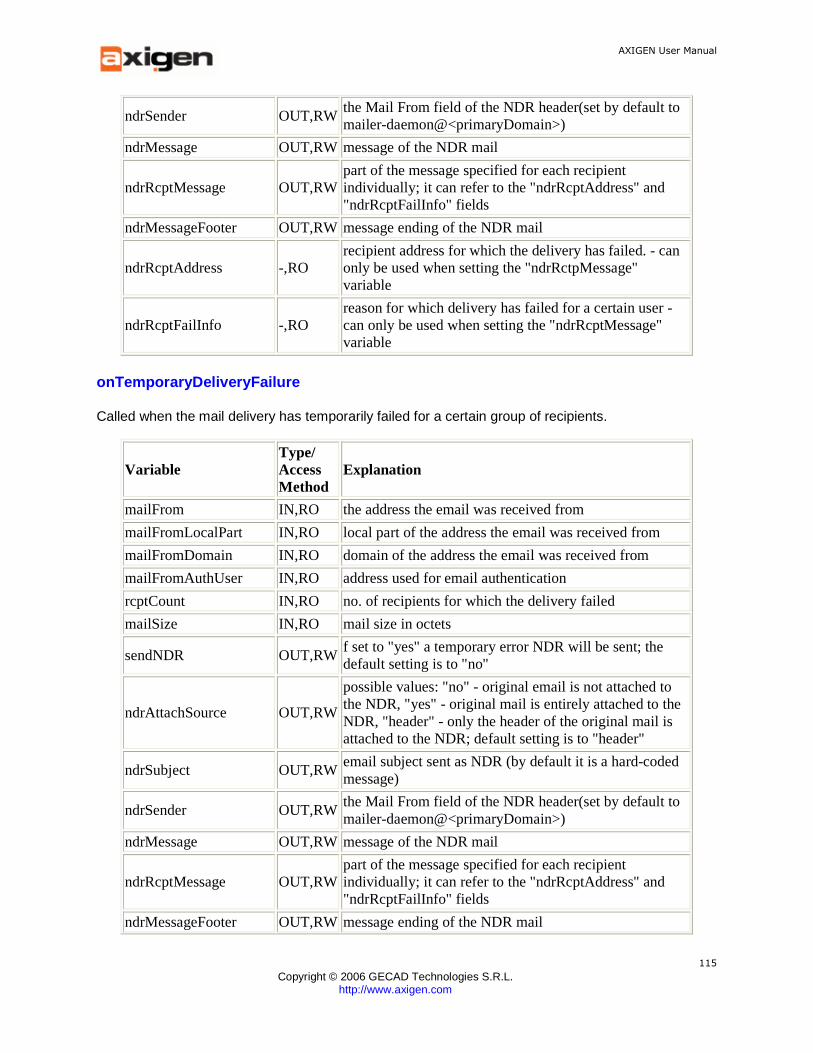
AXIGEN User Manual
Copyright © 2006 GECAD Technologies S.R.L.
http://www.axigen.com
115
ndrSender OUT,RW the Mail From field of the NDR header(set by default to mailer-daemon@<primaryDomain>)
ndrMessage OUT,RW message of the NDR mail
ndrRcptMessage OUT,RW part of the message specified for each recipient individually; it can refer to the "ndrRcptAddress" and "ndrRcptFailInfo" fields
ndrMessageFooter OUT,RW message ending of the NDR mail
ndrRcptAddress -,RO recipient address for which the delivery has failed. - can only be used when setting the "ndrRctpMessage" variable
ndrRcptFailInfo -,RO reason for which delivery has failed for a certain user - can only be used when setting the "ndrRcptMessage" variable
onTemporaryDeliveryFailure
Called when the mail delivery has temporarily failed for a certain group of recipients.
Variable Type/ Access Method
Explanation
mailFrom IN,RO the address the email was received from
mailFromLocalPart IN,RO local part of the address the email was received from
mailFromDomain IN,RO domain of the address the email was received from
mailFromAuthUser IN,RO address used for email authentication
rcptCount IN,RO no. of recipients for which the delivery failed
mailSize IN,RO mail size in octets
sendNDR OUT,RW f set to "yes" a temporary error NDR will be sent; the default setting is to "no"
ndrAttachSource OUT,RW
possible values: "no" - original email is not attached to the NDR, "yes" - original mail is entirely attached to the NDR, "header" - only the header of the original mail is attached to the NDR; default setting is to "header"
ndrSubject OUT,RW email subject sent as NDR (by default it is a hard-coded message)
ndrSender OUT,RW the Mail From field of the NDR header(set by default to mailer-daemon@<primaryDomain>)
ndrMessage OUT,RW message of the NDR mail
ndrRcptMessage OUT,RW part of the message specified for each recipient individually; it can refer to the "ndrRcptAddress" and "ndrRcptFailInfo" fields
ndrMessageFooter OUT,RW message ending of the NDR mail
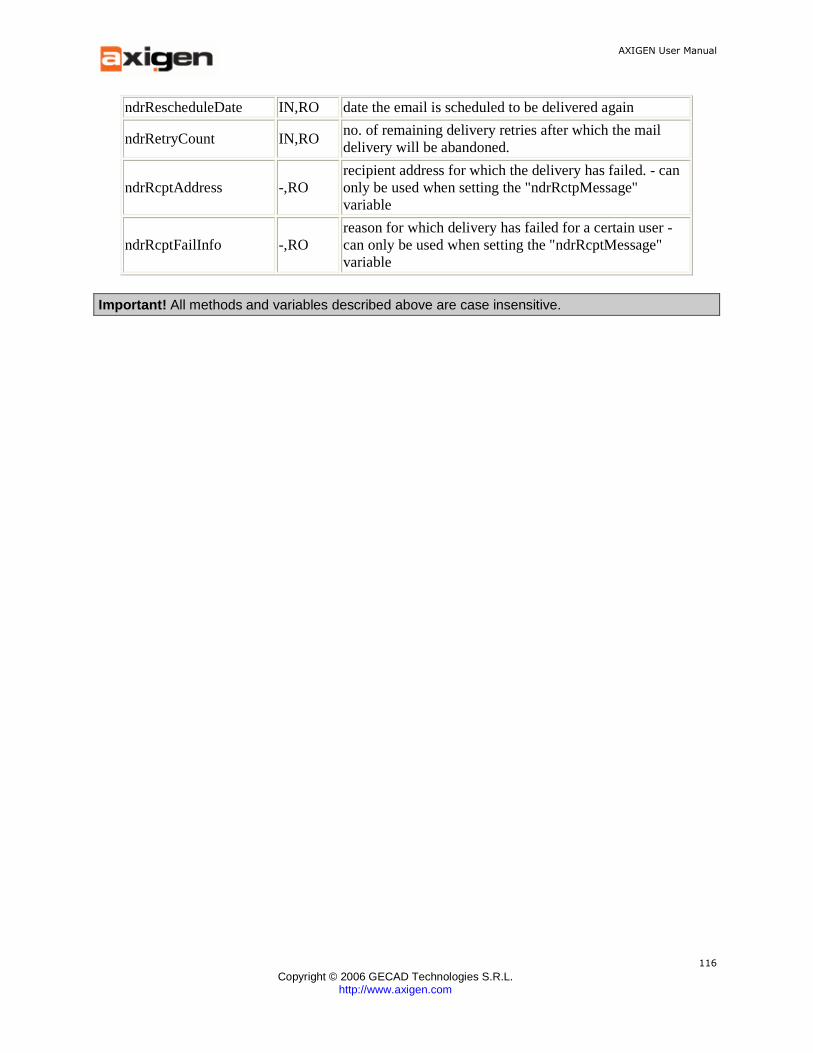
AXIGEN User Manual
Copyright © 2006 GECAD Technologies S.R.L.
http://www.axigen.com
116
ndrRescheduleDate IN,RO date the email is scheduled to be delivered again
ndrRetryCount IN,RO no. of remaining delivery retries after which the mail delivery will be abandoned.
ndrRcptAddress -,RO recipient address for which the delivery has failed. - can only be used when setting the "ndrRctpMessage" variable
ndrRcptFailInfo -,RO reason for which delivery has failed for a certain user - can only be used when setting the "ndrRcptMessage" variable
Important! All methods and variables described above are case insensitive.
AXIGEN User Manual
Copyright © 2006 GECAD Technologies S.R.L.
http://www.axigen.com
117
5. User and Domain Configuration
AXIGEN provides you with unmatched configurability for domain, user, forwarder and mail list configuration. For each type of entity, AXIGEN allows you to configure anything from services to run to advanced parameters regarding mailbox characteristics and WebMail behavior.
5.1. Domains
In AXIGEN, domain management has several features that give you full and easy control of administered domains while enabling you to fine tune resource allocation for each of these domains. Two administration tools allow you to create domain databases and domains:
• WebAdmin - also gives you access to all advanced domain configuration parameters, see Domains tab
• CLI - see Configuring AXIGEN using CLI for more details
Important! When creating domains, one message storage location is recommended for each predicted 20GB of message occupied storage space. For larger spaces, additional message storage locations should be created to correspond to the number of 20GB storages you need. You can add multiple message storage locations using CLI only within the domain creation context. After creating the domain, additional locations cannot be added. The command to create multiple message storage locations is as follows: ADD MessagesLocation <path>
Domain settings in AXIGEN are available at the following levels:
• General
You can define as many secondary domains as allowed by your license type, and for each of these domains, as many aliases as you need. For information on setting the primary domain in WebAdmin, see Other Generic Server Parameters. You can also specify the services to run for this domain, assign an IP address to this domain, set the mailbox quota for accounts within this domain and a message/account storage locations. See Domain General Configuration for information on how to configure general domain parameters using WebAdmin.
• Migration
If switching from a different mail server to AXIGEN, you can migrate all domain data automatically using WebAdmin, or using a script in CLI. This way, all domain accounts and messages are migrated effortlessly in a matter of minutes.
See Domain Migration Data for information on how to configure migration parameters using WebAdmin.

AXIGEN User Manual
Copyright © 2006 GECAD Technologies S.R.L.
http://www.axigen.com
118
• Filtering
For each configured domain, you can add and activate any number of filters. This way you can implement different security policies for different domains For general information on filter types available in AXIGEN, see Mail Filtering. For detailed information on how to configure filters, see Domain Filter Configuration. Domains and accounts can also be added using the Command Line Interface, but the best option for domain configuration is WebAdmin, which gives you easy access to all the categories of parameters mentioned above.
5.2. User Accounts
In AXIGEN, account and user management has several features that give you full and easy control of administered accounts while enabling you to fine tune resource allocation for each of these accounts. Note that in order to create an account you need to first create a domain. For details on how to create domains in AXIGEN, see the Creating a New Domain section. Two administration tools allow you to create domains and accounts:
• WebAdmin - also gives you access to all advanced account configuration parameters, see Accounts tab.
• CLI - see Configuring AXIGEN using CLI for more details
Account settings in AXIGEN are available at the following levels:
• General
You can define as many accounts as allowed by your license type, and for each of these accounts, as many aliases as you need. At the account level, you can also specify the services to run. This is a distinctive feature of AXIGEN, as you can easily selectively restrict access to one or more services (i.e. WebMail) for certain users within one domain. You can also view the current mailbox size for an account, specify the mailbox quota for accounts and limit the number of messages sent per hour from that account. See Account General Configuration for information on how to configure general domain parameters using WebAdmin.
• WebMail
For account behavior in WebMail, AXIGEN provides a variety of parameters allowing you to set attachment size and number limits, mail size limits, the maximum number of simultaneous sessions, and the HTML filtering level for email messages. You can make special settings for one account or use the one inherited from domain level. See Account WebMail Data for information on how to configure WebMail parameters using WebAdmin.
AXIGEN User Manual
Copyright © 2006 GECAD Technologies S.R.L.
http://www.axigen.com
119
• Filtering
For each configured account, you can add and activate any number of filters. This way you can implement different security policies for different accounts For general information on filter types available in AXIGEN, see Mail Filtering. For detailed information on how to configure filters, see Account Filter Configuration. Accounts can also be added using the Command Line Interface, but the best option for account configuration is WebAdmin, which gives you access to all the categories of parameters mentioned above.
5.3. Forwarders
Forwarders are functional entities meant to forward emails to specified email addresses. A forwarder is a RCPT in the domain to which it is assigned. Forwarders do not have an actual mailbox. Using forwarders, you can make sure that several recipients get email from a published email address (i.e. [email protected]). Also, you can change the recipient email addresses without having to change the published email address. The forwarder receives emails at the [email protected], where name is the value of the name
parameter and domain is the value of the domain parameter as set on forwarder definition. In AXIGEN, the maximum number of forwarders that can be defined for a server/domain cannot be greater than the number of licensed mailboxes. These administration tools allow you to create and configure forwarders:
• WebAdmin - also gives you access to all advanced forwarder configuration parameters, see Forwarders tab.
• CLI - see Configuring AXIGEN using CLI for more details.
5.4. Lists
List Server Overview In AXIGEN, the integrated list server provides advanced lists administration options. For each list, advanced parameters allow administrators to specify:
• AXIGEN services running, content type, what messages are moderated messages, what headers to remove.
• WebMail specific settings allow configuring the way mail lists are viewed and managed on the Web (see List WebMail Settings).
AXIGEN List Server also provides RFC compliant templates / macros for automated list interaction which allow you to add header text and other types of text before and after the message body. For each list, standard text messages can be specified to be returned in the following cases: invalid user name, unknown user, request needs confirmation, user already subscribed, rejected response, welcome text, goodbye text, subscribe denied, etc
All these advanced parameters guarantee easy list administration and easily definable custom appearance and behavior for each list. For information how to configure advanced parameters, see Advanced List Settings.
AXIGEN User Manual
Copyright © 2006 GECAD Technologies S.R.L.
http://www.axigen.com
120
Administration of the Mail List
The current version of AXIGEN Mail Server does not differentiate, from an operational point of view, a list administrator from a list moderator . This operational difference will be featured in a next version of AXIGEN Mail Server. Therefore, currently the person who creates the mail list will act as both administrator and moderator of the list created. Also, please note that, list users are distinct from user mailboxes, even if both entities are administered using AXIGEN Mail Server. Message Flow for AXIGEN List Server From the moderator / administrator point of view, the folders below describe the flow for a message sent to a list managed with AXIGEN Mail Server:
• INBOX: stores all messages that have been already delivered are to be delivered. • PendingRequests: stores all the requests that have to be confirmed by the administrator. The
administrator can confirm a message in this folder by moving it to ConfirmedRequests. • Requests: stores all requests that need to be confirmed by their senders (for instance
subscription requests). When such a confirmation is received and verified, the request is moved to ConfirmedRequests.
• ConfirmedRequests: stores all requests confirmed by their senders. • Pending: stores all messages that need to be moderated. The moderation is executed by
moving the corresponding message to:
1. INBOX (the message will be published) 2. Reject (the message is automatically rejected), 3. ToBeRejected (the message is stored for a future manual reject)
• Reject: When a message arrives in this folder, the sender of the message receives a reject message and the original message is moved to Deleted.
• ToBeRejected: stores messages that need to be manually rejected by one of the list moderators.
• Deleted: Here are stored all messages that have been rejected by list moderators.
From the mail list user point of view:
A mail list user would interact with the list in different stages: when subscribing to the mail list, when confirming his/her subscription, when making a request, when accessing the list WebMail page or root mailbox, etc. The answers received from the list server are generated automatically, depending on the initial configuration of the mail list (done by the administrator) and the administrator's corresponding actions.
Templates explained
From a mail list administrator/moderator point of view, most of the messages send as answers on a mail list created and operated with AXIGEN Mail Server are in fact expanded macros or templates. All macros have the following form:
%[-][width][.precision]{macro letter} Here is the algorithm used when expanding these mac ros: len = strlen(macro text); width default = 0;
AXIGEN User Manual
Copyright © 2006 GECAD Technologies S.R.L.
http://www.axigen.com
121
precision default = INT_MAX; left pading default = false; if minus => left pading = true; precision = min (len, precision); pading = max (0, min(512, pading - precision)); if left pading => the trailing spaces are inserted before macro text ; if not => the trailing spaces are inserted after th e macro text;
Here is the list of macro letters and their meanings:
• l - Name of the list • d - The domain name of the list. • r - A short description of the list. • o - Operation to be executed (this option is valid only for the answers sent to requests). • e - Address of the original message sender. • i - Identity confirmation. This is a message in the following format: "confirm {ID message}
{random number}" Note that this option can also be used as a boundary when building multipart messages.
• x - Row • M - Original message (populated only for answers to automatically rejected messages. • f - Sender of the message (can be either a name or an e-mail address). • w - Original message date. • s - Original message subject. • m - Original Message ID • n - The number of the digest message.
For detailed information on how to configure mail lists in WebAdmin, see Lists tab. Lists can also be configures using CLI - see Configuring AXIGEN using CLI.
5.5. Public Folders
Starting with version 2.0, AXIGEN supports Public Folders for the WebMail and IMAP services. System administrator can also associate a certain email address with a domain’s public folder. Thus, emails can be sent directly to the public folder, access being given instantly to all the account users within the respective domain.
Public folders are defined per each domain managed by AXIGEN. To have a functional public folder, system administrators have to first configure the public folder and its subfolders (or Mboxes) and then associate a Folder Recipient to each defined subfolder. The Postmaster of each domain can create and/or delete folders and messages within Public Folder, while the rest of the users have read writes only on the existing folders and messages.
Configuring Public Folders
When configuring parameters relative to public folders, first you need to choose the domain you want to edit. To do so, using WebAdmin, select the Domains tab, then click on the Edit button corresponding to the desired domain.
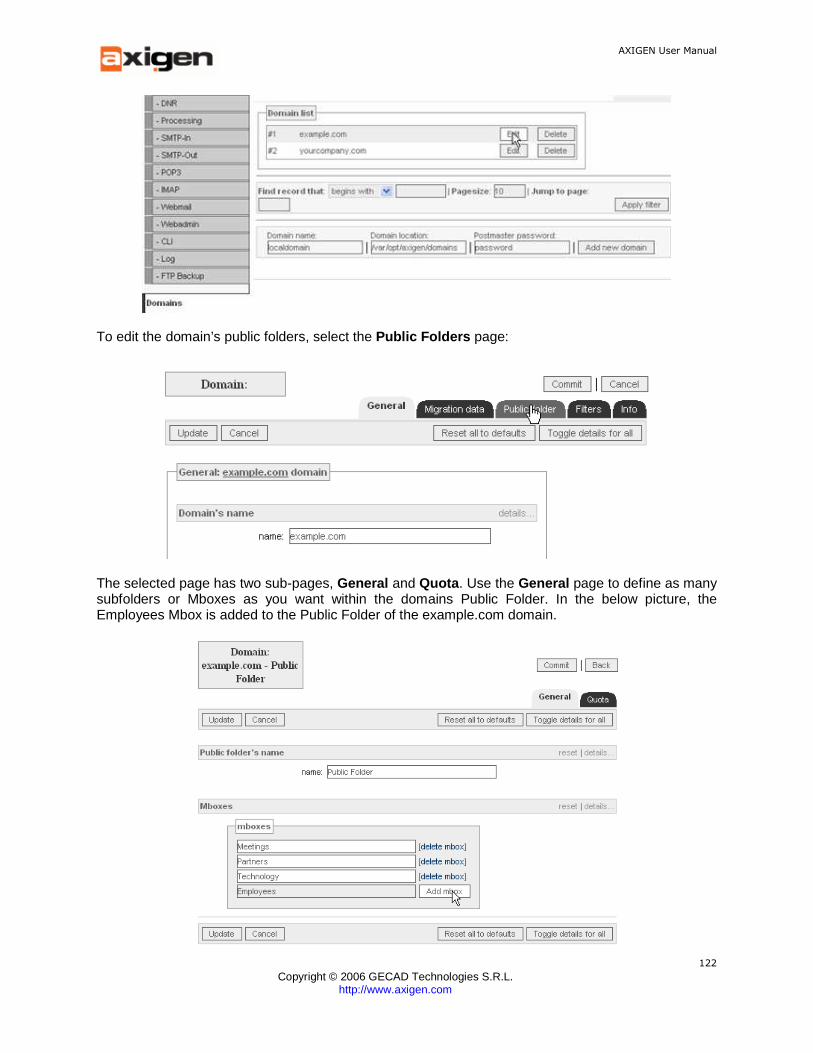
AXIGEN User Manual
Copyright © 2006 GECAD Technologies S.R.L.
http://www.axigen.com
122
To edit the domain’s public folders, select the Public Folders page:
The selected page has two sub-pages, General and Quota . Use the General page to define as many subfolders or Mboxes as you want within the domains Public Folder. In the below picture, the Employees Mbox is added to the Public Folder of the example.com domain.

AXIGEN User Manual
Copyright © 2006 GECAD Technologies S.R.L.
http://www.axigen.com
123
For further details on public folder parameters configuration via WebAdmin, see the corresponding documentation section.
Associating Folder Recipients to Public Folders
When defining public folders using the Domains tab, system administrators simply define the folders as they appear for domain users in the WebMail interface or in IMAP email clients. For example, the previously defined Meetings, Partners and Technology mboxes, will be displayed in the WebMail interface as in the following picture:
To actually associate an email address to a public folder Mbox, administrators need to define FolderRCPTs. Folder recipients are used to specify a certain folder within a domain's Public Folder to which email messages should be delivered. This feature is only available for mailboxes within the local domains and allows users to deliver messages directly to a specified folder in the recipient mbox. Folder recipients can be configured in WebAdmin using the FolderRCPTs tab. Within this tab, select the domain you are interested in and use the Mbox name to add a new FolderRCPT. In the next picture, the Employees folder recipient is created for the example.com domain’s public folder.

AXIGEN User Manual
Copyright © 2006 GECAD Technologies S.R.L.
http://www.axigen.com
124
When creating a folder recipient, an email address of the type mbox@domain will be created automatically, i.e. [email protected] in this specific case. Further sub-pages are available to configure all needed parameters.
For details on how to configure these parameters, see the FolderRCPTs tab in the WebAdmin configuration chapter.
AXIGEN User Manual
Copyright © 2006 GECAD Technologies S.R.L.
http://www.axigen.com
125
6. Working with the WebMail Module in AXIGEN
This chapter presents the AXIGEN WebMail Service and its features and configuration from a user's point of view. The sub-pages of this section will present in detail how to connect to the WebMail interface, how to manage the respective user account, how to add contacts to the address book or how to create or manage email messages and WebMail folders. When accessing the WebMail interface through a browser, the individual user can configure all parameters relative to their respective account, except for the mail quota limitations which are imposed by the system administrator. For an overview of the WebMail service in AXIGEN, see the corresponding section in the Architecture Chapter. For tips on how to configure WebMail parameters and behavior using WebAdmin, see the WebMail tab in the corresponding chapter.
6.1. Accessing the WebMail Interface
Connecting to AXIGEN WebMail
To connect to AXIGEN WebMail, enter in your browser the IP:port combination where your AXIGEN WebMail service is running. If you are accessing WebMail from the machine on which AXIGEN is installed, this address is by default, http://127.0.0.1:8000.
Remote access
If you are accessing the WebMail from a different machine, you need to set in the listener's address parameter the IP address of the machine on which AXIGEN is installed. Or, you can set this parameter to 0.0.0.0 (in this case, the listener will listen to all machine interfaces). When accessing the AXIGEN WebMail, you need to replace the 127.0.0.1 IP from the URL with the IP address of the machine on which the AXIGEN Mail Server is installed. For example, if the machine running AXIGEN has the 192.168.1.1 IP address, change the IP/port data under Server->Webmail->Listeners->Address to match your IP/port:server
... web { ... listeners = ( { ... address = 192.168.1.1:9000 enable = yes Remember to reload your AXIGEN Mail Server after each change in the configuration files.
In the window thus displayed, enter the WebMail username and password provided by the system administrator.
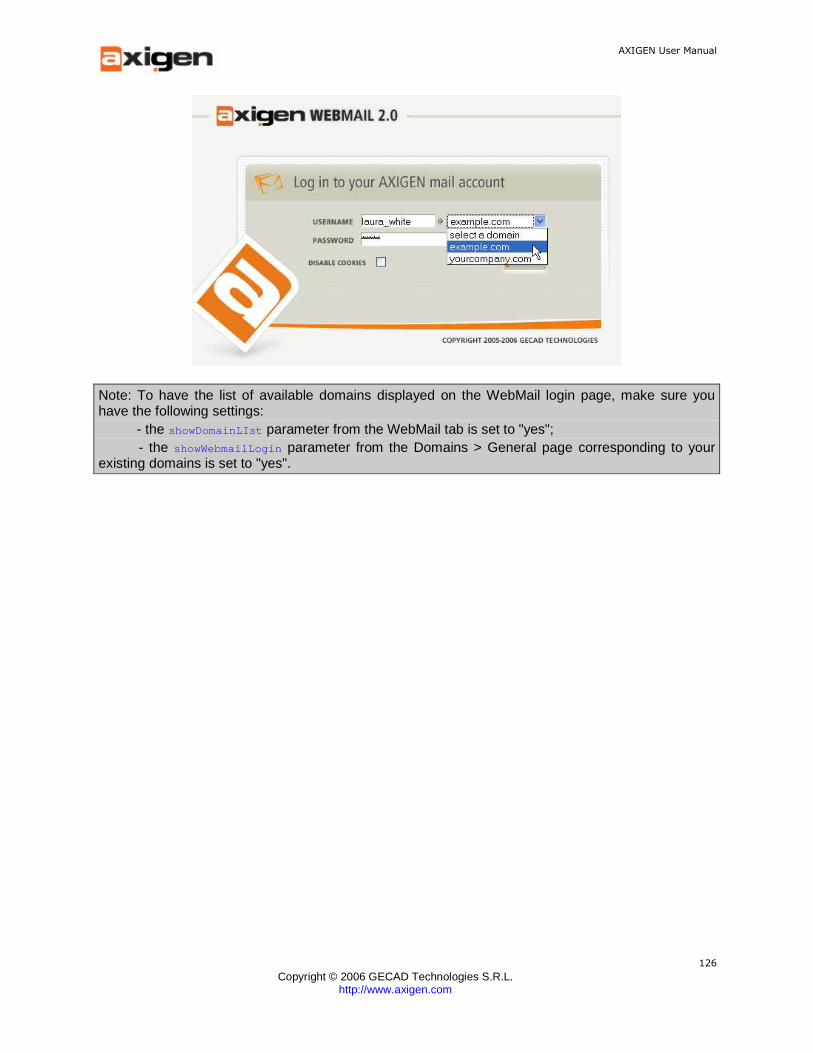
AXIGEN User Manual
Copyright © 2006 GECAD Technologies S.R.L.
http://www.axigen.com
126
Note: To have the list of available domains displayed on the WebMail login page, make sure you have the following settings: - the showDomainLIst parameter from the WebMail tab is set to "yes"; - the showWebmailLogin parameter from the Domains > General page corresponding to your existing domains is set to "yes".
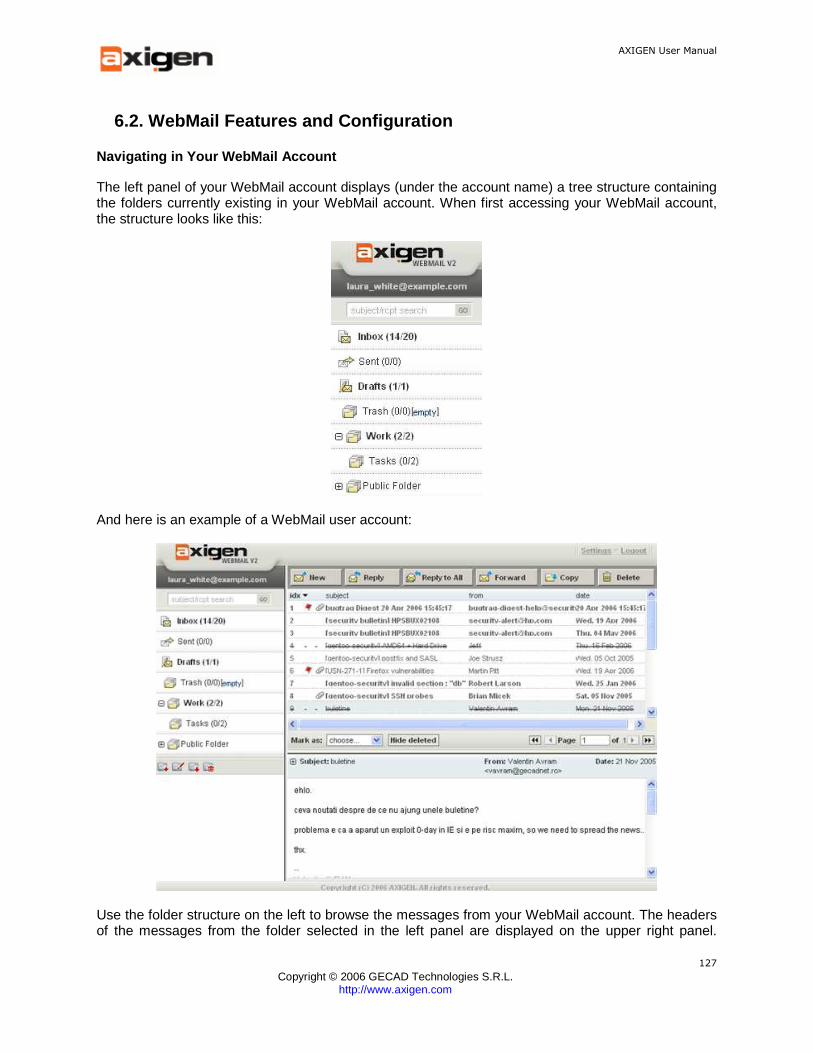
AXIGEN User Manual
Copyright © 2006 GECAD Technologies S.R.L.
http://www.axigen.com
127
6.2. WebMail Features and Configuration
Navigating in Your WebMail Account
The left panel of your WebMail account displays (under the account name) a tree structure containing the folders currently existing in your WebMail account. When first accessing your WebMail account, the structure looks like this:
And here is an example of a WebMail user account:
Use the folder structure on the left to browse the messages from your WebMail account. The headers of the messages from the folder selected in the left panel are displayed on the upper right panel.

AXIGEN User Manual
Copyright © 2006 GECAD Technologies S.R.L.
http://www.axigen.com
128
When selecting an email from the upper right panel by clicking on it, the message body will be displayed in the lower right Preview Pane. The Preview Pane can also be moved to the right of the
message list. By default, the Preview Pane displays the sender, recipient(s) and date details of
the email horizontally. To have them displayed vertically, press the "+" icon in front of the
Subject line, as shown in the below picture.
Through the Public Folders, users may now share email messages by simply copying and/or
moving them to a public folder. System administrator can also associate a certain email address
with a public folder. Thus, emails can be sent directly to the public folder, archiving options being
also available.
Creating/Renaming/Copying/Deleting Folders in WebMa il
Use the icons in the lower part of the left WebMail pane to create a new folder in your WebMail account, rename a currently existing folder, copy the current folder or delete the current folder.
The icons in this area have the following meanings:
• = create a new folder or a new sub-folder in an existing WebMail folder; • = rename current folder; • = move the current folder to the root structure or to another folder; • = delete the current folder.
When clicking on the any of the icons, a new pop-up window is displayed, allowing you to select on which folder you want to make changes. For example, when creating a new folder, the window below is displayed:

AXIGEN User Manual
Copyright © 2006 GECAD Technologies S.R.L.
http://www.axigen.com
129
Specify the name of the new folder in the Folder name text area and click on the Root icon (the first displayed) or on the folder you want as a parent, then press the Create button.
Working with messages in AXIGEN WebMail
• Main Button Bar
Use the New button to create a new email message. The Reply and Reply to All buttons allow you to reply to a particular email message or to all previously selected messages. Use the Forward button to redirect a received email to a different recipient and the Copy button to make a copy of an email message to a different folder. The Delete button allows you to delete the previously selected messages. For further actions on email messages, use the More actions drop down menu, which allows you to add a new contact, select a message, select all messages, invert a previous selection, deselect all messages or forward an email as attachment.
• Searching within your email account
You can search through the existing email messages stored in your account using the search option in the left uppermost corner of the WebMail page, above the folders tree structure.
The Search function also supports internationalized searches. Having this feature, language-specific characters can now be used when running a search (i.e. using diacritics). Type your search query in the search filed, then press the Go button. The search results will be displayed in the same window.
• Marking messages
To mark a message, you must first select it in the upper panel by clicking on it. Then choose one of the options displayed in the Mark as dropdown box:
• Select Mark as read to set the status of the currently selected message(s) to Read. • Select Mark as not read to set the status of the currently selected message(s) to Not read.

AXIGEN User Manual
Copyright © 2006 GECAD Technologies S.R.L.
http://www.axigen.com
130
• Select Flagged to add a flag to the currently selected message(s). • Select Not Flagged to delete the flag for the currently selected message(s). This option is only
available for previously flagged messages. • Select Deleted to mark a message as deleted (it will be displayed in strikethrough style).
When marking certain messages as deleted, you can also choose to hide them by pressing the Hide deleted button
• Select Not deleted to remove a deleted mark from a certain email message.
• Deleting messages
To delete one or more messages, select the message(s) and click on the Delete button under the Settings and Logout buttons (lower part, WebMail upper right panel). Depending on the value set by the administrator in the account.cfg file for deleteToTrash parameter or of the corresponding user setting in WebMail, the deleted message will be sent to the Trash folder or be permanently deleted.
• Composing a new message
To compose a message, press the New button. A pop-up window similar to the one below is displayed.
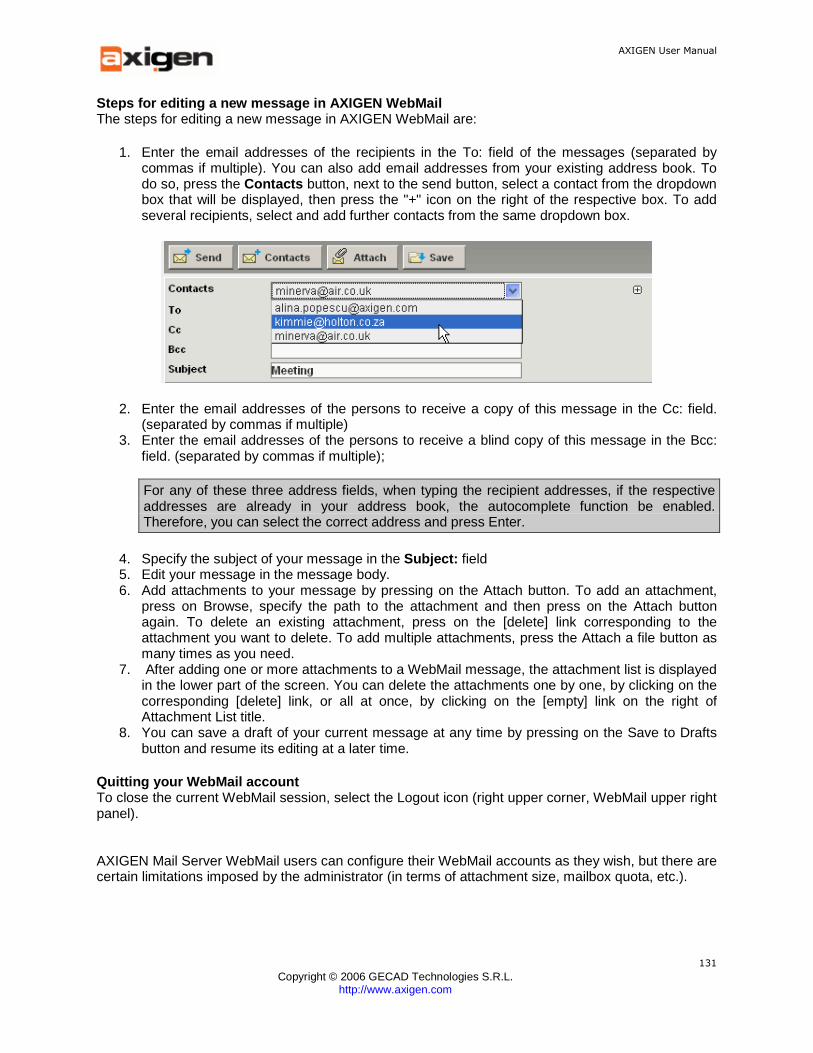
AXIGEN User Manual
Copyright © 2006 GECAD Technologies S.R.L.
http://www.axigen.com
131
Steps for editing a new message in AXIGEN WebMail The steps for editing a new message in AXIGEN WebMail are:
1. Enter the email addresses of the recipients in the To: field of the messages (separated by commas if multiple). You can also add email addresses from your existing address book. To do so, press the Contacts button, next to the send button, select a contact from the dropdown box that will be displayed, then press the "+" icon on the right of the respective box. To add several recipients, select and add further contacts from the same dropdown box.
2. Enter the email addresses of the persons to receive a copy of this message in the Cc: field. (separated by commas if multiple)
3. Enter the email addresses of the persons to receive a blind copy of this message in the Bcc: field. (separated by commas if multiple);
For any of these three address fields, when typing the recipient addresses, if the respective addresses are already in your address book, the autocomplete function be enabled. Therefore, you can select the correct address and press Enter.
4. Specify the subject of your message in the Subject: field 5. Edit your message in the message body. 6. Add attachments to your message by pressing on the Attach button. To add an attachment,
press on Browse, specify the path to the attachment and then press on the Attach button again. To delete an existing attachment, press on the [delete] link corresponding to the attachment you want to delete. To add multiple attachments, press the Attach a file button as many times as you need.
7. After adding one or more attachments to a WebMail message, the attachment list is displayed in the lower part of the screen. You can delete the attachments one by one, by clicking on the corresponding [delete] link, or all at once, by clicking on the [empty] link on the right of Attachment List title.
8. You can save a draft of your current message at any time by pressing on the Save to Drafts button and resume its editing at a later time.
Quitting your WebMail account To close the current WebMail session, select the Logout icon (right upper corner, WebMail upper right panel). AXIGEN Mail Server WebMail users can configure their WebMail accounts as they wish, but there are certain limitations imposed by the administrator (in terms of attachment size, mailbox quota, etc.).

AXIGEN User Manual
Copyright © 2006 GECAD Technologies S.R.L.
http://www.axigen.com
132
WebMail Account Settings
To access the WebMail account parameters, press the Settings button on the upper menu bar, next to the Logout button. When pressing the button, users are given access to five configuration tabs:
• Personal Data - containing options relative to the user's personal details; • Contacts - listing the page of available contact and allowing users to add new contact details; • WebMail Data - gives access to settings managing the webmail account behavior (all these
parameters can be configured via WebAdmin from the Account > WebMail Data page); • Filters - gives access to filter configuration using the AXIGEN Rules Wizard; • Account Info - quota related parameters can be viewed in this page.
6.2.1. Configuring Personal Data
While on the Personal Data page, users can define personal details such as their first and last name. They can also change the current password to their WebMail account.

AXIGEN User Manual
Copyright © 2006 GECAD Technologies S.R.L.
http://www.axigen.com
133
To set your first and last name, use the two corresponding text fields, First name and Last name . You can set further personal details using the Nickname and Personal email fields. The first one allows you to choose a nickname to be used and the second to specify a personal email, for non-professional purposes.
You can specify your phone numbers in the Phone and Mobile Phone fields. To specify your home phone and address data, use the Home address and Home phone fields.
Use the Business phone , Business address and Business email fields to specify your office contact details.
The password previously defined by the administrator when creating the account can be changed from the Personal Data page. To do so, users have to first type their current password in the Old password field, then type a new one using the Password field and finally confirm the new selected password in the Retype password field .
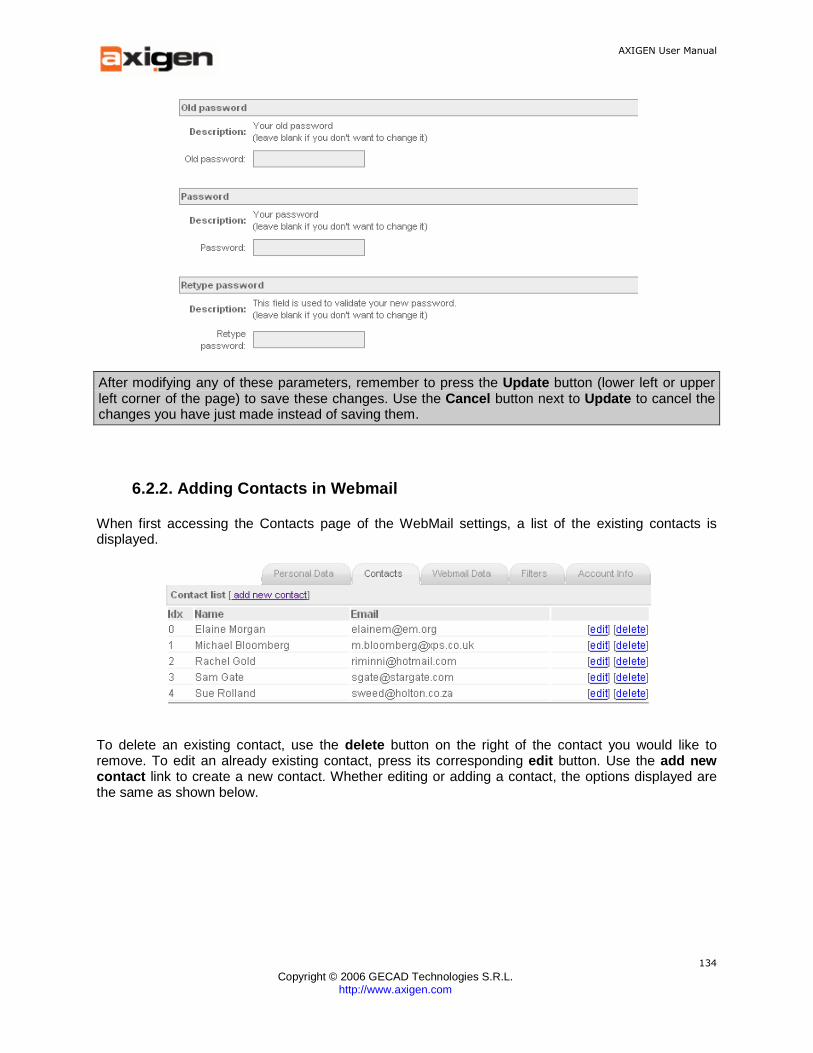
AXIGEN User Manual
Copyright © 2006 GECAD Technologies S.R.L.
http://www.axigen.com
134
After modifying any of these parameters, remember to press the Update button (lower left or upper left corner of the page) to save these changes. Use the Cancel button next to Update to cancel the changes you have just made instead of saving them.
6.2.2. Adding Contacts in Webmail
When first accessing the Contacts page of the WebMail settings, a list of the existing contacts is displayed.
To delete an existing contact, use the delete button on the right of the contact you would like to remove. To edit an already existing contact, press its corresponding edit button. Use the add new contact link to create a new contact. Whether editing or adding a contact, the options displayed are the same as shown below.
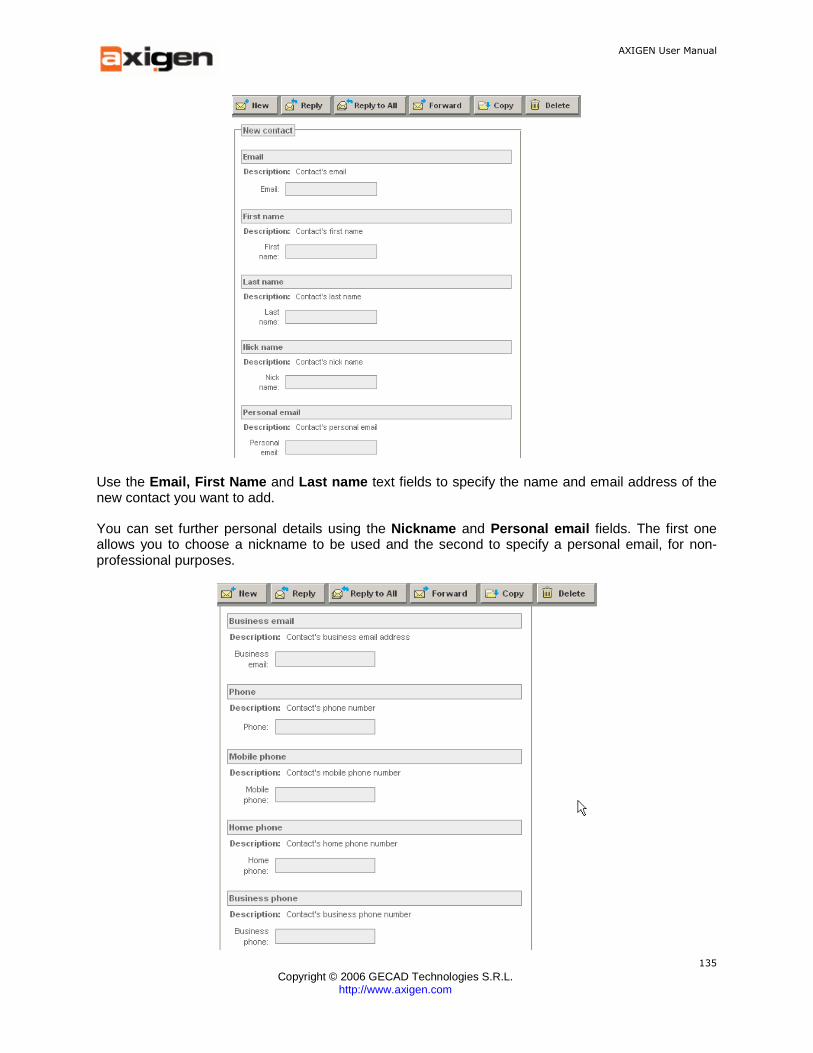
AXIGEN User Manual
Copyright © 2006 GECAD Technologies S.R.L.
http://www.axigen.com
135
Use the Email, First Name and Last name text fields to specify the name and email address of the new contact you want to add.
You can set further personal details using the Nickname and Personal email fields. The first one allows you to choose a nickname to be used and the second to specify a personal email, for non-professional purposes.

AXIGEN User Manual
Copyright © 2006 GECAD Technologies S.R.L.
http://www.axigen.com
136
Using the Business email field you can specify the business email address for your new contact. You can specify the contact's phone numbers in the Phone and Mobile Phone fields. To specify the home phone and address data, use the Home address and Home phone fields.
Use the Business phone and Business address fields to specify the office contact details. You can further use the Notes text field to type any information regarding the currently edited contact.
Should these parameters not suffice in defining your contacts, you can add new attributes and values to the predefined ones existing in WebMail.
Use the add new element button to add extra fields for the currently edited contact. Each such attribute is defined by a name and a value assigned to the given name. To delete an element, use the delete button corresponding to its name and value.
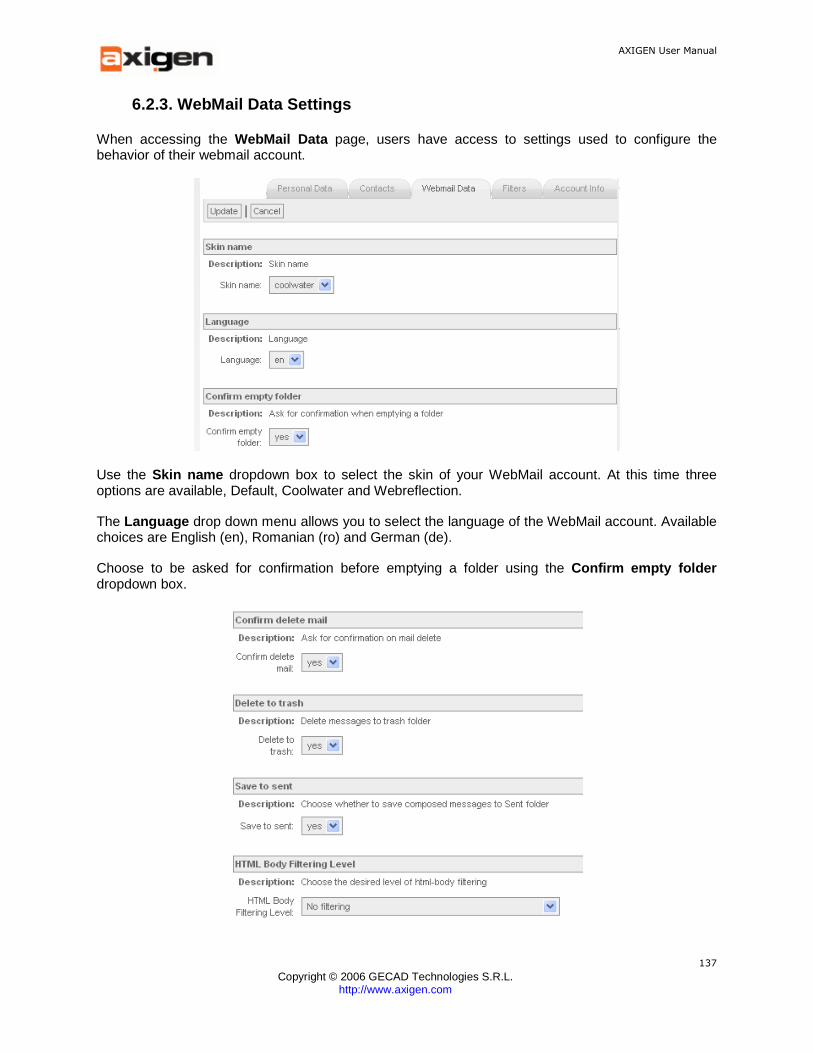
AXIGEN User Manual
Copyright © 2006 GECAD Technologies S.R.L.
http://www.axigen.com
137
6.2.3. WebMail Data Settings
When accessing the WebMail Data page, users have access to settings used to configure the behavior of their webmail account.
Use the Skin name dropdown box to select the skin of your WebMail account. At this time three options are available, Default, Coolwater and Webreflection.
The Language drop down menu allows you to select the language of the WebMail account. Available choices are English (en), Romanian (ro) and German (de).
Choose to be asked for confirmation before emptying a folder using the Confirm empty folder dropdown box.
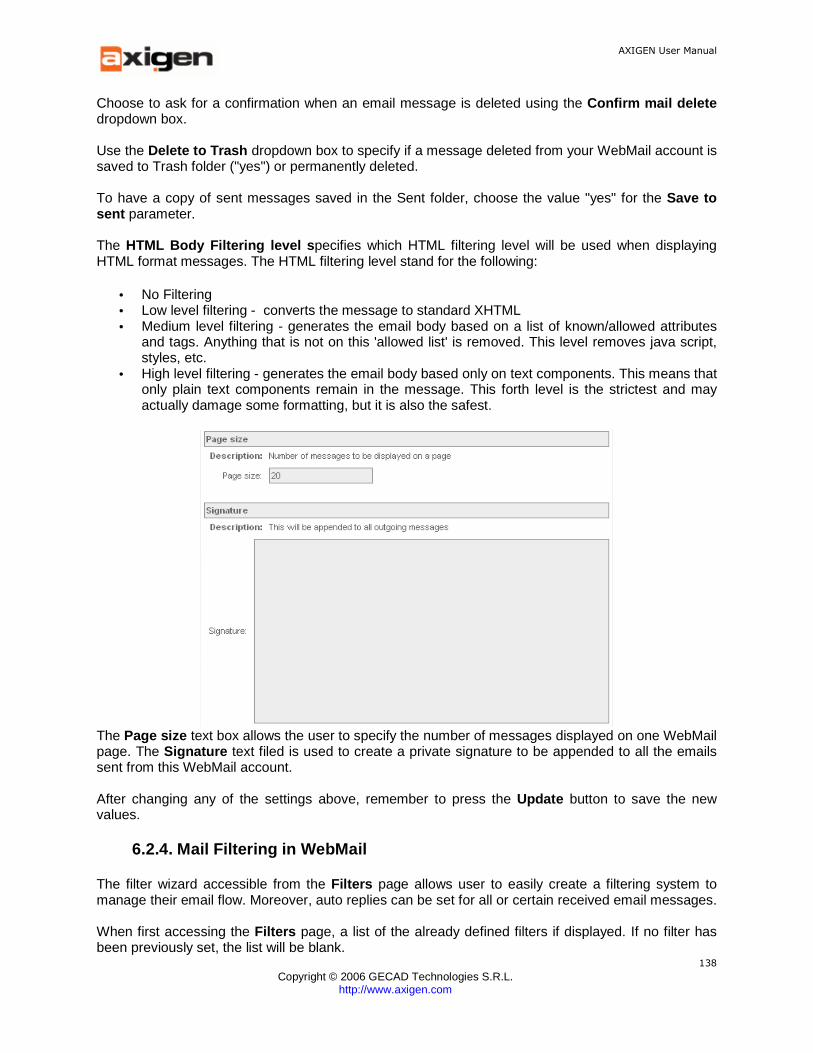
AXIGEN User Manual
Copyright © 2006 GECAD Technologies S.R.L.
http://www.axigen.com
138
Choose to ask for a confirmation when an email message is deleted using the Confirm mail delete dropdown box. Use the Delete to Trash dropdown box to specify if a message deleted from your WebMail account is saved to Trash folder ("yes") or permanently deleted. To have a copy of sent messages saved in the Sent folder, choose the value "yes" for the Save to sent parameter. The HTML Body Filtering level s pecifies which HTML filtering level will be used when displaying HTML format messages. The HTML filtering level stand for the following:
• No Filtering • Low level filtering - converts the message to standard XHTML • Medium level filtering - generates the email body based on a list of known/allowed attributes
and tags. Anything that is not on this 'allowed list' is removed. This level removes java script, styles, etc.
• High level filtering - generates the email body based only on text components. This means that only plain text components remain in the message. This forth level is the strictest and may actually damage some formatting, but it is also the safest.
The Page size text box allows the user to specify the number of messages displayed on one WebMail page. The Signature text filed is used to create a private signature to be appended to all the emails sent from this WebMail account. After changing any of the settings above, remember to press the Update button to save the new values.
6.2.4. Mail Filtering in WebMail
The filter wizard accessible from the Filters page allows user to easily create a filtering system to manage their email flow. Moreover, auto replies can be set for all or certain received email messages. When first accessing the Filters page, a list of the already defined filters if displayed. If no filter has been previously set, the list will be blank.
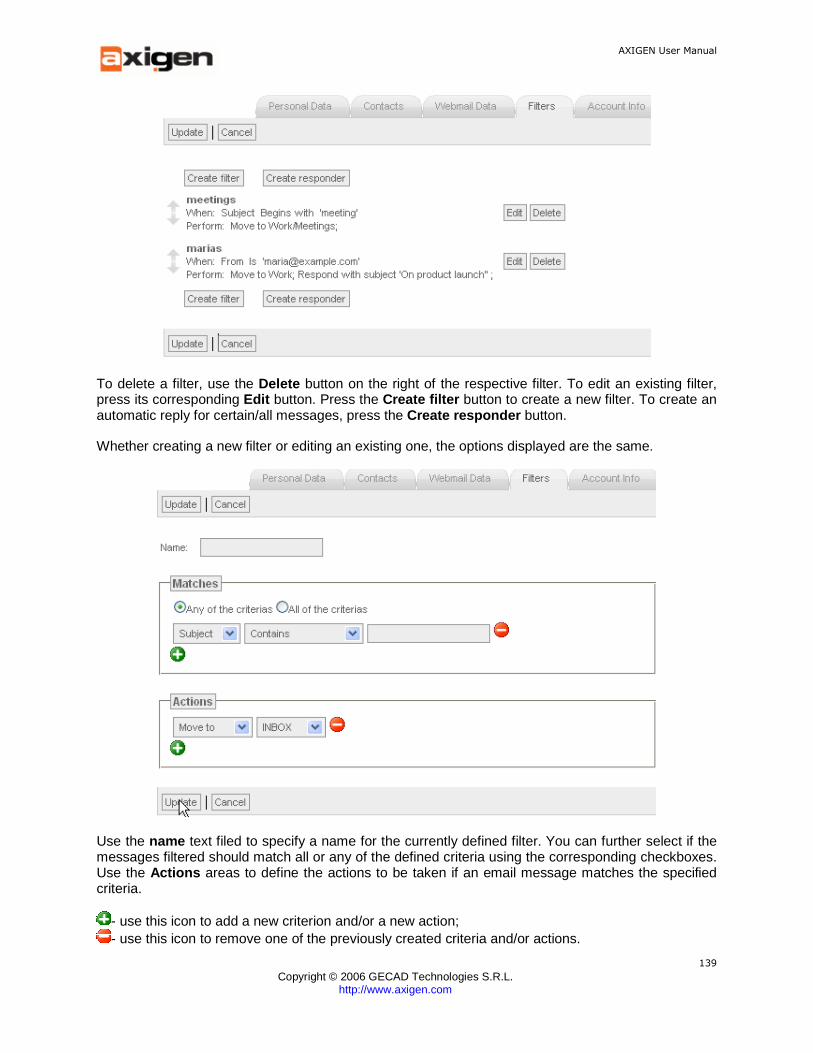
AXIGEN User Manual
Copyright © 2006 GECAD Technologies S.R.L.
http://www.axigen.com
139
To delete a filter, use the Delete button on the right of the respective filter. To edit an existing filter, press its corresponding Edit button. Press the Create filter button to create a new filter. To create an automatic reply for certain/all messages, press the Create responder button.
Whether creating a new filter or editing an existing one, the options displayed are the same.
Use the name text filed to specify a name for the currently defined filter. You can further select if the messages filtered should match all or any of the defined criteria using the corresponding checkboxes. Use the Actions areas to define the actions to be taken if an email message matches the specified criteria.
- use this icon to add a new criterion and/or a new action; - use this icon to remove one of the previously created criteria and/or actions.
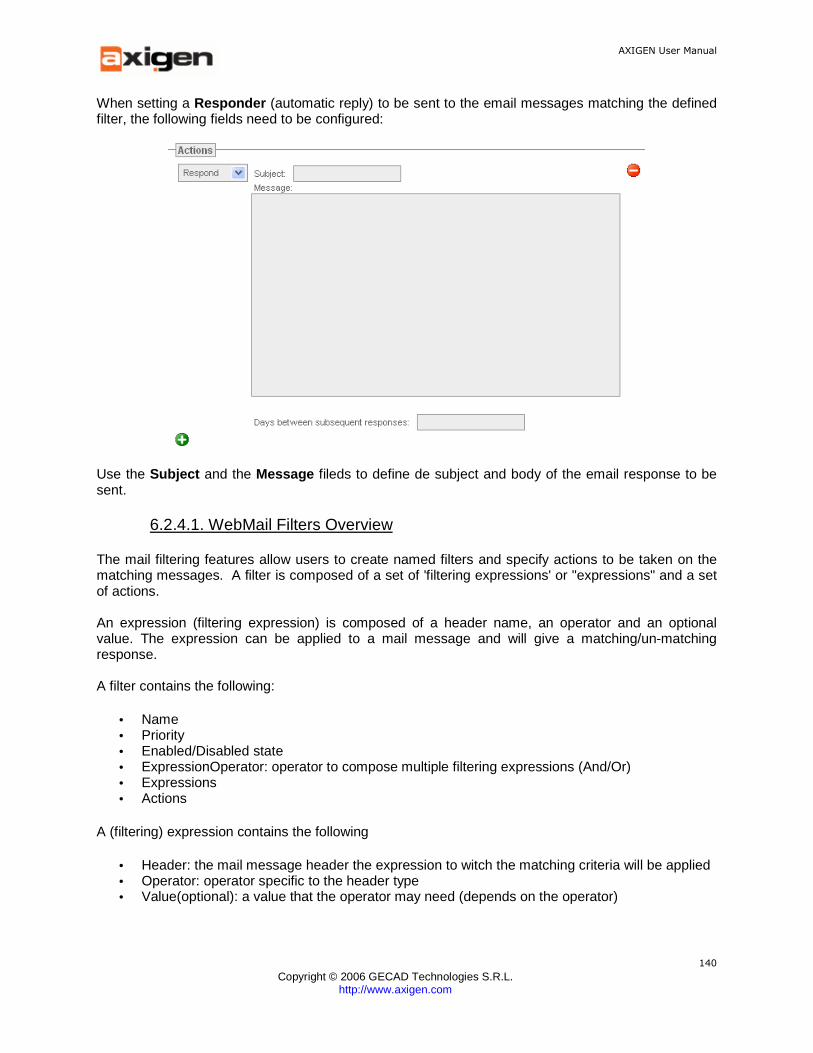
AXIGEN User Manual
Copyright © 2006 GECAD Technologies S.R.L.
http://www.axigen.com
140
When setting a Responder (automatic reply) to be sent to the email messages matching the defined filter, the following fields need to be configured:
Use the Subject and the Message fileds to define de subject and body of the email response to be sent.
6.2.4.1. WebMail Filters Overview
The mail filtering features allow users to create named filters and specify actions to be taken on the matching messages. A filter is composed of a set of 'filtering expressions' or "expressions" and a set of actions. An expression (filtering expression) is composed of a header name, an operator and an optional value. The expression can be applied to a mail message and will give a matching/un-matching response. A filter contains the following:
• Name • Priority • Enabled/Disabled state • ExpressionOperator: operator to compose multiple filtering expressions (And/Or) • Expressions • Actions
A (filtering) expression contains the following
• Header: the mail message header the expression to witch the matching criteria will be applied • Operator: operator specific to the header type • Value(optional): a value that the operator may need (depends on the operator)
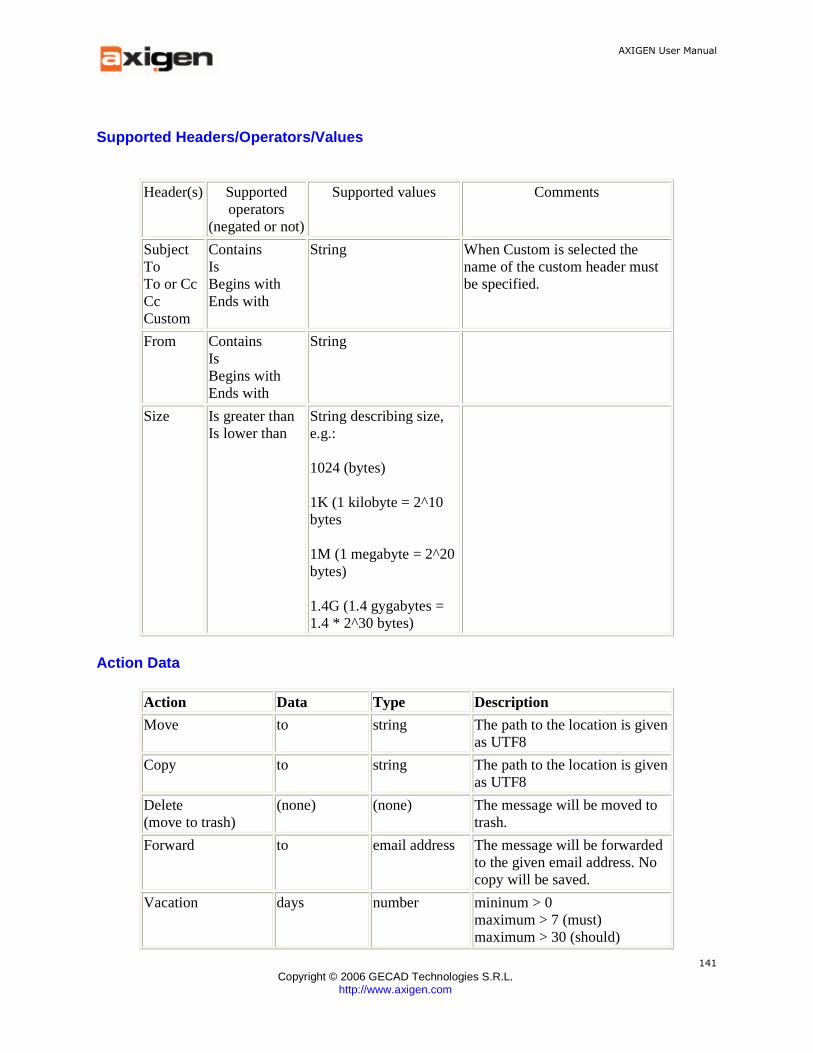
AXIGEN User Manual
Copyright © 2006 GECAD Technologies S.R.L.
http://www.axigen.com
141
Supported Headers/Operators/Values
Header(s) Supported operators
(negated or not)
Supported values Comments
Subject To To or Cc Cc Custom
Contains Is Begins with Ends with
String When Custom is selected the name of the custom header must be specified.
From Contains Is Begins with Ends with
String
Size Is greater than Is lower than
String describing size, e.g.: 1024 (bytes) 1K (1 kilobyte = 2^10 bytes 1M (1 megabyte = 2^20 bytes) 1.4G (1.4 gygabytes = 1.4 * 2^30 bytes)
Action Data
Action Data Type Description
Move to string The path to the location is given as UTF8
Copy to string The path to the location is given as UTF8
Delete (move to trash)
(none) (none) The message will be moved to trash.
Forward to email address The message will be forwarded to the given email address. No copy will be saved.
Vacation days number mininum > 0 maximum > 7 (must) maximum > 30 (should)

AXIGEN User Manual
Copyright © 2006 GECAD Technologies S.R.L.
http://www.axigen.com
142
if omitted, days defaults to 7 or minimum (whichever is greater) if given value > maximum, days defaults to maximum if given value < minimum, days defaults to minimum
subject string (utf8) Alternate subject for response. If not given, the incoming mail's subject is used
text string (utf8) Body of the response message.
Filter Container
The FilterContainer is responsible for serializing an ordered collection of filters into a file and for parsing a sieve script that contains one or more filters. The parts of the scripts that are not recognized are stored as raw text in memory. When doing the serialization, the container will reorder the scripts. The ones that were edited by WebMail will be written at the beginning of the file while all 'raw' scripts will be written at the end. A script is recognized as being a WebMail script if:
• contains only directives that have been implemented in webmail filters • has a header with the following data:
o Name: user specified string o Id: internal integer to uniquely identify the script o Position: integer used for ordering the scripts o Enabled: boolean
If the script has a header but has been edited by hand to contain other directives it is rejected and put into the raw scripts collection.
If the script does not have a header but can be handled as a WebMail script it will be given an auto-generated id, a last position in the list and an auto-generated name.
Examples
HeaderType enum HeaderType { NO_HEADER = 0, SUBJECT, TO, CC, TO_OR_CC, FROM, SIZE, CUSTOM };

AXIGEN User Manual
Copyright © 2006 GECAD Technologies S.R.L.
http://www.axigen.com
143
OperatorType enum OperatorType { NO_OPERATOR = 0, CONTAINS, IS, BEGINS_WITH, ENDS_WITH, IS_GREATER_THAN, IS_LOWER_THAN }; Operator typedef struct Operator_ { bool neg; OperatorType op; } Operator; ActionType enum ActionType { NO_ACTION = 0, MOVE, COPY, DELETE, FORWARD, VACATION }; Filter class Filter { public: bool getEnabled(); void setEnabled(bool value); int getPosition(); void setPosition(int value); const char* getName(); void setName(const char* value); enum ExpressionOperatorType { NO_EXPRESSION_OPERATOR = 0, AND, OR }; ExpressionOperatorType getOperator(); void setOperator(ExpressionOperatorType value); int addExpression(HeaderType header, const Operator & op, const char* value); int addExpression(const char* customHeader, const O perator& op, const char* value); HVector& getExpressions(); int addActionWithLocation(ActionType action, const char* path); int addActionDelete(); int addActionVacation(int days_ = 0, const char* su bject_ = 0, const char* text_ = 0); int addActionForward(const char* emailAddress);
AXIGEN User Manual
Copyright © 2006 GECAD Technologies S.R.L.
http://www.axigen.com
144
HVector& getActions() int serializeTo(Stream* stream); bool isValid(); Filter(); ~Filter(); }; filter->addExpression(header, condition, value); filter->addVacation(days, subject, text); filter->addAction(type, value); expr->getOperatorName(); action->getDestinationName(); action->getActionName()
Expression class Expression { public: HeaderType getHeader(); const char* getCustomHeader(); int setHeader(HeaderType value); int setHeader(const char* customHeaderName); Operator getOperator(); int setOperator(Operator value); const char* getValue(); void setValue(const char* value_); bool isValid(); void clear(); }; Action class Action { public: static const int MINIMUM_DAYS; static const int MAXIMUM_DAYS; static const int DEFAULT_DAYS; ActionType getAction(); int setAction(ActionType action); const char* getPath(); int setPath(const char* value); const char* getAddress(); int setAddress(const char* value); int getDays(); int setDays(int value); const char* getSubject(); int setSubject(const char* value);
AXIGEN User Manual
Copyright © 2006 GECAD Technologies S.R.L.
http://www.axigen.com
145
const char* getText(); int setText(const char* value); bool isValid(); void clear(); }; FilterContainer class FilterContainer { public: static FilterContainer* create(const char *filterFi lePath); ~FilterContainer(); bool isExpired(UINT64 currentTime) const; const HVector* getFilterList() const; const Filter* getFilter(const Key *) const; int addFilter(Filter *filter); int removeFilter(const Key *); int save(); int setOrder(const HVector<Key*> *list); int updateFilter(const Key*, Filter *); private: FilterContainer(const char *filterFilePath); };
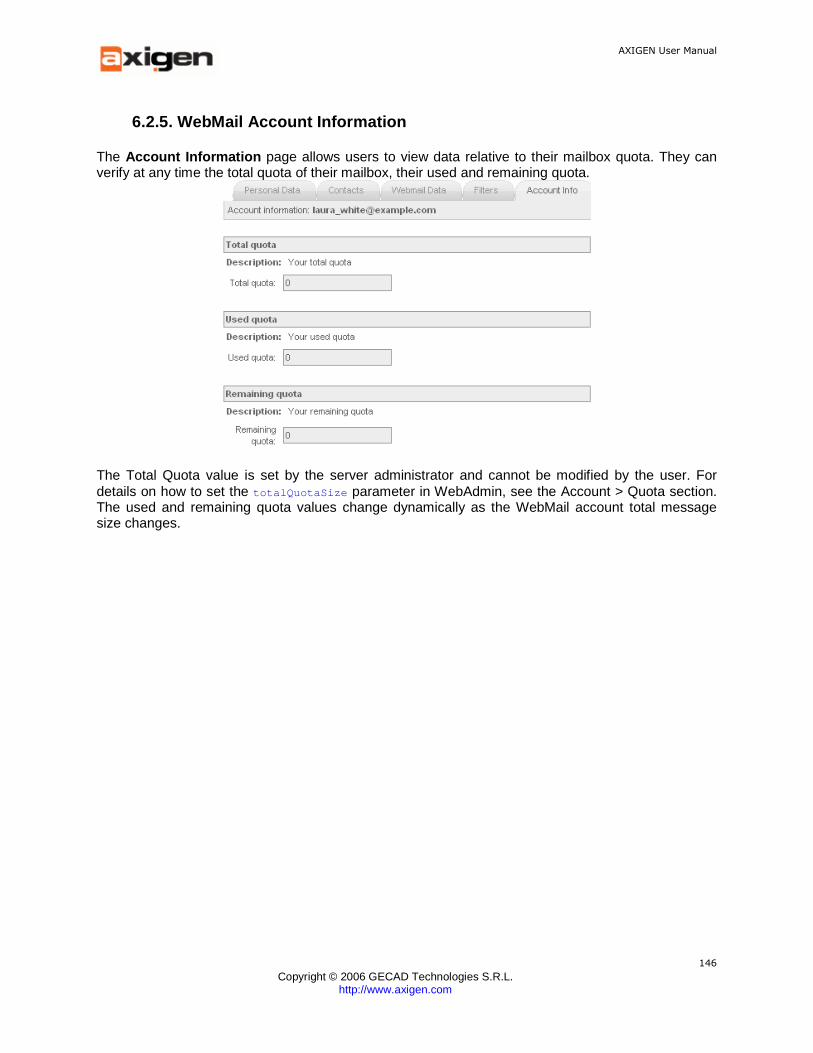
AXIGEN User Manual
Copyright © 2006 GECAD Technologies S.R.L.
http://www.axigen.com
146
6.2.5. WebMail Account Information
The Account Information page allows users to view data relative to their mailbox quota. They can verify at any time the total quota of their mailbox, their used and remaining quota.
The Total Quota value is set by the server administrator and cannot be modified by the user. For details on how to set the totalQuotaSize parameter in WebAdmin, see the Account > Quota section. The used and remaining quota values change dynamically as the WebMail account total message size changes.

AXIGEN User Manual
Copyright © 2006 GECAD Technologies S.R.L.
http://www.axigen.com
147
7. Administration Tools Overview
AXIGEN Mail Server provides several alternatives for mail server administration.
• Config file
The configuration file allows you to perform extensive configuration by manually editing this text file - axigen.cfg. This administration method allows fine tuning the server functioning to existing hardware configuration and mailing requirements. Experienced System Administrators have a readily accessible method of setting both basic and very advanced parameters directly, without going through an administration interface.
For information on using the axigen.cfg file, see Configuring AXIGEN using axigen.cfg
• WebAdmin
WebAdmin is a central administration Web interface that allows configuring the mailserver using a tab-organized GUI. Allowing secure access (HTTPS protocol), WebAdmin provides fully described parameters (long description, default values, possible values, suggested values). WebAdmin allows configuring the email server remotely, over the Internet and provides access to most parameters for every module. This configuration method is highly intuitive, has a fast learning curve and can be used by anyone with users-level skills.
For detailed information on how to use WebAdmin, see Configuring AXIGEN using WebAdmin.
• CLI Command line configuration interface
CLI is a TCP service with specified dedicated socket accessible using Telnet applications and Netcat. CLI provides added functionality as, apart from providing an alternate method of performing basic configuration tasks, it allows automating administration tasks using scripts (adding users, migration). For detailed information on how to use CLI, see Configuring AXIGEN using CLI.
AXIGEN User Manual
Copyright © 2006 GECAD Technologies S.R.L.
http://www.axigen.com
148
8. Configuring AXIGEN using WebAdmin
WebAdmin Overview
AXIGEN WebAdmin is the recommended administration tool for AXIGEN. While alternative methods are provided (Command Line Interface, text-editable configuration file), WebAdmin is the most intuitive and user-friendly. WebAdmin is a web-based configuration interface, tested for all standard Internet browsers (Mozilla, Internet Explorer, Netscape) which gives you access to all configuration parameters for all services in AXIGEN Mail Server. Functionally, it is considered an AXIGEN service, and it can be started and stopped at any time. WebAdmin is enabled by default in the latest versions of AXIGEN Mail Server, and can be accessed by default on the 127.0.0.1:9000 address. For information on how to manually enable Webadmin, and set the Webadmin admin password, see Enabling WebAdmin Interface and Setting the Admin Password. The current chapter Configuring AXIGEN using WebAdmin is dedicated to configuration options provided in WebAdmin, acting as a complete Administration Guide for AXIGEN Mail Server. It provides information on the configuration of all parameters included in the respective tabs.
When a parameter is discussed in a subsection of this chapter, information on its type, class and values as they appear in the configuration file, axigen.cfg , is displayed. This is to provide you with an alternate configuration method and give you a better idea of where to find that parameter in the configuration file. For more information on the structure of axigen.cfg and how to work with it, see Configuring AXIGEN using the configuration file.
WebAdmin Features
The WebAdmin service, offers a wide range of functionalities which make it extremely configurable and secure.
Connection Thread Control
AXIGEN can run on a large variety of systems and machines, in networks with very different traffic loads, structures, domain configurations, user rights, authorization procedures, etc. Depending on your specific network specifications and conditions, you can adapt the workload to the server's processing power, in order to prevent a system overload (with maxConnThreads ) or to improve server performance (with minConnThreads ). These two complementary parameters define the lower and upper limit for the number of threads that are opened at any given moment by the AXIGEN WebAdmin module. With maxConnThreads you can set the maximum number of threads that can be opened at a specific moment of time and prepare for unforeseen peaks in server activity to avoid a system overload. With minConnThreads you can set the minimum number of threads that can be opened at a specific moment of time. This is important because even when there is no activity for AXIGEN Mail Server, a large number of service requests may arrive at any moment. At that time, the number of threads
AXIGEN User Manual
Copyright © 2006 GECAD Technologies S.R.L.
http://www.axigen.com
149
specified using minConnThreads threads will already have a "waiting" status, thus ready to process service requests in good conditions, without delays. For information on how to configure connection thread control parameters for WebAdmin, see WebAdmin Connection Thread Control.
Log Control
Just like all the other AXIGEN main services, the WebAdmin module can log different types of events. The system administrator can specify what events are logged, where and how they are logged. The WebAdmin Log Control function can be configured using the following three attributes: logLevel , logType and logHost . See Logging service for more details on logging in AXIGEN. For information on how to configure log control parameters for WebAdmin, see WebAdmin Log Control.
WebAdmin Connection and Session Control
In WebAdmin, you can either allow or disallow persistent connections to the service and impose time limits on sessions, either active or idle. By doing this, you can better manage security and resource related issues. For information on how to configure connection and session control parameters for WebAdmin, see WebAdmin Connection and Session Control.
HTTP Limits for WebAdmin
WebAdmin allows you to set HTTP limits for any request made to the WebAdmin service. This prevents you from automatically accepting excessive amounts of data (HTTP headers, HTTP body and upload data).
For information on how to configure HTTP limits for WebAdmin, see WebAdmin HTTP Limits.
Secure WebAdmin Connections
In WebAdmin, you can define any number of SSL rules, which allow you to redirect plain connections to secure sockets. This way, you grant certain WebAdmin users, connecting from certain addresses, secure access to WebAdmin. For information on how to configure SSL rules for WebAdmin, see WebAdmin URL Redirect Rules.
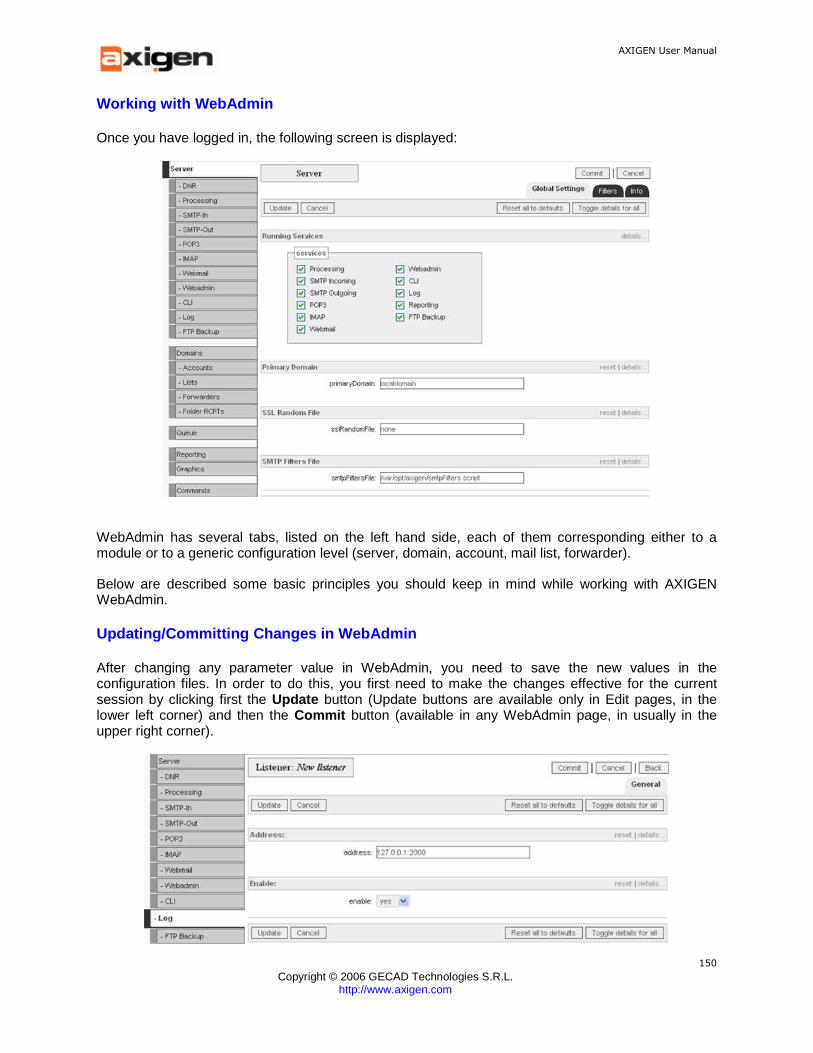
AXIGEN User Manual
Copyright © 2006 GECAD Technologies S.R.L.
http://www.axigen.com
150
Working with WebAdmin
Once you have logged in, the following screen is displayed:
WebAdmin has several tabs, listed on the left hand side, each of them corresponding either to a module or to a generic configuration level (server, domain, account, mail list, forwarder).
Below are described some basic principles you should keep in mind while working with AXIGEN WebAdmin.
Updating/Committing Changes in WebAdmin
After changing any parameter value in WebAdmin, you need to save the new values in the configuration files. In order to do this, you first need to make the changes effective for the current session by clicking first the Update button (Update buttons are available only in Edit pages, in the lower left corner) and then the Commit button (available in any WebAdmin page, in usually in the upper right corner).

AXIGEN User Manual
Copyright © 2006 GECAD Technologies S.R.L.
http://www.axigen.com
151
Using the Update and/or Commit buttons only saves your changes (if any) for the current AXIGEN Mail Server session. In case you want your changes to be applied also after the restart of AXIGEN Mail Server, you should save your changes in the configuration file (axigen.cfg) , after using the Update/Commit buttons. To do this, go to the Commands page and press the Save config button.
Confirmation / Error Messages
After each command issued, you should check the confirmation message displayed usually in the lower left corner of the page. In the example below, Commit operation has been executed successfully.
In the following example, a domain creation operation has failed and you are informed on this status both in the upper section and in the lower left corner of the WebAdmin page:
Displaying full details for a parameter / all param eters on a page
You can display in WebAdmin additional information about each available configuration option using the Details button. In the example below, additional information about the primaryDomain parameter is displayed.
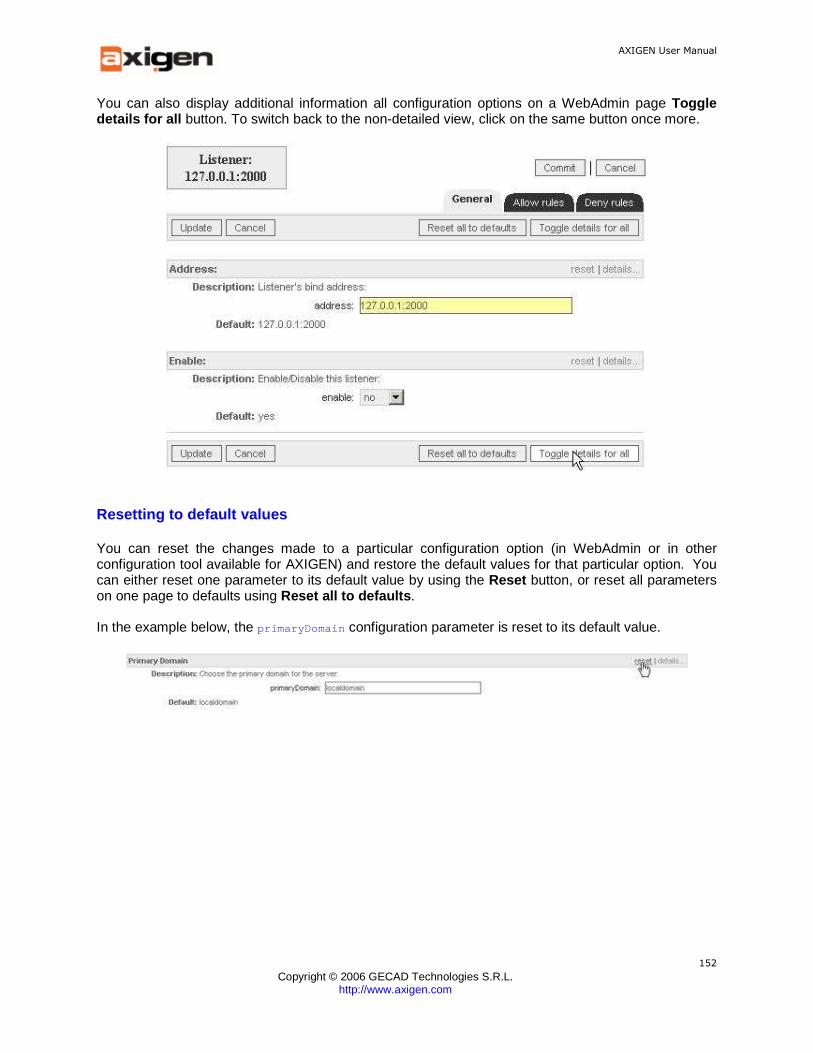
AXIGEN User Manual
Copyright © 2006 GECAD Technologies S.R.L.
http://www.axigen.com
152
You can also display additional information all configuration options on a WebAdmin page Toggle details for all button. To switch back to the non-detailed view, click on the same button once more.
Resetting to default values
You can reset the changes made to a particular configuration option (in WebAdmin or in other configuration tool available for AXIGEN) and restore the default values for that particular option. You can either reset one parameter to its default value by using the Reset button, or reset all parameters on one page to defaults using Reset all to defaults .
In the example below, the primaryDomain configuration parameter is reset to its default value.

AXIGEN User Manual
Copyright © 2006 GECAD Technologies S.R.L.
http://www.axigen.com
153
8.1. Server tab
The Sever tab gives you access to the following pages:
• Global Settings - containing global server parameters; • Filters - containing filter configuration information; • Info - containing information on current server version and license.
8.1.1. Global Settings
This page allows you to set basic server parameters, such as Running services and Primary domain.
Use the Running Services checkboxes in the Server > General settings page to specify what services should be run by AXIGEN Mail Server. Each checkbox corresponds to an AXIGEN service, select those you wish your mail server to run. AXIGEN can run with any number of these services inhibited.
By default, when installing AXIGEN Mail Server, the following services will be running: SMTP, IMAP, POP3, Webmail and Webadmin.
A similar option is available at domain and account / mail list level, with relevant choices for the respective level.
Attribute Name: services Attribute Class: Server Attribute Type: VALUESET Value Type: multi choice - processing smtpIncoming smtpOutgoing pop3 imap webmail log report cli webadmin Default Value: processing smtpIncoming smtpOutgoing imap pop3 log
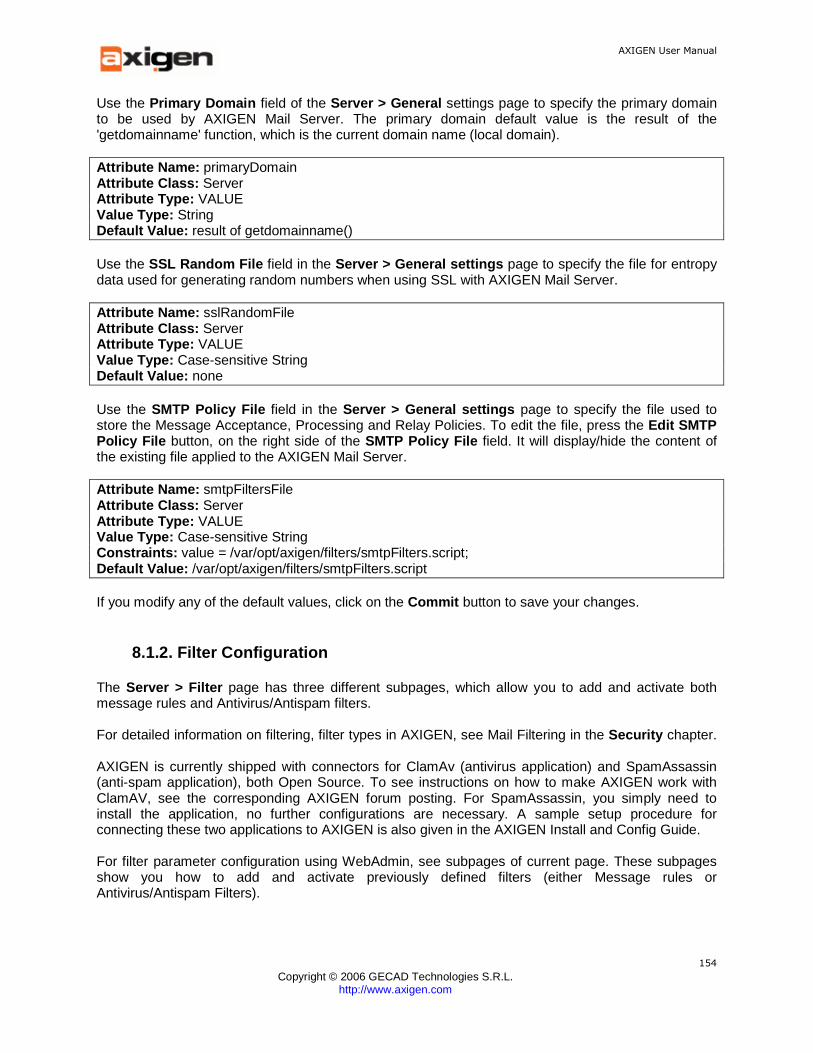
AXIGEN User Manual
Copyright © 2006 GECAD Technologies S.R.L.
http://www.axigen.com
154
Use the Primary Domain field of the Server > General settings page to specify the primary domain to be used by AXIGEN Mail Server. The primary domain default value is the result of the 'getdomainname' function, which is the current domain name (local domain).
Attribute Name: primaryDomain Attribute Class: Server Attribute Type: VALUE Value Type: String Default Value: result of getdomainname() Use the SSL Random File field in the Server > General settings page to specify the file for entropy data used for generating random numbers when using SSL with AXIGEN Mail Server.
Attribute Name: sslRandomFile Attribute Class: Server Attribute Type: VALUE Value Type: Case-sensitive String Default Value: none Use the SMTP Policy File field in the Server > General settings page to specify the file used to store the Message Acceptance, Processing and Relay Policies. To edit the file, press the Edit SMTP Policy File button, on the right side of the SMTP Policy File field. It will display/hide the content of the existing file applied to the AXIGEN Mail Server.
Attribute Name: smtpFiltersFile Attribute Class: Server Attribute Type: VALUE Value Type: Case-sensitive String Constraints: value = /var/opt/axigen/filters/smtpFilters.script; Default Value: /var/opt/axigen/filters/smtpFilters.script If you modify any of the default values, click on the Commit button to save your changes.
8.1.2. Filter Configuration
The Server > Filter page has three different subpages, which allow you to add and activate both message rules and Antivirus/Antispam filters. For detailed information on filtering, filter types in AXIGEN, see Mail Filtering in the Security chapter. AXIGEN is currently shipped with connectors for ClamAv (antivirus application) and SpamAssassin (anti-spam application), both Open Source. To see instructions on how to make AXIGEN work with ClamAV, see the corresponding AXIGEN forum posting. For SpamAssassin, you simply need to install the application, no further configurations are necessary. A sample setup procedure for connecting these two applications to AXIGEN is also given in the AXIGEN Install and Config Guide. For filter parameter configuration using WebAdmin, see subpages of current page. These subpages show you how to add and activate previously defined filters (either Message rules or Antivirus/Antispam Filters).

AXIGEN User Manual
Copyright © 2006 GECAD Technologies S.R.L.
http://www.axigen.com
155
8.1.2.1. Configuring Message Rules
To configure message rules at server level, make sure you are located on the Server page and click the Filters tab on the upper right hand side. In this page, click the Message rules tab.
If no filters have been previously defined, the Message rule list displayed will be empty. To add a new Message rule, click the Add new rule button.
This displays the New message rule area containing three configurable parameters: name, type and file :
The name parameter allows you to specify the name of the rule to be added. This will need to coincide with the name of the script file containing the rule. This name is used as unique identifier for the rule being added. Also, keep in mind that this name is case sensitive.
Attribute Name: name Attribute Class: ScriptFilter Attribute Type: VALUE Value Type: Case-sensitive String The type parameter refers to the scripting language used to define the filter. Currently, in AXIGEN, only Sieve filters are available. For more information on Sieve script based rules, see Message rules.
Attribute Name: type Attribute Class: ScriptFilter Attribute Type: VALUE Value Type: Single-Choice Menu Possible values: (sieve) - single choice Default Value: 0

AXIGEN User Manual
Copyright © 2006 GECAD Technologies S.R.L.
http://www.axigen.com
156
The file attribute requires you to specify the path to the rule file. Note that this value is mandatory in order to complete the rule definition, and that this field is case sensitive.
Attribute Name: file Attribute Class: ScriptFilter Attribute Type: VALUE Value Type: Case-sensitive String Required When you are done with these parameters, click the Add button to complete the filter definition. The message rule you have just added will appear in the Message rule list and you will be able to edit it at any later time, by clicking the Edit button displayed next to it.
8.1.2.2. Configuring Antivirus/Antispam Filters
To configure Antivirus/Antispam filters at server level, make sure you are located on the Server page and click the Filters tab on the upper right hand side. In this page, click the AV/AS filters tab.
If no filters have been previously defined, the AV/AS filters list displayed will be empty. To add a new Script filter, click the Add new filter button.
This will display a window containing parameters needed to define a new AV/AS filter:

AXIGEN User Manual
Copyright © 2006 GECAD Technologies S.R.L.
http://www.axigen.com
157
The name parameter allows you to specify the name of the filter to be added. This will need to coincide with the name of the script file containing the filter. This name is used as unique identifier for the filter being added. Also, keep in mind that this name is case sensitive.
Attribute Name: name Attribute Class: SocketFilter Attribute Type: VALUE Value Type: Case-sensitive String Required The address parameter allows you to specify the address used to communicate with the filter. This must be either an Internet or a Unix local address.
Attribute Name: address Attribute Class: SocketFilter Attribute Type: VALUE Value Type: Case-sensitive String Required
The Protocol file field allows you to set the values of the protocolFile parameter. This is the path to the AFSL file containing the description of the protocol used to communicate with the filter.
Attribute Name: protocolFile Attribute Class: SocketFilter Attribute Type: VALUE Value Type: Case-sensitive String Required In the Idle timeout field you can specify the value of the idleTimeout parameter. This will be the inactivity interval in seconds after which the connection with the filter is timed out. A value of zero means that the connection is never timed out. The default value is 60s.
Attribute Name: idleTimeout Attribute Class: SocketFilter Attribute Type: VALUE Value Type: Unsigned Integer MIN-MAX: 0-86400 (0=infinite) Default Value: 60 The Action on match dropdown box allows you to set the actionOnMatch parameter. This is the action to be taken in case the filter matches an email (it found something in the email that matches the criterion specified in the filter). By selecting the value pass, the email is passed on to the next filter.
Attribute Name: actionOnMatch Attribute Class: SocketFilter Attribute Type: VALUE Value Type: single choice - discard | pass | reject Default Value: reject
The Max. connections field specifies the value for the maxConnections parameter. This will be the maximum number of simultaneous connections allowed for this filter (for instance when several emails are being processed simultaneously using this filter). The maximum number of simultaneous
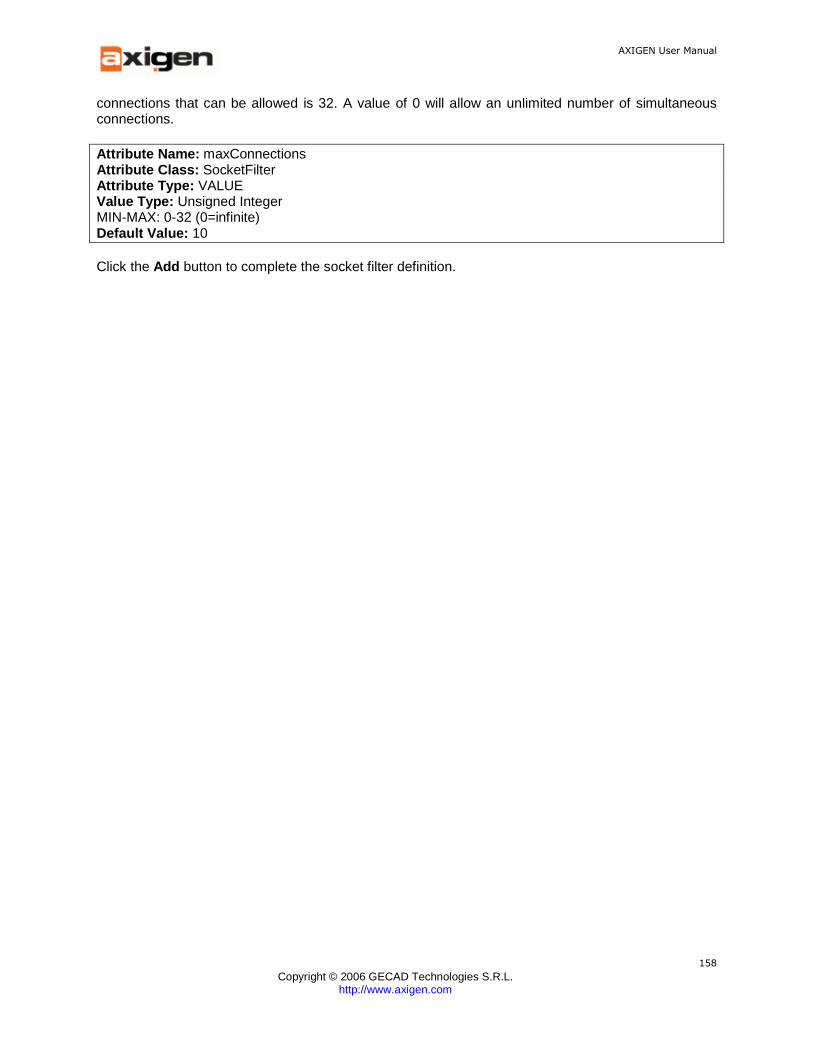
AXIGEN User Manual
Copyright © 2006 GECAD Technologies S.R.L.
http://www.axigen.com
158
connections that can be allowed is 32. A value of 0 will allow an unlimited number of simultaneous connections.
Attribute Name: maxConnections Attribute Class: SocketFilter Attribute Type: VALUE Value Type: Unsigned Integer MIN-MAX: 0-32 (0=infinite) Default Value: 10 Click the Add button to complete the socket filter definition.
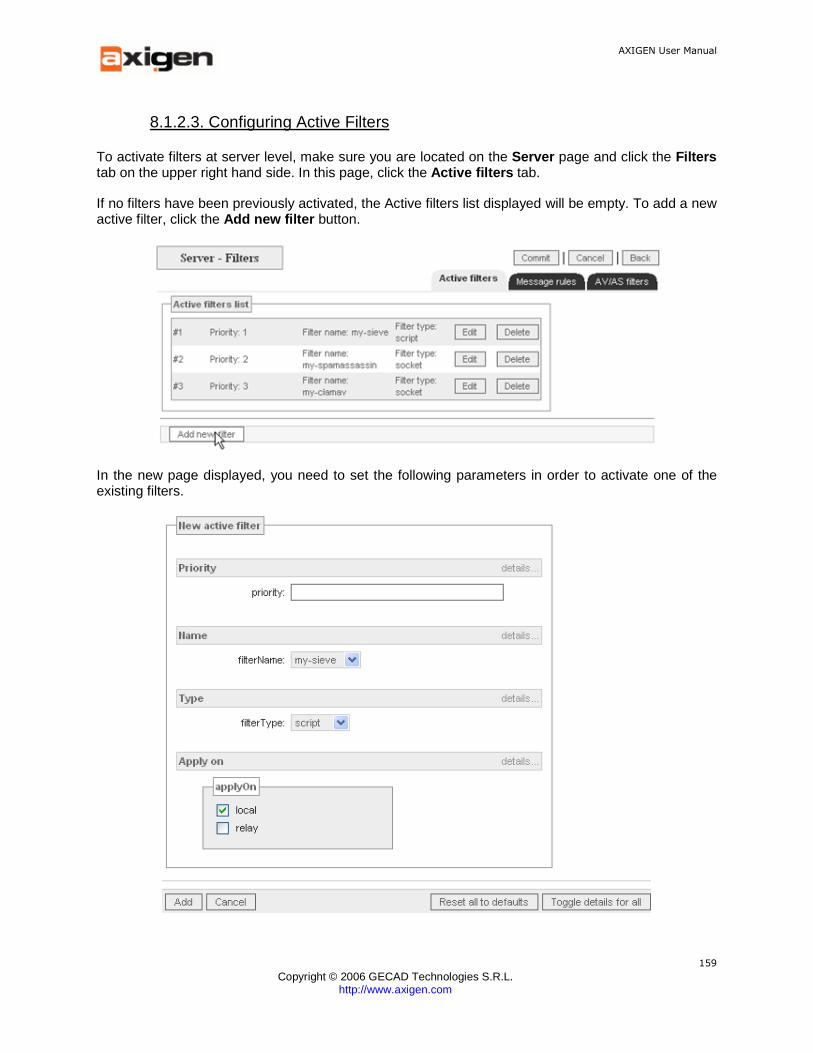
AXIGEN User Manual
Copyright © 2006 GECAD Technologies S.R.L.
http://www.axigen.com
159
8.1.2.3. Configuring Active Filters
To activate filters at server level, make sure you are located on the Server page and click the Filters tab on the upper right hand side. In this page, click the Active filters tab.
If no filters have been previously activated, the Active filters list displayed will be empty. To add a new active filter, click the Add new filter button.
In the new page displayed, you need to set the following parameters in order to activate one of the existing filters.
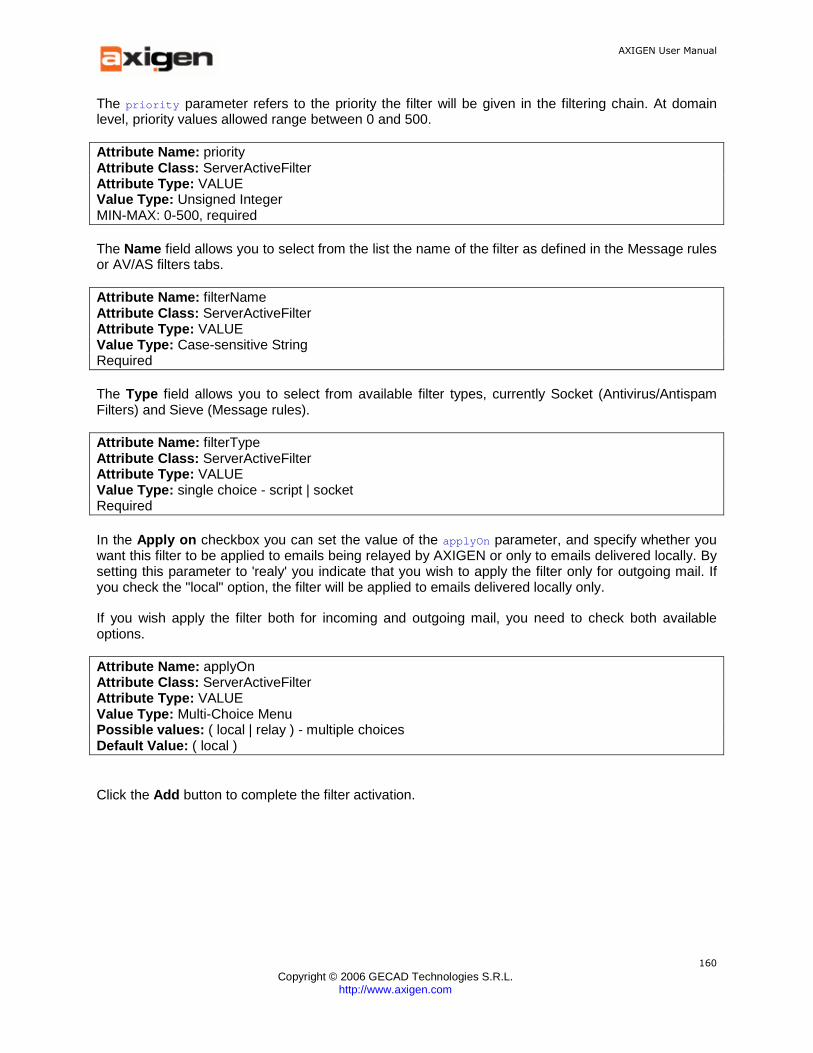
AXIGEN User Manual
Copyright © 2006 GECAD Technologies S.R.L.
http://www.axigen.com
160
The priority parameter refers to the priority the filter will be given in the filtering chain. At domain level, priority values allowed range between 0 and 500.
Attribute Name: priority Attribute Class: ServerActiveFilter Attribute Type: VALUE Value Type: Unsigned Integer MIN-MAX: 0-500, required The Name field allows you to select from the list the name of the filter as defined in the Message rules or AV/AS filters tabs.
Attribute Name: filterName Attribute Class: ServerActiveFilter Attribute Type: VALUE Value Type: Case-sensitive String Required The Type field allows you to select from available filter types, currently Socket (Antivirus/Antispam Filters) and Sieve (Message rules).
Attribute Name: filterType Attribute Class: ServerActiveFilter Attribute Type: VALUE Value Type: single choice - script | socket Required In the Apply on checkbox you can set the value of the applyOn parameter, and specify whether you want this filter to be applied to emails being relayed by AXIGEN or only to emails delivered locally. By setting this parameter to 'realy' you indicate that you wish to apply the filter only for outgoing mail. If you check the "local" option, the filter will be applied to emails delivered locally only.
If you wish apply the filter both for incoming and outgoing mail, you need to check both available options.
Attribute Name: applyOn Attribute Class: ServerActiveFilter Attribute Type: VALUE Value Type: Multi-Choice Menu Possible values: ( local | relay ) - multiple choices Default Value: ( local ) Click the Add button to complete the filter activation.
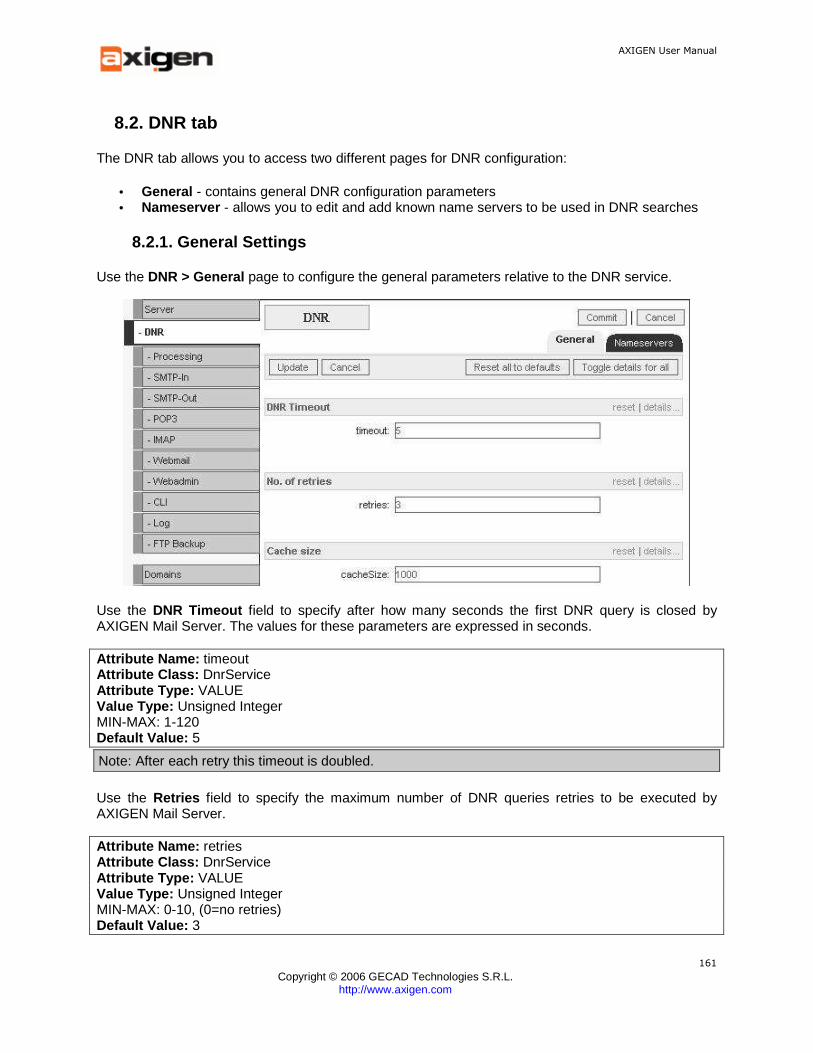
AXIGEN User Manual
Copyright © 2006 GECAD Technologies S.R.L.
http://www.axigen.com
161
8.2. DNR tab
The DNR tab allows you to access two different pages for DNR configuration:
• General - contains general DNR configuration parameters • Nameserver - allows you to edit and add known name servers to be used in DNR searches
8.2.1. General Settings
Use the DNR > General page to configure the general parameters relative to the DNR service.
Use the DNR Timeout field to specify after how many seconds the first DNR query is closed by AXIGEN Mail Server. The values for these parameters are expressed in seconds.
Attribute Name: timeout Attribute Class: DnrService Attribute Type: VALUE Value Type: Unsigned Integer MIN-MAX: 1-120 Default Value: 5
Note: After each retry this timeout is doubled.
Use the Retries field to specify the maximum number of DNR queries retries to be executed by AXIGEN Mail Server.
Attribute Name: retries Attribute Class: DnrService Attribute Type: VALUE Value Type: Unsigned Integer MIN-MAX: 0-10, (0=no retries) Default Value: 3
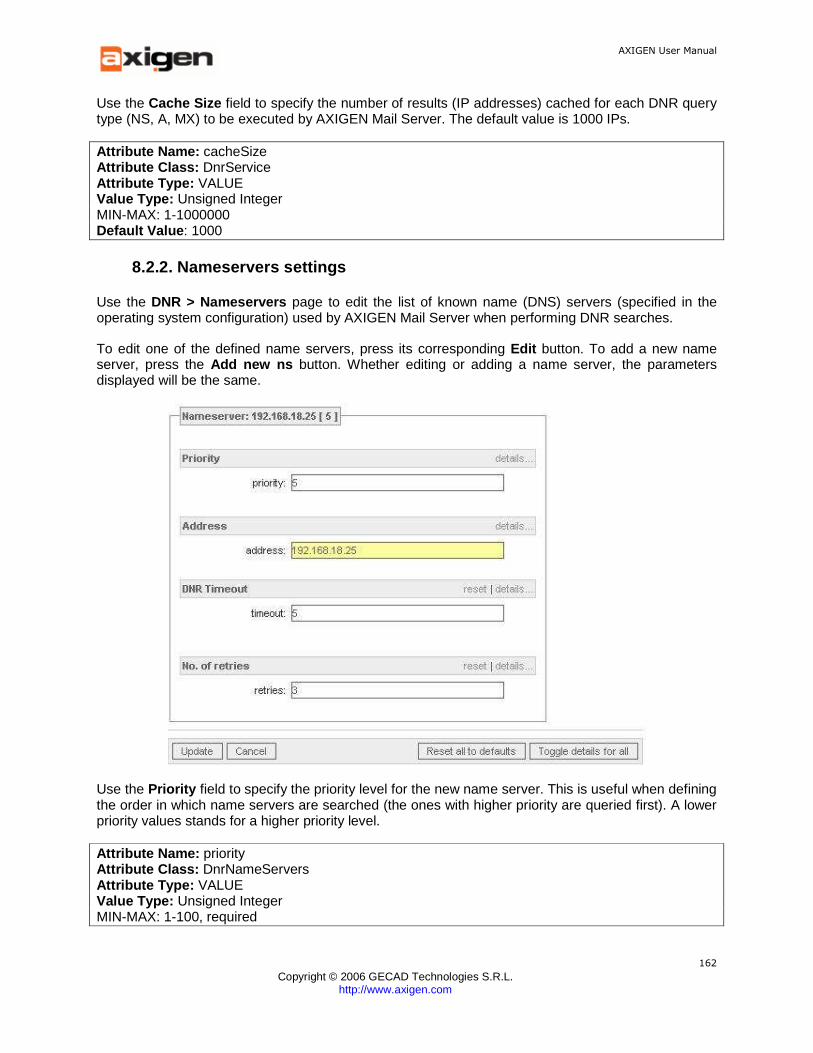
AXIGEN User Manual
Copyright © 2006 GECAD Technologies S.R.L.
http://www.axigen.com
162
Use the Cache Size field to specify the number of results (IP addresses) cached for each DNR query type (NS, A, MX) to be executed by AXIGEN Mail Server. The default value is 1000 IPs.
Attribute Name: cacheSize Attribute Class: DnrService Attribute Type: VALUE Value Type: Unsigned Integer MIN-MAX: 1-1000000 Default Value : 1000
8.2.2. Nameservers settings
Use the DNR > Nameservers page to edit the list of known name (DNS) servers (specified in the operating system configuration) used by AXIGEN Mail Server when performing DNR searches.
To edit one of the defined name servers, press its corresponding Edit button. To add a new name server, press the Add new ns button. Whether editing or adding a name server, the parameters displayed will be the same.
Use the Priority field to specify the priority level for the new name server. This is useful when defining the order in which name servers are searched (the ones with higher priority are queried first). A lower priority values stands for a higher priority level.
Attribute Name: priority Attribute Class: DnrNameServers Attribute Type: VALUE Value Type: Unsigned Integer MIN-MAX: 1-100, required
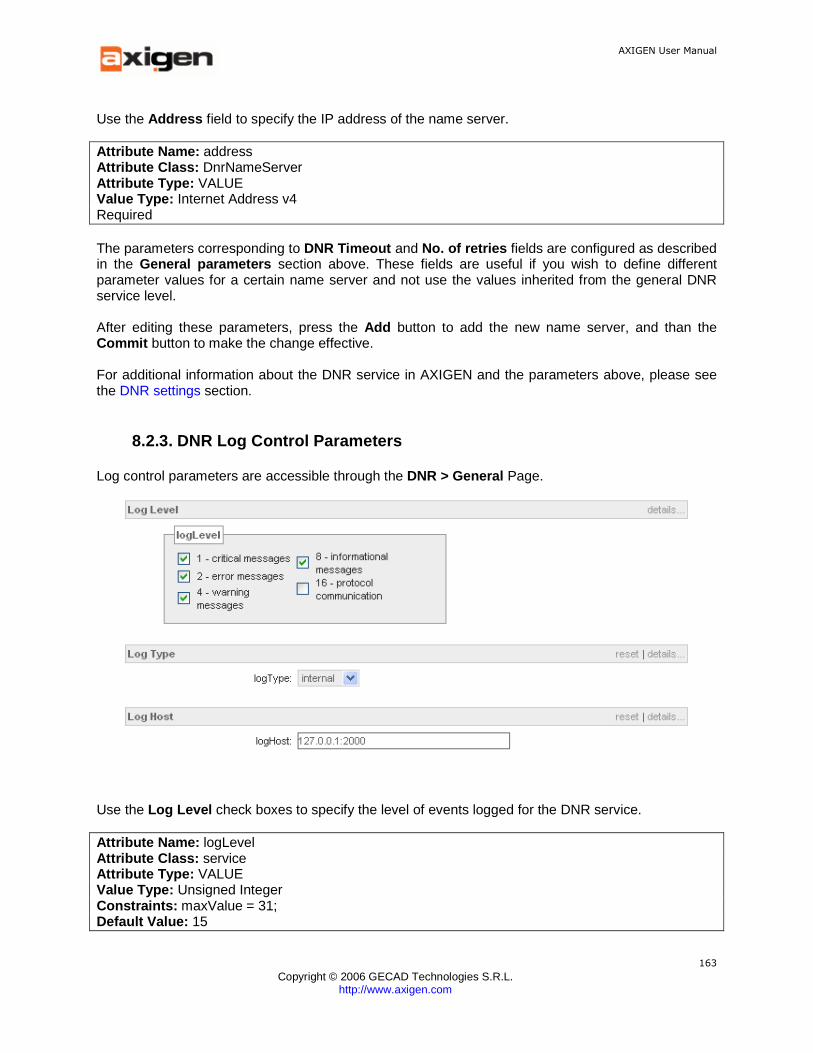
AXIGEN User Manual
Copyright © 2006 GECAD Technologies S.R.L.
http://www.axigen.com
163
Use the Address field to specify the IP address of the name server.
Attribute Name: address Attribute Class: DnrNameServer Attribute Type: VALUE Value Type: Internet Address v4 Required The parameters corresponding to DNR Timeout and No. of retries fields are configured as described in the General parameters section above. These fields are useful if you wish to define different parameter values for a certain name server and not use the values inherited from the general DNR service level. After editing these parameters, press the Add button to add the new name server, and than the Commit button to make the change effective. For additional information about the DNR service in AXIGEN and the parameters above, please see the DNR settings section.
8.2.3. DNR Log Control Parameters
Log control parameters are accessible through the DNR > General Page.
Use the Log Level check boxes to specify the level of events logged for the DNR service.
Attribute Name: logLevel Attribute Class: service Attribute Type: VALUE Value Type: Unsigned Integer Constraints: maxValue = 31; Default Value: 15
AXIGEN User Manual
Copyright © 2006 GECAD Technologies S.R.L.
http://www.axigen.com
164
Use the Log Type drop-down box to specify the log type for DNR. Possible values are: internal, system and remote.
Attribute Name: logType Attribute Class: service Attribute Type: VALUE Value Type: Single-Choice Menu Possible values: (internal | system | host) - single choice Default Value: (internal) Use the Log Host field to specify the DNR remote logging host IP address.
Attribute Name: logHost Attribute Class: service Attribute Type: VALUE Value Type: Internet Socket Address Default Value: 127.0.0.1:2000
Note: This option is used and valid only if logType=remote for DNR.
For a general description of the logging service and related parameters see Logging Service.
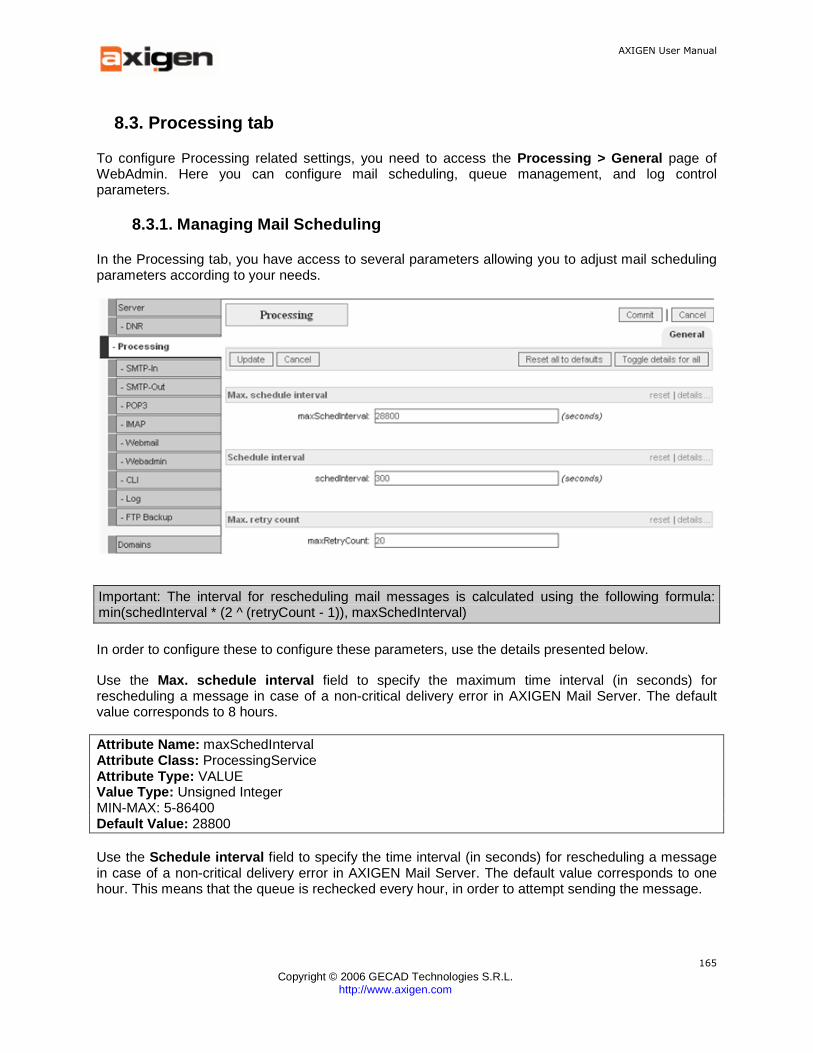
AXIGEN User Manual
Copyright © 2006 GECAD Technologies S.R.L.
http://www.axigen.com
165
8.3. Processing tab
To configure Processing related settings, you need to access the Processing > General page of WebAdmin. Here you can configure mail scheduling, queue management, and log control parameters.
8.3.1. Managing Mail Scheduling
In the Processing tab, you have access to several parameters allowing you to adjust mail scheduling parameters according to your needs.
Important: The interval for rescheduling mail messages is calculated using the following formula: min(schedInterval * (2 ^ (retryCount - 1)), maxSchedInterval)
In order to configure these to configure these parameters, use the details presented below.
Use the Max. schedule interval field to specify the maximum time interval (in seconds) for rescheduling a message in case of a non-critical delivery error in AXIGEN Mail Server. The default value corresponds to 8 hours.
Attribute Name: maxSchedInterval Attribute Class: ProcessingService Attribute Type: VALUE Value Type: Unsigned Integer MIN-MAX: 5-86400 Default Value: 28800 Use the Schedule interval field to specify the time interval (in seconds) for rescheduling a message in case of a non-critical delivery error in AXIGEN Mail Server. The default value corresponds to one hour. This means that the queue is rechecked every hour, in order to attempt sending the message.
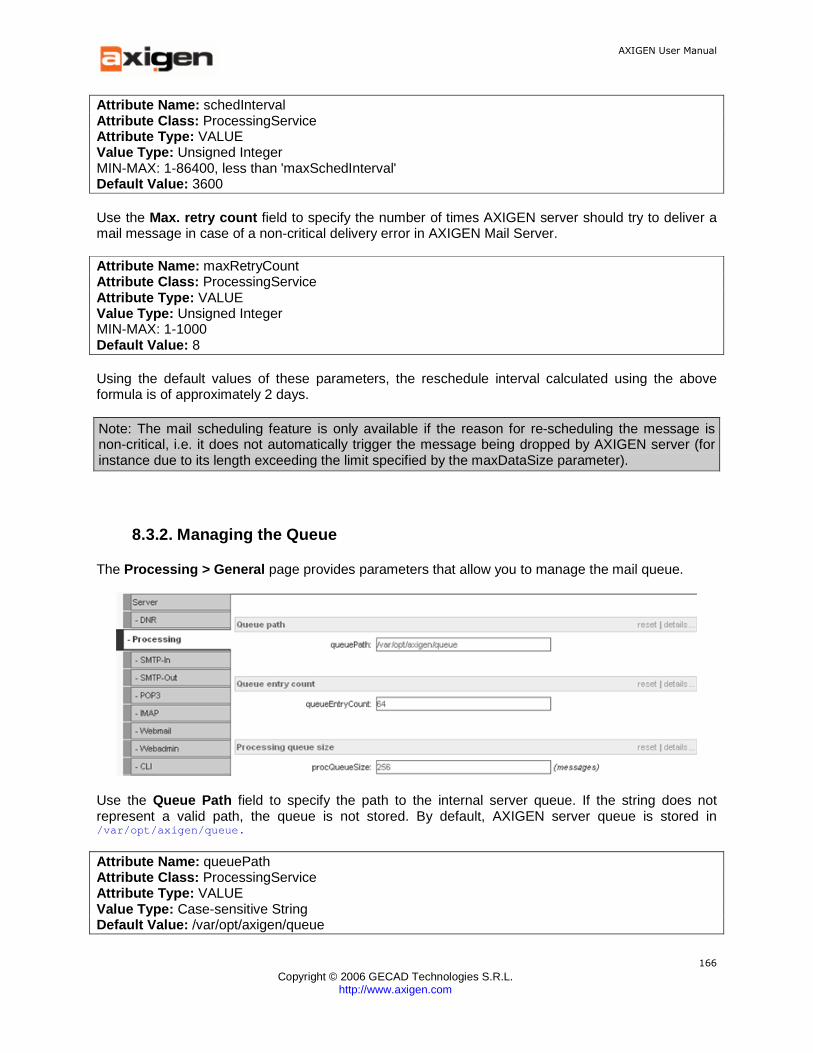
AXIGEN User Manual
Copyright © 2006 GECAD Technologies S.R.L.
http://www.axigen.com
166
Attribute Name: schedInterval Attribute Class: ProcessingService Attribute Type: VALUE Value Type: Unsigned Integer MIN-MAX: 1-86400, less than 'maxSchedInterval' Default Value: 3600 Use the Max. retry count field to specify the number of times AXIGEN server should try to deliver a mail message in case of a non-critical delivery error in AXIGEN Mail Server.
Attribute Name: maxRetryCount Attribute Class: ProcessingService Attribute Type: VALUE Value Type: Unsigned Integer MIN-MAX: 1-1000 Default Value: 8 Using the default values of these parameters, the reschedule interval calculated using the above formula is of approximately 2 days.
Note: The mail scheduling feature is only available if the reason for re-scheduling the message is non-critical, i.e. it does not automatically trigger the message being dropped by AXIGEN server (for instance due to its length exceeding the limit specified by the maxDataSize parameter).
8.3.2. Managing the Queue
The Processing > General page provides parameters that allow you to manage the mail queue.
Use the Queue Path field to specify the path to the internal server queue. If the string does not represent a valid path, the queue is not stored. By default, AXIGEN server queue is stored in /var/opt/axigen/queue.
Attribute Name: queuePath Attribute Class: ProcessingService Attribute Type: VALUE Value Type: Case-sensitive String Default Value: /var/opt/axigen/queue

AXIGEN User Manual
Copyright © 2006 GECAD Technologies S.R.L.
http://www.axigen.com
167
Use the Queue Entry Count field to specify the upper limit for the number of subdirectories in the internal queue. The actual number of subdirectories will be computed based on this value, as maximum power of 2 smaller than 'queueEntryCount' value.
Attribute Name: queueEntryCount Attribute Class: ProcessingService Attribute Type: VALUE Value Type: Unsigned Integer MIN-MAX: 1-256 Default Value: 64 Use the Processing queue size field to specify the size of internal processing queue. When too many messages have to be processed and this queue is full, the next messages will be rescheduled.
Attribute Name: procQueueSize Attribute Class: ProcessingService Attribute Type: VALUE Value Type: Unsigned Integer MIN-MAX: 1-65536 Default Value: 256
8.3.3. Specifying Threads for Local Delivery
To specify the threads for local delivery, first access the Processing > General page.
Use the Delivery threads text area to specify the number of threads handling local SMTP delivery. Thus you can fine tune the server behavior to your usage scenario. If you want to use your server mainly for local delivery, you can set a higher number of delivery threads.
Attribute Name: deliveryThreads Attribute Class: ProcessingService Attribute Type: VALUE Value Type: Unsigned Integer MIN-MAX: 1-128 Default Value: 20
8.3.4. Configuring Mailbox Related Parameters
In the Processing > General page, you can configure parameters which allow you to adjust the maximum number of messages received per second by one mailbox and the interval in seconds during which that mailbox will be disabled if that maximum is reached. This way, you can avoid flooding attacks.
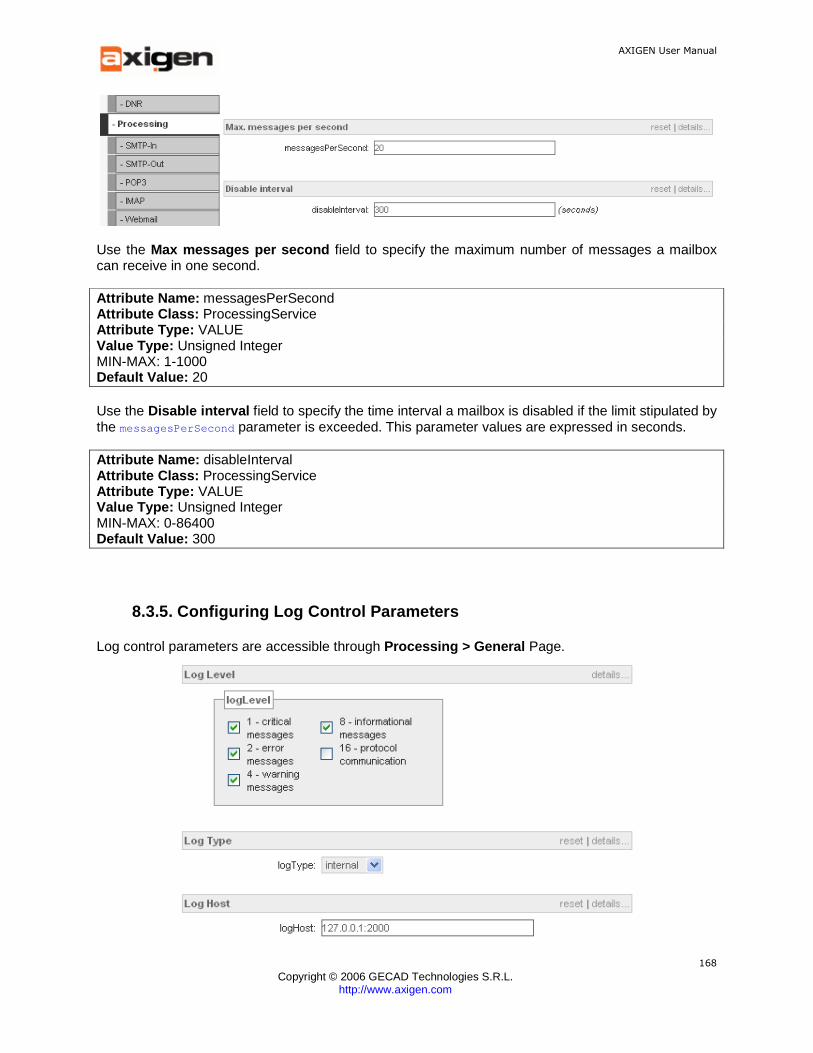
AXIGEN User Manual
Copyright © 2006 GECAD Technologies S.R.L.
http://www.axigen.com
168
Use the Max messages per second field to specify the maximum number of messages a mailbox can receive in one second.
Attribute Name: messagesPerSecond Attribute Class: ProcessingService Attribute Type: VALUE Value Type: Unsigned Integer MIN-MAX: 1-1000 Default Value: 20 Use the Disable interval field to specify the time interval a mailbox is disabled if the limit stipulated by the messagesPerSecond parameter is exceeded. This parameter values are expressed in seconds.
Attribute Name: disableInterval Attribute Class: ProcessingService Attribute Type: VALUE Value Type: Unsigned Integer MIN-MAX: 0-86400 Default Value: 300
8.3.5. Configuring Log Control Parameters
Log control parameters are accessible through Processing > General Page.
AXIGEN User Manual
Copyright © 2006 GECAD Technologies S.R.L.
http://www.axigen.com
169
Use the Log Level check boxes to specify the log level for the Processing service.
Attribute Name: logLevel Attribute Class: ProcessingService Attribute Type: VALUE Value Type : Unsigned Integer MIN-MAX: 0-31 Default Value: 15
Use the Log Type drop-down box to specify the log type for the Processing service. Possible values are: internal, system and remote.
Attribute Name: logType Attribute Class: ProcessingService Attribute Type : VALUE Value Type: single choice - internal | system | remote Default Value: internal Use the Log Host field to specify the Processing service remote logging host IP address.
Attribute Name: logHost Attribute Class: ProcessingService Attribute Type: VALUE Value Type: Internet Socket Address Default Value: 127.0.0.1:2000
Note: This option is used and valid only if logType=remote for Processing.
For a general description of the logging service and related parameters see Logging Service.
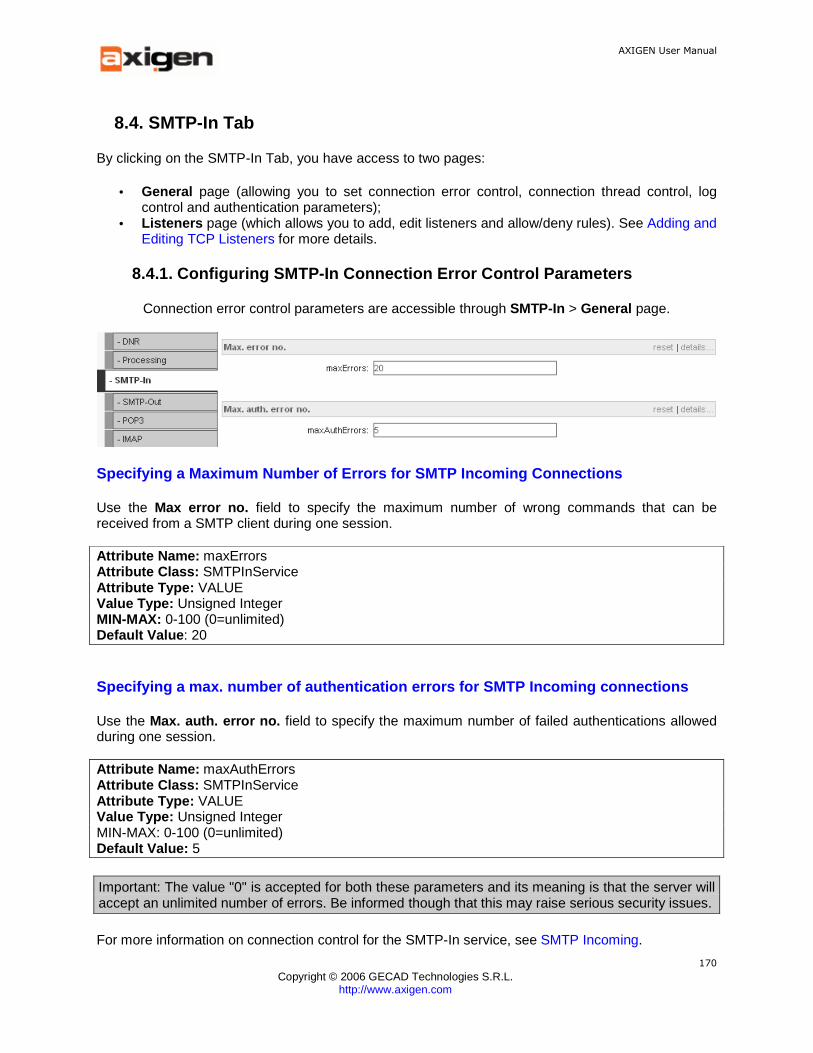
AXIGEN User Manual
Copyright © 2006 GECAD Technologies S.R.L.
http://www.axigen.com
170
8.4. SMTP-In Tab
By clicking on the SMTP-In Tab, you have access to two pages:
• General page (allowing you to set connection error control, connection thread control, log control and authentication parameters);
• Listeners page (which allows you to add, edit listeners and allow/deny rules). See Adding and Editing TCP Listeners for more details.
8.4.1. Configuring SMTP-In Connection Error Control Parameters
Connection error control parameters are accessible through SMTP-In > General page.
Specifying a Maximum Number of Errors for SMTP Inco ming Connections
Use the Max error no. field to specify the maximum number of wrong commands that can be received from a SMTP client during one session.
Attribute Name: maxErrors Attribute Class: SMTPInService Attribute Type: VALUE Value Type: Unsigned Integer MIN-MAX: 0-100 (0=unlimited) Default Value : 20
Specifying a max. number of authentication errors f or SMTP Incoming connections
Use the Max. auth. error no. field to specify the maximum number of failed authentications allowed during one session.
Attribute Name: maxAuthErrors Attribute Class: SMTPInService Attribute Type: VALUE Value Type: Unsigned Integer MIN-MAX: 0-100 (0=unlimited) Default Value: 5
Important: The value "0" is accepted for both these parameters and its meaning is that the server will accept an unlimited number of errors. Be informed though that this may raise serious security issues.
For more information on connection control for the SMTP-In service, see SMTP Incoming.
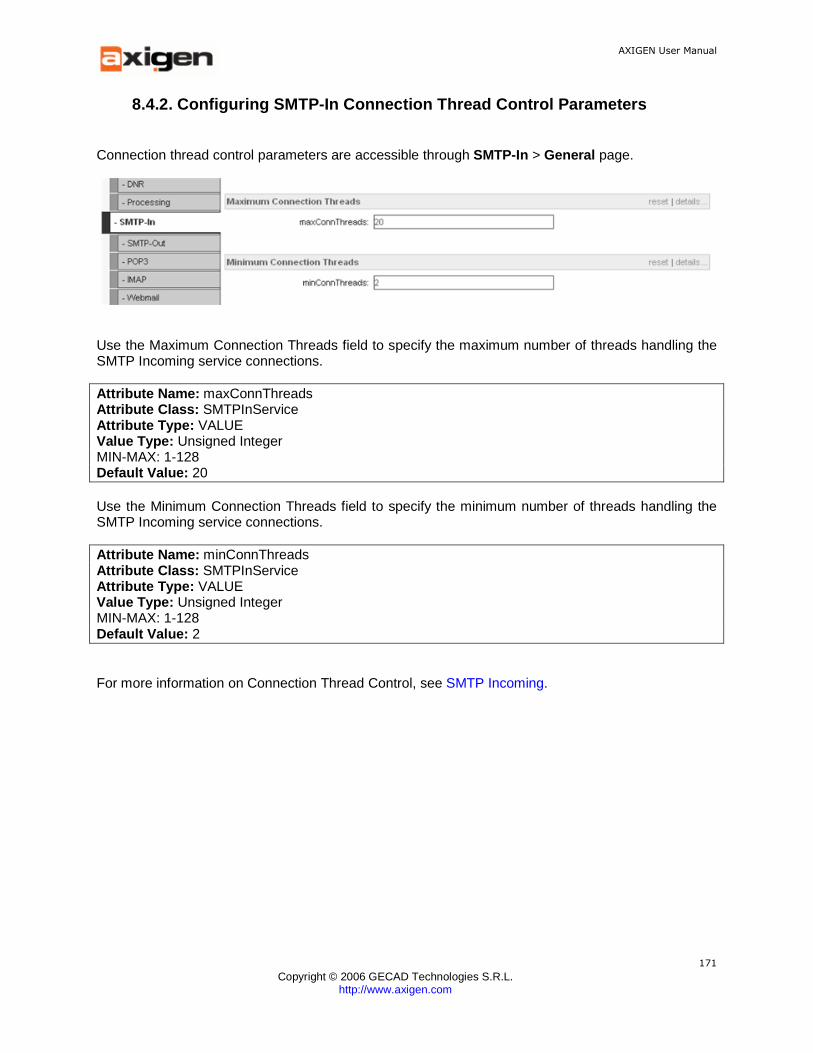
AXIGEN User Manual
Copyright © 2006 GECAD Technologies S.R.L.
http://www.axigen.com
171
8.4.2. Configuring SMTP-In Connection Thread Contro l Parameters
Connection thread control parameters are accessible through SMTP-In > General page.
Use the Maximum Connection Threads field to specify the maximum number of threads handling the SMTP Incoming service connections.
Attribute Name: maxConnThreads Attribute Class: SMTPInService Attribute Type: VALUE Value Type: Unsigned Integer MIN-MAX: 1-128 Default Value: 20 Use the Minimum Connection Threads field to specify the minimum number of threads handling the SMTP Incoming service connections.
Attribute Name: minConnThreads Attribute Class: SMTPInService Attribute Type: VALUE Value Type: Unsigned Integer MIN-MAX: 1-128 Default Value: 2 For more information on Connection Thread Control, see SMTP Incoming.
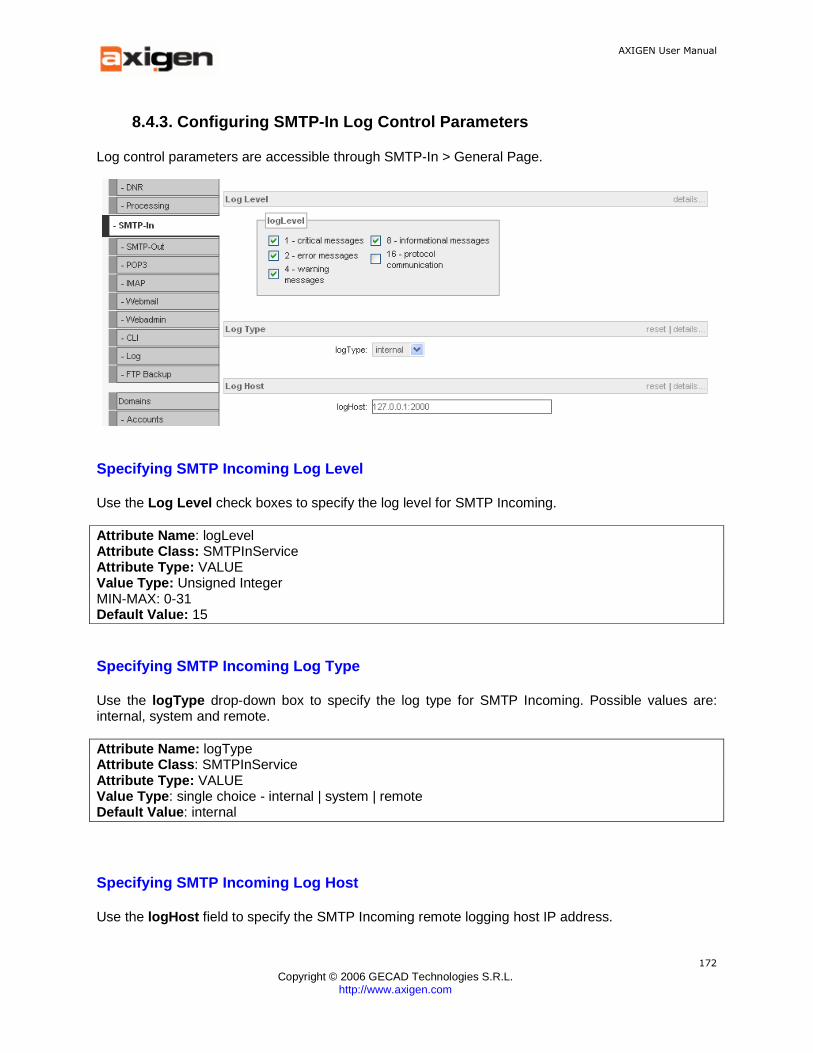
AXIGEN User Manual
Copyright © 2006 GECAD Technologies S.R.L.
http://www.axigen.com
172
8.4.3. Configuring SMTP-In Log Control Parameters
Log control parameters are accessible through SMTP-In > General Page.
Specifying SMTP Incoming Log Level
Use the Log Level check boxes to specify the log level for SMTP Incoming.
Attribute Name : logLevel Attribute Class: SMTPInService Attribute Type: VALUE Value Type: Unsigned Integer MIN-MAX: 0-31 Default Value: 15
Specifying SMTP Incoming Log Type
Use the logType drop-down box to specify the log type for SMTP Incoming. Possible values are: internal, system and remote.
Attribute Name: logType Attribute Class : SMTPInService Attribute Type: VALUE Value Type : single choice - internal | system | remote Default Value : internal
Specifying SMTP Incoming Log Host
Use the logHost field to specify the SMTP Incoming remote logging host IP address.
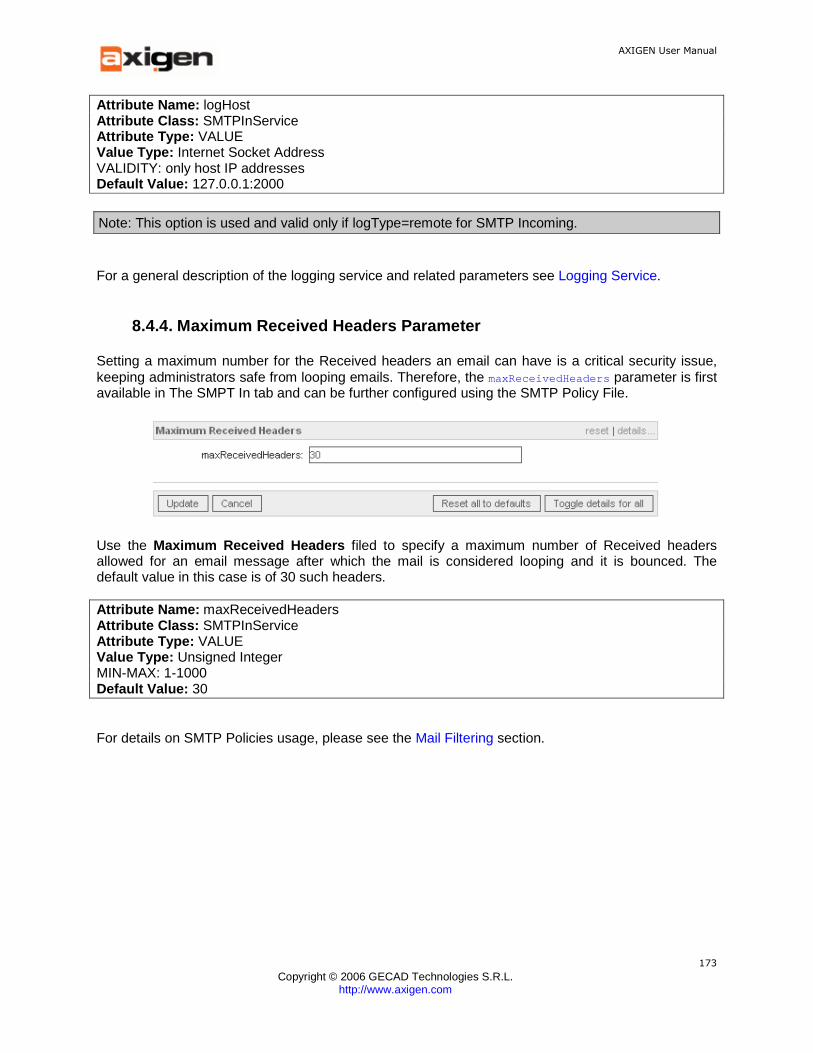
AXIGEN User Manual
Copyright © 2006 GECAD Technologies S.R.L.
http://www.axigen.com
173
Attribute Name: logHost Attribute Class: SMTPInService Attribute Type: VALUE Value Type: Internet Socket Address VALIDITY: only host IP addresses Default Value: 127.0.0.1:2000
Note: This option is used and valid only if logType=remote for SMTP Incoming.
For a general description of the logging service and related parameters see Logging Service.
8.4.4. Maximum Received Headers Parameter
Setting a maximum number for the Received headers an email can have is a critical security issue, keeping administrators safe from looping emails. Therefore, the maxReceivedHeaders parameter is first available in The SMPT In tab and can be further configured using the SMTP Policy File.
Use the Maximum Received Headers filed to specify a maximum number of Received headers allowed for an email message after which the mail is considered looping and it is bounced. The default value in this case is of 30 such headers.
Attribute Name: maxReceivedHeaders Attribute Class: SMTPInService Attribute Type: VALUE Value Type: Unsigned Integer MIN-MAX: 1-1000 Default Value: 30 For details on SMTP Policies usage, please see the Mail Filtering section.
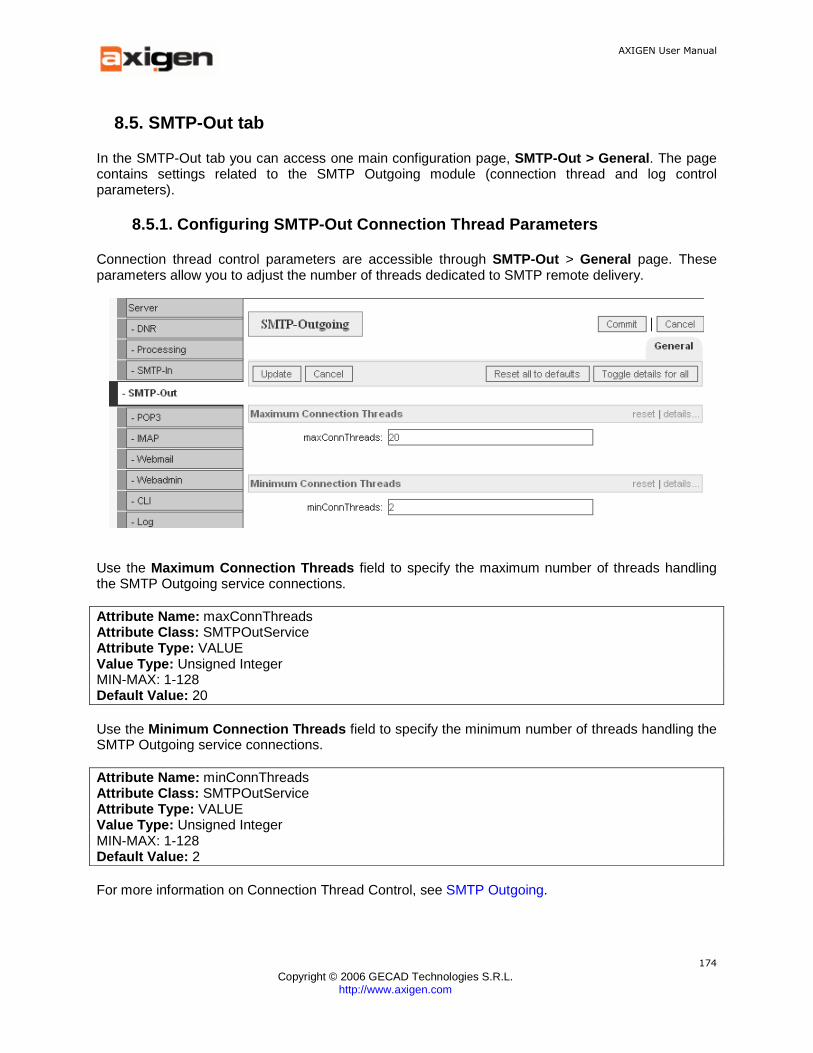
AXIGEN User Manual
Copyright © 2006 GECAD Technologies S.R.L.
http://www.axigen.com
174
8.5. SMTP-Out tab
In the SMTP-Out tab you can access one main configuration page, SMTP-Out > General . The page contains settings related to the SMTP Outgoing module (connection thread and log control parameters).
8.5.1. Configuring SMTP-Out Connection Thread Param eters
Connection thread control parameters are accessible through SMTP-Out > General page. These parameters allow you to adjust the number of threads dedicated to SMTP remote delivery.
Use the Maximum Connection Threads field to specify the maximum number of threads handling the SMTP Outgoing service connections.
Attribute Name: maxConnThreads Attribute Class: SMTPOutService Attribute Type: VALUE Value Type: Unsigned Integer MIN-MAX: 1-128 Default Value: 20 Use the Minimum Connection Threads field to specify the minimum number of threads handling the SMTP Outgoing service connections.
Attribute Name: minConnThreads Attribute Class: SMTPOutService Attribute Type: VALUE Value Type: Unsigned Integer MIN-MAX: 1-128 Default Value: 2 For more information on Connection Thread Control, see SMTP Outgoing.
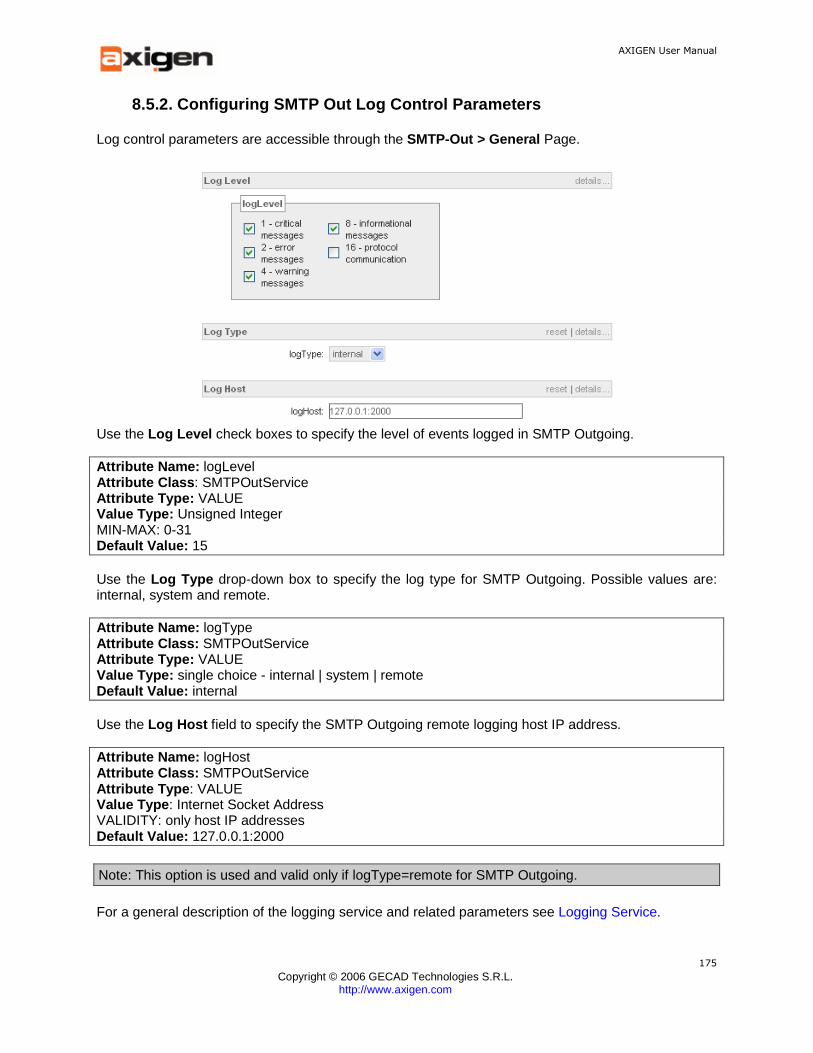
AXIGEN User Manual
Copyright © 2006 GECAD Technologies S.R.L.
http://www.axigen.com
175
8.5.2. Configuring SMTP Out Log Control Parameters
Log control parameters are accessible through the SMTP-Out > General Page.
Use the Log Level check boxes to specify the level of events logged in SMTP Outgoing.
Attribute Name: logLevel Attribute Class : SMTPOutService Attribute Type: VALUE Value Type: Unsigned Integer MIN-MAX: 0-31 Default Value: 15 Use the Log Type drop-down box to specify the log type for SMTP Outgoing. Possible values are: internal, system and remote.
Attribute Name: logType Attribute Class: SMTPOutService Attribute Type: VALUE Value Type: single choice - internal | system | remote Default Value: internal Use the Log Host field to specify the SMTP Outgoing remote logging host IP address.
Attribute Name: logHost Attribute Class: SMTPOutService Attribute Type : VALUE Value Type : Internet Socket Address VALIDITY: only host IP addresses Default Value: 127.0.0.1:2000
Note: This option is used and valid only if logType=remote for SMTP Outgoing.
For a general description of the logging service and related parameters see Logging Service.

AXIGEN User Manual
Copyright © 2006 GECAD Technologies S.R.L.
http://www.axigen.com
176
8.6. POP3 tab
Clicking on the POP3 tab, you get access to:
• General page - allows you to set global POP3 parameters (connection error control, connection thread control, log control and secure connection parameters)
• Listeners page which allows you to configure listeners for the POP3 service. See Adding and Editing TCP Listeners for more details.
8.6.1. Configuring POP3 Connection Error Control Pa rameters
Connection error control parameters are accessible through POP3 > General page.
Use the Max error no. field to specify the maximum number of wrong commands that can be received from a POP3 client during one session.
Attribute Name: maxErrors Attribute Class: POP3Service Attribute Type: VALUE Value Type: Unsigned Integer MIN-MAX: 0-100 (0=unlimited) Default Value: 20 Use the Max. auth. error no. field to specify the maximum number of failed authentications allowed during one session.
Attribute Name: maxAuthErrors Attribute Class: POP3Service Attribute Type: VALUE Value Type: Unsigned Integer MIN-MAX: 0-100 (0=unlimited) Default Value: 5 For more information on connection control see POP3 section.
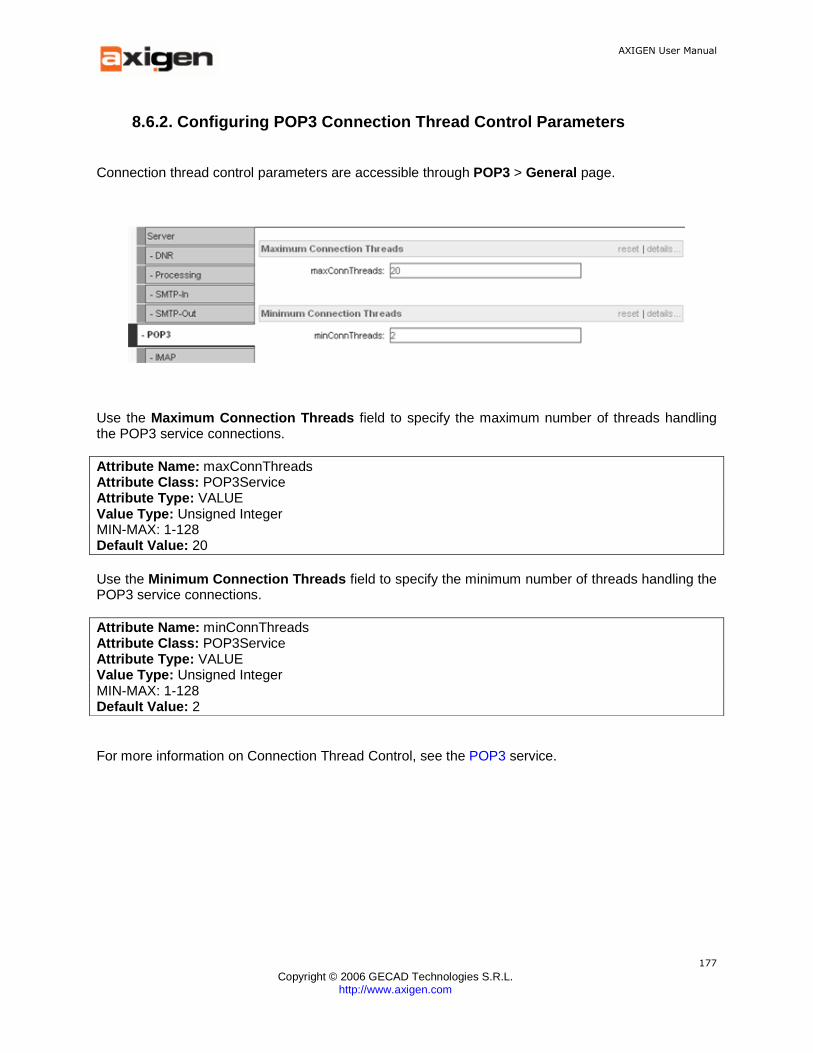
AXIGEN User Manual
Copyright © 2006 GECAD Technologies S.R.L.
http://www.axigen.com
177
8.6.2. Configuring POP3 Connection Thread Control P arameters
Connection thread control parameters are accessible through POP3 > General page.
Use the Maximum Connection Threads field to specify the maximum number of threads handling the POP3 service connections.
Attribute Name: maxConnThreads Attribute Class: POP3Service Attribute Type: VALUE Value Type: Unsigned Integer MIN-MAX: 1-128 Default Value: 20 Use the Minimum Connection Threads field to specify the minimum number of threads handling the POP3 service connections.
Attribute Name: minConnThreads Attribute Class: POP3Service Attribute Type: VALUE Value Type: Unsigned Integer MIN-MAX: 1-128 Default Value: 2 For more information on Connection Thread Control, see the POP3 service.
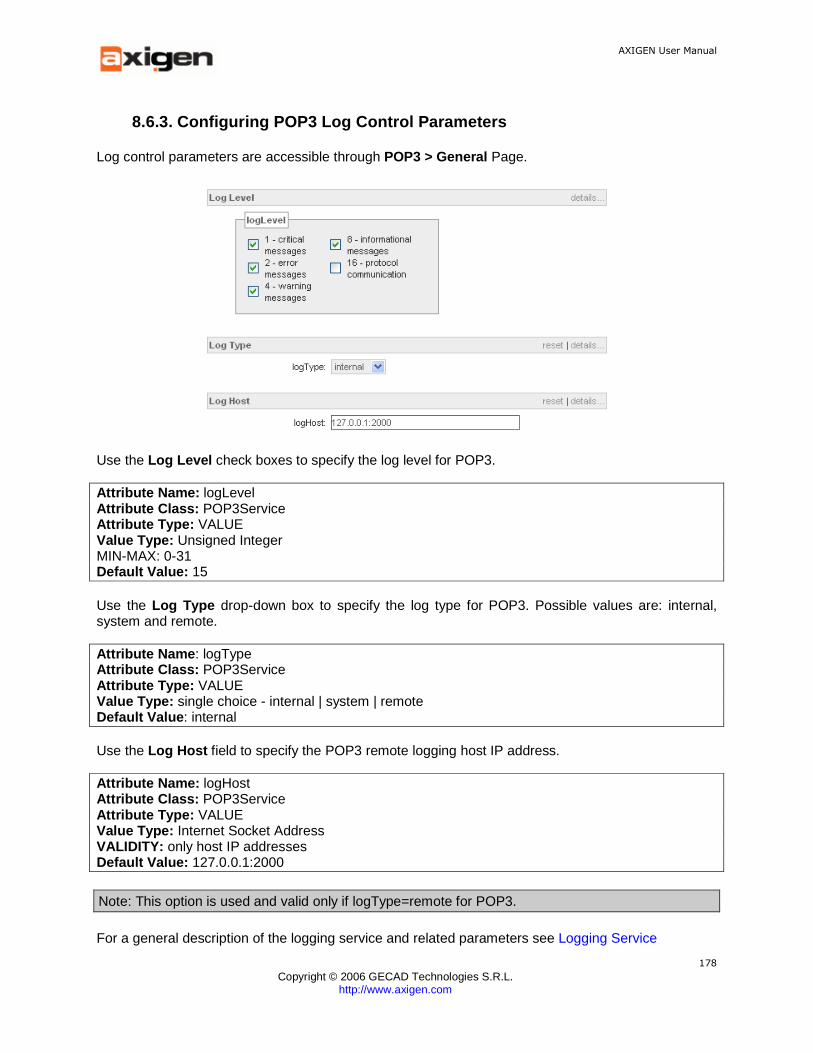
AXIGEN User Manual
Copyright © 2006 GECAD Technologies S.R.L.
http://www.axigen.com
178
8.6.3. Configuring POP3 Log Control Parameters
Log control parameters are accessible through POP3 > General Page.
Use the Log Level check boxes to specify the log level for POP3.
Attribute Name: logLevel Attribute Class: POP3Service Attribute Type: VALUE Value Type: Unsigned Integer MIN-MAX: 0-31 Default Value: 15 Use the Log Type drop-down box to specify the log type for POP3. Possible values are: internal, system and remote.
Attribute Name : logType Attribute Class: POP3Service Attribute Type: VALUE Value Type: single choice - internal | system | remote Default Value : internal Use the Log Host field to specify the POP3 remote logging host IP address.
Attribute Name: logHost Attribute Class: POP3Service Attribute Type: VALUE Value Type: Internet Socket Address VALIDITY: only host IP addresses Default Value: 127.0.0.1:2000
Note: This option is used and valid only if logType=remote for POP3.
For a general description of the logging service and related parameters see Logging Service

AXIGEN User Manual
Copyright © 2006 GECAD Technologies S.R.L.
http://www.axigen.com
179
8.6.4. POP3 Secure Connections
In the POP3 > General Tab, you can use the Allow TLS field to specify whether you want to enable secure connections for POP3.
By setting this parameter to 'yes', you allow sending the STARTTLS command for encrypting the connection if the server supports this command.
Attribute Name: allowStartTLS Attribute Class: POP3Service Attribute Type: VALUE Value Type: single choice - yes | no Default Value: yes

AXIGEN User Manual
Copyright © 2006 GECAD Technologies S.R.L.
http://www.axigen.com
180
8.7. IMAP tab
The IMAP tab in WebAdmin gives you access to:
• General page - containing general IMAP module configuration parameters, such as connection thread control, connection error control, log control and authentication parameters;
• Listeners page - where you can add and edit Listeners for the IMAP module. For details on how to configure IMAP Listeners, see Adding and Editing TCP Listeners.
8.7.1. Configuring IMAP Connection Error Control Pa rameters
Connection error control parameters are accessible through IMAP > General page.
Use the Max error no. field to specify the maximum number of wrong commands that can be received from a IMAP client during one session.
Attribute Name: maxErrors Attribute Class: IMAPService Attribute Type: VALUE Value Type: Unsigned Integer MIN-MAX: 0-100 (0=unlimited) Default Value: 20 Use the Max. auth. error no. field to specify the maximum number of failed authentications allowed during one session.
Attribute Name: maxAuthErrors Attribute Class: IMAPService Attribute Type: VALUE Value Type: Unsigned Integer MIN-MAX: 0-100 (0=unlimited) Default Value: 5 For more information on connection control, see the IMAP section.
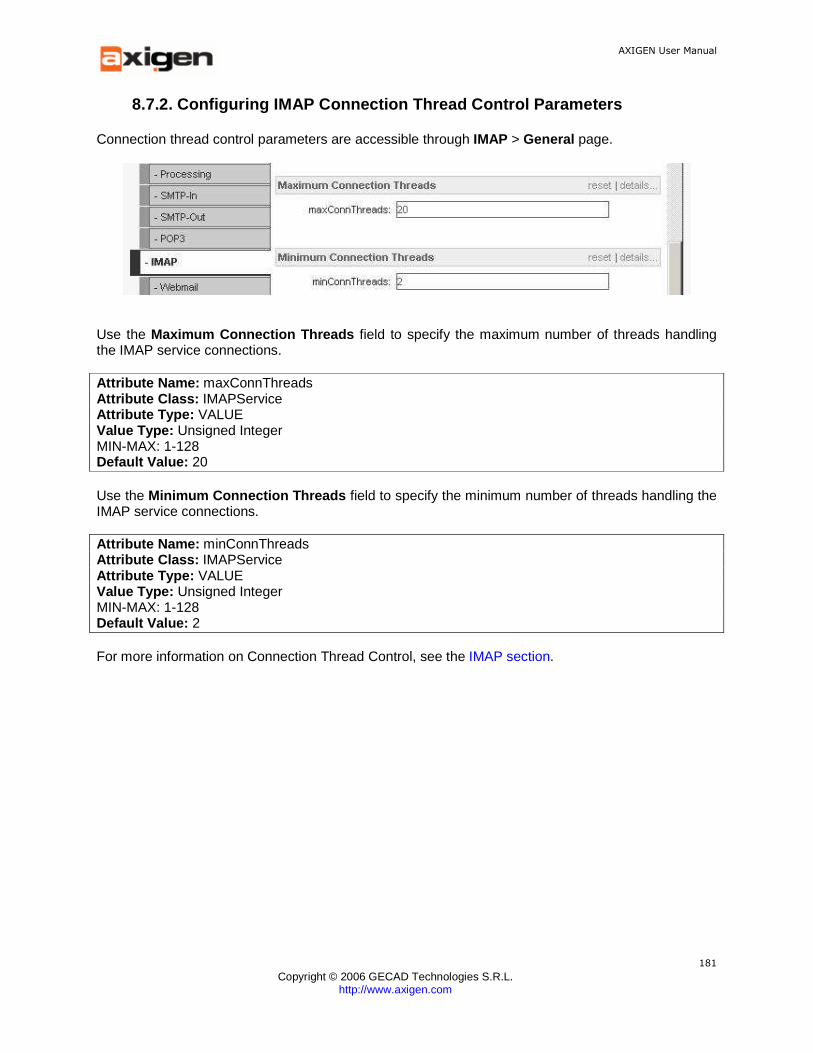
AXIGEN User Manual
Copyright © 2006 GECAD Technologies S.R.L.
http://www.axigen.com
181
8.7.2. Configuring IMAP Connection Thread Control P arameters
Connection thread control parameters are accessible through IMAP > General page.
Use the Maximum Connection Threads field to specify the maximum number of threads handling the IMAP service connections.
Attribute Name: maxConnThreads Attribute Class: IMAPService Attribute Type: VALUE Value Type: Unsigned Integer MIN-MAX: 1-128 Default Value: 20 Use the Minimum Connection Threads field to specify the minimum number of threads handling the IMAP service connections.
Attribute Name: minConnThreads Attribute Class: IMAPService Attribute Type: VALUE Value Type: Unsigned Integer MIN-MAX: 1-128 Default Value: 2 For more information on Connection Thread Control, see the IMAP section.
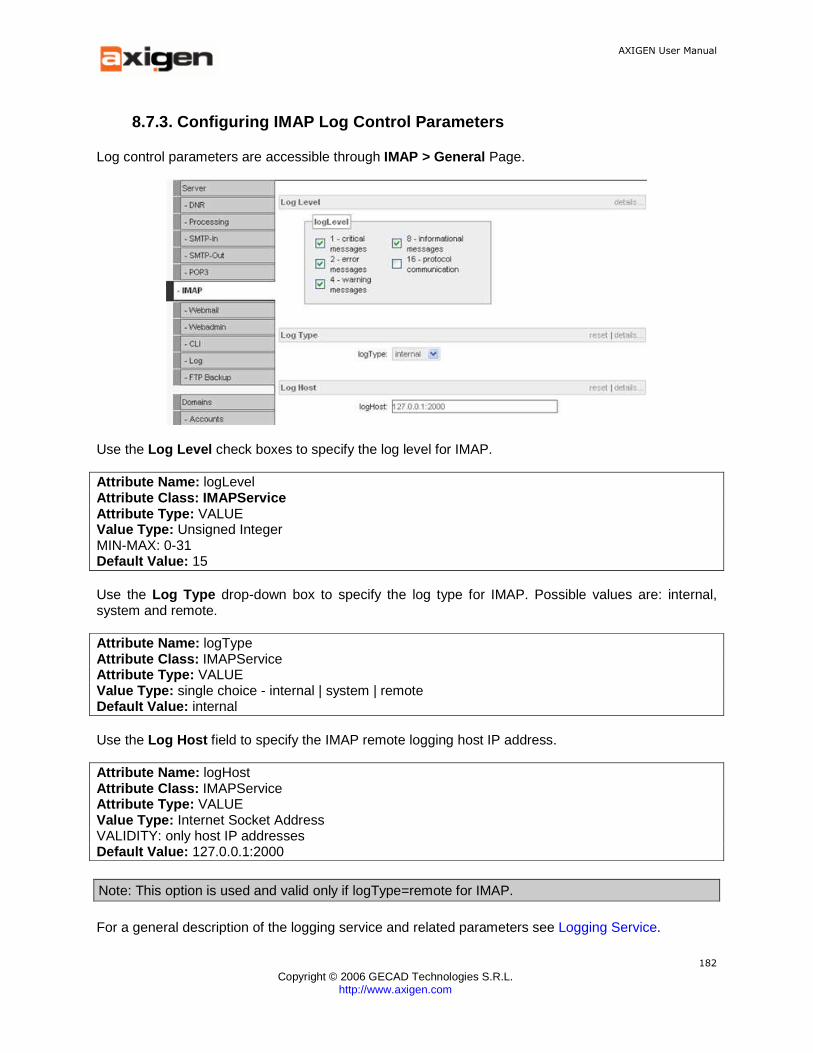
AXIGEN User Manual
Copyright © 2006 GECAD Technologies S.R.L.
http://www.axigen.com
182
8.7.3. Configuring IMAP Log Control Parameters
Log control parameters are accessible through IMAP > General Page.
Use the Log Level check boxes to specify the log level for IMAP.
Attribute Name: logLevel Attribute Class: IMAPService Attribute Type: VALUE Value Type: Unsigned Integer MIN-MAX: 0-31 Default Value: 15 Use the Log Type drop-down box to specify the log type for IMAP. Possible values are: internal, system and remote.
Attribute Name: logType Attribute Class: IMAPService Attribute Type: VALUE Value Type: single choice - internal | system | remote Default Value: internal Use the Log Host field to specify the IMAP remote logging host IP address.
Attribute Name: logHost Attribute Class: IMAPService Attribute Type: VALUE Value Type: Internet Socket Address VALIDITY: only host IP addresses Default Value: 127.0.0.1:2000
Note: This option is used and valid only if logType=remote for IMAP.
For a general description of the logging service and related parameters see Logging Service.
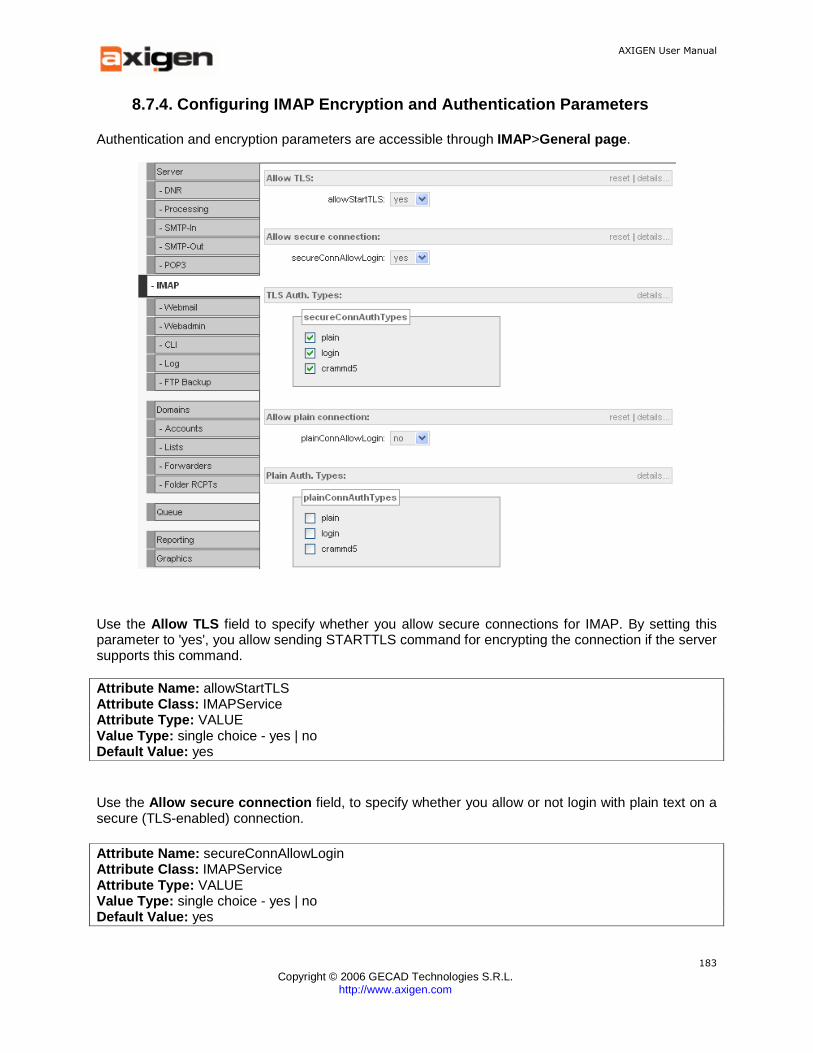
AXIGEN User Manual
Copyright © 2006 GECAD Technologies S.R.L.
http://www.axigen.com
183
8.7.4. Configuring IMAP Encryption and Authenticati on Parameters
Authentication and encryption parameters are accessible through IMAP>General page .
Use the Allow TLS field to specify whether you allow secure connections for IMAP. By setting this parameter to 'yes', you allow sending STARTTLS command for encrypting the connection if the server supports this command.
Attribute Name: allowStartTLS Attribute Class: IMAPService Attribute Type: VALUE Value Type: single choice - yes | no Default Value: yes
Use the Allow secure connection field, to specify whether you allow or not login with plain text on a secure (TLS-enabled) connection.
Attribute Name: secureConnAllowLogin Attribute Class: IMAPService Attribute Type: VALUE Value Type: single choice - yes | no Default Value: yes
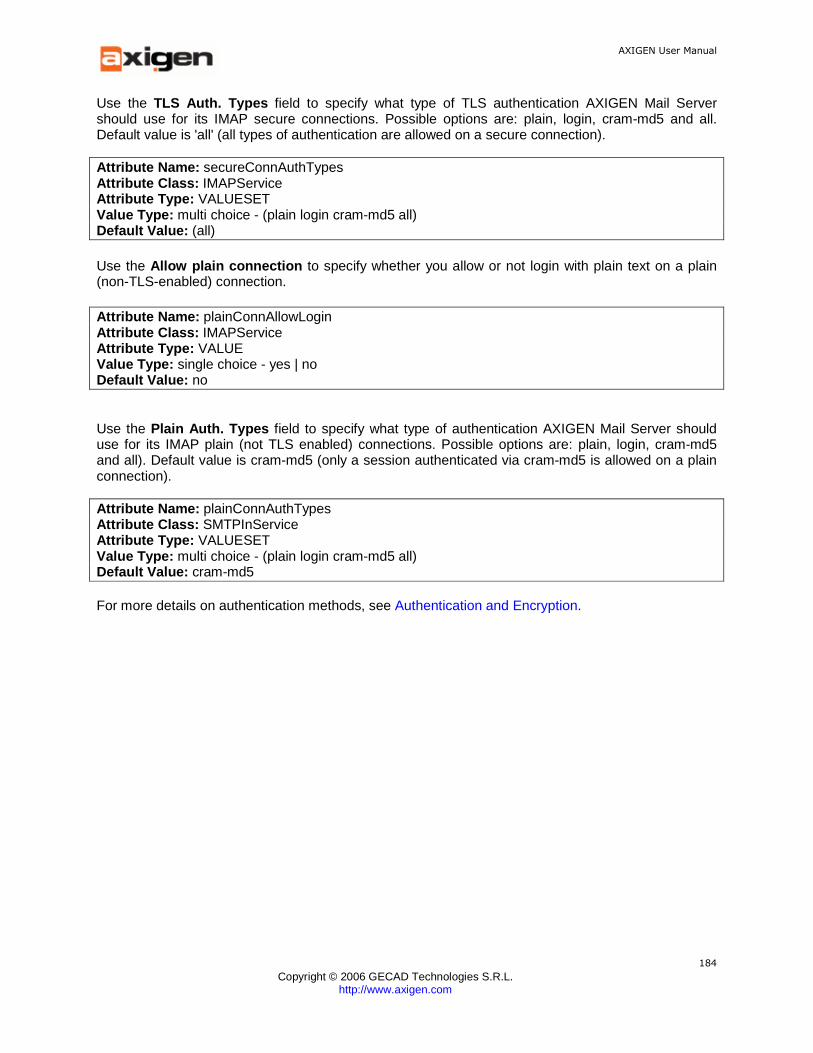
AXIGEN User Manual
Copyright © 2006 GECAD Technologies S.R.L.
http://www.axigen.com
184
Use the TLS Auth. Types field to specify what type of TLS authentication AXIGEN Mail Server should use for its IMAP secure connections. Possible options are: plain, login, cram-md5 and all. Default value is 'all' (all types of authentication are allowed on a secure connection).
Attribute Name: secureConnAuthTypes Attribute Class: IMAPService Attribute Type: VALUESET Value Type: multi choice - (plain login cram-md5 all) Default Value: (all)
Use the Allow plain connection to specify whether you allow or not login with plain text on a plain (non-TLS-enabled) connection.
Attribute Name: plainConnAllowLogin Attribute Class: IMAPService Attribute Type: VALUE Value Type: single choice - yes | no Default Value: no
Use the Plain Auth. Types field to specify what type of authentication AXIGEN Mail Server should use for its IMAP plain (not TLS enabled) connections. Possible options are: plain, login, cram-md5 and all). Default value is cram-md5 (only a session authenticated via cram-md5 is allowed on a plain connection).
Attribute Name: plainConnAuthTypes Attribute Class: SMTPInService Attribute Type: VALUESET Value Type: multi choice - (plain login cram-md5 all) Default Value: cram-md5 For more details on authentication methods, see Authentication and Encryption.
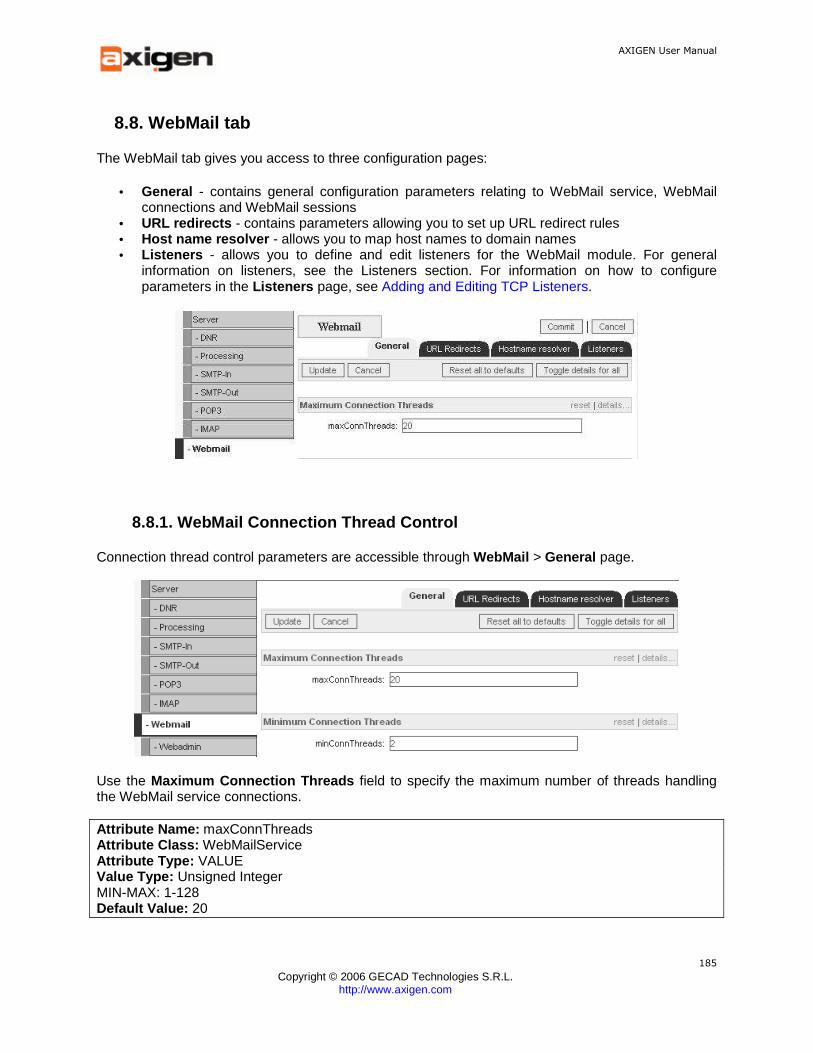
AXIGEN User Manual
Copyright © 2006 GECAD Technologies S.R.L.
http://www.axigen.com
185
8.8. WebMail tab
The WebMail tab gives you access to three configuration pages:
• General - contains general configuration parameters relating to WebMail service, WebMail connections and WebMail sessions
• URL redirects - contains parameters allowing you to set up URL redirect rules • Host name resolver - allows you to map host names to domain names • Listeners - allows you to define and edit listeners for the WebMail module. For general
information on listeners, see the Listeners section. For information on how to configure parameters in the Listeners page, see Adding and Editing TCP Listeners.
8.8.1. WebMail Connection Thread Control
Connection thread control parameters are accessible through WebMail > General page.
Use the Maximum Connection Threads field to specify the maximum number of threads handling the WebMail service connections.
Attribute Name: maxConnThreads Attribute Class: WebMailService Attribute Type: VALUE Value Type: Unsigned Integer MIN-MAX: 1-128 Default Value: 20

AXIGEN User Manual
Copyright © 2006 GECAD Technologies S.R.L.
http://www.axigen.com
186
Use the Minimum Connection Threads field to specify the minimum number of threads handling the WebMail service connections.
Attribute Name: minConnThreads Attribute Class: WebMailService Attribute Type: VALUE Value Type: Unsigned Integer MIN-MAX: 1-128 Default Value: 2 For more information on Connection Thread Control, see WebMail in the Product Architecture chapter.
8.8.2. WebMail Log Control
Log control parameters are accessible through WebMail > General Page.
Use the Log Level check boxes to specify the log level for the WebMail service.
Attribute Name: logLevel Attribute Class: WebMailService Attribute Type: VALUE Value Type: Unsigned Integer MIN-MAX: 0-31 Default Value: 15
Use the Log Type drop-down box to specify the log type for the WebMail service. Possible values are: internal, system and remote.
Attribute Name: logType Attribute Class: WebMailService Attribute Type: VALUE Value Type: single choice - internal | system | remote Default Value: internal
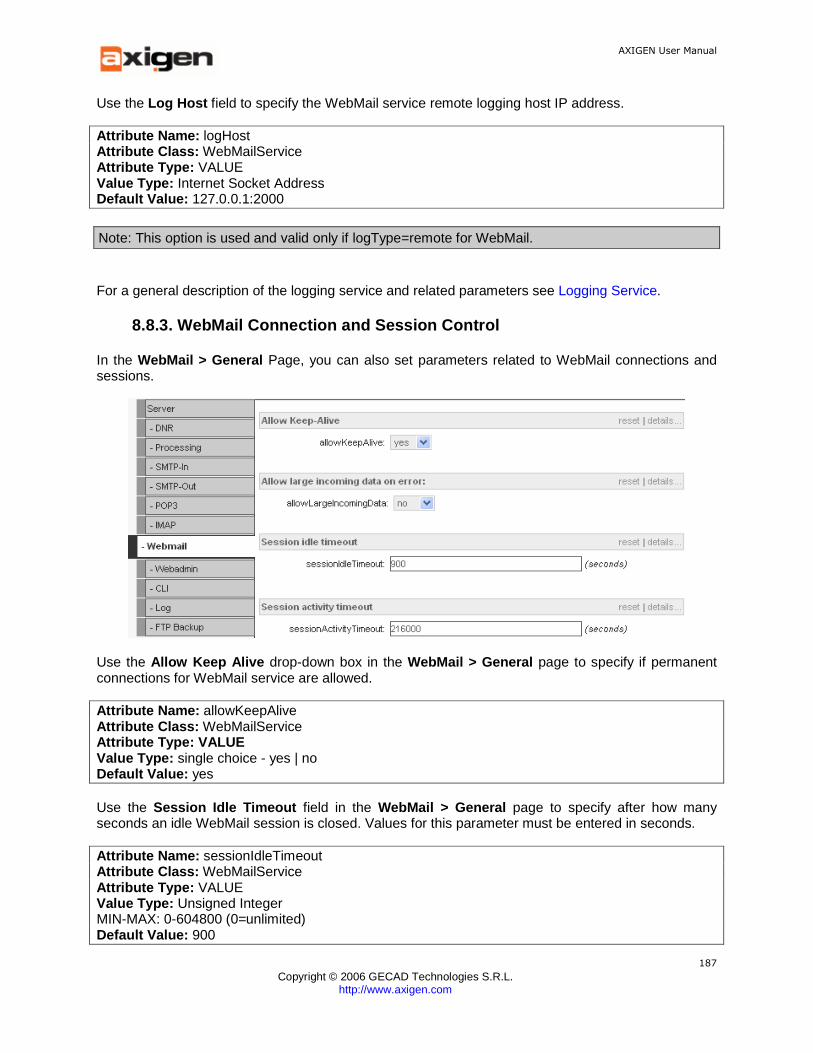
AXIGEN User Manual
Copyright © 2006 GECAD Technologies S.R.L.
http://www.axigen.com
187
Use the Log Host field to specify the WebMail service remote logging host IP address.
Attribute Name: logHost Attribute Class: WebMailService Attribute Type: VALUE Value Type: Internet Socket Address Default Value: 127.0.0.1:2000
Note: This option is used and valid only if logType=remote for WebMail.
For a general description of the logging service and related parameters see Logging Service.
8.8.3. WebMail Connection and Session Control
In the WebMail > General Page, you can also set parameters related to WebMail connections and sessions.
Use the Allow Keep Alive drop-down box in the WebMail > General page to specify if permanent connections for WebMail service are allowed.
Attribute Name: allowKeepAlive Attribute Class: WebMailService Attribute Type: VALUE Value Type: single choice - yes | no Default Value: yes Use the Session Idle Timeout field in the WebMail > General page to specify after how many seconds an idle WebMail session is closed. Values for this parameter must be entered in seconds.
Attribute Name: sessionIdleTimeout Attribute Class: WebMailService Attribute Type: VALUE Value Type: Unsigned Integer MIN-MAX: 0-604800 (0=unlimited) Default Value: 900
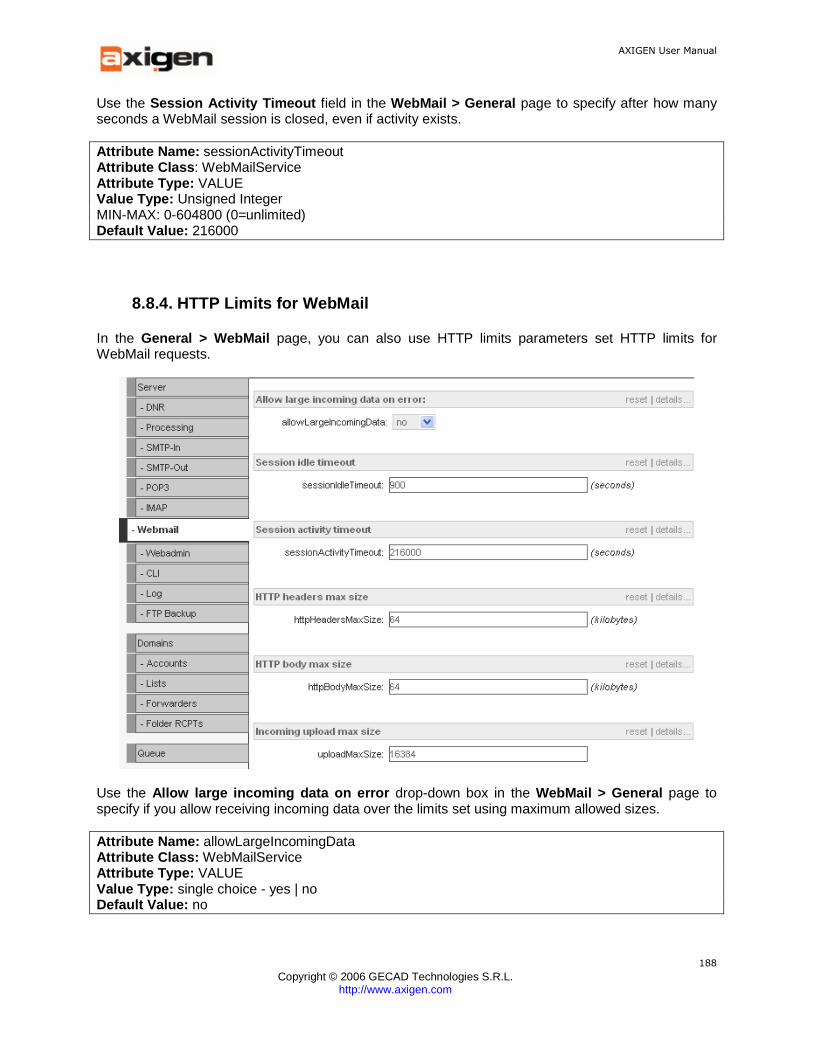
AXIGEN User Manual
Copyright © 2006 GECAD Technologies S.R.L.
http://www.axigen.com
188
Use the Session Activity Timeout field in the WebMail > General page to specify after how many seconds a WebMail session is closed, even if activity exists.
Attribute Name: sessionActivityTimeout Attribute Class : WebMailService Attribute Type: VALUE Value Type: Unsigned Integer MIN-MAX: 0-604800 (0=unlimited) Default Value: 216000
8.8.4. HTTP Limits for WebMail
In the General > WebMail page, you can also use HTTP limits parameters set HTTP limits for WebMail requests.
Use the Allow large incoming data on error drop-down box in the WebMail > General page to specify if you allow receiving incoming data over the limits set using maximum allowed sizes.
Attribute Name: allowLargeIncomingData Attribute Class: WebMailService Attribute Type: VALUE Value Type: single choice - yes | no Default Value: no
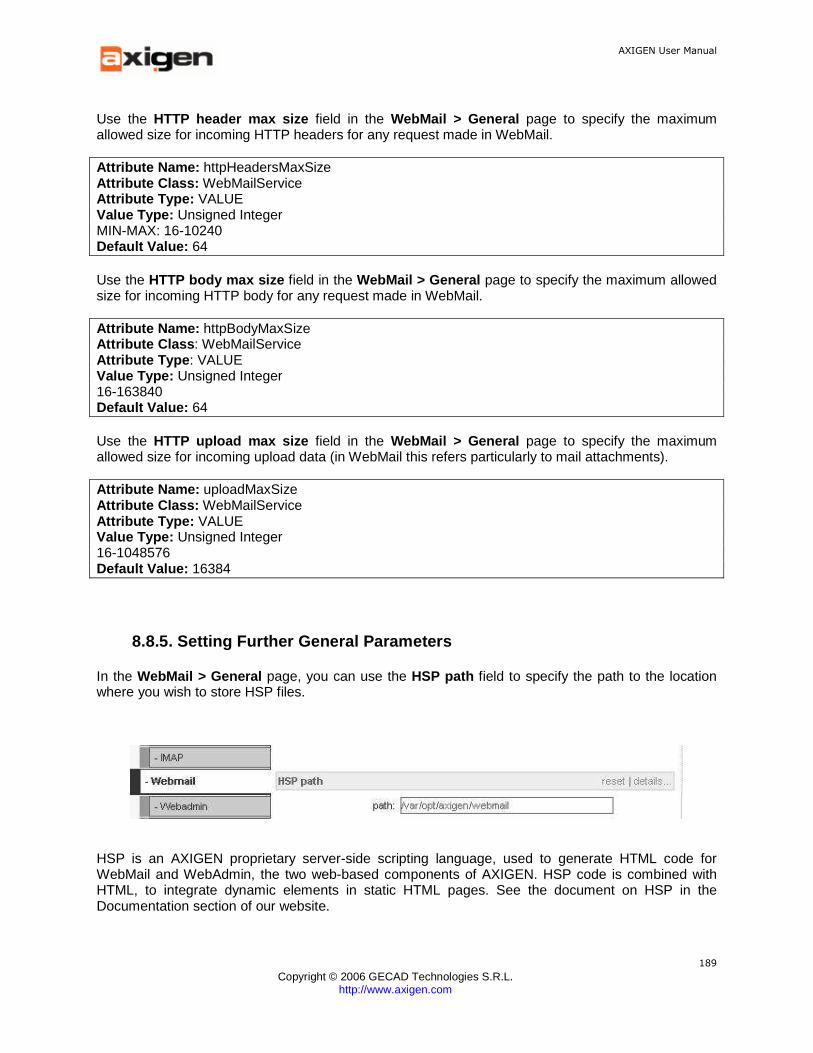
AXIGEN User Manual
Copyright © 2006 GECAD Technologies S.R.L.
http://www.axigen.com
189
Use the HTTP header max size field in the WebMail > General page to specify the maximum allowed size for incoming HTTP headers for any request made in WebMail.
Attribute Name: httpHeadersMaxSize Attribute Class: WebMailService Attribute Type: VALUE Value Type: Unsigned Integer MIN-MAX: 16-10240 Default Value: 64 Use the HTTP body max size field in the WebMail > General page to specify the maximum allowed size for incoming HTTP body for any request made in WebMail.
Attribute Name: httpBodyMaxSize Attribute Class : WebMailService Attribute Type : VALUE Value Type: Unsigned Integer 16-163840 Default Value: 64 Use the HTTP upload max size field in the WebMail > General page to specify the maximum allowed size for incoming upload data (in WebMail this refers particularly to mail attachments).
Attribute Name: uploadMaxSize Attribute Class: WebMailService Attribute Type: VALUE Value Type: Unsigned Integer 16-1048576 Default Value: 16384
8.8.5. Setting Further General Parameters
In the WebMail > General page, you can use the HSP path field to specify the path to the location where you wish to store HSP files.
HSP is an AXIGEN proprietary server-side scripting language, used to generate HTML code for WebMail and WebAdmin, the two web-based components of AXIGEN. HSP code is combined with HTML, to integrate dynamic elements in static HTML pages. See the document on HSP in the Documentation section of our website.

AXIGEN User Manual
Copyright © 2006 GECAD Technologies S.R.L.
http://www.axigen.com
190
You can also choose to display or not the domain list when logging in to WebMail.
To specify your choice, use the Show Domain List dropdown box.
Attribute Name: showDomainList Attribute Class: WebMailService Attribute Type: VALUE Value Type: Single-Choice Menu Possible values: ( no | yes ) - single choice Default Value: ( no )
8.8.6. URL Redirects for WebMail
Use the options available in the WebMail > URL Redirects page to define redirect rules for WebMail. These rules allow you to redirect connections established on one listener (domain:port location) to a specified host. These can be used, for instance, for redirecting plain connections to secure locations or to set up virtual hosts (if you wish to host several domains on the same IP address).
When first entering WebMail > URL Redirects , a list of currently defined URL Redirects is displayed. To add a new redirect rule, press the Add new urlredirect button or press the Edit button next to a rule to edit its parameters.
Whether adding or editing a URL redirect, the parameters displayed are the same.
AXIGEN User Manual
Copyright © 2006 GECAD Technologies S.R.L.
http://www.axigen.com
191
Use the Address field in WebMail > URL Redirects to specify the address of a TCP listener (domain:port location) from which connections will be redirected (when accepted).
Attribute Name: address Attribute Class: URLRedirect Attribute Type: VALUE Value Type: Internet Socket Address Default: 0.0.0.0:8000 The Port and Hostname parameters are used to specify a location (port and host name) to which the connection will be redirected. In the Host name field, you need to enter the domain name (or host name / IP address written as a string).
Attribute Name: Port Attribute Class: UrlRedirect Attribute Type: VALUE Value Type: Unsigned Integer MIN-MAX: 1-65535 Default: 443 Attribute Name: hostname Attribute Class: UrlRedirect Attribute Type: VALUE Value Type: String Default Value: localhost When you are done configuring these parameters, press the Add button to add the new rule and the Commit button to enforce your changes.

AXIGEN User Manual
Copyright © 2006 GECAD Technologies S.R.L.
http://www.axigen.com
192
8.8.7. Hostname Resolver for Webmail
The WebMail > Hostname Resolver page allows you to map hostnames (IP adress:port) to domain names. When first entering WebMail > Hostname Resolver , a list of currently defined host - domain name value pairs is displayed. To add a new mapping, press the Add new hostresolver button, or press the Edit button next to an existing one to edit its parameters.
Whether adding or editing a hostname resolver, the parameters displayed are the same.
Use the Host and Domain fields to specify the host name (IP:port combination) and the domain name you wish to associate to it.
Attribute Name: host Attribute Class: HostNameResolver Attribute Type: VALUE Value Type: STRING Required Attribute Name: domain Attribute Class: HostNameResolver Attribute Type: VALUE Value Type: STRING Required This allows setting up virtual hosts; that is specifying different domain names to be hosted on the same IP address (for instance, if you wish to have different WebMail login pages for two local pages).

AXIGEN User Manual
Copyright © 2006 GECAD Technologies S.R.L.
http://www.axigen.com
193
8.9. WebAdmin tab
The WebAdmin tab gives you access to WebAdmin related configuration parameters grouped in three pages:
• General - contains general configuration parameters relating to WebAdmin service, WebAdmin connections, sessions and HTTP limits
• URL redirects - contains parameters allowing you to set up URL redirect rules • Listeners - allows you to define and edit listeners for the WebAdmin module. For general
information on listeners, see the Listeners section. For information on how to configure parameters in the Listeners page, see Adding and Editing TCP Listeners.
8.9.1. WebAdmin Connection Thread Control
Connection thread control parameters are accessible through WebAdmin > General page.
Use the Maximum Connection Threads field to specify the maximum number of threads handling the WebAdmin service connections.
Attribute Name: maxConnThreads Attribute Class: WebAdminService Attribute Type: VALUE Value Type: Unsigned Integer MIN-MAX: 1-128 Default Value: 20 Use the Minimum Connection Threads field to specify the minimum number of threads handling the WebAdmin service connections.
Attribute Name: minConnThreads Attribute Class: WebAdminService Attribute Type : VALUE Value Type: Unsigned Integer MIN-MAX: 1-128 Default Value: 2

AXIGEN User Manual
Copyright © 2006 GECAD Technologies S.R.L.
http://www.axigen.com
194
8.9.2. WebAdmin Log Control
Log control parameters are accessible through WebAdmin> General Page.
Use the Log Level check boxes to specify the log level for the WebAdmin service.
Attribute Name: logLevel Attribute Class : WebAdminService Attribute Type: VALUE Value Type: Unsigned Integer MIN-MAX: 0-31 Default Value: 15
Use the Log Type drop-down box to specify the log type for the WebAdmin service. Possible values are: internal, system and remote.
Attribute Name: logType Attribute Class: WebAdminService Attribute Type: VALUE Value Type : single choice - internal | system | remote Default Value: internal Use the Log Host field to specify the WebAdmin service remote logging host IP address.
Attribute Name: logHost Attribute Class: WebAdminService Attribute Type: VALUE Value Type: Internet Socket Address Default Value: 127.0.0.1:2000
Note: This option is used and valid only if logType=remote for WebAdmin.
For a general description of the logging service and related parameters see Logging Service.

AXIGEN User Manual
Copyright © 2006 GECAD Technologies S.R.L.
http://www.axigen.com
195
8.9.3. Specifying the HSP Path
In the WebAdmin > General page, you can use the HSP path field to specify the path to the location where you wish to store HSP files.
HSP is the AXIGEN proprietary server-side scripting language, used to generate HTML code for WebMail and WebAdmin, the two web-based components of AXIGEN. HSP code is combined with HTML, to integrate dynamic elements in static HTML pages. See the document on HSP in the Documentation section of our website.
8.9.4. WebAdmin Connection and Session Control
In the WebAdmin > General Page, you can also set parameters related to WebAdmin connections and sessions.
Use the Allow Keep Alive drop-down box in the WebAdmin > General page to specify if permanent connections for WebAdmin service are allowed.
Attribute Name: allowKeepAlive Attribute Class: WebAdminService Attribute Type: VALUE Value Type: single choice - yes | no Default Value: yes Use the Session Idle Timeout field in the WebAdmin > General page to specify after how many seconds an idle WebAdmin session is closed. Values for this parameter must be entered in seconds.
Attribute Name: sessionIdleTimeout Attribute Class: WebAdminService Attribute Type: VALUE Value Type: Unsigned Integer MIN-MAX: 0-604800 (0=unlimited) Default Value: 900

AXIGEN User Manual
Copyright © 2006 GECAD Technologies S.R.L.
http://www.axigen.com
196
Use the Session Activity Timeout text area in the WebAdmin > General page to specify after how many seconds a WebAdmin session is closed, even if activity exists.
Attribute Name: sessionActivityTimeout Attribute Class: WebAdminService Attribute Type : VALUE Value Type: Unsigned Integer MIN-MAX: 0-604800 (0=unlimited) Default Value: 216000
8.9.5. HTTP Limits for WebAdmin
In the WebAdmin > General page, you can also use HTTP limits parameters set HTTP limits for WebAdmin requests.
Use the Allow large incoming data on error drop-down box in the WebAdmin > General page to specify if you allow receiving incoming data over the limits set using maximum allowed sizes.
Attribute Name: allowLargeIncomingData Attribute Class: WebAdminService Attribute Type: VALUE Value Type: single choice - yes | no Default Value: no Use the HTTP headers max size field in the WebAdmin > General page to specify the maximum allowed size for incoming HTTP headers for any request made in WebAdmin.
Attribute Name: httpHeadersMaxSize Attribute Class: WebAdminService Attribute Type: VALUE Value Type: Unsigned Integer MIN-MAX: 16-10240 Default Value: 64
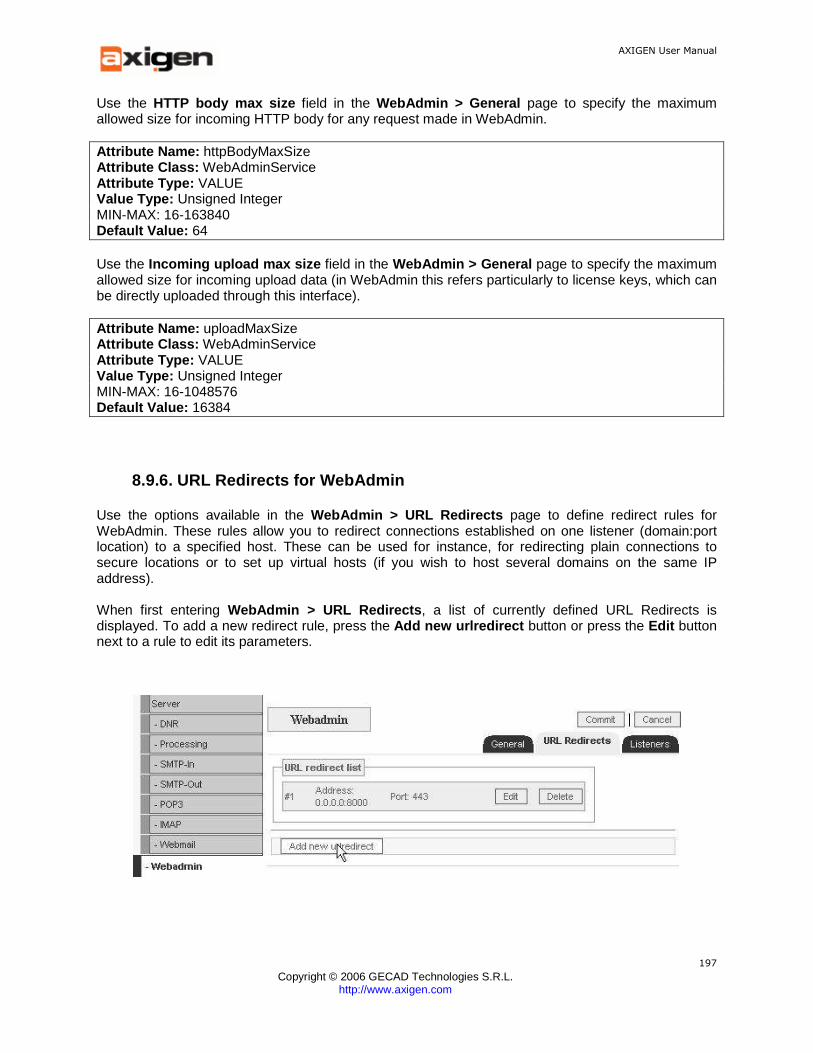
AXIGEN User Manual
Copyright © 2006 GECAD Technologies S.R.L.
http://www.axigen.com
197
Use the HTTP body max size field in the WebAdmin > General page to specify the maximum allowed size for incoming HTTP body for any request made in WebAdmin.
Attribute Name: httpBodyMaxSize Attribute Class: WebAdminService Attribute Type: VALUE Value Type: Unsigned Integer MIN-MAX: 16-163840 Default Value: 64 Use the Incoming upload max size field in the WebAdmin > General page to specify the maximum allowed size for incoming upload data (in WebAdmin this refers particularly to license keys, which can be directly uploaded through this interface).
Attribute Name: uploadMaxSize Attribute Class: WebAdminService Attribute Type: VALUE Value Type: Unsigned Integer MIN-MAX: 16-1048576 Default Value: 16384
8.9.6. URL Redirects for WebAdmin
Use the options available in the WebAdmin > URL Redirects page to define redirect rules for WebAdmin. These rules allow you to redirect connections established on one listener (domain:port location) to a specified host. These can be used for instance, for redirecting plain connections to secure locations or to set up virtual hosts (if you wish to host several domains on the same IP address). When first entering WebAdmin > URL Redirects , a list of currently defined URL Redirects is displayed. To add a new redirect rule, press the Add new urlredirect button or press the Edit button next to a rule to edit its parameters.
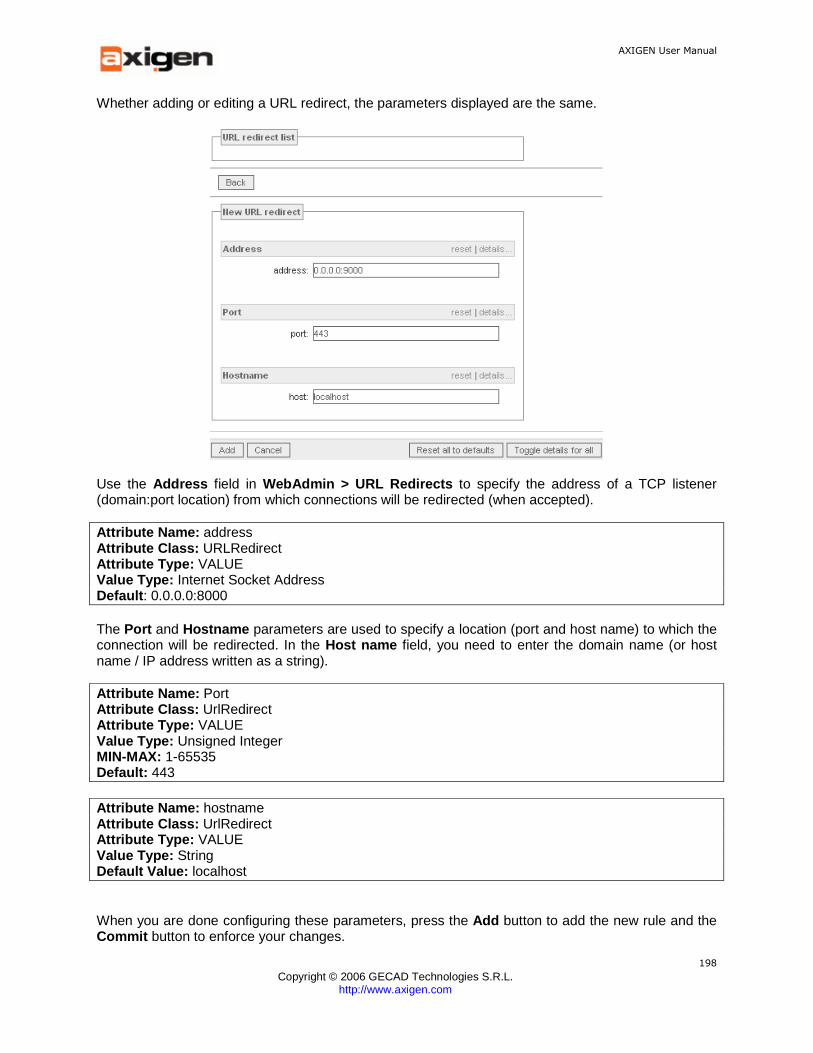
AXIGEN User Manual
Copyright © 2006 GECAD Technologies S.R.L.
http://www.axigen.com
198
Whether adding or editing a URL redirect, the parameters displayed are the same.
Use the Address field in WebAdmin > URL Redirects to specify the address of a TCP listener (domain:port location) from which connections will be redirected (when accepted).
Attribute Name: address Attribute Class: URLRedirect Attribute Type: VALUE Value Type: Internet Socket Address Default : 0.0.0.0:8000 The Port and Hostname parameters are used to specify a location (port and host name) to which the connection will be redirected. In the Host name field, you need to enter the domain name (or host name / IP address written as a string).
Attribute Name: Port Attribute Class: UrlRedirect Attribute Type: VALUE Value Type: Unsigned Integer MIN-MAX: 1-65535 Default: 443 Attribute Name: hostname Attribute Class: UrlRedirect Attribute Type: VALUE Value Type: String Default Value: localhost When you are done configuring these parameters, press the Add button to add the new rule and the Commit button to enforce your changes.

AXIGEN User Manual
Copyright © 2006 GECAD Technologies S.R.L.
http://www.axigen.com
199
8.10. CLI Tab
The CLI tab allows you to configure parameters related to the CLI connections, logs and listeners. CLI (Command Line Interface) is a stand-alone administration tool for AXIGEN Mail Server.
CLI tab allows you to access these pages:
• General - contains parameters relating to connection thread, connection error and log control for CLI
• Listeners - contains parameters related to listener configuration for CLI. Refer to Adding and Editing TCP Listeners for a full configuration procedure
You can find full information on CLI and how to configure AXIGEN using this tool in Configuring AXIGEN using CLI.
8.10.1. Configuring CLI Connection Error Control Pa rameters
Connection error control parameters are accessible through CLI > General page.
Use the Max error no. field to specify the maximum number of wrong commands that can be received from a CLI client during one session.
Attribute Name: maxErrors Attribute Class: CLIService Attribute Type: VALUE Value Type: Unsigned Integer MIN-MAX: 0-100 (0=unlimited) Default Value: 20

AXIGEN User Manual
Copyright © 2006 GECAD Technologies S.R.L.
http://www.axigen.com
200
Use the Max. auth. error no. field to specify the maximum number of failed authentications allowed during one session.
Attribute Name: maxAuthErrors Attribute Class: CLIService Attribute Type: VALUE Value Type: Unsigned Integer MIN-MAX: 0-100 (0=unlimited) Default Value: 5 Use the Max. non-authenticated commands field of the CLI > General page to specify the maximum number of commands allowed before authentication.
Attribute Name: maxAuthCommands Attribute Class: CLIService Attribute Type: VALUE Value Type: Unsigned Integer MIN-MAX: 0-100 (0=unlimited) Default Value: 20 If you change any of the default values, make sure you click on Commit to apply your changes.
8.10.2. Configuring CLI Connection Thread Control P arameters
Connection thread control parameters are accessible through CLI > General page.
Use the Maximum Connection Threads field to specify the maximum number of threads handling the CLI service connections.
Attribute Name: maxConnThreads Attribute Class: CLIService Attribute Type: VALUE Value Type: Unsigned Integer MIN-MAX: 1-128 Default Value: 20 Use the Minimum Connection Threads field to specify the minimum number of threads handling the CLI service connections.
Attribute Name: minConnThreads Attribute Class: CLIService Attribute Type: VALUE
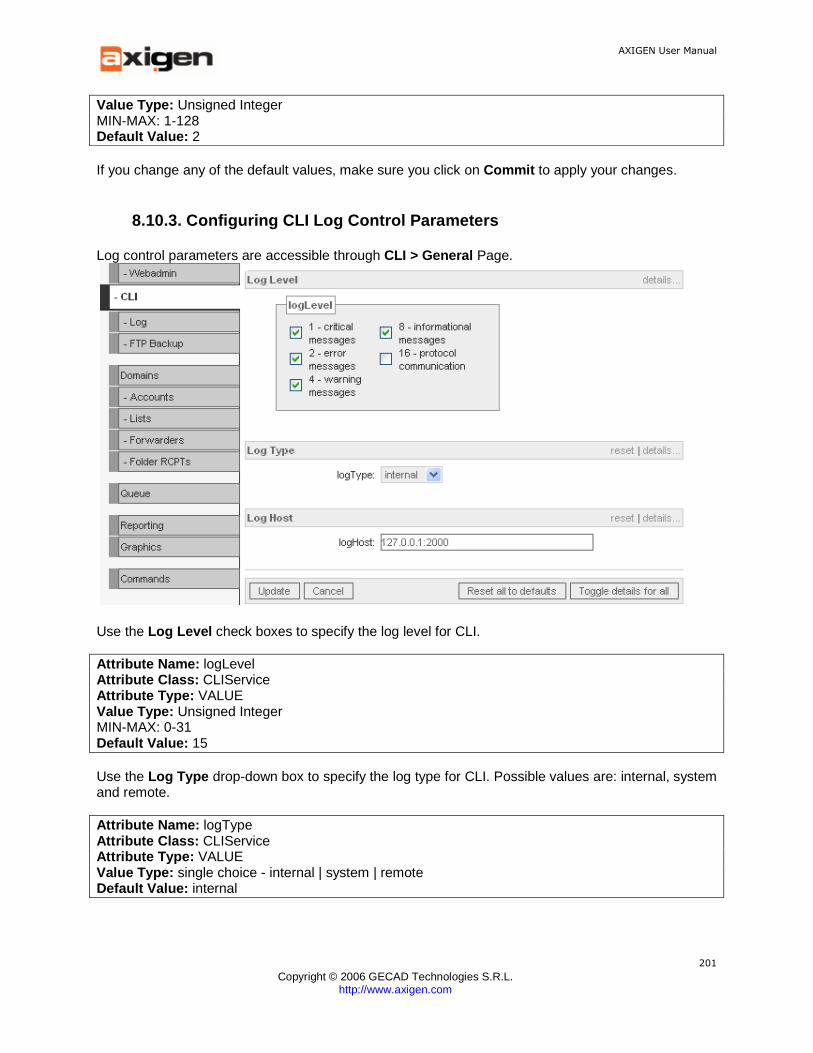
AXIGEN User Manual
Copyright © 2006 GECAD Technologies S.R.L.
http://www.axigen.com
201
Value Type: Unsigned Integer MIN-MAX: 1-128 Default Value: 2 If you change any of the default values, make sure you click on Commit to apply your changes.
8.10.3. Configuring CLI Log Control Parameters
Log control parameters are accessible through CLI > General Page.
Use the Log Level check boxes to specify the log level for CLI.
Attribute Name: logLevel Attribute Class: CLIService Attribute Type: VALUE Value Type: Unsigned Integer MIN-MAX: 0-31 Default Value: 15 Use the Log Type drop-down box to specify the log type for CLI. Possible values are: internal, system and remote.
Attribute Name: logType Attribute Class: CLIService Attribute Type: VALUE Value Type: single choice - internal | system | remote Default Value: internal

AXIGEN User Manual
Copyright © 2006 GECAD Technologies S.R.L.
http://www.axigen.com
202
Use the Log Host field to specify the CLI remote logging host IP address.
Attribute Name: logHost Attribute Class: CLIService Attribute Type: VALUE Value Type: Internet Socket Address Default Value: 127.0.0.1:2000
Note: This option is used and valid only if logType=remote for the CLI service.
For a general description of the logging service and these parameters see Logging service.
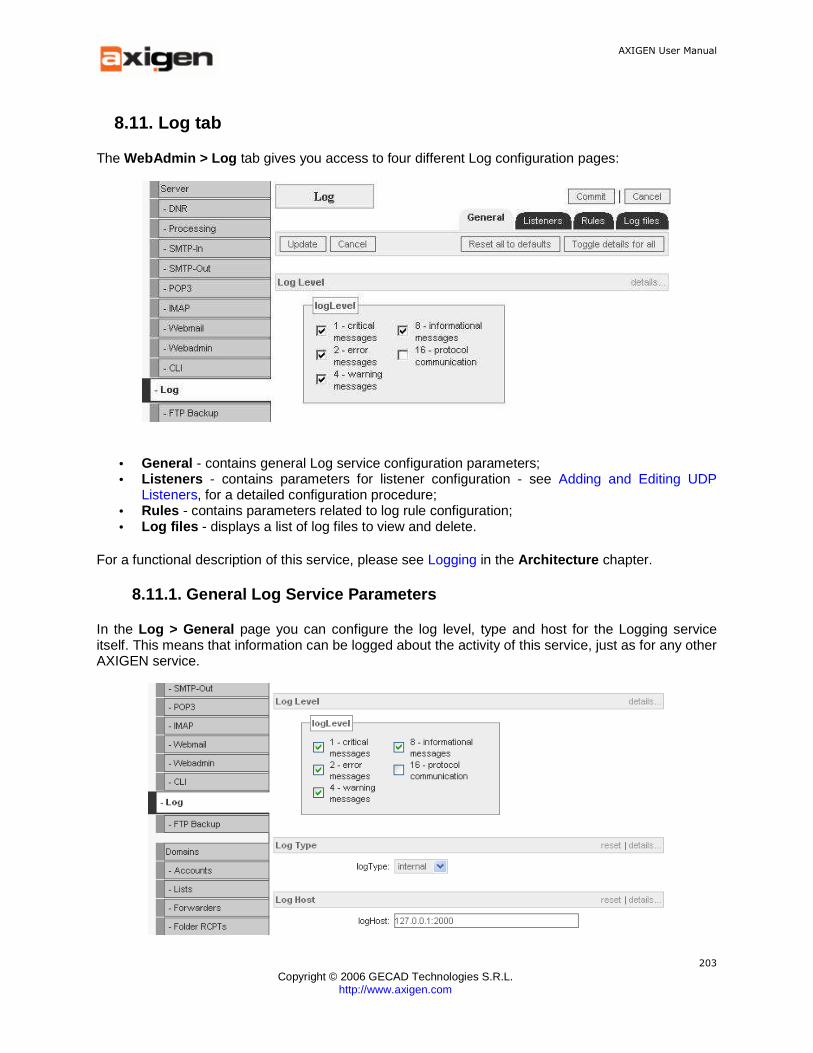
AXIGEN User Manual
Copyright © 2006 GECAD Technologies S.R.L.
http://www.axigen.com
203
8.11. Log tab
The WebAdmin > Log tab gives you access to four different Log configuration pages:
• General - contains general Log service configuration parameters; • Listeners - contains parameters for listener configuration - see Adding and Editing UDP
Listeners, for a detailed configuration procedure; • Rules - contains parameters related to log rule configuration; • Log files - displays a list of log files to view and delete.
For a functional description of this service, please see Logging in the Architecture chapter.
8.11.1. General Log Service Parameters
In the Log > General page you can configure the log level, type and host for the Logging service itself. This means that information can be logged about the activity of this service, just as for any other AXIGEN service.

AXIGEN User Manual
Copyright © 2006 GECAD Technologies S.R.L.
http://www.axigen.com
204
Use the Log Level check boxes to specify the log level for the service.
Attribute Name: logLevel Attribute Class: LogService Attribute Type: VALUE Value Type: Unsigned Integer MIN-MAX: 0-31 Default Value: 15
Use the Log Type drop-down box to specify the log type. Possible values are: internal, system and remote.
Attribute Name : logType Attribute Class: LogService Attribute Type: VALUE Value Type: single choice - internal | system | remote Default Value: internal Use the Log Host field to specify the remote logging host IP address.
Attribute Name: logHost Attribute Class: LogService Attribute Type: VALUE Value Type: Internet Socket Address Default Value: 127.0.0.1:2000
Note: This option is used and valid only if logType=remote for the Log Service.
For a general description of the logging service and related parameters see Logging service.
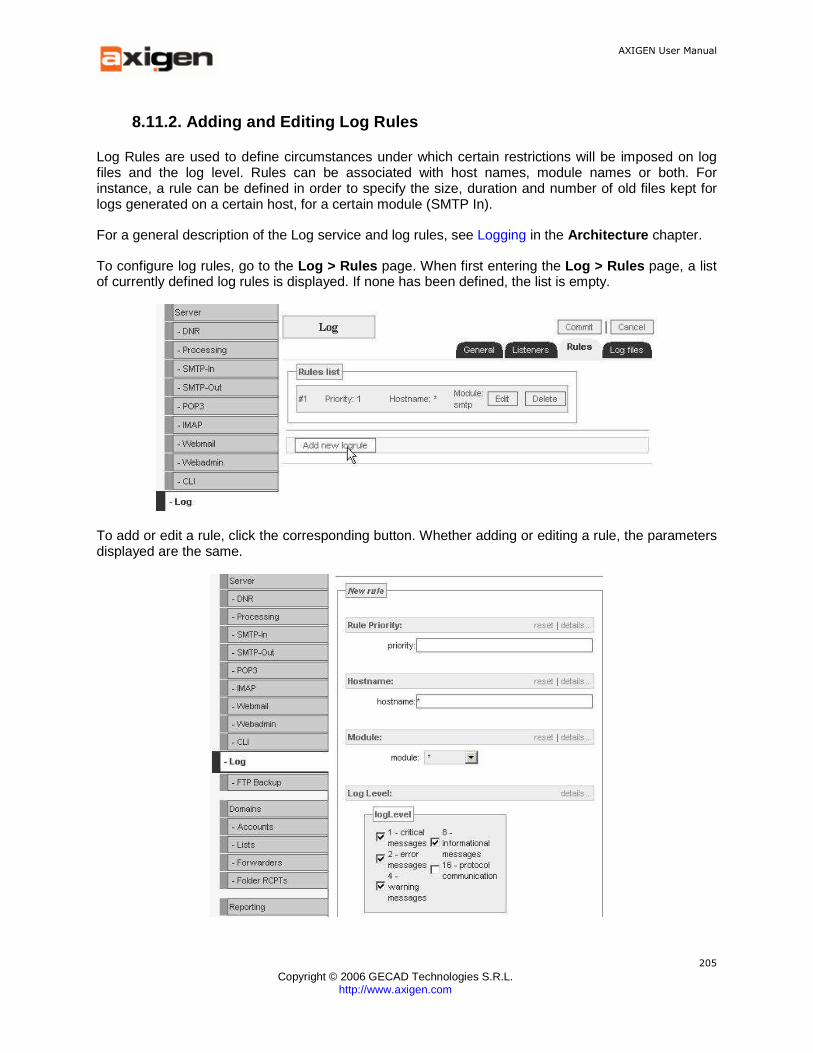
AXIGEN User Manual
Copyright © 2006 GECAD Technologies S.R.L.
http://www.axigen.com
205
8.11.2. Adding and Editing Log Rules
Log Rules are used to define circumstances under which certain restrictions will be imposed on log files and the log level. Rules can be associated with host names, module names or both. For instance, a rule can be defined in order to specify the size, duration and number of old files kept for logs generated on a certain host, for a certain module (SMTP In).
For a general description of the Log service and log rules, see Logging in the Architecture chapter.
To configure log rules, go to the Log > Rules page. When first entering the Log > Rules page, a list of currently defined log rules is displayed. If none has been defined, the list is empty.
To add or edit a rule, click the corresponding button. Whether adding or editing a rule, the parameters displayed are the same.
AXIGEN User Manual
Copyright © 2006 GECAD Technologies S.R.L.
http://www.axigen.com
206
Use the Rule Priority text area to specify the rule priority. If several rules are defined for the same log client, rules are applied in the order of priority. A lower priority value denotes a higher priority. '1' denotes the highest priority, thus a rule with priority 1 will always be applied first.
Attribute Name: priority Attribute Class: LogRule Attribute Type: VALUE Value Type: Unsigned Integer MIN-MAX: 1-1000 (1001 is reserved for default 'catch all' rule), required The following three parameters refer to the user of the current rule. Use the Hostname field to specify the hostname of the user of this rule. '*' stands for 'any host'. Attribute Name: hostname Attribute Class: LogRule Attribute Type : VALUE Value Type: String Default Value: * Use the Module field to specify the module (i.e. AXIGEN Mail Server service) of the user of this rule. You can specify smtp, pop3, imap, webmail or all these modules. '*' stands for 'any module'.
Attribute Name: module Attribute Class: LogRule Attribute Type: VALUE Value Type: String VALID (insensitive) VALUES : smtp relay pop3 imap webmail * Default Value: * (* = any module) Use the Log Level checkboxes to specify the level of log generated by the user of this log. The log level is computed by adding the following defined levels:
• 0 - no log • 1 - critical messages • 2 - error messages • 4 - warning messages • 8 - informational messages • 16 - protocol communication
Example: level 15 contains critical, error, warning and informational messages.
Attribute Name: logLevel Attribute Class : LogRule Attribute Type: VALUE Value Type: Unsigned Integer MIN-MAX: 0-31 Default Value: 15
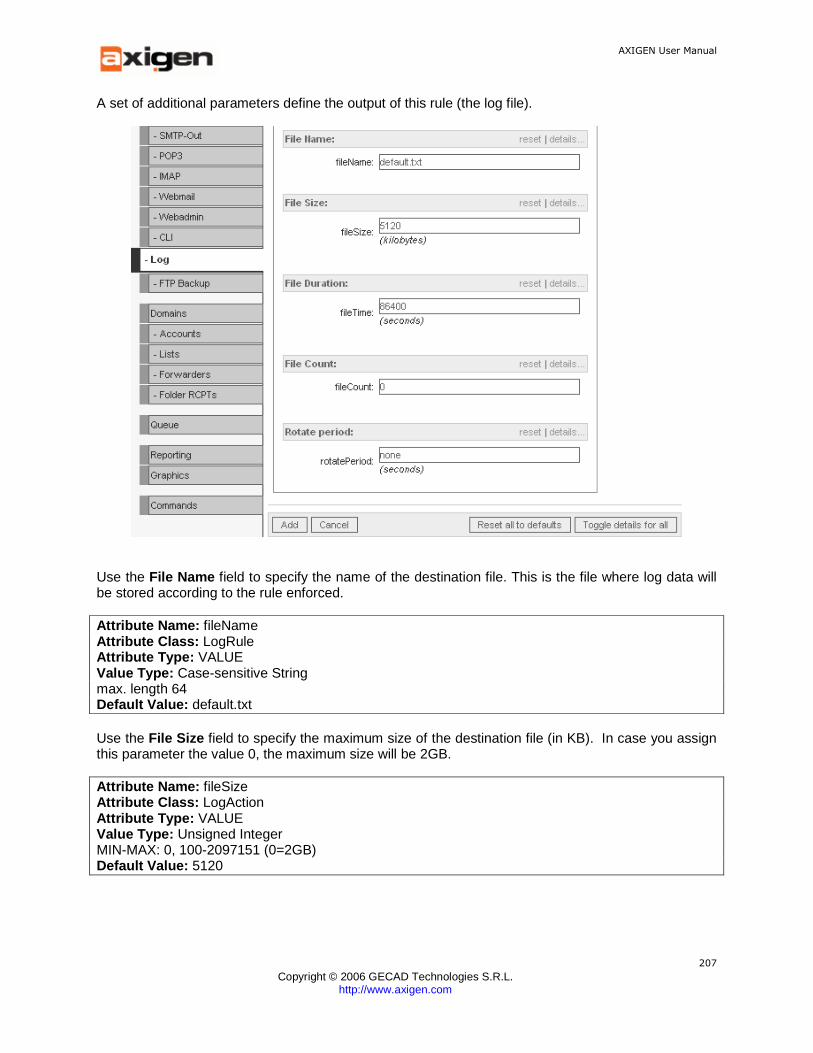
AXIGEN User Manual
Copyright © 2006 GECAD Technologies S.R.L.
http://www.axigen.com
207
A set of additional parameters define the output of this rule (the log file).
Use the File Name field to specify the name of the destination file. This is the file where log data will be stored according to the rule enforced.
Attribute Name: fileName Attribute Class: LogRule Attribute Type: VALUE Value Type: Case-sensitive String max. length 64 Default Value: default.txt Use the File Size field to specify the maximum size of the destination file (in KB). In case you assign this parameter the value 0, the maximum size will be 2GB.
Attribute Name: fileSize Attribute Class: LogAction Attribute Type: VALUE Value Type: Unsigned Integer MIN-MAX: 0, 100-2097151 (0=2GB) Default Value: 5120
AXIGEN User Manual
Copyright © 2006 GECAD Technologies S.R.L.
http://www.axigen.com
208
Use the File Duration field to specify the maximum duration the destination file is used (in seconds).
Attribute Name: fileTime Attribute Class : LogRule Attribute Type: VALUE Value Type: Unsigned Integer MIN-MAX: 0, 600-2592000 (0=unlimited) Default Value: 86400 Use the File Count field to specify the maximum number of old (saved) files kept by AXIGEN Mail Server Log service.
Attribute Name: fileCount Attribute Class: LogAction Attribute Type: VALUE Value Type: Unsigned Integer MIN-MAX: 0-1000 (0=unlimited) Default Value: 0 Use the Rotate period to specify how often you wish a new log file to be created (daily, weekly, monthly). The default value "none" means that information will be written to the same log file until the file reaches its maximum size specified using the fileSize parameter.
Attribute Name: rotatePeriod Attribute Class: logService Attribute Type: VALUE Value Type: single choice - none | day | week | month Default Value: none When you are done configuring these parameters, don't forget to click the Add and Commit buttons to add and commit your rule.

AXIGEN User Manual
Copyright © 2006 GECAD Technologies S.R.L.
http://www.axigen.com
209
8.11.3. Log files Page
The Log > Log files page is displayed after selecting the Log files page in WebAdmin Log tab . You can use this page to manage/view different logs generated by AXIGEN Mail Server Log service. When first entering the Log > Rules page, a list of current log files is displayed.
To view a log file, press on the View button on the right of the log file you want to view. The log file is then displayed. To delete a log file, press on the Delete button on the right of the log file you want to delete. A confirmation dialog box is displayed. Press OK to delete the specified log file or Cancel to cancel the deletion and return to the previous window.
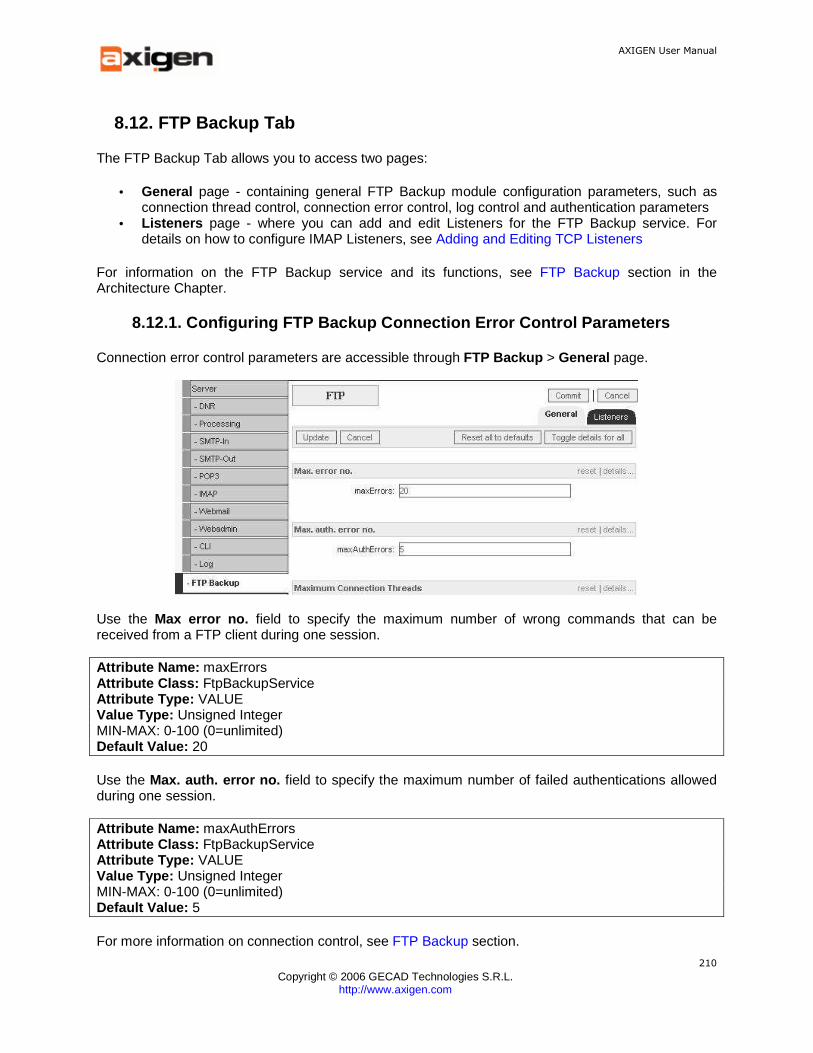
AXIGEN User Manual
Copyright © 2006 GECAD Technologies S.R.L.
http://www.axigen.com
210
8.12. FTP Backup Tab
The FTP Backup Tab allows you to access two pages:
• General page - containing general FTP Backup module configuration parameters, such as connection thread control, connection error control, log control and authentication parameters
• Listeners page - where you can add and edit Listeners for the FTP Backup service. For details on how to configure IMAP Listeners, see Adding and Editing TCP Listeners
For information on the FTP Backup service and its functions, see FTP Backup section in the Architecture Chapter.
8.12.1. Configuring FTP Backup Connection Error Con trol Parameters
Connection error control parameters are accessible through FTP Backup > General page.
Use the Max error no. field to specify the maximum number of wrong commands that can be received from a FTP client during one session.
Attribute Name: maxErrors Attribute Class: FtpBackupService Attribute Type: VALUE Value Type: Unsigned Integer MIN-MAX: 0-100 (0=unlimited) Default Value: 20 Use the Max. auth. error no. field to specify the maximum number of failed authentications allowed during one session.
Attribute Name: maxAuthErrors Attribute Class: FtpBackupService Attribute Type: VALUE Value Type: Unsigned Integer MIN-MAX: 0-100 (0=unlimited) Default Value: 5 For more information on connection control, see FTP Backup section.

AXIGEN User Manual
Copyright © 2006 GECAD Technologies S.R.L.
http://www.axigen.com
211
8.12.2. Configuring FTP Backup Connection Thread Co ntrol Parameters
Connection thread control parameters are accessible through FTP Backup > General page.
Use the Maximum Connection Threads field to specify the maximum number of threads handling the IFTP Backup service connections.
Attribute Name: maxConnThreads Attribute Class: FtpBackupService Attribute Type: VALUE Value Type: Unsigned Integer MIN-MAX: 1-128 Default Value: 20 Use the Minimum Connection Threads field to specify the minimum number of threads handling the FTP Backup service connections.
Attribute Name: minConnThreads Attribute Class: FtpBackupService Attribute Type: VALUE Value Type: Unsigned Integer MIN-MAX: 1-128 Default Value: 2 For more information on Connection Thread Control, see FTP Backup section.
8.12.3. Configuring FTP Backup Log Control Paramete rs
Log control parameters are accessible through FTP Backup > General Page.

AXIGEN User Manual
Copyright © 2006 GECAD Technologies S.R.L.
http://www.axigen.com
212
Use the Log Level check boxes to specify the log level for FTP Backup.
Attribute Name: logLevel Attribute Class: FtpBackupService Attribute Type: VALUE Value Type: Unsigned Integer MIN-MAX: 0-31 Default Value: 15 Use the Log Type drop-down box to specify the log type for the FTP Backup service. Possible values are: internal, system and remote.
Attribute Name: logType Attribute Class: FtpBackupService Attribute Type: VALUE Value Type: single choice - internal | system | remote Default Value: internal Use the Log Host field to specify the FTP Backup service remote logging host IP address.
Attribute Name: logHost Attribute Class: FtpBackupService Attribute Type: VALUE Value Type: Internet Socket Address VALIDITY: only host IP addresses Default Value: 127.0.0.1:2000
Note: This option is used and valid only if logType=remote for FTP Backup.
For a general description of the logging service and related parameters, see Logging service.
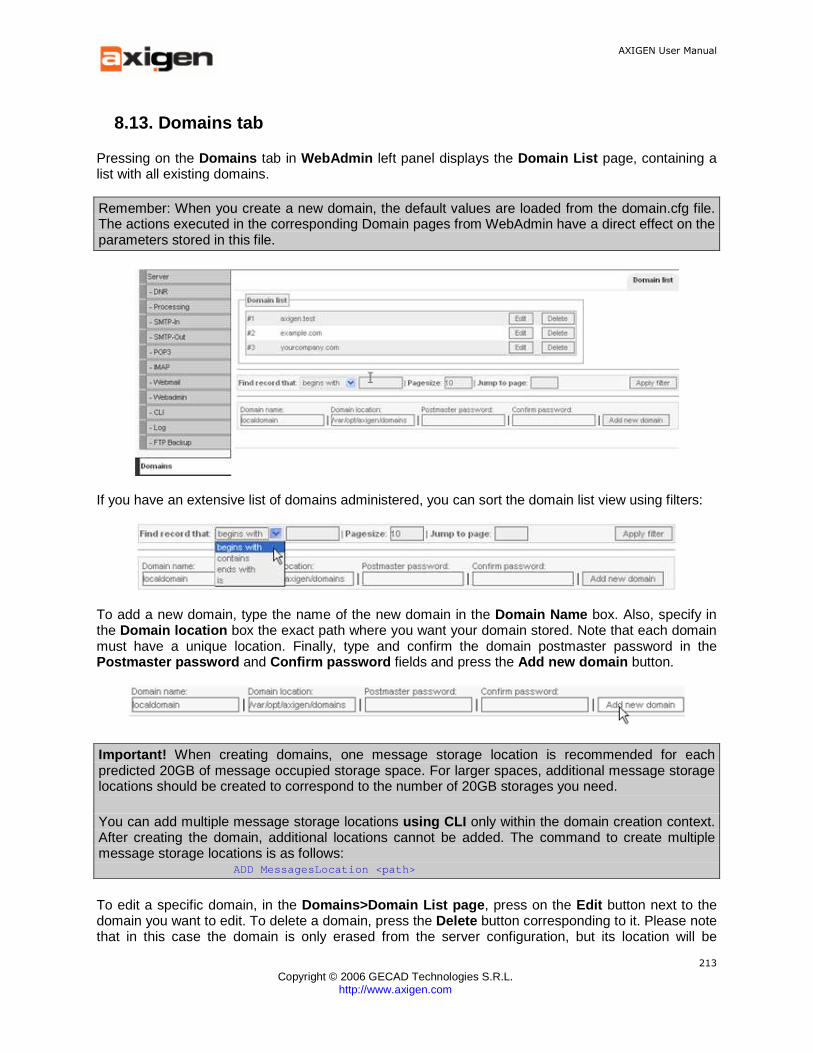
AXIGEN User Manual
Copyright © 2006 GECAD Technologies S.R.L.
http://www.axigen.com
213
8.13. Domains tab
Pressing on the Domains tab in WebAdmin left panel displays the Domain List page, containing a list with all existing domains.
Remember: When you create a new domain, the default values are loaded from the domain.cfg file. The actions executed in the corresponding Domain pages from WebAdmin have a direct effect on the parameters stored in this file.
If you have an extensive list of domains administered, you can sort the domain list view using filters:
To add a new domain, type the name of the new domain in the Domain Name box. Also, specify in the Domain location box the exact path where you want your domain stored. Note that each domain must have a unique location. Finally, type and confirm the domain postmaster password in the Postmaster password and Confirm password fields and press the Add new domain button.
Important! When creating domains, one message storage location is recommended for each predicted 20GB of message occupied storage space. For larger spaces, additional message storage locations should be created to correspond to the number of 20GB storages you need. You can add multiple message storage locations using CLI only within the domain creation context. After creating the domain, additional locations cannot be added. The command to create multiple message storage locations is as follows: ADD MessagesLocation <path>
To edit a specific domain, in the Domains>Domain List page , press on the Edit button next to the domain you want to edit. To delete a domain, press the Delete button corresponding to it. Please note that in this case the domain is only erased from the server configuration, but its location will be
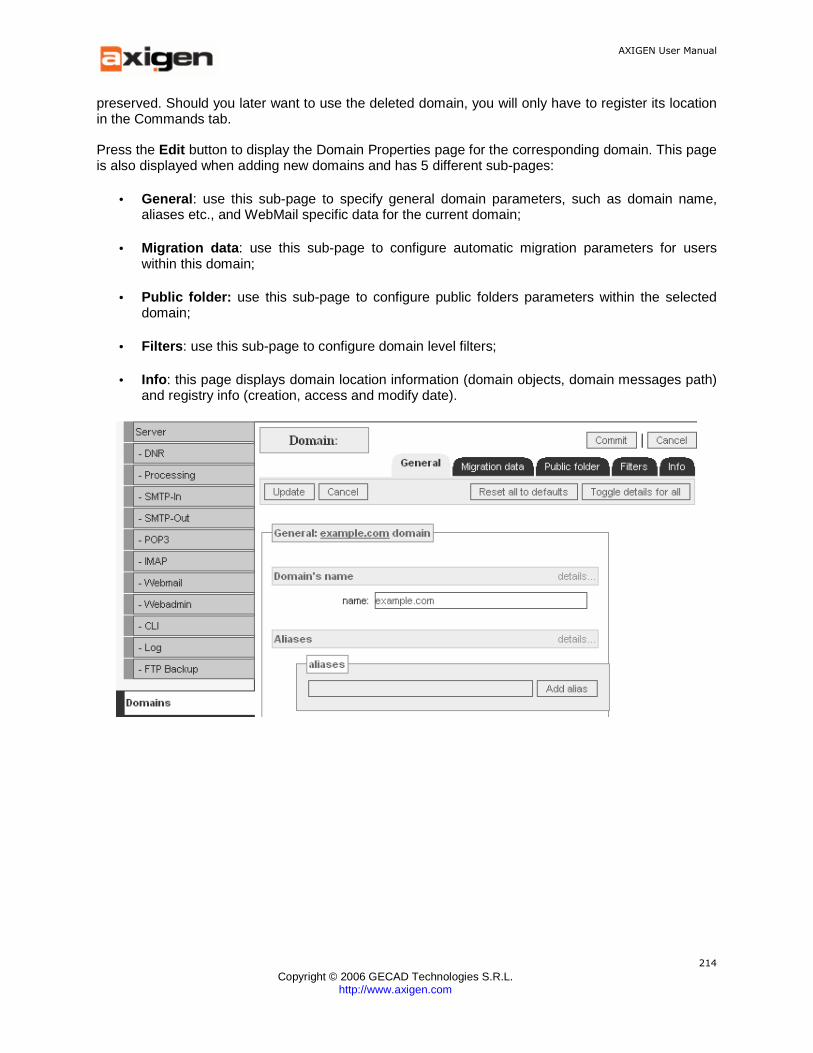
AXIGEN User Manual
Copyright © 2006 GECAD Technologies S.R.L.
http://www.axigen.com
214
preserved. Should you later want to use the deleted domain, you will only have to register its location in the Commands tab.
Press the Edit button to display the Domain Properties page for the corresponding domain. This page is also displayed when adding new domains and has 5 different sub-pages:
• General : use this sub-page to specify general domain parameters, such as domain name, aliases etc., and WebMail specific data for the current domain;
• Migration data : use this sub-page to configure automatic migration parameters for users within this domain;
• Public folder: use this sub-page to configure public folders parameters within the selected domain;
• Filters : use this sub-page to configure domain level filters;
• Info : this page displays domain location information (domain objects, domain messages path) and registry info (creation, access and modify date).

AXIGEN User Manual
Copyright © 2006 GECAD Technologies S.R.L.
http://www.axigen.com
215
8.13.1. General Domain Configuration
The Domains > General page allows you to configure general parameters for domains.
The name of the domain currently edited is displayed in the upper part of the window. You can change the name of the current domain using the Name field. The domain name can include the following characters: any letter a-z, any capital letter, A-Z, any figure 0-9, the '.' character and the '-' character (not allowed at the beginning or the end of the file).
Attribute Name: name Attribute Class: Domain Attribute Type: VALUE Value Type: String Required You can add aliases to the domain currently being edited using the Add alias field.
AXIGEN User Manual
Copyright © 2006 GECAD Technologies S.R.L.
http://www.axigen.com
216
To delete an alias previously added, in the Aliases list area, click on the Delete alias option available on the right of the text box corresponding to the alias you want to delete.
If you want to set different aliases for the same domain, add them one by one. An alias name can include the following characters: any letter a-z, any capital letter, A-Z, any figure 0-9, the '.' character and the '-' (not allowed at the beginning or the end of the name).
Attribute Name: aliases Attribute Class: Domain Attribute Type : VALUESET Value Type: String Default Value : no aliases You can specify an IP address to be assigned to this specific domain. This might be useful when the AXIGEN Mail Server is installed on a machine with multiple network cards and you want to split the flow of incoming messages for this domain from the rest of the message flow.
Attribute Name : assignedIP Attribute Class: Domain Attribute Type: VALUE Value Type: Internet Address v4 Default Value: INETADDR_NONE You can specify what AXIGEN services are allowed for each specific domain, by selecting the checkboxes corresponding to the services you want to run.
Attribute Name: services Attribute Class: Domain Attribute Type: VALUESET Value Type: multi choice - processing smtpIncoming smtpOutgoing pop3 imap ftpBackup webmail log report cli webadmin Default Value: processing smtpIncoming smtpOutgoing imap pop3 log Using the Show webmail login dropdown box, you can specify if you wish to have the domain displayed in the WebMail login drop down box.
Attribute Name: showWebmailLogin Attribute Class: Domain Attribute Type: VALUE Value Type: single choice - yes | no Default Value: yes After configuring these parameters, don't forget to click the Update and Commit buttons to update and save your changes.
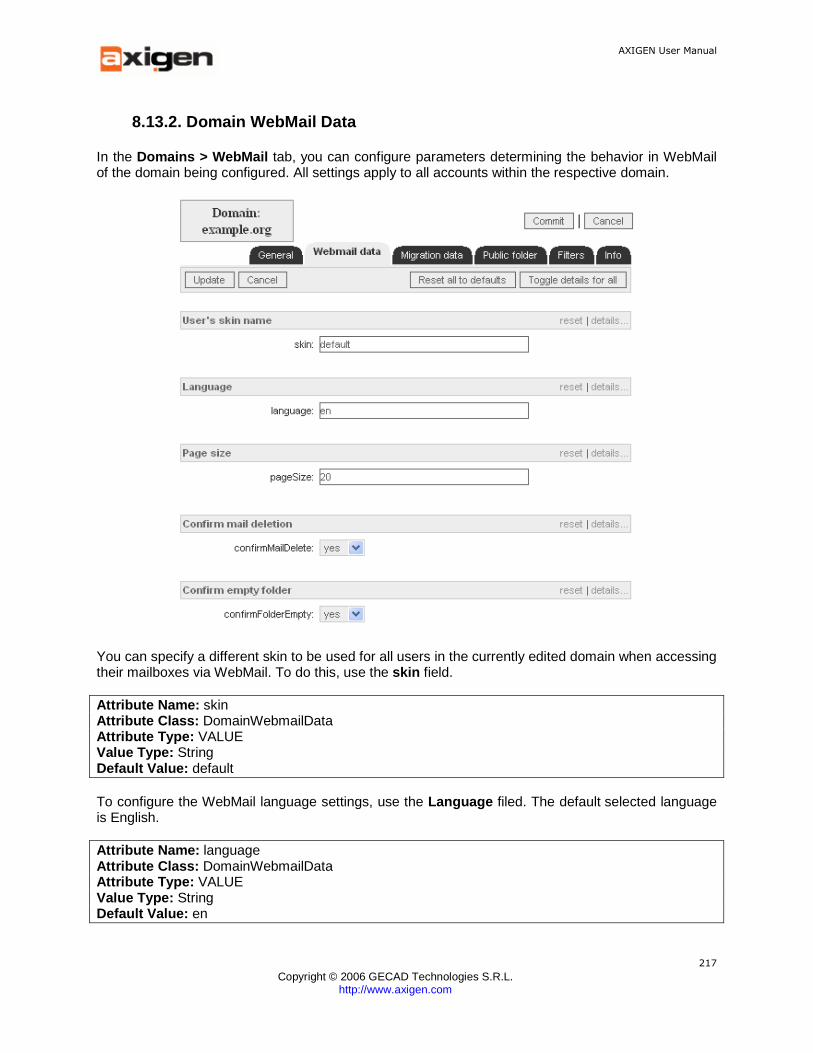
AXIGEN User Manual
Copyright © 2006 GECAD Technologies S.R.L.
http://www.axigen.com
217
8.13.2. Domain WebMail Data
In the Domains > WebMail tab, you can configure parameters determining the behavior in WebMail of the domain being configured. All settings apply to all accounts within the respective domain.
You can specify a different skin to be used for all users in the currently edited domain when accessing their mailboxes via WebMail. To do this, use the skin field.
Attribute Name: skin Attribute Class: DomainWebmailData Attribute Type: VALUE Value Type: String Default Value: default To configure the WebMail language settings, use the Language filed. The default selected language is English.
Attribute Name: language Attribute Class: DomainWebmailData Attribute Type: VALUE Value Type: String Default Value: en
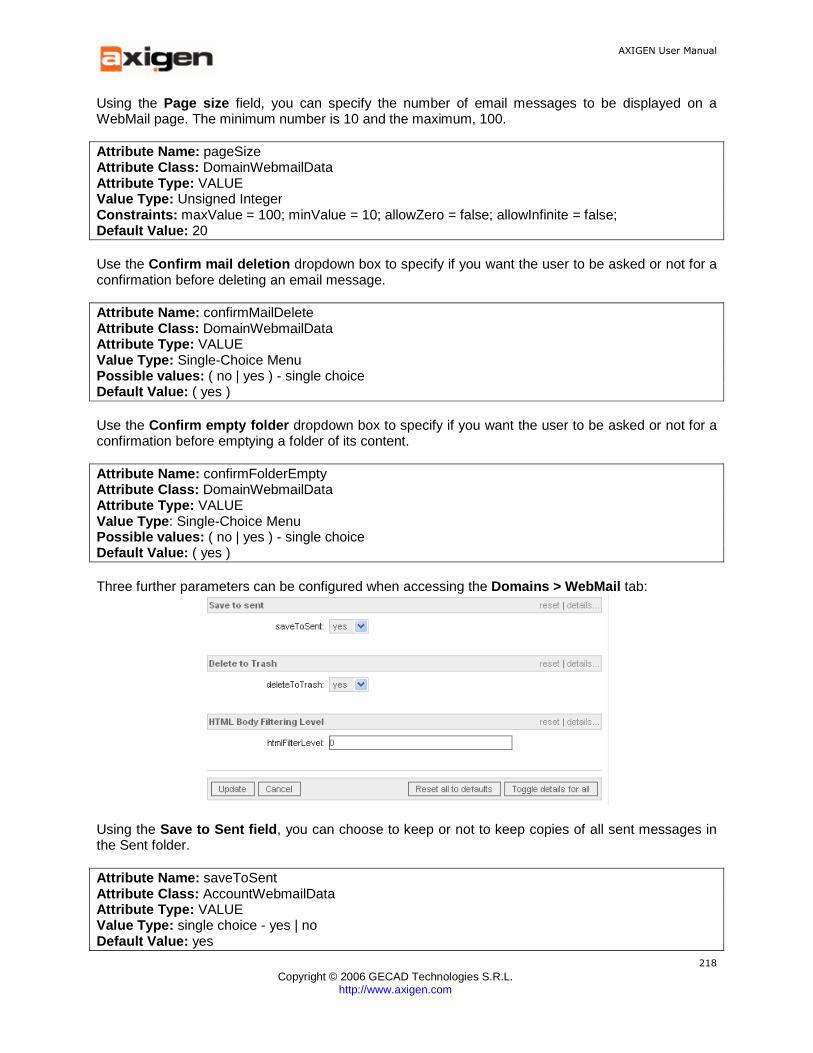
AXIGEN User Manual
Copyright © 2006 GECAD Technologies S.R.L.
http://www.axigen.com
218
Using the Page size field, you can specify the number of email messages to be displayed on a WebMail page. The minimum number is 10 and the maximum, 100.
Attribute Name: pageSize Attribute Class: DomainWebmailData Attribute Type: VALUE Value Type: Unsigned Integer Constraints: maxValue = 100; minValue = 10; allowZero = false; allowInfinite = false; Default Value: 20 Use the Confirm mail deletion dropdown box to specify if you want the user to be asked or not for a confirmation before deleting an email message.
Attribute Name: confirmMailDelete Attribute Class: DomainWebmailData Attribute Type: VALUE Value Type: Single-Choice Menu Possible values: ( no | yes ) - single choice Default Value: ( yes ) Use the Confirm empty folder dropdown box to specify if you want the user to be asked or not for a confirmation before emptying a folder of its content.
Attribute Name: confirmFolderEmpty Attribute Class: DomainWebmailData Attribute Type: VALUE Value Type : Single-Choice Menu Possible values: ( no | yes ) - single choice Default Value: ( yes ) Three further parameters can be configured when accessing the Domains > WebMail tab:
Using the Save to Sent field , you can choose to keep or not to keep copies of all sent messages in the Sent folder.
Attribute Name: saveToSent Attribute Class: AccountWebmailData Attribute Type: VALUE Value Type: single choice - yes | no Default Value: yes

AXIGEN User Manual
Copyright © 2006 GECAD Technologies S.R.L.
http://www.axigen.com
219
Using the Delete to Trash , you can specify if you want deleted messages to be moved to the Trash folder (select 'yes') or to have them permanently deleted (select 'no')
Attribute Name: deleteToTrash Attribute Class: DomainWebmailData Attribute Type : VALUE Value Type: Single-Choice Menu Possible values: (no | yes) - single choice Default Value : (yes) You can specify a filtering level for all HTML format emails using the HTML Body Filtering Level field. Level 1 is the least restrictive and level 4 the strictest (basically converting HTML to text)
Attribute Name: htmlFilterLevel Attribute Class: DomainWebmailData Attribute Type: VALUE Value Type: Unsigned Integer Constraints: minValue = 0; maxValue = 4; allowZero = true; Default Value: 0 If you add or modify values for any of these parameters, don't forget to click Update and Commit to save and commit your changes.
8.13.3. Domain Migration Data
Use this tab to enable and configure automatic migration for a particular domain.
AXIGEN User Manual
Copyright © 2006 GECAD Technologies S.R.L.
http://www.axigen.com
220
Use the Enable migration field to enable automatic migration for this domain data. By setting the
enable parameter to yes , you enable automatic migration for that domain.
Attribute Name: enable Attribute Class: DomainMigrationData Attribute Type: VALUE Value Type: single choice - yes | no Default Value: no When the domain has the enabled attribute set to yes and some account tries to login (via any of WebMail, IMAP, POP3), AXIGEN verifies if the account exists in its accounts storage. If it does, it considers the account already migrated and doesn't perform any special migration-related operation.
If the account doesn't exist, it will try to connect to an IMAP host at the address you specify when setting the remoteImapHost and remoteImapPort parameters (remoteImapHost :remoteImapPort ). When connecting, AXIGEN uses the account credentials received. If the credentials allow AXIGEN to login successfully, it will create the account with the same username and password as the ones previously used to login and authenticate the user. It will also transfer the messages in this account via IMAP. This operation is equivalent to the one performed using the CLI MIGRATE command).
If the credentials are not correct, the account is not created and the user receives an authentication failure message.
Important! The migration operation will only work if the remote host has a working IMAP server.
Attribute Name: remoteImapHost Attribute Class: DomainMigrationData Attribute Type: VALUE Value Type: String Default Value: [127.0.0.1] Attribute Name : remoteImapPort Attribute Class: DomainMigrationData Attribute Type: VALUE Value Type: Unsigned Integer Default Value: 1430 On the SMTP-side, if AXIGEN receives an e-mail to an account for a migration-enabled domain and the account does not exist, it will relay the e-mail to the address you specify when setting the remoteSmtpHost and remoteSmtpPort parameters. This way, space is saved by storing all the e-mails for the accounts that were not yet migrated, in the old MTA storage. The messages only get transferred to the AXIGEN storage when the user tries to login for the first time.
Important! This mail relay operation to the old MTA storage will only work if the remote host has a SMTP server working.
Attribute Name : remoteSmtpHost Attribute Class: DomainMigrationData Attribute Type: VALUE Value Type: String Default Value: [127.0.0.1]
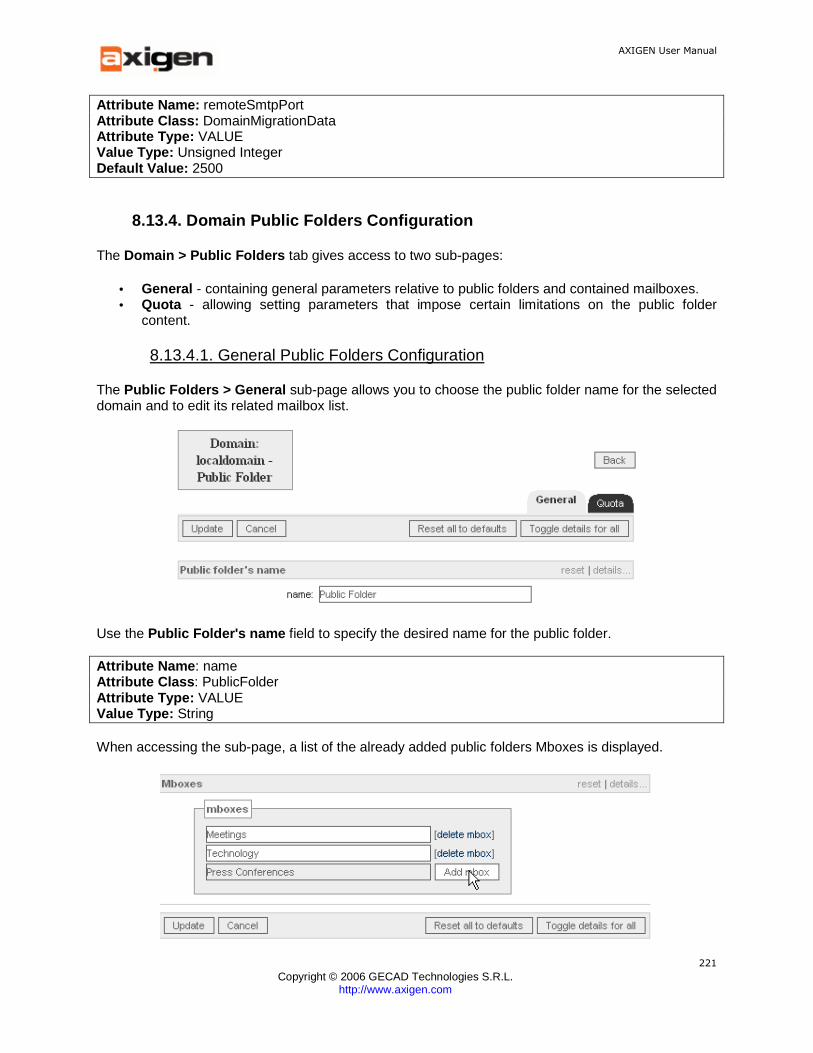
AXIGEN User Manual
Copyright © 2006 GECAD Technologies S.R.L.
http://www.axigen.com
221
Attribute Name: remoteSmtpPort Attribute Class: DomainMigrationData Attribute Type: VALUE Value Type: Unsigned Integer Default Value: 2500
8.13.4. Domain Public Folders Configuration
The Domain > Public Folders tab gives access to two sub-pages:
• General - containing general parameters relative to public folders and contained mailboxes. • Quota - allowing setting parameters that impose certain limitations on the public folder
content.
8.13.4.1. General Public Folders Configuration
The Public Folders > General sub-page allows you to choose the public folder name for the selected domain and to edit its related mailbox list.
Use the Public Folder's name field to specify the desired name for the public folder.
Attribute Name : name Attribute Class : PublicFolder Attribute Type: VALUE Value Type: String When accessing the sub-page, a list of the already added public folders Mboxes is displayed.
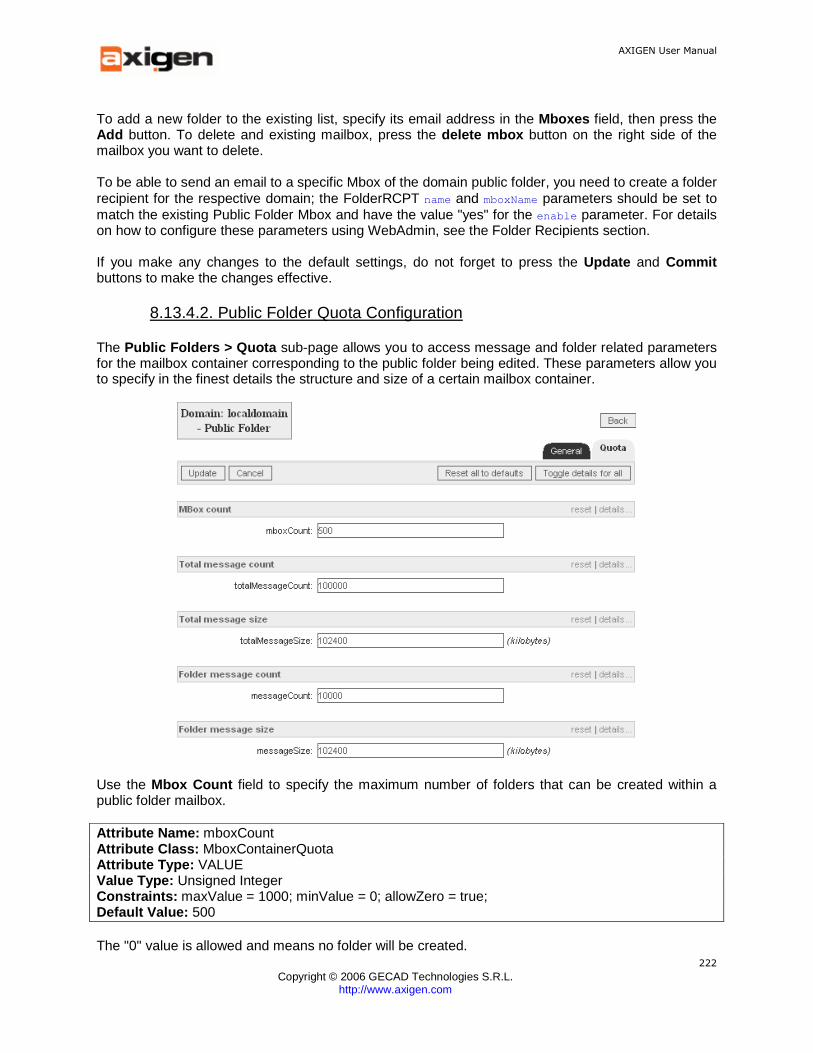
AXIGEN User Manual
Copyright © 2006 GECAD Technologies S.R.L.
http://www.axigen.com
222
To add a new folder to the existing list, specify its email address in the Mboxes field, then press the Add button. To delete and existing mailbox, press the delete mbox button on the right side of the mailbox you want to delete. To be able to send an email to a specific Mbox of the domain public folder, you need to create a folder recipient for the respective domain; the FolderRCPT name and mboxName parameters should be set to match the existing Public Folder Mbox and have the value "yes" for the enable parameter. For details on how to configure these parameters using WebAdmin, see the Folder Recipients section. If you make any changes to the default settings, do not forget to press the Update and Commit buttons to make the changes effective.
8.13.4.2. Public Folder Quota Configuration
The Public Folders > Quota sub-page allows you to access message and folder related parameters for the mailbox container corresponding to the public folder being edited. These parameters allow you to specify in the finest details the structure and size of a certain mailbox container.
Use the Mbox Count field to specify the maximum number of folders that can be created within a public folder mailbox.
Attribute Name: mboxCount Attribute Class: MboxContainerQuota Attribute Type: VALUE Value Type: Unsigned Integer Constraints: maxValue = 1000; minValue = 0; allowZero = true; Default Value: 500 The "0" value is allowed and means no folder will be created.
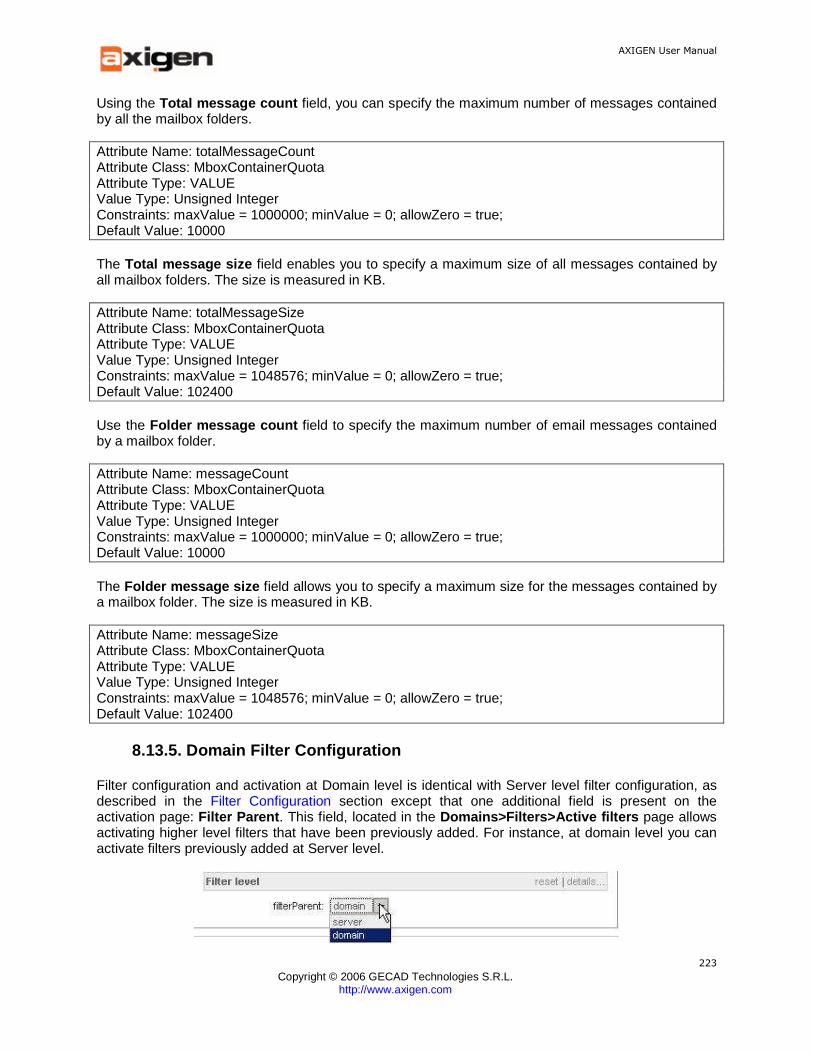
AXIGEN User Manual
Copyright © 2006 GECAD Technologies S.R.L.
http://www.axigen.com
223
Using the Total message count field, you can specify the maximum number of messages contained by all the mailbox folders.
Attribute Name: totalMessageCount Attribute Class: MboxContainerQuota Attribute Type: VALUE Value Type: Unsigned Integer Constraints: maxValue = 1000000; minValue = 0; allowZero = true; Default Value: 10000 The Total message size field enables you to specify a maximum size of all messages contained by all mailbox folders. The size is measured in KB.
Attribute Name: totalMessageSize Attribute Class: MboxContainerQuota Attribute Type: VALUE Value Type: Unsigned Integer Constraints: maxValue = 1048576; minValue = 0; allowZero = true; Default Value: 102400 Use the Folder message count field to specify the maximum number of email messages contained by a mailbox folder.
Attribute Name: messageCount Attribute Class: MboxContainerQuota Attribute Type: VALUE Value Type: Unsigned Integer Constraints: maxValue = 1000000; minValue = 0; allowZero = true; Default Value: 10000 The Folder message size field allows you to specify a maximum size for the messages contained by a mailbox folder. The size is measured in KB.
Attribute Name: messageSize Attribute Class: MboxContainerQuota Attribute Type: VALUE Value Type: Unsigned Integer Constraints: maxValue = 1048576; minValue = 0; allowZero = true; Default Value: 102400
8.13.5. Domain Filter Configuration
Filter configuration and activation at Domain level is identical with Server level filter configuration, as described in the Filter Configuration section except that one additional field is present on the activation page: Filter Parent . This field, located in the Domains>Filters>Active filters page allows activating higher level filters that have been previously added. For instance, at domain level you can activate filters previously added at Server level.
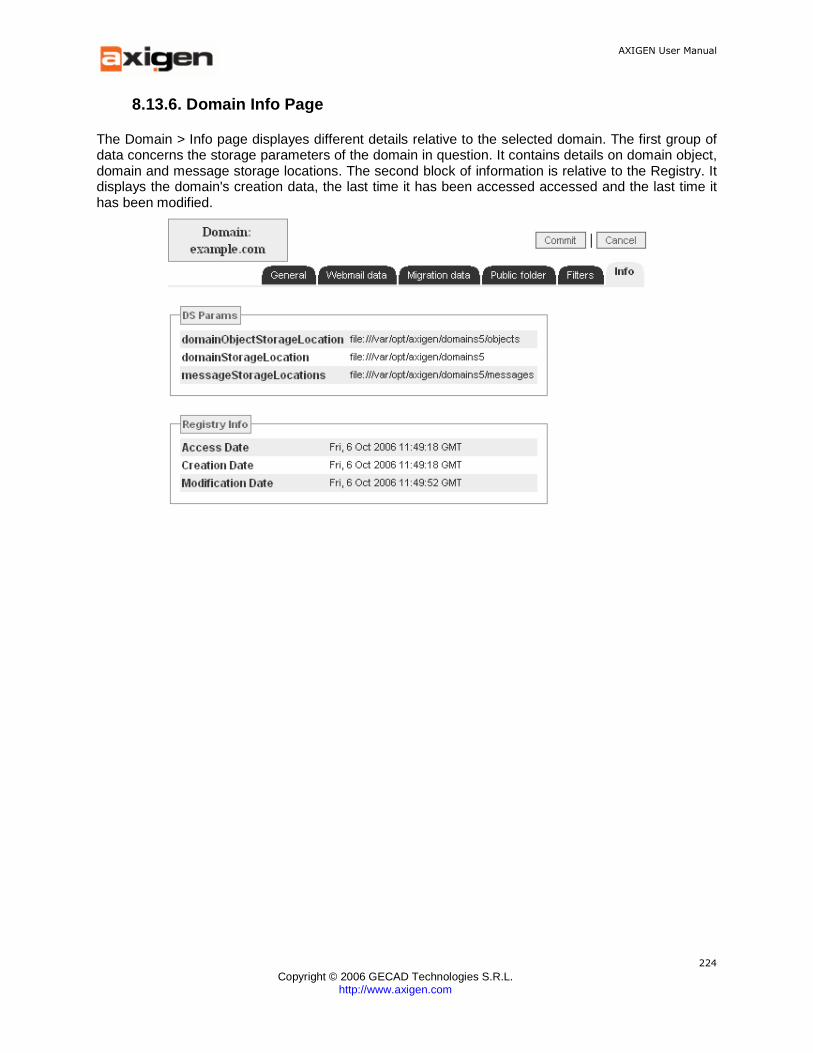
AXIGEN User Manual
Copyright © 2006 GECAD Technologies S.R.L.
http://www.axigen.com
224
8.13.6. Domain Info Page
The Domain > Info page displayes different details relative to the selected domain. The first group of data concerns the storage parameters of the domain in question. It contains details on domain object, domain and message storage locations. The second block of information is relative to the Registry. It displays the domain's creation data, the last time it has been accessed accessed and the last time it has been modified.

AXIGEN User Manual
Copyright © 2006 GECAD Technologies S.R.L.
http://www.axigen.com
225
8.14. Accounts tab
Pressing on the Accounts tab in WebAdmin left panel displays the Domain List page, containing a list with all domains already created. Each domain has a corresponding View button you can use to display the accounts for this domain.
After pressing the View button for a domain, all the accounts for the corresponding domain are displayed. To delete a currently existing account, press on the Delete button next to the account you want to delete. To edit a currently existing account, press on the Edit button next to the account you want to edit. To add a new account in the current domain, enter the name of the account in the Account name field, enter and confirm the account password in the Password and Confirm Password fileds, and press the Add new account button.
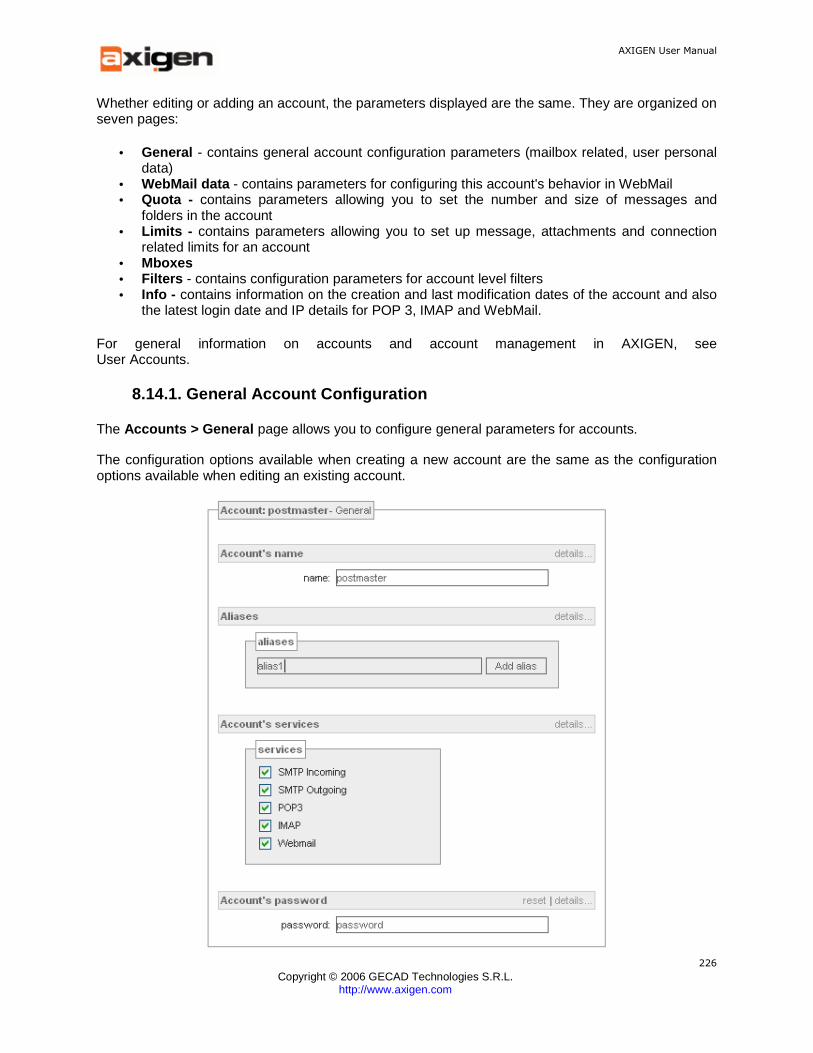
AXIGEN User Manual
Copyright © 2006 GECAD Technologies S.R.L.
http://www.axigen.com
226
Whether editing or adding an account, the parameters displayed are the same. They are organized on seven pages:
• General - contains general account configuration parameters (mailbox related, user personal data)
• WebMail data - contains parameters for configuring this account's behavior in WebMail • Quota - contains parameters allowing you to set the number and size of messages and
folders in the account • Limits - contains parameters allowing you to set up message, attachments and connection
related limits for an account • Mboxes • Filters - contains configuration parameters for account level filters • Info - contains information on the creation and last modification dates of the account and also
the latest login date and IP details for POP 3, IMAP and WebMail.
For general information on accounts and account management in AXIGEN, see User Accounts.
8.14.1. General Account Configuration
The Accounts > General page allows you to configure general parameters for accounts.
The configuration options available when creating a new account are the same as the configuration options available when editing an existing account.

AXIGEN User Manual
Copyright © 2006 GECAD Technologies S.R.L.
http://www.axigen.com
227
Use the Account's name field to enter a name for the new account. This is the part of the email address that appears before the @ sign, that is the user name for this email account.
Attribute Name: name Attribute Class: Account Attribute Type: VALUE Value Type : String Required You can add aliases to the account currently being edited using the Add alias field.
Attribute Name: aliases Attribute Class: Account Attribute Type: VALUESET Value Type: String Default Value: no aliases To delete an alias previously added, in the Aliases list area, click on the Delete alias option available on the right of the text box corresponding to the alias you want to delete.
You can specify what AXIGEN services are allowed for each specific account, by selecting the checkboxes corresponding to the services you want to run.
Attribute Name: services Attribute Class: Account Attribute Type: VALUESET Value Type : multi choice - smtp | pop3 | imap | webmail Default Value: (smtp pop3 imap webmail) Use the Password field to specify/edit the password used for accessing this account. This field cannot be left empty.
Attribute Name: passwd Attribute Class: Account Attribute Type: VALUE Value Type: Case-sensitive String CHECK: length not zero, required In a separate region of this screen, you can enter the personal data for an account (user's first name and last name).
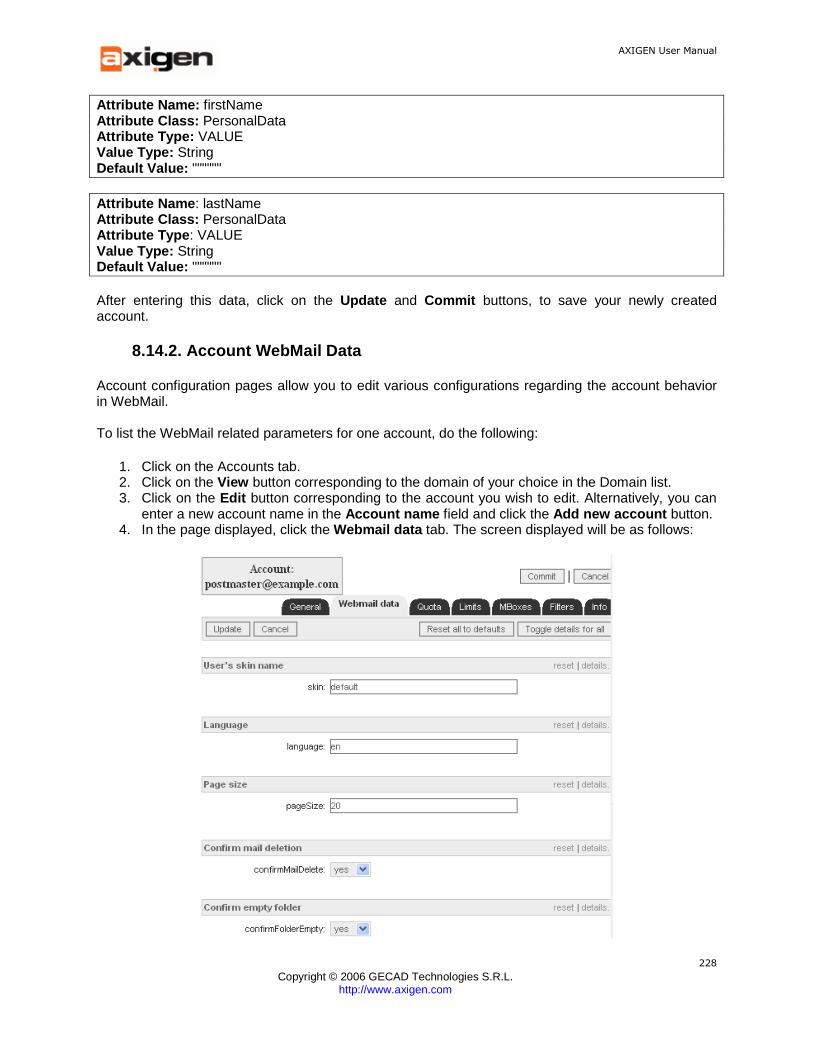
AXIGEN User Manual
Copyright © 2006 GECAD Technologies S.R.L.
http://www.axigen.com
228
Attribute Name: firstName Attribute Class: PersonalData Attribute Type: VALUE Value Type: String Default Value: """""" Attribute Name : lastName Attribute Class: PersonalData Attribute Type : VALUE Value Type: String Default Value: """""" After entering this data, click on the Update and Commit buttons, to save your newly created account.
8.14.2. Account WebMail Data
Account configuration pages allow you to edit various configurations regarding the account behavior in WebMail. To list the WebMail related parameters for one account, do the following:
1. Click on the Accounts tab. 2. Click on the View button corresponding to the domain of your choice in the Domain list. 3. Click on the Edit button corresponding to the account you wish to edit. Alternatively, you can
enter a new account name in the Account name field and click the Add new account button. 4. In the page displayed, click the Webmail data tab. The screen displayed will be as follows:

AXIGEN User Manual
Copyright © 2006 GECAD Technologies S.R.L.
http://www.axigen.com
229
In the User's skin name field, specify the WebMail skin that should be used for this account.
Attribute Name: skin Attribute Class: AccountWebmailData Attribute Type: VALUE Value Type: String Default Value: default To configure the WebMail language settings for the respective account, use the Language filed. The default selected language is English.
Attribute Name: language Attribute Class: AccountWebmailData Attribute Type: VALUE Value Type: String Default Value: en You can specify the number of messages to be displayed on a WebMail page for the currently edited mailbox using the Page size field.
Attribute Name : pageSize Attribute Class: AccountWebmailData Attribute Type: VALUE Value Type: Unsigned Integer MIN-MAX: 10-100 Default Value: 20 You can specify if a confirmation should be requested or not before deleting a message via WebMail from the currently edited mailbox using the Confirm mail deletion dropdown box.
Attribute Name : confirmMailDelete Attribute Class: AccountWebmailData Attribute Type: VALUE Value Type: single choice - yes | no Default Value: yes You can specify if a confirmation should be requested or not before emptying a folder in WebMail in the currently edited mailbox using the Confirm empty folder dropdown box.
Attribute Name: confirmFolderEmpty Attribute Class: AccountWebmailData Attribute Type : VALUE Value Type: single choice - yes | no Default Value: yes
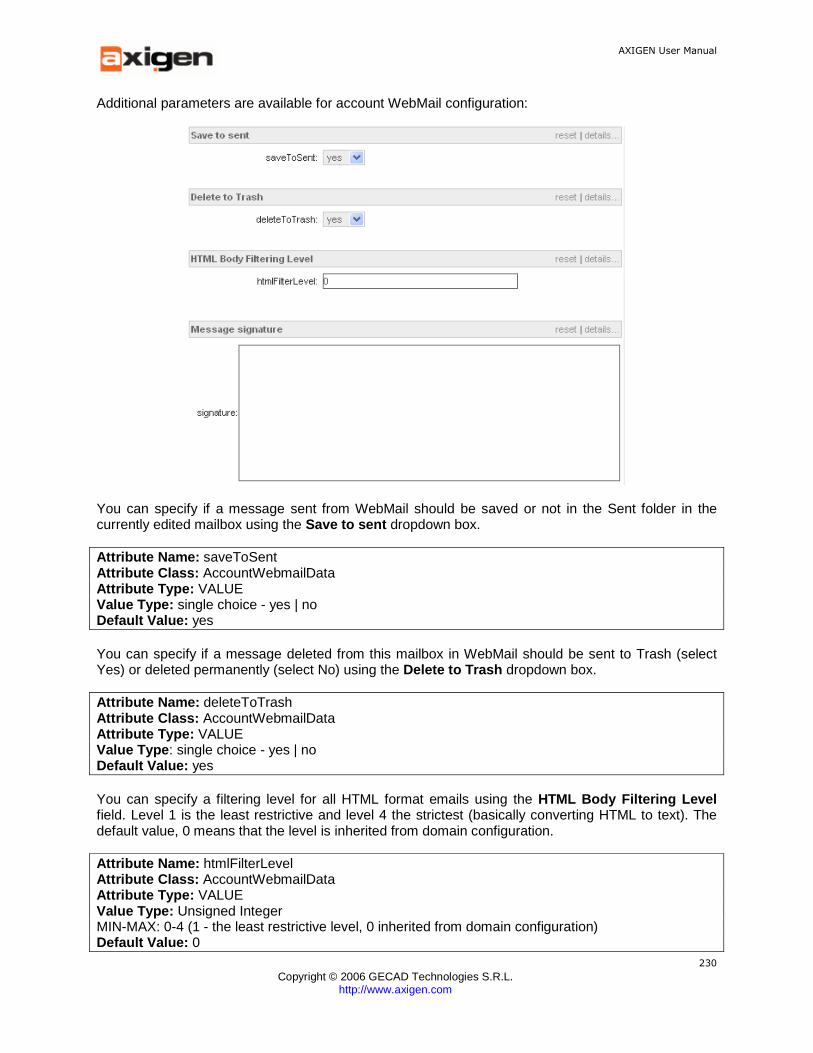
AXIGEN User Manual
Copyright © 2006 GECAD Technologies S.R.L.
http://www.axigen.com
230
Additional parameters are available for account WebMail configuration:
You can specify if a message sent from WebMail should be saved or not in the Sent folder in the currently edited mailbox using the Save to sent dropdown box.
Attribute Name: saveToSent Attribute Class: AccountWebmailData Attribute Type: VALUE Value Type: single choice - yes | no Default Value: yes You can specify if a message deleted from this mailbox in WebMail should be sent to Trash (select Yes) or deleted permanently (select No) using the Delete to Trash dropdown box.
Attribute Name: deleteToTrash Attribute Class: AccountWebmailData Attribute Type: VALUE Value Type : single choice - yes | no Default Value: yes You can specify a filtering level for all HTML format emails using the HTML Body Filtering Level field. Level 1 is the least restrictive and level 4 the strictest (basically converting HTML to text). The default value, 0 means that the level is inherited from domain configuration.
Attribute Name: htmlFilterLevel Attribute Class: AccountWebmailData Attribute Type: VALUE Value Type: Unsigned Integer MIN-MAX: 0-4 (1 - the least restrictive level, 0 inherited from domain configuration) Default Value: 0
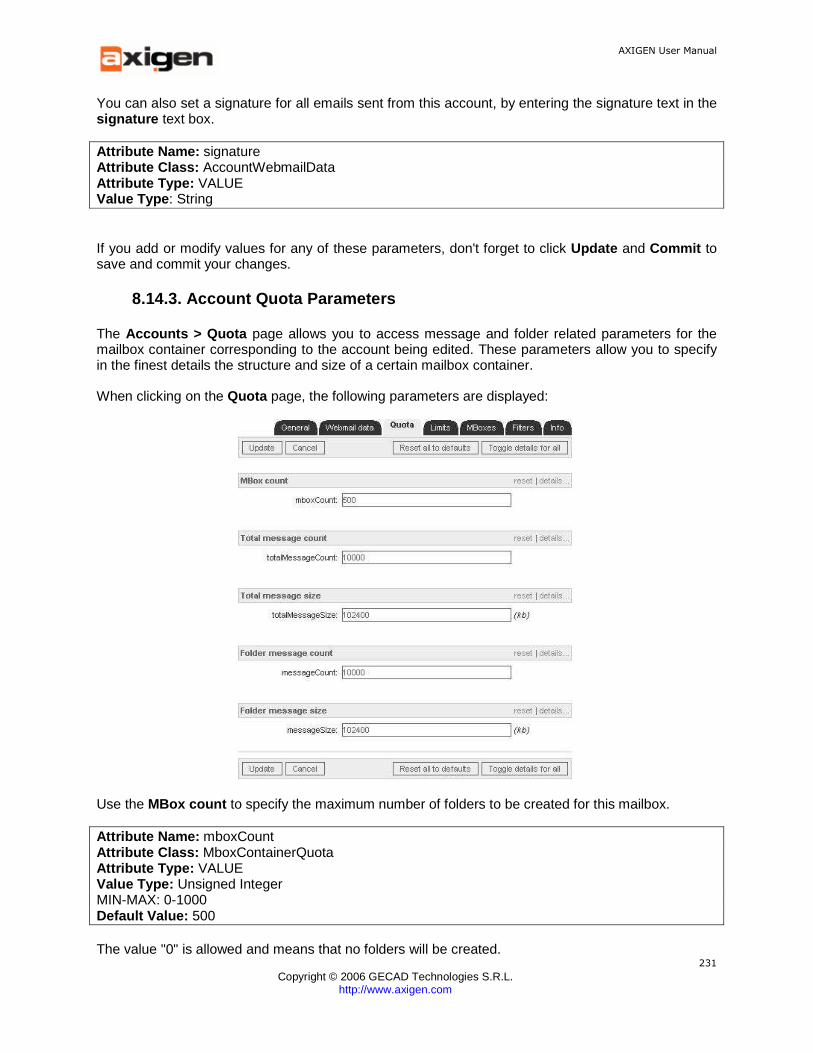
AXIGEN User Manual
Copyright © 2006 GECAD Technologies S.R.L.
http://www.axigen.com
231
You can also set a signature for all emails sent from this account, by entering the signature text in the signature text box.
Attribute Name: signature Attribute Class: AccountWebmailData Attribute Type: VALUE Value Type : String If you add or modify values for any of these parameters, don't forget to click Update and Commit to save and commit your changes.
8.14.3. Account Quota Parameters
The Accounts > Quota page allows you to access message and folder related parameters for the mailbox container corresponding to the account being edited. These parameters allow you to specify in the finest details the structure and size of a certain mailbox container.
When clicking on the Quota page, the following parameters are displayed:
Use the MBox count to specify the maximum number of folders to be created for this mailbox.
Attribute Name: mboxCount Attribute Class: MboxContainerQuota Attribute Type: VALUE Value Type: Unsigned Integer MIN-MAX: 0-1000 Default Value: 500 The value "0" is allowed and means that no folders will be created.

AXIGEN User Manual
Copyright © 2006 GECAD Technologies S.R.L.
http://www.axigen.com
232
Use the Total message count to specify the maximum total number of messages in all folders.
Attribute Name: totalMessageCount Attribute Class : MboxContainerQuota Attribute Type: VALUE Value Type: Unsigned Integer MIN-MAX: 0-1000000 Default Value: 10000 Use the Total message size field to specify a maximum total size in KB for all messages in all folders. Values for this parameter are specified in KB.
Attribute Name: totalMessageSize Attribute Class : MboxContainerQuota Attribute Type: VALUE Value Type: Unsigned Integer MIN-MAX: 0 - 1048576 Default Value: 102400 Use the Folder message count parameter to set the maximum number of messages that can be stored in a folder of the account being edited.
Attribute Name: messageCount Attribute Class: MboxContainerQuota Attribute Type: VALUE Value Type: Unsigned Integer MIN-MAX: 0 - 1000000 Default Value : 10000 Use the Folder message size field to specify the maximum total size in KB of all messages that can be stored in a folder of this account.
Attribute Name: messageSize Attribute Class: MboxContainerQuota Attribute Type: VALUE Value Type: Unsigned Integer MIN-MAX: 0 - 1048576 Default Value: 102400 If you modify any of the default values, do not forget to click Update and then Commit to update your changes and make them effective.
8.14.4. Account Limits
By accessing the Limits page, you can set various parameters setting limits for the account being edited. Sent Messages Limits
Three interconnected parameters are available to you for imposing limitations on messages sent from one account. The first two specify limits for the number and size of messages, and the third one specifies the time interval for which these limits are enforced.
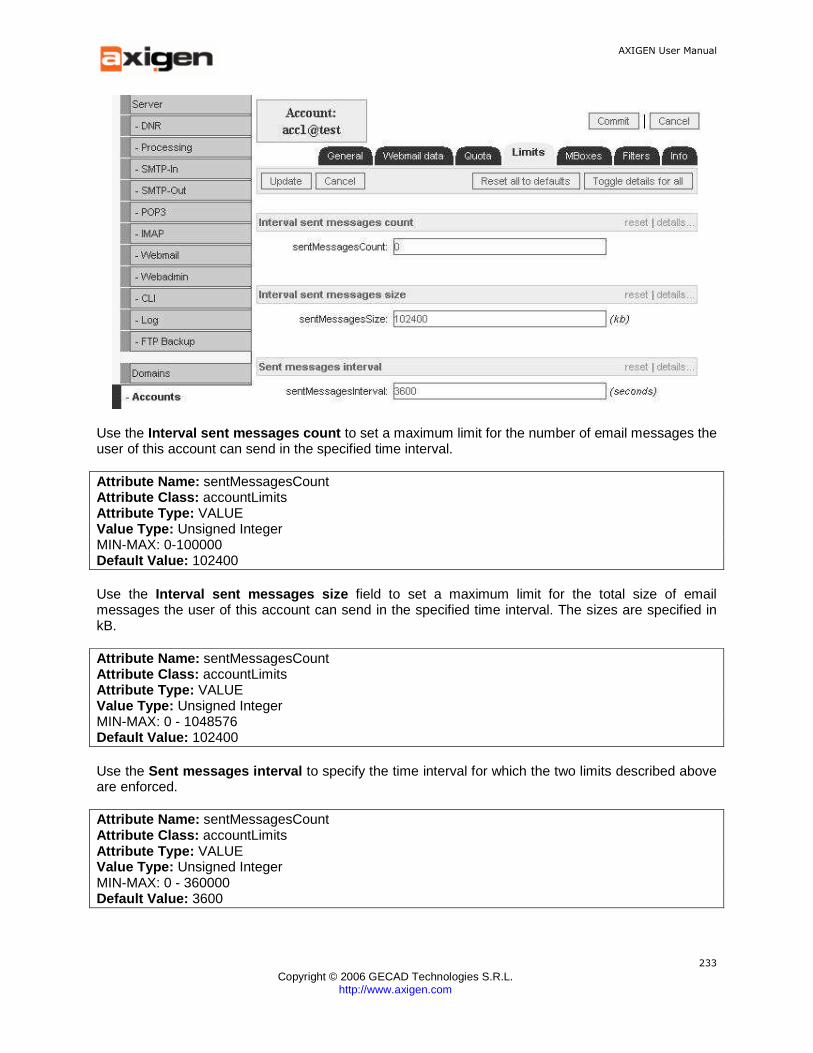
AXIGEN User Manual
Copyright © 2006 GECAD Technologies S.R.L.
http://www.axigen.com
233
Use the Interval sent messages count to set a maximum limit for the number of email messages the user of this account can send in the specified time interval.
Attribute Name: sentMessagesCount Attribute Class: accountLimits Attribute Type: VALUE Value Type: Unsigned Integer MIN-MAX: 0-100000 Default Value: 102400 Use the Interval sent messages size field to set a maximum limit for the total size of email messages the user of this account can send in the specified time interval. The sizes are specified in kB.
Attribute Name: sentMessagesCount Attribute Class: accountLimits Attribute Type: VALUE Value Type: Unsigned Integer MIN-MAX: 0 - 1048576 Default Value: 102400 Use the Sent messages interval to specify the time interval for which the two limits described above are enforced.
Attribute Name: sentMessagesCount Attribute Class: accountLimits Attribute Type: VALUE Value Type: Unsigned Integer MIN-MAX: 0 - 360000 Default Value: 3600
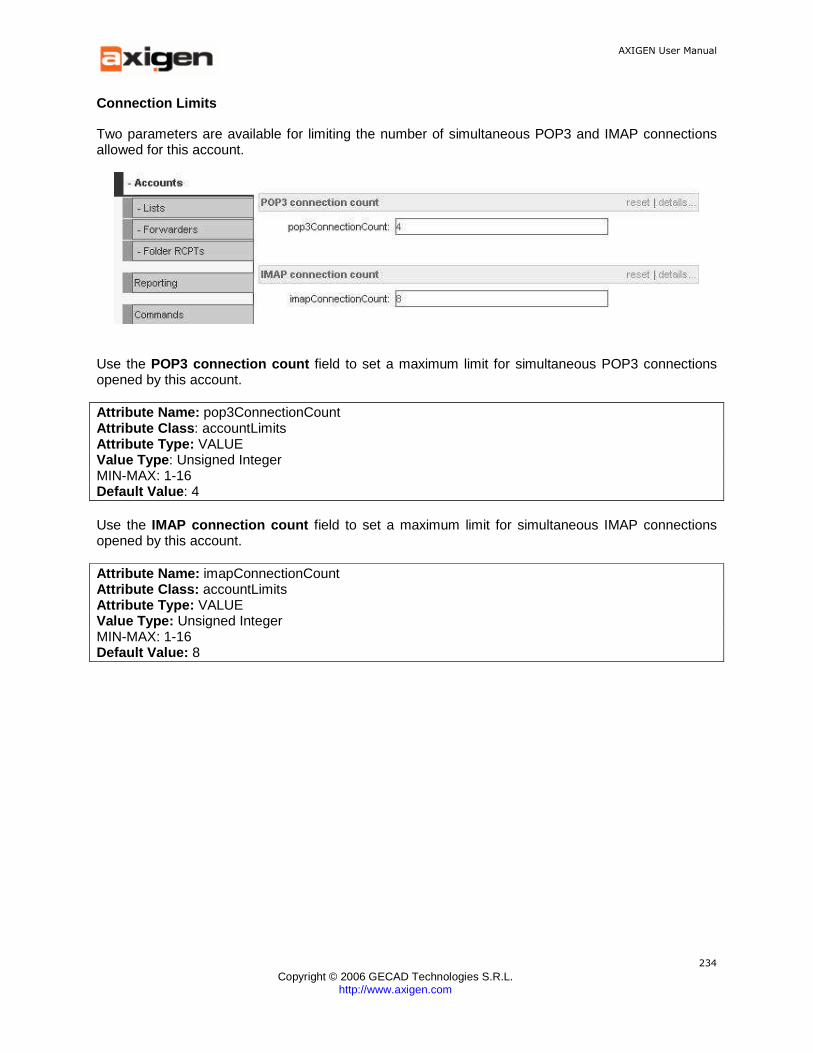
AXIGEN User Manual
Copyright © 2006 GECAD Technologies S.R.L.
http://www.axigen.com
234
Connection Limits
Two parameters are available for limiting the number of simultaneous POP3 and IMAP connections allowed for this account.
Use the POP3 connection count field to set a maximum limit for simultaneous POP3 connections opened by this account.
Attribute Name: pop3ConnectionCount Attribute Class : accountLimits Attribute Type: VALUE Value Type : Unsigned Integer MIN-MAX: 1-16 Default Value : 4 Use the IMAP connection count field to set a maximum limit for simultaneous IMAP connections opened by this account.
Attribute Name: imapConnectionCount Attribute Class: accountLimits Attribute Type: VALUE Value Type: Unsigned Integer MIN-MAX: 1-16 Default Value: 8

AXIGEN User Manual
Copyright © 2006 GECAD Technologies S.R.L.
http://www.axigen.com
235
WebMail Limits
Several parameters are available for imposing limitations related to the behavior of the account in WebMail.
Use the Webmail RCPT count field to set a maximum limit for the number recipients of any email composed in this account using WebMail.
Attribute Name: webmailRCPTCount Attribute Class: accountLimits Attribute Type: VALUE Value Type: Unsigned Integer MIN-MAX: 1-2048 Default Value : 1024 Use the WebMail session count field to set a maximum limit for the number of Webmail sessions opened simultaneously by the account being edited.
Attribute Name: webmailSessionCount Attribute Class: accountLimits Attribute Type: VALUE Value Type: Unsigned Integer MIN-MAX: 1-1024 Default Value: 4

AXIGEN User Manual
Copyright © 2006 GECAD Technologies S.R.L.
http://www.axigen.com
236
Use the Webmail attachment max. size field to set a maximum limit for size of individual attachments uploaded in this account using WebMail. Values for this parameter are expressed in kB.
Attribute Name : webmailAttSize Attribute Class : accountLimits Attribute Type : VALUE Value Type: Unsigned Integer MIN-MAX: 0 - 102400 Default Value : 1024 Use the Webmail attachment max. count field to set a maximum limit for the number of attachments uploaded with one email message in this account.
Attribute Name: webmailAttCount Attribute Class: accountLimits Attribute Type: VALUE Value Type: Unsigned Integer MIN-MAX: 1-1024 Default Value: 10 Use the Webmail max. message size field to set a maximum limit for the total size of one email message (body + attachments) composed in this account using WebMail. Values for this parameter are expressed in kB.
Attribute Name: webmailMessageSize Attribute Class: AccountLimits Attribute Type : VALUE Value Type: Unsigned Integer Constraints: minValue = 0; maxValue = 1048576; allowZero = true; allowInfinite = false; Default Value: 10240 To add the new account or save the changes to the account being edited make sure to press the Add or Update button and the press the Commit button.
8.14.5. Account Mboxes Page
When first accessing the Accounts > Mboxes page, a list of all existing folders for the respective account is displayed. If the account user has not logged in with the respective account, the list will be empty.
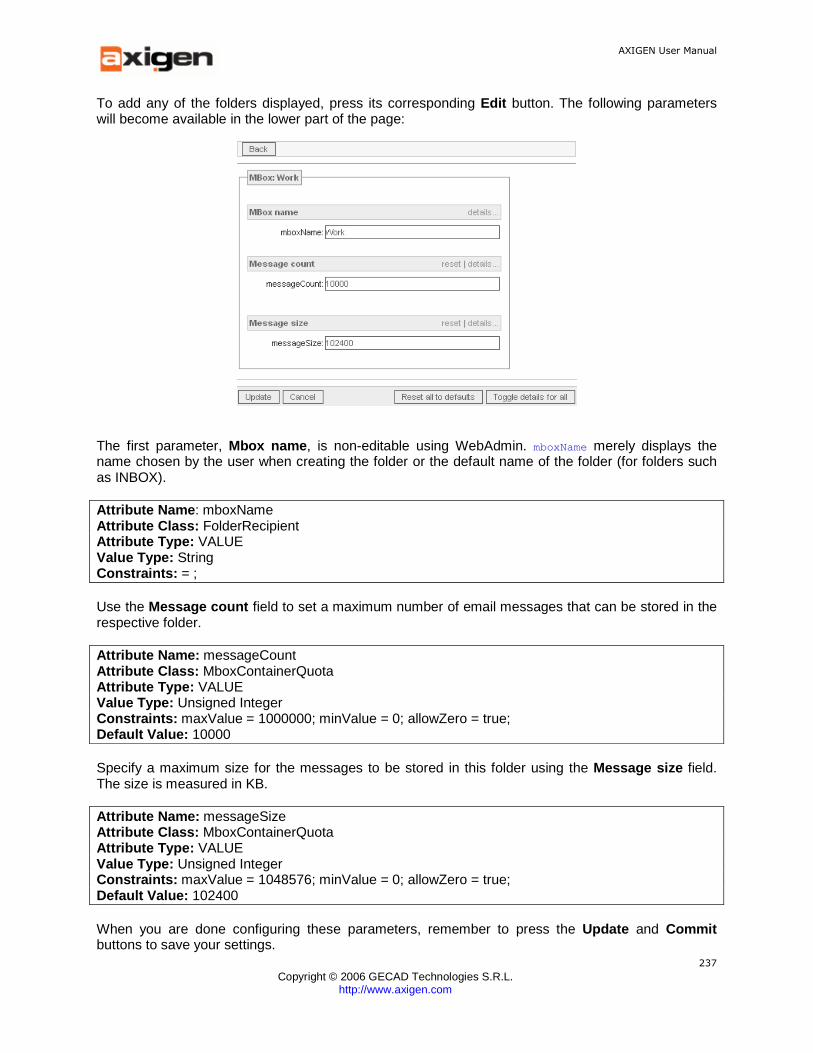
AXIGEN User Manual
Copyright © 2006 GECAD Technologies S.R.L.
http://www.axigen.com
237
To add any of the folders displayed, press its corresponding Edit button. The following parameters will become available in the lower part of the page:
The first parameter, Mbox name , is non-editable using WebAdmin. mboxName merely displays the name chosen by the user when creating the folder or the default name of the folder (for folders such as INBOX).
Attribute Name : mboxName Attribute Class: FolderRecipient Attribute Type: VALUE Value Type: String Constraints: = ; Use the Message count field to set a maximum number of email messages that can be stored in the respective folder.
Attribute Name: messageCount Attribute Class: MboxContainerQuota Attribute Type: VALUE Value Type: Unsigned Integer Constraints: maxValue = 1000000; minValue = 0; allowZero = true; Default Value: 10000 Specify a maximum size for the messages to be stored in this folder using the Message size field. The size is measured in KB.
Attribute Name: messageSize Attribute Class: MboxContainerQuota Attribute Type: VALUE Value Type: Unsigned Integer Constraints: maxValue = 1048576; minValue = 0; allowZero = true; Default Value: 102400 When you are done configuring these parameters, remember to press the Update and Commit buttons to save your settings.

AXIGEN User Manual
Copyright © 2006 GECAD Technologies S.R.L.
http://www.axigen.com
238
8.14.6. Account Filter Configuration
Filter configuration and activation at account level is identical with Server level filter configuration, as described in the Filter Configuration section except that one additional field is present on the activation page: Filter Parent . This field, located in the Accounts>Filters>Active filters page allows activating higher level filters that have been previously added. At account level you can activate filters previously added at Server or Domain level.
8.14.7. Account Info
The Accounts > Info page displays detailed information on the selected account. It registers the account creation date and time and also the latest date when it was modified. It further displays the most recent information (date and IP used) used to login to IMAP, POP 3 and WebMail.
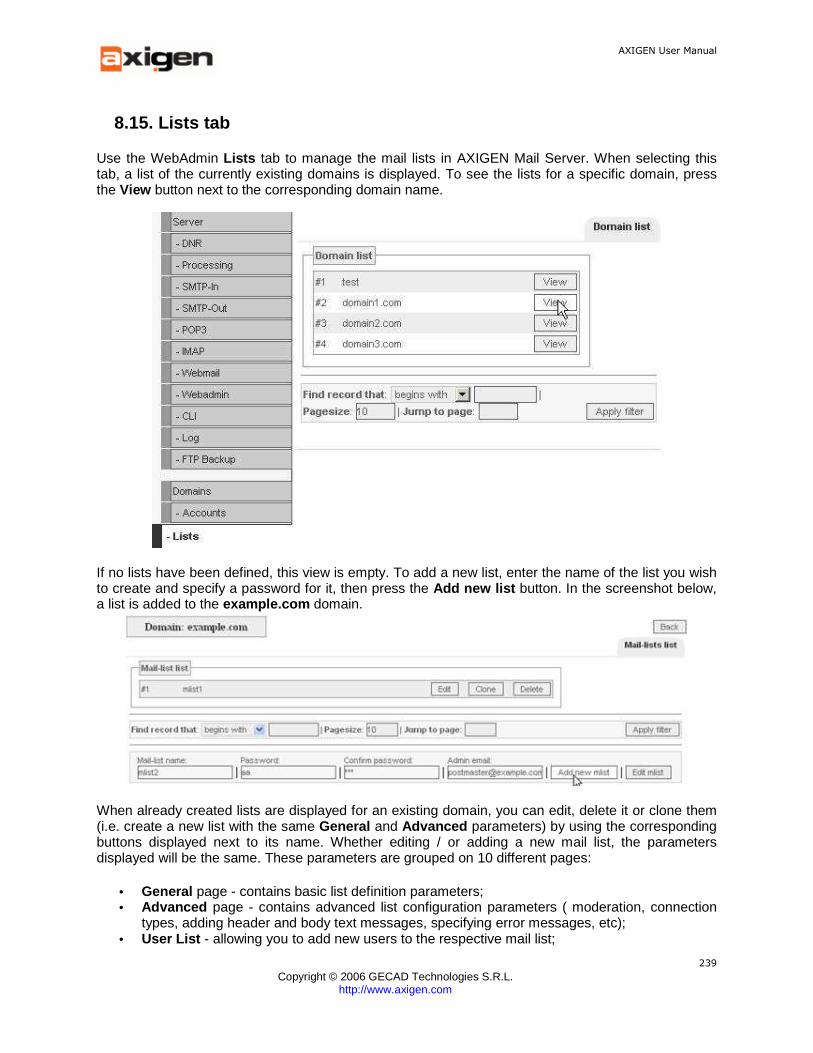
AXIGEN User Manual
Copyright © 2006 GECAD Technologies S.R.L.
http://www.axigen.com
239
8.15. Lists tab
Use the WebAdmin Lists tab to manage the mail lists in AXIGEN Mail Server. When selecting this tab, a list of the currently existing domains is displayed. To see the lists for a specific domain, press the View button next to the corresponding domain name.
If no lists have been defined, this view is empty. To add a new list, enter the name of the list you wish to create and specify a password for it, then press the Add new list button. In the screenshot below, a list is added to the example.com domain.
When already created lists are displayed for an existing domain, you can edit, delete it or clone them (i.e. create a new list with the same General and Advanced parameters) by using the corresponding buttons displayed next to its name. Whether editing / or adding a new mail list, the parameters displayed will be the same. These parameters are grouped on 10 different pages:
• General page - contains basic list definition parameters; • Advanced page - contains advanced list configuration parameters ( moderation, connection
types, adding header and body text messages, specifying error messages, etc); • User List - allowing you to add new users to the respective mail list;
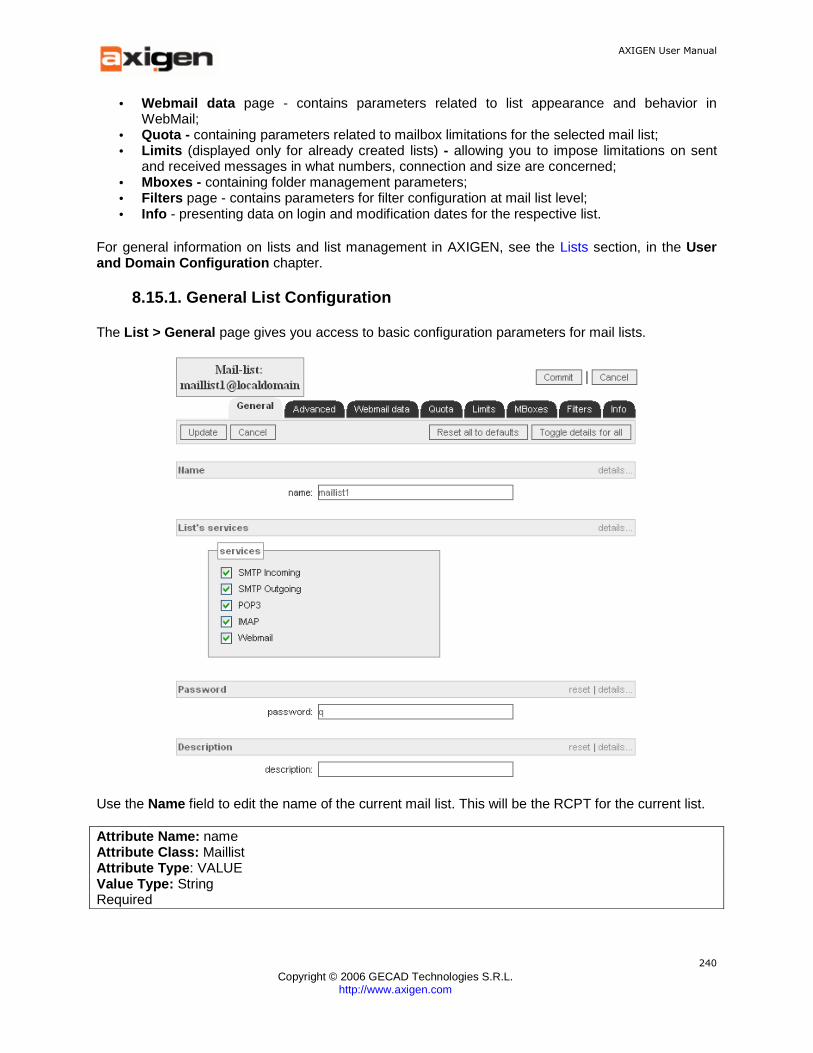
AXIGEN User Manual
Copyright © 2006 GECAD Technologies S.R.L.
http://www.axigen.com
240
• Webmail data page - contains parameters related to list appearance and behavior in WebMail;
• Quota - containing parameters related to mailbox limitations for the selected mail list; • Limits (displayed only for already created lists) - allowing you to impose limitations on sent
and received messages in what numbers, connection and size are concerned; • Mboxes - containing folder management parameters; • Filters page - contains parameters for filter configuration at mail list level; • Info - presenting data on login and modification dates for the respective list.
For general information on lists and list management in AXIGEN, see the Lists section, in the User and Domain Configuration chapter.
8.15.1. General List Configuration
The List > General page gives you access to basic configuration parameters for mail lists.
Use the Name field to edit the name of the current mail list. This will be the RCPT for the current list.
Attribute Name: name Attribute Class: Maillist Attribute Type : VALUE Value Type: String Required

AXIGEN User Manual
Copyright © 2006 GECAD Technologies S.R.L.
http://www.axigen.com
241
Use the Services field to specify what services are enabled for this rule. If you want the list to be accessible via WebMail, click the corresponding service.
Attribute Name: services Attribute Class: Maillist Attribute Type: VALUESET Value Type: multi choice - smtp | pop3 | imap | webmail Default Value: (smtp pop3 imap webmail) Use the Password text area to specify the password for accessing the mailbox of this list.
Attribute Name: passwd Attribute Class : Maillist Attribute Type: VALUE Value Type: Case-sensitive String CHECK: length not zero, required Use the Description field to specify a description for the list. This will be the text displayed in the RCPT, next to the list address.
Attribute Name: description Attribute Class: Maillist Attribute Type: VALUE Value Type: STRING Default Value: """""" At this stage, you can make a few more additional settings for your mail list:
AXIGEN User Manual
Copyright © 2006 GECAD Technologies S.R.L.
http://www.axigen.com
242
The Subscribe recipient , Unsubscribe recipient and Request recipient fields allow you to enter RCPTs used for subscribing, unsubscribing recipients and making requests. So, for instance, in order to subscribe to the list [email protected] , the user needs to send an email to the address mail-
[email protected] , because mail-list-subscribe was specified in the Subscribe recipient field.
Use the checkboxes in the Enabled RCPTs area to specify which of the three addresses specified above you want to enable.
Attribute Name: enabledRcpts Attribute Class: Maillist Attribute Type: VALUESET Value Type: multi choice - subscribe | unsubscribe | request Default Value : () (none of the CHOICEs) Use the Mail box quota field to specify a quota for the list mailbox. This setting is inherited from domain level, but if you wish to change this, enter your value here. The default value, 0, stands for unlimited.
Attribute Name : mboxQuota Attribute Class: Account Attribute Type: VALUE Value Type: Unsigned Integer MIN-MAX: 0-2097151 (0 - inherited from domain configuration) Default Value: 0 In the Send limit field, you can enter a limitation for the number of messages that can be sent within one hour from the list mailbox. The default value, 0, stands for unlimited. Attribute Name: sendLimit Attribute Class: Account Attribute Type : VALUE Value Type : Unsigned Integer MIN-MAX: 0-100000 (0 - inherited from domain configuration) Default Value: 0 If you change any of the default values, make sure you click the Update and Commit buttons to save your changes and make them effective.
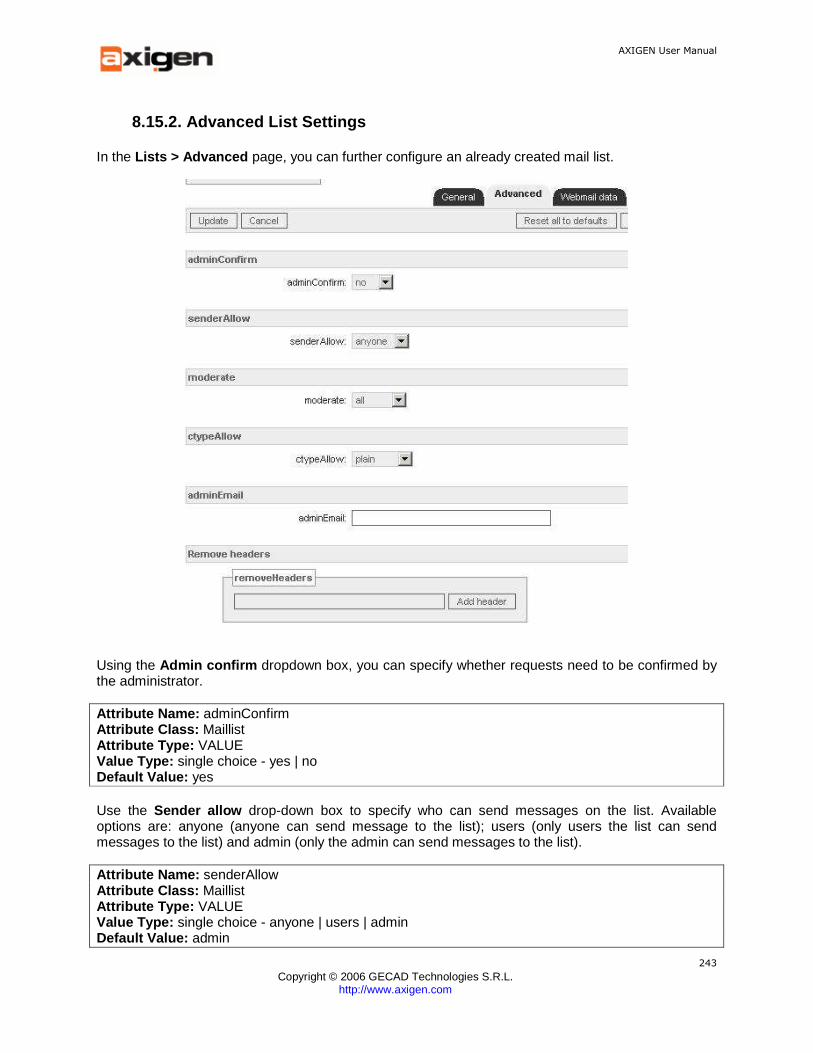
AXIGEN User Manual
Copyright © 2006 GECAD Technologies S.R.L.
http://www.axigen.com
243
8.15.2. Advanced List Settings
In the Lists > Advanced page, you can further configure an already created mail list.
Using the Admin confirm dropdown box, you can specify whether requests need to be confirmed by the administrator.
Attribute Name: adminConfirm Attribute Class: Maillist Attribute Type: VALUE Value Type: single choice - yes | no Default Value: yes Use the Sender allow drop-down box to specify who can send messages on the list. Available options are: anyone (anyone can send message to the list); users (only users the list can send messages to the list) and admin (only the admin can send messages to the list).
Attribute Name: senderAllow Attribute Class: Maillist Attribute Type: VALUE Value Type: single choice - anyone | users | admin Default Value: admin

AXIGEN User Manual
Copyright © 2006 GECAD Technologies S.R.L.
http://www.axigen.com
244
Use the Moderate drop-down box to specify what messages on the list are moderated. Available options are: all (all messages sent to the list are moderated); guests (only messages sent by guests to the list are moderated) and none (no message sent on the list is moderated).
Attribute Name: moderate Attribute Class : Maillist Attribute Type : VALUE Value Type: single choice - all | guests | none Default Value: none Use the ctypeAllow drop-down box to specify what type of content can be posted on the list. Available options are:
• plain (only plain text is accepted - Content Type: text/plain); • text (any type of text is accepted - Content Type: text/*, i.e. text/html) • garbage (no restriction is imposed).
Attribute Name: ctypeAllow Attribute Class: Maillist Attribute Type: VALUE Value Type: single choice - plain | text | garbage Default Value: plain Use the adminEmail text area to specify an e-mail address for the admin that needs to be recognized (validated) when input is filtered.
Attribute Name: adminEmail Attribute Class: Maillist Attribute Type: VALUE Value Type: String
Use the Remove headers field, to specify the list of headers that will be removed from a message that is published. After entering each header name, press the Add header button.
Attribute Name: removeHeader Attribute Class: Maillist Attribute Type: VALUESET Value Type: String Use the Add header field to specify headers that will be added to the headers of the messages that will be published. These headers follow the format specified by the RFC2822. This is a template and will expand the % format according to the settings specified in the Lists section (Templates explained) in the User and Domain Configuration chapter. Example: addHeader = "From: %l@%d\r\n"
The following fields allow you to specify templates used for sending messages for various situations and standard text to be inserted at the beginning or at the end of the email body, welcome and goodbye texts for new users or error messages in case the request needs confirmation or the user has already subscribed. Most of these text boxes allow entering templates that expand the % token. The list below displays the name of these fields, the name or the corresponding parameter, and their function.
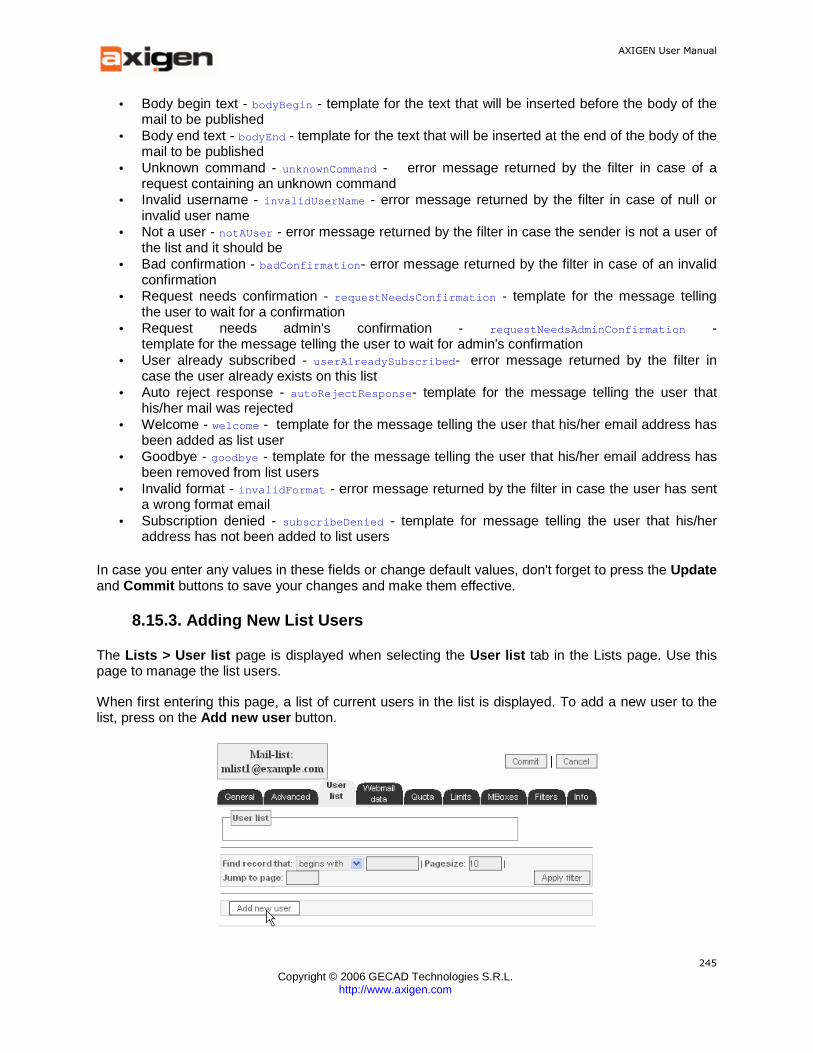
AXIGEN User Manual
Copyright © 2006 GECAD Technologies S.R.L.
http://www.axigen.com
245
• Body begin text - bodyBegin - template for the text that will be inserted before the body of the mail to be published
• Body end text - bodyEnd - template for the text that will be inserted at the end of the body of the mail to be published
• Unknown command - unknownCommand - error message returned by the filter in case of a request containing an unknown command
• Invalid username - invalidUserName - error message returned by the filter in case of null or invalid user name
• Not a user - notAUser - error message returned by the filter in case the sender is not a user of the list and it should be
• Bad confirmation - badConfirmation - error message returned by the filter in case of an invalid confirmation
• Request needs confirmation - requestNeedsConfirmation - template for the message telling the user to wait for a confirmation
• Request needs admin's confirmation - requestNeedsAdminConfirmation - template for the message telling the user to wait for admin's confirmation
• User already subscribed - userAlreadySubscribed - error message returned by the filter in case the user already exists on this list
• Auto reject response - autoRejectResponse - template for the message telling the user that his/her mail was rejected
• Welcome - welcome - template for the message telling the user that his/her email address has been added as list user
• Goodbye - goodbye - template for the message telling the user that his/her email address has been removed from list users
• Invalid format - invalidFormat - error message returned by the filter in case the user has sent a wrong format email
• Subscription denied - subscribeDenied - template for message telling the user that his/her address has not been added to list users
In case you enter any values in these fields or change default values, don't forget to press the Update and Commit buttons to save your changes and make them effective.
8.15.3. Adding New List Users
The Lists > User list page is displayed when selecting the User list tab in the Lists page. Use this page to manage the list users.
When first entering this page, a list of current users in the list is displayed. To add a new user to the list, press on the Add new user button.
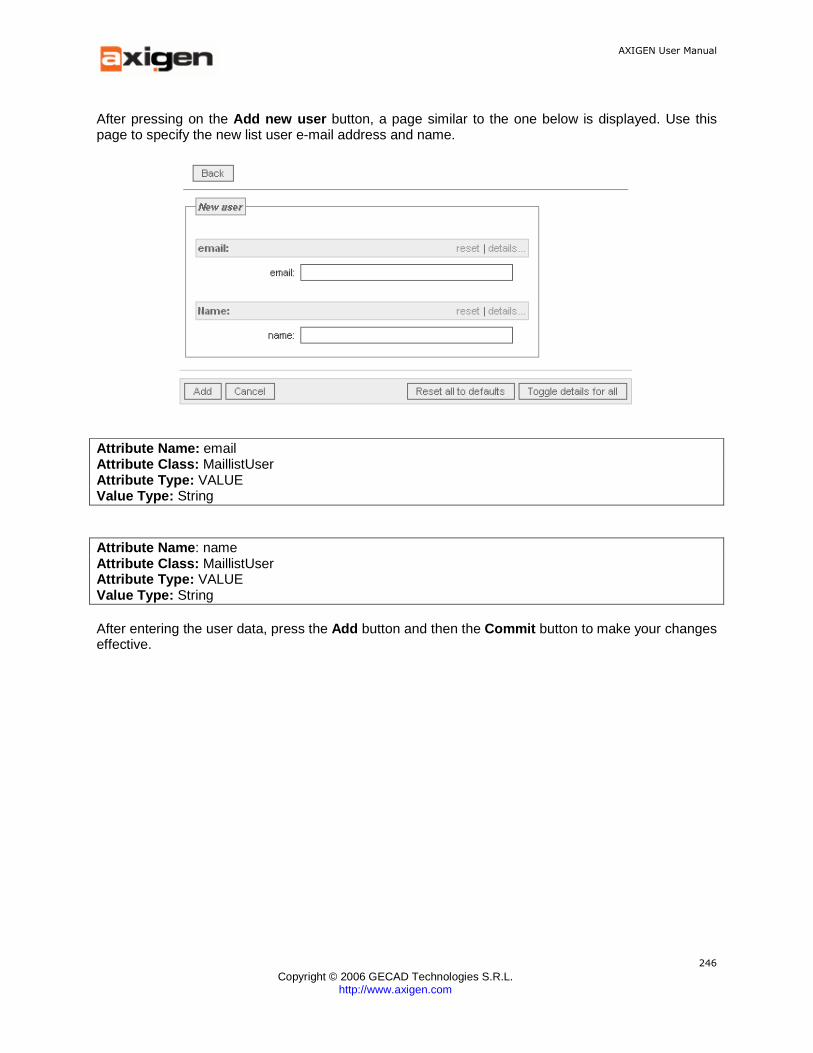
AXIGEN User Manual
Copyright © 2006 GECAD Technologies S.R.L.
http://www.axigen.com
246
After pressing on the Add new user button, a page similar to the one below is displayed. Use this page to specify the new list user e-mail address and name.
Attribute Name: email Attribute Class: MaillistUser Attribute Type: VALUE Value Type: String
Attribute Name : name Attribute Class: MaillistUser Attribute Type: VALUE Value Type: String After entering the user data, press the Add button and then the Commit button to make your changes effective.
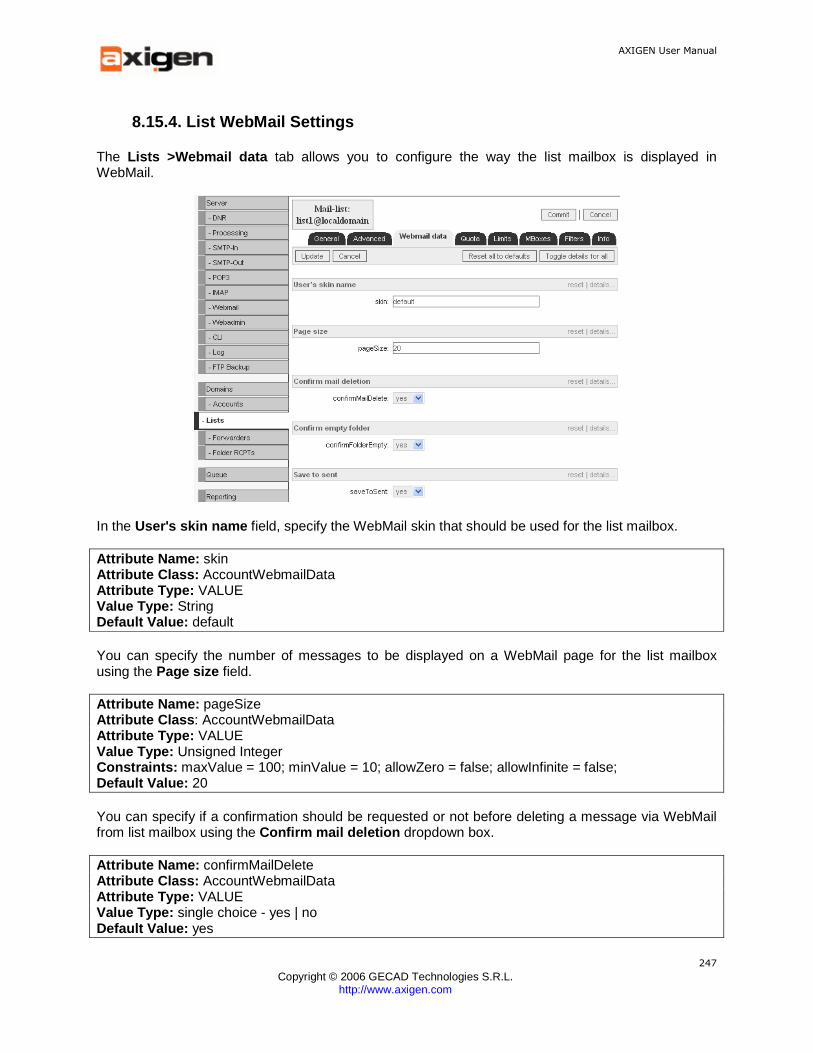
AXIGEN User Manual
Copyright © 2006 GECAD Technologies S.R.L.
http://www.axigen.com
247
8.15.4. List WebMail Settings
The Lists >Webmail data tab allows you to configure the way the list mailbox is displayed in WebMail.
In the User's skin name field, specify the WebMail skin that should be used for the list mailbox.
Attribute Name: skin Attribute Class: AccountWebmailData Attribute Type: VALUE Value Type: String Default Value: default You can specify the number of messages to be displayed on a WebMail page for the list mailbox using the Page size field.
Attribute Name: pageSize Attribute Class : AccountWebmailData Attribute Type: VALUE Value Type: Unsigned Integer Constraints: maxValue = 100; minValue = 10; allowZero = false; allowInfinite = false; Default Value: 20 You can specify if a confirmation should be requested or not before deleting a message via WebMail from list mailbox using the Confirm mail deletion dropdown box.
Attribute Name: confirmMailDelete Attribute Class: AccountWebmailData Attribute Type: VALUE Value Type: single choice - yes | no Default Value: yes
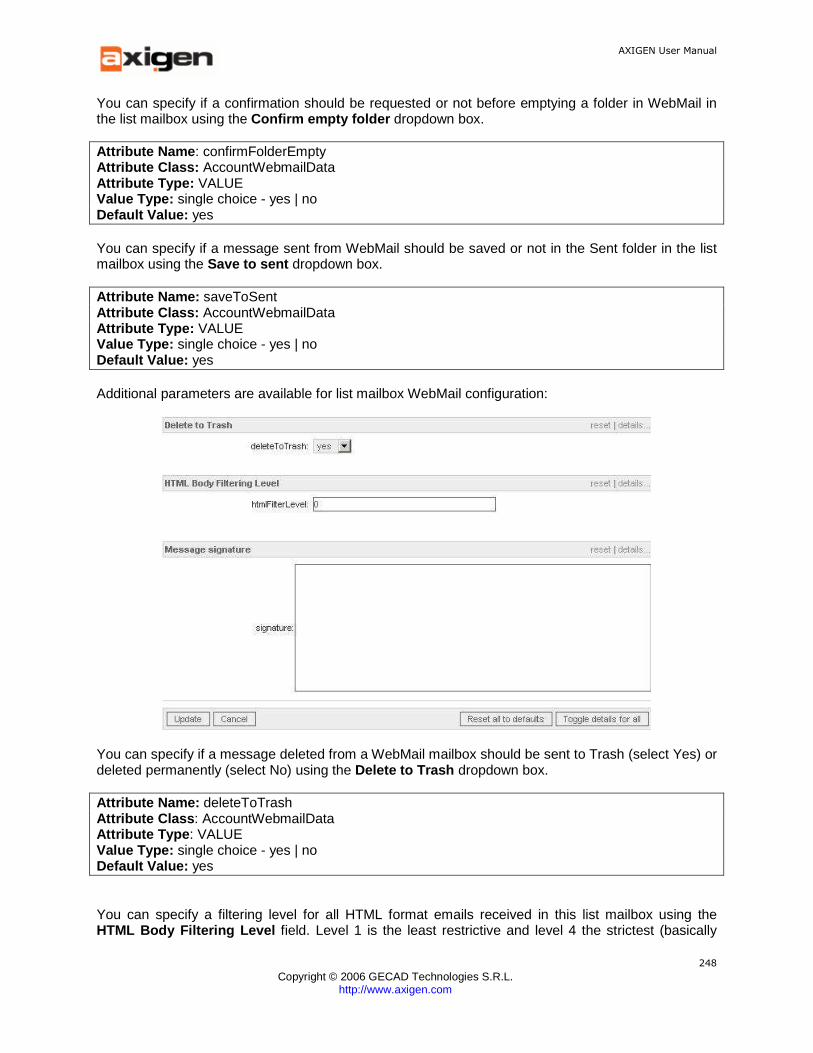
AXIGEN User Manual
Copyright © 2006 GECAD Technologies S.R.L.
http://www.axigen.com
248
You can specify if a confirmation should be requested or not before emptying a folder in WebMail in the list mailbox using the Confirm empty folder dropdown box.
Attribute Name : confirmFolderEmpty Attribute Class: AccountWebmailData Attribute Type: VALUE Value Type: single choice - yes | no Default Value: yes You can specify if a message sent from WebMail should be saved or not in the Sent folder in the list mailbox using the Save to sent dropdown box.
Attribute Name: saveToSent Attribute Class: AccountWebmailData Attribute Type: VALUE Value Type: single choice - yes | no Default Value: yes Additional parameters are available for list mailbox WebMail configuration:
You can specify if a message deleted from a WebMail mailbox should be sent to Trash (select Yes) or deleted permanently (select No) using the Delete to Trash dropdown box.
Attribute Name: deleteToTrash Attribute Class : AccountWebmailData Attribute Type : VALUE Value Type: single choice - yes | no Default Value: yes
You can specify a filtering level for all HTML format emails received in this list mailbox using the HTML Body Filtering Level field. Level 1 is the least restrictive and level 4 the strictest (basically
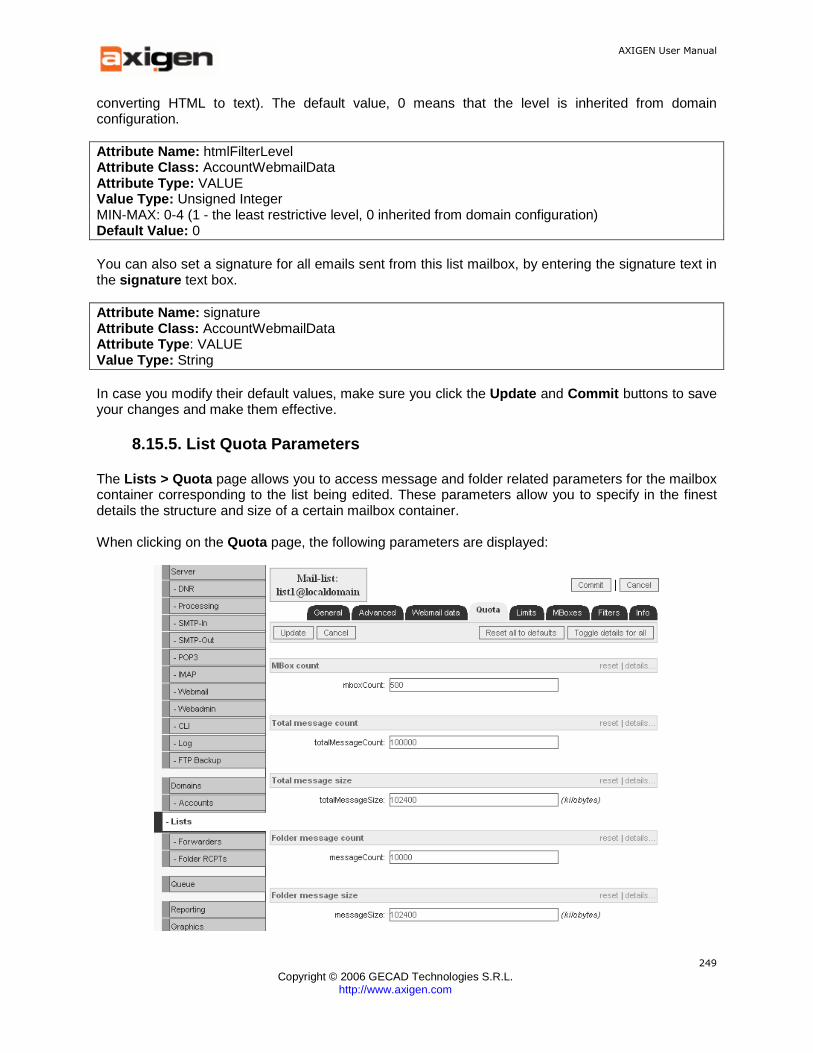
AXIGEN User Manual
Copyright © 2006 GECAD Technologies S.R.L.
http://www.axigen.com
249
converting HTML to text). The default value, 0 means that the level is inherited from domain configuration.
Attribute Name: htmlFilterLevel Attribute Class: AccountWebmailData Attribute Type: VALUE Value Type: Unsigned Integer MIN-MAX: 0-4 (1 - the least restrictive level, 0 inherited from domain configuration) Default Value: 0 You can also set a signature for all emails sent from this list mailbox, by entering the signature text in the signature text box.
Attribute Name: signature Attribute Class: AccountWebmailData Attribute Type : VALUE Value Type: String In case you modify their default values, make sure you click the Update and Commit buttons to save your changes and make them effective.
8.15.5. List Quota Parameters
The Lists > Quota page allows you to access message and folder related parameters for the mailbox container corresponding to the list being edited. These parameters allow you to specify in the finest details the structure and size of a certain mailbox container. When clicking on the Quota page, the following parameters are displayed:

AXIGEN User Manual
Copyright © 2006 GECAD Technologies S.R.L.
http://www.axigen.com
250
Use the MBox count to specify the maximum number of folders to be created for this list mailbox.
Attribute Name: mboxCount Attribute Class: MboxContainerQuota Attribute Type: VALUE Value Type: Unsigned Integer MIN-MAX: 0-1000 Default Value : 500 The value "0" is allowed and means that no folders will be created.
Use the Total message count to specify the maximum total number of messages in all folders of this list mailbox.
Attribute Name: totalMessageCount Attribute Class: MboxContainerQuota Attribute Type: VALUE Value Type: Unsigned Integer MIN-MAX: 0-1000000 Default Value: 10000 Use the Total message size field to specify a maximum total size in KB for all messages in all folders of this list mailbox. Values for this parameter are specified in kB.
Attribute Name: totalMessageSize Attribute Class : MboxContainerQuota Attribute Type: VALUE Value Type: Unsigned Integer MIN-MAX: 0 - 1048576 Default Value: 102400 Use the Folder message count parameter to set the maximum number of messages that can be stored in a folder of the list mailbox being edited.
Attribute Name: messageCount Attribute Class: MboxContainerQuota Attribute Type: VALUE Value Type: Unsigned Integer MIN-MAX: 0 - 1000000 Default Value: 10000 Use the Folder message size field to specify the maximum total size in KB of all messages that can be stored in a folder of this list mailbox.
Attribute Name: messageSize Attribute Class: MboxContainerQuota Attribute Type: VALUE Value Type: Unsigned Integer MIN-MAX: 0 - 1048576 Default Value: 102400
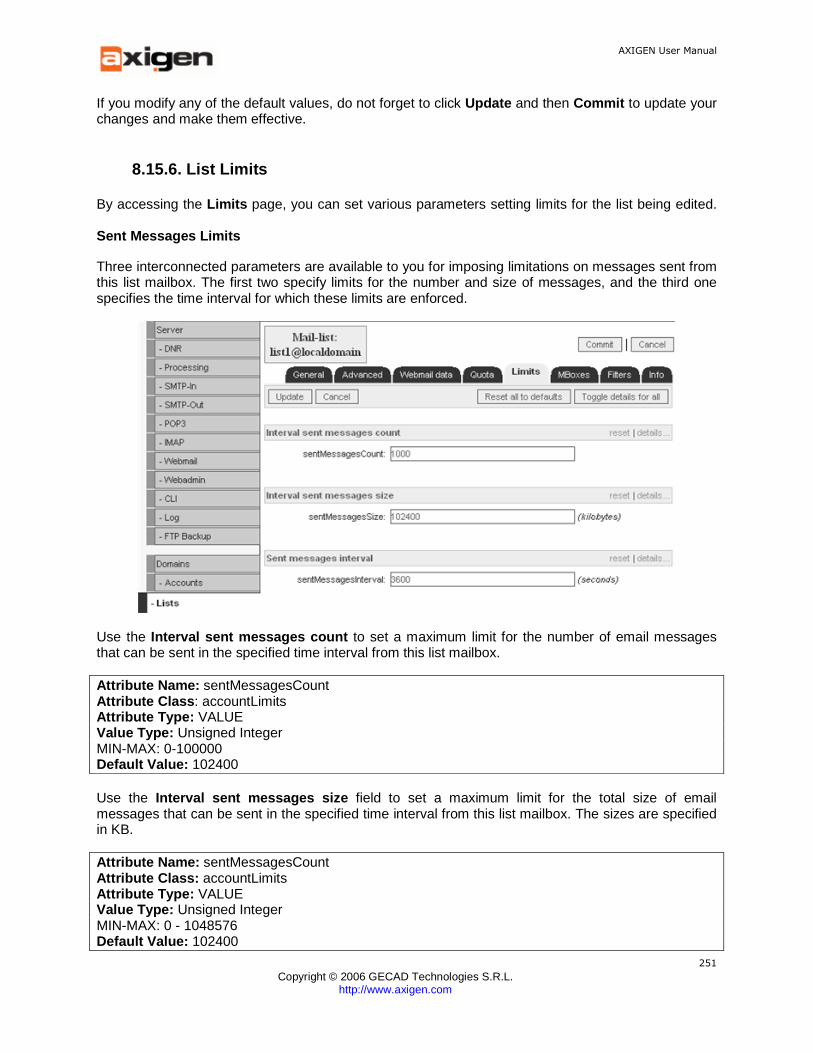
AXIGEN User Manual
Copyright © 2006 GECAD Technologies S.R.L.
http://www.axigen.com
251
If you modify any of the default values, do not forget to click Update and then Commit to update your changes and make them effective.
8.15.6. List Limits
By accessing the Limits page, you can set various parameters setting limits for the list being edited. Sent Messages Limits
Three interconnected parameters are available to you for imposing limitations on messages sent from this list mailbox. The first two specify limits for the number and size of messages, and the third one specifies the time interval for which these limits are enforced.
Use the Interval sent messages count to set a maximum limit for the number of email messages that can be sent in the specified time interval from this list mailbox.
Attribute Name: sentMessagesCount Attribute Class : accountLimits Attribute Type: VALUE Value Type: Unsigned Integer MIN-MAX: 0-100000 Default Value: 102400 Use the Interval sent messages size field to set a maximum limit for the total size of email messages that can be sent in the specified time interval from this list mailbox. The sizes are specified in KB.
Attribute Name: sentMessagesCount Attribute Class: accountLimits Attribute Type: VALUE Value Type: Unsigned Integer MIN-MAX: 0 - 1048576 Default Value: 102400
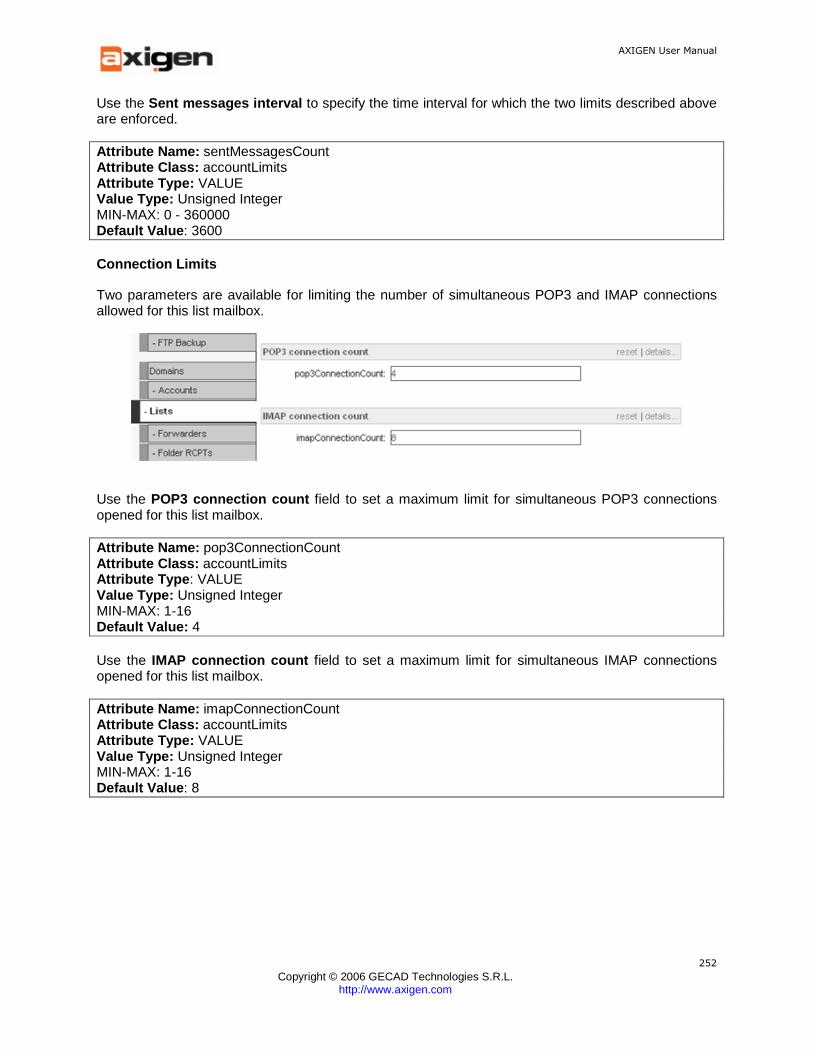
AXIGEN User Manual
Copyright © 2006 GECAD Technologies S.R.L.
http://www.axigen.com
252
Use the Sent messages interval to specify the time interval for which the two limits described above are enforced.
Attribute Name: sentMessagesCount Attribute Class: accountLimits Attribute Type: VALUE Value Type: Unsigned Integer MIN-MAX: 0 - 360000 Default Value : 3600 Connection Limits
Two parameters are available for limiting the number of simultaneous POP3 and IMAP connections allowed for this list mailbox.
Use the POP3 connection count field to set a maximum limit for simultaneous POP3 connections opened for this list mailbox.
Attribute Name: pop3ConnectionCount Attribute Class: accountLimits Attribute Type : VALUE Value Type: Unsigned Integer MIN-MAX: 1-16 Default Value: 4 Use the IMAP connection count field to set a maximum limit for simultaneous IMAP connections opened for this list mailbox.
Attribute Name: imapConnectionCount Attribute Class: accountLimits Attribute Type: VALUE Value Type: Unsigned Integer MIN-MAX: 1-16 Default Value : 8
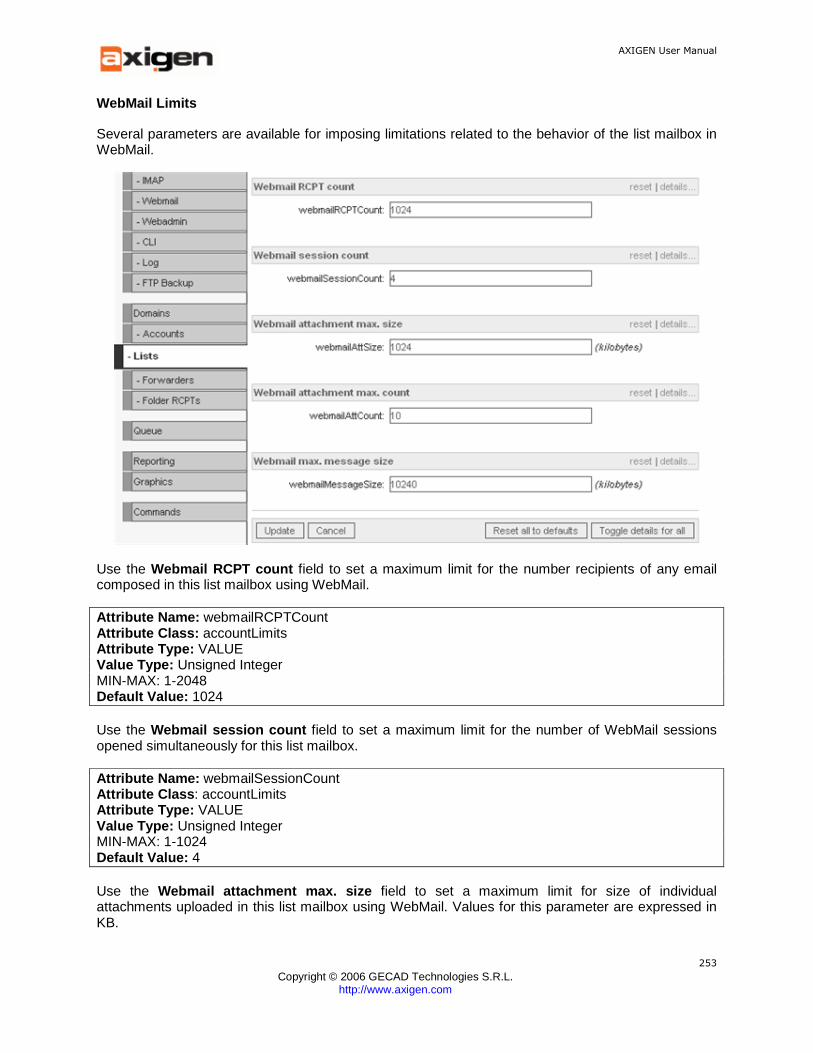
AXIGEN User Manual
Copyright © 2006 GECAD Technologies S.R.L.
http://www.axigen.com
253
WebMail Limits
Several parameters are available for imposing limitations related to the behavior of the list mailbox in WebMail.
Use the Webmail RCPT count field to set a maximum limit for the number recipients of any email composed in this list mailbox using WebMail.
Attribute Name: webmailRCPTCount Attribute Class: accountLimits Attribute Type: VALUE Value Type: Unsigned Integer MIN-MAX: 1-2048 Default Value: 1024 Use the Webmail session count field to set a maximum limit for the number of WebMail sessions opened simultaneously for this list mailbox.
Attribute Name: webmailSessionCount Attribute Class : accountLimits Attribute Type: VALUE Value Type: Unsigned Integer MIN-MAX: 1-1024 Default Value: 4 Use the Webmail attachment max. size field to set a maximum limit for size of individual attachments uploaded in this list mailbox using WebMail. Values for this parameter are expressed in KB.
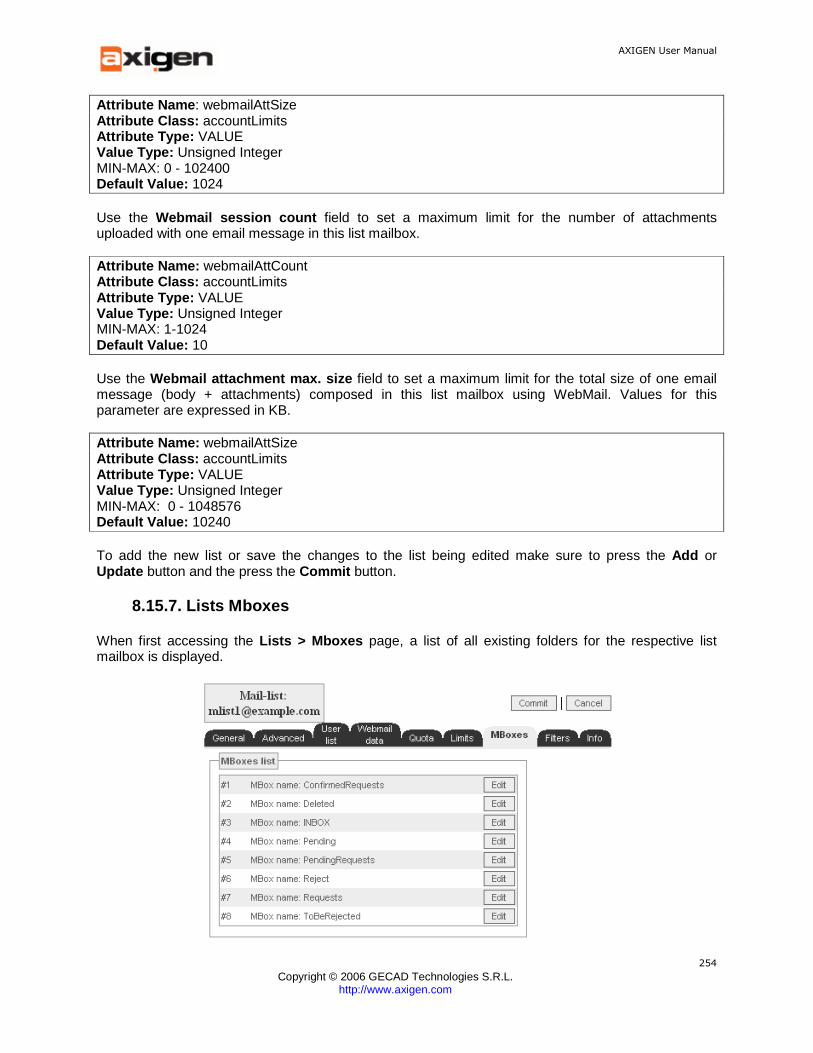
AXIGEN User Manual
Copyright © 2006 GECAD Technologies S.R.L.
http://www.axigen.com
254
Attribute Name : webmailAttSize Attribute Class: accountLimits Attribute Type: VALUE Value Type: Unsigned Integer MIN-MAX: 0 - 102400 Default Value: 1024 Use the Webmail session count field to set a maximum limit for the number of attachments uploaded with one email message in this list mailbox.
Attribute Name: webmailAttCount Attribute Class: accountLimits Attribute Type: VALUE Value Type: Unsigned Integer MIN-MAX: 1-1024 Default Value: 10 Use the Webmail attachment max. size field to set a maximum limit for the total size of one email message (body + attachments) composed in this list mailbox using WebMail. Values for this parameter are expressed in KB.
Attribute Name: webmailAttSize Attribute Class: accountLimits Attribute Type: VALUE Value Type: Unsigned Integer MIN-MAX: 0 - 1048576 Default Value: 10240 To add the new list or save the changes to the list being edited make sure to press the Add or Update button and the press the Commit button.
8.15.7. Lists Mboxes
When first accessing the Lists > Mboxes page, a list of all existing folders for the respective list mailbox is displayed.
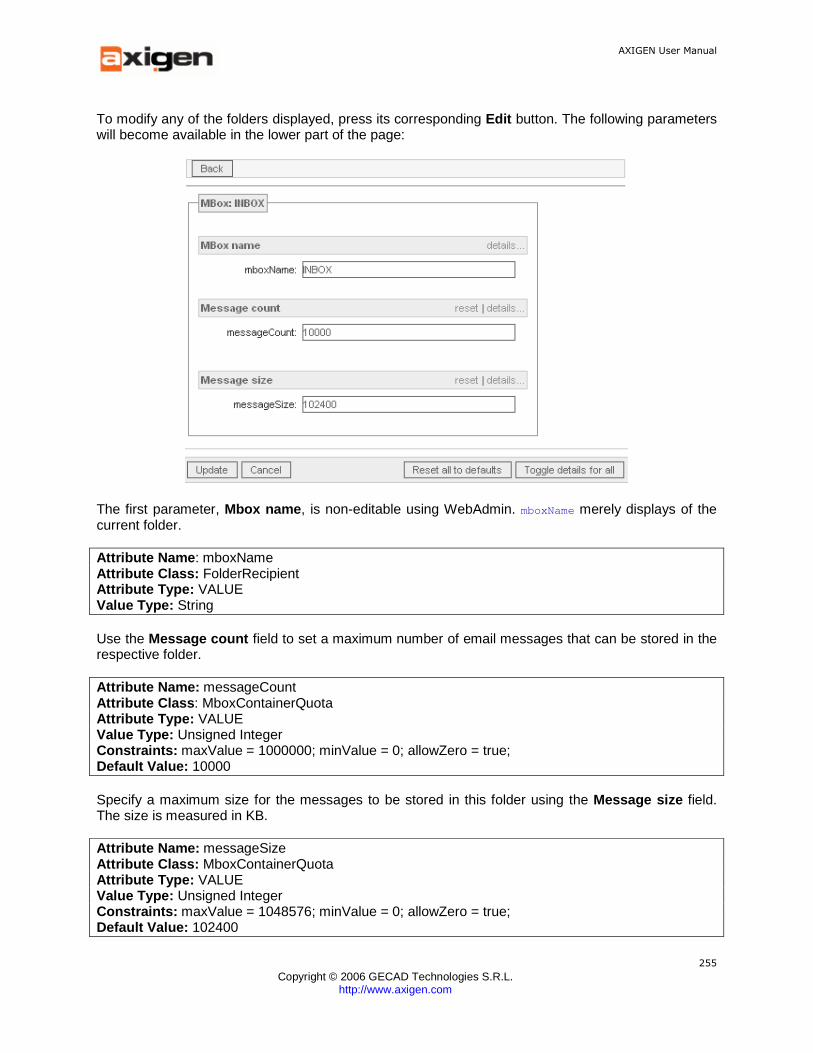
AXIGEN User Manual
Copyright © 2006 GECAD Technologies S.R.L.
http://www.axigen.com
255
To modify any of the folders displayed, press its corresponding Edit button. The following parameters will become available in the lower part of the page:
The first parameter, Mbox name , is non-editable using WebAdmin. mboxName merely displays of the current folder.
Attribute Name : mboxName Attribute Class: FolderRecipient Attribute Type: VALUE Value Type: String Use the Message count field to set a maximum number of email messages that can be stored in the respective folder.
Attribute Name: messageCount Attribute Class : MboxContainerQuota Attribute Type: VALUE Value Type: Unsigned Integer Constraints: maxValue = 1000000; minValue = 0; allowZero = true; Default Value: 10000 Specify a maximum size for the messages to be stored in this folder using the Message size field. The size is measured in KB.
Attribute Name: messageSize Attribute Class: MboxContainerQuota Attribute Type: VALUE Value Type: Unsigned Integer Constraints: maxValue = 1048576; minValue = 0; allowZero = true; Default Value: 102400
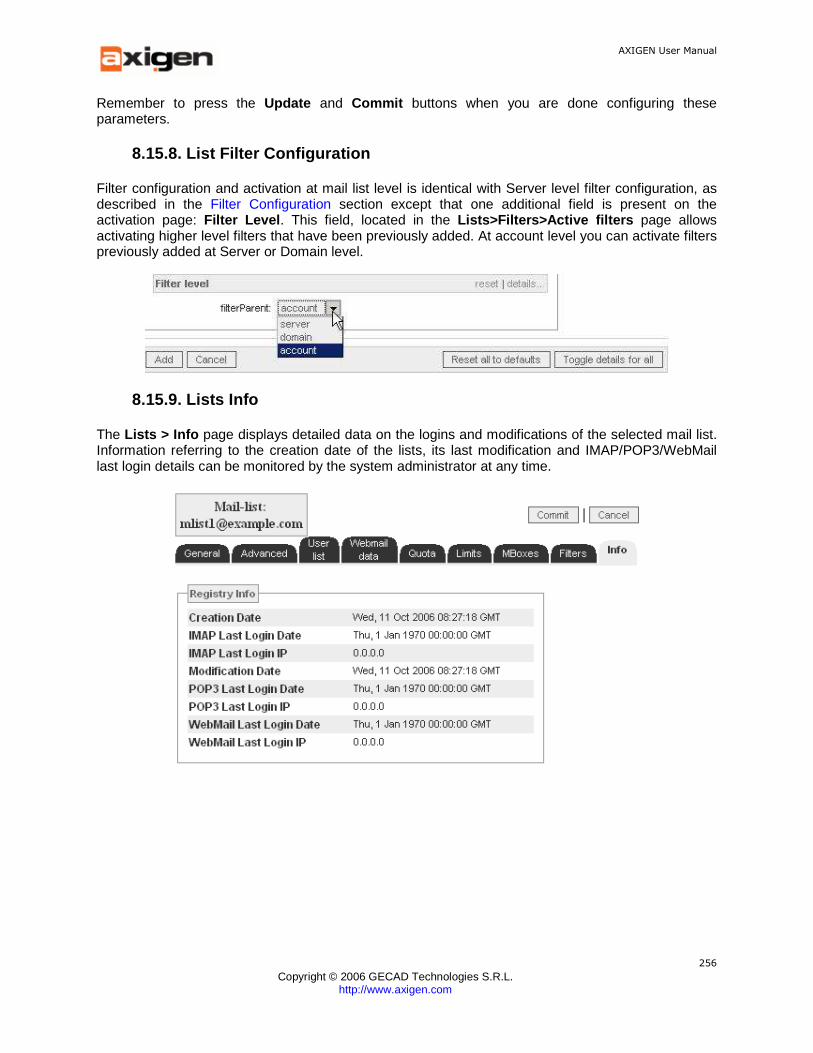
AXIGEN User Manual
Copyright © 2006 GECAD Technologies S.R.L.
http://www.axigen.com
256
Remember to press the Update and Commit buttons when you are done configuring these parameters.
8.15.8. List Filter Configuration
Filter configuration and activation at mail list level is identical with Server level filter configuration, as described in the Filter Configuration section except that one additional field is present on the activation page: Filter Level . This field, located in the Lists>Filters>Active filters page allows activating higher level filters that have been previously added. At account level you can activate filters previously added at Server or Domain level.
8.15.9. Lists Info
The Lists > Info page displays detailed data on the logins and modifications of the selected mail list. Information referring to the creation date of the lists, its last modification and IMAP/POP3/WebMail last login details can be monitored by the system administrator at any time.
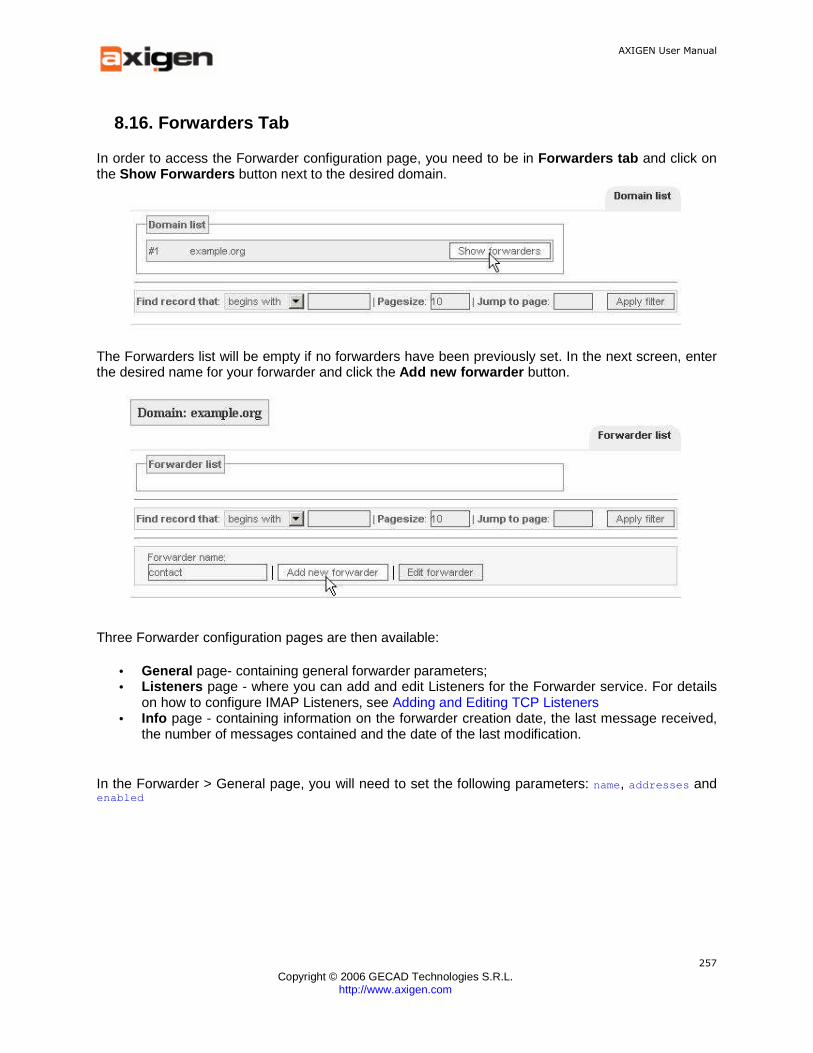
AXIGEN User Manual
Copyright © 2006 GECAD Technologies S.R.L.
http://www.axigen.com
257
8.16. Forwarders Tab
In order to access the Forwarder configuration page, you need to be in Forwarders tab and click on the Show Forwarders button next to the desired domain.
The Forwarders list will be empty if no forwarders have been previously set. In the next screen, enter the desired name for your forwarder and click the Add new forwarder button.
Three Forwarder configuration pages are then available:
• General page- containing general forwarder parameters; • Listeners page - where you can add and edit Listeners for the Forwarder service. For details
on how to configure IMAP Listeners, see Adding and Editing TCP Listeners • Info page - containing information on the forwarder creation date, the last message received,
the number of messages contained and the date of the last modification.
In the Forwarder > General page, you will need to set the following parameters: name, addresses and enabled
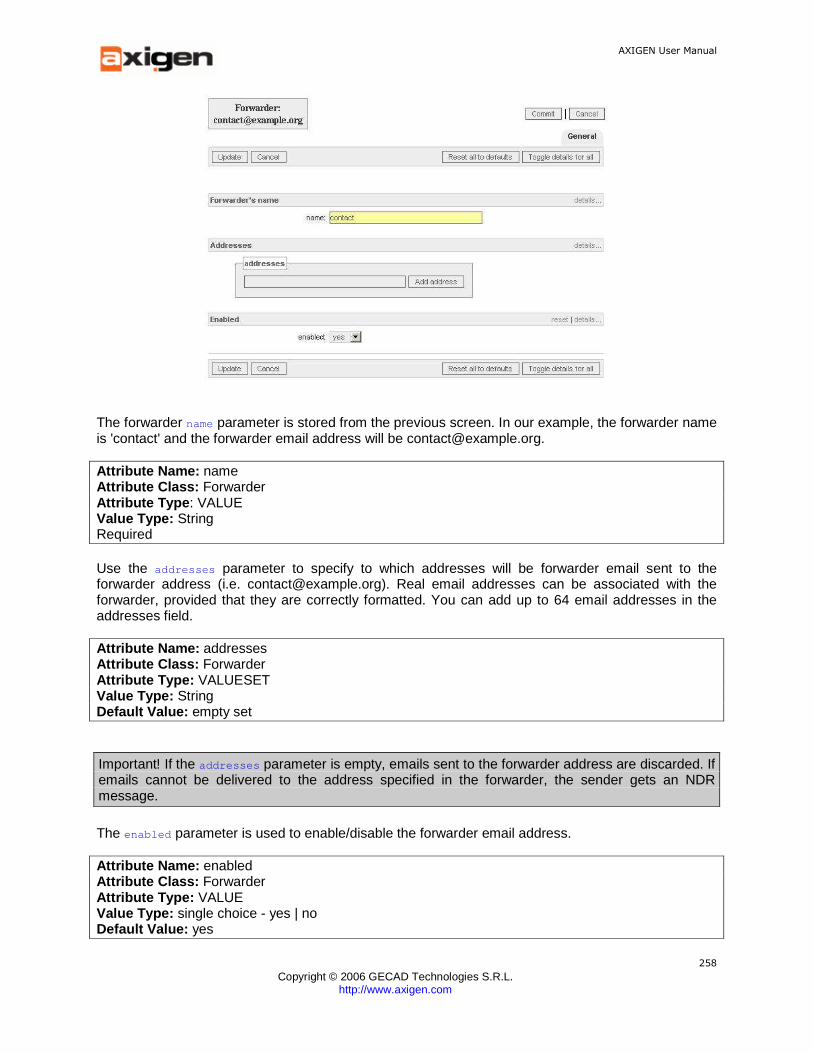
AXIGEN User Manual
Copyright © 2006 GECAD Technologies S.R.L.
http://www.axigen.com
258
The forwarder name parameter is stored from the previous screen. In our example, the forwarder name is 'contact' and the forwarder email address will be [email protected].
Attribute Name: name Attribute Class: Forwarder Attribute Type : VALUE Value Type: String Required Use the addresses parameter to specify to which addresses will be forwarder email sent to the forwarder address (i.e. [email protected]). Real email addresses can be associated with the forwarder, provided that they are correctly formatted. You can add up to 64 email addresses in the addresses field.
Attribute Name: addresses Attribute Class: Forwarder Attribute Type: VALUESET Value Type: String Default Value: empty set
Important! If the addresses parameter is empty, emails sent to the forwarder address are discarded. If emails cannot be delivered to the address specified in the forwarder, the sender gets an NDR message.
The enabled parameter is used to enable/disable the forwarder email address.
Attribute Name: enabled Attribute Class: Forwarder Attribute Type: VALUE Value Type: single choice - yes | no Default Value: yes

AXIGEN User Manual
Copyright © 2006 GECAD Technologies S.R.L.
http://www.axigen.com
259
After setting these parameters, click on the Update button. You can edit the forwarder at any later time, by clicking the Edit button displayed in the forwarder list. For general information on forwarders and their management in AXIGEN, see Forwarders section in the User and Domain Configuration chapter.

AXIGEN User Manual
Copyright © 2006 GECAD Technologies S.R.L.
http://www.axigen.com
260
8.17. Folder Recipients
Use the WebAdmin Folder RCPTs tab to create and manage the folder recipients in AXIGEN Mail Server. Folder recipients are used to specify a certain folder within a domain's Public Folder to which email messages should be delivered. This feature is only available for mailboxes within the local domains and allows users to deliver messages directly to a specified folder in the recipient mbox defined in Domains>Public Folders (i.e. to the Work folder within example.com Public Folder). For details on how to configure Public Folders Mboxes using WebAdmin, see the Domain Public Folders Configuration section.
When selecting this tab, a list of the currently existing domains is displayed. To see the lists for a specific domain, press the View button next to the corresponding domain name.
If no folder recipients have been defined, this view is empty. To add a new folder recipient, enter the name of the folder recipient you wish to create and press the Add new folderrcpt button. In the screenshot below, a folder recipient named Technology is added to example.com.
The name specified in the Folder-rcpt name field is actually the RCPT folder (Public Folder Mbox)

AXIGEN User Manual
Copyright © 2006 GECAD Technologies S.R.L.
http://www.axigen.com
261
within the local domain for which you define this rule (i.e. if you want to define a folder recipient for [email protected], you should enter the value "Technology" in this field).
When already created folder recipients are displayed for an existing domain, you can edit or delete them by using the corresponding buttons displayed next to their name. Whether editing / or adding a new folder recipient, the parameters displayed will be the same. These parameters are grouped on the following pages:
• General page - contains basic folder recipient definition parameters • Filters page - contains parameters for filter configuration at folder recipient level • Info - containing information on the folder recipient and the messages sent to it.
For general information on folder recipients and their usage with Public Folder, see the Public Folders section in the User and Domain Configuration chapter.
8.17.1. General Folder Recipients Parameters
Use the General page to configure the folder recipients general parameters.
Use the Folder-RCPT's name field to specify the name you wish to assign to this delivery rule. This name can refer to any folder within the local domain Public Folder.
Attribute Name: name Attribute Class: DomainObject Attribute Type: VALUE Value Type: String Use the Folder-RCPT's mailbox name field to specify the Mbox name within the public folder you want to define as recipient.
Attribute Name: mboxName Attribute Class : FolderRecipient Attribute Type: VALUE Value Type : String
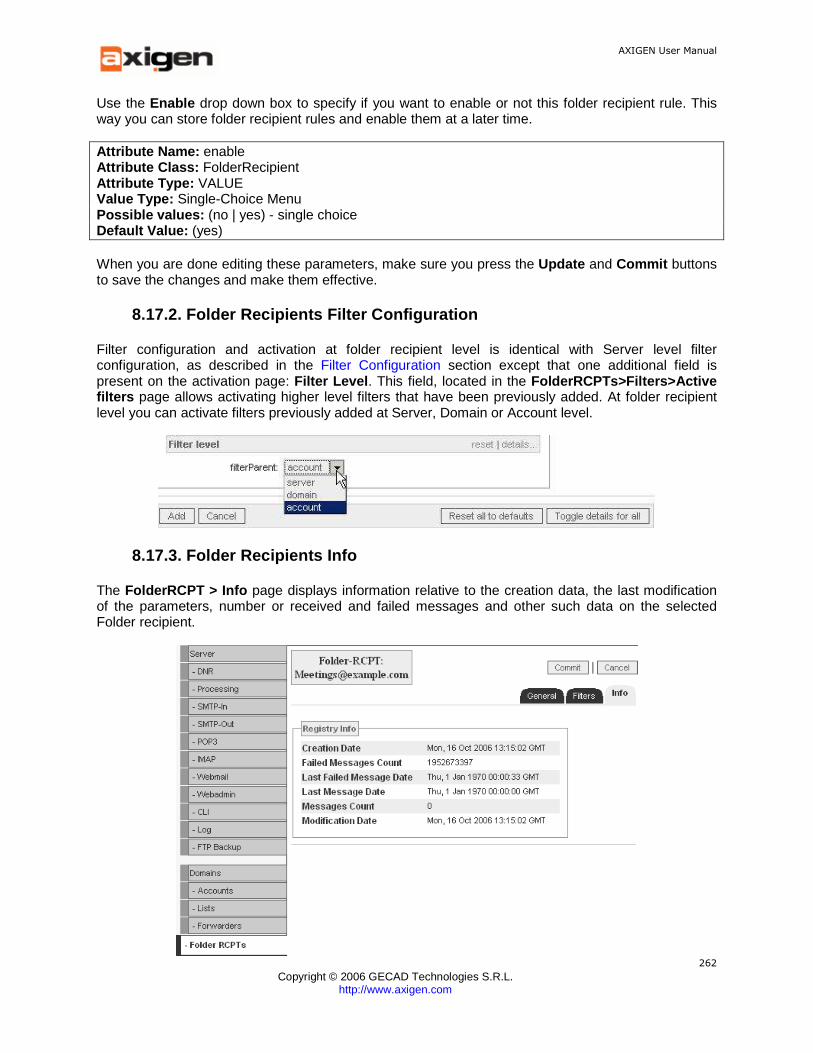
AXIGEN User Manual
Copyright © 2006 GECAD Technologies S.R.L.
http://www.axigen.com
262
Use the Enable drop down box to specify if you want to enable or not this folder recipient rule. This way you can store folder recipient rules and enable them at a later time.
Attribute Name: enable Attribute Class: FolderRecipient Attribute Type: VALUE Value Type: Single-Choice Menu Possible values: (no | yes) - single choice Default Value: (yes) When you are done editing these parameters, make sure you press the Update and Commit buttons to save the changes and make them effective.
8.17.2. Folder Recipients Filter Configuration
Filter configuration and activation at folder recipient level is identical with Server level filter configuration, as described in the Filter Configuration section except that one additional field is present on the activation page: Filter Level . This field, located in the FolderRCPTs>Filters>Active filters page allows activating higher level filters that have been previously added. At folder recipient level you can activate filters previously added at Server, Domain or Account level.
8.17.3. Folder Recipients Info
The FolderRCPT > Info page displays information relative to the creation data, the last modification of the parameters, number or received and failed messages and other such data on the selected Folder recipient.
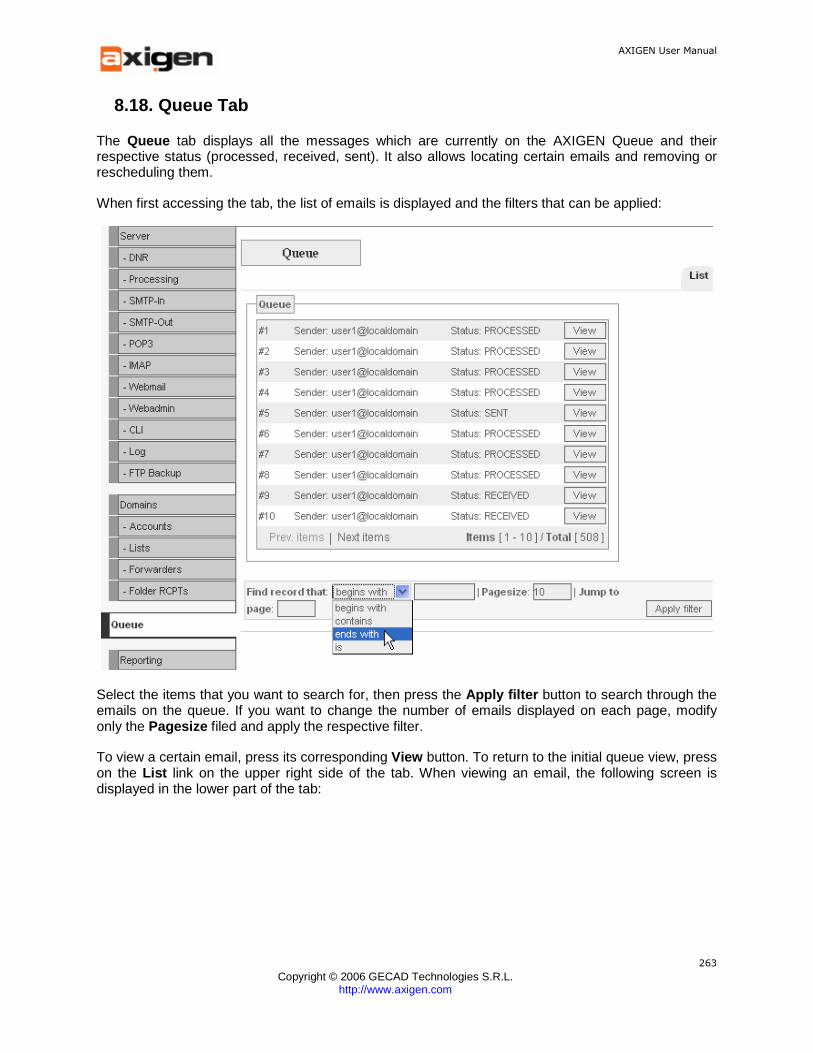
AXIGEN User Manual
Copyright © 2006 GECAD Technologies S.R.L.
http://www.axigen.com
263
8.18. Queue Tab
The Queue tab displays all the messages which are currently on the AXIGEN Queue and their respective status (processed, received, sent). It also allows locating certain emails and removing or rescheduling them.
When first accessing the tab, the list of emails is displayed and the filters that can be applied:
Select the items that you want to search for, then press the Apply filter button to search through the emails on the queue. If you want to change the number of emails displayed on each page, modify only the Pagesize filed and apply the respective filter.
To view a certain email, press its corresponding View button. To return to the initial queue view, press on the List link on the upper right side of the tab. When viewing an email, the following screen is displayed in the lower part of the tab:

AXIGEN User Manual
Copyright © 2006 GECAD Technologies S.R.L.
http://www.axigen.com
264
You can thus check at any time the size, date, status, and other such details relative to any email message on your queue. You can also remove or reschedule email messages at any time using the Reschedule message and Remove message buttons. To view the details of the email recipient, press the show info button. In a information box opened under the selected recipient, the email status, the destination folder and eventual failure information will be displayed. To hide the data displayed, press the hide info button.
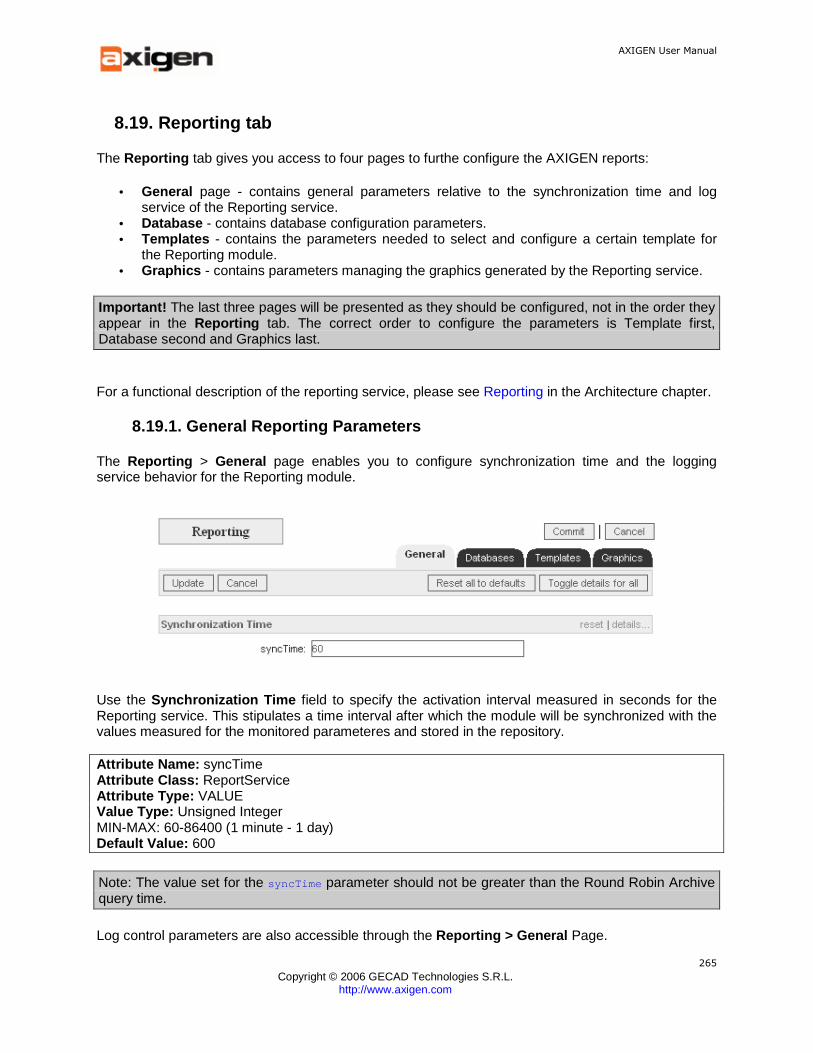
AXIGEN User Manual
Copyright © 2006 GECAD Technologies S.R.L.
http://www.axigen.com
265
8.19. Reporting tab
The Reporting tab gives you access to four pages to furthe configure the AXIGEN reports:
• General page - contains general parameters relative to the synchronization time and log service of the Reporting service.
• Database - contains database configuration parameters. • Templates - contains the parameters needed to select and configure a certain template for
the Reporting module. • Graphics - contains parameters managing the graphics generated by the Reporting service.
Important! The last three pages will be presented as they should be configured, not in the order they appear in the Reporting tab. The correct order to configure the parameters is Template first, Database second and Graphics last.
For a functional description of the reporting service, please see Reporting in the Architecture chapter.
8.19.1. General Reporting Parameters
The Reporting > General page enables you to configure synchronization time and the logging service behavior for the Reporting module.
Use the Synchronization Time field to specify the activation interval measured in seconds for the Reporting service. This stipulates a time interval after which the module will be synchronized with the values measured for the monitored parameteres and stored in the repository.
Attribute Name: syncTime Attribute Class: ReportService Attribute Type: VALUE Value Type: Unsigned Integer MIN-MAX: 60-86400 (1 minute - 1 day) Default Value: 600
Note: The value set for the syncTime parameter should not be greater than the Round Robin Archive query time.
Log control parameters are also accessible through the Reporting > General Page.
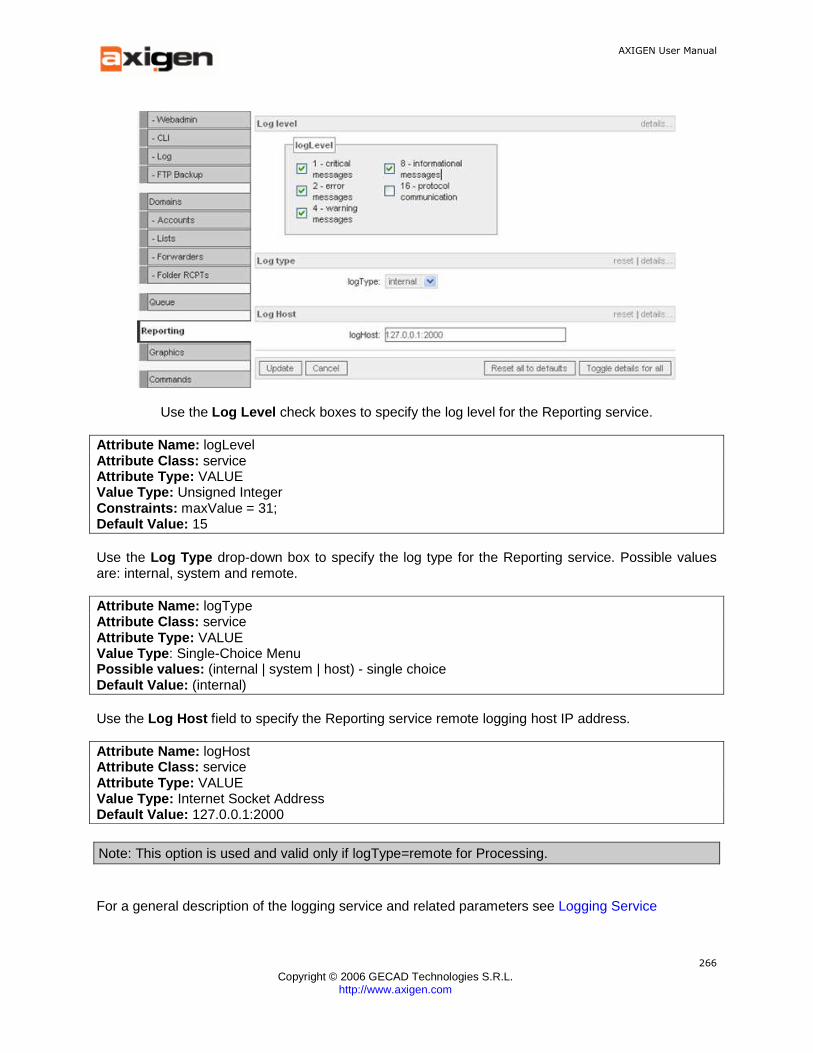
AXIGEN User Manual
Copyright © 2006 GECAD Technologies S.R.L.
http://www.axigen.com
266
Use the Log Level check boxes to specify the log level for the Reporting service.
Attribute Name: logLevel Attribute Class: service Attribute Type: VALUE Value Type: Unsigned Integer Constraints: maxValue = 31; Default Value: 15 Use the Log Type drop-down box to specify the log type for the Reporting service. Possible values are: internal, system and remote.
Attribute Name: logType Attribute Class: service Attribute Type: VALUE Value Type : Single-Choice Menu Possible values: (internal | system | host) - single choice Default Value: (internal) Use the Log Host field to specify the Reporting service remote logging host IP address.
Attribute Name: logHost Attribute Class: service Attribute Type: VALUE Value Type: Internet Socket Address Default Value: 127.0.0.1:2000
Note: This option is used and valid only if logType=remote for Processing.
For a general description of the logging service and related parameters see Logging Service
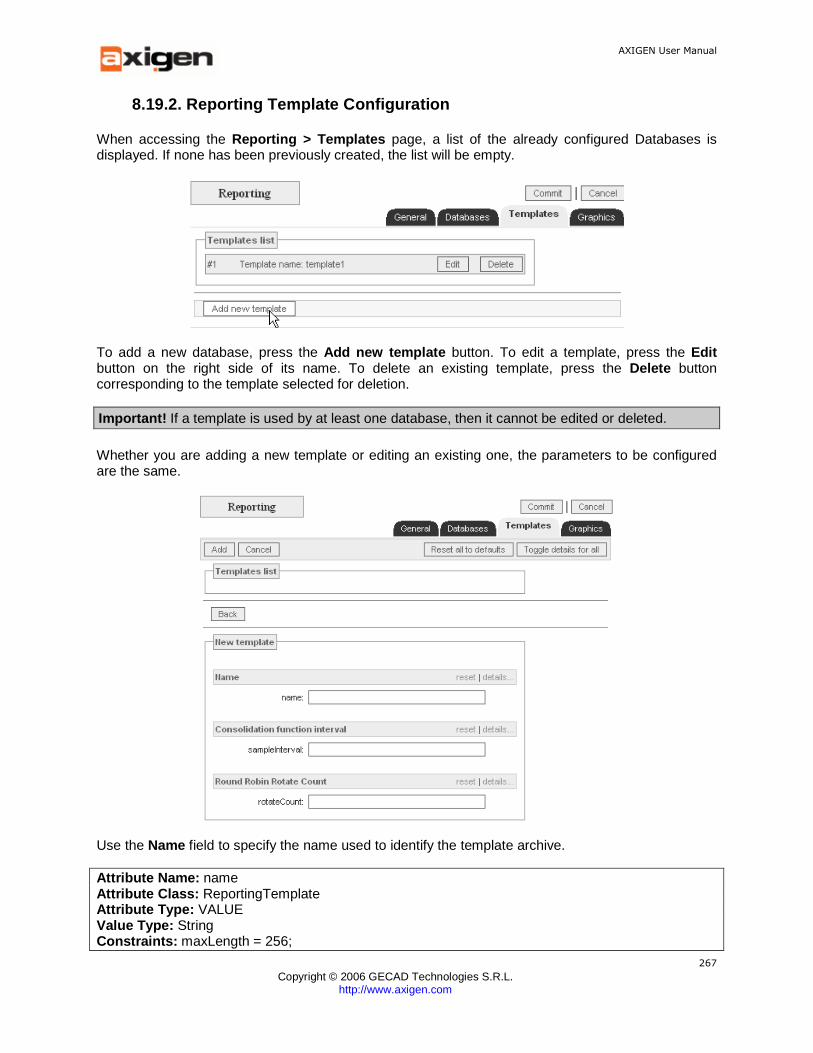
AXIGEN User Manual
Copyright © 2006 GECAD Technologies S.R.L.
http://www.axigen.com
267
8.19.2. Reporting Template Configuration
When accessing the Reporting > Templates page, a list of the already configured Databases is displayed. If none has been previously created, the list will be empty.
To add a new database, press the Add new template button. To edit a template, press the Edit button on the right side of its name. To delete an existing template, press the Delete button corresponding to the template selected for deletion.
Important! If a template is used by at least one database, then it cannot be edited or deleted.
Whether you are adding a new template or editing an existing one, the parameters to be configured are the same.
Use the Name field to specify the name used to identify the template archive.
Attribute Name: name Attribute Class: ReportingTemplate Attribute Type: VALUE Value Type: String Constraints: maxLength = 256;
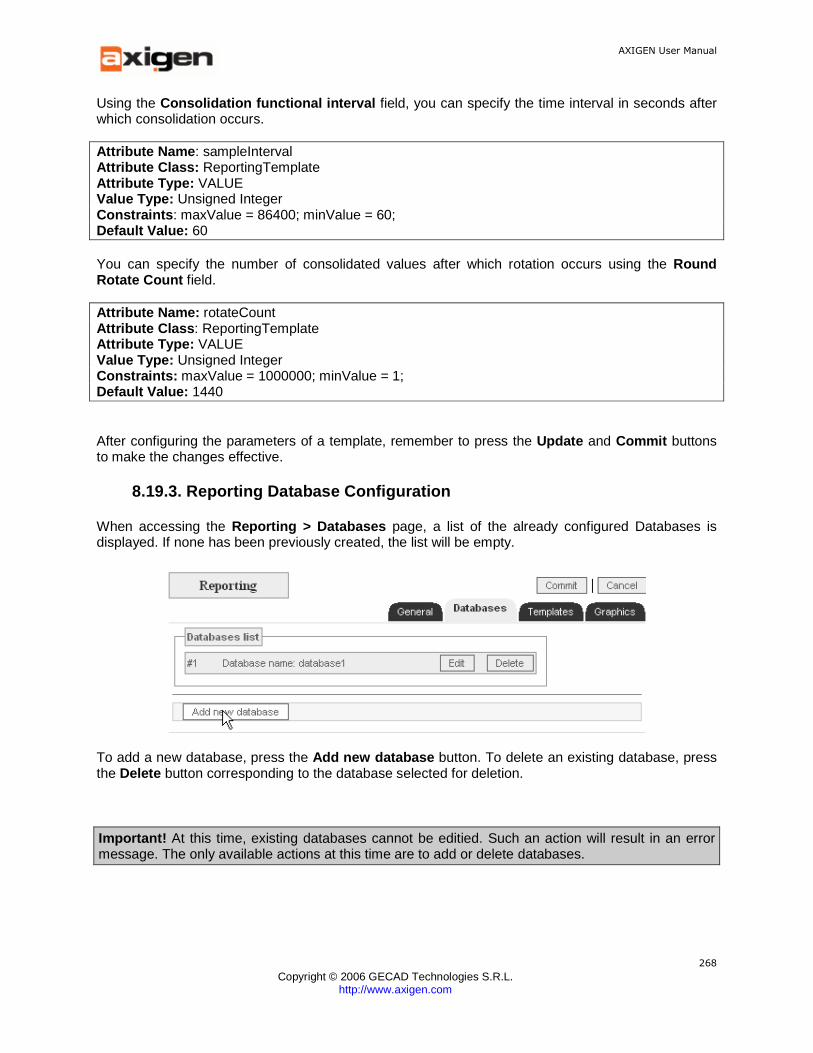
AXIGEN User Manual
Copyright © 2006 GECAD Technologies S.R.L.
http://www.axigen.com
268
Using the Consolidation functional interval field, you can specify the time interval in seconds after which consolidation occurs.
Attribute Name : sampleInterval Attribute Class: ReportingTemplate Attribute Type: VALUE Value Type: Unsigned Integer Constraints : maxValue = 86400; minValue = 60; Default Value: 60 You can specify the number of consolidated values after which rotation occurs using the Round Rotate Count field.
Attribute Name: rotateCount Attribute Class : ReportingTemplate Attribute Type: VALUE Value Type: Unsigned Integer Constraints: maxValue = 1000000; minValue = 1; Default Value: 1440 After configuring the parameters of a template, remember to press the Update and Commit buttons to make the changes effective.
8.19.3. Reporting Database Configuration
When accessing the Reporting > Databases page, a list of the already configured Databases is displayed. If none has been previously created, the list will be empty.
To add a new database, press the Add new database button. To delete an existing database, press the Delete button corresponding to the database selected for deletion.
Important! At this time, existing databases cannot be editied. Such an action will result in an error message. The only available actions at this time are to add or delete databases.

AXIGEN User Manual
Copyright © 2006 GECAD Technologies S.R.L.
http://www.axigen.com
269
Whether you are adding a new database the parameters to be configured are the same.
Use the Name field to specify the name of your new Database which will then be used to identify it.
Attribute Name : name Attribute Class: ReportingDatabase Attribute Type: VALUE Value Type: String Constraints: maxLength = 256; You can select the name of the parameter to be monitored, used to identify the data source, from the Report Parameter dropdown box.
Attribute Name: parameter Attribute Class: ReportingDatabase Attribute Type : VALUE Value Type: String Constraints: maxLength = 256; The available parameters to be monitored are:
• SMTP_InboundConnection • SMTP_InboundConnectionAuthenticated • SMTP_InboundConnectionAuthenticatedSuccess • SMTP_InboundMessage • SMTP_InboundMessageMessageBytes • SMTP_InboundMessageTOcommandsAccepted • SMTP_InboundMessageTOcommandsRejected • SMTP_InboundMessageFROMAccepted • SMTP_InboundMessageDATAUsed
AXIGEN User Manual
Copyright © 2006 GECAD Technologies S.R.L.
http://www.axigen.com
270
• SMTP_InboundMessageDATAAccepted • SMTP_InboundMessageBDATAccepted • SMTP_InboundMessageBodyAccepted • SMTP_OutboundConnection • SMTP_OutboundConnectionAuthenticated • SMTP_OutboundConnectionAuthenticatedSuccess • SMTP_OutboundConnectionErrorFinish • SMTP_OutboundMessage • SMTP_OutboundMessageMessageBytes • SMTP_OutboundMessageTOcommandsAccepted • SMTP_OutboundMessageTOcommandsRejected • SMTP_OutboundMessageFROMAccepted • SMTP_OutboundMessageDATAUsed • SMTP_OutboundMessageDATAAccepted • SMTP_OutboundMessageBDATAccepted • SMTP_OutboundMessageBodyAccepted • POP3_InboundConnection • POP3_InboundConnectionMessagesDelivered • POP3_InboundConnectionToppedMessagesDelivered • POP3_InboundConnectionMessagesDeleted • POP3_InboundConnectionMessagesSent • HTTP_InboundConnection • HTTP_InboundConnectionAuthenticated • HTTP_InboundConnectionAuthenticatedSuccess • HTTP_InboundConnectionProtocolError • HTTP_User • HTTP_UserUploadedBytes • HTTP_UserMessagesRead • HTTP_UserMessagesComposed • HTTP_UserFinishInError • IMAP_InboundConnection • IMAP_InboundConnectionAuthenticated • IMAP_InboundConnectionAuthenticatedSuccess • IMAP_InboundConnectionSyntaxError • IMAP_InboundConnectionCloseConnectionForced • IMAP_InboundConnectionConnectionTimeout • IMAP_FetchRequest • IMAP_FetchRequestSentBytes • IMAP_FetchRequestTimeSpan • IMAP_FetchRequestError • IMAP_SearchRequest • IMAP_SearchRequestSentBytes • IMAP_SearchRequestTimeSpan • IMAP_SearchRequestError • IMAP_AppendRequest • IMAP_AppendRequestSentBytes • IMAP_AppendRequestTimeSpan • IMAP_AppendRequestError • IMAP_ListRequest • IMAP_ListRequestSentBytes • IMAP_ListRequestTimeSpan • IMAP_ListRequestError • QUEUE_Size • SYSTEM_LoadAverage
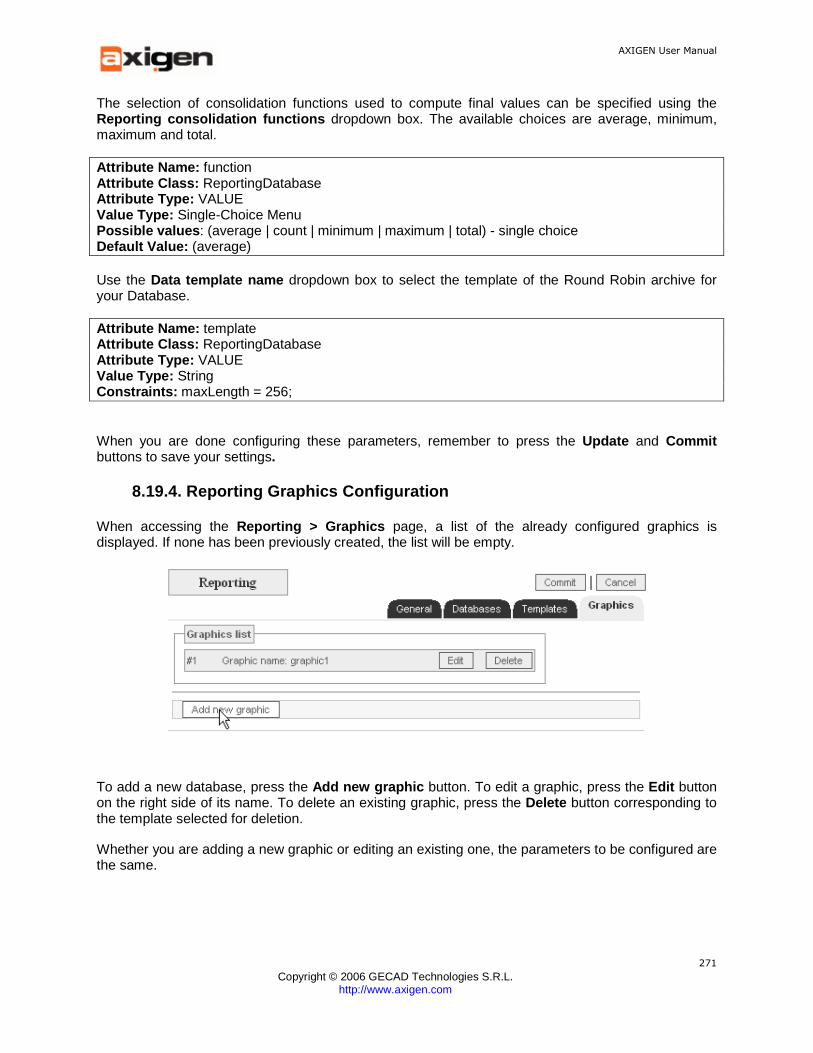
AXIGEN User Manual
Copyright © 2006 GECAD Technologies S.R.L.
http://www.axigen.com
271
The selection of consolidation functions used to compute final values can be specified using the Reporting consolidation functions dropdown box. The available choices are average, minimum, maximum and total.
Attribute Name: function Attribute Class: ReportingDatabase Attribute Type: VALUE Value Type: Single-Choice Menu Possible values : (average | count | minimum | maximum | total) - single choice Default Value: (average) Use the Data template name dropdown box to select the template of the Round Robin archive for your Database.
Attribute Name: template Attribute Class: ReportingDatabase Attribute Type: VALUE Value Type: String Constraints: maxLength = 256; When you are done configuring these parameters, remember to press the Update and Commit buttons to save your settings.
8.19.4. Reporting Graphics Configuration
When accessing the Reporting > Graphics page, a list of the already configured graphics is displayed. If none has been previously created, the list will be empty.
To add a new database, press the Add new graphic button. To edit a graphic, press the Edit button on the right side of its name. To delete an existing graphic, press the Delete button corresponding to the template selected for deletion.
Whether you are adding a new graphic or editing an existing one, the parameters to be configured are the same.

AXIGEN User Manual
Copyright © 2006 GECAD Technologies S.R.L.
http://www.axigen.com
272
Use the Name field to specify the desired name for your graphic. You can further select the database you want to monitor using the Database name dropdown box, allowing you to select one of the existing databases.
Attribute Name: name Attribute Class: ReportingGraphic Attribute Type: VALUE Value Type : String Constraints : maxLength = 256; Attribute Name: database Attribute Class: ReportingGraphic Attribute Type: VALUE Value Type: String Constraints: maxLength = 256; To choose one of the predefined graphic types, use the Graphic Type dropdown box. Available options are bars, fill, outline, fillWithOutline, descreteDots and descreteLines.
Attribute Name: type Attribute Class : ReportingGraphic Attribute Type: VALUE Value Type: Single-Choice Menu Possible values: (bars | fill | outline | fillWithOutline | discreteDots | discreteLines) - single choice Default Value: (bars)

AXIGEN User Manual
Copyright © 2006 GECAD Technologies S.R.L.
http://www.axigen.com
273
You can further customize the colors of your defined graphic using the Graphic fill color and Graphic outline color dropdown boxes.
Attribute Name: fillColor Attribute Class: ReportingGraphic Attribute Type: VALUE Value Type: String Constraints: maxLength = 32; Default Value: LightGray Attribute Name: outlineColor Attribute Class: ReportingGraphic Attribute Type: VALUE Value Type: String Constraints: maxLength = 32; Default Value: Black The History Page no. dropdown box allows you to select the page of the Graphics tab the defined graph will be displayed on.
Attribute Name : onPage Attribute Class: ReportingGraphic Attribute Type: VALUE Value Type: Unsigned Integer Constraints: maxValue = 16; minValue = 1; Default Value: 1 Remember to press the Update and Commit buttons to save the settings you have made for your graphic.
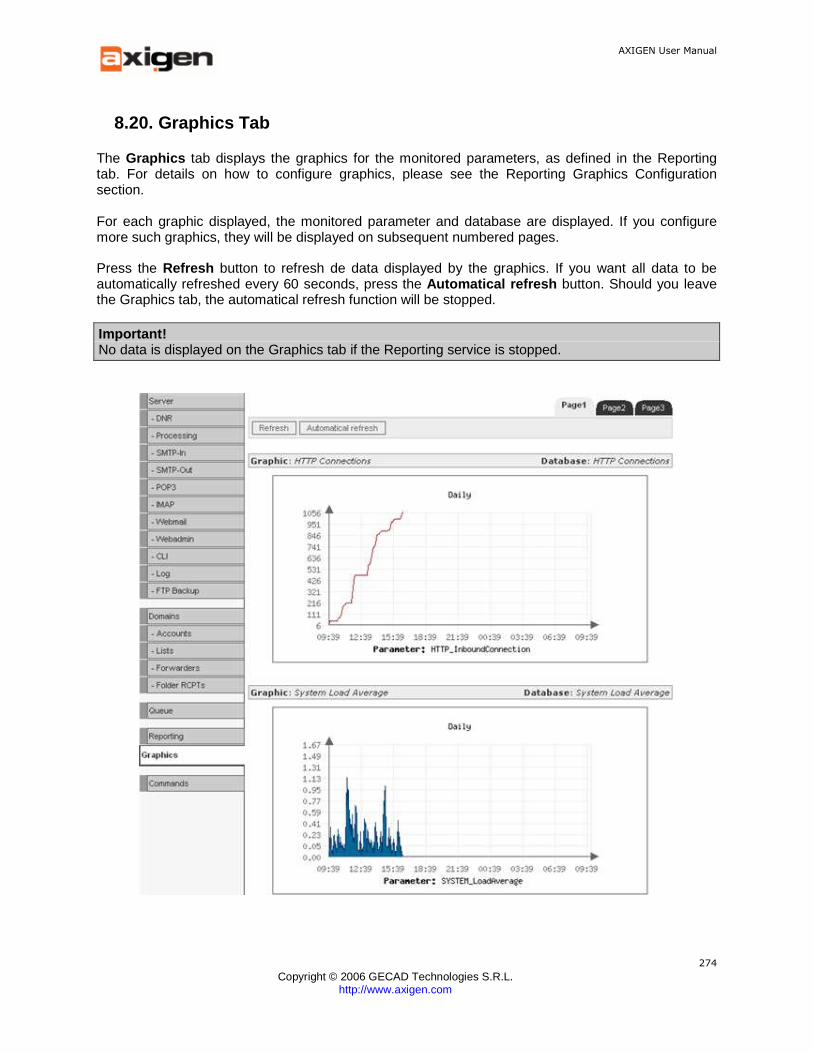
AXIGEN User Manual
Copyright © 2006 GECAD Technologies S.R.L.
http://www.axigen.com
274
8.20. Graphics Tab
The Graphics tab displays the graphics for the monitored parameters, as defined in the Reporting tab. For details on how to configure graphics, please see the Reporting Graphics Configuration section. For each graphic displayed, the monitored parameter and database are displayed. If you configure more such graphics, they will be displayed on subsequent numbered pages.
Press the Refresh button to refresh de data displayed by the graphics. If you want all data to be automatically refreshed every 60 seconds, press the Automatical refresh button. Should you leave the Graphics tab, the automatical refresh function will be stopped.
Important! No data is displayed on the Graphics tab if the Reporting service is stopped.
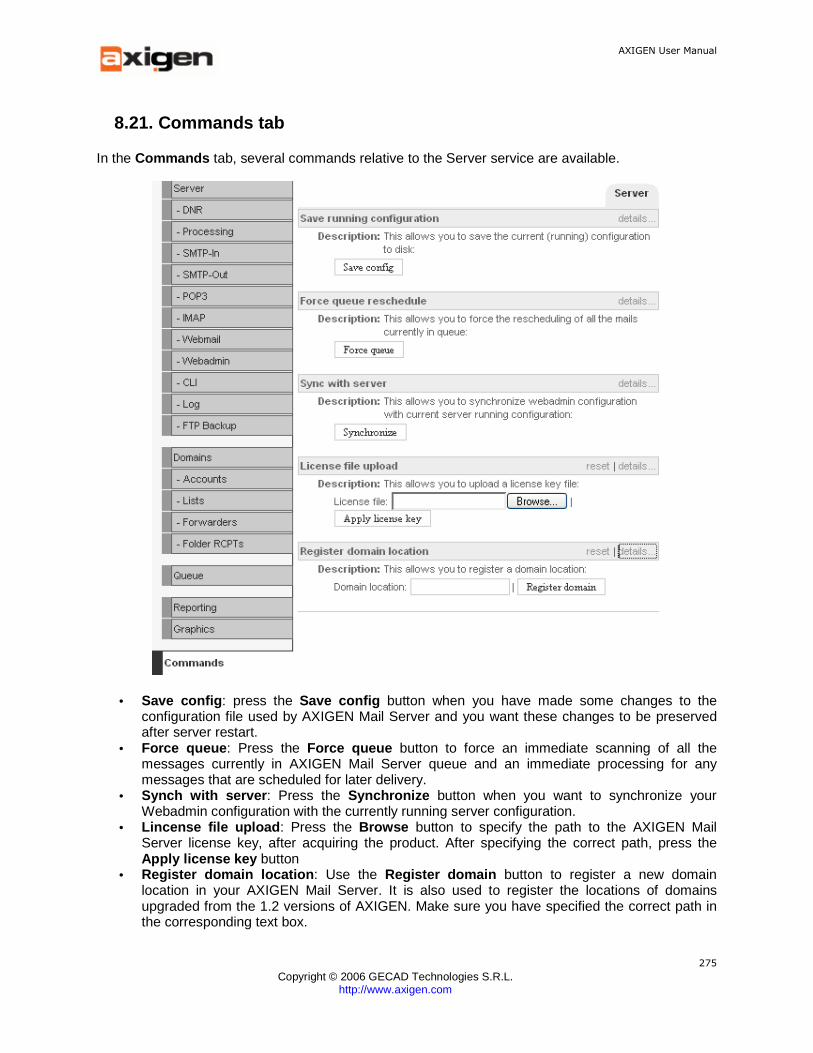
AXIGEN User Manual
Copyright © 2006 GECAD Technologies S.R.L.
http://www.axigen.com
275
8.21. Commands tab
In the Commands tab, several commands relative to the Server service are available.
• Save config : press the Save config button when you have made some changes to the configuration file used by AXIGEN Mail Server and you want these changes to be preserved after server restart.
• Force queue : Press the Force queue button to force an immediate scanning of all the messages currently in AXIGEN Mail Server queue and an immediate processing for any messages that are scheduled for later delivery.
• Synch with server : Press the Synchronize button when you want to synchronize your Webadmin configuration with the currently running server configuration.
• Lincense file upload : Press the Browse button to specify the path to the AXIGEN Mail Server license key, after acquiring the product. After specifying the correct path, press the Apply license key button
• Register domain location : Use the Register domain button to register a new domain location in your AXIGEN Mail Server. It is also used to register the locations of domains upgraded from the 1.2 versions of AXIGEN. Make sure you have specified the correct path in the corresponding text box.

AXIGEN User Manual
Copyright © 2006 GECAD Technologies S.R.L.
http://www.axigen.com
276
8.22. Adding and Editing TCP Listeners
In AXIGEN, it is possible to configure TCP listeners for all TCP services: SMTP-In, POP3, IMAP, WebMail, WebAdmin and CLI.
To access listener configuration in WebAdmin, click on the service tab (SMTP-In, POP3, IMAP, WebMail, WebAdmin or CLI ) and then on the Listeners page. These pages are identical in terms of parameters displayed.
Important! Some of these parameters displayed on different service Listeners pages may have different default values: for instance, maxconnections has a default value of 1000 in WebMail, while for all other modules the default value is 200. To find out a parameter default value, click on the details button for the respective parameter to see what its default value is.
Use the Listeners page to configure listener-related settings, such as maximum connections accepted on a specific listener, maximum connections accepted from a single host on the listener, inactivity timeout, etc.
When first entering Listeners page, a list of currently defined listeners is displayed (see below), sorted by their IP addresses (lowest first), if any have been defined previously.
To add a new TCP listener, click on the Add new listener button. If you want to edit an existing listener, click on the Edit button displayed next to that specific listener in the list. The parameters displayed both when adding and editing a listener are the same.
AXIGEN User Manual
Copyright © 2006 GECAD Technologies S.R.L.
http://www.axigen.com
277
The Listeners page contains 4 (four) different tabs. You can select them in the right uppermost corner of the page:
• General tab • Allow rules tab • Deny rules tab • SSL settings tab
The configurations pertaining strictly to the listener definition are listed in the General and SSL settings tab. For details on how to configure rules associated with listeners, using the Allow rules and Deny rules tabs, see Adding and Editing Rules.
General Tab Parameters
Use the Address field to specify the listener bind address. Listeners are uniquely identified by their address attribute. Two or more listeners cannot have the same address value - only the first object correctly defined is considered. This will be the IP address followed by a colon and the port number.
Attribute Name: address Attribute Class: TCPListener Attribute Type: VALUE Value Type: Internet Socket Address only host IP addresses Default Value: 127.0.0.1:25 Use the Enable drop-down box to enable/disable the TCP listener. This way you can store defined listeners and enable them only when you need to.
Attribute Name: enable Attribute Class: TCPListener Attribute Type: VALUE Value Type: single choice - yes | no Default Value: yes
Connection parameters
By setting all these connection related parameters, you can limit the number of simultaneous connections, and specify a number of maximum connections on the listener during a specified time interval. This way, you can manage the connection requests for a certain service, using the current listener and ensure higher service availability.
Use the Max. connections field to specify the maximum number of simultaneous connections accepted by this TCP listener.
Attribute Name: maxConnections Attribute Class: TCPListener Attribute Type: VALUE Value Type: Unsigned Integer MIN-MAX: 1-2048 Default Value: 200
AXIGEN User Manual
Copyright © 2006 GECAD Technologies S.R.L.
http://www.axigen.com
278
Use the Time interval and Max. interval connections to specify a time interval and a maximum number of connections to be accepted during that interval. For instance, if you use the default values of these parameters, a maximum number of 60 connections will be accepted within an interval of 600 seconds. These two parameters are used in conjunction.
Attribute Name: timeInterval Attribute Class: TCPListener Attribute Type: VALUE Value Type: Unsigned Integer MIN-MAX: 30-86400 Default Value: 60
Attribute Name: maxIntervalConnections Attribute Class: TCPListener Attribute Type: VALUE Value Type: Unsigned Integer MIN-MAX: 0-100000 (0=unlimited) Default Value: 600 The value of this parameter is specified in seconds.
Use the Peer max. connections field to specify the maximum number of simultaneous connections to the listener accepted with a single host.
Attribute Name : peerMaxConnections Attribute Class: TCPListener Attribute Type : VALUE Value Type: Unsigned Integer MIN-MAX: 1-2048 Default Value: 20 Use the Peer time interval and Peer max. interval connections fields to specify a time interval and a maximum number of connections to be accepted with a single host during that time interval. These two parameters are used in conjunction.
Attribute Name: peerTimeInterval Attribute Class: TCPListener Attribute Type: VALUE Value Type: Unsigned Integer MIN-MAX: 30-86400 Default Value: 60
Attribute Name: peerMaxConnections Attribute Class : TCPListener Attribute Type: VALUE Value Type: Unsigned Integer MIN-MAX: 1-2048 Default Value: 20 The value of this parameter is specified in seconds.
AXIGEN User Manual
Copyright © 2006 GECAD Technologies S.R.L.
http://www.axigen.com
279
Use the Idle timeout field to specify the inactivity timeout on the listener (in seconds), that is the time interval before the connection is reset.
Attribute Name: idleTimeout Attribute Class: TCPListener Attribute Type: VALUE Value Type: Unsigned Integer MIN-MAX: 0-86400 (0=infinite) Default Value: 300 When you are done defining these parameters make sure you click the Update and Commit buttons to add your listener to save your listener. If you want to further configure your listener by enabling SSL and setting SSL related parameters, go to the SSL settings page (see SSL Parameters for Listeners). If you want to define additional rules for your listener, go to the Allow rules or respectively Deny rules tab within the Listener page. For details on rule configuration, see Adding and Editing Rules. For a general description of listeners and their usage in AXIGEN, see Listeners in the Architecture chapter.
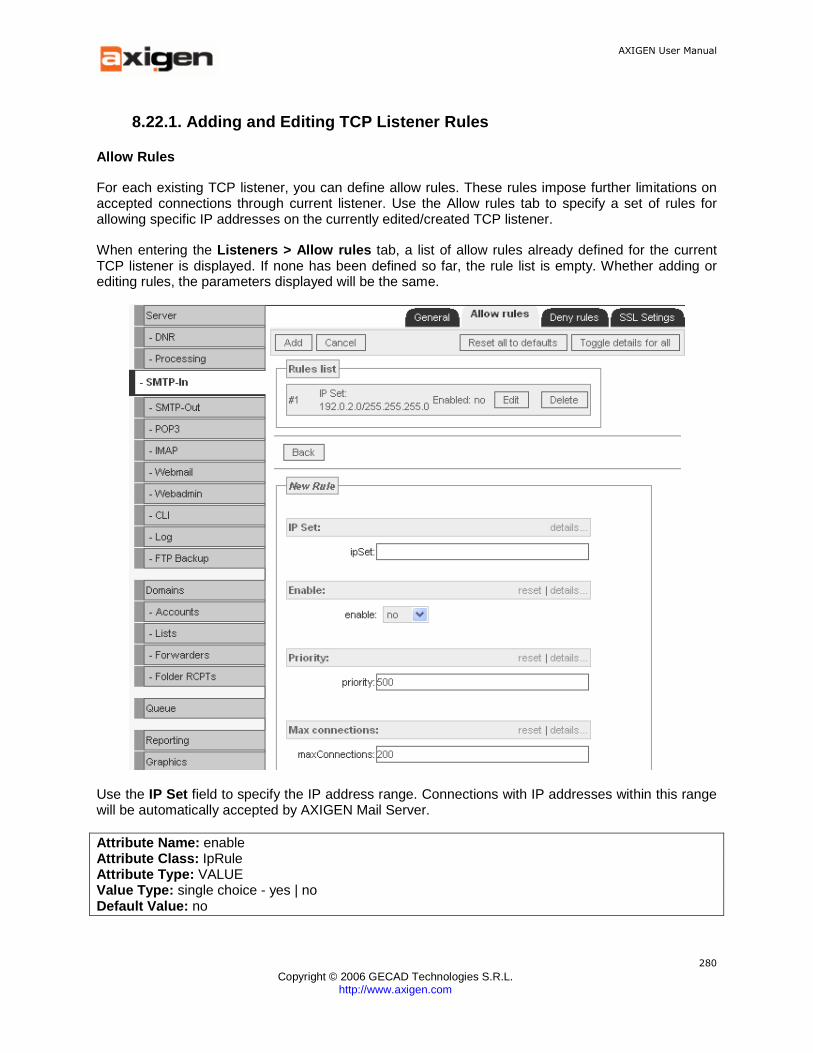
AXIGEN User Manual
Copyright © 2006 GECAD Technologies S.R.L.
http://www.axigen.com
280
8.22.1. Adding and Editing TCP Listener Rules
Allow Rules
For each existing TCP listener, you can define allow rules. These rules impose further limitations on accepted connections through current listener. Use the Allow rules tab to specify a set of rules for allowing specific IP addresses on the currently edited/created TCP listener.
When entering the Listeners > Allow rules tab, a list of allow rules already defined for the current TCP listener is displayed. If none has been defined so far, the rule list is empty. Whether adding or editing rules, the parameters displayed will be the same.
Use the IP Set field to specify the IP address range. Connections with IP addresses within this range will be automatically accepted by AXIGEN Mail Server.
Attribute Name: enable Attribute Class: IpRule Attribute Type: VALUE Value Type: single choice - yes | no Default Value: no

AXIGEN User Manual
Copyright © 2006 GECAD Technologies S.R.L.
http://www.axigen.com
281
Use the Enable drop-down box to enable/disable the TCP listener allow rule. This way you can store defined listeners and enable them only when you need to.
Attribute Name: enable Attribute Class: IPRule Attribute Type: VALUE Value Type: single choice - yes | no Default Value: yes Use the Priority field to specify what priority level you associate with this rule. When a connection is initiated with an IP address which subject to two or more different rules, priority levels are used to decide which rules will be given precedence. See the Rules section for a detailed description of the rules enforcement policy.
Attribute Name: priority Attribute Class: IpRule Attribute Type: VALUE Value Type: Unsigned Integer MIN-MAX: 1-1000 Default Value : 500
Connection parameters
By setting all these connection related parameters, you can limit the number of simultaneous connections, and specify a number of maximum connections during a specified time interval, thus specifying extra limitations for all connections with addresses within the allow rule range . Use the Max. connections field to specify the maximum number of simultaneous connections accepted by the TCP listener.
Attribute Name: maxConnections Attribute Class: IpRule Attribute Type : VALUE Value Type: Unsigned Integer MIN-MAX: 1-2048 Default Value: 200 Use the Time interval and Max. interval connections to specify a time interval and a maximum number of connections to be accepted during that interval. For instance, if you use the default values of these parameters, a maximum number of 60 connections will be accepted within an interval of 600 seconds. These two parameters are used in conjunction.
Attribute Name: timeInterval Attribute Class: IpRule Attribute Type: VALUE Value Type: Unsigned Integer MIN-MAX: 30-86400 Default Value : 60
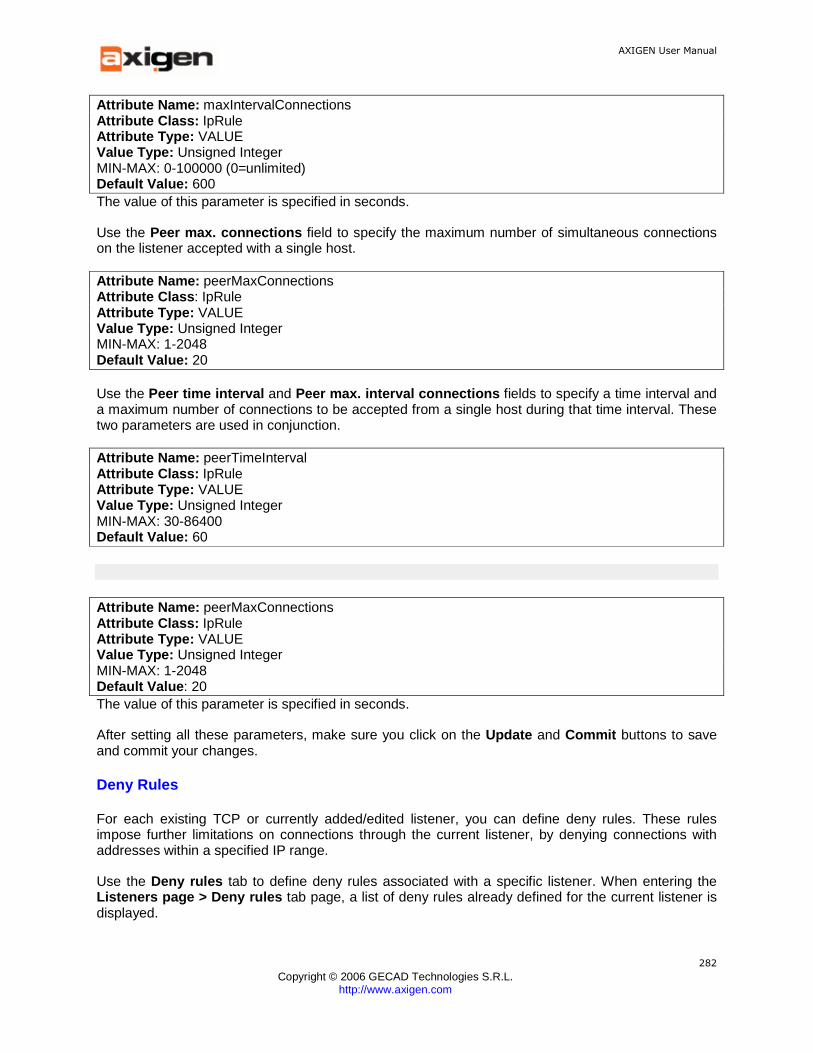
AXIGEN User Manual
Copyright © 2006 GECAD Technologies S.R.L.
http://www.axigen.com
282
Attribute Name: maxIntervalConnections Attribute Class: IpRule Attribute Type: VALUE Value Type: Unsigned Integer MIN-MAX: 0-100000 (0=unlimited) Default Value: 600 The value of this parameter is specified in seconds.
Use the Peer max. connections field to specify the maximum number of simultaneous connections on the listener accepted with a single host.
Attribute Name: peerMaxConnections Attribute Class : IpRule Attribute Type: VALUE Value Type: Unsigned Integer MIN-MAX: 1-2048 Default Value: 20 Use the Peer time interval and Peer max. interval connections fields to specify a time interval and a maximum number of connections to be accepted from a single host during that time interval. These two parameters are used in conjunction.
Attribute Name: peerTimeInterval Attribute Class: IpRule Attribute Type: VALUE Value Type: Unsigned Integer MIN-MAX: 30-86400 Default Value: 60
Attribute Name: peerMaxConnections Attribute Class: IpRule Attribute Type: VALUE Value Type: Unsigned Integer MIN-MAX: 1-2048 Default Value : 20 The value of this parameter is specified in seconds.
After setting all these parameters, make sure you click on the Update and Commit buttons to save and commit your changes.
Deny Rules
For each existing TCP or currently added/edited listener, you can define deny rules. These rules impose further limitations on connections through the current listener, by denying connections with addresses within a specified IP range.
Use the Deny rules tab to define deny rules associated with a specific listener. When entering the Listeners page > Deny rules tab page, a list of deny rules already defined for the current listener is displayed.
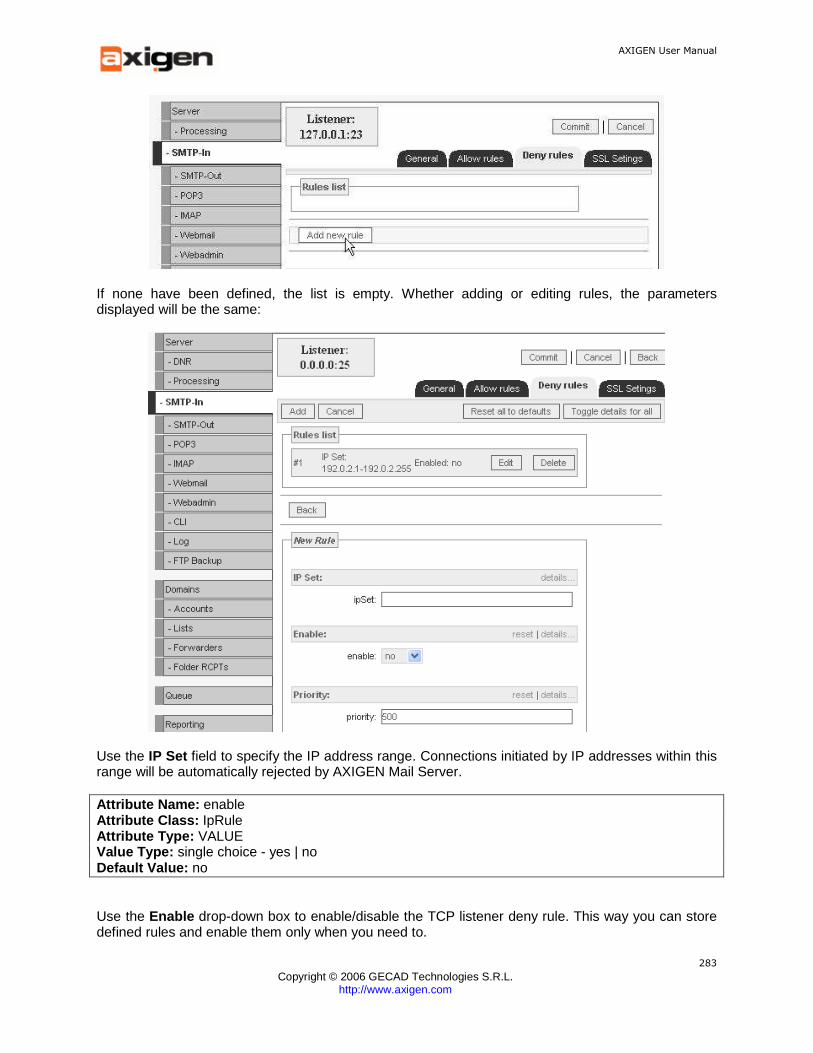
AXIGEN User Manual
Copyright © 2006 GECAD Technologies S.R.L.
http://www.axigen.com
283
If none have been defined, the list is empty. Whether adding or editing rules, the parameters displayed will be the same:
Use the IP Set field to specify the IP address range. Connections initiated by IP addresses within this range will be automatically rejected by AXIGEN Mail Server.
Attribute Name: enable Attribute Class: IpRule Attribute Type: VALUE Value Type: single choice - yes | no Default Value: no
Use the Enable drop-down box to enable/disable the TCP listener deny rule. This way you can store defined rules and enable them only when you need to.
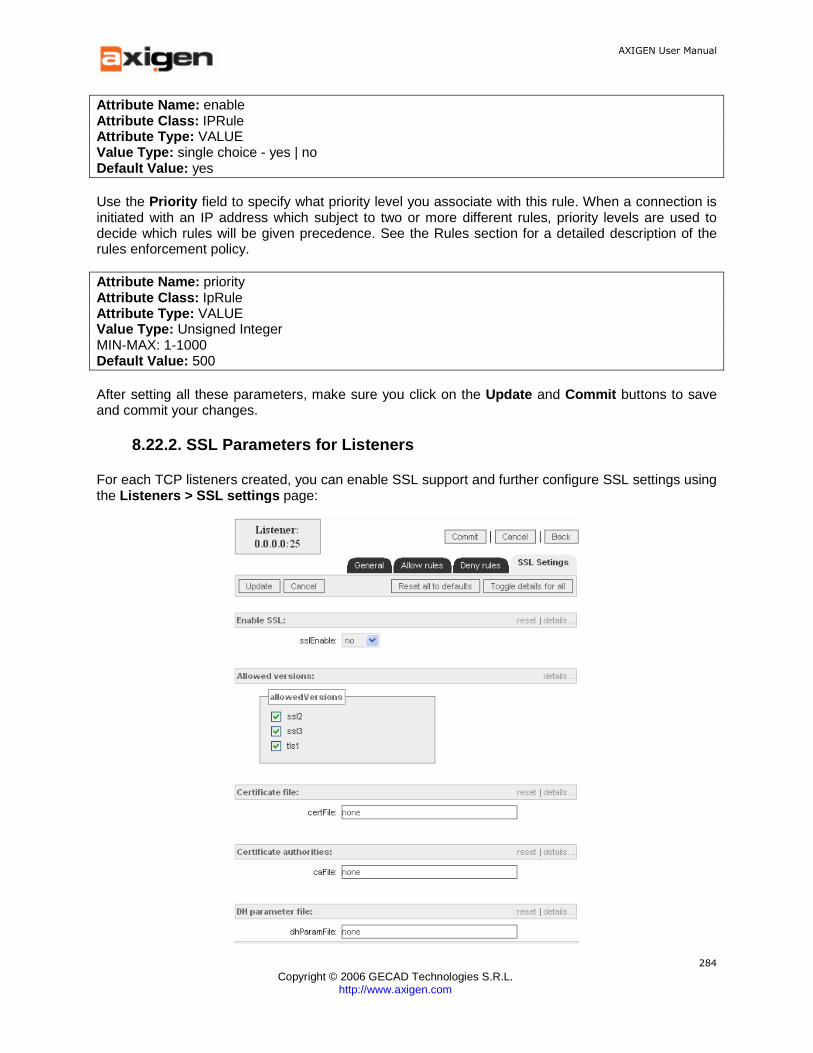
AXIGEN User Manual
Copyright © 2006 GECAD Technologies S.R.L.
http://www.axigen.com
284
Attribute Name: enable Attribute Class: IPRule Attribute Type: VALUE Value Type: single choice - yes | no Default Value: yes Use the Priority field to specify what priority level you associate with this rule. When a connection is initiated with an IP address which subject to two or more different rules, priority levels are used to decide which rules will be given precedence. See the Rules section for a detailed description of the rules enforcement policy.
Attribute Name: priority Attribute Class: IpRule Attribute Type: VALUE Value Type: Unsigned Integer MIN-MAX: 1-1000 Default Value: 500 After setting all these parameters, make sure you click on the Update and Commit buttons to save and commit your changes.
8.22.2. SSL Parameters for Listeners
For each TCP listeners created, you can enable SSL support and further configure SSL settings using the Listeners > SSL settings page:
AXIGEN User Manual
Copyright © 2006 GECAD Technologies S.R.L.
http://www.axigen.com
285
AXIGEN implements OpenSSL compliant SSL settings for all TCP listeners.
Use the Enable SSL drop-down box in WebAdmin Listeners page > SSL Settings tab to enable/disable the SSL for the current listener.
Attribute Name: sslEnable Attribute Class: TCPListener Attribute Type : VALUE Value Type: single choice - yes | no Default Value: no Use the Allowed version checkboxes to specify the SSL versions to be used by AXIGEN Mail Server. Possible values are: ssl2, ssl3 and tls1. While SSL 3 and TLS1 are the most recent versions, you can use any combination of these you may find useful. All three versions are enabled by default.
Attribute Name: allowedVersions Attribute Class: SSLControl Attribute Type: VALUESET Value Type: multi choice - (ssl2 ssl3 tls1) Default Value: (ssl2 ssl3 tls1) Use the Certificate file field to specify the file containing the containing the certificate chain used for the current listener. The certificate chain refers to a chain of intermediate certificate issuers, that is, Certificate Authority certificates that are followed while verifying the remote server certificate.
If this attribute is set to "none", to an invalid file or to a file not containing a valid certificate chain, then any attempt to use SSL on this listener or STARTTLS on any of the connections accepted on this listeners will fail because of lack of a valid certificate chain.
Attribute Name : certFile Attribute Class: SSLControl Attribute Type: VALUE Value Type: Case-sensitive String Default Value: """none""" Specify the file containing the certificate authorities for the current listener using the Certificate authorities filed.
If this attribute is set to "none", to an invalid file or to a file not containing a valid certificate chain, then any attempt to use SSL on this listener or STARTTLS on any of the connections accepted on this listeners will fail because of lack of a valid certificate chain.
Attribute Name: caFile Attribute Class : SSLControl Attribute Type: VALUE Value Type: Case-sensitive String Constraints : value = none; Default Value : none Use the DH parameter field in SSL Settings tab to specify the path in local file system to the file containing the (OpenSSL) Diffie-Hellman parameter used by this listener. If keyword value "none" is used, no file will be used. The Diffie-Hellman key agreement protocol (also called exponential key agreement) allows two users to exchange a secret key over an insecure medium without any prior

AXIGEN User Manual
Copyright © 2006 GECAD Technologies S.R.L.
http://www.axigen.com
286
secrets. Find more information about this protocol and how to configure this protocol, on RSA Laboratories website.
Attribute Name: dhParamFile Attribute Class : SSLControl Attribute Type: VALUE Value Type: Case-sensitive String Default Value: """none""" Use the Max. chain depth field to specify the depth of verification for the certificate chain. The depth refers the maximum number of intermediate certificate issuers, i.e. the number of CA certificates which are max allowed to be followed when verifying the remote server certificate. For instance, a depth of 1 means the remote server certificate can be self-signed or has to be signed by a CA which is directly known to the server. The default value of 4 means that 4 intermediate certificate issuers are accepted.
Attribute Name : maxChainDepth Attribute Class: SSLControl Attribute Type: VALUE Value Type: Unsigned Integer MIN-MAX: 1-16 Default Value : 4 Use the Cipher suite field in the SSL Settings tab to specify the OpenSSL-like string indicating the cipher suite to be used.
Attribute Name: cipherSuite Attribute Class: SSLControl Attribute Type: VALUE Value Type: Case-sensitive String Default Value: """ALL:ADH""" AXIGEN implements cipher suites active in OpenSSL, except for idea , rc5 and mdc2. Click here to see the corresponding OpenSSL documentation file, listing ciphers and their OpenSSL equivalents. In the Use ephemeral key drop-down box to specify ephemeral keys should be used or not. This options allows generating ephemeral keys, which actually transform all keys exchanged during one connection session into ephemeral keys (valid only for the current connection).
Attribute Name: useEphemeralKey Attribute Class: SSLControl Attribute Type : VALUE Value Type: single choice - yes | no Default Value: yes Use the Request client auth. drop-down box to specify if client certificate-based authentication should be requested or not.
Attribute Name: requestClientAuth Attribute Class: SSLControl Attribute Type: VALUE Value Type: single choice - yes | no Default Value: yes

AXIGEN User Manual
Copyright © 2006 GECAD Technologies S.R.L.
http://www.axigen.com
287
If you modify any of the default values, make sure you click the Update and Commit buttons to make your changes effective.
8.22.3. Example of Listener Configuration
This section presents some examples of a possible listener configuration. The default values specified here are applied for all listeners specific to AXIGEN main modules. Some exceptions may apply, and they are presented accordingly for each parameter.
maxConnections Parameter used for specifying the maximum number of connection accepted by this listener. Type: UINT Accepted values: 1-2048 Default value: 200 (for all AXIGEN main modules but WebMail, where default value is 1000). Example: maxConnections = 200 timeInterval Parameter used for specifying the time interval used to enforce maxIntervalConnections. Type: UINT Accepted values: 30-86400 Default value: 60 Example: timeInterval = 60 maxIntervalConnections Parameter used for specifying the maximum number of connections accepted in 'timeInterval' seconds Type: UINT Accepted values: 0-100000 (0=unlimited) Default value: 600 (for all AXIGEN main modules but WebMail, where default value is 1200). Example: maxIntervalConnections = 600 peerMaxConnections Parameter used for specifying the maximum connection accepted from a single host on the listener. Type: UINT Accepted values: 1-2048 Default value: 10 (for all AXIGEN main modules but WebMail, where default value is 100, and SMTP Incoming, where default value is 20). Example: peerMaxConnections = 20 peerTimeInterval Parameter used for specifying the time interval used to enforce peerMaxIntervalConnections. Type: UINT Accepted values: 30-86400 Default value: 60 Example: peerTimeInterval = 60 peerMaxIntervalConnections Parameter used for specifying the maximum connections accepted in 'peerTimeInterval' seconds from a single host. Type: UINT
AXIGEN User Manual
Copyright © 2006 GECAD Technologies S.R.L.
http://www.axigen.com
288
Accepted values: 0-100000 (0=unlimited) Default value: 20. Example: peerMaxIntervalConnections = 20 idleTimeout Parameter used for specifying the inactivity timeout on the listener (in seconds). Type: UINT Accepted values: 0-86400 (0=unlimited) Default value: 300 Example: idleTimeout = 300 denyrules Use the following sub-section to specify the list of rejected hosts, i.e. hosts from which mail traffic is automatically rejected by AXIGEN. ipSet Parameter used for specifying the IP addresses to be automatically rejected by AXIGEN Mail Server. Type: REQUIRED IP_SET Default value: None Example: ipSet = 10.0.0.128-10.0.0.255 enable Parameter used for specifying if this rule should be enabled/disabled. Type: CHOICE (yes | no) Default value: yes Example: enable = yes priority Parameter used for specifying the rule's priority. 1 means the highest priority. Type: UINT Accepted values: 1-1000 Default value: 500 Example: priority = 100
allowRules Use the following sub-section to specify the list of allowed hosts, i.e. hosts from which mail traffic is automatically accepted by AXIGEN. The following parameters should be used in connection with denyRules, in order to specify exceptions from the rules defined there (i.e. reject all mail traffic from IP class 168.168.0.1-168.168.0.255, but accept mail traffic from IP address 168.168.0.22).
ipSet Parameter used for specifying the IP addresses to be automatically accepted by AXIGEN Mail Server. Type: IP_SET Default value: N/A Example: ipSet = 10.0.0.1/8 enable Parameter used for specifying if this rule should be enabled/disabled. Type: CHOICE (yes | no)
AXIGEN User Manual
Copyright © 2006 GECAD Technologies S.R.L.
http://www.axigen.com
289
Default value: yes Example: enable = yes priority Parameter used for specifying the rule's priority. 1 means the highest priority. Type: UINT Accepted values: 1-1000 Default value: 500 Example: priority = 500 maxConnections Parameter used for specifying the maximum connections accepted on the listener. Type: UINT Accepted values: 1-2048 Default value: 200 Example: maxConnections = 200 timeInterval Parameter used for specifying the time interval used to enforce maxIntervalConnections. Type: UINT Accepted values: 30-86400 Default value: 60 Example: timeInterval = 60 maxIntervalConnections Parameter used for specifying the maximum connections accepted in 'timeInterval' seconds. Type: UINT Accepted values: 0-100000 (0=unlimited) Default value: 600 Example: maxIntervalConnections = 600 peerMaxConnections Parameter used for specifying the maximum connection accepted from a single host on the listener. Type: UINT Accepted values: 1-2048 Default value: 20 Example: peerMaxConnections = 20 peerTimeInterval Parameter used for specifying the time interval used to enforce peerMaxIntervalConnections. Type: UINT Accepted values: 30-86400 Default value: 60 Example: peerTimeInterval = 60 peerMaxIntervalConnections Parameter used for specifying the maximum connections accepted in 'peerTimeInterval' seconds from a single host.

AXIGEN User Manual
Copyright © 2006 GECAD Technologies S.R.L.
http://www.axigen.com
290
Type: UINT Accepted values: 0-100000 (0=unlimited) Default value: 600 Example: peerMaxIntervalConnections = 20
Limiting the Number of Allowed Connections for a Gi ven Listener
The maxConnections attribute specifies the maximum number of simultaneous connections the TCP service will allow for the specific listener from any Internet host. The maxIntervalConnections and timeInterval attributes are used in conjunction: maxIntervalConnections specifies the maximum number of connections the TCP service will allow for the specific listener from any Internet host in a specific time interval defined in seconds by the value of the timeInterval attribute. The maxConnections attribute therefore limits the number of simultaneous connections from any host, while maxIntervalConnections limits temporarily (for the time interval specified by the timeInterval attribute) the number of connections from any host. Example: Assuming maxIntervalConnections=4 and timeInterval=60. If on t0 moment (in seconds) AXIGEN received a first connection, and after 40 seconds (at t0 40 moment) other 3 connections have been received (for a total of 4 accepted connections, no matter what their current status is - closed or not), then no other connection will be accepted by the TCP service on that listener for another 20 seconds (by t0 60 moment). In order to avoid limiting the number of connections accepted on a specific listener, you can set and maxIntervalConnections=0 (an unlimited number of connections are accepted for any given time interval; in this case, the value of the 'timeInterval' attribute is ignored. The maxConnections attribute accepts values between 1-2048. AXIGEN Mail Server will not accept an unlimited number of simultaneous connections.
Limiting the Number of Accepted Connections for a Specific IP Address
These attributes have a similar applicability with maxConnections , maxIntervalConnections and timeInterval , but they are applied to the number of connections from the same IP address to be accepted by the listener.
The peerMaxConnections attribute specifies the maximum number of simultaneous connections coming from the same host (no matter what that host is) that are accepted by the TCP service on the listener. The peerMaxIntervalConnections and peerTimeInterval attributes are used in conjunction: peerMaxIntervalConnections specifies the maximum number of connections accepted by the TCP service on the current listener, from the same host (same IP address), in the time interval in seconds defined by the value of the peerTimeInterval attribute.
The peerMaxConnections attribute therefore limits the number of connections from the same host, while peerMaxIntervalConnections limits temporarily (for the time interval specified by the peerTimeInterval attribute) the number of connections from the same host.
AXIGEN User Manual
Copyright © 2006 GECAD Technologies S.R.L.
http://www.axigen.com
291
Limiting the Inactivity for a Given Listener
Sometimes active connection threads can be blocked with stagnating communication sessions - for instance in case of full bandwidth, when messages cannot be sent and the session must wait until some bandwidth is free). For an efficient usage of all available connections, communication threads can be stopped after a certain interval of inactivity. The communication session can be re-established later (when the mail client resends its query). The system administrator can configure the inactivity interval with the timeout attribute.
The idleTimeout attribute specifies the inactivity period (in seconds) after which the TCP service will close the idle connection. To disable this limitation, you can use 'idleTimeout'=0 , meaning no timeout will occur for an idle connection.
Note: The limitations defined by these attributes are applied for any host connecting to the current listener.
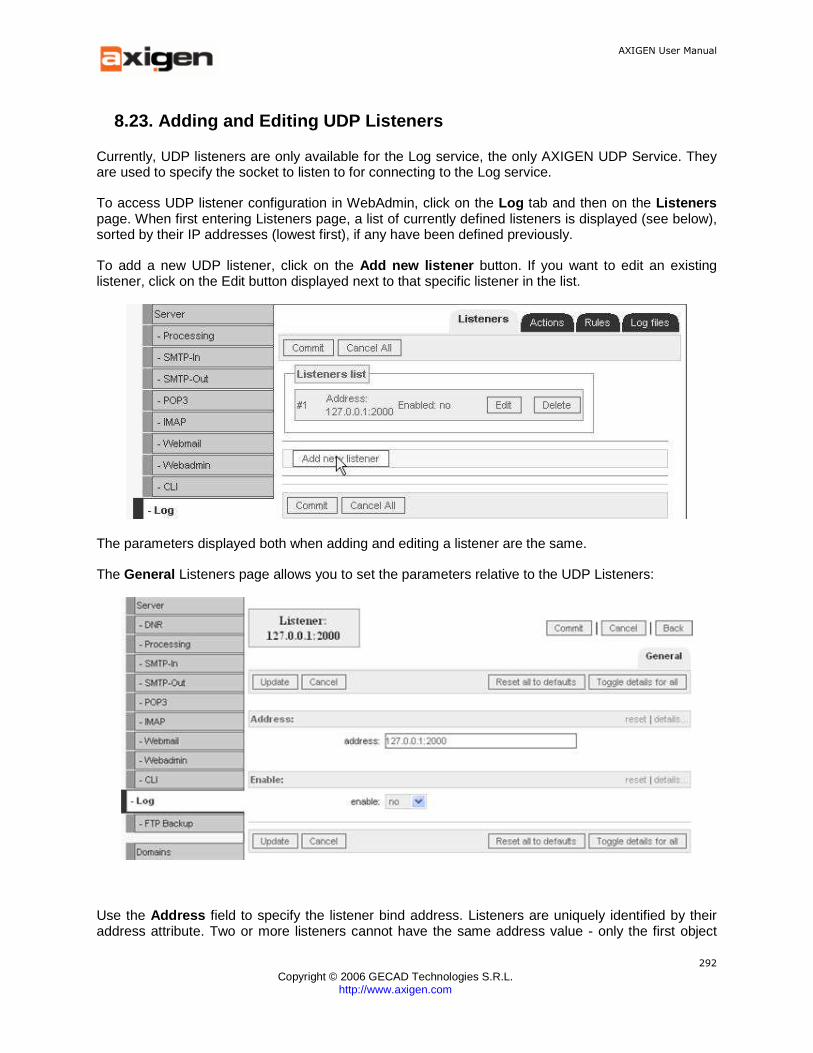
AXIGEN User Manual
Copyright © 2006 GECAD Technologies S.R.L.
http://www.axigen.com
292
8.23. Adding and Editing UDP Listeners
Currently, UDP listeners are only available for the Log service, the only AXIGEN UDP Service. They are used to specify the socket to listen to for connecting to the Log service.
To access UDP listener configuration in WebAdmin, click on the Log tab and then on the Listeners page. When first entering Listeners page, a list of currently defined listeners is displayed (see below), sorted by their IP addresses (lowest first), if any have been defined previously.
To add a new UDP listener, click on the Add new listener button. If you want to edit an existing listener, click on the Edit button displayed next to that specific listener in the list.
The parameters displayed both when adding and editing a listener are the same.
The General Listeners page allows you to set the parameters relative to the UDP Listeners:
Use the Address field to specify the listener bind address. Listeners are uniquely identified by their address attribute. Two or more listeners cannot have the same address value - only the first object

AXIGEN User Manual
Copyright © 2006 GECAD Technologies S.R.L.
http://www.axigen.com
293
correctly defined is considered. This will be the IP address followed by a colon and the port number. The default value for this parameter is '127.0.0.1:2000'
Attribute Name: address Attribute Class: UDPListener Attribute Type: VALUE Value Type: Internet Socket Address only host IP addresses, required Use the Enable drop-down box to enable/disable the UDP listener. This way you can store defined listeners and enable them only when you need to.
Attribute Name: enable Attribute Class: UDPListener Attribute Type: VALUE Value Type: single choice - yes | no Default Value: yes For a detailed view of listener usage in AXIGEN, see the Listeners section.
AXIGEN User Manual
Copyright © 2006 GECAD Technologies S.R.L.
http://www.axigen.com
294
9. Configuring AXIGEN using CLI
The Command Line Interface (in short CLI) is an interface for configuring AXIGEN remotely. In order to do that, a socket will listen on a specified address for connections, thus the commands can be issued using common tools such as Telnet, Netcat, etc.
Service Description
CLI is for AXIGEN another service, more precisely a TCP service, just like SMTP, IMAP, POP3, etc. The CLI service can be configured in its turn similarly to the other services, either by editing the configuration files or by using the remote configuration tools like CLI and WebAdmin. It has common parameters such as maxErrors , logLevel , etc. and also a list of listeners for configuring incoming connections. The connection to the service must be authenticated using the default ‘admin’ username and the password previously set for it. For more details on how to set the admin password using the AXIGEN Configuration Wizard see this section. For details on how to set the admin password manually, please read this section. See Connecting to CLI for a detailed login procedure. CLI is structured in contexts, each of them including a specific set of commands. CLI also uses a common set of commands. Each context provides commands allowing switching to the previous and next context and a HELP command to view the available commands at that specific location. When connected, the login context is activated and an username and password must be provided; after activation, the initial context becomes active. The initial context is the only one not having a name in the command prompt. Commands are not case sensitive, meaning that you can enter HELP, help, Help, HeLP, it will still mean HELP. Also, when you need to assign values to parameters of certain commands, these values can be entered in 3 ways:
1. escaped 2. quoted 3. double quoted.
This is useful when entering regular expressions and spaces and is very similar to the way the strings are entered in unix bash.
1. escaped string: in this form, the string cannot contain not printable characters, and the characters that must be escaped with a backslash are: spaces, quotes and double-quotes.
2. quoted string: (e.g.: 'something') in this form, the string will preserve the literal value of each character within the quotes. A single quote may not occur between single quotes, even when preceded by a backslash
3. double quoted string: (e.g. "something"): in this form, the string will behave just like in the escaped form, ignoring the backslash before any character. The difference is that all the characters, including non-printables, are accepted and that the spaces and single quotes need not be escaped.
In the escaped and double-quoted form, the backslash character must be escaped in order to have a backslash as a result. The CLI parent / child contexts follow the structure of the configuration file where some objects are children of other parent objects. In general, a context that uses COMMIT for saving changes is
AXIGEN User Manual
Copyright © 2006 GECAD Technologies S.R.L.
http://www.axigen.com
295
considered a parent and a context that uses DONE for saving changes is considered a child. Contexts are, with a few exceptions, associated with configuration objects that appear in the config file. The notion of key parameter-value pair is related to the primary key concept. It uniquely identifies an object in a list of objects. The key value cannot be changed if the context was created using an ADD command. The configuration contexts corresponding config objects (like server, all services, etc.) update only when entering and leaving the respective context and when one of the reset commands is issued. Thus, if anything is changed using another version of CLI or WEBADMIN, the change will be present only when leaving and entering the context again or after a reset command is issued. When leaving the context using COMMIT and the commit fails, update of the context is NOT performed. This happens because any modifications made before commit would be lost. As a result, invalid settings may appear to exist in config. If you want to reset the configuration for that context, issue a CANCEL or a RESET command. Any changes made to a TCP service like: CLI, WEBMAIL, WEBADMIN, etc. affect only new connections to that service and not the active ones. The subsections of this chapter contain the following:
• Special Contexts - the most important contexts in CLI are explained • Common commands - commands used in all AXIGEN contexts • Context Specific Commands - a list of all contexts and commands available in CLI you can
use for reference to see all the different operations you can perform using CLI
Important! Within all CLI contexts and commands, the term "Script Filters" refers to Message rules, "Socket Filters" refers to Antivirus/Antispam Filters, while "SMTP Filters" generically defines Message Acceptace, Processing and Realy Policies.
9.1. Special Contexts
The action of each command may differ in specific contexts that represent exceptions to the general behavior. As said before, some contexts have additional commands that have an exceptional character. Thus a detailed overview of each context is presented below.
Login Context
prompt: <login> parent: none
The login context is used only for authentication and has the following commands: HELP, USER, EXIT/QUIT, SET. The USER command usage is USER <username>.
This context is associated with the maxAuthErrors config parameter: when this parameter is exceeded, the connection is closed; the maxAuthCommands parameter also applies to this context: if the number of commands issued is greater (with or without error), the connection is closed.
In this context, global options can be set. The CONSOLE-CODES option allows console codes used for colors to be turned on/off. The QUIET option, if set to on, will display in all contexts and with all

AXIGEN User Manual
Copyright © 2006 GECAD Technologies S.R.L.
http://www.axigen.com
296
commands only the minimum amount of text needed to present the information, thus making the output script friendly.
WARNING: if the CONSOLE_CODES option is set to off, the password will also be visible in the command line (not applicable if connecting through a script).
Initial Context
prompt: <#> parent: none
The initial context is the starting point of configuring the server. Here, several actions can be started: domain configuration (including accounts and lists), server configuration and also reports can be viewed. Also, the Commands context is accessible from here where some commands can be issued to the server.
This context does not have COMMIT/DONE or CANCEL commands because it is the first context. It neither has SHOW without parameters because it is not related to any config object.
From the Initial context, we can access the REPORTING, MIGRATION and COMMANDS contexts which are detailed below. The LIST DOMAINDATA command is here because a domain database location must be provided when adding a domain.
The ADD DOMAIN command, takes 2 parameter-value pairs, one for setting the domain name and one for specifying in which domain database location the domain should be created.
Reporting Context
prompt: <reporting#> parent: Initial
This context is for viewing various reports for the server. It has the BACK command for switching back to the Initial context but does not have COMMIT/DONE because it is a read-only context.
The commands available are: VIEW CONTORS with a parameter of all, others and domain. If domain is the parameter, a value must be specified, that is, a list of domains separated by '+'. The list must be in double quoted format. Another command is VIEW QUEUE which displays a snapshot of the mail queue and information on the emails in processing stage.
The VIEW CONTORS domain command makes a sum of all counter of the domains given as parameters. If a domain does not exist, it will not be counted in the sum. This means, to an extent, that if the list is made of one or more domains that do not exist, the list will show for all counters, a value of 0.
Server Context
prompt: <server#> parent: Initial
The server context is where the server configuration is started. It has commands for entering the configuration context of every service for configuring filters and domain database locations, etc.
AXIGEN User Manual
Copyright © 2006 GECAD Technologies S.R.L.
http://www.axigen.com
297
It has the common commands CANCEL, COMMIT, HELP, QUIT/EXIT, and SHOW. The SHOW command will show the value parameters of the server like services, primaryDomain, etc. In the case of the services param, it will show the services started but it is updated only when the server context is entered or left with commit or cancel. Therefore, if a service was stopped while in the server context, it will not show up as stopped.
The SET command will set the one or more param-value pairs that are given as parameters. In the case of the services value parameter, it will stop or start the services only when COMMIT is issued. If CLI is removed from the list of services, it will be stopped at COMMIT but it will show up as started when SHOW is issued.
The ADD FILTER command, takes 3 parameter-value pairs because the respective values are required. The commands for configuring the services are CONFIG <SERVICE_NAME> and the context will switch to the one corresponding to that specific service.
From this context domains database locations can be managed. Thus there are functions to LIST, ADD, REMOVE, CREATE and DESTROY a domain database location. Before a location can be added, it must be created, otherwise the commit command will fail and no location will be added. The CREATE command, aside from the path, takes an additional parameter: an unique id that has to be from 0 to 255. It is impossible to add two locations with the same id on the server's list.
Commands Context
prompt: <commands#> parent: Initial
The Commands context is a special context that allows the remote administrator to issue commands to the server. It has two subcontexts, the Server and Storage contexts that will be described below.
Directly from the Commands context, the password for the CLI and Webadmin sessions can be changed and the two subcontexts can be entered.
As in the case of MIGRATION and REPORTING contexts, the COMMANDS context has the BACK command for switching back to the Initial context and does not have COMMIT/DONE commands.
Commands-Server Context
prompt: <commands-server#> parent: Commands
The Server subcontext, is used to issue server-related commands to AXIGEN. There is a command for trying to force all mail in the queue to be processed and/or sent, regardless of their rescheduled time. This command is FORCE QUEUE.
The command SAVE CONFIG, saves the configuration. If no parameter is given, it will be saved in the default location. If a path parameter is given, it will be saved in that location but for security reasons, a suffix will be added to the file. The SHOW CONFIG command will dump the configuration as it is written in the config file. This command is also available from the Initial and Initial-Server contexts.

AXIGEN User Manual
Copyright © 2006 GECAD Technologies S.R.L.
http://www.axigen.com
298
The START/STOP service command will start/stop a service immediately without the need for COMMIT command as in the case where services are modified from the Initial-Server context.
Commands-Storage Context
prompt: <commands-storage#> parent: Commands This context allows several operations with the AXIGEN Storage System. The storage system is composed of Message Containers, where messages for a certain domain are kept. The operations available are LIST containers, CHECK container, COMPACT container, LOCK container and UNLOCK container. The LIST container command takes as parameter the domain name and lists all message containers available for that domain. The LOCK and UNLOCK container commands, as their names suggest, lock and unlock the container given as parameter, meaning respectively that messages can or cannot be stored. These commands are useful when a snapshot of the container needs to be saved. The CHECK container command, starts a check on the structure of a certain container. After a check is started, the status can be seen by issuing the LIST containers command. The COMPACT container command, will start a defragmentation of the specified container and, similarly to CHECK, issuing the LIST command will show the status of the container. The optional parameter priority, if set to high, will increase the speed of that operation but the container will be unavailable to any service, even for reading. The default value is low. Migration Context prompt: <migration#> parent: Initial The Migration context, allows messages to be migrated from other servers to AXIGEN. The common commands are the same as in the case of REPORTING and COMMANDS and it has one command with many parameters for migration. The MIGRATE command will migrate all emails from an account on a remote server using the IMAP protocol. The migration is completed when the entire directory structure is migrated. The mandatory domain and account parameters, will identify an account into which the messages will be migrated. The remoteHost , remotePort , remoteUser and remotePass parameters are self explanatory. All the optional parameters have the default value of no. A complete list of commands available in each AXIGEN context is available in the CLI Context Specific Commands page.

AXIGEN User Manual
Copyright © 2006 GECAD Technologies S.R.L.
http://www.axigen.com
299
9.2. Common commands
The following commands are common to a subset of contexts: HELP, QUIT, EXIT, CANCEL, BACK, COMMIT|DONE, SHOW, LIST, SET, ADD, REMOVE, UPDATE, CONFIG, RESET.
Some of the commands described below apply only to a set of contexts, others apply to all contexts, and others have different flavors according to certain contexts. Below are listed only the common and most important commands used in CLI, but other commands are also available.
• HELP - the help command is present in all contexts, including Login and is used for displaying a list of available commands in that context
• QUIT - this command exits CLI. It is available from all contexts • EXIT - the same as QUIT • BACK - this command, cancels any changes (where it applies) and switches back to the
previous context. This is available from every context except Login and Initial. • COMMIT - this command saves the changes and also writes these changes to the server
configuration. This also includes the changes done in child contexts and saved with DONE. A switch back to the previous context is also done.
• DONE - this command saves the changes for a child context and switches back to the previous context but does not write anything to the server's configuration.
• SHOW - the SHOW command has two flavors, one without parameters, and in this case, the value parameters (that means not the children or child lists) are shown, and one with parameters, in this case, the value parameters of a child from a child list are shown. In both cases, there is an optional ATTR parameter which, if present, will only show the specified attribute.
• LIST - this command lists the members of a given child list in the form of a table. If the list has a separate context, some parameters are put in the table, otherwise all value parameters are present.
• SET - the SET command sets a value for a specified value parameter of the given object associated with the context (if there is one). To the SET command, one or several parameter-value pair can be given.
• ESET - the ESET command (SET Extended) enters a new context in which large amounts of data can be entered. The context can be left with <empty line> <.> <empty line>, the same as in the case of the SMTP protocol. This command is useful for parameters that require large amounts of text.
• ADD - This command has several flavors. The simplest one is for adding values to a value list. In this case, the parameter is the name of the value list and a value (for instance ADD nameserver ip). Another form is used to add objects to list of objects. This form has three versions: one that takes the list and the key parameter-value pair of the object and changes the context; another that is the same except it takes additional required parameter-value pairs; and one that takes the key param-value pair and other optional pairs and doesn't change context but directly adds the object to the list.
• UPDATE - This command changes an object from a list of objects. It is similar to add, except it does not apply to value lists.
• REMOVE - This usually takes as parameters the list name, and key param-value pair for object lists, and list name and value for value lists and as the name suggests, removes an object from a list. It does not change the context.
• CONFIG - The config command changes the context for configuring a child object. A child object is different form a list by the fact that it is a single object and it exists permanently. A list may have one, none or several objects.
AXIGEN User Manual
Copyright © 2006 GECAD Technologies S.R.L.
http://www.axigen.com
300
• RESET - The RESET command will update the context to the active one on the server. This also means that any changes made to that part of the context will be lost. The reset command, depending on the parameter, will reset the value attributes, or a list of objects or values.
• ENTER - This command, changes a context, entering a sub-context. This usually applies to contexts unrelated to the object-child object configuration hierarchy.
The action of each command may differ in specific contexts that represent exceptions to the general behavior. As said before, some contexts have additional commands that have an exceptional character. Thus a detailed overview of each context is presented in the Special Contexts section.
9.3. Connecting to CLI
To connect to AXIGEN command line interface (CLI), after installing AXIGEN with its default settings, please enter in your terminal, while logged as root: [root@example ~]# telnet 127.0.0.1 7000
In order to be able to connect to AXIGEN CLI, you should enable the CLI listener and connect to the correct IP:port address. You can verify the CLI listeners using the CLI > Listeners page in WebAdmin. You should see a welcome message similar to the one below Connected to <hostname> (127.0.0.1). Escape character is '^]'. Welcome to AXIGEN's Command Line Interface You must login first. For a list of available comma nds, type HELP <login> Enter the username (admin) and password set in WebAdmin, for instance. A list of commands available in different contexts and sub-contexts of AXIGEN command-line interface is included in CLI
Commands section.
9.4. Troubleshoot the CLI Connection
If you cannot connect to CLI, please check if:
• You have enabled the CLI service (open the Server>Global Settings page in WebAdmin, for instance, CLI is enabled in the Running Services area)
• You have correctly configured the CLI listener (the list with the listeners currently defined in AXIGEN can be found in the CLI > Listeners page in WebAdmin; check if your listener is enabled);
• You’re connecting using the correct username: for the current version, please use the “admin” username and the password you have previously configured using WebAdmin and CLI.
AXIGEN User Manual
Copyright © 2006 GECAD Technologies S.R.L.
http://www.axigen.com
301
9.5. Context Specific Commands
This section lists all CLI contexts and their specific commands, as displayed in the Command Line Interface. You may use this list as reference to find out what operations you can perform using CLI.
Login Context <login>
The commands available for the Login context are:
HELP - prints this help message EXIT/QUIT - exits CLI and closes connection to AXIGEN USER <user> - CLI username, (in this version only "admin" username is implemented) GET VERSION - gets the AXIGEN version SET CONSOLE-CODES on|off - sets the color and other console codes on/off SET QUIET off|on - enables/disables detailed information SHOW - shows the options for this context
Initial Conext <#>
The commands available for the Initial context are:
EXIT/QUIT - exits CLI and closes connection to AXIGEN HELP - prints this help message LIST Domains [wildcard (ex: domain*)] - lists the domains of this server LIST Requests - lists the requests made for domain reqistration CLEAR Requests - clear the list of requests not pending SAVE CONFIG [<path>] - saves the server's running configuration (a suffix will be added) CONFIG SERVER - enters the Server context ENTER REPORTING - enters the Reporting context ENTER MIGRATION - enters the Migration context ENTER COMMANDS - enters the Commands context ENTER DEBUG - enters the Debug context CREATE Domain name <name> domainLocation <path> postmasterPasswd <pass> - creates a domain (changes context) REGISTER Domain domainLocation <path> - registers a domain to the server (changes context) UNREGISTER Domain name <domainName> - unregisters a domain from the server UPDATE Domain name <domainName> - updates a domain from the server (changes context) SHOW Domain name <domainName> [ATTR <param>] - shows the given domain Server Context <server#>
The commands available for the Server context are:
EXIT/QUIT - exits CLI and closes connection to AXIGEN HELP - prints this help message BACK - cancels any changes made and switches back to the previous context COMMIT - commits the changes made in this context SHOW [ATTR <param>] - shows information about this context SAVE CONFIG [<path>] - saves the server's running configuration (a suffix will be added) SET [services (list of services)] - sets the services for the server
AXIGEN User Manual
Copyright © 2006 GECAD Technologies S.R.L.
http://www.axigen.com
302
SET [primaryDomain <name>] - sets the server's primary domain SET [sslRandomFile <file>] - sets file for entropy data used when generating random RESET - resets the service to the currently active configuration CONFIG LOG - enters the Log context CONFIG CLI - enters the CLI context CONFIG SMTP-INCOMING - enters the SMTP-Incoming context CONFIG SMTP-OUTGOING - enters the SMTP-Outgoing context CONFIG PROCESSING - enters the Processing context CONFIG POP3 - enters the POP3 context CONFIG IMAP - enters the IMAP context CONFIG WEBMAIL - enters the Webmail context CONFIG WEBADMIN - enters the Webadmin context CONFIG FTP-BACKUP - enters the FTP-Backup context CONFIG DNR - enters the DNR context CONFIG REPORT - enters the Report context CONFIG FILTERS - enters the Filters context CLI Context <server-cli#> The commands available for the CLI context are: EXIT/QUIT - exits CLI and closes connection to AXIGEN HELP - prints this help message BACK - cancels any changes made and switches back to the previous context COMMIT - commits the changes made in this context SHOW [ATTR <param>] - shows information about this context LIST Listeners - lists available listeners SET [maxErrors <maxErrors>] - sets max no. of wrong commands SET [maxAuthErrors <maxErrors>] - sets max no. of failed authentications SET [maxAuthCommands <maxCmds>] - sets max no. of commands that can be issued before authentication SET [maxConnThreads <maxThreads>] - sets max no. of threads handling the conn. SET [minConnThreads <minThreads>] - sets min no. of threads handling the conn. SET [logLevel <level>] - sets the service's logging level SET [logType <type>] - sets the service's logging type SET [logHost <host>] - sets the service's remote logging host RESET - resets the service to the currently active configuration ADD Listener address <address> - adds a listener to the service (changes context) UPDATE Listener address <address> - updates a listener from the service (changes context) REMOVE Listener address <address> - removes a listener from the service SHOW Listener address <address> [ATTR <param>] - shows the given listener Listener context <server-(service_name)-listener#> The commands available for the Listener context are: EXIT/QUIT - exits CLI and closes connection to AXIGEN HELP - prints this help message BACK - cancels any changes made and switches back to the previous context COMMIT - commits the changes made in this context SHOW [ATTR <param>] - shows information about this context LIST AllowRules - lists the allow rules for this listener LIST DenyRules - lists the deny rules for this listener SET [address <address>] - sets the listener's address - only usable in an UPDATE operation SET [enable <yes|no>] - enable/disable the listener SET [maxConnections <maxConn>] - sets max number of connections

AXIGEN User Manual
Copyright © 2006 GECAD Technologies S.R.L.
http://www.axigen.com
303
SET [timeInterval <interval>] - sets the time interval SET [maxIntervalConnections <interval>] - sets max connections in time interval SET [peerMaxConnections <maxConnr>] - sets sets max connections no. from a single host SET [peerTimeInterval <interval>] - sets the time interval - single host SET [peerMaxIntervalConnections <interval>] - sets max connections in time interval - single host SET [idleTimeout <timeout>] - sets the inactivity timeout SET [sslEnable <yes|no>] - enable/disable SSL on the listener CONFIG SSLCONTROL - enters the SslControl context ADD DenyRule ipSet <ipRange> [enable <yes|no>] [priority <priority>] - adds a deny rule to the listener(changes context) UPDATE DenyRule ipSet <ipRange> [enable <yes|no>] [priority <priority>] - updates a deny rule from the listener(changes context) REMOVE DenyRule ipSet <ipRange> - removes a deny rule from the listener SHOW DenyRule ipSet <ipRange> - shows the given rule ADD AllowRule ipSet <ipRange> - adds an allow rule to the listener(changes context) UPDATE AllowRule ipSet <ipRange> - updates an allow rule from the listener(changes context) REMOVE AllowRule ipSet <ipRange> - removes an allow rule from the listener SHOW AllowRule ipSet <ipRange> - shows the given rule Allow Rule Context <server-(service_name)-listener- allowrule#> The commands available for the AllowRule context are: EXIT/QUIT - exits CLI and closes connection to AXIGEN HELP - prints this help message BACK - cancels any changes made and switches back to the previous context DONE - saves the changes and switches back to previous context SHOW [ATTR <param>] - shows information about this context SET [ipSet <ipSet>] - sets the ipSet parameter - only usable in an UPDATE operation SET [enable <yes|no>] - enable/disable the rule SET [priority <priority>] - sets the rule's priority SET [maxConnections <maxConn>] - sets max number of connections SET [timeInterval <interval>] - sets the time interval SET [maxIntervalConnections <interval>] - sets max connections in time interval SET [peerMaxConnections <maxConnr>] - sets sets max connections no. from a single host SET [peerTimeInterval <interval>] - sets the time interval - single host SET [peerMaxIntervalConnections <interval>] - sets max connections in time interval - single host SSL Control Context <server-(service_name)-listener -sslcontrol#> The commands available for the SSLControl context are: EXIT/QUIT - exits CLI and closes connection to AXIGEN HELP - prints this help message BACK - cancels any changes made and switches back to the previous context DONE - saves the changes and switches back to previous context SHOW [ATTR <param>] - shows information about this context SET [allowedVersions (version list)] - sets SSL versions allowed SET [maxChainDepth <maxDepth>] - sets max depth of verification SET [chipherSuite <chipher>] - sets the chipher suite to be used SET [useEphemeralKey <yes|no>] - use/not use ephemeral keys SET [certFile <file>] - sets path for certification chain file SET [caFile <file>] - sets path for certificate authorities file SET [dhParamFile <file>] - sets path to Diffie-Hellman param file
AXIGEN User Manual
Copyright © 2006 GECAD Technologies S.R.L.
http://www.axigen.com
304
SET [requestClientAuth <yes|no>] - request/not request client authentication Log Context <server-log#> The commands available for the Log context are: EXIT/QUIT - exits CLI and closes connection to AXIGEN HELP - prints this help message BACK - cancels any changes made and switches back to the previous context COMMIT - commits the changes made in this context SHOW [ATTR <param>] - shows information about this context LIST Listeners - lists available listeners LIST Rules - lists rules SET [logLevel <level>] - sets the service's logging level SET [logType <type>] - sets the service's logging type SET [logHost <host>] - sets the service's remote logging host RESET - resets the service to the currently active configuration ADD Listener address <address> - adds a listener to the service (changes context) UPDATE Listener address <address> - updates a listener from the service (changes context) REMOVE Listener address <address> - removes a listener from the service SHOW Listener address <address> [ATTR <param>] - shows the given listener ADD Rule priority <priority> - adds a rule (changes context) UPDATE Rule priority <priority> - updates a rule (changes context) REMOVE Rule priority <priority> - removes a rule SHOW Rule priority <priority> [ATTR <param>] - shows the given rule Rule Context <server-log-rule#> The commands available for the Rule context are: EXIT/QUIT - exits CLI and closes connection to AXIGEN HELP - prints this help message BACK - cancels any changes made and switches back to the previous context DONE - saves the changes and switches back to previous context SHOW [ATTR <param>] - shows information about this context SET [priority <priority>] - sets the rule's priority - only usable in an UPDATE operation SET [hostname <hostname>] - sets hostname of the user of this rule SET [module <module>] - sets module of the user of this rule SET [logLevel <level>] - sets the log level SET [fileName <name>] - sets the name of the destination file ET [fileSize <size>] - sets the maximum duration the destination file is used in seconds SET [fileTime <time>] - sets the maximum duration the destination file is used in seconds SET [fileCount <count>] - sets the maximum number of old (saved) files kept SET [rotatePeriod <period>] - sets the period after which a file change is forced (choice: day|week|month) SMTP-Incoming Contxt <server-smtpIncoming#> The commands available for the SMTP-Incoming context are: EXIT/QUIT - exits CLI and closes connection to AXIGEN HELP - prints this help message BACK - cancels any changes made and switches back to the previous context COMMIT - commits the changes made in this context
AXIGEN User Manual
Copyright © 2006 GECAD Technologies S.R.L.
http://www.axigen.com
305
SHOW [ATTR <param>] - shows information about this context LIST Listeners - lists available listeners SET [maxErrors <maxErrors>] - sets max no. of wrong commands SET [maxAuthErrors <maxErrors>] - sets max no. of failed authentications SET [maxConnThreads <maxThreads>] - sets max no. of threads handling the conn. SET [minConnThreads <minThreads>] - sets min no. of threads handling the conn. SET [logLevel <level>] - sets the service's logging level SET [logType <type>] - sets the service's logging type SET [logHost <host>] - sets the service's remote logging host SET [maxReceivedHeaders <maxHeaders>] - sets max no. of received headers for a mail RESET - resets the service to the currently active configuration ADD Listener address <address> - adds a listener to the service (changes context) UPDATE Listener address <address> - updates a listener from the service (changes context) REMOVE Listener address <address> - removes a listener from the service SHOW Listener address <address> [ATTR <param>] - shows the given listener SMTP-Outgoing Context <server-smtpOutgoing#> The commands available for the SMTP-Outgoing context are: EXIT/QUIT - exits CLI and closes connection to AXIGEN HELP - prints this help message BACK - cancels any changes made and switches back to the previous context COMMIT - commits the changes made in this context SHOW [ATTR <param>] - shows information about this context SET [maxConnThreads <maxThreads>] - sets max no. of threads handling the conn. SET [minConnThreads <minThreads>] - sets min no. of threads handling the conn. SET [logLevel <level>] - sets the service's logging level SET [logType <type>] - sets the service's logging type SET [logHost <host>] - sets the service's remote logging host RESET - resets the service to the currently active configuration Processing Context <server-processing#> The commands available for the Processing context are: EXIT/QUIT - exits CLI and closes connection to AXIGEN HELP - prints this help message BACK - cancels any changes made and switches back to the previous context COMMIT - commits the changes made in this context SHOW [ATTR <param>] - shows information about this context SET [maxSchedInterval <maxInterval>] - sets max interval for rescheduling a mail SET [schedInterval <interval>] - sets interval for rescheduling queue checking SET [maxRetryCount <count>] - sets max no. of times for trying to deliver SET [queuePath <path>] - sets path to internal server queue SET [queueEntryCount <count>] - sets upper limit for no. of subdirectories in queue SET [deliveryThreads <threads>] - sets no. of threads handling SMTP delivery SET [logLevel <level>] - sets the service's logging level SET [logType <type>] - sets the service's logging type SET [logHost <host>] - sets the service's remote logging host SET [procQueueSize <size>] - sets the size of internal processing queue SET [messagesPerSecond <no>] - sets the maximum number of messages a mail box can receive in one second SET [disableInterval <no>] - sets the time interval a mail box will be disabled if messagesPerSecond

AXIGEN User Manual
Copyright © 2006 GECAD Technologies S.R.L.
http://www.axigen.com
306
limit is exceded RESET - resets the service to the currently active configuration POP3 Context <server-pop3#> The commands available for the POP3 context are: EXIT/QUIT - exits CLI and closes connection to AXIGEN HELP - prints this help message BACK - cancels any changes made and switches back to the previous context COMMIT - commits the changes made in this context SHOW [ATTR <param>] - shows information about this context LIST Listeners - lists available listeners SET [maxErrors <maxErrors>] - sets max no. of wrong commands SET [maxAuthErrors <maxErrors>] - sets max no. of failed authentications SET [maxConnThreads <maxThreads>] - sets max no. of threads handling the conn. SET [minConnThreads <minThreads>] - sets min no. of threads handling the conn. SET [logLevel <level>] - sets the service's logging level SET [logType <type>] - sets the service's logging type SET [logHost <host>] - sets the service's remote logging host SET [allowStartTLS <yes|no>] - allow|not allow secure connections (STLS command) RESET - resets the service to the currently active configuration ADD Listener address <address> - adds a listener to the service (changes context) UPDATE Listener address <address> - updates a listener from the service (changes context) REMOVE Listener address <address> - removes a listener from the service SHOW Listener address <address> [ATTR <name>] - shows the given listener IMAP Context <server-imap#> The commands available for the IMAP context are: EXIT/QUIT - exits CLI and closes connection to AXIGEN HELP - prints this help message BACK - cancels any changes made and switches back to the previous context COMMIT - commits the changes made in this context SHOW [ATTR <param>] - shows information about this context LIST Listeners - lists available listeners SET [maxErrors <maxErrors>] - sets max no. of wrong commands SET [maxAuthErrors <maxErrors>] - sets max no. of failed authentications SET [maxConnThreads <maxThreads>] - sets max no. of threads handling the conn. SET [minConnThreads <minThreads>] - sets min no. of threads handling the conn. SET [logLevel <level>] - sets the service's logging level SET [logType <type>] - sets the service's logging type SET [logHost <host>] - sets the service's remote logging host SET [allowStartTLS <yes|no>] - allow/not allow secure connections SET [secureConnAuthTypes <types>] - sets types of authentication on secure conn. SET [plainConnAuthTypes <types>] - sets types of authentication on plain conn. SET [secureConnAllowLogin <yes|no>] - allow/not allow plain text login on secure conn. SET [plainConnAllowLogin <yes|no>] - allow/not allow plain text login on plain conn. RESET - resets the service to the currently active configuration ADD Listener address <address> - adds a listener to the service (changes context) UPDATE Listener address <address> - updates a listener from the service (changes context) REMOVE Listener address <address> - removes a listener from the service SHOW Listener address <address> [ATTR <param>] - shows the given listener
AXIGEN User Manual
Copyright © 2006 GECAD Technologies S.R.L.
http://www.axigen.com
307
Webmail Context <server-webmail#> The commands available for the Webmail context are: EXIT/QUIT - exits CLI and closes connection to AXIGEN HELP - prints this help message BACK - cancels any changes made and switches back to the previous context COMMIT - commits the changes made in this context SHOW [ATTR <param>] - shows information about this context LIST Listeners - lists available listeners LIST UrlRedirects - lists the rules used for secure login LIST HostNameResolvers - lists the hostname resolvers SET [maxErrors <maxErrors>] - sets max no. of wrong commands SET [maxAuthErrors <maxErrors>] - sets max no. of failed authentications SET [maxConnThreads <maxThreads>] - sets max no. of threads handling the conn. SET [minConnThreads <minThreads>] - sets min no. of threads handling the conn. SET [logLevel <level>] - sets the service's logging level SET [logType <type>] - sets the service's logging type SET [logHost <host>] - sets the service's remote logging host SET [path <path>] - sets the location of HSP files SET [sessionIdleTimeout <timeout>] - sets the inactivity timeout SET [sessionActivityTimeout <timeout>] - sets maximum living time for a session SET [allowKeepAlive <yes|no>] - enables/disables persistent connection SET [allowLargeIncomingData <yes|no>] - enables/disables receiving incoming data after the limit is exceeded SET [httpHeadersMaxSize <size>] - sets the maximum allowed size for received HTTP headers SET [httpBodyMaxSize <size>] - sets the maximum allowed size for incoming HTTP body SET [uploadMaxSize <size>] - sets the maximum allowed size for incoming upload data SET [showDomainList <yes|no>] - enables/disables displaying domains list at user login RESET - resets the service to the currently active configuration ADD Listener address <address> - adds a listener to the service (changes context) UPDATE Listener address <address> - updates a listener from the service (changes context) REMOVE Listener address <address> - removes a listener from the service SHOW Listener address <address> [ATTR <param>] - shows the given listener ADD HostNameResolver host <host> domain <domain> UPDATE HostNameResolver host <host> domain <domain> REMOVE HostNameResolver host <host> ADD UrlRedirect address <address> port <port> host <host> UPDATE UrlRedirect address <address> [port <port>] [host <host>] REMOVE UrlRedirect address <address> Webadmin Context <server-webadmin#> The commands available for the Webadmin context are: EXIT/QUIT - exits CLI and closes connection to AXIGEN HELP - prints this help message BACK - cancels any changes made and switches back to the previous context COMMIT - commits the changes made in this context SHOW [ATTR <param>] - shows information about this context LIST Listeners - lists available listeners LIST UrlRedirects - lists the rules used for secure login SET [maxErrors <maxErrors>] - sets max no. of wrong commands SET [maxAuthErrors <maxErrors>] - sets max no. of failed authentications
AXIGEN User Manual
Copyright © 2006 GECAD Technologies S.R.L.
http://www.axigen.com
308
SET [maxConnThreads <maxThreads>] - sets max no. of threads handling the conn. SET [minConnThreads <minThreads>] - sets min no. of threads handling the conn. SET [logLevel <level>] - sets the service's logging level SET [logType <type>] - sets the service's logging type SET [logHost <host>] - sets the service's remote logging host SET [path <path>] - sets the location of HSP files SET [sessionIdleTimeout <timeout>] - sets the inactivity timeout SET [sessionActivityTimeout <timeout>] - sets maximum living time for a session SET [allowKeepAlive <yes|no>] - enables/disables persistent connection SET [allowLargeIncomingData <yes|no>] - enables/disables receiving incoming data after the limit is exceeded SET [httpHeadersMaxSize <size>] - sets the maximum allowed size for received HTTP headers SET [httpBodyMaxSize <size>] - sets the maximum allowed size for incoming HTTP body SET [uploadMaxSize <size>] - sets the maximum allowed size for incoming upload data RESET - resets the service to the currently active configuration ADD Listener address <address> - adds a listener to the service (changes context) UPDATE Listener address <address> - updates a listener from the service (changes context) REMOVE Listener address <address> - removes a listener from the service SHOW Listener address <address> [ATTR <param>] - shows the given listener ADD UrlRedirect address <address> port <port> host <host> UPDATE UrlRedirect address <address> [port <port>] [host <host>] REMOVE UrlRedirect address <address> FTP Backup Context <server-ftpBackup#> The commands available for the FTP-Backup context are: EXIT/QUIT - exits CLI and closes connection to AXIGEN HELP - prints this help message BACK - cancels any changes made and switches back to the previous context COMMIT - commits the changes made in this context SHOW [ATTR <param>] - shows information about this context LIST Listeners - lists available listeners SET [maxErrors <maxErrors>] - sets max no. of wrong commands SET [maxAuthErrors <maxErrors>] - sets max no. of failed authentications SET [maxConnThreads <maxThreads>] - sets max no. of threads handling the conn. SET [minConnThreads <minThreads>] - sets min no. of threads handling the conn. SET [logLevel <level>] - sets the service's logging level SET [logType <type>] - sets the service's logging type SET [logHost <host>] - sets the service's remote logging host RESET - resets the service to the currently active configuration ADD Listener address <address> - adds a listener to the service (changes context) UPDATE Listener address <address> - updates a listener from the service (changes context) REMOVE Listener address <address> - removes a listener from the service SHOW Listener address <address> [ATTR <param>] - shows the given listener DNR Context <server-dnr#> The commands available for the DNR context are: EXIT/QUIT - exits CLI and closes connection to AXIGEN HELP - prints this help message BACK - cancels any changes made and switches back to the previous context COMMIT - commits the changes made in this context

AXIGEN User Manual
Copyright © 2006 GECAD Technologies S.R.L.
http://www.axigen.com
309
SHOW [ATTR <param>] - shows information about this context LIST Nameservers - lists the nameservers SET [timeout <timeout>] - sets the timeout SET [retries <retries>] - sets the number of retries SET [cacheSize <cacheSize>] - sets the cache size SET [logLevel <level>] - sets the service's logging level SET [logType <type>] - sets the service's logging type SET [logHost <host>] - sets the service's remote logging host RESET - resets the service to the currently active configuration ADD Nameserver priority <priority> - adds a nameserver to the service (changes context) UPDATE Nameserver priority <priority> - updates a nameserver from the service (changes context) REMOVE Nameserver priority <priority> - removes a nameserver from the service SHOW Nameserver priority <priority> [ATTR <param>] - shows the given nameserver Name Server Context <server-dnr-nameserver#> The commands available for the NameServer context are: EXIT/QUIT - exits CLI and closes connection to AXIGEN HELP - prints this help message BACK - cancels any changes made and switches back to the previous context DONE - saves the changes and switches back to previous context SHOW [ATTR <param>] - shows information about this context SET [priority <priority>] - sets the priority of the nameserver SET [address <address>] - sets the IP of the nameserver SET [timeout <timeout>] - sets the timeout for first DNS query SET [retries <retries>] - sets the maximum number of DNS queries retries Report Context <server-report#> The commands available for the Report context are: EXIT/QUIT - exits CLI and closes connection to AXIGEN HELP - prints this help message BACK - cancels any changes made and switches back to the previous context COMMIT - commits the changes made in this context SHOW [ATTR <param>] - shows information about this context SET [logLevel <level>] - sets the service's logging level SET [logType <type>] - sets the service's logging type SET [logHost <host>] - sets the service's remote logging host RESET - resets the service to the currently active configuration Filters Context <server-filters#> The commands available for the Filters context are: EXIT/QUIT - exits CLI and closes connection to AXIGEN HELP - prints this help message BACK - switches back to the previous context LIST ScriptFilters - lists the script filters defined LIST SocketFilters - lists the socket filters defined LIST ActiveFilters - lists the active filters LIST Filters - lists all three categories of filters ADD ScriptFilter name <name> file <file> - adds a script filter (changes context)

AXIGEN User Manual
Copyright © 2006 GECAD Technologies S.R.L.
http://www.axigen.com
310
UPDATE ScriptFilter name <name> - updates a script filter (changes context) REMOVE ScriptFilter name <name> - removes a script filter from the listener SHOW ScriptFilter name <name> [ATTR <param>] - shows the given script filter ADD SocketFilter name <name> address <addr> protocolFile <file> - adds a socket filter (changes context) UPDATE SocketFilter name <name> - updates a socket filter (changes context) REMOVE SocketFilter name <name> - removes a socket filter from the listener SHOW SocketFilter name <name> [ATTR <param>] - shows the given socket filter ADD ActiveFilter priority <no.> filterName <name> filterType <type> - adds an active filter to the active filter list (changes context) UPDATE ActiveFilter priority <no.> - updates a filter (changes context) REMOVE ActiveFilter priority <no.> - removes a filter from the active filter list SHOW ActiveFilter priority <no.> [ATTR <param>] - shows the given filter Script Filters Context <server-filters-script#> The commands available for the ScriptFilter context are: EXIT/QUIT - exits CLI and closes connection to AXIGEN HELP - prints this help message BACK - cancels any changes made and switches back to the previous context DONE - saves the changes and switches back to previous context SHOW [ATTR <param>] - shows information about this context SET [name <name>] - sets the name of the filter - only usable in an UPDATE operation SET [type <type>] - sets the type of the script filter SET [file <path>] - sets the path to the file where the script is located Socket Filter Context<server-filters-socket#> The commands available for the SocketFilter context are: EXIT/QUIT - exits CLI and closes connection to AXIGEN HELP - prints this help message BACK - cancels any changes made and switches back to the previous context DONE - saves the changes and switches back to previous context SHOW [ATTR <param>] - shows information about this context SET [name <name>] - sets the name of the filter - only usable in an UPDATE operation SET [address <addr>] - sets the address of the filter, used to communicate with the filter SET [protocolFile <path>] - sets the path to the ASFL file that describes the communication protocol SET [idleTimeout <timeout>] - sets the inactivity timeout of the connection (in seconds) SET [actionOnMatch <action>] - sets the action to be taken in case the filter matches an email SET [maxConnections <no.>] - sets the maximum numnber of connections that will be made to the filter Active Filter Context <server-filters-active#> The commands available for the ActiveFilter context are: EXIT/QUIT - exits CLI and closes connection to AXIGEN HELP - prints this help message BACK - cancels any changes made and switches back to the previous context DONE - saves the changes and switches back to previous context SHOW [ATTR <param>] - shows information about this context SET [priority <priority>] - sets the priority of the filter - only usable in an UPDATE operation

AXIGEN User Manual
Copyright © 2006 GECAD Technologies S.R.L.
http://www.axigen.com
311
SET [filterName <name>] - sets the name of the filter as defined in the socket/script object sets SET [filterType <type>] - sets type of the filter (to which object set belongs) SET [applyOnRelay <yes|no>] - specifies if a relay message will be filterd with this filter Domain Context <domain#>
Important! When creating domains, one message storage location is recommended for each predicted 20GB of message occupied storage space. For larger spaces, additional message storage locations should be created to correspond to the number of 20GB storages you need. You can add multiple message storage locations using CLI only within the domain creation context. After creating the domain, additional locations cannot be added. The command to create multiple message storage locations is as follows: ADD MessagesLocation <path>
The commands available for the Domain context are:
EXIT/QUIT - exits CLI and closes connection to AXIGEN HELP - prints this help message BACK - cancels any changes made and switches back to the previous context COMMIT - commits the changes made in this context SHOW [ATTR <param>] - shows information about this context LIST Aliases - lists aliases for current domain LIST Accounts [wildcard (ex: user*)] - lists accounts for current domain LIST Forwarders [wildcard (ex: user*)] - lists forwarders for current domain LIST FolderRcpts [wildcard (ex: user*)] - lists folder recipients for current domain LIST Lists [wildcard (ex: user*)] - lists mail lists for current domain SHOW RegistryInformation - shows registry information SET [name <name>] - sets the domain's name - only usable in an UPDATE operation SET [assignedIp <ip>] - sets the assigned ip SET [services (list of services)] - sets the services for this domain SET [showWebmailLogin <yes|no>] - enables/disables displaying this domain at Webmail login CONFIG MIGRATIONDATA - enters the migrationdata context CONFIG FILTERS - enters the filters context CONFIG PUBLIC-FOLDER - enters the Public Folder context CONFIG QUOTAS - enters the quotas context ADD Account name <name> passwd <passwd> - adds an account to the domain (changes context) UPDATE Account name <name> - updates an account from the domain (changes context) REMOVE Account name <name> - removes an account from the domain SHOW Account name <name> [ATTR <param>] - shows the given account ADD Forwarder name <name> - adds a forwarder to the domain (changes context) UPDATE Forwarder name <name> - updates a forwarder from the domain (changes context) REMOVE Forwarder name <name> - removes a forwarder from the domain SHOW Forwarder name <name> [ATTR <param>] - shows the given forwarder ADD FolderRcpt name <name> - adds a folder recipient to the domain (changes context) UPDATE FolderRcpt name <name> - updates a folder recipient from the domain (changes context) REMOVE FolderRcpt name <name> - removes a folder recipient from the domain SHOW FolderRcpt name <name> [ATTR <param>] - shows the given folder recipient ADD List name <listName> passwd <passwd> adminEmail <email> - adds a list to this domain (changes context) UPDATE List name <listName> - updates a list from this domain (changes context)
AXIGEN User Manual
Copyright © 2006 GECAD Technologies S.R.L.
http://www.axigen.com
312
REMOVE List name <listName> - removes a list from this domain SHOW List name <listName> [ATTR <param>] - shows the given list ADD Alias <aliasName> - adds an alias for the domain REMOVE Alias <aliasName> - removes an alias from the domain Fillters Context <parent_context-filters#> The commands available for the Filters context are: EXIT/QUIT - exits CLI and closes connection to AXIGEN HELP - prints this help message BACK - switches back to the previous context LIST ScriptFilters - lists the script filters defined LIST SocketFilters - lists the socket filters defined LIST ActiveFilters - lists the active filters LIST Filters - lists all three categories of filters ADD ScriptFilter name <name> file <file> - adds a script filter (changes context) UPDATE ScriptFilter name <name> - updates a script filter (changes context) REMOVE ScriptFilter name <name> - removes a script filter from the listener SHOW ScriptFilter name <name> [ATTR <param>] - shows the given script filter ADD SocketFilter name <name> address <addr> protocolFile <file> - adds a socket filter (changes context) UPDATE SocketFilter name <name> - updates a socket filter (changes context) REMOVE SocketFilter name <name> - removes a socket filter from the listener SHOW SocketFilter name <name> [ATTR <param>] - shows the given socket filter ADD ActiveFilter priority <no.> filterName <name> filterType <type> - adds an active filter to the active filter list (changes conte UPDATE ActiveFilter priority <no.> - updates a filter (changes context) REMOVE ActiveFilter priority <no.> - removes a filter from the active filter list SHOW ActiveFilter priority <no.> [ATTR <param>] - shows the given filter Script Filter Context <parent_context-filters-scrip t#> The commands available for the ScriptFilter context are: EXIT/QUIT - exits CLI and closes connection to AXIGEN HELP - prints this help message BACK - cancels any changes made and switches back to the previous context DONE - saves the changes and switches back to previous context SHOW [ATTR <param>] - shows information about this context SET [name <name>] - sets the name of the filter - only usable in an UPDATE operation SET [type <type>] - sets the type of the script filter SET [file <path>] - sets the path to the file where the script is located SocketFilter Context /<parent_context-filters-socke t#> The commands available for the SocketFilter context are: EXIT/QUIT - exits CLI and closes connection to AXIGEN HELP - prints this help message BACK - cancels any changes made and switches back to the previous context DONE - saves the changes and switches back to previous context SHOW [ATTR <param>] - shows information about this context SET [name <name>] - sets the name of the filter - only usable in an UPDATE operation

AXIGEN User Manual
Copyright © 2006 GECAD Technologies S.R.L.
http://www.axigen.com
313
SET [address <addr>] - sets the address of the filter, used to communicate with the filter SET [protocolFile <path>] - sets the path to the ASFL file that describes the communication protocol SET [idleTimeout <timeout>] - sets the inactivity timeout of the connection (in seconds) SET [actionOnMatch <action>] - sets the action to be taken in case the filter matches an email SET [maxConnections <no.>] - sets the maximum numnber of connections that will be made to the filter ActiveFilter Context <parent_context-filters-active #> The commands available for the ActiveFilter context are: EXIT/QUIT - exits CLI and closes connection to AXIGEN HELP - prints this help message BACK - cancels any changes made and switches back to the previous context DONE - saves the changes and switches back to previous context SHOW [ATTR <param>] - shows information about this context SET [priority <priority>] - sets the priority of the filter - only usable in an UPDATE operation SET [filterName <name>] - sets the name of the filter as defined in the socket/script object sets SET [filterType <type>] - sets type of the filter (to which object set belongs)
Note: “parent_context” refers to any of the domain or account contexts.
Accounts Context <domain-account#>
The commands available for the Account context are:
EXIT/QUIT - exits CLI and closes connection to AXIGEN HELP - prints this help message BACK - cancels any changes made and switches back to the previous context COMMIT - commits the changes made in this context SHOW [ATTR <param>] - shows information about this context LIST Aliases - lists aliases for current account SHOW RegistryInformation - shows registry information SET [name <name>] - sets the account's name - only usable in an UPDATE operation SET [services (list of services)] - sets the services for this account SET [passwd <passwd>] - sets password for the account SET [firstName <firstName>] - sets the first name of the user SET [lastName <lastName>] - sets the last name of the user CONFIG WEBMAILDATA - enters the webmaildata context CONFIG FILTERS - enters the filters context CONFIG QUOTAS - enters the quotas context CONFIG LIMITS - enters the limits context SHOW ContactInfo [ATTR <param>] - shows the firstName and lastName parameters ADD Alias <aliasName> - adds an alias for the account REMOVE Alias <aliasName> - removes an alias from the account WebmailData Context <domain-account-webmaildata#> The commands available for the WebmailData context are: EXIT/QUIT - exits CLI and closes connection to AXIGEN HELP - prints this help message BACK - cancels any changes made and switches back to the previous context
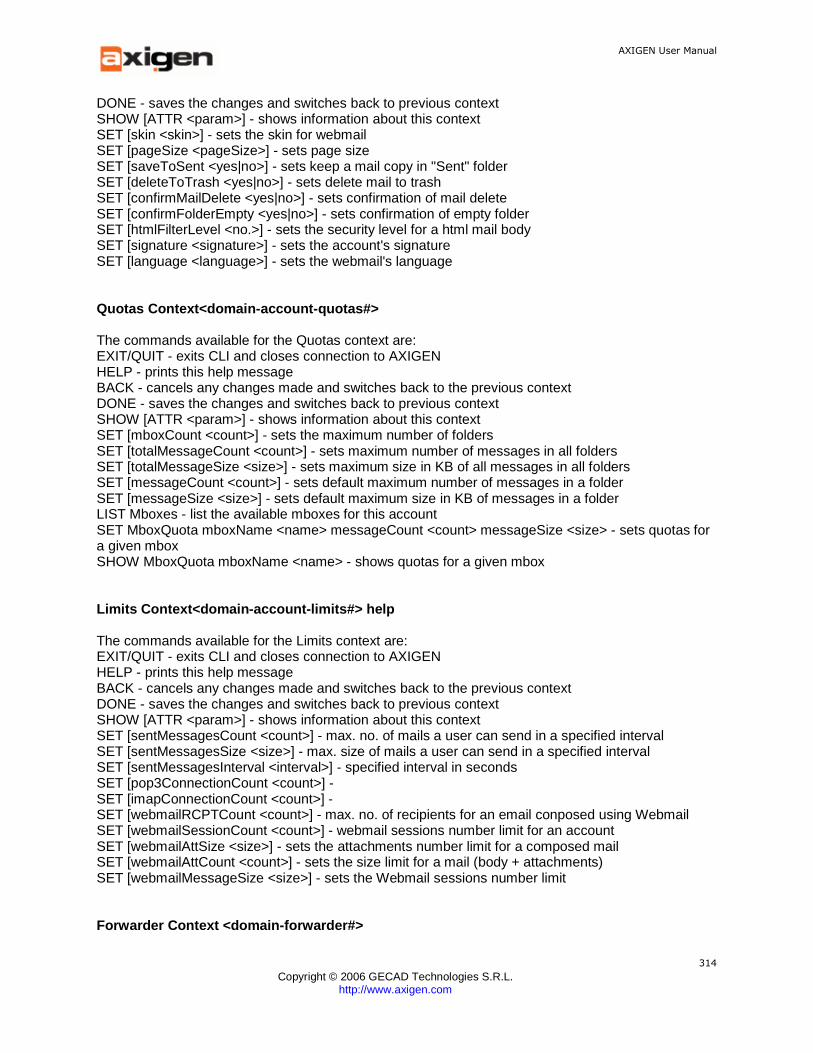
AXIGEN User Manual
Copyright © 2006 GECAD Technologies S.R.L.
http://www.axigen.com
314
DONE - saves the changes and switches back to previous context SHOW [ATTR <param>] - shows information about this context SET [skin <skin>] - sets the skin for webmail SET [pageSize <pageSize>] - sets page size SET [saveToSent <yes|no>] - sets keep a mail copy in "Sent" folder SET [deleteToTrash <yes|no>] - sets delete mail to trash SET [confirmMailDelete <yes|no>] - sets confirmation of mail delete SET [confirmFolderEmpty <yes|no>] - sets confirmation of empty folder SET [htmlFilterLevel <no.>] - sets the security level for a html mail body SET [signature <signature>] - sets the account's signature SET [language <language>] - sets the webmail's language Quotas Context<domain-account-quotas#> The commands available for the Quotas context are: EXIT/QUIT - exits CLI and closes connection to AXIGEN HELP - prints this help message BACK - cancels any changes made and switches back to the previous context DONE - saves the changes and switches back to previous context SHOW [ATTR <param>] - shows information about this context SET [mboxCount <count>] - sets the maximum number of folders SET [totalMessageCount <count>] - sets maximum number of messages in all folders SET [totalMessageSize <size>] - sets maximum size in KB of all messages in all folders SET [messageCount <count>] - sets default maximum number of messages in a folder SET [messageSize <size>] - sets default maximum size in KB of messages in a folder LIST Mboxes - list the available mboxes for this account SET MboxQuota mboxName <name> messageCount <count> messageSize <size> - sets quotas for a given mbox SHOW MboxQuota mboxName <name> - shows quotas for a given mbox Limits Context<domain-account-limits#> help The commands available for the Limits context are: EXIT/QUIT - exits CLI and closes connection to AXIGEN HELP - prints this help message BACK - cancels any changes made and switches back to the previous context DONE - saves the changes and switches back to previous context SHOW [ATTR <param>] - shows information about this context SET [sentMessagesCount <count>] - max. no. of mails a user can send in a specified interval SET [sentMessagesSize <size>] - max. size of mails a user can send in a specified interval SET [sentMessagesInterval <interval>] - specified interval in seconds SET [pop3ConnectionCount <count>] - SET [imapConnectionCount <count>] - SET [webmailRCPTCount <count>] - max. no. of recipients for an email conposed using Webmail SET [webmailSessionCount <count>] - webmail sessions number limit for an account SET [webmailAttSize <size>] - sets the attachments number limit for a composed mail SET [webmailAttCount <count>] - sets the size limit for a mail (body + attachments) SET [webmailMessageSize <size>] - sets the Webmail sessions number limit Forwarder Context <domain-forwarder#>
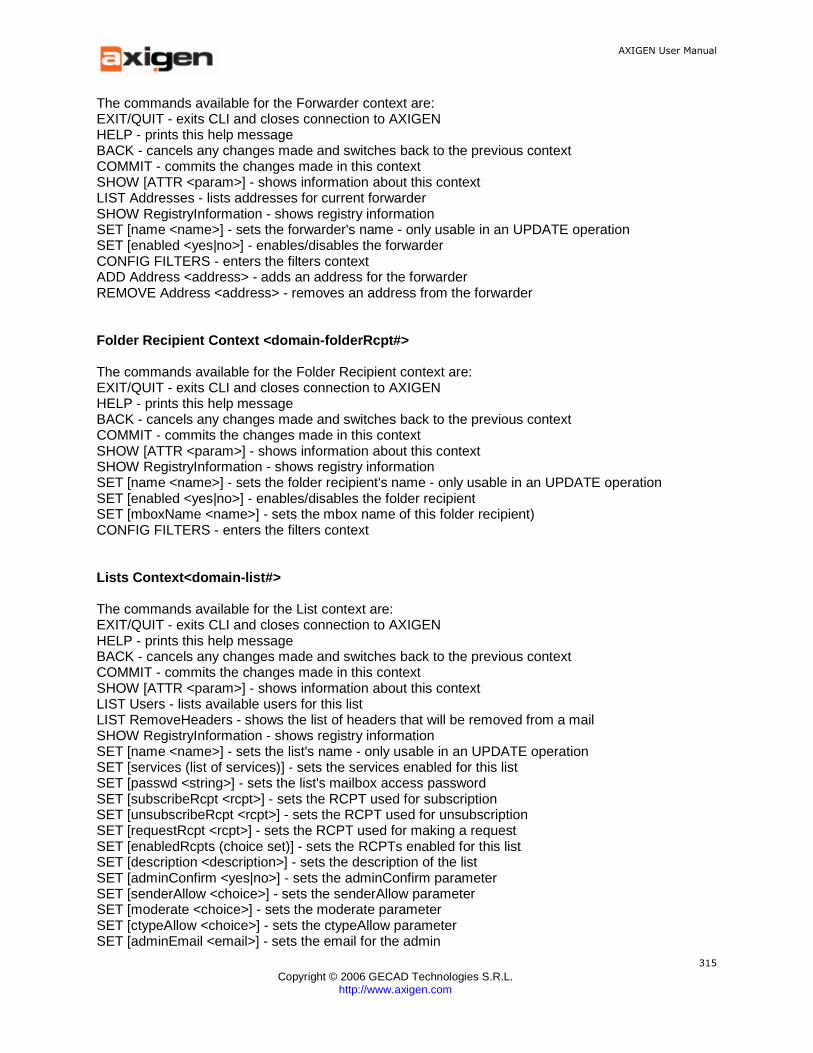
AXIGEN User Manual
Copyright © 2006 GECAD Technologies S.R.L.
http://www.axigen.com
315
The commands available for the Forwarder context are: EXIT/QUIT - exits CLI and closes connection to AXIGEN HELP - prints this help message BACK - cancels any changes made and switches back to the previous context COMMIT - commits the changes made in this context SHOW [ATTR <param>] - shows information about this context LIST Addresses - lists addresses for current forwarder SHOW RegistryInformation - shows registry information SET [name <name>] - sets the forwarder's name - only usable in an UPDATE operation SET [enabled <yes|no>] - enables/disables the forwarder CONFIG FILTERS - enters the filters context ADD Address <address> - adds an address for the forwarder REMOVE Address <address> - removes an address from the forwarder Folder Recipient Context <domain-folderRcpt#> The commands available for the Folder Recipient context are: EXIT/QUIT - exits CLI and closes connection to AXIGEN HELP - prints this help message BACK - cancels any changes made and switches back to the previous context COMMIT - commits the changes made in this context SHOW [ATTR <param>] - shows information about this context SHOW RegistryInformation - shows registry information SET [name <name>] - sets the folder recipient's name - only usable in an UPDATE operation SET [enabled <yes|no>] - enables/disables the folder recipient SET [mboxName <name>] - sets the mbox name of this folder recipient) CONFIG FILTERS - enters the filters context Lists Context<domain-list#> The commands available for the List context are: EXIT/QUIT - exits CLI and closes connection to AXIGEN HELP - prints this help message BACK - cancels any changes made and switches back to the previous context COMMIT - commits the changes made in this context SHOW [ATTR <param>] - shows information about this context LIST Users - lists available users for this list LIST RemoveHeaders - shows the list of headers that will be removed from a mail SHOW RegistryInformation - shows registry information SET [name <name>] - sets the list's name - only usable in an UPDATE operation SET [services (list of services)] - sets the services enabled for this list SET [passwd <string>] - sets the list's mailbox access password SET [subscribeRcpt <rcpt>] - sets the RCPT used for subscription SET [unsubscribeRcpt <rcpt>] - sets the RCPT used for unsubscription SET [requestRcpt <rcpt>] - sets the RCPT used for making a request SET [enabledRcpts (choice set)] - sets the RCPTs enabled for this list SET [description <description>] - sets the description of the list SET [adminConfirm <yes|no>] - sets the adminConfirm parameter SET [senderAllow <choice>] - sets the senderAllow parameter SET [moderate <choice>] - sets the moderate parameter SET [ctypeAllow <choice>] - sets the ctypeAllow parameter SET [adminEmail <email>] - sets the email for the admin

AXIGEN User Manual
Copyright © 2006 GECAD Technologies S.R.L.
http://www.axigen.com
316
The following parameters' value describe text that will be inserted in the mail ESET addHeader - sets the the headers that will be added to the mail - enters text context ESET bodyBegin - sets the text that will be inserted before the body - enters text context ESET bodyEnd - sets the text that will be added to the body to the mail - enters text context The following parameters' value describe text that will be included in the NDR ESET unknownCommand - sets the descrition of the error in case of a unknown command - enters text context ESET invalidUserName - sets the descrition of the error in case of an invalid user name - enters text context ESET notAUser - sets the descrition of the error in case the user does not belong to the list - enters text context ESET badConfirmation - sets the descrition of the error in case of a bad confirmation - enters text context ESET userAlreadySubscribed - sets the descrition of the error in case the user already exists - enters text context ESET invalidFormat - sets the descrition of the error in case of an invalid format - enters text context The following parameters' value should be a RFC2822 compliant mail ESET requestNeedsConfirmation - sets the template that will ask the user for a confirmation - enters text context ESET requestNeedsAdminConfirmation - sets the template that will tell the user to wait for admin's confirmation - enters text context ESET autoRejectResponse - sets the template that will tell the user that his mail is rejected ESET welcome - sets the template that will tell the user that he has been created - enters text context ESET goodbye - sets the template that will tell the user that he has been deleted - enters text context ESET subscribeDenied - sets the template that will tell the user that he has not been created - enters text context CONFIG WEBMAILDATA - enters the webmaildata context CONFIG FILTERS - enters the filters context ADD User email <email> name <name> - adds an user to the list (changes context) UPDATE User email <email> - updates an user from the list (changes context) REMOVE User email <email> - removes an user from the list SHOW User email <email> [ATTR <param>] - shows an user from the list ADD RemoveHeader <name> - adds a header to the list of headers to be removed REMOVE RemoveHeader <name> - removes a header from the list of headers to be removed WebmailData Context <domain-list-webmaildata#> The commands available for the WebmailData context are: EXIT/QUIT - exits CLI and closes connection to AXIGEN HELP - prints this help message BACK - cancels any changes made and switches back to the previous context DONE - saves the changes and switches back to previous context SHOW [ATTR <param>] - shows information about this context SET [skin <skin>] - sets the skin for webmail SET [pageSize <pageSize>] - sets page size SET [saveToSent <yes|no>] - sets keep a mail copy in "Sent" folder SET [deleteToTrash <yes|no>] - sets delete mail to trash SET [confirmMailDelete <yes|no>] - sets confirmation of mail delete SET [confirmFolderEmpty <yes|no>] - sets confirmation of empty folder SET [htmlFilterLevel <no.>] - sets the security level for a html mail body SET [signature <signature>] - sets the account's signature

AXIGEN User Manual
Copyright © 2006 GECAD Technologies S.R.L.
http://www.axigen.com
317
User Context<domain-list-user#> The commands available for the User context are: EXIT/QUIT - exits CLI and closes connection to AXIGEN HELP - prints this help message BACK - cancels any changes made and switches back to the previous context DONE - saves the changes and switches back to previous context SHOW [ATTR <param>] - shows information about this context SET [email <email>] - sets the user's email - only usable in an UPDATE operation SET [name <name>] - sets the user's name
WebmailData Context <domain-webmaildata#> The commands available for the WebmailData context are: EXIT/QUIT - exits CLI and closes connection to AXIGEN HELP - prints this help message BACK - cancels any changes made and switches back to the previous context DONE - saves the changes and switches back to previous context SHOW [ATTR <param>] - shows information about this context SET [skin <skin>] - sets the skin for webmail SET [pageSize <pageSize>] - sets page size SET [saveToSent <yes|no>] - sets keep a mail copy in "Sent" folder SET [deleteToTrash <yes|no>] - sets delete mail to trash SET [confirmMailDelete <yes|no>] - sets confirmation of mail delete SET [confirmFolderEmpty <yes|no>] - sets confirmation of empty folder SET [htmlFilterLevel <no.>] - sets the security level for a html mail body MigrationData Context <domain-migrationdata#> The commands available for the MigrationData context are: EXIT/QUIT - exits CLI and closes connection to AXIGEN HELP - prints this help message BACK - cancels any changes made and switches back to the previous context DONE - saves the changes and switches back to previous context SHOW [ATTR <param>] - shows information about this context SET [enable <yes|no>] - enables migration of accounts from this domain SET [remoteImapHost <host>] - sets the name of remote IMAP machine from which the domain's accounts are migrated SET [remoteImapPort <port>] - sets the IMAP server's port on the remote machine SET [remoteSmtpHost <host>] - sets the name of remote SMTP machine from which the domain's accounts are migrated SET [remoteSmtpPort <port>] - sets the SMTP server's port on the remote machine PublicFolder Context <domain-publicFolder#> The commands available for the Public Folder context are: EXIT/QUIT - exits CLI and closes connection to AXIGEN HELP - prints this help message BACK - cancels any changes made and switches back to the previous context COMMIT - commits the changes made in this context SHOW [ATTR <param>] - shows information about this context
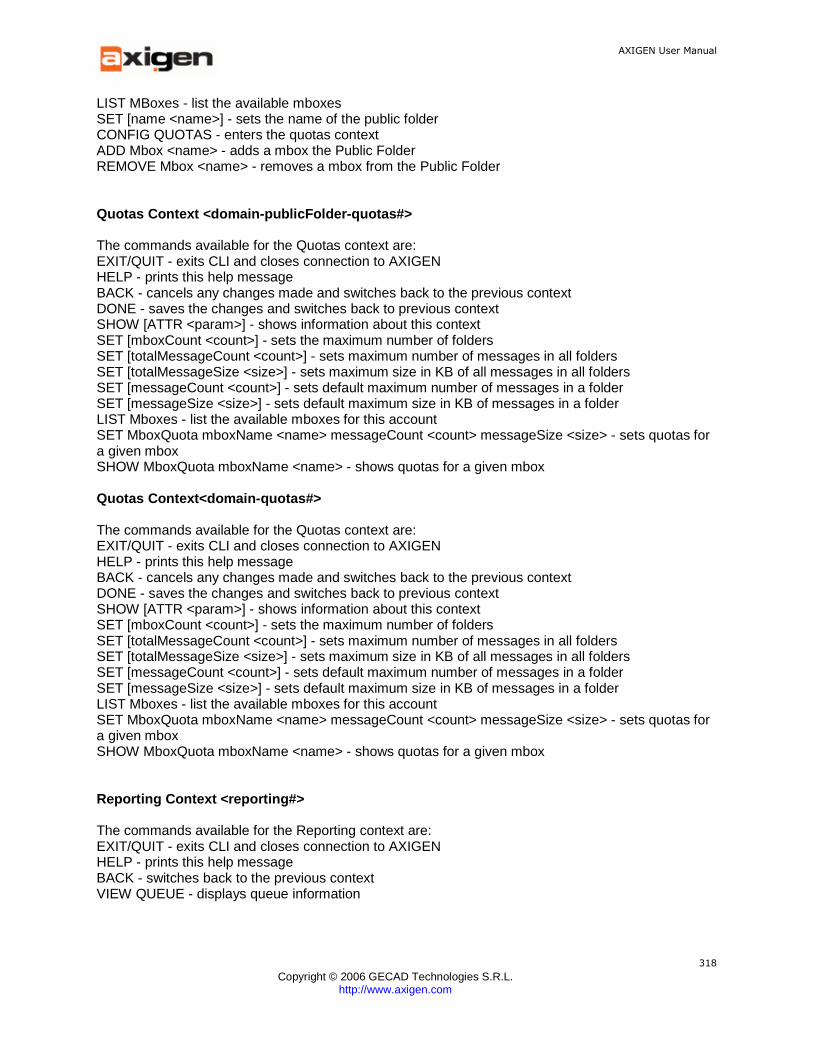
AXIGEN User Manual
Copyright © 2006 GECAD Technologies S.R.L.
http://www.axigen.com
318
LIST MBoxes - list the available mboxes SET [name <name>] - sets the name of the public folder CONFIG QUOTAS - enters the quotas context ADD Mbox <name> - adds a mbox the Public Folder REMOVE Mbox <name> - removes a mbox from the Public Folder Quotas Context <domain-publicFolder-quotas#> The commands available for the Quotas context are: EXIT/QUIT - exits CLI and closes connection to AXIGEN HELP - prints this help message BACK - cancels any changes made and switches back to the previous context DONE - saves the changes and switches back to previous context SHOW [ATTR <param>] - shows information about this context SET [mboxCount <count>] - sets the maximum number of folders SET [totalMessageCount <count>] - sets maximum number of messages in all folders SET [totalMessageSize <size>] - sets maximum size in KB of all messages in all folders SET [messageCount <count>] - sets default maximum number of messages in a folder SET [messageSize <size>] - sets default maximum size in KB of messages in a folder LIST Mboxes - list the available mboxes for this account SET MboxQuota mboxName <name> messageCount <count> messageSize <size> - sets quotas for a given mbox SHOW MboxQuota mboxName <name> - shows quotas for a given mbox Quotas Context<domain-quotas#> The commands available for the Quotas context are: EXIT/QUIT - exits CLI and closes connection to AXIGEN HELP - prints this help message BACK - cancels any changes made and switches back to the previous context DONE - saves the changes and switches back to previous context SHOW [ATTR <param>] - shows information about this context SET [mboxCount <count>] - sets the maximum number of folders SET [totalMessageCount <count>] - sets maximum number of messages in all folders SET [totalMessageSize <size>] - sets maximum size in KB of all messages in all folders SET [messageCount <count>] - sets default maximum number of messages in a folder SET [messageSize <size>] - sets default maximum size in KB of messages in a folder LIST Mboxes - list the available mboxes for this account SET MboxQuota mboxName <name> messageCount <count> messageSize <size> - sets quotas for a given mbox SHOW MboxQuota mboxName <name> - shows quotas for a given mbox Reporting Context <reporting#> The commands available for the Reporting context are: EXIT/QUIT - exits CLI and closes connection to AXIGEN HELP - prints this help message BACK - switches back to the previous context VIEW QUEUE - displays queue information
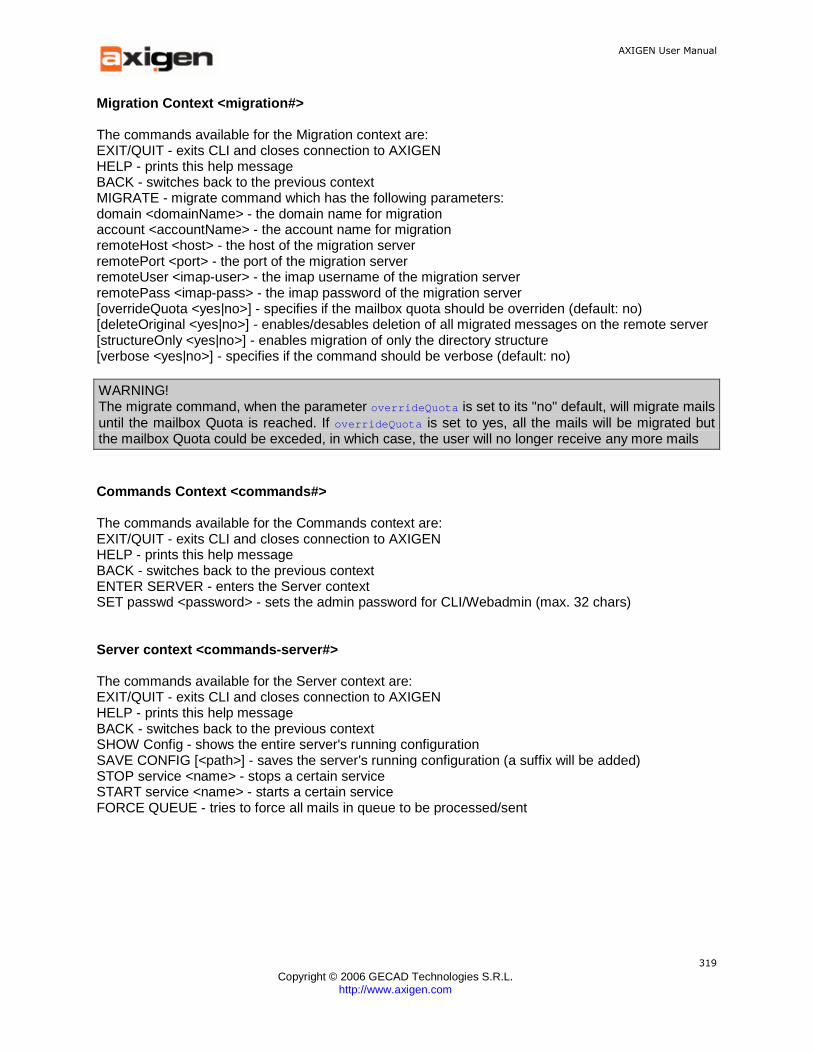
AXIGEN User Manual
Copyright © 2006 GECAD Technologies S.R.L.
http://www.axigen.com
319
Migration Context <migration#> The commands available for the Migration context are: EXIT/QUIT - exits CLI and closes connection to AXIGEN HELP - prints this help message BACK - switches back to the previous context MIGRATE - migrate command which has the following parameters: domain <domainName> - the domain name for migration account <accountName> - the account name for migration remoteHost <host> - the host of the migration server remotePort <port> - the port of the migration server remoteUser <imap-user> - the imap username of the migration server remotePass <imap-pass> - the imap password of the migration server [overrideQuota <yes|no>] - specifies if the mailbox quota should be overriden (default: no) [deleteOriginal <yes|no>] - enables/desables deletion of all migrated messages on the remote server [structureOnly <yes|no>] - enables migration of only the directory structure [verbose <yes|no>] - specifies if the command should be verbose (default: no)
WARNING! The migrate command, when the parameter overrideQuota is set to its "no" default, will migrate mails until the mailbox Quota is reached. If overrideQuota is set to yes, all the mails will be migrated but the mailbox Quota could be exceded, in which case, the user will no longer receive any more mails
Commands Context <commands#> The commands available for the Commands context are: EXIT/QUIT - exits CLI and closes connection to AXIGEN HELP - prints this help message BACK - switches back to the previous context ENTER SERVER - enters the Server context SET passwd <password> - sets the admin password for CLI/Webadmin (max. 32 chars) Server context <commands-server#> The commands available for the Server context are: EXIT/QUIT - exits CLI and closes connection to AXIGEN HELP - prints this help message BACK - switches back to the previous context SHOW Config - shows the entire server's running configuration SAVE CONFIG [<path>] - saves the server's running configuration (a suffix will be added) STOP service <name> - stops a certain service START service <name> - starts a certain service FORCE QUEUE - tries to force all mails in queue to be processed/sent

AXIGEN User Manual
Copyright © 2006 GECAD Technologies S.R.L.
http://www.axigen.com
320
10. Configuring AXIGEN using the Configuration File
The configuration process for AXIGEN Mail Server can also be executed by manually editing the AXIGEN Mail Server configuration file (axigen.cfg). This file contains the general server configuration settings. The general server configuration file currently used by AXIGEN Mail Server is located by default in /var/opt/axigen/run/axigen.cfg . Besides the axigen.cfg file, there are currently another 3 (three) configuration files, available only in binary (not-editable) format:
• account.cfg : file containing the configuration for an individual user account. Data is written to this file when a new user is created or an existing user is modified. More information on configuring accounts using WebAdmin in the Accounts Tab section;
• domain.cfg : file containing the configuration for a domain. Data is written to this file when a domain is added or modified. More information on configuring accounts using WebAdmin in the Domains Tab section
• maillist.cfg : file containing the configuration for a mail list. Data is written to this file when a mail list is added or modified. More information on configuring lists using WebAdmin in the Lists tab section.
Samples of AXIGEN Mail Server configuration files can be found in /opt/axigen/share/examples directory.
10.1. Working with axigen.cfg
The general server configuration file currently used by AXIGEN Mail Server is located by default in /var/opt/axigen/run/axigen.cfg . A sample configuration file can also be found in the /opt/axigen/share/examples directory.
The axigen.cfg file includes the complete specifications for AXIGEN configuration. Besides containing configuration data specific for AXIGEN modules, axigen.cfg is also used for specifying the primary domain for AXIGEN server (primaryDomain ).
Using axigen.cfg , you have access to all AXIGEN Mail Server configuration parameters. Using a text editor, you can manually edit the parameter values and modify the server configuration. The configuration file also contains information on default and possible values and a short explanation for each parameter.
The same options are available when using WebAdmin, except that changes to the configuration are made through the Web GUI. Detailed information on how to configure each parameter and information on its functions are given in the Configuring AXIGEN using WebAdmin subsections.
Restrictions
When working with axigen.cfg file, you need to follow the restrictions listed below:
• maximum attribute name length: 64 • maximum attribute value length: 128 (expressed as string in configuration file). Each STRING
value is limited to this length, 255
Note: Each time you modify the main configuration file, a reload signal must be sent to AXIGEN, in order to load the new configuration settings.
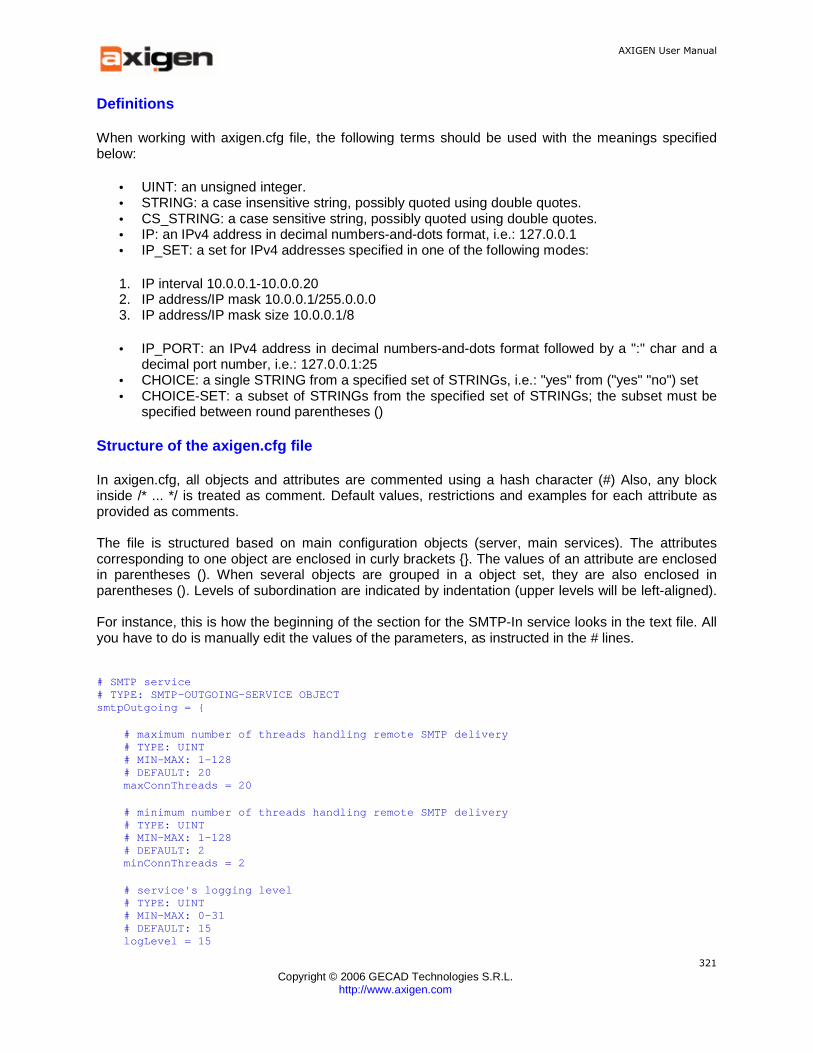
AXIGEN User Manual
Copyright © 2006 GECAD Technologies S.R.L.
http://www.axigen.com
321
Definitions
When working with axigen.cfg file, the following terms should be used with the meanings specified below:
• UINT: an unsigned integer. • STRING: a case insensitive string, possibly quoted using double quotes. • CS_STRING: a case sensitive string, possibly quoted using double quotes. • IP: an IPv4 address in decimal numbers-and-dots format, i.e.: 127.0.0.1 • IP_SET: a set for IPv4 addresses specified in one of the following modes:
1. IP interval 10.0.0.1-10.0.0.20 2. IP address/IP mask 10.0.0.1/255.0.0.0 3. IP address/IP mask size 10.0.0.1/8
• IP_PORT: an IPv4 address in decimal numbers-and-dots format followed by a ":" char and a decimal port number, i.e.: 127.0.0.1:25
• CHOICE: a single STRING from a specified set of STRINGs, i.e.: "yes" from ("yes" "no") set • CHOICE-SET: a subset of STRINGs from the specified set of STRINGs; the subset must be
specified between round parentheses ()
Structure of the axigen.cfg file
In axigen.cfg, all objects and attributes are commented using a hash character (#) Also, any block inside /* ... */ is treated as comment. Default values, restrictions and examples for each attribute as provided as comments. The file is structured based on main configuration objects (server, main services). The attributes corresponding to one object are enclosed in curly brackets {}. The values of an attribute are enclosed in parentheses (). When several objects are grouped in a object set, they are also enclosed in parentheses (). Levels of subordination are indicated by indentation (upper levels will be left-aligned). For instance, this is how the beginning of the section for the SMTP-In service looks in the text file. All you have to do is manually edit the values of the parameters, as instructed in the # lines. # SMTP service # TYPE: SMTP-OUTGOING-SERVICE OBJECT smtpOutgoing = { # maximum number of threads handling remote SMT P delivery # TYPE: UINT # MIN-MAX: 1-128 # DEFAULT: 20 maxConnThreads = 20 # minimum number of threads handling remote SMT P delivery # TYPE: UINT # MIN-MAX: 1-128 # DEFAULT: 2 minConnThreads = 2 # service's logging level # TYPE: UINT # MIN-MAX: 0-31 # DEFAULT: 15 logLevel = 15
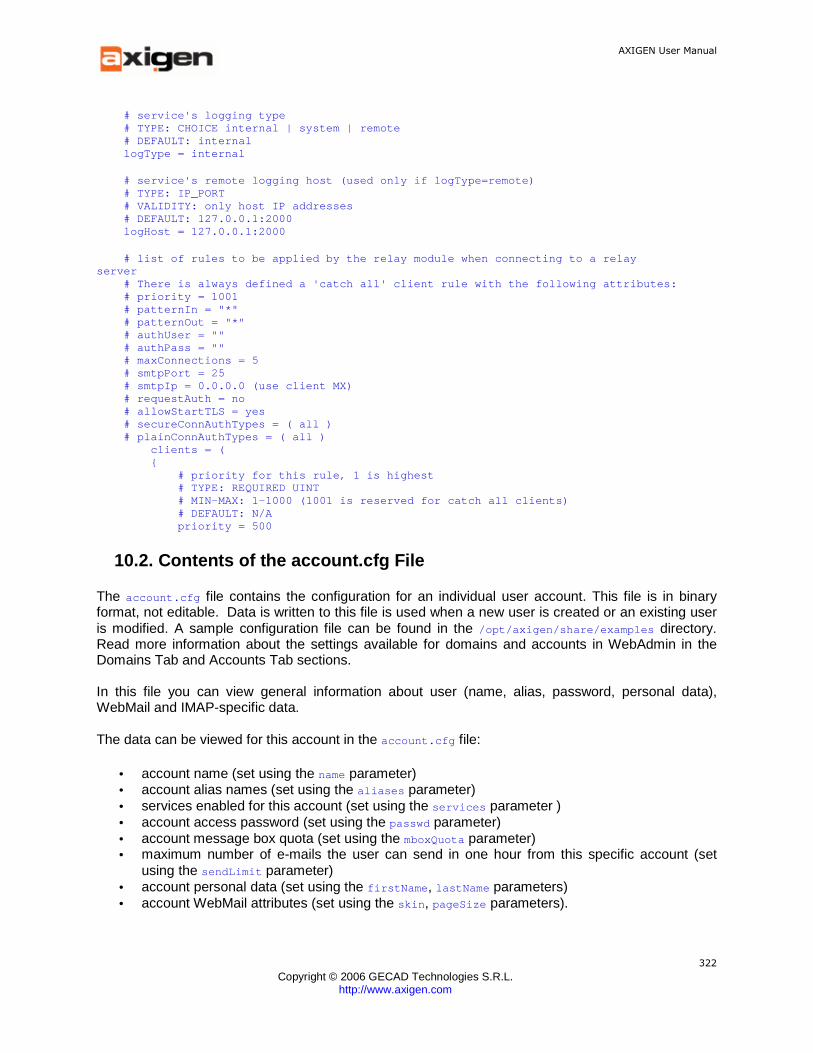
AXIGEN User Manual
Copyright © 2006 GECAD Technologies S.R.L.
http://www.axigen.com
322
# service's logging type # TYPE: CHOICE internal | system | remote # DEFAULT: internal logType = internal # service's remote logging host (used only if l ogType=remote) # TYPE: IP_PORT # VALIDITY: only host IP addresses # DEFAULT: 127.0.0.1:2000 logHost = 127.0.0.1:2000 # list of rules to be applied by the relay modu le when connecting to a relay server # There is always defined a 'catch all' client rule with the following attributes: # priority = 1001 # patternIn = "*" # patternOut = "*" # authUser = "" # authPass = "" # maxConnections = 5 # smtpPort = 25 # smtpIp = 0.0.0.0 (use client MX) # requestAuth = no # allowStartTLS = yes # secureConnAuthTypes = ( all ) # plainConnAuthTypes = ( all ) clients = ( { # priority for this rule, 1 is highest # TYPE: REQUIRED UINT # MIN-MAX: 1-1000 (1001 is reserved for catch all clients) # DEFAULT: N/A priority = 500
10.2. Contents of the account.cfg File
The account.cfg file contains the configuration for an individual user account. This file is in binary format, not editable. Data is written to this file is used when a new user is created or an existing user is modified. A sample configuration file can be found in the /opt/axigen/share/examples directory. Read more information about the settings available for domains and accounts in WebAdmin in the Domains Tab and Accounts Tab sections. In this file you can view general information about user (name, alias, password, personal data), WebMail and IMAP-specific data. The data can be viewed for this account in the account.cfg file:
• account name (set using the name parameter) • account alias names (set using the aliases parameter) • services enabled for this account (set using the services parameter ) • account access password (set using the passwd parameter) • account message box quota (set using the mboxQuota parameter) • maximum number of e-mails the user can send in one hour from this specific account (set
using the sendLimit parameter) • account personal data (set using the firstName , lastName parameters) • account WebMail attributes (set using the skin , pageSize parameters).

AXIGEN User Manual
Copyright © 2006 GECAD Technologies S.R.L.
http://www.axigen.com
323
Example of a possible account configuration account { name = userName aliases = () services = (smtp pop3 imap webmail) passwd = "password" mboxQuota = 0 sendLimit = 0 personalData = { firstName = Foo lastName = BAR webmailData = { skin = default pageSize = 20 } }
10.3. Contents of the domain.cfg file
The domain.cfg file contains the configuration for a domain. It is used when a domain is added or modified. This file is in binary format and cannot be directly (manually) edited. In order to change it, you can use another configuration method available in AXIGEN Mail Server, for instance WebAdmin. The parameters available in the domain.cfg file and their possible/default values are presented in this section for information purposes only. This file contains general information about domain (name, alias, assigned IP address, AXIGEN services and Sieve scripts enabled for this domain), WebMail-specific data, topology and storage specific information. After being created, a domain.cfg file must be loaded in AXIGEN server as detailed in the Domains tab section)
• The domain name (using the name parameter) • The domain aliases on the AXIGEN server (using the aliases parameter • The IP address assigned to this specific domain (using the assignedIP parameter) • The AXIGEN services enabled for this specific domain (using the services parameter) • The filters to be used before delivering e-mails to this specific domain • The domain maximum number of simultaneous opened storage files (using the maxOpenFiles
parameter) • The account's message box quota (using the mboxQuota parameter) • The maximum number of e-mails that can be sent within one hour from an account from this
specific domain (using the sendLimit parameter) • The domain's specific attributes for WebMail (using the skin, pageSize, confirmMailDelete,
confirmFolderEmpty, saveToSent, deleteToTrash parameters) • The topology of message storages for this specific domain (using the
messageStorageTopology, path, ID, maxDirs, maxFiles , maxFileSize parameters) • The topology of account storages for this specific domain (using the accountStorageTopology,
path, ID, maxMboxes parameters)
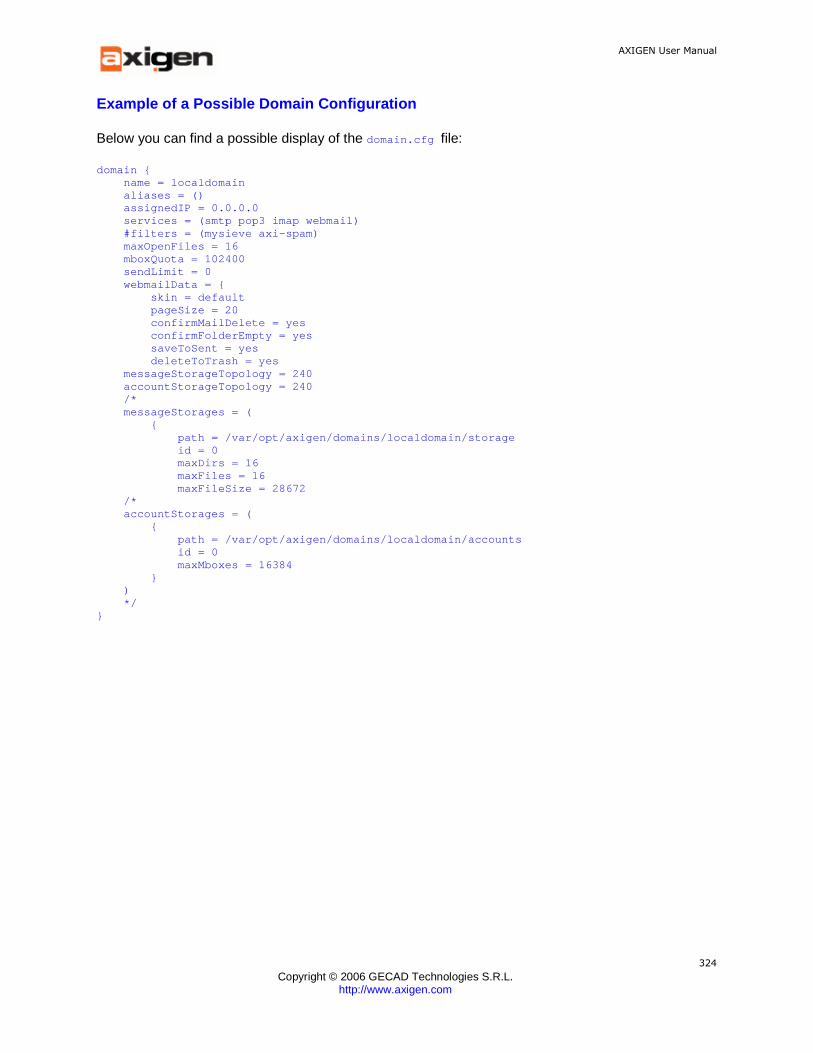
AXIGEN User Manual
Copyright © 2006 GECAD Technologies S.R.L.
http://www.axigen.com
324
Example of a Possible Domain Configuration
Below you can find a possible display of the domain.cfg file:
domain { name = localdomain aliases = () assignedIP = 0.0.0.0 services = (smtp pop3 imap webmail) #filters = (mysieve axi-spam) maxOpenFiles = 16 mboxQuota = 102400 sendLimit = 0 webmailData = { skin = default pageSize = 20 confirmMailDelete = yes confirmFolderEmpty = yes saveToSent = yes deleteToTrash = yes messageStorageTopology = 240 accountStorageTopology = 240 /* messageStorages = ( { path = /var/opt/axigen/domains/localdom ain/storage id = 0 maxDirs = 16 maxFiles = 16 maxFileSize = 28672 /* accountStorages = ( { path = /var/opt/axigen/domains/localdom ain/accounts id = 0 maxMboxes = 16384 } ) */ }

AXIGEN User Manual
Copyright © 2006 GECAD Technologies S.R.L.
http://www.axigen.com
325
11. Command Line Parameters for AXIGEN
The following command line parameters are available in the current version of AXIGEN. These parameters are common to all platforms.
Display version
Use the -v , --version command to print the version currently installed and exit.
Run in foreground
Use the --foreground command to run the program in foreground.
Crash control
Use the --drop-core command to specify the full path (maximum length is 256 characters) to an existing directory where to drop the core (section in memory containing relevant information about resident processes). Useful in case of errors causing the program to exit. No default value is set, meaning the core is not saved by default.
Process ID
Use the -P , --pidfile c ommand to specify the full path to pid file. The default value is /var/opt/axigen/run/axigen.pid .
Path to configuration file
Use the -C , --configfile command to specify the path where the server configuration file resides. Default value is:
/etc/opt/axigen/axigen.cfg
Using mqview tool to view status for messages in th e queue
The AXIGEN queue contains for each message stored in the queue, besides the message itself, a file with a status report for the message. You can view the status report for the files currently in the AXIGEN queue using the mqview tool:
/var/opt/axigen/queue/0F/S12BE Solution 1:
cd /var/opt/axigen/queue/0F /opt/axigen/bin/mqview @ S12BE Solution 2:
/opt/axigen/bin/mqview /var/opt/axigen/queue 0F12BE Each of these commands displays an output similar to the one below: johnd /var/opt/axigen/queue/00 # mqview @ S5F4E Mail Queue view of file : ../00/S5F4E
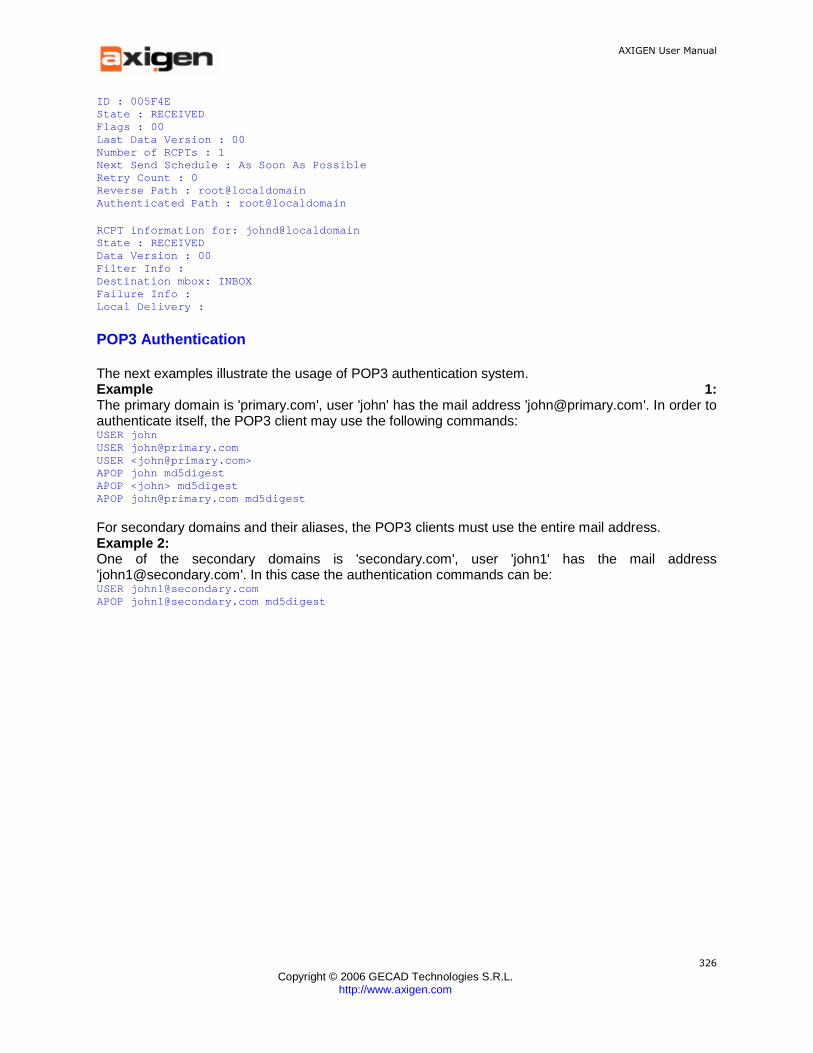
AXIGEN User Manual
Copyright © 2006 GECAD Technologies S.R.L.
http://www.axigen.com
326
ID : 005F4E State : RECEIVED Flags : 00 Last Data Version : 00 Number of RCPTs : 1 Next Send Schedule : As Soon As Possible Retry Count : 0 Reverse Path : root@localdomain Authenticated Path : root@localdomain RCPT information for: johnd@localdomain State : RECEIVED Data Version : 00 Filter Info : Destination mbox: INBOX Failure Info : Local Delivery :
POP3 Authentication
The next examples illustrate the usage of POP3 authentication system. Example 1: The primary domain is 'primary.com', user 'john' has the mail address '[email protected]'. In order to authenticate itself, the POP3 client may use the following commands: USER john USER [email protected] USER <[email protected]> APOP john md5digest APOP <john> md5digest APOP [email protected] md5digest For secondary domains and their aliases, the POP3 clients must use the entire mail address. Example 2: One of the secondary domains is 'secondary.com', user 'john1' has the mail address '[email protected]'. In this case the authentication commands can be: USER [email protected] APOP [email protected] md5digest

AXIGEN User Manual
Copyright © 2006 GECAD Technologies S.R.L.
http://www.axigen.com
327
12. RFCs Currently Implemented by AXIGEN
POP3
RFC 1939 - Post Office Protocol (version 3) RFC 2449 - POP3 Extension Mechanism RFC 1734 - POP3 AUTHentication command
POP3 and IMAP Specifications
RFC 2195 - IMAP/POP AUTHorize Extension for Simple Challenge/Response RFC 2595 - Using TLS with IMAP, POP3 and ACAP
SMTP specifications
RFC 2821 - Simple Mail Transfer Protocol RFC 821 - Simple Mail Transfer Protocol (obsolete) RFC 822 - Format of ARPA Internet text messages RFC 974 - Mail routing and the domain system RFC 1891 - SMTP Service Extension for Delivery Status Notification0073 RFC 3501 - Internet message access protocol (version 4rev1)
SMTP service extensions
RFC 2821 - Simple Mail Transfer Protocol RFC 1869 - SMTP Service Extensions RFC 2554 - SMTP Service Extension for Authentication RFC 1830 - SMTP Service Extensions for Transmission of Large and Binary MIME Messages RFC 2920 - SMTP Service Extension for Command Pipelining RFC 1652 - SMTP Service Extension for 8bit-MIME transport RFC 1870 - SMTP Service Extension for Message Size Declaration
IMAP specifications
RFC 3501 - NTERNET MESSAGE ACCESS PROTOCOL - VERSION 4rev1 RFC 2342 - IMAP4 Namespace RFC 2180 - IMAP4 Multi-Accessed Mailbox Practice RFC 2683 - IMAP4 Implementation Recommendations RFC 2087 - IMAP4 QUOTA extension
Implementation Recommendations
RFC 2359 - IMAP4 UIDPLUS extension RFC 2088 - IMAP4 non-synchronizing literals RFC 2177 - IMAP4 IDLE command

AXIGEN User Manual
Copyright © 2006 GECAD Technologies S.R.L.
http://www.axigen.com
328
RFC 3502 - Internet Message Access Protocol (IMAP) - MULTIAPPEND Extension RFC 3348 - The Internet Message Action Protocol (IMAP4) Child Mailbox Extension
HTTP specifications:
RFC 2616 - Hypertext Transfer Protocol -- HTTP/1.1 RFC 2965 - HTTP State Management Mechanism RFC 2396 - Uniform Resource Identifiers (URI): Generic Syntax
DNS specifications
RFC 1034 - Domain names, Concepts and Facilities RFC 1035 - Domain names, Implementation and Specification
Sieve extensions implemented in AXIGEN
RFC 3028 - Sieve: A Mail Filtering Language (Extensions defined in the base RFC: fileinto, reject, envelope) RFC 3894 - Sieve Extension: Copying without Side Effects RFC 3431 - Sieve Extension: Relational Tests; Comparator extension: i;numeric-comparator RFC 3598 - Sieve Email Filtering -- Subaddress Extension
Generic RFCs
RFC 2822 - Internet message format RFC 2045 - MIME Part One: Format of Internet Message Bodies RFC 2046 - MIME Part Two: Media Types RFC 2047 - MIME Part Three: Message Header Extensions for Non-ASCII Text


