BASIC DATA ENTRY IN SERVICE POINT Training Manual Contents Introduction and User Agreements........................................................ 2 Logon Procedures ................................................................................. 3 Key Features of the Main Navigation Screen ........................................ 4 Creating a Client Record ....................................................................... 6 o Client Search .................................................................................. 6 o Search Results ............................................................................... 7 o Creating a Household..................................................................... 8 o Release of Information (ROI) ......................................................... 9 o Shelter Point ...................................................................................12 o Entry/Exit Screen............................................................................15 Ongoing Data Entry ...............................................................................18 o Service Transactions Screen .........................................................18 o Back Dating Mode ..........................................................................22 o Previous Answers/Historical Data/Creating Goals .........................23 o Deleting Clients ..............................................................................24 Exiting a Client ......................................................................................25 Recap of Important Policies ..................................................................28 Explanation of Universal Data Elements ...............................................30 Explanation of Program Specific Data Elements ...................................33 Page
Introduction and User Agreements........................................................ 2 Logon Procedures ................................................................................. 3 Key Features of the Main Navigation Screen........................................ 4 Creating a Client Record ....................................................................... 6
o Client Search.................................................................................. 6 o Search Results ............................................................................... 7 o Creating a Household..................................................................... 8 o Release of Information (ROI) ......................................................... 9 o Shelter Point...................................................................................12 o Entry/Exit Screen............................................................................15
Ongoing Data Entry...............................................................................18 o Service Transactions Screen .........................................................18 o Back Dating Mode ..........................................................................22 o Previous Answers/Historical Data/Creating Goals .........................23 o Deleting Clients ..............................................................................24
Exiting a Client ......................................................................................25 Recap of Important Policies ..................................................................28
Explanation of Universal Data Elements ...............................................30 Explanation of Program Specific Data Elements...................................33
Page
HMIS Training Manual – Basic Data Entry
April, 2009 Page 2
Introduction and User Agreements This manual is designed to serve as a training tool as well as a reference guide for basic data entry in the Summit County Homeless Management Information System (HMIS). Before you can use the HMIS you will need to read and sign all HMIS User Agreements and complete necessary HMIS User Training and follow-up assessments. Once training is completed and your Agency HMIS Administrator approves your level of readiness, you will be assigned a unique user ID and password that is to be used by only you and to be kept confidential. At any time if you forget your user ID or password, you may contact your Agency HMIS Administrator and get your password reset. You should have received:
• Summit County HMIS Policies and Procedures Manual • HMIS User Agreement • Helpdesk contact information
HMIS Training Manual – Basic Data Entry
April, 2009 Page 3
Logon to the Summit County HMIS
1. Establish your internet connection and open the Internet Explorer Window. 2. Type the following web address to access the Logon website.
http://citrix.infolineinc.org 3. Type your Citrix User ID, and
Password, then click the Logon button. (Individual User ID’s will be assigned to you once training is complete.)
4. Click on the Service Point icon.
5. Type your assigned HMIS User ID, and Password, then click the Logon button.
6. Your main Service Point navigation screen should appear. (Options on the Service Point navigation screen may be different depending on your user access level.)
IMPORTANT NOTE: All transactions you complete while logged in the system are being recorded within your user profile. It is important you do not share your Logon ID and password with anyone else in your office, you will be held responsible for all transactions completed under your own ID. Your Agency HMIS Administrator will be able to run a report to see all transactions completed by each user profile.
Software logon requirements An Internet connection (56K minimum speed), and Internet Explorer 6.0 or higher is required to connect to the Info Line Citrix Server and logon to ServicePoint.
HMIS Training Manual – Basic Data Entry
April, 2009 Page 4
Key Features of the Main Navigation Screen
Newsflash – System
The Systems Administrator has the capability of posting important messages regarding System-wide updates, meetings, and/or issues related to the system in this section. You should check the Newsflash – System box for new information each time you logon. Every agency which logs on can see this information.
Newsflash - Agency Individual Agency Administrators can post messages in this area that can only be viewed by members of their own agency. It’s important to check this information each time you logon.
Navigation Tabs/Links
The Navigation Tabs are links to the various modules of the system. They remain viewable at all times during data entry. The Navigation links are only viewable on the main screen, and link to the same modules of the system that the tabs do. Links on the main screen define what each module contains. Individual user profiles determine which modules are viewable by each user.
Followup List The follow up list is user specific. It will list any pending item that has been entered for follow-up by that specific user only.
ServicePoint Modules
ClientPoint, ResourcePoint, Shelterpoint, ActivityPoint, SkanPoint, Reports, Newsflash, Help, Administration are all modules of the ServicePoint software within our HMIS. Only modules you have approved access to will appear on this screen when you log on.
HMIS Training Manual – Basic Data Entry
April, 2009 Page 5
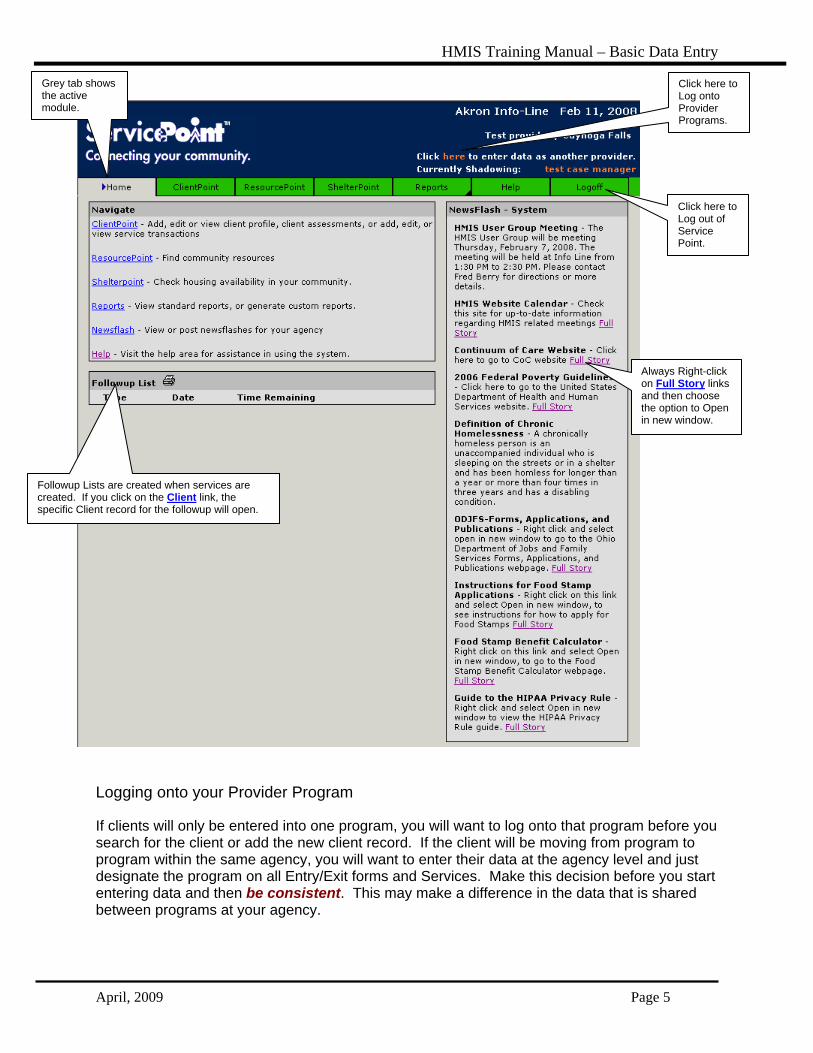
Logging onto your Provider Program
If clients will only be entered into one program, you will want to log onto that program before you search for the client or add the new client record. If the client will be moving from program to program within the same agency, you will want to enter their data at the agency level and just designate the program on all Entry/Exit forms and Services. Make this decision before you start entering data and then be consistent. This may make a difference in the data that is shared between programs at your agency.
Grey tab shows the active module.
Click here to Log out of Service Point.
Click here to Log onto Provider Programs.
Always Right-click on Full Story links and then choose the option to Open in new window.
Followup Lists are created when services are created. If you click on the Client link, the specific Client record for the followup will open.
HMIS Training Manual – Basic Data Entry
April, 2009 Page 6
Creating a Client Record
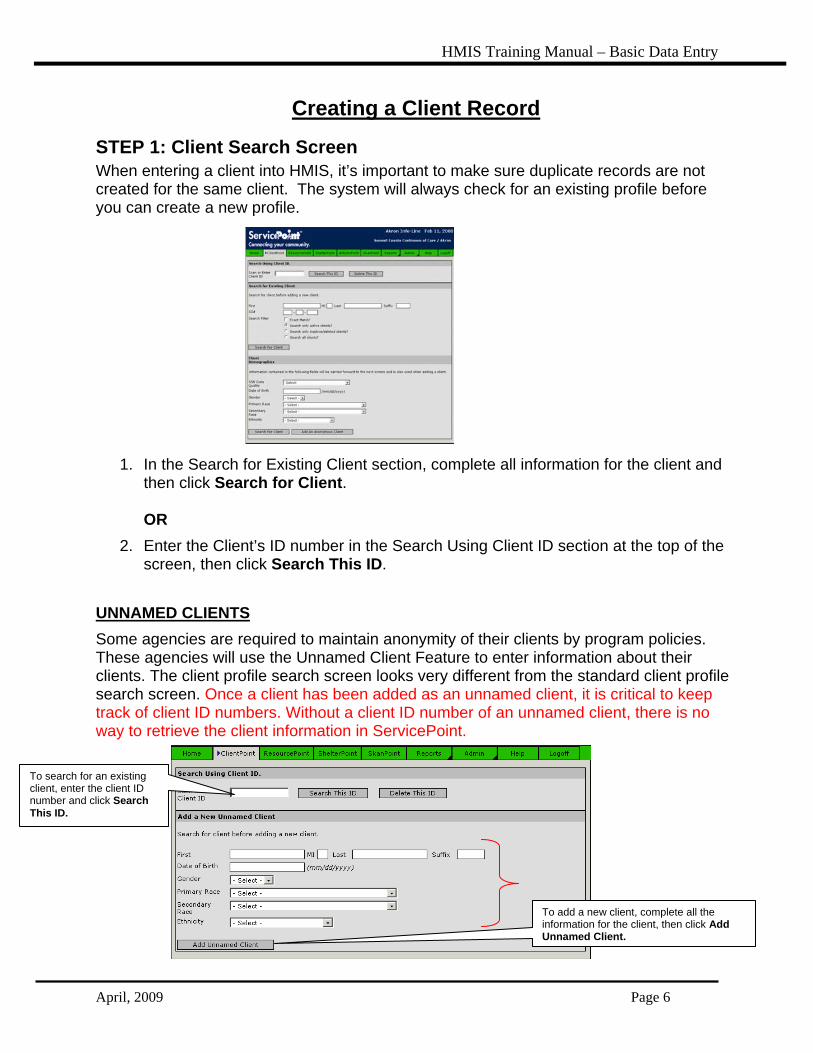
STEP 1: Client Search Screen When entering a client into HMIS, it’s important to make sure duplicate records are not created for the same client. The system will always check for an existing profile before you can create a new profile.
1. In the Search for Existing Client section, complete all information for the client and then click Search for Client. OR
2. Enter the Client’s ID number in the Search Using Client ID section at the top of the screen, then click Search This ID.
UNNAMED CLIENTS Some agencies are required to maintain anonymity of their clients by program policies. These agencies will use the Unnamed Client Feature to enter information about their clients. The client profile search screen looks very different from the standard client profile search screen. Once a client has been added as an unnamed client, it is critical to keep track of client ID numbers. Without a client ID number of an unnamed client, there is no way to retrieve the client information in ServicePoint. To search for an existing
client, enter the client ID number and click Search This ID.
To add a new client, complete all the information for the client, then click Add Unnamed Client.
HMIS Training Manual – Basic Data Entry
April, 2009 Page 7
STEP 2: Search Results Screen
3. If the client’s information does not show up at the top of the screen, then click the button Add Client with This Information.
G
STEP 3: Client Profile Screen (Closed Status) The main profile screen that is displayed once you create/open a client profile displays only the client’s basic information and household details.
If the client profile already exists, it will appear here. To open the client profile, just click on the client’s name.
A red star means this client was entered by your agency.
Clicking on the Trashcan will delete the client record permanently.
Document the client id number.
Click here to expand the household information. Create a client Household ONLY if the client is NOT single.
HMIS Training Manual – Basic Data Entry
April, 2009 Page 8
1. Make sure the Household Information is expanded and click Start New Household. 2. Complete the following screen for the current client and click Start New
Household.
3. To add family members, complete all fields in the Add Additional Clients to Household section (add family members one at a time), then click Search For Client. Once you are sure there is no existing profile for the family member, complete the relationship fields for that family member.
Click Add Client with This Information. 4. Click Save & Exit when all members have been added to return to the client profile.
Select Self for the Relationship to Head of the Household.
Add Additional Clients to Household Section
HMIS Training Manual – Basic Data Entry
April, 2009 Page 9
Important Information about Households Create household members before creating an Entry/Exit or an ROI so that you can record services for all family members at one time. If your agency is not providing services to all members of a household, it will appear that you are providing services to them all if you enter them as a part of the ServicePoint household connected to your program. We recommend that you do not enter these persons as part of the ServicePoint household connected to your program. If they receive services later, add them to the household connected to your program at that time. The user can delete clients from a household; however, this should only occur if entry was incorrect. If a client was a household member and the data entered is correct, the user must enter the ‘Date Removed’ to avoid incorrect reporting.
RELEASE OF INFORMATION ( ROI)
A Release of Information (ROI) is required to share client information with other providers in your community. As of March 1, 2010 everything but AIDS/HIV, mental health and entry exit information will be shared. To Add an ROI:
1. View the client's record, also called a client profile.
2. Click the orange ROI button.
The Release of Information window will display.
3. Click the Add Release button and the Release of Info Data window on the next page will display.
HMIS Training Manual – Basic Data Entry
April, 2009 Page 10
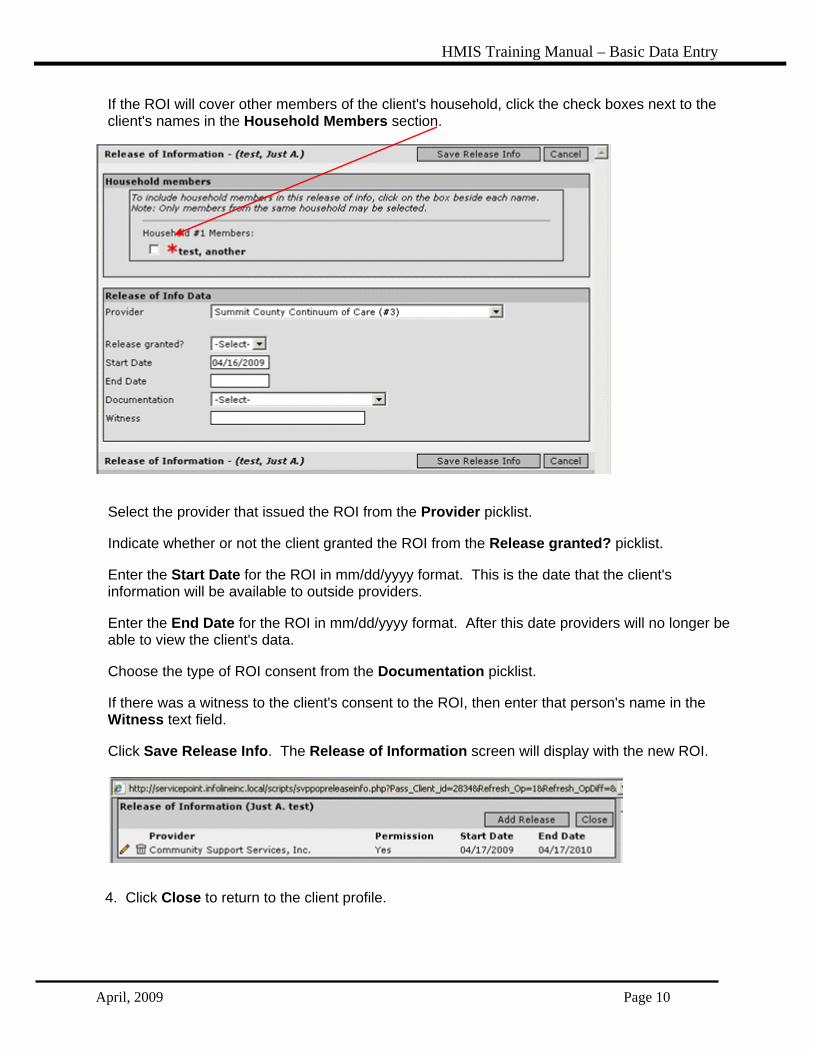
If the ROI will cover other members of the client's household, click the check boxes next to the client's names in the Household Members section.
Select the provider that issued the ROI from the Provider picklist.
Indicate whether or not the client granted the ROI from the Release granted? picklist.
Enter the Start Date for the ROI in mm/dd/yyyy format. This is the date that the client's information will be available to outside providers.
Enter the End Date for the ROI in mm/dd/yyyy format. After this date providers will no longer be able to view the client's data.
Choose the type of ROI consent from the Documentation picklist.
If there was a witness to the client's consent to the ROI, then enter that person's name in the Witness text field.
Click Save Release Info. The Release of Information screen will display with the new ROI.
4. Click Close to return to the client profile.
HMIS Training Manual – Basic Data Entry
April, 2009 Page 11
To Edit or Delete an ROI:
1. View the client's record, also called a client profile.
2. Click the orange ROI button.
The Release of Information window will display.
To Edit an ROI: Click the pencil icon. The screen will refresh and display the client's ROI data. Make the desired changes. Click Save Release Info. The screen will refresh and display the Release of Information screen.
To Delete an ROI: Click the trash can icon. A warning window will display asking the following, "Are you sure you want to delete this release of info?" Click OK to continue. The Release of Information window will refresh and the ROI will no longer be listed.
3. Click Close to return to the Client Profile.
HMIS Training Manual – Basic Data Entry
April, 2009 Page 12
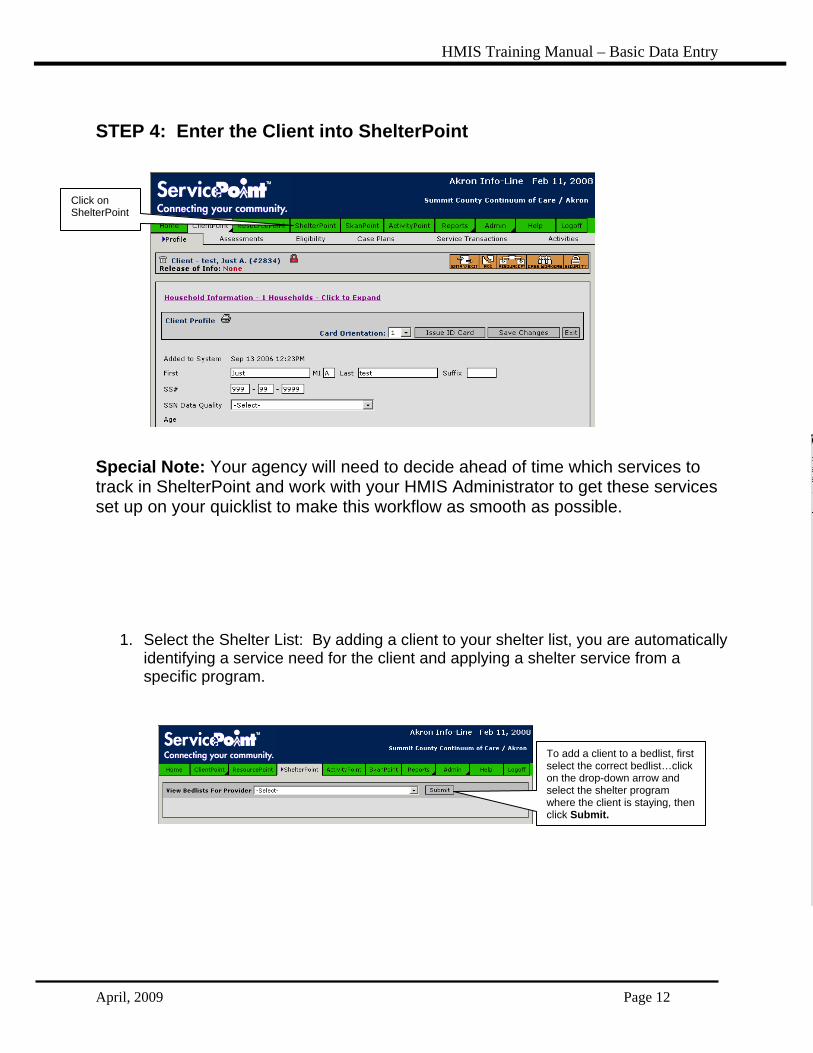
STEP 4: Enter the Client into ShelterPoint
Special Note: Your agency will need to decide ahead of time which services to track in ShelterPoint and work with your HMIS Administrator to get these services set up on your quicklist to make this workflow as smooth as possible.
1. Select the Shelter List: By adding a client to your shelter list, you are automatically
identifying a service need for the client and applying a shelter service from a specific program.
Click on ShelterPoint
To add a client to a bedlist, first select the correct bedlist…click on the drop-down arrow and select the shelter program where the client is staying, then click Submit.
HMIS Training Manual – Basic Data Entry
April, 2009 Page 13
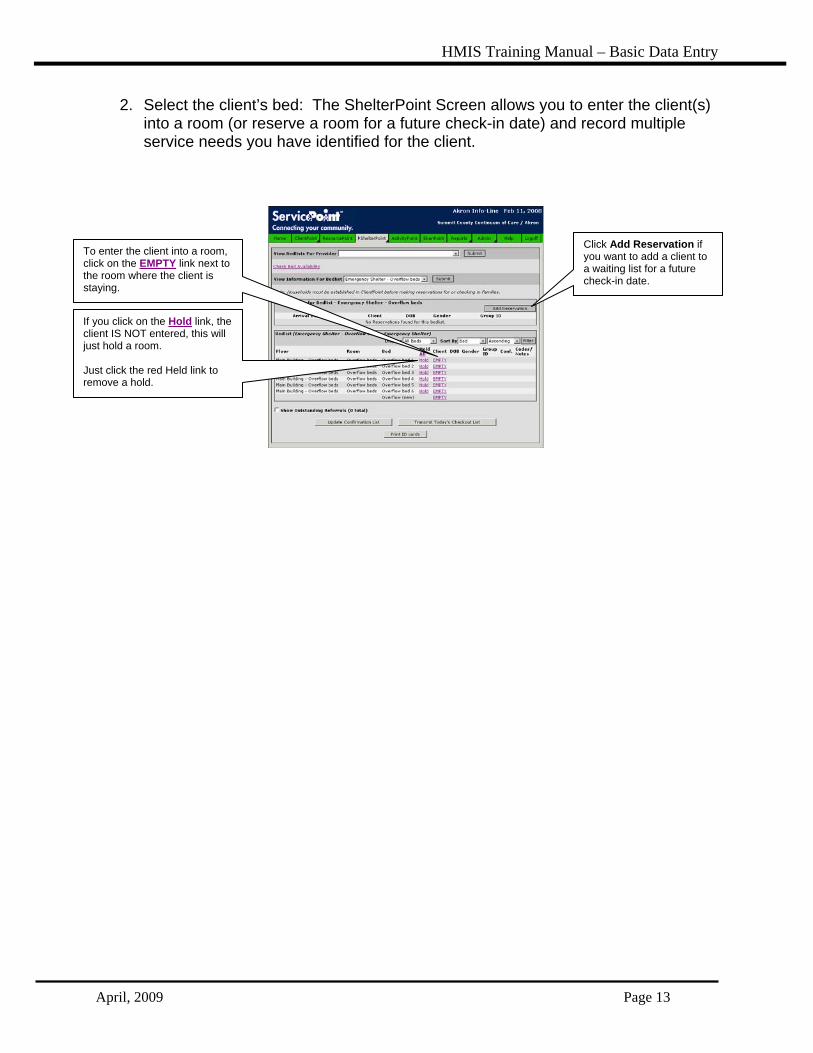
2. Select the client’s bed: The ShelterPoint Screen allows you to enter the client(s) into a room (or reserve a room for a future check-in date) and record multiple service needs you have identified for the client.
To enter the client into a room, click on the EMPTY link next to the room where the client is staying.
If you click on the Hold link, the client IS NOT entered, this will just hold a room. Just click the red Held link to remove a hold.
Click Add Reservation if you want to add a client to a waiting list for a future check-in date.
HMIS Training Manual – Basic Data Entry
April, 2009 Page 14
3. Completing the Checkin:
The top portion of the screen is to record details of the client checkin, such as supplies given, etc. Any information can be recorded in the Codes/Notes field.
Set the time to 12:00 AM if you cannot remember the exact time Remember to change the
Check In date to reflect the date the client moved in.
Check all household members and click Assign Bed to select a bed for each family member. If you do not assign a bed for each family member, they will be put into overflow beds.
An Entry/Exit date will be added to reflect the checkin date and time for all checked members of the household. Verify the correct program is selected for the Entry/Exit Date. By default the Entry/Exit Type is HUD40118.
Depending on how your agency is set up, you can enter services one at a time or multiple services at one time.
Remember to click Save & Continue to complete the checkin transaction.
All services will be set to start on the date and time indicated. Should match entry/exit date.
Use the Set All feature to enter all service Status at one time.
HMIS Training Manual – Basic Data Entry
April, 2009 Page 15
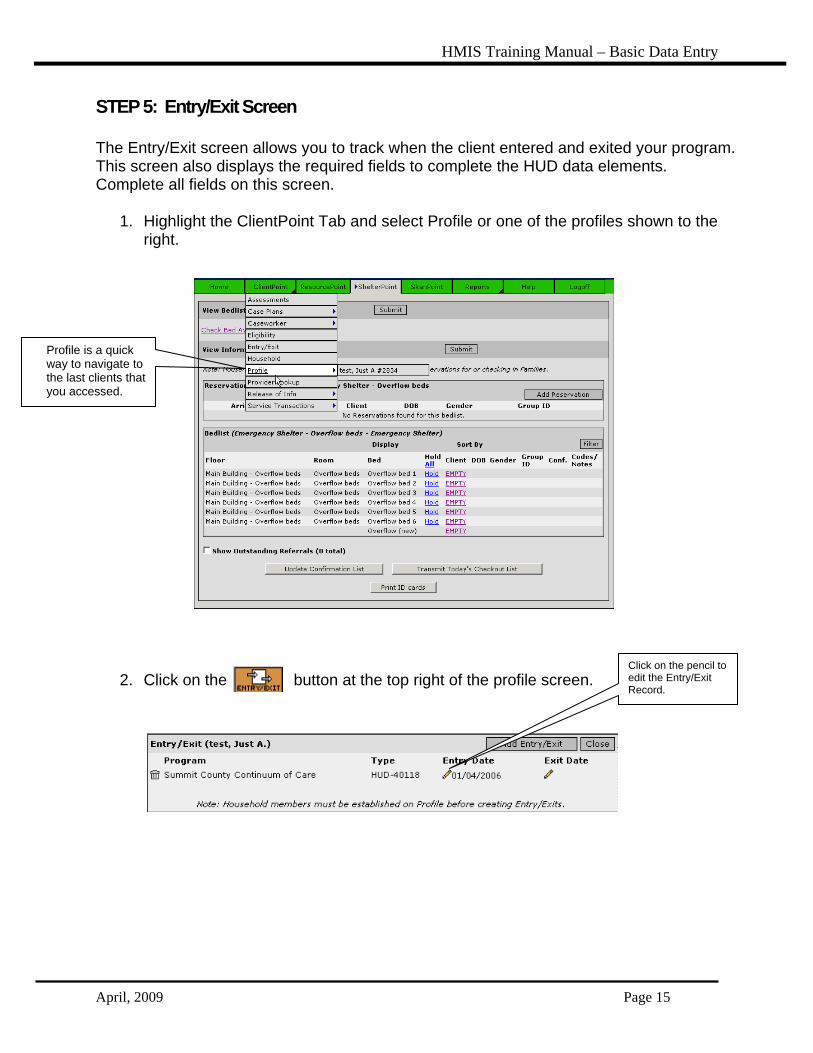
STEP 5: Entry/Exit Screen The Entry/Exit screen allows you to track when the client entered and exited your program. This screen also displays the required fields to complete the HUD data elements. Complete all fields on this screen.
1. Highlight the ClientPoint Tab and select Profile or one of the profiles shown to the right.
2. Click on the button at the top right of the profile screen.
Click on the pencil to edit the Entry/Exit Record.
Profile is a quick way to navigate to the last clients that you accessed.
HMIS Training Manual – Basic Data Entry
April, 2009 Page 16
3. Complete the Household Data Sharing Assessment and the required Universal
Data Elements for this client. The questions in Household Data Sharing contain elements required by HUD that could pertain to all members of a household if the individual were in a household. They are grouped in this assessment so that after a household is created the questions can be answered one time then applied equally to all members in a given household. Only answer questions that apply to every member of the household.
Verify that all members of the household are shown in the Entry/Exit Record.
If there is no secondary race, enter the primary race twice.
Click Add to enter Income information for the Client. Skip if Client has no income at program entry. Remember to update Income information when client exits the program.
You must enter Disability Types if you entered Yes to the client having a disability of long duration in the Universal Elements.
Add Household Data button.
HMIS Training Manual – Basic Data Entry
April, 2009 Page 17
4. After completing the questions for the client you entered, go to each of the client’s household member's records and complete all information for each member of the household. Children’s information won’t always have a SSN available, but you must enter a Date of Birth, otherwise the child will be treated as a single adult on reports. SPECIAL NOTE: If you don’t know the child’s exact birthdate, use the first day of the year for the child’s age (i.e. 8 year old would be 01/01/2000).
5. Click Save and Close to save the Entry/Exit and the Assessment. If you accidentally
close the Entry/Exit form before you are ready, you can click the Pencil next to the Entry Date to edit the information.
SPECIAL NOTE: Customized Assessments are available if your agency needs to collect additional information on your clients. Contact the Info Line HMIS Administrator if you want to use one of the additional standard assessments or wish to customize a unique assessment.
Click on the pencil to edit the Exit Date when the client exits the program.
Click on the pencil to edit the Entry if you need to fix a mistake.
Special Note: Only complete Children’s Enrollment Information in the Child’s record.
HMIS Training Manual – Basic Data Entry
April, 2009 Page 18
Ongoing Data Entry
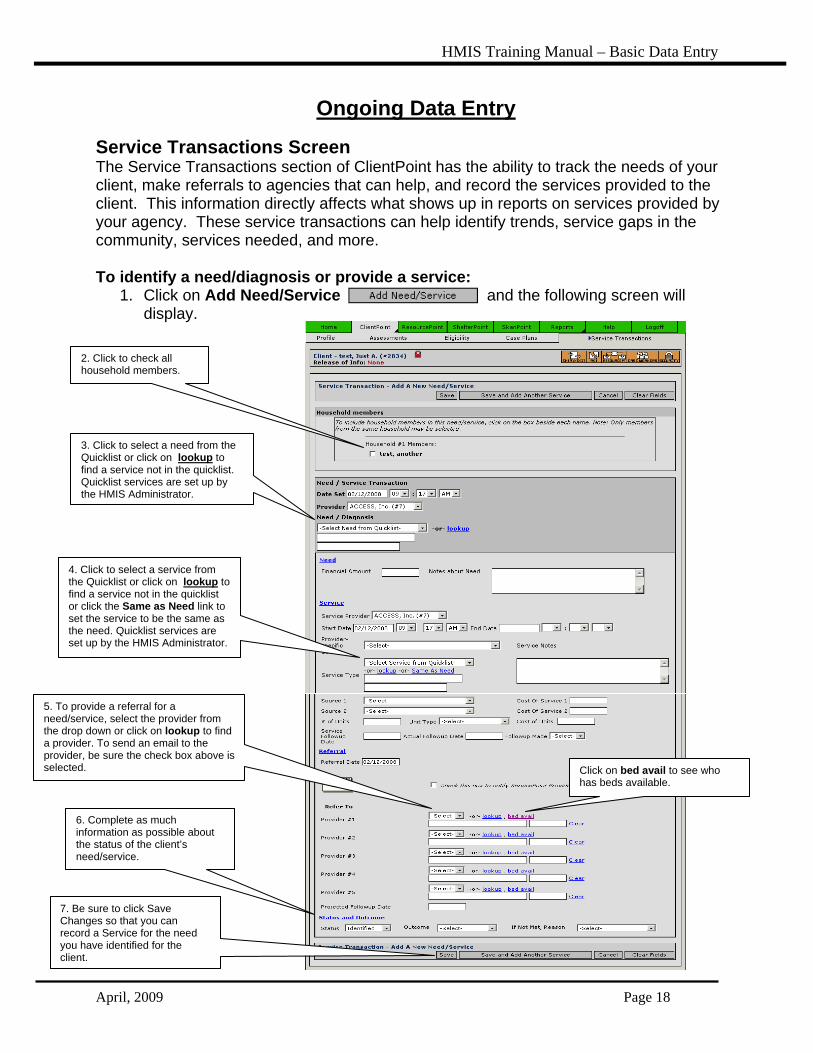
Service Transactions Screen The Service Transactions section of ClientPoint has the ability to track the needs of your client, make referrals to agencies that can help, and record the services provided to the client. This information directly affects what shows up in reports on services provided by your agency. These service transactions can help identify trends, service gaps in the community, services needed, and more. To identify a need/diagnosis or provide a service:
1. Click on Add Need/Service and the following screen will display.
2. Click to check all household members.
3. Click to select a need from the Quicklist or click on lookup to find a service not in the quicklist. Quicklist services are set up by the HMIS Administrator.
6. Complete as much information as possible about the status of the client’s need/service.
7. Be sure to click Save Changes so that you can record a Service for the need you have identified for the client.
4. Click to select a service from the Quicklist or click on lookup to find a service not in the quicklist or click the Same as Need link to set the service to be the same as the need. Quicklist services are set up by the HMIS Administrator.
5. To provide a referral for a need/service, select the provider from the drop down or click on lookup to find a provider. To send an email to the provider, be sure the check box above is selected. Click on bed avail to see who
has beds available.
HMIS Training Manual – Basic Data Entry
April, 2009 Page 19
To Provide Multiple Services (NOTE: a need must be identified first):
1. Under the section Service Transactions - Referrals, click on Multiple Services and complete the details on the service screen including information about how services were funded if applicable.
Click on any of these buttons to view the indicated services or needs.
HMIS Training Manual – Basic Data Entry
April, 2009 Page 20
2. Enter the Services as previously described on the bedlist checkin screen. 3. Click Save and Exit. NOTE: If you forget to add services you provided, these individuals will not show up on reports for your agency services.
HMIS Training Manual – Basic Data Entry
April, 2009 Page 21
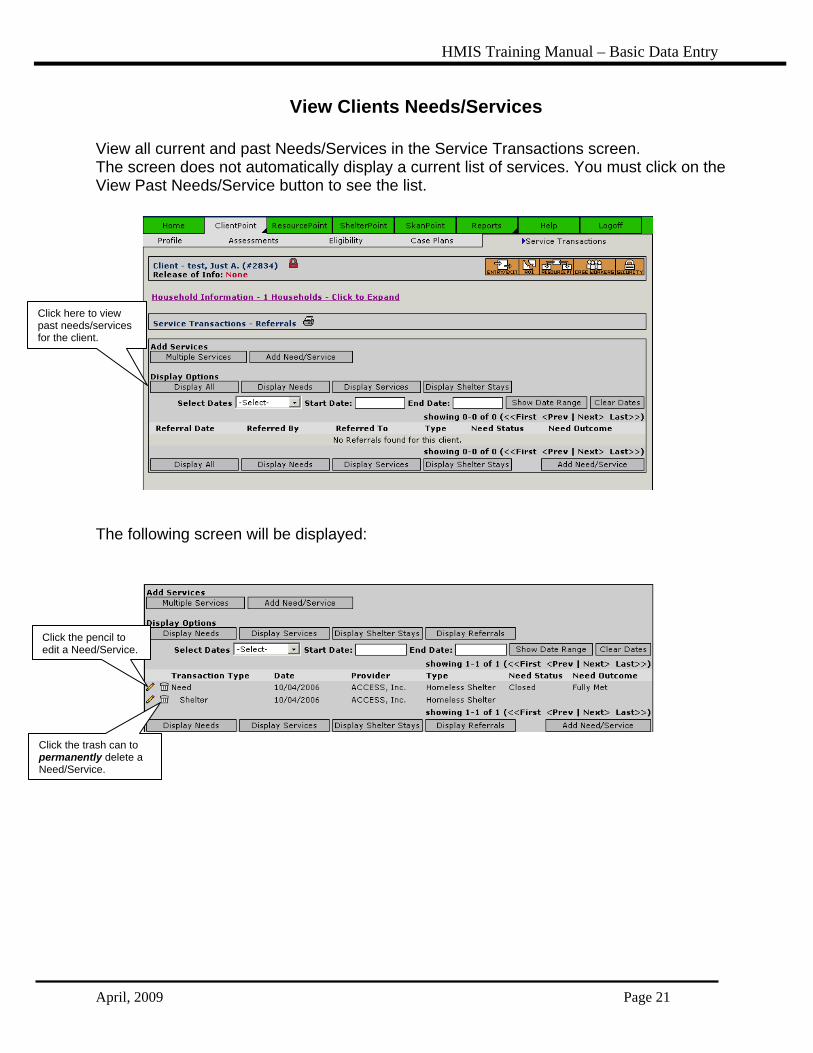
View Clients Needs/Services View all current and past Needs/Services in the Service Transactions screen. The screen does not automatically display a current list of services. You must click on the View Past Needs/Service button to see the list. The following screen will be displayed:
Click here to view past needs/services for the client.
Click the pencil to edit a Need/Service.
Click the trash can to permanently delete a Need/Service.
HMIS Training Manual – Basic Data Entry
April, 2009 Page 22
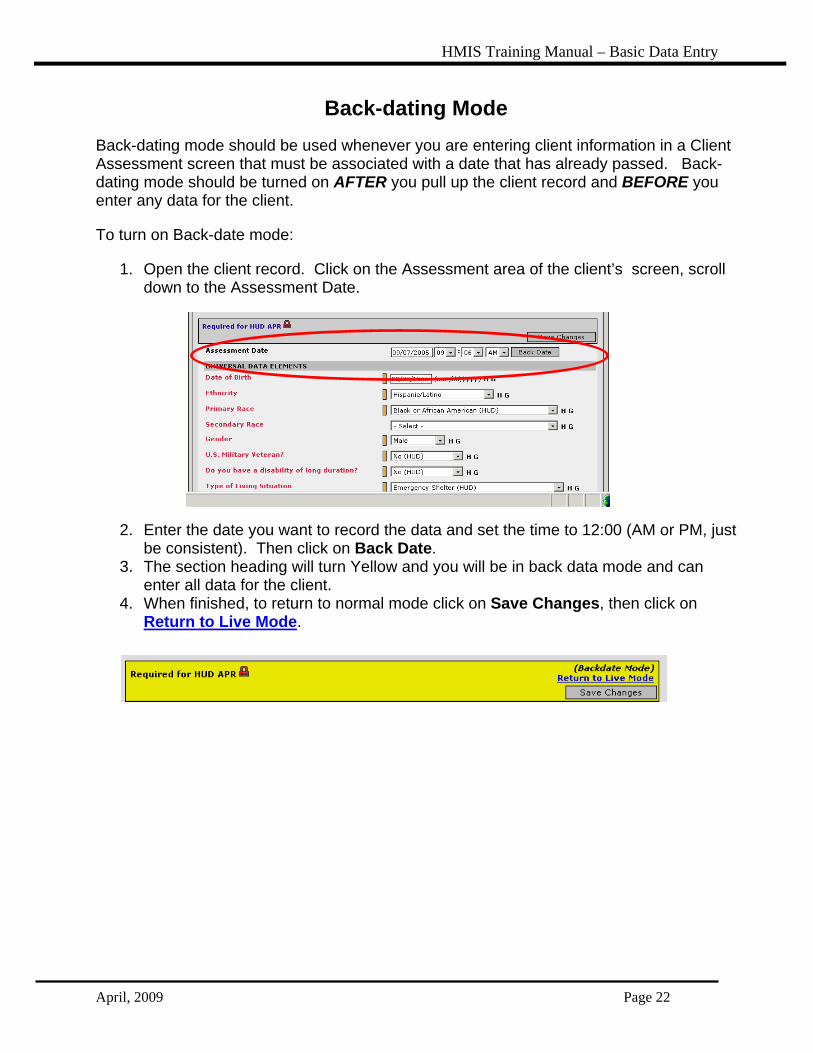
Back-dating Mode Back-dating mode should be used whenever you are entering client information in a Client Assessment screen that must be associated with a date that has already passed. Back-dating mode should be turned on AFTER you pull up the client record and BEFORE you enter any data for the client.
To turn on Back-date mode:
1. Open the client record. Click on the Assessment area of the client’s screen, scroll down to the Assessment Date.
2. Enter the date you want to record the data and set the time to 12:00 (AM or PM, just be consistent). Then click on Back Date.
3. The section heading will turn Yellow and you will be in back data mode and can enter all data for the client.
4. When finished, to return to normal mode click on Save Changes, then click on Return to Live Mode.
HMIS Training Manual – Basic Data Entry
April, 2009 Page 23
Previous Answers/Historical Data and Creating Goals If you have used Back-date mode, or updated information on an assessment, a record of the previous answer is always stored. This will allow you to report on historical data and give you a picture of how the client’s situation has changed over time. A small ‘H’ appears next to the answer field in assessments. Click the ‘H’ to see if historical data is stored for a specific question. If there are no previous answers, a blank screen will appear.
The ‘G’ next to the small ‘H’ allows the user to create a goal at the same time the user answers the assessment question. By clicking the ‘G’, the goal screen opens in a pop up box. The case note for the goal indicates creation while completing or editing the assessment. Goals can also be created in Case Plans.
NOTE: Goal follow-up dates show up on the main screen in Service Point at the bottom of the screen as a reminder and to allow the user to return to the goal and enter the actual follow-up date and outcome of the follow-up.
HMIS Training Manual – Basic Data Entry
April, 2009 Page 24
Deleting Clients
It is not a good idea to delete a client record from ClientPoint. You should only need to delete a record if the client has requested not to be in the database or an error has been made.
To delete a client record:
1. You must have an Agency Administrator access level or above to delete a record. 2. Find the client record by searching by name or social security #. 3. Possible matches display. 4. When you have identified the client record you wish to delete, click on the Delete Icon
(trash can). The record will remain within the database for reporting/statistical counts, but is no longer accessible via ServicePoint.
HMIS Training Manual – Basic Data Entry
April, 2009 Page 25
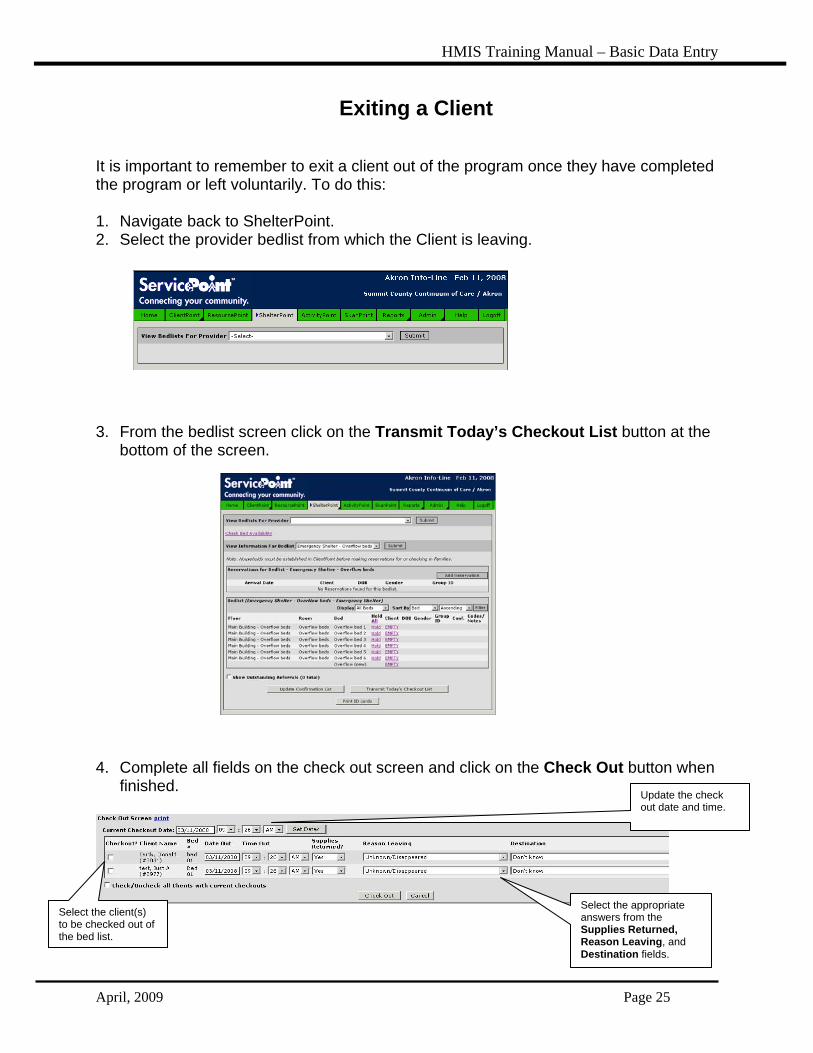
Exiting a Client It is important to remember to exit a client out of the program once they have completed the program or left voluntarily. To do this: 1. Navigate back to ShelterPoint. 2. Select the provider bedlist from which the Client is leaving.
3. From the bedlist screen click on the Transmit Today’s Checkout List button at the
bottom of the screen.
4. Complete all fields on the check out screen and click on the Check Out button when
finished.
Select the client(s) to be checked out of the bed list.
Update the check out date and time.
Select the appropriate answers from the Supplies Returned, Reason Leaving, and Destination fields.
HMIS Training Manual – Basic Data Entry
April, 2009 Page 26
5. Navigate to the client profile from the drop down menu.
6. Click on the Entry/Exit button. 7. The Entry/Exit record has been updated with an exit date.
8. Click on the pencil next to the Exit Date to enter exit data for the client(s).
Click on the pencil to edit the Entry/Exit record.
HMIS Training Manual – Basic Data Entry
April, 2009 Page 27
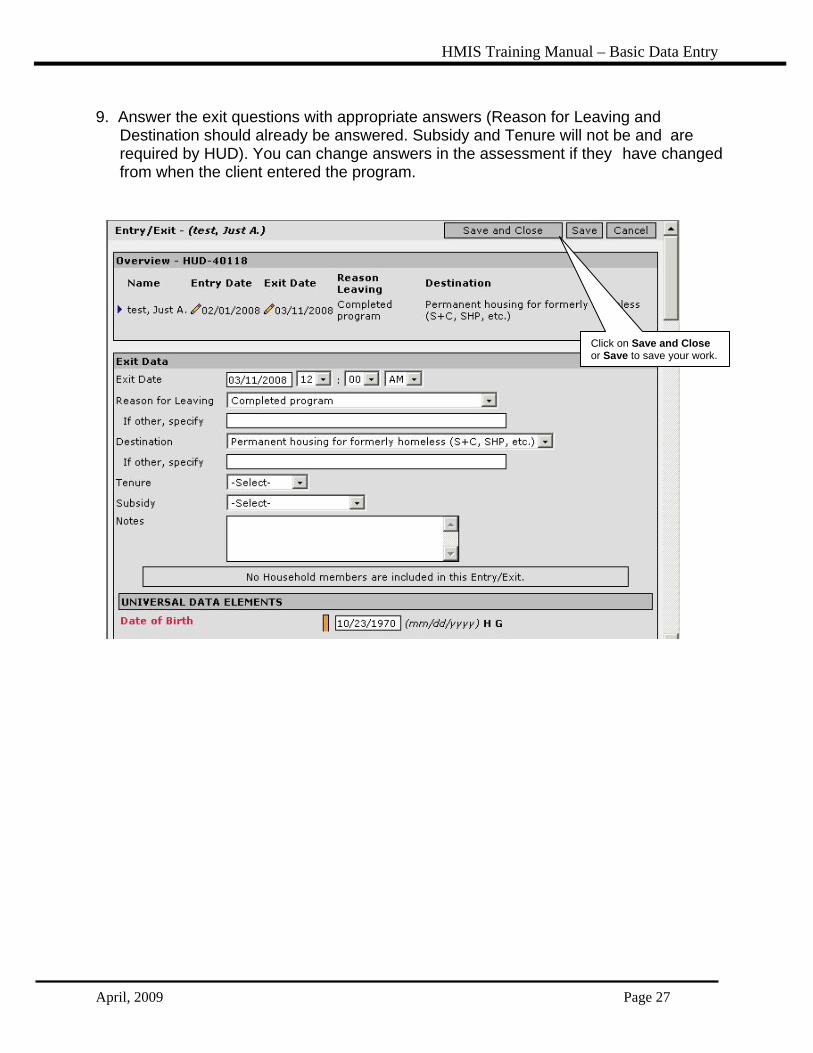
9. Answer the exit questions with appropriate answers (Reason for Leaving and Destination should already be answered. Subsidy and Tenure will not be and are required by HUD). You can change answers in the assessment if they have changed from when the client entered the program.
Click on Save and Close or Save to save your work.
HMIS Training Manual – Basic Data Entry
April, 2009 Page 28
Recap of Important Policies • Data Access
Since no ServicePoint data is stored on the local computer the physical vulnerability of agency computers does not constitute a significant threat to client confidentiality. However, any user access data, such as a password, that is stored on a computer or in a written file, does constitute a risk to client confidentiality.
• Unattended Active Sessions Users who have logged on to HMIS and have an active session should never leave their computer terminal unattended. They system does have an automatic log off feature (after 5 minutes?). If you are leaving your terminal for any period of time the user should logoff the active HMIS session.
• Downloaded Data Users who have been granted access to Report Writer/Query Function have the ability to download and save client level data onto their local computer. All client records containing identifying information that are stored within the participating agency’s local computers are the responsibility of the participating agency. A participating agency should develop protocol regarding the handling and protection of data downloaded.
• Data Disposal The Participating Agency agrees to dispose of documents that contain identifiable client level data by shredding paper records, deleting any information from diskette before disposal, and deleting any copies of client level data from the hard drive of any machine before transfer or disposal of property. The Participating Agencies must establish internal access to data protocols. These policies should include who has access, for what purpose, and how they can transmit this information. Issues to be addressed include storage, transmission and disposal of data.
Printed versions of confidential data should not be copied or left unattended and open to unauthorized access.
Media containing client-identified data will not be shared with any agency other than the owner of the data for any reason. Authorized employees using methods deemed appropriate by the participating agency may transport HMIS data that meet the above standard. Reasonable care should be used, and media should be secured when left unattended.
Magnetic media containing HMIS data that is released and/or disposed of from the Participating Agency and Central Server should first be processed to destroy any data residing on that media.
Formatting and overwriting are acceptable methods of destroying data.
HMIS Training Manual – Basic Data Entry
April, 2009 Page 29
Responsible personnel must authorize the shipping and receiving of magnetic media, and appropriate records must be maintained.
HMIS information in hardcopy format should be disposed of properly. This may include shredding finely enough to ensure that the information is unrecoverable.
Agency Specific Process discussion: • Is the person who interviews each client also responsible for the data entry of that
information into HMIS? If not, how will you handle missing information? • Are there any questions that may be difficult to ask the client, what will you do to collect
that data? • What happens to the client’s paper trail, signed consent forms, etc.? • Who is responsible for client requests of HMIS records? What will your procedure be?
ADDITIONAL TRAINING:
Intermediate: Administrator training Review of agency administrator roles and responsibilities Review of security policies and procedures Overview of HMIS administrative functions Setting up users and assigning access levels Entering and updating information pertaining to the participating agency
Advanced: Reporting Querying with HMIS Introduction to the report writing/query tool Using existing reports Creating new reports Exporting information to other software applications
HMIS Training Manual – Basic Data Entry
April, 2009 Page 30
Universal Data Elements
Name
– When Data Are Collected: Upon initial program entry/intake. – Subjects: All clients served. – Definition and Instructions:
• In four separate fields record the legal full, middle, last names and any suffixes (avoid aliases or nicknames)
• Record any other name used to receive services previously • Response Format: John David Doe Jr.
Social Security Number (SSN)
– When Data Are Collected: Upon initial program entry/intake. – Subjects: All clients served. – Definition and Instructions: In two separate fields record:
• Nine-digit Social Security Number • Quality of the data (Full SSN, Partial SSN, Don’t Know or Don’t Have,
Refused) • Response Format: 123456789
Date of Birth (DOB)
– When Data Are Collected: Upon initial program entry/intake. – Subjects: All clients served. – Definition and Instructions: Collect the month, day and year of birth for every
person served. • If a client cannot remember the year of birth, ask their age and
calculate the approximate year of birth. • Response Format: 08/31/1965, or if the DOB is unknown but age is known: AGE 30
= 01/01/1976 Ethnicity and Race
– When Data Are Collected: Upon initial program entry. – Subjects: All clients served. – Definition and Instructions: In two separate fields record both the self-
identified Hispanic or Latino ethnicity and the self-identified race of each client served.
• Allow clients to identify multiple racial categories. • Staff observation should NOT be used to collect this information.
Gender
– When Data Are Collected: Upon initial program entry. – Subjects: All clients served. – Definition and Instructions: Record the gender of each client served.
• Programs may add “transgender male to female” and “transgender female to male” categories.
• Response Categories: Female, Male
HMIS Training Manual – Basic Data Entry
April, 2009 Page 31
Veteran Status
– When Data Are Collected: Upon each program entry. – Subjects: All adults served. – Definition and Instructions: A veteran is someone who has served on active
duty in the Armed Forces of the United States. • This does not include inactive military reserves or the National Guard
unless the person was called up to active duty. • Response Categories: No, Yes
Disabling Condition
– When Data Are Collected: After the client has been admitted into the program.
– Subjects: All adults served. – Definition and Instructions: A disabling condition means:
• A disability as defined in Section 223 of the Social Security Act. • A physical, mental or emotional impairment which is of long-continued
and indefinite duration, substantially impedes ones ability to function independently, and of such a nature that such ability could be improved by more suitable housing conditions.
• A developmental disability as defined in Section 102 of the Developmental Disabilities Assistance and Bill of Rights Act.
• The disease of AIDS or any conditions arising from the etiological agency of AIDS.
• A diagnosable substance abuse disorder. Response Categories: No, Yes, Don’t Know, Refused
Residence Prior to Program Entry
– When Data Are Collected: Any time after the client has been admitted into the program.
– Subjects: All adults and unaccompanied youth served. – Definition and Instructions: In two separate fields record the type of living
arrangement the night before entry into the program and the length of time the client spent in that living arrangement.
Zip Code of Last Permanent Address
– When Data Are Collected: Upon each program entry. – Subjects: All adults and unaccompanied youth served. – Definition and Instructions: In two separate fields record the five-digit zip
code of the apartment, room, or house where the client last lived for 90 days or more, and the zip data quality code.
Program Entry Date
– When Data Are Collected: Upon each program entry. – Subjects: All clients served. – Definition and Instructions: Record the month, day, and year of first day of
service of program entry.
HMIS Training Manual – Basic Data Entry
April, 2009 Page 32
• For a shelter visit, this date would represent the first day of residence in a shelter program following residence outside of the shelter or in another program.
• For services, this date may represent the day of program enrollment, the day a service was provided, or the first date of a period of continuous participation in a service (e.g., daily, weekly or monthly).
• Response Format: 01/30/2004 Program Exit Date
– When Data Are Collected: Upon program exit. – Subjects: All clients served. – Definition and Instructions: Record the month, day, and year of last day of
service. • For a program providing housing or shelter, this date would represent
the last day of residence in the program’s housing before the client transfers to another residential program or leaves the shelter.
• For services, the exit date may represent the last day a service was provided or the last date of a period of continuous service.
• Response Format: 01/30/2004
HMIS Training Manual – Basic Data Entry
April, 2009 Page 33
Program Specific Data Elements Income and Sources
– When Data Are Collected: In the course of client assessment and at exit. – Subjects: All clients served. – Definition and Instructions: In three separate fields, record:
• (1) whether the client received income from each source listed on the next slide in the past 30 days;
• (2) the amount of income received from each source identified by the client; and
• (3) the client’s total monthly income (rounded to the nearest U.S. dollar).
– Allow clients to identify multiple sources of income. Non-Cash Benefits
– When Data Are Collected: In the course of client assessment and at exit. – Subjects: All adults and unaccompanied youth served. – Definition and Instructions: For each source, determine if the client received
any of the non-cash benefits in the past month (30 days). • Allow clients to identify multiple sources.
Physical Disability
– When Data Are Collected: In the course of client assessment once the client is admitted, unless this information is needed prior to admission to determine program eligibility.
– Subjects: All clients served. – Definition and Instructions: A physical disability includes an impairment which
is: • Expected to be of long-continued and indefinite duration; • Substantially impedes an individual’s ability to live independently; and • Of such a nature that such ability could be improved by more suitable
housing conditions. • Response Categories: No, Yes
HMIS Training Manual – Basic Data Entry
April, 2009 Page 34
Developmental Disability – When Data Are Collected: In the course of client assessment once the client
is admitted, unless this information is needed prior to admission to determine program eligibility.
– Subjects: All clients served. – Definition and Instructions: A developmental disability includes:
• Severe, chronic disability that is attributed to a mental and/or physical impairment;
• Occurs before 22 years of age; and • Limits the capacity for independent living & economic self-sufficiency.
• Response Categories: No, Yes HIV/AIDS
– When Data Are Collected: In the course of client assessment once the client is admitted, unless this information is needed prior to admission to determine program eligibility.
– Subjects: All adults and unaccompanied youth served. – Definition and Instructions: Determine if the client has been diagnosed with
AIDS or has tested positive for HIV. • If the client does not provide the information and it is not in case
manager records, leave the response field blank. • Response Categories: No, Yes
Mental Health
– When Data Are Collected: In the course of client assessment once the client is admitted, unless this information is needed prior to admission to determine program eligibility.
– Subjects: All adults and unaccompanied youth served. – Definition and Instructions: In separate fields, record:
• If the client has a mental health problem; • Whether the problem is expected to be of long-continued and
indefinite duration, and substantially impedes a client’s ability to live independently; and
• A mental health problem may include serious depression, serious anxiety, hallucinations, violent behavior, or thoughts of suicide.
HMIS Training Manual – Basic Data Entry
April, 2009 Page 35
Substance Abuse – When Data Are Collected: In the course of client assessment once the client
is admitted, unless this information is needed prior to admission to determine program eligibility.
– Subjects: All adults and unaccompanied youth served. – Definition and Instructions: In separate fields, record:
• If the client has an alcohol or drug abuse problem, or both. • Whether the problem is expected to be of long-continued and
indefinite duration, and substantially impedes a client’s ability to live independently.
Domestic Violence
– When Data Are Collected: In the course of client assessment. – Subjects: All adults and unaccompanied youth served. – Definition and Instructions: In separate fields, record:
• If the client has ever been a victim of domestic violence, and if so, • How long ago did the client have the most recent experience.
Services Received
– When Data Are Collected: In the course of client assessment and at appropriate points during the program stay.
– Subjects: All clients served. – Definition and Instructions: For each service encounter, two types of
information must be recorded in two separate fields: • The date of service as the two-digit month, two-digit day, and four-digit
year; and • The type of service
Destination
• When Data Are Collected: At program exit. • Subjects: All clients served. • Definition and Instructions: Record in three separate fields:
1. Where the client will be staying after they leave the program;
2. If this move is permanent or transitional (i.e., temporary); and
3. Does the move involve a HUD subsidy or other subsidy.
HMIS Training Manual – Basic Data Entry
April, 2009 Page 36
Reason for Leaving – When Data Are Collected: At program exit. – Subjects: All clients served. – Definition and Instructions: Record the reason why the client left the
program. If the client left for more than one reason, record only the primary reason.
Employment
– When Data Are Collected: In the course of client assessment and at exit. – Subjects: All adults and unaccompanied youth served. – Definition and Instructions: In four separate fields determine:
1. If client is currently employed; 2. How many hours client worked; 3. If work is permanent, temporary, or seasonal; and 4. If client is looking for work.
Education
– When Data Are Collected: In the course of client assessment and at exit. – Subjects: All adults and unaccompanied youth served – Definition and Instructions: In four separate fields determine:
1. If client is currently in school; 2. Whether clients has received training or vocational certificates; 3. The highest level of schooling client has achieved; and 4. Additional higher degrees. (Allow multiple degrees)
General Health Status
– When Data Are Collected: In the course of client assessment and at exit. – Subjects: All clients served. – Definition and Instructions: Determine how clients assess their health in
comparison to other people their age. Pregnancy Status
– When Data Are Collected: In the course of client assessment – Subjects: All females of child-bearing age – Definition and Instructions: In separate fields determine:
• Whether client is pregnant, and if so; • The client’s due date.
HMIS Training Manual – Basic Data Entry
April, 2009 Page 37
Veteran’s Information – When Data Are Collected: In the course of client assessment – Subjects: All person who answered “Yes” to Veteran Status question – Definition and Instructions: In separate fields determine:
1. Military service era; 2. Number of months on active duty; 3. Whether client served in war zone; 4. Name of war zone (multiple allowed); 5. Months served in war zone; 6. Whether client received hostile or friendly fire; 7. Branch of military (multiple allowed); and 8. Discharge type.
Children’s Education
– When Data Are Collected: In the course of client assessment – Subjects: All children between 5 and 17 years old – Definition and Instructions: For each child, determine in separate fields
1. Whether child is in school; 2. Name of school; 3. Type of school; 4. Date last enrolled in school, if not currently enrolled; and 5. Problems enrolling child in school (multiple allowed).