+ All Categories
Home > Documents > BCF Mackie Mode Guide - rockinrob.co.uk Sonar Mackie Mode Guide.pdf · control is identical whether...

BCF Mackie Mode Guide - rockinrob.co.uk Sonar Mackie Mode Guide.pdf · control is identical whether...

Date post: 14-Oct-2019
Category:
Upload: others
View: 6 times
Download: 0 times
Share this document with a friend
13
BCF Mackie Mode Guide I’ve made this document to compliment Blades’ (Cakewalk forums) excellent tutorial videos. I like to try and help out where I can and typing the same answers to the same questions several times has inspired me to produce this. I hope you find it useful............. I’ve made a few assumptions. I am assuming that you have the BCF connected in Sonar Mackie mode and the unit controls Sonar without problems. If you are having trouble with any of this then please visit http://www.blades85.com/sonar.htm or the Cakewalk Forums at http://forum.cakewalk.com/default.aspx and search for BCF posts notably by Jesse G, Blades, and me (FastBikerBoy) amongst others. INTRODUCTION As already stated everything in this tutorial relates to the unit being in Mackie Sonar mode (NCSo on the display at start up) and used with Sonar. In this configuration it is capable of just about everything the Mackie CS is with the exception of a few jog wheel related functions. I highly recommend downloading BCF View – a virtual LCD for use with the BCF. I’m led to believe however that it doesn’t work with Vista or Win 7. With XP though it works very well and helps you to “see” where you are. I find it easiest to think of the BCF being in various “modes”. Controls then relate to the current mode. Don’t worry I’ll explain all that later. The other recommendation that I’d err.... recommend is that you make up and print an overlay template from the Behringer website. A bit of good quality photo paper and craft knife will make your life much easier, not only using this tutorial but also to remind you of “what does what” when using the unit. I’ll write this guide as if you are completely new to the BCF so feel free to skip and pick at the bits you want to read.
Transcript

BCF Mackie Mode Guide

I’ve made this document to compliment Blades’ (Cakewalk forums) excellent tutorial videos. I like to

try and help out where I can and typing the same answers to the same questions several times has

inspired me to produce this. I hope you find it useful.............

I’ve made a few assumptions. I am assuming that you have the BCF connected in Sonar Mackie mode

and the unit controls Sonar without problems. If you are having trouble with any of this then please

visit http://www.blades85.com/sonar.htm or the Cakewalk Forums at

http://forum.cakewalk.com/default.aspx and search for BCF posts notably by Jesse G, Blades, and

me (FastBikerBoy) amongst others.

INTRODUCTION

As already stated everything in this tutorial relates to the unit being in Mackie Sonar mode (NCSo on

the display at start up) and used with Sonar. In this configuration it is capable of just about

everything the Mackie CS is with the exception of a few jog wheel related functions. I highly

recommend downloading BCF View – a virtual LCD for use with the BCF. I’m led to believe however

that it doesn’t work with Vista or Win 7. With XP though it works very well and helps you to “see”

where you are.

I find it easiest to think of the BCF being in various “modes”. Controls then relate to the current

mode. Don’t worry I’ll explain all that later. The other recommendation that I’d err.... recommend is

that you make up and print an overlay template from the Behringer website. A bit of good quality

photo paper and craft knife will make your life much easier, not only using this tutorial but also to

remind you of “what does what” when using the unit.

I’ll write this guide as if you are completely new to the BCF so feel free to skip and pick at the bits

you want to read.

LET’S GET STARTED

A quick look round the BCF – the various areas and functions are all explained in depth later

Rotaries (V-pots) – with push

function. Track buttons

LED display

Main button bank Faders

The Basics

As mentioned earlier I find it easier to think of the BCF in various modes. So with this in mind I’ll

explain how to change modes and then explain how each mode works. It can get confusing if you

don’t realise what mode you are in or if you are in edit control mode. Buttons may not behave as

expected. I’ll attempt to explain all of this in the following sections.

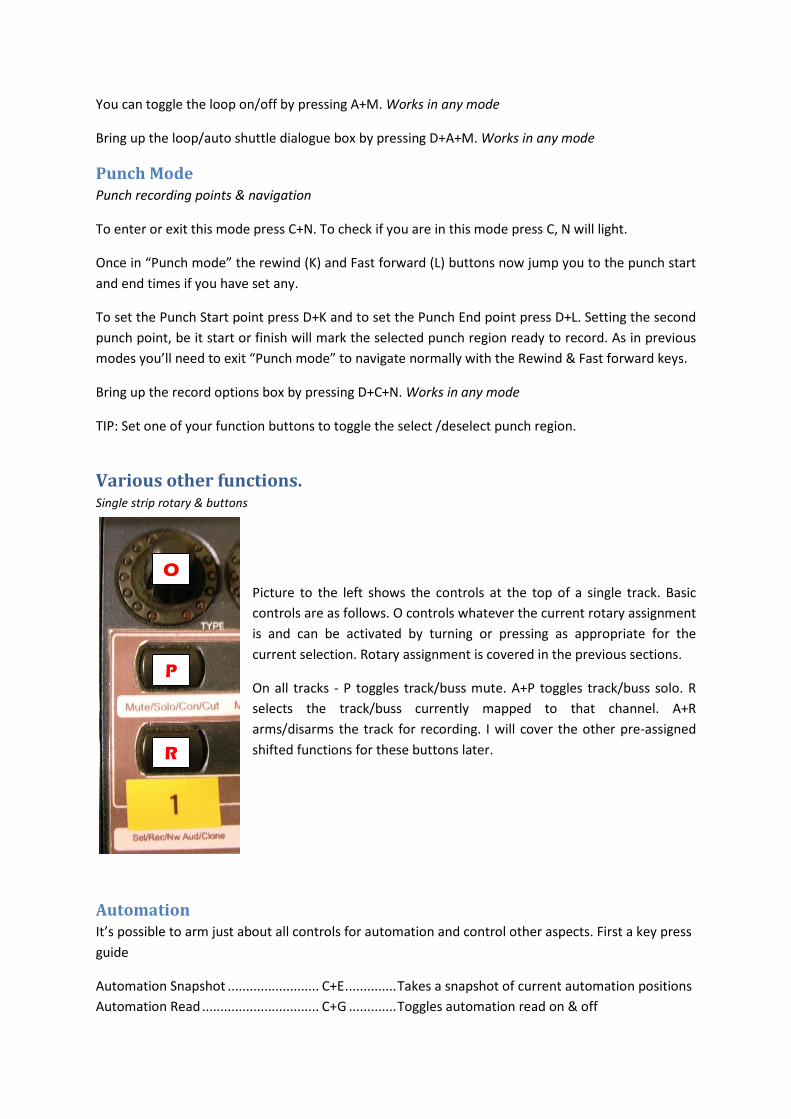
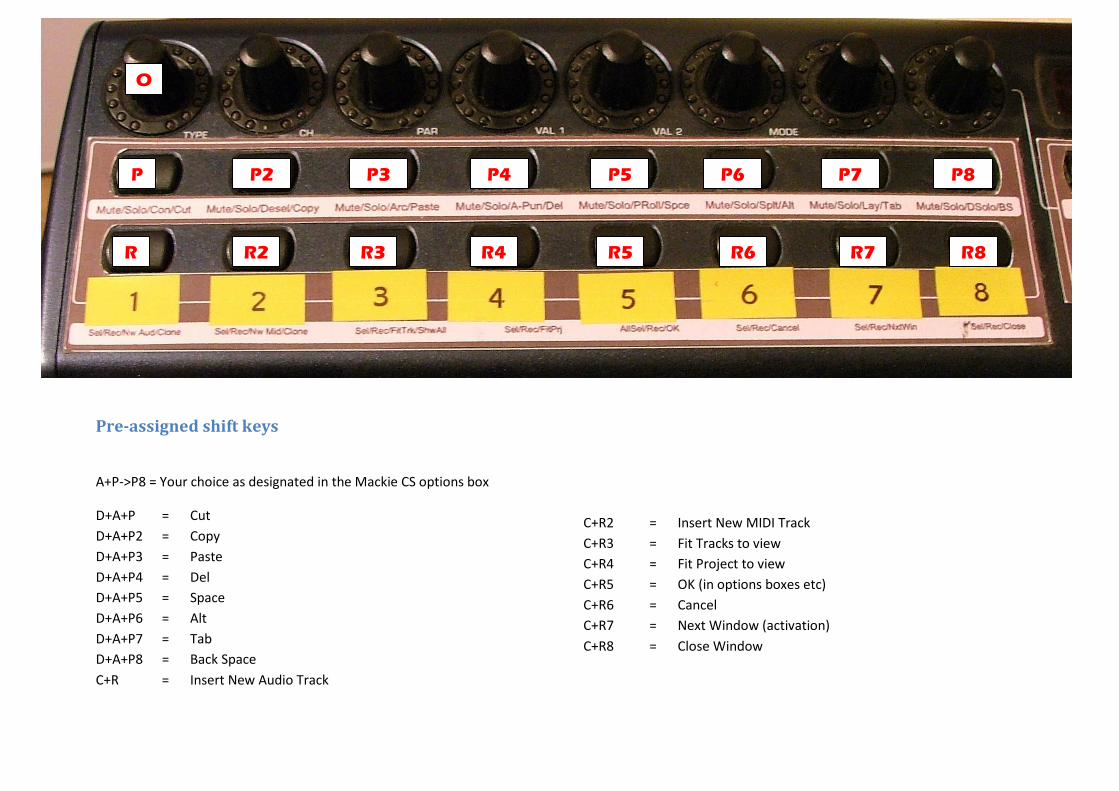
As you can see from the picture on the left, below the LED there

are several groups of buttons. In very general terms they can be

thought of as the following.

Top group of buttons A-D are shift and BCF ‘mode’ buttons.

The next group of four E – H (below my yellow “Mode” sticker) are

the ‘Sonar mode’ select keys (surprise, surprise)

The next two down I & J are the Bank/track navigation keys

The bottom four K-N are project navigation and ‘navigation mode’

select keys.

These are very rough generalisations but give us a starting point.

For my sanity (and yours) I’ve labelled the buttons A – N and will

refer to those letters all the way through this tutorial, so A + D will

put you into or out of “Edit” mode. You can hopefully read my

overlay beneath the buttons which show an abbreviation for that

buttons function(s). All buttons except G & H, which have no first

shift function, have three different functions. I will use a “+”

between buttons to mean all buttons are pressed together, usually

easiest by pressing and holding the first 1 or 2 and pressing the

final key once.

I think it’s best to start with a project that has at least 16 or more

tracks, several busses and that some of the tracks and busses have

2 or more sends and 2 or more plug-ins inserted into the FX bins to

fully explore the BCF’s capabilities.

Main Button Group

A B

C D

G H

I J

L

E F

K

M N

We’ll start with the shift keys. Button A is Shift 1 and button C is shift 2. These need to be held down

and used in conjunction with other keys. At all times except when in EQ-F1 mode (explained later)

the faders control volume of the current bank of tracks/busses/main outs – depending on mode.

By default when you first fire up Sonar buttons B, F, and M should be lit. This shows that you are

currently controlling banks of tracks (B), in “Track Mode (multi)” (F), and audio is stopped (M). Press

and hold A, this should extinguish all lights. Release and the lights will come back on. Press and hold

C and lights should again go out. So far so good. If you have lights lit with either A or C pressed, you

have another mode or function active.

Getting to the Nitty Gritty

Assignment

The BCF can control tracks, busses, and main outs. Button B in combination with A & C controls what

the whole BCF is assigned to. Most of the following sections apply to all modes, for example plug-in

control is identical whether you are in Track or Buss mode, so to save repeating information we’ll

start by swapping the fader and control assignments between Tracks, Busses and Main outs.

Press and hold A, then press B. The BCF goes into “Buss control assignment “. The LED should read

bu - all faders and rotaries now control your busses. The various “Sonar modes” will also allow you

to control EQ, Sends, and Plug-ins etc on your busses. We’ll get to those shortly. To get back to

“Track control assignment” press B. The LED should again read tr

Press and hold C, then press B. The BCF goes into “Main outs assignment”. The LED should read oP.

All faders and rotaries now control your main outs, probably just two but this will of course depend

on your set up. Press B again to get back to “Track Control Assignment”.

Editing Parameters and “modes”

It is possible to control any parameter on any track, buss, or plug-in with the rotary pots. You control

the rotary assignments using the “Sonar modes” (my description of them). In any of the following

modes where a parameter is either on or off, it can be changed either by pressing the rotary and/or

by turning it. Otherwise pressing a rotary will set a parameter back to its default. For example

pressing a pan assigned pot will centre the pan.

“Track Mode” Gives you control over the individual tracks and busses

Multi & Single channel modes

There are two modes within the control assignments - “Multi channel mode” and “Single Channel

Mode”. When in multi channel mode you can control the same parameter on multiple tracks at the

same time via the rotary pots. For example by default the rotaries are assigned to Pan so all the

rotaries control the pan on 8 different tracks. This assignment can be changed to almost anything.

Enter “Edit mode” by pressing A+D together. You can now press A+J together and the rotary

assignments will change to Output Select. Press A+I together and the rotaries go back to Pan, press

A+I again and the rotaries control Volume. Using this method you can step through every track

function one at a time. The assignment order is shown below in the single channel mode

explanation.

To switch between multi mode and single mode press button F. The LED in multi channel mode

shows tr or bu depending on assignment and in single channel mode it shows tr. or bu. (Note the

period) again depending on assignment. I’ll expand on the multi/single channel modes as we go

along. Once you get your head around this concept you’re halfway there.

In single channel mode the rotary assignments change so all 8 rotaries control a separate parameter

on the currently selected track. By default for audio tracks left to right.....

Volume-Pan-Output select-Input select-Phase Invert-Mono/Stereo switch-Input Monitor switch-

Send 1 On/Off-Send 1 Level-Send 1 Pan-Send 1 Pre/Post Fader On/Off-Send 2 On/Off-Send 2

Level-Send 2 Pan-Send 2 Pre/Post Fader On/Off-Send 3 etc etc

Obviously if you have no sends on that track or buss, the assignments stop at the Input Monitor

switch. MIDI track assignments are also different but work on the same principle. If there are more

than 8 parameters assigned you can again step to the next bank of parameters by using the “Edit

mode”. To enter “Edit Mode” press A+D. Once in “Edit mode” the bank and track navigation buttons

I & J now move to the previous/next set of parameters instead of changing track banks. To move one

parameter at a time press and A+I or A+J depending whether you wish to go to the next or previous

parameter. You can check if you are in “Edit mode” at any time by pressing and holding button A

(Button D will light if you are in “Edit mode”). If the bank/track change buttons (I & J) do not behave

as expected in normal use (i.e. change banks) you are almost certainly in “Edit mode”

Now swapping between Tracks, Busses and main outs is sorted and we’ve had a brief look at track

mode, we’ll look at the other “Modes”. Most of these modes can apply to tracks and busses. To

swap between tracks and busses use the “assignment” method above. Remember the multi channel

& single channel modes as well though and use whichever suits your workflow. Also remember, to

step through parameters of the track, EQ, plug-ins, sends etc. Enter edit mode (A+D) and use the

bank select keys I & J as described above.

All the following modes work on a similar principle.

“EQ Mode” Gives you control over the track and buss EQ

Multi channel mode

Press E (1st

press). You are now in “EQ – multi-channel mode”. The LED displays E1 and each of the 8

rotaries by default now control Band Freq 1 of the track EQ on the 8 mapped tracks. This rotary

assignment can be changed by switching to “Edit mode” (A+D) Now press J to jump 8 parameters

which will take you to Band 1 Gain of the track EQ. Press I to jump back. Hold A & press J to step

through the EQ parameters one at a time so 1st

press (A+J) the rotary goes to Band 2 Freq, 2nd

press

Band 3 Freq, etc all the way through the EQ controls

Single Channel Mode

Press E again (2nd

press). You are now in “EQ – single channel mode”. The LED displays E1. (<-note

period) and each of the 8 rotaries are now assigned to the EQ controls of the currently selected

track/buss. It is not possible to change the order of assignment but it is possible to change each

individual rotary using the “Edit mode” and stepping through the parameters either in banks or one

at a time as described above. The assigned order for the EQ in this mode is as follows arranged in

banks of eight..

Band 1 Freq->Band 2 Freq->Band 3 Freq->Band 4 Freq->Band 1 Q->Band 2 Q->Band 3 Q->Band 4 Q

Bnd 1 Gain->Bnd 2 Gn->Bnd 3 Gn->Bnd 4 Gn->Bnd 1 On/Off-> Bnd 2 On/Off-> Bnd 3 On/Off->Bnd 4 On/Off

Band 1 Filter type->Band 2 Filter Type->Band 3 Filter Type->Band 4 Filter Type->Track EQ On/Off

So as you can see it is possible to have complete control over track and Buss EQ.

Fader Mode

Press E again (3rd

press). You are now in “EQ – Fader mode”. The LED displays F1. This is the only

mode to have this extra function. The first four faders now control the Band Gains 1 - 4 of the EQ

and the rotaries control the Band Freqs 1-4 of the currently selected track. I find this a very intuitive

way of fine tuning track EQ. “Flip mode” explained later is useful in this mode. Press F twice to

return to multi-track mode.

“Pan Mode” Gives you control over the pans – both track and sends etc.

Multi channel mode

Press G. (1st

Press) You are now in “Pan – multi channel mode”. The LED display shows Pn and by

default each of the eight rotaries now control the track/buss Pan for the current bank of eight

tracks.

Make sure the BCF is in “Edit mode” (A+D) and then press A+J together. If you have sends on the

tracks the rotary will now control the Send Pan for the first send. Each extra press of A+J will step to

the next send pan. If there are no sends on the track the rotary will be unassigned. You could of

course press J to jump to the next bank of 8 pans but unless you have more than 8 sends on the

track the rotary will end up unassigned.

Single channel mode

Press G. (2nd

Press) You are now in “Pan – single channel mode”. The LED display shows Pn. The

rotaries are now assigned to the pan controls of the currently selected track. On a track with no

sends this will result in only the first rotary being assigned to the track pan. On tracks with one or

more sends the send pans will be assigned to rotaries 2, 3, 4 etc (depending on how many sends you

have). Press F twice to return to track-multi mode.

“Send Mode” Gives you control over the track and buss sends

Multi channel mode

Press H. (1st

Press) You are now in “Send – multi channel mode”. The LED displays SE and each of the

eight rotaries now controls the Send Level of the first send on the current bank of eight tracks.

Make sure the BCF is in “Edit mode” (A+D) and then press A+J. If you have sends on the tracks the

rotary will now control the Send Pan for the first send. Each extra press of A+J will step to the next

send parameter. Once at the end of send 1’s parameters it will start on send 2 and so on until there

are no more sends, in which case it will become unassigned. Of course if there are no sends on the

track the rotary will be unassigned as default. You could of course press J to jump to the next bank of

8 sends but unless you have more than 8 sends on the track the rotary will end up unassigned. This

mode is unusual in that the default rotary assignment is the second send parameter, the first

parameter (send on/off) is accessed by pressing A+I from the default.

Single channel mode

Press H. (2nd

press). You are now in “Send – single channel mode”. The rotaries are now assigned to

send parameters on the currently selected tracks. Of course if there are no sends they will be

unassigned. Assuming you have 2 sends the rotaries will be assigned to rotaries 1 – 8 as follows.......

Send 1 on/off->Send 1 Level->Send 1 Pan->Send 1 Post/Pre->Snd 2 on/off->Snd 2 Level->Snd 2 Pan->Snd 2 Post/Pre

Press F twice to return to multi-track mode.

Hopefully you are starting to see a pattern develop here..........

“Dynamics Mode” I have only recently worked out how to assign a compressor to this mode. It appears to work in a very

similar fashion to the EQ & plugin modes. For details on how to assign a compressor see the

following post on the Cakewalk Sonar forum. http://forum.cakewalk.com/fb.ashx?m=1928916

Press A + E to enter this mode, once for multi mode, twice for single mode. Press F twice to return to

multi-track mode.

“Plug-in Mode” Gives you control over track and buss plug-ins inserted in the FX bin. The following description will be

vaguer than previous ones regarding rotary assignments because it will depend entirely on the plug-

in(s) you have inserted. Note that some plug-ins, especially older ones are not compatible with this

method.

Probably one of the most asked about modes......

Multi channel mode

Press A+F. (1st

Press) You are now in “Plug-in– multi channel mode”. The LED displays P1 which

always relates to the EQ. You can use this the same as the EQ mode but without the F1 option. To

step to the first plug-in proper, make sure the BCF is in “Edit mode” (A+D) and then press D +A (hold)

and then press J. The LED display changes to P2 and the rotaries are now assigned to the first

parameter of the first plug-in on each of the current selected bank of tracks/busses. If there is no

plug-in on some of the tracks the rotary will be unassigned, the actual assignments will vary

depending on your individual plug-ins.

Single channel mode

Press A+F. (2nd

press). You are now in “Plug-in – single channel mode”. If you have already followed

the previous paragraph the LED display will show P2. and the rotaries are now assigned to the first

eight parameters on the first plug-in on the currently selected track. As in previous Sonar modes,

enter “Edit mode” and you can step through the parameters in banks of 8 by pressing J or one

parameter at a time by pressing A+J,. To move to the next plug-in on that track press and hold

D+A(hold) then press J, the LED display changes to P3. This process continues up to a maximum of 9

plug-ins (I believe, I’ve never had that many on one track!!) To step back down the plug-in order

press and D+A (hold) then press I. Press F twice to return to multi-track mode.

This covers the “Sonar modes” - six in all - Track, EQ, Dynamics, Pan, Send, & Plug-ins. It may sound

and look complicated but is much easier once you start using the unit and soon becomes second

nature. Of course in all single channel modes just press the track select button or touch a fader to

change selected track.

Next we’ll look at the navigation and selection methods.........

More modes....... “Transport modes” this time

Similar to how the “Sonar modes” change the rotary controls, the “Transport modes” change how

buttons K & L respond. There are five modes in total, the basic “Play mode” which is default and the

other four modes are Marker, Select, Loop, and Punch. Enter and exit mode key presses are the

same but selecting another mode will automatically exit you from the previous selected mode. I.e. If

you are in “Select mode” you can jump straight to “Loop mode” by pressing A+C – you do not need

to exit “Select mode” first.

Play mode

I’m not going to dwell too long on the basic “play mode” navigation/transport features. Blades

videos cover these as well. http://www.blades85.com/sonar.htm

To summarise - press N to play and again to pause. Press M to stop & rewind to previous start

position. K rewinds and L fast forwards. To start recording press A+N. (you must have at least one

track armed for recording though).

Resolution of the rewind and fast forward is set in the Mackie Control Surface options box and can

be ticks, beats, or measures.

To jump to the beginning of a project press A+K, to jump to the end of a project press and hold D+A,

then press K.

Marker mode

For navigating and inserting markers

To enter this mode press C+L. You can tell which of the transport modes you are in by pressing and

holding C and the corresponding light on buttons K-N will light. In this case L.

Once in “marker mode” the rewind (K) and Fast forward (L) buttons now jump you to the

next/previous marker. You can still jump to start and end project by using A+K and D+A+K

respectively.

It is also possible to insert a marker by pressing D+C+L. Works in any mode

Select Mode

For setting from and thru times and selecting whole tracks

To enter this mode press C+K. Check whether you are in this mode by pressing C – Button K will light.

Once in “select mode” the rewind (K) and Fast forward (L) buttons now jump you to the from and

thru times if you have set any.

To set the from point press D+K and to set the thru point press D+L. You’ll need to exit “Select

mode” to navigate normally with the Rewind & Fast forward keys. So for example to select an area

between measures 10 and 30 assuming you are currently in “Play mode” press either K or L to get to

measure 10. Press C+K (select mode) release, press D+K (set from point) release, press C+K(exit

select mode)release, press L to fast forward to measure 30, Press C+K (select mode) release, press

D+L (set thru point)release, you should now have measure 10 – 30 selected. Sounds complicated but

it soon becomes second nature.

You can then toggle the from/thru time selection in the current selected track by pressing D+C+K. If

you have no from/thru times set press D+C+K to select the whole of the currently selected track.

Works in any mode

TIP: Set one of your function buttons as “Select none” to deselect from and thru markers.

Loop Mode

Loop points

To enter or exit this mode press C+M. To check if you are in this mode press C, M will light.

Once in “Loop mode” the rewind (K) and Fast forward (L) buttons now jump you to the loop start

and end times if you have set any.

To set the Loop Start point press D+K and to set the Loop End point press D+L. As in previous modes

you’ll need to exit “Loop mode” to navigate normally with the Rewind & Fast forward keys.

You can toggle the loop on/off by pressing A+M. Works in any mode

Bring up the loop/auto shuttle dialogue box by pressing D+A+M. Works in any mode

Punch Mode

Punch recording points & navigation

To enter or exit this mode press C+N. To check if you are in this mode press C, N will light.

Once in “Punch mode” the rewind (K) and Fast forward (L) buttons now jump you to the punch start

and end times if you have set any.

To set the Punch Start point press D+K and to set the Punch End point press D+L. Setting the second

punch point, be it start or finish will mark the selected punch region ready to record. As in previous

modes you’ll need to exit “Punch mode” to navigate normally with the Rewind & Fast forward keys.

Bring up the record options box by pressing D+C+N. Works in any mode

TIP: Set one of your function buttons to toggle the select /deselect punch region.

Various other functions. Single strip rotary & buttons

Picture to the left shows the controls at the top of a single track. Basic

controls are as follows. O controls whatever the current rotary assignment

is and can be activated by turning or pressing as appropriate for the

current selection. Rotary assignment is covered in the previous sections.

On all tracks - P toggles track/buss mute. A+P toggles track/buss solo. R

selects the track/buss currently mapped to that channel. A+R

arms/disarms the track for recording. I will cover the other pre-assigned

shifted functions for these buttons later.

Automation

It’s possible to arm just about all controls for automation and control other aspects. First a key press

guide

Automation Snapshot ......................... C+E .............. Takes a snapshot of current automation positions

Automation Read ................................ C+G ............. Toggles automation read on & off

O

P

R

Automation Write ............................... D+A+N ........ Toggles automation write on & off

Offset/Envelope Toggle ...................... C+F .............. Toggles between offset mode & envelope mode

Disarm ................................................. C+H ............. Disarms all automation

Arm volume for automation ............... D+A+R

Arm current rotary assignment

for automation .................................... D+A+O (Press) Covered in more detail next

I’ve briefly mentioned arming controls with the rotary above but given the speed with which

multiple controls and tracks can be armed for automation I thought it worthy of more explanation.

To arm multiple controls for automation on multiple tracks.

Here’s an example on how to arm various controls for recording automation. I’ll assume you have a

bank of 8 audio tracks mapped to the 8 channels on the BCF.

1. Put the BCF into multiple track mode and then into edit mode. The default will assign

rotaries (O) to pan.

2. Press and hold D+A. Then press R on the channels that you wish to automate volume on.

3. Continue holding D+A and then press rotary (O) on each channel you wish to automate pan

on

4. Release D; continue holding A and press J 7 times. This assigns the rotaries O to send levels

(if you have sends)

5. Press D+A and then press rotary (O) on each channel you wish to automate send levels on.

Note that all send levels will arm.

6. Release D, continue holding A and press J once more. This assigns the rotaries O to send

pans (if you have sends)

7. Press D+A and then press rotary (O) on each channel you wish to automate send pans on.

Note that all send pans will arm.

8. You are now ready to start recording automation

To arm multiple controls for automation on a single track.

Similarly a single track can be armed very quickly

1. Put the BCF into single track mode and then into edit mode. The rotaries O are now assigned

from left to right

Volume-Pan-Output select-Input select-Phase Invert-Mono/Stereo switch-Input

Monitor switch-Send 1 On/Off-Send 1 Level-Send 1 Pan-Send 1 Pre/Post Fader On/Off-

Send 2 On/Off-Send 2 Level-Send 2 Pan-Send 2 Pre/Post Fader On/Off-Send 3 etc etc

2. Hold D+A and press rotaries O for each control you wish to automate. Remember to step

through the banks of controls press J

3. You are now ready to start recording automation.

Pre-assigned shift keys

A+P->P8 = Your choice as designated in the Mackie CS options box

D+A+P = Cut

D+A+P2 = Copy

D+A+P3 = Paste

D+A+P4 = Del

D+A+P5 = Space

D+A+P6 = Alt

D+A+P7 = Tab

D+A+P8 = Back Space

C+R = Insert New Audio Track

C+R2 = Insert New MIDI Track

C+R3 = Fit Tracks to view

C+R4 = Fit Project to view

C+R5 = OK (in options boxes etc)

C+R6 = Cancel

C+R7 = Next Window (activation)

C+R8 = Close Window

O

P

R

P2 P3 P4 P5 P6 P7 P8

R2 R3 R4 R5 R6 R7 R8

That leaves just three key presses I haven’t mentioned, C+I which is Undo as in the Edit/Undo

command and C+J which is Redo. C+D is flip mode, mentioned earlier. Pressed once the Faders

duplicate whatever the rotaries are assigned to, and pressed again the Faders and Rotary

assignments swap. The third press returns to default. For example in default track view with Pan

assigned to rotaries enter “first flip mode” and the faders & rotaries both control pan, in “second flip

mode” the rotaries control volume, and the faders pan. This duplicate/swap function can be applied

in all modes with results varying depending on the current rotary assignment.

One more trick worthy of a mention is using button D as a ‘fine’ control. If you hold this key down

while turning the rotaries you will get much finer control over the currently assigned parameter.

The only key press that seems to serve no function is A+L which equates to “Jog P”. I have no idea

what that does so if you do please let me know via the Cakewalk Sonar forum. I suspect it may be a

way of changing the transport resolution but I haven’t made it work yet.

And finally...........

If you have a BCF2000 I hope you glean something from this document. I hope it isn’t too confusing;

the BCF is very powerful and at first seems quite complex but like anything as you get used to the

key presses you’ll find you can really fly around the Sonar interface.

Please feel free to link others to this document or distribute as you wish. All that I ask if you do

distribute it is you don’t charge anything for it or alter it.

Regards

Karl Rose (FastBikerBoy on the Cakewalk Forums)


Recommended