32
ADVANCED WEB ORDERING USER MANUAL BELTSVILLE SERVICE CENTER 6351 AMMENDALE ROAD BELTSVILLE, MD 20705 301-394-0400

ADVANCED WEB ORDERING USER MANUAL
BELTSVILLE SERVICE CENTER 6351 AMMENDALE ROAD BELTSVILLE, MD 20705
301-394-0400

2
Advanced Web Ordering (AWO) – User Manual
Table of Contents To jump to a page from the Table of Contents:
- Hold down the Ctrl key and click the Section Title SECTION TITLE Page Introduction………………………………………………………………………..….3 Getting Started - BSC Home Page…………………….…………………………...…4 E-Authentication Login Page…………………………………………………………5 First Time Login to Advanced Web Ordering (AWO)…………………………….... 7 Advanced Web Ordering (AWO) Homepage……………………………………..….8 Complete PO………………………………………………………………………….9 News………………………………………………………………….……….9
Product Search ................................................................................................10 To Place Orders - To order Using Product Search Orders Program………………………12 - To order Using Quick Orders Program…………………………….…..15 - To order Using Frequent Orders Program..…….…………………….18 View Current Order…………………………………………………………..21 View (Previous) Orders….…………………………………………………...23 Archive of Orders…………………………………………………………….25 Sponsor/Supervisor………………………………………………….………..26
Profile………………………………………………………………………………...27 News……………………………………………………………………….....27
Password……………………………………………………………………...28 Shipping………………………………………………………………………29
User…………………………………………………………………………...30 Beltsville Service Center Point of Contact List…………………….……………...31 **Reminder- Always use the BACK button at the bottom of the screen to return to a previous screen!!!! Never use the Browser ‘Back’ button at top of the screen. **You Must Use Internet Explorer as your browser!!!!

3
Introduction The Advanced Web Ordering (AWO) system is an Internet-based solution designed to simplify, speed up and optimize ordering processes. The AWO significantly improves order/transaction management and customer service operations.
Key features include:
o Order creation by: Traditional, based on search results Frequently Ordered Items List. This will speed up product search and ordering. Quick Order – Quick entry features all you to simply enter the SKU (Product Number)
and quantity.
o Order cancellation - Users may cancel order even after order has been submitted. o Email Notifications - AWO automatically sends e-mail notifications to user whenever an order
has been submitted or order status has been changed. o Order Tracking – Enables users to view order status on-line, eliminating the need to call
customer service. o Order History – Enables users to browse all of their orders. o Edit your own Profile. Users may modify their name, email address and phone number.

Getting Started – BSC Home Page
Click ‘Customer Order Login’ on the left side of the screen
4

E-Authentication Login Page
Enter your E-Authentication User ID and Password. If you do NOT have one, click Create an Account on the left side of the screen. Reminder: USDA employees are Level 2; Non-USDA employees are Level 1. If you are having trouble with the eAuthentication system or have questions, the ITS Service Desk can be reached at [email protected] or call 800-457-3642.
5

Press Continue
6

First Time Login to Advanced Web Ordering (AWO)
This screen will only appear the first time you log into AWO from the E-Authentication screen. 1. Input your Supply Card Number / Customer ID for the User Name and Password, then click Login. 2. Future access to AWO will be automatically activated following successful E-Authentication Login.
7

Advanced Web Ordering (AWO) Homepage
Main Menu
• News – Important news/instructions pertaining to System Processing requirements; news Items; replacement and/or obsolete Items
• Product Search – Allows users to search an item by SKU (Product Number), Keyword, and/or
Categories. Users may also place an order from this function.
• Quick Order – Allows users to order an item by simply entering the Product Number into the area labeled SKU and the quantity
• Frequent Order – Allows users to order frequently ordered items by just entering the quantity of
material needed for the desired product
• View Current Order – Allows user will review, input shipping, PO info and submit final order
• View Orders – Allows user to view past submitted orders
• Archive of Orders – Lists Archived orders
• Sponsor / Supervisor – Lists user’s Sponsor or Supervisor (if applicable) Header Menu
• Complete PO – News, to order items, view orders
• Profile – To update users information
• Help – Help answer system questions
• Logout – To log off of the Advanced Web Ordering System
8

COMPLETE PO News
To access, Click News in Main Menu on left side of the screen.
• The News selection includes important news items/instructions on System Processing requirements, new items, replacement and/or obsolete items.
• You may click on the arrows on the right side of the page to view or hide specific news details.
9
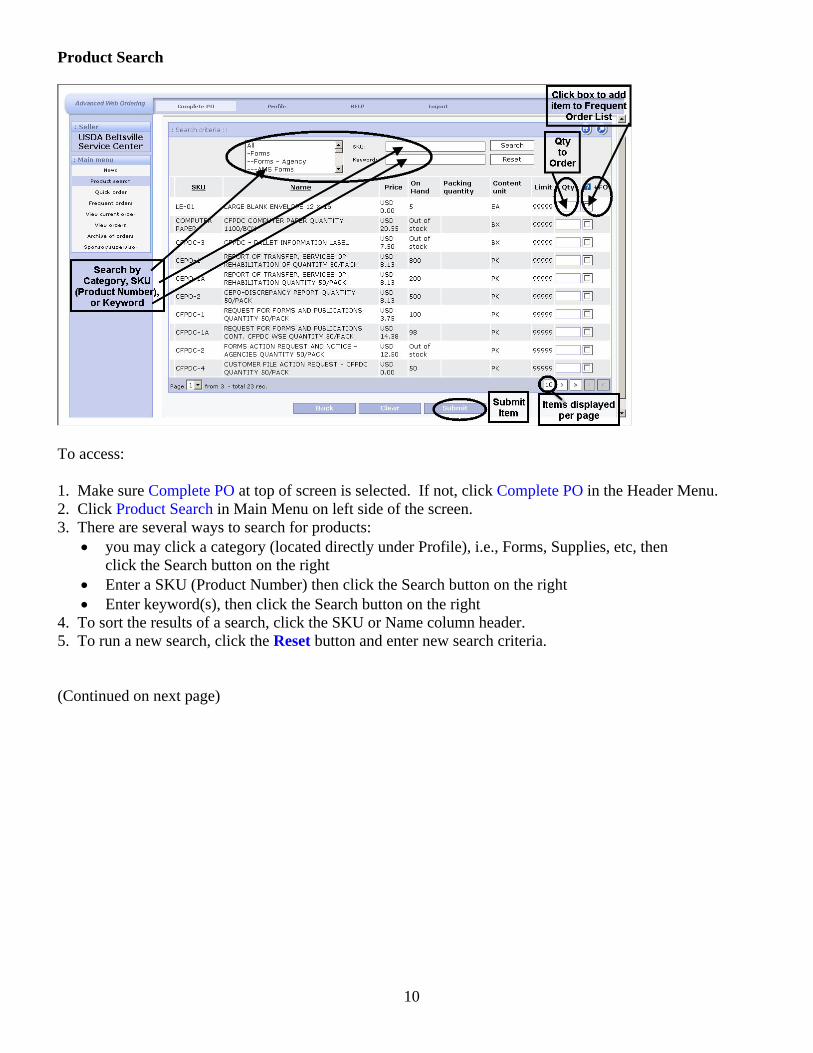
Product Search
To access: 1. Make sure Complete PO at top of screen is selected. If not, click Complete PO in the Header Menu. 2. Click Product Search in Main Menu on left side of the screen. 3. There are several ways to search for products:
• you may click a category (located directly under Profile), i.e., Forms, Supplies, etc, then click the Search button on the right • Enter a SKU (Product Number) then click the Search button on the right • Enter keyword(s), then click the Search button on the right
4. To sort the results of a search, click the SKU or Name column header. 5. To run a new search, click the Reset button and enter new search criteria. (Continued on next page) 10

Product Search Cont.
6. To access product information, left click anywhere along the specific product line.
7. You may also enter a qty in the Qty field and click Submit to place an order. (See page 11 for further information on placing an order using the Product Search program).
8. Click the Back button at the bottom of the screen to return to Product search.
11

To Order Using Product Search Program
To access: 1. Make sure Complete PO at top of screen is selected. If not, click Complete PO in the Header Menu. 2. Click Product Search in Main Menu on left side of the screen. To Search: 1. Enter criteria in only one of the search boxes (SKU or Keyword)
• Program will display item from search box PLUS all products with the same string of characters, i.e., 1009, N2HPC-1009, N211009, etc.
OR Highlight one of the categories listed above, i.e., AMS Forms, Supplies, etc. 2. Click the Search button. 3. Locate the SKU (Product number) and enter the quantity to be ordered in the Qty box.
• If the item is one that will be frequently ordered, click the +FO box for the item so that it will be added to the Frequent Orders list. 4. Click the Submit button at the bottom of the page. 5. Click the OK button for the message below:
(Continued on next page)
12

To order Using Product Search Program cont. 6. To add more items to your order, click the Reset button, and enter the new criteria. 7. Once all items have been entered, click on View Current Order, located in the Main Menu on the left side of the screen.
8. If location field is blank (right side of screen), click the down arrow and select individual receiving the order. 9. For Ship Via, select appropriate shipping method by clicking on down arrow.
Bestway selection will automatically calculate the cheapest cost to ship the order. 10. Payment Type – Leave blank. 11. Complete Only – This box should be checked ONLY if you wish to wait for the complete order to ship. The system will hold the order until all items are on hand to fill the order. 12. User PO (Purchase Order) number must be filled in. You must create your own PO using
letters and/or numbers. This is another method of tracking your order. 13. Verify quantities for each item. If you need to modify a quantity, change the qty in the QTY field and then click the Update button below the order. 14. To Remove a product from your order list, change the item’s quantity to zero (0) in the QTY field. Click the Update button at the bottom of the screen. 15. To DELETE All items in your order, click the Clear button. 16. Once your order items are correct, press the Submit button at the bottom of the screen. (Continued on next page)
13

To order Using Product Search Program cont. 17. The submitted order number is displayed on the screen. Print this page for your records. 18. Click ‘OK’.
19. The next screen, “Your Order has been Processed” simply means that your order has been sent.
14

To Order Using Quick Orders Program
To Access: 1. Make sure Complete PO at top of screen is selected. If not, click Complete PO in the Header Menu. 2. Click Quick Order in the Main Menu on the left side of the screen. To Order: 3. Enter the SKU (Product Number) of the item to be ordered in the SKU box. 4. Enter the quantity to be ordered for the item in the Qty box. 5. Repeat for each item as needed. You may enter items across or down the page. 6. Click the Submit button at the bottom of the screen. 7. If item displays ‘Select SKU’ in red:
a. Click the down arrow on the corresponding product number line. b. Select the correct SKU (Product Number). c. Repeat for each item as needed.
d. Click the Submit button. (Continued on next page)
15

To Order Using Quick Orders Program cont. 8. After submitting items, click on View Current Order, located in the Main Menu on the left side of the screen.
9. If location field is blank (right side of screen), click the down arrow and select individual receiving the order. 10. Select appropriate shipping method. If Bestway is chosen, system will automatically calculate the cheapest cost to ship the order. 11. Complete Only – This box should be checked ONLY if you wish to wait for the complete order to ship. The system will hold the order until all items are on hand to fill the order. 12. User PO (Purchase Order) number must be filled in. You must create your own PO. This is another method of tracking your order. 13. Verify quantities for each item. If you need to modify a quantity, change the qty in the QTY field and then click the Update button below the order. 14. If you wish to delete an item from your order, change the item’s quantity to zero (0) in the QTY field.
Click the Update button at the bottom of your screen. 15. To DELETE ALL items from your order, click the Clear button at the bottom of your screen. 16. Once all items are correct, press the Submit button at the bottom of your screen. (Continued on the next page)
16

To order Using Quick Orders Program cont. 17. The submitted order number is displayed on the screen. Print this page for your records. Click ‘OK’.
18. The next screen, “Your Order has been Processed” simply means that your order
has been sent.
17

To Order Using Frequent Orders Program
To Access: 1. Make sure Complete PO at top of screen is selected. If not, click Complete PO in the Header Menu. 2. Click Frequent Orders from Main Menu on the left side of the page. To Order: 1. Enter the quantity to be ordered in the Qty box of the item. 2. If you wish to remove all quantities from the list, click the Clear button (see diagram above). 3. Click the Submit button (see diagram above). 4. Once all items have been input, click on View Current Order, located in the Main Menu on the left side of the screen.
5. If location field is blank (right side of screen), click the down arrow and select the individual receiving the order.
18(Continued on next page)

To Order Using Frequent Orders Program cont. 6. Select appropriate shipping method. If BESTWAY is chosen, system will automatically calculate the cheapest cost to ship the order. 7. Complete Only – This box should be checked ONLY if you wish to wait for the Complete order to ship. The system will hold the order until all items are on hand to fill the order. 8. User PO (Purchase Order) number must be filled in. You must create your own PO. This is another method of tracking your order. 9. Verify quantities for each item. If you need to modify a quantity, change the qty in the QTY field and then click the Update button below the order. 10. If you wish to delete an item from your order, change the item’s quantity to zero (0) in the QTY field. Click the Update button at the bottom of your screen. 11. To DELETE ALL items in your order, click the Clear button. 12. Once all items are correct, press the Submit button at the bottom of the page. 13. The submitted order number is displayed on the screen. Print this page for your records. Click ‘OK’.
14. The next screen, “Your Order has been Processed” simply means that your order
has been sent.
(Continued on next page)
19

To order Using Frequent Orders Program cont. To Remove an item from the Frequent Orders (-FO) List
20
1. Make sure Complete PO at top of screen is selected. If not, click Complete PO in the Header Menu. 2. Click Frequent Orders from Main Menu on the left side of the page. 3. Click the –FO box for the specific item(s) on the right side of the page. 4. Click the Submit button. Item will no longer appear in the Frequent Orders List.

View Current Order
To Access: 1. Make sure Complete PO at top of screen is selected. If not, click Complete PO in the Header Menu. 2. Click View Current Order in the Main Menu To Complete Order: 1. If location field is blank (right side of screen), click the down arrow and select individual receiving the order. 2. Select appropriate shipping method. If Bestway is chosen, system will automatically calculate the cheapest cost to ship the order. 3. Complete Only – This box should be checked ONLY if you wish to wait for the complete order to ship. The system will hold the order until all items are on hand to fill the order. 4. User PO (Purchase Order) number must be filled in. You must create your own PO. This is another method of tracking your order. 5. Verify quantities for each item and change qty in the QTY field if needed. 6. If an item is no longer needed, change the item’s quantity to zero (0) in the QTY field. Click the Update button at the bottom of the screen. 7. To DELETE ALL items from the View Current Order screen, click the Clear button at the
bottom of the screen. 8. Once all items are correct, press the Submit button at the bottom of the screen. **NOTE: Order items will remain in your shopping cart in View Current Order until the order is submitted or deleted from your cart. (Continued on next page)
21
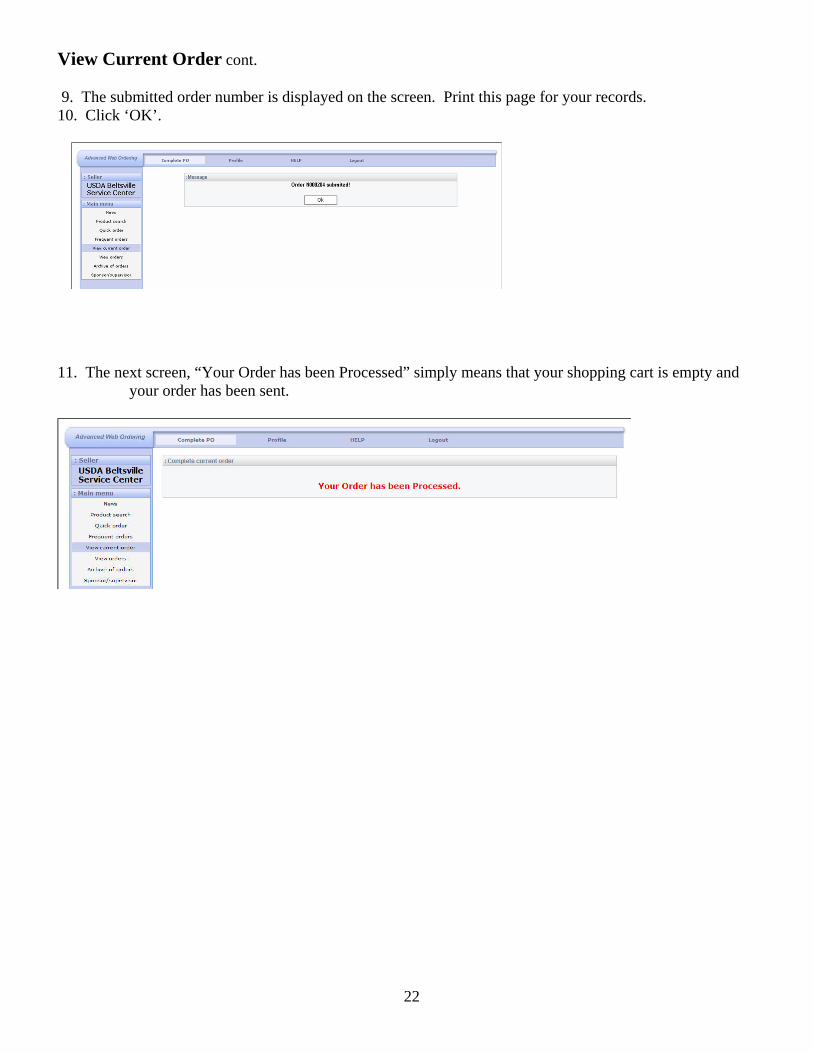
View Current Order cont. 9. The submitted order number is displayed on the screen. Print this page for your records. 10. Click ‘OK’.
11. The next screen, “Your Order has been Processed” simply means that your shopping cart is empty and
your order has been sent.
22

View (Previous) Orders
To access: 1. Make sure Complete PO at top of screen is selected. If not, click Complete PO in the Header Menu. 2. Click View Orders in the Main Menu at the left side of the screen. Search by:
• PO Number –the system generated Purchase Order number from a previous order • Location – Will be Your Name UNLESS you ordered for another person • Status – such as Submitted, In Process, Shipped, Call, Cancelled • Date Range • User PO Number – the PO number you created
Using your mouse, Left click on a specific line item anywhere along the line.
(Continued on next page)
23
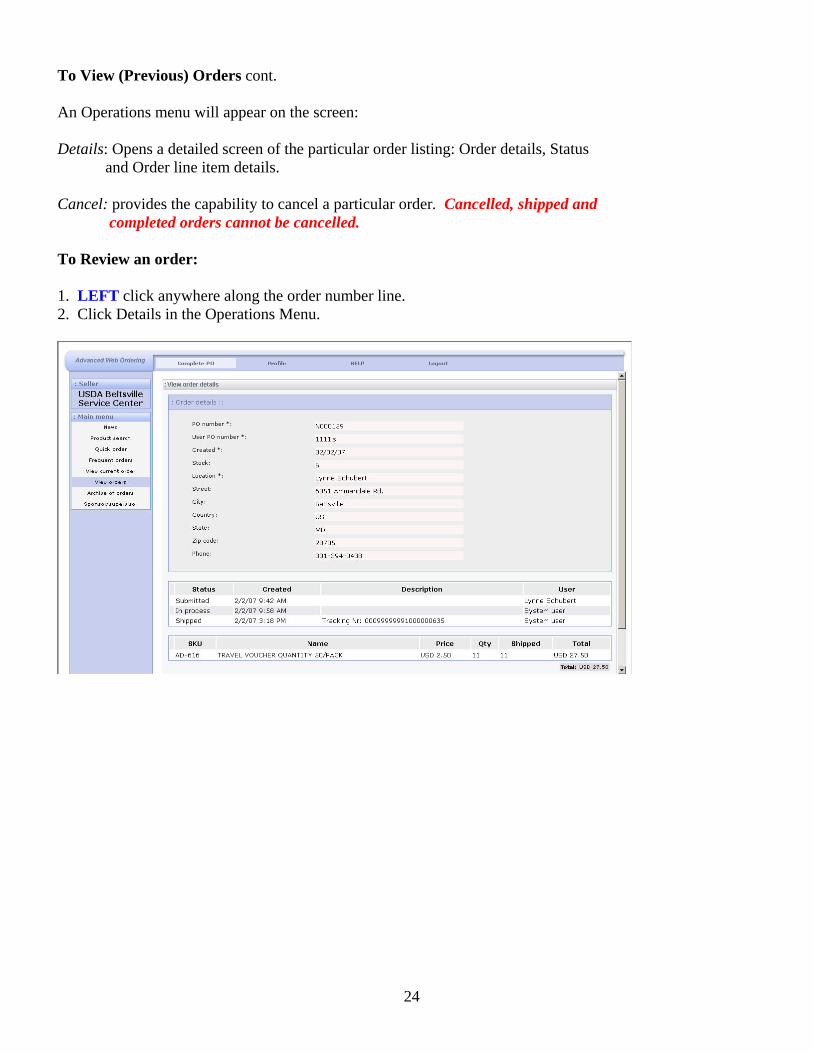
To View (Previous) Orders cont. An Operations menu will appear on the screen: Details: Opens a detailed screen of the particular order listing: Order details, Status and Order line item details. Cancel: provides the capability to cancel a particular order. Cancelled, shipped and completed orders cannot be cancelled. To Review an order: 1. LEFT click anywhere along the order number line. 2. Click Details in the Operations Menu.
24
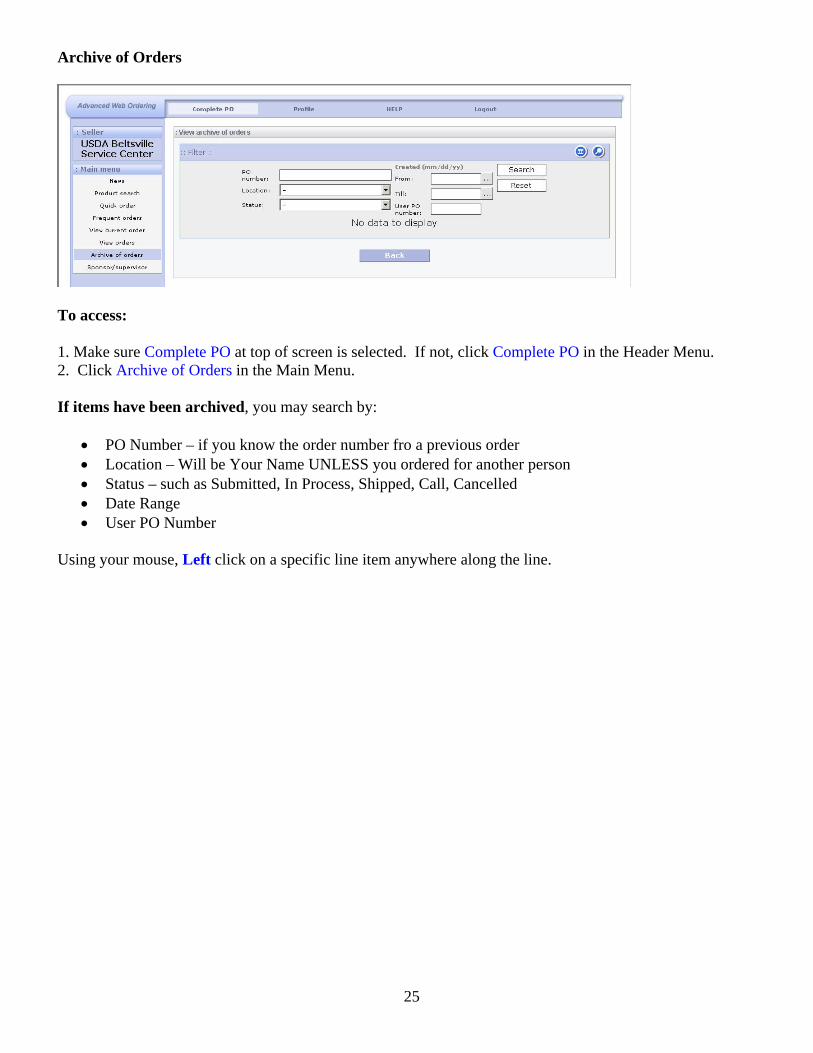
Archive of Orders
To access: 1. Make sure Complete PO at top of screen is selected. If not, click Complete PO in the Header Menu. 2. Click Archive of Orders in the Main Menu. If items have been archived, you may search by:
• PO Number – if you know the order number fro a previous order • Location – Will be Your Name UNLESS you ordered for another person • Status – such as Submitted, In Process, Shipped, Call, Cancelled • Date Range • User PO Number
Using your mouse, Left click on a specific line item anywhere along the line.
25

Sponsor/Supervisor
To Access: 1. Make sure Complete PO at top of screen is selected. If not, click Complete PO in the Header Menu. 2. Click Quick Order in the Main Menu. This screen displays information about the employee’s manager. Not all users have
access to this screen.
26

PROFILE News
To access: 1. Make sure Profile at top of screen is selected. If not, click Profile in the Header Menu. 2. Click News in Main Menu on left side of the screen. The News selection includes important news items/instructions on System Processing requirements, new items, replacement and/or obsolete items.
27

Password
To access: 1. Make sure Profile at top of screen is selected. If not, click Profile in the Header Menu. 2. Click Password in Main Menu on left side of the screen. To change your password: 1. Enter your current password in the Old Password block. 2. Enter your New password in the New password block. 3. Re-Enter your New password in the Notify new block. 4. Press the Change button at the bottom of the screen.
28

Shipping
If you have access to this feature, the Shipping selection provides the ability to add, change, or remove SHIP-TO locations. To access: 1. Make sure Profile at top of screen is selected. If not, click Profile in the Header Menu. 2. Click Shipping in Main Menu on left side of the screen. 3. To Add new Shipping name/address:
• Click Create at the bottom of the screen to create a new shipping location OR • Using your mouse, Left click on an existing alternate shipping address and click Create
4. To Edit a name or address - LEFT click anywhere on the line with the person’s name. Click Update. 5. To Delete an alternate name/address, LEFT click anywhere on the line with the person’s name. Click
Remove.
29
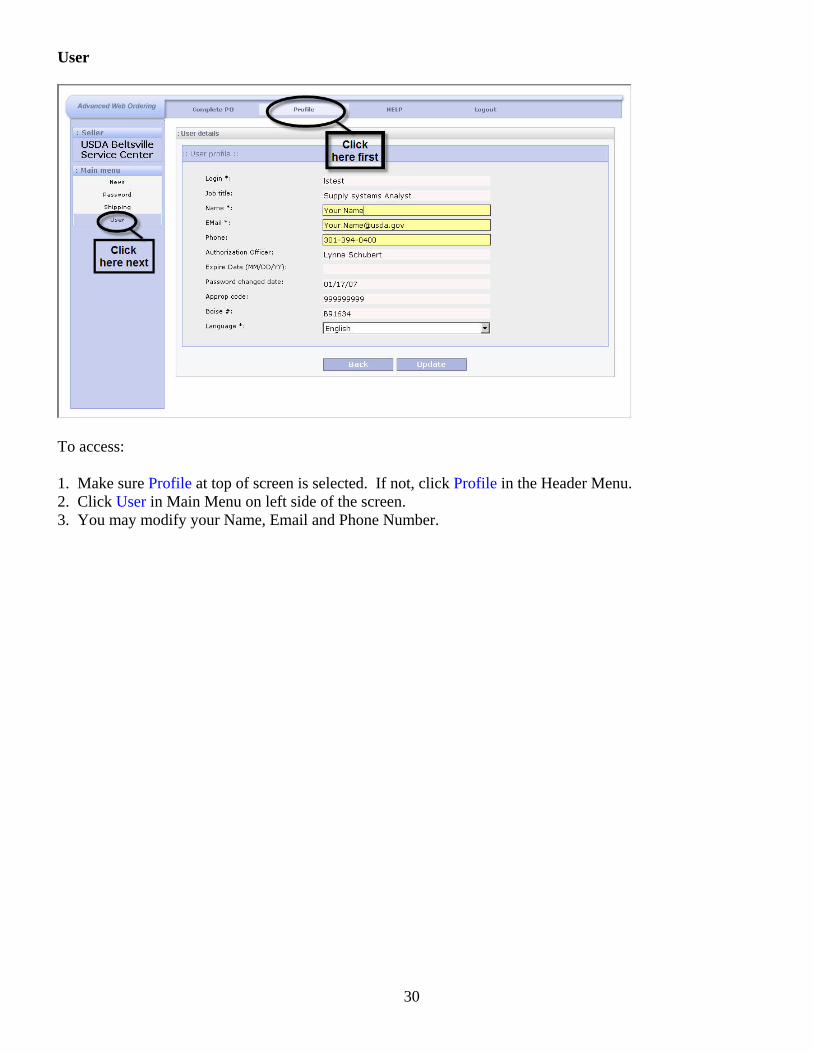
User
To access: 1. Make sure Profile at top of screen is selected. If not, click Profile in the Header Menu. 2. Click User in Main Menu on left side of the screen. 3. You may modify your Name, Email and Phone Number.
30

Contact the Beltsville Service Center
BSC Contact Information:
6351 Ammendale Road
Beltsville, MD. 20705
Toll Free Number: (877) 576-6329
Phone: (301) 394-0400
Fax: (301) 394-0300
All correspondence must be mailed to:
United States Department of Agriculture
Beltsville Service Center
1400 Independence Ave., S.W., Stop Code 9897
Washington, D.C. 20250-9897
Beltsville Service Center:
For information about the Beltsville Service Center Facility contact:
Carlos Casaus, Director
Consolidated Forms & Publications Distribution Center:
For Forms, Publications and Mass Mailing information contact:
Roselyn Roebuck, Chief
For status of orders and inventory information contact:
Nicole Jones, Supervisory Supply Specialist
Warehouse Operations:
For information on warehouse operations contact:
Joseph Bailey, Warehouse Operations Manager
Warehouse Management System (WMS) Operations:
For information on WMS systems operations contact:
Ressie Rollins, Management and Systems Analyst

FSIS Contact Information:
To receive a Customer ID number or to update your current address
information (FSIS employees only) contact:
Pam Veal
Phone: 800-714-8335
Fax:(301)504-4231
When contacting this office, please provide the Headquarters establishment
number, name, address, phone number, and email address and we will assist
you with your request.
![6351 Class-01 Slides [Compatibility Mode]](https://static.documents.pub/doc/80x56/577dacce1a28ab223f8e665f/6351-class-01-slides-compatibility-mode.jpg)


