49
Billings Pro User Guide (Last updated: February 20th, 2018) Quick Tip - To search for a specific word, use the command+F keyboard shortcut to open the seach field
Billings Pro User Guide
(Last updated: February 20th, 2018)
Quick Tip - To search for a specific word, use the command+F keyboard shortcut to open the seach field
Table of ContentsTable of Contents 2
Overview 5
System Requirements 5
Ecosystem 6
Background Sync 7
Installing Billings Pro 7
Billings Pro Setup Assistant 7
The Billings Pro User Interface 9
The Sidebar 10
The Projects list 12
The Estimate Slips tab 12
The Working Slips tab 13
The Account view 14
Billings Pro workflow 15
About Clients 17
Adding a client 17
About Projects 18
Making a new project 19
Working with Slips 20
Creating an estimate slip 22
Sending an estimate 22
Starting work from estimate slips 23
!2

Creating a working slip 24
Working with timed slips and timers 24
Making timed slips 26
Starting timers 26
Working with Approvals 27
Sending an invoice 29
Sending a project invoice 30
Sending a consolidated client invoice 31
Creating a Pro Forma invoice 32
Receiving a payment 34
About Statements 34
Sending a statement 34
Setting up recurring invoices 35
Working with multiple currencies 37
Searching 40
Reports 41
Customizing Billings Pro 42
General 43
Timers 43
Hot Keys 43
Identity & Rates 44
Currencies 45
Taxes 45
Blueprints 46
!3

Templates 46
Numbering 47
Labels 47
Extra Fields 48
Exporting data 48
Help and other resources 48
!4
Overview
The Billings Pro solution consists of multiple applications. These include Billings Pro on the Mac, Billings Pro on iOS, & Timecard. This guide discusses the Billings Pro app with an emphasis on the Mac version. There are other guides available for the other apps and these are referenced at the end of this document. With Billings Pro Cloud your database is hosted on Marketcircle’s cloud server.
Billings Pro allows you to try the application free for 30 days. After 30 days you may either choose to subscribe to Billings Pro or select the Limited Free Plan from within your Control Panel. If you forget to subscribe and the trial ends, your data is still there and you can subscribe or move to free at any time to regain access. This document assumes that you’re using the latest version of Billings Pro. If you’re using an older version of Billings Pro and find some incompatibility, please contact us at [email protected] and we’ll assist you.
System Requirements Billings Pro on Mac
❖ Mac OS X Lion 10.7.5 or higher
❖ 200 MB free hard drive space (database size may vary)
❖ 2 GB RAM
❖ 1280 x 800 screen resolution
Billings Pro on iOS
❖ iOS 9 or Higher
❖ Apple Watch users require iPhone 5 or later with iOS 9 or higher with Billings Pro iOS 1.9 or higher.
Timecard
❖ On Mac: Safari 4 or newer, latest stable release of Chrome, Firefox 2 or newer
❖ On Windows: Chrome, Firefox 2 or newer, Safari 4 or newer. (IE 8+)
❖ On iPad: Safari
❖ On Smartphones: iPhone, iPod touch, Android, Blackberry Torch
!5
Ecosystem
Billings Pro Cloud
Billings Pro Cloud is a secure cloud server that stores your Billings Pro data. Billings Pro Cloud is accessible over the Internet through the Billings Pro client apps. With Billings Pro Cloud, users don’t have to worry about setting up or maintaining servers as we take care of it. You simply have to install Billings Pro on client machines and sign up for a Marketcircle Cloud account when you login. With Marketcircle Cloud, we store and back up your data for you and you can sync your devices from anywhere with an internet connection.
If you are an administrator of a Billings Pro Cloud hosted account, then the Cloud preference setting displays your account information and a URL. You can enter this URL in your web browser to access a control panel where you can manage your Cloud account, add and remove users, adjust billing details or perform other administrative tasks.
Billings Pro on Mac
Billings Pro on the Mac is the full featured version of the application with no restrictions on viewable data. It can be used from a desktop or laptop computer. Billings Pro users have full access to client info, billable hours, client & project rates, invoicing, and reports. The components of the solution are discussed below.
Billings Pro on iOS
Billings Pro for iOS is a companion app which means slightly less functionality. iOS users have full access to client info, billable hours, client & project rates, invoicing, and some reports. Billings Pro for Apple Watch users will have access to basic timing functions, but not the same as iPhone or iPad.
Timecard
Timecard is a limited access web interface that allows workers to enter timed, expense, and mileage slips. There is no access to billing rates, financial data, client information etc. All slips created via Timecard must be approved by a manager with full access using the Billings Pro on the Mac before they can be invoiced.
!6

Background Sync Billings Pro on the Mac has a background sync function that automatically tries to reach the server and synchronize about every 5 minutes to keep your computer up to date with the changes on the server (or in the Cloud for cloud customers). You can trigger a sync manually using the > File/Sync... menu command. When the system is syncing you will see a spinning indicator on the top right side of your Billings Pro main window.
Installing Billings Pro You can download the Billings Pro from the macOS and iOS app stores, or from the Marketcircle Website. To sign in Cloud account for subscription based customers. Timecard is a web-app so no download is required for it, the URL is provided in the email that is sent out when the administrator creates a worker account. Installation is covered in greater detail in the getting started guides mentioned at the end of this document.
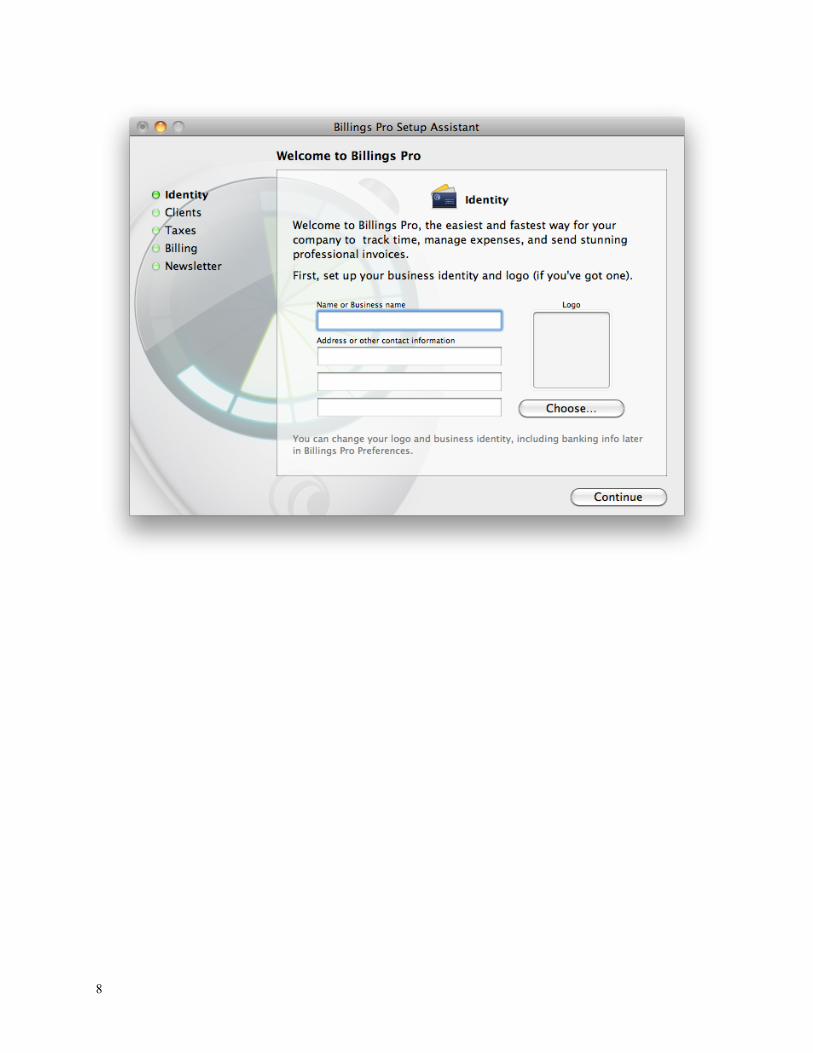
Billings Pro Setup Assistant
When you launch Billings Pro on the first time whether on the Mac or iOS, the setup assistant appears with some first run screens. The assistant helps you to get started quickly, configuring some important settings. It guides you through the process of specifying your identity, adding clients, choosing a tax, default billing rate etc. You can always adjust these settings later by choosing Billings Pro > Preferences. If you go through the setup assistant once, you won’t see it again on any other Mac or device, even for other users. Additional users and devices will be taken straight into the app.
Identity. This pane is for setting up your business identity by specifying a logo, business name, and contact information.
Clients. This pane describes Billings Pro clients, and how you can add clients to Billings Pro from your Address Book. Click Add Clients Now to choose people or organizations that you’d like to add to your Billings Pro client list. Click Continue to go to the taxes pane.
Taxes. This pane introduces tax setups in Billings Pro. You should choose a basic tax setup here—Billings Pro provides setups for more than 120 regions worldwide—and customize it later to suit your specific needs. Simply choose a tax region from the pop-up menu, and the setup assistant will show you more details about the basic taxes for the region you select. Don’t worry if the taxes are slightly incorrect, as you can easily change them later in the Taxes pane of Billings Pro Preferences.
Billing. This pane lets you specify your default billing rate, and in what increment you bill your time. These settings and many others can be changed in Billings Pro Preferences.
!7
!8
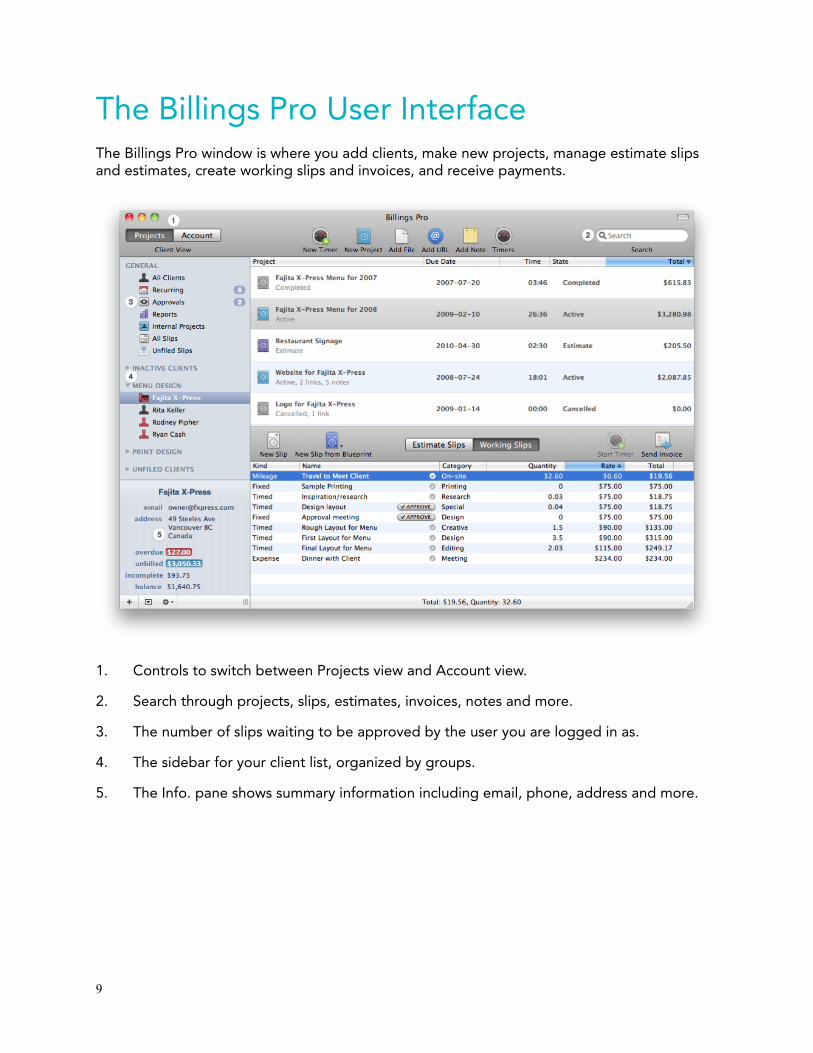
The Billings Pro User Interface
The Billings Pro window is where you add clients, make new projects, manage estimate slips and estimates, create working slips and invoices, and receive payments.
1. Controls to switch between Projects view and Account view.
2. Search through projects, slips, estimates, invoices, notes and more.
3. The number of slips waiting to be approved by the user you are logged in as.
4. The sidebar for your client list, organized by groups.
5. The Info. pane shows summary information including email, phone, address and more.
!9
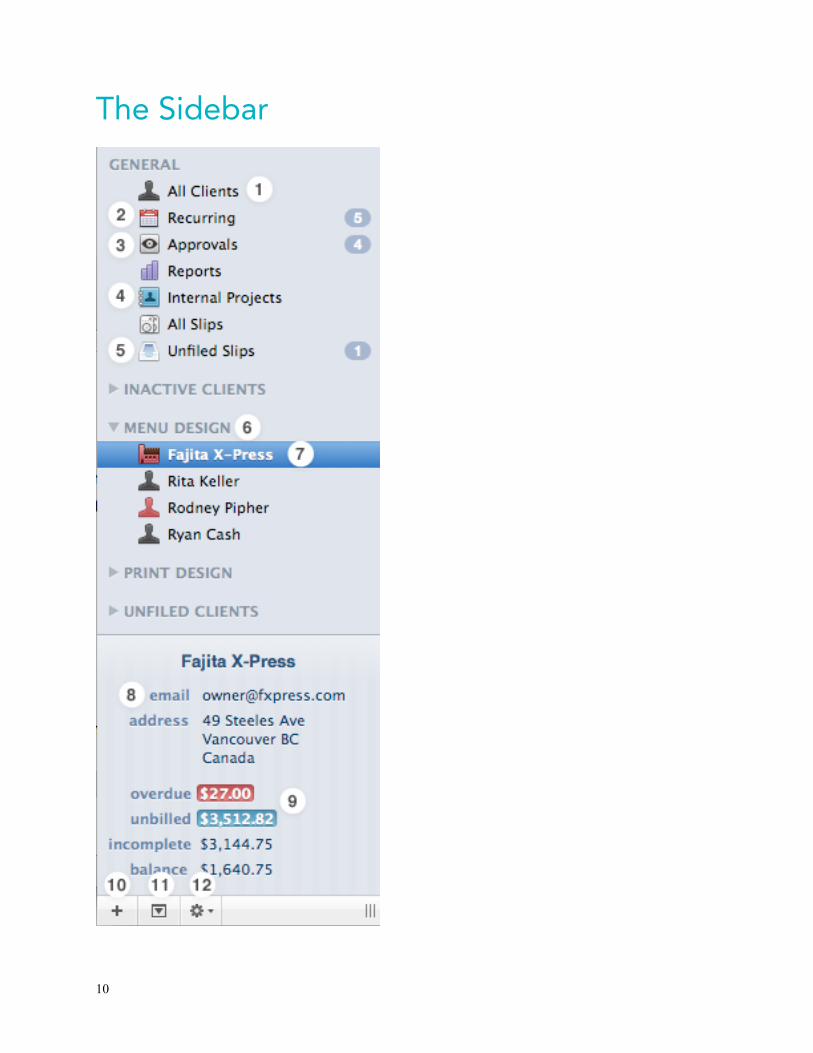
The Sidebar
!10
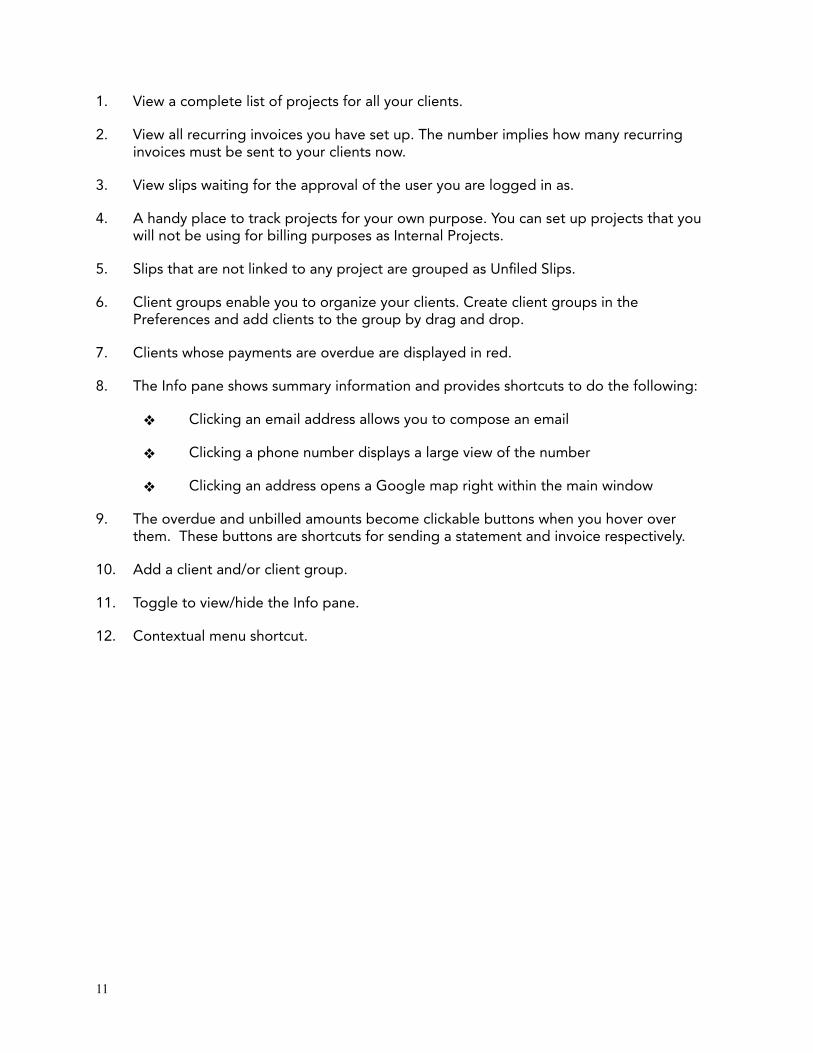
1. View a complete list of projects for all your clients.
2. View all recurring invoices you have set up. The number implies how many recurring invoices must be sent to your clients now.
3. View slips waiting for the approval of the user you are logged in as.
4. A handy place to track projects for your own purpose. You can set up projects that you will not be using for billing purposes as Internal Projects.
5. Slips that are not linked to any project are grouped as Unfiled Slips.
6. Client groups enable you to organize your clients. Create client groups in the Preferences and add clients to the group by drag and drop.
7. Clients whose payments are overdue are displayed in red.
8. The Info pane shows summary information and provides shortcuts to do the following:
❖ Clicking an email address allows you to compose an email
❖ Clicking a phone number displays a large view of the number
❖ Clicking an address opens a Google map right within the main window
9. The overdue and unbilled amounts become clickable buttons when you hover over them. These buttons are shortcuts for sending a statement and invoice respectively.
10. Add a client and/or client group.
11. Toggle to view/hide the Info pane.
12. Contextual menu shortcut.
!11
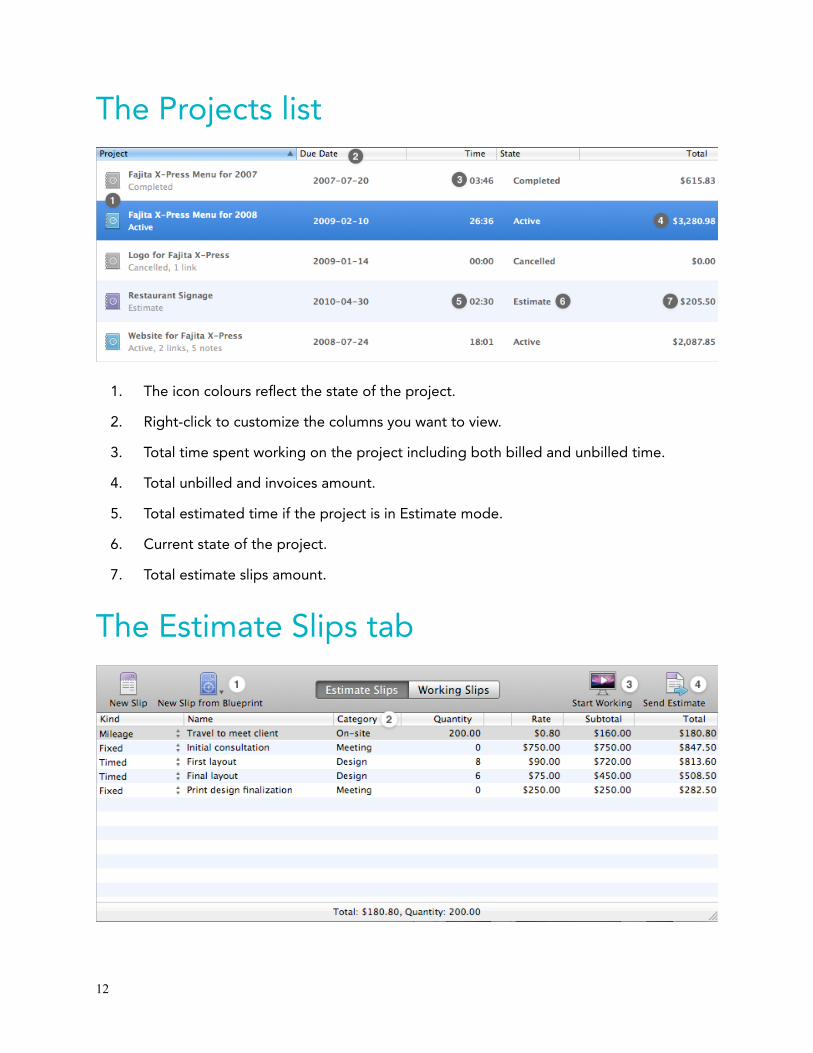
The Projects list
1. The icon colours reflect the state of the project.
2. Right-click to customize the columns you want to view.
3. Total time spent working on the project including both billed and unbilled time.
4. Total unbilled and invoices amount.
5. Total estimated time if the project is in Estimate mode.
6. Current state of the project.
7. Total estimate slips amount.
The Estimate Slips tab
!12
1. Create estimate slips from templates you have defined in the Preferences.
2. Right-click to customize the columns you want to view.
3. Create working slips that retain all the characteristics of the estimate slips. Converts the project to Active state from Estimate state.
4. Generate and send an estimate with the selected slips.
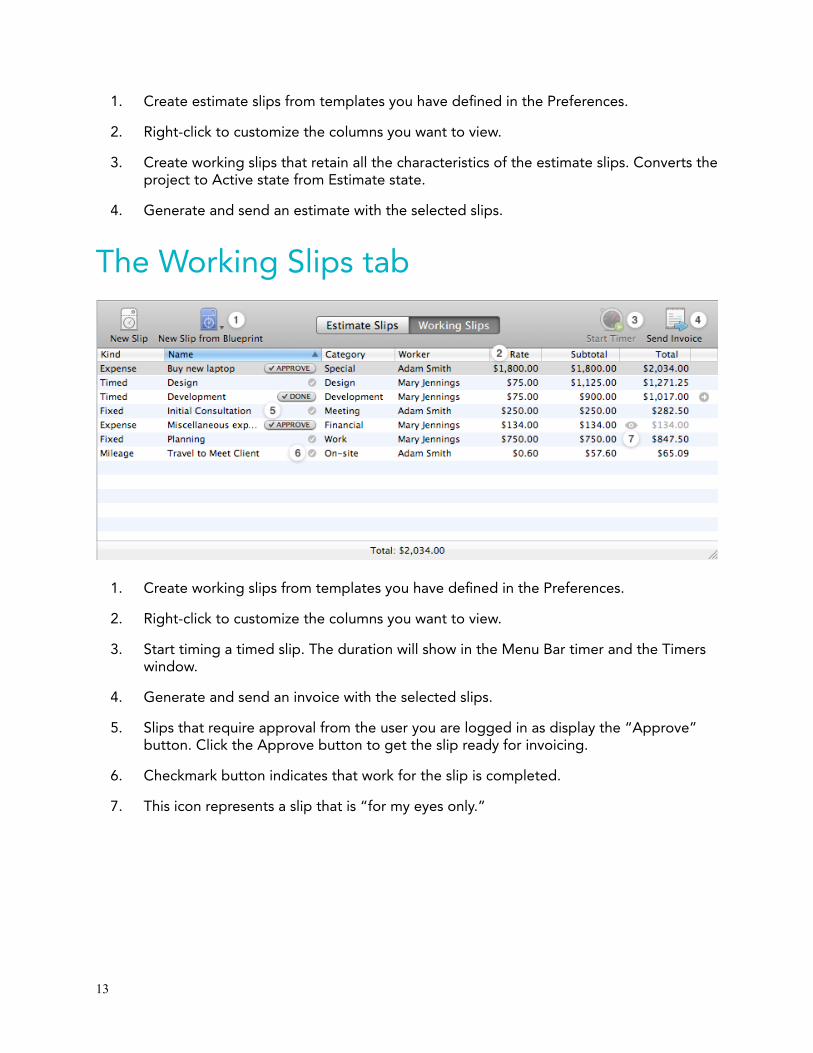
The Working Slips tab
1. Create working slips from templates you have defined in the Preferences.
2. Right-click to customize the columns you want to view.
3. Start timing a timed slip. The duration will show in the Menu Bar timer and the Timers window.
4. Generate and send an invoice with the selected slips.
5. Slips that require approval from the user you are logged in as display the “Approve” button. Click the Approve button to get the slip ready for invoicing.
6. Checkmark button indicates that work for the slip is completed.
7. This icon represents a slip that is “for my eyes only.”
!13

The Account view
1. Chronological display of estimates, invoices, payments, retainers, and statements.
2. Displays an overdue invoice in red.
3. Inline display of an invoice with a “Paid” stamp if the invoice is fully paid.
4. Unapplied amount of a payment in green.
5. Balance of any retainer the client has provided.
6. The current account balance for the selected client. It is the sum of all invoices and payments for the selected client.
The Account view
!14
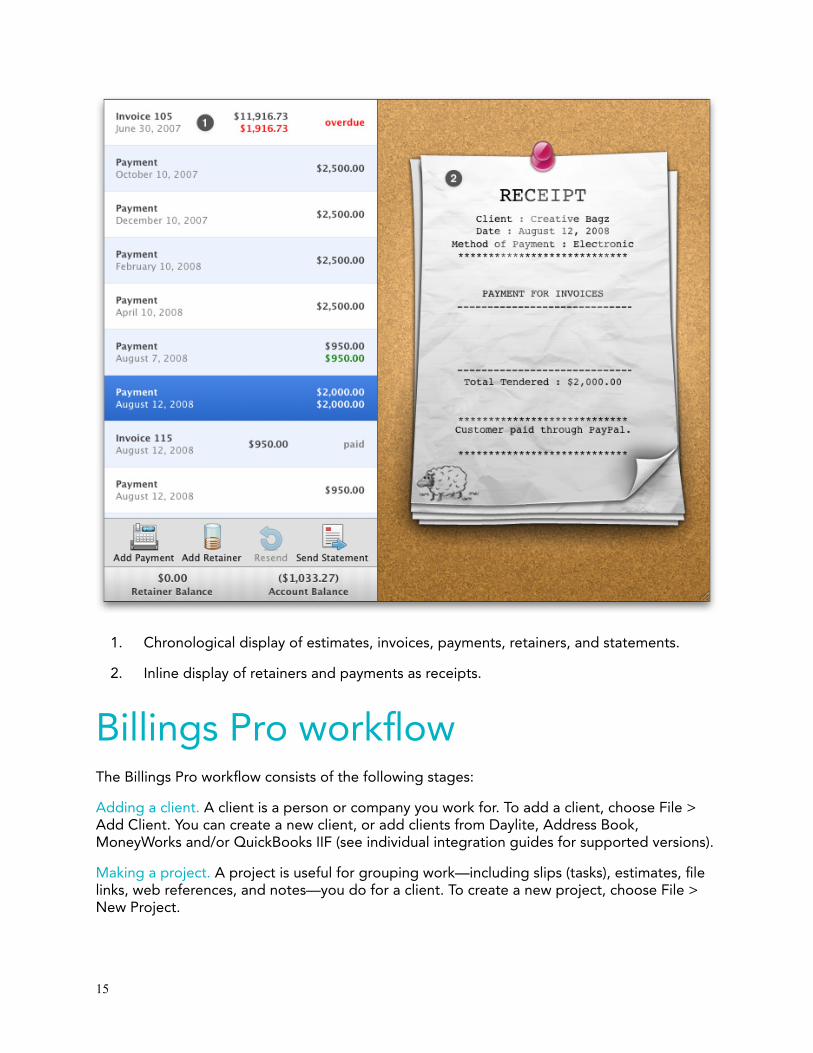
1. Chronological display of estimates, invoices, payments, retainers, and statements.
2. Inline display of retainers and payments as receipts.
Billings Pro workflow
The Billings Pro workflow consists of the following stages:
Adding a client. A client is a person or company you work for. To add a client, choose File > Add Client. You can create a new client, or add clients from Daylite, Address Book, MoneyWorks and/or QuickBooks IIF (see individual integration guides for supported versions).
Making a project. A project is useful for grouping work—including slips (tasks), estimates, file links, web references, and notes—you do for a client. To create a new project, choose File > New Project.
!15
The Workers tab of the Project window has an option where you can select an approver for the slips belonging to that project. Only a user with Billings Pro access can be an approver. The “Approver” menu displays only users with Billings Pro access and you must select one among them. If an approver is not required, then this option must be set to “None Required.” Further, you must specify who will be working on the project by selecting the appropriate checkboxes under “Project Workers.” The selected workers will be able to login into Timecard and add/edit slips for the project.
Sending an estimate. An estimate calculates the approximate cost and time requirements for a project. To create an estimate slip, choose Slips > New Estimate Slip and then generate an estimate from the slip. If you don’t send estimates to your clients, you can skip this step and start working right away.
Starting work. There are six different ways to start working.
❖ Select an estimate slip and choose Slips > Start Working. Billings Pro creates a working slip that is linked to your original estimate, so you can later compare your estimated time or cost to the actual result.
❖ Create a new working slip by choosing Slips > New Working Slip. Typically, you would do this if you need to record an expense, mileage driven, product sold, or to set up tasks you need to time.
❖ In the Timers window, create a new slip and start timing it. When you are done, you must click the Checkmark button to mark the slip as completed and then link it to a project.
❖ Using a hot key or by option-clicking the play/pause button in the Billings Pro menubar timer, create a new timed slip instantly from any application.
❖ From the menubar timer, choose New Timed Slip. Start timing this slip when appropriate.
❖ Certain workers (staff members) who are not given access to Billings Pro must use Timecard for creating timed, expense, and mileage slips for a project and send it for approval.
Approving slips. Slips linked to a project must be approved by the approver set for that project before invoicing them. To approve a slip, select the slip and choose Slips > Approve Slip. Upon approval, the slips are ready to be invoiced.
Sending an invoice. Billings Pro generates professional invoices that you can send to your clients. You can send the invoice on a per project basis or you can send a consolidated client invoice. To send a project invoice, select the working slip(s) and choose Project > Send Invoice. To send a consolidated client invoice, select the working slip(s) and choose Client > Send Invoice. You can customize your invoices, apply different styles, and choose a suitable delivery option.
Recording received payments. You can add payments and apply them against specific invoices to track your income. To make a payment, choose Client > Add Payment. Billings Pro also allows you to set up a retainer when you require a client to pay in advance.
!16
About Clients
A client is a person or organization for whom you do work. Projects are the basis of the Billings Pro workflow, and clients are the people or companies for whom you create projects. Working from the Projects view (View > Projects), you can select a client and the project list shows all the projects associated with that client. There is no limit to the number of clients that can be added to your client list.
When you select a client in Billings Pro, the Info pane shows summary information for that client including email, phone, address, and brief account information. Here you can do the following:
❖ Click the email address to compose an email.
❖ Click the phone number to see a larger view.
❖ Click the address to see a Google map right within the main window.
❖ View a brief summary of account information including overdue, unbilled amounts, balance and more.
Both the overdue and unbilled amounts become clickable buttons when you hover over them. These buttons are shortcuts for sending a statement and sending an invoice respectively.
Billings Pro and Address Book
Each client in Billings Pro can have corresponding record in your Address Book, but this is optional. To do this, simply right-click the client name and you could either choose “Link To” and select an existing contact in Address Book or choose “Restore In Address Book” to create the client in Address Book.
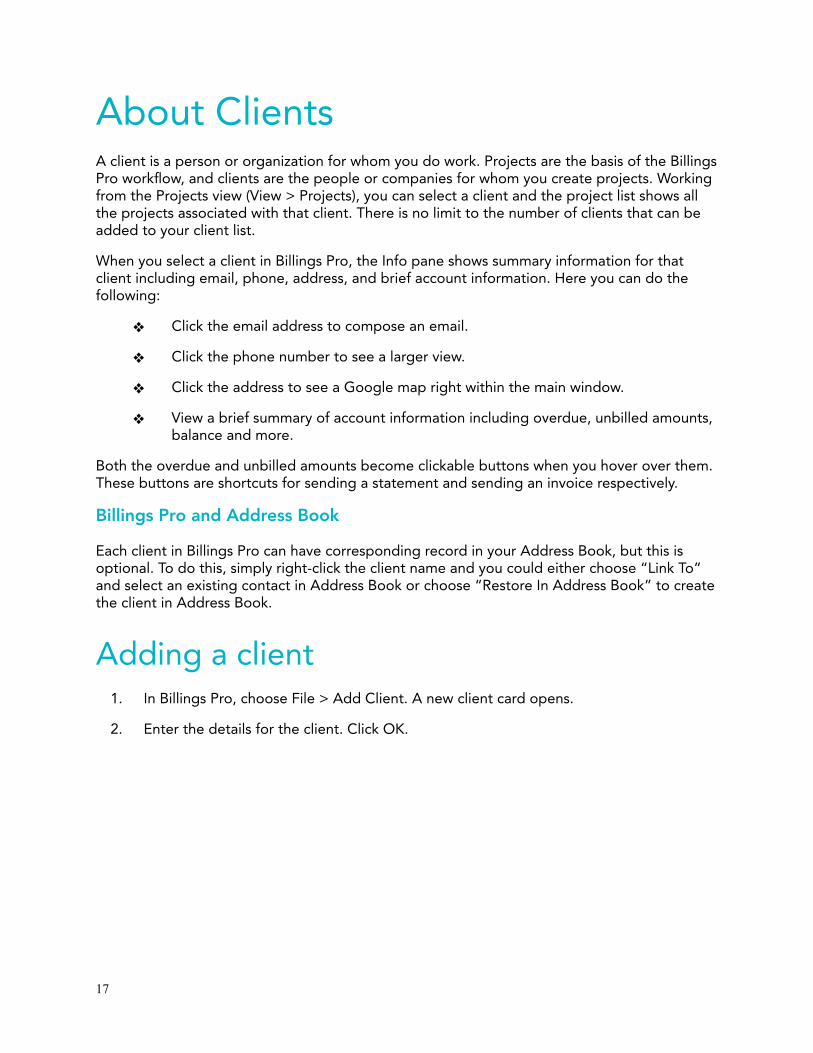
Adding a client
1. In Billings Pro, choose File > Add Client. A new client card opens.
2. Enter the details for the client. Click OK.
!17
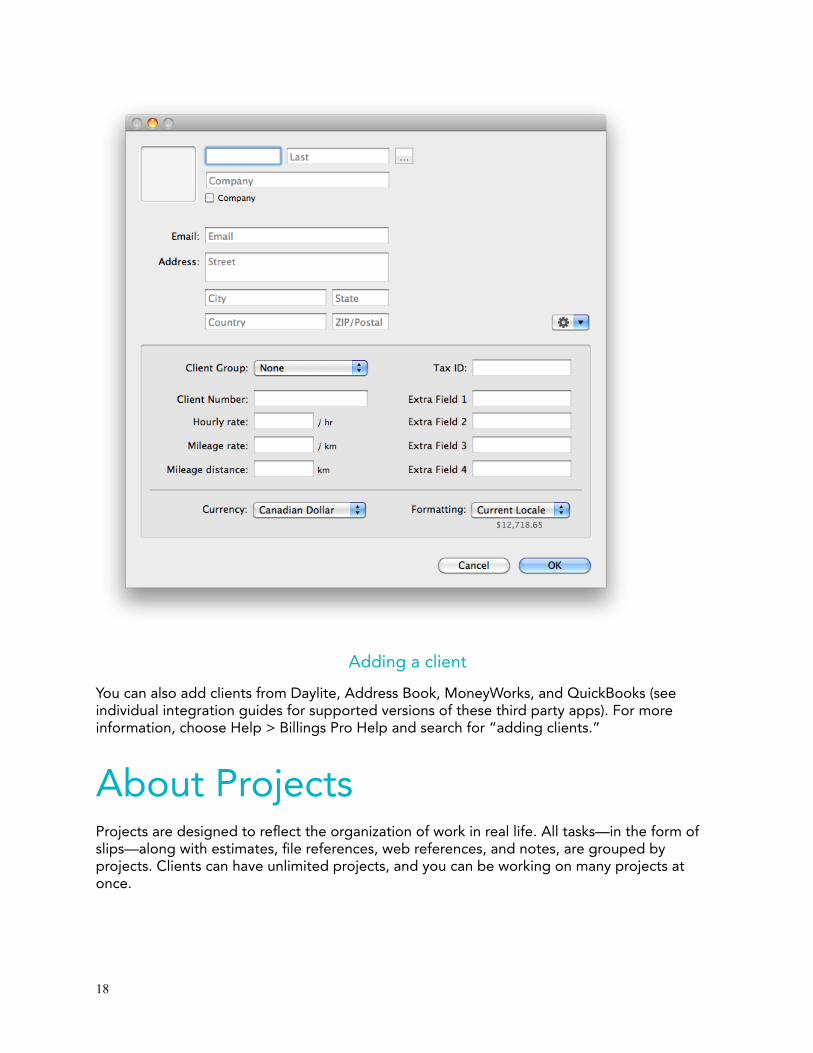
Adding a client
You can also add clients from Daylite, Address Book, MoneyWorks, and QuickBooks (see individual integration guides for supported versions of these third party apps). For more information, choose Help > Billings Pro Help and search for “adding clients.”
About Projects
Projects are designed to reflect the organization of work in real life. All tasks—in the form of slips—along with estimates, file references, web references, and notes, are grouped by projects. Clients can have unlimited projects, and you can be working on many projects at once.
!18
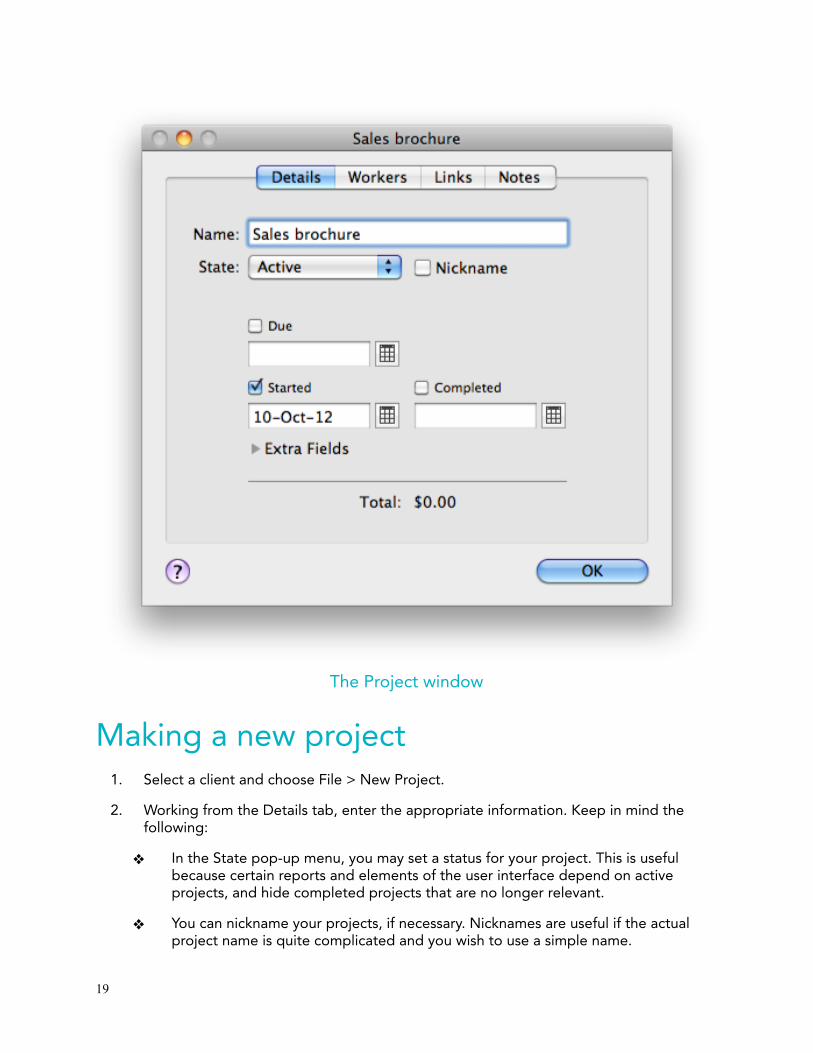
The Project window
Making a new project
1. Select a client and choose File > New Project.
2. Working from the Details tab, enter the appropriate information. Keep in mind the following:
❖ In the State pop-up menu, you may set a status for your project. This is useful because certain reports and elements of the user interface depend on active projects, and hide completed projects that are no longer relevant.
❖ You can nickname your projects, if necessary. Nicknames are useful if the actual project name is quite complicated and you wish to use a simple name.
!19
3. Working from the Workers tab, enter the appropriate information. Keep in mind the following:
❖ Only a manager with Billings Pro access can be an approver. Note that if a project is assigned an
❖ approver, then any other manager having Billings Pro access on a different machine will also be able to approve slips for the project; hence, it’s very important to choose your managers wisely. If no approver is required, then the approver must be set to “None Required.”
❖ v Select the workers who will be working on the project. This will enable them to access and add slips to the project via Timecard.
❖ v For each worker, you can enter a project-specific rate, if desired. If the worker has a normal rate, then the project-specific rate overrides the normal rate for that project only.
4. Working from the Links tab, you can link a file or a web URL to the project.
5. Working from the Notes tab, you can add additional information related to the project as a note.
6. Click OK.
Working with Slips
A slip generally corresponds to a task. Such tasks may include performing a service, selling a product, incurring an expense, or travelling. Generally, each slip you make corresponds to a single line item on either an estimate or invoice. You can create slips as you need them, and save frequently reused slips as blueprints. You can use categories to group slips by the type of work or product they represent.
!20
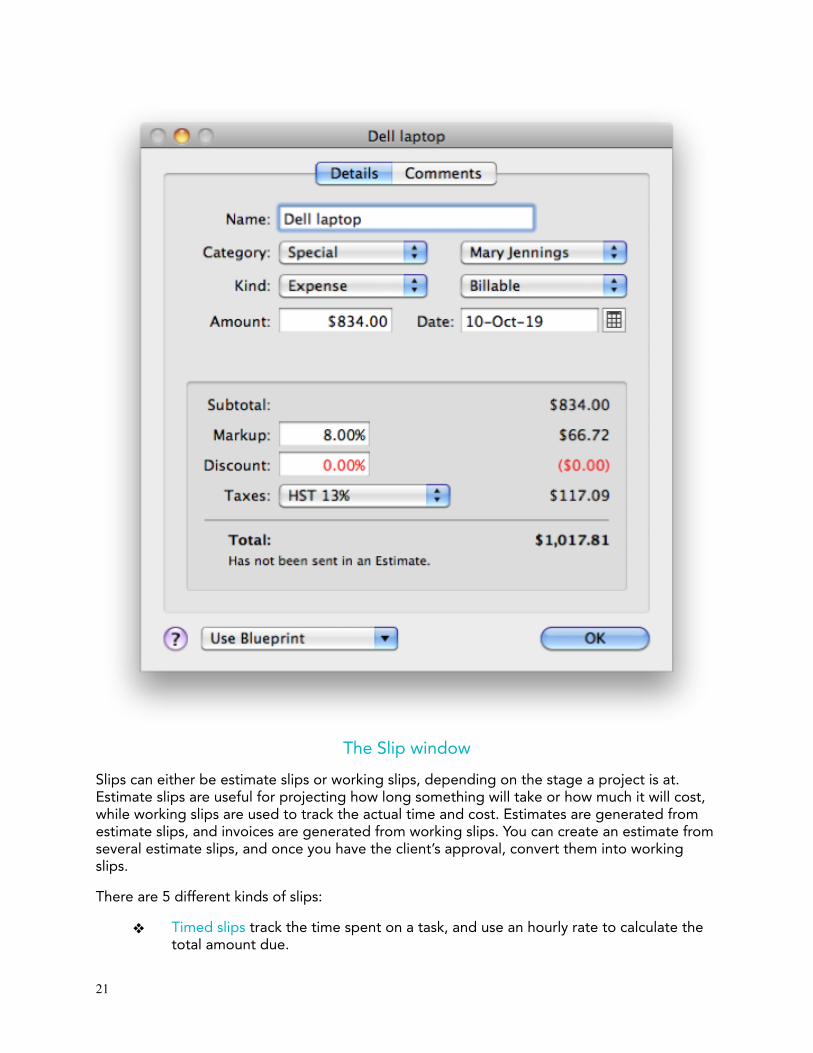
The Slip window
Slips can either be estimate slips or working slips, depending on the stage a project is at. Estimate slips are useful for projecting how long something will take or how much it will cost, while working slips are used to track the actual time and cost. Estimates are generated from estimate slips, and invoices are generated from working slips. You can create an estimate from several estimate slips, and once you have the client’s approval, convert them into working slips.
There are 5 different kinds of slips:
❖ Timed slips track the time spent on a task, and use an hourly rate to calculate the total amount due.
!21
❖ Fixed slips track the time spent on a task, but allow you to charge a flat rate to your client.Quantity slips use the number and price of an item, such as a product, to calculate a total cost.Expense slips are a way of specifically tracking any miscellaneous expenses associated with a project.
❖ Mileage slips record a distance travelled and rate per mile or kilometre to calculate a total cost. Mileage can be recorded with two digit or three digit decimals.
Creating an estimate slip
Estimate slips are used to predict the time required for and eventual cost of a project. Typically, you would create estimate slips that you would expect to correspond to actual tasks required to complete a project. Another way of looking at estimate slips is that they should represent “major chunks” of work, and translate into single line items on an estimate or invoice.
To create an estimate slip, first select a client and a project in the Billings Pro window.
1. In Billings Pro, choose Slips > New Estimate Slip.
2. Enter the details.
3. Click OK.
Sending an estimate
Once you’ve created the estimate slips that describe your best guess at the final time required for and cost of a project, you can send them on an estimate. Simply select the slips and choose Project > Send Estimate. Billings Pro estimates are fully customizable, and can be printed, sent by email, and saved as a PDF. For more information about sending estimates, choose Help > Billings Pro Help and search for estimate.
Once your client approves your quote, you can convert your estimate slips into working slips and start using Billings Pro to actively track your time and expenses.
!22
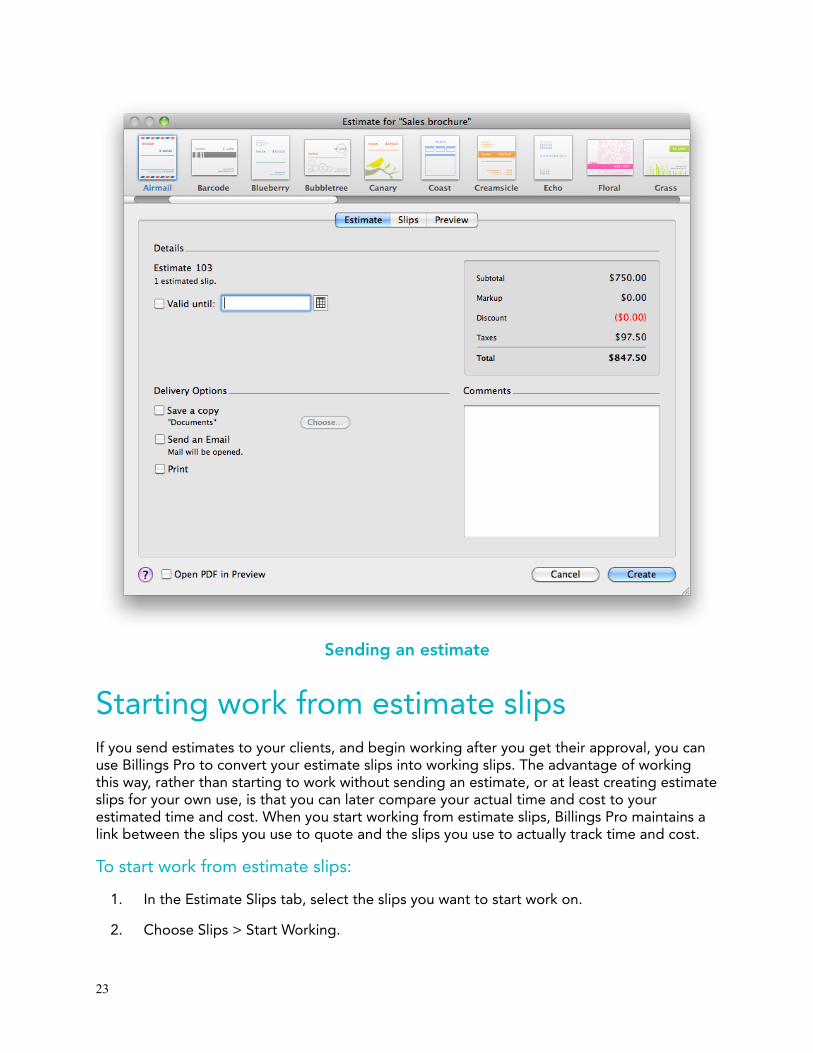
Sending an estimate
Starting work from estimate slips
If you send estimates to your clients, and begin working after you get their approval, you can use Billings Pro to convert your estimate slips into working slips. The advantage of working this way, rather than starting to work without sending an estimate, or at least creating estimate slips for your own use, is that you can later compare your actual time and cost to your estimated time and cost. When you start working from estimate slips, Billings Pro maintains a link between the slips you use to quote and the slips you use to actually track time and cost.
To start work from estimate slips:
1. In the Estimate Slips tab, select the slips you want to start work on.
2. Choose Slips > Start Working.
!23
Billings Pro switches to the Working Slips tab, and activates any timed or fixed slips, making them available in the Timers window and the menubar timer.
Creating a working slip
If you prefer not to create estimate slips or send estimates, but instead wish to begin using Billings Pro to track time and expenses for projects right away, you can bypass the estimate system entirely and only use working slips.
To create a working slip:
1. In Billings Pro, choose Slips > New Working Slip.
2. Enter the details.
3. Click OK.
Working timed and fixed slips instantly appear in the Timers window and the menubar timer, ready to track your work.
Working with timed slips and timers
Timed and fixed slips are used to track the duration you spend working on particular tasks. Eventually, these slips become line items on your invoice, and can show how long you worked on a task, your rate, and so on.
Timed slips have a duration and an hourly rate, and are used to track work paid by the hour. Billings Pro multiplies the duration of a timed slip with its billing rate to determine the final cost.
Fixed slips are like timed slips, except they have a flat rate instead of an hourly rate. Billings Pro still records the duration of a fixed slip, but its cost is determined by the flat rate. This kind of slip is useful if you need to track the time spent on a task, but will charge a fixed fee for the work.
Active timed and fixed slips—those that have not been marked as completed or that have not been invoiced— appear in the appropriate project Working Slips tab, and in the Timers window and menubar timer. You can start the timer for a timed or fixed slip using either of those interfaces. The following instructions detail how to make these slips, and how to work with the timer. Generally, the steps refer to timed slips, but the same principles apply to fixed slips.
!24
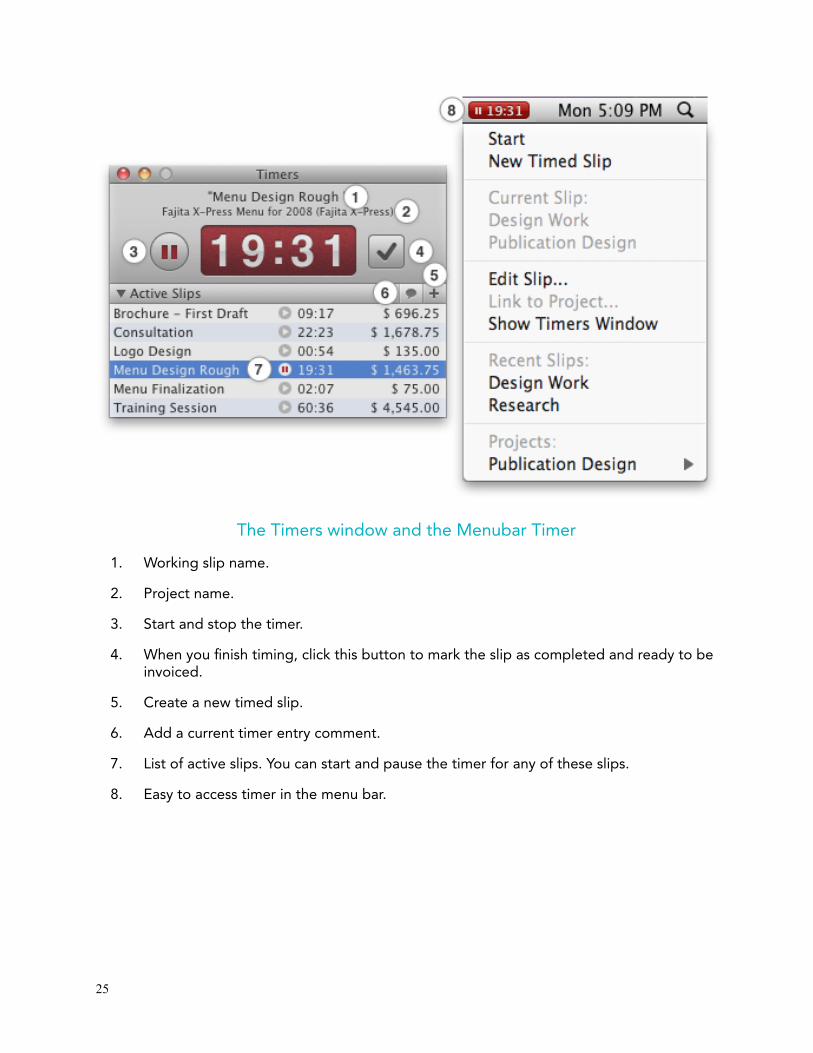
The Timers window and the Menubar Timer
1. Working slip name.
2. Project name.
3. Start and stop the timer.
4. When you finish timing, click this button to mark the slip as completed and ready to be invoiced.
5. Create a new timed slip.
6. Add a current timer entry comment.
7. List of active slips. You can start and pause the timer for any of these slips.
8. Easy to access timer in the menu bar.
!25
Making timed slips
There are many ways to conveniently make timed slips, including the following common methods:
❖ When the Billings Pro window is open, you can create a working slip that is linked to a project, using the menu.
❖ You can start a new, unlinked timed slip (not linked to any project) from the Timers window.
❖ From within any application, you can start a new, unlinked timed slip from the Menubar timer.
❖ From within any application, you can create a new, unlinked timed slip instantly by using the hot key you have setup in Billings Pro Preferences.
❖ Workers having access to Timecard can create timed slips for tracking their work duration and send them for approval when done.
Starting timers
There are a number of ways to start timers. The following methods detail several common cases.
To start a timer for a working slip already linked to a project
1. Choose Window > Timers.
2. Select the timed slip you want to start timing.
3. Click the Play button to start the timer. The Play button and the background of the timer turn red to confirm that the timer is active.
You can also start the timer for a working slip already linked to a project by control– or right–clicking on it in the slip list on the Working Slips tab, and choosing Start Timer.
To start a new, unlinked timed slip using the Timers window
1. In the Timers window, click the + button to add a new slip to the active slips list.
2. Enter a name for the new slip.
3. Click the Play button to start the timer. The Play button and the background of the timer turn red to confirm that the timer is active.
When you finish timing the unlinked slip, you should link it to a project so that you can later invoice it. Until the slip is linked, it will only appear in the Timers window and in the menubar timer.
!26
To start a new, unlinked timed slip using the menubar timer
1. Click the menubar timer and choose New Timed Slip.
2. Click the Play button in the menubar timer, or choose Start from the menubar timer menu. The menubar timer turns red to confirm that the timer is active.
You can also instantly create a new timed slip and start its timer right away by option–clicking the play or pause button in the menubar timer. When you finish timing the unlinked slip, you should link it to a project so that you can later invoice it. Until the slip is linked, it will only appear in the Timers window and in the menubar timer. Choose the slip from the menubar timer menu, and when it is the current slip, choose Link to Project.
To set up a new timed slip via Timecard
1. Connect to Timecard from your web browser. (For more information about working with Timecard, launch Billings Pro and choose Help > Billings Pro Help.)
2. Select a project.
3. Click Add Time Slip.
4. Enter a name for the slip. Click Start.
5. When done, click Send For Approval.
6. In the window that opens, click Send Slip.
The slip is available in Billings Pro upon synchronization and must be approved by an approver set for the project prior to invoicing.
Working with Approvals
Approvals are useful to ensure the accuracy and validity of slips before they are invoiced to the client. Upon completion of work, if an approver has been set on a project, all slips of the project must be approved prior to invoicing. Only a manager with Billings Pro access can be an approver on a project.
Why approvals are necessary?
Generally, most companies or businesses present themselves in a way that deceives outsiders into getting an impression that everything is perfect and systematic. But, in reality, this is not always the case. Inside businesses, things can be very disorganized and chaotic. This is true to certain industries and may sometimes exist due to company behavior.
For example, consider a design-based company doing work for their clients. The design project might involve plenty of re-work and iterations before presenting the final piece to the client. There could be certain stipulations existing for your project—like not all the work done by the designer is billable, or, the client gets a startup discount for this project only, but that is not applicable to their next project. All this criteria must be carefully verified by the individual responsible for sending the invoice to the client.
!27
Here, approvals come in handy as they allow you to control what charges appear on an invoice and whether it is in accordance with the terms and conditions on your contract, if one exists.
Key aspects
❖ You can assign only 1 approver for a project.
❖ Always ensure that the approver you set on a project is very knowledgable about the project and well aware of the terms and conditions of the agreement, if any.
❖ Suppose it is time to deliver the project to the client and the approver is away on business. Any other Billings Pro user on a different machine can also approve slips for the project provided they are eligible and capable of taking certain decisions in the absence of the real approver. This should only be used in certain circumstances to avoid delay in meeting deadlines.
Approval Workflow
1. Manager creates a project in Billings Pro and enters all the details including setting an approver, specifying project workers, rates for the workers for that project (if different from normal rate), etc.
2. Staff member accesses the project via Timecard. He/she creates slips, tracks time, and sends slips for approval when done.
3. In the Approvals view of Billings Pro, the approver views all slips they must approve and makes adjustments, if necessary. When ready, the approver approves the slip(s).
4. The slips are now ready to be marked as Done and invoiced. The approver sends an invoice to the client.
Scenarios
Case 1
John owns a design firm. Sandra works as a graphic designer at the firm. John has signed a contract with his client for their upcoming design project. He creates a new project for the client in Billings Pro. In the same project, he sets himself as an approver, and links Sandra as a project worker.
Sandra starts working on the project and creates timed slips for the work she is doing via Timecard. When Sandra presents her first prototype to John, he does not like it and asks for a re-do. It takes a few iterations to get to the final version. Each time Sandra creates a new prototype, she sets up a new timed slip, starts timing it, and sends it for approval upon completion. Sandra completes a total of 5 prototypes and John agrees on the final piece.
Now, it’s time to send an invoice to the client. The contract has certain terms and conditions according to which John can bill the client for only 3 prototypes. So, John goes to the project
!28
and marks those slips that will not be invoiced as “My Eyes Only.” He makes adjustments to other aspects, for example, the description, hours worked, etc. When done, he approves them and sends the invoice.
Thus, using approvals, John was able to review the re-work, analyze which one is good to bill the client for, and present it to them accordingly on the invoice. He is able to do business with ease all while maintaining a highly professional image for working in accordance with the terms and conditions set by the client.
Case 2
Ryan owns an advertising firm and Andrew is a partner in the same company. Kathy is a staff member of the firm. Ryan and Andrew both have access to Billings Pro, whereas Kathy has access to Timecard. Ryan creates a new project in Billings Pro, adds himself as an approver and selects Kathy as a project worker.
Kathy creates timed, expense, and mileage slips for the work she is doing and sends them for approval upon completion. Ryan must approve the slips and make them ready for invoicing. But, at the crucial moment, Ryan has to travel for business. He is unable to approve slips for the project.
Andrew, who is also a partner in the firm has the authority to approve slips for the project and is completely aware of the terms and conditions of the agreement. He connects to Billings Pro on his machine, and working from the Approvals view, he selects “All Unapproved Slips.” He reviews the slips, makes adjustments where necessary, approves them, and invoices them.
Sending an invoice
Sending an invoice in Billings Pro is very similar to sending an estimate. When you’ve finished all the tasks for a project, and your working slips list has all the timed, fixed, quantity, mileage, and expense slips that you need to bill for, you can collect them onto an invoice. Each slip will correspond to one line item on the invoice.
You can send invoices on a per-project basis. Select the slips you want to invoice and choose Project > Send Invoice.
Or, you can also send consolidated invoices on a per-client basis across multiple projects. Select a clientand choose Client > Send Invoice. Another way of doing this is to hover over the unbilled amount in the Info pane for a client. You will notice a clickable Send Invoice button for generating and sending invoices.
The invoices have to be assigned a variety of information including a specific due date in Billings Pro. If you wish to have any previous balance that a client owes you on your invoice, you can do so. When you are sending the invoice, click Options and select the “Show previous balance” checkbox.
Billings Pro invoices are fully customizable, and can be printed, sent by email, and saved as a PDF. For more information about sending invoices, choose Help > Billings Pro Help and search for invoice.
!29
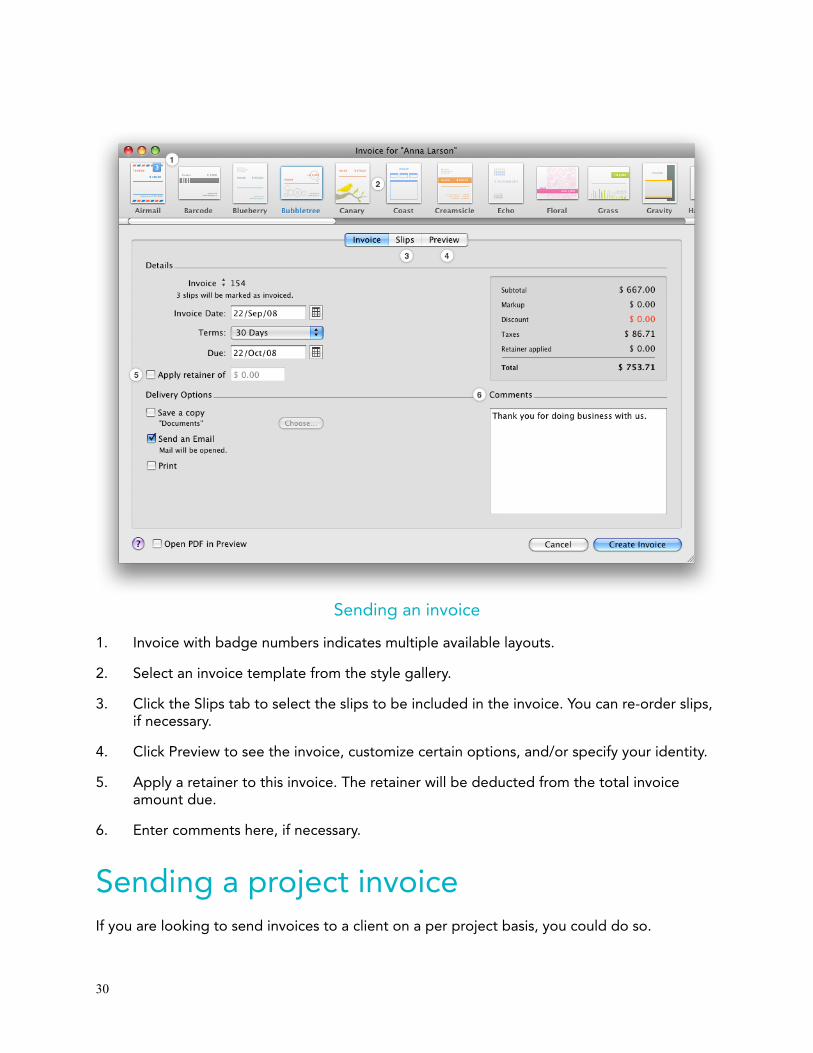
Sending an invoice
1. Invoice with badge numbers indicates multiple available layouts.
2. Select an invoice template from the style gallery.
3. Click the Slips tab to select the slips to be included in the invoice. You can re-order slips, if necessary.
4. Click Preview to see the invoice, customize certain options, and/or specify your identity.
5. Apply a retainer to this invoice. The retainer will be deducted from the total invoice amount due.
6. Enter comments here, if necessary.
Sending a project invoice
If you are looking to send invoices to a client on a per project basis, you could do so.
!30
To send a project invoice
1. Select a project.
2. Highlight the slip(s) that you want to invoice. To highlight multiple slips, hold down the Apple key.
3. Choose Project > Send Invoice.
4. Enter information as appropriate. Keep in mind the following:
❖ Click the Invoice tab to enter details, pick a delivery option, and specify comments for the invoice.
❖ Click the Slips tab to see what slips of the project will be included as individual line items of the invoice. If you wish, you can re-order slips by simple drag and drop.
❖ Select a style from the style gallery. Note that styles with badge numbers indicate multiple available layouts for grouping data.
❖ Click the Preview tab to see the invoice. If you have selected a style with multiple layouts, you can select a layout from the Layout pop-up menu.
❖ To customize the invoice, click Options. Select the settings for the invoice and click OK.
5. When you are ready to send the invoice, click Create.
Sending a consolidated client invoice
Billings Pro gives you the ability to send consolidated invoices on a per-client basis across multiple projects. For example, if you are working on many projects for a client and you want to send 1 invoice for all those projects, then you can send a consolidated client invoice.
To send a consolidated client invoice
1. Select a client.
2. Choose Client > Send Invoice.
3. Enter information as appropriate. Keep in mind the following:
❖ Click the Invoice tab to enter details, pick a delivery option, and specify comments for the invoice.
❖ Click the Slips tab to see what slips will be included in the invoice. If you wish, you can re-order slips by simple drag and drop. Note that Billings Pro automatically selects the slips that have been marked as completed.
❖ Select a style from the style gallery. Note that styles with badge numbers indicate multiple available layouts for grouping data.
!31
❖ Click the Preview tab to see the invoice. If you have selected a style with multiple layouts, you can select a layout from the Layout pop-up menu.
❖ To customize the invoice, click Options. Select the settings for the invoice and click OK.
4. When you are ready to send the invoice, click Create.
When you send an invoice by email, the subject of your email shows information in the same format matching the filename format you have entered for invoices in the Numbering Preferences. If no format is chosen, the subject of your email says Invoice. For more information about setting up filenames for saving invoices, see Numbering Preferences.
How do I show the previous balance on an invoice?
1. In the Invoice window, click the Preview tab
2. Click Options.
3. Select the Show previous balance checkbox.
4. Click OK.
Creating a Pro Forma invoice
Pro Forma invoices are used to validate an invoice with the client or a boss/manager before making the real invoice. It is a draft of the invoice and is useful in identifying any discrepancies before you make the final invoice.
Pro Forma invoices don’t have an invoice number. Billings Pro replaces the title of the invoice to say “Pro Forma Invoice.” However, you can customize these aspects.
Keep in mind that a slip should not be a part of multiple Pro Forma invoices.
To create a Pro Forma invoice
1. Select a slip.
2. Choose Project > Send Invoice.
3. Keep in mind the following:
❖ Click the Invoice tab to enter details. To create a Pro Forma invoice, choose Pro Forma Invoice from the pop-up menu next to the Invoice #. You can also pick a delivery option and specify comments for the Pro Forma invoice.
❖ Click the Slips tab to see what slips of the project will be included as individual line items of the Pro Forma invoice. If you wish, you can re-order slips by drag and drop. Billings Pro remembers the slip order you have set up when you send the actual invoice.
!32

❖ Select a style from the style gallery. Note that styles with badge numbers indicate multiple available layouts for grouping data.
❖ Click the Preview tab to see the Pro Forma invoice. If you have selected a style with multiple layouts, you can select a layout from the Layout pop-up menu.
❖ To customize the invoice, click Options. For Pro Forma invoices, you can customize the header text and invoice number text, if necessary. Select other settings as needed and click OK.
4. When you are ready to send the Pro Forma invoice, click Pro Forma.Billings Pro creates the Pro Forma invoice and takes you to the Account view where you can see it.
At this point, you can validate the Pro Forma invoice with the concerned person. If there is any discrepancy, you can edit the Pro Forma invoice and validate it again. Otherwise, you can create the final invoice and send it to the client.
To edit a Pro Forma invoice
1. In the Account view, select a Pro Forma invoice.
2. Double-click to open the Pro Forma invoice.
3. Click the Invoice tab. Under Details, choose Pro Forma Invoice from the pop-up menu next to the Invoice #.
4. Make the necessary changes.
5. When done, click Pro Forma.
To send the final invoice
1. In the Account view, select a Pro Forma Invoice.
2. Double-click to open the Pro Forma Invoice.
3. Enter any other information as needed.
4. Click Create.
Note: Terms change to “Specific Date” when you edit a Pro Forma invoice or when you want to make it a real invoice. Once you have sent the real invoice, you can delete the Pro Forma invoice.
!33
Receiving a payment
Beyond simply letting you send estimates and invoices, Billings Pro helps you track the income you receive by way of payments. If you receive a payment from a client and want to add it to Billings Pro, simply select the client and choose Client > Add Payment.
When you add a payment, you can specify the amount of money received, the date, and method of payment. Payments may also be applied against a specific invoice, or multiple invoices. When you add payments and apply them against invoices, the balances of the invoices and the overall client balance update appropriately. It is good practice to carefully apply payments, because Billings Pro comes with several reports that will help you identify outstanding invoices, total income earned, and other important business information, but they rely on the proper use of payments.
For more information about payments, choose Help > Billings Pro Help and search for payment.
About Statements
A statement is a record of invoices and payments. If you wish to see the history of all the invoices sent to a client and payments made by the client, you must create a statement. A statement can also be sent to a client whose invoice is overdue as a reminder for making the payment.
When you are sending a statement, you may choose to include invoices and payments in one of the following ways:
❖ From first outstanding item: The statement will include the first unpaid invoice for the client to the current date.
❖ From date: The statement will include unpaid invoices for the client from the date you specify to the current date. The date you specify should be earlier than the first unpaid invoice. This option is also useful if you want to get a history of the activities from a specific date.
When you are sending a statement, you can use one of the existing template styles or design your own statement by choosing Design > New Statement. The statements you send to a client can be viewed in the Account view.
Sending a statement
1. Select a client.
2. Choose Client > Send Statement.
3. Enter the appropriate information. Keep in mind the following:
!34
❖ Click the Statement tab to specify details, delivery option, and comments, if necessary.
❖ Select a style for the statement from the style gallery.
❖ To see the statement, click the Preview tab.
❖ To customize the statement, click Options. Here you can customize the font, general options, table options, and currency format for the statement.
4. When you are ready to send the statement, click Create.
When you send a statement by email, the subject of your email shows information in the same format matching the filename format you have entered for statements in the Numbering Preferences. If no format is chosen, the subject of your email says Statement. For more information about setting up filenames for saving statements, see Numbering Preferences.
Setting up recurring invoices
If you send the same invoice to a client periodically, then you must set up a recurring invoice. For example, consider you offer web hosting services to your client and send an invoice for the same every month. Instead of manually creating and sending the invoice every month, you can set up a recurring invoice. When it’s time to send the invoice, a simple click of a button will do the job.
To set up a recurring invoice
1. Choose File > New Recurring Invoice.
2. Enter the appropriate information. Keep in mind the following:
❖ You must select a client to bill.
❖ To create a slip, click New Slip and enter the details. If you have set up slip blueprints, you can also create a new slip from blueprint by clicking New Slip From Blueprint and selecting a blueprint from the list.
❖ Specify how frequently Billings Pro should send the invoice.
3. Click OK. Billings Pro creates the recurring invoice.
To send the invoice
1. Choose View > Recurring.
!35
2. When the current date matches the scheduled date for sending the invoice or is past the scheduled date, you will see a Send button. To generate and send the invoice, click Send.
3. In the Invoice window, enter information as appropriate. Keep in mind the following:
❖ In the Invoice tab, enter details, pick a delivery option, and specify comments for the invoice.
❖ In the Slips tab, you can see what slips will be included as individual line items of the invoice. You can also add other slips of the client in the invoice or re-order slips by drag and drop.
❖ Select a style from the style gallery. Note that styles with badge numbers indicate multiple available layouts for grouping data.
❖ Click the Preview tab to see the invoice. If you have selected a style with multiple layouts, you can select a layout from the Layout pop-up menu.
❖ To customize the invoice, click Options. Select the settings you need for the invoice and click OK.
4. When you are ready to send the invoice, click Create.
If you have set up recurring invoices that are waiting to be sent, you will see a number next to “Recurring” in the Billings Pro window. This number shows how many invoices are ready to go.
!36
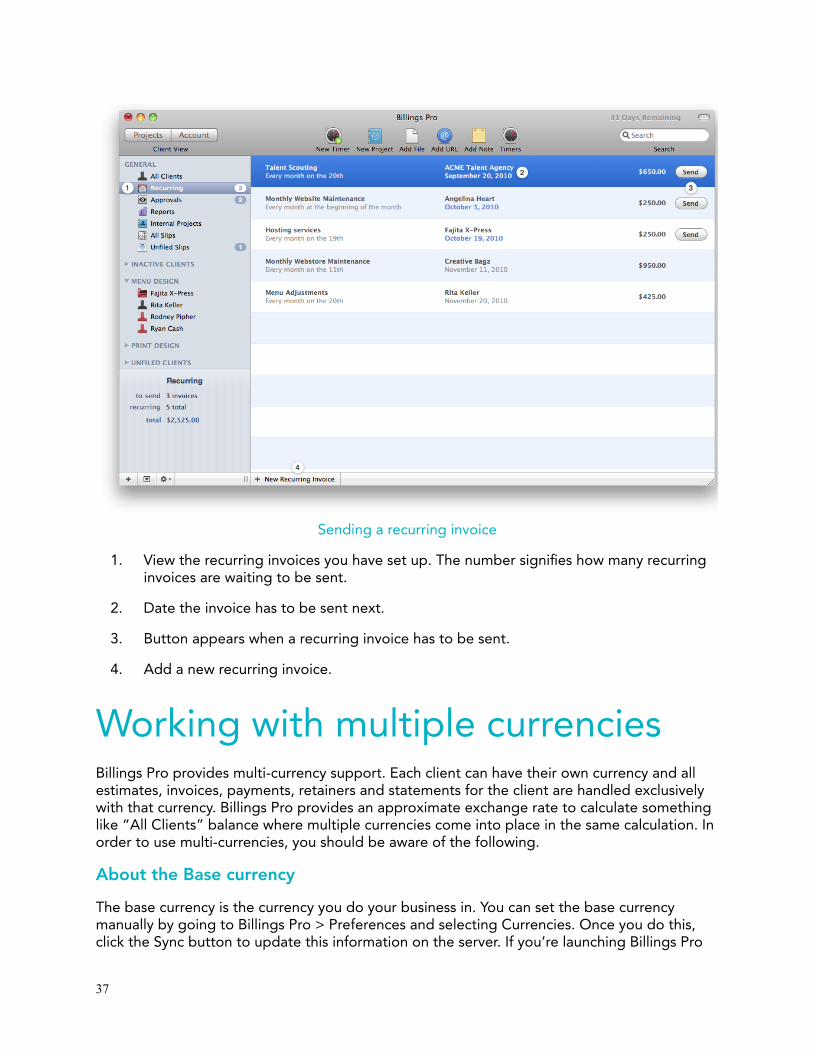
Sending a recurring invoice
1. View the recurring invoices you have set up. The number signifies how many recurring invoices are waiting to be sent.
2. Date the invoice has to be sent next.
3. Button appears when a recurring invoice has to be sent.
4. Add a new recurring invoice.
Working with multiple currencies
Billings Pro provides multi-currency support. Each client can have their own currency and all estimates, invoices, payments, retainers and statements for the client are handled exclusively with that currency. Billings Pro provides an approximate exchange rate to calculate something like “All Clients” balance where multiple currencies come into place in the same calculation. In order to use multi-currencies, you should be aware of the following.
About the Base currency
The base currency is the currency you do your business in. You can set the base currency manually by going to Billings Pro > Preferences and selecting Currencies. Once you do this, click the Sync button to update this information on the server. If you’re launching Billings Pro
!37
on the first time and have not set a base currency, then your system default currency is assigned as the base currency. You can change the base currency at a later stage, if desired. By default, the base currency is assigned to all new clients.
If you delete a currency that is currently in use, Billings Pro will warn you. If you decide to proceed, then Billings Pro changes the currency of the clients that currently use it to the base currency.
Using reports, you can view a history of changes made to the base currency and currency used by clients. Simply choose View > Reports and select the “Currency Changes” report.
To define the currencies
1. Choose Billings Pro > Preferences.
2. Select Currencies.
3. Click the “+” button at the bottom-left corner of the window.
4. In the sheet that opens, do the following:
❖ Select the appropriate currency.
❖ If necessary, you can modify the exchange rate.
❖ Click Add.
5. Click Sync.
You can view the latest exchange rates for currencies you’ve added. You should be connected to the internet for his purpose. Working from the Currencies pane of Billings Pro Preferences, click Update Rates. For more information about exchange rates, see “How do exchange rates work?” section.
How do exchange rates work?
For every currency you add in the preferences, Billings Pro displays the approximate exchange rate for the currency. The calculations rendered by Billings Pro are based on this approximate rate only. In reality, banks could be offering a different exchange rate and hence there might be some variations. Exchange rates are necessary to do the following.
❖ All Clients. Billings Pro displays the details/balance information for different clients using different currencies. Exchange rates are important to calculate the balance for different clients and translate them into your base currency. This conversion is only approximate as the final calculation may vary depending on the exchange rate used.
❖ All Slips. Billings Pro displays values in the “All Slips” view matching the currency used by the client. If you select a bunch of slips belonging to different clients, then Billings Pro uses the exchange rate to calculate the total amount in each currency type which is visible at the bottom of the application window. This conversion is only approximate as the final calculation may vary depending on the exchange rate used.
!38
Exchange rates also influence the reports you generate using Billings Pro. See “Reading reports in a multi- currency environment” section for more information.
Assigning a currency to a client
You can open a client card in Billings Pro and assign a currency to the client. The list of currencies displayed matches the ones you’ve set up in the preferences. All estimates, statements, invoices, payments and retainers for that client are handled exclusively with that currency. Note that new clients are always assigned the base currency.
To assign a currency to a client
1. Open the client card.
2. From the Currency pop-up menu, select a currency.
3. Click OK.
From the Currency pop-up menu, you can select “Add Currency” to set up a new currency. This opens the Currencies preference pane.
Currency usage in blueprints
Blueprints do not use any specific currency. The currency is indicated with a ¤ character in a blueprint.
This is because blueprints can be assigned to any number of clients who could be using different currencies. Only when a blueprint is made real on a project assigned to a client, the amount is unchanged and the currency symbol is set.
Currency usage for adding payments and retainers
We recommend that you always enter payment and/or retainer amount in the currency used by the client. Due to fluctuations with exchange rates, figuring out how much you’ve actually collected can a bit difficult and reports can be erroneous. Further, exchange rates can fluctuate between the time you’ve invoiced a client and when you receive payment. To get around these complexities, you should always enter the payment/retainer amounts in the client’s currency—this makes balances in the application work right.
For report accuracy, you’ll see an additional field where you can enter the “Actual” amount you’ve received in *your* base currency. For example, you’ve received 500 Euros from the client for a 500 Euro invoice. You enter
the 500 Euros and the client’s account is now balanced. For record keeping purposes, you can also enter the 749 Dollars that you actually received when you deposited the 500 Euros in the bank. You can edit this base currency field at any time. Billings Pro displays the “Actual” amount you’ve entered for payments/retainers in their receipts as well as in the account list under amount applied. If the client is using the same currency as your base currency, then the “Actual” amount field is hidden.
Reading reports in a multi-currency environment
!39
Billings Pro includes many reports that display values that are calculated from multiple clients. Each one of these clients can have a different currency. Hence, showing the aggregate totals in your base currency can be tricky due to constant variations in exchange rates.
In cases like this, Billings Pro will display a ~ in front of “Totals” (or variations of that word or with no word at all). This indicates that the aggregate totals in base currency are approximate and based on the current exchange rates (as specified in the Currencies preference pane).
Importance of locales
Locales are used to determine the right formatting for values in Billings Pro. When you add a new currency in Billings Pro Preferences, observe that the list is sorted by countries. This is because some countries have different conventions and customers in those countries will expect to see things using those conventions.
For example, in some countries the currency symbol is placed after the value. Another one is the use of decimals and commas. Locales are used when generating invoices, estimates and statements. When you preview an invoice, you’ll see the proper locale in use (i.e. if you are in the U.S, you’d expect to see 1,089.00, whereas that same value looks like 1.089,00 in most European countries). However, for consistency of display and input in the application, Billings Pro uses the rules of your base currency locale.
Searching
Billings Pro has powerful search capabilities. You can search for clients, projects, estimate slips, working slips, invoiced slips, invoices, estimates, payments, retainers, recurring invoices, notes, filename, and more.
Billings Pro shows the search results in collapsible sections and highlights where the search term was located. You can do one of the following with your search results:
❖ Double-clicking a search result allows you to edit that item.
❖ Clicking the Go-to arrow takes you to that item in Billings Pro.
!40
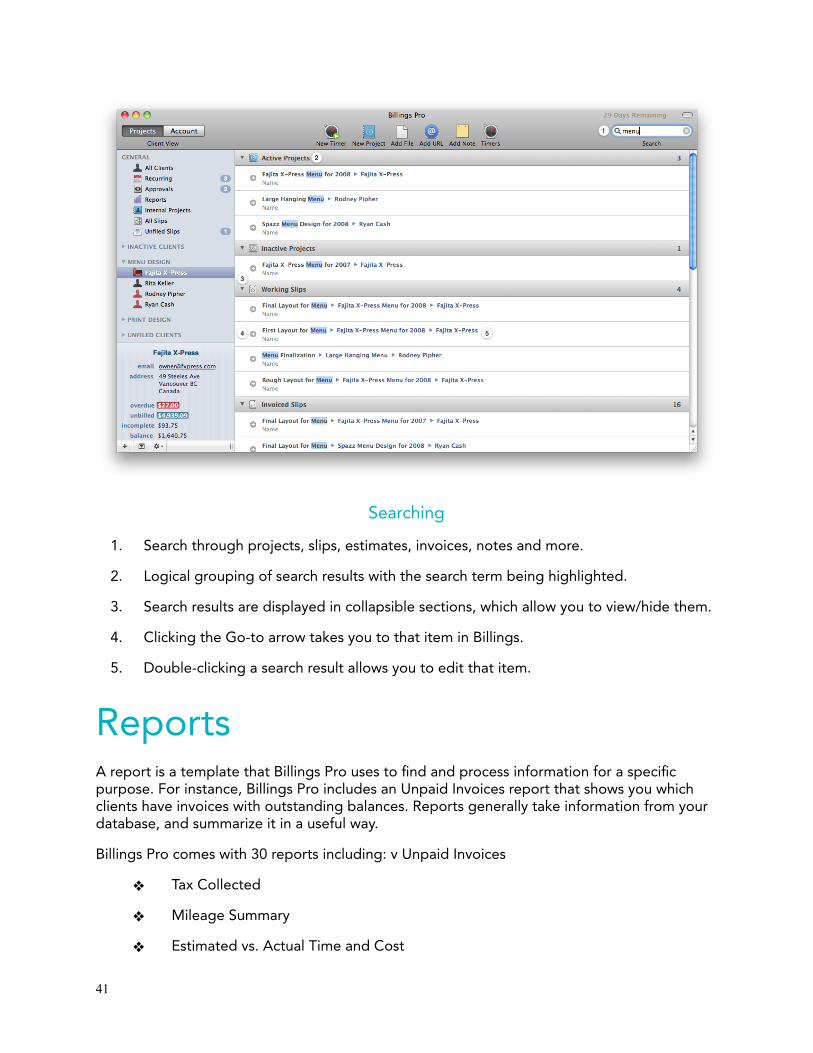
Searching
1. Search through projects, slips, estimates, invoices, notes and more.
2. Logical grouping of search results with the search term being highlighted.
3. Search results are displayed in collapsible sections, which allow you to view/hide them.
4. Clicking the Go-to arrow takes you to that item in Billings.
5. Double-clicking a search result allows you to edit that item.
Reports
A report is a template that Billings Pro uses to find and process information for a specific purpose. For instance, Billings Pro includes an Unpaid Invoices report that shows you which clients have invoices with outstanding balances. Reports generally take information from your database, and summarize it in a useful way.
Billings Pro comes with 30 reports including: v Unpaid Invoices
❖ Tax Collected
❖ Mileage Summary
❖ Estimated vs. Actual Time and Cost
!41
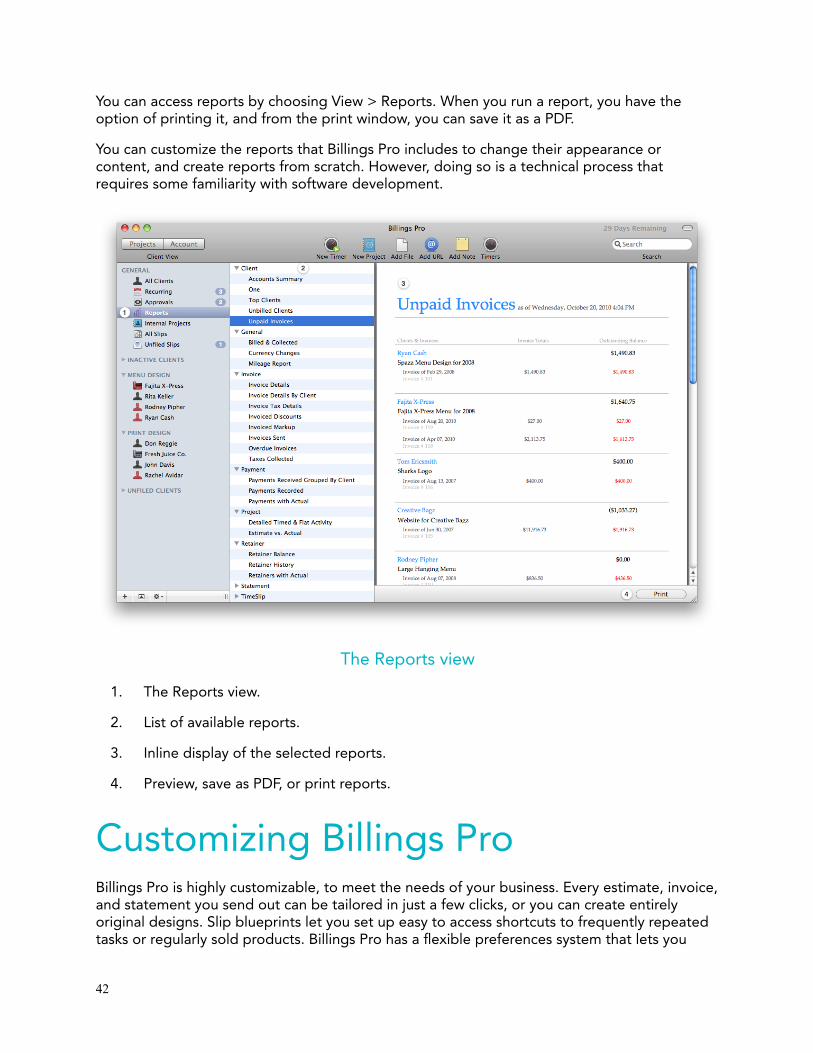
You can access reports by choosing View > Reports. When you run a report, you have the option of printing it, and from the print window, you can save it as a PDF.
You can customize the reports that Billings Pro includes to change their appearance or content, and create reports from scratch. However, doing so is a technical process that requires some familiarity with software development.
The Reports view
1. The Reports view.
2. List of available reports.
3. Inline display of the selected reports.
4. Preview, save as PDF, or print reports.
Customizing Billings Pro
Billings Pro is highly customizable, to meet the needs of your business. Every estimate, invoice, and statement you send out can be tailored in just a few clicks, or you can create entirely original designs. Slip blueprints let you set up easy to access shortcuts to frequently repeated tasks or regularly sold products. Billings Pro has a flexible preferences system that lets you
!42
control automatic estimate, invoice, and statement numbering, taxes, categories, and other important settings.
Besides estimate and invoice design, most of the customization options in Billings Pro are found by choosing Billings Pro > Preferences.
Note: Certain preference panes display a Sync button. When you are done working with that preference pane, click the Sync button to update the information to the Cloud immediately. Otherwise, Billings Pro syncs with the Cloud every 5 minutes automatically and will update the information during the next sync.
General The General pane of Billings Pro Preferences allows you to customize a variety of settings that affect the day-to- day usage of Billings Pro. You can specify the following settings:
❖ Show “All Slips” after import.
❖ Automatically check for updates.
❖ Choose a format for displaying duration.
❖ Sort clients by person’s name or company name.
❖ Reset warnings.
Timers
The Timers window has a list of active timed slips and allows you to start and stop the timer for any of those slips. The behaviour of the Timers window can be customized by choosing Billings Pro > Preferences and clicking Timers. You can specify preferences for the following:
❖ Show/hide the menubar timer.
❖ Control the behavior of the Timers window.
❖ Control the idle behavior when you’ve been away from your computer for a certain amount of time.
❖ Pause timers when your computer goes to sleep.
Hot Keys
Billings Pro has two customizable hot keys. These hot keys are available from any application provided Billings Pro is open. Hot keys are optional, but you may wish to use them to have quick access to these two important features of Billings Pro.
!43
❖ Start a new timed slip. For instance, if you receive a phone call and want to start timing it right away you will find this hot key useful.
❖ Show or hide the Timers window. The Timers window displays all your active timed and fixed slips and allows you to keep track of which ones are running.
You can configure hot keys by going to Billings Pro > Preferences and selecting Hot Keys. Timed slips created using a hot key must be later linked to a project.
Identity & Rates
Working from the Identity & Rates pane of Billings Pro Preferences, you can specify a logo (for example, your company logo), name, address, bank transaction details, and rates. Your contact details and banking information appear on estimates, invoices, and statements; hence, they must be customized properly as they reflect your business presence.
The first time you open Billings Pro, it looks in your Address Book card (the “Me” card) for basic identity information. You can change that information at any time in the preferences.
Nearly any graphic can be used as your logo, but vector graphics formats, PDF, or Encapsulated PostScript (EPS) work best. The stationery templates that Billings Pro comes with are designed to work with most logos, drawing them at a maximum height of approximately 2/3 inch, or a maximum width of two inches.
You can store your banking information and choose to display it on your invoices. This is useful for clients that utilize bank wire transfers when making payments.
You can enter preferences for rates including billing increments, normal rate, and mileage kind to be used for the worker you are logged in as. The normal rate is the default hourly rate you charge your clients. This normal rate can be overridden on a per-project and worker basis.
!44

The Identity & Rates Preferences
Currencies
Billings Pro comes with multi-currency support. Each client can have their own currency and all estimates, invoices, payments, retainers and statements for the client are handled exclusively with that currency. Billings Pro provides an approximate exchange rate to calculate something like “All Clients” balance where multiple currencies come into place in the same calculation.
Working from the Currencies pane of Billings Pro Preferences, you can select a base currency, add new currencies that you wish to assign to your clients, and update exchange rates. For more information about working with multiple currencies, choose Help > Billings Pro Help and search for “multi-currency.”
Taxes
Billings Pro is designed to meet the tax requirements of almost any country or other tax jurisdiction, and comes with basic tax set ups for more than 120 regions. Taxes are applied on a per-slip basis, so that you can mix and match taxed and tax-free items on a single invoice.
Taxes are defined in the Taxes pane of Billings Pro Preferences. There are two kinds of taxes:
!45
❖ Regular taxes, which have a name, a rate, and can have a registration number to be shown on invoices, and
❖ Consolidated taxes, which are groups of regular taxes.
Regular taxes can either be ordinary or compound. When applying taxes to a slip, you choose from a list that includes the regular taxes, and any consolidated tax groups.
You can set up as many different taxes as you need, and combine them into consolidated tax groups if you need to charge more than one tax at a time. When you send invoices, the taxes are separated appropriately and each is given its own line item with a total for that tax. You can also save tax set ups, to share with other Billings Pro users, or to back up old tax information if the governing body in your country or tax jurisdiction changes a tax rate. For more information about customizing taxes, choose Help > Billings Help and search for “taxes.”
Blueprints
A slip blueprint is a preset for frequently used slips. The blueprint has pre-filled information for the different fields in a slip window so you can quickly create and use slips. Slip blueprints are useful if you repeat similar tasks frequently for many clients, or if you regularly sell certain products or incur certain expenses.
For example, if you consistently perform a certain task for each client for a fixed rate, but always want to record how long the task takes, you can set it up as a fixed slip blueprint. Using slip blueprints for creating slips saves you time.
To set up slip blueprints, go to the Blueprints pane of Billings Pro Preferences, click the “+” button and enter the details. Alternately, you can select a slip in Billings Pro and choose Slips > Create Blueprint from Slip.
Templates
Billings Pro comes with built-in template styles for sending estimates/invoices/and statements. If you have custom templates that you wish to share with other workers in your network, you can do so.
To share templates with other workers
1. Choose Billings Pro > Preferences.
2. Click Templates.
3. To add a new template, click the + button. This opens the Templates folder. By default, all custom templates are saved in this folder.
4. Select a template(s). Click Open. The selected templates are added into Billings Pro.
!46

Numbering
The Numbering Preferences allow you to customize your retainer label, numbering and file name settings for estimates, invoices, and statements. If you intend to use retainers, you must set up a retainer label. When you apply a retainer on an invoice, Billings Pro automatically creates a special line item on the invoice to display the retainer amount with the selected label.
Under Numbering, the Prefix and Number fields are used to set numbering for estimates, invoices, and statements. You can assign a number to start and Billings Pro increments it as you send more and more estimates, invoices, and statements. The number format could be anything you prefer.
For example, you can set your first estimate to be 1 or 001 or 0001. If this is your case, Billings Pro numbers your second estimate as 2 or 002 or 0002 respectively. Billings Pro respects the 0 padding in the Number field. When you send an estimate, the Estimate # shows the combination of the prefix and number you have set up in the Preferences for “Next estimate.”
For invoices, the Invoice # shows the combination of the prefix and number you have set up in the Preferences for “Next invoice.” For statements, the Statement # shows the combination of the prefix and number you have set up in the Preferences for “Next statement.”
The Filenames section allows you to set up file names to save your estimates, invoices, and statements. File names are completely customizable. For example,
❖ %estNum% saves your estimate by allocating the “Estimate #” as the filename.
❖ %invNum% saves your invoice by allocating the “Invoice #” as the filename.
❖ %staNum% saves your statement by allocating the “Statement #” as the filename.
Labels
The Labels pane of Billings Pro Preferences is where you can setup client groups, categories, and payment methods.
❖ Client Groups are useful for organizing clients into distinct groups to manage them easily. For example, if you have clients all over the world, and you want to group them based on location, then you must set up client groups such as North America, Asia, Africa, etc. All client groups you have set up in the preferences are displayed in the Client View of the Billings Pro window. You can move a client from one group to another by drag and drop.
❖ Categories are useful for grouping items that share common characteristics. Billings Pro comeswith several predefined categories, but you can customize them to suit your working habits. Slip categories are useful for grouping slips generally by the kind of work they are used to track. For instance, if you are a writer, you may wish to group slips in research, writing, and editing categories. In the Slip window, you can apply
!47
a category either to a new or existing slip by choosing one from the Category pop-up menu.
❖ Billings Pro comes with many built-in payment methods—for example, Cheque, Cash, Visa, Mastercard, Amex and many others. However, you can customize how you wish to receive payments by setting up your own payment methods.
Extra Fields
Extra fields are useful if you want to keep track of additional information about your project or client beyond what Billings Pro normally records. For example, you might want to use extra-fields to keep track of internal client number or any project-specific information.
For more information, contact us at [email protected] and we will assist you.
Exporting data You can export data out of Billings Pro into TSV or tab-separated-values. Clients, Projects, Slips, Invoices, Payments, Estimates, and Statements can all be exported using the (File > Export > Export All to TSV…) command in the menu. The resulting files will need to be saved to the computer and Billings Pro will allow you to select where the files get saved.
Note: Export All to TSV is a global command. You cannot choose which specific records get exported. Once you’ve saved the export file you can go into the folder and choose which export files you wish to use (i.e. slips, invoices etc). But the initial file export is all or nothing.
Help and other resources There are a number of resources available to help you to learn more about Billings Pro and provide answers when you have technical questions.
• The support website has links to video tutorials, knowledge base articles and our support staff that can help you solve technical difficulties. Visit https://www.marketcircle.com/help/ for more information.
• Their are additional documents describing the various components of the Billings Pro ecosystem found on the support website.
• We have certified partners who can provide product training and other specialized services. For more information, click here.
ⓒ 2012-2018 Marketcircle Inc. All rights reserved.
!48
Under the copyright laws, this manual may not be copied, in whole or in part, without the written consent of Marketcircle Inc.
Every effort has been made to ensure that the information in this manual is accurate. Marketcircle is not responsible for printing or clerical errors.
Marketcircle Inc. 30 Centurian Dr, Suite 201 Markham, Ontario L3R8B8, Canada
Phone: +1 905 480 5555 Fax: +1 905 248 3101 Email: [email protected]
!49


