28
Owner's Manual DC AC AC & BATTERY POWERED FET
| Date post: | 07-May-2017 |
| Category: |
Documents |
| Upload: | mastroranda |
| View: | 214 times |
| Download: | 0 times |

1
Owner's Manual
DCAC
AC & BATTERYPOWERED
FET

2
Thank you, and congratulations on your choice of BOSS AC-2 Acoustic Simulator.
Before using this unit, carefully read the sections entitled: “USING THE UNIT SAFELY”and “IMPORTANT NOTES” (separate sheet). These sections provide important informationconcerning the proper operation of the unit. Additionally, in order to feel assured that youhave gained a good grasp of every feature provided by your new unit, this manual shouldbe read in its entirety. The manual should be saved and kept on hand as a convenientreference.
Copyright © 1997 BOSS CORPORATIONAll rights reserved. No part of this publication may be reproduced in any form without thewritten permission of BOSS CORPORATION.

3
FEATURES
• This is an effect unit that transforms an electric guitar sound into an acoustic sound.
• Any of the four different sounds can be selected by changing the position of the Modeswitch.
• You can output the acoustic sound and electric guitar sound separately.
• Using the “Body” and “Top” tone control knobs, you can simulate a broad variety ofacoustic guitar sounds.
4
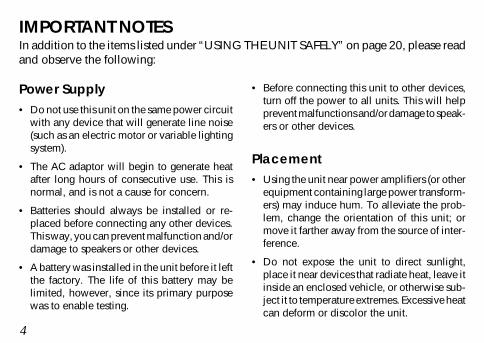
IMPORTANT NOTESIn addition to the items listed under “USING THE UNIT SAFELY” on page 20, please readand observe the following:
• Before connecting this unit to other devices,turn off the power to all units. This will helpprevent malfunctions and/or damage to speak-ers or other devices.
Placement• Using the unit near power amplifiers (or other
equipment containing large power transform-ers) may induce hum. To alleviate the prob-lem, change the orientation of this unit; ormove it farther away from the source of inter-ference.
• Do not expose the unit to direct sunlight,place it near devices that radiate heat, leave itinside an enclosed vehicle, or otherwise sub-ject it to temperature extremes. Excessive heatcan deform or discolor the unit.
Power Supply• Do not use this unit on the same power circuit
with any device that will generate line noise(such as an electric motor or variable lightingsystem).
• The AC adaptor will begin to generate heatafter long hours of consecutive use. This isnormal, and is not a cause for concern.
• Batteries should always be installed or re-placed before connecting any other devices.This way, you can prevent malfunction and/ordamage to speakers or other devices.
• A battery was installed in the unit before it leftthe factory. The life of this battery may belimited, however, since its primary purposewas to enable testing.

5
Maintenance• For everyday cleaning wipe the unit with a
soft, dry cloth or one that has been slightlydampened with water. To remove stubborndirt, use a cloth impregnated with a mild, non-abrasive detergent. Afterwards, be sure towipe the unit thoroughly with a soft, dry cloth.
• Never use benzene, thinners, alcohol or sol-vents of any kind, to avoid the possibility ofdiscoloration and/or deformation.
Additional Precautions• Use a reasonable amount of care when using
the unit's buttons, sliders, or other controls;and when using its jacks and connectors.Rough handling can lead to malfunctions.
• When connecting / disconnecting all cables,grasp the connector itself—never pull on thecable. This way you will avoid causing shorts,or damage to the cable's internal elements.
• To avoid disturbing your neighbors, try tokeep the unit's volume at reasonable levels.You may prefer to use headphones, so you donot need to be concerned about those aroundyou (especially when it is late at night).
• When you need to transport the unit, packageit in the box (including padding) that it camein, if possible. Otherwise, you will need to useequivalent packaging materials.
6
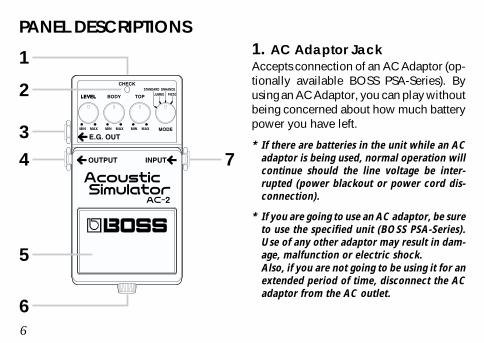
PANEL DESCRIPTIONS1. AC Adaptor JackAccepts connection of an AC Adaptor (op-tionally available BOSS PSA-Series). Byusing an AC Adaptor, you can play withoutbeing concerned about how much batterypower you have left.
* If there are batteries in the unit while an ACadaptor is being used, normal operation willcontinue should the line voltage be inter-rupted (power blackout or power cord dis-connection).
* If you are going to use an AC adaptor, be sureto use the specified unit (BOSS PSA-Series).Use of any other adaptor may result in dam-age, malfunction or electric shock.Also, if you are not going to be using it for anextended period of time, disconnect the ACadaptor from the AC outlet.
1
2
4
5
6
7
3

7
2. CHECK IndicatorThis indicator shows whether an effect isON/OFF, and also doubles as the BatteryCheck indicator.The indicator lights when an effect is ON.If this indicator goes dim or no longer lightswhile an effect is ON, the battery is nearexhaustion and should be replaced imme-diately.
3. E.G. OUT JackThis is an output jack that should be con-nected to an amplifier or a different effectunit. It can be effectively used to output theeffect and the direct sound separately. Whenthe effect is turned on, this jack is muted,and it outputs the direct sound when theeffect is off. For a detailed explanationabout this jack, see “MAKING THE CON-NECTIONS” on page 12.
4. OUTPUT JackProvides the output from the unit—shouldbe connected to an amplifier or some othereffect unit.When there is only one output, connect theamplifier or the effect unit to this jack, andthe effect or direct sound will be outputdepending on whether the effect is on oroff.When a cable is connected to the E.G.Output jack, the Output jack will send aneffect sound in the effect mode (when theeffect is turned on) and it will be muted inthe direct mode (when the effect is turnedoff). For a detailed explanation, see “MAK-ING THE CONNECTIONS” on page 12.
5. Pedal SwitchThis switch turns the effects ON/OFF.

8
6. ThumbscrewThis thumbscrew is loosened to open thepedal, allowing battery replacement. Forinstructions on how to replace the battery,please refer to “CHANGING THE BAT-TERY (p.16).”
7. INPUT JackThis jack accepts input signals (comingfrom a guitar, some other musical instru-ment, or another effects unit).
* The INPUT jack also serves as the powerswitch. Power is turned on whenever a plug isinserted into the INPUT jack, and is turned offwhen the plug is disconnected. When notusing the unit, you should disconnect anycord connected to the INPUT jack.
LEVEL Knob
BODY Knob
MODE Switch
TOP Knob

9
LEVEL KnobThis knob adjusts the level of the effectsounds.
BODY KnobThis adjusts the resonance of the soundcaused by the body, controlling the soft-ness and fatness of an acoustic guitar.
TOP KnobThis adjusts the treble, controlling the at-tack and harmonic contents.
MODE SwitchThis selects one of the four types of sounds.
* When you change the position of the Modeswitch, be sure that the Level knob is rotatedfully counterclockwise.
STANDARDThis is a normal acoustic guitar.
JUMBOThis is an acoustic guitar with a bodythat is bigger than STANDARD. Thebass sound is powerful.
ENHANCEThis is an acoustic guitar that with amore responsive attack, so the guitarwill retain more of its prominence inalmost any situation.
PIEZOThis simulates the sound you would getfrom a pickup installed on an electric-acoustic guitar. During the attack, acertain amount of compression will beapplied.
10
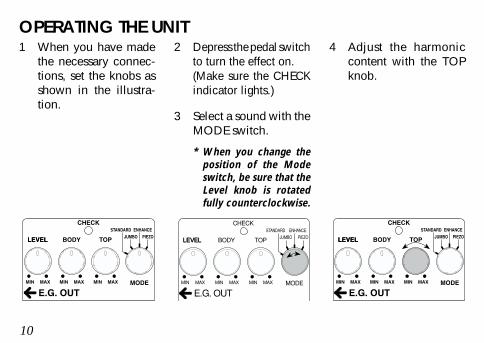
OPERATING THE UNIT1 When you have made
the necessary connec-tions, set the knobs asshown in the illustra-tion.
2 Depress the pedal switchto turn the effect on.(Make sure the CHECKindicator lights.)
3 Select a sound with theMODE switch.
* When you change theposition of the Modeswitch, be sure that theLevel knob is rotatedfully counterclockwise.
4 Adjust the harmoniccontent with the TOPknob.
11
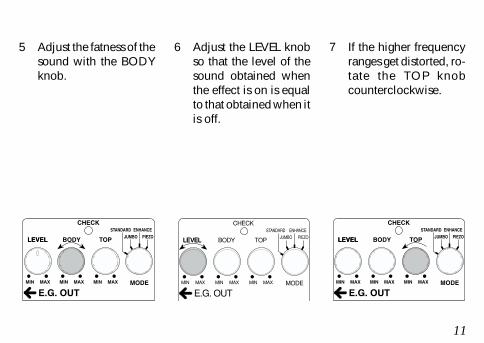
5 Adjust the fatness of thesound with the BODYknob.
6 Adjust the LEVEL knobso that the level of thesound obtained whenthe effect is on is equalto that obtained when itis off.
7 If the higher frequencyranges get distorted, ro-tate the TOP knobcounterclockwise.
12
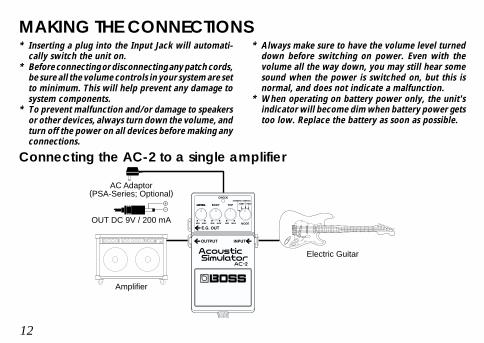
MAKING THE CONNECTIONS* Inserting a plug into the Input Jack will automati-
cally switch the unit on.* Before connecting or disconnecting any patch cords,
be sure all the volume controls in your system are setto minimum. This will help prevent any damage tosystem components.
* To prevent malfunction and/or damage to speakersor other devices, always turn down the volume, andturn off the power on all devices before making anyconnections.
Connecting the AC-2 to a single amplifier
AC Adaptor (PSA-Series; Optional)
Electric Guitar
Amplifier
OUT DC 9V / 200 mA
* Always make sure to have the volume level turneddown before switching on power. Even with thevolume all the way down, you may still hear somesound when the power is switched on, but this isnormal, and does not indicate a malfunction.
* When operating on battery power only, the unit'sindicator will become dim when battery power getstoo low. Replace the battery as soon as possible.
13
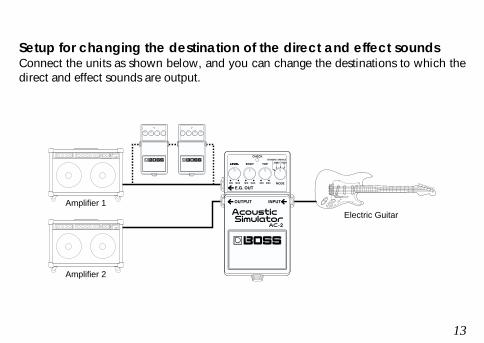
Setup for changing the destination of the direct and effect soundsConnect the units as shown below, and you can change the destinations to which thedirect and effect sounds are output.
Electric Guitar
Amplifier 2
Amplifier 1

14
When the effect is switched onThe Check indicator lights and amplifier 1 is muted, while the effect sound is outputthrough amplifier 2.
Electric Guitar
Amplifier 2
Amplifier 1
Effect sound
(Mute)CEB-3
CEB-3 CEB-3
CEB-3
15
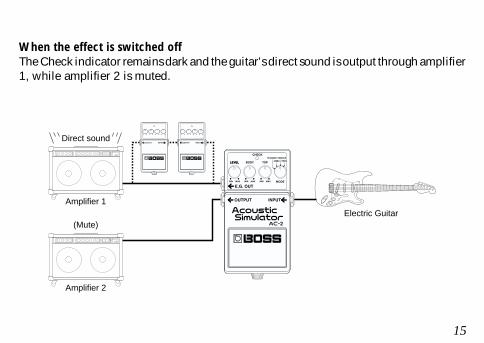
When the effect is switched offThe Check indicator remains dark and the guitar’s direct sound is output through amplifier1, while amplifier 2 is muted.
Electric Guitar
Amplifier 2
Amplifier 1
(Mute)
Direct soundOUTPUT
CEB-3
CEB-3 CEB-3
CEB-3
16
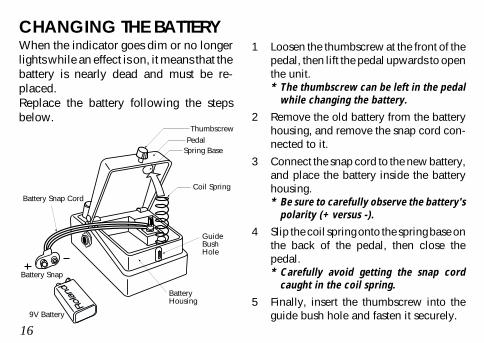
CHANGING THE BATTERYWhen the indicator goes dim or no longerlights while an effect is on, it means that thebattery is nearly dead and must be re-placed.Replace the battery following the stepsbelow.
1 Loosen the thumbscrew at the front of thepedal, then lift the pedal upwards to openthe unit.* The thumbscrew can be left in the pedal
while changing the battery.
2 Remove the old battery from the batteryhousing, and remove the snap cord con-nected to it.
3 Connect the snap cord to the new battery,and place the battery inside the batteryhousing.* Be sure to carefully observe the battery's
polarity (+ versus -).
4 Slip the coil spring onto the spring base onthe back of the pedal, then close thepedal.* Carefully avoid getting the snap cord
caught in the coil spring.
5 Finally, insert the thumbscrew into theguide bush hole and fasten it securely.
ThumbscrewPedal
Spring Base
Coil Spring
GuideBushHole
BatteryHousing
Battery Snap Cord
Battery Snap
9V Battery
17
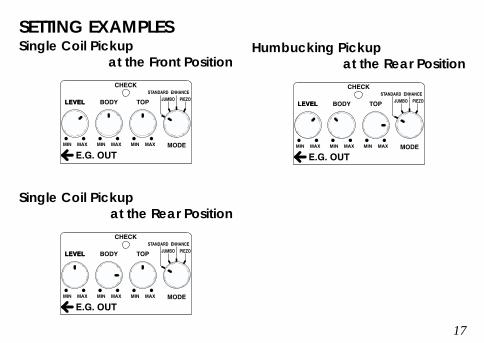
SETTING EXAMPLESSingle Coil Pickup
at the Front Position
Single Coil Pickupat the Rear Position
Humbucking Pickupat the Rear Position

18
SPECIFICATIONSAC-2: Acoustic Simulator
Nominal Input Level ........ -20 dBuInput Impedance .............. 1 MΩNominal Output Level ..... -20 dBuOutput Impedance ........... 1 kΩResidual Noise Level ........ -80 dBu (IHF-A Weighted, Typ.)
(BODY Knob: Center, TOP Knob: Center)
Controls ........................... Pedal Switch, MODE Switch, BODY Knob, TOP Knob, LEVEL KnobIndicator .......................... CHECK Indicator (Serves also as battery check indicator)Connectors ...................... INPUT Jack, E.G.OUT Jack, OUTPUT Jack,
AC Adaptor Jack (DC 9 V)Power Supply ................... DC 9 V: Dry Battery (6F22/ 9 V), AC Adaptor (PSA Series: Optional)Current Draw ................... 18 mA (DC 9 V)
* Expected battery life under continuous use:Carbon: 14 hoursThese figures will vary depending on the actual conditions of use.

19
Dimensions ...................... 73 (W) x 129 (D) x 59 (H) mm2-7/8 (W) x 5-1/8 (D) x 2-3/8 (H) inches
Weight ............................. 440 g/ 1 lb (including battery)Accessories ...................... Owner's Manual, Dry Battery; 6F22/ 9 V (Carbon),
Leaflet (“USING THE UNIT SAFELY,” “IMPORTANT NOTES,” and “Information”)Options ............................ AC Adaptor PSA-Series
* 0 dBu = 0.775 Vrms
* In the interest of product improvement, the specifications and/or appearance of this unit aresubject to change without prior notice.
20
USING THE UNIT SAFELY
ALWAYS OBSERVE THE FOLLOWING
Used for instructions intended to alert the user to the risk of injury or material damage should the unit be used improperly.
* Material damage refers to damage or other adverse effects caused with respect to the home and all its furnishings, as well to domestic animals or pets.
Used for instructions intended to alert the user to the risk of death or severe injury should the unit be used improperly.
The symbol alerts the user to things that must be carried out. The specific thing that must be done is indicated by the design contained within the circle. In the case of the symbol at left, it means that the power-cord plug must be unplugged from the outlet.
WARNING
CAUTION
The symbol alerts the user to important instructions or warnings.The specific meaning of the symbol is determined by the design contained within the triangle. In the case of the symbol at left, it is used for general cautions, warnings, or alerts to danger.
The symbol alerts the user to items that must never be carried out (are forbidden). The specific thing that must not be done is indicated by the design contained within the circle. In the case of the symbol at left, it means that the unit must never be disassembled.
21
• Before using this unit, make sure toread the instructions below, and theOwner's Manual.
..........................................................................................
• Do not open (or modify in any way)the unit or its AC adaptor.
..........................................................................................
• Do not attempt to repair the unit, orreplace parts within it (except whenthis manual provides specific instruc-tions directing you to do so). Refer allservicing to your dealer, or qualifiedRoland service personnel.
..........................................................................................
• Never use or store the unit in placesthat are:• Subject to temperature extremes
(e.g., direct sunlight in an enclosedvehicle, near a heating duct, on topof heat-generating equipment); orare
• Damp (e.g., baths, washrooms, onwet floors); or are
• Humid; or are• Dusty; or are• Subject to high levels of vibration.
..........................................................................................
• Make sure you always have the unitplaced so it is level and sure toremain stable. Never place it onstands that could wobble, or oninclined surfaces.
..........................................................................................
WARNING
22
• Use only the specified AC adaptor(PSA-Series), and make sure the linevoltage at the installation matchesthe input voltage specified on the ACadaptor's body. Other AC adaptorsmay use a different polarity, or bedesigned for a different voltage, sotheir use could result in damage,malfunction, or electric shock.
..........................................................................................
• Avoid damaging the power cord. Donot bend it excessively, step on it,place heavy objects on it, etc. A dam-aged cord can easily become a shockor fire hazard. Never use a powercord after it has been damaged.
..........................................................................................
• This unit, either alone or in combina-tion with an amplifier and head-phones or speakers, may be capableof producing sound levels that couldcause permanent hearing loss. Donot operate for a long period of timeat a high volume level, or at a levelthat is uncomfortable. If you experi-ence any hearing loss or ringing inthe ears, you should immediatelystop using the unit, and consult anaudiologist.
..........................................................................................
• Do not allow any objects (e.g., flam-mable material, coins, pins); or liq-uids of any kind (water, soft drinks,etc.) to penetrate the unit.
..........................................................................................
23
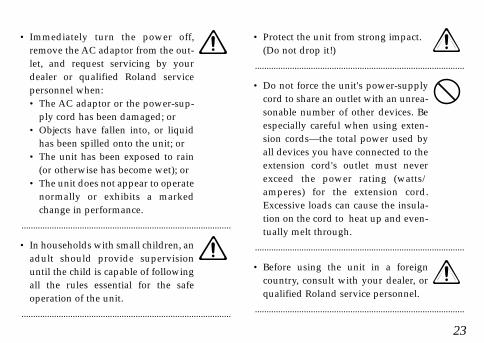
• Immediately turn the power off,remove the AC adaptor from the out-let, and request servicing by yourdealer or qualified Roland servicepersonnel when:• The AC adaptor or the power-sup-
ply cord has been damaged; or• Objects have fallen into, or liquid
has been spilled onto the unit; or• The unit has been exposed to rain
(or otherwise has become wet); or• The unit does not appear to operate
normally or exhibits a markedchange in performance.
..........................................................................................
• In households with small children, anadult should provide supervisionuntil the child is capable of followingall the rules essential for the safeoperation of the unit.
..........................................................................................
• Protect the unit from strong impact.(Do not drop it!)
..........................................................................................
• Do not force the unit's power-supplycord to share an outlet with an unrea-sonable number of other devices. Beespecially careful when using exten-sion cords—the total power used byall devices you have connected to theextension cord's outlet must neverexceed the power rating (watts/amperes) for the extension cord.Excessive loads can cause the insula-tion on the cord to heat up and even-tually melt through.
..........................................................................................
• Before using the unit in a foreigncountry, consult with your dealer, orqualified Roland service personnel.
..........................................................................................
24
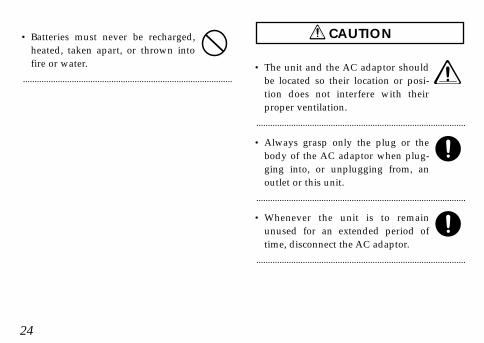
• Batteries must never be recharged,heated, taken apart, or thrown intofire or water.
..........................................................................................• The unit and the AC adaptor should
be located so their location or posi-tion does not interfere with theirproper ventilation.
..........................................................................................
• Always grasp only the plug or thebody of the AC adaptor when plug-ging into, or unplugging from, anoutlet or this unit.
..........................................................................................
• Whenever the unit is to remainunused for an extended period oftime, disconnect the AC adaptor.
..........................................................................................
CAUTION
25
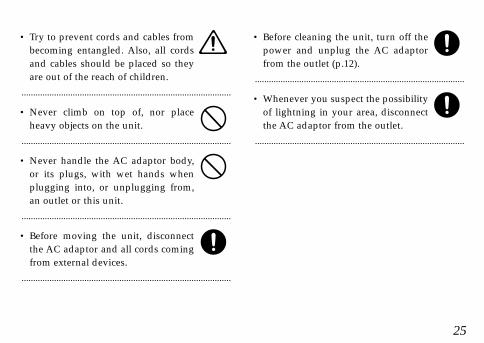
• Try to prevent cords and cables frombecoming entangled. Also, all cordsand cables should be placed so theyare out of the reach of children.
..........................................................................................
• Never climb on top of, nor placeheavy objects on the unit.
..........................................................................................
• Never handle the AC adaptor body,or its plugs, with wet hands whenplugging into, or unplugging from,an outlet or this unit.
..........................................................................................
• Before moving the unit, disconnectthe AC adaptor and all cords comingfrom external devices.
..........................................................................................
• Before cleaning the unit, turn off thepower and unplug the AC adaptorfrom the outlet (p.12).
..........................................................................................
• Whenever you suspect the possibilityof lightning in your area, disconnectthe AC adaptor from the outlet.
..........................................................................................
26
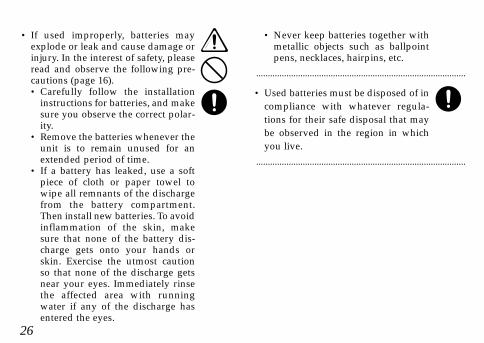
• If used improperly, batteries mayexplode or leak and cause damage orinjury. In the interest of safety, pleaseread and observe the following pre-cautions (page 16). • Carefully follow the installation
instructions for batteries, and makesure you observe the correct polar-ity.
• Remove the batteries whenever theunit is to remain unused for anextended period of time.
• If a battery has leaked, use a softpiece of cloth or paper towel towipe all remnants of the dischargefrom the battery compartment.Then install new batteries. To avoidinflammation of the skin, makesure that none of the battery dis-charge gets onto your hands orskin. Exercise the utmost cautionso that none of the discharge getsnear your eyes. Immediately rinsethe affected area with runningwater if any of the discharge hasentered the eyes.
• Never keep batteries together withmetallic objects such as ballpointpens, necklaces, hairpins, etc.
..........................................................................................
• Used batteries must be disposed of incompliance with whatever regula-tions for their safe disposal that maybe observed in the region in whichyou live.
..........................................................................................

27
This product complies with the requirements of European Directive 89/336/EEC.
For EU Countries

28G601726103
![[E4] Aire.Referencias](https://static.documents.pub/doc/80x56/55c135e1bb61eb7e3e8b4826/e4-airereferencias.jpg)


![Campus map - surrey.ac.uk · campus ACADEMIC BUILDINGS 1 Thomas Telford Building [D4] AA Rooms 2 Frank Whittle Building [D4] AB Rooms 3 [E4] AC Rooms 4 Elizabeth Fry Building [E4]](https://static.documents.pub/doc/80x56/5e6977c86d6ac36984328eee/campus-map-campus-academic-buildings-1-thomas-telford-building-d4-aa-rooms-2.jpg)


