1 BRICK SLIP INSTALLATION THE DEFINITIVE GUIDE You’ve made the excellent choice of buying Brick Slips from Real Brick Limited, so now what? Before you begin to fit your Brick Slips and transform your room into a room to be proud of, you need to protect the area where you are working. You can do this by either covering your floor with cardboard, or by using Roll and Stroll Carpet Protec- tor. We can provide the Roll and Stroll if you decide to use this to protect your floor. You will also need to ensure you have the correct tools: These are available by clicking here. A Mixing Bucket Paint Brush (4inch) Roller Adhesive Spreader Adhesive Brick Slip Spacers A Mortar Pointing Gun Bag of gun injected mortar PVA Glue A Brick Jointer Wire Brush Spirit Level Having the correct tools will ensure that the installation of your Brick slips will be quick and hassle free. Our Brick Slips can be fitted to many different types of walls, however, the type of wall you want to fit them to, will effect the way you prepare the surface. Therefore, the first, very important, step you need to take is to find out the material of your wall. Once you know what type of wall you have, you need to follow the instructions on
Transcript
1
BRICK SLIP
INSTALLATIONTHE DEFINITIVE GUIDE
You’ve made the excellent choice of buying Brick Slips from Real Brick Limited, so now what?
Before you begin to fit your Brick Slips and transform your room into a room to be proud of, you need to protect the area where you are working. You can do this by either covering your floor with cardboard, or by using Roll and Stroll Carpet Protec-tor. We can provide the Roll and Stroll if you decide to use this to protect your floor. You will also need to ensure you have the correct tools:These are available by clicking here.
A Mixing BucketPaint Brush (4inch)RollerAdhesive SpreaderAdhesiveBrick Slip SpacersA Mortar Pointing GunBag of gun injected mortarPVA GlueA Brick JointerWire BrushSpirit Level
Having the correct tools will ensure that the installation of your Brick slips will be quick and hassle free.
Our Brick Slips can be fitted to many different types of walls, however, the type of wall you want to fit them to, will effect the way you prepare the surface. Therefore, the first, very important, step you need to take is to find out the material of your wall.
Once you know what type of wall you have, you need to follow the instructions on
We advise not to add a full bag of your adhesive to the cold water. Instead only use half of a bag at a time. Stir continu-ously until you have a smooth paste, ensuring that it is free from lumps.
Now you are ready to apply your adhesive. Starting where your first tile is to be in-stalled, spread an even layer of your adhesive to your wall or back of the brick slip, using your adhesive spreader. You will only need a 2-3mm bed on each slip.
Fitting Your Brick Slips
Once you have fitted the first tile and made sure it is level and secure, push a 10mm spacer into the adhesive at the end of the brick slip. Apply the next brick slip in the same way you did the first, ensuring the second brick slip sits tight against the spac-er.
Repeat the above step, in horizontal rows until you have covered the whole wall with brick slips.
Due to our Pro Rapid RS being fast setting, you will need to mix a quarter of a bag at a time. This will reduce the chance of the adhesive setting before you apply it to your wall. If you source your adhesive from another merchant, you will need to follow the instructions on the back of the packet of adhesive.
Applying The Adhesive
You will need the following tools for this step:Mixing bucketAdhesive spreaderAdhesive
Render, Brickwork or Plaster
Remove all dust and debris from your wall using your wire brush. Ensure all dirt has been removed. Any remaining dirt will effect how the brick slip fits to your wall.
To help your brick slips fix to these types of wall, you will need to apply a layer of PVA Bond, which is available to buy on our website. The primer should be gener-ously applied to your wall using the paintbrush, or roller, we mentioned in the list of tools you will need. Please be aware that some walls may require more than one coat of the primer.
Plywood
Ensure your surface is clear from any dust and debris. Your surface needs to be dry and free from any grease.
If you are fitting your brick slips on to plywood, you will have to apply PVA on to the board before fitting your brick slips. To create the best finish, we advise you to apply the PVA to all of your surfaces.
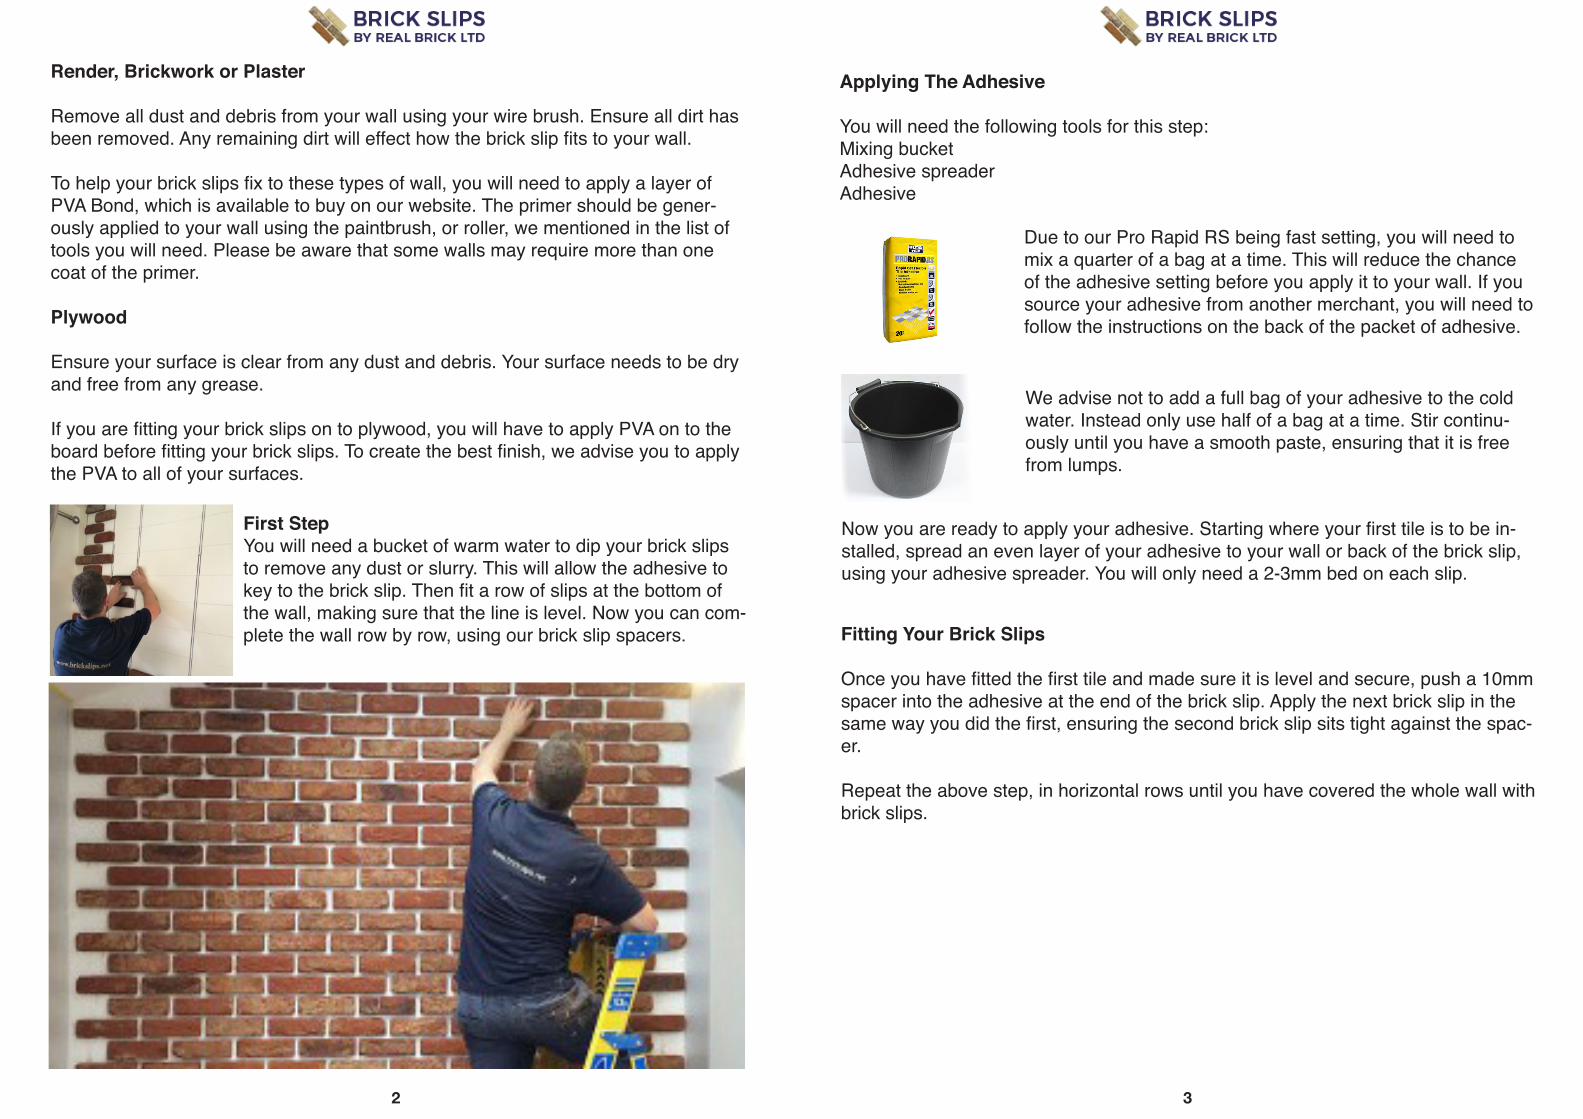
First StepYou will need a bucket of warm water to dip your brick slips to remove any dust or slurry. This will allow the adhesive to key to the brick slip. Then fit a row of slips at the bottom of the wall, making sure that the line is level. Now you can com-plete the wall row by row, using our brick slip spacers.
Brick slips require little to no maintenance, however, the following steps will ensure your brick slip wall continues to look as impressive as they did on the first day you fitted them.
If you spill any liquid, other than water, on to your brick slips, you need to ensure you wipe it up immediately, using a soft clean cloth and clean cold water.
If you are using the brick slips behind a cooker, it is advisable to seal the brick slips using our stone protector. The mortar should also be sealed with a natural stone sealer. This will prevent the wall being stained.
If you wish to hang pictures or put up shelves on your brick slip wall, always ensure you drill the holes through the brick and not through the mortar.
For more detailed information on how to maintain your brick slip wall, see the follow-ing article: MAINTENANCE AND CLEANING OF BRICK SLIP INTERIOR WALLS. If you have any questions regarding your brick slips, please don’t hesitate to contact us on 01759 307979 or email us at [email protected].
Cutting Brick Slips
Carefully measure the size of the brick slip needed. Mark your brick slip to the size of the space it is going to fill. It is recommended to cut each slip individually and not all to the same size.
Carefully cut through your marked line using an angle grinder or tile cutter. When you are cutting the brick slips, always wear protective equipment and carry out all cutting outdoors.
Once you have completed cutting all the required brick slips, remove all the debris using your wire brush and wash again if necessary.
You fit these brick slips, using the same process as described in the ‘fitting your brick slips’ section.
Brick slips can be cut with either an angle grinder or an electric tile cutter.
How To Mortar Point
Tools required for mortar-pointing:
A mixing bucketA mortar-pointing gunGun injecting mortarWire brush
Fill your mixing bucket with 3.75 litres of cold water.
Gradually pour the full bag of injecting mortar into your mixing bucket. Using the tolls provided in the Gun Kit, stir the mixture continuously until there are no lumps.
Using a trowel, fill the gun ¾ full with mortar and reinsert the plunger.
Starting at the bottom of the wall, work up, filling the spaces between the brick slips with mortar. Ensure you fill the spaces until they are level with the edge of the brick slips.
Once you have completed the whole wall and the mortar is semi dried, use the joint-ing tool to smooth the mortar into the joints. Remove any excess mortar using your wire brush. While taking care not brush into the face of the brick.