Revision date: July 13, 2018 For an updated copy of this booklet, check out the Reference Materials page of our website: https://www.cuanswers.com/resources/doc/cubase-reference/ CU*BASE ® is a registered trademark of CU*Answers, Inc. Budgeting with CU*BASE Using CU*BASE tools to create, maintain, and monitor your credit union's annual budget I NTRODUCTION This booklet is both a step-by-step guide to creating a budget in CU*BASE, as well as a discussion of concepts that will help you decide how to attack writing your credit union’s annual budget using CU*BASE tools. Using CU*BASE for your budget allows you to evaluate your projections against your actual performance immediately, any time you want...no downloads or formatting or special skills needed. And your budget is automatically granular all the way down to the individual branch level, for more control than you’ve ever had...without any extra work. The budgeting tools are an ongoing part of the CU*BASE Active Beta program. Active (live) beta allows us to get software out in the field more quickly by expanding the testing process into a real-world environment, in place of our more typical QC testing process. This means we need your help testing these tools! Your feedback will help us continue to refine and fine-tune the functionality, so let the AI team know your thoughts at [email protected]. Active betA* *
Transcript
Revision date: July 13, 2018 For an updated copy of this booklet, check out the Reference Materials page of our website:
https://www.cuanswers.com/resources/doc/cubase-reference/ CU*BASE® is a registered trademark of CU*Answers, Inc.
Budgeting with CU*BASE Using CU*BASE tools to create, maintain, and monitor your credit union's annual budget
INTRODUCTION This booklet is both a step-by-step guide to creating a budget in CU*BASE, as well as a discussion of concepts that will help you decide how to attack writing your credit union’s annual budget using CU*BASE tools.
Using CU*BASE for your budget allows you to evaluate your projections against your actual performance immediately, any time you want...no downloads or formatting or special skills needed. And your budget is automatically granular all the way down to the individual branch level, for more control than you’ve ever had...without any extra work.
The budgeting tools are an ongoing part of the CU*BASE Active Beta program. Active (live) beta allows us to get software out in the field more
quickly by expanding the testing process into a real-world environment, in
place of our more typical QC testing process. This means we need your help testing these tools! Your feedback will
help us continue to refine and fine-tune the functionality, so let the AI team
JUST LIKE A SPREADSHEET...WELL, SORT OF 3 CREATING A BUDGET IN MULTIPLE “PASSES” 3 BUDGETS OUR WAY...TRY SOMETHING NEW AND SAVE SOME TIME 4 GLOSSARY OF CONCEPTS & TERMS 4 BUDGETS FROM AN EXTERNAL SOURCE 5
BEFORE YOU BEGIN 7 PREPARING THE TOOLS 7 TO MODEL OR NOT TO MODEL: FREQUENTLY-ASKED QUESTIONS 9
RESEARCHING YOUR ASSUMPTIONS 12 3-YEAR GL ACCOUNT BALANCE COMPARISON 13 10-YEAR TRENDS BY GL ACCOUNT 14 ANALYZE YOUR LOAN PORTFOLIO 16 ANALYZE YOUR SAVINGS PORTFOLIO 17 ANALYZE YOUR CERTIFICATE PORTFOLIO 18
STEP 1: OPEN (UNLOCK) YOUR BUDGET 19
STEP 2: CREATE BUDGET GROUPS 22
STEP 3: LINK G/L ACCOUNTS FOR MODELING 25
STEP 4: MARK BRANCHES WITH NO MEMBER ACCOUNTS (IF MODELING) 28
STEP 5: PROJECT ASSET BALANCES (IF MODELING) 29
STEP 6: MODEL INCOME BASED ON BALANCE PROJECTIONS (IF MODELING) 43
STEP 8: MODEL EXPENSES BASED ON BALANCE PROJECTIONS (IF MODELING) 54
STEP 9: BUDGET INCOME NOT ALREADY MODELED 57
STEP 10: BUDGET EXPENSES NOT ALREADY MODELED 62
STEP 11: ARCHIVE YOUR BUDGET 66 OTHER HELPFUL TIPS ABOUT THE BUDGET ARCHIVE 69
UNDERSTANDING BUDGET NOTES 72
REVIEWING YOUR BUDGET FIGURES 73 PRINTING BUDGET FIGURES FOR VERIFICATION 76
REVIEWING BUDGET VARIANCES 79 USING THE VARIANCE DASHBOARD 79 VIEWING BUDGET VARIANCES ON FINANCIAL STATEMENTS 82
OTHER HANDY “HOW TO”S 86 HOW TO CLEAR A BUDGET AND START OVER 86 HOW TO MANUALLY CHANGE FIGURES FOR A SINGLE G/L OR A SINGLE MONTH 86 HOW TO IDENTIFY A BRANCH CLOSING IN YOUR BUDGET 88
APPENDIX A: UPLOADING BUDGET FIGURES 90
Budgeting with CU*BASE 3
CU*BASE BUDGET PRIMER JUST LIKE A SPREADSHEET...WELL, SORT OF
It can be helpful to think of the CU*BASE budget tool as a way to fill in a budget spreadsheet, similar to what you’d do using a tool like Excel...except that your CU*BASE budget “spreadsheet” includes a separate cell for every G/L, with an entry for every month in the year, and — most important of all for analysis purposes — a separate entry for every branch of every G/L account.
Say your credit union has 5 branches and about 1,700 G/L accounts:
8,500 × 12 months = 102,000 cells in your worksheet!
CU*BASE takes care of the branches automatically, so you can fill in every one of those 102,000 cells with no extra effort. The payoff is that when you use the variance dashboard, you’ll be able to see your performance all the way down to the branch level on every G/L, every time.
CREATING A BUDGET IN MULTIPLE “PASSES” CU*BASE is intended to help you fill in your budget spreadsheet a little at a time, in multiple calculation “passes.” In each pass, you choose one or more G/L accounts, set some calculation parameters (% increase over last year’s actual, etc.) and the system populates figures for those accounts. Each subsequent pass updates another batch of accounts.
The process is made even faster and more efficient by the use of Budget Groups. Going back to our analogy of a spreadsheet with 102,000 cells, think of Budget Groups as a way to take big swaths of your worksheet and populate all of the cells at the same time, using the same calculation assumptions.
You can update figures from an earlier pass, too. So if the totals aren’t coming out quite right, you can run another pass on a group of accounts and CU*BASE will overwrite existing figures with the ones calculated in that pass.
4 Budgeting with CU*BASE
BUDGETS OUR WAY...TRY SOMETHING NEW AND SAVE SOME TIME This booklet is set up a little differently than our usual documentation. The CU*BASE budget tool is very robust and allows for your calculations to be as complex as you need them to be. But if you’re not familiar with the nuances, that can be a bit intimidating.
So this guide will be very direct in saying “this is how you budget,” with specific guidance on which option to use and exactly how to perform each step. In other words, we’re not just explaining how the features work and letting you make up your own rules for how to use them. Here we’re getting very detailed about how we think you should use the tools for maximum effect—with minimum effort.
If you really want to become a guru and do things with your own twist, you certainly can. The tools are very robust and you can learn screen by screen via our online help tools.
But trust us...you’ll save yourself a lot of time and energy by following our step-by-step guide from beginning to end, at least for the first budget you create in CU*BASE.
GLOSSARY OF CONCEPTS & TERMS
Term/Concept Description
“B” Records Budget figures that have been saved in the GLBALA database table, where your general ledger monthly balance data is also stored. (To identify them as budget records, they are flagged with a “B” in the THIRYN field.)
Budget Archive
This is a separate file to which a snapshot of your budget records can be copied at any point during the budget process. Used for compiling multiple budgets per year, doing mid-year recasts, or even for backup purposes as a safety net while you do your work. (See Page 66 for more details.)
Budget Assumptions The calculation parameters used to determine monthly budget figures for every G/L, for every branch. Budget calculations can be done on a batch of G/L accounts at the same time (via a Budget Group), or on one G/L account at a time, or even on one branch at a time. The determining factor is the assumptions you are making for the calculation. Grouping G/Ls according to common assumptions (certain % of growth, for example) allows you to streamline the budgeting process and fill in large blocks of your budget spreadsheet with the minimum number of passes.
NOTE: You can always tweak an individual G/L here and there, for one-off situations that don’t quite match the rest of the batch. But you can save yourself a lot of time by filling in the entire block at one time, then going back and adjusting individual figures as needed.
Budget Groups CU-defined Codes that group similar G/L accounts together to make budget calculations and analysis easier.
Classical Budget Calc This term refers to the method for calculating budget figures that simply takes figures from a prior year and adds (or subtracts) to calculate your budget. This is how the old CU*BASE budget tool worked (although the calculations are even more flexible now). Remember that the term
Budgeting with CU*BASE 5
Term/Concept Description “budgeting” applies only when referring to the income statement portion of your general ledger (income and expense accounts).
Modeling
Now for investments, OTB products, and more!
This is the term CU*BASE uses to describe special tools designed just for projecting member loan income and savings dividend expenses for your budget. A two-part process, modeling involves first projecting monthly balances for your loan assets and savings liabilities, then using those projections to estimate the associated interest income and dividend expenses for your budget. NEW: You can also use the modeling tools to project balances on other income-producing assets (such as investment income) or liabilities with associated expenses (such as an OTB mortgage product). The key is that there must be a one-to-one connection between a single asset (or liability) and a single income (or expense) GL. Modeling is used in addition to the classical budget method to compute your full budget, so you’ll still use a straight percent +/- calculation for things like fee income, utilities and salary expenses, and the like.
Monthly/Daily Average
A calculation technique for the classical budget calc that annualizes budget figures by dividing evenly across each month. See Page 57 for an illustration. This can be done using a monthly average (taking the annualized total and dividing by the # of months) or a daily average (compensating for months that have 28 days versus 31 days automatically).
Parallel A calculation technique for the classical budget calc that automatically adjusts for seasonal effects from one month to the next. See Page 57 for an illustration.
Pass Refers to the method of populating your budget “spreadsheet” in CU*BASE by filling in batches of figures, one calculation pass at a time. Each time you run a pass, the system completes another portion of the entire budget, and you can make as many passes as needed until all of the accounts have been touched. A pass can overwrite figures from a previous pass, so you can try different calculations until you get the results you want.
Projections This is the term used when referring to any of your asset or liability general ledger accounts. There is no such thing as “budgeting” these GLs. Instead you will be projecting monthly and year-end ending balances. For your loan assets and savings liabilities, those projected balances will, in turn, be used to estimate related income or expenses using the modeling tools. Beyond member loans and savings, projections can also be made on investment assets, OTB products, etc., as long as you can link a single asset (or liability) GL to a single income (or expense) GL.
BUDGETS FROM AN EXTERNAL SOURCE Already did your budget somewhere else but still want to use the variance dashboard? Upload your budget to CU*BASE!
If you’ve already used Excel or another tool to develop your budget, you can upload the income and expense records into CU*BASE so that the variance analysis dashboard and other reports will be ready to monitor your
6 Budgeting with CU*BASE
performance throughout the year. See Page 90 for instructions on how to upload your budget figures into CU*BASE.
NOTE: Only income and expense net change figures can be imported. The upload feature currently does not support importing asset and liability projected balances into the CU*BASE budget.
Budgeting with CU*BASE 7
BEFORE YOU BEGIN Doing a budget has as much to do with preparation as anything. You’ll need to prepare the tools themselves so that the calculations happen the way you want and the process is easier to manage. And you’ll need to prepare yourself for working the budget numbers: using forecasting and comparison tools that help you get a picture of where you are and where you want to go.
PREPARING THE TOOLS Before diving in, here’s a summary of the steps you’ll need to complete, with some decisions to think about in advance, to help speed the process along.
Step Decisions to Make Now Learn More
1: Set budget controls to open the budget for maintenance
Each year when budgeting season begins you’ll need to add a new control record to allow budget figures to be generated.
Page 19
2: Create budget groups
Every G/L in your income statement must be in a budget group.
In order for the variance dashboard to work, you’ll need a group for at least every sub-total on your income statement and balance sheet.
To make the budget calcs easier, think about grouping according to the G/Ls that can use the same budget assumptions for the calculations.
Page 22
3: Link G/L accounts for modeling
If you plan on using the modeling tools, you’ll need to link each asset account to its corresponding income G/L, and link each liability account to its corresponding expense G/L.
Who on your team is familiar with the one-to-one relationship between these G/L accounts? You’ll need their help during this step.
Page 25
4: Mark branches with no member accounts (if modeling)
If you plan on using the modeling tools, this optional step lets you mark any branch(s) that do not have member accounts attached, such as a strictly administrative branch.
This is informational only and only affects display of branches on certain dashboards and screens; it has no effect on how projected balances are calculated or stored in your budget records.
Page 28
5: Project asset balances (if modeling)
If necessary, first adjust your Budget Controls to allow changes to your Asset G/Ls.
Page 29
8 Budgeting with CU*BASE
Each G/L must be projected separately, but you will start by choosing a Budget Group, which helps keep things organized and allows you to work accounts using similar assumptions. Be sure to consider this when setting up your budget groups in Step 2.
TIP: Although this guide recommends doing modeling work (Steps 5-8) before finishing the remainder of your budget using classical budgeting tools (Steps 9-10), it can be done the other way around if you prefer. You could also have one team work on modeling while someone else does the non-trial balance budgeting work, if you like. Use your Budget Groups to help you stay organized and keep careful track of which G/Ls are being worked in each step.
6: Model income based on asset balance projections
If necessary, first adjust your Budget Controls to allow changes to your Income G/Ls.
In order to perform this step, you must have completed Step 5 for all of your loan asset GLs.
Page 43
7: Project liability balances (if modeling)
If necessary, first adjust your Budget Controls to allow changes to your Liability G/Ls.
Each G/L must be projected separately, but you will start by choosing a Budget Group, which helps keep things organized and allows you to work accounts using similar assumptions. Be sure to consider this when setting up your budget groups in Step 2.
Page 49
8: Model expenses based on liability balance projections
If necessary, first adjust your Budget Controls to allow changes to your Savings G/Ls.
In order to perform this step, you must have completed Step 7 for all of your savings liability GLs.
Page 54
9: Budget other income
If you aren’t modeling, this is the next step after setting up your budget groups and opening your budget for the year.
Note: Even if you are modeling, this step can be done concurrently with the modeling steps (4-8) if you have multiple people working on different segments of your budget.
If necessary, first adjust your Budget Controls to allow changes to your Income G/Ls.
This step may involve multiple passes to calculate income G/Ls.
Think about how these calculations could be done in batches using the same calculation parameters (like the same % growth) and consider
Page 57
Budgeting with CU*BASE 9
that when setting up your budget groups in Step 1.
10: Budget other expenses
If necessary, first adjust your Budget Controls to allow changes to your Expense G/Ls.
This step will involve multiple passes to calculate expense G/Ls.
Think about how these calculations could be done in batches using the same calculation parameters (like the same % increase) and consider that when setting up your budget groups in Step 1.
Page 62
11: Archive your finalized budget
This can actually be done more than once, at any point during the previous steps, but is most commonly done after all budget figures are entered and approved, to take a snapshot of the final figures for posterity.
Page 66
TO MODEL OR NOT TO MODEL: FREQUENTLY-ASKED QUESTIONS Q: Can I just take my last year actual and figure my budget to be 5% higher? A: Yes. We call that the “classical” budgeting method and you can do this without using any of the modeling tools if you like. You’ll still need to do steps 1 & 2 to configure your chart of accounts, then proceed directly to step 9 (Page 57) and budget all of your income and expenses using the same technique, using as many passes as needed for different calculation parameters.
Q: Can I model my investment G/Ls?
A: Yes you can! You can now link any asset (or liability) GL account to any associated income (or expense) GL, then use the same tools you use for projecting member balances and modeling the associated income/expense. The key is that there must be a one-to-one connection: a single asset tied to a single income GL. For example, if you have multiple assets that feed into a single income GL, those assets cannot be modeled via these tools.
Q: How are figures are “spread” across the budget worksheet?
A: When it comes to filling in your budget worksheet, it’s important to understand the distinction between the classical budgeting calculation (% increase or decrease based on previous year figures), versus how the modeling projections are determined:
• With the classical budgeting tools, CU*BASE calculates individual branch G/L figures, one month at a time, using previous year data, then shows you the total of those figures on the screen – it does not figure a total then spread it among the branches.
• But for projecting asset and liability balances it’s just the opposite – CU*BASE figures a total (there are several methods from which you can choose), then spreads that amount across all branches/months.
See Page 32 for details about how projections are spread across branches.
10 Budgeting with CU*BASE
Q: What if I still want to use my own method for calculating my savings and loan projections but want to store the budget in CU*BASE? A: You can use a third party tool to work your asset and liability projects and the associated income and expenses. Just remember that you can only upload the income and expense figures into your budget. The upload tool does not support uploading resulting balances for asset and liability G/Ls. See Page 90 for more details.
Q: I like to have my accountant handle budgeting things like salary expenses and other routine things, while I focus on forecasting loans and savings in my budget. Can I do that with the CU*BASE tools?
A: Yes. As long as you’ve set up your Budget Groups carefully, the modeling steps (Steps 5-8) can be done before, after, or simultaneously with the classical budgeting steps (Steps 9-10). Use your Budget Groups (see Page 22) to help you stay organized and keep careful track of which G/Ls are being worked in each step. You’ll also need to coordinate any adjustments to your Budget Controls (see Page 19) to make sure the proper G/L types are opened or closed at the appropriate times.
Q: I’m new to CU*BASE. Can I manually enter my G/L history so that I can use the trending tools when working my budget?
A: Yes, this is possible in most cases, at least for the monthly balances that are used by most budgeting tools and trending dashboards. Since importing detailed history of debits and credits to G/L accounts might not be possible, keep in mind that functionality may still be limited for some tools. Contact Keegan Daniel, VP Professional Services for Earnings Edge, at [email protected] to discuss your options for either flooding data into your database or manually entering data that could be used by the budget tools and trending dashboards.
Q: Can I project changes to my branches for the coming year, such as if I’m adding a branch or plan to reallocate member branch assignments at some point?
A: Yes, there is a technique for reviewing and manually adjusting branch allocation calculations for projected asset and liability balances. See Page 88 for instructions.
NOTE: The classical budgeting tools also contain a “Close a branch” function (see Page 88) which zeros out monthly figures from your budget starting with a month you specify. But this does not affect projections for asset and liability balances used in the modeling tools.
Q: Can I have more than one version of my budget going at a time?
A: Yes, with the budget archive feature you can take a snapshot of your entire budget at any time and store it in a new warehouse file, separate from where your “live” budget is stored. This lets you store several versions of your budget – such as both a conservative and aggressive budget using different calculation assumptions. You can use archived snapshot(s) in the Variance Analysis dashboard to compare your actual performance against multiple archived budgets. By having an archived copy of your final approved budget, you can even come back mid-year and adjust your figures for the remainder of the year, producing a mid-year budget recast. See Page 66 for more details about the Budget Archive.
Q: Can I wait until after January 1 to start my budget for that year?
A: Yes. When doing projections on assets and liabilities, you won’t need to do the steps involved in projecting a beginning balance for the year, since we can use the real EOM balance from your files, but otherwise the process is pretty much the same. If you are doing your budget in February, when modeling your income or expenses you’ll see actual balances for January and then projected ones for the remainder of the year.
It is also possible to make changes to an existing budget during the year. Therefore, when new figures are saved in the modeling tools, the system will not replace any existing “B” budget records with actual figures. That way you still have your original budgeted figures for variance analysis later.
12 Budgeting with CU*BASE
RESEARCHING YOUR ASSUMPTIONS The CU*BASE Budgeting Tools are comprised of analysis dashboards and reports that can help you get a big-picture of your numbers as you begin.
Most of these are forecasting and inquiry tools that show your performance in various ways:
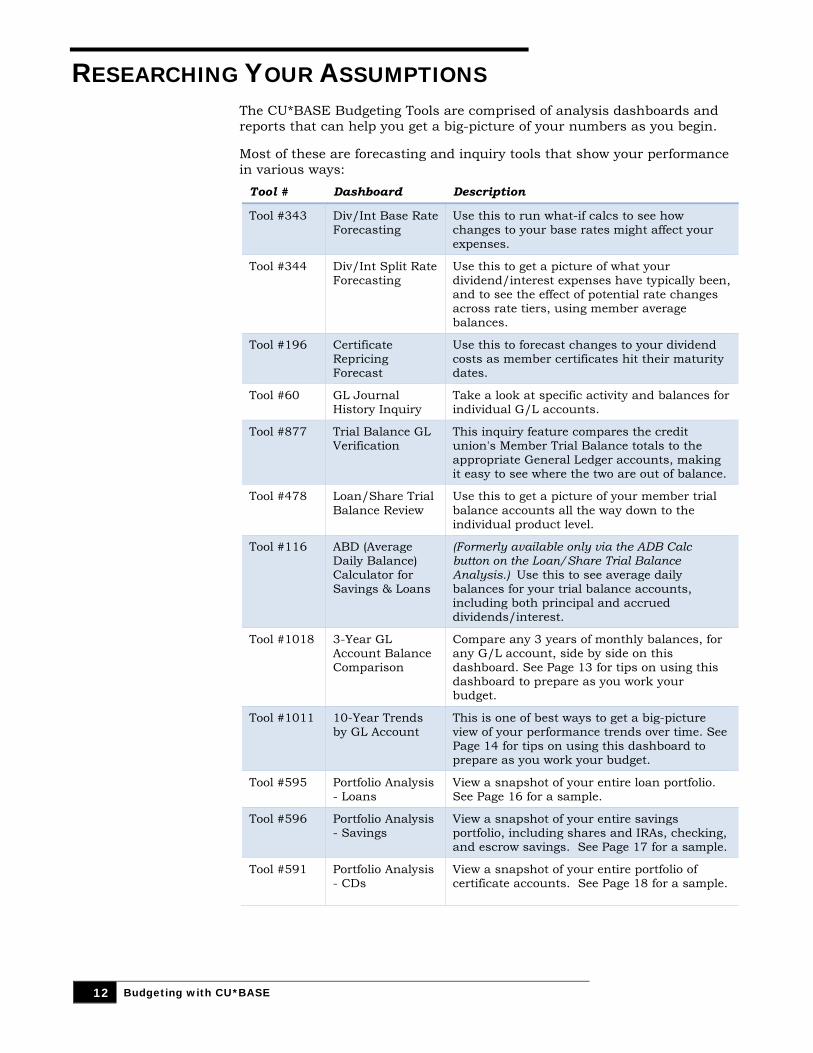
Tool # Dashboard Description
Tool #343 Div/Int Base Rate Forecasting
Use this to run what-if calcs to see how changes to your base rates might affect your expenses.
Tool #344 Div/Int Split Rate Forecasting
Use this to get a picture of what your dividend/interest expenses have typically been, and to see the effect of potential rate changes across rate tiers, using member average balances.
Tool #196 Certificate Repricing Forecast
Use this to forecast changes to your dividend costs as member certificates hit their maturity dates.
Tool #60 GL Journal History Inquiry
Take a look at specific activity and balances for individual G/L accounts.
Tool #877 Trial Balance GL Verification
This inquiry feature compares the credit union's Member Trial Balance totals to the appropriate General Ledger accounts, making it easy to see where the two are out of balance.
Tool #478 Loan/Share Trial Balance Review
Use this to get a picture of your member trial balance accounts all the way down to the individual product level.
Tool #116 ABD (Average Daily Balance) Calculator for Savings & Loans
(Formerly available only via the ADB Calc button on the Loan/Share Trial Balance Analysis.) Use this to see average daily balances for your trial balance accounts, including both principal and accrued dividends/interest.
Tool #1018 3-Year GL Account Balance Comparison
Compare any 3 years of monthly balances, for any G/L account, side by side on this dashboard. See Page 13 for tips on using this dashboard to prepare as you work your budget.
Tool #1011 10-Year Trends by GL Account
This is one of best ways to get a big-picture view of your performance trends over time. See Page 14 for tips on using this dashboard to prepare as you work your budget.
Tool #595 Portfolio Analysis - Loans
View a snapshot of your entire loan portfolio. See Page 16 for a sample.
Tool #596 Portfolio Analysis - Savings
View a snapshot of your entire savings portfolio, including shares and IRAs, checking, and escrow savings. See Page 17 for a sample.
Tool #591 Portfolio Analysis - CDs
View a snapshot of your entire portfolio of certificate accounts. See Page 18 for a sample.
Budgeting with CU*BASE 13
3-YEAR GL ACCOUNT BALANCE COMPARISON This tool lets you see a history of account performance over time, for a single general ledger account or an entire Budget Group. Use this tool before starting your budget to start getting familiar with the typical balance levels of your G/L accounts.
1. Start by choosing Tool #1018 3-Year GL Account Balance Comparison. The first screen allows you to choose exactly which accounts you wish to review, as well as specify the years to be compared:
2. Choose a G/L type and make other selections as desired (such as choosing a budget group), then use Enter to see the dashboard:
Any three years can be compared, going back as far as your credit union’s data is stored on CU*BASE: just type a different year into the boxes at the top of the screen and use Enter to refresh.
The Analysis button will show some interesting statistics compiled for each year selected:
A beginning balance and annual
growth % will appear for asset
and liability accounts only.
Use these to specify any years you wish to
compare. The current year can be included but will of course contain only
partial data.
Use these fields to compare to a
different year; use Enter to refresh.
14 Budgeting with CU*BASE
3. When done use to exit.
10-YEAR TRENDS BY GL ACCOUNT Similar to the 3-year comparison, this tool lets you see a history of account performance, but for a single G/L account and over a 10-year period (or whatever you have in your history) for a more detailed trending analysis. Use this tool before starting your budget to get a big-picture view of how your G/L balances have been trending.
1. Start by choosing Tool #101110-Year Trends by GL Account.
2. Although you can go directly to a single G/L, for best results start by choosing a Budget Group and use Enter to continue to a screen showing all of the G/Ls in that group:
Budgeting with CU*BASE 15
3. Select one of the G/L accounts and use Enter to proceed to the 10-year balance comparison:
Remember that data can only be shown as far back as you have actual data in your general ledger balance file, up to 10 years. The current year is also displayed at the bottom, as of the most recent end-of-month balance.
4. When done use to choose a different G/L account or to exit.
Click the lookup button on any year to
jump to the 3-Year Balance Comparison
(described on Page 13) showing that year side
by side with the previous and next years.
16 Budgeting with CU*BASE
ANALYZE YOUR LOAN PORTFOLIO This tool gives a quick a snapshot of your entire loan portfolio. This tool is the easiest and best way to get a picture of your rates across member accounts. Similar research will also be shown when you are working through the modeling tools to help you understand how your projections relate to your portfolio.
1. Start by choosing Tool #595 Portfolio Analysis – Loans.
2. Choose which data you’d like to use (current or any of the three prior month-end snapshots) and how you’d like the accounts to be grouped for analysis purposes, then use Enter to proceed to the dashboard:
For online credit cards the system will include all of the rates from the individual rate “buckets” (purchases, balance transfers, and cash advances) found on each individual account. For credit cards as well as other loans, the weighted average rates are calculated using the actual outstanding balance for each rate.
3. When done use to exit
Your selection on the initial window controls
what appears in the first two columns of the
dashboard
Click to sort by any column
These options let you decide how the data will be listed on the dashboard –a list of GL accounts, loan categories,
purpose or security codes, or loan categories just for a specific business
unit.
Use these to export this specific group of
members so that you can communicate with them
via Member Connect
Use this to see Common Bonds
analyses for these specific members
Budgeting with CU*BASE 17
ANALYZE YOUR SAVINGS PORTFOLIO This tool gives a quick a snapshot of your entire savings portfolio, including shares and IRAs, checking, and escrow savings. Similar research will also be shown when you are working through the modeling tools to help you understand how your projections relate to your portfolio.
1. Start by choosing Tool #595 Portfolio Analysis - Savings.
2. Choose which data you’d like to use (current or any of the three prior month-end snapshots) and how you’d like the accounts to be grouped for analysis purposes, then use Enter to proceed to the dashboard:
3. When done use to exit
Click to sort by any column
These options let you decide how the data will be listed on the dashboard – either a list of GL accounts under a certain budget group, or a list of GL accounts for a specific Application Type (SH=Shares, SD=Checking, TX=Escrow), or a list of Dividend Applications (savings products).
Your selection on the initial window controls what appears in these
first few columns.
Use this to see balance ranges and
rates on your split rate products
Use this to see Common Bonds
analyses for these specific
members
18 Budgeting with CU*BASE
ANALYZE YOUR CERTIFICATE PORTFOLIO This tool gives a quick a snapshot of your entire portfolio of certificate accounts. This tool is the easiest and best way to get a picture of your rates across member certificates. Similar research will also be shown when you are working through the modeling tools to help you understand how your projections relate to today’s portfolio.
1. Start by choosing Tool #591 Portfolio Analysis - CDs.
2. Choose which data you’d like to use (current or any of the three prior month-end snapshots) and how you’d like the accounts to be grouped for analysis purposes, then use Enter to proceed to the dashboard:
3. When done use to exit
These options let you decide how the data will be listed on
the dashboard – either a list of GL accounts under a certain budget group, or a list of GL accounts by CD Application Type, or a list of certificate
types.
Click to sort by any column
Use these to export this specific group of members so
that you can communicate with them via Member
Connect Use this to see Common Bonds
analyses for these specific
members
Budgeting with CU*BASE 19
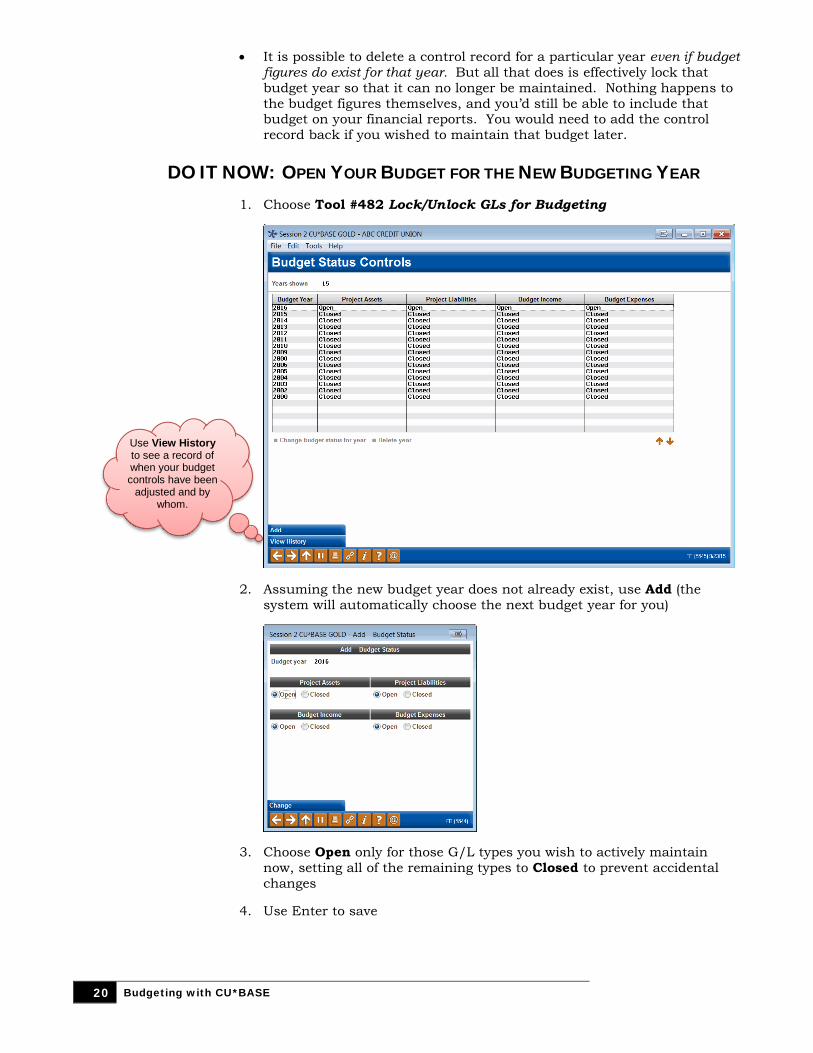
STEP 1: OPEN (UNLOCK) YOUR
BUDGET WHAT YOU SHOULD KNOW
Budget Controls are like padlocks for your budget records. They allow the credit union’s budgeting manager to control how data gets into the budget records and how and when modifications can be made. There will be one set of Budget Controls for every year of data in your general ledger balance file (GLBALA). Each set contains four separate padlocks (on/off controls), one each for Assets, Liabilities, Income and Expenses.
In the fall when you’re ready to begin working next year’s budget, the first step is to add that budget year into your Budget Controls. You’ll set the appropriate G/L type(s) to “open,” unlocking them so that budget figures can be created, modified, or deleted.
For credit unions that use a tag team approach to working on the budget, Budget Controls help manage the workflow and avoid someone accidentally overwriting work already completed by someone else. For example:
♦ The budgeting manager adds the 2016 Budget Control record and announces that budgeting season is now open. She opens the control for Assets only.
♦ The credit union’s lending experts begin working on projecting loan asset balances.
♦ When those projections are complete the budgeting manager locks the Asset controls and opens up the Income controls.
♦ Interest yield projections are calculated using the projected loan asset balances.
♦ When all of the loan yields have been calculated and added to the budget, the budgeting manager locks the Income G/Ls again and unlocks the control for Liabilities.
♦ The credit union’s savings experts now begin working on projecting liability balances for member shares.
♦ ...and so on.
Even if you only have one person working your budget, the controls can be helpful to keep yourself organized and prevent yourself from accidentally changing or deleting a portion of your budget that you’ve already finished and verified.
Tips
• A history log is automatically maintained showing every time a budget control record was changed. That will allow you to see who has been working on your budget and when, and could be used to track when various tasks are completed should you have multiple people working on the same budget.
• By setting all four of the padlocks to “closed” after a budget is complete, changes can no longer be made, preventing anyone from accidentally deleting or changing it later while working on a future year’s budget.
20 Budgeting with CU*BASE
• It is possible to delete a control record for a particular year even if budget figures do exist for that year. But all that does is effectively lock that budget year so that it can no longer be maintained. Nothing happens to the budget figures themselves, and you’d still be able to include that budget on your financial reports. You would need to add the control record back if you wished to maintain that budget later.
DO IT NOW: OPEN YOUR BUDGET FOR THE NEW BUDGETING YEAR 1. Choose Tool #482 Lock/Unlock GLs for Budgeting
2. Assuming the new budget year does not already exist, use Add (the system will automatically choose the next budget year for you)
3. Choose Open only for those G/L types you wish to actively maintain now, setting all of the remaining types to Closed to prevent accidental changes
4. Use Enter to save
Use View History to see a record of when your budget controls have been
adjusted and by whom.
Budgeting with CU*BASE 21
Locking/Unlocking Budget Controls During Budgeting
During the budgeting process you may return to the controls and close G/L types where budgeting is complete, and open G/L types you are ready to begin budgeting. Remember that it is possible to delete a budget control record entirely, even if budget figures already exist, but that does not affect the budget itself, only your ability to maintain or delete that year’s budget.
1. Navigate to Tool #482 Lock/Unlock GLs for Budgeting
2. Select the desired budget year in the list and choose Change budget status for year
3. Choose Open only for those G/L types you wish to actively maintain now, setting all of the remaining types to Closed to prevent accidental changes
4. Use Enter to save
22 Budgeting with CU*BASE
STEP 2: CREATE BUDGET GROUPS WHAT YOU SHOULD KNOW
A Budget Group allows you to run budget calculations on a group of G/L accounts at the same time. It’s best if you put every G/L account you have into a budget group, even if you end up deciding not to use modeling tools to project assets and liabilities, because of how the Groups are used by the Variance Dashboard and other analysis dashboards and reports.
Going back to our analogy of a spreadsheet with 102,000 cells, think of Budget Groups as a way to take big swaths of your worksheet and populate all of the cells at the same time, using the same calculation assumptions.
Another way to think of Budget Groups is to imagine the sub-totals on your financial reports. Each sub-total would represent a Budget Group. You might eventually get even more granular than that, but that’s a great place to start.
TIP: To make the modeling calculations work right with different product rates, we recommend you split savings into sub-groups by application type (Shares/IRAs, Checking, Escrow, and Certificates). At the very least make sure to separate savings from time deposits.
Setting Up the Groups
Generally you’ll create a group, then select a batch of G/Ls to be in it.
You can also assign groups one G/L at a time, but that’s mostly for situations where you need to tweak where a particular account goes, or you are setting up a brand-new G/L account.
Budget Groups Are Not Static
Because the groups are used not only for the calculations, but also by all of the variance analysis tools, it may take some time to get the groups just right. The system makes this easy by letting you move a G/L from one group to another, and the budget analysis tools will adapt automatically, on the fly.
This does mean, however, that if you print a budget report today, then a year from now you print that same budget report, if you’ve made any changes to your budget groups in the meantime, the reports will not look exactly the same. CU*BASE does not retain the original budget groups as part of the budget records.
And that’s on purpose. The tools are intended to be dynamic and adapt to your changing organization over time. This makes your analysis more useful, as it instantly lets you see trends in the income statement sub-totals you use today.
Budgeting with CU*BASE 23
DO IT NOW: CREATE YOUR BUDGET GROUPS
Access the Tool
1. Navigate to Tool #202 Chart of Accounts/Budget Groups Maint
2. Choose Full Chart
3. Choose Budget Group Maint to display the list of groups you’ve already created, if any
Create a Group Code
4. Choose Add
5. Type a Budget group code (can use letters and numbers) and a Display sequence (numeric 0001-9999)
6. Enter a Description, and choose a Type (income, expense, asset or liability
For example, let’s say we’re creating the group for our interest income, which is sub-totaled as “TOTAL INCOME FROM LOANS” on our income statement. This group would use that as the description and include all of the interest income G/Ls that make up that sub-total.
7. Use or press Enter to continue
Assign the G/Ls to the Groups
8. If the G/L account numbers you need are sequential, choose Flood to accounts OR Choose Select accounts if you need to pick and choose individual accounts from your full list
9. Use or press Enter to proceed
10. If flooding accounts, simply enter the range of account numbers that should be in this group (cannot use a range if any of the G/Ls in that range are already assigned) OR If selecting accounts, hold the Ctrl key and click on accounts in the list, one at a time, then click Select
The Display sequence controls the order in which this group will
appear on the Variance Dashboard and elsewhere, and can be changed later if you wish to reorganize your groups (the
Budget group code itself cannot be changed). For best results, use an interval such as 10, 20,
30, etc., to make it easier to insert new groups later.
24 Budgeting with CU*BASE
TIP: The flood feature is just an easy way to put the budget group on many G/L account records at the same time; from that point on each account configuration is still separate. You can go back into individual accounts and adjust the budget group code as needed.
11. Choose Assign (F6) to save and continue
12. You should now be looking at a screen listing the groups you’ve created so far, like this:
13. Repeat #4-12 until all groups are created
14. To double-check you haven’t missed any, choose Accts With No Group to see accounts that have not yet been assigned to a Budget Group
15. Use to exit
If you see a group without any GL Accounts, select it and use either Flood to
accounts (to enter a range) or Choose G/L accounts (to select them manually)
Use Clear from accounts to keep the Group but
remove the code from any GLs assigned to it. Use Delete to un-assign and remove the code entirely.
Budgeting with CU*BASE 25
STEP 3: LINK G/L ACCOUNTS FOR
MODELING If you do not wish to use the modeling calculations to estimate, for example, interest income based on loan growth, dividend expenses based on member savings balances, investment income based on investment assets, etc., you may skip this step.
WHAT YOU SHOULD KNOW In CU*BASE budgeting, to “model” means to forecast the projected growth or decline of an asset, and then use those projected balances to calculate the impact on the associated income. In this step you tell the budget tool which assets are tied to which income accounts, and which liabilities go with which expenses. (See Page 9 for more details about why to model.)
While CU*BASE configurations like loan categories and share products do include similar G/L account cross-references, the configuration used by the budget tool is completely separate. And that’s on purpose, to force you to think in terms of budgeting when it comes to these relationships.
For example, the budget tool requires a 1:1 relationship – one income account goes with one asset – and there can be no overlap. Your CU*BASE configurations could potentially use the same income G/L for more than one product, while the modeling calculations can only handle data from a single account.
You may find when setting up this configuration that your chart of accounts as it stands won’t support modeling on all of the income G/Ls you have, but this way you will know going in which groups can be modeled and which will need to calculated using a straight budget calculation.
Tips On Modeling Beyond Member Loans and Savings Balances
CU*BASE will now allow you to set up links between other types of asset/liability GLs and their associated income/expense GLs, and run these accounts through the same projection and modeling calculations. For example, you can link an investment asset GL to its associated investment income GL (must be a 1:1 relationship, as already described) and then project investment balances and use those projections to budget that investment income.
One word of caution: As you’ll see later when we discuss how projections are allocated across your branches (see Page 32), if you are projecting an asset that doesn’t have any associated member accounts, the branch allocations can be a little trickier, especially if you do not use branch accounting for all activity on those assets. All this means is that you should take advantage of the optional branch “proration” feature to verify and adjust how the projected balances should be spread among your branches, rather than use the system’s default calculations, to ensure the results are what you expect.
See Page 41 for more details on using this feature.
26 Budgeting with CU*BASE
Tips on Where to Gather Information You’ll Need
For loan products, use Tool #458 Loan Category Configuration.
For savings and certificate products, use Tool #777 Savings/Checking Products Configuration and Tool #194 Certificate Products Configuration
For investment products, use Tool #993 INV 1: Work With CU Investments (if you use GL Codes to simplify your investment configurations, Tool #253 Configure Investment GL Codes may also be helpful).
DO IT NOW: LINK G/LS FOR MODELING After you initially create your groups, each subsequent year you should at least review them to make sure they are set up the way you like, especially if you’ve added or removed G/Ls since last budget season.
Create the Group Codes
1. Navigate to Tool #202 Chart of Accounts/Budget Groups Maint
2. Choose Full Chart
3. Under G/L type select Assets and use Enter to refresh
4. Select an Asset G/L account and use Change to display the following screen:
5. Make sure that a Budget group has been selected for this account
6. In the bottom section of the screen, enter the income G/L and accrual G/L that correspond to this asset OR
The Accrual G/L is not currently used by the
budget tool but is intended for future use; it can be left
blank if you wish.
Budgeting with CU*BASE 27
If the asset represents member savings or loans, you can choose Auto Pick and the system will make a best guess for both fields by looking at your loan category configurations (or share dividend application configurations) for a product that uses this G/L. (A confirmation window will appear showing the selections made; use Select (F5) to confirm and return to this screen.)
IMPORTANT: The system only looks for the first match it finds. If you happen to have more than one loan product tied to this G/L, the modeling calculation will not work properly for you. In this case we suggest you leave both the income and accrual fields blank and use the classical budget calc method to manually calculate the budget for this particular G/L.
NOTE: Auto Pick will not work for investment GLs or any others where there are no associated member accounts. In those cases simply enter the associated income GL account number manually.
7. Use Enter to save that G/L account
8. Repeat #4-7 for all remaining loan asset G/L accounts
9. Repeat #3, changing the G/L type to Liabilities
10. Repeat #4-7 for all of your savings liability G/L accounts
11. When done use to Exit
28 Budgeting with CU*BASE
STEP 4: MARK BRANCHES WITH NO
MEMBER ACCOUNTS (IF MODELING) This steps is optional, even if you are planning to use the modeling tools, and applies only to CUs who have branches to which members loan/savings accounts are never assigned.
WHAT YOU SHOULD KNOW This step lets you flag specific branches that do not have any member loan or savings accounts attached to them, for special handling via the budgeting and modeling tools. For example, you may have an administrative branch that is never used for member loan or savings accounts. Setting this configuration flag will prevent that branch from appearing on certain dashboards and maintenance screens.
For now this feature will affect only certain screens where branches are listed, but at the present time does not have any effect on how projection figures are calculated and stored in your budget records. See “How Balance Projections Are Spread Across Branches” on Page 32 for details.
DO IT NOW: EXCLUDE A BRANCH FROM MODELING These settings only need to be adjusted once unless you make changes to your branch structure in the future.
1. Navigate to Tool #176 Branch Office Description/Modeling Ctrls
2. Enter the branch/vault number to be excluded and use Enter to proceed:
3. Remove the checkmark from the Include this branch in budget modeling projections
IMPORTANT: The branch name here is used for other things besides this budget control, so be careful about changing the description for any of these records!
4. Use Update (F5) to save
5. Repeat for any other branches that do not have member accounts attached
6. Use to exit
Budgeting with CU*BASE 29
STEP 5: PROJECT ASSET BALANCES
(IF MODELING) If you do not wish to use the modeling calculations, such as to estimate interest income based on loan growth, you may skip this step.
WHAT YOU SHOULD KNOW In this step you will use a series of screens and calculation options to project year-end balances for your asset G/Ls, such as member loan assets. Remember that only the asset G/Ls that have been linked to income G/Ls (in Step 3, see Page 25) can be projected using this tool.
Balance sheet G/L accounts are different from income statement accounts when it comes to your budget. As you know, when printing a financial statement, the income statement format always includes both a starting and ending date so you can define the period for which net change figures are shown. For a balance sheet there is no “starting” period but rather a resulting balance as of a specific point in time.
But regardless of the G/L type, the budget tool itself ultimately will be storing a net change figure for each month of the budget year. Therefore, when projecting balances for assets (or liabilities), the system needs a starting balance to which it can add or subtract those monthly net changes.
A word about written-off loans: Remember that modeling tools, like the classical budgeting tools, use G/L accounts and the associated general ledger history for all calculations. So if you set up your loan products properly and use the CU*BASE Loan Write-Off and Charge-Off tools as intended, your projection calculations for loan assets will not include written off loans because those loans will have been already moved to your configured G/L(s) for written-off assets, and no longer part of the original asset G/L.
Start at the Beginning: The Beginning Balance
If you wait to start your budget until after the budget year has begun (say, during January), then the system can use the December year-end balance as the budget year’s starting balance. But if you do your budgeting during November or December, you’ll have to project what that year-end balance will be when you begin your budget modeling.
That means that no matter which method you use for figuring the projected ending balance, the first step is always to project a starting balance for the budget year. Then the next step is to choose a calculation method to project the year-end balances from that starting point:
Understanding the Calc Techniques
There are three approaches you can use for how you arrive at the projected ending balances for the budget year. Choose the one that is easiest for you to understand and best fits your approach to budgeting your member loan
30 Budgeting with CU*BASE
asset G/Ls (the examples below assume member loan balances but the same methods apply to other assets you may be projecting, such as investments):
Project Your Monthly Net Balance
This commonly-used method is for CUs that prefer to budget by predicting how much loan balances are likely to change (go up or down) each month during the year.
Starting balance + Monthly net change to member loans = Ending balance
• With this method you can specify the exact $ amount you’re targeting and have the system spread that evenly across the months. Or you can have the system calculate the target based on a $ or % pattern from last year’s actual performance. See below for a description of how the pattern calculations work.
Project Your Monthly Resulting Balance
This is another commonly-used method that lets you target where your loan balances will wind up at the end of the year, and the system will calculate the net change amount for each month based on this projection.
Target ending balance / 12 months = Net change amount to record to the budget OR Target ending balance / 365 or 366 days * # of days in month = Net change amt to record to the budget
• With this method you can spread the same amount across each month or use a daily calculation that accounts for the variation in the number of days in each calendar month.
Project Your Annual Debits and Credits
This is a less common method but can be useful for loan G/Ls where you have a sense of the total amount of new loan dollars you will receive during the year as well as the typical pattern of loan payments coming in throughout the year.
Starting bal + debits (disbursements) to mbr loans – credits (payments) to mbr loans = Ending bal
• With this method you can specify the exact $ amount you’re targeting for the year and have the system spread that across the months. Or you can have the system calculate the target based on a $ or % pattern from last year’s actual performance. See below for a description of how the pattern calculations work.
• NOTE: Currently the model does not automatically adjust credits based on your predictions for new loans (debits), so you’ll need to take that into consideration when doing your credit assumptions.
Using Fixed Assumptions vs. a Pattern
When calculating your projections using either the Net Balance or the Debits/Credits technique, you can choose to do the math via either a Fixed Assumption or a Pattern.
A Fixed Assumption simply takes whatever dollar amount you enter on the budget calculation screen and spreads it across the months. Or you can do a straight % increase/decrease calculation from one month to the next. A fixed assumption does NOT use any previous year figures in the calculation, so it’s perfect for when you want to set goals/targets for the budget year without any connection to last year’s performance.
Budgeting with CU*BASE 31
With a Pattern, you will look at last year’s performance from a trending perspective, using the ups and downs for each calendar month to determine the ups and downs you can expect next year. This can be done by dollar amount (the $ amount change in your loan balances from one month to the next last year) or percent change (how much loan balances went up or how much they went down last year, as a percentage of the total balance). If you wish, you can even add a little to the calculated amount each month, or subtract a little. But you can also simply use the exact same pattern as last year, the only difference being what balance you start with (next January vs. last January).
The following illustrations show how a Pattern calculation uses last year’s numbers, including the effect of adding an optional deviation in the form of a $ amount or additional % per month:
Sample 1a: Dollar Amount Pattern This example takes last month’s performance and mirrors it for next year, using the same $ amount change from one month to the next as last year. The only difference between last year and next year is the starting balance:
Sample 1b: Dollar Amount Pattern + $ Deviation Similar to the previous sample, but in addition to mirroring the monthly change from last year, we also tacked on another $1,000 each month:
Sample 2a: Percent Pattern This example takes last month’s performance and mirrors it for next year, using the same % change from one month to the next as last year. The only difference between last year and next year is the starting balance (because no additional amount is added, the results are identical to the first sample $ pattern above):
Same $$ Pattern as last year (just a different starting balance)
Actual Resulting Balance Net Change
% Change from last month's EOM Balance
Budget Resulting Balance
BOY 100,000 125,000 Jan EOM 102,000 2,000 2.00% 127,500 Feb EOM 104,000 2,000 1.96% 130,000 Mar EOM 106,000 2,000 1.92% 132,500 Apr EOM 109,000 3,000 2.83% 136,250
May EOM 112,000 3,000 2.75% 140,000
Same $$ Pattern as last year, diff starting bal, add another $1K per month
Actual Resulting Balance Net Change
% Change from last month's EOM Balance
Add another $1,000/month
Budget Resulting Balance
BOY 100,000 125,000 Jan EOM 102,000 2,000 2.00% 1,000.00 128,000 Feb EOM 104,000 2,000 1.96% 1,000.00 131,000 Mar EOM 106,000 2,000 1.92% 1,000.00 134,000 Apr EOM 109,000 3,000 2.83% 1,000.00 138,000
May EOM 112,000 3,000 2.75% 1,000.00 142,000
32 Budgeting with CU*BASE
Sample 2b: Percent Pattern with % Deviation In addition to the % change from last year, in this next sample we also tacked on another 1.5% change each month (calculated as a % change from the previous month’s projected resulting balance):
TIP: Another way to look at it is that instead of adding 2% for January, the calculation uses 3.5% (2.0%+1.5%), 3.46% for Feb, and so on.
How Balance Projections Are Spread Across Branches
After you’ve projected your monthly balances for a G/L, when saving the system will automatically spread the projections among the branches for each month of the year, by dividing the total amount across your current mix of branches. This includes all branches that currently have balances in that G/L account.
Unless you elect to prorate the percentages manually (see Page 41 for more details), the spread will be done proportionately to the current balance per branch. So if one branch currently represents 58% of the balance in that G/L account, then 58% of the new projected balance will be spread to that branch in your budget records, like this:
$ Amt Represented
by Branch % of Total Branch 01 $8.2M 58% ← Once projections are calculated
for the entire G/L account, 58% of that total will be saved under this branch # in your budget records
Branch 02 $3.2M 23% Branch 03 $1.4M 10% Branch 04 $1.2M 9% Current Balance in G/L 701.00 $14.0M 100%
IMPORTANT: This calculation must take into account any balance currently found under any branch for that G/L account. So even if you’ve marked a branch in Step 4 as not being used by modeling, if there is an amount in the G/L under that branch (even $1!), it still will be used in the calculation for saving projections, so that the proportions come out to 100%. If you are
Same % Change Pattern as last year (just a different starting balance)
Actual Resulting Balance Net Change
% Change from last month's EOM Balance
Budget Resulting Balance
BOY 100,000 125,000 Jan EOM 102,000 2,000 2.00% 127,500 Feb EOM 104,000 2,000 1.96% 130,000 Mar EOM 106,000 2,000 1.92% 132,500 Apr EOM 109,000 3,000 2.83% 136,250
May EOM 112,000 3,000 2.75% 140,000
Same % Change Pattern as last year, diff starting bal, add another 1.5% change each month
Actual Resulting Balance Net Change
% Change from last month's EOM Balance
Add another 1.50%
change/monthBudget Resulting
BalanceBOY 100,000 125,000
Jan EOM 102,000 2,000 2.00% 1.50% 129,375 Feb EOM 104,000 2,000 1.96% 1.50% 133,852 Mar EOM 106,000 2,000 1.92% 1.50% 138,434 Apr EOM 109,000 3,000 2.83% 1.50% 144,429
May EOM 112,000 3,000 2.75% 1.50% 150,570
Budgeting with CU*BASE 33
unsure, you can use the Do you wish to use your own branch proration percentages option that appears when savings your projections (see Page 40), to set the branch allocation percentages yourself manually.
DO IT NOW: PROJECT YOUR MEMBER LOAN BALANCES The examples below show member loan assets but the same techniques apply to other assets you may be projecting, such as investments.
NOTE: While working in the modeling tools, remember that a minus sign (-) always means a decrease to that G/L, regardless of whether that G/L is a debit- or credit-balance account.
1. Navigate to Tool #699 Project Asset/Liability Balances
2. Enter the budget year, then select a Budget Group representing member loans and use Enter to continue
3. Select one of the G/L accounts in the group and use Enter to proceed to the research screen:
This screen will show the year-end projections for each G/L account in this
group as you save them in subsequent steps, so you’ll
be able to watch your progress as you work
through each account, one after the other.
After you’ve saved projections for a G/L, use
Branch Allocation to see or adjust how the total was
spread across all branches. See Page 86 for tips.
34 Budgeting with CU*BASE
This screen lets you pause and familiarize yourself with this G/L account’s performance over the last 10 years. These numbers will be useful for ballpark analysis when running projection calculations for next year’s budget.
4. When done reviewing prior performance for the G/L, use Done/Continue to move on to the main projection calculation screen:
Click the lookup button on any year to
jump to the 3-Year Balance Comparison
(described on Page 13) showing that year side
by side with the previous and next years.
The middle row shows current year figures as of the most
recent month end. Use the lookup button to see a monthly
breakdown for that year.
The first row in this bottom area will be filled
in with budget year projections as you use the calculation features
on this screen.
The bottom row shows performance for the most recent completed annual.
Use the lookup button to see a monthly breakdown for
that year.
Use these tabs to see graphs showing the 10-year trends in
this G/L.
Start here!
At any time while working on this screen you can use Clear Assumptions to erase all of the figures you’ve calculated and return to
where you started.
Use these buttons to look at charts showing 10-year trends. (Tip: Use the “X”
button at the bottom of the chart to close the chart.)
Remember that this is a partial year with no end-of-year balance, so be sure to notice the “as of” date in the
heading bar!
Use the Notes button to record notes about your calculation assumptions.
See Page 72 for tips.
Budgeting with CU*BASE 35
Specifying the Starting Balance
Skip this step if you are creating a budget for the current year, since this year’s beginning balance has already been recorded. Proceed directly to #9 on the next page.
5. Click the near the January balance (F17) to display the window below:
6. On this window you’ll see a narrative showing what the system estimates your ending balance for this year will be, assuming your average monthly change levels remain consistent from now until the end of the year
7. Enter the balance you want to use as your beginning balance for next year’s budget projections (although you can use the number calculated by the system, to make the math easier to understand you might prefer to enter a whole number, rounded up or down from that estimate)
8. Use Enter to insert that balance onto the main projections screen
IMPORTANT: While this starting balance is critical to the remaining calculations you’ll perform on this screen, this amount is not retained by CU*BASE. The budget will ultimately store only a monthly net change amount and resulting balance for each branch.
A “D” in this column means a debit to the G/L account (remember that for this
screen, a minus sign (-) is used only to signify a decrease, regardless of whether
it’s a credit- or debit-balance G/L).
At this point the projected balance will remain the same all year, so your next step will
be to choose a method for estimating the monthly change amount and projecting a year-
end balance for the year.
36 Budgeting with CU*BASE
9. Next, choose which method you want to use to calculate the monthly
change amounts:
Do you prefer to predict how much loan balances are likely to go up or down each month during the year?
Would you rather try to target where your
loan balances are likely to wind up at the end of the year?
Or do you want to esti-mate the new loan dollars
(debits) you expect to receive throughout the year as well as the loan payments (credits) you
anticipate? See Running the
Assumption Calcs: Net Change
Technique below
See Running the Assumption Calcs: Resulting Balance Technique (pg 37)
See Running the Assumption Calcs:
Debits/Credits Technique (pg 38)
TIP: You can also click the button over the Net Change column or over the Debit/Disbursement and Credit/Payoffs columns to manually enter amounts for every month in the budget year, using Enter to refresh the projected year-end balance as you go. Once you see the resulting balance you want, proceed directly to #21.
Running the Assumption Calcs: Net Change Technique
10. Use the button over the Net Balance column (F20)
11. First select whether you want to enter a Fixed assumption or follow the Pattern from the last 12 months of actual history (see Page 30 for an explanation of the difference)
12. For a pattern assumption, check either Use same dollars OR Use same percent and, if appropriate, enter an additional $ amount or % to be added (or subtracted) on top of the pattern calculations
OR
For a fixed assumption, enter either the dollar amount or percentage increase/decrease you want to use every month, or a total for a 3-month
Use Historical Pattern (F11) to see the
numbers on which the Pattern calculations will be based (see Page 40
for a sample of the window that will appear).
Budgeting with CU*BASE 37
quarterly period, or a total annual amount to be spread across all months:
Remember that for the fixed assumption the % increase/decrease is calculated as a percentage of the previous month’s budget balance (January compared to February, February compared to March, etc.). (If the year isn’t complete yet, the system will use that month from the previous year.)
13. For the fixed quarterly and annual options, also specify how the total is spread among the months by making a choice for Calculate the monthly amount based on
14. Use Enter to save and return to the main screen
15. Repeat #10-14 as many times as needed until you are happy with the year-end resulting balance projection for this account
16. Proceed to #21 (see Page 40)
OR
Running the Assumption Calcs: Resulting Balance Technique
10. Use button over the Resulting Balance column (F21) to display the following window:
11. If you want to target a certain ending result, enter the dollar amount
TIP: If choosing the quarterly method, enter a total for the quarter (will be divided by 3).
38 Budgeting with CU*BASE
OR
Enter a percentage increase or decrease – this will be calculated as a difference between the beginning balance for the year and the ending balance for the year (for example, to target growth of 4% for the year you’d enter 4.000 + here)
12. To specify how the total is spread among the months, make a choice in the Calculate the monthly amount based on drop-down
13. Use Enter to save and return to the main screen
14. Repeat #10-13 as many times as needed until you are happy with the year-end resulting balance projection for this account
15. Proceed to #21 (see Page 40)
OR
Running the Assumption Calcs: Debits/Credits Technique
10. To estimate monthly debit amounts, use the button over the Debit/Disbursement column (F18)
11. First select whether you want to enter a Fixed assumption or follow the Pattern from the last 12 months of actual history (see Page 30 for an explanation of the difference)
12. For a pattern assumption, check either Use same dollars OR Use same percent and, if appropriate, enter an additional $ amount or % to be added (or subtracted) on top of the pattern calculations
OR
For a fixed assumption, enter either the dollar amount or percentage increase/decrease you want to use every month, or a total for a 3-month quarterly period, or a total annual amount to be spread across all months
Use Historical Pattern to see the numbers on
which the Pattern calculations will be
based (see Page 40 for a sample of the window
that will appear).
Budgeting with CU*BASE 39
Remember that for the fixed assumption the % increase/decrease is calculated as a percentage of the previous month’s budget balance (January compared to February, February compared to March, etc.).
13. For the quarterly and annual options, also specify how the total is spread among the months by making a choice in the Calculate the monthly amount based on drop-down
14. Use Enter to save and return to the main screen
15. Repeat #10-14 as many times as needed until you are happy with the total debits projection for this account
16. Use the button over the Credit/Payoffs column (F19)
17. The following warning window will appear:
This message simply means that any figures that are in the Net Balance column now will be updated when you finish calculating the credits. (This same warning message also shows if you use after already calculating some figures.)
18. Check Continue and use Enter to proceed
19. Repeat #10-15 for monthly credits
Remember to take into account that credit assumptions do NOT automatically factor in new loans you are anticipating, even if you included that growth when calculating your Debit Assumptions.
20. Proceed to #21 (see Page 40)
TIP: If choosing the quarterly method, enter a total for the quarter (will be divided by 3).
40 Budgeting with CU*BASE
Using the Historical Patterns Research
While working with both the Net Change and Debits/Credits calculation windows you can use the Historical Pattern button to see a recap showing the monthly dollar and % change amounts on which the pattern calculations will be based.
This is a handy “show the math” feature to help you decide how the calculation will come out, and to help you decide if you need to tack on an additional $ amount or % per month to the pattern calculations.
Saving Your Projections
21. When the monthly projections and annual resulting balance amounts look right on the main projections screen, use Save Projection (F6)
22. If you wish to specify how the total balance should be spread among your branches, check the Do you wish to use your own branch proration percentages? flag
This is required for any GLs where you have no prior year history, and recommended in cases where you don’t normally use branch accounting for that asset and want to ensure the entire projection is allocated to a single branch. When in doubt, use this feature to at least see how the system will calculate the spread.
23. Use Continue to save the net change amounts to your budget
24. If you checked the Do you wish to use your own branch proration percentages? option, proceed to #25; if not, you’ll be returned to the list
Notice that for any months remaining in the current year, the system
will pull from the corresponding calendar
month from last year instead.
Check this to proceed to the screen shown on the following
page, to specify how the total is spread among your branches.
Budgeting with CU*BASE 41
of G/L accounts (be patient; this can take a moment); proceed to #28 instead
Remember that while the starting balance you entered is critical to estimating the monthly projections, that balance will not be retained by CU*BASE. Instead, the budget stores a monthly net change amount and resulting balance for each branch. Later when you view your performance, the actual previous year-end balance will be used as your starting point, so the resulting balances you’ll see then won’t exactly match the ones you saw here.
Prorating your Branch Allocation Percentages
25. If the Do you wish to use your own branch proration percentages? option was checked on the Save window, the screen below will appear:
26. Use the right-hand column to enter the percentage that should be allocated for each branch (use Enter to refresh the total at the top of the window; total must be 100.00% in order to continue)
27. When the entire amount has been allocated, use Update Now to save and return to the list of GL accounts
TIP: Later on if you want to change how the amounts were spread across all of your branches (or among the months of the year), use the “Adjusting Asset and Liability Projections” steps starting on Page 88.
28. Repeat #3-19 for the remaining G/L accounts in this Budget Group
29. When all of the G/Ls in that Group show a projected balance, use and repeat all #2-20 for the next Budget Group
TIP: At any time after saving you may use exit to stop, and resume working at another time, repeating all steps until all of your loan asset G/Ls have been projected. When you exit, you may see this message:
42 Budgeting with CU*BASE
30. When all assets have been projected, to avoid changes being made inadvertently be sure to adjust your Budget Controls (see Page 21) to close budgeting for asset G/Ls
If you want to take an archive snapshot of your entire budget now,
use Add/Update (see Page 66).
Otherwise, use to continue back to the home page (your live budget
is already saved).
Budgeting with CU*BASE 43
STEP 6: MODEL INCOME BASED ON
BALANCE PROJECTIONS (IF
MODELING) This step can only be done if you have already run Step 5 to project growth on your loans or other assets. If you are not using the modeling tools at all, skip this step.
WHAT YOU SHOULD KNOW In this step you will use a series of screens to estimate monthly income amounts based on the balances you projected for your loan or other asset G/Ls. Remember that only the asset G/Ls that were run through balance projections calculations (Step 5, see Page 29) can be worked via this tool.
In a nutshell, you’ll select one of the asset G/Ls you projected earlier. Then you’ll enter a weighted average rate for each month of the budget year and the system will calculate monthly income for the associated income G/L using this formula:
Asset avg balance × (weighted rate ÷ 365 or 366) × days in month = Monthly income amt
TIP: If you wish, the system will also allow you to manually enter or adjust the rate or monthly income amount for each month.
For this tool, if you have online credit cards any rate projections are across the entire credit card portfolio, regardless of individual rate buckets (purchases, balance transfers, cash advances, or promos).
DO IT NOW: MODEL YOUR INTEREST INCOME The examples below show interest income from member loans but the same techniques apply to income from other assets, such as investments.
NOTE: While working in the modeling tools, remember that a minus sign (-) always means a decrease to that G/L, regardless of whether that G/L is a debit- or credit-balance account.
1. Navigate to Tool #535 Model Yield & Cost Projections
2. Enter the budget year, then select a Budget Group representing member loans and use Enter to continue
44 Budgeting with CU*BASE
3. Select one of the G/L accounts that shows a total in the Y/E Projection column and use Enter to proceed to the research screen:
This screen lets you pause and familiarize yourself with the performance over the last 10 years for both the asset G/L as well as its associated income G/L. These numbers will be useful for ballpark analysis when running modeling calculations for next year’s budget.
This shows the change in $$ from the beginning to the end of that year and is calculated as follows:
Resulting balance – Beginning balance
TIP: You will only be able to select items in this list that have a number
in the Y/E Projection column, meaning Step 5 was completed for
that G/L.
Use Analysis to see average, low, and high balances for these two
G/Ls over time.
Choose a year and use Select to see a monthly
breakdown (the screen is similar to this but with monthly figures for just
that year).
Use the Chart buttons to see a graphical representation of
these trends. (Tip: Use the “X” button at the bottom of the chart to close the chart.)
TIP: In order to be shown in this list, a loan asset
G/L must be linked to an income G/L (Step 3, see
page 25).
A figure will appear in the Income column once you’ve calculated the yield on the income G/L associated with this asset. (WARNING: If you see a number here for a
G/L you haven’t modeled yet, it means this G/L was already budgeted via the classical
budgeting tools. Changes made here will overwrite those figures!)
Budgeting with CU*BASE 45
This is the average monthly balance in this G/L for this year and is calculated as follows (to see the figures that make up this calculation, use Select to drill down to the monthly detail screen):
(Beginning bal for every month + Resulting bal for every month) / (2 * # mos.)
This shows the change in % from the beginning of the year to the end of that year and is calculated as follows:
For income G/Ls this column will show Net Yield and is calculated as follows:
Actual annual income / Average monthly balance
(NOTE: For expense G/Ls this column will be labeled Net Cost of Funds but is calculated the same way.)
4. When done reviewing prior performance for these G/Ls, use Continue to move on to the main modeling calculation screen:
Setting Your Rates
You can manually enter the income amounts for every month, but the easiest method is to enter monthly weighted rates and the system will automatically calculate net income for your budget:
5. Click the Rates button to display the following window:
This side shows the projections for the asset G/L that you
calculated in Step 5.
Start here!
This side is used to estimate monthly net change amounts for
the associated income G/L.
Use the Notes button to record notes about your calculation assumptions.
See Page 72 for tips.
46 Budgeting with CU*BASE
6. Decide how frequently the rates are expected to change for this product:
• Click Quarter to display fields where you can enter a single rate to be used for all three of the months in each quarter (remember to enter the monthly rate for that quarter):
OR
• Use the Year option to display a field for a single rate to be used for every month of the year
This is a handy summary of current
rates for this product, to help estimate what rates should be used
for next year’s budget.
Enter monthly rates to be used for all three
months in that quarter
Enter the monthly rate to be used for all 12 months of the year
Budgeting with CU*BASE 47
NOTE: If you choose the Monthly option the main modeling screen will reappear with all of the rate fields opened up so you can enter a rate for each month (the same as if you had clicked the “Enter manually” button at the top of the Weighted Rate column).
7. When done entering rates use Enter to calculate and return to the main modeling screen with the income estimates calculated:
TIP: A “C” in the Income column means a credit to the G/L account. For this screen, a minus sign (-) is used only to signify a decrease, regardless of whether it’s a credit- or debit-balance G/L).
8. Repeat #6-7 as needed until you are happy with the income totals for this G/L
Saving Your Income Projections
9. When the monthly income amounts look right on the main modeling screen, use Save (F5)
In this example we used the “quarterly” option to
use the same monthly rate across all 3 months of
each quarter
TIP: To compare these estimates to actual yield
from prior years, use Display Yield and enter
the year you’d like to see.
TIP: Use this to adjust
these figures manually.
48 Budgeting with CU*BASE
10. Use Continue to save the income net change amounts to your budget and return to the list of G/L accounts (be patient; this can take a moment)
Only the income G/L will be affected; your asset G/L figures are not changed by this procedure.
11. Repeat #3-10 for the remaining G/L accounts in this Budget Group
12. When all of the G/Ls in that Group show a projected balance, use and repeat all #2-11 for the next Budget Group
TIP: At any time after saving you may use exit to stop, and resume working at another time, repeating all steps until all projected asset G/Ls have been projected. When you exit, you may see this message:
13. By default the amounts will be spread across branches proportionately according to the branch balances we have on file for that income G/L. If you entered your own allocation percentages while running the asset projections (as described on Page 41) then the system will use the percentages you specified per branch instead
If you need to adjust how the amounts were spread across all of your branches or among the months of the year, use the “Adjusting Income and Expense Figures” steps starting on Page 87
14. When income amounts have been saved for all of your assets, to avoid changes being made inadvertently you may wish to adjust your Budget Controls (see Page 21) to close budgeting for income G/Ls
If you want to take an archive snapshot of your entire budget now,
use Add/Update (see Page 66).
Otherwise, use to continue back to the home page (your live budget
is already saved).
Budgeting with CU*BASE 49
STEP 7: PROJECT LIABILITY
BALANCES (IF MODELING) If you do not wish to use the modeling calculations to estimate expenses, such as dividend expenses based on member savings balances, you may skip this step.
WHAT YOU SHOULD KNOW The process of projecting your liability balances, such as member savings balances, is similar to the techniques used when projecting balances for member loans or other assets. Refer to Page 29 for tips and an explanation of the calculation options.
To avoid having to redo your work, before you begin you should review your Budget Groups to ensure that your share products are in separate group, preferably by application type (Shares/IRAs, Checking, Escrow, and Certificates), but at the very least to separate savings from time deposits. Otherwise the research tools that show weighted rates in the modeling tools you’ll use later (Step 8) will not work correctly. See Page 22 for instructions and adjust your budget group configurations if needed before proceeding with your projections.
DO IT NOW: PROJECT YOUR SAVINGS BALANCES The examples below show liability accounts for member savings but the same techniques apply to other liabilities you may be projecting.
NOTE: While working in the modeling tools, remember that a minus sign (-) always means a decrease to that G/L, regardless of whether that G/L is a debit- or credit-balance account.
Refer to Page 29 for pictures of the associated screens and an explanation of the options.
1. Navigate to Tool #699 Project Asset/Liability Balances
2. Enter the budget year, then select a Budget Group representing member savings and use Enter to continue
3. Select one of the G/L accounts in the group and use Enter to proceed to the research screen, where you can familiarize yourself with this G/L account’s performance over the last 10 years
4. When done reviewing prior performance for the G/L, use Done/Continue to move on to the main projection calculation screen
Specifying the Starting Balance
Skip this step if you are creating a budget for the current year, since this year’s beginning balance has already been recorded. Proceed directly to #8 on the next page.
5. Click the near the January balance (F17)
50 Budgeting with CU*BASE
6. Enter the balance you want to use as your beginning balance for next year’s budget projections (although you can use the number calculated by the system, to make the math easier to understand you might prefer to enter a whole number, rounded up or down from that estimate)
7. Use Enter to insert that balance onto the main projections screen
Remember that while this starting balance is critical to the remaining calculations you’ll perform on this screen, this amount is not retained by CU*BASE. The budget will ultimately store only a monthly net change amount and resulting balance for each branch.
8. Next, choose which method you want to use to calculate the monthly change amounts:
Do you prefer to predict how much
savings or certificate balances are likely to go up or down each month during the
year?
Would you rather try to target where
your savings or certificate balances are likely to wind
up at the end of the year?
Or do you want to esti-mate the withdrawals (debits) you expect to
throughout the year as well as the deposits
(credits) you anticipate?
See Running the Assumption Calcs: Net
Change Technique below
See Running the Assumption Calcs: Resulting Balance Technique (pg 37)
See Running the Assumption Calcs:
Debits/Credits Technique (pg 38)
TIP: You can also click the button over the Net Change column or over the Debit/Withdrawals and Credit/Deposits columns to manually enter amounts for every month in the budget year, using Enter to refresh the projected year-end balance as you go. Once you see the resulting balance you want, proceed directly to #21.
Running the Assumption Calcs: Net Change Technique
9. Use the button over the Net Balance column (F20)
10. First select whether you want to enter a Fixed assumption or follow the Pattern from the last 12 months of actual history (see Page 30 for an explanation of the difference)
11. For a pattern assumption, check either Use same dollars OR Use same percent and, if appropriate, enter an additional $ amount or % to be added (or subtracted) on top of the pattern calculations
OR
For a fixed assumption, enter either the dollar amount or percentage increase/decrease you want to use every month, or a total for a 3-month quarterly period, or a total annual amount to be spread across all months
Budgeting with CU*BASE 51
Remember that for the fixed assumption the % increase/decrease is calculated as a percentage of the previous month’s budget balance (January compared to February, February compared to March, etc.).
12. For the fixed quarterly and annual options, also specify how the total is spread among the months by making a choice in the Calculate the monthly amount based on drop-down
13. Use Enter to save and return to the main screen
14. Repeat #9-13 as many times as needed until you are happy with the year-end resulting balance projection for this account
15. Proceed to #19 (see Page 52)
OR
Running the Assumption Calcs: Resulting Balance Technique
9. Use button over the Resulting Balance column (F21)
10. If you want to target a certain ending result, enter the dollar amount
OR
Enter a percentage increase or decrease – this will be calculated as a difference between the beginning balance for the year and the ending balance for the year (for example, to target growth of 4% for the year you’d enter 4.000 + here)
11. To specify how the total is spread among the months, make a choice in the Calculate the monthly amount based on drop-down
12. Use Enter to save and return to the main screen
13. Repeat #9-12 as many times as needed until you are happy with the year-end resulting balance projection for this account
14. Proceed to #19 (see Page 52)
OR
Running the Assumption Calcs: Debits/Credits Technique
9. To estimate monthly debit amounts, use the button over the Debit/Withdrawals column (F18)
10. First select whether you want to enter a Fixed assumption or follow the Pattern from the last 12 months of actual history (see Page 30 for an explanation of the difference)
11. For a pattern assumption, check either Use same dollars OR Use same percent and, if appropriate, enter an additional $ amount or % to be added (or subtracted) on top of the pattern calculations
OR
For a fixed assumption, enter either the dollar amount or percentage increase/decrease you want to use every month, or a total for a 3-month
52 Budgeting with CU*BASE
quarterly period, or a total annual amount to be spread across all months
Remember that for the fixed assumption the % increase/decrease is calculated as a percentage of the previous month’s budget balance (January compared to February, February compared to March, etc.).
12. For the quarterly and annual options, also specify how the total is spread among the months by making a choice in the Calculate the monthly amount based on drop-down
13. Use Enter to save and return to the main screen
14. Repeat #9-13 as many times as needed until you are happy with the total debits projection for this account
15. Use the button over the Credit/Deposits column (F19)
16. When the warning window appears check Continue and use Enter to proceed
This warning simply means that any figures that are in the Net Balance column now will be updated when you finish calculating the credits. (This same warning message also shows if you use after already calculating some figures.)
17. Repeat #15-16 for monthly credits
18. Proceed to #19
Saving Your Projections
19. When the monthly projections and annual resulting balance amounts look right on the main projections screen, use Save Projection (F6)
20. If you wish to specify how the total balance should be spread among your branches, check the Do you wish to use your own branch proration percentages? flag
This is required for any GLs where you have no prior year history, and recommended in cases where you don’t normally use branch accounting for that liability and want to ensure the entire projection is allocated to a single branch. When in doubt, use this feature to at least see how the system will calculate the spread.
21. Use Continue to save the net change amounts to your budget
22. If you checked the Do you wish to use your own branch proration percentages? option, proceed to #23; if not, you’ll be returned to the list of G/L accounts (be patient; this can take a moment); proceed to #26 instead
Remember that while the starting balance you entered is critical to estimating the monthly projections, that balance will not be retained by CU*BASE. Instead, the budget stores a monthly net change
Budgeting with CU*BASE 53
amount and resulting balance for each branch. Later when you view your performance, the actual previous year-end balance will be used as your starting point, so the resulting balances you’ll see then won’t exactly match the ones you saw here.
Prorating your Branch Allocation Percentages
23. If the Do you wish to use your own branch proration percentages? option was checked on the Save window, the Prorate Percentage screen will appear
24. Use the right-hand column to enter the percentage that should be allocated for each branch (use Enter to refresh the total at the top of the window; total must be 100.00% in order to continue)
25. When the entire amount has been allocated, use Update Now to save and return to the list of GL accounts
TIP: Later on if you want to change how the amounts were spread across all of your branches (or among the months of the year), use the “Adjusting Asset and Liability Projections” steps starting on Page 86.
26. Repeat #3-20 for the remaining G/L accounts in this Budget Group
27. When all of the G/Ls in that Group show a projected balance, use and repeat all #2-20 for the next Budget Group
TIPS: At any time after saving you may use exit to stop, and resume working at another time, repeating all steps until all of your liability G/Ls have been projected.
When you, you may see a message asking if you want to add a fresh archive snapshot now. See Page 66 for details about this feature.
28. When all liabilities have been projected, to avoid changes being made inadvertently be sure to adjust your Budget Controls (see Page 21) to close budgeting for liability G/Ls
54 Budgeting with CU*BASE
STEP 8: MODEL EXPENSES BASED ON
BALANCE PROJECTIONS (IF
MODELING) This step can only be done if you have already run Step 7 to project growth for your savings or other liabilities. If you are not using the modeling tools at all, skip this step.
WHAT YOU SHOULD KNOW The process of modeling your savings dividend expenses (or other expenses) is similar to the techniques used when modeling your loan interest income. Refer to Page 43 for tips and an explanation of the calculation options.
WARNING: If you did not follow the instructions in Step 8 to separate your savings Budget Groups into different groups for savings vs. certificates, you may have trouble getting the calculations to work right here, and the screens showing weighted rates will not be correct. Refer to Pages 22 and 49 for more details.
DO IT NOW: MODEL YOUR DIVIDEND EXPENSES The examples below show dividend expenses from member savings but the same techniques apply to expenses from other liabilities as well.
NOTE: While working in the modeling tools, remember that a minus sign (-) always means a decrease to that G/L, regardless of whether that G/L is a debit- or credit-balance account.
Refer to Page 43 for pictures of the associated screens and an explanation of the options.
1. Navigate to Tool #535 Model Yield & Cost Projections
2. Enter the budget year, then select a Budget Group representing member savings or certificates and use Enter to continue
3. Select one of the G/L accounts that shows a total in the Y/E Projection column and use Enter to proceed to the research screen and familiarize yourself with the performance over the last 10 years for both the liability G/L as well as its associated expense G/L
4. When done reviewing prior performance for these G/Ls, use Done/Continue to move on to the main modeling calculation screen
Setting Your Rates
You can manually enter the expense amounts for every month, but the easiest method is to enter monthly weighted rates and the system will automatically calculate the dividend expense for your budget:
5. Click the Rates button
6. Decide how frequently the rates are expected to change for this product:
Budgeting with CU*BASE 55
• Click Quarter to display fields where you can enter a single rate to be used for all three of the months in each quarter (remember to enter the monthly rate for that quarter)
OR
• Use the Year option to display a field for a single rate to be used for every month of the year
NOTE: If you choose the Monthly option the main modeling screen will reappear with all of the rate fields opened up so you can enter a rate for each month (the same as if you had clicked the “Enter manually” button at the top of the Weighted Rate column).
7. When done entering rates use Enter to calculate and return to the main modeling screen with the dividend expense estimates calculated
TIP: A “D” in the Expense column means a debit to the G/L account. For this screen, a minus sign (-) is used only to signify a decrease, regardless of whether it’s a credit- or debit-balance G/L).
8. Repeat #6-7 as needed until you are happy with the expense totals for this G/L
Saving Your Income Projections
9. When the monthly income amounts look right on the main modeling screen, use Save (F5)
10. Use Continue to save the income net change amounts to your budget and return to the list of G/L accounts (be patient; this can take a moment)
Only the expense G/L will be affected; your liability G/L figures are not changed by this procedure.
11. Repeat #3-10 for the remaining G/L accounts in this Budget Group
12. When all of the G/Ls in that Group show a projected balance, use and repeat all #2-11 for the next Budget Group
TIPS: At any time after saving you may use exit to stop, and resume working at another time, repeating all steps until expenses have been estimated for all projected liabilities.
When you exit, you may see a message asking if you want to add a fresh archive snapshot now. See Page 66 for details about this feature.
13. By default the amounts will be spread across branches proportionately according to the branch balances we have on file for that expense G/L. If you entered your own allocation percentages while running the liability projections (as described on Page 53) then the system will use the percentages you specified per branch instead
56 Budgeting with CU*BASE
If you need to adjust how the amounts were spread across all of your branches or among the months of the year, use the “Adjusting Income and Expense Figures” steps starting on Page 87
14. When expense amounts have been saved for all of your liabilities, to avoid changes being made inadvertently you may wish to adjust your Budget Controls (see Page 21) to close budgeting for expense G/Ls
Budgeting with CU*BASE 57
STEP 9: BUDGET INCOME NOT
ALREADY MODELED If you have chosen not to use the modeling tools, this is the next step after creating your Budget Groups (see Page 22).
WHAT YOU SHOULD KNOW
Understanding the Calc Techniques
The graphs here illustrate the key difference between the two main calculation techniques. Notice how the parallel method automatically adjusts for seasonal effects from one month to the next, whereas the monthly and daily average methods annualize to determine an average amount across the entire period.
The formulas:
Monthly Average
(Period total ÷ # of months in period) × % change = Monthly budget amount All months use the same amount.
• Use this for flat monthly expenses like league dues where the amount does not vary depending on the # of days in the month.
Daily Average
((Period total ÷ 365 or 366) × # of days in month) × % change = Monthly budget amount Each month is calculated separately.
• Use this for things like dividend expenses or employee salaries that are affected by the # of days in a particular month, but otherwise remain generally consistent from one month to the next.
Parallel
Previous monthly amount × % change = Monthly budget amount Each month is calculated separately.
• Use this for budget groups like interest income or utility expenses which have cyclical performance and do not remain level throughout the year.
You may make multiple passes, doing all Budget group 01 with one set of calculation settings, then going back and doing G/L account 111-24 (part of Budget Group 01) another way, and so on. Subsequent passes will overwrite earlier ones, so be careful.
58 Budgeting with CU*BASE
Calculating Your Budget one Period at a Time
Just like you can run multiple passes for different calculation parameters, you can also run multiple passes to fill in portions of your budget spreadsheet by date range, as well, if you wish.
For example, you might want to run your first quarter income figures on one calculation, but something projected to happen in the 2nd quarter means you want to run the rest of the year using different assumptions. Or you might want to use 3rd quarter actual figures to calculate your 1st quarter budget. This is done by using the fields at the top of the calculation parameters screen, shown on the next page.
Note that when using this technique for a period of less than 12 months, you may also need to adjust the
settings to match the same number of months, especially if using the “Parallel months” calculation method.
Calculating Budget Figures for Inactive GLs
As a rule, the budget tools will generally ignore GL accounts that have been suspended. But you might have a few GLs that you have not suspended but where there has not been any activity in recent years. If you anticipate activity in those accounts during the coming budget year, you’ll need to handle those accounts a little differently for your budget.
Without recent history to use for the calculations, the system won’t be able to figure your budget amounts automatically the same as your other GLs. So after the bulk of your budget is done, you’ll need to use the Manual Update technique described starting on page 86 to manually enter budget figures for those GLs.
TIP: If you still want to use the automated calculations, try running a separate calculation pass for each of these GLs, expanding the month range for the calculation to go back to when the GL account was last active.
DO IT NOW: BUDGET INCOME NOT ALREADY MODELED 1. If necessary, adjust your Budget Controls (see Page 21) to open (unlock)
budgeting for your income G/L accounts
2. Navigate to Tool #992 Work with CU Budget
3. Enter the year for your budget (if you’ve already begun, notice the notation at the top of the screen showing the most recent budget on file)
4. Choose Maintain Budget
5. Use or press Enter to proceed
6. Choose Income
7. Use or press Enter to proceed
Budgeting with CU*BASE 59
If you see the message, “Budget and/or modeling for this year and type is not open” you’ll need to open your Budget Controls for Income G/Ls. See Page 19.
8. On the Create/Work with CU Budget screen, click the button and choose the Income Budget Group you
wish to populate with this pass
Remember you’ll be able to tweak individual accounts within a budget group later, if needed. See Page 86.
9. Enter the calculation settings you want to use for this pass, using the tips shown below:
Budget Calculation Parameters
Notes: A - The % change defaults to increase (+); you may change to decrease (-). This
is the multiplier, so be careful. For example, income is typically in the file as a negative value. If you then enter a negative multiplier, you’d end up with a positive value—maybe not what you want. Best to think of them as increase and decrease; CU*BASE will take care of doing the math correctly.
B - If you are using the Parallel calculation method, the number of months being filled in has to match the number of months used in the math. So if you are filling in budget figures for a 3-month period (such as 1st quarter), then you’ll have to use comparison figures from a 3-month period, too (such as 3rd quarter prior year). Monthly/Daily Average will annualize any range then use the calculated averages to populate whatever range you wish. You may specify a range that crosses a calendar year-end if you wish (October to March, for example), although the range cannot be longer than 12 months.
C - After you have selected at least one Budget Group or G/L account, the bottom half of the screen will display last 10 years of history for that group or account. This is a “show the math” feature to help you select the calculation
Choose which month range you want to
populate with this pass
Enter a % change. See Note A below.
Use these to choose which figures are used for the math. See Note
B below.
Choose a calculation method. See Note B below.
Use the branch selection only if you want to limit
which branches are calculated in this pass,
then do a separate pass for your other branches
This history recap will not appear until you choose at least one Budget Group
or G/L account. See Note C below.
Choose all of the Budget Groups
that can be popu-lated with these same calculation
parameters
Use the Notes button to record notes about your calculation parameters. See Page 72 for tips.
60 Budgeting with CU*BASE
settings for this pass. Be sure to note the partial year section at the very bottom of the screen, which shows this year’s data as of the most recent month-end.
10. When ready, use or press Enter to run the calculations and display a recap of the figures that were calculated:
Budget Figures Calculated This Pass
This screen is intended for a quick check for ballpark accuracy. If the figures seem way off or something else is not as intended, you can easily discard the pass and try again. If you choose to save, then the figures from that pass are saved in your budget, overwriting any that may have been calculated for those particular G/Ls during a previous pass (shown with * in the first column).
11. To keep this set of figures, use Save Pass OR To recalculate this pass using different parameters, use Discard Pass
Only the monthly net change amounts (not resulting balances) will be recorded in the G/L balance file.
12. The calculation parameters screen will reappear
13. Repeat #7-11 to run additional passes to fill in more portions of your budget spreadsheet for your Income G/Ls
BE CAREFUL: This is where it becomes very important to keep track of which budget groups you’ve already calculated. If you choose a group that already has figures, the new ones will overwrite the ones calculated in a previous pass!
14. Use to exit (you can return and calculate more passes later if needed)
If you see an asterisk (*) here, it means a budget
figure was already calculated for this G/L in a prior calculation pass or upload. If you save,
that figure will be replaced with this new
one.
This column shows whatever was entered into the Month range to use in calculation
for this pass. Partial years are NOT annualized here even if they were
annualized for the budget calculation itself. Use the Compare button to change which
numbers are shown in this column. Use the Notes button to record notes about your calculation parameters. See Page 72 for tips.
Budgeting with CU*BASE 61
TIP: When you exit, you may see this message:
15. After all income has been budgeted, to avoid changes being made inadvertently be sure to adjust your Budget Controls (see Page 21) to close budgeting for income G/Ls
Checking Your Status
At any time while running budget passes you can use the Budgeted to Date button on the main calculation parameters screen to get a quick summary showing what portion of your budget worksheet has been filled in so far:
On this summary, an account is considered budgeted if at least one budget figure has been recorded for the G/L # (even if for only one branch location or just a single month). The “percentage completed” stat is calculated using all G/Ls in your chart of accounts, except for ones at a suspended status.
The Asset and Liability lines will contain figures
only if you used the modeling tools to project
balances for your member savings and loan G/Ls.
There will usually be no different
between the two sides of the
window, unless accessed after a
pass was calculated but before saving.
If you want to take an archive snapshot of your entire budget now,
use Add/Update (see Page 66).
Otherwise, use to continue back to the home screen (your live
budget is already saved).
62 Budgeting with CU*BASE
STEP 10: BUDGET EXPENSES NOT
ALREADY MODELED WHAT YOU SHOULD KNOW
The process for budgeting expenses using a straight % calculation is the same as budgeting income. See Page 57 for an illustration of the available calculation types.
DO IT NOW: BUDGET EXPENSES NOT ALREADY MODELED 1. If necessary, adjust your Budget Controls (see Page 21) to open (unlock)
budgeting for your income G/L accounts
2. Navigate to Tool #992 Work with CU Budget
3. Enter the year for your budget (if you’ve already begun, notice the notation at the top of the screen showing the most recent budget on file)
4. Choose Maintain Budget
5. Use or press Enter to proceed
6. Choose Expense
7. Use or press Enter to proceed
If you see the message, “Budget and/or modeling for this year and type is not open” you’ll need to open your Budget Controls for Expense G/Ls. See Page 19.
8. On the Create/Work with CU Budget screen, click the button and choose the Expense Budget Group you
wish to populate with this pass
Remember you’ll be able to tweak individual accounts within a budget group later, if needed. See Page 86.
9. Enter the calculation settings you want to use for this pass, using the tips shown below:
Budgeting with CU*BASE 63
Budget Calculation Parameters
Notes: A - The % change defaults to increase (+); you may change to decrease (-).
B - If you are using the Parallel calculation method, the number of months being filled in has to match the number of months used in the math. So if you are filling in budget figures for a 3-month period (such as 1st quarter), then you’ll have to use comparison figures from a 3-month period, too (such as 3rd quarter prior year). Monthly/Daily Average will annualize any range then use the calculated averages to populate whatever range you wish. You may specify a range that crosses a calendar year-end if you wish (October to March, for example), although the range cannot be longer than 12 months.
C - After you have selected at least one Budget Group or G/L account, the bottom half of the screen will display last 10 years of history for that group or account. This is a “show the math” feature to help you select the calculation settings for this pass. Be sure to note the partial year section at the very bottom of the screen, which shows this year’s data as of the most recent month-end.
10. When ready, use or press Enter to run the calculations and display a recap of the figures that were calculated:
Choose which month range you want to
populate with this pass
Enter a % change. See Note A below.
Use these to choose which figures are used for the math. See Note
B below.
Choose a calculation method. See Note B below.
Use the branch selection only if you want to limit
which branches are calculated in this pass,
then do a separate pass for your other branches
This history recap will not appear until you choose at least one Budget Group
or G/L account. See Note C below.
Choose all of the Budget Groups
that can be popu-lated with these same calculation
parameters
Use the Notes button to record notes about your calculation parameters. See Page 72 for tips.
64 Budgeting with CU*BASE
Budget Figures Calculated This Pass
This screen is intended for a quick check for ballpark accuracy. If the figures seem way off or something else is not as intended, you can easily discard the pass and try again. If you choose to save, then the figures from that pass are saved in your budget, overwriting any that may have been calculated for those particular G/Ls during a previous pass (shown with * in the first column).
11. To keep this set of figures, use Save Pass OR To recalculate this pass using different parameters, use Discard Pass
Only the monthly net change amounts (not resulting balances) will be recorded in the G/L balance file.
12. The calculation parameters screen will reappear
13. Repeat #7-11 to run additional passes to fill in more portions of your budget spreadsheet for your Income G/Ls
BE CAREFUL: This is where it becomes very important to keep track of which budget groups you’ve already calculated. If you choose a group that already has figures, the new ones will overwrite the ones calculated in a previous pass!
14. Use to exit (you can return and calculate more passes later if needed)
TIP: When you exit, you may see this message:
If you see an asterisk (*) here, it means a budget
figure was already calculated for this G/L in a prior calculation pass or upload. If you save,
that figure will be replaced with this new
one.
This column shows whatever was entered into the Month range to use in calculation
for this pass. Partial years are NOT annualized here even if they were
annualized for the budget calculation itself. Use the Compare button to change which
numbers are shown in this column. Use the Notes button to record notes about your calculation parameters. See Page 72 for tips.
Budgeting with CU*BASE 65
15. After all expenses have been budgeted, to avoid changes being made inadvertently be sure to adjust your Budget Controls (see Page 21) to close budgeting for expense G/Ls
Checking Your Status
At any time while running budget passes you can use the Budgeted to Date button on the main calculation parameters screen to get a quick summary showing what portion of your budget worksheet has been filled in so far:
On this summary, an account is considered budgeted if at least one budget figure has been recorded for the G/L # (even if for only one branch location or just a single month). The “percentage completed” stat is calculated using all G/Ls in your chart of accounts, except for ones at a suspended status.
The Asset and Liability lines will contain figures
only if you used the modeling tools to project
balances for your member savings and loan G/Ls.
There will usually be no different
between the two sides of the
window, unless accessed after a
pass was calculated but before saving.
If you want to take an archive snapshot of your entire budget now,
use Add/Update (see Page 66).
Otherwise, use to continue back to the home screen (your live
budget is already saved).
66 Budgeting with CU*BASE
STEP 11: ARCHIVE YOUR BUDGET WHAT YOU SHOULD KNOW
The Budget Archive is a separate file where a snapshot of your budget records can be copied at any point during your budgeting process. The most common reason would be once the budget has been finalized and approved, to take a final permanent snapshot for your records.
You can use this feature to save different versions of your budget, such as a conservative budget versus an aggressive one with different calculation assumptions.
You can also use this to start a mid-year revision process where you review and update your budget halfway through the year based on your actual figures from the first six months. In this scenario you’d take an archive snapshot at the time you finish your original budget. Half-way through the year you’d then import that copy into your live budget, make your changes, then take another snapshot of the recast budget.
TIP: The Variance Analysis dashboard will allow you to select either of those budget snapshots and compare them against actual performance.
Finally, you might simply wish to save a backup copy of budget figures at various points during the process just in case you want to revert back to a previous set of numbers if you change your mind somewhere along the way.
IMPORTANT: All of the Budget maintenance tools make changes to live budget data in the GLBALA file ONLY. It is not possible to modify budget figures in the warehouse directly, although you can change your live budget and re-copy the data to the archive using the same snapshot name, overwriting the previous snapshot with new figures.
How the Archive Works
Remember that the archive is a completely separate file (GLBALAWHSE), and always contains a copy of whatever was in your live budget file (GLBALA) at the time the snapshot was taken. You can copy data from your live budget to the warehouse—referred to as archiving your live budget. You can also copy from the warehouse back to your live files—referred to as importing an archive snapshot.
You can choose to take this snapshot at the end of your budget process when everything’s finalized, or take a snapshot at any time in the process and refresh (overwrite) it as additional calculations are completed.
IMPORTANT: No matter when you take an archive snapshot (while doing your asset/liability projections, after modeling your income or expenses, or while using the classical budget calculation tools), the snapshot will include a copy of all of the “B” budget records from your general ledger balance file (GLBALA).
Using the archive makes it easy to experiment with new features, try new calculations, and play around any way you like, with the confidence that a
Budgeting with CU*BASE 67
copy of your official budget is safe and sound in your archive should you need it later.
Once the snapshot it taken it becomes an independent set of figures you can then use with the Variance Analysis dashboard to compare your actual performance to more than one budget snapshot.
DO IT NOW: SAVE A BUDGET SNAPSHOT
As the above illustration shows, the warehouse can store many budget snapshots, but you will have only one live budget for any given budget year. Any time you use the Archive Live Budget button from the Budget Snapshots screen, a copy of all of the “B” records from GLBALA is made and stored in the separate GLBALAWHSE file.
STEP BY STEP TIP: These steps explain how to save a new snapshot to the archive. See Page 69 for instructions on refreshing an existing snapshot with recent changes.
1. Navigate to Tool #992 Work with CU Budget
2. Enter the Budget year
3. Use the Budget Archive button to proceed to the Budget Snapshots screen, shown below:
68 Budgeting with CU*BASE
4. Use Archive 20xx Live Budget
5. Enter a title for this snapshot into the Description box, enter your name as the Owner, and use the Comments lines to enter any notes that will help you remember when this snapshot was taken and why
6. Use or press Enter to save the snapshot
7. The Budget Snapshots screen will reappear with a confirmation message showing the total number of records that were saved; your live budget files are affected
This button is used to take a copy of your live budget and store it as a
new snapshot in the archive
Budgeting with CU*BASE 69
Congratulations! If you’ve been following the step-by-step instructions in this booklet, you have now completed the core steps to set up your budget in CU*BASE.
The information below and on the following pages explains other details about using the budget archive, as well as instructions for how to view and print your budget figures (which you can also do at any time during the budget process).
Once the new year is underway, use the Variance Analysis dashboard to monitor your performance compared to your budget. See Page 76.
OTHER HELPFUL TIPS ABOUT THE BUDGET ARCHIVE
How to Refresh an Archive Snapshot With Changes
If you are using the archive in order to make a backup copy of your figures periodically while working on your budget, you can choose to save each snapshot as a separate item in the warehouse if you like. You’ll just need to be careful with your naming convention and take advantage of the comments to help keep everything straight.
As an alternative, you can also update the same archived budget every time you take a fresh snapshot.
To do this, use the steps outlined under “DO IT NOW: Save a Budget Snapshot” (see Page 67), but when the Budget Snapshots screen appears, instead of using the Archive 20xx Live Budget button, simply select an existing archive on the Budget Snapshots screen and use the Save Live Budget to option instead:
A confirmation message will appear warning that all of your previous data is being overwritten. (Remember that the system always copies all GL accounts that have “B” records in the GLBALA, no matter where you are in your budgeting process.)
Use this instead if you want to refresh an
existing snapshot with changes you’ve made
to your live budget
70 Budgeting with CU*BASE
How to Import a Snapshot from the Archive
As the illustration above shows, you can also take a copy of any budget from your archive and pull it back into your live files. Doing this will overwrite all of the existing “B” records in the GLBALA file with the data from the snapshot copy (the snapshot itself is unchanged).
This is helpful if you want to start playing with some new calculations, but want to make sure you are starting with the right set of figures.
IMPORTANT: Remember that when you import from your archive, your current live budget files will be overwritten with the data from the snapshot. It’s usually a good idea to archive your live budget first, before performing the import function.
STEP BY STEP 1. Navigate to Tool #992 Work with CU Budget
2. Enter the Budget year
3. Use the Budget Archive button to proceed to the Budget Snapshots screen, shown below:
4. If you have not already done so, use the Archive 20xx Live Budget feature (see Page 67) or the Save Live Budget to feature (see Page 69) to save a copy of your current live data before proceeding
5. Select the snapshot in the list and choose Import from Snapshot into Live Budget
Budgeting with CU*BASE 71
6. A confirmation window will appear; use Proceed with Import to continue
7. Your live budget files have now been replaced with data copied from the snapshot (the original snapshot itself is unaffected)
How to Save a Budget and Start with a Clean Slate
If you would like to start over with a clean slate for any budget year without losing any work you’ve already done, use the steps on Page 86, which include a step to take an archive snapshot before clearing your live data.
72 Budgeting with CU*BASE
UNDERSTANDING BUDGET NOTES Budget notes are like a scratch pad where you can jot down details about your budget work and assumptions while you are running the numbers, then save those comments as part of your budget. This could include things like a general narrative explaining the thought process you used, or specific details about calculation settings, percentages, and the like.
Budget notes, which are simply free-form text input fields, can be changed and appended at any time. Every time you access notes, any notes you already entered will be shown so in addition to adding more notes, you can see your previous notes and edit them if you like.
There are five different types of notes you can record on your budget:
• Notes about asset projections (all G/Ls), which you can enter/view when working with the projection tools (Step 5).
• Notes about liability projections (all G/Ls), which you can enter/view when working with the projection tools (Step 7).
• Notes about income (all G/Ls), which you can enter/view either when working with the modeling tools (Step 6) or the classical budgeting tools (Step 9).
• Notes about expenses (all G/Ls), which you can enter/view either when working with the modeling tools (Step 8) or the classical budgeting tools (Step 10).
If you take a snapshot of your live budget for the archive, you can also save:
• General notes about the budget snapshot, which you can enter when you are saving the snapshot to the archive.
Things to Remember
• There is just one set of notes per budget, per G/L type (income/ expenses/assets/liabilities). Notes are not unique by G/L account. Even though you can access your notes after every individual calculation pass, you’ll simply be appending your previously-entered content with additional notes.
• Other than the general notes that you save when archiving the budget, all other notes types do not require that you use the budget archive. However, when you do save to the archive, a copy of the notes is also retained with the archived snapshot.
To create budget notes, simply use one of the buttons that appears at the bottom of many different budget and modeling screens, as shown elsewhere in this document (see Pages 34, 45, 59, and 63).
To view budget notes, either use the same Notes buttons you use to update them, or use the button on the Budget Archive screen (Page 68).
Budgeting with CU*BASE 73
REVIEWING YOUR BUDGET FIGURES Remember that the dashboard described here is for checking the accuracy of your budget figures and keeping track of where you are in the budgeting process. To monitor your actual performance compared to your budget, use the Variance Analysis dashboard, described starting on Page 76.
The primary purpose of the Budget Dashboard is to help you keep track of the progress of your budgeting calculations. Similar to the Variance Dashboard described on Page 76, the Budget Dashboard does include tools that let you filter and summarize the data. But here these are intended primarily to help you focus on specific portions of your budget spreadsheet to verify the numbers.
When accessing the Budget Dashboard, the Filters window shown below can be used to narrow down the data so you are only reviewing a portion of your budget records at a time.
USING THE BUDGET DASHBOARD TO REVIEW BUDGET FIGURES 1. Navigate to Tool #973 View/Analyze CU Budget
2. In the G/L type drop-down box, choose Net Income
3. Enter the Budget date range you wish to analyze
This can be a full calendar year, or you can analyze just a portion of the year such as a calendar quarter or 6-month period.
4. Enter a Compare to date range
TIP: The dashboard will let you toggle between both budget and actual figures for this comparison range. The range can even span across a year-end if you like, such as Oct 2014 to Sept 2015.
5. Use Enter or the Display Summary button to reveal the summary recap at the bottom of the screen:
74 Budgeting with CU*BASE
Notes: A - The Net Income option combines both income and expense G/Ls and
provides handy sub-totals as well as a net income summary total. Choosing this is the fastest way to verify the budget figures pertaining to your income statement.
B - Once you’ve chosen what to analyze and specified your date ranges, use Enter to see the summary recap at the bottom of the screen. When your budget is complete you should generally see both Income and Expense items at 100% budgeted. (BE CAREFUL: This summary will reflect any filters you select for budget group, G/L account and branch.)
If you have run passes on all of your income/expense budget groups and these still show less then 100%, it usually means there are G/Ls of that type that have not been assigned to a budget group. Remember you can run a calculation pass on individual G/Ls using the G/L accounts to populate option on the Create/Work with CU Budget screen (see Page 58 or 62).
If either of these shows more than 100%, you may have budget figures recorded for G/L accounts that have subsequently been suspended (budget figures are not written to suspended accounts, but if you’ve already saved your budget and then suspend a G/L, those budget figures still remain.)
6. Use Continue (F10) to proceed to the Budget Dashboard:
The Net Income option gives the
quickest look at your income statement
budget figures. See Note A below.
After specifying your date ranges, use Enter or Display Summary to see this recap. See
Note B below.
The dashboard will show both actual and budget figures for the Compare to period.
These filters let you narrow down which data you want to view – helpful if you are
validating newly-saved budget figures.
(Remember that the summary at the bottom will
reflect these settings.)
Budgeting with CU*BASE 75
Understanding the Budget Dashboard Screen
This column shows your budget figures.
This column shows actual figures from the year prior to your budget year (so if you are working next year’s budget, you’ll see this year’s actual figures here, up through the most recent month-end completed). Use Toggle Budget/Actual to toggle this to show last year’s budget instead.
This column shows the difference between the figures in column and column , in both amount and %.
Working with Dashboard Data
There are several things you can do to see more details about the budget totals displayed when the screen first appears:
There are three levels for how this data is organized: From here you can select a Budget Group and use Drill to Account to see all of the G/Ls in that group. Then you can drill down another level to see all branches for a single G/L.
At any level, you can choose an item in the list and use View by Month to see a month-by-month breakdown of the budget figures, like this:
Use Print on any dashboard screen to print a report showing the data you
are currently viewing. (There is no confirmation window; the report prints directly to your default report printer.)
76 Budgeting with CU*BASE
TIP: See Page 86 for instructions on how to make changes to these monthly figures.
Use the Summary button (F10) to see a window showing a summary of the current view:
BE CAREFUL! Unlike the “budgeted to date” summary that appears when calculating your budget, this summary window only shows a summary of the records you are currently viewing. If you used any filters on the initial window, or if you have drilled down to the G/L account or branch level, the summary includes ONLY those items.
7. When ready, use to exit
PRINTING BUDGET FIGURES FOR VERIFICATION Although you can print budget figures on Financial Statements, those are best for comparing actual performance to the budget, similar to the Variance Dashboard. If you want a printout showing your budget amounts for verification purposes, or to show to your Board, or simply to archive as budget documentation, the best technique is to use the Print Budget Reports feature.
Budgeting with CU*BASE 77
1. Navigate to Tool #634 Print Budget Reports
2. Enter the budget year and choose one of the print formats:
Quarterly columns with annual total
Monthly columns (3 months) with a quarterly total
Monthly columns (12 months) with quarterly sub-totals and annual total
Cannot be printed – see below for instructions on exporting this report for use via Query or Excel
3. You must specify either Income or Expense (currently it is not possible to get both during the same report run)
4. The remaining selections are optional; when ready, use or press Enter to generate the report (see samples on the following page)
5. The window will remain open so that you can produce a second report as needed; when done use to exit
Report sample #1 – Quarterly subtotals with annual total
Report sample #2 – Monthly columns with quarterly total (also shows the branches summarized, and includes only GLs from a single budget group)
Exporting Budget Figures to a File
If you choose the Monthly columns with quarterly subtotals and annual total (export only) option on the window shown on the previous page, you will be directed to an export window where you can specify a file name for the report output:
REVIEWING BUDGET VARIANCES Once the budget year has begun, there are two tools that help you track how your performance is matching up to your budget plan: the Variance Dashboard and the Variance Financial Statement reports.
USING THE VARIANCE DASHBOARD Unlike the analysis tool that you use while working on the budget (see Page 72), which compares your budget to last year, the Variance Dashboard tool compares your plan (budget figures) to your performance (actual figures for the same year).
This means that you shouldn’t really use this dashboard until after February 1, when you have at least one set of month-end actual figures to compare!
1. Start by navigating to Tool #936 Variance Analysis
2. A window will appear showing entries for Live Budget and Actual, plus all of the budgets you have saved for this same budget year in your archive, if any:
3. Click on the item labeled “Actual” in the list
4. Hold the Ctrl key and click on the budget you wish to compare to actual performance
5. Choose Make two selections (or Enter) to proceed
6. The next step is to choose what data you wish to evaluate:
Using the Filters
These filters are intended to let you focus on just the portion of your performance you wish to monitor. For example, you could use the Variance > $ or Variance > % filters to look only at G/Ls where the variance from your budgeted figures is large enough to warrant investigation or a report to your Board. Or look just at your income or expense budget groups, or even select a single G/L account to review.
80 Budgeting with CU*BASE
7. When ready, use or press Enter to proceed to the Variance Dashboard itself:
Understanding the Variance Dashboard Screen
This column shows your actual figures for the selected year (usually the current year), up to and including the most recent month-end. So if you are viewing this dashboard in June, you’d see January through May figures represented.
Use Print to print a report with this data
– perfect for your Board report!
If you selected Net Income on the initial
filters window, use the Expand/Condense toggle to see your
income and expense budget groups, as in
this example.
Enter an amount or % to see areas where your performance is out of
synch with your budget plan, and might need
extra attention from your team or Board.
The Net Income option gives the
quickest look at your income statement
variances.
These periods are based on what was selected in the previous pop-up window.
Adjust the periods now if you wish to evaluate just a
portion of the budget year.
These totals reflect only the G/Ls you are currently viewing, so be careful. If
you used any of the filters, this number will NOT
represent your actual total net income!
Budgeting with CU*BASE 81
This column shows budget figures from the selected year.
This column shows the difference between the figures in column and column , in both amount and %.
Working with Dashboard Data
There are several things you can do to work with the data on this dashboard:
The area at the top of the screen shows a summary of which G/L accounts you are currently viewing. (Remember that the totals at the bottom of the list only reflect these specific accounts, not necessarily your entire net income!)
If you selected Net Income on the initial filters window, the records will be in order by budget group sequence # and you will not be able to re-sort the list by clicking the column headings. But if viewing all G/Ls or a specific G/L type (such as expenses only), you will be able to click any column heading to sort by that column. (Look for the orange or other theme-colored heading to indicate that it’s clickable.)
There are three levels for how this data is organized: From here you can select a Budget Group and use Drill to Account to see all of the G/Ls in that group. Then you can drill down another level to see all branches for a single G/L.
TIP: If you selected Net Income on the initial filter window, you’ll need to use Expand first to show the budget group detail, then the Drill option will become available.
At any level, you can choose an item in the list and use View by Month to see a month-by-month breakdown of the budget figures, like this:
82 Budgeting with CU*BASE
TIP: See Page 86 for instructions on how to make changes to these monthly figures.
Use the Filters button to view which filters you selected, or change them to focus on different accounts on the dashboard. Remember that when you use Print, only the data currently displayed will be included on the report.
8. When done, use to exit
Tips for Evaluating Your Numbers
Remember that there are many factors that affect the variances you’ll see in comparing your projections and budget figures to actual performance. If you are not seeing the results you thought you would, consider:
♦ Was your estimate for this year’s beginning balance off compared to your actual December month-end? Even if you estimate monthly activity correctly, your balances won’t match if you aren’t starting from the same point as you anticipated.
Remember that the beginning balance estimate you used when calculating projections is NOT saved by CU*BASE.
♦ Was your estimate for monthly activity off compared to the income (or expenses) you are actually seeing each month?
♦ Was your estimate for projected resulting balances on your loan or savings off compared to where you are ending up?
One technique that can help in evaluating variances shown on the dashboard can be to use the different formats on the financial statements, as described below, to compare net change (monthly activity) separately from resulting balance (where you ended up each month).
VIEWING BUDGET VARIANCES ON FINANCIAL STATEMENTS This tool lets you use your financial statement reports to review your budget figures and compare them to your actual G/L activity. This is particularly helpful after the budget year begins to watch how your plan matches up to your performance. You can compare two periods side by side, up to a maximum of 8 columns on the report including the $ variance and % variance. There is also an optional export option so you can pull down as many columns as you need for variance analysis via Microsoft Excel or other third-party tool.
Configure Your Financial Statements for Variance Reporting
1. Navigate to Tool #376 Financial Report Configuration
2. Choose Revise in the drop-down, enter your Corp ID, and enter the Report #, then use or press Enter to proceed
3. For any financial statement formats you want to use for showing budget variances, check the flag
4. Use or press Enter to save; repeat for additional reports
Budgeting with CU*BASE 83
TIP: If you want to be able to view asset or liability net change (monthly activity) projections, you must configure a report that uses the “Combined” format and include your member loan and savings G/L accounts in the layout. For more help on setting up financial statement reports, refer to online help while working in this feature.
Printing Variance Financials
5. Navigate to Tool #692 Print Variance Financial Statements
6. Choose one of the financial statement styles:
Balance sheet projection using Resulting Balance
Compares the actual asset or liability balance to the projected/target balance. Allowed for financial statements set up as Format “B” (balance sheet). Use this format to answer the question, “Did our balances end up where we said they would?”
Balance sheet projection using Net Change
Compares the actual asset or liability activity for the period to the projected activity levels. Allowed for financial statements set up as Format “C” (combined balance sheet/income statement). Use this format to answer the question, “Did we do as much as we said we would this month?”
Income Statement Budget Variance
Compares actual to budget numbers for income and expense GLs. Allowed for financial statements set up as Format “I” (income statement). Use this format to answer the question, “Did we hit our yield/cost of funds target for the month?”
7. Use or press Enter to see the list of configured reports configured with that format
8. Select one of the reports in the list and use Select to proceed to the second screen
Sample of the combined balance sheet format showing net change projections (notice you can define both a start date and end date, to look at a specific slice of time):
The only reports that will appear here are those that are have been flagged for variance reporting in your
Financial Report Configuration.
84 Budgeting with CU*BASE
Sample of the income statement format (notice you can define both a start date and end date, to look at a specific slice of time):
Sample of the balance sheet format showing resulting balance projections (notice you can define an end date only):
To assist in entering your settings on this screen, it’s helpful to correlate the selections to the columns on the finished report:
Notice how columns 1-4 show actual and projected figures for your “Period 1” selections, and columns 5-8 show actual and projected figures for your “Period 2” selections.
9. When ready, use or press Enter to proceed to the third and final screen:
The calculated variance $ and %
columns are optional and you can choose
either, both, or neither as you wish.
Period 1 Period 2
Period 1 Period 2
Budgeting with CU*BASE 85
This allows similar printing options as when you are printing your normal financial statements, including the ability to view the report on the screen, export to a file, or print a hard copy.
10. After making your selections use Run/Next Report to produce the report
11. When done, use to exit
86 Budgeting with CU*BASE
OTHER HANDY “HOW TO”S HOW TO CLEAR A BUDGET AND START OVER
WARNING! This procedure will throw away all of your existing budget figures so that you can start over. To be safe, in most cases you’ll want to save a snapshot of your budget into your archive first.
1. If necessary, adjust your Budget Controls to allow maintenance to
income and expense G/Ls (see Page 21)
2. Navigate to Tool #992 Work with CU Budget
3. Enter the Budget year
4. Use the Budget Archive button to proceed to the Budget Snapshots screen
5. Use Archive 20xx Live Budget
6. Enter a Description, Owner, and Comments
7. Use or press Enter to save the snapshot
8. Use to return to the main Work with CU Budget screen
9. Use the Clear Budget button (F17)
You will not be able to proceed if the Budget Control record is either missing or set to “Closed” for any G/L type for this budget year. See Page 19.
10. A confirmation window will appear; use Delete to confirm
This clears all “B” budget records in the GLBALA database table for the selected year, no matter what G/L type they happen to be.
11. You can now use start your first calculation pass on a new budget – see Step 2 on Page 58
HOW TO MANUALLY CHANGE FIGURES FOR A SINGLE G/L OR A SINGLE
MONTH After running your automated calculation passes, you can use this procedure to manually adjust budget figures, one G/L account at a time. There is also an optional “allocate” command that will take an annual figure and automatically spread it across all months.
The process of adjusting individual income and expense budget figures works the same regardless of whether you calculated them using the modeling tools or via the classical budgeting tools. Note, however, that the
Budgeting with CU*BASE 87
instructions are slightly different for adjusting your asset and liability balance projections, as explained below.
Adjusting Income and Expense Budget Figures
1. If necessary, adjust your Budget Controls to allow maintenance to Income and/or Expense G/Ls (see Page 21)
2. Navigate to Tool #992 Work with CU Budget
3. Enter the year of the budget you wish to adjust
4. Choose Manual update
5. Use or press Enter to proceed
6. Choose the G/L type you wish to adjust, either Income or Expense
7. Change other filters if desired then use Continue to proceed
TIP: For this type of maintenance it is usually easier just to leave the other filters alone. You’ll be able to navigate to the G/L account you want to adjust.
8. The budget dashboard will appear
9. Select a Budget Group in the list and choose Drill to Account
10. Select a G/L Account in the list and choose Drill to Branch
11. Select a Branch from the list and choose Edit
If this option is not available, you will need to adjust your Budget Controls to allow maintenance on this G/L type (see Page 21).
12. Enter figures for each individual month, one at a time
Remember that for credit-balance accounts you’ll need to enter a minus (-) sign for a positive number (increase).
OR
13. Click the Allocate button and enter an amount in the window, then use or press Enter to divide that amount by 12 and enter it into each of
the monthly fields (you can then adjust individual months if you wish)
14. Use or press Enter as needed to recalculate the totals at the bottom
15. Use Save to save the changes made on this G/L to your budget
16. Use Next GL or Next Location if you wish to edit another G/L, or use to return to the Budget Dashboard
17. When done, use to exit
88 Budgeting with CU*BASE
Adjusting Asset and Liability Projections
1. If necessary, adjust your Budget Controls to allow maintenance to Asset and/or Liability G/Ls (see Page 21)
2. Navigate to Tool #699 Project Asset/Liability Balances
3. Enter the year of the budget you wish to adjust
4. Select the Budget group that contains the G/L you wish to adjust
5. Use or press Enter to proceed
6. Select a G/L Account in the list and choose Branch Allocation
If you don’t see the branch you need, try using the All Branches button, which reveals branches that have no budget figures saved to them yet.
7. Select a Branch from the list and choose Maintain Brn
If this option is not available, you will need to adjust your Budget Controls to allow maintenance on this G/L type (see Page 21).
8. Enter figures for each individual month, one at a time
Remember that for credit-balance accounts you’ll need to enter a minus (-) sign for a positive number (increase).
OR
9. Click the Allocate button and enter an amount in the window, then use or press Enter to divide that amount by 12 and enter it into each of
the monthly fields (you can then adjust individual months if you wish)
10. Use or press Enter as needed to recalculate the totals at the bottom
11. Use Save to save the changes made on this G/L to your budget
12. Use Next GL or Next Location if you wish to edit another G/L, or use to return to the Budget Dashboard
13. When done, use to exit
HOW TO IDENTIFY A BRANCH CLOSING IN YOUR BUDGET Use this procedure if you are planning to close a branch during the budget year. This simply changes all of the budget figures for a particular branch (all G/Ls) to $0.00, starting as of a month you specify. This feature does NOT close a branch on CU*BASE; it simply clears monthly net change amounts from your budget spreadsheet, starting with the month you specify and continuing through the remainder of that budget year.
Because this tool only affects net change budget amounts in the G/L balance file, it is NOT recommended for credit unions that have projected asset and liability balances with the modeling tools.
Budgeting with CU*BASE 89
Once this is done, keep in mind that you can still go back in and manually enter new budget amounts for individual G/Ls for that branch, if you wish.
1. Make sure all budget figures have been entered for all G/Ls
Since using this procedure sets all G/Ls for that branch to $0, it’s best to wait to do this until the rest of your budget is pretty much done. If you run additional calculation passes after this is done, those G/Ls will contain figures for this branch # again. You may need to run the close option again to clean those up.
2. If necessary, adjust your Budget Controls to allow maintenance to income and expense G/Ls (see Page 21)
3. Navigate to Tool #992 Work with CU Budget
4. Enter the budget year
5. Choose Close Branch
6. Use or press Enter to proceed
7. Enter the branch # that you are planning to close during the budget year
8. Enter the last month that branch will be open on your books
9. Press Enter to proceed
10. A confirmation message will appear; use Continue (F10) when ready
11. The net change amount for all G/L accounts for this branch will be set to $0.00 in your budget records and the budget will be saved
90 Budgeting with CU*BASE
APPENDIX A: UPLOADING BUDGET
FIGURES WHAT YOU SHOULD KNOW
Security Requirements
Special authority is required to upload files from a PC onto the CU*BASE system. Start by completing the iShield Security Access Request for CU*BASE Uploads form, available with the link shown below, to request access privileges (select the “General Ledger Import File” item):
When uploading budget figures, amounts will be recorded as the “net change” for each G/L account (not resulting balance). Currently you can import budget figures for Income and Expense G/Ls only. Projected resulting balances for your asset and liability G/Ls are not supported through the current upload process. See Page 77 for more information.
If any G/L accounts in the incoming file are an Asset or Liability type, they will appear as exceptions, similar to an invalid G/L account number. You’ll need to remove them from your original source file then try the upload and import again.
A Word About Uploads & Branch-Level Budgets
It’s pretty typical for a CU that uses a third-party budget tool to keep things simple by avoiding branch-level calculations for the budget figures. What that means to CU*BASE is that the entire budget amount will be logged under branch 01, with no budget figures stored for any other branch on any of your G/L accounts.
That’ll work just fine with the analysis tools, but remember you won’t be able to use any of the screens that drill down to the branch level. Rather, you’ll stay on the summary screens that show all branches under a single line item.
Supported File Types
Supported File Types include the following:
• Flat file format – Not common, but might be an option available from your third-party vendor.
• User-defined fixed file – Instead of a delimiter (separator between fields), the fields are padded to a fixed width.
*IMPORTANT: This amount is recorded as the net change (field name is actually Net Balance or NETBAL) per month for the G/L account, NOT the resulting balance.
Other requirements for each file type:
Type Field order Extra fields allowed? Notes
Flat File Format
Must be in the exact order as shown above
No
User-defined Fixed File Format
Same fields as above but can be in any order in the file
No Field length must be exact and consistent from one record to the next
User-defined Comma-Delimited Format
Same fields as above but can be in any order in the file
Yes, but must be to the right (after) the required fields, not between them
Field lengths cannot be greater than the sizes shown above
Currency amounts cannot contain commas but must include decimals
Otherwise the amounts will pull in as whole dollars in CU*BASE. If you create a file in Excel this will happen auto-matically, but be sure to alert your vendor so that this is applied correctly.
As a rule, worksheets you intend to convert and upload should not include other extraneous information such as column headings, blank rows, titles, graphics, or other special layout formatting. In other words,
This: ...not this:
92 Budgeting with CU*BASE
DO IT NOW (STEP 1): UPLOAD THE FILE TO CU*BASE
Prepare Your File for Upload
In this step you will upload your file from your PC to the IBM i so that it can be imported by the budget tool.
Once you have created your file, save it to your C:\ drive or a network location. (Either location works fine for the file upload process.)
Because of how a System i works, you will actually be pulling data into an existing file on CU*BASE (basically a big, empty file that is large enough to contain the data you’re uploading).
BE CAREFUL: The file into which you will be pulling your budget data is the same file as used by the import feature available in Tool #61 Create/Post Journal Entries. So if anyone routinely pulls data into that file for posting to your G/L, this import will overwrite whatever is already in that file. Be sure to coordinate the timing with anyone else at your credit union who is authorized to upload data into your G/L.
Upload Your Budget File
1. To upload your G/L file, use Tool #374 File Upload (PC to System i).
2. The upload screen will appear:
3. Fill in as shown in the above sample, using these rules:
Field Name Description
PC These settings refer to where the data is coming from.
File name Enter the path (the storage location, both drive and folder) and file name where the file is stored on your PC. Use backslashes between the folder name and the file name, as in the sample above (or better yet, use the Browse button to locate the file).
IBM i These settings refer to where the data will be going.
Enter the path and exact name of your file in this field
along with the correct file extension (such as .XLS or .CSV.) You can also use the Browse button to the
right to search for the file on your computer.
Remember to enter your CUID here in place of
the XX.
This should default to your system name.
Budgeting with CU*BASE 93
Field Name Description
IBM i This designates the iSeries system to which the files will be uploaded. For online credit unions, this will read PROD.CUANSWERS.COM and should not be changed. (If this defaults to something else, leave it as the default.)
Library/File (Member)
Enter your credit union’s Query library name, a forward slash, then the name of the file that holds records to be imported into the G/L: QUERYxx/GLIMPORT
(For the xx, fill in your credit union’s two-character credit union ID)
4. Click the Details button
5. Enter C:\CUBASE\CUBASE\RESOURCES\GLIMPORT.FDF in the screen as shown below (casing doesn’t matter):
6. Click OK to save and return to the Data Transfer window
94 Budgeting with CU*BASE
7. From the screen shown above, select the File menu and choose Properties
8. Check Convert CCSID 65535 as shown above
9. Click OK
10. To begin the transfer process, click the Transfer data to IBM i button. A series of messages will appear to report on the progress of the transfer.
If you experience problems uploading, it may be because you have not been authorized to upload data. If you receive the error: “Data in this field is incorrect or does not match the PC data type,” make sure to set the properties as shown in #8 above.
11. When the transfer is complete, the following message will appear: Click OK and the Data Transfer dialog box will reappear. Click Close [] to
This option must be selected for the upload
to work properly.
Budgeting with CU*BASE 95
return to the CU*BASE home screen. (See below for details on saving the transfer request.)
12. The file is now uploaded to the GLIMPORT file definition and is ready for import into your budget
DO IT NOW (STEP 2): IMPORT THE FILE INTO YOUR BUDGET Once you have uploaded the data to CU*BASE, you will now be ready to import the budget figures into your G/L files:
1. If necessary, adjust your Budget Controls to allow maintenance to income and expense G/Ls (see Page 21)
2. Navigate to Tool #992 Work with CU Budget
3. Enter the budget year
4. If desired, clear all figures from your existing budget (see the steps on Page 86)
BE CAREFUL: Do NOT do this step if you wish to keep the results of any budget passes you’ve already run. This decision depends on whether you are only uploading a portion of your budget or the entire thing.
5. Choose Maintain Budget
6. Use or press Enter to proceed
7. Use Upload (F19)
8. For the file name, enter GLIMPORT
9. Choose a format (we’ll use User-defined comma-delimited as our example since that’s the most common)
10. Use or press Enter to proceed
This number should match the number of individual budget figures in your
original source file.
96 Budgeting with CU*BASE
11. Specify the field sequence to exactly match the order in which the data appeared in your PC file
If you had extra fields after these six, they will be ignored, but there cannot be extra columns between these required ones.
12. Use or press Enter to proceed; the Import CU Budget window will reappear with a new button shown
13. Click Import File Data
14. If there are any records that could not be imported for any reason, the following exceptions screen will display showing the errors to be corrected:
HINT: This screen shows only the records that had an invalid G/L account, an invalid branch/location #, or other error that caused the record not to be compatible with your budget files; all the remaining records from your file will be displayed next after you finish correcting these errors.
Highlighted items indicate errors that
need to be corrected before the records can
be pulled into your budget.
TIP: To work all exceptions one after another, select the first one in the list, hold Shift and click on the last one in the list, then use Edit.
TIP: If you would like to go ahead and
upload everything except for these
records, use now and see #16 below.
Budgeting with CU*BASE 97
15. Select one or more items in the list and item in the list (for even faster editing, hold Ctrl or Shift and click to select multiple items) then choose Edit to proceed to the edit window:
16. Make the necessary correction(s) to the record and use or press Enter to proceed to the next selected item, or to return to the exceptions list
17. Once all corrections have been made and there are no longer any records left to display on the exceptions screen, you’ll proceed to the budget calculation screen showing the budget figures that were generated in this “pass”:
18. Verify the figures then use Save Pass to save the imported records to your budget
Remember that if your budget already contained budget figures for these same G/Ls, the imported data will overwrite the exiting data!
19. Use to exit and use the steps outlined earlier in this book to run additional calculation passes to fill in other budget figures or adjust specific G/L accounts in your budget
If this error appears, the G/L # is an asset or liability type and
cannot be uploaded. Use exit and retry the upload after