22
CCpilot VS 12” Revision: A Programmer’s Guide 2017-11-23 CCpilot VS 12” Programmer’s Guide www.crosscontrol.com
| Date post: | 23-Mar-2018 |
| Category: |
Documents |
| Upload: | truongmien |
| View: | 222 times |
| Download: | 1 times |

CCpilot VS 12” Revision: A
Programmer’s Guide 2017-11-23
CCpilot VS 12”
Programmer’s Guide
www.crosscontrol.com

CCpilot VS 12” Revision: A
Programmer’s Guide 2017-11-23
www.crosscontrol.com 2
Contents Revision history ..................................................................................................................................2
1. Introduction ..................................................................................................................................3
1.1. Convention and defines .......................................................................................................... 3
1.2. List of abbreviations .................................................................................................................. 3
1.3. References .................................................................................................................................. 3
2. Interfaces ......................................................................................................................................4
2.1. Standard libraries ....................................................................................................................... 4
2.2. CCAux library ............................................................................................................................. 4
2.3. CCAux API calling convention ............................................................................................... 5
2.4. Telematics API ............................................................................................................................ 6
3. Board Support Package ..............................................................................................................7
3.1. Downloading and installing the BSP ...................................................................................... 7
3.2. BSP structure ............................................................................................................................... 7
3.3. Using the BSP .............................................................................................................................. 9
4. Software Development Kit ........................................................................................................11
4.1. Downloading and installing the SDK ................................................................................... 11
4.2. Using the SDK ............................................................................................................................ 11
4.3. Debugging remotely .............................................................................................................. 12
5. Device specifics for CCpilot VS ................................................................................................14
5.1. CAN ............................................................................................................................................ 14
5.2. Analog video ........................................................................................................................... 15
5.3. Graphics .................................................................................................................................... 17
5.4. Serial Number Broadcast interface ..................................................................................... 17
6. Examples .....................................................................................................................................18
6.1. Building applications with the SDK ....................................................................................... 18
7. Technical support ......................................................................................................................22
8. Trademarks and terms of use ...................................................................................................22
Revision history
Rev Date Comments
A 2017-11-23 Released

CCpilot VS 12” Revision: A
Programmer’s Guide 2017-11-23
www.crosscontrol.com 3
1. Introduction
This document contains device specific reference information describing application development
and APIs used when developing applications for the CCpilot products supported in the CCLinux
platform (currently, this includes the CCpilot VS device). Additionally, this document contains
information on how to build a custom Linux operating system for your device based on the
CCLinux reference system.
Several functionalities are available using operating system or de-facto standard APIs. These may
be briefly mentioned but not further described within this documentation.
A good prior understanding of Linux programming is needed to fully benefit from this
documentation. It is also recommended to read the Software Guide for your CCpilot device prior to
reading this document.
1.1. Convention and defines
This document covers all devices included in the CCLinux platform. For the sake of example, the
CCpilot VS device is sometimes used throughout this document. Any significant device differences
will be stated. When the <xx> is used, it should be replaced with the proper device name (VS, for
instance).
The observe symbol is used to highligt information in this document, such as differences between
product models.
The exclamation symbol is used to highlight important information.
Text formats used in this document:
Format Use
Italics Paths, filenames, definitions.
Bolded Command names and important information
1.2. List of abbreviations
API Application Programming Interface
BSP Board Support Package
CCAux CrossControl Common Aux Control
LED Light Emitting Diode
MP Main Processor running Linux
OS Operating System
SDK Software Development Kit
SS System Supervisor co-processor
1.3. References
For further information on the device software and the available APIs see the following references. [1] CCpilot VS – Software Guide [2] CCAux API documentation

CCpilot VS 12” Revision: A
Programmer’s Guide 2017-11-23
www.crosscontrol.com 4
2. Interfaces
This section covers basic information on how to access the device hardware. Most of the hardware
is accessed using the default Linux interfaces but some specific interfaces may require additional
functions to be accessed.
Table 1 lists the API used to access each interface. These interfaces can be grouped into two
categories; Standard operating system libraries (Std. API) and CCAux Library (CCAux API).
See also the operating system specific sections and additional documentation describing the
software API.
Table 1: APIs used for different interfaces in CCpilot devices
Functionality Std. API CCAux API Comment
CAN √ SocketCAN available through Linux.
Ethernet √ Standard Linux kernel drivers.
USB √ Standard Linux kernel drivers.
RS232 √ Standard Linux kernel drivers.
RS485 √ Standard Linux kernel drivers.
Video in √ √ Video4Linux2 API, gstreamer, and QtMultimedia
can be used directly without CCAux API.
Digital outputs √
Configurable input √
Analog input √
Status indicator √
Backlight √
Ambient light sensor √
Buzzer √
Power management √
Your device might not support all interfaces stated here. See the Product Leaflet or Technical
Manual of your device for a complete list of available interfaces.
2.1. Standard libraries
Most interfaces are accessed using standard libraries and access methods. Various access methods
are possible to be used depending on the development environment and additional installed
frameworks, such as Qt.
The standard libraries used for Linux are described in their respective documentation sources, such
as MAN pages.
2.2. CCAux library
The CCAux API gives access to several hardware specific interfaces. The API functions of this
library are documented in the CCAux API documentation.
Table 2 gives a brief introduction on the API’s found therein and their functions. Most API
functions can be used from the pre-installed CCSettingsConsole application as well.
CCpilot VS 12” Revision: A
Programmer’s Guide 2017-11-23
www.crosscontrol.com 5
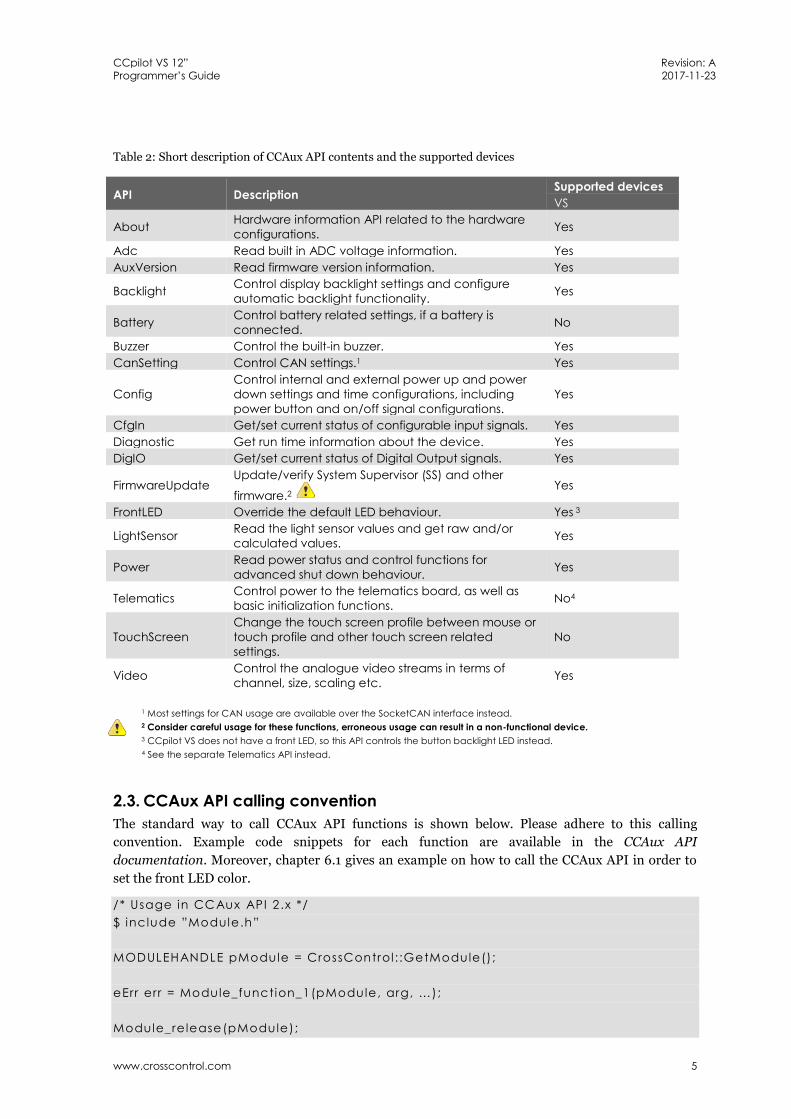
Table 2: Short description of CCAux API contents and the supported devices
API Description Supported devices
VS
About Hardware information API related to the hardware
configurations. Yes
Adc Read built in ADC voltage information. Yes
AuxVersion Read firmware version information. Yes
Backlight Control display backlight settings and configure
automatic backlight functionality. Yes
Battery Control battery related settings, if a battery is
connected. No
Buzzer Control the built-in buzzer. Yes
CanSetting Control CAN settings.1 Yes
Config
Control internal and external power up and power
down settings and time configurations, including
power button and on/off signal configurations.
Yes
CfgIn Get/set current status of configurable input signals. Yes
Diagnostic Get run time information about the device. Yes
DigIO Get/set current status of Digital Output signals. Yes
FirmwareUpdate Update/verify System Supervisor (SS) and other
firmware.2 Yes
FrontLED Override the default LED behaviour. Yes 3
LightSensor Read the light sensor values and get raw and/or
calculated values. Yes
Power Read power status and control functions for
advanced shut down behaviour. Yes
Telematics Control power to the telematics board, as well as
basic initialization functions. No4
TouchScreen
Change the touch screen profile between mouse or
touch profile and other touch screen related
settings.
No
Video Control the analogue video streams in terms of
channel, size, scaling etc. Yes
1 Most settings for CAN usage are available over the SocketCAN interface instead. 2 Consider careful usage for these functions, erroneous usage can result in a non-functional device. 3 CCpilot VS does not have a front LED, so this API controls the button backlight LED instead. 4 See the separate Telematics API instead.
2.3. CCAux API calling convention
The standard way to call CCAux API functions is shown below. Please adhere to this calling
convention. Example code snippets for each function are available in the CCAux API
documentation. Moreover, chapter 6.1 gives an example on how to call the CCAux API in order to
set the front LED color.
/* Usage in CCAux API 2 .x */
$ inc lude ”Module.h”
MODULEHANDLE pModule = CrossControl : :GetModule();
eErr err = Module_function_1(pModule, arg, …);
Module_release(pModule);

CCpilot VS 12” Revision: A
Programmer’s Guide 2017-11-23
www.crosscontrol.com 6
2.4. Telematics API
Some CCpilot devices support the external add-on telematics device CrossLink AI. The interfaces
provided by this board are not accessed via the CCAux API, but through the separate Telematics
API instead. This API is included in both the BSP and SDK and its functions are called in the same
way as in CCAux API. Please refer to the Telematics API reference documentation for more
information about the functions available.

CCpilot VS 12” Revision: A
Programmer’s Guide 2017-11-23
www.crosscontrol.com 7
3. Board Support Package
In order to create custom Linux images for CCpilot devices, a board support package (BSP) has
been created. The BSP is a Yocto-project build system that produces complete Linux images for the
CCpilot devices. It also includes necessary application and driver code, as well as example or
template code that may serve as a basis for further application and driver development.
The open-source Yocto system has built-in package support with many thousands of maintained
packages available, while also providing a set of standard tools and build guidelines. The BSP adds
necessary drivers and applications required for the CCpilot board images. For more information
regarding the Yocto project, please refer to the Yocto Project reference manual at
www.yoctoproject.org/docs/2.2/dev-manual/dev-manual.html
3.1. Downloading and installing the BSP
The BSP package comes in the form of a gzipped tar archive which can be acquired from the
CrossControl support site. The BSP was created on an x86-64 machine running Ubuntu 14.04.5
LTS and must be unpacked to a Linux host machine/build server. Much disk space (at least several
hundred gigabytes) and memory is required for the Yocto system, as the folder structure tends to
grow quickly in size. Please refer to the Yocto Project reference manual mentioned earlier for
information about required dependencies.
3.2. BSP structure
This chapter will go through the structure of the BSP, covering CrossControl specific parts. For
other third party components (Qt, OpenEmbedded, Yocto, etc.), please refer to their respective
reference documentation.
Initially, the BSP base directory only contains CrossControl folders. All other required third party
tools are provided as hash-files which will be downloaded from remote repositories upon first
build. The following subsections will describe these initial folders.
Internet connection is required to build BSP.
While most components in the BSP are released under various open source licenses,
others are of proprietary nature and protected under the CrossControl Software
License. Be aware of which license applies and comply with the license terms.
VS is the internal CrossControl code name for the CCpilot VS architecture/platform; therefore the
BSP contains references to the VS platform such as “PLATFORM_VS”. The same applies for other
CCpilot devices. Additionally, CrossControl specific components are named “cc”, such as “meta-cc”
and “recipes-cc”.
3.2.1. apps
Contains the source code to CrossControl-developed libraries and applications such as CCAux API
library, CCAux daemon, CCLauncher, CCSettingsConsole, CCVideo, Telematic API, etc.
3.2.2. drivers
The drivers folder contains the source code to the following CrossControl-developed drivers:

CCpilot VS 12” Revision: A
Programmer’s Guide 2017-11-23
www.crosscontrol.com 8
ss
Handles communications between the System Supervisor (SS) and the main processor (MP, i.e. the
Linux system) over the MP-SS SPI bus. This driver is required for the CCAux API to work.
<xx>-io
Used to set the direction of the internal UART, in order to support either bootloader output to the
update board or to the serial port of the SS.
3.2.3. meta-cc
This folder contains the Yocto layer with all CrossControl developed board-specific recipes. See
Table 3 for more details of the subfolders.
Table 3: Content of the subfolders in the meta-cc folder in the BSP.
Folder Content
classes
Class recipes which can be inherited by other recipes:
Class recipes to be inherited in recipes building applications and
modules with locally stored source code
Class recipes which enable recipes to switch between Qt 4 and 5 when
building applications
conf
meta-cc layer configuration files for the <xx> machines. The machines are
based on more general machines. For instance, the ‘vs’ machine is based
on the ‘mx6q’ machine, which in turn is based on the ‘mx6’ machine in the
meta-fsl-arm layer.
recipes-bsp Contains the u-boot specific patches which adapt the default iMX6 u-boot
configuration.
recipes-cc Contains recipes for CrossControl-developed libraries and applications.
These have the source code stored locally in the apps/ folder.
recipes-core
Image recipes (both main and rescue system) for all supported devices;
used to produce the reference CCLinux image. This is a good starting
place to add or remove features from the image.
Psplash recipe, used to create a bootsplash image during the time
which the Linux system loads
Initscript recipes
recipes-devtools A recipe for input utilities, which are used to enable the touch panel driver
for devices with a touch panel, such as CCpilot VS.
recipes-extended A recipe to enable password free sudo privileges for users.
recipes-graphics An init script for the Weston reference implementation of the Wayland
graphics server.
recipes-kernel
Kernel recipes; board-specific kernel patches, device tree, kernel
configuration files
Recipes for the CrossControl developed drivers in the drivers folder
recipes-qt
Recipe-append to build QtMultimedia with the gstreamer backend
Recipe-append to separate some default Qt applications (calculator for
instance) from their examples-package, in order to enable individual
installation

CCpilot VS 12” Revision: A
Programmer’s Guide 2017-11-23
www.crosscontrol.com 9
3.2.4. platform
The platform folder contains a folder for each of the CCLinux devices as well as one common folder.
These folders contain environment-setup scripts, extra Makefile rules to build individual system
components with bitbake, and the configuration files for configuring the build system. The file
local.conf can be modified to change the default Yocto download directory etc. If you want to add a
new layer to the Yocto build, it must be added to the bblayers.conf file.
When building, the working directory build will be located in the platform/<xx> directory, as well
as the resulting images.
3.2.5. tools
Contains scripts to be used for device OS update. See the CCpilot VS – Software Guide for
instructions on how to use them.
3.3. Using the BSP
The purpose of this chapter is not to give the reader a full description of the Yocto build system and
all its possibilities; but rather give useful tips on how to build Linux images and application binaries
from within the BSP.
3.3.1. Building Linux images
Out of the box, the BSP produces a CCLinux image containing a reference implementation, as
described in the CCpilot VS – Quick Start Guide. The reference implementation is intended to be
used as a basis for creating custom images.
The first time building the image will take several hours, depending on your host
machine. Subsequent builds will be quicker as Yocto reuses all unchanged
components from previous builds.
Depending on your host machine, you might need to edit the platform/<xx>/local.conf file. For
instance, the default download directory can be changed; and if you have limited disk space, there
is a setting for removing temporary files once builds are completed. However, removing temporary
files will slow down your build process.
In the BSP root directory there is a Makefile containing rules to make main and rescue images for
all CCLinux devices. For instance, to make the CCpilot VS rescue image, type
$ make vs-rescue
make will automatically source the environment scripts in the platform folder and invoke bitbake
to bake the image recipe in the meta-cc/recipes-core/images directory.
The resulting image is located in platform/<xx>.
To build your own custom Linux image, either edit the image recipe right away, or make a new
recipe and add a new rule for it to the Makefile. If choosing the latter, don’t forget to add a rule to
the platform/<xx>/Makefile as well.
See the CCpilot <XX> - Software Guide for your CCpilot device for instructions on how to program
the images to the device.

CCpilot VS 12” Revision: A
Programmer’s Guide 2017-11-23
www.crosscontrol.com 10
3.3.2. Building applications
Provided there exists a recipe for the application, building with the BSP can be done in two ways.
The first method is the most straightforward whereas the second can be more convenient during
development as it is more flexible and fast.
First method:
1. Include the recipe for the application in the image recipe:
IMAGE_INSTALL += “applicationname”
2. Make the image as usual:
$ make <imagerule>
Second method:
1. Make sure you are in the platform/<xx> folder and source the environment script:
$ source oe-env
2. Use bitbake to build your application:
$ bitbake <applicationname>
Both methods will put the resulting application binaries in platform/<xx>/build/tmp/work.
In the second method, additional bitbake commands can be invoked. For instance, use the –c flag
to recompile the application without re-fetching the source files.

CCpilot VS 12” Revision: A
Programmer’s Guide 2017-11-23
www.crosscontrol.com 11
4. Software Development Kit
This section is dedicated to useful tips and hints about how to use the Software Development Kit
(SDK) on a Linux development host for application development and debugging purposes.
The SDK is based on the Yocto Project SDK. Refer to the Yocto Project SDK Developer’s Guide
(www.yoctoproject.org/docs/2.2/sdk-manual/sdk-manual.html) for additional information and
tips.
4.1. Downloading and installing the SDK
The toolchain included in the SDK is an ARM GNU/Linux cross compiler based on the standard
GNU GCC compiler toolchain. Additionally, the SDK contains header and library files for CCAux
API and other peripherals. To get the SDK, visit the CrossControl support site. For support on SDK
issues, please contact CrossControl directly.
The SDK comes in the form of a self-extracting shell script. It contains precompiled binaries for
64-bit x86 Linux systems. To install the SDK, move the script to the host computer and run the
following shell command:
$ sh scr iptname.sh -d <sdk instal l di r>
Omitting the -d flag will install the SDK to the default directory, /opt/poky/2.2.1.
Example output from installing the CCpilot VS SDK to /opt/sdk/:
$ sh poky-gl ibc-x86_64-ccpi lot-vs- image-v1000-cortexa9hf-neon-toolchain-2.2 .1 .sh -
d /opt/sdk/
Poky (Yocto Project Reference Distro) SDK instal ler vers ion 2.2 .1
=================================================================
You are about to instal l the SDK to "/opt/sdk/" . Proceed[Y/n]? Y
Extracting SDK... . . . . . . . . . . . . . . . .done
Setting i t up.. .done
SDK has been successfu l ly set up and is ready to be used.
The SDK for CCpilot VS is named poky-glibc-x86_64-ccpilot-vs-image-v1000-cortexa9hf-neon-
toolchain-2.2.1.sh and was created using an x86-64 machine running Ubuntu 14.04 LTS.
4.2. Using the SDK
4.2.1. Starting a new session
Once installed, the SDK contains the sysroots directory with target and host system root file
systems, and an environment setup file; environment-setup-XXXX-linux-gnueabi. The
environment setup file exports the correct $PATH and other important build environment
variables, such as $CC and $CFLAGS. (Read the file content to get an understanding of the default
settings).
This file needs to be sourced before using the SDK each time a new shell session is started:
$ source envi ronment-setup-XXXX- l inux-gnueabi
Now the cross-compiler is ready to use.

CCpilot VS 12” Revision: A
Programmer’s Guide 2017-11-23
www.crosscontrol.com 12
4.2.2. Using correct development headers
The SDK is released containing binary images. This package contains libraries available at the unit
and all header files for utilizing them. The header files are located in:
<sdk-install-dir>/sysroots/<targetsysroot>/usr/include/
and the libraries are found in these two directories:
<sdk-install-dir>/sysroots/<targetsysroot>/lib/
<sdk-install-dir>/sysroots/<targetsysroot>/usr/lib/
These directories are automatically added to the search path when sourcing the environment setup
script and don’t need any special consideration.
If additional development files placed outside of the SDK installation directory is to be used they
can be added to the compiler search path by appending the $CFLAGS/$CXXFLAGS variable. This
can be done either in the project settings or in the Makefile using:
CFLAGS+= – I<path-to-headerf i le -di r> -L<path-to- l ibrary-di r>
4.2.3. Compiler optimizations
The environment setup script automatically sets the –mcpu=<cpu> compiler flag for optimizing
the code for the instruction set generated for the specific processor. Additionally, floating point
computations are automatically set to use hardware acceleration (–mfpu=<fpu>).
In order to optimize floating point additionally, append the -funsafe-math-optimizations flag to the
$CFLAGS/$CXXFLAGS environment variables.
To see which optimizations are done by default, study the content of the environment setup script. All these settings can be overridden after the script has been sourced. See the compiler documentation for additional information about available optimizer flags.
4.2.4. Special considerations using CCAux API
In order to build applications using functions from the CCAux API library two steps need to be
specially considered in either the project file or the Makefile:
1. The $LD variable should be overridden to use the same content as the $CXX variable
2. The $CFLAGS/$CXXFLAGS must be appended with the -DLINUX flag
If omitting these steps, the build will fail. See chapter 6.1 for examples of how to build CCAux API
applications.
4.3. Debugging remotely
To use GDB to debug an application running on the device, the application must have been
compiled with the -g flag. Start gdbserver on the device:
~$ gdbserver :10000 testApplication
Then start the host GDB and connect to the server:
$ arm-poky-l inux-gnueabi -gdb testApplication
$ (gdb) target remote Y.Y.Y.Y:10000

CCpilot VS 12” Revision: A
Programmer’s Guide 2017-11-23
www.crosscontrol.com 13
Above Y.Y.Y.Y is the IP address of the device. Then issue the set sysroot command:
$ (gdb) set sysroot $SDKTARGETSYSROOT
You can now debug the application normally, except that rather than to issue the run command one
should use continue since the application is already running on the remote side.
Note that it is possible to fully debug the application but not to make system calls made by the
application. Such system calls include calls to the soft float library, like divide, add or multiply on
floating point variables. It is therefore recommended to use next rather than step when such system
calls are being made.

CCpilot VS 12” Revision: A
Programmer’s Guide 2017-11-23
www.crosscontrol.com 14
5. Device specifics for CCpilot VS
This section is dedicated to device specifics that require extra attention when programming.
5.1. CAN
In Linux, CAN is interfaced using SocketCAN which is a widely used CAN communication interface
for Linux environments, and is a standard used in the Linux kernel.
Usage of SocketCAN requires knowledge of some system specific settings and details described
herein. For additional SocketCAN information see the official SocketCAN documentation.
5.1.1. Configuration of the device interface
The device node files for the CAN interfaces are can0 … can3 (for a device with 4 CAN interfaces).
The interfaces should be shown when listing all network interfaces with the ifconfig command. The
device drivers are implemented as loadable kernel modules. The modules are can_dev.ko and
flexcan.ko. Startup scripts handle the loading of the kernel modules upon start-up.
When the device has finished its start-up, the CAN driver modules are loaded as a part of the
kernel. This can be checked via terminal access using lsmod command:
$ lsmod | grep can
f lexcan 10092 0
can_dev 8641 1 f lexcan,x l inx
Since the drivers are compiled as modules, unnecessary protocols may be removed or new modules
inserted according to user needs.
The CAN bus itself is not initialized during start-up, it only loads the drivers. Before any
communications can be executed, user must set correct bus speed (as an example 250kbps) by first
writing value into bitrate parameter:
$ sudo ip l ink set can0 type can bitrate 250000
and then setting interface up with ifconfig:
$ sudo i fconf ig can0 up
After this, ifconfig should show can0 as a network interface:
$ i fconf ig
can0 L ink encap:UNSPEC HWaddr 00 -00-00-00-00-00
UP RUNNING NOARP MTU:16 Metr ic:1
RX packets:0 errors :0 dropped:0 overruns:0 f rame:0
TX packets:0 errors :0 dropped:0 overruns:0 carr ier :0
col l i s ions:0 txqueuelen:10
RX bytes:0 (0 .0 B) TX bytes:0 (0 .0 B)
Interrupt:31
5.1.2. Configuring the CAN socket transmission buffer
By default, the CAN driver is configured with a transmission buffer that can hold 10 CAN frames.
As each frame is sent on the bus, the buffer is cleared. However, it is possible to write frames to the
socket faster than the frames are sent, especially if your messages are low-priority frames on a
CCpilot VS 12” Revision: A
Programmer’s Guide 2017-11-23
www.crosscontrol.com 15
high-traffic bus. If your application needs to send more than 10 CAN frames in bursts, it might be a
good idea to increase the size of the transmission buffer:
$ i fconf ig can0 txqueuelen 100
5.1.3. Bus recovery options
It is possible to implement automatic bus recovery after bus off has occurred. State changes are
automatically detected and controller is re-initialized after the specified time period.
Automatic bus recovery from bus off state is by default turned off. It can be turned on using the ip
command, where the wanted restart period in milliseconds is set. For example, a 100 ms restart
period for can0 is set from command line like this:
$ i fconf ig can0 down
$ ip l ink set can0 type can restart -ms 100
$ i fconf ig can0 up
Same commands apply for all available CAN interfaces by replacing can0 appropriately. The period
is possible to set as needed by the application. Value zero turns automatic bus recovery off.
Warning: Enabling automatic bus recovery may disturb other nodes on the bus, if CAN interface
is incorrectly initialized.
5.2. Analog video
For QML applications with analog video, CrossControl recommends using the QtMultimedia
framework rather than CCAux API since the video performance is higher and development process
quicker. For non-QML applications, CCAux API is recommended.
5.2.1. Analogue Video using QtMultimedia
CCLinux includes an example QML application CCVideo for displaying analog video using a
QtCamera instance. This application is for test purposes only, CrossControl recommends
implementing the video functionality into your application for correct behavior. The source code
for CCVideo is provided in both the BSP and SDK.
QtMultimedia uses the gstreamer backend and the application must export the correct video
source:
setenv("QT_GSTREAMER_CAMER ABIN_VIDEOSRC", " imxv4l2videosrc", 1);
5.2.2. Analogue Video using CCAux API
There are some design constraints on the usage of analog video and CCAux API that is important to
highlight, to create a better understanding of what can be done and what is necessary to do within
the applications. Below is a brief video API description for the developers to consider.
The most important CCAuxVideo API functions are as follows:
Initialize (will open file handles, setup basic settings and request frame buffers), select deviceNr=1
for input channel 1:
Video_ini t(VIDEOHANDLE pObj , unsigned char deviceNr )
Select the active channel 1-4, corresponds to the physical port number:

CCpilot VS 12” Revision: A
Programmer’s Guide 2017-11-23
www.crosscontrol.com 16
Video_setActiveChannel(VIDEOHANDLE pObj , VideoChannel channel)
CCpilot VS only has one video channel.
Set the area where video is shown:
Video_setVideoArea(VIDEOHANDLE pObj , unsigned short topLeftX, unsigned short
topLeftY, unsigned short bottomRightX, unsigned short bottomRightY)
Enable or disable (horizontal) mirroring of the video image:
Video_setMirror ing(VIDEOHANDLE pObj , CCStatus mode)
Show (or hide) video image:
Video_showVideo(VIDEOHANDLE pObj , bool show)
Further and more detailed API information can be found in the CCAux API documentation.
CCpilot VS 12” Revision: A
Programmer’s Guide 2017-11-23
www.crosscontrol.com 17
5.3. Graphics
The graphics framework uses the Wayland protocol reference implementation Weston for graphics
operations. Wayland is is fast and efficient, and is used by all modern major Linux desktop systems,
giving it vast standard support in the Linux user space world.
For instance, Qt has a plugin that enables the Qt libraries to be built for Weston. For Qt
applications the impact for that means that it simply needs to be started with a specific
flag, -platform wayland-egl, and built with the correct development libraries. In CCpilot VS, this
flag has been set to the default graphics framework, hence there’s no need to pass the flag.
Weston includes a windowing system, enabling several applications to be run overlapped.
The Wayland protocol does not allow its clients (Qt applications etc.) to have any information about
where on the screen the client is positioned. Therefore, some Qt functions, like QWidget::pos(),
will always give a zero return.
5.4. Serial Number Broadcast interface
The device has a Serial Number Broadcast service (SNB). The SNB does not have programming
interface at the device end, but the broadcasted data output can be handled elsewhere; even in
another device if required.
The message sent is a multicast UDP datagram to address 224.0.0.27. The message contains a char
array with three values separated by tabs; Serial number, Firmware version and device type. The
sender’s IP address is available in datagram headers.
Example data contents (without quotes):
“PR01<tab>10.0 .0<tab>0”
An example implementation of the data listener is available in the BSP: apps/snb/snb_reader.c.

CCpilot VS 12” Revision: A
Programmer’s Guide 2017-11-23
www.crosscontrol.com 18
6. Examples
Source code for the example applications included in the CCLinux reference image
(CCSettingsConsole, CCSettings, CCVideo, CCLauncher, CCMultitouchDemo, etc.) is provided in
both the SDK and BSP. These can be used as templates or starter points for your applications.
Example snippets on how to call the functions provided by CCAux API are found in the CCAux API
documentation and in the examples folder of the CCAux API source code provided in the BSP.
Additionally, this chapter provides examples on the build process.
6.1. Building applications with the SDK
This chapter gives two examples on how build a small example application which uses CCAux API
functions to set the color of the status LED. The first example shows how to build a C++ application
using a Makefile. The second example shows how to build a Qt application with qmake to
autogenerate the Makefile.
6.1.1. C++ Makefile example
This example shows how to build a C++ application example using a Makefile. The source file
example.cpp is listed below. The file consists of a simple main function calling the status LED
functions.
/**
* example.cpp
**/
#include <stdio.h>
#include <FrontLED.h>
#include <CCAuxEr rors .h>
using namespace CrossControl ;
int main(void)
{
pr intf ("Setting FrontLED to blue! \r\n");
FRONTLEDHANDLE pLed = GetFrontLED();
eErr err ;
err = FrontLED_setStandardColor(pLed, BLUE);
i f (err != ERR_SUCCESS)
pr intf ("An error occurred!\r\n");
FrontLED_release(pLed);
return 0;
}
Following is an example Makefile that is used to build example. The additional -Wall flag enables
all warnings and is recommended. This file can easily be expanded to build more complex
applications.

CCpilot VS 12” Revision: A
Programmer’s Guide 2017-11-23
www.crosscontrol.com 19
#
# Makefi le for example using FrontLed
#
# NOTE: before running make, the SDK envi ronment must be set up by
# sourcing the envi ronment f i le
#
TARGET=example
LD = $(CXX)
CC_OBJS = $(TARGET).o
C_OBJS =
OBJS = $(CC_OBJS) $(C_OBJS)
CXXFLAGS+= -DLINUX -Wal l
CFLAGS+= -DLINUX -Wal l
LDFLAGS+= - lcc-aux2 - lpthread
CCCMD = $(CC) -c $(CFLAGS)
CXXCMD = $(CXX) -c $(CXXFLAGS)
al l : c lean
$(TARGET)
$(TARGET): $(OBJS)
$(LD) -o $@ $(OBJS) $(LDFLAGS)
# pattern ru les for object f i les
%.o: %.c
$(CCCMD) $< -o $@
%.o: %.cpp
$(CXXCMD) $< -o $@
c lean:
rm -rf *.o *.e l f *.gdb *~ $(TARGET)
To build example, make sure the environment setup script has been sourced, and then issue the
following command:
$ make example
make will expand the content of the Makefile and the previously sourced environment setup script
to the following output (for CCpilot VS):

CCpilot VS 12” Revision: A
Programmer’s Guide 2017-11-23
www.crosscontrol.com 20
arm-poky-l inux-gnueabi -g++ -march=armv7-a -marm -mfpu=neon -mf loat-abi=hard
-mcpu=cortex-a9 - -sysroot=/opt/vs-sdk/sysroots/cortexa9hf -neon-poky- l inux-
gnueabi -c -O2 -pipe -g -fel iminate-unused-debug-types -DLINUX -Wal l
example.cpp -o example.o
arm-poky-l inux-gnueabi -g++ -march=armv7-a -marm -mfpu=neon -mf loat-abi=hard
-mcpu=cortex-a9 - -sysroot=/opt/vs-sdk/sysroots/cortexa9hf -neon-poky- l inux-
gnueabi -o example example.o -Wl ,-O1 -Wl,- -hash-sty le=gnu -Wl,- -as-needed - lcc-
aux2 - lpthread
6.1.2. Qt qmake example
This example shows how to build a Qt application example-qt. The source file example-qt.cpp is
listed below. The file consists of a simple main function calling the status LED functions and
opening a MessageBox widget.
/**
* example-qt.cpp
**/
#include <FrontLED.h>
#include <CCAuxEr rors .h>
#include <QMessageBox>
#include <QtWidgets/QAppl ication>
using namespace CrossControl ;
int main(int argc, char *argv[])
{
QAppl ication a(argc, argv);
QMessageBox msg;
msg.setText("Setting FrontLED to red! \r\n");
msg.show() ;
FRONTLEDHANDLE pLed = GetFrontLED();
eErr err ;
err = FrontLED_setStandardColor(pLed, RED);
i f (err != ERR_SUCCESS)
pr intf ("An error occurred!\r\n");
FrontLED_release(pLed);
a.exec() ;
return 0;
}
Following is an example Qt project file that is used to build example-qt. It can easily be expanded
for more complex applications.

CCpilot VS 12” Revision: A
Programmer’s Guide 2017-11-23
www.crosscontrol.com 21
#
# Example-qt.pro
#
QT += core gui widgets
TARGET = example-qt
TEMPLATE = app
SOURCES += example-qt.cpp
unix :{
l inux-oe-g++ {
message(Compi l ing for Yocto L inux)
DEFINES+=LINUX
L IBS += - lcc-aux2
}
}
To autogenerate the Makefile from the project file, make sure the environment setup script has
been sourced, and then run qmake:
$ qmake
Project MESSAGE: Compi l ing for Yocto L inux
Then, run make in order to build the application:
$ make example-qt
make will expand the content of the Makefile and the previously sourced environment setup script
to the following output (for CCpilot VS):
arm-poky-l inux-gnueabi -g++ -march=armv7-a -marm -mfpu=neon -mf loat-abi=hard
-mcpu=cortex-a9 - -sysroot=/opt/vs-sdk/sysroots/cortexa9hf -neon-poky- l inux-
gnueabi -c -pipe -O2 -pipe -g -fel iminate-unused-debug-types -O2 -Wal l -W -
D_REENTRANT -fPIC -DLINUX -DQT_NO_DEBUG -DQT_WIDGETS_LIB -DQT_GUI_LIB -
DQT_CORE_LIB - I . - I . ./vs-sdk/sysroots/cortexa9hf-neon-poky- l inux-
gnueabi/usr/ include/qt5 -I . ./vs-sdk/sysroots/cortexa9hf -neon-poky-l inux-
gnueabi/usr/ include/qt5/QtWidgets - I . ./vs-sdk/sysroots/cortexa9hf -neon-poky-l inux-
gnueabi/usr/ include/qt5/QtGui - I . ./vs-sdk/sysroots/cortexa9hf -neon-poky-l inux-
gnueabi/usr/ include/qt5/QtCore - I . - I . ./vs-sdk/sysroots/cortexa9hf -neon-poky-l inux-
gnueabi/usr/ l ib/qt5/mkspecs/ l inux -oe-g++ -o example-qt.o example-qt.cpp
arm-poky-l inux-gnueabi -g++ -march=armv7-a -marm -mfpu=neon -mf loat-abi=hard
-mcpu=cortex-a9 - -sysroot=/opt/vs-sdk/sysroots/cortexa9hf -neon-poky- l inux-
gnueabi -Wl ,-O1 -Wl,- -hash-sty le=gnu -Wl,- -as-needed -Wl,-O1 -o example-qt
example-qt.o - lcc-aux2 - lQt5Widgets - lQt5Gui - lQt5Core - lEGL - lGLESv2 - lpthread

CCpilot VS 12” Revision: A
Programmer’s Guide 2017-11-23
Phone: +46 271 75 76 00
www.crosscontrol.com
CrossControl
Box 83, SE-822 22 ALFTA
Fax +46 271 75 76 89
Kopparlundsvägen 14
SE-721 30 VÄSTERÅS
Fax + 46 21 40 32 10
Fyrisborgsgatan 4
SE-754 50 UPPSALA
Fax + 46 18 12 38 85
7. Technical support
Contact your reseller or supplier for help with possible problems with your device. In order to get
the best help, you should have access to your device and be prepared with the following information
before you contact support.
The part number and serial number of the device, which you find on the brand label.
Date of purchase, which is found on the invoice.
The conditions and circumstances under which the problem arises.
Status indicator patterns (i.e. LED blink pattern).
Prepare a system report on the device, using CCSettingsConsole (if possible).
Detailed description of all external equipment connected to the unit (when relevant to the
problem).
8. Trademarks and terms of use
© 2017 CrossControl
All trademarks sighted in this document are the property of their respective owners.
CCpilot is a trademark which is the property of CrossControl.
Linux® is a registered trademark of Linus Torvalds.
Microsoft® and Windows® are registered trademarks which belong to Microsoft Corporation in
the USA and/or other countries.
Arm® is a registered trademark of Arm Limited (or its subsidiaries) in the US and/or elsewhere.
Qt is a registered trademark of The Qt Company Ltd. and its subsidiaries.
CrossControl is not responsible for editing errors, technical errors or for material which has been
omitted in this document. CrossControl is not responsible for unintentional damage or for damage
which occurs as a result of supplying, handling or using of this material including the devices and
software referred to herein. The information in this handbook is supplied without any guarantees
and can change without prior notification.
For CrossControl licensed software, CrossControl grants you a license, to under CrossControl’s
intellectual property rights, to use, reproduce, distribute, market and sell the software, only as a
part of or integrated within, the devices for which this documentation concerns. Any other usage,
such as, but not limited to, reproduction, distribution, marketing, sales and reverse engineer of this
documentation, licensed software source code or any other affiliated material may not be
performed without written consent of CrossControl.
CrossControl respects the intellectual property of others, and we ask our users to do the same.
Where software based on CrossControl software or products is distributed, the software may only
be distributed in accordance with the terms and conditions provided by the reproduced licensors.
For end-user license agreements (EULAs), copyright notices, conditions, and disclaimers,
regarding certain third-party components used in the device, refer to the copyright notices
documentation.


![Irrigation Materials - bmtc-sa.com1].pdf · Irrigation Materials ... 65145001 7101-BSP K-RAIN 1" BSP PVC 24VAC/60 691.00 ... 65145010 7102-BSP K-RAIN 2"BSP PVC 24VAC 731.00](https://static.documents.pub/doc/80x56/5b9e30aa09d3f204248b4b86/irrigation-materials-bmtc-sa-1pdf-irrigation-materials-65145001-7101-bsp.jpg)


