98
6 Technology Park Drive Westford, MA 01886-3140 http://www.swhouse.com Fax: 978-5 77-4392 Ph one: 978-577-4000 C•CURE 9000 Version 2.0 VideoEdge 4.0 Integration User Guide REVISION C0
| Date post: | 02-Mar-2016 |
| Category: |
Documents |
| Upload: | david-josue-yanac |
| View: | 103 times |
| Download: | 0 times |

7/18/2019 CCURE 9000 v2 0 Videoedge 4 0 User Guide Lt En
http://slidepdf.com/reader/full/ccure-9000-v2-0-videoedge-4-0-user-guide-lt-en 1/98
6 Technology Park DriveWestford, MA 01886-3140http://www.swhouse.com
Fax: 978-577-4392 Phone: 978-577-4000
C•CURE 9000
Version 2.0
VideoEdge 4.0 Integration
User GuideREVISION C0

7/18/2019 CCURE 9000 v2 0 Videoedge 4 0 User Guide Lt En
http://slidepdf.com/reader/full/ccure-9000-v2-0-videoedge-4-0-user-guide-lt-en 2/98
Copyright and Trademarks
C•CURE and Software House are registered trademarks of Tyco International Ltd. and itsrespective companies.
The trademarks, logos, and service marks displayed on this document are registered in theUnited States [or other countries]. Any misuse of the trademarks is strictly prohibited andTyco International Ltd. will aggressively enforce its intellectual property rights to the fullestextent of the law, including pursuit of criminal prosecution wherever necessary. All
trademarks not owned by Tyco International Ltd. are the property of their respective owners,and are used with permission or allowed under applicable laws.
Product offerings and specifications are subject to change without notice. Actual products mayvary from photos. Not all products include all features. Availability varies by region; contactyour sales representative.
Software version: 2.0Document Number: UM-256Revision Number: C0Release Date: June, 2011
This manual is proprietary information of Software House. Unauthorized reproduction of anyportion of this manual is prohibited. The material in this manual is for information purposesonly. It is subject to change without notice. Software House assumes no responsibility forincorrect information this manual may contain.
Copyright © 2011 by Tyco International Ltd. and its respective companies.
All Rights Reserved.

7/18/2019 CCURE 9000 v2 0 Videoedge 4 0 User Guide Lt En
http://slidepdf.com/reader/full/ccure-9000-v2-0-videoedge-4-0-user-guide-lt-en 3/98
C•CURE9000 VideoEdge 4.0 Integration User Guide iii
Table o f Con tents
Preface
How to Use this Manual . . . . . . . . . . . . . . . . . . . . . . . . . . . . . . . . . . . . . . . . . . . . . . . . . . . . . . viii
Find More Information . . . . . . . . . . . . . . . . . . . . . . . . . . . . . . . . . . . . . . . . . . . . . . . . . . . . . . . . . . x
Conventions . . . . . . . . . . . . . . . . . . . . . . . . . . . . . . . . . . . . . . . . . . . . . . . . . . . . . . . . . . . . . . . . . . .xi
Chapter 1 Introduction
Overview . . . . . . . . . . . . . . . . . . . . . . . . . . . . . . . . . . . . . . . . . . . . . . . . . . . . . . . . . . . 1-2
Features . . . . . . . . . . . . . . . . . . . . . . . . . . . . . . . . . . . . . . . . . . . . . . . . . . . . . . . . . . . . . 1-3
Chapter 2 Installation
Installation Overview . . . . . . . . . . . . . . . . . . . . . . . . . . . . . . . . . . . . . . . . . . . . . . . . . 2-2Before You Begin . . . . . . . . . . . . . . . . . . . . . . . . . . . . . . . . . . . . . . . . . . . . . . . . . . . . . . . . . 2-3
Checking Networks Status . . . . . . . . . . . . . . . . . . . . . . . . . . . . . . . . . . . . . . . . . . . . . 2-3
Checking System Privileges . . . . . . . . . . . . . . . . . . . . . . . . . . . . . . . . . . . . . . . . . . . . 2-3Database Installation . . . . . . . . . . . . . . . . . . . . . . . . . . . . . . . . . . . . . . . . . . . . . . . . . . 2-3
Installing the VideoEdge 4.0 Integration Interface . . . . . . . . . . . . . . . . . . . . . . . . . 2-4Running the Setup Program. . . . . . . . . . . . . . . . . . . . . . . . . . . . . . . . . . . . . . . . . . . . 2-4Starting the Server Components . . . . . . . . . . . . . . . . . . . . . . . . . . . . . . . . . . . . . . . 2-10
Uninstalling the VideoEdge 4.0 Integration Interface . . . . . . . . . . . . . . . . . . . . . 2-11
Chapter 3 VideoEdge 4.0 Server
VideoEdge 4.0 Server Editor Overview . . . . . . . . . . . . . . . . . . . . . . . . . . . . . . . . . . 3-2Accessing the VideoEdge 4.0 Server Editor . . . . . . . . . . . . . . . . . . . . . . . . . . . . . . . . . . 3-2Creating a VideoEdge 4.0 Server . . . . . . . . . . . . . . . . . . . . . . . . . . . . . . . . . . . . . . . . . . . 3-3Deleting a VideoEdge 4.0 Server . . . . . . . . . . . . . . . . . . . . . . . . . . . . . . . . . . . . . . . . . . . 3-3Configuring an VideoEdge 4.0 Server . . . . . . . . . . . . . . . . . . . . . . . . . . . . . . . . . . . . . . . 3-5

7/18/2019 CCURE 9000 v2 0 Videoedge 4 0 User Guide Lt En
http://slidepdf.com/reader/full/ccure-9000-v2-0-videoedge-4-0-user-guide-lt-en 4/98
Table of Contents
iv C•CURE9000 VideoEdge 4.0 Integration User Guide
VideoEdge 4.0 Server General Tab . . . . . . . . . . . . . . . . . . . . . . . . . . . . . . . . . . . . . .3-6
VideoEdge 4.0 Server General Tab Definitions . . . . . . . . . . . . . . . . . . . . . . . . . . . . . . . 3-6VideoEdge 4.0 Server Alarms Tab . . . . . . . . . . . . . . . . . . . . . . . . . . . . . . . . . . . . . . .3-9
VideoEdge 4.0 Server Alarms Tab Definitions . . . . . . . . . . . . . . . . . . . . . . . . . . . . . . . 3-10Examples of Defining Alarms for a VideoEdge 4.0 Server . . . . . . . . . . . . . . . . . . . . . 3-12
VideoEdge 4.0 Server State Images Tab . . . . . . . . . . . . . . . . . . . . . . . . . . . . . . . . .3-15VideoEdge 4.0 Server State Images Icons . . . . . . . . . . . . . . . . . . . . . . . . . . . . . . . . . . . 3-15Customizing State Images for a VideoEdge 4.0 Server . . . . . . . . . . . . . . . . . . . . . . . . 3-16
Chapter 4 VideoEdge 4.0 Video Camera
VideoEdge 4.0 Video Camera Overview . . . . . . . . . . . . . . . . . . . . . . . . . . . . . . . . .4-2Accessing the VideoEdge 4.0 Video Camera Editor . . . . . . . . . . . . . . . . . . . . . . . . . . . 4-2Importing a Camera . . . . . . . . . . . . . . . . . . . . . . . . . . . . . . . . . . . . . . . . . . . . . . . . . . . . . . 4-3Creating a Camera . . . . . . . . . . . . . . . . . . . . . . . . . . . . . . . . . . . . . . . . . . . . . . . . . . . . . . . 4-4
Deleting a VideoEdge 4.0 Video Camera . . . . . . . . . . . . . . . . . . . . . . . . . . . . . . . . . . . . 4-5Configuring an VideoEdge 4.0 Video Camera . . . . . . . . . . . . . . . . . . . . . . . . . . . . . . . . 4-6
VideoEdge 4.0 Video Camera General Tab . . . . . . . . . . . . . . . . . . . . . . . . . . . . . . .4-8VideoEdge 4.0 Video Camera General Tab Definitions . . . . . . . . . . . . . . . . . . . . . . . . 4-8Preset Controls . . . . . . . . . . . . . . . . . . . . . . . . . . . . . . . . . . . . . . . . . . . . . . . . . . . . . . . . . . 4-9Pattern Controls . . . . . . . . . . . . . . . . . . . . . . . . . . . . . . . . . . . . . . . . . . . . . . . . . . . . . . . . 4-10
VideoEdge 4.0 Video Camera Alarms Tab . . . . . . . . . . . . . . . . . . . . . . . . . . . . . . .4-11VideoEdge 4.0 Video Camera Alarms Tab Definitions . . . . . . . . . . . . . . . . . . . . . . . . 4-12Defining an Alarm for a Camera . . . . . . . . . . . . . . . . . . . . . . . . . . . . . . . . . . . . . . . . . . 4-14
VideoEdge 4.0 Video Camera State ImagesTab . . . . . . . . . . . . . . . . . . . . . . . . . . .4-16VideoEdge 4.0 Video Camera State Images Icons . . . . . . . . . . . . . . . . . . . . . . . . . . . . 4-16Customizing State Images for a VideoEdge 4.0 Video Camera . . . . . . . . . . . . . . . . . 4-17
VideoEdge 4.0 Video Camera Viewer . . . . . . . . . . . . . . . . . . . . . . . . . . . . . . . . . . .4-18Retrieving a Recorded Video . . . . . . . . . . . . . . . . . . . . . . . . . . . . . . . . . . . . . . . . . . . . . 4-19Exporting a Video . . . . . . . . . . . . . . . . . . . . . . . . . . . . . . . . . . . . . . . . . . . . . . . . . . . . . . . 4-21
VideoEdge 4.0 Playback Controls . . . . . . . . . . . . . . . . . . . . . . . . . . . . . . . . . . . . . .4-22Instant Playback Controls . . . . . . . . . . . . . . . . . . . . . . . . . . . . . . . . . . . . . . . . . . . . . . . . 4-23Playback Controls . . . . . . . . . . . . . . . . . . . . . . . . . . . . . . . . . . . . . . . . . . . . . . . . . . . . . . . 4-24

7/18/2019 CCURE 9000 v2 0 Videoedge 4 0 User Guide Lt En
http://slidepdf.com/reader/full/ccure-9000-v2-0-videoedge-4-0-user-guide-lt-en 5/98
Table of Contents
C•CURE9000 VideoEdge 4.0 Integration User Guide v
Chapter 5 Video View
Video View Overview . . . . . . . . . . . . . . . . . . . . . . . . . . . . . . . . . . . . . . . . . . . . . . . . 5-2Accessing the Video View Editor . . . . . . . . . . . . . . . . . . . . . . . . . . . . . . . . . . . . . . . . . . . 5-2Creating a Video View . . . . . . . . . . . . . . . . . . . . . . . . . . . . . . . . . . . . . . . . . . . . . . . . . . . . 5-3Deleting a Video View . . . . . . . . . . . . . . . . . . . . . . . . . . . . . . . . . . . . . . . . . . . . . . . . . . . . 5-4Configuring a Video View . . . . . . . . . . . . . . . . . . . . . . . . . . . . . . . . . . . . . . . . . . . . . . . . . 5-5Video View Editor Field Definitions . . . . . . . . . . . . . . . . . . . . . . . . . . . . . . . . . . . . . . . . 5-6
VideoEdge 4.0 Video View Viewer . . . . . . . . . . . . . . . . . . . . . . . . . . . . . . . . . . . . . 5-7
Chapter 6 Video Tour
Video Tour Overview . . . . . . . . . . . . . . . . . . . . . . . . . . . . . . . . . . . . . . . . . . . . . . . . . 6-2Accessing the Video Tour Editor . . . . . . . . . . . . . . . . . . . . . . . . . . . . . . . . . . . . . . . . . . . 6-3Creating a Video Tour . . . . . . . . . . . . . . . . . . . . . . . . . . . . . . . . . . . . . . . . . . . . . . . . . . . . 6-4Deleting a Video Tour . . . . . . . . . . . . . . . . . . . . . . . . . . . . . . . . . . . . . . . . . . . . . . . . . . . . 6-4
Configuring a Video Tour . . . . . . . . . . . . . . . . . . . . . . . . . . . . . . . . . . . . . . . . . . . . . . . . . 6-5VideoEdge 4.0 Video Tour General Tab . . . . . . . . . . . . . . . . . . . . . . . . . . . . . . . . . 6-6
VideoEdge 4.0 Video Tour General Tab Definitions . . . . . . . . . . . . . . . . . . . . . . . . . . . 6-6Preview Window . . . . . . . . . . . . . . . . . . . . . . . . . . . . . . . . . . . . . . . . . . . . . . . . . . . . . . . . 6-7
Chapter 7 VideoEdge 4.0 Journal Messages
C•CURE 9000-VideoEdge 4.0 Integration Journal Messages Definitions . . . . . 7-2
Chapter 8 VideoEdge 4.0 Limitations
VideoEdge 4.0 Integration Limitations . . . . . . . . . . . . . . . . . . . . . . . . . . . . . . . . . . 8-2
Index

7/18/2019 CCURE 9000 v2 0 Videoedge 4 0 User Guide Lt En
http://slidepdf.com/reader/full/ccure-9000-v2-0-videoedge-4-0-user-guide-lt-en 6/98
Table of Contents
vi C•CURE9000 VideoEdge 4.0 Integration User Guide

7/18/2019 CCURE 9000 v2 0 Videoedge 4 0 User Guide Lt En
http://slidepdf.com/reader/full/ccure-9000-v2-0-videoedge-4-0-user-guide-lt-en 7/98
C•CURE9000 VideoEdge 4.0 Integration User Guide vii
Preface
The C•CURE 9000 VideoEdge 4.0 Integration User Guide is for new andexperienced security system users who want to learn to use the C•CURE 9000
VideoEdge 4.0 Integration for the C•CURE 9000 Security ManagementSystem.
In this preface
How to Use this Manual .................................................................................................viiiFind More Information........................................................................................................xConventions .........................................................................................................................xi

7/18/2019 CCURE 9000 v2 0 Videoedge 4 0 User Guide Lt En
http://slidepdf.com/reader/full/ccure-9000-v2-0-videoedge-4-0-user-guide-lt-en 8/98
How to Use this Manual
viii C•CURE9000 VideoEdge 4.0 Integration User Guide
How to Use this Manual
This manual contains the following chapters that provide information aboutthe C•CURE 9000 VideoEdge 4.0 Integration. Turn to the appropriate chapterfor the information you need.
Chapter 1, Introduction
Provides an overview of this product.
Chapter 2, Installation
Provides detailed information for installing and uninstalling C•CURE 9000VideoEdge 4.0 Integration software.
Chapter 3, VideoEdge 4.0 Server
Describes how to use the VideoEdge 4.0 Video Server Editor to create a basicconfiguration in the C•CURE 9000 system.
Chapter 4, VideoEdge 4.0 Video Camera
Provides detailed information about VideoEdge 4.0 Video Camera and how touse it.
Chapter 5, Video View
Provides the basic information about Video View.
Chapter 6, Video Tour
Provides the basic information about Video Tour.

7/18/2019 CCURE 9000 v2 0 Videoedge 4 0 User Guide Lt En
http://slidepdf.com/reader/full/ccure-9000-v2-0-videoedge-4-0-user-guide-lt-en 9/98
How to Use this Manual
C•CURE9000 VideoEdge 4.0 Integration User Guide ix
Chapter 7, VideoEdge 4.0 Journal Messages
Defines the Journal Messages you receive concerning the VideoEdge 4.0C•CURE 9000.

7/18/2019 CCURE 9000 v2 0 Videoedge 4 0 User Guide Lt En
http://slidepdf.com/reader/full/ccure-9000-v2-0-videoedge-4-0-user-guide-lt-en 10/98
Find More Information
x C•CURE9000 VideoEdge 4.0 Integration User Guide
Find More Information
You can access C•CURE 9000 manuals and online Help for more informationabout C•CURE 9000.
Manuals
C•CURE 9000 software manuals and Software House hardware manuals are
available in Adobe PDF format on the C•CURE 9000 DVD.You can access the manuals if you copy the appropriate PDF files from theC•CURE 9000 Installation DVD English\Manuals folder and install theAdobe Acrobat Reader. Adobe Acrobat Reader can be installed from theC•CURE 9000 Installation DVD English\Reader folder.
The available C•CURE 9000 and Software House manuals are listed in theC•CURE 9000 Getting Started Guide and Help section, and appear ashyperlinks in the online.pdf file on the C•CURE 9000 DVD in theEnglish\Manuals folder.
These manuals are also available from the Software House Member Centerwebsite: http://membercenter.swhouse.com/home/default.aspx.
Online Help
You can access C•CURE 9000 Help by pressing F1 or click Help from themenu bar in the Administration/Monitoring Station applications.
Windows Help
You can get help for the Windows products by selecting Help from the specificWindows Start menu or by going to the Microsoft website atwww.microsoft.com.

7/18/2019 CCURE 9000 v2 0 Videoedge 4 0 User Guide Lt En
http://slidepdf.com/reader/full/ccure-9000-v2-0-videoedge-4-0-user-guide-lt-en 11/98
Conventions
C•CURE9000 VideoEdge 4.0 Integration User Guide xi
Conventions
This guide uses the following text formats and symbols.
The following items are used to indicate important information.
Convention Meaning
Bold This font indicates screen elements, and also indicates when youshould take a direct action in a procedure.
Bold font describes one of the following items:
A command or character to type, or
A button or option on the screen to press, or
A key on your keyboard to press
A screen element or name
Regular italic font Indicates a new term.
<text> Indicates a variable.
NOTE Indicates a note. Notes call attention to any item of information that maybe of special importance.
TIPIndicates an alternate method of performing a task.
Indicates a caution. A caution contains information essential to avoiddamage to the system. A caution can pertain to hardware or software.
Indicates a warning. A warning contains information that advises users
that failure to avoid a specific action could result in physical harm to theuser or to the hardware.
Indicates a danger. A danger contains information that users must knowto avoid death or serious injury.

7/18/2019 CCURE 9000 v2 0 Videoedge 4 0 User Guide Lt En
http://slidepdf.com/reader/full/ccure-9000-v2-0-videoedge-4-0-user-guide-lt-en 12/98
Conventions
xii C•CURE9000 VideoEdge 4.0 Integration User Guide

7/18/2019 CCURE 9000 v2 0 Videoedge 4 0 User Guide Lt En
http://slidepdf.com/reader/full/ccure-9000-v2-0-videoedge-4-0-user-guide-lt-en 13/98
C•CURE9000 VideoEdge 4.0 Integration User Guide 1–1
1
Introduction
This chapter introduces the VideoEdge 4.0 Integration software that providesintegration between the VideoEdge 4.0 and C•CURE 9000.
In this chapter:
Overview........................................................................................................................... 1-2Features.............................................................................................................................. 1-3

7/18/2019 CCURE 9000 v2 0 Videoedge 4 0 User Guide Lt En
http://slidepdf.com/reader/full/ccure-9000-v2-0-videoedge-4-0-user-guide-lt-en 14/98
Overview
1–2 C•CURE9000 VideoEdge 4.0 Integration User Guide
Overview
VideoEdge 4.0 integration is a C•CURE 9000 integration application whichcan configure VideoEdge 4.0 video servers and video cameras. The operatorcan display video views, video tours, perform PTZ controls and trigger alarmevents or camera actions when the camera alarm is activated.

7/18/2019 CCURE 9000 v2 0 Videoedge 4 0 User Guide Lt En
http://slidepdf.com/reader/full/ccure-9000-v2-0-videoedge-4-0-user-guide-lt-en 15/98
Features
C•CURE9000 VideoEdge 4.0 Integration User Guide 1–3
Features
The following is a list of major features supported by this integration:
Live video
Simultaneous live and recorded video views from up to 16 cameras
Audio support
Up to four live video camera windows based on events
Video ExportPlayback of pre-recorded video
Video control such as PTZ (domes only)
Audio control
Video views
Video toursVideo alarms
PTZ presets based on events, alarm inputs or video tours

7/18/2019 CCURE 9000 v2 0 Videoedge 4 0 User Guide Lt En
http://slidepdf.com/reader/full/ccure-9000-v2-0-videoedge-4-0-user-guide-lt-en 16/98
Features
1–4 C•CURE9000 VideoEdge 4.0 Integration User Guide

7/18/2019 CCURE 9000 v2 0 Videoedge 4 0 User Guide Lt En
http://slidepdf.com/reader/full/ccure-9000-v2-0-videoedge-4-0-user-guide-lt-en 17/98
C•CURE9000 VideoEdge 4.0 Integration User Guide 2–1
2
Installation
This chapter provides instructions for installing the VideoEdge 4.0 Integrationsoftware on a C•CURE 9000 server or client system.
In this chapter:
Installation Overview...................................................................................................... 2-2Installing the VideoEdge 4.0 Integration Interface...................................................... 2-4Uninstalling the VideoEdge 4.0 Integration Interface ...............................................2-11

7/18/2019 CCURE 9000 v2 0 Videoedge 4 0 User Guide Lt En
http://slidepdf.com/reader/full/ccure-9000-v2-0-videoedge-4-0-user-guide-lt-en 18/98
Installation Overview
2–2 C•CURE9000 VideoEdge 4.0 Integration User Guide
Installation Overview
Before installing the C•CURE 9000 VideoEdge 4.0 Integration software, youmust first install C•CURE 9000 software on your target computer. Forinformation on installing C•CURE 9000, see the C•CURE 9000 Installation andUpgrade Guide.
Similar to the C•CURE 9000 system, VideoEdge 4.0 Integration has Client andServer components. You must install the client components on everycomputer that runs C•CURE 9000 client applications, and you must install theServer components on the C•CURE 9000 server computer. It is recommendedthat VideoEdge 4.0 Integration client has at least 4GB memory and enables3GB model .
Table 2-1 on page 2-2 lists the steps to install and register the C•CURE 9000VideoEdge 4.0 Integration on each computer in your C•CURE 9000 system.Perform these steps in order.
Table 2-1: Standard Installation Tasks
NOTE VideoEdge 4.0 Integration client don’t support Windows 2008.
Task See...
1. Install C •CURE 9000. C•CURE 9000 Installation and UpgradeGuide
2. Close any open applications and disablevirus checking software.
3. Perform the pre-installation steps. “Before You Begin” on page 2-3
Note: Stop the Crossfire servers if C•CURE9000 is already installed.
4. Start the C •CURE 9000 VideoEdge 4.0Integration installation program.
“Installing the VideoEdge 4.0 IntegrationInterface” on page 2-4
5. Verify the license for the VideoEdge 4.0software by running the License programon your C•CURE 9000 server.
C•CURE 9000 Installation and UpgradeGuid e
6. When the Installation and registration arecomplete, restart the services.

7/18/2019 CCURE 9000 v2 0 Videoedge 4 0 User Guide Lt En
http://slidepdf.com/reader/full/ccure-9000-v2-0-videoedge-4-0-user-guide-lt-en 19/98
Installation Overview
C•CURE9000 VideoEdge 4.0 Integration User Guide 2–3
Before You Begin
You may need to perform some pre-installation steps before you install theC•CURE 9000 VideoEdge 4.0 Integration.
Checking Networks Status
If you are installing C•CURE 9000 on a corporate network, be sure tocoordinate with your corporate network administrator. Check that thenetwork is working properly.
Checking System Privileges
To perform the installation, you must have appropriate Windowspermissions. You must be in the local Administrators group, or haveequivalent privileges. See the Microsoft Operating System documentation oryour system administrator for more information.
If you do not have sufficient permissions, the error message is displayed asshown in Figure 2-1 on page 2-3
Figure 2-1: Privileges Error Message
Database Installation
If you are installing server components of the C•CURE 9000 VideoEdge 4.0Integration, the C•CURE 9000 VideoEdge 4.0 Integration adds some tables tothe C•CURE 9000 database. Currently, the C•CURE 9000 VideoEdge 4.0Integration does not support installation with C•CURE 9000 on an OracleDatabase. Therefore, you must install on a C•CURE 9000 system that is usingSQL Server. The C•CURE 9000 VideoEdge 4.0 Integration install programautomatically finds the C•CURE 9000 database and adds tables and initialdata to it.

7/18/2019 CCURE 9000 v2 0 Videoedge 4 0 User Guide Lt En
http://slidepdf.com/reader/full/ccure-9000-v2-0-videoedge-4-0-user-guide-lt-en 20/98
Installing the VideoEdge 4.0 Integration Interface
2–4 C•CURE9000 VideoEdge 4.0 Integration User Guide
Installing the VideoEdge 4.0 Integration Interface
You can install the C•CURE 9000 VideoEdge 4.0 Integration software on alocal computer either from a local drive or from a shared drive over anetwork.
To Install on a Local Computer
1. Log into the server or client with Windows administration privileges.
2. Run CCURE_9000_VideoEdge4.0_Integration.exe from the installationkit.
3. Follow the instructions, as described in “Running the Setup Program” onpage 2-4 .
To Install over the Network
1. Log into the server or client with the appropriate Windows privileges.
2. Copy the installation kit for the C•CURE 9000 VideoEdge 4.0 Integrationto a share on another machine.
3. From your system, map a share to the remote share over the network.
4. Run the CCURE_9000_VideoEdge4.0_Integration.exe from the
installation kit, as described in “Running the Setup Program” on page 2-4 .
Running the Setup Program
To install the C•CURE 9000 VideoEdge 4.0 Integration software, run theCCURE_9000_VideoEdge4.0_Integration.exe from the installation kit.
To Run the Setup Program
1. Navigate to the installation kit folder.
2. Double-click CCURE_9000_VideoEdge4.0_Integration.exe.
NOTE For information about share folders, refer to your Microsoftdocumentation or see your system administrator.

7/18/2019 CCURE 9000 v2 0 Videoedge 4 0 User Guide Lt En
http://slidepdf.com/reader/full/ccure-9000-v2-0-videoedge-4-0-user-guide-lt-en 21/98
Installing the VideoEdge 4.0 Integration Interface
C•CURE9000 VideoEdge 4.0 Integration User Guide 2–5
3. The InstallShield Wizard dialog box, shown in Figure 2-2 on page 2-5 ,appears.
Figure 2-2: Preparing to Install
The Setup program then checks the system to see if it meets minimumrequirements. If minimum requirements are met, a Welcome dialog boxopens, as shown in Figure 2-3 on page 2-5 .
Figure 2-3: Welcome Dialog Box

7/18/2019 CCURE 9000 v2 0 Videoedge 4 0 User Guide Lt En
http://slidepdf.com/reader/full/ccure-9000-v2-0-videoedge-4-0-user-guide-lt-en 22/98
Installing the VideoEdge 4.0 Integration Interface
2–6 C•CURE9000 VideoEdge 4.0 Integration User Guide
4. Click Next , a warning message is shown on the Welcome dialog box toinform you that if you install the VideoEdge 4.0 Integration, you will nolonger be able to user VideoEdge 3.0 with C•CURE 9000, as shown inFigure 2-4 on page 2-6 .
Figure 2-4: Welcome Dialog Box - Warning Message
5. Click Continue to proceed with the installation. A Custom Setup dialogbox opens, as shown in Figure 2-5 on page 2-6 .
Figure 2-5: Custom Setup Dialog Box

7/18/2019 CCURE 9000 v2 0 Videoedge 4 0 User Guide Lt En
http://slidepdf.com/reader/full/ccure-9000-v2-0-videoedge-4-0-user-guide-lt-en 23/98
Installing the VideoEdge 4.0 Integration Interface
C•CURE9000 VideoEdge 4.0 Integration User Guide 2–7
In the Custom Setup dialog box, you can can choose to install the ServerComponent, the Client Component, or both. If you click on a component,
you can choose from the context menu shown in “Custom SetupSelection” on page 2-7 . If you do not want the Server Componentinstalled, click under the Server Component. Similarly, if you do notwant to install the Client Component, click under the ClientComponent.
Figure 2-6: Custom Setup Selection

7/18/2019 CCURE 9000 v2 0 Videoedge 4 0 User Guide Lt En
http://slidepdf.com/reader/full/ccure-9000-v2-0-videoedge-4-0-user-guide-lt-en 24/98
Installing the VideoEdge 4.0 Integration Interface
2–8 C•CURE9000 VideoEdge 4.0 Integration User Guide
6. Click Next to continue. The Database Server dialog box opens, as shownin “Database Server Dialog Box” on page 2-8 , so you can choose the
database server.Figure 2-7: Database Server Dialog Box
7. After configuration, click Next to open the Ready to Install the Program dialog box, as shown in Figure 2-8 on page 2-8
Figure 2-8: Ready to Install the Program Dialog Box
I t lli th Vid Ed 4 0 I t ti I t f
7/18/2019 CCURE 9000 v2 0 Videoedge 4 0 User Guide Lt En
http://slidepdf.com/reader/full/ccure-9000-v2-0-videoedge-4-0-user-guide-lt-en 25/98
Installing the VideoEdge 4.0 Integration Interface
C•CURE9000 VideoEdge 4.0 Integration User Guide 2–9
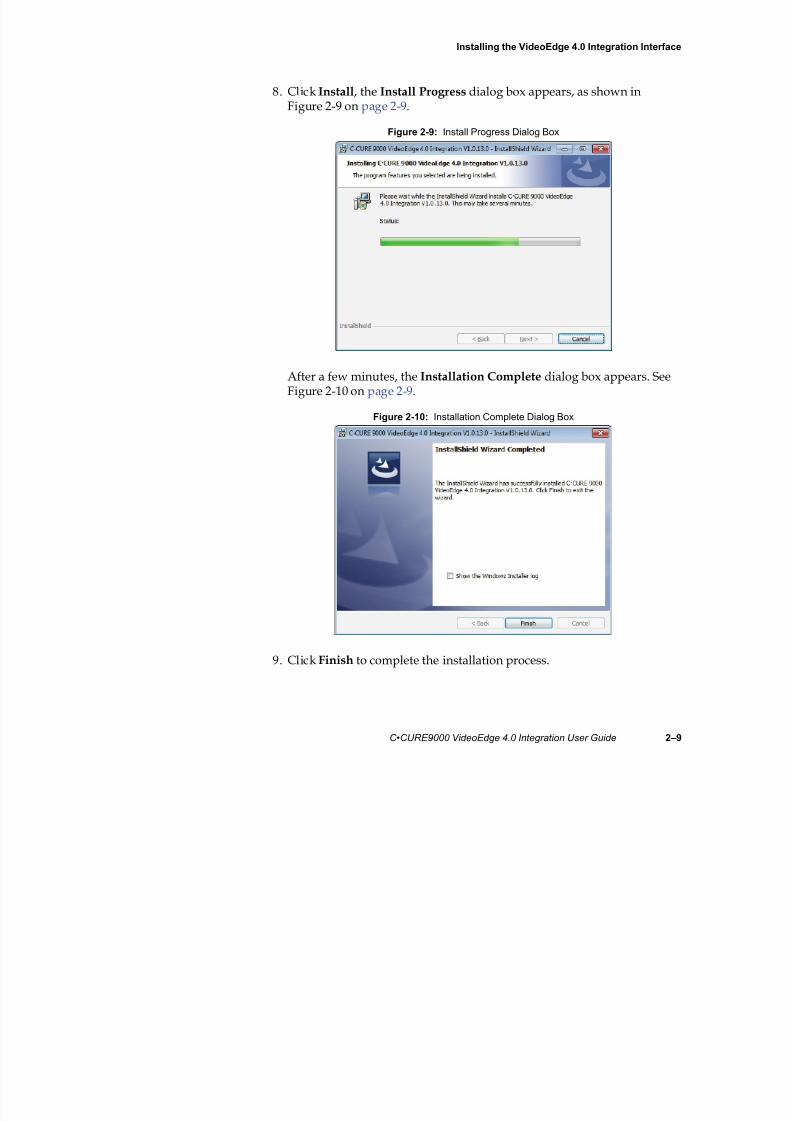
8. Click Install , the Install Progress dialog box appears, as shown inFigure 2-9 on page 2-9 .
Figure 2-9: Install Progress Dialog Box
After a few minutes, the Installation Complete dialog box appears. SeeFigure 2-10 on page 2-9 .
Figure 2-10: Installation Complete Dialog Box
9. Click Finish to complete the installation process.
Installing the VideoEdge 4 0 Integration Interface

7/18/2019 CCURE 9000 v2 0 Videoedge 4 0 User Guide Lt En
http://slidepdf.com/reader/full/ccure-9000-v2-0-videoedge-4-0-user-guide-lt-en 26/98
Installing the VideoEdge 4.0 Integration Interface
2–10 C•CURE9000 VideoEdge 4.0 Integration User Guide
Starting the Server Components
Before you can configure a VideoEdge 4.0 video server and video camera, youmust start the VideoEdge 4.0 Integration server component using theC•CURE 9000 Server Management Application Server Components tab.
1. From the Start Menu, select Start>All Programs>Software House>Server Configuration . The C•CURE 9000 Server ManagementApplication opens.
2. Click Server Component tab.
3. Right-click ConnectedPro.HardwareInterface.VideoEdge 4.0 IntegrationInterface and select Start Server Component from the context menu.
Uninstalling the VideoEdge 4.0 Integration Interface

7/18/2019 CCURE 9000 v2 0 Videoedge 4 0 User Guide Lt En
http://slidepdf.com/reader/full/ccure-9000-v2-0-videoedge-4-0-user-guide-lt-en 27/98
Uninstalling the VideoEdge 4.0 Integration Interface
C•CURE9000 VideoEdge 4.0 Integration User Guide 2–11
Uninstalling the VideoEdge 4.0 Integration Interface
This section describes how to uninstall the C•CURE 9000 VideoEdge 4.0Integration software from the Server computer and from each Clientcomputer in your security system.
The uninstallation process removes all software components that wereinstalled on the computer by the C•CURE 9000 VideoEdge 4.0 Integrationsoftware program.
Once the uninstallation process completes, the computer will be in a “clean”state
To Uninstall VideoEdge 4.0 Integration
1. On the Windows Start menu, select Settings >Control panel.
2. Double-click Add/Remove . The Add/Remove Programs dialog boxappears. See Figure 2-11 on page 2-11 .
Figure 2-11: Add/Remove Programs
3. Select C•CURE 9000 VideoEdge 4.0 Integration from the list.
Uninstalling the VideoEdge 4.0 Integration Interface

7/18/2019 CCURE 9000 v2 0 Videoedge 4 0 User Guide Lt En
http://slidepdf.com/reader/full/ccure-9000-v2-0-videoedge-4-0-user-guide-lt-en 28/98
g g g
2–12 C•CURE9000 VideoEdge 4.0 Integration User Guide
4. Click Change . The Welcome dialog box opens as shown in Figure 2-12 onpage 2-12 .
Figure 2-12: Welcome (Uninstall)
5. Click Next to continue. The Program Maintenance dialog box opens, asshown in Figure 2-13 on page 2-12
Figure 2-13: Program Maintenance Dialog Box
Select Modify if you want to change some of the program features.
Select Repair if you want to repair installation errors in the program.
Select Remove if you want to remove C•CURE 9000 VideoEdge 4.0Integration from your computer.
Uninstalling the VideoEdge 4.0 Integration Interface

7/18/2019 CCURE 9000 v2 0 Videoedge 4 0 User Guide Lt En
http://slidepdf.com/reader/full/ccure-9000-v2-0-videoedge-4-0-user-guide-lt-en 29/98
C•CURE9000 VideoEdge 4.0 Integration User Guide 2–13
6. Select Remove and click Next . A dialog box appears as shown inFigure 2-14 on page 2-13 for you to choose whether or not to drop
VideoEdge 4.0 Integration Database. To drop the database, select thecheck box. To keep the database, click Next .
Figure 2-14: Dropping Database or not
7. The Remove the Program dialog box opens. See Figure 2-15 on page 2-13 .Click Remove to continue the uninstallation.
Figure 2-15: Remove the ProgramDialog Box
Uninstalling the VideoEdge 4.0 Integration Interface
7/18/2019 CCURE 9000 v2 0 Videoedge 4 0 User Guide Lt En
http://slidepdf.com/reader/full/ccure-9000-v2-0-videoedge-4-0-user-guide-lt-en 30/98
2–14 C•CURE9000 VideoEdge 4.0 Integration User Guide
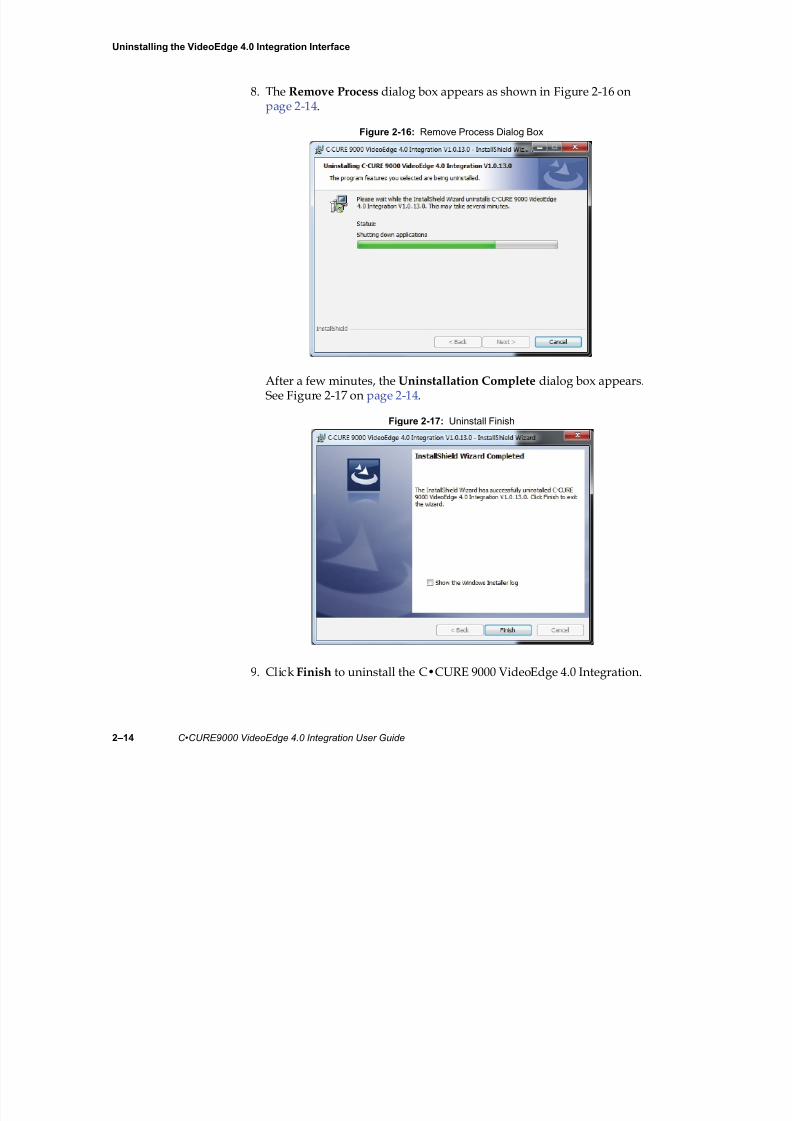
8. The Remove Process dialog box appears as shown in Figure 2-16 onpage 2-14 .
Figure 2-16: Remove Process Dialog Box
After a few minutes, the Uninstallation Complete dialog box appears.See Figure 2-17 on page 2-14 .
Figure 2-17: Uninstall Finish
9. Click Finish to uninstall the C•CURE 9000 VideoEdge 4.0 Integration.

7/18/2019 CCURE 9000 v2 0 Videoedge 4 0 User Guide Lt En
http://slidepdf.com/reader/full/ccure-9000-v2-0-videoedge-4-0-user-guide-lt-en 31/98
C•CURE9000 VideoEdge 4.0 Integration User Guide 3–1
3
VideoEdge 4.0 Server
This chapter describles how to create and configure VideoEdge 4.0 Server.
In this chapter:
VideoEdge 4.0 Server Editor Overview ........................................................................ 3-2VideoEdge 4.0 Server General Tab................................................................................. 3-6VideoEdge 4.0 Server Alarms Tab ................................................................................. 3-9VideoEdge 4.0 Server State Images Tab...................................................................... 3-15
VideoEdge 4.0 Server Editor Overview

7/18/2019 CCURE 9000 v2 0 Videoedge 4 0 User Guide Lt En
http://slidepdf.com/reader/full/ccure-9000-v2-0-videoedge-4-0-user-guide-lt-en 32/98
3–2 C•CURE9000 VideoEdge 4.0 Integration User Guide
VideoEdge 4.0 Server Editor Overview
VideoEdge 4.0 Server Editor lets you create VideoEdge 4.0 Server objects, Youcan associate the video server objects with camera, alarm and server actionobjects.
Accessing the VideoEdge 4.0 Server Editor
To Access the VideoEdge 4.0 Server on the Video Tree1. In the Navigation pane of the C•CURE 9000 Administration Station, click
Video . The Video pane opens.
2. Expand the Video tree. Open the Company Name folder by clicking tothe left of the folder.
3. Right-click the VideoEdge 4.0 that you want to access. Select Edit from the
context menu to open the VideoEdge 4.0 Server Editor with the General tab available. You can also open a VideoEdge 4.0 Server by double-clicking its name.
To Access the VideoEdge 4.0 Server Editor in Dynamic View
1. In the Navigation pane of the Administration Station, click Video to openthe Video pane.
2. Select VideoEdge 4.0 Server from the Video pane drop-down list.
3. Click to open a Dynamic View showing all VideoEdge 4.0 objects.
VideoEdge 4.0 Server Editor Overview

7/18/2019 CCURE 9000 v2 0 Videoedge 4 0 User Guide Lt En
http://slidepdf.com/reader/full/ccure-9000-v2-0-videoedge-4-0-user-guide-lt-en 33/98
C•CURE9000 VideoEdge 4.0 Integration User Guide 3–3
4. Double-click on the VideoEdge 4.0 in the list that you want to access andselect Edit from the context menu. The VideoEdge 4.0 Server editor opens
with the General tab available.
Creating a VideoEdge 4.0 Server
To Create a VideoEdge 4.0 Server
1. In the Navigation pane of the C•CURE 9000 Administration Station, clickVideo to open the Video pane.
2. Expand the Video tree. Right-click the Company Name folder and selectVideoEdge 4.0 Server ->New .
3. The VideoEdge 4.0 Server editor opens allowing you create aconfiguration. For more information about configuration, see“Configuring an VideoEdge 4.0 Server” on page 3-5 .
4. After you finish your configuration, click Save and Close to save and exit.
Alternatively, if you want to save the Video server and then create a newone, click Save and New . The current Video Server is saved and closed,but the Video Server Editor remains open to allow you create a new VideoServer.
Deleting a VideoEdge 4.0 Server
To Delete a VideoEdge 4.0 Server on the Video Tree
1. In the Navigation pane of the C•CURE 9000 Administration Station, clickVideo to open the Video pane.
2. Expand the Video tree. Open the Company Name folder by clicking tothe left of the folder.
3. Right-click the VideoEdge 4.0 that you want to delete, select Delete fromthe context menu.
VideoEdge 4.0 Server Editor Overview

7/18/2019 CCURE 9000 v2 0 Videoedge 4 0 User Guide Lt En
http://slidepdf.com/reader/full/ccure-9000-v2-0-videoedge-4-0-user-guide-lt-en 34/98
3–4 C•CURE9000 VideoEdge 4.0 Integration User Guide
A message box appears stating "Are you sure that you want to delete theselected VideoEdge 4.0 Server?"
4. Click Yes in the message box to delete the VideoEdge 4.0 Server.
To Delete a VideoEdge 4.0 Server in Dynamic View
1. In the Navigation pane of the Administration Station, click Video to openthe Video pane.
2. Select VideoEdge 4.0 from the Hardware pane drop-down list.
3. Click to open a Dynamic View showing all VideoEdge 4.0 Serverobjects.
4. In the list, right-click the VideoEdge 4.0 Server that you want to delete andselect Delete from the context menu.
A message box appears stating "Are you sure that you want to delete theselected VideoEdge 4.0 Server?"
5. Click Yes in the message box to delete the VideoEdge 4.0 Server.
VideoEdge 4.0 Server Editor Overview

7/18/2019 CCURE 9000 v2 0 Videoedge 4 0 User Guide Lt En
http://slidepdf.com/reader/full/ccure-9000-v2-0-videoedge-4-0-user-guide-lt-en 35/98
C•CURE9000 VideoEdge 4.0 Integration User Guide 3–5
Configuring an VideoEdge 4.0 Server
To Configure an VideoEdge 4.0 Server
1. Create a new VideoEdge 4.0 Server or open an existing one with theGeneral tab available. See “Creating a VideoEdge 4.0 Server” on page 3-3 and “Accessing the VideoEdge 4.0 Server Editor” on page 3-2 .
2. Enter a unique name up to 100 characters long in the Name field.
3. Enter a textual description up to 500 characters for the VideoEdge 4.0Server in the Description field.
4. Click the Enabled option to establish communication between C•CURE9000 and the VideoEdge 4.0 Server.
5. Make a basic configuration in General tab. See “VideoEdge 4.0 ServerGeneral Tab Definitions” on page 3-6 .
6. Click the Alarms tab to configure alarm for the VideoEdge 4.0 Server. See“VideoEdge 4.0 Server Alarms Tab Definitions” on page 3-10 .
7. Click the State Images tab to view the state images for VideoEdge 4.0Server. See “VideoEdge 4.0 Server State Images Icons” on page 3-15 .
8. If you finish editing, click Save and Close to save the configuration.
VideoEdge 4.0 Server General Tab

7/18/2019 CCURE 9000 v2 0 Videoedge 4 0 User Guide Lt En
http://slidepdf.com/reader/full/ccure-9000-v2-0-videoedge-4-0-user-guide-lt-en 36/98
3–6 C•CURE9000 VideoEdge 4.0 Integration User Guide
VideoEdge 4.0 Server General Tab
The VideoEdge 4.0 Server General tab, see Figure 3-1 on page 3-6 , lets youconfigure the VideoEdge 4.0 Server basic information, check the video serverconnection and open a VideoEdge 4.0 Web page. It also shows the currentVideo Protocol.
Figure 3-1: VideoEdge 4.0 Server General Tab
VideoEdge 4.0 Server General Tab Definitions
Table 3-1 on page 3-6 provides definitions for the fields on the VideoEdge 4.0Server General tab.
Table 3-1: VideoEdge 4.0 Server General Tab
Field & Buttons Description
Name Enter a unique name up to 100 characters long to identify the server.
Description Enter a textual description up to 500 characters for the server.
VideoEdge 4.0 Server General Tab

7/18/2019 CCURE 9000 v2 0 Videoedge 4 0 User Guide Lt En
http://slidepdf.com/reader/full/ccure-9000-v2-0-videoedge-4-0-user-guide-lt-en 37/98
C•CURE9000 VideoEdge 4.0 Integration User Guide 3–7
Enabled If enabled, C•CURE9000 attempts to communicate with the server. Ifnot enabled C•CURE9000 does not attempt to communicate with theserver.
Server ID
Video Protocol Automatically populated with the video protocol: VideoEdge 4.0.
Time zone Not applicable for VideoEdge 4.0. Specify the time zone of the physicallocation of the video server.
Import Cameras Imports all camera set up information from video server.
Connect Checks the server connection. If all user credentials are entered andvalidated, the server is online.
Online After the connection is successfully established, indicates if the currentvideo server is online.
Server Info
IP Address Enter the IP Address for the specific video server.
CommunicationPort
Displays the communication port number previously configured forremote communication in the VideoEdge 4.0 Server. The default is 80.
Live Video Port Displays the port number previously configured for live video in theVideoEdge 4.0 Server. The default value is 554.This field is read only.
Alarm Port Displays the port number previously configured for the alarm trigger inthe VideoEdge 4.0 Server. The default value is 5003.This field is readonly.
Open NVRConfiguration
Open the VideoEdge 4.0 Web page to configure the VideoEdge 4.0.
Domain Not applicable for VideoEdge 4.0.
User Name Enter the user name used to login the VideoEdge 4.0 Server.
Password Enter the password used to login the VideoEdge 4.0 Server.
Re-enterPassword
Re-enter the password.
IP Adress Enter the IP address for the specfied video server.
Table 3-1: VideoEdge 4.0 Server General Tab, continued
Field & Buttons Description
VideoEdge 4.0 Server General Tab

7/18/2019 CCURE 9000 v2 0 Videoedge 4 0 User Guide Lt En
http://slidepdf.com/reader/full/ccure-9000-v2-0-videoedge-4-0-user-guide-lt-en 38/98
3–8 C•CURE9000 VideoEdge 4.0 Integration User Guide
Event Action Info
Poll Period Indicates how often you want the video server polled for statusinformation. Range is 0 to 999. The default is 100 seconds.
Comm Fail Delay Not applicable for VideoEdge 4.0.
Pre-second framerate tp use duringrecording
Not applicable for VideoEdge 4.0.
Time Sync athh:mm:ss
Not applicable for VideoEdge 4.0.
Table 3-1: VideoEdge 4.0 Server General Tab, continued
Field & Buttons Description
VideoEdge 4.0 Server Alarms Tab

7/18/2019 CCURE 9000 v2 0 Videoedge 4 0 User Guide Lt En
http://slidepdf.com/reader/full/ccure-9000-v2-0-videoedge-4-0-user-guide-lt-en 39/98
C•CURE9000 VideoEdge 4.0 Integration User Guide 3–9
VideoEdge 4.0 Server Alarms Tab
The VideoEdge 4.0 Server Alarms tab provides a list of alarms you haveconfigured for this video server. You must set up server alarms using thevendor utility on the video server side before the alarms can work in C•CURE9000. See Figure 3-2 on page 3-9 .
Figure 3-2: VideoEdge 4.0 Server Alarms Tab
Table 3-2 on page 3-10 contains an example of how an alarm is configured.
VideoEdge 4.0 Server Alarms Tab

7/18/2019 CCURE 9000 v2 0 Videoedge 4 0 User Guide Lt En
http://slidepdf.com/reader/full/ccure-9000-v2-0-videoedge-4-0-user-guide-lt-en 40/98
3–10 C•CURE9000 VideoEdge 4.0 Integration User Guide
VideoEdge 4.0 Server Alarms Tab Definitions
Table 3-3 on page 3-10 provides definitions for the fields on VideoEdge 4.0Server Alarms tab.
Table 3-2: Alarms Tab Setting Example
The following Alarms tab settings
Property Value Action Details Schedule
Video Server Alarm Online Activate Event Display_1 Always
Would create the following Event:
Anytime (Always Schedule ) the Video Server Alarm ( Property) equals Online(Value) , activate the event ( Action ) named Display_1 ( Details ).
Display_1 is an event you select in the Event field.
For information about how to create and configure an event, see the C•CURE 9000Software Configuration Guide
Table 3-3: VideoEdge 4.0 Server Alarms Tab Definitions
Field Description
Add Click Add in the Alarms tab to create a new alarm.
Remove Click Remove in the Alarms tab to delete a selected alarm.
Property Click within the Property column, and then click . The Property browser opens presenting properties available for the server. Click aProperty to select it and add it to the column.
For VideoEdge 4.0 Server, available properties are listed below:
Failover Occurred
Hard Drive Failure
RAID Degraiding
Rebooted
Switched to Backup Server
Video Server Alarm
VideoEdge 4.0 Server Alarms Tab

7/18/2019 CCURE 9000 v2 0 Videoedge 4 0 User Guide Lt En
http://slidepdf.com/reader/full/ccure-9000-v2-0-videoedge-4-0-user-guide-lt-en 41/98
C•CURE9000 VideoEdge 4.0 Integration User Guide 3–11
Value Click within the Value column to display a drop-down list of Valuesassociated with the Property that you have selected. Click a Value youwant to include as a parameter for the trigger to assign it to the column.
If you select Failover Occurred , Hard Drive Failure , RAIDDegraiding , Rebooted or Switched to Backup Server property, twovalues are available: True and False.To enable the value of True ,select the check box that appears when you click in the field. To changethe value of False , clear the check box.
If you select the property of Video Server Alarm , click within the Value column to display a drop-down list with two values available for you toselect: Online, offline.
NOTE: You must select the Property before you can select the Value .
Action Click within the Action column to display a drop-down list of validactions. Click on Action that you want to include as a parameter for thetrigger to add it to the column. Two types of actions are available:
Activate Event and Video Camera Action.
If you select Activate Event , the lower pane in the Alarm tab displaysan Event field for you to define the Action details. See “Activate anEvent” on page 3-12 .
If you select Video Camera Action , the lower pane displays two sub-tabs: Camera tab and Action Type tab. See “Video Camera Action” onpage 3-14 .
Details Displays details about how the Action was configured.
Schedule Only the Always schedule is available for VideoEdge 4.0 Server.
Event Allows you select an event for the alarm.
NOTE: Event is available only if Activated an Event was selected inthe Action column drop-down list.
See the C•CURE9000 Software Configuration Guide for informationabout events.
Camera tab (available if Video Camera Action was selected in the Action field)Server Specify the server for the action. Click to open a list of predefined
video servers.
NOTE: You must select the server before you can select the camera.
Camera Specify the camera for the action. Click to open a list of predefinedvideo cameras.
Table 3-3: VideoEdge 4.0 Server Alarms Tab Definitions, continued
Field Description
VideoEdge 4.0 Server Alarms Tab

7/18/2019 CCURE 9000 v2 0 Videoedge 4 0 User Guide Lt En
http://slidepdf.com/reader/full/ccure-9000-v2-0-videoedge-4-0-user-guide-lt-en 42/98
3–12 C•CURE9000 VideoEdge 4.0 Integration User Guide
Examples of Defining Alarms for a VideoEdge 4.0 Server
Activate an Event
1. From the VideoEdge 4.0 Server Editor dialog box, navigate to the Alarms tab.
2. Click Add in the Alarms tab to create a new alarm.
3. In the Property column, select Failover Occurred .
Action Type tab (available if Video Camera Action was selected)
Action Type Select the action type, such as Record Camera, Camera PresetCommand and Camera Pattern Command.
NOTE: Only Camera Preset Command and Camera Pattern Commandare available.
Enter the parameters for the action type. The parameters varyaccording to the action type selected. See “Parameters” on page 3-12 .
Parameters
Pre Alarm Time Set pre-alarm recording time for the camera when you select RecordCamera as the action type.
Post Alarm Time Set post-alarm recording time for the camera when you select RecordCamera as the action type
Preset Select the preset number to set this preset as the object when youselect Camera Preset Command as the action type.
Pattern Select the pattern number to set this pattern as the object when youselect Camera Pattern Command as the action type.
Schedule Only the Always Schedule is available for VideoEdge 4.0 Server.
Table 3-3: VideoEdge 4.0 Server Alarms Tab Definitions, continued
Field Description
VideoEdge 4.0 Server Alarms Tab

7/18/2019 CCURE 9000 v2 0 Videoedge 4 0 User Guide Lt En
http://slidepdf.com/reader/full/ccure-9000-v2-0-videoedge-4-0-user-guide-lt-en 43/98
C•CURE9000 VideoEdge 4.0 Integration User Guide 3–13
4. In the Value column, select the check box.
5. In the Action column, select Activate an Event .6. The lower pane in the Alarm tab displays an Event field for you to define
the Action details.
Click to open the Event dialog box. Select an event (for example,ViewDisplay Event) that you want to associate with the alarm. JournalLogBackup Event is an event configured in C•CURE 9000 AdministrationStation. See the C•CURE 9000 Software Configuration Guide for informationabout Event.
Once you define the Action details, the Details column displaysinformation about how the Action has been configured.
7. Click Save and Close to save this setting and exit.
8. When a VideoEdge 4.0 server failover occurs, this alarm is triggered. Youcan find the following logs in the C•CURE 9000 Monitoring Station.
VideoEdge 4.0 Server Alarms Tab

7/18/2019 CCURE 9000 v2 0 Videoedge 4 0 User Guide Lt En
http://slidepdf.com/reader/full/ccure-9000-v2-0-videoedge-4-0-user-guide-lt-en 44/98
3–14 C•CURE9000 VideoEdge 4.0 Integration User Guide
Video Camera Action
1. From the VideoEdge 4.0 Server Editor dialog box, navigate to the Alarms tab.
2. Click Add in the Alarms tab to create a new alarm.
3. Click within the Property column to open the VideoEdge 4.0 Serverdialog box showing Properties available for the server. Select Rebooted .
4. Check the check box within the Value column.
5. Click within the Action column to display a drop-down list of validactions and select Video Camera Action . The lower pane in the Alarms tab displays two sub-tabs: Camera tab and Action Type tab.
6. In the Camera sub-tab, select a server (for example, VideoEdge 4.0 withthe IP address of 10.51.237.105) and a camera (for example, Camera3).
7. In the Action Type sub-tab, select Camera Preset Command as theAction Type . Select 1 from Preset drop-down list.
8. Click Save and Close to save this setting and exit.
9. When a VideoEdge 4.0 server reboots, the configured alarm is triggered.You can find the following logs in C•CURE 9000 Monitoring Station.
To Remove an Alarm
1. From the VideoEdge 4.0 Server Editor dialog box, navigate to the Alarms tab.
2. Use to select the row in the Alarms table for the alarm you want toremove.
3. Click Remove .
4. Click Save and Close to save and exit.
VideoEdge 4.0 Server State Images Tab

7/18/2019 CCURE 9000 v2 0 Videoedge 4 0 User Guide Lt En
http://slidepdf.com/reader/full/ccure-9000-v2-0-videoedge-4-0-user-guide-lt-en 45/98
C•CURE9000 VideoEdge 4.0 Integration User Guide 3–15
VideoEdge 4.0 Server State Images Tab
The State Images tab, shown in Figure 3-3 on page 3-15 , provides a means tochange the default images used to indicate the VideoEdge 4.0 Server states onthe Monitoring Station.
Figure 3-3: Video Server State Images Tab
VideoEdge 4.0 Server State Images Icons
Table 3-4 on page 3-15 lists the name and description of each VideoEdge 4.0Server State Images icon.
Table 3-4: VideoEdge 4.0 Server State Images Icons
Icon Name Description
Unknown The video server is in unknown state.
Online The video server is online.
VideoEdge 4.0 Server State Images Tab

7/18/2019 CCURE 9000 v2 0 Videoedge 4 0 User Guide Lt En
http://slidepdf.com/reader/full/ccure-9000-v2-0-videoedge-4-0-user-guide-lt-en 46/98
3–16 C•CURE9000 VideoEdge 4.0 Integration User Guide
Customizing State Images for a VideoEdge 4.0 Server
From the VideoEdge 4.0 Server State Images tab, you can change the imagesthat appear in the Monitoring Station to represent VideoEdge 4.0 Server.
To Customize VideoEdge 4.0 Server State Images
1. From the VideoEdge 4.0 Server State Images tab, double-click the existingimage. A Windows Open dialog box appears allowing you to browse fora folder in which you have placed replacement images.
2. When you locate the replacement image, select it and click Open to
replace the default image with this image.3. When you are done editing the VideoEdge 4.0 Server Editor, click Save
and Close to save the configuration.
Offline The video server is offline.
Hard DriveFailure
There is a Hard Drive Failure alarm on the videoserver.
Rebooted There is a Rebooted alarm on the video server.
RAIDDegrading
There is a RAID Degrading alarm on the video server.
Switched ToBackup Server
There is a Switched To Backup Server alarm on thevideo server.
Failover
Occurred
There is a Failover Occurred alarm on the video
server.
Icon Name Description

7/18/2019 CCURE 9000 v2 0 Videoedge 4 0 User Guide Lt En
http://slidepdf.com/reader/full/ccure-9000-v2-0-videoedge-4-0-user-guide-lt-en 47/98
C•CURE9000 VideoEdge 4.0 Integration User Guide 4–1
4
VideoEdge 4.0 Video
Camera
This chapter provides information about the VideoEdge 4.0 Video Camera
Editor and VideoEdge 4.0 Video Camera Viewer.In this chapter:
VideoEdge 4.0 Video Camera Overview ...................................................................... 4-2VideoEdge 4.0 Video Camera General Tab................................................................... 4-8VideoEdge 4.0 Video Camera Alarms Tab...................................................................4-11VideoEdge 4.0 Video Camera State ImagesTab ......................................................... 4-16
VideoEdge 4.0 Video Camera Viewer ......................................................................... 4-18

7/18/2019 CCURE 9000 v2 0 Videoedge 4 0 User Guide Lt En
http://slidepdf.com/reader/full/ccure-9000-v2-0-videoedge-4-0-user-guide-lt-en 48/98
VideoEdge 4.0 Video Camera Overview
2 Select VideoEdge 4 0 Video Camera from the Video pane drop down list

7/18/2019 CCURE 9000 v2 0 Videoedge 4 0 User Guide Lt En
http://slidepdf.com/reader/full/ccure-9000-v2-0-videoedge-4-0-user-guide-lt-en 49/98
C•CURE9000 VideoEdge 4.0 Integration User Guide 4–3
2. Select VideoEdge 4.0 Video Camera from the Video pane drop-down list.
3. Click to open a Dynamic View showing all camera objects.
4. Double-click on the camera in the list that you want to access and selectEdit from the context menu. The VideoEdge 4.0 Video Camera editoropens with the General tab available.
Importing a Camera
To Import a Camera
1. Open the VideoEdge 4.0 Server panel with the General tab available.
2. In the General tab, click Import Cameras button to import cameras set up
with the current video server.3. After a while, a message box appears stating “The camera import is
complete. Click Save and Close to take effect.”
VideoEdge 4.0 Video Camera Overview
4 Click OK Click Save and Close You can see the imported cameras listed

7/18/2019 CCURE 9000 v2 0 Videoedge 4 0 User Guide Lt En
http://slidepdf.com/reader/full/ccure-9000-v2-0-videoedge-4-0-user-guide-lt-en 50/98
4–4 C•CURE9000 VideoEdge 4.0 Integration User Guide
4. Click OK . Click Save and Close . You can see the imported cameras listedin the VideoEdge 4.0 tree in the left Video pane.
Creating a Camera
To Create a Camera
1. In the Navigation pane of the C•CURE 9000 Administration Station, clickVideo to open the Video pane.
2. Open the Company Name folder by clicking to the left of the folder.
3. Right-click the VideoEdge 4.0 folder, select VideoEdge 4.0 Video Camera->New .
4. The VideoEdge 4.0 Video Camera Editor opens allowing you to configurethe camera.
5. After you have configured the camera, click Save and Close to save andexit.
Alternatively, if you want to save the video camera and then create a newone, click Save and Close . The current video camera is saved and closed,but the Video Camera Editor remains open to allow you create a new
video camera.
NOTE Sometimes you will see the camera name similar to { cameraname_(n)}.This happens in the following situation.
The VideoEdge 4.0 server in C•CURE 9000 has a camera named such as‘FrontDoor’. Adds a video camera named as ‘FrontDoor’ for thisVideoEdge 4.0 server on Web page. Then this newly added camera isadded automatically in C•CURE 9000 with a new name ‘FrontDoor_(n)’.
Here n starts at 2. If the new name {FrontDoor_(n)} is also same as theexisting one, renames it as {FrontDoor_(n+1)} till the name is unique.
NOTE When VideoEdge 4.0 server changes from offine to online, if the cameraindex in C•CURE 9000 didn’t exist on VideoEdge 4.0 server, this camerawill be deleted automatically.
VideoEdge 4.0 Video Camera Overview
Deleting a VideoEdge 4.0 Video Camera

7/18/2019 CCURE 9000 v2 0 Videoedge 4 0 User Guide Lt En
http://slidepdf.com/reader/full/ccure-9000-v2-0-videoedge-4-0-user-guide-lt-en 51/98
C•CURE9000 VideoEdge 4.0 Integration User Guide 4–5
Deleting a VideoEdge 4.0 Video Camera
To Delete a VideoEdge 4.0 Video Camera on the Video Tree
1. In the Navigation pane of the C•CURE 9000 Administration Station, clickVideo to open the Video pane.
2. Open the Company Name folder by clicking to the left of the folder.
3. Expand the VideoEdge 4.0 tree by clicking to the left of the folder.
4. In the VideoEdge 4.0 Tree, right-click the camera that you want to delete,select Delete from the context menu.
A message box appears stating "Are you sure that you want to delete theselected camera?"
5. Click Yes in the message box to delete the VideoEdge 4.0 Video Camera.
To Delete a VideoEdge 4.0 Video Camera in Dynamic View
1. In the Navigation pane of the Administration Station, click Video to openthe Video pane.
2. Select VideoEdge 4.0 Video Camera from the Video pane drop-down list.
3. Click to open a Dynamic View showing all camera objects.
4. In the list, right-click the camera that you want to delete and select Delete from the context menu.
VideoEdge 4.0 Video Camera Overview
A message box appears stating "Are you sure that you want to delete the

7/18/2019 CCURE 9000 v2 0 Videoedge 4 0 User Guide Lt En
http://slidepdf.com/reader/full/ccure-9000-v2-0-videoedge-4-0-user-guide-lt-en 52/98
4–6 C•CURE9000 VideoEdge 4.0 Integration User Guide
g pp g y yselected camera?"
5. Click Yes in the message box to delete the VideoEdge 4.0 Video Camera.
Configuring an VideoEdge 4.0 Video Camera
To Configure a VideoEdge 4.0 Video Camera
1. In the Navigation pane of the Administration Workstation, click Video toopen the Video pane.
2. Select VideoEdge 4.0 from the Video pane drop-down list.
3. Click to open a Dynamic View showing all VideoEdge 4.0 VideoCamera objects.
4. Double-click the VideoEdge 4.0 Video Camera in the list that you want toconfigure. The VideoEdge 4.0 Video Camera Editor opens.
5. Type a unique name up to 100 characters in the Name field.6. Type a textual description up to 500 characters in the Description field.
7. Click the Enabled option to establish communication between C•CURE9000 and the VideoEdge 4.0 Video Camera.
8. Create a basic configuration in General tab. See “VideoEdge 4.0 VideoCamera General Tab” on page 4-8 .
9. You can click the Alarms tab to configure Alarms for the VideoEdge 4.0Video Camera Editor panel. See “VideoEdge 4.0 Video Camera AlarmsTab” on page 4-11 .
10. You can click the State Images tab to view the state images for VideoEdge4.0 Video Camera Editor panel. See “VideoEdge 4.0 Video Camera StateImagesTab” on page 4-16 .
VideoEdge 4.0 Video Camera Overview
11. After you finish editing, click Save and Close to save the configuration.

7/18/2019 CCURE 9000 v2 0 Videoedge 4 0 User Guide Lt En
http://slidepdf.com/reader/full/ccure-9000-v2-0-videoedge-4-0-user-guide-lt-en 53/98
C•CURE9000 VideoEdge 4.0 Integration User Guide 4–7
VideoEdge 4.0 Video Camera General Tab
VideoEdge 4.0 Video Camera General Tab
7/18/2019 CCURE 9000 v2 0 Videoedge 4 0 User Guide Lt En
http://slidepdf.com/reader/full/ccure-9000-v2-0-videoedge-4-0-user-guide-lt-en 54/98
4–8 C•CURE9000 VideoEdge 4.0 Integration User Guide
g
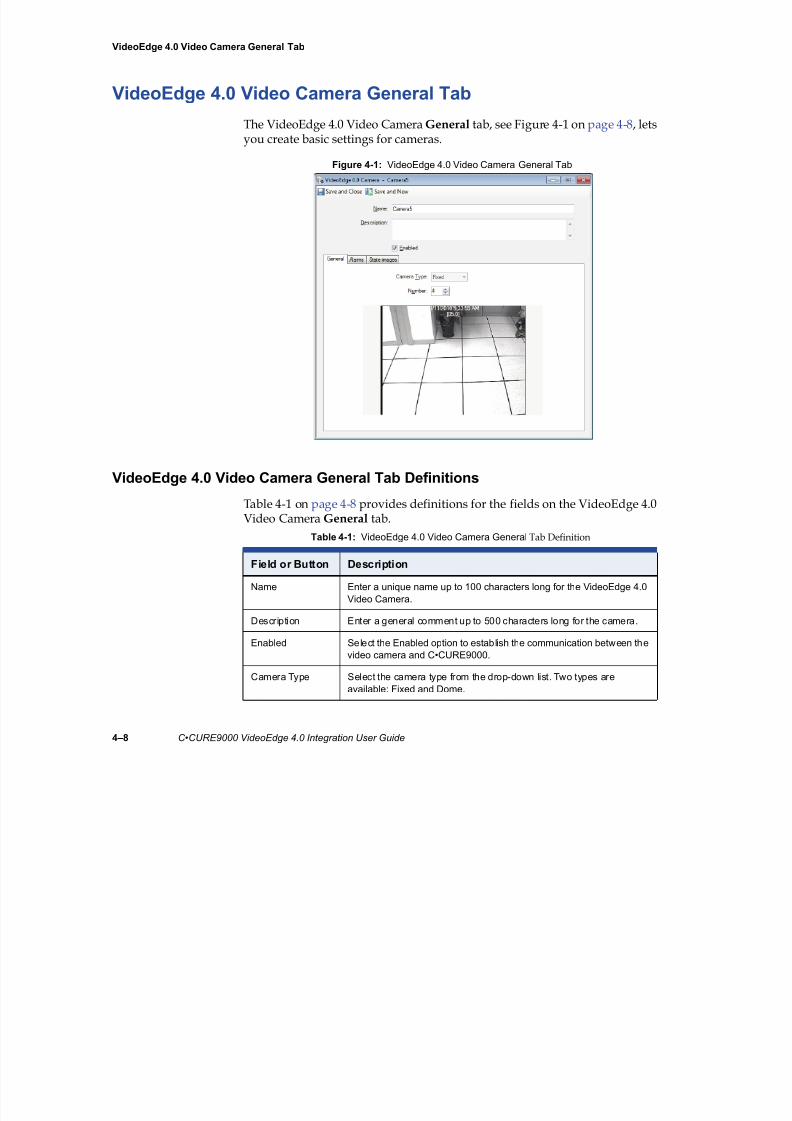
The VideoEdge 4.0 Video Camera General tab, see Figure 4-1 on page 4-8 , letsyou create basic settings for cameras.
Figure 4-1: VideoEdge 4.0 Video Camera General Tab
VideoEdge 4.0 Video Camera General Tab DefinitionsTable 4-1 on page 4-8 provides definitions for the fields on the VideoEdge 4.0Video Camera General tab.
Table 4-1: VideoEdge 4.0 Video Camera General Tab Definition
Field or Button Description
Name Enter a unique name up to 100 characters long for the VideoEdge 4.0Video Camera.
Description Enter a general comment up to 500 characters long for the camera.
Enabled Select the Enabled option to establish the communication between thevideo camera and C•CURE9000.
Camera Type Select the camera type from the drop-down list. Two types areavailable: Fixed and Dome.
VideoEdge 4.0 Video Camera General Tab
Table 4-1: VideoEdge 4.0 Video Camera General Tab Definition, continued

7/18/2019 CCURE 9000 v2 0 Videoedge 4 0 User Guide Lt En
http://slidepdf.com/reader/full/ccure-9000-v2-0-videoedge-4-0-user-guide-lt-en 55/98
C•CURE9000 VideoEdge 4.0 Integration User Guide 4–9
Preset Controls
1. Click to open the preset control, as shown below:
2. If you want to create a new preset, select a preset position by using Pan/Tilt control, then open the preset control and click . The new presetnumber is automatically added in the preset drop-down list.
3. If you want to delete an existing preset, select the preset from the presetdrop-down list and click .
4. If you want go to one specifc preset, select the preset from the preset drop-down list and click .
5. If you want set one specifc preset, select a preset position by using Pan/Tilt control, then open the preset control, select the preset from the presetdrop-down list and click .
Number The unique channel number used to identify the camera. Once youenter a new number the live video from that camera displayed on thevideo control. The default is 0.
Dome Controls
NOTE:According to the type of dome and recorder being used, thecontrols available may vary.
Field or Button Description
Preset
VideoEdge 4.0 Video Camera General Tab
Pattern Controls

7/18/2019 CCURE 9000 v2 0 Videoedge 4 0 User Guide Lt En
http://slidepdf.com/reader/full/ccure-9000-v2-0-videoedge-4-0-user-guide-lt-en 56/98
4–10 C•CURE9000 VideoEdge 4.0 Integration User Guide
1. Click to open pattern control, as shown below:
2. If you want to create a new patternt, click . The new pattern numberis automatically added in the pattern drop-down list.
3. If you want to delete an existing pattern, select the pattern from thepattern drop-down list and click .
4. If you want go to one specifc pattern, select the pattern from the patterndrop-down list and click .
5. If you want set one specifc pattern, select the pattern from the patterndrop-down list and click to open the pattern recording control, asshown below:
Select a position where the pattern will start, then click to begin
recording. Then do operations that this pattern should perform.
Finally, click to end recording.
VideoEdge 4.0 Video Camera Alarms Tab
VideoEdge 4.0 Video Camera Alarms Tab

7/18/2019 CCURE 9000 v2 0 Videoedge 4 0 User Guide Lt En
http://slidepdf.com/reader/full/ccure-9000-v2-0-videoedge-4-0-user-guide-lt-en 57/98
C•CURE9000 VideoEdge 4.0 Integration User Guide 4–11
The VideoEdge 4.0 Video Camera Alarms tab provides a list of alarms youhave configured for this video camera. You must set up camera alarms usingthe vendor utility on the video server side before the alarms can work inC•CURE 9000. See Figure 4-2 on page 4-11 .
Figure 4-2: VideoEdge 4.0 Video Camera Alarms Tab
Table 4-2 on page 4-12 contains an example of how an Alarm is configured.
VideoEdge 4.0 Video Camera Alarms Tab
T bl 4 2 Al i t S tti g E l

7/18/2019 CCURE 9000 v2 0 Videoedge 4 0 User Guide Lt En
http://slidepdf.com/reader/full/ccure-9000-v2-0-videoedge-4-0-user-guide-lt-en 58/98
4–12 C•CURE9000 VideoEdge 4.0 Integration User Guide
VideoEdge 4.0 Video Camera Alarms Tab Definitions
Table 4-3 on page 4-12 provides definitions for the fields on VideoEdge 4.0Video Camera Alarms tab of the VideoEdge 4.0 Video Camera.
Table 4-2: Alarmists Setting Example
The following Alarms tab settings
Property Value Action Details Schedule
Videoloss True Activate Event Display_1 Always
Would create the following Event:
Anytime (Always Schedule ) the Videoloss ( Property) equals True ( Value) , activate theevent( Action ) named Display_1 ( Details ).
Display_1 is an event you select in the Action Type pane.
For information about how to create and configure an event, see the C•CURE 9000Software Configuration Guide
Table 4-3: VideoEdge 4.0 Video Camera Tab Definitions
Field Description
Add Click Add in the Alarms tab to create a new alarm.Remove Click Remove in the Alarms tab to delete an alarm.
Property Click within the Property column, and then click . The Property browser opens with a list of properties available for the panel. Click aProperty to select it and add it to the column.
Available properties are listed below:
Dry Contact
Video Camera Alarm
User Alarm
Videoloss.
VideoEdge 4.0 Video Camera Alarms Tab
Table 4-3: VideoEdge 4.0 Video Camera Tab Definitions, continued

7/18/2019 CCURE 9000 v2 0 Videoedge 4 0 User Guide Lt En
http://slidepdf.com/reader/full/ccure-9000-v2-0-videoedge-4-0-user-guide-lt-en 59/98
C•CURE9000 VideoEdge 4.0 Integration User Guide 4–13
Value Click within the Value column to display a drop-down list of Valuesassociated with the Property that you have selected. Click a Value you want to include as a parameter for the trigger to assign it to thecolumn.
If you select the property of Dry Contact , click within the Value columnto display a drop-down list with four values available for you to select:Normal, Motion, Analytics and Alarm.
If you select the property of Video Camera Alarm , click within theValue column to display a drop-down list with four values available foryou to select: Normal, Motion, Analytics and Alarm.
If you select the property of User Alarm, two values are available: Trueand False.To enable the value of True , select the check box thatappears when you click in the field. To change the value of False , clearthe check box.
If you select the property of Videoloss, two values are available: Trueand False.To enable the value of True , select the check box that
appears when you click in the field. To change the value of False , clearthe check box.
NOTE: You must select the Property before you can select the Value .
Action Click within the Action column to display a drop-down list of validactions. Click on an Action that you want to include as a parameter forthe trigger to add it to the column. Two types of actions are availablenow: Activate Event and Video Camera Action.
For more information on Activate Event, please take “Activate an
Event” on page 3-12 as reference.
For more information on Video Camera Action, see “Video Camera Action” on page 3-14 .
Details Displays details about how the Action was configured.
Schedule Only the Always Schedule is available for VideoEdge 4.0 VideoCamera.
Event (available if Activate an Eventwas selected in the
Action field)
Allows you select an event for the alarm.
NOTE: Event is available only if Activated an Event was selected inthe Action colum drop-down list.
See the C•Cure9000 Software Configuration Guide for informationabout events.
Field Description
VideoEdge 4.0 Video Camera Alarms Tab
Table 4-3: VideoEdge 4.0 Video Camera Tab Definitions, continued
Fi ld D i i

7/18/2019 CCURE 9000 v2 0 Videoedge 4 0 User Guide Lt En
http://slidepdf.com/reader/full/ccure-9000-v2-0-videoedge-4-0-user-guide-lt-en 60/98
4–14 C•CURE9000 VideoEdge 4.0 Integration User Guide
Defining an Alarm for a Camera
To Define an Alarm
Camera tab (available if Video Camera Action was selected in the Actionfield)
Server Specify the server for the action. Click to open a list of predefinedvideo servers.
NOTE: You must select the server before you can select the camera.
Camera Specify the camera for the action. Click to open a list ofpredefined video cameras.
Action Type tab (available if Video Camera Action was selected)
Action Type Select the action type, such as Record Camera, Camera PresetCommand and Camera Pattern Command.
NOTE: Only Camera Preset Command and Camera PatternCommand are available now.
Enter the parameters for the action type. The parameters vary
according to the action type selected. See “Parameters” on page 4-14 .
Parameters
Pre Alarm Time Set the pre-alarm recording time for the camera when you selectRecord Camera as the action type.
Post Alarm Time Set the post-alarm recording time for the camera when you selectRecord Camera as the action type.
Preset Select the preset number as the object when you select CameraPreset Command as the action type.
Pattern Select the pattern number as the object when you select CameraPattern Command as the action type.
Field Description
NOTE To define an alarm for a camera, see “Examples of Defining Alarms for aVideoEdge 4.0 Server” on page 3-12 .
VideoEdge 4.0 Video Camera Alarms Tab
To Remove an Alarm

7/18/2019 CCURE 9000 v2 0 Videoedge 4 0 User Guide Lt En
http://slidepdf.com/reader/full/ccure-9000-v2-0-videoedge-4-0-user-guide-lt-en 61/98
C•CURE9000 VideoEdge 4.0 Integration User Guide 4–15
1. From the VideoEdge 4.0 Video Camera dialog box, navigate to the Alarms tab.
2. Use to select the row in the Alarms table for the Alarm you want toremove.
3. Click Remove .
4. Click Save and Close to save and exit.
VideoEdge 4.0 Video Camera State ImagesTab
VideoEdge 4.0 Video Camera State ImagesTab

7/18/2019 CCURE 9000 v2 0 Videoedge 4 0 User Guide Lt En
http://slidepdf.com/reader/full/ccure-9000-v2-0-videoedge-4-0-user-guide-lt-en 62/98
4–16 C•CURE9000 VideoEdge 4.0 Integration User Guide
The State Images tab, shown in Figure 4-3 on page 4-16 , lets you change thedefault images used to indicate the VideoEdge 4.0 Video Camera states on theMonitoring Station.
Figure 4-3: VideoEdge 4.0 Video Camera State Images Tab
VideoEdge 4.0 Video Camera State Images Icons
Table on page 4-16 lists the name and description of each VideoEdge 4.0Video Camera State Images icon.
Table 4-4: VideoEdge 4.0 Video Camera State Images Icons
Icon Name Description
Unknown The camera is in unknown state.
Recording The camera is recording.
VideoEdge 4.0 Video Camera State ImagesTab
Table 4-4: VideoEdge 4.0 Video Camera State Images Icons, continued
Icon Name Description

7/18/2019 CCURE 9000 v2 0 Videoedge 4 0 User Guide Lt En
http://slidepdf.com/reader/full/ccure-9000-v2-0-videoedge-4-0-user-guide-lt-en 63/98
C•CURE9000 VideoEdge 4.0 Integration User Guide 4–17
Customizing State Images for a VideoEdge 4.0 Video Camera
From the VideoEdge 4.0 Video Camera State Images tab, you can change theimages that appear in the Monitoring Station to represent VideoEdge 4.0Video Camera.
To Customize VideoEdge 4.0 Video Camera State Images
1. From the VideoEdge 4.0 Video Camera State Images tab, double-clickthe existing image. A Windows Open dialog box appears allowing you tobrowse for a folder in which you have placed replacement images.
2. When you locate the replacement image, select it and click Open toreplace the default image with this image.
3. When you are done editing, click Save and Close to save theconfiguration.
Alarm The camera is in alarm state.
Commloss The communication between camera and video serveris lost.
Icon Name Description
VideoEdge 4.0 Video Camera Viewer
VideoEdge 4.0 Video Camera Viewer
Th Vid Edg 4 0 Vid C Vi bl t i id f ll

7/18/2019 CCURE 9000 v2 0 Videoedge 4 0 User Guide Lt En
http://slidepdf.com/reader/full/ccure-9000-v2-0-videoedge-4-0-user-guide-lt-en 64/98
4–18 C•CURE9000 VideoEdge 4.0 Integration User Guide
The VideoEdge 4.0 Video Camera Viewer enables you to view video from allcameras connected to the VideoEdge 4.0 Server in the AdministrationWorkstation.
Note: The video server name and camera name displayed on top of the videostream come from the VideoEdge 4.0 server, not the names configured onC•CURE 9000.
There are three views that can be accessed from the context menu:
View displays the video in a Dynamic View.
Popup View displays the video in a pop-up Window.
View in Current Tab displays the video in the current tab in the content
area.The Video Camera Viewer has the buttons shown in Table 4-5 on page 4-18 .
Table 4-5: Video Viewer Buttons
Click... To...
Display camera information on the top of the video stream andplayback controls on the bottom of the video stream.
Take a snapshot. This function is not available now.
VideoEdge 4.0 Video Camera Viewer
Table 4-5: Video Viewer Buttons, continued
Click... To...

7/18/2019 CCURE 9000 v2 0 Videoedge 4 0 User Guide Lt En
http://slidepdf.com/reader/full/ccure-9000-v2-0-videoedge-4-0-user-guide-lt-en 65/98
C•CURE9000 VideoEdge 4.0 Integration User Guide 4–19
Retrieving a Recorded Video
To Retrieve a Recorded Video
1. Click to open a Recorded dialog box at the bottom of the window.
Retrieve a recorded video.
Opens a Recorded Video Configuration so that you can select acertain period of time to retrieve a video. See “Retrieving a RecordedVideo” on page 4-19 .
Begin to record a video.
Reconnect the camera.
Export video. See “Exporting a Video” on page 4-21 .
Generate a user alarm.
Camera PTZ Controls. Use horizontal arrows to pan left/right. Usethe vertical arrows to tilt up/down. This function is only available forPTZ cameras.
Zoom the image in or out. This function is only available for PTZcameras.
To access the Camera Preset, click on the arrow near Presets.This
function is only available when PTZ camera already has presets.
To access the Camera Pattern, click on the arrow located at the endof the top right of the display. This function is only available whenPTZ camera alaready has patterns.
VideoEdge 4.0 Video Camera Viewer
2. Click Time Range . The Retrieve Recorded Video dialog box opens toenter the dates and times to retrieve the recorded video.

7/18/2019 CCURE 9000 v2 0 Videoedge 4 0 User Guide Lt En
http://slidepdf.com/reader/full/ccure-9000-v2-0-videoedge-4-0-user-guide-lt-en 66/98
4–20 C•CURE9000 VideoEdge 4.0 Integration User Guide
3. Click Get Video to retrieve the recorded video for the dates and timesspecified. You are returned to the VideoEdge 4.0 Video Camera viewerand the video starts playing immediately, as shown in Figure 4-4 onpage 4-20 .
The Retrieve recorded video button turns red when you areretrieving recorded video.
Click on to launch live video.
Figure 4-4: Playback Recorded Video
VideoEdge 4.0 Video Camera Viewer
Exporting a Video
Video clips are exported in Native format .ISO, which includes MP4 files. You

7/18/2019 CCURE 9000 v2 0 Videoedge 4 0 User Guide Lt En
http://slidepdf.com/reader/full/ccure-9000-v2-0-videoedge-4-0-user-guide-lt-en 67/98
C•CURE9000 VideoEdge 4.0 Integration User Guide 4–21
can open MP4 files to play recorded videos.
To Export a Video
1. Click to export a pre-recorded video. The Retrieve Recorded Videodialog box opens to enter the dates and times to retrieve the recordedvideo that you want to export.
2. Click Get Video to open the Save as dialog box. Select a folder to save theexported file in a drop-down list and enter the filename.
3. Click Save . When save is complete, a dialog box opens informing ofcompletion of export.
VideoEdge 4.0 Playback Controls
VideoEdge 4.0 Playback Controls
Playback Control provides all of the standard VCR operations (Fast Rewind,

7/18/2019 CCURE 9000 v2 0 Videoedge 4 0 User Guide Lt En
http://slidepdf.com/reader/full/ccure-9000-v2-0-videoedge-4-0-user-guide-lt-en 68/98
4–22 C•CURE9000 VideoEdge 4.0 Integration User Guide
y p p ( ,Play reverse, Play, Pause, Play Forward, Fast Forward) as well as JumpForward and Jump Back by intervals, giving users total control over a videostream.
Instant Playback controls are illustrated in Figure 4-5 on page 4-22 . These arethe controls available when displaying live video.
Figure 4-5: Instant Playback Controls
Playback controls are illustrated in Figure 4-6 on page 4-22 . These are thecontrols available when displaying recorded video.
Figure 4-6: Playback Controls (Retrieve)
Jump Forward
Play Forward FastPlay Forward
Toggle Play/Pause
Play in Reverse
Play in Reverse FastJump in ReverseToggle Audio /Mute
olume Control Slider
Exit Instant Playback
Select Date
Jump Forward
Play Forward FastPlay Forward
Toggle Play/Pause
Play in Reverse
Play in Reverse FastJump in Reverse
Toggle Audio /Mute
Volume Control Slider
VideoEdge 4.0 Playback Controls
1. Playback controls is available only selected one or more cameras from

7/18/2019 CCURE 9000 v2 0 Videoedge 4 0 User Guide Lt En
http://slidepdf.com/reader/full/ccure-9000-v2-0-videoedge-4-0-user-guide-lt-en 69/98
C•CURE9000 VideoEdge 4.0 Integration User Guide 4–23
Instant Playback Controls
The following Instant Playback controls are available:
Volume Control slider - Use to control volume level.
Toggle Audio/Mute - Use to enable/disable audio on current videostream.
Exit Instant Playback - Use to exit playback and return to live view.
Jump in Reverse - Use to jump back by defined intervals - 30 secs, 1 min.,5 min., 10 min., 30 min., 60 min.
Play in Reverse Fast - Use to Play video in reverse at various speeds.
Available speeds are 2x, 3x, 4x.Play in Reverse - Use to play video 1x in reverse.
Toggle Play/Pause - Use to Pause/Play video.
Play Forward - Use to play video 1x.
Play Forward Fast - Use to play video forward at various speeds.Available speeds are 2x, 3x,4x.
Jump Forward - Use to jump forward by defined intervals - 30 secs, 1min., 5 min., 10 min., 30 min., 60 min.
Select Date via Calendar.
NOTE view.
2. Audio is disabled when in instant playback unless you are running at x1speed forwards. Only one source can be running at any time. For example,enabling audio on camera 2 will disable it on camera 1.
3. To enable audio when playing back retrieved video, select on the topright of viewer. The icon turns green. Unless this is selected, the volumeslider and mute controls are disabled.
VideoEdge 4.0 Playback Controls
Playback Controls
The following Controls are available when viewing recorded video:

7/18/2019 CCURE 9000 v2 0 Videoedge 4 0 User Guide Lt En
http://slidepdf.com/reader/full/ccure-9000-v2-0-videoedge-4-0-user-guide-lt-en 70/98
4–24 C•CURE9000 VideoEdge 4.0 Integration User Guide
Volume Control slider - Use to control volume level.
Toggle Audio/Mute - Use to enable/disable audio on current videostream.
Jump in Reverse - Use to jump back by defined intervals - 30 secs, 1 min.,5 min., 10 min., 30 min., 60 min.
Play in Reverse Fast - Use to Play video in reverse at various speeds.
Available speeds are 1x,2x, 3x, 4x.Play in Reverse - Use to Play video 1x in reverse.
Toggle Play/Pause - Use to Pause/Play video.
Play Forward - Use to play video 1x.
Play Forward Fast - Use to play video forward at various speeds.Available speeds are 2x, 3x, 4x.
Jump Forward - Use to jump forward by defined intervals - 30 secs, 1min., 5 min., 10 min., 30 min., 60 min.
Further options are available in paused mode:
Step back multiple frames - Use to jump back a set number of frames(depending on the framerate the camera is set to)
Step back one frame
Step forward one frame
Step forward multiple frames - Use to jump forward a set number offrames (depending on the framerate the camera is set to)
5

7/18/2019 CCURE 9000 v2 0 Videoedge 4 0 User Guide Lt En
http://slidepdf.com/reader/full/ccure-9000-v2-0-videoedge-4-0-user-guide-lt-en 71/98
C•CURE9000 VideoEdge 4.0 Integration User Guide 5–1
Video View
This chapter describles how to create and configure Video View withVideoEdge 4.0 Video Camera.
In this chapter:
Video View Overview...................................................................................................... 5-2
Video View Overview
Video View Overview
The Video View Editor lets you create Video View objects. A Video View is ai f f hi h b Vid Ed 4 0 Vid

7/18/2019 CCURE 9000 v2 0 Videoedge 4 0 User Guide Lt En
http://slidepdf.com/reader/full/ccure-9000-v2-0-videoedge-4-0-user-guide-lt-en 72/98
5–2 C•CURE9000 VideoEdge 4.0 Integration User Guide
view from a camera or a group of cameras, which can be VideoEdge 4.0 VideoCameras. It serves as a building block to construct a video tour. Video Viewprovides different grid types to display video, as shown in Figure 5-1 onpage 5-2 .
Figure 5-1: Video View
Accessing the Video View Editor
To Access the Video View Editor on the Video Tree
1. In the Navigation pane of the C•CURE 9000 Administration Station, click
Video to open the Video Pane.2. Expand the Video tree. Open the Company Name folder by clicking to
the left of the folder.
3. Open the Views folder by clicking to the left of the folder.
Video View Overview
4. In the Views folder, right-click the Video View that you want to access.Select Edit from the context menu to open the Video View Editor.

7/18/2019 CCURE 9000 v2 0 Videoedge 4 0 User Guide Lt En
http://slidepdf.com/reader/full/ccure-9000-v2-0-videoedge-4-0-user-guide-lt-en 73/98
C•CURE9000 VideoEdge 4.0 Integration User Guide 5–3
To Access the Video View Editor in Dynamic View
1. In the Navigation pane of the Administration Station, click Video to openthe Video pane.
2. Select Video View from the Video pane drop-down list.
3. Click to open a Dynamic View showing all Video View objects.
4. Double-click on the Video View in the list that you want to access andselect Edit from the context menu. The Video View Editor opens.
Creating a Video View
To Create a VideoEdge 4.0 Video View
1. In the Navigation pane of the C•CURE 9000 Administration Station, clickVideo to open the Video pane.
2. Open the Company Name folder by clicking to the left of the folder. In
the Company Name folder, right-click the Views and select New .3. The Video View Editor opens, allowing you create a new view. For more
information about configuration, see “Configuring a Video View” onpage 5-5 .
4. After you finish your configuration, click Save and Close to save and exit.
Video View Overview
Alternatively, if you want to save the video view and then create a newone, click Save and Close . The current video view is saved and closed, butthe Video View Editor remains open to allow you create a new video view.

7/18/2019 CCURE 9000 v2 0 Videoedge 4 0 User Guide Lt En
http://slidepdf.com/reader/full/ccure-9000-v2-0-videoedge-4-0-user-guide-lt-en 74/98
5–4 C•CURE9000 VideoEdge 4.0 Integration User Guide
Deleting a Video View
To Delete a Video View on the Video Tree
1. In the Navigation pane of the C•CURE 9000 Administration Station, clickVideo to open the Video pane.
2. Open the Company Name folder by clicking to the left of the folder.
3. Open the Views folder by clicking to the left of the folder.
4. In the Video Tree, right-click the Video View that you want to delete,select Delete from the context menu.
A message box appears stating "Are you sure that you want to delete theselected view?".
5. Click Yes in the message box to delete the view.
To Delete a Video View in Dynamic View
1. In the Navigation pane of the Administration Station, click Video to openthe Video pane.
2. Select Video View from the Video pane drop-down list.3. Click to open a Dynamic View showing all View objects.
4. In the list, right-click the View that you want to delete and select Delete from the context menu.
Video View Overview
A message box appears stating "Are you sure that you want to delete theselected view object?".

7/18/2019 CCURE 9000 v2 0 Videoedge 4 0 User Guide Lt En
http://slidepdf.com/reader/full/ccure-9000-v2-0-videoedge-4-0-user-guide-lt-en 75/98
C•CURE9000 VideoEdge 4.0 Integration User Guide 5–5
5. Click Yes in the message box to delete the view.
Configuring a Video View
To Configure a Video View
1. Create a new View or open an existed View. See “Creating a Video View”on page 5-3 , “Accessing the Video View Editor” on page 5-2 .
2. Enter a unique name, up to 100 characters, in the Name field.
3. Enter a textual description, up to 500 characters, in the Description field.
4. Click on the type of grid that you want to use for the Video View.
5. Expand the server folder and select the VideoEdge 4.0 Video Camera thatyou want to add to the Video View using drag and drop into the area
below the grid icons. Or, if you want to use all cameras on an VideoEdge4.0 Server, drag and drop the server into the area below the grid icons.
6. Click Save and Close to save the configuration.
NOTE It is recommended that only adds VideoEdge 4.0 cameras in one view inconsideration of performance.
NOTE When You add a VideoEdge 4.0 Camera into the view,only displays
VideoEdge 4.0 server name and VideoEdge4.0 camera name, no video, inthe camera preview window.
Video View Overview
To Delete a Camera from the View
1. After you successfully add a camera, the camera name and a mark willappear on the top of the image

7/18/2019 CCURE 9000 v2 0 Videoedge 4 0 User Guide Lt En
http://slidepdf.com/reader/full/ccure-9000-v2-0-videoedge-4-0-user-guide-lt-en 76/98
5–6 C•CURE9000 VideoEdge 4.0 Integration User Guide
appear on the top of the image.
2. To delete the camera from the view, click .
3. Click Save and Close to save and exit.
Video View Editor Field Definitions
Table 5-1 on page 5-6 provides definitions for the fields on VideoEdge 4.0Video View Editor.
Table 5-1: VideoEdge 4.0 Video View Editor Field Definition
Field Description
Name Enter a unique name up to 100 characters long to identify theVideoEdge 4.0 Video View.
Description Enter a description up to 500 characters to identify the Video View.
Camera List List all the video hardware starting with the video server and thecameras connected to it. To add a camera to the view, you must selecta view grid type, and then drag and drop the camera into theappropriate view grid.
View Grid Type Enables you to select the number of cameras displayed inside theview. After you select a view grid type, the appropriate view grid
appears in the view area. Each grid is linked to a camera and showsthe video for that camera. Without a link to the camera, the gridremains blank. You can choose 1x1, 2x2, 3x3, 4x4, 1x5 and 2x8 gridtypes.
NOTE: If you create a 1x5 or 2x8 view which only has VideoEdge4.0Cameras, there may have several seconds latency when openthe view.
VideoEdge 4.0 Video View Viewer
VideoEdge 4.0 Video View Viewer
Video View Viewer enables you to view a Video View in AdministrationWorkstation.

7/18/2019 CCURE 9000 v2 0 Videoedge 4 0 User Guide Lt En
http://slidepdf.com/reader/full/ccure-9000-v2-0-videoedge-4-0-user-guide-lt-en 77/98
C•CURE9000 VideoEdge 4.0 Integration User Guide 5–7
There are three ways to view a video view.
Video View displays the video in a Dynamic View
Popup View displays the video in a Popup Window
View in Current Tab displays the video view in the current tab in the
content areaFigure 5-2 shows a Popup View. Table 5-2 describes the buttons. The UserAlarm button is only available for VideoEdge 4.0 camera.
Figure 5 -2: Video View Popup View
VideoEdge 4.0 Video View Viewer
NOTE The Video View buttons are hidden. To view them, move your mouse overthe top of the view.

7/18/2019 CCURE 9000 v2 0 Videoedge 4 0 User Guide Lt En
http://slidepdf.com/reader/full/ccure-9000-v2-0-videoedge-4-0-user-guide-lt-en 78/98
5–8 C•CURE9000 VideoEdge 4.0 Integration User Guide
Table 5-2: Video View Viewer buttons specific for VideoEdge 4.0 Camera
To keep the buttons visible, click .
Click... To...
Display camera information on the top of the video stream andplayback controls on the bottom of the video stream.
Take a snapshot. This function is not available now.
Retrieve a recorded video.
Opens a Recorded Video Configuration so that you can select acertain period of time to retrieve a video. See “Retrieving a RecordedVideo” on page 4-19 .
Begin to record a video.
Reconnect the camera.
Export video. The funtion is only available for 1*1 view. See“Exporting a Video” on page 4-21 .
Generate a user alarm.
Camera PTZ Controls. Use horizontal arrows to pan left/right. Usethe vertical arrows to tilt up/down. This function is only available for
PTZ cameras.
Zoom the image in or out. This function is only available for PTZcameras.
VideoEdge 4.0 Video View Viewer
To access the Camera Preset, click on the arrow near Presets.This
function is only available when PTZ camera already has presets.
Click... To...

7/18/2019 CCURE 9000 v2 0 Videoedge 4 0 User Guide Lt En
http://slidepdf.com/reader/full/ccure-9000-v2-0-videoedge-4-0-user-guide-lt-en 79/98
C•CURE9000 VideoEdge 4.0 Integration User Guide 5–9
To access the Camera Pattern, click on the arrow located at the endof the top right of the display. This function is only available whenPTZ camera alaready has patterns.
VideoEdge 4.0 Video View Viewer

7/18/2019 CCURE 9000 v2 0 Videoedge 4 0 User Guide Lt En
http://slidepdf.com/reader/full/ccure-9000-v2-0-videoedge-4-0-user-guide-lt-en 80/98
5–10 C•CURE9000 VideoEdge 4.0 Integration User Guide
6

7/18/2019 CCURE 9000 v2 0 Videoedge 4 0 User Guide Lt En
http://slidepdf.com/reader/full/ccure-9000-v2-0-videoedge-4-0-user-guide-lt-en 81/98
C•CURE9000 VideoEdge 4.0 Integration User Guide 6–1
Video Tour
This chapter describles how to create and configure Video Tour withVideoEdge 4.0 Video Camera.
In this chapter:
Video Tour Overview ...................................................................................................... 6-2VideoEdge 4.0 Video Tour General Tab ........................................................................ 6-6
Video Tour Overview
Video Tour Overview
A video tour is a list of views in sequence for a user-defined dwell time in aLive Video Window. Video Tour Editor, as shown in Figure 6-1 on page 6-2 ,lets you add or remove a video view on a video tour and adjust the sequence

7/18/2019 CCURE 9000 v2 0 Videoedge 4 0 User Guide Lt En
http://slidepdf.com/reader/full/ccure-9000-v2-0-videoedge-4-0-user-guide-lt-en 82/98
6–2 C•CURE9000 VideoEdge 4.0 Integration User Guide
y j qof video views.
This feature enables you to view live video from a configured collection ofviews that are configured to display different cameras and camera groups in atime sequence.
Beginning with the first camera, video is displayed for a fixed amount of timebefore automatically advancing to the next camera. This process continuesuntil the last camera in the tour is reached, or indefinitely if looping isenabled. Looping is the ability for a user to continuously replay the videotour. In addition, users retain full access to PTZ Camera Control.
Figure 6-1: Video Tour
Video Tour Overview
Accessing the Video Tour Editor
To Access the Video Tour Editor on the Video Tree
1. In the Navigation pane of the C•CURE 9000 Administration Station, click

7/18/2019 CCURE 9000 v2 0 Videoedge 4 0 User Guide Lt En
http://slidepdf.com/reader/full/ccure-9000-v2-0-videoedge-4-0-user-guide-lt-en 83/98
C•CURE9000 VideoEdge 4.0 Integration User Guide 6–3
g p ,Video to open the Video pane.
2. Expand the Video tree. Open the Company Name folder by clicking tothe left of the folder.
3. Open the Tours folder by clicking to the left of the folder.
4. In the Tour Tree, right-click the Tour that you want to access, select Edit from the context menu to open the Video Tour Editor.
To Access the Video Tour Editor in Dynamic View
1. In the Navigation pane of the Administration Station, click Video to openthe Video pane.
2. Select Video Tour from the Video pane drop-down list.
3. Click to open a Dynamic View showing all Video Tour objects.
4. Double-click on the Video Tour in the list that you want to access andselect Edit from the context menu. The Video Tour Editor opens.
Video Tour Overview
Creating a Video Tour
To Create a Video Tour
1. In the Navigation pane of the C•CURE 9000 Administration Station, click

7/18/2019 CCURE 9000 v2 0 Videoedge 4 0 User Guide Lt En
http://slidepdf.com/reader/full/ccure-9000-v2-0-videoedge-4-0-user-guide-lt-en 84/98
6–4 C•CURE9000 VideoEdge 4.0 Integration User Guide
g pVideo to open the Video pane.
2. Open the Company Name folder by clicking to the left of the folder. Inthe Company Name folder, right-click the Tours and select New .
3. The Video Tour Editor opens, allowing you create the configuration. For
more information about configuration, see “Configuring a Video Tour” onpage 6-5 .
4. After you finish your configuration, click Save and Close to save and exit.
Alternatively, if you want to save the video tour and then create a newone, click Save and New. The current video tour is saved and closed, butthe Video Tour Editor remains open to allow you create a new video tour.
Deleting a Video Tour
To Delete a Video Tour on the Video Tree
1. In the Navigation pane of the C•CURE 9000 Administration Station, clickVideo to open the Video Pane.
2. Open the Company Name folder by clicking to the left of the folder.3. Open the Tours folder by clicking to the left of the folder.
4. In the Tour Tree, right-click the Tour that you want to delete, select Delete from the context menu.
A message box appears stating "Are you sure that you want to delete theselected tour?".
Video Tour Overview
5. Click Yes in the message box to delete the tour.
To Delete a Video Tour in Dynamic View
1. In the Navigation pane of the Administration Station, click Video to open

7/18/2019 CCURE 9000 v2 0 Videoedge 4 0 User Guide Lt En
http://slidepdf.com/reader/full/ccure-9000-v2-0-videoedge-4-0-user-guide-lt-en 85/98
C•CURE9000 VideoEdge 4.0 Integration User Guide 6–5
the Video pane.
2. Select Video Tour from the Video pane drop-down list.
3. Click to open a Dynamic View showing all Tour objects.
4. In the list, right-click the Tour that you want to delete and select Delete from the context menu.
A message box appears stating “Are you sure that you want to delete theselected Tour?”.
5. Click Yes in the message box to delete the tour.
Configuring a Video Tour
To Configure a Video Tour
1. Create a new tour or open an existed tour. See “Creating a Video Tour” onpage 6-4 , “Accessing the Video Tour Editor” on page 6-3 .
2. Enter a unique name, up to 100 characters, in the Name field.
3. Enter a textual description, up to 500 characters, in the Description field.
4. Create a configuration in the General tab. See “VideoEdge 4.0 Video TourGeneral Tab” on page 6-6 .
5. Click Save and Close to save the configuration.
VideoEdge 4.0 Video Tour General Tab
VideoEdge 4.0 Video Tour General Tab
The Video Tour General tab lets you configure the Video Tour properties.
Vid Ed 4 0 Vid T G l T b D fi iti

7/18/2019 CCURE 9000 v2 0 Videoedge 4 0 User Guide Lt En
http://slidepdf.com/reader/full/ccure-9000-v2-0-videoedge-4-0-user-guide-lt-en 86/98
6–6 C•CURE9000 VideoEdge 4.0 Integration User Guide
VideoEdge 4.0 Video Tour General Tab Definitions
Table 6-1 on page 6-6 provides definitions for the fields on the Video TourGeneral tab.
Table 6-1: Video Tour General Tab definitions.
Field DescriptionName Enter a unique name up to 100 characters long to identify the
VideoEdge 4.0 Video Tour.
Description Enter a description up to 500 characters to identify the Video Tour.
Tour looping If you select Tour Looping , the Video Tour continuously starts overagain after the final camera is displayed. If not checked, the tour runsonly once.
Show text overlay If you select Show Text Overlay , predefined text appears over video.This function is not available now.
Preview Enables you to preview the tour. A separate window is created anddisplays all the views of the tour one-by-one in sequence.
Add Open the Video Tours Editor to add a Video View to the tour.
Remove Removes a Video View from the tour.
Move Up In the View list, click the cell to the left of a View to select the View.Then click Move Up to move the selected video view up in the viewsequence.
Move Down In the View list, click the cell to the left of a View to select the View.Then click Move Down to move the selected video view down in theview sequence.
VideoEdge 4.0 Video Tour General Tab
Preview Window
In the Preview window, as shown in Figure 6-2 on page 6-7 , all the views of
the tour are displayed one-by-one.Figure 6-2: Preview Window

7/18/2019 CCURE 9000 v2 0 Videoedge 4 0 User Guide Lt En
http://slidepdf.com/reader/full/ccure-9000-v2-0-videoedge-4-0-user-guide-lt-en 87/98
C•CURE9000 VideoEdge 4.0 Integration User Guide 6–7
Table 6-2 on page 6-7 provides definition of the buttons on the Previewwindow.
Table 6-2: Buttons and Bars on the Preview Window
Buttons &Bars Description
Progress bar. Show the display progress of a video view.
Backward the video.
Pause the video.
Forward the video.
VideoEdge 4.0 Video Tour General Tab
As videos of the tour display one by one, the slide will automaticallymove.
Table 6-2: Buttons and Bars on the Preview Window, continued
Buttons &Bars Description

7/18/2019 CCURE 9000 v2 0 Videoedge 4 0 User Guide Lt En
http://slidepdf.com/reader/full/ccure-9000-v2-0-videoedge-4-0-user-guide-lt-en 88/98
6–8 C•CURE9000 VideoEdge 4.0 Integration User Guide
7

7/18/2019 CCURE 9000 v2 0 Videoedge 4 0 User Guide Lt En
http://slidepdf.com/reader/full/ccure-9000-v2-0-videoedge-4-0-user-guide-lt-en 89/98
C•CURE9000 VideoEdge 4.0 Integration User Guide 7–1
VideoEdge 4.0 JournalMessages
This chapter describes the customized Journal messages available fromVideoEdge 4.0 integration.
In this chapter:
C•CURE 9000-VideoEdge 4.0 Integration Journal Messages Definitions ............... 7-2
C•CURE 9000-VideoEdge 4.0 Integration Journal Messages Definitions
C•CURE 9000-VideoEdge 4.0 Integration Journal MessagesDefinitions
The following table lists the Journal Messages that can be reported by theVideoEdge 4.0 Integration products to the C•CURE 9000 database.

7/18/2019 CCURE 9000 v2 0 Videoedge 4 0 User Guide Lt En
http://slidepdf.com/reader/full/ccure-9000-v2-0-videoedge-4-0-user-guide-lt-en 90/98
7–2 C•CURE9000 VideoEdge 4.0 Integration User Guide
In Table 7-1, objects, such as a panel name, point name, or computer name arerepresented by the “#” symbol. The actual value for the object property willreplace the "#" in the Journal.
Table 7-1: Journal Messages Definitions
Message Type Ob ject State Change Message
System Activity SoftwareHouse CrossFire VideoEdge 4.0 Video DriverService started on computer {#}.
SoftwareHouse CrossFire VideoEdge 4.0 Video DriverService stopped on computer {#}.
System Error SoftwareHouse CrossFire VideoEdge 4.0 Video Driver
Service started failed on computer {#}.SoftwareHouse CrossFire VideoEdge 4.0 Video DriverService stopped failed on computer {#}.
C•CURE 9000-VideoEdge 4.0 Integration Journal Messages Definitions
NetVideo Activity VideoEdge 4.0Server
Online Server online on Server {#}.
Offline Server offline on Server {#}.
Table 7-1: Journal Messages Definitions, continued
Message Type Ob ject State Change Message

7/18/2019 CCURE 9000 v2 0 Videoedge 4 0 User Guide Lt En
http://slidepdf.com/reader/full/ccure-9000-v2-0-videoedge-4-0-user-guide-lt-en 91/98
C•CURE9000 VideoEdge 4.0 Integration User Guide 7–3
Protection Status:Failover Occurred
Server failover occurred on Server {#}.
Protection Status:None
VideoEdge4.0 Server ‘{#}’ protection status normal.
Storage Status:Hard Driver Failure Server Hard Driver Failure on Server {#}.
Storage Status:RAID is degrading
Server RAID is degrading on Server {#}.
Storage Status:Switched backupserver
Server Switched backup server on Server {#}.
Storage Status:Normal VideoEdge4.0 Server ‘{#}’ storage status normal.
Unit Status:Reboot
Server Reboot on Server {#}.
Unit Status:Normal
VideoEdge4.0 Server ‘{#}’ recorder state normal.
C•CURE 9000-VideoEdge 4.0 Integration Journal Messages Definitions
NetVideo Activity VideoEdge 4.0Video Camera
Dry Contact Camera dry contact alarm started on VideoEdge 4.0Video Camera {#}.
Normal Camera dry contact alarm ended on VideoEdge 4.0
Table 7-1: Journal Messages Definitions, continued
Message Type Ob ject State Change Message

7/18/2019 CCURE 9000 v2 0 Videoedge 4 0 User Guide Lt En
http://slidepdf.com/reader/full/ccure-9000-v2-0-videoedge-4-0-user-guide-lt-en 92/98
7–4 C•CURE9000 VideoEdge 4.0 Integration User Guide
y gVideo Camera {#}.
User Alarm Camera user alarm started on VideoEdge 4.0 VideoCamera {#}.
Normal Camera user alarm ended on VideoEdge 4.0 Video
Camera {#}.
Video loss Camera video loss alarm started on VideoEdge 4.0Video Camera {#}.
Normal Camera video lossalarm ended on VideoEdge 4.0 VideoCamera {#}.
Motion Camera motion alarm started on VideoEdge 4.0 VideoCamera {#}.
Normal Camera motion alarm ended on VideoEdge 4.0 VideoCamera {#}.
Pattern Pattern cmd on VideoEdge 4.0 Video Camera {#}.
Preset Preset cmd on VideoEdge 4.0 Video Camera {#}.
8

7/18/2019 CCURE 9000 v2 0 Videoedge 4 0 User Guide Lt En
http://slidepdf.com/reader/full/ccure-9000-v2-0-videoedge-4-0-user-guide-lt-en 93/98
C•CURE9000 VideoEdge 4.0 Integration User Guide 8–1
VideoEdge 4.0Limitations
This chapter lists the known limitations for this VideoEdge 4.0 Integrationversion.
In this chapter:
VideoEdge 4.0 Integration Limitations ......................................................................... 8-2
VideoEdge 4.0 Integration Limitations
VideoEdge 4.0 Integration Limitations
It is recommended that VideoEdge 4.0 Integration client has at least 4GB
memory and enables 3GB model in 32 bit OS system. Otherwise, It mayprompt the error message about out of memory, and then close the C•CURE9000 Administration Workstation.

7/18/2019 CCURE 9000 v2 0 Videoedge 4 0 User Guide Lt En
http://slidepdf.com/reader/full/ccure-9000-v2-0-videoedge-4-0-user-guide-lt-en 94/98
8–2 C•CURE9000 VideoEdge 4.0 Integration User Guide
VideoEdge 4.0 Integration request a good network environment, since videostreaming requires high bandwidth.
VideoEdge 4.0 Integration client features have not been fully qualified onWindow2008.
View requests a lot of resources (memory and display card), so you cannotopen too many views at the same time (even the view in tour). It isrecommended to open fewer than at the same time. Otherwise, it mayreport one D3D error.
It will take a few seconds to open a view for the first time, but subsequentviewings will load faster.
In a live view with audio enabled, click the "reconnect" button willdeactivate the audio. Click the "audio" button again to stream audio.
In maps, the VideoEdge 4.0 server icon will only change to reflect theonline, offline, unknown states.
The 1x5 and 2x8 views may open slowly.
When you add a VideoEdge 4.0 Camera into a view, only the VideoEdge4.0 server name and VideoEdge4.0 camera name will be displayed. Novideo will stream in the camera preview window.
Video clips are exported in Native format .ISO, which includes MP4 files.You can open MP4 files to play recorded videos.
In the 1x5 and 2x8 views, if you only add VideoEdge 4.0 cameras in theseviews, when you click button, it always pops up the first cameraviewer.
If you upgrade C•CURE 9000 1.93 with VideoEdge 4.0 IntegrationV1.0.57.0 to C•CURE 9000 2.0, and then upgrade the VideoEdge 4.0Integration from V1.0.57.0 to v1.1.64.0, configured VideoEdge 4.0 serverswill not display in the Video tree. You must uninstall VideoEdge 4.0V1.0.57.0 first, and then install VideoEdge 4.0 v1.1.64.0 in order for theservers to display properly.
VideoEdge 4.0 Integration Limitations
VideoEdge 4.0 Integration client is not supported over remote desktop.
If you install the VideoEdge 4.0 Integration, you will no longer be able touse VideoEdge 3.0 with C•CURE 9000. If you installed VideoEdge 4.0Integration, then need to use a VideoEdge 3.0 server, you can uninstall theVideoEdge 4.0 integration and run a repair on the C•CURE 9000 in orderto restore VideoEdge 3.0.

7/18/2019 CCURE 9000 v2 0 Videoedge 4 0 User Guide Lt En
http://slidepdf.com/reader/full/ccure-9000-v2-0-videoedge-4-0-user-guide-lt-en 95/98
C•CURE9000 VideoEdge 4.0 Integration User Guide 8–3
If you installed VideoEdge4.0 Integration, and do repair or upgradeinstallation of C•CURE 9000, the VideoEdge 4.0 Integration will need tobe reinstalled.
VideoEdge 4.0 Integration Limitations

7/18/2019 CCURE 9000 v2 0 Videoedge 4 0 User Guide Lt En
http://slidepdf.com/reader/full/ccure-9000-v2-0-videoedge-4-0-user-guide-lt-en 96/98
8–4 C•CURE9000 VideoEdge 4.0 Integration User Guide
Index

7/18/2019 CCURE 9000 v2 0 Videoedge 4 0 User Guide Lt En
http://slidepdf.com/reader/full/ccure-9000-v2-0-videoedge-4-0-user-guide-lt-en 97/98
C•CURE9000 VideoEdge 4.0 Integration User Guide Index–1
AAccessing
Video Tour Editor 6-3Video View Editor 5-2VideoEdge4.0 Video Server 3-2VideoEdge4.0 Video Server Editor 3-2
Activate an Event 3-12
BBefore You Begin 2-3Buttons
ToolbarDoors 4-18, 5-8Events 4-18, 5-8Inputs 4-19, 5-8
Live Video Display 4-19, 5-8Log Message 4-19, 5-8Manual Actions 4-19, 5-8Map 4-19, 5-8Outputs 4-19, 5-8Toggle 4-19, 5-8Up/Down 4-18, 5-8
CChecking Networks Status 2-3Checking System Privileges 2-3Configuring
Video Tour 6-5Video View 5-5VideoEdge4.0 Video Camera 4-6VideoEdge4.0 Video Server 3-5
Creating 6-4VideoEdge4.0 Video Server 3-3VideoEdge4.0 Video Tour 6-4VideoEdge4.0 Video View 5-3
DDatabase Installation 2-3Deleting 6-4
Video Tour 6-4Video View 5-4VideoEdge4.0 Video Camera 4-3, 4-4VideoEdge4.0 Video Server 3-3
EExamples of Defining Alarm for a VideoEdge4.0
Video Server 3-12
FFeatures 1-3
Index
OOverview 1-2
Video Tour 6-2Video View 5-2VideoEdge4.0 Video Camera 4-2VideoEdge4 0 Video Server Editor 3-2
Viewer 4-18, 4-22VideoEdge4.0 Video Server
Alarms Tab 3-6
General Tab 3-6State Images Tab 3-15
VideoEdge4.0 Video Tour General Tab 6-6

7/18/2019 CCURE 9000 v2 0 Videoedge 4 0 User Guide Lt En
http://slidepdf.com/reader/full/ccure-9000-v2-0-videoedge-4-0-user-guide-lt-en 98/98
Index–2 C•CURE9000 VideoEdge 4.0 Integration User Guide
VideoEdge4.0 Video Server Editor 3 2
PPreview Window 6-7
RRunning the Setup Program 2-4
TTo Install on a Local Computer 2-4To Install over the Network 2-4To Remove an Alarm 3-14To Uninstall VideoEdge4.0 Integration 2-11
UUninstalling the VideoEdge4.0 Integration
Interface 2-11
VVideo Camera Action 3-14VideoEdge4.0 Video Camera
Alarms Tab 4-11General Tab 4-8State ImagesTab 4-16


![[XLS] · Web view0 0 7/31/2018 10/16/2017 0 0 39 40 41 42 43 0 2 0 0 0 0 2 0 0 0 0 2 0 0 0 0 1 0 0 0 0 2 0 0 0 0 1 0 0 0 0 2 0 0 0 0 2 0 0 0 0 2 0 0 0 0 2 0 0 0 0 2 0 0 0 0 2 0 0](https://static.documents.pub/doc/80x56/5afad2057f8b9a32348e4124/xls-view0-0-7312018-10162017-0-0-39-40-41-42-43-0-2-0-0-0-0-2-0-0-0-0-2-0.jpg)


