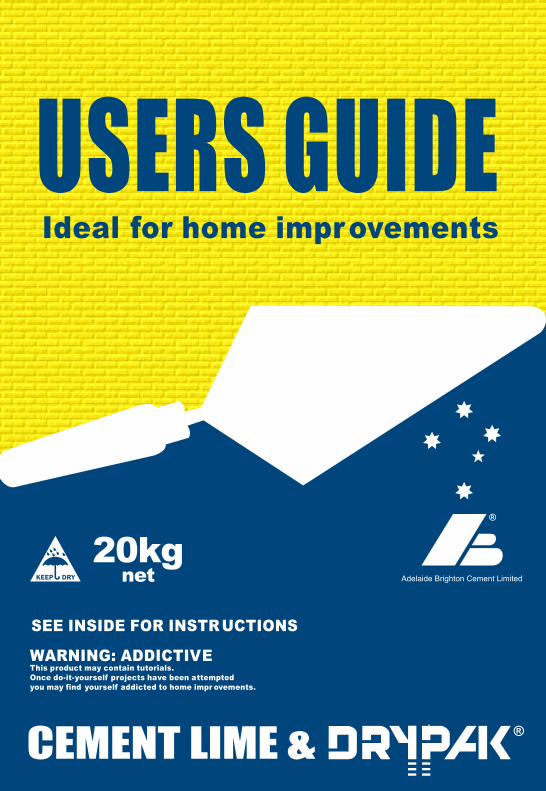
USERS GUIDE Ideal for home improvements SEE INSIDE FOR INSTR UCTIONS WARNING: ADDICTIVE This product may contain tutorials. Once do-it-yourself projects have been attempted you may find yourself addicted to home impr ovements. Adelaide Brighton Cement Limited CEMENT LIME &
Transcript
USERS GUIDEIdeal for home improvements
SEE INSIDE FOR INSTRUCTIONS
WARNING: ADDICTIVEThis product may contain tutorials.Once do-it-yourself projects have been attemptedyou may find yourself addicted to home impr ovements.
Adelaide Brighton Cement Limited
CEMENT LIME &
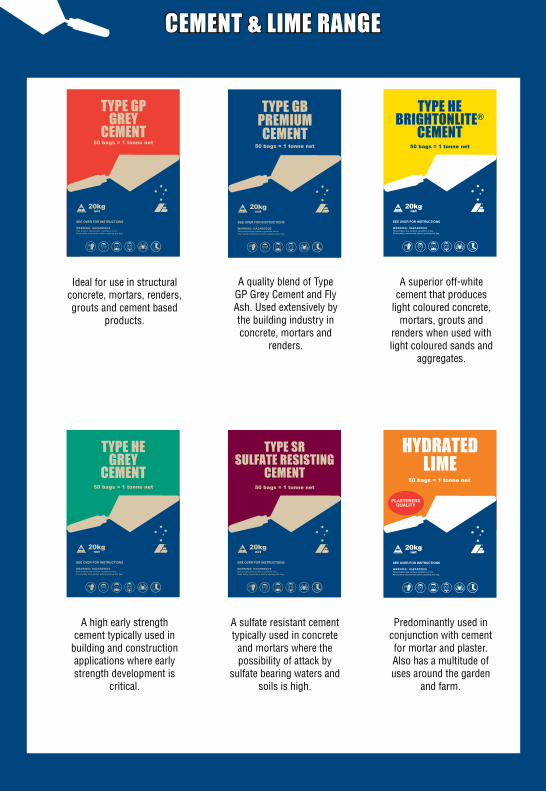
A superior off-white cement that produces
light coloured concrete, mortars, grouts and
renders when used with light coloured sands and
aggregates.
A high early strength cement typically used in
building and construction applications where early strength development is
critical.
A sulfate resistant cement typically used in concrete
and mortars where the possibility of attack by
sulfate bearing waters and soils is high.
CEMENT & LIME RANGE
A quality blend of Type GP Grey Cement and Fly Ash. Used extensively by the building industry in concrete, mortars and
renders.
Ideal for use in structural concrete, mortars, renders, grouts and cement based
products.
Predominantly used in conjunction with cement for mortar and plaster. Also has a multitude of uses around the garden
and farm.
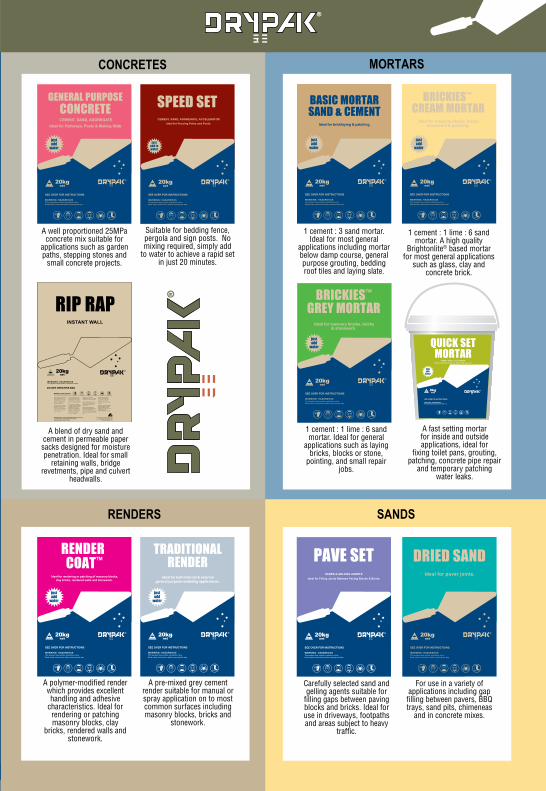
A pre-mixed grey cement render suitable for manual or spray application on to most common surfaces including masonry blocks, bricks and
stonework.
1 cement : 1 lime : 6 sand mortar. A high quality
Brightonlite® based mortar for most general applications
such as glass, clay and concrete brick.
A well proportioned 25MPa concrete mix suitable for
applications such as garden paths, stepping stones and
small concrete projects.
Suitable for bedding fence, pergola and sign posts. No mixing required, simply add
to water to achieve a rapid set in just 20 minutes.
1 cement : 3 sand mortar. Ideal for most general
applications including mortar below damp course, general purpose grouting, bedding roof tiles and laying slate.
1 cement : 1 lime : 6 sand mortar. Ideal for general
applications such as laying bricks, blocks or stone,
pointing, and small repair jobs.
Carefully selected sand and gelling agents suitable for
filling gaps between paving blocks and bricks. Ideal for use in driveways, footpaths and areas subject to heavy
traffic.
For use in a variety of applications including gap
filling between pavers, BBQ trays, sand pits, chimeneas
and in concrete mixes.
CEMENT & LIME RANGE
A polymer-modified render which provides excellent handling and adhesive
characteristics. Ideal for rendering or patching masonry blocks, clay
bricks, rendered walls and stonework.
A blend of dry sand and cement in permeable paper sacks designed for moisture penetration. Ideal for small
retaining walls, bridge revetments, pipe and culvert
headwalls.
A fast setting mortar for inside and outside applications, ideal for
CEMENT, SAND, AGGREGATEIdeal for Pathways, Posts & Making Slabs
WARNING: HAZARDOUSThis product may contain crystalline silica. Read safety instructions before opening this bag .
SEE OVER FOR INSTRUCTIONS
®
®
When handling cement-based products care should be taken to ensure that you adequately protect yourself from any possible discomfort. Below is a summary of advice that should be adhered to when using cement-based products.
For detailed safety and product information you can download our material safety data sheets and our product data sheets at www.adelaidebrighton.com.au or telephone (08) 8300 0300.
SafetyKeep exposure to dust as low as practicable to minimise health problems such as skin, eye and respiratory irritation. Avoid repeated skin contact with wet concrete, mortar, render and dry or wet cement. Wear loose comfortable protective clothing and impervious boots. Apply barrier cream to hands or wear impervious gloves.
Safety spectacles with side shields or safety goggles should be worn if dust is likely to be generated. If dust is generated, wear a class P1 or P2 particulate respirator.
First AidSwallowed: Rinse mouth and lips with water. Do not induce vomiting. Give water to drink to dilute stomach contents. If symptoms persist, seek medical attention.
Eyes: Flush thoroughly with flowing water for at least 15 minutes. Seek medical attention if symptoms persist.
Skin: Wash thoroughly with water. A shower may be required.
Inhaled: Remove from dusty area to fresh air. If symptoms persist, seek medical attention.
Manual HandlingManual handling of bag products without due care and attention may result in personal injury.
Unless you have been trained in manual handling methods it is suggested that you share the load with another person.
SAFETY & FIRST AID
4
CONTENTS
SAFETY & FIRST AID
5
CONTENTSEFFECTIVE USE OF CONCRETE• Materials • Mixes • Application
EFFECTIVE USE OF MORTAR• Materials • Mixes
EFFECTIVE USE OF RENDER• Materials • Surface Preparation • Mixes • Application
PROJECT ADVICE • Concrete Paths & Slabs • Making Concrete Pavers • Concrete Repair • Concrete Cleaning • Setting Posts • Basic Bricklaying • Laying Slate Or Stone • Build A Fishpond • Rendering An Existing Wall • Laying Pavers • Rip Rap Walls • Cement Stabilisation
LIME - HOME & GARDEN• Plant & Soils • White Wash • Disinfecting & Deodorising • White Ant Deterrent • Clarifying Dam Water • Drying Out Muddy Areas • Rust Prevention
Concrete is a versatile building material made by mixing cement, water, coarse (stone) and fine (sand) aggregates. It is the cement and water that forms a paste which glues the aggregates together and enables the concrete to set into a hard, durable product.
To obtain the maximum strength and durability from the product, it is necessary to follow some simple rules. These points are outlined in this guide.
MaterialsTo produce good concrete it is necessary to use good quality materials.
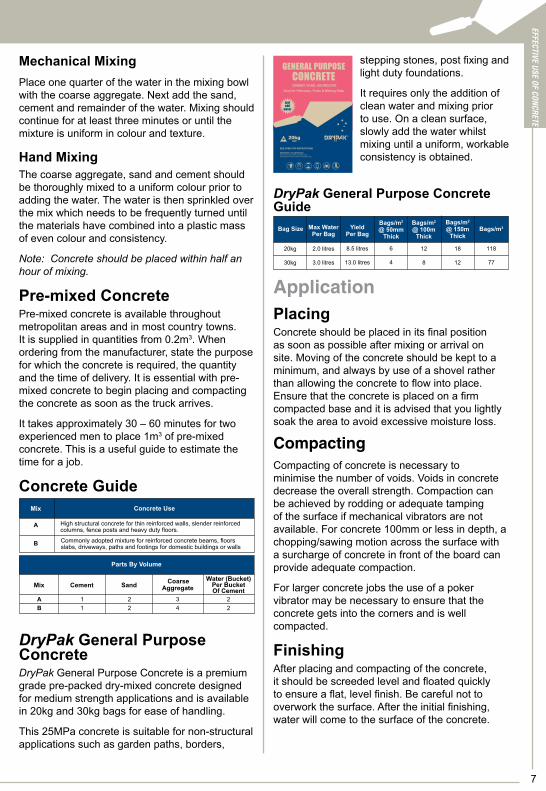
Cement For general use around the home, Type GP Grey and Type GB Premium Cements are both suitable. The cement should be stored in a well-aired, dry environment, stacked off of the ground. Cement has a limited shelf life – do not use if it has become lumpy.
WaterWater for use in a concrete mix must be clean, fresh and free from impurities. As a general rule, if the water is suitable for drinking (potable), it will be okay for making concrete.
Aggregates Both coarse aggregates, such as crushed rock & gravel, and fine aggregates such as sand, should be strong, hard and clean. Do not use aggregates that have impurities, such as clay, as this will weaken the bond of the cement paste.
Aggregates should be graded to contain a variety of sizes and should be stored so as to remain clean and dry.
Coarse aggregate (also called metal) with a 20mm maximum size is suitable for general concrete work.
Sand for concrete should be concrete sand and not brickie’s or plasterer’s sand.
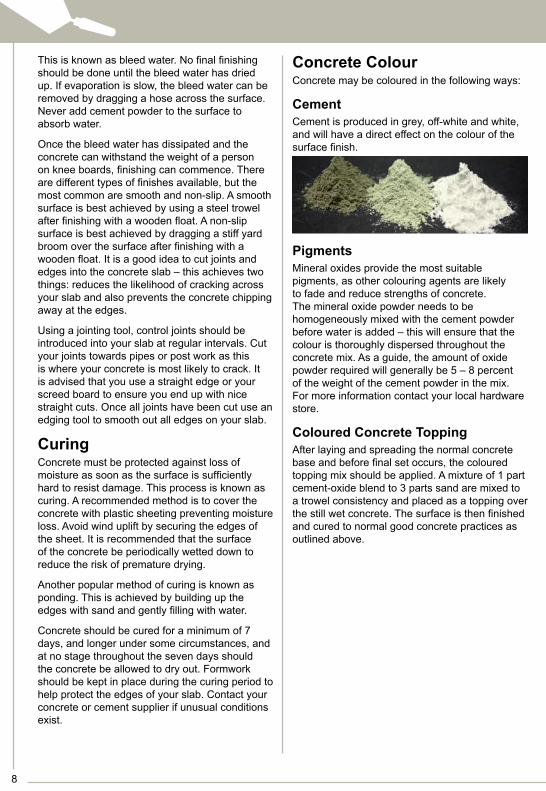
FormworkFormwork is the mould for the concrete and is usually made out of 25mm thick timber. Forms must be placed carefully and accurately with adequate bracing. Ensure that the formwork is smooth, clean and does not warp under the pressure of freshly poured concrete (fresh concrete can exert considerable pressure). All formwork should be lightly oiled with a proprietary form oil or release agent to aid removal once the concrete has set. When placing formwork keep in mind drainage. Formwork should be slightly lower on one side than the other so rainwater can run off.
ReinforcingWhen concrete is subject to very heavy loads or traffic it is wise to use steel or mesh re-inforcing. It is essential that the right amount of steel be used and that it is placed correctly in the concrete mass. Obtain further advice from your steel supplier.
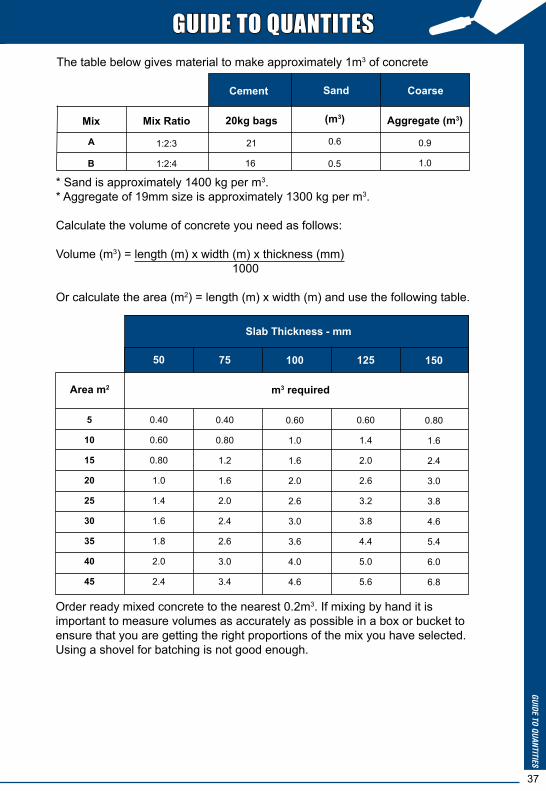
MixesSite Mixed Concrete When site mixing concrete, always measure materials by volume in a suitable container (i.e. a bucket). Do not measure by shovelfuls. For small quantities DryPak General Purpose Concrete can be used.
EFFECTIVE USE OF CONCRETE
6
TYPE GPGREY
CEMENT50 bags = 1 tonne net
stepping stones, post fixing and light duty foundations.
It requires only the addition of clean water and mixing prior to use. On a clean surface, slowly add the water whilst mixing until a uniform, workable consistency is obtained.
DryPak General Purpose Concrete Guide
ApplicationPlacingConcrete should be placed in its final position as soon as possible after mixing or arrival on site. Moving of the concrete should be kept to a minimum, and always by use of a shovel rather than allowing the concrete to flow into place. Ensure that the concrete is placed on a firm compacted base and it is advised that you lightly soak the area to avoid excessive moisture loss.
CompactingCompacting of concrete is necessary to minimise the number of voids. Voids in concrete decrease the overall strength. Compaction can be achieved by rodding or adequate tamping of the surface if mechanical vibrators are not available. For concrete 100mm or less in depth, a chopping/sawing motion across the surface with a surcharge of concrete in front of the board can provide adequate compaction.
For larger concrete jobs the use of a poker vibrator may be necessary to ensure that the concrete gets into the corners and is well compacted.
FinishingAfter placing and compacting of the concrete, it should be screeded level and floated quickly to ensure a flat, level finish. Be careful not to overwork the surface. After the initial finishing, water will come to the surface of the concrete.
Mechanical MixingPlace one quarter of the water in the mixing bowl with the coarse aggregate. Next add the sand, cement and remainder of the water. Mixing should continue for at least three minutes or until the mixture is uniform in colour and texture.
Hand MixingThe coarse aggregate, sand and cement should be thoroughly mixed to a uniform colour prior to adding the water. The water is then sprinkled over the mix which needs to be frequently turned until the materials have combined into a plastic mass of even colour and consistency.
Note: Concrete should be placed within half an hour of mixing.
Pre-mixed ConcretePre-mixed concrete is available throughout metropolitan areas and in most country towns. It is supplied in quantities from 0.2m3. When ordering from the manufacturer, state the purpose for which the concrete is required, the quantity and the time of delivery. It is essential with pre-mixed concrete to begin placing and compacting the concrete as soon as the truck arrives.
It takes approximately 30 – 60 minutes for two experienced men to place 1m3 of pre-mixed concrete. This is a useful guide to estimate the time for a job.
Concrete Guide
DryPak General Purpose ConcreteDryPak General Purpose Concrete is a premium grade pre-packed dry-mixed concrete designed for medium strength applications and is available in 20kg and 30kg bags for ease of handling.
This 25MPa concrete is suitable for non-structural applications such as garden paths, borders,
EFFECTIVE USE OF CONCRETE EFFECTIVE USE OF CONCRETE
7
justadd
water
CEMENT, SAND, AGGREGATEIdeal for Pathways, Posts & Making Slabs
WARNING: HAZARDOUSThis product may contain crystalline silica. Read safety instructions before opening this bag .
SEE OVER FOR INSTRUCTIONS
Mix
AB
Cement
11
Sand
22
34
22
CoarseAggregate
A
B
High structural concrete for thin reinforced walls, slender reinforced columns, fence posts and heavy duty floors.
Commonly adopted mixture for reinforced concrete beams, floors slabs, driveways, paths and footings for domestic buildings or walls
Mix Concrete Use
Water (Bucket)Per BucketOf Cement
Parts By Volume
20kg
30kg
Bag Size Max WaterPer Bag
YieldPer Bag
Bags/m2
@ 50mmThick
Bags/m2
@ 100mThick
Bags/m2
@ 150mThick
Bags/m3
2.0 litres
3.0 litres
8.5 litres
13.0 litres
6
4
12
8
18
12
118
77
Concrete ColourConcrete may be coloured in the following ways:
CementCement is produced in grey, off-white and white, and will have a direct effect on the colour of the surface finish.
PigmentsMineral oxides provide the most suitable pigments, as other colouring agents are likely to fade and reduce strengths of concrete. The mineral oxide powder needs to be homogeneously mixed with the cement powder before water is added – this will ensure that the colour is thoroughly dispersed throughout the concrete mix. As a guide, the amount of oxide powder required will generally be 5 – 8 percent of the weight of the cement powder in the mix. For more information contact your local hardware store.
Coloured Concrete Topping After laying and spreading the normal concrete base and before final set occurs, the coloured topping mix should be applied. A mixture of 1 part cement-oxide blend to 3 parts sand are mixed to a trowel consistency and placed as a topping over the still wet concrete. The surface is then finished and cured to normal good concrete practices as outlined above.
This is known as bleed water. No final finishing should be done until the bleed water has dried up. If evaporation is slow, the bleed water can be removed by dragging a hose across the surface. Never add cement powder to the surface to absorb water.
Once the bleed water has dissipated and the concrete can withstand the weight of a person on knee boards, finishing can commence. There are different types of finishes available, but the most common are smooth and non-slip. A smooth surface is best achieved by using a steel trowel after finishing with a wooden float. A non-slip surface is best achieved by dragging a stiff yard broom over the surface after finishing with a wooden float. It is a good idea to cut joints and edges into the concrete slab – this achieves two things: reduces the likelihood of cracking across your slab and also prevents the concrete chipping away at the edges.
Using a jointing tool, control joints should be introduced into your slab at regular intervals. Cut your joints towards pipes or post work as this is where your concrete is most likely to crack. It is advised that you use a straight edge or your screed board to ensure you end up with nice straight cuts. Once all joints have been cut use an edging tool to smooth out all edges on your slab.
CuringConcrete must be protected against loss of moisture as soon as the surface is sufficiently hard to resist damage. This process is known as curing. A recommended method is to cover the concrete with plastic sheeting preventing moisture loss. Avoid wind uplift by securing the edges of the sheet. It is recommended that the surface of the concrete be periodically wetted down to reduce the risk of premature drying.
Another popular method of curing is known as ponding. This is achieved by building up the edges with sand and gently filling with water.
Concrete should be cured for a minimum of 7 days, and longer under some circumstances, and at no stage throughout the seven days should the concrete be allowed to dry out. Formwork should be kept in place during the curing period to help protect the edges of your slab. Contact your concrete or cement supplier if unusual conditions exist.
8
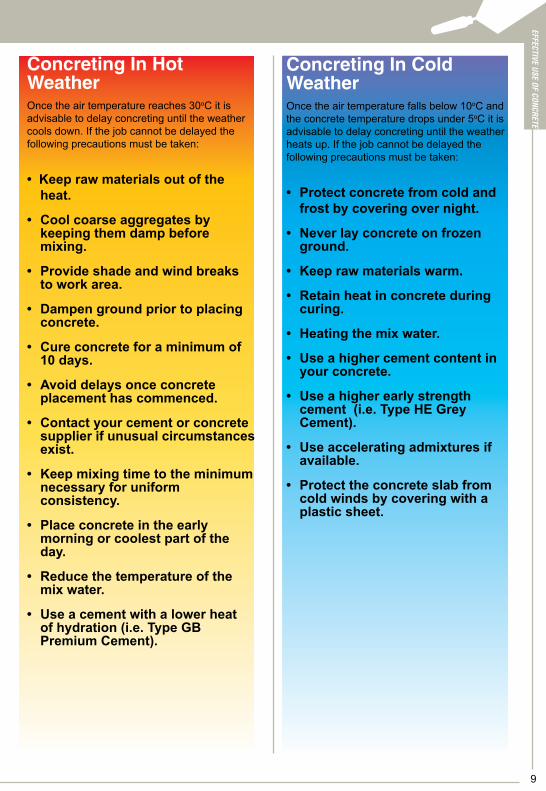
Concreting In Hot WeatherOnce the air temperature reaches 30oC it is advisable to delay concreting until the weather cools down. If the job cannot be delayed the following precautions must be taken:
• Keep raw materials out of the heat.
• Cool coarse aggregates by keeping them damp before mixing.
• Provide shade and wind breaks to work area.
• Dampen ground prior to placing concrete.
• Cure concrete for a minimum of 10 days.
• Avoid delays once concrete placement has commenced.
• Contact your cement or concrete supplier if unusual circumstances exist.
• Keep mixing time to the minimum necessary for uniform consistency.
• Place concrete in the early morning or coolest part of the day.
• Reduce the temperature of the mix water.
• Use a cement with a lower heat of hydration (i.e. Type GB Premium Cement).
Concreting In Cold WeatherOnce the air temperature falls below 10oC and the concrete temperature drops under 5oC it is advisable to delay concreting until the weather heats up. If the job cannot be delayed the following precautions must be taken:
• Protect concrete from cold and frost by covering over night.
• Never lay concrete on frozen ground.
• Keep raw materials warm.
• Retain heat in concrete during curing.
• Heating the mix water.
• Use a higher cement content in your concrete.
• Use a higher early strength cement (i.e. Type HE Grey Cement).
• Use accelerating admixtures if available.
• Protect the concrete slab from cold winds by covering with a plastic sheet.
EFFECTIVE USE OF CONCRETE
9
Good mortar is of vital importance in all brick or block walls as it bonds the units together, helps to carry the weight placed on the wall and seals the joints to provide a weatherproof wall.
To obtain the best results when making mortar, it is necessary to follow some simple rules. These are outlined in this section.
Materials To make good mortar, you need to use good quality materials.
Cement
For normal brick and block work, Type GP Grey, Type GB Premium and Type HE Brightonlite® Cements are suitable. Cement should be stored off the ground in a dry environment free of moisture. Cement has a limited shelf life - do not use if it has become lumpy.
Hydrated Lime
Lime is added to make the mortar creamier or more workable and durable. It also helps to minimise cracking as the mix dries out.
Aggregate Sand is the fine aggregate component which is the basis of the mortar and only recognised brickie’s sand should be used.
WaterWater for use in making mortars should be clean, fresh and free from impurities. As a general rule, if the water is suitable for drinking (potable) it will be okay for making mortar.
Admixture Chemical additives should be used only in strict accordance with the manufacturer’s instructions and should not be used to replace lime. Pigments added to colour the mortar should not exceed 10 percent of the weight of cement in the mix and should be thoroughly mixed with the other materials prior to the addition of water. It is advised that a sample of the coloured mortar should be made and allowed to completely dry before commencing work to ensure the desired colour is achieved.
MixesSite Mixed MortarWhen site mixing, it is important to carefully measure the material by volume in a suitable container (i.e. a bucket) not by shovelfuls.
Mechanical MixingThis is usually done in a concrete mixer. A small amount of mixing water is placed in the mixer followed by the sand, cement and then lime. More water is then slowly added to create a thick creamy mortar. Each batch should be thoroughly mixed for three minutes to ensure that a uniform consistency is obtained.
Hand Mixing Mixing should be done in a clean wheelbarrow or on a mixing board to avoid contamination. The raw materials should be combined and mixed to an even colour prior to adding water. Water is
10
TYPE GPGREY
CEMENT50 bags = 1 tonne net
EFFECTIVE USE OF MORTAR
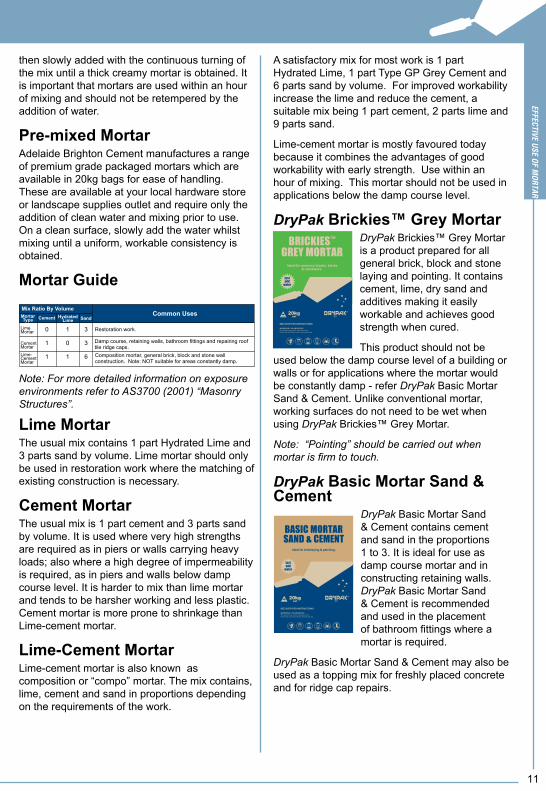
A satisfactory mix for most work is 1 part Hydrated Lime, 1 part Type GP Grey Cement and 6 parts sand by volume. For improved workability increase the lime and reduce the cement, a suitable mix being 1 part cement, 2 parts lime and 9 parts sand.
Lime-cement mortar is mostly favoured today because it combines the advantages of good workability with early strength. Use within an hour of mixing. This mortar should not be used in applications below the damp course level.
DryPak Brickies™ Grey MortarDryPak Brickies™ Grey Mortar is a product prepared for all general brick, block and stone laying and pointing. It contains cement, lime, dry sand and additives making it easily workable and achieves good strength when cured.
This product should not be used below the damp course level of a building or walls or for applications where the mortar would be constantly damp - refer DryPak Basic Mortar Sand & Cement. Unlike conventional mortar, working surfaces do not need to be wet when using DryPak Brickies™ Grey Mortar.
Note: “Pointing” should be carried out when mortar is firm to touch.
DryPak Basic Mortar Sand & Cement
DryPak Basic Mortar Sand & Cement contains cement and sand in the proportions 1 to 3. It is ideal for use as damp course mortar and in constructing retaining walls. DryPak Basic Mortar Sand & Cement is recommended and used in the placement of bathroom fittings where a mortar is required.
DryPak Basic Mortar Sand & Cement may also be used as a topping mix for freshly placed concrete and for ridge cap repairs.
then slowly added with the continuous turning of the mix until a thick creamy mortar is obtained. It is important that mortars are used within an hour of mixing and should not be retempered by the addition of water.
Pre-mixed MortarAdelaide Brighton Cement manufactures a range of premium grade packaged mortars which are available in 20kg bags for ease of handling. These are available at your local hardware store or landscape supplies outlet and require only the addition of clean water and mixing prior to use. On a clean surface, slowly add the water whilst mixing until a uniform, workable consistency is obtained.
Mortar Guide
Note: For more detailed information on exposure environments refer to AS3700 (2001) “Masonry Structures”.
Lime MortarThe usual mix contains 1 part Hydrated Lime and 3 parts sand by volume. Lime mortar should only be used in restoration work where the matching of existing construction is necessary.
Cement Mortar The usual mix is 1 part cement and 3 parts sand by volume. It is used where very high strengths are required as in piers or walls carrying heavy loads; also where a high degree of impermeability is required, as in piers and walls below damp course level. It is harder to mix than lime mortar and tends to be harsher working and less plastic. Cement mortar is more prone to shrinkage than Lime-cement mortar.
Lime-Cement MortarLime-cement mortar is also known as composition or “compo” mortar. The mix contains, lime, cement and sand in proportions depending on the requirements of the work.
EFFECTIVE USE OF MORTAR
11
EFFECTIVE USE OF MORTAR
Cement HydratedLime Sand
Mix Ratio By VolumeMortarType
LimeMortar
CementMortar
Lime-CementMortar
0
1
1
1
0
1
3
3
6
Restoration work.
Damp course, retaining walls, bathroom fittings and repairing rooftile ridge caps.Composition mortar, general brick, block and stone wall construction. Note: NOT suitable for areas constantly damp.
Common Uses
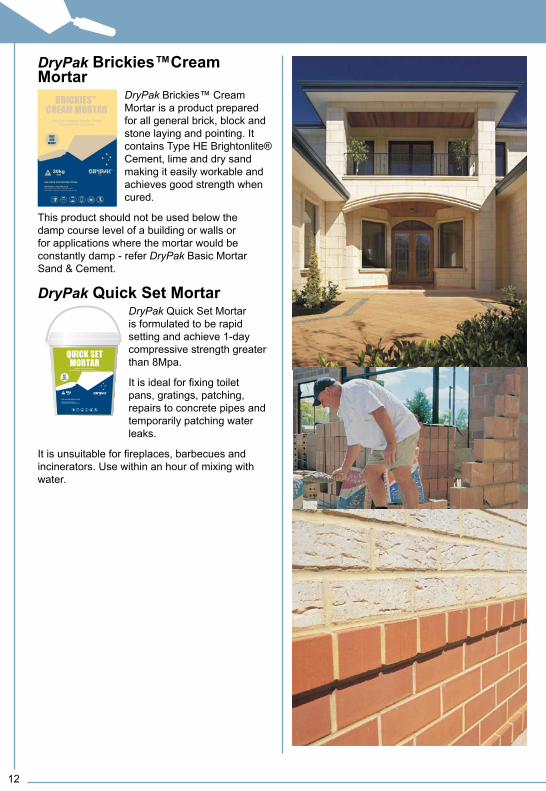
DryPak Brickies™Cream Mortar
DryPak Brickies™ Cream Mortar is a product prepared for all general brick, block and stone laying and pointing. It contains Type HE Brightonlite® Cement, lime and dry sand making it easily workable and achieves good strength when cured.
This product should not be used below the damp course level of a building or walls or for applications where the mortar would be constantly damp - refer DryPak Basic Mortar Sand & Cement.
DryPak Quick Set MortarDryPak Quick Set Mortar is formulated to be rapid setting and achieve 1-day compressive strength greater than 8Mpa.
It is ideal for fixing toilet pans, gratings, patching, repairs to concrete pipes and temporarily patching water leaks.
It is unsuitable for fireplaces, barbecues and incinerators. Use within an hour of mixing with water.
12
Cement based renders on both internal and external walls, perform a number of functions. These include better water-proofing, improved fire rating and an improved appearance through the use of coloured or textured renders.
To get the best results from a render coating, it is important that the mix is suited to the background surface, that it is properly applied to the correct thickness in the appropriate number of coats and that attention is paid to curing. Some simple guidelines are outlined in this information section.
MaterialsTo make good render it is necessary to use good quality materials.
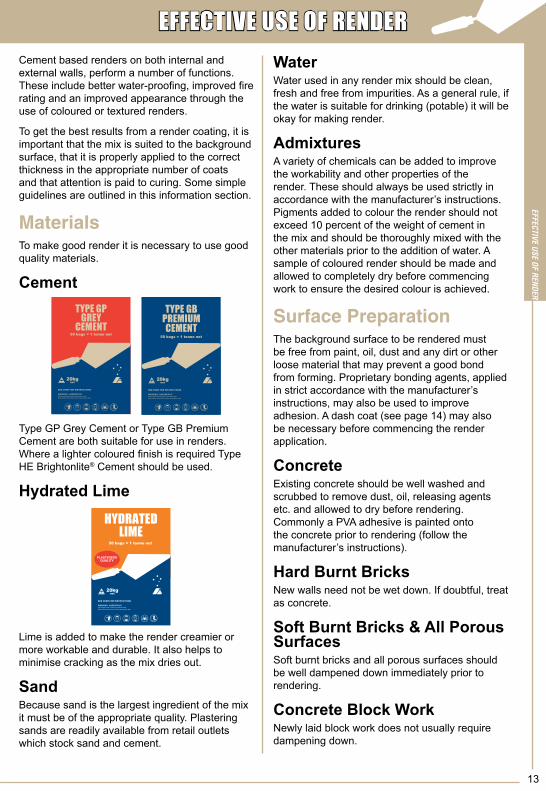
Cement
Type GP Grey Cement or Type GB Premium Cement are both suitable for use in renders. Where a lighter coloured finish is required Type HE Brightonlite® Cement should be used.
Hydrated Lime
Lime is added to make the render creamier or more workable and durable. It also helps to minimise cracking as the mix dries out.
SandBecause sand is the largest ingredient of the mix it must be of the appropriate quality. Plastering sands are readily available from retail outlets which stock sand and cement.
WaterWater used in any render mix should be clean, fresh and free from impurities. As a general rule, if the water is suitable for drinking (potable) it will be okay for making render.
AdmixturesA variety of chemicals can be added to improve the workability and other properties of the render. These should always be used strictly in accordance with the manufacturer’s instructions. Pigments added to colour the render should not exceed 10 percent of the weight of cement in the mix and should be thoroughly mixed with the other materials prior to the addition of water. A sample of coloured render should be made and allowed to completely dry before commencing work to ensure the desired colour is achieved.
Surface PreparationThe background surface to be rendered must be free from paint, oil, dust and any dirt or other loose material that may prevent a good bond from forming. Proprietary bonding agents, applied in strict accordance with the manufacturer’s instructions, may also be used to improve adhesion. A dash coat (see page 14) may also be necessary before commencing the render application.
ConcreteExisting concrete should be well washed and scrubbed to remove dust, oil, releasing agents etc. and allowed to dry before rendering. Commonly a PVA adhesive is painted onto the concrete prior to rendering (follow the manufacturer’s instructions).
Hard Burnt BricksNew walls need not be wet down. If doubtful, treat as concrete.
Soft Burnt Bricks & All Porous SurfacesSoft burnt bricks and all porous surfaces should be well dampened down immediately prior to rendering.
Concrete Block WorkNewly laid block work does not usually require dampening down.
EFFECTIVE USE OF RENDEREFFECTIVE USE OF RENDER
13
TYPE GPGREY
CEMENT50 bags = 1 tonne net
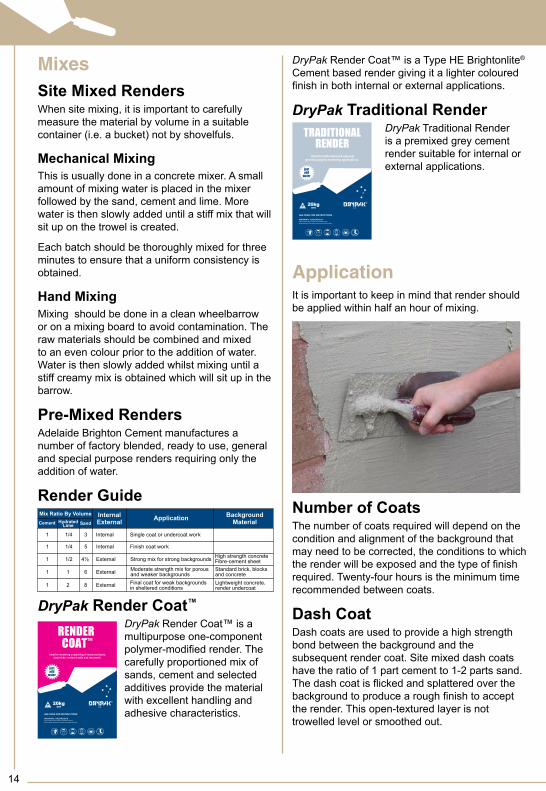
DryPak Render Coat™ is a Type HE Brightonlite®
Cement based render giving it a lighter coloured finish in both internal or external applications.
DryPak Traditional RenderDryPak Traditional Render is a premixed grey cement render suitable for internal or external applications.
Application It is important to keep in mind that render should be applied within half an hour of mixing.
Number of CoatsThe number of coats required will depend on the condition and alignment of the background that may need to be corrected, the conditions to which the render will be exposed and the type of finish required. Twenty-four hours is the minimum time recommended between coats.
Dash CoatDash coats are used to provide a high strength bond between the background and the subsequent render coat. Site mixed dash coats have the ratio of 1 part cement to 1-2 parts sand. The dash coat is flicked and splattered over the background to produce a rough finish to accept the render. This open-textured layer is not trowelled level or smoothed out.
MixesSite Mixed RendersWhen site mixing, it is important to carefully measure the material by volume in a suitable container (i.e. a bucket) not by shovelfuls.
Mechanical MixingThis is usually done in a concrete mixer. A small amount of mixing water is placed in the mixer followed by the sand, cement and lime. More water is then slowly added until a stiff mix that will sit up on the trowel is created.
Each batch should be thoroughly mixed for three minutes to ensure that a uniform consistency is obtained.
Hand MixingMixing should be done in a clean wheelbarrow or on a mixing board to avoid contamination. The raw materials should be combined and mixed to an even colour prior to the addition of water. Water is then slowly added whilst mixing until a stiff creamy mix is obtained which will sit up in the barrow.
Pre-Mixed Renders Adelaide Brighton Cement manufactures a number of factory blended, ready to use, general and special purpose renders requiring only the addition of water.
Render Guide
DryPak Render Coat™
DryPak Render Coat™ is a multipurpose one-component polymer-modified render. The carefully proportioned mix of sands, cement and selected additives provide the material with excellent handling and adhesive characteristics.
14
1 1/4 3 Internal Single coat or undercoat work
Cement HydratedLime Sand
InternalExternal
Mix Ratio By VolumeApplication Background
Material
1 1/4 5 Internal Finish coat work
1 1/2 4½ External Strong mix for strong backgrounds High strength concreteFibre-cement sheet
UndercoatsUndercoats are normally applied by trowel at a minimum thickness of 10mm and a maximum of 15mm. Once the render is firm it should be raked or scratched to provide a key for the next coat.
Final CoatsFinal coats are normally applied by trowel at a maximum thickness of 5mm over the undercoat.
Control JointsCement-based renders can crack as a result of the render shrinking as it dries, movement or changes in the background material and other causes. With the placement of these joints this unsightly cracking can be controlled. Control joints should be formed in the render to coincide with all joints in the background and locations in the structure where movement is likely to occur.
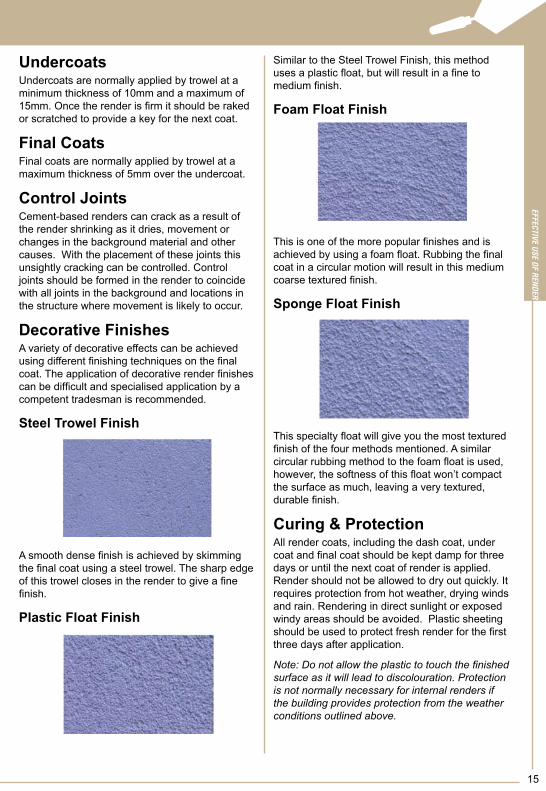
Decorative FinishesA variety of decorative effects can be achieved using different finishing techniques on the final coat. The application of decorative render finishes can be difficult and specialised application by a competent tradesman is recommended.
Steel Trowel Finish
A smooth dense finish is achieved by skimming the final coat using a steel trowel. The sharp edge of this trowel closes in the render to give a fine finish.
Plastic Float Finish
Similar to the Steel Trowel Finish, this method uses a plastic float, but will result in a fine to medium finish.
Foam Float Finish
This is one of the more popular finishes and is achieved by using a foam float. Rubbing the final coat in a circular motion will result in this medium coarse textured finish.
Sponge Float Finish
This specialty float will give you the most textured finish of the four methods mentioned. A similar circular rubbing method to the foam float is used, however, the softness of this float won’t compact the surface as much, leaving a very textured, durable finish.
Curing & Protection All render coats, including the dash coat, under coat and final coat should be kept damp for three days or until the next coat of render is applied. Render should not be allowed to dry out quickly. It requires protection from hot weather, drying winds and rain. Rendering in direct sunlight or exposed windy areas should be avoided. Plastic sheeting should be used to protect fresh render for the first three days after application.
Note: Do not allow the plastic to touch the finished surface as it will lead to discolouration. Protection is not normally necessary for internal renders if the building provides protection from the weather conditions outlined above.
EFFECTIVE USE OF RENDER
15
PROJECT ADVICE
Concrete Paths & Slabs 18
Making Concrete Pavers 19
Concrete Repair 20
Concrete Cleaning 21
Setting Posts 22
Basic Bricklaying 23
Laying Slate Or Stone 26
Building A Fishpond 27
Rendering An Existing Wall 28
Laying Pavers 30
Rip Rap Walls 32
Cement Stabilisation 33
17
PROJECT ADVICE - CONTENTS
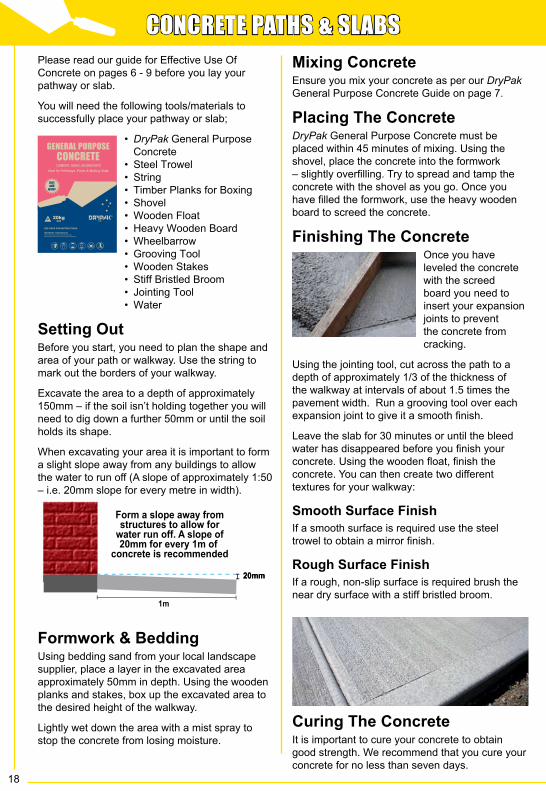
20mm20mm
Please read our guide for Effective Use Of Concrete on pages 6 - 9 before you lay your pathway or slab.
You will need the following tools/materials to successfully place your pathway or slab;
Setting OutBefore you start, you need to plan the shape and area of your path or walkway. Use the string to mark out the borders of your walkway.
Excavate the area to a depth of approximately 150mm – if the soil isn’t holding together you will need to dig down a further 50mm or until the soil holds its shape.
When excavating your area it is important to form a slight slope away from any buildings to allow the water to run off (A slope of approximately 1:50 – i.e. 20mm slope for every metre in width).
Formwork & BeddingUsing bedding sand from your local landscape supplier, place a layer in the excavated area approximately 50mm in depth. Using the wooden planks and stakes, box up the excavated area to the desired height of the walkway.
Lightly wet down the area with a mist spray to stop the concrete from losing moisture.
Mixing ConcreteEnsure you mix your concrete as per our DryPak General Purpose Concrete Guide on page 7.
Placing The ConcreteDryPak General Purpose Concrete must be placed within 45 minutes of mixing. Using the shovel, place the concrete into the formwork – slightly overfilling. Try to spread and tamp the concrete with the shovel as you go. Once you have filled the formwork, use the heavy wooden board to screed the concrete.
Finishing The ConcreteOnce you have leveled the concrete with the screed board you need to insert your expansion joints to prevent the concrete from cracking.
Using the jointing tool, cut across the path to a depth of approximately 1/3 of the thickness of the walkway at intervals of about 1.5 times the pavement width. Run a grooving tool over each expansion joint to give it a smooth finish.
Leave the slab for 30 minutes or until the bleed water has disappeared before you finish your concrete. Using the wooden float, finish the concrete. You can then create two different textures for your walkway:
Smooth Surface FinishIf a smooth surface is required use the steel trowel to obtain a mirror finish.
Rough Surface FinishIf a rough, non-slip surface is required brush the near dry surface with a stiff bristled broom.
Curing The ConcreteIt is important to cure your concrete to obtain good strength. We recommend that you cure your concrete for no less than seven days.
18
CONCRETE PATHS & SLABS MAKING CONCRETE PAVERS
justadd
water
CEMENT, SAND, AGGREGATEIdeal for Pathways, Posts & Making Slabs
WARNING: HAZARDOUSThis product may contain crystalline silica. Read safety instructions before opening this bag .
SEE OVER FOR INSTRUCTIONS
Please read our guide for Effective Use Of Concrete on pages 6 - 9 before you make your concrete pavers.
You will need the following tools/materials to successfully make your concrete pavers;
• DryPak General Purpose Concrete • Steel Trowel • Shovel • Timber Planks for Boxing • Wooden Float • Wooden Board • Wheelbarrow • Water
Setting OutPrecast concrete pavers are available in a wide range of sizes, colors and shapes. You can cast your own concrete pavers by using our DryPak General Purpose Concrete mix. You will need to decide what shape paver you want to make. You will have a range of things around the home that can be used to mould your pavers, use your imagination to create the desired effect. We suggest that you don’t make your pavers any bigger than 500mm x 500mm x 50mm to ensure you minimise the likelihood of shrinkage cracking.
Paver MouldsRe-usable Wooden FormsWooden forms are easy to construct and provide an easy way to reproduce the same dimension paver over and over. Take a block of wood larger than the paver size you want to mould. Using wooden planks construct a box on top of your wooden base.
Ensure that the wooden planks are no wider than 50mm (this will be the depth of your paver). Join two of the wooden planks with screws or nails.
On the two adjacent corners join the planks with hinges. Ensure that your hinged corners are cut at 45 degrees to provide a good seal when enclosed. On the last corner (diagonally opposite the screwed/nailed corner) place a latch – used for ease of de-molding the form.
Alternative FormsUsing common household items such as bin lids and metal containers can create some interesting and unique paver shapes. Ensure that whatever you use to mould your pavers will be able to withstand the weight of the concrete, will not leak, will provide easy de-molding and won’t create thin edges that can break off easily.
Mixing The ConcreteEnsure you mix your concrete as per our DryPak General Purpose Concrete Guide on page 7.
Ensure that your moulds have been lightly coated with a releasing oil – which will aid in de-moulding. Using the shovel place the concrete into the formwork – slightly overfilling. Try to spread and tamp the concrete with the shovel as you go. Once you have filled the formwork use the heavy wooden board to screed the concrete.
Finishing The ConcreteOnce you have leveled the concrete with the screed leave the slab for approximately 10–20 minutes, or until the bleed water has disappeared, before you finish your concrete. Using the wooden float finish the concrete.
Curing The ConcreteIt is important to cure your concrete to obtain good strength. We recommend that you cure your concrete for no less than seven days.
19
CONCRETE PATH & SLABS / M
AKING CONCRETE PAVERS
CONCRETE PATHS & SLABS MAKING CONCRETE PAVERS
justadd
water
CEMENT, SAND, AGGREGATEIdeal for Pathways, Posts & Making Slabs
WARNING: HAZARDOUSThis product may contain crystalline silica. Read safety instructions before opening this bag .
SEE OVER FOR INSTRUCTIONS
Please read our guide for Effective Use Of Concrete on pages 6 - 9 before your repair your concrete.
You will need the following tools/materials to successfully repair your concrete;
• DryPak General Purpose Concrete • Circular Saw with Masonry Blade • Heavy Steel Hammer • Wooden Float • Mason’s Chisel • Sponge • Edging Tool • Concrete Mixer • Shovel • Trowel • Gloves, Dust Mask,Safety Goggles, and Hearing Protection • Water • Bonding Agent
Setting OutBefore beginning any repair, assess the general condition of the concrete slab. Sometimes the best strategy is to break out an entire section and repour it with new concrete rather than patch it. Patching works best for local damage in otherwise sound concrete.
Removing The Damaged AreaThe key to a lasting repair is to make a saw cut around the perimeter of the damaged area, cutting back to solid concrete. The cut should be at least 30mm deep.
Most repairs that fail do so because the patch is too thin at the edges and breaks off. Set a masonry blade at a 5-degree angle so the cut out is slightly wider at the bottom than at the top. This helps “lock in” the patch.
Slowly guide the saw through the concrete. The masonry blade grinds a groove, so don’t put a lot of pressure on the saw; let the blade do the work.
Cut about 50mm on each pass. Using the mason’s chisel and steel hammer, chip out the damaged concrete back to where you have made your cuts with the masonry blade.
Clean the surface with a stiff brush to remove all loose particles. Hose it off well. The surface should be damp but free of any standing water.
The use of gloves, goggles, and a dust mask is recommended during preparation or when handling cement products. Never use a wire brush as broken bits of wire left behind may cause rust stains.
Applying The Bond CoatApply a concrete bonding agent to promote the best bond possible between the old surface and the patching material. Your local hardware store should stock a suitable bonding agent. Use an old paintbrush to work the liquid primer/bonding agent into the surface.
Mixing The ConcreteEnsure you mix your concrete as per our DryPak General Purpose Concrete Guide to Effective Use of Concrete on pages 6 - 9.
FormsFor large repairs, build a wooden form and hold it in place with suitable wooden braces. Then fill the form with concrete, being sure to press the initial material firmly into the existing surface to assure a good bond.
Edging & FinishingWhen the patch has set but before it has dried (time varies according to the mix and weather conditions) texture the repair to match the surrounding area. If you used a form, remove it. Using the wooden float smooth the surface with a swirling motion to level it and blend it into the surrounding area. If a rougher texture is called for use a stiff brush or broom in a similar manner. For a smooth finish use a steel trowel. Use an edging tool to round over the corners to match the existing shape.
Curing The ConcreteIt is important to cure your concrete to obtain good strength. We recommend that you cure your concrete for no less than seven days.
20
CONCRETE REPAIR
justadd
water
CEMENT, SAND, AGGREGATEIdeal for Pathways, Posts & Making Slabs
WARNING: HAZARDOUSThis product may contain crystalline silica. Read safety instructions before opening this bag .
SEE OVER FOR INSTRUCTIONS
Please read our Safety & First Aid section on page 4 before attempting to clean your concrete.
Chewing GumChewing gum can turn into an unsightly stain on any concrete surface. Follow the steps below to remove most chewing gum stains. Firstly you will need to solidify the gum with ice cubes and scrape off as much as possible. Then apply a mound of kitty litter saturated in methylated spirits.
Leave the mound until it has dried (usually overnight), this should cause the gum to turn brittle, making removal possible with a stiff bristled or wire brush. Finish by washing the affected area with hot soapy water, then rinse with clean water.
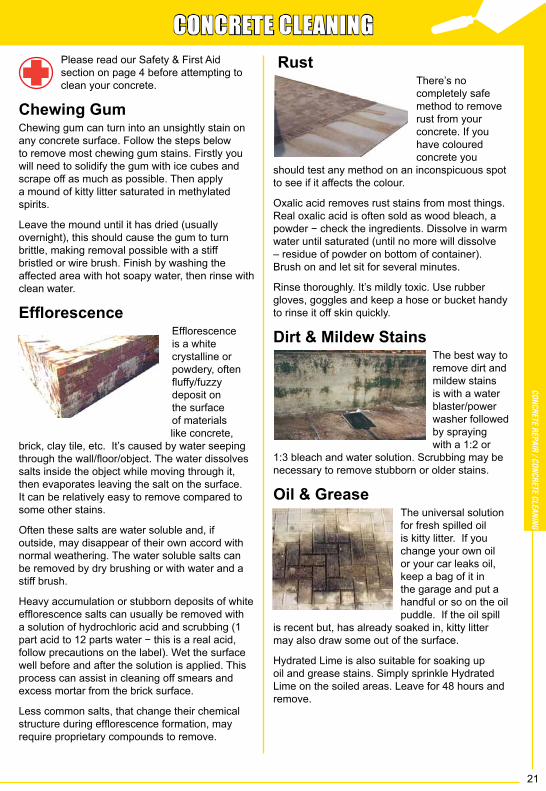
EfflorescenceEfflorescence is a white crystalline or powdery, often fluffy/fuzzy deposit on the surface of materials like concrete,
brick, clay tile, etc. It’s caused by water seeping through the wall/floor/object. The water dissolves salts inside the object while moving through it, then evaporates leaving the salt on the surface. It can be relatively easy to remove compared to some other stains.
Often these salts are water soluble and, if outside, may disappear of their own accord with normal weathering. The water soluble salts can be removed by dry brushing or with water and a stiff brush.
Heavy accumulation or stubborn deposits of white efflorescence salts can usually be removed with a solution of hydrochloric acid and scrubbing (1 part acid to 12 parts water − this is a real acid, follow precautions on the label). Wet the surface well before and after the solution is applied. This process can assist in cleaning off smears and excess mortar from the brick surface.
Less common salts, that change their chemical structure during efflorescence formation, may require proprietary compounds to remove.
RustThere’s no completely safe method to remove rust from your concrete. If you have coloured concrete you
should test any method on an inconspicuous spot to see if it affects the colour.
Oxalic acid removes rust stains from most things. Real oxalic acid is often sold as wood bleach, a powder − check the ingredients. Dissolve in warm water until saturated (until no more will dissolve – residue of powder on bottom of container). Brush on and let sit for several minutes.
Rinse thoroughly. It’s mildly toxic. Use rubber gloves, goggles and keep a hose or bucket handy to rinse it off skin quickly.
Dirt & Mildew StainsThe best way to remove dirt and mildew stains is with a water blaster/power washer followed by spraying with a 1:2 or
1:3 bleach and water solution. Scrubbing may be necessary to remove stubborn or older stains.
Oil & GreaseThe universal solution for fresh spilled oil is kitty litter. If you change your own oil or your car leaks oil, keep a bag of it in the garage and put a handful or so on the oil puddle. If the oil spill
is recent but, has already soaked in, kitty litter may also draw some out of the surface.
Hydrated Lime is also suitable for soaking up oil and grease stains. Simply sprinkle Hydrated Lime on the soiled areas. Leave for 48 hours and remove.
21
CONCRETE REPAIR / CONCRETE CLEANING
CONCRETE REPAIR CONCRETE CLEANING
Please read our guide for Effective Use Of Concrete on pages 6 - 9 before setting your posts.
You will need the following tools/materials to successfully secure your post;
• DryPak General Purpose Concrete or DryPak Speed Set • Posthole Digger or Small Blade Shovel • Wooden Props or Broken Bricks • Spirit Level • Water
Setting OutUsing the posthole digger or the small bladed shovel, excavate a hole for your post. Ensure that there is a clearance of 50 to 80mm between your post and the hole sides. Dig the hole deep enough so that 25 percent of the post is in the ground to achieve sufficient strength.
Securing The PostTo ensure that your post remains level whilst the concrete cures, you will need to anchor it. This can be done in two simple ways. Holding the post upright, wedge one or two broken bricks in between the post and the hole sides. Alternatively the post can be held up-right with wooden props. Once the post is in position, check that it is level using the spirit level – and adjust the bricks or props to obtain a level post.
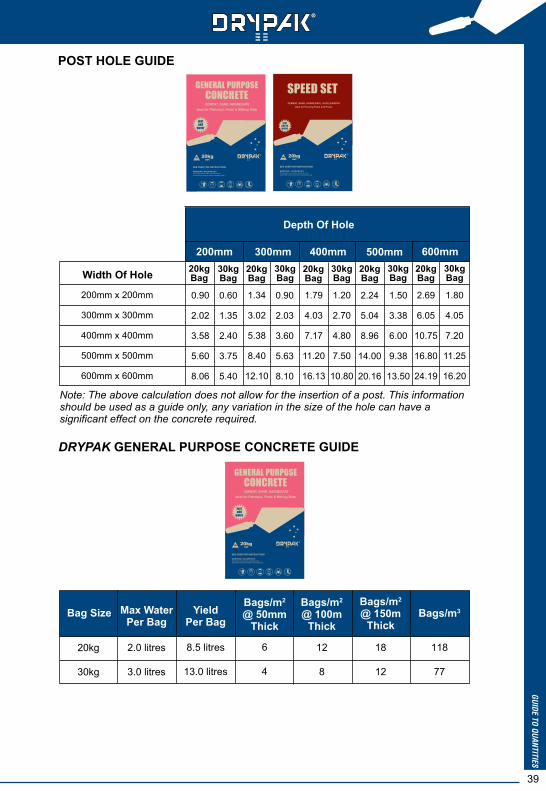
Placing DryPak Speed SetUsing the following table as a guide, thoroughly saturate the hole with potable water.
Without any delay, pour the correct quantity of DryPak Speed Set into the hole ensuring an even distribution around the post.
DO NOT MIX - DryPak Speed Set will set in 20 to 30 minutes.
Leave the post undisturbed for at least 45 minutes before removing any supports.
Where more than one bag is needed for a hole, repeat above instructions and place the next bag within five minutes of the previous bag. If a part bag is used, the quantity required must be carefully weighed out without causing segregation of the blended materials.
Placing DryPak General Purpose ConcreteMix the DryPak General Purpose Concrete in a wheelbarrow following the instructions listed on the packaging. Without any delay, pour the correct quantity of premixed DryPak General Purpose Concrete into the hole ensuring an even distribution around the post. Leave the post undisturbed for at least 2½ hours before removing any supports
Leave for 24 hours before placing any strain on the post.
Where more than one bag is needed for one hole, repeat above instructions and place the next bag within 5 minutes of the previous bag. If a part bag is used, the quantity required must be carefuly weighed out.
Manual handling of bag products without due care and attention may result in personal injury. Unless you have been trained in manual handling methods it is suggested that you share the load with another person.
22
SETTING POSTS
justadd
water
CEMENT, SAND, AGGREGATEIdeal for Pathways, Posts & Making Slabs
WARNING: HAZARDOUSThis product may contain crystalline silica. Read safety instructions before opening this bag .
SEE OVER FOR INSTRUCTIONS
0.5 litres
1.1 litres
2.2 litres
3.2 litres
5 kg
10 kg
20 kg
30 kg
Water Speed Set
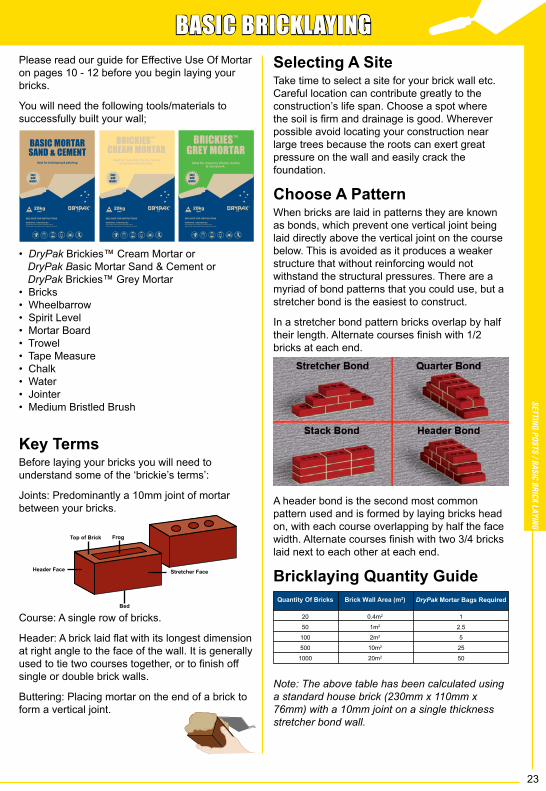
Selecting A SiteTake time to select a site for your brick wall etc. Careful location can contribute greatly to the construction’s life span. Choose a spot where the soil is firm and drainage is good. Wherever possible avoid locating your construction near large trees because the roots can exert great pressure on the wall and easily crack the foundation.
Choose A PatternWhen bricks are laid in patterns they are known as bonds, which prevent one vertical joint being laid directly above the vertical joint on the course below. This is avoided as it produces a weaker structure that without reinforcing would not withstand the structural pressures. There are a myriad of bond patterns that you could use, but a stretcher bond is the easiest to construct.
In a stretcher bond pattern bricks overlap by half their length. Alternate courses finish with 1/2 bricks at each end.
A header bond is the second most common pattern used and is formed by laying bricks head on, with each course overlapping by half the face width. Alternate courses finish with two 3/4 bricks laid next to each other at each end.
Bricklaying Quantity Guide
Note: The above table has been calculated using a standard house brick (230mm x 110mm x 76mm) with a 10mm joint on a single thickness stretcher bond wall.
Please read our guide for Effective Use Of Mortar on pages 10 - 12 before you begin laying your bricks.
You will need the following tools/materials to successfully built your wall;
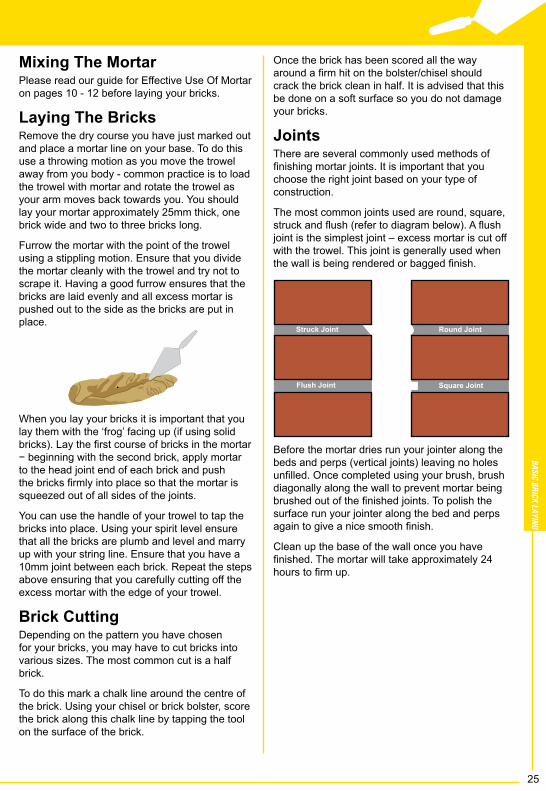
Key TermsBefore laying your bricks you will need to understand some of the ‘brickie’s terms’:
Joints: Predominantly a 10mm joint of mortar between your bricks.
Course: A single row of bricks.
Header: A brick laid flat with its longest dimension at right angle to the face of the wall. It is generally used to tie two courses together, or to finish off single or double brick walls.
Buttering: Placing mortar on the end of a brick to form a vertical joint.
SETTING POSTS / BASIC BRICK LAYING
23
SETTING POSTS BASIC BRICKLAYING
Top of Brick Frog
Stretcher FaceHeader Face
Bed
20
50
100
500
1000
Quantity Of Bricks Brick Wall Area (m2) DryPak Mortar Bags Required
0.4m2
1m2
2m2
10m2
20m2
1
2.5
5
25
50
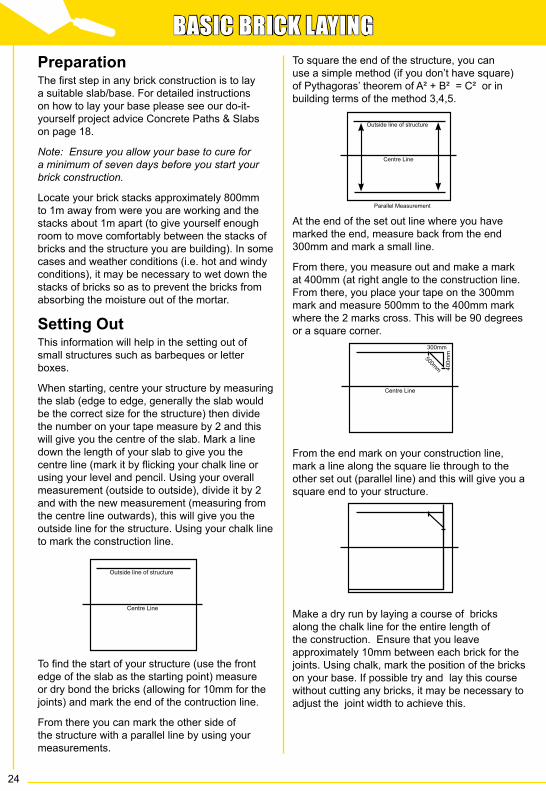
To square the end of the structure, you can use a simple method (if you don’t have square) of Pythagoras’ theorem of A² + B² = C² or in building terms of the method 3,4,5.
At the end of the set out line where you have marked the end, measure back from the end 300mm and mark a small line.
From there, you measure out and make a mark at 400mm (at right angle to the construction line. From there, you place your tape on the 300mm mark and measure 500mm to the 400mm mark where the 2 marks cross. This will be 90 degrees or a square corner.
From the end mark on your construction line, mark a line along the square lie through to the other set out (parallel line) and this will give you a square end to your structure.
Make a dry run by laying a course of bricks along the chalk line for the entire length of the construction. Ensure that you leave approximately 10mm between each brick for the joints. Using chalk, mark the position of the bricks on your base. If possible try and lay this course without cutting any bricks, it may be necessary to adjust the joint width to achieve this.
PreparationThe first step in any brick construction is to lay a suitable slab/base. For detailed instructions on how to lay your base please see our do-it- yourself project advice Concrete Paths & Slabs on page 18.
Note: Ensure you allow your base to cure for a minimum of seven days before you start your brick construction.
Locate your brick stacks approximately 800mm to 1m away from were you are working and the stacks about 1m apart (to give yourself enough room to move comfortably between the stacks of bricks and the structure you are building). In some cases and weather conditions (i.e. hot and windy conditions), it may be necessary to wet down the stacks of bricks so as to prevent the bricks from absorbing the moisture out of the mortar.
Setting OutThis information will help in the setting out of small structures such as barbeques or letter boxes.
When starting, centre your structure by measuring the slab (edge to edge, generally the slab would be the correct size for the structure) then divide the number on your tape measure by 2 and this will give you the centre of the slab. Mark a line down the length of your slab to give you the centre line (mark it by flicking your chalk line or using your level and pencil. Using your overall measurement (outside to outside), divide it by 2 and with the new measurement (measuring from the centre line outwards), this will give you the outside line for the structure. Using your chalk line to mark the construction line.
To find the start of your structure (use the front edge of the slab as the starting point) measure or dry bond the bricks (allowing for 10mm for the joints) and mark the end of the contruction line.
From there you can mark the other side of the structure with a parallel line by using your measurements.
Outside line of structure
Centre Line
Outside line of structure
Centre Line
Parallel Measurement
Centre Line
300mm500mm 400m
m
24
BASIC BRICK LAYING
Mixing The MortarPlease read our guide for Effective Use Of Mortar on pages 10 - 12 before laying your bricks.
Laying The BricksRemove the dry course you have just marked out and place a mortar line on your base. To do this use a throwing motion as you move the trowel away from you body - common practice is to load the trowel with mortar and rotate the trowel as your arm moves back towards you. You should lay your mortar approximately 25mm thick, one brick wide and two to three bricks long.
Furrow the mortar with the point of the trowel using a stippling motion. Ensure that you divide the mortar cleanly with the trowel and try not to scrape it. Having a good furrow ensures that the bricks are laid evenly and all excess mortar is pushed out to the side as the bricks are put in place.
When you lay your bricks it is important that you lay them with the ‘frog’ facing up (if using solid bricks). Lay the first course of bricks in the mortar − beginning with the second brick, apply mortar to the head joint end of each brick and push the bricks firmly into place so that the mortar is squeezed out of all sides of the joints.
You can use the handle of your trowel to tap the bricks into place. Using your spirit level ensure that all the bricks are plumb and level and marry up with your string line. Ensure that you have a 10mm joint between each brick. Repeat the steps above ensuring that you carefully cutting off the excess mortar with the edge of your trowel.
Brick CuttingDepending on the pattern you have chosen for your bricks, you may have to cut bricks into various sizes. The most common cut is a half brick.
To do this mark a chalk line around the centre of the brick. Using your chisel or brick bolster, score the brick along this chalk line by tapping the tool on the surface of the brick.
Once the brick has been scored all the way around a firm hit on the bolster/chisel should crack the brick clean in half. It is advised that this be done on a soft surface so you do not damage your bricks.
JointsThere are several commonly used methods of finishing mortar joints. It is important that you choose the right joint based on your type of construction.
The most common joints used are round, square, struck and flush (refer to diagram below). A flush joint is the simplest joint – excess mortar is cut off with the trowel. This joint is generally used when the wall is being rendered or bagged finish.
Before the mortar dries run your jointer along the beds and perps (vertical joints) leaving no holes unfilled. Once completed using your brush, brush diagonally along the wall to prevent mortar being brushed out of the finished joints. To polish the surface run your jointer along the bed and perps again to give a nice smooth finish.
Clean up the base of the wall once you have finished. The mortar will take approximately 24 hours to firm up.
25
BASIC BRICK LAYING
Struck Joint Round Joint
Flush Joint Square Joint
Please read our guide for Effective Use Of Mortar on pages 10 - 12 before you begin laying your slate or stone.
You will need the following tools/materials to successfully complete this project;
• DryPak Basic Mortar Sand & Cement • Slate or Stone • Wheelbarrow • Spirit Level • Trowel • Water • Suitable Bonding Agent
Setting OutDryPak Basic Mortar Sand & Cement can be used to bed down slate or stone for internal or external applications on hardened concrete.
Ensure that the concrete has a rough surface and is sound, clean, free of dust, oil stains etc.
Lay out your slate or stone to determine a suitable pattern.
Bedding The Stone Or SlateCoat the surface of the old concrete with a suitable bonding agent - which can be purchased from your local hardware store.
Use DryPak Basic Mortar Sand & Cement to bed in your stone or slate.
If necessary mortaring between slate or stone can be carried out after a minimum of 24 hours from fixing the slate or stone to the concrete.
26
LAYING SLATE OR STONE
Please read our guide for Effective Use Of Mortar on pages 10 - 12 before you begin building your fishpond.
You will need the following tools/materials to successfully construct your fish pond;
• DryPak Basic Mortar Sand & Cement • Chicken Wire • Shovel • Wheelbarrow • Trowel • String • Small Wooden Stakes • House Bricks or Rocks • Plastic Sheet • Stiff Bristled Broom • Sand • Water
Setting OutYou will need to select a site that is smooth and level – keeping in mind the size, shape and depth of the fishpond.
Excavating The AreaPlease check with your local council for fencing requirements around larger/deeper water features.
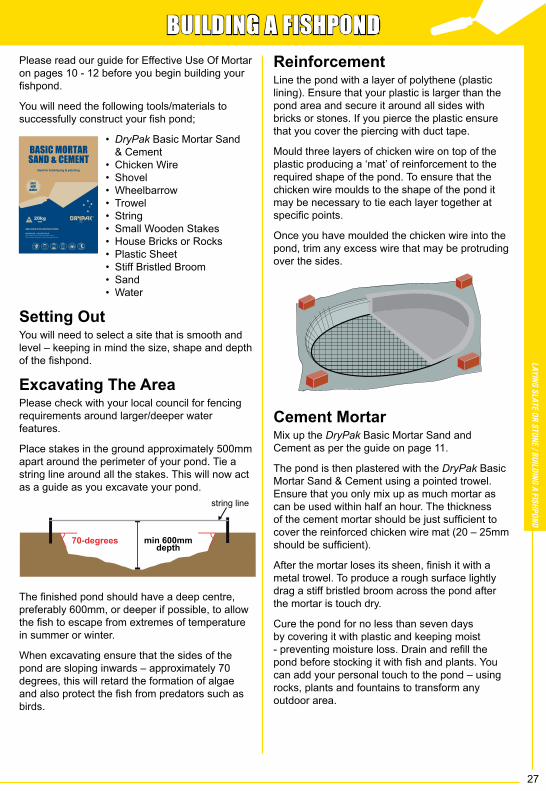
Place stakes in the ground approximately 500mm apart around the perimeter of your pond. Tie a string line around all the stakes. This will now act as a guide as you excavate your pond.
The finished pond should have a deep centre, preferably 600mm, or deeper if possible, to allow the fish to escape from extremes of temperature in summer or winter.
When excavating ensure that the sides of the pond are sloping inwards – approximately 70 degrees, this will retard the formation of algae and also protect the fish from predators such as birds.
ReinforcementLine the pond with a layer of polythene (plastic lining). Ensure that your plastic is larger than the pond area and secure it around all sides with bricks or stones. If you pierce the plastic ensure that you cover the piercing with duct tape.
Mould three layers of chicken wire on top of the plastic producing a ‘mat’ of reinforcement to the required shape of the pond. To ensure that the chicken wire moulds to the shape of the pond it may be necessary to tie each layer together at specific points.
Once you have moulded the chicken wire into the pond, trim any excess wire that may be protruding over the sides.
Cement MortarMix up the DryPak Basic Mortar Sand and Cement as per the guide on page 11.
The pond is then plastered with the DryPak Basic Mortar Sand & Cement using a pointed trowel. Ensure that you only mix up as much mortar as can be used within half an hour. The thickness of the cement mortar should be just sufficient to cover the reinforced chicken wire mat (20 – 25mm should be sufficient).
After the mortar loses its sheen, finish it with a metal trowel. To produce a rough surface lightly drag a stiff bristled broom across the pond after the mortar is touch dry.
Cure the pond for no less than seven days by covering it with plastic and keeping moist - preventing moisture loss. Drain and refill the pond before stocking it with fish and plants. You can add your personal touch to the pond – using rocks, plants and fountains to transform any outdoor area.
27
BUILDING A FISHPONDLAYING SLATE OR STONE / BUILDING A FISHPOND
Please read our guide for Effective Use Of Render on pages 13 - 15 before you begin rendering your wall.
You will need the following tools/materials to successfully render your wall;
• DryPak Render Coat™ • Metal Float • Mechanical Mixing Device (600 rpm drill with spiral paddle) • Suitable Container for Mixing (approx 20 ltrs) • Water
Setting OutBefore you start you need to ensure that the surface you are rendering is free from dirt, dust, oil, grease, paint, silicone and loose or friable material. Smooth dense surfaces with low absorption rates like concrete should be prepared with a dash coat prior to application of the render.
A dash coat is simply a very strong mix of cement and water flicked over the wall to give something for the render to grip to. If you are applying a dash coat allow the cement to dry for at least 24 hours before you start to apply the render. Highly absorbent surfaces like sandstone or aerated concrete blocks will normally require soaking to prevent losing water from the render.
Coverage Rates1mm thickness requires 1.8kg of DryPak Render Coat™ per square meter of coverage.
Note: For thin applications the use of a suitable acrylic bonding liquid should be added to the gauging water at the dosage suggested below; 4mm thick: 1 part bonding liquid to 5 parts water, 6mm thick: 1 part bonding liquid to 8 parts water.
Mixing The RenderFill a suitable container with 3.0 litres of water per 20kg bag of DryPak Render Coat™. Using a suitable mixing device (such as a 600 rpm drill with a spiral paddle) agitate water whilst steadily adding the DryPak Render Coat™ powder.
If you are using a metallic oxide to colour the render ensure you add it evenly with the render powder to obtain a consistent colour.
Once all powder has been added mix until an even colour and consistency is obtained. If necessary, add additional gauging water to achieve desired consistency.
Care should be taken not to add excess water, as this will cause shrinkage cracking and low strengths. Do not mix more material than can be used within one hour. Spillage and partially set material should not be retempered with water and should be discarded.
Applying The RenderUsing the steel float, apply the first layer to your wall at the desired thickness. To keep a consistent thickness you can nail wooden battens at each end of the wall to act as a guide and to give you a clear edge to work to.
If you are applying a second coat you will need to scour the surface of the initial coat with a sharp object to provide a good surface for the render to bond to.
28
RENDERING AN EXISTING WALL
4mm
6mm
8mm
1
1
1 (or 2)
Average CoatThickness
Weight of DryRender/m2
Number ofCoats
7.20 kg/m2
10.80 kg/m2
14.40 kg/m2
Finishing The RenderThere are an unlimited number of ways you can finish the render. Refer to page 15 for different trowel & float finishes. Many other speciality tools are available at your local hardware store. Some of the more popular methods of finishes are described below.
Bagged/Patterned FinishRub a ball of wet hessian over the surface with different patterns achieved depending on the action used.
Brushed FinishDrag a stiff brush over the surface to produce a wide range of patterns that are only limited by your imagination.
Sponge FinishMopping or sponging the unhardened surface with a damp sponge will result in an eye-catghing effect.
Painted FinishAlmost any rendered finish can be painted using an oil or alkali based paint - ensure that you allow the render to cure for twenty-one days before painting.
29
RENDERING AND EXISTING WALL
Coverage Rates
Note: This table is a guide only and is based on nominal 3mm joint width between square pavers.
Preparing The BeddingLay down the bedding sand to an approximate depth of 40mm (as the height will decrease with compaction and settling).
Spread evenly over the area to be paved using a rake. Placing screed rails along the sides of the area, level the sand using a screed board. Do not use beach or fine sand – river sand or sand suitable for concrete should be used.
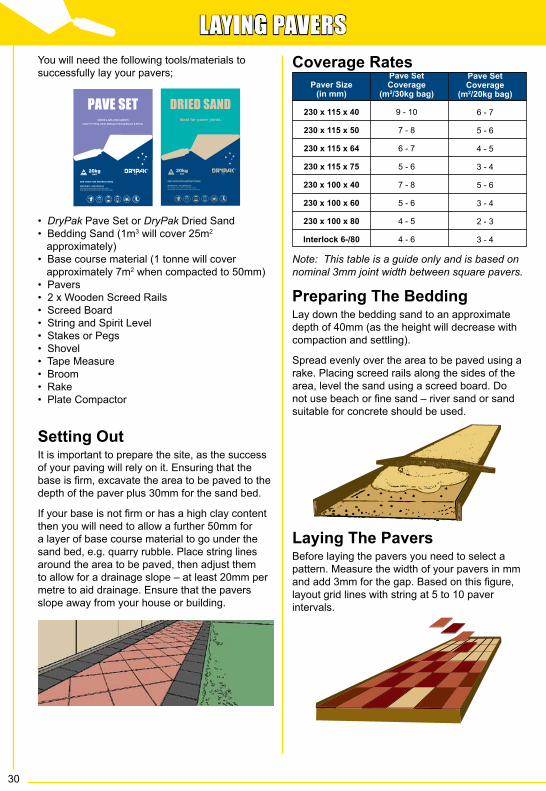
Laying The PaversBefore laying the pavers you need to select a pattern. Measure the width of your pavers in mm and add 3mm for the gap. Based on this figure, layout grid lines with string at 5 to 10 paver intervals.
You will need the following tools/materials to successfully lay your pavers;
• DryPak Pave Set or DryPak Dried Sand • Bedding Sand (1m3 will cover 25m2 approximately) • Base course material (1 tonne will cover approximately 7m2 when compacted to 50mm) • Pavers • 2 x Wooden Screed Rails • Screed Board • String and Spirit Level • Stakes or Pegs • Shovel • Tape Measure • Broom • Rake • Plate Compactor
Setting OutIt is important to prepare the site, as the success of your paving will rely on it. Ensuring that the base is firm, excavate the area to be paved to the depth of the paver plus 30mm for the sand bed.
If your base is not firm or has a high clay content then you will need to allow a further 50mm for a layer of base course material to go under the sand bed, e.g. quarry rubble. Place string lines around the area to be paved, then adjust them to allow for a drainage slope – at least 20mm per metre to aid drainage. Ensure that the pavers slope away from your house or building.
30
LAYING PAVERSPave SetCoverage
(m2/30kg bag)
9 - 10
7 - 8
6 - 7
5 - 6
7 - 8
5 - 6
4 - 5
4 - 6
Pave SetCoverage
(m2/20kg bag)
6 - 7
5 - 6
4 - 5
3 - 4
5 - 6
3 - 4
2 - 3
3 - 4
Paver Size(in mm)
230 x 115 x 40
230 x 115 x 50
230 x 115 x 64
230 x 115 x 75
230 x 100 x 40
230 x 100 x 60
230 x 100 x 80
Interlock 6-/80
Ensure that you always leave a 2mm gap between your pavers. Consideration should be given to the pattern you choose for sloping sites to reduce sand wash out.
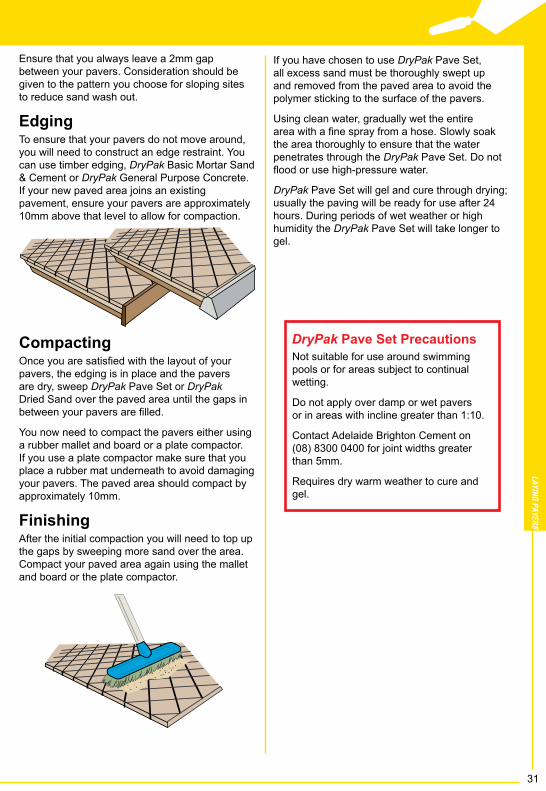
EdgingTo ensure that your pavers do not move around, you will need to construct an edge restraint. You can use timber edging, DryPak Basic Mortar Sand & Cement or DryPak General Purpose Concrete. If your new paved area joins an existing pavement, ensure your pavers are approximately 10mm above that level to allow for compaction.
CompactingOnce you are satisfied with the layout of your pavers, the edging is in place and the pavers are dry, sweep DryPak Pave Set or DryPak Dried Sand over the paved area until the gaps in between your pavers are filled.
You now need to compact the pavers either using a rubber mallet and board or a plate compactor. If you use a plate compactor make sure that you place a rubber mat underneath to avoid damaging your pavers. The paved area should compact by approximately 10mm.
FinishingAfter the initial compaction you will need to top up the gaps by sweeping more sand over the area. Compact your paved area again using the mallet and board or the plate compactor.
If you have chosen to use DryPak Pave Set, all excess sand must be thoroughly swept up and removed from the paved area to avoid the polymer sticking to the surface of the pavers.
Using clean water, gradually wet the entire area with a fine spray from a hose. Slowly soak the area thoroughly to ensure that the water penetrates through the DryPak Pave Set. Do not flood or use high-pressure water.
DryPak Pave Set will gel and cure through drying; usually the paving will be ready for use after 24 hours. During periods of wet weather or high humidity the DryPak Pave Set will take longer to gel.
DryPak Pave Set Precautions
Not suitable for use around swimming pools or for areas subject to continual wetting.
Do not apply over damp or wet pavers or in areas with incline greater than 1:10.
Contact Adelaide Brighton Cement on (08) 8300 0400 for joint widths greater than 5mm.
Requires dry warm weather to cure and gel.
31
LAYING PAVERS
You will need the following tools/materials to successfully place your Rip Rap wall;
• DryPak Rip Rap • Steel Rods • Large Rubber Mallet • Water • Rake
Setting OutDryPak Rip Rap walls can be used in a number of applications – landscaping, retaining walls, earth fills, trench walls, lake canal and creek surroundings etc. DryPak Rip Rap has been designed to allow easy and convenient construction, with only the use of a few simple tools. DryPak Rip Rap is supplied in engineered bags that biodegrade over time and also allow for the easy passage of water through them to set.
Dig a shallow trench, 50mm deep and 100mm wider than the bag width, making sure that it is level.
Ensure that the base on which the bottom layer is to be placed is solid and free of loose material.
Choose A PatternIn constructing a tiered barrier wall, bags should be placed in a running bond pattern (see diagram) and should be stepped or inclined for added rigidity.
Placing BagsFirst place a layer of bags along the back of the trench. Bags should be placed closely together and stamped into final position with a heavy flat object (large rubber mallet). A stronger wall is achieved by placing the longest bag dimensions at right angles to the barrier’s alignment. When additional barrier stability is required or when
subject to moving water, steel rods can be driven through the bags and into the ground.
Compact the ground along the front edge at the base of the wall. This helps to hold the wall secure to the ground
Wetting BagsIt is recommended that the top of each layer is punctured and wetted before the next layer is placed. If a water supply is not readily available, the bags will absorb moisture from the surrounding ground and air, or when it next rains.
Engineering AdviceMovement of the earth being protected can put significant pressure on the DryPak Rip Rap wall. Advice should be sought from a civil engineer in such situations.
32
RIP RAP WALLS
Cement stabilisation can be used in any rural area which may be subject to a concentration of traffic. The use of cement to stabilise soils is a proven and low cost method for a variety of uses including sheep yards, cattleyards, dams and catchment areas, farm roadways, piggeries, laneways, gate entrances, work areas and machinery sheds.
You will need the following tools/materials;
• Type GP Grey Cement or Type GB Premium Cement • Gravel and Fines (crusher run) • Water • Rotary Hoe • Small Vibrating Roller or Vibrating Plate (for compaction) • Rake • Shovel • Hand Tamper
Determine the area to be stabilised, source all raw materials and equipment. Ensure that you remove any contaminated soils in the area you are going to stabilise. Spread the gravel and fines over the excavated area to a depth of approximately 100mm.
Check the moisture content of the material using the hand clamp test (squeeze a sample of material in your hand, when moulded by hand pressure it should show finger marks – not too wet or too crumbly).
Lightly compact the material with vibrating roller or vibrating plate. Check levels for drainage.
Mark out the location and place cement bags in position (refer Dose Rates table). Spread cement evenly over the area to be stabilised. This can be done with a rake or shovel.
Note: When a fence line is involved, dig out soil to a depth of approximately 200mm and place soil on top of spread cement. This material can be pushed back and compacted after mixing.
Mix cement using a rotary hoe mixing in two directions, three to four passes are necessary. Thorough mixing is essential.
Roll the area using the vibrating roller or plate. Any corrections to the surface can be made at this time i.e. high spots or low spots can be leveled or filled. At least two passes of the plate or roller would be necessary. Compact around fence line with hand tamper if required.
Keep the completed surface damp for approximately seven days to ensure the cement has hydrated and optimum performance of the pavement is achieved.
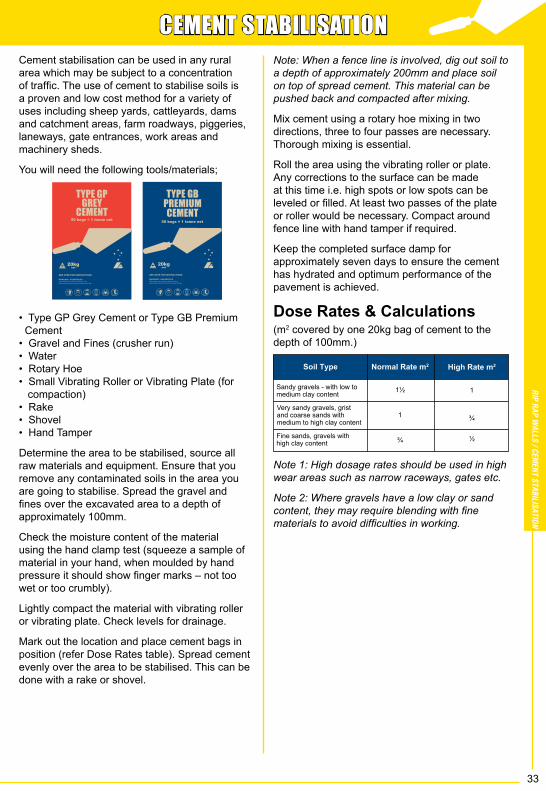
Dose Rates & Calculations(m2 covered by one 20kg bag of cement to the depth of 100mm.)
Note 1: High dosage rates should be used in high wear areas such as narrow raceways, gates etc.
Note 2: Where gravels have a low clay or sand content, they may require blending with fine materials to avoid difficulties in working.
33
CEMENT STABILISATION
TYPE GPGREY
CEMENT50 bags = 1 tonne net
RIP RAP WALLS / CEM
ENT STABILISATION
Soil Type Normal Rate m2 High Rate m2
Sandy gravels - with low to medium clay content
Very sandy gravels, grist and coarse sands with medium to high clay content
Fine sands, gravels with high clay content
1½
1
¾
1
¾
½
LawnsLawn grasses grow well within the range of 6 to 7.5. As a rough guide for correcting acid soil, use about half a kilogram Hydrated Lime per square metre for the first year, followed by a quarter of a kilogram every third year. Apply evenly to surface of soil after spreading, then rake it in. Can be applied at any time of the year, but is absorbed best after heavy rain.
CompostCompost is vegetable waste of all kinds rotted down in a pit or heap to form a dark browny earthy humus. Many things can go into compost: lawn clippings, vegetable and fruit waste, leaves, manure, weeds, hedge clippings etc. Build the compost heap by alternating layers of vegetable matter with soil.
To hasten decay, scatter a mixture of garden fertiliser and Hydrated Lime, or two parts superphosphate, two parts Hydrated Lime and one part ammonium sulphate on each layer of vegetable matter, using 5kg of the mixture per 50kg of compost material.
When the pile is complete, wet thoroughly and cover with soil. The soil is used to absorb the ammonia, which would otherwise escape. The process of decay requires a warm temperature, consequently, it is most rapid during the summer months.
Bordeaux MixFungus diseases are controlled by Bordeaux mixture. The diseases include:
Bordeaux Mixture should be used on the day of making so prepare only sufficient for the day’s use. The following quantities are guides to the proportions.
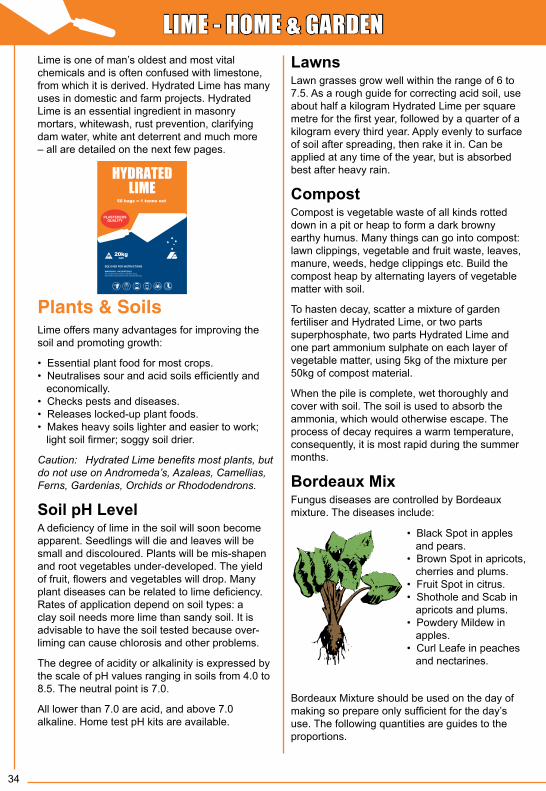
Lime is one of man’s oldest and most vital chemicals and is often confused with limestone, from which it is derived. Hydrated Lime has many uses in domestic and farm projects. Hydrated Lime is an essential ingredient in masonry mortars, whitewash, rust prevention, clarifying dam water, white ant deterrent and much more – all are detailed on the next few pages.
Plants & SoilsLime offers many advantages for improving the soil and promoting growth:
• Essential plant food for most crops. • Neutralises sour and acid soils efficiently and economically. • Checks pests and diseases. • Releases locked-up plant foods. • Makes heavy soils lighter and easier to work; light soil firmer; soggy soil drier.
Caution: Hydrated Lime benefits most plants, but do not use on Andromeda’s, Azaleas, Camellias, Ferns, Gardenias, Orchids or Rhododendrons.
Soil pH LevelA deficiency of lime in the soil will soon become apparent. Seedlings will die and leaves will be small and discoloured. Plants will be mis-shapen and root vegetables under-developed. The yield of fruit, flowers and vegetables will drop. Many plant diseases can be related to lime deficiency. Rates of application depend on soil types: a clay soil needs more lime than sandy soil. It is advisable to have the soil tested because over-liming can cause chlorosis and other problems.
The degree of acidity or alkalinity is expressed by the scale of pH values ranging in soils from 4.0 to 8.5. The neutral point is 7.0.
All lower than 7.0 are acid, and above 7.0 alkaline. Home test pH kits are available.
34
LIME - HOME & GARDEN
• Black Spot in apples and pears. • Brown Spot in apricots, cherries and plums. • Fruit Spot in citrus. • Shothole and Scab in apricots and plums. • Powdery Mildew in apples. • Curl Leafe in peaches and nectarines.
Citrus MixDissolve 50g of Bluestone fines (Blue Copper Sulfate) in 400ml of water. Pour through a fine wire screen into a large non-metallic container and stir well. Add enough water to make 6 litres.
Mix 50g of Hydrated Lime in 400ml of water. Pour this lime solution through a fine wire screen in the Bluestone solution. Add another 500ml of water and stir well. Always add the Hydrated Lime mixture to the Bluestone solution, never vice versa.
Soft Skin Fruit MixFor Apples, Apricots and other soft skin fruits dissolve 100g of Bluestone fines (Blue Copper Sulfate) in 900ml of water. Pour through a fine wire screen into a large non-metallic container and stir well. Add sufficient water to make up to 5 & 1/2 litres.
Mix 100g of Hydrated Lime in 900ml of water. Pour this lime solution through a fine wire screen into the Bluestone solution. Stir well. Always add the Hydrated Lime mixture to the Bluestone solution, never vice versa.
White WashWhitewash is pure white and used as a protective coating and to improve the appearance of home and farm structures and keep them cooler. It is easily made and when compared with the cost of commercial paint, whitewash is extremely cheap. To obtain best results apply the wash in thin coats. Use either a spray or a good brush, and do not attempt to brush out the brush marks as with oil paint, but simply spread it as evenly and quickly as possible. Carefully wash and dry brushes after use.
Coverage Rates
Masonry Structures• Interior and exterior masonry surfaces.
In a clean container dissolve 1kg pool salt in 5 litres of clean water. Make sure all salt is dissolved, then add 13kg Hydrated Lime and 6kg Portland Cement (grey or white). Stir thoroughly and thin down as required with water. Prepare only sufficient for use within one hour.
Other Uses• Sheds, barns and other buildings • Posts, fences, trellises, arbors • Kerbs and edges of driveways, paths, steps
In a clean container, dissolve 1.7kg pool salt in 20 litres of clean water. Make sure all salt is dissolved then add, whilst stirring slowly, 12.5kg of Hydrated Lime. Stir until the mixture is of a cream-like consistency; add 6 grams of alum per litre of whitewash.
Allow to stand overnight, then thin down so that the final mixture has consistency of whole milk. Clean the surface to be painted, remove all dirt, scale and loose material and apply the paint with a brush or spray.
Disinfecting & DeodorisingHydrated Lime may be used effectively to destroy odours and promote sanitary conditions about the house and farm. It is a low-cost deodorant when used for sanitary dusting and helps to control the fly nuisance.
Use for such places as drains, outhouses, garbage bins, poultry houses, kennels, stables, cow sheds and pig pens. Clean away debris and dirt and sprinkle Hydrated Lime freely. Use freely around drinking troughs and stockyards to reduce the chance of footrot. For septic tank systems, Hydrated Lime will help in maintaining sanitary and odour-free conditions. For a septic tank cistern of family size mix 100g of Hydrated Lime in a litre of water and pour into the sink or toilet and flush with water. Repeat the process every fortnight.
35
LIME - HOM
E & GARDEN
White Ant DeterrentWhen building, cover the ground beneath the floor area with dry Hydrated Lime to a depth of 25mm before the wooden floors are installed. This does not guarantee protection from white ants infestation but reduces the risk.
Clarifying Dam WaterHydrated Lime used in determined amounts will clear muddy water in dams, stabilise the dam bottom and condition the water. The size of the dam and the state of the water will determine the amount of Hydrated Lime required.
Drying Out Muddy AreasHydrated Lime is excellent for drying and firming wet ground and natural soil paths. For each m2 of surface add about 10kg of Hydrated Lime to an even thickness. Mix the soil and lime thoroughly to a depth of about 150mm. Then consolidate with a roller to form a water-resistant material which will suppress the growth of soursobs and other weeds.
Rust PreventionPloughs, shovels, hoes and other implements may be kept clean and bright if they are lightly coated with a mixture of Hydrated Lime and water.
36
GLOSSARYAggregate - Loose material, such as sand (fine), gravel, or pebbles (coarse), added to a cementing agent to make concrete, render, etc. Sometimes referred to as ‘metal’ in the term ‘sand & metal’.
Bleed Water - The water that forms on the surface of freshly poured concrete.
Brick Bolster - A chisel with a blade splayed toward the edge, used for cutting bricks.
Compressive Strength - The capacity of a material to withstand direct pressure, measured in Mega Pascals (MPa).
Damp Course Level - The layer of impermeable material laid in the foundation walls of buildings near the ground to prevent dampness from rising into the building.
Float - A flat-bladed rectangular hand tool for leveling, spreading, or shaping substances such as concrete or render.
Floating - The act of using a float to spread and smooth material.
Jointing Tool - A tool used for creating grooves or control joints in freshly poured concrete to control cracking.
Plastic - A term used to describe the state of a material that is able to be shaped or moulded.
Pointing - The act of using a pointing tool.
Pointing Tool - A tool used for inserting and shaping mortar in the joints around brickwork.
Potable - Suitable for drinking.
Retempering - To add water to a product in an attempt to readjust it’s consistency to a desired level.
Rodding - To repeatedly poke a rod into freshly poured concrete in an attempt to ensure consistent coverage and compaction.
Screed - A board or metal strip dragged across a freshly poured concrete slab to give it its proper level.
Tamping - To pack down tightly by a succession of blows or taps.
Trowel - A flat-bladed pointed hand tool for leveling, spreading, or applying mortar.
37
GUIDE TO QUANTITESGUIDE TO QUANTITIES
The table below gives material to make approximately 1m3 of concrete
Mix
A
B
Mix Ratio
1:2:3
1:2:4
20kg bags
21
16
(m3)
0.6
0.5
Aggregate (m3)
0.
6
Cement Sand Coarse
Order ready mixed concrete to the nearest 0.2m3. If mixing by hand it is important to measure volumes as accurately as possible in a box or bucket to ensure that you are getting the right proportions of the mix you have selected. Using a shovel for batching is not good enough.
* Sand is approximately 1400 kg per m3.* Aggregate of 19mm size is approximately 1300 kg per m3.
Calculate the volume of concrete you need as follows:
Volume (m3) = length (m) x width (m) x thickness (mm) 1000
Or calculate the area (m2) = length (m) x width (m) and use the following table.
Slab Thickness - mm
50
0.40
0.60
0.80
1.0
1.4
1.6
1.8
2.0
2.4
75
0.40
0.80
1.2
1.6
2.0
2.4
2.6
3.0
3.4
m3 required
100
0.60
1.0
1.6
2.0
2.6
3.0
3.6
4.0
4.6
125
0.60
1.4
2.0
2.6
3.2
3.8
4.4
5.0
5.6
150
0.80
1.6
2.4
3.0
3.8
4.6
5.4
6.0
6.8
5
10
15
20
25
30
35
40
45
Area m2
1.0
38
GUIDE TO QUANTITES
MORTAR GUIDE
Cement HydratedLime Sand
Mix Ratio By VolumeMortarType
LimeMortar
CementMortar
Lime-CementMortar
0
1
1
1
0
1
3
3
6
Restoration work.
Damp course, retaining walls, bathroom fittings and repairing rooftile ridge caps.Composition mortar, general brick, block and stone wall construction. Note: NOT suitable for areas constantly damp.
Common Uses
Note: For more detailed information on exposure environments refer to AS3700 (2001) “Masonry Structures”. Adelaide Brighton Cement manufactures a range of premium grade packaged mortars which are available in 20kg bags.
CONCRETE GUIDE
Mix
AB
Cement
11
Sand
22
34
22
CoarseAggregate
A
B
High structural concrete for thin reinforced walls, slender reinforced columns, fence posts and heavy duty floors.
Commonly adopted mixture for reinforced concrete beams, floors slabs, driveways, paths and footings for domestic buildings or walls
Mix Concrete Use
Water (Bucket)Per BucketOf Cement
Parts By Volume
Note: The mix designs supplied above should be used as a guide only as varying qualities of sand and aggregate may affect your concrete.
1 1/4 3 Internal Single coat or undercoat work
Cement HydratedLime Sand
InternalExternal
Mix Ratio By VolumeApplication Background
Material
1 1/4 5 Internal Finish coat work
1 1/2 4½ External Strong mix for strong backgrounds High strength concreteFibre-cement sheet
Quantity Of Bricks Brick Wall Area (m2) DryPak Mortar Bags Required
0.4m2
1m2
2m2
10m2
20m2
1
2.5
5
25
50
Note: The above table has been calculated using a standard house brick (230mm x 110mm x 76mm) with a 10mm mortar joint on a single thickness stretcher bond wall.
GUIDE TO QUANTITIES
39
justadd
water
CEMENT, SAND, AGGREGATEIdeal for Pathways, Posts & Making Slabs
WARNING: HAZARDOUSThis product may contain crystalline silica. Read safety instructions before opening this bag .
SEE OVER FOR INSTRUCTIONS
justadd
water
CEMENT, SAND, AGGREGATEIdeal for Pathways, Posts & Making Slabs
WARNING: HAZARDOUSThis product may contain crystalline silica. Read safety instructions before opening this bag .
SEE OVER FOR INSTRUCTIONS
®
POST HOLE GUIDE
0.90
2.02
3.58
5.60
8.06
1.34
3.02
5.38
8.40
12.10
1.79
4.03
7.17
11.20
16.13
2.24
5.04
8.96
14.00
20.16
Note: The above calculation does not allow for the insertion of a post. This information should be used as a guide only, any variation in the size of the hole can have a significant effect on the concrete required.
Depth Of Hole
200mm x 200mm
300mm x 300mm
400mm x 400mm
500mm x 500mm
600mm x 600mm
Width Of Hole
200mm 400mm300mm 500mm
2.69
6.05
10.75
16.80
24.19
600mm20kgBag
30kgBag
0.60
1.35
2.40
3.75
5.40
20kgBag
30kgBag
0.90
2.03
3.60
5.63
8.10
20kgBag
30kgBag
1.20
2.70
4.80
7.50
10.80
20kgBag
30kgBag
1.50
3.38
6.00
9.38
13.50
20kgBag
30kgBag
1.80
4.05
7.20
11.25
16.20
20kg
30kg
Bag Size Max WaterPer Bag
YieldPer Bag
Bags/m2
@ 50mmThick
Bags/m2
@ 100mThick
Bags/m2
@ 150mThick
Bags/m3
2.0 litres
3.0 litres
8.5 litres
13.0 litres
6
4
12
8
18
12
118
77
DRYPAK GENERAL PURPOSE CONCRETE GUIDE
Disclaimer
The information contained in this booklet is for general guidance only. It does not replace the advice of professional consultants. Where unusual conditions or requirements exist seek professional advice. No liability is accepted by Adelaide
Brighton Cement Ltd or the suppliers, for any associated expenses, losses, damages or costs resulting from the use of this information, as the use is beyond
their control. Incorrect use of any product, or failure to adhere to recommendations in this booklet, or those of any supplier, and any associated safety information may
result in serious damage or injury.
ABN 96 007 870 199
For further information contact the Sales and Marketing Department at:
DryPak, Brightonlite, Render Coat, the Adelaide Brighton Logo, the Trowel device and Adelaide Brighton Cement are trade marks of Adelaide Brighton Cement Ltd.
Brickies is a trade mark of Cockburn Cement Ltd used under licence.