307
Centrify Administrator’s Guide for Mac OS X and macOS September 2016 Centrify Corporation
Centrify
Administrator’s Guide for Mac OS X and macOS September 2016
Centrify Corporation

Administrator’s Guide for Mac OS X and macOS 2

Legal notice
This document and the software described in this document are furnished under and are subject to the terms of a license agreement or a non-disclosure agreement. Except as expressly set forth in such license agreement or non-disclosure agreement, Centrify Corporation provides this document and the software described in this document “as is” without warranty of any kind, either express or implied, including, but not limited to, the implied warranties of merchantability or fitness for a particular purpose. Some states do not allow disclaimers of express or implied warranties in certain transactions; therefore, this statement may not apply to you.
This document and the software described in this document may not be lent, sold, or given away without the prior written permission of Centrify Corporation, except as otherwise permitted by law. Except as expressly set forth in such license agreement or non-disclosure agreement, no part of this document or the software described in this document may be reproduced, stored in a retrieval system, or transmitted in any form or by any means, electronic, mechanical, or otherwise, without the prior written consent of Centrify Corporation. Some companies, names, and data in this document are used for illustration purposes and may not represent real companies, individuals, or data.
This document could include technical inaccuracies or typographical errors. Changes are periodically made to the information herein. These changes may be incorporated in new editions of this document. Centrify Corporation may make improvements in or changes to the software described in this document at any time.
© 2004-2016 Centrify Corporation. All rights reserved. Portions of Centrify software are derived from third party or open source software. Copyright and legal notices for these sources are listed separately in the Acknowledgements.txt file included with the software.
U.S. Government Restricted Rights: If the software and documentation are being acquired by or on behalf of the U.S. Government or by a U.S. Government prime contractor or subcontractor (at any tier), in accordance with 48 C.F.R. 227.7202-4 (for Department of Defense (DOD) acquisitions) and 48 C.F.R. 2.101 and 12.212 (for non-DOD acquisitions), the government’s rights in the software and documentation, including its rights to use, modify, reproduce, release, perform, display or disclose the software or documentation, will be subject in all respects to the commercial license rights and restrictions provided in the license agreement.
Centrify, DirectControl, DirectAuthorize, DirectAudit, DirectSecure, DirectControl Express, Centrify User Suite, and Centrify Server Suite are registered trademarks and Centrify for Mobile, Centrify for SaaS, Centrify for Mac, DirectManage, Centrify Express, DirectManage Express, Centrify Identity Platform, Centrify Identity Service, and Centrify Privilege Service are trademarks of Centrify Corporation in the United States and other countries. Microsoft, Active Directory, Windows, and Windows Server are either registered trademarks or trademarks of Microsoft Corporation in the United States and other countries.
Centrify software is protected by U.S. Patents 7,591,005; 8,024,360; 8,321,523; 9,015,103 B2; 9,112,846; 9,197,670; and 9,378,391.
The names of any other companies and products mentioned in this document may be the trademarks or registered trademarks of their respective owners. Unless otherwise noted, all of the names used as examples of companies, organizations, domain names, people and events herein are fictitious. No association with any real company, organization, domain name, person, or event is intended or should be inferred.
Contents
About this guide 8
Intended audience . . . . . . . . . . . . . . . . . . . . . . . . . . . . . . . . . . . . . . . . . . . . . . . . . . . . . . . . . . . . . . . . . . . . . . . 8
Topic covered in this guide . . . . . . . . . . . . . . . . . . . . . . . . . . . . . . . . . . . . . . . . . . . . . . . . . . . . . . . . . . . . . . . 8
Conventions used in this guide. . . . . . . . . . . . . . . . . . . . . . . . . . . . . . . . . . . . . . . . . . . . . . . . . . . . . . . . . . . . 9
Where to go for more information. . . . . . . . . . . . . . . . . . . . . . . . . . . . . . . . . . . . . . . . . . . . . . . . . . . . . . . . 10
Contacting Centrify . . . . . . . . . . . . . . . . . . . . . . . . . . . . . . . . . . . . . . . . . . . . . . . . . . . . . . . . . . . . . . . . . . . . . 10
Chapter 3 Installing the Centrify agent 11
Preparing to install the Centrify agent . . . . . . . . . . . . . . . . . . . . . . . . . . . . . . . . . . . . . . . . . . . . . . . . . . . . 11
Installing the Centrify agent . . . . . . . . . . . . . . . . . . . . . . . . . . . . . . . . . . . . . . . . . . . . . . . . . . . . . . . . . . . . . 12
Logging on. . . . . . . . . . . . . . . . . . . . . . . . . . . . . . . . . . . . . . . . . . . . . . . . . . . . . . . . . . . . . . . . . . . . . . . . . . . . . 16
Upgrading the Centrify agent . . . . . . . . . . . . . . . . . . . . . . . . . . . . . . . . . . . . . . . . . . . . . . . . . . . . . . . . . . . . 16
Chapter 4 Creating home directories 17
Understanding home directories . . . . . . . . . . . . . . . . . . . . . . . . . . . . . . . . . . . . . . . . . . . . . . . . . . . . . . . . . .18
Configuring a local home directory . . . . . . . . . . . . . . . . . . . . . . . . . . . . . . . . . . . . . . . . . . . . . . . . . . . . . . . 18
Configuring a network home directory . . . . . . . . . . . . . . . . . . . . . . . . . . . . . . . . . . . . . . . . . . . . . . . . . . . 20
Configuring a portable home directory . . . . . . . . . . . . . . . . . . . . . . . . . . . . . . . . . . . . . . . . . . . . . . . . . . . 22
Chapter 5 Working with Macs 32
Specifying the Macintosh user’s home directory location . . . . . . . . . . . . . . . . . . . . . . . . . . . . . . . . . . . 32
Setting shared directory permissions . . . . . . . . . . . . . . . . . . . . . . . . . . . . . . . . . . . . . . . . . . . . . . . . . . . . . 35
Enabling users to manage their print queues . . . . . . . . . . . . . . . . . . . . . . . . . . . . . . . . . . . . . . . . . . . . . . 39
Setting up authenticated printing . . . . . . . . . . . . . . . . . . . . . . . . . . . . . . . . . . . . . . . . . . . . . . . . . . . . . . . . 40
Setting up local and remote administrative privileges . . . . . . . . . . . . . . . . . . . . . . . . . . . . . . . . . . . . . . 47
Querying user information for Active Directory users. . . . . . . . . . . . . . . . . . . . . . . . . . . . . . . . . . . . . . . 48
Migrating from Open Directory to Centrify Active Directory . . . . . . . . . . . . . . . . . . . . . . . . . . . . . . . . . 48
Converting a local user to a Centrify Active Directory user . . . . . . . . . . . . . . . . . . . . . . . . . . . . . . . . . . 50
Migrating a user from Apple’s Active Directory plugin to Centrify Active Directory . . . . . . . . . . . . 52
Using Apple’s scheme to generate UIDs and GIDs for Mac users . . . . . . . . . . . . . . . . . . . . . . . . . . . . . 54
Mapping local user accounts to Active Directory . . . . . . . . . . . . . . . . . . . . . . . . . . . . . . . . . . . . . . . . . . . 59
4

Configuring auto-enrollment . . . . . . . . . . . . . . . . . . . . . . . . . . . . . . . . . . . . . . . . . . . . . . . . . . . . . . . . . . . . 59
Configuring 802.1X wireless authentication . . . . . . . . . . . . . . . . . . . . . . . . . . . . . . . . . . . . . . . . . . . . . . . 60
Configuring single sign-on for SSH and Screen Sharing. . . . . . . . . . . . . . . . . . . . . . . . . . . . . . . . . . . . . 71
Configuring FileVault 2 . . . . . . . . . . . . . . . . . . . . . . . . . . . . . . . . . . . . . . . . . . . . . . . . . . . . . . . . . . . . . . . . . . 73
Deploy configuration profiles to multiple computers. . . . . . . . . . . . . . . . . . . . . . . . . . . . . . . . . . . . . . . 89
Chapter 6 Understanding group policies for Mac users and computers 92
Understanding group policies and system preferences . . . . . . . . . . . . . . . . . . . . . . . . . . . . . . . . . . . . . 92
Linking Group Policy Objects . . . . . . . . . . . . . . . . . . . . . . . . . . . . . . . . . . . . . . . . . . . . . . . . . . . . . . . . . . . . .96
Installing Mac group policies. . . . . . . . . . . . . . . . . . . . . . . . . . . . . . . . . . . . . . . . . . . . . . . . . . . . . . . . . . . . . 96
Setting Mac group policies. . . . . . . . . . . . . . . . . . . . . . . . . . . . . . . . . . . . . . . . . . . . . . . . . . . . . . . . . . . . . . . 99
Applying standard Windows policies to Mac OS X. . . . . . . . . . . . . . . . . . . . . . . . . . . . . . . . . . . . . . . . . 100
Configuring Mac OS X-specific parameters . . . . . . . . . . . . . . . . . . . . . . . . . . . . . . . . . . . . . . . . . . . . . . . 101
Chapter 7 Setting computer-based policies 104
Setting computer-based policies for Mac . . . . . . . . . . . . . . . . . . . . . . . . . . . . . . . . . . . . . . . . . . . . . . . . 106
Allow certificates with no extended key usage certificate attribute . . . . . . . . . . . . . . . . . . . . . . . . 108
Map /home to /Users . . . . . . . . . . . . . . . . . . . . . . . . . . . . . . . . . . . . . . . . . . . . . . . . . . . . . . . . . . . . . . . . . . 109
802.1X Settings . . . . . . . . . . . . . . . . . . . . . . . . . . . . . . . . . . . . . . . . . . . . . . . . . . . . . . . . . . . . . . . . . . . . . . . 110
Accounts . . . . . . . . . . . . . . . . . . . . . . . . . . . . . . . . . . . . . . . . . . . . . . . . . . . . . . . . . . . . . . . . . . . . . . . . . . . . . 117
App Store . . . . . . . . . . . . . . . . . . . . . . . . . . . . . . . . . . . . . . . . . . . . . . . . . . . . . . . . . . . . . . . . . . . . . . . . . . . . . 120
Custom Settings . . . . . . . . . . . . . . . . . . . . . . . . . . . . . . . . . . . . . . . . . . . . . . . . . . . . . . . . . . . . . . . . . . . . . . . 121
EnergySaver . . . . . . . . . . . . . . . . . . . . . . . . . . . . . . . . . . . . . . . . . . . . . . . . . . . . . . . . . . . . . . . . . . . . . . . . . . 124
Firewall . . . . . . . . . . . . . . . . . . . . . . . . . . . . . . . . . . . . . . . . . . . . . . . . . . . . . . . . . . . . . . . . . . . . . . . . . . . . . . . 127
Internet Sharing . . . . . . . . . . . . . . . . . . . . . . . . . . . . . . . . . . . . . . . . . . . . . . . . . . . . . . . . . . . . . . . . . . . . . . . 130
Network . . . . . . . . . . . . . . . . . . . . . . . . . . . . . . . . . . . . . . . . . . . . . . . . . . . . . . . . . . . . . . . . . . . . . . . . . . . . . . 131
Remote Management . . . . . . . . . . . . . . . . . . . . . . . . . . . . . . . . . . . . . . . . . . . . . . . . . . . . . . . . . . . . . . . . . . 136
Scripts (Login/Logout) . . . . . . . . . . . . . . . . . . . . . . . . . . . . . . . . . . . . . . . . . . . . . . . . . . . . . . . . . . . . . . . . . 138
Scripts (LaunchDaemons) . . . . . . . . . . . . . . . . . . . . . . . . . . . . . . . . . . . . . . . . . . . . . . . . . . . . . . . . . . . . . . 139
Security & Privacy . . . . . . . . . . . . . . . . . . . . . . . . . . . . . . . . . . . . . . . . . . . . . . . . . . . . . . . . . . . . . . . . . . . . . 140
Services . . . . . . . . . . . . . . . . . . . . . . . . . . . . . . . . . . . . . . . . . . . . . . . . . . . . . . . . . . . . . . . . . . . . . . . . . . . . . . 145
Software Update Settings . . . . . . . . . . . . . . . . . . . . . . . . . . . . . . . . . . . . . . . . . . . . . . . . . . . . . . . . . . . . . . 148
Chapter 8 Setting user-based policies 151
Setting user-based policies . . . . . . . . . . . . . . . . . . . . . . . . . . . . . . . . . . . . . . . . . . . . . . . . . . . . . . . . . . . . . 153
802.1X Wireless Settings . . . . . . . . . . . . . . . . . . . . . . . . . . . . . . . . . . . . . . . . . . . . . . . . . . . . . . . . . . . . . . . 155
Administrator’s Guide for Mac OS X 5

Application Access Settings . . . . . . . . . . . . . . . . . . . . . . . . . . . . . . . . . . . . . . . . . . . . . . . . . . . . . . . . . . . . 156
Automount Settings . . . . . . . . . . . . . . . . . . . . . . . . . . . . . . . . . . . . . . . . . . . . . . . . . . . . . . . . . . . . . . . . . . . 159
Custom Settings . . . . . . . . . . . . . . . . . . . . . . . . . . . . . . . . . . . . . . . . . . . . . . . . . . . . . . . . . . . . . . . . . . . . . . . 161
Desktop Settings . . . . . . . . . . . . . . . . . . . . . . . . . . . . . . . . . . . . . . . . . . . . . . . . . . . . . . . . . . . . . . . . . . . . . . 162
Dock Settings . . . . . . . . . . . . . . . . . . . . . . . . . . . . . . . . . . . . . . . . . . . . . . . . . . . . . . . . . . . . . . . . . . . . . . . . . 163
Finder Settings . . . . . . . . . . . . . . . . . . . . . . . . . . . . . . . . . . . . . . . . . . . . . . . . . . . . . . . . . . . . . . . . . . . . . . . . 167
Folder Redirection . . . . . . . . . . . . . . . . . . . . . . . . . . . . . . . . . . . . . . . . . . . . . . . . . . . . . . . . . . . . . . . . . . . . . 171
Import Settings . . . . . . . . . . . . . . . . . . . . . . . . . . . . . . . . . . . . . . . . . . . . . . . . . . . . . . . . . . . . . . . . . . . . . . . 174
Login Settings . . . . . . . . . . . . . . . . . . . . . . . . . . . . . . . . . . . . . . . . . . . . . . . . . . . . . . . . . . . . . . . . . . . . . . . . . 177
Media Access Settings . . . . . . . . . . . . . . . . . . . . . . . . . . . . . . . . . . . . . . . . . . . . . . . . . . . . . . . . . . . . . . . . . 180
Mobility Settings . . . . . . . . . . . . . . . . . . . . . . . . . . . . . . . . . . . . . . . . . . . . . . . . . . . . . . . . . . . . . . . . . . . . . . 183
Printing settings . . . . . . . . . . . . . . . . . . . . . . . . . . . . . . . . . . . . . . . . . . . . . . . . . . . . . . . . . . . . . . . . . . . . . . 213
Scripts (Login/Logout) . . . . . . . . . . . . . . . . . . . . . . . . . . . . . . . . . . . . . . . . . . . . . . . . . . . . . . . . . . . . . . . . . 216
Security & Privacy Settings . . . . . . . . . . . . . . . . . . . . . . . . . . . . . . . . . . . . . . . . . . . . . . . . . . . . . . . . . . . . . 219
System Preference Settings . . . . . . . . . . . . . . . . . . . . . . . . . . . . . . . . . . . . . . . . . . . . . . . . . . . . . . . . . . . . 221
Chapter 9 Configuring a Mac computer for smart card login 236
Understanding smart card login. . . . . . . . . . . . . . . . . . . . . . . . . . . . . . . . . . . . . . . . . . . . . . . . . . . . . . . . . 236
Configuring smart card login. . . . . . . . . . . . . . . . . . . . . . . . . . . . . . . . . . . . . . . . . . . . . . . . . . . . . . . . . . . . 237
Using smart card login . . . . . . . . . . . . . . . . . . . . . . . . . . . . . . . . . . . . . . . . . . . . . . . . . . . . . . . . . . . . . . . . . 245
Troubleshooting smart card log in. . . . . . . . . . . . . . . . . . . . . . . . . . . . . . . . . . . . . . . . . . . . . . . . . . . . . . . 250
Configuring web browsers and mail clients . . . . . . . . . . . . . . . . . . . . . . . . . . . . . . . . . . . . . . . . . . . . . . 250
Chapter 10 Managing a Mac computer that is joined to a domain and enrolled in identity platform256
How to enroll a joined computer with Centrify identity platform . . . . . . . . . . . . . . . . . . . . . . . . . . . 256
What happens after a joined computer is enrolled with Centrify identity platform? . . . . . . . . . . 262
Chapter 11 Troubleshooting tips 265
Using common account management commands . . . . . . . . . . . . . . . . . . . . . . . . . . . . . . . . . . . . . . . . 265
Enabling logging for the Centrify agent . . . . . . . . . . . . . . . . . . . . . . . . . . . . . . . . . . . . . . . . . . . . . . . . . . 266
Enabling logging for the Mac Directory Service . . . . . . . . . . . . . . . . . . . . . . . . . . . . . . . . . . . . . . . . . . . 267
Using the Centrify agent on a dual-boot system . . . . . . . . . . . . . . . . . . . . . . . . . . . . . . . . . . . . . . . . . . 268
Using adgpupdate appropriately . . . . . . . . . . . . . . . . . . . . . . . . . . . . . . . . . . . . . . . . . . . . . . . . . . . . . . . . 268
Understanding delays when logging on the first time with a new user account. . . . . . . . . . . . . . 269
Configuring single-sign on to work with non-Mac computers . . . . . . . . . . . . . . . . . . . . . . . . . . . . . . 269
• 6

Restricting login using FTP. . . . . . . . . . . . . . . . . . . . . . . . . . . . . . . . . . . . . . . . . . . . . . . . . . . . . . . . . . . . . . 269
Logging on using localhost . . . . . . . . . . . . . . . . . . . . . . . . . . . . . . . . . . . . . . . . . . . . . . . . . . . . . . . . . . . . . 269
Changing the password for Active Directory users . . . . . . . . . . . . . . . . . . . . . . . . . . . . . . . . . . . . . . . . 269
Logging in if Directory Service or Security agent crashes. . . . . . . . . . . . . . . . . . . . . . . . . . . . . . . . . . . 270
Disabling Apple’s built-in Active Directory plug-in . . . . . . . . . . . . . . . . . . . . . . . . . . . . . . . . . . . . . . . . 273
Showing the correct status of the Centrify plug-in . . . . . . . . . . . . . . . . . . . . . . . . . . . . . . . . . . . . . . . . 274
Resolving VPN access issues with Mac OS X 10.7 and later . . . . . . . . . . . . . . . . . . . . . . . . . . . . . . . . . 275
Diagnosing smart card log in problems . . . . . . . . . . . . . . . . . . . . . . . . . . . . . . . . . . . . . . . . . . . . . . . . . . 275
Opening a support case online . . . . . . . . . . . . . . . . . . . . . . . . . . . . . . . . . . . . . . . . . . . . . . . . . . . . . . . . . . 278
Collecting information for support cases . . . . . . . . . . . . . . . . . . . . . . . . . . . . . . . . . . . . . . . . . . . . . . . . . 279
Chapter 12 Using sctool 282
Displaying usage information . . . . . . . . . . . . . . . . . . . . . . . . . . . . . . . . . . . . . . . . . . . . . . . . . . . . . . . . . . . 282
Understanding sctool . . . . . . . . . . . . . . . . . . . . . . . . . . . . . . . . . . . . . . . . . . . . . . . . . . . . . . . . . . . . . . . . . . 282
Chapter 13 Installing and removing the agent and joining and leaving a domain 288
Installing using the install.sh command-line program . . . . . . . . . . . . . . . . . . . . . . . . . . . . . . . . . . . . 289
Installing silently on a remote computer . . . . . . . . . . . . . . . . . . . . . . . . . . . . . . . . . . . . . . . . . . . . . . . . . 289
Removing the Centrify agent . . . . . . . . . . . . . . . . . . . . . . . . . . . . . . . . . . . . . . . . . . . . . . . . . . . . . . . . . . . 295
Joining an Active Directory domain. . . . . . . . . . . . . . . . . . . . . . . . . . . . . . . . . . . . . . . . . . . . . . . . . . . . . . 297
Leaving an Active Directory domain . . . . . . . . . . . . . . . . . . . . . . . . . . . . . . . . . . . . . . . . . . . . . . . . . . . . . 300
Index 303
Administrator’s Guide for Mac OS X 7

About this guide
With Centrify Identity Service,TM Mac Edition, you can use Active Directory to centrally manage authentication, policy enforcement, single sign-on (SSO), and user self-service for popular endpoint devices running Mac OS X, macOS, iOS, and Android.
A key component of Centrify Identity Service, Mac Edition is the Centrify agent for Mac computers. You must install the agent on each computer that you want to integrate with Active Directory and manage through Centrify DirectManage Access Manager.
After you install the agent on a Mac computer, you can perform many administration and configuration tasks on the computer to enable the computer to work with Centrify DirectManage Access Manager and with Active Directory.
In addition to managing your Mac computers through DirectManage Access Manager, you can choose to manage your Mac computers by enrolling them in the Centrify identity platform (also called Centrify cloud service).
Intended audienceThis guide is intended for Mac system administrators.
Topic covered in this guideThe Administrator’s Guide for Mac OS X provides information about the administration and configuration tasks that you perform on a Mac computer after you install the agent so that you can manage users, groups, computers, and zones with DirectManage Access Manager. Additional topics, such as installing the agent, optionally enrolling the computer in the Centrify identify platform, and troubleshooting issues after the agent is installed are also covered.
Specific areas of focus are as follows:
This guide provides installation instructions and step-by-step instructions for configuring Mac computers to join an Active Directory domain through Auto Zone, which essentially creates one large zone for all Mac computers. Auto Zone requires minimal configuration and is appropriate for most Mac environments. If your environment is larger, or more complex, and doesn’t easily fit into Auto Zone, you must consult the Centrify Server Suite Planning and Deployment Guide for detailed information on how to move your Mac users and computers to Active Directory and use Centrify zones to structure your environment.
8
Conventions used in this guide
This guide describes how to enroll a Mac computer in the Centrify identify platform. You can enroll a Mac computer in the Centrify identify platform during, after, or instead of agent installation. That is, a Mac computer can be managed by just the agent (in which case it is joined to a domain), just the Centrify identify platform, or both. Both the agent and the Centrify identify platform enable the computer to be managed through Active Directory and group policies.
If the computer is managed through both the agent and the Centrify identify platform, it can be viewed and managed through both the Centrify DirectManage Access Manager console and the Centrify user portal. In this scenario, a single computer object is created in an Active Directory container of your choosing.
This guide explains how to handle issues and tasks that are specific or unique to a Mac environment.
Note If you choose to enroll a Mac computer in the Centrify identify platform as described in this document, you should consult the Cloud Management documentation and online help for information about cloud-specific configuration and administration tasks.
This guide does not cover planning or DirectManage Access Manager tasks handled through the Access Manager console. For more information about those topics, see “Where to go for more information” on page 10.
This guide assumes you have a working knowledge of performing administrative tasks in a Mac environment.
Conventions used in this guideThe following conventions are used in this guide:
Fixed-width font is used for sample code, program names, program output, file names, and commands that you type at the command line. When italicized, the fixed-width font is used to indicate variables. In addition, in command line reference information, square brackets ([ ]) indicate optional arguments.
Bold text is used to emphasize commands, buttons, or user interface text, and to introduce new terms.
Italics are used for book titles and to emphasize specific words or terms.
The variable release is used in place of a specific release number in the file names for individual CentrifyDC software packages. For example, centrifydc-release-mac10.9-x86_64.tgz in this guide refers to the specific release of the Centrify agent for Intel-based Mac computers running Mac OS X 10.9 or later, available on the Centrify CD or in a Centrify download package. On the CD or in the download package, the file name indicates the Centrify version number. For example, if the software package installs version number 5.3.0, the full file name is centrifydc-5.3.0-mac10.9-x86_64.tgz.
Administrator’s Guide for Mac OS X 9

Where to go for more information
Where to go for more informationThis document focuses on information and tasks specific to Mac computers. However, much of the information you need to configure and administer an agent-managed Mac computer is contained in other documents. You can find the most up-to-date versions of this document as well as the following documents at https://www.centrify.com/support/documentation.
Centrify Server Suite Release Notes provides the most up-to-date information about the current release. Information includes system requirements, supported platforms, and additional information that is specific to this release, but is not included in other documentation.
The Centrify Server Suite Planning and Deployment Guide provides guidelines, strategies, and best practices to help you plan for and deploy Centrify Server Suite in a production environment.This guide covers issues that you should consider in planning a Centrify deployment project. This guide should be used in conjunction with the information covered in the Centrify Server Suite Administrator’s Guide for UNIX and the Centrify Administrator’s Guide for Mac OS X.
The Centrify Server Suite Administrator’s Guide for UNIX describes how to perform administrative tasks using the DirectManage Access Manager console and command line programs to manage UNIX and Linux computers, users, groups, and zones through Active Directory. Although the focus is on UNIX and Linux computers, the information is relevant to Mac OS X computers as well.
The Centrify Server Suite Administrator’s Guide for Windows describes how to install Centrify group policy extensions as a standalone package on a Windows domain computer.
The Centrify Server Suite Configuration and Tuning Reference Guide provides reference information for the Centrify configuration parameters that enable you to customize your environment.
Individual UNIX man pages for command reference information for Centrify UNIX command line programs. You can run these command line programs from a terminal window on a Mac computer.
In addition to this document and the Centrify Server Suite documentation, you may want to consult the documentation for your Windows or Mac OS X operating system, or the documentation for Microsoft Active Directory.
Contacting CentrifyIf you have questions or comments, we look forward to hearing from you. For information about contacting Centrify with questions or suggestions, visit our Web site at www.centrify.com. From the Web site, you can get the latest news and information about Centrify products, support, services, and upcoming events. For information about purchasing or evaluating Centrify products, send email to [email protected].
• About this guide 10
Chapter 3
Installing the Centrify agent
This chapter provides step-by-step instructions for installing the Centrify agent on a Mac computer.
The following topics are covered:
Preparing to install the Centrify agent
Installing the Centrify agent
Logging on
Upgrading the Centrify agent
Preparing to install the Centrify agentYou must install the Centrify agent on each computer that you want to manage through Centrify and Active Directory. You can check the Release Notes included with the software, or visit the Centrify Web site (scroll to Supported Platforms and click the Details tab) to verify that each computer where you plan to install is running a supported version of the mac os x operating system.
Note The installation package also contains a utility, ADCheck, which verifies that each of your Mac computers is ready for installation of the Centrify agent. ADCheck confirms that a computer is running a supported OS, has sufficient disk space to install the Centrify agent, and that the domain you intend to join has functioning domain controllers and DNS servers. Information about running ADCheck is included in the installation instructions.
Before installing the Centrify agent on your Mac computers, be certain that you or another administrator has installed Centrify Server Suite on a Windows computer in the domain. Centrify Server Suite includes the Access Manager Console, which is the primary management console for performing ongoing operations, including the application of group policies. Always install this console unless you are installing and running Centrify Express for Linux, UNIX and Mac, which does not contain a console component.
For information about other Centrify Server Suite components, such as DirectManage Deployment Manager and Zone Provisioning Agent, which are useful in mid-size to large deployments, see the Centrify Server Suite Planning and Deployment Guide and the Centrify Server Suite Administrator’s Guide for Linux and UNIX.
11

Installing the Centrify agent
Deciding when and how to join a domain
Following installation, you will be prompted to join a domain. Whether to join a domain depends primarily on how you intend to join. Centrify provides two ways to join a domain:
Through Auto Zone, which is the recommended method for installations with 1500 or fewer users. When joined through Auto Zone, all users and groups defined in Active Directory for the forest — as well as all Active Directory users defined in a forest with a two-way, cross-forest trust relationship to the forest of the joined domain — automatically become valid users and groups on the Mac computer.
By connecting to a specific Centrify zone, which is the recommended method for installations with 1500 or more users, or for installations in which fine-tuned access control is needed. A zone is similar to an Active Directory organizational unit (OU) and allows you to organize the computers in your organization in meaningful ways to simplify account and access management and the migration of information from existing sources to Active Directory.
The assumption of this guide is that you are joining Auto Zone. After installation, you can follow the instructions to join the domain and with a few configuration steps all of your Active Directory users will be able to log into this computer.
Note If you have a set of Apple Open Directory users, you should migrate them following installation but before joining a domain.
On the other hand, if your environment requires a zone structure, you must create that structure before joining a domain. Therefore, after installing Centrify Identity Service, Mac Edition, consult the Centrify Server Suite Planning and Deployment Guide and the Centrify Server Suite Administrator’s Guide for UNIX, which explain in detail how to plan, create, and maintain an Active Directory installation of non-Windows computers with Centrify Server Suite.
Installing the Centrify agentThe Centrify agent for Mac computers can be installed in several different ways. The procedure in this section shows how do so by double-clicking the Centrify Installer package (DMG) and following the instructions displayed on the screen. This installation method is recommended for most users when installing on a single computer or a limited number of computers.
When you use the Centrify package installer, you will be prompted to join the domain. You may also join the domain after installation using either the adjoin command-line program or the Centrify Directory Access plug-in.
Centrify provides a number of other ways to install the Centrify agent:
By executing the Centrify installation script, install.sh in a Terminal window on a Mac computer and following the instructions displayed by the script.
Chapter 3 • Installing the Centrify agent 12
Installing the Centrify agent
If you are an experienced UNIX administrator and are familiar with UNIX command-line installations, running install.sh is a good method to use. When you install using the install.sh script, you can automatically join an Active Directory domain as part of the installation process; see “Installing using the install.sh command-line program” on page 288 for details.
By installing remotely, without user interaction, using Apple Remote Desktop. This is a good method to use if you are generally using Apple Remote Desktop for software distribution. With Apple Remote Desktop you can add pre- and post-installation scripts that allow you to join the remote computer to a domain after installation; see “Installing silently on a remote computer” on page 288 for details.
By installing remotely with the DirectManage Deployment Manager. Deployment Manager runs as a Windows Console and allows you to analyze a non-Windows computer, download the appropriate version of the Centrify agent from the Centrify Download Center, and install it on the target computer. This installation method is recommended for larger installations in which you must install the Agent on multiple Mac computers. See the Planning and Deployment Guide and the Deployment Manager Administrator’s Guide for more information.
To install the Centrify agent on a Mac computer using the graphical user interface:
Notes Before installing the Centrify agent, disable Apple’s built-in Active Directory plug-in, and remove Active Directory from the Authentication, and Contacts search paths. For more information, see “Disabling Apple’s built-in Active Directory plug-in” on page 272.
In addition, be certain that the Apple Directory Utility is closed.
1 Log on with the Administrator account.
2 Navigate to the directory on the CD or your local network where the Centrify agent package is located. For example, if you are installing from the Centrify CD, open the MacOS directory.
3 Double-click the DMG file, for example:centrifydc-release-mac10.7-x86_64.dmg
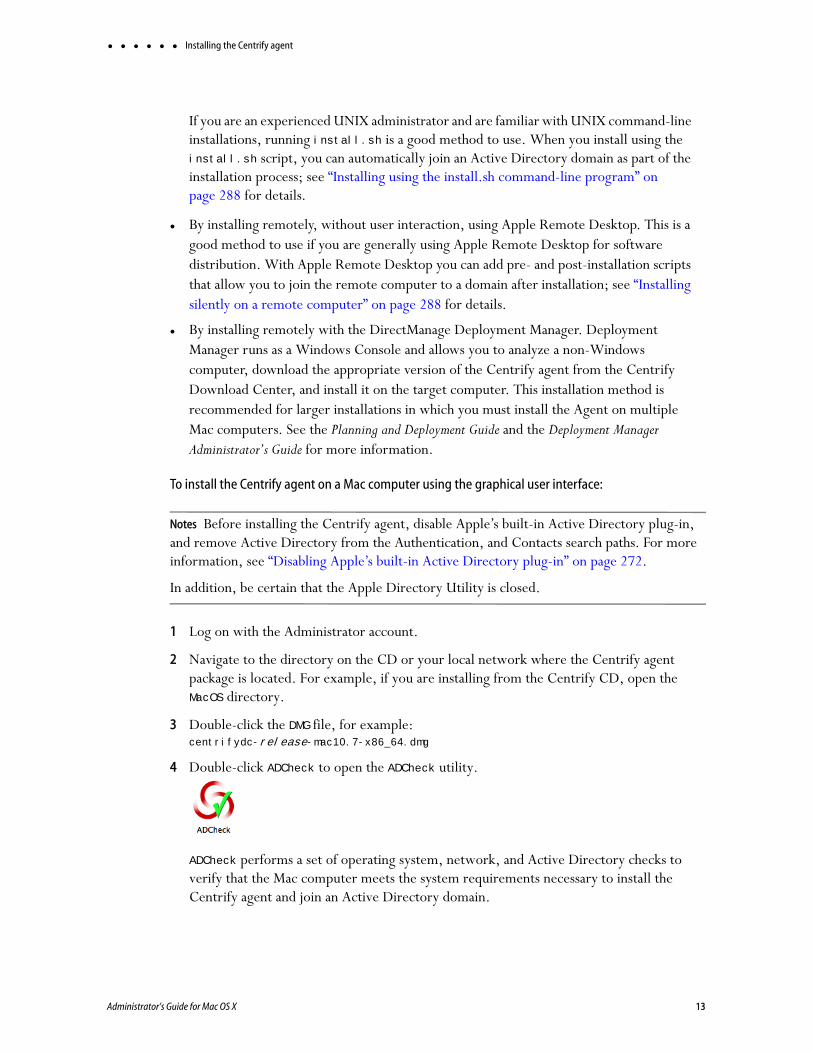
4 Double-click ADCheck to open the ADCheck utility.
ADCheck performs a set of operating system, network, and Active Directory checks to verify that the Mac computer meets the system requirements necessary to install the Centrify agent and join an Active Directory domain.
Administrator’s Guide for Mac OS X 13
Installing the Centrify agent
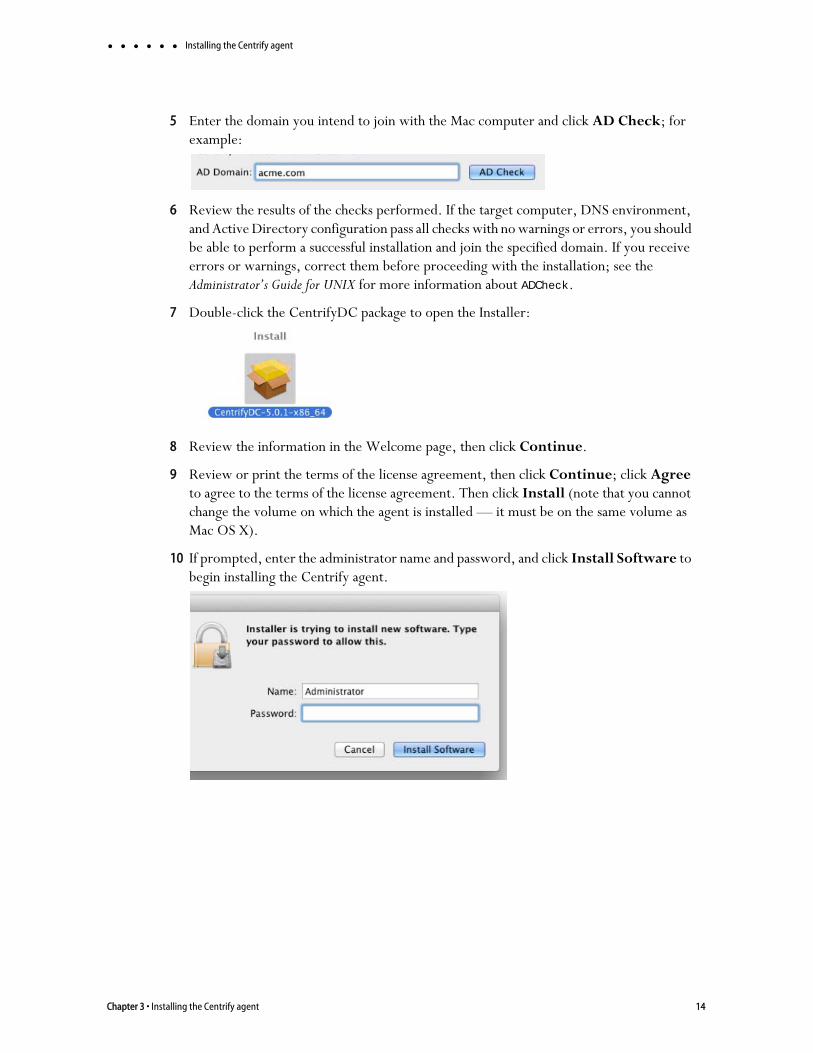
5 Enter the domain you intend to join with the Mac computer and click AD Check; for example:
6 Review the results of the checks performed. If the target computer, DNS environment, and Active Directory configuration pass all checks with no warnings or errors, you should be able to perform a successful installation and join the specified domain. If you receive errors or warnings, correct them before proceeding with the installation; see the Administrator’s Guide for UNIX for more information about ADCheck.
7 Double-click the CentrifyDC package to open the Installer:
8 Review the information in the Welcome page, then click Continue.
9 Review or print the terms of the license agreement, then click Continue; click Agree to agree to the terms of the license agreement. Then click Install (note that you cannot change the volume on which the agent is installed — it must be on the same volume as Mac OS X).
10 If prompted, enter the administrator name and password, and click Install Software to begin installing the Centrify agent.
Chapter 3 • Installing the Centrify agent 14
Installing the Centrify agent
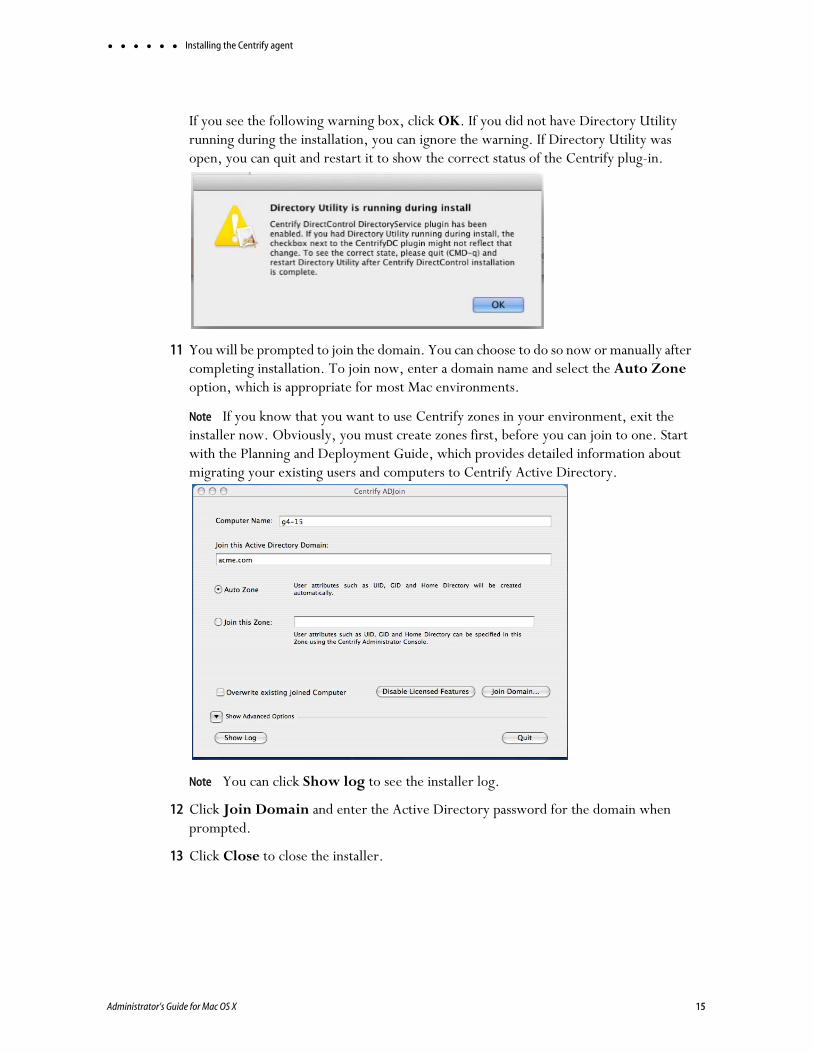
If you see the following warning box, click OK. If you did not have Directory Utility running during the installation, you can ignore the warning. If Directory Utility was open, you can quit and restart it to show the correct status of the Centrify plug-in.
11 You will be prompted to join the domain. You can choose to do so now or manually after completing installation. To join now, enter a domain name and select the Auto Zone option, which is appropriate for most Mac environments.
Note If you know that you want to use Centrify zones in your environment, exit the installer now. Obviously, you must create zones first, before you can join to one. Start with the Planning and Deployment Guide, which provides detailed information about migrating your existing users and computers to Centrify Active Directory.
Note You can click Show log to see the installer log.
12 Click Join Domain and enter the Active Directory password for the domain when prompted.
13 Click Close to close the installer.
Administrator’s Guide for Mac OS X 15

Logging on
Logging onWhen using Auto Zone, all Active Directory users in the domain become valid users on a joined computer. To verify that Centrify is working properly, you can simply log into the Mac computer by using an Active Directory account.
On the Mac login screen, select Other and enter an AD user name and password:
Upgrading the Centrify agentIn most cases, you can update agents on Mac computers by simply installing the new agent either directly or remotely on top of an existing agent. As a best practice, you should perform in-place upgrades using a local Mac administrative (admin) account or any other user account that has local administrative rights and reboot the computer after completing the upgrade. In most cases, you should not perform the upgrade while you are logged on as an Active Directory user in a currently active session.
In rare cases, you might be advised to run adflush to clear the Active Directory cache before performing an in-place upgrade. For example, if you are updating agents from version 4.x, or earlier, to 5.1.x, run adflush first to ensure a smooth upgrade. It is highly unusual for an upgrade to require you to leave and rejoin a managed Mac computer to the domain.
Chapter 3 • Installing the Centrify agent 16
Chapter 4
Creating home directories
This chapter explains how to create different types of home directories for a Mac computer.
The following topics are covered:
Understanding home directories
Configuring a local home directory
Configuring a network home directory
Configuring a portable home directory
17

Understanding home directories
Understanding home directoriesWhenever an Active Directory user logs in to a Mac computer, a home directory is created for the user. Mac provides three possible styles of home directory, which can be configured by an administrator to fit the type of user who will be using the computer, the type of computer, and the use to which the computer will be put. Auto Zone supports each of these styles:
Local home directory — The user’s home directory is created on the local computer in the Users folder with the user’s login name (/Users/username).
Network shared directory — The user’s home directory is created on a network share.
Portable home directory — The user’s home directory is created on a network share and copied and synchronized to the local computer. This type of directory is also called a mobile home directory.
When you join a computer to a domain by connecting to Auto Zone, the home directory is created based on the following:
Active Directory user settings; for example, an administrator can specify a network home directory in the Profile for an Active Directory user.
Auto Zone default values; by default, Auto Zone is configured to support the creation of home directories in the Users folder on the local computer.
Auto Zone parameters set in the Centrify configuration file, /etc/centrifydc/centrifydc.conf by an administrator or by a group policy. See the Configuration and Tuning Reference Guide for a description of all Auto Zone parameters.
The following sections explain in detail how to set up each type of user home directory.
Configuring a local home directory In general, you do not need to explicitly configure local home directories for your Active Directory users because Auto Zone is configured to work for Active Directory users exactly as if they were local users. That is, by default, an Active Directory user who logs in to a Mac computer that is joined to a domain through Auto Zone is given a local home directory at /Users/username. For example, for a user, Glen Morris, whose login name is gmorris, the local home directory is set to: /Users/gmorris.
Although it generally isn’t necessary to explicitly configure the agent for local home directories, in some situations you might want to do so. For example, if a Windows user has a local home directories defined in their Active Directory profile, that home directory will be assigned when the user attempts to log in and may prevent the user from logging in. The agent provides a configuration parameter (auto.schema.use.adhomedir)that you can set to ignore home directories in an Active Directory profile and always set the home directory to the default (/Users/username).
Chapter 4 • Creating home directories 18

Configuring a local home directory
To explicitly configure a computer for local home directories:
1 On the Mac computer, edit the configuration file, /etc/centrifydc/centrifydc.conf.
2 Add the following two parameters:auto.schema.use.adhomedir: false
auto.schema.homedir: /Users/%{user}
Setting auto.schema.use.adhomedir to false configures the local computer to ignore any home directories that are set for users in Active Directory. This parameter is set to true by default.
Setting auto.schema.homedir: /Users/%{user} configures the local computer to set the home directory to /Users/username, where username is the user logon name defined in the user’s Active Directory account. Note that this parameter is set to this value by default on all Mac computers.
Note If you plan to configure network-home or portable-home directories for this computer, you must set auto.schema.use.adhomedir to true, the default value, otherwise, the agent will ignore the network home directories that you specify for users in Active Directory.
3 Save and close the file.
Administrator’s Guide for Mac OS X 19

Configuring a network home directory
Configuring a network home directoryFor each user whom you want to have a network home directory, you must specify the location in Active Directory.
Note In earlier releases of Centrify Identity Service (formerly called User Suite), you had to first create a network home directory for a user if you planned to also create a portable home (mobile home) directory for that user. With the current release of Centrify Identity Service, you can create portable home directories for users without first creating network home directories for those users.
Configuring a network home directory for a user connected to Auto Zone:
1 Create a network share to host the home directory.
For example, on the dc-demo server (acme.com domain), create a network share called MacUsers.
You must assign appropriate permissions to the network shared directory so the Active Directory account is able to write to the user’s home directory. One way to do this is to assign read/write permissions to Authenticated Users on the network share. Each home directory that is created inherits permission from the network share so the account of the logged-in user is granted write permission its network home directory. See Setting shared directory permissions for more details about properly setting and fine-tuning network share permissions.
2 On a domain controller in the forest to which the Mac OS computer is joined, open Active Directory Users and Computers.
3 Select Users, select the user, then right-click the user and click Properties.
Chapter 4 • Creating home directories 20

Configuring a network home directory
4 Click the Profile tab, then under Home folder select Connect.
5 In Connect...To type the location of the share you created in Step 1 by using the following format://Server/share/path
For example://dc-demo.acme.com/MacUsers/rdavis
6 Click OK to save the user profile.
7 (Optionally) By default, the agent is configured to use the Active Directory home folder if one is specified in a user’s profile. However, to be explicit, you can edit the configuration file and add the following parameter: auto.schema.use.adhomedir: true
Save and close the file.
8 Specify the type of share to mount for the network home directory on the Mac computer, SMB, or AFP.
By default, the Mac computer will attempt to mount an SMB share for the network home. If you specified an AFP share, you must set the following parameter in the configuration file:auto.schema.remote.file.service:AFP
Or enable the Computer Configuration > Centrify Settings > DirectControl Settings > Adclient Settings > Auto Zone remote file service group policy to specify SMB (the default) or AFP for all Mac computers.
9 Optionally, if you want the network home directory to be mounted automatically on the user’s computer, enable the following group policy: User Configuration > Centrify
Administrator’s Guide for Mac OS X 21

Configuring a portable home directory
Settings > Mac OS X Settings > Automount Settings > Automount user’s Windows home.
When the specified user next logs onto the Mac computer, the home directory will be created on the specified share. On the Mac computer, you should see the server and share under SHARED in the Finder.
Configuring a portable home directoryYou can create a portable home directory for a user and synchronize that directory with the share defined in the user’s Centrify Profile. You can synchronize to /SMB/, /AFP/, or /Network/Servers (NFS) shares.
Advantages of a portable home directory are as follows:
If a user does not have a portable home directory and the computer becomes disconnected from the domain controller (and therefore disconnected from Active Directory), the user can log in with Active Directory credentials only if the user’s information exists in the Centrify cache. If there is any issue with the Centrify cache (for example, if the adflush --force command was issued to flush the cache immediately before the computer was disconnected from the domain), Active Directory users cannot log in unless they have portable home directories.
Active Directory users without portable home directories are required to log in at least once in connected mode to populate their account information in the Centrify cache. If the computer is not connected to the domain controller, the Centrify cache is not updated with the initial set of Active Directory user data, and Active Directory users cannot log in.
You use group policies to configure synchronization. These group policies perform the same function as the Mobility preferences that you can manage through Workgroup Manager.
The following sections describe the process of specifying the options for creating mobile accounts, and for specifying the options for synchronizing mobile accounts with the network home directory.
Before you begin you should have the following in place:
A Group Policy Object that applies to a domain or OU that includes Mac users.
A good understanding of the synchronization rules that you want to apply. The procedures in the following sections explain the group policies and options that you can enable, but you should consult the Mac OS X Server documentation for strategies about which options to apply.
Chapter 4 • Creating home directories 22

Configuring a portable home directory
Creating mobile user accounts
To automatically create mobile user accounts:
1 Perform this step only if you will require mobile account users to first have network home directories (in Step 10 on page 25 you will specify whether this is a requirement). If you will not require mobile account users to first have network home directories, go to Step 2 and continue from there.
a In Active Directory Users and Computers, create or select the Active Directory user account to use.
b Click the Profile tab to define a network home for the new user. For example, in the Profile tab select Connect, a drive letter, and a home path, such as \\dc-demo.acme.com\MacUsers\rdavis
dc-demo.acme.com is the Windows network server, including the domain name
MacUsers is a shared folder on the server
rdavis is the user’s home directory on the server
c Click OK to save the user information and create the network home directory. This directory must exist for folder synchronization.
If you will require mobile account users to first have network home directories (as configured in Step 10 on page 25), only users with their home directory set to a /SMB/ or /AFP/ network share in their Centrify Profile can have a mobile account created and synchronized. Users with a local home directory are not prompted to create a mobile account and will not have one created for them unless you create it manually.
Note For users with their home directory set to /Network/Servers, the shared directory must already exist on the NFS server before users login because DirectManage Access cannot create the directory automatically at login. If the shared directory exists, DirectManage Access will synchronize it at login. Therefore, for users whose mobile-home directory is on an NFS share, be certain to create all mobile-user home directories on the network share before users log into the Mac computer.
2 (For NFS shares only) Configure the NFS share as an automount point. Skip this step for an SMB or AFP share.
Go to “Configuring an automount point for an NFS share” on page 30. After configuring the automount point, return to the current procedure and go to the next step.
3 Set appropriate permissions for the shared directory; see “Setting shared directory permissions” on page 34 for details about how to do this.
4 Open the Group Policy Management Editor to edit the group policy object that is applied to a domain or organizational unit that includes Mac users:
a Select Start > Group Policy Management.
Administrator’s Guide for Mac OS X 23

Configuring a portable home directory
b Navigate to Forest forest_name > Domains > domain_name > Group Policy Objects.
c Right-click Default Domain Policy and select Edit.
5 In Group Policy Management Editor, navigate to User Configuration > Policies > Centrify Settings > Mac OS X Settings > Mobility Settings.
6 Open the Use version specific settings group policy.
Note This group policy allows you to use mobility settings that are specific to the version of Mac that you are using. If you enable this group policy, you can use version-specific settings that will exactly match the Mac version that you are running. As an alternative, you can use legacy settings that are not specific to the version of Mac that you are using. To do so, skip this step, navigate to Legacy Settings, and go to Step 9.
7 In the Use version specific settings group policy, click Enable, then OK.
8 In the Mobility Settings folder, double-click the folder for your version of Mac OS X. If your environment contains computers running multiple versions, you need to configure the policies for each version.
Chapter 4 • Creating home directories 24

Configuring a portable home directory
These group policies correspond to the Mobility preferences you can manage using the Mac OS X Workgroup Manager.
9 If you are using version-specific group policies, double-click the Configure mobile account creation group policy. If you are using legacy group policies, double-click the Enable/disable synchronization group policy.
10 Click Enabled and select one or more of the following group policy options:
Create mobile account when user logs in to network account to automatically create a mobile account when the Active Directory user logs in.
Create mobile account even if user does not have a network home directory to create mobile accounts automatically for users the next time they log in to the Mac. This applies to all users, including users who do not have a network home directory. To use this option, you must also select the Create mobile account when user logs in to network account option.
Require confirmation before creating a mobile account if you want the user to be prompted to confirm the creation of the mobile account.
Create home using network home and default sync settings to initially sync local and network home directories so that the network home directory replaces the local home directory. When the local home directory is created, it contains the contents of the network home directory instead of the default subdirectories (such as Downloads, Documents, Music, and so on). You cannot use this option if you select the Create home using local home template option.
Create home using local home template to create the local home directory using the local home default template. When the local home directory is created, it contains the default set of subdirectories (such as Downloads, Documents, Music, and so on). You cannot use this option if you select the Create home using network home and default sync settings option.
11 Click Apply.
If you are using version-specific group policies, click Next Setting to go to the Configure mobile account options policy. Go to Step 12 and continue from there.
If you are using legacy group policies, click OK to save your changes.
12 In the Configure mobile account options policy, check the following:
Encrypt contents with FileVault to encrypt the mobile home directory using the Mac OS X FileVault system.
Note FileVault protection can only be applied when a new mobile user is created at login. FileVault protection cannot encrypt an existing mobile-user home directory.
Administrator’s Guide for Mac OS X 25

Configuring a portable home directory
Select one of the computer master password options. The computer master password is a safety feature that allows you to unlock the FileVault disk image if the Active Directory user forgets their password:
Use computer master password, if available — With this option checked, the mobile account will be created and FileVault protection applied whether or not a computer master password is available.
Require computer master password — With this option checked, the mobile user account will only be created if a master password is available for the computer.You can create a master password by clicking: System Preferences > Security > FileVault > Set Master Password.
Do not select Restrict size, unless you want to limit the size of the local home folder.
Click OK to apply this group policy and close the properties page.
If you want to test the creation of the mobile user account before configuring synchronization rules, you can log on to a Mac computer using the Active Directory user you created or selected in Step 1. When you are prompted to create a mobile account, click Yes. A local copy of the remote network home directory will be created according to the rules you have defined with the group policies in the Synchronization Rules: Background Sync category. After this initial synchronization, when you successfully log on as a valid user, Centrify DirectManage begins synchronizing the files and folders you have defined with the group policies in the Synchronization Rules: Login & Logout Sync category between the local home directory and the network share home directory.
For information about defining synchronization rules, items to be synchronized, and the items to skip during background updates, see “Configuring background synchronization rules and interval” on page 28. For information about defining synchronization rules, items
Chapter 4 • Creating home directories 26
Configuring a portable home directory
to be synchronized, and the items to skip when users log in and log out, see “Configuring login and logout synchronization rules” on page 27.
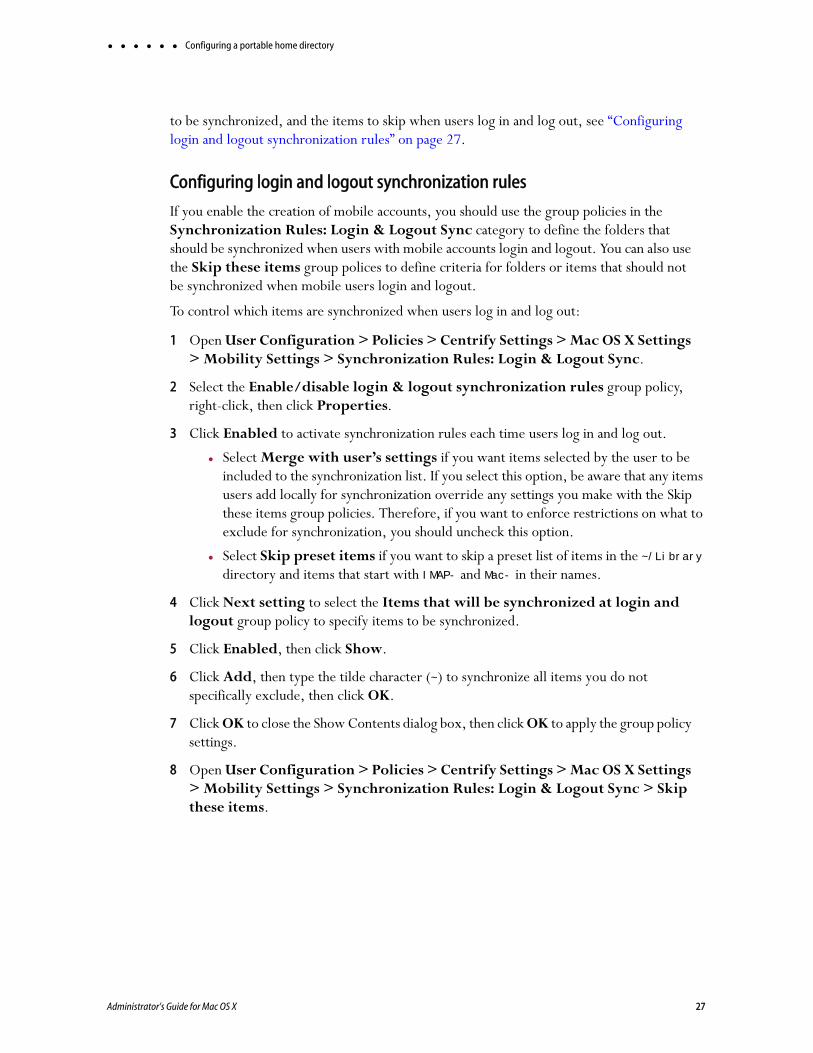
Configuring login and logout synchronization rules
If you enable the creation of mobile accounts, you should use the group policies in the Synchronization Rules: Login & Logout Sync category to define the folders that should be synchronized when users with mobile accounts login and logout. You can also use the Skip these items group polices to define criteria for folders or items that should not be synchronized when mobile users login and logout.
To control which items are synchronized when users log in and log out:
1 Open User Configuration > Policies > Centrify Settings > Mac OS X Settings > Mobility Settings > Synchronization Rules: Login & Logout Sync.
2 Select the Enable/disable login & logout synchronization rules group policy, right-click, then click Properties.
3 Click Enabled to activate synchronization rules each time users log in and log out.
Select Merge with user’s settings if you want items selected by the user to be included to the synchronization list. If you select this option, be aware that any items users add locally for synchronization override any settings you make with the Skip these items group policies. Therefore, if you want to enforce restrictions on what to exclude for synchronization, you should uncheck this option.
Select Skip preset items if you want to skip a preset list of items in the ~/Library directory and items that start with IMAP- and Mac- in their names.
4 Click Next setting to select the Items that will be synchronized at login and logout group policy to specify items to be synchronized.
5 Click Enabled, then click Show.
6 Click Add, then type the tilde character (~) to synchronize all items you do not specifically exclude, then click OK.
7 Click OK to close the Show Contents dialog box, then click OK to apply the group policy settings.
8 Open User Configuration > Policies > Centrify Settings > Mac OS X Settings > Mobility Settings > Synchronization Rules: Login & Logout Sync > Skip these items.
Administrator’s Guide for Mac OS X 27
Configuring a portable home directory
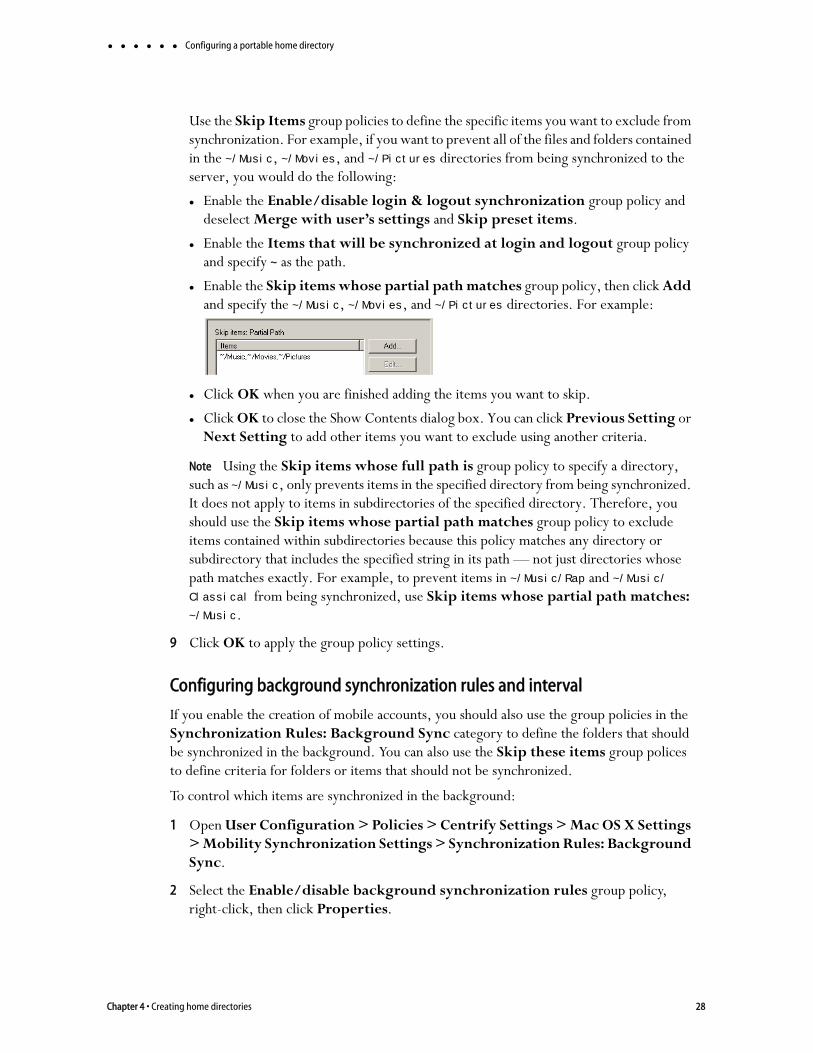
Use the Skip Items group policies to define the specific items you want to exclude from synchronization. For example, if you want to prevent all of the files and folders contained in the ~/Music, ~/Movies, and ~/Pictures directories from being synchronized to the server, you would do the following:
Enable the Enable/disable login & logout synchronization group policy and deselect Merge with user’s settings and Skip preset items.
Enable the Items that will be synchronized at login and logout group policy and specify ~ as the path.
Enable the Skip items whose partial path matches group policy, then click Add and specify the ~/Music, ~/Movies, and ~/Pictures directories. For example:
Click OK when you are finished adding the items you want to skip.
Click OK to close the Show Contents dialog box. You can click Previous Setting or Next Setting to add other items you want to exclude using another criteria.
Note Using the Skip items whose full path is group policy to specify a directory, such as ~/Music, only prevents items in the specified directory from being synchronized. It does not apply to items in subdirectories of the specified directory. Therefore, you should use the Skip items whose partial path matches group policy to exclude items contained within subdirectories because this policy matches any directory or subdirectory that includes the specified string in its path — not just directories whose path matches exactly. For example, to prevent items in ~/Music/Rap and ~/Music/Classical from being synchronized, use Skip items whose partial path matches: ~/Music.
9 Click OK to apply the group policy settings.
Configuring background synchronization rules and interval
If you enable the creation of mobile accounts, you should also use the group policies in the Synchronization Rules: Background Sync category to define the folders that should be synchronized in the background. You can also use the Skip these items group polices to define criteria for folders or items that should not be synchronized.
To control which items are synchronized in the background:
1 Open User Configuration > Policies > Centrify Settings > Mac OS X Settings > Mobility Synchronization Settings > Synchronization Rules: Background Sync.
2 Select the Enable/disable background synchronization rules group policy, right-click, then click Properties.
Chapter 4 • Creating home directories 28

Configuring a portable home directory
3 Click Enabled to activate background synchronization rules. In most cases you should use the following settings:
Deselect Merge with user’s settings if you want to prevent users from adding items to the synchronization list and overriding items you do not want to be synchronized.
Select Synchronize user’s home directory to have the home directory automatically synchronized at a regular interval.
Deselect Skip preset items if you want to explicitly define the items or directories to skip.
4 Click Next Setting to select the Items that will be synchronized in the background group policy.
5 Click Enabled, then click Show.
6 Click Add, then type the tilde character (~) to synchronize all items you do not specifically exclude, then click OK.
7 Click OK to close the Show Contents dialog box, then click OK to apply the group policy settings for the files and folders to be synchronized in the background.
8 Open User Configuration Policies > Centrify Settings > Mac OS X Settings > Mobility Synchronization Settings > Synchronization Rules: Background Sync > Skip these items.
Use the Skip Items group policies to define the specific items you want to exclude from synchronization. For example, if you want to prevent all of the files and folders contained in the ~/Music, ~/Movies, and ~/Pictures directories from being synchronized to the server, you would enable the Skip items whose partial path matches group policy, click Show, then Add, and add the ~/Music, ~/Movies, and ~/Pictures directories, one at a time, to the list of items you want to skip, then click OK to close the Show Contents dialog box.
You can click Previous Setting or Next Setting to add other items you want to exclude using another criteria, for example, items that start with a specific string.
9 Click OK to apply the group policy settings for the files and folders to skip during synchronization.
10 Open User Configuration > Policies > Centrify Settings > Mac OS X Settings > Mobility Synchronization Settings > Synchronization Rules: Options.
11 Select the Manually/automatically synchronize background folders group policy, right-click, then click Properties.
12 Click Enabled to activate background synchronization options, then select whether to synchronize background folders automatically or manually. If you select manually, users should periodically select Sync Now from the Accounts page of System
Administrator’s Guide for Mac OS X 29
Configuring a portable home directory
Preferences. If you select automatically to allow items to be synchronized in the background automatically, you should also set the interval for synchronizing background folders.
In most cases, you should use the following settings:
Select automatically to have items synchronized automatically in the background at a regular interval.
Set the interval in minutes for periodically synchronizing folders in the background. Folders can be synchronized from every 5 to every 60 minutes, but synchronization can only take place if there is a connection to the network. In selecting an interval, you should consider the size and number of files and folders to be synchronized and the level of network traffic.
13 Click OK to apply the group policy settings for synchronizing files and folders in the background.
Configuring an automount point for an NFS share
If you are configuring mobile-home-directory synchronization (“Setting shared directory permissions” on page 34) for an NFS share, you must configure the NFS share as an automount point (see Step 2 on page 23). This section explains how to do this.
To configure an automount point:
1 With a text editor, create or edit /etc/fstab and add a line similar to one of the following, depending on how you are configuring the NFS mount:nfs_server:/nfs_share dummy_mountpoint nfs net 0 0
For example:rhes.acme.com:/nfsshare/ dmpoint nfs net 0 0
ornfs_server:/nfs_share dummy_mountpoint url net,automounted,url==nfs://nfs_server:/nfs_share 0 0
For example:rhes.acme.com:/nfsshare/ dmpoint url net,automounted,url==nfs://192.168.1.70:/
nfs_share 0 0
Note You can specify any directory for the mount point as it will be under /Network/Servers in any case.
Chapter 4 • Creating home directories 30

Configuring a portable home directory
2 Run the automount command to reload automount settings:automount -c
If you are configuring automount for NFS as part of setting up a mobile user account, return to Step 3 on page 23 to complete the procedure.
Administrator’s Guide for Mac OS X 31

Chapter 5
Working with Macs
This chapter describes the unique characteristics or known limitations that are specific to using DirectManage Access on a Mac computer.
The following topics are covered:
Specifying the Macintosh user’s home directory location
Enabling users to manage their print queues
Enabling users to manage their print queues
Setting up authenticated printing
Setting up local and remote administrative privileges
Querying user information for Active Directory users
Migrating from Open Directory to Centrify Active Directory
Converting a local user to a Centrify Active Directory user
Migrating a user from Apple’s Active Directory plugin to Centrify Active Directory
Using Apple’s scheme to generate UIDs and GIDs for Mac users
Mapping local user accounts to Active Directory
Configuring auto-enrollment
Configuring 802.1X wireless authentication
Configuring single sign-on for SSH and Screen Sharing
Configuring FileVault 2
Deploy configuration profiles to multiple computers
Specifying the Macintosh user’s home directory locationIf you configure NFS, SMB, or AFP network file sharing for your Mac OS X computers, you can automatically mount and log on to file shares using Active Directory credentials.
To enable Mac OS X users to log on to file shares when the network is configured with NFS, SMB, or AFP network sharing:
1 Open Active Directory Users and Computers or the Access Manager console.
2 Select the user account for which you want to enable automounting, right-click, then click Properties.
32

Specifying the Macintosh user’s home directory location
3 Click the Centrify Profile tab and set the Home directory path to use one of the following formats:
/Users/user_login_name to set the user’s home directory to the default home directory location for all user home directories on Mac OS X computers.
/SMB/server_name/share[/path] to automount a file share on the SMB server_name you specify. Be certain to use the fully-qualified domain name for server_name, or the IP address. The short name does not work. For example:/SMB/myHost.acme.com/Users/isuzuki
/SMB/unix_username/server_name/share[/path] to automount a file share when you are using Fast User Switching on the SMB server_name you specify. Be certain to use the fully-qualified domain name for server_name, or the IP address. The short name does not work. For example:/SMB/isuzuki/myHost.acme.com/Users/isuzuki
/AFP/server_name/share[/path] to automount a file share on the Apple server_name you specify.
/AFP/unix_username/server_name/share[/path] to automount a file share when you are using Fast User Switching on the Apple server_name you specify.
In specifying the remote SMB or AFP file share, you must use the uppercase letters SMB or AFP at the beginning of the path. If you use lowercase letters (smb or afp), automounting fails.
Note If you plan to use Fast User Switching to switch between Active Directory users on the same computer, you should use the /SMB/unix_username/server_name/share[/path] or /AFP/unix_username/server_name/share[/path] format to specify the user’s home directory to prevent conflicts between users logging on using the same share. If you want to automount a share on an Apple file server using the Apple File Protocol (AFP), however, you must use Centrify 3.0.1 or later.
4 In Step 3, if you specified a network directory, make certain that the Active Directory user logon name (pre-Windows 2000), also known as the samAccountName, matches the Mac login name (UNIX name). Otherwise, the login is not guaranteed to work on all Mac systems.
The name must be 8 characters or less because the UNIX name is automatically truncated to 8 characters and won’t match if the Active Directory name is longer.
Administrator’s Guide for Mac OS X 33
Specifying the Macintosh user’s home directory location
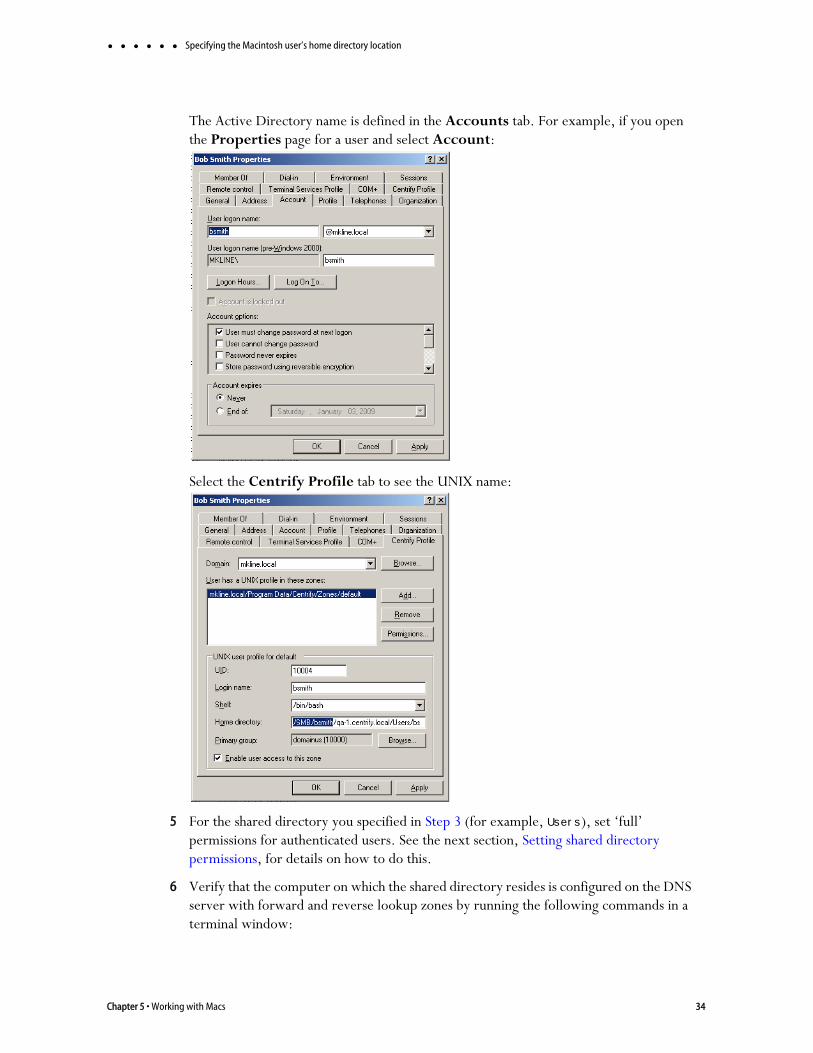
The Active Directory name is defined in the Accounts tab. For example, if you open the Properties page for a user and select Account:
Select the Centrify Profile tab to see the UNIX name:
5 For the shared directory you specified in Step 3 (for example, Users), set ‘full’ permissions for authenticated users. See the next section, Setting shared directory permissions, for details on how to do this.
6 Verify that the computer on which the shared directory resides is configured on the DNS server with forward and reverse lookup zones by running the following commands in a terminal window:
Chapter 5 • Working with Macs 34

Setting shared directory permissions
nslookup computerName.domainName
for example: nslookup QA1.acme.com
Server: acme.comAddress: 192.168.1.139
Name: QA1.acme.comAddress: 192.168.1.139
nslookup ipAddress
for example:nslookup 192.168.1.139
Server: acme.com
Address: 192.168.1.139
Name: QA1.acme.com
Address: 192.168.1.139
If you get an error message such as Can’t find server name for address 192.168.1.139
it means a reverse lookup zone is not configured for the specified server. To configure DNS forward and reverse lookup zones, see the Microsoft Knowledge base article 323445.
Setting shared directory permissionsAll users who are set up with a network home or portable home directory must have proper permissions to the shared directory in which the home directories are created. Initially, you can provide access to the shared directory through the Windows built-in security group, Authenticated Users. Later on, you can fine tune permissions for this group based on your company’s file sharing needs. For example, if an administrator pre-creates home directories for each user before they log in, users only need Read access to the shared directory in order to access their home directories.
Administrator’s Guide for Mac OS X 35
Setting shared directory permissions
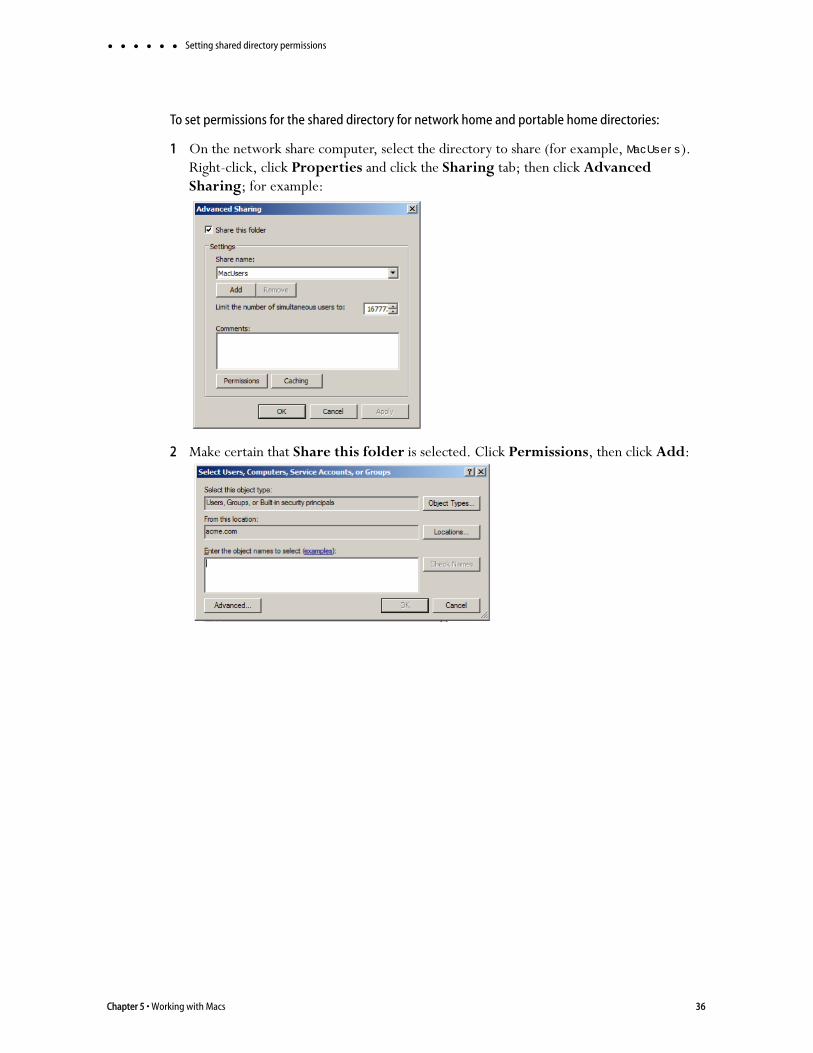
To set permissions for the shared directory for network home and portable home directories:
1 On the network share computer, select the directory to share (for example, MacUsers). Right-click, click Properties and click the Sharing tab; then click Advanced Sharing; for example:
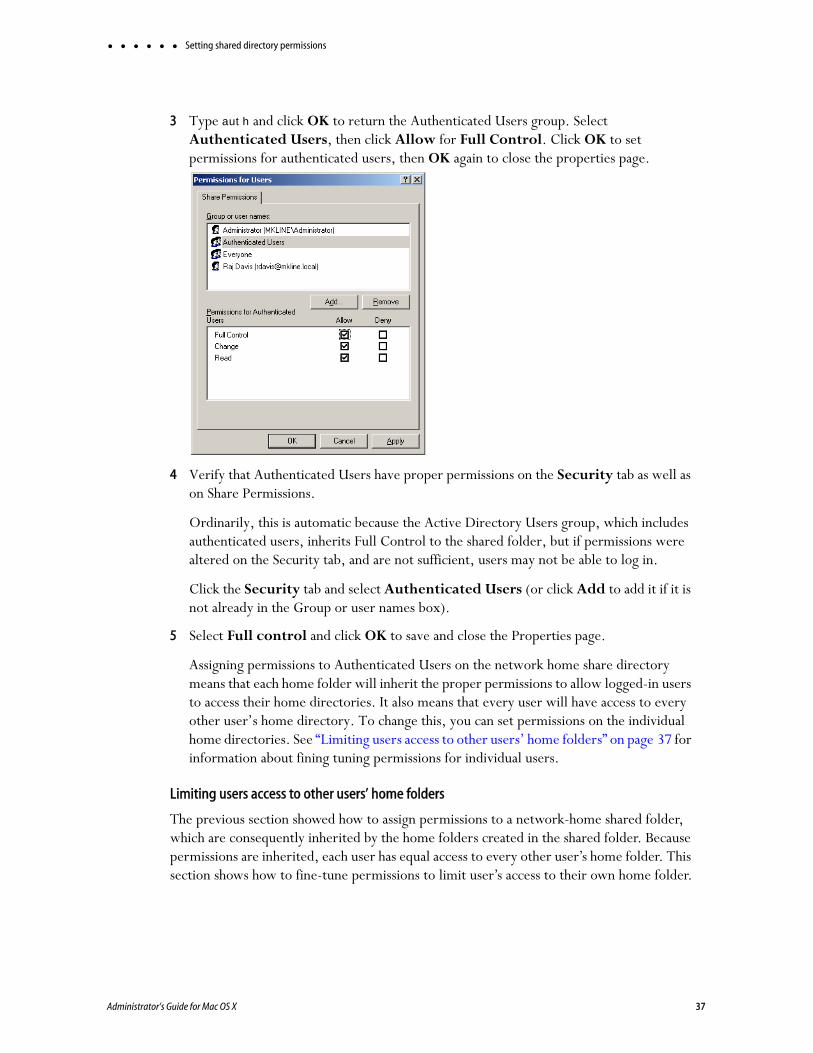
2 Make certain that Share this folder is selected. Click Permissions, then click Add:
Chapter 5 • Working with Macs 36
Setting shared directory permissions
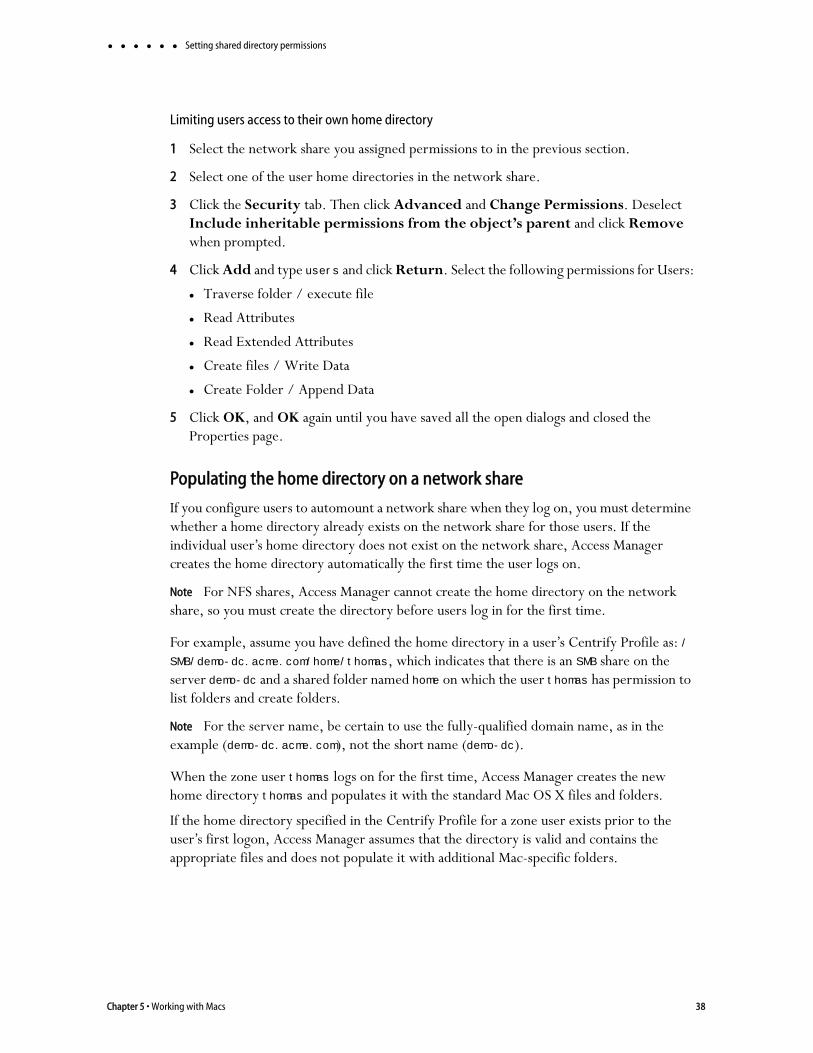
3 Type auth and click OK to return the Authenticated Users group. Select Authenticated Users, then click Allow for Full Control. Click OK to set permissions for authenticated users, then OK again to close the properties page.
4 Verify that Authenticated Users have proper permissions on the Security tab as well as on Share Permissions.
Ordinarily, this is automatic because the Active Directory Users group, which includes authenticated users, inherits Full Control to the shared folder, but if permissions were altered on the Security tab, and are not sufficient, users may not be able to log in.
Click the Security tab and select Authenticated Users (or click Add to add it if it is not already in the Group or user names box).
5 Select Full control and click OK to save and close the Properties page.
Assigning permissions to Authenticated Users on the network home share directory means that each home folder will inherit the proper permissions to allow logged-in users to access their home directories. It also means that every user will have access to every other user’s home directory. To change this, you can set permissions on the individual home directories. See “Limiting users access to other users’ home folders” on page 37 for information about fining tuning permissions for individual users.
Limiting users access to other users’ home folders
The previous section showed how to assign permissions to a network-home shared folder, which are consequently inherited by the home folders created in the shared folder. Because permissions are inherited, each user has equal access to every other user’s home folder. This section shows how to fine-tune permissions to limit user’s access to their own home folder.
Administrator’s Guide for Mac OS X 37
Setting shared directory permissions
Limiting users access to their own home directory
1 Select the network share you assigned permissions to in the previous section.
2 Select one of the user home directories in the network share.
3 Click the Security tab. Then click Advanced and Change Permissions. Deselect Include inheritable permissions from the object’s parent and click Remove when prompted.
4 Click Add and type users and click Return. Select the following permissions for Users:
Traverse folder / execute file
Read Attributes
Read Extended Attributes
Create files / Write Data
Create Folder / Append Data
5 Click OK, and OK again until you have saved all the open dialogs and closed the Properties page.
Populating the home directory on a network share
If you configure users to automount a network share when they log on, you must determine whether a home directory already exists on the network share for those users. If the individual user’s home directory does not exist on the network share, Access Manager creates the home directory automatically the first time the user logs on.
Note For NFS shares, Access Manager cannot create the home directory on the network share, so you must create the directory before users log in for the first time.
For example, assume you have defined the home directory in a user’s Centrify Profile as: /SMB/demo-dc.acme.com/home/thomas, which indicates that there is an SMB share on the server demo-dc and a shared folder named home on which the user thomas has permission to list folders and create folders.
Note For the server name, be certain to use the fully-qualified domain name, as in the example (demo-dc.acme.com), not the short name (demo-dc).
When the zone user thomas logs on for the first time, Access Manager creates the new home directory thomas and populates it with the standard Mac OS X files and folders.
If the home directory specified in the Centrify Profile for a zone user exists prior to the user’s first logon, Access Manager assumes that the directory is valid and contains the appropriate files and does not populate it with additional Mac-specific folders.
Chapter 5 • Working with Macs 38

Enabling users to manage their print queues
Defining a home directory in the Active Directory profile
When you are configuring a network home directory for remote Mac users, the home directory is created automatically when users first log on and should not exist prior to that initial log on unless you want to prevent Access Manager from creating the home directory. Therefore, you should not define a home directory connection point in the Profile properties for new Active Directory users or new mobile user accounts. Instead, you should allow Access Manager to create and populate the remote home directory. If you need to synchronize a network home directory from a local home directory as part of your migration process, however, the network home directory must exist prior to migration. If you are synchronizing from a local home directory to a remote share, you can create the remote home directory manually or click the Profile tab, and set the connection path. For example:
Enabling users to manage their print queuesOn Mac computers, Centrify Active Directory users are unable to manage their own print jobs. For example, if they attempt to pause, stop, or resume one of their own print jobs, they are prompted to supply the name and password of a user in the “Print Operator” group, otherwise, they cannot continue.
Centrify supplies the group policy, Map zone groups to local group, that you can use to enable all Mac users who are authenticated through Active Directory to manage their printers.
This policy gives members of a specified zone group (an AD group, or AD group that has been added to a Centrify zone) the privileges that belong to members of a local group on the local group. For example, as explained in the following procedure, mapping an AD group to the local _lpoperator and _lpadmin groups, provides members of the AD group with the privileges to manage print jobs on the local Mac computer when they log in.
Set this option ifmigrating and
synchronizing folders
Administrator’s Guide for Mac OS X 39
Setting up authenticated printing
To map a zone group to local _lpoperator and _lpadmin groups:
For purposes of illustration, this procedure instructs you to create a specific group (MacPrint) and add the users who you want to manage printers on Mac computers to this group. You could also map an existing AD group to the local _lpoperator and _lpadmin groups, or create a new group with a different name.
1 On a Windows computer, open Active Directory Users and Computers, select Users and right-click and select New > Group.
2 Enter a name for the group, such as MacPrint and select Global and Security.
3 Double-click the group, select the Members tab, then click Add and browse for and add the AD users who you want to have printing privileges on the Mac computer.
4 Open the Access Manager Console, expand the zone hierarchy and expand the zone containing Mac computers. Expand UNIX Data, select Groups, then right-click and select Create UNIX Group.
5 Browse for and select the AD group you crated (MacPrint) and click OK to add it to the zone.
6 Open the Group Policy Management Editor and select the GPO that you use for Mac OS X computers. Click Computer Configuration > Policies > Centrify Settings > Mac OS X Settings > Accounts, then double-click Map zone groups to local group.
7 Click the Policy tab and click Enabled. Click Add and do the following:
a In Local Group, type _lpoperator to add the printer operators group.
b In Zone Group: click Browse then search for and select the AD zone group you created (MacPrint), then click OK to map MacPrint to the printer operators group.
c Click Add again and in Local Group type _lpadmin to add the printer admin group.
d In Zone Group: click Browse then search for and select MacPrint again to map MacPrint to the printer admin group.
8 Click OK to save the policy.
The first time users attempts to manage their printer, for example by pausing the printer, they will be prompted for credentials for a user in the “Printer Operator” group. They can simply enter their own name and password. Subsequently, they can manage the printer without supplying credentials.
Setting up authenticated printingIn a Windows Active Directory environment that requires authentication for printing services, Mac users who are already authenticated must provide credentials again when using a Windows network printer. To provide single-sign on when using printers, the
Chapter 5 • Working with Macs 40
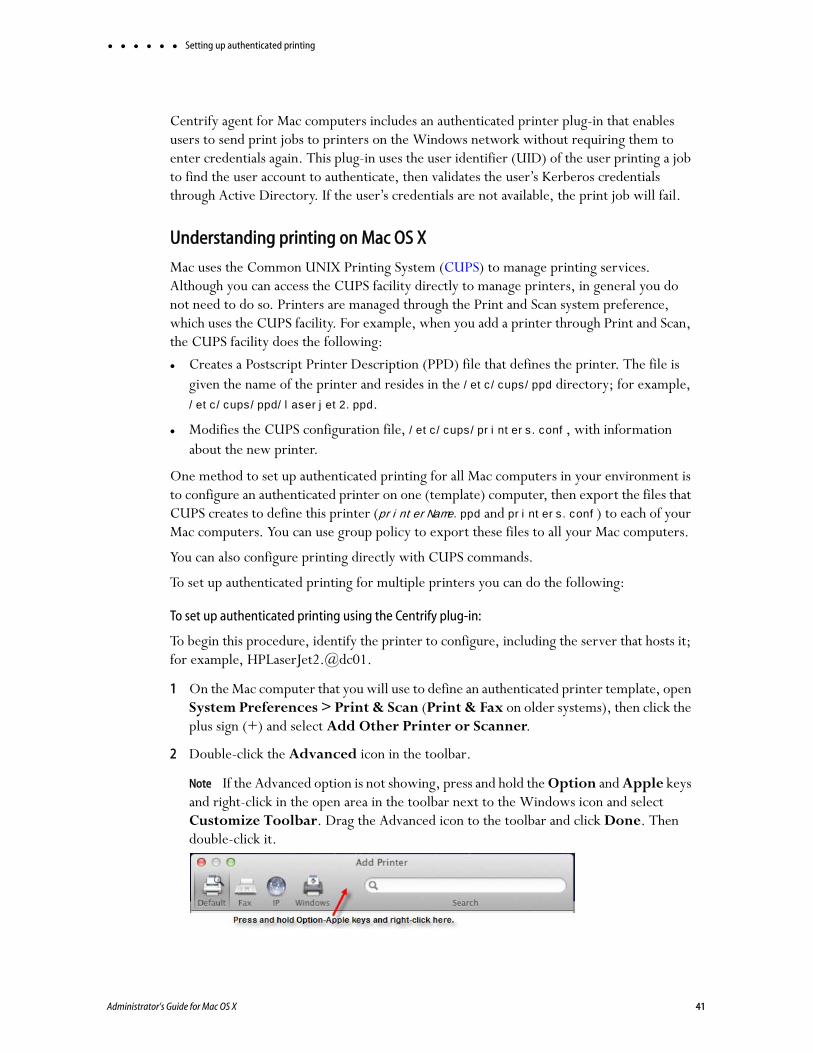
Setting up authenticated printing
Centrify agent for Mac computers includes an authenticated printer plug-in that enables users to send print jobs to printers on the Windows network without requiring them to enter credentials again. This plug-in uses the user identifier (UID) of the user printing a job to find the user account to authenticate, then validates the user’s Kerberos credentials through Active Directory. If the user’s credentials are not available, the print job will fail.
Understanding printing on Mac OS X
Mac uses the Common UNIX Printing System (CUPS) to manage printing services. Although you can access the CUPS facility directly to manage printers, in general you do not need to do so. Printers are managed through the Print and Scan system preference, which uses the CUPS facility. For example, when you add a printer through Print and Scan, the CUPS facility does the following:
Creates a Postscript Printer Description (PPD) file that defines the printer. The file is given the name of the printer and resides in the /etc/cups/ppd directory; for example, /etc/cups/ppd/laserjet2.ppd.
Modifies the CUPS configuration file, /etc/cups/printers.conf, with information about the new printer.
One method to set up authenticated printing for all Mac computers in your environment is to configure an authenticated printer on one (template) computer, then export the files that CUPS creates to define this printer (printerName.ppd and printers.conf) to each of your Mac computers. You can use group policy to export these files to all your Mac computers.
You can also configure printing directly with CUPS commands.
To set up authenticated printing for multiple printers you can do the following:
To set up authenticated printing using the Centrify plug-in:
To begin this procedure, identify the printer to configure, including the server that hosts it; for example, HPLaserJet2.@dc01.
1 On the Mac computer that you will use to define an authenticated printer template, open System Preferences > Print & Scan (Print & Fax on older systems), then click the plus sign (+) and select Add Other Printer or Scanner.
2 Double-click the Advanced icon in the toolbar.
Note If the Advanced option is not showing, press and hold the Option and Apple keys and right-click in the open area in the toolbar next to the Windows icon and select Customize Toolbar. Drag the Advanced icon to the toolbar and click Done. Then double-click it.
Administrator’s Guide for Mac OS X 41

Setting up authenticated printing
3 Scroll in the Type drop-down list and select Windows Printer via Centrify from the list.
Note that after you make this selection, the URI scheme in the Device URI window changes to cdcsmb://, which specifies the Centrify plugin.
4 Type the complete URI specification for the printer in the form:
scheme://hostname/name
for example:cdcsmb://dc01.acme.com/hplaserjet2
Note A URI specification does not accept spaces. If the printer name contains spaces, you must replace them with %20 (ASCII code for space); for example, to specify the HP Color LaserJet 4 printer:cdcsmb://dc01.acme.com/HP%20Color%20LaserJet%204
5 Type a name for the printer; for example HPLaserJetMac.
When you type the URI for the printer, the first part of the name automatically appears in the Name field. You can change that name now. This is the name that will appear in the list of printers in the Print and Scan system preference and in the list of available printers when a user prints a document. It is also the name of the PPD (Postscript Printer Description) file that the CUPS facility creates for each printer that is added to your Printer preferences.
Type an optional description in Location to assist users in locating the printer.
6 In the Print Using window, specify the type of the printer, which enables you to properly manage the printer.
For example, if you have drivers installed for the printer, click Select Printer Software and select the appropriate item such as HP Laserjet 4300, then click OK.
You can also specify Generic Postscript Printer, or click Other to browse for drivers or printer software.
Click the Add button to add the printer to the list of available printers.
7 Repeat this procedure for as many printers as you want to make available for authenticated printing.
You can now use the Copy Files group policy to copy the new printerName.ppd file and updated CUPS configuration file (printers.conf) to the appropriate locations on each of your Mac computers in the domain.
To copy printer files to other computers
1 In the Finder on the Mac template computer, navigate to the /etc/cups directory by clicking Go > Go to Folder, then type /etc/cups and click Go.
Chapter 5 • Working with Macs 42

Setting up authenticated printing
2 Select printers.conf and copy it to the desktop. When prompted, enter your administrator password to copy the file.
3 Open the ppd folder (/etc/cups/ppd). Select the files for all the authenticated printers you defined in the previous procedure and copy them to the desktop.
4 On the desktop, change the file permissions for the printers.conf and *.ppd files so you can copy them to sysvol:
a Select the files and click File > Get Info.
b For each open dialog box, expand Sharing & Permissions, then click the lock icon and provide administrator credentials for making changes. Set the permissions for everyone to Read only.
c Reset the lock and close all the open dialogs.
5 On the Windows domain controller create a sub-directory for the printer file in SYSVOL.
SYSVOL is a well-known shared directory on the domain controller that stores server copies of public files that must be shared throughout the domain. You can use it to copy the printer definition and configuration files to all Mac computers that join the domain.
SYSVOL is located at:C:\Windows\SYSVOL\sysvol\domainName\
For example, assuming the domain is acme.com, and using the name MacPrinters for the directory, create the following directory:C:\Windows\SYSVOL\sysvol\acme.com\MacPrinters
6 On the Mac computer, copy the files from the desktop to SYSVOL on the Windows domain controller. If you are connected to the domain, you should see the domain controller in the Finder. If the domain controller is not visible in the Finder, connect to it:
a Click Go > Connect to Server and select the domain controller.
b When prompted select SYSVOL; for example:
Administrator’s Guide for Mac OS X 43

Setting up authenticated printing
c Navigate to the MacPrinters directory you created, for example by clicking acme.com then MacPrinters.
d Drag the printer files to MacPrinters.
7 Configure the Copy Files group policy.
a On the Windows domain controller, open the Group Policy Management Editor and select the GPO that is used to manage Mac computers.
b Navigate to Computer Configuration > Policies > Common UNIX Settings and double-click Copy Files.
c In Copy file policy setting, select Enabled.
d Click Add, then Browse. Double-click to open the directory you created for the printer files in Step 5 (for example, MacPrinters).
e Select the printers.conf file. Filename now shows MacPrinters/printers.conf.
f In Destination, type /etc/cups. This group policy will copy printers.conf to the /etc/cups directory of each computer that joins the domain.
g Select Use destination file ownership and permissions. The file will be assigned the default ownership and permissions:owner: root (0)group: lp (26)permission 0600 (rw- --- ---)
h Select OK to add the printers.conf file.
8 Click Add again and browse to MacPrinters to add the PPD files.
a Select one of the PPD files you copied to the MacPrinters directory.
b In Destination, type /etc/cups/ppd.
c Select Use destination file ownership and permissions. The file will be assigned the default ownership and permissions:owner: root (0)group: lp (26)permission 0644 (rw- r-- r--)
d Click OK to add the file.
9 Repeat the sub-steps in Step 8 for each of the PPD files that you have defined, then click OK to enable the policy.
This group policy will copy each printerName.ppd file to the /etc/cups/ppd directory of every computer to which the policy applies and that is joined to the domain.
10 Run the adgpupdate command on each target Mac computer to trigger an update of group policies and execute the new Copy Files policy.
Chapter 5 • Working with Macs 44

Setting up authenticated printing
By default, group policies are updated automatically every 90 minutes, so you can skip this step and wait for the automatic update if you wish. You should also log out and back in again on each computer to update the printer configuration dialogs.
Removing a printer definition from client computers
This section explains how to remove printer definitions that you created for Mac computers in the domain. It assumes that you set up the Copy Files group policy to add printer definitions to each of your joined Mac computers (as explained in “Setting up authenticated printing” on page 40).
To remove a printer definition from computers in a domain
1 Identify the name of the PPD file to delete in /etc/cups/ppd; for example, laserjet4300.ppd.
2 On the Mac template computer (the computer on which you originally defined the authenticated printer), open System Preferences > Print & Scan. Select the printer to delete, click the minus (-) button, then click Delete Printer.
Deleting the printer removes the printer from the list, updates the /etc/cups/printers.conf file by removing the definition of the deleted printer, and removes the printerName.ppd file from the /etc/cups/ppd directory.
3 Copy the updated printers.conf file to the desktop and change the permissions to everyone: Read only.
4 Copy the updated printers.conf file to the SYSVOL and replace the existing file; also remove the PPD file for the deleted printer.
SYSVOL is a well-known shared directory on the domain controller that stores server copies of public files that must be shared throughout the domain. When authenticated printing was set up, the CUPS configuration file, printers.conf was placed in the SYSVOL/acme.com/MacPrinters folder.
SYSVOL is located at:C:\Windows\SYSVOL\sysvol\domainName\
If you are connected to the domain, you should see the domain controller in the Finder. If the domain controller is not visible in the Finder, connect to it:
a Click Go > Connect to Server and select the domain controller.
Administrator’s Guide for Mac OS X 45
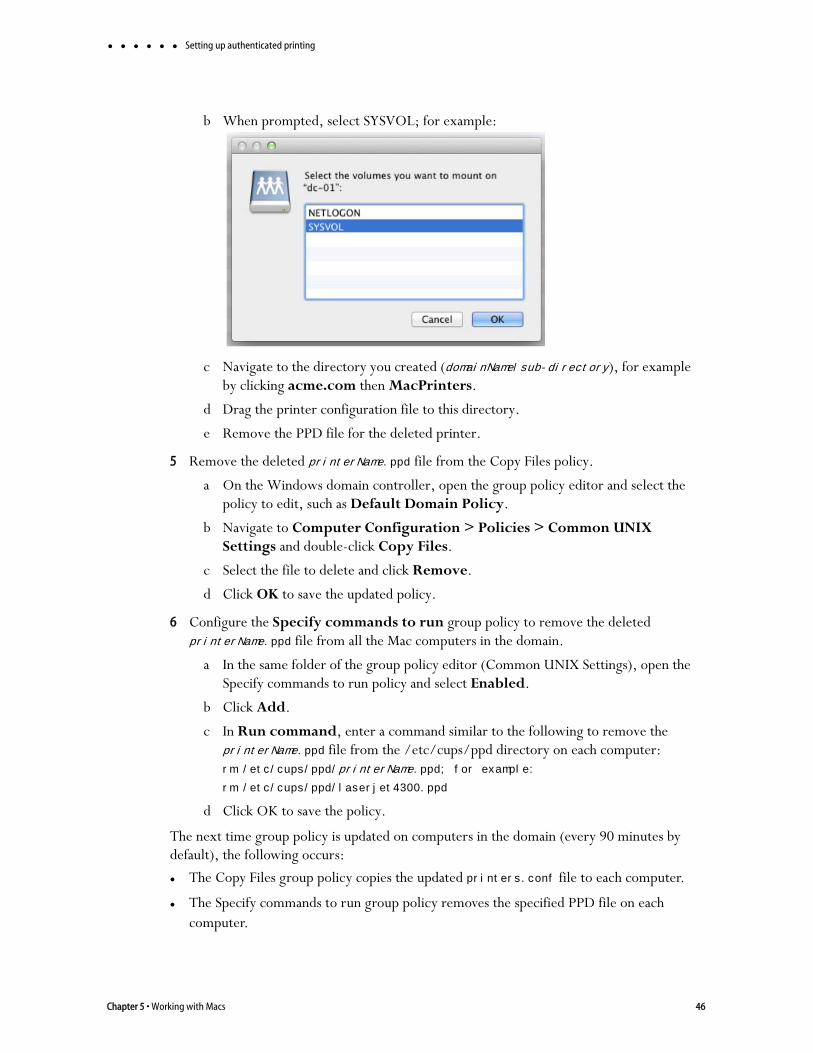
Setting up authenticated printing
b When prompted, select SYSVOL; for example:
c Navigate to the directory you created (domainName/sub-directory), for example by clicking acme.com then MacPrinters.
d Drag the printer configuration file to this directory.
e Remove the PPD file for the deleted printer.
5 Remove the deleted printerName.ppd file from the Copy Files policy.
a On the Windows domain controller, open the group policy editor and select the policy to edit, such as Default Domain Policy.
b Navigate to Computer Configuration > Policies > Common UNIX Settings and double-click Copy Files.
c Select the file to delete and click Remove.
d Click OK to save the updated policy.
6 Configure the Specify commands to run group policy to remove the deleted printerName.ppd file from all the Mac computers in the domain.
a In the same folder of the group policy editor (Common UNIX Settings), open the Specify commands to run policy and select Enabled.
b Click Add.
c In Run command, enter a command similar to the following to remove the printerName.ppd file from the /etc/cups/ppd directory on each computer:rm /etc/cups/ppd/printerName.ppd; for example:
rm /etc/cups/ppd/laserjet4300.ppd
d Click OK to save the policy.
The next time group policy is updated on computers in the domain (every 90 minutes by default), the following occurs:
The Copy Files group policy copies the updated printers.conf file to each computer.
The Specify commands to run group policy removes the specified PPD file on each computer.
Chapter 5 • Working with Macs 46
Setting up local and remote administrative privileges
Setting up local and remote administrative privilegesCentrify provides two group policies to set administrative privileges on the local computer:
Map zone groups to local admin groups allows you to specify one or more zone groups to map to the local admin group. Members of the specified group are given administrative privileges on Mac computers managed by Access Manager.
Enable administrator access groups allows users in the zone group ard_admin to access a computer via Apple Remote Desktop with full privileges.
This section shows you how to use these policies together to enable local and remote administrative access to Mac computers.
To enable remote and local access for a group:
1 Create an Active Directory group, for example, My_Mac_Admins, and add users who you want to have administrative privileges.
2 Create an Active Directory group that is a Domain Local Security group. For convenience, name it ard_admin.
3 Add My_Mac_Admins as a member of ard_admin.
4 Create a Centrify zone group, My_Mac_Admins and map it to the Active Directory group My_Mac_Admins.
Note If the local computer is connected to the domain through Auto Zone, you cannot create a zone group because there are no zones. However, all Active Directory groups are valid for the joined computer, so you can map any group, such as My_Mac_Admins, to the local admin group, but you need to know the group’s UNIX name, which you can retrieve on the local computer, by using the adquery command, as follows [root]#adquery group -n
For example, the following shows an adquery command and the name it returns:[root]#adquery group -n |grep -i Mac_Admins
my_mac_admins
5 Create a zone group, ard_admin, and map it to the Active Directory group ard_admin.
Note This zone group must be named ard_admin.
6 In the Group Policy Editor, edit the group policy for the domain, then click Centrify Settings > Mac OS X Settings > Accounts > Map zone groups to local admin group.
7 Open the policy, select Enable, then click Add. Enter My_Mac_Admins (or the name retrieved from the adquery -n command in Step 4), then click OK.
This step maps My_Mac_Admins to the admin group on the local computer and gives members of My_Mac_Admins all privileges.
Administrator’s Guide for Mac OS X 47
Querying user information for Active Directory users
8 Click Centrify Settings > Mac OS X Settings > Remote Management > Enable administrator access groups.
9 Open the policy and select Enable.
This step allows members of ard_admin to access a computer via Apple Remote Desktop with full privileges. In Step 7, you effectively gave members of My_Mac_Admins administrative privileges. Since My_Mac_Admins includes members of ard_admin, members of ard_admin now have full local and remote administrative access.
Querying user information for Active Directory usersWhen you run commands or use applications that look up user information in the directory, the local Mac directory service is always consulted first before the look-up request is made to Active Directory. If a local user exists with the same name as a UNIX profile name that has been defined for the zone, a lookup request such as id username will return the UID and GID associated with the local user account from the local directory service rather than the information associated with the UNIX profile defined in Active Directory.
For example, if you have a UNIX profile in Active Directory for the user mia with the UID of 10024 and the user’s primary group is mia with the GID of 10024 and the user is also a member of the Active Directory group users and GID of 10001, running the id mia command returns the following information from Active Directory:uid=10024(mia) gid=10024(mia) groups=10024(mia), 10001(users)
However, if there is also a local user account with the same user name of mia, but with a UID of 502 and a primary group named mia with a GID of 502, running id mia returns the information for the local user retrieved from the Mac directory service, then any additional group membership information retrieved from Active Directory. For example:id mia
uid=502(mia) gid=502(mia) groups=502(mai), 10001(users)
Because the Mac directory service is queried first, the information for the local user mia takes precedence over the information defined in Active Directory. To avoid retrieving the information for a local user instead of the UNIX profile defined in Active Directory, you should make sure that the UNIX profile user names in Active Directory are different from the local user or disable local user accounts.
Migrating from Open Directory to Centrify Active DirectoryIf you install the Centrify agent in an environment where existing Mac users and computers are managed with Open Directory, you may need to migrate the account information and home directories for those users from the Open Directory environment to Centrify Active Directory. Open Directory and Active Directory support three types of users:
Local users
Chapter 5 • Working with Macs 48

Migrating from Open Directory to Centrify Active Directory
Network home users
Portable home, or mobile home, users
For example, you may need to migrate existing mobile user accounts from Open Directory to Active Directory or migrate local home directories to a network share.
To migrate users with existing mobile accounts from Open Directory to Active Directory:
1 Create a copy of the user’s local home directory in a temporary location if you have enough disk space to do so. This copy can serve as a backup to restore the user’s home directory if you run into any synchronization problems.
2 Log on to the Mac client as an administrator.
3 Disable the LDAP service.
Open the Directory Utility and select the Services tab; then deselect LDAPv3 and click Apply.
4 Open a Terminal window and run the following Directory Service command to delete the user’s record:dscl /Local/Default -delete /Users/userName
where userName is a local user; for example, to delete the record for cain:dscl /Local/Default -delete /Users/cain
5 Navigate to the /Users/user_name/Library/Mirrors directory and delete this folder.
6 Join the Mac computer to an Active Directory domain and restart the computer to shut down and restart services.
7 Create an Active Directory user account for the Open Directory user account, if one does not already exist.
If you are creating a new Active Directory user, use Active Directory Users and Computers to add the user account.
8 Add the Active Directory user to the Mac computer’s zone and define the Centrify Profile for the user:
Use the same user name, UID, and GID as the Open Directory user account. You can change this information later with the adfixid program, but for migration you must use the same values.
Set the home directory for the user to the appropriate network share using the /SMB/share/path or /AFP/share/path syntax. For example, /SMB/cain/server2003.myDomain.com/Users/cain.
Note For synchronizing new mobile user accounts, the empty home directory must exist on the network share. If the user home directories are on the same network share as you previously used with Open Directory, logging on with the new Active Directory account should not affect the files available on the share.
Administrator’s Guide for Mac OS X 49
Converting a local user to a Centrify Active Directory user
Because GID values of 0 to 99 are usually reserved for system accounts, you may see a warning message when you save the user’s profile if the user’s primary GID value is less than 99.
9 Create a Group Policy Object and link it to an organizational unit that includes the Active Directory users and enable the following policies:
Enable/disable synchronization to create a new mobile account for the users.
Enable/disable background synchronization rules to activate background synchronization rules.
Items that will be synchronized in the background, then click Show > Add, and type the tilde character (~) to synchronize the home folder.
Enable/disable login & logout synchronization rules and Items that will be synchronized at login and logout to activate login and logout synchronization rules.
10 Log on to the Mac computer with the Active Directory or zone user account name and password to create a mobile account for this user. If prompted to confirm the creation of the a portable home directory, click Yes. If logging in is successful and the mobile account is created, the files and folders you have specified using the User Configuration > Policies > Centrify Settings > Mac OS Settings > Mobility Synchronization Settings > Synchronization Rules: Background Sync group policies are synchronized from the /Users/user_name folder to the network share you have defined. For example, /SMB/cain/server2003/Users/cain.
After the initial synchronization of background items, any files and folders you have specified using the Items that will be synchronized at login and logout group policy are synchronized from the /Users/user_name folder to the network share folder.
If you have Open Directory users that do not have mobile accounts or portable home directories and you want to synchronize their local home directories with their network home, you should first use the Workgroup Manager to create mobile accounts for those users to establish a portable home directory. You can then follow the steps above to synchronize the portable home directories with their network home directory. If you don’t want to synchronize the local home directory with the home directory on the network share, you can simply create Active Directory accounts for the Open Directory users and remove the local user records; see “Mapping local user accounts to Active Directory” on page 59 for information about removing local user records.
Converting a local user to a Centrify Active Directory userAlthough local user accounts can co-exist with Active Directory user accounts, in some cases, you may want to convert some or all of your local accounts to Active Directory user accounts. Converting local users to Active Directory users simplifies account management, but requires you to take some steps manually.
Chapter 5 • Working with Macs 50

Converting a local user to a Centrify Active Directory user
On Mac computers, the local account database is always checked for authentication before Active Directory. If a local user has the same username as an Active Directory user, the local user account is used for authentication. If the local user’s password is different from the Active Directory user’s password whether logging on using the Mac login window, or remotely (for example, using telnet or ssh), the local user password is required for authentication to succeed. Although authentication succeeds, Access Manager will generate a username conflict warning.
In most cases, you should remove or convert local user accounts to avoid conflicts between Active Directory and local user accounts and to ensure Active Directory password and configuration policies are enforced. If you need to keep local user accounts, you should ensure the logins are distinguishable from Active Directory accounts. For more information about removing local user accounts, see “Mapping local user accounts to Active Directory” on page 59.
To convert a local Mac user to an Active Directory user:
1 Open a Terminal window and run the following Directory Service command to delete the user’s record:dscl /Local/Default -delete /Users/userName
where userName is a local user; for example, to delete the record for cain:dscl /Local/Default -delete /Users/cain
Note Although the user record is deleted, the home directory for the user (/Users/cain), including all sub-directories and files, still exists. When you create an Active Directory user with the same name, this user will have access to everything in the existing local home directory.
2 On a Windows computer, use Active Directory Users and Computers to create an Active Directory user account for the local user account (for example, cain), if one does not already exist.
3 In the Access Manager console add the Active Directory user to the appropriate zone and define the Centrify Profile for the user. Set the home directory for the user:
Note The default home directory for Mac users is the /Users directory, unlike most UNIX systems where /home is the default by convention.
To a local home directory: /Users/userName; for example, /Users/cain.
To an appropriate network share using the /SMB/share/path or /AFP/share/path syntax. For example, /SMB/cain/server2003.myDomain.com/Users/cain. See “Configuring a network home directory” on page 20.
To a network home directory. If you wish to create a mobile account for the user and synchronize the user’s folders the next time the user logs on, see “Configuring a portable home directory” on page 22.
4 Reboot the Mac computer, then log in as the new Active Directory user.
Administrator’s Guide for Mac OS X 51

Migrating a user from Apple’s Active Directory plugin to Centrify Active Directory
Migrating a user from Apple’s Active Directory plugin to Centrify Active Directory
When you create an Active Directory user by using the Mac Directory Utility Active Directory plug-in it creates numeric user (UID) and group (GID) identifiers. When you migrate a current Active Directory user to Centrify Identity Service, Mac Edition, the Access Manager console creates a UID and GID that are different than the current UID and GID. When an Active Directory user attempts to log in after the agent is installed, the changed UID and GID cause ownership and permission problems with the user’s home directory.
There are two basic approaches to solving this problem:
Make the Centrify UIDs and GIDs match the existing values.
Change ownership on the user’s primary group to match the value in Centrify Active Directory.
Changing the Centrify UIDs and GIDs
To change the UID and GID values in Centrify Active Directory to match the existing values:
1 Log in to the Mac computer as a local administrator.
2 Open a terminal session.
3 Open the user’s home folder and type:ls -ln total 32
-rw-r--r--@ 1 505 505 3 Mar 26 2007 .CFUserTextEncoding
-rw-r--r--@ 1 505 505 6148 Mar 26 2007 .DS_Store
-rw------- 1 505 505 74 Mar 26 2007 .bash_history
drwx------@ 3 505 505 102 Mar 26 2007 Desktop
drwx------@ 3 505 505 102 Mar 26 2007 Documents
drwx------@ 19 505 505 646 Mar 26 2007 Library
drwx------@ 3 505 505 102 Mar 26 2007 Movies
drwx------@ 3 505 505 102 Mar 26 2007 Music
drwx------@ 4 505 505 136 Mar 26 2007 Pictures
drwxr-xr-x@ 4 505 505 136 Mar 26 2007 Public
drwxr-xr-x@ 5 505 505 170 Mar 26 2007 Sites
The third column shows the UID (505 in this example) and the fourth column shows the GID (also 505).
4 On the Windows workstation, open the Access Manager console. Expand the zone, expand users, and double-click the user to open the property page.
5 Type 505 for the UID.
Chapter 5 • Working with Macs 52

Migrating a user from Apple’s Active Directory plugin to Centrify Active Directory
6 To change the GID, you need to either change the GID of the group to which the user belongs (which will change for all users who belong to that group) or create a new group. To create a new group:
Open ADUC. Then right-click Users > New > Group. Enter a name for the group and click OK.
In the Access Manager console, right click Groups > Create UNIX Group. Search for the group you created. Change the GID to the desired value (for example, 505) and click OK.
7 To change the GID of the existing group to which the user belongs, expand Groups and double-click the group name. Change the GID to the desired value (for example, 505). Click Yes on the warning message.
Modifying the Mac UID and GID to match Centrify
To change the existing UID and GID to match the values in Centrify Active Directory depends on whether you have a local home directory, a network home directory, or a mobile home directory.
To change the existing UID and GID if you have a local home or network home directory:
1 Log in to the Mac computer as a local administrator.
2 Open Applications > Directory Utility > Services. Double-click Active Directory, then click Unbind. Enter your administrator name and password if necessary.
3 Use the ADJoin tool (either the GUI or the command-line version) to connect to an Active Directory domain.
4 Open a terminal session and type the following:id userName
Note the primary group. For example:id cain
...gid=10000(support)
5 Type:chown -R userName:primaryGroupName /Users/userName
For example, for a local home directory:chown -R cain:support /Users/cain
For example, for a network home directory:chown -R cain:support /SMB/Users/cain
To change the existing UID and GID if you have a mobile home directory:
1 Be certain the local home directory is synchronized with the network home directory.
Administrator’s Guide for Mac OS X 53

Using Apple’s scheme to generate UIDs and GIDs for Mac users
2 Log in to the Mac computer as a local administrator.
3 Open Applications > Directory Utility > Services. Double-click Active Directory, then click Unbind. Enter your administrator name and password if necessary.
4 Use the ADJoin tool (either the GUI or the command-line version) to connect to an Active Directory domain.
5 Open a terminal session and type the following Directory Service command to delete the cached local user:dscl . -delete /Users/userName
For example:dscl . -delete /Users/cain
6 Then type the following commands to remove the home directory so that it syncs again from the network and remove the local copy of mcx so you are prompted to create a mobile account:rm -rf /Users/userName
rm -rf /Library/Managed\ Preferences/userName
7 On the Windows Active Directory computer, set the User Configuration > Policies > Centrify Settings > Macintosh Settings > Mobility Synchronization Settings group policies.
Using Apple’s scheme to generate UIDs and GIDs for Mac usersBy default, Centrify uses a different scheme than the Apple Active Directory plugin to generate numeric user (UID) and group (GID) identifiers for Mac users added to Active Directory. If you use the default Centrify scheme to generate identifiers, you must resolve UID and GID conflicts after migrating users. For example, after migrating you can change ownership on the existing files (see Modifying the Mac UID and GID to match Centrify) otherwise users have Centrify-generated UIDs whereas their files belong to Apple-generated UIDs so users will be unable to access files and folders in their home directories.
On the other hand, Centrify allows you to use the Apple scheme, rather than the default Centrify scheme, to create UIDs and GIDs for migrated users. This method ensures compatibility with Mac tools, such as ExtremeZ-IP, that require UIDs and GIDs generated with the Apple scheme, not the Centrify scheme.
This section explains how to create Apple-generated UIDs and GIDs for Mac users who you are adding to Active Directory with Centrify Identity Service, Mac Edition when a computer is connected to Centrify Active Directory through Auto Zone.
Note If your computer is joined to a zone, however you are adding users to the zone, you can choose to use the Apple scheme to generate UID and GID values. For example, you can
Chapter 5 • Working with Macs 54

Using Apple’s scheme to generate UIDs and GIDs for Mac users
specify the Apple scheme with adedit, with the Zone Provisioning Agent, and in the Access Manager Console.
Centrify provides the auto.schema.apple_scheme parameter to enable use of the Apple schema for generating UIDs for new users. The recommended way to set this parameter is by way of group policy so that you can set it for a group of computers. You may also set the parameter on individual computers by editing the Centrify configuration file.
To use group policy to enable the Apple scheme for generating UIDs and GIDs:
1 If you are generating new UIDs and GIDs for files that reside remotely in AFP or NFS mounted shares, back up the UIDs and GIDs on the computer where the share resides by executing a command similar to the following:adquery user > olduid
Note You do not need to perform this step for Samba shares.
2 On a Windows computer, open the Group Policy Management Editor and edit a group policy object that applies to Mac computers.
3 Expand Computer Configuration > Policies > Centrify Settings > Direct Control Settings > Adclient Settings, and double-click Generate New uid/gid using Apple scheme in Auto Zone.
4 Select Enabled and click OK to set the policy.
To edit the configuration file and enable the Apple scheme for generating UIDs and GIDs on a single computer:
1 If you are generating new UIDs and GIDs for files that reside remotely in AFP or NFS mounted shares, back up the UIDs and GIDs on the server where the computer resides by executing a command similar to the following:adquery user > olduid
Note You do not need to perform this step for Samba shares.
2 Log in to a Mac computer.
3 Edit the Centrify configuration file: /etc/centrifydc/centrifydc.conf.
4 Find the following parameter, remove the comment and set its value to true:auto.schema.apple_scheme: true
You may also enable the Apple scheme to set the primary GID for users if you wish.
Note You may set the primary GID in this way only if the parameter auto.schema.private.group is set to false. Otherwise, the primary GID is set to the value of the user’s UID.
Administrator’s Guide for Mac OS X 55

Using Apple’s scheme to generate UIDs and GIDs for Mac users
To enable the Apple scheme for generating the primary GID:
1 If you are generating new UIDs and GIDs for files that reside remotely in AFP or NFS mounted shares, back up the UIDs and GIDs on the computer where the share resides by executing a command similar to the following:adquery user > olduid
Note You do not need to perform this step for Samba shares.
2 In the Group Policy Management Editor, edit a group policy object that applies to Mac computers, expand Computer Configuration > Policies > Centrify Settings > Direct Control Settings > Adclient Settings, and double-click Set user’s primary gid in Auto Zone.
3 Select Enabled.
4 In Set user’s primary gid in Auto Zone, type -1.
The primary GID for each user will be generated by the Apple scheme, as specified with the “Generate New uid/gid using Apple scheme in Auto Zone” group policy, which you enabled in the previous procedure.
5 Click OK to save the setting.
After setting these policies, run adgpupdate to update the group policies you just set, and flush the cache on each joined computer to update the UID and GID values for any existing users.
To flush the cache on each Mac OX X computer:
1 Log in to a Mac computer and open the Terminal application.
2 Execute the following command as root:adflush
New users who you migrate to Active Directory from the Apple Active Directory plug-in will automatically keep the same UID, GID, and primary GID values that they had before migration, and their home ownership will work properly.
After you flush the cache, any existing users and groups will have their UID, GID, and primary GID values changed from the Centrify scheme to the Apple scheme. However, ownership of files and folders in home directories will still belong to the Centrify UID and GID. To change ownership to the new UID and GID generated by the Apple scheme, run the fixhome.pl script as explained in the following procedure.
To correct file ownership by running fixhome.pl:
Note If you generated new UIDs and GIDs for files that reside remotely in AFP or NFS mounted shares, the fixhome.pl script does not have permission to change UIDs and GIDs in the share, and you must manually update the UIDs and GIDs on the server where the share
Chapter 5 • Working with Macs 56

Using Apple’s scheme to generate UIDs and GIDs for Mac users
folders reside. In this scenario, go to “Workaround for AFP and NFS mounted shares” on page 57 and continue from there.
For Samba shares and local UIDs and GIDs:
1 Log in on a Mac computer for which you have changed UID and GID values to the Apple scheme.
2 Execute the following command as root:/usr/local/share/centrifydc/sbin/fixhome.pl
The script changes ownership of files and folders in the home directory of all Centrify Active Directory users from the Centrify-generated UID or GID to the Apple-generated UID or GID.
The script uses /Users as the root for all home directories. You may specify a different home root if necessary by using the --dir option. Use the --help option to see a list of options that you can specify with this command:/usr/local/share/centrifydc/sbin/fixhome.pl --help
For example, you can run the command in test mode to see the changes that will be made, but without committing the changes:[root]#/usr/local/share/centrifydc/sbin/fixhome.pl --test
User Home UID Map GID Map
user1 /Users/user1 796918879=>558948313 20=>5287576209
Or you could update specific users rather than all users:[root]#/usr/local/share/centrifydc/sbin/fixhome.pl --include user2
Workaround for AFP and NFS mounted shares
For AFP and NFS mounted share folders (or remote file systems), fixhome.pl does not have permission to change the UID/GID of files in the folder. Perform the following steps to work around this issue:
1 On the server where the share folders reside, open the UID/GID backup file that you created in Step 1 on page 55 or Step 1 on page 56 to have access to the old UID/GID strings.
2 On the server where the share folders reside, change the old UIDs and GIDs to the new UIDs and GIDs one at a time by executing commands similar to the following:find ShareFolder -user previous_uid -group previous_gid -exec chown new_uid:new_gid {} \;
To enable the Apple scheme for mobile users:
Additional steps are required to enable the Apple scheme for mobile users. After enabling the Apple scheme as described in the preceding sections, you must ensure that the UID and PGID for the mobile user’s local user record match the UID and PGID used by the Centrify agent.
Administrator’s Guide for Mac OS X 57

Using Apple’s scheme to generate UIDs and GIDs for Mac users
1 Change the UID and PGID in the local user record so that they match the IDs used by the agent:
a Open Users and Groups.
b Right-click the mobile user account.
c Choose Advanced Options, and change the UID and PGID so that they match the IDs used by the agent.
2 After changing the UIDs and PGIDs of mobile users, run the fixhome.pl script as described in “To correct file ownership by running fixhome.pl:” on page 56.
To use the Zone Provisioning Agent to enable the Apple scheme for generating UIDs and GIDs:
1 Ensure that the Zone Provisioning Agent is configured as described in the section “Configure the Zone Provisioning Agent” in the Planning and Deployment Guide.
2 Ensure that zone provisioning groups are created and configured as described in Chapter 8, “Preparing the environment for migration of existing users and groups” in the Planning and Deployment Guide.
3 Start DirectManage Access Manager.
4 In the console tree, expand the Zones node.
5 Select the top-level parent zone, right-click, then click Properties.
6 Click the Provisioning tab.
7 Click Enable auto-provisioning for group profiles.
8 Click the Find icon to search for and select the primary group (typically the Domain Users group) as the Source Group.
9 Select Generate using Apple scheme as the method for assigning a new GID to new UNIX group profiles.
This method generates group GIDs based on the Apple algorithm for generating numeric identifiers from the Active Directory group’s objectGuid. This option is only supported for hierarchical zones.
10 Select a method for assigning a new group name to new UNIX group profiles:
SamAccountName attribute generates the group name for the new UNIX group profile based on the samAccountName value.
CN attribute can be used if you verify the common name does not contain spaces or special characters. Otherwise, you should not use this option.
RFC 2307 attribute can be used if you have added the RFC 2307 groupName attribute to Active Directory group principals. Otherwise, you should not use this option.
Zone default value to use the setting from the Group Defaults tab for the zone. In most cases, the default is a variable that uses the sAMAccountName attribute.
Chapter 5 • Working with Macs 58

Mapping local user accounts to Active Directory
By default, all UNIX group names are lowercase and invalid characters are replaced with underscores.
11 Click OK to save your changes.
Mapping local user accounts to Active DirectoryIn most environments, you can map local user accounts to Active Directory accounts to manage the passwords for local users using your Active Directory password policies. Although you can map local Mac OS user accounts to Active Directory accounts with the User Map group policy, Mac OS users can still log on (through the Mac login window, or remotely by using telnet or ssh) by using their local account password, so you cannot effectively use Active Directory to enforce your password policies for local Mac OS user accounts.
To enforce Active Directory password policies for Mac users, you need to delete the local user accounts to prevent those local account names and passwords from being used to log on.
There are different ways to delete local accounts that will impact how those users’ home directories are handled. To delete local user accounts on Mac computers, do one of the following:
Click Systems Preferences > Accounts, select the account and click the minus (-) sign, then click OK. Deleting the user account in this way moves local user’s home directory to /Users/Deleted Users/localuser.dmg and the user account and home directory are made inactive. If you click Delete Immediately instead of OK, the home directory will not be saved in the /Users/Deleted Users folder.
Open a Terminal window and run the following Directory Service command to delete the user’s record:dscl /Local/Default -delete /Users/userName
where userName is a local user; for example, to delete the record for cain:dscl /Local/Default -delete /Users/cain
Deleting the user account in this way leaves the user’s home directory in place. If the Active Directory user you enable for UNIX is configured with the same UID and GID as the deleted local user, the Active Directory user will assume ownership of the home directory.
Configuring auto-enrollmentCentrify uses the Microsoft Windows certificate auto-enrollment feature to make certificates available to UNIX and Mac computers. If auto-enrollment is enabled, when a UNIX or Mac computer joins a domain, certificates are requested from the Certification
Administrator’s Guide for Mac OS X 59

Configuring 802.1X wireless authentication
Authority based on particular templates, and the certificates are installed on the joined computer.
To enable auto-enrollment, you must do the following:
Enable auto-enrollment for the group policy.
Create a certificate template with auto-enrollment enabled.
For details about enabling auto-enrollment, including how to perform these procedures, see Chapter 6, “Configuring a Certificate Authority for auto-enrollment,” in the DirectSecure Administrator’s Guide.
Configuring 802.1X wireless authenticationThis section explains how to configure Active Directory and Mac to authenticate Active Directory users by using a Microsoft RADIUS server with the 802.1X PEAP (MSCHAPv2) protocol over a wireless network from a Mac computer.
On Mac OS X, 802.1X wireless authentication does not rely on Centrify Access Manager or Apple's Active Directory plugin but is configured primarily through group policies that apply to the Windows server and the Mac computers.
System configuration for 802.1X wireless authentication
The following table summarizes the environment that is needed for 802.1X wireless authentication:
Environment Components / Configuration
Windows side
Windows Server 2003 R2 Enterprise Edition Domain Controller (supports PEAP) with Internet Authentication Service (IAS) installed; on Windows server 2003, RADIUS server is part of IAS.
or
Windows Server 2008 R2 Enterprise Edition Domain Controller (supports PEAP/TLS) with Network Policy Server (NPS) installed; on Windows Server 2008, Radius server is part of NPS.
Active Directory on the Windows Server
Group Policy Management Console (GPMC), which is required to configure 802.1x group policies and deploy certificates.
Certificate Services, which is required to obtain the required certificates.
DirectControl Console 5.0.1-171 or later, or Access Manager console 5.1.x or later, which is required to set group policies that apply to Mac computer.
Chapter 5 • Working with Macs 60

Configuring 802.1X wireless authentication
Note Although it is possible to configure other RADIUS servers for 802.1X wireless authentication, or use other protocols, this document focuses on the Microsoft RADIUS server and the PEAP and TLS protocols.
The assumption of this document is that you have a RADIUS server properly configured for 802.1X wireless authentication and can now proceed to configure your Mac environment. The following is a list of how the RADUIS server must be configured to support 802.1X wireless authentication on Mac OS X. Click a link if you have questions about whether your RADIUS server is configured properly with regard to any particular item:
Internet Information Services (IIS) supports CertEnroll and CertSrv URLs
Windows public key group policies are set to trust the root certificate authority and enroll certificates automatically
A certificate template is configured to automatically enroll domain computers
A certificate template is configured to automatically enroll domain users
Of course, there are other configuration steps that are required to set up a RADIUS server, such as configuring the RADIUS client and configuring a remote access policy, however, the important consideration for Mac 802.1X authentication is that the specified certificate and private key have been created and deployed to the domain. When a Mac computer joins a Windows domain, Access Manager automatically finds certificates on the Domain Controller and adds them as trusted certificates to Keychain Access on the Mac computer.
Once you are certain that the RADIUS server is properly configured, you can configure your Mac environment; see the following section for instructions on configuring OS X 10.7 or later.
Configuring Mac OS X 10.7 or later for 802.1X wireless authentication
Mac OS X 10.7 changed the way to create and manage profiles such that configuring 802.1X wireless authentication varies significantly between 10.7 and earlier versions of OS X. This section explains how to configure a Mac OS X 10.7 or later computer for 802.1X wireless authentication.
Before configuring your Mac environment, be certain that the RADIUS server is configured as described in System configuration for 802.1X wireless authentication. This configuration includes a domain root CA certificate or RAS/IAS server certificate, as well as a private key that are required to be trusted on the Mac computer.
Mac side Centrify agent 5.0.1-171 or later to enforce group policies on the Mac computer.
Wireless access point device Supports 802.1x wireless authentication through one of these protocols:
• WPA Enterprise
• WPA2 Enterprise
• 802.1X WEP (the name can be different, for example, RADIUS)
Environment Components / Configuration
Administrator’s Guide for Mac OS X 61
Configuring 802.1X wireless authentication
However, there are no manual steps that you must perform to trust these certificates on your Mac computers. As mentioned previously, when a computer is joined to a domain, Access Manager automatically looks for certificates on the domain controller, and adds these certificates and the private key to the system Keychain on the Mac computer.
Through group policy settings you can use these certificates to create two different types of system profiles
A profile that allows users to authenticate to an 802.1X-protected ethernet network — see the next procedure: “To configure Mac OS X 10.7 or later to create an 802.1X ethernet profile” on page 62.
A profile that allows users to authenticate to an 802.1X wireless network — see the procedure: “To configure Mac OS X 10.7 or later to create an 802.1X WiFi profile” on page 63.
Notes The certificate template — as well as a certificate chain file and private key — are pushed to /var/centrify/net/certs on the Mac computer when it joins the domain. Before you configure the group policy for the Mac computer, if you want to verify that auto-enrollment is operating correctly, you can open a Terminal window on the Mac computer and run a command similar to the following to check that the certificate has been downloaded to the computer:admin$ls /var/centrify/net/certs |grep -i auto_
...
auto_TemplateName.cert
auto_TemplateName.chain
auto_TemplateName.key
You should see three auto_ files as shown in the example.
To configure Mac OS X 10.7 or later to create an 802.1X ethernet profile
1 On a Windows computer, open the Group Policy Management Editor and edit a group policy object that applies to Mac computers.
2 Expand Computer Configuration > Policies > Centrify Settings > Mac OS X Settings > 802.1X Settings, and double-click Enable Ethernet Profile.
3 Select Enable, then click Add.
4 Type the name of the auto-enrollment machine certificate that has been pushed down from the Windows domain server.
When pushed to a Mac computer, certificate names are prepended with auto_; for example:auth_Centrify-1X
Chapter 5 • Working with Macs 62

Configuring 802.1X wireless authentication
This group policy runs a script that looks for the specified certificate template in the /var/centrify/net/certs directory (which contains the certificate templates pushed down to Mac when they join the domain) and creates a WiFi profile from this certificate.
5 Click OK to save the profile information and OK again to save the policy setting.
Note This group policy will take effect at the next group policy update interval, or you can run adgpupdate in a Terminal window on the Mac computer to have the policy take effect immediately.
When the group policy takes effect, it runs a script to create an ethernet profile for the computer from the certificate template and private key downloaded from the domain controller. This policy supports the TLS protocol for certificate-based authentication. The Mac computer is now configured for access to the radius access point.
On the Mac computer you can view the profile in System Preferences.
To configure Mac OS X 10.7 or later to create an 802.1X WiFi profile
1 On a Windows computer, open the Group Policy Management Editor and edit a group policy object that applies to Mac computers.
2 Expand Computer Configuration > Policies > Centrify Settings > Mac OS X Settings > 802.1X Settings, and double-click Enable Wi-Fi Profile.
3 Select Enable, then click Add.
4 Enter the following information for the Wi-Fi profile:
Select this To do this
SSID Type the SSID for the wireless network.
Template name Type the name of the auto-enrollment machine certificate that has been pushed down from the Windows domain server. When pushed to a Mac computer, certificate names are prepended with auto_; for example:
auth_Centrify-1X
This group policy runs a script that looks for the specified certificate template in the /var/centrify/net/certs directory (which contains the certificate templates pushed down from the domain controller) and creates an ethernet profile from this certificate.
Administrator’s Guide for Mac OS X 63
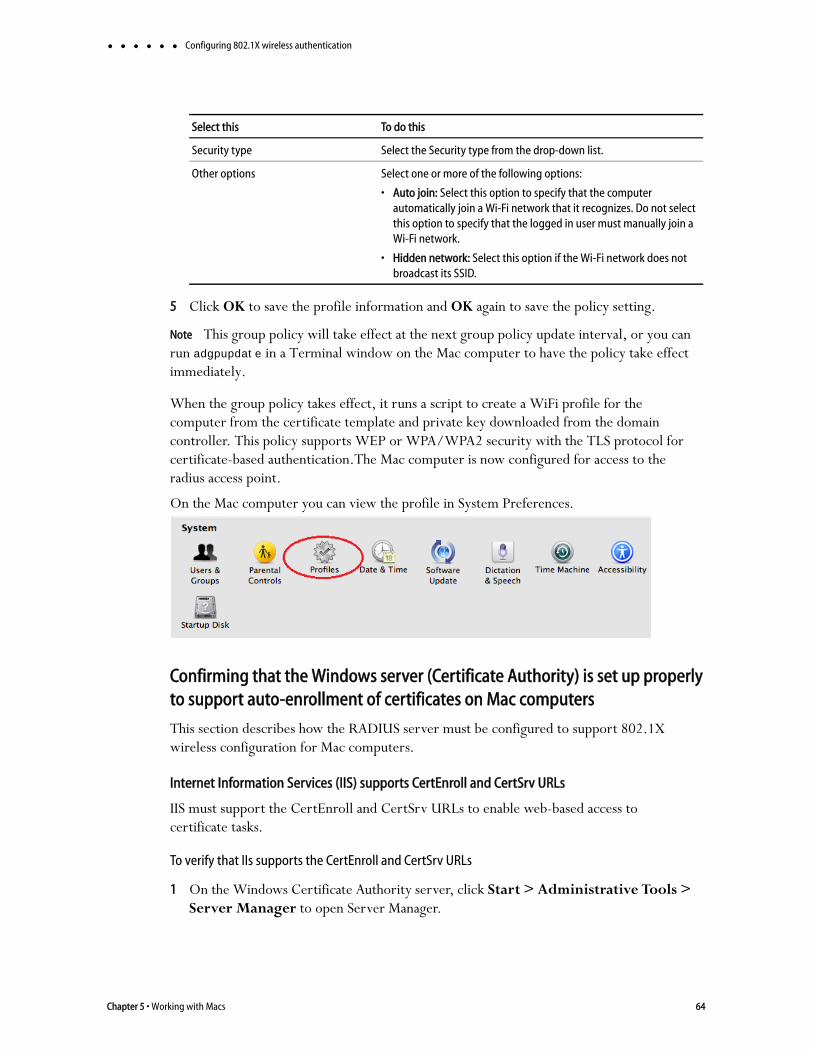
Configuring 802.1X wireless authentication
5 Click OK to save the profile information and OK again to save the policy setting.
Note This group policy will take effect at the next group policy update interval, or you can run adgpupdate in a Terminal window on the Mac computer to have the policy take effect immediately.
When the group policy takes effect, it runs a script to create a WiFi profile for the computer from the certificate template and private key downloaded from the domain controller. This policy supports WEP or WPA/WPA2 security with the TLS protocol for certificate-based authentication.The Mac computer is now configured for access to the radius access point.
On the Mac computer you can view the profile in System Preferences.
Confirming that the Windows server (Certificate Authority) is set up properly to support auto-enrollment of certificates on Mac computers
This section describes how the RADIUS server must be configured to support 802.1X wireless configuration for Mac computers.
Internet Information Services (IIS) supports CertEnroll and CertSrv URLs
IIS must support the CertEnroll and CertSrv URLs to enable web-based access to certificate tasks.
To verify that IIs supports the CertEnroll and CertSrv URLs
1 On the Windows Certificate Authority server, click Start > Administrative Tools > Server Manager to open Server Manager.
Security type Select the Security type from the drop-down list.
Other options Select one or more of the following options:
• Auto join: Select this option to specify that the computer automatically join a Wi-Fi network that it recognizes. Do not select this option to specify that the logged in user must manually join a Wi-Fi network.
• Hidden network: Select this option if the Wi-Fi network does not broadcast its SSID.
Select this To do this
Chapter 5 • Working with Macs 64
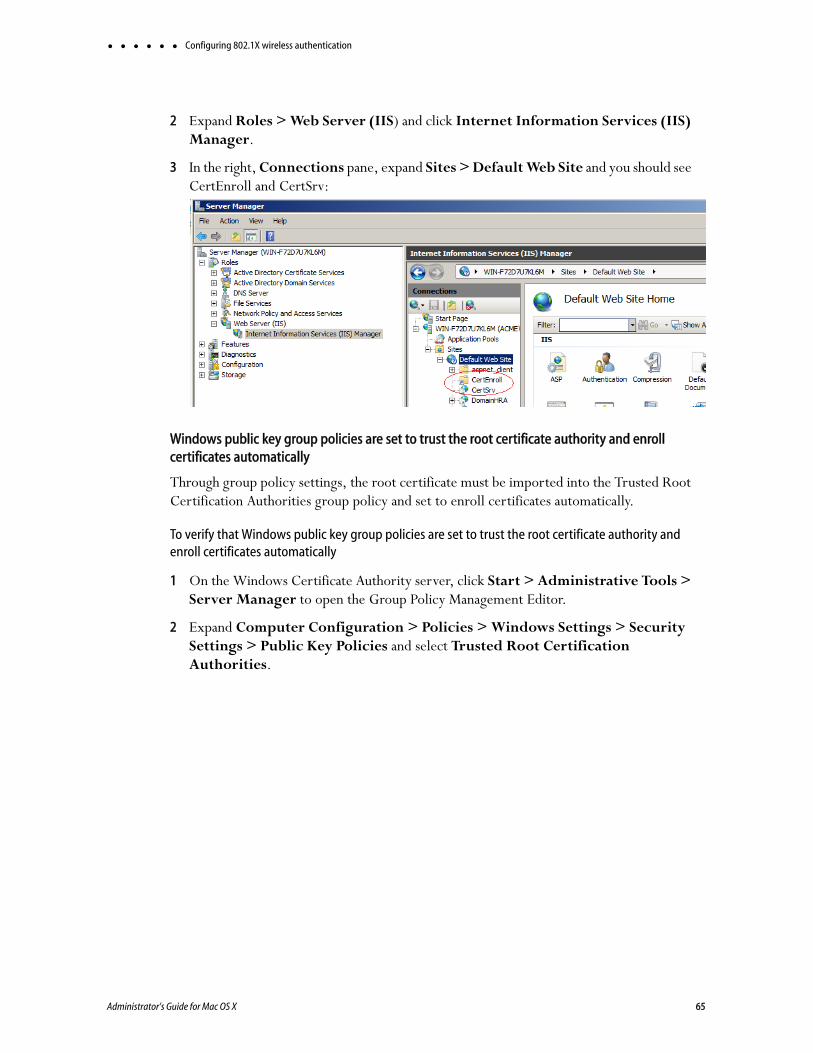
Configuring 802.1X wireless authentication
2 Expand Roles > Web Server (IIS) and click Internet Information Services (IIS) Manager.
3 In the right, Connections pane, expand Sites > Default Web Site and you should see CertEnroll and CertSrv:
Windows public key group policies are set to trust the root certificate authority and enroll certificates automatically
Through group policy settings, the root certificate must be imported into the Trusted Root Certification Authorities group policy and set to enroll certificates automatically.
To verify that Windows public key group policies are set to trust the root certificate authority and enroll certificates automatically
1 On the Windows Certificate Authority server, click Start > Administrative Tools > Server Manager to open the Group Policy Management Editor.
2 Expand Computer Configuration > Policies > Windows Settings > Security Settings > Public Key Policies and select Trusted Root Certification Authorities.
Administrator’s Guide for Mac OS X 65

Configuring 802.1X wireless authentication
You should see your root certificate:
3 Expand Computer Configuration > Policies > Windows Settings > Security Settings > Public Key Policies and double-click Certificate Services Client - Auto-Enrollment.
4 In Configuration Model select Enabled.
5 Select both boxes, Renew expired certificates and Update certificates that use certificate templates.
6 Click OK to save the policy.
A certificate template is configured to automatically enroll domain computers
To automatically enroll domain computers, you must have a certificate template that supports auto-enrollment for domain computers.
To configure a certificate template to automatically enroll domain computers
1 On the Windows Certificate Authority server, open an mmc console that contains the Certification Authority and Certificates snap-ins (Start > Run > mmc.exe).
2 If snap-ins for Certificate Templates, Certificates, and Certifications Authority are not displayed under Console Root in the navigation pane, add them now. To do so, click File > Add/Remove Snap-in.
a Select Certificate Templates and click Add.
b Click Certificates and click Add.
c Select Computer Account and click Next.
Chapter 5 • Working with Macs 66

Configuring 802.1X wireless authentication
d Select Local computer and click Finish.
e Select Certification Authority and click Add.
f Select Local computer and click Finish.
g Click OK
3 Select Certificate Templates (domainController) in the navigation pane.
4 In Certificate Templates, duplicate the Workstation Authentication certificate. Right-click Workstation Authentication and select All Tasks > Duplicate Template.
5 Perform the following steps in the Properties of New Template dialog:
a In the General tab, type a template name of your choice (for example, Mac Auto-Enroll Certificates) in the Template name field (do not use special characters such as brackets and asterisks). Type the same name in the Template display name field so that the template displays by that name in the Certificate Templates list.
b In the Extensions tab, select Application Policies > Edit. In the resulting dialog, select Add > Server Authentication and click OK.
c In the Extensions tab, verify the Client Authentication is already in the application policy list. If it is not, add it in the same way that you added the Server Authentication policy.
d In the Subject Name tab, select Build from this Active Directory information. In the Subject name format field, select Common name.
Administrator’s Guide for Mac OS X 67
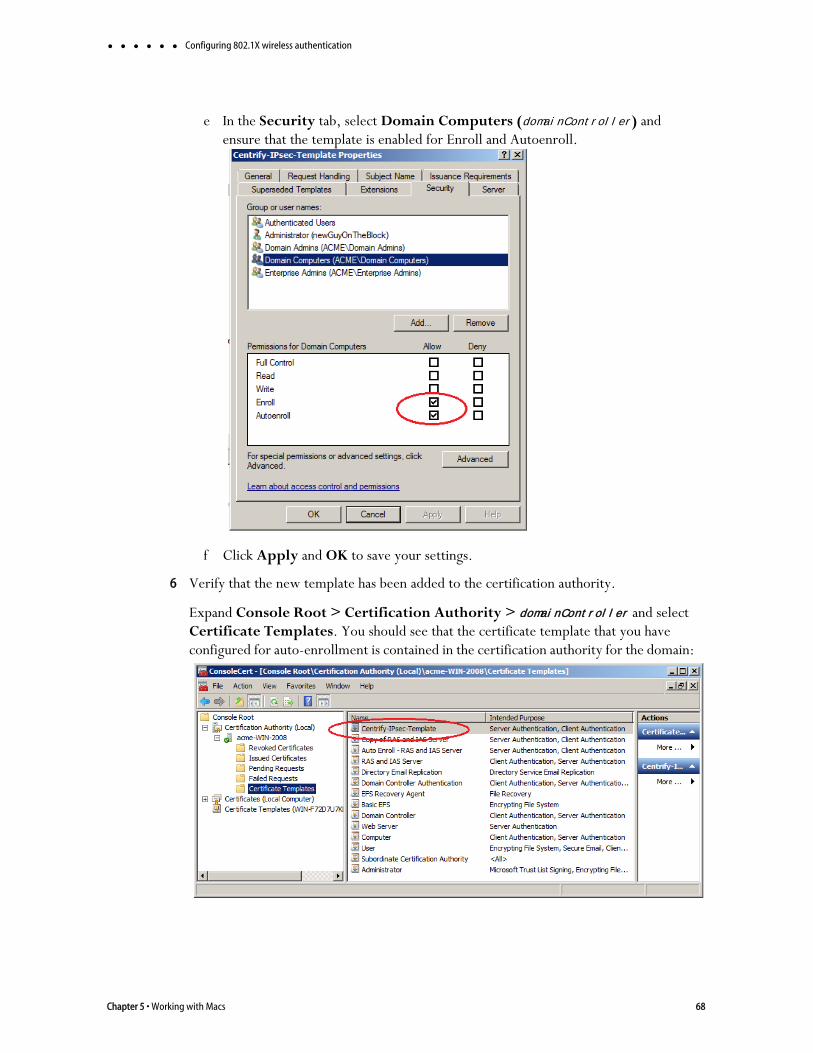
Configuring 802.1X wireless authentication
e In the Security tab, select Domain Computers (domainController) and ensure that the template is enabled for Enroll and Autoenroll.
f Click Apply and OK to save your settings.
6 Verify that the new template has been added to the certification authority.
Expand Console Root > Certification Authority > domainController and select Certificate Templates. You should see that the certificate template that you have configured for auto-enrollment is contained in the certification authority for the domain:
Chapter 5 • Working with Macs 68
Configuring 802.1X wireless authentication
If the new certificate template is not contained in the certification authority, add it now:
a In the navigation pane, right-click Certification Templates under Console Root > Certification Authority > domainController.
b Select New > Certificate Template to Issue.
c Scroll to the newly created template, select it, and click OK.
7 Enable the following group policy:
On Windows 2003: Computer configuration > Policies > Windows Settings > Security Settings > Public Key Policies > Autoenrollment Settings.
On Windows 2008: Computer configuration > Policies > Windows Settings > Security Settings > Public Key Policies > Certificate Services Client - Auto-Enrollment Settings.
Note To enable a group policy, open the Group Policy Management console by selecting Start > Administrative Tools > Group Policy Management. In the Group Policy Management console navigation pane, expand Group Policy Management > ForestName > Domains > DomainName > Group Policy Objects. Right-click Default Domain Policy and select Edit. In the resulting Group Policy Management Editor, navigate to the group policy described above and double-click the group policy. In the resulting dialog, select Enabled in the Configuration Model field.
8 On the Mac computer, download the certificates by executing the following commands in a terminal window:sudo adflush
adgpupdate
9 Verify that the certificates were downloaded:
a On the Mac computer, open Keychain Access and verify that the certificates are there.
b On the Mac computer, verify that the certificates are in /var/centrify/net/certs.
c On the Windows Certificate Authority server, open the Certification Authority console (Start > Run > certsrv.msc) and verify that the certificates are in the Issued Certificates folder.
A certificate template is configured to automatically enroll domain users
To automatically enroll domain users, you must have a certificate template that supports auto-enrollment for domain users.
To configure a certificate template to automatically enroll domain users
1 On the Windows Certificate Authority server, open an mmc console that contains the Certification Authority and Certificates snap-ins (Start > Run > mmc.exe).
Administrator’s Guide for Mac OS X 69

Configuring 802.1X wireless authentication
2 Verify that the snap-ins described in Step 2 on page 66 are present under Console Root in the navigation pane. If they are not, add them now as described in Step 2 on page 66.
3 Select Certificate Templates (domainController) in the navigation pane.
4 In Certificate Templates, duplicate the User certificate. Right-click User and select All Tasks > Duplicate Template.
5 Perform the following steps in the Properties of New Template dialog:
a In the General tab, type a template name in the Template name field. Type the same name in the Template display name field so that the template displays by that name in the Certificate Templates list. For Centrify DirectControl for Mac, you can specify a name of your choice (do not use special characters such as brackets and asterisks). For Centrify for Mobile, the template name must be User-ClientAuth.
b In the Security tab, select Domain Users (domainController) and ensure that the template is enabled for Enroll and Autoenroll.
c Optionally, in the Subject Name tab, select Build from this Active Directory information. De-select the Include email in subject name and E-mail name check boxes. If you perform this step, Active Directory users do not need an email address.
6 Verify that the new template has been added to the certification authority as described in Step 6 on page 68. If the new certificate template is not contained in the certification authority, add it now as described in Step 6 on page 68.
7 Enable the following group policy:
On Windows 2003: Computer configuration > Windows Settings > Security Settings > Public Key Policies > Autoenrollment Settings.
On Windows 2008: Computer configuration > Windows Settings > Security Settings > Public Key Policies > Certificate Services Client - Auto-Enrollment Settings.
Note See Step 7 on page 69 for details about how to enable the group policy.
8 On the Mac computer, download the certificates by executing the following commands in a terminal window.
As the local Administrator:sudo adflush
As an Active Directory user:adgpupdate
9 Verify that the certificates were downloaded:
a On the Mac computer, open Keychain Access and verify that the certificates are in the Login keychain.
Chapter 5 • Working with Macs 70
Configuring single sign-on for SSH and Screen Sharing
b On the Mac computer, verify that the certificates are in ~/.centrify/:ls -l ~./centrify/
Configuring single sign-on for SSH and Screen SharingOn OS X 10.10 and later, you can change configuration settings to allow single sign-on for SSH and Screen Sharing using Kerberos. Kerberos authorization for SSH and Screen Sharing allows you to establish an SSH or Screen Sharing connection to configured target machines joined to the same domain within the same single sign-on (SSO) session. In addition to authorizing SSH or Screen Sharing for the currently logged in user, you can authorize SSH or Screen Sharing for a different smart card user (for example, an admin user) by obtaining that user’s Kerberos credentials.
To configure SSH SSO
To configure Screen Sharing SSO
To obtain Kerberos credentials for a smart card user for SSH or Screen Sharing SSO
To configure SSH SSO
Note Smart card authentication for SSH sessions across different forests or domains is not supported.
1 Verify that all client and target machines are joined to the same AD domain.
See Joining an Active Directory domain for more information.
2 Enable GSSAPIAuthentication and GSSAPIDelegateCredentials in the /etc/ssh/ssh_config (/etc/ssh_config on OS X 10.10) file on both the client and target machine.GSSAPIAuthentication yesGSSAPIDelegateCredentials yes
3 Enable GSSAPIAuthentication and GSSAPIKeyExchange in the /etc/ssh/sshd_config (/etc/sshd_config on OS X 10.10) file on both the client and target machine.GSSAPIAuthentication yesGSSAPIKeyExchange yes
4 Enable adclient.krb5.autoedit on the target machine.
The easiest way to do this is enabling the DirectControl Settings > Kerberos Settings > Manage Kerberos configuration group policy.
5 Restart Centrify DC on the target machine.$ sudo /usr/local/share/centrifydc/bin/centrifydc restart
The logged in user can now open SSH connections to the target machine using a FQDN.$ ssh hostname.domainname
Administrator’s Guide for Mac OS X 71
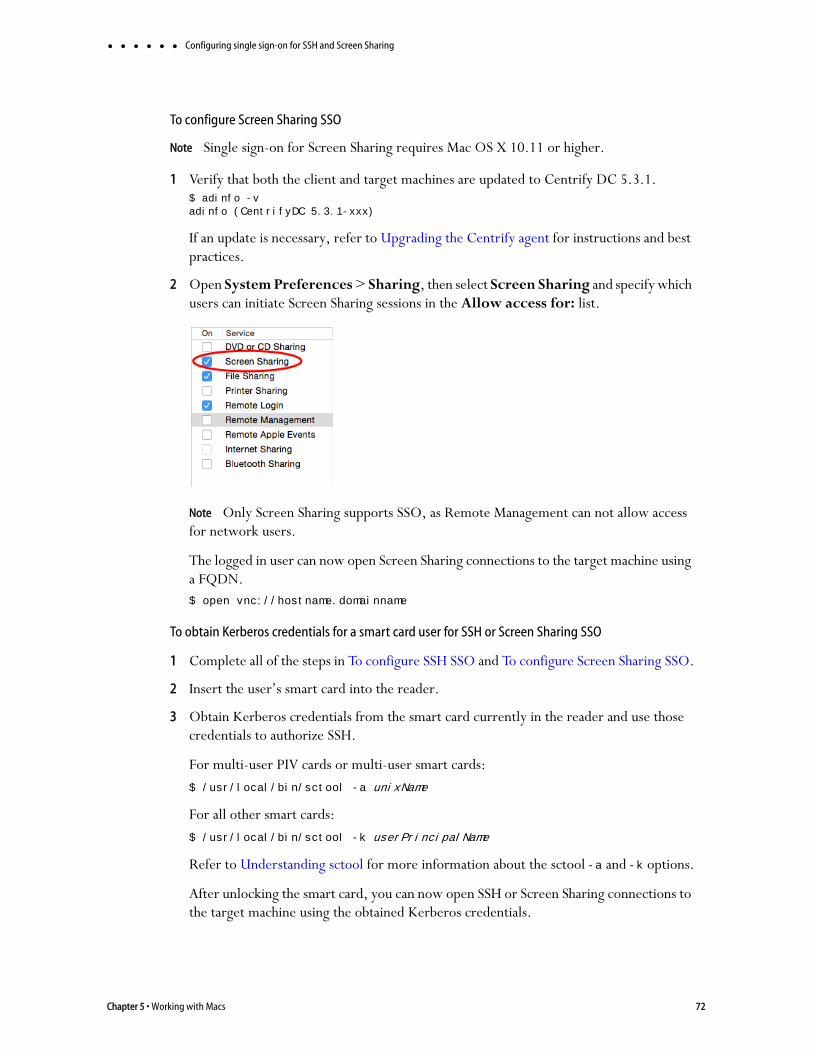
Configuring single sign-on for SSH and Screen Sharing
To configure Screen Sharing SSO
Note Single sign-on for Screen Sharing requires Mac OS X 10.11 or higher.
1 Verify that both the client and target machines are updated to Centrify DC 5.3.1.$ adinfo -vadinfo (CentrifyDC 5.3.1-xxx)
If an update is necessary, refer to Upgrading the Centrify agent for instructions and best practices.
2 Open System Preferences > Sharing, then select Screen Sharing and specify which users can initiate Screen Sharing sessions in the Allow access for: list.
Note Only Screen Sharing supports SSO, as Remote Management can not allow access for network users.
The logged in user can now open Screen Sharing connections to the target machine using a FQDN.$ open vnc://hostname.domainname
To obtain Kerberos credentials for a smart card user for SSH or Screen Sharing SSO
1 Complete all of the steps in To configure SSH SSO and To configure Screen Sharing SSO.
2 Insert the user’s smart card into the reader.
3 Obtain Kerberos credentials from the smart card currently in the reader and use those credentials to authorize SSH.
For multi-user PIV cards or multi-user smart cards:
$ /usr/local/bin/sctool -a unixName
For all other smart cards:
$ /usr/local/bin/sctool -k userPrincipalName
Refer to Understanding sctool for more information about the sctool -a and -k options.
After unlocking the smart card, you can now open SSH or Screen Sharing connections to the target machine using the obtained Kerberos credentials.
Chapter 5 • Working with Macs 72
Configuring FileVault 2
Configuring FileVault 2FileVault 2, available in OS X 10.8 and later, allows encryption of an entire drive to keep data secure. Although you can enable FileVault 2 through System Preferences on your Mac computers, using Centrify Identity Service, Mac Edition to configure FileVault 2 through group policy provides the advantage of creating an institutional recovery key for each of your Mac computers. Two different recovery key approaches—institutional and personal—guarantee that you will always have access to all of your encrypted computers, even if users forget their passwords.
For more information about FileVault 2, see the following Apple Knowledge Base article: “OS X: About FileVault 2”.
How FileVault2 protection is enabled by Centrify
Centrify relies on two features to enable FileVault 2 protection:
The "Managed By" user setting, which specifies an Active Directory user who can manage and unlock an encrypted disk. You specify the “Managed By” user in Active Directory Users and Computers on the domain controller. The "Managed By" user is associated with the Mac computer object, so it is possible for each computer to have its own "Managed By" user.
The FileVault recovery key, which can be either one “institutional” key that is applied to multiple Mac computers, or computer-specific keys which are generated individually for each Mac computer.
If you choose to use one institutional key, you first create a FileVaultMaster certificate, which is applied to Mac computers through the Enable FileVault 2 group policy. When you enable the Enable FileVault 2 group policy, the FileVaultMaster certificate is applied to Mac computers automatically at the next scheduled group policy update interval. Or, you can apply the FileVaultMaster certificate immediately by executing the adgpupdate command.
If you choose to use computer-specific keys that are unique to each Mac computer, you do not create a FileVaultMaster certificate. Instead, the key is generated automatically when the “Managed By” user logs into the Mac computer for the first time and then logs out. The key, which is the “Managed By” user’s personal key, is then stored in the computer’s computer object in Active Directory.
Note Enabling the Enable FileVault 2 group policy does not enable FileVault 2 protection on the Mac computers to which the group policy is applied. Instead, FileVault 2 protection is enabled on Mac computers as described in the remainder of this section.
The following list describes the overall process that results in FileVault 2 protection being enabled on a Mac computer.
1 The “Managed By” user is set in ADUC for one or more Mac computers.
Administrator’s Guide for Mac OS X 73
Configuring FileVault 2
2 The Enable FileVault 2 group policy is enabled.
If you select the Use Institutional Recovery Key option in the group policy, the FileVaultMaster certificate is applied to Mac computers. In this situation, all of the Mac computers to which the group policy was applied use the same key.
If you did not select the Use Institutional Recovery Key option in the group policy, a recovery key is not generated until the “Managed By” user logs into a Mac computer.
3 A user logs into a Mac computer. If FileVault 2 protection is not already enabled on the computer, the user’s Active Directory credentials are checked to verify that the user is the “Managed By” user. For this step to complete successfully, one of the following conditions must exist:
The Mac computer must be able to communicate with the domain controller (that is, it must be in connected mode), or
If the Mac computer is disconnected from the domain controller, locally cached AD user credentials must be available in the Centrify cache.
4 When the user is verified to be the “Managed By” user, one of the following actions takes place:
If you selected the Use Institutional Recovery Key option in the Enable FileVault 2 group policy, the FileVaultMaster certificate data is used to enable FileVault 2 protection on the computer.
If you did not select the Use Institutional Recovery Key option in the Enable FileVault 2 group policy, a personal recovery key is created for the computer and stored in the computer object in Active Directory. The personal recovery key is used to enable FileVault2 protection on the computer.
Configuration Overview
Configuring a Mac computer for FileVault 2 protection requires configuration steps on both the Mac computer and the domain controller (or any Windows computer on which you can configure Group Policy on the domain controller). The following is a list of the major steps in the process, with links to each procedure that you must complete.
1 “Create FileVault master keychain” on page 75. The master keychain contains a private key that can be used to unlock the encrypted disk.
Note This step is required only if you are using one institutional key for multiple Mac computers. If you are using computer-specific (“personal”) keys, go to Step 4.
2 “Export certificate from FileVault master keychain and upload it to a domain server” on page 77. Uploading the certificate to a domain server allows you to select it when you enable the “FileVault 2” group policy.
Chapter 5 • Working with Macs 74

Configuring FileVault 2
Note This step is required only if you are using one institutional key for multiple Mac computers. If you are using computer-specific (“personal”) keys, go to Step 4.
3 “Enable BitLocker Recovery Password Viewer in Active Directory” on page 79.
Note This step is required only if you are using computer-specific (“personal”) keys. If you are using one institutional key for multiple Mac computers, go to Step 4.
4 “Assign an Active Directory user who is authorized to manage an encrypted disk” on page 80. FileVault 2 requires that you specify one or more “Managed By” users who can manage the encrypted disk, including the ability to lock and unlock it.
5 “Enable the Enable FileVault 2 group policy” on page 81. Enabling the “FileVault 2” group policy applies the FileVaultMaster certificate to Mac computers.
6 “Set up and verify FileVault 2 protection” on page 83. After FileVault 2 protection is enabled, the disk encryption process begins after the FileVault-authorized user logs off the computer.
Before you begin
Be aware of the following requirements and limitations when configuring FileVault 2 through Centrify group policy:
The Mac computer must be running OS X 10.9 or above.
The Mac computer must have a recovery partition — generally, this partition is created by default during Mac OS X or macOS installation.
FileVault 2 must not be enabled on the Mac computer (through the Security & Privacy System Preference). If it is already configured, configuring FileVault 2 through Centrify Identity Service, Mac Edition will have no effect.
Enabling FileVault 2 protection disables auto log on for the Mac computer.
FileVault 2 protection does not support smart card authentication at start up of the computer.
The Apple technical white paper, “Best Practices for Deploying FileVault 2” provides more information about using FileVault 2; specifically, the section “Two Factor Authentication” discusses the limitations of using FileVault 2 with alternate authentication methods such as smart cards.
Create FileVault master keychain
The procedure described in this section is required only if you are using one institutional key for multiple Mac computers. If you are using computer-specific (“personal”) keys, go to “Assign an Active Directory user who is authorized to manage an encrypted disk” on page 80.
Administrator’s Guide for Mac OS X 75
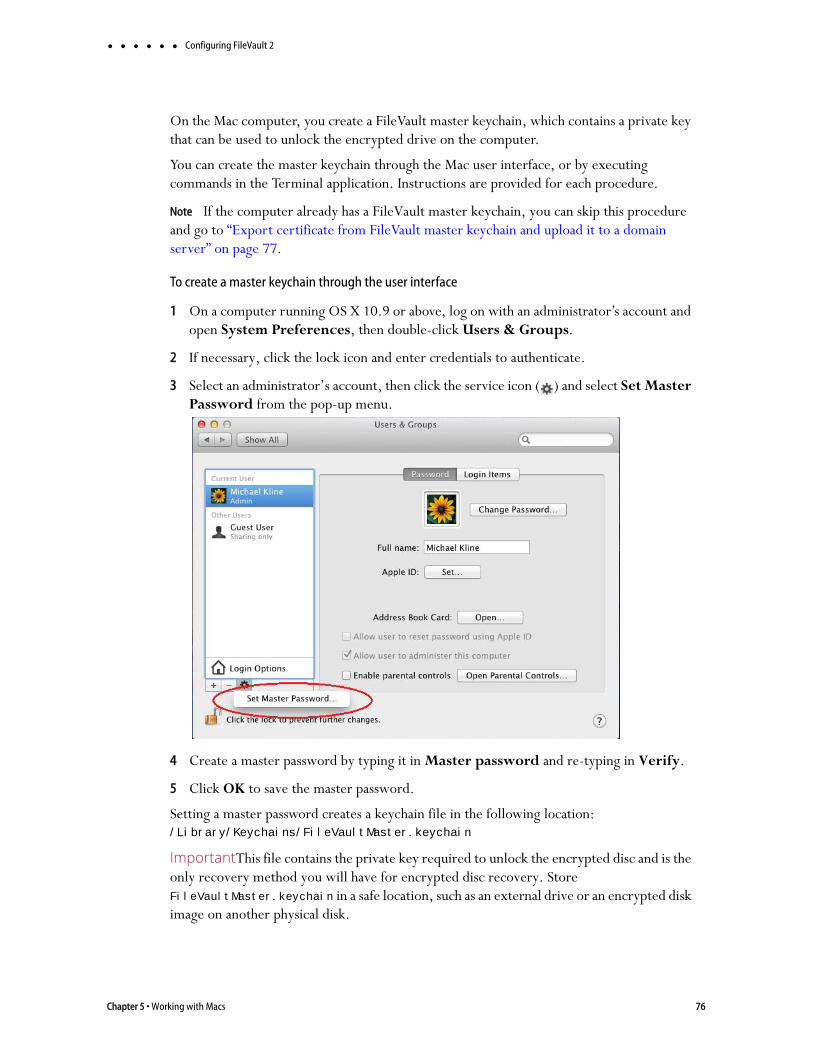
Configuring FileVault 2
On the Mac computer, you create a FileVault master keychain, which contains a private key that can be used to unlock the encrypted drive on the computer.
You can create the master keychain through the Mac user interface, or by executing commands in the Terminal application. Instructions are provided for each procedure.
Note If the computer already has a FileVault master keychain, you can skip this procedure and go to “Export certificate from FileVault master keychain and upload it to a domain server” on page 77.
To create a master keychain through the user interface
1 On a computer running OS X 10.9 or above, log on with an administrator’s account and open System Preferences, then double-click Users & Groups.
2 If necessary, click the lock icon and enter credentials to authenticate.
3 Select an administrator’s account, then click the service icon ( ) and select Set Master Password from the pop-up menu.
4 Create a master password by typing it in Master password and re-typing in Verify.
5 Click OK to save the master password.
Setting a master password creates a keychain file in the following location:/Library/Keychains/FileVaultMaster.keychain
ImportantThis file contains the private key required to unlock the encrypted disc and is the only recovery method you will have for encrypted disc recovery. Store FileVaultMaster.keychain in a safe location, such as an external drive or an encrypted disk image on another physical disk.
Chapter 5 • Working with Macs 76
Configuring FileVault 2
To create a master keychain by executing commands in the Terminal application
1 On a Mac computer, open the Terminal application.
2 Run the following command sudo security create-filevaultmaster-keychain
3 Enter the password for the root account when prompted as follows:To proceed, enter your password or type Ctrl-C to abort
4 Enter the master password to create when prompted to do so:password for new keychain
5 Retype the new master password when prompted to do so:retype password for new keychain
You will see a message that the new password is being created:Generating a 2048 bit key pair; ...
Setting a master password creates a keychain file in the following location:/Library/Keychains/FileVaultMaster.keychain
ImportantThis file contains the private key required to unlock the encrypted disc and is the only recovery method you will have for encrypted disc recovery. Store FileVaultMaster.keychain in a safe location, such as an external drive or an encrypted disk image on another physical disk.
Export certificate from FileVault master keychain and upload it to a domain server
The procedure described in this section is required only if you are using one institutional key for multiple Mac computers. If you are using computer-specific (“personal”) keys, go to “Assign an Active Directory user who is authorized to manage an encrypted disk” on page 80.
After you create a master password, as explained in the previous section, you must export the certificate associated with the master keychain to make it available for upload to the domain controller.
You can export the certificate by using the Mac user interface, or by executing commands in the Terminal application. Instructions are provided for each procedure.
To export the certificate by using the Keychain Access utility
1 On the Mac computer, open the Keychain Access utility, or double-click the FileVaultMaster.keychain file, which is at the following location:/Library/Keychains/FileVaultMaster.keychain
2 Enter you password if prompted to do so.
Administrator’s Guide for Mac OS X 77

Configuring FileVault 2
3 In Keychains, select FileVaultMaster.
4 Select the certificate, FileVault Recovery Key in the right pane and expand it; then right-click and select Export “FileVault Recovery Key”.
5 Enter the following information for saving the certificate:
Save As: Type a name for the certificate, such as “FileVaultMasterCert”.
Where: Navigate to a folder in which to save the certificate.
File Format: Select Certificate (.cer) from the scroll-down list.
The certificate is now available for upload to a domain controller.
Chapter 5 • Working with Macs 78
Configuring FileVault 2
6 Copy the certificate to a location on a server that is accessible from the computer that you use to configure Group Policy for the domain.
Later, when you enable the group policy to turn on FileVault 2 protection (see “Enable the Enable FileVault 2 group policy” on page 81), you must be able to access this certificate from the domain controller on which you are running the Group Policy Editor.
To export the certificate by using Terminal commands
1 On the Mac computer, open the Terminal utility application.
2 Run the following command: sudo security export -k /PathToKeychain -t certs -f x509 -o /PathToCert
Note The sudo command is required only if FileVaultMaster.keychain is owned by root.
where:
PathToKeychain is the path to FileVaultMaster.keychain; for example: /Library/Keychains/FileVaultMaster.keychain
PathToCert is the path to the location in which to export the certificate; for example:/Documents/FileVaultMaster.cer
The certificate is now available for upload to a domain controller.
3 Copy the certificate to a location on a server that is accessible from the computer that you are using to configure Group Policy for the domain.
Later, when you enable the group policy to turn on FileVault 2 protection (see “Enable the Enable FileVault 2 group policy” on page 81), you must be able to access this certificate from the domain controller on which you are running the Group Policy Editor.
Enable BitLocker Recovery Password Viewer in Active Directory
The procedure described in this section is required only if you are using computer-specific (“personal”) keys. If you are using one institutional key for multiple Mac computers, go to “Assign an Active Directory user who is authorized to manage an encrypted disk” on page 80.
To enable the BitLocker Recovery Password Viewer feature in Active Directory
1 On the domain controller, open Administrative Tools > Server Manager.
2 In the navigation pane, right-click Features and select Add Features.
Administrator’s Guide for Mac OS X 79

Configuring FileVault 2
3 In the Add Features wizard, expand Remote Server Administration Tools > Feature Administration Tools, select BitLocker Drive Encryption Administration Utilities, click Next, and click Install.
4 After the BitLocker Drive Encryption Administration Utilities are installed, click Close.
5 To verify that the BitLocker Drive Encryption Administration Utilities are installed:
a Open Active Directory Users and Computers.
b Navigate to domaincontroller > Domain Controllers.
c In the right-hand ADUC pane, right-click the domain controller and select Properties.
d If the BitLocker Drive Encryption Administration Utilities installed correctly, the Properties dialog contains a Bitlocker Recovery tab. On that tab, a “No items in this view” message displays. That message is normal, and does not indicate a problem with the BitLocker Drive Encryption Administration Utilities installation.
Assign an Active Directory user who is authorized to manage an encrypted disk
Before enabling FileVault 2, you must assign a user account that is able to open the disk for the Mac computer after it is encrypted by FileVault 2. This setting specifies the “Managed By” user for a computer.
Note Enabling the “FileVault2” group policy, as explained in the next section, encrypts the entire disk for the computer. The user account that you assign in the current procedure will be authorized to access the disk during boot up so that this account will be able to log on. You can later add other accounts, but for now, this is the only account that will be able to log on to this computer.
The “Managed By” user account must be an Active Directory mobile user account. See “Configuring a portable home directory” on page 22 for information about the steps you must take to create a mobile user account.
Note After you enable a user account to open an encrypted disk at start up, you cannot remove that account from the list. If you no longer want this user account to be able to unlock the disk, you can delete the account from Active Directory. Before doing so, be certain that you have at least one other account that can unlock the hard disk on this computer, otherwise you will no longer be able to access this computer.
To assign an account that can unlock the encrypted disk
1 On a domain controller, open Active Directory Users and Computers
2 Expand the domain object and navigate to the container that contains the Mac computer, for example, Computers.
3 Select the Mac computer that you plan to encrypt, right-click and select Properties.
Chapter 5 • Working with Macs 80

Configuring FileVault 2
4 Click the Managed By tab.
5 Click Change.
6 Enter the all or part of the name to search for (make certain that User is selected in Object Type) and click Check Names.
7 If the name is correct, click OK then OK again to save your changes.
Enable the Enable FileVault 2 group policy
Next, enable the “Enable FileVault 2” group policy to encrypt the disk. When you enable this group policy, you select whether to use one institutional key for multiple Mac computers, or computer-specific (“personal”) keys.
To enable the Enable FileVault 2 group policy
1 On a Windows computer, open the Group Policy Object Editor.
Administrator’s Guide for Mac OS X 81

Configuring FileVault 2
2 Select a Group Policy Object that applies to the Mac computer you are planning to encrypt, then right-click and select Edit.
3 Open Computer Configuration > Centrify Settings > Mac OS X Settings > Security & Privacy, then double-click Enable FileVault 2.
4 Click Enable.
5 Specify whether to use one institutional key for multiple Mac computers, or computer-specific (“personal”) keys:
To use one institutional key for multiple Mac computers, select Use Institutional Recovery Key. Then click Select to select the FileVault keychain certificate that you created earlier as described in “Create FileVault master keychain” on page 75. If you select this option, the FileVaultMaster certificate is distributed to all of the Mac computers to which the group policy applies. Go to Step 6 and continue from there.
To use computer-specific (“personal”) keys, leave Use Institutional Recovery Key unchecked. In this situation, a personal recovery key is created for the Mac computer and stored in the computer object in Active Directory. The key is created and sent to the computer object in Active Directory after the “Managed By” user reboots the Mac computer (or restarts the agent), logs in, logs out, and provides the user password as described in Step 1 and Step 2 on page 84. The personal recovery key is used to enable FileVault2 protection on the Mac computer. Go to Step 8 and continue from there.
6 In the Explorer dialogue, navigate to the folder in which you uploaded the certificate.
7 Select the certificate and click Open.
8 Click OK to enable the group policy.
Chapter 5 • Working with Macs 82

Configuring FileVault 2
This group policy will automatically take effect at the next group policy update interval. To have it take effect immediately, run the following command in the Terminal application on the Mac computer:adgpudate
If you selected Use Institutional Recovery Key in Step 5, the FileVaultMaster certificate name, a thumbnail, and the expiration date are displayed in the Group Policy.
Note The expiration date is not important because OS X does no revocation checking on this certificate.
The selected certificate should have the following usages: “Digital Signature”, “Key Encipherment”, “Data Encipherment” and “Key Certificate Sign”. If the certificate does not have these usages, an error message will appear:
Set up and verify FileVault 2 protection
FileVault 2 protects a Mac computer by encrypting the entire hard drive when a FileVault-authorized user (the “Managed By” user) logs out. To set up FileVault 2 for the first time, you must log on to the Mac computer as the “Managed By” user, then log out, as explained in the following procedure. After FileVault 2 is set up, only a FileVault 2-authorized user may start up the Mac computer. You may add more authorized users if you wish, or maintain a single account.
Note Although starting up the Mac computer requires a user account that is authorized to decrypt the start up disk, after the computer has started, this user account may log out to allow other user accounts to log in.
To set up FileVault 2 protection
1 Log on to the Mac computer with the “Managed By” account that you specified in “Assign an Active Directory user who is authorized to manage an encrypted disk” on page 80.
Administrator’s Guide for Mac OS X 83

Configuring FileVault 2
2 Log the “Managed By” user out of the Mac computer, and when prompted, enter the user’s password to set up FileVault 2 protection.
The system displays a message that it is enabling FileVault protection, and when finished, restarts the computer.
3 Log back on to the Mac computer with the “Managed By” account.
The log on screen will show the FileVault 2-authorized user alone, because this is the only user authorized to open the start up disk.
4 Open System Preferences, click Security & Privacy and click the FileVault tab to verify details about FileVault protection.
5 Log out the FileVault-authorized user.
The log on screen now shows all users who are authorized for the computer.
A FileVault-authorized user is always required to start up the computer because the start up disk is encrypted. However, after the computer is running, any authorized user can log on to the computer. At this point, you have specified a single authorized account. To add more FileVault-authorized users, see “Adding FileVault-authorized users” on page 85.
Confirming FileVault 2 protection on multiple computers
An administrator can verify the FileVault 2 status of multiple Mac computers that are enrolled in the Centrify identify platform.
Note Centrify Identity Service, Mac Edition allows you to both join a computer to a domain and enroll the same computer in the Centrify identify platform. To enroll a computer in the Centrify identify platform that is already joined to a domain — to take advantage of FileVault 2 reporting or for any other reason — see Chapter 10, “Managing a Mac computer that is joined to a domain and enrolled in identity platform.”
Chapter 5 • Working with Macs 84

Configuring FileVault 2
After you have enrolled one or more Mac computers in the identify platform, you can verify their FileVault 2 status by logging into the Cloud Manager administrator’s web portal. A user can see the FileVault 2 status of his or her computer by logging into the Centrify user portal.
To verify the FileVault 2 status of computers enrolled in the identify platform:
1 Log in to Cloud Manager.
2 Click the Devices tab to see a list of enrolled devices.
3 Click the name of any particular computer to see its FileVault 2 status:
Note For OS X versions 10.8 and lower, Cloud Manager shows the FileVault 2 status as ‘Unknown’.
Cloud Manager displays FileVault 2 status when the device is enrolled and updates the status at the regular device polling interval (24 hours by default). Turning on FileVault 2 (encryption) and turning it off (decryption) requires rebooting the computer to take effort. Therefore, the FileVault 2 status depends on the setting (on or off), and whether the computer has been restarted. For example, if FileVault 2 encryption is on, but the computer has not been restarted, Cloud Manager will show FileVault 2 status as ‘Disabled’. Once the computer has been restarted, even if encryption is still in progress, status will show as ‘Enabled’. Likewise for decryption; if FileVault 2 encryption is turned off, the status will show as ‘Enabled’ until the computer is restarted.
Adding FileVault-authorized users
You can assign only one user as the “Managed By” user for the computer in Active Directory. If you want to authorize additional users to manage FileVault 2 protection, you must do so on the Mac computer by performing either one of the following procedures.
To authorize FileVault 2 users by using System Preferences
1 On the Mac computer, open System Preferences > Security & Privacy.
2 Click the FileVault tab, and if necessary, unlock the padlock.
3 Click the Enable Users button and an account list pops up.
4 Click Enable Users to add and enter password of that user.
Administrator’s Guide for Mac OS X 85
Configuring FileVault 2
To authorize FileVault 2 users by using Terminal commands
1 On the Mac computer, open the Terminal application.
2 Run the following command:sudo fdesetup add -usertoadd user1
If prompted, enter the sudo password.
3 When prompted, enter the primary FileVault-authorized user name — this is the user who you specified to manage FileVault 2 (in “Assign an Active Directory user who is authorized to manage an encrypted disk” on page 80).
4 When prompted, enter the password for the primary FileVault-authorized user.
5 When prompted, enter the password for the new user who you specified on the command line (user1 in this example).
Changing FileVault 2 settings
After you enable FileVault 2, the settings that you are most likely to change at a later time are the “Managed By” user and the FileVaultMaster certificate.
To change the “Managed By” user on a Mac computer
1 Disable FileVault 2 manually on the Mac computer as described in “Disabling FileVault 2 protection” on page 87.
2 On the domain controller, change the “Managed By” user as described in “Assign an Active Directory user who is authorized to manage an encrypted disk” on page 80.
3 Ensure that the Mac computer can communicate with the domain controller (that is, it is in connected mode) so that it can fetch the new “Managed By” user information from Active Directory.
After you complete these steps, FileVault 2 protection is enabled on the Mac computer the next time the new “Managed By” user logs into the Mac computer.
To change the FileVaultMaster certificate
Note The procedure described in this section is supported only if you are using one institutional key for multiple Mac computers (that is, if you selected Use Institutional Recovery Key in Step 5 on page 82).
1 Disable FileVault 2 manually on each Mac computer that will use the new FileVaultMaster certificate. In most situations, this includes all computers to which the Enable FileVault 2 group policy is applied.
2 Specify a new FileVaultMaster certificate in the Enable FileVault 2 group policy as described in “Enable the Enable FileVault 2 group policy” on page 81.
Chapter 5 • Working with Macs 86

Configuring FileVault 2
3 Execute the adgpupdate command to have the Enable FileVault 2 group policy implement the new FileVaultMaster certificate on the Mac computers.
If you do not execute adgpupdate, the old FileVaultMaster certificate is used until the next scheduled group policy update interval.
After you complete these steps:
All of the Mac computers on which you disabled FileVault 2 (in Step 1) will use the new FileVaultMaster certificate the next time the “Managed By” user logs in.
FileVault 2 protection is enabled on a Mac computer the next time the “Managed By” user logs into that Mac computer.
Disabling FileVault 2 protection
The only way to disable FileVault 2 protection is manually on the Mac computer. You cannot disable it by disabling the Enable FileVault 2 group policy.
You can disable FileVault 2 protection through the Security & Privacy System Preference, or by issuing commands in the Terminal application — view one or the other of the two sets of instructions that follow.
To disable FileVault 2 protection by using Security & Privacy preferences
1 On the Mac computer, open System Preferences > Security & Privacy and click the FileVault tab.
2 Click the padlock and enter authentication information to unlock System Preferences.
3 Click Turn Off FileVault.
4 Click the padlock to secure the changes.
5 Restart the Mac computer.
The disk is no longer encrypted and all authorized users, not just FileVault-authorized users, should be visible on the log on screen.
To disable FileVault 2 protection by issuing Terminal commands
1 On the Mac computer, open the Terminal application.
2 Enter the following command:sudo fdesetup disable
3 Enter the root password when prompted.
4 Enter the password for the user account that is authorized to lock or unlock the disk.
This is the password for the user who you assigned in Active Directory to manage the Mac OS X computer.
5 Restart the Mac computer.
Administrator’s Guide for Mac OS X 87
Configuring FileVault 2
The disk is no longer encrypted and all authorized users, not just FileVault-authorized users, should be visible on the log on screen.
What happens if the FileVault-authorized user’s password is reset?
If the password is reset while the computer is off or not connected to the domain, the password will not be immediately updated so the user must first log in with the old password, then back in with the new password.
For example, follow these steps for a sample set up such as the following
The Mac computer is turned off.
FileVault 2 is enabled.
user1 is the primary FileVault 2 authorized user.
1 An administrator changes the user1 password in Active Directory Users and Computers (through Reset Password), and informs user1 of the change.
2 You start up the computer, log on as user1, and enter the new password, which fails.
3 Enter the old password, which works.
4 Restart the computer, log on and enter the new password, which should be successful.
Restoring the FileVault user list after adflush
In Server Suite 2015, if your FileVault 2 user list contains mobile users from another forest with one-way trust (that is, cross-forest mobile users), it is possible that those users will be removed from the FileVault 2 user list after you execute adflush or adflush -f.
After you upgrade to release 2015.1 or later, perform the following steps to ensure that cross-forest mobile users are added to the FileVault 2 user list permanently:
1 In your Server Suite 2015.1 or later environment, execute the following command:adflush -f
Executing this command removes the 2015-format, temporary GUID from cross-forest mobile users.
2 Execute the following command for each cross-forest mobile user that you want to add permanently to the FileVault 2 user list:adquery user -guid cross-forest-mobile-user-name
Executing this command assigns a new, permanent GUID to each user that you specify.
3 Execute the following command for each cross-forest mobile user that you want to add to the FileVault 2 user list:fdesetup add -usertoadd cross-forest-mobile-user-name
Executing this command adds the specified user to the FileVault 2 user list.
Chapter 5 • Working with Macs 88

Deploy configuration profiles to multiple computers
4 Execute the following command to verify that the users are added to the FileVault 2 user list:fdesetup list
How to recover an encrypted disk
If a user forgets the password for their encrypted disk, you can unlock the disk for them using the institutional recovery key that you created. See the following two Web articles for information:
Apple Support: “OS X: How to create and deploy a recovery key for FileVault 2”.
Note that you have already created the recovery key — you only need to read the information in the “Recovery” section.
“Unlock or decrypt your FileVault 2-encrypted boot drive from the command line”
Deploy configuration profiles to multiple computers This section explains how to deploy mobile configuration profiles to multiple computers by using a group policy setting (Install mobileconfig Profiles).
Note You can create mobile configuration profiles in a number of ways, for example by using the iPhone Config utility or OS X Server Profile Manager. This document assumes that you have already created a profile that you want to deploy, but does not show you how to do so.
You can deploy either computer or user profiles. For computer profiles, this feature requires OS X 10.7 or higher. For user profiles, this feature requires OS X 10.9 and higher.
The process for deploying a mobile configuration profile is as follows:
1 Create the mobile configuration profile.
2 Create a subdirectory in SYSVOL on the domain controller and copy the mobile configuration profile file to this directory. SYSVOL is a well-known shared directory on the domain controller that stores server copies of public files that must be shared throughout the domain.
3 Enable the “Install mobileconfig Profiles” group policy and specify the name of the file that you copied to SYSVOL.
4 The mapper script for the group policy runs on each Mac computer controlled by the GPO (when a user logs in or runs adupdate), downloads the profiles from the Active Directory server, and installs them in the Profiles system preference.
To create a subdirectory in SYSVOL.
1 Log in to the domain controller.
Administrator’s Guide for Mac OS X 89

Deploy configuration profiles to multiple computers
2 Change to the SYSVOL directory.
For example, go to this directory:C:\Windows\SYSVOL\domain
3 Create a new folder named mobileconfig.
Note Be certain that the name of the folder is exactly as shown in the step above. The group policy setting allows you to specify the name of the file but the location in which it looks is always SYSVOL\mobileconfig. Likewise, do not create sub-folders — the group policy does not look in sub-folders.
To copy configuration files to SYSVOL on the domain controller:
1 In the Finder on the Mac computer navigate to the folder that contains the profile to copy.
2 Select the file, for example, settings_for_all.mobileconfig and copy it to the desktop. When prompted, enter your administrator password to copy the file.
3 On the desktop, change the file permissions for settings_for_all.mobileconfig as follows, so you can copy it to SYSVOL:
a Select the file and click File > Get Info.
b In the dialog box, expand Sharing & Permissions, then click the lock icon and provide administrator credentials for making changes. Set the permissions for everyone to Read only.
c Reset the lock and close the open dialog.
4 On the Mac computer, copy the file from the desktop to SYSVOL on the Windows domain controller. If you are connected to the domain, you should see the domain controller in the Finder. If the domain controller is not visible in the Finder, connect to it:
a Click Go > Connect to Server and select the domain controller.
b When prompted select SYSVOL; for example:
c Navigate to the mobileconfig directory you created, for example by clicking acme.com then mobileconfig.
d Drag the settings_for_all.mobileconfig file to mobileconfig.
Chapter 5 • Working with Macs 90

Deploy configuration profiles to multiple computers
To configure the “Install MobileConfig Profiles” group policy:
1 On the Windows domain controller, open the Group Policy Management Editor and select the GPO that is used to manage Mac computers.
2 Navigate to Computer Configuration > Policies > Mac OS X Settings > Custom Settings and double-click Install MobileConfig Profiles to install a machine profile.
To install a user profile, navigate to User Configuration > Policies > Mac OS X Settings > Custom Settings and double-click Install MobileConfig Profiles.
3 Select Enabled.
4 Click Add, then enter the name of the file that you copied to SYSVOL, for example, settings_for_all.mobileconfig.
Be certain to include the .mobileconfig suffix.
5 Click OK to add the settings_for_all.mobileconfg file.
6 Click OK to enable the policy.
This group policy will copy the settings_for_all.mobileconfg file, and install the profile, on every computer to which the GPO applies and that is joined to the domain. Note that after the profile is installed, it is deleted from the Mac computer.
7 Run the adgpupdate command on each target Mac computer to trigger an update of group policies and execute the new Install MobileConfig Profiles policy settings.
By default, group policies are updated automatically every 90 minutes, so you can skip this step and wait for the automatic update if you wish.
Note the following about this process:
If you add a profile file to SYSVOL, but do not specify it in the group policy setting, the profile will not be installed. Likewise, if you specify a file in the group policy that does not exist in SYSVOL, the profile will not be installed.
If you add new files to the existing list in the group policy, those profiles will be installed — existing profiles will not be touched.
If you remove a file from the group policy list (after the profile for the file was installed), the profile for that file will be uninstalled from the managed Mac computers.
If you modify a file, the corresponding profile will be reinstalled.
If two or more profile files have the same payloadIdentifier attribute, only one of them will be installed.
If you change the group policy to “Disabled” or “Not Configured”, all existing profiles that were installed previously by the group policy will now be uninstalled from the managed Mac computers.
Administrator’s Guide for Mac OS X 91

Chapter 6
Understanding group policies for Mac users and computers
Centrify group policies allow administrators to extend the configuration management capabilities of Windows Group Policy Objects to managed Mac computers and to users who log on to Mac computers. This chapter provides an overview to using the Centrify Mac group policies that can be applied to Mac computers and users.
The following topics are covered.
Understanding group policies and system preferences
Installing Mac group policies
Setting Mac group policies
Applying standard Windows policies to Mac OS X
Configuring Mac OS X-specific parameters
For reference information about the Mac OS X-specific computer and user policies that you can set, see the following topics.
Understanding group policies for Mac users and computers
Setting user-based policies
For additional information about creating and using group policies and Group Policy Objects, see your Windows or Active Directory documentation, such as https://technet.microsoft.com/en-us/windowsserver/bb310732.aspx.
For information about other Centrify group policies that are not specific to Mac computers and users, see the Group Policy Guide.
Understanding group policies and system preferencesIn many organizations, administrators who have both Windows and Mac computers in their organization want to manage settings for their Windows and Macintosh computers and users using a standard set of tools. In a Windows environment, the standard method for managing computer and user configuration settings is through Group Policy Objects applied to the appropriate site, domain, or organizational unit (OU) for different sets of computer and user accounts.
Centrify provides this capability for Mac computers and users through a group policy extension. The Centrify administrative template for Mac OS X (centrify_mac_settings.xml or centrify_mac_settings.adm) provides group policies that can be applied from a Windows server to control Mac OS X settings and behavior.
92
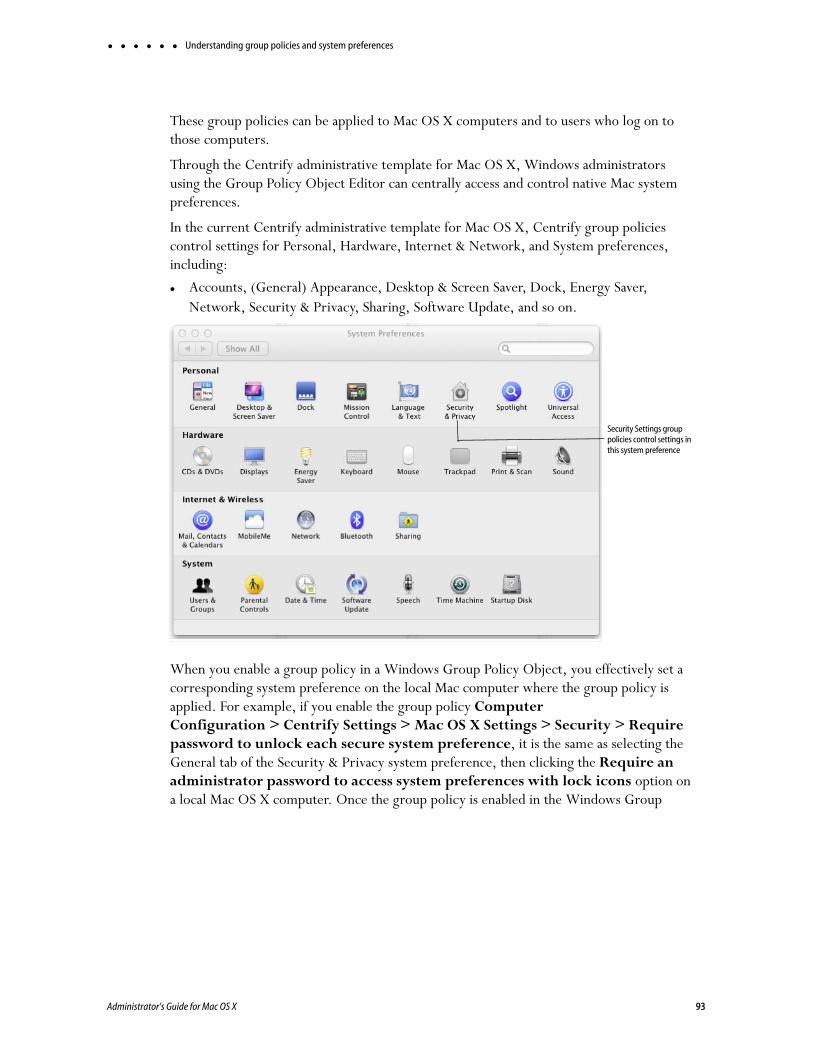
Understanding group policies and system preferences
These group policies can be applied to Mac OS X computers and to users who log on to those computers.
Through the Centrify administrative template for Mac OS X, Windows administrators using the Group Policy Object Editor can centrally access and control native Mac system preferences.
In the current Centrify administrative template for Mac OS X, Centrify group policies control settings for Personal, Hardware, Internet & Network, and System preferences, including:
Accounts, (General) Appearance, Desktop & Screen Saver, Dock, Energy Saver, Network, Security & Privacy, Sharing, Software Update, and so on.
When you enable a group policy in a Windows Group Policy Object, you effectively set a corresponding system preference on the local Mac computer where the group policy is applied. For example, if you enable the group policy Computer Configuration > Centrify Settings > Mac OS X Settings > Security > Require password to unlock each secure system preference, it is the same as selecting the General tab of the Security & Privacy system preference, then clicking the Require an administrator password to access system preferences with lock icons option on a local Mac OS X computer. Once the group policy is enabled in the Windows Group
Security Settings group policies control settings in this system preference
Administrator’s Guide for Mac OS X 93
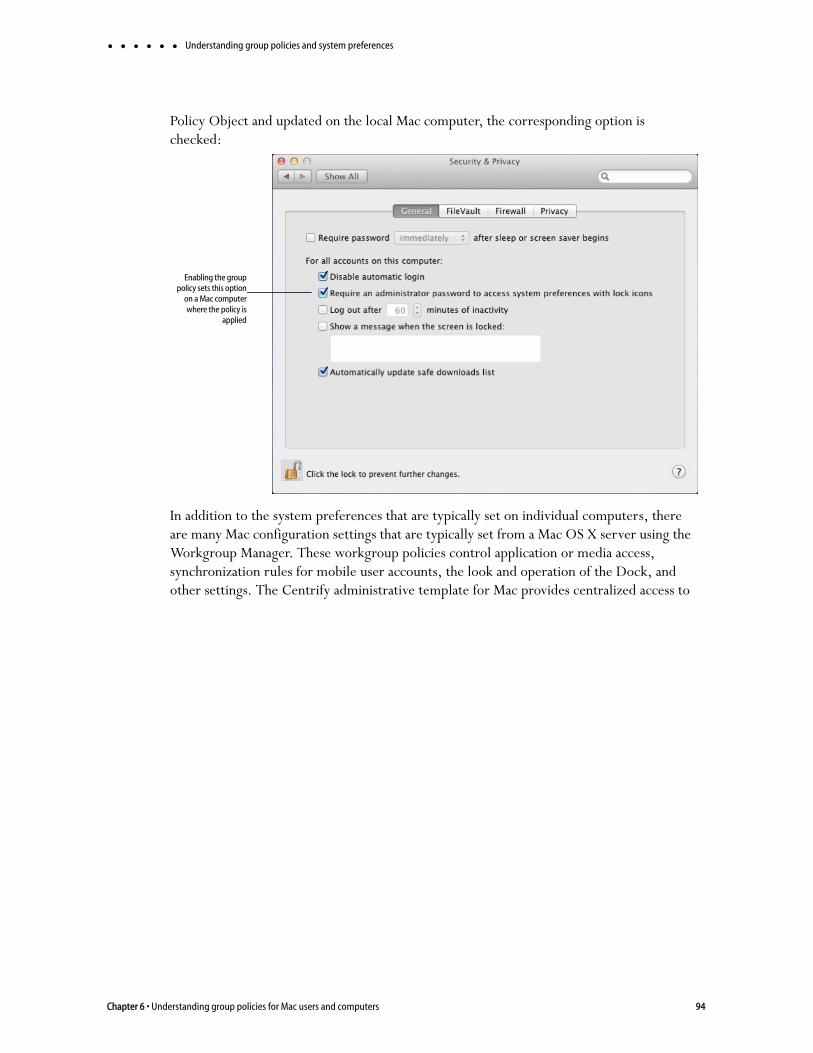
Understanding group policies and system preferences
Policy Object and updated on the local Mac computer, the corresponding option is checked:
In addition to the system preferences that are typically set on individual computers, there are many Mac configuration settings that are typically set from a Mac OS X server using the Workgroup Manager. These workgroup policies control application or media access, synchronization rules for mobile user accounts, the look and operation of the Dock, and other settings. The Centrify administrative template for Mac provides centralized access to
Enabling the grouppolicy sets this option
on a Mac computerwhere the policy is
applied
Chapter 6 • Understanding group policies for Mac users and computers 94

Understanding group policies and system preferences
many of these Workgroup Manager settings, including Applications, Dock, Media Access, Mobility, Software Update. and System Preferences
Note Not all group policies apply to all versions of the Mac operating environment or all computer models. If a particular system preference does not exist, is not applicable to the installed operating system, or is implemented differently on some computers, the group policy setting may be ignored or overridden by a local setting.
Group policies are available after you install the Centrify administrative template for Mac as described in “Installing the administrative template” on page 96. After you install the administrative template, the Windows administrator can use Active Directory MMC snap-ins or the Group Policy Management Console to create and link Group Policy Objects to sites, domains, or organizational units that include Mac computers that are joined to an Active Directory domain. Administrators can then use the Group Policy Object Editor to enable and configure the specific policies they want to enforce on Mac computers that are joined to the Active Directory domain.
For more information about using Active Directory Users and Computers or the Group Policy Management Console to create and link Group Policy Objects to sites, domains, or OUs, see the Group Policy Guide. You can also refer to the Group Policy Guide for more information about how to add other Centrify administrative templates to a Group Policy Object.
Dock Settings group policies control settings in this Workgroup Manager preference
Administrator’s Guide for Mac OS X 95

Linking Group Policy Objects
Linking Group Policy ObjectsTo apply group policies to Mac computers, you can link an existing group policy object (GPO) that you are using for a Windows or UNIX computer, or create a new GPO to link to a domain or OU that contains your Mac computers and users. In general, it is recommended that you create an OU specifically for your Mac computers and link a new GPO to that OU. However, there is no problem adding the Mac group policies to an existing GPO and configuring policies for Mac computers; Mac OS X-specific policies that are applied to Windows or UNIX computers are simply ignored.
You apply GPOs to Mac users the same way; link the GPO to an OU containing the users. Group policies are only applied to users and computers in the organizational unit (OU) linked to the Group Policy object (GPO) and any of the child OUs. If your users and computers are in different OUs (which is common), Centrify recommends using user Group Policy loopback processing to make sure user policies are applied to everyone who logs on to a Mac. This is a standard Microsoft Group Policy that applies to every user to the computer. See Setting user-based policies for more information about applying user policies.
Installing Mac group policiesCentrify group policies for Mac consist of two components:
The Centrify agent for Mac and its associated configuration and system plug-in files that reside on the Mac computer. The Centrify agent and related files determine the policies that have been applied to the local computer, or to the user who is logging on, and implement the policy through system preferences or other local configuration settings. This guide assumes that you have installed the Centrify agent on your Mac computers.
An administrative template (.xml or .admx file) that describes the policy settings available to the Group Policy Object Editor. The administrative template must be installed on a Windows computer that has the Group Policy Object Editor and the Centrify Group Policy Editor Extension. The Group Policy Object Editor and the Centrify Group Policy Editor Extension must be available for you to enable and configure policies. See the Centrify Server Suite Administrator’s Guide for Linux and UNIX for more information.
Installing the administrative template
Notes Centrify provides templates in both XML and ADMX format. In most cases it is best to use the XML templates, which provide greater flexibility, such as the ability to edit settings after setting them initially, and in many cases contain validation scripts for the policies implemented in the template.
Chapter 6 • Understanding group policies for Mac users and computers 96
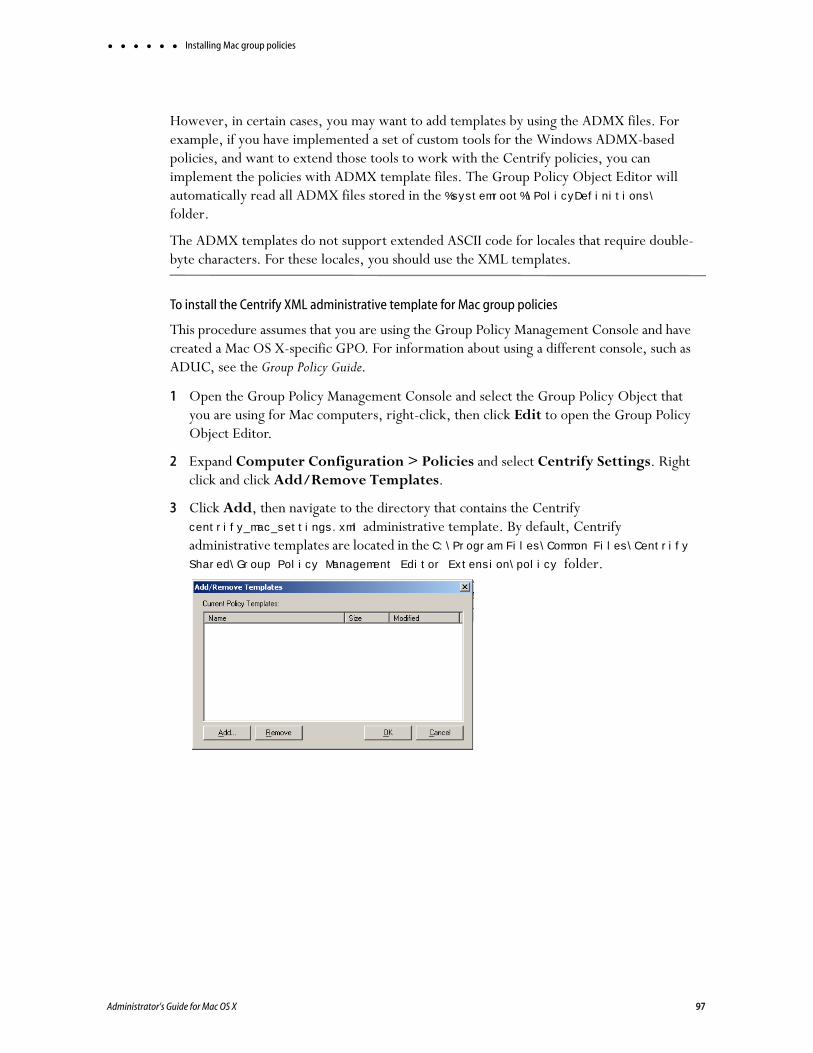
Installing Mac group policies
However, in certain cases, you may want to add templates by using the ADMX files. For example, if you have implemented a set of custom tools for the Windows ADMX-based policies, and want to extend those tools to work with the Centrify policies, you can implement the policies with ADMX template files. The Group Policy Object Editor will automatically read all ADMX files stored in the %systemroot%\PolicyDefinitions\ folder.
The ADMX templates do not support extended ASCII code for locales that require double-byte characters. For these locales, you should use the XML templates.
To install the Centrify XML administrative template for Mac group policies
This procedure assumes that you are using the Group Policy Management Console and have created a Mac OS X-specific GPO. For information about using a different console, such as ADUC, see the Group Policy Guide.
1 Open the Group Policy Management Console and select the Group Policy Object that you are using for Mac computers, right-click, then click Edit to open the Group Policy Object Editor.
2 Expand Computer Configuration > Policies and select Centrify Settings. Right click and click Add/Remove Templates.
3 Click Add, then navigate to the directory that contains the Centrify centrify_mac_settings.xml administrative template. By default, Centrify administrative templates are located in the C:\Program Files\Common Files\Centrify Shared\Group Policy Management Editor Extension\policy folder.
Administrator’s Guide for Mac OS X 97

Installing Mac group policies
4 Select the centrify_mac_settings.xml file, then click Open to add this template to the list of Policy Templates.
5 Click OK.
You should now see the categories of Mac group policies listed as Mac OS X Settings under Centrify Settings in the Group Policy Object Editor. For example:
Note If you update Centrify to a new version, new templates may be included with the installation. To make any new policies included in the templates available for use, you must reapply each template by following the steps in one of these procedures. If you see the message, The selected XML file already exists. Do you want to overwrite it?, click Yes. This action overwrites the template with any new or modified group policies. It does
Chapter 6 • Understanding group policies for Mac users and computers 98

Setting Mac group policies
not affect any configuration in the template that has been applied; that is, any policies that you have enabled remain enabled.
Setting Mac group policiesLike other group policies, policies for Mac users and computers are organized into categories within the Group Policy Object Editor under Computer Configuration > Policies > Centrify Settings > Mac OS X Settings (Setting computer-based policies) or User Configuration > Centrify Settings > Mac OS X Settings (Setting user-based policies). In general, these categories map directly to different types of Mac system preferences and individual policy settings within the categories map to specific settings within the system preference.
Normally, once enabled, policies get applied at the next group policy refresh interval, after the user logs out and logs back in, or after the computer has been rebooted. Some Mac group policies, however, require the user to log out and log back in or the computer to be rebooted. The description of each group policy indicates whether the policy can be applied “dynamically” at the next refresh interval or requires a re-login or a reboot.
You may also update group policies manually by running the adgpupdate command on an individual computer. See “Updating configuration policies manually” on page 99.
Note The system preference updated on an individual computer must be closed, then reopened for the group policy setting to be visible.
In most cases, group policies can be Enabled to activate the policy or Disabled to deactivate a previously enabled policy. Changing a policy to Not Configured has no effect for any Mac group policies. Once a group policy is set on a local computer, it remains in effect even if the computer leaves the Active Directory domain. The administrator or users with an administrative account can change settings manually at the local computer, but any manual change are overwritten when the group policy is applied.
Updating configuration policies manually
Although there are Windows group policy settings that control whether group policies should be refreshed in the background at a set interval, Centrify also provides a command line program to manually refresh group policy settings at any time. This command line program, adgpupdate, forces the adclient daemon to contact Active Directory and collect group policy settings. With the adgpupdate command, you can specify whether you want to refresh computer configuration policies, user configuration policies, or both.
When you run the adgpupdate command, the adclient daemon does the following:
Contacts Active Directory for computer configuration policies, user configuration policies, or both. By default, adclient collects both computer and user configuration policies.
Administrator’s Guide for Mac OS X 99

Applying standard Windows policies to Mac OS X
Determines all of the configuration settings that apply to the computer, the current user, or both, and retrieves those settings from the System Volume (SYSVOL).
Writes all of the configuration settings to a virtual registry on the local computer.
Starts the runmappers program to initiate the mapping of configuration settings using individual mapping programs for user and computer policies.
Resets the clock for the next refresh interval.
For more information about using the adgpupdate command, see the adgpupdate man page or “Using adgpupdate” in the Administrator’s Guide for Linux and UNIX.
Applying standard Windows policies to Mac OS XEvery Group Policy Object includes several default Windows-based group policy categories and default Windows-based administrative templates for user and computer configuration. Most of the settings in the default Windows policies and administrative templates only apply to Windows computers and Windows user accounts. However, some of the common Windows configuration settings for password enforcement, such as the policies for minimum password length and complexity, do apply to Mac computers. If these settings are enabled for a Group Policy Object applied to a site, domain, or OU that includes Mac OS X computers, the settings are enforced for Mac users and computers.
The following table describes the standard Windows group policies can be applied to Mac computers and users and where to find these policies when viewing a Group Policy Object in the Group Policy Object Editor:
To set this policy for Mac OS X Select this Windows object
• Turn off background refresh of Group Policy
• Group Policy refresh interval for computers
• User Group Policy loopback processing mode
Computer Configuration > Administrative Templates > System > Group Policy
• Global Configuration Settings - MaxPollInterval
Computer Configuration > Administrative Templates > System > Windows Time Service > Time Providers
• Enable Windows NTP Client
• Configure Windows NTP Client
Computer Configuration > Administrative Templates > System > Windows Time Service > Time Providers
• Interactive logon: Message text for users attempting to log on
• Interactive logon: Prompt user to change password before expiration
Note These policies apply to SSH login only, not to login through the graphical user interface.
Computer Configuration > Windows Settings > Security Settings > Local Policies > Security Options
Chapter 6 • Understanding group policies for Mac users and computers 100
Configuring Mac OS X-specific parameters
Synchronizing time
By default, the local Network Time Protocol (NTP) Client is enabled and synchronizes your computer’s clock to the Domain Controller. If you do not want your local NTP service to synchronize to the NTP service on the Domain Controller, explicitly disable the (Windows) Enable Windows NTP Client group policy. You can also synchronize to a different NTP server by specifying one in the Configure Windows NTP Client group policy.
To set these policies, in the Group Policy Editor, click Computer Configuration > Administrative Templates > System > Windows Time Service > Time Providers.
Configuring Mac OS X-specific parametersMost configuration parameters apply to both Mac or only to actual UNIX or Linux systems. All these parameters are described in the Configuration and Tuning Reference Guide. However, the following parameters apply only to Mac OS X and are described in this section:
adclient.autoedit.mac.netlogin
adclient.mac.map.home.to.users
adclient.network.wait.max
logger.login.log
• Enforce password history
• Maximum password age
• Minimum password age
• Minimum password length
• Password must meet complexity requirements
• Store passwords using reversible encryption
Computer Configuration > Windows Settings > Security Settings > Account Policies > Password Policy
• Group Policy refresh interval for users User Configuration > Administrative Templates > System > Group Policy
To set this policy for Mac OS X Select this Windows object
Administrator’s Guide for Mac OS X 101

Configuring Mac OS X-specific parameters
adclient.autoedit.mac.netlogin
System Preferences > Users & Groups (Accounts) has a login option: Allow network users to log in at login window:
If this option is deselected, Active Directory users will not be able to log into the computer. The configuration parameter adclient.autoedit.mac.netlogin controls whether this option can be deselected by users. By default, the parameter is true in the /etc/centrifydc/centrifydc.conf file:adclient.autoedit.mac.netlogin: true
In this case, even if a user deselects the box, the box is selected again when adclient is restarted, effectively preventing a user from deactivating network login.
If you want to allow a user to deactivate network login, set the parameter to false. If a user deselects network login in System Preferences > Accounts, the next time adclient starts, network users will be unable to log in to the computer.
adclient.mac.map.home.to.users
On some versions of Mac OS X, /home is an automount point. If a zone user’s home directory is set to /home/username, the operating system cannot create the home directory and the user cannot log in. Therefore, you should not specify /home/username as the home directory for any Mac OS X users, but since this is a typical UNIX home directory, there may be Active Directory users who have a /home/username home directory.
To avoid potential problems, you can configure Centrify to change /home/username to /Users/username (the default Mac OS X home directory), in one of two ways:
Enable the group policy, Map /home to /Users.
Set this parameter, adclient.mac.map.home.to.users to true to enable the change for the local computer only; for example:adclient.mac.map.home.to.users:true
Chapter 6 • Understanding group policies for Mac users and computers 102
Configuring Mac OS X-specific parameters
adclient.network.wait.max
The Centrify agent for Mac OS X performs network checks during startup to determine whether the device is connected to the domain. The adclient.network.wait.max parameter sets the maximum time the agent waits for the network before deciding to boot in either connected or disconnected mode. The default value is five seconds.
If DNS latency is high in your environment, the agent might determine that the device is in a Disconnected state too soon.
You can increase the value for the adclient.network.wait.max parameter if it’s appropriate for your network environment; however, this might result in increased boot times.
logger.login.log
Login events are captured in /var/log/centrifydc-login.log by default. You can turn off this feature by setting the logger.login.log parameter to off. Refer to Collecting information specific to login events for more information about /var/log/centrifydc-login.
Administrator’s Guide for Mac OS X 103

Chapter 7
Setting computer-based policies
Centrify group policies allow administrators to extend the configuration management capabilities of Windows Group Policy Objects to managed Mac computers and to users who log on to Mac computers. This chapter provides reference information for the Centrify Mac group policies that can be applied specifically to Mac computers.
The following topics are covered:
Setting computer-based policies for Mac
Allow certificates with no extended key usage certificate attribute
Map /home to /Users
802.1X Settings
Accounts
App Store
Custom Settings
EnergySaver
Firewall
Internet Sharing
Network
Remote Management
Scripts (Login/Logout)
Scripts (LaunchDaemons)
Security & Privacy
Services
Software Update Settings
The computer-based group policies are defined in the Centrify Mac administrative template (centrify_mac_settings.xml) and accessed from Computer Configuration > Policies > Centrify Settings > Mac OS X Settings. See Chapter 6, “Understanding group policies for Mac users and computers,” for general information about how Centrify uses group policies to manage Mac settings and for information on how to install the group policy administrative templates.
For reference information about user-based policies, see Chapter 8, “Setting user-based policies.”
104

For information about applying standard Windows policies to Mac OS X, see “Applying standard Windows policies to Mac OS X” on page 100 and for information about Mac OS X-specific parameters, see “Configuring Mac OS X-specific parameters” on page 101.
Note For more complete information about creating and using group policies and Group Policy Objects, see your Windows or Active Directory documentation. For more information about adding and using other Centrify group policies that are not specific to Mac computers and users, see the Group Policy Guide.
Administrator’s Guide for Mac OS X 105

Setting computer-based policies for Mac
Setting computer-based policies for MacThe following table provides a summary of the group policies you can set for Mac computers. These group policies are in the Centrify Mac administrative template (centrify_mac_settings.xml) and accessed from Computer Configuration > Policies > Centrify Settings > Mac OS X Settings.
Use this policy To do this
Allow certificates with no extended key usage certificate attribute
For smart card log in, allow the use of certificates that do not contain the extended key usage (EKU) attribute. This is a Windows policy that is defined in the Administrative Templates > Windows Components > Smart Card folder using an adm template.
Map /home to /Users Map the /home/username directory to /Users/username. This is a Mac OS X-specific policy but defined in the Direct Control Settings > Adclient Settings folder using the centrifydc_settings.xml template.
802.1X Settings Create login and system profiles for wireless authentication.
These group policies correspond to 802.1X Options in the Networks system preference.
Accounts Control the look and operation of the login window on Mac computers and map zone groups to the local administrator group.
These group policies correspond to Login Options in the Accounts system preference.
App Store Control the users and groups who can access the App Store.
These group policies correspond to settings in the Sleep and Options panes in the Energy Saver system preference.
Custom Settings Customize and install configuration profiles.
EnergySaver Control sleep and wake-up option on Mac computers.
These group policies correspond to settings in the Sleep and Options panes in the Energy Saver system preference.
Firewall Control the firewall configuration on Mac computers.
These group policies correspond to settings in the Firewall pane of the Sharing system preference.
Internet Sharing Manage Internet connections on Mac computers.
These group policies correspond to settings in the Internet pane of the Sharing system preference.
Network Control DNS searching and proxy settings.
These group policies correspond to settings in the TCP/IP and Proxies panes of the Network system preference.
Remote Management Control Apple Remote Desktop access for zone users. These group policies correspond to the Manage > Change Client Settings options in Apple Remote Desktop.
Chapter 7 • Setting computer-based policies 106

Setting computer-based policies for Mac
For information about specific policies and how to set them, see the policy description (Explain text) or the corresponding discussion of the specific system preference or individual setting in the Mac Help.
Security & Privacy Control security settings on Mac computers.
These group policies correspond to settings in the Security system preferences.
Services Control access to various services on Mac computers.
These group policies correspond to settings in the Services pane of the Sharing system preference.
Software Update Settings Control the options for automatic software updates on Mac computers.
These group policies correspond to settings in the Software Update system preference.
Use this policy To do this
Administrator’s Guide for Mac OS X 107
Allow certificates with no extended key usage certificate attribute
Allow certificates with no extended key usage certificate attributeThe group policy, “Allow certificates with no extended key usage certificate attribute” is defined in a Windows administrative template file (.adm), not in centrify_mac_settings.xml, and is in Administrative Templates, not in Mac Settings.
To enable or disable this policy, click Computer Configuration > Administrative Templates: Policy Definitions> Windows Components> Smart Card.
Enabling this policy setting allows the use of certificates for smart card login that do not have the Extended Key Usage (EKU) attribute set. Normally, certificates that are used for smart card login require this attribute with a smart card logon object identifier.
When you enable this policy, it sets the smartcard.allow.noeku parameter to true in the Centrify configuration file. Certificates with the following attributes can also be used to log on with a smart card:
Certificates with no EKU
Certificates with an All Purpose EKU
Certificates with a Client Authentication EKU
If you disable or do not configure this policy setting (and do not set the smartcard.allow.noeku parameter to true in the Centrify configuration file) only certificates that contain the smart card logon object identifier can be used with smart card log in.
After changing the value of this parameter, you must re-enable smart card support by running the following sctool command as root:[root]$ sctool -E
Note You must also specify the --altpkinit or --pkinit parameter when you run sctool with the -E option.
Chapter 7 • Setting computer-based policies 108

Map /home to /Users
Map /home to /UsersThe Mac group policy, Map /home to /Users is defined in the centrifydc_settings.xml file, not in centrify_mac_settings.xml, and is in Centrify Settings, not in Mac Settings.
To enable or disable this policy, click Computer Configuration > Centrify Settings > DirectControl Settings > Adclient Settings.
On some versions of Mac OS X, /home is an automount point. If a zone user’s home directory is set to /home/username, the operating system cannot create the home directory and the user cannot log in. Therefore, you should not specify /home/username as the home directory for any Mac users, but since this is a typical UNIX home directory, there may be Active Directory users who have a /home/username home directory. To avoid potential problems, enable this group policy, Map /home to /Users, to configure Centrify to change /home/username to /Users/username (the default Mac home directory). If you do not enable this policy, the change does not take effect.
This policy modifies the adclient.mac.map.home.to.users parameter in the Centrify configuration file.
Administrator’s Guide for Mac OS X 109
802.1X Settings
802.1X SettingsUse the Computer Configuration > Centrify Settings > Mac OS X Settings > 802.1X Settings to create profiles for wireless network authentication. The profiles you specify with these group policies are created in the Network system preferences pane.
Chapter 7 • Setting computer-based policies 110

802.1X Settings
Use this policy To do this
Enable Machine Ethernet Profile Enable this policy to create an 802.1X ethernet profile so users can authenticate to an 802.1X-protected network by using the specified machine certificate.
This policy only applies to Mac OS X 10.7 and later.
This policy supports the TLS protocol for certificate-based authentication for computers.
Before you can enable this policy, you must have a Windows server configured for 802.1X wireless authentication. The configuration includes certificate templates that are configured for auto-enrollment of domain computers and automatically downloaded to Mac computers when they join the domain. See “Configuring 802.1X wireless authentication” on page 60 for details about what you must configure before enabling the current policy.
After enabling this policy, set the following:
• Template Name: Type the name of the auto-enrollment machine certificate that has been pushed down from the Windows domain server. When pushed to a Mac computer, certificate names are prepended with auto_; for example: auth_Centrify-1X
This group policy runs a script that looks for the specified certificate template in the /var/centrify/net/certs directory (which contains the certificate templates pushed down from the domain controller) and creates an ethernet profile from this certificate.
Once enabled, this policy takes effect dynamically at the next group policy refresh interval.
Administrator’s Guide for Mac OS X 111

802.1X Settings
Enable Machine Wi-Fi Profile Enable this policy to create an 802.1X Wi-Fi profile for wireless network authentication for a computer.
This policy only applies to Mac OS X 10.7 and later.
This policy supports WEP or WPA/WPA2 security with the TLS protocol for certificate-based authentication for computers.
Before you can enable this policy, you must have a Windows server configured for 802.1X wireless authentication. The configuration includes certificate templates that are configured for auto-enrollment of domain computers and automatically downloaded to Mac computers when they join the domain. See “Configuring 802.1X wireless authentication” on page 60 for details about what you must configure before enabling the current policy.
After enabling this policy, set the following:
• SSID: Type the SSID for the wireless network.
• Template Name: Type the name of the auto-enrollment machine certificate that has been pushed down from the Windows domain server. When pushed to a Mac computer, certificate names are prepended with auto_; for example: auth_Centrify-1X
This group policy runs a script that looks for the specified certificate template in the /var/centrify/net/certs directory (which contains the certificate templates downloaded from the domain controller) and creates a WiFi profile from this certificate.
• Security Type: Select the security type from the drop-down list.
• Other options: Select one or more of the following options:
Auto join: Select this option to specify that the computer automatically join a Wi-Fi network that it recognizes. Do not select this option to specify that the logged in user must manually join a Wi-Fi network.
Hidden network: Select this option if the Wi-Fi network does not broadcast its SSID.
Once enabled, this policy takes effect dynamically at the next group policy refresh interval.
Use this policy To do this
Chapter 7 • Setting computer-based policies 112

802.1X Settings
Enable User Ethernet Profile Enable this policy to create an 802.1X ethernet profile so users can authenticate to an 802.1X-protected network by using the specified user certificate.
This policy only applies to Mac OS X 10.7 and later.
This policy supports the TLS protocol for certificate-based authentication for users.
By default, the auto-enrolled user certificates are pushed down to ~/.centrify/autouser_(name).{cert.key.chain}. Certificates are also imported into each user’s login keychain.
Before you can enable this policy, you must have a Windows server configured for 802.1X wireless authentication. The configuration includes certificate templates that are configured for auto-enrollment of domain computers and automatically downloaded to Mac computers when they join the domain. See “Configuring 802.1X wireless authentication” on page 60 for details about what you must configure before enabling the current policy.
Users must perform these steps after login to authenticate to the network as the user:
1 Select System Preferences > Network > Ethernet.
2 If there are any pre-existing 802.1X connections, click Disconnect to disconnect the pre-existing connections. For example, if a machine 802.1X ethernet policy has been set, the computer will already be authenticated using the machine credential.
3 Click Connect. This action prompts the user with a list of available user identities in certificate-key pair format.
4 Choose the appropriate auto-enrolled user identity.
Use this policy To do this
Administrator’s Guide for Mac OS X 113

802.1X Settings
Enable User Wi-Fi Profile Enable this policy to create an 802.1X Wi-Fi profile for wireless network authentication for a user.
This policy only applies to Mac OS X 10.7 and later.
This policy supports the TLS protocol for certificate-based authentication for users.
By default, the auto-enrolled user certificates are pushed down to ~/.centrify/autouser_(name).{cert.key.chain}. Certificates are also imported into each user’s login keychain.
The resulting profile is signed using the first available auto-enrolled machine certificates, which are under /var/centrify/net/certs/auto_(name).{cert.key.chain}. If an auto-enrolled machine certificate is not available, the profile will be unsigned.
Before you can enable this policy, you must have a Windows server configured for 802.1X wireless authentication. The configuration includes certificate templates that are configured for auto-enrollment of domain computers and automatically downloaded to Mac computers when they join the domain. See “Configuring 802.1X wireless authentication” on page 60 for details about what you must configure before enabling the current policy.
Users must perform these steps after login to authenticate to the network as the user:
1 Select System Preferences > Network > Wi-Fi.
2 If there are any pre-existing 802.1X connections, click Disconnect to disconnect the pre-existing connections. For example, if a machine 802.1X ethernet policy has been set, the computer will already be authenticated using the machine credential.
3 Click Connect. This action prompts the user with a list of available user identities in certificate-key pair format.
4 Choose the appropriate auto-enrolled user identity (a certificate-key pair).
Use this policy To do this
Chapter 7 • Setting computer-based policies 114

802.1X Settings
Specify Login Window Profiles This group policy is provided for backward compatibility with Mac OS X 10.6. If your environment does not contain any 10.6 computers, do not use this group policy.
Enable this policy to specify 802.1X login window profiles for wireless network authentication.
Login window profiles can establish a network connection automatically after a user enters a username and password in the login window.
To add a login window profile, enable the policy and click Add to enter the profile name and setting.
Setting must follow this format:
• Network;Security Type;Authentication
Method,username;[password] where each field is separated by a semi-colon (;).
• Network is the wireless network name
• Security type is one of 802.1X WEP, WPA Enterprise, WPA2 Enterprise
• Authentication method is one or more of the following, separated by commas: TTLS, PEAP, TLS, EAP-FAST, LEAP, MD5
• Username is the user for 802.1X authentication. It cannot contain \ or 'characters.
• Password is optional and is transferred without encryption. You can also specify the password in System Preferences on the Mac computer, but note that a password is required for a system profile to work correctly so if you do not specify a password here, you must do so in System Preferences. It cannot contain \ or ' characters.
For example:
OFFICE1;WPA Enterprise;PEAP;user
OFFICE2;802.1X WEP;TTLS,PEAP;user;passwd
• Automatically turn on Airport; to automatically turn on AirPort device if this type of profile is specified. Otherwise, the status of the AirPort device will not change.
Once enabled, this policy takes effect dynamically at the next group policy refresh interval.
Use this policy To do this
Administrator’s Guide for Mac OS X 115
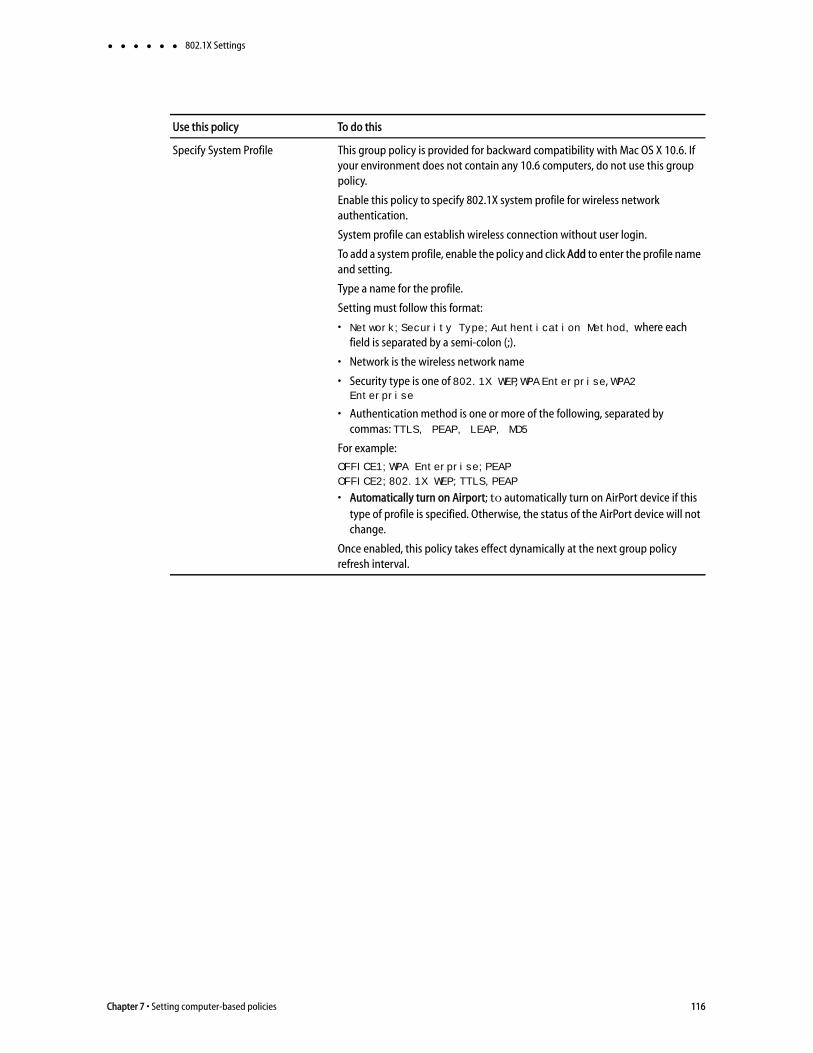
802.1X Settings
Specify System Profile This group policy is provided for backward compatibility with Mac OS X 10.6. If your environment does not contain any 10.6 computers, do not use this group policy.
Enable this policy to specify 802.1X system profile for wireless network authentication.
System profile can establish wireless connection without user login.
To add a system profile, enable the policy and click Add to enter the profile name and setting.
Type a name for the profile.
Setting must follow this format:
• Network;Security Type;Authentication Method, where each field is separated by a semi-colon (;).
• Network is the wireless network name
• Security type is one of 802.1X WEP, WPA Enterprise, WPA2 Enterprise
• Authentication method is one or more of the following, separated by commas: TTLS, PEAP, LEAP, MD5
For example:
OFFICE1;WPA Enterprise;PEAP
OFFICE2;802.1X WEP;TTLS,PEAP
• Automatically turn on Airport; to automatically turn on AirPort device if this type of profile is specified. Otherwise, the status of the AirPort device will not change.
Once enabled, this policy takes effect dynamically at the next group policy refresh interval.
Use this policy To do this
Chapter 7 • Setting computer-based policies 116

Accounts
AccountsUse the Computer Configuration > Centrify Settings > Mac OS X Settings >
Accounts settings to manage the options from the Accounts ( ) system preference on
Mac computers and to enable a group for administrative access to managed computers.
Manage login options
Use the Login window settings policy to configure login options on a computer.
Use this policy To do this
Set login window settings Configure the Login Options on a computer. If you enable this policy, you can configure the Login Window to:
• Display a text string as a login banner. The Banner you specify is displayed when the user is prompted to log on.
• Display a List of Users or a Name and Password field. Displaying the Name and Password requires users to provide their account name and password, and is more secure than displaying a list of user names.
• Show the Restart, Sleep, and Shut Down buttons.
• Show the Input menu in the login window to allow users to change the current Keyboard Layout.
• Show password hints in the login window.
• Use VoiceOver at the login window.
• Enable fast user switching.
• Display the HostName, IP Address, and OS X or macOS Version. Users need to click the clock in the top right corner to view each field.
• Disable reopening applications when logging back in. Check this to always uncheck the Reopen Windows when logging back in checkbox at logout, restart, or shutdown.
• Hide all Local Users with a UID less than 500.
Enabling the options in this group policy is the same as clicking Login Options in the Accounts system preference and setting the corresponding login window options.
Note If you click Enable Fast User Switching, this setting does not take effect until the Login Options in the Accounts system preference is opened manually by a user on the local host. This step is required to display the list of users in the upper-right corner of the menu bar. After users log on, the user's full name, short name, or icon identifier is displayed in the menu bar. If you want to change how users are displayed in the menu, you also must do so manually from the Login Options in the Accounts system preference.
Once enabled, this group policy takes effect when users log out and log back in or when the computer is rebooted.
Administrator’s Guide for Mac OS X 117

Accounts
These group policies correspond to the options displayed when you select the Accounts system preference, then click Login Options. For example:
Specify group for administrative access
Use the following group policy to specify a group whose members have administrative access to a local computer. See “Setting up local and remote administrative privileges” on page 47 for information on how to use this group policy with the Enable ARD administrator group policy to enable both local and remote administrative access for the same group of users.
Chapter 7 • Setting computer-based policies 118

Accounts
Use this policy To do this
Map zone groups to local admin group
Specify one or more zone groups to map to the admin group on the local computer. Members of the groups you specify here have administrative privileges on the local computer, including:
• The use of sudo command in a shell
• The ability to unlock and make changes to System Preferences.
Be certain to create a zone group in Access Manager (or adedit) and add users who you want to have administrative privileges on managed Mac computers.
Note If the local computer is connected to the domain through Auto Zone, you cannot create a zone group because there are no zones. However, all Active Directory groups are valid for the joined computer, so you can map any group to the local admin group, but you need to know the group’s UNIX name, which you can retrieve on the local computer, by using the adquery command, as follows [root]#adquery group -n
To set this policy:
1 Open the policy and select Enabled.
2 Click Add.
3 Enter the name of a zone group in the box (or the UNIX group name if connected through Auto Zone). Then click OK.
Map zone groups to local group Specify one or more zone groups to map to a Mac local group on the local computer. Members of the zone groups you specify here will be given the privileges of the local group on the local computer; for example,:
• If you map to the _lpadmin and _lpoperator local groups, members of the zone group can manage printer settings on the local computer.
• If you map to the admin local group, members of the zone group obtain administrator privileges on the local computer.
Note To obtain administrator privileges for a zone group, you can either map to the local admin group with this policy, or use the Map zone groups to local admin group policy. However, do not do both as the results are unpredictable.
Be certain to create a zone group in Access Manager (or adedit) and add users who you want to have administrative privileges on managed Mac computers.
Note If the local computers is connected to the domain through Auto Zone, you cannot create a zone group because there are no zones. However, all Active Directory groups are valid for the joined computer, so you can map any group to the local admin group, but you need to know the group’s UNIX name, which you can retrieve on the local computer, by using the adquery command, as follows [root]#adquery group -n
To set this policy:
1 Open the policy and select Enabled.
2 Click Add.
3 Enter the name of a local group and of a zone group in the respective boxes (or the UNIX group name if connected through Auto Zone). Then click OK. You can repeat this step multiple times to map the zone group to more than one local group.
Administrator’s Guide for Mac OS X 119
App Store
App StoreNote This policy has been deprecated and is no longer supported. Enabling it will have no effect. It is provided simply to allow you to disable the policy if it was set in an earlier version of the product. You can use the Application Access Settings group policies to control access to the App Store if you wish.
Use the Computer Configuration > Centrify Settings > Mac OS X Settings > App Store > Prohibit Access to App Store group policy to control access to the App Store.
By default, all users can access the App Store. Enable this group policy to prohibit access to App Store to all users except the root user and those you specifically authorize with the options, Allow these users to access App store, and Allow these groups to access App Store.
You can set the following options with this policy:
This policy can take effect dynamically at the next group policy refresh interval without rebooting the computer.
Use this policy To do this
Allow these users to access App Store The names of local or AD users who are allowed to access the App Store. When this policy is enabled, only users on this list and the root user are allowed to access the App Store.
Allow these groups to access App Store The names of local or AD groups that are allowed to access the App Store. When this policy is enabled, only users in the specified groups, and the root user, are allowed to access the App Store.
Chapter 7 • Setting computer-based policies 120

Custom Settings
Custom SettingsUse the Computer Configuration > Centrify Settings > Mac OS X Settings > Custom Settings group policy settings to customize and install configuration profiles. The “Install MobileConfig Profiles” policy installs a device profile. To install a user profile, use the same policy in User Configuration > Centrify Settings > Mac OS X Settings > Custom Settings.
Custom Settings includes the following two policies.
Administrator’s Guide for Mac OS X 121

Custom Settings
Chapter 7 • Setting computer-based policies 122

Custom Settings
Use this policy To do this
Enable profile custom settings Enable this group policy to use the Custom payload to specify preference settings for applications that use the standard plist format for their preference files.
You can use this GP to add specific keys and values to an existing preferences plist file. However, not all applications work with managed preferences, and in some cases only specific settings can be managed.
By default you should place the plist files with preference settings in the folder \\domain\SYSVOL\<domain>\customsettings.
To add a file, click Add and enter name of a file that you placed in the SYSVOL location. The file you specify is relative to this path:
\\domain\SYSVOL\domain\customsettingsFor example, if you enter:
com.apple.plist
the file that is imported is:
\\domain\SYSVOL\domain\customsettings\com.apple.plist
Install MobileConfig profiles Enable this group policy to install mobile configuration profiles on managed Mac computers.
Note: There is a Computer Configuration version of this policy (which installs device profiles) and a User Configuration version (which installs user profiles).
Before enabling this policy, you must create a directory and copy mobile configuration files to SYSVOL on the domain controller. SYSVOL is a well-known shared directory on the domain computer that stores server copies of public files that must be shared throughout the domain.
Specifically, create the following directory on the domain controller: \\domainName\SYSVOL\domainName\mobileconfig
and copy one or more mobile configuration profile files to this directory. See “Deploy configuration profiles to multiple computers” on page 89 for details on how to do this.
To specify mobile configuration files to install, enable the policy, then click Add. Enter the name of a mobile configuration file that you placed in SYSVOL on the domain controller. Include the .mobileconfig suffix with the name.
If you specify a file that is not in the SYSVOL mobileconfig directory, the profile will not be installed.
If you add new files to the existing list in the group policy, those profiles will be installed — existing profiles will not be touched. If you remove previously specified files, the profiles defined by these files will be uninstalled.
If you add two or more profile files that have the same payloadIdentifier, only one of them will be installed.
If you change the group policy to “Disabled” or “Not Configured”, all existing profiles that were installed previously by the group policy will now be uninstalled from the managed Mac computers.
Administrator’s Guide for Mac OS X 123

EnergySaver
EnergySaverUse the Computer Configuration > Centrify Settings > Mac OS X Settings >
EnergySaver settings to manage sleep and wake-up options from the Energy Saver ( )
system preference on Mac computers. For example:
You can configure power options or schedule startup and shutdown times.
Configuring power options
Open the appropriate folder to set power options when running on AC power or battery power. Each folder has the identical set of group policies:
On AC power
On battery power
Use this policy To do this
Allow power button to sleep the computer
Allow the power button to sleep the computer.
Enabling this group policy is the same as selecting the Allow power button to sleep the computer option in the Options pane of Energy Saver system preference.
This policy can take effect dynamically at the next group policy refresh interval.
Put the hard disk(s) to sleep when possible
Put computer hard disks to sleep when they are inactive.
Enabling this group policy is the same as selecting the Put the hard disk(s) to sleep when possible option in the Sleep pane of Energy Saver system preference.
This policy can take effect dynamically at the next group policy refresh interval.
Chapter 7 • Setting computer-based policies 124

EnergySaver
Restart automatically after a power failure
Enable to set the computer to automatically restart after a power failure.
Enabling this group policy is the same as selecting the Restart automatically after a power failure option in the Options pane of Energy Saver system preference.
This policy can take effect dynamically at the next group policy refresh interval.
Set computer sleep time Specify the number of minutes of inactivity to allow before automatically putting a computer into the sleep mode.
If you enable this group policy, the period of inactivity you specify applies only when the computer is using its power adapter. If the computer is inactive for the number of minutes you specify, it is put in sleep mode.
Enabling this group policy is the same as selecting a time using the Put the computer to sleep when it is inactive for slider in the Sleep pane of Energy Saver system preference.
To prevent the computer from ever going into sleep mode, enter 0 for the number of minutes, or disable the policy.
This policy can take effect dynamically at the next group policy refresh interval.
Set display sleep time Specify the number of minutes of inactivity to allow before automatically putting the display into the sleep mode.
If you enable this group policy, the period of inactivity you specify applies when the computer is using its power adapter. If the computer is inactive for the number of minutes you specify, the display is put in sleep mode.
Enabling this group policy is the same as selecting a time using the Put the display to sleep when it is inactive for slider in the Sleep pane of Energy Saver system preference.
To prevent the display from ever going into sleep mode, enter 0 for the number of minutes, or disable the policy.
This policy can take effect dynamically at the next group policy refresh interval.
Wake when the modem detects a ring Automatically take a computer out of sleep mode when the modem detects a ring. This group policy allows a computer that has been put to sleep to remain available to answer the modem.
This policy can take effect dynamically at the next group policy refresh interval.
Wake for Ethernet network administrator access
Automatically take a computer out of sleep mode when the computer receives a Wake-on-LAN packet from an administrator. This group policy allows a computer that has been put to sleep to remain available to network administrator access.
Enabling this group policy is the same as selecting the Wake for Ethernet network administrator access option in the Options pane of Energy Saver system preference.
This policy can take effect dynamically at the next group policy refresh interval.
Use this policy To do this
Administrator’s Guide for Mac OS X 125

EnergySaver
Scheduling startup and shutdown times
To configure sleep/shutdown times and startup times, open the Scheduled events folder (Computer Configuration Policies > Centrify Settings > Mac OS X Settings > EnergySaver > Scheduled events).
Use this policy To do this
Set machine sleep/shutdown time Specify a time to shut down or put the computer to sleep.
Enabling this group policy is the same as selecting the Schedule button in the Energy Saver system preference, then specifying times and days to shut down or put the computer to sleep.
After enabling this policy, specify values for the following:
• Action: Select sleep or shutdown
• Set machine sleep/shutdown time: Enter a time in the format HH:mm using a 24 hour clock; for example, to shut down or put the computer to sleep at 10:05 P.M.:
22:05
• Sleep/shutdown machine on every: Select the days of the week on which to shut down or sleep the computer at the specified time. All days are selected by default.
This policy can take effect dynamically at the next group policy refresh interval.
Set machine startup time Specify a time to start up the computer.
Enabling this group policy is the same as selecting the Schedule button in the Energy Saver system preference, then specifying times and days to start up the computer.
After enabling this policy, specify values for the following:
• Set machine startup time: Enter a time in the format HH:mm using a 24 hour clock; for example, to start up the computer at 7:55 A.M.:
7:55
• Start machine on every: Select the days of the week on which to start the computer at the specified time. All days are selected by default.
This policy can take effect dynamically at the next group policy refresh interval.
Chapter 7 • Setting computer-based policies 126

Firewall
FirewallUse the Computer Configuration > Centrify Settings > Mac OS X Settings > Firewall settings to manage the firewall options on Mac computers.
Enabling the Centrify firewall group policies is the same as setting options from System Preferences > Security > Firewall.
Note With the Centrify Firewall Group Policies, you can allow all incoming connections, or limit connections to the specified services and applications. You cannot block all connections:
Administrator’s Guide for Mac OS X 127
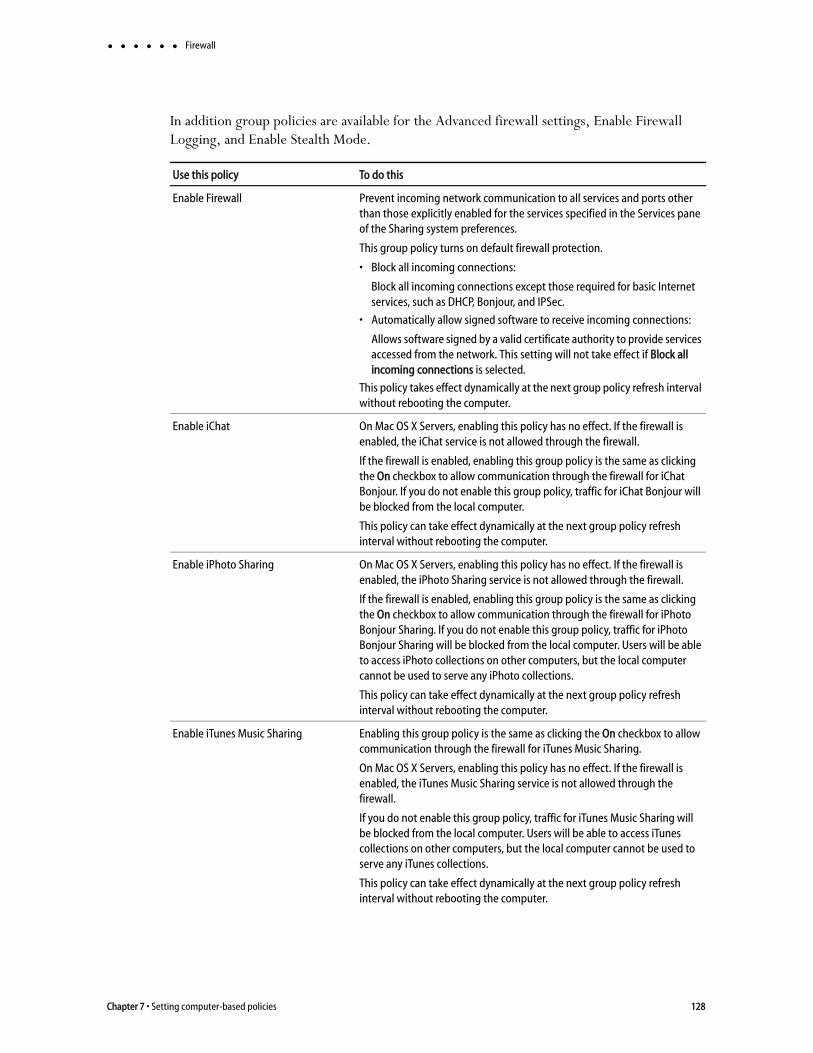
Firewall
In addition group policies are available for the Advanced firewall settings, Enable Firewall Logging, and Enable Stealth Mode.
Use this policy To do this
Enable Firewall Prevent incoming network communication to all services and ports other than those explicitly enabled for the services specified in the Services pane of the Sharing system preferences.
This group policy turns on default firewall protection.
• Block all incoming connections:
Block all incoming connections except those required for basic Internet services, such as DHCP, Bonjour, and IPSec.
• Automatically allow signed software to receive incoming connections:
Allows software signed by a valid certificate authority to provide services accessed from the network. This setting will not take effect if Block all incoming connections is selected.
This policy takes effect dynamically at the next group policy refresh interval without rebooting the computer.
Enable iChat On Mac OS X Servers, enabling this policy has no effect. If the firewall is enabled, the iChat service is not allowed through the firewall.
If the firewall is enabled, enabling this group policy is the same as clicking the On checkbox to allow communication through the firewall for iChat Bonjour. If you do not enable this group policy, traffic for iChat Bonjour will be blocked from the local computer.
This policy can take effect dynamically at the next group policy refresh interval without rebooting the computer.
Enable iPhoto Sharing On Mac OS X Servers, enabling this policy has no effect. If the firewall is enabled, the iPhoto Sharing service is not allowed through the firewall.
If the firewall is enabled, enabling this group policy is the same as clicking the On checkbox to allow communication through the firewall for iPhoto Bonjour Sharing. If you do not enable this group policy, traffic for iPhoto Bonjour Sharing will be blocked from the local computer. Users will be able to access iPhoto collections on other computers, but the local computer cannot be used to serve any iPhoto collections.
This policy can take effect dynamically at the next group policy refresh interval without rebooting the computer.
Enable iTunes Music Sharing Enabling this group policy is the same as clicking the On checkbox to allow communication through the firewall for iTunes Music Sharing.
On Mac OS X Servers, enabling this policy has no effect. If the firewall is enabled, the iTunes Music Sharing service is not allowed through the firewall.
If you do not enable this group policy, traffic for iTunes Music Sharing will be blocked from the local computer. Users will be able to access iTunes collections on other computers, but the local computer cannot be used to serve any iTunes collections.
This policy can take effect dynamically at the next group policy refresh interval without rebooting the computer.
Chapter 7 • Setting computer-based policies 128
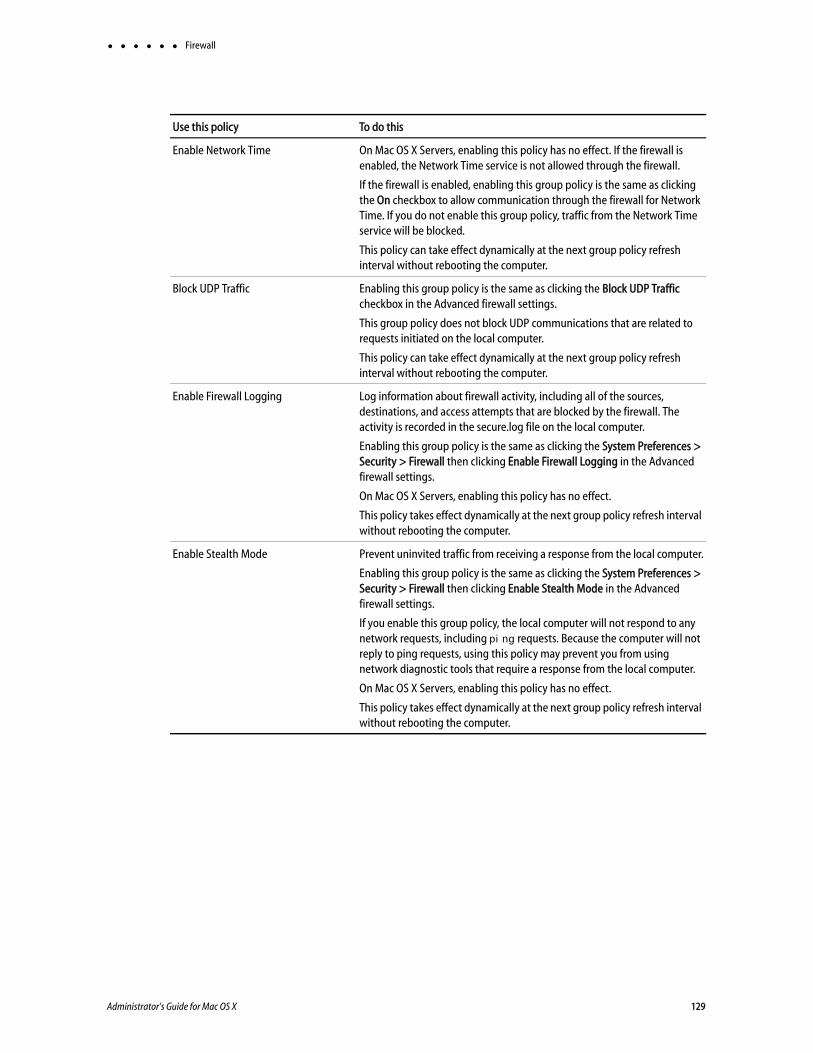
Firewall
Enable Network Time On Mac OS X Servers, enabling this policy has no effect. If the firewall is enabled, the Network Time service is not allowed through the firewall.
If the firewall is enabled, enabling this group policy is the same as clicking the On checkbox to allow communication through the firewall for Network Time. If you do not enable this group policy, traffic from the Network Time service will be blocked.
This policy can take effect dynamically at the next group policy refresh interval without rebooting the computer.
Block UDP Traffic Enabling this group policy is the same as clicking the Block UDP Traffic checkbox in the Advanced firewall settings.
This group policy does not block UDP communications that are related to requests initiated on the local computer.
This policy can take effect dynamically at the next group policy refresh interval without rebooting the computer.
Enable Firewall Logging Log information about firewall activity, including all of the sources, destinations, and access attempts that are blocked by the firewall. The activity is recorded in the secure.log file on the local computer.
Enabling this group policy is the same as clicking the System Preferences > Security > Firewall then clicking Enable Firewall Logging in the Advanced firewall settings.
On Mac OS X Servers, enabling this policy has no effect.
This policy takes effect dynamically at the next group policy refresh interval without rebooting the computer.
Enable Stealth Mode Prevent uninvited traffic from receiving a response from the local computer.
Enabling this group policy is the same as clicking the System Preferences > Security > Firewall then clicking Enable Stealth Mode in the Advanced firewall settings.
If you enable this group policy, the local computer will not respond to any network requests, including ping requests. Because the computer will not reply to ping requests, using this policy may prevent you from using network diagnostic tools that require a response from the local computer.
On Mac OS X Servers, enabling this policy has no effect.
This policy takes effect dynamically at the next group policy refresh interval without rebooting the computer.
Use this policy To do this
Administrator’s Guide for Mac OS X 129

Internet Sharing
Internet SharingUse the Computer Configuration > Policies > Centrify Settings > Mac OS X Settings >Internet Sharing group policy to prevent any kind of Internet sharing on the local computer. This group policy can only be used to prevent Internet sharing. Although this group policy corresponds to a setting on the Internet pane of the Sharing ( ) system
preference, you can not use it to start Internet sharing, configure the shared connection, or set any other options. For example:
Use this policy To do this
Disallow all Internet Sharing Prevent any kind of Internet sharing on the local computer. Enabling this group policy is the same as clicking Stop to prevent other computers from sharing an Internet connection on a local computer in the Internet pane of the Sharing system preference.
For this group policy, clicking Disabled or Not Configured has no effect. If you have previously Enabled the group policy, Internet sharing will remain off until you manually start it on the local computer.
Once enabled, this group policy takes effect when users log out and log back in, or dynamically at the next group policy refresh interval without rebooting the computer.
Chapter 7 • Setting computer-based policies 130

Network
NetworkUse the Computer Configuration > Policies > Centrify Settings > Mac OS X Settings > Network settings to manage DNS search requests and proxy settings. These group policies correspond to settings in the TCP/IP and Proxies panes of the Network ( ) system preference on Mac computers. For example:
Use this policy To do this
Legacy location settings Configure network settings for the Automatic location setting.
Location 1 and Location 2 Configure network settings for additional network locations.
Adjust multicast DNS timeout for .local domain
Configure multicast DNS timeout (in seconds) for computers in a .local domain to improve the response time of mounting a network share and network user logon.
If this policy is not configured, the default value is 1.
This policy overrides the following settings in /etc/centrifydc/centrifydc.conf on client computers.
- mac.network.autoedit.mdns_timeout
- mac.network.mdns_timeout
To prohibit Centrify DirectControl from changing the timeout value, set this policy to Disabled.
Once enabled, this policy will take effect after restarting the client computer.
Administrator’s Guide for Mac OS X 131

Network
Legacy location settings
Use Computer Configuration > Centrify Settings > Mac OS X Settings > Network > Legacy location settings to configure network settings for the Automatic network location.
Location 1 and Location 2
Use Computer Configuration > Policies > Centrify Settings > Mac OS X Settings > Network > Location 1 to configure network settings for an additional
Use this policy To do this
Adjust list of DNS servers Control the list of DNS servers when performing DNS lookups.
To use this policy, click Enabled, then click Add, type the IP address for a DNS server, then click OK to add the server to the list of DNS servers. Add as many servers as you want in this manner. When you are finished adding the servers, click OK to close the dialog box.
At any time while the policy is enabled, you can select an address in the list and click Edit to change the address, or Remove to remove it as a DNS server.
This policy can take effect dynamically at the next group policy refresh interval without rebooting the computer.
Adjust list of searched domains Control the list of domains to search when performing DNS lookups.
To use this policy, click Enabled, then click Add, type a domain name, then click OK to add the domain to the list of domains to search. Add as many domains as you want in this manner. When you are finished adding the domains to search, click OK to close the dialog box.
At any time while the policy is enabled, you can select a domain in the list and click Edit to change the name, or Remove to remove it as a domain to be searched.
This policy can take effect dynamically at the next group policy refresh interval without rebooting the computer.
Configure Proxies Configure proxy servers to provide access to services through a firewall.
Chapter 7 • Setting computer-based policies 132

Network
network location. The group policies in Location 2 are identical, and allow you to configure network settings for another network location.
Use this policy To do this
Adjust list of DNS servers Control the list of DNS servers when performing DNS lookups.
To use this policy, click Enabled, then click Add, type the IP address for a DNS server, then click OK to add the server to the list of DNS servers. Add as many servers as you want in this manner. When you are finished adding the servers, click OK to close the dialog box.
At any time while the policy is enabled, you can select an address in the list and click Edit to change the address, or Remove to remove it as a DNS server.
This policy can take effect dynamically at the next group policy refresh interval without rebooting the computer.
Adjust list of searched domains Control the list of domains to search when performing DNS lookups.
To use this policy, click Enabled, then click Add, type a domain name, then click OK to add the domain to the list of domains to search. Add as many domains as you want in this manner. When you are finished adding the domains to search, click OK to close the dialog box.
At any time while the policy is enabled, you can select a domain in the list and click Edit to change the name, or Remove to remove it as a domain to be searched.
This policy can take effect dynamically at the next group policy refresh interval without rebooting the computer.
Enable network location Enable all network location settings under the current location category and set its location name. This policy must be enabled to apply settings in this location category (for example, Location1).
This policy can take effect dynamically at the next group policy refresh interval without rebooting the computer.
Configure Proxies Configure proxy servers to provide access to services through a firewall.
Administrator’s Guide for Mac OS X 133

Network
Configure Proxies
Use the Computer Configuration > Policies > Centrify Settings > Mac OS X Settings > Network > Configure Proxies settings to manage settings on the Proxies panes of the Network system preference. For example:
These group policies enable you to configure the host names (or IP addresses) and port numbers for the computers providing specific services, such as File Transfer Protocol (ftp), Hypertext Transfer Protocol (http), and HTTP over Secure Sockets Layer (https), through a firewall. A proxy server is a computer on a local network that acts as an
Chapter 7 • Setting computer-based policies 134

Network
intermediary between computer users and the Internet to ensure the security and administrative control of the network.
Use this policy To do this
Enable Proxies Configure the host name (or IP address) and port number for the computers providing specific services. Within this category, you can enable the following proxy servers:
• Use the Enable FTP Proxy policy to configure the host name and port number for the FTP proxy server (FTP protocol).
• Use the Enable Web Proxy policy to configure the host name and port number for the Web proxy server (HTTP protocol).
• Use the Enable Secure Web Proxy policy to configure the host name and port number for the Secure Web proxy server (HTTPS protocol).
• Use the Enable Streaming Proxy policy to configure the host name and port number for the Streaming proxy server (RTSP protocol).
• Use the Enable SOCKS Proxy policy to configure the host name and port number for the Streaming proxy server (SOCKS protocol).
• Use the Enable Gopher Proxy policy to configure the host name and port number for the Gopher proxy server.
• Use the Enable Streaming Proxy policy to configure the host name and port number for the Streaming proxy server (RTSP protocol).
• Use the Enable Proxies using a PAC file policy to configure proxy servers from a proxy configuration file.
These policies can take effect dynamically at the next group policy refresh interval without rebooting the computer.
Exclude simple hostnames Prevent requests to unqualified host names from using proxy servers. If you enable this policy, users can enter unqualified host names to contact servers directly rather than through a proxy.
This policy can take effect dynamically at the next group policy refresh interval without rebooting the computer.
Use Passive FTP Mode (PASV) Use the FTP passive mode (PASV) to access Internet sites when computers are protected by a firewall.
This policy can take effect dynamically at the next group policy refresh interval without rebooting the computer.
Bypass Proxy settings for these Hosts & Domains
Specify fully-qualified host names and domains for which you want to bypass proxy settings.
You should use this policy to define the hosts or domains that should never be contacted by proxy.
To use this policy, click Enabled, then click Add, type a host or domain name, and click OK to add the entry to the Show Contents list.
Each host or domain should be listed as a separate line in the Hosts and Domains list. For each host or domain, click Add, type the host or domain name, and click OK to add the host or domain as a new entry in the list. When you are finished adding items to the list, click OK to close the policy dialog box.
This policy can take effect dynamically at the next group policy refresh interval without rebooting the computer.
Administrator’s Guide for Mac OS X 135

Remote Management
Remote ManagementUse the Computer Configuration > Policies > Centrify Settings > Mac OS X Settings > Remote Management settings to control Apple Remote Desktop access for zone users. You can use these group policies to give Active Directory group members permission to remotely control Mac computers without physically having to activate the Apple Remote Desktop on the remote Mac computer.
The Remote Management group policies correspond to the Manage > Change Client Settings options in Apple Remote Desktop and are similar to access privileges defined on a client computer using the Sharing system preference. For example:
Note Because the group policies correspond to the Manage > Change Client Settings options in Apple Remote Desktop, the group policy settings are not displayed in the local system preference on the Mac client. Although the tasks you can assign to different groups by group policy correspond to tasks you can assign using the local Sharing system preference on a Mac client computer, the group policy settings do not update the local system
Click Add to add remote users and control the tasks remote users can perform
Tasks remote users areallowed to perform
Chapter 7 • Setting computer-based policies 136
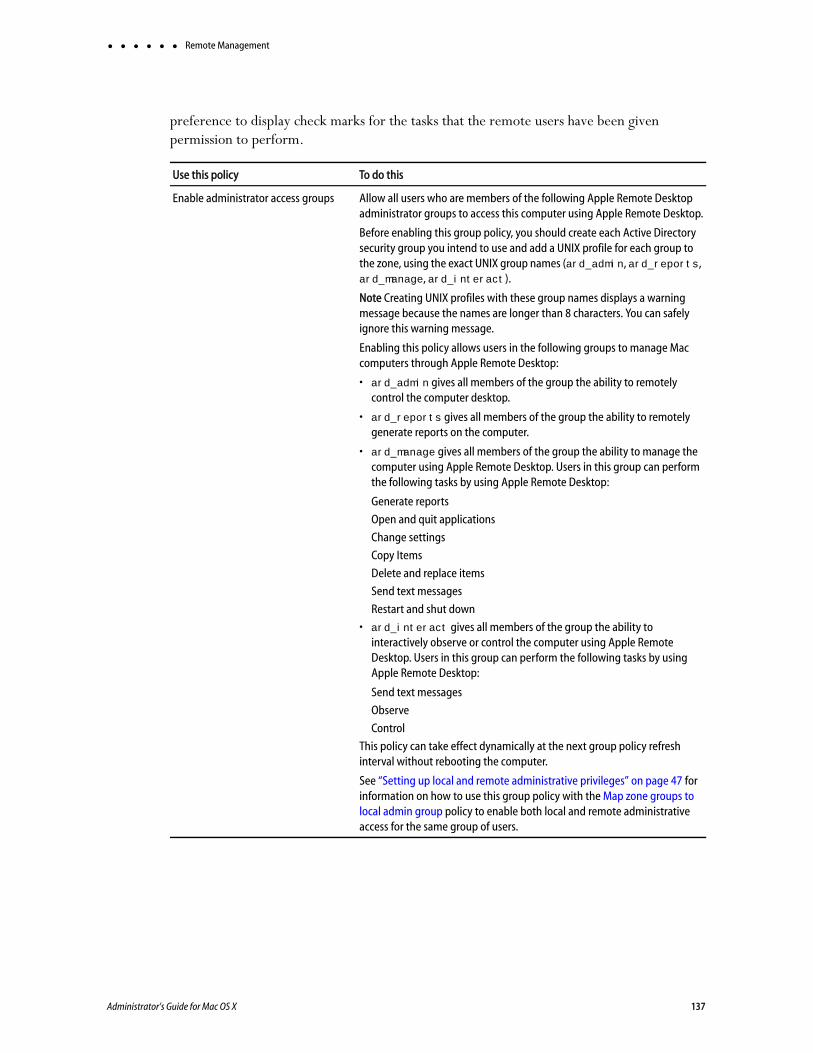
Remote Management
preference to display check marks for the tasks that the remote users have been given permission to perform.
Use this policy To do this
Enable administrator access groups Allow all users who are members of the following Apple Remote Desktop administrator groups to access this computer using Apple Remote Desktop.
Before enabling this group policy, you should create each Active Directory security group you intend to use and add a UNIX profile for each group to the zone, using the exact UNIX group names (ard_admin, ard_reports, ard_manage, ard_interact).
Note Creating UNIX profiles with these group names displays a warning message because the names are longer than 8 characters. You can safely ignore this warning message.
Enabling this policy allows users in the following groups to manage Mac computers through Apple Remote Desktop:
• ard_admin gives all members of the group the ability to remotely control the computer desktop.
• ard_reports gives all members of the group the ability to remotely generate reports on the computer.
• ard_manage gives all members of the group the ability to manage the computer using Apple Remote Desktop. Users in this group can perform the following tasks by using Apple Remote Desktop:
Generate reports
Open and quit applications
Change settings
Copy Items
Delete and replace items
Send text messages
Restart and shut down
• ard_interact gives all members of the group the ability to interactively observe or control the computer using Apple Remote Desktop. Users in this group can perform the following tasks by using Apple Remote Desktop:
Send text messages
Observe
Control
This policy can take effect dynamically at the next group policy refresh interval without rebooting the computer.
See “Setting up local and remote administrative privileges” on page 47 for information on how to use this group policy with the Map zone groups to local admin group policy to enable both local and remote administrative access for the same group of users.
Administrator’s Guide for Mac OS X 137

Scripts (Login/Logout)
Scripts (Login/Logout)Use the Computer Configuration > Policies > Centrify Settings > Mac OS X Settings > Scripts (Login/Logout) > Specify multiple login scripts group policy to deploy login scripts that run when an Active Directory or local user logs on. When you use this group policy, the login scripts are stored in the Active Directory domain’s system volume (sysvol) and transferred to the Mac computer when the group policies are applied. Login scripts are useful for performing common tasks such as mounting and un-mounting shares
This policy is also available as a user policy. If you specify scripts using both the computer and user policies, the computer scripts are executed first.
Use this policy To do this
Specify multiple login scripts Specify the names of one or more login scripts to execute when an AD or local user logs on. The scripts you specify run simultaneously in no particular order.
Before enabling this policy, you should create the scripts and copy them to the system volume (sysvol) on the domain controller. By default, the login scripts are stored in the system volume (SYSVOL) on the domain controller in the directory:
\\domain\SYSVOL\domain\Scripts\scriptname1\scriptname2...After enabling this policy, click Add and enter the following information:
• Script: The name of the script and an optional path, which are relative to \\domain\SYSVOL\domain\scripts\. For example, if the domain name is ajax.org and you enter a script name of start.sh, the script that gets executed on the domain controller is:\\ajax.org\SYSVOL\ajax.org\Scripts\mlogin.sh
You can specify additional relative directories in the path, if needed; for example, if you type sub\mlogin.sh, the file that gets executed is:\\ajax.org\SYSVOL\ajax.org\Scripts\sub\mlogin.sh
• Parameters: An optional set of arguments to pass to the script. These arguments are interpreted the same way as in a UNIX shell; that is, space is a delimiter, and backslash is an escape character. You can also use $USER to represent the current user's name. For example: arg1 arg2 arg3 arg1 'a r g 2' arg3
Note Be certain authenticated users have permission to read these files so the scripts can run when they log in.
Once this group policy is enabled, it takes effect when users log out and log back in.
Chapter 7 • Setting computer-based policies 138

Scripts (LaunchDaemons)
Scripts (LaunchDaemons)Use the Computer Configuration > Policies > Centrify Settings > Mac OS X Settings > Scripts (LaunchDaemons) > Specify multiple LaunchDaemon scripts group policy to deploy scripts that run when launchd starts (system boot up). When you use this group policy, the LaunchDaemon scripts are stored in the Active Directory domain’s system volume (sysvol) and transferred to the Mac computer when the group policies are applied. Using LaunchDaemons to run scripts allows you to run the scripts as root, where the Specify multiple login scripts group policy can only be run as the logged in user.
Refer to the following Apple resources to learn more about Launch Daemons and Agents.
https://developer.apple.com/library/mac/documentation/MacOSX/Conceptual/BPSystemStartup/Chapters/CreatingLaunchdJobs.html
https://developer.apple.com/library/mac/technotes/tn2083/_index.html#//apple_ref/doc/uid/DTS10003794
Use this policy To do this
Specify multiple LaunchDaemon scripts Enable this group policy to specify multiple scripts to run automatically when launchd starts (system boot up).
The scripts you specify run simultaneously in no particular order.
Before enabling this policy, you should create the scripts and copy them to the system volume (sysvol) on the domain controller. By default, the LaunchDaemon scripts are stored in the system volume (SYSVOL) on the domain controller in the directory:
\\domain\SYSVOL\domain\Scripts\scriptname1\scriptname2...After enabling this policy, click Add and enter the following information:
• Script: The name of the script and an optional path, which are relative to \\domain\SYSVOL\domain\scripts\. For example, if the domain name is ajax.org and you enter a script name of startup.sh, the script that gets executed on the domain controller is:\\ajax.org\SYSVOL\ajax.org\Scripts\startup.sh
You can specify additional relative directories in the path, if needed; for example, if you type sub\mlogin.sh, the file that gets executed is:\\ajax.org\SYSVOL\ajax.org\Scripts\sub\startup.sh
• Parameters: An optional set of arguments to pass to the script. These arguments are interpreted the same way as in a UNIX shell; that is, space is a delimiter, and backslash is an escape character. For example: arg1 arg2 arg3
arg1 'a r g 2' arg3
Administrator’s Guide for Mac OS X 139

Security & Privacy
Security & PrivacyUse the Centrify group policies found in Computer Configuration > Centrify Settings > Mac OS X Settings > Security & Privacy to manage the options from the
Security & Privacy ( ) system preference on Mac OS X computers.
Use this policy To do this
Certificate validation method Specify the certificate validation method to use for the Mac computer.
Note This group policy has no effect on the “Keychain Access > Preferences > Certificates” settings. Keychain Access > Preferences are per-user settings, which are not used by a Mac computer during login. This group policy changes Centrify SmartCardTool > Revocation settings, which represent the system settings used by a Mac computer during login.
This policy allows you to choose either one, or both of the two common methods for verifying the validity of a certificate:
• Certificate Revocation List: Use a certificate revocation list (CRL) from a revocation server.
• Online Certificate Status Protocol: Use an online certificate status protocol (OCSP) responder to validate certificates. If you select this option, you can specify a local responder to override the one provided in the certificates.
For each validation option, you can select one of the following settings:
• Off: No revocation checking is performed.
• Best attempt: The certificate passes unless the server returns an indication of a bad certificate. This setting is recommended for most environments.
• Require if cert indicates: If the URL to the revocation server is provided in the certificate, this setting requires a successful connection to a revocation server as well as no indication of a bad certificate. Specify this option only in a tightly controlled environment that guarantees the presence of a CRL server or OCSP responder. If a CRL server or OCSP responder is not available, SSL and S/MIME evaluations could hang or fail.
• Require for all certs: This setting requires successful validation of all certificates. Use only in a tightly controlled environment that guarantees the presence of a CRL server or OCSP responder. If a CRL server or OCSP responder is not available, SSL and S/MIME evaluations could hang or fail.
• Local Responder: If you choose to validate the certificate via OCSP, you can specify a local responder to override that provided in the certificates.
• Priority: The priority determines which method (OCSP or CRL) is attempted first. If the first method chosen returns a successful validation, the second method is not attempted, unless you choose to require both.
Chapter 7 • Setting computer-based policies 140

Security & Privacy
Disable automatic login Disable the automatic login setting. If you enable this group policy, it overrides the Login Options set in the General tab of the Security & Privacy system preference.
For this group policy, clicking Disabled or Not Configured has no effect.
Once enabled, this group policy takes effect when the computer is rebooted.
Disable Location Services Disable the “Enable Location Services” setting. If you enable this group policy, it overrides the Enable Location Services setting in the Privacy tab of the Security & Privacy system preference.
For this group policy, clicking Disabled or Not Configured has no effect.
Once enabled, this group policy takes effect at the next group policy refresh interval.
Disable smart card UPN mapping Disable smart card UPN mapping. With UPN mapping enabled, inserting a smart card changes the login UI to welcome the UPN user identified in the UPN field on the PIV card, which prevents the use of multi-user Personal Identity Verification (PIV) cards.
This policy must be used in combination with the smartcard.name.mapping parameter to enable multi-user PIV cards on Mac devices. Refer to “Enabling support for multi-user PIV and multi-user smart cards” on page 238 for more information.
Enable smart card support Enable users to logon with smart cards. If you enable this group policy, it adds smart card support to the authorization database on Mac computers that are linked to the group policy object.
This policy also creates a text file named /etc/cacloginconfig.plist on each computer. This configuration file directs the Mac smart card log-in to look for a user in Active Directory with a user principal name (UPN) that is the same as the NT Principal Name attribute in the smart card log-in certificate.
See Chapter 9, “Configuring a Mac computer for smart card login,” for details.
Select Enable YubiKeys as a smart card to enable using YubiKeys as a smart card. Enabling YubiKeys as a smart card installs Yubico’s libccid to enable communication to the YubiKey using CCID protocol, allowing users to authenticate with a YubiKey PIV token.
Note Unchecking this option does not remove Yubico’s libccid from impacted computers.
If you later disable this policy, the smart card support strings are removed from the authorization database and the /etc/cacloginconfig.plist file is deleted.
Note Changing this policy to Not configured does not remove the smart card support strings nor remove the plist file. Once this policy is enabled, you must select Disabled to do this.
Once enabled, this group policy takes effect when the computer is rebooted.
Use this policy To do this
Administrator’s Guide for Mac OS X 141
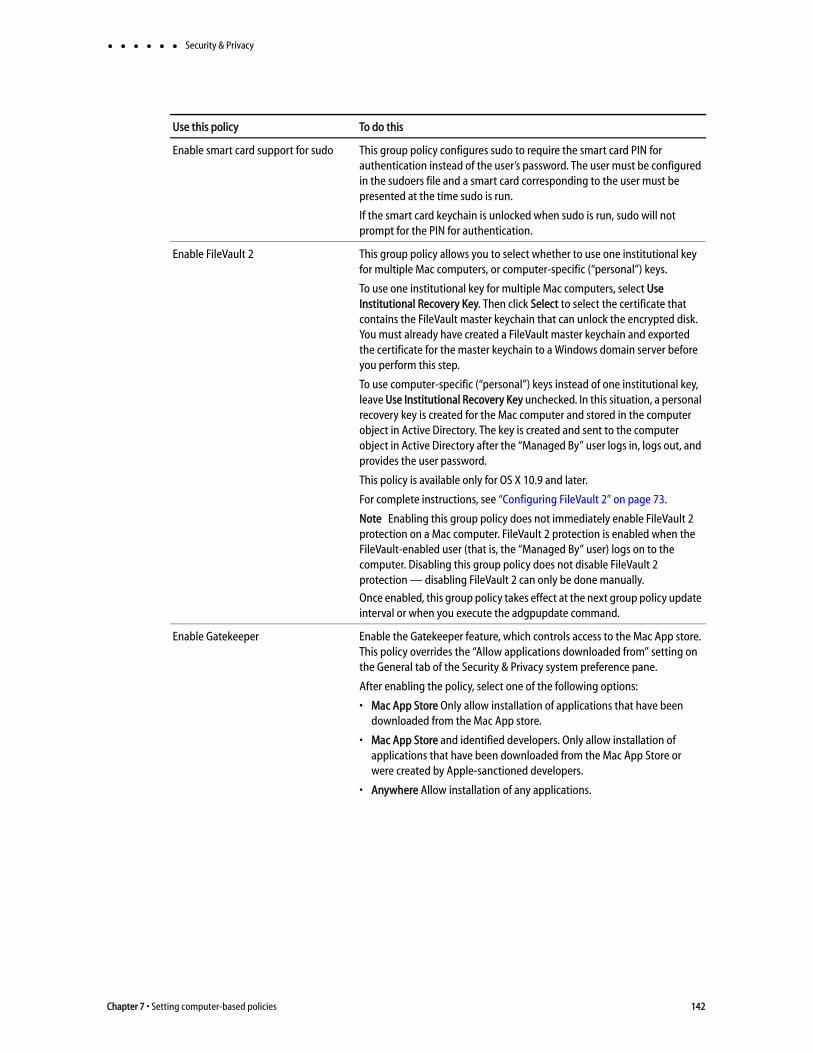
Security & Privacy
Enable smart card support for sudo This group policy configures sudo to require the smart card PIN for authentication instead of the user’s password. The user must be configured in the sudoers file and a smart card corresponding to the user must be presented at the time sudo is run.
If the smart card keychain is unlocked when sudo is run, sudo will not prompt for the PIN for authentication.
Enable FileVault 2 This group policy allows you to select whether to use one institutional key for multiple Mac computers, or computer-specific (“personal”) keys.
To use one institutional key for multiple Mac computers, select Use Institutional Recovery Key. Then click Select to select the certificate that contains the FileVault master keychain that can unlock the encrypted disk. You must already have created a FileVault master keychain and exported the certificate for the master keychain to a Windows domain server before you perform this step.
To use computer-specific (“personal”) keys instead of one institutional key, leave Use Institutional Recovery Key unchecked. In this situation, a personal recovery key is created for the Mac computer and stored in the computer object in Active Directory. The key is created and sent to the computer object in Active Directory after the “Managed By” user logs in, logs out, and provides the user password.
This policy is available only for OS X 10.9 and later.
For complete instructions, see “Configuring FileVault 2” on page 73.
Note Enabling this group policy does not immediately enable FileVault 2 protection on a Mac computer. FileVault 2 protection is enabled when the FileVault-enabled user (that is, the “Managed By” user) logs on to the computer. Disabling this group policy does not disable FileVault 2 protection — disabling FileVault 2 can only be done manually.
Once enabled, this group policy takes effect at the next group policy update interval or when you execute the adgpupdate command.
Enable Gatekeeper Enable the Gatekeeper feature, which controls access to the Mac App store. This policy overrides the “Allow applications downloaded from” setting on the General tab of the Security & Privacy system preference pane.
After enabling the policy, select one of the following options:
• Mac App Store Only allow installation of applications that have been downloaded from the Mac App store.
• Mac App Store and identified developers. Only allow installation of applications that have been downloaded from the Mac App Store or were created by Apple-sanctioned developers.
• Anywhere Allow installation of any applications.
Use this policy To do this
Chapter 7 • Setting computer-based policies 142
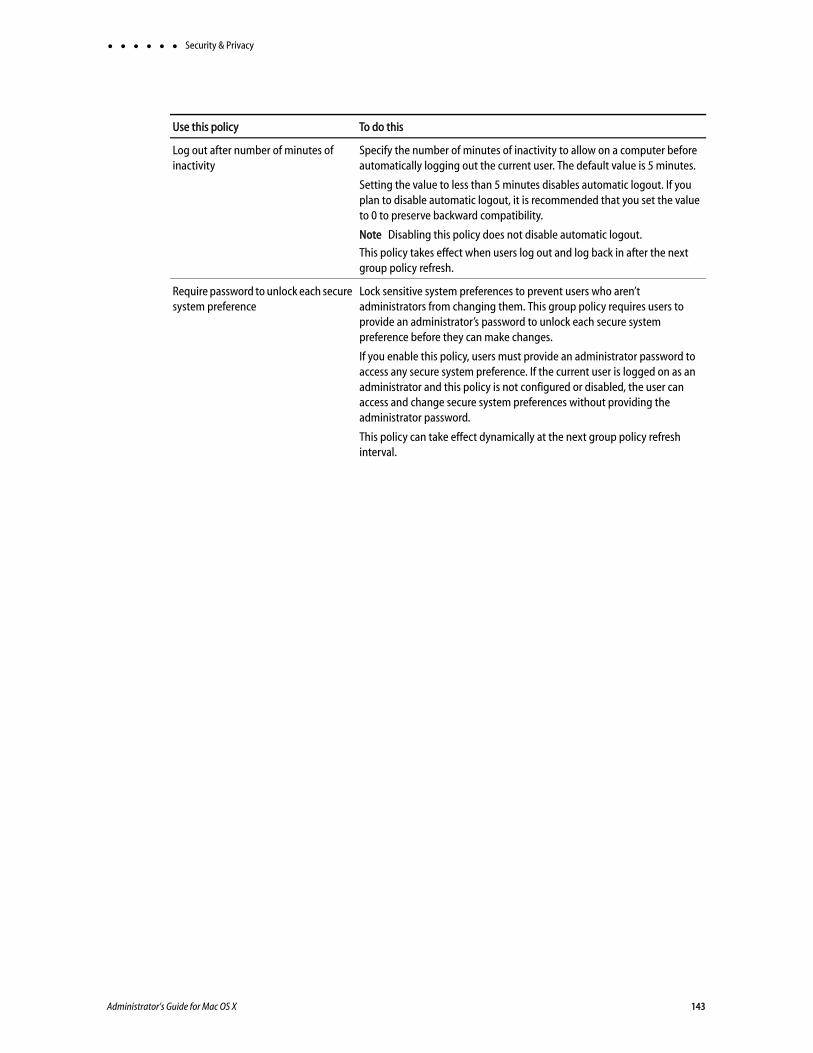
Security & Privacy
Log out after number of minutes of inactivity
Specify the number of minutes of inactivity to allow on a computer before automatically logging out the current user. The default value is 5 minutes.
Setting the value to less than 5 minutes disables automatic logout. If you plan to disable automatic logout, it is recommended that you set the value to 0 to preserve backward compatibility.
Note Disabling this policy does not disable automatic logout.
This policy takes effect when users log out and log back in after the next group policy refresh.
Require password to unlock each secure system preference
Lock sensitive system preferences to prevent users who aren’t administrators from changing them. This group policy requires users to provide an administrator’s password to unlock each secure system preference before they can make changes.
If you enable this policy, users must provide an administrator password to access any secure system preference. If the current user is logged on as an administrator and this policy is not configured or disabled, the user can access and change secure system preferences without providing the administrator password.
This policy can take effect dynamically at the next group policy refresh interval.
Use this policy To do this
Administrator’s Guide for Mac OS X 143

Security & Privacy
Require smart card login Require all users to log in with a smart card. When this policy is enabled, no users can log in to the computer simply with a user name and password, with the exception of those you add to an exception group as explained below.
Note To require smart card login for a specific user rather than all users on the computer, in the user’s Active Directory account properties, specify the option, Smart card is required for interactive logon.
The Enable smart card support policy must also be enabled in order for this policy to take effect.
Once enabled, this group policy takes effect when the computer is rebooted
Exception groups
Exception groups are Active Directory groups that you create, whose members are exempted from this option. Users in these groups can log in using their AD user name and password, if necessary. The purpose of creating exception groups is to allow users who regularly use a smart card for login, but don’t have it with them, to temporarily log in with a user name and password.
You create a group in Active Directory and add the user accounts that will be able to log in to their computers without a smart card. After enabling the policy, click Add and enter the name of the group or click Browse and enter search criteria to find it. You can add multiple exception groups if you wish.
The computer must be in connected mode for any group membership changes to take effect immediately.
Note “Smart card is required for interactive logon” should be disabled in user account settings in order for the exception group to work.
A smart-card user who is a member of an exception group may see the following prompt at some point after logging in with an Active Directory user name and password, “The system was unable to unlock your login keychain”, because the login keychain is locked with the smartcard PIN and cannot be unlocked with a user name and password. If adding the user to the exception group is temporary, the user should click "Continue Log In" and enter the smartcard PIN when prompted with “Security wants to use the 'login' keychain.”
Use secure virtual memory Prevent passwords from being recoverable from virtual memory.
Any time a password is entered, it is possible for system to write that password in a block of memory that it dumps to a file in /var/vm, making the password recoverable.
Enabling this group policy ensures that the virtual memory /var/vm files are encrypted, preventing any passwords written there from being recovered.
This policy can take effect dynamically at the next group policy refresh interval.
Use this policy To do this
Chapter 7 • Setting computer-based policies 144

Services
ServicesUse the Computer Configuration > Policies > Centrify Settings > Mac OS X Settings > Services settings to manage access to the service options from the Sharing
( ) system preference on Mac computers. These group policies correspond to the
options displayed on the Services pane. For example:
Use this policy To do this
Enable Personal File Sharing Allow users on other Mac computers access to Public folders on the local computer. If you enable this group policy, all users can access files in the Public folder through the Apple File Sharing protocol. Users with appropriate permission can also access other folders on the local computer if properly authenticated.
Enabling this group policy is the same as opening the Sharing system preference, selecting File Sharing, then clicking the Options button and selecting the Share Files and Folders using AFP option.
On Mac OS X Servers, enabling this policy has no effect.
This policy can take effect dynamically at the next group policy refresh interval without rebooting the computer.
Enable Windows Sharing Allow users on Windows computers access to shared folders on the local computer through SMB/CIFS file shares.
Enabling this group policy is the same as opening the Sharing system preference, selecting File Sharing, then clicking the Options button and selecting the Share Files and Folders using SMB option.
On Mac OS X Servers, this policy has no effect.
This policy can take effect dynamically at the next group policy refresh interval without rebooting the computer.
Administrator’s Guide for Mac OS X 145

Services
Enable Personal Web Sharing Allow users on other computers to view Web pages in each user’s sites folder on the local computer.
Enabling this group policy is the same as opening the Sharing system preference and selecting the Web Sharing option.
On Mac OS X Servers, enabling this policy has no effect.
This policy can take effect dynamically at the next group policy refresh interval without rebooting the computer.
Enable Remote Login Allow users on other computers to access this computer using SSH.
Enabling this group policy is the same as opening the Sharing system preference and selecting the Remote Login option.
This policy can take effect dynamically at the next group policy refresh interval without rebooting the computer.
Enable FTP Access Allow users on other computers to exchange files with this computer using FTP applications.
Enabling this group policy is the same as opening the Sharing system preference, selecting File Sharing, then clicking the Options button and selecting the Share Files and Folders using FTP option.
On Mac OS X Servers enabling this policy has no effect.
This policy can take effect dynamically at the next group policy refresh interval without rebooting the computer.
Enable Apple Remote Desktop Allow others to access this computer using the Apple Remote Desktop program.
Enabling this group policy is the same as opening the Sharing system preference and selecting the Remote Management option.
If you enable this group policy, you can set the following access privileges:
• Allow guest users to request permission to control the screen
• Prevent VNC viewers from controlling the screen. Because allowing VNC viewers to control the screen requires setting a password to take control of the screen and this behavior presents a potential security issue, this group policy can only be used to disallow VNC access.
This policy can take effect dynamically at the next group policy refresh interval without rebooting the computer.
Enable Remote Apple Events Allow applications on other Mac computers to send Apple Events to the local computer.
Enabling this group policy is the same as opening the Sharing system preference and selecting the Remote Apple Events option.
This policy can take effect dynamically at the next group policy refresh interval without rebooting the computer.
Enable Printer Sharing Allow other people to use printers connected to the local computer.
Enabling this group policy is the same as opening the Sharing system preference and selecting the Printer Sharing option.
On Mac OS X Servers, enabling this policy has no effect.
This policy can take effect dynamically at the next group policy refresh interval without rebooting the computer.
Use this policy To do this
Chapter 7 • Setting computer-based policies 146

Services
Enable Xgrid Allow clustered Mac OS Xgrid controllers to distribute tasks to the local computer for completion.
Enabling this group policy is the same as opening the Sharing system preference and selecting the Xgrid Sharing option.
On Mac OS X Servers enabling this policy has no effect.
This policy can take effect dynamically at the next group policy refresh interval without rebooting the computer.
Use this policy To do this
Administrator’s Guide for Mac OS X 147

Software Update Settings
Software Update SettingsUse the Computer Configuration > Policies > Centrify Settings > Mac OS X Settings > Software Update Settings group policies to manage software updates. The group policies in this category enable you to set the interval for checking for software updates and to identify a specific server from which updates should be received.
These group policies correspond to settings you make using the Software Update ( )
system preference on client Mac OS X computers and the Software Update preference in the Workgroup Manager on Mac OS X servers. For example, the interval for checking for software updates is typically configured Software Update system preference on client Mac computers:
Note Identifying a software update server to use for downloading updates is configured on a Mac OS X server using the Software Update preference in the Workgroup Manager. For example:
Chapter 7 • Setting computer-based policies 148

Software Update Settings
The software update group policies are computer policies, applied as the root user, and apply to all users of the computer. Setting these group policies updates the plist files for individual users with the group policy parameters, such as update server URL, update interval, and so on. However, to prevent local users from using Software Update in System Preferences to manually set software update server parameters, an administrator should also limit access to the Software Update Preferences Pane by setting the group policy, Limit items shown in System Preferences, and then enabling the group policy, “Enable System Preferences Pane: System > Enable Software Update.
Otherwise, you may see anomalous behavior. For example, a user can open Software Update and change parameters, such as disabling software updates (by deselecting Check for updates). If the user then re-enables software updates, the update server resets to the Apple software update server, not the server specified in the software update server group policy. However, at the next login, or at the next adgpupdate period, the Server URL and other group parameters will be re-applied.
The Software Update Settings contain separate folders that allow you to specify a different update server for each operating system version that you are running. For example, if you have computers with different versions of OS X in your environment, you can specify a different update server for each one by enabling the Specify software update server policy in each of the version-specific folders. In order to do this you must enable Use version specific settings.
If you do not enable Use version specific settings, Legacy Settings are used instead. If you applied Software Update Settings to computers running previous versions of the product, those settings are in Legacy Settings, though you may update them if you wish.
Administrator’s Guide for Mac OS X 149
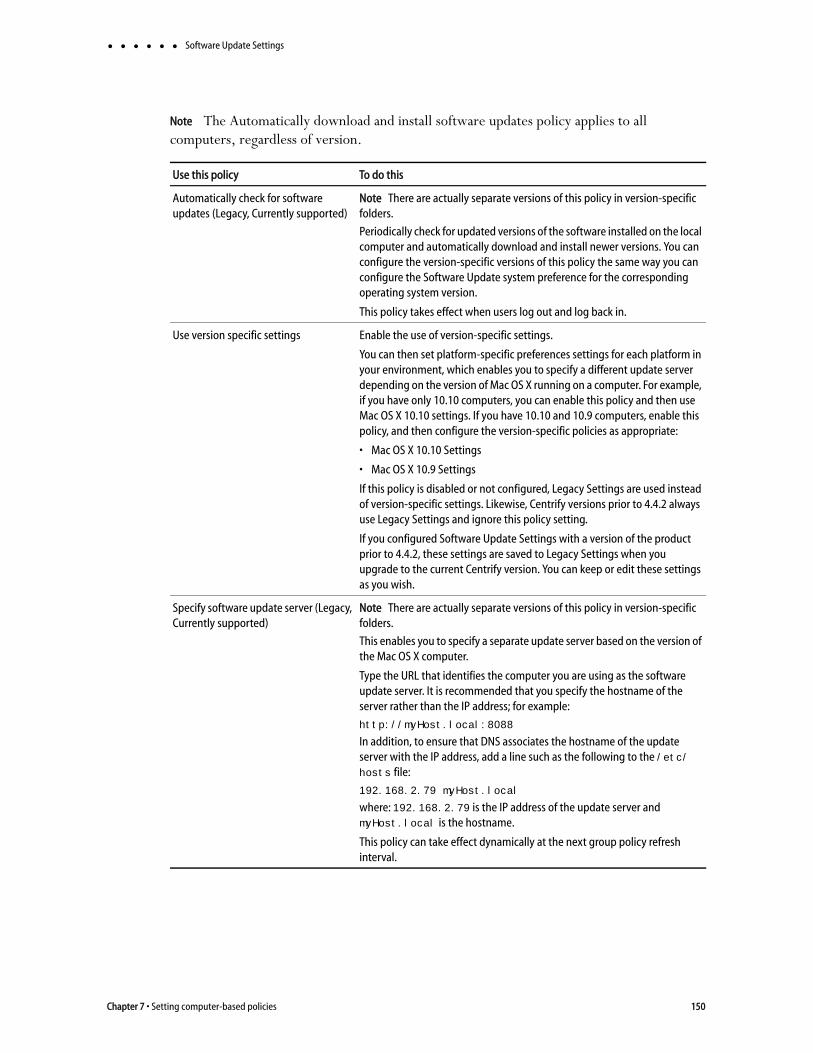
Software Update Settings
Note The Automatically download and install software updates policy applies to all computers, regardless of version.
Use this policy To do this
Automatically check for software updates (Legacy, Currently supported)
Note There are actually separate versions of this policy in version-specific folders.
Periodically check for updated versions of the software installed on the local computer and automatically download and install newer versions. You can configure the version-specific versions of this policy the same way you can configure the Software Update system preference for the corresponding operating system version.
This policy takes effect when users log out and log back in.
Use version specific settings Enable the use of version-specific settings.
You can then set platform-specific preferences settings for each platform in your environment, which enables you to specify a different update server depending on the version of Mac OS X running on a computer. For example, if you have only 10.10 computers, you can enable this policy and then use Mac OS X 10.10 settings. If you have 10.10 and 10.9 computers, enable this policy, and then configure the version-specific policies as appropriate:
• Mac OS X 10.10 Settings
• Mac OS X 10.9 Settings
If this policy is disabled or not configured, Legacy Settings are used instead of version-specific settings. Likewise, Centrify versions prior to 4.4.2 always use Legacy Settings and ignore this policy setting.
If you configured Software Update Settings with a version of the product prior to 4.4.2, these settings are saved to Legacy Settings when you upgrade to the current Centrify version. You can keep or edit these settings as you wish.
Specify software update server (Legacy, Currently supported)
Note There are actually separate versions of this policy in version-specific folders.
This enables you to specify a separate update server based on the version of the Mac OS X computer.
Type the URL that identifies the computer you are using as the software update server. It is recommended that you specify the hostname of the server rather than the IP address; for example:
http://myHost.local:8088
In addition, to ensure that DNS associates the hostname of the update server with the IP address, add a line such as the following to the /etc/hosts file:
192.168.2.79 myHost.local
where: 192.168.2.79 is the IP address of the update server and myHost.local is the hostname.
This policy can take effect dynamically at the next group policy refresh interval.
Chapter 7 • Setting computer-based policies 150
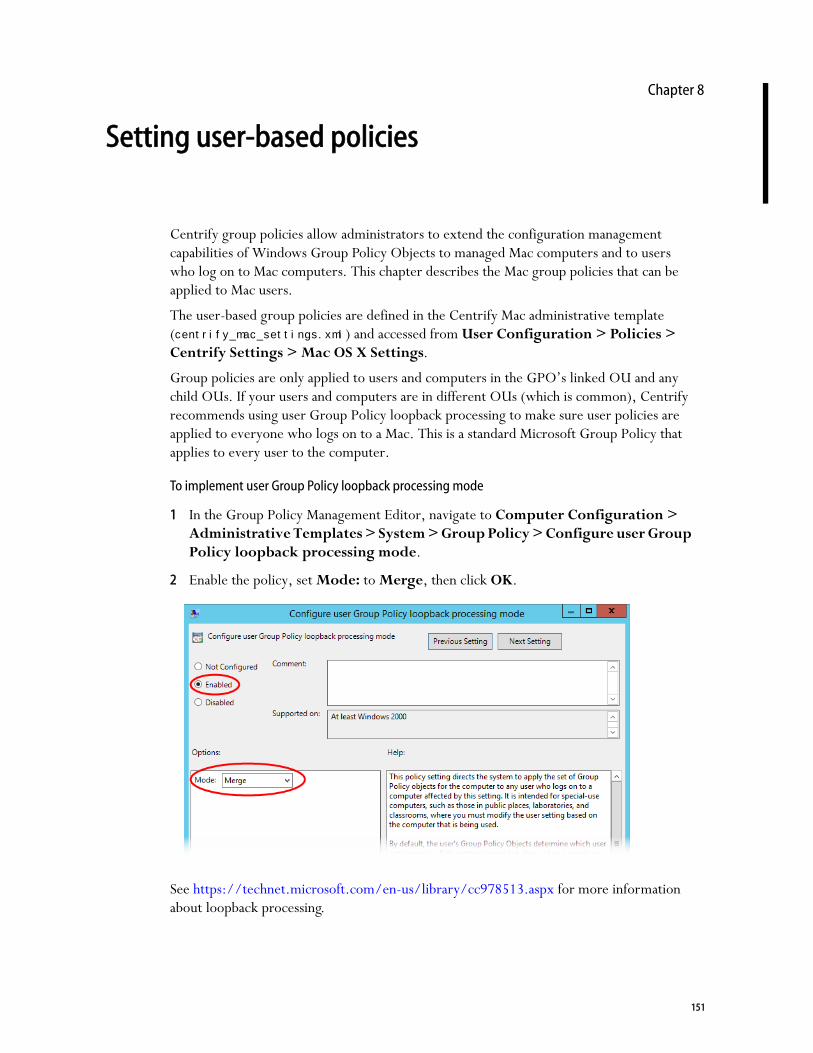
Chapter 8
Setting user-based policies
Centrify group policies allow administrators to extend the configuration management capabilities of Windows Group Policy Objects to managed Mac computers and to users who log on to Mac computers. This chapter describes the Mac group policies that can be applied to Mac users.
The user-based group policies are defined in the Centrify Mac administrative template (centrify_mac_settings.xml) and accessed from User Configuration > Policies > Centrify Settings > Mac OS X Settings.
Group policies are only applied to users and computers in the GPO’s linked OU and any child OUs. If your users and computers are in different OUs (which is common), Centrify recommends using user Group Policy loopback processing to make sure user policies are applied to everyone who logs on to a Mac. This is a standard Microsoft Group Policy that applies to every user to the computer.
To implement user Group Policy loopback processing mode
1 In the Group Policy Management Editor, navigate to Computer Configuration > Administrative Templates > System > Group Policy > Configure user Group Policy loopback processing mode.
2 Enable the policy, set Mode: to Merge, then click OK.
See https://technet.microsoft.com/en-us/library/cc978513.aspx for more information about loopback processing.
151
See Understanding group policies for Mac users and computers for general information about how to use group policies to manage Mac settings and for information on how to install the group policy administrative templates.
Note For additional information about creating and using group policies and Group Policy Objects, see your Windows or Active Directory documentation. For more information about adding and using other Centrify group policies that are not specific to Mac computers and users, see the Group Policy Guide.
Chapter 8 • Setting user-based policies 152

Setting user-based policies
Setting user-based policiesThis section describes user-based policies for Mac that you can set. The following table provides a summary of the group policies you can set for Mac users. These group policies are in the Centrify Mac administrative template (centrify_mac_settings.xml) and accessed from User Configuration > Policies > Centrify Settings > Mac OS X Settings.
Note Group policies are only applied to users and computers in the GPO’s linked OU and any child OUs. Enable Computer Configuration > Administrative Templates > System > Group Policy > Configure user Group Policy loopback processing mode in Merge mode to make sure user policies are applied to everyone who logs on to a Mac. See To implement user Group Policy loopback processing mode for additional detail.
Use this policy To do this
802.1X Wireless Settings Create user profiles for wireless authentication.
This group policy corresponds to 802.1X Options in the Networks system preference.
Application Access Settings Control the specific applications users are either permitted to use or prohibited from using.
These group policies correspond to Applications preferences set in the Workgroup Manager.
Desktop Settings Control the desktop and screen saver options for users on Mac computers.
These group policies correspond to settings in the Desktop & Screen Saver system preference.
Dock Settings Control the look and operation of the Dock displayed on the user’s desktop.
These group policies correspond to Dock preferences set in the Workgroup Manager.
Finder Settings Specify whether to use the standard Finder, or the Simple Finder, which restricts users to applications and folders in the Dock.
Folder Redirection Redirect specified network home folders to the local computer to improve performance.
Import Settings Specify plist files to import preferences from another computer.
This group policy corresponds to the import plist functionality in Workgroup Manager.
Login Settings Specify frequently used applications, folders, and server connections to open when a user logs in.
This group policy corresponds to the login functionality in Workgroup Manager.
Media Access Settings Control the specific media types users are either permitted to use or prohibited from using.
These group policies correspond to Media Access preferences set in the Workgroup Manager.
Administrator’s Guide for Mac OS X 153

Setting user-based policies
Mobility Settings Control the synchronization rules applied for users access services from mobile devices.
These group policies correspond to Mobility preferences set in the Workgroup Manager.
Scripts (Login/Logout) Specify login and logout scripts that run when Active Directory users log on or log out.
Security & Privacy Settings Control the secure login options for users on Mac computers.
These group policies correspond to settings in the Security system preference.
System Preference Settings Control the specific system preferences displayed for users.
These group policies correspond to System Preferences set in the Workgroup Manager.
Use this policy To do this
Chapter 8 • Setting user-based policies 154

802.1X Wireless Settings
802.1X Wireless SettingsUse the User Configuration > Centrify Settings > Mac OS X Settings > 802.1X settings to create profiles for wireless network authentication. The profiles you specify with these group policies are created in the Network system preferences pane.
Use this policy To do this
Specify User Profiles Enable this policy to specify 802.1X User Profiles for wireless network authentication.
When using a user profile, a user will be prompted for username and password to authenticate to a wireless network after login.
To add a user profile, enable the policy and click Add to enter the profile name and setting.
Type a name for the profile.
Setting must follow this format:
• Network;Security Type;Authentication Method, where each field is separated by a semi-colon (;).
• Network is the wireless network name
• Security type is one of 802.1X WEP, WPA Enterprise, WPA2 Enterprise
• Authentication method is one or more of the following, separated by commas: TTLS, PEAP, TLS, EAP-FAST, LEAP, MD5
For example:
OFFICE1;WPA Enterprise;PEAP
OFFICE2;802.1X WEP;TTLS,PEAP
• Automatically turn on Airport; to automatically turn on AirPort device if this type of profile is specified. Otherwise, the status of the AirPort device will not change.
Once enabled, this policy takes effect dynamically at the next group policy refresh interval.
Administrator’s Guide for Mac OS X 155
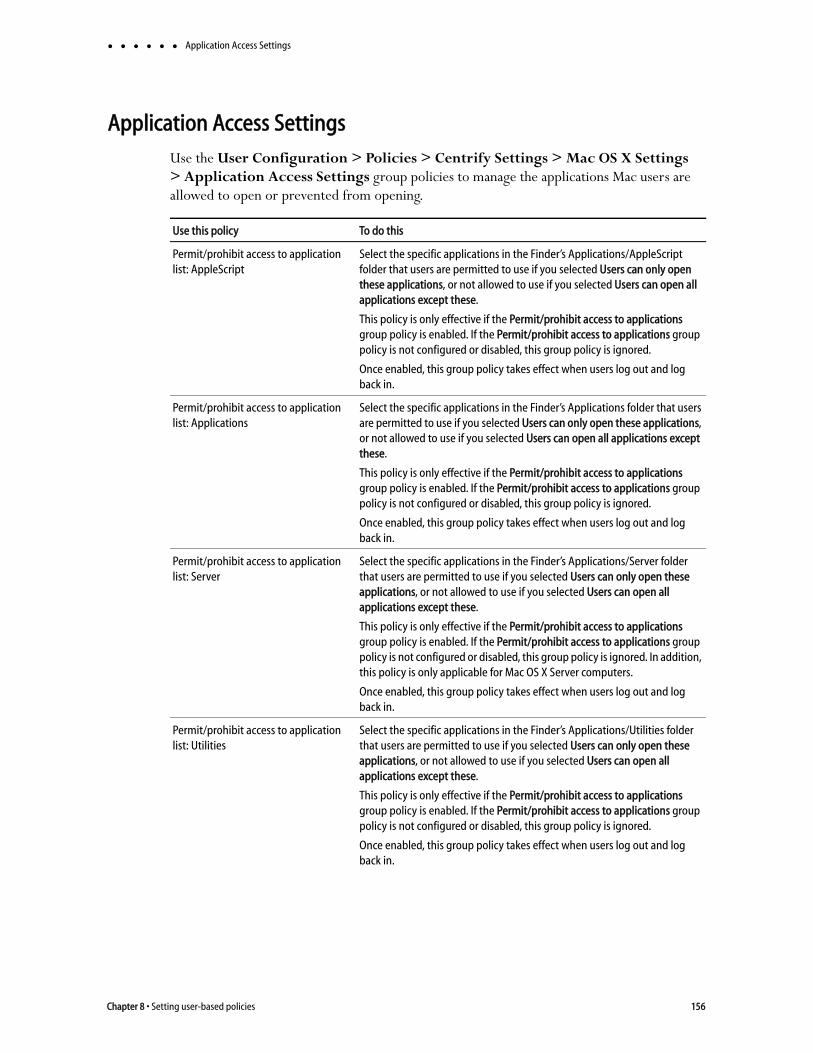
Application Access Settings
Application Access SettingsUse the User Configuration > Policies > Centrify Settings > Mac OS X Settings > Application Access Settings group policies to manage the applications Mac users are allowed to open or prevented from opening.
Use this policy To do this
Permit/prohibit access to application list: AppleScript
Select the specific applications in the Finder’s Applications/AppleScript folder that users are permitted to use if you selected Users can only open these applications, or not allowed to use if you selected Users can open all applications except these.
This policy is only effective if the Permit/prohibit access to applications group policy is enabled. If the Permit/prohibit access to applications group policy is not configured or disabled, this group policy is ignored.
Once enabled, this group policy takes effect when users log out and log back in.
Permit/prohibit access to application list: Applications
Select the specific applications in the Finder’s Applications folder that users are permitted to use if you selected Users can only open these applications, or not allowed to use if you selected Users can open all applications except these.
This policy is only effective if the Permit/prohibit access to applications group policy is enabled. If the Permit/prohibit access to applications group policy is not configured or disabled, this group policy is ignored.
Once enabled, this group policy takes effect when users log out and log back in.
Permit/prohibit access to application list: Server
Select the specific applications in the Finder’s Applications/Server folder that users are permitted to use if you selected Users can only open these applications, or not allowed to use if you selected Users can open all applications except these.
This policy is only effective if the Permit/prohibit access to applications group policy is enabled. If the Permit/prohibit access to applications group policy is not configured or disabled, this group policy is ignored. In addition, this policy is only applicable for Mac OS X Server computers.
Once enabled, this group policy takes effect when users log out and log back in.
Permit/prohibit access to application list: Utilities
Select the specific applications in the Finder’s Applications/Utilities folder that users are permitted to use if you selected Users can only open these applications, or not allowed to use if you selected Users can open all applications except these.
This policy is only effective if the Permit/prohibit access to applications group policy is enabled. If the Permit/prohibit access to applications group policy is not configured or disabled, this group policy is ignored.
Once enabled, this group policy takes effect when users log out and log back in.
Chapter 8 • Setting user-based policies 156

Application Access Settings
Permit/Prohibit access to applications Allow other policies to specify the applications that users are permitted to access or prohibited from accessing. You must enable this policy for any other application access group policies to take effect. Once enabled, only the applications explicitly specified in Application List policies are permitted or prohibited.
If you enable this policy, in Access mode, select one of:
• Users can only open these applications to grant access only to the applications you select with the other application access policies. Note that if you select the option: “User can also open all applications on local volumes” users can access any local applications. Restrictions only apply to applications on CDs, DVDs, or external disks.
• Users can open all applications except these to prevent access only to the applications you select with the other application access policies.
You can also set the following options in this group policy:
• Select User can also open all applications on local volumes to allow access to applications on a computer’s local hard drive. If selected, users can access any local applications in addition to the applications explicitly approved using the other application access policies. If you uncheck this option, users can only access applications on CDs, DVDs, or external disks that have been explicitly approved.
• Select Allow approved applications to launch non-approved applications to allow approved applications to open applications that aren't explicitly approved. For example, if users click a link in an email message, this option allows the email application to open a browser to display the Web page even if the browser is not listed as an approved application. To prevent approved applications from opening applications that aren’t explicitly approved, uncheck this option.
• Select Allow UNIX tools to run to allow applications or the operating system to run tools, such as the QuickTime Image Converter, without explicitly listing them as approved applications. These tools usually operate in the background, but can be run from the command line. If you want to prevent access to these tools, do not check this option.
Once enabled, this group policy takes effect when users log out and log back in.
Use this policy To do this
Administrator’s Guide for Mac OS X 157

Application Access Settings
These group policies correspond to settings you can make using the Applications preference in the Workgroup Manager.
Permit/prohibit access to the user-specific applications
Define a list of additional applications that users are permitted to run if you selected Users can only open these applications, or not allowed to use if you selected Users can open all applications except these. If enabled, you must specify the CFBundleIdentifier to identify the application; for example, for the Firefox browser, the CFBundleIdentifier is: org.mozilla.firefox. To find the CFBundleIdentifier complete the following steps:
1 In the Finder, locate the application to control.
2 Control-click or right-click the application, then select Show Package Contents.
3 If necessary, expand the Contents folder, then open info.plist with a text editor.
4 Find the string: <key>CFBundleIdentifier</key>. On the next line is the application’s CFBundleIdentifier; for example:<string>org.mozilla.firefox</string>
5 Use org.mozilla.firefox to identify the Firefox browser.
To add an application to the list, select Enabled, then click Add and enter the CFBundleIdentifier and click OK.
You may also control access to system preference panes by using the CFBundleIdentifier. You can find the CFBundleIdentifier for system preference panes in /System/Library/PreferencePanes. You can specify any application object that has a CFBundleIdentifier in its info.plist file.
Note Some applications may not have a CFBundleIdentifier (when you right-click the application name, there is no Show Package Contents menu item). In this case, you cannot add the application to the list of permitted or prohibited applications.
This policy is only effective if the Permit/prohibit access to applications group policy is enabled. If the Permit/prohibit access to applications group policy is not configured or disabled, this group policy is ignored.
Once enabled, this group policy takes effect when users log out and log back in.
Use this policy To do this
Chapter 8 • Setting user-based policies 158

Automount Settings
Automount SettingsUse the Automount Settings to automatically mount network shares and the user’s Windows home directory when a user logs in.
Use this policy To do this
Automount network shares Specify the network shares to automatically mount when a user logs in. The default network share mount location is User_Home/Network Share.
This policy supports SMB, AFP, and NFS shares. To add a share, click Enabled, then click Add and enter the share in one of the following formats:
keyword://server/share
where:
• keyword is one of smb, nfs, afp
• server is the name or IP address of the server and can include a user or user and password in the form: user:@server or user:password@server.
• share can include spaces and be followed by a subdirectory.
For example, the following are all valid share specifications;:
smb://acme.com/MacUsers
smb://acme.com/Mac Users
smb://acme.com/MacUsers/Shared_resources
smb://jsmith:[email protected]/MacUsers
afp://acme.com/Users_server
nfs://acme.com/MacUsers
nfs://192.168.0.1/MacUsers
Once enabled, this policy takes effect when a user logs out and back in to a computer.
Automount user’s Windows home
Automatically mount the user’s Windows home directory when the user logs in.
Specify the Windows home directory by using the Profile tab for a user in Active Directory Users and Computers (ADUC).
Once enabled, this policy takes effect when a user logs out and back in to a computer.
Administrator’s Guide for Mac OS X 159

Automount Settings
Create alias instead of symbolic link
This group policy is provided for compatibility with Centrify releases earlier than 2015. If you are using release 2015 or later, do not use this group policy.
In releases prior to 2015, the default mount point for network shares was /var/centrify/mnt/user. Starting with release 2015, the default mount point for network shares is User_Home/Network Share.
In Centrify releases prior to 2015, the “Automount network shares” group policy creates symbolic links to the specified shared network directories. However, certain versions of Microsoft Office are unable to save files to a shared folder by using the symbolic link (the link is greyed-out). The “Create alias instead of symbolic link” group policy corrects the problem by creating an alias instead of a symbolic link. In release 2015 or later, because of the new mount location, symbolic links are not required, and this group policy has no effect.
If you enable this group policy, the alias points to network shares that are automatically mounted when a user logs in.
Note The operating system treats an alias as a file, which means that you cannot use the Terminal program to access files or folders that are pointed to by the alias.
Once enabled, this policy takes effect when a user logs out and back in to a computer.
Use this policy To do this
Chapter 8 • Setting user-based policies 160

Custom Settings
Custom SettingsUse the User Configuration > Centrify Settings > Mac OS X Settings > Custom Settings > Install MobileConfig Profiles group policy to install mobile configuration profiles. This policy installs a user profile. To install a device profile, use the same policy in Computer Configuration > Centrify Settings > Mac OS X Settings > Custom Settings.
Use this policy To do this
Install MobileConfig profiles Enable this group policy to install mobile configuration profiles on managed Mac computers.
Note: There is a Computer Configuration version of this policy (which installs device profiles) and a User Configuration version (which installs user profiles).
Before enabling this policy, you must create a directory and copy mobile configuration files to SYSVOL on the domain controller. SYSVOL is a well-known shared directory on the domain computer that stores server copies of public files that must be shared throughout the domain.
Specifically, create the following directory on the domain controller: \\domainName\SYSVOL\domainName\mobileconfig
and copy one or more mobile configuration profile files to this directory. See “Deploy configuration profiles to multiple computers” on page 89 for details on how to do this.
To specify mobile configuration files to install, enable the policy, then click Add. Enter the name of a mobile configuration file that you placed in SYSVOL on the domain controller. Include the .mobileconfig suffix with the name.
If you specify a file that is not in the SYSVOL mobileconfig directory, the profile will not be installed.
If you add new files to the existing list in the group policy, those profiles will be installed — existing profiles will not be touched. If you remove previously specified files, the profiles defined by these files will be uninstalled.
If you add two or more profile files that have the same payloadIdentifier, only one of them will be installed.
If you change the group policy to “Disabled” or “Not Configured”, all existing profiles that were installed previously by the group policy will now be uninstalled from the managed Mac computers.
Administrator’s Guide for Mac OS X 161

Desktop Settings
Desktop SettingsUse the User Configuration > Policies > Centrify Settings > Mac OS X Settings > Desktop Settings group policy to manage the start time for the screen saver from the
Desktop & Screen Saver ( ) system preference on Mac computers. This group policy
corresponds to the Start screen saver option displayed on the Screen Saver pane. For example:
Use this policy To do this
Set computer idle time for starting screen saver
Select the length of time to wait before starting the screen saver. If you enable this group policy, you can specify the number of minutes to wait while a computer is not in use before starting the screen saver. For example, if you want the screen saver to start after a computer has been idle for 10 minutes, you can set Start screen saver to 10 minutes.
Note Disabling this policy does not disable the screen saver. To disable the screen saver, enable this policy and set the value to 0.
Note Although you may specify values greater than 60 minutes, and the screen saver works appropriately, the Macintosh Screen Saver dialog box shows values that are greater than 60 as Never.
Enabling this group policy is the same as selecting when to start the screen saver using the Start screen saver slider in the Desktop & Screen Saver system preference.
Once enabled, this group policy takes effect when users log out and log back in.
Chapter 8 • Setting user-based policies 162

Dock Settings
Dock SettingsUse the User Configuration > Policies > Centrify Settings > Mac OS X Settings > Dock Settings group policies to manage the characteristics of the Dock for Mac users. These settings correspond to the Dock preferences you can manage using the Workgroup Manager. In the Workgroup Manager, the Dock Items pane controls the items placed in the Dock and whether the workgroup Dock is merged with the user’s Dock, and the Dock
Administrator’s Guide for Mac OS X 163
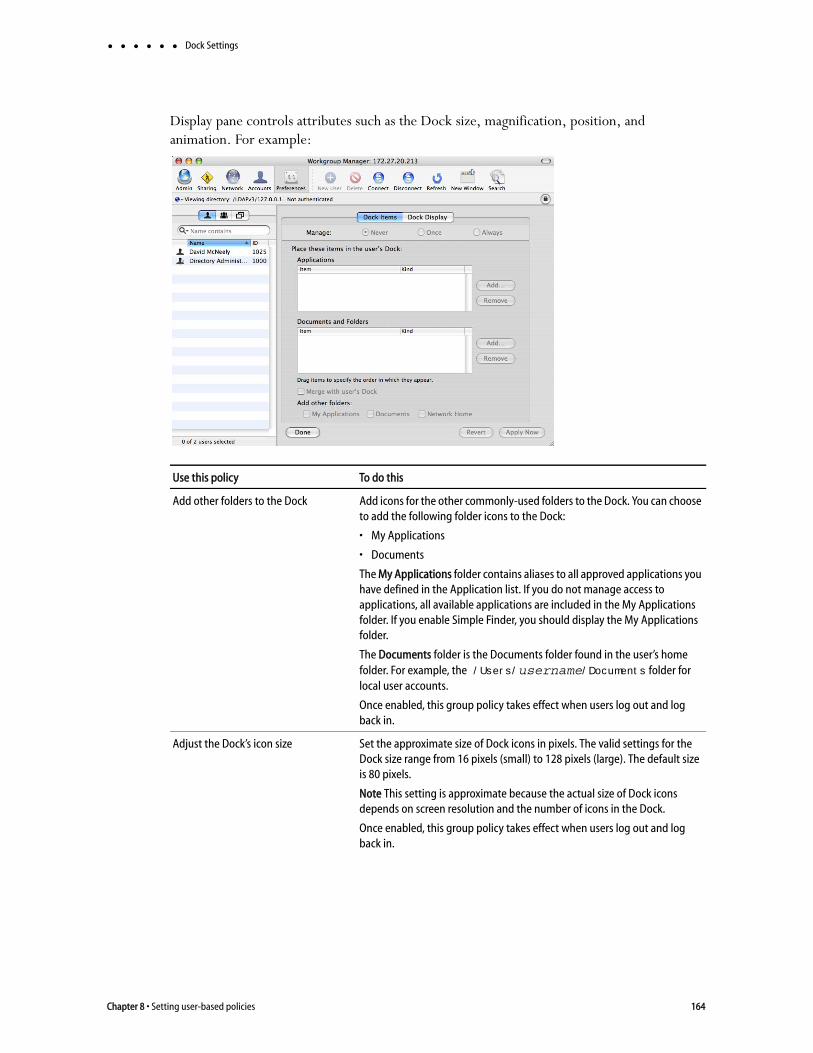
Dock Settings
Display pane controls attributes such as the Dock size, magnification, position, and animation. For example:
Use this policy To do this
Add other folders to the Dock Add icons for the other commonly-used folders to the Dock. You can choose to add the following folder icons to the Dock:
• My Applications
• Documents
The My Applications folder contains aliases to all approved applications you have defined in the Application list. If you do not manage access to applications, all available applications are included in the My Applications folder. If you enable Simple Finder, you should display the My Applications folder.
The Documents folder is the Documents folder found in the user’s home folder. For example, the /Users/username/Documents folder for local user accounts.
Once enabled, this group policy takes effect when users log out and log back in.
Adjust the Dock’s icon size Set the approximate size of Dock icons in pixels. The valid settings for the Dock size range from 16 pixels (small) to 128 pixels (large). The default size is 80 pixels.
Note This setting is approximate because the actual size of Dock icons depends on screen resolution and the number of icons in the Dock.
Once enabled, this group policy takes effect when users log out and log back in.
Chapter 8 • Setting user-based policies 164
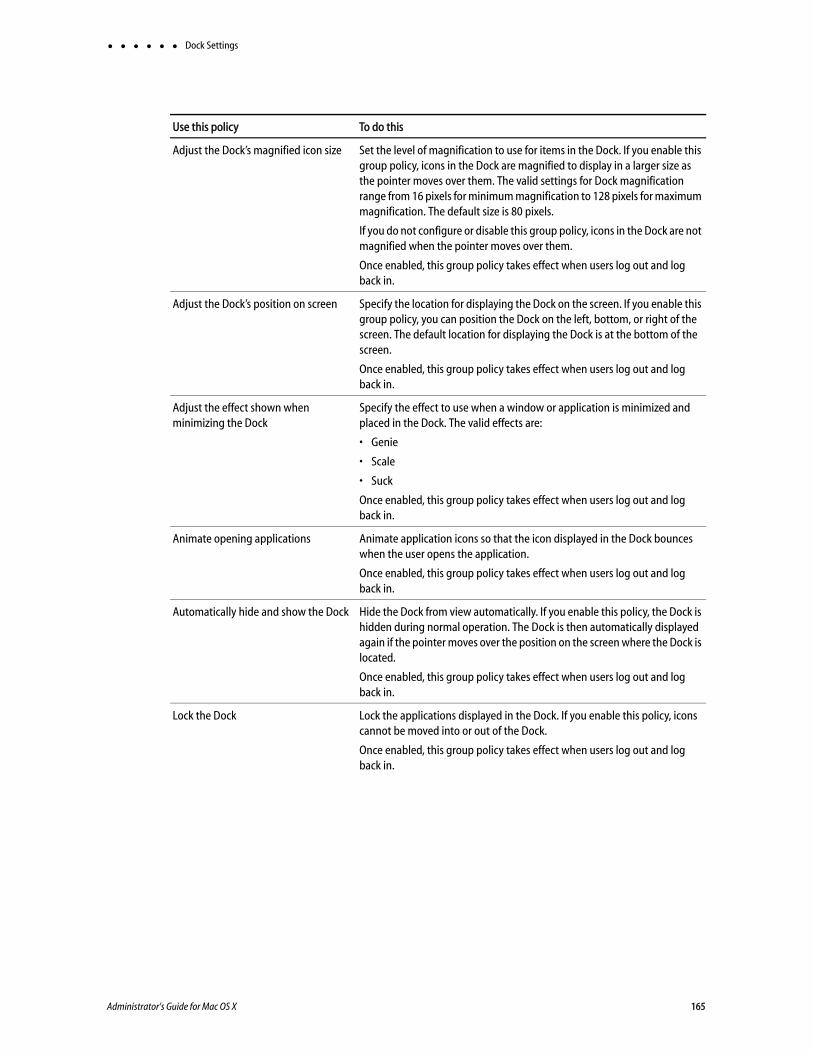
Dock Settings
Adjust the Dock’s magnified icon size Set the level of magnification to use for items in the Dock. If you enable this group policy, icons in the Dock are magnified to display in a larger size as the pointer moves over them. The valid settings for Dock magnification range from 16 pixels for minimum magnification to 128 pixels for maximum magnification. The default size is 80 pixels.
If you do not configure or disable this group policy, icons in the Dock are not magnified when the pointer moves over them.
Once enabled, this group policy takes effect when users log out and log back in.
Adjust the Dock’s position on screen Specify the location for displaying the Dock on the screen. If you enable this group policy, you can position the Dock on the left, bottom, or right of the screen. The default location for displaying the Dock is at the bottom of the screen.
Once enabled, this group policy takes effect when users log out and log back in.
Adjust the effect shown when minimizing the Dock
Specify the effect to use when a window or application is minimized and placed in the Dock. The valid effects are:
• Genie
• Scale
• Suck
Once enabled, this group policy takes effect when users log out and log back in.
Animate opening applications Animate application icons so that the icon displayed in the Dock bounces when the user opens the application.
Once enabled, this group policy takes effect when users log out and log back in.
Automatically hide and show the Dock Hide the Dock from view automatically. If you enable this policy, the Dock is hidden during normal operation. The Dock is then automatically displayed again if the pointer moves over the position on the screen where the Dock is located.
Once enabled, this group policy takes effect when users log out and log back in.
Lock the Dock Lock the applications displayed in the Dock. If you enable this policy, icons cannot be moved into or out of the Dock.
Once enabled, this group policy takes effect when users log out and log back in.
Use this policy To do this
Administrator’s Guide for Mac OS X 165
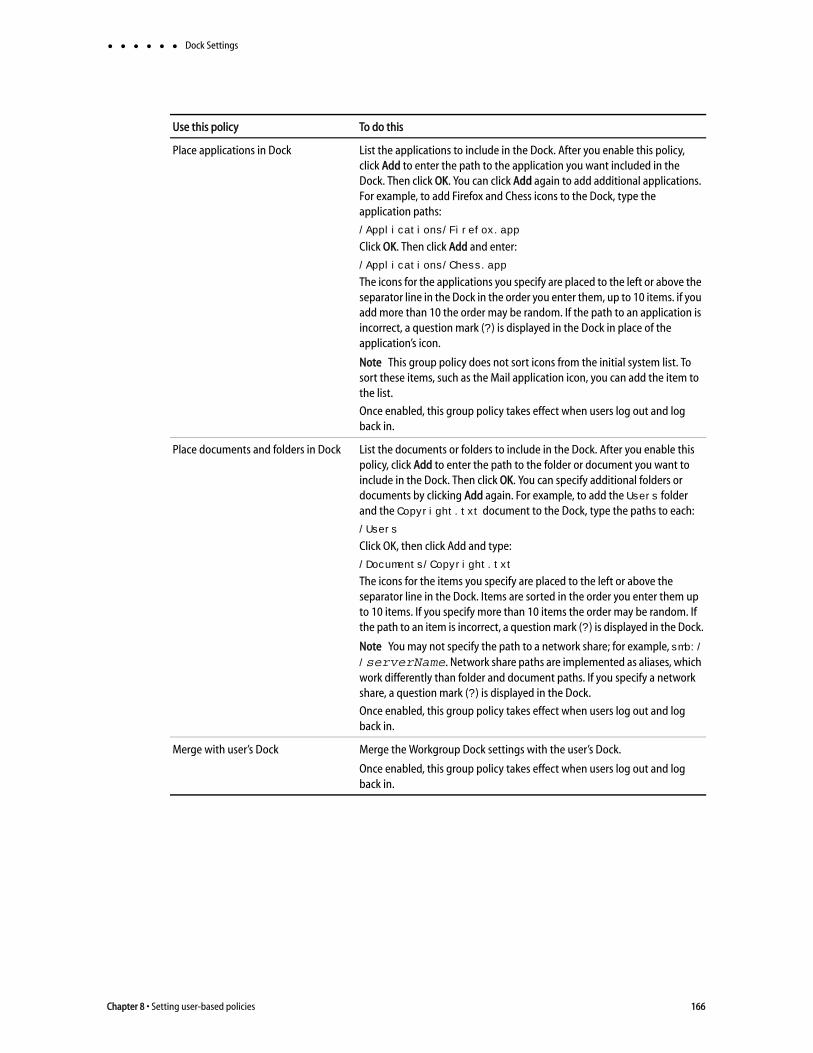
Dock Settings
Place applications in Dock List the applications to include in the Dock. After you enable this policy, click Add to enter the path to the application you want included in the Dock. Then click OK. You can click Add again to add additional applications. For example, to add Firefox and Chess icons to the Dock, type the application paths:
/Applications/Firefox.app
Click OK. Then click Add and enter:
/Applications/Chess.app
The icons for the applications you specify are placed to the left or above the separator line in the Dock in the order you enter them, up to 10 items. if you add more than 10 the order may be random. If the path to an application is incorrect, a question mark (?) is displayed in the Dock in place of the application’s icon.
Note This group policy does not sort icons from the initial system list. To sort these items, such as the Mail application icon, you can add the item to the list.
Once enabled, this group policy takes effect when users log out and log back in.
Place documents and folders in Dock List the documents or folders to include in the Dock. After you enable this policy, click Add to enter the path to the folder or document you want to include in the Dock. Then click OK. You can specify additional folders or documents by clicking Add again. For example, to add the Users folder and the Copyright.txt document to the Dock, type the paths to each:
/Users
Click OK, then click Add and type:
/Documents/Copyright.txt
The icons for the items you specify are placed to the left or above the separator line in the Dock. Items are sorted in the order you enter them up to 10 items. If you specify more than 10 items the order may be random. If the path to an item is incorrect, a question mark (?) is displayed in the Dock.
Note You may not specify the path to a network share; for example, smb://serverName. Network share paths are implemented as aliases, which work differently than folder and document paths. If you specify a network share, a question mark (?) is displayed in the Dock.
Once enabled, this group policy takes effect when users log out and log back in.
Merge with user’s Dock Merge the Workgroup Dock settings with the user’s Dock.
Once enabled, this group policy takes effect when users log out and log back in.
Use this policy To do this
Chapter 8 • Setting user-based policies 166
Finder Settings
Finder SettingsUse the User Configuration> Policies > Centrify Settings > Mac OS X Settings > Finder Settings group policies to configure Finder commands, preferences and views.
The Configure Finder commands policy allows you to control which commands are available in the Apple menu and Finder menus for users.
The Configure Finder preferences policy enables you to specify the type of Finder for the user environment. After enabling the policy, you can choose one of two types from the drop-down list:
Normal Finder applies the standard Mac desktop. This is the default value, and is the environment that all users will have if the policy is not enabled.
Simple Finder restricts users to applications that are in the Dock.
When Simple Finder is enabled, users cannot open applications, open, modify, or delete documents, or create folders in the Finder. They also cannot mount network drives. They can only use items that are in the Dock. Use the Dock Settings policies to configure the Dock; for example, enable Place applications in Dock and Place documents and folders in Dock to control the applications and folders that users can access.
The Configure Finder views policy enables you to control the arrangement and appearance of items on the user’s desktop, in Finder windows, and in the top-level folder of the computer.
Administrator’s Guide for Mac OS X 167

Finder Settings
The Finder Settings policies are as follows:
Use this policy To do this
Configure Finder commands Specify the commands in Finder menus and the Apple menu that are available to users. Select commands from the following list:
• Connect to Server
Select to allow users to connect to a remote server by choosing 'Connect to Server' in the Finder Go menu. Deselect to prevent users from accessing this command.
• Go to iDisk
Select to allow users to connect to an iDisk by choosing 'Go to iDisk' in the Finder Go menu. Deselect to prevent users from accessing this command.
• Eject
Select to allow users to eject discs (for example, CDs, DVDs, floppy disks, or FireWire drives). Deselect to prevent users from ejecting disks.
• Burn Disc
Select to allow user on computers with relevant hardware to burn discs. Deselect to prevent users from burning disks.
• Go to Folder
Select to allow users to open a specific folder by choosing the 'Go to Folder' command in the Finder Go menu. Deselect to prevent users from using the 'Go to Folder' command.
• Restart
Select to allow users to restart the computer they're using, or deselect to prevent them from restarting the computer.
• Shut Down
Select to allow users to shut down the computer they're using, or deselect to prevent them from shutting down the computer.
Once enabled, this group policy takes effect when users log out and back in.
Chapter 8 • Setting user-based policies 168

Finder Settings
Configure Finder preferences Configure Finder preferences, including whether to use normal or Simple Finder, which items to show on the desktop, how a new window behaves, and whether to show filename extensions and the Empty Trash warning.
Select from the following options:
• Finder type
Select the normal Finder or Simple Finder as the user environment. The normal Finder looks and acts like the standard Mac desktop. Simple Finder removes the ability to use a Finder window to access applications or modify files, limiting users' access to only what is in the Dock. In addition, users can't mount network volumes, create folders, or delete files.
• Show these items on the Desktop
Choose whether users see icons for local hard disks, external disks, CDs (DVDs and iPods), and connected servers on the desktop.
If you hide them, icons for disks and servers still appear in the top-level folder when a user clicks the Computer icon in a Finder window's toolbar.
• New Finder window shows
Select Home to show items in the user's home folder, or select Computer to show the top-level folder, which includes local disks and mounted volumes.
• Always open folders in a new window
Select this option to display folder contents in a separate window when a user opens a folder.
• Always open windows in column view
Select this option to display folders in column view, which maintains a consistent view across windows.
• Show warning before emptying the Trash
Select this option to display the normal warning when a user empties the Trash, or deselect it if you don't want users to see this message.
• Always show file extensions
Select this option to show filename extensions (such as .txt or .jpg) that identify the file type; or deselect it to hide filename extensions.
Once enabled, this group policy takes effect when users log out and back in.
Use this policy To do this
Administrator’s Guide for Mac OS X 169

Finder Settings
Configure Finder views Enable this group policy to control Finder views, for example the arrangement and appearance of items on a user's desktop, in Finder windows, and in the top-level folder of the computer.
The options in Desktop View allow you to adjust the size and arrangement of icons on the desktop.
Use Icon Size to adjust the icon size.
Use Icon Arrangement to specify how to arrange icons:
• To keep items aligned in rows and columns, select Snap to grid.
• To arrange items by criteria such as name or type (for example, all folders grouped together), select Keep arranged by.
Items in Finder windows are viewed in a list or as icons and you can control aspects of how these items look.
Default View settings control the overall appearance of all Finder windows. Computer View settings control the view for the top-level computer folder, showing hard disks and disk partitions, external hard drives, mounted volumes, and removable media (such as CDs or DVDs).
In Icon View, use Icon Size to adjust the size of icons.
Use Icon Arrangement to specify how to arrange icons:
• To keep items aligned in rows and columns, select Snap to grid.
• To arrange items by criteria such as name or type (for example, all folders grouped together), select Keep arranged by.
In List View, set the following:
Select relative dates to show an item's creation or modification date relative to today, rather than as a fixed date; for example, Today, or Yesterday, instead of 3/24/10.
Select Calculate folder sizes to calculate the total size of each folder shown in a Finder window, which can take a lot of time depending on the size of the folder.
In Icon Size, select Select small or big for the size of icons in list view.
Once enabled, this group policy takes effect when users log out and back in.
Use this policy To do this
Chapter 8 • Setting user-based policies 170

Folder Redirection
Folder Redirection Use the User Configuration > Policies > Centrify Settings > Mac OS X Settings > Folder Redirection group policies to redirect specified folders from a network home directory to the local computer.
When you set up a network home directory, all home directory files are written to the network share. Some folders, such as /Library/Caches, get heavy I/O from Apple and third-party applications, which may cause performance issues. The folder redirection policies enable you to redirect specific folders, such as /Library/Caches, to the local computers, which can result in dramatic performance improvements.
Folder Redirection contains two folders with identical sets of four policies:
Folder redirection actions at login time applies the specified policy when the user logs in. For example, at login delete a folder in the network home directory and create a symbolic link to it on the local computer.
Folder redirection actions at logout time applies the specified policy when the user logs out. For example, at logout, delete the symbolic link on the local computer (created at login) and restore the original folder to the network home directory.
After enabling the policy, click Add, then enter the following:
Path The path to the folder on the network share. You do not need to specify the actual network share location — you can simply use the tilde (~) for the user’s home directory; for example, ~/Library/Caches specifies the /Library/Caches directory in the user’s network home directory.
Link The location to create or delete on the local computer. For example:
/tmp/Library/Caches
If you wish, you can use the syntax %@ to specify the logged in user’s name. For example:
/tmp/%@/Library/Caches
If cain is the logged in user, the folder that is created is:
/tmp/cain/Library/Caches
Administrator’s Guide for Mac OS X 171
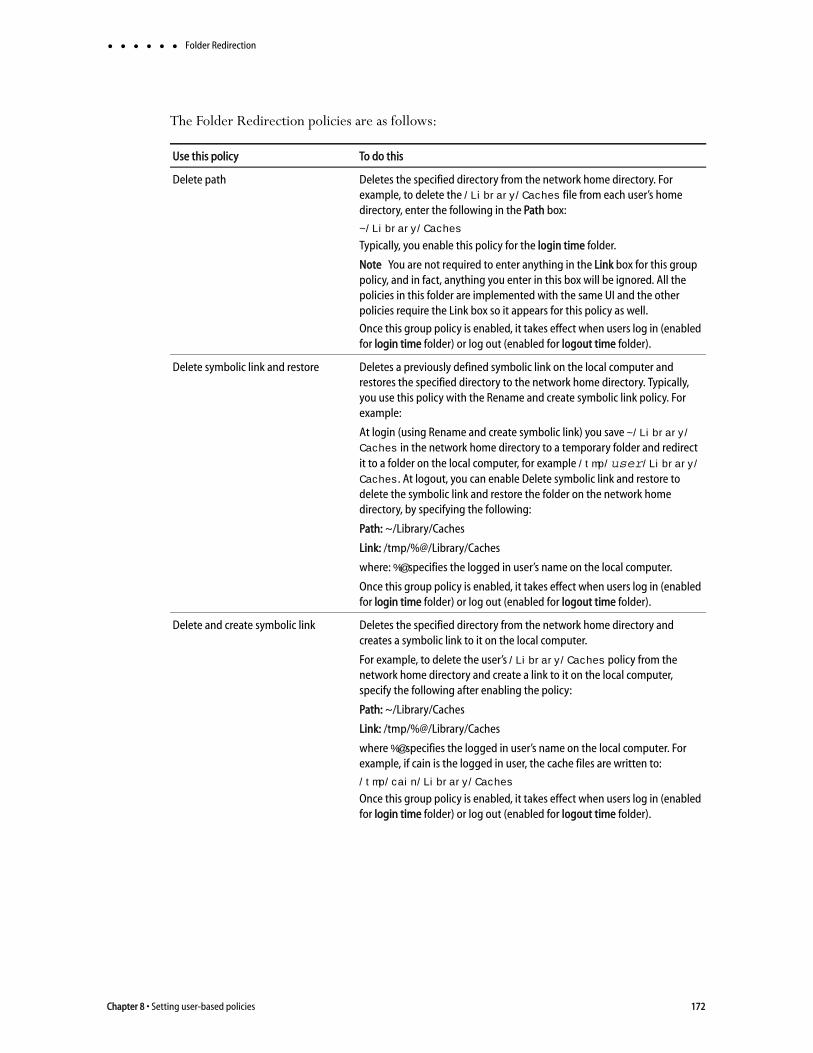
Folder Redirection
The Folder Redirection policies are as follows:
Use this policy To do this
Delete path Deletes the specified directory from the network home directory. For example, to delete the /Library/Caches file from each user’s home directory, enter the following in the Path box:
~/Library/Caches
Typically, you enable this policy for the login time folder.
Note You are not required to enter anything in the Link box for this group policy, and in fact, anything you enter in this box will be ignored. All the policies in this folder are implemented with the same UI and the other policies require the Link box so it appears for this policy as well.
Once this group policy is enabled, it takes effect when users log in (enabled for login time folder) or log out (enabled for logout time folder).
Delete symbolic link and restore Deletes a previously defined symbolic link on the local computer and restores the specified directory to the network home directory. Typically, you use this policy with the Rename and create symbolic link policy. For example:
At login (using Rename and create symbolic link) you save ~/Library/Caches in the network home directory to a temporary folder and redirect it to a folder on the local computer, for example /tmp/user/Library/Caches. At logout, you can enable Delete symbolic link and restore to delete the symbolic link and restore the folder on the network home directory, by specifying the following:
Path: ~/Library/Caches
Link: /tmp/%@/Library/Caches
where: %@ specifies the logged in user’s name on the local computer.
Once this group policy is enabled, it takes effect when users log in (enabled for login time folder) or log out (enabled for logout time folder).
Delete and create symbolic link Deletes the specified directory from the network home directory and creates a symbolic link to it on the local computer.
For example, to delete the user’s /Library/Caches policy from the network home directory and create a link to it on the local computer, specify the following after enabling the policy:
Path: ~/Library/Caches
Link: /tmp/%@/Library/Caches
where %@ specifies the logged in user’s name on the local computer. For example, if cain is the logged in user, the cache files are written to:
/tmp/cain/Library/Caches
Once this group policy is enabled, it takes effect when users log in (enabled for login time folder) or log out (enabled for logout time folder).
Chapter 8 • Setting user-based policies 172

Folder Redirection
Rename and create symbolic link Renames the specified directory in the network home directory to a temporary folder and creates a symbolic link to it on the local computer.
For example, to rename the user’s /Library/Caches policy on the network home directory and create a link to it on the local computer, specify the following after enabling the policy for the login time folder:
Path: ~/Library/Caches
Link: /tmp/%@/Library/Caches
where %@ specifies the logged in user’s name on the local computer. For example, if cain is the logged in user, the cache files are written to:
/tmp/cain/Library/Caches
To restore the original /Library/Caches directory, use the Delete symbolic link and restore policy (enabled for the logout time folder).
Once this group policy is enabled, it takes effect when users log in (enabled for login time folder) or log out (enabled for logout time folder).
Use this policy To do this
Administrator’s Guide for Mac OS X 173
Import Settings
Import SettingsMac OS X uses plist files to store application and other preferences. Use the User Configuration > Policies > Centrify Settings > Mac OS X Settings > Import Settings group policies to import plist files to customize your preferences:
Import plist files. This group policy allows you to import preferences from another computer to computers in your Centrify-managed domain. To do so you:
a Copy the plist files you want to use to the system volume on the domain controller.
b Use the Import plist files group policy to import the plist files to computers in the domain.
This group policy automatically processes plist files to extract MCX settings when the files are imported.
Import MCX setting plist files. This group policy is similar to the Import plist file group policy, except that it does not process any data from the inputted plist files. This group policy copies the exact content (that is, the “raw” content) from the plist file and imports it to the Active Directory user record.
When you import the plist files, Centrify copies them to the appropriate directories on the local computers to implement the preferences that they control.
You can gather and copy plist files from multiple computers and paste them to the sysvol directory on the domain controller, but a more structured approach is to set up a preferences ‘template’ computer, that is, a computer that is set up with your desired preferences. Then you can copy the appropriate plist files to sysvol on the domain controller. Finally, you can use either of the group policies described here to import the plist files to Centrify-managed computers in the domain.
Mac OS X stores plist files in the /Library/Preferences directory and in the /Users/userName/Library/Preferences directory.
Chapter 8 • Setting user-based policies 174

Import Settings
The following table shows specifics of using these group policies.
Use this policy To do this
Import plist files Specify the names of plist files to import from the system volume (SYSVOL) — similar to importing plist files in Mac Workgroup Manager. By default, the system volume folder is at: \\domain\SYSVOL\domain\plist.
Before enabling this policy, you should copy all the plist files to import to the system volume (sysvol) on the domain controller.
To add a file, select Enabled, click Add, then type a filename.
The path you type in plist file is relative to \\domain\SYSVOL\domain\plist. For example, if the domain name is ajax.org and you enter a plist file named com.apple.MCX.plist, the file that gets imported is:
\\ajax.org\sysvol\ajax.org
\com.apple.MCX.plist
You can specify additional relative directories in the path, if needed.
Once this group policy is enabled, it takes effect when users log out and log back in.
Administrator’s Guide for Mac OS X 175

Import Settings
Import MCX setting plist files Enable this group policy to import raw MCX settings plist files from SYSVOL. By default the folder is \\<domain>\SYSVOL\<domain>\mcxplist, similar to importing plist files in Mac Workgroup Manager.
The plist file path that you specify is relative to this path: \\<domain>\SYSVOL\<domain>\mcxplist
For example, if you specify this path:
com.apple.MCX.plist
the following plist file is imported:
\\<domain>\SYSVOL\<domain>\mcxplist\com.apple.MCX.plist
This group policy is similar to "Import plist files". However, instead of extracting MCX settings from the plist file like "Import plist files" does, this policy imports the entire plist file without processing it.
An example plist file format is as follows:
<?xml version="1.0" encoding="UTF-8"?>
<!DOCTYPE plist PUBLIC "-//Apple//DTD PLIST 1.0//EN" "http://www.apple.com/DTDs/PropertyList-1.0.dtd">
<plist version="1.0">
<dict>
<key>mcx_application_data</key>
<dict>
<key>TARGET</key>
<dict>
<key>Forced</key>
<array>
<dict>
Settings
</dict>
</array>
</dict>
</dict>
</dict>
</plist<
In this example, TARGET is the targeted MCX settings (such as com.apple.dock or com.apple.finder)
The recommended way to obtain the plist file with the correct format is by using the dscl command, and reading the MCX settings attribute of the user object that has the same MCX settings configured. Then copy the exact MCX settings and paste them into a plist file.
For example:
dscl /CentrifyDC read /Users/XXXX MCXSettings
where XXXX is an Active Directory user with the desired MCX settings.
Use this policy To do this
Chapter 8 • Setting user-based policies 176

Login Settings
Login SettingsUse the User Configuration > Policies > Centrify Settings > Mac OS X Settings > Login Settings group policy to specify frequently used items, such as applications, folders, or server connections to automatically open when a user logs in.
After enabling this policy, you can do the following:
Use the Add button to specify the path to applications to open.
In the Network Home area, use the Add button to specify URLs for servers to connect to; use the check box to specify whether to automatically connect the logged in user to the specified servers.
Use the other check boxes to control whether users have the ability to add or remove login items.
The following table shows specifics of using this group policy.
Administrator’s Guide for Mac OS X 177

Login Settings
Note Only the Login items area is visible when you first open the properties page for the group policy. Use the scroll bar to see the Network share area and other items that you can configure with this policy.
Use this policy To do this
Enable login items Specify the names of applications, folders, and server locations to open automatically when a user logs in. Select Enable, then do any or all of the following:
• Login items. To add an application to open automatically, click Add, then type the path to the application; for example:
/Applications/TextEdit.app
To initially hide the application, select Hide. The application will open, but its window and menu bar remain hidden until the user activates the application (for example, by clicking the application icon in the doc).
Click OK to save the item you entered. You can click Add as often as necessary to add multiple applications. You can also select an item in the window and click Edit to change it, or Remove to delete it.
• Network share. To add access to a network share, click Add, then type the URL in one of the following formats:
smb://server/sharesmb://server/hidden$smb://server/share/subdirsmb://user:password@server/sharesmb://user:@server/shareafp://server/sharenfs://server/sharenfs://192.168.0.1/shareTo automatically connect the user to the share with the user's login name and password, select Authenticate selected share point with user’s login name and password.
Note If you uncheck this option, the share name must comply with RFC1738 - Uniform Resource Locators (URL), which specifies that special characters need to be encoded, for example, by using %20 instead of a space.
Chapter 8 • Setting user-based policies 178

Login Settings
Enable login items(continued)
If the network share can be authenticated using Kerberos, this option can be ignored. If the network share cannot be authenticated using Kerberos, and this option is unchecked, then the user will be prompted for a username and password.
If a username is specified in the URL for the network share, then checking this option will still mount the share as the login user, while deselecting this option will mount the share as the user specified in the URL. For example, if network share is smb://mount_user:password@server/share, checking the option will mount the share as login_user, while deselecting the option will mount the share as mount_user.
Click OK to save the item you entered. You can click Add as often as necessary to add multiple shares. You can also select an item in the window and click Edit to change it, or Remove to delete it.
• Select User may add and remove additional items to allow users to add items to the list and remove items from the list. Deselect this box to prevent users from adding items or removing the items that you have specified. Note that they can remove login items that they specified on their own.
• Select User may press Shift to keep items from opening to allow user’s to stop items from opening by holding down the Shift key during login until the Finder appears on the desktop. Deselect this option to prevent users from stopping applications from opening automatically.
Once enabled, this group policy takes effect when users log out and log back in.
Use this policy To do this
Administrator’s Guide for Mac OS X 179

Media Access Settings
Media Access SettingsUse the User Configuration > Policies > Centrify Settings > Mac OS X Settings > Media Access Settings group policies to manage the access to discs and other media for Mac users. These group policies enable you to control access to specific types of media, such as CDs or DVDs, but you cannot restrict access to specific discs or to specific items, such as music or movies, on a disc type users are permitted to access. These settings correspond to the Media Access preferences you can manage using the Workgroup Manager. For example:
Use this policy To do this
Permit/prohibit access: CDs and CD-ROMs
Control whether users can access data and applications on CDs and CD-ROMs. The valid options are:
• allow to allow access to CDs and CD-ROMs without authentication.
• allow, require authentication to require users to provide credentials for authentication before allowing them access to CDs and CD-ROMs.
• deny to prevent users from accessing any data or applications on CDs and CD-ROMs.
Once enabled, this group policy takes effect when users log out and log back in.
Permit/prohibit access: DVDs Control whether users can access data and applications on DVDs. The valid options are:
• allow to allow access to DVDs without authentication.
• allow, require authentication to require users to provide credentials for authentication before allowing them access to DVDs.
• deny to prevent users from accessing any data or applications on DVDs.
Once enabled, this group policy takes effect when users log out and log back in.
Chapter 8 • Setting user-based policies 180

Media Access Settings
Permit/prohibit access: Recordable Discs
Control whether users can record or access data and applications on recordable discs. The valid options are:
• allow to allow access to recordable discs without authentication.
• allow, require authentication to require users to provide credentials for authentication before allowing them access to recordable discs.
• deny to prevent users from accessing any data or applications on recordable discs.
Allowing users access to recordable discs enables users to burn CDs and DVDs. Recordable discs can be blank or rewritable disc media.
Once enabled, this group policy takes effect when users log out and log back in.
Permit/prohibit access: Internal Discs Control whether users can access data and applications on internal discs. The valid options are:
• allow to allow read and write access to internal discs without authentication.
• allow, read-only to allow read-only access to the media.
• allow, require authentication to require users to provide credentials for authentication before allowing them access to the media.
• allow, require authentication, read-only to require users to provide credentials for authentication before allowing them access to internal discs, and grant read-only access to the media if authentication is successful.
• deny to prevent users from accessing any data or applications on internal discs.
Once enabled, this group policy takes effect when users log out and log back in.
Use this policy To do this
Administrator’s Guide for Mac OS X 181

Media Access Settings
Permit/prohibit access: External Discs Control whether users can access data and applications on external discs. External disks include floppy disks, FireWire drives, and all other external storage devices except CDs and DVDs. The valid options are:
• allow to allow read and write access to external discs without authentication.
• allow, read-only to allow read-only access to external discs.
• allow, require authentication to require users to provide credentials for authentication before allowing them access to external discs.
• allow, require authentication, read-only to require users to provide credentials for authentication before allowing them access to external discs, and grant read-only access to the media if authentication is successful.
• deny to prevent users from accessing any data or applications on external discs.
Once enabled, this group policy takes effect when users log out and log back in.
Eject all removable media at logout Control whether removable media, such as CDs, DVDs, Zip disks, or FireWire drives, are automatically ejected when users log out. If you enable this group policy, CDs, DVDs, and other disk media are automatically ejected when users log out to ensure removable media is properly disconnected and put away when users end their sessions.
Once enabled, this group policy takes effect when users log out and log back in.
Use this policy To do this
Chapter 8 • Setting user-based policies 182

Mobility Settings
Mobility SettingsUse the User Configuration > Policies > Centrify Settings > Mac OS X Settings > Mobility Settings group policies to manage the synchronization rules for mobile Mac OS X users. These settings correspond to the Mobility preferences you can manage using the Workgroup Manager. The group policy categories correspond to panes in the Workgroup Manager. For example:
The user interface for mobility settings differs significantly between different versions of Mac OS X. Therefore, separate mobility settings group policies are provided for each supported operating system. In addition, to support existing installations that configured group policies by using a previous centrifydc_mac_settings template, a set of legacy mobility settings is provided.
The Use version specific settings group policy determines whether to use legacy settings or platform-specific mobility settings. This group policy is enabled by default. If you do not set it to Disabled or Not configured, legacy settings are used.
Administrator’s Guide for Mac OS X 183
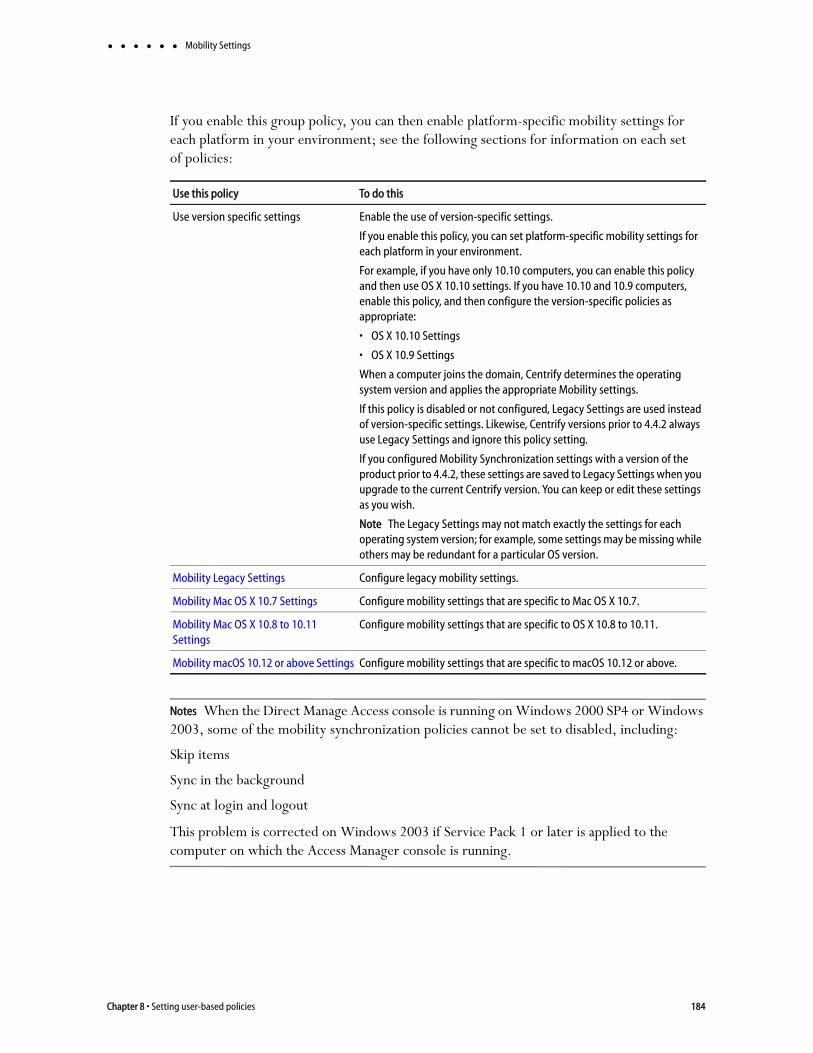
Mobility Settings
If you enable this group policy, you can then enable platform-specific mobility settings for each platform in your environment; see the following sections for information on each set of policies:
Notes When the Direct Manage Access console is running on Windows 2000 SP4 or Windows 2003, some of the mobility synchronization policies cannot be set to disabled, including:
Skip items
Sync in the background
Sync at login and logout
This problem is corrected on Windows 2003 if Service Pack 1 or later is applied to the computer on which the Access Manager console is running.
Use this policy To do this
Use version specific settings Enable the use of version-specific settings.
If you enable this policy, you can set platform-specific mobility settings for each platform in your environment.
For example, if you have only 10.10 computers, you can enable this policy and then use OS X 10.10 settings. If you have 10.10 and 10.9 computers, enable this policy, and then configure the version-specific policies as appropriate:
• OS X 10.10 Settings
• OS X 10.9 Settings
When a computer joins the domain, Centrify determines the operating system version and applies the appropriate Mobility settings.
If this policy is disabled or not configured, Legacy Settings are used instead of version-specific settings. Likewise, Centrify versions prior to 4.4.2 always use Legacy Settings and ignore this policy setting.
If you configured Mobility Synchronization settings with a version of the product prior to 4.4.2, these settings are saved to Legacy Settings when you upgrade to the current Centrify version. You can keep or edit these settings as you wish.
Note The Legacy Settings may not match exactly the settings for each operating system version; for example, some settings may be missing while others may be redundant for a particular OS version.
Mobility Legacy Settings Configure legacy mobility settings.
Mobility Mac OS X 10.7 Settings Configure mobility settings that are specific to Mac OS X 10.7.
Mobility Mac OS X 10.8 to 10.11 Settings
Configure mobility settings that are specific to OS X 10.8 to 10.11.
Mobility macOS 10.12 or above Settings Configure mobility settings that are specific to macOS 10.12 or above.
Chapter 8 • Setting user-based policies 184

Mobility Settings
Mobility Legacy Settings
When you upgrade from a version of Centrify prior to 4.4.2, your Mobility Synchronization settings are saved to Legacy Settings. You can keep or edit the individual legacy mobility group policy settings as you wish.
Note The legacy settings might not match exactly the settings for each operating system version; for example, some settings may be missing while others may be redundant for a particular OS version.
Use this policy To do this
Enable/disable synchronization Create mobile accounts for users automatically and synchronize mobile accounts for offline use. If you enable this policy, a mobile account is created the next time the user logs into the network account.
Check the Create mobile account even if user does not have a network home directory option to create mobile accounts automatically for users the next time they log in to the Mac. This applies to all users, including users who do not have a network home directory.
Check the Require confirmation before creating a mobile account option if you want the user to be prompted to confirm the creation of the mobile account.
Check Encrypt contents with FileVault to encrypt the mobile home directory using the Mac FileVault system.
Note FileVault protection can only be applied when a new mobile user is created at login. FileVault protection cannot encrypt an existing mobile-user home directory.
Select one of the computer master password options. The computer master password is a safety feature that allows you to unlock the FileVault disk image if the Active Directory user forgets their password:
• Use computer master password, if available — With this option checked, the mobile account will be created and FileVault protection applied whether or not a computer master password is available.
• Require computer master password — With this option checked, the mobile user account will only be created if a master password is available for the computer. You can create a master password by clicking: System Preferences > Security > FileVault > Set Master Password.
This group policy corresponds to settings you make by opening Mobility preferences, then clicking the Synchronization pane in the Workgroup Manager.
Once enabled, this group policy takes effect when users log out and log back in.
Synchronization Rules: Background Sync
See “Setting synchronization rules for background synchronization” on page 186 for details on the policies in this folder.
Specify the folders to synchronize in the background for users with mobile accounts. You can also choose to skip synchronization for items matching the criteria you define.
Group policies in this category correspond to settings you make by opening Mobility preferences, clicking Rules, then clicking the Background Sync pane in the Workgroup Manager.
Administrator’s Guide for Mac OS X 185

Mobility Settings
Setting synchronization rules for background synchronization
Use the group policies in the Synchronization Rules: Background Sync category to choose the folders that should be synchronized in the background for users with mobile
Synchronization Rules: Login & Logout Sync
See “Setting synchronization rules for login and logout” on page 188 for details on the policies in this folder.
Specify the folders to synchronize at login and logout for users with mobile accounts. You can also choose to skip synchronization for items matching the criteria you define.
Group policies in this category correspond to settings you make by opening Mobility preferences, clicking Rules, then clicking the Login & Logout Sync pane in the Workgroup Manager.
Synchronization Rules: Options
See “Setting synchronization rules for manual or automatic synchronization” on page 191 for details on the policies in this folder.
Select whether you want to synchronize background folders manually or automatically at a specific interval.
Group policies in this category correspond to settings you make by opening Mobility preferences, clicking Rules, then clicking the Options pane in the Workgroup Manager.
Use this policy To do this
Chapter 8 • Setting user-based policies 186

Mobility Settings
accounts. You can also use the Skip these items group polices to define criteria for folders that should not be synchronized in the background.
Use this policy To do this
Enable/disable background synchronization rules
Enable or disable background synchronization for mobile user accounts.
You can set the following options with this policy:
• Check Merge with user’s settings if you want items selected by the user for background synchronization to be added to the synchronization list.
• Check Synchronize user’s home directory if you want to synchronize the user’s home directory when background synchronization takes place.
• Check Skip preset items if you want to automatically skip synchronization for items that usually do not require synchronization. Selecting this option enables the Skip items whose full path is policy with a default list of items to skip.
If you select the Skip preset items option, the Skip items whose full path is policy is configured by default to skip the following items:
~/Library
~/.Trash
Once enabled, this group policy takes effect when users log out and log back in.
Administrator’s Guide for Mac OS X 187

Mobility Settings
Setting synchronization rules for login and logout
Use the group policies in the Synchronization Rules: Login & Logout Sync category to choose the folders that should be synchronized when users with mobile accounts login
Adjust items that will be synchronized in the background
Specify the folders to synchronize in the background for users with mobile accounts.
If you enable this group policy, click Add and type a relative path to the files and folders that should be synchronized, then click OK. The path should not start with the slash (/) character. If the path you specify does not start with the relative path designation (~), the client adds ~/ to the front of the path. You can specify multiple paths by separating each path with a comma, or by clicking Add and typing a path multiple times. For example:
~/.bash_profile,~/Documents/offline
This policy requires the Enable/disable background synchronization rules policy to be enabled.
Once this group policy is enabled, it takes effect when users log out and log back in.
Skip these items Set the criteria to identify folders that should not be synchronized in the background for users with mobile accounts. These group policies allow you to specify a string that identifies files and folders to skip during synchronization:
• Use the Skip items that start with policy to skip items that start with the specified string. The string should not contain the slash (/) character.
• Use the Skip items that end with policy to skip items that end with the specified string. The string should not contain the slash (/) character.
• Use the Skip items whose name contains policy to skip items that contain the specified string. The string should not contain the slash (/) character.
• Use the Skip items whose name is policy to skip items that exactly match the specified string. The string should not contain the slash (/) character.
• Use the Skip items whose full path is policy to skip all items the specified directory. For example, if you specify ~/Library, no items in ~/Library directory will be synchronized.
• Use the Skip items whose partial path matches policy to skip items with a partial path that matches the specified string.
If you enable any of these group policies, click Show, then click Add and type a string, for example Users or /Users,~/Library, then click OK.
These policies require the Enable/disable background synchronization rules policy to be enabled.
Note When the Access Manager console is running on Windows 2000 SP4 or Windows 2003, this policy cannot be set to disabled. This problem is corrected if Service Pack 1 or later is applied to the computer on which the Access Manager console is running.
Once any of there policies are enabled, they take effect when users log out and log back in.
Use this policy To do this
Chapter 8 • Setting user-based policies 188
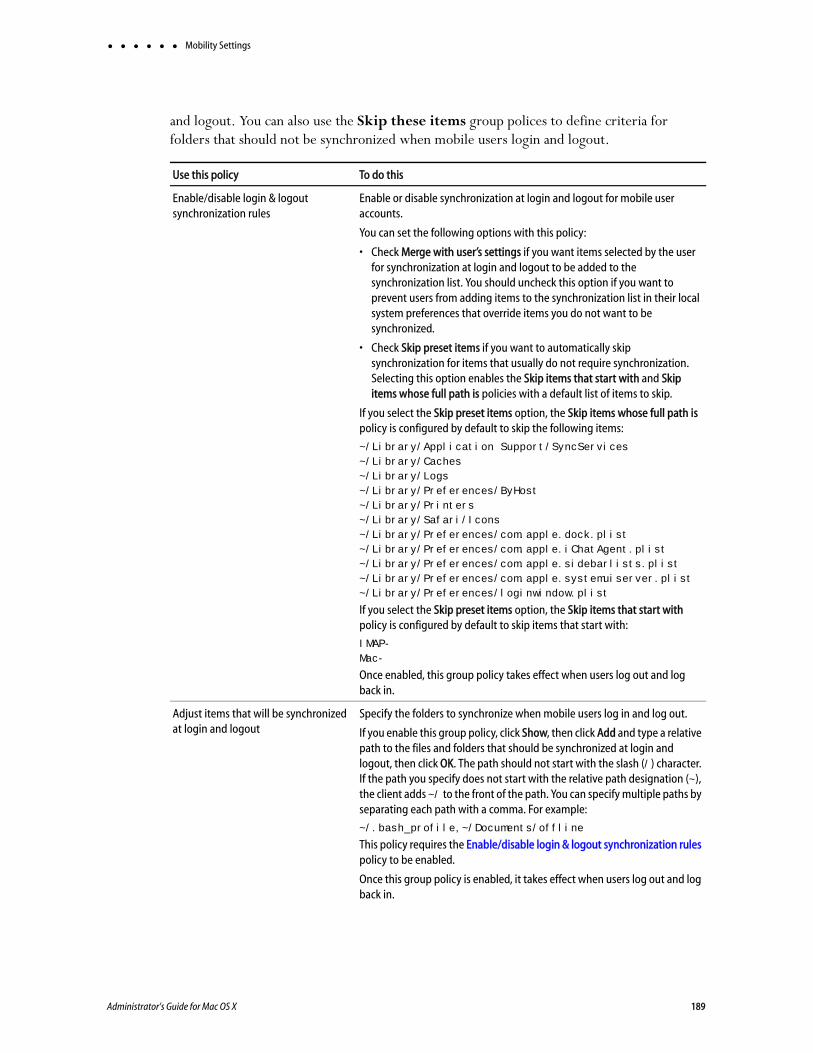
Mobility Settings
and logout. You can also use the Skip these items group polices to define criteria for folders that should not be synchronized when mobile users login and logout.
Use this policy To do this
Enable/disable login & logout synchronization rules
Enable or disable synchronization at login and logout for mobile user accounts.
You can set the following options with this policy:
• Check Merge with user’s settings if you want items selected by the user for synchronization at login and logout to be added to the synchronization list. You should uncheck this option if you want to prevent users from adding items to the synchronization list in their local system preferences that override items you do not want to be synchronized.
• Check Skip preset items if you want to automatically skip synchronization for items that usually do not require synchronization. Selecting this option enables the Skip items that start with and Skip items whose full path is policies with a default list of items to skip.
If you select the Skip preset items option, the Skip items whose full path is policy is configured by default to skip the following items:
~/Library/Application Support/SyncServices
~/Library/Caches
~/Library/Logs
~/Library/Preferences/ByHost
~/Library/Printers
~/Library/Safari/Icons
~/Library/Preferences/com.apple.dock.plist
~/Library/Preferences/com.apple.iChatAgent.plist
~/Library/Preferences/com.apple.sidebarlists.plist
~/Library/Preferences/com.apple.systemuiserver.plist
~/Library/Preferences/loginwindow.plist
If you select the Skip preset items option, the Skip items that start with policy is configured by default to skip items that start with:
IMAP-
Mac-
Once enabled, this group policy takes effect when users log out and log back in.
Adjust items that will be synchronized at login and logout
Specify the folders to synchronize when mobile users log in and log out.
If you enable this group policy, click Show, then click Add and type a relative path to the files and folders that should be synchronized at login and logout, then click OK. The path should not start with the slash (/) character. If the path you specify does not start with the relative path designation (~), the client adds ~/ to the front of the path. You can specify multiple paths by separating each path with a comma. For example:
~/.bash_profile,~/Documents/offline
This policy requires the Enable/disable login & logout synchronization rules policy to be enabled.
Once this group policy is enabled, it takes effect when users log out and log back in.
Administrator’s Guide for Mac OS X 189

Mobility Settings
Skip these items Set the criteria to identify folders that should not be synchronized when mobile users log in and log out. These group policies allow you to specify a string that identifies files and folders to skip during synchronization at login and logout:
• Use the Skip items that start with policy to skip items that start with the specified string. The string should not contain the slash (/) character.
• Use the Skip items that end with policy to skip items that end with the specified string. The string should not contain the slash (/) character.
• Use the Skip items whose name contains policy to skip items that contain the specified string. The string should not contain the slash (/) character.
• Use the Skip items whose name is policy to skip items that exactly match the specified string. The string should not contain the slash (/) character.
• Use the Skip items whose full path is policy to skip all items in the specified directory. For example, if you specify ~/Library, no items in ~/Library directory will be synchronized. Note that this policy applies to all items in the specified directory, but not to items in subdirectories. To skip items in subdirectories, either explicitly add the subdirectories; for example:
~/Library/Caches, ~/Library/Logs
or use the next policy, Skip items whose partial path matches, which will skip items in any directory whose path includes the specified string.
• Use the Skip items whose partial path matches policy to skip items with a partial path that matches the specified string. For example,
~/Library
skips items in ~/Library and in all its subdirectories; or:~/Caches
skips items in ~/Library/Caches, ~/Users/jrich/Caches, and so on.
If you enable any of these group policies, click Add and type a string, for example Users or /Users,~/Library, then click OK.
These policies require the Enable/disable login & logout synchronization rules policy to be enabled.
Note When the Access Manager console is running on Windows 2000 SP4 or Windows 2003, this policy cannot be set to disabled. This problem is corrected if Service Pack 1 or later is applied to the computer on which the Access Manager console is running.
Once any of these policies are enabled, they take effect when users log out and log back in.
Use this policy To do this
Chapter 8 • Setting user-based policies 190
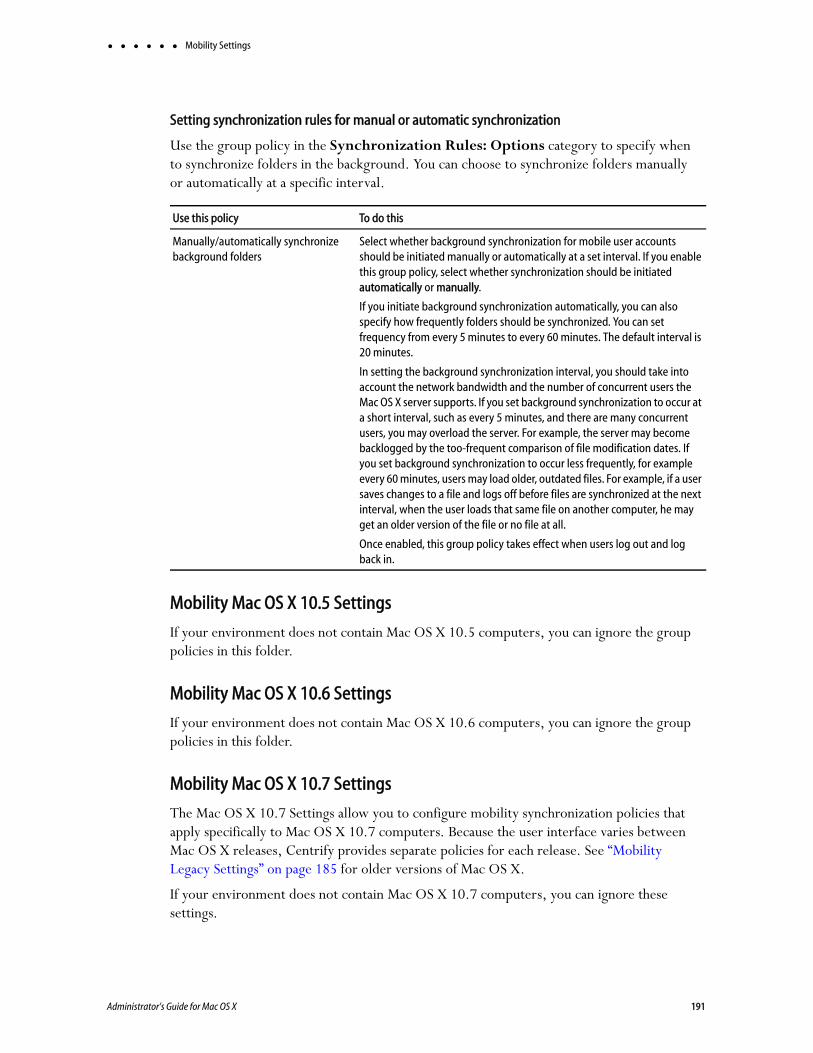
Mobility Settings
Setting synchronization rules for manual or automatic synchronization
Use the group policy in the Synchronization Rules: Options category to specify when to synchronize folders in the background. You can choose to synchronize folders manually or automatically at a specific interval.
Mobility Mac OS X 10.5 Settings
If your environment does not contain Mac OS X 10.5 computers, you can ignore the group policies in this folder.
Mobility Mac OS X 10.6 Settings
If your environment does not contain Mac OS X 10.6 computers, you can ignore the group policies in this folder.
Mobility Mac OS X 10.7 Settings
The Mac OS X 10.7 Settings allow you to configure mobility synchronization policies that apply specifically to Mac OS X 10.7 computers. Because the user interface varies between Mac OS X releases, Centrify provides separate policies for each release. See “Mobility Legacy Settings” on page 185 for older versions of Mac OS X.
If your environment does not contain Mac OS X 10.7 computers, you can ignore these settings.
Use this policy To do this
Manually/automatically synchronize background folders
Select whether background synchronization for mobile user accounts should be initiated manually or automatically at a set interval. If you enable this group policy, select whether synchronization should be initiated automatically or manually.
If you initiate background synchronization automatically, you can also specify how frequently folders should be synchronized. You can set frequency from every 5 minutes to every 60 minutes. The default interval is 20 minutes.
In setting the background synchronization interval, you should take into account the network bandwidth and the number of concurrent users the Mac OS X server supports. If you set background synchronization to occur at a short interval, such as every 5 minutes, and there are many concurrent users, you may overload the server. For example, the server may become backlogged by the too-frequent comparison of file modification dates. If you set background synchronization to occur less frequently, for example every 60 minutes, users may load older, outdated files. For example, if a user saves changes to a file and logs off before files are synchronized at the next interval, when the user loads that same file on another computer, he may get an older version of the file or no file at all.
Once enabled, this group policy takes effect when users log out and log back in.
Administrator’s Guide for Mac OS X 191

Mobility Settings
Configuring mobile account creation and options (10.7)
Use the Configure mobile account creation group policy to specify whether to create mobile accounts when users log in.
You can use this policy to automatically create mobile accounts or to explicitly prevent the creation of mobile accounts.
Use the Configure mobile account options group policy to specify options for mobile accounts, including FileVault settings and home folder location.
Note The mobile account options specified by this policy apply only to new mobile users who are created during login. This policy does not affect existing mobile users.
Use this policy To do this
Configure mobile account creation Configure mobile account creation.
Check Create mobile account when user logs in to network account to create a mobile account automatically when a user logs in. A local home folder is created for the user at first login.
To prevent creation of a mobile account, enable the policy and deselect this option. A local home folder is not created for a user who is logged in as a network user.
Note If you do not enable this policy, and you allow access to the Accounts pane of System Preferences, network users can create their own mobile accounts.
Check the Create mobile account even if user does not have a network home directory option to create mobile accounts automatically for users the next time they log in to the Mac. This applies to all users, including users who do not have a network home directory.
Check Require confirmation before creating mobile account to allow users to decide whether to enable a mobile account at login. Users see a confirmation dialog when logging in and can click one of the following:
• “Create Now” to create a local home folder and enable the mobile account.
• “Don't Create” to log in as a network user without enabling the mobile account.
• “Cancel Login” to return to the login window.
Select Show “Don't ask me again” checkbox to provide a check box that allows users to prevent display of the mobile account creation dialog on that computer in the future. Users who select “Don't ask me again” and click “Don't Create”, are not asked to create a mobile account on that computer (unless they hold down the Option key during login to redisplay the dialog). Select one of the Create home options:
• Select network home and default sync settings to initially sync local and network homes so that the network home folder replaces the local home folder. The default Mac sync settings in the Accounts pane of System Preferences are enabled.
• Select local home template to create the local home folder without syncing. The default Mac sync settings are enabled.
Once enabled, this group policy takes effect when users log out and back in.
Chapter 8 • Setting user-based policies 192

Mobility Settings
Configure mobile account options Specify options for mobile accounts, including FileVault settings and home folder location.
Note These options only apply to a new user being created at login and do not affect existing mobile users.
Select Encrypt contents with FileVault to encrypt the contents of the home directory.
Select one of the password options:
• Select Use computer master password if available
The mobile account uses FileVault regardless of whether a master password has been set. However, if a user forgets their password, an administrator will be unable to unlock the account.
• Select Require computer master password If a master password has not been set, the user will be unable to create a mobile account.
To prevent the user's local home folder from using more space than is available in the user's network home folder, select Restrict size and enter a fixed size for the home folder.
Select a location for the home folder or allow users to choose, by using the pull-down menu in Home folder location. To choose a location, select one of the following:
• on startup volume — The local home folder is created in /Users/username on the startup volume.
• at path specified below — Specify a different volume or folder in the Path field, using the format:
/Volumes/driveName/Folder — for example:/Volumes:E/Users
If you do not specify a volume, the folder is created on the startup volume.
To allow users to choose a location, select one of the following.
• user chooses any volume | internal volume | external volume— When users with mobile accounts log in and a mobile account is being created, a window appears for choosing the location of the home folder.
Use this policy To do this
Administrator’s Guide for Mac OS X 193

Mobility Settings
Account Expiry (10.7)
The group policy in this folder enables you to specify whether, and when, to delete mobile accounts and folders.
Synchronization Rules (10.7)
Use the group policies in the Synchronization Rules folder to specify rules for synchronizing folders for mobile users, as follows:
Specify the folders to synchronize in the background. These group policies are located in the Home Sync folder.
Specify the folders to synchronize at login and logout. These group policies are located in the Options folder.
Specify whether to synchronize background folders manually, or automatically at a specific interval. These group policies are located in the Preference Sync folder.
You can also use the Skip these items group polices to define criteria for folders that should not be synchronized in the background or when mobile users login and logout.
Understanding synchronization This section explains some aspects of synchronization to keep in mind when enabling synchronization policies.
Use this policy To do this
Delete mobile accounts automatically Specify whether to delete mobile accounts and their local home folders automatically after a specified period of inactivity.
Typically, Mac OS X creates a local home folder on each computer on which a user enables a mobile account. If a user stops using one or more of these computers, these local home folders create clutter and unnecessarily consume disk space.
If you enable this policy, a mobile account and its local home folder are deleted after the specified period of inactivity.
Set the expiration to 0 to delete the mobile account and its local home folder immediately after the user logs out.
Enter the following information:
Time: The number of hours, days, or weeks (specified in Time Unit Period of inactivity that triggers deletion of mobile accounts and their associated local home folders.
Time Unit: Select hours, days, or weeks as the type of unit for the number specified in Time.
Delete only after successful sync: Select this option to wait to delete the account and folder until after the account has been synced.
This policy does not delete external accounts, that is, accounts with local home folders on an external drive.
Once enabled, this group policy takes effect when users log out and log back in.
Chapter 8 • Setting user-based policies 194
Mobility Settings
If a file in one home folder has been modified and the same file in another home folder has not, the newer file overwrites the older file. If both files have been modified since the last sync, the user is prompted to choose which file to keep.
Administrators can enable and configure syncing through group policy, and users can configure syncing through Accounts preferences. With group policy, you can sync any folder in a user’s home folder. However, a user who creates a mobile account through the Accounts System Preferences can only sync top-level folders like ~/Desktop or ~/Documents.
It is not recommended to use background syncing with folders containing files accessed by multiple computers because it is easy to inadvertently load older, un-synced files.
Be careful with Login and logout syncing because a user’s login and logout is delayed while files are syncing. Therefore, avoid syncing a lot of files or large files at login and logout. One strategy is to sync smaller files (such as preference files) at login and logout, while syncing larger files (such as movies) in the background. Or, you can further reduce network traffic by choosing not to sync the movies folder at all, requiring users to access the movies folder locally.
Note If you want to sync parts of a user’s ~/Library folder, you must use login and logout syncing. Syncing the ~/Library folder retains user’s bookmarks and application preferences.
See your Mac OS X Server documentation for more details about synchronizing mobile accounts.
Administrator’s Guide for Mac OS X 195

Mobility Settings
Setting home sync rules To specify home synchronization rules, set the following group policies, which are found in the Home Sync folder:
Use this policy To do this
Enable home sync rules Enable this policy to configure home sync rules.
This policy is used for files in the user’s home folder (~), but not for ~/Library.
To configure home sync, enable this policy and select one or more of the following sync options:
• at login Sync files when a mobile user logs in.
• at logout Sync files when a mobile user logs out.
• in the background Sync files in the background at the interval specified by the Manually/automatically sync in the background policy.
• manually Allow users to sync manually.
Deselect any of these options to prevent that type of syncing. For example, deselect manually to prevent users from syncing manually.
To stop mobile accounts from syncing files entirely, you must enable this policy and deselect all options. You also need to set the Manually/automatically sync in the background policy to “Not Configured” or “Disabled”.
If you don't manage these policies, users' current sync settings remain in effect and users can choose their sync settings in the Accounts pane of System Preferences.
You also need to set the Synchronize items > Synchronize home sync items policy to Not Configured or Disabled.
Select Merge with user's settings to add synced folders to folders the user selects for syncing,
If you sync the same folder in group policy as the user chooses in the Accounts pane of System Preferences, merging causes the group policy sync settings to take precedence. If you do not select Merge with user's settings, the folders you sync replace those chosen by the user.
Once enabled, this group policy takes effect when users log out and back in.
Chapter 8 • Setting user-based policies 196
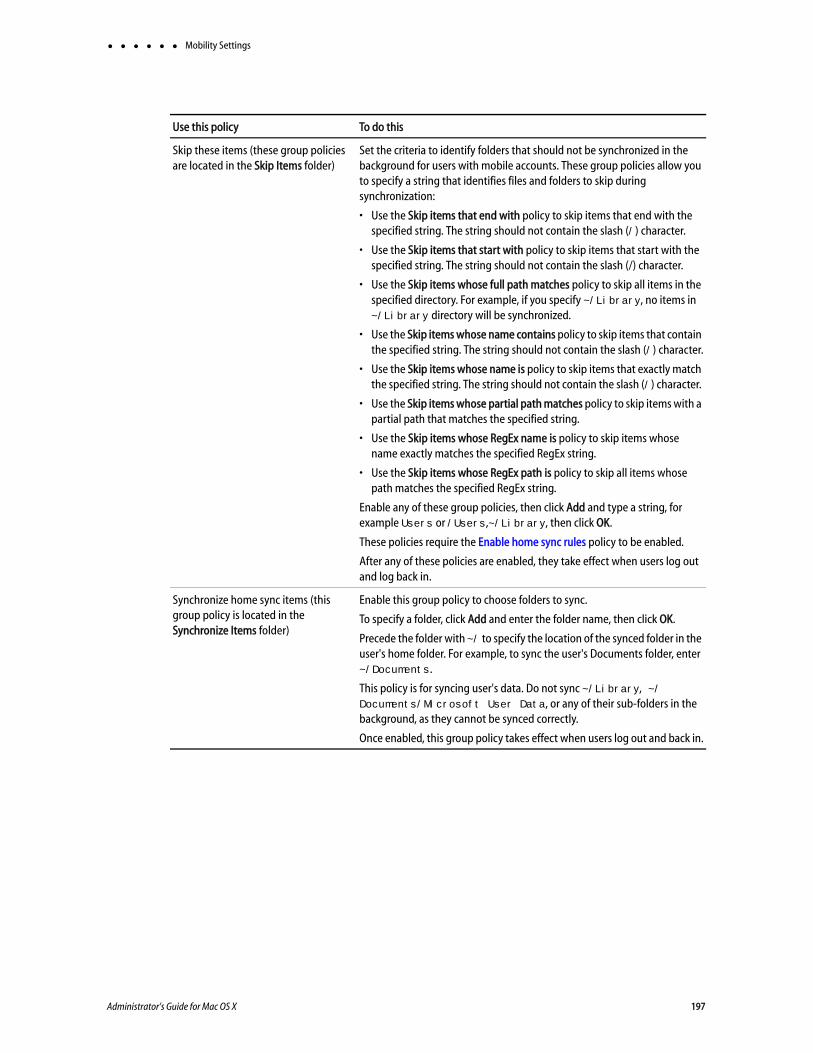
Mobility Settings
Skip these items (these group policies are located in the Skip Items folder)
Set the criteria to identify folders that should not be synchronized in the background for users with mobile accounts. These group policies allow you to specify a string that identifies files and folders to skip during synchronization:
• Use the Skip items that end with policy to skip items that end with the specified string. The string should not contain the slash (/) character.
• Use the Skip items that start with policy to skip items that start with the specified string. The string should not contain the slash (/) character.
• Use the Skip items whose full path matches policy to skip all items in the specified directory. For example, if you specify ~/Library, no items in ~/Library directory will be synchronized.
• Use the Skip items whose name contains policy to skip items that contain the specified string. The string should not contain the slash (/) character.
• Use the Skip items whose name is policy to skip items that exactly match the specified string. The string should not contain the slash (/) character.
• Use the Skip items whose partial path matches policy to skip items with a partial path that matches the specified string.
• Use the Skip items whose RegEx name is policy to skip items whose name exactly matches the specified RegEx string.
• Use the Skip items whose RegEx path is policy to skip all items whose path matches the specified RegEx string.
Enable any of these group policies, then click Add and type a string, for example Users or /Users,~/Library, then click OK.
These policies require the Enable home sync rules policy to be enabled.
After any of these policies are enabled, they take effect when users log out and log back in.
Synchronize home sync items (this group policy is located in the Synchronize Items folder)
Enable this group policy to choose folders to sync.
To specify a folder, click Add and enter the folder name, then click OK.
Precede the folder with ~/ to specify the location of the synced folder in the user's home folder. For example, to sync the user's Documents folder, enter ~/Documents.
This policy is for syncing user's data. Do not sync ~/Library, ~/Documents/Microsoft User Data, or any of their sub-folders in the background, as they cannot be synced correctly.
Once enabled, this group policy takes effect when users log out and back in.
Use this policy To do this
Administrator’s Guide for Mac OS X 197
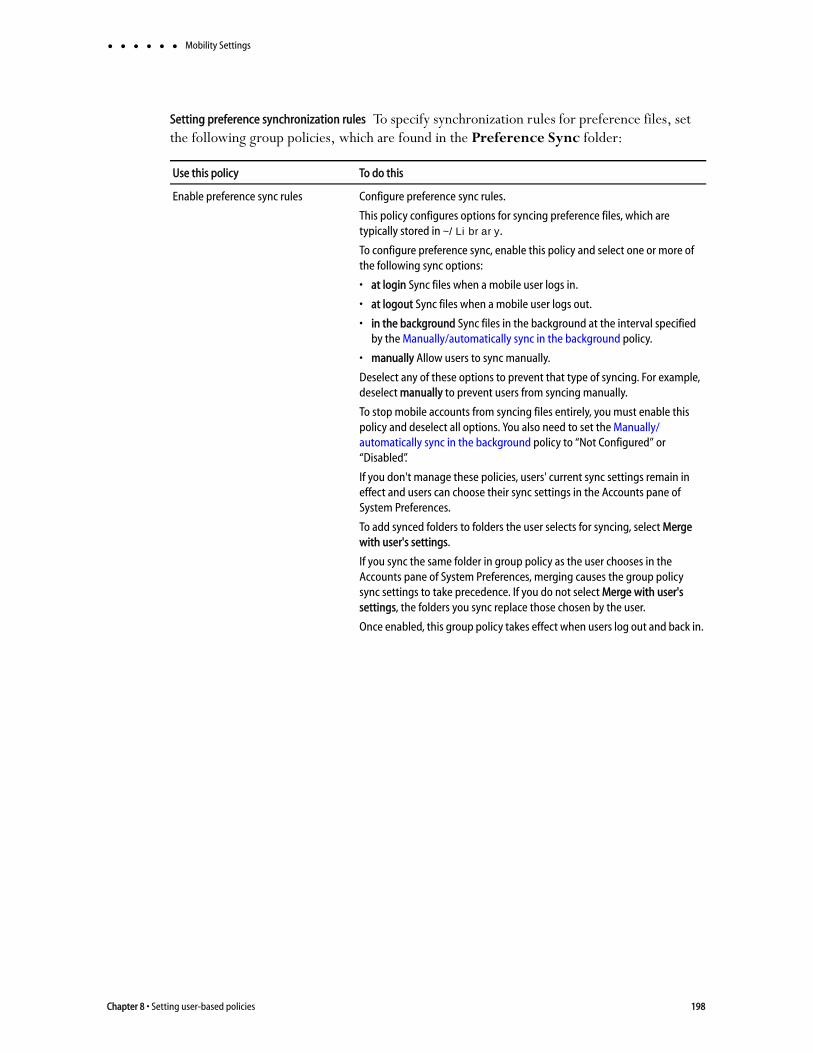
Mobility Settings
Setting preference synchronization rules To specify synchronization rules for preference files, set the following group policies, which are found in the Preference Sync folder:
Use this policy To do this
Enable preference sync rules Configure preference sync rules.
This policy configures options for syncing preference files, which are typically stored in ~/Library.
To configure preference sync, enable this policy and select one or more of the following sync options:
• at login Sync files when a mobile user logs in.
• at logout Sync files when a mobile user logs out.
• in the background Sync files in the background at the interval specified by the Manually/automatically sync in the background policy.
• manually Allow users to sync manually.
Deselect any of these options to prevent that type of syncing. For example, deselect manually to prevent users from syncing manually.
To stop mobile accounts from syncing files entirely, you must enable this policy and deselect all options. You also need to set the Manually/automatically sync in the background policy to “Not Configured” or “Disabled”.
If you don't manage these policies, users' current sync settings remain in effect and users can choose their sync settings in the Accounts pane of System Preferences.
To add synced folders to folders the user selects for syncing, select Merge with user's settings.
If you sync the same folder in group policy as the user chooses in the Accounts pane of System Preferences, merging causes the group policy sync settings to take precedence. If you do not select Merge with user's settings, the folders you sync replace those chosen by the user.
Once enabled, this group policy takes effect when users log out and back in.
Chapter 8 • Setting user-based policies 198

Mobility Settings
Skip these items (these group policies are located in the Skip Items folder)
Set the criteria to identify preference folders that should not be synchronized for users with mobile accounts. These group policies allow you to specify a string that identifies files and folders to skip during synchronization:
• Use the Skip items that end with policy to skip items that end with the specified string. The string should not contain the slash (/) character.
• Use the Skip items that start with policy to skip items that start with the specified string. The string should not contain the slash (/) character.
• Use the Skip items whose full path matches policy to skip all items in the specified directory. For example, if you specify ~/Library, no items in ~/Library directory will be synchronized.
• Use the Skip items whose name contains policy to skip items that contain the specified string. The string should not contain the slash (/) character.
• Use the Skip items whose name is policy to skip items that exactly match the specified string. The string should not contain the slash (/) character.
• Use the Skip items whose partial path matches policy to skip items with a partial path that matches the specified string.
• Use the Skip items whose RegEx name is policy to skip items whose name exactly matches the specified RegEx string.
• Use the Skip items whose RegEx path is policy to skip all items whose path matches the specified RegEx string.
Enable any of these group policies, then click Add and type a string, for example Users or /Users,~/Library, then click OK.
These policies require the Enable preference sync rules policy to be enabled.
Once any of there policies are enabled, they take effect when users log out and log back in.
Sync preference sync items (this group policy is located in the Synchronize Items folder)
Enable this group policy to choose folders to sync in the user’s home folder.
To specify a folder, click Add and enter the folder name, then click OK.
Precede the folder with ~/ to specify the location of the synced folder in the user's home folder. For example, to sync the user's Library folder, enter ~/Library.
This policy is for syncing user's preferences and settings. Do not sync folders outside ~/Library and ~/Documents/Microsoft User Data at login and logout, as they cannot be synced correctly.
Once enabled, this group policy takes effect when users log out and back in.
Use this policy To do this
Administrator’s Guide for Mac OS X 199
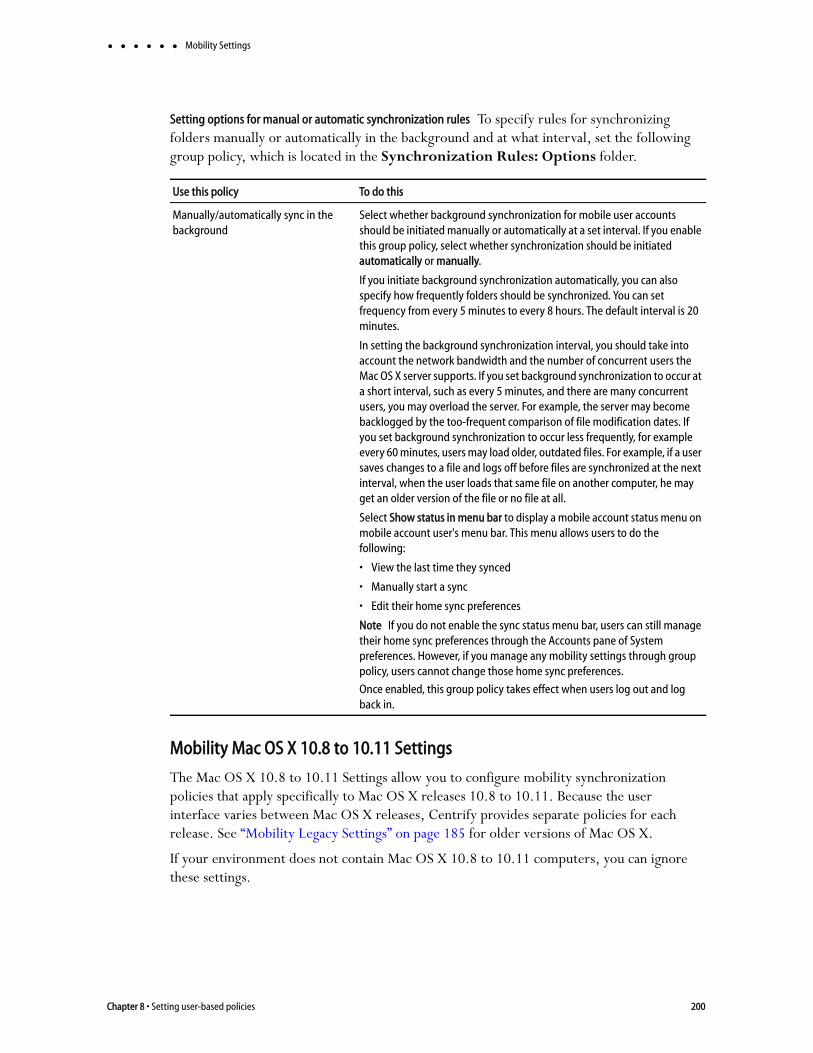
Mobility Settings
Setting options for manual or automatic synchronization rules To specify rules for synchronizing folders manually or automatically in the background and at what interval, set the following group policy, which is located in the Synchronization Rules: Options folder.
Mobility Mac OS X 10.8 to 10.11 Settings
The Mac OS X 10.8 to 10.11 Settings allow you to configure mobility synchronization policies that apply specifically to Mac OS X releases 10.8 to 10.11. Because the user interface varies between Mac OS X releases, Centrify provides separate policies for each release. See “Mobility Legacy Settings” on page 185 for older versions of Mac OS X.
If your environment does not contain Mac OS X 10.8 to 10.11 computers, you can ignore these settings.
Use this policy To do this
Manually/automatically sync in the background
Select whether background synchronization for mobile user accounts should be initiated manually or automatically at a set interval. If you enable this group policy, select whether synchronization should be initiated automatically or manually.
If you initiate background synchronization automatically, you can also specify how frequently folders should be synchronized. You can set frequency from every 5 minutes to every 8 hours. The default interval is 20 minutes.
In setting the background synchronization interval, you should take into account the network bandwidth and the number of concurrent users the Mac OS X server supports. If you set background synchronization to occur at a short interval, such as every 5 minutes, and there are many concurrent users, you may overload the server. For example, the server may become backlogged by the too-frequent comparison of file modification dates. If you set background synchronization to occur less frequently, for example every 60 minutes, users may load older, outdated files. For example, if a user saves changes to a file and logs off before files are synchronized at the next interval, when the user loads that same file on another computer, he may get an older version of the file or no file at all.
Select Show status in menu bar to display a mobile account status menu on mobile account user's menu bar. This menu allows users to do the following:
• View the last time they synced
• Manually start a sync
• Edit their home sync preferences
Note If you do not enable the sync status menu bar, users can still manage their home sync preferences through the Accounts pane of System preferences. However, if you manage any mobility settings through group policy, users cannot change those home sync preferences.
Once enabled, this group policy takes effect when users log out and log back in.
Chapter 8 • Setting user-based policies 200

Mobility Settings
Configuring mobile account creation and options (10.8 to 10.11)
Use the Configure mobile account creation group policy to specify whether to create mobile accounts when users log in.
You can use this policy to automatically create mobile accounts or to explicitly prevent the creation of mobile accounts.
Use the Configure mobile account options group policy to specify options for mobile accounts, including FileVault settings and home folder location.
Note The mobile account options specified by this policy apply only to new mobile users who are created during login. This policy does not affect existing mobile users.
Use this policy To do this
Configure mobile account creation Configure mobile account creation.
Check Create mobile account when user logs in to network account to create a mobile account automatically when a user logs in. A local home folder is created for the user at first login.
To prevent creation of a mobile account, enable the policy and deselect this option. A local home folder is not created for a user who is logged in as a network user.
Note If you do not enable this policy, and you allow access to the Accounts pane of System Preferences, network users can create their own mobile accounts.
Check the Create mobile account even if user does not have a network home directory option to create mobile accounts automatically for users the next time they log in to the Mac. This applies to all users, including users who do not have a network home directory.
Check Require confirmation before creating mobile account to allow users to decide whether to enable a mobile account at login. Users see a confirmation dialog when logging in and can click one of the following:
• “Create Now” to create a local home folder and enable the mobile account.
• “Don't Create” to log in as a network user without enabling the mobile account.
• “Cancel Login” to return to the login window.
Select Show “Don't ask me again” checkbox to provide a check box that allows users to prevent display of the mobile account creation dialog on that computer in the future. Users who select “Don't ask me again” and click “Don't Create”, are not asked to create a mobile account on that computer (unless they hold down the Option key during login to redisplay the dialog). Select one of the Create home options:
• Select network home and default sync settings to initially sync local and network homes so that the network home folder replaces the local home folder. The default Mac sync settings in the Accounts pane of System Preferences are enabled.
• Select local home template to create the local home folder without syncing. The default Mac sync settings are enabled.
Once enabled, this group policy takes effect when users log out and back in.
Administrator’s Guide for Mac OS X 201
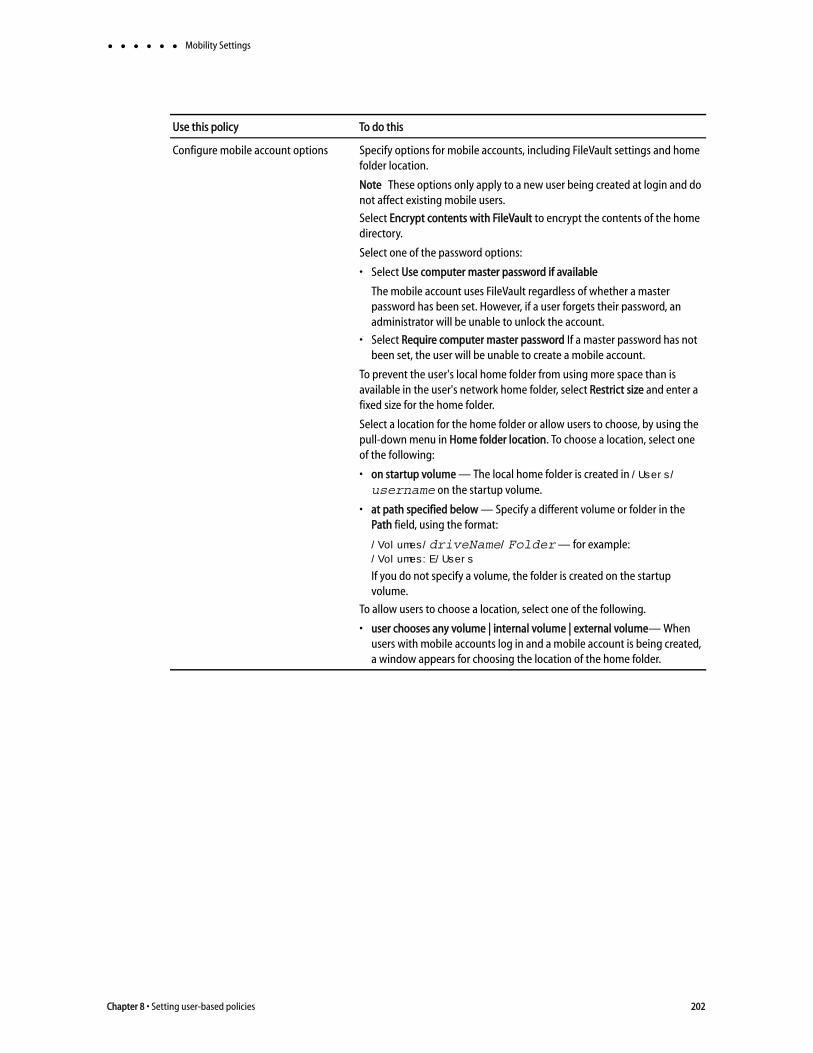
Mobility Settings
Configure mobile account options Specify options for mobile accounts, including FileVault settings and home folder location.
Note These options only apply to a new user being created at login and do not affect existing mobile users.
Select Encrypt contents with FileVault to encrypt the contents of the home directory.
Select one of the password options:
• Select Use computer master password if available
The mobile account uses FileVault regardless of whether a master password has been set. However, if a user forgets their password, an administrator will be unable to unlock the account.
• Select Require computer master password If a master password has not been set, the user will be unable to create a mobile account.
To prevent the user's local home folder from using more space than is available in the user's network home folder, select Restrict size and enter a fixed size for the home folder.
Select a location for the home folder or allow users to choose, by using the pull-down menu in Home folder location. To choose a location, select one of the following:
• on startup volume — The local home folder is created in /Users/username on the startup volume.
• at path specified below — Specify a different volume or folder in the Path field, using the format:
/Volumes/driveName/Folder — for example:/Volumes:E/Users
If you do not specify a volume, the folder is created on the startup volume.
To allow users to choose a location, select one of the following.
• user chooses any volume | internal volume | external volume— When users with mobile accounts log in and a mobile account is being created, a window appears for choosing the location of the home folder.
Use this policy To do this
Chapter 8 • Setting user-based policies 202
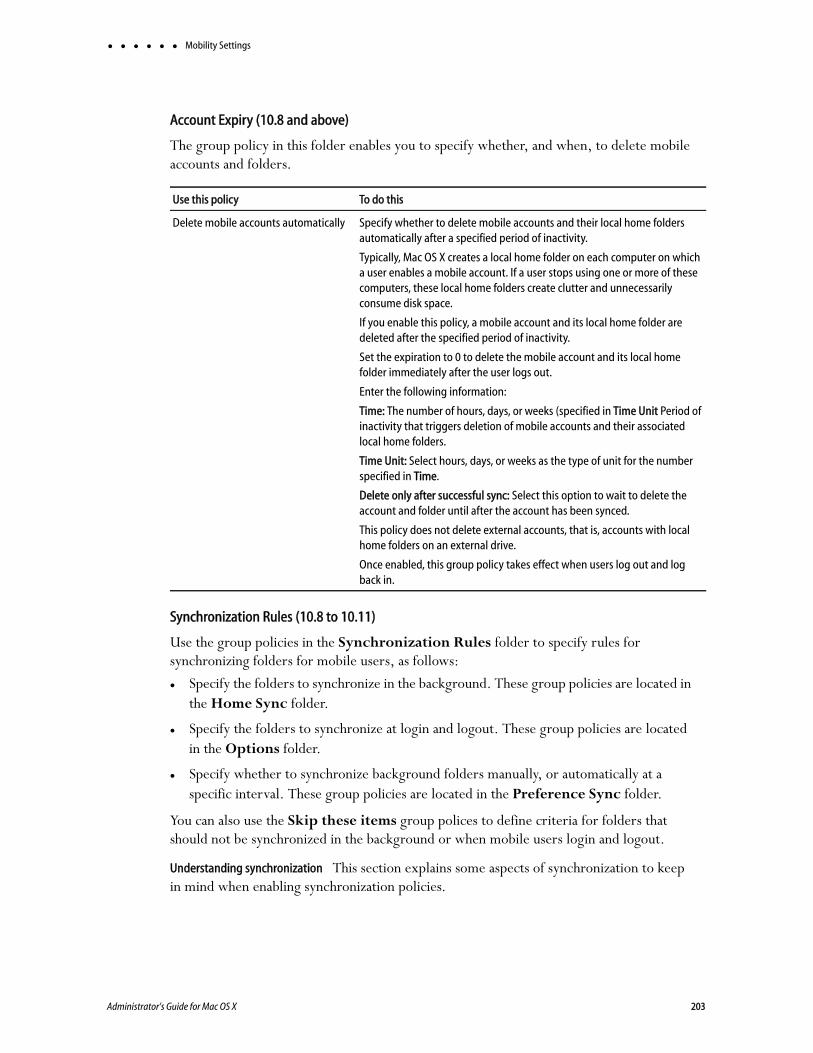
Mobility Settings
Account Expiry (10.8 and above)
The group policy in this folder enables you to specify whether, and when, to delete mobile accounts and folders.
Synchronization Rules (10.8 to 10.11)
Use the group policies in the Synchronization Rules folder to specify rules for synchronizing folders for mobile users, as follows:
Specify the folders to synchronize in the background. These group policies are located in the Home Sync folder.
Specify the folders to synchronize at login and logout. These group policies are located in the Options folder.
Specify whether to synchronize background folders manually, or automatically at a specific interval. These group policies are located in the Preference Sync folder.
You can also use the Skip these items group polices to define criteria for folders that should not be synchronized in the background or when mobile users login and logout.
Understanding synchronization This section explains some aspects of synchronization to keep in mind when enabling synchronization policies.
Use this policy To do this
Delete mobile accounts automatically Specify whether to delete mobile accounts and their local home folders automatically after a specified period of inactivity.
Typically, Mac OS X creates a local home folder on each computer on which a user enables a mobile account. If a user stops using one or more of these computers, these local home folders create clutter and unnecessarily consume disk space.
If you enable this policy, a mobile account and its local home folder are deleted after the specified period of inactivity.
Set the expiration to 0 to delete the mobile account and its local home folder immediately after the user logs out.
Enter the following information:
Time: The number of hours, days, or weeks (specified in Time Unit Period of inactivity that triggers deletion of mobile accounts and their associated local home folders.
Time Unit: Select hours, days, or weeks as the type of unit for the number specified in Time.
Delete only after successful sync: Select this option to wait to delete the account and folder until after the account has been synced.
This policy does not delete external accounts, that is, accounts with local home folders on an external drive.
Once enabled, this group policy takes effect when users log out and log back in.
Administrator’s Guide for Mac OS X 203

Mobility Settings
If a file in one home folder has been modified and the same file in another home folder has not, the newer file overwrites the older file. If both files have been modified since the last sync, the user is prompted to choose which file to keep.
Administrators can enable and configure syncing through group policy, and users can configure syncing through Accounts preferences. With group policy, you can sync any folder in a user’s home folder. However, a user who creates a mobile account through the Accounts System Preferences can only sync top-level folders like ~/Desktop or ~/Documents.
It is not recommended to use background syncing with folders containing files accessed by multiple computers because it is easy to inadvertently load older, un-synced files.
Be careful with Login and logout syncing because a user’s login and logout is delayed while files are syncing. Therefore, avoid syncing a lot of files or large files at login and logout. One strategy is to sync smaller files (such as preference files) at login and logout, while syncing larger files (such as movies) in the background. Or, you can further reduce network traffic by choosing not to sync the movies folder at all, requiring users to access the movies folder locally.
Note If you want to sync parts of a user’s ~/Library folder, you must use login and logout syncing. Syncing the ~/Library folder retains user’s bookmarks and application preferences.
See your Mac OS X Server documentation for more details about synchronizing mobile accounts.
Chapter 8 • Setting user-based policies 204

Mobility Settings
Setting home sync rules To specify home synchronization rules, set the following group policies, which are found in the Home Sync folder:
Use this policy To do this
Enable home sync rules Enable this policy to configure home sync rules.
This policy is used for files in the user’s home folder (~), but not for ~/Library.
To configure home sync, enable this policy and select one or more of the following sync options:
• at login Sync files when a mobile user logs in.
• at logout Sync files when a mobile user logs out.
• in the background Sync files in the background at the interval specified by the Manually/automatically sync in the background policy.
• manually Allow users to sync manually.
Deselect any of these options to prevent that type of syncing. For example, deselect manually to prevent users from syncing manually.
To stop mobile accounts from syncing files entirely, you must enable this policy and deselect all options. You also need to set the Manually/automatically sync in the background policy to “Not Configured” or “Disabled”.
If you don't manage these policies, users' current sync settings remain in effect and users can choose their sync settings in the Accounts pane of System Preferences.
You also need to set the Synchronize items > Synchronize home sync items policy to Not Configured or Disabled.
Select Merge with user's settings to add synced folders to folders the user selects for syncing,
If you sync the same folder in group policy as the user chooses in the Accounts pane of System Preferences, merging causes the group policy sync settings to take precedence. If you do not select Merge with user's settings, the folders you sync replace those chosen by the user.
Once enabled, this group policy takes effect when users log out and back in.
Administrator’s Guide for Mac OS X 205

Mobility Settings
Skip these items (these group policies are located in the Skip Items folder)
Set the criteria to identify folders that should not be synchronized in the background for users with mobile accounts. These group policies allow you to specify a string that identifies files and folders to skip during synchronization:
• Use the Skip items that end with policy to skip items that end with the specified string. The string should not contain the slash (/) character.
• Use the Skip items that start with policy to skip items that start with the specified string. The string should not contain the slash (/) character.
• Use the Skip items whose full path matches policy to skip all items in the specified directory. For example, if you specify ~/Library, no items in ~/Library directory will be synchronized.
• Use the Skip items whose name contains policy to skip items that contain the specified string. The string should not contain the slash (/) character.
• Use the Skip items whose name is policy to skip items that exactly match the specified string. The string should not contain the slash (/) character.
• Use the Skip items whose partial path matches policy to skip items with a partial path that matches the specified string.
• Use the Skip items whose RegEx name is policy to skip items whose name exactly matches the specified RegEx string.
• Use the Skip items whose RegEx path is policy to skip all items whose path matches the specified RegEx string.
Enable any of these group policies, then click Add and type a string, for example Users or /Users,~/Library, then click OK.
These policies require the Enable home sync rules policy to be enabled.
After any of these policies are enabled, they take effect when users log out and log back in.
Synchronize home sync items (this group policy is located in the Synchronize Items folder)
Enable this group policy to choose folders to sync.
To specify a folder, click Add and enter the folder name, then click OK.
Precede the folder with ~/ to specify the location of the synced folder in the user's home folder. For example, to sync the user's Documents folder, enter ~/Documents.
This policy is for syncing user's data. Do not sync ~/Library, ~/Documents/Microsoft User Data, or any of their sub-folders in the background, as they cannot be synced correctly.
Once enabled, this group policy takes effect when users log out and back in.
Use this policy To do this
Chapter 8 • Setting user-based policies 206

Mobility Settings
Setting preference synchronization rules To specify synchronization rules for preference files, set the following group policies, which are found in the Preference Sync folder:
Use this policy To do this
Enable preference sync rules Configure preference sync rules.
This policy configures options for syncing preference files, which are typically stored in ~/Library.
To configure preference sync, enable this policy and select one or more of the following sync options:
• at login Sync files when a mobile user logs in.
• at logout Sync files when a mobile user logs out.
• in the background Sync files in the background at the interval specified by the Manually/automatically sync in the background policy.
• manually Allow users to sync manually.
Deselect any of these options to prevent that type of syncing. For example, deselect manually to prevent users from syncing manually.
To stop mobile accounts from syncing files entirely, you must enable this policy and deselect all options. You also need to set the Manually/automatically sync in the background policy to “Not Configured” or “Disabled”.
If you don't manage these policies, users' current sync settings remain in effect and users can choose their sync settings in the Accounts pane of System Preferences.
To add synced folders to folders the user selects for syncing, select Merge with user's settings.
If you sync the same folder in group policy as the user chooses in the Accounts pane of System Preferences, merging causes the group policy sync settings to take precedence. If you do not select Merge with user's settings, the folders you sync replace those chosen by the user.
Once enabled, this group policy takes effect when users log out and back in.
Administrator’s Guide for Mac OS X 207

Mobility Settings
Skip these items (these group policies are located in the Skip Items folder)
Set the criteria to identify preference folders that should not be synchronized for users with mobile accounts. These group policies allow you to specify a string that identifies files and folders to skip during synchronization:
• Use the Skip items that end with policy to skip items that end with the specified string. The string should not contain the slash (/) character.
• Use the Skip items that start with policy to skip items that start with the specified string. The string should not contain the slash (/) character.
• Use the Skip items whose full path matches policy to skip all items in the specified directory. For example, if you specify ~/Library, no items in ~/Library directory will be synchronized.
• Use the Skip items whose name contains policy to skip items that contain the specified string. The string should not contain the slash (/) character.
• Use the Skip items whose name is policy to skip items that exactly match the specified string. The string should not contain the slash (/) character.
• Use the Skip items whose partial path matches policy to skip items with a partial path that matches the specified string.
• Use the Skip items whose RegEx name is policy to skip items whose name exactly matches the specified RegEx string.
• Use the Skip items whose RegEx path is policy to skip all items whose path matches the specified RegEx string.
Enable any of these group policies, then click Add and type a string, for example Users or /Users,~/Library, then click OK.
These policies require the Enable preference sync rules policy to be enabled.
Once any of there policies are enabled, they take effect when users log out and log back in.
Sync preference sync items (this group policy is located in the Synchronize Items folder)
Enable this group policy to choose folders to sync in the user’s home folder.
To specify a folder, click Add and enter the folder name, then click OK.
Precede the folder with ~/ to specify the location of the synced folder in the user's home folder. For example, to sync the user's Library folder, enter ~/Library.
This policy is for syncing user's preferences and settings. Do not sync folders outside ~/Library and ~/Documents/Microsoft User Data at login and logout, as they cannot be synced correctly.
Once enabled, this group policy takes effect when users log out and back in.
Use this policy To do this
Chapter 8 • Setting user-based policies 208

Mobility Settings
Setting options for manual or automatic synchronization rules To specify rules for synchronizing folders manually or automatically in the background and at what interval, set the following group policy, which is located in the Synchronization Rules: Options folder.
Mobility macOS 10.12 or above Settings
The macOS 10.12 or above Settings allow you to configure mobility synchronization policies that apply specifically to Mac OS X releases macOS 10.12 or above. Because the user interface varies between Mac OS X releases, Centrify provides separate policies for each release. See “Mobility Legacy Settings” on page 185 for older versions of Mac OS X.
If your environment does not contain macOS 10.12 or above computers, you can ignore these settings.
Use this policy To do this
Manually/automatically sync in the background
Select whether background synchronization for mobile user accounts should be initiated manually or automatically at a set interval. If you enable this group policy, select whether synchronization should be initiated automatically or manually.
If you initiate background synchronization automatically, you can also specify how frequently folders should be synchronized. You can set frequency from every 5 minutes to every 8 hours. The default interval is 20 minutes.
In setting the background synchronization interval, you should take into account the network bandwidth and the number of concurrent users the Mac OS X server supports. If you set background synchronization to occur at a short interval, such as every 5 minutes, and there are many concurrent users, you may overload the server. For example, the server may become backlogged by the too-frequent comparison of file modification dates. If you set background synchronization to occur less frequently, for example every 60 minutes, users may load older, outdated files. For example, if a user saves changes to a file and logs off before files are synchronized at the next interval, when the user loads that same file on another computer, he may get an older version of the file or no file at all.
Select Show status in menu bar to display a mobile account status menu on mobile account user's menu bar. This menu allows users to do the following:
• View the last time they synced
• Manually start a sync
• Edit their home sync preferences
Note If you do not enable the sync status menu bar, users can still manage their home sync preferences through the Accounts pane of System preferences. However, if you manage any mobility settings through group policy, users cannot change those home sync preferences.
Once enabled, this group policy takes effect when users log out and log back in.
Administrator’s Guide for Mac OS X 209

Mobility Settings
Configuring mobile account creation and options (10.12 or above)
Use the Configure mobile account creation group policy to specify whether to create mobile accounts when users log in.
You can use this policy to automatically create mobile accounts or to explicitly prevent the creation of mobile accounts.
Use the Configure mobile account options group policy to specify options for mobile accounts, including FileVault settings and home folder location.
Note The mobile account options specified by this policy apply only to new mobile users who are created during login. This policy does not affect existing mobile users.
Use this policy To do this
Configure mobile account creation Configure mobile account creation.
Check Create mobile account when user logs in to network account to create a mobile account automatically when a user logs in. A local home folder is created for the user at first login.
To prevent creation of a mobile account, enable the policy and deselect this option. A local home folder is not created for a user who is logged in as a network user.
Note If you do not enable this policy, and you allow access to the Accounts pane of System Preferences, network users can create their own mobile accounts.
Check the Create mobile account even if user does not have a network home directory option to create mobile accounts automatically for users the next time they log in to the Mac. This applies to all users, including users who do not have a network home directory.
Check Require confirmation before creating mobile account to allow users to decide whether to enable a mobile account at login. Users see a confirmation dialog when logging in and can click one of the following:
• “Create Now” to create a local home folder and enable the mobile account.
• “Don't Create” to log in as a network user without enabling the mobile account.
• “Cancel Login” to return to the login window.
Select Show “Don't ask me again” checkbox to provide a check box that allows users to prevent display of the mobile account creation dialog on that computer in the future. Users who select “Don't ask me again” and click “Don't Create”, are not asked to create a mobile account on that computer (unless they hold down the Option key during login to redisplay the dialog). Select one of the Create home options:
• Select network home and default sync settings to initially sync local and network homes so that the network home folder replaces the local home folder. The default Mac sync settings in the Accounts pane of System Preferences are enabled.
• Select local home template to create the local home folder without syncing. The default Mac sync settings are enabled.
Once enabled, this group policy takes effect when users log out and back in.
Chapter 8 • Setting user-based policies 210

Mobility Settings
Configure mobile account options Specify options for mobile accounts, including FileVault settings and home folder location.
Note These options only apply to a new user being created at login and do not affect existing mobile users.
Select Encrypt contents with FileVault to encrypt the contents of the home directory.
Select one of the password options:
• Select Use computer master password if available
The mobile account uses FileVault regardless of whether a master password has been set. However, if a user forgets their password, an administrator will be unable to unlock the account.
• Select Require computer master password If a master password has not been set, the user will be unable to create a mobile account.
To prevent the user's local home folder from using more space than is available in the user's network home folder, select Restrict size and enter a fixed size for the home folder.
Select a location for the home folder or allow users to choose, by using the pull-down menu in Home folder location. To choose a location, select one of the following:
• on startup volume — The local home folder is created in /Users/username on the startup volume.
• at path specified below — Specify a different volume or folder in the Path field, using the format:
/Volumes/driveName/Folder — for example:/Volumes:E/Users
If you do not specify a volume, the folder is created on the startup volume.
To allow users to choose a location, select one of the following.
• user chooses any volume | internal volume | external volume— When users with mobile accounts log in and a mobile account is being created, a window appears for choosing the location of the home folder.
Use this policy To do this
Administrator’s Guide for Mac OS X 211
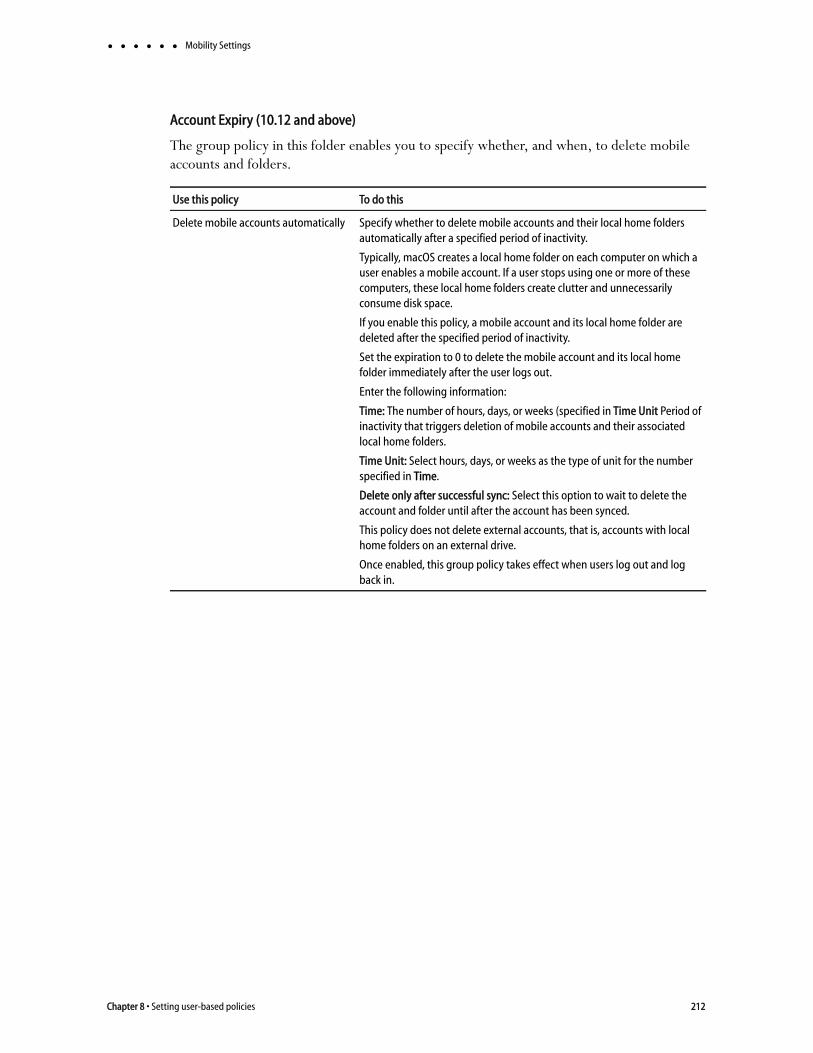
Mobility Settings
Account Expiry (10.12 and above)
The group policy in this folder enables you to specify whether, and when, to delete mobile accounts and folders.
Use this policy To do this
Delete mobile accounts automatically Specify whether to delete mobile accounts and their local home folders automatically after a specified period of inactivity.
Typically, macOS creates a local home folder on each computer on which a user enables a mobile account. If a user stops using one or more of these computers, these local home folders create clutter and unnecessarily consume disk space.
If you enable this policy, a mobile account and its local home folder are deleted after the specified period of inactivity.
Set the expiration to 0 to delete the mobile account and its local home folder immediately after the user logs out.
Enter the following information:
Time: The number of hours, days, or weeks (specified in Time Unit Period of inactivity that triggers deletion of mobile accounts and their associated local home folders.
Time Unit: Select hours, days, or weeks as the type of unit for the number specified in Time.
Delete only after successful sync: Select this option to wait to delete the account and folder until after the account has been synced.
This policy does not delete external accounts, that is, accounts with local home folders on an external drive.
Once enabled, this group policy takes effect when users log out and log back in.
Chapter 8 • Setting user-based policies 212

Printing settings
Printing settingsUse the User Configuration > Policies > Centrify Settings > Mac OS X Settings > Printing Settings (Specify printer list) group policy to specify a list of printers for a user.
The printers that are available to a user are a combination of those specified in this policy and those added through System Preferences on the local computer. Note that this policy allows an administrator to control whether the user can add or see printers on the local computer, or is only allowed to use the managed printers specified by this policy.
Specifying the device URI
When you add a printer through the Specify printer list group policy, or locally by using the Print & Scan, Add Printer advanced options, the printer is implemented through
Use this policy To do this
Specify printer list Specify a managed list of network printers that are available to a user on this computer. Printers specified by this policy use a generic PostScript driver.
To add a printer, click Add and enter the following information:
• Name: A name of your choosing for the printer.
• DeviceURI: The device Uniform Resource Identifier, which specifies the device that is assigned to the printer (see Specifying the device URI); for example:
socket://192.168.0.20:9100 (which identifies the protocol, IP address, and port number)
cdcsmb://dc1.acme.com/HPLaserJet2 (which identifies a Windows printer added using the Centrify protocol and identified by hostname.)
• (Optional) Model: The printer driver for the printer model (see Specifying the model (printer driver)); for example: HP Photosmart C6100 series. Fax
You can use the following options to control access to the printers on the local computer:
• Allow user to modify the printer list: Check this option to allow local users to make changes in System Preferences to the printers that have been added by this policy, including deleting them.
Deselect this option to prevent local users from modifying the printers added by this policy.
• Allow printers that connect directly to user’s computer: Check this option to allow users to add their own local printers.
Deselect this option to prevent users from adding local printers.
• Require an administrator password: Check this option to require an administrator’s password when adding local printers.
• Only show managed printers: Check this option to allow local users to use only the managed printers specified by this option. Printers added locally, for example, through System Preferences, will not be visible.
Deselect this option to allow local users to use printers added locally, as well as the managed printers added by this policy.
Administrator’s Guide for Mac OS X 213

Printing settings
the Common UNIX Printing System (CUPS), which was developed by Apple for Mac OS X and other UNIX-like operating systems.
The CUPS system supports the following device Uniform Resource Identifier (URI) protocols that you can use to specify the printers to add.
AppSocket or Jetdirect protocol
The AppSocket, or JetDirect, protocol normally prints over port 9100 and uses the socket URI scheme:socket://ip-address-or-hostname
socket://ip-address-or-hostname:port-number
Internet Printing Protocol (IPP)
CUPS supports IPP natively. IPP printing normally happens over port 631 and uses the http and ipp URI schemes:ipp://ip-address-or-hostname/resource
ipp://ip-address-or-hostname:port-number/resource
http://ip-address-or-hostname:port-number/resource
Line printer daemon protocol (LPD)
LPD is the original network printing protocol and is supported by many network printers. LPD printing normally happens over port 515 and uses the lpd URI scheme:lpd://ip-address-or-hostname/queue
lpd://username@ip-address-or-hostname/queue
Windows Printer via Centrify
When Mac users print on a Windows network printer, they must authenticate separately. Specifying a Windows printer via Centrify allows users to access the printer without providing credentials as they have already been authenticated through Active Directory.
Centrify printing normally happens over port 445 and uses the cdcsmb URI scheme: cdcsmb://server_fqdn/printersharename
Windows
Windows printing normally happens over port 445 and uses the smb URI scheme:
Note You can use the Centrify protocol (cdcsmb), if you want to use Windows network printers without providing credentials each time.
smb://workgroup/server/printersharename
smb://ip-address-or-hostname/printersharename
smb://username:password@workgroup/ip-address-or-hostname/printersharename
smb://username:password@ip-address-or-hostname/printersharename
Chapter 8 • Setting user-based policies 214
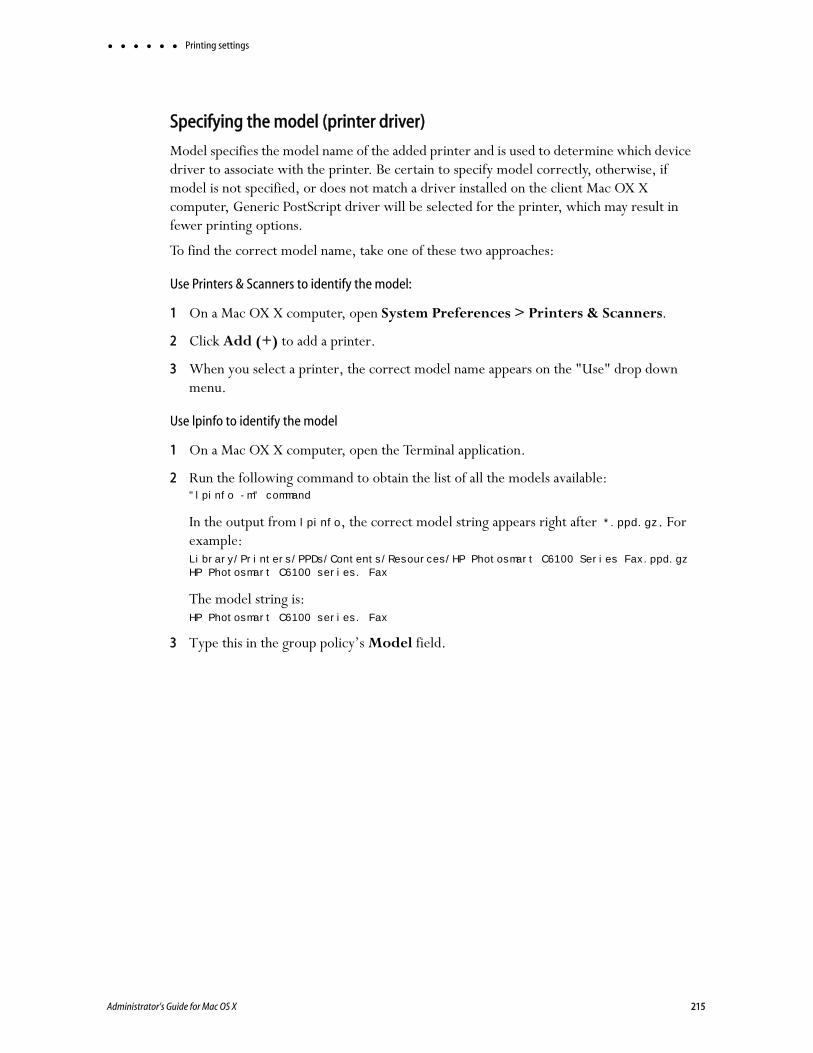
Printing settings
Specifying the model (printer driver)
Model specifies the model name of the added printer and is used to determine which device driver to associate with the printer. Be certain to specify model correctly, otherwise, if model is not specified, or does not match a driver installed on the client Mac OX X computer, Generic PostScript driver will be selected for the printer, which may result in fewer printing options.
To find the correct model name, take one of these two approaches:
Use Printers & Scanners to identify the model:
1 On a Mac OX X computer, open System Preferences > Printers & Scanners.
2 Click Add (+) to add a printer.
3 When you select a printer, the correct model name appears on the "Use" drop down menu.
Use lpinfo to identify the model
1 On a Mac OX X computer, open the Terminal application.
2 Run the following command to obtain the list of all the models available:"lpinfo -m" command
In the output from lpinfo, the correct model string appears right after *.ppd.gz. For example:Library/Printers/PPDs/Contents/Resources/HP Photosmart C6100 Series Fax.ppd.gz
HP Photosmart C6100 series. Fax
The model string is:HP Photosmart C6100 series. Fax
3 Type this in the group policy’s Model field.
Administrator’s Guide for Mac OS X 215

Scripts (Login/Logout)
Scripts (Login/Logout)Use the User Configuration > Policies > Centrify Settings > Mac OS X Settings > Scripts (Login/Logout) group policies to deploy login and logout scripts that run when an Active Directory user logs on or logs out. When you use these group policies, the login and logout scripts are stored in the Active Directory domain’s system volume (sysvol) and transferred to the Mac computer when the group policies are applied. Login and logout scripts are useful for performing common tasks such as mounting and un-mounting shares.
Note When these group policies are enabled, the first login by an AD user will restart the login script and return the user to the login window. Subsequent logins by this user or a different user occur normally and the changes generated by the script happen immediately.
Following the descriptions for these policies, see “Using the sample login and logout scripts” on page 218 for an explanation of how to use the sample login and logout scripts shipped with Centrify.
Use this policy To do this
Specify login script Specify the name of a login script to execute when users log on. You can specify only one file as the login script.
Before enabling this policy, you should create the login script and copy it to the system volume (sysvol) on the domain controller. By default, the login script is stored in the system volume (SYSVOL) on the domain controller in the directory:
\\domain\SYSVOL\domain\Scripts\scriptnameThe script path you type in Login script is relative to \\domain\SYSVOL\domain\scripts\. For example, if the domain name is ajax.org and you enter a script name of mlogin.sh, the script that gets executed on the domain controller is:
\\ajax.org\SYSVOL\ajax.org\Scripts\mlogin.sh
You can specify additional relative directories in the path, if needed.
Note Be certain authenticated users have permission to read this file so the script can run when they log in.
By default, the script runs with the Active Directory user’s permissions. If the script contains commands that require root permission to run, select Run with root user privileges.
Once this group policy is enabled, it takes effect when users log out and log back in.
Note The first AD user to log in is taken back to the login screen. Subsequent logins by this user or a different user occur normally and changes generated by the script happen immediately.
Chapter 8 • Setting user-based policies 216

Scripts (Login/Logout)
Specify logout script Specify the name of a logout script to execute when users log out. You can specify only one file as the logout script.
Before enabling this policy, you should create the logout script and copy it to the system volume (SYSVOL) on the domain controller. By default, the logout script is stored in the system volume (SYSVOL) on the domain controller in the following directory:
\\domain\SYSVOL\domain\Scripts\scriptnameThe script path you type in Logout script is relative to: \domain\SYSVOL\domain\scripts\.
For example, if the domain name is ajax.org and you enter a script name of mlogout.sh, the script that gets executed on the domain controller is:
\\ajax.org\SYSVOL\ajax.org\Scripts\mlogout.sh
Note Be certain authenticated users have permission to read this file so the script can run when they log out.
By default, the script runs with the Active Directory user’s permissions. If the script contains commands that require root permission to run, select Run with root user privileges.
Once this group policy is enabled, it takes effect when users log out and log back in.
Use this policy To do this
Administrator’s Guide for Mac OS X 217
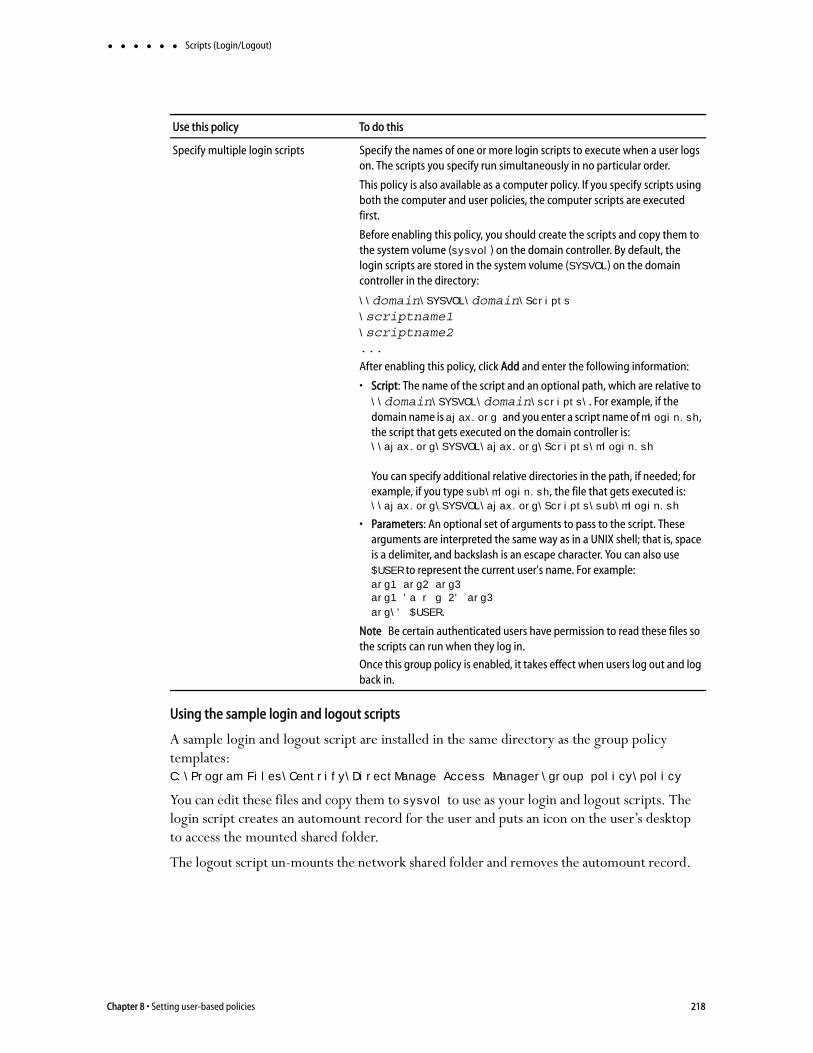
Scripts (Login/Logout)
Using the sample login and logout scripts
A sample login and logout script are installed in the same directory as the group policy templates:C:\Program Files\Centrify\DirectManage Access Manager\group policy\policy
You can edit these files and copy them to sysvol to use as your login and logout scripts. The login script creates an automount record for the user and puts an icon on the user’s desktop to access the mounted shared folder.
The logout script un-mounts the network shared folder and removes the automount record.
Specify multiple login scripts Specify the names of one or more login scripts to execute when a user logs on. The scripts you specify run simultaneously in no particular order.
This policy is also available as a computer policy. If you specify scripts using both the computer and user policies, the computer scripts are executed first.
Before enabling this policy, you should create the scripts and copy them to the system volume (sysvol) on the domain controller. By default, the login scripts are stored in the system volume (SYSVOL) on the domain controller in the directory:
\\domain\SYSVOL\domain\Scripts\scriptname1\scriptname2...After enabling this policy, click Add and enter the following information:
• Script: The name of the script and an optional path, which are relative to \\domain\SYSVOL\domain\scripts\. For example, if the domain name is ajax.org and you enter a script name of mlogin.sh, the script that gets executed on the domain controller is:\\ajax.org\SYSVOL\ajax.org\Scripts\mlogin.sh
You can specify additional relative directories in the path, if needed; for example, if you type sub\mlogin.sh, the file that gets executed is:\\ajax.org\SYSVOL\ajax.org\Scripts\sub\mlogin.sh
• Parameters: An optional set of arguments to pass to the script. These arguments are interpreted the same way as in a UNIX shell; that is, space is a delimiter, and backslash is an escape character. You can also use $USER to represent the current user's name. For example: arg1 arg2 arg3 arg1 'a r g 2' arg3
arg\' $USER.
Note Be certain authenticated users have permission to read these files so the scripts can run when they log in.
Once this group policy is enabled, it takes effect when users log out and log back in.
Use this policy To do this
Chapter 8 • Setting user-based policies 218
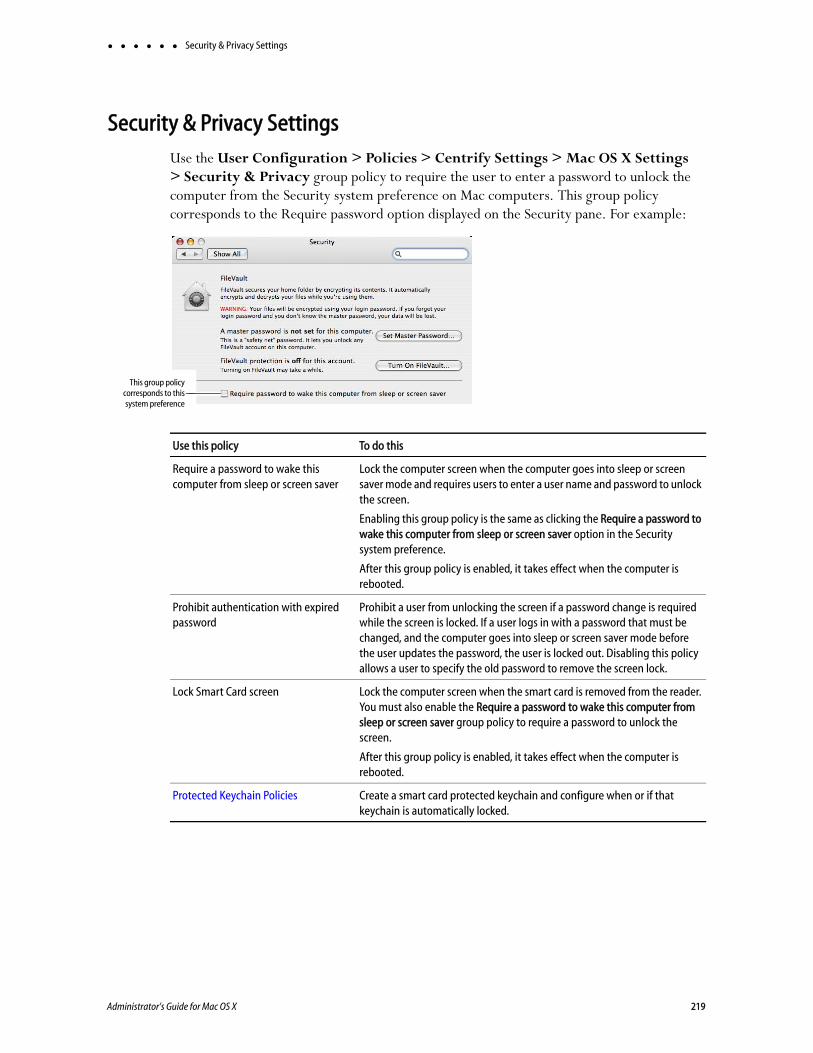
Security & Privacy Settings
Security & Privacy SettingsUse the User Configuration > Policies > Centrify Settings > Mac OS X Settings > Security & Privacy group policy to require the user to enter a password to unlock the computer from the Security system preference on Mac computers. This group policy corresponds to the Require password option displayed on the Security pane. For example:
Use this policy To do this
Require a password to wake this computer from sleep or screen saver
Lock the computer screen when the computer goes into sleep or screen saver mode and requires users to enter a user name and password to unlock the screen.
Enabling this group policy is the same as clicking the Require a password to wake this computer from sleep or screen saver option in the Security system preference.
After this group policy is enabled, it takes effect when the computer is rebooted.
Prohibit authentication with expired password
Prohibit a user from unlocking the screen if a password change is required while the screen is locked. If a user logs in with a password that must be changed, and the computer goes into sleep or screen saver mode before the user updates the password, the user is locked out. Disabling this policy allows a user to specify the old password to remove the screen lock.
Lock Smart Card screen Lock the computer screen when the smart card is removed from the reader. You must also enable the Require a password to wake this computer from sleep or screen saver group policy to require a password to unlock the screen.
After this group policy is enabled, it takes effect when the computer is rebooted.
Protected Keychain Policies Create a smart card protected keychain and configure when or if that keychain is automatically locked.
This group policycorresponds to thissystem preference
Administrator’s Guide for Mac OS X 219
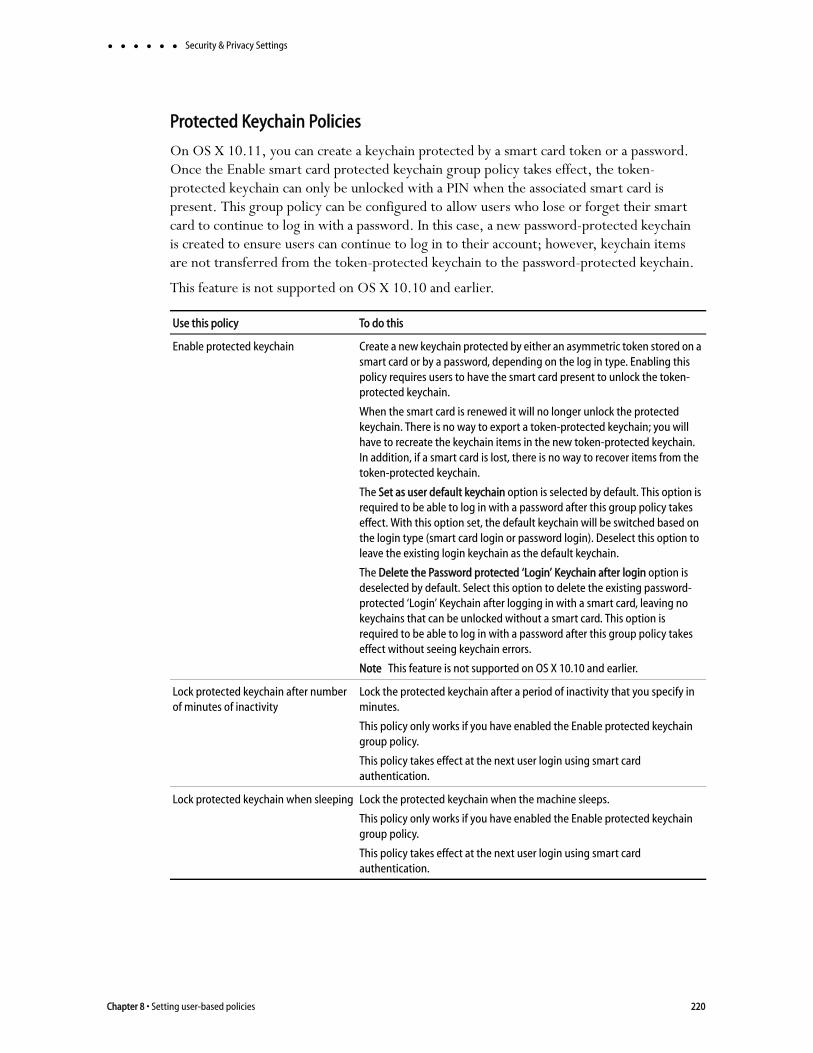
Security & Privacy Settings
Protected Keychain Policies
On OS X 10.11, you can create a keychain protected by a smart card token or a password. Once the Enable smart card protected keychain group policy takes effect, the token-protected keychain can only be unlocked with a PIN when the associated smart card is present. This group policy can be configured to allow users who lose or forget their smart card to continue to log in with a password. In this case, a new password-protected keychain is created to ensure users can continue to log in to their account; however, keychain items are not transferred from the token-protected keychain to the password-protected keychain.
This feature is not supported on OS X 10.10 and earlier.
Use this policy To do this
Enable protected keychain Create a new keychain protected by either an asymmetric token stored on a smart card or by a password, depending on the log in type. Enabling this policy requires users to have the smart card present to unlock the token-protected keychain.
When the smart card is renewed it will no longer unlock the protected keychain. There is no way to export a token-protected keychain; you will have to recreate the keychain items in the new token-protected keychain. In addition, if a smart card is lost, there is no way to recover items from the token-protected keychain.
The Set as user default keychain option is selected by default. This option is required to be able to log in with a password after this group policy takes effect. With this option set, the default keychain will be switched based on the login type (smart card login or password login). Deselect this option to leave the existing login keychain as the default keychain.
The Delete the Password protected ‘Login’ Keychain after login option is deselected by default. Select this option to delete the existing password-protected ‘Login’ Keychain after logging in with a smart card, leaving no keychains that can be unlocked without a smart card. This option is required to be able to log in with a password after this group policy takes effect without seeing keychain errors.
Note This feature is not supported on OS X 10.10 and earlier.
Lock protected keychain after number of minutes of inactivity
Lock the protected keychain after a period of inactivity that you specify in minutes.
This policy only works if you have enabled the Enable protected keychain group policy.
This policy takes effect at the next user login using smart card authentication.
Lock protected keychain when sleeping Lock the protected keychain when the machine sleeps.
This policy only works if you have enabled the Enable protected keychain group policy.
This policy takes effect at the next user login using smart card authentication.
Chapter 8 • Setting user-based policies 220

System Preference Settings
System Preference SettingsUse the User Configuration > Policies > Centrify Settings > Mac OS X Settings > System Preference Settings group policies to specify which preferences are enabled for use in System Preferences for Mac OS X users. Enabling a preference for use does not enable non-admin users to modify that preference. For example, some preferences, such as Startup Disk preferences, require an administrator name and password before a user can modify its settings. Displaying a preference does enable a user to view the preference’s current settings.
By default, no system preference panes are displayed unless explicitly enabled. The group policies in this category correspond to System Preferences you can select for display in the Workgroup Manager. For example:
The user interface for System Preferences Settings differs significantly between different versions of Mac OS X. Therefore, there are separate System Preferences policies for each supported version of Mac OS X. In addition, to support existing installations that configured group policies by using a previous centrifydc_mac_settings template, the Centrify group policies provide a set of legacy preferences settings.
The Use version specific settings group policy determines whether to use legacy settings or platform-specific system preferences settings. By default (if you do not configure or disable this policy) legacy settings are used.
Administrator’s Guide for Mac OS X 221
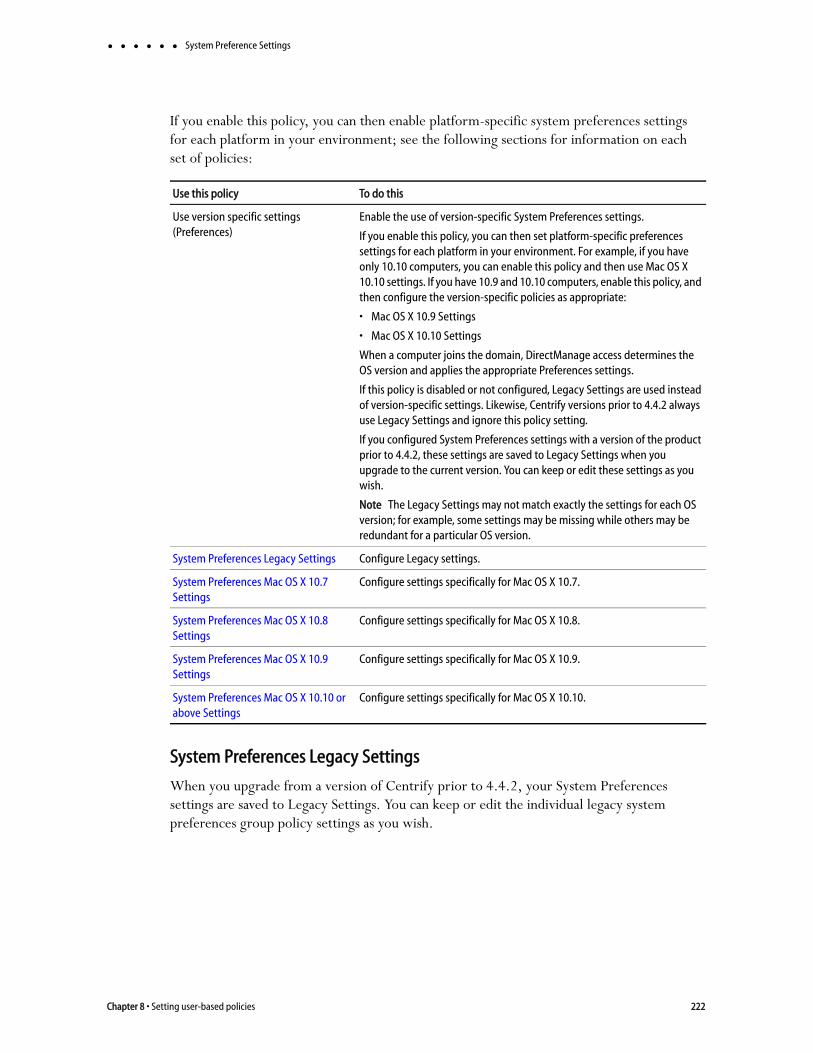
System Preference Settings
If you enable this policy, you can then enable platform-specific system preferences settings for each platform in your environment; see the following sections for information on each set of policies:
System Preferences Legacy Settings
When you upgrade from a version of Centrify prior to 4.4.2, your System Preferences settings are saved to Legacy Settings. You can keep or edit the individual legacy system preferences group policy settings as you wish.
Use this policy To do this
Use version specific settings (Preferences)
Enable the use of version-specific System Preferences settings.
If you enable this policy, you can then set platform-specific preferences settings for each platform in your environment. For example, if you have only 10.10 computers, you can enable this policy and then use Mac OS X 10.10 settings. If you have 10.9 and 10.10 computers, enable this policy, and then configure the version-specific policies as appropriate:
• Mac OS X 10.9 Settings
• Mac OS X 10.10 Settings
When a computer joins the domain, DirectManage access determines the OS version and applies the appropriate Preferences settings.
If this policy is disabled or not configured, Legacy Settings are used instead of version-specific settings. Likewise, Centrify versions prior to 4.4.2 always use Legacy Settings and ignore this policy setting.
If you configured System Preferences settings with a version of the product prior to 4.4.2, these settings are saved to Legacy Settings when you upgrade to the current version. You can keep or edit these settings as you wish.
Note The Legacy Settings may not match exactly the settings for each OS version; for example, some settings may be missing while others may be redundant for a particular OS version.
System Preferences Legacy Settings Configure Legacy settings.
System Preferences Mac OS X 10.7 Settings
Configure settings specifically for Mac OS X 10.7.
System Preferences Mac OS X 10.8 Settings
Configure settings specifically for Mac OS X 10.8.
System Preferences Mac OS X 10.9 Settings
Configure settings specifically for Mac OS X 10.9.
System Preferences Mac OS X 10.10 or above Settings
Configure settings specifically for Mac OS X 10.10.
Chapter 8 • Setting user-based policies 222

System Preference Settings
Note The legacy settings may not match exactly the settings for each OS version; for example, some settings may be missing while others may be redundant for a particular OS version.
Showing items in the Personal pane of System Preferences
Use the group policies in this category to choose which items to display in the Personal pane of System Preferences.
Use this policy To do this
Enable System Preferences Pane: Personal
Select the items to display in the Personal pane of System Preferences.
Enable System Preferences Pane: Hardware
Select the items to display in the Hardware pane of System Preferences.
Enable System Preferences Pane: Internet & Network
Select the items to display in the Internet & Network pane of System Preferences.
Enable System Preferences Pane: System
Select the items to display in the System pane of System Preferences.
Enable System Preferences Pane: Other Preferences Panes
Select the items to display in the Other pane of System Preferences.
Limit items usage in System Preferences
Limit the usage of items in System Preferences. You must enable this group policy for any of the other group policy settings to take effect.
Once this group policy is enabled, it takes effect when users log out and log back in.
Use this policy To do this
Enable Appearance Enable usage of Appearance preferences in the Personal pane of System Preferences.
Once this group policy is enabled, it takes effect when users log out and log back in.
Enable Dashboard & Expose Enable usage of Dashboard & ExposE preferences in the Personal pane of System Preferences.
Once this group policy is enabled, it takes effect when users log out and log back in.
Enable Desktop & Screen Saver Enable usage of Desktop & Screen Saver preferences in the Personal pane of System Preferences.
Once this group policy is enabled, it takes effect when users log out and log back in.
Enable Dock Enable usage of Dock preferences in the Personal pane of System Preferences.
Once this group policy is enabled, it takes effect when users log out and log back in.
Administrator’s Guide for Mac OS X 223

System Preference Settings
Showing items in the Hardware System pane of Preferences
Use the group policies in this category to display items in the Hardware pane of System Preferences.
Enable International (Language & Text) Enable usage of International preferences in the Personal pane of System Preferences.
Once this group policy is enabled, it takes effect when users log out and log back in.
Enable Security Enable usage of Security preferences in the Personal pane of System Preferences.
Once this group policy is enabled, it takes effect when users log out and log back in.
Enable Spotlight Enable usage of Spotlight preferences in the Personal pane of System Preferences.
Once this group policy is enabled, it takes effect when users log out and log back in.
Use this policy To do this
Enable Bluetooth Enable usage of Bluetooth preferences in the Hardware pane of System Preferences.
Once this group policy is enabled, it takes effect when users log out and log back in.
Enable CDs & DVDs Enable usage of CDs & DVDs preferences in the Hardware pane of System Preferences.
Once this group policy is enabled, it takes effect when users log out and log back in.
Enable Displays Enable usage of Displays preferences in the Hardware pane of System Preferences.
Once this group policy is enabled, it takes effect when users log out and log back in.
Enable Energy Saver Enable usage of Energy Saver preferences in the Hardware pane of System Preferences.
Once this group policy is enabled, it takes effect when users log out and log back in.
Enable Ink Enable usage of Ink preferences in the Hardware pane of System Preferences.
Note Ink preferences are only shown if a graphics tablet is connected to the Mac computer.
Once this group policy is enabled, it takes effect when users log out and log back in.
Use this policy To do this
Chapter 8 • Setting user-based policies 224

System Preference Settings
Showing items in the Internet & Network pane of System Preferences
Use the group policies in this category to display items in the Internet & Network pane of System Preferences.
Enable Keyboard & Mouse (Keyboard) Enable usage of Keyboard & Mouse preferences in the Hardware pane of System Preferences.
Once this group policy is enabled, it takes effect when users log out and log back in.
Enable Mouse Enable usage of Mouse preferences in the Hardware pane of System Preferences.
Once this group policy is enabled, it takes effect when users log out and log back in.
Enable Print & FAX Enable usage of Print & FAX preferences in the Hardware pane of System Preferences.
Once this group policy is enabled, it takes effect when users log out and log back in.
Enable Sound Enable usage of Sound preferences in the Hardware pane of System Preferences.
Once this group policy is enabled, it takes effect when users log out and log back in.
Enable Trackpad Enable usage of Trackpad preferences in the Hardware pane of System Preferences.
Once this group policy is enabled, it takes effect when users log out and log back in.
Use this policy To do this
Enable .Mac (MobileMe) Enable usage of .Mac preferences in the Internet & Network pane of System Preferences.
Once this group policy is enabled, it takes effect when users log out and log back in.
Enable Fibre Channel Enable usage of Fibre Channel preferences in the Internet & Network pane of System Preferences.
Once this group policy is enabled, it takes effect when users log out and log back in.
Enable Network Enable usage of Network preferences in the Internet & Network pane of System Preferences.
Once this group policy is enabled, it takes effect when users log out and log back in.
Use this policy To do this
Administrator’s Guide for Mac OS X 225

System Preference Settings
Showing items in the System pane of System Preferences
Use the group policies in this category to display items in the System pane of System Preferences.
Enable QuickTime Enable usage of QuickTime preferences in the Internet & Network pane of System Preferences.
Once this group policy is enabled, it takes effect when users log out and log back in.
Enable Sharing Enable usage of Sharing preferences in the Internet & Network pane of System Preferences.
Once this group policy is enabled, it takes effect when users log out and log back in.
Use this policy To do this
Enable Accounts Enable usage of Accounts preferences in the System pane of System Preferences.
Once this group policy is enabled, it takes effect when users log out and log back in.
Enable Classic Enable usage of Classic preferences in the System pane of System Preferences.
Once this group policy is enabled, it takes effect when users log out and log back in.
Enable Date & Time Enable usage of Date & Time preferences in the System pane of System Preferences.
Once this group policy is enabled, it takes effect when users log out and log back in.
Enable Parental Controls Enable usage of Parental Controls preferences in the System pane of System Preferences.
Once this group policy is enabled, it takes effect when users log out and log back in.
Enable Software Update Enable usage of Software Update preferences in the System pane of System Preferences.
Once this group policy is enabled, it takes effect when users log out and log back in.
Enable Speech Enable usage of Speech preferences in the System pane of System Preferences.
Once this group policy is enabled, it takes effect when users log out and log back in.
Enable Startup Disk Enable usage of Startup Disk preferences in the System pane of System Preferences.
Once this group policy is enabled, it takes effect when users log out and log back in.
Use this policy To do this
Chapter 8 • Setting user-based policies 226
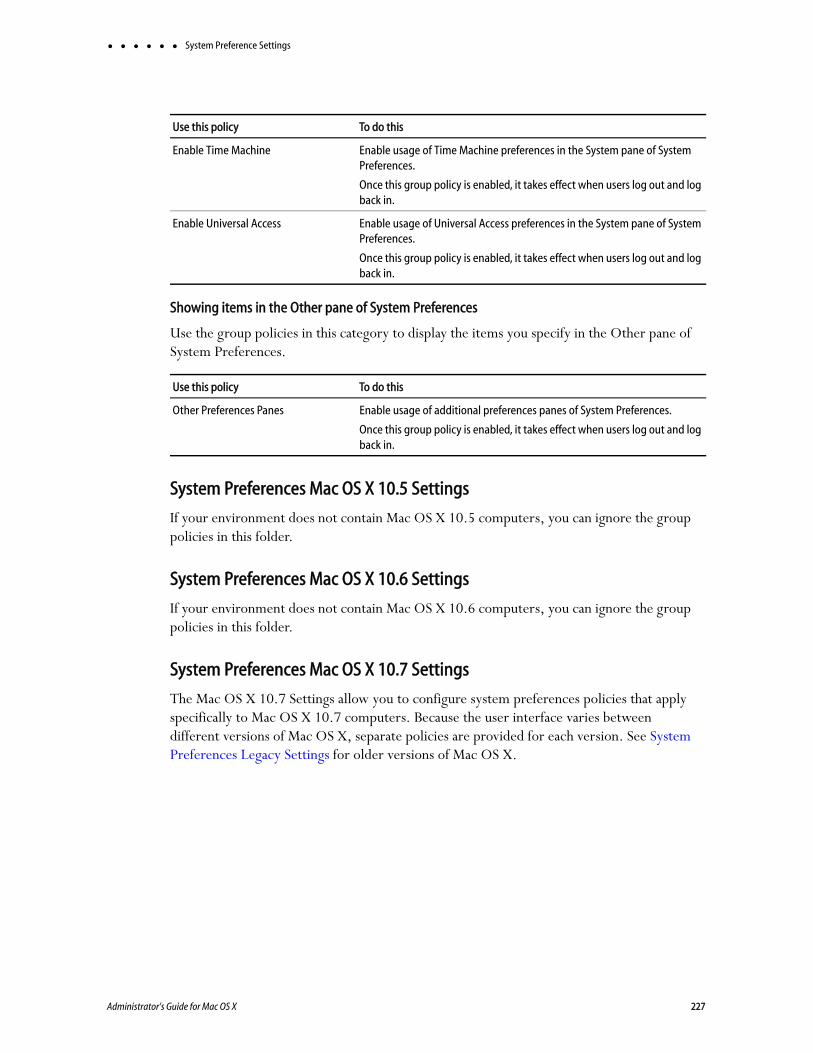
System Preference Settings
Showing items in the Other pane of System Preferences
Use the group policies in this category to display the items you specify in the Other pane of System Preferences.
System Preferences Mac OS X 10.5 Settings
If your environment does not contain Mac OS X 10.5 computers, you can ignore the group policies in this folder.
System Preferences Mac OS X 10.6 Settings
If your environment does not contain Mac OS X 10.6 computers, you can ignore the group policies in this folder.
System Preferences Mac OS X 10.7 Settings
The Mac OS X 10.7 Settings allow you to configure system preferences policies that apply specifically to Mac OS X 10.7 computers. Because the user interface varies between different versions of Mac OS X, separate policies are provided for each version. See System Preferences Legacy Settings for older versions of Mac OS X.
Enable Time Machine Enable usage of Time Machine preferences in the System pane of System Preferences.
Once this group policy is enabled, it takes effect when users log out and log back in.
Enable Universal Access Enable usage of Universal Access preferences in the System pane of System Preferences.
Once this group policy is enabled, it takes effect when users log out and log back in.
Use this policy To do this
Other Preferences Panes Enable usage of additional preferences panes of System Preferences.
Once this group policy is enabled, it takes effect when users log out and log back in.
Use this policy To do this
Administrator’s Guide for Mac OS X 227

System Preference Settings
If your environment does not contain Mac OS X 10.7 computers, you can ignore these settings.
Enable System Preferences Panes 10.7
Use Enable built-in System Preferences panes to select the items to add to the standard System Preferences panes.
Use this policy To do this
Limit items usage in System Preferences
Limit the usage of items in the System Preferences panel.
Once enabled, this group policy takes effect when users log out and log back in.
Enable System Preferences Panes (folder)
Use the group policies in this folder to select items to add to the built-in System Preferences panes and to define items to add to the Other pane of System Preferences.
Chapter 8 • Setting user-based policies 228

System Preference Settings
Use Enable other System Preferences panes to add preferences for third-party applications to the Other pane of the System Preferences.
System Preferences Mac OS X 10.8 Settings
The Mac OS X 10.8 Settings allow you to configure system preferences policies that apply specifically to Mac OS X 10.8 computers. Because the user interface varies between different versions of Mac OS X, separate policies are provided for each version. See System Preferences Legacy Settings for older versions of Mac OS X.
Use this policy To do this
Enable built-in System Preferences panes
Select items to add to the System Preferences panel.
This policy is only effective if the Limit items shown in System Preferences group policy is enabled. If the Limit items usage in System Preferences group policy is not configured or is disabled, this group policy is ignored.
Once enabled, this group policy takes effect when users log out and log back in.
Enable other System Preferences panes Define a list of additional items to add to the Other pane of the System Preferences panel.
Preference pane applications are actually collections of files inside a directory (called bundles). Inside the Contents directory of every preference pane application is the info.plist file, and inside that file is the CFBundleIdentifier key that identifies the preference pane application. You need to use the value for this key when adding a preference pane application.
Generally, installed third party preference panes can be found in /System/Library/PreferencePanes, /Library/PreferencePanes or ~/Library/PreferencePanes.
You can find the CFBundleIdentifier key by using the defaults command. For example, to find the value for the QuickTime pane, use the following command in a terminal window:
defaults read /System/Library/PreferencePanes/
QuickTime.prefPane/Contents/info CFBundleIdentifier
which returns:
com.apple.preference.quicktime
To display the QuickTime icon in the Other pane of the System Preferences Panel, enable this policy, then click Add and enter com.apple.preference.quicktime.
This policy is only effective if the Limit items shown in System Preferences group policy is enabled. If the Limit items shown in System Preferences group policy is not configured or is disabled, this group policy is ignored.
Once enabled, this group policy takes effect when users log out and log back in.
Administrator’s Guide for Mac OS X 229

System Preference Settings
If your environment does not contain Mac OS X 10.8 computers, you can ignore these settings.
Enable System Preferences Panes 10.8
Use Enable built-in System Preferences panes to select the items to add to the standard System Preferences panes.
Use this policy To do this
Limit items usage in System Preferences
Limit the usage of items in the System Preferences panel.
Once enabled, this group policy takes effect when users log out and log back in.
Enable System Preferences Panes (folder)
Use the group policies in this folder to select items to add to the built-in System Preferences panes and to define items to add to the Other pane of System Preferences.
Chapter 8 • Setting user-based policies 230

System Preference Settings
Use Enable other System Preferences panes to add preferences for third-party applications to the Other pane of the System Preferences.
System Preferences Mac OS X 10.9 Settings
The Mac OS X 10.9 Settings allow you to configure system preferences policies that apply specifically to Mac OS X 10.9 computers. Because the user interface varies between different versions of Mac OS X, separate policies are provided for each version. See System Preferences Legacy Settings for older versions of Mac OS X.
Use this policy To do this
Enable built-in System Preferences panes
Select items to add to the System Preferences panel.
This policy is only effective if the Limit items shown in System Preferences group policy is enabled. If the Limit items shown in System Preferences group policy is not configured or is disabled, this group policy is ignored.
Once enabled, this group policy takes effect when users log out and log back in.
Enable other System Preferences panes Define a list of additional items to add to the Other pane of the System Preferences panel.
Preference pane applications are actually collections of files inside a directory (called bundles). Inside the Contents directory of every preference pane application is the info.plist file, and inside that file is the CFBundleIdentifier key that identifies the preference pane application. You need to use the value for this key when adding a preference pane application.
Generally, installed third party preference panes can be found in /System/Library/PreferencePanes, /Library/PreferencePanes or ~/Library/PreferencePanes.
You can find the CFBundleIdentifier key by using the defaults command. For example, to find the value for the QuickTime pane, use the following command in a terminal window:
defaults read /System/Library/PreferencePanes/
QuickTime.prefPane/Contents/info CFBundleIdentifier
which returns:
com.apple.preference.quicktime
To display the QuickTime icon in the Other pane of the System Preferences Panel, enable this policy, then click Add and enter com.apple.preference.quicktime.
This policy is only effective if the Limit items shown in System Preferences group policy is enabled. If the Limit items shown in System Preferences group policy is not configured or is disabled, this group policy is ignored.
Once enabled, this group policy takes effect when users log out and log back in.
Administrator’s Guide for Mac OS X 231

System Preference Settings
If your environment does not contain Mac OS X 10.9 computers, you can ignore these settings.
Enable System Preferences Panes 10.9
Use Enable built-in System Preferences panes to select the items to add to the standard System Preferences panes.
Use this policy To do this
Limit items usage in System Preferences
Limit the usage of items in the System Preferences panel.
Once enabled, this group policy takes effect when users log out and log back in.
Enable System Preferences Panes (folder)
Use the group policies in this folder to select items to add to the built-in System Preferences panes and to define items to add to the Other pane of System Preferences.
Chapter 8 • Setting user-based policies 232

System Preference Settings
Use Enable other System Preferences panes to add preferences for third-party applications to the Other pane of the System Preferences.
System Preferences Mac OS X 10.10 or above Settings
The Mac OS X 10. 10 or above Settings allow you to configure system preferences policies that apply specifically to Mac OS X 10.10 and above computers. Because the user interface varies between different versions of Mac OS X, separate policies are provided for each version. See System Preferences Legacy Settings for other versions of Mac OS X.
Use this policy To do this
Enable built-in System Preferences panes
Select items to add to the System Preferences panel.
This policy is only effective if the Limit items shown in System Preferences group policy is enabled. If the Limit items shown in System Preferences group policy is not configured or is disabled, this group policy is ignored.
Once enabled, this group policy takes effect when users log out and log back in.
Enable other System Preferences panes Define a list of additional items to add to the Other pane of the System Preferences panel.
Preference pane applications are actually collections of files inside a directory (called bundles). Inside the Contents directory of every preference pane application is the info.plist file, and inside that file is the CFBundleIdentifier key that identifies the preference pane application. You need to use the value for this key when adding a preference pane application.
Generally, installed third party preference panes can be found in /System/Library/PreferencePanes, /Library/PreferencePanes or ~/Library/PreferencePanes.
You can find the CFBundleIdentifier key by using the defaults command. For example, to find the value for the QuickTime pane, use the following command in a terminal window:
defaults read /System/Library/PreferencePanes/
QuickTime.prefPane/Contents/info CFBundleIdentifier
which returns:
com.apple.preference.quicktime
To display the QuickTime icon in the Other pane of the System Preferences Panel, enable this policy, then click Add and enter com.apple.preference.quicktime.
This policy is only effective if the Limit items shown in System Preferences group policy is enabled. If the Limit items shown in System Preferences group policy is not configured or is disabled, this group policy is ignored.
Once enabled, this group policy takes effect when users log out and log back in.
Administrator’s Guide for Mac OS X 233
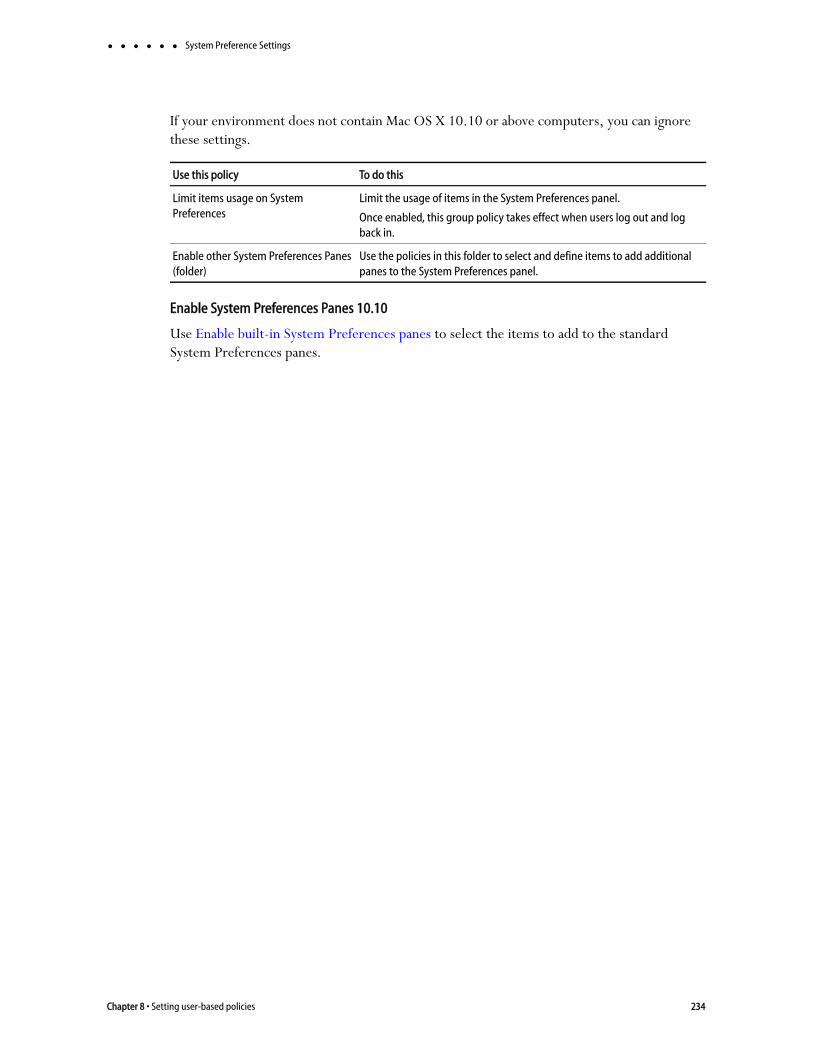
System Preference Settings
If your environment does not contain Mac OS X 10.10 or above computers, you can ignore these settings.
Enable System Preferences Panes 10.10
Use Enable built-in System Preferences panes to select the items to add to the standard System Preferences panes.
Use this policy To do this
Limit items usage on System Preferences
Limit the usage of items in the System Preferences panel.
Once enabled, this group policy takes effect when users log out and log back in.
Enable other System Preferences Panes (folder)
Use the policies in this folder to select and define items to add additional panes to the System Preferences panel.
Chapter 8 • Setting user-based policies 234

System Preference Settings
Use Enable other System Preferences panes to add preferences for third-party applications to the Other pane of the System Preferences.
Use this policy To do this
Enable built-in System Preferences panes
Enable this group policy to enable the built-in System Preferences panes.
Enable or disable usage of items in the built-in System Preferences panes by checking or unchecking boxes corresponding to the items.
This policy is only effective if the Limit items shown in System Preferences group policy is enabled. If the Limit items shown in System Preferences group policy is not configured or is disabled, this group policy is ignored.
Once enabled, this group policy takes effect when users log out and log back in.
Enable other System Preferences panes Define a list of additional items to add to the Other pane of the System Preferences panel.
Preference pane applications are actually collections of files inside a directory (called bundles). Inside the Contents directory of every preference pane application is the info.plist file, and inside that file is the CFBundleIdentifier key that identifies the preference pane application. You need to use the value for this key when adding a preference pane application.
Generally, installed third party preference panes can be found in /System/Library/PreferencePanes, /Library/PreferencePanes or ~/Library/PreferencePanes.
You can find the CFBundleIdentifier key by using the defaults command. For example, to find the value for the QuickTime pane, use the following command in a terminal window:
defaults read /System/Library/PreferencePanes/
QuickTime.prefPane
/Contents/info CFBundleIdentifier
which returns:
com.apple.preference.quicktime
To display the QuickTime icon in the Other pane of the System Preferences Panel, enable this policy, then click Add and enter com.apple.preference.quicktime.
This policy is only effective if the Limit items shown in System Preferences group policy is enabled. If the Limit items shown in System Preferences group policy is not configured or is disabled, this group policy is ignored.
Once enabled, this group policy takes effect when users log out and log back in.
Administrator’s Guide for Mac OS X 235

Chapter 9
Configuring a Mac computer for smart card login
This chapter explains how to set up smart card login for a Mac computer.
The following topics are covered:
Understanding smart card login
Configuring smart card login
Using smart card login
Troubleshooting smart card log in
Configuring web browsers and mail clients
Understanding smart card loginSmart cards provide an enhanced level of security authentication for logging into an Active Directory domain. To configure a smart card for use on a Mac computer that is running the Centrify agent, requires that you have already set up a smart card for use in a Windows domain. You do not need to add any smart card infrastructure to the Mac computer, other than a smart card reader and a provisioned smart card.
In a Windows environment, a smart card may be set up either for a single user account or for multiple user accounts. For example, an individual contributor might have access to a single Active Directory account that he uses for all his work. In this case, the card is set up for a single user and the card is linked directly to a UPN. When a user inserts the card to log on, the smart card system looks for the UPN in Active Directory and prompts for a PIN.
Windows 2008 also provides a name-mapping feature that enables configuring a smart card with multiple user accounts. For example, a user might want to log in with a regular account to check mail or perform routine tasks, but log in with an administrator’s account to perform privileged tasks. To set up a card for multiple users, an administrator maps a certificate to each user account on the card. When a user inserts the card to log on, the smart card system prompts the user to select which account to use, and prompts for the card’s PIN.
If you have set up smart card login for Windows clients in a domain, you can use Access Manager to configure smart card login for Mac clients joined to the same domain. If you have provisioned a smart card for use on a Windows computer — either for a single user or multiple users — once you configure smart card support for a Mac computer, you can use the same smart card to log in to a Mac computer.
Note Configuring smart card support in Access Manager is nearly the same for a single-user or multi-user card with the exception that for multi-user cards, you must set an extra
236
Configuring smart card login
configuration parameter as explained in Enabling support for multi-user PIV and multi-user smart cards.
Setting up a single user smart card login for Windows requires either:
Microsoft enterprise root certification authority; see the Microsoft TechNet article: Install an enterprise root certification authority.
A third party certification authority — see the Microsoft KB article: Guidelines for enabling smart card logon with third-party certification authorities.
Setting up a multi-user smart card login for Windows requires mapping the certificate on the card to the users who the card is associated with. See the following Microsoft Technet Blog post: “Mapping One Smart Card to Multiple Accounts” for more information on how to do this.
For more information about how Access Manager supports smart card log in, see the following video chalk talks:
Smart Card for Mac Part 1: Introduction to Active Directory Integration, which provides a basic introduction to smart card for Access Manager.
Smart Card for Mac Part 2: Architecture & Authentication Flow, which provides technical details about the Access Manager implementation of smart card.
Configuring smart card login Centrify provides group policies, configuration options, and account options to perform the following smart card configuration tasks.
Note Before configuring smart card login, refer to Verifying prerequisites for configuring smart card login to ensure your environment meets all the prerequisites.
Enabling smart card support (including authentication via YubiKey tokens)
Enabling support for multi-user PIV and multi-user smart cards
Enabling smart card support for sudo
Enabling protected keychains
Requiring smart card login
Enabling certificates that do not have the extended key usage (EKU) attribute
Verifying smart card configuration
Enabling screen locking for smart card removal
Disabling smart card support
Administrator’s Guide for Mac OS X 237

Configuring smart card login
Verifying prerequisites for configuring smart card login
The prerequisites for enabling smart card support differ depending on whether you have configured a single-user or multi-user smart card.
For a single-user card, before enabling smart card support, make sure you do the following:
Provision a smart card with an NT principal name and PIN. Currently, Access Manager supports Common Access Card (CAC) and Personal Identify Verification (PIV) smart cards.
Verify that the Active Directory Zone user’s UPN matches the UPN on the smart card.
For a multi-user card, before enabling smart card support, make sure you have the following in place:
A Windows Server 2008 domain controller for authentication. Windows Server 2003 domain controllers require a UPN on the card, which prevents them from using the name-mapping feature.
The card is not configured with a UPN. If a card with a UPN is inserted, the Mac prompts for a PIN rather than prompting for a username and password.
An administrator has added the certificate on the card to the name mapping for the users the card is associated to. See the following Microsoft Technet Blog post: “Mapping One Smart Card to Multiple Accounts” for more information on how to do this.
For either type of card, verify that the public key infrastructure to support smart card login is operational on the Windows computer running Active Directory and Access Manager. If the user is able to log in to a Windows computer with a smart card, and you have a card reader and a fully-provisioned card for the Mac computer, the user should be able to log in to the Mac computer once you configure it for smart card support.
Enabling smart card support (including authentication via YubiKey tokens)
Smart card and YubiKey token support requires configuration changes to Mac OS X. Enabling the relevant policies makes the required changes to Mac configuration files.
To enable smart card support for logging on
1 Make a backup of the authorization database by exporting it to a plist file on all computers for which you are enabling smart card login support. Enabling the group policy Enable smart card support causes edits to this file, so you should create a backup to be safe.security authorizationdb read system.login.console >
system.login.console.backup.plist
security authorizationdb read authenticate > authenticate.backup.plist
2 Create or edit an existing Group Policy Object linked to a site, domain, or OU that includes Mac computers.
Chapter 9 • Configuring a Mac computer for smart card login 238

Configuring smart card login
3 In the Group Policy Object Editor, expand Computer Configuration > Centrify Settings > Mac OS X Settings > Security, then double-click Enable smart card support.
4 Select Enabled to enable smart card support.
This group policy adds smart card support to the authorization database on Mac computers that are linked to the group policy object. This policy also creates a text file named /etc/cacloginconfig.plist on each computer.
This configuration file directs the Mac smart card log-in to look for a user in Active Directory with a user principal name (UPN) that is the same as the NT Principal Name attribute in the smart card log-in certificate.
Note The /etc/cacloginconfig configuration file for use with Access Manager and Active Directory is different from the default configuration file provided by Apple.
5 Select Enable YubiKeys as a smart card to enable authentication using a YubiKey PIV token.
Enabling YubiKeys as a smart card installs Yubico’s libccid to enable communication to the YubiKey using CCID protocol. To authenticate with a YubiKey PIV token, the certificates issue to the YubiKey must be part of a domain that is already provisioned and setup to accept PIV smart cards. See https://www.yubico.com/support/documentation/ for more information about YubiKeys.
After reboot, the computers linked to the group policy object are ready for smart card use. Complete the procedure in the next section if you plan to use multi-user smart cards with your Mac computers, or go to “Enabling screen locking for smart card removal” on page 244 to enable screen locking when the smart card is removed from a computer.
Enabling support for multi-user PIV and multi-user smart cards
If you plan to use multi-user PIV cards or multi-user smart cards with a Mac computer in your domain, you must make the following changes in your environment.
Configure Active Directory to support multi-user PIV cards and multi-user smart cards
Configure Centrify to support multi-user PIV cards and multi-user smart cards
Note Making the following changes results in an environment that supports multi-user PIV card login, which means users always need to provide a unixname or UPN. Single-user PIV cards will continue to work; however, those users will be required to provide a username. Military CACNG cards will no longer work if you change your environment to support multi-user PIV cards.
Configure Active Directory to support multi-user PIV cards and multi-user smart cards
The following steps are necessary to support multi-user PIV cards and multi-user smart cards in Active Directory.
Administrator’s Guide for Mac OS X 239
Configuring smart card login
On the computer acting as the Key Distribution Center (KDC), set the following registry key to 0 to disable UPN mapping:
HKEY_LOCAL_MACHINE\SYSTEM\CurrentControlSet\Services\Kdc\useSubjectAltName
Export the user smart card certificate and enable name mapping to the users associated with the card. Refer to the following Microsoft Technet Blog post: “Mapping One Smart Card to Multiple Accounts” for more information.
Configure Centrify to support multi-user PIV cards and multi-user smart cards
From the Group Policy Management Editor, enable the Disable smart card UPN mapping policy to prevent the login UI from greeting the UPN user identified on the PIV card. This policy is found at Computer Configuration > Policies > Centrify Settings > Mac OS X Settings > Security & Privacy. Refer to “Security & Privacy” on page 140 for additional information.
Tip Alternatively, you can use the sctool command-line tool to disable smart card UPN mapping on an individual Mac for testing or evaluation purposes.
To disable smart card UPN mapping with sctool: sctool -u '###'
To enable smart card UPN mapping with sctool: sctool -u 'NT Principal Name'
On the Mac computer where you want to enable support for multi-user PIV cards, set the smartcard.name.mapping parameter in the /etc/centrifydc/centrifydc.conf file to true.
Enabling smart card support for sudo
This group policy configures sudo to require the smart card PIN for authentication instead of the user’s password. The user must be configured in the sudoers file and a smart card corresponding to the user must be presented at the time sudo is run.
If the smart card keychain is unlocked when sudo is run, sudo will not prompt for the PIN for authentication.
To enable smart card authorization for sudo
1 Make a backup of the following files.
/etc/pam.d/sudo
/etc/pam.d/sudo.pre_cdc
2 Create or edit an existing Group Policy Object linked to a site, domain, or OU that includes Mac OS X computers.
3 In the Group Policy Object Editor, expand Computer Configuration > Centrify Settings > Mac OS X Settings > Security & Privacy, then double-click Enable smart card support for sudo.
Chapter 9 • Configuring a Mac computer for smart card login 240

Configuring smart card login
4 Select the Enabled option and click OK.
Enabling protected keychains
On OS X 10.11, you can enable the Enable protected keychain group policy to create a keychain protected by either a smart card token or a password and set it as the default keychain, depending on the log in type. Once the Enable protected keychain group policy takes effect, the token-protected keychain can only be unlocked with a PIN when the associated smart card is present.
In addition, you can select options in the group policy that allow users who forget or lose their smart card to continue to log in with a password. In this case, a new password-protected keychain is created to ensure users can continue to log in to their account; however, keychain items are not transferred from the token-protected keychain to the password-protected keychain.
This feature is not supported on OS X 10.10 and earlier.
Note When the smart card is renewed it will no longer unlock the token-protected keychain. There is no way to export a token-protected keychain; you will have to recreate the keychain items in the new token-protected keychain. In addition, if a smart card is lost, there is no way to recover items from the token-protected keychain.
To create a smart card token protected keychain
1 Enable the Enable protected keychain group policy (User Configuration > Centrify Settings > Mac OS X Settings > Security & Privacy > Keychain Policies > Enable protected keychain).
2 Select the Set as user default keychain option to make the protected keychain the default keychain.
Th group policy switches the default keychain depending on login type (smart card login or password login). This option is selected by default, and is required to be able to log in with a password after this group policy takes effect.
3 Select the Delete the Password protected ‘Login’ Keychain after login option to delete the existing password protected ‘Login’ keychain.
This removes existing keychains that can be unlocked without a smart card. This option is deselected by default, but is required to be able to log in with a password after this group policy takes effect without seeing keychain errors.
4 Click Apply, then click OK.
Once enabled, this policy takes effect at the next user login using smart card authentication. Connect only one smart card to the client machine to log in and create a token-protected keychain. Choosing a specific smart card to protect the keychain when multiple smart cards are present is not supported.
Administrator’s Guide for Mac OS X 241

Configuring smart card login
5 (Optional) Set parameters for when to lock the protected keychain using the following two group policies.
Lock protected keychain after number of minutes of inactivity
Lock protected keychain when sleeping
Note If you do not enable these policies, the default behavior for a new keychain is to lock after five minutes or when sleeping.
Both of these policies take effect at the next user login using smart card authentication.
Requiring smart card login
To fully support smart card login, you can do either one of the following.
Configure a computer to require smart card login by enabling the Require smart card login group policy (Computer Configuration > Centrify Settings > Mac OS X Settings > Security & Privacy > Require smart card login.) When you enable this policy, no one can log into a computer for which this policy applies with a user name and password but must insert a smart card, unless you create an exception group. An exception group is simply an Active Directory group that you create and add to this group policy to allow group members to log in, if necessary, with a user name and password. The purpose of creating an exception group is to allow users to temporarily log in if they do not have their smart card in hand.
Note If you use set this policy, be certain that all users have their passwords set to never expire. Otherwise, if a password expires, a user may be unable to log in with a smart card and see a potentially confusing error message about changing their password. If you use the option to require smart card login for specific users, as explained in the next bullet, you can ignore password expiration.
Set an individual user’s account options to require login with a smart card, as shown in the following procedure. When you set this option, the user cannot interactively log in to a computer with a user name and password but must insert a smart card. Do not use this option if you want to allow specific users to log in temporarily with a user name and password in case they do not have their smart card with them. In this case, use the Require smart card login group policy and create and add an exception group.
To require smart-card login for a specific user:
1 Open the Access Manager console or Active Directory Users and Computers.
2 Select the user. For example, in the Access Manager console, open domainName > Zones > zoneName > Users > userName.
3 Right-click the userName and select Properties.
4 Select the Account tab.
Chapter 9 • Configuring a Mac computer for smart card login 242

Configuring smart card login
5 In Account options, scroll until Smart card is required for interactive logon is visible, then select it.
6 Click OK.
Enabling certificates that do not have the extended key usage (EKU) attribute
Normally, smart card use requires certificates that contain the extended key usage attribute. However, Windows provides a group policy that allows the use of certificates that do not have this attribute.
Note This group policy is implemented as an administrative template (.adm file), not as an xml file, as are the Centrify group policies.
To enable certificates that do not have the EKU attribute for use with smart cards:
1 Open the group policy editor and edit the GPO that contains the Linux computers enabled for smart-card login.
2 Open Computer Configuration > Policies > Administrative Templates > Windows Components > Smart Card and double-click Allow certificates with no extended key usage certificate attribute.
3 Click Enabled and click OK.
When you enable this policy, it sets the smartcard.allow.noeku parameter to true in the Centrify configuration file. Certificates with the following attributes can also be used to log on with a smart card:
Certificates with no EKU
Certificates with an All Purpose EKU
Certificates with a Client Authentication EKU
4 In a Terminal window, run the sctool command as root with the -E (--no-eku) parameter to re-enable smart card support. You must use either the -a (--altpkinit) or -k (--pkinit) parameter with the -E option; for example:sctool -E -k [email protected]
Verifying smart card configuration
After enabling smart card support, as described in Configuring smart card login, do the following to verify that a smart card is working:
1 Verify that the user is enabled for the zone the Mac computer has joined.
On the Windows computer, open Activity Directory Users and Computers or the Access Manager console and view the Centrify Profile for the user. Verify that the user has a profile and is assigned to a role in the zone to which the Mac computer is joined.
Administrator’s Guide for Mac OS X 243

Configuring smart card login
2 On the Mac computer, Click Utilities > Keychain Access.
3 Insert the smart card into the reader and the keychain for the smart card certificate appears in the Keychains window, whose name is in the form, CardType-CardNumber, for example, CAC-4190-6145-7ACC-2122.
If the new keychain does not appear, quit and restart Keychain Access.
4 Double-click the certificate for the user in the right-hand pane, for example, test user 3.
5 Scroll to find the NT Principal name; for example:NT Principal Name [email protected]
The NT Principal name in the certificate should match the UPN in Active Directory.
Enabling screen locking for smart card removal
Depending on what you consider best practices for using a smart card, you may want the screen to lock when a user removes the smart card. Enabling the Lock smart card screen policy creates a daemon that locks the screen if the user removes the smart card.
Chapter 9 • Configuring a Mac computer for smart card login 244

Using smart card login
To enable screen locking when the smart card is removed from a computer:
1 Edit the Group Policy Object (GPO) linked to a site, domain, or OU that includes Mac computers, expand User Configuration > Centrify Settings > Mac OS X Settings > Security Settings, then double-click Lock Smart Card screen.
2 Select the Enabled option and click OK.
3 Expand User Configuration > Centrify Settings > Mac OS X Settings > Security Settings, then double-click Require a password to wake this computer from sleep or screen saver to require a password to unlock the screen.
4 Select the Enabled option and click OK.
This group policy creates a daemon that listens for the smart card removal event and locks the screen when it occurs.
Disabling smart card support
To disable smart card support:
1 Edit the Group Policy Object linked to a site, domain, or OU that includes Mac computers, expand Computer Configuration > Centrify Settings > Mac OS X Settings > Security, then double-click Enable smart card support.
2 Select Disabled and click OK.
When the policy takes effect, the smart card specific strings are removed from the authorization database, and the /etc/cacloginconfig.plist file is deleted.
3 Expand User Configuration > Centrify Settings > Mac OS X Settings > Security Settings, then double-click Lock Smart Card screen.
4 Select Disabled and click OK.
Using smart card loginWhen a user inserts a smart card into the card reader attached to a Mac computer that is waiting for login, the login dialog is replaced by a smart card enabled login (if the card is provisioned for one or more Active Directory users who are enabled for the Centrify zone to which the computer is joined). However, the actual log on screen varies depending on whether the card is provisioned for a single user or for multiple users.
Administrator’s Guide for Mac OS X 245
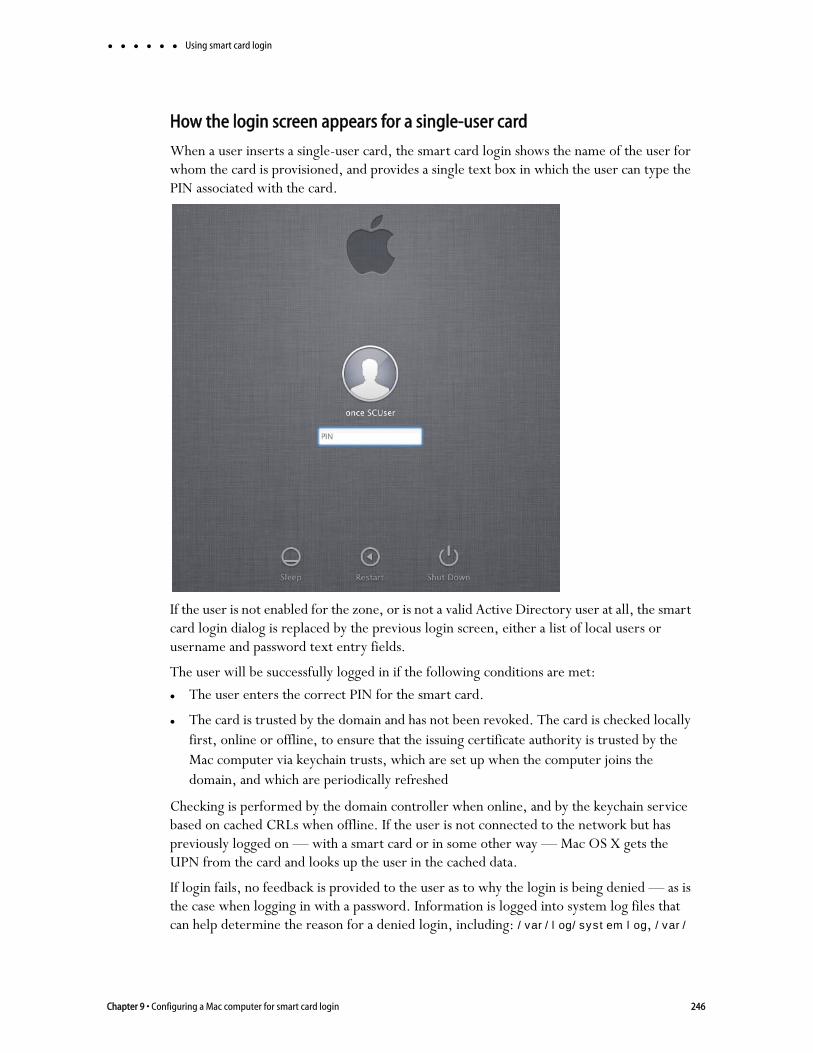
Using smart card login
How the login screen appears for a single-user card
When a user inserts a single-user card, the smart card login shows the name of the user for whom the card is provisioned, and provides a single text box in which the user can type the PIN associated with the card.
If the user is not enabled for the zone, or is not a valid Active Directory user at all, the smart card login dialog is replaced by the previous login screen, either a list of local users or username and password text entry fields.
The user will be successfully logged in if the following conditions are met:
The user enters the correct PIN for the smart card.
The card is trusted by the domain and has not been revoked. The card is checked locally first, online or offline, to ensure that the issuing certificate authority is trusted by the Mac computer via keychain trusts, which are set up when the computer joins the domain, and which are periodically refreshed
Checking is performed by the domain controller when online, and by the keychain service based on cached CRLs when offline. If the user is not connected to the network but has previously logged on — with a smart card or in some other way — Mac OS X gets the UPN from the card and looks up the user in the cached data.
If login fails, no feedback is provided to the user as to why the login is being denied — as is the case when logging in with a password. Information is logged into system log files that can help determine the reason for a denied login, including: /var/log/system.log, /var/
Chapter 9 • Configuring a Mac computer for smart card login 246

Using smart card login
log/secure.log, and the Centrify log file (/var/log/centrifydc.log) if logging is enabled.
How the login screen appears for a multi-user card
When a user inserts a multi-user card, the smart card login shows a generic username and password login screen. The user may select one of the accounts provisioned for the card by typing the account name in the Name box. In the Password box, the user must enter the PIN for the card, not the password for the account.
If the user is not enabled for the zone, or is not a valid Active Directory user at all, the smart card login dialog is replaced by the previous login screen, either a list of local users or username and password text entry fields.
The user will be successfully logged in if the following conditions are met:
The user enters the correct PIN for the smart card.
The card is trusted by the domain and has not been revoked. The card is checked locally first, online or offline, to ensure that the issuing certificate authority is trusted by the Mac computer via keychain trusts, which are set up when the computer joins the domain, and which are periodically refreshed
Checking is performed by the domain controller when online, and by the keychain service based on cached CRLs when offline. If the user is not connected to the network but has previously logged on — with a smart card or in some other way — Mac OS X gets the name from the log on screen and looks up the user in the cached data.
Administrator’s Guide for Mac OS X 247

Using smart card login
If login fails, no feedback is provided to the user as to why the login is being denied — as is the case when logging in with a password. Information is logged into system log files that can help determine the reason for a denied login, including /var/log/system.log, /var/log/secure.log, and the Centrify log file (/var/log/centrifydc.log) if logging is enabled.
Screen saver shows password not PIN prompt
Most smart card users are allowed to log on with a smart card and PIN only — they cannot authenticate with a user name and password. However, it is possible to configure users for both smart card/PIN and user name/password authentication. Generally, this set up works seamlessly: the user either enters a user name and password at the log on prompt, or inserts a smart card and enters a PIN at the prompt.
However, for multi-user cards, it can be problematic when the screen locks and the card is in the reader. When a user attempts to unlock the screen, the system prompts for a password, not for a PIN, although the PIN is required because the card is in the reader. If the user is not aware that the card is still in the reader and enters his password multiple times, the card will lock once the limit for incorrect entries is reached.
Understanding what happens after login
A user who is logged in with a smart card has access to the same Mac and Access Manager features and behaviors as a user who is logged in with a username and password. For example, the user’s network home directory is mounted (if so configured), a mobile user is created (if enabled in Group Policy), and so on.
Note In general the user experience is the same in both connected and disconnected modes, with the exception of single sign-on (SSO). Because Access Manager does not cache the smart card’s PIN, SSO is only available for smart card login while connected to the domain.
Of course, certain behaviors and system responses are specific to smart card login:
If the user removes the smart card after login, the response of the system depends on whether the group policy Lock smart card screen is enabled in the domain. If it is enabled (and the System Preference to require a password after the screen saver begins is not set), the screen locks. Otherwise, the screen does not lock and the user may continue working.
If the user inserts a smart card while the screen saver is active, the response depends on whether Lock smart card screen is enabled in the domain. If it is, the screen saver deactivates. If the policy is not enabled, the screen saver continues running until the user moves the mouse or touches a key.
When the screen saver deactivates, the system response depends on the following:
Chapter 9 • Configuring a Mac computer for smart card login 248

Using smart card login
If Require password to wake this computer from sleep or screen saver (and the local version of this policy, if it is not overridden by group policy) is set, the user is prompted to authenticate when the screen saver is deactivated.
Otherwise, if Lock smart card screen is set, and the screen saver was activated by the user removing the smart card, the user is prompted to authenticate.
If neither of these policies is set, the user is not prompted to authenticate when the screen saver deactivates.
If the user is prompted to authenticate when the screen saver deactivates, the type of prompt depends on whether a smart card is inserted into the reader at that moment, and the type of card. If a single-user smart card is inserted into the reader, the user is prompted for the PIN associated with that card. If a multi-user smart card is inserted into the reader, the user is prompted for a name and password — note, however, that the Password box requires the PIN for the card, not the user account password.
If a card is not inserted in the reader, the user is not prompted for a password. The reason the screen saver was activated (smart card removal or idle time) has no effect on the type of prompt that is issued when the screen saver deactivates.
Do not use local users who conflict with Active Directory users
When you configure a user for a smart card be certain that the Active Directory username does not match that of a local user.
In general, to avoid potential conflicts, Centrify does not recommend creating a local user with the same username as an Active Directory user, although such a configuration does not necessarily cause problems. However, configuring a smart card user with the same name as a local user is inherently unstable and can cause unpredictable results.
For a standard login, a local user is always logged in instead of an Active Directory user of the same name because the local account database is checked for authentication before Active Directory. However, the authentication mechanism is different for smart card login, so the Active Directory user on the card will be authenticated instead of the local user, unless the local user has been configured explicitly for the smart card.
Although the Active Directory user is logged in, some commands and applications will look up and apply information for the local user because the Mac directory database is consulted before Active Directory. This means that some of the group policy settings for smart card will not be applied to the Active Directory user and the smart card will not operate properly.
How smart card log in works with fast user switching
Fast user switching enables a user to log in to a computer with a different account without logging out the first account. If a user is logged in with a smart card, fast user switching does not work.
Administrator’s Guide for Mac OS X 249
Troubleshooting smart card log in
If you want to switch to a different user, you must unplug the smart card to so. The following procedure shows how to work around the smart-card limitation on fast user switching.
To perform fast user switching when logged in with a smart card
1 With fast user switching enabled, log in to a Mac computer using a smart card — for this example, assume a single-user card provisioned with the name scuser.
2 Switch to a different, non-smart card account (for example, normal1) and enter the password.
The login fails for the new account and you are prompted for the smart card PIN.
3 Unplug the smart card.
If the Lock smart card screen is not enabled in the domain, the desktop for normal1 is displayed.
If this policy is enabled, the screen is locked. You can unlock the screen by logging in as normal1.
Troubleshooting smart card log inIf you have problems with smart card logon, Access Manager provides a command-line tool, sctool, which you can run to configure smart card logon, as well as to provide diagnostic information. See “Understanding sctool” on page 281 or the sctool man page.
Additional smart card diagnostic procedures are provided in “Diagnosing smart card log in problems” on page 274.
Configuring web browsers and mail clientsThe subsections in this section provide tips for configuring different web browsers and mail clients to work with Centrify Smart Card on Mac computers. The following topics are covered:
Using Microsoft Outlook 2011 for signed and encrypted mail
Using Safari to access protected web sites
Using Chrome to access protected web sites
Enabling Firefox and Thunderbird to access protected web sites
Using Microsoft Outlook 2011 for signed and encrypted mail
To use Outlook for Mac 2011 to send and receive encrypted email, you must have a valid digital certificate. After you have downloaded and imported the appropriate intermediate
Chapter 9 • Configuring a Mac computer for smart card login 250

Configuring web browsers and mail clients
certificates for your smart card, you can configure Microsoft Outlook 2011 to sign email with your certificate and send encrypted mail.
To send a digitally signed message:
1 Log on the Mac and open Microsoft Outlook.
2 On the Tools menu, click Accounts.
3 Select the account from which you want to send a digitally signed message.
4 Click Advanced, then click the Security tab.
5 Under Digital signing, click the Certificate menu, then select the certificate that you want to use.
6 Click Include my certificates in signed messages check box if all of your recipients have email that supports digital signing and encryption.
7 Click OK, then close the Accounts dialog box.
8 When composing email messages, click the Options tab, click Security, then click Digitally Sign Message.
To send an encrypted message:
1 Log on the Mac and open Microsoft Outlook.
2 On the Tools menu, click Accounts.
3 Select the account from which you want to send an encrypted message.
4 Click Advanced, then click the Security tab.
5 Under Encryption, click the Certificate menu, then select the certificate that you want to use.
6 Click OK, then close the Accounts dialog box.
7 When composing email messages, click the Options tab, click Security, then click Encrypt Message.
To send an encrypted message, you must have the public certificate of the user to whom you are sending the mail message. If the recipient is a contact in your address book, this certificate is typically available on the Certificates tab in Outlook. If you do not have the certificate, Outlook will not create an encrypted mail message. However, if the name of the person matches a contact in your address book, Outlook encrypts the message before sending it.
For more information about managing digital certificates and sending and receiving encrypted email in Outlook for Mac 2011, see the Microsoft topic How users manage digital certificates in Outlook for Mac 2011.
Administrator’s Guide for Mac OS X 251

Configuring web browsers and mail clients
Using Safari to access protected web sites
If you want to use a smart card to access restricted Web sites — such as those for the Department of Defense (DOD) — using Safari as your web browser, you should configure the certificate to use for authentication.
To configure a certificate for the smart card:
1 If you have Safari open, choose the Safari menu, then click Quit Safari.
2 Insert your smart card in the reader, then navigate to Utilities and open Keychain Access.
3 Select the provisioned CAC keychain for your smart card.
4 From Category list, select My Certificates.
5 Right-click the certificate you want to use to authenticate your identity. In most cases, you should select the Authentication Private Key certificate or the Digital Signature Private Key certificate, depending on the web site you want to view.
6 Select New Identity Preference.
7 Type the complete URL for the web site you want to access, then click Add. For example:https://akocac.us.army.mil/
https://www.jtfgno.mil/
Using Chrome to access protected web sites
If you want to use a smart card to access restricted Web sites — such as those for the Department of Defense (DOD) — using Google Chrome as your web browser, you should configure the certificate to use for authentication.
To configure a certificate for the smart card:
1 If you have Chrome open, choose the Chrome menu, then click Quit Google Chrome.
2 Insert your smart card in the reader, then navigate to Utilities and open Keychain Access.
3 Select the provisioned CAC keychain for your smart card.
4 From Category list, select My Certificates.
5 Right-click the certificate you want to use to authenticate your identity. In most cases, you should select the Authentication Private Key certificate or the Digital Signature Private Key certificate, depending on the web site you want to view.
6 Select New Identity Preference.
Chapter 9 • Configuring a Mac computer for smart card login 252

Configuring web browsers and mail clients
7 Type the complete URL for the web site you want to access, then click Add. For example:https://akocac.us.army.mil/
https://www.jtfgno.mil/
Enabling Firefox and Thunderbird to access protected web sites
Firefox and Thunderbird cannot be used with a smart card for secure browsing and e-mail signing because they require a PKCS#11 module and Centrify Identity Service, Mac Edition ships with Tokend only, not with PKCS#11. However, Apple provides an open-source module, TokenPKCS11.so, which can act as a shim between Tokend and PKCS#11. Centrify provides group policies that allow you to install the TokenPKCS11.so module to provide the PKCS#11 interface to Firefox and Thunderbird.
The following group policies, located in User Configuration > Policies > Centrify Settings > Mac OS X Settings > Security & Privacy, enable Firefox and Thnderbird to be used with a smart card:
Allow NSSDB based applications to use smart card allows NSSDB-based applications to use a smart card and adds Firefox and Thunderbird to the list of applications.
NSSDB based applications allowed to use smart card loads the TokenPKCS11 module to the appropriate location for Firefox and Thunderbird.
To enable smart card use with Firefox and Thunderbird:
1 Enable the “Enable smart card support” policy:
Computer Configuration > Policies > Centrify Settings > Mac OS X Settings > Security & Privacy > Enable smart card support.
Click OK.
2 Enable the “Allow NSSDB based applications to use smart card” group policy.
User Configuration > Policies > Centrify Settings > Mac OS X Settings > Security & Privacy > Allow NSSDB based applications to use smart card
Click OK.
3 Open the “NSSDB based applications allowed to use smart card” group policy.
This policy loads the TokenPKCS11 module to a specified location. Note that enabling “Allow NSSDB based applications to use smart card” automatically added the appropriate locations for Firefox and Thunderbird.
Click OK.
4 In the Centrify configuration file, set the smartcard.name.mapping parameter to true.
Administrator’s Guide for Mac OS X 253

Configuring web browsers and mail clients
This parameter allows the use of multi-user smart cards. See Enabling support for multi-user PIV and multi-user smart cards for more information.
5 In a Terminal window, run adgpupdate and adreload to apply the group policy and configuration parameter changes.
To verify that Firefox and Thunderbird are configured for smart card users:
1 Use a smart card to log in to the computer.
2 Open Firefox (and Thunderbird) and click Options > Advanced > Certificates > Security Devices.
You should see the Centrify PKCS #11 Module.
3 Open Firefox (and Thunderbird) and click Options > Advanced > Certificates > View Certificates > Authorities.
You should see U.S Government.
4 Open Firefox, type and type https://10.100.2.133 in the address bar.
You are prompted to select the certificate.
5 After selecting the certificate, the web page should load successfully.
6 Open Thunderbird and configure smart card e-mail.
You should be able to send encrypted e-mail and decrypt encrypted e-mails from othr users.
Chapter 9 • Configuring a Mac computer for smart card login 254

Configuring web browsers and mail clients
Administrator’s Guide for Mac OS X 255

Chapter 10
Managing a Mac computer that is joined to a domain and enrolled in identity platform
This guide focuses mostly on how to manage Mac computers through the Centrify agent that is installed on the Mac computer, and communicates with Active Directory. However, Centrify also provides a cloud-based service that allows you to manage Mac computers through Apple’s mobile device support and profile-based management capabilities.
The Centrify identity platform is intended primarily for managing smart phones and tablets. Consequently, if you enroll a Mac computer with the Centrify identity platform, it is managed in much the same way as smart phones and tablets. The identity platform installs mobile device management (MDM) profiles on the computer that allow an administrator to manage the computer through policy settings. For example, among other things, an administrator can specify the applications, system preferences, and directories that are available to the computer user, as well as set password requirements. See Cloud Manager help for a complete list of available policies.
You can enroll a Mac computer in the Centrify identity platform during, after, or instead of agent installation. That is, a Mac computer can be managed by just the agent (in which case it is joined to a domain), just the Centrify identity platform, or both. Both the agent and the Centrify identity platform enable the computer to be managed through Active Directory and group policies.
If the computer is managed through both the agent and the Centrify identity platform, it can be viewed and managed through both the Centrify DirectManage Access Manager console and the Centrify user portal. In this scenario, a single computer object is created in an Active Directory container of your choosing.
Note The information in this chapter applies only to Mac computers running Mac OS X 10.7 or later. Computers running versions of OS X older than 10.7 cannot be enrolled in the identity platform.
The rest of this chapter explains what you need to know as an administrator who is managing Mac computers that are joined to a domain through the Centrify UNIX agent and that have also been enrolled in the identity platform. If you are a cloud administrator, see the Cloud Manager help for information about how to manage an enrolled Mac computer that is also joined to a domain.
How to enroll a joined computer with Centrify identity platformThe recommended method for joining a Mac computer to a domain and enrolling it with the identity platform at the same time is to use Centrify Join Assistant, which provides an easy-to-use interface for doing both, and creates a single computer object in the Active
256

How to enroll a joined computer with Centrify identity platform
Directory container of your choosing — managing the same computer through two different computer objects is not a configuration that is supported by Centrify.
Centrify Join Assistant allows you to do any of the following:
Join the computer to a domain and enroll it with the Centrify identity platform at the same time.
Centrify Join Assistant creates a new computer object when joining the domain and reuses the same object for enrollment. See “Using Centrify Join Assistant to join a computer to a domain and enroll it in the identity platform” on page 257.
Enroll a computer that is already joined to a domain; see “Enrolling a computer that is already joined to a domain” on page 260.
Centrify Join Assistant locates the computer object for the joined computer and reuses it for the enrollment.
Simply join the computer to a domain — this option is not covered in this chapter; see “Joining an Active Directory domain” on page 296 for more information.
Note Centrify Join Assistant does not support joining a computer that is already enrolled with the identity platform. Doing so will erase meta data for the enrolled computer. The recommended method for dealing with this situation is to first unenroll the computer, then join and enroll the computer at the same time.
Using Centrify Join Assistant to join a computer to a domain and enroll it in the identity platform
This section shows you how to join a Mac computer to a domain and enroll it in the Centrify identity platform at the same time. Typically, an Active Directory administrator performs this procedure, but during the enrollment steps, assigns the computer to a different Active Directory user account (see Step 8 in the following procedure). The assigned user is added to the identity platform as the device owner and is able to view and manage the enrolled computer through the Centrify user portal. A identity platform administrator can assign the user to one or more roles that determine the applications, permissions, and policies that apply to the user on this computer.
Before you begin, have the following items in place:
User name and password for an administrative account on the Mac computer to allow Centrify Join Assistant to make changes.
User name and password for an Active Directory account that has permissions to join a domain.
User name and password for an Active Directory account (such as the domain administrator) that is authorized to enroll a device with the identity platform.
Administrator’s Guide for Mac OS X 257

How to enroll a joined computer with Centrify identity platform
Apple Push Notification Service (APNS) certificate uploaded to Cloud Manager. Refer to Generating an APNS certificate in the Cloud Manager online help for more information.
If you will enroll the Mac computer in Centrify identity platform on behalf of another user (as described in Step 8 in the following procedure), you must have sysadmin or dsadmin privileges in Cloud Manager.
Note By default, domain administrator privileges are required to enroll a Mac computer in the Centrify identity platform. However, it is possible to grant non-administrative domain users the ability to enroll Mac computers in the Centrify identity platform using Cloud Manager. To do so, enable users to enroll devices. Refer to the Cloud Manager online help for more information.
To use Centrify Join Assistant to join a computer to a domain and enroll it in the identity platform:
1 In the Finder, launch the Centrify Join Assistant by clicking Applications > Utilities > Centrify, then double-click Centrify Join Assistant to open it.
Click Continue on the Welcome page.
2 Enter the name and password for an administrator’s account on the computer and click OK.
3 Enter the name of the domain to join and the name and password of an Active Directory administrator with permissions to join the computer to this domain, then click Continue.
A page appears that allows you to select how to join the domain with an option to enroll in the identity platform. The Auto option is recommended for most Mac computers, however if you have already created zones and are using them for Mac computers in your environment, select the Zone option and enter the name of the zone to join.
Chapter 10 • Managing a Mac computer that is joined to a domain and enrolled in identity platform 258
How to enroll a joined computer with Centrify identity platform
4 Select Enroll with Centrify Cloud Service (identity platform) to enable remote management to enroll the computer in the identity platform and join it to a domain; then do one of the following.
To create the computer object for the Mac computer in the Active Directory “Computers” container, which is the default container for computer objects, skip ahead to Step 7.
To optionally create the computer object in a container that you specify, rather than in the default container, go to Step 5.
To optionally specify that UIDs be generated using Apple’s UID algorithm instead of the default Centrify UID algorithm, go to Step 6.
5 (Optional) Select the container in which to create the computer object:
a Click the arrow next to Advanced Options to view the advanced options.
b Click Browse to browse Active Directory and select the container to use, or click Container DN and enter the name of the container in distinguished name format; for example:
CN=MobileDevices,DN=acme,DN=com
6 (Optional) Select whether UIDs are generated using Apple’s UID algorithm instead of the default Centrify UID algorithm. This choice is available only if you selected Auto in Step 3. Selecting this option is equivalent to enabling the Generate new uid/gid using Apple scheme group policy or setting the auto.schema.apple_scheme parameter in the centrifydc.conf configuration file.
a Click the arrow next to Advanced Options to view the advanced options.
b Select Utilize Apple UID generation scheme.
7 Click Join and enter your Mac administrator name and password when prompted.
Centrify Join Assistant joins the computer to the domain and when finished, displays a screen to enroll the computer in the identity platform.
Note The enrollment screen shows the distinguished name of the container that you selected for the computer object (for example, CN=Computers,DN=acme,DN=com). If you see the following symptoms, verify that the cloud connector has read/write access to the container:
The enrolled computer’s description field is empty.
If a computer is joined to a domain and enrolled in the identity platform, and then is removed from the domain but not unenrolled from the identity platform, the computer object cannot be enabled again.
See Modifying cloud connector permissions in Cloud Manager help for details on how to set these permissions manually if necessary.
8 Assign the Mac computer to a user by doing one of the following:
Administrator’s Guide for Mac OS X 259

How to enroll a joined computer with Centrify identity platform
Check the box Do you want to assign this Mac to a different user and enter a user name, including domain name.
This option is selected by default and allows an administrator who is performing the enrollment procedure to assign the device in to a different Active Directory account. If you are enrolling your own computer, remove the selection to enroll with your own account.
Remove the check from the box to accept the user who joined the computer to the domain and whose name is displayed. Use this option if you are enrolling your own computer.
9 Click Continue and enter the user name and password for the computer’s administrator account when prompted.
Centrify Join Assistant enrolls the computer in the Centrify identity platform and when finished, displays a summary screen.
10 Click Done on the summary page to close Centrify Join Assistant.
Enrolling a computer that is already joined to a domain
You can use the Centrify Join Assistant to enroll a computer that is already joined to a domain. Typically, an Active Directory administrator performs this procedure, but assigns the computer to a different Active Directory user account (see Step 5 in the following procedure). The assigned user is added to the identity platform as the device owner and is able to view and manage the enrolled computer through the Centrify user portal. A identity platform administrator can assign the user to one or more roles that determine the applications, permissions, and policies that apply to the user on this computer.
Before you begin, have the following items in place:
User name and password for the administrative account on the Mac computer to allow Centrify Join Assistant to make changes.
User name and password for an Active Directory account that has permissions to join a domain.
Apple Push Notification Service (APNS) certificate uploaded to Cloud Manager. Refer to Generating an APNS certificate in the Cloud Manager online help for more information.
User name and password for an Active Directory account that is authorized to enroll a device with the identity platform. See the note on page 258 for exceptions to this requirement.
To use Centrify Join Assistant to enroll a joined computer in the identity platform:
1 In the Finder, launch the Centrify Join utility by clicking Applications > Utilities > Centrify, then double-click Centrify Join Assistant to open it.
Chapter 10 • Managing a Mac computer that is joined to a domain and enrolled in identity platform 260

How to enroll a joined computer with Centrify identity platform
Click Continue on the Welcome page.
2 Enter the name and password for an administrator’s account on the computer and click OK.
Centrify Join Assistant displays information about the domain to which the computer is joined:
3 Click Enroll to begin the enrollment process.
Centrify Join Assistant displays a screen for entering the Active Directory information. Note that the domain is set and cannot be edited.
4 Enter the user name and password for an Active Directory account with permission to join the domain and click Continue.
Enter your Mac administrator name and password when prompted.
Centrify Join Assistant displays a screen to enroll the computer in the identity platform.
The URL is set to https://cloud.centrify.com, which you generally should not change, unless you are running a custom identity platform for testing or other purposes. In this case, contact the identity platform administrator for the URL to use.
Note The enrollment screen shows the distinguished name of the container that you selected for the computer object (for example, CN=Computers,DN=acme,DN=com). If you see the following symptoms, verify that the cloud proxy server has read/write access to the container:
The enrolled computer’s description field is empty.
Administrator’s Guide for Mac OS X 261

What happens after a joined computer is enrolled with Centrify identity platform?
If a computer is joined to a domain and enrolled in the identity platform, and then is removed from the domain but not unenrolled from the identity platform, the computer object cannot be enabled again.
See Modifying cloud connector permissions in Cloud Manager help for details on how to set these permissions manually if necessary.
5 Assign the Mac computer to a user by doing one of the following:
Check the box Do you want to assign this Mac to a different user and enter a user name, including domain name.
This option is selected by default and allows an administrator who is performing the enrollment procedure to assign the device in to a different Active Directory account. If you are enrolling your own computer, remove the selection to enroll with your own account.
Remove the check from the box to accept the user who joined the computer to the domain and whose name is displayed. Use this option if you are enrolling your own computer.
6 Click Continue and enter the user name and password for the computer’s administrator account when prompted.
Centrify Join Assistant enrolls the computer in the Centrify identity platform and when finished, displays a summary screen.
7 Click Done on the summary page to close Centrify Join Assistant.
What happens after a joined computer is enrolled with Centrify identity platform?
When a user or administrator enrolls a computer in the Centrify identity platform, the identity platform installs a mobile device management (MDM) profile on the computer that allows a identity platform administrator to manage the computer through policy settings. The profile is installed in the System Preferences panel on the computer. You can use the following procedure to verify that the MDM profile was installed.
To see the installed MDM profile:
1 On the Mac computer, click Apple menu > System Preferences.
2 In System, double-click Profiles.
You should see the Centrify MDM profile:
Chapter 10 • Managing a Mac computer that is joined to a domain and enrolled in identity platform 262

What happens after a joined computer is enrolled with Centrify identity platform?
You cannot modify the Centrify MDM profile in any way. If you delete it, the computer will be unenrolled from the identity platform. Likewise, if you, or someone else, unenrolls the computer from the identity platform, the identity platform will delete the profiles from the computer.
The process of enrolling a computer in the identity platform is transparent to an administrator who is already managing the computer through the Centrify agent. Enrolling a computer does not change the status of the computer object in Active Directory nor affect the UNIX agent (adclient) running on the computer.
Note The enrollment process does not update the password for the computer account. The password is created and maintained by Centrify Identity Service, Mac Edition through the UNIX agent on the computer.
Likewise, there should be no conflict with on-going management of a computer that has been enrolled with the identity platform. You control authorization and access to the computer through Active Directory (which you can fine tune by creating a zone structure and defining and assigning specific rights and roles) and can control various aspects of the computer through Group Policy and configuration parameters.
Note Although the identity platform enforces a set of Mac-specific group policies, and the settings for these might conflict with your settings enabled through the Centrify agent, the policies set and enforced through the Centrify agent always take precedence if there is a conflict.
If a jointly managed computer is unenrolled from the Centrify identity platform, the profiles are removed from the computer, but there is no effect on the Centrify agent, which remains connected to the domain, and there is no change to the status of the computer object in Active Directory.
Note Deleting a Mac device from Cloud Manager also removes the computer object from Active Directory, so identity platform administrators should be aware that a Mac computer might be joined to a domain before deleting the device from Cloud Manager.
If you are jointly managing a computer, and you remove the computer from the domain, the effect on the computer in the identity platform is temporary. Leaving the domain disables the computer object, however, the status of the computer in the identity platform remains as ‘Active’. At the next synchronization interval, the identity platform will reenable the object in Active Directory.
Managing an enrolled computer with identity platform interfaces
After a joined computer is enrolled in the Centrify identity platform, it can be managed through the Cloud Manager and user web-portals as well as through Access Manager and command-line tools. The identity platform provides the following interfaces:
The Centrify Cloud Manager, a web interface for administrators to manage mobile devices, including Mac computers. See the Cloud Manager help for more information.
Administrator’s Guide for Mac OS X 263

What happens after a joined computer is enrolled with Centrify identity platform?
The Centrify user portal, a web interface for users to administer their mobile devices, including Mac computers. See the user portal help for more information. The Centrify mobile ADUC extension, an Active Directory Users and Computers (ADUC) snap-in that displays mobile-specific properties for mobile devices, including Mac computers, and provides commands to manage enrolled devices and computers.
The Centrify mobile group policy extension, a Group Policy Management Editor (GPME) extension that offers mobile-specific policies when creating group policies for mobile devices, including Mac computers.
Note If you want to add the mobile-specific menus and group policy extensions to your Active Director Users and Computers installation, you can run the Centrify Cloud Management installer on your Windows ADUC computer and install just these extensions. Note that after installing the mobile-specific menus, you won’t be able to use them unless the cloud administrator authorizes you to do so.
When you enroll a computer with Centrify Join Assistant, it installs the Centrify User Portal application in the Applications folder. This application provides single-sign on access to the Centrify user portal. If a user is logged in to the computer as the user who enrolled the computer in the identity platform, launching the application opens a browser and logs the user into the Centrify user portal without the need to enter a password. If a different user has logged into the computer, the application opens the sign-in page for the user portal, allowing a user to provide an Active Directory user name and password.
Chapter 10 • Managing a Mac computer that is joined to a domain and enrolled in identity platform 264

Chapter 11
Troubleshooting tips
This appendix provides troubleshooting tips for administrators using the Centrify agent on Mac computers.
The following topics are covered:
Using common account management commands
Enabling logging for the Centrify agent
Enabling logging for the Mac Directory Service
Using the Centrify agent on a dual-boot system
Using adgpupdate appropriately
Understanding delays when logging on the first time with a new user account
Configuring single-sign on to work with non-Mac computers
Restricting login using FTP
Logging on using localhost
Changing the password for Active Directory users
Logging in if Directory Service or Security agent crashes
Disabling Apple’s built-in Active Directory plug-in
Showing the correct status of the Centrify plug-in
Resolving VPN access issues with Mac OS X 10.7 and later
Diagnosing smart card log in problems
Opening a support case online
Collecting information for support cases
Using common account management commandsMost UNIX-based platforms store account information in the local /etc/passwd file, and use commands such as getent command to query that information. On Mac computers, however, you would typically use the Directory Service application to manage local accounts and retrieve user information. For troubleshooting purposes, therefore, you should be familiar with the commands to use for retrieving information about Active Directory users and groups.
265

Enabling logging for the Centrify agent
The following table describes several common Directory Service Command Line (dscl) commands that you may find useful.
To get detailed information for all users or groups recognized on the Mac computer, you can use the following commands:lookupd –q user –a name
lookupd –q group –a name
To get detailed information for a specific user or group, you can use the following commands:lookupd –q user –a name username
lookupd –q group –a name groupname
To clear the Directory Service cache, you can use the following command:lookupd -flushcache
To completely clear the cache of Active Directory login credentials, you should also run the adflush command:adflush
To retrieve Mac OS version and build information that uname -a does not provide, you can run the following command:/usr/bin/sw_vers
Enabling logging for the Centrify agentThe Centrify agent installation includes some basic diagnostic tools and a logging mechanism to help you trace the source of problems if they occur. These diagnostic tools and log files allow you to periodically check your environment and view information about the agent operation, your Active Directory connections, and the configuration settings for individual computers.
In most cases, logging is not enabled by default for performance reasons. Once enabled, however, log files provide a detailed record of Centrify agent activity and can be used to
Use this command To do this
dscl /Search –list /Users List all of the users in the Directory Service and in Active Directory for the zone.
dscl /CentrifyDC –list /Users List only the Active Directory users enabled for the zone.
dscl /CentrifyDC –read /Users/username Display detailed information about the specified Active Directory username.
dscl /Search –list /Groups List all of the groups in the Directory Service and in Active Directory for the zone.
dscl /CentrifyDC –list /Groups List only the Active Directory groups enabled for the zone.
dscl /CentrifyDC –read /Groups/
groupnameDisplay detailed information about the specified Active Directory groupname.
Chapter 11 • Troubleshooting tips 266

Enabling logging for the Mac Directory Service
analyze the behavior of adclient and communication with Active Directory to locate points of failure.
To enable logging on the Centrify agent:
1 Log in as or switch to the root user.
2 Run the addebug command:/usr/local/share/centrifydc/bin/addebug on
Note You must type the full path to the command because addebug is not included in the path by default.
Once you run this command, all of the agent activity is written to the /var/log/centrifydc.log file. If the adclient process stops running while you have logging on, the addebug program records messages from PAM and NSS requests in the /var/centrifydc/centrify_client.log file. Therefore, you should also check that file location if you enable logging.
By default, agent logging uses the Macintosh’s logging system, which does not capture some important logging information. To guarantee that you capture all agent logging information, complete the following additional steps to direct logging to a specific file.
3 Stop the syslogd service:service com.apple.syslogd stop
4 Open the file, /etc/centrifydc/centrifydc.conf, with a text editor, find the parameter and value, logger.destination:syslog, then change the value as follows to direct logging output to the file, /var/log/logfile.log:logger.destination:/var/log/logfile.log
5 Restart the agent:/usr/local/share/centrifydc/bin/centrifydc restart
Note For more information about starting and stopping the agent, see the Administrator’s Guide for UNIX.
For performance and security reasons, you should only enable agent logging when necessary, for example, when requested to do so by Centrify Technical Support, and for short periods of time to diagnose a problem. Keep in mind that sensitive information may be written to this file and you should evaluate the contents of the file before giving others access to it.
When you are ready to stop logging activity, run the addebug off command.
Enabling logging for the Mac Directory ServiceIn addition to enabling logging for the agent, you may find it necessary to enable logging for the Open Directory Service.
Administrator’s Guide for Mac OS X 267
Using the Centrify agent on a dual-boot system
To create a log file for the Open Directory Service:
1 Log in as or switch to the root or admin user.
2 Run the following command:odutil set log debug
After running this command, you can find the resulting log files at: /var/log/opendirectoryd.log*. You can then provide both the agent log file and the Directory Service log file to Centrify Support if you need assistance troubleshooting issues.
Using the Centrify agent on a dual-boot systemIf you are using a dual-boot system, and the computer name is the same for each version of the operating system, the Centrify agent (adclient) will not launch when you reboot and switch operating systems. The problem is that each operating system sets its own password for adclient and the password does not work for the other operating system.
The best way to avoid this problem is to provide a different computer name for each operating system. Because the computer names are different, the password for one operating system is not changed by the other operating system.
If you want to use the same computer name for both operating systems, you can work around the problem, as follows:
1 Leave the domain (adleave) before rebooting and switching operating systems.
Note You may leave and join the domain after rebooting and switching the operating system. However, you will experience some delay while adclient attempts to launch and fails.
2 Reboot with the other operating system.
3 Rejoin the domain (adjoin).
Using adgpupdate appropriatelyIf adgpupdate is run multiple times in succession, it is possible that not all group policies will be applied correctly. To avoid this problem, do not run adgpupdate more than once per minute.
Chapter 11 • Troubleshooting tips 268

Understanding delays when logging on the first time with a new user account
Understanding delays when logging on the first time with a new user account
Depending on the configuration of your startup services, you may find that new users are unable to log on to a computer immediately (within the first 15 to 30 seconds) after a computer is rebooted.
By default, the Mac login window only requires the Disks and SecurityService startup services to start successfully to prompt for the user to log in. Authenticating users to Active Directory, however, requires the additional DirectoryServices startup service to be available. Starting the DirectoryServices startup service causes a 10 to 15 second delay before the LoginWindow can successfully authenticate new Active Directory users.
Configuring single-sign on to work with non-Mac computersOn a Mac computer, the ssh client does not forward (delegate) credentials to the server by default. Therefore, when attempting to use ssh from a Mac computer with Centrify agent installed to a non-Mac computer with Centrify agent installed, single sign-on (SSO) does not work. To fix this problem, set the configuration parameter, GSSAPIDelegateCredentials, to yes in the /etc/ssh_config file on the Mac computer.
Restricting login using FTP In Active Directory, you can set properties to prevent a user from logging in to other Macintosh computers. However, this restriction will not prevent a user from logging in via FTP to Macintosh computers with the Centrify agent installed. It does restrict logging in with telnet, ssh, rlogin, and rsh.
Logging on using localhostFor many UNIX platforms, you can log on using localhost to refer to the local computer; for example:root@localhost
This syntax does not work when logging on to a Macintosh computer, whether using the Macintosh UI, or remotely through ssh or FTP.
Changing the password for Active Directory usersIn the Mac OS X, the passwd command authenticates the user only after you type the user password. Because of this, the passwd command does not recognize the user as an Active Directory user until after the password is entered and the password prompts defined for
Administrator’s Guide for Mac OS X 269

Logging in if Directory Service or Security agent crashes
Active Directory users, which are typically set through group policy or by modifying the Centrify configuration file, are not displayed. You can still use the passwd or chpass command to change the Active Directory password for a user, but you will not see any visual indication that you are modifying an Active Directory account rather than a local user account.
Logging in if Directory Service or Security agent crashesIf the Apple Directory Service or Security agent crashes, all users may be locked out of the system. If the crash is caused by any of the Centrify agent plug-ins, you can do the following to regain access to the system:
Boot into single-user mode
Remove Centrify agent software from the login executable path.
Reboot the system and collect log files and configuration files to send to Centrify customer support.
Checking the status of Centrify components
This section shows how to check the status of Centrify components that may have contributed to the Directory Service or Security agent crash. If you are already certain of the Centrify component that may be a problem, skip this section and go to “Disabling Centrify components on a non-functioning system” on page 271 to disable the problem component.
To check the current status of Centrify components:
1 Shut down the Mac computer if it is on.
2 Log on to the computer in single-user mode by pressing the power key while clicking and holding Apple-S until you see the root prompt in a terminal window.
3 Execute the following command to see if adclient will be started at boot time:launchctl list | grep com.centrify.adclient
If the output is:
com.centrify.adclient — adclient will be started at boot time.
empty — adclient will not be started at boot time.
On Centrify versions prior to 4.0, execute the following command as well:ls -1 /Library/StartupItems | grep Centrify
If the output is:
anything but empty — adclient may be started at boot time.
empty — adclient will not be started at boot time.
Chapter 11 • Troubleshooting tips 270

Logging in if Directory Service or Security agent crashes
4 Execute the following command to see if dsplugin will be started at boot time:odutil show nodenames | grep CentrifyDC
If nodes are registered, you will see output similar to the following, and dsplugin will be loaded:/CentrifyDC Online 1 Legacy X
/CentrifyDC/Default Online 12 Legacy X
5 Execute the following command to see if CentrifyPAM is enabled.security authorizationdb read system.login.console | grep CentrifyPAM
security authorizationdb read system.login.done | grep CentrifyPAM
security authorizationdb read authenticate | grep CentrifyPAM
If the output contains lines similar to the following: <string>CentrifyPAM:setcred,privileged</string> — the CentrifyPAM module is enabled.
If the output is empty — the CentrifyPAM module is not enabled.
6 Execute the following command to see if CentrifySmartCard is enabled:security authorizationdb smartcard status
If the output contains lines similar to the following: Current smartcard login state: enabled (system.login.console enabled, authentication rule enabled)) — the CentrifySmartCard module is enabled.
7 Execute the following commands to see if CentrifyDC PAM module is enabled for particular services: cat /etc/pam.d/sshd | grep pam_centrify
cat /etc/pam.d/sudo | grep pam_centrify
cat /etc/pam.d/login | grep pam_centrify
If the output contains lines similar to the following: auth sufficient pam_centrifydc.so — the CentrifyDC PAM module is enabled for that service.
If the output is empty — the CentrifyDC PAM module is not enabled for that service.
Disabling Centrify components on a non-functioning system
To disable Centrify components when you cannot log in normally:
1 Shut down the Mac computer if it is on.
2 Log on to the computer in single-user mode by pressing the power key while clicking and holding Apple-S until you see the root prompt in a terminal window.
3 Remount the root file system in read/write mode:mount /
4 Disable automatic startup of adclient.
When the computer is joined to a domain, adclient starts automatically when the computer boots up. Then, adclient enables DSPlugin and CentrifyPAM. To prevent the plug-ins from starting you disable adlcient, as follows:
Administrator’s Guide for Mac OS X 271

Logging in if Directory Service or Security agent crashes
launchctl unload -w /Library/LaunchDaemons/com.centrify.adclient.plist
5 Remove the CentrifyPAM plug-in from the Apple Security agent by executing the following command:/System/Library/CoreServices/SecurityAgentPlugins/CentrifyPAM.bundle/Contents/
Resources/config disable
6 If it’s enabled, remove the CentrifySmartCard plugin from the Apple Security agent by executing the following command:System/Library/CoreServices/SecurityAgentPlugins/CentrifySmartCard.bundle/Contents/Resources/config disable
7 Remove pam_centrifydc.so rules from ssh, sudo, and login configuration files.
When a Mac computer joins a domain, CentrifyPAM rules for using pam_centrifydc.so are added to ssh, sudo, and login configuration files. If CentrifyPAM is not working, you need to remove these rules. The easiest way to do so is to restore the backup configuration files that are created when the computer joins a domain. The backup files are named: service.pre_cdc (for example, sshd.pre_cdc):cp -f /etc/pam.d/sshd.pre_cdc /etc/pam.d/sshd
cp -f /etc/pam.d/sudo.pre_cdc /etc/pam.d/sudo
cp -f /etc/pam.d/login.pre_cdc /etc/pam.d/login
8 Reboot the computer. No Centrify code should be running at this point.
If you still cannot log in after completing the steps in this procedure, you can use target disk mode to connect to the disabled computer via a FireWire connection to another computer. Then you can transfer log and configuration files to the running computer to show to Centrify customer support.
To connect using target disk mode:
1 Shut down the disabled computer and turn on a second computer.
2 Connect the two computers using a 6-pin to 6-pin FireWire cable (or use a 9-pin to 9-pin cable if both computers have higher-speed Firewire 800 ports).
3 Start up the disabled computer while holding down the T key.
A disk icon for the disabled computer appears on the desktop of the second computer. You can open this icon and drag the relevant log and configuration files to the second computer.
4 Drag the icon for the disabled computer to the trash to eject it.
5 Push and hold the power button of the disabled computer for at least five seconds to force it to shut down. Then disconnect the FireWire cable.
Creating a local admin to restore a disabled login
If you cannot log on with the original local administrator, you can create a new one.
To create a new local administrator:
Chapter 11 • Troubleshooting tips 272

Disabling Apple’s built-in Active Directory plug-in
1 Log on to the computer in single-user mode by pressing the power key while clicking and holding Apple-S until you see the root prompt in a terminal window.
2 Remount the root file system in read/write mode:mount /
3 Start opendirectoryd:launchctl load /System/Library/LaunchDaemons/com.apple.opendirectoryd.plist
4 Create a new user named super with a password of super. dscl . -create /Users/super
dscl . -create /Users/super UserShell /bin/bash
dscl . -create /Users/super RealName SUPERUSER
dscl . -create /Users/super UniqueID 505
dscl . -create /Users/super PrimaryGroupID 0
dscl . -create /Users/super NFSHomeDirectory /Users/super
mkdir /Users/super
dscl . -passwd /Users/super super
dscl . -append /Groups/admin GroupMembership super
5 Restart the computer normally (in multi-user mode) and login with the username super and the password super.
Re enabling Centrify
To re enable Centrify software:
1 Log in to the computer as an administrator in multi-user mode.
2 Leave the domain.
3 Rejoin the domain.
Disabling Apple’s built-in Active Directory plug-inApple provides a built-in Apple Directory plug-in that may interfere with the Centrify agent installation and operation. Therefore, before installing the agent, disable Apple’s built-in Active Directory plug-in. In addition, remove Active Directory from the Authentication and Contacts search paths. If this plug-in is enabled and the Centrify agent has been installed, disable the plug-in, then reboot the Macintosh computer for reliable Centrify operation.
To disable the Apple Directory plug-in and remove Apple Directory from the Authentication and Contacts search paths:
1 On a Mac computer, open the Directory Utility.
You can find the Directory Utility in one of these folders depending on the operating system that you are running: /System/Library/CoreServices
/Applications/Utilities
Administrator’s Guide for Mac OS X 273

Showing the correct status of the Centrify plug-in
2 Click the lock icon and enter credentials to allow you to make changes.
3 Click the Search Policy icon.
4 Click the Authentication tab, then select Custom path in the Search box.
If Active Directory was previously enabled, Active Directory appears in the Directory Domains box; for example:/Active Directory/All Domains
5 Select /Active Directory/All Domains and click Remove — or select the minus (-) sign). Then click Apply.
6 Click the Contacts tab, then select Custom path in the Search box. If Active Directory was previously enabled, Active Directory shows (in red font) in the Directory Domains box; for example:/Active Directory/All Domains
7 Select /Active Directory/All Domains and click Remove. Then click Apply.
8 Close the window.
9 If you have already installed the Centrify agent, reboot the computer.
Showing the correct status of the Centrify plug-inThe Centrify plug-in is automatically added to the list of Apple Directory Utility plug-ins that are used for lookup and authentication. However, if the Apple Directory Utility tool is running when you install the Centrify agent, or when you join or leave a domain before updating to a new version of the agent, it will incorrectly display the status of the plug-in. For example, it will show the status as disabled, when in fact, the plug-in is enabled.
To avoid this problem, before launching the installer, be certain that the Apple Directory Utility tool is closed.
If the Directory Utility was open during installation, simply close and re-open Directory Utility, then make certain that the Centrify plug-in is enabled.
You may also restart the Centrify plug-in from the command line, as follows:
1 Close the Directory Utility.
2 Open a terminal.
3 Enter the following command:/usr/local/share/centrifydc/bin/dsconfig restart
4 Open the Directory Utility. The status of Centrify should be enabled.
Chapter 11 • Troubleshooting tips 274
Resolving VPN access issues with Mac OS X 10.7 and later
Resolving VPN access issues with Mac OS X 10.7 and laterStarting with Mac OS X 10.7, /etc/resolv.conf is no longer used for domain controller name resolution. Therefore, some VPN programs no longer update DNS server information in /etc/resolv.conf when signing on. On computers running Mac OS X 10.7 and later, this can result in the computer not being able to connect to a domain controller through a VPN.
To resolve this issue, explicitly specify in centrifydc.conf the location of DNS servers that are used to resolve domain controller names:
1 Open /etc/centrifydc/centrifydc.conf for editing.
2 Specify the IP addresses of DNS servers in the dns.servers parameter (if the parameter does not exist yet, create it now):dns.servers: x.x.x.x y.y.y.y where x.x.x.x y.y.y.y are the IP addresses of the DNS servers to use. This example shows two IP addresses; note that each IP address is separated by a space.
3 Save your changes to centrifydc.conf.
4 Restart the agent for the changes to take effect:sudo /usr/local/share/centrifydc/bin/centrifydc restart
Diagnosing smart card log in problemsTwo general methods for diagnosing smart card log in problems are provided:
By using the sctool utility as described in Using sctool
By performing the diagnostic procedures described in this section.
The following procedures are intended to diagnose multiple causes of smart card log in failure. It is recommended that you retest smart card login at regular intervals (such as after each step) as you perform this procedure.
1 Ensure that the Mac computer is able to recognize the smart card. To do so, open Keychain Access and insert the smart card into the reader. The card should appear in the Keychain Access window as another Keychain with its certificates loaded.
If the smart card does not appear in the Keychain window:
a Ensure that the firmware of the smart card reader has been updated to the latest version.
b Ensure that no other conflicting smart card drivers have been installed. Server Suite ships with CAC, CACNG, PIV, and BELPIC drivers by default. Other drivers, such as Gemalto, are incompatible with some cards. Check /var/log/system.log to see if non-default (and possibly incompatible) drivers were installed. Log entries for smart card drivers appear similar to the following:
Administrator’s Guide for Mac OS X 275

Diagnosing smart card log in problems
reader SCM SCR inserted token "First.Last.100xxxx" subservice 12 using driver com.gemalto.tokend
If non-default drivers are present, locate them in /System/Library/Security/tokend and use the sudo mv command to remove them.
2 If the card is visible in Keychain Access, select Certificates under Category in the Keychain Access window and verify that the certificate trust chains for each certificate are valid all the way up the chains.
3 If a PIN prompt does not appear when the smart card is inserted, go to “Smart card PIN prompt does not display” on page 277 and perform the procedure described there. When you are done, return to this procedure if you need to continue to diagnose smart card problems.
4 Ensure that there are no remaining objects from previous smart card insertions by clearing out the smart card token cache. To do so, log in as the local Administrator and execute the following command in a terminal window: sudo rm -rf /var/db/TokenCache/tokens/*
5 Online Certificate Status Protocol (OCSP) in Mac can cause unexpected behavior in some environments. Disable OCSP by executing the following command in a terminal window: sudo sctool -r -t ocsp:none -t crl:best -p crl
6 If logins still fail with OCSP disabled, set Certificate Revocation List (CRL) to Off as described in Step 4 on page 278.
If the PIN prompt appears when CRL checking is Off, but not when set to Best Attempt, the CRL in the environment has expired. Update to a valid CRL and set CRL checking back to Best Attempt.
7 The Mac login window display mode can produce different behaviors with smart card logins, especially between different versions of Mac OS X 10.7.x.
To check for this issue, go to System Preferences > Users & Groups > Login Options > Display login window as. Try each of the following options to see if either allows the PIN prompt to display:
List of users
Name and password
8 Insert the smart card and execute the following command in a terminal window:sctool -D
This command lists all the certificates present on the smart card and how their attributes match against Active Directory.
a Ignore any certificate that displays This certificate cannot be used for pkinit, as such certificates are not applicable for system logins.
Chapter 11 • Troubleshooting tips 276

Diagnosing smart card log in problems
b Make sure that the user for the applicable certificate can be found in Active Directory through the user’s principal name, and that the user has been authorized for logging in to the Zone.
c If the message Cannot locate NT principal name in AD is displayed for a certificate that can be used for pkinit, make sure the user has been configured correctly in Active Directory Users and Computers.
d Make sure that the UPN and alternate UPN of the Active Directory account have been configured correctly in Active Directory Users and Computers.
e If the UPN on the smart card is something other than mil, make sure that the adclient.altupns parameter in /etc/centrifydc/centrifydc.conf has been configured accordingly. For example, if the UPN on the smart card is [email protected], the parameter should be configured as adclient.altupns: mysmartcard.local. This parameter can also be set through the group policy Computer Configuration > Centrify Settings > DirectControl Settings > Add centrifydc.conf properties.
f In Active Directory Users and Computers, expand DomainName > Users. In the list of users, right-click the user who is attempting to log in, and select Properties. Select the Account tab in the Properties dialog and verify that the name in the User logon name field matches the NT Principal Name on the smart card:
9 If the preceding steps have been verified and smart card logins still fail, there might be a compatibility issue between the smart card and the Mac OS itself. See the following Security Notes from Apple detailing the smart card compatibility fixes as of Mac OS X 10.9 Mavericks:http://support.apple.com/kb/HT6011 (Security - Smart Card Services)
10 If necessary, contact Centrify Support and provide the information described in “Collecting information specific to smart card log in failure” on page 281.
Smart card PIN prompt does not display
If no PIN prompt is shown when a smart card is inserted, and you have verified that smart card support is enabled through the Centrify Smart Card Assistant, and the smart card certificates appear in Keychain Access and are all fully trusted, perform the procedure described in this section.
Starting with release 10.7, Mac OS X does not ship with the configuration file (/Library/Preferences/com.apple.security.revocation) that holds the system-wide certificate revocation settings. The login window behavior when a smart card is inserted is dependent on this file. When the file is missing, no PIN prompt will be shown.
Note The Smart Card Assistant will show all settings as “Off” when this file is missing, which might not be the actual state of the configuration.
1 Execute the following command in a terminal window to check whether the configuration file is present:
Administrator’s Guide for Mac OS X 277

Opening a support case online
sudo defaults read /Library/Preferences/com.apple.security.revocation
If the configuration file is not present, the following message is shown:Domain com.apple.security.revocation.plist does not exist
2 Generate the configuration file by manually applying a change in the Smart Card Assistant, or by executing the following command in a terminal window:sudo sctool -r -t ocsp:none -t crl:best -p crl
3 Rerun the command from Step 1 to verify that the file was generated. You should now see results similar to the following: {
CRLStyle = BestAttempt;
CRLSufficientPerCert = 1;
OCSPStyle = None;
OCSPSufficientPerCert = 1;
Revocation = CRL;
}
4 If the PIN prompt still does not appear when you insert a smart card, in the Smart Card Assistant set Certificate Revocation List (CRL) checking to Off and test again.
If the PIN prompt appears when CRL checking is Off, but not when set to Best Attempt, the CRL in the environment has expired.
Update to a valid CRL and set CRL checking back to Best Attempt.
Note CRL behavior on Mac differs from that on Windows, in which the smart card is still accepted even if the CRL has expired.
5 In the Smart Card Assistant, it is recommended that you keep the Online Certificate Status Protocol (OCSP) setting of Off. Settings other than Off can cause the PIN to not be shown again.
6 If you performed this procedure as part of the overall smart card diagnostic procedure, return to Step 4 on page 276 and continue from there.
Opening a support case onlineIf you need assistance with troubleshooting an issue, you may need to open a case with Centrify Support.
Centrify recommends you take the following steps in preparation for opening a new case:
1 Check the Centrify Support Portal on the Centrify Web site to search the Knowledge Base to see if your problem is a known issue or something for which there is a recommended solution.
a Open http://www.centrify.com/support/login.asp in a Web browser.
b Log in using your customer account information and password.
c Click Knowledge Base & Cases.
Chapter 11 • Troubleshooting tips 278

Collecting information for support cases
d Click Search the Knowledge Base and View Your Cases.
e Click Find Answer and type one or more key words to describe the issue, then click Find to view potential answers to your question. For example, to search for known issues, type known issues and click Find to see articles related to the known issues in different releases.
If your issue is not covered in an existing Knowledge Base article or the Centrify documentation set, you should open a case with Centrify Support.
2 Click Log a Case to open a new case using the Centrify Support Portal.
Alternatively, you can contact Centrify Support by email or telephone, if you prefer. Worldwide contact information is available in the “How to open a case and collect information for Centrify Support” Knowledge Base article (KB-0301).
3 Provide as much information as possible about your case, including the operating environment where you encountered the issue, and the version of the Centrify product you are working with, then click Submit to open the case.
Collecting information for support casesTo help ensure your issue gets resolved quickly and efficiently, gather as much information about your working environment as possible.
Collecting general information about your environment
Collecting information specific to smart card log in failure
Collecting information specific to login events
Collecting general information about your environment
Take the following steps to gather information about your working environment before opening a support case.
1 Verify that the Centrify agent is running on the computer where you have encountered a problem. For example, run the following command:ps aux | grep adclient
If the adclient process is not running, check whether the watchdog process, cdcwatch, is running:ps aux | grep cdcwatch
The cdcwatch process is used to restart adclient if it stops unexpectedly.
Note The commands in the following three steps must be run as root or with the sudo command.
2 Enable logging for the Centrify agent; for example:sudo /usr/local/share/centrifydc/bin/cdcdebug on
Administrator’s Guide for Mac OS X 279

Collecting information for support cases
Note Login events are captured in /var/log/centrifydc-login.log by default. Turning on cdcdebug captures login events in /var/log/centrifydc.log
3 Create a log file for the Mac Directory Service. For example:
To enable logging for opendirectoryd:odutil set log debug
To disable logging for opendirectoryd when sufficient log information is collected:odutil set log default
4 Duplicate the steps that led to the problem you want to report. For example, if an Active Directory user can’t log in to a managed system, attempt to log the user in and confirm that the attempt fails. Be sure to make note of key information such as the user name or group name being used, so that Centrify Support can identify problem accounts more quickly.
5 Verify that log file /var/log/centrifydc.log or /var/adm/syslog/centrifydc.log exists and contains data.
6 Run the cdcdebug command to generate logs that describe the domain and current environment; for example:sudo /usr/local/share/centrifydc/bin/cdcdebug -f pack username
The following log files are created in /var/centrify/tmp when you execute the cdcdebug command:
adinfo_support.tar.gz
adinfo_support.txt
cdcdebug.tar.gz
dump_cache_error.log
stacktrace.txt
7 If there is a core dump during or related to the problem, save the core file and inform Centrify Support that it exists. Centrify Support may ask for the file to be uploaded for their review.
If the core dump is caused by a Centrify process or command, such as adclient or adinfo, open the /etc/centrifydc/centrifydc.conf file and change the adclient.dumpcore parameter from never to always and restart the agent:sudo /usr/local/share/centrifydc/bin/centrifydc restart
Note For more information about starting and stopping the agent, see the Administrator’s Guide for UNIX.
8 If there is a cache-related issue, Centrify Support may want the contents of the /var/centrifydc directory. You should be able to create an archive of the directory, if needed.
Chapter 11 • Troubleshooting tips 280
Collecting information for support cases
9 If there is a DNS, LDAP, or other network issue, Centrify Support may require a network trace. You can use Ethereal to create the network trace from Windows or UNIX. You can also use Netmon on Windows computers.
10 Create an archive (for example, a .tar or .zip file) that contains all of the log files and diagnostic reports you have generated, and add the archive to your case or send it directly to Centrify Support.
11 Consult with Centrify Support to determine whether to turn off debug logging. If no more information is needed, run the following commands, which must be run as root or with sudo:odutil set log default
sudo /usr/local/share/centrifydc/bin/cdcdebug off
Collecting information specific to smart card log in failure
Collect the following information prior to opening a support case related to smart card log in failure:
The smart card type (for example, PIV, CAC, CACNG, and so on), manufacturer, and model.
A screen image of the smart card and its certificates in Keychain Access.
The following log files:
/tmp/sctool_D.log
/tmp/adquery.log
/tmp/tokendfolder.log
/var/centrify/tmp/adinfo_support.tar.gz
To generate these logs, run the following commands while logged in as the local administrator:
sctool -D > /tmp/sctool_D.log
adquery user -A username_of_smartcard_user > /tmp/adquery.log
sudo ls -l /System/Library/Security/tokend/ > /tmp/tokendfolder.log
sudo adinfo -t
Collecting information specific to login events
Login events are captured in /var/log/centrifydc-login.log by default. If you enable logging for the Centrify agent by turning on cdcdebug, login events are then captured in /var/log/centrifydc.log.
The /var/log/centrifydc-login.log grows to a maximum size of 50M before it is compressed. When all compressed centrifydc-login.log files combined with the current log file exceed 250M, the oldest compressed log is replaced.
Administrator’s Guide for Mac OS X 281

Chapter 12
Using sctool
This chapter provides a complete reference to the sctool command-line tool. The sctool utility is used to enable, disable, and diagnose smart card support. It may also be used to obtain Kerberos credentials from the smart card in the reader.
For additional smart card diagnostic procedures, see “Diagnosing smart card log in problems” on page 275.
Displaying usage information You can display a summary of usage information for sctool by typing the command and the --help or -h option; for example:
sctool --help
The usage information displayed is a summary of the valid command line options and required arguments and a brief description of each option.
For more complete information about sctool, you can review the information in the command’s manual page. For example, to see the manual page for sctool:
man sctool
Understanding sctoolCentrify provides a group policy, Enable smart card support, to enable smart card support on Mac computers. This group policy uses the sctool utility to add smart card specific strings to the authorization database and to create the /etc/cacloginconfig.plist file. In general, you can use the group policy to enable smart card support. However, the sctool utility is also available to specifically configure or diagnose smart card support on any Mac computer.
When you disable smart card support, with the group policy or with sctool, the smart card strings are removed from the authorization database and /etc/cacloginconfig.plist is deleted.
See Chapter 9, “Configuring a Mac computer for smart card login,” for detailed information about using group policies to enable smart card login and screen locking.
Note When you enable or disable smart card support with sctool, the change is temporary, unless the group policy, Enable smart card support, is not configured. For example, if the policy is set to enable smart card support, and you disable it with sctool, at the next reboot
282

Understanding sctool
the policy takes effect and smart card support is re-enabled. If the policy is not configured, you can control smart card support on individual computers using sctool.
Synopsissctool -e --enable
-d --disable
-s --status
-u --update-upn-map [mapping]
-D --dump
-S --support
-c --clearcrls
-r --revokecheck
Extra options for -r:
-t --type [ocsp|crl]:[none|best|cert|all]
-p --priority [ocsp|crl|both]
-l --localocsp [ocsp server url]
-k --pkinit userPrincipalName
-a --altpkinit unixname
-E --no-eku
-L --lock-status
-o --sudo enable | disable
Setting valid options
You can use the following options with this command:
Note You may specify only one option at a time when running sctool.
Use this option To do this
-e, --enable Enable smart card support by making necessary edits to the authorization database, and by creating the /etc/cacloginconfig.plist file.
-d, --disable Disable smart card support by removing smart-card specific strings from the authorization database, and by deleting /etc/cacloginconfig.plist.
-s, --status Show whether smart card support is enabled or disabled.
This option outputs one of these two messages:
• .“Centrify SmartCard support is enabled” (then exits with status 0).
• “Centrify SmartCard support is disabled” (then exits with status 1).
-u --update-upn-
map [mapping]This option specifies a field of the smart card certificate to be used as the UPN search value.
[mapping] denotes the preferred field to be used to override the default field (NT Principal Name) of the smart card certificate.
Administrator’s Guide for Mac OS X 283

Understanding sctool
-D, --dump Display information about the system setup and about any smart cards that are attached to the computer. For each card, this option lists the type of card and any summary information. It also enumerates all identities on the card and lists the following for each:
• Subject name
• UPN (if present)
• Whether the card is trusted
• Data signing success or not
• Signature verification
-S, --support Lists the same information as the --dump option and additionally lists the state of the system configuration files.
-c --clearcrls Removes all CRLs from the keychain.
Use this option To do this
Chapter 12 • Using sctool 284

Understanding sctool
-r --revokecheck
[-t] [-p] [-l]Extra options:
-t, --type [ocsp|crl]:[none|best|cert|all]
Change certificate validation setting for method [ocsp|crl]
to [none|best|cert|all]
ocsp :
Online Certificate Status Protocol.
crl :
Certificate Revocation List.
none :
No revocation checking is performed.
best :
The certificate passes unless the server returns an indica-
tion of a bad certificate. This setting is best for most
circumstances.
cert :
If the URL to the revocation server is provided in the cer-
tificate, this setting requires a successful connection to
a revocation server and no indication of a bad certificate.
Use only in a tightly controlled environment that guaran-
tees the presence of a CRL server or OCSP responder. If a
CRL server or OCSP responder is not available, SSL and
S/MIME evaluations could fail to respond.
all :
This setting requires successful validation of all certifi-
cates. Use only in a tightly controlled environment that
guarantees the presence of a CRL server or OCSP responder.
If a CRL server or OCSP responder is not available, SSL and
S/MIME evaluations could fail to respond.
-p, --priority [ocsp|crl|both]
This setting determines which method [ocsp|crl|both] is
attempted first. If the first method chosen returns a suc-
cessful validation, the second method is not attempted.
-l, --localocsp [ocsp server url]
Use this option To do this
Administrator’s Guide for Mac OS X 285
This setting overrides the OCSP server URL of certificate with
[ocsp server url]
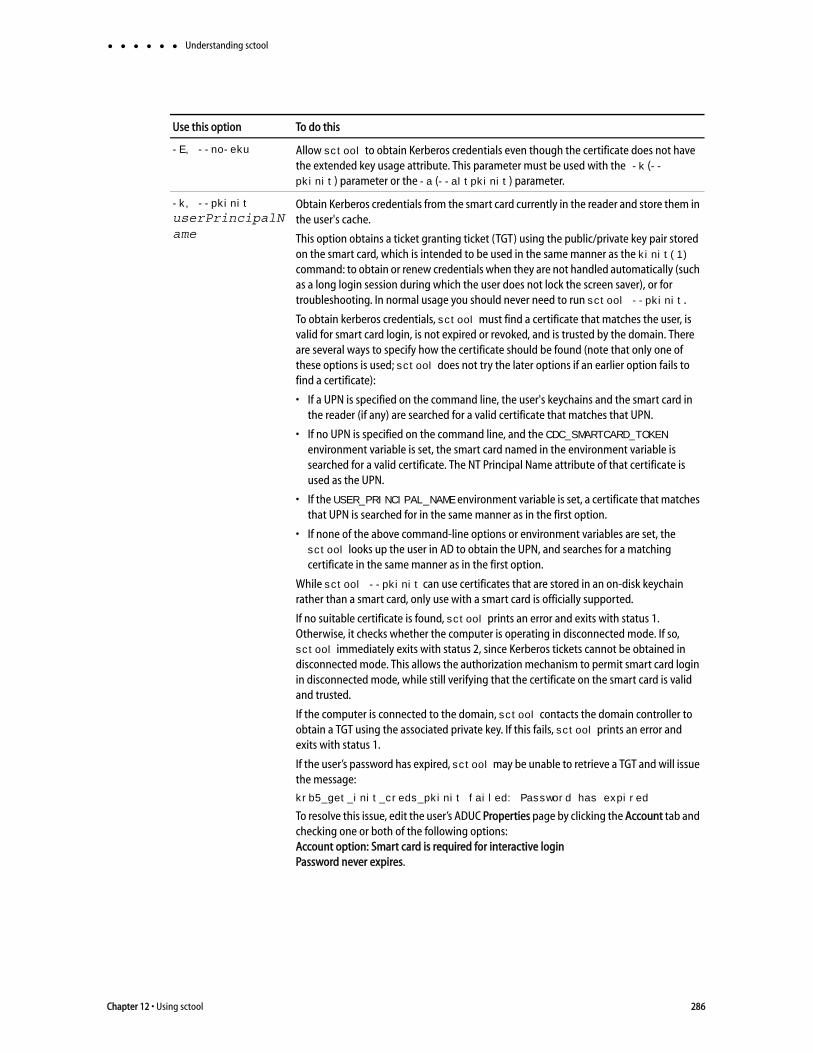
Understanding sctool
-E, --no-eku Allow sctool to obtain Kerberos credentials even though the certificate does not have the extended key usage attribute. This parameter must be used with the -k (--pkinit) parameter or the -a (--altpkinit) parameter.
-k, --pkinit
userPrincipalName
Obtain Kerberos credentials from the smart card currently in the reader and store them in the user's cache.
This option obtains a ticket granting ticket (TGT) using the public/private key pair stored on the smart card, which is intended to be used in the same manner as the kinit(1) command: to obtain or renew credentials when they are not handled automatically (such as a long login session during which the user does not lock the screen saver), or for troubleshooting. In normal usage you should never need to run sctool --pkinit.
To obtain kerberos credentials, sctool must find a certificate that matches the user, is valid for smart card login, is not expired or revoked, and is trusted by the domain. There are several ways to specify how the certificate should be found (note that only one of these options is used; sctool does not try the later options if an earlier option fails to find a certificate):
• If a UPN is specified on the command line, the user's keychains and the smart card in the reader (if any) are searched for a valid certificate that matches that UPN.
• If no UPN is specified on the command line, and the CDC_SMARTCARD_TOKEN environment variable is set, the smart card named in the environment variable is searched for a valid certificate. The NT Principal Name attribute of that certificate is used as the UPN.
• If the USER_PRINCIPAL_NAME environment variable is set, a certificate that matches that UPN is searched for in the same manner as in the first option.
• If none of the above command-line options or environment variables are set, the sctool looks up the user in AD to obtain the UPN, and searches for a matching certificate in the same manner as in the first option.
While sctool --pkinit can use certificates that are stored in an on-disk keychain rather than a smart card, only use with a smart card is officially supported.
If no suitable certificate is found, sctool prints an error and exits with status 1. Otherwise, it checks whether the computer is operating in disconnected mode. If so, sctool immediately exits with status 2, since Kerberos tickets cannot be obtained in disconnected mode. This allows the authorization mechanism to permit smart card login in disconnected mode, while still verifying that the certificate on the smart card is valid and trusted.
If the computer is connected to the domain, sctool contacts the domain controller to obtain a TGT using the associated private key. If this fails, sctool prints an error and exits with status 1.
If the user’s password has expired, sctool may be unable to retrieve a TGT and will issue the message:
krb5_get_init_creds_pkinit failed: Password has expired
To resolve this issue, edit the user’s ADUC Properties page by clicking the Account tab and checking one or both of the following options: Account option: Smart card is required for interactive loginPassword never expires.
Use this option To do this
Chapter 12 • Using sctool 286

Understanding sctool
Examples
Display information about the smart cards attached to the computer:#sudo sctool -D
Password:
Enable smart card support:#sudo sctool -e
Password:
-a --altpkinit
unixNameObtain Kerberos credentials from a multi-user smart card currently in the reader and store them in the user's cache. Because the card is configured for multiple accounts, the user is prompted to enter the user name, which the command uses to retrieve the Kerberos credentials.
-L --lock-status Show the smart card lock status for all connected smart cards. Possible values are:
• No smart card inserted
• Authentication attempts remaining:
• Card is locked
-o --sudo enable | disable
Enable/Disable smart card authorization for sudo.
Use this option To do this
Administrator’s Guide for Mac OS X 287

Chapter 13
Installing and removing the agent and joining and leaving a domain
This appendix shows other methods of installing the agent besides the standard method using the package installer (DMG file); see “Installing the Centrify agent” on page 12. It also shows how to remove the agent and how to join and leave a domain.
This appendix contains the following topics:
Installing using the install.sh command-line program
Installing silently on a remote computer
Removing the Centrify agent
Joining an Active Directory domain
Leaving an Active Directory domain
288
Installing using the install.sh command-line program
Installing using the install.sh command-line programThis section explains how to install using the install.sh command-line program. This method is recommended for experienced UNIX administrators who are familiar with UNIX command-line installations. Otherwise, you should install by using the graphical user interface, which is described in “Installing the Centrify agent” on page 12.
To install using the install.sh command-line program:
Note Before launching the installer, be certain that Apple Directory Utility is closed. If it is open while running the installer, it causes the Centrify Directory Access plug-in to show the incorrect status, that is, it shows that the plug-in is disabled when in fact it is enabled.
1 Log on with a valid user account.
Note You are not required to log on as the root user on, but you must know the password for the Administrator account to complete the installation.
2 Mount the CD-ROM device using the appropriate command for the local computer’s operating environment, if it is not automatically mounted.
3 Change to the appropriate directory on the CD or on the network where the Centrify agent package is located. For example, change to the Agent_Mac directory.
4 Run the install.sh script to start the installation of Centrify on the local computer’s operating environment. For example:sudo ./install.sh
Before beginning the installation, the install.sh script runs the ADCheck utility, which performs a set of operating system, network, and Active Directory checks to verify that the Mac computer meets the system requirements necessary to install the Centrify agent and join an Active Directory domain.
5 Review the results of the checks performed. If the target computer, DNS environment, and Active Directory configuration pass all checks with no warnings or errors, you should be able to perform a successful installation and join. If you receive errors or warnings, correct them before proceeding with the installation.
6 Follow the prompts displayed to select the services you want to install and the tasks you want to perform. For example, you can choose whether you want to join a domain or restart the local computer automatically at the conclusion of the installation.
When installation is complete, see “Understanding the directory structure” on page 294 for a description of the directories and files installed for Centrify.
Installing silently on a remote computerYou can install the agent silently on a remote Mac computer in either of these ways:
Administrator’s Guide for Mac OS X 289

Installing silently on a remote computer
By using sudo commands from the command line. If you use this method, no user interaction on the target Mac computer is required. See “Installing remotely on a Mac computer using sudo commands” on page 290 for details about using this method to install the agent remotely.
By using Apple Remote Desktop. This method requires that you have Apple Remote Desktop 3 for remote software distribution. See “Installing remotely on a Mac computer using Apple Remote Desktop” on page 291 for details about using this method to install the agent remotely.
If you use this method to install version 5.1.0 of the agent, the Centrify Join Assistant launches on the target Mac computer after the installation completes, and a user must interact with the Centrify Join Assistant to complete the join process. This limitation exists only in version 5.1.0 of the agent. Earlier versions of the agent (that is, 5.0.x and lower) and later versions (5.1.1 and above) do not have this limitation, and can be installed using Apple Remote Desktop without any user interaction on the target Mac computer.
Installing remotely on a Mac computer using sudo commands
Perform the following steps to use sudo commands to install the agent remotely on a target Mac computer without requiring any user interaction on the target Mac computer.
1 Ensure that you have administrator account credentials on the target Mac computer, and that SSH is installed on the target Mac computer.
2 On the computer where the Centrify packages were downloaded (that is, the source computer), use an appropriate file transfer method to push the CentrifyDC-x.x.x.pkg file to the target Mac computer.For example, perform these steps to transfer files from a PC source computer to the target Mac computer:
a On the source computer, ensure that file sharing is enabled, and that the folder containing the Centrify packages is a shared folder.
b On the target Mac computer:
Open a new window in the Finder.
In the sidebar under Shared, click All.
Select the source computer.
Click Connect As, type the user name and password for the source computer, and click Connect.
c The folder that you shared on the source computer appears in the Finder on the target Mac computer. Locate the CentrifyDC-x.x.x.pkg file on the source computer and drag it to the location of your choice on the target Mac computer.
Chapter 13 • Installing and removing the agent and joining and leaving a domain 290

Installing silently on a remote computer
3 On the source computer, use a program such as Putty to connect remotely to the target Mac computer through SSH. Log in to the target Mac computer using an account that has local administration privileges, such as the Local Admin account.
4 On the target Mac computer, navigate to the directory where the .pkg file was transferred and execute the following command:sudo /usr/sbin/installer –pkg CentrifyDC-x.x.x.pkg –target /
When you execute this command, the agent is installed silently on the target Mac computer.
If an agent was already installed on the target Mac computer and this was an update of the existing agent, the target Mac computer was already joined to the domain, and you do not need to perform any additional steps.
If this was the first installation of the agent on the target Mac computer, you must enable licensed features and join the target Mac computer to a domain as described in Step 5 and Step 6.
5 Execute the following command on the target Mac computer to enable licensed features:sudo adlicense -l
6 When you join the target Mac computer to a domain, you can choose to join the auto zone or a specified hierarchical zone.
Execute the following command on the target Mac computer to join the target Mac computer to a domain and the Auto Zone:
sudo /usr/local/sbin/adjoin --user Domain_Admin --container "domain.com/Path/To/OU" --name computer_name --workstation domain_name.com
Alternatively, execute the following command on the target Mac computer to join the target Mac computer to a domain and a specified hierarchical zone:
sudo /usr/local/sbin/adjoin --user Domain_Admin --container "domain.com/Path/To/OU" --name computer_name --zone zone_name domain_name.com
Installing remotely on a Mac computer using Apple Remote Desktop
Perform the following steps to install the agent remotely on a target Mac computer without requiring any user interaction on the target Mac computer.
Note If you use this method to install version 5.1.0 of the agent, the Centrify Join Assistant launches on the target Mac computer after the installation completes, and a user must interact with the Centrify Join Assistant to complete the join process. For all other versions of the agent, no user interaction on the target Mac computer is required.
To remotely install the Centrify agent and join a computer to the domain using Apple Remote Desktop 3:
1 Verify that you have an Apple Remote Desktop 3 Admin station and one or more Apple Remote Desktop 3 Clients.
Administrator’s Guide for Mac OS X 291

Installing silently on a remote computer
2 Verify that all of the Apple Remote Desktop 3 Client computers where you want to install the Centrify agent are set to Allow Remote Desktop using the Service pane in the Sharing system preference. For example:
3 Copy the Centrify agent package, for example centrifydc-release-macversion-i386.dmg, to the Apple Remote Desktop 3 Admin computer and verify that you can access the disk image.
4 Open Remote Desktop on the Admin Computer, then click Scanner and verify that the Mac computers on which you plan to install Centrify are listed and that ARD Version column displays 3.0 (or later). For example:
Check this column for the Remote Desktop version
Chapter 13 • Installing and removing the agent and joining and leaving a domain 292

Installing silently on a remote computer
5 Select one or more computers from the list, then click Install. For example:
6 In the Install Packages window, click + to locate the CentrifyDC.pkg in the Centrify agent disk image. For example:
7 In the Centrify agent disk image, select the CentrifyDC.pkg file and click Open to add it to the Install Packages list. For example:
Select one or more computers from the list
Click Install
Click + to add theCebtrifyDC.pkg
Administrator’s Guide for Mac OS X 293

Installing silently on a remote computer
8 In the Install Packages window, click Install to install the listed packages, For example:
In most cases, you can use the default settings to install the Centrify agent. If you want to schedule the installation for another time rather than completing the installation now, click Schedule. For more information about the Apple Remote Desktop installation parameters, see Chapter 8 “Administering Client Computers,” in the Apple Remote Desktop Manual.
If you click Install the Remote Desktop displays a progress bar and task status for each of the computers selected for the installation.
Understanding the directory structure
When you complete the installation, the local computer will be updated with the following directories and files for Centrify:
This directory Contains
/etc/centrifydc The Centrify agent configuration file and the Kerberos configuration file.
/usr/local/share/centrifydc Kerberos-related files and service library files used by the Centrify agent to enable group policy and authentication and authorization services.
/usr/local/sbin
/usr/bin
Command line programs to perform Active Directory tasks, such as join the domain and change a user password.
Chapter 13 • Installing and removing the agent and joining and leaving a domain 294
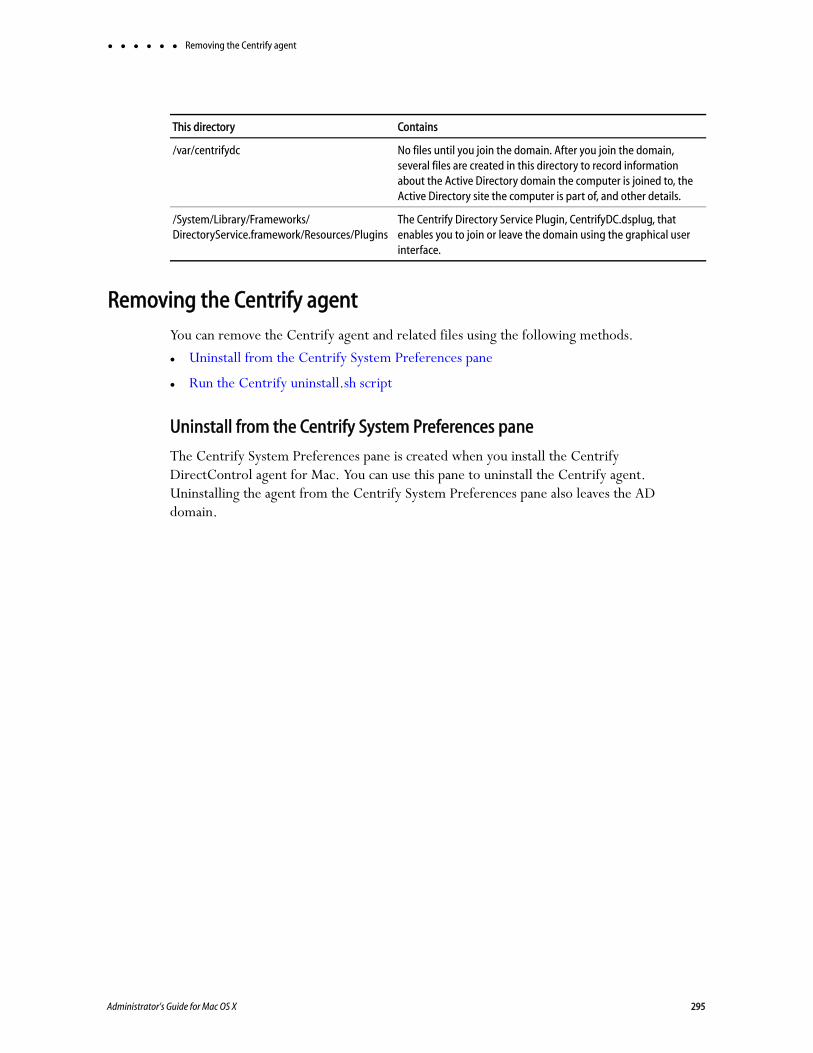
Removing the Centrify agent
Removing the Centrify agentYou can remove the Centrify agent and related files using the following methods.
Uninstall from the Centrify System Preferences pane
Run the Centrify uninstall.sh script
Uninstall from the Centrify System Preferences pane
The Centrify System Preferences pane is created when you install the Centrify DirectControl agent for Mac. You can use this pane to uninstall the Centrify agent. Uninstalling the agent from the Centrify System Preferences pane also leaves the AD domain.
/var/centrifydc No files until you join the domain. After you join the domain, several files are created in this directory to record information about the Active Directory domain the computer is joined to, the Active Directory site the computer is part of, and other details.
/System/Library/Frameworks/DirectoryService.framework/Resources/Plugins
The Centrify Directory Service Plugin, CentrifyDC.dsplug, that enables you to join or leave the domain using the graphical user interface.
This directory Contains
Administrator’s Guide for Mac OS X 295

Removing the Centrify agent
To uninstall the Centrify agent from the Centrify System Preferences pane
1 Open System Preferences, then click Centrify.
2 Click Uninstall, then click OK at the confirmation prompt.
The Uninstall Centrify window appears, prompting for administrator credentials and a decision on what to do with the computer object when you leave the AD domain. See Leaving an Active Directory domain for more information about leaving an AD domain.
Chapter 13 • Installing and removing the agent and joining and leaving a domain 296
Joining an Active Directory domain
3 Enter administrator credentials and select an option for leaving the AD domain, then click OK.
The uninstall process starts.
4 Click OK to quit when you see the window indicating that the Centrify Agent, Mac Edition was uninstalled.
Run the Centrify uninstall.sh script
The uninstall.sh script is installed by default in the /usr/local/share/centrifydc/bin directory on each Centrify-managed system.
To remove the Centrify agent on a Mac computer by running the uninstall.sh script
1 Open a Terminal window on the computer where the Centrify agent is installed. For example, select Applications > Utilities > Terminal.
2 Switch to the root user or a user with superuser permissions. For example:su -
Password: root_password
3 Run the uninstall.sh script. For example:/bin/sh /usr/local/share/centrifydc/bin/uninstall.sh
The uninstall.sh script will detect whether the Centrify agent is currently installed on the local computer and whether the computer is currently joined to a domain. If the computer is not currently joined to a domain, the script will begin removing Centrify files from the local computer.
Joining an Active Directory domainThis section shows how to use the Centrify Join Assistant to join a domain.
Note Alternately, you may run the adjoin command-line utility, interactively or in a script, for each Macintosh computer you want to add to a domain in the forest. See the Centrify Administrator’s Guide for details.
To start the Centrify program for joining or leaving a domain:
1 Click Applications > Utilities > Centrify, then double-click Centrify Join Assistant to open it.
Click Continue on the Welcome page.
2 Enter credentials for an administrator’s account on the computer and click OK.
Administrator’s Guide for Mac OS X 297
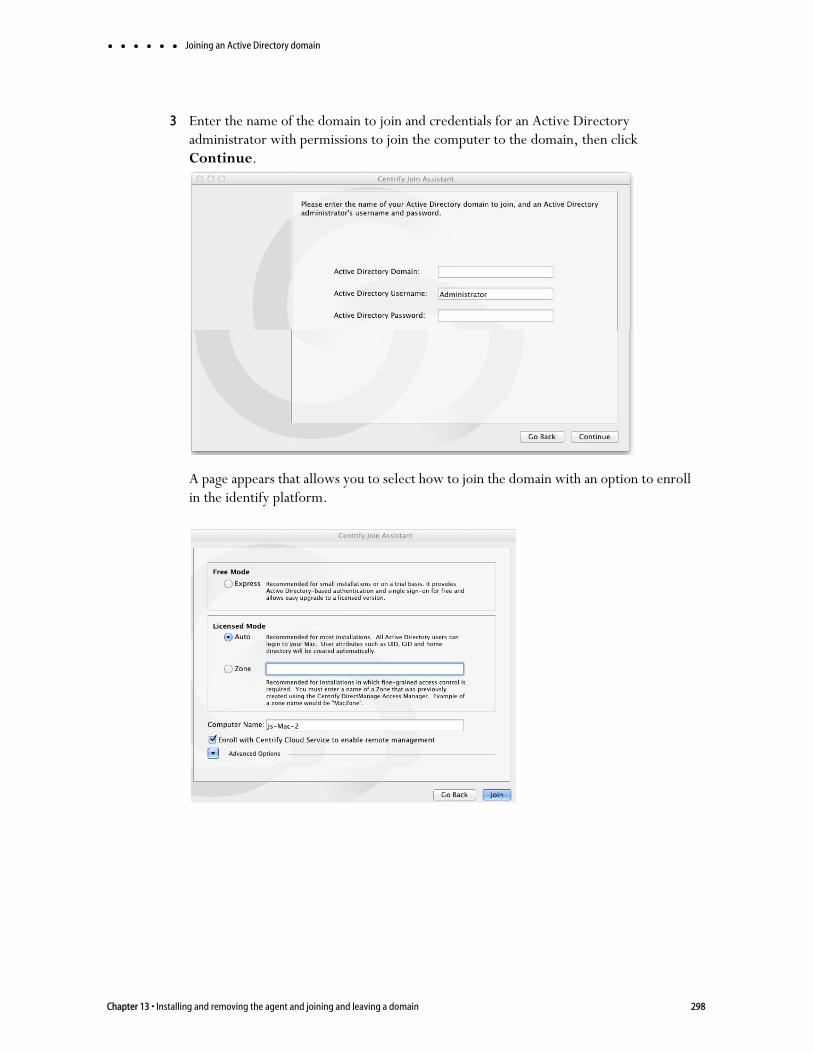
Joining an Active Directory domain
3 Enter the name of the domain to join and credentials for an Active Directory administrator with permissions to join the computer to the domain, then click Continue.
A page appears that allows you to select how to join the domain with an option to enroll in the identify platform.
Chapter 13 • Installing and removing the agent and joining and leaving a domain 298

Joining an Active Directory domain
4 Select from the following options:
Select this option To do this
Express Joins a domain using a free version of Centrify called Centrify Express that does not include licensed features, such as group-policy enforcement, zone-based access control, and smart card login to Active Directory.
Auto Joins the computer through Auto Zone, which allows joining a computer with little or no configuration. This option is recommended for most installations.
Zone Joins to the zone that you type in the box. Note that you must have created at least one zone before you can use this option.
Computer name Defaults to the name of the computer on which you are running the join assistant, but you can change it if you want to use a different name for the local host in Active Directory.
Enroll Enrolls the computer in the Centrify identify platform at the same time as joining a domain.
If you select this option, Centrify Join Assistant provides additional pages to step you through the process of enrolling in the identify platform, however, this section does not show these steps. See “How to enroll a joined computer with Centrify identity platform” on page 256 for step-by-step information for enrolling in the identify platform while joining a domain.
Administrator’s Guide for Mac OS X 299

Leaving an Active Directory domain
5 (Optional) Click the arrow next to Advanced Options to view the advanced options:
6 Click Join and enter your Mac administrator name and password when prompted.
Centrify Join Assistant joins the computer to the domain.
7 Click Done on the summary page to close Centrify Join Assistant.
Leaving an Active Directory domainTo start the Centrify program for joining or leaving a domain:
Select this option To do this
Overwrite existing joined computer Overwrite the information stored in Active Directory for an existing
computer account. This option allows you to replace the information for a computer previously joined to the domain. If there is already a computer account with the same name stored in Active Directory, you must use this option if you want to replace the stored information. You should only use this option when you know it is safe to force information from the local computer to overwrite existing information.
Checking this option is the same as running the adjoin command with the --force option.
Container DN Specify the distinguished name (DN) of the container or Organizational Unit in which you want to place this computer account.
By default, computer accounts are created in the domain’s default Computers container.
Click Browse to browse Active Directory and select the container to use, or click Container DN and enter the name of the container in distinguished name format; for example, if the domain suffix is acme.com and you want to place this computer in the paris.regional.sales.acme.com organizational unit, you would type:
ou=paris, ou=regional, ou=sales
Checking this option is the same as running the adjoin command with the --container option.
Preferred Domain Server Specify the name of the domain controller to which you prefer to connect. You can use this option to override the automatic selection of a domain controller based on the Active Directory site information.
Checking this option is the same as running the adjoin command with the --server option.
Computer Alias Name Specify an alias name you want to use for this computer in Active Directory. This option creates a Kerberos service principal name for the alias and the computer may be referred to by this alias.
Checking this option is the same as running the adjoin command with the --alias option.
Chapter 13 • Installing and removing the agent and joining and leaving a domain 300

Leaving an Active Directory domain
1 Click Applications > Utilities > Centrify, then double-click Centrify Join Assistant to open it.
Click Continue on the Welcome page and the join assistant displays information about the domain to which the computer is connected:
2 Select whether to disable the computer object in Active Directory, remove the computer object from Active Directory, or leave without contacting Active Directory.
Disable: Disables the computer object in Active Directory.
Remove: Removes the computer object from Active Directory.
Leave without contacting Active Directory: This option forces the local computer's settings to their pre-join conditions without contacting Active Directory. The Computer Object will not be removed or disabled in Active Directory.
Use this option if the Active Directory computer account has been modified or deleted so that the host computer can no longer work with it.
3 Click Leave to leave the domain.
Note The Enroll button is displayed unless the computer is already joined to the identify platform. You can ignore this option when leaving the domain.
Administrator’s Guide for Mac OS X 301

Leaving an Active Directory domain
4 Type the Active Directory user name and password for a user with permission to remove the local computer from the Active Directory domain, then click OK.
5 Type the user name and password for the local Administrator account.
Chapter 13 • Installing and removing the agent and joining and leaving a domain 302

Index
Aaccount mapping 59Active Directory
leaving the domain 300linking Group Policy Objects 95
ADCheck 13adclient
log file 266adgpupdate program 99administrative template
installation 97introduction 92
agentenabling logging 266installation 12installation options 12removing 295
Allow certificates with no extended key usage certificate attribute 108
Apple Directory Accesssee Directory Access
Apple Directory Utilitysee Directory Utility
Apple Remote Desktopdeploying Centrify agent 290enabling access 146enabling administrators 137sharing preference 146
application access 156Automount network shares 159Automount user’s Windows home 159
BBlock UDP Traffic 129Bypass proxy settings for these hosts & domains 135
Ccannot connect via VPN 275Centrify
enabling logging 266files and directories 294
group policy extension 92package location 13technical support 10troubleshooting issues 266updating policies manually 99
Centrify agentinstallation 12removing 295
Centrify cloud serviceenrolling Mac computer in 256 to 264
Centrify web site 10centrify_mac_settings.adm template 92centrify_mac_settings.xml template 92Certificate validation method 140certificates
specifying validation method for 140command line programs
man pages 282Computer configuration
disable smart card UPN mapping 141Enable multi-user PIV support 141
computer configuration802.1X settings 110, 155accounts settings 117automatic downloads 150automatic login 141bypass proxy settings 135default firewall 128disable location services 141display sleep mode 125energy saver 124, 126firewall logging 129firewall settings 127FTP access 146group policy refresh 100hard disk sleep mode 124iChat 128inactive periods 143Internet sharing 130iPhoto 128iTunes 128
303

launchdaemon script 139login options 117logon banner 100MaxPollInterval setting 100network settings 131network time 129network time provider 100, 101passive FTP mode 135password policies 101personal file sharing 145policy categories 104, 106power button sleep 124printer sharing 146proxy servers 135remote desktop 146remote events 146remote login 146remote management 120, 136restart automatically 125searched domains 132, 133security settings 140simple host names 135sleep mode 125software updates 148stealth mode 129UDP traffic 129update server 150virtual memory 144waking 125Web sharing 146Windows sharing 145Xgrid controllers 147
Configure Finder commands 168Configure Finder preferences 169Configure Finder views 170Configure Windows NTP Client 101conventions, documentation 9Create alias instead of symbolic link 160
Ddelete mobile accounts automatically 194, 203, 212Directory Utility 273Disable automatic login 141disable location services 141Disallow all Internet Sharing 130Dock settings
adding other folders 164
animation 165applications listed 166documents or folders 166hide and show 165icon size 164locking 165magnification 165merging 166minimizing effect 165position 165workgroup preference 163
documentationadditional 10conventions 9
EEnable built-in System Preferences panes 229, 231,
233, 235Enable Ethernet Profile 111Enable FileVault 2 142Enable Firewall 128Enable Firewall Logging 129Enable Gatekeeper 142Enable iChat 128Enable iPhoto 128Enable iTunes Music Sharing 128Enable login items 178Enable Network Time 129Enable other System Preferences panes 229, 231, 233,
235Enable smart card logon 141Enable Stealth Mode 129Enable WiFi Profile 112Enable Windows NTP Client 101enroll mac computer in cloud service 256 to 264
FFileVault 2
enabling 142FTP Access 146
Ggroup policies
administrative template 93background refresh 100limitations 95Printing Settings 213
• Index 304

relation to preferences 93Specify printer list 213updating manually 99using default policies 100workgroup manager 94
Group Policy Management Console 95Group Policy Object Editor 95, 100
Iinstallation
administrative template 97command line script 12files and directories 294
Jjoining a domain 297 to ??
Llaunchdaemon script 139Legacy Settings (Mobility Synchronization) 185Limit items shown in System Preferences 228, 230,
232, 234localhost syntax 269Lock Smart Card screen 219Lock the Dock 165log files
location 267performance impact 267purpose 266
Log out after number of minutes of inactivity 143login items, enabling 178login script 138, 216, 218Login Settings 177Login Window Settings 117logout script 217
MMac OS X
authenticated printing 41auto mounting file shares 32directory on CD 13disconnected operation 275files and directories 294group policies 93, 96local account mapping 59local administrator account 16log-on delays 269
password changes 269password enforcement policies 100system preferences 92
man pagesdisplaying 282source of information 10
managed computersMac OS X 16
Manually/automatically sync in the background 10.7 200, 209
Map /home to /Users 109Map zone groups to local admin group 119media access policies 180mobile accounts
delete automatically 194, 203, 212mobility preferences 183
Nnetwork file sharing 32Network Time Protocol 101
OOpen Directory, migrating from 48 to 50
Ppassword changes 269Personal File Sharing 137, 145Personal Web Sharing 137, 146Place applications in Dock 166Place documents and folders in Dock 166Printer Sharing 146Printing Settings group policy 213Prohibit Access to App Store 120Prohibit authentication with expired password 219
Rrelease notes 11Remote Apple Events 146Remote Login 137, 146remote management
administrators group 137Require password 143Require smart card login 144root user
enabling logging 267, 268
Administrator’s Guide for Mac OS X 305

SScreen Sharing SSO 72scripts 138, 139, 216sctool 282 to 287secure virtual memory 144Set computer idle time for starting screen saver 162Set computer sleep time 125Set display sleep time 125Set login window settings 117Set machine sleep/shutdown time 126Set machine startup time 126single sign-on
configuring 269Skip items that end with 188, 190, 197, 199, 206, 208Skip items that start with 188, 190, 197, 199, 206, 208Skip items whose full path is 188, 190, 197, 199, 206,
208Skip items whose name contains 188, 190, 197, 199,
206, 208Skip items whose name is 188, 190, 197, 199, 206, 208Skip items whose partial path matches 188, 190, 197,
199, 206, 208sleep hard disk(s) 124Smart card protected keychain 219smart cards
configuring machines for 236 to 254enabling 141enabling screen lock for 219logging in with while offline 246, 247
software updates 150Specify login script 216specify Login Window Profiles 115Specify logout script 217Specify multiple LaunchDaemon scripts 139Specify multiple login scripts 138, 218Specify printer list group policy 213specify System Profiles 116specify User Profiles 155SSH SSO 71SSO
configuring 269synchronization rules 183
automatic synch 191background 185, 186enable/disable 185, 187listing items 188, 189login & logout 186, 189
options 186, 191options 10.7 200options 10.8 and 10.9 209skipping preset items 189skipping specific items 188, 190skipping specific items 10.7 197, 199, 206, 208
Synchronize home sync items 197, 206synchronize time 101system preferences
disabling Internet sharing 130energy saving 124inconsistencies 95locking computer configuration
locking system preferences 143login options 117overview 93panes displayed 223 to 227screen saver 162security settings 140, 219service sharing 145software updates 148updating 99
Ttechnical support 10time, synchronize 101troubleshooting
agent operation 266
UUNIX
man pages 282user configuration
AppleScript allowed/denied 156application access 156applications allowed/denied 156CD/CD-ROM access 180desktop settings 162Dock settings 163DVD access 180external disc access 182internal disc access 181login & logout synchronization 186login script 138, 216, 218logout script 217media access 180mobility 183
• Index 306

permit/prohibit access 157policy categories 151, 153preferences displayed 221recordable disc access 181refresh interval 101requiring passwords 219screen saver 162security 219server folders allowed/denied 156user-specific allowed/denied 158utilities allowed/denied 156
VVNC SSO 72VPN
cannot connect 275
WWindows Sharing 137, 145workgroup preferences
application access 156Dock settings 163media access 180mobility preferences 183
XXgrid 147
Administrator’s Guide for Mac OS X 307


